SCF291
User manual

Table of Contents
Important � � � � � � � � � � � � � � � � � � � � � � � � � � � � � � � � � � � � � � � � � � � � � � � � � � � � � � � � � � � � � �3
Danger � � � � � � � � � � � � � � � � � � � � � � � � � � � � � � � � � � � � � � � � � � � � � � � � � � � � � � � � � � � � � � � � � � 3
Warning � � � � � � � � � � � � � � � � � � � � � � � � � � � � � � � � � � � � � � � � � � � � � � � � � � � � � � � � � � � � � � � � � 3
Caution � � � � � � � � � � � � � � � � � � � � � � � � � � � � � � � � � � � � � � � � � � � � � � � � � � � � � � � � � � � � � � � � � � 4
Introduction � � � � � � � � � � � � � � � � � � � � � � � � � � � � � � � � � � � � � � � � � � � � � � � � � � � � � � � � � � � � �6
General description � � � � � � � � � � � � � � � � � � � � � � � � � � � � � � � � � � � � � � � � � � � � � � � � � � � � � �6
Things to Note � � � � � � � � � � � � � � � � � � � � � � � � � � � � � � � � � � � � � � � � � � � � � � � � � � � � � � � � � �7
Getting to know the settings � � � � � � � � � � � � � � � � � � � � � � � � � � � � � � � � � � � � � � � � � � � � �8
Before rst use � � � � � � � � � � � � � � � � � � � � � � � � � � � � � � � � � � � � � � � � � � � � � � � � � � � � � � � � � �8
Preparing for use � � � � � � � � � � � � � � � � � � � � � � � � � � � � � � � � � � � � � � � � � � � � � � � � � � � � � � �10
Preparing for sterilizing � � � � � � � � � � � � � � � � � � � � � � � � � � � � � � � � � � � � � � � � � � � � � � � � � � 10
Assembling the sterilizer � � � � � � � � � � � � � � � � � � � � � � � � � � � � � � � � � � � � � � � � � � � � � � � � � 10
Using the appliance � � � � � � � � � � � � � � � � � � � � � � � � � � � � � � � � � � � � � � � � � � � � � � � � � � � � �11
Sterilizing � � � � � � � � � � � � � � � � � � � � � � � � � � � � � � � � � � � � � � � � � � � � � � � � � � � � � � � � � � � � � � � 11
Cleaning � � � � � � � � � � � � � � � � � � � � � � � � � � � � � � � � � � � � � � � � � � � � � � � � � � � � � � � � � � � � � � �13
Descaling � � � � � � � � � � � � � � � � � � � � � � � � � � � � � � � � � � � � � � � � � � � � � � � � � � � � � � � � � � � � � �14
Ordering accessories � � � � � � � � � � � � � � � � � � � � � � � � � � � � � � � � � � � � � � � � � � � � � � � � � � � �15
Recycling � � � � � � � � � � � � � � � � � � � � � � � � � � � � � � � � � � � � � � � � � � � � � � � � � � � � � � � � � � � � � � �15
Support � � � � � � � � � � � � � � � � � � � � � � � � � � � � � � � � � � � � � � � � � � � � � � � � � � � � � � � � � � � � � � � �15
Troubleshooting � � � � � � � � � � � � � � � � � � � � � � � � � � � � � � � � � � � � � � � � � � � � � � � � � � � � � � � �16

Important
Read this important information carefully before you use the
appliance and save it for future reference�
Danger
- Never immerse the base, the power cord or the mains plug in
water or any other liquid�
- Failure to follow the descaling instructions may cause
irreparable damage�
- Never disassemble the base to avoid the risk of electric shock�
Warning
- This appliance can be used by persons with reduced physical,
sensory or mental capabilities or lack of experience and
knowledge if they have been given supervision or instruction
concerning use of the appliance in a safe way and if they
understand the hazards involved�
- This appliance shall not be used by children� Keep the
appliance and its cord out of the reach of children�
- Children shall not play with the appliance�
- Check if the voltage indicated on the appliance corresponds to
the local mains voltage before you connect the appliance�
- Do not use the appliance if the plug, the mains cord or the
appliance itself is damaged�
- If the mains cord is damaged, it must be replaced by Philips, a
service center authorized by Philips or similarly qualied
persons in order to avoid a hazard�
- There are no serviceable parts inside the appliance� Do not
attempt to open, service or repair the appliance yourself�
- The appliance becomes extremely hot during operation and
may cause burns if it is touched�
- Beware of hot steam that comes out of the vent in the lid or
when you remove the lid� Steam can cause burns�
- 3 -

- Do not touch the base, the baskets and the lid during or shortly
after operation because they are very hot� Only lift the lid by its
grip�
- Never move or open the appliance when it is in use or when
the water in it is still hot�
- Never place items on top of the appliance when it is in use�
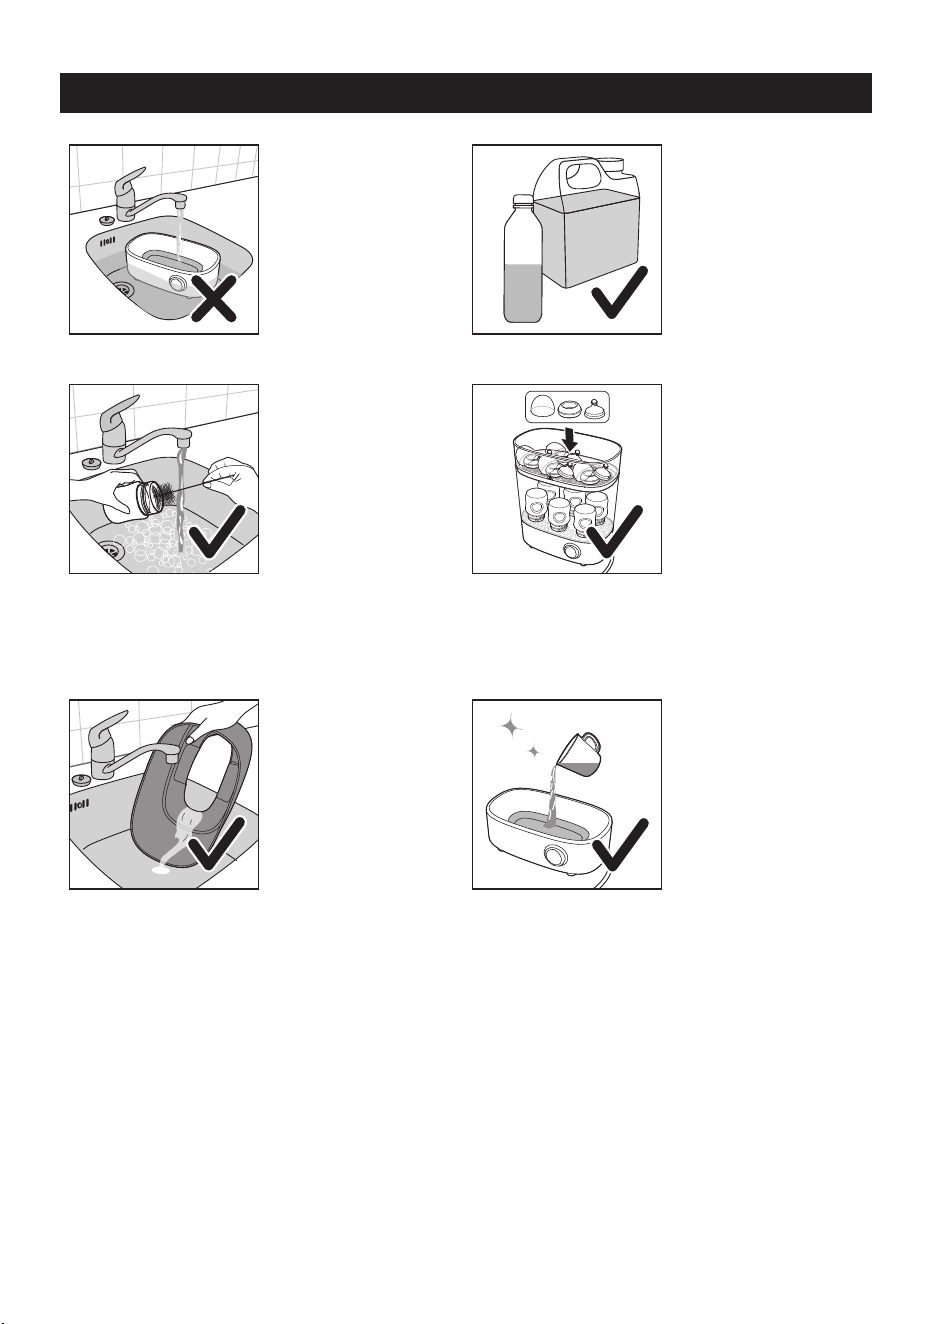
- Only use water without any additives�
- Do not put bleach or other chemicals in the appliance�
- Do not pour water over the indication on reservoir or 130 ml
water�
- Only sterilize baby bottles and other items that are suitable for
this appliance� Check the user manual of the items you want to
sterilize, to make sure they are suitable for this appliance�
- If you want to stop the operation, press power o button to
turn o the appliance.
- This appliance is intended for household use only�
- Do not misuse the appliance for other than its intended use to
avoid potential injury�
Caution
- Never use any accessories or parts from other manufacturers or
that Philips does not specically recommend. If you use such
accessories or parts, your guarantee becomes invalid�
- Do not expose the appliance to extreme heat or direct sunlight�
- Always let the appliance cool down before you move or store
it�
- The accessible surfaces may become hot during use�
- Do not sterilize very small items which can fall through
the holes in the bottom of the basket�
- Never place items directly on the heating element when the
appliance is switched on�
- Do not use the appliance if it has fallen or is damaged in any
way� Take it to an authorized Philips service center for repair�
- Always place and use the appliance on a dry, stable, level and
horizontal surface�
- 4 -

- Do not place the appliance on a hot surface�
- Do not let the mains cord hang over the edge of the table or
worktop on which the appliance stands�
- Always pour any remaining water out of the appliance after
use and when the appliance has cooled down�
- Switch o the appliance and disconnect from supply before
changing accessories or approaching parts that move in use�
- Environmental conditions, such as temperature and altitude,
may aect the functioning of this appliance.
- Cleaning and user maintenance shall not be made by children�
- Always disconnect the device from supply if it’s left
unattended�
Electromagnetic elds (EMF)
This Philips appliance complies with all applicable standards and regulations regarding
exposure to electromagnetic elds.
- 5 -
Introduction
Congratulations on your purchase and welcome to Philips Avent! To fully benet from the
support that Philips Avent oers, register your product at www.philips.com/welcome�
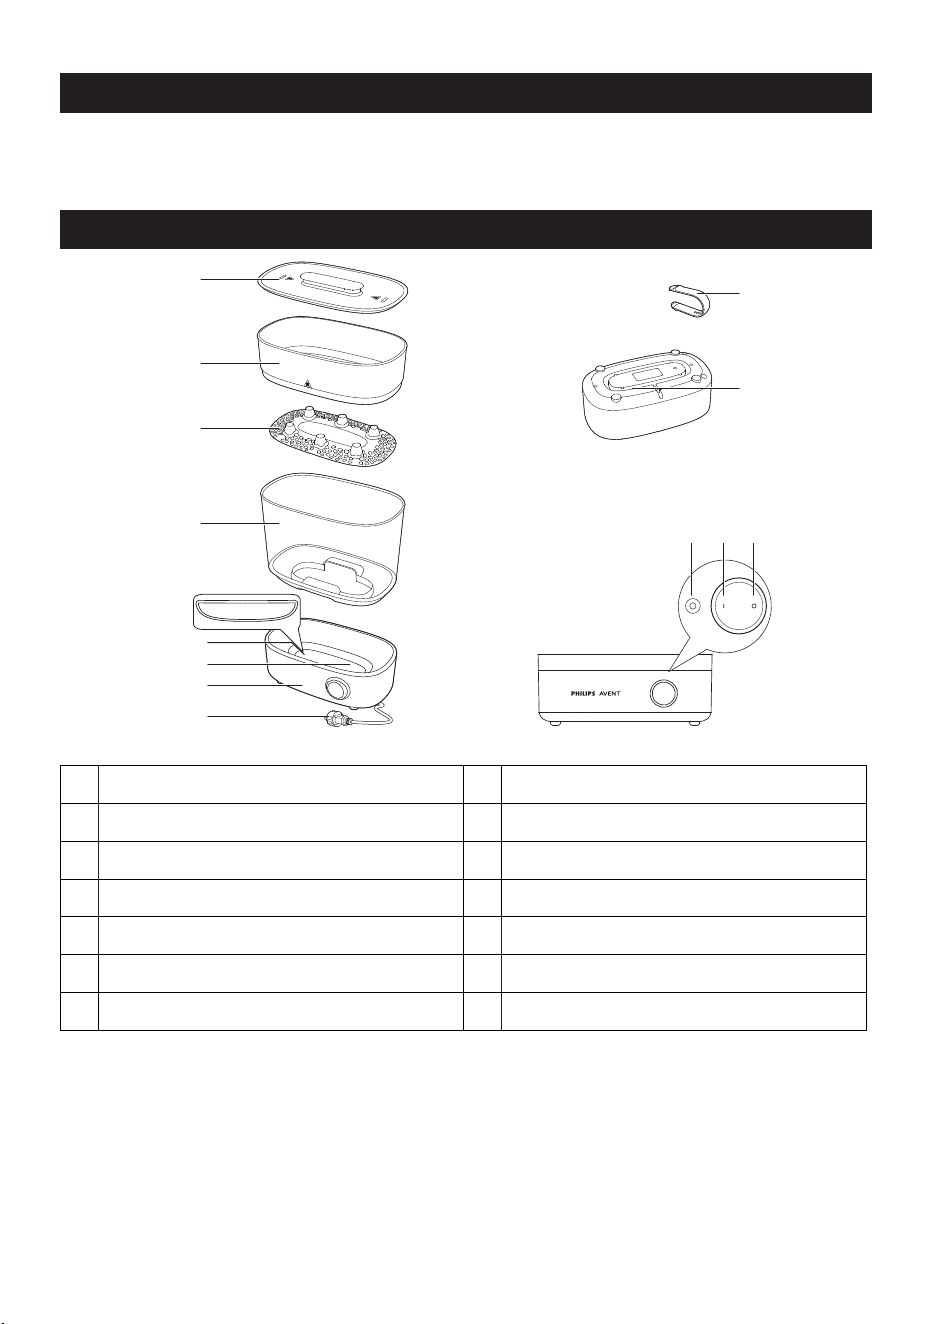
General description
A
B
C
D
G
H
F
E
J
I
130ml
K ML
A
Lid with grip
H
Power cord
B
Small basket
I
Tongs
C
Bottom plate for large basket
J
Cord storage
D
Large basket with drip tray
K
Indicator light
E
Maximum water level indicator
L
Power on button
F
Heating element with water reservoir
M
Power o button
G
Base unit
- 6 -
Things to Note
• Don’t immerse the base unit in water�
130ml
• Use 130 ml water�
• Clean items prior to putting them into
the appliance�
• Disassemble all bottle parts completely
and place them in the appliance with
openings pointing down to prevent
from lling up with water.
• Pour out the remaining water from
large basket after each use�
• Descale the appliance every 2 weeks�
- 7 -
Getting to know the settings
Note: Before you sterilize bottles and other items, clean them rst.
Only place items in the sterilizer which are suitable for sterilizing� Do not sterilize items that
are lled with liquid, e.g. a teether with cooling uid.
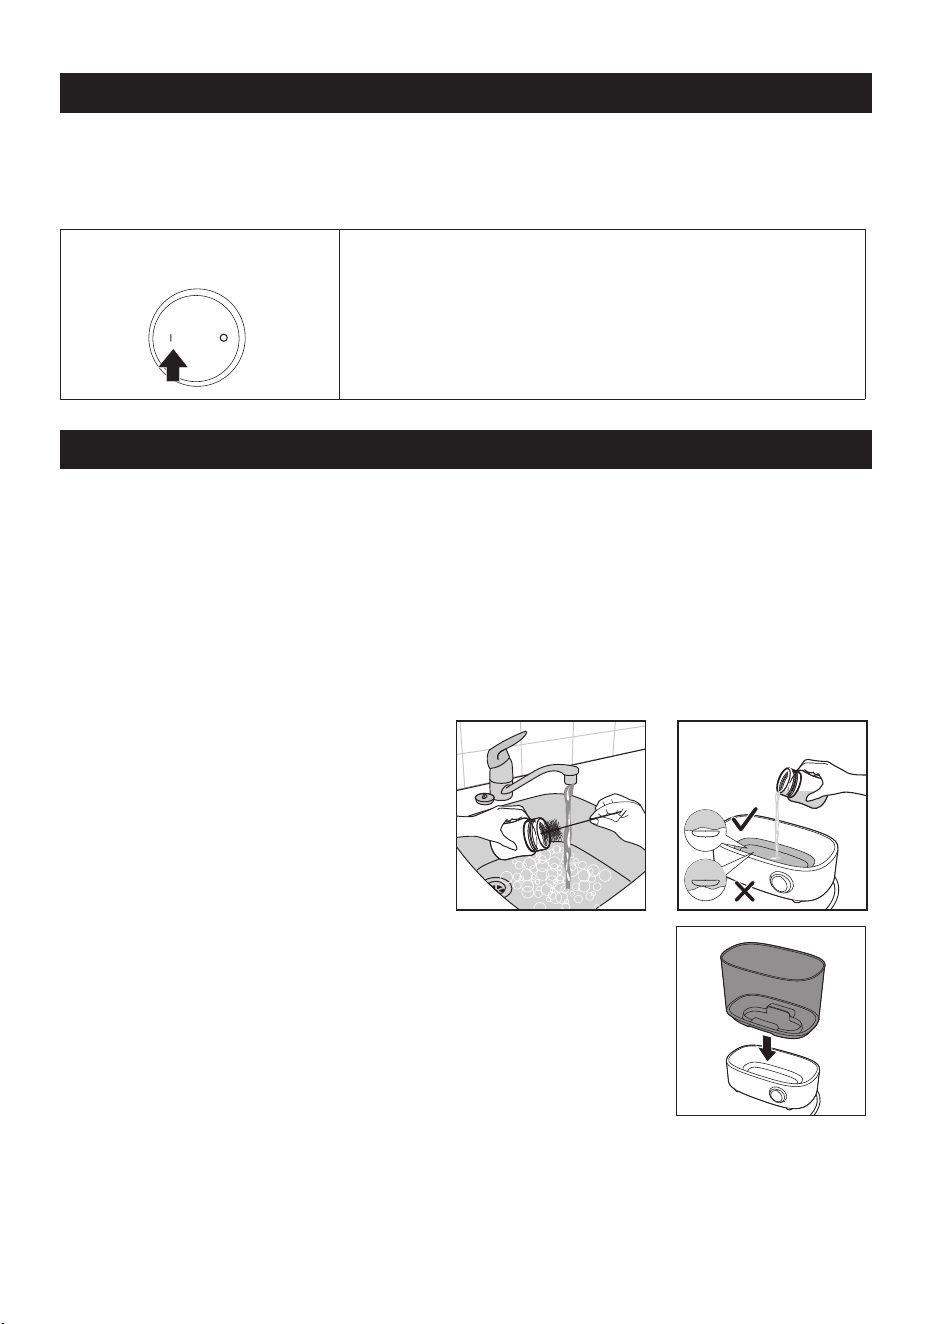
Sterilize • Sterilize mode is for sterilizing baby items�
• A sterilizing cycle takes approximately 10 minutes�
• Heating up takes approximately 4 minutes and
sterilizing takes approximately 6 minutes�
• Make sure to pour exactly 130 ml water directly into
the water reservoir of the base �
Before rst use
When you use the appliance for the rst time, we advise you to let it complete one
sterilization process with empty baskets�
1 Use a clean baby bottle and pour exactly 130 ml water directly into the water
reservoir of the base�
Tip: This appliance has been designed to be used with tap water. In case you live in
an area with hard water, fast scale build-up may occur. Therefore, it is recommended
to use water without minerals such as distilled or puried water to prolong the
lifetime of your appliance. For more information on limescale, see section
“Descaling”.
130ml
130ml
130ml
2 Place the large basket on the base�
- 8 -
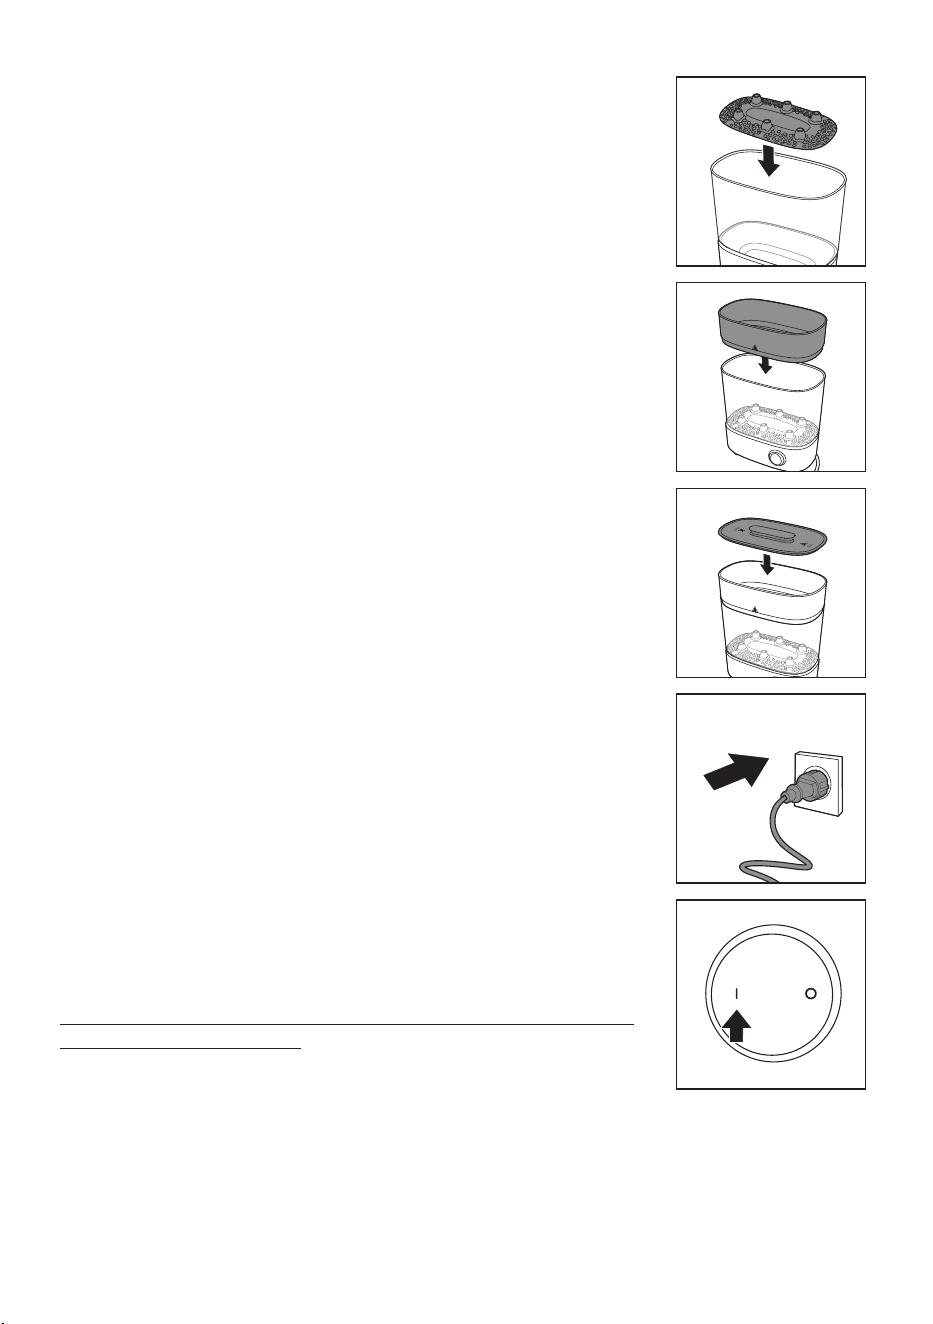
3 Place the bottom plate in the large basket�
4 Place the small basket on the large basket�
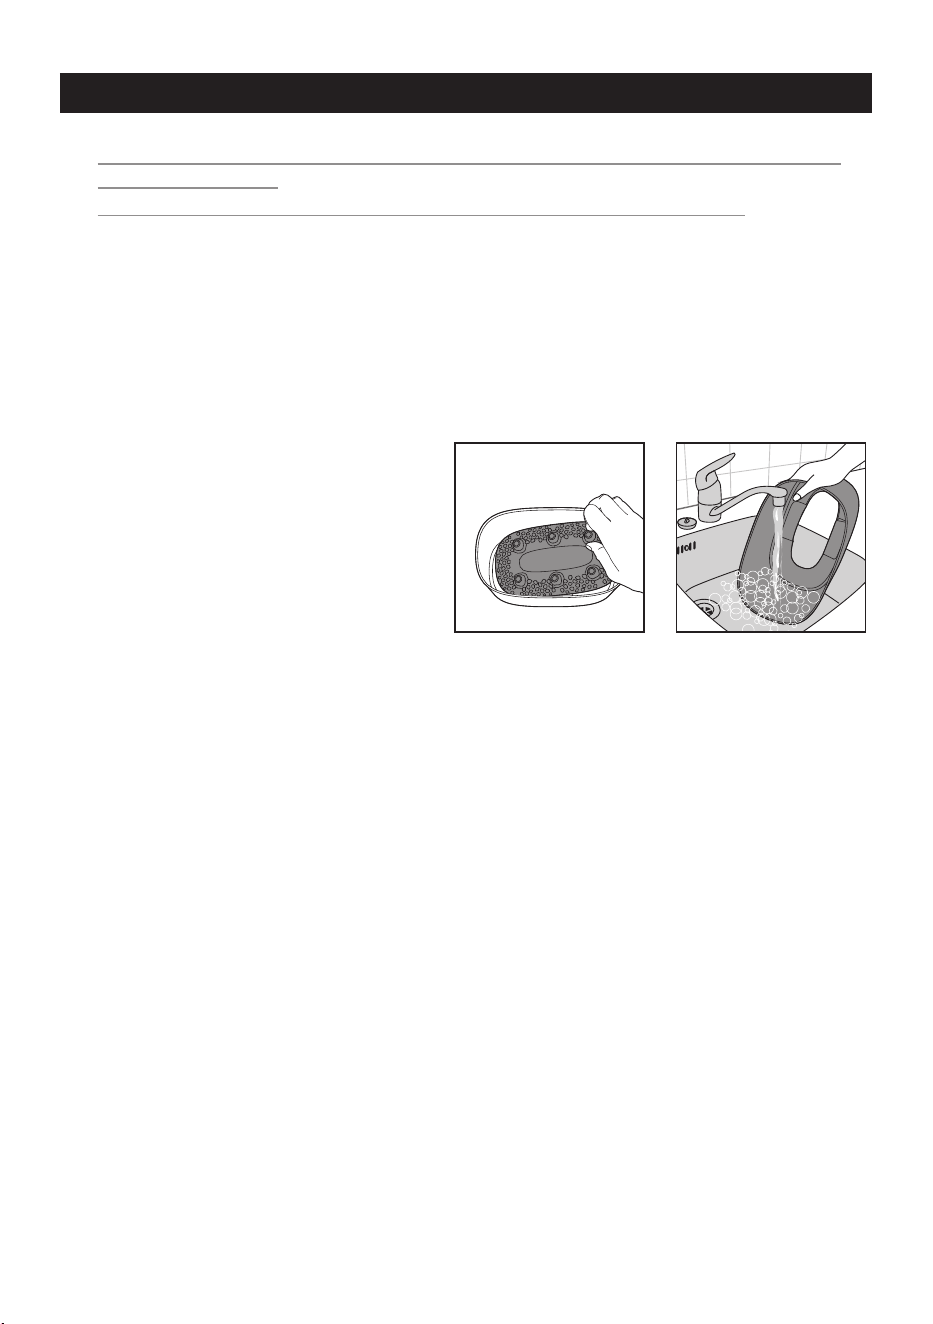
5 Place the lid on top of the small basket�
6 Put the plug in the wall socket�
7 Press the power on button to switch on the appliance�
Note: If you plug in the appliance after you have pressed the
power on button, the sterilizer starts working immediately.
You can switch it o by pressing the power o button.
Caution: The base, the baskets and the lid become hot during
or shortly after operation.
• The on/o indicator light lights up to indicate that the
appliance starts sterilizing�
• When the sterilization process is nished, the light goes o
and the appliance switches o automatically.
- 9 -
8 After the appliance has cooled down completely, remove the lid, the small basket,
the bottom plate, the large basket and wipe them dry�
Note: When you remove the large basket from the base, be aware of the remaining
water on the base drip tray.
9 Let the appliance cool down completely for approximately 10 minutes before you
use it again�
Note: The appliance does not work for 10 minutes after a sterilizing cycle. It needs to
cool down rst.
Preparing for use
Preparing for sterilizing
Before you put the items to be sterilized in the sterilizer, clean them thoroughly in the
dishwasher or clean them by hand with hot water and liquid dishwashing detergent�
Assembling the sterilizer
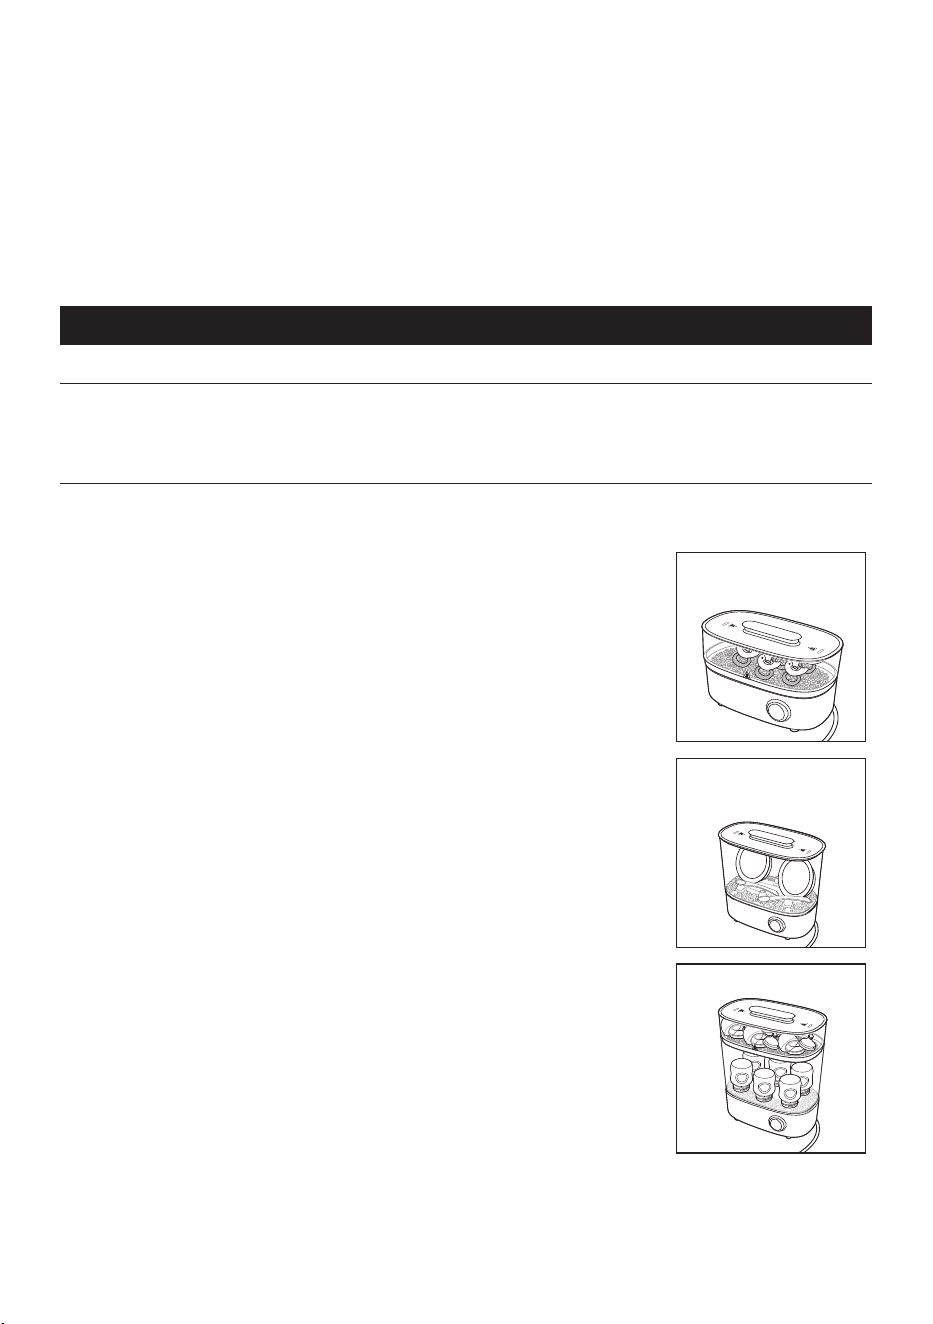
There are several ways to assemble the sterilizer�
1 With only the small basket on the base to sterilize small
items such as soothers�
2 With only the large basket on the base to sterilize
medium-sized items such as breast pump parts, toddler
plates or toddler cutlery�
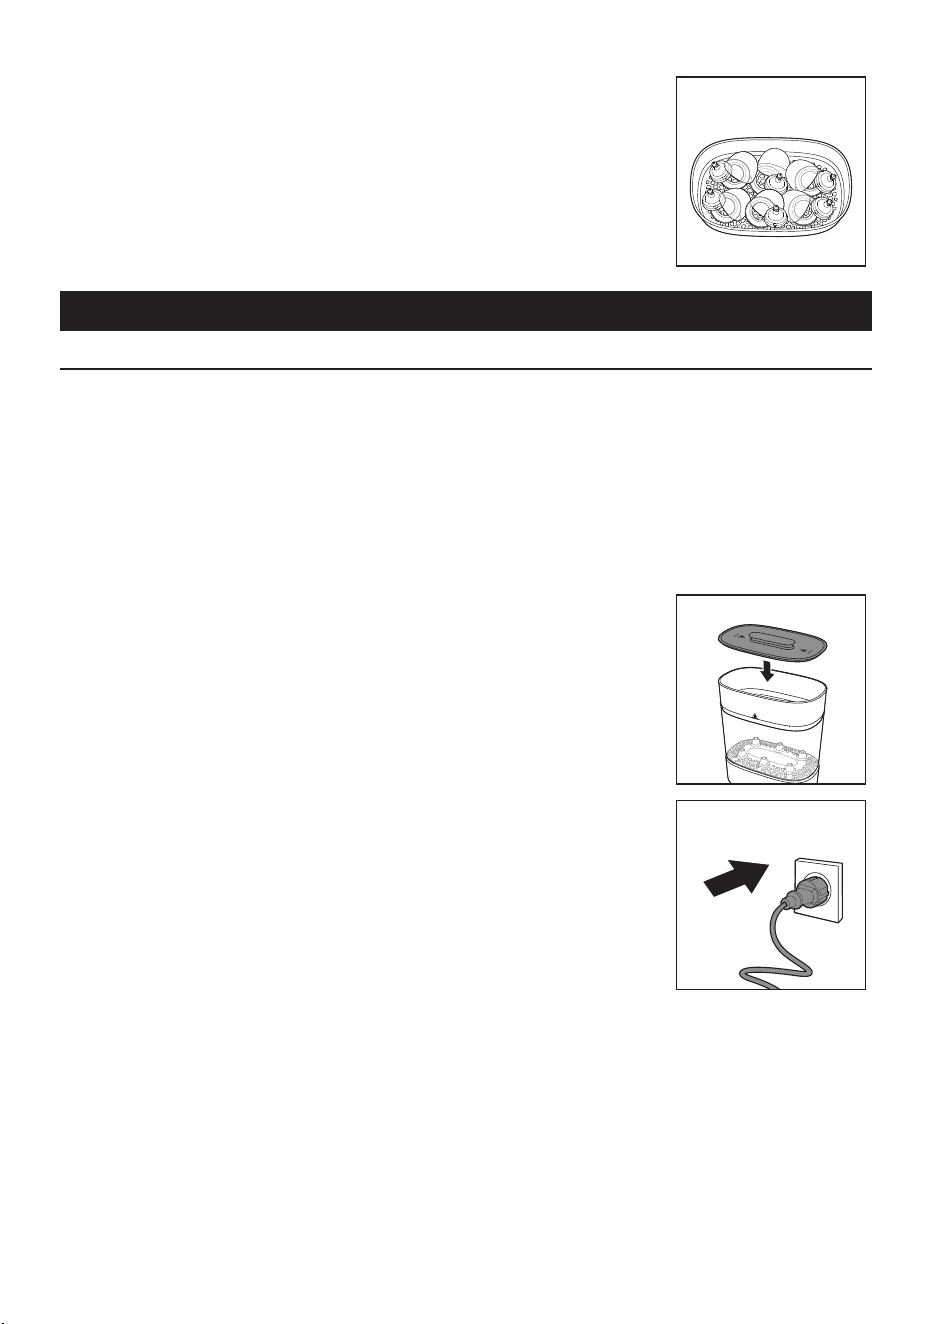
3 With the large basket and the small basket on the base to
sterilize up to six 330ml bottles� Place the bottles upside
down in the large basket and place the bottle dome caps,
screw rings and teats in the small basket�
- 10 -
Note: When you ll the small basket, put screw rings on the
bottom, place the teats and the bottle caps loosely on top of
the screw rings.
Note: Make sure all parts that need to be sterilized are
completely disassembled and place them in the basket with
their openings pointing down to prevent them from lling
up with water.
Using the appliance
Sterilizing
The sterilizer’s thorough and chemical-free cleaning will keep its contents sterile for up to
24 hours with the lid on� After sterilization, the water left on the baby items is sterile and
will not collect germs�
1 Pour water directly into the water reservoir of the base (see section “Before rst
use”)�
2 Assemble the sterilizer (see section “Assembling the sterilizer”) and place the
items to be sterilized in it�
3 Place the lid on top of the small or large basket�
4 Put the plug in the wall socket�
- 11 -

5 Press the power on button to switch on the appliance�
Caution: The base, the baskets and the lid become hot during
or shortly after operation.
Note: You can switch the appliance o by pressing the power
o button.
• The on/o indicator light lights up to indicate that the
appliance starts sterilizing�
• When the sterilization process is nished, the light goes o
and the appliance switches o automatically.
6 Remove the lid�
Wait until the appliance has cooled down before you remove the lid�
Be careful� Hot steam may come out of the sterilizer�
7 Remove the bottles and other items from the basket� Use the tongs to remove the
smaller items�
Be careful� The sterilized items may still be hot�
Note: Make sure you wash your hands thoroughly before you touch the sterilized
items.
8 Unplug the appliance and wait until the appliance has cooled down completely�
9 Remove the small basket and large basket�
Note: When you remove the large basket, be aware of the remaining water on the
base drip tray.
Note: The drip tray is designed to catch milk or food residue and prevent it from
going into the water reservoir of the base. This is to optimize the sterilizing
performance and make the heating element easy to clean.
10 Detach the bottom plate from the large basket� Pour out any remaining water
from the large basket drip tray and clean it (see section “Cleaning”)�
11 Pour out any remaining water from the water reservoir and wipe it dry�
Note: The appliance does not work for 10 minutes after a sterilizing cycle. It needs to
cool down rst.
- 12 -
Cleaning
Do not use abrasive or aggressive cleaning agents (e�g� bleach) or a scouring pad to
clean this appliance�
Never immerse the base and the power cord in water or any other liquid�
Note: The sterilizer is not dishwasher-proof. The baskets, the bottom plate and the lid
can be cleaned with hot water and liquid dishwashing detergent.
1 Always unplug the appliance and let it cool down before you clean it�
2 Clean the base with a moist cloth�
3 Detach the bottom plate from the large basket�
Pour out any remaining water from the large basket drip tray�
Note: Water accumulates on the large basket drip tray after each sterilizing cycle.
Pour out the remaining water from the large basket after each use.
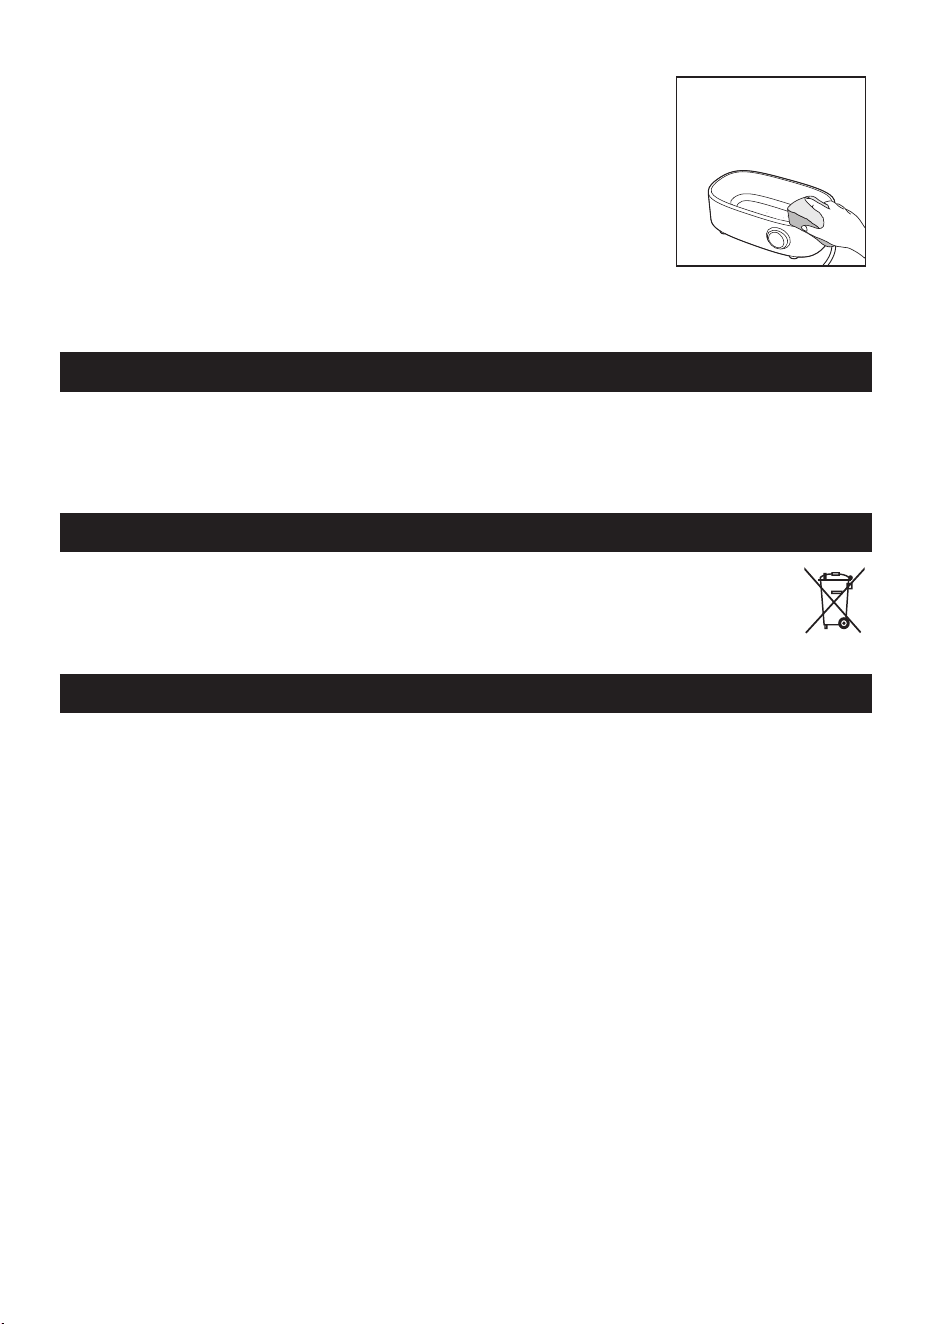
4 Clean the lid, the small basket, the bottom plate and the large basket in hot
water with some liquid dishwashing detergent�
Note: After cleaning, store the sterilizer in a clean and dry place.
- 13 -

Descaling
The sterilization process is extremely important to ensure the most hygienic standards for
your baby� Limescale deposits can slow down the sterilization cycle and even impair its
eectiveness.
Limescale is the hard and chalky deposit� Depending on the water type in your area,
limescale can have dierent appearances ranging from snow white looking powder to
brownish stains� The harder the water, the faster scale builds up� It builds up in appliances
as the residue of minerals naturally contained in water, which fail to evaporate when water
is heated� Although it is not harmful as such, it is unsightly, hard to clean and can impair the
operation of appliances or damage their components if allowed to build up�
Descale the sterilizer at least every 2 weeks to ensure it works eciently.
1 Pour 12 ml of white vinegar (5 % acetic acid) and 120 ml
of water into the water reservoir�
2 Wait for 6 hours/overnight or until all limescale has
dissolved�
6 hr
3 Empty the water reservoir and rinse it thoroughly�
- 14 -
4 If you still see scale traces, remove it by a sponge� Rinse
again and wipe the base with a damp cloth�
Note: You can also use citric acid based descalers.
Note: Do not use other types of descalers.
Ordering accessories
To buy accessories or spare parts, visit www.philips.com or go to your Philips dealer� You
can also contact the Philips Consumer Care Centre in your country (see the worldwide
guarantee leaet for contact details).
Recycling
This symbol means that electrical products shall not be disposed of with normal
household waste�
Follow your country’s rules for the separate collection of electrical products�
Support
For all product support such as frequently asked questions, please visit
www.philips.com/support�
Note: This appliance needs to be descaled regularly for optimal performance. If you
do not do this, the appliance may eventually stop working. In this case, repair is NOT
covered by your warranty.
- 15 -

Troubleshooting
This chapter summarizes the most common problems you could encounter with the
appliance� If you are unable to resolve the problem with the information below, contact
the Consumer Care Centre in your country�
Problem Solution
When should I descale
my sterilizer?
When you use the sterilizer, you may notice that there are
small spots ranging from snow white to brownish appearing
on the heating plate� This is a sign that your sterilizer should be
descaled�
In any case, the sterilizer should be descaled at least every
2weeks to ensure that it continues to work eectively.
Why is the sterilizing
time so short?
You did not add enough water for sterilizing�
Pour exactly 130 ml water directly into the water reservoir of
the base�
Why is there still much
water remaining on
heating plate after
sterilizing?
The heating plate may be blocked by the limescale� The
sterilizer should be descaled at least every 2weeks.
See section “Descaling”�
Why is there a burning
smell and burnt mark
on the base?
You may not have poured out the remaining water from the
large basket drip tray regularly� Water accumulates on the
large basket drip tray after each sterilizing cycle� Pour out any
remaining water from large basket after each use�
1 Detach the bottom plate from the large basket� Pour out
any remaining water from the large basket drip tray�
2 Clean the bottom plate and the large basket in hot water
with liquid dishwashing detergent�
The items may not have been cleaned thoroughly before
sterilizing�
Before you put the items to be sterilized in the sterilizer, clean
them thoroughly in the dishwasher or by hand with hot water
and liquid dishwashing detergent�
- 16 -

Problem Solution
Coating is peeling
o from the heating
plate. Does it aect the
function?
It does not aect the function of the sterilizer.
Make sure you do not use any abrasive or aggressive cleaning
agents (e�g� bleach) or a scouring pad to clean the heating
plate�
Avoid pouring cold water on the heating plate immediately
after use, as it can cause cracking due to the rapid cooling of
the non-stick coating�
Why does the sterilizer
stop working?
The heating plate may be blocked by the limescale� The
sterilizer should be descaled at least every 2 weeks�
See section “Descaling”�
Do I need to dry baby
items after sterilizing?
The sterilizer's thorough, chemical-free cleaning will keep its
contents sterile for up to 24 hours if keeping the lid on� Water
left on baby items after sterilization is sterile and would not
collect germs, so you do not need to dry�
- 17 -

© 2023 Koninklijke Philips N�V�
All rights reserved�
28/02/2023