
Owner’s Manual

49-4000255 Rev 0 11-23 GEA
Write the model and serial numbers here:
Model # _______________________________
Serial # _______________________________
You can find them on the dishwasher’s frame
face, between the drawers, on the left side.
Dishwashers
Models: CDD220 Series and CDD420 Series
Contents
Safety Information ...............................3
Using the Dishwasher
Appliance Communication ........................6
Getting Started .................................8
Dispensers ...................................12
Loading .....................................15
Care and Cleaning ..............................20
Troubleshooting Tips ...........................24
Limited Warranty ...............................29
Consumer Support .............................30
English • Español
Owner's Manual

2 49-4000255 Rev 1
THANK YOU FOR MAKING CAFÉ A PART OF YOUR HOME.
We take pride in the craftsmanship, innovation and design that goes into every Café product, and
we think you will too. Among other things, registration of your appliance ensures that we can deliver
important product information and warranty details when you need them.
Register your Café appliance now online. Helpful websites are available in the Consumer Support
section of this Owner’s Manual. You may also mail in the pre-printed registration card included in the
packing material.
49-4000255 Rev 1 3
IMPORTANT SAFETY INFORMATION
READ ALL INSTRUCTIONS BEFORE USING THE APPLIANCE
SAFETY INFORMATION
WARNING
For your safety, the information in this manual must be followed to minimize
the risk of fire, explosion, electric shock, and to prevent property damage, personal injury,
or death.
READ AND SAVE THESE INSTRUCTIONS
WARNING
PROPER INSTALLATION AND MAINTENANCE
This dishwasher must be properly installed and located in accordance with the Installation Instructions before
it is used. If you did not receive an Installation Instructions sheet with your dishwasher, you can receive one by
visiting our Website at cafeappliances.com.
Ŷ
Connect the dishwasher/appliance to a grounded
metal, permanent wiring system; or run an
equipment-grounding conductor with the circuit
conductors and connect to the equipment-grounding
terminal or lead of the appliance.
Ŷ
Improper connection of the equipment-grounding
conductor can result in a risk of electric shock.
Check with a qualified electrician or service
representative if you are in doubt whether the
appliance is properly grounded.
Ŷ
Detailed grounding instructions can be found in the
“Installation Preparation” section of the Installation
Instructions.
Ŷ
Dispose of discarded appliances and shipping or
packing material properly.
Ŷ
Do not attempt to repair or replace any part of your
dishwasher unless it is specifically recommended in
this manual. All other servicing should be referred to
a qualified technician.
Ŷ
Use only included product cord or hard-wire to
building electrical as described in the Installation
Instructions. Failure to follow this instruction, could
result in risk of fire and personal injury.
Ŷ
To minimize the possibility of electric shock,
disconnect this appliance from the power supply
before attempting any maintenance.
NOTE: Turning the dishwasher off does not disconnect
the appliance from the power supply. We recommend
having a qualified technician service your appliance.
WARNING
WHEN USING YOUR DISHWASHER, FOLLOW BASIC PRECAUTIONS,
INCLUDING THE FOLLOWING:
Ŷ
Use this appliance only for its intended purpose as
described in this Owner’s Manual.
Ŷ
Use only detergents or wetting agents
recommended for use in a dishwasher and keep
them out of reach of children. Using a detergent
that is not specifically designed for dishwashers will
cause the dishwasher to fill with suds.
Ŷ
Locate sharp items so that they are not likely to
damage the drawer seal.
Ŷ
Load sharp knives with the handles up to reduce
the risk of cut-type injuries.
Ŷ
Do not wash plastic items unless marked
dishwasher safe or the equivalent. For plastic
items not so marked, check the manufacturer’s
recommendations.
Ŷ
Do not operate your dishwasher unless all
enclosure panels are properly in place.
Ŷ
Do not tamper with controls.
Ŷ
Do not abuse, sit on or stand on the drawer of the
dishwasher.
Ŷ
To reduce the risk of injury, do not allow children to
play with, on or inside this appliance at any time.
Ŷ
Do not store or use combustible materials including
gasoline or other flammable liquids or vapors in the
vicinity of this or any other appliance.
Ŷ
Small parts can be a choke hazard to small children
if removed from the dishwasher. Keep out of reach
of small children.
4 49-4000255 Rev 1
SAFETY INFORMATION
IMPORTANT SAFETY INFORMATION
READ ALL INSTRUCTIONS BEFORE USING THE APPLIANCE
READ AND SAVE THESE INSTRUCTIONS
WARNING
WATER HEATER SAFETY
Under certain conditions, hydrogen gas may be produced in a water heater that has not been used for two or more weeks.
HYDROGEN GAS IS EXPLOSIVE.
If the hot water has not been used for two or more weeks, prevent the possibility of damage or injury by turning
on all hot water faucets and allowing them to run for several minutes. Do this before using any electrical
appliance connected to the hot water system. This simple procedure will allow any built-up hydrogen gas to
escape. Since the gas is flammable, do not smoke, use an open flame, or use the appliance during this process.
CAUTION
TO PREVENT MINOR INJURY AND PROPERTY DAMAGE
Ŷ 'XULQJRUDIWHUZDVKF\FOHFRQWHQWVPD\EHKRWWR
the touch. Use care before handling.
Ŷ &ORVHVXSHUYLVLRQLVQHFHVVDU\LIWKLVDSSOLDQFHLV
used by or near children. Do not allow children to play
around the dishwasher when closing the drawers due
to the possibility of small fingers being pinched.
Ŷ 1RQ'LVKZDUH,WHPV'RQRWZDVKLWHPVVXFKDV
electronic air cleaner filters, furnace filters and
paint brushes in your dishwasher. Damage to the
dishwasher and discoloration or staining of the
dishwasher may result.
Ŷ /RDGOLJKWZHLJKWSODVWLFLWHPVVRWKH\GRQRWEHFRPH
dislodged and drop to the bottom of the dishwasher.
WARNING
RISK OF CHILD ENTRAPMENT
PROPER DISPOSAL OF THE DISHWASHER
Junked or abandoned dishwashers are dangerous…even if they will sit for “just a few days.” If you are getting
rid of your dishwasher, please follow the instructions below to help prevent accidents.
Ŷ 'RQRWDOORZFKLOGUHQWRSOD\ZLWKRQRULQVLGHWKLVRUDQ\GLVFDUGHGDSSOLDQFH
NOTICE
Ŷ
Use only powder, Cascade
®
Platinum™ ActionPacs™ or Finish
®
Quantum
®
Automatic Dishwashing Detergent
or
rinse agents recommended for use in a dishwasher and keep them out of the reach of children. Cascade
®
Platinum™ ActionPacs™ or
Finish
®
Quantum
®
Automatic Dishwashing Detergent,
and Cascade
®
Platinum™
Power Dry™ Rinse Aid
or Finish
®
Jet-Dry
®
Rinse Aid rinse agents have
been
approved for use in all Café
dishwashers.
CAUTION
Ŷ 8QGHUQRFLUFXPVWDQFHVVKRXOG\RXRSHQWKH
drawer while the dishwasher is in operation.
Ŷ $OZD\VNQRFNRQWKHULJKWVLGHIURQWRIWKHGUDZHU
to pause the dishwasher and wait until you hear the
four additional beeps before opening the drawer.
Ŷ 7KHGLVKZDVKHUPXVWEHXVHGZLWKWKHPRWRU
assembly, filter plate, drain filter and spray arm in
place. To identify what these parts are, see the
Care and Cleaning section in this Owner’s Manual.
Ŷ 7DNHFDUHZKHQORDGLQJWKHGUDZHUQRWWRORDG
dishware items so they prevent the internal lid from
properly sealing with the drawer. Items should be
placed so they do not protrude above and/or forced
into the drawer, otherwise a service call may result.
Ŷ &OHDQLQJDQGXVHUPDLQWHQDQFHVKDOOQRWEHGRQHE\
children without supervision.
Ŷ ,IWKHGLVKZDVKHULVQRWEHLQJXVHGIRUORQJSHULRGV
of time, turn the electricity and water supply to the
dishwasher off.

49-4000255 Rev 1 5
IMPORTANT SAFETY INFORMATION
READ ALL INSTRUCTIONS BEFORE USING THE APPLIANCE
SAFETY INFORMATION
READ AND SAVE THESE INSTRUCTIONS
ELECTRICAL REQUIREMENTS
Be sure that the electrical connection and wire size are adequate
DQGLQFRQIRUPDQFHZLWKWKH1DWLRQDO(OHFWULF&RGH$16,1)3$
70 – latest edition, and all local codes and ordinances.
This appliance must have:
Ŷ
120V, 60Hz, AC-only, 15-ampere or 20-ampere, fused
electrical supply.
Ŷ
Wiring must be 2 wire with ground and rated for 167°F.
Ŷ
If the electrical supply does not meet the above
requirements, call a licensed electrician before
proceeding.
It is recommended to have:
Ŷ
A circuit breaker or time-delay fuse.
Ŷ
A properly grounded individual branch circuit.
Proper Disposal of your Appliance
Ŷ
Dispose of or recycle your appliance in accordance with Federal and Local Regulations. Contact your local
authorities for the environmentally safe disposal or recycling of your appliance.
Ŷ
Consider recycling options for your appliance packaging material.
6 49-4000255 Rev 1
USING THE DISHWASHER
Appliance Communication
WiFi Connect (for customers in the United States)
Your dishwasher is GE Appliances WiFi Connect
capable. A WiFi communication card is built into the
product allowing it to communicate with your smartphone
for remote monitoring, control and notifications.
1) Use the QR code to download and access the
SmartHQ App or visit cafeappliances.com/connect.
2) Follow the instructions in the App to connect your
dishwasher.
Please visit cafeappliances.com/connect to connect
your appliance, learn more about connected appliance
features and learn what connected appliance app’s will
work with your smartphone.
In Canada, visit cafeappliances.ca.
This device complies with Part 15 of the FCC Rules. Operation is subject to the following two conditions:
1. This device may not cause harmful interference, and
2. This device must accept any interference received, including interference that may cause undesired operation.
This equipment has been tested and found to comply with the limits for a Class B digital device, pursuant to Part
15 of the FCC Rules. These limits are designed to provide reasonable protection against harmful interference in a
residential installation. This equipment generates uses and can radiate radio frequency energy and, if not installed
and used in accordance with the instructions, may cause harmful interference to radio communications. However,
there is no guarantee that interference will not occur in a particular installation. If this equipment does cause
harmful interference to radio or television reception, which can be determined by turning the equipment off and
on, the user is encouraged to try to correct the interference by one or more of the following measures:
• Reorient or relocate the receiving antenna.
• Increase the separation between the equipment and receiver.
• Connect the equipment into an outlet on a circuit different from that to which the receiver is connected.
• Consult the dealer or an experienced radio/television technician for help.
Labelling: Changes or modifications to this unit not expressly approved by the manufacturer could void the user’s
authority to operate the equipment.

49-4000255 Rev 1 7
NOTES
Notes
8 49-4000255 Rev 1
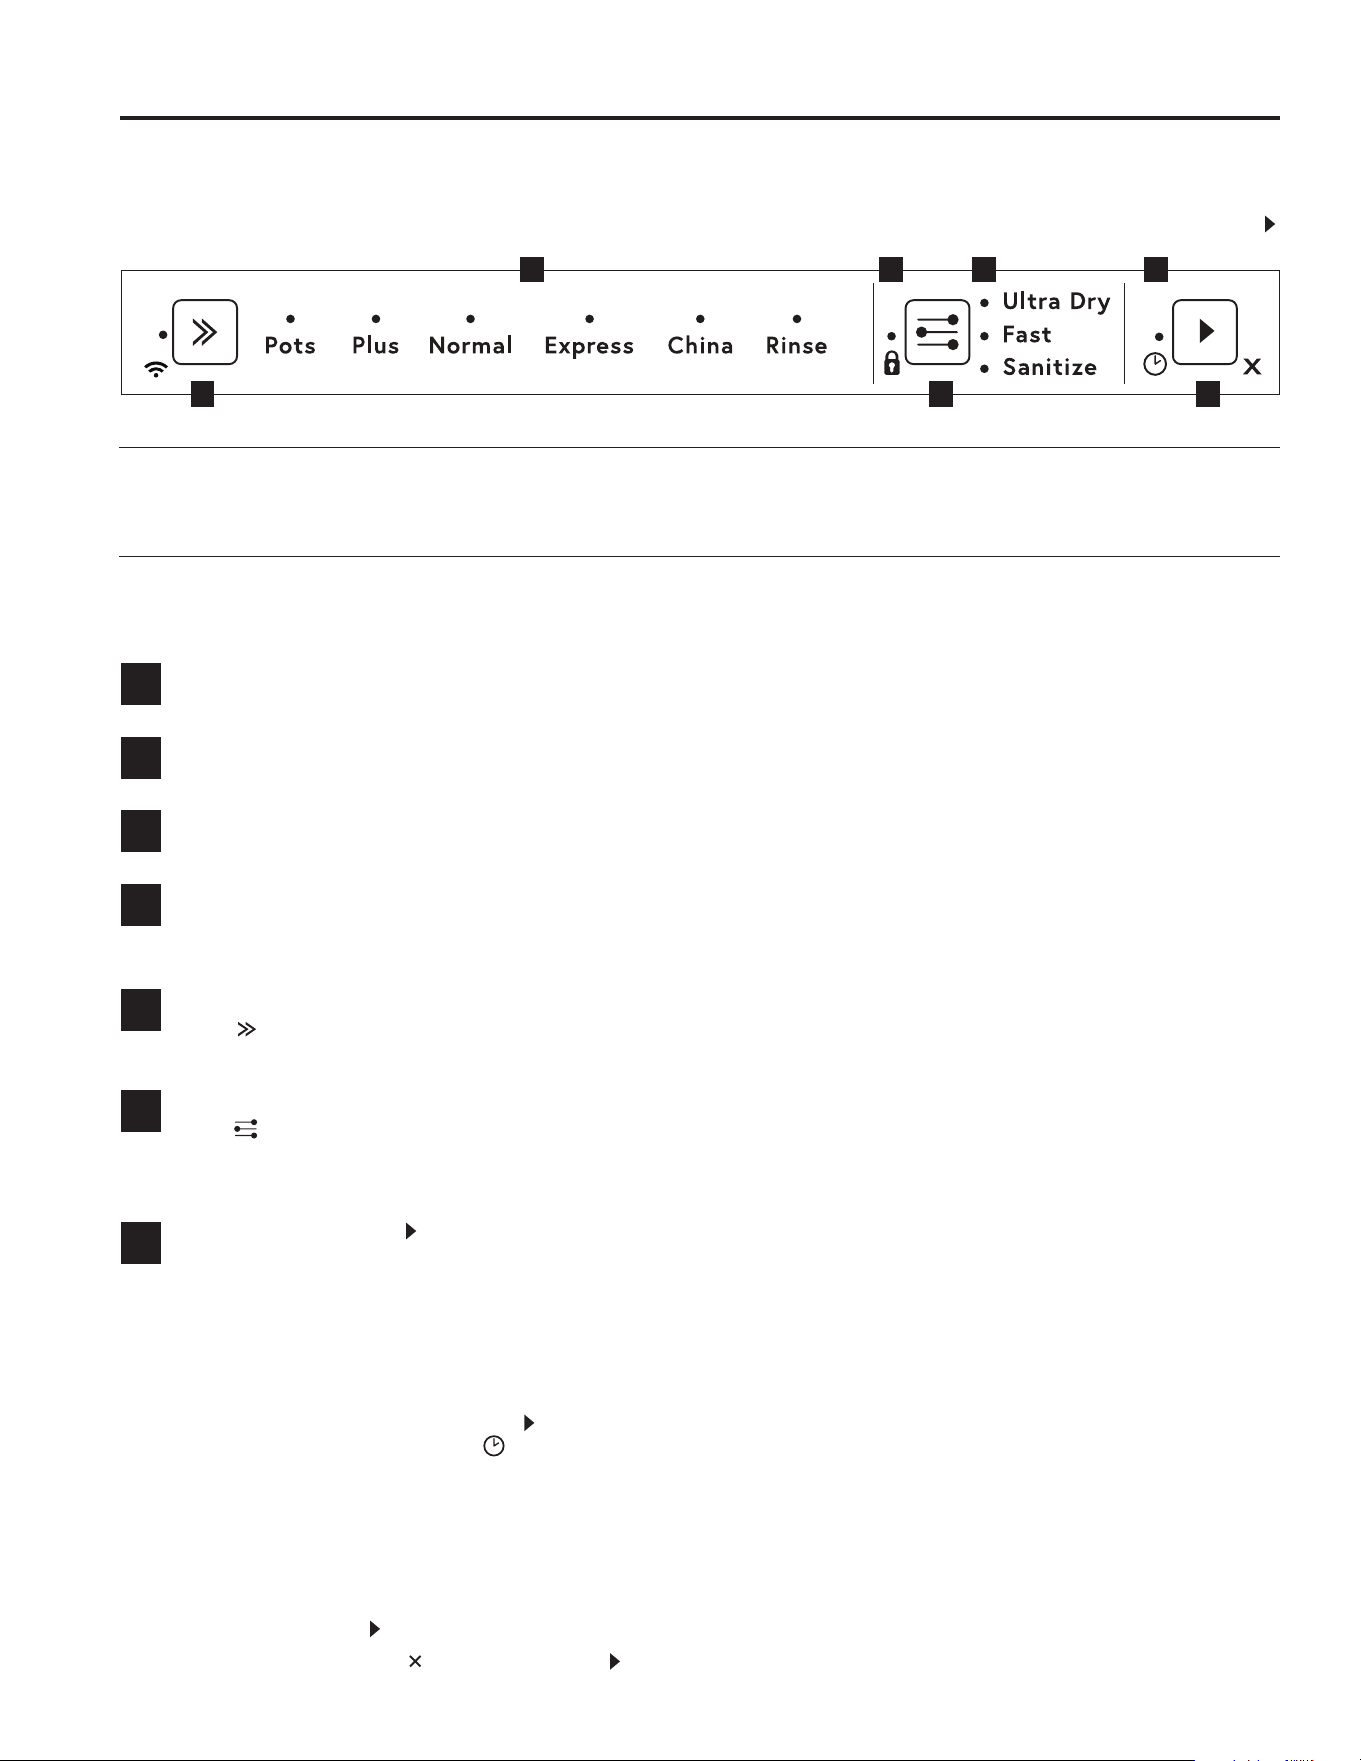
Getting started
USING THE DISHWASHER
Features and appearance will vary throughout this manual
Indicators
Off/On - Opening the drawer will automatically turn the dishwasher on. If the dishwasher is in an idle state, touch any
button to reactivate it.
Wash Program Indicators
If lit: The wash program has been selected.
Lock Indicator
If lit: Keylock or Childlock is activated.
Wash Option Indicators
If lit: The wash cycle option has been selected. The wash program length and temperature will
be set accordingly.
Delay Start Indicator
If lit: Delay start is set. The wash program will
start after the selected time delay (1-12 hours).
Controls
Wash Cycle Selector
Press to scroll through the available wash programs and select the desired one.
NOTE: (DFK GUDZHU FDQ UXQ LQGHSHQGHQWO\ RI WKH RWKHU GUDZHU RU DW WKH VDPH WLPH DV WKH RWKHU GUDZHU
Options Selector
Press to scroll through the wash options.
NOTE: 1RW DOO RSWLRQV DUH DYDLODEOH IRU DOO ZDVK SURJUDPV
Start Selector (on the inner control panel)
To Start Wash: Press on the control panel before closing the drawer.
To Pause: Firmly knock twice on the right side of the drawer front.
• Wait for three short and one long tone before opening the drawer.
NOTE: Forcing the drawer open mid cycle may cause damage or injury.
• If the dishwasher drawer is not restarted within seven minutes, it will sound intermittently until it is restarted.
Delay start
To Set Delay Start: Press and hold
WR VHW WKH GHOD\ VWDUW WLPH (DFK WRQH LQGLFDWHV D KRXU GHOD\ XS WR
hours). The delay start indicator will light up.
• If you scroll past 12h (12 hours) the dishwasher will exit delay start.
To re-enter delay start follow the instructions above.
• The wash will start when the delay time is over, provided the drawer is closed.
If drawer is not closed within 4 seconds of setting delay start, OR If the drawer is opened after delay start has
been set (for example, to load more dishes), delay start will be suspended.
To Resume: Press and close the drawer.
To Cancel Delay Start : Press and hold .
• If there is any water in the drawer, it will automatically drain before the dishwasher turns off.
1 2 3 4
A B C
1
2
3
4
A
B
C
Quick Start
This dishwasher operates differently than most dishwashers. When a cycle is running, the drawer is locked closed.
To
open the drawer mid cycle, you must pause the cycle. Since there are no controls on the outside of the dishwasher,
you must knock on the right side of the drawer front, 2 knocks, wait for 3 seconds and then open the drawer. Press
to restart the cycle.
Smart
Assist
Connect your dishwasher to SmartHQ to unlock enhanced capabilities and information for the Smart Assist
feature to maintain optimal wash and dry performance. Smart Assist is designed to monitor your dishwasher’s
functionality and will help ensure optimal performance.
See the Appliance Communication section for instructions on how to connect.
49-4000255 Rev 1 9
USING THE DISHWASHER
Getting started
Select Wash Cycle - Press to scroll through the available wash programs and stop to select the
desired one. The lit indicator light above the selected wash program will indicate the selected wash program.
Pots This cycle is meant for heavily soiled dishes, cookware, pots, or pans with dried-on or baked-on
VRLOV (YHU\GD\ GLVKHV DUH VDIH WR EH XVHG LQ WKLV F\FOH 7LPH KRXUV PLQXWHV
Plus 7KLV F\FOH LV PHDQW IRU GDLO\ IXOO ORDGV RI PHGLXP WR KHDYLO\ VRLOHG GLVKHV 7LPH KRXUV PLQXWHV
Normal 7KLV F\FOH LV QRUPDOO\ VRLOHG GLVKHV DQG SURYLGHV RSWLPXP ZDWHU DQG HQHUJ\ XVDJH 7KH (QHUJ\
*XLGH LV EDVHG RQ WKLV F\FOH 1R ZDVK 2SWLRQV DUH DYDLODEOH IRU WKLV F\FOH 7LPH KRXUV
Express )RU ZDVKLQJ SDUWLDO ORDGV ZLWK ORRVH VRLOV :DVK WLPHV DQG ZDWHU WHPSHUDWXUHV DUH UHGXFHG 7LPH
46 minutes.
China For washing lightly soiled and heat sensitive dishware. Wash temperatures are reduced.
7LPH KRXU PLQXWHV
Rinse For rinsing partial loads that will be washed later. Prevents odors and keeps soils from drying on
dishes. Do not use detergent. Detergent is not dispensed during the rinse cycle.
7LPH PLQXWHV
:DVKLQJ WLPH RQO\ 'RHV QRW LQFOXGH GU\LQJ WLPH
6
Discard Scraps
Scrape large food particles off (eg bones, fruit stones) and remove any foreign objects (eg toothpicks, strings,
paper).
Load Dishes Carefully- See the Loading section for more information.
To help with wash performance, arrange dishes so they are evenly spaced and not nesting.
IMPORTANT!
Accommodates plates up to a max height of 11” for
lower drawers or 12 1/4” for upper drawers.
Check Spray Arm(s) - See the Care and Cleaning section for more information.
Check the spray arm is mounted correctly by physically rotating it around with your hand.
Before a wash, ensure there are no items preventing the spray arm(s) from rotating.
Add Detergent - See the Dispensers section for more information.
Fill the detergent dispenser with powder detergent and close the dispenser door.
IMPORTANT!
Do not use liquid detergent.
Do not place tablets or put liquid detergent in the detergent dispenser.
If using a tablet or gel pouch, place it in the cutlery basket or at the edge of the base rack.
Check Rinse Aid - See the Dispensers section for more information.
If the indicator on its plug glows bright red, refill the rinse aid dispenser with liquid rinse aid.
Make sure you then refit the rinse aid plug back into its original position, by rotating the plug back into an
upright position.
1
2
4
Leak Protection
If a leak is detected, the dishwasher will drain, the cycle will stop and the below indicated control panel lights will
turn on. If this occurs, contact Café for service.
3
5
10 49-4000255 Rev 1
Getting Started
USING THE DISHWASHER
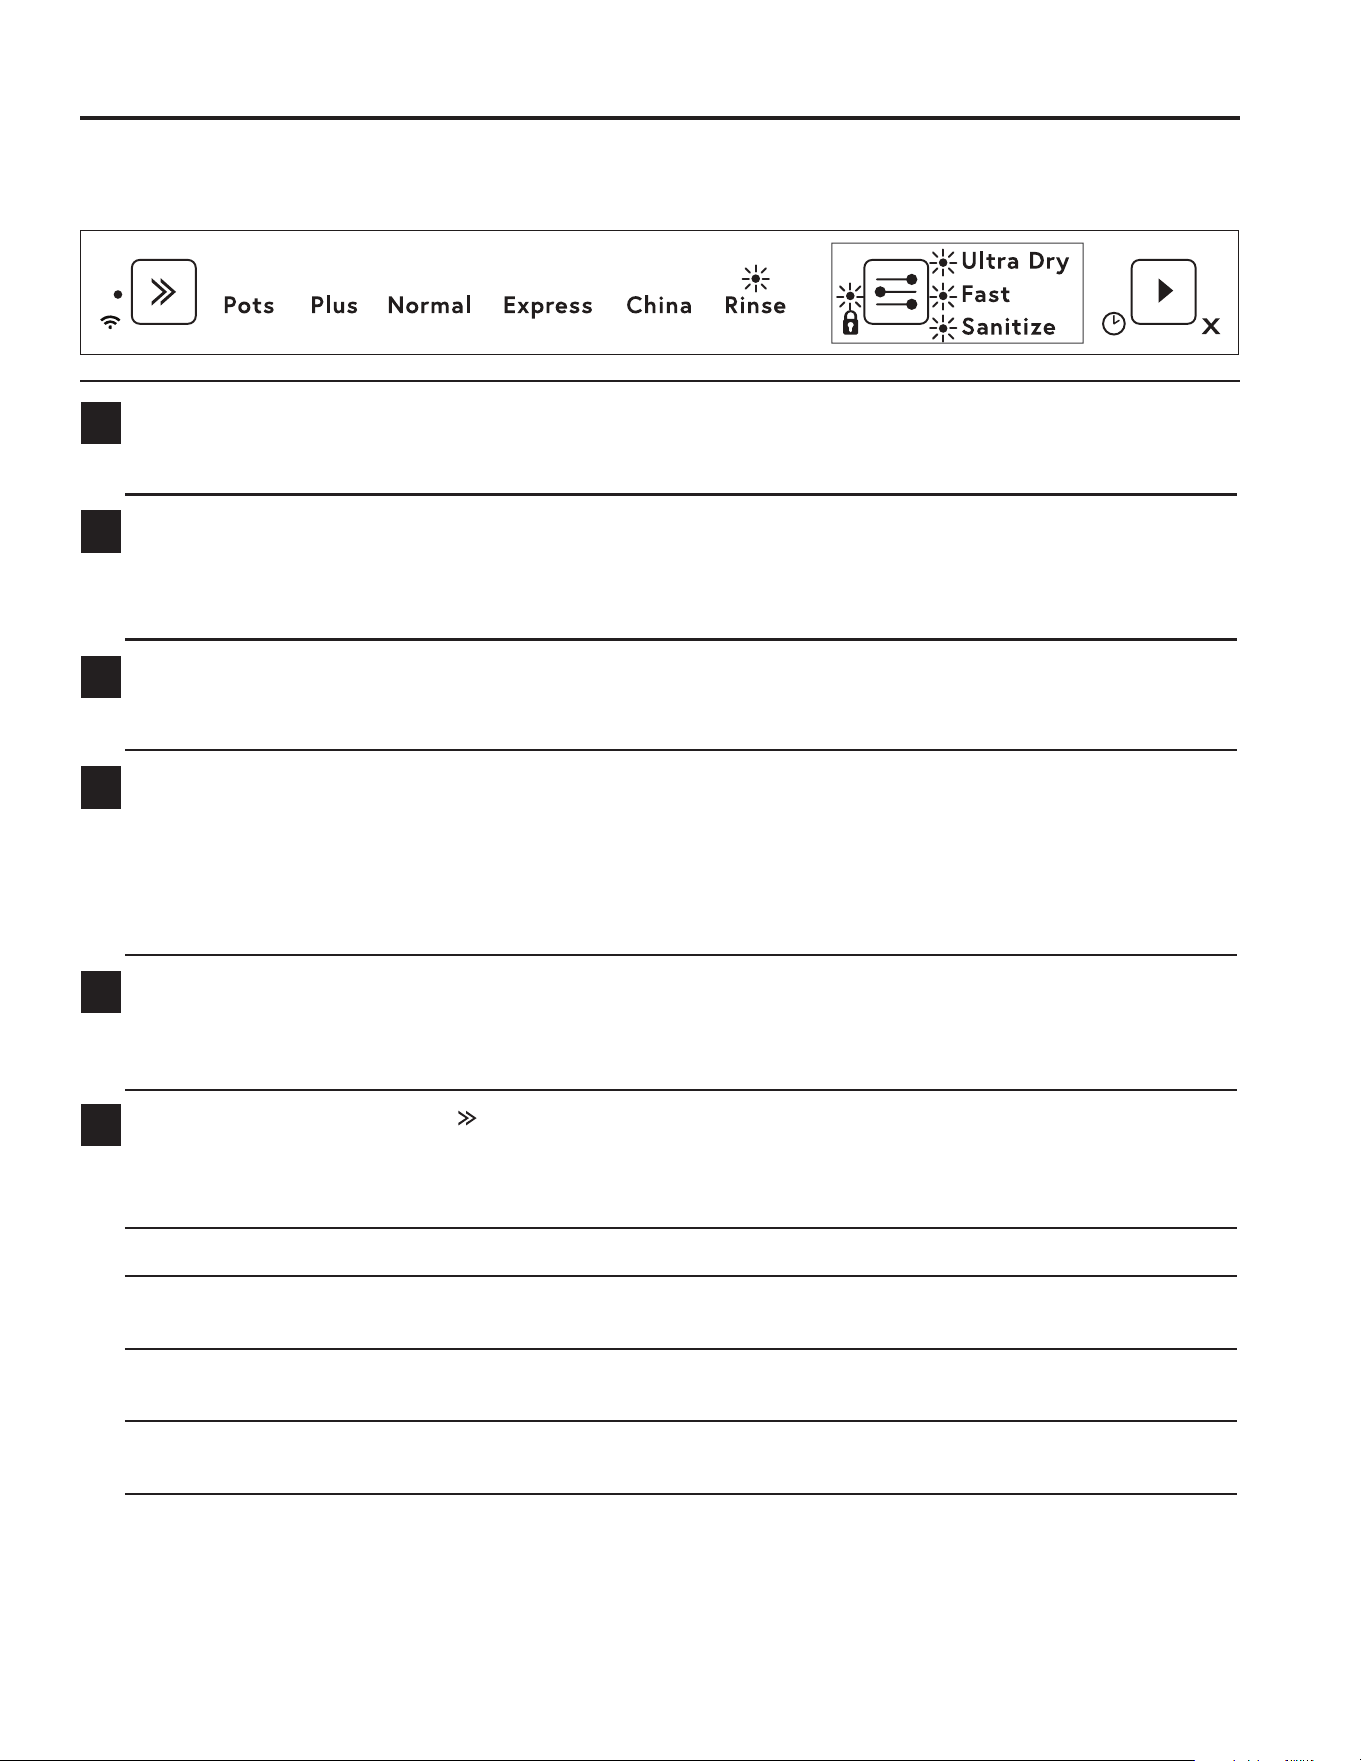
Select Options - Press to scroll through the available options and stop to select the desired one. The lit
indicator light above the selected option will indicate the selected option.
Ultra Dry Increases the final rinse temperature and the length of the drying phase for improved drying
performance.
Fast Uses additional water and energy for a faster wash time, while maintaining wash performance.
Sanitize Raises the water temperature during the rinse phase to sanitize dishes. Ideal for washing items
such as baby bottles and preserving jars.
7KHVDQLWL]HZDVKRSWLRQDGMXVWVWKHZDVKSURJUDPWRPHHWWKHFRQGLWLRQVUHTXLUHGE\16)
Section 6 for sanitization to occur.
While sanitize is running, the wash program is monitored to ensure that these conditions are met.
IMPORTANT!
• Only programs utilising the sanitize wash option are certified to meet the conditions required
E\16)6HFWLRQ2WKHUZDVKSURJUDPVPD\QRWUHDFKWKHWHPSHUDWXUHVUHTXLUHGIRU
sanitization to occur. See table for wash programs that have sanitize available as an option.
• For sanitization to occur, the temperature of the water needs to reach 158°F. Make sure that all
items are marked dishwasher safe or the equivalent before running the sanitize option.
• If the wash is interrupted or the water supply is turned off during the program, then the heating
conditions for sanitization may not be met. You may need to run the program again to ensure
sanitization of your dishes.
At the end of a wash program with sanitize, always check to make sure that sanitization was successful.
If sanitization was successful: The wash will finish as normal.
If sanitization was not successful:
• An alert will sound.
• When the drawer is opened the sanitize indicator will flash.
• Check if the water supply has been turned off or the wash program interrupted.
• Press and hold once to stop the beeping and a second time to clear the flashing alert code.
• Reset sanitize and then run the cycle again.
NOTES:
Only one option can be set at a time.
1RWDOORSWLRQVDUHDYDLODEOHIRUHYHU\ZDVKSURJUDP,IDZDVKRSWLRQLVQRWDYDLODEOHIRUWKHFKRVHQZDVK
program, then that option cannot be selected. See the table below for options available with each wash program.
7
Wash Program Options Available
Pots Ultra Dry Fast Sanitize
Plus Ultra Dry Fast Sanitize
Normal ---
Express Ultra Dry - -
China Ultra Dry Fast -
Rinse ---
Lock Options - Press to scroll through the available options and stop to select the desired one. The lit
indicator light above the selected option will indicate the selected option.
Keylock Disables all the buttons - Helpful when cleaning the dishwasher.
To activate: Press and hold until you hear a tone. The lock indicator
will light up.
To cancel: Press and hold until you hear a tone. The lock indicator
will turn off.
Childlock Disables all the buttons and locks the drawer closed (preventing unauthorized use by children).
To activate: Press and hold until you hear two tones. The lock indicator
will light up.
To cancel: Press and hold until you hear a tone. The lock indicator
will turn off.

49-4000255 Rev 1 11
USING THE DISHWASHER
Getting Started
Start Dishwasher
Start Press on the control panel and close the drawer within 4 seconds. If the drawer was not
closed within 4 seconds, then press again before closing the drawer.
Pause Firmly knock twice on the right side of the drawer front. Wait for three short and one long tone
before opening the drawer. NOTE: Forcing the drawer open mid cycle may cause damage or
injury.
If the dishwasher drawer is not restarted within seven minutes, it will sound intermittently until it
is restarted.
Cancel Press and hold .
Delay Start Press and hold WRVHWWKHGHOD\VWDUWWLPH(DFKWRQHLQGLFDWHVDKRXUGHOD\XSWRKRXUV
The delay start indicator will light up.
• If you scroll past 12h (12 hours) the dishwasher will exit delay start.
To re-enter delay start follow the instructions above.
• The wash will start when the delay time is over, provided the drawer is closed.
If drawer is not closed within 4 seconds of setting delay start, OR If the drawer is opened after
delay start has been set (for example, to load more dishes), delay start will be suspended.
To Resume: Press and close the drawer.
To Cancel Delay Start : Press and hold .
• If there is any water in the drawer, it will automatically drain before the dishwasher turns off.
9
1 CHECK
Check that there is no wash underway, then open drawer.
2 ENTER MENU
To enter the menu: Press and hold the
and at
the same time for four seconds.
•
You are now in the Rinse Aid option of the options menu.
• To change the Rinse Aid setting, go to step 4 now.
3 SCROLL TO OPTION
Press to scroll to the next option. The option indicators
will display which option is selected (see table below).
When you have scrolled to the end of the sequence,
the menu will start again with Rinse Aid.
4 CHANGE SETTING
Press to change the setting within an option.
The wash program indicators will display which setting
is selected (see table below).
5 SAVE SETTING & QUIT MENU
Press to save the new setting and quit the
preference options menu.
You can use either drawer to change the settings.
Changing the settings in one drawer will set your
preferences for the whole dishwasher.
Additional Options - How to set and change the settings of the additional options.
8
OPTION RINSE AID
O PE N D RAW E R
AUTO POWER-ON
(SUITABLE AS A
SABBATH OPTION)
TONES AT END
OF WASH
CLOSED
DRAWER
AUTOLOCK
WI-FI
Which
option
am I in?
Possible
settings
0 to 5 (max) On or Off On or Off On or Off On or Off
Settings
examples
4 indicators lit = setting 4
1 indicator lit = setting 1
On
Off
On
Off
On
Off
Connected
Disconnected
12 49-4000255 Rev 1
Dispensers
USING THE DISHWASHER
Check the Water Temperature
The entering water should be at least 120°F and not more
than 150°F for effective cleaning and to prevent dish
damage. Check the water temperature with a candy or
meat thermometer.
Turn on the hot water faucet nearest the dishwasher,
place the thermometer in a glass and let the water run
continuously into the glass until the temperature stops
rising.
Use a Rinse Agent
High quality rinse agents such as Cascade
®
Platinum™
Power Dry™ Rinse Aid or Finish
®
Jet-Dry
®
Rinse Aid
are designed for great drying action and to protect against
spots and film build-up on your dishes, glasses, flatware,
cookware, and plastic.
NOTE: You may hear some unusual, high-pitched
beeping when rinse aid is being dispensed. This is
normal.
When to Fill the Rinse Agent Dispenser
If the indicator glows or flashes
bright red, refill rinse aid.
If the indicator glows or flashes
dimly or not at all, you do not need
to refill, there is enough rinse aid
for the wash.
NOTE: Lighter colored rinse
aids will not dim the indicator as
effectively as darker ones.
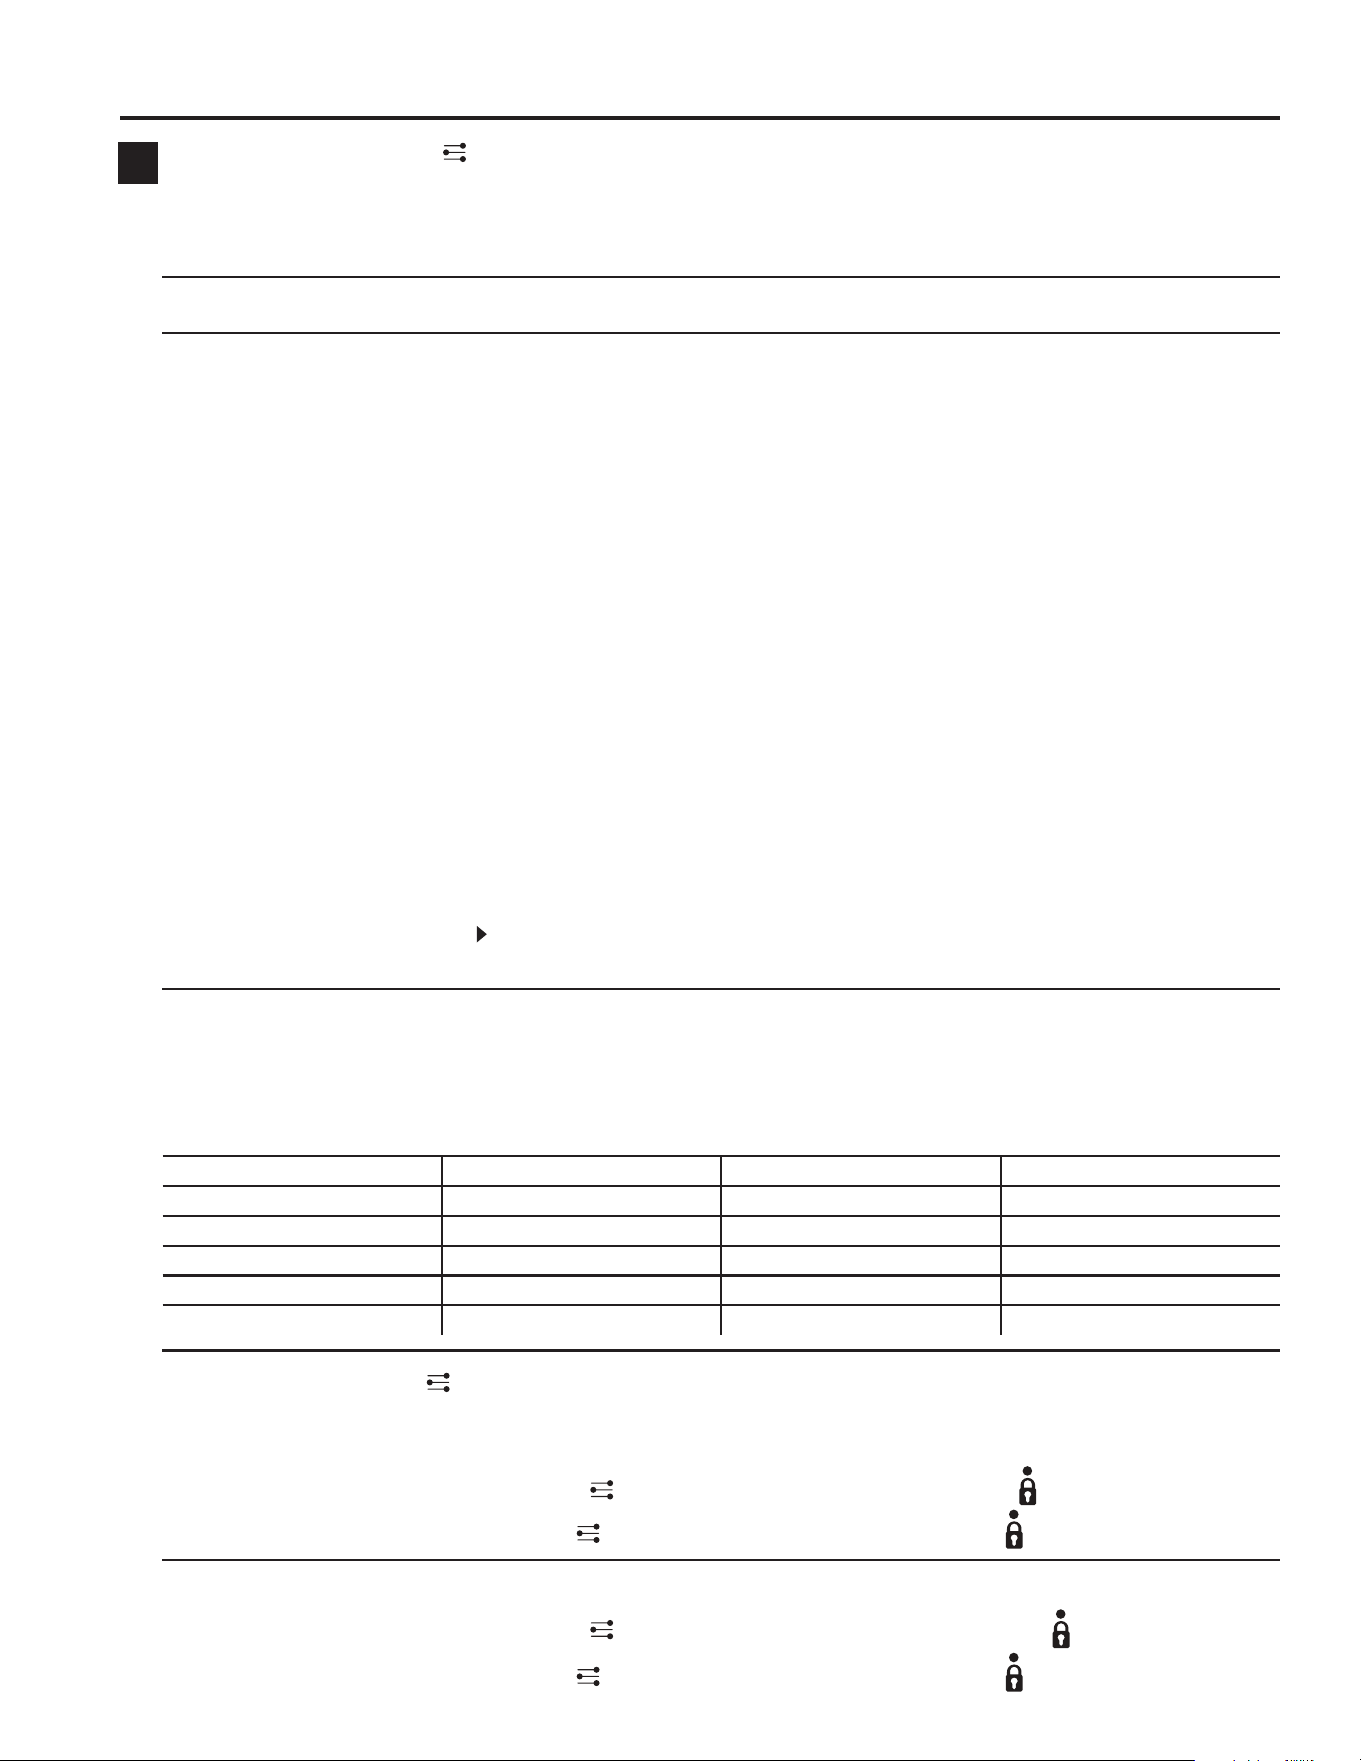
Filling the Rinse Agent Dispenser
The rinse agent dispenser holds 1.7 oz. of rinse agent.
Under normal conditions, this will last approximately one
month.
The rinse aid dispenser is on the inside of the drawer,
underneath the detergent dispenser.
1
Turn the plug counterclockwise and remove.
2
Pour rinse aid into the circular opening, taking care
not to spill any into the drawer.
IMPORTANT!
Any accidental spillages of rinse aid must be wiped up.
If not wiped up, rinse aid will cause excessive foaming,
which may result in a service call that will not be covered
by warranty.
3
Replace the plug, then turn it clockwise back to its
original position.
IMPORTANT!
Make sure that the plug is closed tight, with its finger grip
in the vertical position.
Rinse Aid Setting
You may need to adjust the amount of rinse aid
dispensed in each wash to suit your water conditions.
The lowest setting is 0 (off), the highest is 5.
If there is excessive foam at the end of the wash, reduce
the setting.
If dishes are wet or streaky after drying, increase the
setting.
If you live in a hard water area and you have no water
softener installed in your water supply or built into your
dishwasher, we recommend adjusting the rinse aid
setting to 5.
To adjust the setting
See
8
Additional Options in the Getting Started
section.
Indicator
light
Turn counterclockwise
and pull to remove
Pour rinse aid into the
circular opening and
wipe up any spilled
Replace plug and turn
clockwise to tighten
49-4000255 Rev 1 13
USING THE DISHWASHER
Dispensers
Detergent Dispensing
IMPORTANT!
Do not use liquid detergent.
Do not place tablets or put liquid detergent in the
detergent dispenser.
If using a tablet or gel pouch, place it in the cutlery
basket or at the edge of the base rack as described later
in this section.
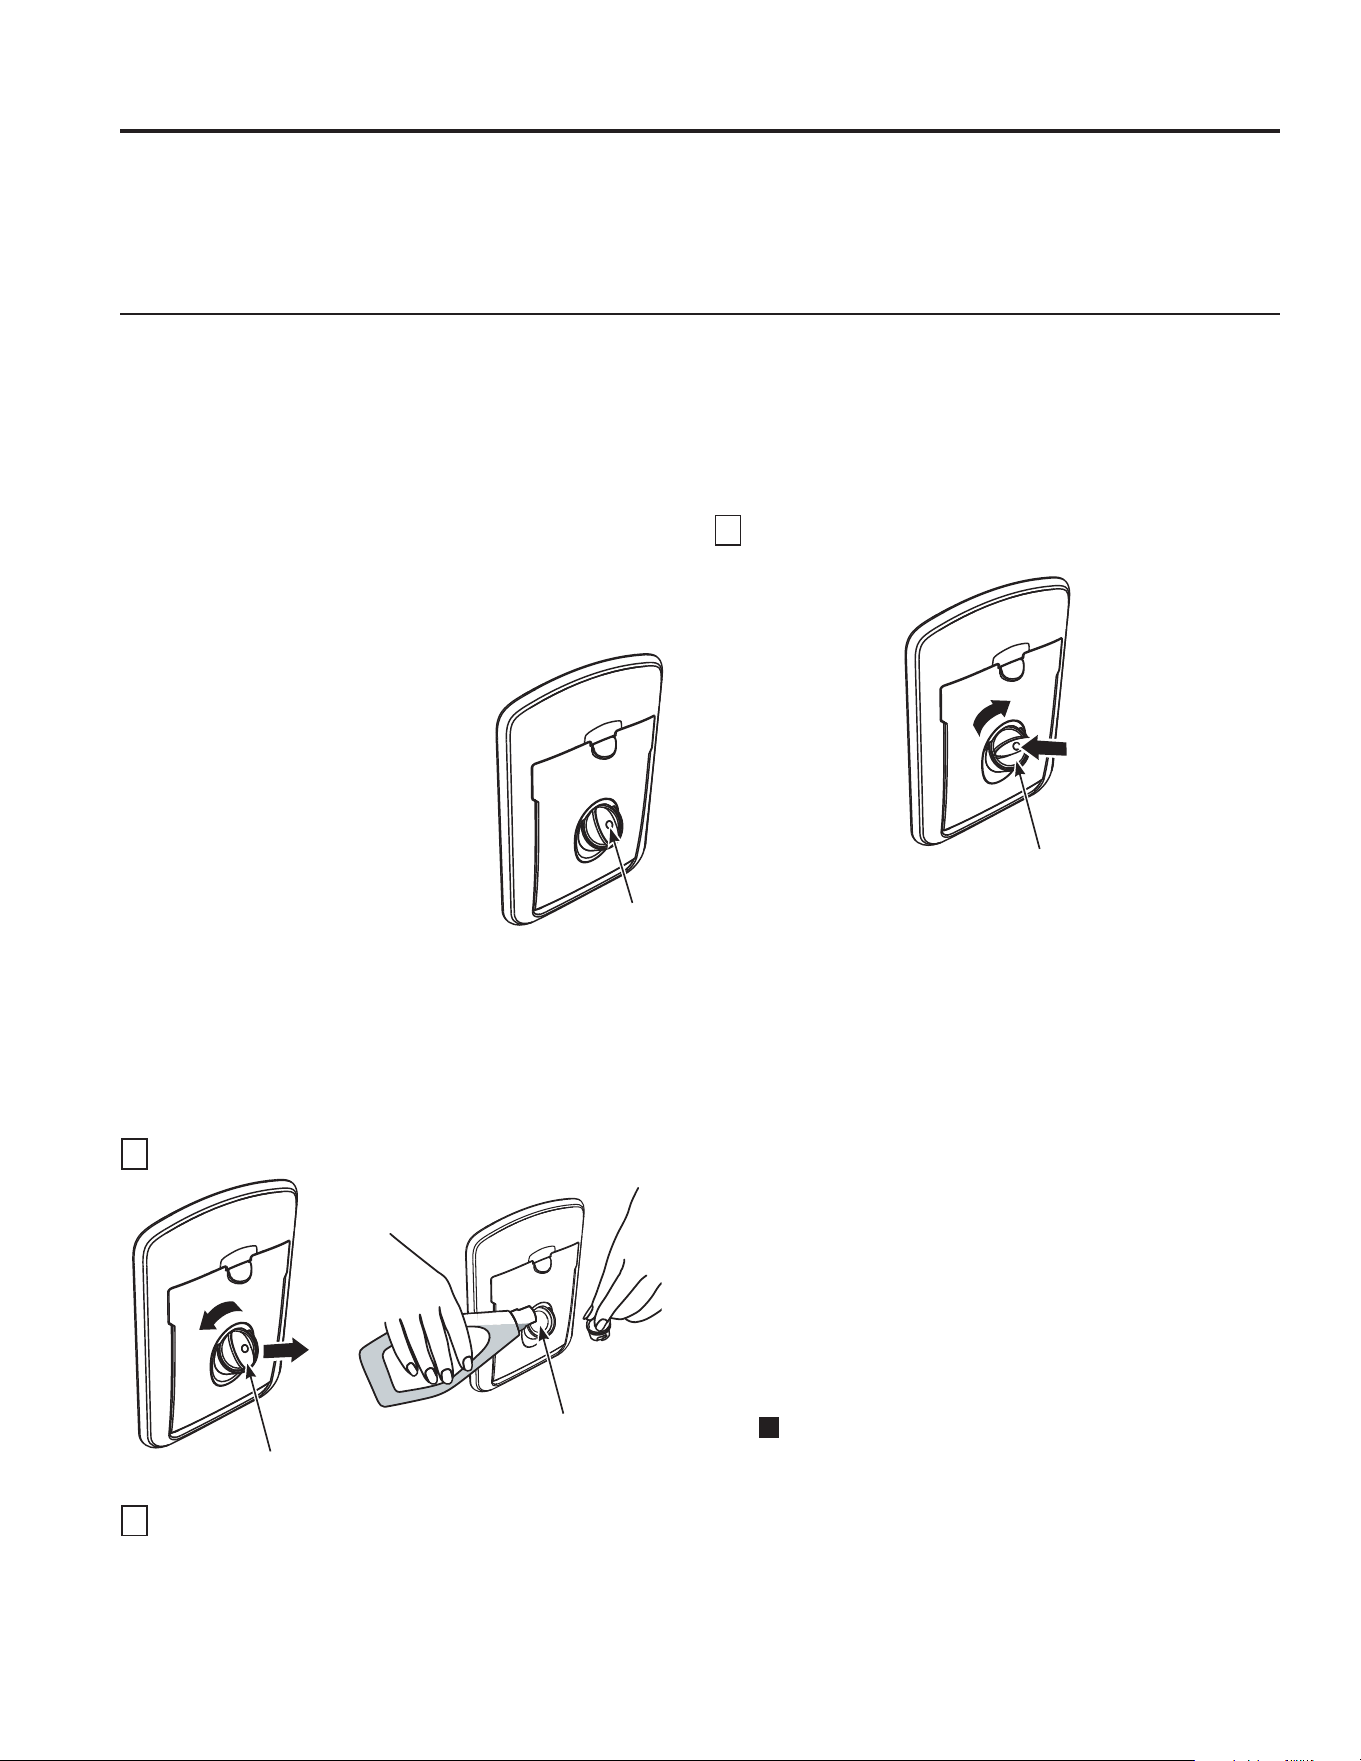
Powder Detergent Dispenser
The detergent dispenser is located inside the drawer on
the front left side.
Use only powder detergent designed for automatic
dishwashers in the detergent dispenser.
Filling the Powder Detergent Dispenser
1
Press the latch down to open the dispenser.
2
Check that the dispenser is empty and dry, then add
powder detergent (do not place solid or liquid tablets
LQ WKH GLVSHQVHU 1R GHWHUJHQW LV QHHGHG IRU WKH
Rinse program.
3
Close the dispenser until it clicks shut. The detergent
will automatically be released into the drawer during
the wash program.
NOTE: When washing heavily soiled dishes and in very
hard water you may also fill the secondary dispenser
with detergent to aid dishwasher performance.
When using the detergent dispenser the amount of
powder detergent you use will be determined by the
hardness of your water, the temperature of your water,
and the food soil load inside the dishwasher. Contact
your water company to get information about the
hardness of the water in your area. Water hardness is
measured in grains per gallon. Use this information and
the table below to determine the amount of detergent to
use. You may purchase a hard water test strip from
Café. Call 877-959-8688 and ask for part number
WD01X10295.
Use the table as a starting point and then adjust the
amount of detergent you use. Use just enough to get
good wash performance. Using just the right amount of
detergent will provide great wash performance without
wasting detergent or etching glassware.
Using too much detergent with very soft and/or very
hot water may cause a condition called etching on your
JODVVZDUH (WFKLQJ LV D SHUPDQHQW FORXGLQHVV LQ \RXU
glassware. This condition is irreversible. However, using
too little detergent will cause poor wash performance.
DO NOT USE HAND DISH DETERGENT
NOTE: Using a detergent that is not specifically designed
for dishwashers will cause the dishwasher to fill with suds.
During operation, these suds will spill out of the dishwasher
vents, covering the kitchen floor and making the floor wet.
Because so many detergent containers look alike,
store the dishwasher detergent in a separate space
from all other cleaners. Show anyone who may use the
dishwasher the correct detergent and where it is stored.
While there will be no lasting damage to the dishwasher,
your dishes will not get clean using a dishwashing
detergent that is not formulated for automatic dishwashers.
Press to release
and open dispenser
compartment
Main
Dispenser
Secondary
Dispenser
Number of
Grains/Gal.
Detergent Dispenser(s) to Fill
Less than 4 Fill main to 1/3 full
4 to 8 Fill main to 2/3 full
8 to 12 Fill main completely full
Greater than 12
Fill both main and secondary
dispensers
Completely
Full
2/3
Full
1/3
Full
Main
Dispenser
Secondary
Dispenser

14 49-4000255 Rev 1
USING THE DISHWASHER
Dispensers
Detergent Dispensing
IMPORTANT!
Do not use liquid detergent.
Tablet Tray - For Gel Pouch or Tablet
The tablet tray is located on the cutlery basket.
Use only gel pouches or tablets designed for
automatic dishwashers.
Placement on the Tablet Tray
1
Place on the tablet tray in the cutlery basket.
2
Slide the tray down and secure in the cutlery basket.
Placement within the Side Rack Rails -
For Gel Pouch or Tablet
If the cutlery basket is not being used in the dishwasher
for a particular load, the gel pouch or tablet may be
wedged within the side rack rails.
Use only gel pouches or tablets designed for
automatic dishwashers.
Placement within the Side Rack Rails
1
Securely wedge the gel pouch or tablet within the
side rack rails.
2
IMPORTANT!
Do not place the gel pouch or tablet on the floor of the
drawer, as it may interfere with the spray arm rotation
and affect wash performance.
Notes on using tablets
• If you are using tablets, follow manufacturer instructions
on the packet. Some tablets may not be suitable for all
wash programs.
• Using tablets could improve wash performance in hard
water areas.
• Make sure that tablets never come into direct contact
with dishes or cutlery.
• If you are using dishwasher tablets with a built-in rinse
aid component, we recommend turning off the rinse aid.
DO NOT USE HAND DISH DETERGENT
NOTE: Using a detergent that is not specifically designed
for dishwashers will cause the dishwasher to fill with suds.
During operation, these suds will spill out of the dishwasher
vents, covering the kitchen floor and making the floor wet.
Because so many detergent containers look alike,
store the dishwasher detergent in a separate space
from all other cleaners. Show anyone who may use the
dishwasher the correct detergent and where it is stored.
While there will be no lasting damage to the dishwasher,
your dishes will not get clean using a dishwashing
detergent that is not formulated for automatic dishwashers.
Tablet
Tray
Gel Pouch
OR
Tablet
Gel Pouch
OR
Tablet
49-4000255 Rev 1 15
USING THE DISHWASHER
Loading
For best dishwashing results, follow these loading guidelines. Features and appearance of racks and cutlery
basket may vary from your model.
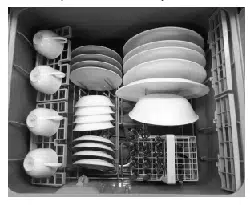
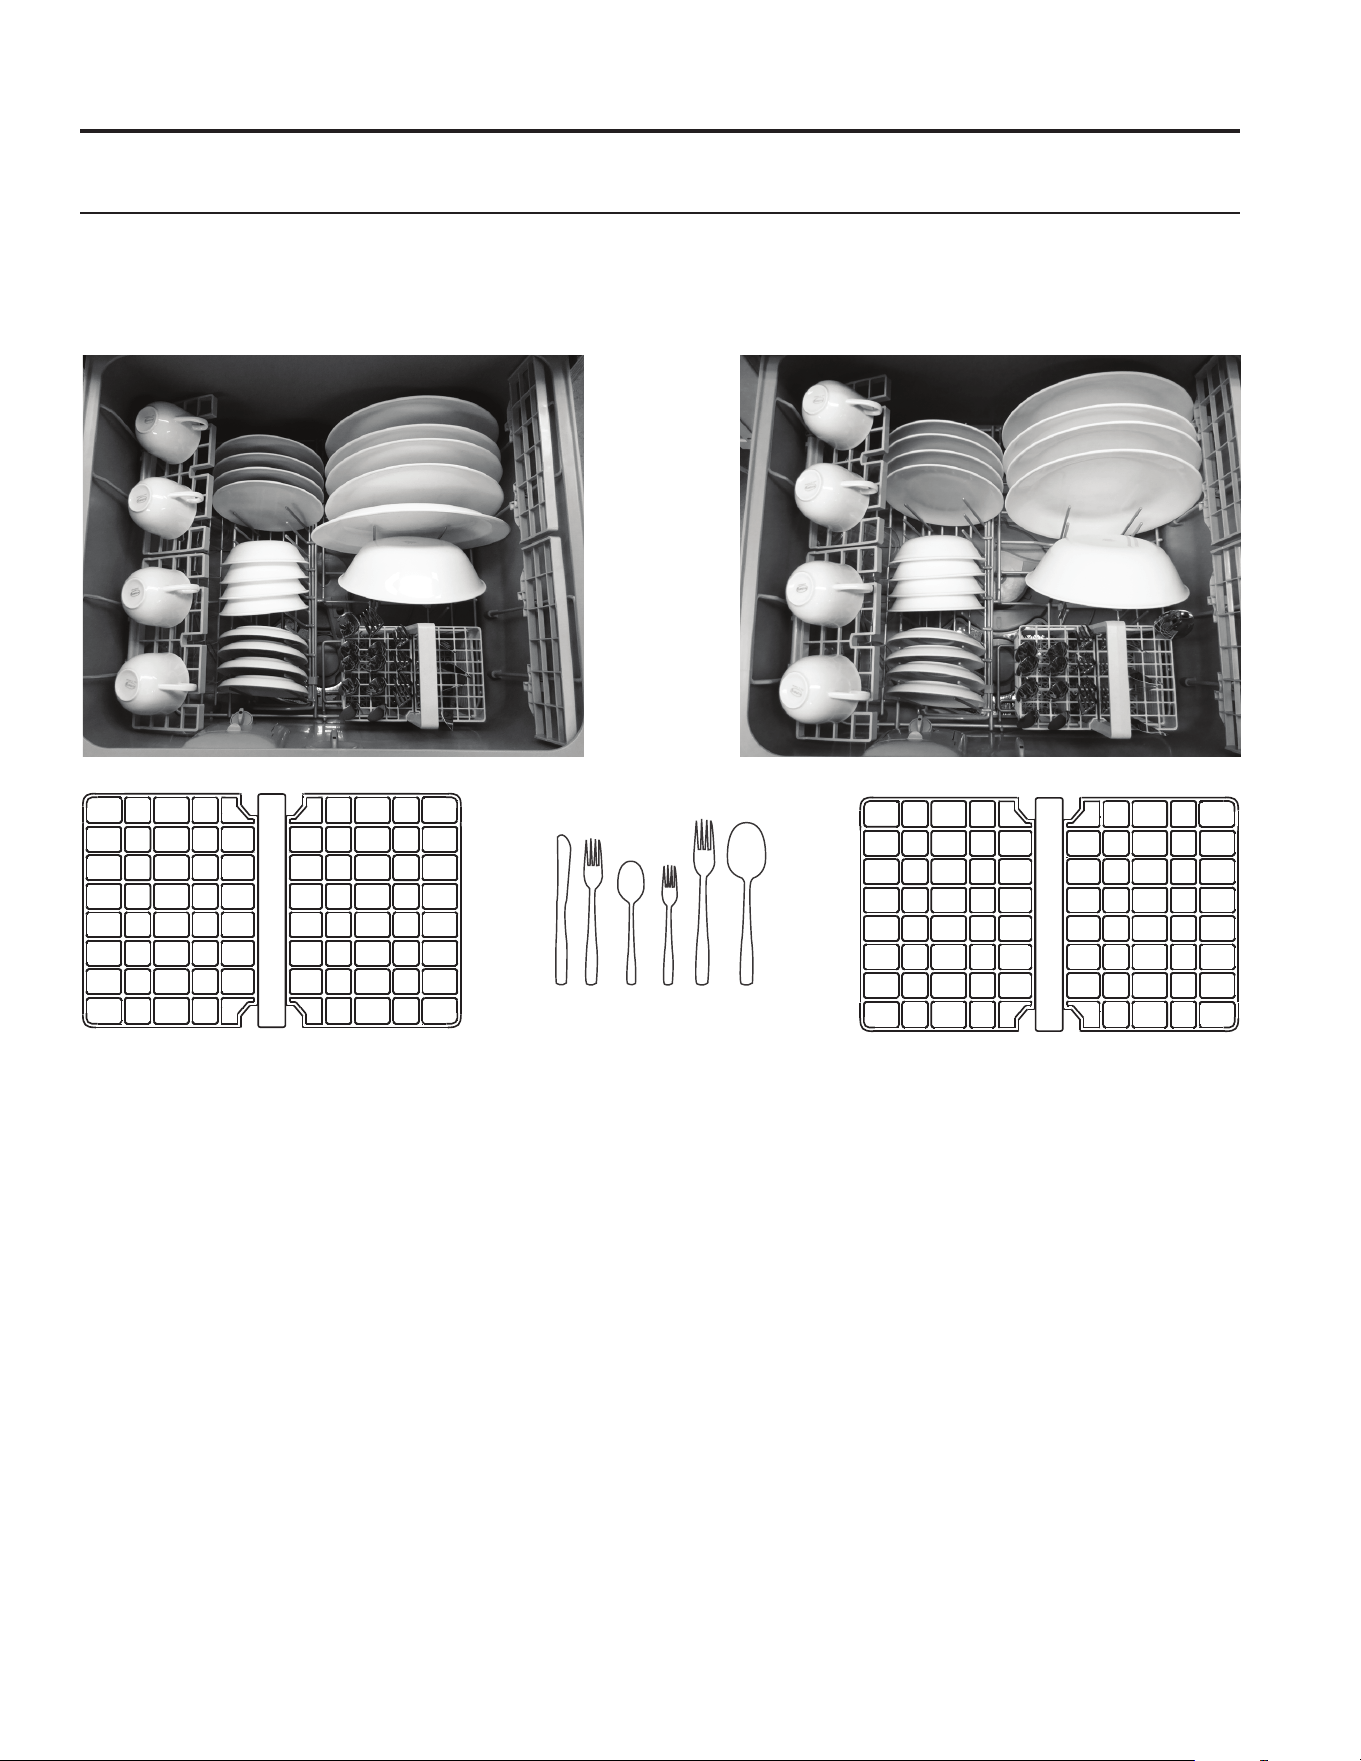
Top Drawer and Cutlery Basket
Bottom Drawer and Cutlery Basket
12 3 45 6
65
3
3
3
241
1
1
1
4
4
4
2
2
2
3
3
3
3
3
1
1
1
1
4
4
4
4
2
2
2
2
6
3
3
3
3
3
3
3
3
Recommended Loading
The dishwasher is tested to 10 CFR part 430 for energy and water consumption using the parameters detailed below.
16 49-4000255 Rev 1
USING THE DISHWASHER
Loading
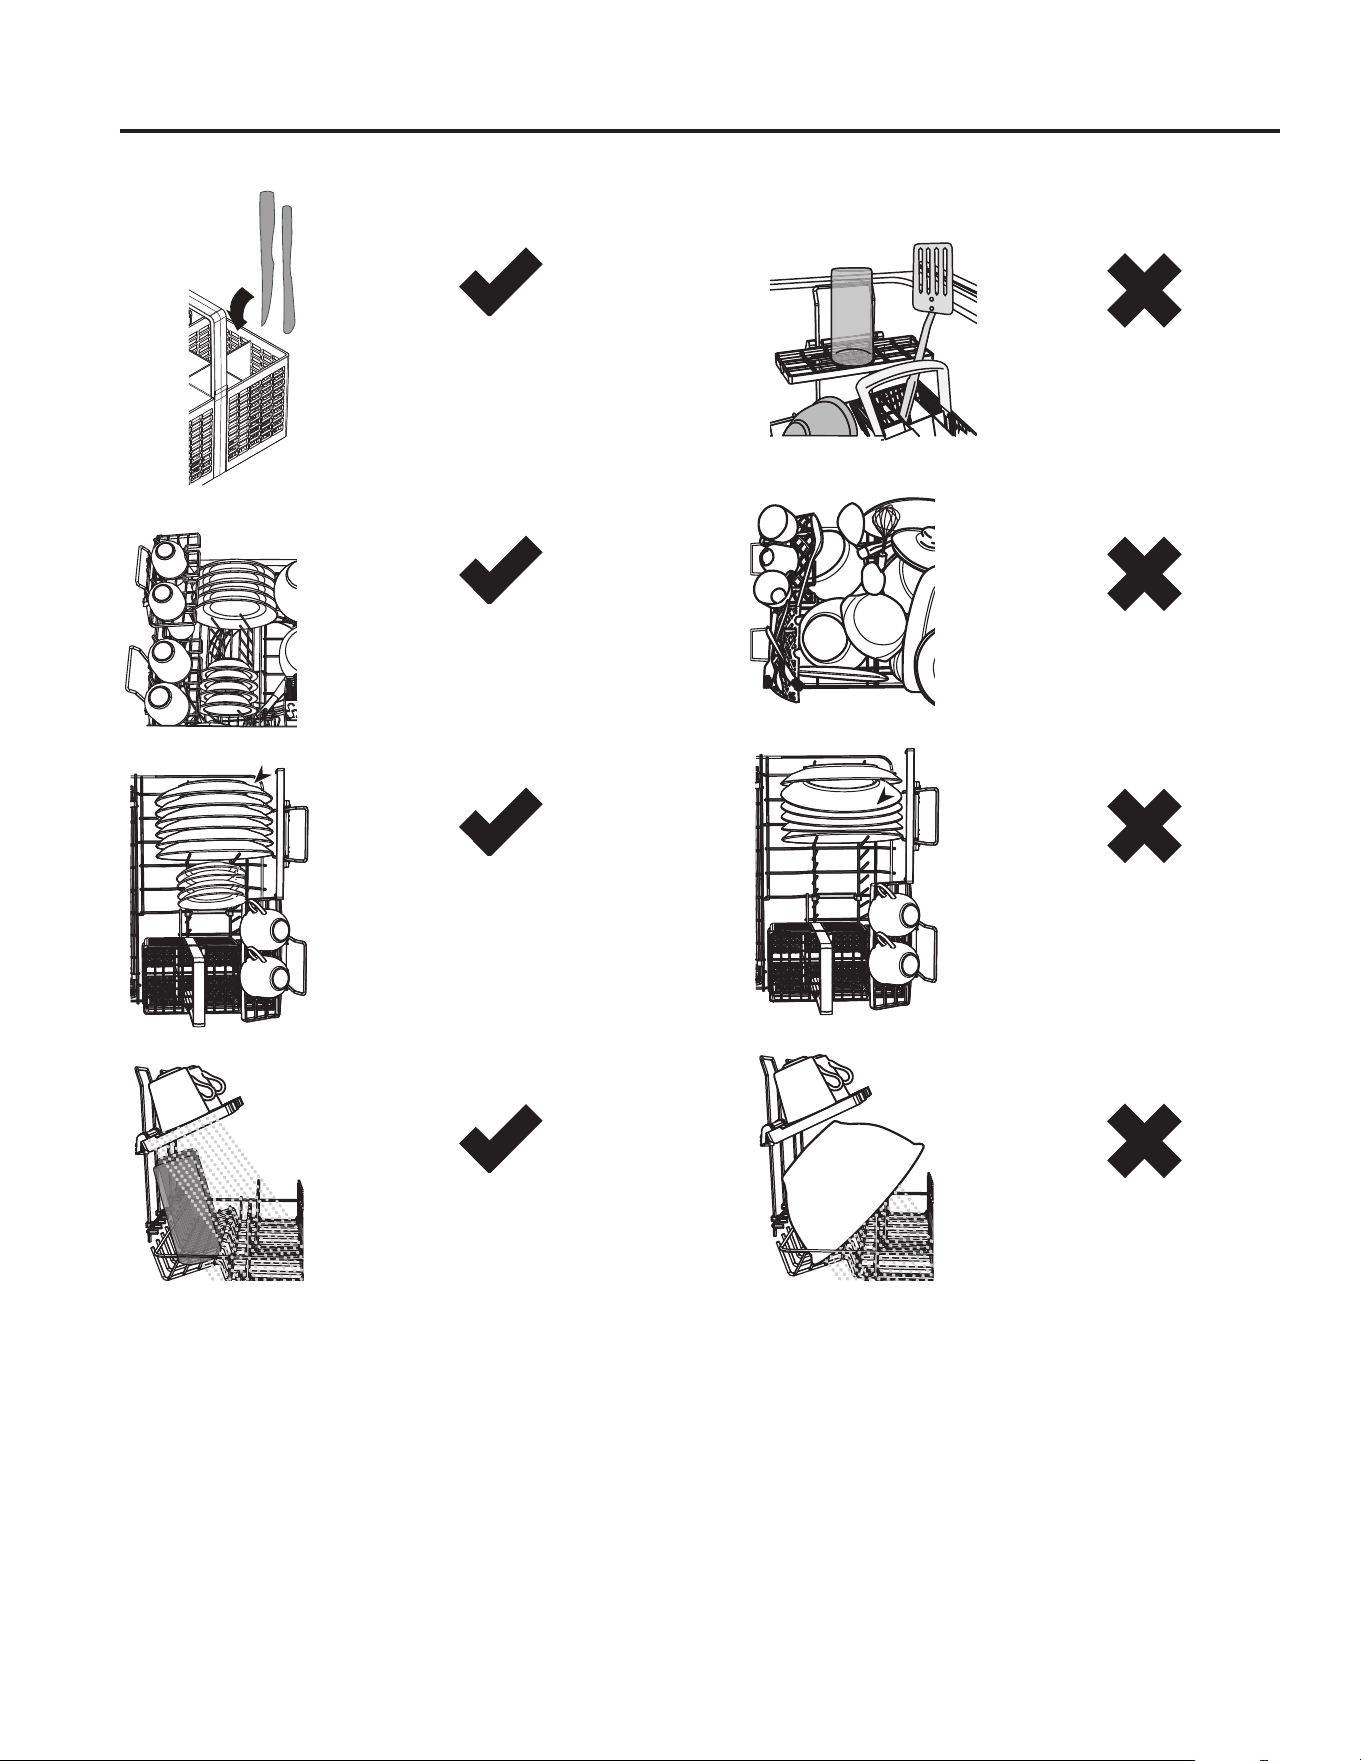
A neatly arranged load
with evenly spaced dishes
helps wash performance.
Sharp or pointed
items must be placed
horizontally or with sharp
edges/points facing down
to avoid risk of injury.
Overcrowding reduces
wash performance.
Protruding items will stop
the internal lid of the
dishwasher from sealing
properly, which could
result in a service call.
(QVXUH WKHUH LV HQRXJK
space between plates. Mix
spoons, knives and forks
within the cutlery basket to
prevent them from nesting.
If plates and cutlery are
nesting, they are less
likely to be cleaned well.
(QVXUH WKDW ZDWHU UHDFKHV
all items on the racks.
Dishware is blocking water
from reaching items on the
racks.
Dos and Don’ts of Loading
49-4000255 Rev 1 17
USING THE DISHWASHER
Loading
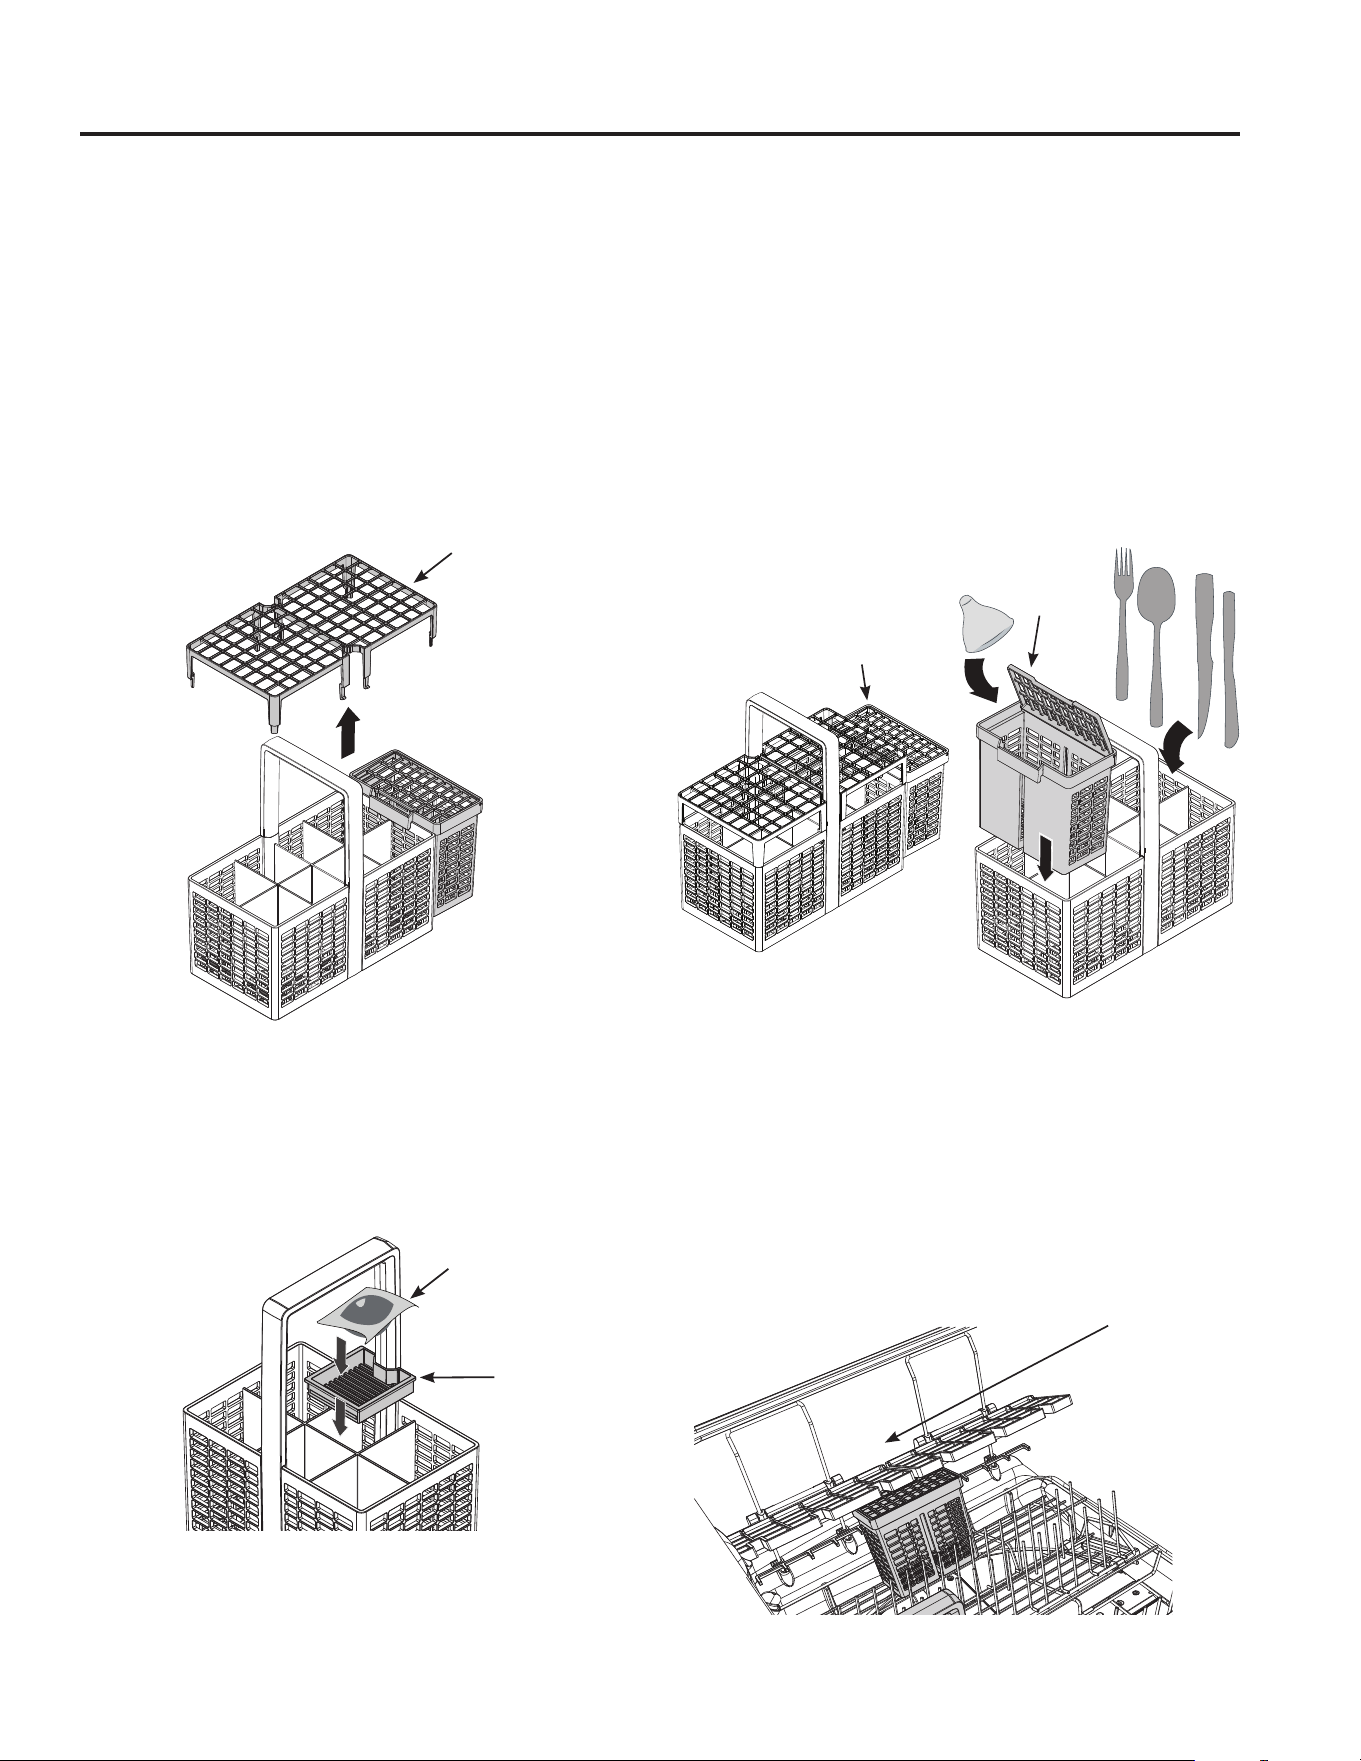
Cutlery Basket
Place flatware in the removable cutlery basket. Sharp objects, such as forks and knives, may be placed with the
handles facing up, in order to protect your hands. For the best wash performance, place other items such as spoons
with the handles facing down. Avoid allowing items to nest together, which may keep them from being properly washed.
When loading, distribute items evenly in the basket.
The cutlery basket may also be used for small items, such as measuring spoons, baby bottle nipples, plastic lids, or
corn cob holders.
Removable Anti-Nesting Grid
• The anti-nesting grid clips onto the top of the cutlery
basket.
• Use the grid to separate cutlery items and stop them
from nesting together.
Removable Tablet Tray
• If using dishwasher gel pacs or tablets, place them on
the removable tablet tray, as shown. When not in use
make sure the removable tablet tray is securely stored
outside of the dishwasher. See the Dispensers section
for proper use of gel pouches and tablets.
Removable Small Items Container
• You can extend the cutlery basket by clipping the small
items container onto its side.
• Small, light items like baby bottle teats are best placed
into the small items container to prevent them from
being displaced during the wash.
Small Items Container Placement
• To optimize the cutlery space within the basket, the
small items container can be placed elsewhere in the
drawer.
• If you lay the container flat, make sure that the solid
plastic side is facing up.
• If you place a fully laden container under the stem
safe shelves, it is best to leave the rack space directly
above the container empty - there may not be enough
water reaching items that are placed above.
Removable
$QWL1HVWLQJ
Grid
Tablet
Tray
Gel Pouch
OR
Tablet
Clip on
small items
container
Place small
items
Leave the
rack space
directly above
the container
empty if small
items container
is place under
the stem safe
shelves
18 49-4000255 Rev 1
USING THE DISHWASHER
Loading
Additional Options - How to set and change the settings of the additional options.
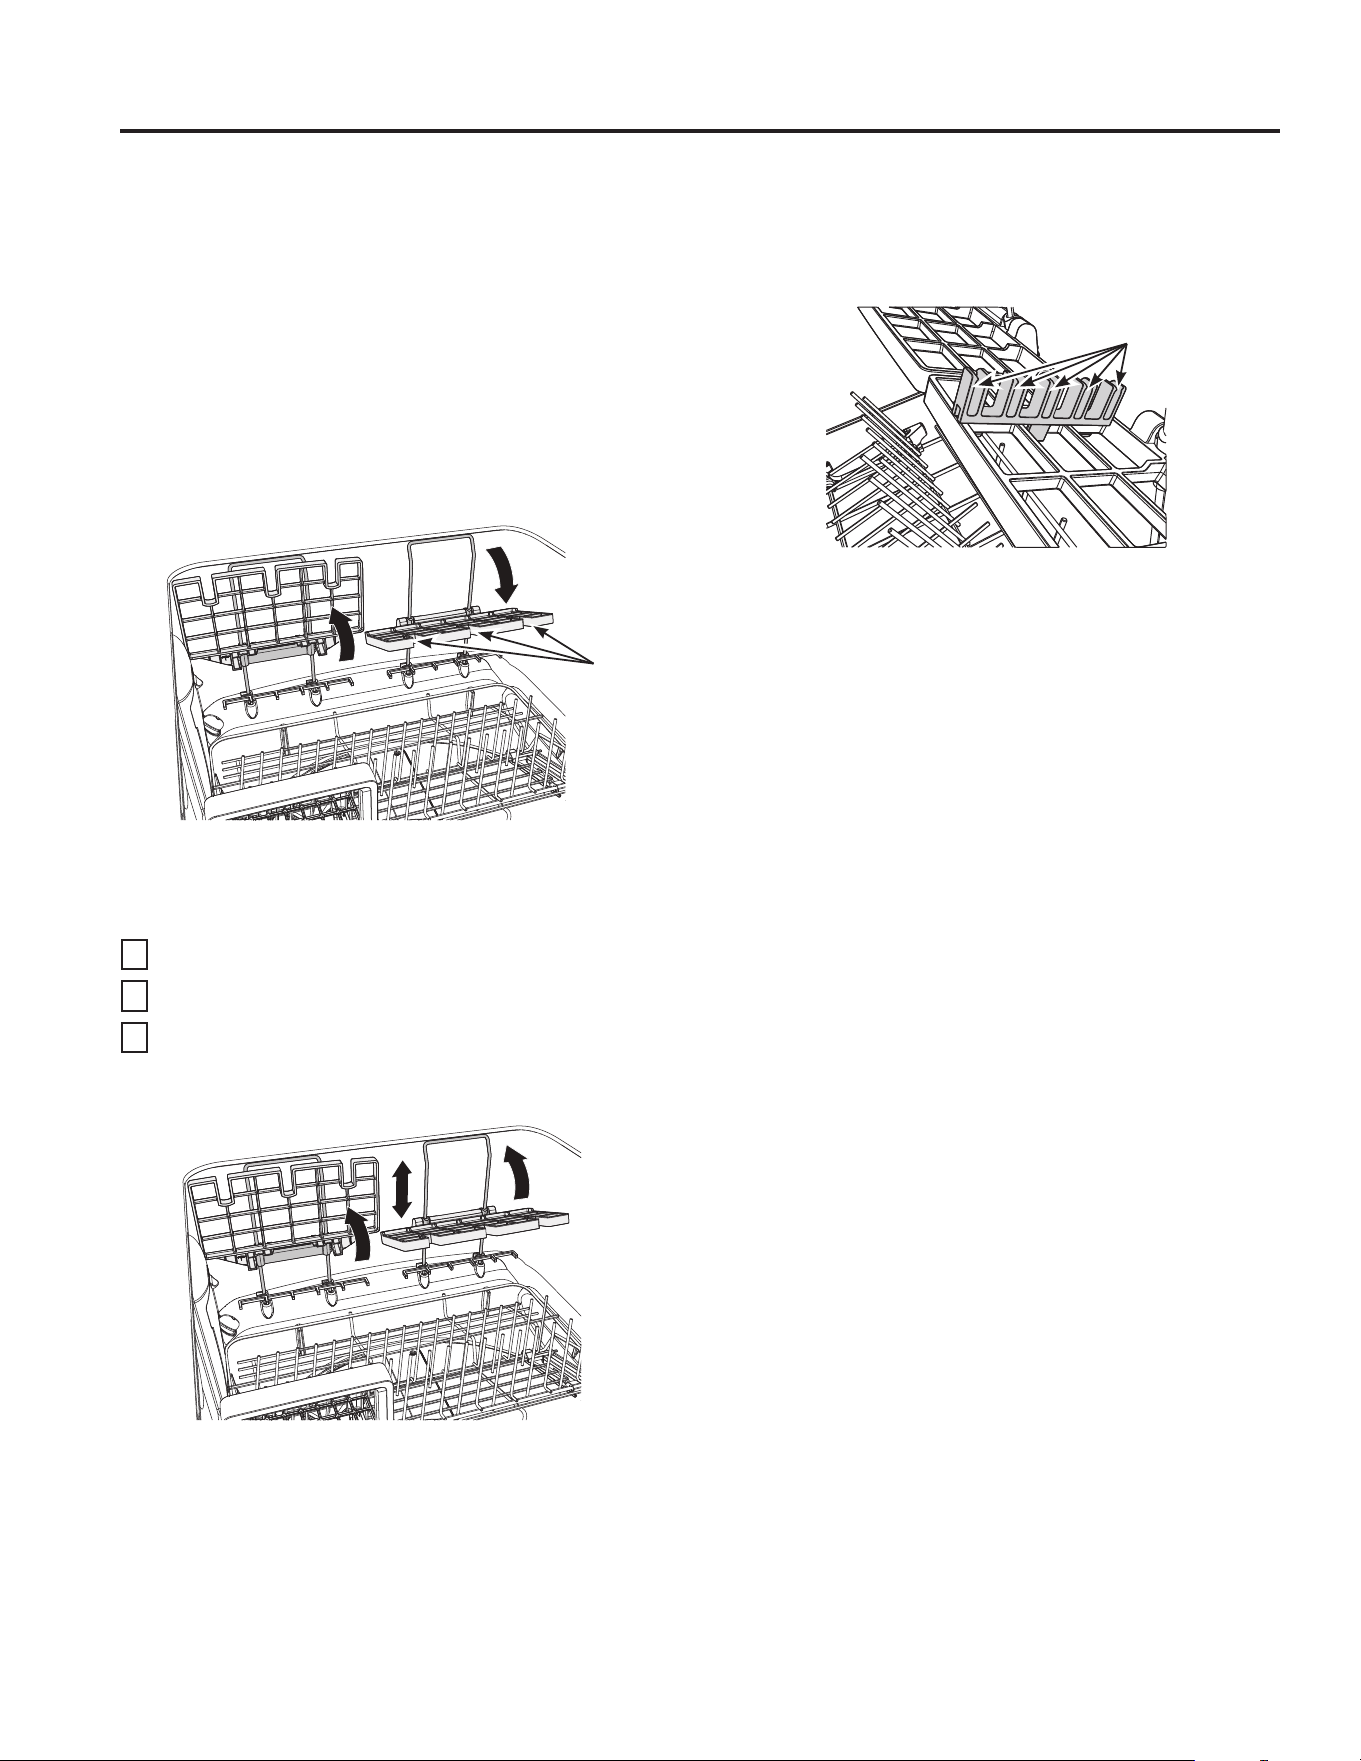
Racks - Stem Safe Shelves
To add flexibility in loading, the stem safe shelves can
be placed in the up or down position. They may also be
adjusted up or down.
Foldaway
• They can be folded up or down independently of each
other.
• Fold them down to use their stemware notches to help
support long-stemmed glassware or for rows of cups.
• Fold them up for more space for taller items such as
glasses.
Adjustable Height
• The shelves are independently height adjustable to
accommodate glassware and cups of varying heights.
1
Fold up to unlock the shelf.
2
Adjust to the desired height by sliding up or down.
3
Fold down to lock in position.
Racks - Knife Clips
• The knife clips clip onto the adjustable racks and
support knives and other utensils during the wash.
• Always ensure that knife blades are facing down.
Stemware
1RWFKHV
Fold
up or down
Fold up and
slide up and down
to adjust
Knife
Clips
49-4000255 Rev 1 19
USING THE DISHWASHER
Loading
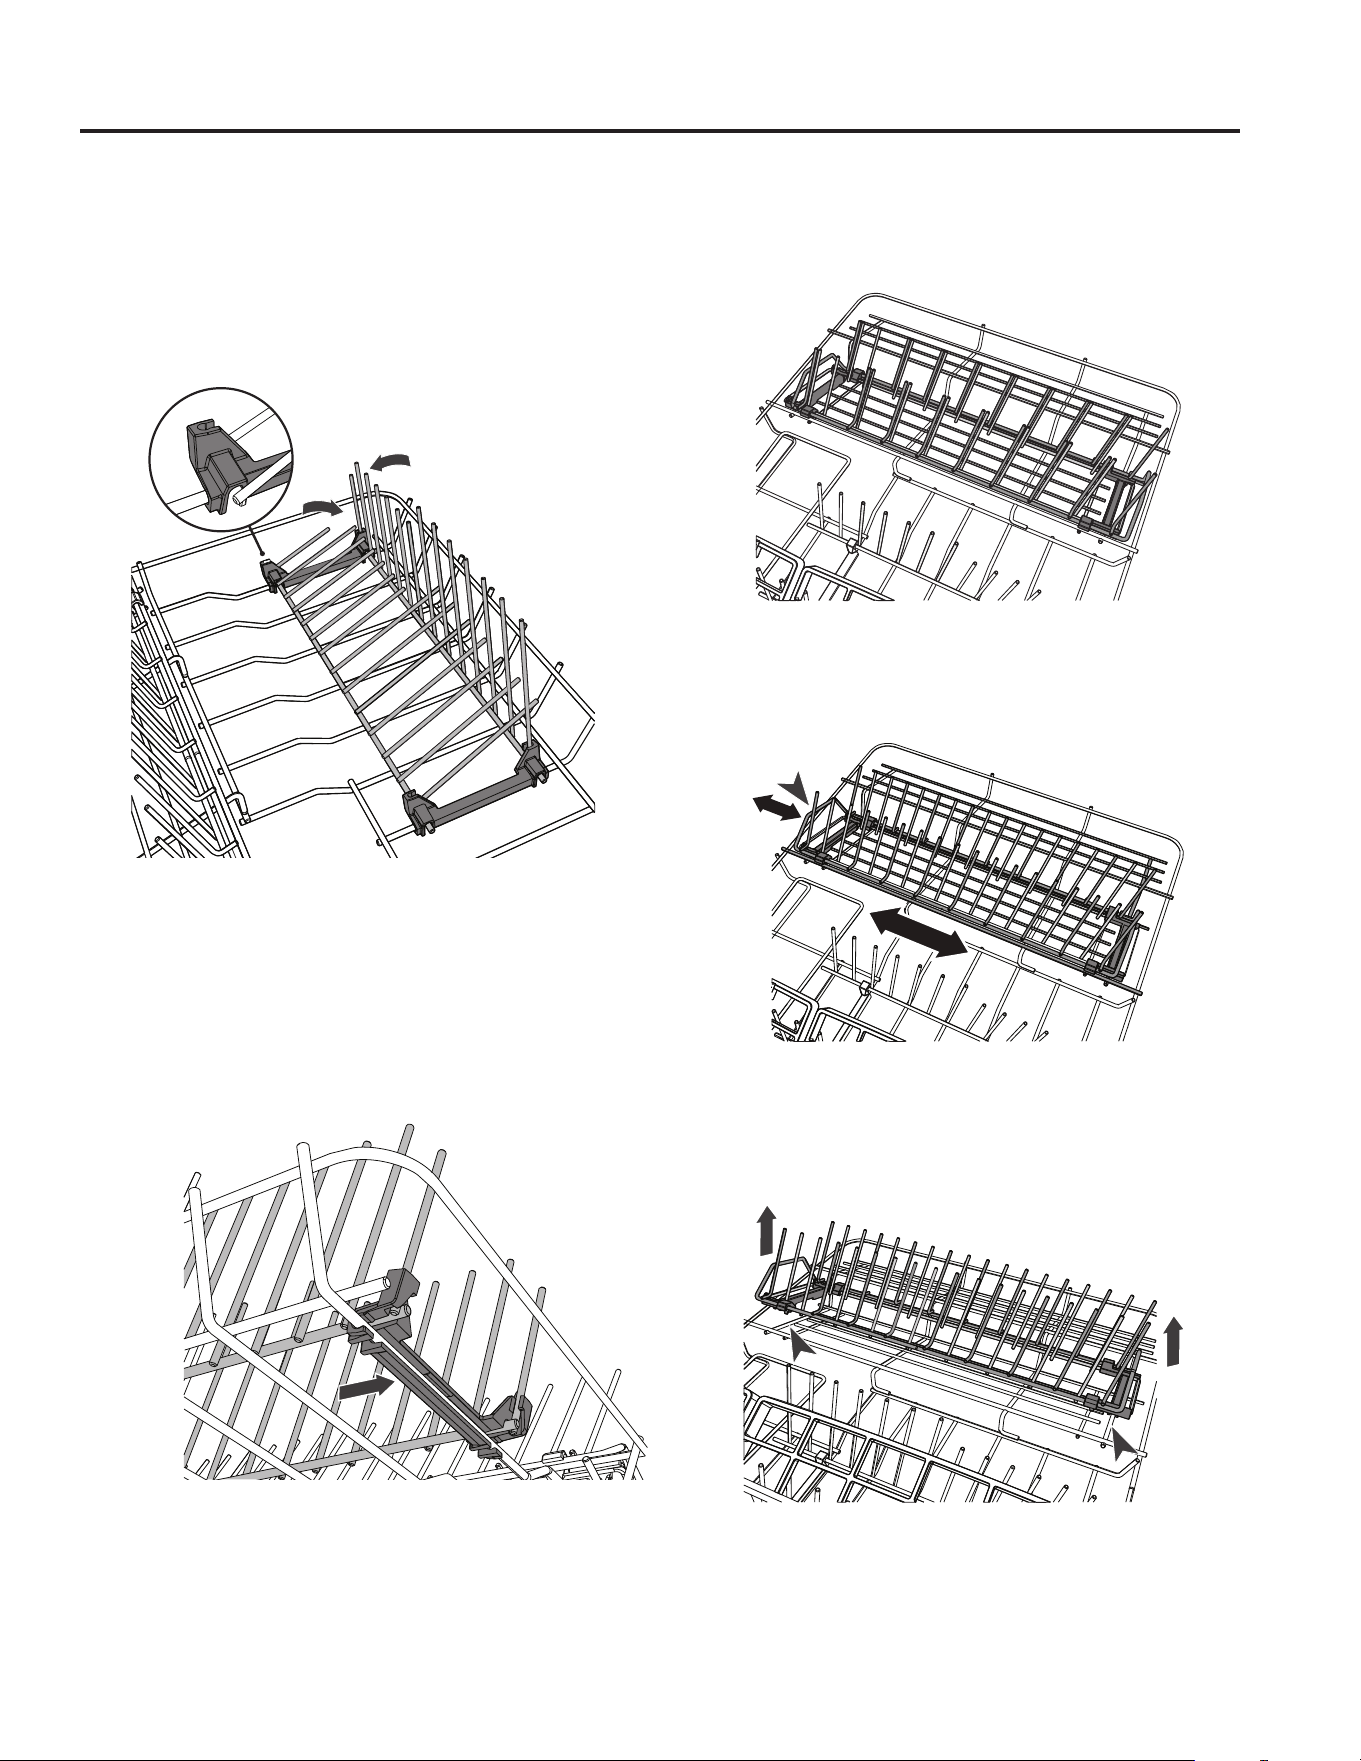
Racks - Folding Tines
• For optimum stability, place larger plates between the
longer tines in the front.
• Fold the tines down if you need the space for pots or
other large items.
• Release by folding tines down towards each other to
detach them from the clips at the rear of the unit.
Removing the Folding Tines
The folding tines can be removed if so desired. However
it is recommended you fold the tines down rather
than removing them (if more space is needed in the
dishwasher).
To remove:
Unclip the folding tine rack at each end by pulling firmly
towards you.
To replace:
Line up the clips with the base rack and push firmly to
click into place.
Removable Spacing-Adjustable Tine Rack
• Designed to fit deep bowls (wide spacing) or small
plates (narrow spacing), depending on adjustment.
Adjust the Tine Spacing
• To adjust between wide and narrow spacings, slide
the tines backward or forward by pushing or pulling the
handle at the front.
Remove the Rack to Make Space for Larger Items
To remove the rack:
Grip handles at the front and rear of the rack and pull up
to unclip.
To replace the rack:
Align front and rear clips with the base of the basket and
click into place.
Release by folding tines down
towards each other to detach
them from the clips
Pull each
end to
remove
20 49-4000255 Rev 1
Care and Cleaning
CARE AND CLEANING
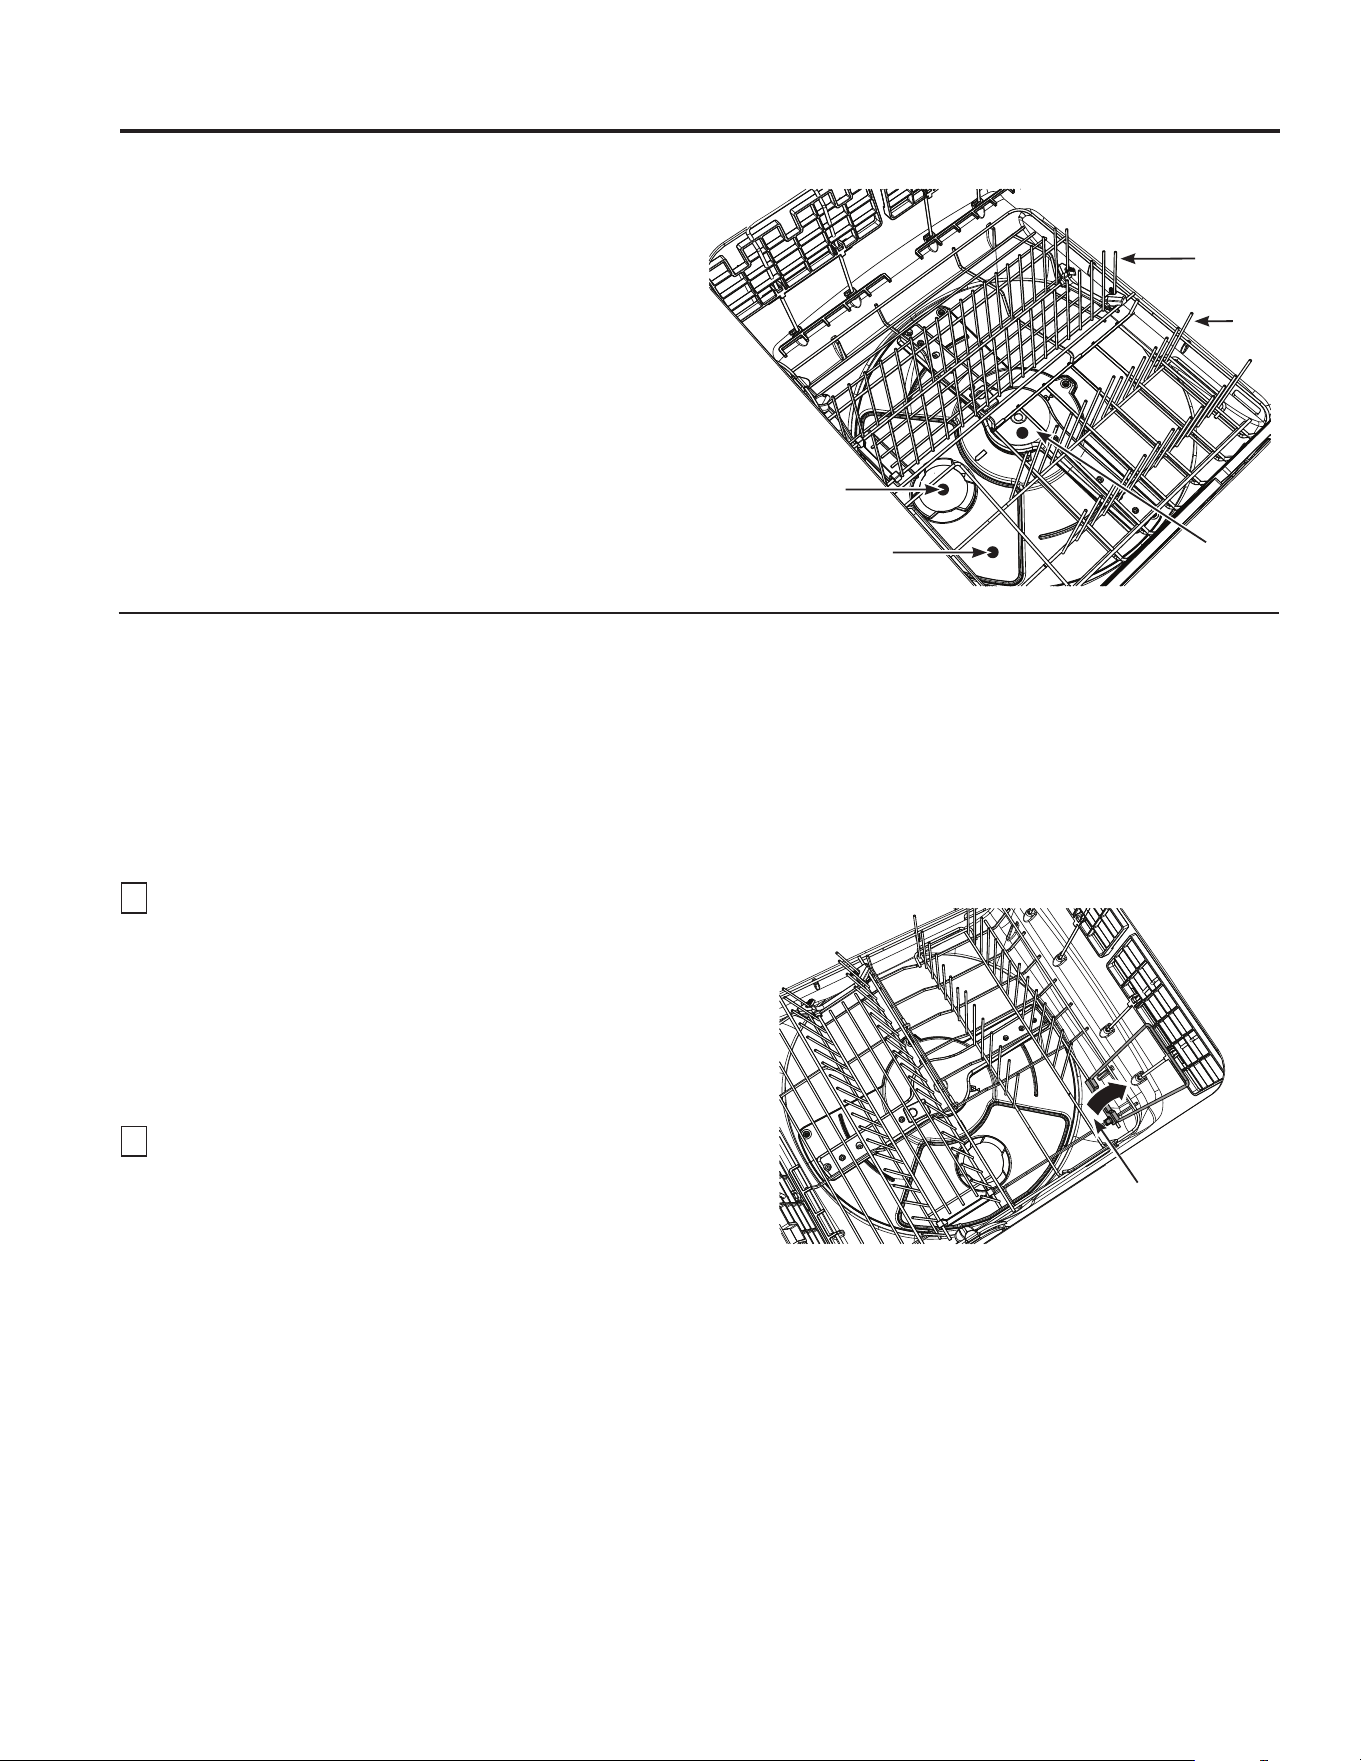
Drain Filter, Filter Plate and Spray Arm
We recommend that the drain filter and filter plate in each
drawer are removed and cleaned about once a month
in normal use or whenever there is evidence of food
particles.
The spray arm in normal use should require cleaning less
frequently.
Base
Rack
Tines
Drain
Filter
Filter
Plate
Spray
Arm
Lift the
trap door up
Cleaning the Drain Filter and Filter Plate
IMPORTANT!
• If a dishwasher cleaner / descaler is used, you must run a wash program with detergent immediately
afterward to prevent any damage to the dishwasher.
• The dishwasher must be used with the filter plate, drain filter and spray arm correctly in place.
• We recommend that you always use the dishwasher with the right hand fold down tine rack in place.
Remove the base rack first:
1
Unplug the dishwasher or turn it off at the power
supply.
NOTE: For ease of access to the drain filter and filter
plate you may find it easier to remove the whole base rack
(including tine racks) first.
To remove the whole base rack: Lift the rack up from
the back first, to prevent it knocking against the detergent
and rinse aid dispenser, and lift out.
2
If the base rack is left in, to access the drain filter:
• Remove the cutlery basket.
• Lift the trap door up.
49-4000255 Rev 1 21
Removing the Drain Filter and Filter Plate
3
Twist the circular drain filter counter-clockwise and
lift to remove. It is normal to find some water under it.
4
Remove the drain filter mesh by pinching one side
only and pulling it off, as shown.
NOTE: Do not attempt to remove the drain filter mesh
by pinching two opposing sides together as this may
damage the drain filter mesh.
5
Wash both parts of the drain filter in hot soapy water
and rinse thoroughly under running water.
6
Carefully lift the filter plate out. Remove any foreign
material on either side, wash in hot soapy water and
rinse thoroughly in clean water, then wipe with a
damp cloth.
Replacing the Filter Plate and Drain Filter
7
&DUHIXOO\UHSODFHWKHILOWHUSODWH(QVXUHLWLVIXOO\
pushed into position.
8
Refit the circular drain filter:
a) Push the drain filter mesh back onto the holder.
It should click into place.
b) Rotate the drain filter mesh until the arrow on the
mesh filter lines up with the arrow on the holder.
c) Refit the drain filter into the drain hole by lining
up the arrow on the top of the drain filter with the
arrow on the filter plate.
d) Rotate the drain filter clock wise until the arrow on
the drain filter lines up with the arrow on the base
of the drawer.
9
Replace the whole base rack (if removed).
10
Fold down the trap door so it is resting on the base
rack and replace the cutlery basket.
Care and Cleaning
CARE AND CLEANING
Drain
Filter
Holder
Drain Filter
Mesh
Pinch one
side and
pull off
mesh
Remove
Filter
Plate
Replace
Filter
Plate
After
cleaning
push mesh
back on
Rotate the mesh
counterclockwise
until the arrows
line up as shown.
Line up the
arrows on
the filter
plate and
insert the
drain filter
Rotate the
drain filter
clockwise
until these
arrows
line up as
shown

22 49-4000255 Rev 1
Care and Cleaning
Spray
Arm
Impeller
Cleaning the Spray Arm
1
Unplug the dishwasher or turn it off at the power
supply.
2
Unclip the glass supports (if fitted) from the rack wires
and fold up all the foldaway stem safe shelves, so that
they are all upright and close to the top.
3
Remove the base rack carefully. Lift from the back first
to prevent knocking the detergent and rinse aid
dispenser.
4
Lift the spray arm and shake any foreign material out.
Rinse it clean under running water and wipe with a
damp cloth.
5
Replace the spray arm back onto the impeller.
Check that the spray arm is firmly seated and turns
freely.
6
Replace the base rack, lowering its front edge into
position first.
7
Plug the dishwasher back in or turn it on at the power
supply.
NOTE: If there is broken crockery or glass in the drawer,
it must be carefully removed to prevent damage to the
dishwasher.
When refitting
the base rack,
ensure the outer
edges of the
rack sit on all
the rests within
the inside of the
drawer
CARE AND CLEANING
49-4000255 Rev 1 23
Care and Cleaning
Exterior Drawer Panels
Do NOT use Stainless Steel cleaners on the drawer surfaces. Use a clean, soft, lightly dampened cloth, then dry
thoroughly. The Stainless Steel is coated to make it fingerprint resistant.
IMPORTANT!
We do not recommend the use of the following cleaning aids on your dishwasher as they may damage the
surfaces:
• Plastic or stainless steel scouring pads
• Abrasive, solvent, household cleaners
• Acid or alkaline cleaners
• Hand washing liquids or soap
• Stainless steel cleaners or polishes
• Laundry detergents or disinfectants
Interior
To clean and de-odorize your dishwasher, use citric
acid, or Cascade
®
Platinum™ Dishwasher Cleaner
or Finish
®
Dishwasher Cleaner, a detergent additive.
They will break up mineral deposits, and remove hard
water film and stains.
You can order citric acid Café kit WD35X151 through
Café Parts by visiting cafeappliances.com/parts.
You can purchase dishwasher cleaners at your local
grocery store.
Stainless Steel Drawers
The stainless steel used to make the drawers provides
the highest reliability available in a Café dishwasher.
If the drawers should be scratched or dented during
normal use, they will not rust or corrode. These surface
blemishes will not affect their function or durability.
Protect Against Freezing
If your dishwasher is left in an unheated place during the
winter, ask a service technician to:
1
Turn off electrical power to the dishwasher. Remove
fuses or trip circuit breaker.
2
Turn off the water supply and disconnect the water inlet
line from the water valve.
3
Drain water from the water inlet line and water valve.
(Use a pan to catch the water.)
4
Reconnect the water inlet line to the water valve.
Does Your Dishwasher Have an Air Gap?
An air gap protects your dishwasher
against water backing up into it if a drain
clogs. The air gap is not a part of the
dishwasher. It is not covered by your
ZDUUDQW\1RWDOOSOXPELQJFRGHVUHTXLUH
air gaps, so you may not have one.
The air gap is easy to clean.
1
Turn off the dishwasher and lift off the air gap cover.
2
Remove the plastic cap under the cover and clean with a
toothpick.
3
Replace the cap and cover when the air gap is clean.
Check the air gap any
time your dishwasher
isn’t draining well.
Air gap
CARE AND CLEANING
24 49-4000255 Rev 1
TROUBLESHOOTING TIPS
Troubleshooting Tips... Before you schedule service
Problem Possible Cause What To Do
Dishes and flatware
not clean
Filters are clogged Clean filters. See the Care and Cleaning section.
Wash program unsuitable
for the load
See the Getting started section for a suitable wash
program. Soils were too heavily baked on and dishes
may need soaking.
Spray arm unable to rotate (QVXUHQRLWHPVDUHREVWUXFWLQJWKHVSUD\DUPSDWK
Make sure the spray arm is mounted correctly and free
to rotate.
Drawer overloaded/
incorrectly loaded
See the Loading section.
Filter plate/drain filter is
incorrectly inserted
See the Care and Cleaning section.
Detergent put in the
wrong compartment of the
dispenser
Detergent must be placed in the large compartment.
See Detergent Dispensing in the Dispensing section.
Excess food not removed
from dinnerware prior to
loading
Scrape all food scraps off dinnerware prior to loading.
Spray arm holes are
blocked
Clean the spray arm. See the Care and Cleaning
section.
Low inlet water temperature Make sure inlet water temperature is correct. See Check
the Water Temperature in the Getting started section).
Turn on the hot water faucet nearest the dishwasher, let
run until the water temperature stops rising. Then start
the dishwasher and turn off the
faucet. This ensures the
entering water is hot.
Water pressure is
temporarily low
Turn on a faucet. Is water coming out more slowly than usual?
If so, wait until pressure is normal before using your dishwasher.
1RUPDOZDWHUSUHVVXUHWRWKHGLVKZDVKHUVKRXOGEHSVL
Air gap or disposer clogged Clean the air gap or flush the disposer.
High drain loop or air gap
not installed
Refer to the Installation Instructions for proper drain line
installation.
Improper rack loading Make sure large dishware does not block the detergent
dispenser or the wash arms. See the Loading section.
Poor performing detergent Use high quality detergents such as Cascade
®
Platinum™ ActionPacs™ or Finish
®
Quantum
®
Automatic Dishwashing Detergent.
Not enough detergent Add detergent. See Detergent Dispensing in the
Dispensers section.
Cloudiness on
glassware
Combination of soft water
and too much detergent
This is called etching and is permanent. To prevent this
from happening, use less detergent if you have soft
water. Wash glassware in the shortest cycle that will get
it clean.
Low performing phosphate-
free detergent
See A white film on glassware, dishware and the
interior in this Troubleshooting Tips section.
Water temperature entering
the dishwasher exceeds
150°F
This could be etching. Lower the water heater
temperature.
A white film on
glassware, dishware
and the interior
This problem is likely
caused by a low quality
phosphate-free dishwasher
detergent
To remove the white film, run your dishes through a dishwasher
cycle with citric acid. Use a WD35X151 citric acid kit found
online.
Otherwise, use high quality rinse agents such as Cascade
®
Platinum™ Dishwasher Cleaner or Finish
®
Dishwasher
Cleaner found at your local grocery store.
Pour the citric acid in the detergent cup and close the cover.
Place the filmed but otherwise clean glassware and dishware
in the dishwasher. Leave silverware and other metal items
out of the dishwasher. Turn the dishwasher on and let it run
through a complete cycle without detergent. The glassware,
dishware, and dishwasher should come out film free.
49-4000255 Rev 1 25
Problem Possible Cause What To Do
Spots and filming
on glasses and
flatware
Extremely hard water Increase the rinse aid setting and the amount of
detergent. See the Dispensers section.
Use high quality rinse agents such as
Cascade
®
Platinum™ Power Dry™ Rinse Aid or
Finish
®
Jet-Dry
®
Rinse Aid to prevent spots and prevent new film build-up.
If water is extremely hard, a softener may be required.
Low inlet water temperature Make sure water temperature is at least 120°F.
Overloading or improper
loading of the dishwasher
Load dishwasher as shown in the Loading section.
Old or damp powder
detergent
Make sure detergent is fresh. Use high quality detergents
such as Cascade
®
Platinum™ ActionPacs™ or Finish
®
Quantum
®
Automatic Dishwashing Detergent.
Rinse agent dispenser empty
Refill with high quality rinse agents such as Cascade
®
Platinum™
Power Dry™ Rinse Aid or Finish
®
Jet-Dry
®
Rinse Aid.
Rinse aid setting too low
or off
Increase/turn on the rinse aid setting. See Use a Rinse
Agent in the Dispensers section.
Too little or low performing
detergent
Make sure you use the proper amount of highly rated
powder detergent.
Black or gray marks
on dishes
Aluminum utensils have
rubbed against dishes
Remove marks with a mild, abrasive cleaner.
Dishes don’t dry
Normal wash program used Choose Plus or Pots wash program.
Overloading or improper
loading of the dishwasher
Load dishwasher as shown in the Loading section.
Additional drying time is
needed
Leave drawer closed after the wash program has
stopped to allow the fan to run as needed.
Select Ultra Dry option to add additional drying time.
NOTE: If you open the drawer, this fan extension will be
cancelled.
Low inlet water temperature Make sure inlet water temperature is at least 120°F.
Select Ultra Dry.
Select a higher cycle, such as Plus or Pots.
Rinse agent dispenser is
empty
Check the rinse agent dispenser and fill as required.
Rinse aid setting too low
or off
Increase/turn on the rinse aid setting. See Use a Rinse
Agent in the Dispensers section.
Dishes were left in the
drawer for several hours
after a wash
We recommend unloading the dishes within a few hours
after a wash program has finished, as the small amount
of vapor left after the wash may, with time, resettle on
dishes as condensation. Using rinse aid or increasing its
setting will also help with drying.
Program is taking
much longer than
usual
Wrong type of detergent used
Auto recovery program has
been triggered to stop the
dishwasher overflowing and
to disperse excess foam.
1RDFWLRQUHTXLUHG$OORZWKHSURJUDPWRILQLVK
NOTE: You may need to run your chosen wash program
again with the correct detergent if the dishes are not
clean at the end of the recovery program.
The wash program
seems to have
finished (the
dishwasher is idle),
but the end of wash
beeps haven’t
sounded and the
drawer cannot be
opened
The wash program is still
in progress. It is in a ‘quiet’
phase that is needed for
ensuring the best wash
results.
1RDFWLRQUHTXLUHG7KHSURJUDPZLOOWUDQVLWLRQLQWRD
more audible phase after the ‘quiet’ phase is over.
Troubleshooting Tips... Before you schedule service
TROUBLESHOOTING TIPS

26 49-4000255 Rev 1
TROUBLESHOOTING TIPS
Troubleshooting Tips... Before you schedule service
Problem Possible Cause What To Do
Intermittent beeping Dishwasher is in pause
mode
Press on the control panel then close the drawer to
resume the program.
Sanitized light
flashes when the
drawer is opened at
the end of the cycle
A drawer was opened and
the cycle was interrupted
during the final rinse
Do not interrupt the cycle by opening a drawer during the
wash cycle.
The incoming water
temperature was too low
Raise the water heater temperature to between 120°F
and 150°F.
Detergent left in
dispenser
Dishes or utensils are
blocking the detergent cup
Reposition the dishes, so the water from the lower spray
arm can flush the detergent cup. See the Loading section.
Reposition the tall utensils or heavy silverware that may
be keeping the dispenser cup door from opening. See the
Loading section.
Don’t place large bowls or pots directly in front of the
detergent dispenser.
Powder detergent
not dispensed
Detergent dispenser was
wet when loaded
Clean the dispenser and ensure it is dry before adding
powder detergent.
Suds in the drawers Wrong amount of detergent See Detergent Dispensing in the Dispensers section.
Wrong detergent Use only high quality automatic dishwasher detergents to
avoid sudsing. Cascade
®
Platinum™ ActionPacs™ or Finish
®
Quantum
®
Automatic Dishwashing Detergent have
been approved for use in all Café dishwashers.
To remove suds from the dishwasher, open the drawers
and let suds dissipate.
Rinse aid setting too high Decrease the rinse aid setting. See Use a Rinse Agent
in the Dispensers section.
Rinse aid dispenser plug
not closed tightly enough
(QVXUHWKDWWKHULQVHDLGGLVSHQVHUSOXJLVIXOO\FORVHGZLWK
its finger grip pointing vertically. See Use Rinse Aid in the
Dispensers section.
Rinse agent was spilled Always wipe up rinse agent spills immediately.
Water under the
drain filter
This is normal 1RDFWLRQLVQHHGHG
Drawer interior is
stained
White film on inside
surface— hard water
minerals
Café
recommends high quality rinse agents such as
Cascade
®
Platinum™ Power Dry™ Rinse Aid or
Finish
®
Jet-Dry
®
Rinse Aid
to help prevent hard water mineral
deposits from forming.
Run dishwasher with citric acid to remove mineral deposits.
Citric acid (Part number: WD35X151) can be ordered
WKURXJK*($SSOLDQFHV3DUWV6HHEDFNFRYHUIRURUGHULQJ
information. Alternatively, purchase Cascade
®
Platinum™
Dishwasher Cleaner or Finish
®
Dishwasher Cleaner
and follow the directions on the label.
Some foods, like tomato
based products, may stain
the inside of the drawer
Pre-rinse dishes before placing in the drawer.
Alternatively, using the Rinse program after adding the
dishes may minimize staining.
Hard Water Living in an area with very
hard water
Increase the rinse aid setting and the amount of
detergent. See the Dispensers section.
If living in an area with very hard water, consult a
plumber on installing a household water softener.
49-4000255 Rev 1 27
Troubleshooting Tips... Before you schedule service
TROUBLESHOOTING TIPS
Problem Possible Cause What To Do
Water standing in the
dishwasher
Air gap is clogged Clean the air gap. See the Care and Cleaning section.
High drain loop or air gap
not installed
Refer to the Installation Instructions for proper drain line
installation.
Drain hose(s) bent or kinked Straighten the drain hose(s).
Filters blocked Clean the filter plate/drain filter. See the Care and
Cleaning section.
Water won’t
pump out of the
dishwasher
Drain is clogged If you have an air gap, clean it. See the Care and
Cleaning section.
If the dishwasher drains into a disposer, run disposer clear.
Check to see if your kitchen sink is draining well. If not,
you may need a plumber.
Dishwasher won’t
run
The start ( ) button was
not pressed
Press the start ( ) button.
The drawer is not closed
properly
(QVXUHWKHGUDZHULVIUHHIURPDQ\REMHFWVDQGILUPO\
closed.
Dishwasher drawer is in
“showroom mode”
Contact Café for further information.
Fuse is blown or circuit
breaker is tripped
Replace fuse or reset circuit breaker. Remove any other
appliances from the circuit.
Power is not connected or
turned off
Connect power, replace fuse or reset circuit breaker.
Remove any other appliances from the circuit.
Keylock or Childlock is on Unlock controls. See Lock Options in the Getting
started section.
Possible leak is detected Some models are equipped with leak detection and the
cycle will be cancelled if a leak is detected. See Leak
Protection in the Getting started section. Contact Café
for service.
Control panel
responded to inputs
but dishwasher
never filled with
water
Drawer may not be
completely closed
Make sure the drawer is firmly closed.
Water valve may be turned
off
Make sure water valve (usually located under the sink) is
turned on.
Drawer will not open
(no beeping, no
wash in progress)
Childlock feature is on Turn the Childlock off. See Lock Options in the Getting
started section.
Closed drawer auto lock is
on
Knock once on the right side of the drawer front and open
drawer within 30 seconds.
Power failure during
wash program
Power outage in your home
or area
Wait until power resumes, program will restart in same
part of wash program.
Dishwasher does
not recognize
when I knock on
the drawer front to
pause or unlock it
Not knocking hard enough
or not knocking on the right
side of the drawer front
(QVXUH\RXDUHNQRFNLQJILUPO\RQWKHULJKWVLGHRIWKH
drawer front, rather than using a light tap.
Drawer front knock sensor
is incorrectly installed or
calibrated
Contact Café for service.
Dishwasher is
registering taps
and bumps as
knocks and pausing
inadvertently
Drawer front knock sensor
is incorrectly installed or
calibrated
Contact Café for service.

28 49-4000255 Rev 1
TROUBLESHOOTING TIPS
Troubleshooting Tips... Before you schedule service
Problem Possible Cause What To Do
Noise Normal operating sounds:
Beeping at the end of the
cycle (on some models)
Detergent cup opening
Water entering dishwasher
Motor stops and starts at
various times during cycle
Spray arms start and stop at
various times
Drain pump sounds during
pump out
Drain pump starts and stops
several times during each
drain
7KHVHDUHDOOQRUPDO1RDFWLRQLVUHTXLUHG
Rattling dishes when the
spray arm rotates
Make sure dishes are properly loaded. See the Loading
section.
Fan noise starts up
when I close the
drawer, even though
I didn’t start a new
wash
This is normal. In some
cases, the drying fan will
run whenever the drawer
is closed for a set period
of time after a program has
finished.
1RDFWLRQUHTXLUHG7KHIDQZLOODXWRPDWLFDOO\VWRSDIWHU
the set time is over.
Fan noise coming
from the dishwasher
after a wash program
has finished
This is normal. The drying
fan continues to run for a
set period of time after a
program has finished to
assist with drying.
1RDFWLRQUHTXLUHG7KHIDQZLOODXWRPDWLFDOO\VWRSDIWHU
the set time is over, or when the drawer is opened. In
some cases, the fan may resume when the drawer is
closed again.
Excessive motor
noise
No water in the motor area This usually occurs on the first use or when the
dishwasher has not been used for long periods of time.
Pour 3 cups of water into the drawer before running a
wash program.
Water pooling on
inner rim of drawer
after a wash
This is normal
condensation
Wipe dry.
Water leaking Drain hose disconnected
from waste pipe
Reconnect the drain hose to the waste pipe.
Water inlet hose not
properly connected
(QVXUHWKHLQOHWKRVHLVFRQQHFWHGVHFXUHO\
Other leaks Turn water and power supplies to the dishwasher off.
Contact Café for service.
Rinse aid dispenser plug
not closed properly
(QVXUHWKDWWKHULQVHDLGGLVSHQVHUSOXJLVIXOO\FORVHG
with its hand grip pointing vertically. See Use a Rinse
Agent in the Dispensers section.

49-4000255 Rev 1 29
LIMITED WARRANTY
Café Dishwasher Limited Warranty
Staple your receipt here. Proof of the original purchase
date is needed to obtain service under the warranty.
cafeappliances.com
All warranty service is provided by our Factory Service Centers, or an authorized service technician. To schedule service
online, visit us at cafeappliances.com/service.
Servicing your appliance may require the use of the onboard data port for diagnostics. This gives a Café factory service
technician the ability to quickly diagnose any issues with your appliance and helps Café improve its products by providing
Café with information on your appliance. If you do not want your appliance data to be sent to Café, please advise your
technician not to submit the data to Café at the time of service.
This limited warranty is extended to the original purchaser and any succeeding owner for products purchased for home use
within the USA. If the product is located in an area where service by a Café Authorized Servicer is not available, you may
be responsible for a trip charge or you may be required to bring the product to an Authorized Café Service location for
service. In Alaska, the limited warranty excludes the cost of shipping or service calls to your home.
Some states do not allow the exclusion or limitation of incidental or consequential damages. This limited warranty
gives you specific legal rights, and you may also have other rights which vary from state to state. To know what your
legal rights are, consult your local or state consumer affairs office or your state’s Attorney General.
Warrantor: GE Appliances, a Haier Company
Louisville, KY 40225
EXCLUSION OF IMPLIED WARRANTIES
Your sole and exclusive remedy is product repair as provided in this Limited Warranty. Any implied warranties,
including the implied warranties of merchantability or fitness for a particular purpose, are limited to one year or the
shortest period allowed by law.
For the period of: We will replace:
One year
From the date of the
original purchase
Any part of the dishwasher which fails due to a defect in materials or workmanship.
During this limited one-year warranty, we will also provide, free of charge, all labor
and related service to replace the defective part.
What is not covered:
Ŷ
Service trips to your home to teach you how to use
the product.
Ŷ
Improper installation, delivery or maintenance.
Ŷ
Failure of the product if it is abused, misused, or used for
other than the intended purpose or used commercially.
Ŷ
Replacement of house fuses or resetting of circuit
breakers.
Ŷ
Products which are not defective or broken, or which
are working as described in the Owner’s Manual.
Ŷ
Damage to the product caused by accident, fire,
floods or acts of God.
Ŷ
Incidental or consequential damage caused by
possible defects with this appliance.
Ŷ
Defects or damage due to operation in freezing
temperatures.
Ŷ
Damage caused after delivery.
Ŷ
Product not accessible to provide required service.
Ŷ
Cleaning or servicing of the air gap device in the drain line.
Extended Warranties: Purchase a Café extended warranty and learn about special discounts that are available while
your warranty is still in effect. You can purchase it online anytime at
cafeappliances.com/extended-warranty.
Café Service will still be there after your warranty expires.

30 49-4000255 Rev 1
Consumer Support
CONSUMER SUPPORT
Parts and Accessories
Individuals qualified to service their own appliances can have parts or accessories sent directly to their homes
(VISA, MasterCard and Discover cards are accepted). Order on-line today 24 hours every day.
cafeappliances.com/parts
Instructions contained in this manual cover procedures to be performed by any user. Other servicing
generally should be referred to qualified service personnel. Caution must be exercised, since improper
servicing may cause unsafe operation.
Café Website
Have a question or need assistance with your appliance? Try the Café website 24 hours a day, any day of the year!
You can also shop for more great Café products and take advantage of all our on-line support services designed for
your convenience.
cafeappliances.com
Register Your Appliance
Register your new appliance on-line at your convenience! Timely product registration will allow for enhanced
communication and prompt service under the terms of your warranty, should the need arise. You may also mail in
the pre-printed registration card included in the packing material.
cafeappliances.com/register
Schedule Service
([SHUW&DIpUHSDLUVHUYLFHLVRQO\RQHVWHSDZD\IURP\RXUGRRU*HWRQOLQHDQGVFKHGXOH\RXUVHUYLFHDW\RXU
convenience any day of the year.
cafeappliances.com/service
Extended Warranties
Purchase a Café extended warranty and learn about special discounts that are available while your warranty is still in
effect. You can purchase it on-line anytime. Café Service will still be there after your warranty expires.
cafeappliances.com/extended-warranty
Contact Us
If you are not satisfied with the service you receive from Café, contact us on our website with all the details including
your phone number, or write to:
General Manager, Customer Relations, Café | Appliance Park | Louisville, KY 40225
cafeappliances.com/contact

Escriba el modelo y los números de serie a
continuación:
Modelo No: ____________________________
Serial No:______________________________
Los encontrará en la cara frontal del marco del
lavavajillas, entre los cajones, sobre el lado
izquierdo.
Lavavajillas
Modelos: CDD220 Serie y CDD420 Serie
Contenido
Información de Seguridad ........................3
Uso del lavavajillas
Acerca de la Comunicación del Electrodoméstico ......6
Puesta en Marcha ..............................8
Dispensadores ................................12
Carga del lavavajillas ...........................15
Cuidado y Limpieza .............................20
Consejos para la Solución de Problemas ..........24
Garantía Limitada ..............................29
Soporte para el Consumidor .....................30
Manual del Propietario

2 49-4000255 Rev 1
GRACIAS POR HACER QUE CAFÉ SEA PARTE DE SU HOGAR.
Sentimos orgullo por el nivel de arte, innovación y diseño de cada uno de los electrodomésticos de
Café, y creemos que usted también. Entre otras cosas, el registro de su electrodoméstico asegura que
podamos entregarle información importante del producto y detalles de la garantía cuando los necesite.
Registre su electrodoméstico Café ahora a través de Internet. Sitios Web útiles están disponibles
en la sección de Soporte para el Consumidor de este Manual del Propietario. También puede enviar
una carta en la tarjeta de inscripción preimpresa que se incluye con el material embalado.
49-4000255 Rev 1 3
INFORMACIÓN DE SEGURIDAD
INFORMACIÓN IMPORTANTE DE SEGURIDAD
LEA TODAS LAS INSTRUCCIONES ANTES DE USAR
ADVERTENCIA
Para su seguridad, siga las instrucciones de este manual a fin de
minimizar riesgos de incendio, explosión, descargas eléctricas, y para evitar daños en
su propiedad, lesiones personales o la muerte.
LEA Y GUARDE ESTAS INSTRUCCIONES
ADVERTENCIA
INSTALACIÓN Y MANTENIMIENTO ADECUADOS
Esta lavadora se deberá instalar y ubicar de acuerdo con las Instrucciones de Instalación antes de ser usada. Si
no recibió una ficha de Instrucciones de Instalación con su lavavajillas, podrá acceder a una visitando nuestro sitio
web en cafeappliances.com.
Ŷ &RQHFWHHOODYDYDMLOODVHOHFWURGRPpVWLFRDXQ
sistema de cableado de metal permanente con
conexión a tierra o se debe tender un conducto
para la conexión a tierra del equipo con los
conductores del circuito y conectado al terminal de
tierra del equipo o al conductor de suministro del
electrodoméstico.
Ŷ 8QDFRQH[LyQLQDSURSLDGDGHOFRQGXFWRUGHFRQH[LyQ
a tierra del equipo puede provocar riesgos de
descargas eléctricas. Consulte a un electricista
calificado o personal del servicio técnico si tiene
dudas de que el electrodoméstico se encuentre
conectado a tierra apropiadamente.
Ŷ /DVLQVWUXFFLRQHVGHWDOODGDVGHFRQH[LyQDWLHUUD
se pueden encontrar en la sección “Préparation de
l’installation” de las Instrucciones de instalación.
Ŷ 'HVKiJDVHGHIRUPDFRUUHFWDGHHOHFWURGRPpVWLFRV
y materiales de envío o embalajes descargados.
Ŷ 1RLQWHQWHUHSDUDURUHHPSOD]DUQLQJXQDSDUWH
de la cocina, a menos que se lo recomiende
específicamente en este manual. Cualquier otra
reparación deberá ser realizada por un técnico
calificado.
Ŷ 8WLOLFHVRORODH[WHQVLyQRDODPEUDGRGLUHFWRD
la electricidad del edificio como se describe en
las Instrucciones de Instalación. Si no se siguen
estas instrucciones, se pueden producir riesgos de
incendio y lesiones personales.
Ŷ $ILQGHPLQLPL]DUODSRVLELOLGDGGHGHVFDUJDV
eléctricas, desconecte este electrodoméstico del
suministro de corriente antes de intentar cualquier
mantenimiento.
NOTA: Apagar el lavavajillas no desconecta el
electrodoméstico del suministro de corriente.
Le recomendamos que el servicio técnico de su
electrodoméstico sea realizado por un técnico calificado.
ADVERTENCIA
AL USAR SU LAVAVAJILLAS, SIGA LAS PRECAUCIONES
BÁSICAS, INCLUYENDO LO SIGUIENTE:
Ŷ 8VHHVWHHOHFWURGRPpVWLFRVyORSDUDVXSURSyVLWR
original, como se describe en el Manual del
Propietario.
Ŷ 8VHVyORGHWHUJHQWHVRDJHQWHVKXPHFWDQWHV
recomendados para use con un lavavajillas y
mantenga los mismos fuera del alcance de los
niños. El uso de un detergente que no esté diseñado
específicamente para lavavajillas hará que este
último se llene de agua con jabón.
Ŷ 8ELTXHDUWtFXORVSXQWLDJXGRVGHPRGRTXHQRKD\D
posibilidades de daños sobre el sellador de la puertal.
Ŷ &DUJXHORVFXFKLOORVSXQWLDJXGRVFRQORVPDQJRV
hacia arriba, a fin de reducir el riesgo de lesiones
por cortes.
Ŷ 1RODYHSURGXFWRVGHSOiVWLFRDPHQRVTXH
contengan una marca de seguridad en lavavajillas
o su equivalente. Cuando se trate de productos de
plástico que no estén marcados de esta manera,
consulte las recomendaciones del fabricante.
Ŷ 1RXVHVXODYDYDMLOODVDPHQRVTXHWRGRVORV
paneles de cercamiento estén correctamente en sus
lugares.
Ŷ 1RPDQLSXOHLQGHELGDPHQWHORVFRQWUROHV
Ŷ 1RDEXVHQRVHVLHQWHQLVHSDUHVREUHHOFDMyQGHO
lavavajillas.
Ŷ $ILQGHUHGXFLUHOULHVJRGHLQFHQGLRVQRSHUPLWD
que los niños jueguen con, sobre o dentro de este
electrodoméstico en cualquier momento.
Ŷ 1RJXDUGHQLXVHPDWHULDOHVFRPEXVWLEOHV
incluyendo gasolina u otros líquidos o
vapores inflamables cerca de éste o de otros
electrodomésticos.
Ŷ /DVSLH]DVSHTXHxDVSXHGHQJHQHUDUULHVJRV
de asfixia en niños pequeños si son retirados del
lavavajillas. Mantenga fuera del alcance de los niños
pequeños.
4 49-4000255 Rev 1
INFORMACIÓN DE SEGURIDAD
INFORMACIÓN IMPORTANTE DE SEGURIDAD
LEA TODAS LAS INSTRUCCIONES ANTES DE USAR
LEA Y GUARDE ESTAS INSTRUCCIONES
ADVERTENCIA
SEGURIDAD DEL CALENTADOR DE AGUA
Bajo ciertas condiciones, se podrá producir gas de hidrógeno en un calentador de agua que no fue usado por dos
semanas o más. EL GAS DE HIDRÓGENO ES UN EXPLOSIVO.
If the hot water has not been used for two or more weeks, prevent the possibility of damage or injury by turning
on all hot water faucets and allowing them to run for several minutes. Do this before using any electrical
appliance connected to the hot water system. This simple procedure will allow any built-up hydrogen gas to
escape. Since the gas is flammable, do not smoke, use an open flame, or use the appliance during this process.
PRECAUCIÓN
A FIN DE EVITAR LESIONES MENORES Y DAÑOS SOBRE LA
PROPIEDAD
Ŷ 'XUDQWHRGHVSXpVGHOFLFORGHODYDGRHVSRVLEOH
que los contenidos estén calientes al tacto. Tenga
cuidado antes de tomar los mismos.
Ŷ 6HGHEHUiHVWDUHVSHFLDOPHQWHDWHQWRVLHO
electrodoméstico es usado por niños o se encuentra
cerca de los mismos. No permita que los niños
jueguen alrededor del lavavajillas al cerrar las gavetas
debido a la posibilidad de pillarse los dedos pequeños.
Ŷ 3URGXFWRVTXHQRVHDQXWHQVLOLRVQRODYH
artículos tales como filtros electrónicos de limpieza
con aire, filtros de horno y brochas de pintura
en su lavavajillas. Se podrán producir daños,
descoloración o manchas sobre el lavavajillas.
Ŷ &DUJXHDUWtFXORVGHSOiVWLFROLYLDQRVGHPRGR
que no sean desplazados ni caigan al fondo del
lavavajillas.
ADVERTENCIA
RIESGO DE QUE UN NIÑO QUEDE ATRAPADO
FORMA ADECUADA DE DESCARTAR EL LAVAVAJILLAS
Los lavavajillas tirados o abandonados son peligrosos…incluso aunque se conserven por “sólo unos pocos
días”. Si se deshará de su lavavajilla, siga las siguientes instrucciones a fin de evitar accidentes.
Ŷ 1RSHUPLWDTXHORVQLxRVMXHJXHQFRQHQRGHQWURGHpVWHRFXDOTXLHUHOHFWURGRPpVWLFRTXHKD\D
descartado.
AVISO
Ŷ 8VHVyORSROYRCascade
®
Platinum™ ActionPacs™
o Finish
®
Quantum
®
Automatic Dishwashing Detergent
o
agentes de enjuague recomendados
para uso con un lavavajillas y mantenga los mismos fuera
del alcance de los niños.
El Detergente para Lavavajillas
Automáticos Cascade
®
Platinum™ ActionPacs™ o Finish
®
Quantum
®
Automatic
Dishwashing Detergent, y los
agentes de enjuagues Cascade
®
Platinum™ Power Dry™
Rinse Aid o Finish
®
Jet-Dry
®
Rinse Aid fueron aprobados
para su uso en todos los lavavajillas de Café.
PRECAUCIÓN
Ŷ %DMRQLQJXQDFLUFXQVWDQFLDVHGHEHUiDEULUHO
cajón mientras el lavavajillas se encuentre en
funcionamiento.
Ŷ 6LHPSUHJROSHHHOIUHQWHGHOFDMyQSDUDSDXVDUHO
lavavajillas y espere hasta que escuche los cuatro
pitidos adicionales antes de abrir el cajón.
Ŷ (OODYDYDMLOODVVHGHEHUiXVDUFRQHOHQVDPEOH
del motor, la placa del filtro, el filtro de drenaje
y el brazo rociador en sus posiciones. A fin de
identificar cuáles son cada una de estas partes,
consulte la sección de Cuidado y Limpieza de este
Manual del Propietario.
Ŷ $OFDUJDUHOFDMyQWHQJDFXLGDGRGHQRFRORFDUtWHPV
de vajilla de modo tal que impidan que la tapa interior
se selle de forma correcta con el cajón. Los ítems
se deberán colocar de modo que no sobresalgan
VREUHODSDUWHVXSHULRU\RVHDQIRU]DGRVHQHOFDMyQ
de otro modo, podrá ser necesario llamar al servicio
técnico.
Ŷ /DOLPSLH]D\PDQWHQLPLHQWRGHOXVXDULRQRGHEHUiQ
ser realizados por niños sin supervisión.
Ŷ 6LHOODYDYDMLOODVQRVHXWLOL]DGXUDQWHSHUtRGRV
de tiempo prolongados, corte los suministros de
electricidad y agua al lavavajillas.

49-4000255 Rev 1 5
INFORMACIÓN DE SEGURIDAD
INFORMACIÓN IMPORTANTE DE SEGURIDAD
LEA TODAS LAS INSTRUCCIONES ANTES DE USAR
LEA Y GUARDE ESTAS INSTRUCCIONES
REQUISITOS ELÉCTRICOS
Asegúrese de que la conexión eléctrica y el tamaño
del cable sean los adecuados y que cumplan con el
&yGLJR1DFLRQDOGH(OHFWULFLGDG$16,1)3$±~OWLPD
edición, y con todos los códigos y ordenanzas locales.
Este electrodoméstico deberá contar con:
Ŷ 120V, 60Hz, CA - únicamente, 15 amperes o 20
amperes, suministro eléctrico con fusible.
Ŷ
El cableado deberá constar de 2 cables con tierra y
UHVLVWHQWHD))
Ŷ Si el suministro eléctrico provisto no cumple con
los requisitos anteriores, llame a un electricista
matriculado antes de proceder.
Se recomienda contar con:
Ŷ8QGLV\XQWRU\XQIXVLEOHGHUHWDUGR
Ŷ8QFLUFXLWRGHHPSDOPHVLQGLYLGXDOFRUUHFWDPHQWH
conectado a tierra.
Forma adecuada de descartar su electrodoméstico
Ŷ
'HVFDUWHRUHFLFOHVXHOHFWURGRPpVWLFRGHDFXHUGRFRQODV5HJXODFLRQHV)HGHUDOHV\/RFDOHV&RPXQtTXHVHFRQ
las autoridades locales para descartar o reciclar su electrodoméstico de forma ambientalmente segura.
Ŷ
Tenga en cuenta las opciones de reciclaje del material de embalaje de su electrodoméstico.
6 49-4000255 Rev 1
USO DEL LAVAVAJILLAS
Acerca de la Comunicación del Electrodoméstico
Conexión WiFi (Para clientes en Estados Unidos)
Su lavavajillas es apto para con GE Appliances WiFi
Connect*($SSOLDQFHV&RQH[LyQ:L)L8QDWDUMHWD
de comunicación incorporada en el producto permite la
comunicación del mismo con su teléfono inteligente para
un monitoreo remoto, control y recepción de notificaciones.
8WLOLFHHOFyGLJR45SDUDGHVFDUJDU\DFFHGHUDOD
DSOLFDFLyQ6PDUW+4RYLVLWHcafeappliances.com/
connect.
Siga las instrucciones de la aplicación para conectar
el lavavajillas.
Para aprender más sobre las funciones del
electrodoméstico conectado y para saber qué aplicaciones
del electrodoméstico conectado funcionarán con su teléfono
inteligente, visite cafeappliances.com/connect.
Este dispositivo cumple con la Parte 15 de la Normativa de la FCC. Su funcionamiento está sujeto a las dos
condiciones siguientes:
1. Este dispositivo no causa interferencias perjudiciales, y
2. Este dispositivo debe aceptar cualquier interferencia recibida, incluidas las interferencias que puedan provocar un
funcionamiento no deseado. Este equipo fue probado y cumple con los límites establecidos para un dispositivo
digital de clase B, según la parte 15 de la Normativa de la FCC. Estos límites fueron diseñados para brindar
una protección razonable contra interferencias nocivas en una instalación residencial. Este equipo genera, usa
y puede emitir energía de radiofrecuencia y, si no se instala y utiliza de acuerdo con las instrucciones, puede
ocasionar interferencias perjudiciales sobre las comunicaciones radiales. Sin embargo, no se garantiza que no
se presenten interferencias en una instalación en particular. Si el equipo provoca interferencias perjudiciales para
la recepción de radio o televisión, lo cual puede comprobar encendiendo y apagando el equipo, se aconseja al
usuario que intente corregir la interferencia a través de una de las siguientes medidas:
• Reoriente o reubique la antena receptora.
• Aumente la separación entre el equipo y el receptor.
• Conecte el equipo a un tomacorriente de un circuito diferente al tomacorriente al cual se encuentra conectado el
receptor.
• Para solicitar ayuda, consulte al proveedor minorista o a un técnico experimentado de radio/TV.
Etiqueta: Las modificaciones sobre esta unidad no aprobadas expresamente por parte del fabricante podrían anular
la autoridad del usuario para utilizar el equipo.

49-4000255 Rev 1
NOTAS
Notas
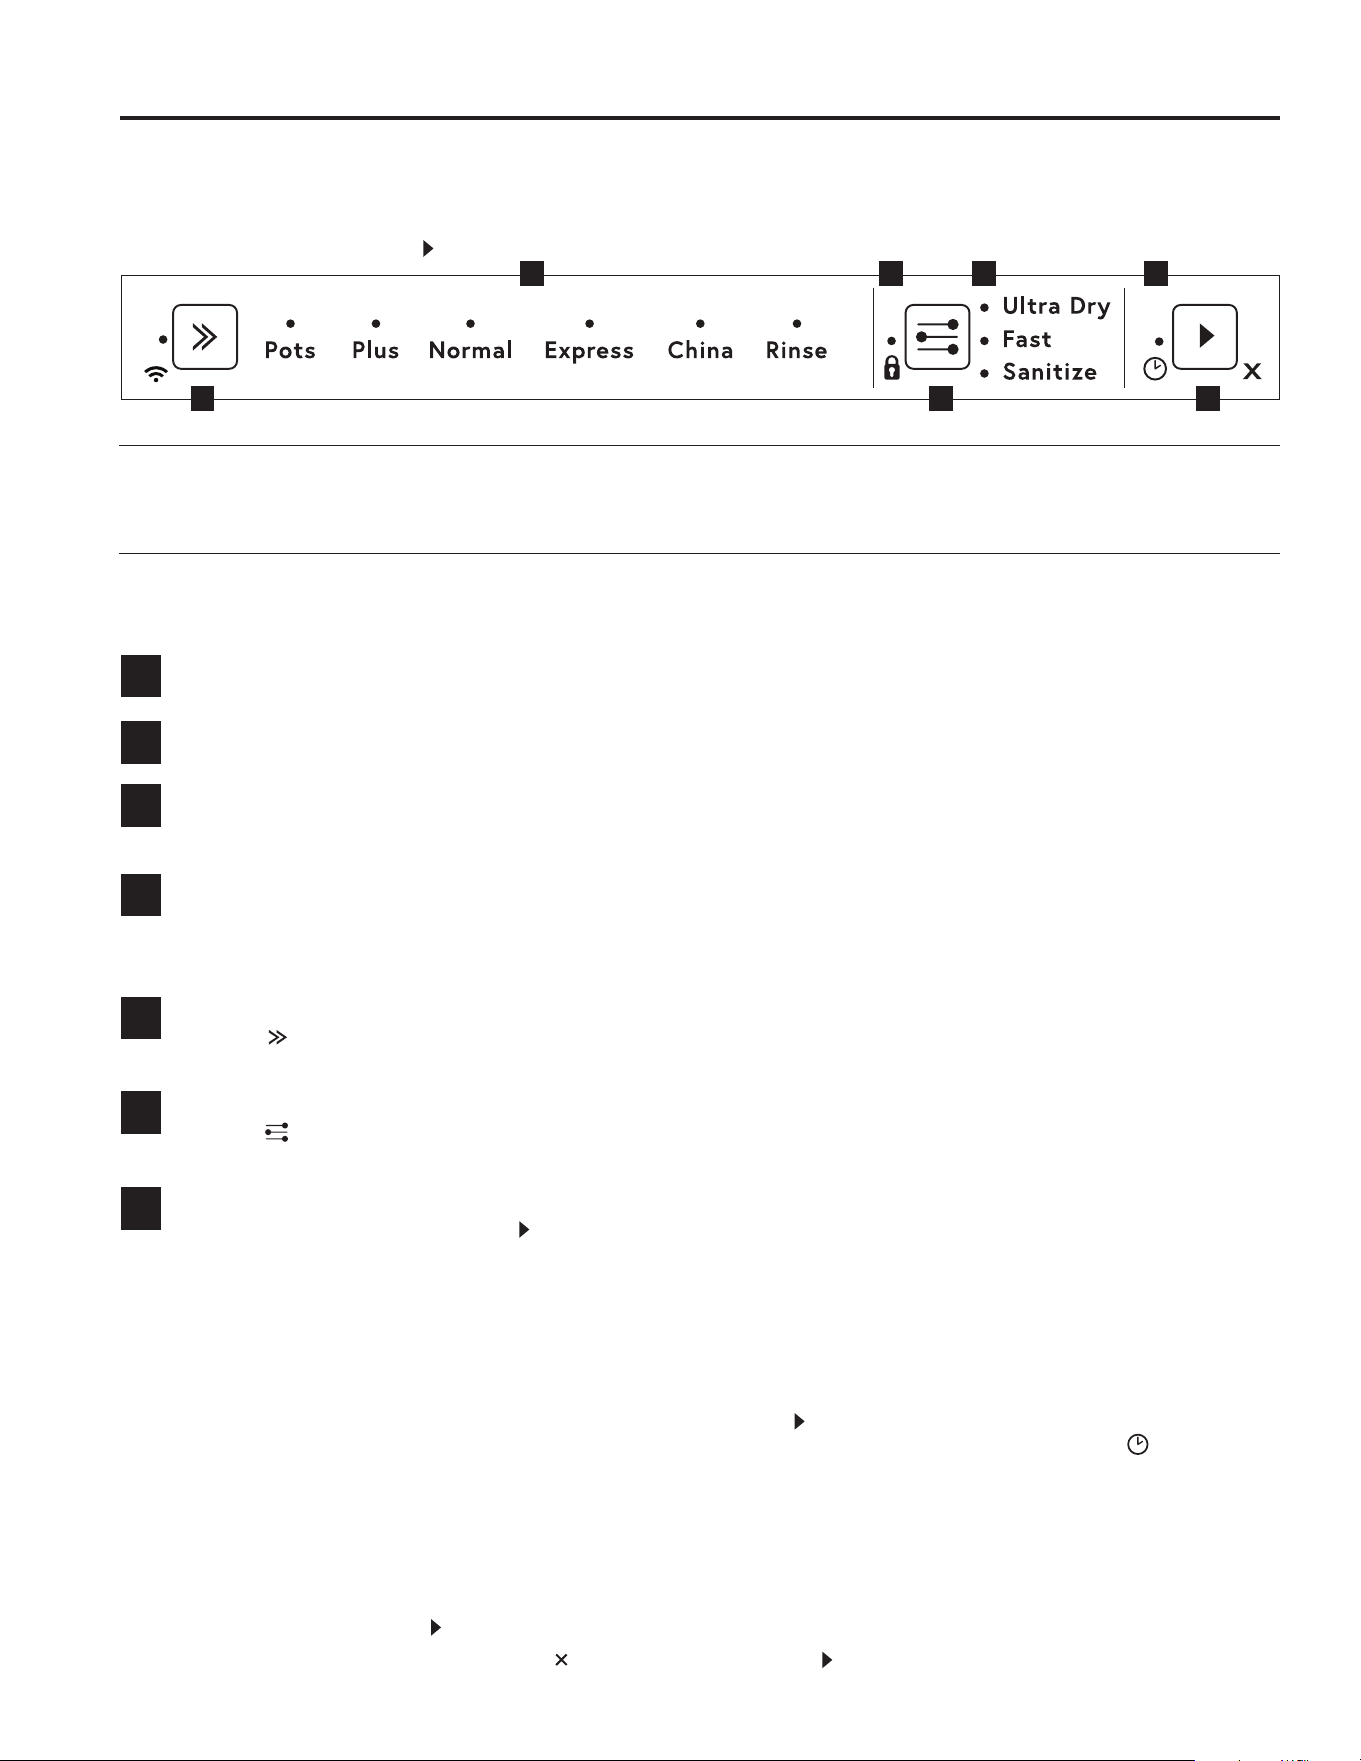
8 49-4000255 Rev 1
Puesta en Marcha
USO DEL LAVAVAJILLAS
Las características y la apariencia variarán a lo largo de este manual
Indicadores
Apagado/ Encendido ± $EULU HO FDMyQ DFWLYDUi HO ODYDYDMLOODV GH IRUPD DXWRPiWLFD 6L HO ODYDYDMLOODV VH HQFXHQWUD
detenido, presione cualquier botón para su reactivación.
Observe los Indicadores del Programa
Si está iluminado: El programa de lavado fue seleccionado.
Indicador de Bloqueo
Si está iluminado: .H\ ORFN %ORTXHR GH 7HFODGR \ &KLOGORFN %ORTXHR SDUD 1LxRV VH HQFXHQWUDQ DFWLYDGRV
Indicadores de Opciones de Lavado
If lit: La opción del ciclo de lavado fue seleccionada. La duración y temperatura del programa de lavado se configurarán
de forma correspondiente
.
Indicador de Inicio con Demora
Si está iluminado: El inicio con demora se encuentra configurado. El programa de lavado comenzará luego de la
GHPRUD GHO WLHPSR VHOHFFLRQDGR D KRUDV
.
Controles
Selector del Ciclo de Lavado
Presione para pasar a través de los programas de lavado disponibles y seleccione el que desee.
NOTA: Cada cajón podrá funcionar de forma independiente del otro cajón o al mismo tiempo que el otro cajón.
Selector de Opciones
Presione para pasar a través de las opciones de lavado.
NOTA: No todas las opciones están disponibles para todos los programas de lavado.
Selector de Inicio (en el panel de control interior)
Para Iniciar el Lavado: Presione en el panel de control antes de cerrar el cajón.
Para Pausar: Dé dos golpes de manera firme sobre el frente del cajón.
• Espere los tres tonos cortos y uno largo antes de abrir el cajón.
NOTA: Forzar la apertura del cajón a mitad del ciclo podrá ocasionar daños o lesiones.
• Si el lavavajillas no se reinicia dentro de los siete minutos, sonará de manera intermitente hasta que se reinicie.
Inicio con Demora
Para Configurar el Inicio con Demora: Mantenga presionado
y configure el tiempo de inicio con demora.
&DGD WRQR LQGLFD XQD GHPRUD GH KRUD KDVWD GXUDQWH KRUDV (O LQGLFDGRU GH LQLFLR FRQ GHPRUD
se iluminará.
• 6L DO UHDOL]DU OD VHOHFFLyQ SDVD OD RSFLyQ K KRUDV HO ODYDYDMLOODV DQXODUi HO LQLFLR FRQ GHPRUD
A fin de reingresar el inicio con demora, siga las instrucciones anteriores.
• El lavado comenzará cuando el tiempo de demora finalice, siempre que el cajón se encuentre cerrado.
Si el cajón no se cierra dentro de los 4 segundos desde la configuración del inicio con demora, O si el cajón se abre luego de
TXH HO LQLFLR FRQ GHPRUD KD\D VLGR FRQILJXUDGR SRU HMHPSOR SDUD FDUJDU PiV SODWRV HO LQLFLR FRQ GHPRUD VH VXVSHQGHUi
Para Reiniciar: Presione y cierre el cajón.
Para Cancelar el Inicio con Demora : Mantenga presionado .
• Si hay alguna cantidad de agua en el cajón, ésta será drenada de forma automática antes del apagado del lavavajillas.
1 2 3 4
A B C
1
2
3
4
A
B
C
Inicio Rápido
Este lavavajillas funciona de forma diferente que la mayoría de los lavavajillas. Cuando un ciclo está en funcionamiento,
el cajón queda bloqueado. Para abrir el cajón a mitad de un ciclo, se deberá pausar el ciclo. Debido a que no hay
controles en la parte exterior del lavavajillas, se deberá golpear el frente del cajón, dar 2 golpes, esperar 3 segundos y
luego abrir el cajón. Presione
para reiniciar el ciclo.
Asistencia
inteligente
6L FRQHFWD VX ODYDYDMLOODV D 6PDUW+4 REWHQGUi PiV LQIRUPDFLyQ \ IXQFLRQHV PHMRUDGDV GH OD IXQFLyQ 6PDUW
$VVLVW SDUD PDQWHQHU XQ UHQGLPLHQWR ySWLPR GH ODYDGR \ VHFDGR 6PDUW $VVLVW $VLVWHQFLD LQWHOLJHQWH HVWi
diseñada para supervisar el funcionamiento de su lavavajillas y le ayudará a garantizar un rendimiento óptimo.
Consulte la sección Acerca de la Comunicación del Electrodoméstico para obtener instrucciones.
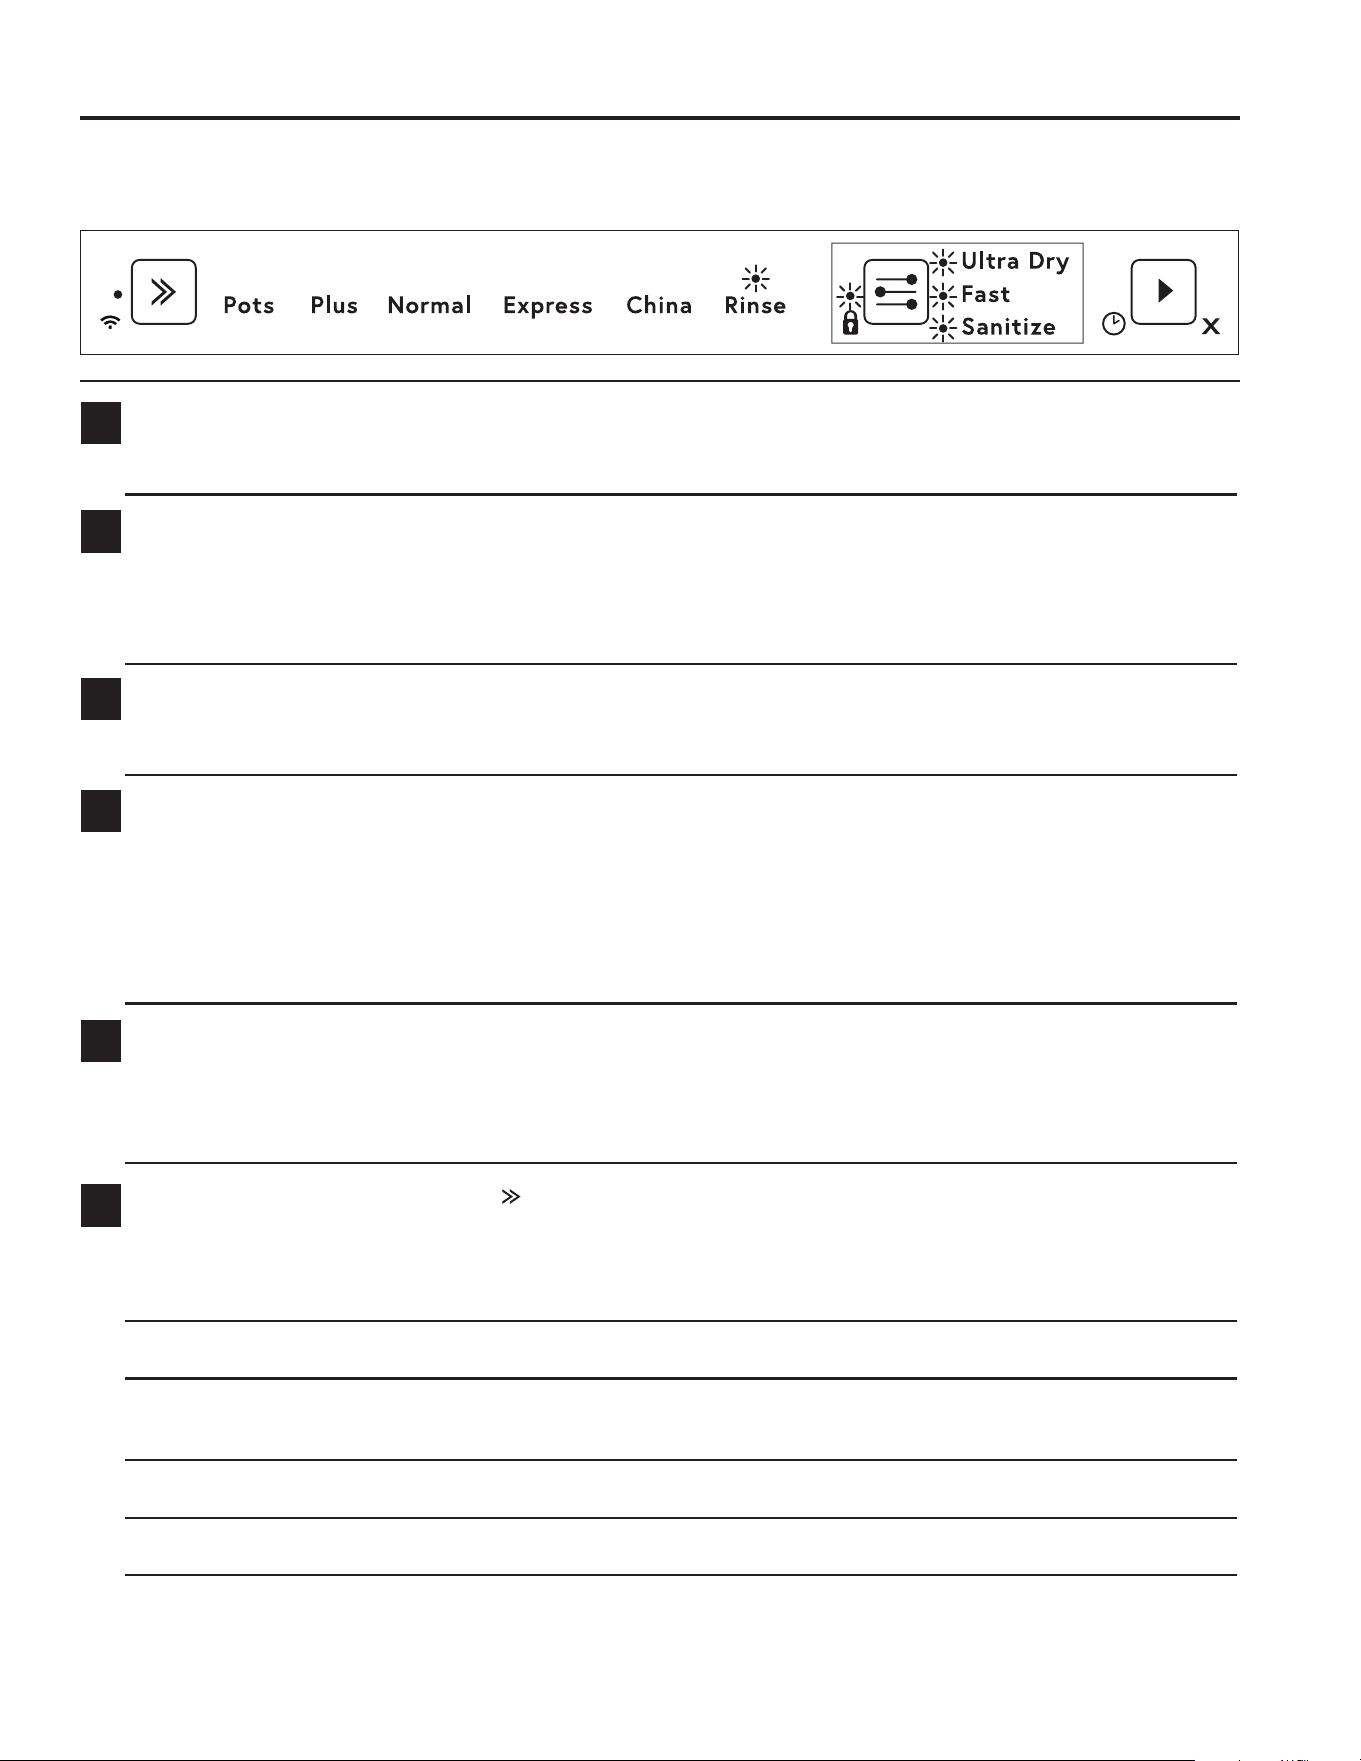
49-4000255 Rev 1 9
USO DEL LAVAVAJILLAS
Puesta en Marcha
Seleccione el Ciclo - Presione para pasar a través de los programas de lavado disponibles y
seleccione el que desee. La luz del indicador encendida sobre el programa de lavado seleccionado indicará el
programa de lavado seleccionado.
Pots Este ciclo se utiliza con platos, utensilios, ollas o sartenes muy sucios y con suciedad seca u
horneada. Es seguro usar los platos que utiliza a diario con este ciclo. *Tiempo: 2 horas y 31 minutos.
Plus Este ciclo fue diseñado para cargas diarias completas de platos con niveles de suciedad de media a
alta. *Tiempo: 2 horas y 15 minutos.
Normal Este ciclo se usa con platos con niveles de suciedad normal y brinda un uso óptimo de agua y
FRUULHQWH /D *XtD GH 8VR GH &RUULHQWH HVWi EDVDGD HQ HVWH FLFOR 1R KD\ 2SFLRQHV GH ODYDGR
disponibles para este ciclo. *Tiempo: 2 horas.
Express Para lavar cargas parciales con suciedad floja. Los tiempos y temperaturas de lavado estarán
reducidos. *Tiempo: 46 minutos.
China Para lavar vajillas con poca suciedad o sensibles al calor. Las temperaturas de lavado son
reducidas. *Tiempo: 1 hora y 30 minutos.
Rinse Para enjuagar cargas parciales que se lavarán después. Evita olores y evita que la suciedad
se seque sobre los platos. No use detergente. No se dispensa detergente durante el ciclo de
enjuague. *Tiempo: 16 minutos.
*Sólo tiempo de lavado. No incluye el tiempo de secado.
6
Descarte Restos de Comida
5DVSH \ HOLPLQH SDUWtFXODV JUDQGHV GH FRPLGD SRU HM KXHVRV FDUR]RV GH IUXWD \ UHWLUH FXDOTXLHU REMHWR
H[WUDxR SRU HM SDOLOORV KLORV SDSHO
Cargue los Platos con Cuidado – Para más información, consulte la sección de Carga.
Como ayuda para el rendimiento del lavado, organice los platos que modo que estén espaciados de forma
pareja y no apilados.
¡IMPORTANTE!
Acomode los platos hasta una altura máxima de 11” para los cajones inferiores o de 12-¼” para los cajones superiores.
Controle el brazo(s) rociador - Para más información, consulte la sección de Cuidado y Limpieza.
Controle que el brazo rociador se encuentre montado de forma correcta, girando el mismo con su mano.
$QWHV GH XQ ODYDGR DVHJ~UHVH GH TXH QR KD\D tWHPV TXH LPSLGDQ OD URWDFLyQ GHO EUD]RV URFLDGRU
Agregue Detergente - Para más información, consulte la sección de Dispensadores.
Llene el dispensador de detergente con detergente en polvo y cierre la puerta del dispensador.
¡IMPORTANTE!
No use detergente líquido.
No coloque tabletas ni coloque detergente líquido en el dispensador de detergente.
Si usará una tableta o una bolsa con gel, coloque la misma en la cesta de cubiertos o en el extremo del
estante de la base.
Controle el Abrillantador de Enjuague - Para más información, consulte la sección de Dispensadores.
Si el tapón de la salida posee un color rojo brillante, vuelva a llenar el dispensador de abrillantador de
enjuague con este último.
Asegúrese de volver a colocar correctamente el tapón del abrillantador de enjuague en su posición original,
volviendo a girar el tapón en posición vertical.
1
2
4
Protección contra Pérdidas
Si se detecta una pérdida, el lavavajillas será drenado, el ciclo se detendrá y las luces del panel de control que
se indican más abajo se encenderán. Si esto sucede, comuníquese con Café para solicitar el servicio técnico.
3
5
10 49-4000255 Rev 1
Puesta en Marcha
USO DEL LAVAVAJILLAS
Seleccione Opciones - Presione para pasar a través de las opciones disponibles y deténgase para
seleccionar la que desee. La luz del indicador encendida sobre la opción seleccionada indicará esta última.
Ultra Dry Incrementa la temperatura del enjuague final y la duración de la fase de secado para un mayor
rendimiento del secado.
Fast 8VDDJXD\FRUULHQWHDGLFLRQDOSDUDXQWLHPSRGHODYDGRPiVUiSLGRPLHQWUDVPDQWLHQHHO
rendimiento del lavado.
Sanitize Eleva la temperatura del agua durante la fase de enjuague a fin de desinfectar los platos. Ideal
para lavar ítems tales como biberones y preservar jarras.
La opción de lavado con desinfección ajusta el programa de lavado, a fin de cumplir con las
FRQGLFLRQHVUHTXHULGDVSRU16)6HFFLyQSDUDTXHVHSURGX]FDODGHVLQIHFFLyQ
Mientras el proceso de desinfección está en funcionamiento, el programa de lavado es
monitoreado para asegurar que estas condiciones se cumplan.
¡IMPORTANTE!
• Sólo los programas que utilizan la opción de lavado con desinfección están certificados
SDUDFXPSOLUFRQODVFRQGLFLRQHVUHTXHULGDVSRU16)6HFFLyQ(VSRVLEOHTXHRWURV
programas de lavado no alcancen las temperaturas requeridas para que se produzca la
desinfección. Consulte la tabla de programas de lavado donde la opción de desinfección se
encuentra disponible.
• 3DUDTXHVHSURGX]FDODGHVLQIHFFLyQODWHPSHUDWXUDGHODJXDGHEHUiDOFDQ]DUORV)
Asegúrese de que todos los ítems posean la marca de uso seguro en lavavajillas o su
equivalente antes de activar la opción de desinfección.
•
Si el lavado se interrumpe o el suministro de agua se corta durante el programa, entonces es posible
que no se estén cumpliendo las condiciones de calentamiento para la desinfección. Es posible que
sea necesario activar el programa nuevamente para asegurar la desinfección de sus platos.
Al final de un programa de lavado con desinfección, siempre asegúrese de que la desinfección se haya
realizado con éxito.
Si la desinfección se realizó con éxito: El lavado finalizará de forma normal.
Si la desinfección no se realizó con éxito
:
• Sonará una alerta.
• Cuando se abra el cajón para la desinfección, el indicador parpadeará.
• Controle que el suministro de agua se haya cortado o que el programa de lavado se haya
interrumpido.
• Mantenga presionado una vez para detener el pitido y una segunda vez para quitar el código
de alerta parpadeante.
• Reinicie la desinfección y luego active el ciclo nuevamente.
NOTA: Sólo se podrá configurar una opción por vez. No todas las opciones están disponibles para todos los programas de
lavado. Si una opción de lavado no se encuentra disponible para el programa de lavado elegido, entonces dicha opción no
se podrá seleccionar. Para conocer las opciones disponibles para cada programa de lavado, consulte la siguiente tabla.
Programa de lavado Opciones disponibles
Pots 8OWUD'U\ )DVW Sanitize
Plus 8OWUD'U\ )DVW Sanitize
Normal ---
Express 8OWUD'U\ --
China 8OWUD'U\ )DVW -
Rinse ---
Opciones de Bloqueo - Presione para pasar a través de las opciones disponibles y deténgase para
seleccionar la que desee. La luz del indicador encendida sobre la opción seleccionada indicará esta última.
Bloqueo
del
Teclado
'HVDFWLYDWRGRVORVERWRQHV±(V~WLODOOLPSLDUHOODYDYDMLOODV
Para activar: Mantenga presionado hasta que escuche un tono. El indicador de bloqueo se iluminará.
Para cancelar: Mantenga presionado hasta que escuche un tono. El indicador de bloqueo se apagará.
Bloqueo
para
Niños
'HVDFWLYDWRGRVORVERWRQHV\EORTXHDHOFDMyQFHUUDGRHYLWDQGRXQXVRQRDXWRUL]DGRSDUDQLxRV
Para activar: Mantenga presionado hasta que escuche dos tonos. El indicador de bloqueo se iluminará.
Para cancelar: Mantenga presionado hasta que escuche un tono. El indicador de bloqueo se apagará.
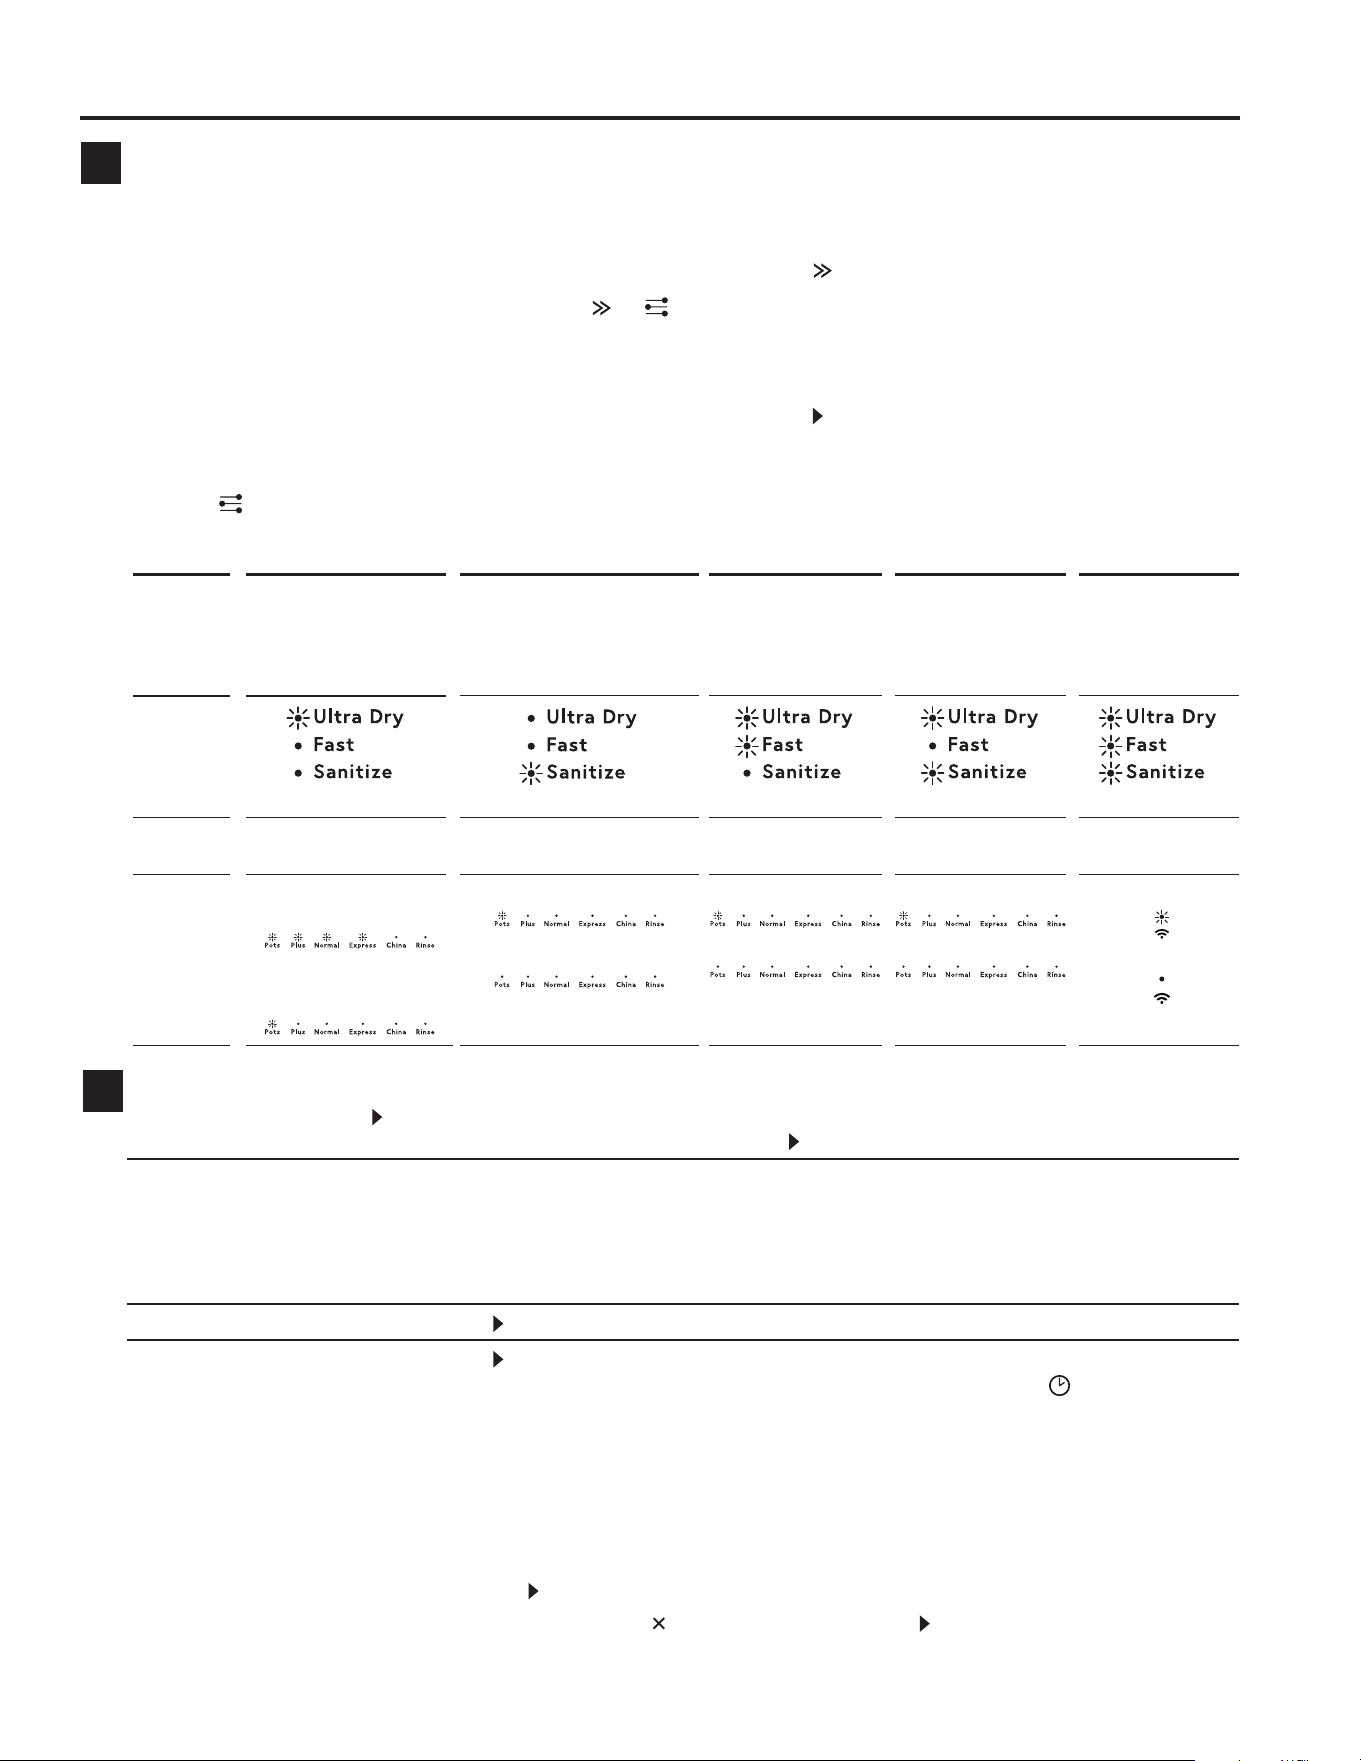
49-4000255 Rev 1 11
USO DEL LAVAVAJILLAS
Puesta en Marcha
Inicio del Lavavajillas
Start Presione en el panel de control y cierre el cajón dentro de los 4 segundos. Si el cajón no se
cerró dentro de los 4 segundos, entonces presione nuevamente antes de cerrar el cajón.
Pause Dé dos golpes de manera firme sobre el frente del cajón. Espere los tres tonos cortos y uno
largo antes de abrir el cajón. NOTA: Forzar la apertura del cajón a mitad del ciclo podrá
ocasionar daños o lesiones.
Si el lavavajillas no se reinicia dentro de los siete minutos, sonará de manera intermitente hasta
que se reinicie.
Cancel
Mantenga presionado
.
Delay Start
Mantenga presionado
y configure el tiempo de inicio con demora. Cada tono indica una
GHPRUDGHKRUDKDVWDGXUDQWHKRUDV(OLQGLFDGRUGHLQLFLRFRQGHPRUD se iluminará.
• 6LDOUHDOL]DUODVHOHFFLyQSDVDODRSFLyQKKRUDVHOODYDYDMLOODVDQXODUiHOLQLFLRFRQ
demora. A fin de reingresar el inicio con demora, siga las instrucciones anteriores.
•
El lavado comenzará cuando el tiempo de demora finalice, siempre que el cajón se encuentre cerrado.
Si el cajón no se cierra dentro de los 4 segundos desde la configuración del inicio con demora,
2VLHOFDMyQVHDEUHOXHJRGHTXHHOLQLFLRFRQGHPRUDKD\DVLGRFRQILJXUDGRSRUHMHPSORSDUD
FDUJDUPiVSODWRVHOLQLFLRFRQGHPRUDVHVXVSHQGHUi
Para Reiniciar: Presione y cierre el cajón.
Para Cancelar el Inicio con Demora
: Mantenga presionado .
• Si hay alguna cantidad de agua en el cajón, ésta será drenada de forma automática antes del
apagado del lavavajillas.
9
1 CONTROLE
Controle que no haya un lavado en curso, y luego abra
el cajón.
2 INGRESE AL MENÚ
Para ingresar al menú: Mantenga presionado
y
al mismo tiempo durante cuatro segundos.
•
8VWHGVHHQFXHQWUDDKRUDHQODRSFLyQ5LQVH$LG
$EULOODQWDGRUGH(QMXDJXHGHOPHQ~GHRSFLRQHV.
• Para cambiar la configuración de Abrillantador de
Enjuague, vaya al paso 4 ahora.
3 IR HASTA LA OPCIÓN
Presione para ir hasta la siguiente opción. Los
indicadores de opciones exhibirán qué opción fue
VHOHFFLRQDGDFRQVXOWHODVLJXLHQWHWDEOD
Cuando haya ido hasta el final de la secuencia, el menú
comenzará nuevamente con Abrillantador de Enjuague.
4 CAMBIE LAS CONFIGURACIONES
Presione
para cambiar la configuración dentro de
una opción.
Los indicadores de programas de lavado exhibirán qué
RSFLyQIXHVHOHFFLRQDGDFRQVXOWHODVLJXLHQWHWDEOD
5 GUARDE LA CONFIGURACIÓN Y QUITE EL MENÚ
Presione para guardar la nueva configuración y
quite el menú de opciones de preferencia.
Podrá usar cualquiera de los cajones para cambiar
las configuraciones. Cambiar las configuraciones de
un cajón configurará sus preferencias para todo el
lavavajillas.
Opciones adicionales - Cómo configurar y cambiar los ajustes de las opciones adicionales
8
OPCIÓN
AYUDA PARA EL
ENJUAGUE
ENCENDIDO
AUTOMÁTICO AL ABRIR
EL CAJÓN (ADECUADO
COMO OPCIÓN DEL
MODO SABÁTICO)
TONOS AL
FINALIZAR EL
LAVADO
BLOQUEO
AUTOMÁTICO
CON EL CAJÓN
CERRADO
WI-FI
¿En qué
opción
me
encuen-
tro?
Configur.
posibles
0 to 5 (max) Encendida o Apagada Encendida o
Apagada
Encendida o
Apagada
Encendida o
Apagada
Ejemplos
de
configur.
4 indicadores encendidos
±FRQILJXUDFLRQHV
LQGLFDGRUHQFHQGLGR±
1 config uraciones
Encendida
Apagada
Encendida
Apagada
Encendida
Apagada
Conectada
Desconectada
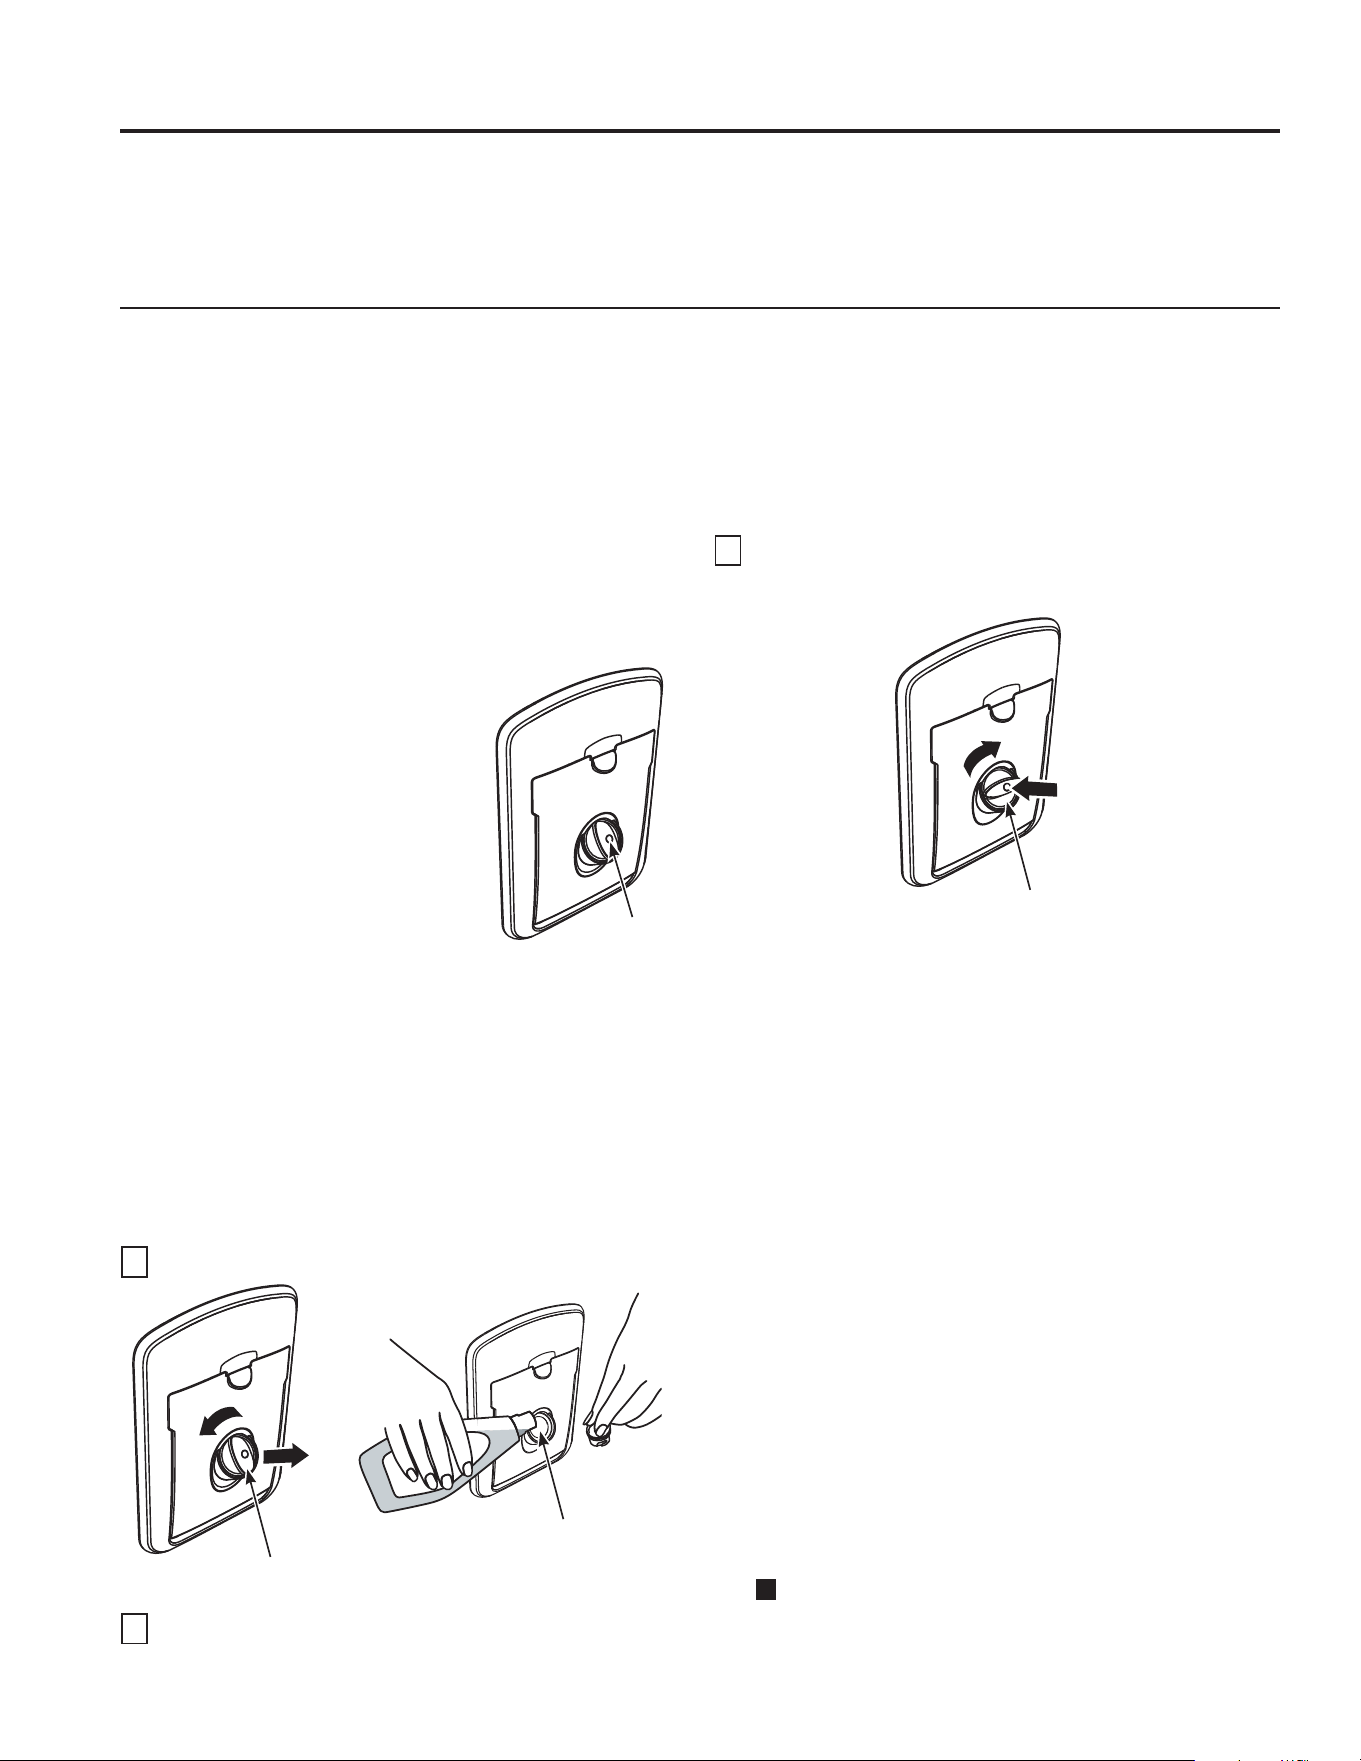
12 49-4000255 Rev 1
USO DEL LAVAVAJILLAS
Dispensadores
Use un Agente de Enjuague
Los agentes de enjuague de alta calidad como
Cascade
®
Platinum™ Power Dry™ Rinse Aid o
Finish
®
Jet-Dry
®
Rinse Aid están diseñados para una
gran acción de secado y para brindar protección contra
manchas y acumulación de películas en sus platos,
vasos, cubiertos, utensilios y plástico.
NOTA: Es posible que escuche ciertos pitidos atípicos
y agudos cuando se dispense el abrillantador de
enjuague. Esto es normal.
Cuándo Llenar el Dispensador del Agente
de Enjuague
Si el indicador brilla o parpadea
con una luz roja, vuelva a llenar el
abrillantador de enjuague
Si el indicador brilla o parpadea de
forma tenue o no lo hace en absoluto,
no necesitará volver a realizar el
OOHQDGR KD\ VXILFLHQWH DEULOODQWDGRU
de enjuague para el lavado.
NOTA: 8Q HQMXDJXH FRQ FRORUHV
más claros no atenuará el indicador de forma tan
efectiva como sucederá con colores más oscuros.
Llenado del Dispensador
El dispensador del agente de enjuague tiene una capacidad
GH R] GH DJHQWH GH HQMXDJXH %DMR FRQGLFLRQHV
normales, esto durará aproximadamente un mes.
El dispensador de abrillantador de enjuague se
encuentra en el interior del cajón, debajo del
dispensador de detergente.
1
*LUH HO WDSyQ HQ VHQWLGR DQWLKRUDULR \ UHWLUH HO PLVPR
2
Vierta abrillantador de enjuague en la abertura circular,
teniendo cuidado de no producir ningún tipo de
derrame en el cajón.
¡IMPORTANTE!
Cualquier derrame accidental del abrillantador de
enjuague se deberá limpiar. De no limpiarse, el
abrillantador de enjuague producirá un nivel excesivo
de espuma, el cual resultará en una llamada al servicio
técnico que no estará cubierta por la garantía.
3
Reemplace el tapón y luego vuelva a girar en sentido
horario hasta su posición original.
¡IMPORTANTE!
Asegúrese de que el tapón quede bien ajustado en su
cierre, con el espacio para apoyar los dedos en posición
vertical.
Configuración de la Ayuda para el
Enjuague
Es posible que necesite ajustar la cantidad de
abrillantador de enjuague dispensado en cada lavado
para que se ajuste a las condiciones del agua. La
FRQ¿JXUDFLyQ PiV EDMD HV DSDJDGR \ OD PiV DOWD HV
'H KDEHU H[FHVR GH HVSXPD DO ¿QDO GHO ODYDGR UHGX]FD
OD FRQ¿JXUDFLyQ
Si los platos están mojados o con suciedad luego del
VHFDGR LQFUHPHQWH OD FRQ¿JXUDFLyQ
Si vive en un área donde el agua es dura y no
cuenta con un ablandador de agua instalado en su
suministro de agua o incorporado en su lavavajillas, le
UHFRPHQGDPRV DMXVWDU OD FRQ¿JXUDFLyQ GHO DEULOODQWDGRU
de enjuague a 5.
Para ajustar la configuración
Lea
8
Opciones Adicionales en la sección de Puesta
en Marcha.
Indicator
light
*LUH HQ VHQWLGR DQWLKRUDULR
y empuje para su retiro
Vierta abrillantador de enjuague
en la abertura circular y limpie
cualquier derrame
Vuelva a colocar el tapón y gire
en sentido horario para ajustar
Controle la Temperatura del Agua
(O DJXD HQWUDQWH GHEHUi VHU GH SRU OR PHQRV ) &
\ QR PiV GH ) & SDUD XQD OLPSLH]D HIHFWLYD \
para evitar daños sobre los platos. Controle la temperatura
del agua con un termómetro para caramelos o para carne.
Abra el grifo de agua caliente más cercano al lavavajillas,
coloque el termómetro en un vaso y deje que el agua corra
de forma continua en el vaso hasta que la temperatura
deje de subir.

49-4000255 Rev 1 13
USO DEL LAVAVAJILLAS
Dispensadores
Dispensador de Detergente
¡IMPORTANTE!
No use detergente líquido.
No coloque tabletas ni coloque detergente líquido en
el dispensador de detergente.
Si usará una tableta o una bolsa con gel, coloque la
misma en la cesta de cubiertos o en el extremo del
estante de la base, como se describe más adelante en
esta sección.
Powder Detergent Dispenser
Dispensador de Detergente en Polvo
El dispensador de detergente se encuentra ubicado
dentro del cajón, del lado frontal izquierdo.
Use sólo el detergente en polvo diseñado para
lavavajillas automáticos en el dispensador de
detergente.
Llenado del Dispensador de Detergente
en Polvo
1
Presione el pestillo hacia abajo para abrir el
dispensador.
2
Controle que el dispensador se encuentre vacío y
VHFR \ OXHJR DJUHJXH GHWHUJHQWH HQ SROYR QR
coloque tabletas sólidas o líquidas en el
GLVSHQVDGRU 1R HV QHFHVDULR HO XVR GH GHWHUJHQWH
SDUD HO SURJUDPD 5LQVH (QMXDJXH.
3
Cierre el dispensador hasta que haga un sonido de
clic. El detergente será liberado de forma automática
en el cajón durante el programa de lavado.
NOTA: WAl lavar platos con mucha suciedad y con
agua muy dura, usted también podrá llenar un segundo
dispensador con detergente como ayuda en el
rendimiento del lavavajillas.
Al usar el dispensador de detergente, la cantidad de
detergente en polvo que use estará determinada por la
dureza del agua, la temperatura del agua, y la carga de
suciedad de comida que haya dentro del lavavajillas.
Para acceder
a información sobre la dureza del agua en
su área,
comuníquese con su compañía proveedora de
agua. La
dureza del agua se mide en granos por galón.
8VH HVWD
información y la tabla a continuación más arriba
para determinar
la cantidad de detergente que se debe
XVDU 8VWHG SXHGH DGTXLULU XQD WLUD GH SUXHED GH DJXD GXUD
GH &DIp /ODPH DO \ VROLFLWH HO Q~PHUR GH
pieza
WD01X10295
.
8VH OD WDEOD FRPR SXQWR LQLFLDO \ OXHJR DMXVWH OD FDQWLGDG
GH GHWHUJHQWH TXH XVDUi 8VH VyOR OD FDQWLGDG VXILFLHQWH
SDUD XQ EXHQ UHQGLPLHQWR GHO ODYDGR 8VDU VyOR OD
cantidad correcta de detergente proveerá un gran
rendimiento del lavado sin desperdiciar detergente ni
enturbiar su cristalería.
El uso de demasiado detergente con agua muy suave
\R PX\ FDOLHQWH SRGUi RFDVLRQDU XQD FRQGLFLyQ
llamada grabado sobre su cristalería. El grabado es un
enturbiamiento permanente sobre su cristalería. Esta
condición es irreversible. Sin embargo, el uso de muy poco
detergente ocasionará un rendimiento deficiente del lavado.
NO USE DETERGENTE PARA LAVADO MANUAL
NOTA: El uso de un detergente que no esté diseñado
específicamente para lavavajillas hará que este último se llene
de agua con jabón. Durante el funcionamiento, esta agua
con jabón se esparcirá por las ventilaciones del lavavajillas,
cubriendo el piso de la cocina y mojando el mismo.
Debido a que muchos envases de detergente son
parecidos, guarde el detergente para lavavajillas en
un espacio aparte de los demás limpiadores. Muestre
a cualquier persona que pueda usar el lavavajillas el
detergente correcto y dónde se guarda.
Mientras que no habrá daños duraderos sobre el
lavavajillas, sus platos no se limpiarán si usa un detergente
para platos cuya fórmula no haya sido diseñada para
funcionar en lavavajillas automáticos.
Presione para liberar y
abrir el compartimiento del
dispensador
Dispensador
Principal
Dispensador
Secundario
Completamente
Lleno
Llenado
KDVWD
Llenado
KDVWD
Dispensador
Principal
Dispensador
Secundario
Cantidad de Granos/Gal. Galon(es) a Llenar
Menos de 4 /OHQH OD WD]D KDVWD
4 a 8 /OHQH OD WD]D KDVWD
8 a 12 Llene la taza completamente
Superior a 12 Llene tanto el dispensador
principal como el secundario

14 49-4000255 Rev 1
Dispensador de Detergente
¡IMPORTANTE!
No use detergente líquido.
Charola para Tabletas – Para Bolsas de
Gel o Tabletas
La charola para tabletas se encuentra ubicada en la
cesta de cubiertos.
Use sólo bolsas de gel o tabletas diseñadas para
lavavajillas automáticos.
Colocación de la Charola para Tabletas
1
Realice la colocación en la charola para tabletas de
la cesta de cubiertos.
2
Deslice la charola y asegure la misma en la cesta de
cubiertos.
Colocación dentro de los Rieles del
Estante Lateral – Para Bolsa de Gel o
Tableta
Si la cesta de cubiertos no se usará en el lavavajillas
para una carga particular, la bolsa de gel o tableta se
podrá calzar dentro de los rieles del estante lateral.
Use sólo bolsas de gel o tabletas diseñadas para
lavavajillas automáticos.
Colocación dentro de los Rieles del
Estante Lateral
1
De forma segura, coloque la bolsa de gel o tableta
dentro de los rieles del estante lateral.
2
¡IMPORTANTE!
No coloque la bolsa de gel o tableta sobre el piso del
cajón, ya que podrá interferir con la rotación del brazo
rociador y afectar el rendimiento del lavado.
Notas sobre el uso de tabletas
• Si usará tabletas, siga las instrucciones del fabricante
que figuran en el paquete. Es posible que algunas
tabletas no sean adecuadas para todos los programas
de lavado.
• El uso de tabletas podrá mejorar el rendimiento del
lavado en zonas de agua dura.
• Asegúrese de que las tabletas nunca tengan contacto
directo con platos o cubiertos.
• Si usará tabletas de lavavajilla con un componente
de abrillantador de enjuague incorporado, le
recomendamos desactivar el abrillantador de enjuague.
NO USE DETERGENTE PARA LAVADO MANUAL
NOTA: El uso de un detergente que no esté diseñado
específicamente para lavavajillas hará que este último se llene
de agua con jabón. Durante el funcionamiento, esta agua
con jabón se esparcirá por las ventilaciones del lavavajillas,
cubriendo el piso de la cocina y mojando el mismo.
Debido a que muchos envases de detergente son
parecidos, guarde el detergente para lavavajillas en
un espacio aparte de los demás limpiadores. Muestre
a cualquier persona que pueda usar el lavavajillas el
detergente correcto y dónde se guarda.
Mientras que no habrá daños duraderos sobre el
lavavajillas, sus platos no se limpiarán si usa un detergente
para platos cuya fórmula no haya sido diseñada para
funcionar en lavavajillas automáticos.
Charola
para
Tabletas
Tome la Bolsa
O
Tableta
Tome la Bolsa
O
Tableta
USO DEL LAVAVAJILLAS
Dispensadores
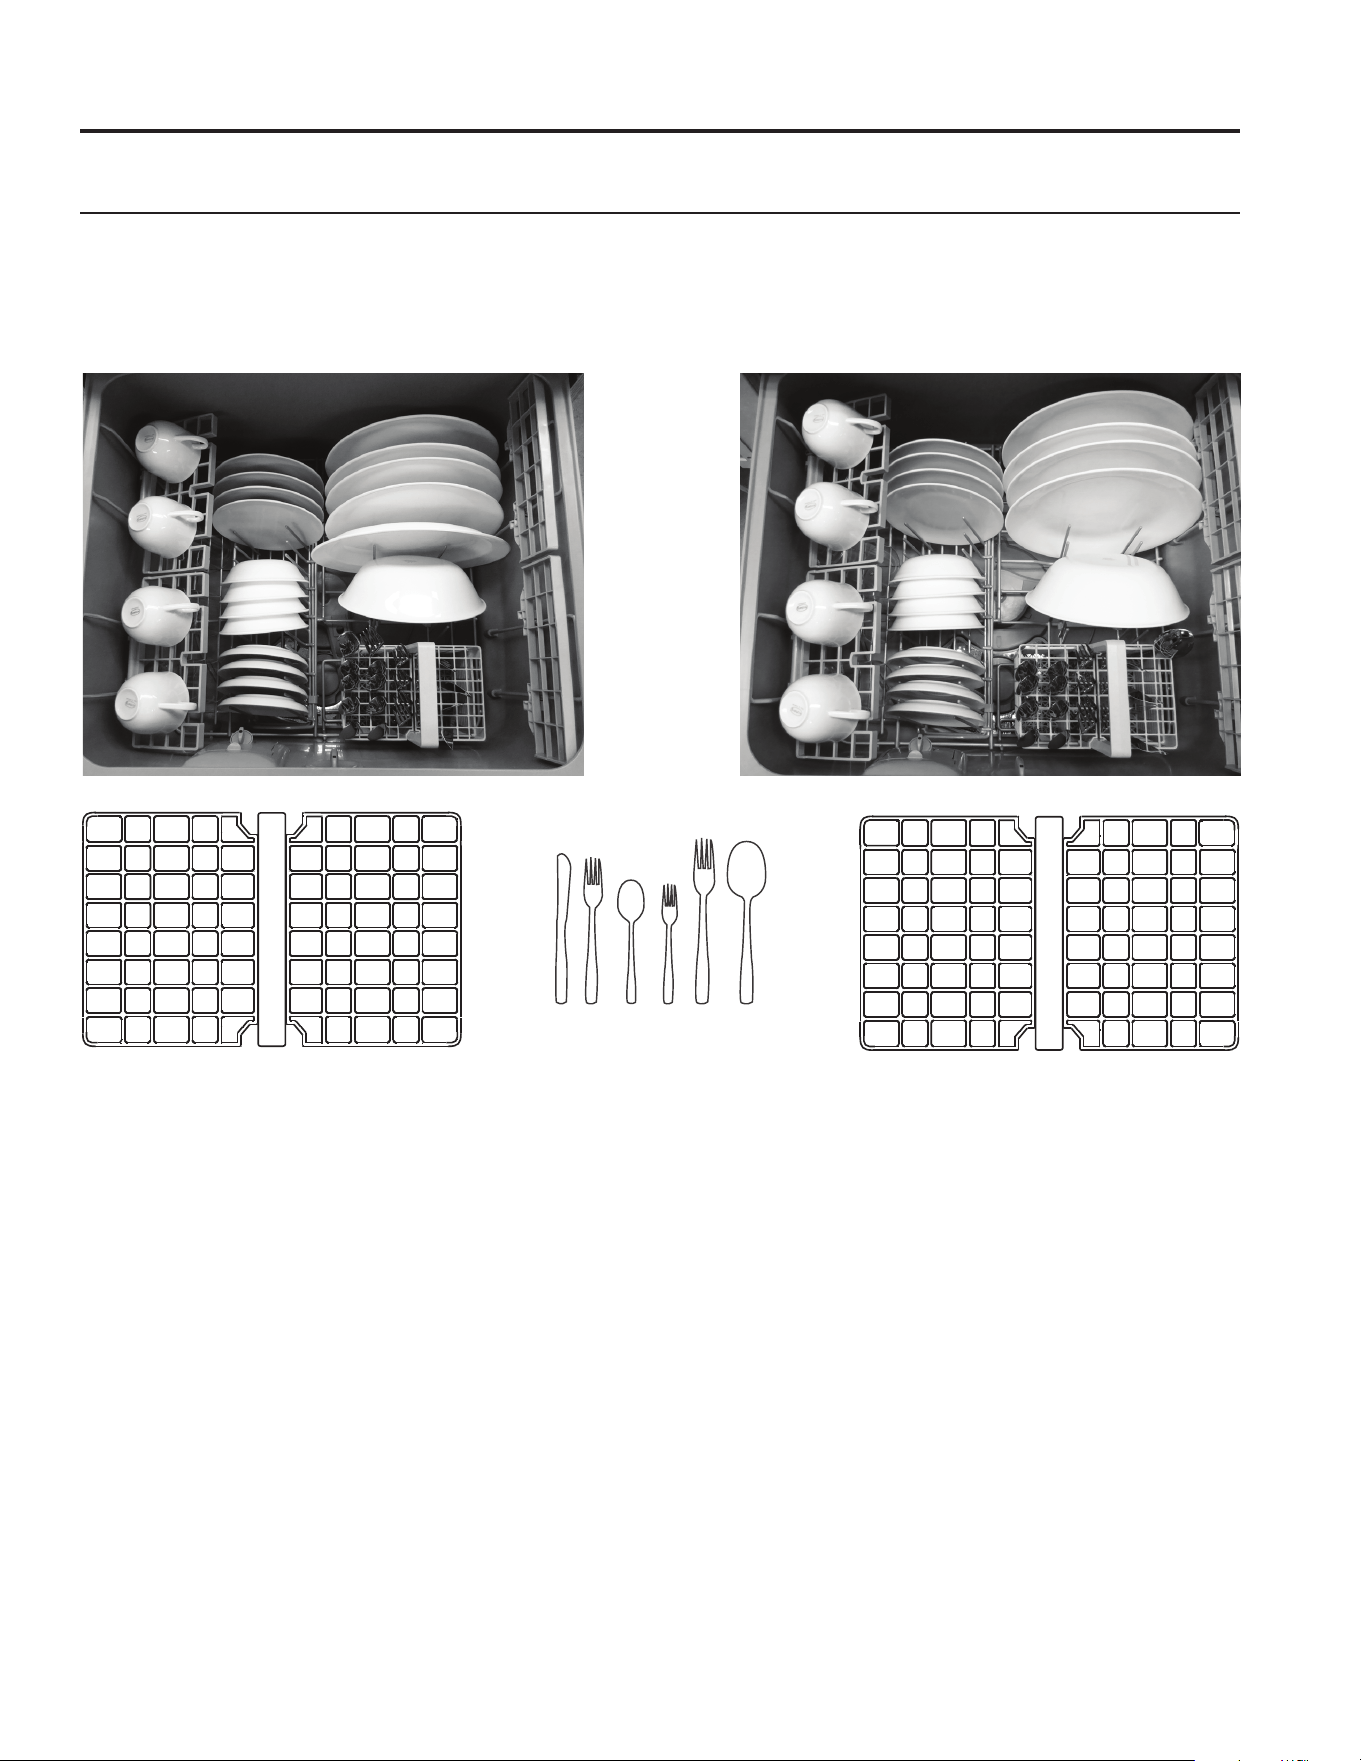
49-4000255 Rev 1 15
USO DEL LAVAVAJILLAS
Carga del Lavavajillas
Para obtener mejores resultados con el lavavajillas, siga estas pautas de carga. Las funciones y apariencia
de los estantes y canastas de cubiertos pueden variar con relación a su modelo.
Cajón Superior y Cesta de Cubiertos
Cajón Inferior y Cesta de Cubiertos
12 3 45 6
65
3
3
3
241
1
1
1
4
4
4
2
2
2
3
3
3
3
3
1
1
1
1
4
4
4
4
2
2
2
2
6
3
3
3
3
3
3
3
3
Carga Recomendada
6HUHDOL]DODSUXHED&)5SDUWHGHFRQVXPRGHFRUULHQWH\DJXDGHOODYDYDMLOODVXVDQGRORVSDUiPHWURVTXH
se detallan a continuación.

16 49-4000255 Rev 1
USO DEL LAVAVAJILLAS
Carga del Lavavajillas
8QD FDUJD RUJDQL]DGD GH IRUPD
prolija con los platos espaciados
de forma pareja ayuda en el
rendimiento del lavado.
Los ítems filosos o puntiagudos
se deberán colocar de forma
horizontal o con los extremos
ILORVRV SXQWLDJXGRV KDFLD DEDMR
a fin de evitar riesgos de lesiones.
La sobrecarga reduce el
rendimiento del lavado.
Los ítems que sobresalgan
impedirán que la tapa
interior del lavavajillas quede
correctamente sellada, lo
cual podrá resultar en una
llamada al servicio técnico.
Asegúrese de que haya suficiente
espacio entre los platos. Mezcle
cucharas, cuchillos y tenedores
dentro de la cesta de cubiertos
para evitar que queden apilados.
Si los platos y los cubiertos
se encuentran apilados,
es menos probable que
queden bien limpios.
Asegúrese de que el agua
llegue hasta todos los
ítems sobre los estantes.
La vajilla impide que el
agua alcance algunos
ítems de los estantes.
Qué Hacer y Qué No en la Carga
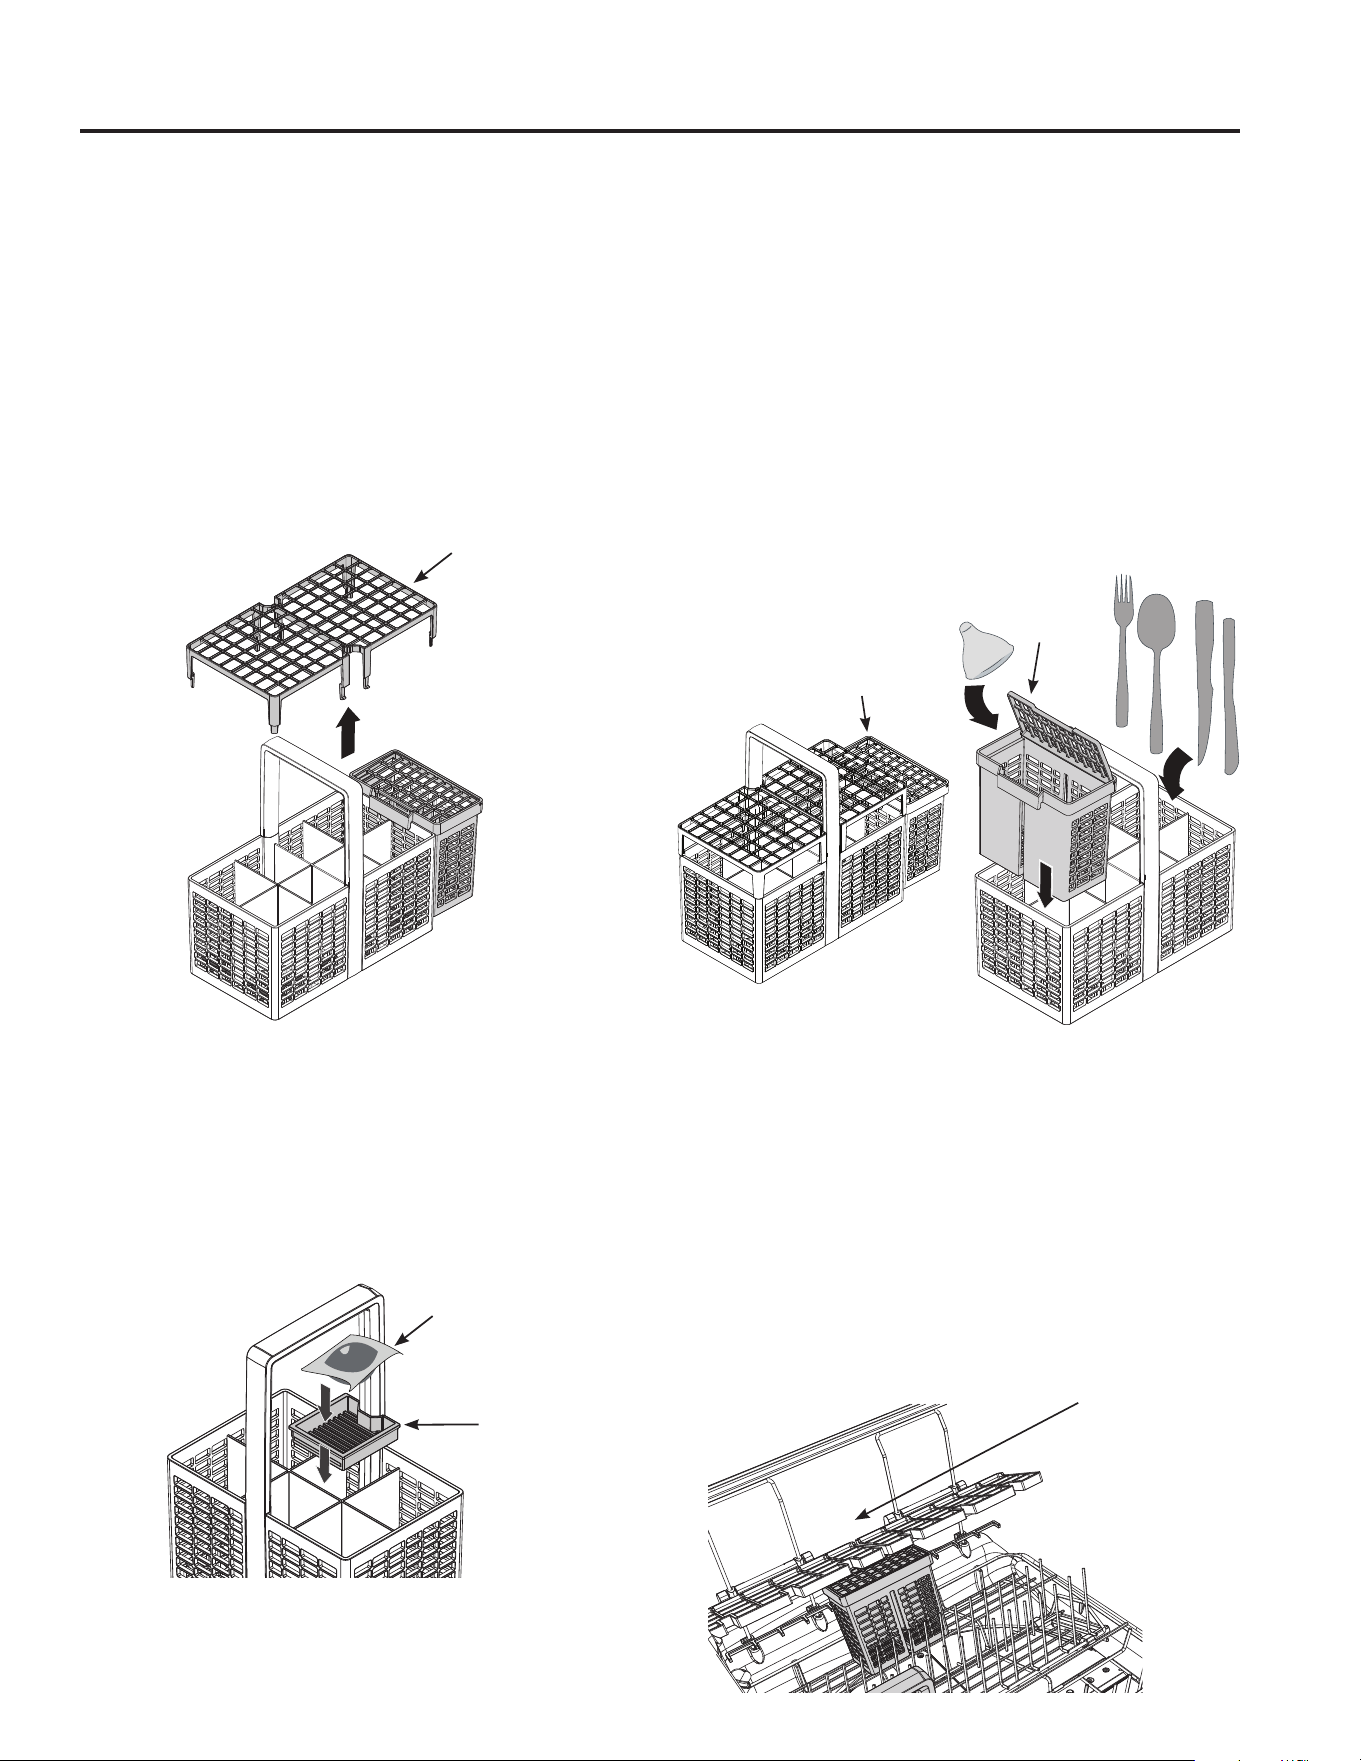
49-4000255 Rev 1
USO DEL LAVAVAJILLAS
Carga del Lavavajillas
Cesta de Cubiertos
Coloque la vajilla plana en la cesta de cubiertos extraíble. Los objetos puntiagudos, tales como tenedores y cuchillos, podrán
ser colocados con los mangos hacia arriba, a fin de proteger sus manos. Para el mejor rendimiento del lavado, coloque
otros utensilios tales como cucharas con los mangos hacia abajo. Evite que los utensilios queden ubicados juntos, lo cual
podrá impedir que se laven de forma adecuada. Al realizar la carga, distribuya los utensilios de forma pareja en la cesta.
La cesta de cubiertos podrá también ser usada para utensilios pequeños, tales como cucharas de medición, tetinas
de biberones, tapas de plástico, o recipientes de maíz.
Rejilla Anti Apilable Extraíble
• La rejilla anti apilable se cuelga sobre la parte superior
de la cesta de cubiertos.
• 8VHODUHMLOODSDUDVHSDUDUFXELHUWRV\HYLWDUTXHHVWRV
queden apilados.
Charola para Tabletas Extraíble
• Si usará packs de gel o tabletas para lavavajillas,
coloque los mismos sobre la charola para tabletas
extraíble, como se muestra. Cuando no se encuentre en
uso, asegúrese de que la charola para tabletas extraíble
quede guardada de forma segura fuera del lavavajillas.
Para un uso correcto de bolsas de gel y tabletas,
consulte la sección de Dispensadores.
Recipiente de Ítems Pequeños Extraíble
• 8VWHGSRGUiH[WHQGHUODFHVWDGHFXELHUWRVFROJDQGRHO
recipiente de ítems pequeños sobre su lateral.
• Los ítems pequeños y livianos tales como tetinas de
biberones quedarán mejor ubicados en el recipiente
de ítems pequeños, a fin de evitar su desplazamiento
durante el lavado.
Colocación del Recipiente de Ítems Pequeños
• A fin de optimizar el espacio de la cubiertos dentro
de la cesta, el recipiente de ítems pequeños se podrá
ubicar en cualquier parte del cajón.
• Si apoyará el recipiente, asegúrese de que el lado de
plástico sólido mire hacia arriba.
• Si coloca un recipiente completamente cargado debajo
de los estantes para copas, es mejor dejar vacío el
espacio del estante que está directamente sobre el
UHFLSLHQWH±HVSRVLEOHTXHQRKD\DVXILFLHnte agua que
alcance los ítems que estén colocados encima.
Rejilla Anti
Apilable y
Extraíble
Charola
para
Tabletas
Tome la Bolsa
O
Tableta
Cuelgue el
recipiente
de ítems
pequeños
Coloque
los ítems
pequeños
Deje vacío el espacio
del estante que
está directamente
sobre el recipiente,
si el recipiente de
ítems pequeños está
ubicado debajo de
los estantes para
copas
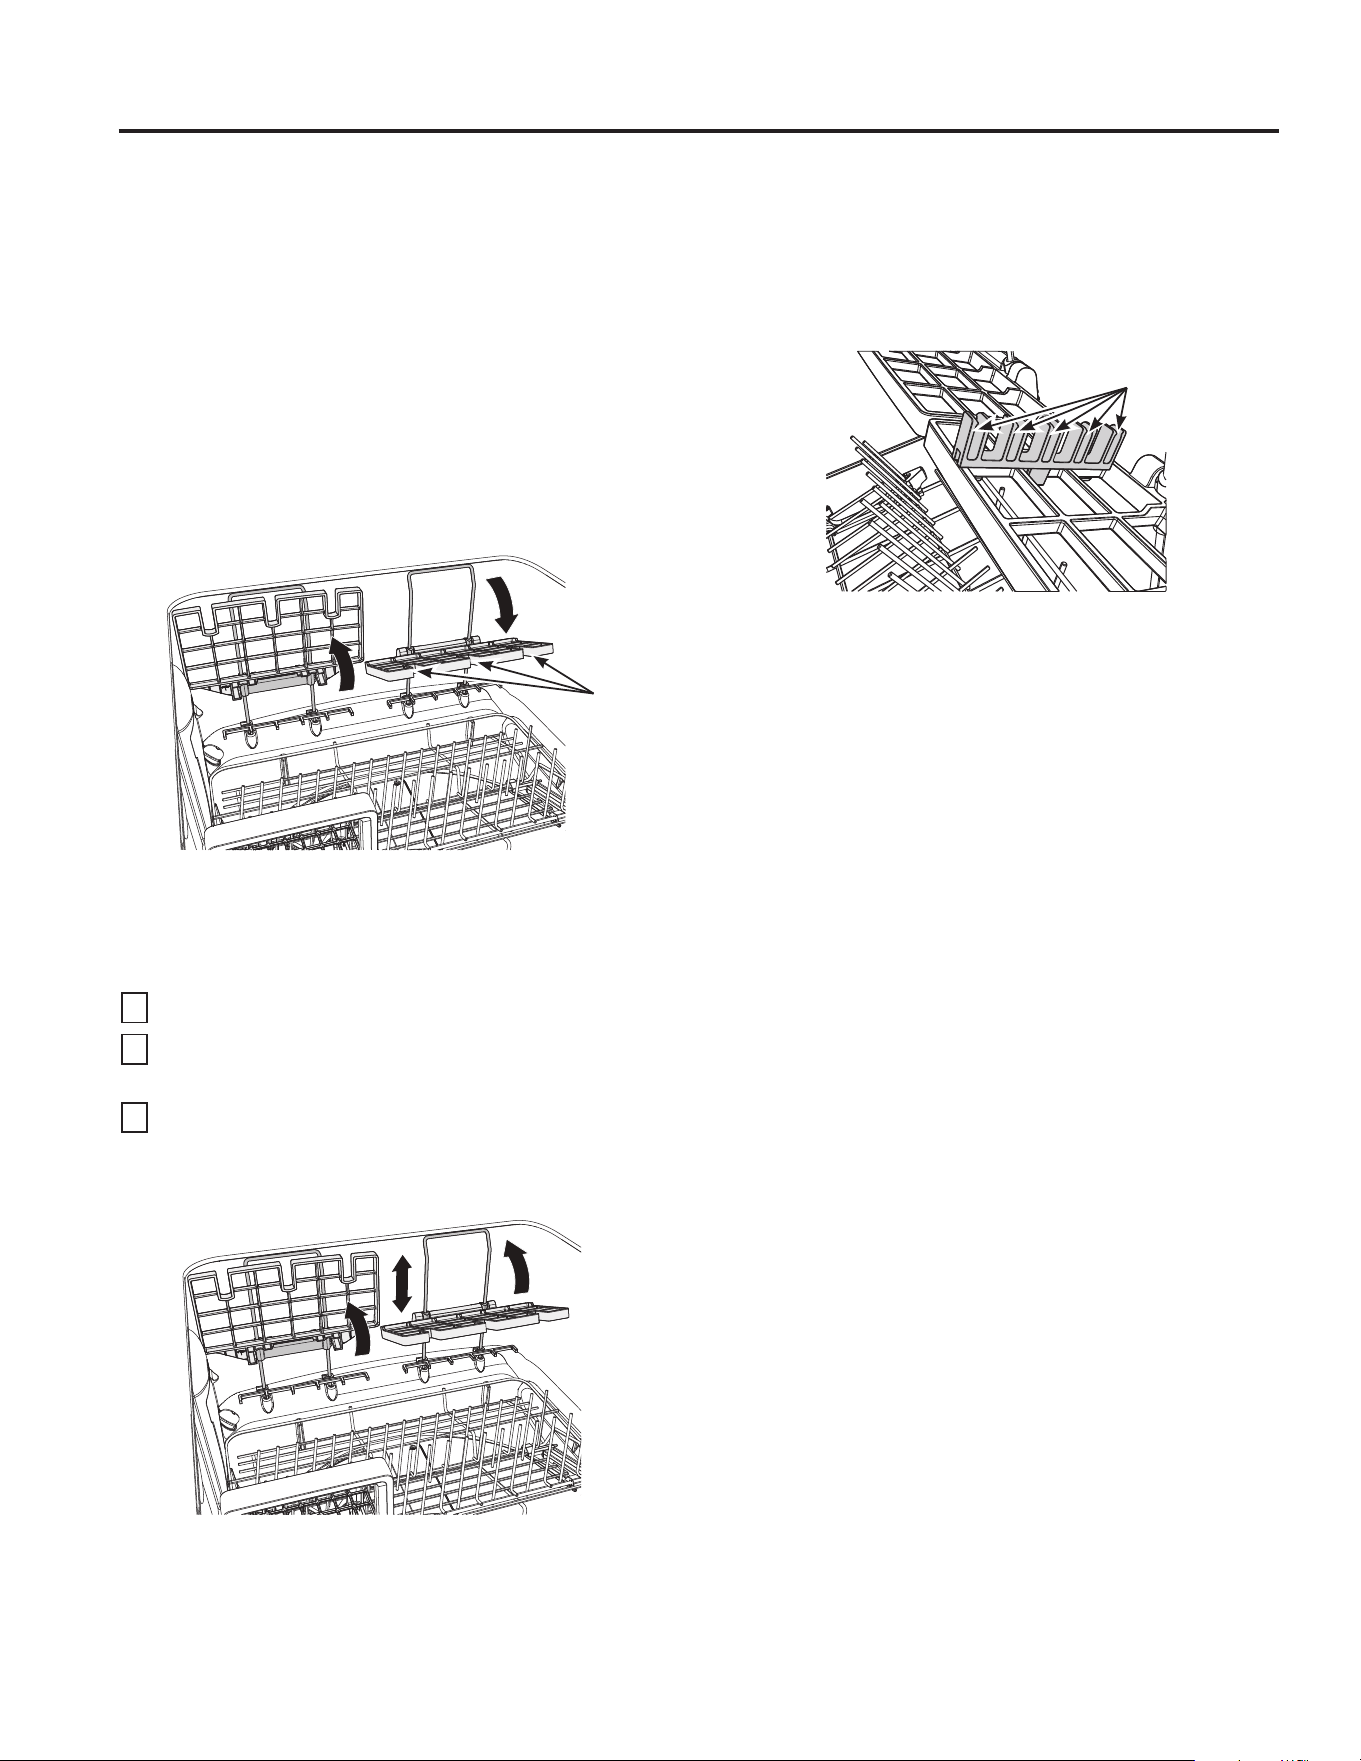
18 49-4000255 Rev 1
USO DEL LAVAVAJILLAS
Carga del Lavavajillas
Estantes – Repisas para Copas
A fin de agregar flexibilidad en la carga, las repisas para
copas se podrán ubicar en la posición superior o inferior.
También se podrán ajustar hacia arriba o abajo.
Plegables
• Se podrán plegar hacia arriba o abajo
independientemente una de la otra.
• Pliegue las mismas hacia abajo para usar las trabas de
las copas, a fin de ayudar a sostener la cristalería con
base larga o filas de tazas.
• Pliegue las mismas para obtener más espacio para
ítems más altos tales como vasos.
Altura Ajustable
• La altura de las repisas se podrá ajustar de forma
LQGHSHQGLHQWHD¿QGHXELFDUFRSDV\WD]DVGH
diferentes alturas.
1
Realice el pliegue para desbloquear la repisa.
2
Ajuste sobre la altura deseada, deslizando hacia
arriba o abajo.
3
Realice el pliegue hacia abajo para bloquear dicha
posición.
Repisas – Sujetadores de Cuchillos
• Los sujetadores de cuchillos se apoyan sobre los
estantes ajustables y sostienen cuchillos y otros
utensilios durante el lavado.
• Siempre asegúrese de que los filos de los cuchillos
miren hacia abajo.
Trabas
para
Copas
Pliegue hacia arriba o abajo
Pliegue hacia
arriba y abajo para
realizar el ajuste
Sujetadores
de Cuchillos
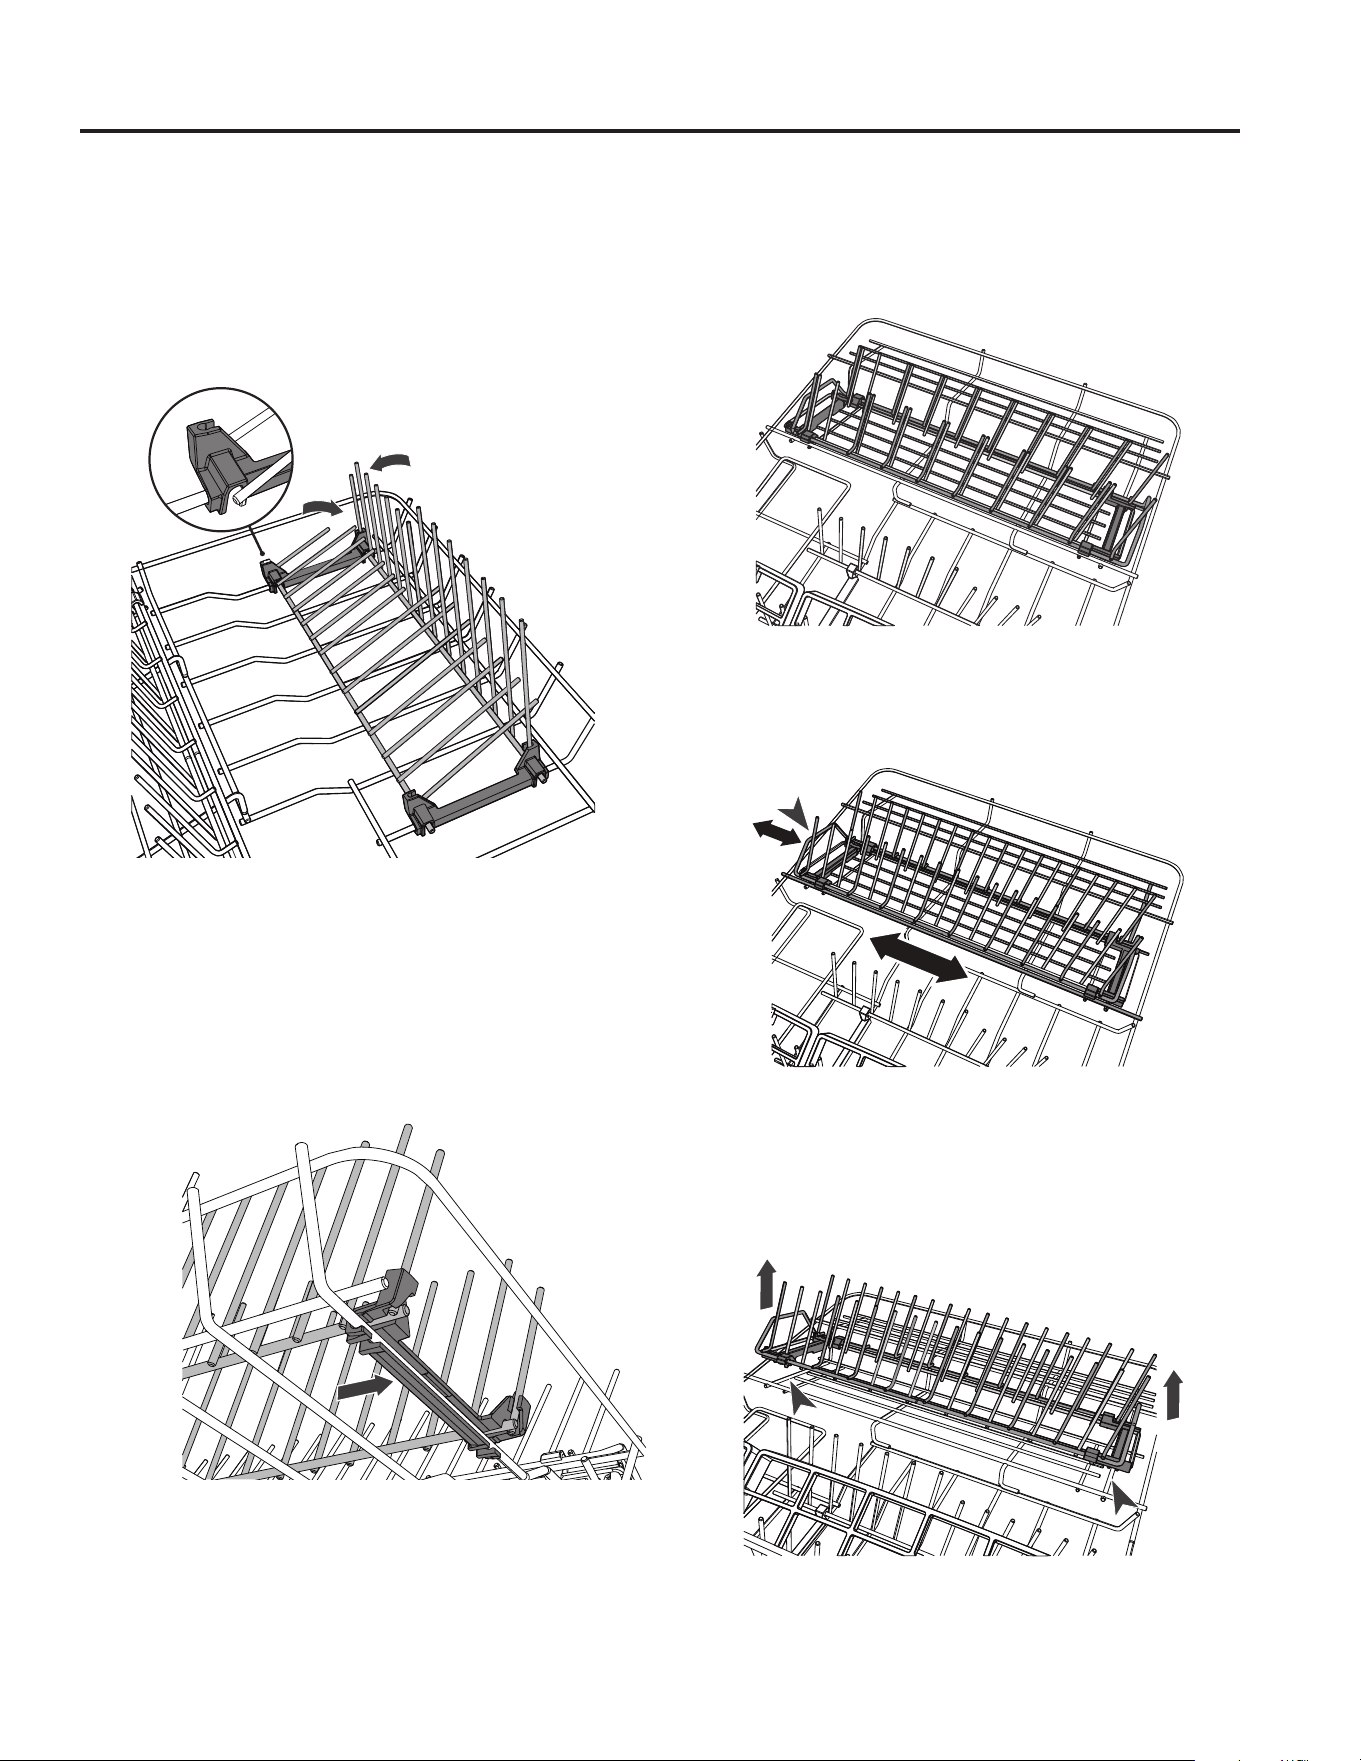
49-4000255 Rev 1 19
USO DEL LAVAVAJILLAS
Carga del Lavavajillas
Repisas – Brazos Plegables
• Para lograr una óptima estabilidad, coloque los platos
más grandes entre los brazos más largos sobre el frente.
• Pliegue los brazos si necesita el espacio para sartenes
y otros ítems más grandes.
•
Libere los brazos plegables unos hacia otros para liberarlos
de los sujetadores sobre la parte trasera de la unidad.
Retiro de los Brazos Plegables
Los brazos plegables se podrán retirar, si así se desea.
Sin embargo, se recomienda plegar los brazos hacia
DEDMRHQOXJDUGHUHWLUDUORVVLVHQHFHVLWDPiVHVSDFLR
HQHOODYDYDMLOODV
Para retirar:
Desajuste la repisa de brazos plegables en cada
extremo, empujando de manera firme hacia usted.
Para volver a colocar:
Alinee los sujetadores con el estante de la base y
empuje de manera firme hasta que haga clic en su
posición.
Estante con Brazo Extraíble y Ajustable al Espacio
'LVHxDGRSDUDXELFDUUHFLSLHQWHVJUDQGHVJUDQ
HVSDFLDGRRSODWRVSHTXHxRVHVSDFLDGRSHTXHxR
dependiendo del ajuste.
Ajuste el Espaciado de los Brazos
• Para realizar un ajuste entre espacios amplios y pequeños,
deslice los brazos hacia atrás o adelante presionando hacia
adelante o tras la manija que se encuentra en el frente.
Retire el Estante para Hacer Espacio para Ítems Más
Grandes
Para retirar la repisa:
Tome las manijas en el frente y la parte trasera de la
repisa y empuje para su descalce.
Para volver a colocar la repisa:
Alinee los sujetadores frontal y trasero con la base de la
cesta y haga clic sobre su posición.
Libere los brazos plegables
unos hacia otros para
liberarlos de los sujetadores
Presione
cada
extremo
para su
retiro
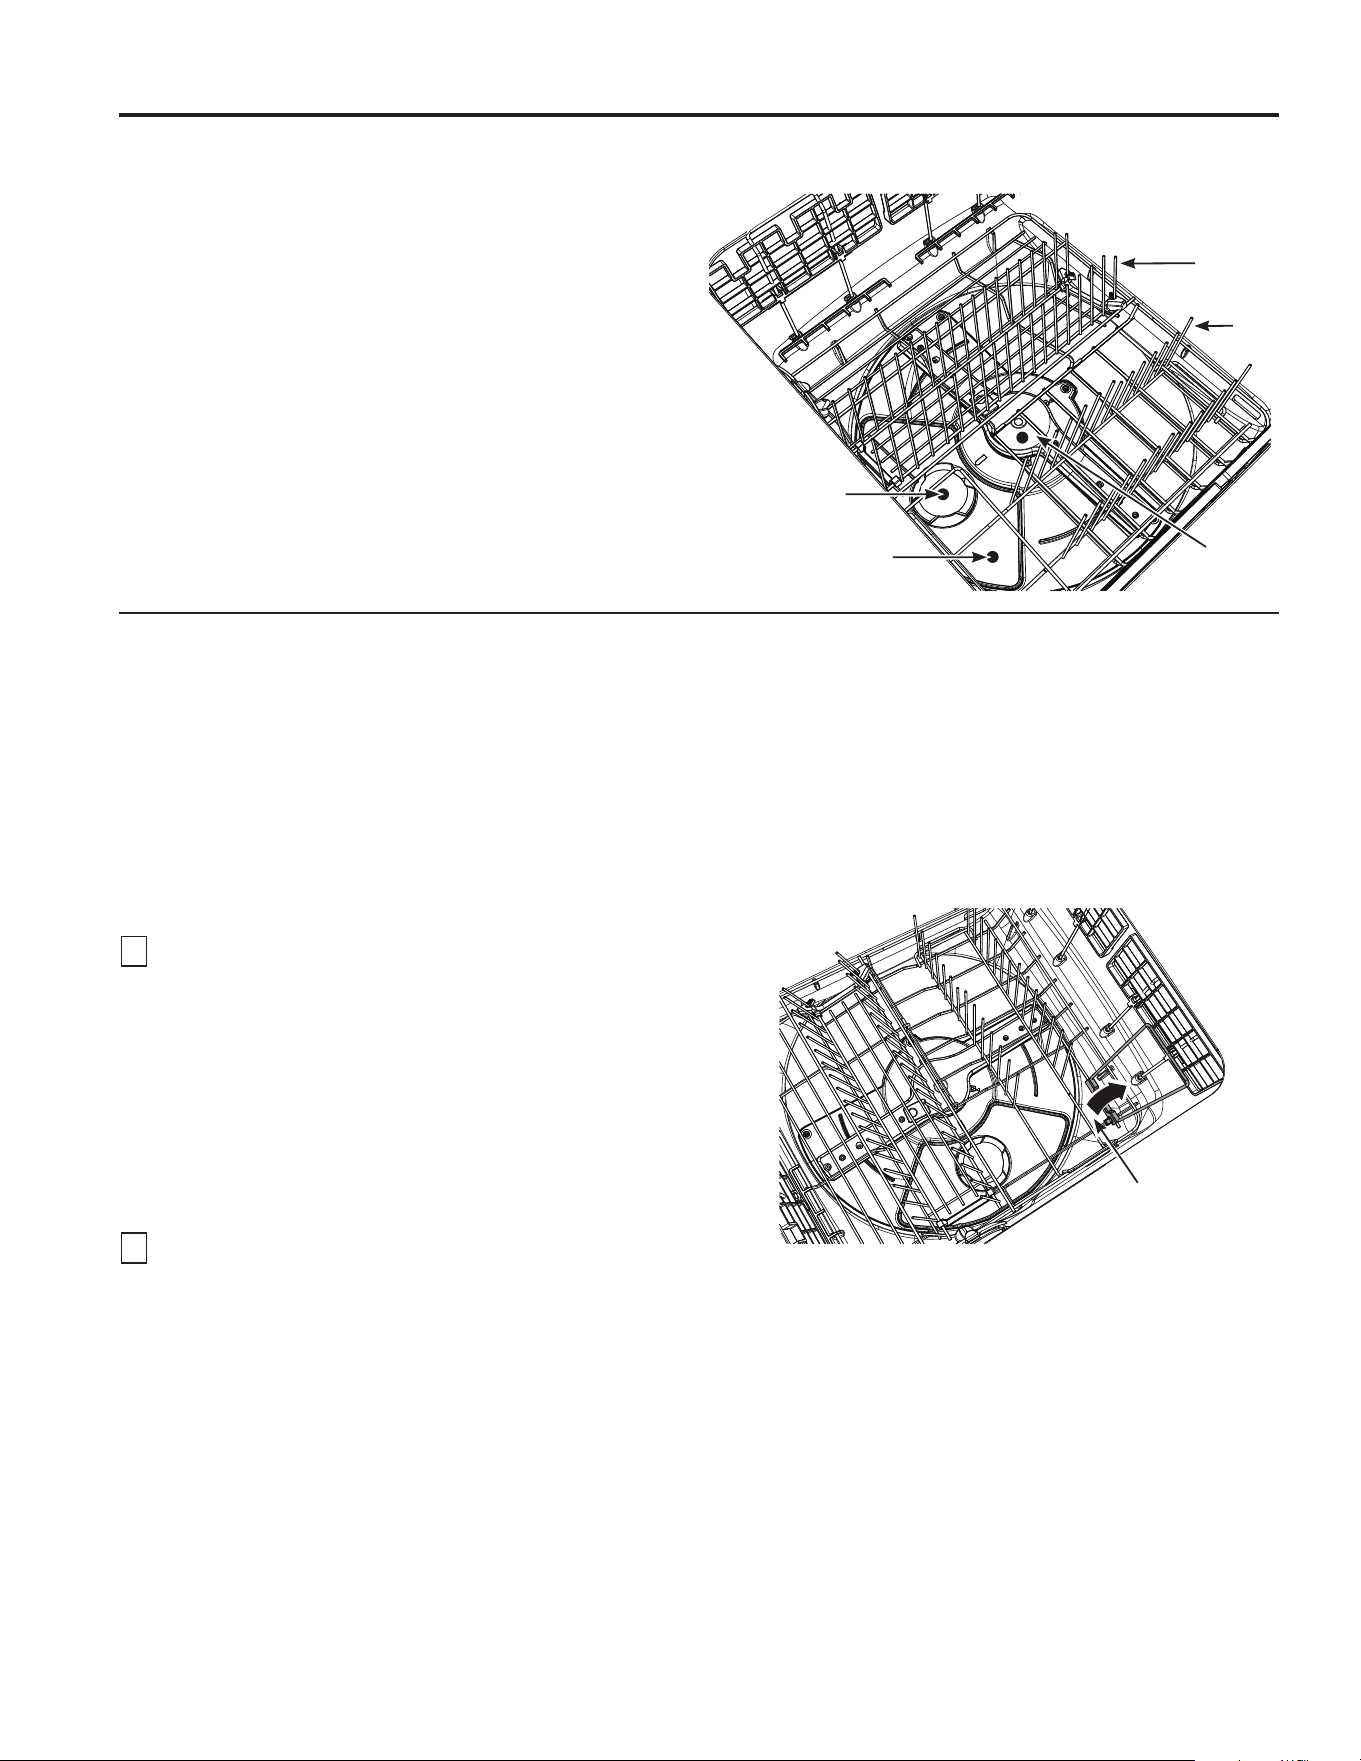
20 49-4000255 Rev 1
CUIDADO Y LIMPIEZA
Cuidado y Limpieza
Filtro de Drenaje, Placa del Filtro y Brazo
Rociador
Le recomendamos retirar y limpiar el filtro del drenaje y la
placa del filtro de cada cajón, aproximadamente una vez
por mes bajo uso normal o si se observan partículas de
comida.
Bajo uso normal, el brazo rociador debería requerir una
limpieza menos frecuente.
Estante de
la Base
Brazos
)LOWURGH
Drenaje
Placa del
)LOWUR
Brazo
Rociador
Levante la traba
de la puerta
Limpieza del Filtro de Drenaje y de la Placa del Filtro
¡IMPORTANTE!
• Si se usa un limpiador/ decapador para lavavajillas, se deberá usar un programa de lavado con detergente
inmediatamente de forma posterior, a fin de evitar cualquier daño sobre el lavavajillas.
• El lavavajillas se deberá usar con la placa del filtro, el filtro de drenaje y el brazo rociador en sus posiciones
correspondientes.
• Le recomendamos que siempre use el lavavajillas con el estante con brazo plegable del lado derecho en su
posición correspondiente.
Retire el estante de la base primero:
1
Desenchufe el lavavajillas o apague el mismo desde
el suministro de corriente.
NOTE: Para un acceso más fácil al filtro de drenaje y a la
placa del filtro, es posible que encuentre más fácil retirar
WRGRHOHVWDQWHGHODEDVHLQFOX\HQGRORVHVWDQWHVFRQ
EUD]RSULPHUR
Para retirar todo el estante de la base: Levante el
estante desde la parte trasera primero, para evitar que
se golpee contra el dispensador de detergente y el
abrillantador de enjuague, y levante hacia afuera.
2
Si el estante de la base se deja colocado, para
DFFHGHUDO¿OWURGHGUHQDMH:
• Retire la cesta de cubiertos.
• Levante la traba de la puerta.
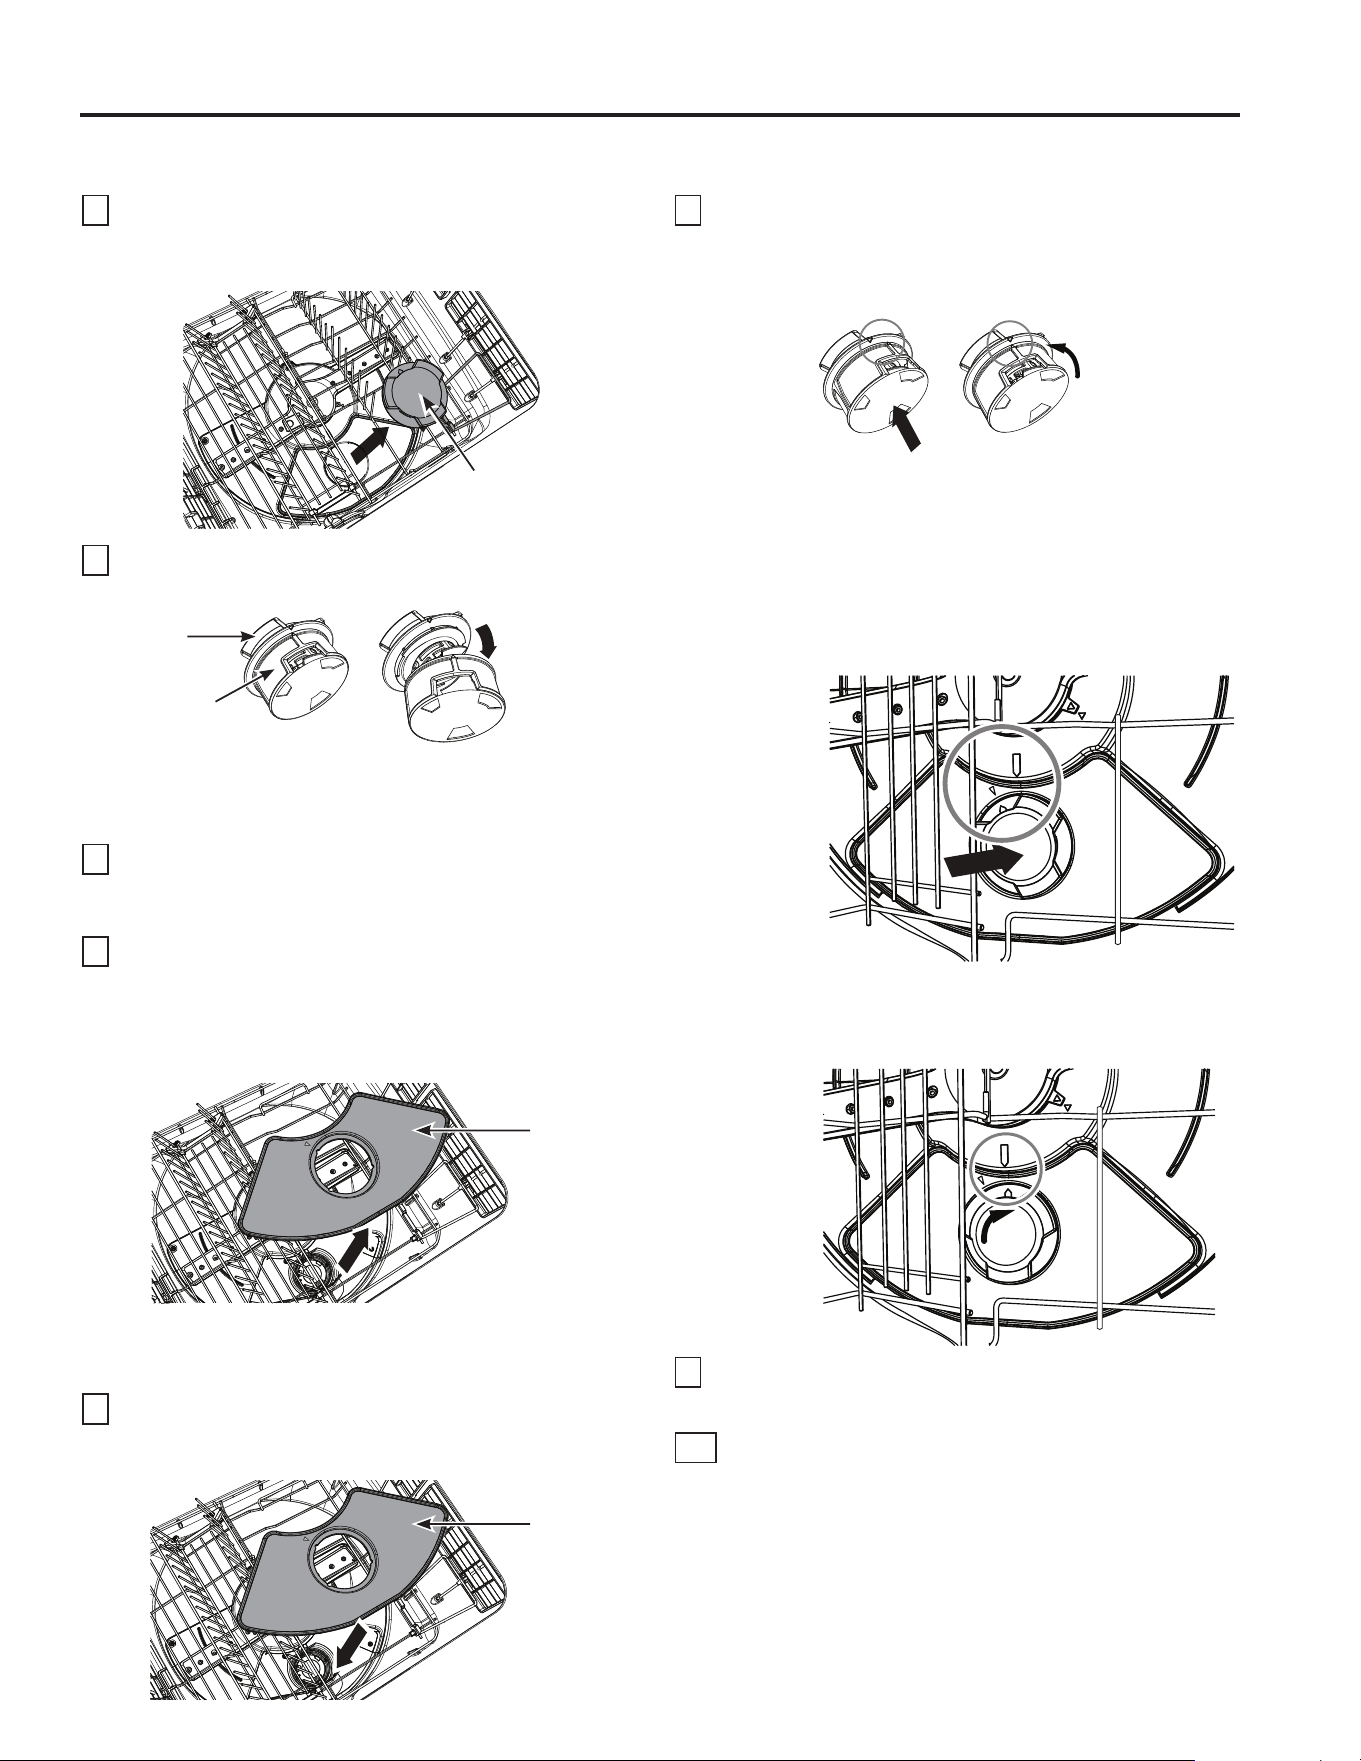
49-4000255 Rev 1 21
CUIDADO Y LIMPIEZA
Cuidado y Limpieza
Retiro del Filtro de Drenaje y de la Placa del Filtro
3
'REOHHO¿OWURGHGUHQDMHFLUFXODUHQVHQWLGRDQWLKRUDULR
y levante el mismo para su retiro. Es normal encontrar
cierta cantidad de agua debajo del mismo.
4
Retire la malla del filtro de drenaje pellizcando un lado
únicamente y empujando hacia afuera, como se muestra.
NOTA: No intente retirar la malla del filtro de drenaje
pellizcando los dos lados opuestos al mismo tiempo, ya
que esto podrá dañar la malla del filtro de drenaje.
5
Lave ambas partes del filtro de drenaje con agua
caliente y jabón y enjuague completamente con
agua corriente.
6
Con cuidado, levante la placa del filtro hacia afuera.
Retire cualquier material extraño sobre cada lado,
lave con agua caliente y jabón y enjuague
completamente con agua limpia, y luego limpie la
placa con una tela húmeda.
Colocación del Filtro de Drenaje y de la
Placa del Filtro
Con cuidado vuelva a colocar la placa del filtro.
Asegúrese de presionar la misma completamente
hasta su posición.
8
Vuelva a ajustar el filtro de drenaje circular:
D9XHOYDDSUHVLRQDUODPDOODGHOILOWURGHGUHQDMH
sobre el suspensor. Deberá hacer clic sobre su
posición.
E*LUHODPDOODGHOILOWURGHGUHQDMHKDVWDTXHOD
flecha sobre el filtro de la malla se alinee hacia
arriba con la flecha sobre el suspensor.
F9XHOYDDDMXVWDUHOILOWURGHGUHQDMHVREUHHO
agujero de drenaje, alineando la flecha que
aparece en la parte superior del filtro de drenaje
con la flecha de la placa del filtro.
G*LUHHOILOWURGHGUHQDMHHQVHQWLGRKRUDULRKDVWD
que la flecha del filtro de drenaje se alinee con la
flecha sobre la base del cajón.
9
9XHOYDDFRORFDUHOHVWDQWHFRPSOHWRGHODEDVHVL
VHUHWLUy
10
Pliegue la puerta con traba de modo que descanse
sobre el estante de la base y vuelva a colocar la
cesta de cubiertos.
Drain
)LOWHU
Suspensor
0DOODGHO)LOWUR
de Drenaje
Pellizque
sobre un lado
y empuje la
malla hacia
afuera
Con
cuidado
vuelva a
colocar
la placa
del filtro
Luego de
la limpieza,
vuelva a
colocar la
malla a
presión
*LUHODPDOOD
en sentido
antihorario hasta
que las flechas
se alineen hacia
arriba, como se
muestra.
Alinee las
flechas de
la placa
del filtro
e inserte
el filtro de
drenaje
*LUHHOILOWUR
de drenaje
en sentido
horario
hasta que
las flechas
queden
alineadas
como se
muestra
Con
cuidado,
levante
la placa
del filtro
hacia
afuera

22 49-4000255 Rev 1
Cuidado y Limpieza
CUIDADO Y LIMPIEZA
Brazo
Rocia-
dor
Impulsor
Cleaning the Spray Arm
1
Desenchufe el lavavajillas o apague el mismo desde
el suministro de corriente.
2
'HVFXHOJXHORVVRSRUWHVSDUDYDVRVVLHVWiQ
DMXVWDGRVGHORVDODPEUHVGHODVUHSLVDV\SOLHJXH
todas las repisas plegables de uso seguro, de modo
que queden verticales y cerca de la parte superior.
3
Retire la repisa de la base con cuidado. Levante la
parte trasera primero, a fin de evitar golpear el
dispensador de detergente y del abrillantador de
enjuague.
4
Levante el brazo rociador y sacuda cualquier material
extraño fuera de éste.
Enjuague el mismo con agua corriente y límpielo con
una tela húmeda.
5
Vuelva a colocar el brazo rociador en el impulsor.
Controle que el brazo rociador quede ajustado de
manera firme y que gire libremente.
6
Vuelva a colocar el estante de la base, bajando el
extremo frontal hasta su posición primero.
Vuelva a enchufar el lavavajillas o encienda el mismo
desde el suministro de corriente.
NOTA: Si hay cerámica o vidrio rotos en el cajón, se
deberá retirar con cuidado a fin de evitar daños sobre el
lavavajillas.
Al reajustar el
estante de la
base, asegúrese
de que sus
extremos se
apoyen sobre
todos los
descansos que
se encuentran
dentro del cajón
49-4000255 Rev 1 23
Cuidado y Limpieza
CUIDADO Y LIMPIEZA
Paneles Exteriores del Cajón
NO use limpiares para Acero Inoxidable en las superficies de los cajones. Limpie con un paño suave, limpio y
levemente húmedo, y luego seque completamente. El Acero Inoxidable cuenta con una cobertura que lo hace
resistente a las huellas dactilares.
¡IMPORTANTE!
No recomendamos el uso de los siguientes limpiadores en su lavavajillas, ya que estos podrán dañar las
superficies:
• Estropajos de plástico o acero inoxidable
• Limpiadores hogareños abrasivos, solventes
• Limpiadores ácidos o alcalinos
• Líquidos o jabón para el lavado de manos
• Limpiadores o pulidores de acero inoxidable
• Detergentes o desinfectantes de lavandería
Interior
Para limpiar y desodorizar su lavavajillas, utilice ácido
cítrico, o Cascade
®
Platinum™ Dishwasher Cleaner
o Finish
®
Dishwasher Cleaner, un detergente aditivo.
Ellas destruirá los depósitos minerales, y eliminará la
película y manchas de agua dura.
Puede ordenar el ácido cítrico WD35X151 visitando
cafeappliances.com/parts.
Puede comprar limpiadores de lavavajillas en su
supermercado local.
Cajones de Acero Inoxidable
El acero inoxidable usado para fabricar los cajones
brinda la mayor confiabilidad disponible en en un
lavavajillas Café.
Si los cajones sufrieran rayones o abolladuras durante
el uso normal, estos no se oxidarán ni corroerán. Estas
imperfecciones sobre la superficie no afectarán su
funcionamiento o durabilidad.
Protección Contra Congelamientos
Si su lavavajillas se deja en un lugar sin calefacción durante
el invierno, solicité a un técnico del servicio que:
1
Corte la corriente eléctrica al lavavajillas. Retire fusibles
quemados o disyuntores desactivados.
2
Corte el suministro de agua y desconecte la línea de
entrada de agua desde la válvula de agua.
3
Drene el agua desde la línea de entrada de agua y la
YiOYXODGHDJXD8VHXQDROODSDUDDWUDSDUHODJXD
4
Vuelva a conectar la línea de entrada de agua a la
válvula de agua.
¿Posee su Lavavajillas un Espacio de Aire?
8QHVSDFLRGHDLUHSURWHJHVX
lavavajillas contra la acumulación de
agua en éste si un drenaje se atasca.
El espacio de aire no es una parte
del lavavajillas. No está cubierto por
su garantía. No todos los códigos de
SORPHUtDUHTXLHUHQHVSDFLRVGHDLUH
por lo tanto, es posible que usted no
tenga uno.
El espacio de aire es fácil de limpiar.
1
Apague el lavavajillas y levante la tapa del espacio de
aire.
2
Retire el tapón de plástico debajo de la tapa y limpie con
un palillo.
3
Reemplace el tapón y la tapa cuando el espacio de aire
esté limpio.
Controle el espacio
de aire en cualquier
momento en que su
lavavajillas no esté
drenando de forma
correcta.
Espacio
de aire
24 49-4000255 Rev 1
CONSEJOS PARA LA SOLUCIÓN DE PROBLEMAS
Antes de Solicitar el Servicio Técnico...
Antes de solicitar el servicio técnico
Problema Causas Posibles Qué Hacer
Los platos y los
cubiertos no están
limpios
Los filtros están atascados Limpiar filtros. Lea la sección de Cuidado y limpieza.
Programa de lavado inadecuado
para la carga
Para acceder a un programa de lavado adecuado, consulte la
sección de Puesta en marcha. El horneado produjo un nivel
suciedad muy alto y es posible que los platos necesiten remojo.
El brazo rociador no gira Asegúrese de que no haya ítems que obstruyan el camino del
brazo rociador.
Asegúrese de que el brazo rociador se encuentre montado de
forma correcta y libre para girar
Cajón sobrecargado/ cargado
de forma incorrecta
Consulte la sección Carga
El plato de filtrado/ filtro de
drenaje se insertó de forma
incorrecta
Lea la sección de Cuidado y limpieza.
Se colocó el detergente en el
compartimiento equivocado del
dispensador
El detergente se deberá colocar en el compartimiento grande.
Consulte sobre el Dispensado de Detergente en la sección
de Dispensado.
Exceso de comida no retirado
de la vajilla antes de la carga
Raspe todos los restos de comida de la vajilla antes de la carga.
Los agujeros del brazo rociador
están bloqueados
Limpie el brazo rociador. Lea la sección de Cuidado y limpieza.
Temperatura baja del agua
entrante
Asegúrese de que la temperatura del agua entrante sea la
FRUUHFWDFRQVXOWHODVHFFLyQUso del lavavajillas(QFLHQGD
el grifo de agua caliente más cercano al lavavajillas, deje correr
hasta que la temperatura del agua deje de subir. Luego inicie el
lavavajillas y apague el grifo. Esto asegura que el agua entrante
está caliente. Seleccione Hi-Temp Wash$XPHQWRGHOD
7HPSHUDWXUDGH/DYDGRVLHVWiGLVSRQLEOH
La presión del agua está
temporariamente baja
Abra el grifo. ¿Sale el agua de forma más lenta que lo normal? Si es así,
espere hasta que la presión sea normal antes de usar el lavavajillas. La
presión normal de agua hasta el lavavajillas debe ser de entre 20 y 120 psi.
El espacio de aire o la salida de
residuos están atascados
Limpie el espacio de aire o despeje la salida de residuos.
El bucle de drenaje alto o el
espacio de aire no fueron
instalados
Consulte las Instrucciones de Instalación para instalar una línea
de drenaje adecuada.
Carga inadecuada del estante Asegúrese de que los utensilios grandes no bloqueen el
dispensador de detergente o los brazos de lavado. Lea la
sección de Carga del lavavajillas.
Detergente de bajo rendimiento 8WLOLFHGHWHUJHQWHVGHDOWDFDOLGDGFRPRCascade
®
Platinum™
ActionPacs™ o Finish
®
Quantum
®
Automatic Dishwashing
Detergent.
Cantidad de detergente
LQVX¿FLHQWH
Agregue detergente. Consulte sobre el Dispensado de
Detergente en la sección de Dispensadores.
Enturbiamiento de la
cristalería
Combinación de agua suave y
demasiado detergente
Esto se llama aguafuerte y es permanente. Para evitar que esto
suceda, use menos detergente si cuenta con agua suave. Lave la
cristalería en el ciclo más corto en que pueda quedar limpia.
Detergente libre de fosfato con
bajo rendimiento
Lea sobre Una película blanca sobre la cristalería, utensilios
y su parte interna en esta sección de Solución de Problemas.
La temperatura del agua que
ingresa al lavavajillas supera los
150°F (66°C)
Esto podría ser aguafuerte. Baje la temperatura del agua
caliente.
Una película blanca en
la cristalería, utensilios
y el interior
Es posible que este problema
sea ocasionado por un libre de
fosfato de baja calidad
A fin de eliminar la película blanca, lave los platos a través del
FLFORGHOODYDYDMLOODVFRQiFLGRFtWULFR8VHHONLWGHiFLGRFtWULFR
WD35X151, el cual puede encontrar a través de Internet. De
lo contrario, use agentes de enjuague de alta calidad como el
limpiador para lavavajillas Cascade
®
Platinum™ Dishwasher
Cleaner o Finish
®
Dishwasher Cleaner, el cual puede adquirir
en una tienda de compras local.
Vierta el ácido cítrico en la taza de detergente y cierre la tapa.
Coloque la cristalería y utensilios con la película o de otro modo
limpia en el lavavajillas. Deje los utensilios de plata y otros
artículos metálicos fuera del lavavajillas. Encienda el lavavajillas
y haga que funcione un ciclo completo sin detergente. La
cristalería, los utensilios y el lavavajillas deberían finalizar sin la
película sobre éstos.
49-4000255 Rev 1 25
Antes de Solicitar el Servicio Técnico...
Antes de solicitar el servicio técnico
CONSEJOS PARA LA SOLUCIÓN DE PROBLEMAS
Problema Causas Posibles Qué Hacer
Manchas y películas en
vasos y utensilios
Agua extremadamente dura 8VHDJHQWHVGHHQMXDJXHGHDOWDFDOLGDGFRPRCascade
®
Platinum™ Power Dry™ Rinse Aid o
Finish
®
Jet-Dry
®
Rinse
Aid
para evitar manchas y evitar una nueva acumulación de
películas.
Si sólo cuando el agua sea extremadamente dura, un
ablandador puede ser necesario.
Temperatura baja del agua
entrante
Asegúrese de que la temperatura del agua sea de por lo menos
)&
Sobrecarga o carga inadecuada
del lavavajillas
Cargue el lavavajillas como se muestra en la sección Carga del
lavavajillas.
Detergente en polvo viejo o
húmedo
$VHJ~UHVHGHTXHHOGHWHUJHQWHHVWpIUHVFR8WLOLFHGHWHUJHQWHV
de alta calidad como Cascade
®
Platinum™ ActionPacs™ o
Finish
®
Quantum
®
Automatic Dishwashing Detergent.
El dispensador del agente de
enjuague está vacío
Rellene con agentes de enjuague de alta calidad como el
abrillantador Cascade
®
Platinum™ Power Dry™ Rinse Aid o
Finish
®
Jet-Dry
®
Rinse Aid.
Configuración del abrillantador
de enjuague demasiado baja o
apagada
,QFUHPHQWHDFWLYHODFRQILJXUDFLyQGHODEULOODQWDGRUGHHQMXDJXH
Consulte sobre el Uso del Agente de Enjuague en la sección
de Dispensadores.
Demasiado poco o bajo
rendimiento del detergente
Asegúrese de usar la cantidad correcta de detergente con alta
calificación.
Marcas negras o grises
en los platos
Utensilios de aluminio fueron
frotados contra los platos
Retire las marcas con un limpiador suave y abrasivo.
Los platos no se secan Es necesario tiempo de secado
adicional
'HMHODSXHUWDFHUUDGDFXDQGRVHHQFLHQGDODOX]GH&OHDQ/LPSLR
para permitir que el ventilador funcione durante 90 minutos adicionales.
Seleccione Dry6HFDGRFRQ&DORU6HFR±RSFLyQUltra
para
agregar tiempo de secado adicional.
NOTA: Si abre la puerta, esta extensión del ventilador será cancelada.
Temperatura baja del agua
entrante
Asegúrese de que la temperatura del agua entrante sea de por
ORPHQRV)
Seleccione Dry6HFDGRHQ&DOLHQWH
8VHODRSFLyQHi-Temp Wash$XPHQWRGHOD7HPSHUDWXUDGH
/DYDGR
Seleccione un ciclo más alto, tal como Presoak+Sani
7HPSHUDWXUDGH/DYDGRSDUD'HVLQIHFWDU, o Pots2OODV
El dispensador del agente de
enjuague está vacío
Controle el dispensador del agente de enjuague y llene como se
requiere.
Los platos no se secan Programa de lavado normal
usado
Elija el programa de lavado Plus0iVRPots6DUWHQHV
Sobrecarga o carga inadecuada
del lavavajillas
Cargue el lavavajillas como se muestra en la sección de Carga.
Es necesario tiempo de secado
adicional
'HMHODSXHUWDFHUUDGDFXDQGRVHHQFLHQGDODOX]GH&OHDQ/LPSLR
para permitir que el ventilador funcione durante 90 minutos adicionales.
Seleccione Dry6HFDGRFRQ&DORU6HFR±RSFLyQUltra
para
agregar tiempo de secado adicional.
NOTA: Si abre la puerta, esta extensión del ventilador será cancelada.
Temperatura baja del agua
entrante
Asegúrese de que la temperatura del agua entrante sea de por
ORPHQRV)
Seleccione Dry6HFDGRHQ&DOLHQWH
8VHODRSFLyQHi-Temp Wash$XPHQWRGHOD7HPSHUDWXUDGH
/DYDGR
Seleccione un ciclo más alto, tal como Presoak+Sani
7HPSHUDWXUDGH/DYDGRSDUD'HVLQIHFWDU, o Pots2OODV
El dispensador del agente de
enjuague está vacío
Controle el dispensador del agente de enjuague y llene como se
requiere.
Configuración del abrillantador
de enjuague demasiado baja o
apagada
,QFUHPHQWHDFWLYHODFRQILJXUDFLyQGHODEULOODQWDGRUGHHQMXDJXH
Consulte sobre el Uso del Agente de Enjuague en la sección
de Dispensadores.
Se dejaron los platos en el
cajón durante varias horas
luego del lavado
Le recomendamos descargar los platos dentro de unas pocas
horas una vez finalizado el programa de lavado, ya que la
pequeña cantidad de vapor restante luego del lavado podrá, con
el paso del tiempo, reasentarse como condensación. El uso de
abrillantador de enjuague o el incremento de su configuración
también ayudarán en el secado

26 49-4000255 Rev 1
CONSEJOS PARA LA SOLUCIÓN DE PROBLEMAS
Antes de Solicitar el Servicio Técnico...
Antes de solicitar el servicio técnico
Problema Causas Posibles Qué Hacer
Pitido intermitente El lavavajillas se encuentra en
modo de pausa
Presione en el panel de control y luego cierre el cajón para
reiniciar el programa.
La luz de desinfección
parpadea cuando se
DEUHHOFDMyQDO¿QDOGHO
ciclo
Se abrió un cajón y el ciclo
fue interrumpido durante el
HQMXDJXH¿QDO
No interrumpa el ciclo abriendo un cajón durante el ciclo de
lavado.
La temperatura del agua
entrante era demasiado baja
(OHYHODWHPSHUDWXUDGHOFDOHQWDGRUGHDJXDHQWUH)\
)
Se dejó detergente
en las tazas del
dispensador
Los platos o utensilios
están bloqueando la taza de
detergente
Reposicione los platos, de modo que el agua del brazo rociador
inferior pueda despejar el detergente de la taza. Lea la sección
Carga del lavavajillas.
Reposiciones los utensilios o la vajilla pesada que pudiera estar
impidiendo que la puerta de la taza del dispensador se abra.
Lea la sección Carga del lavavajillas.
No coloque recipientes ni ollas grandes directamente debajo del
dispensador de detergente.
Detergente en polvo no
dispensado
El dispensador de detergente
estaba mojado cuando se cargó
Limpie el dispensador y asegúrese de que esté seco antes de
agregar detergente en polvo.
Agua de lavado en los
cajones
Cantidad incorrecta de
detergente
See Detergent Dispensing in the Dispensers section.
Detergente equivocado 8WLOLFH~QLFDPHQWHGHWHUJHQWHVSDUDODYDYDMLOODVDXWRPiWLFRVGH
alta calidad para evitar la formación de espuma. Se probó que
los Cascade
®
Platinum™ ActionPacs™ o Finish
®
Quantum
®
Automatic Dishwashing Detergent fueron aprobados para su
uso en todos los lavavajillas de Café.
Para eliminar el agua con jabón en la tina, abra el lavavajillas y
permita que el agua con jabón se disipe. Abra la puerta, mantenga
presionado Start,QLFLDUSRUVHJXQGRV\FLHUUHODSXHUWD
&RQ¿JXUDFLyQGHPDVLDGRDOWD
del abrillantador de enjuague
5HGX]FDODFRQ¿JXUDFLyQGHODEULOODQWDGRUGHHQMXDJXH
Consulte sobre el Uso del Agente de Enjuague en la sección
de Dispensadores.
El tapón del dispensador del
abrillantador de enjuague no se
DMXVWyORVX¿FLHQWHHQHOFLHUUH
Asegúrese de que el tapón del dispensador del abrillantador
de enjuague esté completamente cerrado, con su empuñadura
apuntando de forma vertical. Consulte sobre el Uso del Agente
de Enjuague en la sección de Dispensadores.
El agente de enjuague se
derramó
Siempre limpie los derrames del agente de enjuague de forma
inmediata.
Agua debajo del filtro
de drenaje
Esto es normal Ninguna acción es requerida.
Drawer interior is
stained
Película blanca en la superficie
interna — minerales de agua dura
Café
recomienda agentes de enjuague de alta calidad como
el abrillantador Cascade
®
Platinum™ Power Dry™ Rinse Aid
o Finish
®
Jet-Dry
®
Rinse Aid para evitar la formación de
depósitos minerales de agua dura.
Haga funcionar el lavavajillas con ácido cítrico para eliminar los
GHSyVLWRVPLQHUDOHV(OiFLGRFtWULFRQ~PHURGHSLH]DWD35X151
VHSXHGHRUGHQDUDWUDYpVGH*($SSOLDQFHV3DUWV3LH]DVGH
*(
$SSOLDQFHV3DUDDFFHGHUDLQIRUPDFLyQVREUHFyPRRUGHQDUOHD
la contratapa. De forma alternativa, adquiera
Cascade
®
Platinum™
Dishwasher Cleaner o Finish
®
Dishwasher Cleaner y siga
las instrucciones en la etiqueta.
Sienta el aire en sus
piernas al pararse frente
al lavavajillas durante
el ciclo
Algunas comidas, tales como
productos a base de tomate,
podrán manchar el interior del
cajón
Enjuague los platos de forma previa antes de colocar los mismos
en el cajón. De forma alternativa, el uso del programa Rinse
(QMXDJXHOXHJRGHDJUHJDUORVSODWRVSRGUiPLQLPL]DUHOQLYHO
de manchas.
Agua pesada Si vive en una zona con agua
muy pesada
,QFUHPHQWHODFRQ¿JXUDFLyQGHODEULOODQWDGRUGHHQMXDJXH\OD
cantidad de detergente. Consulte la sección de Dispensadores.
Si vive en una zona con agua muy pesada, consulte a un
plomero sobre la instalación de un ablandador de agua
hogareño.
49-4000255 Rev 1
Antes de Solicitar el Servicio Técnico...
Antes de solicitar el servicio técnico
CONSEJOS PARA LA SOLUCIÓN DE PROBLEMAS
Problema Causas Posibles Qué Hacer
Queda agua en el
lavavajillas
El espacio de aire está atascado Limpie el espacio de aire. Lea la sección de Cuidado y limpieza.
El bucle de drenaje alto o el
espacio de aire no fueron
instalados
Consulte las Instrucciones de Instalación para instalar una línea
de drenaje adecuada.
Manguera(s) de drenaje con
torcedura o pellizco
$ODUJXHODPDQJXHUDVGHGUHQDMH
Filtros bloqueados /LPSLHODSODFDGHOILOWURGUHQDMHGHOILOWUR/HDODVHFFLyQGH
Cuidado y limpieza.
El agua no es
bombeada fuera de la
tina
El drenaje está atascado Si hay un espacio de aire, limpie el mismo. Lea la sección de
Cuidado y limpieza.
Si el lavavajillas drena hacia la salida de residuos, despeje esta
última.
Controle que el lavabo de su cocina esté realizando un drenaje
correcto. De no ser así, es posible que deba llamar a un plomero.
El lavavajillas no
funciona
El botón de inicio (
) no fue
presionado
3UHVLRQHHOERWyQ6WDUW,QLFLDU
El cajón no se cerró de forma
correcta
Asegúrese de que el cajón esté libre de cualquier objeto y que
esté cerrado de manera firme.
El cajón del lavavajillas se
encuentra en el “modo de sala
de exposición”
Para más información, comuníquese con Café
Se quemó el fusible o el
disyuntor está desactivado
Reemplace el fusible o reinicie el disyuntor. Retire cualquier otro
electrodoméstico del circuito.
La corriente no se encuentra
conectada o está apagada
Conecte la corriente, reemplace el fusible o reinicie el disyuntor.
Retire cualquier otro electrodoméstico del circuito.
Keylock (Bloqueo del Teclado) o
Childlock (Bloqueo para Niños)
activado
Desbloquee los controles. Consulte las Opciones de Bloqueo
en la sección de Puesta en Marcha.
Se detectó una posible pérdida Algunos modelos están equipados con un detector de pérdidas y
el ciclo será cancelado en caso de que se detecte una. Consulte
sobre Protección contra Pérdidas en la sección de Puesta
en Marcha. Para acceder al servicio técnico, comuníquese con
Café.
El panel de control
respondió a las
instrucciones pero el
lavavajillas nunca se
llenó de agua
Es posible que el cajón no esté
completamente cerrado
Asegúrese de que el cajón esté firmemente cerrado.
Es posible que el cajón no esté
agua esté cerrado
$VHJ~UHVHGHTXHODYiOYXODGHDJXDQRUPDOPHQWHXELFDGD
GHEDMRGHOODYDERHVWpDELHUWD
El cajón no se abrirá
(no hay pitidos ni un
lavado en progreso)
Función Childlock (Bloqueo
para Niños) activada
$SDJXH&KLOGORFN%ORTXHRSDUD1LxRV&RQVXOWHODVOpciones
de Bloqueo en la sección de Puesta en Marcha
El bloqueo automático con el
cajón cerrado está activado
*ROSHHXQDYH]VREUHHOIUHQWHGHOFDMyQ\DEUDHOPLVPRGHQWUR
de los 30 segundos.
Falla de energía durante
el programa de lavado
Corte de corriente en su hogar
o zona
(VSHUHKDVWDTXHUHWRUQHODFRUULHQWHHOSURJUDPDVHUHLQLFLDUi
desde el mismo punto del programa de lavado.
El lavavajillas no hace
un reconocimiento
cuando golpeo el frente
del cajón para pausar o
desbloquear el mismo
1RJROSHDFRQVX¿FLHQWHIXHU]D $VHJ~UHVHGHJROSHDUGHPDQHUD¿UPHVREUHHOIUHQWHGHOFDMyQ
en lugar de usar un toque suave.
El sensor de golpes del frente
del cajón se instaló o calibró de
forma incorrecta
Contacto con Café para el servicio.
El lavavajillas registra
toques y sacudidas
como golpes y genera
pausas de forma
inadvertida
El sensor de golpes del frente
del cajón se instaló o calibró de
forma incorrecta
Contacto con Café para el servicio.

28 49-4000255 Rev 1
CONSEJOS PARA LA SOLUCIÓN DE PROBLEMAS
Antes de Solicitar el Servicio Técnico...
Antes de solicitar el servicio técnico
Problema Causas Posibles Qué Hacer
Ruido Sonidos de funcionamiento
normal:
Apertura de la taza de detergente
Entra agua al lavavajillas
El motor se detiene y activa en
diferentes momentos durante el
ciclo
Los brazos rociadores se
activan y detienen en diferentes
momentos
Sonidos de bombeo del drenaje
durante el vaciado
El bombeo del drenaje se activa
y detiene varias veces durante
cada drenaje
Todos estos son normales. Ninguna acción es requerida.
Sonido ruidoso de los platos
cuando el brazo rociador gira
Asegúrese de que los platos hayan sido cargados de forma
adecuada. Lea la sección Carga.
El ventilador comienza
a generar ruido cuando
cierro el cajón, incluso
aunque no haya
iniciado un nuevo
lavado
Esto es normal. En algunos
casos, el ventilador de secado
funcionará siempre que el cajón
se cierre durante un período
de tiempo programado luego
de que haya finalizado un
programa.
Ninguna acción es requerida. El ventilador se detendrá de forma
automática una vez finalizado el tiempo programado.
Se escucha el ruido
del ventilador desde
el lavavajillas una vez
¿QDOL]DGRXQSURJUDPD
de lavado
Esto es normal. El ventilador de
secado continua funcionando
durante un período de tiempo
una vez que un programa haya
¿QDOL]DGRSDUDDVLVWLUVREUHHO
secado.
Ninguna acción es requerida. El ventilador se detendrá de forma
DXWRPiWLFDXQDYH]¿QDOL]DGRHOWLHPSRFRQ¿JXUDGRRFXDQGRVH
abra el cajón. En algunos casos, el ventilador se podrá reiniciar
cuando el cajón se cierre nuevamente.
Ruido excesivo del
motor
No hay agua en el área del
motor
This usually occurs on the first use or when the dishwasher has
not been used for long periods of time. Pour 3 cups of water into
the drawer before running a wash program.
Water pooling on inner
rim of drawer after a
wash
This is normal condensation.
Wipe dry.
Water leaking La manguera de drenaje se
desconectó de la tubería de
desechos
Vuelva a conectar la manguera de drenaje a la tubería de
desechos.
La manguera de entrada de
agua no está correctamente
conectada
Asegúrese de que la manguera de entrada esté conectada de
forma segura.
Otras pérdidas Cierre el agua y otros suministros de corriente al lavavajillas.
Contacto con Café para el servicio.
El tapón del dispensador del
abrillantador de enjuague no se
cerro de forma correcta
Asegúrese de que el tapón del dispensador del abrillantador
de enjuague esté completamente cerrado, con su empuñadura
apuntando de forma vertical. Consulte sobre el Uso del Agente
de Enjuague en la sección de Dispensadores.

49-4000255 Rev 1 29
cafeappliances.com
7RGRHOVHUYLFLRGHJDUDQWtDHVSURYLVWRSRUQXHVWURV&HQWURVGH6HUYLFLRGH)DEULFDFLyQRXQWpFQLFRGHVHUYLFLR
autorizado. Para programar una visita del servicio técnico a través de Internet, visítenos en cafeappliances.com/service.
Para realizar el servicio técnico de su electrodoméstico, se podrá requerir el uso de datos del puerto de abordaje para
su diagnóstico. Esto da al técnico del servicio de fábrica de Café la habilidad de diagnosticar de forma rápida cualquier
problema con su electrodoméstico, y de ayudar a Café a mejorar sus productos al brindarle a Café la información sobre su
electrodoméstico. Si no desea que los datos de su electrodoméstico sean enviados a Café, solicitamos que le indique a su
técnico no entregar los datos a Café en el momento del servicio.
GARANTÍA LIMITADA
Garantía Limitada del Lavavajillas de Café
Por el Período de: Reemplazaremos:
Un Año
Desde la fecha de
compra original
Cualquier parte del lavavajillas que falle debido a un defecto en los materiales o la
fabricación. Durante esta garantía limitada de un año, Café también proveerá, sin costo,
todo el trabajo y el servicio en el shogar relacionado con el reemplazo de la pieza que
presente defectos.
Esta garantía limitada se extiende al comprador original y a cualquier dueño subsiguiente de productos comprados
SDUDXVRKRJDUHxRGHQWURGH((886LHOSURGXFWRHVWiHQXQiUHDGRQGHQRVHHQFXHQWUDGLVSRQLEOHXQ3URYHHGRU
Autorizado del Servicio Técnico de Café, usted será responsable por el costo de un viaje o se podrá requerir que traiga
el producto a una ubicación del Servicio Técnico de Café Autorizado para recibir el servicio. Para acceder al servicio
técnico correspondiente a la garantía limitada, se deberá contar con la prueba de la fecha original de compra. En Alaska,
la garantía limitada excluye el costo de envío o llamadas del servicio a su hogar.
Algunos estados no permiten la exclusión o limitación de daños fortuitos o consecuentes. Esta garantía limitada le da
derechos legales específicos y es posible que tenga otros derechos legales que varían entre un estado y otro. Para conocer
FXiOHVVRQVXVGHUHFKRVOHJDOHVFRQVXOWHDODRILFLQDGHDVXQWRVGHOFRQVXPLGRUORFDORHVWDWDORDO)LVFDOGHVXHVWDGR
Garante: GE Appliances, a Haier Company
Louisville, KY 40225
EXCLUSIÓN DE GARANTÍAS IMPLÍCITAS
6X~QLFD\H[FOXVLYDDOWHUQDWLYDHVODUHSDUDFLyQGHOSURGXFWRFRPRVHLQGLFDHQOD*DUDQWtD/LPLWDGD/DVJDUDQWtDV
implícitas, incluyendo garantías implícitas de comerciabilidad o conveniencia sobre un propósito particular, se limitan
a un año o al período más corto permitido por la ley.
Abroche su recibo aquí. Para acceder al servicio técnico de acuerdo con
la garantía deberá contar con la prueba de la fecha original de compra.
Garantías Extendidas: Adquiera una garantía extendida de y conozca los descuentos especiales que están
disponibles mientras su garantía aún está vigente. Puede acceder a la misma a través de Internet en cualquier
momento en
cafeappliances.com/extended-warranty
Los Servicios para los Café aún estarán disponibles cuando su garantía caduque.
Lo que no está cubierto:
Ŷ
Viajes del personal de servicio a su casa para
enseñarle cómo usar su producto.
Ŷ
Instalación, entrega o mantenimiento inapropiada.
Ŷ
)DOODVGHOSURGXFWRVLHVPDOWUDWDGRPDOXVDGRR
usado para un propósito diferente del que se creó o si
es usado para usos comerciales.
Ŷ
Cambio de los fusibles de su casa o reajuste del
circuito de interruptores.
Ŷ
Productos sin defectos o rotos, o los cuales se
encuentran funcionando como se indica en el Manual
del propietario.
Ŷ
Daños al producto causados por accidentes,
incendios, inundaciones o actos de la naturaleza.
Ŷ
Daños imprevistos resultantes causados por posibles
defectos con este electrodoméstico.
Ŷ
Defectos o daños debido a la puesta en
funcionamiento a temperaturas de congelación.
Ŷ
Daño causado después de la entrega, incluido el daño
causado por los objetos que cayeron en la puerta.
Ŷ
Producto no accesible para facilitar el servicio
requerido.
Ŷ
Limpieza o servicio técnico del dispositivo de espacio
de aire en la línea de drenaje.

30 49-4000255 Rev 1
Soporte para el Consumidor
SOPORTE PARA EL CONSUMIDOR
Sitio Web de Café
¿Desea realizar una consulta o necesita ayuda con su electrodoméstico? ¡Intente a través del Sitio Web de Café las 24 horas
GHOGtDFXDOTXLHUGtDGHODxR8VWHGWDPELpQSXHGHFRPSUDUPiVHOHFWURGRPpVWLFRVPDUDYLOORVRVGH&DIp\DSURYHFKDUWRGRV
nuestros servicios de soporte a través de Internet, diseñados para su conveniencia.
cafeappliances.com
Registre su Electrodoméstico
£5HJLVWUHVXHOHFWURGRPpVWLFRQXHYRDWUDYpVGH,QWHUQHWVHJ~QVXFRQYHQLHQFLD8QUHJLVWURSXQWXDOGHVXSURGXFWRSHUPLWLUi
una mejor comunicación y un servicio más puntual de acuerdo con los términos de su garantía, en caso de surgir la necesidad.
También puede enviar una carta en la tarjeta de inscripción preimpresa que se incluye con el material embalado.
cafeappliances.com/register
Servicio Programado
El servicio de reparación de expertos de Café está a sólo un paso de su puerta. Conéctese a través de Internet y programe su
servicio a su conveniencia cualquier día del año. cafeappliances.com/service
Garantías Extendidas
Adquiera una garantía extendida de Café y conozca los descuentos especiales que están disponibles mientras su garantía aún
está vigente. La puede adquirir en cualquier momento a través de Internet. Los servicios de Café aún estarán allí cuando su
garantía caduque. cafeappliances.com/extended-warranty
Piezas y Accesorios
Aquellos individuos calificados para realizar el servicio técnico de sus propios electrodomésticos podrán solicitar el envío de
SLH]DVRDFFHVRULRVGLUHFWDPHQWHDVXVKRJDUHVVHDFHSWDQODVWDUMHWDV9,6$0DVWHU&DUG\'LVFRYHU2UGHQHKR\DWUDYpVGH
Internet durante las 24 horas, todos los días. cafeappliances.com/parts
Las instrucciones que figuran en este manual cubren los procedimientos que serán realizados por cualquier usuario.
Otros servicios técnicos generalmente deben ser derivados a personal calificado del servicio. Se deberá tener cuidado,
ya que una reparación indebida podrá hacer que el funcionamiento no sea seguro.
Contáctenos
Si no se encuentra satisfecho con el servicio que recibió de Café, comuníquese con nosotros a través de nuestro sitio web con
todos los detalles, incluyendo su número telefónico, o escriba a:
(Q((88*HQHUDO0DQDJHU&XVWRPHU5HODWLRQV&DIp_$SSOLDQFH3DUN_/RXLVYLOOH.<
cafeappliances.com/contact