User Manual for Built-In Electric Oven
PARTS AND FEATURES
WARNING: To reduce the risk of fire, electric shock, or injury to persons, read the IMPORTANT SAFETY INSTRUCTIONS, located in your appliance's Owner's Manual, before operating this appliance.
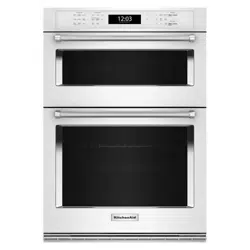
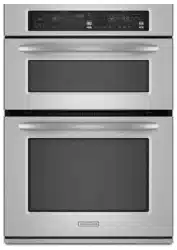
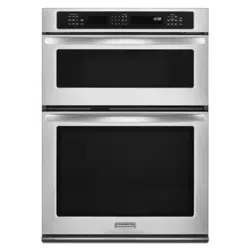
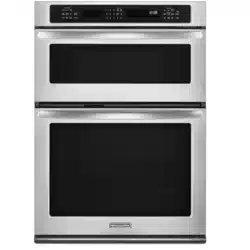
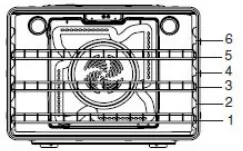
This manual covers different models. The oven you have purchased may have some or all of the items listed. The locations and appearances of the features shown here may not match those of your model.
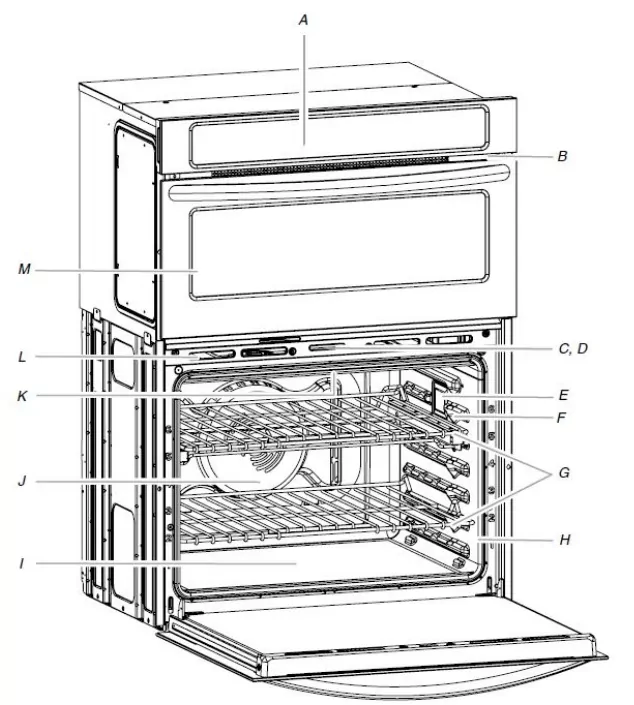
A. Electronic oven control
B. Model and serial number plate (on bottom edge of control panel, right hand side)
C. Automatic oven light switch
D. Oven door lock latch
E. Oven lights
F. Temperature probe jack
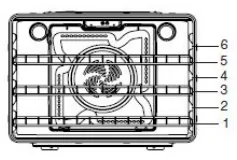
G. Oven racks (roll-out racks available on select models only)
H. Gasket
I. CleanBake™ bake element (hidden beneath floor panel)
J. Convection element and fan (in back panel)
K. Broil elements (not shown)
L. Oven vent
M. Upper microwave oven (combination oven models only)
Parts and Features not shown: Temperature probe
FEATURE GUIDE
This manual covers several models. Your model may have some or all of the items listed. Refer to this manual or the Frequently Asked Questions (FAQs) section of our website at www.kitchenaid.com for more detailed instructions. In Canada, refer to the Service and Support section at www.kitchenaid.ca.
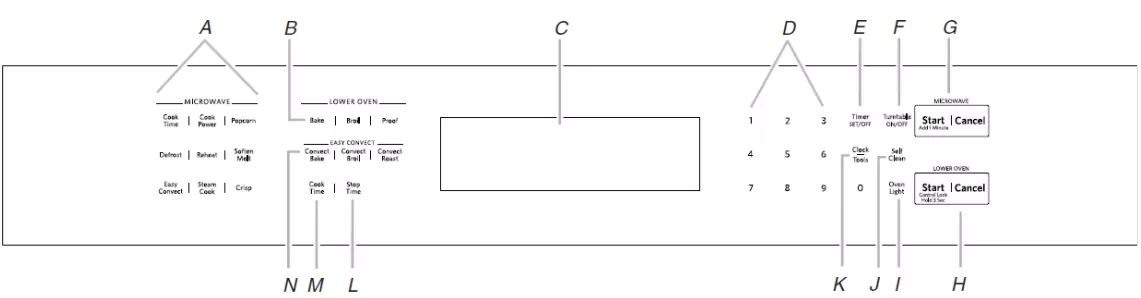
A. Microwave controls (see separate Control Guide)
B. Lower oven controls
C. Oven and microwave display
D. Number keys
E. Timer SET/OFF
F. Turntable ON/OFF
G. Microwave Start/Cancel
H. Lower oven Start/Cancel
I. Oven light
J. Self-clean
K. Clock/tools
L. Stop time
M. Cook time
N. EasyConvectTM controls
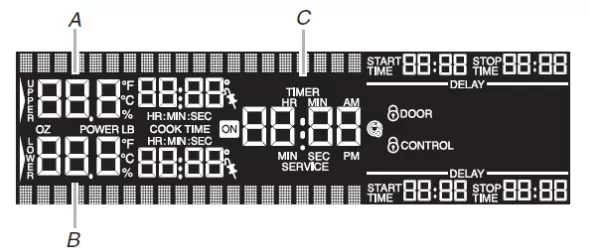
Combination Oven Display
A. Upper oven cavity display
B. Lower oven cavity display
C. Time of day, timer display
| KEYPAD | FEATURE | INSTRUCTIONS |
|---|---|---|
| Clock/Tools | Clock | The Clock uses a 12-hour cycle. See the "Electronic Oven Controls" section. 1. Touch Clock/Tools. 2. Touch the "1" key to select Clock. Then touch the number keys to set the time of day. 3. Touch Start. |
| Clock/Tools | Settings | Enables you to personalize the audible tones and oven operation to suit your needs. See the "Electronic Oven Controls" section. |
| Oven Light | Oven cavity light | The oven light is controlled by a key on the oven control panel. While the oven door is closed, touch Oven Light to turn the light on and off. When the oven door is opened, the oven light will automatically come on. |
| Timer (SET/OFF) | Oven timer | The Timer can be set in hours or minutes up to 23 hours and 59 minutes. 1. Touch Timer SET/OFF. Touch Timer SET/OFF again to switch between MIN/SEC, HR/MIN, and OFF. If no action is taken, the control will continue to wait for a length of time to be entered. 2. Touch the number keys to set the length of time. Touch Timer SET/OFF. If the key is not touched, the control will continue to wait for Timer/SET OFF to be touched. When the set time ends, 4 chimes will continuously repeat until the Timer Set/Off key is touched. 3. Touch Timer SET/OFF anytime to cancel the Oven Timer or stop the reminder tones. If Cancel is touched, the respective oven will turn off. However, the Oven Timer can be turned off only by using the Timer SET/OFF key. |
| Start | Cooking start | The Start key begins any oven function. If Start is not touched within 5 minutes after touching a key, the function is canceled and the time of day is displayed. |
| Cancel (Lower Oven) | Range function | The Cancel keys stop any function for the appropriate oven except the Clock and Timer. |
| Bake (Lower Oven) | Baking and roasting | 1. Touch Lower Oven Bake. Touch the number keys to enter a temperature other than 350°F (177°C). The bake range can be set between 170°F and 550°F (77°C and 288°C). 2. Touch Start. "Lo" will appear on the oven display if the actual oven temperature is under 100°F (38°C), and "Preheating" will appear in the lower area of the display. When the actual oven temperature reaches 100°F (38°C), the oven display will begin displaying the temperature as it increases. When the set temperature is reached, if on, one tone will sound. 3. Touch Cancel for the selected oven when finished cooking. |
| Broil | Broiling | Close the door. 1. Touch Upper or Lower Broil. Touch the number keys to enter a temperature other than 550°F (288°C). The broil range can be set between 450°F and 550°F (232°C and 288°C). 2. Touch Start. A long chime will sound. The set oven temperature will appear on the oven display until the oven is turned off. 3. Touch Cancel for the selected oven when finished cooking. |
| Easy Convect Bake | Convect bake | Before convection baking, position racks according to the "Rack And Bakeware Positions" section. 1. Touch Lower Oven Convect Bake. 2. Touch the number keys to choose whether or not to convert the recipe. 3. If "1: Yes" has been selected, "easy convect bake" will appear in the lower display. Then touch the number keys to enter a temperature. The convection bake range can be set between 170°F and 550°F (77°C and 288°C). The oven temperature will automatically be reduced by 25°F (14°C) for EasyConvect™ Bake, and the adjusted temperature will show on the display, but the cook time will not be adjusted. Then touch the number keys to enter a cook time. NOTE: If a temperature between 170°F and 194°F (77°C and 90°C) is entered, the display will show only 170°F (77°C) and not the reduced temperature. 4. If "2: No" has been selected, Convect Bake will continue without conversion. Touch the "1" number key to use Rapid Preheat or "2" to continue without Rapid Preheat. Then, touch the number keys to enter a temperature. NOTE: Rapid Preheat Convect Bake should only be used for 1-rack baking. 5. Touch Lower Oven Start. "Lo" will appear on the oven display if the actual oven temperature is under 100°F (38°C), and "Preheating" will appear in the lower display. When the actual oven temperature reaches 100°F (38°C), the oven display will show the oven temperature increasing. When the set temperature is reached, if on, 1 chime will sound. 6. Touch Lower Oven Cancel for the selected oven when finished cooking. |
| Easy Connect Roast | Connect roast | 1. Touch Lower Oven Connect Roast. 2. Touch the number keys to choose whether or not to convert the recipe. 3. If "1: Yes" has been selected, you will see screen with "easy connect roast." Touch the number keys to enter a temperature. The convection roast range can be set between 170°F and 550°F (77°C and 288°C). Touch the number keys to enter a cook time. The cook time will automatically be adjusted to 80% of the time entered, and the adjusted cook time will appear on the display, but temperature will not be adjusted. 4. If "2: No" has been selected, Connect Roast will continue without conversion. Touch the number keys to enter a temperature. 5. Touch Start. A long chime will sound. The set oven temperature will appear on the oven display until the oven is turned off. 6. Touch Cancel for the selected oven when finished cooking. |
| Connect Mode | Connect broil | Close the door. 1. Touch Lower Oven Connect Broil. Touch the number keys to enter a temperature other than 550°F (288°C). The convection broil range can be set between 450°F and 550°F (232°C and 288°C). 2. Touch Start. The set oven temperature will appear on the oven display until oven is turned off. 3. Touch Cancel for the selected oven when finished cooking. |
| Proof | Proofing bread | 1. Touch Lower Oven Proof. Display will show 100°F (38°C). 2. Touch Start. Let dough rise until nearly doubled in size, and then check at 20 to 25 minutes. Proofing time may vary depending on dough type and quantity. 3. Touch Cancel for the selected oven when finished cooking. Refer to the "Proofing Bread" section for more information. |
| Stop Time | Delayed start | The Stop Time key is used to enter the starting time for an oven function with a delayed start. Stop Time should not be used for foods such as breads and cakes because they may not bake properly. To set Cook Time or Stop Time, see the "Timed Cooking" section. |
| Cook Time | Timed cooking | Cook Time allows the oven to cook for a set length of time, and/or shut off automatically. To set Cook Time or Stop Time, see the "Timed Cooking" section. |
| Air Fry | Air Fry | 1. Press the Oven Power or Upper or Lower keypad for the desired oven. 2. Select COOKING METHODS. 3. Select AIR FRY. 4. Select the desired temperature by scrolling left to right or manually by selecting the grid in the upper right corner and entering the Convect Roast temperature into the keypad. 5. Select Start. No preheating necessary. 6. Press the Oven Cancel or Upper or Lower keypad for the desired oven when finished. For more information, see the "Air Fry" section. |
Electronic Oven Controls
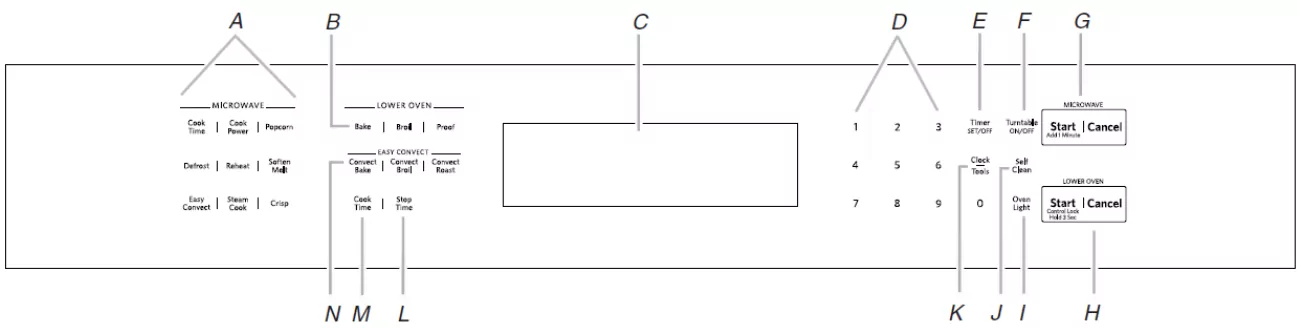
A. Microwave controls (see separate Control Guide)
B. Lower oven controls
C. Oven and microwave display
D. Number keys
E. Timer SET/OFF
F. Turntable ON/OFF
G. Microwave Start/Cancel
H. Lower oven Start/Cancel
I. Oven light
J. Self-clean
K. Clock/tools
L. Stop time
M. Stop time
N. EasyConvectTM controls
Display(s)
When power is first supplied to the oven, the timer display will flash "12:00" and "Clock- Enter Time" will appear on the display. Enter the time by touching the number keys. Touch START to allow operation. To allow operation without setting a time, touch START or CANCEL.
Lower Oven Display (combination oven models)
When the lower oven is in use, this display shows the oven temperature, heat source(s) and start time. In addition, during Timed Cooking, this display shows a time countdown and the stop time (if entered).
If "Err" appears on the lower oven display, an error condition has occurred. To call for service, see the Quick Start Guide for contact information.
Time of Day, Timer Display
When the lower oven is not in use, this display shows the time of day or time countdown.
Upper Microwave Oven Display (combination oven models)
When the upper microwave oven is in use, this display shows the upper oven heat source(s), cooking power, quantities, weights and/or help prompts and time countdown.
When the upper microwave oven is not in use, this display is blank.
Start
START begins all oven functions except Sabbath Mode. If the Start key is not touched within 5 seconds after touching another key, "START?" will appear on the lower oven display as a reminder. Depending on your model, if the Start key is not touched within 5 minutes after touching another key, the lower oven display will return to inactive mode and the programmed function will be canceled.
Cancel
Lower Oven CANCEL stops oven functions except for the Clock, Kitchen Timer and Control Lock. The oven cooling fan(s) may continue to operate even after an oven function has been canceled or completed, depending on the oven temperature.
Tones
Tones are audible signals, indicating the following:
Oven beep:
- Valid key touch
- Function has been entered
One chime:
- Preheat cycle has been completed
Three beeps:
- Invalid key touch
Three chimes:
- End of a cooking cycle
Four chimes:
- When timer reaches zero Includes using the Kitchen Timer for functions other than cooking.
Tone Volume
The volume is preset at low, but can be changed to high.
To Change: Touch Tools, and then "4" to toggle volume between high and low settings.
All Tones
All tones are preset on, but can be turned off.
To Turn Off/On: Touch Clock/Tools, and then "3" to toggle tones between on/off settings.
End-of-Cycle and Reminder Tones
The Timed Cooking end-of-cycle and reminder tones are preset on, but can be turned off. If all tones have been turned off, the end-of-cycle and reminder tones cannot be independently turned on.
To Turn Tones Off/On: Touch Clock/Tools, and then "5" to turn On. Touch Clock/Tools and then "5" to turn Off.
NOTE: Turning off this reminder tone does not turn off the Kitchen Timer tone.
Fahrenheit and Celsius
The temperature is preset in Fahrenheit; however it can be changed to Celsius.
To change: Touch Clock/Tools, and then "2" to toggle temperature between Fahrenheit and Celsius settings.
When the temperature is in Fahrenheit, "F" follows the oven temperature.
When the temperature is in Celsius, "C" follows the oven temperature.
Tools (Combination Oven Models)
The Tools selection key allows you access to 10 hidden functions within the Electronic Oven Control. These hidden functions allow you to set the clock, change the oven temperature between Fahrenheit and Celsius, turn the audible signals and prompts on and off, adjust the oven calibration, change language and turn on demo mode. The Sabbath Mode is also set using the Tools selection key.
To Use: Touch Tools . The oven display will scroll through the various tools, starting at "1" and ending automatically at "0." You can also touch Clock/Tools repeatedly to manually scroll through the list of tools.
| TOOLS | HIDDEN FUNCTION |
|---|---|
| 1 | Clock |
| 2 | Fahrenheit and Celsius conversion |
| 3 | Sound On/Off |
| 4 | Sound High/Low |
| 5 | End tone On/Off |
| 6 | Calibration |
| 7 | Sabbath Mode |
| 8 | Turntable On/Off |
| 9 | Language |
| 0 | Demo Mode |
Clock
This is a 12-hour clock. Before setting, make sure the oven(s), Kitchen Timer, and Timed Cooking are off.
To Set:
- Touch Clock/Tools.
- Touch the "1" key.
- Touch the number keys to set the time of day.
- Touch Start.
Kitchen Timer
The Kitchen Timer can be set in minutes and seconds or hours and minutes, and counts down the set time.
NOTE: The Kitchen Timer does not start or stop the oven.
Control Lock
The Control Lock shuts down the control panel keys to avoid unintended use of the oven(s). The Control Lock will remain set after a power failure, if set before the power failure occurs. When the control is locked, only the Start, Timer Set/Off and Oven Light keys will function. The Control Lock is preset unlocked, but can be locked.
To Lock control: Touch and hold START for approximately 3 seconds, until "Control Locked" appears on the lower text line and a lock icon appears in the display.
To Unlock control: Repeat to unlock. "Control Unlocked" appears on the lower text line and the lock icon will be removed.
Oven Temperature Control
IMPORTANT: Do not use a thermometer to measure the oven temperature. Elements will cycle on and off as needed to maintain a consistent temperature but may run slightly hot or cool at any point in time due to this cycling. Opening the oven door will affect cycling of the elements and impact the temperature.
The oven provides accurate temperatures and has been thoroughly tested at the factory. However, it may cook faster or slower than your previous oven, causing baking or browning differences. If necessary, the temperature calibration can be adjusted in either Fahrenheit or Celsius.
On double ovens, the upper oven and the lower oven can each be calibrated independently. A minus sign means the oven will be cooler by the displayed amount. The absence of a minus sign means the oven will be warmer by the displayed amount. Use the following chart as a guide.
NOTE: The oven display will continue to show the original set temperature and will not reflect the calibration offset. For example, if set to 350° (177°C) and calibrated to -20, the display will continue to show 350° (177°C).
| ADJUSTMENT °F (AUTOMATIC °C CHANGE) | COOKS FOOD |
|---|---|
| 10°F (6°C) | ...a little more |
| 20°F (12°C) | ...moderately more |
| 30°F (18°C) | ...much more |
| 0°F (0°C) | default setting |
| -10°F (-6°C) | ...a little less |
| -20°F (-12°C) | ...moderately less |
| -30°F (-18°C) | ...much less |
To Adjust Oven Temperature Calibration:
- Touch CLOCK/TOOLS, and then "6" to set the calibration.
- For double oven models: Touch the "1" key to select the upper oven or the "2" key to select the lower oven. Each oven calibration can be independently set.
- Touch "3" to increase and "6" to decrease the temperature.
- Touch START to end calibration.
Sabbath Mode
The Sabbath Mode sets the oven(s) to remain on in a bake setting until turned off. A timed Sabbath Mode can also be set to keep the oven on for only part of the Sabbath.
When the Sabbath Mode is set, the allowed keys are: the number keys, Start, Tools (to disable only), and Cancel. The display will scroll information on selecting the desired oven temperature.
When the Sabbath Mode is set, the upper oven is disabled and no function is allowed. When the oven door is opened or closed, the oven light will not turn on or off, and the heating elements will not turn on or off immediately.
If a power failure occurs when the Sabbath Mode is set, the oven (s) will remain in Sabbath Mode but will no longer be actively cooking. The "ON" indicator will no longer be lit. Touch Upper or Lower Cancel for double oven models, and Cancel for single oven models, to return to normal operating mode (non-Sabbath Mode, not cooking).
To enable: Before the Sabbath Mode can be regularly set, the oven(s) must first be enabled with a one time only setup. On double oven models, the following step will enable both ovens.
- Touch Clock/Toos, and then touch number key "7." "SABBATH MODE ON" will appear on the oven display for approximately 5 seconds.
To Disable: The oven can be disabled of the ability to set the Sabbath Mode by repeating the previous steps. See the "To Enable" section. When the oven(s) is disabled, "SABBATH MODE OFF" will appear on the display and remain on for approximately 5 seconds.
The Sabbath Mode cannot be regularly set until re-enabled. On double oven models, these steps will disable both ovens.
To Regularly Set, Untimed to Activate: Sabbath Mode must be enabled before starting the Bake cycle. See the "To Enable" section.
- Touch Bake. Touch the number keys to enter a temperature other than 350°F (177°C). The bake range can be set between 170°F and 550°F (77°C and 288°C).
- Touch Start.
- Touch Clock/Toos, and then number key "7." "SABBATH MODE" will appear on the oven display.
To Regularly Set, Timed:
Sabbath Mode must be enabled before starting the Bake cycle. See the "To Enable" section.
- Touch Bake. Touch the number keys to enter a temperature other than 350°F (177°C). The bake range can be set between 170°F and 550°F (77°C and 288°C).
- Touch COOK TIME.
- Touch the number keys to enter the length of Sabbath Mode time, up to 11 hours 59 minutes.
- Touch Start. The oven will begin a timed bake cycle.
- Touch Clock/Toos, and then touch number key "7." "SABBATH MODE" will appear on the oven display. The start time and stop time will appear on the lower oven display.
- When the stop time is reached, the oven will automatically turn off. The oven control will remain in Sabbath Mode until the Cancel button is touched.
Temperature change
The oven temperature can be changed when the oven(s) are in the Sabbath Mode. No tones will sound, and the display will not change. The heating elements will not turn on or off for a random time, anywhere from 16 to 24 seconds. It may take up to one-half hour for the oven to change temperature.
| NUMBER KEY | OVEN TEMPERATURE |
|---|---|
| 1 | 170°F (76°C) |
| 2 | 200°F (93°C) |
| 3 | 225°F (107°C) |
| 4 | 250°F (121°C) |
| 5 | 300°F (148°C) |
| 6 | 325°F (162°C) |
| 7 | 350°F (176°C) |
| 8 | 375°F (190°C) |
| 9 | 400°F (204°C) |
| 0 | 450°F (232°C) |
To Change Temperature: Initially, on double ovens, the cavities can be set for independent temperatures. However, once Sabbath Mode is running, if the temperature is changed, both cavities will use the new temperature.
- Touch the number key from the chart.
- Touch START.
OVEN USE
Odors and smoke are normal when the oven is used the first few times, or when it is heavily soiled.
During oven use, the heating elements will not remain on, but will cycle on and off throughout oven operation.
IMPORTANT: The health of some birds is extremely sensitive to the fumes given off. Exposure to the fumes may result in death to certain birds. Always move birds to another closed and well ventilated room.
Rack And Bakeware Positions
Use the following illustration and charts as guides.
Rack Positions - Lower Oven
Broiling:
| Food | Rack Position |
| Most broiling | 6 |
Traditional Cooking
| Food | Rack Position |
| Large roasts, turkeys, angel food, bundt cakes, quick breads, pies | 1 or 2 |
| Yeast breads, casseroles, meat and poultry | 2 |
| Cookies, biscuits, muffins, cakes |
2 or 3 when single-rack baking; |
Convection Cooking (For Convection Models Only)
| Oven Setting | Number of Racks Used | Rack Position |
|---|---|---|
| Rapid Preheat Bake | 1 | 3 |
| Rapid Preheat Convection Bake | 1 | 3 |
| Convection Bake | 1 | 1, 2 or 3 |
| Convection Bake | 2 | 2 and 5 |
| Convection Bake | 3 | 1, 3 and 5 |
| Convection Roast | 1 | 1 or 2 |
| Convection Broil | 1 | 4, 5 or 6 |
Bakeware
To cook food evenly, hot air must be able to circulate. For best results, allow 2" (5 cm) of space around bakeware and oven walls. Use the following chart as a guide.
| Number of Pan(s) | Position on Rack |
|---|---|
| 1 | Center of rack. |
| 2 | Side by side or slightly staggered. |
| 3 or 4 | See the rack position graphics in this section for pan placement recommendations. |
SatinGlide Roll-Out Extension Rack
The SatinGlide roll-out extension rack allows easy access to position and remove food in the oven. It can be used in rack positions 1 through 6.
Open Position
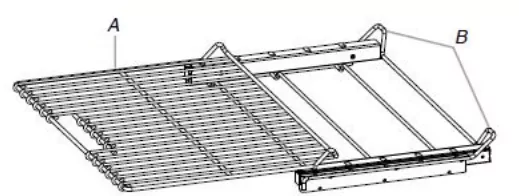
A. SatinGlide roll-out extension rack
B. Sliding shelf
Closed and Engaged Position
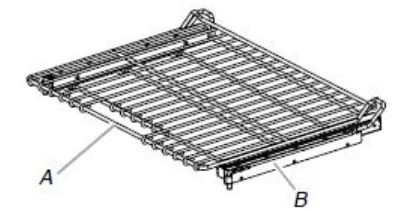
A. SatinGlide roll-out extension rack
B. Sliding shelf
To Remove SatinGlide Roll-Out Extension Rack:
- Slide the rack in completely so that it is closed and engaged with the sliding shelf.
- Using 2 hands, lift up on the front edge of the rack and push the sliding shelf to the back wall of the oven so that the front edge of the sliding shelf sits on the rack guides. The front edge of the rack and the sliding shelf should be higher than the back edge.
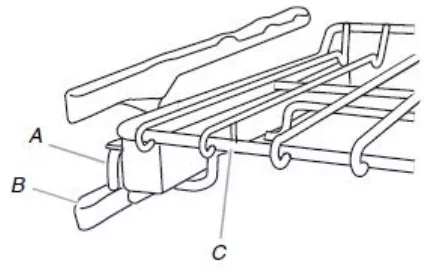
A. Sliding shelf
B. Rack guide
C. SatinGlide roll-out extension rack - Pull the rack and the sliding shelf out.
To Replace SatinGlide Roll-Out Extension Rack:
- Using 2 hands, grasp the front of the closed rack and the sliding shelf. Place the closed rack and the sliding shelf on the rack guide.
- Using 2 hands, lift up on the front edge of the rack and the sliding shelf together.
- Slowly push the rack and the sliding shelf to the back of the oven until the back edge of the rack pulls over the end of the rack guide.
To avoid damage to the sliding shelves, do not place more than 25 lbs (11.4 kg) on the rack or 35 lbs (15.9 kg) on the roll-out rack for powered attachments (on some models).
Do not clean the SatinGlide roll-out extension rack in a dishwasher. It may remove the rack's lubricant and affect its ability to slide.
See the "General Cleaning" section in the Owner's Manual for more information.
Bakeware
The bakeware material affects cooking results. Follow manufacturer's recommendations and use the bakeware size recommended in the recipe. Use the following chart as a guide.
| BAKEWARE/ RESULTS | RECOMMENDATIONS |
|---|---|
| Light colored aluminum ■ Light golden crusts ■ Even browning |
■ Use temperature and time recommended in recipe. |
| Dark aluminum and other bakeware with dark, dull and/or nonstick finish ■ Brown, crisp crusts |
■ May need to reduce baking temperatures slightly. ■ Use suggested baking time. ■ For pies, breads and casseroles, use temperature recommended in recipe. ■ Place rack in center of oven. |
| Insulated cookie sheets or baking pans ■ Little or no bottom browning |
■ Follow rack recommendations in the "Position Racks and Bakeware" section. ■ May need to increase baking time. |
| Stainless steel ■ Light, golden crusts ■ Uneven browning |
■ May need to increase baking time. |
| Stoneware/Baking stone ■ Crisp crusts |
■ Follow manufacturer's instructions. |
| Ovenproof glassware, ceramic glass or ceramic ■ Brown, crisp crusts |
■ May need to reduce baking temperatures slightly. |
Meat Thermometer
Not all models have a temperature probe. On models without a temperature probe, use a meat thermometer to determine whether meat, poultry and fish are cooked to the desired degree of doneness. The internal temperature, not appearance, should be used to determine doneness.
Preheating and Oven Temperature
Preheating
When beginning a Bake or Convect Bake cycle or Convect Roast cycle the oven begins preheating after Start is touched. The oven will take approximately 12 to 17 minutes to reach 350°F (177°C) with all of the oven racks provided with your oven inside the oven cavity. Higher temperatures will take longer to preheat. The preheat cycle rapidly increases the oven temperature. The actual oven temperature will go above your set temperature to offset the heat lost when your oven door is opened to insert food. This ensures that when you place your food in the oven, the oven will begin at the proper temperature. Insert your food when the preheat tone sounds. Do not open the door during preheat until the tone sounds.
Oven Temperature
While in use, the oven elements will cycle on and off as needed to maintain a consistent temperature. They may run slightly hot or cool at any point in time due to this cycling. Opening the oven door while in use will release the hot air and cool the oven which could impact the cooking time and performance. It is recommended to use the oven light to monitor cooking progress.
Baking and Roasting
IMPORTANT: The convection fan and convection element may operate during the Bake function to enhance performance and heat distribution.
The oven will take approximately 12 to 17 minutes to reach 350°F (177°C) with all oven racks inside the oven cavity. The preheat cycle rapidly increases the temperature inside the oven cavity. Higher temperatures will take longer to preheat. Factors that impact preheat times include room temperature, oven temperature, and the number of racks. Unused oven racks can be removed prior to preheating your oven to help reduce preheat time. The actual oven temperature will go above the set temperature to offset the heat lost when the oven door is opened to insert food. This ensures that the oven will begin at the proper temperature when you place food in the oven. Insert food when the preheat tone sounds. Do not open the door during preheat until the tone sounds.
During baking or roasting, the bake and broil elements will cycle on and off in intervals to maintain the oven temperature.
Depending on the model, if the oven door is opened during baking or roasting, the heating elements (bake and broil) will turn off approximately 30 seconds after the door is opened. They will turn on again approximately 30 seconds after the door is closed.
Broiling
Broiling uses direct radiant heat to cook food.
The element cycles on and off in intervals to maintain the oven temperature.
IMPORTANT: Close the door to ensure proper broiling temperature.
If the oven door is opened during broiling, the broil element will turn off in approximately 30 seconds. When the oven door is closed, the element will come back on approximately 30 seconds later.
- For best results, use a broiler pan and grid. It is designed to drain juices and help avoid spatter and smoke.
If you would like to purchase a Broiler Pan Kit, it may be ordered. See the Quick Start Guide for contact information. - For proper draining, do not cover the grid with foil. The bottom of the broiler pan may be lined with aluminum foil for easier cleaning.
- Trim excess fat to reduce spattering. Slit the remaining fat on the edges to avoid curling.
- Pull out oven rack to stop position before turning or removing food. Use tongs to turn food to avoid the loss of juices. Very thin cuts of fish, poultry or meat may not need to be turned.
- After broiling, remove the pan from the oven when removing the food. Drippings will bake on the pan if left in the heated oven, making cleaning more difficult.
Convection
In a convection oven, the fan-circulated hot air distributes heat more evenly. This movement of hot air helps maintain a consistent temperature throughout the oven, cooking foods more evenly, while sealing in moisture.
Most foods, using convection baking mode, can be cooked by lowering cooking temperatures 25°F (14°C). The cooking time, can be shortened significantly when using Convect Roast, especially for large turkeys and roasts.
- It is important not to cover foods with lids or aluminum foil so that surface areas remain exposed to the circulating air, allowing browning and crisping.
- Keep heat loss to a minimum by opening the oven door only when necessary. It is recommended to use the oven light to monitor progress.
- Choose cookie sheets without sides and roasting pans with lower sides to allow air to move freely around the food.
- Test baked goods for doneness a few minutes before the minimum cooking time using a method such as a toothpick.
- Use a meat thermometer or the temperature probe to determine the doneness of meats and poultry. Check the temperature of pork and poultry in 2 or 3 places.
Convection Bake (on some models)
The convection element is hidden in the rear panel of the oven cavity, and assisted by the convection fan, provides balanced, efficient heating.
Convection baking can be used for baking delicate cakes and pastries, as well as foods on multiple racks. It is helpful to stagger items on the racks to allow a more even flow of heat. If the oven is full, extra cooking time may be needed.
When cooking an oven meal with several different types of foods, be sure to select recipes that require similar temperatures. Cookware should sit in the oven with at least 2" (5 cm) of space between the cookware and the sides of the oven.
During convection baking preheat, the convection element, broil element and the CleanBake™ element all heat the oven cavity. After preheat, the convection element, broil element and the CleanBake™ element will cycle on and off in intervals to maintain oven temperature, while the fan circulates the hot air.
If the oven door is opened during convection baking, the fan turns off immediately when the door is opened and turns on immediately when the door is closed. Convection, Bake and Broil elements will turn off approximately 30 seconds after the door is opened. They will turn on again approximately 30 seconds after the door is closed.
NOTE: it is normal for the convection fan to run during non-convection cycles as well as during preheat.
- Reduce recipe temperature 25°F (14°C). The cook time may need to be reduced also.
To Convection Bake:
Before convection baking, position racks according to the "Rack and Bakeware Positions" section.
Convection Roast (on some models)
Convection roasting can be used for roasting meats and poultry. During convection roasting, the broil, convect, and CleanBake™ elements (on some models) will cycle on and off in intervals to maintain oven temperature, while the fan circulates the hot air.
If the oven door is opened during convection roasting, the fan turns off immediately when the door is opened and turns on immediately when the door is closed. Bake, broil, and convect elements will turn off approximately 30 seconds after the door is opened. They will turn on again approximately 30 seconds after the door is closed.
NOTE: it is normal for the convection fan to run during nonconvection cycles as well as during preheat.
To Convection Roast
Before convection roasting, position racks according to the "Rack and Bakeware Positions" section. It is not necessary to wait for the oven to preheat before putting food in, unless recommended in the recipe.
Convection Broil (on some models)
During convection broiling, the broil element will cycle on and off in intervals to maintain oven temperature, while the fan circulates the hot air.
The temperature is preset at 550°F (288°C), but can be changed to a different temperature. Cooking times will vary depending on the rack position and temperature and may need to be adjusted.
If the oven door is opened during convection broiling, fan turns off immediately when the door is opened and turns on again immediately when the door is closed. Broil elements will turn off approximately 30 seconds after the door is opened. They will turn on again approximately 30 seconds after the door is closed.
NOTE: It is normal for the convection fan to run during non-convection cycles as well as during preheat.
To Convection Broil:
Allow the oven to preheat for 5 minutes. Position food on the unheated grid on the broiler pan, and then place it in the center of the oven rack with the longest side parallel to the door.
Proofing Bread
Proofing bread prepares dough for baking by activating the yeast. Proofing twice is recommended unless the recipe directs otherwise.
To Proof
Before first proofing, place dough in a lightly greased bowl and cover loosely with waxed paper or plastic wrap coated with shortening. Place on rack guide 2. See "Rack and Bakeware Positions" for diagram. Close door.
- Touch Upper or Lower Proof. Display will show 100°F (38°C)
- Touch Start.
Let dough rise until nearly doubled in size, and then check at 20 to 25 minutes. Proofing time may vary depending on dough type and quantity. - Touch Cancel for the selected oven when finished proofing.
Before second proofing, shape dough, place in baking pan(s) and cover loosely. Follow same placement, and control steps above. Before baking, remove waxed paper or plastic wrap.
Temperature Probe (single, upper, and on some models, lower oven)
The temperature probe accurately measures the internal temperature of meat, poultry and casseroles with liquid and should be used in determining the doneness of meat and poultry. The temperature probe should only be used with Bake, Convect Bake or Convect Roast.
Always unplug and remove the temperature probe from the oven when removing food.
To Use
Before using, insert the probe into the food item. (For meats, the probe tip should be located in the center of the thickest part of the meat and not into the fat or touching a bone). Place food in oven and connect the temperature probe to the jack. Keep probe as far away from heat source as possible. Close oven door.
NOTE: The temperature probe must be inserted into the food item before the mode is selected.
- Touch the number keys to enter a probe temperature. The probe temperature is the desired internal temperature of the food when it is done. The temperature can be set between 110°F and 200°F (43°C and 93°C).
- Touch Upper or Lower Bake, Convect Bake or Convect Roast.
- Touch Start.
The set oven temperature will appear on the oven display throughout cooking.
"Lo" will appear as the probe temperature until the internal temperature of the food reaches 45°F (7°C). The dish display will show the temperature increasing.
When the set probe temperature is reached, the oven will shut off automatically and "Cooking Complete" will appear on the oven display. - Touch Cancel for the selected oven, or open the oven door to clear the display and/or stop reminder tones.
- Always unplug and remove the temperature probe from the oven when removing food. The probe symbol will remain lit in the display until the probe is unplugged.
To Change Probe Temperature During a Cooking Cycle
- Touch a probe enabled cooking mode (Bake, Convect Bake, or Convect Roast).
- Follow steps 1 through 5 in the "To Use" section.
Timed Cooking
Timed Cooking allows the oven(s) to be set to turn on at a certain time of day, cook for a set length of time, and/or shut off automatically. Delay start should not be used for food such as breads and cakes because they may not bake properly.
To Set a Cook Time:
- Select a cooking function. Touch the number keys to enter a temperature other than the one displayed. Timed Cooking may also be used with the Bread Proof function, but the temperature is not adjustable.
- Touch Cook Time.
- Touch number keys to enter the length of time to cook.
- Touch Start.
The minute time countdown will appear on the oven display. The start time and stop time are not displayed until the oven is finished preheating.
When the stop time is reached, the oven will shut off automatically, and "cooking complete" will appear on the oven display.
If enabled, end-of-cycle tones will sound, then reminder tones will sound every minute. - Touch Cancel for the selected oven, or open and close the oven door to clear the display and/or stop reminder tones.
To Set a Cook Time and Stop Time:
Before setting, make sure the clock is set to the correct time of day. See "Clock" section.
- Select a cooking function. Touch the number keys to enter a temperature other than the one displayed. Timed Cooking may also be used with the Bread Proof function, but the temperature is not adjustable.
- Touch Cook Time.
- Touch number keys to enter the length of time to cook.
- Touch Stop Time.
- Touch the number keys to enter time of day to stop.
- Touch Start.
The start time is automatically calculated and displayed. "DELAY" and the stop time will also appear on the oven display. When the start time is reached, the oven will automatically turn on.
The minute time countdown will appear on the oven display.
When the stop time is reached, the oven will shut off automatically, and "cooking complete" will appear on the oven display.
If enabled, end-of-cycle tones will sound, then reminder tones will sound every minute. - Touch CANCEL for the selected oven, or open and close the oven door to clear the display and/or stop reminder tones.
To Set a Cook Time and Stop Time
Before setting, make sure the clock is set to the correct time of day. See “Clock” section
- Select a cooking function.
Touch the number keys to enter a temperature other than the one displayed.
Timed Cooking may also be used with the Bread Proof function, but the temperature is not adjustable. - Touch Cook Time.
- Touch number keys to enter the length of time to cook.
- Touch Stop Time.
- Touch the number keys to enter time of day to stop.
- Touch Start.
The start time is automatically calculated and displayed. “DELAY” and the stop time will also appear on the oven display.
When the start time is reached, the oven will automatically turn on. The minute time countdown will appear on the oven display.
When the stop time is reached, the oven will shut off automatically, and “cooking complete” will appear on the oven display.
If enabled, end-of-cycle tones will sound, then reminder tones will sound every minute. - Touch CANCEL for the selected oven, or open and close the oven door to clear the display and/or stop reminder tones
Air Fry
IMPORTANT: Cooking times, temperatures, and general instructions may differ depending on recipe.
When air frying, food should be evenly spaced in air fry basket in a single layer. Place food into oven cavity before setting temperature as there is no preheat or preheat tone. Position food in the air fry basket and place into oven as shown in the Positioning Racks and Bakeware section of your Control Guide. Close the oven door to ensure proper temperature.
During air frying, the bake and broil elements or burners, and convection ring cycle on and off in intervals to maintain the oven temperature while the fan circulates the hot air.
- Refer to instructions on packaged food for conventional oven baking regarding air fry time and temperature.
- For best results, only use one rack for air frying.
- For frozen, bone-in, or dense foods with cook times less than 15 minutes, additional time may be required.
- For recipes written for counter top air fryers, additional time will be needed. It is not recommended to use air fry with wet batter.
- For best performance, shake or flip food half-way through bake time. Be sure to close oven door after removing food.
- Spray air fry basket with oil to avoid food sticking to basket.
- For best results, use a large pan such as a cookie sheet under the Air Fry Basket. It is used to collect crumbs and oil and mitigate smoke.
OPERATING INSTRUCTIONS
WARNING: To reduce the risk of fire, electric shock, or injury to persons, read the IMPORTANT SAFETY INSTRUCTIONS, located in your appliance's Owner's Manual, before operating this appliance.
Using Your Oven
Step 1. Select oven function (for double ovens, select cavity then select function)
Step 2. Set the temperature
Step 3. Press Start
Step 4. Place food inside the oven once set temperature is reached. Close the oven door.
Step 5. (Optional) Enter time to cook
Step 6. The Cancel button can be used to cancel the function during or after cook time.
NOTE: For more detailed instructions on specific functions, see the online Control Guide.
Using your Microwave Oven
Step 1. Place food inside the microwave oven. Close the oven door.
Step 2. Select microwave function
Step 3. Enter time to cook
Step 4. Press Start
Step 5. The Cancel button can be used to cancel the function during or after cook time.
NOTE: For more detailed instructions on specific functions, see the online Control Guide.
ALUMINUM FOIL (For Ovens Only)
IMPORTANT: To avoid permanent damage to the oven bottom finish, do not line the oven bottom with any type of foil or liner.
- For best cooking results, do not cover entire rack with foil because air must be able to move freely.
- To catch spills, place foil on rack below dish. Make sure foil is at least 1/2" (1.3 cm) larger than the dish and that it is turned up at the edges.
ALUMINUM FOIL AND METAL (For Microwave Ovens Only)
Always use oven mitts or pot holders when removing dishes from the microwave oven.
Aluminum foil and some metal can be used in the microwave oven. If not used properly, arcing (a blue flash of light) can occur and cause damage to the microwave oven.
OK for Use
Racks and bakeware supplied with the microwave oven (on some models), aluminum foil for shielding, and approved meat thermometers may be used with the following guidelines:
- To avoid damage to the microwave oven, do not allow aluminum foil or metal to touch the inside cavity walls, ceiling or floor.
- Always use the turntable.
- To avoid damage to the microwave oven, do not allow contact with another metal object during microwave cooking.
Do Not Use
Metal cookware and bakeware, gold, silver, pewter, non-approved meat thermometers, skewers, twist ties, foil liners such as sandwich wrappers, staples and objects with gold or silver trim or a metallic glaze should not be used in the microwave oven.
POSITIONING RACKS AND BAKEWARE
IMPORTANT: To avoid permanent damage to the porcelain finish, do not place food or bakeware directly on the oven door or bottom.
Racks
- Position racks before turning on the oven.
- Do not position racks with bakeware on them. Make sure racks are level.
- Place food so it will not rise into the broil element. Allow at least 1/2" (1.3 cm) between pans and the broil element.
To move a rack, pull it out to the stop position, raise the front edge, and then lift it out. Use the following illustration as a guide for positioning racks.
Broiling Patties on 1 Rack
For hamburger patties to have a well-seared exterior and a rare interior, use a flat rack in position 6. Side 1 should cook for approximately 3 minutes. Side 2 should cook for approximately 3 to 4 minutes. Expect a moderate degree of smoke when broiling.
Baking Layer Cakes on 2 Racks
For best results when baking cakes on two racks, use rack positions 2 and 5.
OVEN VENT(S)
The oven vent(s) should not be blocked or covered since they allow the inlet of fresh air into the cooling system. Also, the bottom vent should not be blocked or covered since it allows the inlet of fresh air into the cooling system and the outlet of hot air from the cooling system. Blocking or covering vents will cause poor air circulation, affecting cooking, cleaning, and cooling results.
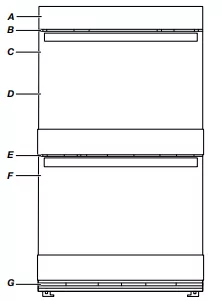
Single and Double Oven
A. Control panel
B. Oven Vent
C. Single oven or upper double oven
Double Oven
D. Upper oven
E. Oven Vent
F. Lower oven
G. Bottom vent
OVEN LIGHTS
The oven lights are 120 V, 40 W maximum halogen bulbs. They will come on when the oven door is opened. On double oven models, both upper and lower lights will come on when either door is opened. The oven lights will not work during the Self-Cleaning cycle. When the door is closed, touch the appropriate Oven Light keypad to turn on the oven light.
To Replace: Before replacing the bulb, make sure the oven is off and cool.
- Disconnect power.
- Remove glass light cover by grasping the front edge and pulling away from oven.
- Remove bulb from socket.
- Replace bulb, using tissue or wearing cotton gloves to handle bulb. To avoid damage to or decreasing the life of the new bulb, do not touch bulb with bare fingers.
- Replace bulb cover by snapping back into wall. 6. Reconnect power.
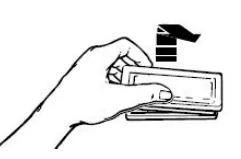
IMPORTANT: Do not use lamps rated higher than 40 W.
SABBATH MODE:
The Sabbath Mode sets the oven to remain on in a bake setting until disabled. For guidance on usage and a complete list of models with Sabbath Mode, visit www.star-k.org or contact us as per the information given below.
WI-FI CONNECT (On Some Models)
Download the KitchenAid® App from the app store on your mobile phone. Follow the instructions in the app.
NOTE: For further information on connecting your appliance to your home Wi-Fi network, read the online Control Guide.
BUILT-IN ELECTRIC MICROWAVE/OVEN COMBINATION SAFETY
IMPORTANT SAFETY INSTRUCTIONS
WARNING: To reduce the risk of fire, electric shock, or injury to persons when using the appliance, follow basic precautions, including the following:
- Proper Installation - The appliance, when installed, must be electrically grounded in accordance with local codes, or in the absence of local codes, with the National Electrical Code, ANSI/NFPA 70 or the Canadian Electrical Code, CSA C22.1- 02. In Canada, the appliance must be electrically grounded in accordance with Canadian Electrical Code. Be sure your appliance is properly installed and grounded by a qualified technician.
- Never Use Your Appliance for Warming or Heating the Room.
- Do Not Leave Children Alone - Children should not be left alone or unattended in area where appliance is in use. They should never be allowed to sit or stand on any part of the appliance.
- Wear Proper Apparel - Loose- fitting or hanging garments should never be worn while using the appliance.
- User Servicing - Do not repair or replace any part of the appliance unless specifically recommended in the manual. All other servicing should be referred to a qualified technician.
- Storage in or on Appliance - Flammable materials should not be stored in an oven or near surface units.
- This appliance is not intended for storage.
- Do Not Use Water on Grease Fires - Smother fire or flame or use dry chemical or foam- type extinguisher.
- Do not use replacement parts that have not been recommended by the manufacturer (e.g. parts made at home using a 3D printer).
- Use Only Dry Potholders - Moist or damp potholders on hot surfaces may result in burns from steam. Do not let potholder touch hot heating elements. Do not use a towel or other bulky cloth.
- Use Care When Opening Door - Let hot air or steam escape before removing or replacing food.
- DO NOT TOUCH HEATING ELEMENTS OR INTERIOR SURFACES OF OVEN - Heating elements may be hot even though they are dark in color. Interior surfaces of an oven become hot enough to cause burns. During and after use, do not touch, or let clothing or other flammable materials contact heating elements or interior surfaces of oven until they have had sufficient time to cool. Other surfaces of the appliance may become hot enough to cause burns - among these surfaces are the coil and cooktop elements, oven vent openings and surfaces near these openings, oven doors, and windows of oven doors.
- Do Not Heat Unopened Food Containers - Build- up of pressure may cause container to burst and result in injury.
- Keep Oven Vent Ducts Unobstructed.
WARNING: To reduce the risk of fire, electric shock, or injury to persons when using the appliance, follow basic precautions, including the following:
- Placement of Oven Racks - Always place oven racks in desired location while oven is cool. If rack must be moved while oven is hot, do not let potholder contact hot heating element in oven.
For self-cleaning ovens:
- CAUTION: DO NOT LEAVE FOOD OR COOKING UTENSILS, ETC., IN OVEN DURING THE PYROLYTIC SELF- CLEANING MODE OF OPERATION.
- Do Not Clean Door Gasket - The door gasket is essential for a good seal. Care should be taken not to rub, damage, or move the gasket.
- Do not use a protective coating to line the oven and do not use commercial oven cleaner unless Certified for use in a self- cleaning oven.
- Clean Only Parts Listed.
- Before Self- Cleaning the Oven - Remove broiler pan and other utensils, and wipe off all excessive spillage.
For smart enabled ranges and ovens:
- Remote Operation - This appliance is configurable to allow remote operation at any time. Do not store any flammable materials or temperature sensitive items inside, on top or near surface units of the appliance.
IMPORTANT SAFETY INSTRUCTIONS
When using electrical appliances basic safety precautions should be followed, including the following:
WARNING: To reduce the risk of burns, electric shock, fire, injury to persons, or exposure to excessive microwave energy:
- Read all instructions before using the appliance.
- Read and follow the specific "PRECAUTIONS TO AVOID POSSIBLE EXPOSURE TO EXCESSIVE MICROWAVE ENERGY" found in this manual.
- This appliance must be grounded. Connect only to properly grounded outlet. See "GROUNDING INSTRUCTIONS" found in this section.
- Install or locate this appliance only in accordance with the provided Installation Instructions.
- Some products such as whole eggs and sealed containers - for example, closed glass jars - are able to explode and should not be heated in this oven. Use this appliance only for its intended use as described in the manual. Do not use corrosive chemicals or vapors in this appliance. This type of oven is specifically designed to heat, cook, or dry food. It is not designed for industrial or laboratory use.
- As with any appliance, close supervision is necessary when used by children.
- Do not operate this appliance if it has a damaged cord or plug, if it is not working properly, or if it has been damaged or dropped.
- This appliance should be serviced only by qualified service personnel. Contact nearest authorized service facility for examination, repair, or adjustment.
- Do not cover or block any openings on the appliance.
- Do not store this appliance outdoors. Do not use this product near water - for example, near a kitchen sink, in a wet basement, near a swimming pool, or similar locations. Do not immerse cord or plug in water.
- Keep cord away from heated surfaces.
- Do not let cord hang over edge of table or counter.
- Do not use replacement parts that have not been recommended by the manufacturer (e.g. parts made at home using a 3D printer).
- See door surface cleaning instructions in the Microwave Oven and Maintenance Care section.
- To reduce the risk of fire in the oven cavity:
- Do not overcook food. Carefully attend appliance when paper, plastic, or other combustible materials are placed inside the oven to facilitate cooking.
- Remove wire twist- ties from paper or plastic bags before placing bag in oven.
- If materials inside the oven ignite, keep oven door closed, turn oven off, and disconnect the power cord, or shut off power at the fuse or circuit breaker panel.
- Do not use the cavity for storage purposes. Do not leave paper products, cooking utensils, or food in the cavity when not in use.
- Liquids, such as water, coffee, or tea are able to be overheated beyond the boiling point without appearing to be boiling. Visible bubbling or boiling when the container is removed from the microwave oven is not always present. THIS COULD RESULT IN VERY HOT LIQUIDS SUDDENLY BOILING OVER WHEN THE CONTAINER IS DISTURBED OR A UTENSIL IS INSERTED INTO THE LIQUID.
For microwave ovens not intended for use above another heating appliance:
- Do not operate any heating or cooking appliance beneath this appliance.
- Do not mount unit over or near any portion of a heating or cooking appliance.
- Do not mount over a sink.
- Do not store anything directly on top of the appliance surface when the appliance is in operation.
PRECAUTIONS TO AVOID POSSIBLE EXPOSURE TO EXCESSIVE MICROWAVE ENERGY
(a) Do not attempt to operate this oven with the door open since open- door operation can result in harmful exposure to microwave energy. It is important not to defeat or tamper with the safety interlocks.
(b) Do not place any object between the oven front face and the door or allow soil or cleaner residue to accumulate on sealing surfaces.
(c) Do not operate the oven if it is damaged. It is particularly important that the oven door close properly and that there is no damage to the: (1) Door (bent), (2) Hinges and latches (broken or loosened), (3) Door seals and sealing surfaces
(d) The oven should not be adjusted or repaired by anyone except properly qualified service personnel.
Internet Connectivity Guide for Connected Appliances Only
IMPORTANT: Proper installation of your appliance prior to use is your responsibility. Be sure to read and follow the installation instructions that came with your appliance.
Connectivity requires Wi- Fi and account creation. App features and functionality are subject to change. Data rates may apply. Once installed, launch the app. You will be guided through the steps to set up a user account and to connect your appliance.
You Will Need:
- A home wireless router supporting Wi- Fi, 2.4 Ghz with WPA2 security. If you are unsure of your router's capabilities, refer to the router manufacturer's instructions.
- The router to be on and have a live internet connection.
- The 10- character SAID code for your appliance. The SAID code is either printed on a label on the appliance or found on the LCD screen.
Federal Communications Commission (FCC) Compliance Notice
This device complies with Part 15 of the FCC Rules. Operation is subject to the following two conditions:
- This device may not cause harmful interference, and
- This device must accept any interference received, including interference that may cause undesired operation.
Changes or modifications not expressly approved by the party responsible for compliance could void the user's authority to operate the equipment.
Industry Canada (IC) Compliance Notice
This Device complies with Industry Canada License- exempt RSS standard(s). Operation is subject to the following two conditions:
- This device may not cause interference.
- This device must accept any interference, including interference that may cause undesired operation of the device.
Under Industry Canada regulations, this radio transmitter may only operate using an antenna of a type and maximum (or lesser) gain approved for the transmitter by Industry Canada. To reduce potential radio interference to other users, the antenna type and its gain should be so chosen that the equivalent isotropically radiated power (e.i.r.p.) is not more than that necessary for successful communication.
To comply with FCC and Industry Canada RF radiation exposure limits for general population, antenna(s) used for this transmitter must be installed such that a minimum separation distance of 20cm is maintained between the radiator (antenna) and all persons at all times and must not be co-located or operating in conjunction with any other antenna or transmitter.
If this equipment does cause harmful interference to radio or television reception, which can be determined by turning the equipment off and on, the user is encouraged to try to correct the interference by one of the following measures:
- Reorient or relocate the receiving antenna.
- Increase the separation between the equipment and receiver.
- Connect the equipment into an outlet on a circuit different from that to which the receiver is connected.
- Consult the dealer or an experienced radio/TV technician for help.
MICROWAVE OVEN MAINTENANCE AND CARE
General Cleaning
IMPORTANT: Before cleaning, make sure all controls are off and the oven and cooktop are cool. Always follow label instructions on cleaning products.
Soap, water, and a soft cloth or sponge are suggested first, unless otherwise noted.
STAINLESS STEEL AND BLACK STAINLESS STEEL (on some models)
NOTE: To avoid damage to stainless steel surfaces, do not use soap- filled scouring pads, abrasive cleaners, Cooktop Cleaner, steel- wool pads, gritty washcloths or abrasive paper towels. Damage may occur to stainless steel surfaces, even with one- time or limited use.
Rub in direction of grain to avoid damaging.
Cleaning Method:
- Aftersh® Stainless Steel Cleaner Part Number W10355016 (not included) or aftersh® Stainless Steel Cleaning Wipes Part Number W10355049 (not included): See the Quick Start Guide for ordering information.
- Liquid detergent or all- purpose cleaner: Rinse with clean water and dry with soft, lint- free cloth
- Vinegar for hard water spots.
EXTERIOR PORCELAIN ENAMEL SURFACES (on some models)
Food spills containing acids, such as vinegar and tomato, should be cleaned as soon as the entire oven is cool. These spills may affect the finish.
Cleaning Method:
- Glass cleaner, mild liquid cleaner or nonabrasive scrubbing pad: Gently clean around the model/serial/rating plate because scrubbing may remove numbers.
- Aftersh® Kitchen and Appliance Cleaner Part Number W10355010 (not included): See the Quick Start Guide for ordering information.
MICROWAVE OVEN DOOR AND EXTERIOR
The area where the oven door and frame touch when closed should be kept clean.
Cleaning Method:
- Mild, nonabrasive soaps and detergents: Rinse with clean water. and dry with soft, lint- free cloth.
- Glass cleaner and paper towels or nonabrasive plastic scrubbing pad: Apply glass cleaner to towel, not directly to surface.
CONTROL PANEL AND OVEN DOOR EXTERIOR
To avoid damage to the control panel, do not use abrasive cleaners, steel- wool pads, gritty washcloths or abrasive paper towels.
The area where the oven door and frame touch when closed should be kept clean.
Cleaning Method:
- Glass cleaner and a soft cloth or sponge or nonabrasive plastic scrubbing pad: Apply glass cleaner to soft cloth or sponge, not directly on panel/Surface.
- Aftersh® Kitchen and Appliance Cleaner Part Number W10355010 (not included): See the Quick Start Guide for ordering information.
OVEN DOOR INTERIOR
Cleaning Method:
Self- Cleaning cycle: For optimal door cleaning result, wipe away any deposits with a damp sponge before running cycle.
OVEN CAVITY
Do not use oven cleaners.
Food spills should be cleaned when oven cools. At high temperatures, foods react with porcelain and staining, etching, pitting or faint white spots can result.
Cleaning Method:
Self- Cleaning cycle: See "Self- Cleaning Cycle" first. Remove racks or they will discolor and become harder to slide. If this happens, a light coating of vegetable oil applied to the rack guides will help them slide.
MICROWAVE OVEN CAVITY
To avoid damage to microwave oven cavity, do not use soap- filled scouring pads, abrasive cleaners, steel- wool pads, gritty washcloths, or some paper towels.
On stainless steel models, rub in direction of grain to avoid damaging.
The area where the oven door and frame touch when closed should be kept clean.
Cleaning Method:
Average Soil
- Mild, nonabrasive soaps and detergents: Rinse with clean water and dry with soft, lint- free cloth.
Heavy Soil
- Mild, nonabrasive soaps and detergents:
Heat 1 cup (250 mL) of water for 2 to 5 minutes in oven. Steam will soften soil. Rinse with clean water and dry with soft, lint- free cloth.
Odors
- Lemon juice or vinegar:
- Heat 1 cup (250 mL) of water with 1 tablespoon (15 mL) of either lemon juice or vinegar for 2 to 5 minutes in oven.
OVEN RACKS
- Steel- wool pad
- Dishwasher
- For racks that have discolored and are harder to slide, a light coating of vegetable oil applied to the rack guides will help them slide.
METALLIC PAINT (on some models)
Do not use abrasive cleaners, cleaners with bleach, rust removers, ammonia or sodium hydroxide (lye) because paint surface may stain.
MICROWAVE OVEN CEILING
The broil element does not need cleaning since the intense heat will burn off any food spatters. However, the ceiling above the broil element may need regular cleaning.
Cleaning Method: Warm water, mild detergent, and a sponge.
- Push the fastening thread gently towards the back of the ceiling and then lower it to release the broil element.
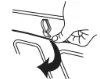
- Lower the front of the broil element to access the ceiling for cleaning.
- Raise broil element back up and return the fastening thread back to its original location.
Always return the broil element to the cooking position after cleaning.
+POWERED ATTACHMENTS (on some models)
To avoid damage to the nonstick surfaces, do not use abrasive cleaners, steel- wool pads, gritty washcloths, or abrasive paper towels. Food spills should be cleaned when the +Powered Attachment cools.
Do not soak or immerse the Heating Element.
Cleaning Method:
- Soap, water, and a soft cloth or sponge:
Wipe the Heating Element when it is cool. All attachments can be cleaned with soap, water, and a soft cloth or sponge. - Dishwasher:
The Base Pan, +Grill Attachment, +Baking Stone Attachment, and +Steamer Attachment are dishwasher- safe. - Affresh Cooktop Cleaner:
Stubborn soils on the +Baking Stone Attachment can be cleaned with baking soda and a non scratch heavy duty scrub sponge. Rub cream into surface with a damp paper towel or soft cloth. Continue rubbing until white film disappears.
See the Smart Oven +Powered Attachments User Instructions for more detailed instructions.
TURNTABLE
Replace turntable immediately after cleaning. Do not operate the microwave oven without the turntable in place.
Cleaning Method:
- Mild cleanser and scouring pad
- Dishwasher
CRISPER PAN
To avoid damage to browning pan, do not immerse or rinse with water while the crisper pan is hot. Do not use steel- wool pads.
Cleaning Method:
- Warm water, mild detergent, and a sponge. Heavily soiled areas can be cleaned with a scouring pad and mild cleanser Dishwasher
BAKING TRAY
- Dishwasher
KITCHENAIDTM STEAMER VESSEL
- Dishwasher
TURNTABLE SUPPORT AND ROLLERS, HUB, CRISPER PAN HANDLE
- Dishwasher
Self-Cleaning Cycle
IMPORTANT: The health of some birds is extremely sensitive to the fumes given off during the Self- Cleaning cycle. Exposure to the fumes may result in death to certain birds. Always move birds to another closed and well- ventilated room.
Self- clean the oven before it becomes heavily soiled. Heavy soil results in longer cleaning and more smoke.
Keep the kitchen well- ventilated during the Self- Cleaning cycle to help get rid of heat, odors, and smoke.
Do not block the oven vent(s) during the Self- Cleaning cycle. Air must be able to move freely. See the "Oven Vents" section in the Quick Start Guide.
Do not clean, rub, damage, or move the oven door gasket. The door gasket is essential for a good seal.
Prepare the Oven
- Remove the broiler pan, grid, cookware and bakeware, and, on some models, the temperature probe from the oven.
- Remove oven racks to keep them shiny and easy to slide. See "General Cleaning" section for more information.
- Remove any foil from the oven because it may burn or melt, damaging the oven.
- Hand clean inside door edge and the 1 1/2" (3.8 cm) area around the inside oven cavity frame, being certain not to move or bend the gasket. This area does not get hot enough during self- cleaning to remove soil. Do not let water, cleaner, etc., enter slots on door frame. Use a damp cloth to clean this area.
- Wipe out any loose soil to reduce smoke and avoid damage. At high temperatures, foods react with porcelain. Staining, etching, pitting or faint white spots can result. This is normal and will not affect cooking performance.
How the Cycle Works
IMPORTANT: The heating and cooling of porcelain on steel in the oven may result in discoloring, loss of gloss, hairline cracks and popping sounds.
The Self- Cleaning Cycle uses very high temperatures, burning soil to a powdery ash.
Suggested clean times are 3 hours for light soil, 4 hours for medium soil, and 5 hours for heavy soil (includes a 30 minute cool- down time).
Once the oven has completely cooled, remove ash with a damp cloth. To avoid breaking the glass, do not apply a cool damp cloth to the inner door glass before it has completely cooled.
The oven lights will not work during the Self- Cleaning cycle.
On double- oven models, only one oven can self- clean at a time. If one oven is self- cleaning, the other oven cannot be set or turned on.
NOTE: The oven has a two- speed cooling fan motor. During the Self- Cleaning cycle, the fan(s) will operate at its highest speed to increase airflow to better exhaust the hotter air through the oven vent(s). An increase in noise may be noticeable during and after the Self- Cleaning cycle until the oven cools.
To Start Self-Cleaning
Before Self- Cleaning, make sure the door is closed completely or it will not lock and the cycle will not begin. When the oven is locked, the doors of the oven cannot be opened. To avoid damage to the doors, do not force the doors open when the oven is locked.
- Touch the Tools keypad.
- Select the Self Clean icon. (On double-oven models): Select Upper Cavity or Lower Cavity.
- Select type of Self-Cleaning:
Steam: 1 hour: Clean up after everyday light spills using lower heat and 1 1/4 cups (295.74 mL) of water.
High temp: 4 hours: 3 hour cycle and 1 hour cooling.
High temp: 5 hours: 4 hour cycle and 1 hour cooling.
High temp: 6 hours: 5 hour cycle and 1 hour cooling. - Follow the prompts on the oven display to prepare the oven.
- Select START to begin the cleaning process.
OR
Select DELAY START to set a delayed Self- Cleaning cycle. See the "To Delay Start Self- Cleaning Cycle" Section. The oven doors will automatically lock.
NOTE: It may take a couple moments for the oven door to automatically lock after starting the Self- Clean Cycle. When the self cleaning cycle is complete and the oven cools, the oven doors will unlock. - When the oven is completely cooled, remove ash with a damp cloth.
To Delay Start of Self-Cleaning
Follow steps 1 through 4 above, then:
- Select DELAY START or DELAY.
- Select the start time of when the Self-Cleaning cycle should begin by scrolling from left to right.
- Select START DELAY. The oven doors will automatically lock after the Delay Start countdown. When the Self-Cleaning cycle is complete and the oven cools, the oven doors will unlock.
- When the oven is completely cooled, remove ash with a damp cloth.
To Stop Self-Cleaning anytime
Touch the Oven Cancel Keypad for single oven models, or the keypads for double oven models. If the oven temperature is too high, the door will remain locked. It will not unlock until the oven cools.
Steam Clean (on some models)
The Steam Clean feature is designed for light oven cavity bottom cleaning on models that have hidden bake in the oven.
Do not use oven cleaners.
Allow the oven to cool to room temperature before using the Steam Clean feature. If your oven cavity is above 200°F (93°C) the Steam Clean feature will not activate until it cools down.
Remove all racks and accessories from the oven cavity.
For best results, use 10 oz (295.7 mL) of distilled or filtered water.
The Steam Clean feature will take approximately 1 hour. A tone will sound at the end of the cycle.
IMPORTANT: Because the water in the oven bottom is hot, do not open the oven door during the Steam Clean cycle.
Touch the Oven Cancel keypad for single oven models and the Upper/Lower keypads for double oven models at any time to end the cycle. The display will return to the time of day.
Helpful Hints
- Once the Steam Clean cycle is complete and the oven is completely cooled, remove all remaining water in the bottom of the oven with a sponge or cloth.
- Wipe any remaining moisture from the oven door interior, oven cavity interior sides, and cooktop.
- Use a soft brush or nylon scrubber to wipe the oven interior. This may help with more stubborn stains.
- It is recommended to use distilled or filtered water, as tap water may leave mineral deposits on the oven bottom. Use a cloth soaked with vinegar or lemon juice to remove any mineral deposits that may be left after the Steam Clean cycle.
- If the oven is heavily soiled, use the Self- Cleaning cycle. The Steam Clean cycle may be used first to eliminate most of the debris, resulting in a more effective self- cleaning.
To Steam Clean:
- Open the oven door of the selected oven and remove all racks and accessories from the oven cavity.
- Pour 10 oz (295.7 mL) of distilled or filtered water into the oven bottom. Then close the oven door.
- Touch the Tools keypad. On double-oven models: Select Upper Cavity or Lower Cavity.
- Select STEAM CLEAN.
- Select START.
- After approximately 1 hour, a tone will sound to signal the end of the cycle. Touch the Oven Cancel keypad for single oven models and the Upper/Lower keypad for double oven models to clear the display.
- When the oven is completely cooled, remove any excess water with a sponge or cloth and wipe down oven interior. If needed, use a non-scratch copper scrubbing pad to remove stubborn soils.
INSTALLATION INSTRUCTIONS
REQUIREMENTS
Tools and Parts
Gather the required tools and parts before starting installation. Read and follow the instructions provided with any tools listed here
Tools Needed
- Phillips screwdriver
- Measuring tape
- Hand or electric drill (for wall cabinet installations)
- 1" (2.5 cm) drill bit (for wall cabinet installations)
- Level
- Flat-blade screwdriver
Parts Supplied
- #8-14 x 3/4" (1.9 cm) screws (2)
- #8-18 x 3/8" (9.5 mm) Phillips head screws - bottom vent shield (2)
- #8-18 x 3/8" (9.5 mm) Phillips head screws - bottom vent trim (2)
- #8-18 x 3/8" (9.5 mm) Hex head screws - plastic feet (4)
- Rear feet (2)
- Front feet (2)
- Bottom vent shield
- Bottom vent trim
Parts Needed
- Deflector Kit (on some models) (for ovens installed above warming drawer or for ovens installed using flush installation cabinetry): See the Online Ordering Information section of your Quick Start Guide.
Check local codes. Check existing electrical supply. See the "Electrical Requirements" section.
It is recommended that all electrical connections be made by a licensed, qualified electrical installer
NOTE: Be sure to purchase only whirlpool factory-certified parts and accessories for your appliance. Your installation may require additional parts. To order, refer to the contact information referenced in your Quick Start Guide.
Location Requirements
IMPORTANT: Observe all governing codes and ordinances.
- Cabinet opening dimensions that are shown must be used. Given dimensions provide minimum clearance with oven.
- Recessed installation area must provide complete enclosure around the recessed portion of the oven.
- Grounded electrical supply is required. See "Electrical Requirements" section.
- Electrical supply junction box should be located 3" (7.6 cm) maximum below the support surface when the oven is installed in a wall cabinet. A 1" (2.5 cm) minimum diameter hole should have been drilled in the right rear or left rear corner of the support surface to pass the appliance cable through to the junction box.
- Oven support surface must be solid, level and flush with bottom of cabinet cutout. Floor must be able to support a total weight (microwave and built-in oven) of 253 lbs (115 kg) for 27" (68.6 cm) models or 280 lbs (127 kg) for 30" (76.2 cm) models.
IMPORTANT: To avoid damage to your cabinets, check with your builder or cabinet supplier to make sure that the materials used will not discolor, delaminate or sustain other damage. This oven has been designed in accordance with the requirements of UL and CSA International and complies with the maximum allowable wood cabinet temperatures of 194°F (90°C).
Standard Installation
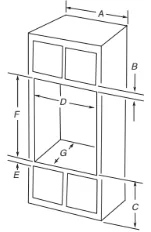
A. 30" (76.2 cm) minimum cabinet width
B. 1 1/4" (3.2 cm) top of cutout to bottom of upper cabinet door
C. 19 1/4" (48.9 cm) bottom of cutout to floor is recommended.
7.5"- 19 1/4" (19.1- 48.9 cm) bottom of cutout to floor is acceptable.
D. 28 1/2" minimum (72.4 cm) cutout width
E. 1 1/2" (3.8 cm) minimum bottom of cutout to top of cabinet door
F. 41 5/16" (105 cm) recommended cutout height
G. 24" (60.7 cm) cutout depth
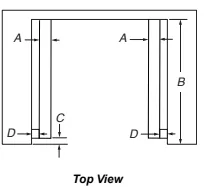
Flush Installation
A 25" (63.5 cm) minimum cutout depth is required.
These dimensions will result in a 1/4" (6 mm) reveal on the top, a 1/4" (6 mm) reveal on the sides, and a 1/8" (3 mm) reveal on the bottom of the wall oven. Top and bottom gaps are not required for installation.
The front face of the cleats and platform will be visible and should be treated as a finished surface.

A. 3/4" (1.9 cm) top cleat*
B. 30 1/4" (76.8 cm) minimum width of flush inset cutout
C. 25 7/8" (65.7 cm) minimum width of opening
D. 43" (109.2 cm) minimum height of flush inset cutout
E. 42 1/2" (107.3 cm) recommended cutout height
F. 11/16" (1.7 cm) side cleat*
G. 1/4" (0.6 cm) recommended with foot. 15/16" to 1 5/16" (2.3 cm to 3.5 cm) allowable without foot.
H. Recommended junction box location
I. 4 5/8"- 19 1/4" (11.7- 48.9 cm) bottom of cutout to floor
J. 25" (63.5 cm) minimum depth of cutout
*Cleats and spacers must be recessed 1 3/8 (3.5 cm) from the front of the cabinet.
A. 2" (5.1 cm) spacer the entire depth of the cutout"
B. 25" (63.5 cm) depth of cutout
C. 1 1/2" (3.5 cm) recess from front of cabinet
D. 11/16" (1.7 cm) side cleat"
"Cleats and spacers must be recessed 1 3/8 (3.5 cm) from the front of the cabinet.
Electrical Requirements
If codes permit and a separate ground wire is used, it is recommended that a qualified electrical installer determine that the ground path and the wire gauge are in accordance with local codes.
Check with a qualified electrical installer if you are not sure the oven is properly grounded.
This oven must be connected to a grounded metal, permanent wiring system.
Be sure that the electrical connection and wire size are adequate and in conformance with the National Electrical Code, ANSI/NFPA 70- latest edition or CSA Standards C22.1- 94, Canadian Electrical Code, Part 1 and C22.2 No. O- M91- latest edition, and all local codes and ordinances.
A copy of the above code standards can be obtained from:
National Fire Protection Association 1 Batterymarch Park Quincy, MA 02169- 7471 CSA International 8501 East Pleasant Valley Road Cleveland, OH 44131- 5575
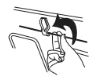
Electrical Connection
To properly install your oven, you must determine the type of electrical connection you will be using and follow the instructions provided for it here.
- Oven must be connected to the proper electrical voltage, amperage, and frequency as specified on the model/serial/rating plate. See the following illustration.
A. Model/serial/rating plate - Models rated from 7.3 to 9.6 kW at 240 V (6.3 to 8.3 kW at 208 V) require a separate 40 A circuit. Models rated from 4.9 to 7.2 kW at 240 V (4.3 to 6.2 kW at 208 V) require a separate 30 A circuit. Models rated at 4.8 kW and below at 240 V (4.2 kW and below at 208 V) require a separate 20 A circuit.
- A circuit breaker is recommended.
- Connect directly to the fused disconnect (or circuit breaker box) through flexible, armored or nonmetallic sheathed, copper cable (with grounding wire). See the “Make Electrical
Connection” section. - Flexible conduit from the oven should be connected directly to the junction box.
- Do not cut the conduit. The length of conduit provided is for serviceability of the oven.
- A UL listed or CSA approved conduit connector must be provided.
- If the house has aluminum wiring, follow the procedure below:
Connect the aluminum wiring using special connectors and/or tools designed and UL listed for joining copper to aluminum.
Follow the electrical connector manufacturer’s recommended procedure. Aluminum/copper connection must conform with local codes and industry accepted wiring practices.
Be sure that the electrical connection and wire size are adequate and in conformance with the National Electrical Code, ANSI/ NFPA 70-latest edition or CSA Standards C22.1-94, Canadian Electrical Code, Part 1 and C22.2 No. O-M91-latest edition, and all local codes and ordinances. A copy of the above code standards can be obtained from: National Fire Protection Association 1 Batterymarch Park Quincy, MA 02169-7471 CSA International 8501 East Pleasant Valley Road Cleveland, OH 44131-5575.
INSTALLATIONS
Prepare Built-In Oven
- Decide on the final location for the oven. Avoid drilling or cutting into house wiring during installation.
- To avoid floor damage, set the oven onto cardboard prior to installation. Do not use handle or any portion of the front frame for lifting.
- Remember to remove bottom vent from the foam packing on top of oven.
- Remove the shipping materials and tape from the oven. Remember to keep the corner posts and other materials that may be needed for installation.
- Remove the hardware package from inside the bag containing literature.
- Remove and set aside racks and other parts from inside the oven.
- Move oven and cardboard close to the oven's final location.
Remove Oven Door(s)
IMPORTANT: Use 2 hands to remove oven door. For double ovens, repeat the process for each door.
- Prior to removing the oven door, prepare a surface where you will place it. This surface should be flat and covered with a soft blanket, or use the corner posts from your packaging material.
- Fully open the oven door.
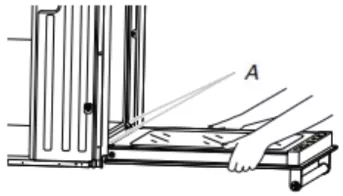
A. Door hinges - Locate the oven door hinge locks in both corners of the oven door, and rotate the hinge locks toward the oven door to the unlocked position. If the door hinge lock is not rotated fully (see unlocked position in illustration), the door will not remove properly.
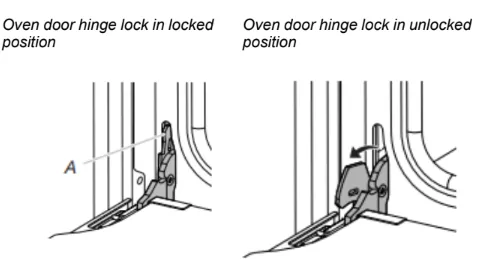
A. Grip here to rotate - Gently start to close the door. The door will stop at a partially closed position.

- Using 2 hands, grasp the edges of the oven door. Close the oven door slightly past the stop position to take the weight off of the door hinges, and then pull the oven door up.
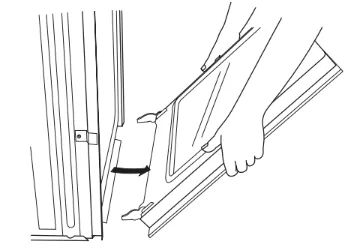
- Pull the oven door toward you, and then remove. You may need to gently shift door from side to side as you pull.
- Set the oven door aside on the prepared covered work surface with the oven door resting on its handle.
- To continue with the oven installation, go to the "Positioning Oven Feet for Multiple Cabinet Cutout Heights" section.
Make Electrical Connection
IMPORTANT: For Flush installation before making electrical connection, the oven feet or spacers need to be installed to allow a microwave/oven combination to be installed in a recommended cutout height. Please contact service for feet to be shipped to you free of charge.
This oven is manufactured with a neutral (white) power supply wire and a cabinet- connected green (or bare) ground wire.
- Disconnect power.
- Feed the flexible conduit from the oven through the opening in the cabinet.
- Remove junction box cover, if it is present.
- Install a UL listed or CSA approved conduit connector to the junction box.
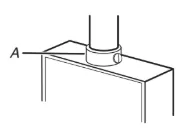
A. UL listed or CSA approved conduit connector - Route the flexible conduit from the oven to the junction box through a UL listed or CSA approved conduit connector.
- Tighten screws on conduit connector.
- See "Electrical Connection Options Chart" to complete installation for your type of electrical connection.
Electrical Connection Options Chart
| If your home has: | Go to section: |
|
4-wire
|
4-Wire Cable from Home Power Supply |
|
3-wire
|
3-Wire Cable from Home Power Supply |
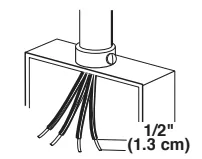
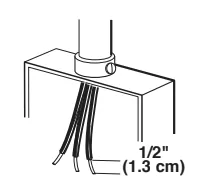
4-Wire Cable from Home Power Supply
IMPORTANT: Use the 4- wire cable from home power supply in the U.S. where local codes do not allow grounding through neutral, New Branch circuit installations (1996 NEC), mobile homes and recreational vehicles, new construction and in Canada.
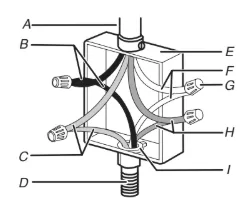
A. Cable from home power supply
B. Black wires
C. Red wires
D. 4-wire flexible conduit from oven
E. Junction box
F. White wires
G. UL listed wire connectors
H. Green (or bare) ground wires
I. UL listed or CSA approved conduit connector
- Connect the 2 black wires (B) together using a UL listed wire connector.
- Connect the 2 red wires (C) together using a UL listed wire connector.
- Connect the 2 white wires (F) together using a UL listed wire connector.
- Connect the green (or bare) ground wire (H) from the oven cable to the green (or bare) ground wire (in the junction box) using a UL listed wire connector.
- Install junction box cover.
3-Wire Cable from Home Power Supply - U.S. Only
IMPORTANT: Use the 3- wire cable from home power supply where local codes permit a 3- wire connection.
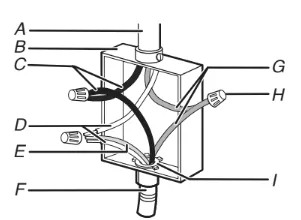
A. Cable from home power supply
B. Junction box
C. Black wires
D. White wires
E. Green (or bare) ground wire (from oven)
F. 4- wire flexible conduit from oven
G. Red wires
H. UL listed wire connectors
I. UL listed or CSA approved conduit connector
- Connect the 2 black wires (C) together using a UL listed wire connector.
- Connect the 2 white wires (D) and the green (or bare) ground wire (of the oven cable) using a UL listed wire connector.
- Connect the 2 red wires (G) together using a UL listed wire connector.
- Install junction box cover.
Install Oven
- Using two or more people, lift oven partially into cabinet cutout. Use the oven opening as an area to grip.
NOTE: Push against seal area of oven front frame when pushing oven into cabinet. Do not push against outside edges.
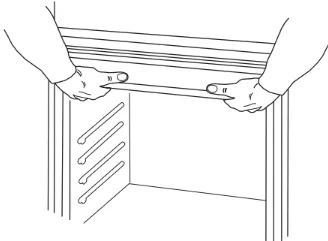
- Push against the seal area of the front frame to push the oven into the cabinet until the back surface of the front frame touches the front wall of the cabinet.
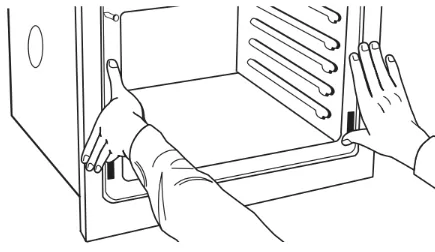
- Push oven completely into cabinet and center oven into cabinet cutout.
- Securely fasten the oven to the cabinet using the #8-14 x 3/4" screws provided. Insert the screws through hole in black trim aligning with hole in oven frame. Do not overtighten screws.
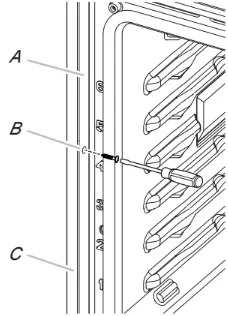
A. Oven frame
B. Side trim hole
C. Side trim piece - The bottom vent trim and bottom vent shield are shipped in the foam packing at the top of the oven.
- Align bottom vent shield tab (B) with oven frame (A) as shown.
- Using one #8-18 x 3/8" (9.5 mm) screw (C) on each side of the bottom vent shield tab (B), fasten the vent shield securely to the oven frame (A).
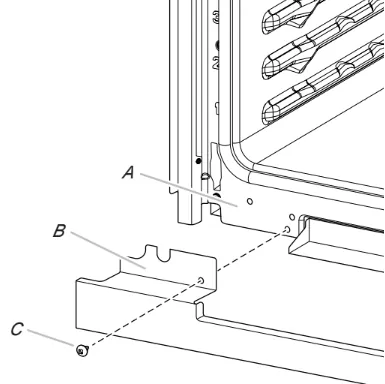
A. Oven frame
B. Bottom vent shield tab
C. #8-18 x 3/8" (9.5 mm) screws
- After the bottom vent shield is installed.
- Align the bottom vent trim tab (B) with the oven frame (A) as shown.
- Using one #8- 18 x 3/8" (9.5 mm) screw (C) on each side of the trim tab (B), align the top edge of the bottom vent trim tab (E) with the hinge receiver edge (D) as shown.
- Fasten the bottom vent trim securely to the oven frame (A).
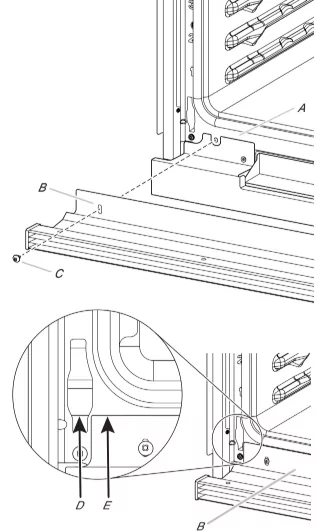
A. Oven frame
B. Trim tab
C. #8-18 x 3/8" (9.5 mm) screw
D. Hinge receiver edge
E. Bottom Vent Trim Tab top edge
- Replace the oven racks.
- Replace the oven door. See the "Replace Oven Door(s) section.
- Check that the door is free to open and close. If it is not, repeat the removal and installation procedures. See the "Prepare Built-In Oven" section.
- Repeat for lower oven door.
IMPORTANT: For proper oven operation, check that the gap between bottom trim of the door and bottom vent trim is at least 1/4" (6.4 mm). - Reconnect power.
- The display panel will light briefly, and "PF" may appear in the display.
- If the display panel does not light, refer the Warranty.
- If F9E0 error code is encountered upon powering up the unit, the appliance is wired incorrectly at the Junction Box or Electrical Panel. Contact a qualified electrician to verify the home electrical supply and the hardware connection at the Junction Box or Electrical Panel (See the Electrical Connection Options section).
Positioning Oven Feet
The oven feet need to be installed to allow the microwave/oven combination to be installed in a Flush Installation or in Standard Installations where the cutout height is 42 1/2 (107.9 cm) or more.
NOTE: Do not remove the spacers.
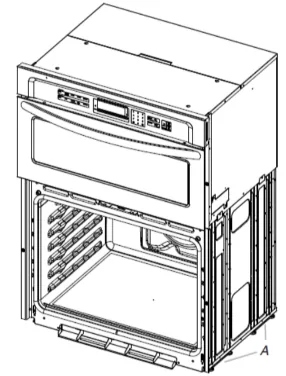
A. Spacers
- Using 2 or more people, place the on its back on a covered surface.
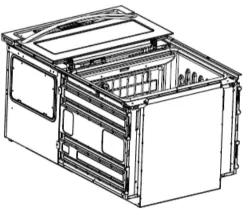
- Install a foot on the left rear spacer using a #8-18 x 3/8" (9.5 mm) screw.
NOTE: Position the foot so the long side of the foot is facing toward the top of the oven.
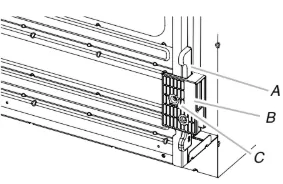
A. Spacers
B. Foot
C. #8-18 x 3/8" (9.5 mm) screw. - In the same manner, install a foot on the right rear of the oven.
- Install a front foot on the left front spacer using a #8-18 x 3/8" (9.5 mm).
NOTE: Position the foot so the long side of the foot is facing toward the inside of the oven.
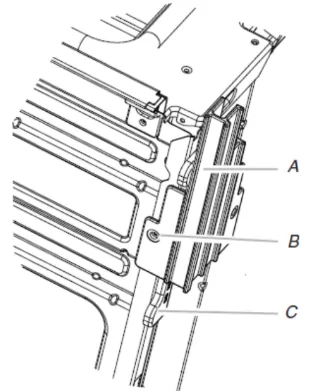
A. Front foot
B. #8-18 x 3/8" (9.5 mm) screw.
C. Spacer - In the same manner, install a front foot on the right front of the oven.
- Using 2 or more people, place the oven in its upright position.
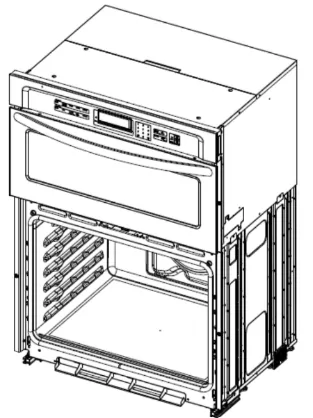
- Go to the "Make Electrical Connection" section in the Installation Instructions provided with your built-in oven.
Install Deflector Kit
On single and double oven models installed above a warming drawer or for ovens installed using flush installation cabinetry, a deflector kit must be installed. See the "Tools and Parts" section for information on ordering.
Parts Supplied in Deflector Kit
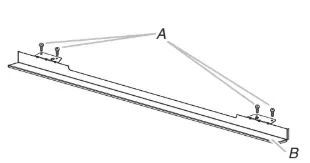
A. Phillips head screws (4), only 2 screws for 27" (68.6 cm) size
B. Deflector (1)
- Install the deflector (B) to the lower vent piece (D) using two #8-18 x 1/4" (6.4 mm) screws on each side.
NOTE: On 27" (68.6 cm) models, only one #8-18 x 1/4" (6.4 mm) screw is used on each side.
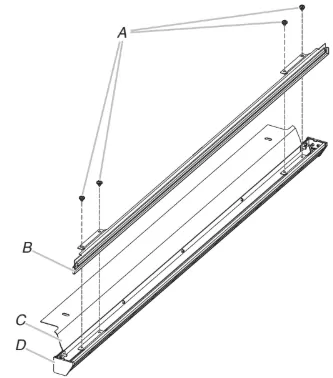
A. #8-18 x 1/4" (6.4 mm) screws
B. Deflector
C. Upper vent piece
D. Lower vent piece - Align vent tab (B) with oven frame (A) as shown in the following illustration.
- Using one #8-18 x 3/8" (9.5 mm) screw (E) on each side of the vent tab (B), fasten the vent securely to the oven.
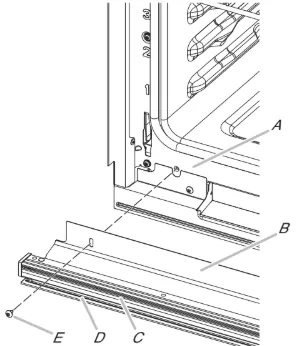
A. Oven frame
B. Vent tab
C. Oven vent
D. Deflector
E. #8-18 x 3/8" (9.5 mm) screw
Replace Oven Door(s)
- Using two hands, grasp side edges of door at the midpoint. Face the oven cavity.
- Locate the slots on each side of the oven cavity for the door hinge locks.
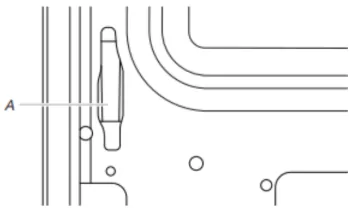
A. Slot in the oven cavity for door hinge lock - Using 2 hands, grasp the edges of the oven door. At a 45° angle, insert the hinges at the same time, and push the oven door into the oven cavity slot to replace. You may need to gently shift the door from side to side as you push.
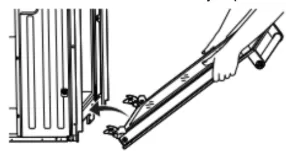
- Make sure the door hinge notch is engaged on the bottom of the oven cavity slot.
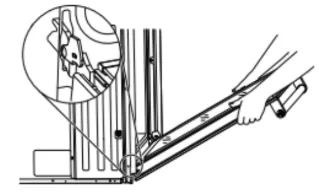
IMPORTANT: Do not close the door at this step or damage may occur to the door hinge. - Lower the oven door to the fully open position. If the oven door does not open to a full 90°, repeat steps 1 through 3.
- Locate the oven door hinge locks in the corners of the oven door, and rotate the hinge locks toward the oven cavity to the locked position.
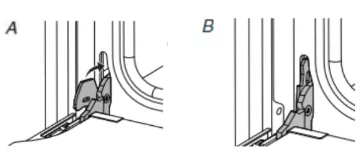
A. Unlocked position
B. Locked position - After the door hinges have been locked, gently swing the door upward to close. The door should not be forced closed.
- When the hinges are properly installed and the door is closed, there should be an even gap between the door and the control panel. If one side of the oven door is lower than the other, the hinge on that side is not properly installed.
Complete Installation
- Check that all parts are now installed. If there is an extra part, go back through the steps to see which step was skipped.
- Check that you have all of your tools.
- Dispose of/recycle all packaging materials.
- For oven cleaning, read the "Oven Maintenance and Care" section.
Check Operation of Single and Double Ovens
- Turn on power.
- At first use, set up the languages, clock, and any other preferences, if available. For more information, read the online "Control Guide".
- Start a broil cycle. NOTE: Odors and smoke are normal when the oven is used the first few times.
- Wait 5 minutes, then check for heat.
If Oven(s) Does Not Operate, Check the Following:- Household fuse is intact and tight; or circuit breaker has not tripped.
- Electrical supply is connected.
- See the online "Troubleshooting".
- Place the SatinGlideTM Roll-Out Extension Rack for Smart Oven+Attachments in the lowest rack position in the unit to make sure the correct accessory rack is on the bottom.
- Press UPPER CANCEL/LOWER CANCEL on double ovens, or press CANCEL on single ovens.
If you need Assistance or Service: Please refer to the Quick Start Guide for contact information.
Check Operation of Microwave Oven
- Fill a microwave-safe container with 1 cup (250 mL) of water and place container inside microwave oven. Close door firmly.
- Press MICROWAVE.
- Select Cooking Method.
- Set microwave oven cook time to 2 minutes.
- Press START. The interior microwave oven light should be on, and the remaining cooking time should be displayed.
When display reads "1:00", open microwave oven door. The microwave should stop cooking. Close door firmly. The interior microwave oven light should turn off. - Press START. Microwave oven should begin cooking, and the microwave oven interior light should be on.
Let microwave oven complete cooking time. A tone will sound four times at the end of the cooking time, and the microwave oven will shut off. - Open microwave oven door and slowly remove container. Water in container should be hot.
If you need Assistance or Service: Please refer to the Quick Start Guide for contact information, or contact the dealer from whom you purchased your built- in electric ovens and microwave ovens.