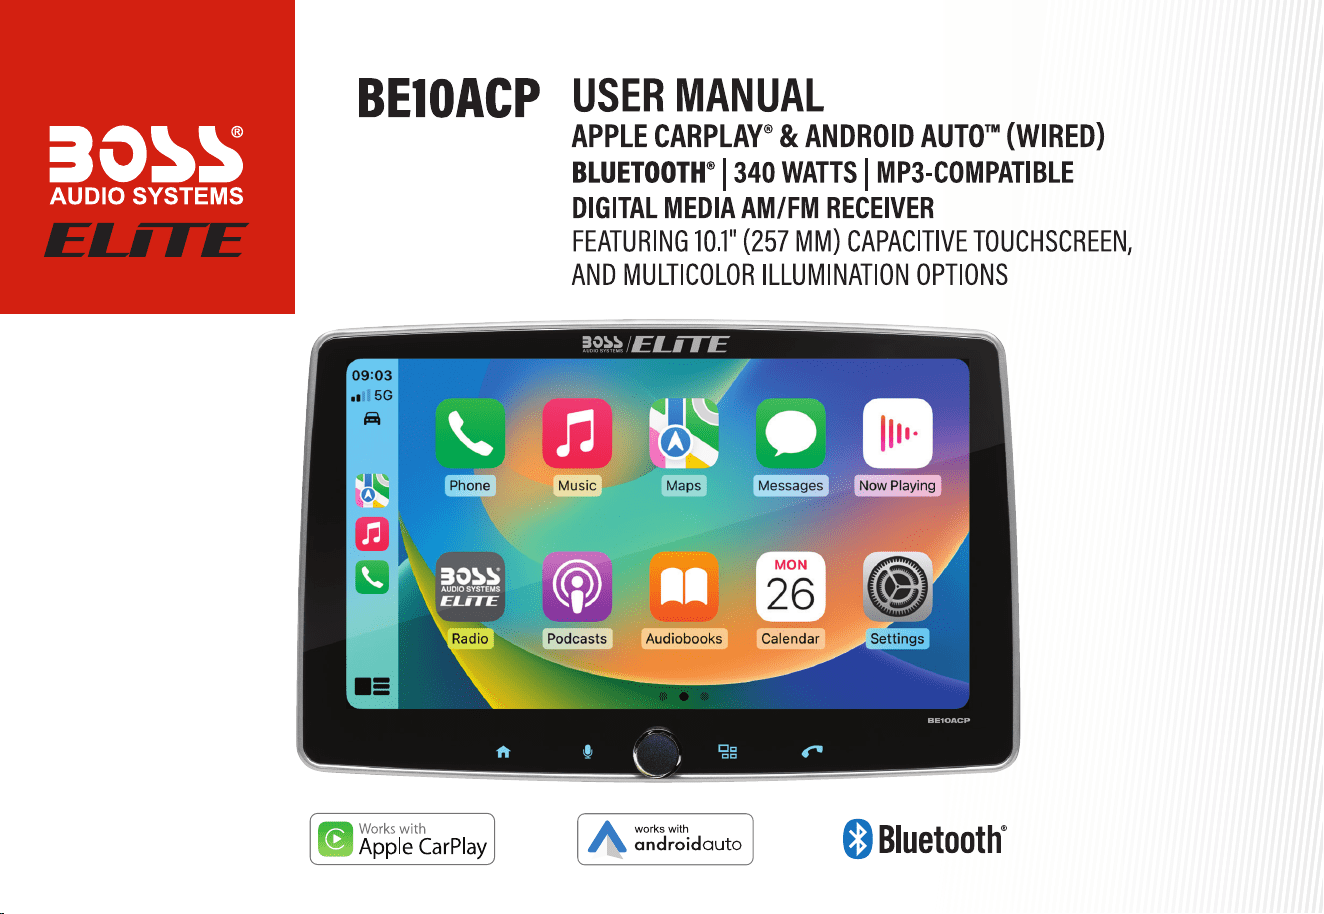
0224

1
Thank you for choosing BOSS Audio Systems!
Sign up for BOSS Audio Systems News and Promos by visiting us on
the web at www.bossaudio.com.
Be part of our community! Join us by signing up on the web at
www.bossinsiders.com
IMPORTANT! Complete the information below and keep for your records.
Model
Serial Number
Date of Purchase
Note: Serial number is located on the packaging and the top of the product chassis.

2
Table of Contents
Important Information 4
About this Manual...................................................... 4
Operation Warnings .................................................. 4
Installation Warnings ................................................ 5
Screen Care ................................................................... 5
Notice ............................................................................. 5
Basic Operation 6
What Comes in the Box ............................................ 6
Control Panel................................................................ 7
Home Menu Description ......................................... 8
Basic Setup.................................................................... 9
FM/AM Radio 10
Radio Home Screen ................................................... 10
Tune to a Radio Station ............................................ 10
Auto Store Radio Stations ....................................... 10
Select a Stored Station ............................................ 10
Set a Favorite Station ................................................ 10
FM Local and Distant ................................................. 10
FM Stereo and Mono ................................................. 10
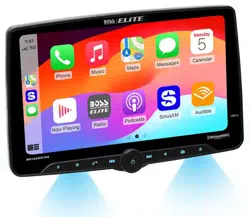
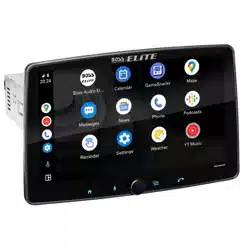
Apple CarPlay 11
Apple CarPlay Introduction .................................... 11
Connect your iPhone ................................................ 11
Arrange your CarPlay Apps ..................................... 12
Disable CarPlay Apps ................................................ 12
Android Auto 13
Android Auto Introduction ..................................... 13
Connect your Android Device ............................... 13
Bluetooth 14
First Time Connection ............................................... 14
Audio Streaming ......................................................... 14
Make a Call .................................................................... 15
Operation during a Call ............................................ 15
Sync Phonebook and History................................. 15
Search a Contact ......................................................... 15
Browse Call History .................................................... 15
View Connection Status ........................................... 15
Voice Assistant (Push-To-Talk) ................................ 15
USB 16
USB Playback ................................................................ 16
Audio/Video/Photo Play Switching ..................... 16
Audio Playback ............................................................ 16
Video Playback ............................................................ 16
Photo Playback ............................................................ 16
Other External Devices 17
Audio/Video Input ..................................................... 17
Playback ......................................................................... 17
Audio Input ................................................................... 17
Video Input ................................................................... 17
Manual Camera Trigger ............................................ 17
Automatic Camera Trigger ...................................... 17
General Settings 18
Language Setting ....................................................... 18
Set Date and Time ...................................................... 18
System Tone and Shutdown Delay ...................... 18
Resetting the Unit ...................................................... 18
Startup Message Display ......................................... 18

3
Table of Contents
Audio Settings 18
Volume Balance Setting ........................................... 18
Subwoofer Setting ..................................................... 19
Loudness and Sound Mode Setting .................... 19
Internal Amplier On/O ........................................ 19
Startup Volume Setting ............................................ 19
Initial Volume Setting for Other Sources ........... 19
Customization of a Source Volume ...................... 19
Display Settings 20
Automatic Dimming Control ................................. 20
Screen Setting ............................................................. 20
Panel Button Light Setting ..................................... 20
Wallpaper Setting ....................................................... 20
Bluetooth Settings 20
Camera Settings 21
Camera Trigger Control ............................................ 21
Parking Assist Guidelines Setting ......................... 21
Radio Settings 22
Radio Region Selecting ............................................ 22
RDS/RBDS Activation ................................................ 22
RDS/RBDS Trac Announcement ........................ 22
RDS/RBDS Alternative Frequency ......................... 22
System Information 22
Firmware Version Information ............................... 22
Steering Wheel Control Retention 22
Unit Installation 23
Single DIN Opening Installation ........................... 23
Double DIN Opening Installation ......................... 24
Display Assembly ....................................................... 24
Display positioning ............................................ ....... 25
Installation Dimensions ........................................... 26
Connections 27
Power and SWI Input Wiring................................... 27
Speaker Wiring ............................................................ 28
Parking Brake Wiring ................................................. 29
AV/Radio ........................................................................ 30
Mic/Camera/CarPlay/Android Auto ..................... 31
Hands-Free Mic Installation .................................... 32
Troubleshooting 33
Specications 34
4
Important Information
About this Manual
To understand how to properly use your new
BOSS Audio Systems product, it is recommended
to read this user manual in its entirety, and keep
it in a safe place for future reference.
This manual uses illustrations to show you
how to use this product safely and alert you
to potential dangers resulting from improper
connections and operation. It is important to
fully understand the meaning of each one of
these illustrations in order to use this manual
and system properly.
WARNING
The WARNING illustration denotes very
important instructions. Failure to follow them
can result in damage to equipment, serious
injury or death.
CAUTION
The CAUTION illustration denotes important
instructions. Failure to follow them can result in
injury or material property damage.
IMPORTANT NOTE
The IMPORTANT NOTE illustration denotes
important instructions for product features and
limitations. Failure to follow them will result in
product misuse and/or unexpected behavior.
The PARKING BRAKE illustration denotes
features that can only be used with vehicle not
in motion and parking brake engaged. Failure to
follow them will result in product misuse and/or
unexpected behavior.
Operation Warnings
WARNING
OPERATION OF THIS PRODUCT WHILE
DRIVING IS DANGEROUS.
Users should come to a complete stop and in
a safe location before using any feature that
requires extended periods of time.
PAY ATTENTION TO ROAD CONDITIONS.
Avoid operating product under dangerous
road conditions and abide by regulations over
information contained on the map display.
Follow trac restrictions and circumstances
while driving.
OPERATE AT SAFE VOLUME LEVELS.
Excessive volume levels may obstruct sounds
such as emergency vehicle sirens or road
warning signals; can be dangerous and may
result in an accident. Listening at high volume
levels can also cause hearing damage.
DO NOT WATCH VIDEO WHILE DRIVING.
Watching video content may distract the driver
from looking ahead of the vehicle and can
potentially cause an accident.

5
Important Information
Installation Warnings
CERTIFIED PROFESSIONAL INSTALLATION.
Installation and service repair of this product
by anyone without professional training and
experience in consumer electronics and mobile
vehicle accessories may be dangerous and result
in electric shock, injury or other hazards.
DISCONNECT BATTERY.
To avoid potential shorts in the electrical system,
be sure to disconnect the NEGATIVE (-) terminal
cable before beginning this product installation.
Failure to do so may result in electric shock, re,
damage to product and/or property damage.
DO NOT DISASSEMBLE OR ALTER PRODUCT.
Disassembly of product may result in an
accident, re or electric shock.
REPLACE FUSE WITH THE CORRECT RATING.
Failure to do so may result in re or property
damage.
PARKING BRAKE INSTALLATION WIRING.
Installing this product incorrectly may enable
the user to watch video while driving. This may
cause distraction, preventing the driver to focus
on the road and potentially cause an accident.
The driver and passengers can be severely
injured.
Screen Care
USE
This head unit utilizes a Capacitive Touchscreen,
the same type that is used on high-end mobile
devices. It should be used for and cared for like
that type of device. As with all capacitive type
technology, if your ngers are wet or sweaty, it
will not function properly.
Do not allow any sharp objects to come in
contact with the screen.
CLEANING
To clean the screen, use a dry or slightly damp
micro ber type cloth to clean. Do not use
ammonia, window cleaner, or any other type
of household chemicals to clean the screen.
Abrasives should never be used.
Best to clean the screen when the unit is
powered o, cool and not in direct sunlight.
Notice
Apple CarPlay is a trademark of Apple Inc.
iPhone® is a trademark of Apple Inc., registered
in the U.S. and other countries.
Use of the Apple CarPlay logo means that
this user interface meets Apple performance
standards.
Apple is not responsible for the operation of
this device or its compliance with safety and
regulatory standards.
BOSS Audio Systems is not aliated with Apple
Inc.
Android Auto is a trademark of Google LLC.
The Bluetooth® word mark and logos are
registered trademarks owned by Bluetooth SIG,
Inc. and any use of such marks by BOSS Audio
Systems is under license. Other trademarks
and trade names are those of their respective
owners.
6
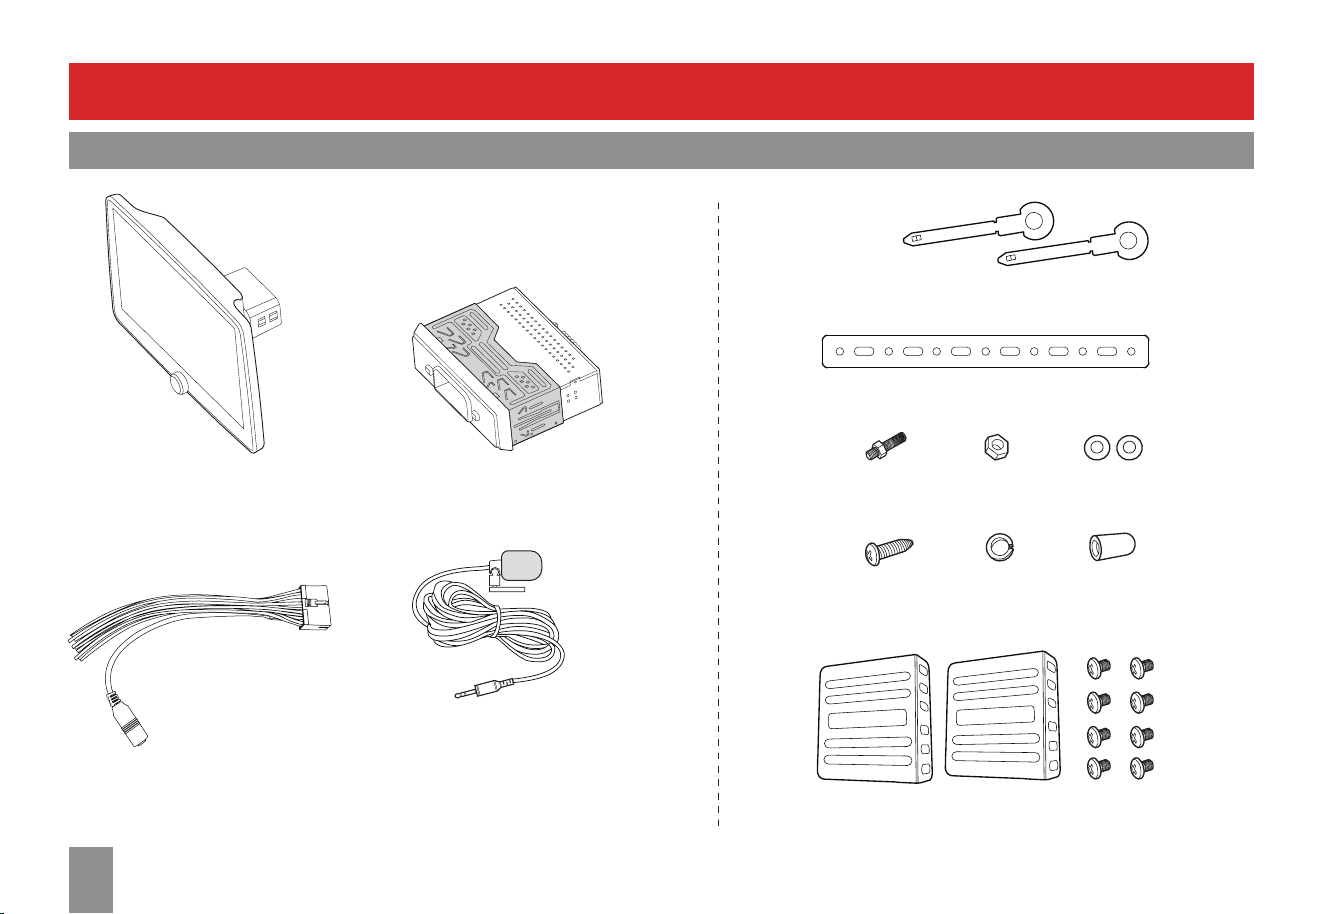
Basic Operation
What Comes in the Box
2x Release Keys
1x Mounting Strap
1x Hex Bolt
1x Tapping Screw
(M5 x 15mm PA)
2x Mounting L-Brackets 8x Bolts (M5 x 6mm)
2x Plain Washers
1x Hex Nut
1x Spring Washer
1x Rubber Grommet
Display
Main Unit with
Removable Mounting Cage
Microphone with 3.5mm Plug
and Sticky Base
Wiring Harness
7
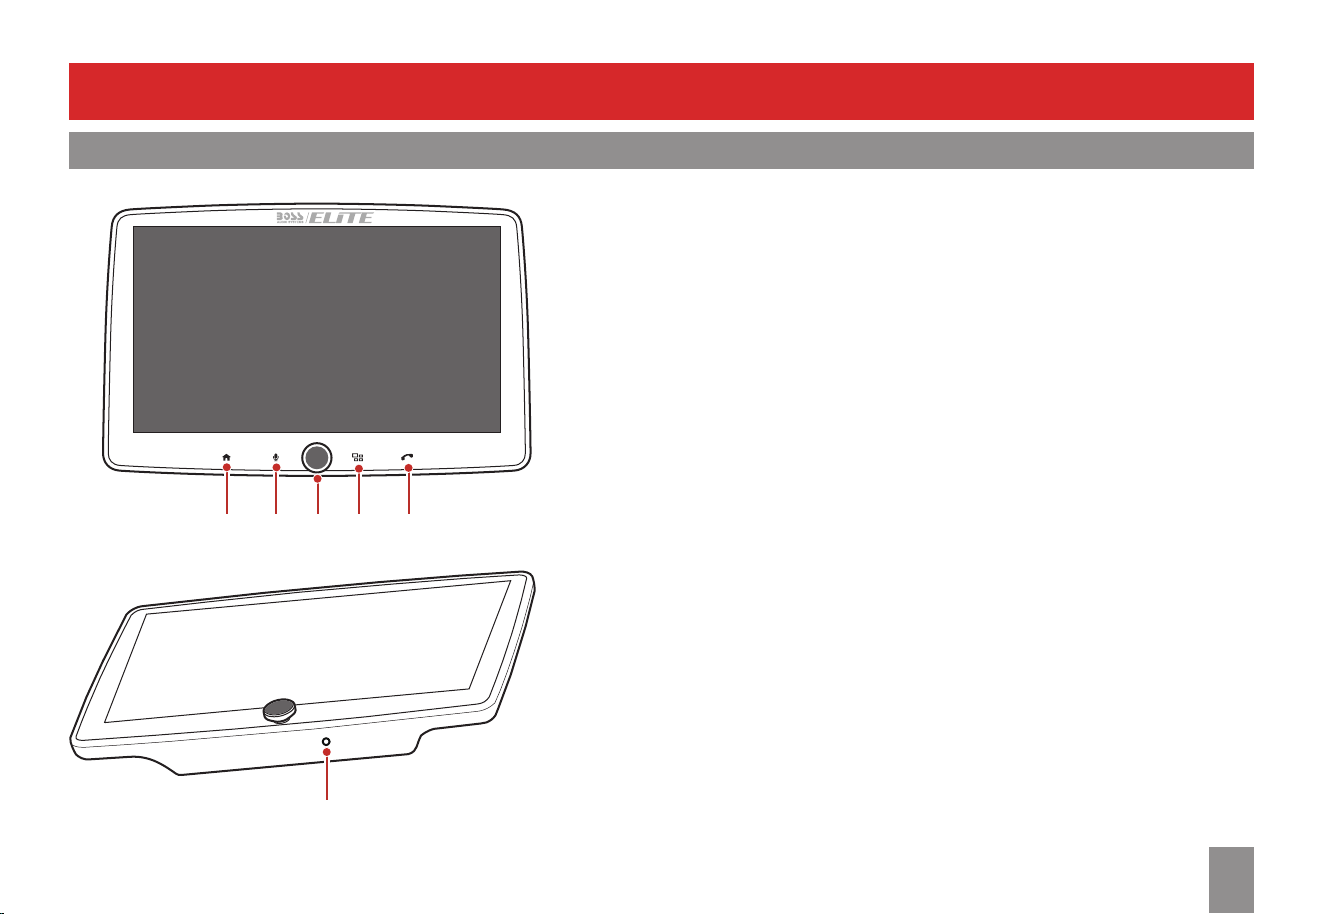
Basic Operation
Control Panel
1
Home button
• Touch to switch between the home menu and the last selected source.
• When powered on, touch and hold to turn the screen o.
2
Voice assistant (Push-To-Talk)
Touch to activate voice assistant.
Enable Apple CarPlay, Android Auto or Bluetooth connection to use voice
assistant.
3
Power/Mute knob
• Press to power on the unit; press and hold to power o the unit.
• Rotate to adjust volume.
• Press to mute or restore the volume when powered on.
4
Mode button
Touch to select a source (Radio, USB, CarPlay/Android Auto, Bluetooth, AUX/AV
input).
5
Phone button
Touch to answer a phone call, or dial a Bluetooth phone call.
6
Reset button
Use a needle or pin to press the button. Reset the unit if the unit fails to function
normally.
TIP:
When the unit is powered o, touch the screen to turn on or o time/date display.
1 2 3 4 5
6
8
Basic Operation
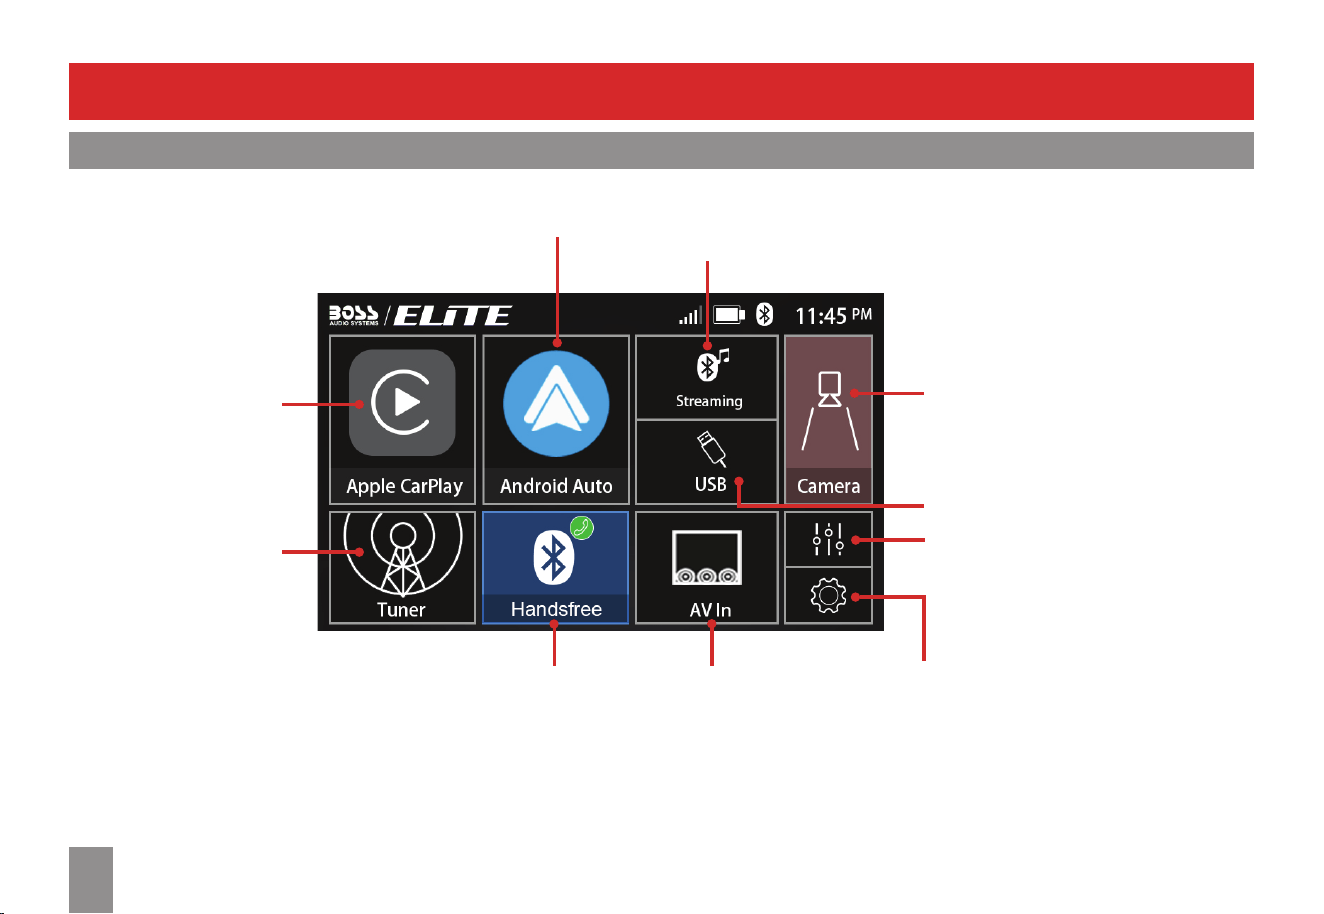
Home Menu Description
FM/AM button
Switch to FM/AM radio.
Bluetooth audio button
Switch to Bluetooth audio streaming from a mobile phone.
Disconnect CarPlay/Android Auto to enable Bluetooth connection.
AUX/AV input button
Switch to audio/video playback
from an external playback device.
Bluetooth hands-free call button
Access Bluetooth phone call interface.
Disconnect CarPlay/Android Auto to
use Bluetooth phone calls.
System Settings button
Access system settings menu.
USB button
Switch to audio/video/photo
playback from a USB ash drive.
Android Auto button
Switch to Android Auto home.
Front/Rear camera button
Access the front/rear camera view.
Apple CarPlay button
Switch to CarPlay home.
Sound settings button
Select predened sound modes,
or customize equalizer settings.
9
Set Language
You can select English or Spanish as a display
language for menu.
1.
From the home menu, touch to access
system settings.
2.
Select [General] > [Language].
Set Clock
Option 1: Automatic Setup
Connect your iPhone to the unit's rear USB
port labeled "Apple CarPlay" to enable Apple
CarPlay.
Then the clock will automatically syn with your
iPhone.
To change time zone
From the home menu, touch > [General] >
[Time Zone].
The default time zone is Pacic Time.
Option 2: Manual Setup
1.
From the home menu, touch to access
system settings.
2.
Select [General] > [Date & Time] to access
the following date and time options.
Touch or to change settings.
• Select 12 or 24 hour format
• Set month, day and year
• Set hours, minutes and AM/PM
To change time zone
Access [Time Zone]. The default time zone is
Pacic Time.
Enable/Disable System Tone
From the home menu, touch > [General] >
[System Tone].
When disabled, sound will not be made when
touching a button or option on the screen.
Set Screen Brightness
You can enable night detection and automatic
dimming, and adjust screen brightness for day
and night settings.
Refer to "Display Settings" section. (P.20)
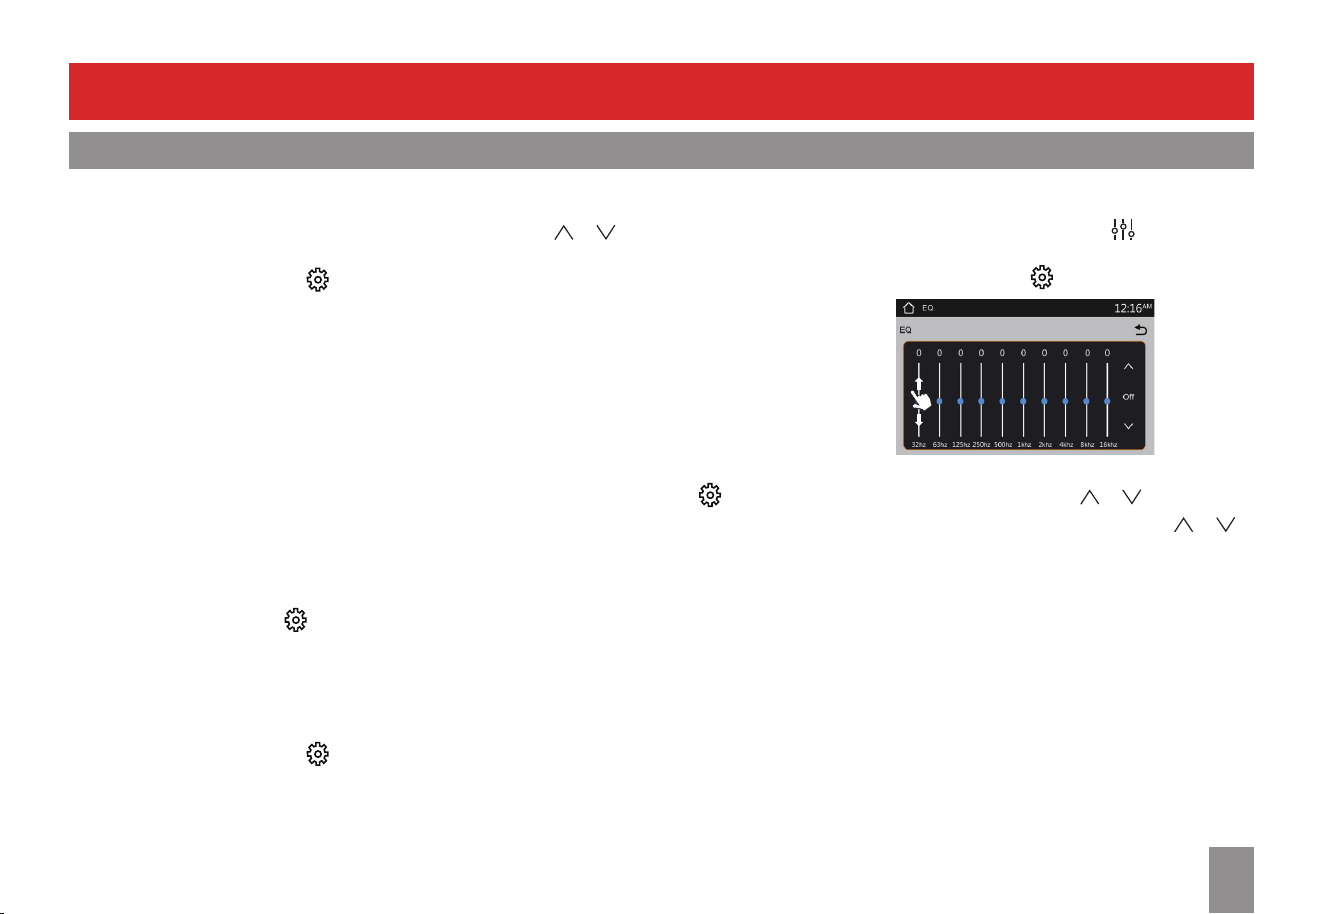
Set Sound Eects
From the home menu, touch to access
predened sound modes or customize equalizer
settings. Or touch > [Audio] > [EQ].
To select a preset sound mode (Jazz, HipHop,
Pop, Rock or R&B), touch or .
To customize equalizer setting, touch or
until [User] appears then swipe up or down
each frequency bar to adjust decibel output.
Basic Operation
Basic Setup
10
FM/AM Radio
Using FM/AM
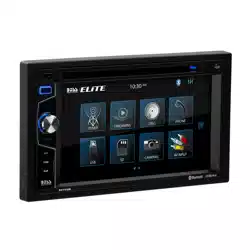
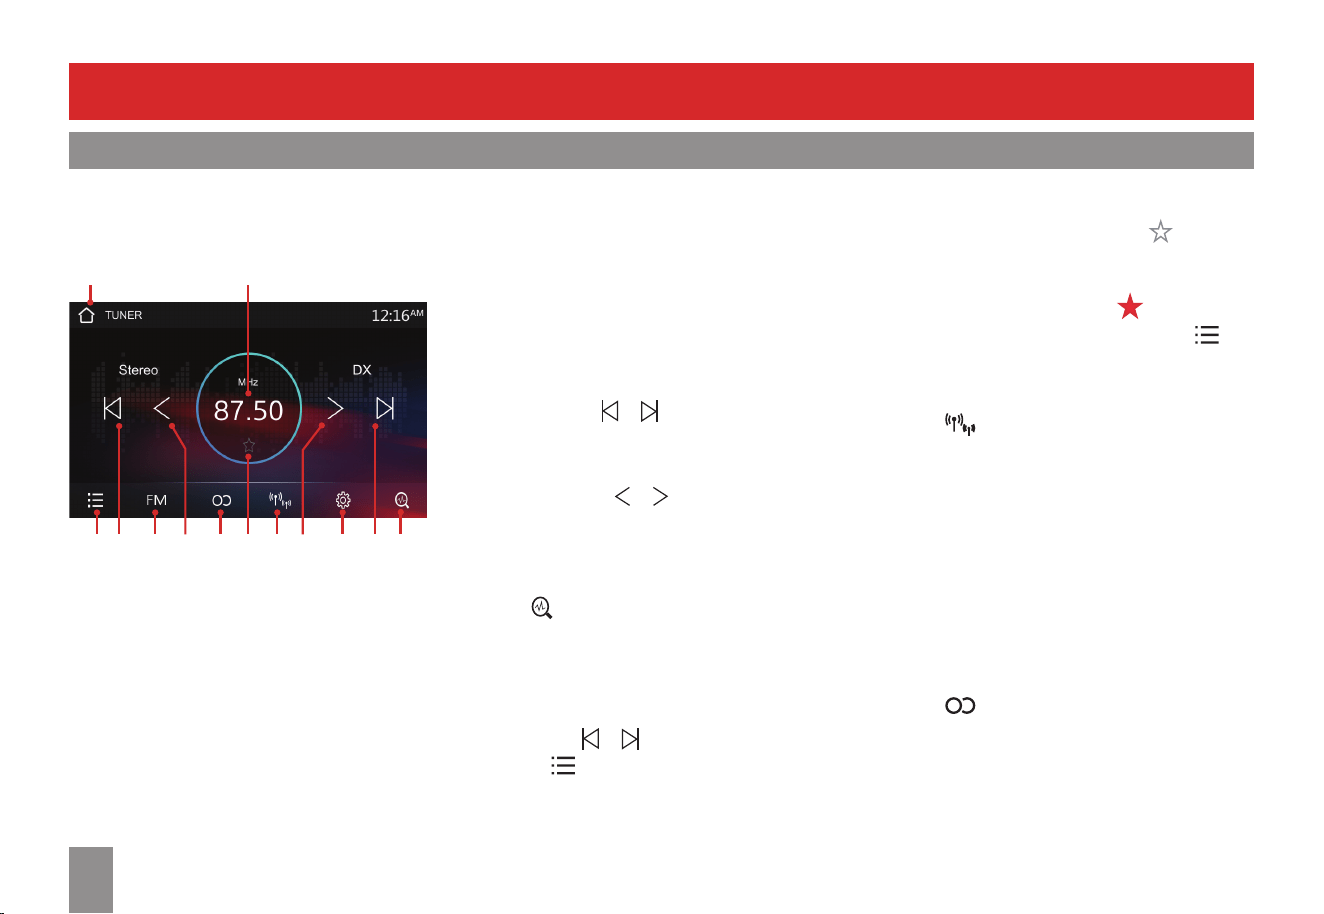
Radio Home Screen
From the home menu, touch the tuner icon to
switch to radio.
TUNER
1 3 5
6
4
2
4
2 8
10
11
7 9
1 Access the stored stations and favorite
stations.
2 Tune to a station, or select a stored station.
3 Switch between FM and AM.
4 Adjust radio frequency in steps.
5 Switch between Stereo and Mono reception
(only applicable to FM).
6 Set/remove the current station as favorite.
7 Switch between local and distant station
reception (only applicable to FM).
8 Access radio settings menu (e.g. RDS/RBDS
options). (P.22)
9 Search and store FM or AM stations.
10 Touch the radio frequency to access the
favorite stations.
11 Return to the home menu.
Tune to a Radio Station
Touch and hold or . The unit automatically
tunes to a station with strong reception.
To ne tune a station
Touch repeatedly or to change frequencies
in steps.
Auto Store Radio Stations
Touch to perform radio search. All available
stations in FM or AM band are stored on the
unit.
Select a Stored Station
Touch briey or to select a stored station.
Or touch to access the station list for stored
FM and AM stations.
Set a Favorite Station
When listening to a station, touch to set the
current station as favorite. The gray star icon will
turn to the red star icon.
To remove the favorite, touch .
To access the set favorite stations, touch .
FM Local and Distant
Touch to select local or distant station
reception. "LOC" display indicates local
reception, "DX" display for distant reception.
Select "DX" when most FM stations are weak
(e.g. in the countrysides). Stations with both
strong and weak signals will be received.
Select "LOC" when most FM stations are strong
enough (e.g. in urban areas). Only the stations
with strong signal will be received.
FM Stereo and Mono
Touch to select Stereo or Mono reception.
When FM signal is weak, select Mono to improve
sound quality (stereo will be lost).
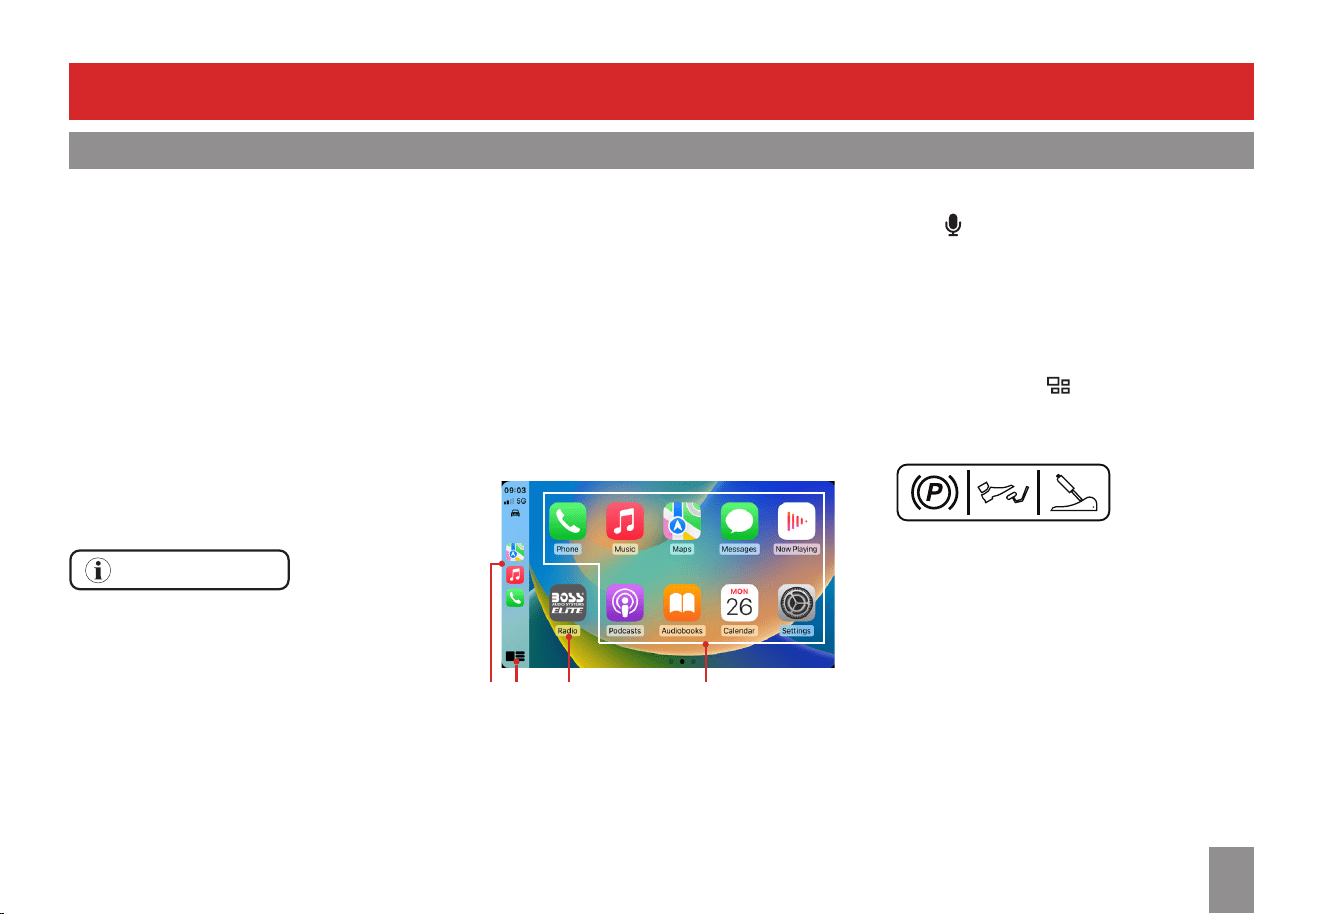
11
Apple CarPlay Introduction
CarPlay provides a smarter, safer way to use your
iPhone while driving. The apps on your iPhone
can be loaded and displayed on the screen of
this unit. Thus, you can navigate, call, control
you music and so more with hands-free control
on your mobile phone.
For more details about Apple CarPlay, visit
https://www.apple.com/ios/carplay.
Compatible iPhones
CarPlay works with iPhone 5 and all the way up
to the most recent versions.
IMPORTANT NOTE
When CarPlay is enabled, hands-free calls and
streaming through Bluetooth is disabled.
You can make hands-free calls and streaming
through the CarPlay app.
Connect your iPhone
USB cable connection will enable CarPlay
feature. iPhone pairing is not needed.
1.
Connect your iPhone to the unit's rear USB
port labeled "Apple CarPlay", using an Apple-
certied USB cable with factory length or
shorter (not included). (P.31)
The apps from the iPhone will be loaded
onto the unit.
Touch the Apple CarPlay icon on the unit's
home menu to access the loaded apps for
navigation, phone and music, etc.
1 2
3
4
1 Menu bar: Touch an app icon for quick access.
2 CarPlay home button: Return to the CarPlay
home screen.
3 Unit's home button: Exit the CarPlay screen
and return to the unit's home menu.
4 Apps loaded from the iPhone.
Apple CarPlay
Using CarPlay
Use Voice Assistant
Touch on the unit's front panel to activate
voice assistant, then speak your command.
Make sure the supplied external microphone is
connected to the unit. (P.31)
Switch to CarPlay from Other Source
Touch once or more on the unit's front panel.
For your safety, park your vehicle in a safe place
and engage the parking brake when you make
any setup which requires extended time.
12
Apple CarPlay
Using CarPlay
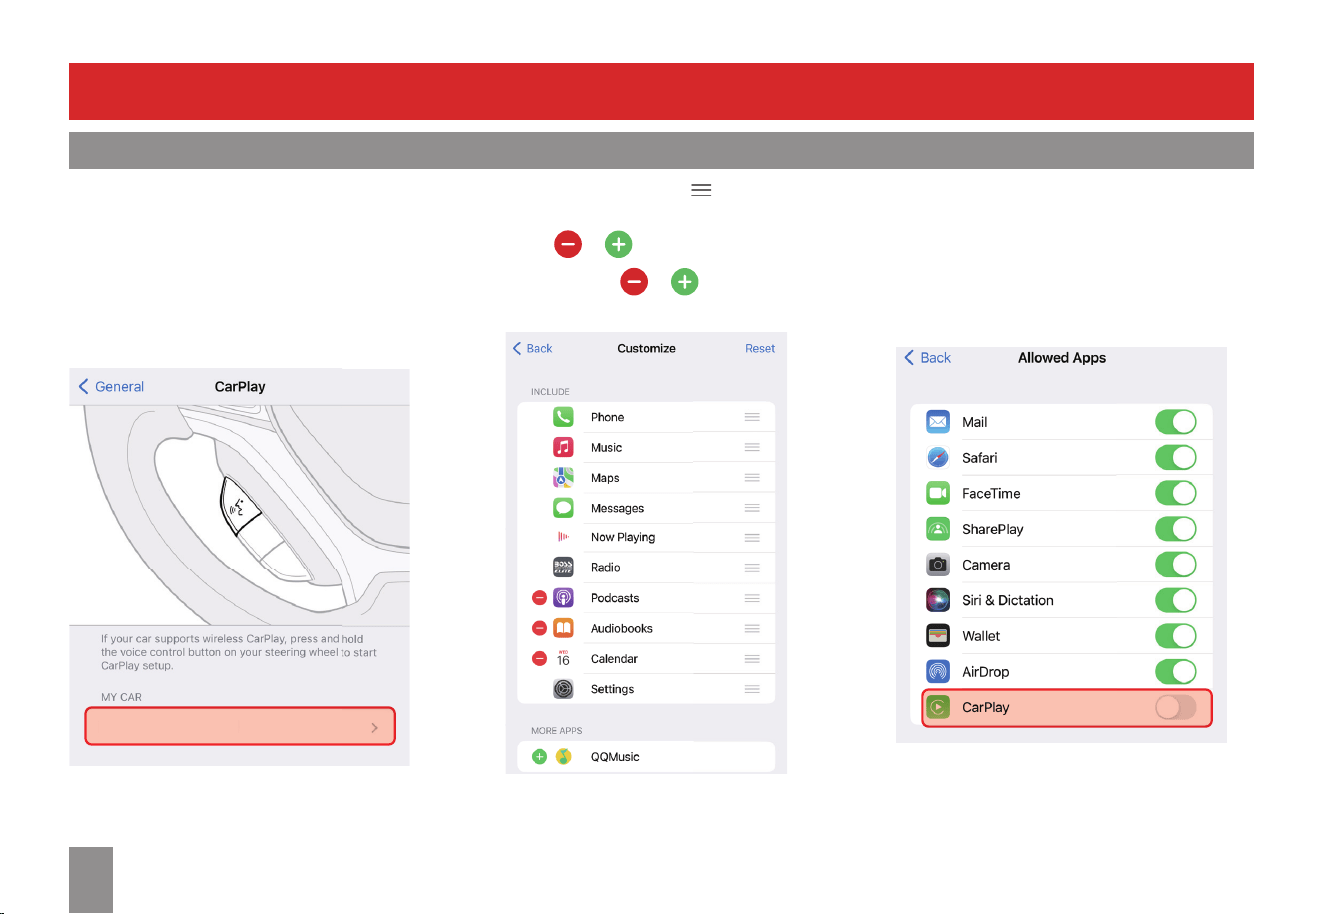
Arrange your CarPlay Apps
You can add, remove, or arrange the order of the
apps on the CarPlay screen of the unit.
1.
On your iPhone, go to Settings > General
> CarPlay, select this unit's name from
the device list (shown below). Then select
Customize to access CarPlay apps.
BOSS AUDIO BE10ACP
2.
Touch and drag an app ( ) to change the
order of the app.
Touch or to remove and add apps,
Only apps with
or can be removed
from CarPlay or added in CarPlay.
Disable CarPlay Apps
You can disable all CarPlay apps to restrict
CarPlay use on this unit.
On your iPhone, go to Settings > Screen Time
> Contents & Privacy Restrictions > Allowed
Apps > CarPlay.
13
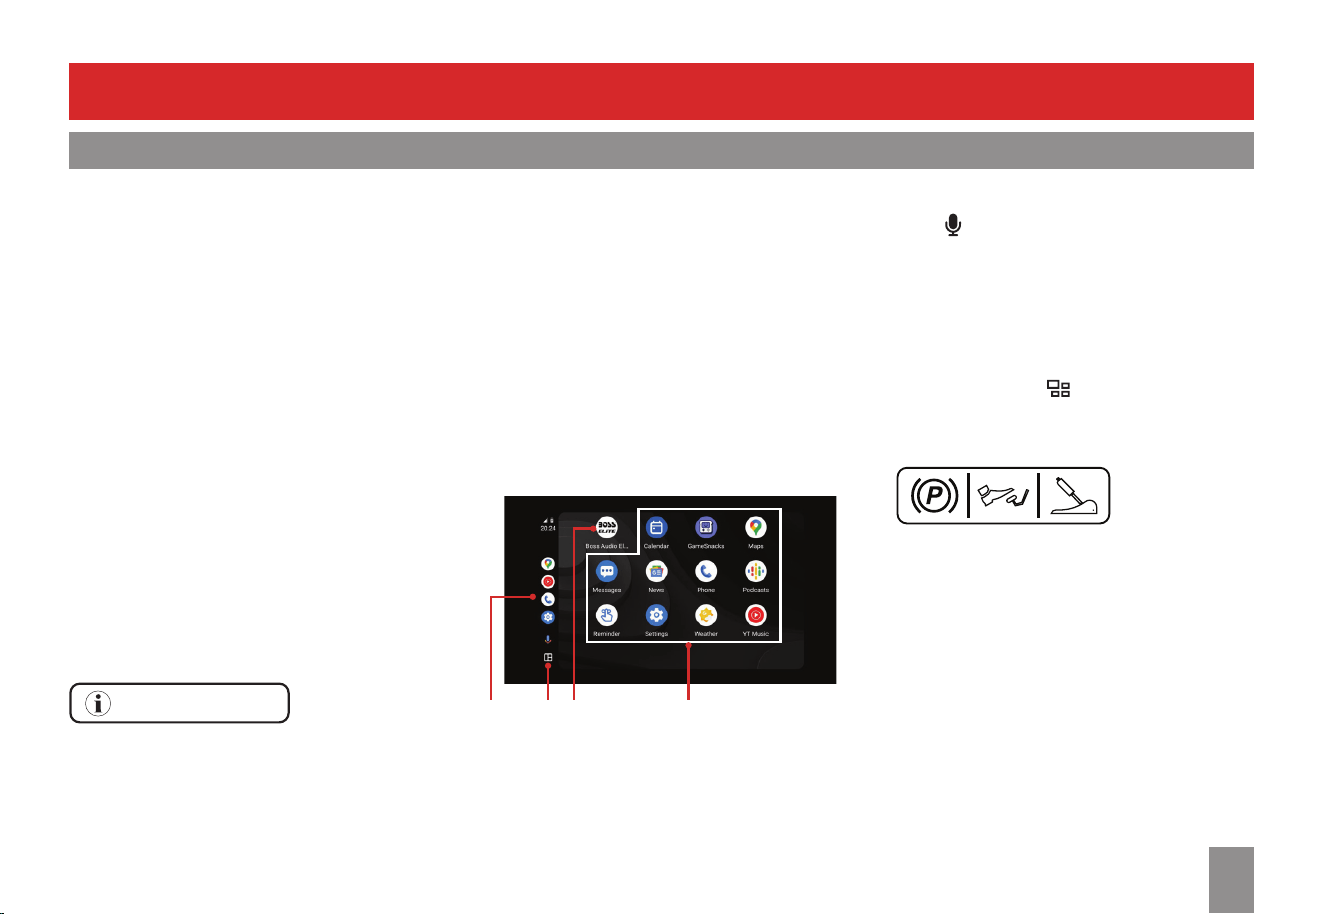
Android Auto
Using Android Auto
Android Auto Introduction
Android Auto allows the apps on your Android
phone to be loaded and displayed on the screen
of this unit. Thus, you can navigate, call, control
you music and so more with hands-free control
on your mobile phone.
For more details about Android Auto, visit
https://www.android.com/auto.
Compatible Android Phones
Android Auto works with phones running
Android 6.0 and later.
Android Auto App
• Phones with Android 9.0 and earlier needs
Android Auto app downloaded from Google
Play Store.
• Phones with Android 10 and above do not
need to download Android Auto app.
IMPORTANT NOTE
When Android Auto is enabled, hands-free calls
and streaming through Bluetooth is disabled.
You can make hands-free calls and streaming
through the Android Auto app.
Connect your Android Device
USB cable connection will enable Android Auto
feature. Bluetooth pairing is automatically
between the unit and your phone.
1.
Connect your Android phone to the unit's
rear USB port labeled "Android Auto", using a
certied cable with factory length or shorter
(not included). (P.31)
The apps from the Android device will be
loaded onto the unit.
Touch the Android Auto icon on the unit's
home menu to access the loaded apps for
navigation, phone and music, etc.
21 43
1 Menu bar: Touch an app icon for quick access.
2 Android Auto Home button: Return to the
Android Auto home screen.
3 Unit's Home button: Exit the Android Auto
screen and return to the unit's home menu.
4 Apps loaded from the Android Phone.
Use Voice Assistant
Touch on the unit's front panel to activate
voice assistant, then speak your command.
Make sure the supplied external microphone is
connected to the unit. (P.31)
Switch to Android Auto from Other Source
Touch once or more on the unit's front panel.
For your safety, park your vehicle in a safe place
and engage the parking brake when you make
any setup which requires extended time.
14
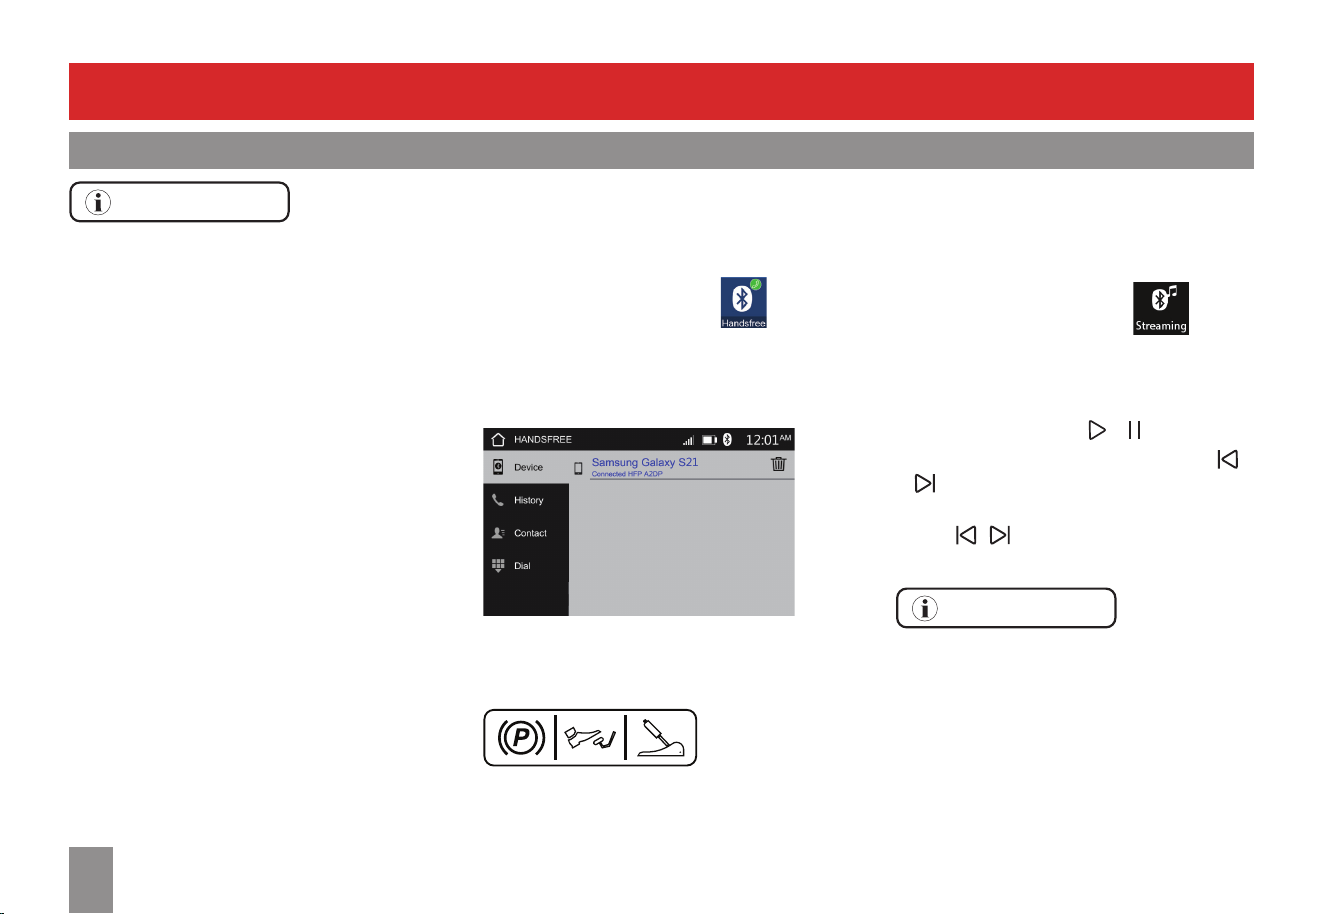
Bluetooth
IMPORTANT NOTE
Bluetooth on the unit is enabled only when
CarPlay or Android Auto is not connected.
Make sure your CarPlay or Android Auto is
disconnected for Bluetooth use.
Compatibility with all mobile devices is not
guaranteed.
First Time Connection
When you connect your Bluetooth device to this
unit for the rst time, pair the device with this
unit.
1.
On your mobile device, go to Settings >
Bluetooth, and select this unit's name (BOSS
AUDIO BE10ACP) to pair.
2.
Follow on-screen instructions to complete
pairing.
When prompted during pairing, select
"Allow" on your mobile phone so that
your phonebook and call history can be
downloaded and displayed on the screen of
this unit.
Bluetooth Reconnection
The unit will automatically connect with the last
paired device each time they are powered on.
Connection to a Second Device
You need to disconnect the currently connected
device before you can pair or connect a second
device.
1.
From the home menu, touch then
select [Device] to display the connected/
paired devices.
2.
Touch the connected device name to
disconnect Bluetooth connection.
3.
You can now pair/connect with a second
device.
For your safety, park your vehicle in a safe place
and engage the parking brake when you make
any setup which requires extended time.
Connection Streaming
Audio Streaming
Before you can stream audio from your mobile
device to this unit, make sure Bluetooth
connection is made.
1.
From the home menu, touch .
The music from the device plays automatically.
Playback Control
• To play or pause, touch or .
• To skip to the previous or next le, touch /
.
• To search fast backward or forward, touch and
hold / .
IMPORTANT NOTE
For best performance, your mobile device
volume should be set to maximum.
All volume adjustment should be controlled
from the unit.
15
Bluetooth
Hands-free Call
Make a Call
From the home menu, touch .
The calling interface is displayed.
3 Options to Dial a Bluetooth Call
• Input a phone number on the virtual keypad,
and touch .
• Touch [Contact] tab to access your contact
list, then touch a contact.
• Touch [History] tab to access your call history,
then touch a number.
Operation during a Call
• To end a call, touch .
• To mute a call, touch .
• To use a keypad during a call, touch .
• To switch to private mode, touch . The
call will move to your mobile device.
• To return to hands-free mode, touch .
The call will move back to the unit.
Sync Phonebook and History
Touch [Contact] or [History] tab, then
[Download].
The phonebook and call history from your
mobile phone will be displayed on the unit.
Search a Contact
Touch [Contact] tab, then . The alphanumeric
keypad is displayed. Enter a contact name for
search.
Browse Call History
Touch [History] tab to display the call history.
Outgoing call
Incoming call
Missed call
View Connection Status
Touch [Device] tab to display the paired devices.
• A highlighted device name indicates the
currently connected device.
• To connect a paired device, simply touch the
paired device name.
• To delete a paired device from the memory,
touch .
Voice Assistant (Push-To-Talk)
You can access smartphone voice assistant
through the unit.
Before you Start
• Enable Bluetooth connection between your
smartphone and the unit, or enable Apple
CarPlay/Android Auto.
• Make sure the hands-free microphone is
connected to the Microphone Input of the
unit for audio input. (P.31)
Touch on the unit's front panel to activate
voice assistant, then speak your command.
Voice Assistant (Push-To-Talk)
16
USB
USB Playback
You can play audio, video and photos stored on
a USB ash drive. Connect your USB ash drive
to the rear USB port labeled "USB/Charging".
From the home menu, touch .
Music from the device plays automatically.
If there are audio, video and photo les in the
USB, audio les will play rst.
Audio/Video/Photo Play Switching
1.
In the playback interface, touch . The le
browser bar is displayed.
2.
Touch [Music], [Video], or [Image] tab to
select an audio, video or picture le to play.
IMPORTANT NOTE
Video and photo cannot not be viewed while
driving. The vehicle must be stationary and the
parking brake applied to enable viewing.
To activate viewing, also make sure the parking
brake switch wire (Light green) is properly
connected to your vehicle. (P.29)
Audio Playback
In the audio playback interface, playback control
is displayed.
• To play or pause, touch or .
• To skip to the previous or next le, touch /
.
• To search fast backward or forward, touch and
hold / until a speed number appears
then touch repeatedly to select a search speed.
• To select a repeat mode, touch .
• To turn on or o shue play, touch .
Video Playback
In the video playback interface, touch the screen
to display playback control.
• To play or pause, touch or .
• To skip to the previous or next le, touch /
.
• To search fast backward or forward, touch and
hold / until a speed number appears
then touch repeatedly to select a search speed.
• To select a repeat mode, touch .
Video Settings
During video playback, touch to access the
Brightness / Contrast / Color settings.
Photo Playback
In the photo playback interface, touch the
screen to display playback control.
• To play or pause, touch or .
• To select the previous or next le, touch /
.
• To select a repeat mode, touch .
• To enlarge the picture, touch then drag
the magnifying slider.
• To rotate the picture, touch .
WARNING
Watching video or photo while driving is against
Federal, State, and Local laws.
Do not use features of this unit if it cannot be
operated safely and legally in your location.
17
Other External Devices
Playback
From the home menu, touch .
Audio and video input screen is displayed.
Audio Input
You can listen to an audio device (e.g. a mobile
phone or MP3 player) through this unit.
Audio Cable Connection
Connect the RCA inputs ("L-IN" and "R-IN") on
the unit's back to the audio output on your
device. (P.30)
If your device does not have an RCA, use the
following audio cable (not included).
• For a device with 3.5mm headphone jack, use
a 3.5mm to RCA audio cable.
• For a device with USB-C port, use a USB-C to
RCA audio cable.
• For an iPhone, use a lightning to RCA audio
cable.
Video Input
You can play video from a playback device (e.g.
a CD/DVD, ect.).
AV Cable Connection
Using audio/video cables (not included), connect
the RCA inputs ("L-IN", "R-IN" and "V-IN") on the
unit's back to the RCA outputs (yellow/white/
red) on your playback device. (P.30)
IMPORTANT NOTE
Use the controls on the external device for
playback control.
Video and photo cannot not be viewed while
driving. The vehicle must be stationary and the
parking brake applied to enable viewing.
To activate viewing, also make sure the parking
brake switch wire (Light green) is properly
connected to your vehicle. (P.29)
WARNING
Never rely solely on the backup camera; always
check your surroundings before backing up.
Images may appear reversed if your camera is
not properly installed or set up.
Do not use features of this unit if it cannot be
operated safely and legally in your location.
Make sure front/rear camera connection is
correctly made. (P.31)
Manual Camera Trigger
From the home menu, touch to access
front and rear camera view options.
Note: To make available the camera view
options, enable the camera signal and power
input. From the home menu, touch >
[Camera].
On the camera view screen, touch the camera
icon to switch between front and rear camera
view.
Automatic Camera Trigger
When the vehicle is put into reverse gear, the
rear camera view will turn on automatically.
The front camera view is not accessible when
reversing.
IMPORTANT NOTE
For automatic rear camera trigger, make sure
the purple/white wire (labeled "REVERSE") is
connected to the reverse light. (P.27)
Audio/Video Input Camera
18
System Settings
General Settings Audio Settings
From the home menu, touch > [General] to
access general settings.
Language Setting
[Language]: Select English or Spanish as display
language for menu.
Set Date and Time
[Time Zone]: Select a time zone in your current
location.
[Date & Time]: Access to set the following date
and time options. Touch or to change
settings.
• Select 12 or 24 hour format
• Set month, day and year
• Set hours, minutes and AM/PM
[Daylight Saving Time]: Enable to adjust
Daylight Saving automatically.
System Tone and Shutdown Delay
[System Tone]: Enable or disable touch sound.
[Power O Delay]: Enable to keep the unit on
for a set time (0/1/2/3 seconds) after accessory
power or vehicle is turned o.
Enable shutdown delay if the unit restarts
during vehicle's crank to start.
Resetting the Unit
[Factory Reset]: Reset the unit to the factory
settings.
CAUTION
Reset the unit only when the unit fails to
function normally. All your settings will be
erased after resetting.
Startup Message Display
[E.U.L.A.]: Turn on or o display of the EULA (End
User License Agreement) about driving safety
notice when the unit is powered on from vehicle
engine ignition.
From the home menu, touch > [Audio] to
access audio settings.
Volume Balance Setting
[Balance / Fader]: Adjust volume balance
between the front or rear speakers.
Touch or from [Balance] to adjust right
and left volume balance until you are pleased
with the sound and a suitable balance is found.
Touch or from [Fader] to adjust front
and rear volume balance until the sound has a
satisfying depth.

19
System Settings
Audio Settings
Subwoofer Setting
[Subwoofer]: Enable or disable subwoofer
output.
[Subwoofer Filter]: Adjust the cuto frequency
for the subwoofer. Only the frequencies below
the one you set will be received to reproduce
sound.
[Subwoofer Level]: Adjust volume output for
subwoofer.
Loudness and Sound Mode Setting
[Loudness]: Enable to boost output of low and
high frequencies.
[EQ]: Select a predened sound mode or
customize equalizer settings. (P.9)
Internal Amplier On/O
[Internal Amp]: When using the pre-amp audio
outputs, turn o the internal amplier to reduce
the possibility of noise entering the signal chain.
Startup Volume Setting
[Main] (under [Default Volume]): Set a desired
volume for main audio (radio and media play)
when the unit starts up with main audio.
1.
Adjust the slider to set a new volume value.
2.
Startup volume will be the set volume if the
set volume is less than the last shutdown
volume (as main audio).
Startup volume will be the last shutdown
volume if the set volume is greater than the
last shutdown volume (as main audio).
Initial Volume Setting for Other
Sources
You can set desired initial volumes for the
following sources (under [Default Volume]).
• [BT Ring]: Bluetooth ringtone volume.
• [BT Talking]: Bluetooth call volume.
• [Navi]: Navigation volume.
• [Voice]: Voice assistant volume.
1.
Adjust the respective slider to set a new
volume value.
2.
Initial volume will be the set volume if the set
volume is less than the last used volume.
Initial volume will be the last used volume if
the set volume is greater than the last used
volume.
Customization of a Source Volume
You can increase or decrease one of the
following source volumes, without aecting
volume of other sources (under [Source Level]).
• [Radio]: Adjust radio volume alone.
• [USB]: Adjust USB playback volume alone.
• [BT Audio]: Adjust Bluetooth streaming
volume alone.
• [AV Input]: Adjust audio input volume alone
for RCA connection.
• [Apple CarPlay]: Adjust CarPlay volume alone.
• [Android Auto]: Adjust Android Auto volume
alone.

20
System Settings
Display Settings Bluetooth Settings
From the home menu, touch > [Display] to
access display settings.
Automatic Dimming Control
[Illumination Control]: When enabled and the
vehicle light is turned on, the screen brightness
and panel button lights will automatically dim.
IMPORTANT NOTE
To enable night detection and auto dimming,
make sure the orange/white wire (labeled
"DIMMER INPUT") is connected to your vehicle's
parking light. (P.27)
Screen Setting
[Gamma Day]: Change the dierences between
dark and light area. Applicable when your
vehicle light is turned o.
[Gamma Night]: Change the dierences
between dark and light area. Applicable when
your vehicle light is turned on.
[Day Brightness]: Adjust screen brightness.
Applicable when your vehicle light is turned o.
[Night Brightness]: Adjust screen brightness.
Applicable when your vehicle light is turned on.
Panel Button Light Setting
[Panel-Light]: Select one of six colors for panel
button lights. Make sure [LED Animation]
option is disabled to make the feature active.
[LED Animation]: Enable to automatically cycle
the panel button lights through six dierent
colors.
Wallpaper Setting
[Wallpaper]: Change a wallpaper for home,
radio, or media playback screen.
[Background Brightness]: Increase or decrease
brightness of the wallpaper.
Make sure CarPlay or Android Auto is not
connected to enable unit's Bluetooth.
From the home menu, touch > [Bluetooth]
to access Bluetooth settings.
XXXXXXXX
[Connection]: Enable or disable Bluetooth
function.
[Auto Connect]: Enable to automatically
connect the paired Bluetooth device.
[Auto Answer]: Enable to automatically answer
an incoming call.
[Device Name]: Show the unit’s Bluetooth
name.
[Clear Records]: Clear all the paired Bluetooth
devices from the unit’s memory.
21
System Settings
Camera Settings
From the home menu, touch > [Camera] to
access camera settings.
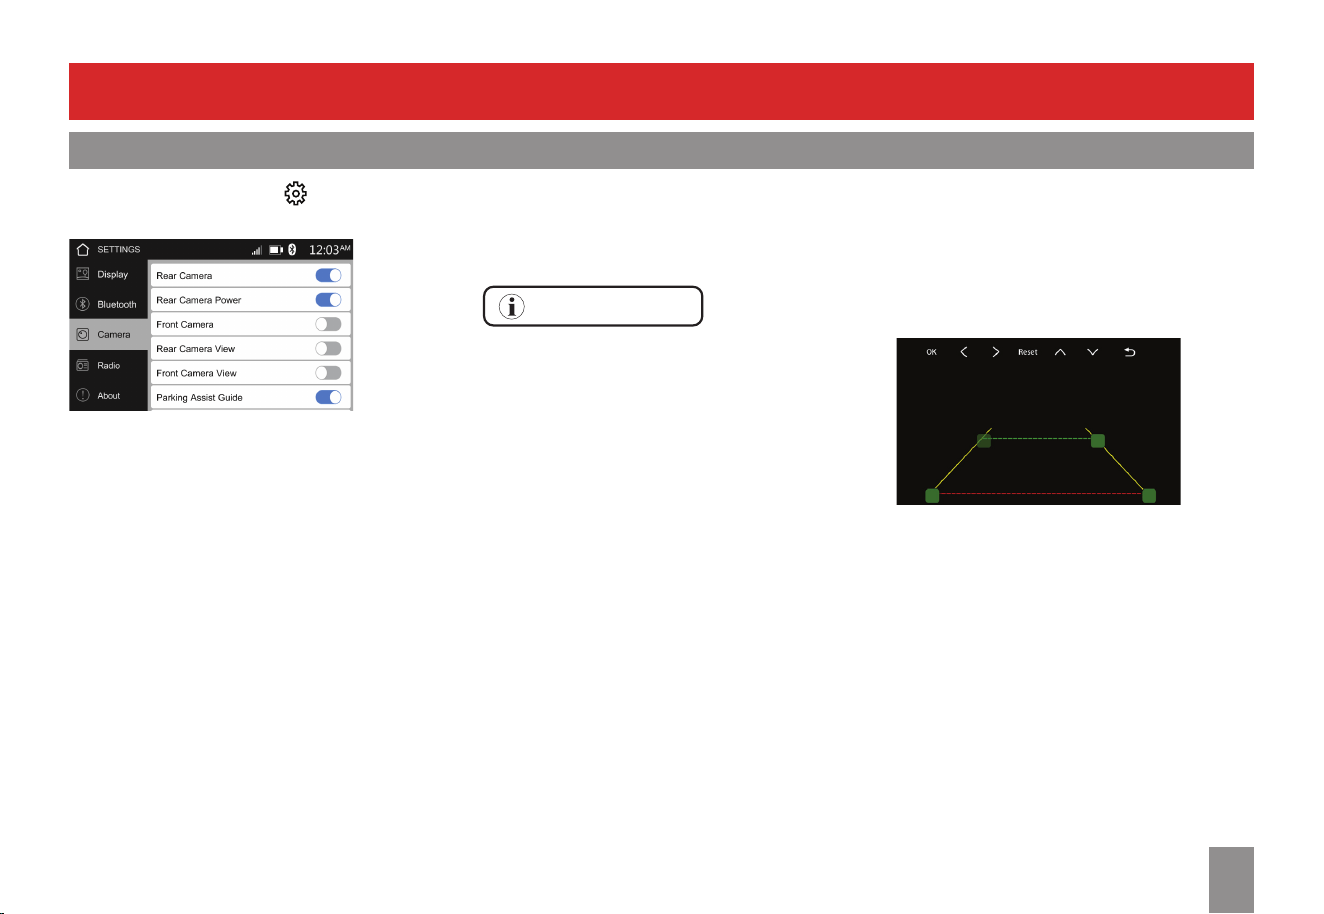
Camera Trigger Control
[Rear Camera]: Enable or disable rear camera
signal input.
[Rear Camera Power]: Enable or disable rear
camera power output. The option is invisible
when [Rear Camera] is turned o.
[Front Camera]: Enable or disable front camera
signal input.
[Front Camera Power]: Enable or disable front
camera power output. The option is invisible
when [Front Camera] is turned o.
[Rear Camera View]: Enable or disable rear
camera view.
[Front Camera View]: Enable or disable front
camera view.
[Rear View Delay]: Delay trigger of rear camera
view by a set time (0/0.1/0.5/1/2 seconds). A
proper time setting prevents the unit's screen
from blinking when shifting gears.
IMPORTANT NOTE
For automatic rear camera trigger, make sure
the purple/white wire (labeled "REVERSE") is
connected to the reverse light. (P.27)
Parking Assist Guidelines Setting
[Parking Assist Guide]: Disable the parking
assist guidelines built in the unit if your rear
camera view has its own parking assist guides.
[Parking Assist Guide Adjust]: Adjust the
parking assist guidelines built in the unit.
Touch and drag a square icon to reposition the
related guideline. Repeatedly touch an arrow
icon to ne tune positioning of the related guide
line. Touch [OK] to conrm the adjustment.
To reset to the default positioning of the guide
lines, touch [Reset].
22
System Settings
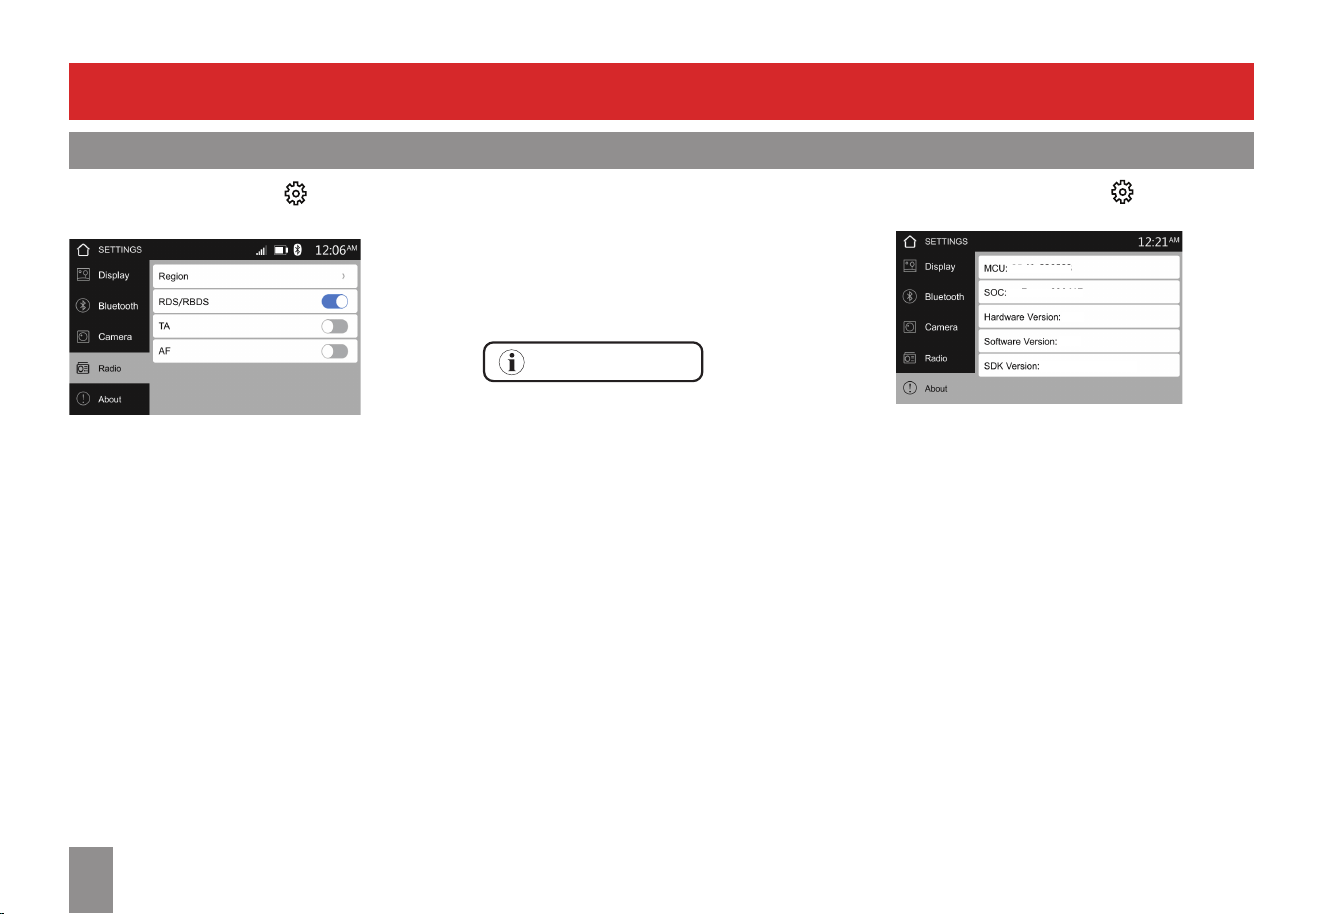
Radio Settings System Information/SWC Retention
From the home menu, touch > [Radio] to
access radio settings.
Radio Region Selecting
Select a radio region where your unit is in.
[Europe]: Enable if you are in this area.
Tuner spacing: FM (50 kHz), AM (9 kHz)
[USA 1]: Enable if your are in this area.
Tuner spacing
:
FM (100 kHz), AM (10 kHz)
[USA 2]: Enable if you are in this area.
Tuner spacing: FM (200 kHz), AM (10 kHz)
RDS/RBDS Activation
[RDS/RBDS]: Enable or disable RDS/RBDS
function.
When enabled, it also allows FM stations to
display additional information (i.e. station name,
program type or other dynamic/static message).
IMPORTANT NOTE
Not all FM stations will have or display RDS/
RBDS information.
RDS/RBDS Trac Announcement
[TA]: When enabled, the unit will automatically
tune in to trac information broadcast despite
the media source you are currently in.
Once the trac announcement ends, the
original source will automatically resume.
RDS/RBDS Alternative Frequency
[AF]: When enabled, the unit will automatically
locate the same tuning program on other
stations and select the strongest signal of those
being broadcast.
This feature is most useful on long trips when
your car goes out of the range of a radio station.
From the home menu, touch > [About] to
access system information.
XXXX-XXXXXX
XXXX-XXXXXX
XXXX
XXXX
XXXX-XXXXXX
Firmware Version Information
Version information starts with MCU, SOC,
Hardware Version, Software Version, or SDK
Version.
Steering Wheel Control Retention
The unit allows you to retain your steering wheel
controls through connection to a steering wheel
interface/adapter (not included). (P.27)
Follow the instructions of your steering wheel
interface/adapter to program the unit's audio
and video functions on your steering wheel
controls.
Not all OEM steering wheel controls may be
supported.
23
WARNING
See the section "Installation Warnings". (P.5)
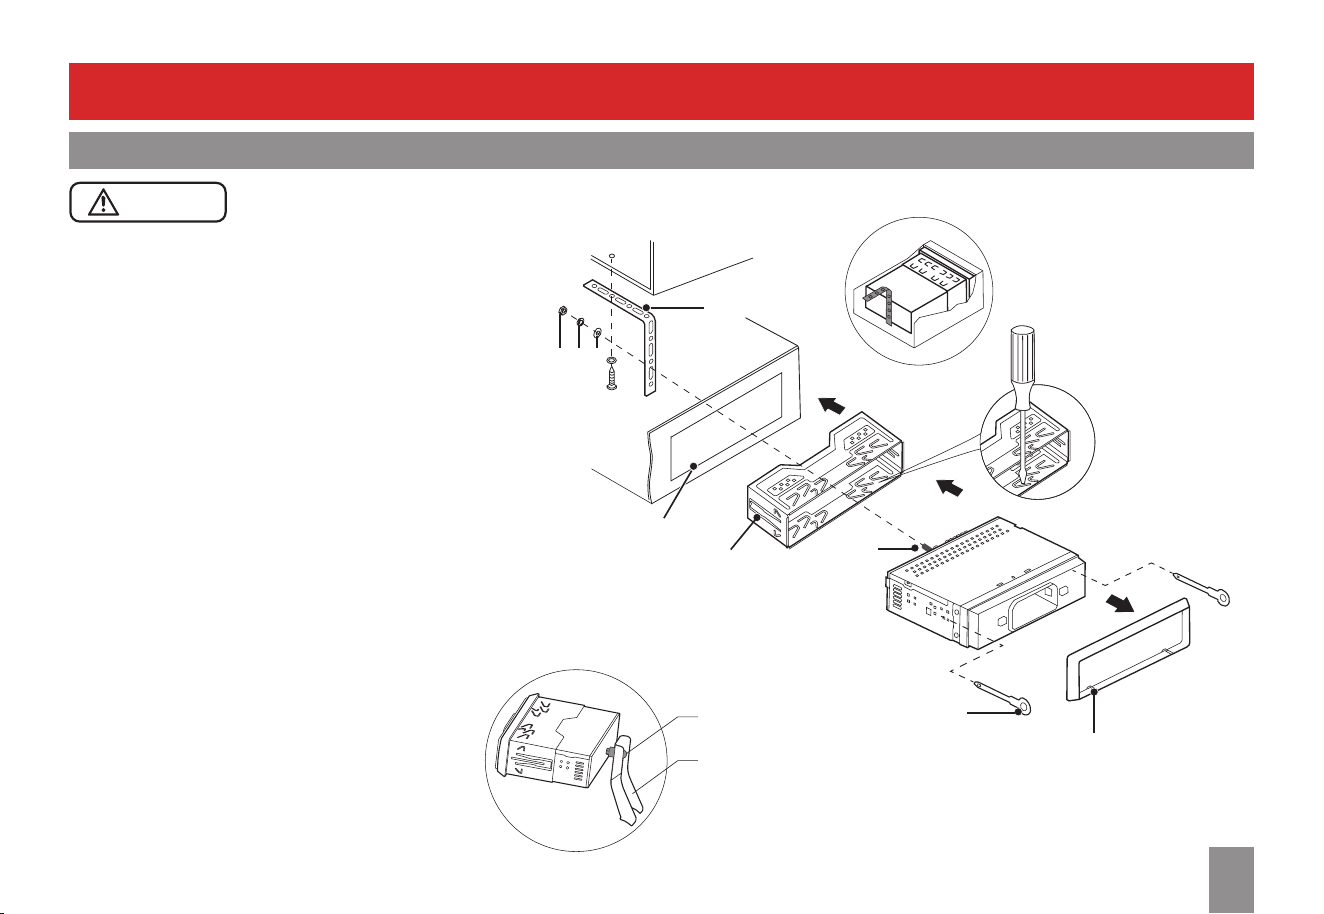
Single DIN Opening Installation
This section explains the installation if your
vehicle has a single DIN dash opening (2" x 7").
1.
Remove the trim ring from the front panel.
Use a screwdriver to pry open the trim ring.
2.
Remove the mounting cage from the unit.
Insert the two supplied release keys into the
locking tabs on both sides of the unit, then
pull the mounting cage o.
Then secure the mounting cage into the dash
opening. Bend the tabs on the mounting
cage to lock the cage into place.
3.
Insert the unit into the dash opening/
mounting cage.
4.
Secure the supplied mounting strap to the
rear of the unit to provide extra fastening (if
your car does not have a rear bracket to x
the unit).
Use the supplied hex bolt, hex nut (a), spring
washer (b), plain washer (c), tapping screw to
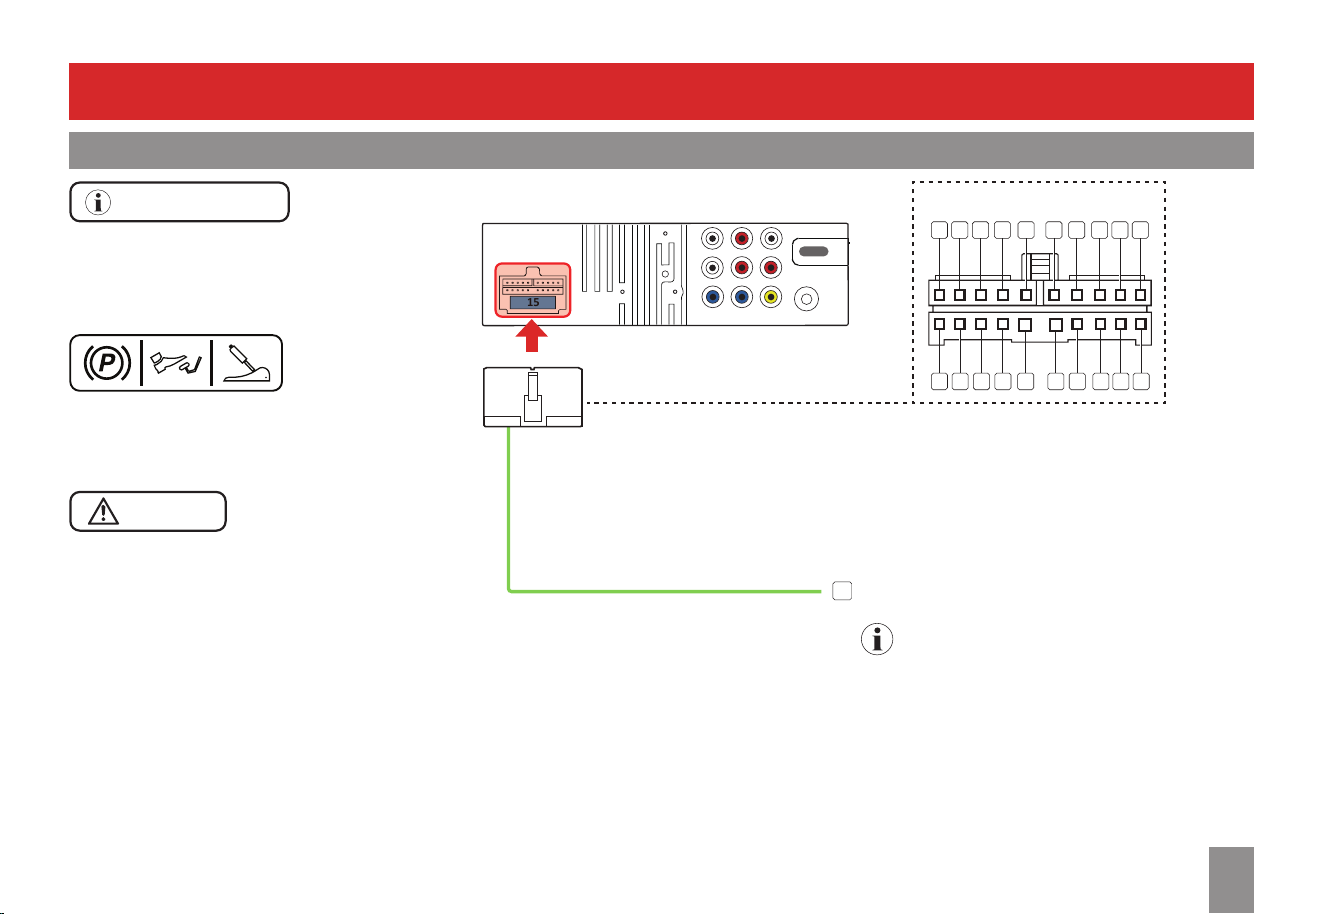
x the mounting strap.
Replace the trim ring after the installation.
Before you mount the unit into the dash, complete the wiring connection (P. 27 to 32).
Dash board
Bend the tabs
Single DIN opening
Mounting strap
Mounting cage
Release key
Unit secured with the
mounting strap
*
Hex bolt
Trim ring
* I
f your car has a rear bracket to x the unit's rear, no
need to install the mounting strap. Use the supplied
hex bolt and rubber grommet to secure the unit's rear
through the hole of the rear bracket.
a
b
c
Unit secured with the
car's rear bracket
Car's rear bracket
The supplied hex bolt
and rubber grommet
Unit Installation
Dash Mounting
24
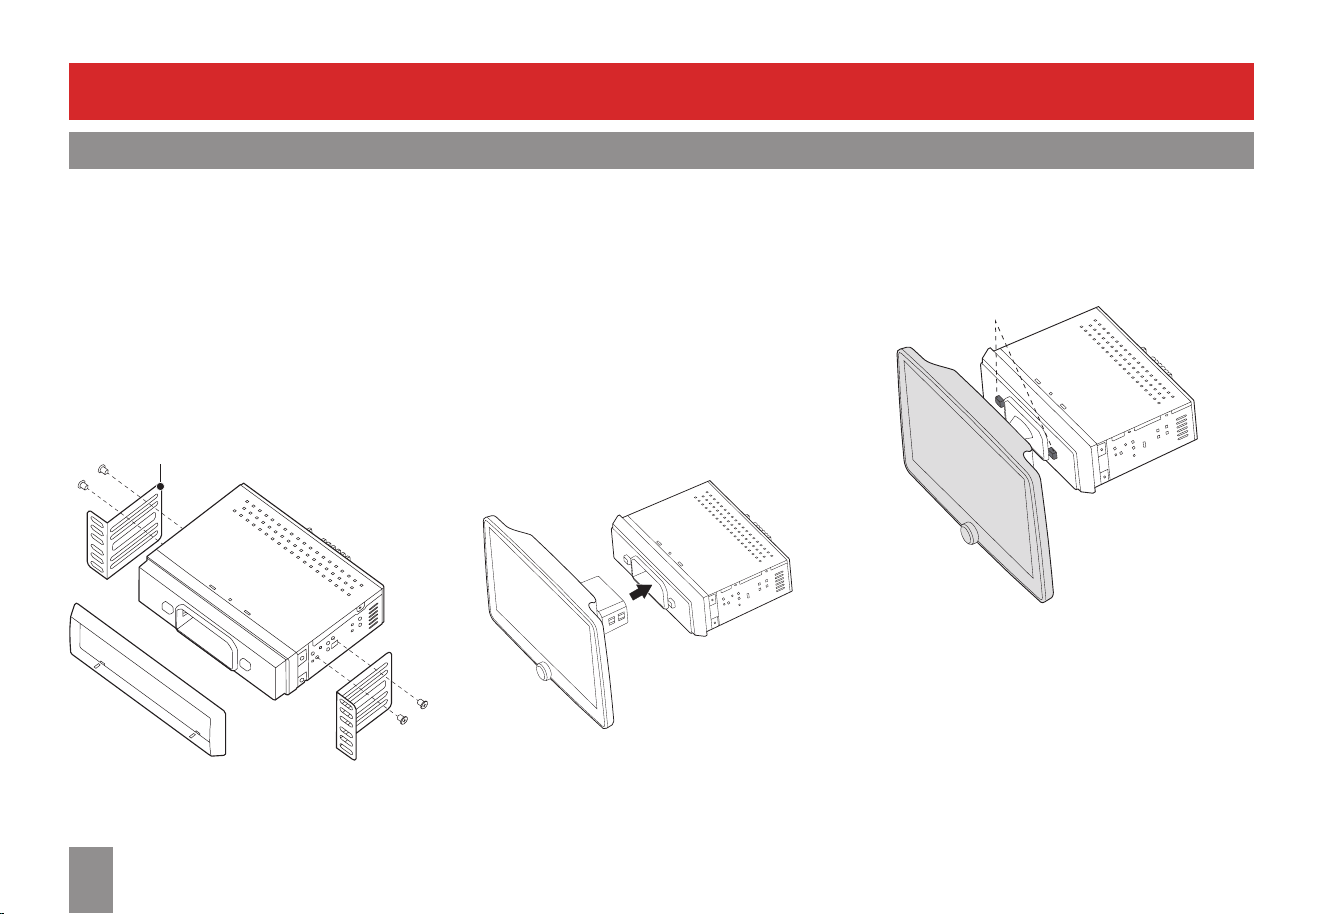
Double DIN Opening Installation
This section explains the installation if your
vehicle has a double DIN dash opening (4" x 7").
1.
Remove the trim plate and the mounting
cage from the unit, as described in the
section "Single DIN Opening Installation".
2.
Attach the two supplied L-brackets to the
both sides of the unit, using the supplied
bolts and the screw holes on both sides of
the unit.
L shaped bracket
3.
Slide the unit into the dash opening. Then x
the unit by fastening the L-brackets around
the dash opening with proper screws (not
included).
Consult a professional installer on whether
screw hole drilling is required.
4.
Replace the trim plate after the installation.
Attach the Display
As illustrated below, insert the supplied display
into the head unit until it clicks.
Detach the Display
As illustrated below, hold down two release
buttons simultaneously to unlock the display
then pull the display out.
Release buttons
Unit Installation
Dash Mounting Display Assembly
25
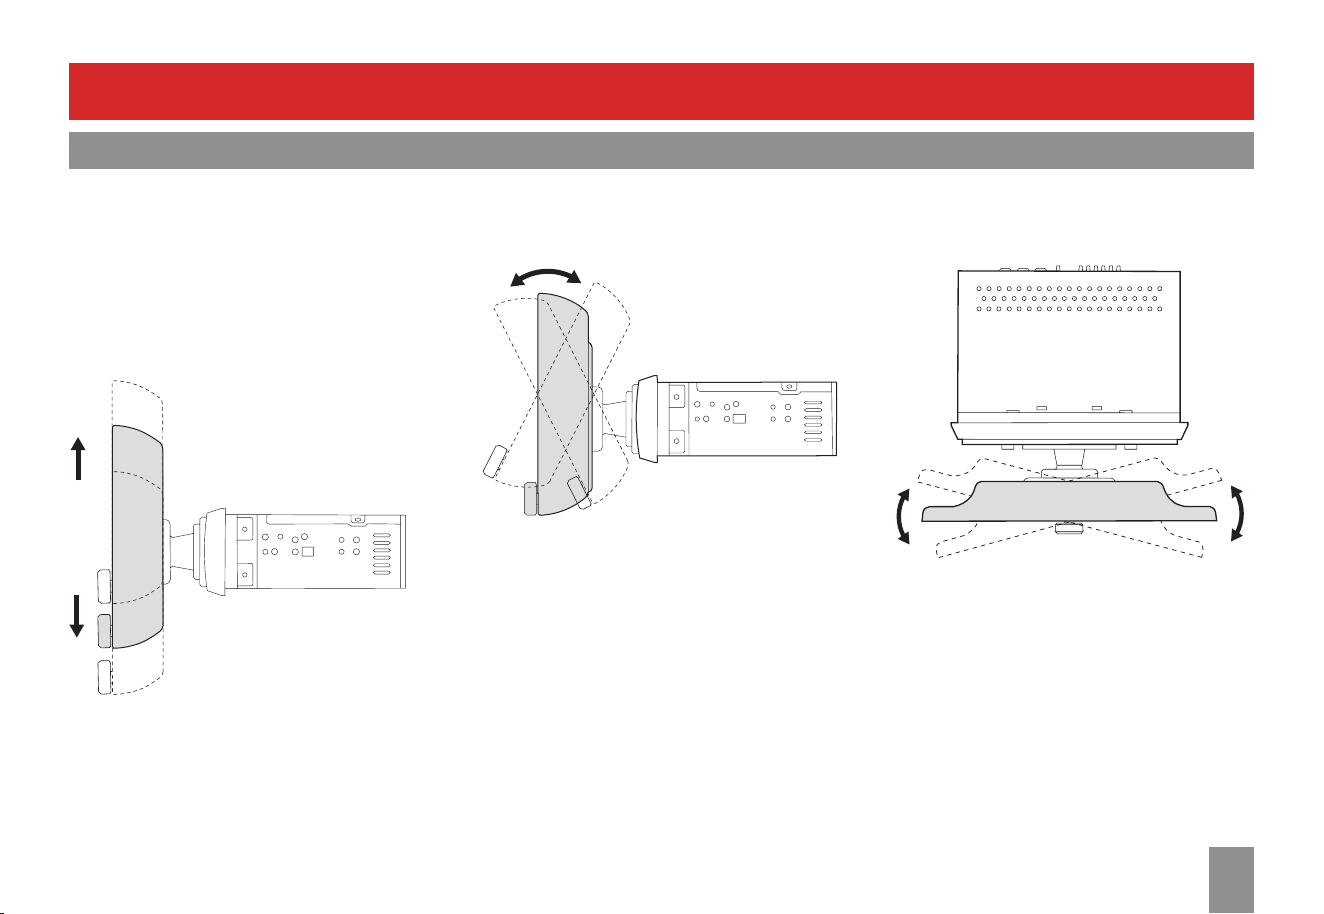
Adjust positioning of the Display
Adjust the display angle so that your view is
clear and it does not impair your driving.
Adjust the Display Height
Hold the display then slide it up or down to
adjust the height.
Tilt the Display Up and Down
The display can be vertically tilted by 25
degrees.
Tilt the Display Left and Right
The display can be horizontally tilted by 15
degrees.
Unit Installation
Display Positioning
26
Unit Dimensions
A
B
D
C
A: 1.97" (50 mm) B: 7" (178 mm)
C (Installation depth): 4.92" (125mm)
D (Overall depth): 5.63" (143 mm)
Display Dimensions
D
E
D: 10.28" (261mm) E: 6.54" (166 mm)
Display Mounting Dimensions
F
G
F: 2.48"
(63 mm) G: 1.18" (30 mm)
H
H’
H (at highest position): 3.90" (99 mm)
H‘ (at lowest position): 1.46" (37 mm)
I
I’
I (with maximum tilting angle at highest
position): 0.51" (13 mm)
I‘ (with maximum tilting angle at lowest
position): 1.54" (39 mm)
J
J (with maximum tilting angle): 1.26" (32 mm)
Unit Installation
Installation Dimensions
27
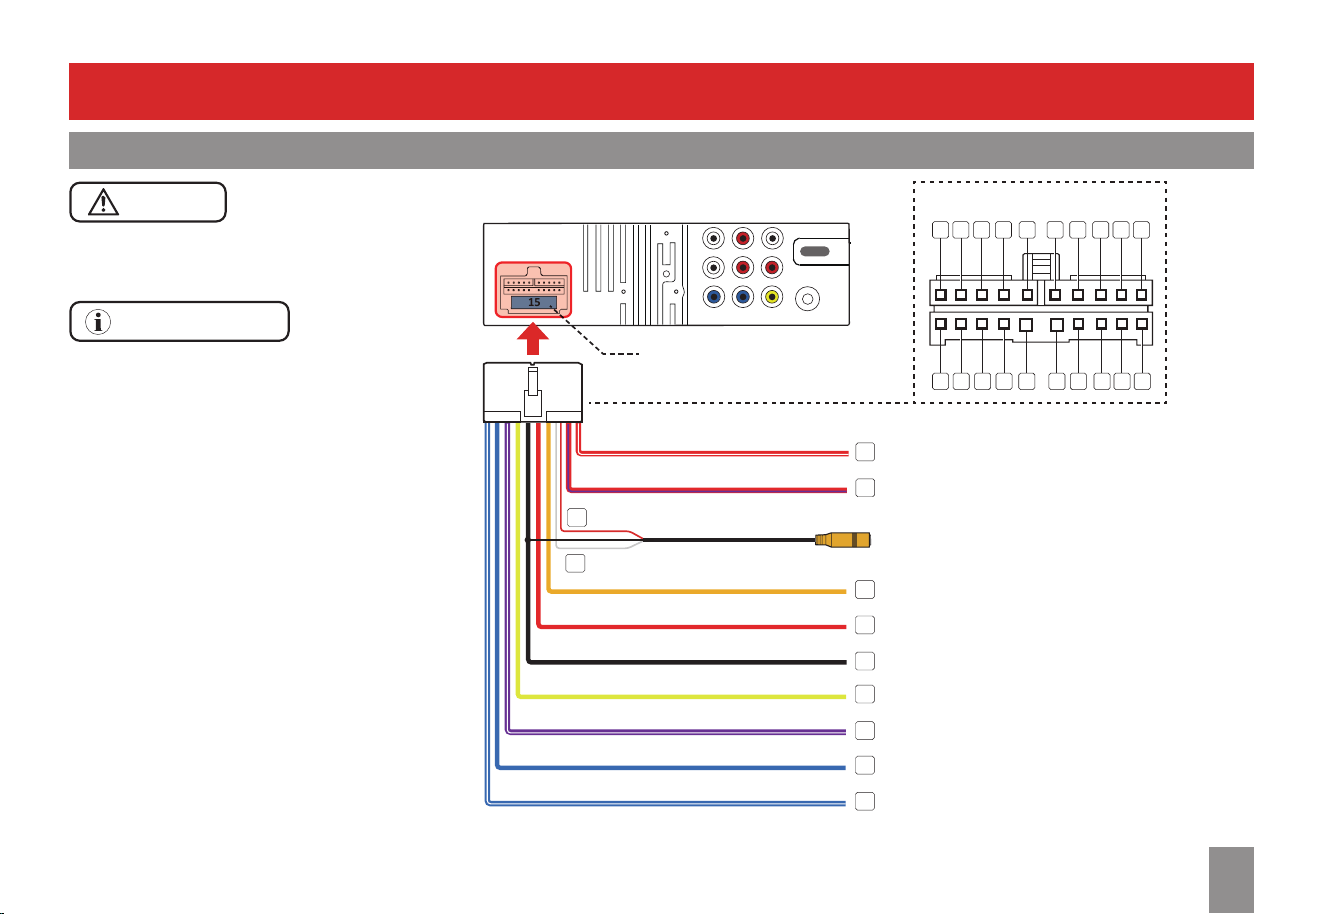
Power and Steering Wheel Interface (SWI) Input Wiring
WARNING
See the section "Installation Warnings". (P.5)
IMPORTANT NOTE
Unused input/output wires need to be insulated
with tape, heat shrink, or crimp connectors.
Never use wire nuts.
Always replace the faulty fuse with the same
type and rating (15A).
"DIMMER INPUT" wire (Orange/white) must
be connected to the parking light for night
detection and auto dimming in screen and
panel button lights.
"REVERSE" wire (Purple/white) must be
connected to the reverse light wire for
automatic rear camera trigger when the gear is
changed to reverse.
* Power output is max. 500mA, 12V. It is
recommended to use a relay if additional power
is required.
** Consult a professional installer for a correct
steering wheel interface/adapter to match
your vehicle, and follow the instructions of the
steering wheel interface/adapter for complete
wiring.
Connections
10 9 8 7 6 5 4 3 2 1
20 19 18 17 16 15 14 13 12 11
SUB2SUB1
FL
RL RR
R-IN
V-IN
FR L-IN
RADIO
15
Front View
15A ATO Fuse
REAR CAM PWR OUT (Red/white)
To rear camera for power supply *
ACC (Red)
To ignition key switch (+12V)
To vehicle’s metal frame/car chassis
To positive car battery terminal (+12V)
FRONT CAM PWR OUT (Red/purple)
SWI (3.5 mm)
DIMMER INPUT (Orange/white)
GND (Black)
BATTERY (Yellow)
REVERSE (Purple/white)
P. ANTENNA (Blue)
REMOTE TURN-ON (Blue/white)
To front camera for power supply *
To a steering wheel interface/adapter (not
included) **
To vehicle's parking light
To reverse light for rear camera trigger
To car antenna (not included) for power control *
To an amplier (not included) for power control *
Red
White
20
18
17
16
15
14
12
11
9
19
10
28
Connections
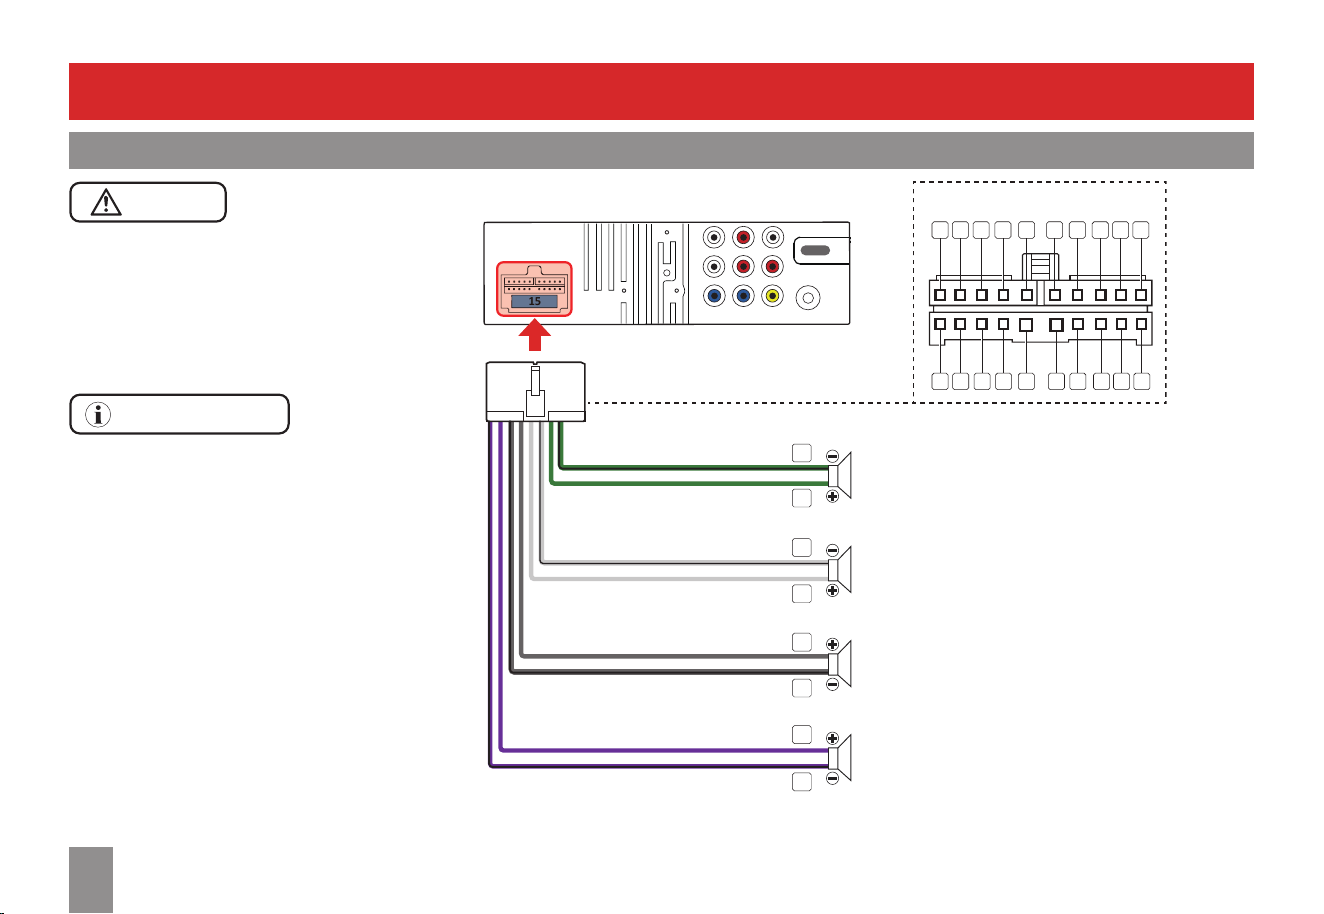
Speaker Wiring
CAUTION
Do not chassis ground any speaker wire leads.
Only use 4-8 Ω speakers.
DO NOT use 1-3 Ω
speakers.
Do not bridge any of the channels. They are only
to be wired in stereo mode.
IMPORTANT NOTE
Unused speaker wires need to be insulated with
tape, heat shrink, or crimp connectors to avoid
damage to the unit. Never use wire nuts.
Double check speaker polarity when making
connections.
FL
RL RR
R-IN
FR L-IN
15
10 9 8 7 6 5 4 3 2 1
20 19 18 17 16 15 14 13 12 11
Front View
FRONT L- (White/black)
FRONT L+ (White)
FRONT R+ (Gray)
FRONT R- (Gray/black)
REAR L- (Green/black)
REAR L+ (Green)
REAR R+ (Purple)
REAR R- (Purple/black)
To rear left speaker
To front left speaker
To front right speaker
To rear right speaker
8
7
6
5
4
3
2
1
29
Connections
Parking Brake Wiring
IMPORTANT NOTE
Video and photo playback can be enabled
only when the parking brake switch wire is
connected to your vehicle, and the vehicle's
parking brake is engaged.
Park your vehicle in a safe place and engage the
parking brake to view video and photo.
WARNING
Improper connection or use of the parking
brake switch wire (e.g. defeating the safety
feature) violates Federal, State, and Local laws.
This may lead to injury, property damage, and/
or death.
Watching videos or photos while driving is
against Federal, State, and Local laws.
To vehicle’s parking brake switch
Note
Parking brake switch location varies from vehicles.
Consult a professional installer.
10 9 8 7 6 5 4 3 2 1
20 19 18 17 16 15 14 13 12 11
SUB2SUB1
FL
RL RR
R-IN
V-IN
FR L-IN
RADIO
15
Front View
PARKING SW (Light green)
13
Parking brake switch wire
30
Connections
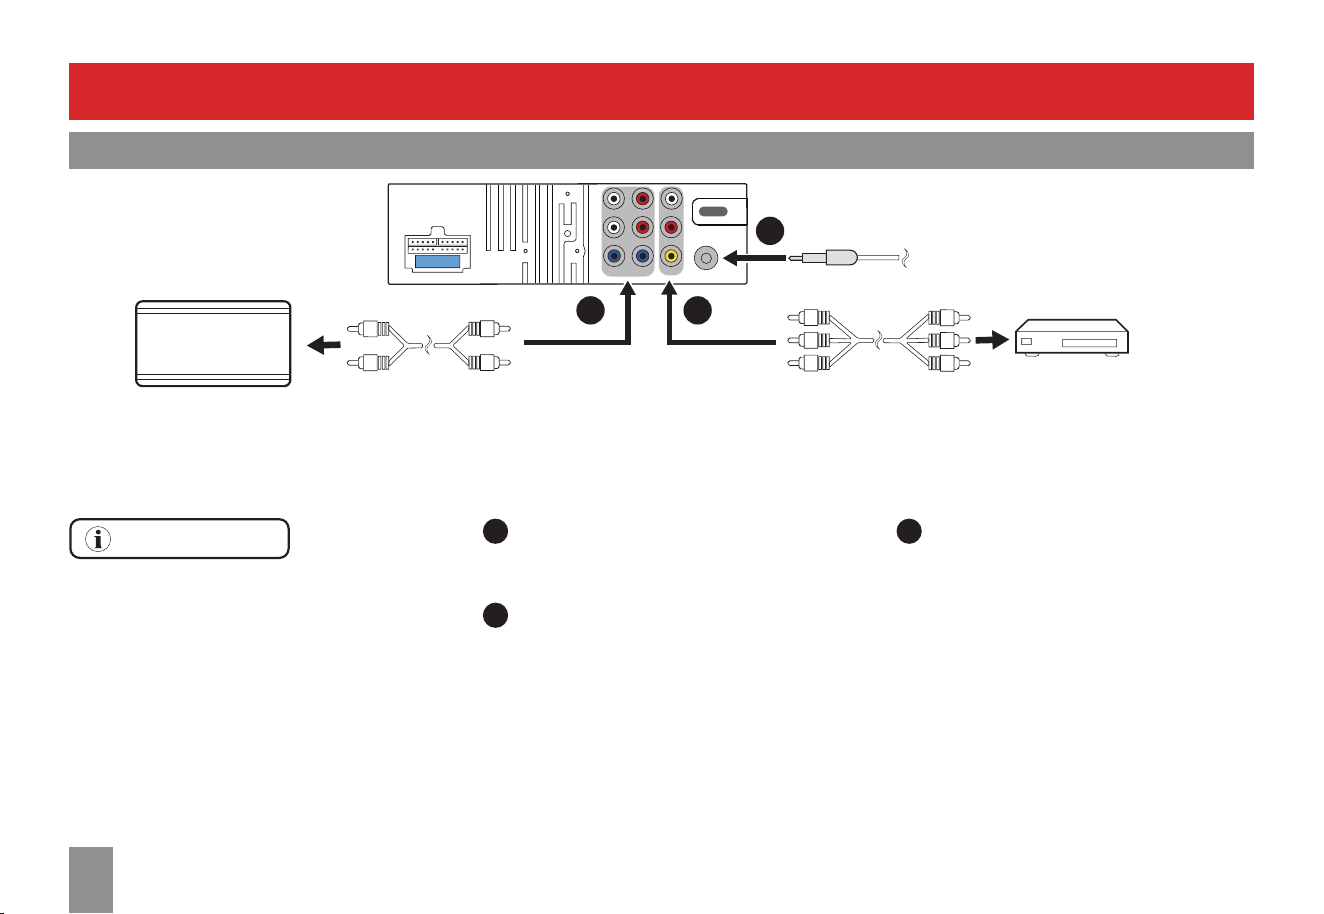
AV/Radio
1
Using RCA audio cables (not included),
connect the audio output on the unit to an
external amplier (not included).
2
Using RCA audio cables (not included),
connect the audio input ("L-IN" and "R-IN")
on the unit to a CD player.
Or using an RCA to 3.5mm/USB-C/lightning
adapter (not included), connect the audio
input ("L-IN" and "R-IN") to the audio output
on your mobile phone.
Using a yellow RCA cable (not included),
connect the video input ("V-IN") on the unit
to the video output on a DVD or other video
playback player.
IMPORTANT NOTE
Subwoofer pre-amp is a non-fading mono
output.
Always run signal wires away from power cables
to reduce the possibility of noise.
3
Connect an FM/AM antenna (not included)
for better radio reception.
CD/DVD, etc.
FM/AM antenna (not included)
1 2
3
SUB2SUB1
FL
RL RR
R-IN
V-IN
FR L-IN
RADIO
15
Pre-amp audio output
Front out (FL & FR)
Rear out (RL & RR)
Subwoofer out (SUB1 & SUB2)
AV input
Audio in (L-IN & R-IN)
Video in (V-IN)
Multi-channel/
Monoblock amplier

31
Connections
Mic/Camera/CarPlay/Android Auto
1
Connect the 3.5mm plug of the supplied
hands-free microphone for sound input
when using phone call or voice assistance
through Bluetooth or CarPlay/Android Auto.
2
Connect the RCA plug of your camera for
video signal input.
To operate your rear camera, you also need
to connect camera power and reverse signal.
(P.27)
3
Connect the lightning cable or USB cable of
your iPhone or Android device to enable use
of CarPlay or Android Auto.
4
Connect a USB ash drive for media
playback, or a mobile phone for charging.
WARNING
Never rely solely on the backup camera. Always
check your surroundings before backing up.
Images may appear reversed if your camera is
not properly installed or set up.
Do not use features of this unit if it cannot be
operated safely and legally in your location.
SUB2SUB1
FL
RL RR
R-IN
V-IN
FR L-IN
RADIO
15
Apple CarPlay
Android Auto
Rear Camera Input
Front Camera Input
Microphone Input
1
2
3
USB/Charging
4
32
Connections
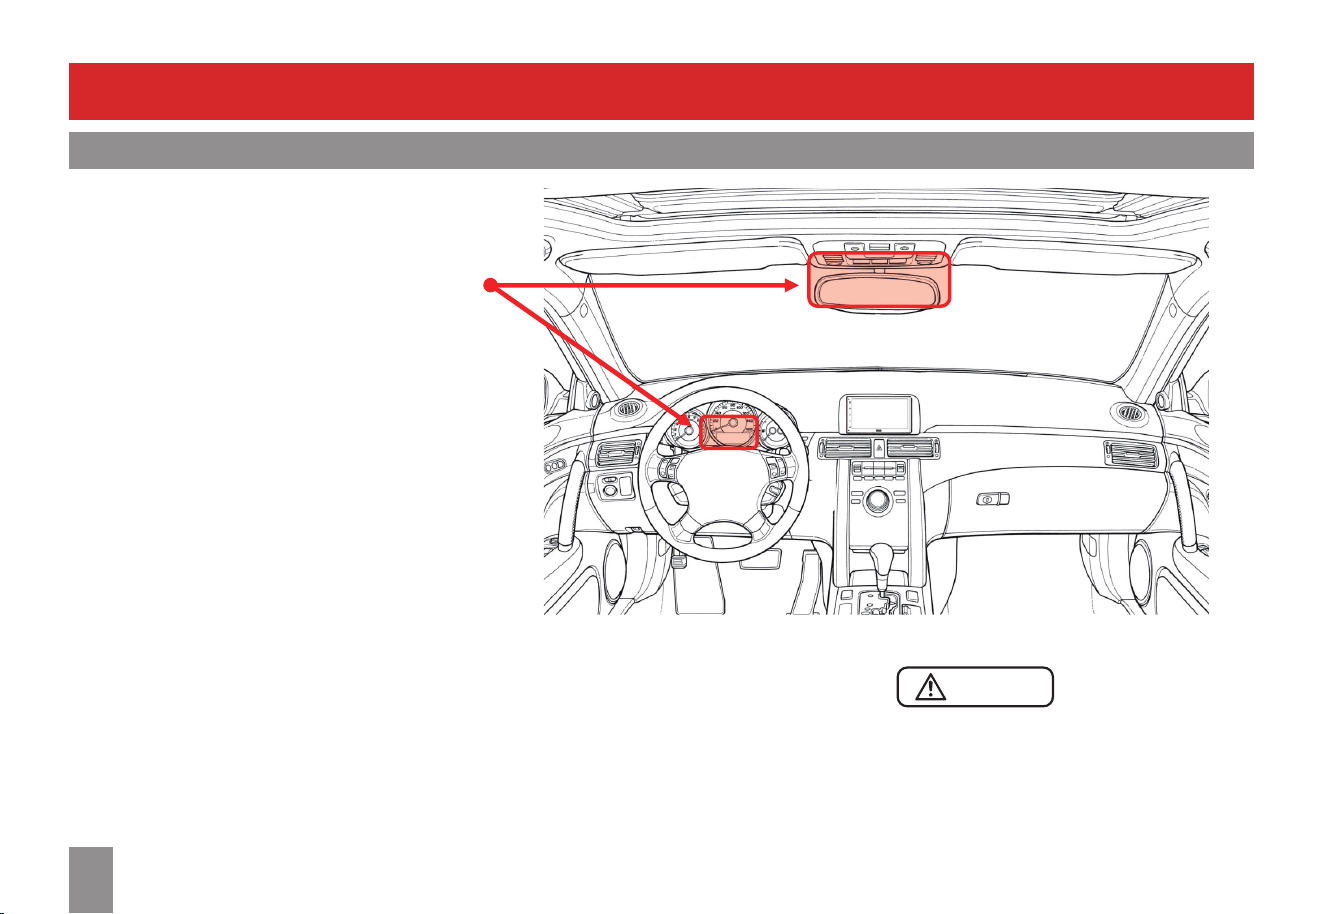
Hands-Free Mic Installation
Placement
The unit comes with a hands-free microphone
with sticky base and 10ft wire.
The location of the microphone can vary
from dierent vehicles due to layout, interior
materials, etc.
The Red shaded areas are the recommended
locations for best microphone performance.
Items to look for before placement:
• Do not place in front of air vents.
• If the vehicle has tweeters placed on sail
panel, do NOT locate the microphone on
steering column area.
• The front of the microphone must not be
blocked.
• Microphone should be rmly attached to
mounting location.
• Do not cover the grille openings surrounding
the microphone.
• To avoid excessive wind noise, do not place
near the sunroof opening.
WARNING
Run the microphone wire where it will NOT
impede with the operation of any safety items
(e.g. airbags, knee airbags, etc.)
Attach the Microphone
1.
Clean the mounting surface.
2.
Remove the backing paper from the
microphone base, then stick the base onto
the mounting surface.
3.
Route and secure the microphone wire
properly.

33
General
No response / Screen or unit not powered on
/ Bad or incorrect picture quality.
• Restart the unit by turning o the vehicle for
ten seconds, then turning the vehicle back on.
No sound from the unit.
• The unit is muted. Adjust the volume.
• Select the correct audio source on the unit.
USB
Cannot play a media le.
• The le format on the USB ash drive is not
supported by the unit. Change media les.
• The le system of the USB ash drive is not
supported by the unit. Change the USB drive.
No video playback or picture display.
• Video or picture display is enabled only
when the parking brake is engaged, and the
parking brake switch wire is connected to
your vehicle. (P.29)
Apple CarPlay/Android Auto
Cannot start Apple CarPlay/Android Auto
• Bad USB cable. Replace the cable.
• The mobile phone is locked. Unlock it.
• CarPlay/Android Auto is frozen. Unplug the
mobile phone, close all apps and plug the
phone in again.
Bluetooth
Cannot make Bluetooth streaming.
• Make sure your mobile phone is within
Bluetooth range.
• Pair and connect your mobile phone. (P.14)
• CarPlay or Android Auto is being connected.
Unplug your mobile phone from the unit to
enable Bluetooth connection.
Poor hands-free phone call quality.
• Check signal strength on your mobile phone.
• Check that the microphone is rmly attached
and plugged in. Or relocate the microphone
for noise reduction. (P.32)
Cannot make Bluetooth connection.
• CarPlay/Android Auto connection disables
Bluetooth on the unit. Unplug CarPlay
or Android Auto from the unit to enable
Bluetooth connection.
• The unit is already connected to a mobile
device. Disconnect the current Bluetooth
connection before connecting to another
Bluetooth device.
FM/AM Radio
Poor radio reception.
• FM/AM antenna is not connected or
extended. Connect and secure an FM/AM
antenna (not included). (P.30)
• The antenna output wire is not connected.
Connect the wire. (P.27)
• Turn o RDS/RBDS, TA and AF. (P.22)
Troubleshooting
Important!
If you have checked the points described in the list and the problem persists, turn o the vehicle for ten seconds then turn it back on again.
If the problem still persists after restarting the unit, reset the unit by using a small pin to press the reset button on the bottom side of the display.
If you still have problems after applying suggestions above, please contact our Customer Service for further assistance.

34
Specications
General
Input voltage.............................................8.5 – 18 VDC
14.4 VDC (Nominal)
Current consumption .................................Max. 15 A
Fuse .....................................................15 A (ATO, blade)
Dimensions (H x W x D)..................1.97" x 7" x 5.63"
Unit weight ........................................................ 4.26 lbs.
Operational temperature ........................-4 to 140°F
Display
Screen size.................................................................10.1"
Aspect ration .............................................................16:9
Resolution ..................................................... 1024 x 600
Screen type.............................TFT-LED Active Matrix
Audio
Max power .........................................................85 W x 4
Speaker impedance ...........................................4 – 8 Ω
Preset EQ....................Jazz, HipHop, Pop, Rock, R&B
EQ bands (Adjustable)....... 32/63/125/250/500 Hz
1/2/4/8/16 kHz
EQ boost/cut .......................................................... ±6 dB
Pre-amp output..................2x Front (4V, full range)
2x Rear (4V, full range)
2x Sub (mono, 4V, LPF)
Sub LPF............................................ 50/80/120/160 Hz
Sub Level ...................................................+1 to +14 dB
Audio input............................... 2x RCA, 1 Vp-p/75 Ω
Video
Signal system .................................................NTSC/PAL
Video input (RCA).....................1x RCA, 1 Vp-p/75 Ω
Radio
Frequency range...................... 87.5 – 108 MHz (FM)
522 – 1710 kHz (AM)
Frequency step (FM)........................100 kHz (USA 1)
200 kHz (USA 2)
50 kHz (Europe)
RDS/RBDS..............................................RT data , TA, AF
Apple CarPlay
Device support .................................iPhone 5 or later
iOS ............................................................ iOS 7.1 or later
Android Auto
Android .......................................................... 6.0 or later
USB
Compatibility......................USB-A (2.0, High Speed)
USB port (1).............................CarPlay/Android Auto
Charging (1.5A)
USB port (2)...........................Media/Charging (1.5A)
Supported USB .............................................Max. 32GB
File system...............................................................FAT32
Audio playback................................MP3, WMA, WAV,
FLAC (192kHz/24bit)
Video playback ....................................AVI, MKV, WMV
Picture playback.................................. JPG, PNG, BMP
Note: Not all listed media les are guaranteed
to play due to dierent creation methods or
le contents.
Bluetooth
Bluetooth version ....................................... V4.2 + EDR
Transmission range............33ft/10m (line of sight)
Bluetooth proles.............A2DP, AVRCP, HFP, PBAP
Specications are subject to change without notice.

35
User Notes


0224