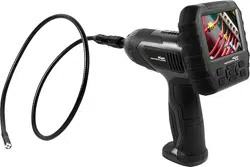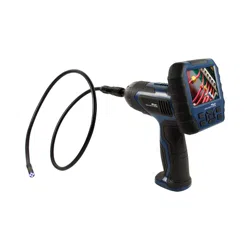
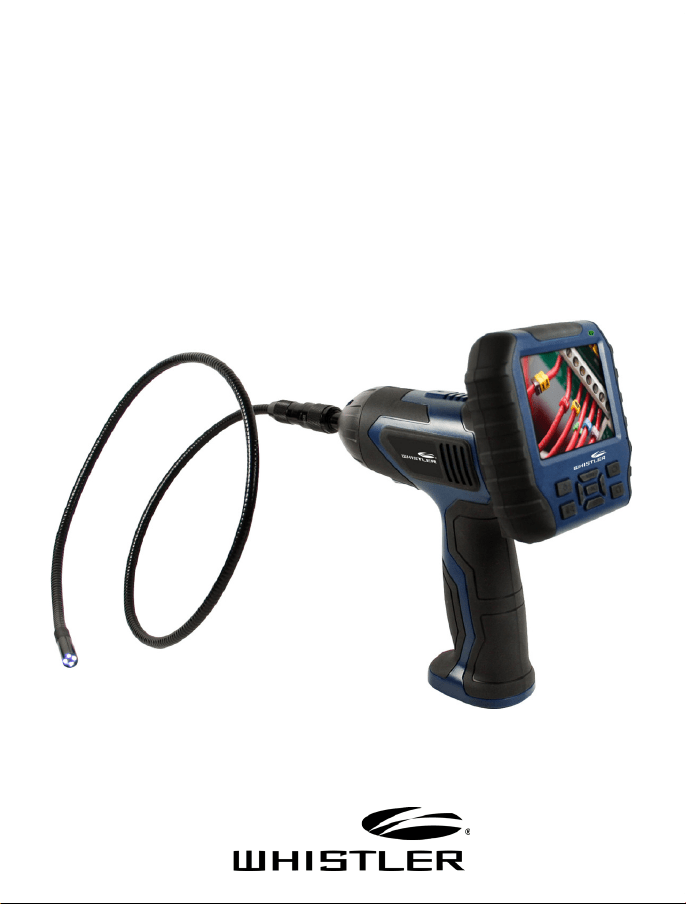
OWNER’S MANUAL
Wireless Inspection Camera
With Recording Color LCD Monitor
WIC5200
2
Welcome
Thank you for choosing a Whistler product. We are dedicated to
providing products that represent both quality and value. Please
read the user manual carefully before using this product. If you
have additional questions, please visit the FAQ page on our
website at www.whistlergroup.com or call toll free 800-531-0004,
8am to 5pm CT, Monday through Friday to speak to a Customer
Service Representative.
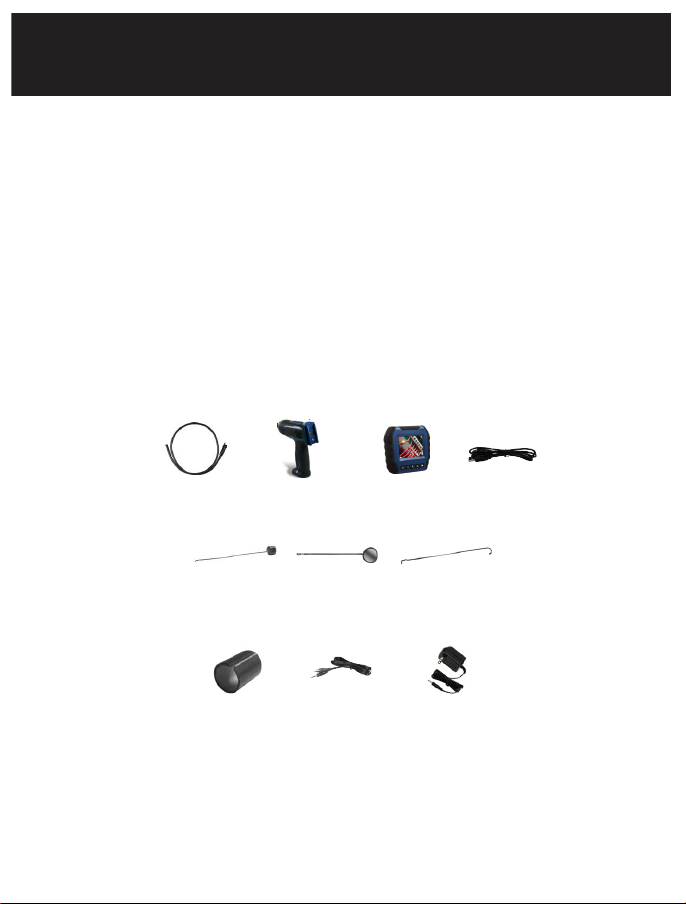
Packing List
INTRODUCTION
9mm Camera
with 3.3 ft. Tube
Accessory
Collar
Handheld
Unit
Video
Cable
3.5 in. LCD
Monitor
USB Cable
Power
Adapter
Magnet
Accessory
Clip
Mirror
Accessory
Clip
Hook
Accessory
Clip
3
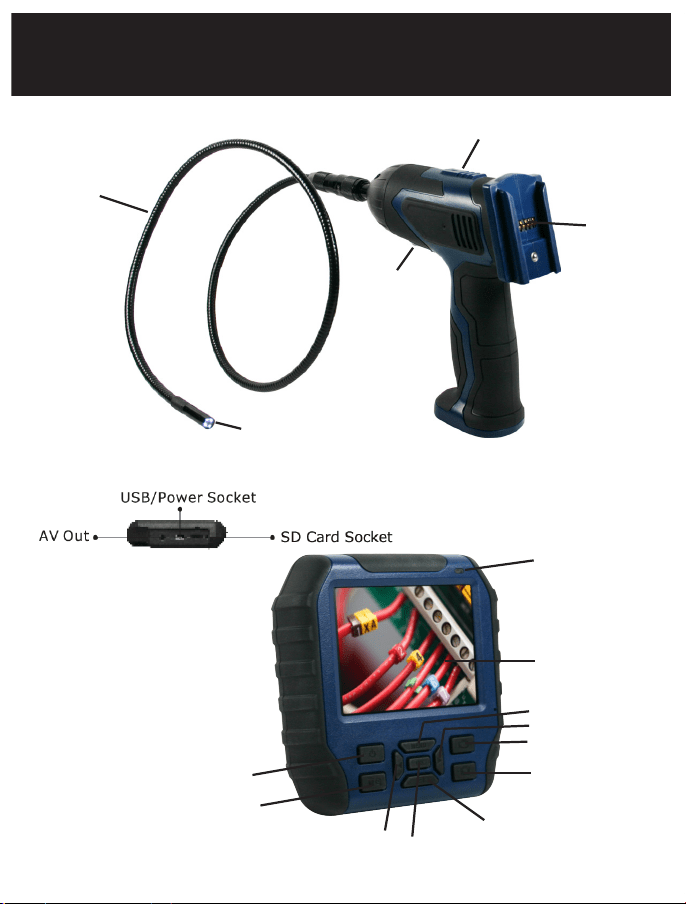
Camera Unit
Monitor
FEATURE DESCRIPTION
3.3 ft. Camera Tube
Power Indicator
Power Indicator
3.5in. LCD Display
Take Picture
Left
Menu
Right
Record Video
Play Video
OK
Delete/
Zoom
Power ON / OFF
Image Rotation
Signal
Output
9mm Camera Lens with
LEDS
Power ON / OFF
LED Brightness
Control
4
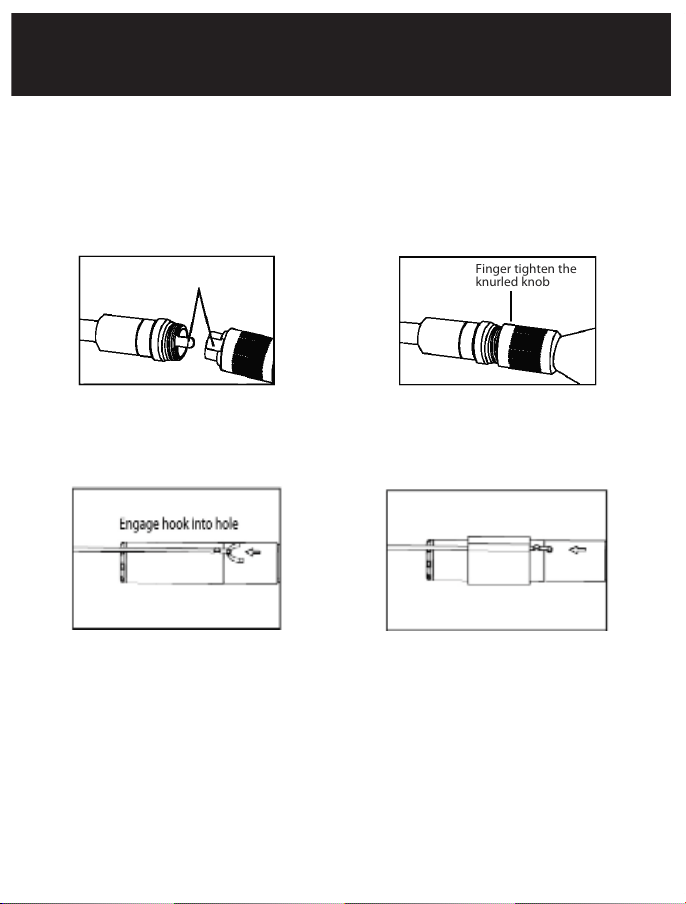
Installation
Installing the Camera Flexible Tube
When connecting the camera tube to the handheld unit, make
sure that the keyed ends are properly aligned. Once they are lined
up, finger tighten the knob to hold the connector in place.
Install the Accessories
The three (3) included accessories (mirror, hook and magnet) are
all attached to the tube in the same way as illustrated below:
Place hook into hole at end of tube. Place rubber ring around
camera head and hook.
INSTALLATION
Keyed end plugs
into socket
Finger tighten the
knurled knob
5
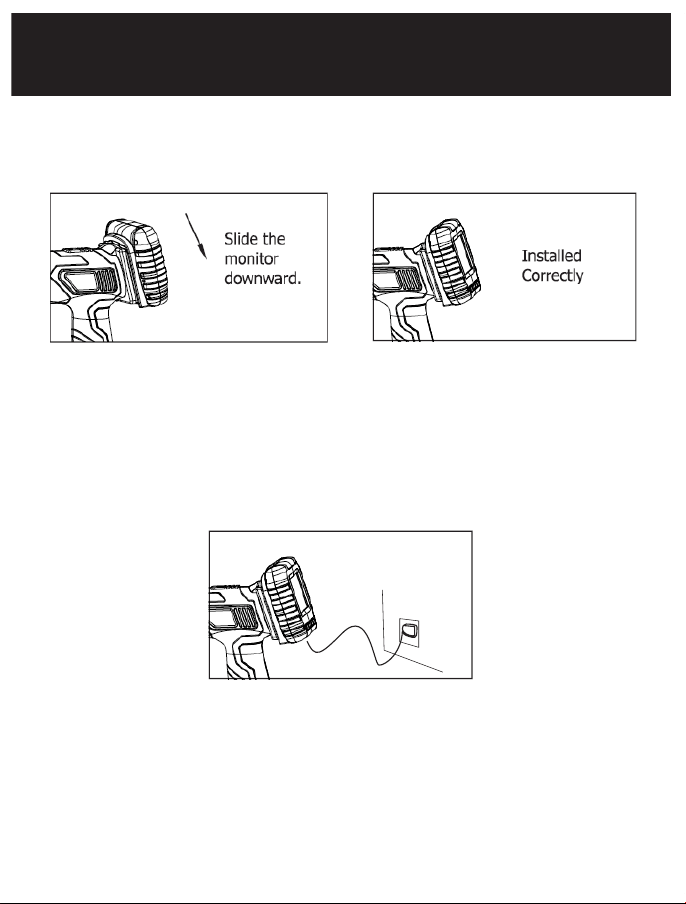
Install Monitor for Wired Use
This product also supports wired use by connecting the monitor
to the camera.
Connect AC Adapter
Connect the adapter to the monitor and then plug the adapter
into a wall outlet. The power indicators on the handheld unit and
the monitor will light red, which indicates the monitor and the
handheld unit are charging at the same time and they will turn off
after fully charged. The product can be used while charging.
NOTE: Monitor must be attached to handheld unit when charging.
INSTALLATION
5

6
Video Out
Insert the video cable into the Video Out jack on the side of the
unit. Insert the other end of the video cable to a video in on a TV
or other video monitor system. The unit will provide high quality
video to an external monitor.
Install Extension Tube (Optional)
To connect the extension tube, first align the keyed end with the
slot in the handle. Use slight force to push them together. Once
properly aligned, twist the threaded knob clockwise until the
connection is securely in place. Repeat this process to connect the
other end of the extension tube to the flexible camera tube.
INSTALLATION
6
7
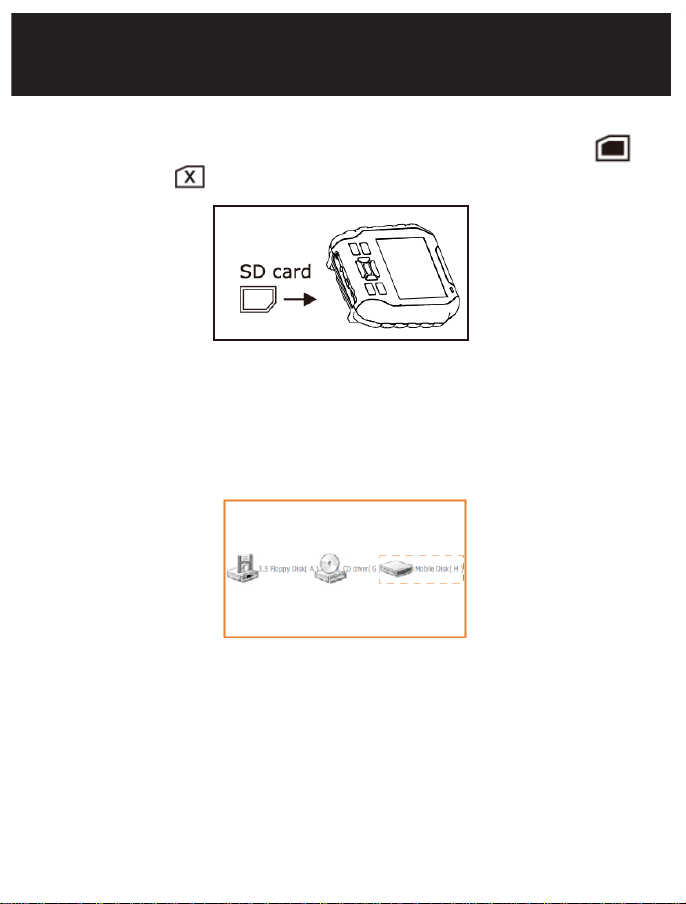
Insert SD Card (Optional)
After the SD Card is inserted properly, the monitor will indicate
icon; otherwise, icon will appear.
Connect USB Cable
Use the USB cable to connect the monitor to a PC. The USB online
icon appears on the PC. Open My Computer, find the Mobile Disk
icon. The video/picture files in the SD card can be copied, cut or
played back.
INSTALLATION
8
Operation
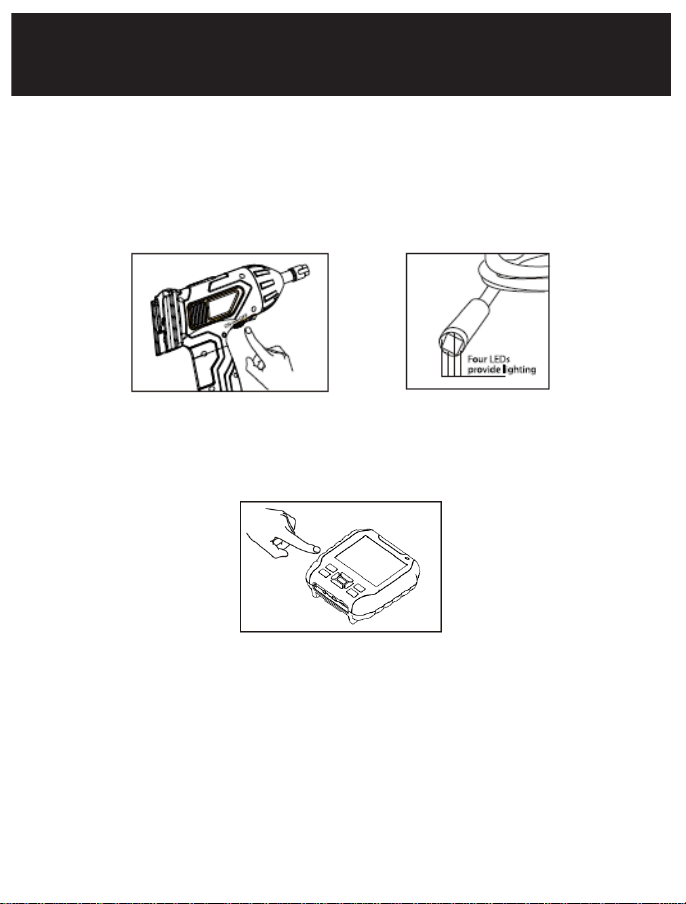
Rotate the ON/OFF switch to turn on the camera. The power
indicator on top of the handheld unit will illuminate. The switch
then acts as a dimmer of the LED’s, that surrounds the camera and
provide high quality lighting.
Press and hold on the Power ON/OFF button on monitor for 2
seconds, the power indicator will be green and the picture will
display on LCD display.
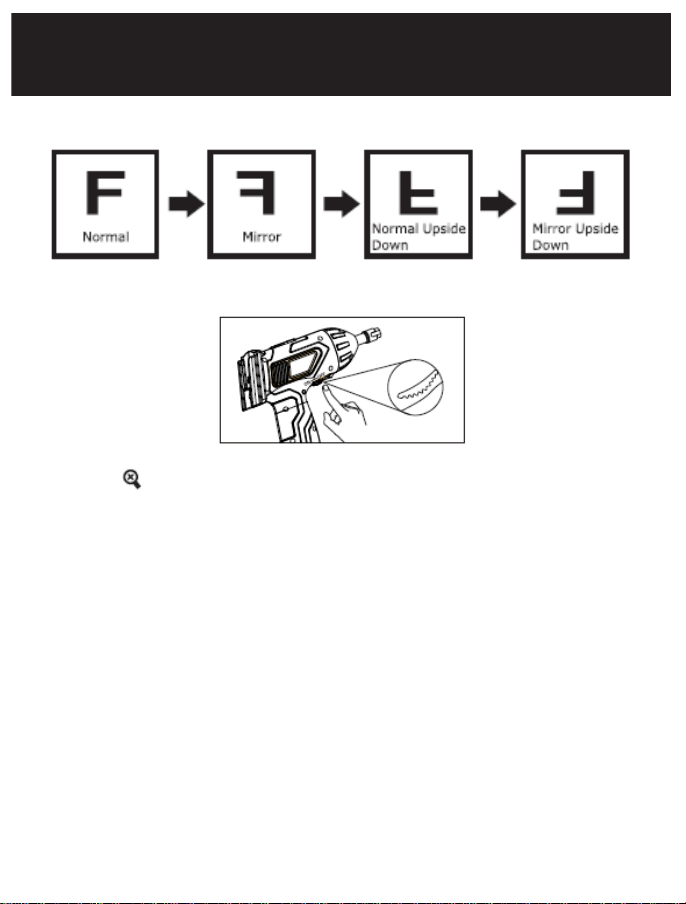
Quick press the power button to turn ON/OFF icons and image
orientation.
• Quick press 1st to turn OFF icons
• Quick press 2nd-4th to orientate the images
• Quick press 5th to recover the image and turn on the icons
• Continue presses will repeat above operations
OPERATION
7
9
Image orientation as below:
Rotate the ON/OFF switch to adjust display brightness.
Press the button to digital zoom the image. Zoom capacity of
1.5x, 2x and 3x.
OPERATION
10
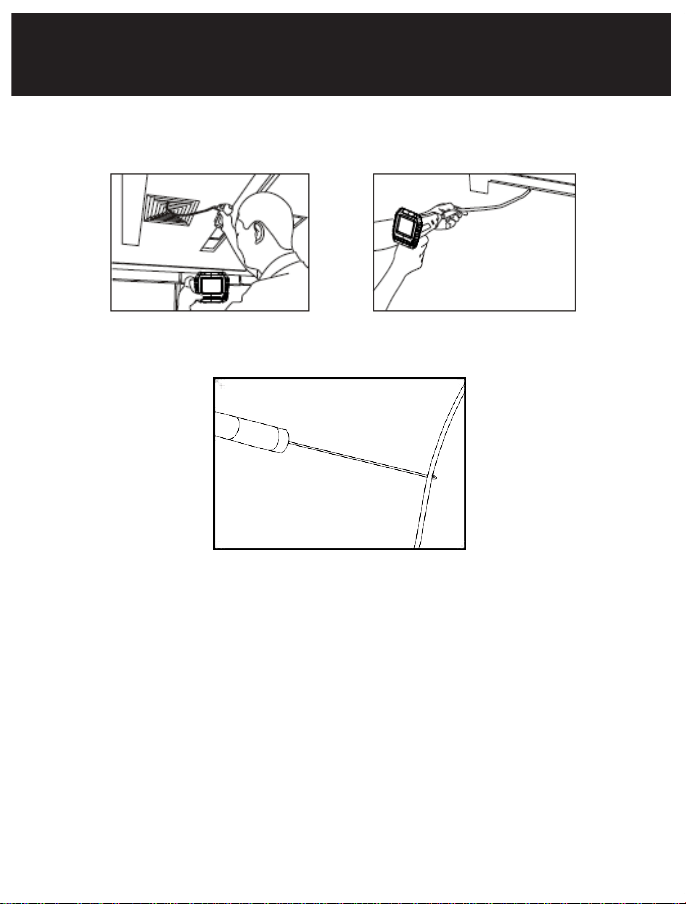
Gently guide the tube into the desired location. Slight adjustments
can be made while maneuvering the head in a forward direction.
IMPORTANT: The flexible tube can be bent to accommodate
exploration in a variety of locations.
The accessories can be used to retrieve small items such as screws
or rings.
OPERATION
11
MONITOR OPERATION
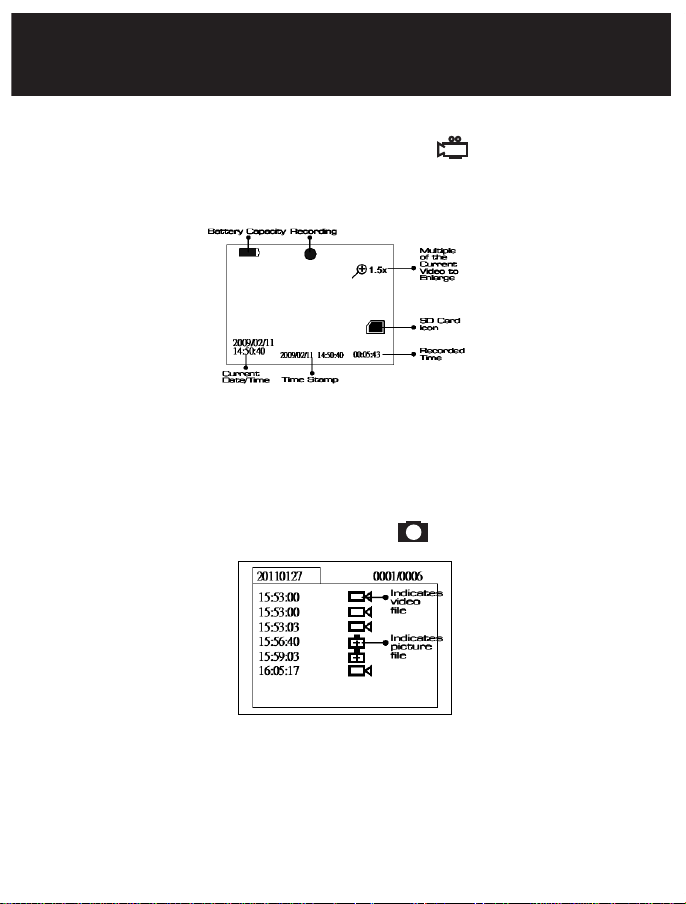
Recording Video
1. In real-time monitoring mode, press the button to
begin recording.
2. Press again to stop recording and save video.
NOTE: The video will be automatically saved as an individual file
every 30 minutes. “Memory Full” appears on the LCD screen to
indicate that the SD card memory is full.
Taking photos
In real-time monitoring mode, press the button to take a photo.
NOTE: “Memory Full” appears on the LCD screen to indicate that
the SD card memory is full.

12
MONITOR OPERATION
Playback Video/Picture
1. In real-time monitoring mode, press the button to toggle to
the video/picture folder.
2. Press the and buttons to select your desired folder, and
then the press OK button to toggle to the right interface:
NOTE: Icon next to a file name indicates that the file is a video.
Icon next to a file indicates that the file is a picture.
For playback video:
Press the or button to select your desired video, and then
press OK button to playback.
Pause:
Press the OK button once to pause, press again to resume play.
Fast Forward:
Press and hold on the button for about 2 seconds.
Fast Backward:
Press and hold on the button for about 2 seconds.
Stop/Exit: press the MENU button.
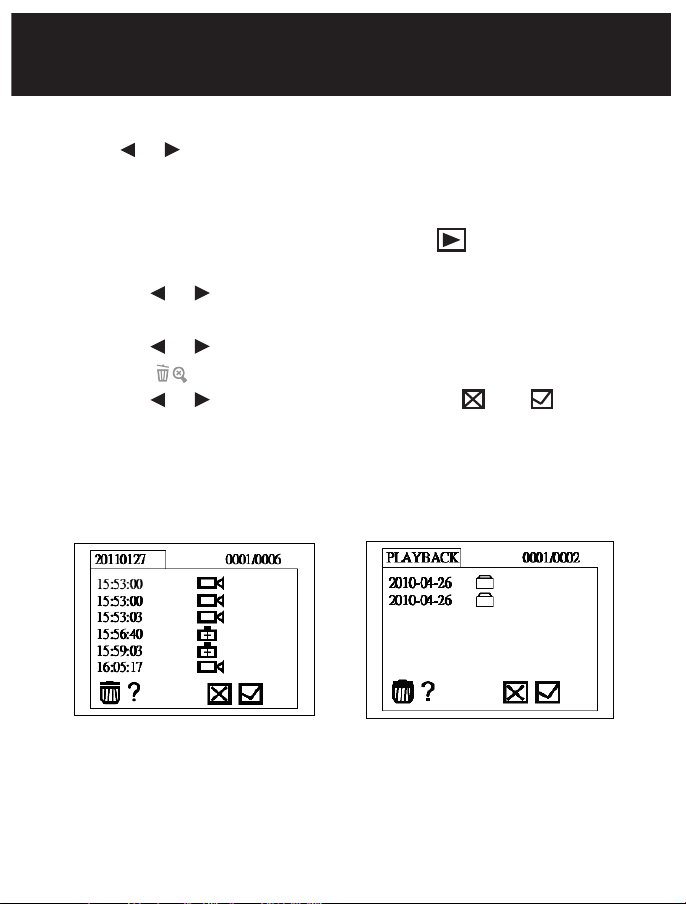
13
For viewing images:
Press the or button to select your desired image, press OK or
MENU button to view and press again to exit.
Deleting Video/Picture
1. In real-time monitoring mode, press the button to toggle to
the video/picture folder.
2. Press the or button to select your desired folder, and then
press OK button.
3. Press the or button to select your desired file, and then
press the button.
4. Press the or button to toggle between and , that is,
to cancel or delete. Once you have highlighted your desired
selection, press the OK button.
Deleting Folder
Deleting a folder is done in the same way as deleting a single file.
MONITOR OPERATION
14
MONITOR OPERATION
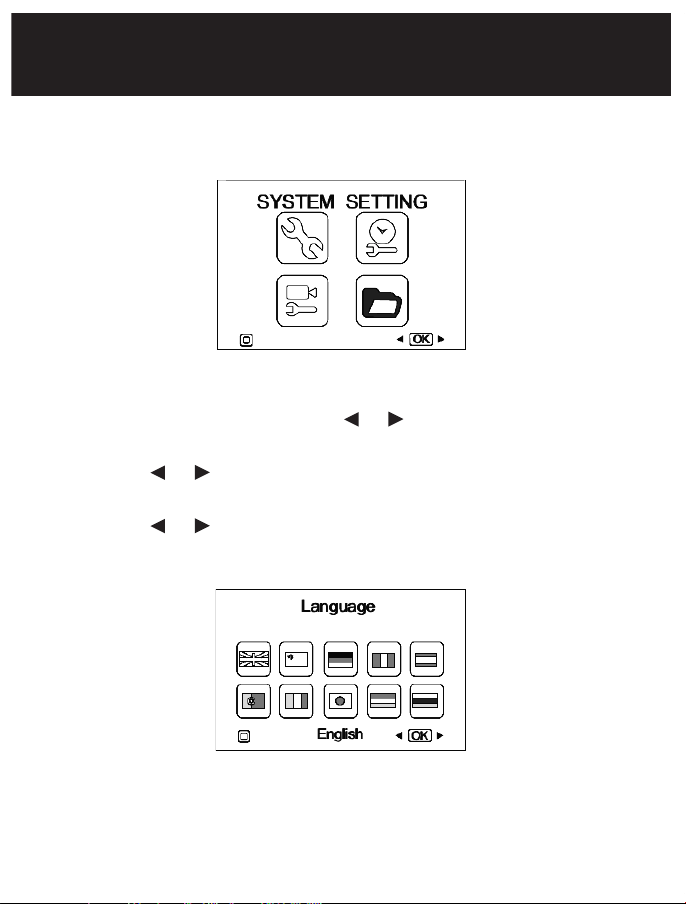
How to enter the Setting Mode
In real-time monitoring mode, press the MENU button:
Language Setting
1. In the setting mode, press the or button to select ‘SYSTEM
SETTING’, and then press OK button.
2. Press the or button to select ‘Language’, and then press
OK button, the following interface will appear:
3. Press the or button to select your desired language.
4. Press OK button to confirm and press MENU button to exit.
15
MONITOR OPERATION
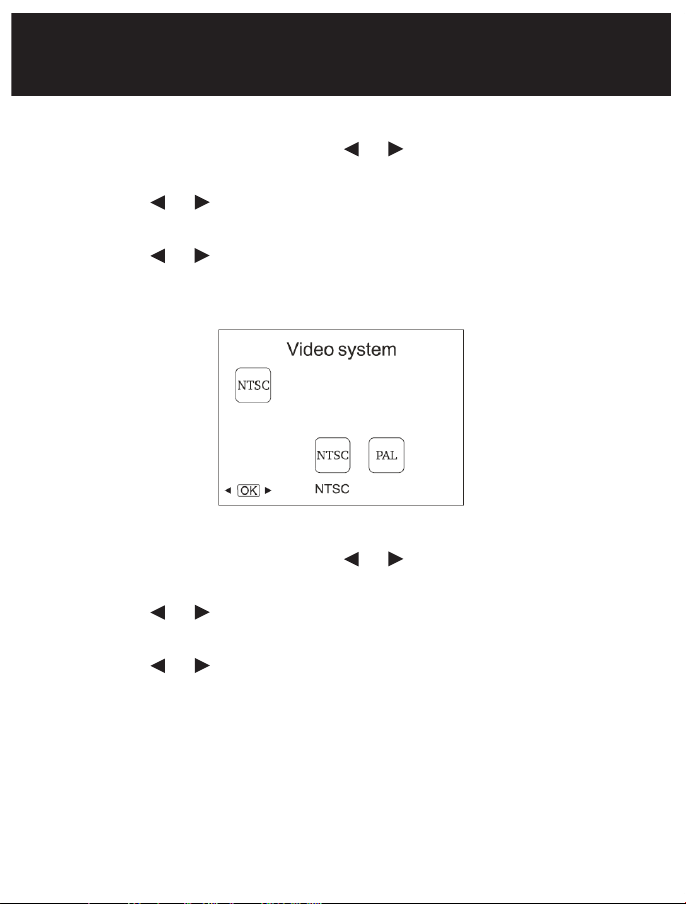
Video System Setting
1. In the setting mode, press the or button to select ‘SYSTEM
SETTING’, and then press OK button.
2. Press the or button to select ‘Video System’ and then press
OK button.
3. Press the or button to toggle between NTSC and PAL. Once
your desired system is selected, press OK button to confirm
and press the MENU button to exit.
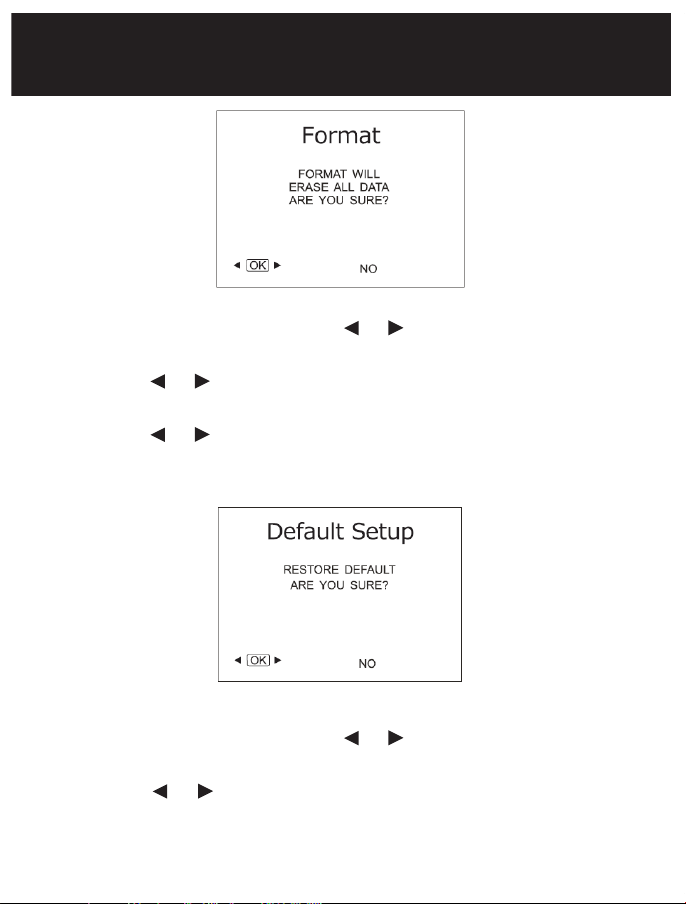
Formatting
1. In the setting mode, press the or button to select ‘SYSTEM
SETTING’, and then press the OK button.
2. Press the or button to select ‘Format’, and then press
OK button.
3. Press the or button to toggle between YES and NO, that is,
to format or cancel. Press the OK button to confirm and press
the MENU button to exit.
16
Default Setup
1. In the setting mode, press the or button to select ‘SYSTEM
SETTING’, and then press OK button.
2. Press the or button to select ‘Default Setup’ and then press
OK button.
3. Press the or button to toggle between YES and NO, that is
to restore default or cancel.
4. Press the OK button to confirm and press the MENU button to exit.
View Version Information
1. In the setting mode, press the or button to select ‘SYSTEM
SETTING’, and then press OK button.
2. Press the or button to select ‘Version’ and then press OK
button. You will now be able to view the version details of
your product.
MONITOR OPERATION
17
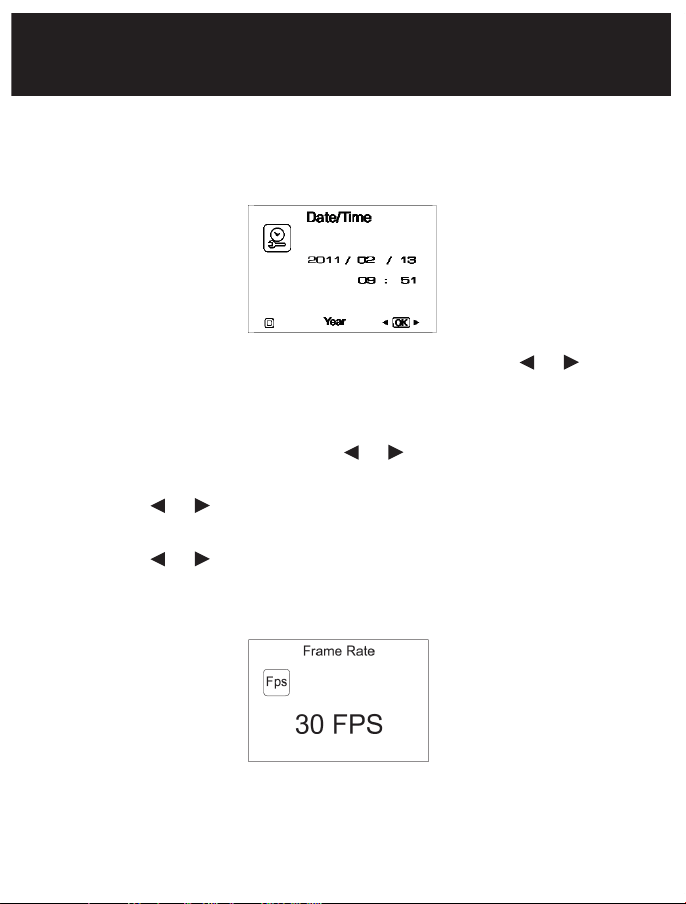
Date/Time Setting
1. In the setting mode, press the or button to select ‘Date/Time’
and then press OK button, The right interface will appear:
2. Press OK button to select Date or Time; Press the or button
to adjust selection; Press the MENU button to confirm and exit.
Frame Rate Setting
1. In the setting mode, press the or button to select
‘RECORDER SETTING’, and then press the OK button.
2. Press the or button to select ‘Frame Rate’ and then press
the OK button.
3. Press the or button to toggle between different frame
rates. Once your desired rate is selected, press OK button to
confirm and press the MENU button to exit.
MONITOR OPERATION
18
MONITOR OPERATION
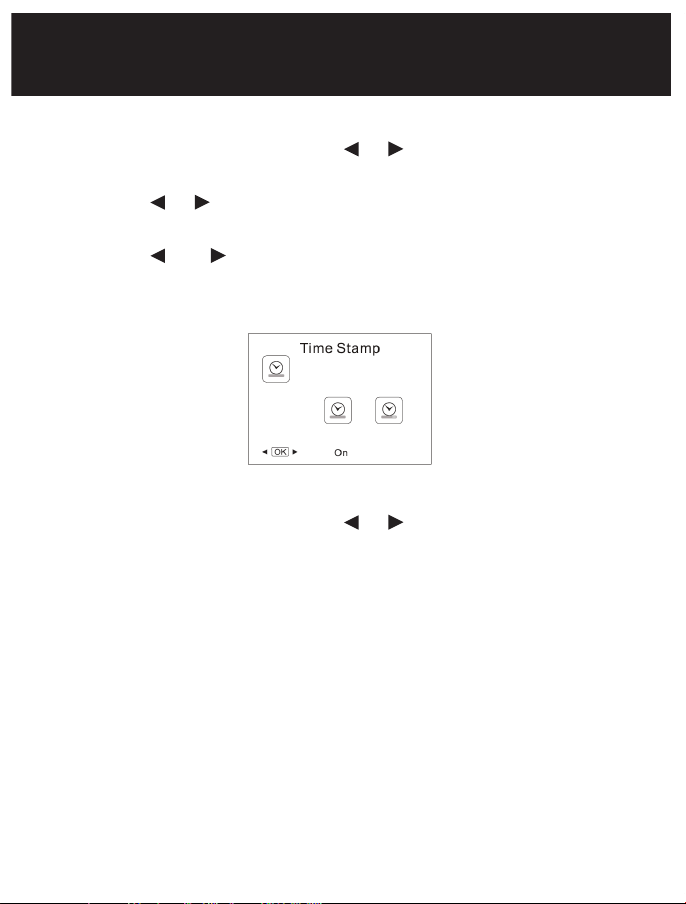
Time Stamp Setting
1. In the setting mode, press the or button to select
‘RECORDER SETTING’, and then press OK button.
2. Press the or button to select ‘Time Stamp’ and then press
OK button.
3. Press the and buttons to toggle between On and Off. Once
your desired selection is made, press the OK button to confirm
and press the MENU button to exit.
Event Playback
1. In the setting mode, press the or button to select ‘EVENT
PLAYBACK’, and then press the OK button.
2. For other operations see Playback of Video/Picture, Deleting
Video/Picture, and Deleting Folder section for guidance.

19
FCC INFORMATION
FCC ID: TW5GB8863
CAUTION: Do not expose the monitor or handheld
unit dripping or splashing liquids. Turn off camera and
monitor when not in use. Use only the AC adaptor and
cable supplied with the unit. Properly dispose of the
batteries. Exposure to high temperatures can cause the
batteries to explode. Do not dispose of the batteries
in a fire. When stored, place tape over the terminals to
prevent direct contact with other objects. Some countries
have regulations concerning battery disposal. Please
follow all applicable regulations.
FCC Information
This device complies with part 15 of the FCC Rules. Operation is
subject to the following two conditions:
(1) this device may not cause harmful interference,
(2) this device must accept any interference received, including
interference that may cause undesired operation.
IMPORTANT: FCC requirements state that changes or
modifications not expressly approved by Whistler could void the
user’s authority to operate the equipment.

20
TROUBLESHOOTING
Troubleshooting
Why won’t the monitor turn on?
• Make sure that the monitor has been charged at least
overnight before first use. Press the reset button on the unit.
Message on monitor says to “See Manual for Troubleshooting“.
• Make sure that the handheld unit is turned on and that the
camera tube is properly attached to the handheld unit.
The power light comes on but nothing shows on the screen?
• This could be due to weak batteries in the handheld.
Replace batteries.
• Is the camera tube fully inserted to the handheld unit? When
connecting the camera tube to the handheld unit, make sure
the keyed ends are properly aligned. Once they are lined up,
press in firmly and then finger tighten the knob to hold the
connector in place.
Why is my picture upside down?
• Simply press the image orientation button or move the camera
tube to properly orient the image.
What is the maximum depth the waterproof camera can be
submerged?
• Approximately 12 feet - the camera extension limit of the unit.
Camera tube has a rating of IP67.

21
TROUBLESHOOTING
Why does the video look “Scrambled”?
• There are two video formats that the inspection camera can be
set to: NTSC format which is used in North America. The PAL
format is used in Europe and other overseas countries. Enter
the menu selection and check the video format to make sure
the monitor is in NTSC format.
What format are the pictures and movies saved as?
• Still images are saved in a .jpg format. Movies are saved in a .avi
format, with video resolution at 640x480 pixels.
Video Output, will display live video or will it only display
playback of recorded video?
• When connected to a different monitor the unit will display live
video as well as picture and recorded playback.
22
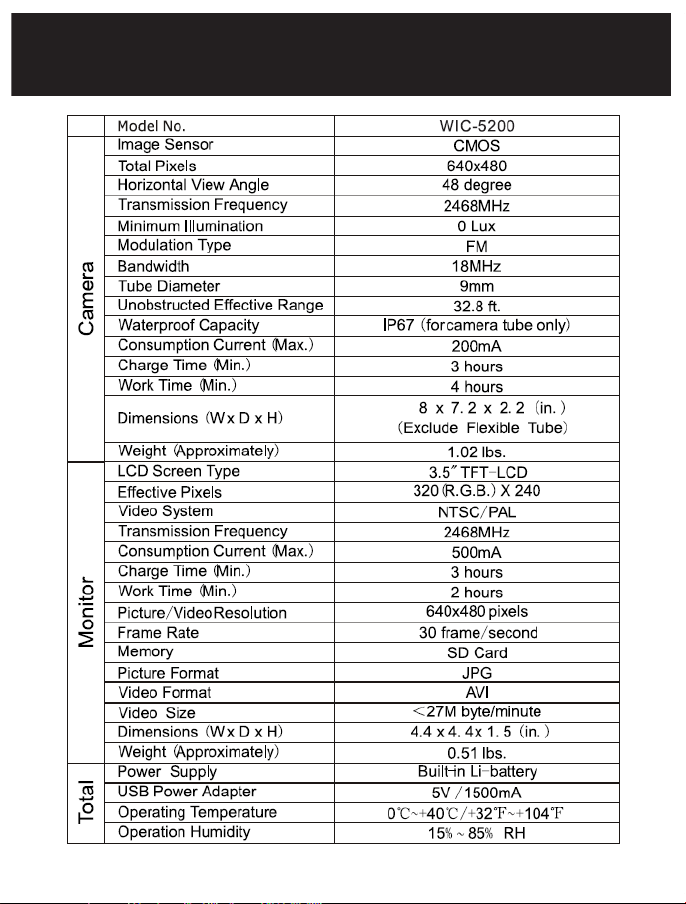
SPECIFICATIONS

23
WARRANTY
Consumer Warranty
This Whistler product is warranted to the original purchaser for a period
of one (1) year from the date of original purchase against all defects in
materials and workmanship, when purchased from an authorized Whistler
retailer. This limited warranty is void if the unit is abused, misused,
modied, installed improperly, or if the housing and/or serial numbers
have been removed. There are no express warranties covering this product
other than those set forth in this warranty. All express or implied warranties
for this product are limited to one (1) year. Whistler is not liable for damages
arising from the use, misuse, or operation of this product including but not
limited to loss of time, inconvenience, loss of use of your product or property
damage caused by your product or its failure to work, or any other incidental or
consequential damages including personal injury.
DO NOT RETURN ITEM TO STORE WHERE PURCHASED.
FOR WARRANTY INFORMATION, CONTACT WHISTLER CUSTOMER SERVICE
AT 1-800-531-0004.
Representatives are available to answer your questions Monday – Friday
from 8:00 a.m. to 5:00 p.m. CST
Service Under Warranty
During the warranty period, defective units will be repaired or replaced
(with the same or a comparable model), at Whistler’s option, without charge
to the purchaser when returned prepaid, with dated proof of purchase to
the address below. Units returned without dated proof of purchase will be
considered out of warranty and therefore are not covered by the described
Limited Warranty. (Refer to Service Out of Warranty section.)
Due to the specialized equipment necessary for testing Whistler products,
there are no authorized service centers other than Whistler. When returning
a unit for service under warranty, please follow these instructions:

24
WARRANTY
1. Ship the unit in the original carton or in a suitable sturdy equivalent, fully
insured, with return receipt requested to:
Whistler Repair Dept.
1412 South 1st St.
Rogers, AR. 72756
Please allow 3 weeks turnaround time.
IMPORTANT: Whistler will not assume responsibility for loss or damage
incurred in shipping. Therefore, please ship your unit insured with return
receipt requested. CODs will not be accepted!
2. Include with your unit the following information, clearly printed:
• Your name and physical street address for shipping (no PO Boxes), a
daytime telephone number, and an email address (if applicable).
• A detailed description of the problem (e.g.,“device will not power ON”).
• A copy of your dated proof of purchase or bill of sale.
3. Be certain your unit is returned with its serial number. Units without
serial numbers are not covered under warranty.
IMPORTANT: To validate that your unit is within the warranty period,
make sure you keep a copy of your dated proof of purchase. For warranty
verication purposes, a copy of your dated store receipt must accompany
any Whistler product sent in for warranty work.
Service Out Of Warranty
Units will be repaired at “out of warranty” service rates when:
• The unit’s original warranty has expired.
• A dated proof of purchase is not supplied.
• The unit has been returned without its serial number.
• The unit has been misused, abused, modied, installed improperly, or
had its housing removed.

25
WARRANTY
The minimum out of warranty service fee for your Whistler WIC5200 is
$75.00 (U.S.). If you require out of warranty service, please return your unit as
outlined in the section “Service Under Warranty” along with a cashier’s check
or money order in the amount of $75.00. Payment may also be made by
MasterCard, VISA or American Express. Personal checks are not accepted.
In the event repairs cannot be covered by the minimum service fee, you
will be contacted by a Whistler technical service specialist who will outline
options available to you.
IMPORTANT: When returning your unit for service, be certain to include a
daytime telephone number and an email address (if applicable).
Customer Service
If you have questions concerning the operation of your Whistler product,
or require service during or after the warranty period, please call Customer
Service at 1-800-531-0004.
Representatives are available to answer your questions Monday - Friday from
8:00 a.m. to 5:00 p.m. (CST) or visit the F.A.Q.’s at www.whistlergroup.com.

CORPORATE HEADQUARTERS
1716 SW Commerce Dr. Ste.8
Bentonville, AR 72712
Toll Free (800) 531-0004
TEL (479) 273-6012
FX (479) 273-2927
www.whistlergroup.com
CUSTOMER RETURN CENTER
1412 South 1st St.
Rogers, AR 72756
Consumer Service Tel (800) 531-0004
Email: [email protected]
P/N
02B15 © 2015 The Whistler Group, Inc.