Made in China | 705-MAGYCX-03
www.godox.com
深圳市神牛摄影器材有限公司
神牛影音微信公众号 海外社媒平台及资讯
Godox Audio Wechat
Ofcial Account
Overseas Ofcial
Accounts & Updates
地址:深圳市宝安区福海街道塘尾社区耀川工业园厂房 2 栋
电话:0755-29609320(8062) 传真:0755-25723423 邮箱:godox@godox. com
Add.: Building 2, Yaochuan Industrial Zone, Tangwei Community, Fuhai Street, Bao'an
District, Shenzhen 518103, China Tel: +86-755-29609320(8062)
Fax: +86-755-25723423 E-mail: [email protected]
GODOX Photo Equipment Co., Ltd.
合格证
QC PASS
使用手册
Instruction Manual
2.4GHz 双通道无线麦克风系统
2.4GHz Dual-Channel Wireless Microphone System

01
前言
主要特点
感谢购买神牛产品!
欢迎使用神牛 2.4GHz 双通道无线麦克风系统 Magic XT1。本产品利用 2.4G 波段传输
为原理;极具创意的接收器即收纳盒设计,集充电和收纳功能于一体;按键加触摸彩
屏,操作便捷;体积小、续航长,适用于直播、户外、采访、短视频拍摄等场景。
使用本产品之前,请仔细阅读说明书 , 以便正确操作及使用。
全球通用频段 2.4GHz 无线技术;
无线距离最远可达 200 米(视距);
无损音质,清晰稳定,数字降噪功能;
输出音量控制,提供静音功能;
单声道 / 立体声 / 安全音轨模式自由切换;
低切功能过滤杂音;
按键搭配触摸彩屏,操作便捷;
接收器可通过背夹收纳两个发射器,并为其充电;
警告
麦克风是精密设备。请勿使其掉落或受到撞击,以避免发生故障。
请勿私自拆卸、改装或尝试维修本产品。产品如出现故障须由本公司或授权的维
修人员进行检查维修。
请保持干燥,请勿用湿手握持本产品,亦不可将产品浸入水中或暴露于雨中。
请勿将本产品存放在阳光直射的地方、加热装置附近或者炎热、潮湿或多尘的地方。
请勿让儿童接触本产品,以避免发生意外。
请勿在易燃易爆环境中使用。在这些场合下,请注意相关警告标识。
请勿放置在超过 50 度的高温环境中。
请仔细阅读并遵守由厂商提供的警告或指示。
02
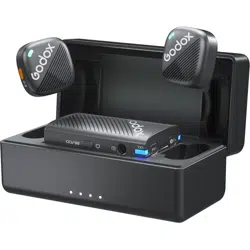
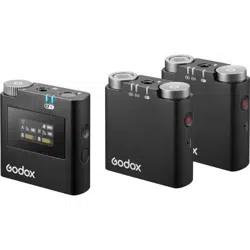
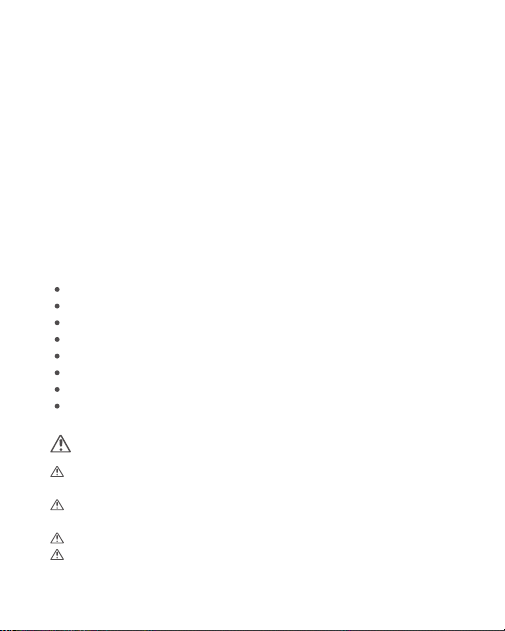
部件名称
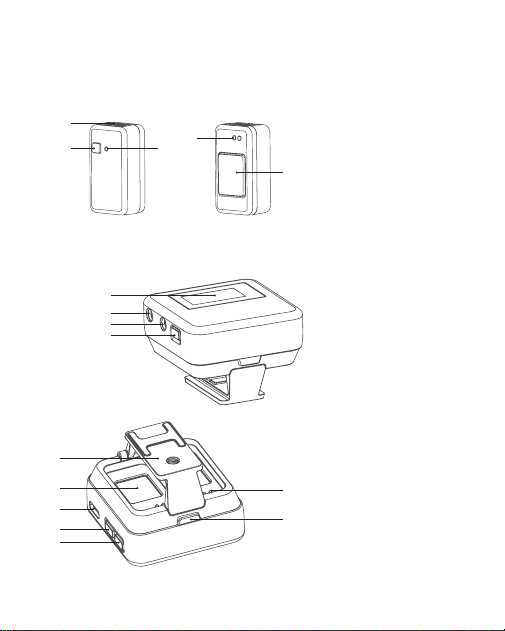
发射器
接收器
1. 咪头
2. 电源 / 降噪 / 配对键
3. 指示灯
4. 充电触点
5. 磁吸背扣
1. 显示屏
2. 电源键
3. 3.5mm 音频输出接口
4. 3.5mm 耳机监听孔
5. 下键
6. 上键
7. USB-C 接口
8. 背夹
9. 充电触点
10. 拆卸按钮
11. 发射器充电仓
5
6
7
11
8
1
2
3
4
9
10
5
4
3
2
1
03
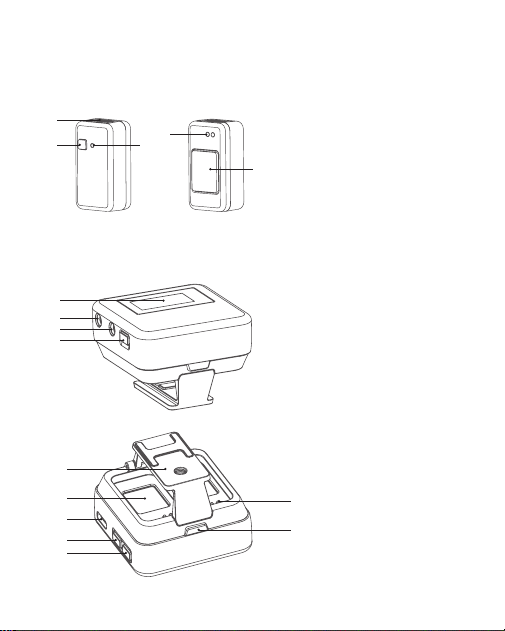
包装清单
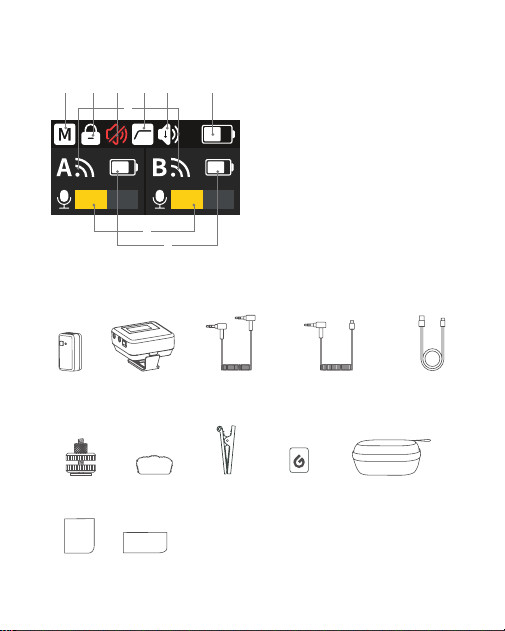
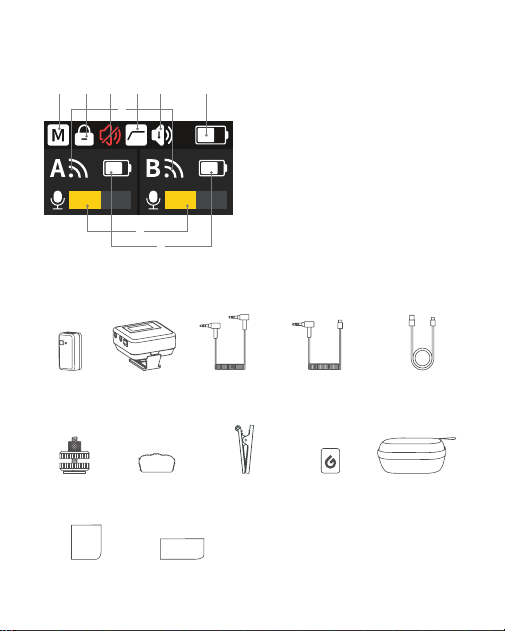
显示屏
1. 声道模式图标
2. 锁屏图标
3. 静音图标
4. 低切图标
5. 降噪图标
6. 接收器电量图标
7. A/B 发射器信号图标
8. A/B 发射器电量图标
9. A/B 发射器音量图标
发射器
x 2
防风毛罩 × 2冷靴底座 x 1
接收器
x 1
磁吸背夹 × 2
3.5mm TRS 转
TRS 连接线 × 1
磁吸背扣 × 4
3.5mm TRS 转 Type-C
音频线 GAC-IC9 × 1
收纳盒 × 1
USB-A 转 USB-C
数据线 × 1
说明书 × 1 指引卡 × 1
温馨提示:说明书线图均为示意图,仅供参考。由于产品不断更
新与升级,产品实物与线图可能存在差异,请以实物为准。
1 2 3 4 5 6
9
8
7

04
使用说明
发射器
接收器
1. 电源 / 降噪 / 配对键
1. 开关机
2. 配对
3. 充电
4. 恢复出厂设置
5. 指示灯说明
长按 3 秒开关机;短按开启 / 关闭降噪模式。将发射器从接收器的充电仓中取出,自
动开机;将发射器放入接收器的充电仓中,充满电后自动关机。
长按电源键 3 秒开关机。
双击按键进入配对模式,配对成功立即退出配对状态,未配对成功 10s 后退出。
绿色长亮
绿色快闪(亮 0.25s/ 灭 0.25s)
绿色呼吸(亮 0.5s/ 灭 0.5s)
红色长亮
橙色长亮
红色闪烁(亮 0.5s/ 灭 0.5s)
蓝色呼吸(亮 1s/ 灭 1s)
白色闪烁
指示灯状态 意义
配对成功
配对中
断开连接
静音模式
降噪模式
电量低于 10%
充电中
恢复出厂设置
发射器通过磁吸背扣放入接收器充电仓内充电。
关机状态下长按按键 6 秒再松开,发射器会恢复出厂设置。
注:首次使用时需撕掉背部保护膜,再长按按键 3S 开机使用。

05
2. 菜单功能介绍
在主界面短按电源键或下滑屏幕进入一级菜单界面,在一级菜单界面短按上 / 下键或
左右滑动屏幕切换菜单选项,再短按电源键进入二级菜单,或直接点击相应图标进行
确认操作。上滑屏幕返回上一级菜单。
2.1 降噪 <
>
2.2 低切 <
>
2.3 静音 <
>
在降噪菜单界面,短按上 / 下键选择开启或关闭,再
短按电源键确认;或直接点击屏幕设置。开启降噪模
式后,主界面会显示降噪图标 < >。
在低切菜单界面,短按上 / 下键选择开启或关闭,再
短按电源键确认;或直接点击屏幕设置。同时短按上 /
下键可快捷进入低切界面。开启低切功能后,主界面
会显示低切图标 < >。
在静音菜单界面,短按上 / 下键选择开启或关闭,再
短按电源键确认;或直接点击屏幕设置。
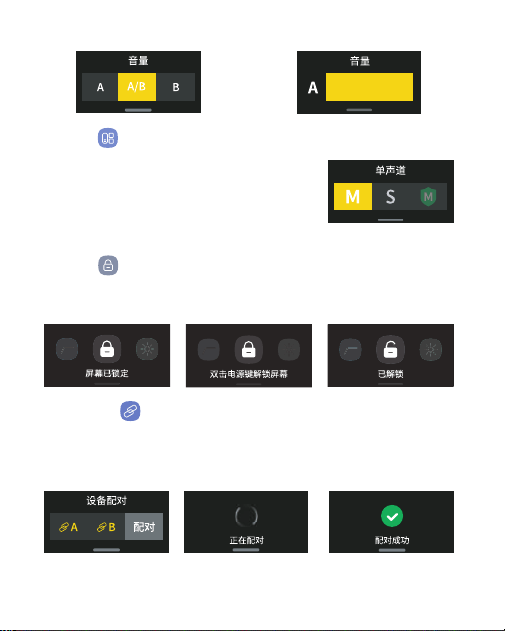
2.4 音量 < >
在音量菜单界面,短按上 / 下键或直接点击屏幕选择发射器 A、B 或 A/B 同时音量调节;
或在主界面长按上键 2s 可直接进入 A 音量调节,长按下键 2s 则可直接进入 B 音量
调节。进入调节界面后,短按上 / 下键或直接左右滑动屏幕调节音量,再短按电源键
确认。
06
2.5 模式 <
>
在模式菜单界面,短按上 / 下键或直接点击屏幕选择
声道模式(单声道 / 立体声 / 安全音轨),再短按电
源键确认。安全音轨为 -6dB,且只能单声道状态。
2.6 锁屏 <
>
在锁屏菜单界面,直接点击屏幕图标,或在主界面双击电源键锁定屏幕,按屏幕提示
再次双击电源键可解锁屏幕。屏幕锁定状态下,仅支持按键操作。
2.7 设备配对 <
>
在设备配对菜单界面,直接点击屏幕选择发射器 A 或 B 或全选,再短按电源键或直
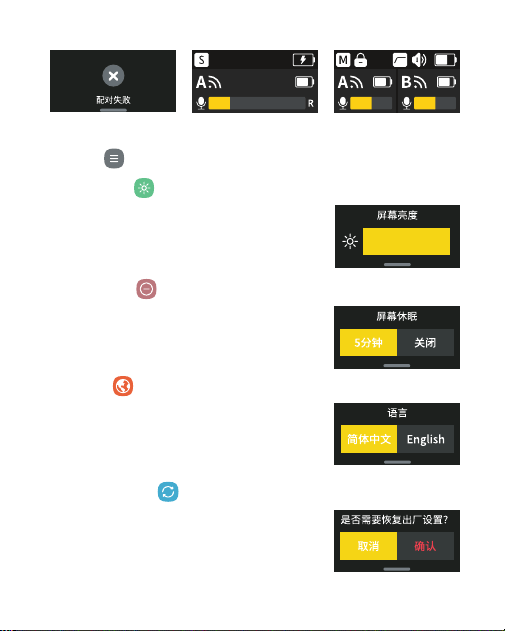
接点击屏幕右侧 < 配对 > 开始配对。配对成功屏幕出现提示,然后返回主界面彩色图
标亮起;配对失败屏幕也会出现提示,然后返回主界面。
配对界面 已配对配对中
注:立体声模式下,如果只使用一个发射器,可能会导致只有一个
声道声音录入,请根据实际需要选择使用。
07
A 发射器配对成功 AB 发射器同时配对成功配对失败
2.8.4 恢复出厂设置 < >
2.8 通用 <
>
在恢复出厂设置菜单界面,短按上 / 下键选择取消或
确认,再短按电源键确认;或直接点击屏幕设置。开
机状态下,同时长按上 / 下键 3 秒,屏幕出现“恢复出
厂设置”,接收器进行恢复出厂设置并返回主界面。
2.8.1 屏幕亮度 < >
2.8.2 屏幕休眠 <
>
在屏幕亮度菜单界面,短按上 / 下键或直接左右滑动
屏幕调节亮度 (0%-100%),再短按电源键确认。
在屏幕休眠菜单界面,短按 上 / 下键或直接点击屏幕
选择 5 分钟或关闭。
2.8.3 语言 < >
首次开机出现 logo 后,自动跳转到语言设置界面。短
按上 / 下键选择语言后再短按电源键确认,或直接点
击屏幕选择并确认语言。后续使用过程中可进入语言
菜单按上述步骤重新设置语言。
08
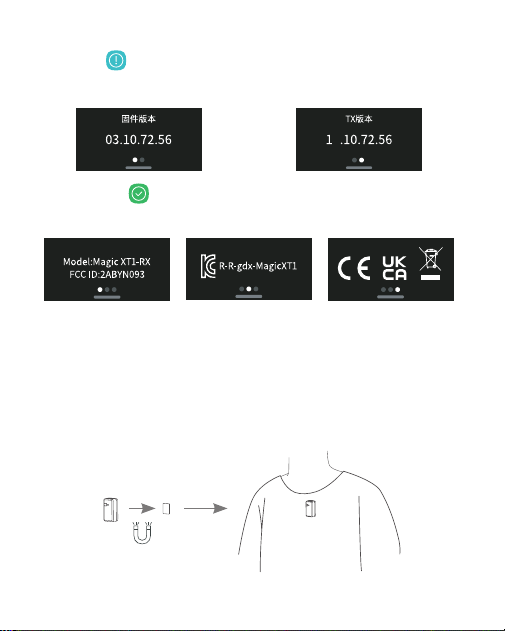
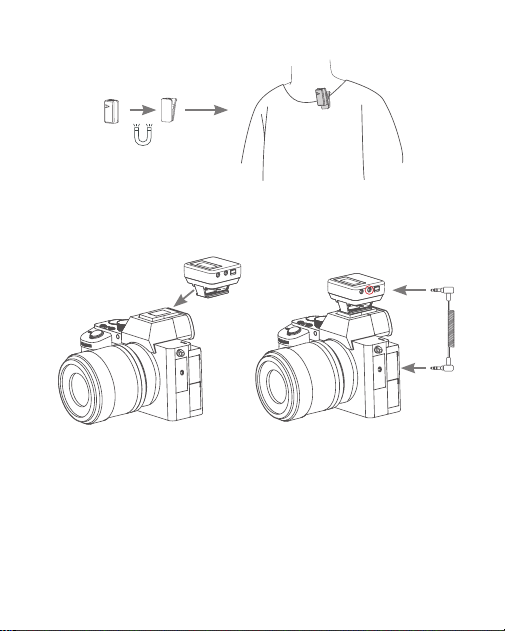
1. 将发射器通过磁吸背扣吸附在衣领处,或通过磁吸背夹夹在衣领处。
安装说明
2.8.5 版本 < >
2.8.6 认证信息 <
>
在版本菜单界面,短按上 / 下键或直接左右滑动屏幕查看固件版本和 TX 版本。
在认证信息菜单界面,短按上 / 下键或直接左右滑动屏幕可查看本产品已通过的认证。
3. 充电
接收器通过 USB-C 接口连接电源充电。
4
09
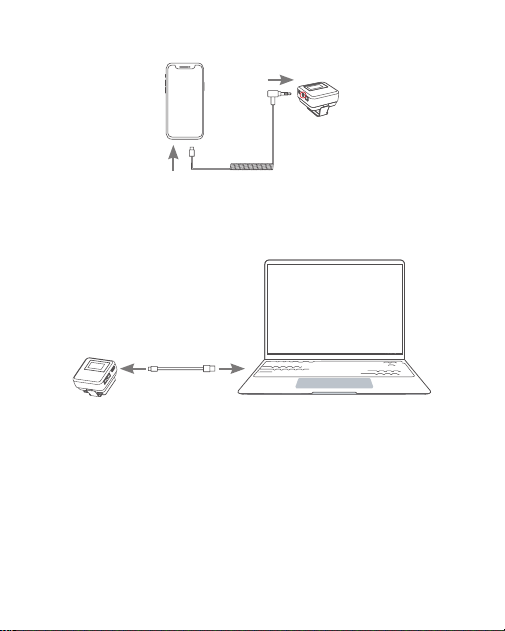
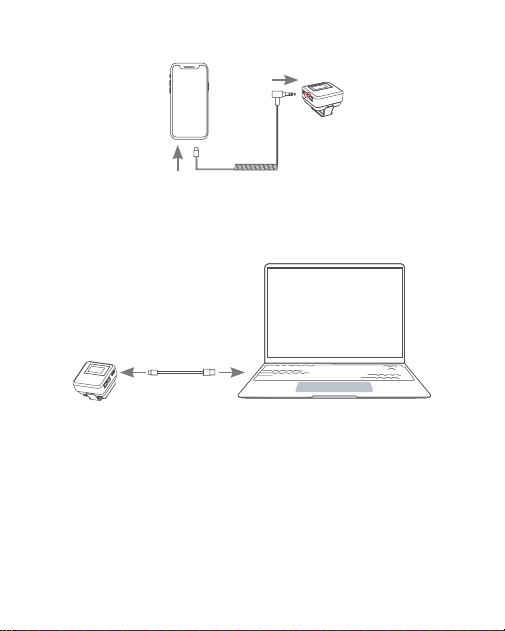
3. 如需连接手机使用,通过 3.5mm TRS 转 Type-C 音频线连接接收器的 3.5mm 音频
输出接口与手机的 USB-C 接口即可。
注:由于接收器背夹属于可拆卸结构,连接相机等重物时切勿提起,以免背夹断开令相机摔落。
2. 将接收器通过背夹插入相机热靴底座,使用 3.5mm TRS 转 TRS 音频线连接接收器
的 3.5mm 音频输出接口与相机的 3.5mm 音频输入接口。
10
4. 如需连接电脑,通过 USB-A 转 USB-C 数据线连接接收器的 USB-C 接口与电脑端
接口,电脑端声音输入选择 Magic XT1 即可使用。
11
规格参数如有变更,恕不另行通知。
以上数据来源于神牛实验室测定值,因客观环境改变,数据可能会有所不同或产生误
差。
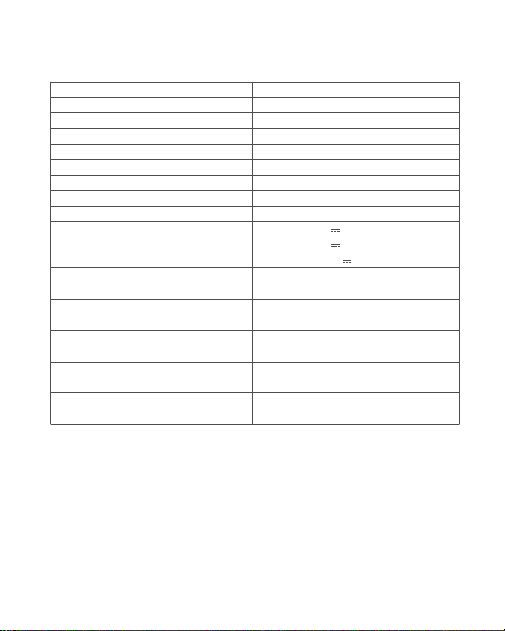
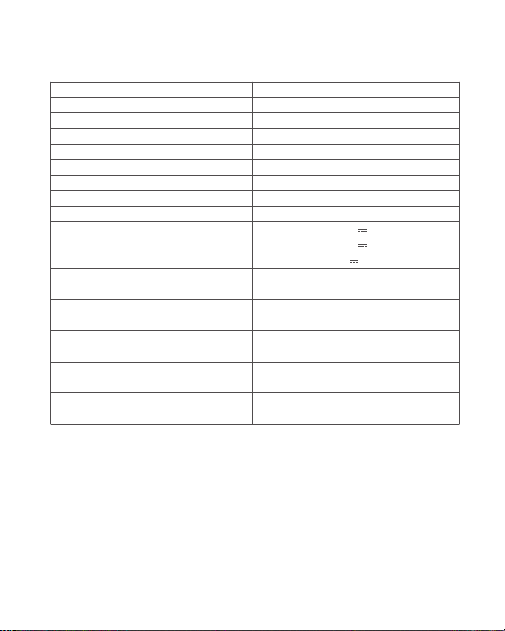
规格参数
系统型号
传输类型
拾音模式
频率范围
最大 SPL
采样率
信噪比≈
最大无线距离
工作环境温度
输入 / 输出参数
锂电池参数
续航时间
充电时间
尺寸≈
净重≈
Magic XT1
2.4GHz 数字跳频系统
全向型
20Hz-20KHz
115dB
48KHz/24Bit
70dB
200 米(视距)
-10℃ ~+50℃
TX 充电触点:5V 80mA
RX 充电触点:5V 80mA(*2)
RX USB-C 输入:5V 550mA
TX:3.8V, 80mAh, 0.304Wh
RX:3.8V, 680mAh, 2.58Wh
TX:约 8 小时
RX:约 16 小时(一拖二状态)
TX:约 2 小时
RX:约 2.5 小时
TX:16.7mmX8.9mmX6.3mm
RX:24mmX24mmX17.4mm
TX(不带磁吸背扣):8g
RX:50g

12
维护保养
避免跌落:
如果受到强烈碰撞或振动,设备可能会发生故障。
保持干燥:
本产品是非防水产品,如果将其浸入水中或放置于高湿度的环境中将可能
发生故障。内部构造生锈可能会导致无法修理的损害。
避免温度骤变:
温度的突变,诸如在寒冷天进出温暖的大楼将可能会使产品内部结露。
为避免结露,请将本产品事先装入手提袋或塑料包内,以防温度突变。
远离强磁场:
无线电广播发射机等设备产生的强静电或强磁场可能会干扰本产品正常
工作。
如有技术更改,恕不另行通知。
13
Foreword
Main Feature
Thank you for purchasing!
Based on the principle of 2.4GHz wireless transmission, Magic XT1 is an innovative
and revolutionary microphone system with great strengths and competences.
All those characteristics such as compact and portable, long battery life, receiver
workable as storage & charging case for transmitters, buttons together with colorful
touching screen operation, denoise and lowcut functions, make it suitable for live
streaming, outdoor shooting, interview, short video recording, etc.
Please read this manual carefully before using to make sure the correct operation and
exert the optimum function.
Globally universal 2.4GHz wireless transmission technology.
The maximum wireless transmission distance up to 200m (sight distance).
Clear and stable sound quality with denoise function.
Output volume adjustment and silent function available.
Mono/Stereo/Safety mode freely switchable.
Lowcut function effectively lters noise .
Buttons and colorful touching screen operation.
Receiver can store and charge two transmitters.
Warning
This product is high-precision instrument, please avoid falling, collision or
pounding.
Do not disassemble. Should repairs become necessary, this product must be sent
to our Company or an authorized maintenance center.
Always keep this product dry. Do not use in rain or damp conditions.
Do not leave or store this product in the environment of direct sunlight, near heating
devices, or in hot, humid or dusty.

14
Keep out of reach of children.
Do not use in flammable and explosive environments. Pay attention to the relevant
warning signs.
Do not leave or store the product if the ambient temperature reads over 50
℃
.
Please read carefully and follow the warnings or instructions provided by the
manufacturer.
15
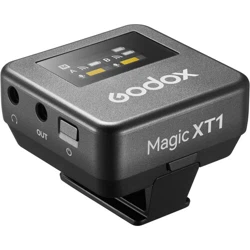
Structure of Product
Transmitter
Receiver
1. Mic
2. Power Switch/Denoise/Pair Button
3. Indicator
4. Charging Points
5. Magnetic Back Button
1. Display
2. Power Switch Button
3. 3.5mm Audio Output Port
4. 3.5mm Earphone Monitoring Port
5. Down Button
6. Up Button
7. USB-C Port
8. Back Clip
9. Charging Points
10. Detaching Button
11. Charging Slot for Transmitter
1
2
3
4
5
6
7
11
8
9
10
5
4
3
2
1
16
What’s in the Box
Display
1. Sound Track Icon
2. Screen Lock Icon
3. Mute Icon
4. Lowcut Icon
5. Denoise Icon
6. Receiver Battery Level Icon
7. A/B Transmitter Signal Icon
8. A/B Transmitter Battery Level Icon
9. A/B Transmitter Volume Icon
Transmitter
× 2
Furry Windscreen
× 2
Cold Shoe Base
× 1
Receiver
× 1
Magnetic Back Clip
× 2
3.5mm TRS-TRS
Connect Cable × 1
Magnetic Back
Button × 4
3.5mm TRS to USB Type-C
Adapter Cable GAC-IC9 × 1
Storage Box
× 1
USB-A to USB-C
Data Cable × 1
Instruction Manual × 1 Instruction Card × 1
Note: Due to continuous updates and upgrades of the
products, there may be differences between the actual
products and the pictures. Therefore, the pictures are
for reference only, products to prevail in kind.
1 2 3 4 5 6
9
8
7

17
Using Instructions
Transmitter
1. Power Switch/Denoise/Pair Button
2. Pairing
3. Charging
4. Factory Reset
5. Indicator Instruction
Press and hold the button for 3s to turn on or off the transmitter, short press it to turn
on or off the denoise mode. Take the transmitter out of the charging slot of receiver, it
will be automatically turned on. Put the transmitter into the charging slot of receiver, it
will be automatically turned off when fully charged.
Short press the button twice to enter pairing mode, it will exit the pairing state
immediately after successfully paired, and exit in 10s after unpaired.
Constant on green
Flash green quickly every 0.25s
Breathe green every 0.5s
Constant on red
Constant on orange
Flash red every 0.5s
Breathe blue every second
Flash white
Status Meaning
Paired
Pairing
Unpaired in power on status
Mute mode
Denoise mode
Battery level below 10%
Charging
Factory resetting
The transmitter can be charged through its charging points after being put into the
charging slot of receiver.
Press and hold the button for 6s then let go, the transmitter will start factory resetting.
Note: Please remove the protective lm from bottom of the transmitter before use, then press and hold the
button for 3s to turn it on.
18
2. Menu Function
In the main interface, short press the power switch button or slide the screen
downward to enter the rst-level menu interface, short press the up/down button or
slide the screen leftward/rightward to switch menu options, then short press the power
switch button to enter the second-level menu, or directly click the corresponding icon
to operate. Slide the screen upward can return to the previous menu.
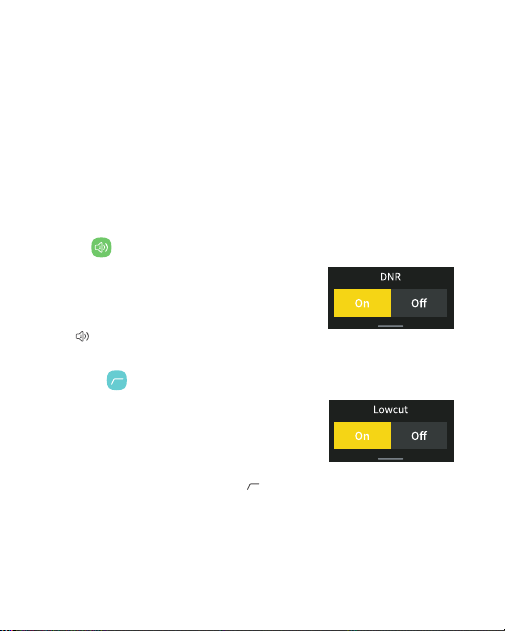
2.1 DNR <
>
2.2 Lowcut<
>
In the DNR interface, short press the up/down
button to select on or off, then short press the
power switch button to conrm, or directly click
the screen to select and conrm. The denoise
icon <
> will be on the main interface in
denoise mode.
In the lowcut interface, short press the up/down
button to select on or off, then short press the
power switch button to conrm, or directly click
the screen to select and conrm. Press the up/
down button at the same time can quickly enter
the lowcut interface.The lowcut icon <
> will be
on the main interface in lowcut mode.
Receiver
1. Power Switch
Long press the power switch button for 3s to turn on or off the receiver.
19
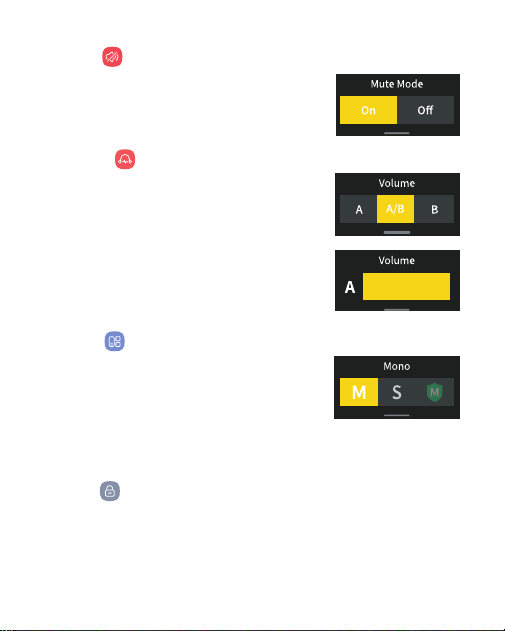
2.3 Mute<
>
In the mute interface, short press the up/down button
to select on or off, then short press the power switch
button to conrm, or directly click the screen to select
and conrm.
2.4 Volume<
>
In the volume interface, short press the up/down
button or directly click the screen to select A, A/B or
B, or long press the up button for 2s to directly enter A
volume adjustment while long press the down button
for 2s to directly enter B volume adjustment in the
main interface. In the volume adjustment interface,
short press the up/down button or directly slide the
screen leftward/rightward to adjust the volume, then
short press the power switch button to conrm.
2.5 Mode< >
In the mode interface, short press the up/down button
or directly click the screen to select track mode (Mono/
Stereo/Safety), then short press the power switch
button to conrm. The safety mode is -6dB and only
available in mono track.
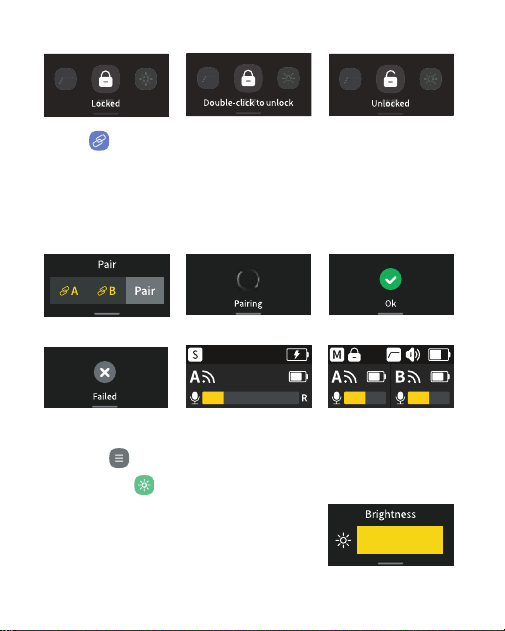
2.6 Lock<
>
Directly click the icon in the lock interface or short press the power switch button twice
in the main interface to lock the screen, short press the power switch button twice
again can unlock the screen. Only buttons are available for operation if the screen is
locked.
Note: Using only one transmitter in stereo mode may result in only
one channel of sound being recorded, so please choose as needed.
20
2.8 General<
>
2.8.1 Brightness< >
In the brightness interface, short press the up/down
button or directly slide the screen leftward/rightward
to adjust the screen brightness from 0% to 100%, then
short press the power switch button to conrm.
2.7 Pair<
>
In pair interface, directly click the screen to select A, B or both, then short press the
power switch button or directly click “pair” on the right of the display to start pairing. If
successfully paired, it will pop up prompts on the display and then return to the main
interface with colorful icons. In the case of unpaired, it will still pop up prompts on the
display and then return to the main interface with grey icons.
Pair Interface Pairing Successfully Paired
Pairing Failed Successfully Paired with
Transmitter A
Successfully Paired with
Transmitters A and B
21
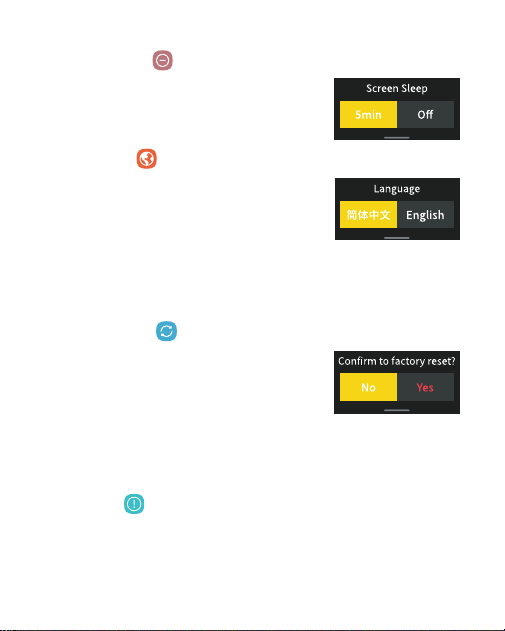
2.8.4 Factory Reset<
>
In the factory reset interface, short press the up/down
button to select yes or no, then short press the power
switch button to conrm, or directly click the screen
to select and conrm. Press and hold the up/down
button at the same time for 3s in power on status, the
screen will display "factory reset" and the receiver will
start factory resetting and return to the main interface
after resetting.
2.8.2 Screen Sleep<
>
In the screen sleep interface, short press the up/down
button or directly click the screen to select 5min or off.
2.8.3 Language<
>
After the rst bootup and the logo appears, it will
automatically turn to the language setting interface.
Short press the up/down button to select language,
then short press the power switch button to conrm,
or directly click the screen to select and conrm the
language. During the subsequent use, user can enter
the language menu and reset the language according
to the above steps.
2.8.5 Version< >
In the version interface, short press the up/down button or directly slide the screen
leftward/rightward to check rmware version and TX version.

22
1. Absorb the transmitter to the collar with magnetic back button, or clip it to the collar
with magnetic back clip
Installing Instruction
2.8.6 Certication< >
In the ceication inteace, sho press the up/down button or directly slide the
screen leftward/rightward to check the ceication of the product.
3. Charging
The receiver can be charged with power source connected through USB-C port.
4

23
3. In case of using with smartphone, connect the 3.5mm audio output port of receiver
to the USB-C port of smartphone with 3.5mm TRS to USB Type-C Adapter Cable.
Note: Since the magnetic back clip is detachable, do not lift it when attaching to heavy objects such as the
camera, as the clip may disconnect and the camera will fall.
2. Insert the receiver into the hotshoe base of the camera through back clip, connect
the 3.5mm audio output port of receiver to the 3.5mm audio input port of camera with
3.5mm TRS-TRS connect cable.
24
4.If you need to connect to a computer, connect the receiver's USB-C port to the
computer's port via the USB-A to USB-C cable, and select Magic XT1 for the sound
input on the computer to use it.
25
Specifcations and data may subject to changes without notice.
The above data are derived from the measured value of Godox laboratory, and may
vary or be inaccurate due to changes in the objective environment.
Technical Data
System Model
Transmission Type
Pickup Pattern
Frequency Range
Max. SPL
Sampling Rate
Signal to Noise Ratio ≈
Max. Wireless Transmission Distance
Working Environment Temperature
Input/Output Parameters
Lithium Battery Parameters
Working Time
Charging Time
Dimension ≈
Net Weight ≈
Magic XT1
2.4GHz frequency hopping system
Omnidirectional
20Hz-20KHz
115dB
48KHz/24Bit
70dB
200m (sight distance)
-10
℃
~+50
℃
TX Charging Points
:
5V 80mA
RX Charging Points
:
5V 80mA(*2)
RX USB-C Inputs
:
5V 550mA
TX
:
3.8V, 80mAh, 0.304Wh
RX
:
3.8V, 680mAh, 2.58Wh
TX
:
Approx. 8h
RX
:
Approx. 16h(with two transmitters)
TX
:Approx.2h
RX
:
Approx. 2.5h
TX
:
0.66“X0.35“X0.25“
RX
:
0.94“X0.94“X0.69“
TX (excluding the magnetic back button)
:
8g
RX
:
50g

26
Maintenance
Avoid falling. Strong collision or vibration may malfunction the device.
Keep dry. This product is not water-proof. Malfunction, rust, and corrosion may occur
and go beyond repair if soaked in water or exposed to high humidity.
Avoid sudden temperature changes. Condensation happens in sudden temperature
changes such as the circumstance when taking the product out of a building with
higher temperature to outside in winter. Please put the product in a handbag or plastic
bag beforehand.
Keep away from strong magnetic eld. The strong static or magnetic eld produced
by devices such as radio transmitters leads to malfunction.
FCC Statement
This device complies with part 15 of the FCC Rules. Operation is subject to the
following two conditions:
(1) This device may not cause harmful interference, and
(2) this device must accept any interference received, including interference that may
cause undesired operation.
Note: This equipment has been tested and found to comply with the limits for a Class B digital device,
pursuant to part 15 of the FCC Rules. These limits are designed to provide reasonable protection against
harmful interference in a residential installation. This equipment generates uses and can radiate radio
frequency energy and, if not installed and used in accordance with the instructions, may cause harmful
interference to radio communications. However, there is no guarantee that interference will not occur in a
particular installation. If this equipment does cause harmful interference to radio or television reception,
which can be determined by turning the equipment off and on, the user is encouraged to try to correct the
interference by one or more of the following measures:
-Reorient or relocate the receiving antenna.
-Increase the separation between the equipment and receiver.
-Connect the equipment into an outlet on a circuit different from that to which the receiver is connected.
Any Changes or modications not expressly approved by the party responsible for
compliance could void the user's authority to operate the equipment.

27
-Consult the dealer or an experienced radio/TV technician for help.
The device has been evaluated to meet general RF exposure requirement.
The device can be used in portable exposure condition without restriction.
Warning
Declaration of Conformity
Operating frequency:2402MHz – 2480MHz
Maximum EIRP Power: -6.53dBm (TX)/ -5.85dBm (RX)
GODOX Photo Equipment Co.,Ltd. hereby declares that this equipment are in
compliance with the essential requirements and other relevant provisions of Directive
2014/53/EU. In accordance with Article 10(2) and Article 10(10), this product is
allowed to be used in all EU member states. For more information of DoC, Please click
this web link:
https://www.godox.com/eu-declaration-of-conformity
The device complies with RF specications when the device used at 0mm from your
body.

28
Marking Information
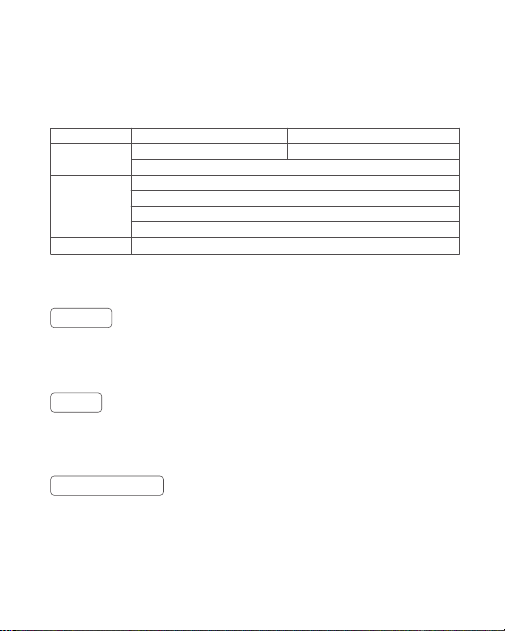
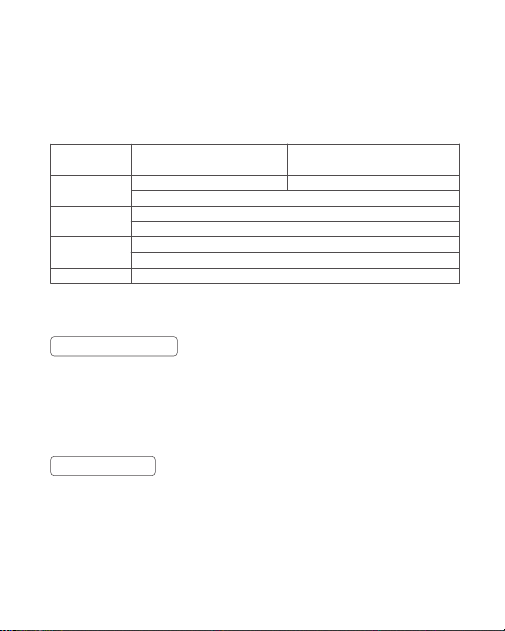
产品保修
尊敬的用户,本保修卡是申请保修服务的重要凭证,请您配合销售商填写并妥善保管,
谢谢!
产品信息
用户信息
销售商信息
备注
型号
姓名
通信地址
名称
联系电话
通信地址
销售日期
产品条码
联系电话
注:此表应由销售商盖章确认。
本文件适用于相关《产品保修信息》( 见后面说明 ) 所列产品,其他非属此范围的产
品或部件 ( 如促销品、赠品及其他出厂后附加的部件等 ) 不在此保修承诺内。
产品信息
产品及部件的相应保修期按相关的《产品保修信息》执行。保修期自产品首次购买日
起算,购买日以购买产品时保修卡登记日期为准。
保修期
您可直接与产品销售商或授权服务机构联系,也可拨打神牛产品售后服务电话,与我
们联系,由我们的服务人员为您安排服务。申请保修时,您应提供有效的保修卡作为
保修凭证,方可获得保修。如您不能提供有效的保修卡,则在我们确认产品或部件属
于保修范围的情况下,也可以为您提供保修,但这不作为我们的义务。
如何获得保修服务
如产品存在下列情况,本文件项下的保证和服务将不适用 : ①产品或部件超过相应保
修期;②错误或不适当使用、维护或保管导致的故障或损坏,如:不当搬运;非按产
品合理预期用途使用;不当插拨外接设备;跌落或外力挤压;接触或暴露于不适当温
度、溶剂、酸碱、水浸或潮湿环境;③由非神牛授权机构或人员安装、修理、更改、
添加或拆卸造成的故障或损坏;④产品或部件原有识别信息被修改变更或除去;⑤无
有效保修卡;⑥使用非合法授权、非标准或非公开发行的软件造成的故障或损坏;⑦
因不可抗力或意外事件造成的故障或损坏;⑧其他非因产品本身质量问题导致的故障
或损坏。遇上述情况,您应向相关责任方寻求解决,神牛对此不承担任何责任。因非
在保修期或保修范围内的部件、附件或软件导致产品不能正常使用的,不是保修范围
内的故障。产品使用过程中正常的脱色,磨损和消耗,不是保修范围内的故障。
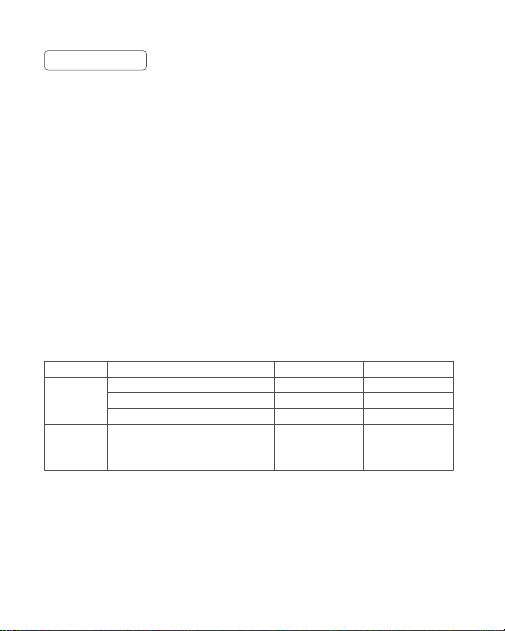
产品类别
部件
其他
选件名称
主机
电池
充电器等带电性能的部件。
如电源线、同步线、电池盒、防风棉、
防风毛罩、锁紧装置、手提绳、扎带、
魔术贴、领夹、便携袋、包装等
保修期(月)
12
3
12
无
神牛产品售后服务电话 0755-29609320-8062
不适用保修情況
产品保修和服务支持信息
产品的保修期和服务类型按以下《产品保修信息》执行:
保修服务类型
客戶送修
客戶送修
客戶送修
无保修
Warranty
Dear customers, as this warranty card is an important certificate to apply for our
maintenance service, please ll in the following form in coordination with the seller
and safe-keep it. Thank you!
Note: This form shall be sealed by the seller.
Applicable ProductsThe document applies to the products listed on the Product
Maintenance lnformation (see below for further information). Other products
or accessories (e.g. promotional items,giveaways and additional accessories
attached,etc.) are not included in this warranty scope.
Applicable Products
The warranty period of products and accessories isimplemented according to the
relevant Product Maintenance Information. The warranty period is calculated from
the day(purchase date) when the product is bought for the rst time,And the purchase
date is considered as the date registered onthe warranty card when buying the
product.
Warranty Period
Product
Information
Customer
Information
Seller
Information
Note
Model
Name
Address
Name
Contact Number
Address
Date of Sale
Product Code Number
Contact Number

The guarantee and service offered by this document are not applicable in the following
cases:
①
The product or accessory has expired its warranty period;
②
Breakage or
damage caused by inappropriate usage, maintenance or preservation, such as
improper packing, improper usage, improper plugging in/out external equipment,
falling off or squeezing by external force, contacting or exposing to the improper
temperature, solvent, acid, base, flooding and damp environments, etc;
③
Breakage
or damage caused by non-authorized institution or staff in the process of installation,
maintenance, alternation, addition and detachment;
④
The original identifying
information of product or accessory is modified, alternated, or removed;
⑤
No
valid warranty card;
⑥
Breakage or damage caused by using illegally authorized,
nonstandard or non-public released software;
⑦
Breakage or damage caused by
force majeure or accident;
⑧
Breakage or damage that could not be attributed to
the product itself. Once met these situations above, you should seek solutions from
the related responsible parties and Godox assumes no responsibility. The damage
caused by parts, accessories and software that beyond the warranty period or scope
is not included in our maintenance scope. The normal discoloration, abrasion and
consumption are not the breakage within the maintenance scope.
Inapplicable Cases
If maintenance service is needed, you can directly contact the product distributor or
authorized service institutions. You can also contact the Godox after-sale service
call and we will offer you service. When applying for maintenance service, you should
provide valid warranty card. If you cannot provide valid warranty card, we may offer
you maintenance service once conrmed that the product or accessory is involved in
the maintenance scope, but that shall not be considered as our obligation.
How to Get the Maintenance Service

Godox After-sale Service Call 0755-29609320-8062
Maintenance and Service Support Information
The warranty period and service types of products are implemented according to
the following Product Maintenance Information:
Product
Type
Parts
Other
Items
Power Cable, Sync Cable, Battery
Case, Windscreen Foam, Wind Cap,
Locking Device, Lanyard,
Tie, Velcro Tape, Clip,
Bag, Package etc.
Electrical parts e.g.battery charger, etc.
Battery
Product Main Body
Name Maintenance
Period(month)
3
12
3
No
Customer sends the
product to designated site
Customer sends the
product to designated site
Customer sends the
product to designated site
Without warranty
Warranty
Service Type