

ITENFRDENLESPT
MANUALE D’USO
PIANO A INDUZIONE PORTATILE
USER MANUAL
PORTABLE INDUCTION COOKER
MANUEL DE L’UTILISATEUR
TABLE À INDUCTION PORTABLE
GEBRAUCHSANLEITUNG
TRAGBARES INDUKTIONSKOCHFELD
GEBRUIKSAANWIJZING
DRAAGBARE INDUCTIEKOOKPLAAT
MANUAL DE USO
PLACA DE INDUCCIÓN PORTÁTIL
MANUAL DE USO
PLACA DE INDUÇÃO PORTÁTIL

Consigliamo di leggere attentamente questo manuale, che riporta tutte le indicazioni per mantenere inalterate le qualità estetiche
e funzionali dell’apparecchio acquistato.
Per ulteriori informazioni sul prodotto: www.smeg.com
We advise you to read this manual carefully, as it contains all the instructions for managing the appliance’s aesthetic and functional
qualities.
For further information on the product: www.smeg.com
Nous conseillons de lire attentivement ce manuel, qui comprend toutes les indications pour maintenir inaltérées les qualités esthétiques
et fonctionnelles de l’appareil acheté.
Pour obtenir des informations supplémentaires sur le produit: www.smeg.com
Wir empfehlen, diese Bedienungsanleitung, die sämtliche Anweisungen enthält, um das Aussehen und die Funktionsfähigkeit des
Geräts zu erhalten, sorgfältig zu lesen.
Für weitere Informationen über das Produkt wird auf www.smeg.com verwiesen
We adviseren om deze handleiding aandachtig door te lezen. Ze bevat aanwijzingen die nodig zijn om de esthetische en functionele
eigenschappen van het gekochte apparaat intact te houden.
Bezoek voor meer informatie over het product: www.smeg.com
Aconsejamos leer atentamente este manual que contienen todas las indicaciones para mantener inalterada la calidad estética y
funcional del aparato adquirido.
Más información sobre el producto en: www.smeg.com
Aconselhamos que leia atentamente este manual, que refere todas as indicações para manter inalteradas as qualidades estéticas
e funcionais do aparelho comprado.
Para mais informações sobre o produto: www.smeg.com
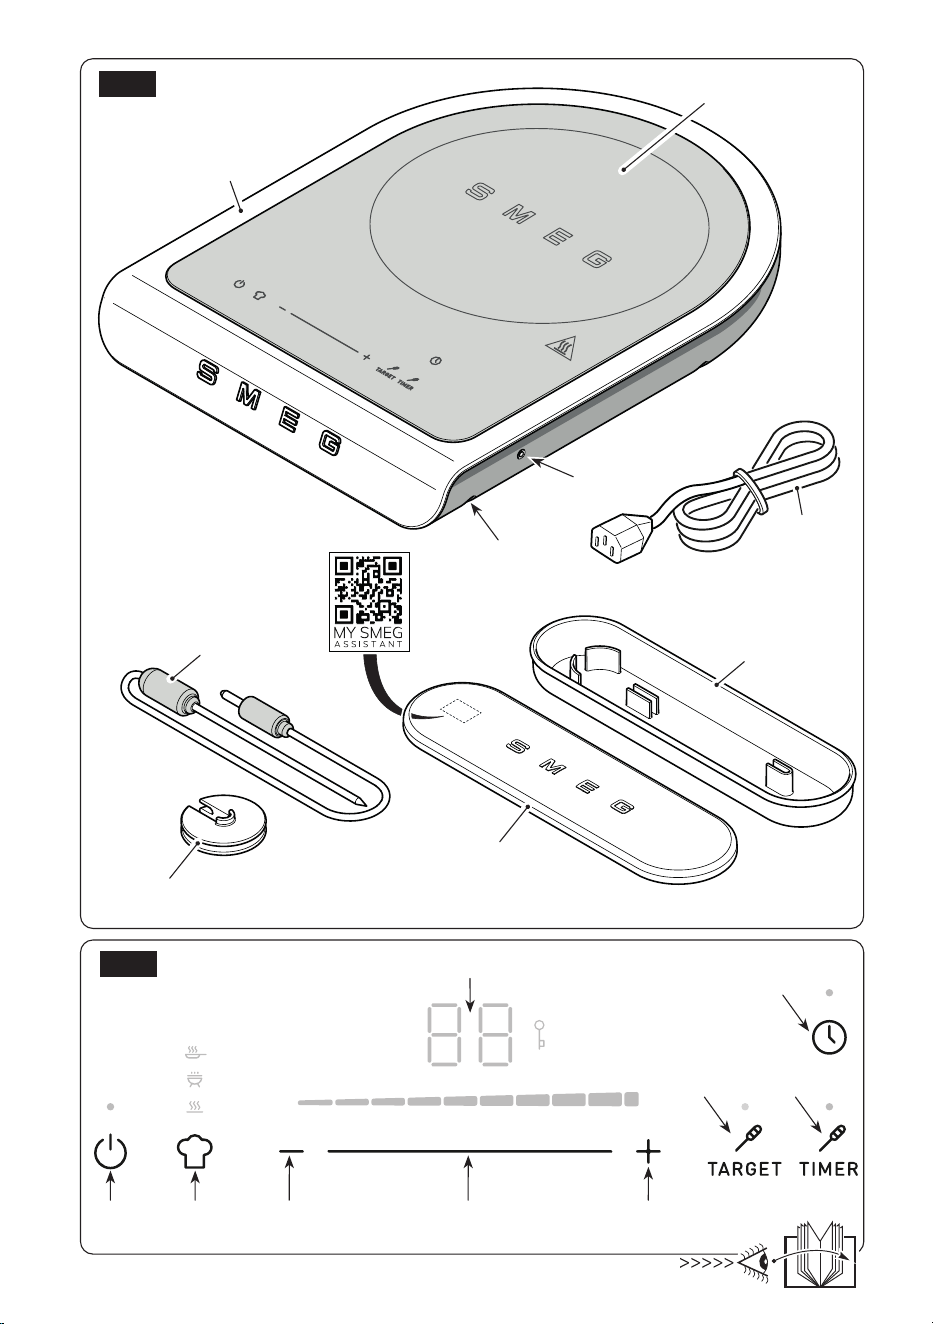
“A”
15
18
1
14
2
“B”
3
4 5 6 7 8
9 10
11
12
13
16
17
“F”
“G”
“E”
“D”
“C”
12
17
17
18
Informazioni importanti per l’utente / Important information for the user
Informations importantes pour l’utilisateur / Wichtige Informationen für den Benutzer
Belangrijke informatie voor de gebruiker / Información importante para el usuario
Informações importantes para o utilizador
Avvertenze / Instructions / Avertissements / Hinweise / Waarschuwingen / Advertencias / Advertências
Informazioni generali su questo manuale d’uso, di sicurezza e per lo smaltimento nale / General information on this user manual, on
safety and nal disposal / Informations générales sur ce manuel d’utilisation, sur la sécurité et sur l’élimination dénitive de l’appareil
/ Allgemeine Informationen zu dieser Gebrauchsanleitung, zur Sicherheit und die endgültige Entsorgung / Algemene informatie over
deze handleiding, veiligheidsinstructies en uiteindelijke verwerking / Información general del manual relativa al uso, la seguridad y la
eliminación nal / Informações gerais sobre este manual do utilizador, segurança e para a eliminação nal
Descrizione / Description / Description / Beschreibung / Beschrijving / Descripción / Descrição
Descrizione dell’apparecchio / Appliance description / Description de l’appareil / Beschreibung des Geräts / Omschrijving van het
apparaat / Descripción del aparato / Descrição do aparelho
Uso / Use / Utilisation / Gebrauch / Gebruik / Uso / Utilização
Informazioni sull’uso dell’apparecchio / Information on using your appliance / Informations sur l’utilisation de l’appareil / Informationen
zum Gebrauch des Geräts / Informatie over het gebruik van het apparaat / Información sobre el uso del aparato / Informações sobre
a utilização do aparelho
Pulizia e manutenzione / Cleaning and care / Nettoyage et entretien / Reinigung und Wartung /
Reiniging en onderhoud / Limpieza y mantenimiento / Limpeza e manutenção
Informazioni per la corretta pulizia e manutenzione dell’apparecchio / Information for proper cleaning and maintenance of the
appliance/ Informations pour un nettoyage et un entretien corrects de l’appareil / Informationen zur ordnungsgemäßen Reinigung und
Wartung des Geräts / Informatie voor de juiste wijze van reiniging en onderhoud van het apparaat / Información sobre la limpieza y
el mantenimiento correctos del aparato / Informações para a limpeza e manutenção corretas do aparelho
Avvertenza di sicurezza / Safety instructions / Consignes de sécurité / Sicherheitshinweise /
Veiligheidswaarschuwingen / Advertencia de seguridad / Advertências de segurança
Informazione / Information / Information / Information / Informatie / Información / Informação
Suggerimento / Advice / Conseil / Empfehlungen / Aanbeveling / Sugerencia / Sugestões

Scansiona il QR code per un accesso rapido al portale My Smeg Assistant
Scan the QR code for a quick access to the portal My Smeg Assistant
Scannez le code QR pour accéder rapidement au portail My Smeg Assistant
Scannen Sie den QR-Code für einen schnellen Zugriff auf das Portal My Smeg Assistant
Scan de QR-code voor snelle toegang tot de portal Mijn Smeg Assistant
Escanee el código QR para acceder rápidamente al portal My Smeg Assistant
Digitalizar o código QR para um acesso rápido ao portal My Smeg Assistant
NOTES

Il costruttore si riserva di apportare senza preavviso tutte le modifiche che riterrà utili al miglioramento dei propri
prodotti. Le illustrazioni e le descrizioni contenute in questo manuale non sono quindi impegnative ed hanno solo
valore indicativo.
The manufacturer reserves the right to make any changes deemed useful for improvement of its products without prior
notice. The illustrations and descriptions contained in this manual are therefore not binding and are merely indicative.
Le fabricant se réserve la faculté d’apporter, sans préavis, toutes les modifications qu’il jugera utiles pour
l’amélioration de ses produits. Les illustrations et les descriptions figurant dans ce manuel ne sont pas contraignantes et
n’ont qu’une valeur indicative.
Der Hersteller behält sich vor, ohne vorherige Benachrichtigung alle Änderungen vorzunehmen, die er zur
Verbesserung seiner Produkte für nützlich erachtet. Die in diesem Handbuch enthaltenen Illustrationen und
Beschreibungen sind daher unverbindlich und dienen nur zur Veranschaulichung.
De fabrikant behoudt zich het recht voor zonder waarschuwing alle wijzigingen aan te brengen die hij nodig acht om
zijn producten te verbeteren. De afbeeldingen en de beschrijvingen die aanwezig zijn in deze handleiding zijn niet
bindend, en hebben enkel een aanduidende waarde.
El fabricante se reserva el derecho a aportar sin aviso previo todas las modificaciones que considere útiles para la
mejora de sus propios productos. Las ilustraciones y las descripciones contenidas en este manual no comprometen,
por tanto, al fabricante y tienen un valor meramente indicativo.
O fabricante reserva-se o direito de efetuar, sem aviso prévio, qualquer modificação que vise o melhoramento dos
respetivos produtos. As ilustrações e descrições contidas neste manual, não são, por isso, vinculativas e possuem
apenas valor indicativo.
Tillverkaren förbehåller sig rätten att genomföra alla de ändringar som anses nödvändiga för att förbättra de egna
produkterna utan att meddela detta i förväg. De illustrationer och beskrivningar som finns i denna bruksanvisning är
vägledande och därmed inte bindande.
Производитель оставляет за собой право вносить без предупреждения все изменения, которые посчитает
полезными для улучшения собственной продукции. Рисунки и описания, содержащиеся в данном Руководстве
по эксплуатации, не имеют обязательств и имеют ознакомительный характер.
Producenten forbeholder sig retten til at foretage eventuelle ændringer, der anses for at være en forbedring af det
oprindelige produkt, uden forudgående varsel. Illustrationer og beskrivelser i denne betjeningsvejledning er derfor ikke
bindende og kun vejledende.
Producent zastrzega sobie prawo do nanoszenia, bez uprzedniego powiadomienia, wszelkich zmian, które uzna za
przydatne w celu ulepszania swoich produktów. Rysunki i opisy zawarte w niniejszej instrukcji nie są zobowiązujące i
mają charakter poglądowy.
Valmistaja pidättää itsellään oikeuden tehdä ohjeisiin mielestään tarpeellisia muutoksia ilman ennakkoilmoitusta. Tässä
oppaassa olevat kuvat ja piirrokset eivät näin ollen ole sitovia, vaan ne annetaan vain viitteellisessä mielessä.
Produsenten forbeholder seg rett til endringer på sine produkter grunnet tekniske fremskritt, uten forutgående varsel.
Illustrasjonene og beskrivelsene i denne bruksanvisningen er derfor ikke bindende og skal kun betraktes som
retningsgivende.
The manufacturer reserves the right to make any changes deemed useful for the improvement of its products without
priornotice. The illustrations and descriptions contained in this manual are therefore not binding and are merely indicative.


EN - 1
EN
1 Warnings
This user manual is an integral part of the
appliance and must therefore be kept in its
entirety and on-hand for the whole working
life of the appliance.
1.1 Intended use
Failure to comply with the safety
recommendations and not reading the
instruction manual can lead to improper
use of the appliance by the users and
consequent personal injury.
• The appliance must only be used as a
portable induction cooker. All other use
is considered improper. Do not use the
appliance for purposes different to those
for which it is intended.
• The appliance is intended for use in the
home and similar environments, such as:
- in the kitchen area for the staff
of shops, offices and other work
environments;
- in bed and breakfast and agritourism
accommodation;
- by guests at hotels and motels, and
in residential environments.
• Other uses, in restaurants, bars and cafés
for example, are improper.
• Do not use the appliance outdoors.
• Do not use the appliance near water, in
damp places or near a swimming pool.
• Do not install the appliance near sources
of heat or ammable materials; in a
room subject to moisture, rain, potential
gas leaks or on an unleveled oor.
• Do not install the appliance on boats or
caravans.
• Place the appliance on a horizontal and
stable worktop, avoiding any delicate
surfaces (e.g. lacquered furniture,
tablecloths, etc.). Objects such as lids,
vases, etc. should not be placed on top
of the appliance.
• Do not insert the appliance into a closed
cabinet (built-in type).
• The appliance is not designed to operate
with external timers or with remote-
control systems.
• This appliance may be used by persons
with reduced physical, sensory or mental
capabilities (including children from the
age of 8) provided they are supervised
or instructed on the safe use of the
appliance and have understood the
hazards connected with its use.
• Children must not play with the appliance.
• Keep the appliance and its power cable
out of the reach of children under 8
years of age.
• Cleaning and maintenance can be
performed by children from the age of
8, only if they are closely supervised
by an adult.
Important safety information
EN - 2
1.2 General safety warnings
Follow all safety instructions for safe use
of the appliance: Electrocution Hazard,
since the machine is powered by electricity,
the following safety warnings must be
complied with:
• Read this user manual carefully before
using the appliance.
• Do not leave the appliance unattended
during use.
• Do not immerse the appliance, the
power cable, the plug or the base in
water or any other liquid. Do not remove
the plug from the socket by pulling on
the cable or with wet hands.
• Do not use the appliance when the
power cable or the plug are damaged
or if the appliance has fallen on the oor
or is damaged in any way whatsoever.
• In the event of a fault, or if the power
supply cable is damaged, have the
appliance repaired only by a qualied
technician or by an authorised after-sales
service.
• The cable is deliberately short to prevent
accidents.
• Do not allow the power cable to hang
over the edge of the table or any other
surface, or to come into contact with hot
surfaces.
• Do not allow the electrical power cable
to come into contact with sharp edges.
• Do not position the appliance above or
near gas or electric hob burners when
they are in use, inside an oven or near
other heat sources.
• Do not touch the plug with wet hands.
• Make sure that the power outlet used is
always freely accessible, because only
in this way can it be unplugged when
necessary.
• If the plug must be removed from the
socket, grasp the plug directly and do
not pull the cable.
• If the machine should suffer a malfunction,
do not attempt to repair it. Switch the
appliance off, remove the plug from the
outlet and contact the Technical After-
sales Service.
• Do not try to make modications or
repair the appliance: in the event of
a fault, have it repaired by a qualied
technician or contact the Technical After-
Sales Service.
Injury hazard! Improper use
of the appliance can cause
injuries. Disconnect the plug
before cleaning.
• Keep packaging material out of the
reach of children.
• Never try to put out a re/ames using
water: turn off the appliance, remove
the plug from the outlet and smother the
ame with a lid or re blanket.
• Always disconnect the appliance from
the power supply when it is not in use, if
left unattended or in the case of a fault.
• Always disconnect the appliance from
the power supply before assembly/
disassembly of components.
Important safety information
EN - 3
EN
• Always disconnect the appliance from
the power supply and let the appliance
cool down before cleaning.
• Do not use the appliance with parts
or accessories produced by other
manufacturers.
• Only use the manufacturer's original
spare parts. The use of spare parts
not recommended by the manufacturer
could lead to res, electric shocks or
personal injury.
• Only place the appliance on level and
dry surfaces.
• Do not wash the appliance in the
dishwasher. Do not spill liquids on the
power plug and on the power base.
Failure to comply with these warnings
can cause death, a re or electrocution.
• Do not use an adapter.
• Only use type-approved extensions
suitable for the type of appliance.
• Do not try to make modications or
repair the supplied power cable if it is
damaged or In the event of a fault.
Make sure that the power cable
connector is fully inserted into
the product connector.
1.3 Safety recommendations
for this appliance
• Do not move the appliance together
with the pot.
• Do not heat an empty pot or overheat it
to avoid dry boiling.
• Do not place metal objects such as
cutlery, lids, jars, aluminium foil, etc.
in the cooking area of the portable
induction cooker when the appliance
is turned on. Danger of burns!
• Do not place sheets of paper between
the pot and the glass hot plate.
The paper could catch re!
• Do not touch the glass hot plate after
removing the pot. Danger of burns!
Warning! If the glass surface is
cracked, switch off the appliance
to avoid the possibility of electric
shock.
• Do not obstruct fans and air outlet grilles.
• Do not use aluminium foil or plastic
containers on the glass hot plate.
• Only use cookwear (pots, pans...)
suitable for induction and of adequate
diameter (12 cm - 24 cm).
• After use, allow the appliance to cool
before moving it and before cleaning
the glass hot plate. The glass hot plate
remains warm after use, do not touch
with your hands!
• Do not use the appliance in contact
with walls or under shelves, tables, etc.
Leave at least 10 cm on both the left and
right sides of the appliance and 50 cm
above.
Important safety information
EN - 4
• The entire appliance gets warm when
used, even if only the glass hot plate in
contact with the container heats up. Use
the appliance with care to avoid burns
by accidentally touching the accessible
scalding parts. Danger of burns!
• Do not use aggressive detergents,
abrasive sponges or scouring pads to
clean the appliance.
• Consult the “Cleaning and maintenance”
chapter for cleaning instructions.
• This appliance cannot be placed in a
cabinet or closed container during use.
• The electromagnetic elds produced by
the appliance when used may cause
malfunctions.
Do not use the device by placing it
near objects that can be altered by
electromagnetic waves such as: radios,
televisions, CD, DVD or cassette players,
magnetic cards (debit cards, credit
cards, etc.)
• Consult a doctor if you have a
pacemaker.before using the portable
induction cooker.
Warning! The plate is
hot after cooking, please
don’t touch with your
hands.
1.4 Manufacturer's liability
The manufacturer declines all liability for
injury/damage to persons and objects
due to:
• use of the appliance different from that
envisioned;
• the user manual not being read;
• tampering with individual parts of the
appliance;
• use of non-original spare parts;
• failure to comply with safety warnings.
Keep these instructions carefully.
Whenever the appliance is
transferred to other persons, it
must be accompanied by these
user instructions.
These instructions can be downloaded
from the Web Smeg site “www.smeg.
com”.
1.5 Disposal
Devices bearing this symbol are subject
to European Directive 2012/19/EU.
• All electric and electronic appliances
must be disposed of separately from
household waste, taking them to the
relevant centres envisioned by the State.
By disposing of the discarded device
correctly, damage to the environment and
risks to human health will be avoided. For
further information regarding disposal of
the discarded appliance, contact the
Municipal Administration, the Disposal
dept. or the shop where the appliance
was purchased.
Important safety information
EN - 5
EN
The parts that may come into
contact with foodstuffs are made
using materials that comply with
the provisions of the legislation in
force.
3 Description of
accessories / controls
(Fig.A-B)
3.1 Description of accessories
(Fig. A)
Accessory carrying case (15)
The appliance comes with a case containing
accessories so that the user has them readily
available.
The case contains a temperature probe (17)
and a pot clip (18).
Temperature probe (17)
To be used when preparing food that requires
a liquid or the centre of the food to reach or
maintain a certain temperature.
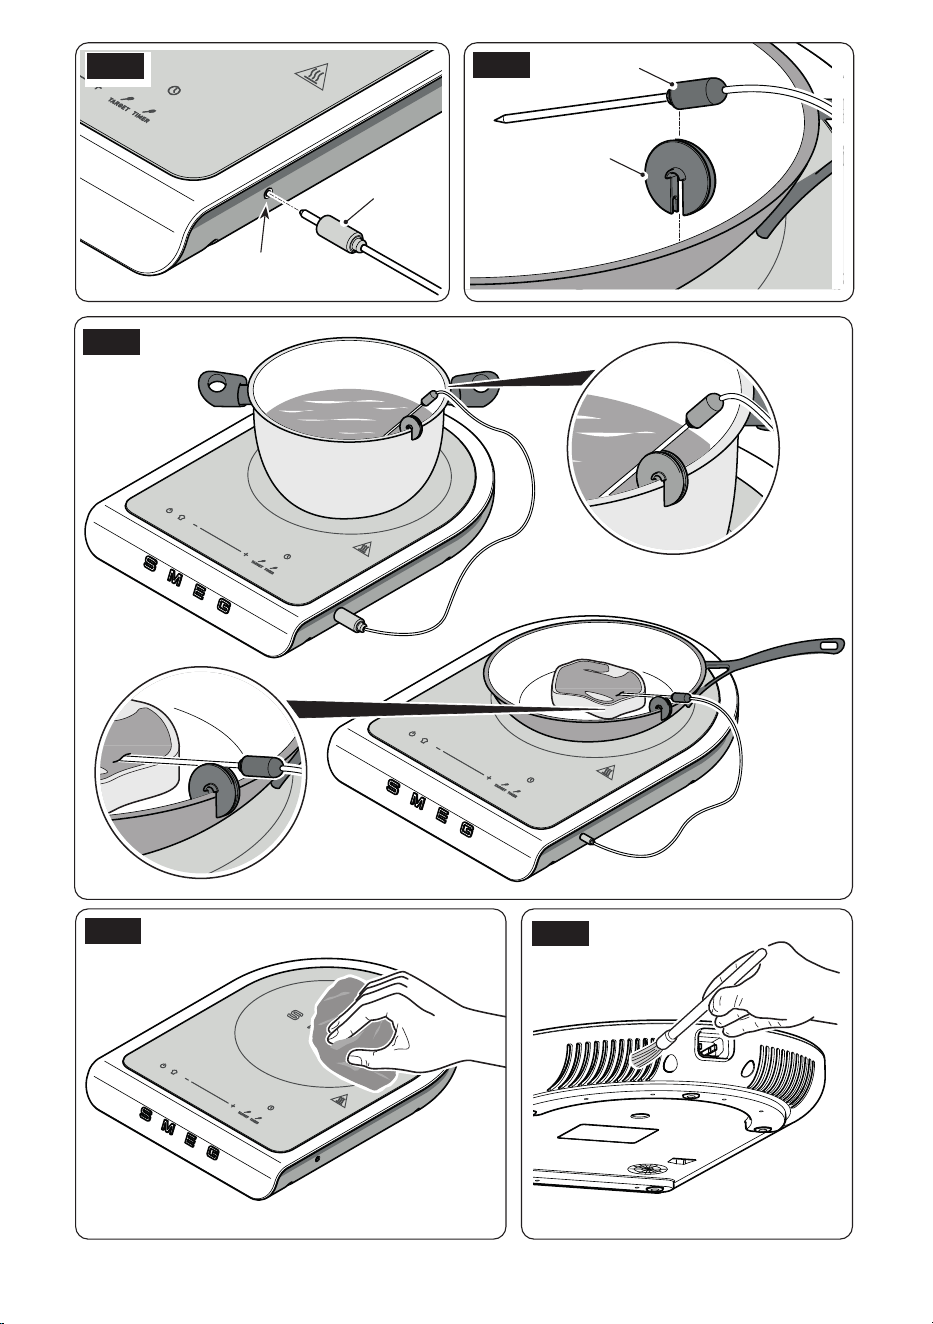
To enable the probe it is necessary to connect
it to the portable induction cooker by tting the
connector into the socket (12).
Pot clips (18)
To be used as a fixing support for the
temperature probe. The clip can be inserted
on the edge of a pan or pot.
Do not put the fixing clip in
contact with ames or objects
at too high a temperature.
Use
2 Description
of the
appliance (Fig.A and B)
1 Appliance body
2 Glass top hot plate
3 Display
4 ON/OFF button
5 “CHEF” program button
6 Time / power / temperature decrease
button
7 Power adjust slider "-/+"
8 Time / power / temperature increase
button
9 Temperature sensor "TARGET" button
10 Temperature sensor "TIMER" button
11 TIMER button
12 Temperature sensor connector socket
13 Support feet
14 Power chord
15 Accessory carrying case
16 Carrying case lid
17 Temperature probe
18 Pot clips
2.1 Before commissioning
(Fig. A)
• Unpack the appliance carefully and remove
all packaging materials.
• Clean the appliance body (1) and glass
hot plate (2) with a damp cloth to remove
any dust.
• Clean accessories in the same way.
• Make sure the appliance and accessories
are dry before reassembling them.
The container used for the portable
induction cooker surface must be
made of metal, have magnetic
characteristics and have a
sufciently at support surface.
EN - 6
Use
3.2 Description of commands
(Fig.B)
ON/OFF key (4)
Press the button to turn the appliance user
interface ON or OFF.
“CHEF” program button (5)
Press the button in sequence to activate one
of the following programs:
" Keep Warm", " Barbecue" and " Fry".
Time/power buttons and slider (6),
(7) and (8)
Tap buttons (6) and (8) to increase/decrease
time, power or temperature with each tap (only
with temperature probe attached).
The slider (7) allows, by sliding with your nger
in the desired direction, to increase/decrease
the time or power.
Power adjustment is visible via the
light level bar. There are 9 power
levels plus the maximum power
function called "Boost".
"TARGET" temperature probe button
(9)
Only with the temperature probe connected,
the button allows you to activate the "TARGET"
function.
"TIMER" temperature probe button
(10)
Only with the temperature probe connected,
this button allows you to activate the "TIMER"
function.
"TIMER" button (11)
The button allows you to set a timer to
automatically stop the cooking cycle when
the time expires.
4 Use
Before starting the appliance,
carefully read chapter “1
Warnings” and the “Before
commissioning” paragraph.
4.1 Appliance accessories
(Fig. A and B)
• Place the appliance on a horizontal and
stable worktop that is resistant to high
temperatures. Make sure all feet (13) touch
on the worktop.
• Unwind the power cord completely (14).
• Connect the power plug to the power
outlet making sure that the mains voltage
corresponds to what is indicated on the
data plate of the appliance.
• The number "88" appears on the display
for one second.
• Place the container with the food to be
cooked on the glass top hot plate (2).
• Press the button (4) to turn on the hob. The
appliance emits a "beep" and the LED button
(4) lights up; This means that it is ready to
be set up.
During operation the plate (2) heats
up.
Pay close attention.
Danger of burns!
EN - 7
EN
4.2 Setting the power level
(Fig. B)
• When the appliance is switched on, the
power is set to "0" by default. To start
cooking, set the power level using the slider
(7) or the specic buttons (6) and (8).
• The appliance automatically starts the
cooking cycle if the pot is detected.
If no pot is detected because it is not
present or because it is not suitably
sized, the letter "u" ashes on the
display with a dash "-"
underneath.
The hob turns off automatically
after 30 seconds if the power level
is set to 0, if no other operations
are performed and if no pot is
detected.
• The "Boost" function is available to heat/
boil a large amount of water or to carry
out the most intense cooking, which allows
the induction to run at the maximum power
available for a limited period of time (5
minutes).
• To activate the "Boost" function, set the "P"
level on the display with the slider (7) or by
pressing the button (8) several times. The
"Boost" function is automatically deactivated
at the end of the maximum safety time of 5
minutes, after which the power is reduced
to level 9.
• To deactivate the "Boost" function, set
another level of power on the display with
the slider (7) or by pressing the button (6)
several times.
• The display shows the residual heat when
completing the cooking cycle:
" " low residual heat.
" " medium residual heat.
" " high residual heat.
Use
Before touching the appliance
to store or clean it, wait for the
residual heat indication shown on
the display to disappear.
Pay close attention.
Danger of burns!
• Depending on the set power level, the
appliance has a maximum operating
time, at the end of which it switches off
automatically or, in the case of the "Boost"
function, returns to the lower power level.
The table shows the maximum operating
time:
Power level
Auto power-off
time
Keep Warm 2 hours
1 6 hours
2 6 hours
3 5 hours
4 5 hours
5 1.5 hours
6 1.5 hours
7 1.5 hours
8 1.5 hours
9 1.5 hours
P 5 minutes
EN - 8
4.3 Pausing and setting the
timer (Fig. B)
Pause
• You can pause each cooking cycle by
pressing and holding the button (11) for 2
seconds. The symbol "II” is shown on the
display when the hob is paused.
• To resume cooking with the last parameters
set and cancel the pause state, press and
hold the button (11).
The appliance can be paused for
10 minutes at most. After this time
the hob turns off.
Timer
You can set a timer to automatically stop the
cooking cycle in progress when the countdown
expires.
Before enabling the timer you need
to place the pot on the plate and
set the desired cooking power.
• Press the button (11) to start the timer. The
LED button ashes and the display displays
the time of duration "00".
• Use the buttons (6) and (8) to set the cooking
timer.
• After setting the desired cooking time, wait
2 seconds or press the button (11) again.
At this point the LED of the "TIMER" function
remains xed access and the countdown
appears on the display.
If, with timer set, the pot is not put
on the plate or is removed, the
"TIMER" function is maintained for
3 minutes. At this stage the LED of
the button (11) ashes. If the pot
is not placed on the plate, after 3
minutes the appliance turns off.
• At the end of the countdown the cooking
cycle stops, the display displays ashing
"00” and a short sequence of sounds is
emitted (20 seconds). After a further interval
of 10 seconds with the power level set to
0, the hob turns off.
When cooking with the timer set
it is always possible to vary the
power via the buttons (6) and (8),
or the slider (7).
You can always change the
countdown when cooking with the
timer set by pressing the button (11)
and then acting on the buttons (6)
and (8).
4.4 Button block function (Fig.
B)
• Pressing the buttons (10) and (11)
simultaneously allows you to lock/unlock
the keypad. The key icon " ” lights up when
the keypad is locked.
• The keypad can be locked/unlocked more
than once while using the hob, without
having to turn it on/off. The key lock
remains active even if the supply voltage
is interrupted and restored within a few
seconds, as it must be turned off manually.
• If the key lock is activated, you can always
turn off the unit by pressing the button (4).
Use
EN - 9
EN
If the button lock is activated,
you cannot turn on and use the
appliance without unlocking the
keypad. Pressing the power button
calls up the key icon on the display.
5 "CHEF” cooking
program (Fig. B)
Pressing the button (5) in sequence calls up
the “CHEF” function that makes it possible to
activate the following programs:
- Keep Warm " "
- Barbecue " "
- Fry " "
Activate any "CHEF" program by
placing the pot on the plate.
5.1 "Keep Warm” program
The program allows you to heat the hob with
constant heat, to keep the ow rates warm
for as long as the user wants.
• Place the pot on the hob and press the
button (5) in sequence until the “ " icon
lights up; The program is active.
• The display displays "U", the plate heats
up and maintains constant heat until the
moment of automatic shutdown.
It is not possible to adjust the
power. Tapping the adjustment
buttons will not adjust the power.
• After starting the program you can set
a stop timer. To set the timer refer to the
"Timer" point in the paragraph "4.3 Pause
and timer setting".
• The program remains active until the user
changes the cooking program, turns off
the appliance, when the set timer or the
maximum shutdown time expires.
5.2 "Barbecue” program
The program allows you to cook meat, sh
and vegetables with dedicated cooking
settings for the use of grill plates. Depending
on the food that the user wants to cook, it
is possible to select a different barbecue
program with dedicated cooking powers
and times.
• Place the food-free grill plate on the hob
and press the button (5) in sequence until
the icon " ” lights up; the icon ashes.
• Use the buttons (6) and (8), or the slider (7),
to select the type of Barbecue program you
want. The display shows the name of the
selected program:
"b1" - Vegetable barbecue program.
"b2" - White meat / fish barbecue
program.
"b3" - Steak / hamburger / bacon
barbecue program.
• At the start of each program, the
preheating phase is activated, during
which the hob and the grill plate heat up
to reach the optimal cooking temperature.
During this phase, the " " icon ashes
until the phase ends.
The warm up phase of each
program has a timer and a
power set by the manufacturer.
These default settings cannot be
changed.
During warm up it is possible to
go directly to the cooking phase
by pressing the button (8).
• When the " " icon remains xed, it
means that the preheating is nished
and that the grill plate has reached the
required cooking temperature.
Use
EN - 10
• Place the food in the grill plate, the hob
will cook with a default power level.
• During cooking it is possible to set a stop
timer, following the instructions provided
in the cooking tables at the end of this
manual. To set the timer refer to the "Timer"
point in the paragraph "4.3 Pause and
timer setting".
You can set the cooking timer
even during the preheating
phase, waiting for it to start later
at the end of this phase. In this
case the LED (11) blinks with a
reduced frequency.
When the warm up phase is
over, the countdown begins and
the LED (11) remains xed.
• The power level can be changed also
while cooking.
Only power levels from 6 to 9
can be selected.
"Barbecue" programs time and
power
The tables show power levels and dened
times for the phases of each program
Program
Warm up phase
b1
Power level: 9
Timer: 2 minutes
b2
Power level: 9
Timer: 2 minutes
b3
Power level: 8
Timer: 4 minutes
Power level and timer are NOT
adjustable.
Program
Cooking phase
b1
Power level: 8
Timer: to set by the user
following table “Cooking
times”
b2
Power level: 7
Timer: to set by the user
following table “Cooking
times”
b3
Power level: 7
Timer: to set by the user
following table “Cooking
times”
Power levels from 6 to 9 can be
adjusted.
Use
EN - 11
EN
5.3 "Fry" program
The program allows you to fry fresh foods,
frozen foods and sweets with dedicated
cooking settings. Depending on the food
that the user wants to fry, it is possible to
select a different fry program with dedicated
cooking powers and times.
• Place the pot containing the oil on the hob
and press the button (5) in sequence until
the icon " ” lights up; the icon ashes.
• Use the buttons (6) and (8), or the slider (7),
to select the type of Fry program you want.
The display shows the name of the selected
program:
“F1" - Fresh food fry program.
"F2" - Frozen food fry program.
"F3" - Sweets fry program.
• At the start of each program, the
preheating phase is activated, during
which the hob and the oil in the pot
heat up to reach the optimal cooking
temperature.
During this phase, the " " icon ashes
until the timer expires.
The warm up phase of each
program has a timer and a
power set by the manufacturer.
These default settings cannot be
changed.
During warm up it is possible to
go directly to the cooking phase
by pressing the button (8).
• When the " " icon remains xed, it
means that the preheating is nished and
that the oil in the pot has reached the
required cooking temperature.
• Position the food in the pot, the hob will
cook the food with the power level set.
• During cooking it is possible to set a stop
timer, following the instructions provided
in the cooking tables at the end of this
manual. To set the timer refer to the "Timer"
point in the paragraph "4.3 Pause and
timer setting".
You can set the cooking timer
even during the preheating
phase, waiting for it to start later
at the end of this phase. In this
case the LED (11) blinks with a
reduced frequency.
When the warm up phase is
over, the countdown begins and
the LED (11) remains xed.
• The power level can be changed also
while cooking.
Only power levels from 6 to 9
can be selected.
Use
EN - 12
"Fry" programs time and power
The tables show power levels and dened
times for the phases of each program
Program
Warm up phase
F1
Power level: 9
Timer: 9 minutes
F2
Power level: 8
Timer: 13 minutes
F3
Power level: 8
Timer: 13 minutes
Power level and timer are NOT
adjustable.
Program
Cooking phase
F1
Power level: 8
Timer: to set by the user
following table “Cooking
times”
F2
Power level: 7
Timer: to set by the user
following table “Cooking
times”
F3
Power level: 7
Timer: to set by the user
following table “Cooking
times”
Power levels from 6 to 9 can be
adjusted.
Use
6 Temperature probe
(Fig. B, C, D and E)
The temperature probe is to be used when
preparing food that requires a liquid or the
centre of the food to reach or maintain a
certain temperature.
Connect the probe to the hob by inserting the
connector into the socket (12), the LEDs of the
buttons (9) and (10) light up waiting for the
user to select the type of function between
"TARGET" or "TIMER".
6.1 "TARGET" function
The "TARGET" function is advised for
preparations requiring that cooking stops
automatically upon reaching a target
temperature at the core of the food (for instance
meat, seafood).
• Place the pot containing the liquid or food
on the hob.
• Latch the clip (18) to the edge of the pot
and dip the tip of the probe in the liquid or
insert it into the food. Position the probe,
place it inside the clip so that it remains
in place.
• Press the button (9) to activate the
function, the LED button ashes.
• Use the buttons (6) and (8) to set the target
temperature; the display displays the default
temperature value 70°C, and then the one
set by the user.
• After 3 seconds the cooking starts, during
this phase the LED of the button (9) ashes
with a reduced frequency and the current
temperature is shown on the display.
You can manually change the
power level using the slider
when cooking.
The default power level is 5.

EN - 13
EN
Use
You can manually change the
set target temperature when
cooking. Press the button (9)
and manually change the target
temperature with buttons (6) and
(8).
• Once the target temperature is reached,
the cooking cycle stops. The display shows
the temperature reached by ashing and
emitting a short sequence of sounds (20
seconds).
• The device switches off automatically after
a further interval of 10 seconds.
6.2 "TIMER" function
The "TIMER" function is advised for preparations
requiring that, for a given time interval, a
dened temperature of a liquid being cooked
is maintained (for instance, in the case of sous-
vide cooking).
• Place the pot containing the liquid or food
on the hob.
• Latch the clip (18) to the edge of the pot
and dip the tip of the probe in the liquid or
insert it into the food. Position the probe,
place it inside the clip so that it remains
in place.
• Press the button (10) to activate the
function, the LED button ashes.
• Use the buttons (6) and (8) to set the target
temperature; the display displays the default
temperature value 70°C, and then the one
set by the user.
• Press the button (11) and set the timer using
the buttons (6) and (8).
• After 3 seconds the cooking starts, during
this phase the LED of the button (10) ashes
with a reduced frequency and the current
temperature is shown on the display.
You can manually change the
power level using the slider
when cooking.
The default power level is 5.
You can display or change the
set target temperature when
cooking. Press the button (9)
and manually change the target
temperature with buttons (6) and
(8).
You can change the set timer
when cooking. Press the button
(11) and manually change the
timer with buttons (6) and (8).
• Once the target temperature is reached,
a sound is emitted and the countdown
begins. In this phase the LED of the buttons
(10) and (11) light up steadily.
• The hob will maintain the set temperature
until the countdown expires.
• At the end of the countdown the cooking
cycle stops, the display displays ashing
"00” and a short sequence of sounds is
emitted (20 seconds).
• The device switches off automatically after
a further interval of 10 seconds.
EN - 14
7 User menu
You can set the individual parameters of the
appliance by using the user menu.
• Access the user menu by simultaneously
holding down the buttons (5) and (9) for
4 seconds.
The operation can only be
performed when the hob is
switched on and no program,
function or timer is active.
• Use the buttons (6) and (8) to scroll through
menu items; The letter identifying the
selected item is shown on the left side of
the display.
• Use the slider (7) to change the value of the
selected item; The number that identies
the value is shown on the right side of the
display.
• To exit the menu and confirm the new
settings, press and hold the button (4) for 2
seconds.
After 30 seconds of inactivity,
the device switches off
automatically.
User menu legend
Item Meaning Value
a
Button volume
0:
OFF buttons volume
1:
ON buttons volume
b
Acoustic signals
volume
0:
OFF signals volume
1:
ON signals volume
c
Display brightness
Scale 0 - 9
0: Min. brightness
9: Max.
brightness
Even with button volume set to
"OFF", it is not possible to turn
off the button tone (4).
Use
EN - 15
EN
Cooking tables
Barbecue function
Recommended cooking times using the barbecue function programs.
Program Food Quantity
Power
Timer
b1) VEGETABLES Courgette 80 - 100g 8 3min per side
b1) VEGETABLES Aubergine 80 - 100g 8 2min per side
b1) VEGETABLES Bell peppers 100g 8 5min per side
b1) VEGETABLES
Vegetable skewers
3 70g
skewers
8 8min per side
b2) WHITE MEATS /
FISH
Chicken breast 100g 7 2 min per side
b2) WHITE MEATS /
FISH
Turkey breast 100g 7 2min per side
b2) WHITE MEATS /
FISH
Fish llets 250g 7 4min per side
b2) WHITE MEATS /
FISH
Whole sh 100g 7 10min per side
b2) WHITE MEATS /
FISH
Prawn skewers 100g 7 10min per side
b3) STEAKS /
HAMBURGERS /
BACON
Hamburger (beef)
2 100g
burgers
7
Rare: 2min per side
Medium: 4min per side
Well done: 6min per
side
b3) STEAKS /
HAMBURGERS /
BACON
Fillet (beef) 150g 7
Rare: 5min per side
Medium: 7min per side
Well done: 9min per
side
b3) STEAKS /
HAMBURGERS /
BACON
Steak (pork) 180g 7 5 min per side
b3) STEAKS /
HAMBURGERS /
BACON
Bacon 180g 7 5 min per side

EN - 16
Cooking tables
Fry Function
Recommended cooking times using the fry function programs.
The times were dened using 900 ml of seed oil (equivalent to one bottle).
Program Food Quantity
Power
Timer
F1) FRESH FOODS Mixed vegetable fry 200g 8 4min
F1) FRESH FOODS Mixed sh fry 200g 8 3min
F1) FRESH FOODS Chicken nuggets 200g 8 7min
F1) FRESH FOODS Fish bites 240g 8 6min
F1) FRESH FOODS Cutlet (chicken) 200g 8 2min per lato
F1) FRESH FOODS Fried pizza 100g 8 4min
F2) FROZEN FOODS Mixed vegetable fry 200g 7 7min
F2) FROZEN FOODS Chicken nuggets 200g 7 3min
F2) FROZEN FOODS Potato croquettes 500g 7 10min
F2) FROZEN FOODS Chips 200g 7 5min
F3) SWEETS Churros - 7 5min
F3) SWEETS
Doughnuts (empty or
stuffed)
70g each 7 30sec per side
F3) SWEETS Apple fritters 20g each 7 1min per side
EN - 17
EN
Cooking tables
SOUS-VIDE cooking
It involves cooking food sealed in vacuum bags at low temperature. The food must be placed
in the pot only after reaching the set temperature and kept in immersion for the suggested
cooking time.
We suggest the use of the appropriate temperature probe with the selection of the
"TIMER" function (11).
The recommended cooking times were dened using a pot with a quantity of water
equal to 4L.
Food Quantity
Temperature Power
Timer
MEAT
Beef llet
100g
Medium: 54°C
Well done: 58°C
8 20min
Chicken breast 250g 70°C 8 56min
FISH
Codsh llet
250g 60°C 8 24min
Salmon steak
200g 64°C 8 18min
EGGS
Poached eggs 1 egg (60g) 68°C 5 45min
Soft 1 egg (60g) 73°C 5 45min
Hard boiled 1 egg (60g) 77°C 5 60min
DESSERTS
AND
FRUIT
Custard cream 350g 80°C 8 25min
Fruit (such as pineapple,
apricot, peaches)
250g 80°C 8 25min
Melting
Recommended cooking times to soften or dissolve foods.
Food Quantity
Power Timer
White chocolate 150g 5 5min
Milk chocolate 150g 4 4min
Dark chocolate 150g 5 6min
Butter 200g 7 4min
EN - 18
Cleaning and maintenance
8 Cleaning and
maintenance (Fig. F
and G)
8.1 Warnings
Electrocution hazard.
• Remove the plug from the power
outlet before cleaning the hob.
• Do not immerse the appliance
in water or other liquids.
• Allow the hob to cool before
cleaning.
Risk of damage to the surfaces.
• Do not use steam jets to clean
the appliance.
• Do not use cleaning products
containing chlorine, ammonia
or bleach on parts with metal
surface nishes (e.g. anodised,
nickel or chrome-plated).
• Do not use abrasive or corrosive
detergents (e.g. powder
products, stain removers and
metallic scourers).
• Do not use rough or abrasive
materials or sharp metal
scrapers.
8.2 Cleaning the glass top
plate (Fig. F)
Clean the glass top plate (2) with a damp
cloth or sponge and dishwashing detergent
if necessary.
Clean the glass top plate (2) after
each use.
You can gently wipe the surface of the plate (2)
with a soft-bristled toothbrush and dishwashing
detergent.
Pay attention to the hardness of
the bristles so as not to scratch the
surface of the plate.
Be careful to move pots or pans
over the glass gently, so as to
avoid scratches that could occur if
the bottom of the pot or pan is not
completely smooth.
8.3 Cleaning the machine
body (Fig. G)
To keep the external surfaces in good
condition, clean them regularly after all use
and when they have cooled down. Clean with
a soft, damp cloth.
Clean the cooling fans with a brush or vacuum
cleaner and use a soft cloth.

EN - 19
EN
What to do if...
Problem Possible causes
Solution
The appliance does not turn on. The plug was not properly plugged
into the power outlet.
Make sure the plug is properly
plugged into the power outlet.
The connector was not inserted t
into the unit.
Make sure the connector is inserted
correctly.
The power button (4) was not
pressed.
Press the power button (4) to turn
on the unit.
The cable is faulty. Contact your local technical
support service.
No electricity. Make sure the power is working
properly.
If the problem does not resolve,
contact a qualied electrician.
The appliance turns on but cooking
does not start or stops.
No crockery or crockery not
positioned correctly on the burner
(the letter "u” with a dash "-”
ashes on the display).
Make sure that the dishes are
placed correctly on the stove.
Use of crockery not suitable for
induction or of unsuitable diameter
(the letter "u” with a dash "-” below
ashes on the display).
Make sure that the dishes are
suitable for induction and of
a suitable diameter (see "1.3
Warnings for this appliance").
The dishes are hot but are removed
from the cooking zone (the letter
"u" with a dash "-” ashes on the
display).
Do not remove cookware from the
stove during cooking.
Button lock is active ( LED On).
Deactivate the button lock (see "4.4
Key block").
The appliance switches off during
use.
The set time has expired and the
appliance has stopped cooking.
If necessary, extend the cooking
time if the food is not cooked
enough.
After not using it for at least 30
seconds, the automatic switch-off
has been activated.
Turn the appliance back on if you
want to continue using it.
Even after the power is turned off,
a fan noise is heard.
The fan continues to run to cool the
appliance even after it is switched
off.
Wait for the time necessary for the
appliance to cool down.
If after a long wait the fan does not
turn off, contact your local technical
support service.
The appliance makes a metallic
noise or a slight vibration when it
starts up.
Possible metallic noises or
vibrations may occur during
cooking with induction hobs.
Make sure that the dishes are
positioned correctly on the hob
and that they are suitable for
induction (see "1.3 Warnings for
this appliance").
If the noises persist, contact your
local technical assistance service.

EN - 20
Problem Possible causes
Solution
The temperature probe is not
detected by the appliance.
The probe connector has not been
inserted correctly into the device.
Make sure the connector is inserted
correctly.
Probe might be damaged. Contact your local technical
support service.
The probe does not detect the
temperature.
The tip of the probe has not been
placed correctly in the food or
liquid inside the pot.
Make sure the probe tip is
positioned correctly.
The temperature is too high or too
low compared to the range of
values measured by the probe.
Make sure the temperature is
between 0 and 99°C so that it can
be detected by the probe.
The display shows the error code:
ER03
Possible presence of water or
dishes placed in the display area.
Make sure that the display area is
dry and free from dishes.
The display shows the error code:
ER21
The temperature detected in the
display area exceeds the safety
limit.
Wait for the time necessary for the
appliance to cool down.
If the problem is not resolved,
contact your local technical
assistance service.
The display shows the error codes:
E2 / E3
Use of empty or unsuitable crockery
for induction, or the temperature of
the glass or pan is too high.
Make sure you are not using empty
cookware suitable for induction
(see "1.3 Warnings for this
appliance").
Let the appliance and the pot cool
down.
If the problem is not resolved,
contact your local technical
assistance service.
The display shows the error code:
E6
Possible error in the supply voltage. Make sure the power supply is
correct.
If the problem does not resolve,
contact a qualied electrician.
The display shows the error code:
E8
The ventilation fan is blocked by
dust or fabrics.
Clean the ventilation fan and
remove any foreign bodies.
If the problem is not resolved,
contact your local technical
assistance service.
The display shows the error code:
EA / EH
- Switch off the appliance, remove
the pan or leave to cool.
If the problem is not resolved,
contact your local technical
assistance service.
The display shows the error codes:
ER36 / ER42 / E4 / E5 / E7
/ E9
- Contact your local technical
support service.