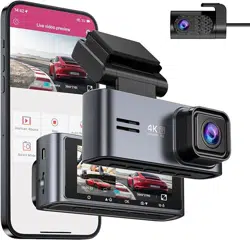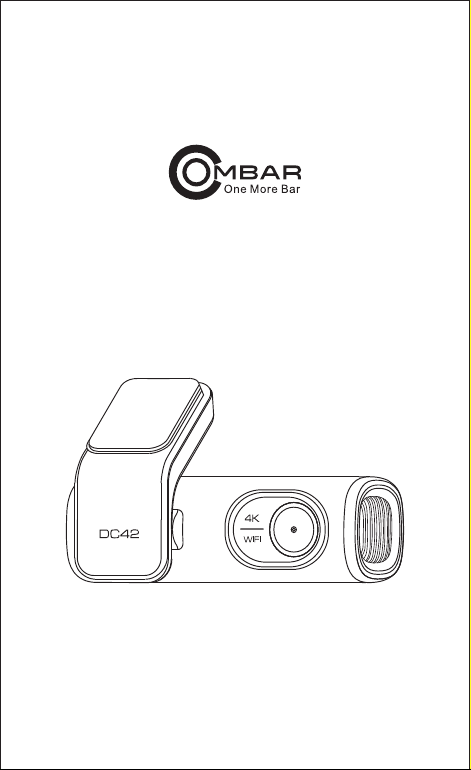
Owner’s Manual
DC42

Format SD Card .................................................................... 20
WiFi Name
.............................................................................. 20
WiFi Password
........................................................................ 20
Default Settings ...................................................................... 20
PLAYING AND MANAGING VIDEOS .................................... 21
Managing videos in WiFi ......................................................... 21
Managing videos by Micro-SD card reader ............................. 22
GPS PLAYER
......................................................................... 24
VOICE PROMPTS .................................................................. 26
FAQ ....................................................................................... 28
NOTICE .................................................................................. 29
IMPORTANT SAFETY INFORMATION ................................. 01
WARRANTY AND SUPPORT ............................................... 03
PACKING LIST ...................................................................... 04
SPECIFICATION ................................................................... 05
GETTING STARTED ............................................................. 06
Camera Overview .................................................................. 07
Installation .............................................................................. 09
Calibrate Date/Time ............................................................... 12
Format Micro-SD Card ........................................................... 16
GENERAL SETTING .......................................................... 16
Photo Size .............................................................................. 16
Video Resolution .................................................................... 16
Loop Record .......................................................................... 16
WDR
...................................................................................... 17
Audio Recording .................................................................... 17
G-Sensor ............................................................................... 17
Picture in Picture
.................................................................... 17
Parking Monitor ...................................................................... 18
Date/Time Format .................................................................. 18
Speed Unit ............................................................................. 18
Volume ................................................................................... 19
Boot Sound ............................................................................ 19
Frequency .............................................................................. 19
GPS Information
.................................................................... 19
Video Stamps ......................................................................... 19
Timezone Setting ................................................................... 19
Date/Time .............................................................................. 19
Free Space ............................................................................ 20
CONTENTS

Format SD Card .................................................................... 20
WiFi Name
.............................................................................. 20
WiFi Password
........................................................................ 20
Default Settings ...................................................................... 20
PLAYING AND MANAGING VIDEOS .................................... 21
Managing videos in WiFi ......................................................... 21
Managing videos by Micro-SD card reader ............................. 22
GPS PLAYER
......................................................................... 24
VOICE PROMPTS .................................................................. 26
FAQ ....................................................................................... 28
NOTICE .................................................................................. 29
IMPORTANT SAFETY INFORMATION ................................. 01
WARRANTY AND SUPPORT ............................................... 03
PACKING LIST ...................................................................... 04
SPECIFICATION ................................................................... 05
GETTING STARTED ............................................................. 06
Camera Overview .................................................................. 07
Installation .............................................................................. 09
Calibrate Date/Time ............................................................... 12
Format Micro-SD Card ........................................................... 16
GENERAL SETTING .......................................................... 16
Photo Size .............................................................................. 16
Video Resolution .................................................................... 16
Loop Record .......................................................................... 16
WDR
...................................................................................... 17
Audio Recording .................................................................... 17
G-Sensor ............................................................................... 17
Picture in Picture
.................................................................... 17
Parking Monitor ...................................................................... 18
Date/Time Format .................................................................. 18
Speed Unit ............................................................................. 18
Volume ................................................................................... 19
Boot Sound ............................................................................ 19
Frequency .............................................................................. 19
GPS Information
.................................................................... 19
Video Stamps ......................................................................... 19
Timezone Setting ................................................................... 19
Date/Time .............................................................................. 19
Free Space ............................................................................ 20

- 01 -
IMPORTANT SAFETY INFORMATION
Thank you for purchasing this OMBAR dashcam.
This instruction manual contains information on how to operate
your dashcam.
Before using your dashcam, we recommend that you read through
this manual to ensure correct usage.
To improve the performance of the product, the contents of this
manual are subject to change without prior notice.
● Do not disassemble, repair, or modify the product yourself.
Doing so may cause fire, electric shock, or malfunction. For
internal inspection and repair, contact the service center.
● If any foreign matter gets inside the product, detach the
power cord immediately.
Contact the service center for repair.
● Do not adjust the product while driving.
Doing so may cause an accident. Stop or park your car in a safe
place before installing and setting up the product.
● Do not operate the product with wet hands.
Doing so may cause electric shock.
● Do not install the product in a location where the product
can interfere with the driver's field of vision.
Doing so may cause an accident.
● Do not use a damaged or modified power cord. Only use
the cords provided by the manufacturer.
Damaged or modified power cords may cause an explosion, fire,
or malfunction.

- 02 -
● Do not leave the product near infants, children, or pets.
There is a risk of them swallowing small components, and/or their
saliva may get into the product, causing an explosion due
to a short circuit.
● Keep the terminals of the power cord clean.
Failure to do so may cause excessive heat and fire.
● Use the correct input voltage.
Failure to do so may cause explosion, fire, or malfunction.
● Do not cover the product with any material.
Doing so may cause external deformation of the product or fire.
Use the product and peripherals in a well-ventilated location.
● Do not install the product in an environment with high
humidity, or combustible gases or liquids.
Doing so may cause an explosion and/or fire.
● Do not spray water or wax directly onto the product while
cleaning the inside of the car.
Doing so may cause fire, electric shock, or malfunction.
● If smoke or an unusual smell is emitted from the power
cord, detach the power cord immediately.
Contact the service center or your distributor.
● Plug in the power cord firmly so that it cannot easily be
disconnected.
Failure to do so may cause fire.

- 03 -
WARRANTY AND SUPPORT
The dash cam comes with a full 12 months warranty.
If you have any questions regarding your product, please do not
hesitate to contact us via Amazon or drop us an email at
[email protected]. Queries are typically answered
within 24 working hours.
Dash cam is firmly committed to always improving our products,
services, and user experience. If you have any thoughts on how
we can do even better, we welcome your constructive feedback
and suggestions.
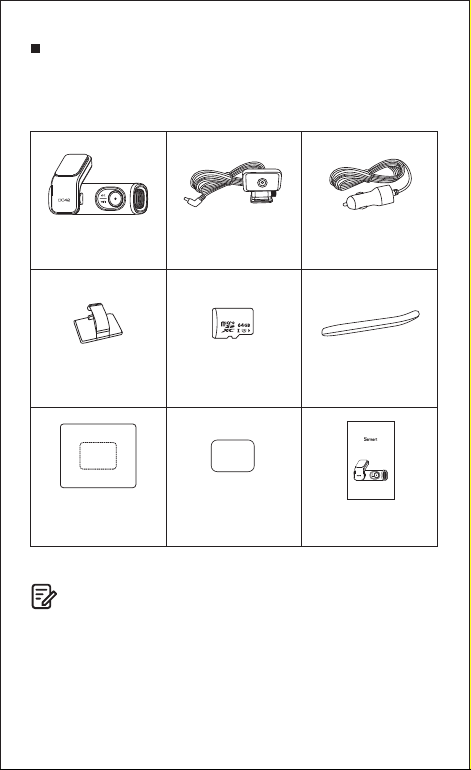
Dash Cam
Cable clips x 5
Electrostatic
sticker x 4
Micro SD Card x 1 Pry tool x 1
Rear Camera
(6m/19feet)
Cigarette lighter power
cable(3.5m/11.6ft)
Double-sided tape
for the Mounting x 2
User Manual x 1
Warm Prompt
1: Please paste the electrostctic film near the top of the front windscreen of the car
2: Please insert the SD card and USB power cabie into deyice
3: Please stick the device into the dotted box
Owner’s Manual
DC42
- 04 -
PACKING LIST
Check the box for each of the following items before installing
the dash cam.
Note
To improve the performance of the product, the contents of this
manual are subject to change without prior notice.

Model
Aperture
Color
Memory
Photo Resolution
Video Code
Photo Format
Video Compression Mode
Video Resolution
GPS Track
WiFi
DC42
F=1.8
Black
64GB SD Card
12M/10M/8M/5M/3M
H.265(4K), H.264
JPG
MP4
Front view on dash cam
-3840x2160P(Default)
-2560x1440P
-1920x1080P
Dual view on dash cam
-3840x2160 P+1920X1080P(Default)
-2560x1440 P+1920X1080P
-1920x1080 P+1920X1080P
Built-in
Built-in
(2.4GHz/5 Ghz Dual band)
USB Port
Power Interface
Operation Temperature
Storage Temperature
Charging and Storage
5V 2.5A
-20°C to 70°C
-30°C~ +85°C
- 05 -
SPECIFICATION
- 06 -
GETTING STARTED
Tips Please read and understand tips before operating.
● Setting Date & Time: Please calibrate the date/time based
on your location under the TIME ZONE SETTING by going to
APP system settings menu, please refer to page 12
● Before first time use, you MUST format the memory card in
the camera to prevent any errors and for smooth operation,
please refer to page 16
● Make sure to always keep the camera plugged into power,
because camera’s adapts super capacitor, if no power supply
dash cam can’t power on.
● You will need to insert a Micro-SD card before you can
start recording. Please insert the SD card we provide
together with our dash cam by 64GB.
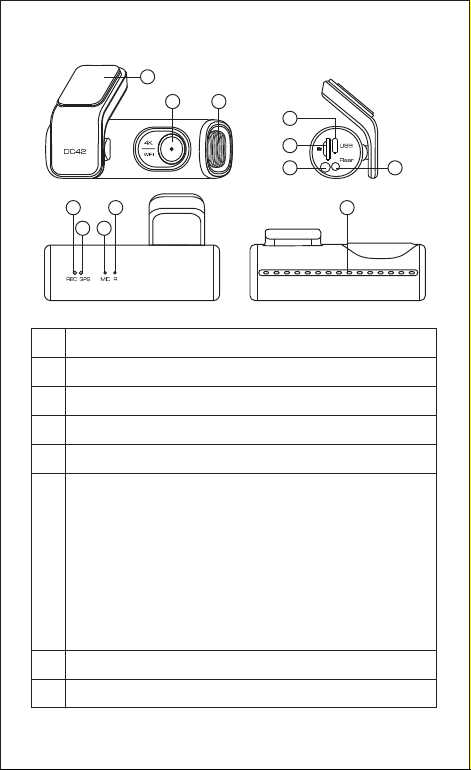
1
2 11
98
7 10
6
3
5
4
12
- 07 -
● Camera Overview
Rear Camera Slot(AV-IN)
Recording LED Indicator
6
7
Description
Sticker Mount
Front Camera
Micro-SD Card Slot
Micro USB Charging Port
1
2
3
4
5
WiFi Key
-During recording, shortly press 1 time to lock the video
-Shortly press 2 times to turn ON/OFF Microphone
-Shortly press 3 times in a row to shift between from 2.4GHz
to 5GHz
-Press and hold for 3 seconds to turn ON/OFF WiFi
-Press once to shift from"Charge Mode" to "Storage Mode"
when connected to USB cable (NOT INCLUDED) that can
transfer data
-Press and hold for 10 seconds to Format Micro-SD Card
and set to default settings
GPS LED Indicator
Mic-phone
Reset Button
Speaker
Heat vents
8
9
10
11
12
5
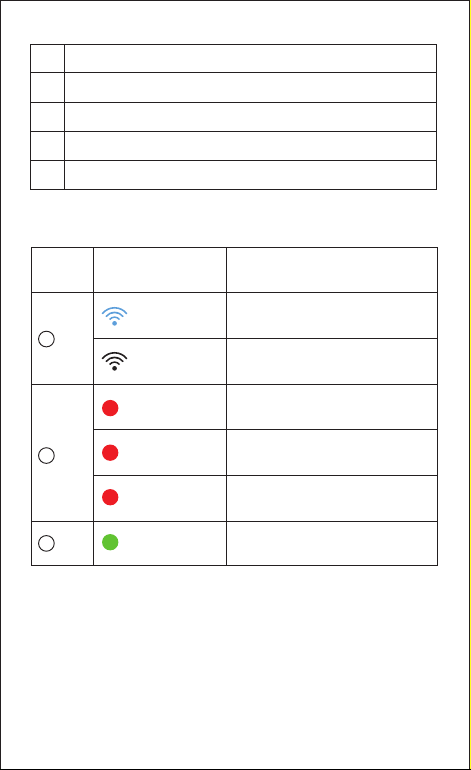
Status
WiFi ON
WiFi OFF
Recording
Connecting to power
Updating firmware
Receiving GPS signal successfully
Blingking
Solid
Bliking Rapidly
Solid
ColorLED
WiFi
7
REC
8
GPS
- 08 -

● Installation
Install the front camera behind the rear view mirror. Install the rear
camera at the top of the back windshield. Remove any foreign matter
and clean and dry the windshield before installation.
Turn off the engine, gently push the card into the slot until it
locks into place.(We alreay finish the setting up with 64GB SD
card)
Find a suitable place on windshield where don’t obstruct the
driver’s field of vision and remove any foreign matter and clean
and dry the windshield before installation.Tear off the
protective layer of the electrostatic sticker and adhere the
electrostatic sticker to the windshield to prevent mark/glue on
your windshield after removing it.
Peel off the protective film from the double-sided tape and
attach the front camera to the electrostatic sticker.Adjust the
angle of the lens by rotating the body of the front camera.
Peel off the protective film from the double-sided tape and attach
the rear camera to the rear windshield. Adjust the angle of the
lens by rotating the body of the rear camera, connect the front
camera and the rear camera.
1.
2.
3.
4.
- 09 -
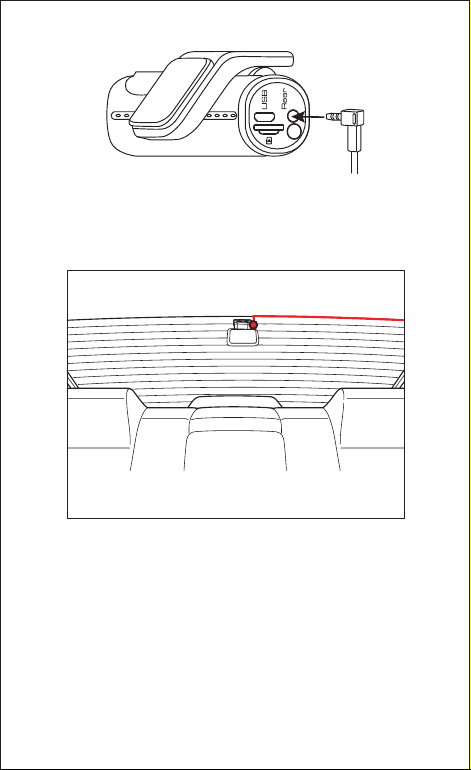
Use the pry tool to lift the edges of the rubber window sealing
and molding and tuck in the rear camera connection cable.
5.
Plug the cigarette lighter power cable into the cigarette lighter
socket and the front camera. Use the pry tool to lift the edges
of the windshield trim/molding and tuck in the power cord.
6.
Rear camera cable
- 10 -

Turn on the engine. The dashcam will power up and start
recording. Video files are stored on the microSD card.Turn off
the engine. The dashcam will automatically stop recording and
power down.
7.
Rear camera cable USB charging cable
- 11 -
● Calibrate Date/Time
DC42 is built-in GPS, need to set Timezone first in APP so that the
video date/time stamp will be correct.
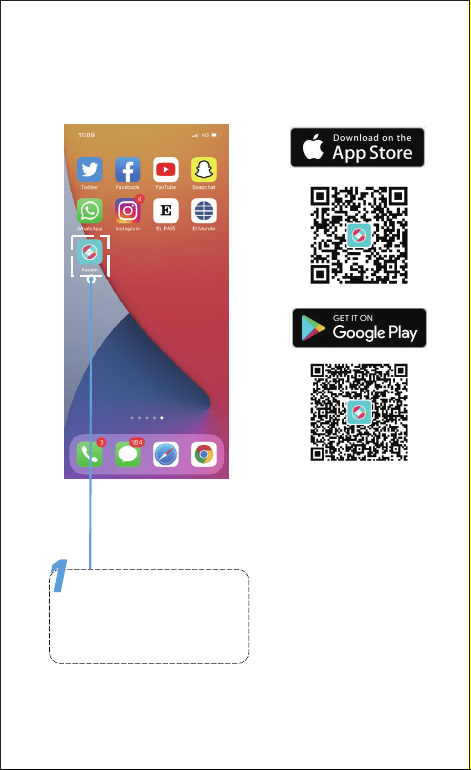
Search for the Kacam app
in the Google Play Store or
Apple App Store and install
it on your smartphone.
- 12 -
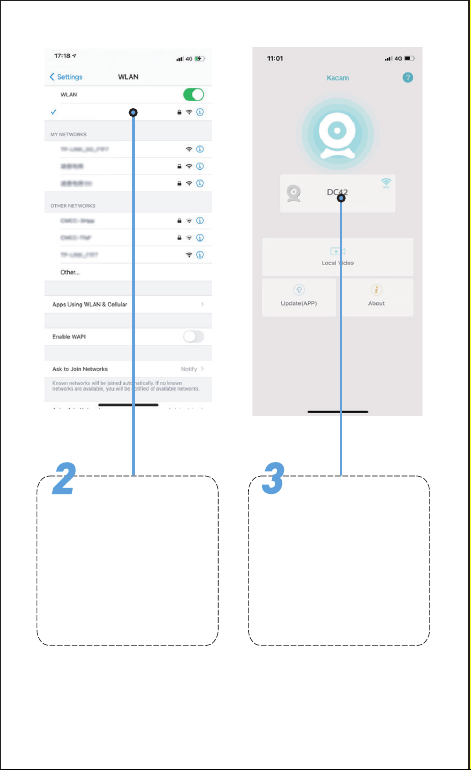
DC42_Dashcam_123456
Go to your
smartphone's Settings to
turn on WiFi, then sel
ect WiFi default named
“DC42_Dashcam_******”
(6 randomly digital number
is setting by our system),
password is 12345678.
There will show dash
cam model DC42 when
connected successfully,
Check Real-time Video.
- 13 -
F
11/ 09/ 2022
00:00:00
1920*1080
Snapshot
11:33:01
Select the “Timezone
Setting “ and “Date/Time”.
The dash camera is set the
date and time based on the
GMT/UTC value selection
when it receives the GPS
signal automatically.
Stop recording, and
press the to enter into
system setting menu.
- 14 -
Note
● Wi-Fi Direct lets you directly connect your smartphone to your
dashcam via Wi-Fi.
● The App is available for devices running Android 7.0 and higher,
or iOS 9.0 and higher.
USA Time Zones
Hawaii
Alaska
Pacific Time Zone
Mountain Time Zone
Central Time Zone
EasternTime Zone
GMT(-9:00)
GMT(-8:00)
GMT(-7:00)
GMT(-6:00)
GMT(-5:00)
GMT (-8:00)
GMT (-7:00)
GMT (-6:00)
GMT (-5:00)
GMT(-4:00)
GMT (-10:00)
When Daylight
Savi-ngs Ends
Nov - March
When Daylight
Savi-ngs Begins
March - Nov
UK Time Zones British Summer Time British Winter Time
GMT/UTC +1
GMT/UTC±0
- 15 -

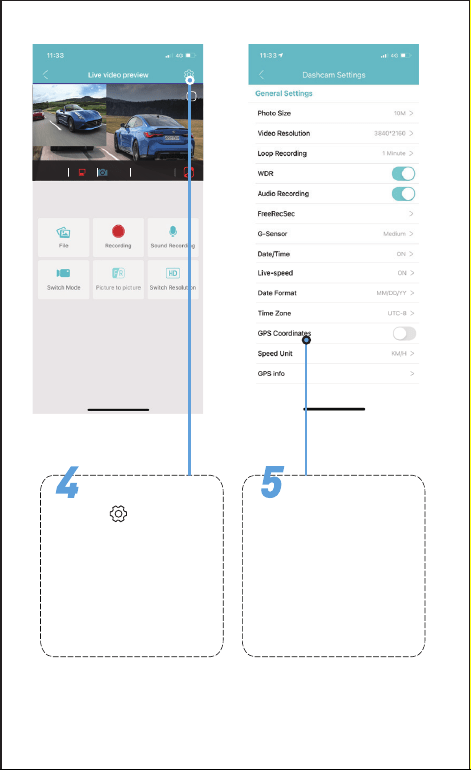
GENERAL SETTING
● Format Micro-SD Card
There are two ways to format Micro-SD card
a. Press and hold WiFi button for 10 seconds to format and default
settings, you will hear sound “di” when format successfully.
b. Please connect to Kacam APP, using the function menu named
“Format” to do.
● Photo Size — 12M/10M(Default)/8M/5M/3M
Here you can choose your desired photo resolution. Higher the
resolution better the pixel resolution for captured image.
● Loop Record — 1min(Default)/2mins/3mins
Allow the dash-cam to continuously record. Please notice: the
dash-cam will keep deleting the oldest files automatically when
memory card gets full so that it can keep recording over and over.
Here select the length of video file for the loop recording.
● Video Resolution
Allow to choose the desired video resolution and fps(frames per
second). Higher resolution and fps videos result in smoother
Front view on dash cam
-3840x2160 P(Default)
-2560x1440 P
-1920x1080 P
Dual view on dash cam
-3840x2160 P+1920X1080P(Default)
-2560x1440 P+1920X1080P
-1920x1080 P+1920X1080P
- 16 -

● WDR — On(Default)/Off
Wide Dynamic Range (WDR) improves the exposure by taking
the combinations of over exposed and under exposed image
into one robust wide range of lighting with higher depth image.
● Audio Recording — On(Default)/Off
Dash cam has built-in microphone to record audio with video.
You can choose to record mute video by choosing OFF.
● G-Sensor — Off/High/ Medium(Default)/Low
G-Sensor is a 3-axis impact gravitational accelerometer which is
designed to detect physical and gravitational forces on the camera.
While Video is Being Recorded: In the event when G-Sensor is
triggered due to physical or gravitational impact force on the camera,
the current loop cycle length of video file will be locked so it will
NOT be deleted by loop cycle function.
● Picture in Picture
- Front Camera: APP ONLY show the front camera image
- Rear Camera: APP ONLY show the rear camera image
- Front(Big)+Rear(Small): The front camera image is the primary
image, rear camera is the secondary image
- Front(Small)+Rear(Big): The front camera image is the
secondary image, rear camera is the primary image
- 17 -

● Speed Unit — KM/H/MPH (Default)
You can choose desired speed option stamp to be displayed and
recorded on video stamp based on your selection.
● Date/Time Format
This feature allows you to select the date format.
● Parking Monitor
This function menu will be shown when connected to 3-lead
hard-wire kit(this kit is not included with our product).
--- Off:The dash cam will also power off when the car power off.
--- Time-Lapse Parking Mode: The function is Time-lapse Parking
Monitor(1 frame per second). if set ON, When you turn OFF the
car’s engine and turn the key to the lock position. Then the camera
will STOP the loop recording and it will go into the Time-lapse
Parking Monitor recording mode automatically.
While this Time-lapse Parking Monitor is being recorded, If
someone hits your car, then the camera will lock the Time-lapse
Parking Monitor recording files, then saved in EMR folder of Micro
SD card > then go on Time-lapse Parking Monitor recording.
Now when you start your car for the next time, it will go into normal
video mode automatically to start the continuous video recording.
--- Impact Detection Parking Mode:If set ON, when you turn OFF
the car’s engine and turn the key to the lock position, the dashcam
will also power off, but if someone hits your car, the dash cam will
turn on to recording for 1minute and saved in EMG folder of Micro
SD card, then dash cam power off.
- 18 -

● Date/Time
It will Synchronize the phone system date/time.
● Timezone Setting
-UTC/GMT - 6:00 (Default)
-UTC/GMT -12:00 to UTC/GMT +12:00
Here you can choose your desired or local time zone setting
based on UTC/ GMT value. Please make sure to adjust time zone
setting, please refer to page 12
● Volume — Low/Medium(Default)/High/Off
This feature allows you to set the volume level for the boot sound
volume, prompt volume through camera’s internal built-in speaker.
● GPS Information
APP will show the status of longitude, latitude, live speed,
satellite number.
● Frequency — 50HZ/60HZ(Default)
Here you should choose the frequency accordingly to your power
supply specification used in your country based on your geographical
location.
● Boot Sound
This feature allows you to turn ON/OFF camera button’s beep sound.
● Video Stamps
This feature menu allows you to choose your choice of stamps
for the bottom of the video. By default they are aloo ON.
- 19 -

● Format SD Card
This feature will allow you to format inserted memory card, all the
data will be deleted.
● Free Space
Free Space in the Micro-SD card.
● WiFi Name
Here you can change the WiFi Name in APP, the dashcam’s default
SSID: DC42_Dashcam_******(******is 6 randomly digital number)
DC42 is built in 2.4G and 5GHz Dual-frequency WiFi module,
the default value is 5G.
If your phone can’t search DC42 WiFi, it means your phone ONLY
support 2.4GHZ band, Short Press 3 times WiFi button in a row
to shift to 2.4GHZ.
● WiFi Password
Here you can change the WiFi Password in APP, the default
password: 12345678
● Default Settings
Here you can restore all the settings to factory default settings.
- 20 -
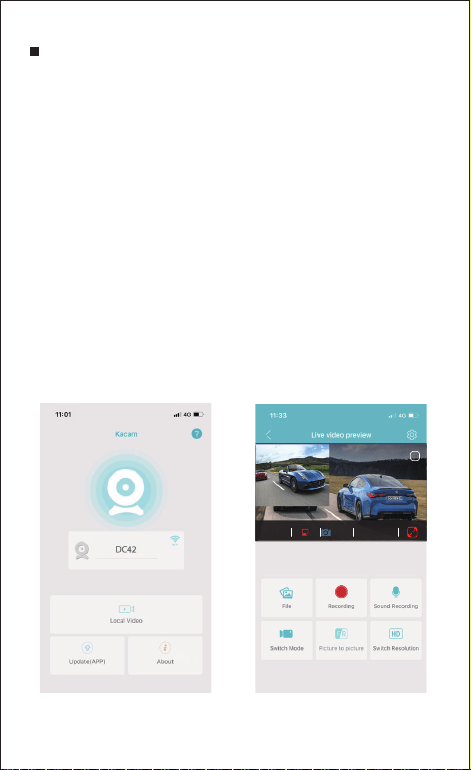
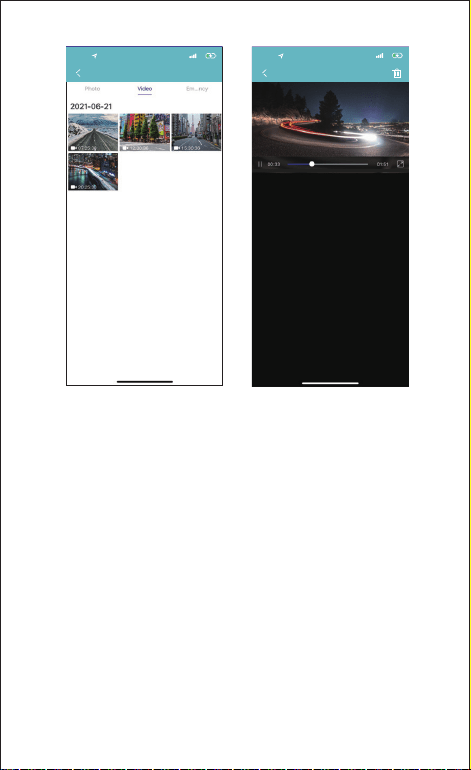
PLAYING AND MANAGING VIDEOS
● Managing videos in Wi-Fi
Search for the Kacam app in the Google Play Store or Apple
App Store and install it on your smartphone.
"Pair" your smartphone with the dash cam via Wi-Fi Direct:
Power on the engineer the dash cam will power on and WiFi
will ON automatically.Choose your dashcam from the
phone WiFi network list. The dashcam’s default SSID begins
with its model number (e.g. DC42_Dashcam_******, password
12345678).
Go to dash cam preview interface. Press the “File” to get Photo,
Video, Emergency files.
You also can select files to download into your smartphone,
please find these downloaded files in APP original interface
menu named “Local Video”.
You can playback the video or edit the video files.
1.
2.
a.
b.
c.
d.
F
11/ 09/ 2022
00:00:00
1920*1080
Snapshot
11:33:01
- 21 -
● Managing videos by Micro-SD card reader
Please remove the Micro SD card from camera and insert it directly
in your laptop if you have a Micro SD Card slot (otherwise please
using a Micro SD Card reader).
You should be able to see drive DASHCAM. Once you find the
added flash drive, double click in it, then you will see the file
folders-Movie/EMR/Photo
Movie: The loop recording video files that can be overwritten.
EMR: The video file will be locked so it will NOT be deleted by
loop recording function.
Photo: The photos
Then simply double click on the video to play them.
1.
2.
Recorder album
Select
20:30
4G
2021-0621-203026-0000003A...
4G
20:30
DC42 2021/06/20 20:05:10
- 22 -

DC42
220915000001A
220915000001B
EMR
Movie
File named ******A=Front dash cam video file
File named ******B=Rear camera video file
- 23 -
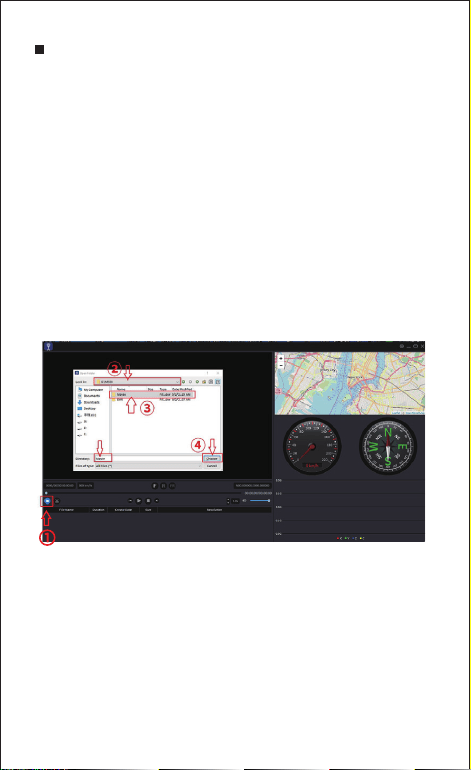
GPS PLAYER
Please contact us at [email protected] to download
GPS Player(For Windows or macOS)
Install the GPS Player in your computer.
(Note: Please close or ignore the prompt of the anti-virus
software, we confirm that it will not bring any security impact to
your computer.)
Take off the memory card from the dashcam and insert it to
your computer.
There are two ways to play video.
A, Click File-Open icon to choose the folder which you want to
play, click to start play. (Note that you can ONLY select one
folder to play and see no video files)
1.
2.
3.
4.
GPS Player V1.6 20200221
- 24 -
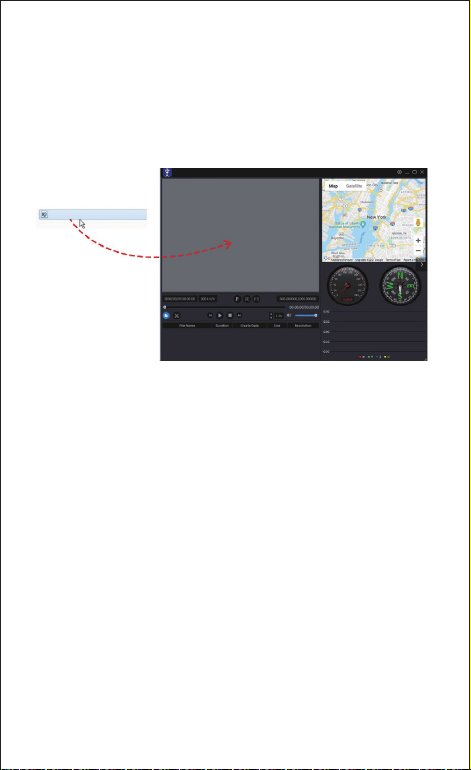
B, Seclect from “My Computer” and find the memory card disk,
choose the video file you want to play, you can drag and drop the
file directly to the player. You can get the GPS information on the
player.
211005000059A.MP4
- 25 -
GPS Player V1.6 20200221

VOICE PROMPTS
- 26 -
Voice
Wi-Fi is on Default ON, after powered on, say it
Wi-Fi is off
Press and hold Wi-Fi button for 3s to
switch off, say it
2.4G Wi-Fi
Default 5G, shortly press three (3)
times switch to 2.4G Wi-Fi
5G Wi-Fi
Shortly press three (3) times switch to
5G Wi-Fi
Recording started
After powered on and boot ringtone
/
operate via App, say it
Recording stopped Operate via App, say it
Emergency video
During recording once G-Sensor
triggered
/ shortly press Wi-Fi buttn one
(1) time to lock current video, say it
Audio off
Default ON, shortly press two (2) times
/
operate via App, say it
Audio on
Shortly press two (2) times
/ operate via
App, say it
Format Successful Operate via App, say it
Description

- 27 -
Format failed, please
try again
Formatting unsuccessful, say it
Wi-Fi is Connected After connected to App, say it
Wi-Fi is Disconnected Quit out App, say it
Please insert TF card If no card inserted, say it every 30s
Memory card error
wrong
/ bad / fake memory card or
memory card error, say it
Sound as “Click” Take picture(s) via App, say it
Firmware is updating,
please DO NOT turn off
the camera
FW updating starts and in progress,
say it
Formatting TF card,
please DO NOT
disconnect the power
press and hold WiFi button for ten (10)
seconds/operate via APP format TF
card, say it
Parking mode is on
Set Parking Mode on via App
(prerequisite: connected Hardwire Kit),
say it
Parking mode is off
Set Parking Mode off via App
(prerequisite: connected Hardwire Kit),
say it
FAQ
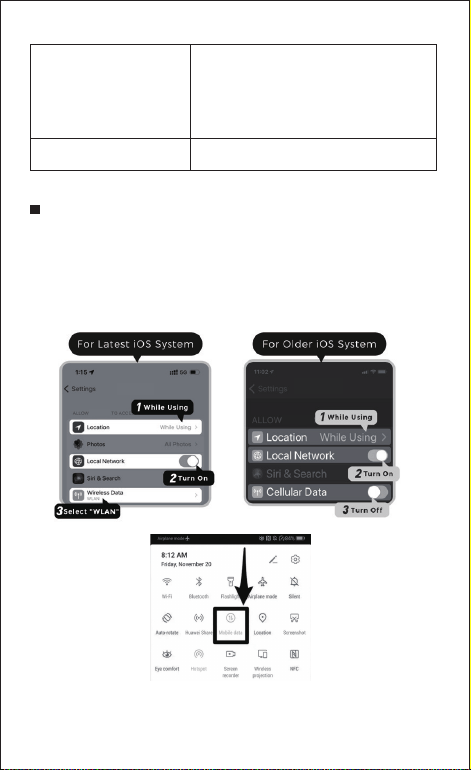
Q: I can’t get live video on Kacam APP, what should I do?
If can’t get live-video on APP, please turn off cellular data of
Kacam APP, take iPhone and Google phone(Android 12) for
example. Technical Service: [email protected]
Kacam
Kacam
Kacam
Kacam
Parking mode was
activated while parking
If parking monitor activated and
generated lokced file(s) during parking,
turn on car again, say it
Factory reset Operate via App, say it
- 28 -

NOTICE
This product complies with the radio interface requirements
of the European Community.
This symbol means the product must not be discarded as
household waste, and should be delivered to an appropriate
and recycling helps protect natural resources, human health and
the environment. For more information on disposal and recycling of
this product, contact your local municipality, disposal service, or the
shop where you bought this product.
Changes or modifications not expressly approved by the
party responsible for compliance could void the user's
authority to operate the equipment.
This equipment has been tested and found to comply with the
limits for a Class B digital device, pursuant to Part 15 of the FCC
Rules. These limits are designed to provide reasonable protection
against harmful interference in a residential installation.
This equipment generates, uses and can radiate radio frequency
energy and, if not installed and used in accordance with the
instructions, may cause harmful interference to radio communications.
However, there is no guarantee that interference will not occur in a
particular installation.
If this equipment does cause harmful interference to radio or
television reception, which can be determined by turning the
equipment off and on, the user is encouraged to try to correct
the interference by one or more of the following measures:
-- Reorient or relocate the receiving antenna.
-- Increase the separation between the equipment and receiver.
-- Connect the equipment into an outlet on a circuit different
- 29 -

from that to which the receiver is connected.
-- Consult the dealer or an experienced radio/TV technician for
help.
This device complies with Part 15 of the FCC Rules.
Operation is subject to the following two conditions: (1) this device
may not cause harmful interference, and (2) this device must
accept any interference received, including interference that may
cause undesired operation.
This equipment complies with FCC radiation exposure limits set
forth for an uncontrolled environment. This equipment should be
installed and operated with a minimum distance of 20cm between
the radiator & your body. This transmitter must not be co-located or
operating in conjunction with any other antenna or transmitter.
- 30 -

Product: Car Dashcam
Model: DC42
Product Warranty: One-year Limited Warranty
Customer Support: [email protected]