
G HUB Manual
Windows Installation 3
Mac Installation 3
Getting Started 4
1: Setting Up A Game Profile 6
Integrations 8
Settings 9
2: G HUB Settings 10
ARX CONTROL 12
3: Your Gear 14
LIGHTSYNC 15
LIGHTSYNC (Keyboards) 17
Assignments 20
Assignments: How to create an assignment on your Gear 22
Assignments: How to assign a G SHIFT command 23
Sensitivity (DPI) 24
Game Mode 27
Acoustics 28
Equalizer 30
Blue VO!CE Equalizer 31
Browsing for more Blue VO!CE Equalizer presets 31
Microphone 33
Browsing for more Blue VO!CE presets 35
3.5mm Output 36
Webcam 38
Camera 38
+ ADD NEW CAMERA 38
Video 39
+ ADD NEW FILTER 40
Steering Wheel 41
Pedal Sensitivity 42
Gear Settings: 43
ON-BOARD MEMORY & PROFILES 43
ENABLING ON-BOARD MEMORY MODE 43
ON-BOARD MEMORY SLOTS 44
4. Advanced settings 46
Assignments: Create new macro 46
NO REPEAT | REPEAT WHILE HOLDING | TOGGLE MACROS 48
SEQUENCE MACRO 49
Assignments: Program a macro 51
1: RECORD KEYSTROKES 52

1
1a. NOTES ON DELAYS: 53
2: TEXT AND EMOJIS: 55
3: ACTION: 57
3a. CREATE NEW ACTION: 60
4: LAUNCH APPLICATION: 63
5: SYSTEM 65
6. DELAY 67
Assignments: Command Lighting 68
Assignments: Profile Cycle and Onboard Profile Cycle Commands 71
LIGHTSYNC: Animations 72
LIGHTSYNC: Create an animation 73
LIGHTSYNC: Audio Visualizer 75
Audio Visualizer features for Audio: 75
Audio Visualizer features for Keyboards 77
LIGHTSYNC: Screen Sampler 78
LIGHTSYNC: Screen Sampler Edit 80
Screen Sampler for light and sound devices 81
Screen Sampler for Mice 82
LIGHTSYNC: G102 Lightsync 83
+NEW ANIMATION 85
Microphone: Blue VO!CE 86
VOICE EQ 86
ADVANCED CONTROLS 87
Microphone: Effects 90
Yeti X WoW® Edition 90
PITCH: 91
AMBIENCE: 92
Assigning EFFECTS In Assignments: 93
Microphone: Sampler 94
Assigning SAMPLES in Assignments 95
5. Scripting 96
Assign a script 97
Script Manager 98
Script Editor 99
6. Sharing Profiles And Presets 101
Sharing your profile 101
Sharing your LIGHTSYNC Animation 103
Sharing your Blue VO!CE Preset 105
Sharing your Equalizer Preset 107
7. Tips and Frequently Asked Questions 109
How to reset commands or disable buttons 109
Delete games and applications from the App list 110
How to duplicate profiles and macros to another game or application 111
How to blacklist a Game/APP from profile switching 114
How to lock a profile for all games and applications 115
How to configure your Yeti X Lighting 116

2
LIVE MUTE: 116
MODE 117
METERING 118
PATTERN 119
How to check your profile activation path and troubleshoot profile switching 120
G HUB (Windows) 120
Checking the path of your executable 120
How to check the path 120
How to add a path to an existing profile 120

3
Windows Installation
1. Download the G HUB Early Access executable and double click the file to start the installation. You may be
prompted to install .NET 3.5 first, if not previously enabled through Windows Features. You will need this
Windows feature to install G HUB.
Note:
If User Account Control asks you ‘Do you want to allow this app to make changes to your device?’ click
Yes
2. When the Logitech G HUB windows appears click INSTALL
to continue.
3. You will see a progress bar, once the download is complete click INSTALL AND LAUNCH
4. Whilst G HUB is being setup, you may see the logo animation for a short time. Once setup is complete you will
see the patch notes. Click the X
at the top to take you to the home screen
5. Congratulations on installing G HUB!
To uninstall G HUB: For Windows 10, go to Windows Settings > Apps > Apps and Features > highlight G HUB and
Uninstall. For Windows 7/8/8.1 go to Control Panel > Programs > Programs and Features > highlight G HUB and
Uninstall
Mac Installation
1. Download the G HUB Early Access executable and run the application from your downloads
2. When the Logitech G HUB windows appears click INSTALL
to continue.
3. You will see a progress bar, once the download is complete click INSTALL AND LAUNCH
To uninstall G HUB: Go to Application and run the Logitech G HUB Uninstaller. Or drag the Logitech G HUB application
onto the Trash
4
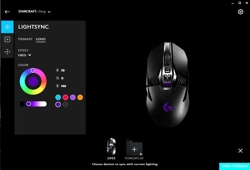
Getting Started
Homepage explained:
1. Current active profile. Clicking on the profile name will take you to the Profile Manager
Note: The lock symbol indicates if the profile is set as persistent. Meaning it will
be active for all applications. You set a profile as persistent in the G HUB
Settings
2. G HUB settings. The Settings page allows you can access APP Settings and My Gear view. You can also
configure startup, lighting, analytics, language, desktop notifications and select a Persistent Profile
3. Your Gear. All your gear will be shown here. The left and right arrows (3a) allow you to scroll through your
gear. Clicking on the gear will take you to its Gear
page.
4. Lighting Effects profile page. Click here to take you to the Lighting Effect Download page. Here you can
download new lighting profiles for your devices. Click the G logo in the top right hand corner to get back to the
homepage.
5. Profile Page. Click here to take you to the Profile Download page. Search profiles for new assignments and
more! Click the G logo in the top right hand corner to get back to the homepage.

5
6. LOGITECHG.COM. This link opens a browser within G HUB to the Logitech Gaming site.
7. User Account page. Click the Account icon to take you to your Account page, where you can sign in/out, edit
your account profile and add Gear
. When you are signed in, the icon will be blue - signed out will be white.
6
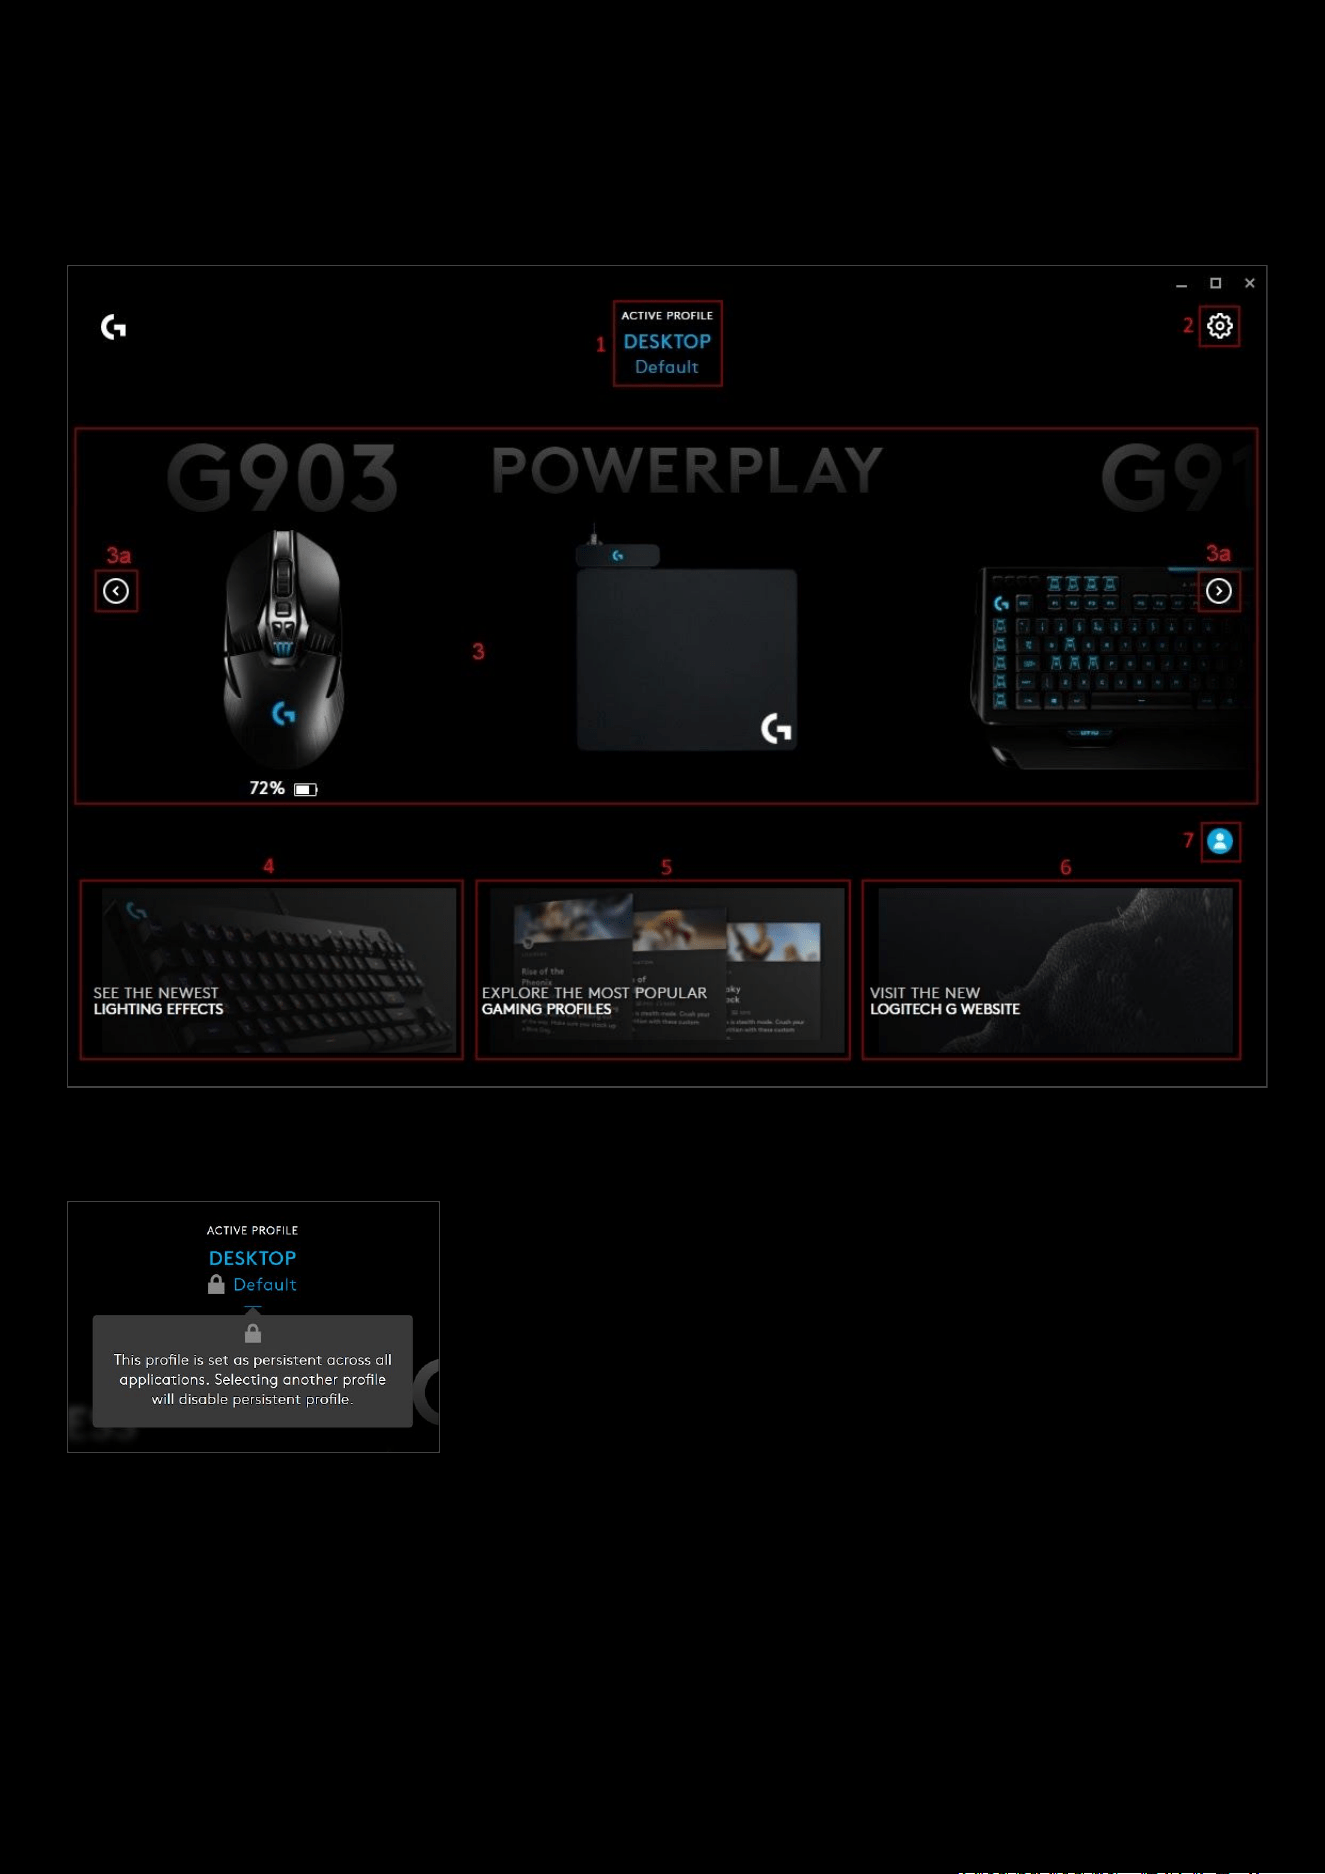
1: Setting Up A Game Profile
Profile page explained:
1. DESKTOP Profile. There will always be a default called DESKTOP which can be configured. You can add
different user profiles to by clicking the + icon (11)
2. Game profiles. G HUB will automatically detects games and setup profiles for you to configure. These will
automatically activate when that game is running. You can add different user profiles to by clicking the + icon
(11)
3. ADD GAME OR APPLICATION. Click the + icon in the profile bar to add a new Game/Application Profile. You
will then see a navigation window to direct the profile to which game/application to associate with. That new
profile will appear in the Game Profiles
list.
4. Profile Scrolling. Use the and arrows to scroll through your Profiles.
5. Click the tab name to switch between PROFILES, MACROS, INTEGRATIONS and SETTINGS.
a. PROFILES is the default view and shows all the different profiles available to that Game/Application
b. Click MACROS to view macro that are assigned to that Game/Application for use in your Gear
Assignments
. You can also click the + to create a new macro.
c. Click INTEGRATIONS to see the different integrations that are available for that Game/Application.
d. Click SETTINGS to view the name and link location for the Profile. There you can see the details of the
Game/Application:
Note
: The highlighted
User Profile
is selected to be used with the main
Game/Application Profile
. You can have more
than one
User Profile
for each
Game/Application Profile
, but only one can be active at a time. If you have more than
one, select which one you want to be active by clicking that
User Profile
; doing so will then take you back to the
Homepage
and you can see that
Game/Application Profile
and
User Profile
displayed at the top.

7
7. DETAILS. Click Details to bring up the information about that User Profile. This shows what Gear has been
setup along with a simple view of their Settings. At the bottom you can click DELETE
to remove that User Profile
Note:
You cannot delete the
Default User Profile
for a
Profile
8. Scripting. Create a Lua Script for your profile. More on this in the Scripting section.
9. Share. Click the button to share and publish your User Profile. More on this in the Profile Sharing section
10. Duplicate User Profile. Click to create a copy of the User Profile, which you can then configure for another
user or possibly for a different class of character for example.
11. Create a new User Profile. This creates a blank User Profile for you to configure for the Game/Application
Profile
. The User Profile will automatically populate with the Gear plugged in at that time, but you can add
Gear
to the User Profile at any time.
12. SCAN NOW. Click this button to rescan for games/applications you have missing from your list or recently
installed.
13. Click the to go back to the Homepage
8
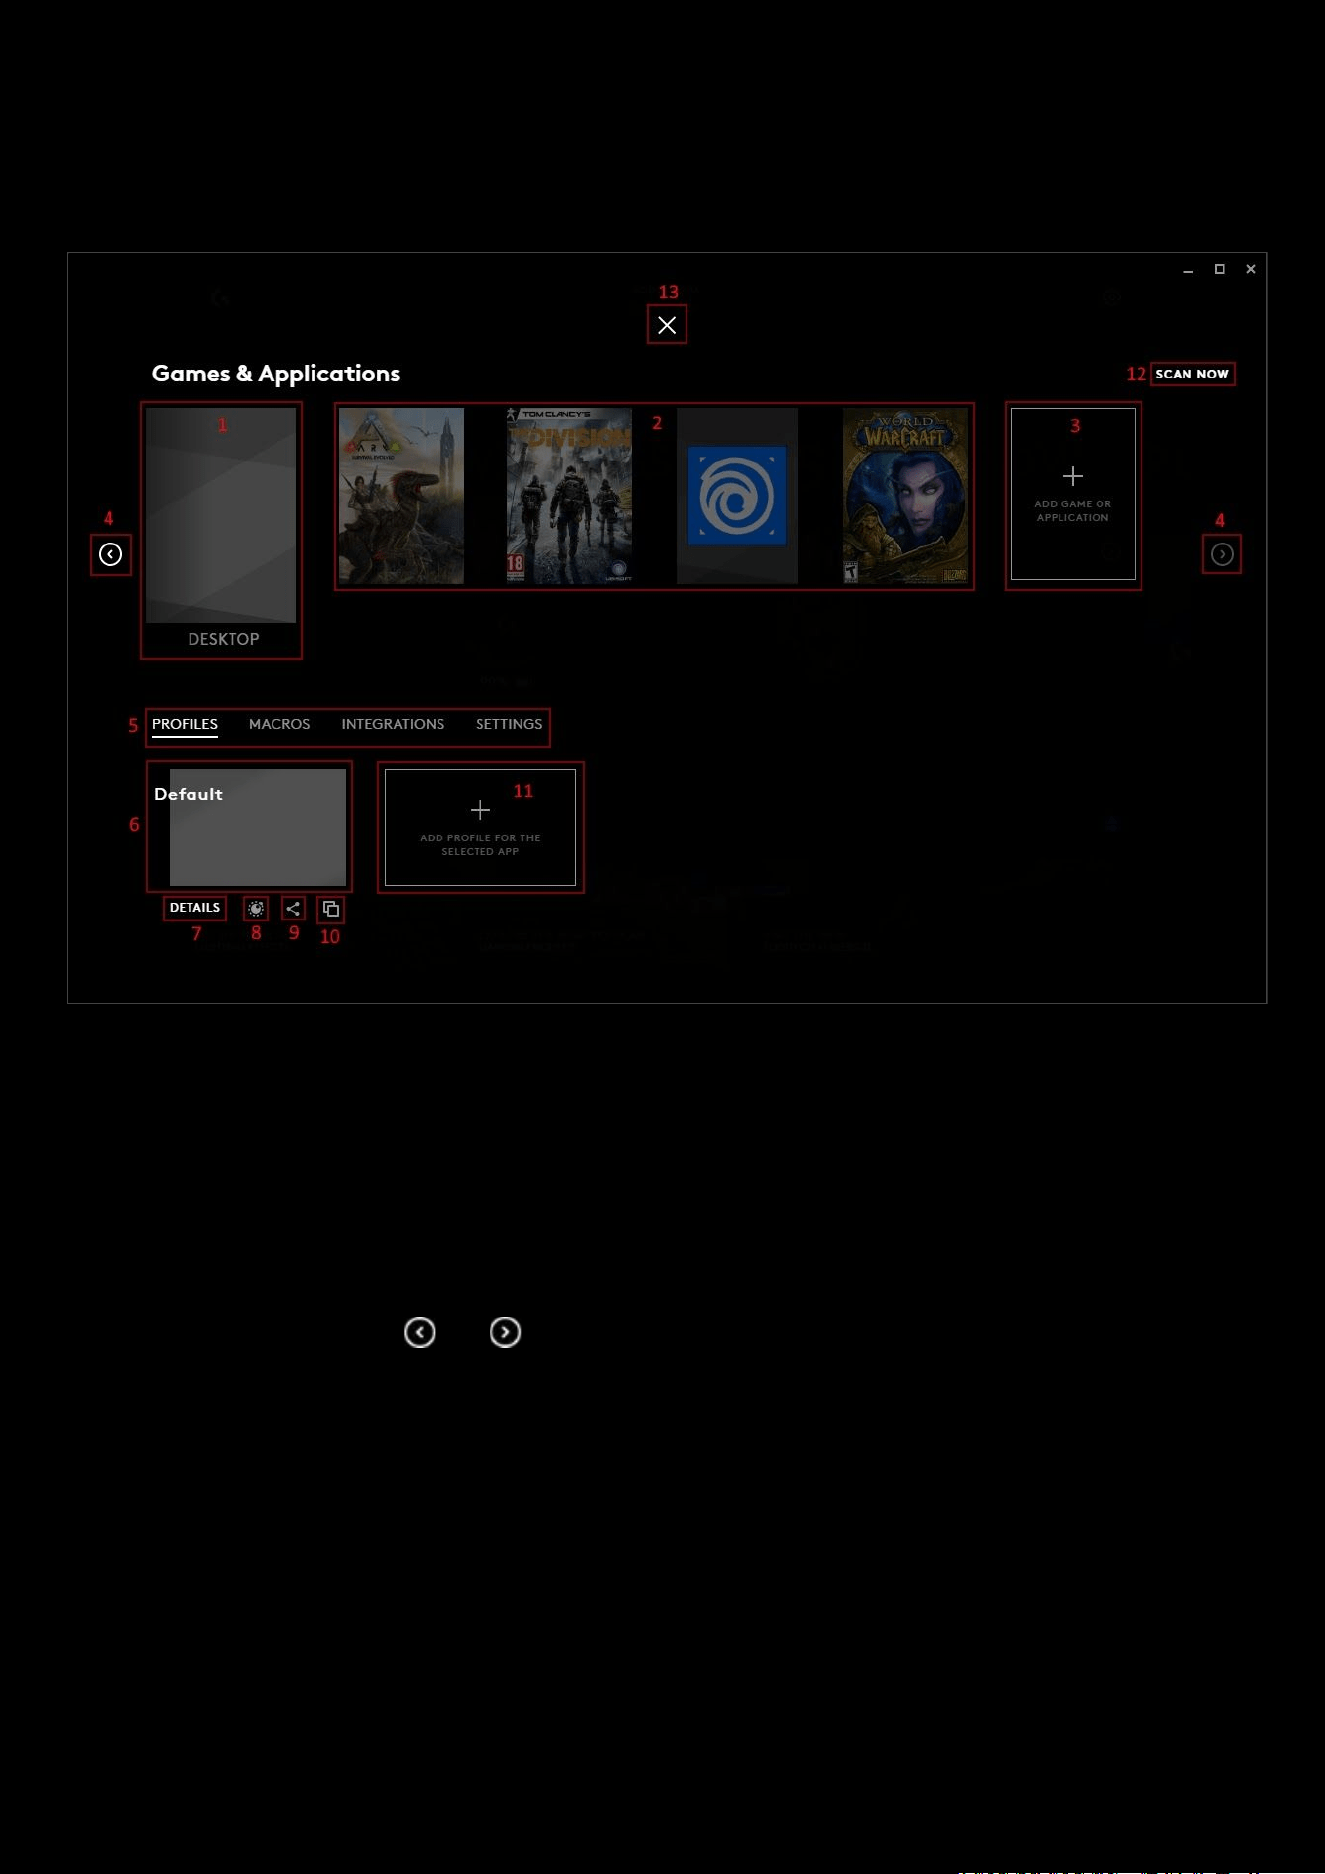
Integrations
An integration is a plugin into an Application or Game. Examples of Integrations are OBS, Discord, Overwolf, Battlefield
5, The Division and Fortnite.
Note:
If you create your own Game/Application you might not see this option
You can enable/disable it by clicking DISABLE/ENABLE
text under the Integration icon. It will then gray out when
disabled. DISABLE
disables all the SDKs associated with that Integration.
● Click ENABLE to re-enable the Integration.
● Click on the Integration icon to see its settings page. You can see the status in the GENERAL tab and all the
available actions/options in the ACTION/LED
tab
In the examples below for the Integration settings page; we can see the Discord
Integration SDK is an Action type and
bfv.exe
(Battlefield 5) is a LED type.
Note: Integrations can have more than one SDK and these can be modified individually
To disable the SDK individually, rather than disabling the whole integration, you can toggle the SDK from ENABLED
to DISABLED .
9
Settings
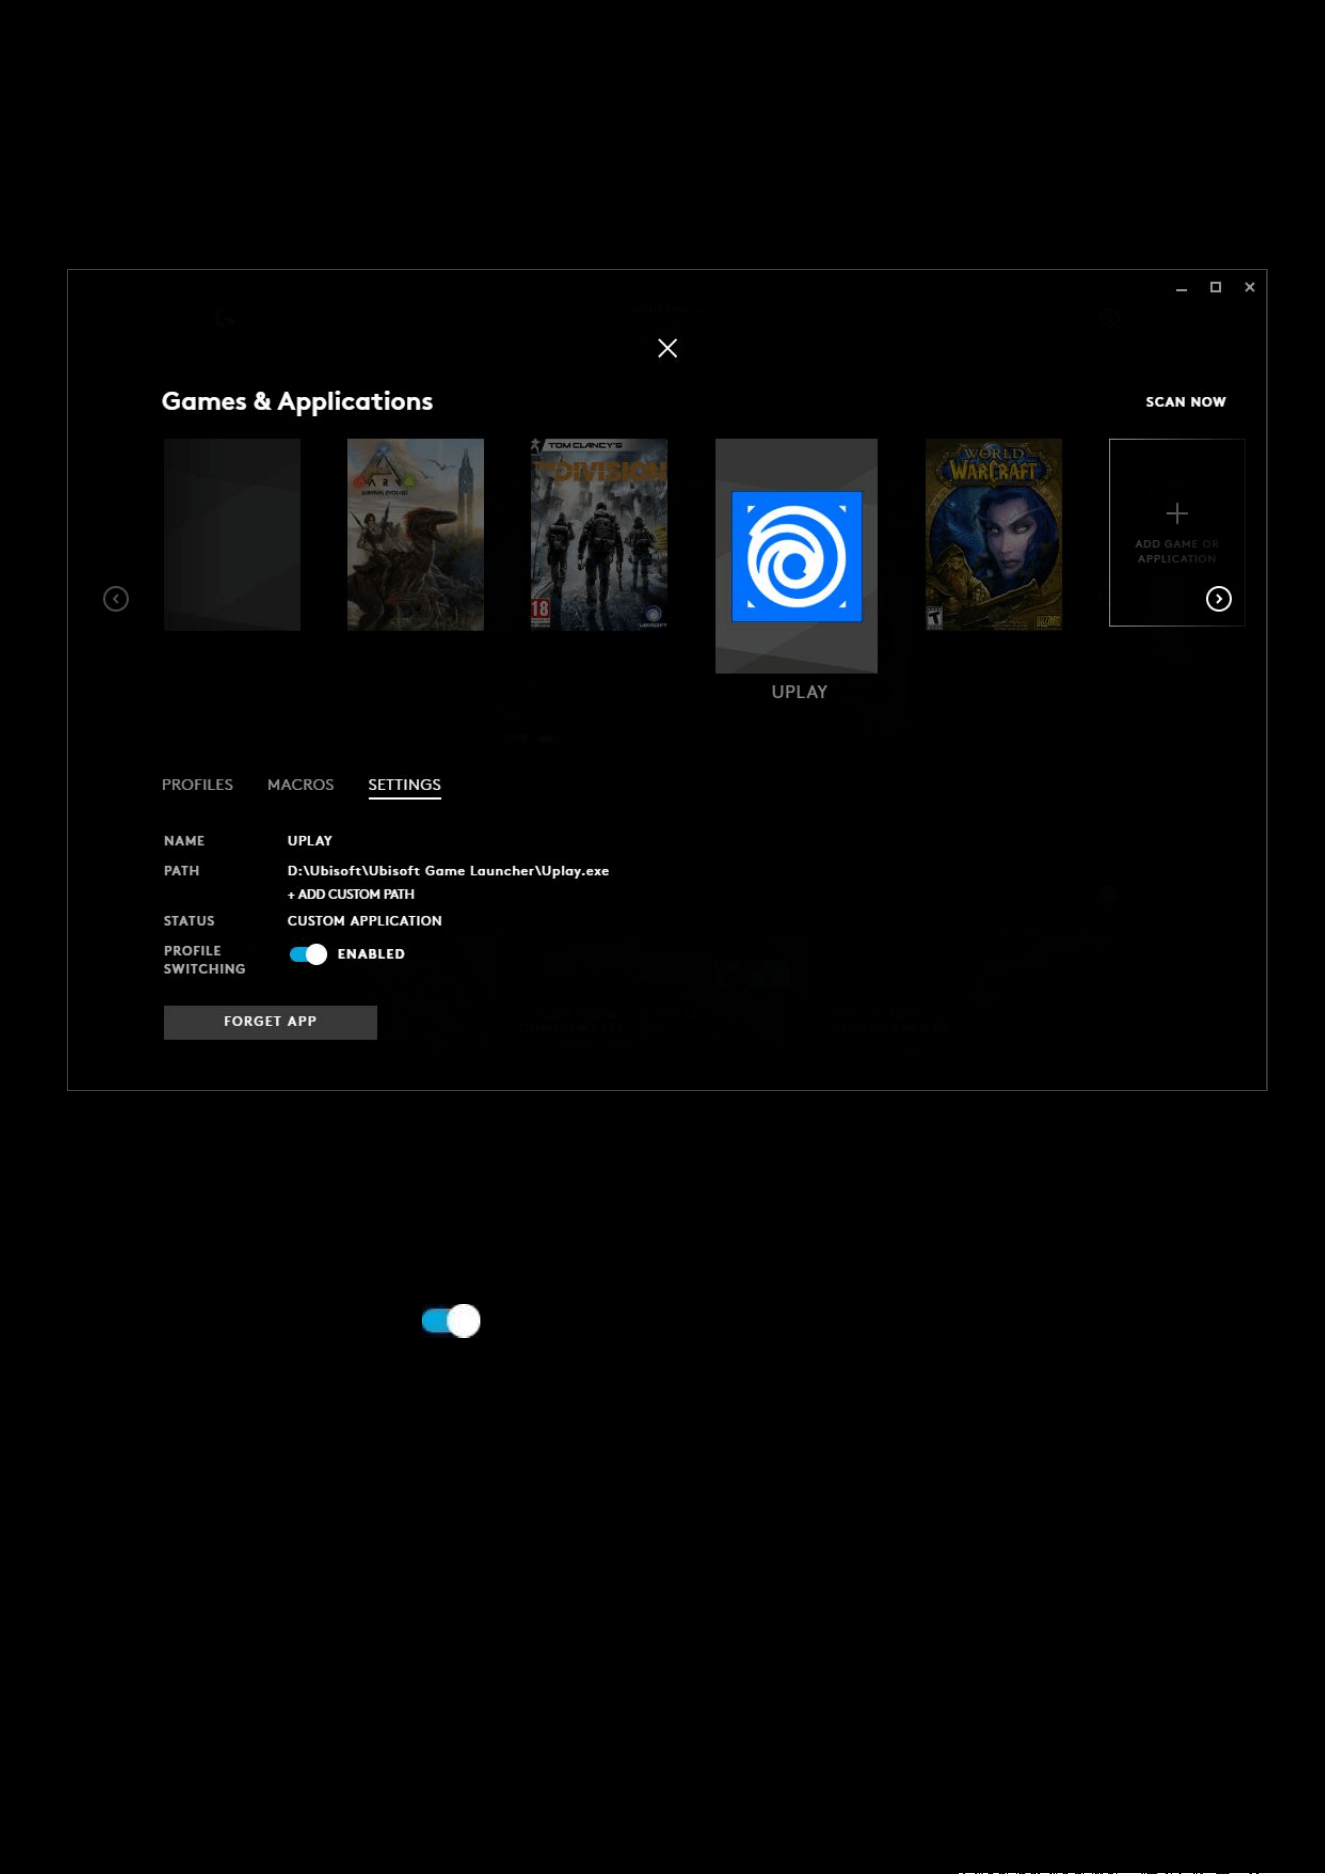
Click SETTINGS to view the name and link location for the Profile. There you can see the details of the
Game/Application:
● NAME. Name of the APP
● PATH. This shows the path of the executable that will activate. You can click + ADD CUSTOM PATH to add
another location of an executable that will also trigger this APP.
● STATUS. Installed mean that the profile is a stock one installed upon detection or SCAN NOW. CUSTOM
APPLICATION describes a profile that has been manually added by the user.
● PROFILE SWITCHING. Click to disable the profile from activation when the Game/Application is running.
If enabled, the profile will automatically activate when the Game/Application is running.
● FORGET APP. To delete a user made APP, click FORGET APP. All profiles and macros assigned to that APP will
also be removed.
10
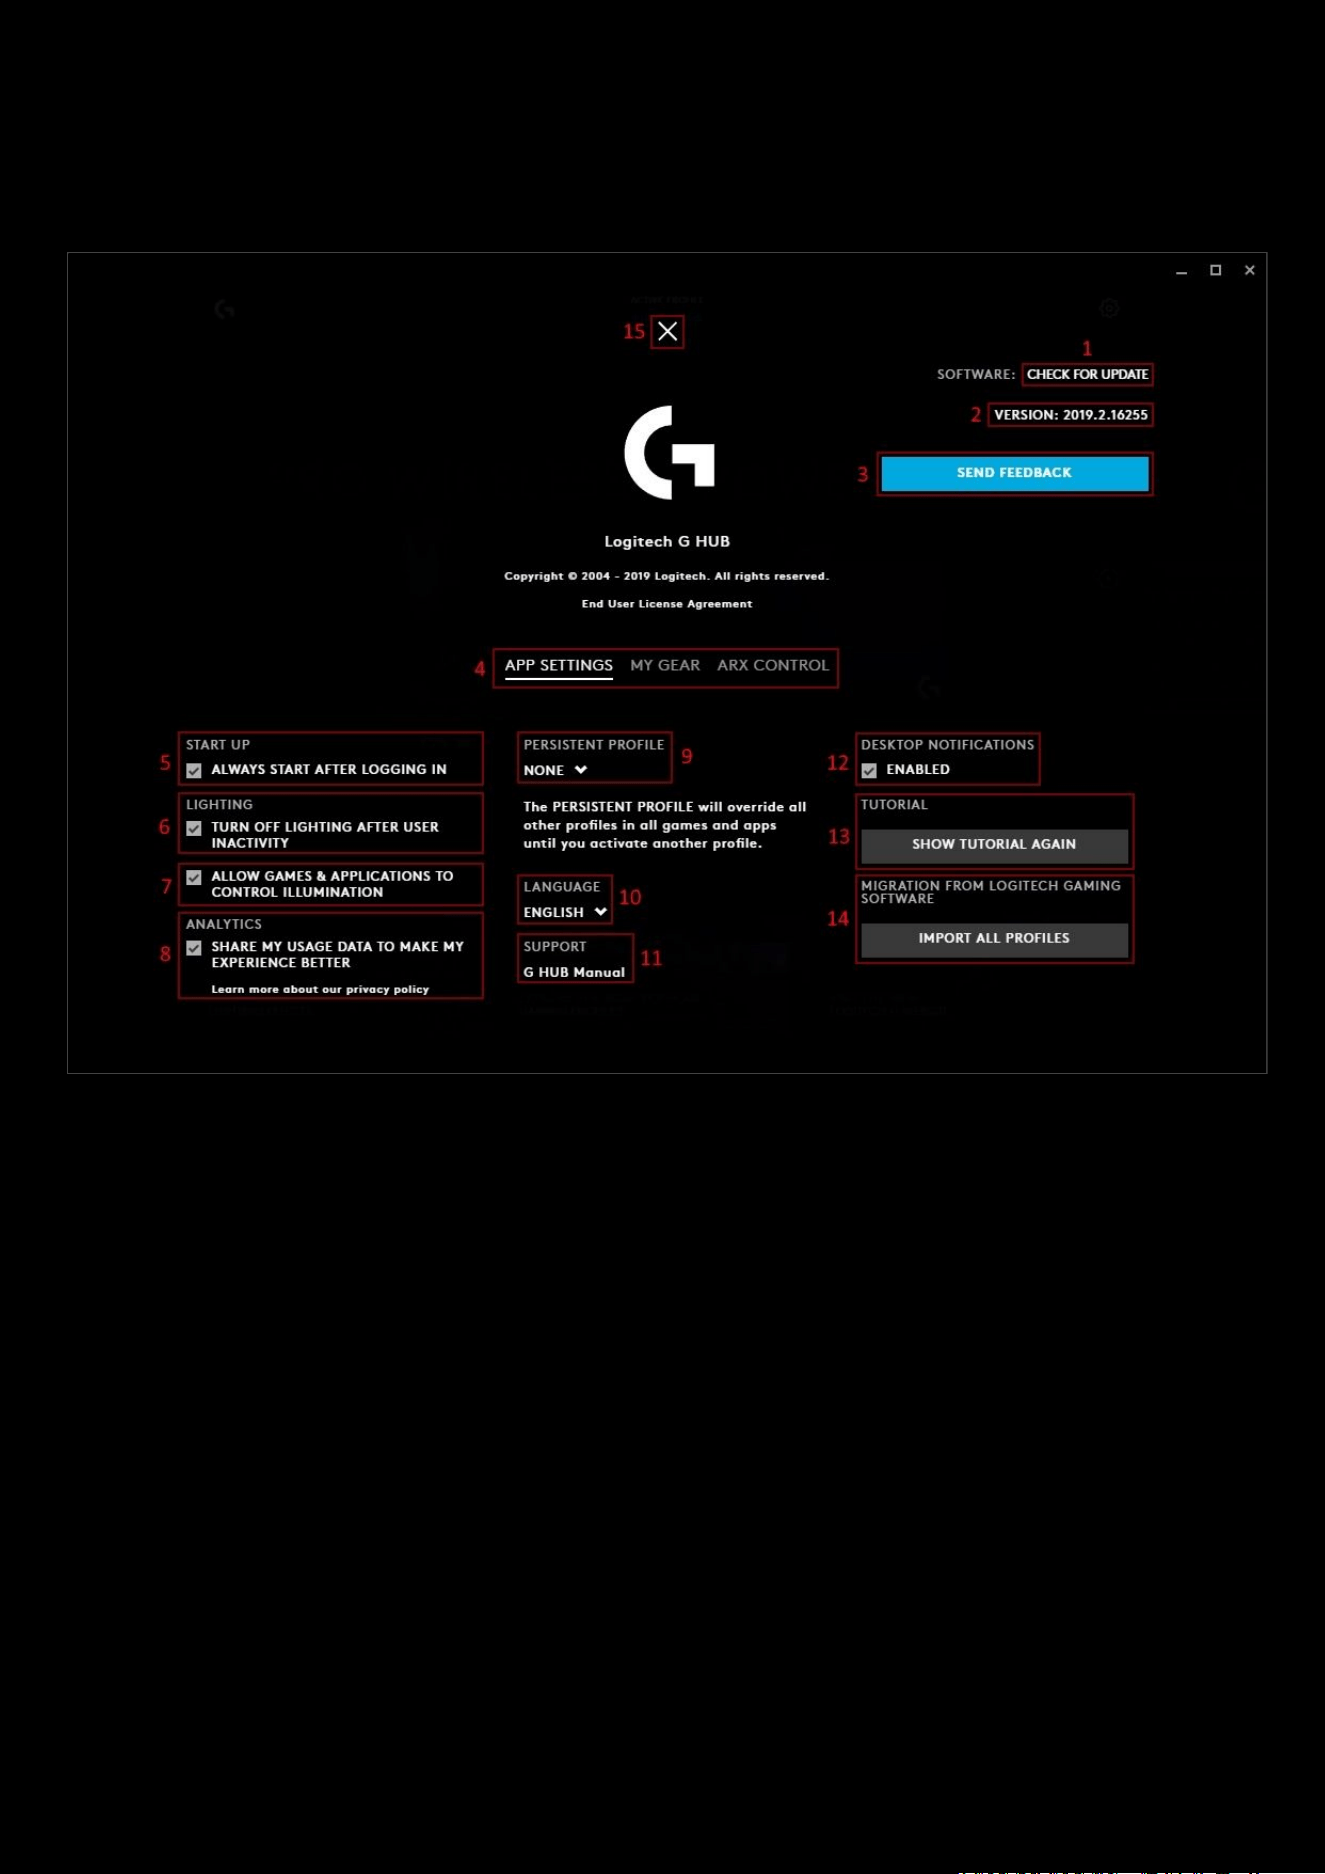
2: G HUB Settings
Settings page explained:
1. CHECK FOR UPDATE. Click this text to see if there are updates.
Note:
G HUB will typically look for updates and you will be notified when there is a new one ready to install
2. VERSION: This is the version number of the software. Year | Version | Build. Please quote this number when
submitting feedback. Click the version number to show the update notes for that version.
3. SEND FEEDBACK. Click this button to send feedback to the Logitech Team. We welcome new ideas, your
thoughts and any bugs you find!
4. Select between the APP SETTINGS, MY GEAR and ARK CONTROL (explained later) tabs. Clicking MY GEAR will
show all your devices that have been connected and downloaded to G HUB
. You can then click on the Gear to
take you to the GEAR SETTINGS
page.
Note:
If you have a wireless device and it is not connected (I.e. powered off), you will need to power the device back on
to go to the
GEAR SETTINGS
page.
5. START UP. By default this is ticked, to allow G HUB to run in the background when you log onto your PC/Mac.
Uncheck this to manually start G HUB.

11
Note: If you select this to
OFF
, then you will need to manually run G HUB to allow profiles to activate. If you find profiles
are not working, check you have G HUB running as a process in your computer Task Manager (Windows) or Activity
Monitor (Mac). If there isn't a G HUB process running, then try running G HUB.
6. LIGHTING. By default this is checked to ON. This setting is to help with power saving on Wireless devices.
Uncheck
this if you want your Gear to always be using Lighting profiles even after a period of inactivity.
7. ALLOW GAMES & APPLICATIONS TO CONTROL MY ILLUMINATION. Have this ticked if you want your Games
(that are compatible) to override the Lightsync effects
8. ANALYTICS. By default this set to OFF. Check this to enable anonymous usage data and help Logitech improve
G HUB!
9. PERSISTENT PROFILE. As mentioned in the Settings page, this will override all other User Profiles. Click the
drag down icon to show the list of your Profiles
and their User Profiles. Select one by clicking the name. If you
then decide to not want a persistent User Profile
, simply go to the Profile Manager page and select a different
profile as normal.
10. LANGUAGE. This shows which language is currently selected. Use the drag down icon to change the language.
11. G HUB Manual. Click this link to open the G HUB Manual PDF.
12. DESKTOP NOTIFICATIONS. If you have this enabled, you will see notification of available updates pop up
13. SHOW TUTORIAL AGAIN. Click this to re-enable all the tool tips.
14. IMPORT ALL PROFILES. Click this to migrate profiles from Logitech Gaming Software (LGS). These profiles will
then populate in your Games & Applications page.
15. Click the to go back to the Homepage
12
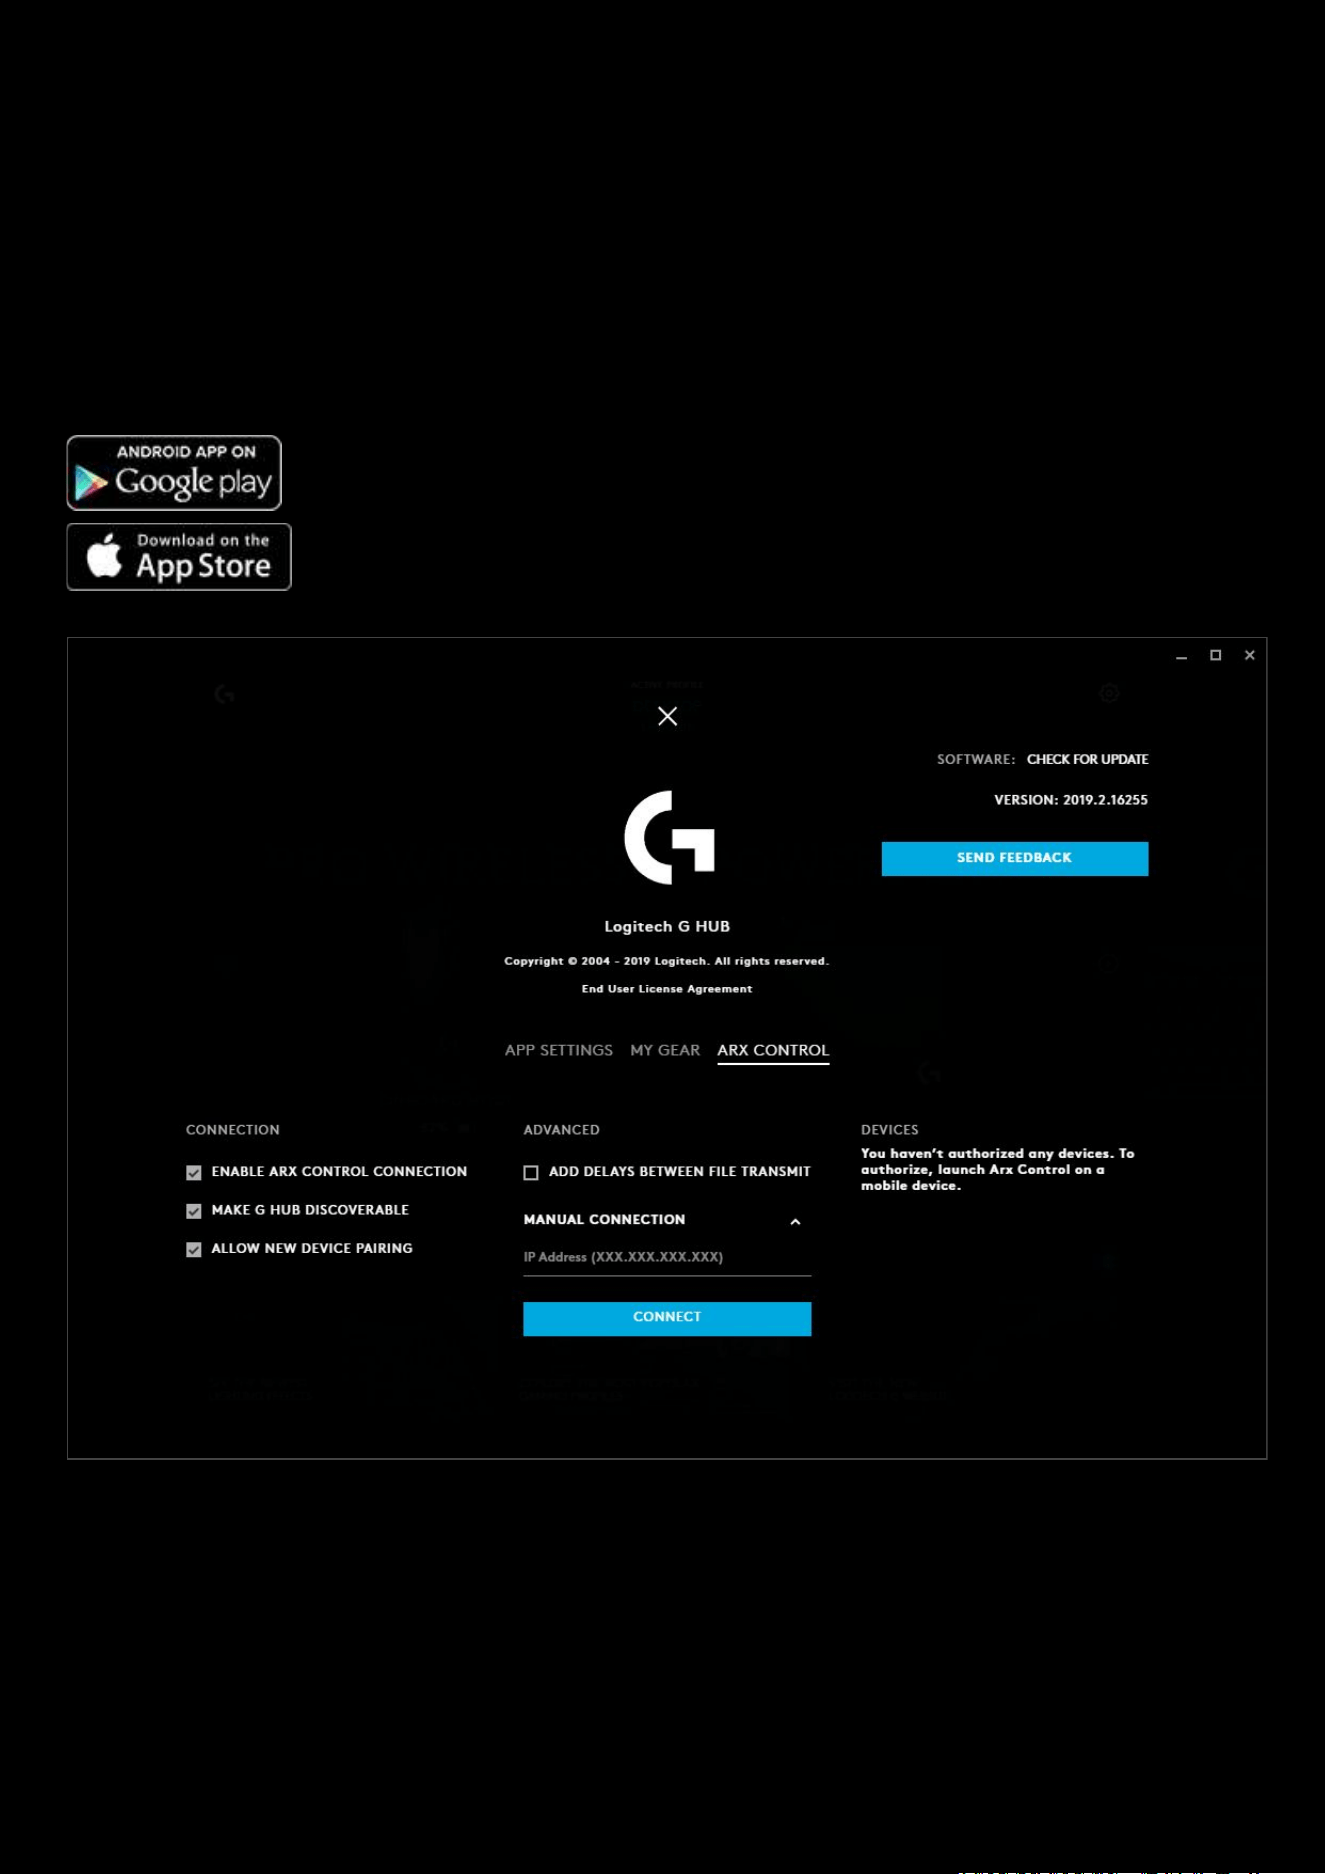
ARX CONTROL
ARX CONTROL lets you monitor your PC and control your Logitech G peripherals without ever leaving the game. You can
fine-tune your mouse DPI in real time, or call up a list of your G-Key macros for quick reference right on your
smartphone or tablet device. Have critical in-game information on your tablet or smartphone, ARX CONTROL serves as a
second screen for supported titles.
Arx Control is available on Android and iOS on tablets and smartphones, and works on any system with G HUB Software
installed.
● CONNECTION.
○ ENABLE ARK CONTROL CONNECTION. Turn ARX CONTROL on or off
○ MAKE G GUB DISCOVERABLE. Make G HUB discoverable to your mobile devices
○ ALLOW NEW DEVICE PAIRING. Untick this to stop other devices pairing to your ARX CONTROL.
● ADVANCED.
○ ADD DELAYS BETWEEN FILE TRANSMIT. If checked this will add a delay for Arx Control development
debug. For developers only.

13
○ MANUAL CONNECTION. If you know the IP Address of your mobile device you can add it manually. Use
this also if your Arx Control App cannot automatically discover your G HUB.
● DEVICES. Shows which mobile devices have been connected to ARX CONTROL, which ones have been
authorized and which devices have had revoked access.

14
3: Your Gear
Clicking on the picture of your device will take you to its Gear page. Depending on what device it is, you will see slightly
different options on the left hand side.
MICE
● LIGHTSYNC
○ PRIMARY | LOGO
● Assignments
○ COMMANDS | KEYS | ACTIONS | MACROS | SYSTEM
● Sensitivity (DPI)
KEYBOARDS
● LIGHTSYNC
○ PRESETS | FREESTYLE | ANIMATIONS
● Assignments
○ COMMANDS | KEYS | ACTIONS | MACROS | SYSTEM
● Game Mode
AUDIO (Headsets and Speakers)
● LIGHTSYNC
○ PRIMARY | LOGO
○ FRONT | BACK (for G560)
● Assignments
○ AUDIO | ACTIONS | MACROS | SYSTEM
● Acoustics
● Equalizer
● Microphone
WEBCAMS
● Webcam
○ CAMERA | VIDEO
GAMING WHEELS
● Assignments
○ COMMANDS | KEYS | ACTIONS | MACROS | SYSTEM
● Steering Wheel
● Pedal Sensitivity
15
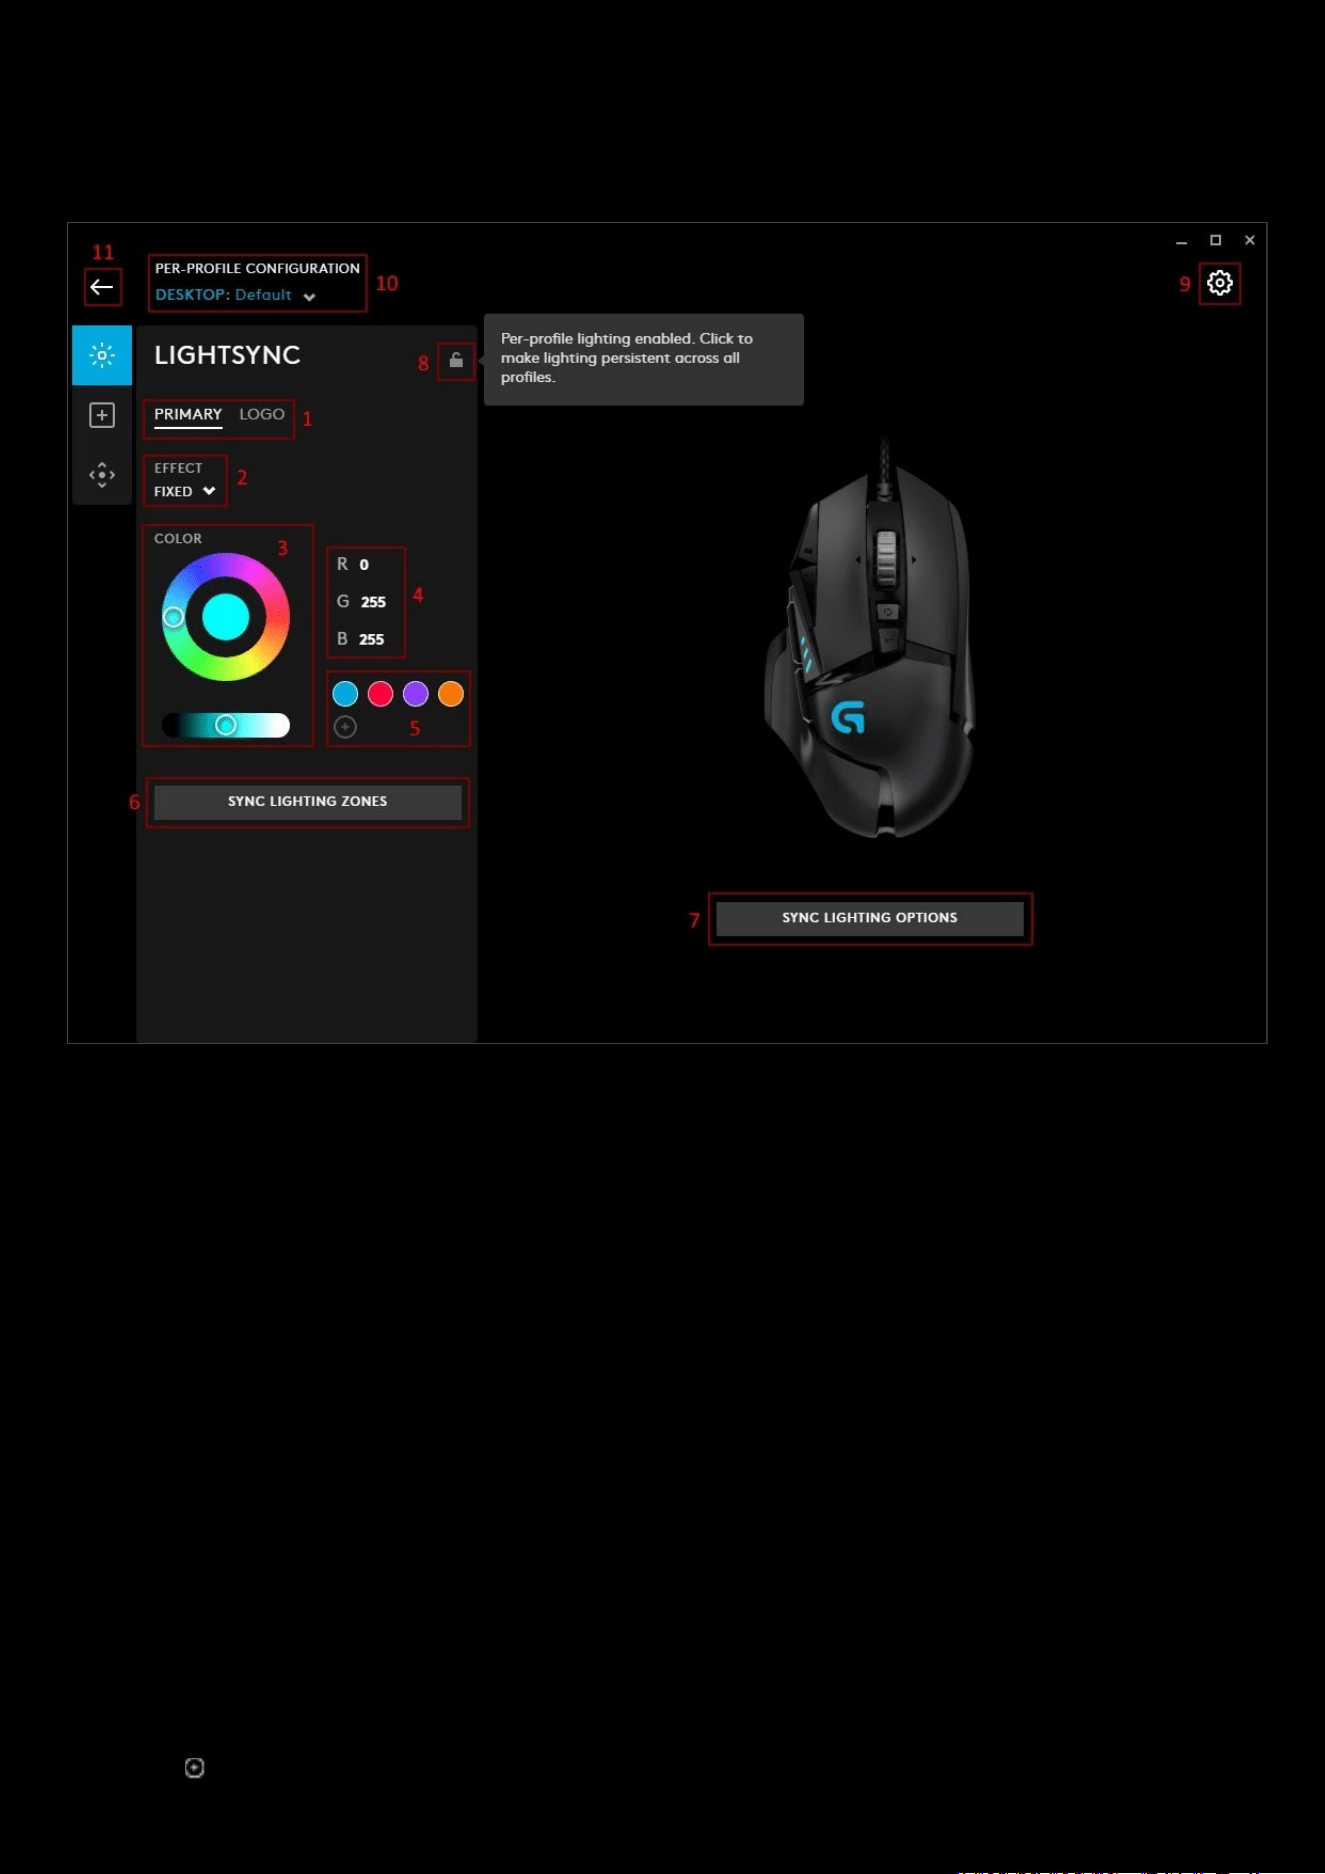
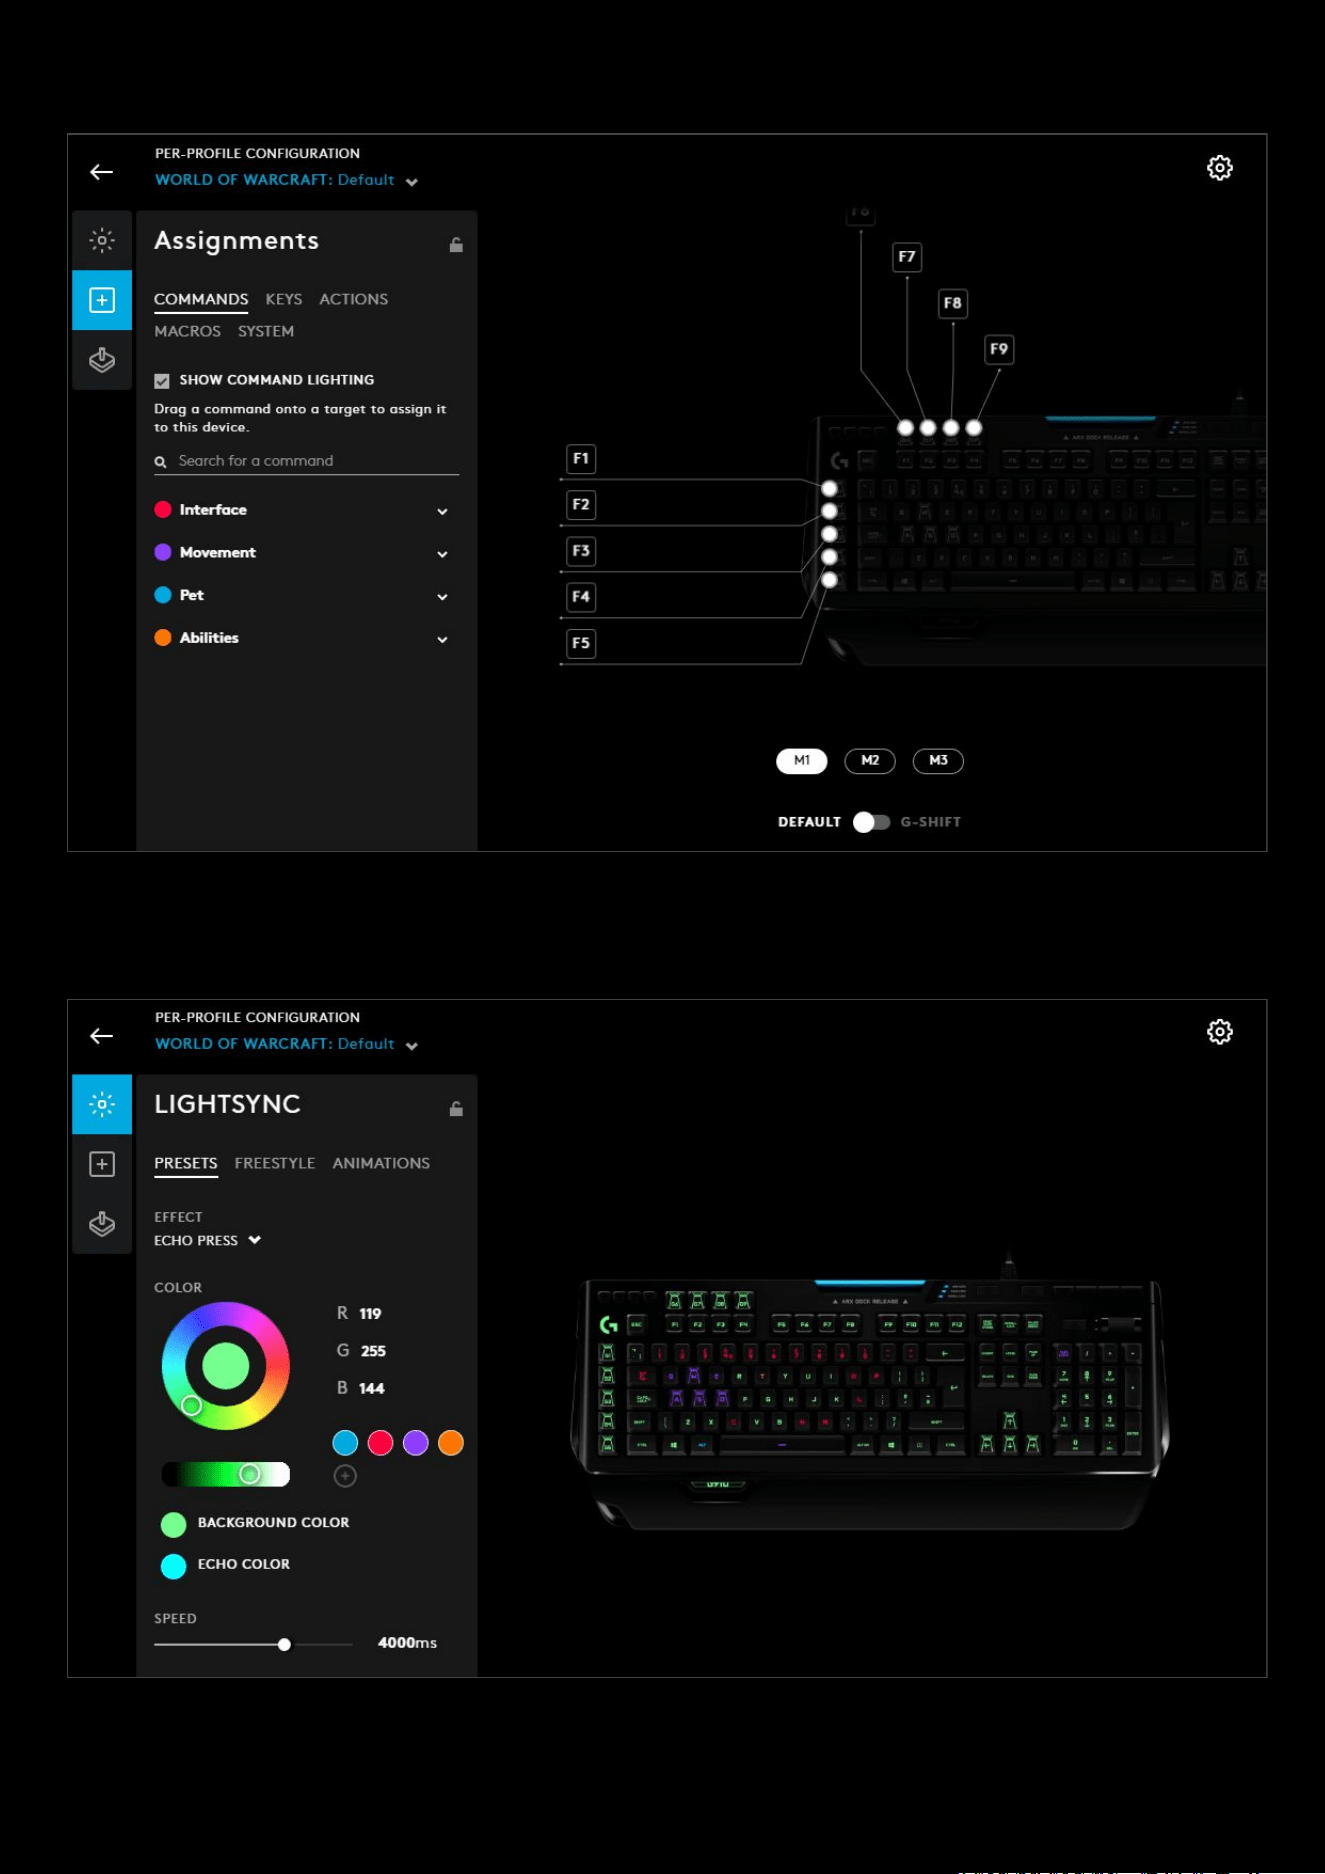
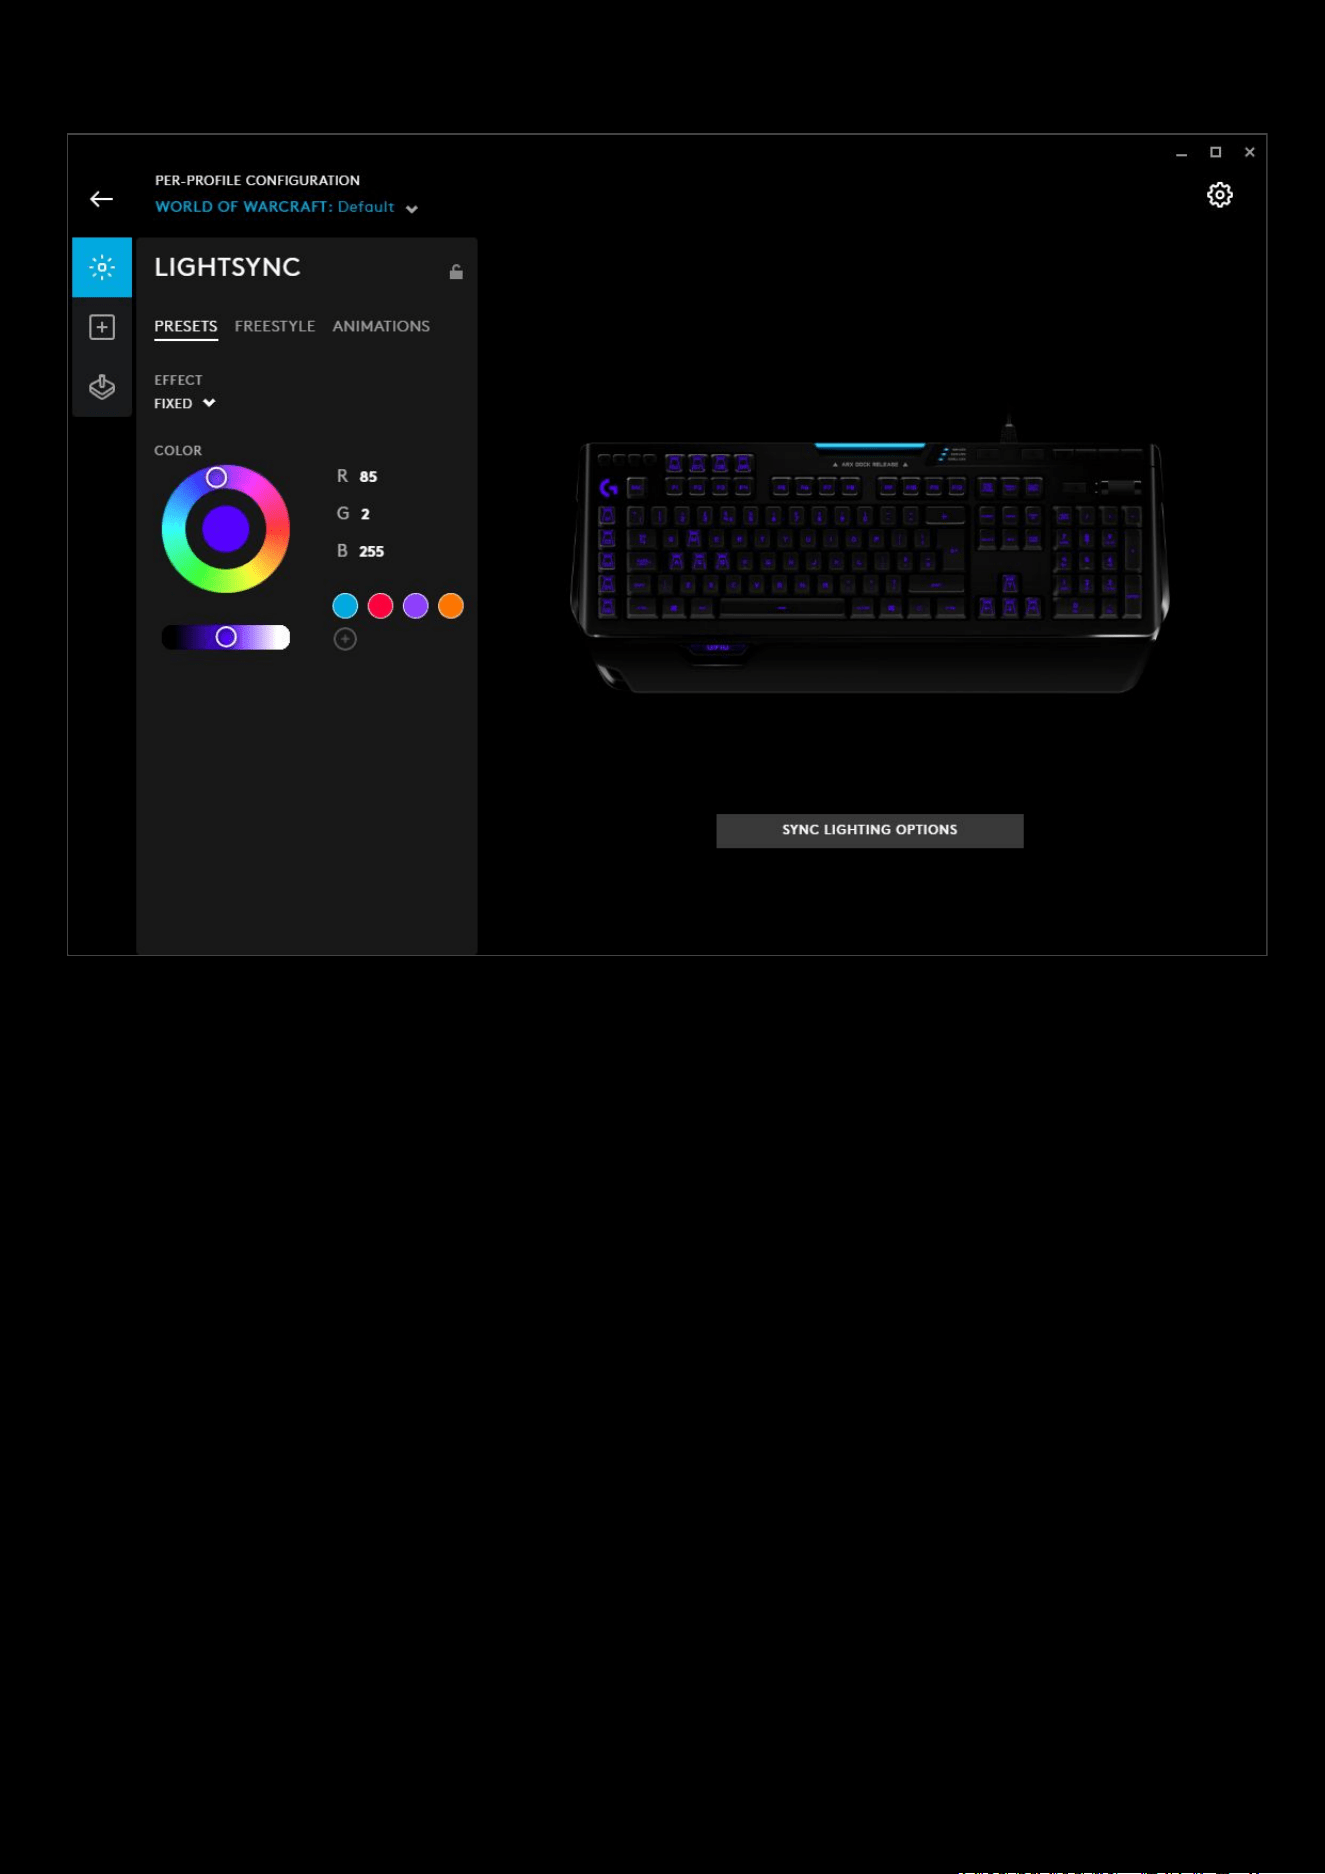
LIGHTSYNC
This tab controls the lighting settings for your device.
1. PRIMARY | LOGO. Select the LIGHTSYNC zone to configure. Your zones can have different effects. Click SYNC
LIGHTING ZONES
(4) to sync the other zone with the current configuration.
2. EFFECT. Select from the drop down list your desired effect.
a. OFF. This will turn that zone lighting off
b. FIXED. This will set a fixed color to the zone, select a color from the color wheel and brightness slider
(
3)
c. CYCLE. Select this to cycle through the color wheel. The RATE is the time taken to cycle once through
the full color range. The shorter the time, the quicker the changes. Select the BRIGHTNESS
between
0-100%.
d. BREATHING. This is a single color fading in and out. Select the color, brightness and time taken to do
once cycle.
e. SCREEN SAMPLER. Select the sampling zone, which picks the average color in that zone, and maps it to
the device. Available only for RGB.
More on this in the advanced section.
f. AUDIO VISUALIZER. This setting will react to the audio of the application. An additional option for the
color mode will allow you to choose from FIXED or REACTIVE. Expand the ADVANCED SETTINGS to
configure them. More on this in the advanced Section.
3. COLOR. Color wheel with brightness slider. Click on the wheel to select a color or if you know the RGB value,
type this into the R, G & B text fields.
4. RGB Value. Here you can manually input the R G B values.
5. Color Swatches. Drag the centre spot of the color wheel on to an existing swatch to change the color or click on
the to add your favourite color.
16
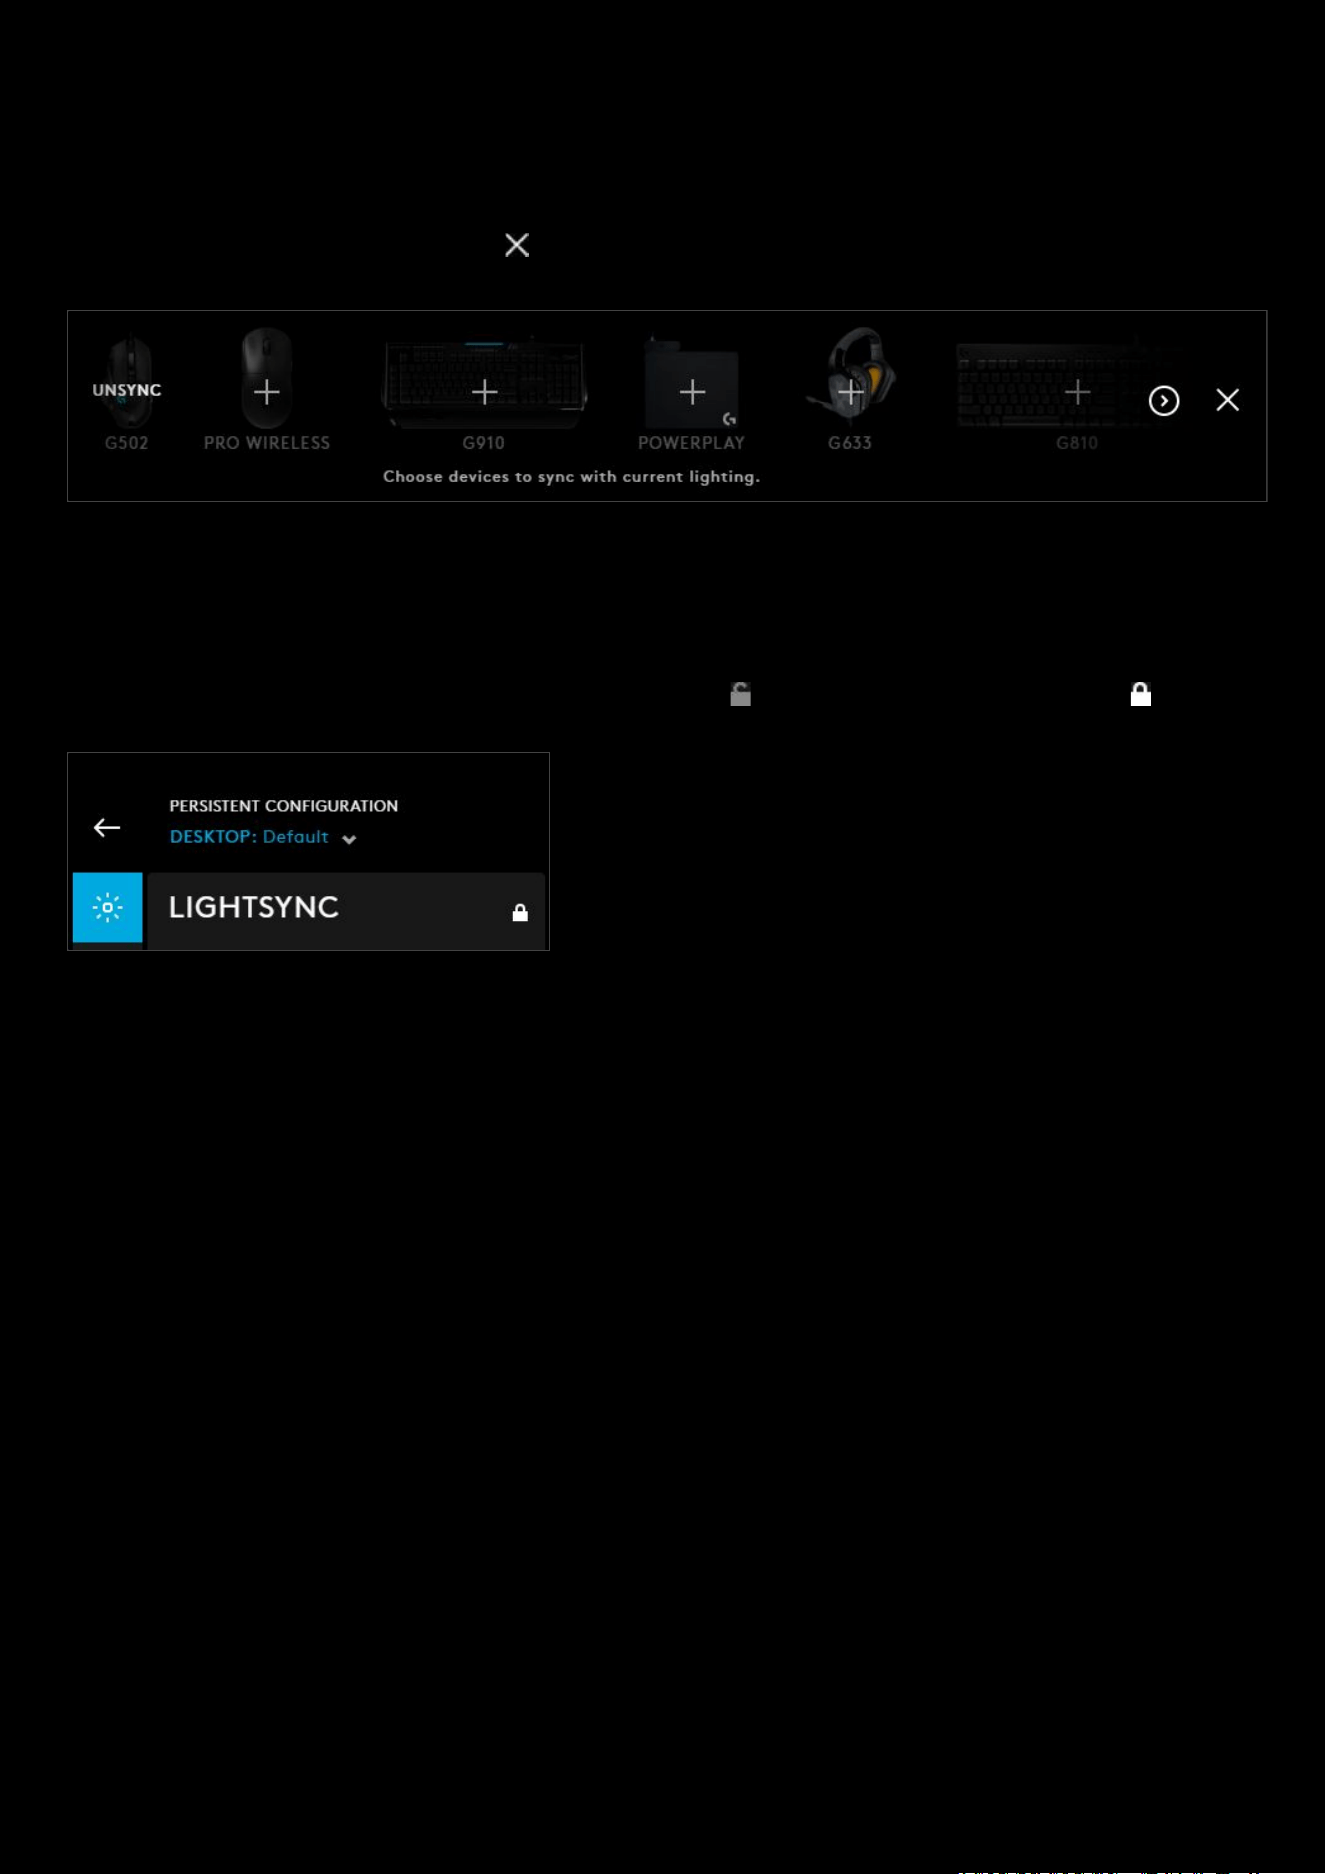
6. SYNC LIGHTING ZONES. Press this to sync the PRIMARY and LOGO LIGHTSYNC zones.
7. SYNC LIGHTING OPTIONS. Click this button to show your other gear. Click their + signs too sync them with the
current LIGHTSYNC
configuration. This will sync the color scheme along with the timing for effects such as
cycles and breathing for example. Hover over the gear icon and click UNSYNC
to remove the device from the
LIGHTSYNC
configuration. Click the to return.
8. Per-profile LIGHTSYNC lock. Click to make LIGHTSYNC persistent across all profiles. This locks/unlocks the
lighting settings to be the same for all profiles.
9. GEAR SETTINGS. Click this to take you to the Gear Settings page
10. PROFILE SELECTOR. Use the drop down to change the User Profile you want to configure for. Also it will
indicate if the profile is in a PER-PROFILE CONFIGURATION or in a PERSISTENT CONFIGURATION
Example here shows the LIGHTSYNC settings are locked and
persistent across all profiles.
11. BACK ARROW. Click the arrow to take you back to the Homepage.
Note: For the G102 Lightsync lighting please refer to section 4: Advanced Settings
17
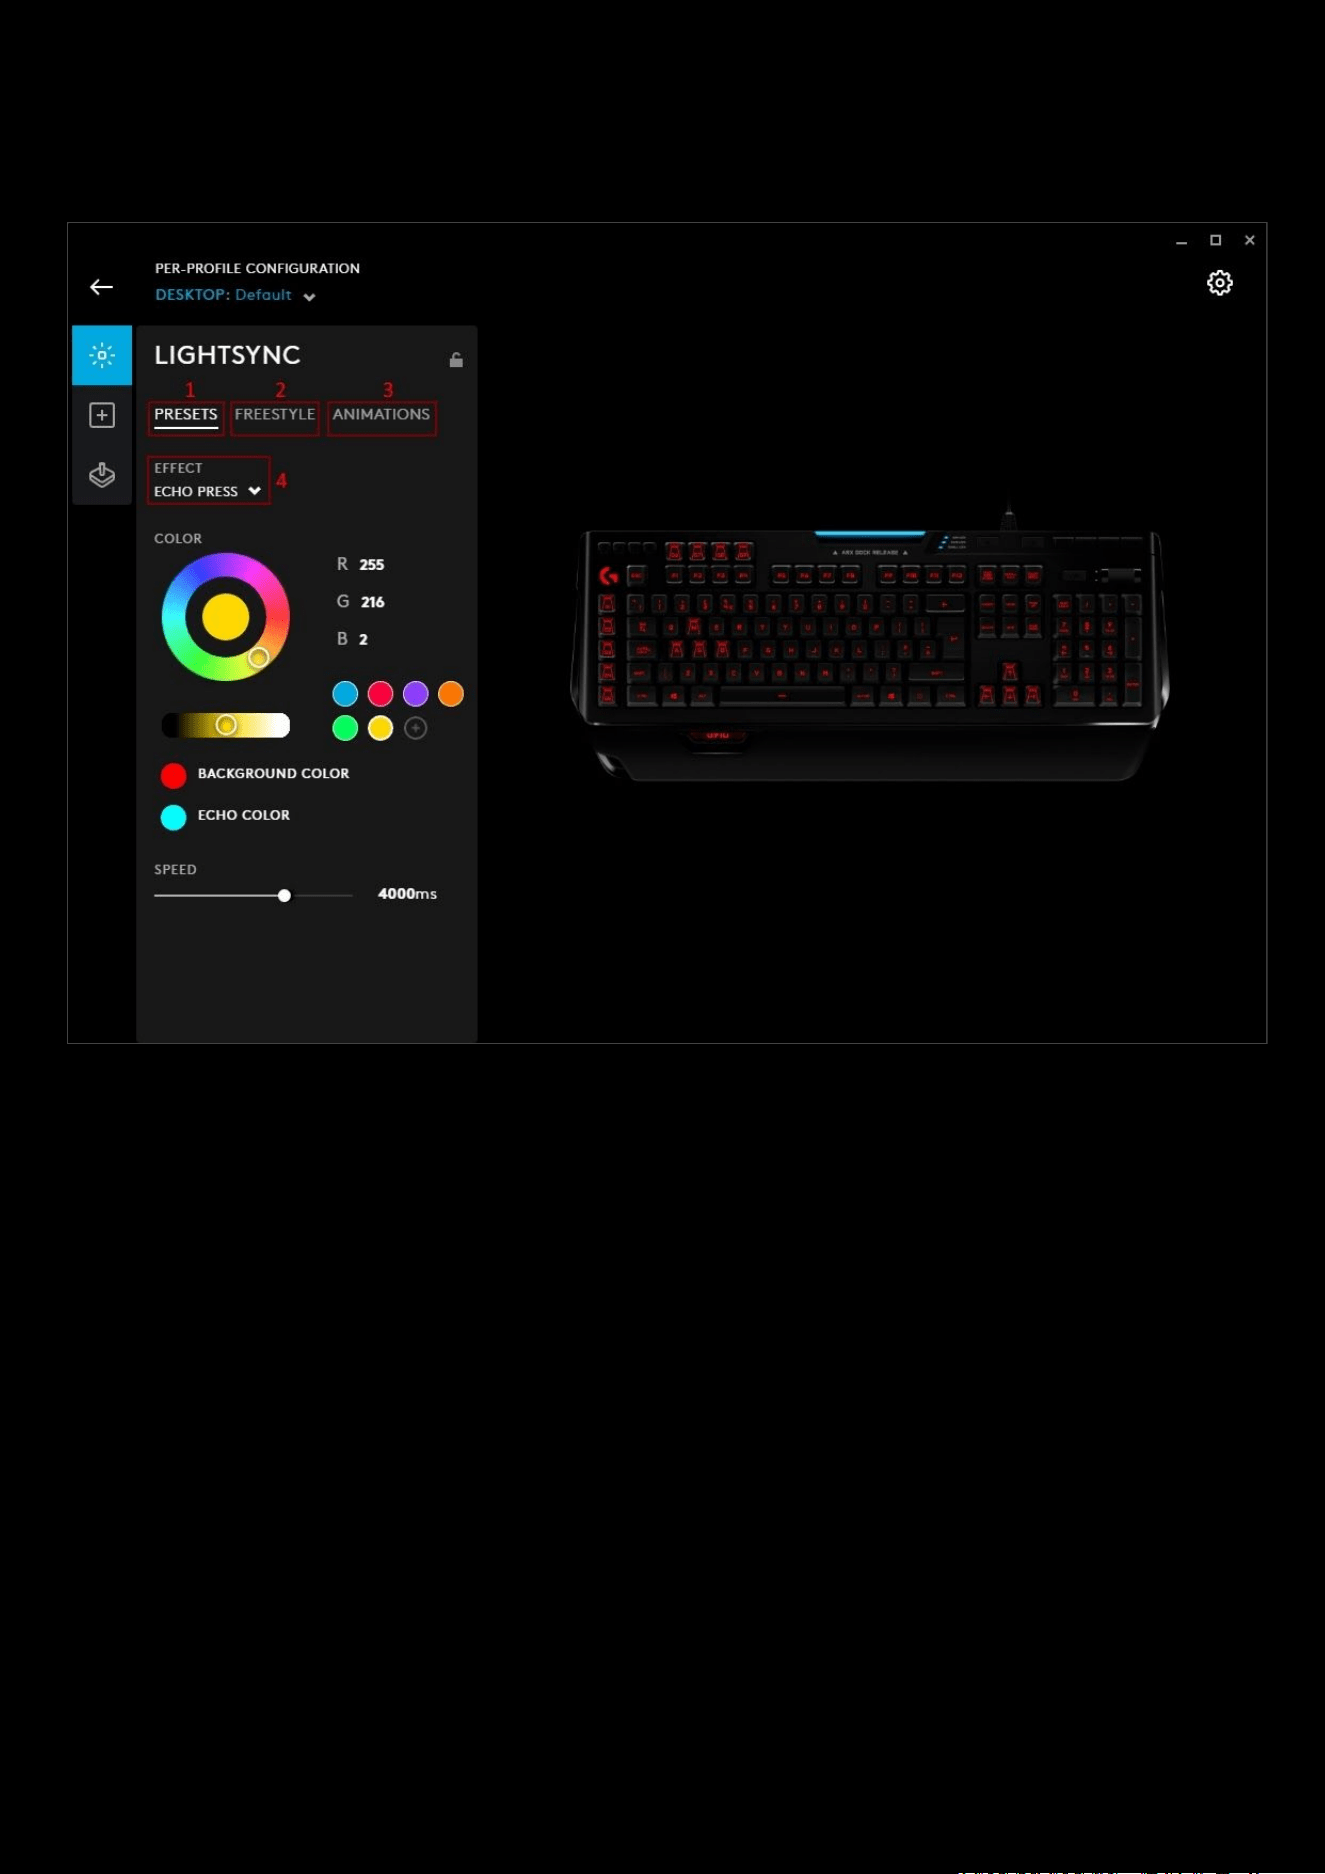
LIGHTSYNC (Keyboards)
With Keyboards, you will see some extra features:
12. PRESETS. This allows you to use presets explained in the LIGHTSYNC section above with these additions to
effects (
4):
a. ECHO PRESS. This feature changes the color of the key once it is pressed. Leaving a footprint of your
typing. The SPEED
controls how long it takes for the ECHO PRESS to fade back to the background color.
Drag the slider to the required time.
b. COLORWAVE. Waves of color crash across your keyboard. The CYCLE drag down option will allow you
to change the direction of the wave:
i. HORIZONTAL. Left to right
ii. VERTICAL
. Top to bottom
iii. CENTER OUT
. From the centre of the keyboard. Outwards in a circle (For example the P key on
the G513).
iv. CENTER IN. Reverse of CENTER OUT, color waves coming in to a point
v. REVERSE HORIZONTAL
. Right to left
vi. REVERSE VERTICAL
. Bottom to top
c. STARLIGHT. Set the keyboard up to flash like the night sky.
i. SKY. Is the background color
ii. STARS. Is the star color
iii. Frequency Slider. Select between 5-100 for the amount of stars
iv. SPEED. Select the speed of the changes.
d. RIPPLE. Sends a wave of color out from the key pressed.
i. Set the BACKGROUND COLOUR this doesn't affect the color wave out from the keypress
18
ii. Set the RATE. This determines how fast the ripple moves. From 200ms <> 2ms
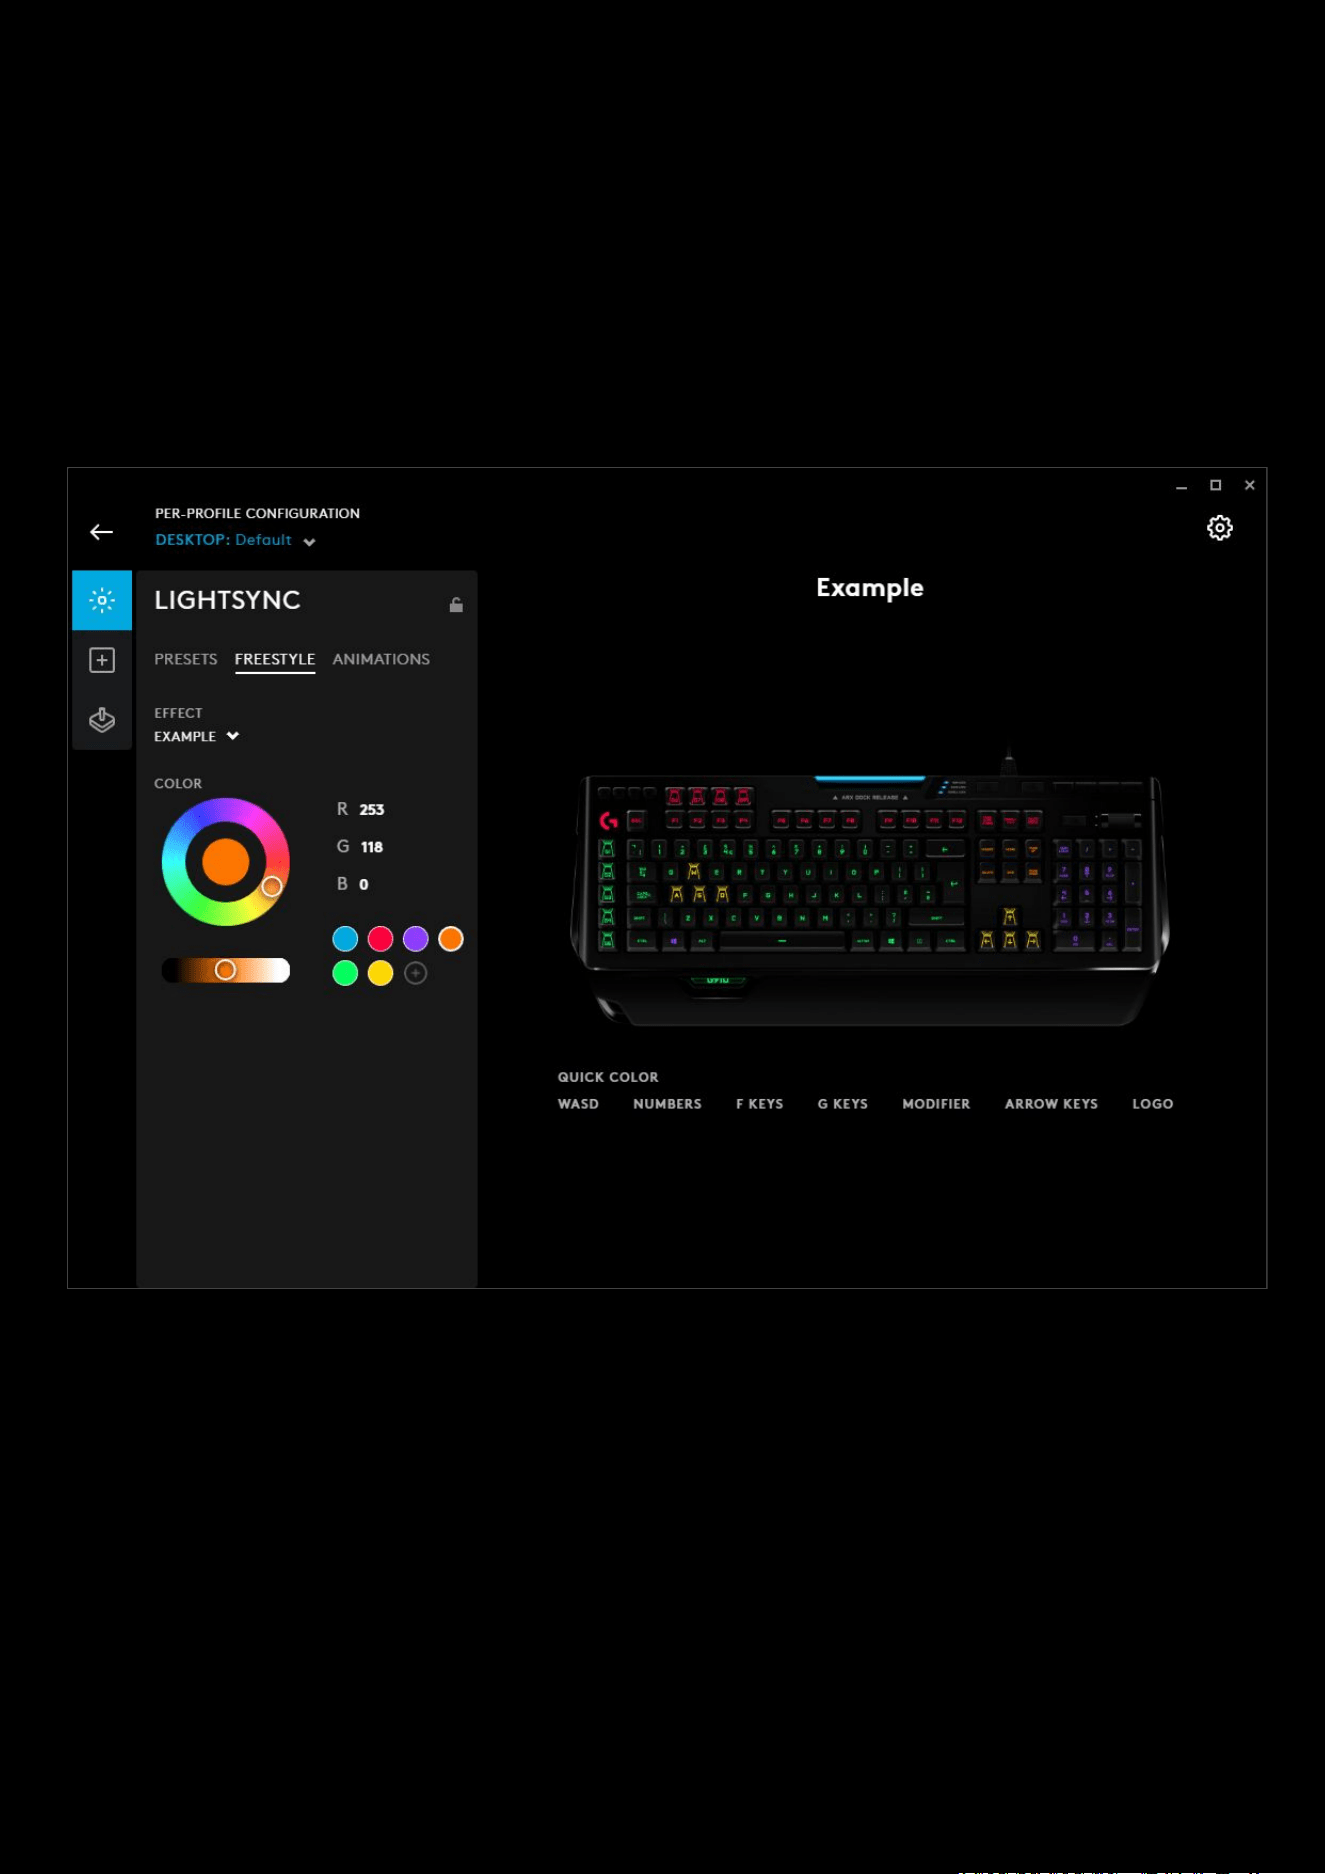
13. FREESTYLE. This allows you to change any color of any key in a set fixed color scheme. Select the color you
want your key to be and then click the key on the image. To color whole sections, drag a rectangle round the
group and this will color all the keys inside.
a. You can configure the DEFAULT effect or select + ADD A NEW FREESTYLE which can be used on other
keyboards. Click the NEW FREESTYLE
text above the keyboard image to rename the effect.
b. In the example below, we’ve selected a yellow, dragged an area around the arrow keys. We’ve also
colored all the QWERTY keys green by dragging a box around them, then individually highlighted the
WSAD keys with yellow. Dragged a box around the ESC & F Keys with the Red swatch selected, colored
all the NUMPAD keys purple and clicked on the Windows Key and boxed colored the HOME keys orange.
Finally, renamed the FREESTYLE PROFILE to Example.

19
14. ANIMATIONS. Choose from lighting effects that are animated. Click on the duplicate icon to copy this effect
and configure the colors and animation.
a. CONTRASTIC. 2 sections of the keyboard will have contrasting colours.
b. LIGHTNING. Simulates flashes of lightning
c. OCEAN WAVE. Waves of blue crashing out and back in.
d. RED WHITE AND BLUE. Cycle between those 3 colors.
e. VERTICOOL. Watch the rows light vertically
f. + NEW ANIMATION. Create your own custom animation. More on this in the advanced settings
20
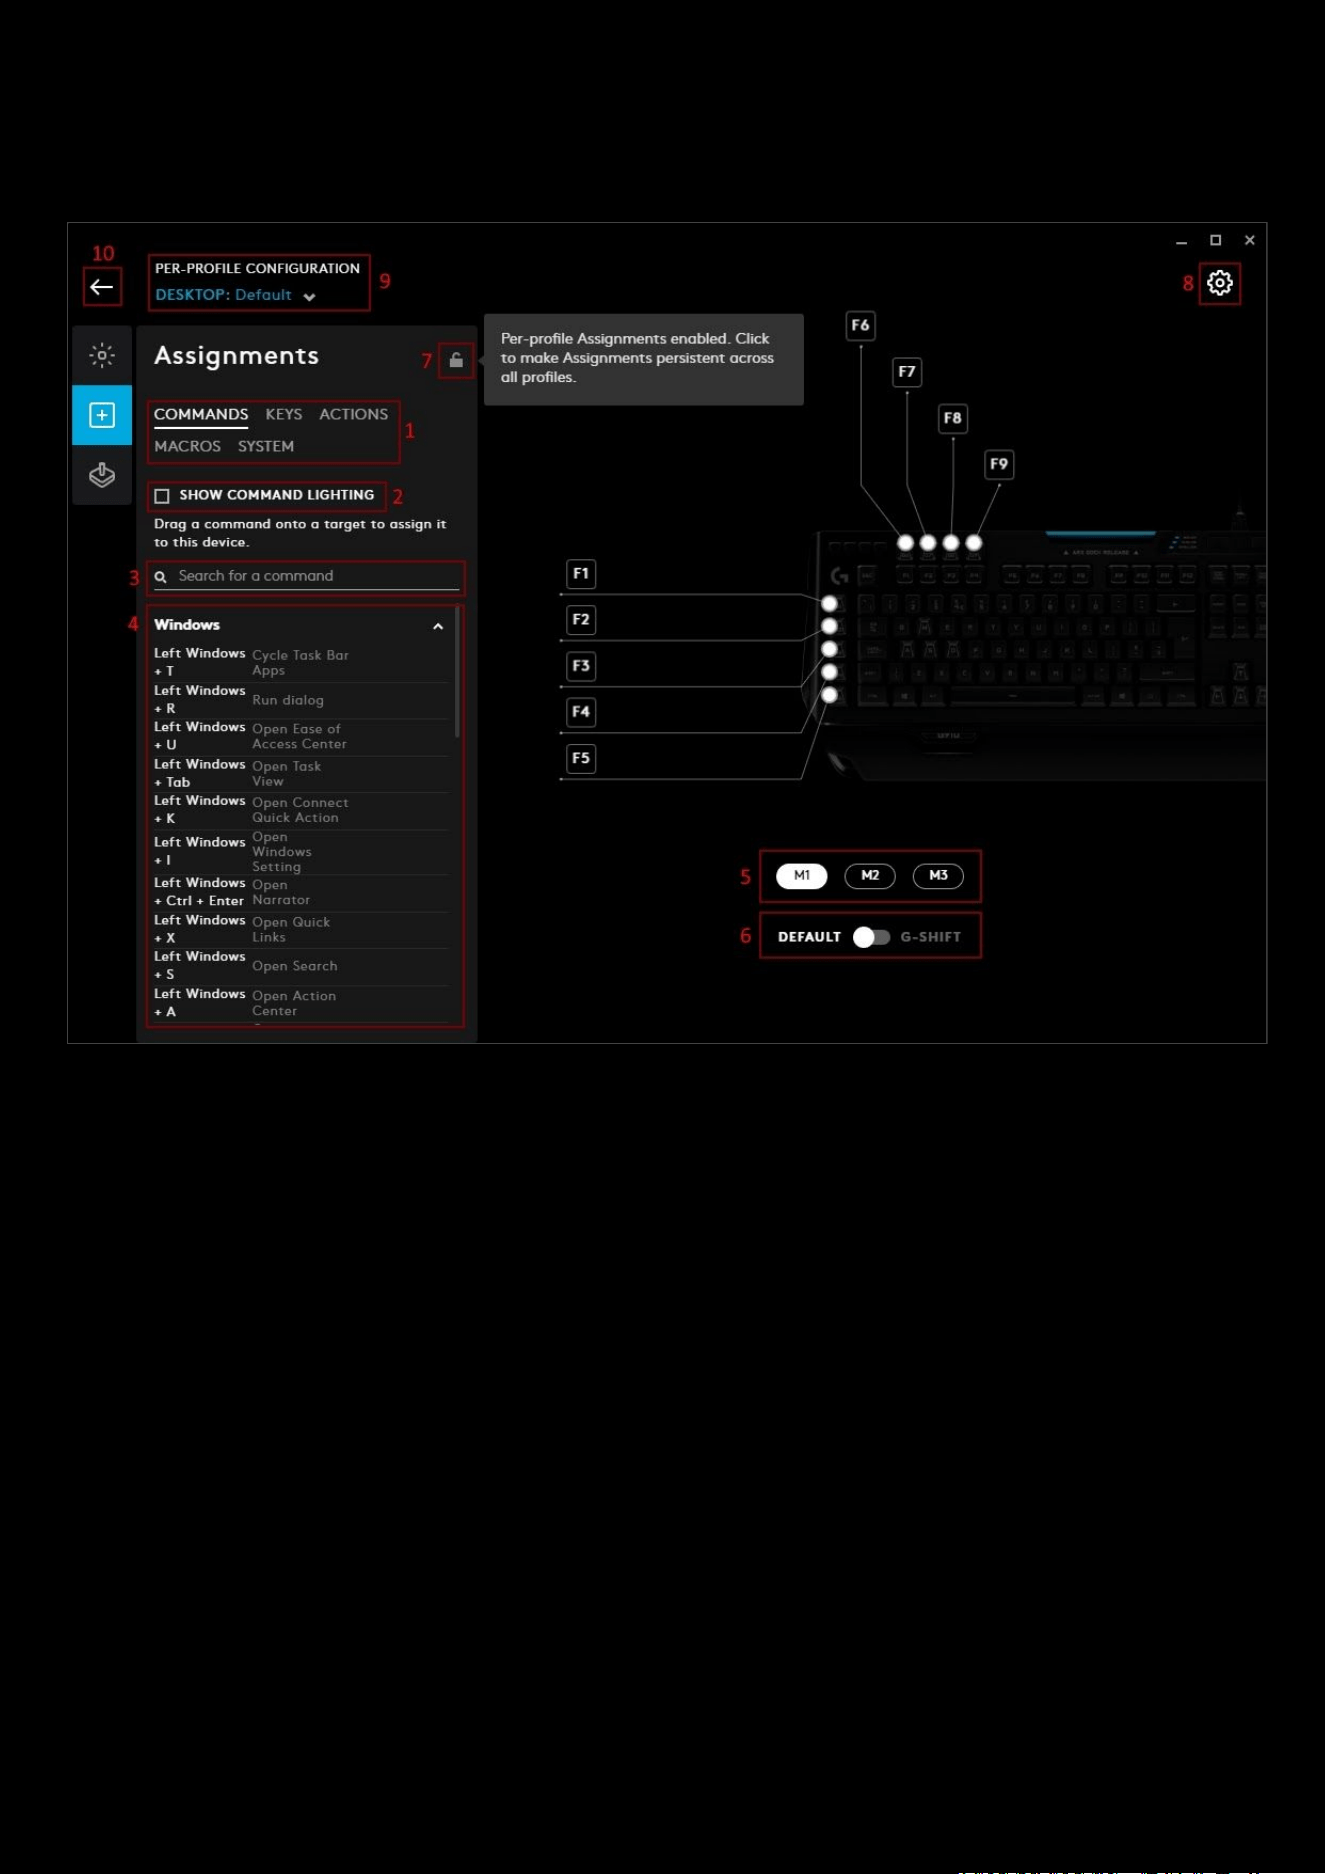
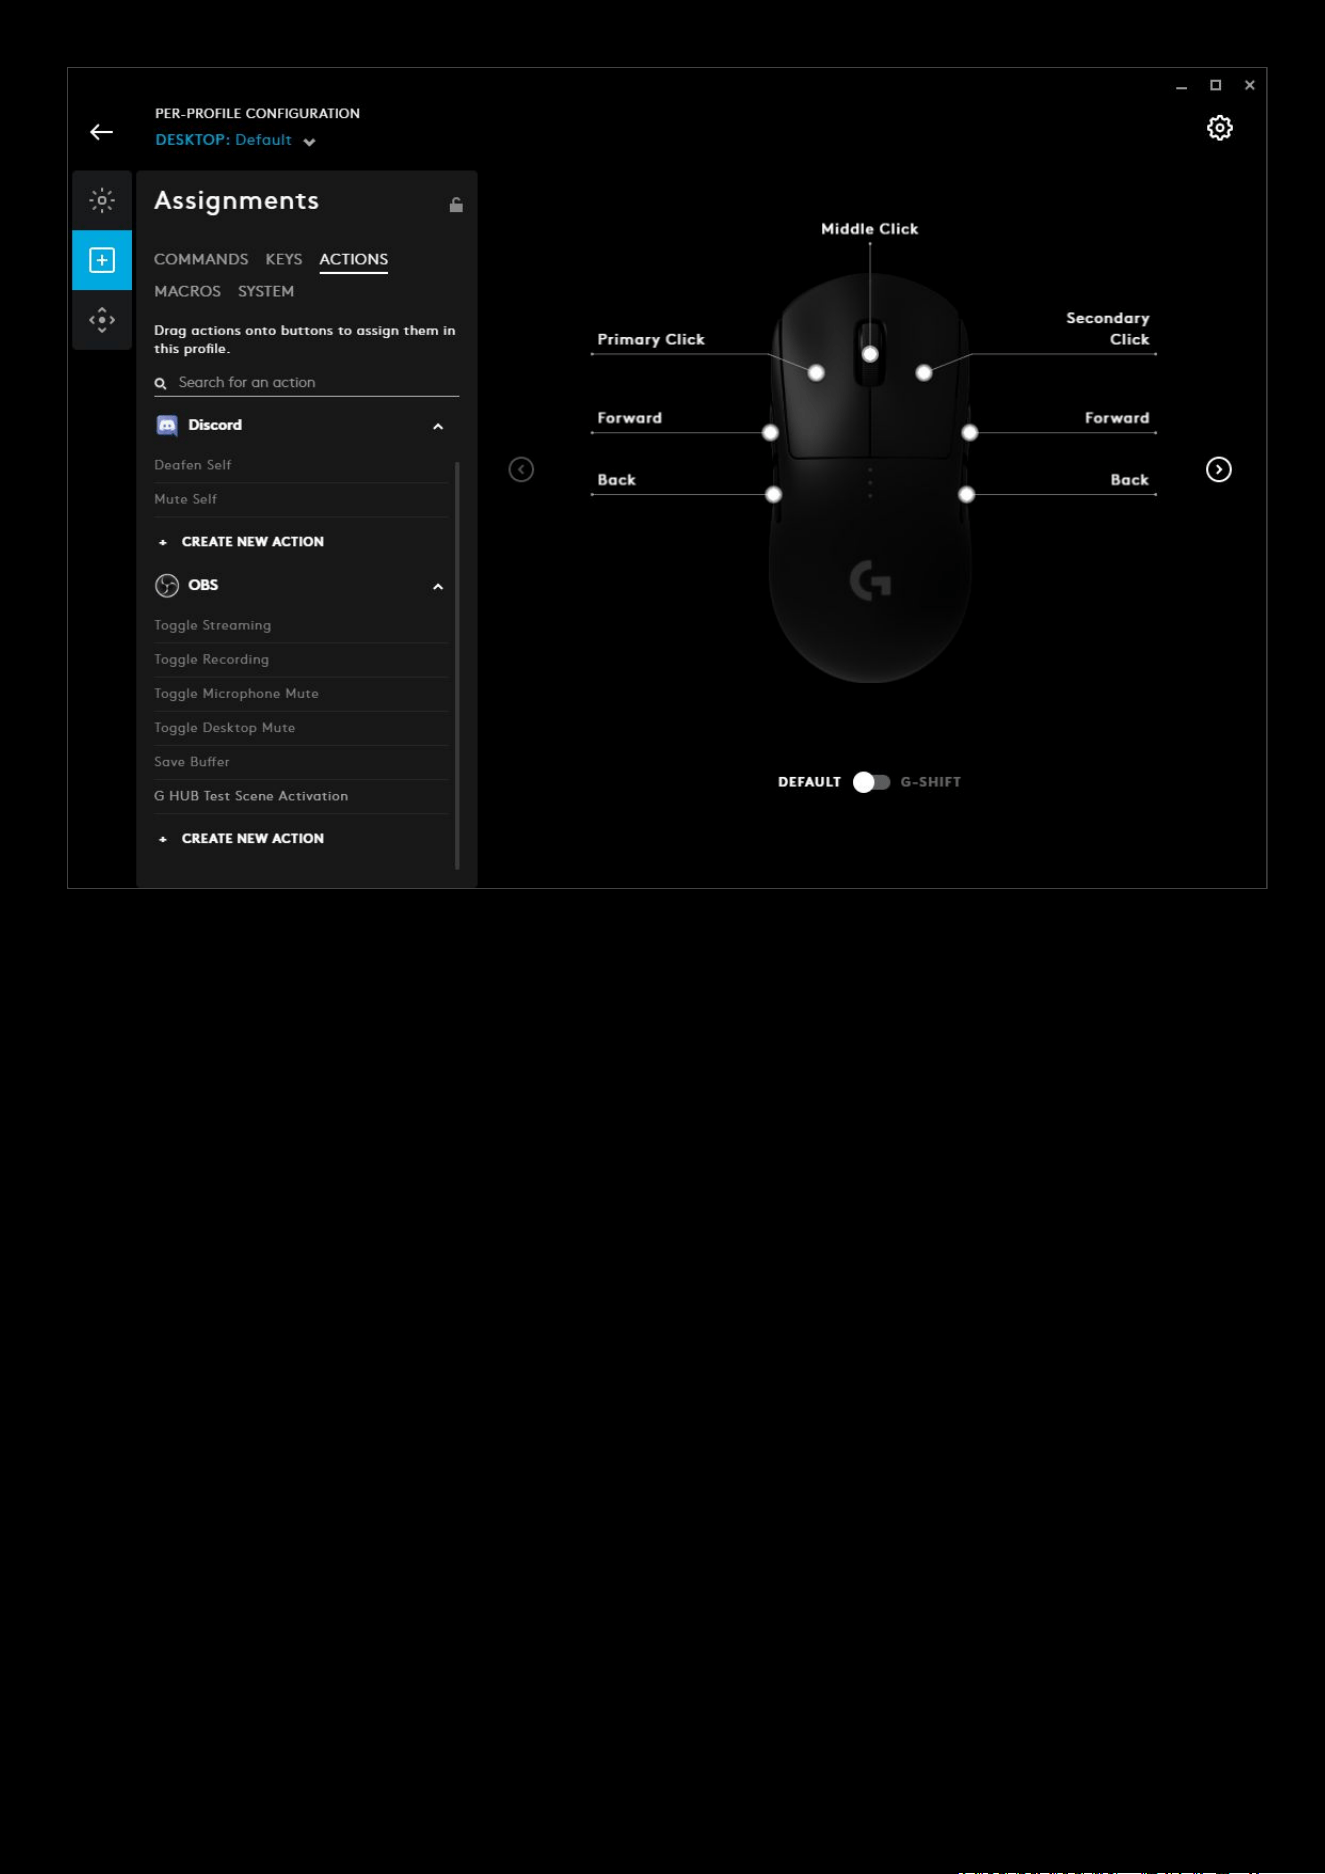
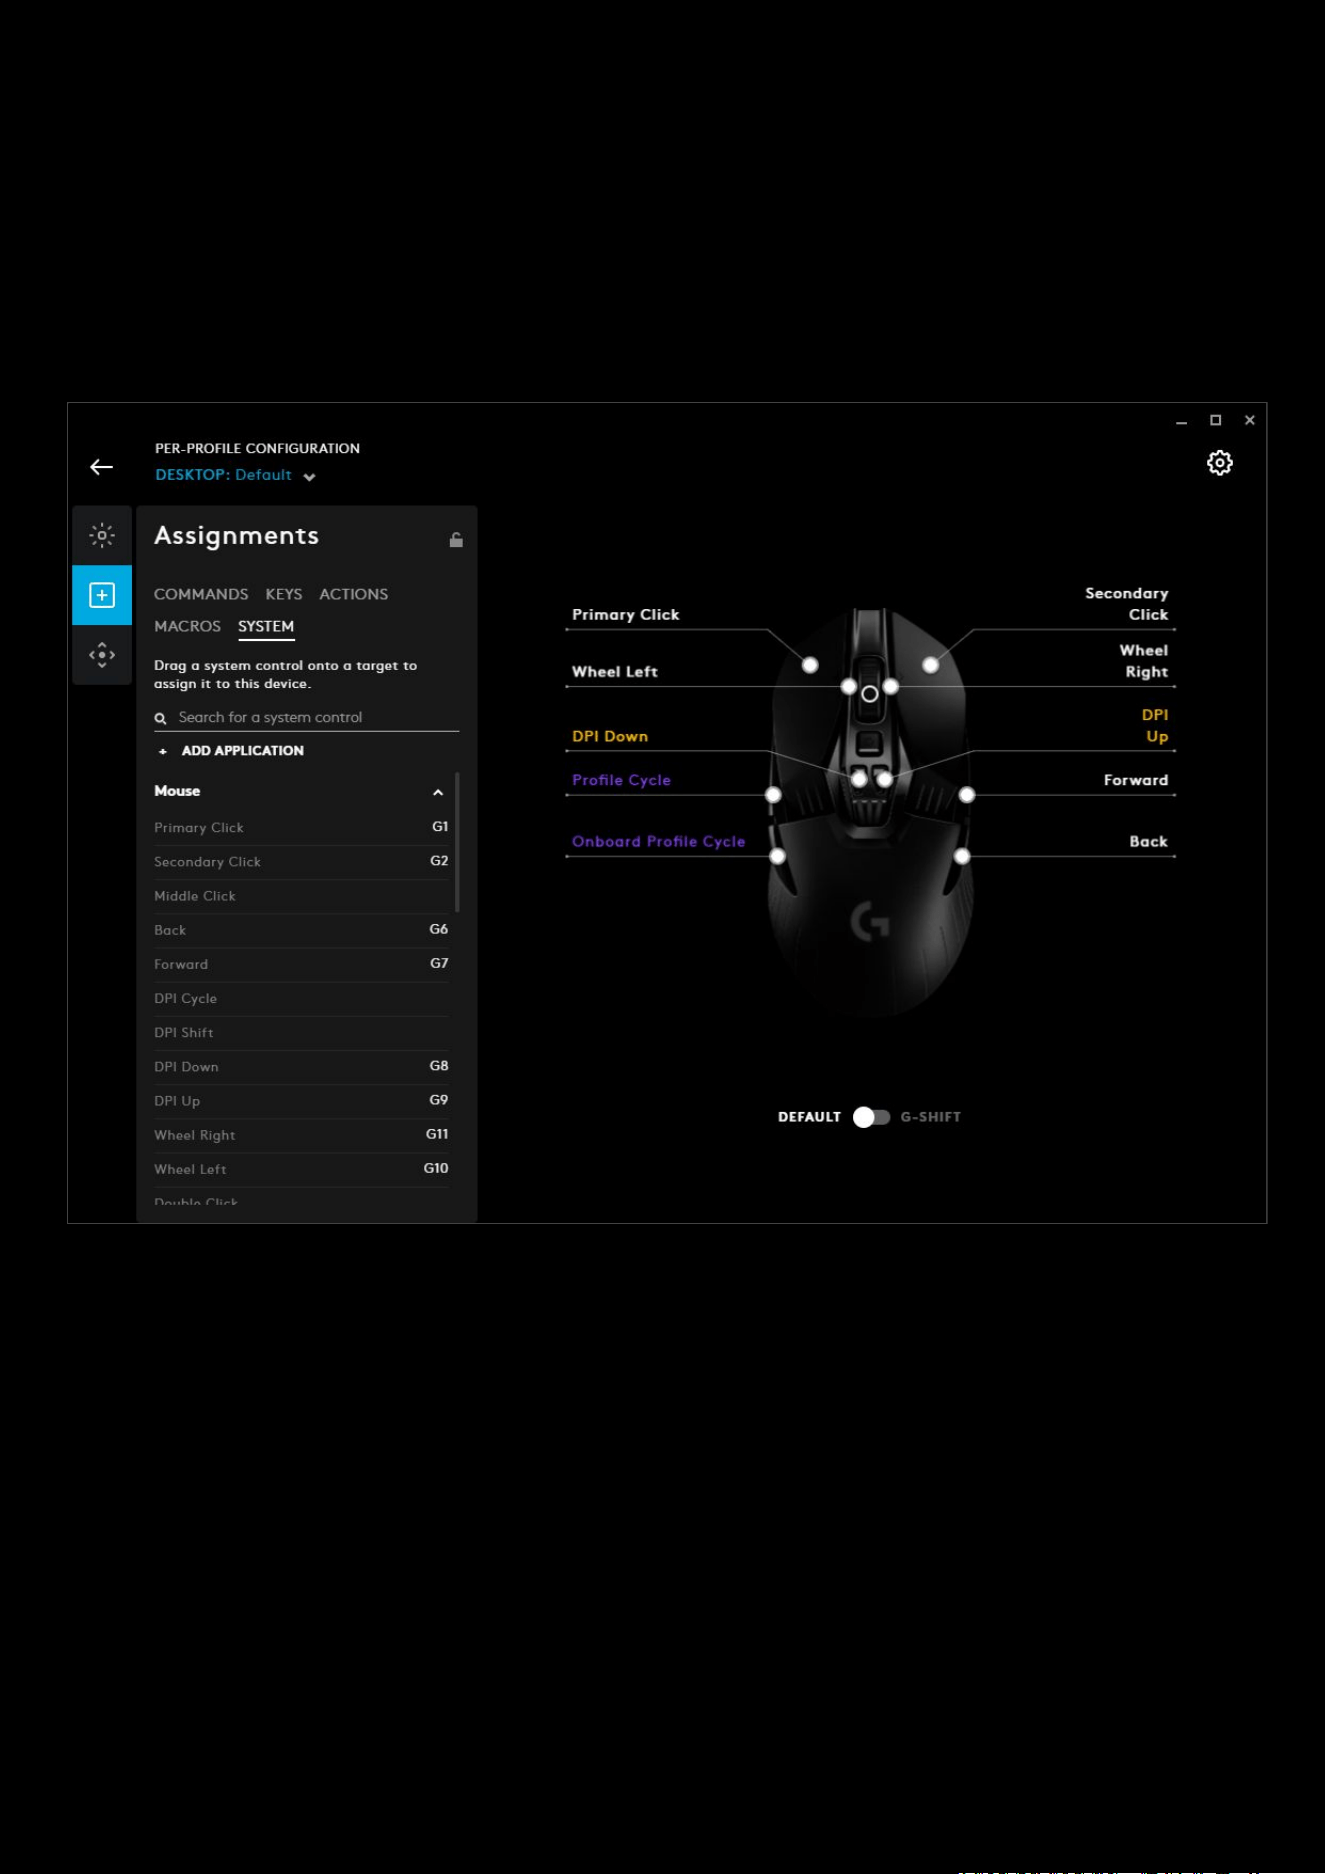
Assignments
This tab configures all your shortcuts and macros.
1. Select between 5 types of assignments. Drag a command onto a target to assign it to the device
a. COMMANDS. Which includes Command Lighting and Default Commands (shortcuts and hotkeys)
b. KEYS. Keys shows all the standard keyboard keys. NEW! Including F13 - F24
c. ACTIONS. Assign actions and integrations from voice applications such as Overwolf, Discord and OBS
Note:
How to create an Action and Integration and assign them is covered in the Advanced Actions section
d. MACROS. Select a macro to drag onto your device. Click the CREATE NEW MACRO to create your own.
More on MACROS in the advanced settings.
e. SYSTEM. System commands; Mouse, Media, Editing, Audio hotkeys and Launch Application.
Note: How to create a
Launch Application command
is covered in the next section: How to create an assignment on
your Gear

21
2. SHOW COMMAND LIGHTING. Tick this box to enable colors per command group. This will change the color of
the key to the color of the group the command comes from. In the example below, we have changed the group
color and dragged Open Search to the G1 key. The G1 key will now illuminate that color regardless of the
LIGHTSYNC setting.
Note:
Command Lighting is compatible with these preset effects: Starlight, Audio Visualizer, Echo Press and Screen
Sampler. If you have used a fixed lighting effect for example, this will be overridden to a Freestyle lighting effect.
3. Search for a command. User the search box to look for a specific command
4. Command list. Use the scroll bar on the right to scroll through the list of commands, drag that command to an
available button or key on your device
5. Mode Selection. If your keyboard supports multiple mode buttons, click which mode you want to configure. IN
the example above, the configuration is set to Mode 1 (M1) and that is highlighted white.
6. DEFAULT | G-SHIFT. Switch between the 2 modes to double up your command assignments.
7. Per-profile Assignments lock. Click to make Assignments persistent across all profiles. This locks/unlocks this
set of assignments to be there for all profiles.
8. GEAR SETTINGS. Click this to take you to the Gear Settings page
9. PROFILE SELECTOR. Use the drop down to change the User Profile you want to configure for. Also it will
indicate if the profile is in a PER-PROFILE CONFIGURATION or in a PERSISTENT CONFIGURATION
10. BACK ARROW. Click the arrow to take you back to the Homepage.
22
Assignments: How to create an assignment on your Gear
1. Identify the command you want to assign, this can be from any of the groups COMMANDS, KEYS, ACTIONS,
MACROS
or SYSTEM
2. Click & drag the command name to the desired button/key
Note:
Another way to assign a command is to click and highlight the
button/key by clicking the or the text. The button/key will then highlight
blue. Click a command to assign it.
3. The Button/Key. This shows what command is assigned to that feature.
Note:
To delete a command, highlight the button/key and drag the command off. Another way is to select it and press
the
DELETE
key
4. DEFAULT | G-SHIFT. Switch between DEFAULT and G-SHIFT (for supported devices). G-SHIFT is another set of
assignments which are all activated when in that mode. Drag commands onto the button/key the same way as
you would in DEFAULT mode.
5. Command Indicator. This shows which button/key this command is currently assigned to. If its Red this would
signify its assigned in G-SHIFT.
23
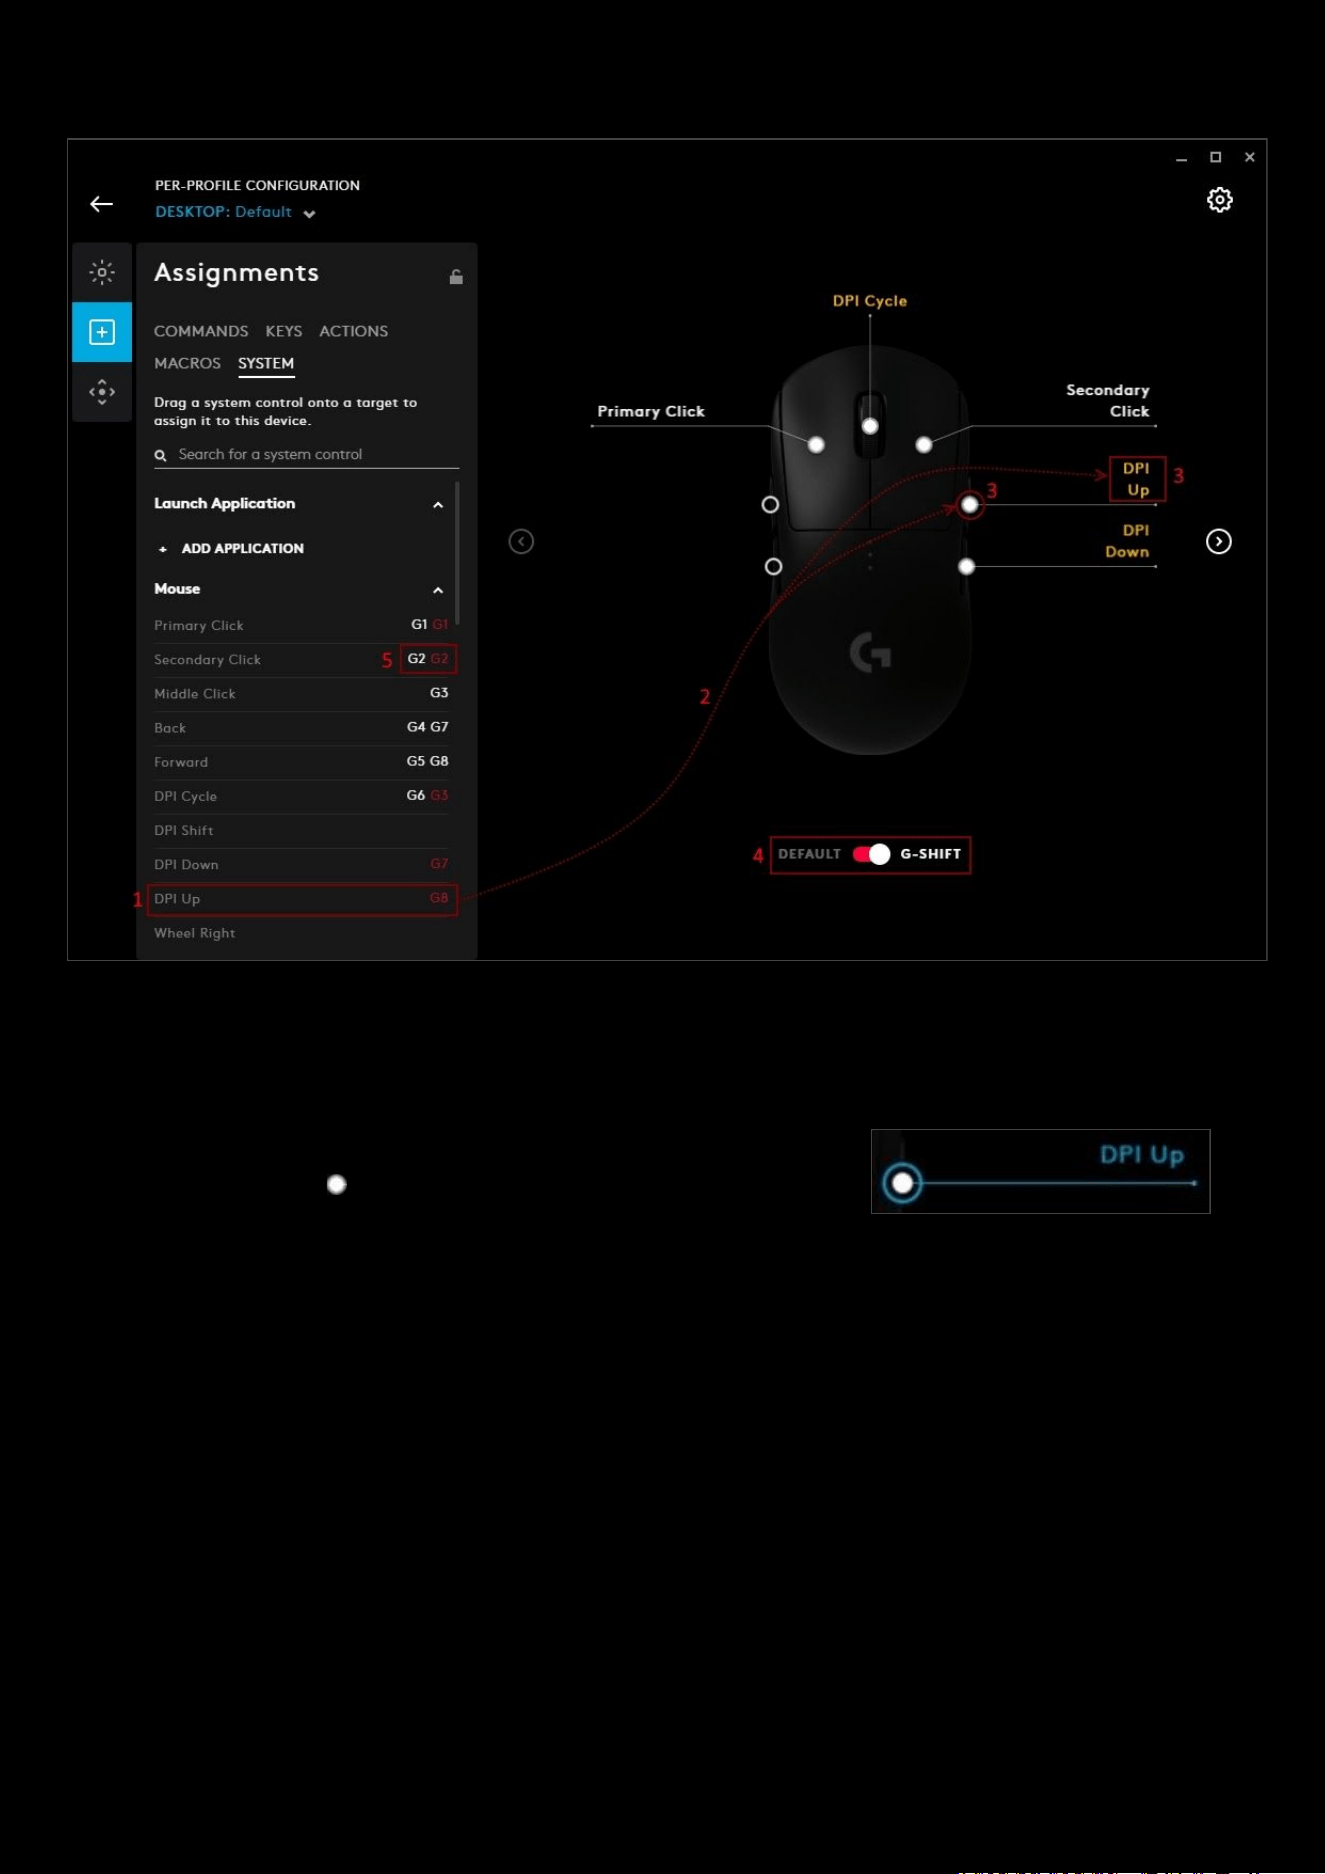
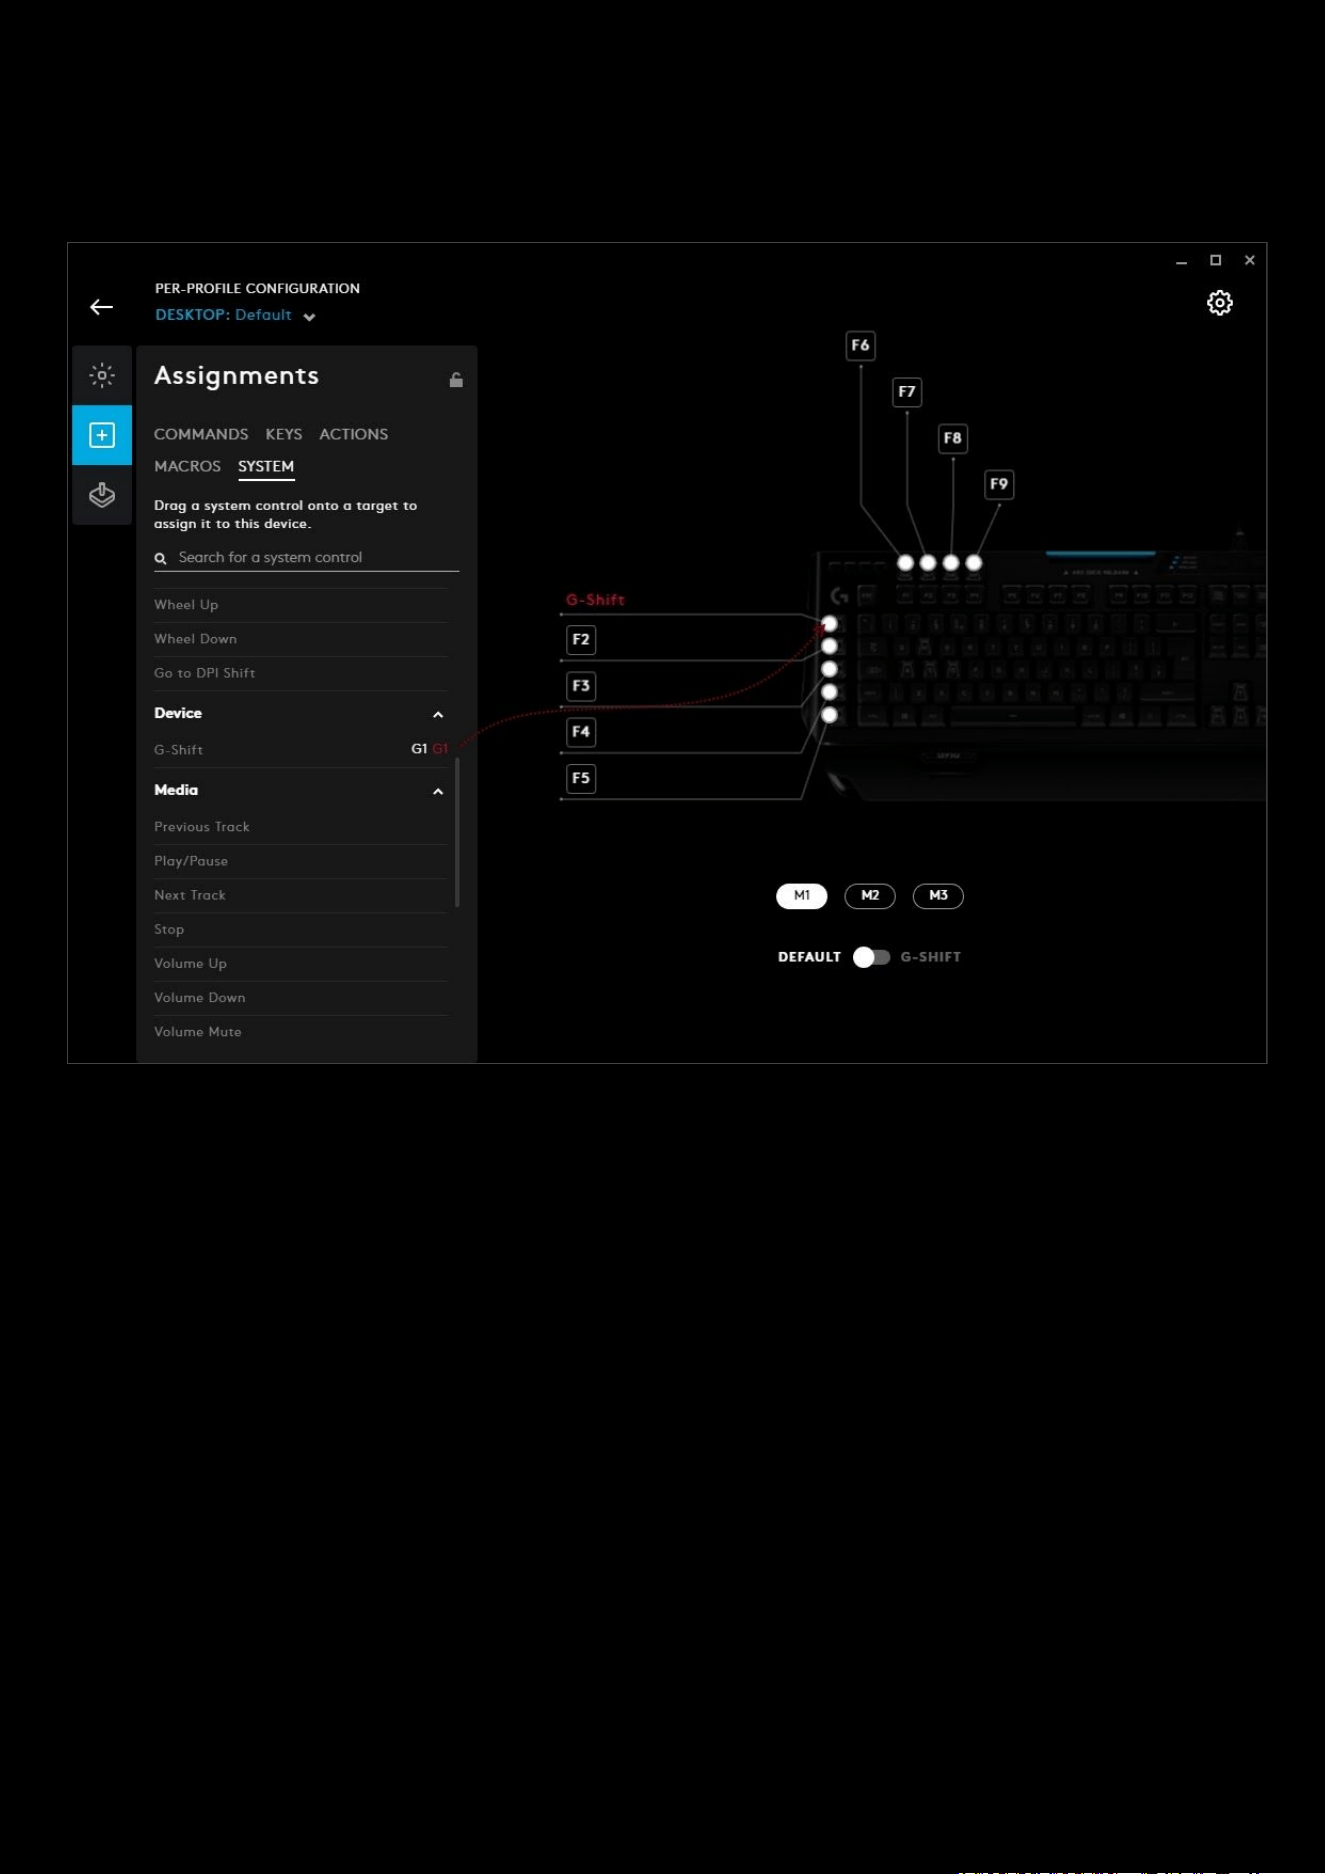
Assignments: How to assign a G SHIFT command
You can assign a G SHIFT key to a device and that G SHIFT key will synchronise on all devices. For example, you can
have a G SHIFT key on your keyboard. When pressed your mouse will also enter the G SHIFT mode and vice versa.
To assign a G SHIFT key, navigate to the SYSTEM tab in Assignments and drag the command to a programmable
key/button.
24
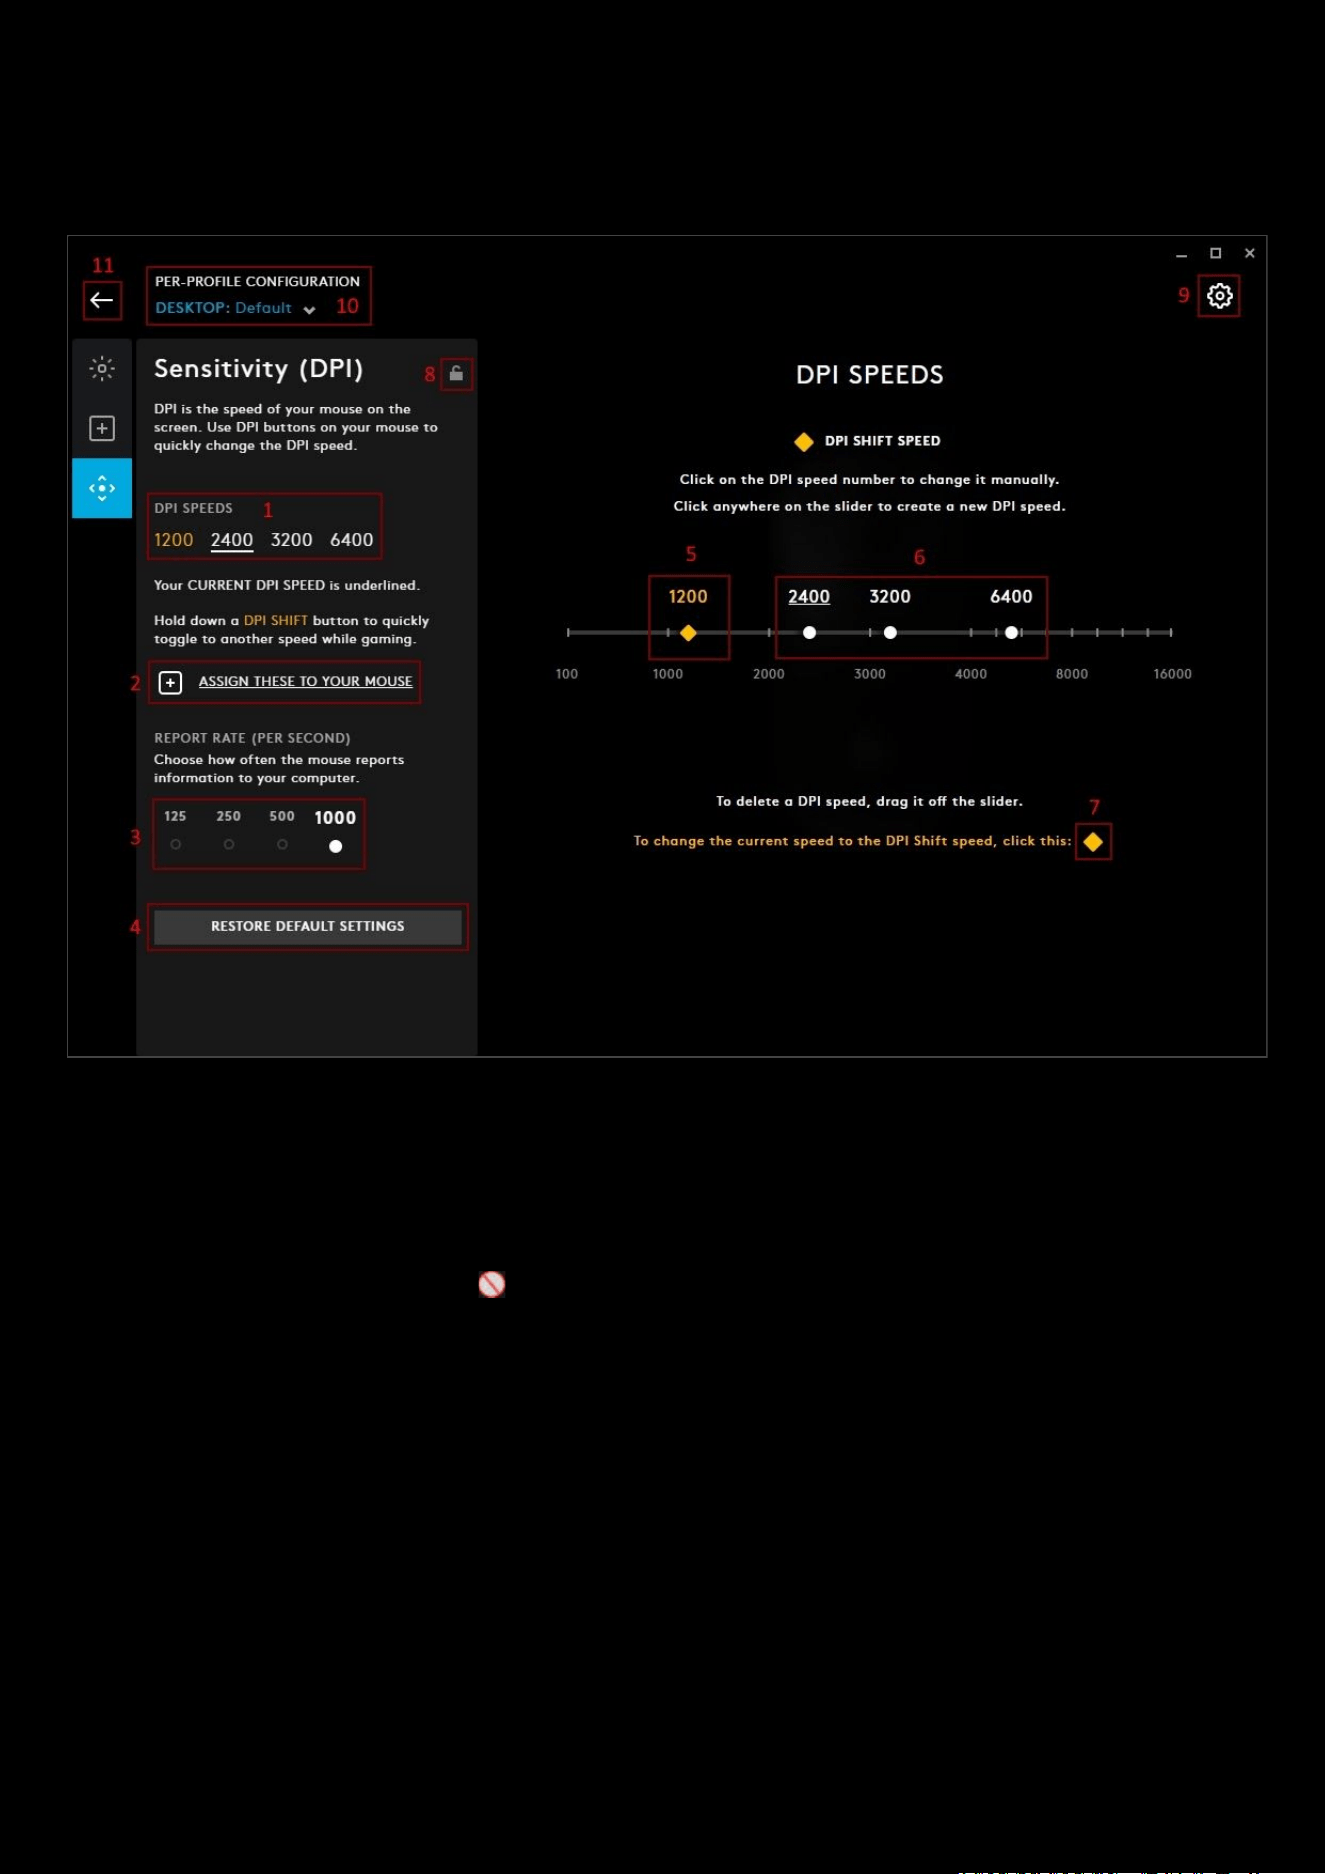
Sensitivity (DPI)
DPI is the speed of your mouse on the screen. Use DPI buttons on your mouse to quickly change the DPI speed.
1. DPI SPEEDS. The underlined value is the current DPI speed. Click on the other values to change the DPI SPEED
or press the DPI buttons (up | down | cycle) on your mouse.
Deleting a DPI Setting: To delete a DPI setting, drag it off the DPI line, either up or down. Once it’s moved far enough to
be removed, you will see a stop sign icon
Note:
You can have a minimum of 1 DPI setting and a DPI SHIFT setting.
25
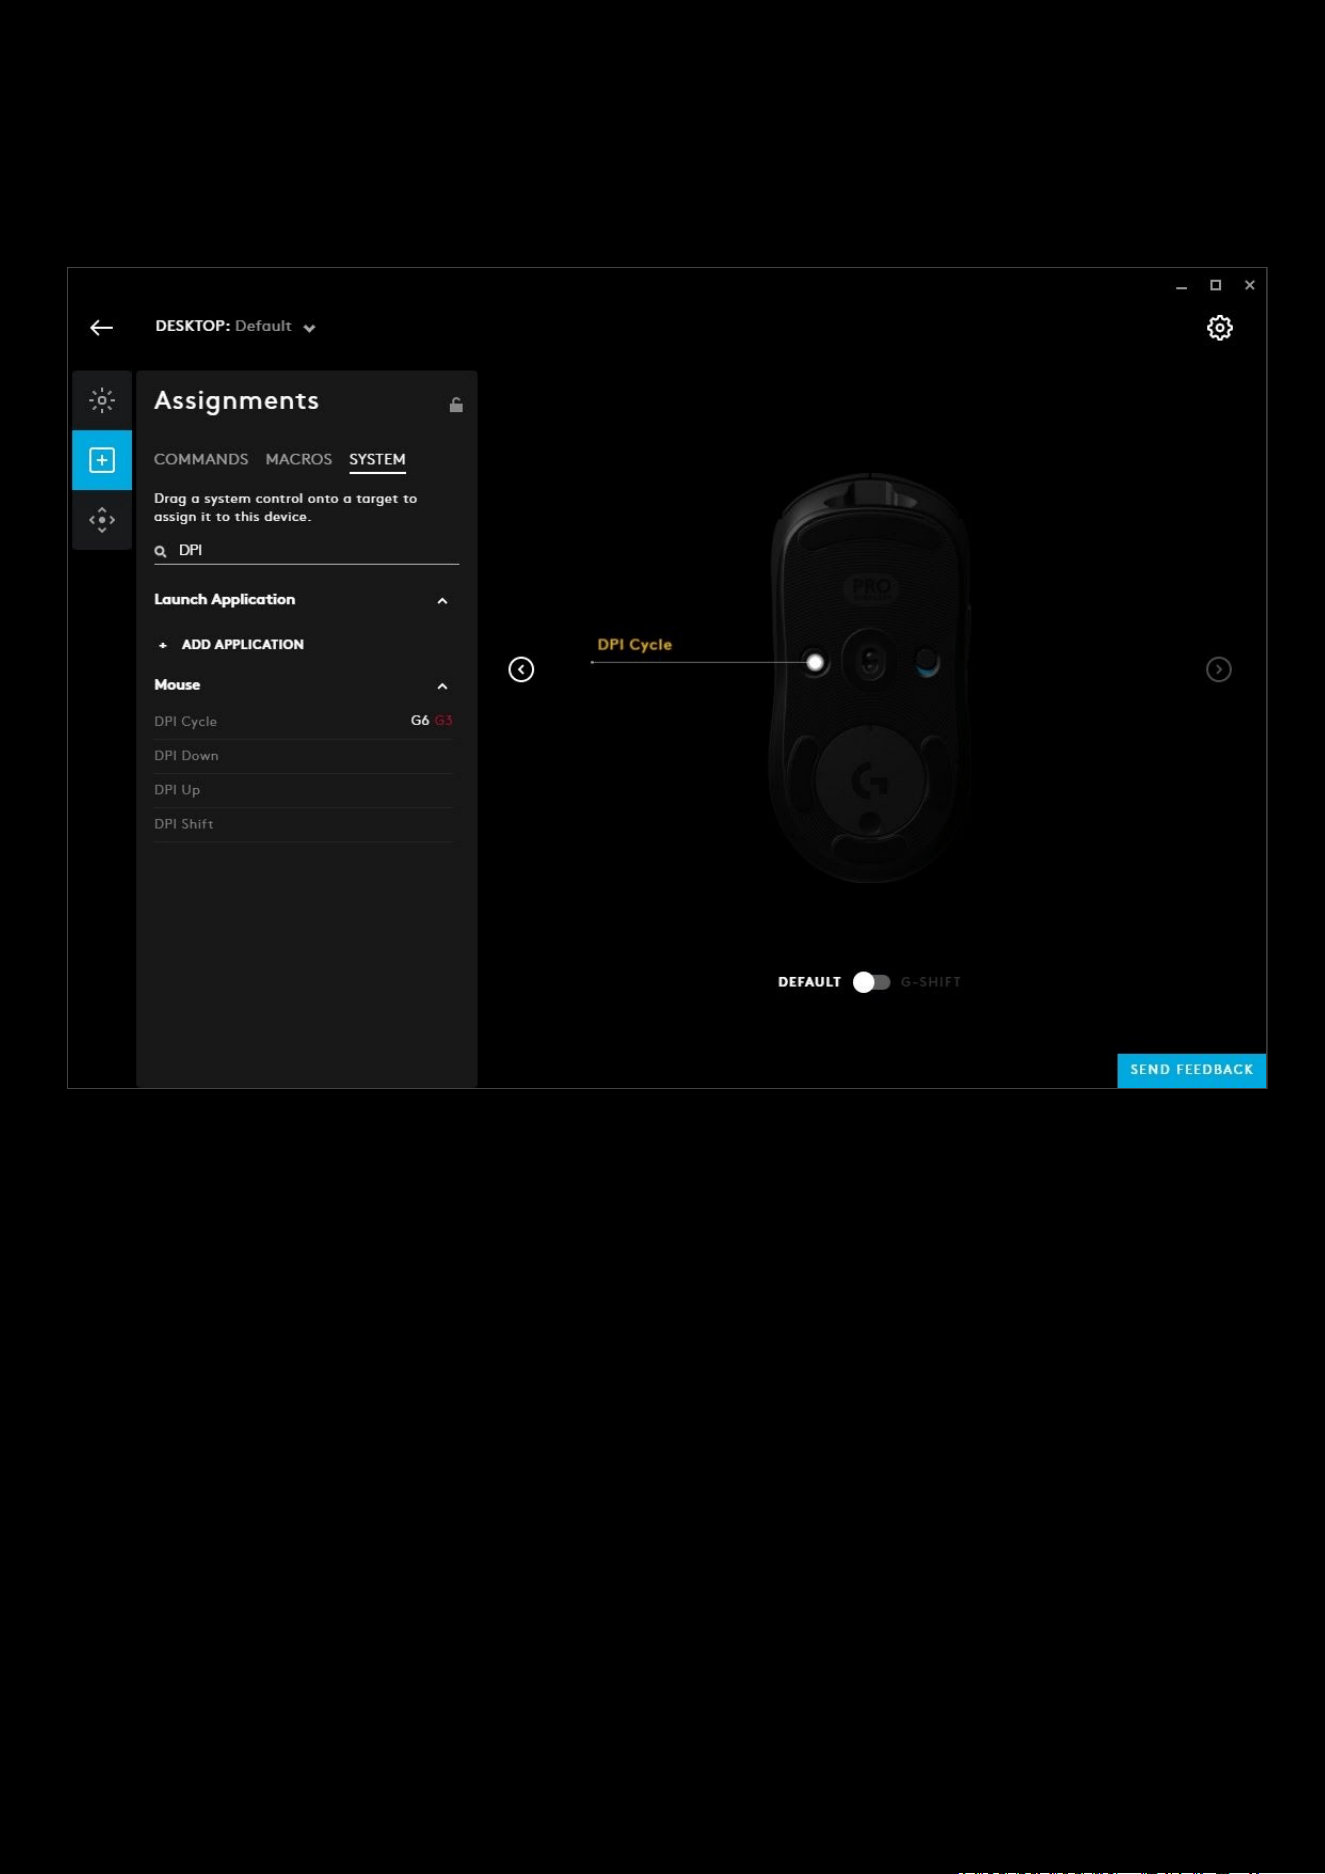
2. ASSIGN DPI CONTROLS. Clicking this will take you to the Assignments page. There is an automatic search in the
SYSTEM
tab with DPI performed to show you just the DPI commands. Not all mice have a DPI SHIFT command
assigned to a button by default so check if you have this command assigned before using it.
Note:
You might have to click the Left/Right arrows either side of the device to see the other button/key view
3. REPORT RATE. This is the speed at which the mouse reports to the computer. By default this should be 1000
and you shouldn't need to change it. If you see skipping with the mouse pointer, reducing this might help.
4. RESTORE DEFAULT SETTINGS. Click this to reset the mouse DPI settings back to factory settings.
5. DPI SHIFT SPEED. One of the DPI modes will be selected as the DPI SHIFT SPEED, this is indicated by being
yellow
6. DPI SLIDERS
a. Drag the slider points to the desired DPI values.
b. The DPI SHIFT speed in yellow is the assigned DPI value for your DPI SHIFT button
c. Click on the slider bar to create a new DPI speed
d. Drag a DPI Speed off by dragging the slider downwards; off the slider bar.
e. All changes are saved automatically
Note:
There are a maximum set of DPI speeds a mouse can have. For example the G502 can support up to 5 individual
DPI values.
7. Change to be DPI SHIFT Speed. Click the yellow diamond to Select the DPI mode you want to be the new DPI
SHIFT speed
8. PER-PROFILE DPI LOCK. Lock this to set the DPI configuration for all your profiles.
9. GEAR SETTINGS. Click this to take you to the Gear Settings page
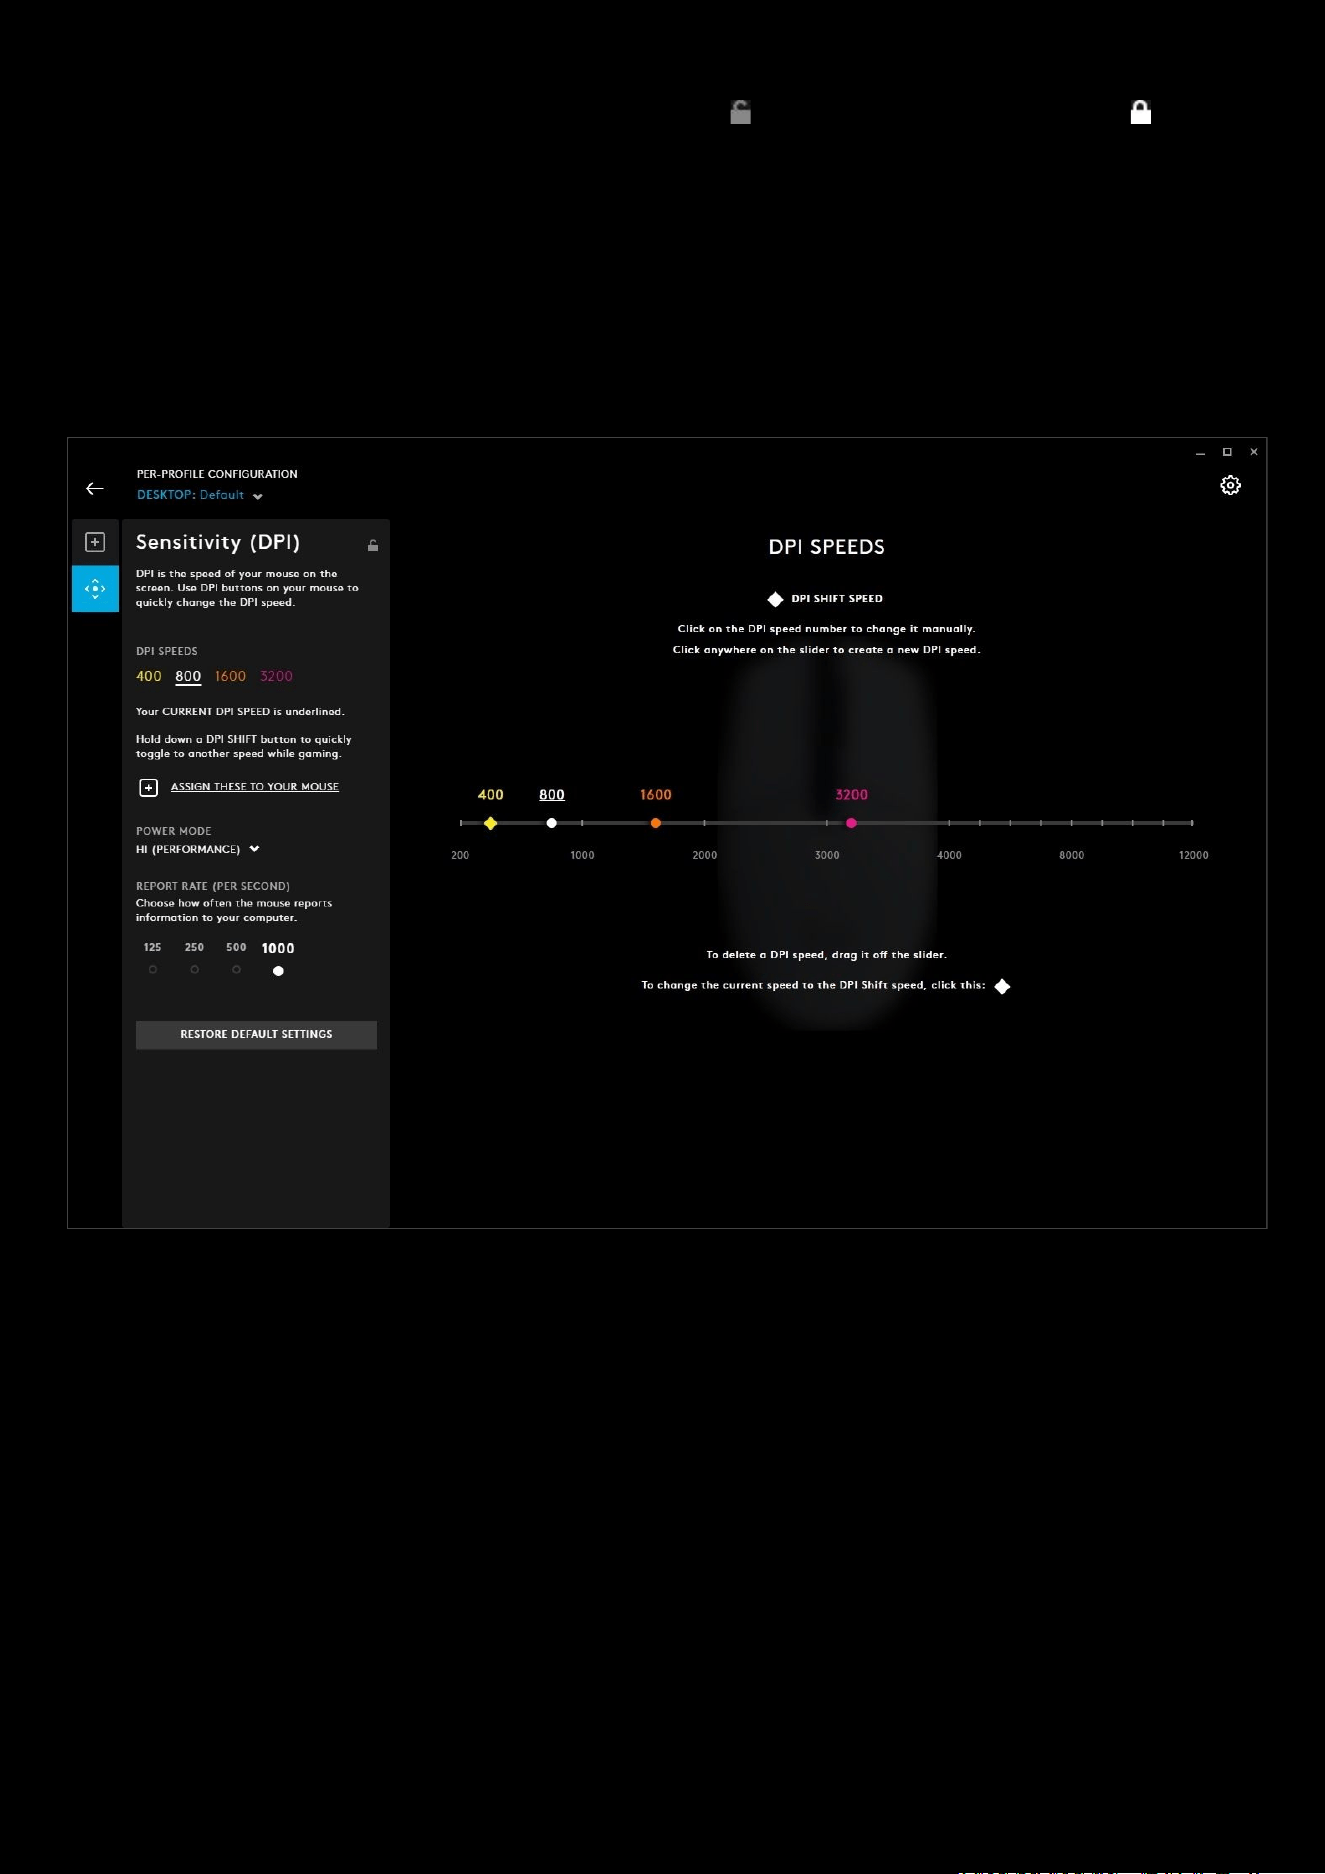
26
10. PROFILE SELECTOR. Use the drop down to change the User Profile you want to configure for. Also it will
indicate if the profile is in a PER-PROFILE CONFIGURATION or in a PERSISTENT CONFIGURATION
11. BACK ARROW. Click the arrow to take you back to the Homepage.
Note:
For the G304/G305, the DPI states are color fixed to the DPI LED on the mouse. This means you will have the
same DPI settings and features but the DPI SHIFT STATE will not always be the YELLOW colored DPI mode. Just follow
the diamond icon.
In the example below, we can see that the user has moved the lowest DPI state (which was also the DPI SHIFT SPEED
)
from 400 to
2400 DPI. The colour of the states will always be yellow for the lowest value and pink for the highest value.
27
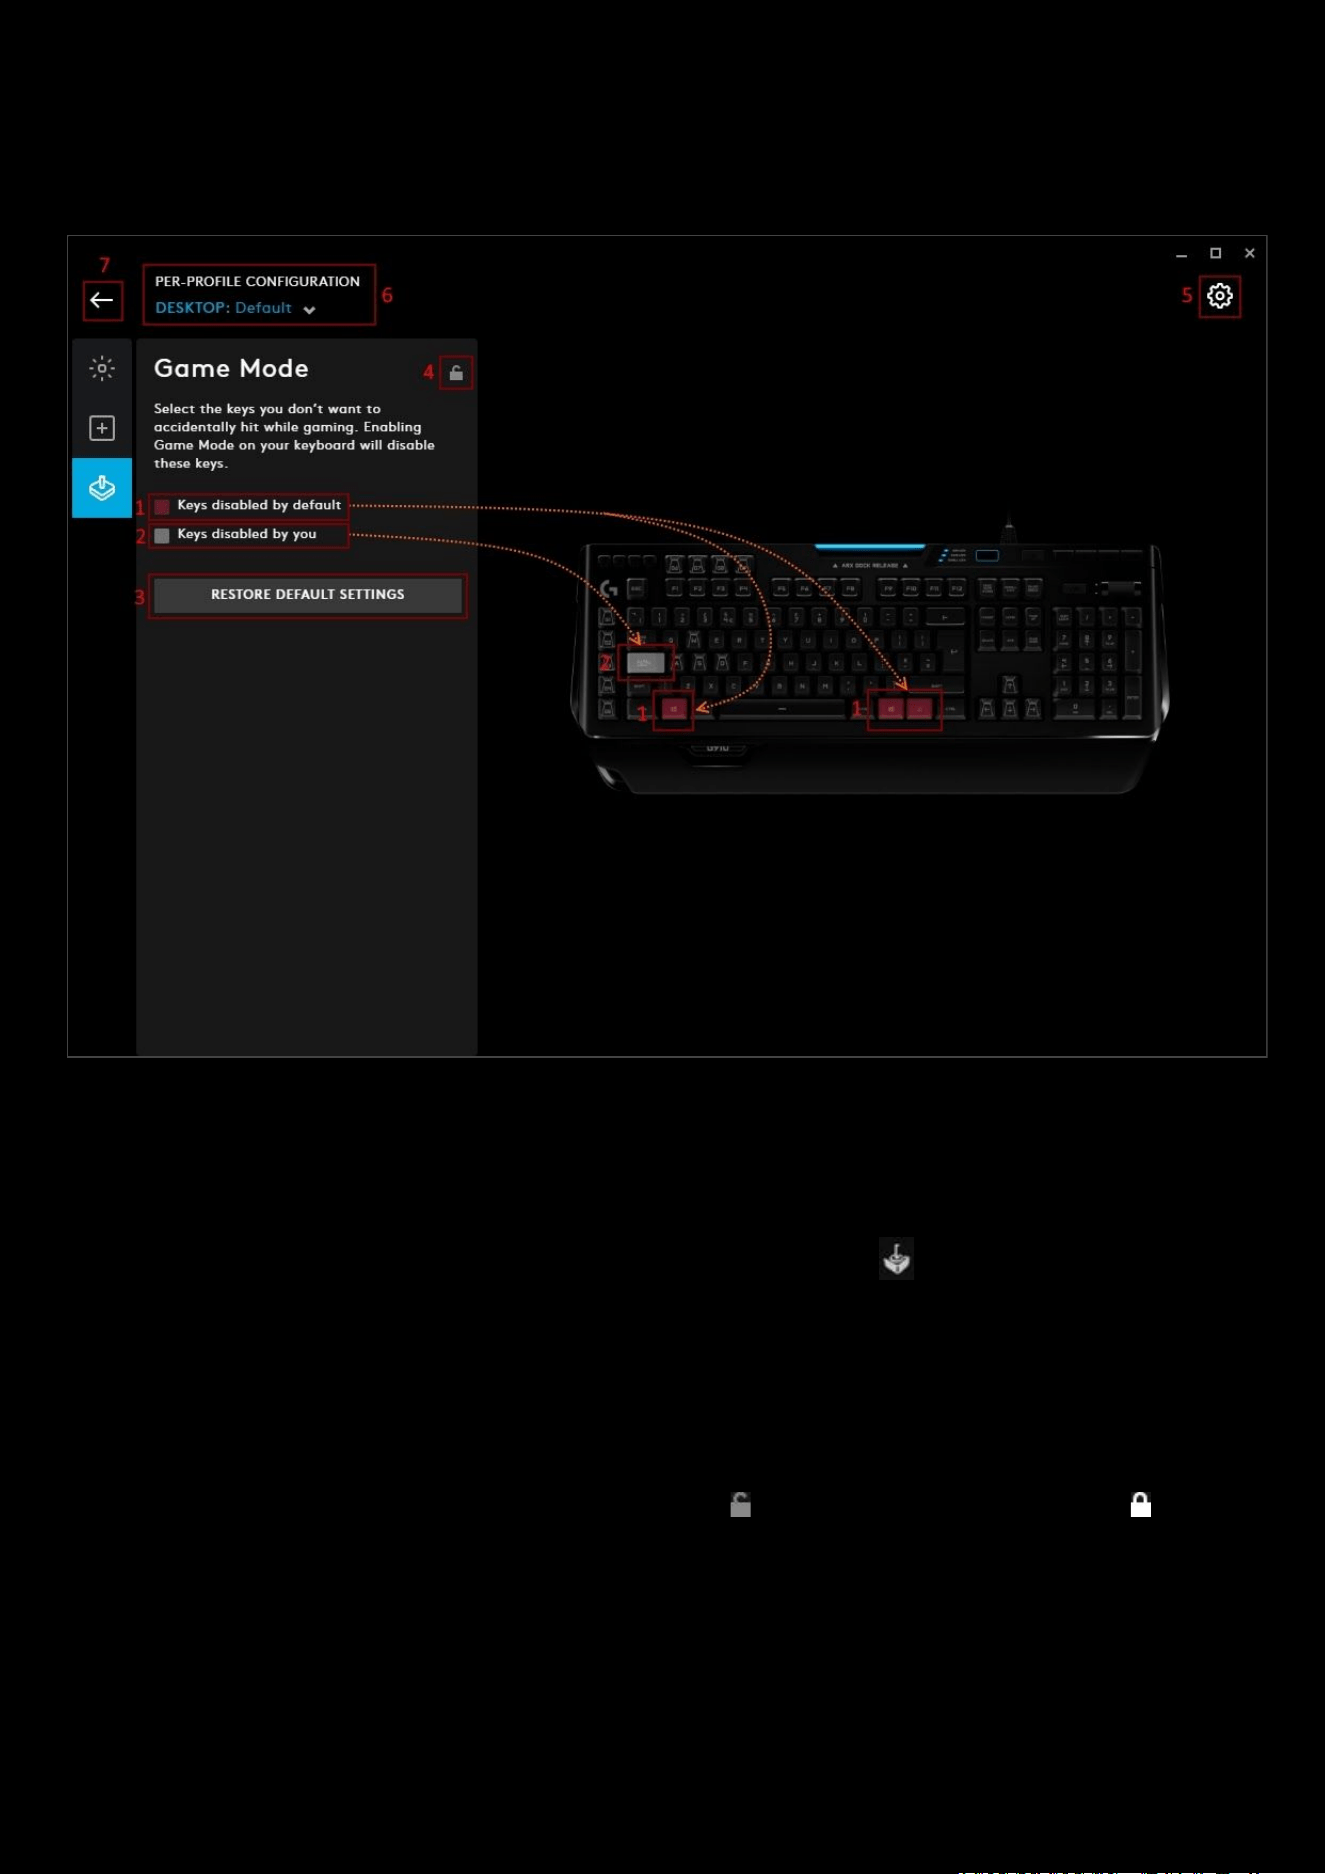
Game Mode
Game Mode controls which keys you want to disable during gaming to avoid accidental key presses.
1. Keys Disabled by default. These are the keys that are always disabled in Game Mode and cannot be changed.
Typically these are the Window and Right Mouse Button keys.
2. Keys disabled by you. Additional keys preset by you to also be disabled in Game Mode. Click each key to add
them to the group. Keys that are added are colored white, as shown in the example above with the CAPS LOCK.
Note
: The Game Mode button is sometimes a physical button with a Joystick Icon or a G key. Look for the G
symbol, if it's on the underside of a key use the FN button to activate.
3. RESTORE DEFAULT SETTINGS. Click this to reset the keys you disabled back to default.
4. PER-PROFILE GAME MODE LOCK. Lock this to set the Game Mode configuration for all your profiles
5. GEAR SETTINGS. Click this to take you to the Gear Settings page
6. PROFILE SELECTOR. Use the drop down to change the User Profile you want to configure for. Also it will
indicate if the profile is in a PER-PROFILE CONFIGURATION or in a PERSISTENT CONFIGURATION
7. BACK ARROW. Click the arrow to take you back to the Homepage.
28
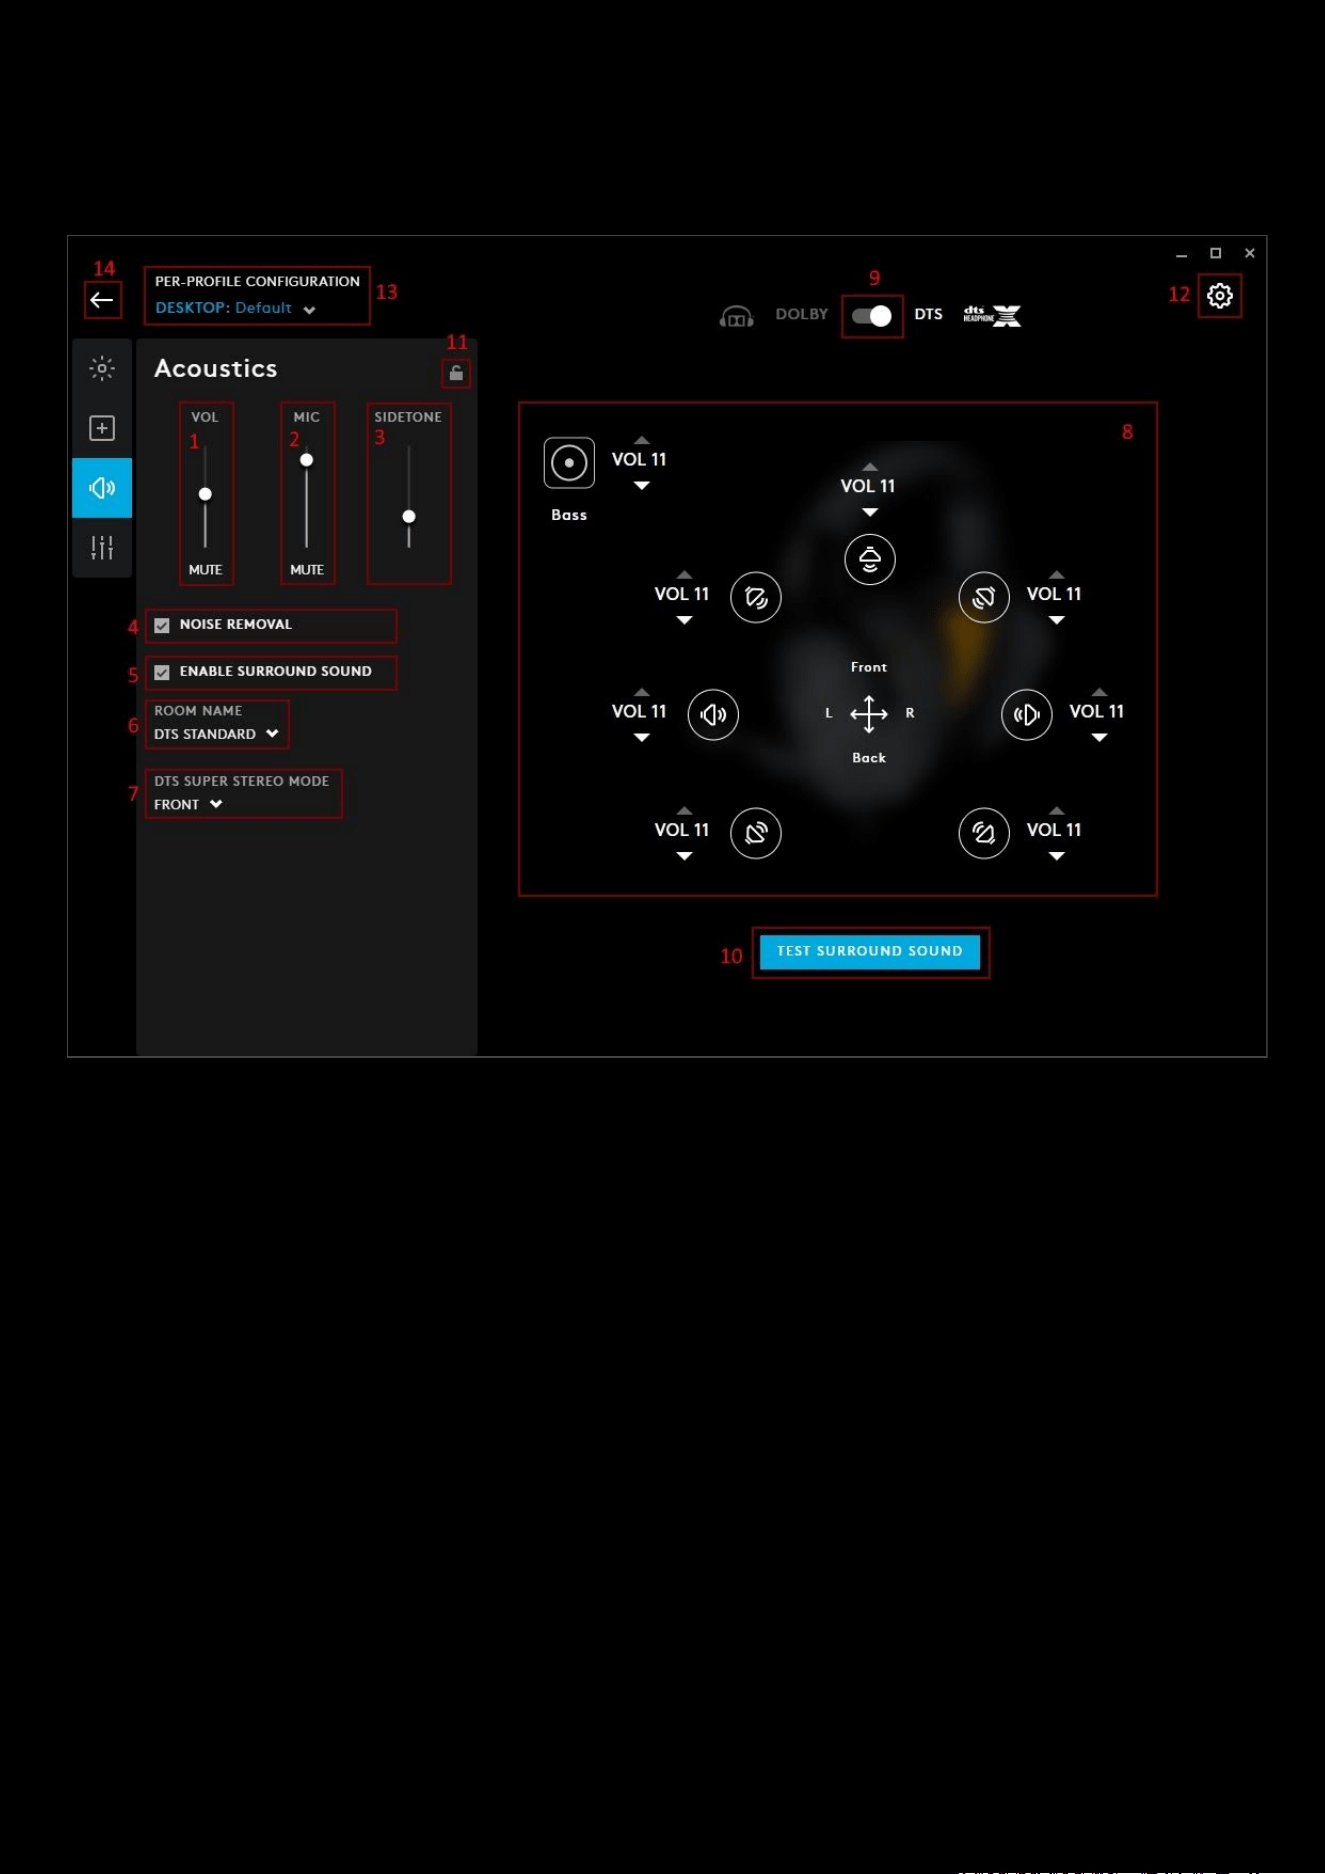
Acoustics
The acoustics tab controls all the audio effects for you gear.
1. VOLUME. This sets the volume of the audio device which syncs up with the system volume for that device.
2. MIC. This controls the volume output of your mic. Also synced to the system device mic level.
3. SIDETONE. This is the output of your mic played back into the headset. This allows you to hear yourself.
Note: Sidetone is now profile specific.
4. NOISE REMOVAL. Activate noise removal to filter out consistent low level humm or sound such as a fan or air
conditioner, it can help to get rid of that extra bit of noise.
Note:
NOISE REMOVAL
does not get rid of:
Dogs barking, Babies crying, Roommates voices, Spousal concern over the
amount of gaming or the doorbell when Chinese food final is delivered for your break between game matches
!
5. Enable Surround Sound. Checking this box will then enable the extra features from Dolby and DTS. Disable this
to keep the headset in stereo mode.
6. DOLBY MODE | ROOM NAME. This selects the type of mode you wish to have your surround sound in. If in
Dolby, you will see DOLBY MODE
. If you are in DTS then you will see ROOM NAME
a. DOLBY MODE. You will see MOVIE & MUSIC as options. These are preset surround sound profiles
b. ROOM NAME. Choose between DTS STANDARD, FPS and SIGNATURE STUDIO. These are preset
surround sound profiles
7. DTS SUPER STEREO MODE. This is only available in DTS mode. Select between FRONT (Default) and WIDE.
Again these are preset values.

29
Note:
You can still adjust volume levels for each surround sound channel (
7
) independently from the surround sound
profile selected.
8. Surround Sound Volume Mixer. You can adjust the individual volumes for each surround channel here. Only
present if you have enabled surround sound.
9. DOLBY | DTS Switch. Click to switch between the two modes. This is only available if you have enabled
surround sound.
10. PER-PROFILE ACOUSTICS LOCK. Lock this to set the Acoustics configuration for all your profiles.
11. TEST SURROUND SOUND. Click this button to play the surround sound test audio. This will go through each
channel and includes samples of film and gaming audio. This is available if you have surround sound enabled.
12. GEAR SETTINGS. Click this to take you to the Gear Settings page
13. PROFILE SELECTOR. Use the drop down to change the User Profile you want to configure for. Also it will
indicate if the profile is in a PER-PROFILE CONFIGURATION or in a PERSISTENT CONFIGURATION
14. BACK ARROW. Click the arrow to take you back to the Homepage.
30
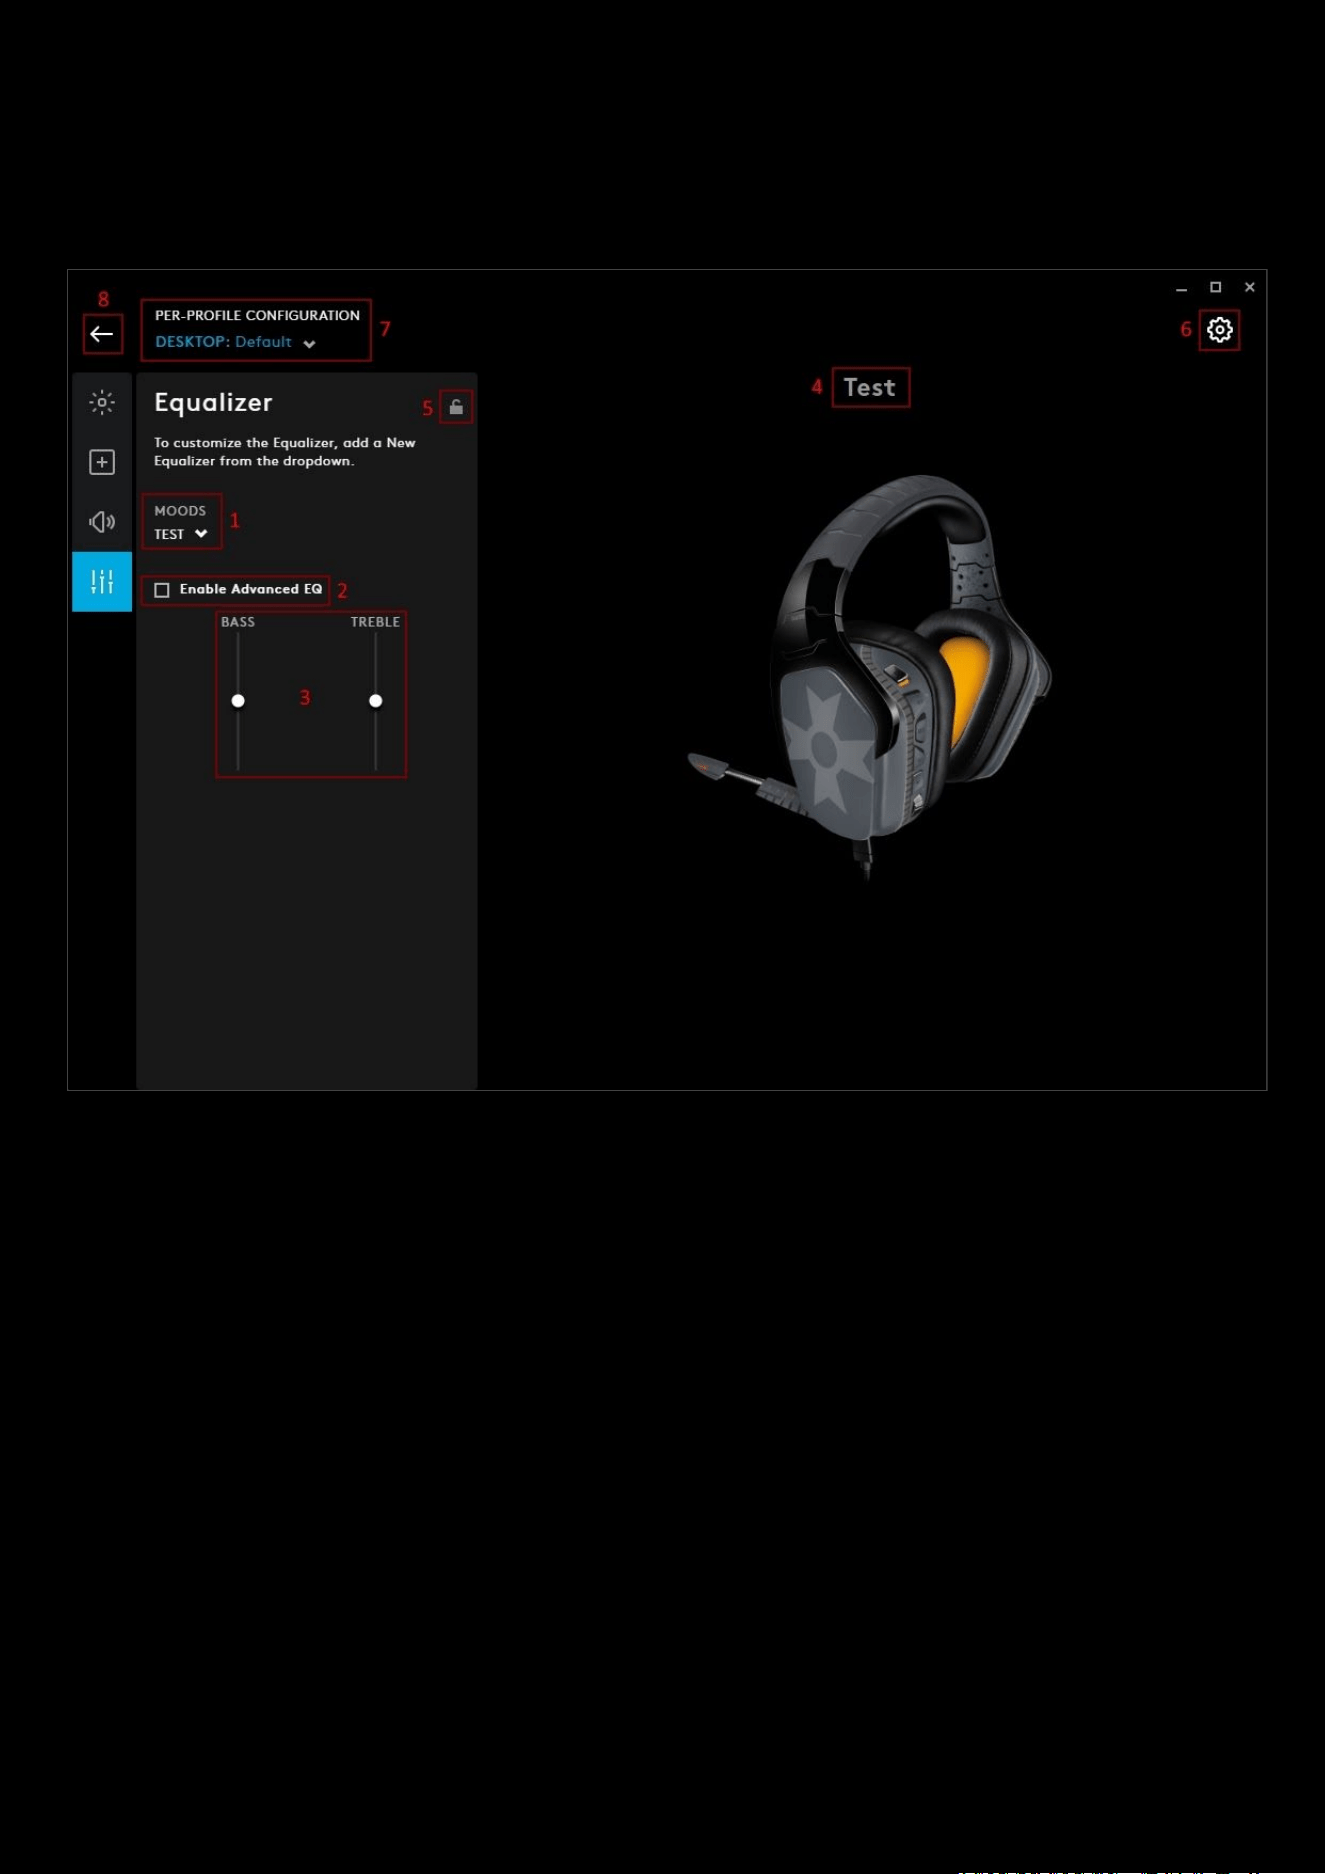
Equalizer
To further enhance your audio, select a MOOD for your gear. In the example below, we have created a new equalizer
and called it Test
1. MOODS. Select your MOOD from :
a. DEFAULT
b. FLAT
c. BASS BOOST
d. MOBA
e. FPS
f. CINEMATIC
g. COMMUNICATIONS
h. + ADD NEW EQUALIZER
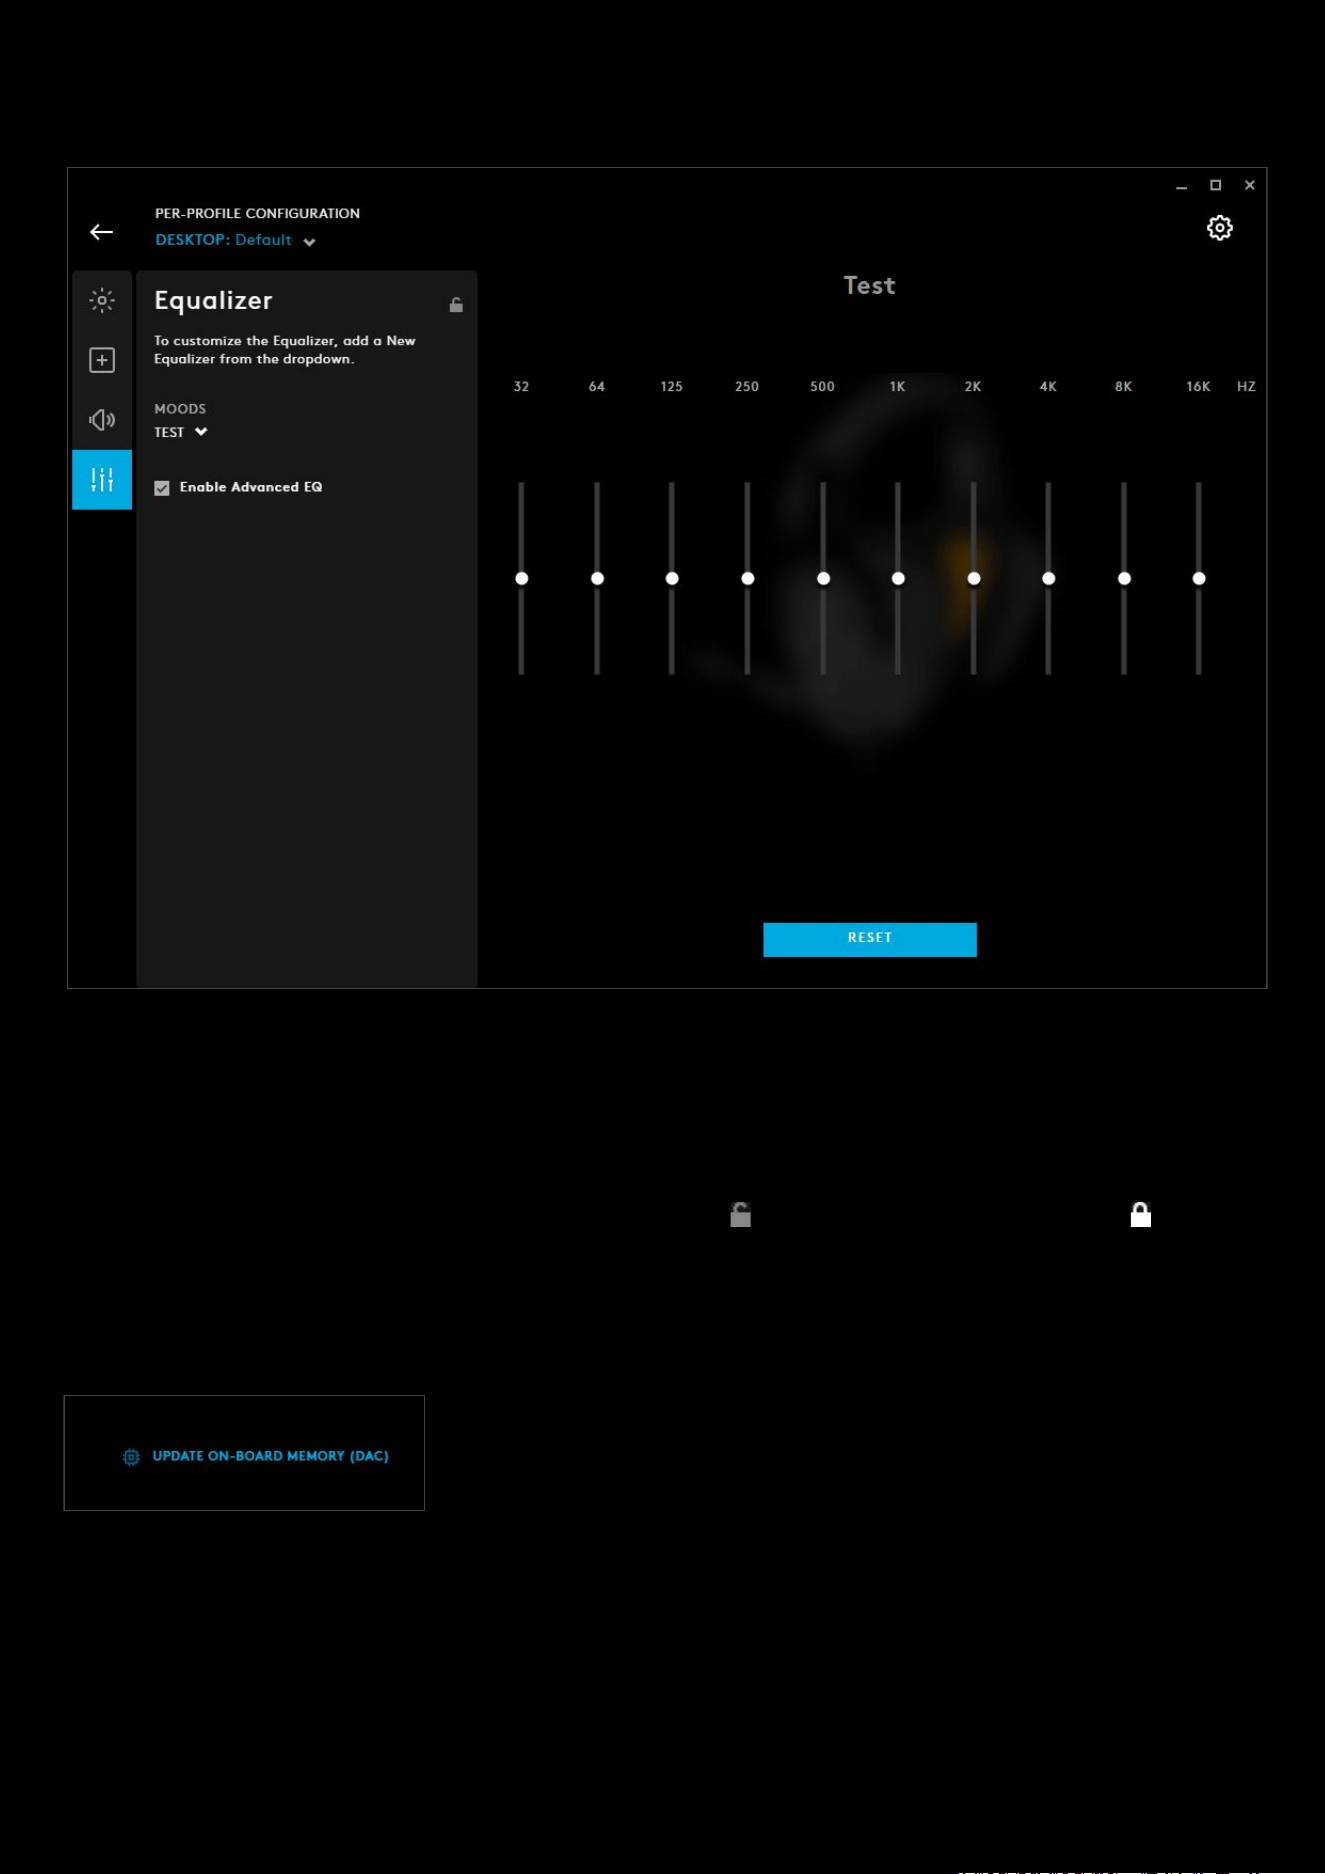
31
2. Enable Advanced EQ. Available when you select + ADD NEW EQUALIZER. Checking this box will switch to the
full EQ view. You will also see the option to RESET
the values back to default if you want to start again.
3. Simple Equalizer View. Drag the BASS and TREBLE sliders to your preferred settings.
4. Equalizer Profile Name. If you have selected + ADD NEW EQUALIZER, click here to rename your Equalizer.
5. PER-PROFILE EQUALIZER LOCK. Lock this to set the Equalizer configuration for all your profiles.
6. GEAR SETTINGS. Click this to take you to the Gear Settings page
7. PROFILE SELECTOR. Use the drop down to change the User Profile you want to configure for. Also it will
indicate if the profile is in a PER-PROFILE CONFIGURATION or in a PERSISTENT CONFIGURATION
8. BACK ARROW. Click the arrow to take you back to the Homepage.
Blue VO!CE Equalizer
For enabled devices, you will also have the option to UPDATE ON-BOARD
MEMORY (DAC). This writes the Equalizer preset to the onboard memory so you
can use this preset on a different machine that does not have G HUB installed.
Note:
The On-board memory update does not include the Blue VO!CE Preset. You will need to create a new preset and
share that online. You can then download that preset onto another computer that has G HUB installed.
Browsing for more Blue VO!CE Equalizer presets
You can search for more Blue VO!CE Equalizer presets that have been shared by other users within G HUB.
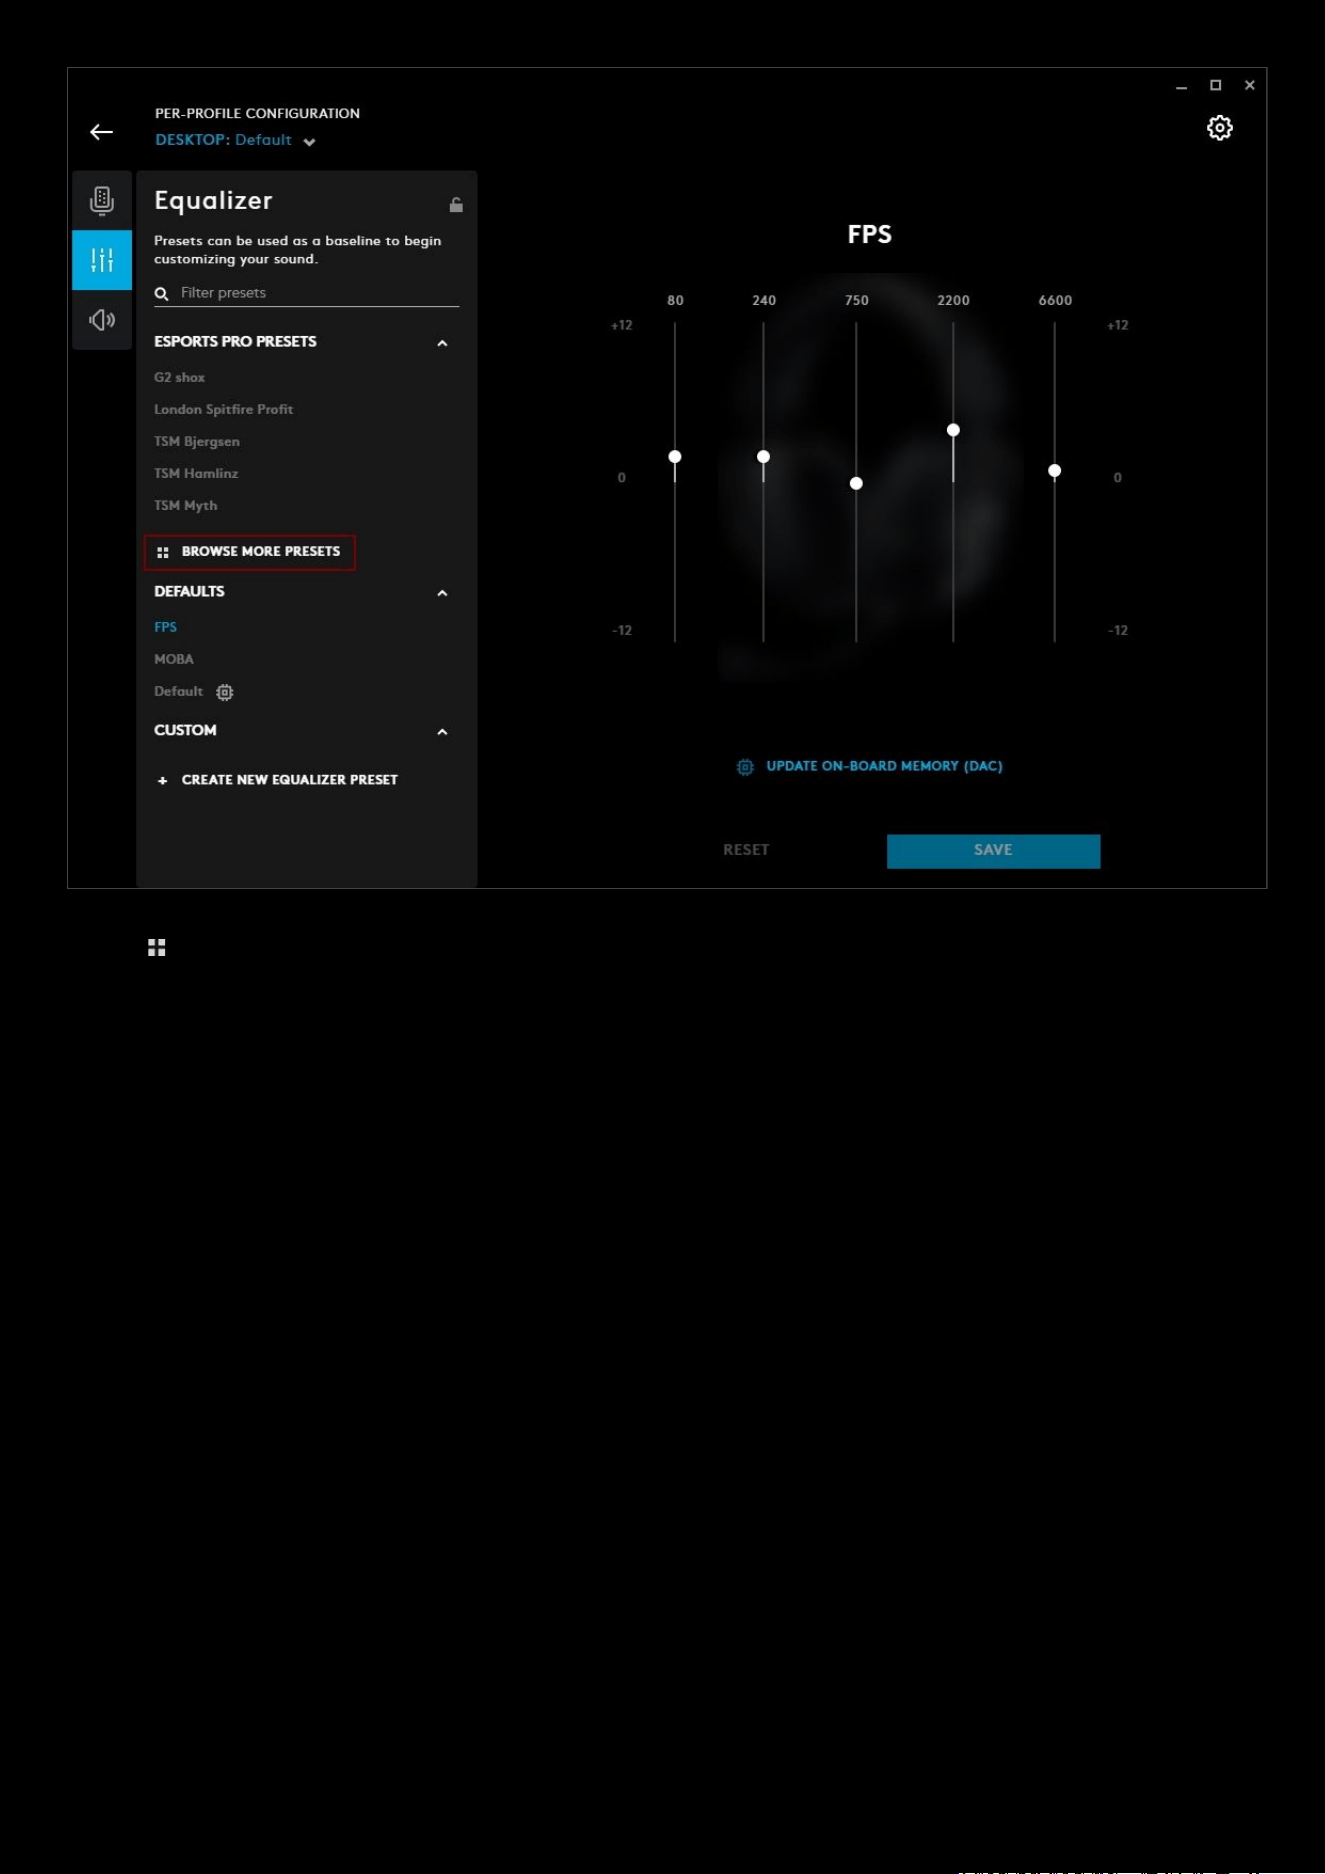
32
Click on BROWSE MORE PRESETS
, this will take you to the Blue VO!CE Equalizer presets download page. This is
similar to the Lighting and Profiles download page. If you know the author or the name of the preset you can enter
these in the search bar.
33
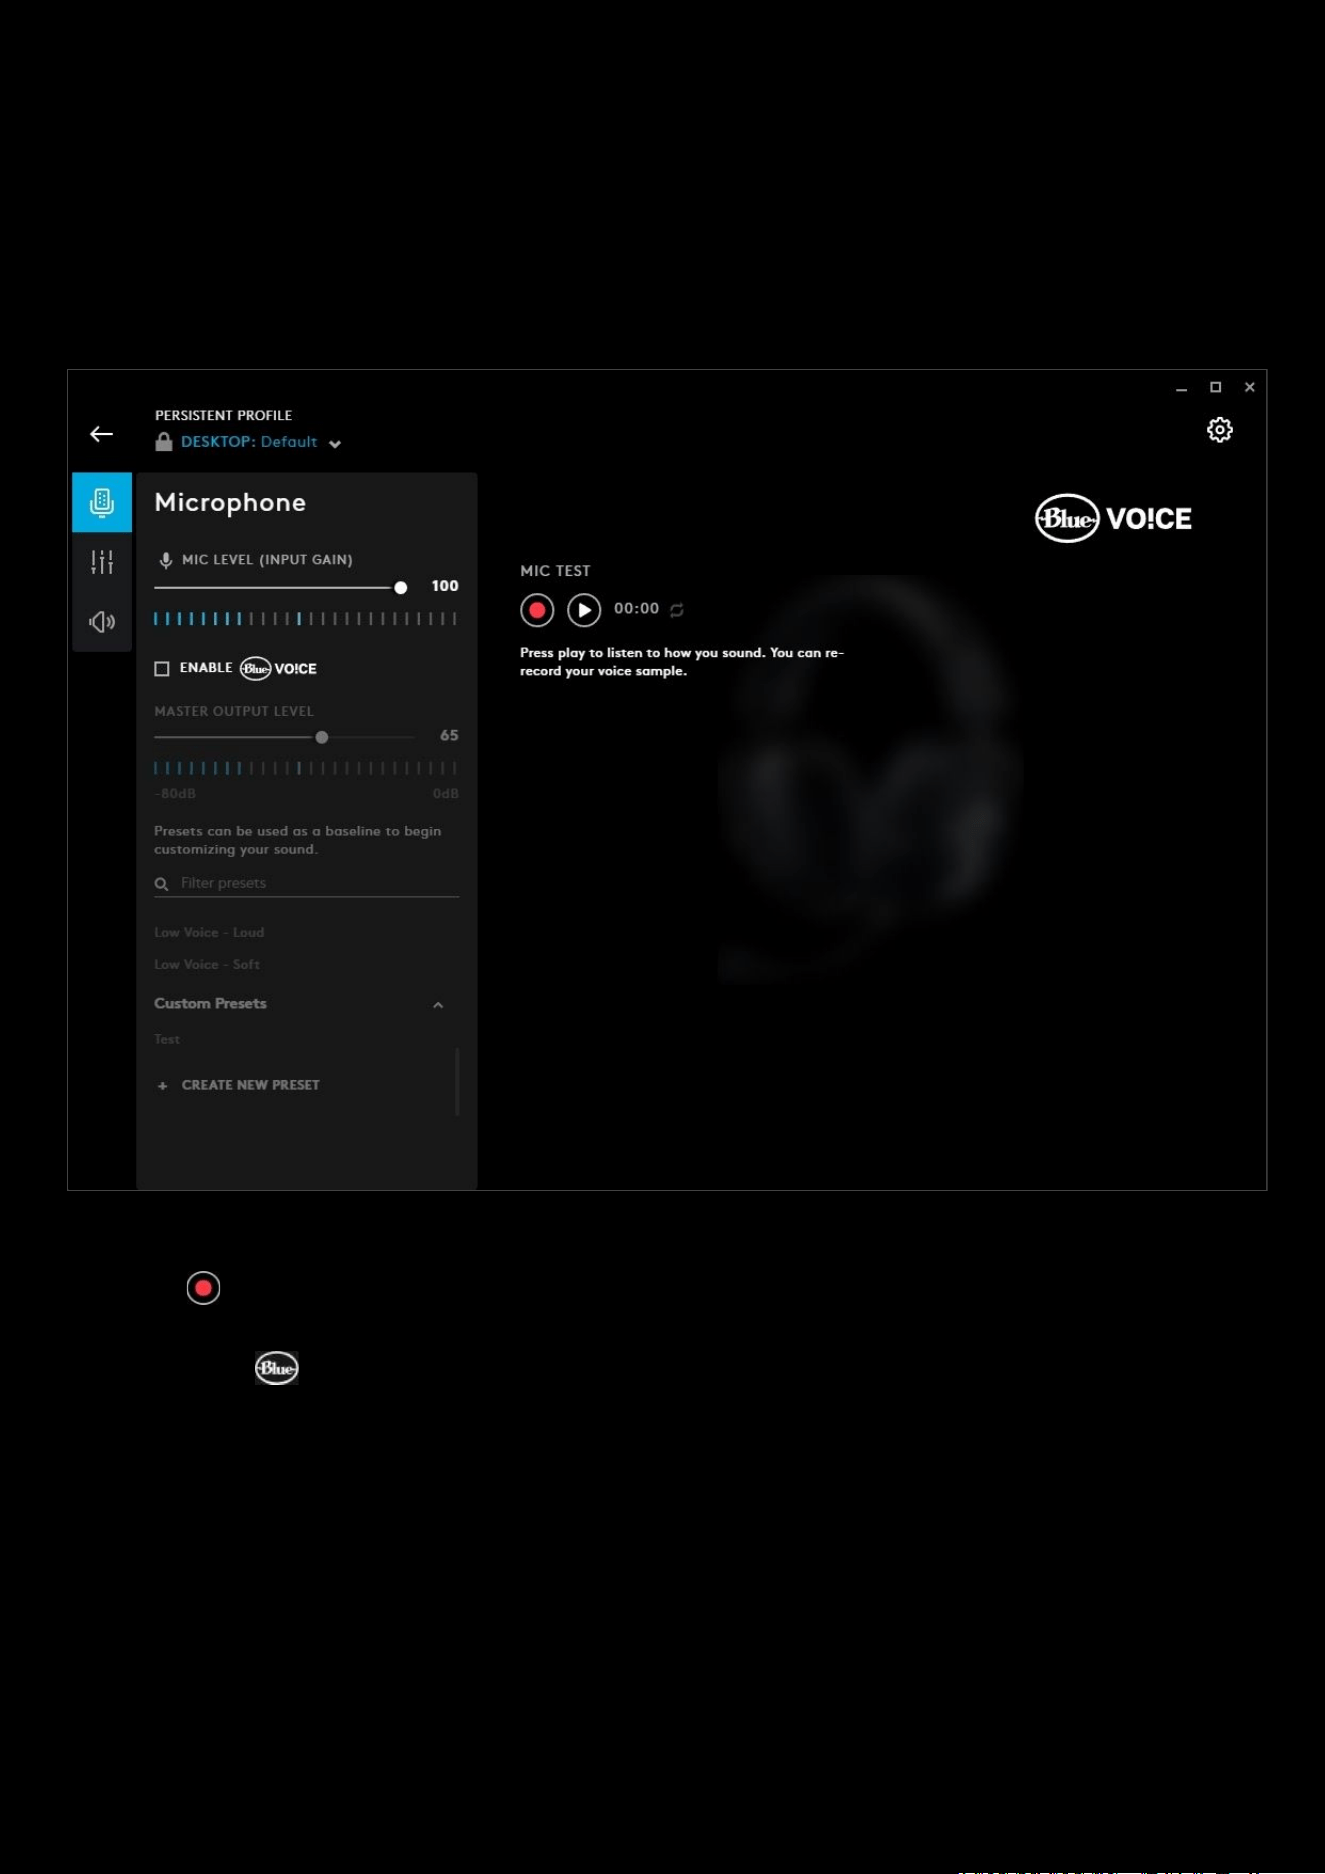
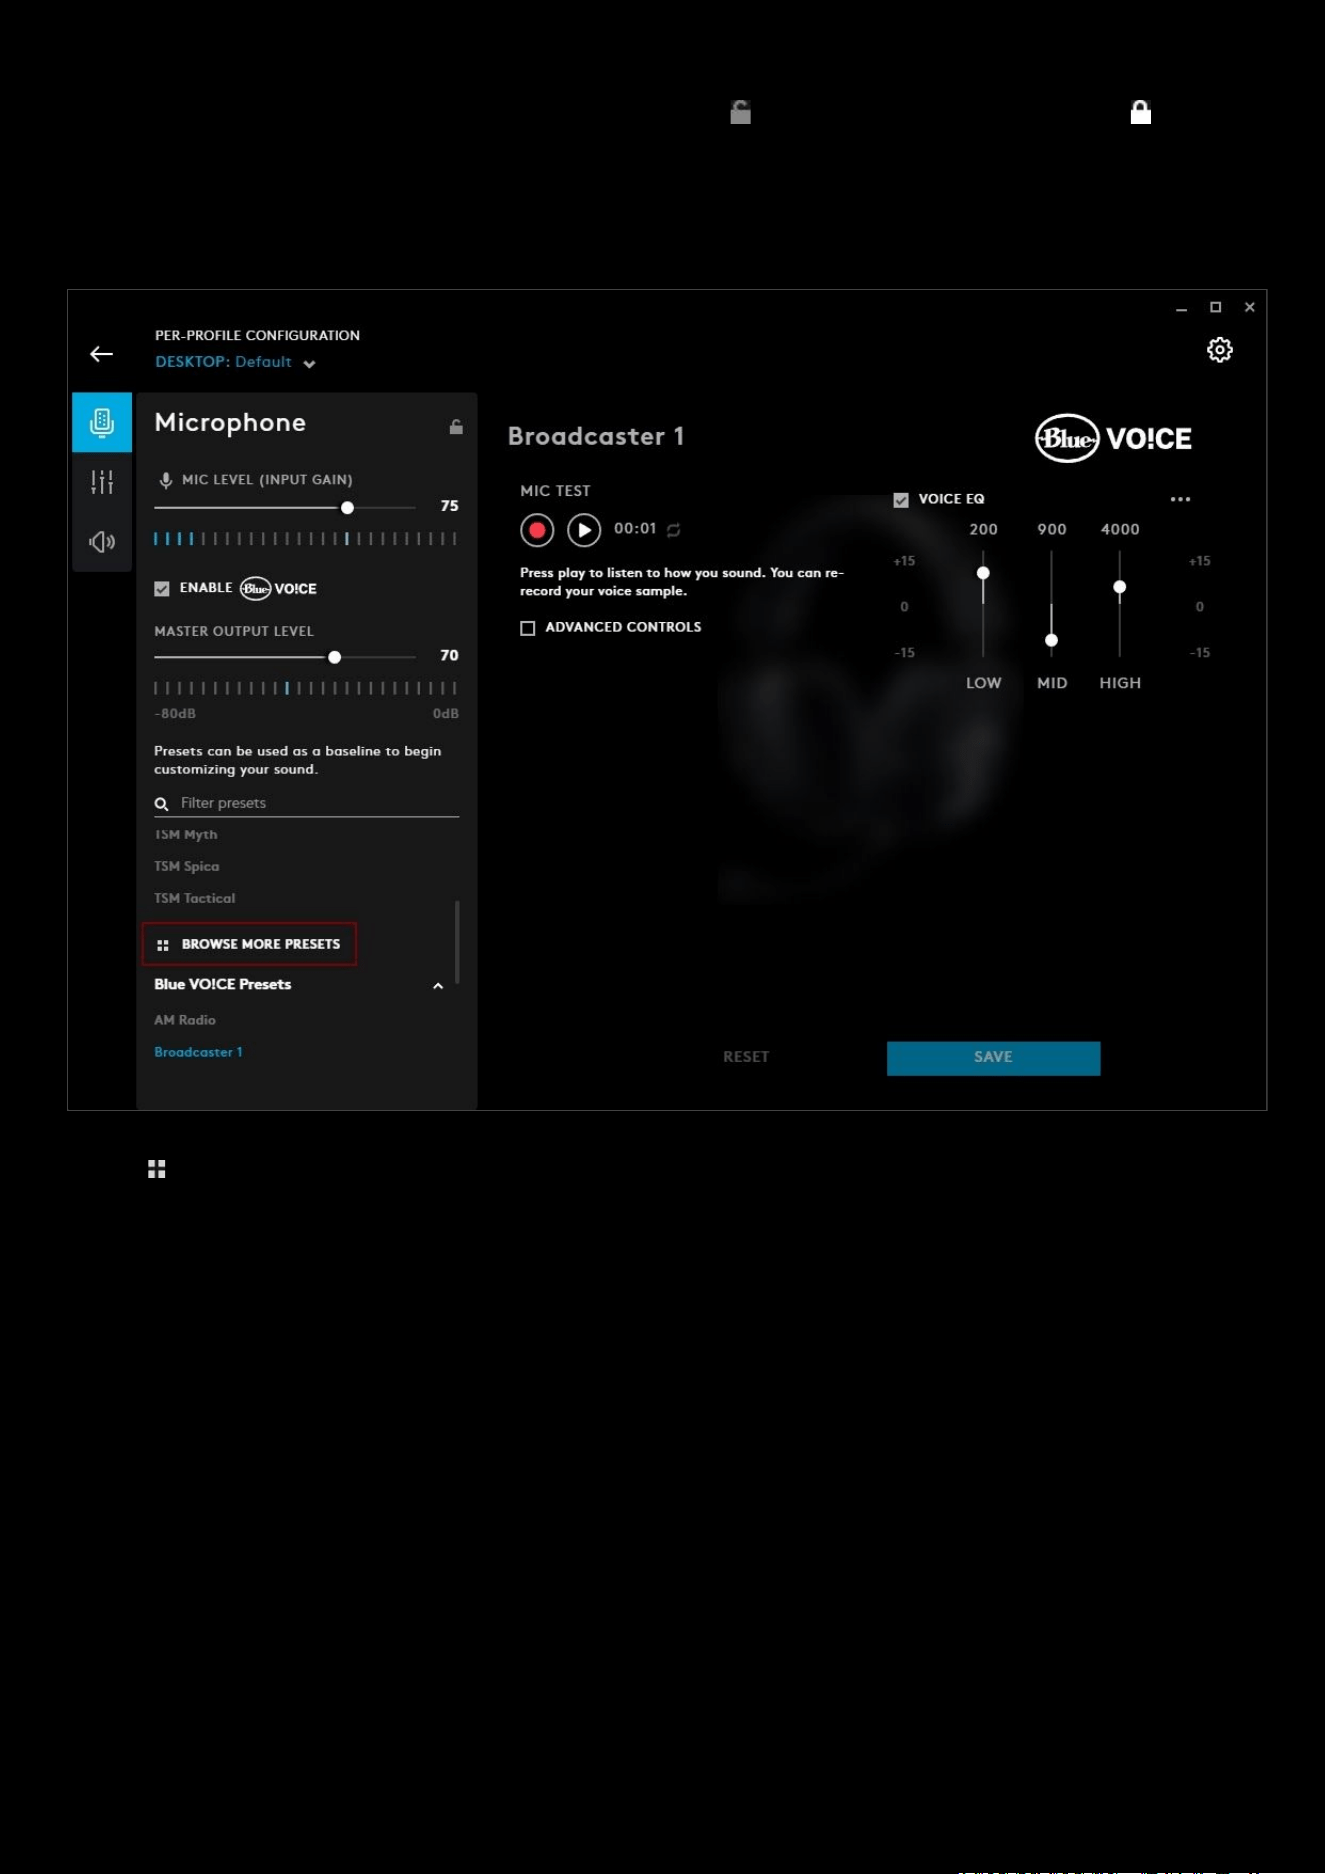
Microphone
For Blue VO!CE enabled headsets, there will be a tab dedicated to setting up your voice, whether it be for streaming,
recording a podcast or communicating with your team.
For the
Yeti X WoW® Edition Effects and Samples, please check section 4: Advanced Settings > Microphone: Effects and
Microphone: Sampler
Even without the Blue VO!CE enabled, you will be able to record and playback the mic to listen to how you sound.
Clicking the will overwrite the last mic test.
Check the ENABLE
VOICE box to show all the additional settings. This will enable presets, VOICE EQ and
ADVANCED CONTROLS
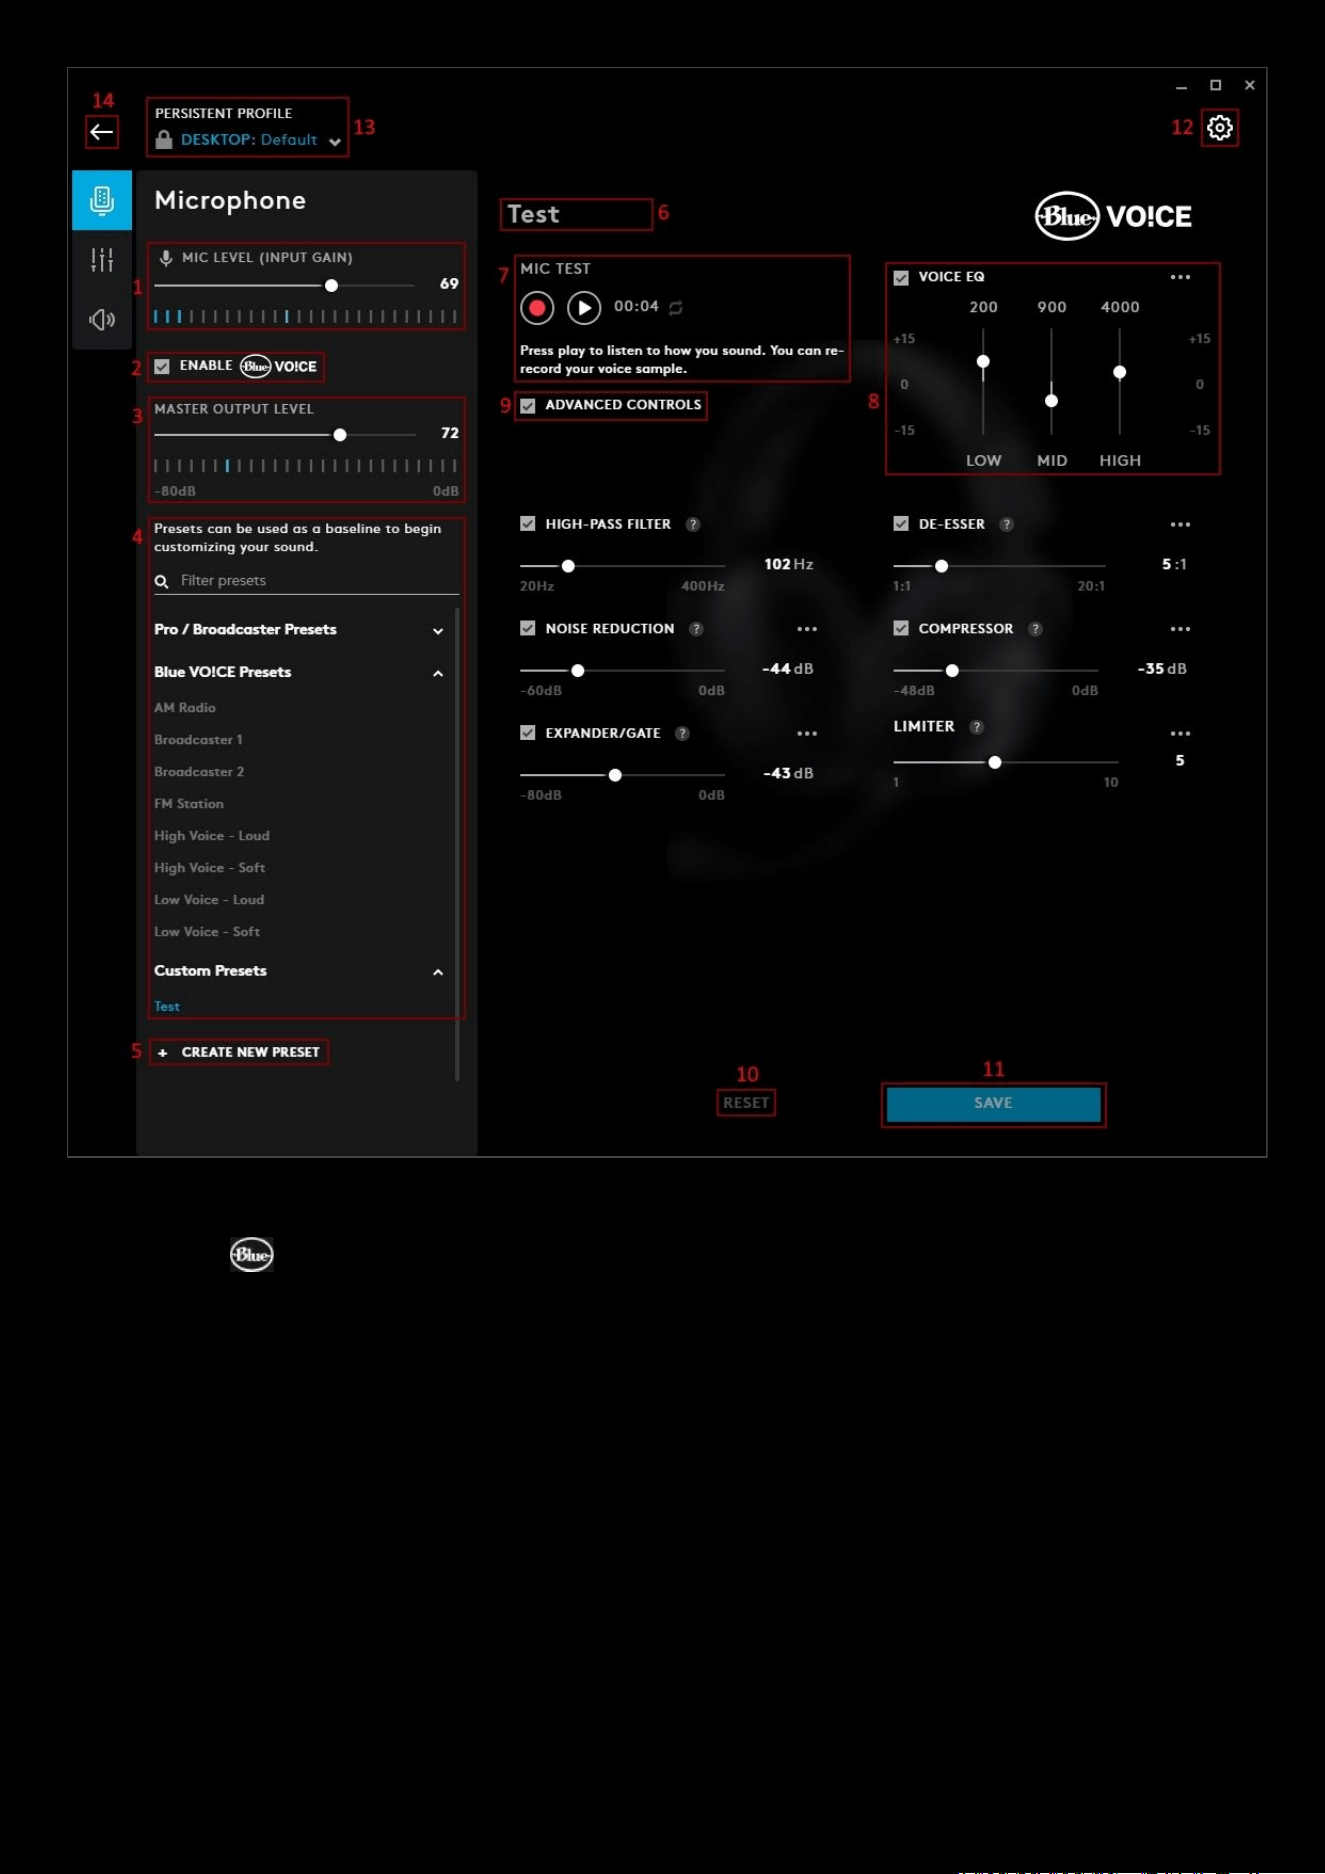
34
1. MIC LEVEL (INPUT GAIN). This adjusts the input gain of the microphone and syncs with the system mic volume.
2. ENABLE VOICE. Tick this box to enable Blue VO!CE
3. MASTER OUTPUT LEVEL. Controls the final output level for the microphone after all Blue VO!CE processing is
done.
4. Presets. You can select one of the Presets that come with G HUB or create your own. Any ones you create will
be in the section Custom Presets
.
5. + CREATE NEW PRESET. Click this to start creating your own preset. Don't forget to rename it! (7)
6. Preset Name. In the example above, we have created a Test preset. Click the name to highlight and edit
7. MIC TEST. Use the record and playback to listen to how you sound. The playback will be on a loop and you can
re-record this at any time. Clicking the record button will overwrite the last recording.
8. VOICE EQ. Check the box to allow you to make changes to the LOW /MID / HIGH ranges. More on this in the
advanced settings section
.
9. ADVANCED CONTROLS. Check this box to show the advanced controls. More on this in the advanced settings
section
.
10. RESET. Click this to reset the preset back to default settings.
11. SAVE. Click save to update the preset
12. GEAR SETTINGS. Click this to take you to the Gear Settings page
35
13. PROFILE SELECTOR. Use the drop down to change the User Profile you want to configure for. Also it will
indicate if the profile is in a PER-PROFILE CONFIGURATION or in a PERSISTENT CONFIGURATION
14. BACK ARROW. Click the arrow to take you back to the Homepage.
Browsing for more Blue VO!CE presets
You can search for more Blue VO!CE presets that have been shared by other users within G HUB.
Click on BROWSE MORE PRESETS
, this will take you to the Blue VO!CE presets download page. This is similar to the
Lighting and Profiles download page. If you know the author or the name of the preset you can enter these in the
search bar.
36
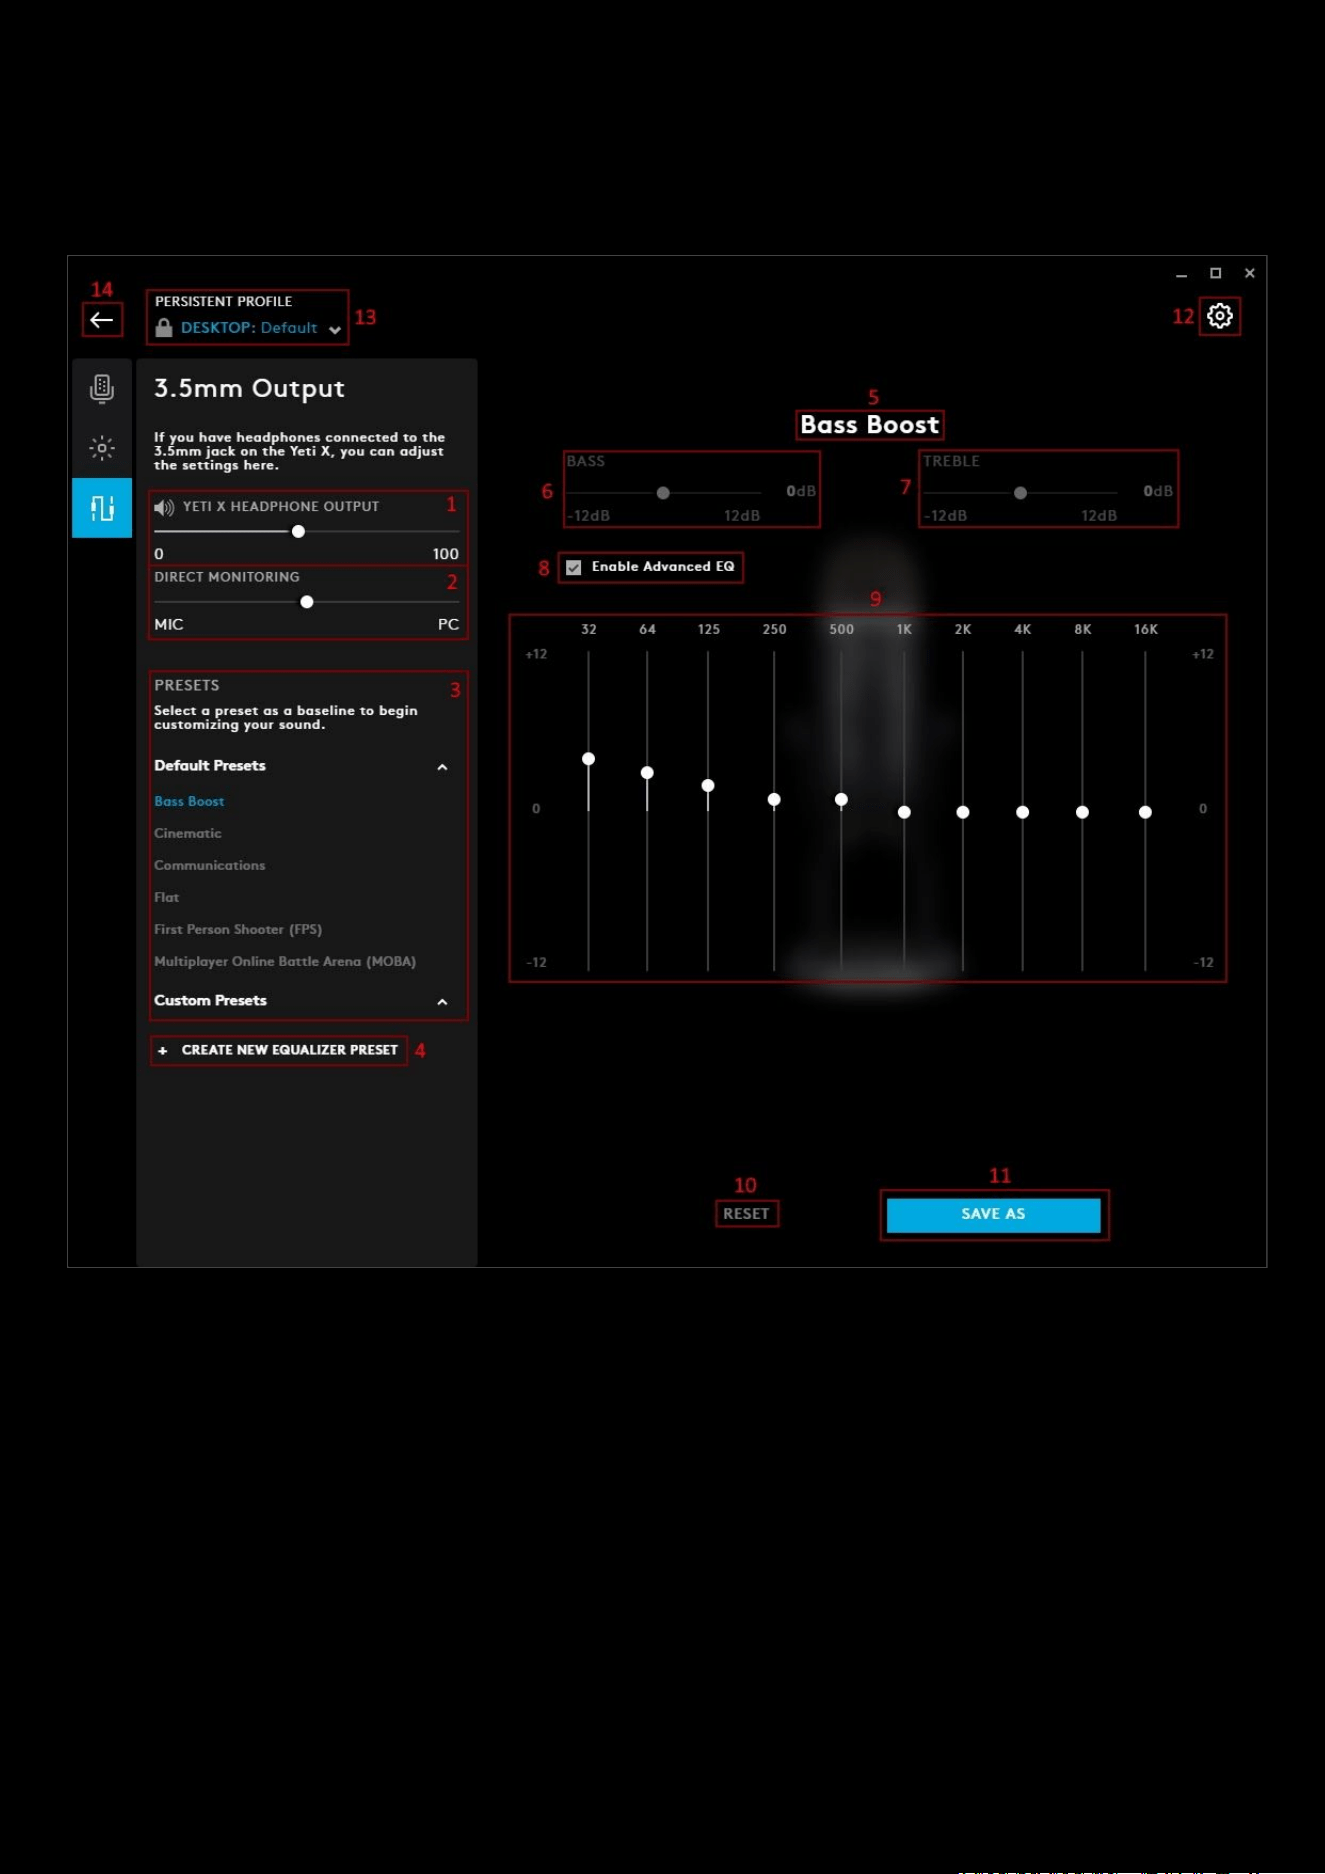
3.5mm Output
For devices such as the Yeti X, you can plug a 3.5mm headset into the unit and adjust the output sound. For example,
you can plug a PRO headset into the Yeti X, having the Yeti X replace the USB DAC.
1. HEADPHONE OUTPUT. This adjusts the output volume of the headset. This is not synced to the system volume
and adjusts only the volume of the 3.5mm output
2. DIRECT MONITORING. Adjust the balance of the feedback of the mic to the output volume. Adjusting the slider
to the MIC will increase the volume of the feedback (also known as sidetone) of your microphone and decrease
the output volume. Adjusting the slider towards the PC will reduce the microphone feedback and increase the
output volume.
3. Presets. You can select one of the EQ Presets that come with G HUB or create your own. Any ones you create
will appear in the section Custom Presets
sections.
4. + CREATE NEW PRESET. Click this to start creating your own EQ preset. Don't forget to rename it! (7)
5. Preset Name. Click the name to highlight and edit
6. BASS. Use the slider to adjust the bass to your preference. 0dB is the default value. If you enable Advanced EQ
then this section will gray out and not be adjustable as you will have finer control of the bass in the advanced EQ
settings.

37
7. TREBLE. Use the slider to adjust the bass to your preference. 0dB is the default value. If you enable Advanced
EQ then this section will gray out and not be adjustable as you will have finer control of the treble in the
advanced EQ settings.
8. ENABLE ADVANCED EQ. Check this box to enable the advanced controls. This gives you finer control of the EQ
Levels, note this will disable the BASS AND TREBLE sliders above. If you are creating your own preset, you can
adjust the values to your preferences and then click SAVE AS
.
9. RESET. Click this to reset the preset back to default settings.
10. SAVE. Click save to update the preset, with the current preset name.
11. GEAR SETTINGS. Click this to take you to the Gear Settings page
12. PROFILE SELECTOR. Use the drop down to change the User Profile you want to configure for. Also it will
indicate if the profile is in a PER-PROFILE CONFIGURATION or in a PERSISTENT CONFIGURATION
13. BACK ARROW. Click the arrow to take you back to the Homepage.
38
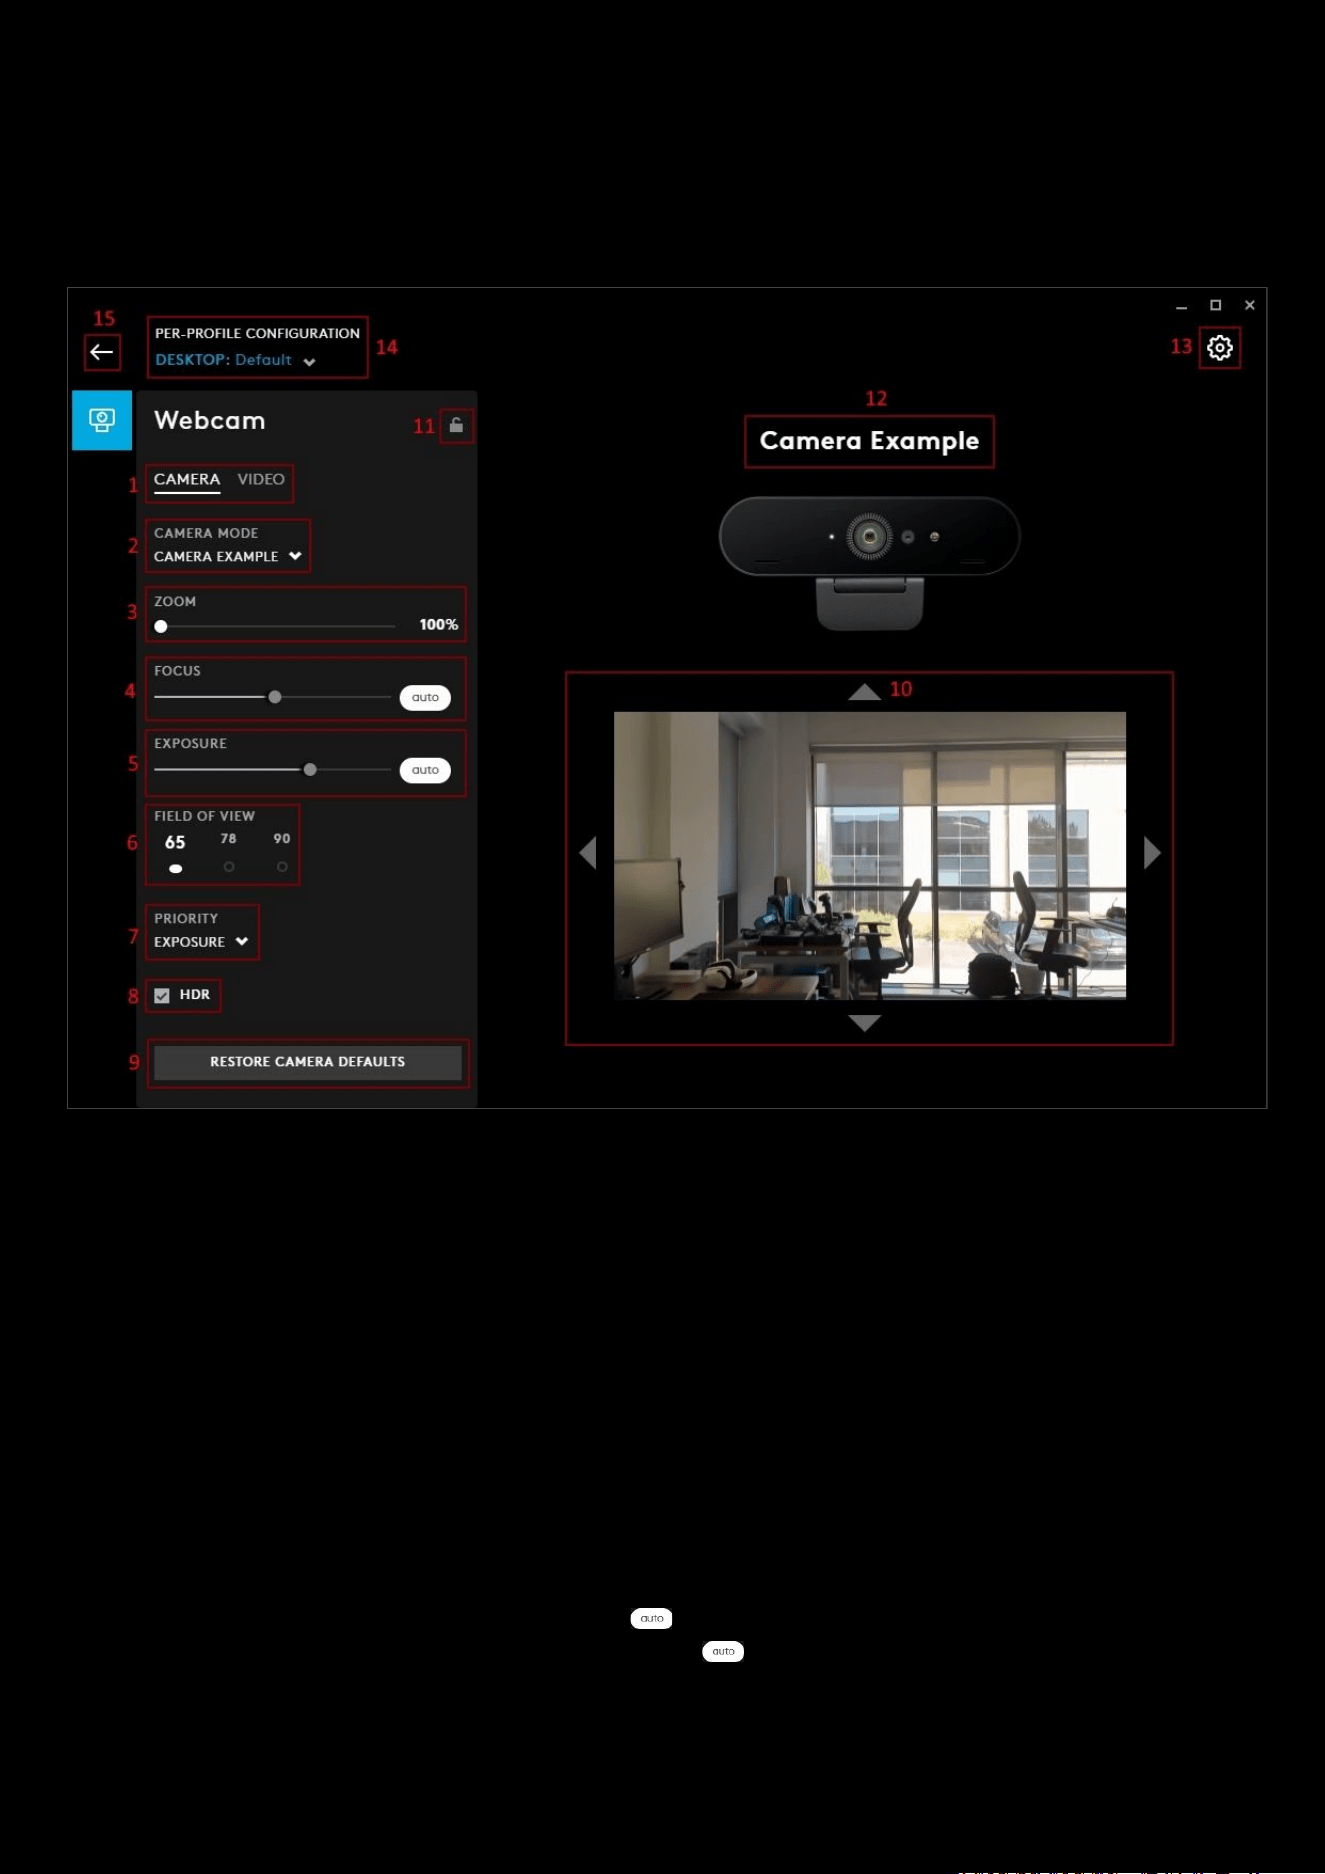
Webcam
The Webcam tab controls your Camera and Video settings. Configuring features such as zoom, brightness and HDR.
Camera
1. CAMERA| VIDEO. Switch between the CAMERA and VIDEO configuration
2. CAMERA MODE. Select between the 3 modes.
a. DEFAULT. Uses factory settings
b. STREAMING. Preset set to give the best streaming results, set at a 78 degree Field of View.
c. VIDEO. Preset configured for group calls. Zoomed out further than streaming at a 90 degree Field of
View.
d. + ADD NEW CAMERA. Allows you to configure the individual elements of your CAMERA experience as a
profile.
Note:
STREAMING and VIDEO modes are preset and do not have any customisable features.
+ ADD NEW CAMERA
3. ZOOM. Default is 100% for CUSTOM. Zoom up to 500%
4. FOCUS. Use the slider to focus manually or click to allow the camera to control the focus automatically.
5. EXPOSURE. Use the slider to increase/decrease or click to allow the camera to control the exposure
automatically.
6. FIELD OF VIEW. Switch between 65, 78 and 90 degrees field of view.
7. PRIORITY. Select between EXPOSURE and FRAMERATE. EXPOSURE will not limit the quality whilst FRAMERATE
will balance the output to work better with streaming.

39
8. HDR. This allows the camera to capture in High Dynamic Range mode (for compatible webcams) if ticked.
Untick to disable this feature.
9. RESTORE CAMERA DEFAULTS. Click this box to reset to factory defaults for your CAMERA settings.
10. Picture Adjust. This will show the image being recorded. By default the zoom is at 100%, but if you zoom in
further, you will be able to adjust the position of the image with the four arrows
11. PER-PROFILE WEBCAM SETTINGS LOCK. Lock this to set the Webcam configuration for all your profiles.
12. Profile Name. Click the text box to rename your Webcam Profile.
13. GEAR SETTINGS. Click this to take you to the Gear Settings page
a. In the Gear Page for Webcam you might see a configuration option
b. (dependent on your Webcam model) to enable other software control. Enable this to disable control
over settings like FOV, AWB etc by G HUB and allow other applications to fully control all the features.
This is disabled by default.
14. PROFILE SELECTOR. Use the drop down to change the User Profile you want to configure for. Also it will
indicate if the profile is in a PER-PROFILE CONFIGURATION or in a PERSISTENT CONFIGURATION
15. BACK ARROW. Click the arrow to take you back to the Homepage.
Video
1. CAMERA| VIDEO. Switch between the CAMERA and VIDEO configuration
2. VIDEO FILTER. Select a filter for your video feed
a. No FILTER
b. CARTOON.
c. ZOMBIE.
d. BLACK & WHITE.
e. SICKNESS

40
f. + ADD NEW FILTER. Allows you to configure the individual elements of your VIDEO experience in a
profile.
Note:
CARTOON, ZOMBIE, BLACK & WHITE and SICKNESS filters are pre-set and do not have any customisable features.
+ ADD NEW FILTER
3. BRIGHTNESS. Use the slider to adjust the brightness. Default is 50%
4. CONTRAST. User to slider to adjust the contrast. Default is 50%
5. SHARPNESS. User to slider to adjust the sharpness. Default is 50%
6. WHITE BALANCE. Use the slider to adjust manually or click to activate Automatic White Balance
7. SATURATION. User to slider to adjust the saturation. Default is 50%
8. ANTI FLICKER. Switch between 50Hz and 60Hz output frequencies.
9. RESTORE VIDEO DEFAULTS. Click this box to reset to factory defaults for your VIDEO settings.
10. Picture Adjust. This will show the image being recorded. By default the zoom (Camera setting) is at 100%, but if
you zoom in further, you will be able to adjust the position of the image with the four arrows
11. PER-PROFILE WEBCAM SETTINGS LOCK. Lock this to set the Webcam configuration for all your profiles.
12. Profile Name. Click the text box to rename your Webcam Profile.
13. GEAR SETTINGS. Click this to take you to the Gear Settings page
14. PROFILE SELECTOR. Use the drop down to change the User Profile you want to configure for. Also it will
indicate if the profile is in a PER-PROFILE CONFIGURATION or in a PERSISTENT CONFIGURATION
15. BACK ARROW. Click the arrow to take you back to the Homepage.
41
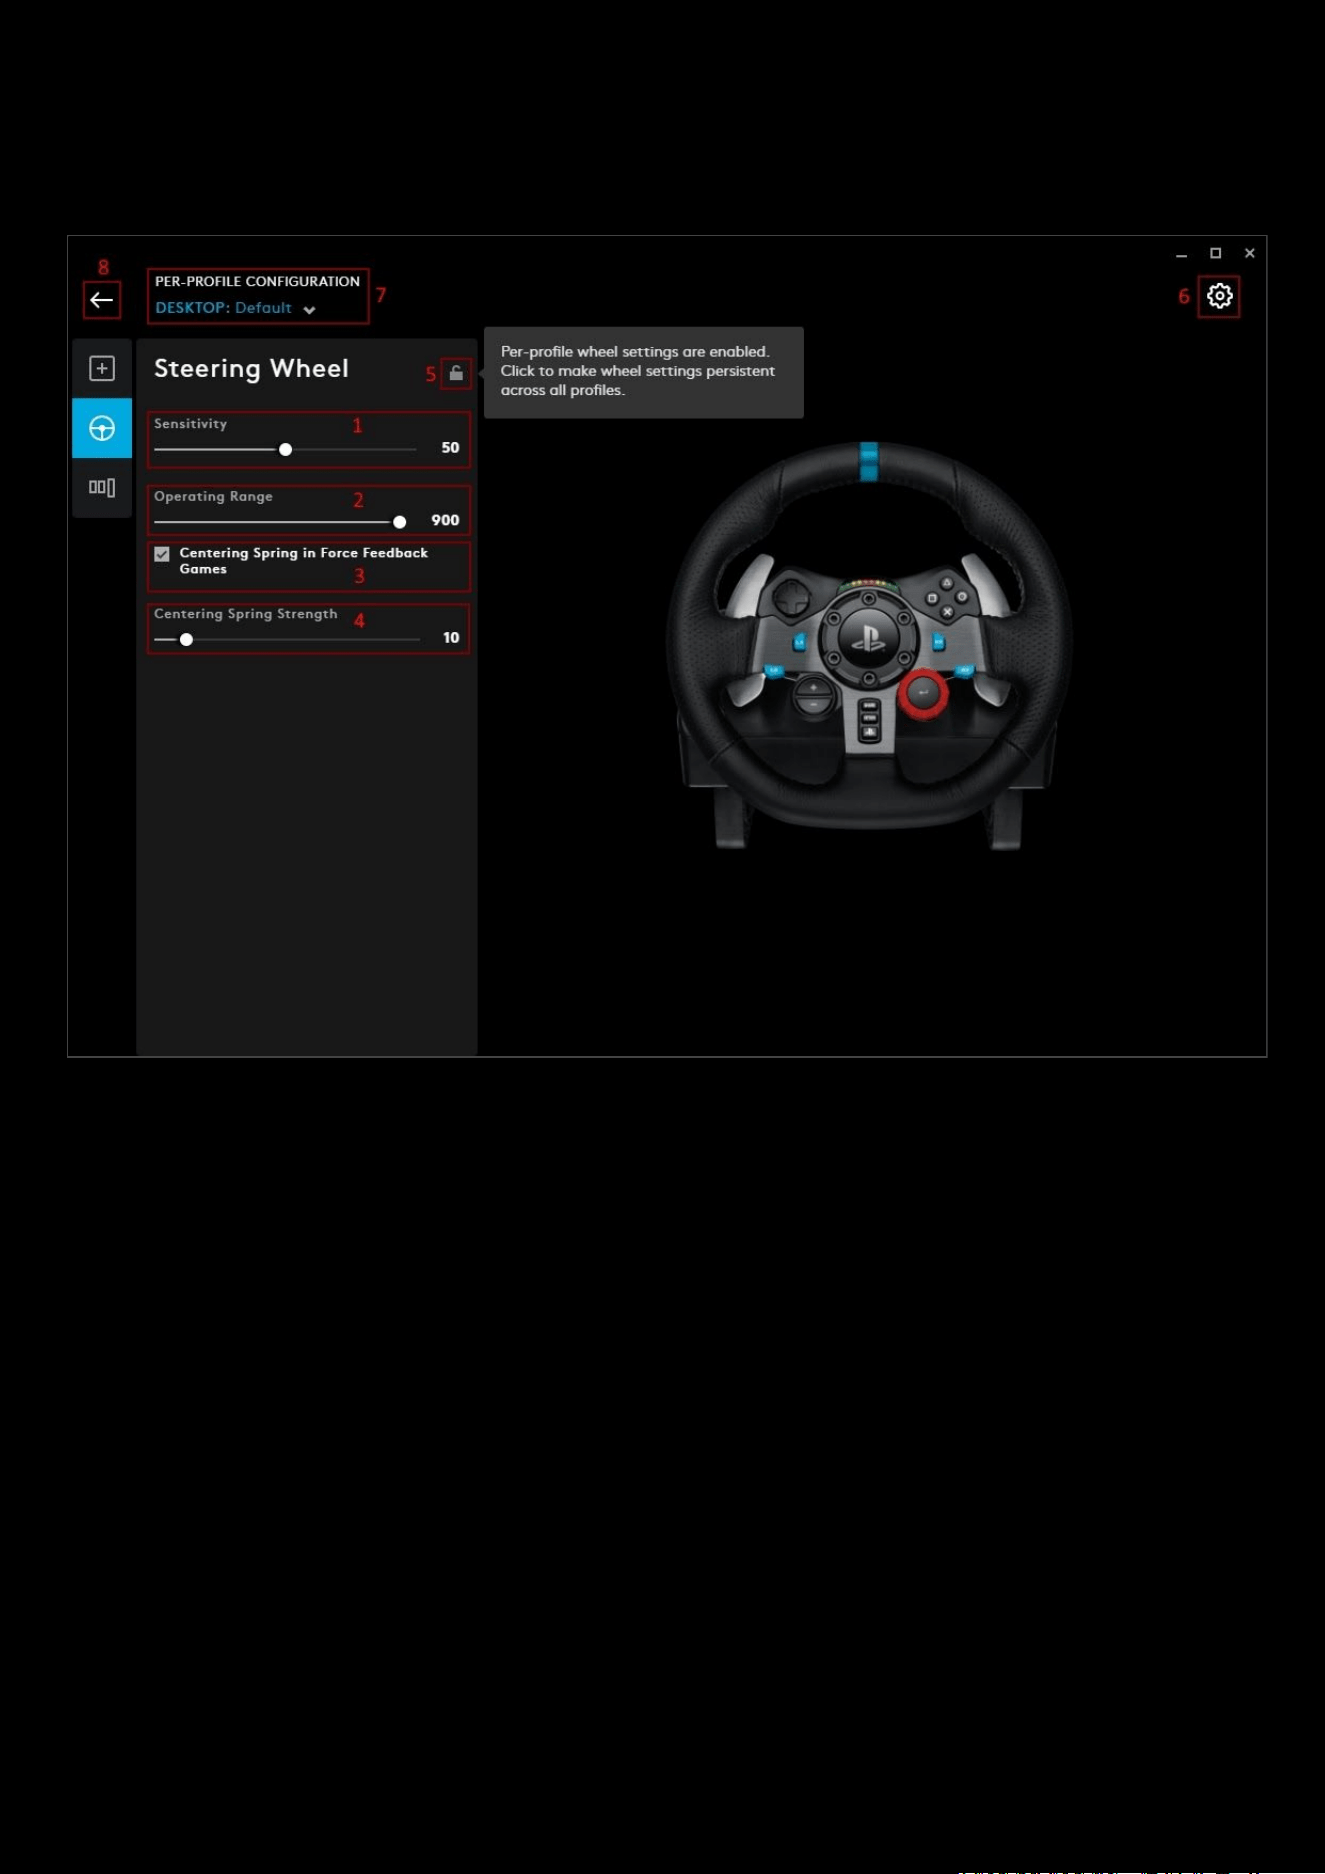
Steering Wheel
The Steering Wheel settings configure your wheel’s sensitivity, turning and spring strength
1. Sensitivity. Default is 50. Alters the output response of the wheel to be more or less sensitive - sometimes
known as a S-Curve. Leaving this slider at 50% will provide a linear 1:1 output. Between 51% and 100% will
make the wheel increasingly more sensitive around the centre movement of the wheel. Between 0% and 49%
will make the wheel decreasingly sensitive around the centre movement of the wheel.
2. Operating Range. Default is 900 (450° either side), which is the maximum range. When you set a value, the
new value will be the hardstop. You will be able to push through the force feedback induced hardstop but no
more values will be read from the wheel as you have reached the maximum. For example setting the Operating
Range to 180 would have 90° either side.
3. Centering Spring in Force Feedback Games. Unticked by default. For the vast majority of titles you would
normally have this disabled off because the games will be modelling the correct return to centre function of
your wheel based on what the virtual car is currently doing. Should you wish to override this you can enable
this and adjust the strength of that return to centre force using the slider
4. Centering Spring Strength. Default is 10. Adjust the value of this to your preference. 100 being the strongest
spring strength, 0 being no centering spring at all.
5. PER-PROFILE STEERING WHEEL SETTINGS LOCK. Lock this to set the Steering Wheel configuration for all your
profiles.
6. GEAR SETTINGS. Click this to take you to the Gear Settings page
7. PROFILE SELECTOR. Click here to change the User Profile you want to configure for.
8. BACK ARROW. Click the arrow to take you back to the Homepage.
42
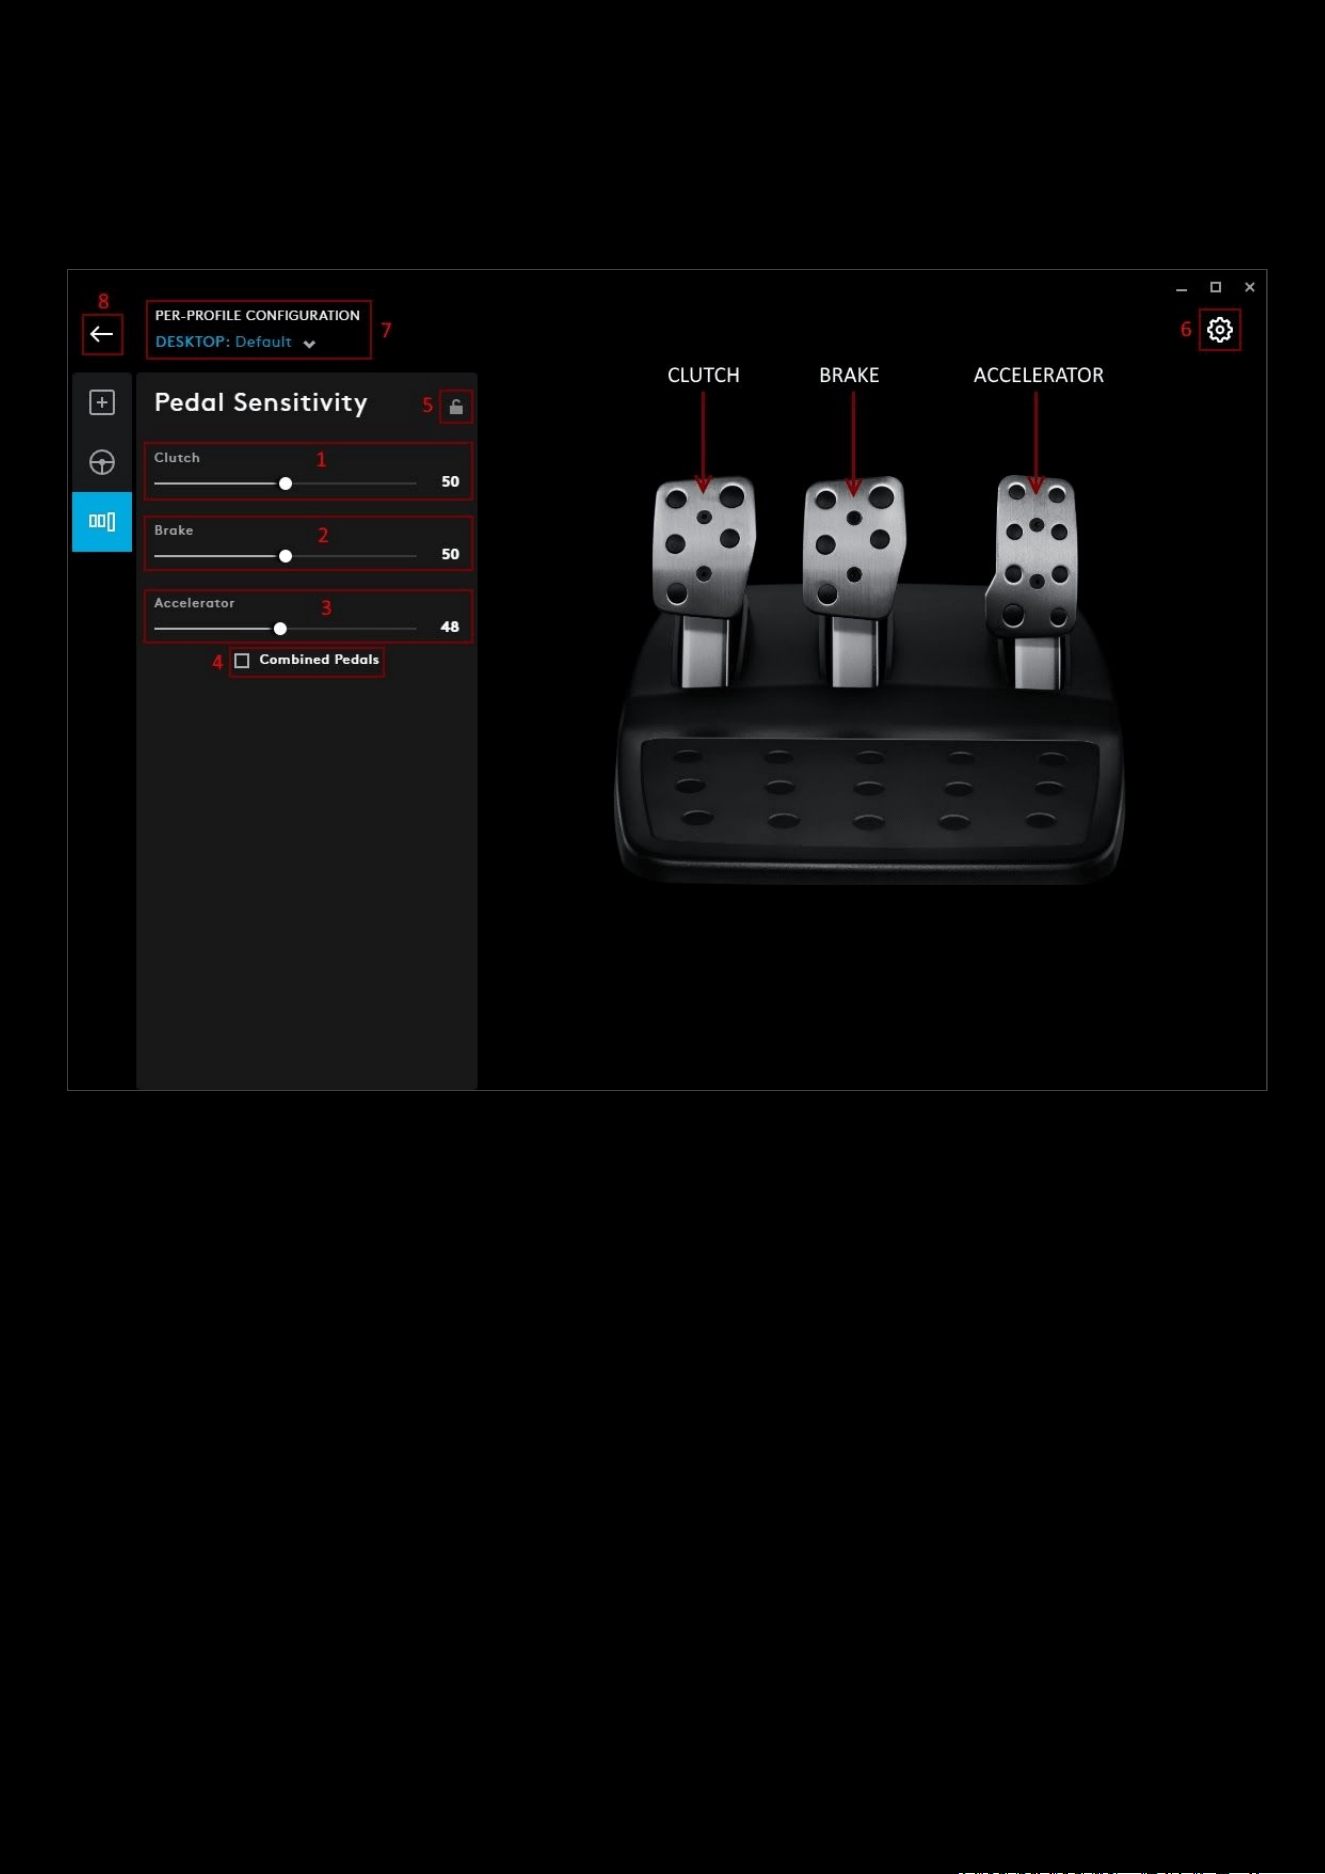
Pedal Sensitivity
Here you can configure your pedals sensitivity and combine the Gas and Brake into single axis for certain games that
only support a single axis for acceleration.
Pedal Sensitivity.
Covers the 3 axis and the sliders have the same behaviour as the Steering Wheel Sensitivity in the
previous section - also known as a J-Curve: The slider alters the output response of the axis to be more or less sensitive.
Leaving this slider at 50% will provide a linear 1:1 output. Between 51% and 100% will make the axis increasingly more
sensitive. Between 0% and 49% will make the axis decreasingly sensitive.
1. Clutch. Default is 50, range 0-100
2. Brake. Default is 50, range 0-100
3. Accelerator. Default is 50, range 0-100
4. Combined Pedals. If checked, this will set the Accelerator and Brake pedals to become two halves of a single
axis. This will help the pedals operate correctly in older racing titles that do not support separate axes for
pedals.
Note:
If Combined Pedals is left checked then the pedals will not behave correctly in modern racing titles. If you find that
just one of your pedals is functioning by accelerating when pressed and braking when released then you should make
sure that this option is not checked.
43
Gear Settings:
ON-BOARD MEMORY & PROFILES
Onboard memory profiles are profiles loaded directly on to the memory of the device. For example, this allows you to
take that device to a Lan Party and still have a profile to use even if the PC you are using does not have G HUB installed.
By default, your device’s on-board memory mode will be set to off. This means that the profiles you have configured in
G HUB will activate.
If you want to use the on-board memory profiles you will need to enable this in the devices GEAR
SETTINGS
Note:
Not all Logitech G devices have on-board memory modes available. Check the product page for your device
specifications @
https://support.logitech.com/category/gaming
for details or on the Logitech G store
@
https://www.logitechg.com
ENABLING ON-BOARD MEMORY MODE
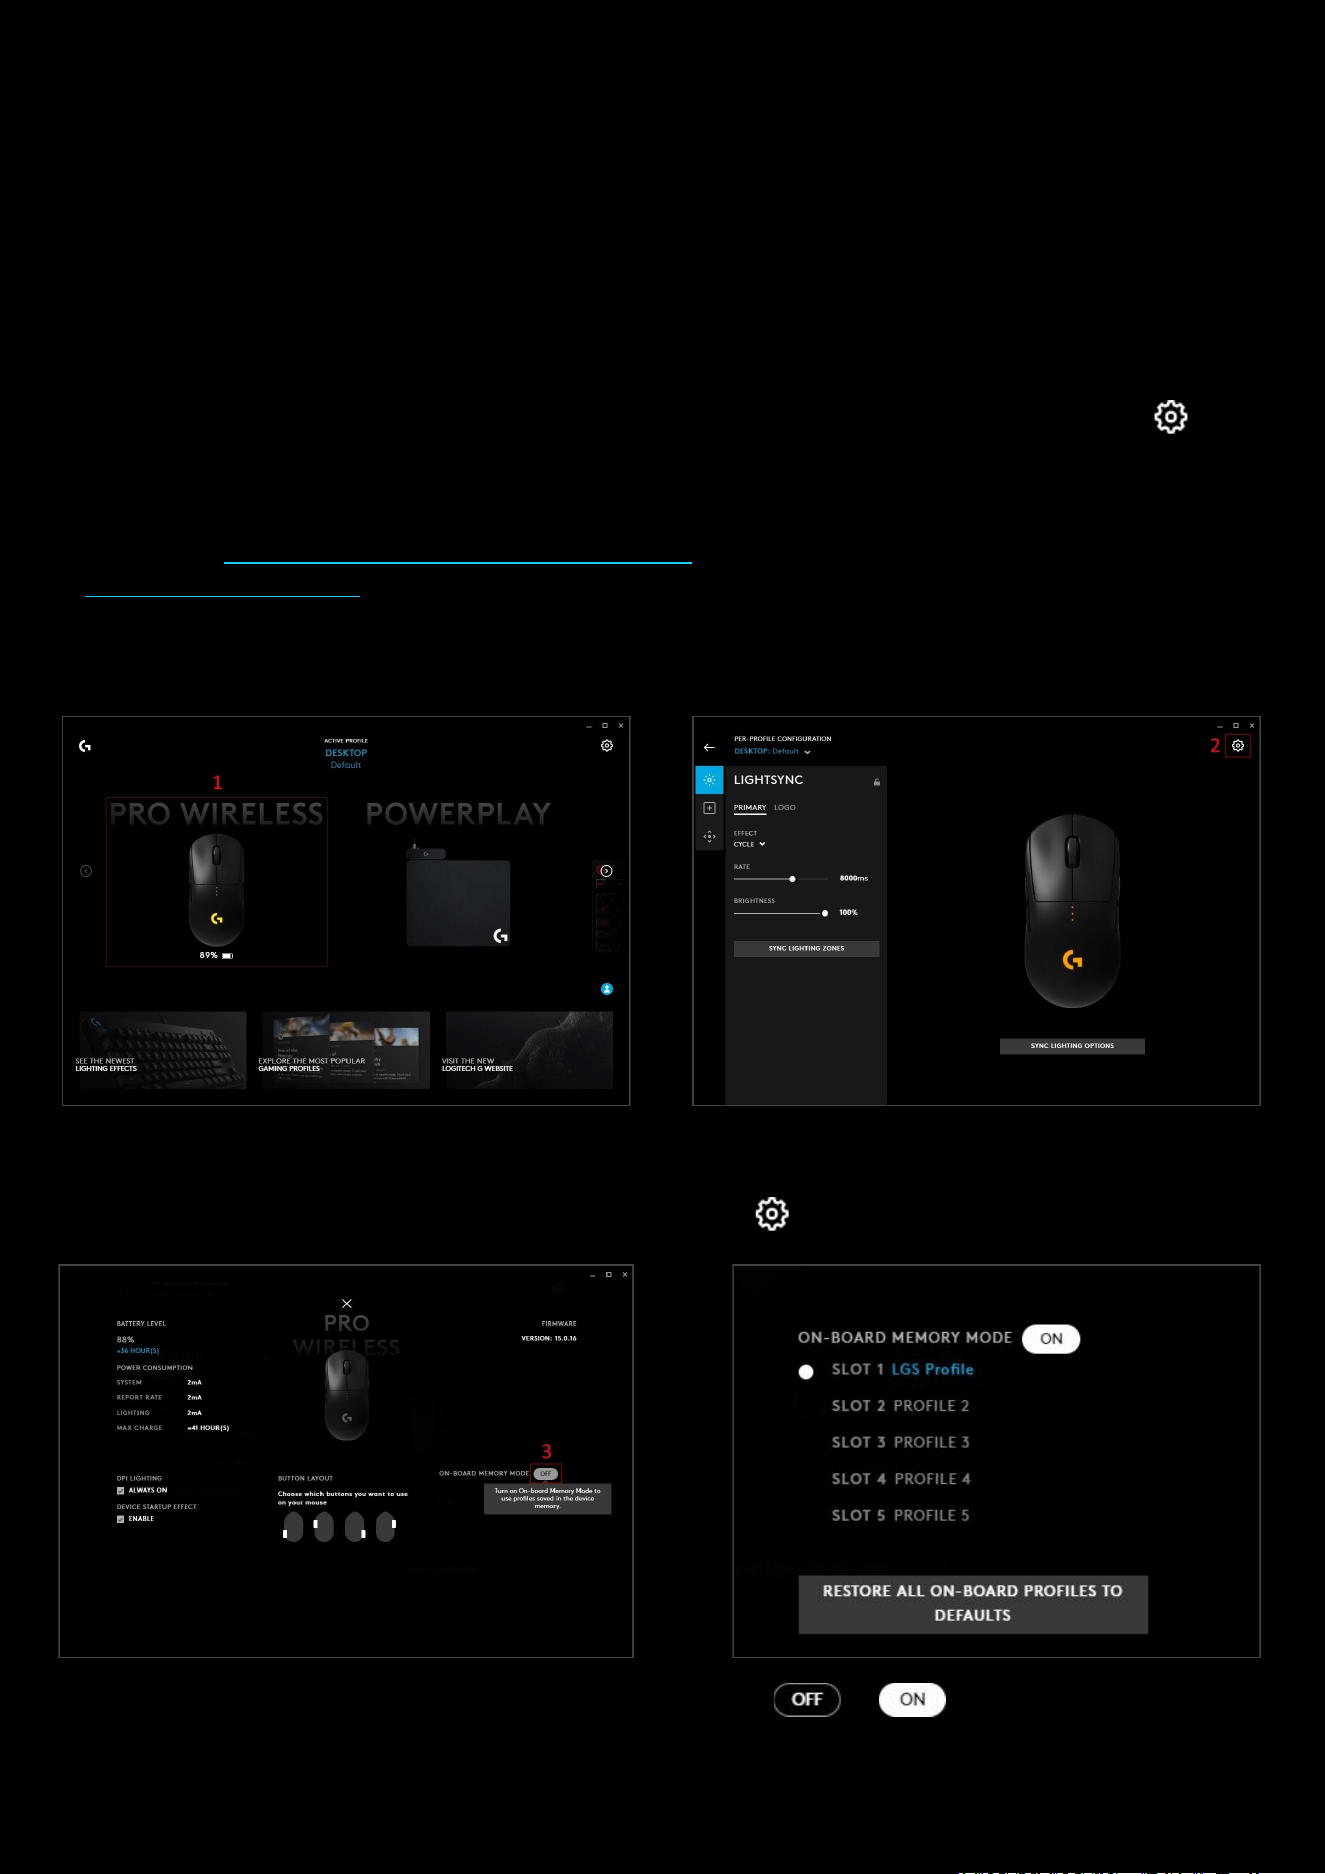
1. Initially you will need to click on the device you are using in the home screen of G HUB. In our example we will
click on the PRO WIRELESS Mouse.
2. In the Device settings, click on the GEAR SETTINGS page icon in the top right corner
3. Click the ON-BOARD MEMORY MODE button to turn this from to . You will now be using
on-board memory profiles. You can have one profile per slot. The number of slots is dependant on the device
and can vary between models.
44
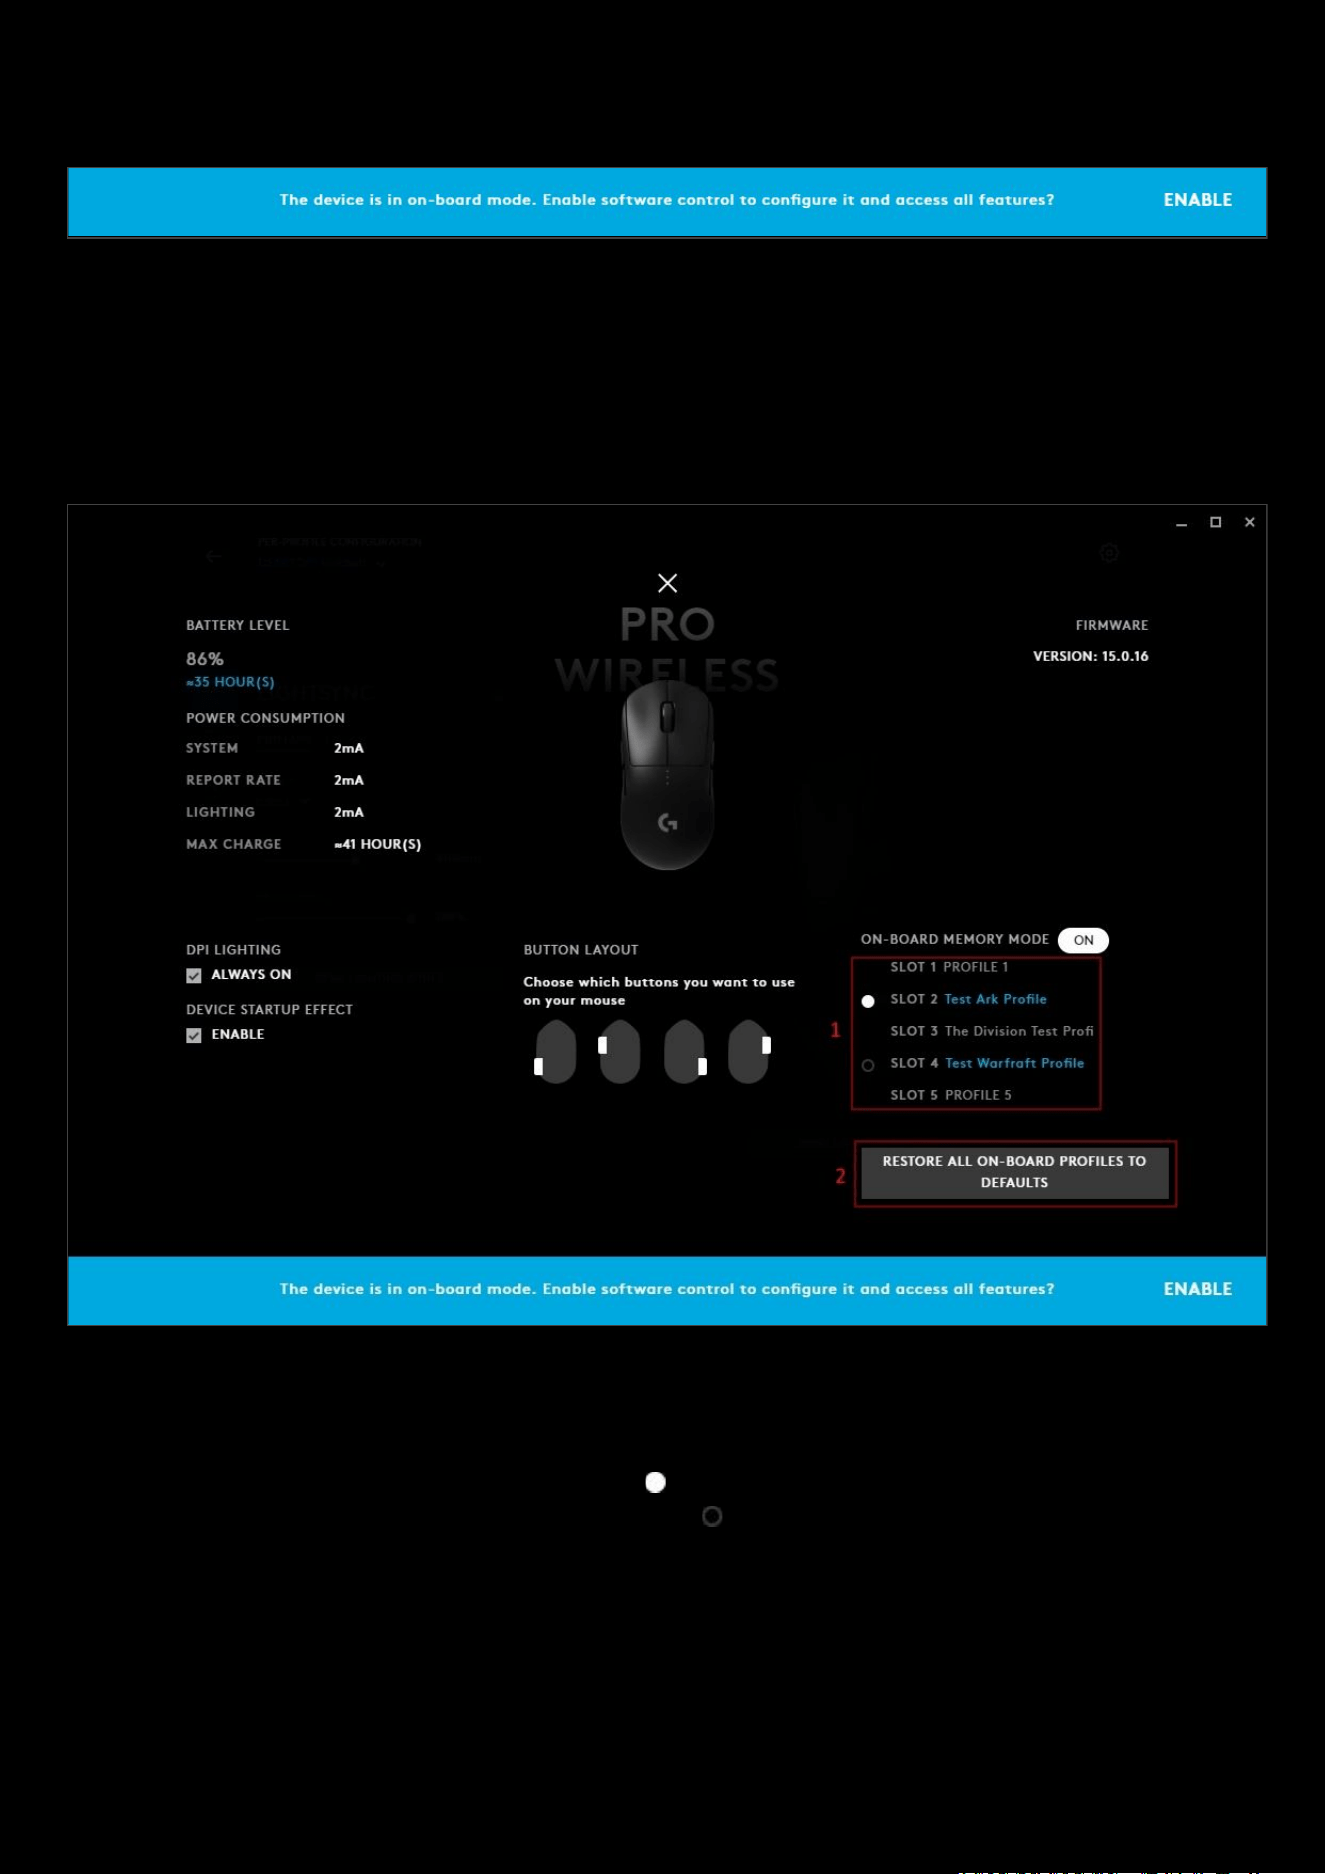
When switch from off to on, You will receive a blue warning that ‘the device is in on-board mode. Enable software
control to configure it and access all features?’
This is a reminder that whilst you are in on-board memory mode, that all software control through G HUB will be paused
for that device. Clicking ENABLE will turn the on-board memory mode to OFF, exactly the same as if you clicked the
ON-BOARD MEMORY MODE
button to OFF
ON-BOARD MEMORY SLOTS
You configure the state of your profiles and which profiles you want assigned to each memory slot.
1. This shows the state of your memory slots.
● We can see this device has 5 slots. 3 slots currently have profiles assigned to them, SLOT 1 and SLOT 5
do not.
● The current active slot is the one with the
● Slots that can be cycled to and activated have a
● Slots that have been disabled have no circle.

45
When you click on a SLOT you will have a drop down menu:
● DETAILS. Click this to take you to the details of the settings
assigned to that SLOT. This will show Lightsync, Assignments and
other features depending on your device. From that page you can
also click DISABLE FROM MEMORY
which is the same as selecting
DISABLE
in the drop down.
● DISABLE. Select DISABLE to disable that SLOT. You won't be able to
cycle to this slot with the on-board profile cycle assignment or use
this slot.
● RESTORE DEFAULT PROFILE. This restored the SLOT back to default
behaviour.
● ENABLE WITH NEW/REPLACE WITH.
○ If the SLOT does not have a profile assigned, this will say
ENABLE WITH NEW. Select from the current profile list
below to assign a profile.
○ If the SLOT has a profile assigned, then this will say
REPLACE WITH. Select from the current profile list below to
replace the current profile with a different one.
2. RESTORE ALL ON-BOARD PROFILES TO DEFAULT. When you click this button, it will revert all the SLOTS back to
default behaviour. Similar if you clicked RESTORE DEFAULT PROFILE individually on each SLOT
.
46
4. Advanced settings
This section will cover some of the more advanced settings.
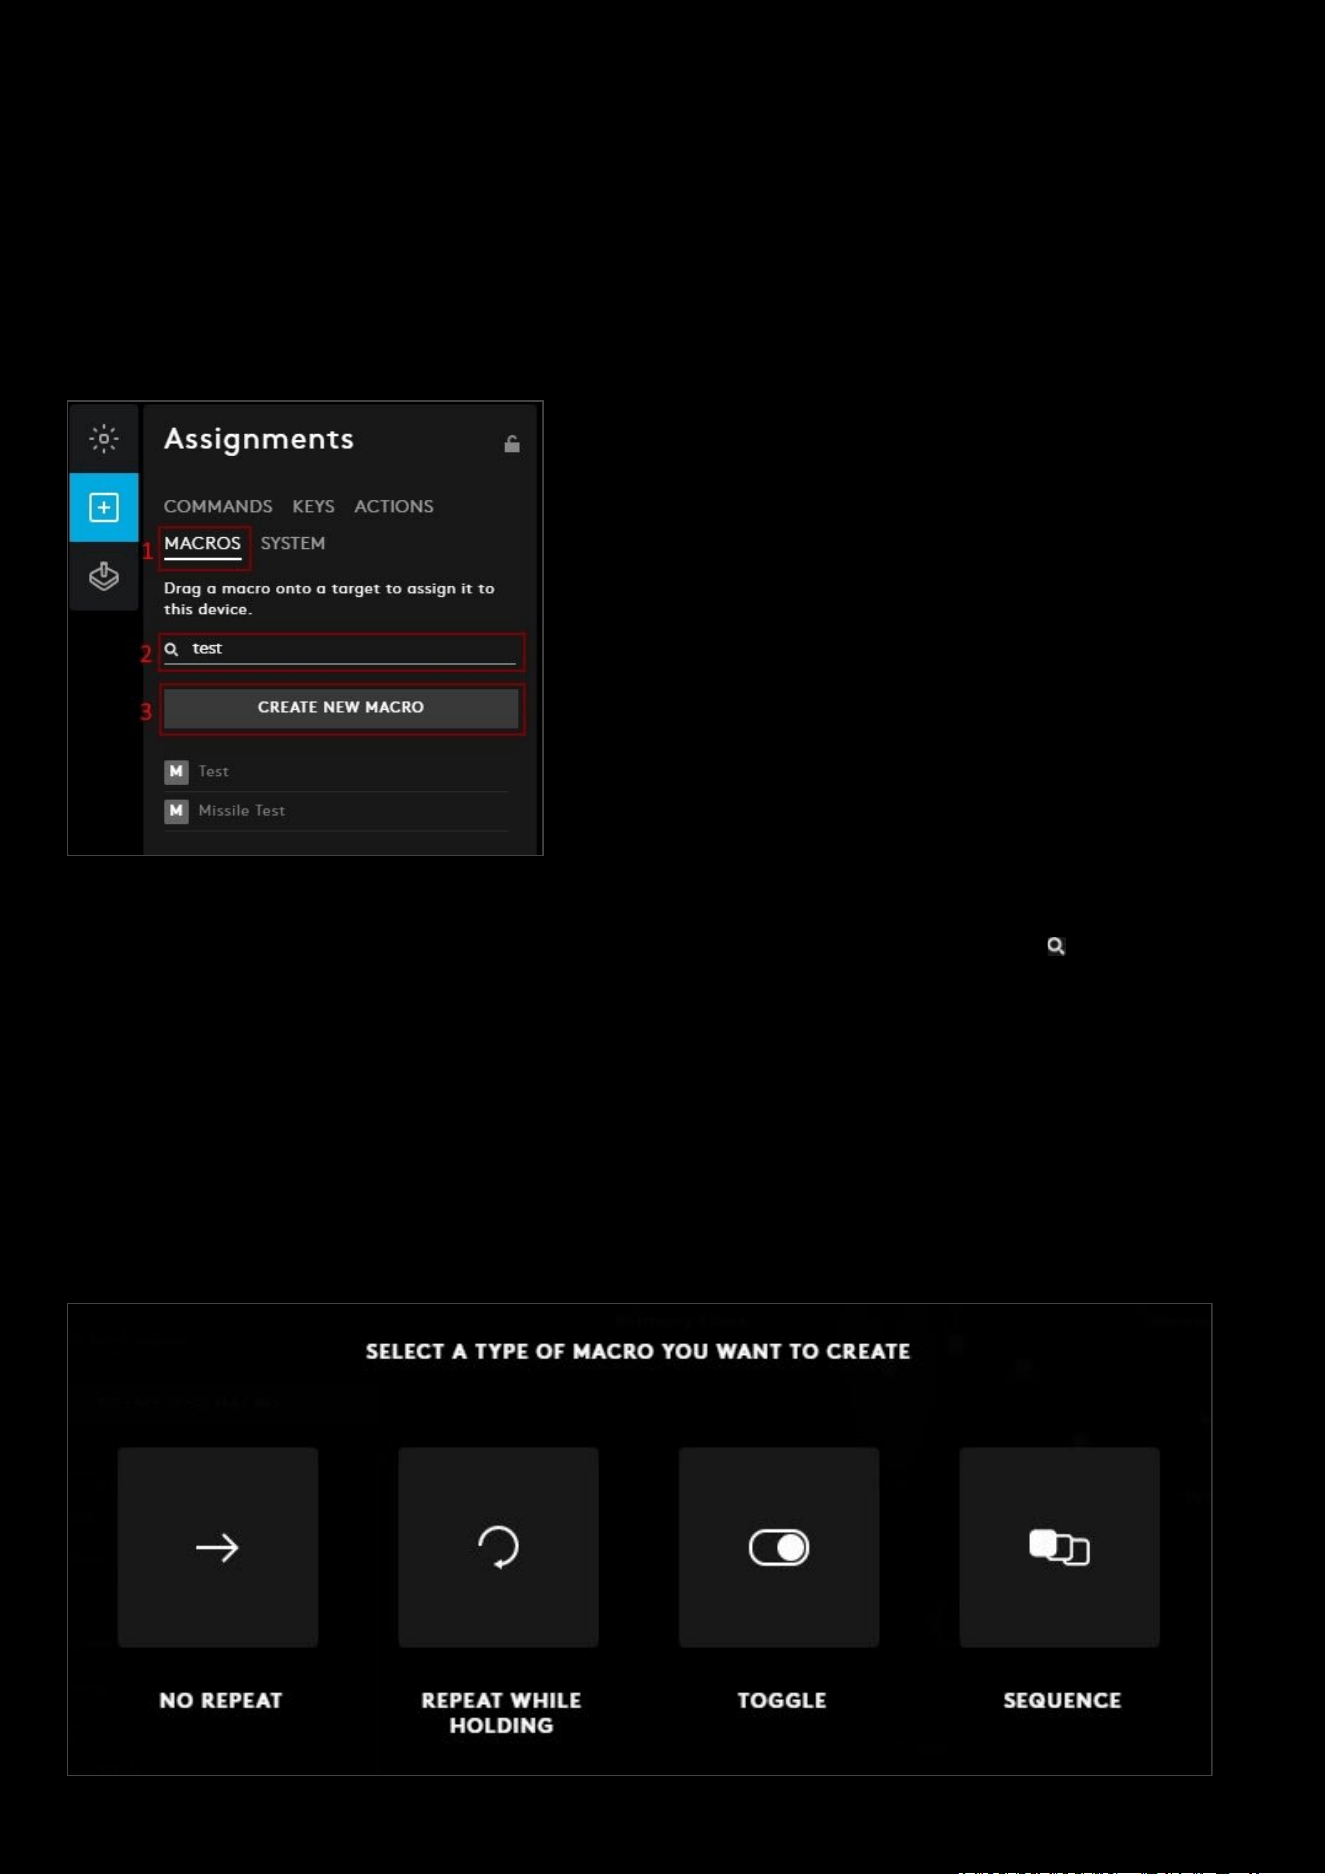
Assignments: Create new macro
A macro is a sequence of events, which can be letters or mouse buttons, configured with timings.
1. In Assignments for your device, click on the MACROS tab.
2. Search Bar. You can search for a macro by typing in the Search for a macro text bar by the (not case
sensitive). In the example we can see that typing ‘test’ will bring up the macros: Test and Missile Test
3. CREATE NEW MACRO. Click CREATE NEW MACRO to start the Macro editor.
● Name This Macro. Click on Name This Macro and type a name for your macro
● SELECT A TYPE OF MACRO YOU WANT TO CREATE. Select a type of Macro
a. NO REPEAT
b. REPEAT WHILE HOLDING
c. TOGGLE
d. SEQUENCE
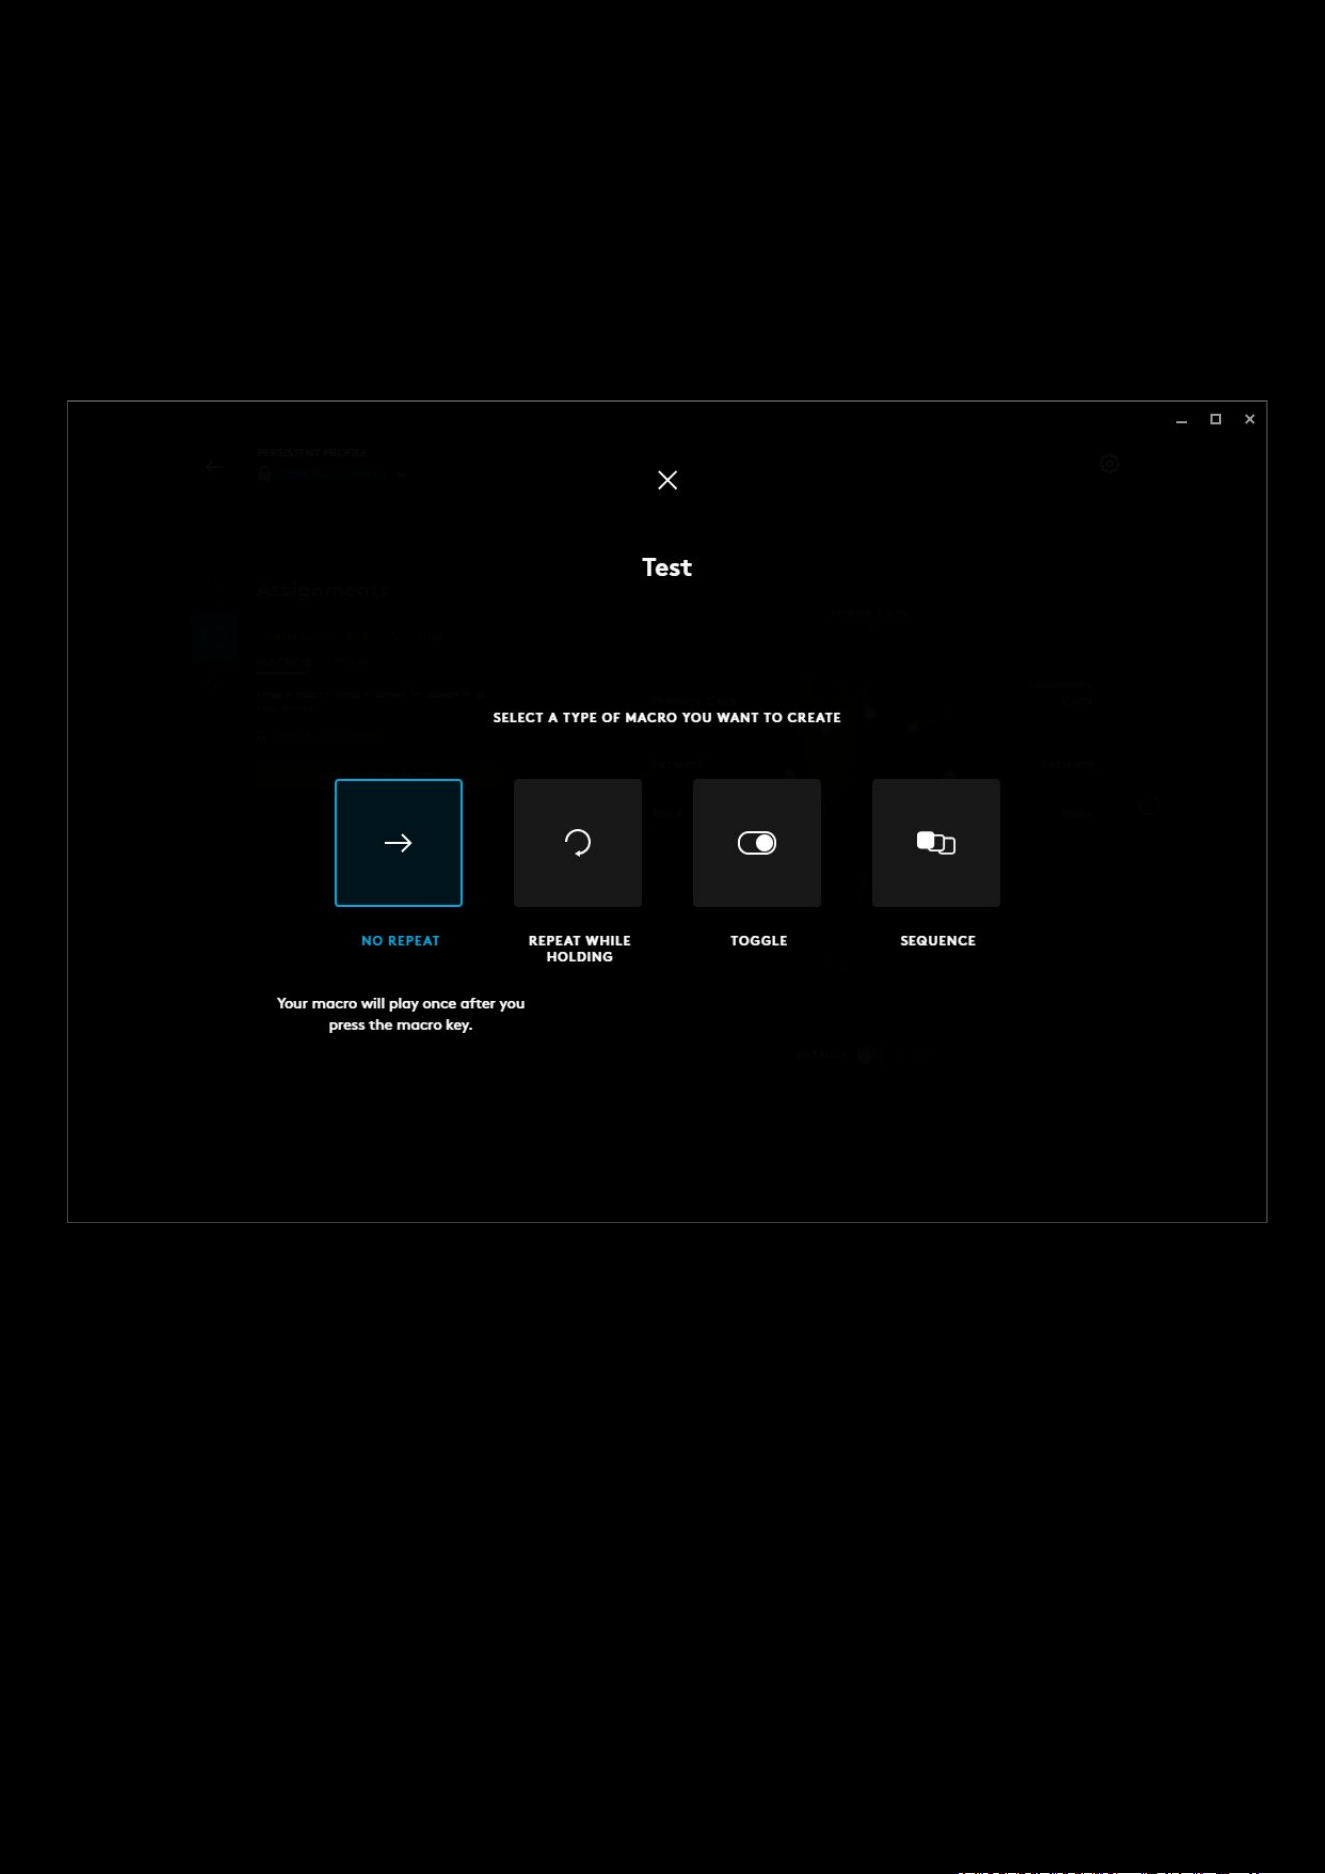
47
● No Repeat Macro. A No Repeat macro will play once after you press the macro button/key. This is good for
single events where you do not want to have that action repeated. For example; Launch an Application.
● Repeat while holding Macro. A Repeat While Holding Macro will loop continuously while the button/key is
pressed. This is good for auto fire events.
● Toggle Macro. A Toggle Macro will loop continuously until you toggle it off by pressing the button/key again.
This is similar to the repeat macro but the button/key is held down on the first press, and let up on the second
press. Good for auto running events.
● Sequence. This is the advanced macro editor where you can edit the press, hold and release events of the
macro.
● Select an option from the selection. This will take you to the macro creation page.
48
NO REPEAT | REPEAT WHILE HOLDING | TOGGLE MACROS
These three types of macro have the same style of macro editor:
1. START NOW. To start recording your macro, click on the + or the START NOW
text. You will be given 6 options:
a. Record Keystrokes
b. TEXT & EMOJIS. Create a personalised text string with emojis
c. ACTION. Create an action to integrate with a Voice Application
d. LAUNCH APPLICATION. Create a shortcut to launch an application
e. SYSTEM. Select a system command
f. DELAY. Add a delay, default is 50ms but this can be changed
g. X. Cancels the START NOW
2. Macro Type. This shows which macro style you chose.
3. Macro Name. Click on the text to change the macro name
4. MACRO OPTIONS. This opens a drop down menu:
a. USE STANDARD DELAYS. By default this is ticked and set to 50ms. If you untick this then each
keypress/mouse button will have its own customisable delay.
b. To change the standard delay, click on the number to edit and enter a new value. Minimum is 25ms.
c. SHOW KEY DOWN/KEY UP. Click this to see the up press and down press of each entry. By default this
is unticked.
d. MACRO COLOR. Click this to assign a color to your macro. Use the color wheel to make your choice.
e. SELECT/DONE. Click this to open/close the color wheel.
49
f. DELETE THIS MACRO. Click this to delete the macro. This will only appear if the Macro has been saved
previously. You will have a notification at the bottom of the screen to verify you want to delete.
5. Click the at the top to cancel the NEW MACRO editor and go back to the Assignments tab. If you have made
any changes, you will see a prompt at the bottom asking if you would like to save any changes.
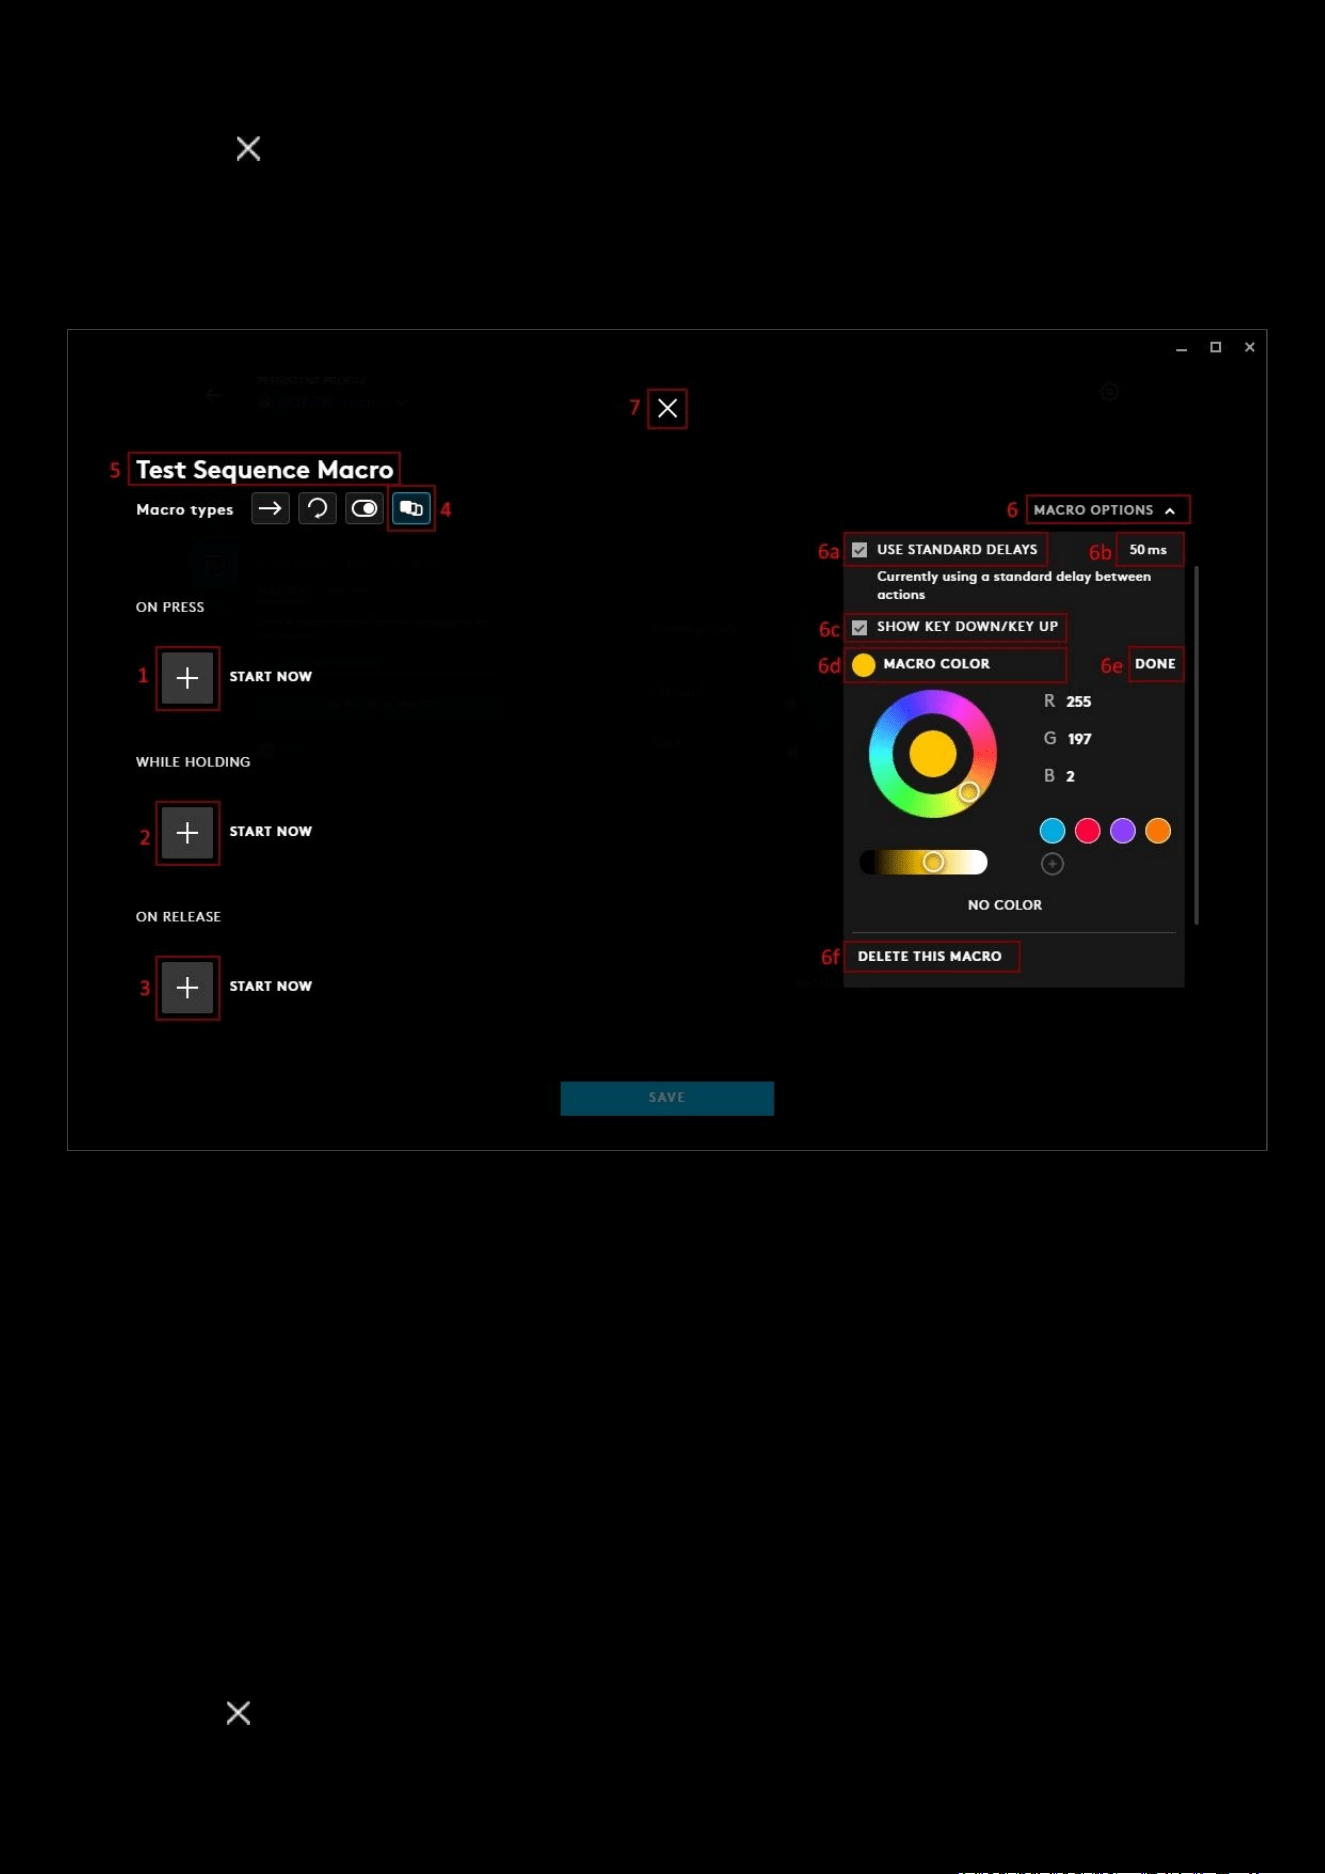
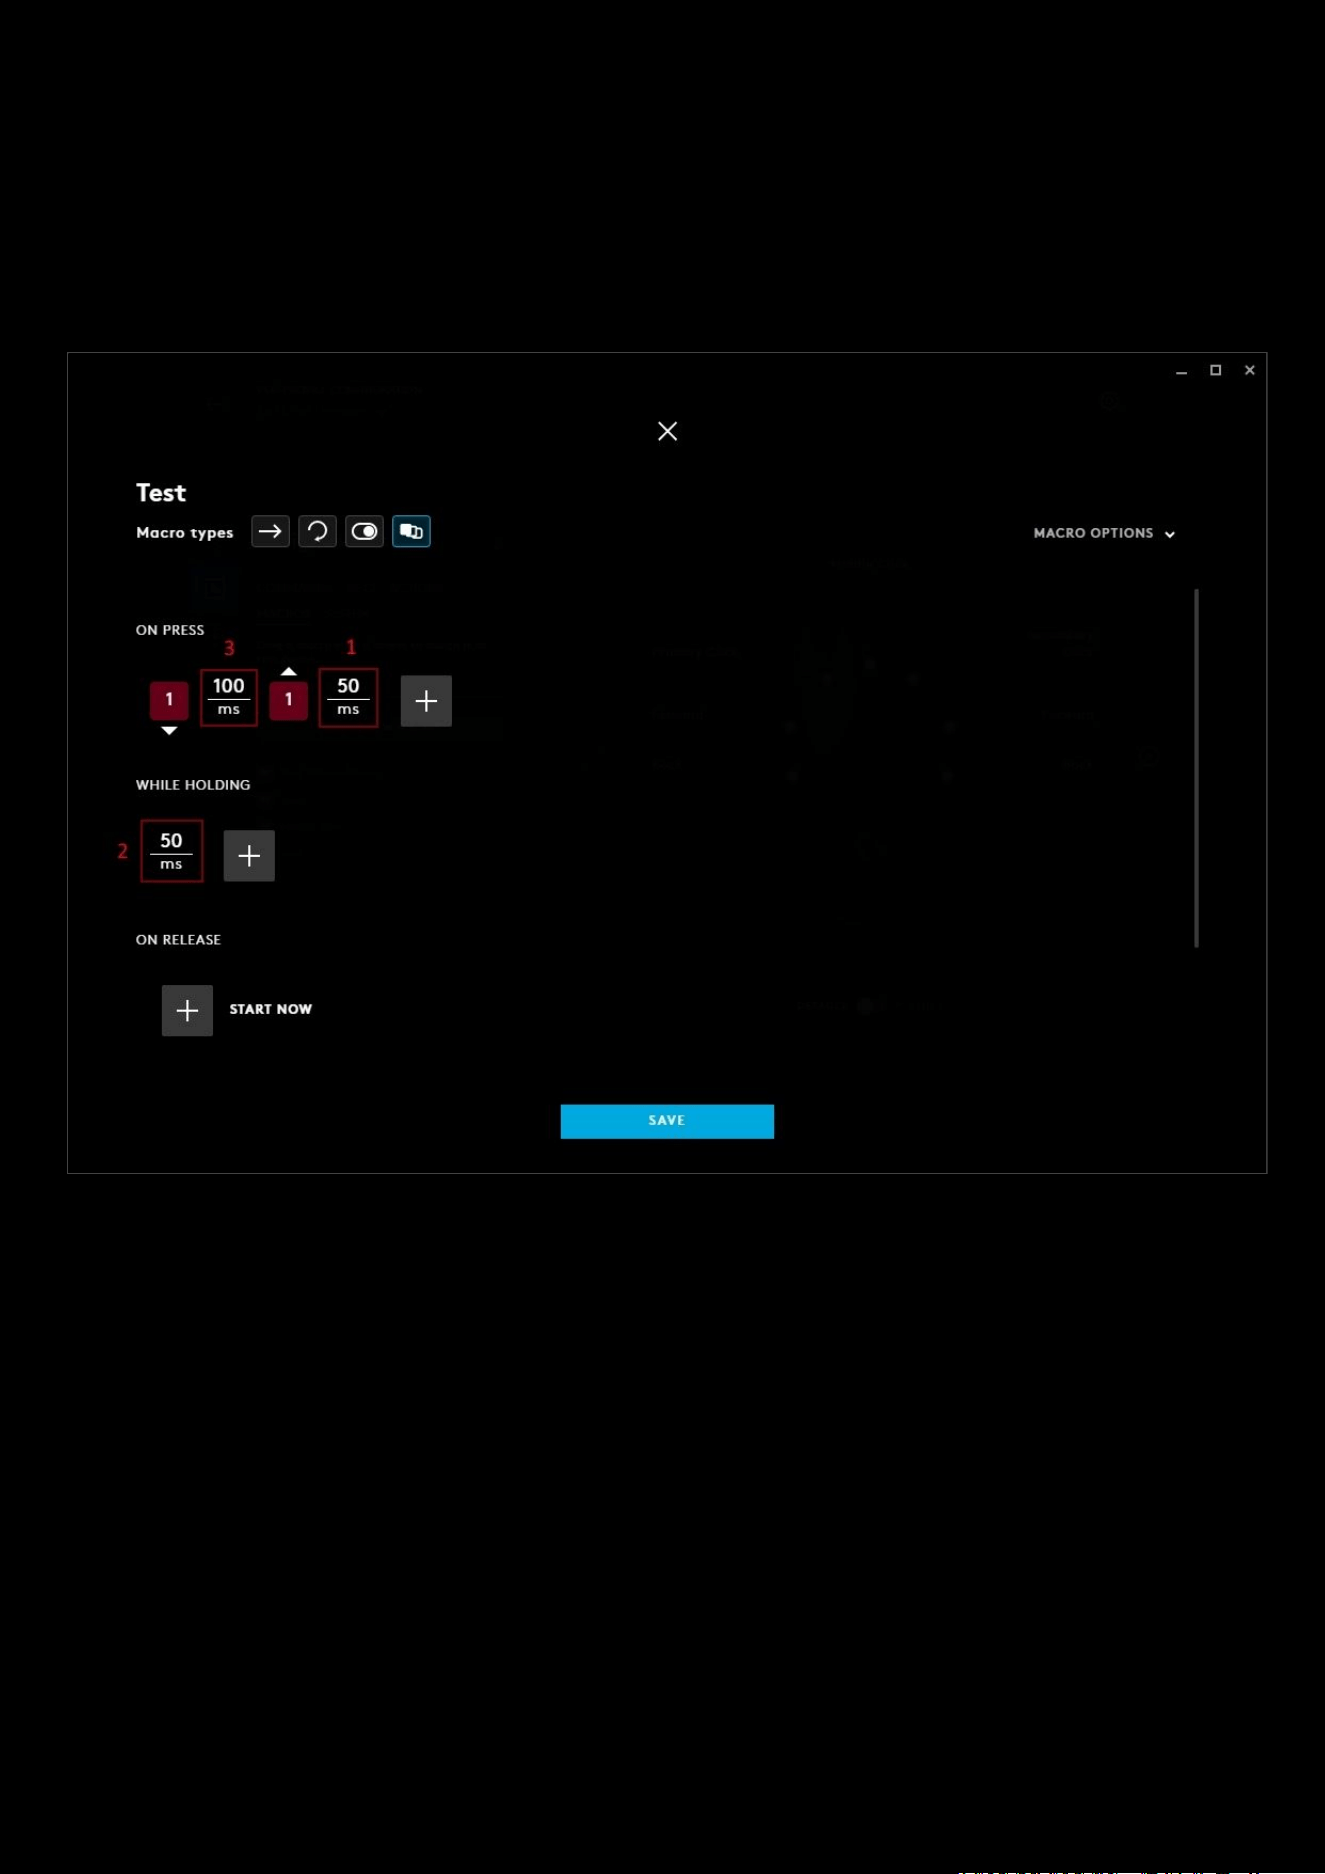
SEQUENCE MACRO
1. ON PRESS. This section will control what happens immediately when you press the button/key.
2. WHILE HOLDING. The commands assigned in this section will repeat whilst the button/key is held down.
3. ON RELEASE. This section will control what happens immediately after you release the button/key.
Note:
The ON PRESS and ON RELEASE which relate to the physical state of the button/key being pressed. Each of these
states can contain a macro. This should not be confused with the down-press and up-press events that happens within
that macro.
To start recording your macro, click on the + or the START NOW
text. You will be given the same 6 options:
a. Record Keystrokes
b. TEXT & EMOJIS. Create a personalised text string with emojis
c. ACTION. Create an action to integrate with a Voice Application
d. LAUNCH APPLICATION. Create a shortcut to launch an application
e. SYSTEM. Select a system command
f. DELAY. Add a delay, default is 50ms but this can be changed
g. . Cancels the START NOW
4. Macro Type. This shows which macro style you chose.

50
5. Macro Name. Click on the text to change the macro name
6. MACRO OPTIONS. This opens a drop down menu:
a. USE STANDARD DELAYS. By default this is ticked and set to 50ms. If you untick this then each
keypress/mouse button will have its own customisable delay.
More on this later
b. To change the standard delay, click on the number to edit and enter a new value. Minimum is 25ms.
c. SHOW KEY DOWN/KEY UP. Click this to see the up press and down press of each entry. By default this
is unticked.
d. MACRO COLOR. Click this to assign a color to your macro. Use the color wheel to make your choice.
e. SELECT/DONE. Click this to open/close the color wheel.
f. DELETE THIS MACRO. Click this to delete the macro. This will only appear if the Macro has been saved
previously. You will have a notification at the bottom of the screen to verify you want to delete.
7. Click the at the top to cancel the NEW MACRO editor and go back to the Assignments tab. If you have made
any changes, you will see a prompt at the bottom asking if you would like to save any changes.
Note: You can come back to a macro at anytime to edit, by clicking on to the MACROS tab in Assignments and then
clicking on the macro name in the list.

51
Assignments: Program a macro
This section will show how to make a macro.
Note:
The method is the same method for no repeat, repeat, toggle and sequence. The only difference being that
sequence has 3 sections that can all hold macros. The way those macros are created though, are the same.
Click on the START NOW button to start creating your macro:
1. RECORD KEYSTROKES. When you click this button the editor will start recording all your mouse button and key
strokes.
2. TEXT & EMOJIS. Create a personalised text string with emojis
3. ACTION. Create an action to integrate with a Voice Application
4. LAUNCH APPLICATION. Create a shortcut to launch an application
5. SYSTEM. Select a system command
6. DELAY. Add a delay, default is 50ms but this can be changed
7. Click the to cancel the START NOW
52
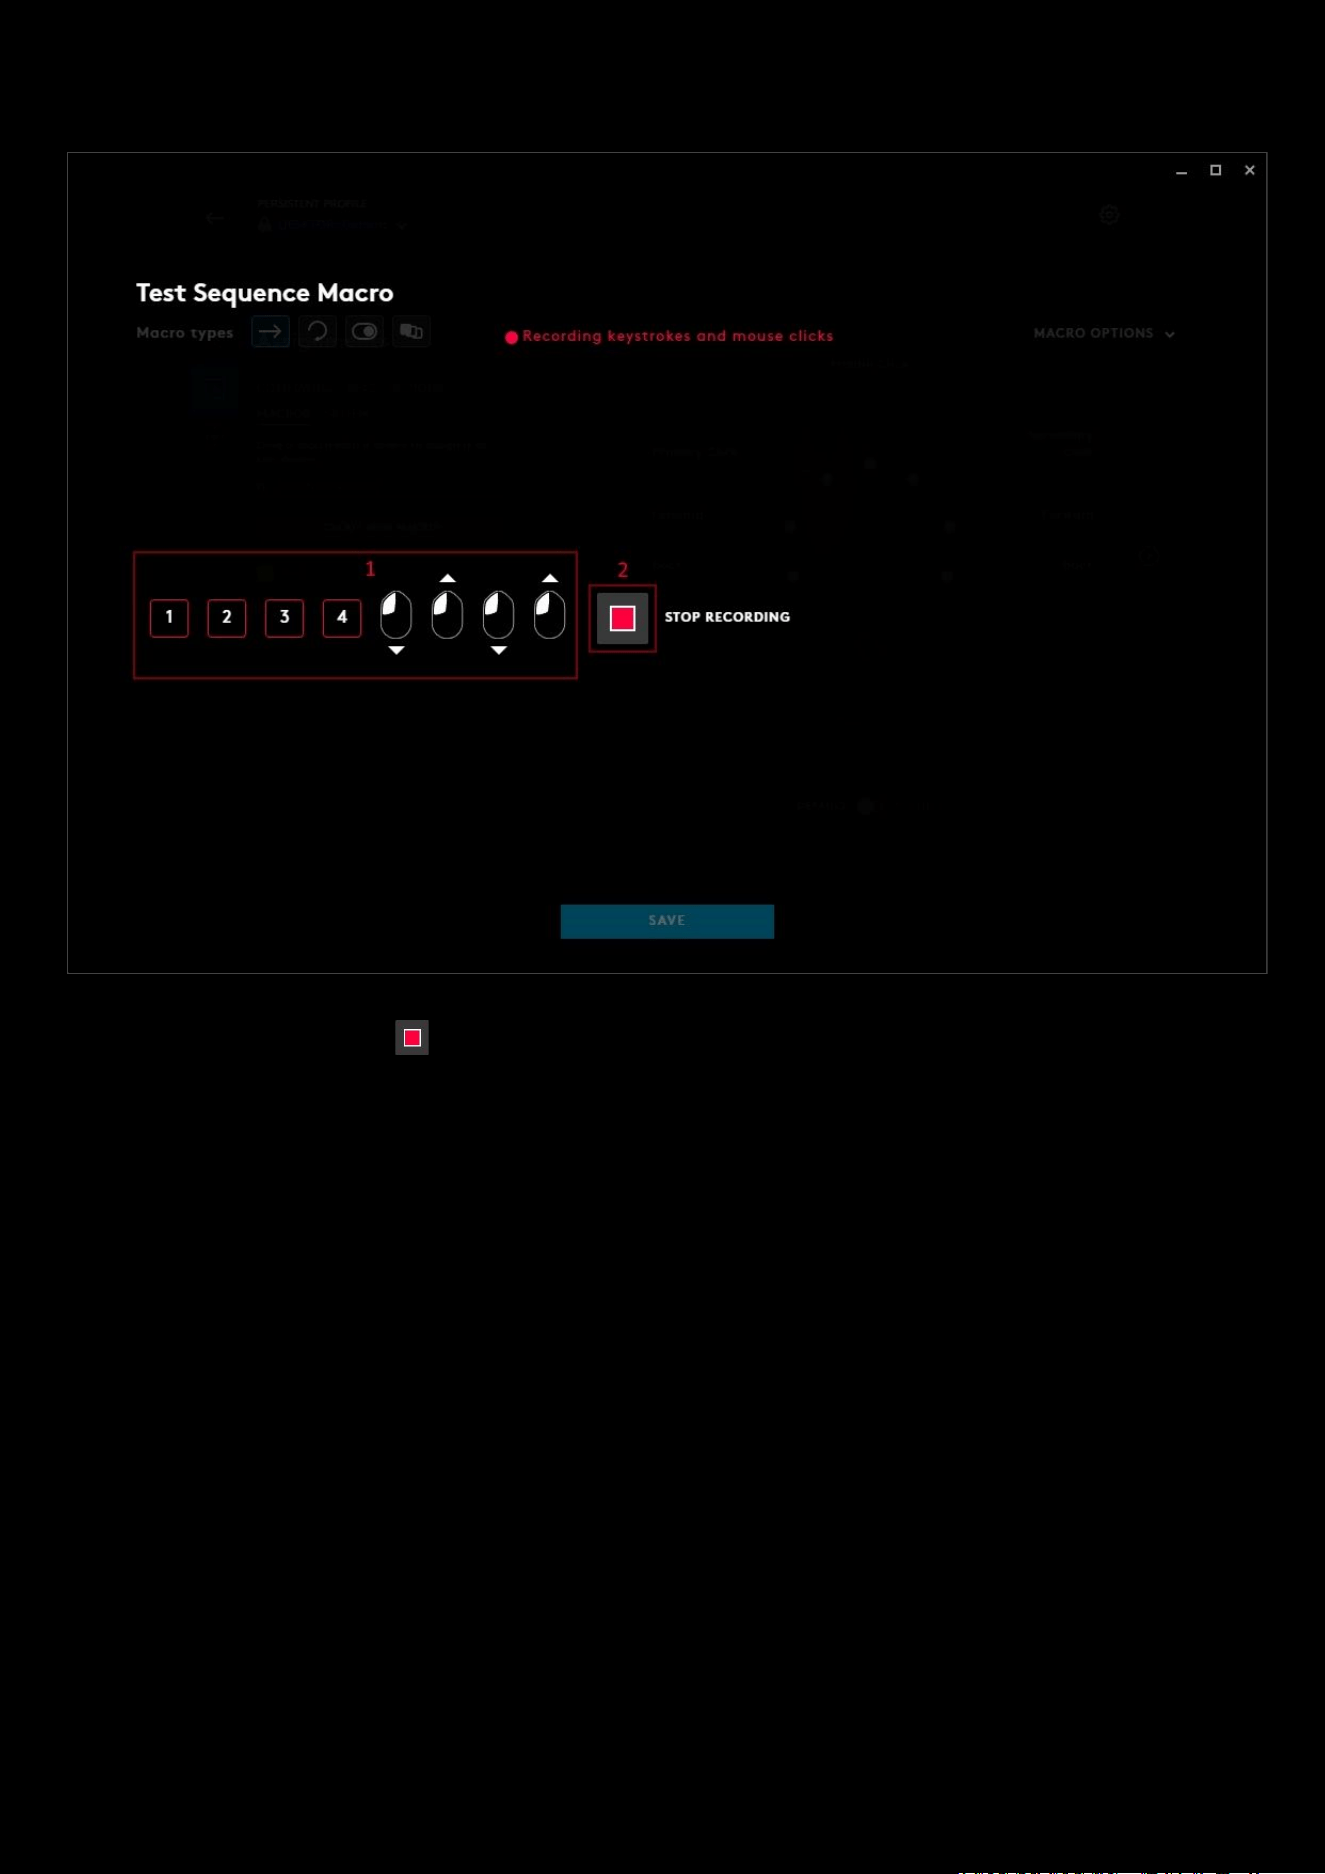
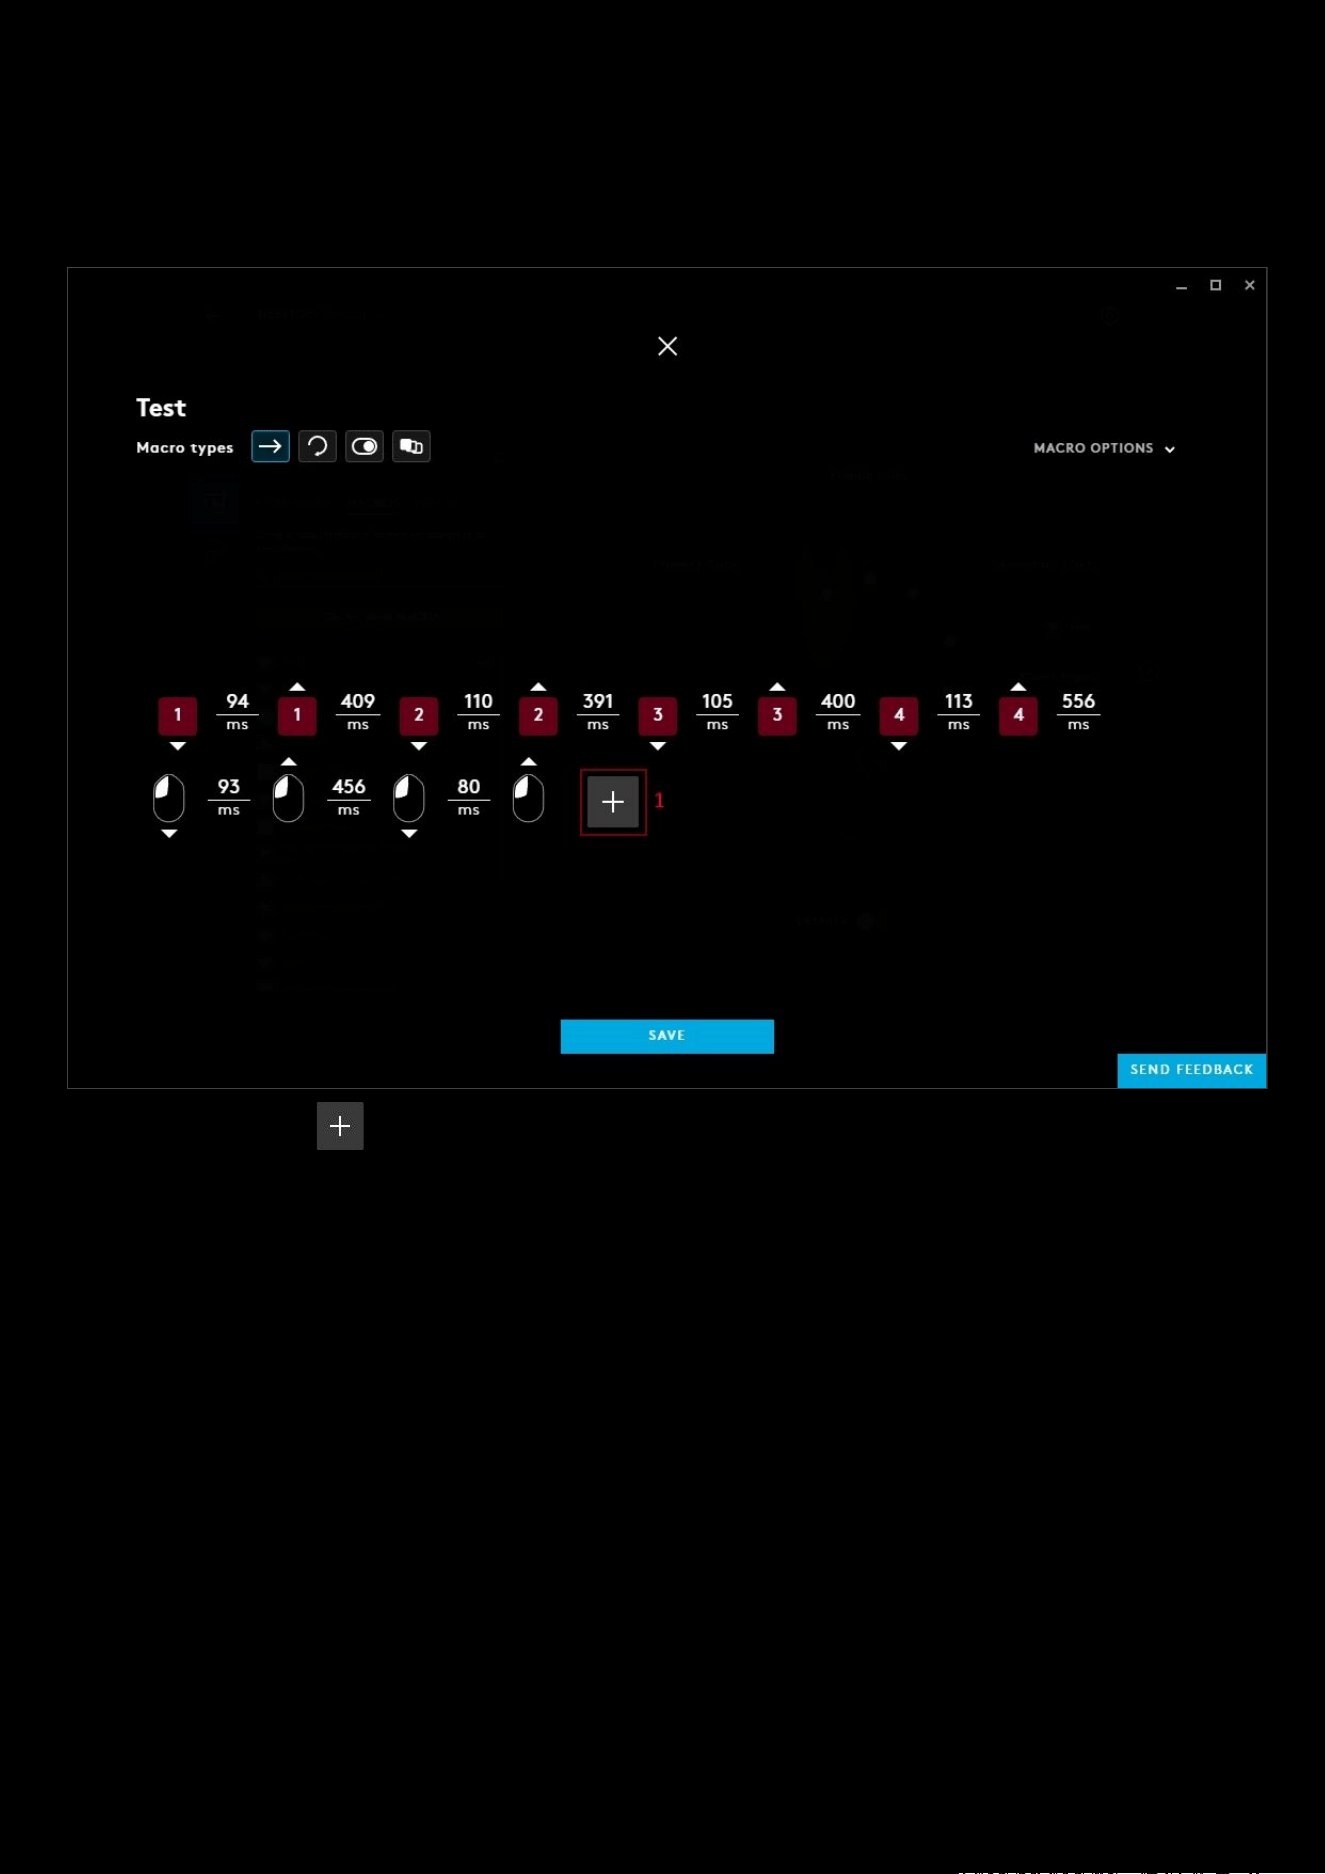
1: RECORD KEYSTROKES
1. Macro content (or string). This will appear as you press keys or mouse buttons.
2. STOP RECORDING. Click once you are finished programming your macro.
53
1. You can highlight any button/keystroke (up or down press) and delete it by pressing the delete key. You don't
need to be in the recording phase to do this. So for example here we would highlight the up press of the left
mouse button and delete, or move it by dragging it along the line to a more appropriate area.
2. You can click the to add another RECORD KEYSTROKE, TEXT & EMOJIS etc. Click SAVE when you are
finished programming the macro to take you back to the assignments tab.
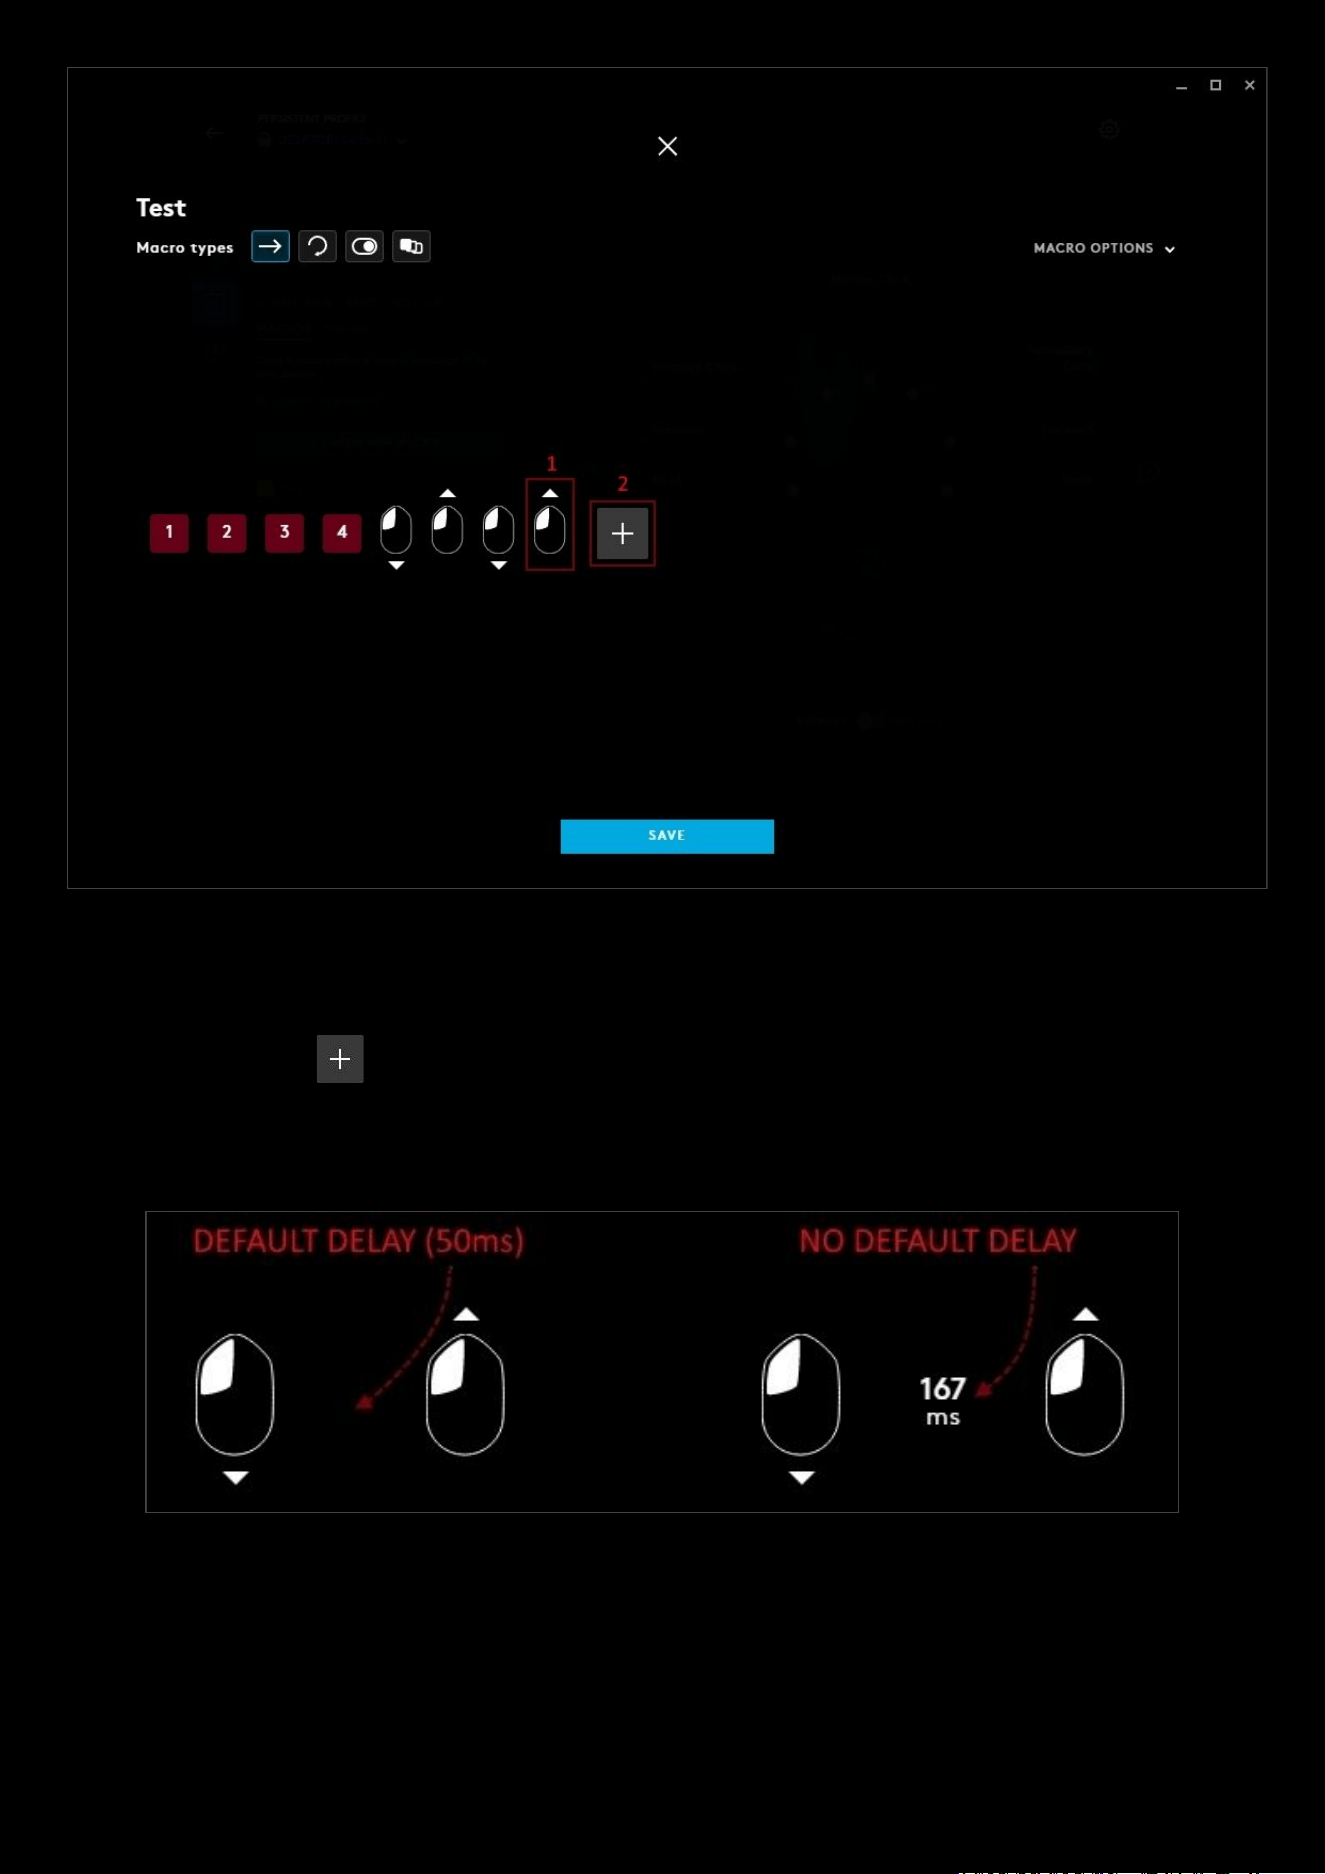
1a. NOTES ON DELAYS:
USE STANDARD DELAYS
● If ticked, the default delay between button/key presses in the editor will be 50ms. This means the delay
between each action will be 50ms. If you change the number in the MACRO OPTIONS, for example to 60ms
then each action in the macro would have a delay of 60ms. This can also be known as a global delay as it affects
everything.
54
● If unticked the delay will be shown between the down-press and up-press of each key/button. You can adjust
any time by clicking the number and entering a new number. This delay affects the time between the event
before and after only.
Example of the Macro with USE STANDARD DELAYS
unticked:
1. You can click the to add another RECORD KEYSTROKE, TEXT & EMOJIS etc. Click SAVE when you are
finished programming the macro to take you back to the assignments tab.
55
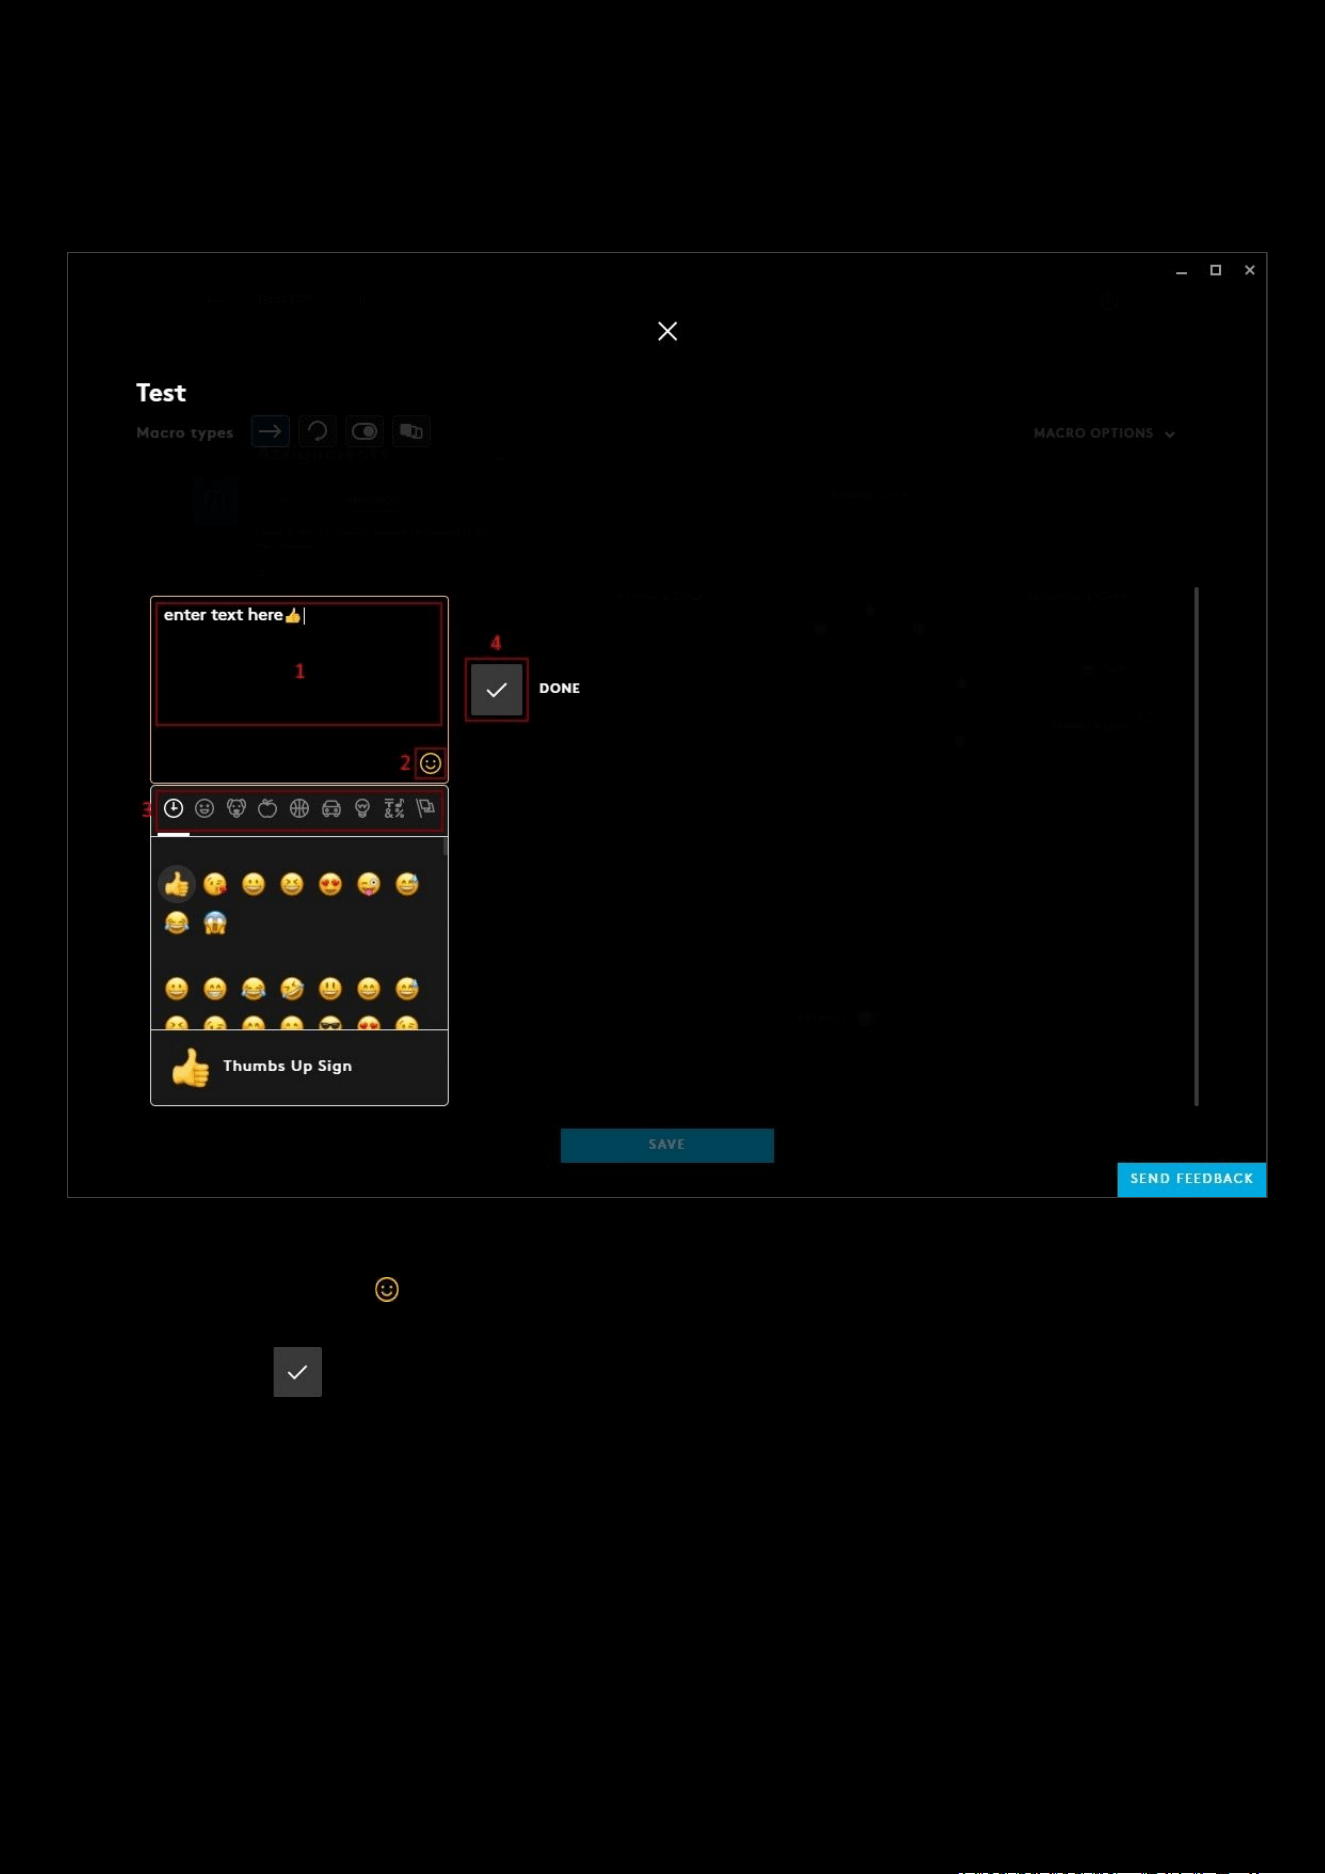
2: TEXT AND EMOJIS:
Emoji text will behave like a no repeat macro.
1. As you type and add emojis, there will appear here.
2. Click the emoji symbol to expand the emoji drop down list
3. Click on the different icons in the bar to see different groups of emojis
4. DONE. Click to finish creating your Emoji macro
56
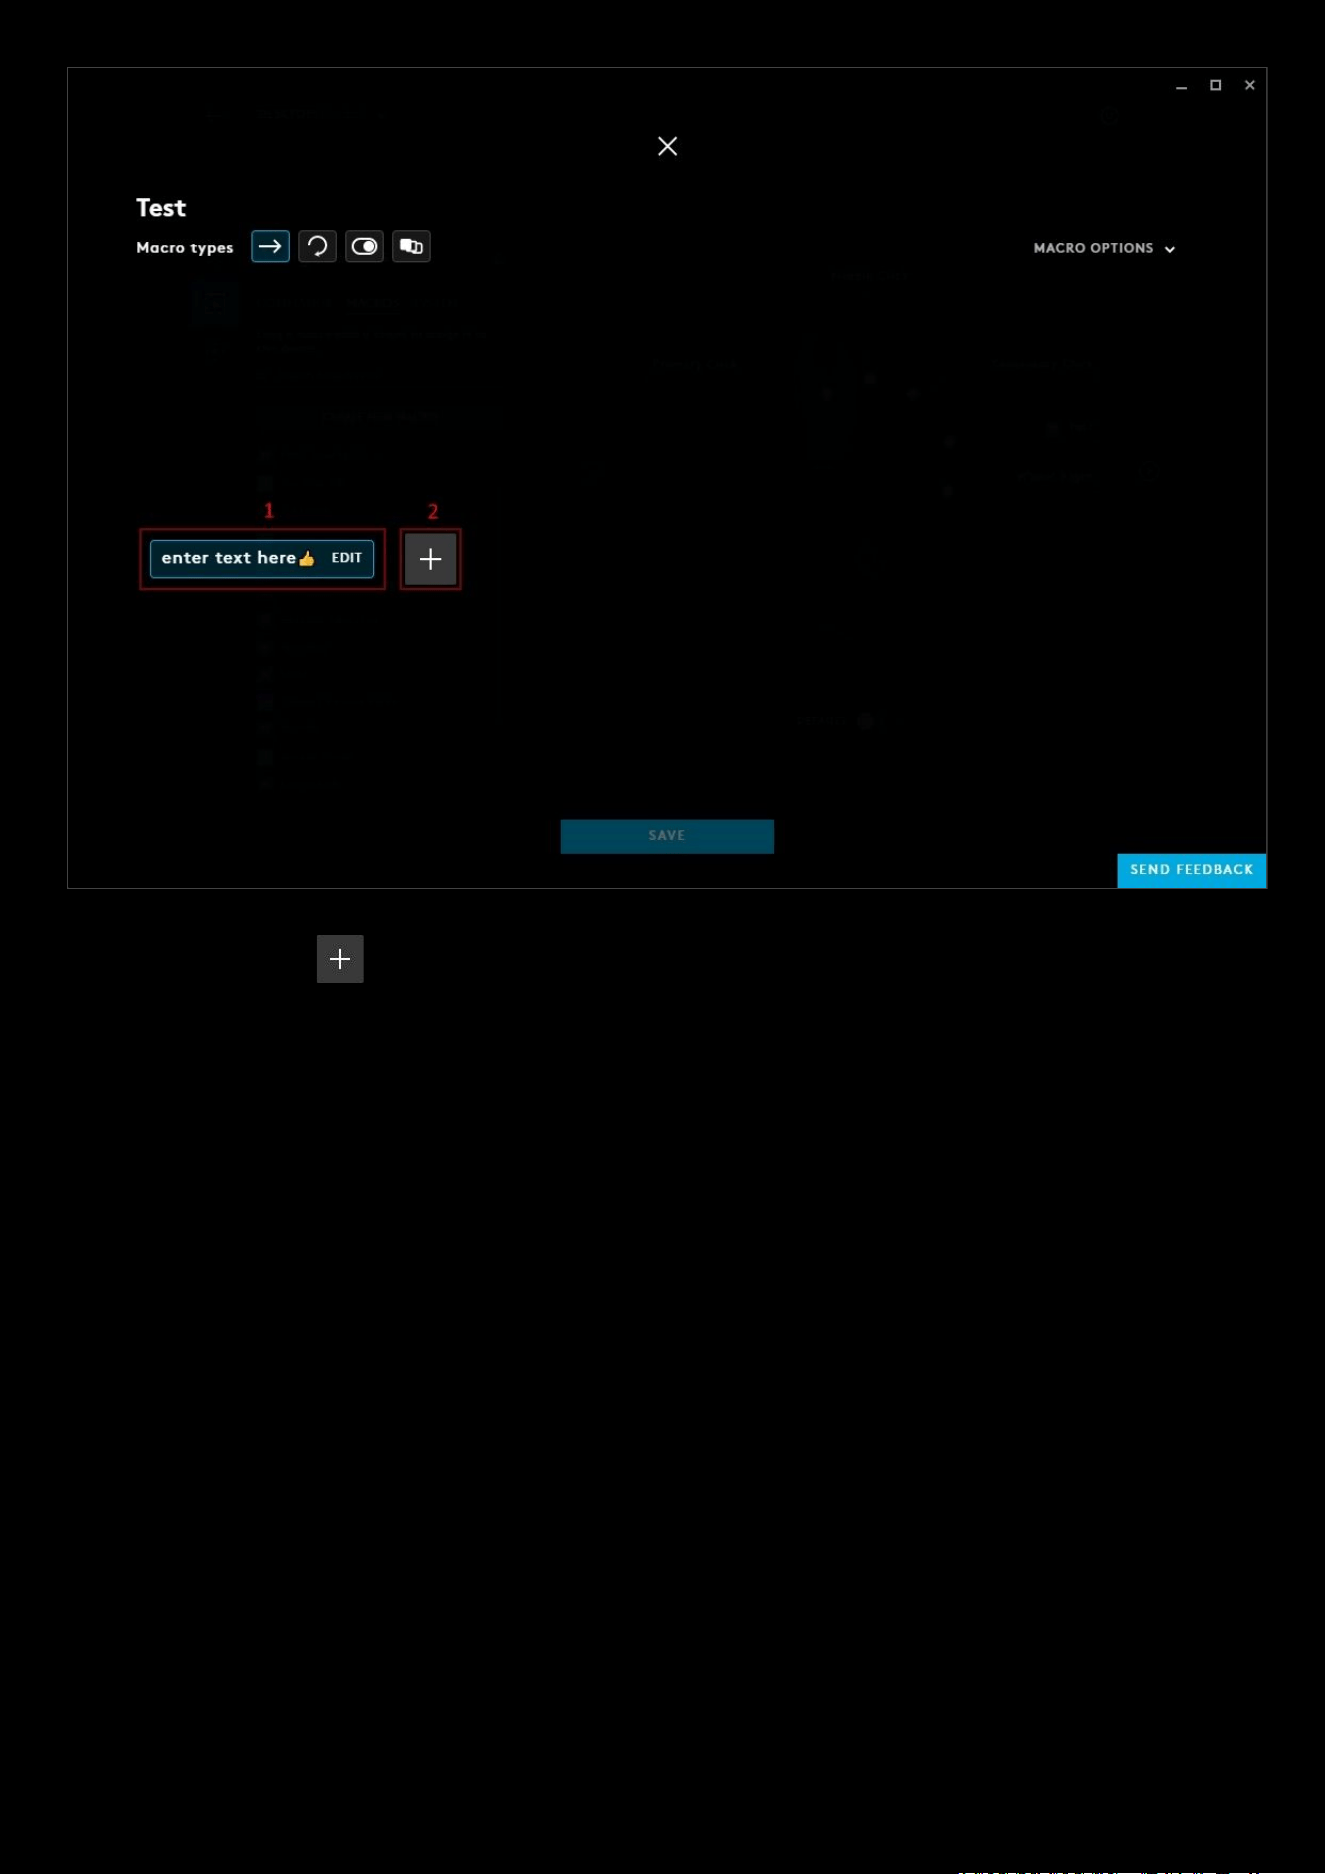
1. Highlight the text to delete or click edit to change the text.
2. You can click the to add another TEXT & EMOJIS or RECORD KEYSTROKE etc. Click SAVE when you are
finished programming the macro to take you back to the assignments tab.
57
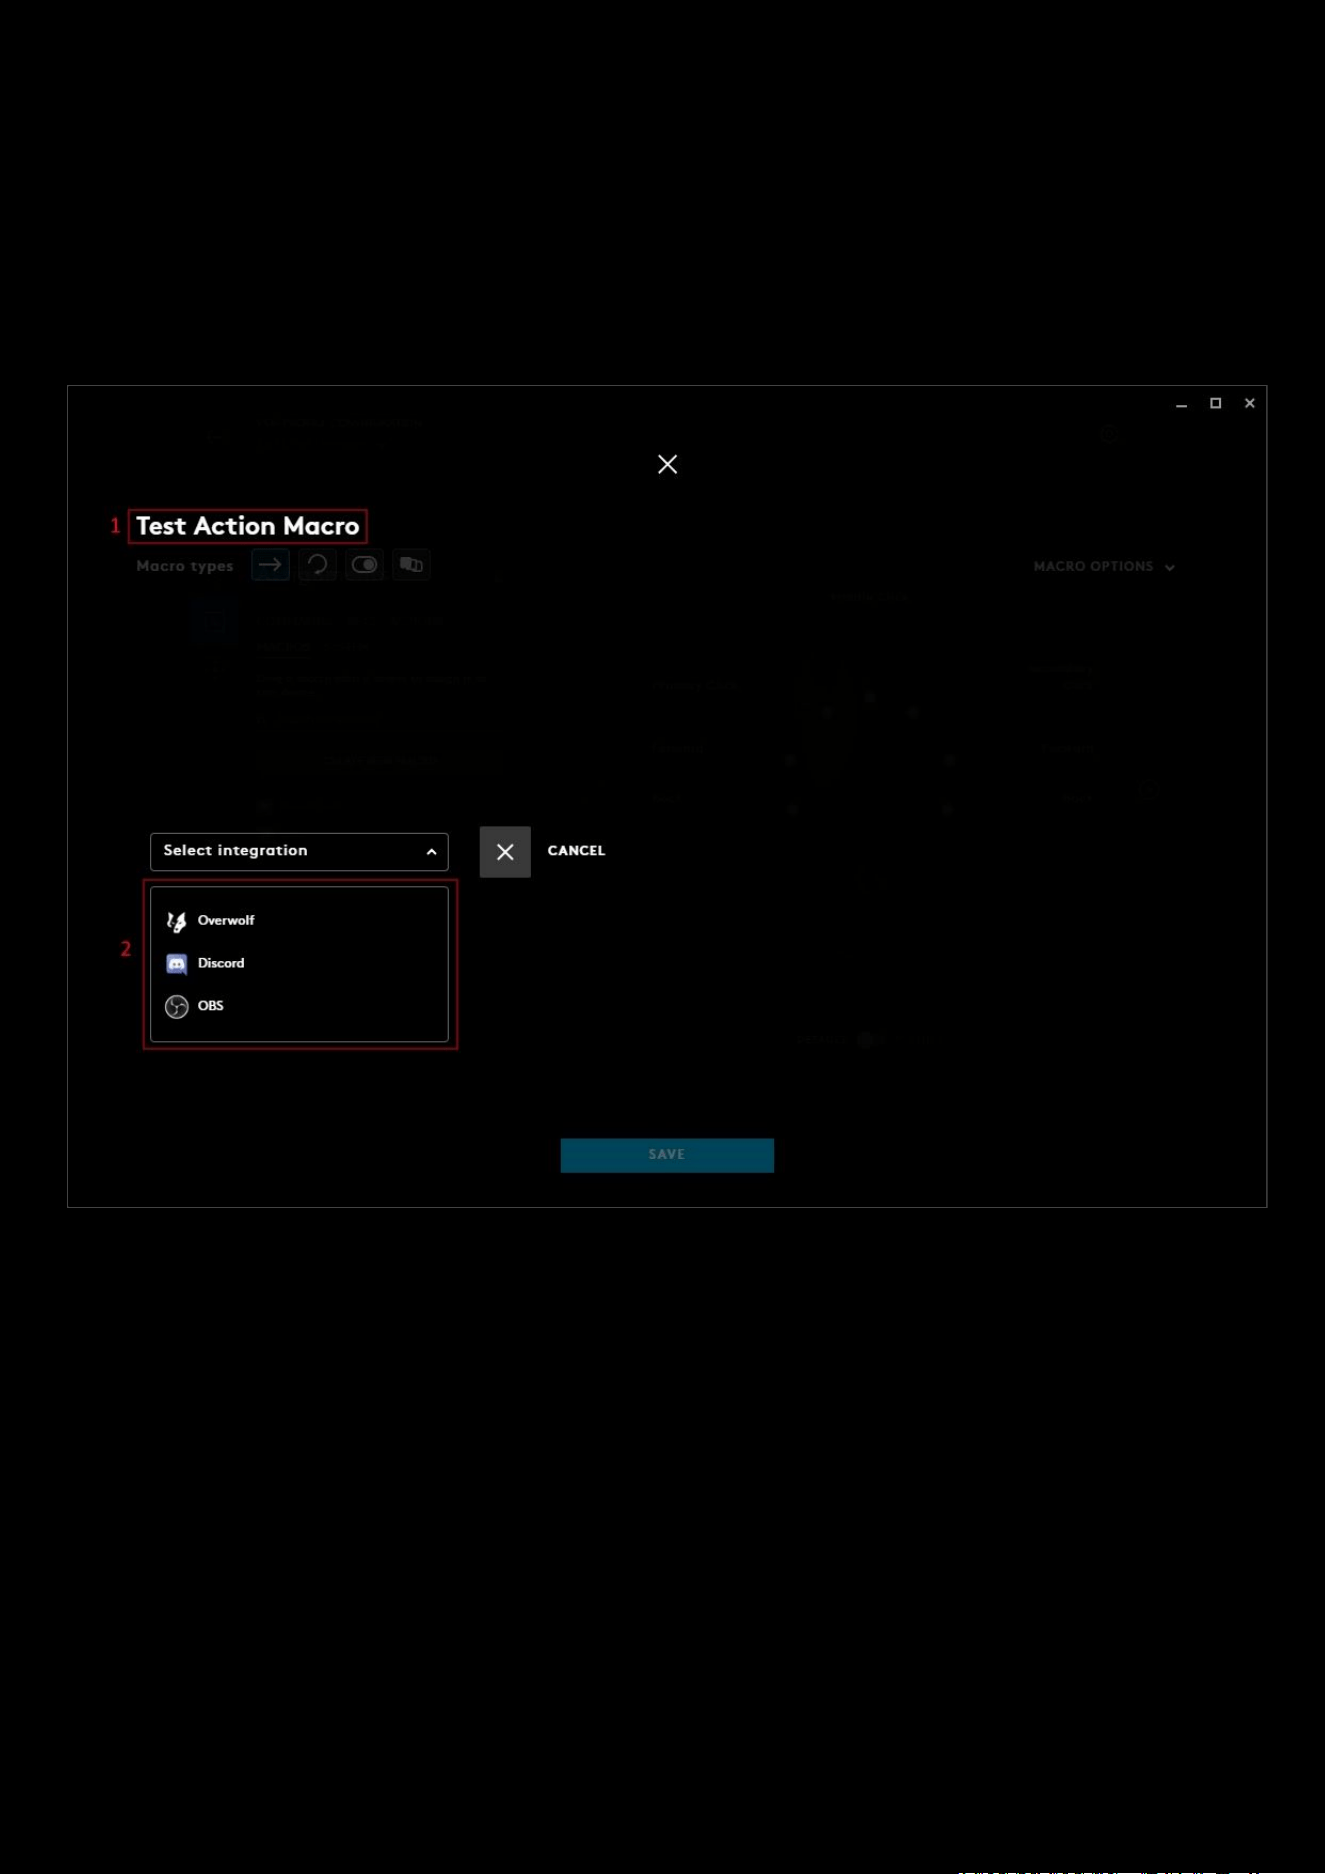
3: ACTION:
An action is a command that is associated to an integration, such as Overwolf, OBS and Discord. Or LED integrations
such as Fortnite and Battlefield 5
Examples of some actions:
● OBS: Toggle Streaming
● Overwolf: Capture Video
● Discord: Mute Self
1. Action Name. Click here to change the name of the Macro. In the example we have named this Test Action
2. Select Integration. All the Integrations will be displayed here. Click one of the options to take you to the next
menu.
58
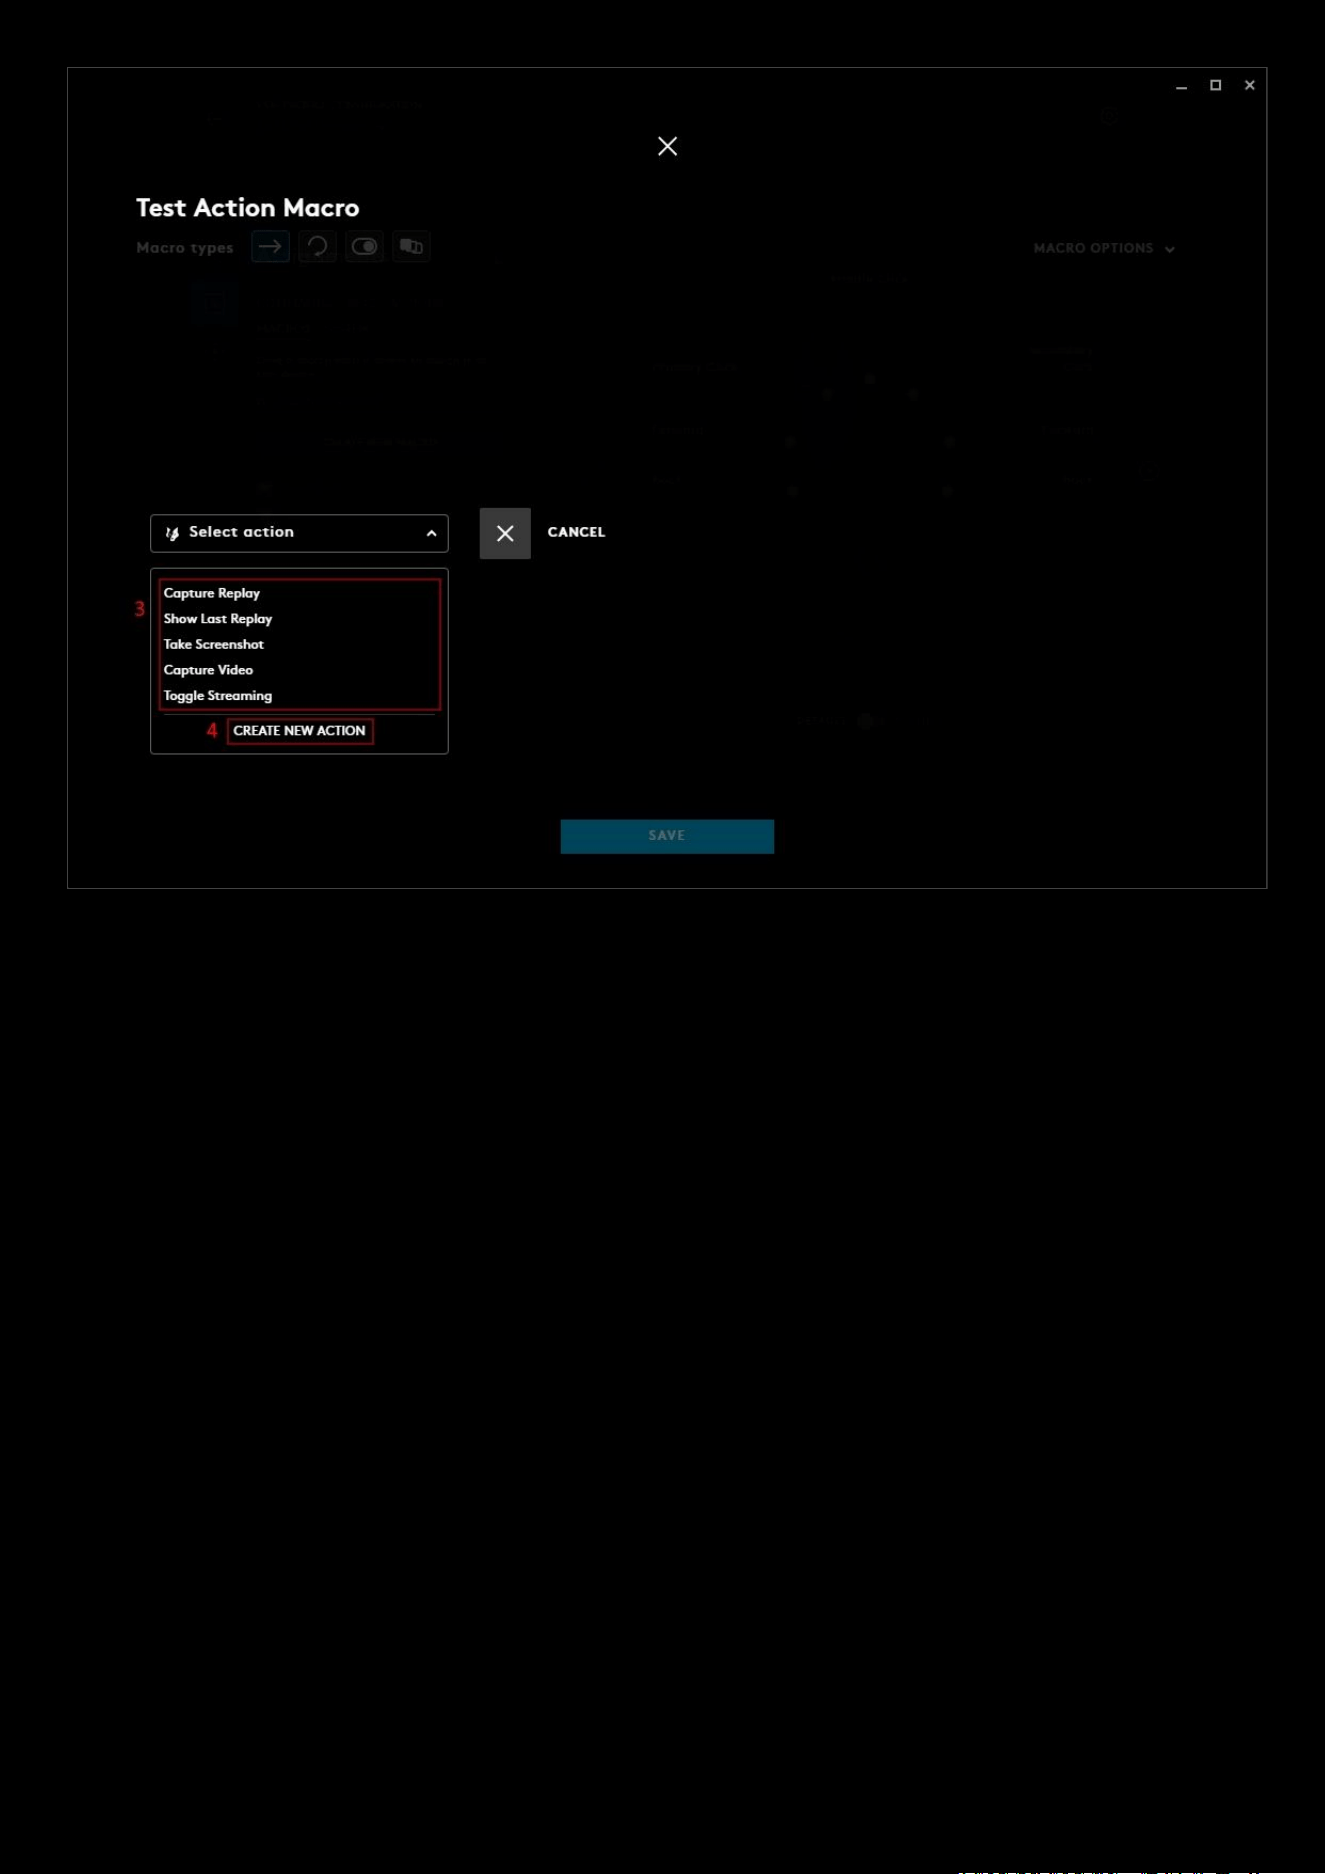
3. Action Menu. In the example, we have selected Overwolf and now have a list of current actions we can choose
from.
4. CREATE NEW ACTION. Click this to create a new action which will then appear in the Action Menu above. More
on this in the 3a. CREATE NEW ACTION section
59
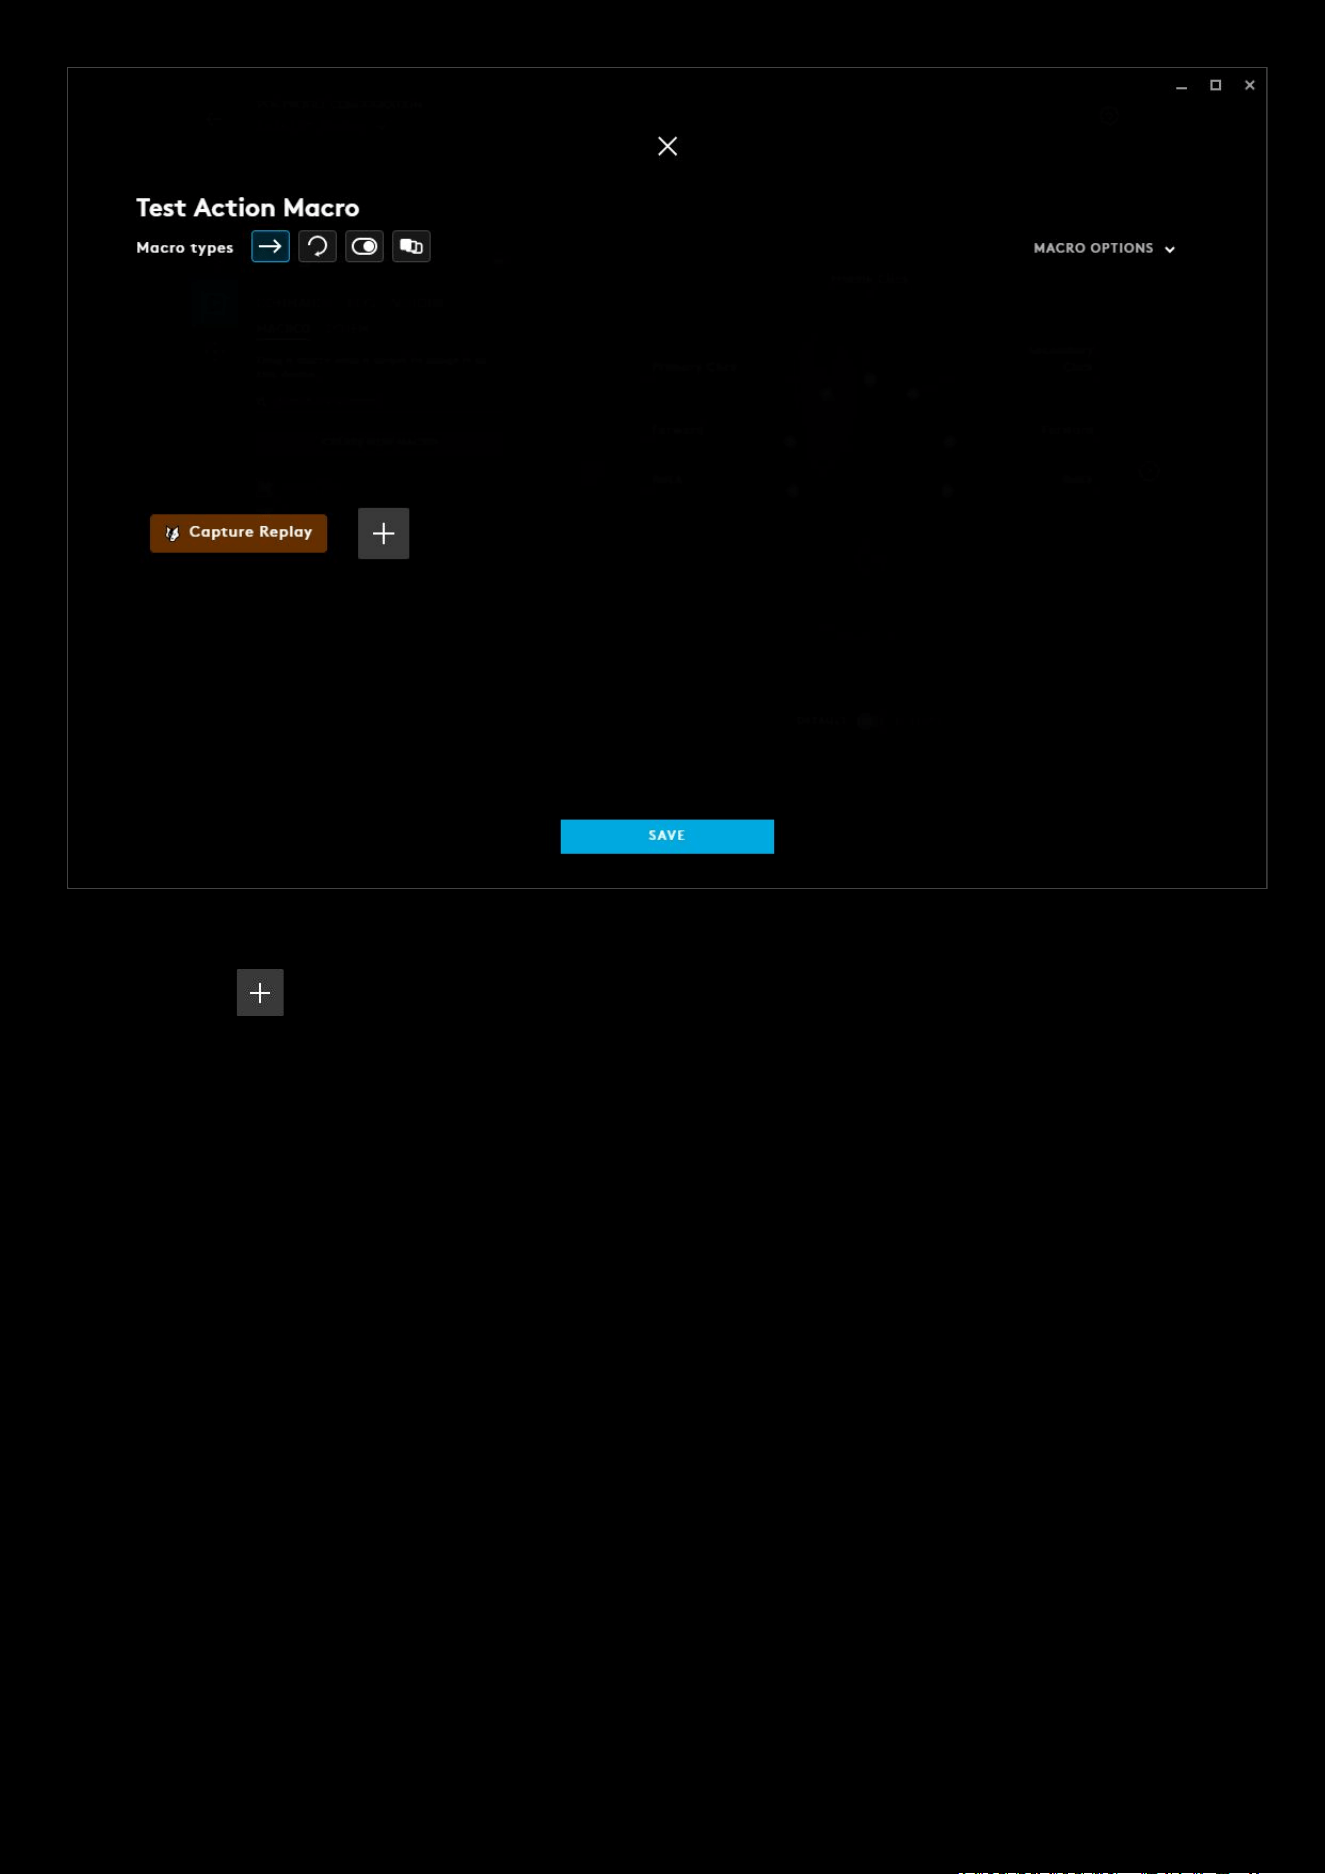
Here we selected Capture Replay and this is now in the Text Acton
macro.
You can click the to add another TEXT & EMOJIS
or RECORD KEYSTROKE etc. Click SAVE when you are finished
programming the macro to take you back to the assignments tab.

60
3a. CREATE NEW ACTION:
When choosing an action from an Integration (to select for an assignment or within a macro), you will also have the
option to create a new action.
1. ACTIONS. In the example above, we have navigated to the ACTIONS tab in ASSIGNMENTS and selected the OBS
Integration.
2. Integration Warning Sign. If you see a next to an Integration it means that it is not currently open and G
HUB will not be able to query its current event list. G HUB has its own default set of actions but to create any
new events, you will need to have that Integration open.
3. + CREATE A NEW ACTION. When you click the + CREATE A NEW ACTION for the Integration selected. In the
example we are taken the CREATE OBS ACTION screen:

61
a. NAME. Click in the box to change the name of the action
b. ACTION TYPES. Click the drop down menu to see all the available action types. You can scroll down the
list and pick the Action Type. Some action types also require a third selection. Once you are done click
SAVE. This will exit the Create Action Screen
In our example we have selected ACTIVATE SCENE
, we then need to select which scene to assign. In this case we select
the G HUB Test Screen which was added previously in OBS:
62
You can see in the example above, that G HUB Test Scene Activation
Action is now available in the OBS actions menu
and can be assigned.
63
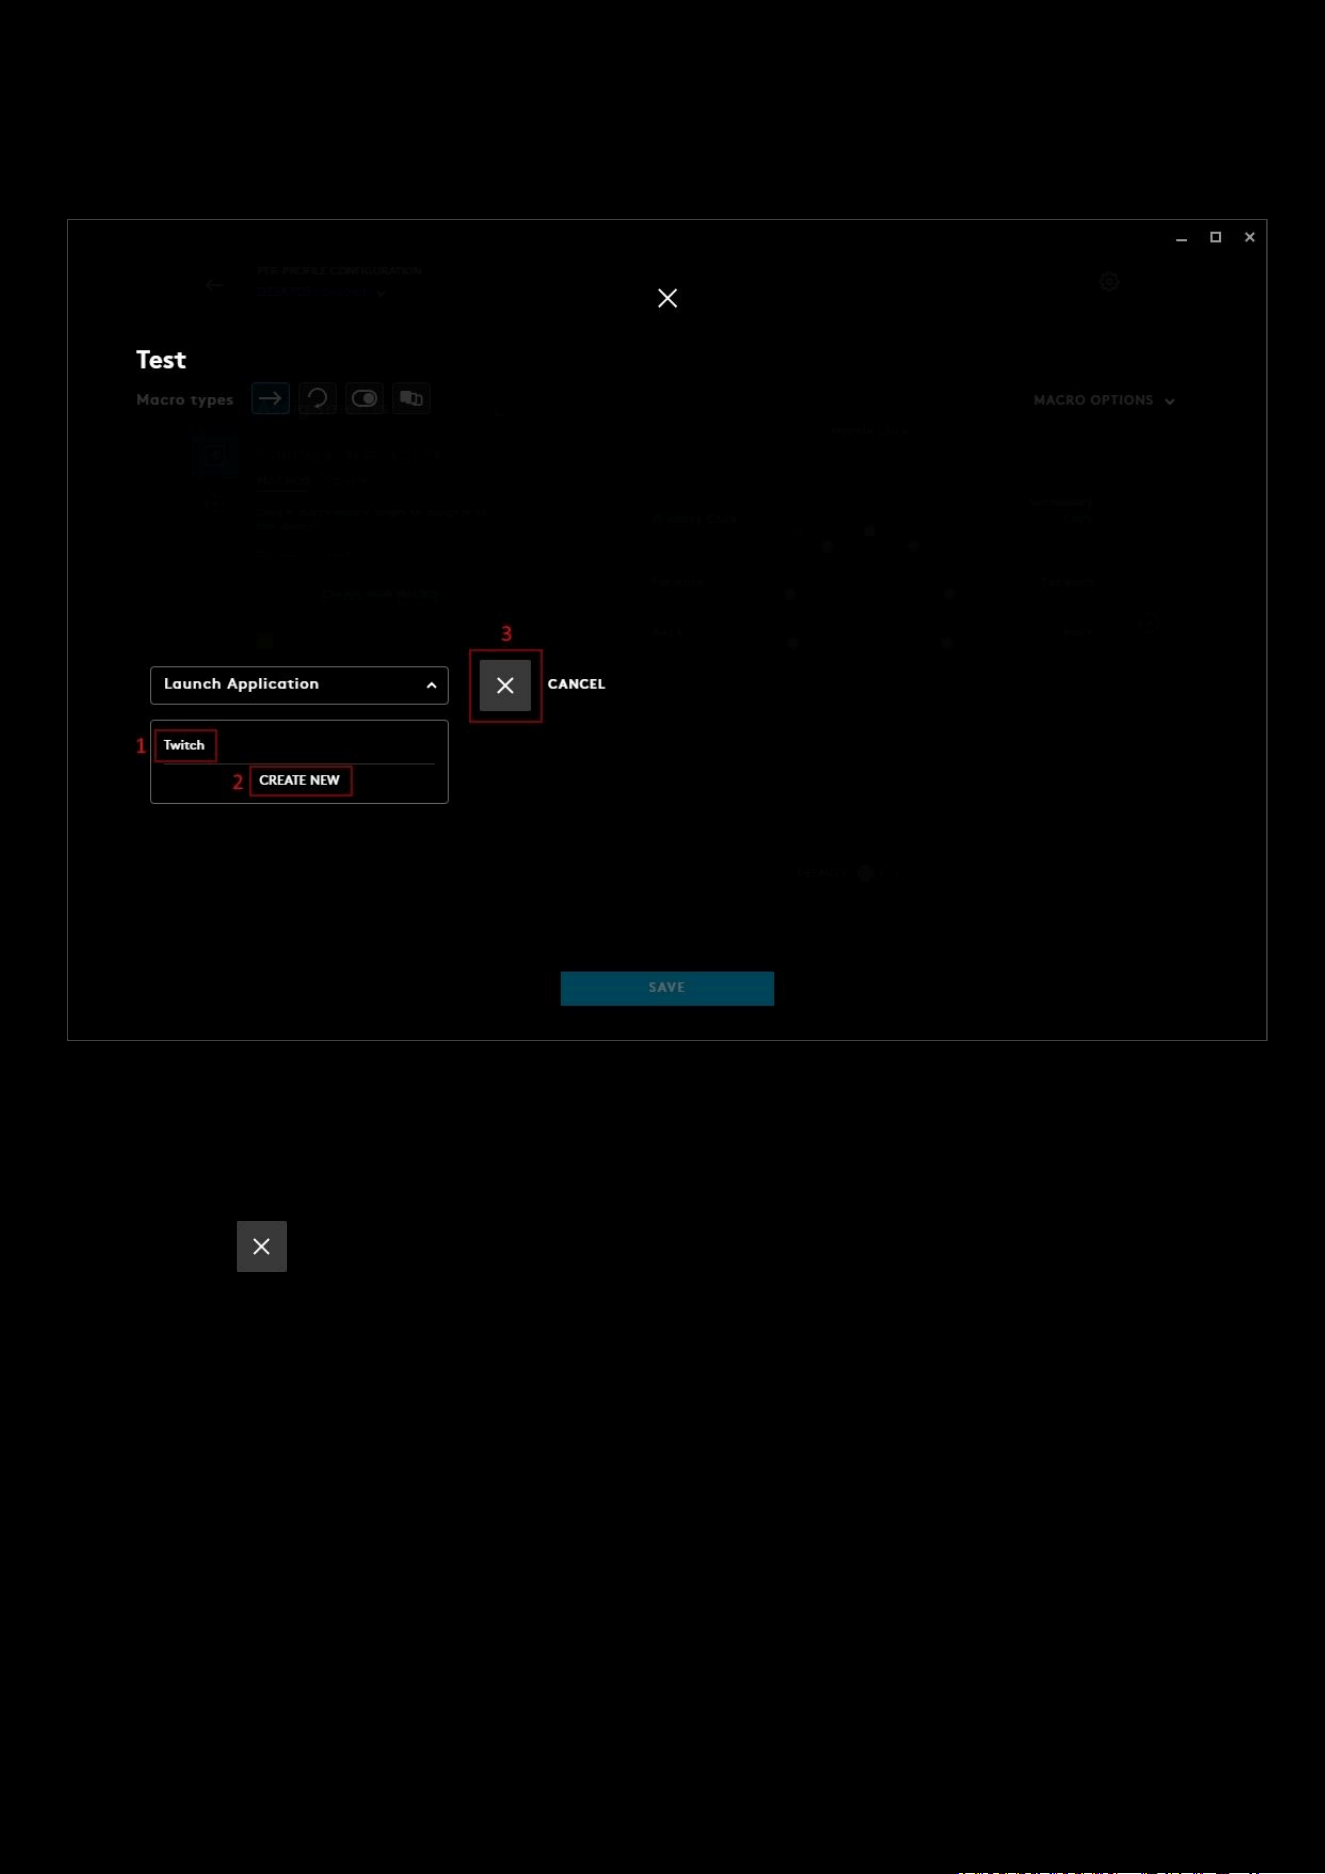
4: LAUNCH APPLICATION:
A launch application shortcut which can be part of a macro.
1. Previously created Launch Application shortcuts will be shown here. For example, we previously created one for
Twitch. Select which application from this list to be assigned to your macro.
2. CREATE NEW. Click this to browse for an application to set up. Once you have selected your application it will
appear in the list (
1) above.
3. Click the to cancel the launch macro editor.
64
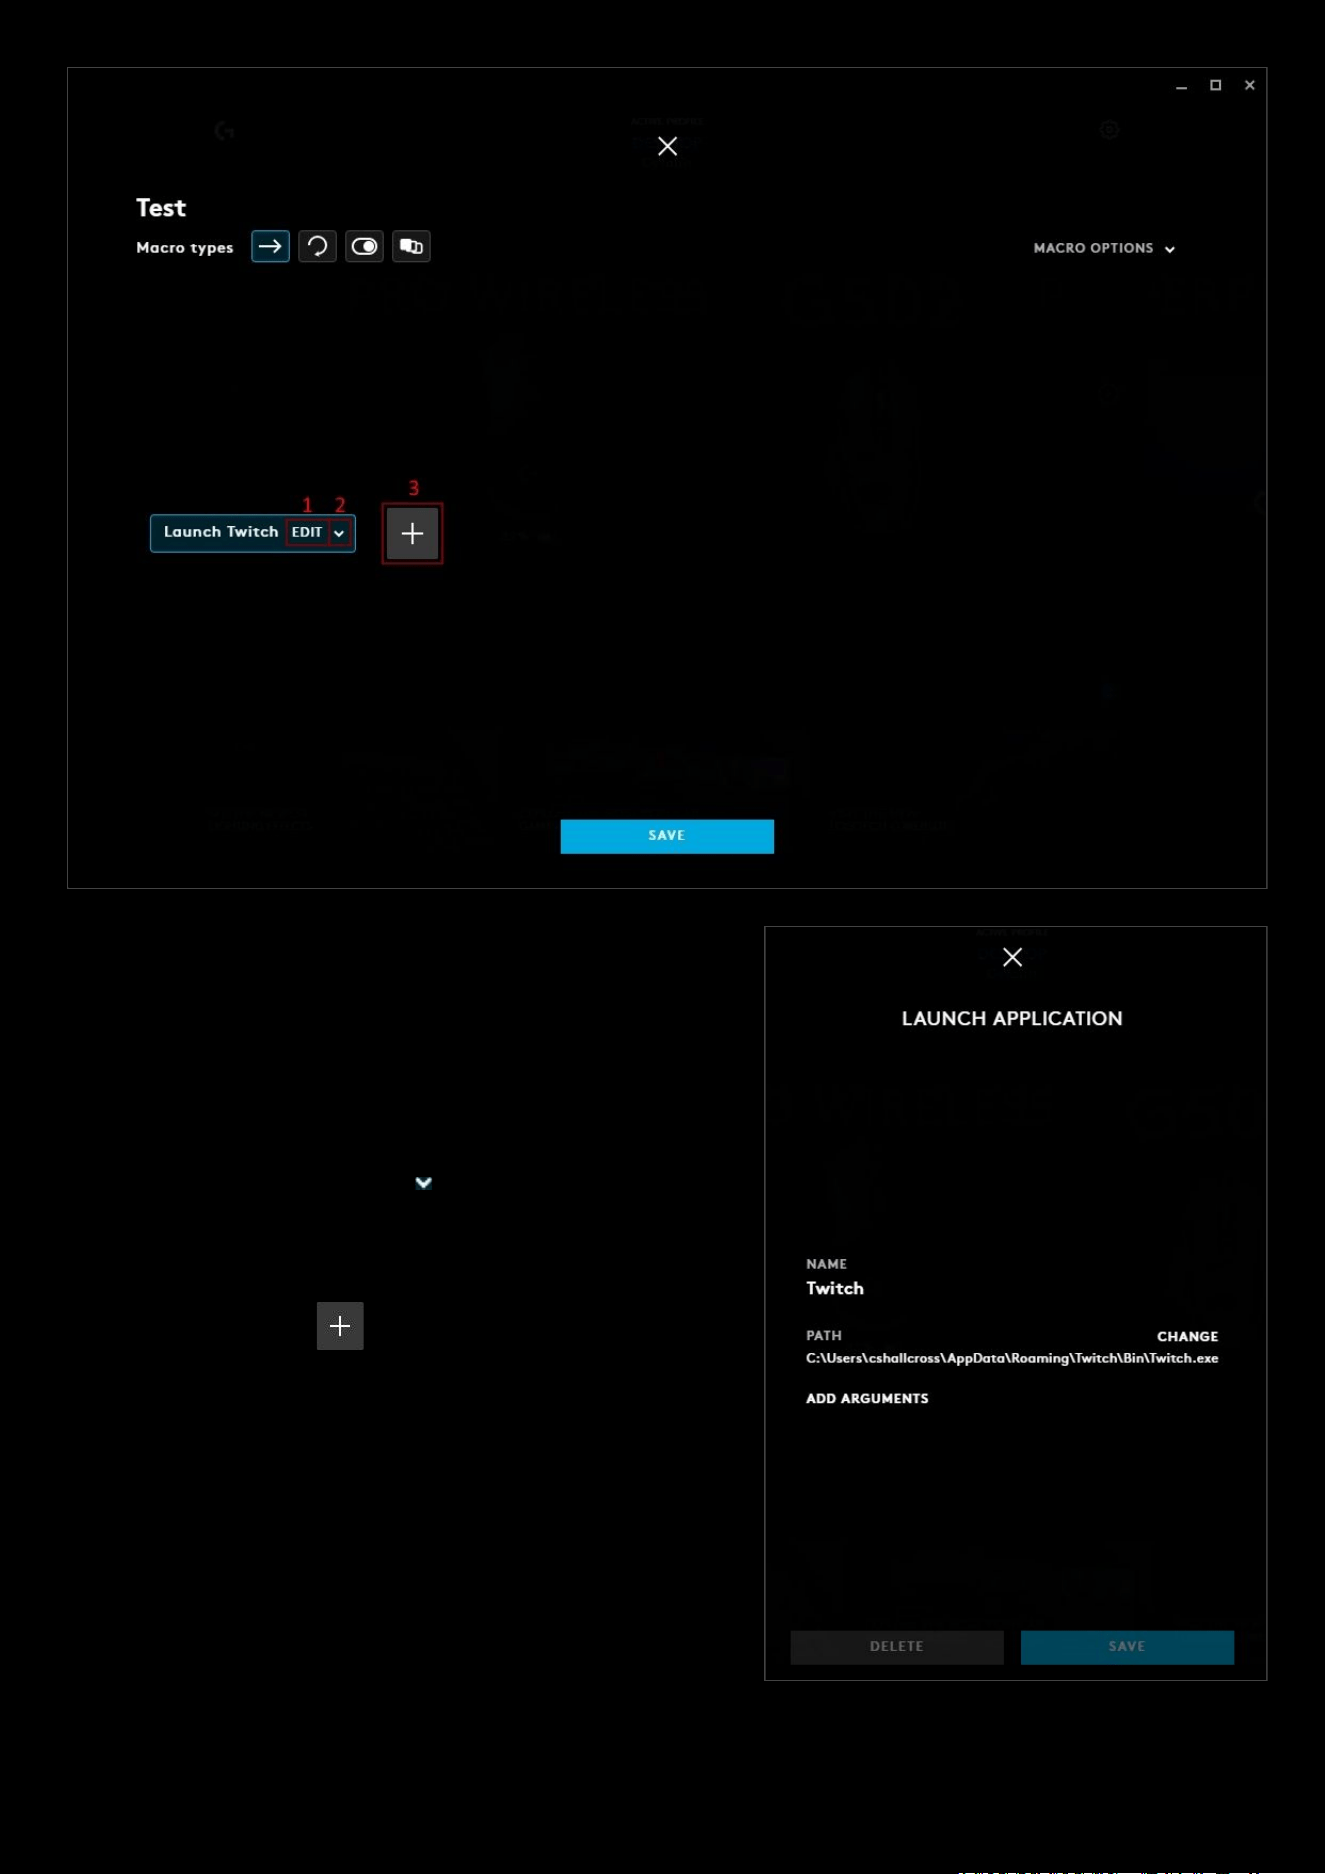
Select the Launch Application shortcut to edit or delete. You can
delete by highlighting and pressing delete.
1. EDIT. Click this to open the editor for the Launch
Application. Here you can change the NAME, PATH and
ADD ARGUMENTS. Click SAVE
if you want to save the
changes.
2. Click the drop down arrow to open up the Launch
Application list. You can select a different application to
launch instead by selecting a different one or creating a new
Launch Application.
3. You can click the to add another LAUNCH
APPLICATION, TEXT & EMOJIS etc. Click SAVE when you
are finished programming the macro to take you back to the
assignments tab.
65
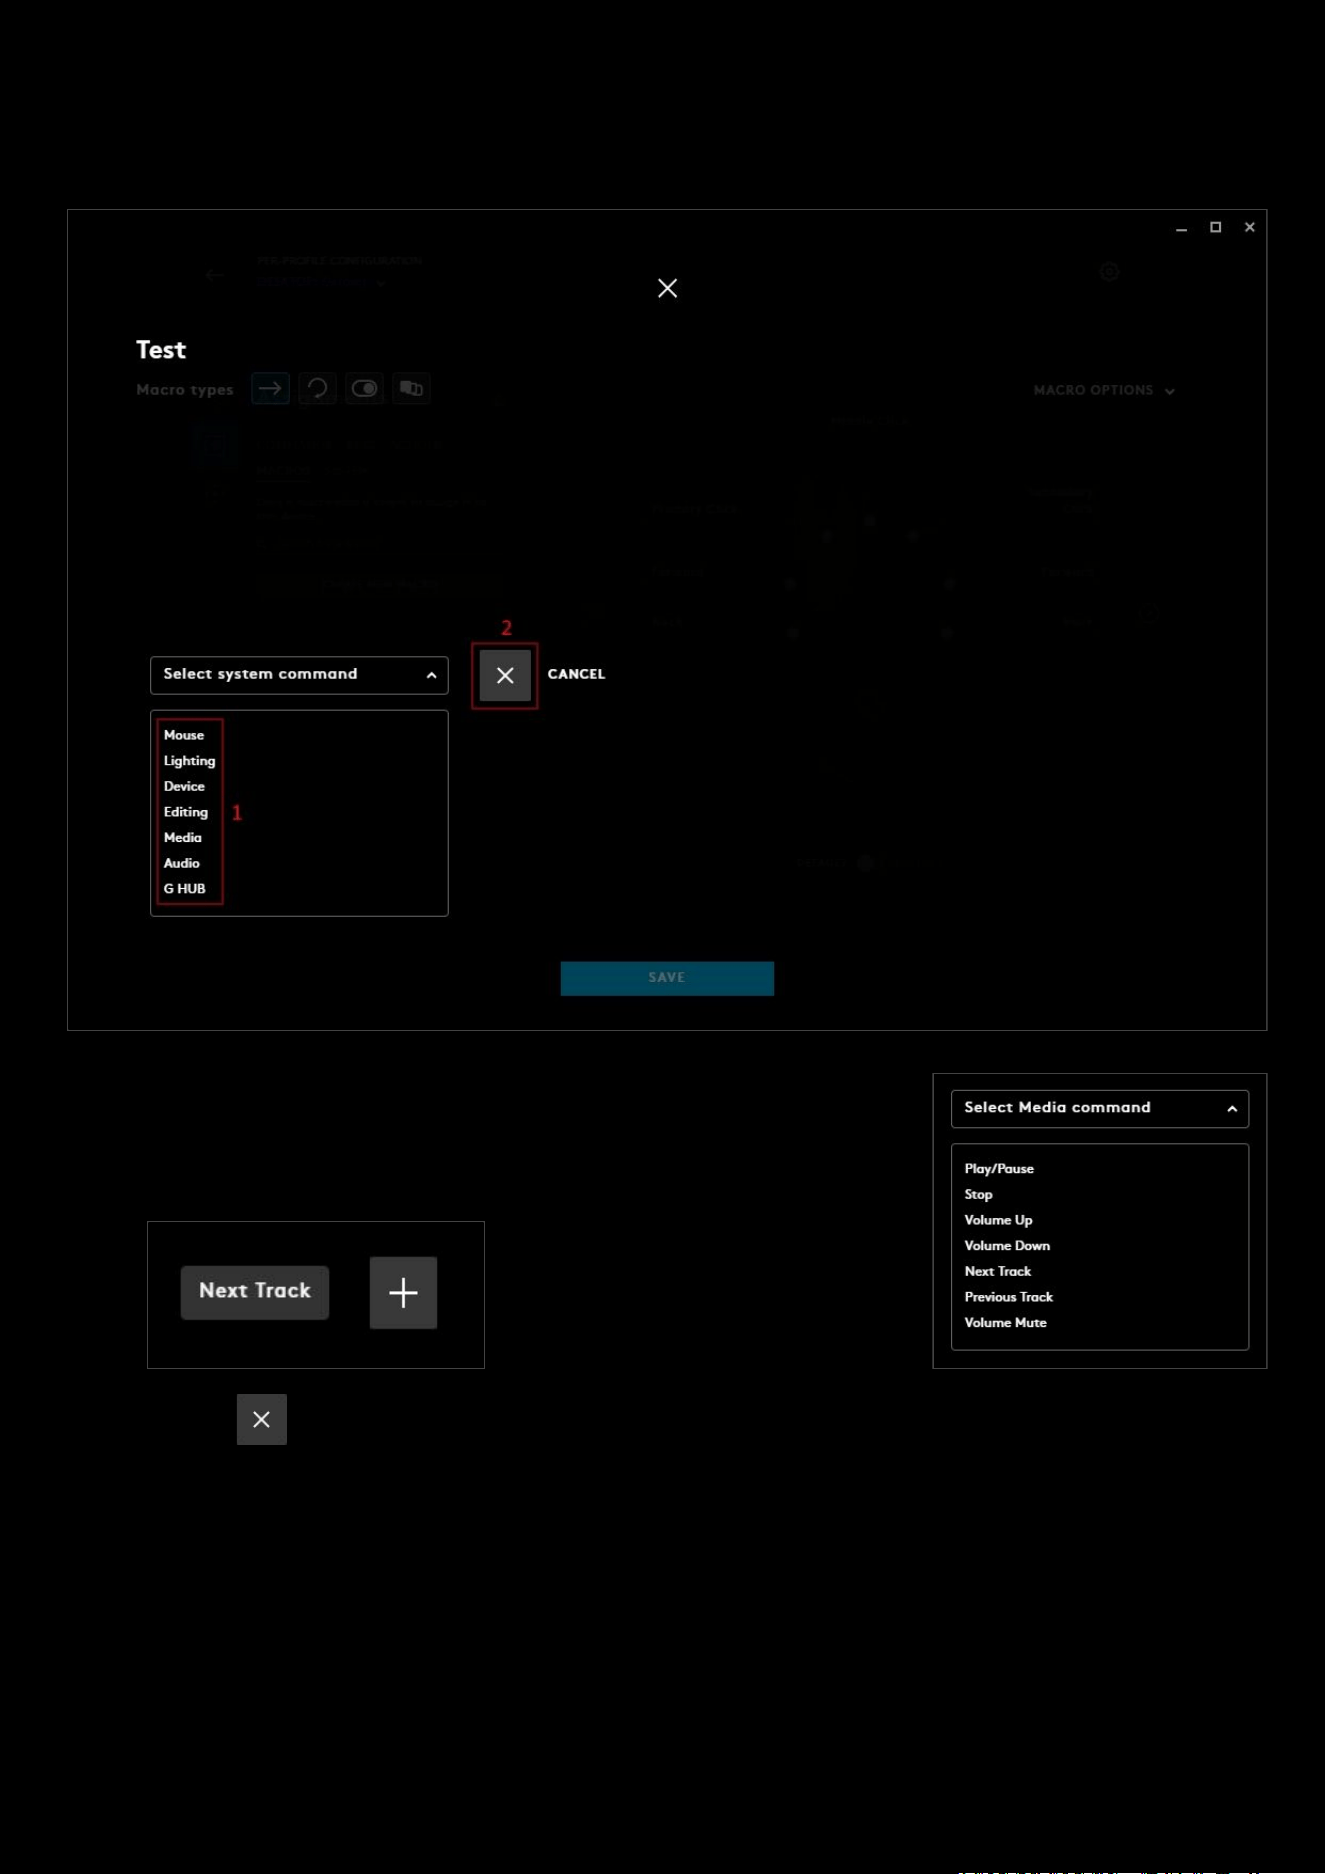
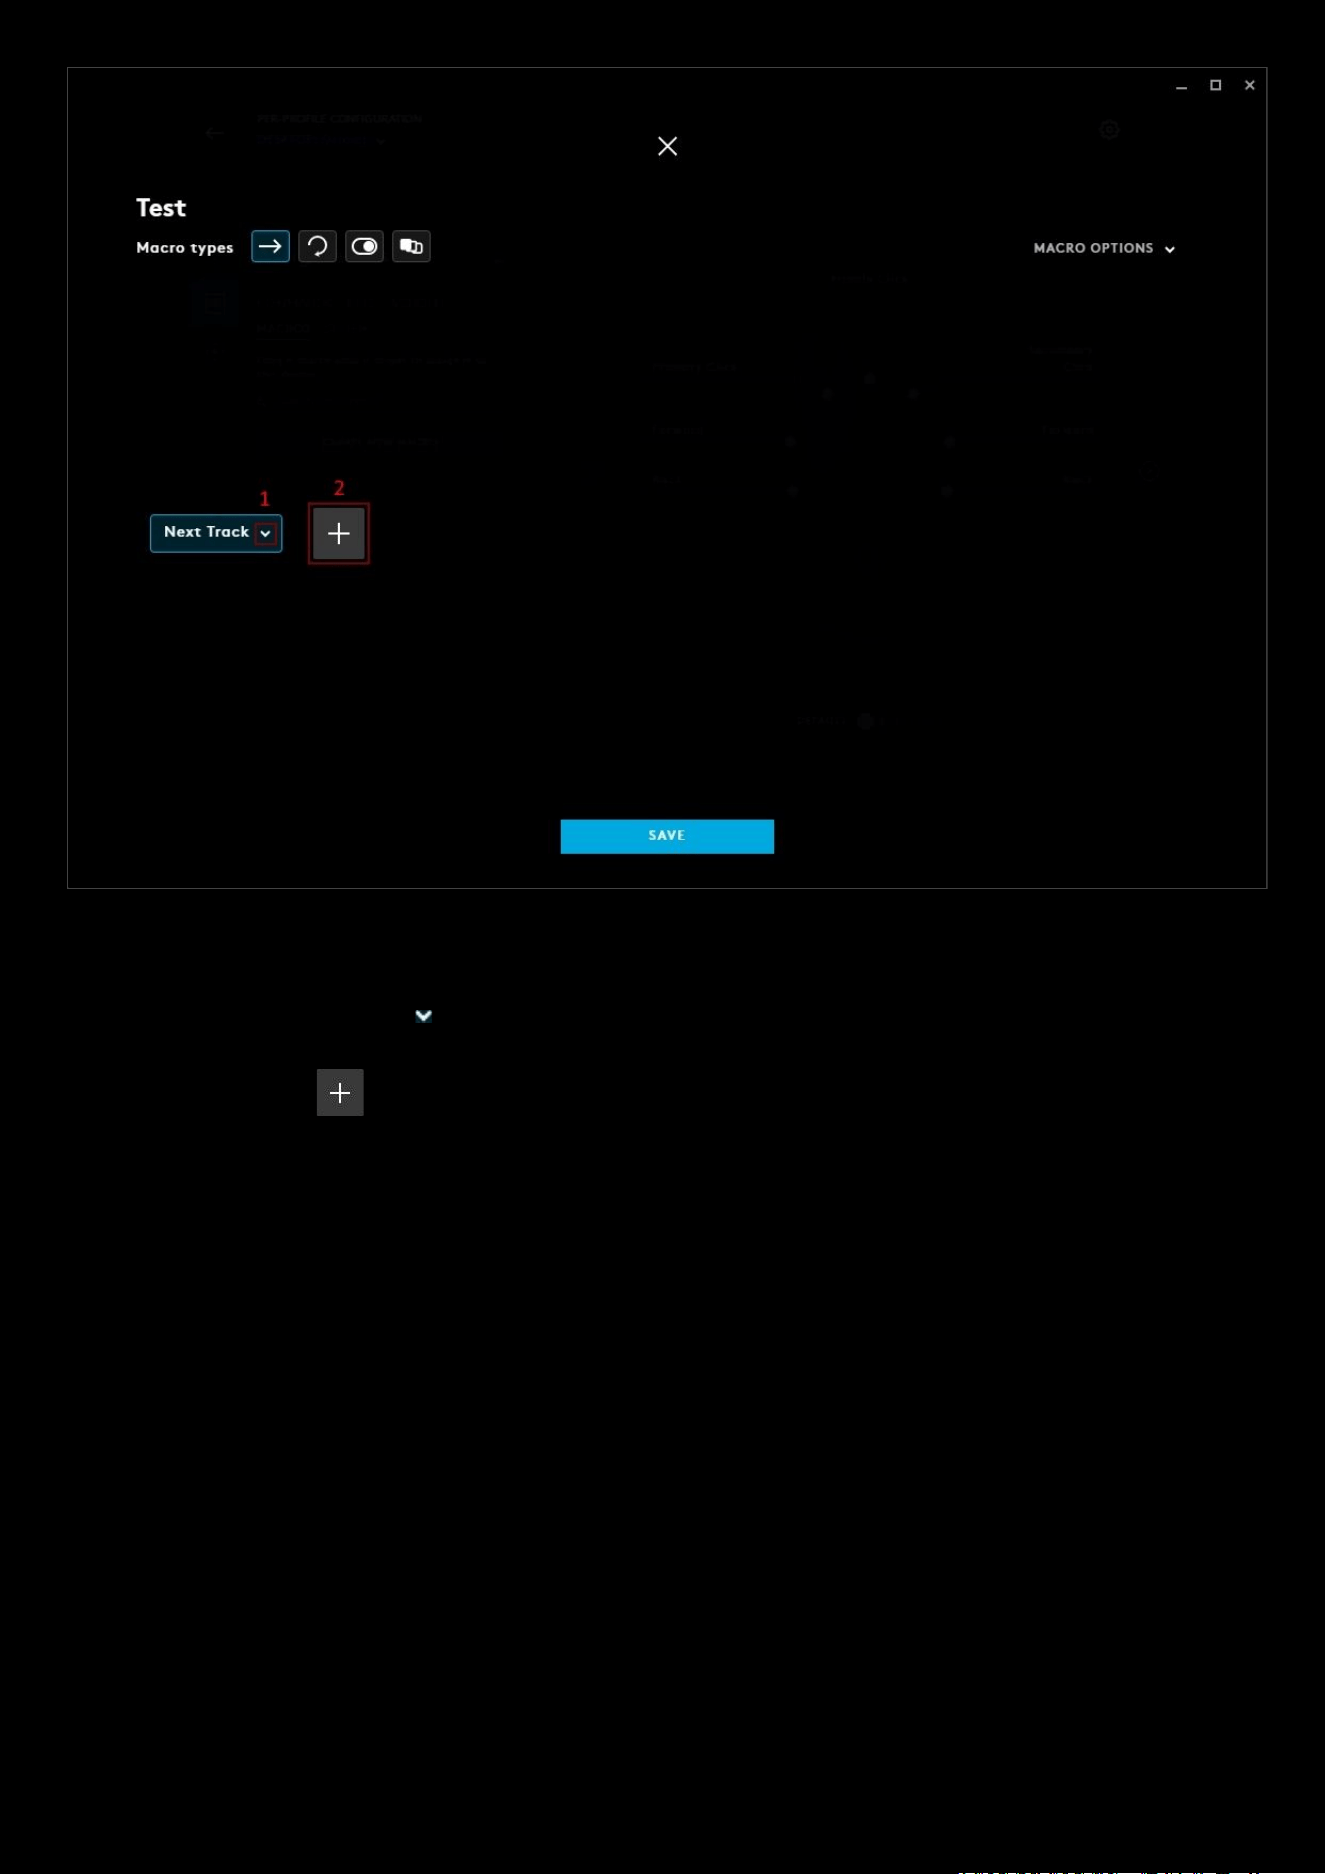
5: SYSTEM
Select a system hotkey to be assigned to the macro.
1. Select which group from the list. This will open up a sub group and pick a
System command from there. Once you make your choice, you will be
automatically taken back.
2. Click the to cancel the System macro editor.
66
Select the Launch Application shortcut to edit or delete. You can delete by highlighting and pressing delete.
1. Click the drop down arrow to open up the System Commands list. You can select a different System
Command by selecting a different one
2. You can click the to add another SYSTEM, LAUNCH APPLICATION, TEXT & EMOJIS etc. Click SAVE when
you are finished programming the macro to take you back to the assignments tab.
67
6. DELAY
You can add a delay between commands. This is different to the delay you can see between key and mouse button
presses whilst making a command in a macro, but is configured the same way:
To add a delay, select DELAY
from the from the drop down menu. The default value will be 50ms but this can be
changed. You can add a delay at the start or after any other macro options
1. Clicking DELAY has added the default 50ms to the end of the command
2. Clicking DELAY has inserted a delay of 50ms to the start of the command. Any command added after will
operate after that delay.
3. This is the delay between the down and uppress of the 1 key and is generated through RECORD KEYSTROKES .
You can change that timer by clicking on MACRO OPTIONS
and unchecking USE STANDARD DELAYS.
68
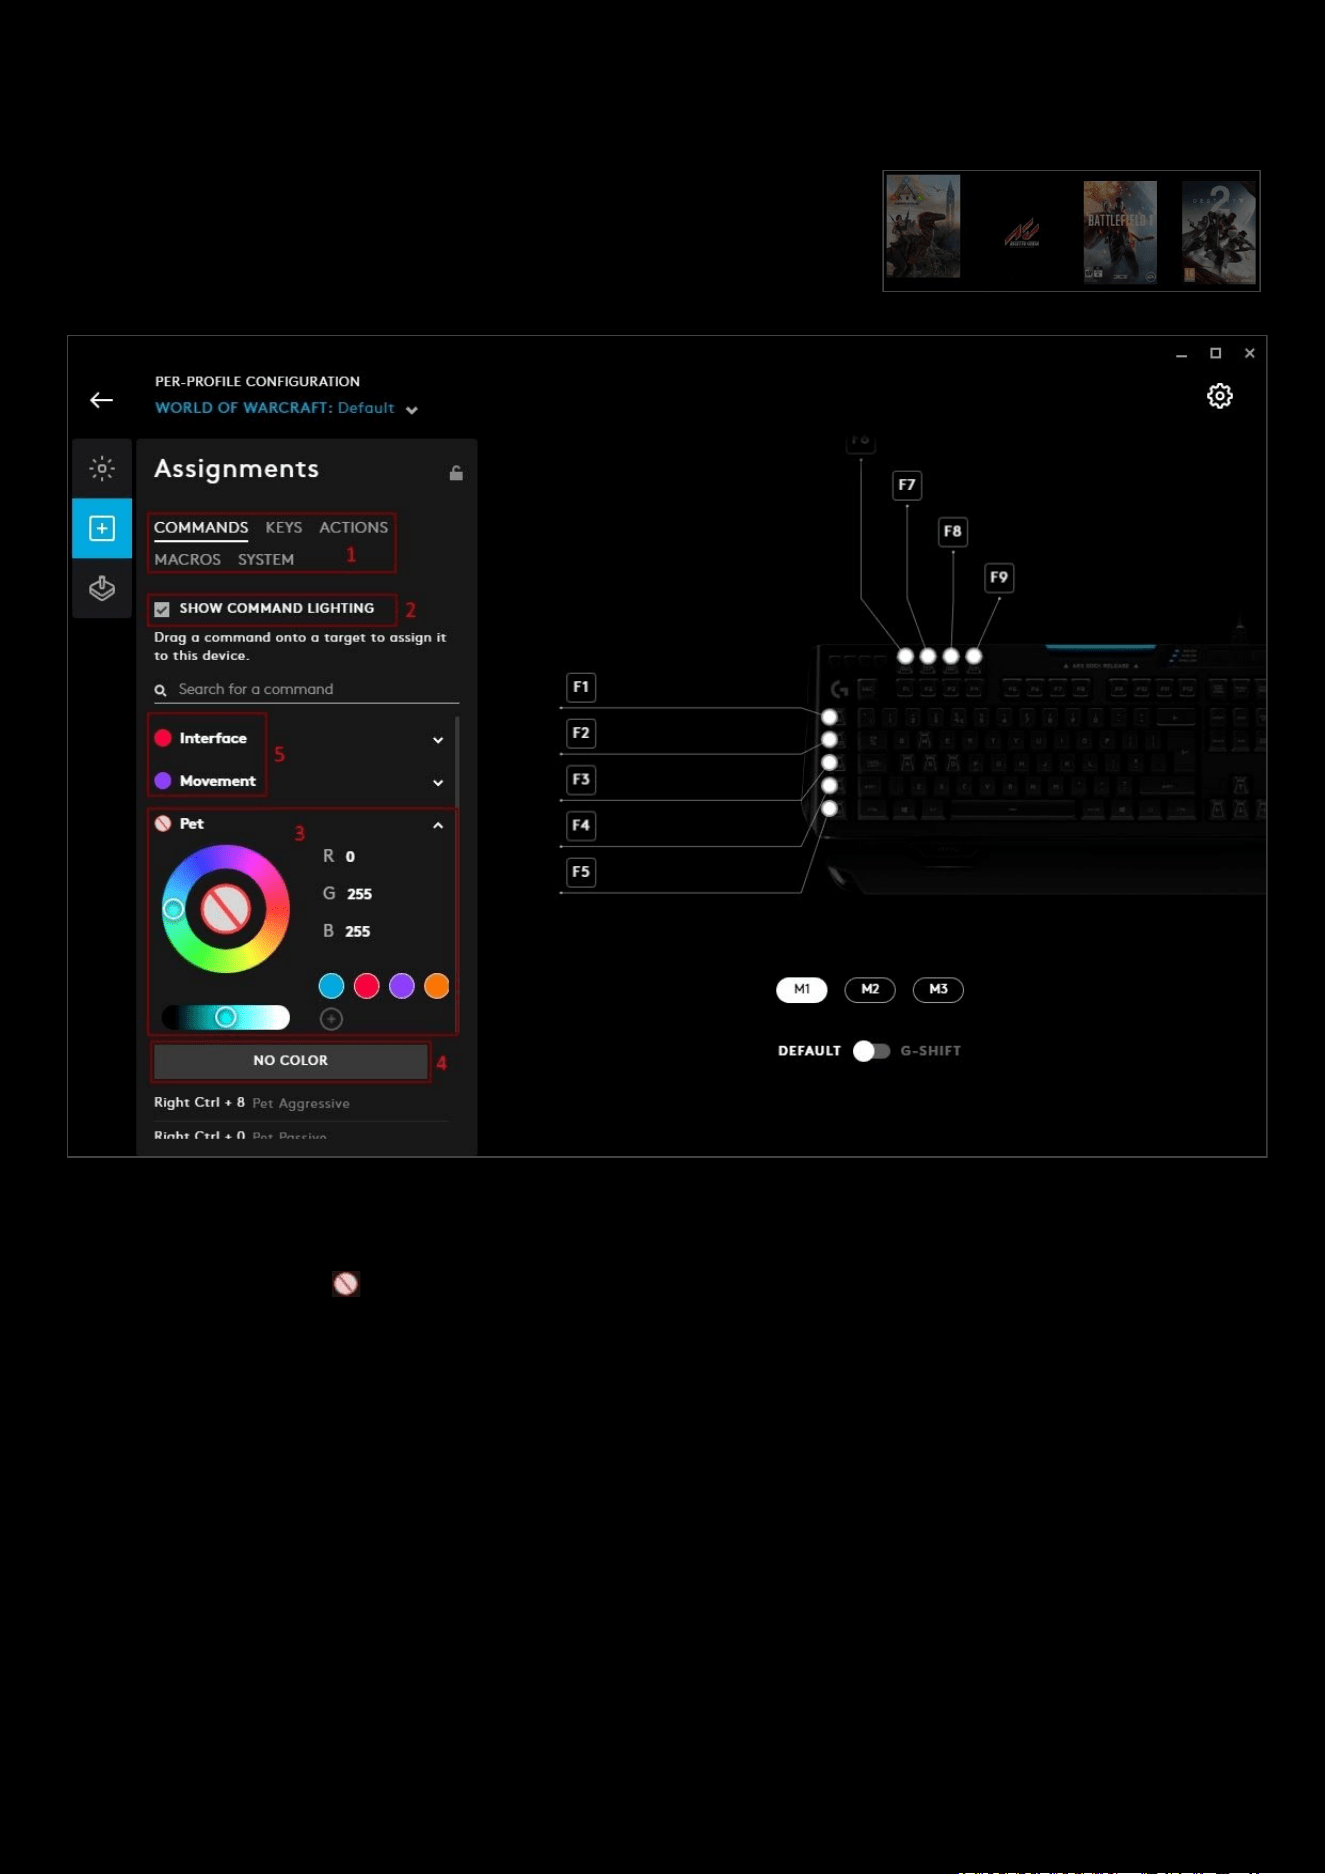
Assignments: Command Lighting
Command Lighting is a lighting effect to highlight in-game commands on your
Keyboard. You will need to start with a profile that built in game commands,
typically a game or APP that has been auto detected by G HUB. For example;
World of Warcraft, Battlefield 1, DOTA 2, ARK Survival Evolved etc.
1. Select your keyboard, go to Assignments and select the COMMANDS tab.
2. Make sure you have SHOW COMMAND LIGHTING ticked.
3. Click on the group icon and you will be shown a color wheel. Select a color for your group.
4. If you want to unassign a color click NO COLOR.
5. Once you have set a color to your group it will appear like the Interface and Movement groups above for
example.
You can have a LIGHTSYNC effect and Command Lighting at the same time. The compatible effects are Starlight, Audio
Visualizer, Echo Press and Screen Sampler. For the other effects, these will appear black / or no color.
69
We will start with a Command Lighting all set up:
We have the
Pet, Interface, Movement and Abilities all with colors assigned to those groups. Those keys in those groups
will now be the group color when the profile is active. So for example, the E Q W S A D keys will all be
purple.
In the example above we have an ECHO PRESS effect with the Command Lighting keys in their respective group colors.
70
If we select a FIXED effect for example:
We can see that the effect has now overwritten the Command Lighting, and now the command lighting will be
deactivated.. This is because the LIGHTSYNC effects will both be trying to Illuminate same key all the time.
71
Assignments: Profile Cycle and Onboard Profile Cycle Commands
Profile Cycling allows you to cycle through profiles of the current active application
Onboard profile Cycling function
will cycle through onboard memory profiles when G HUB is not running.
Note: Onboard memory profiles are profiles loaded directly on to the memory of the device. This allows you to take that
device to a Lan Party for example, and still have a profile to use even if the PC you are using does not have G HUB
installed.
In the example above, we selected a G903 mouse, gone to Assignments and selected the SYSTEM tab. We then dragged
Profile Cycle from the G HUB group to the G305’s Forward button (Left Side). Note that Profile Cycle text is purple to
indicate that this is a special command.
To assign the
Onboard Profile Cycle command, look in the Mouse group in the SYSTEM tab. We then dragged this
command to the Back
button (Left Side).
72
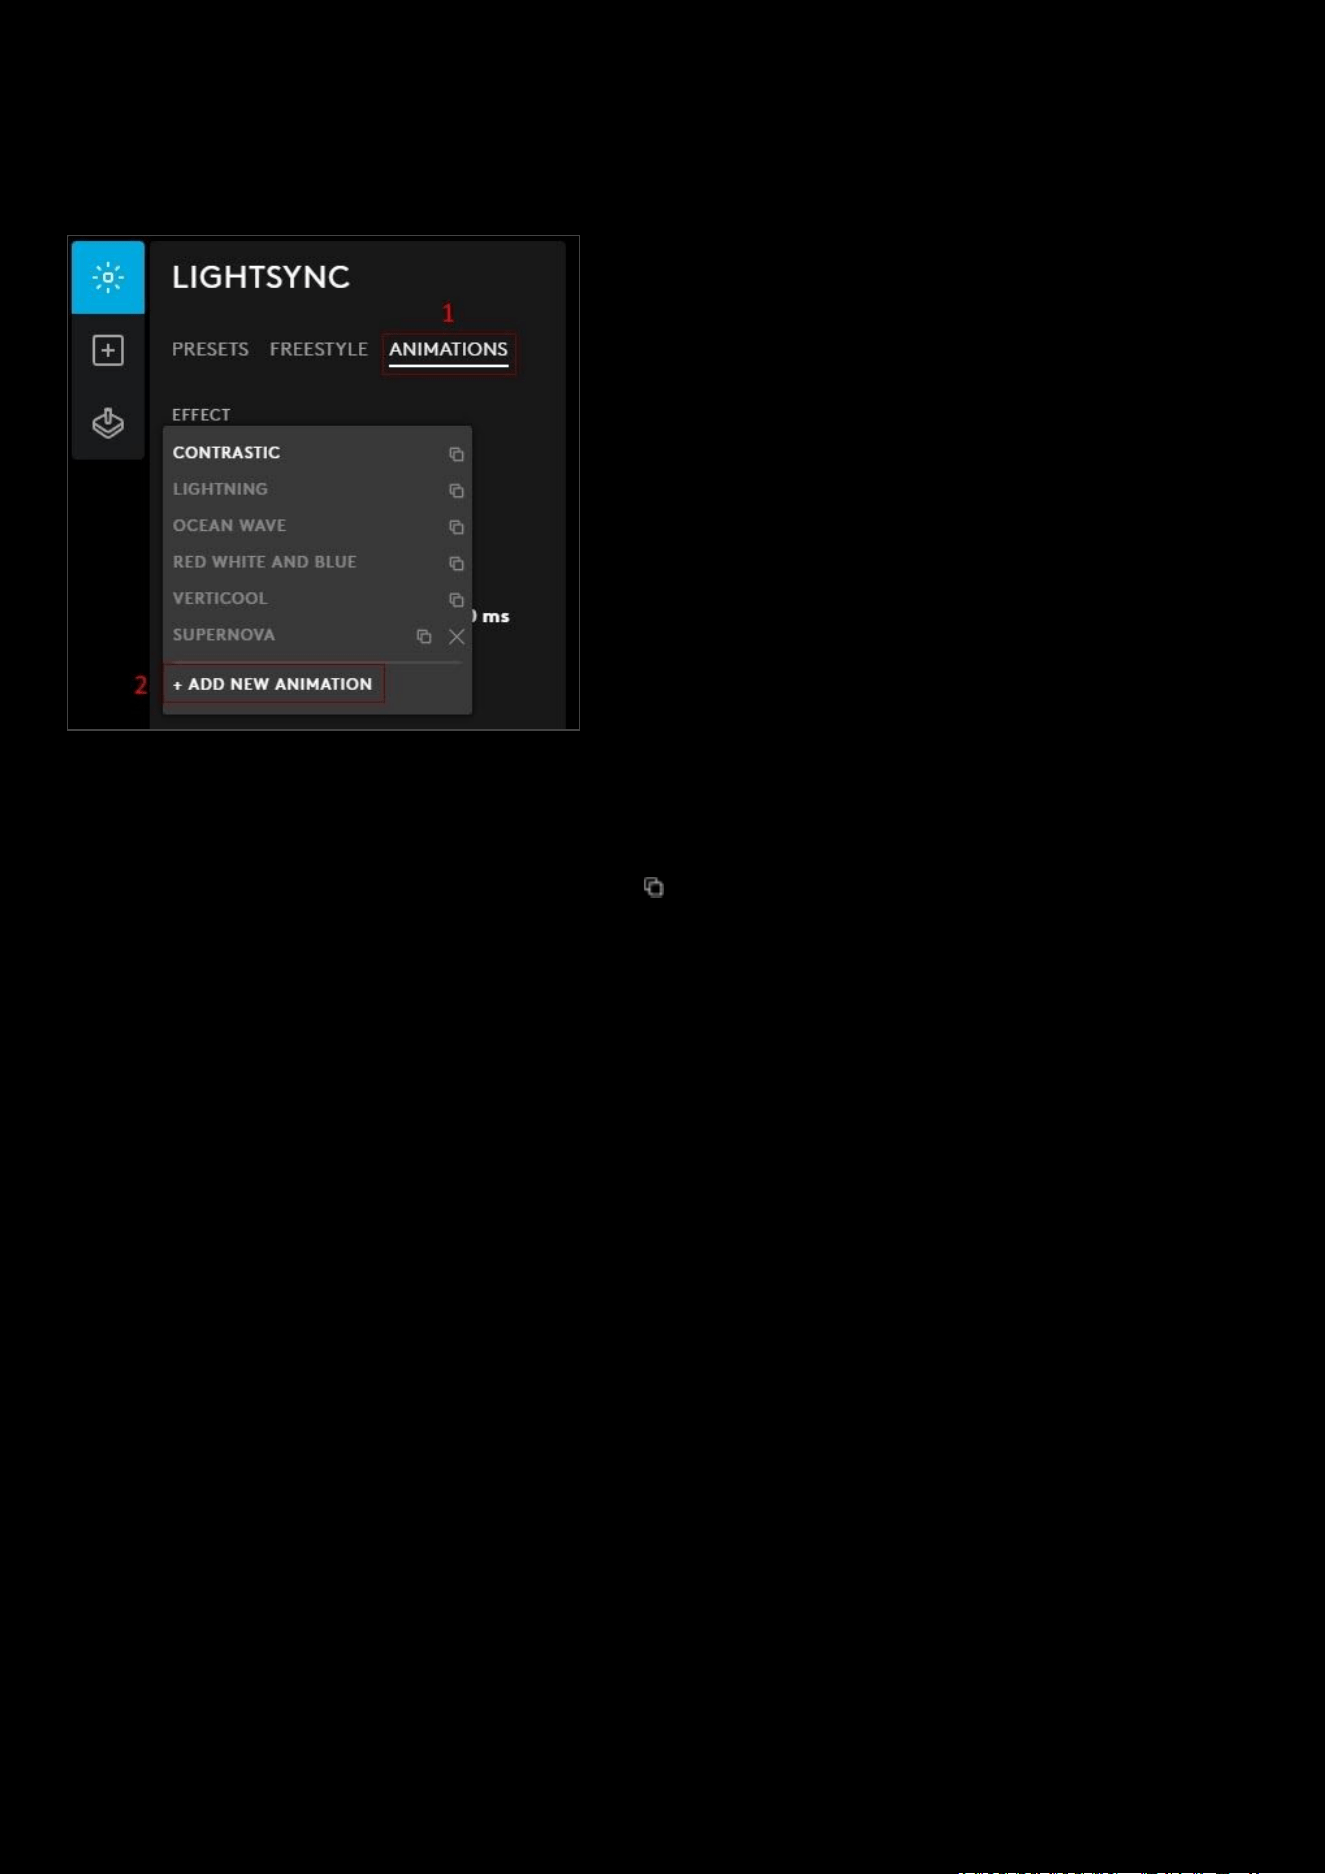
LIGHTSYNC: Animations
An animation is a sequence of freestyle frames. This section will show you how to create your own spectacular lighting!
1. In the LIGHTSYNC tab click the ANIMATIONS tab
2. Click on the drop down arrow under EFFECT and select + ADD NEW ANIMATION from the list.
Note: You can duplicate any lighting effect by clicking the icon. Delete any lighting effect by clicking the X. You can’t
delete the preset lighting animations, only ones imported or created by yourself.
73
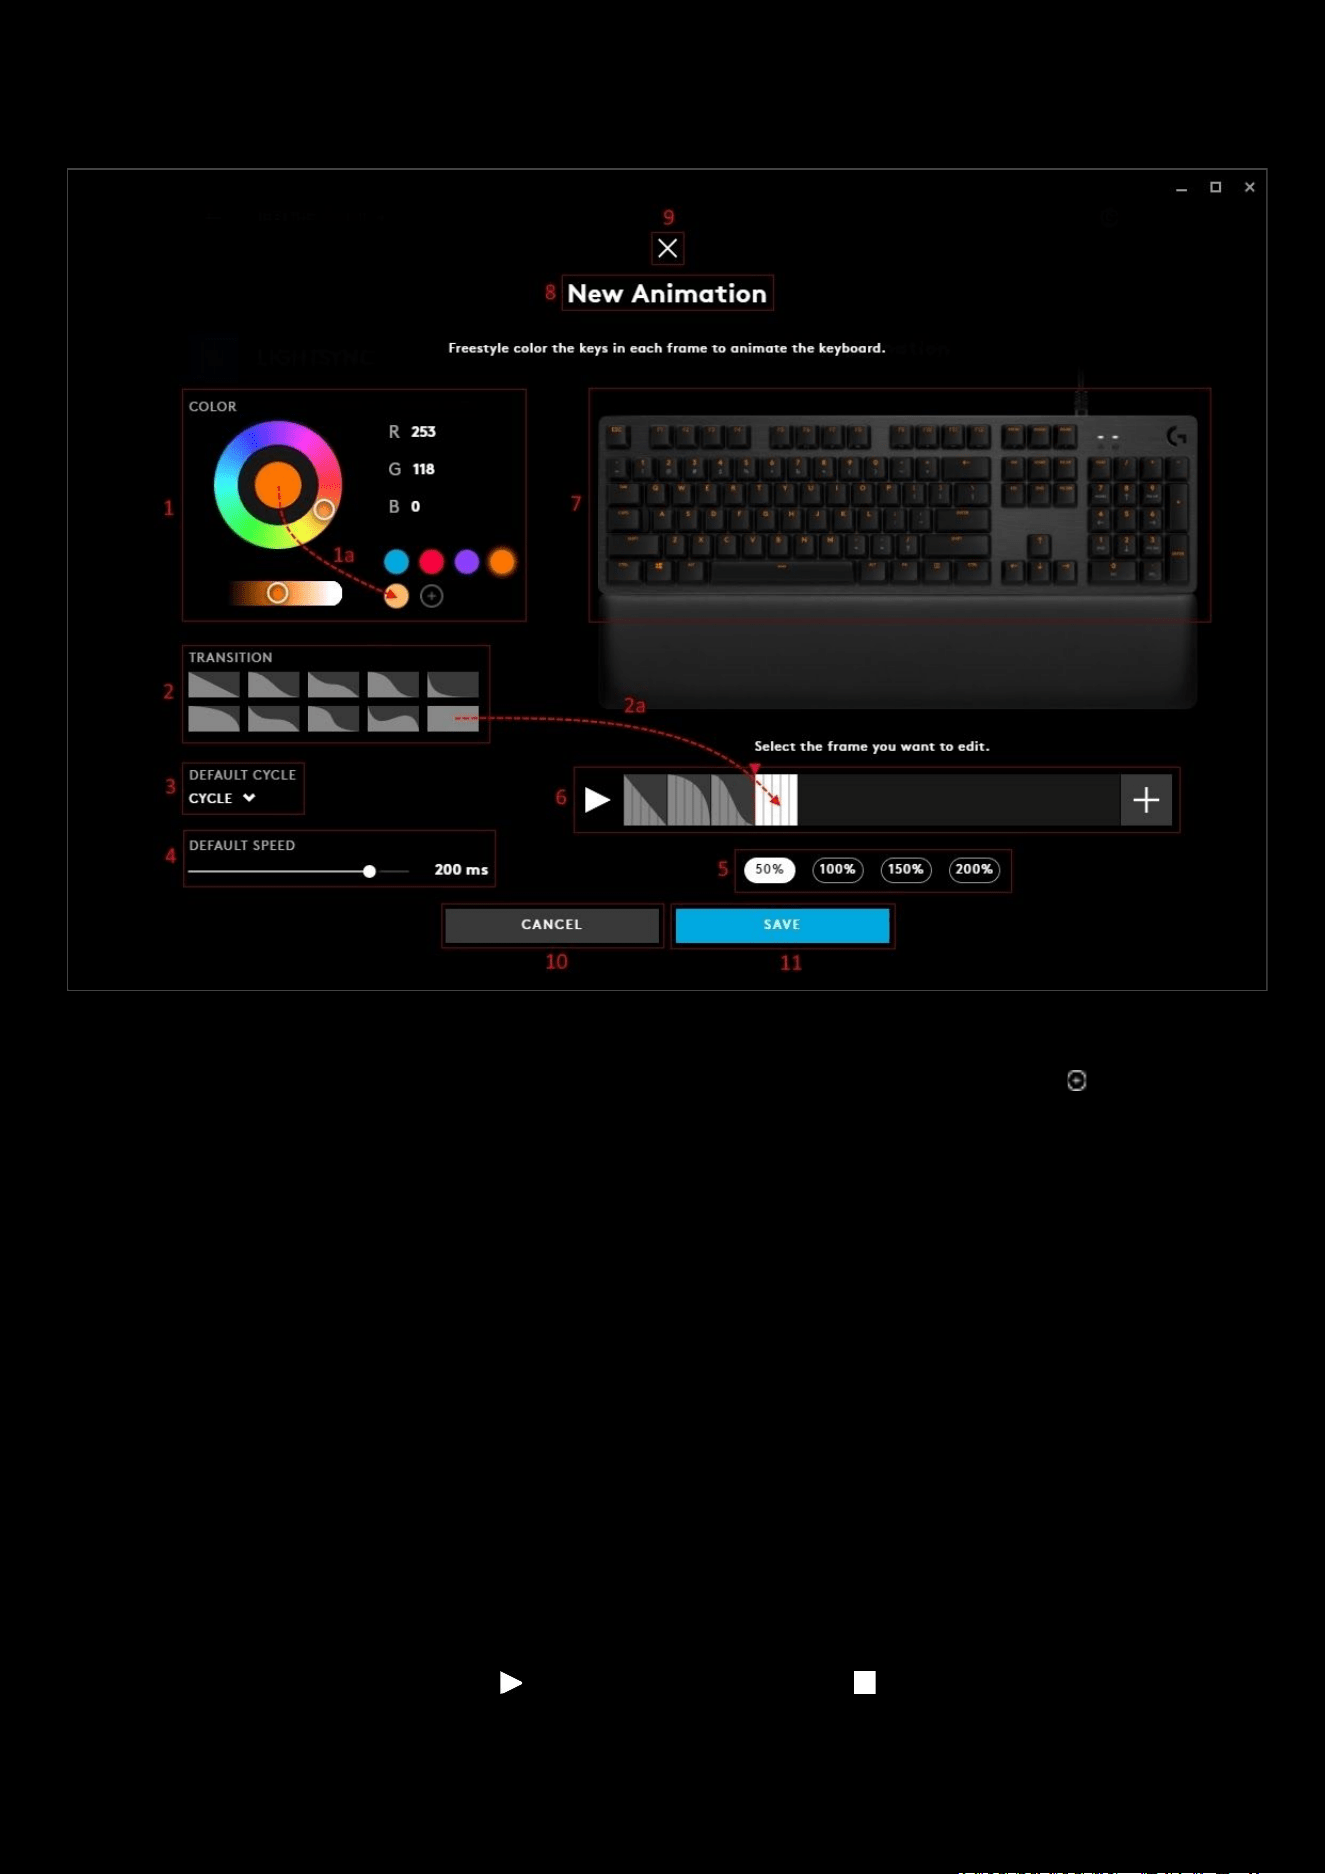
LIGHTSYNC: Create an animation
1. COLOR. Color wheel with brightness slider. Click on the wheel to select a color or if you know the RGB value,
type this into the R, G & B text fields. The color selected can be dragged on to a new swatch (
1a)
2. TRANSITION. Select the transition style. Transition is how the lighting effect fades from one frame to the next.
a. Drag the transition effect onto the any frame in the frame editor. This will change the transition to the
new one.
3. DEFAULT CYCLE. This selection controls how the frames animate.
a. CYCLE. The animation will start with the first (left) frame and continue to the end and then cycle back to
the first frame again.
b. REVERSE CYCLE. The animation will start with the last (right) frame and go backwards through the
frames to the beginning and then cycle back to the last frame again.
c. BOUNCE. Start at the first frame, animating to the last and then going back to the first frame again.
Good for animations like waves and explosions.
d. RANDOM. The animation will pick a frame at random.
4. DEFAULT SPEED. The speed at which the animation transitions. The shorter the time - the quicker the
animation will happen. Ranges from 1000ms (1 second) to 50ms.
5. Frame Editor Resolution. Default is 100%, to see more frames in the editor reduce the frame size to 50%. To
increase the size of each frame, increase to 150/200%. These are useful for checking frame transitions at low
interval speeds.
6. Frame Editor. The editor has 3 parts:
a. PLAY | STOP Button. Click to test out the animation, press to stop.
b. Frames. Each frame is displayed here.
i. Select the one you want to edit by clicking it.
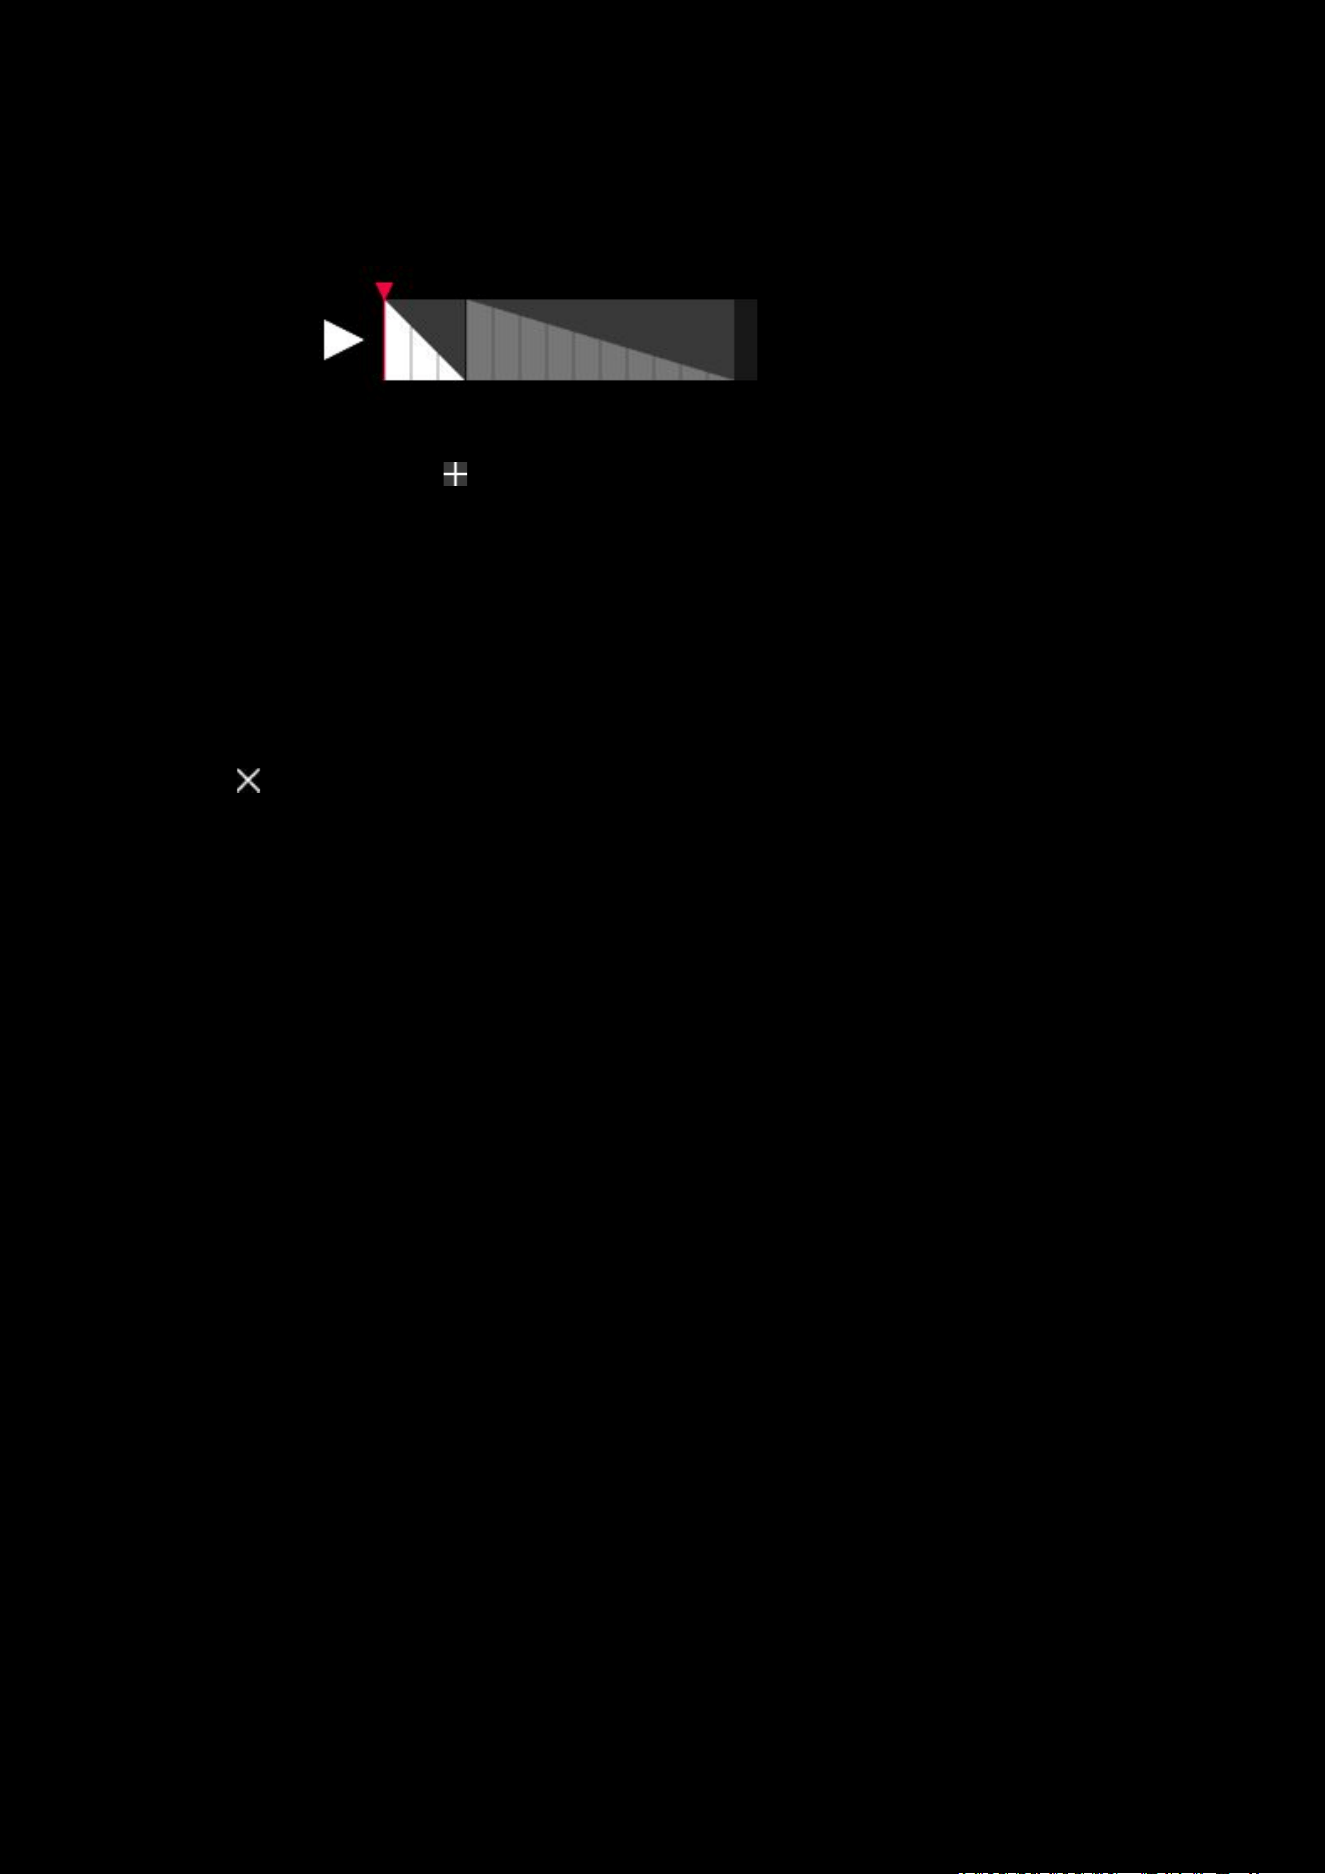
74
ii. Apply changes to the keyboard lighting (7) using the same method as freestyle. I.e. have a color
selected and either click individual keys or drag a box over a group of keys.
iii. You can click a transition style for the frame - or drag the transition style over to it.
iv. Resize the frame by hovering at the end of the frame until you get the double arrow, click and
drag to resize the frame. The smaller the frame the quicker it will transition.
c. Add Frame. Click the sign to the right to add a new frame.
i. To copy/paste a frame, select it, then press CTRL+C (Win) | CMD+C (Mac) and then paste using
CTRL+V | CMD+C. If you are making small changes to a frame each time, this is a good method
to use.
ii. To delete a frame, select it, then press backspace or delete.
7. Freestyle Editor. This allows you to change any color of any key in. Select the color you want your key to be
and then click the key on the image. To color whole sections, drag a rectangle round the group and this will
color all the keys inside. Do this for each frame.
8. Animation Name. Click the New Animation text to rename.
9. Click the at the top to cancel the ANIMATIONS editor and go back to the LIGHTSYNC tab. If you have made
any changes will see a prompt at the bottom asking if you would like to save any changes.
75
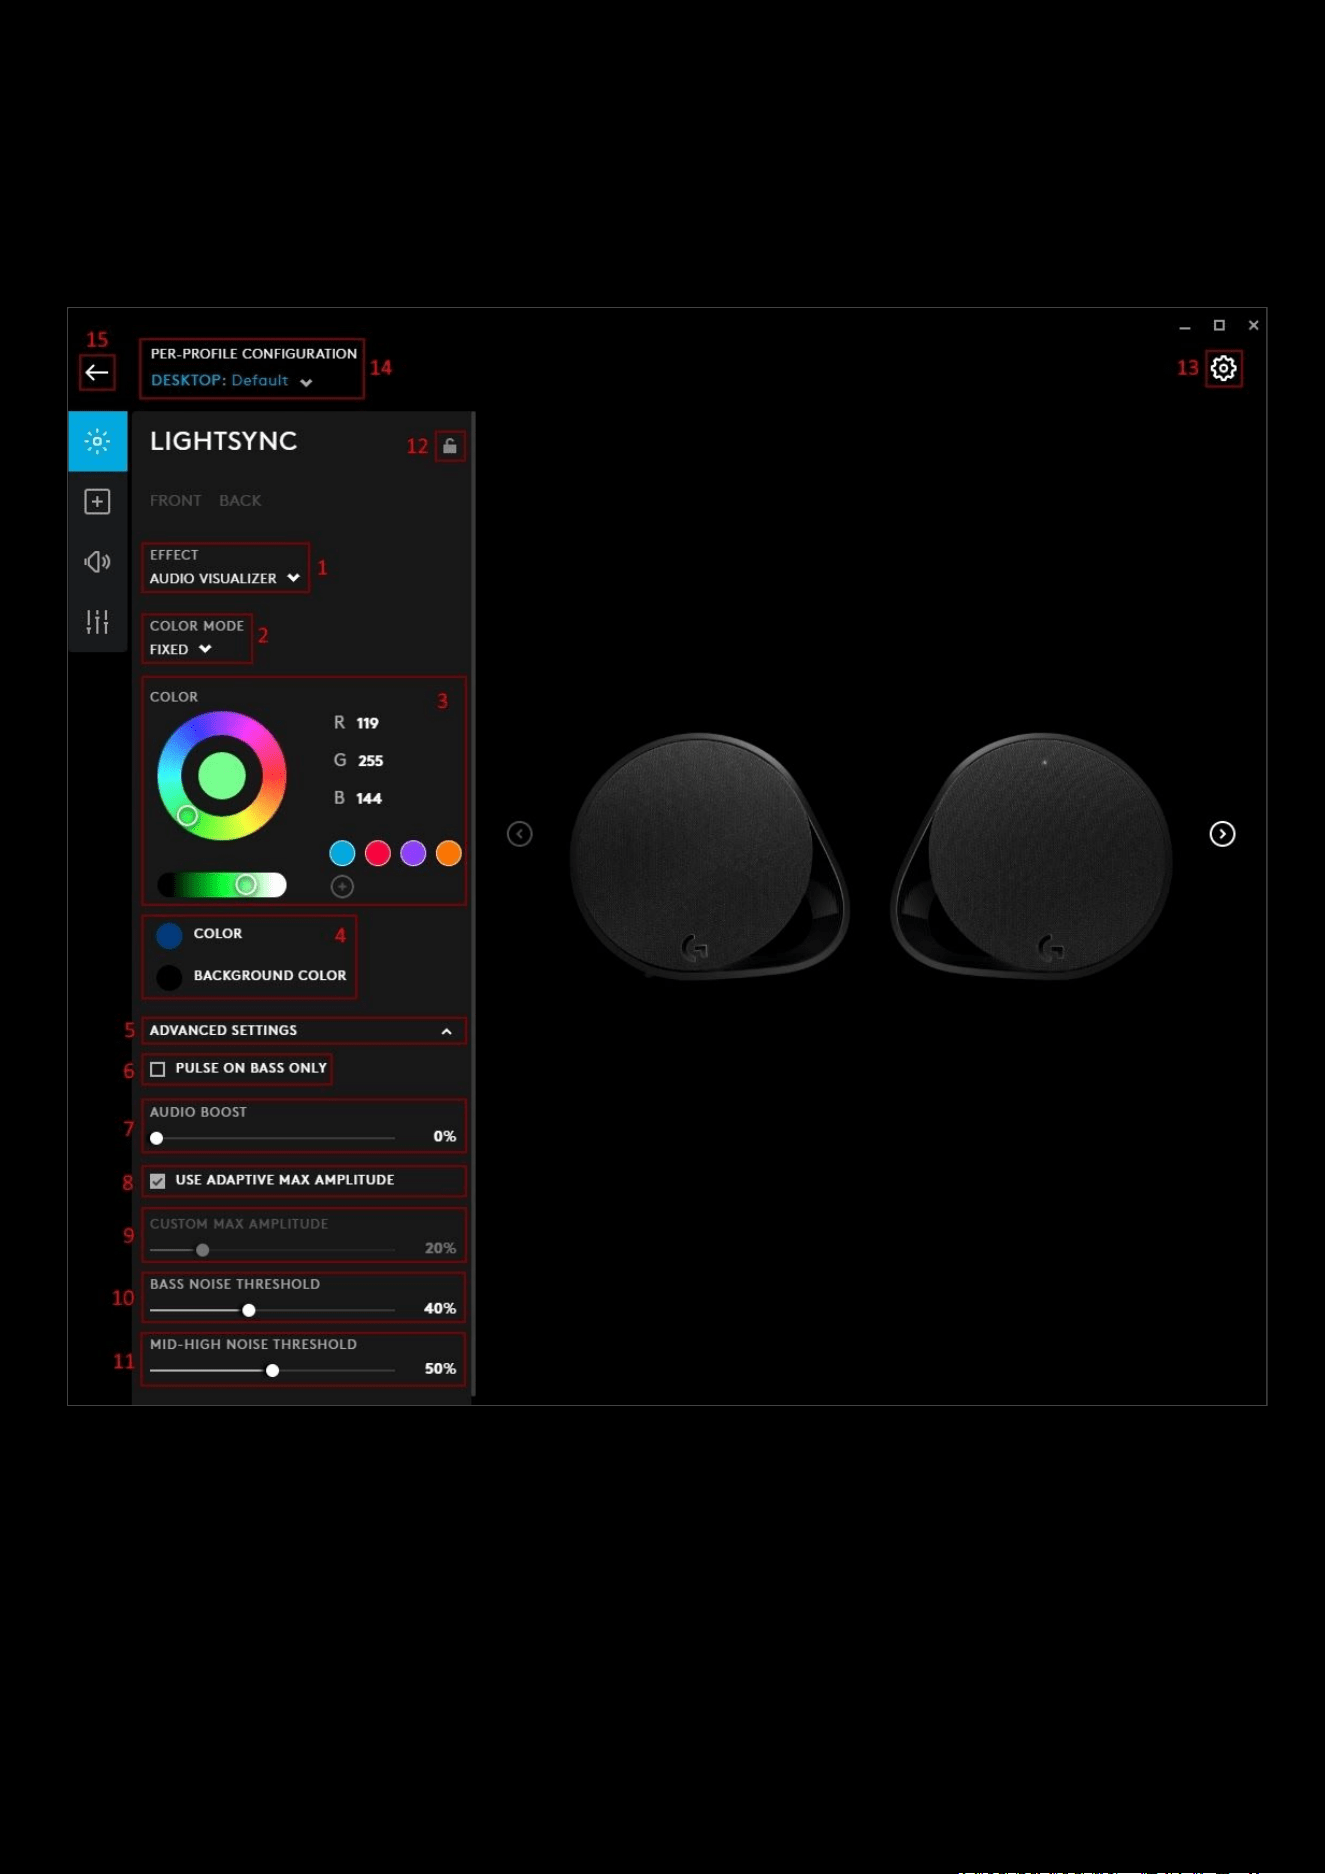
LIGHTSYNC: Audio Visualizer
Audio Visualizer features for Audio:
This section will show the Audio Visualizer for devices such as audio (headsets and G560) and mice
1. EFFECT: Select AUDIO VISUALIZER
2. COLOR MODE. You have 2 options to choose, Expand the ADVANCED SETTINGS (5) to configure them
a. FIXED. Gives you a (4) BACKGROUND COLOR (no audio) and the COLOR audio will give
b. REACTIVE. Gives you a (4) BACKGROUND COLOR (no audio), LOW COLOR and HIGH COLOR
3. COLOR WHEEL. Use the color wheel and R G B values to configure your colors.
4. COLOR | BACKGROUND COLOR | LOW COLOR | HIGH COLOR. Select a color from the wheel and click the
swatch to update to the new color.
5. ADVANCED SETTINGS. Click ADVANCED SETTINGS to expand and configure them
6. PULSE ON BASS ONLY. Click to enable this feature.

76
7. AUDIO BOOST. AUDIO BOOST will enhance the reaction to low sounds. So if a track or game is naturally quiet,
try boosting the audio. 0% is OFF and at 100% any sound will maximise the visualizer. For quiet audio, 30% is a
good value to try first.
8. USE ADAPTIVE MAX AMPLITUDE. When ticked, each frequency bar will dynamically raise the max sound limit
based on a curve and loudness of the frequency.
9. CUSTOM MAX AMPLITUDE. This option is available if ADAPTIVE MAX AMPLITUDE is set to off.
10. BASS NOISE THRESHOLD. The lower limit for each bass frequency that will be deemed as silence. For example,
if the value is set at 10 and incoming bass frequency signal is 9, it will be perceived as 0.
11. MID-HIGH NOISE THRESHOLD. The lower limit for each mid-high frequency that will be deemed as silence. For
example, if the value is set to 10 and incoming frequency signal is 9, it will be perceived as 0.
12. Per-profile LIGHTSYNC lock. Click to make LIGHTSYNC persistent across all profiles. This locks/unlocks the
lighting settings to be the same for all profiles.
13. GEAR SETTINGS. Click this to take you to the Gear Settings page
14. PROFILE SELECTOR. Use the drop down to change the User Profile you want to configure for. Also it will
indicate if the profile is in a PER-PROFILE CONFIGURATION or in a PERSISTENT CONFIGURATION
15. BACK ARROW. Click the arrow to take you back to the Homepage.
77
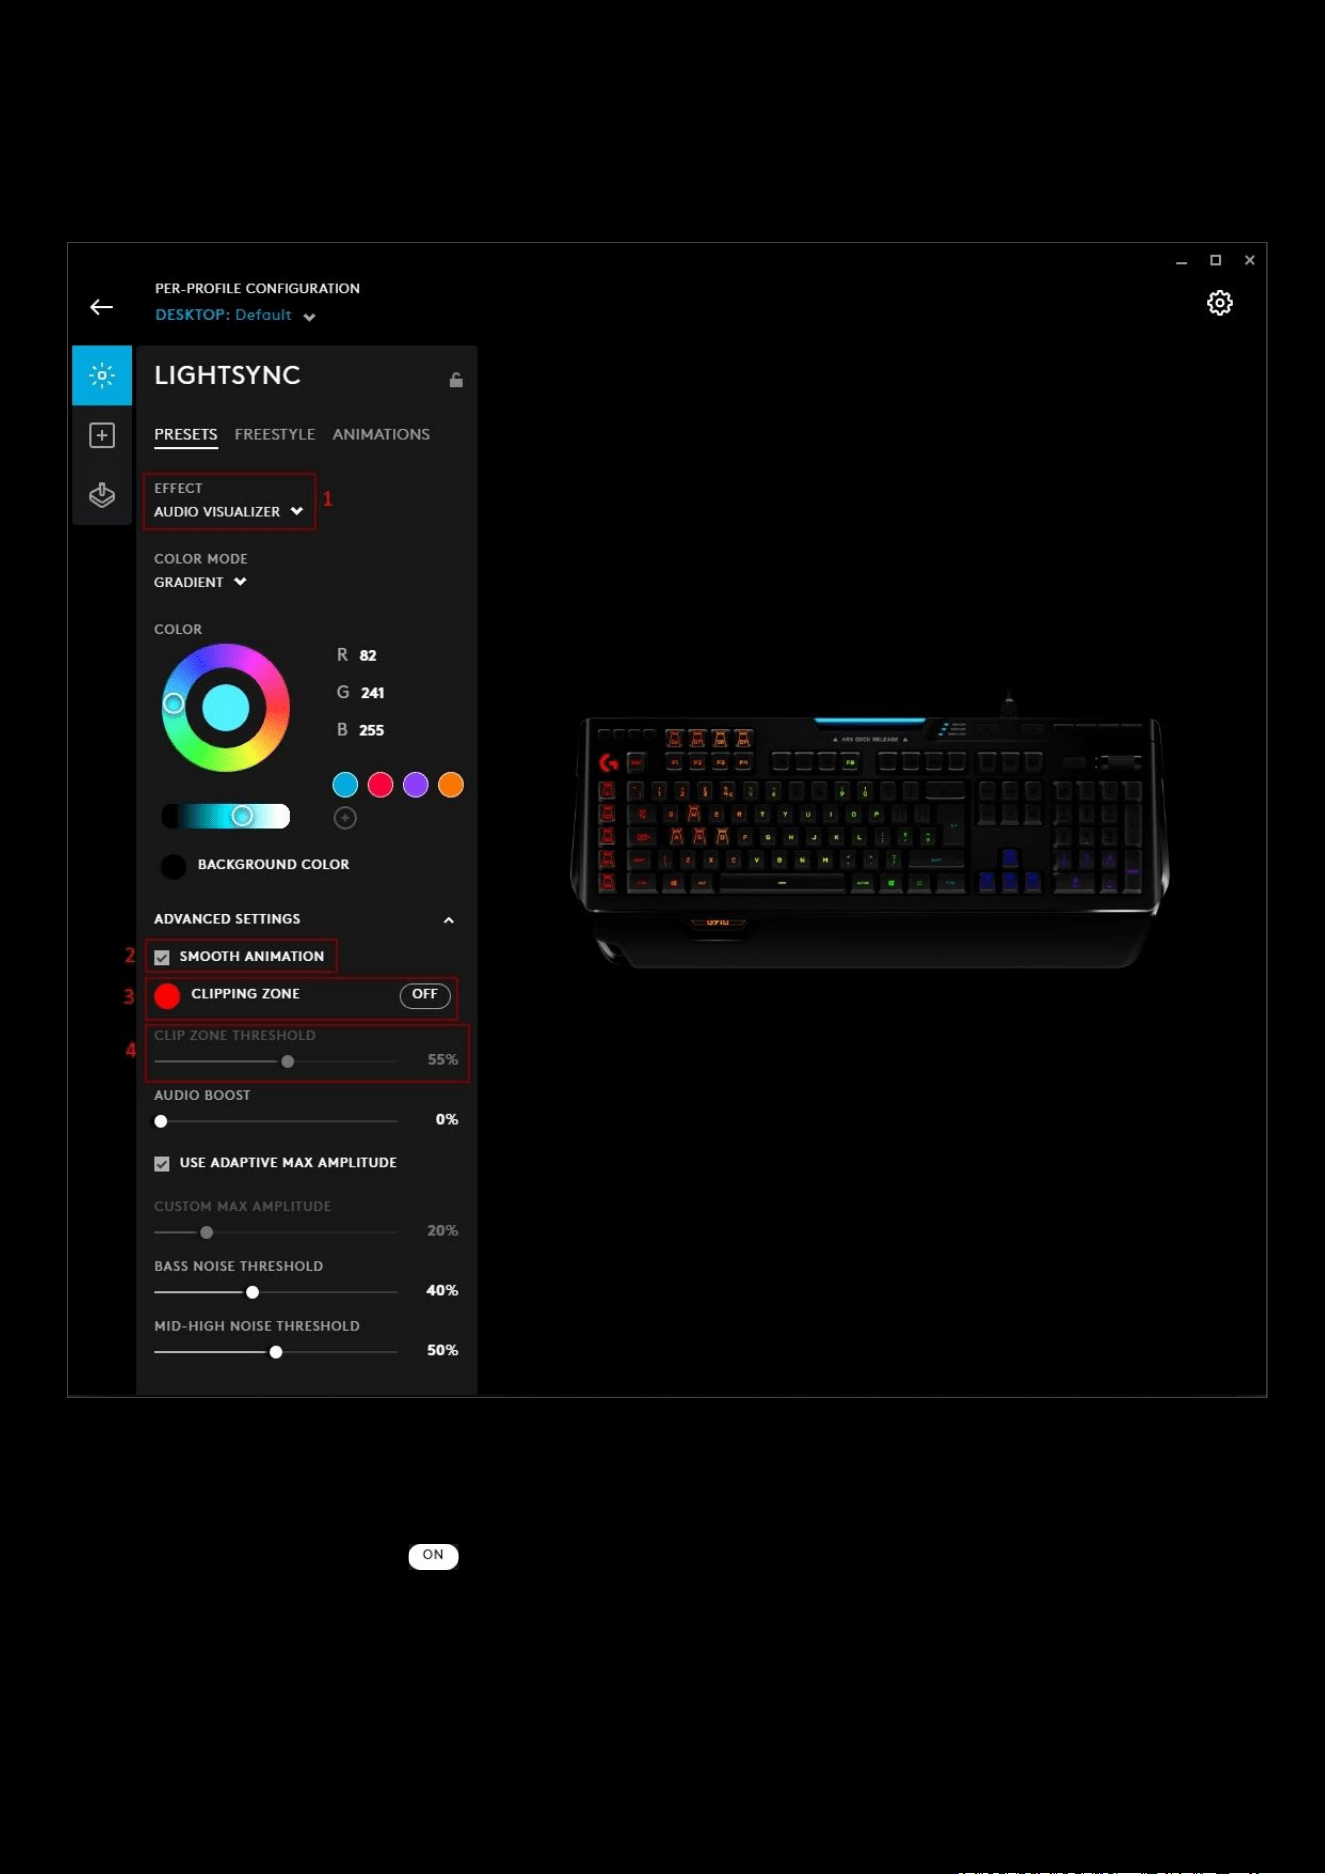
Audio Visualizer features for Keyboards
Keyboards have slightly different additional features to Audio: GRADIENT
, SMOOTH ANIMATION and CLIPPING ZONE
and do not have PULSE ON BASS ONLY
1. COLOR MODE: GRADIENT. This plays the audio visualized on keyboard using a gradient of colors to indicate the
different frequencies
2. SMOOTH ANIMATION. When this option is enabled the color will transition gradually between screen samples
3. CLIPPING ZONE. Click the button to enable the CLIP ZONE THRESHOLD Slider (4). Drag a colour from the
color wheel on to the CLIPPING ZONE swatch if you want to change from red (default).
4. CLIP ZONE THRESHOLD. Drag the slider to the required value. The lower the value, the lower the volume needs
to be to activate clipping. Clipped audio will be the color indicated by the CLIPPING ZONE swatch.
78
LIGHTSYNC: Screen Sampler
The Screen Sampler preset extends color from the screen to your LIGHTSYNC devices. You can choose any area on your
monitor and assign it to any of the lighting zones. G HUB then tracks in real-time and matches
speaker/keyboard/mouse and headset lighting with the colors on screen.
1. EFFECT. Select SCREEN SAMPLER
2. EDIT. Click EDIT to take you to the screen sampler edit screen. This is where you can reposition and resize the
sampling windows.
3. Sample Windows. Select one by clicking it. You will see that window highlighted in blue (3a) and the respective
part of the device LED affected in blue (
3a) as well. For keyboards, by default there are 5 sampling windows
a. MID_RIGHT
b. MIDDLE
c. MID_LEFT
d. LEFT
e. RIGHT
4. ADVANCED SETTINGS. Click ADVANCED SETTINGS to expand and configure them
5. COLOR BOOST. This boosts the color of the sampling. Increasing the % will increase the vibrance of that color.
Default is 33%
6. SMOOTHING. When this option is enabled the color will transition gradually between screen samples

79
7. Keys for current sample | Keys for other samples. This shows which area/set of keys are currently active. In
the example above for the MID_RIGHT
, you can see that the arrow keys and home sections are highlighted blue,
showing that these keys are assigned to the MID_RIGHT
sampling window.
8. GEAR SETTINGS. Click this to take you to the Gear Settings page
9. PROFILE SELECTOR. Use the drop down to change the User Profile you want to configure for. Also it will
indicate if the profile is in a PER-PROFILE CONFIGURATION or in a PERSISTENT CONFIGURATION
10. BACK ARROW. Click the arrow to take you back to the Homepage.

80
LIGHTSYNC: Screen Sampler Edit
On the LIGHTSYNC > PRESETS tab click EDIT (2) to take you to the Screen Sampler edit window:
11. Edit Sampler Window. Click the icon to edit the name of the sampler window. Press enter when you are
done or click off the window.
12. Move/resize. Move or resize the sampler window to focus on certain events or indicators (for example health
bars!).
13. ADD NEW SAMPLE. Click this to add a new sampler window. This adds the option to then link the samplers.
Note: If you have added a new sample, you can now select this and then drag/selects keys on the keyboard which this
will affect. Similar to the FREESTYLE lighting. Those keys assigned to the new sampler will then be unassigned from the
previous sampler. You can't have one key assigned to more than 1 sampler!
14. REFRESH SCREEN. If the screen you are sampling against has changed, click this to refresh.
15. SELECT REFERENCE IMAGE. This is useful, where you have a screenshot of ingame, and want to set your
samplers to match a known setup. You can setup the sampler windows to the reference picture which will then
match ingame when playing.
16. Click the to take you back to the LIGHTSYNC tab.
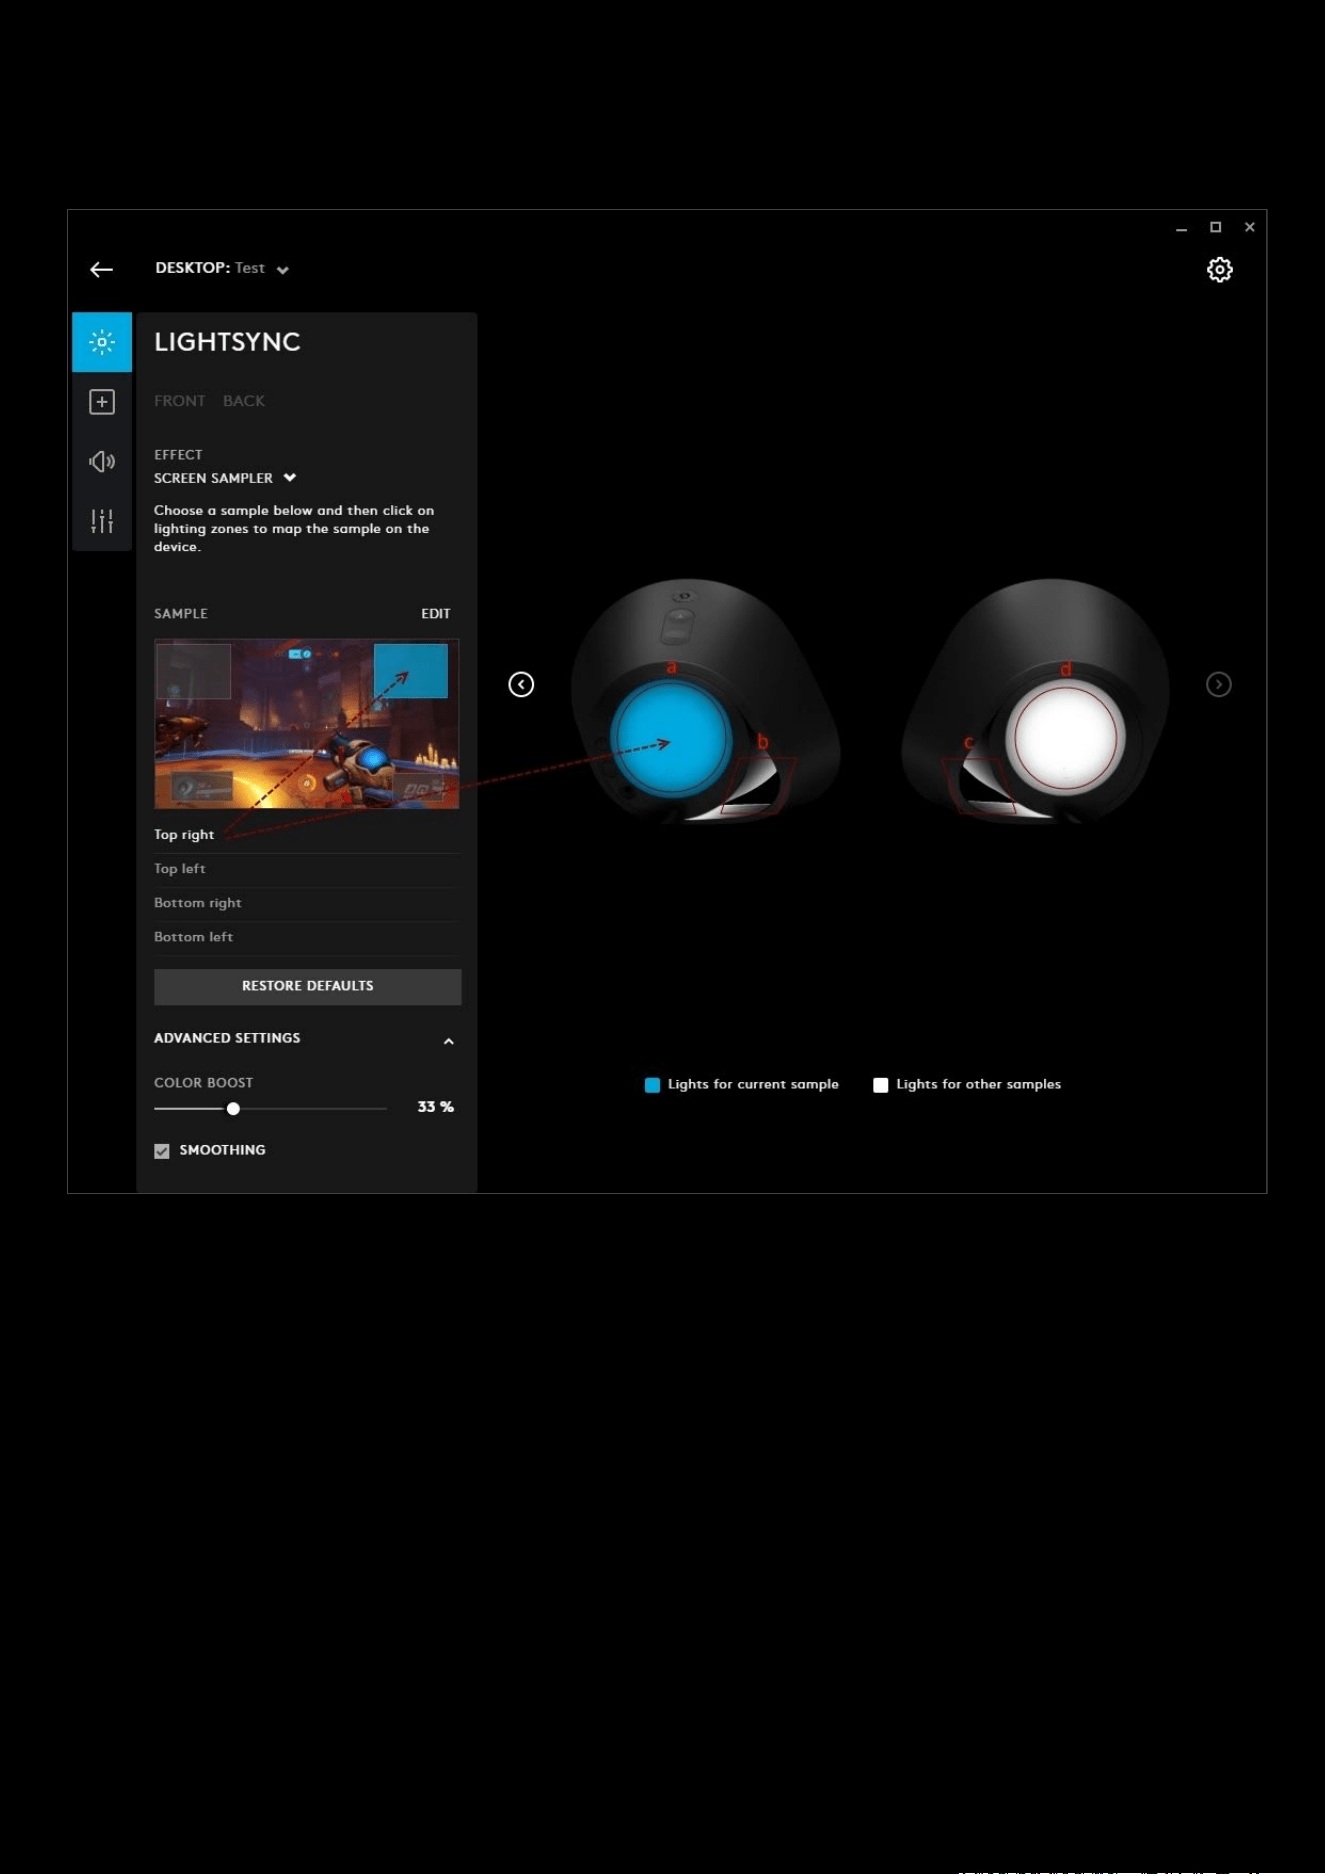
81
Screen Sampler for light and sound devices
There are 4 sampling windows by default for other devices and mice will only have 2 active samplers at any time.
The features are the same as before. For example here we have the Logitech G560 LIGHTSYNC PC GAMING SPEAKER.
The Top Right sampler is highlighted blue and the associated LED section is also highlighted. You can add more sampler
windows but only 4 can be assigned at one time to each of the 4 lighting zones (
a b c d).
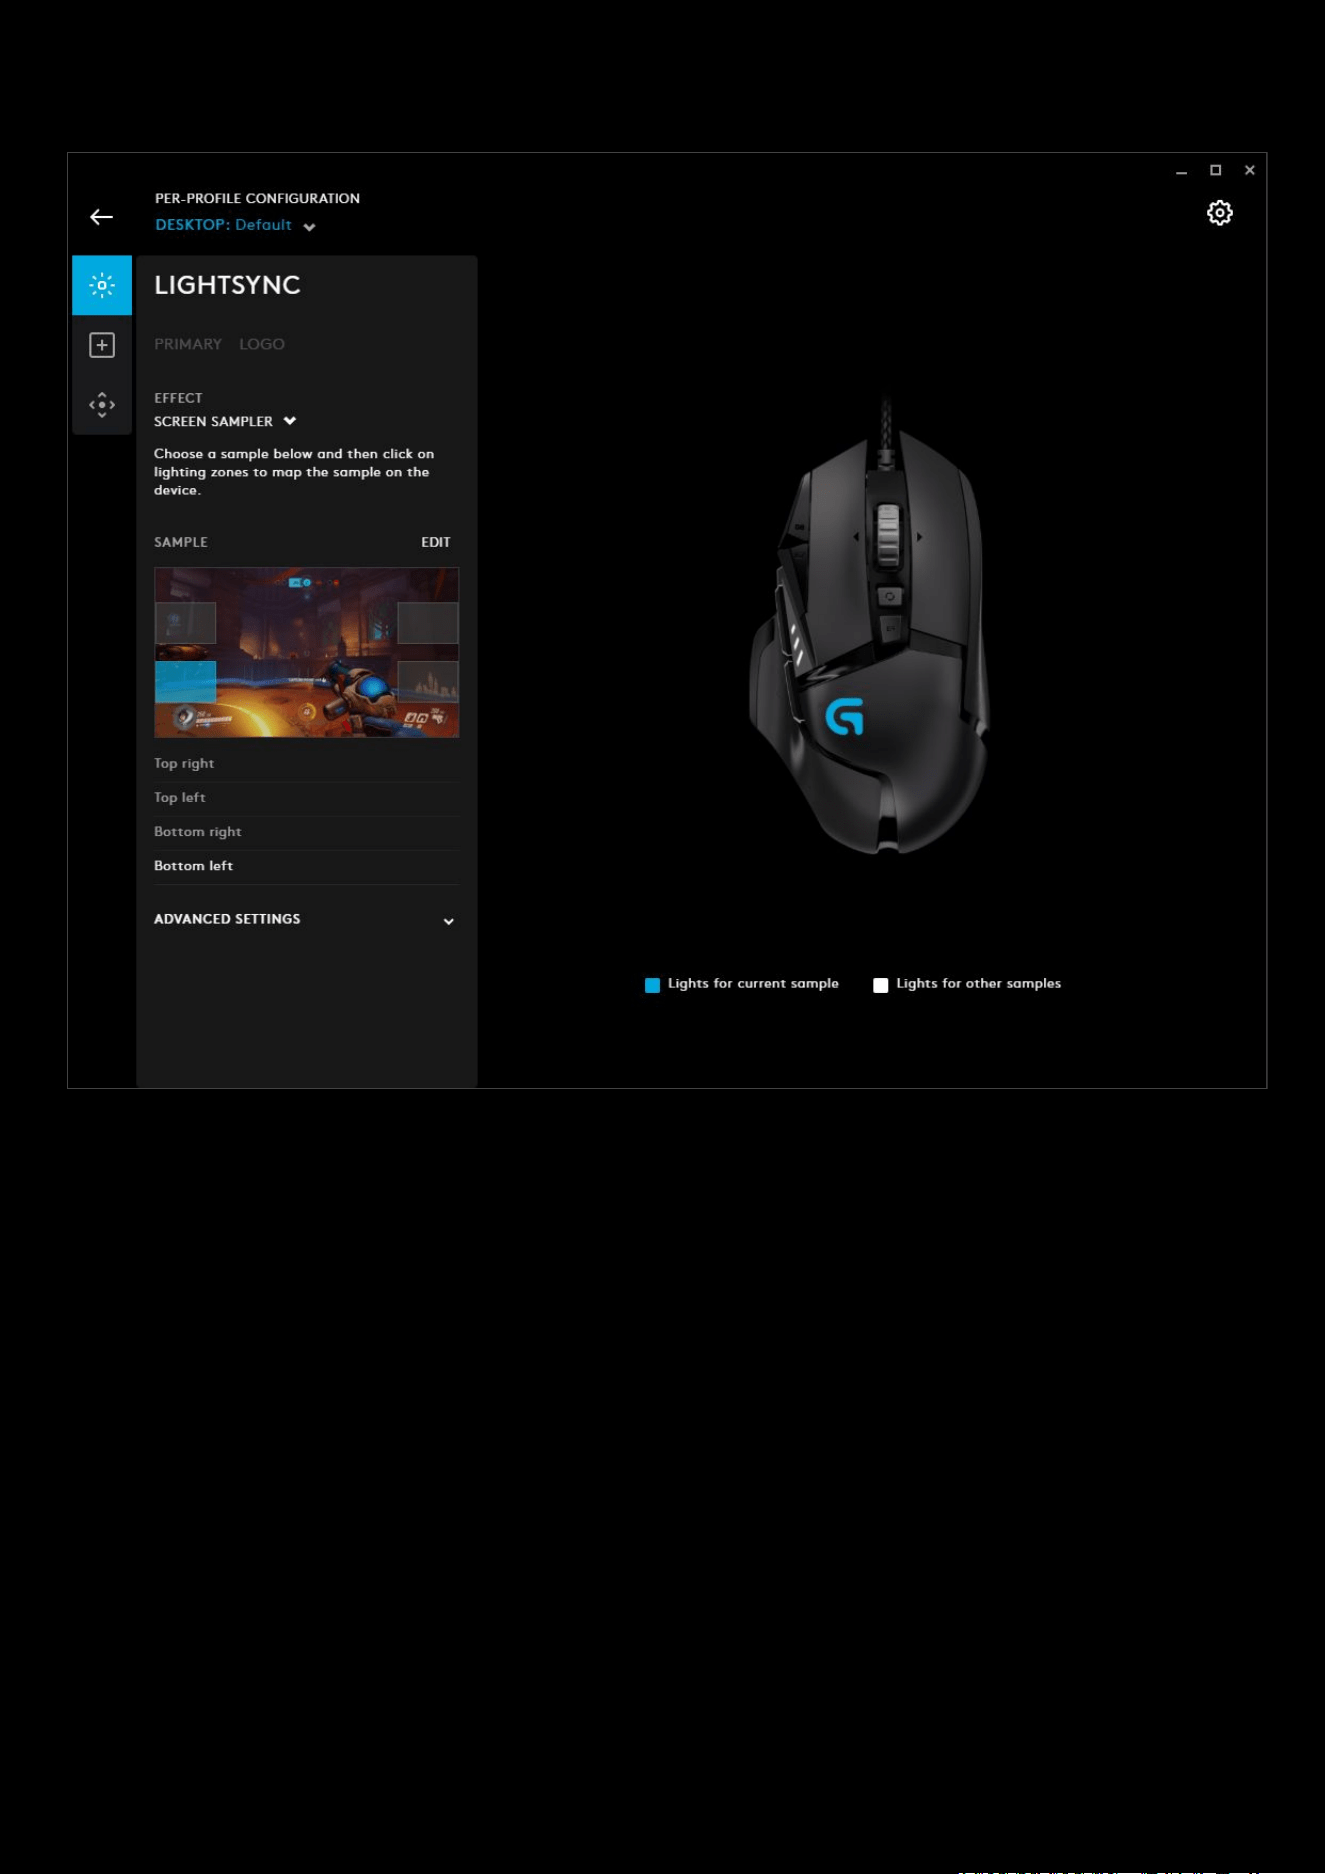
82
Screen Sampler for Mice
For mice, the Top left
and Bottom left are assigned to the PRIMARY and LOGO lighting zones by default. Select the
sampling zone and then click either lighting zone on the mouse to reassign. All other features and settings are the same.
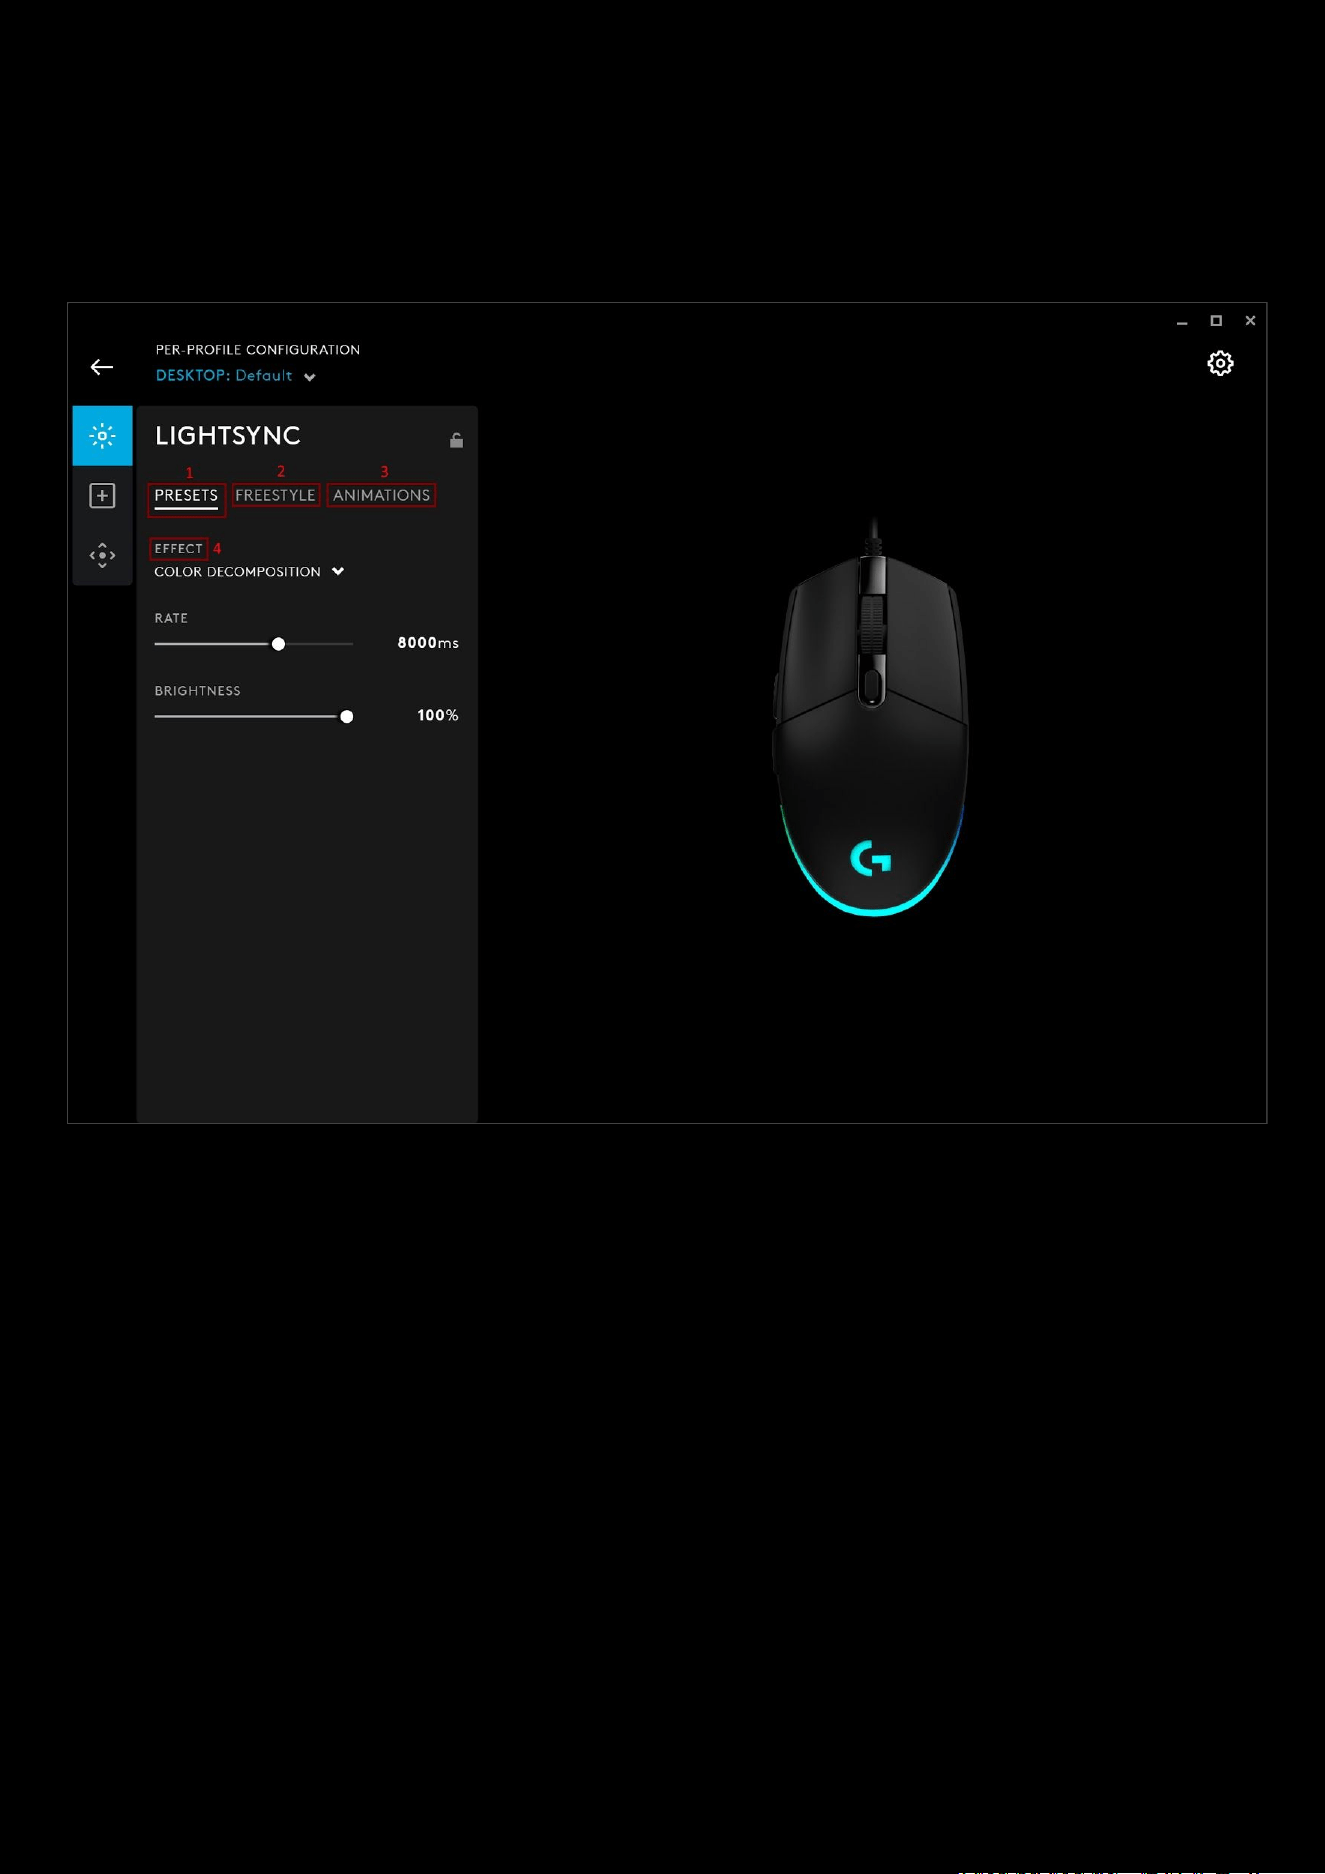
83
LIGHTSYNC: G102 Lightsync
The G102 Lightsync mouse has some additional Lightsync effects to choose from. Whereas most of the gaming mice
have the primary and logo lighting zones, the Lightsync mice have 3 lighting zones which can be utilized similar to the
way keyboard lighting works:
1. PRESETS. This allows you to use presets explained in the LIGHTSYNC section for mice with this addition to the
effects (
4):
a. COLOR DECOMPOSITION. This is a breathing effect mixed with a color cycle from right to left. Each
breathing fade is followed by a full color. The 3 lighting zones then mix the next 3 colors in the RGB
cycle. In the example above, you can see its green-cyan-blue; after the fade, all 3 zones will be a blue
then transition to a cyan-blue-purple. The speed of the transition is controlled by the RATE slider. The
smaller the value the quicker the transition will be. Control the overall brightness with the BRIGHTNESS
slider.
2. FREESTYLE. This allows you to change the color of each of the 3 zones. Select the zone to be changed, then
click the swatch color you want to use from the swatch panel.
a. You can configure the DEFAULT effect or select + ADD A NEW FREESTYLE. Click the NEW FREESTYLE
text above the keyboard image to rename the effect.
b. In the example below, we’ve selected a traffic light scheme, with red, amber and green zones. These
remain fixed. If you want to add some effects to the zones, use the ANIMATIONS
option.
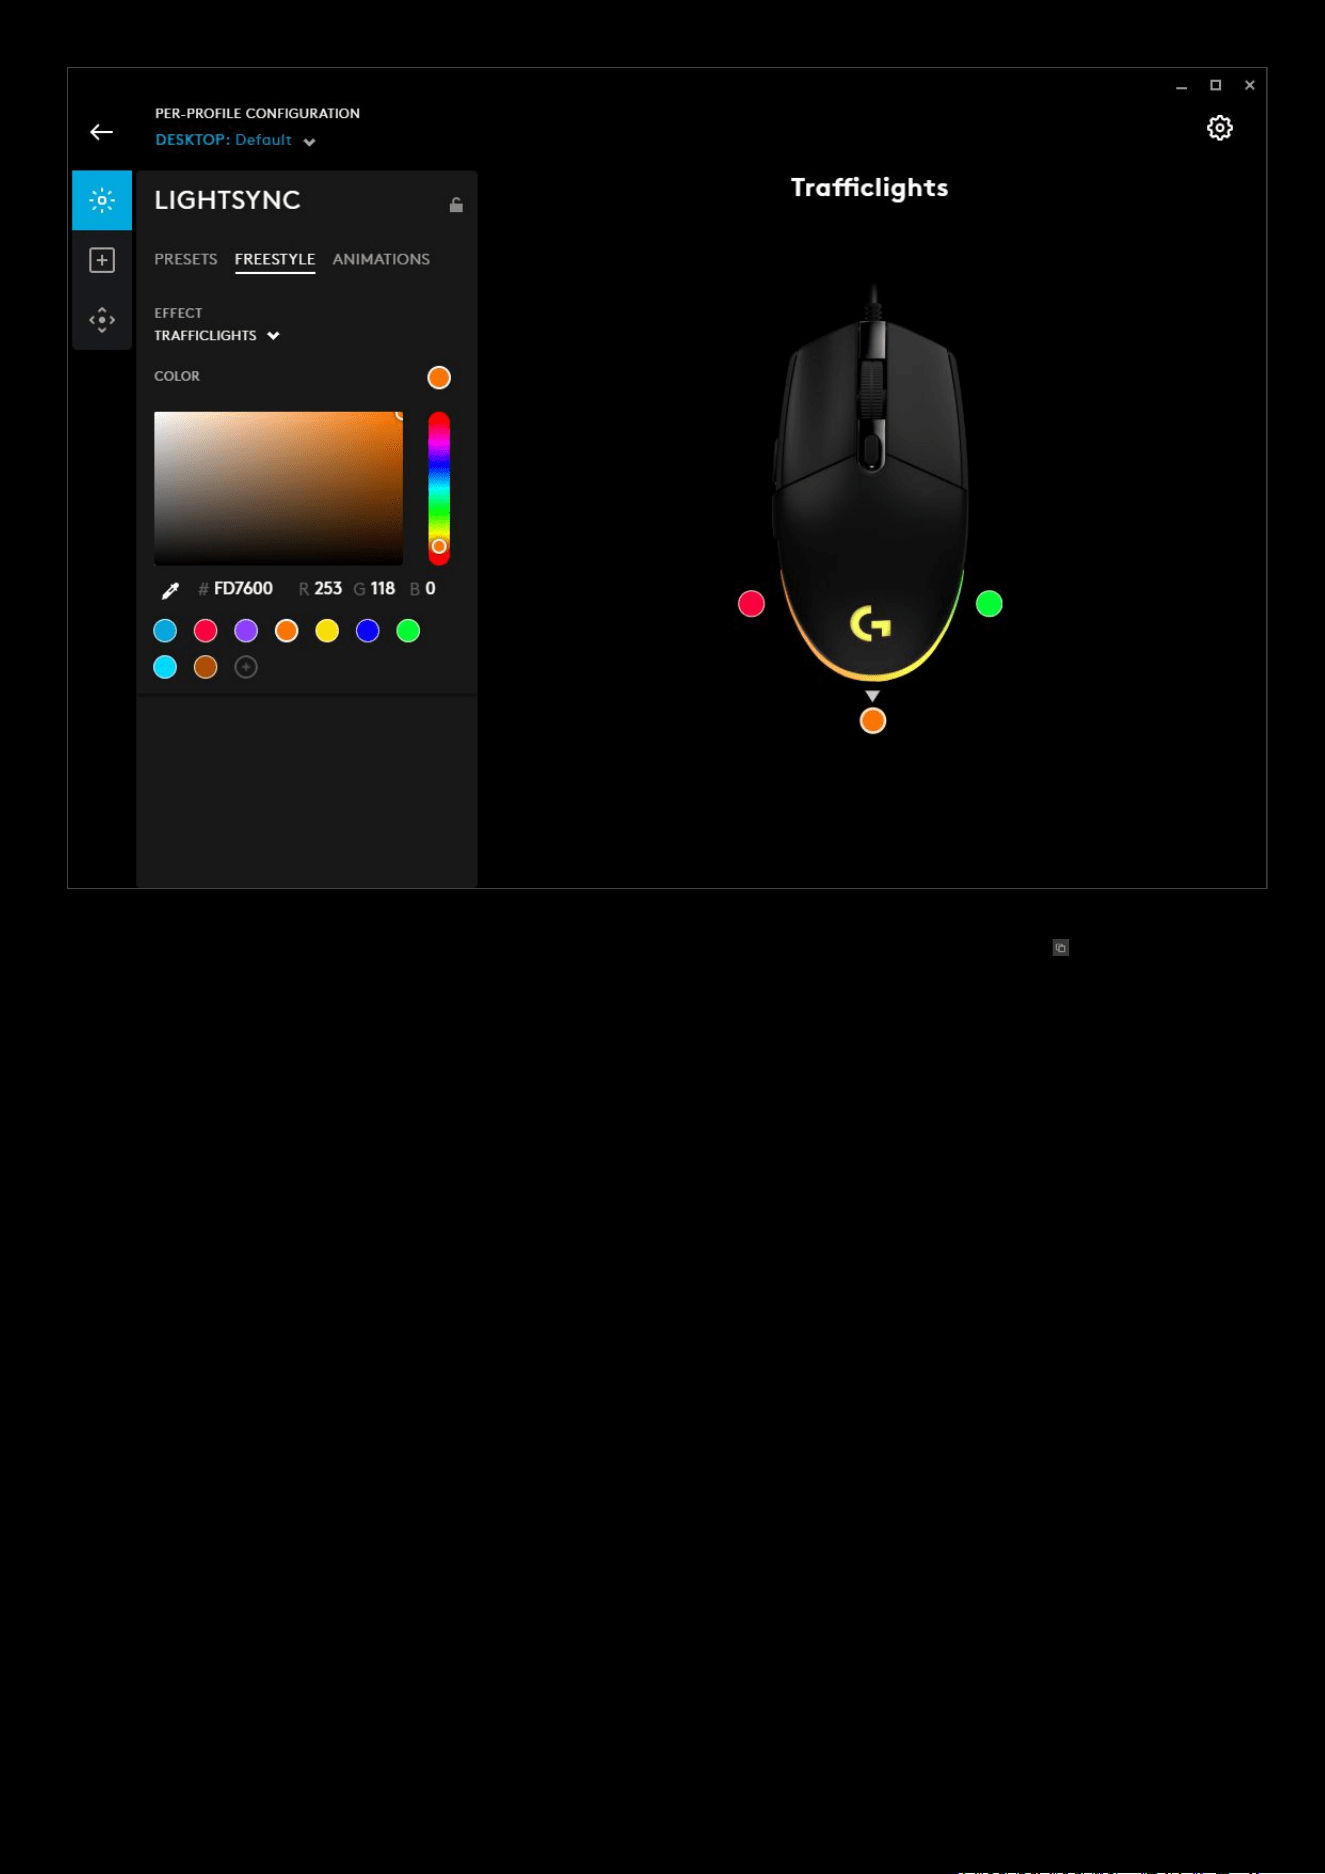
84
3. ANIMATIONS. Choose from lighting effects that are animated. Click on the duplicate icon to copy this effect
and configure the colors and animation.
a. OCEAN WAVE. Waves of blue crashing out and back in.
b. RED WHITE AND BLUE. Cycle between those 3 colors.
c. VERTICOOL. Watch the rows light vertically
d. + NEW ANIMATION. Create your own custom animation.
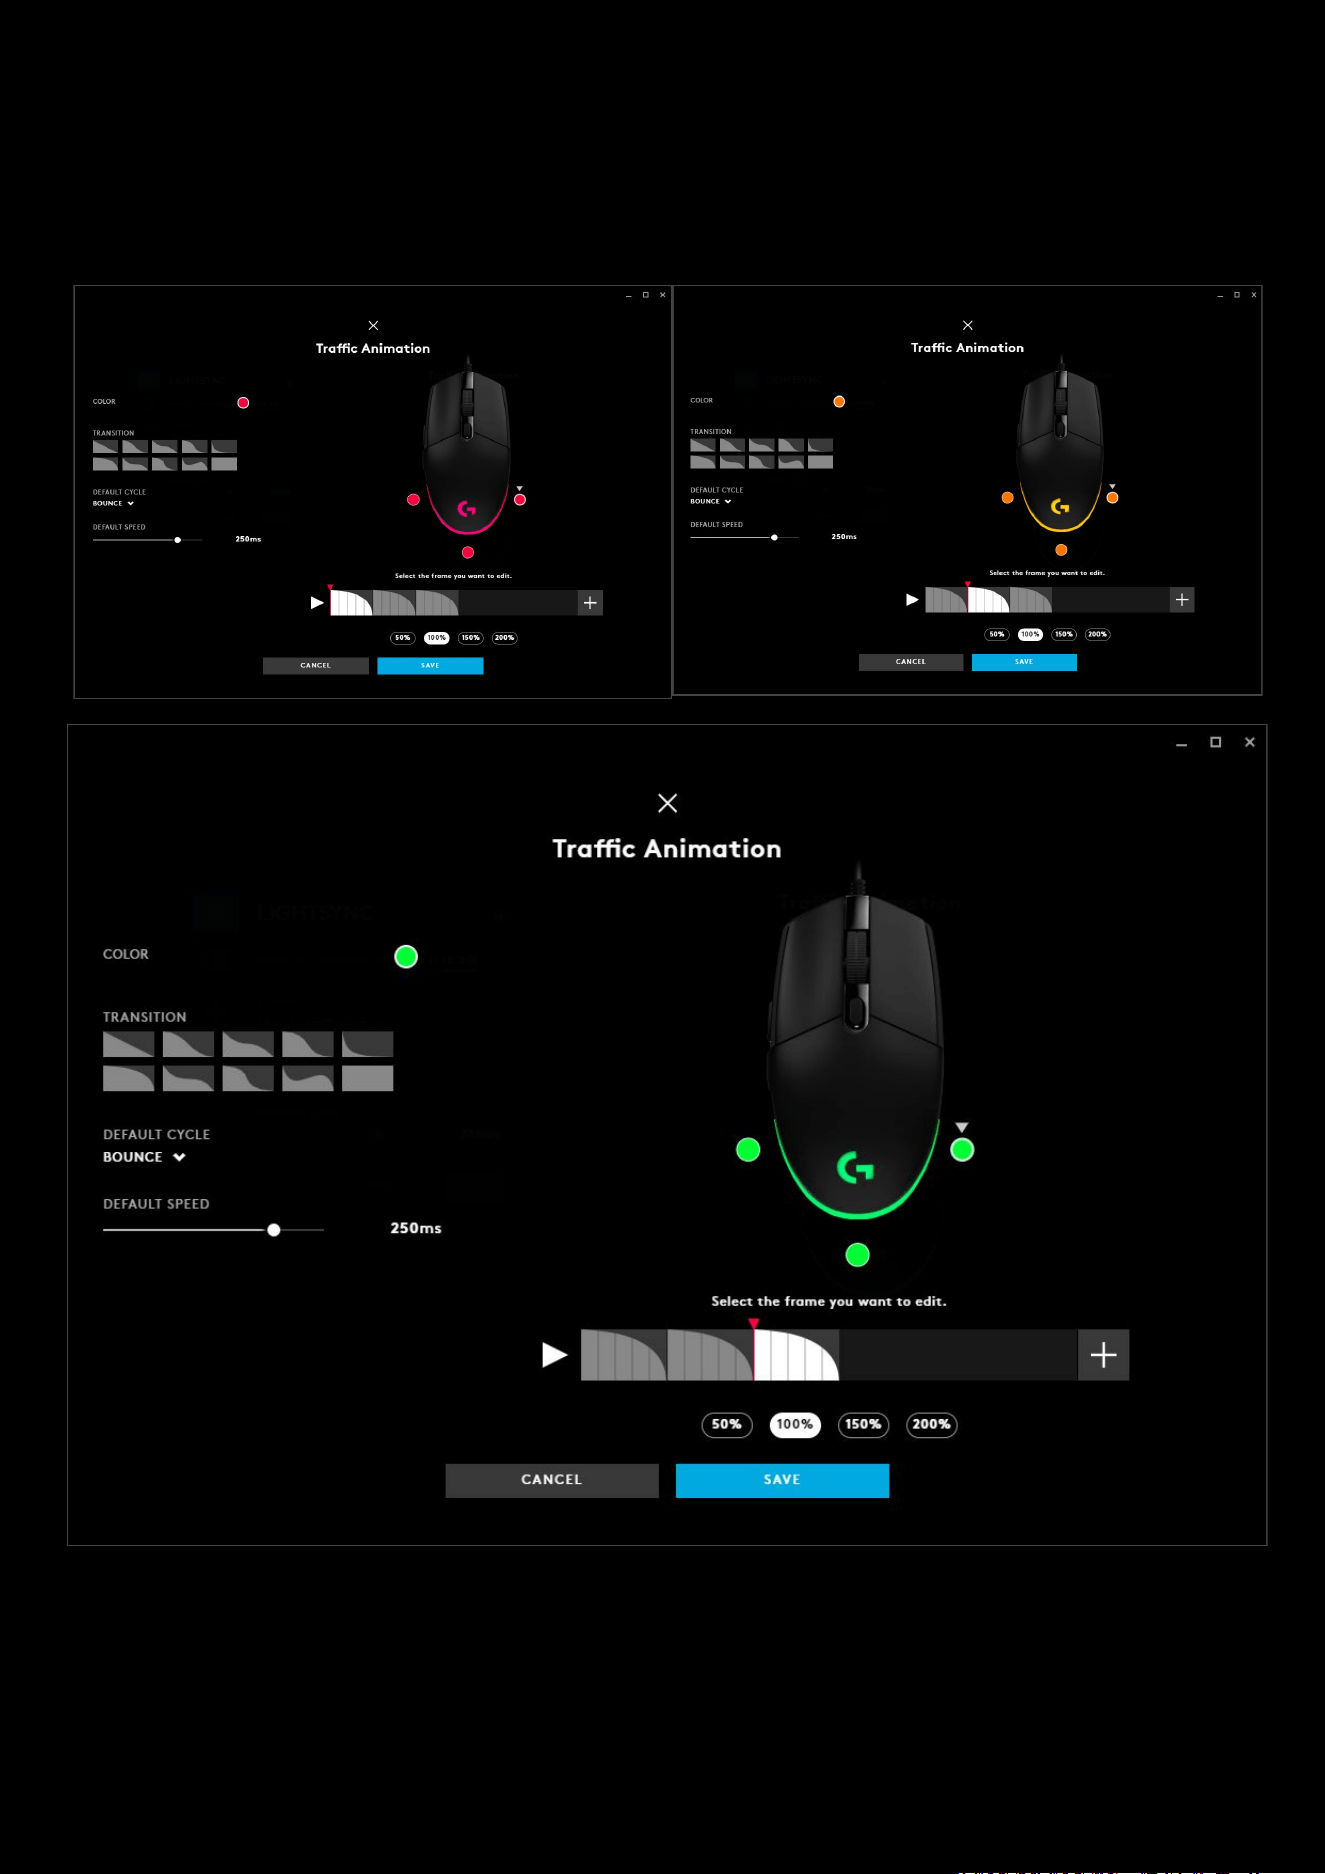
85
+NEW ANIMATION
In the examples below, we have used red, amber and green in a 3 transition animation. Utilizing the bounce DEFAULT
CYCLE to bounce back from green back to amber to red. If we left this as a cycle, then we would see green > red.
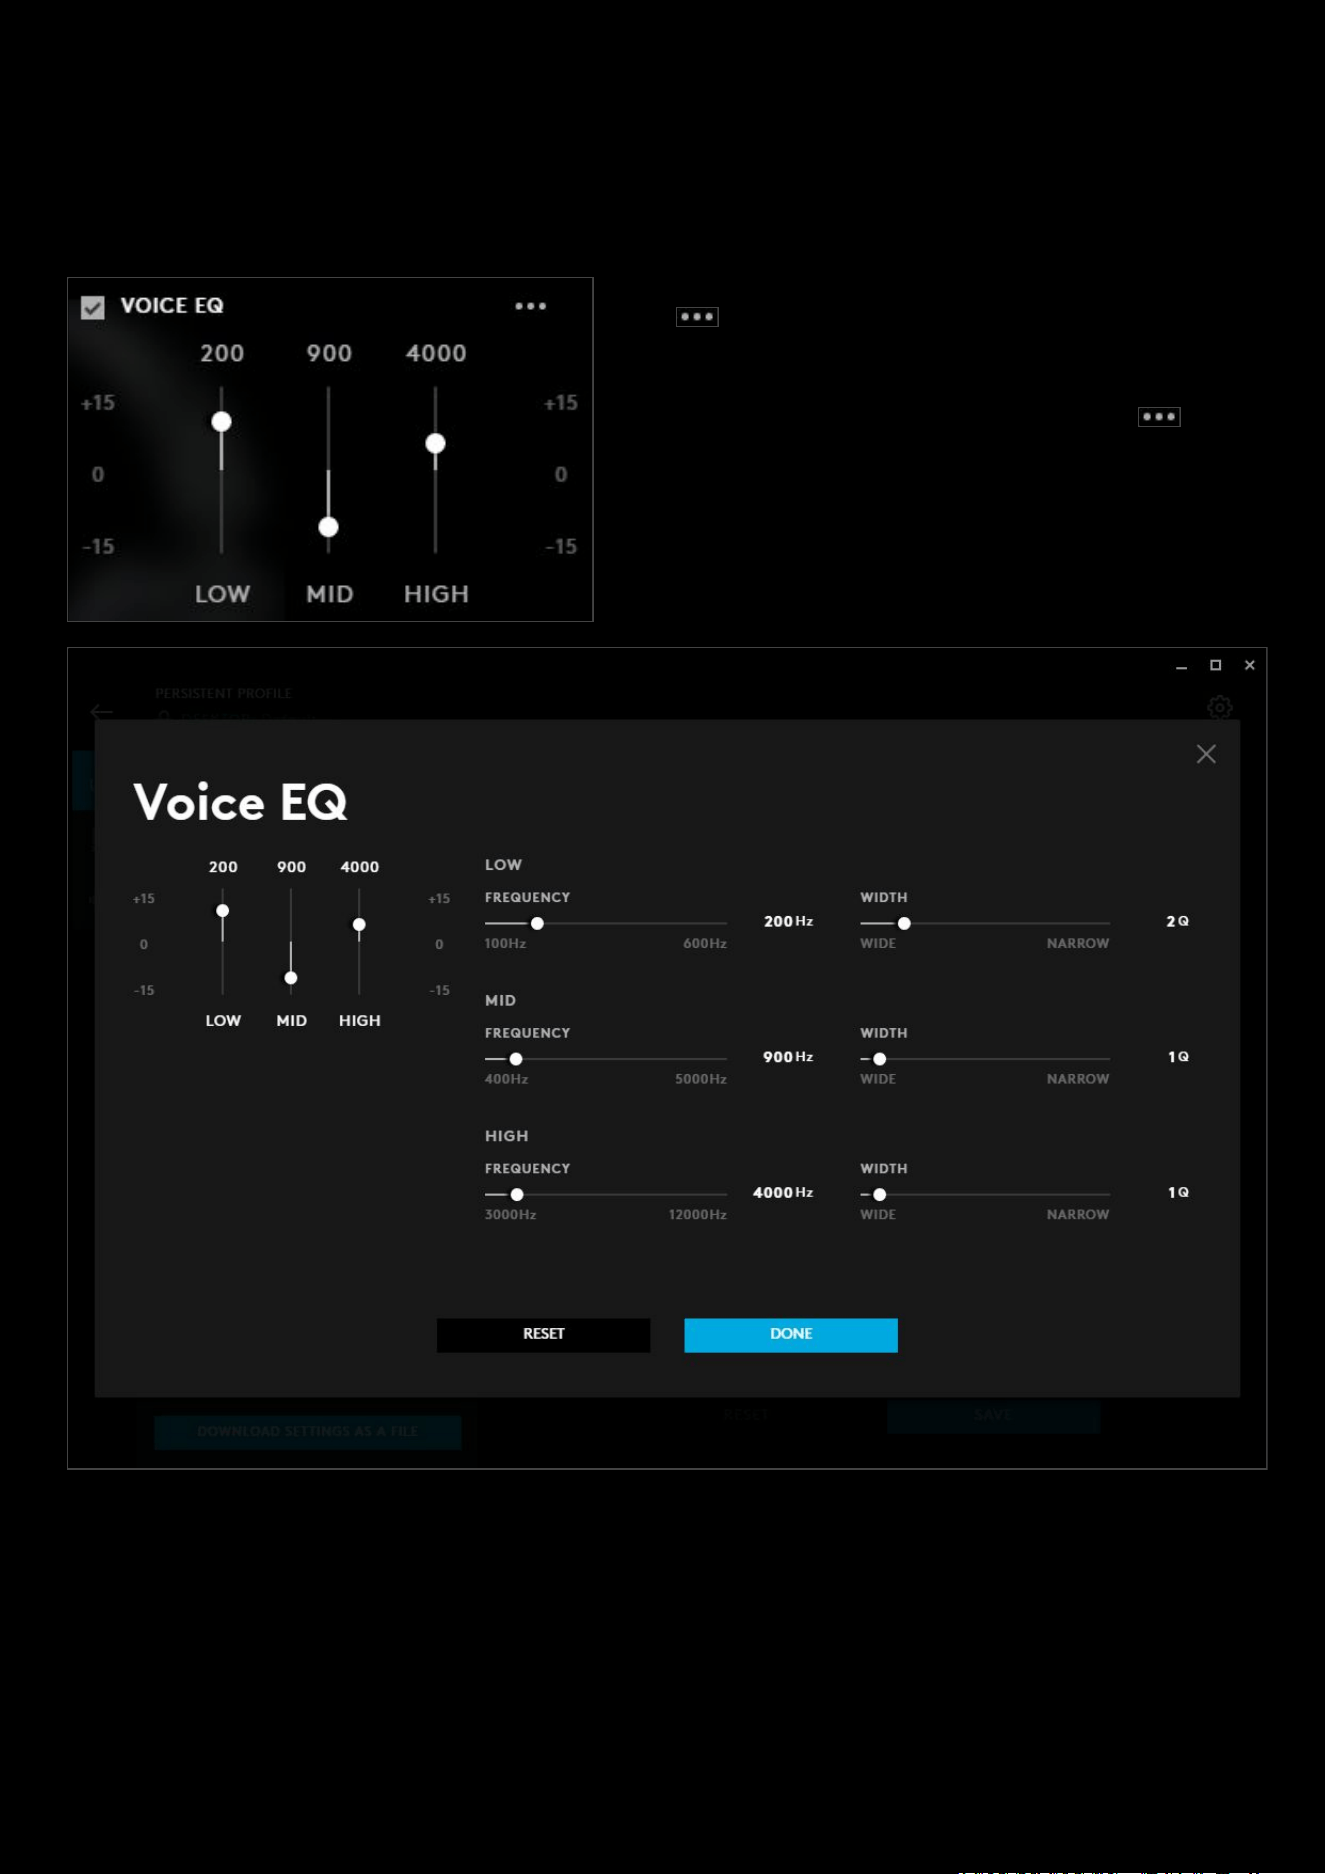
86
Microphone: Blue VO!CE
This section will look at the VOICE EQ and ADVANCED CONTROLS in a bit more depth.
VOICE EQ
Make sure the box is checked, this enables the sliders and the
more menu can be interacted.
You can modify the LOW / MID / HIGH levels from the main
window but if you need finer control, click the more menu
button and this will bring up the VOICE EQ window.
At any time you can click the RESET
button to revert back to default. Click DONE or X once you are finished to go back
to the Blue VO!CE
tab.
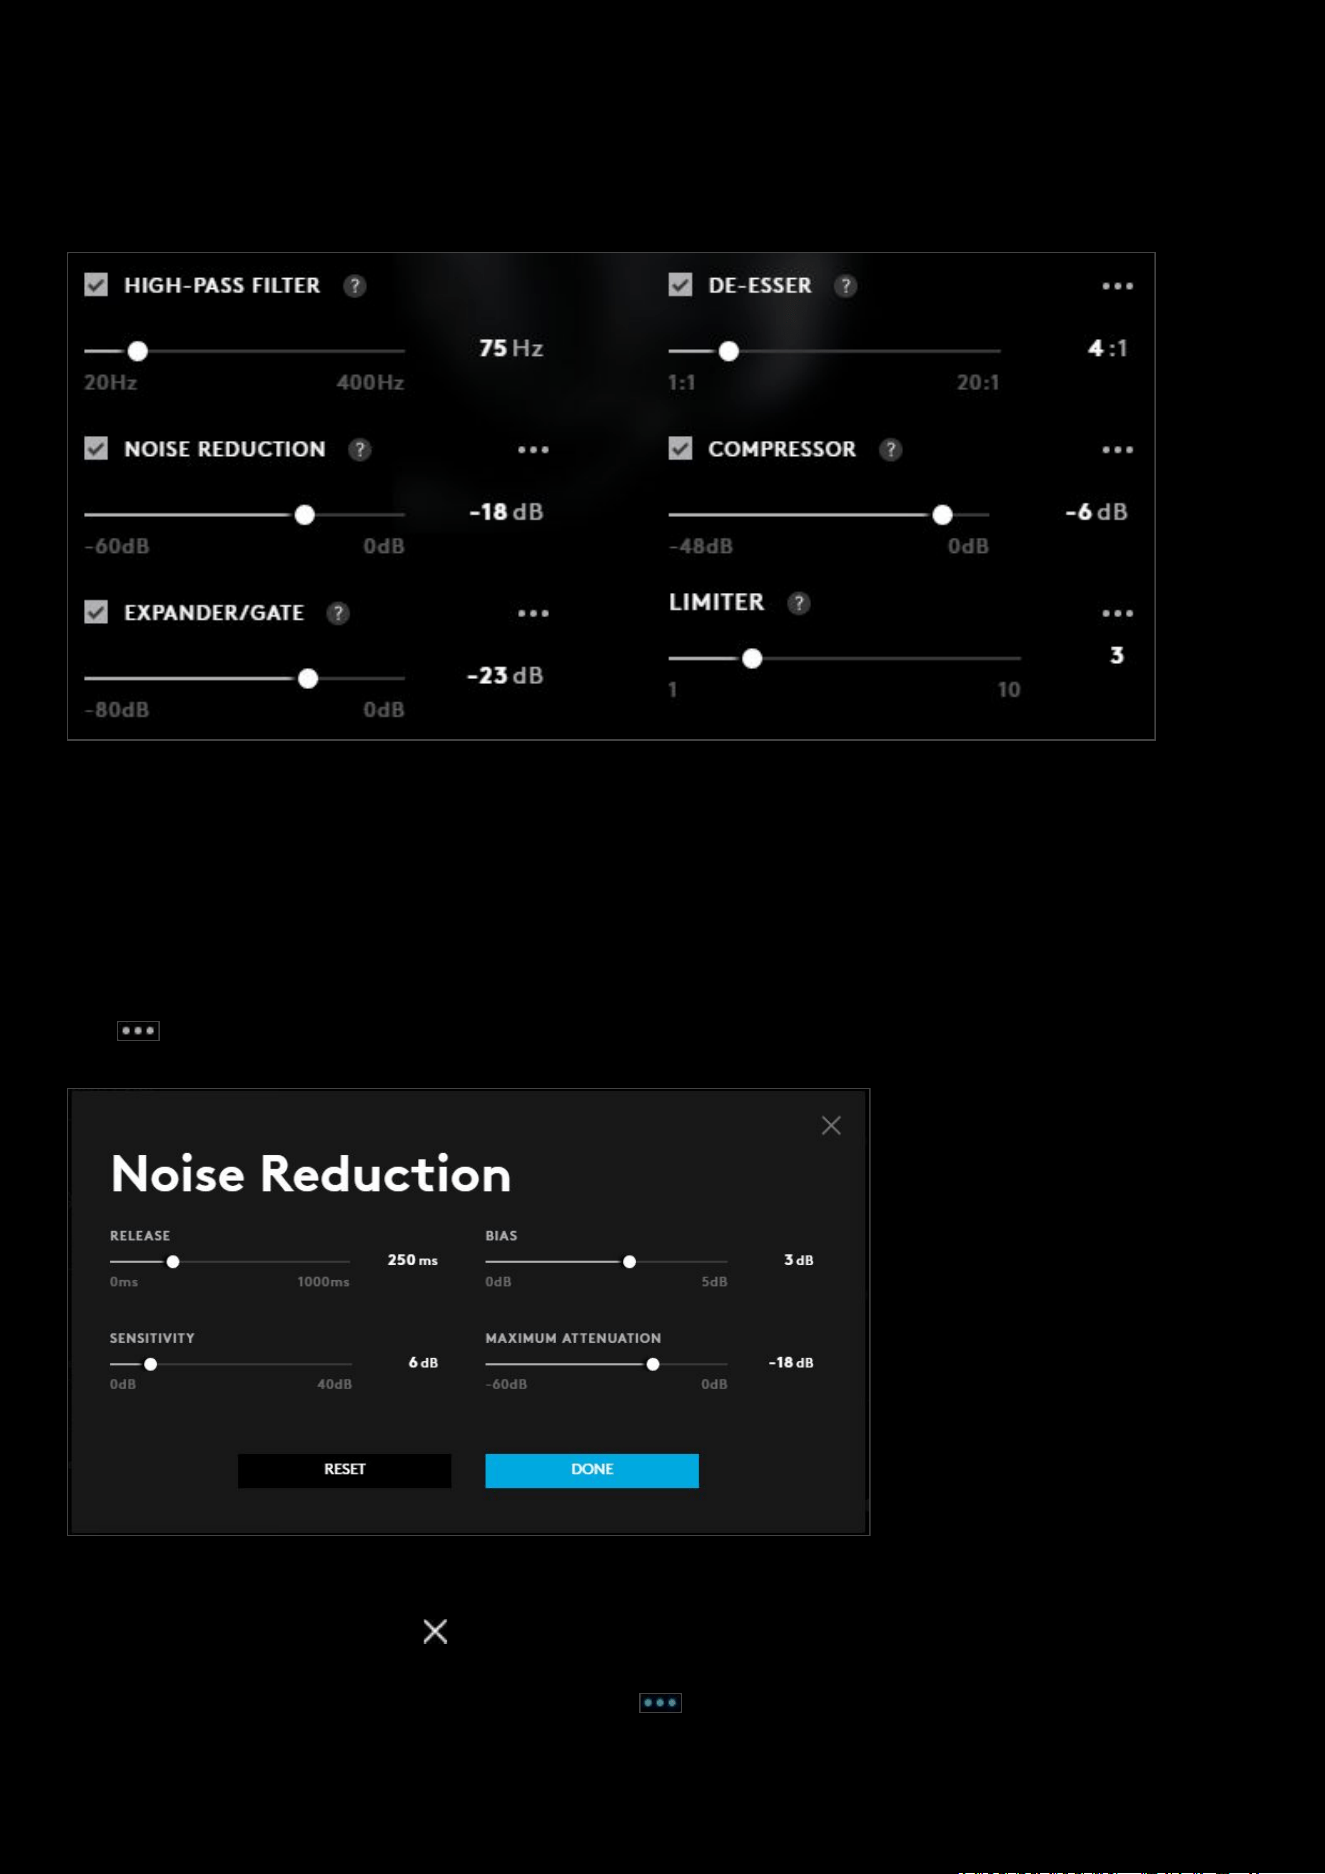
87
ADVANCED CONTROLS
Once the checkbox is ticked you will see the
HIGH-PASS FILTER, NOISE REDUCTION, EXPANDER/GATE, DE-ESSER,
COMPRESSOR and LIMITER options.
HI-PASS FILTER. Hi-Pass filter lets the high frequency information pass through the filter at a target frequency and rolls
off all audio below the target frequency. This can be helpful to remove low frequency noise like car engines or heavy
equipment and even fans in the room.
NOISE REDUCTION. Noise reduction removes unwanted noise from an audio signal. Its best at removing consistently
produced noises like fans, road noise, rain and other non-anomalous and consistent unwanted sounds.
Click to bring up the Noise Reduction
window
Note:
At any time for any of the Advanced Control windows, you can click the
RESET
button to revert back to default.
Click
DONE once you are finished or to cancel and they will go back to the
Blue VO!CE
tab.
Note:
Any changes to the preset will change the icon blue for that Advanced Control
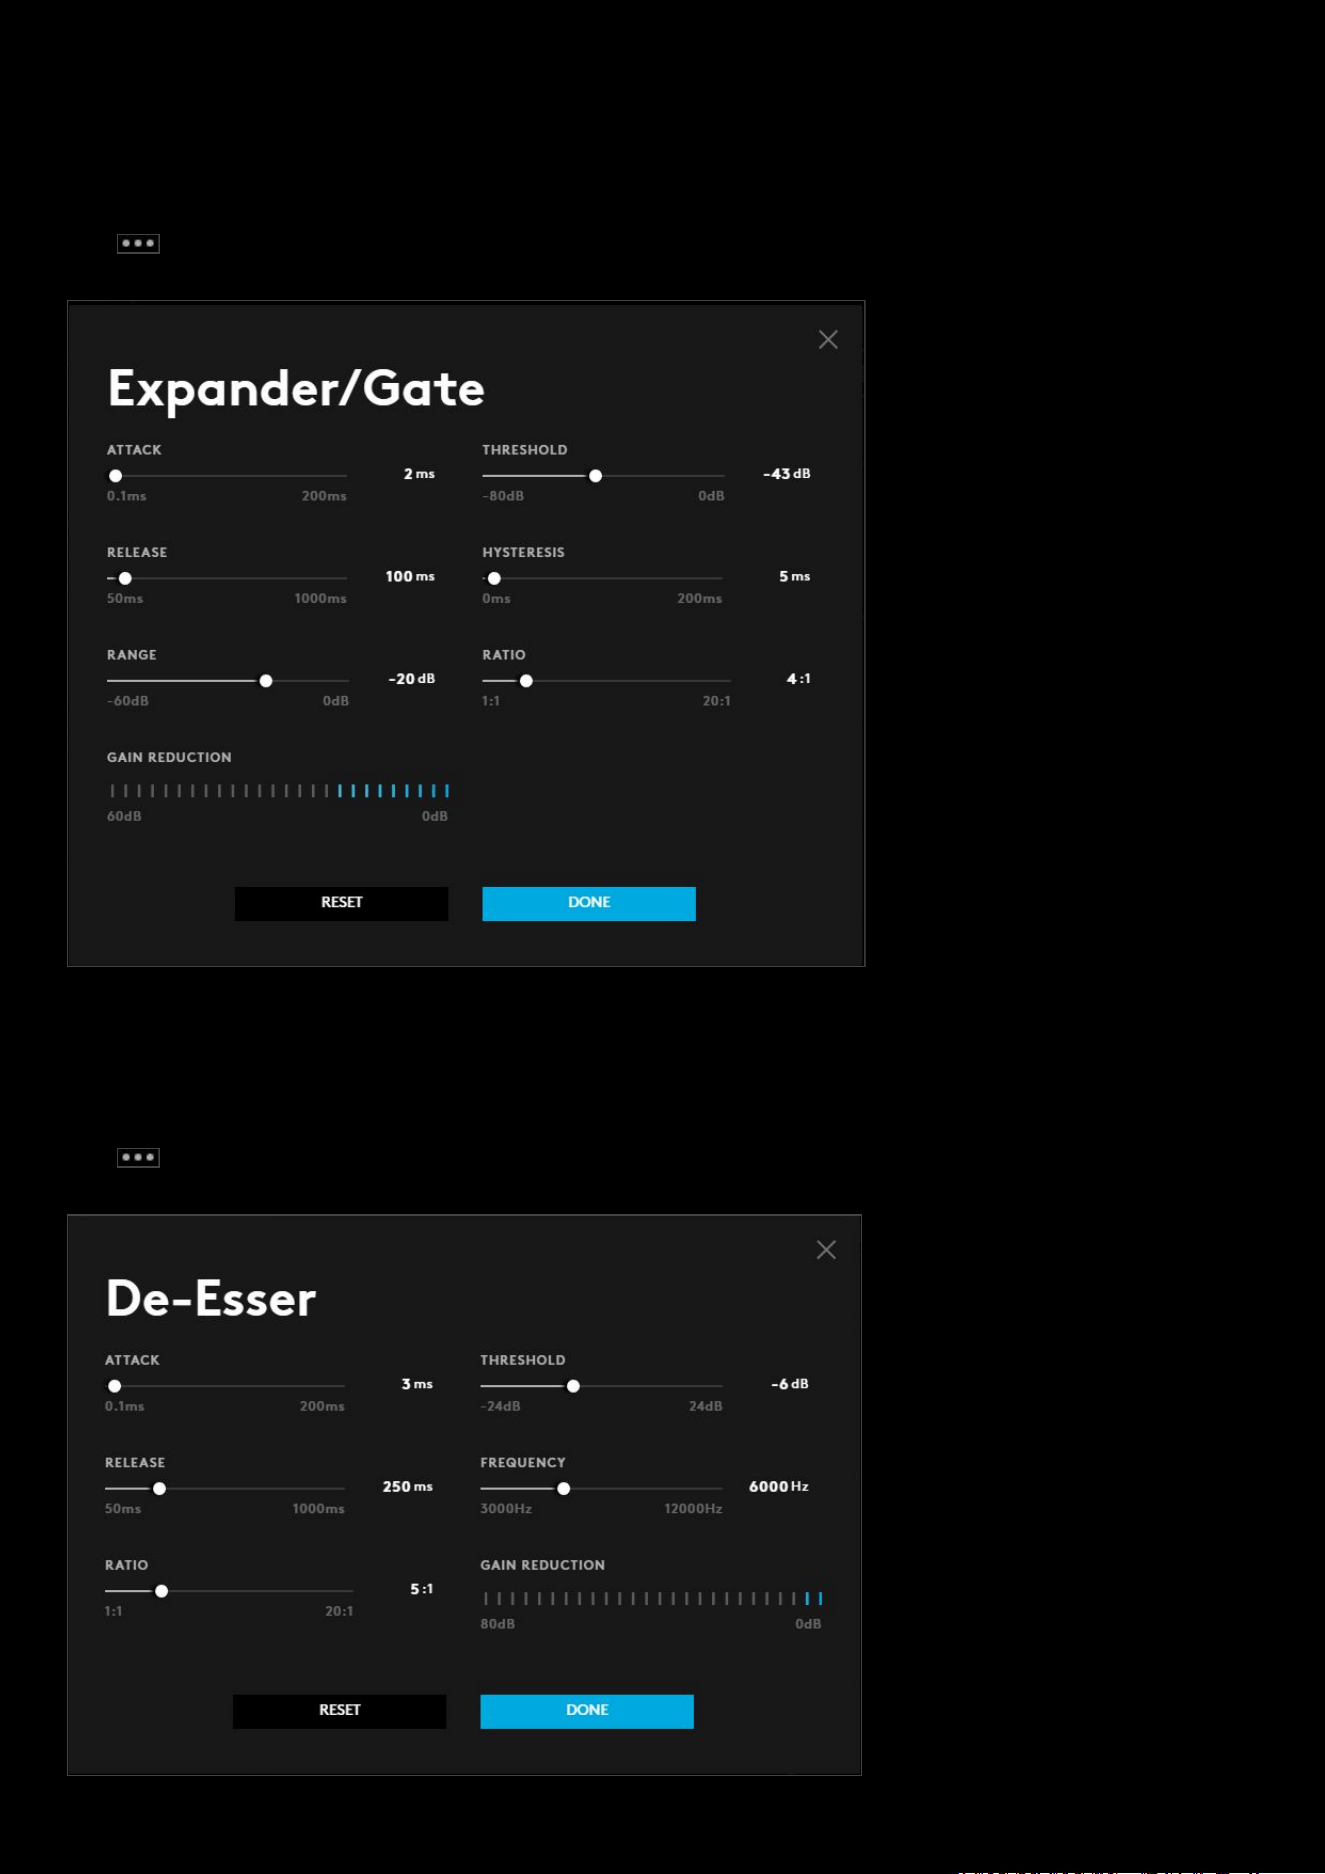
88
EXPANDER/GATE. Expander is a noise gate with a variable range. This can be very useful to remove unwanted
background noise like dogs barking, children playing, television, etc when not speaking into the mic. If you set the
threshold slightly below the level of your voice, the gate will open only when you're speaking and cut out any other
noise when you're not.
Click to bring up the Expander/Gate
window
DE-ESSER. De-esser listens to the high frequencies for hissing or sibilant sounds that are generally unpleasant. The tool
listens at the target frequency (8KHz by default) nd compresses that frequency when the threshold is reached by the
amount set by the ratio control.
Click to bring up the De-Esser window
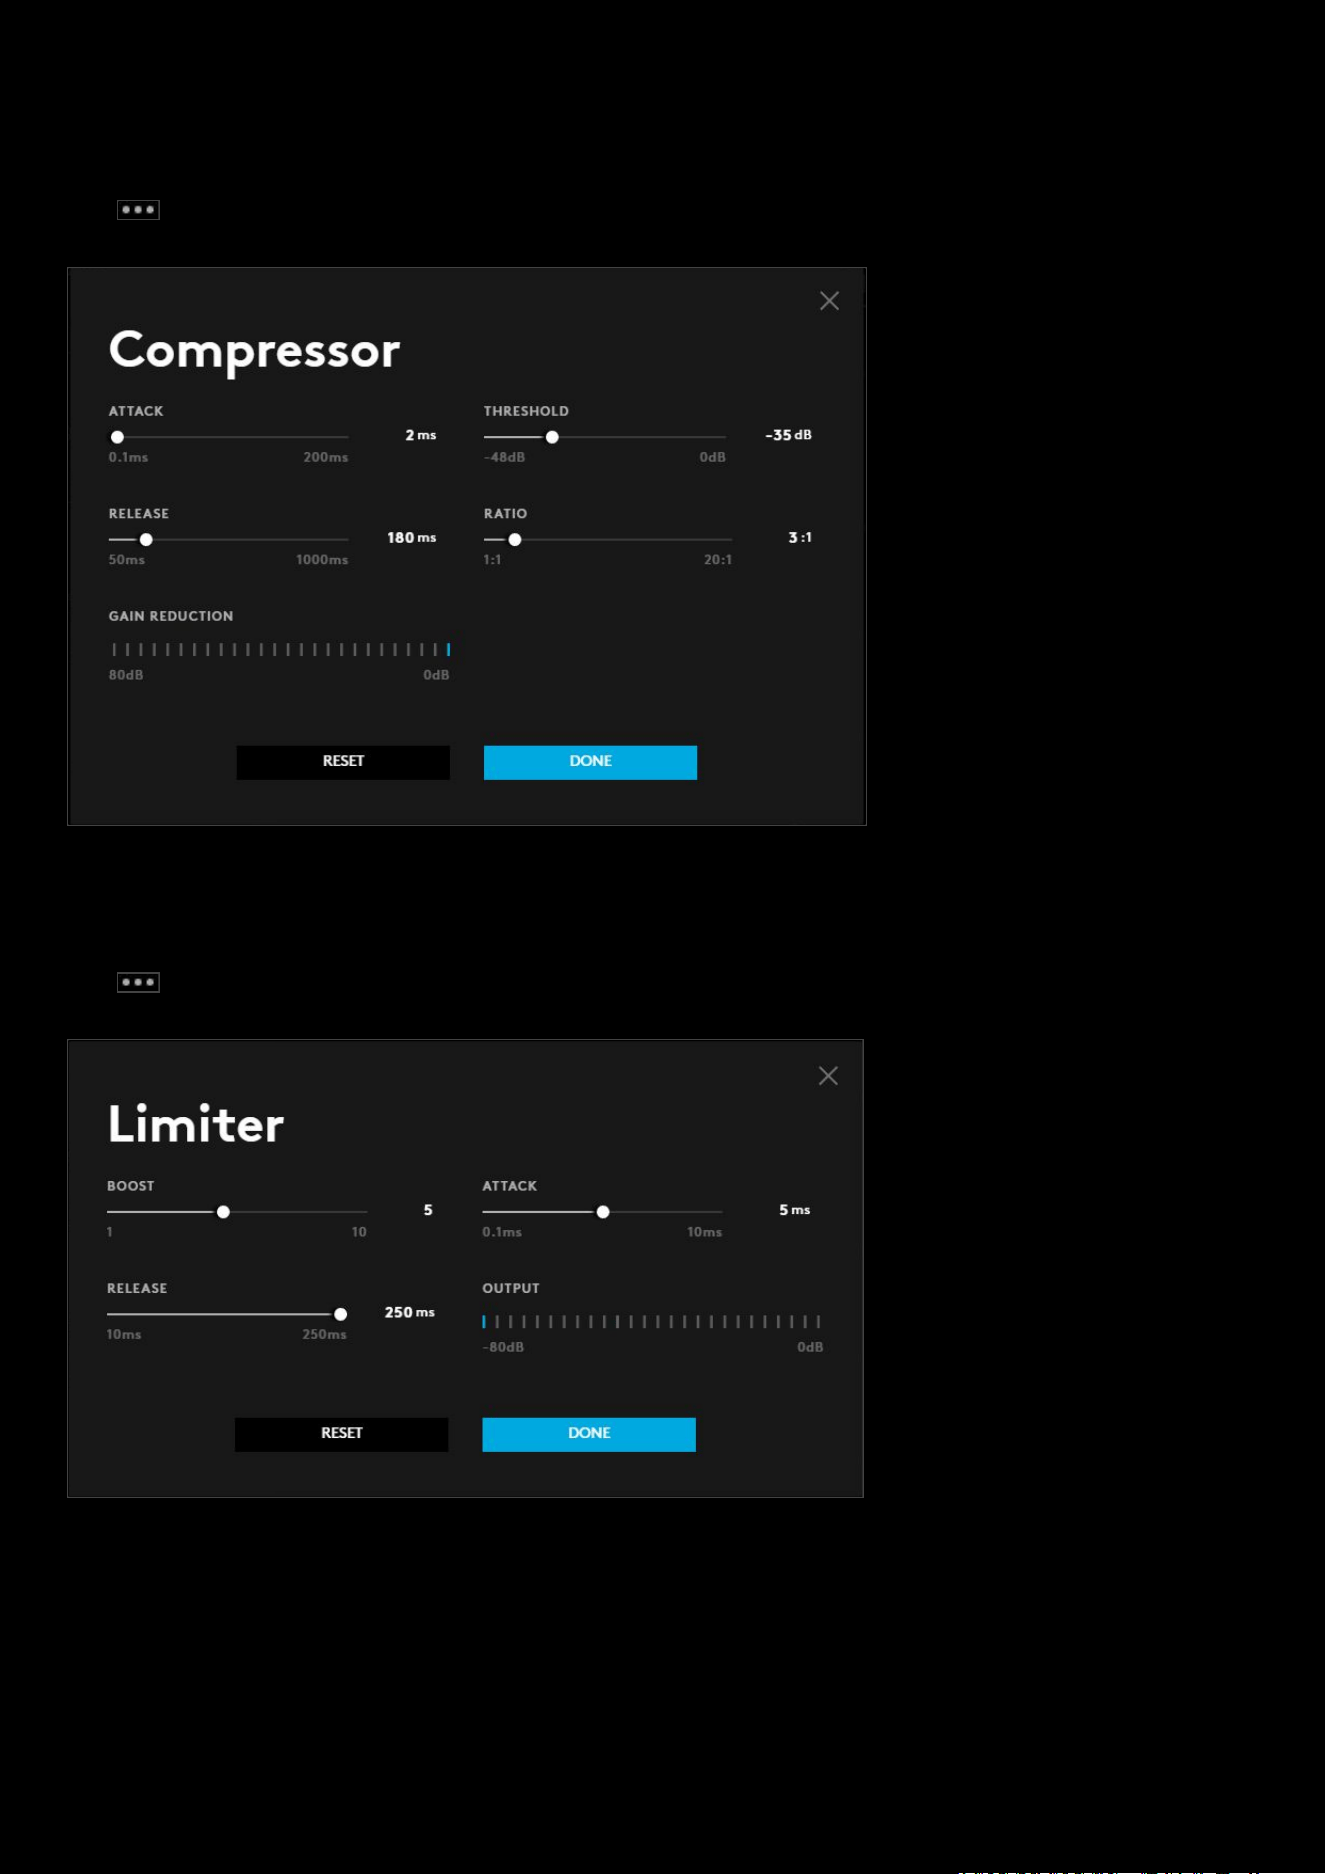
89
COMPRESSOR. Compressor reduces the dynamic range of an audio signal by attenuating the output in relation to the
threshold and ratio controls. This essentially makes your voice signal more consistent in volume and therefore easier to
hear whether you are screaming or whispering.
Click to bring up the Compressor
window
LIMITER. Limiter compresses the output of the audio signal in an infinite ratio essentially “limiting” the signal to never
be able to get louder than the desired level
Click to bring up the Compressor
window
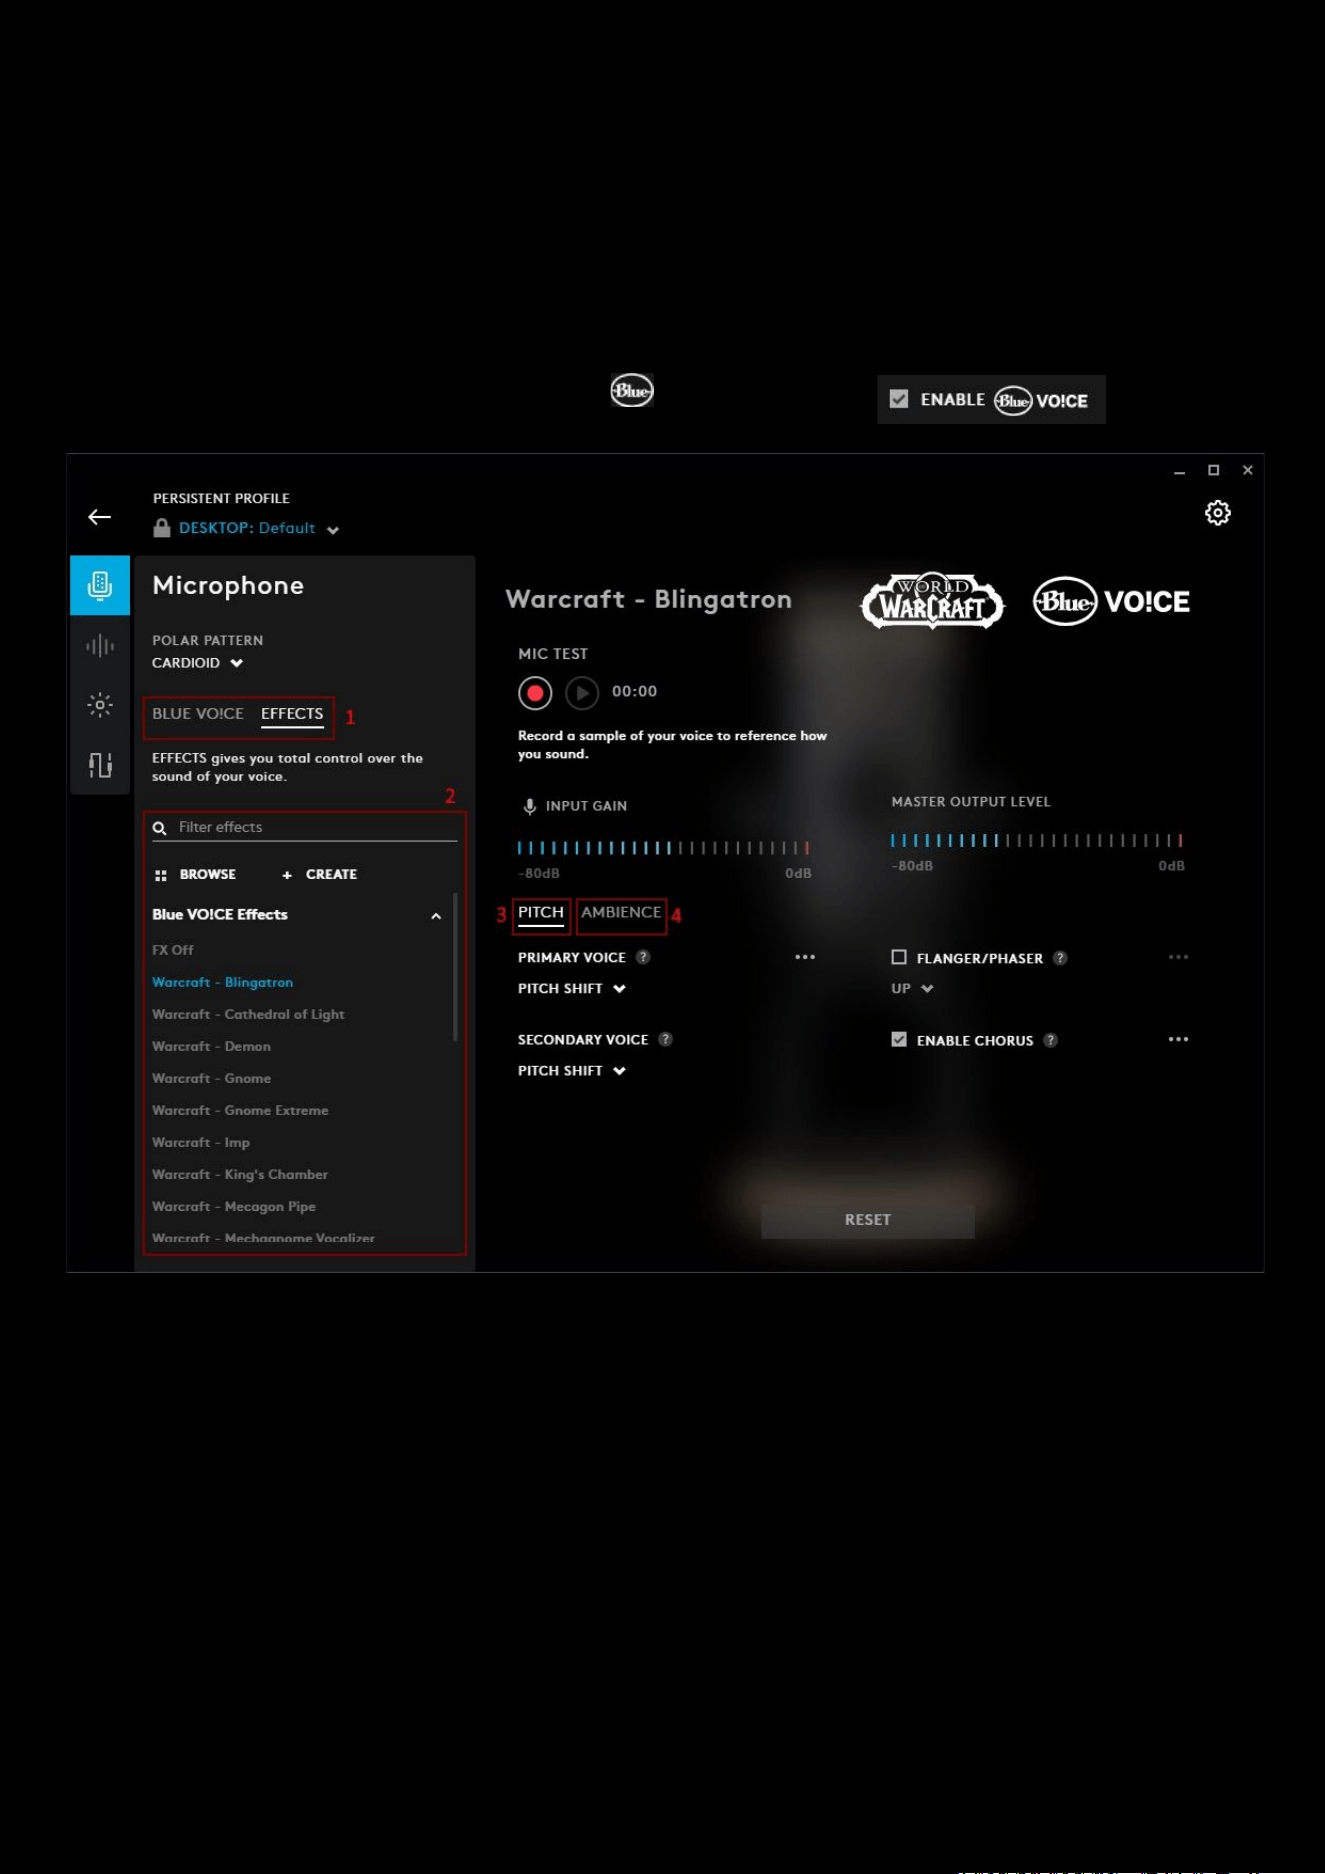
90
Microphone: Effects
Yeti X WoW® Edition
Crafted together with Blizzard Entertainment®, The Yeti X WoW® Edition professional USB mic can change the sound of
your voice. Summoning the sound of your favorite Warcraft characters, using the all-new advanced voice modulation
with Warcraft character presets or with hundreds of Shadowlands and Warcraft HD audio samples.
To have access to the EFFECTS, make sure the ENABLE VO!CE
box is ticked:
1. BLUE VO!CE | EFFECTS. Click EFFECTS to access the voice modulation settings.
2. Effects. You can select one of the Effects that come with G HUB or create your own.
a. To create your own effect, you can start editing an existing one or click +CREATE. Any ones you create
will be in the section Custom Effects
. You can then share your custom effect. Don't forget to give it a
unique title!
b. Click BROWSE to access effects that have been uploaded by other users.
3. PITCH. Select PITCH or AMBIENCE to configure the effect.
a. PRIMARY VOICE: is the first of two distinct voices that can be shifted using one of the preset styles
combined to make polyphonic effects.
b. FLANGER/PHASER: changes the phase alignment of the signal which can create the sensation of
movement and other interesting effects
c. SECONDARY VOICE: is the second of two distinct voices that can be shifted using one of the preset
styles combined to make polyphonic effects
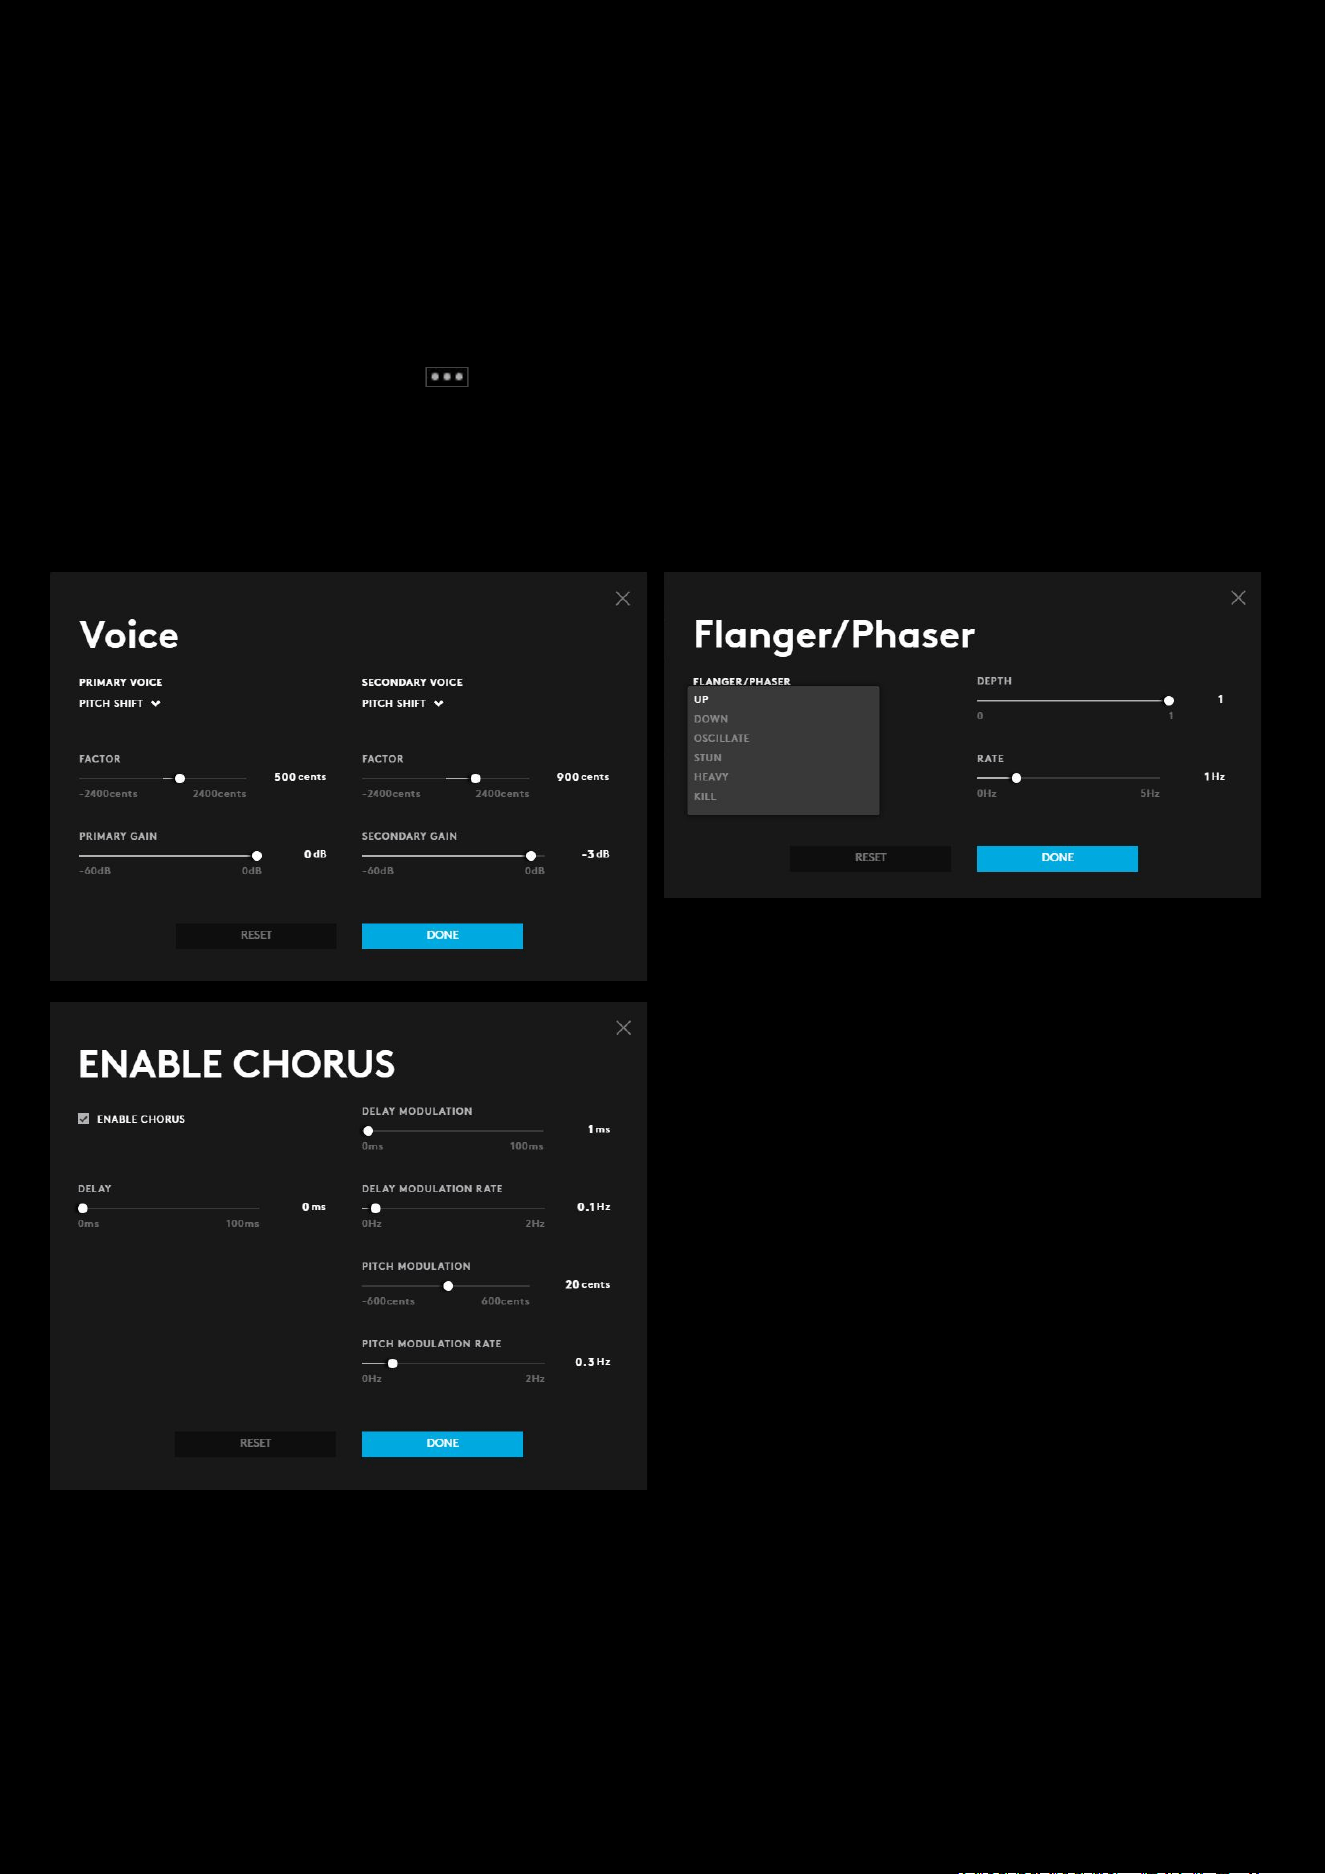
91
d. ENABLE CHORUS: Chorus varies the timing and pitch of the signal to create interesting effects. Both
Primary
and Secondary Voices must be active to use the Chorus effect.
4. AMBIENCE. Select PITCH or AMBIENCE to configure the effect.
a. REVERB: creates the sense of the signal being produced in a different space with different size and echo
feedback.
b. TIME DELAY: Delay changes the timing and repeats of the signal
c. RING MODULATOR: Alters the frequency of the signal to create interesting and sometimes extreme
effects.
For each effect setting you can click to bring up the detailed settings. For the Primary and secondary voice - the
secondary voice is included on the primary voice detailed settings. To access the detailed settings, the effect needs to
be on.
PITCH:
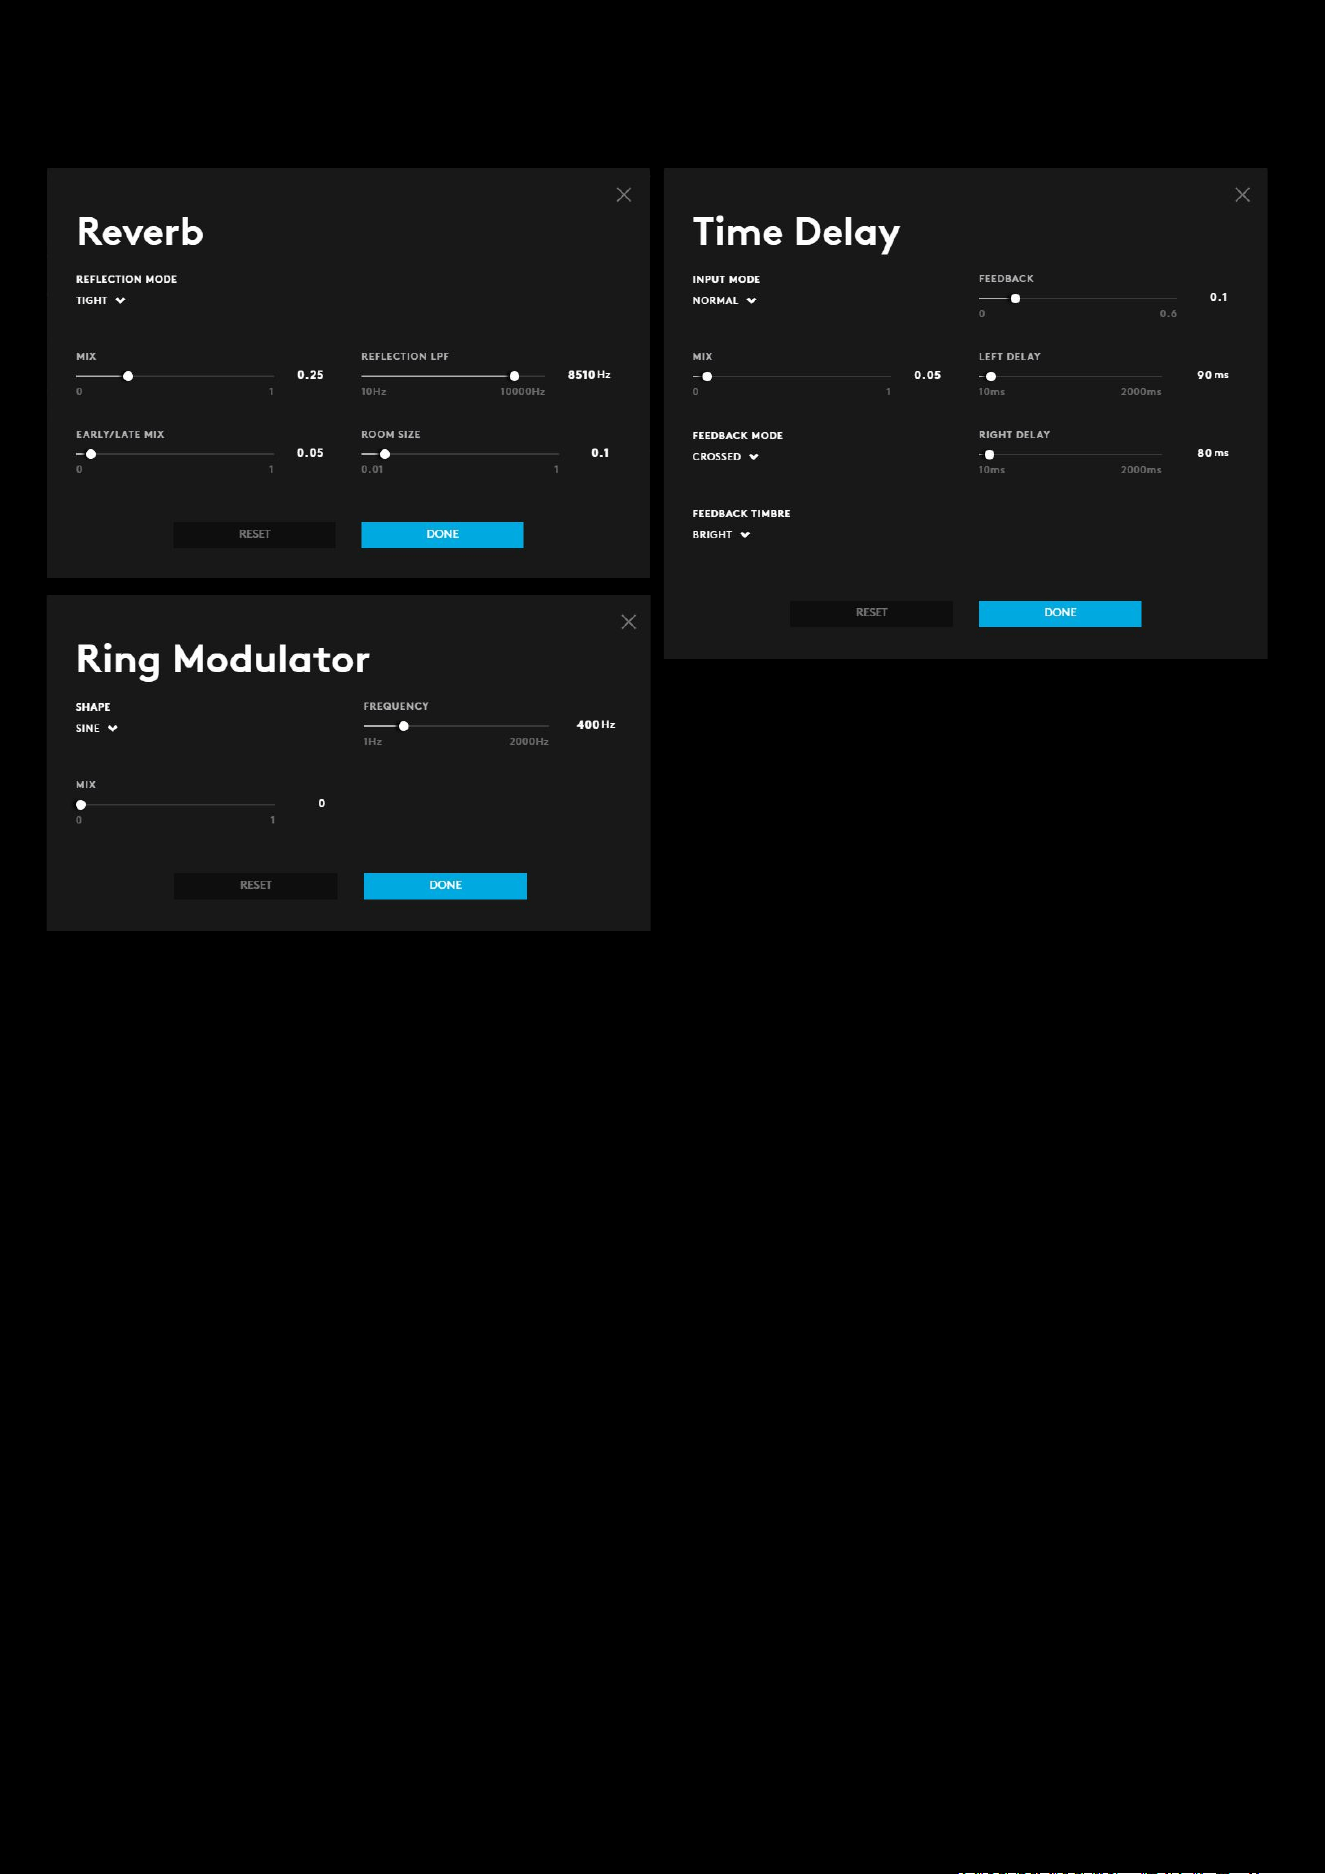
92
AMBIENCE:
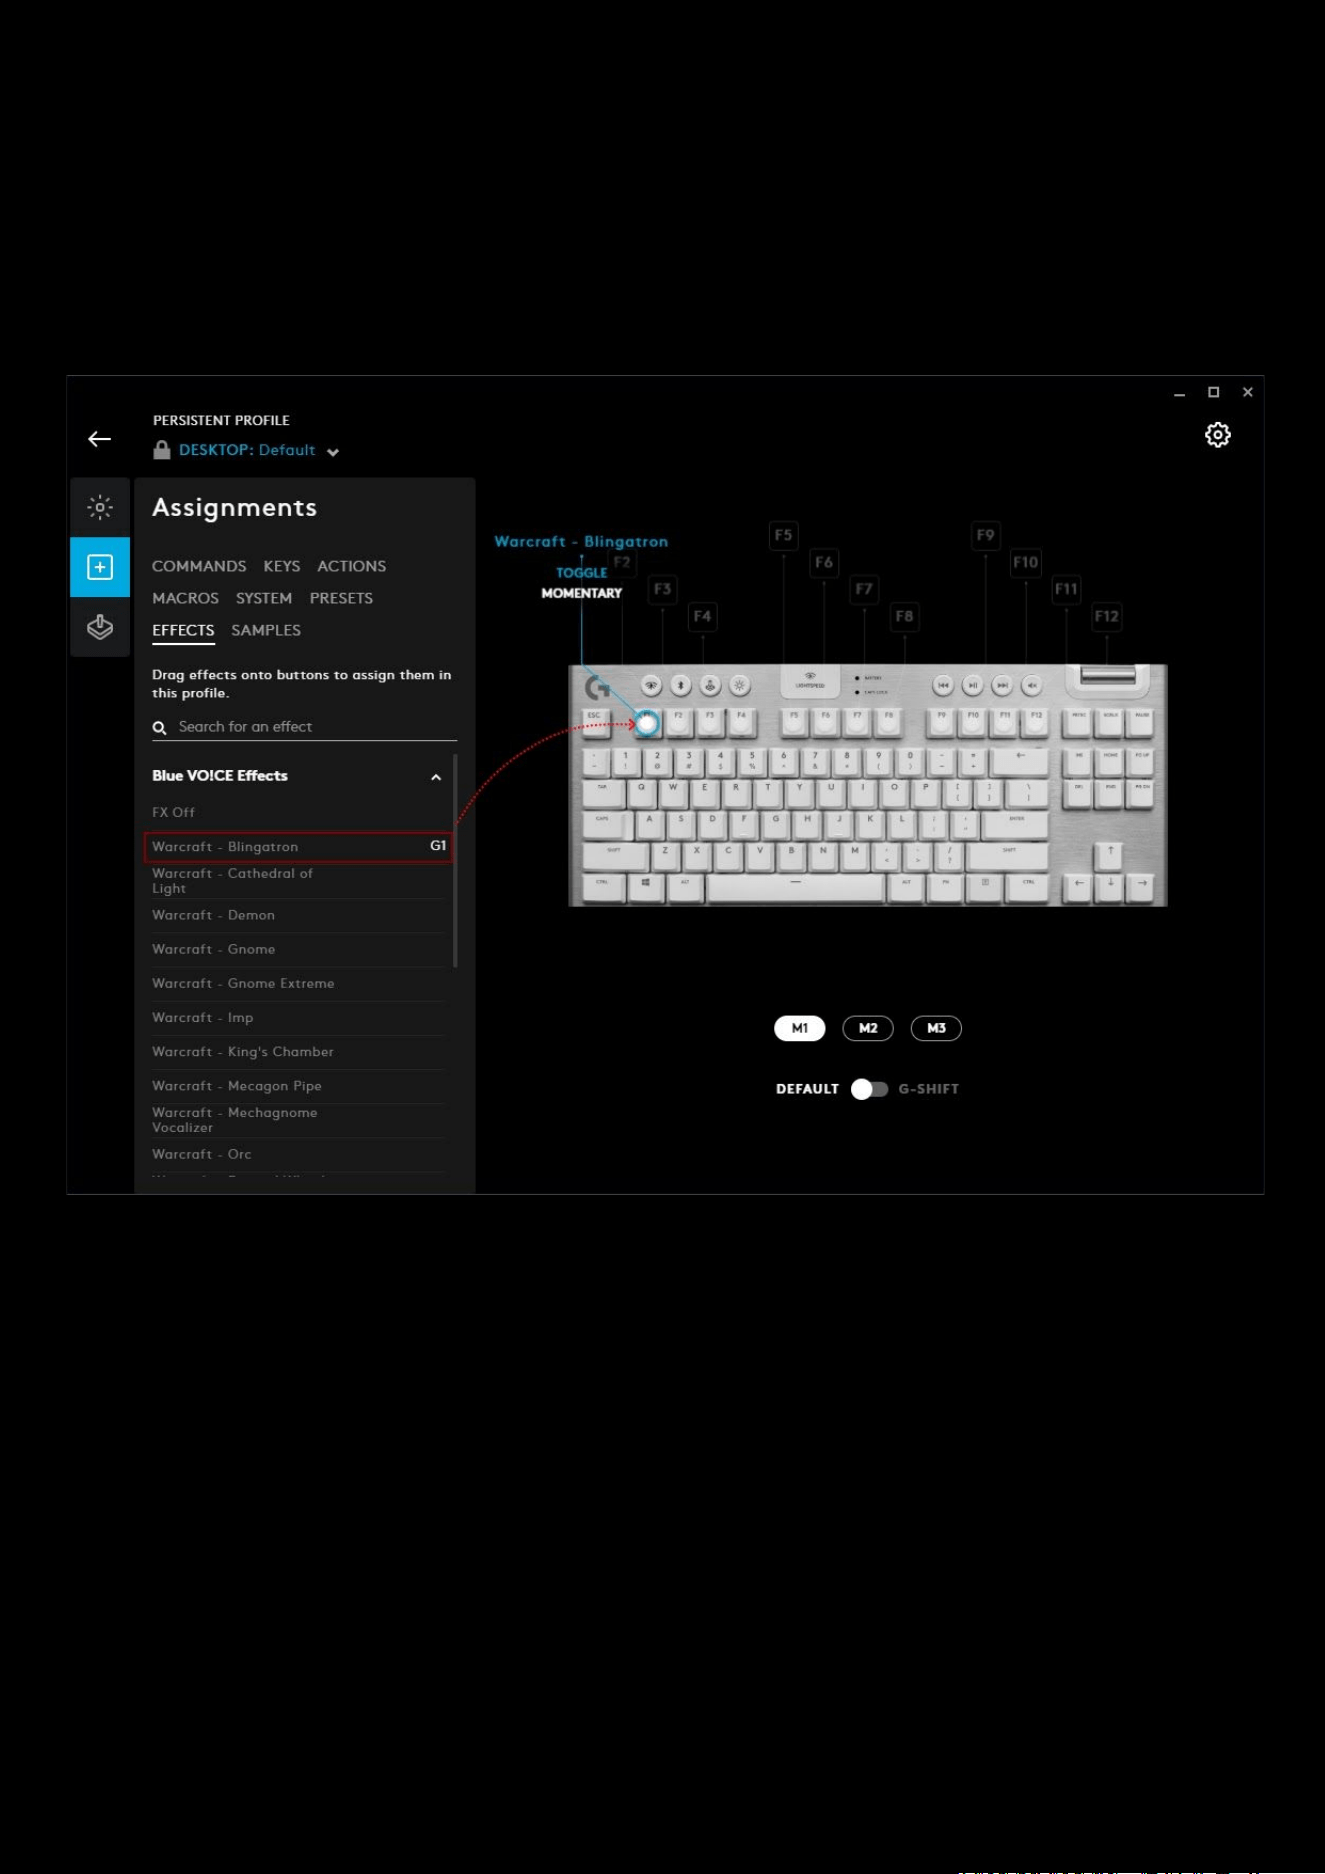
93
Assigning EFFECTS In Assignments:
You can assign an effect to any G key on a G HUB device. So for example we can assign the Blingatron effect to the F1
key as shown below:
1. Goto ASSIGNMENTS
2. Select the EFFECTS tab
3. Drag the effect from the drop down list onto the desired G Key
There are 2 types of activation for effects:
● TOGGLE: The effect will continue to be in use until you press that G Key again
● MOMENTARY: Hold down the G Key to use this effect, similar way that ‘Push To Talk’ works.
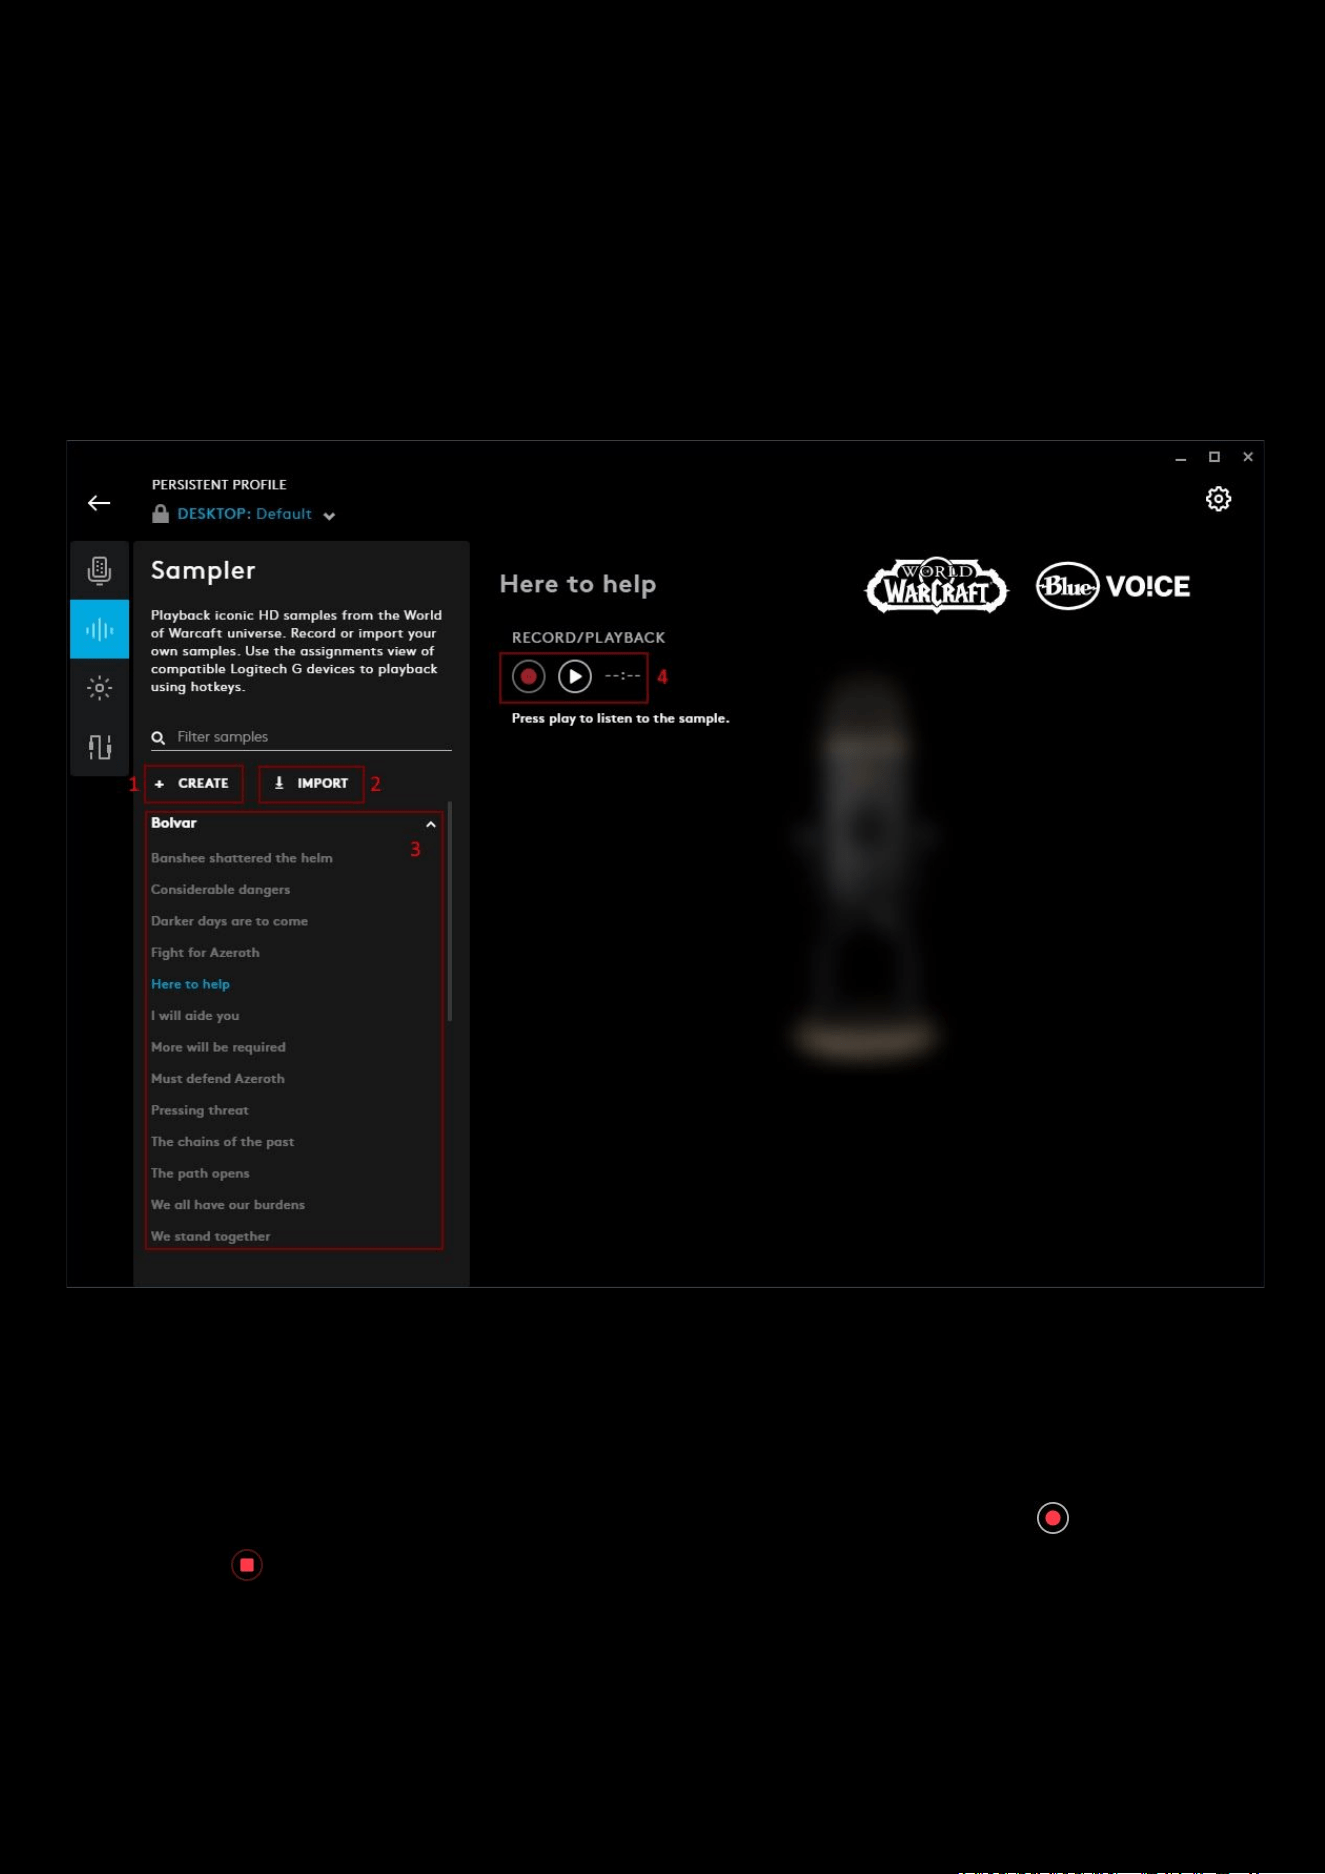
94
Microphone: Sampler
Sampler:
The sampler allows you to playback iconic HD samples from the World of Warcraft universe. You can also record or
import your own .wav samples.
Note:
When playing samples back through an assigned G key/button you will hear the sample and on your recording.
Also, anyone you are communicating with will hear the sample as well as you.
1. +CREATE: Click to create your own sample. Use the RECORD/PLAYBACK tool to capture your voice.
a. Your created samples will be in the Custom Samples section dropdown.
2. IMPORT: Click to import a .wav file on your computer to use as a sample. Don't forget to give it a unique name!
3. Sample presets: Use the drop down lists from the popular WoW characters, Spells, Ambience, Environment,
Creatures and interface sounds.
4. RECORD/PLAYBACK: Use this media tool to capture your own sound effect. Press record to capture and
the stop . You can record over your recording if you need to make changes.

95
Assigning SAMPLES in Assignments
You can assign a sample to any G key on a G HUB device. So for example we can assign the Battle Shout sample to the
F1 key as shown below:
1. Goto ASSIGNMENTS
2. Select the SAMPLES tab
3. Drag the sample from the drop down list onto the desired G Key
There are 3 types of activation for samples:
● ONE SHOT: Press the key and the effect will play a single time in full.
● LOOP ON HOLD: The sample will play as long as the key is held down and will stop when the key is released.
● CONTINUOUS LOOP: Press the key to have the sample on loop. Press the key again to stop.
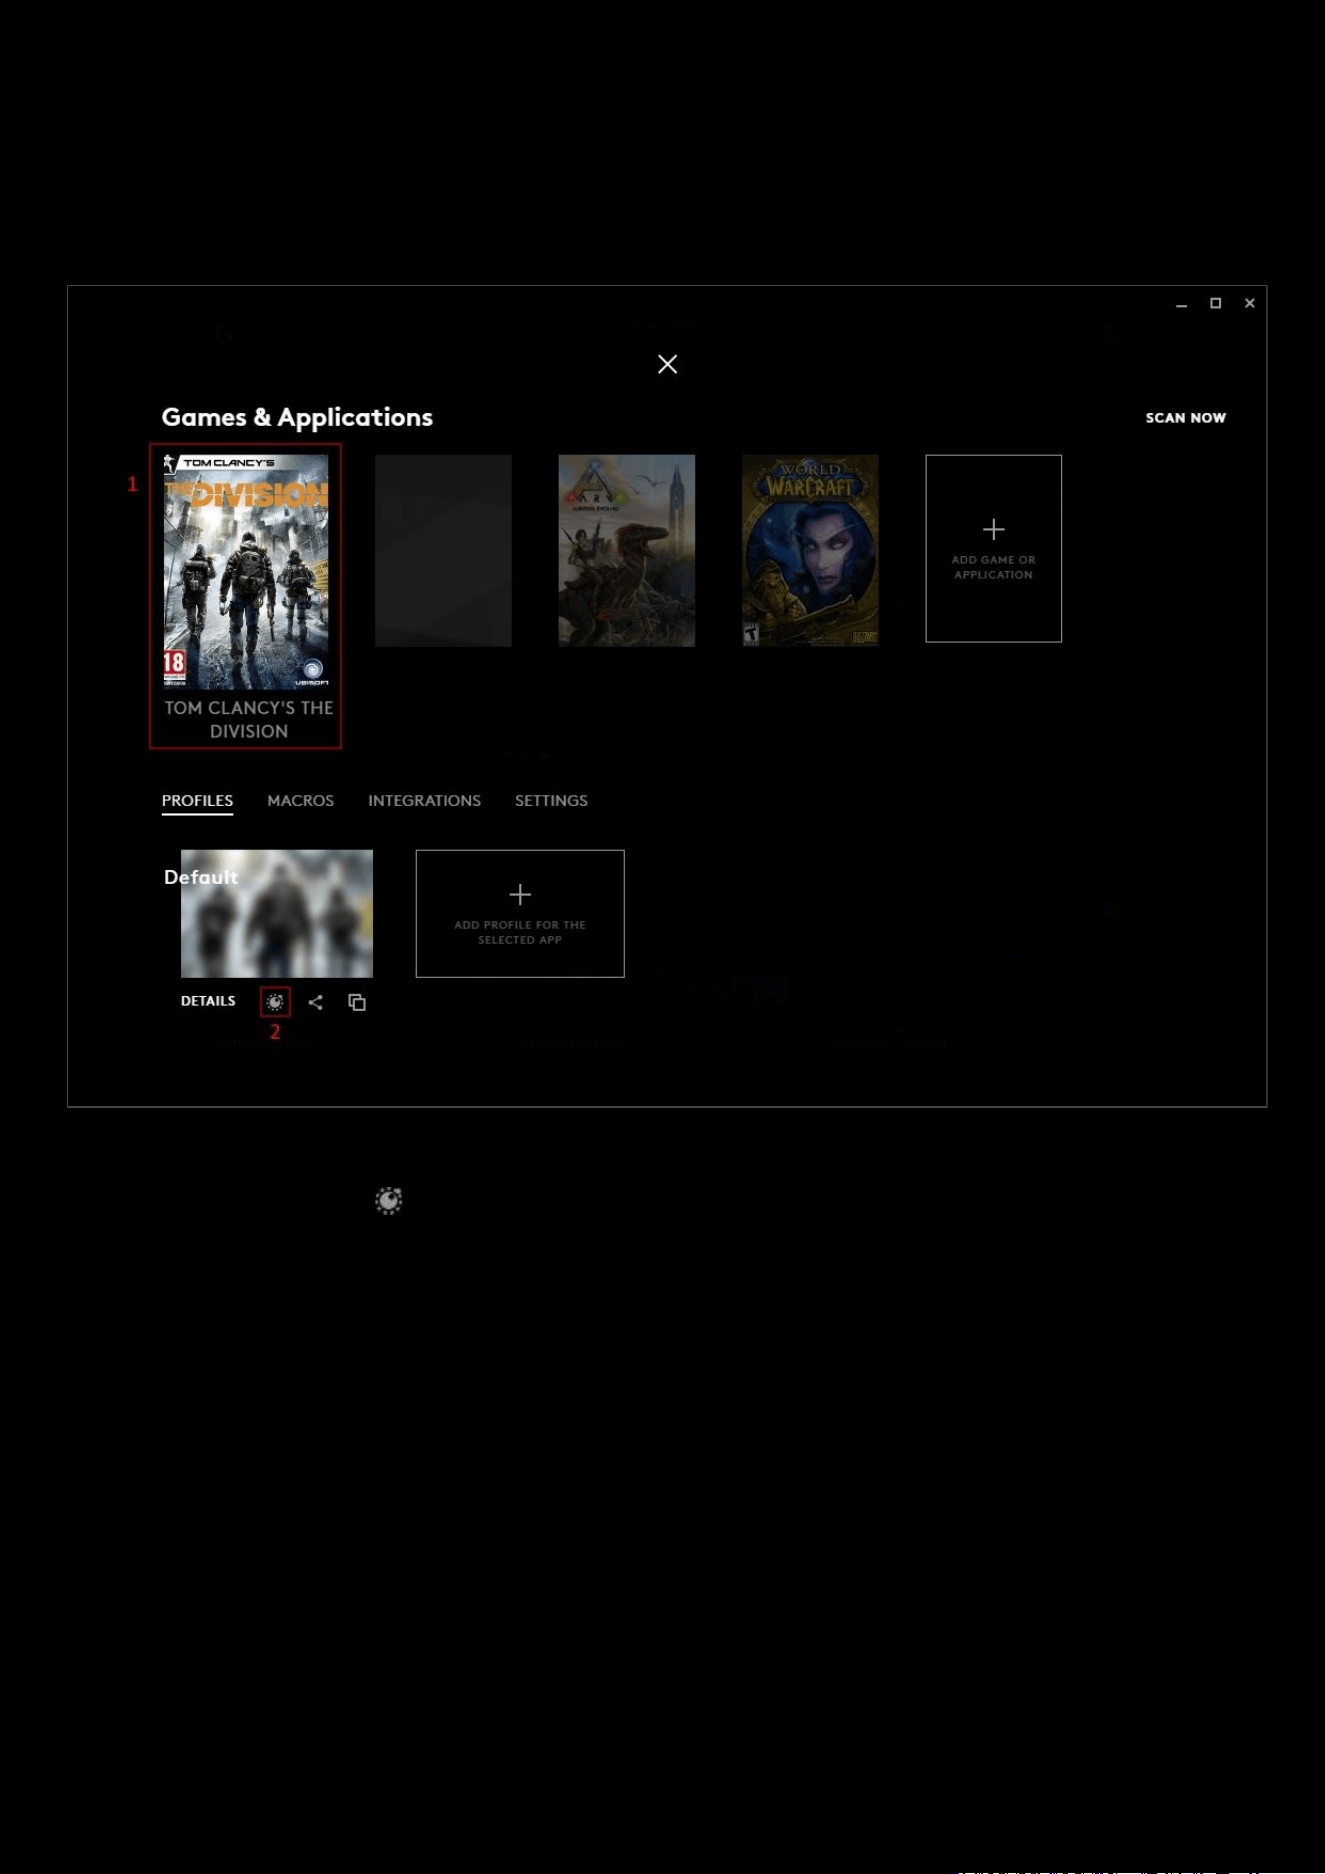
96
5. Scripting
Scripting can be added to a profile from the Games & Applications window. Scripts are not profile specific and can be
applied to any profile.
1. Select the profile you want to add scripting to
2. Click the Scripting icon
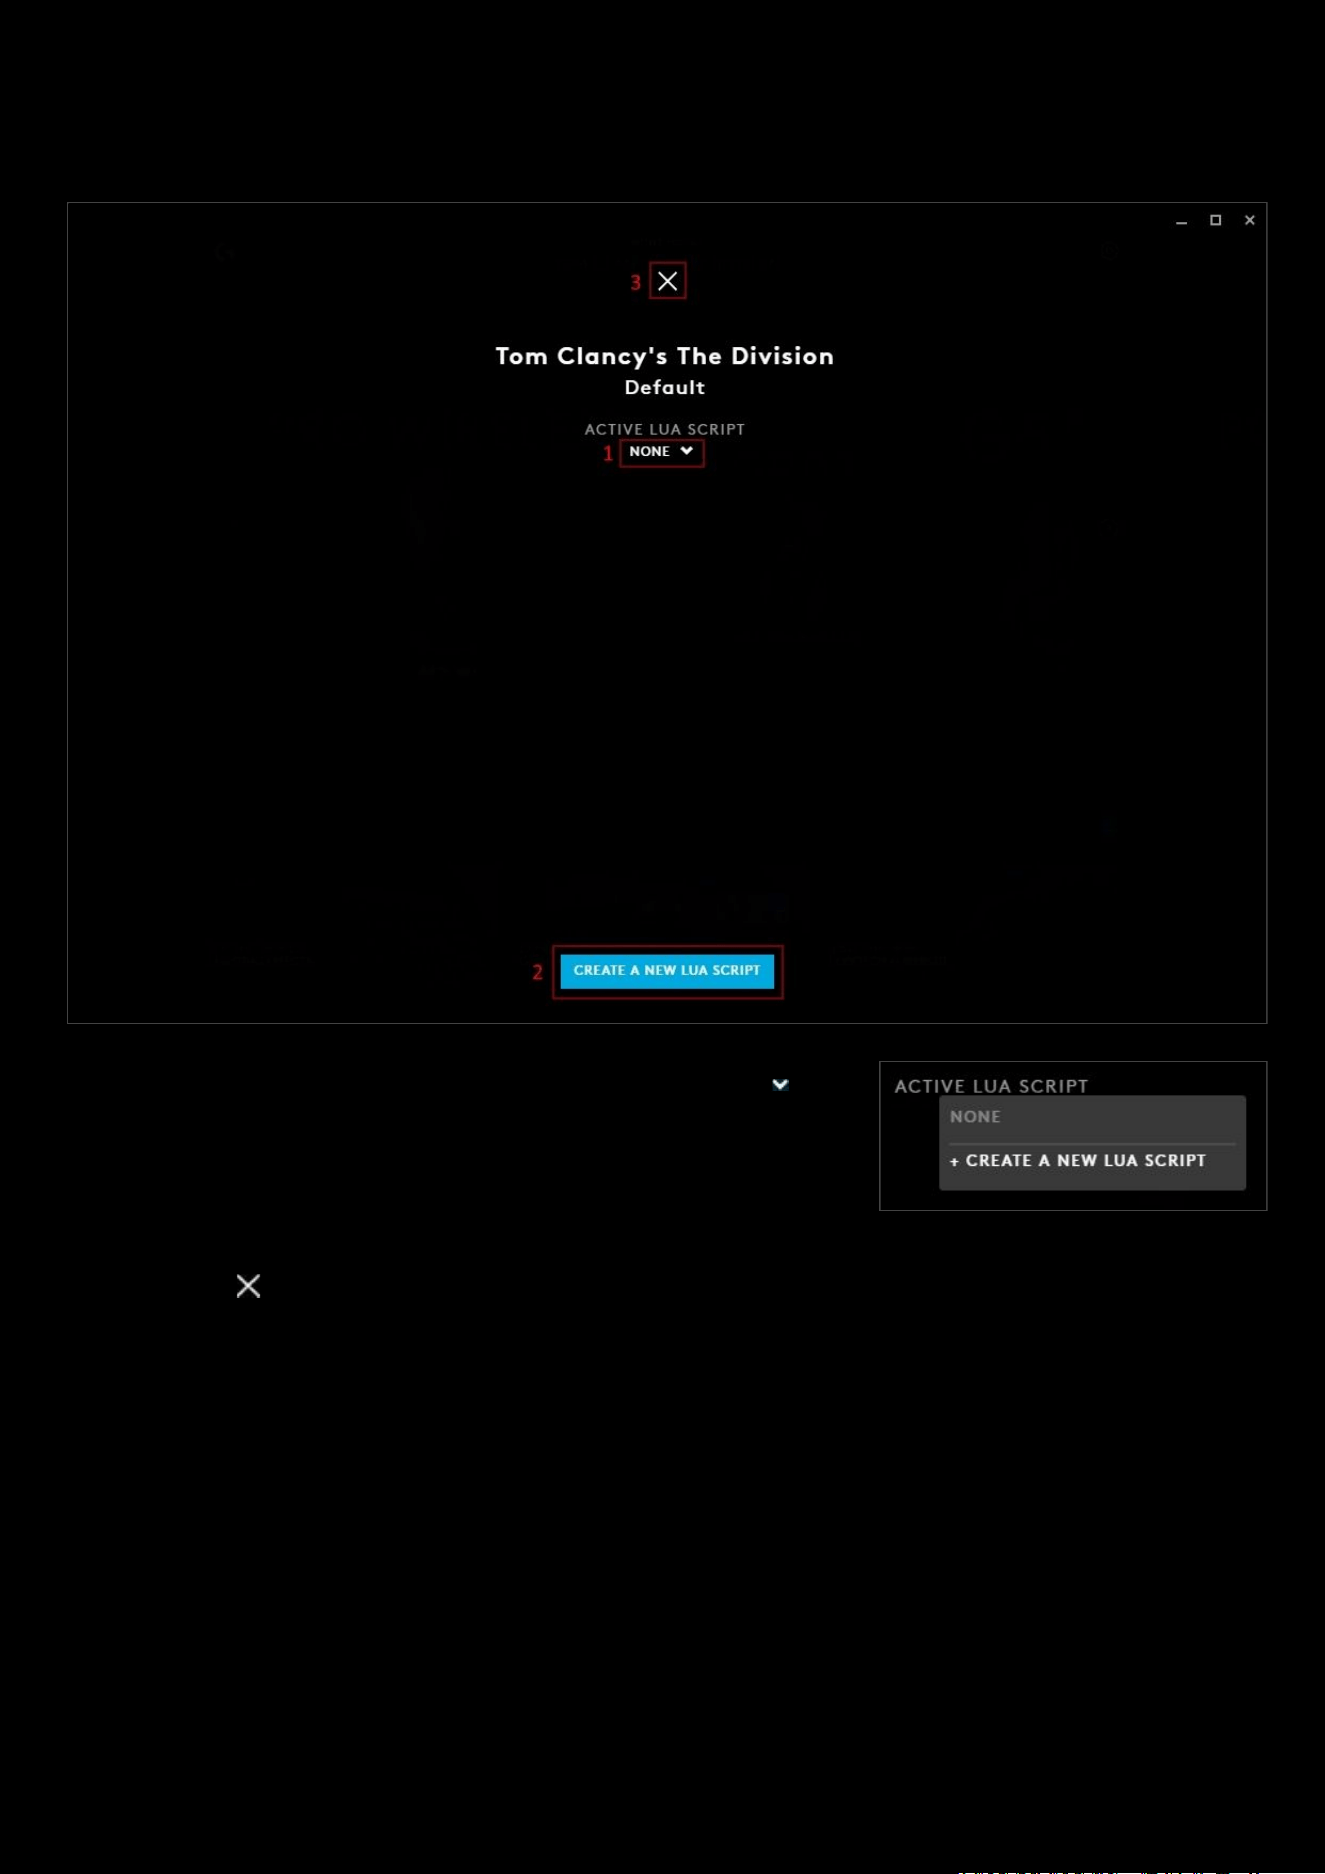
97
Assign a script
1. ACTIVE LUA SCRIPT. Select a script from the drop down menu to run
with your profile. If you do not want a script select NONE. +CREATE A
NEW LUA SCRIPT
will allow you to create new script.
2. CREATE A NEW LUA SCRIPT. Click this box to create a new script.
3. Click the to take you back to the Games & Applications tab.
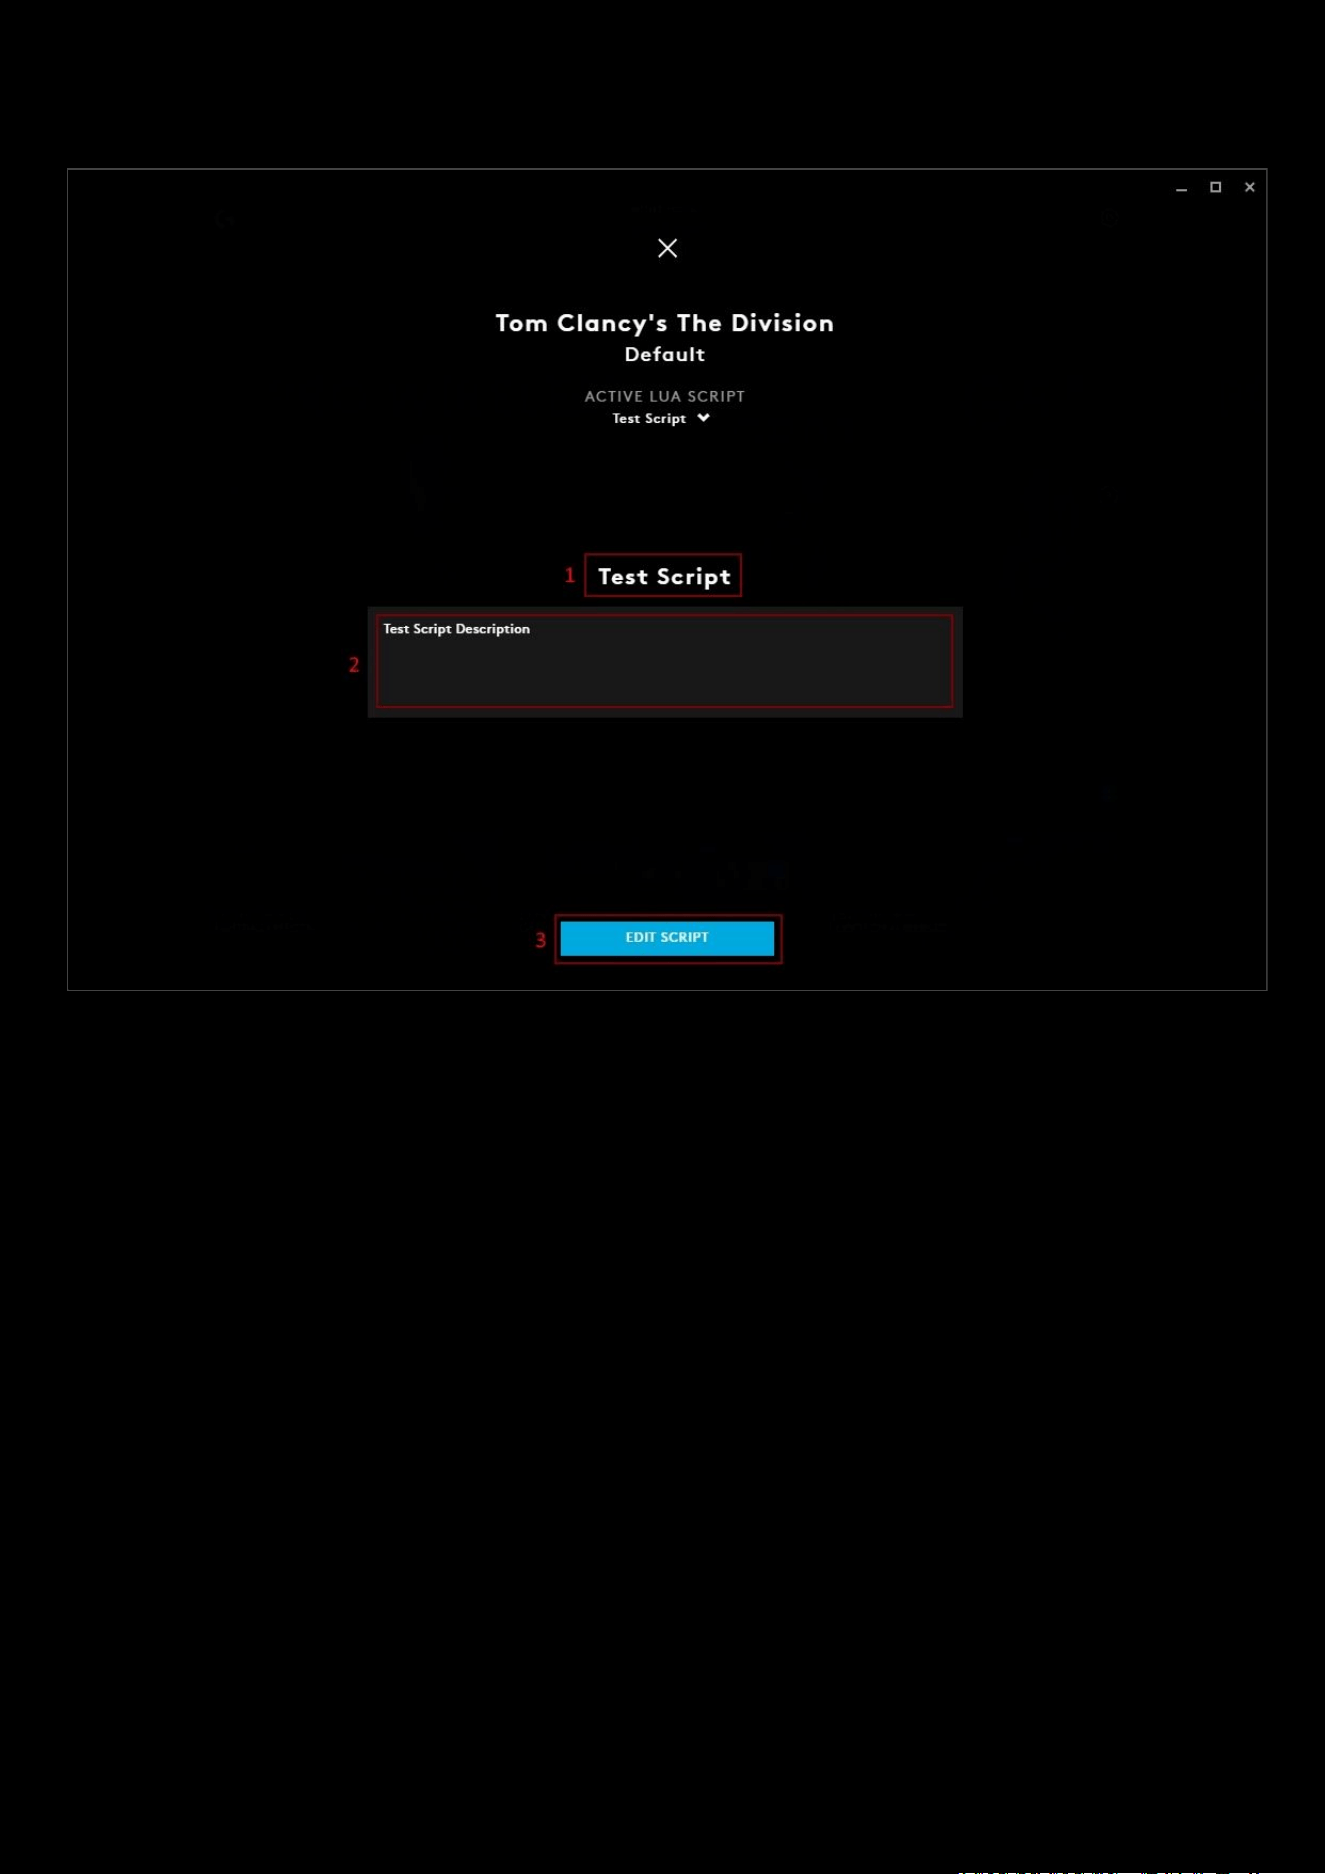
98
Script Manager
1. Script Name. Type a name for your script here.
2. Enter Script Description. Use this text box to add a description for your Script.
3. EDIT SCRIPT. Click this to take you to the script editor.
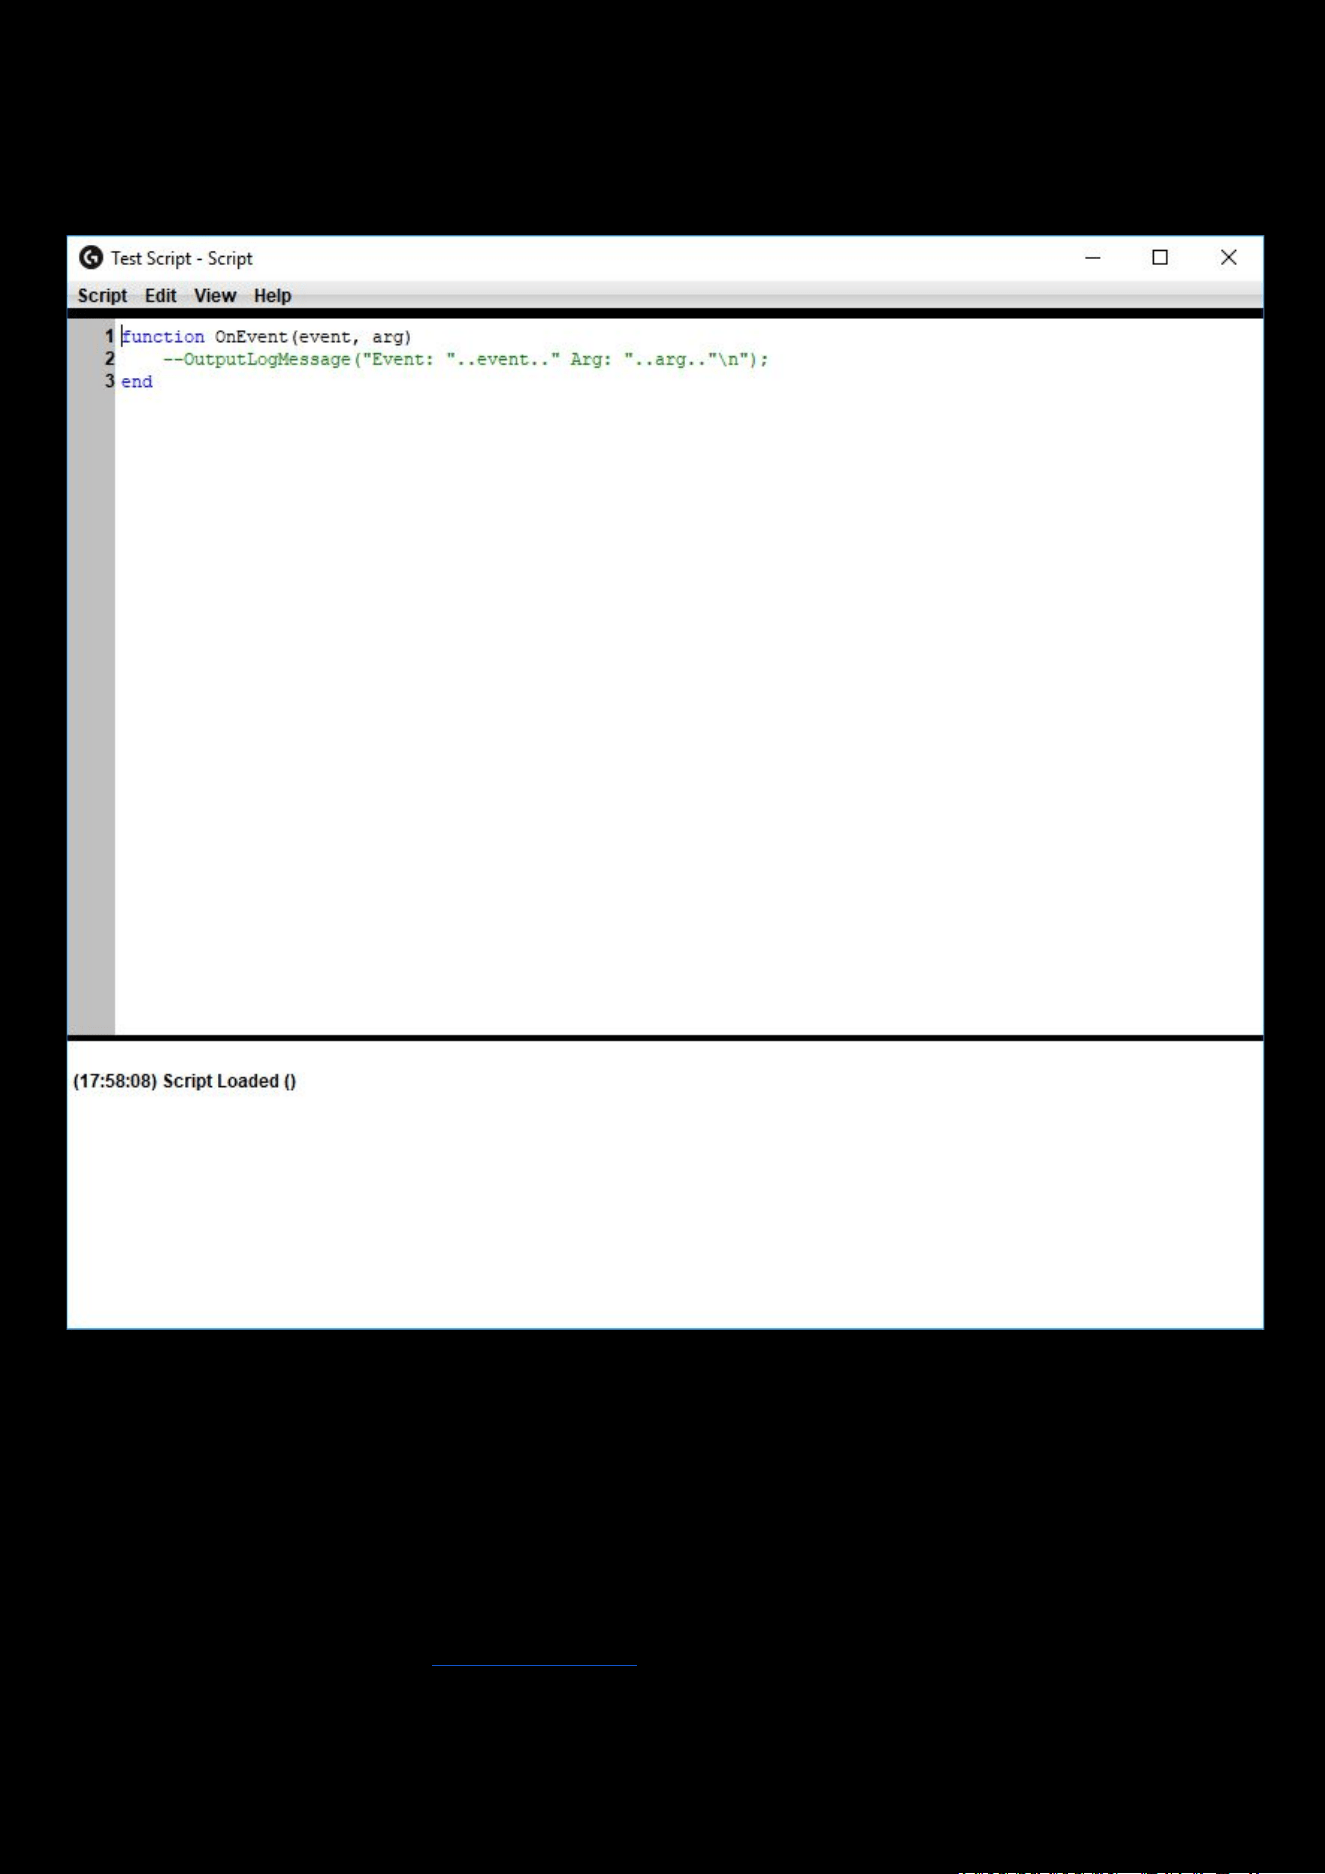
99
Script Editor
When you click EDIT SCRIPT, the Script Editor will open. There are 2 parts: the main scripting area and the Output.
The 3 lines in the script editor will always be there by default.
In the menu bar you will see 4 tabs:
● Script. Save, Import (a Lua file), Export (as a Lua file) and Close
● Edit. Standard editing options: Undo, Redo, Cut, Copy, Paste, Delete, Find Text, Select All and Clear Output
● View. Show/hide Line Numbers, Output and Text Highlighting.
● Help. Click Scripting API to take you to the Overview and Reference Guide for G-series Lua API. Click Lua Online
Reference to take you to the
http://www.lua.org/ page
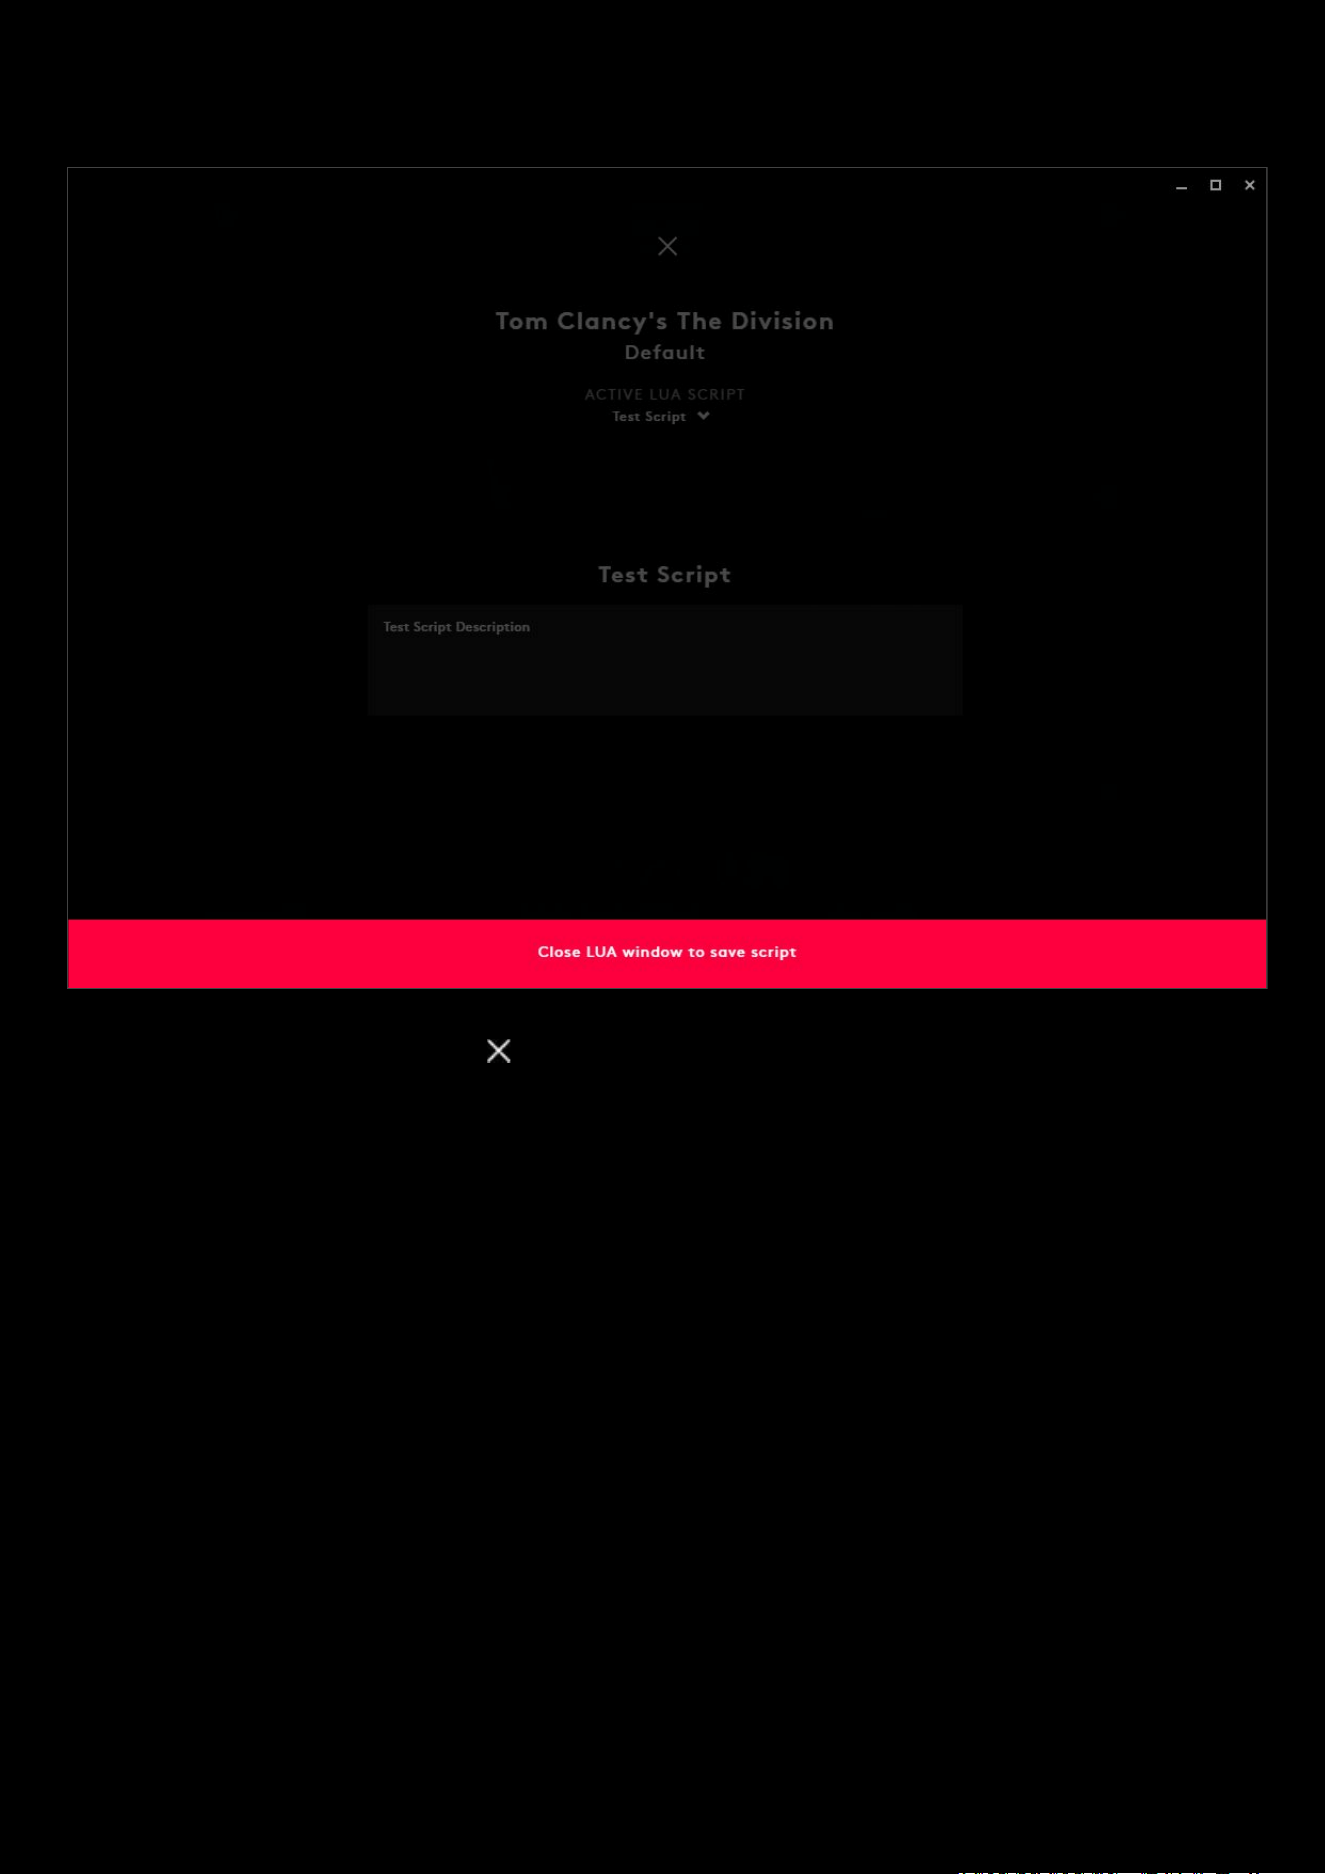
100
You will notice that whilst you have the Script Editor open, that G HUB will have a warning message: Close LUA window
to save script. Once the Script Editor is closed, the warning will disappear.
Once you have saved your script, click the to take you back to the Games & Applications
tab.
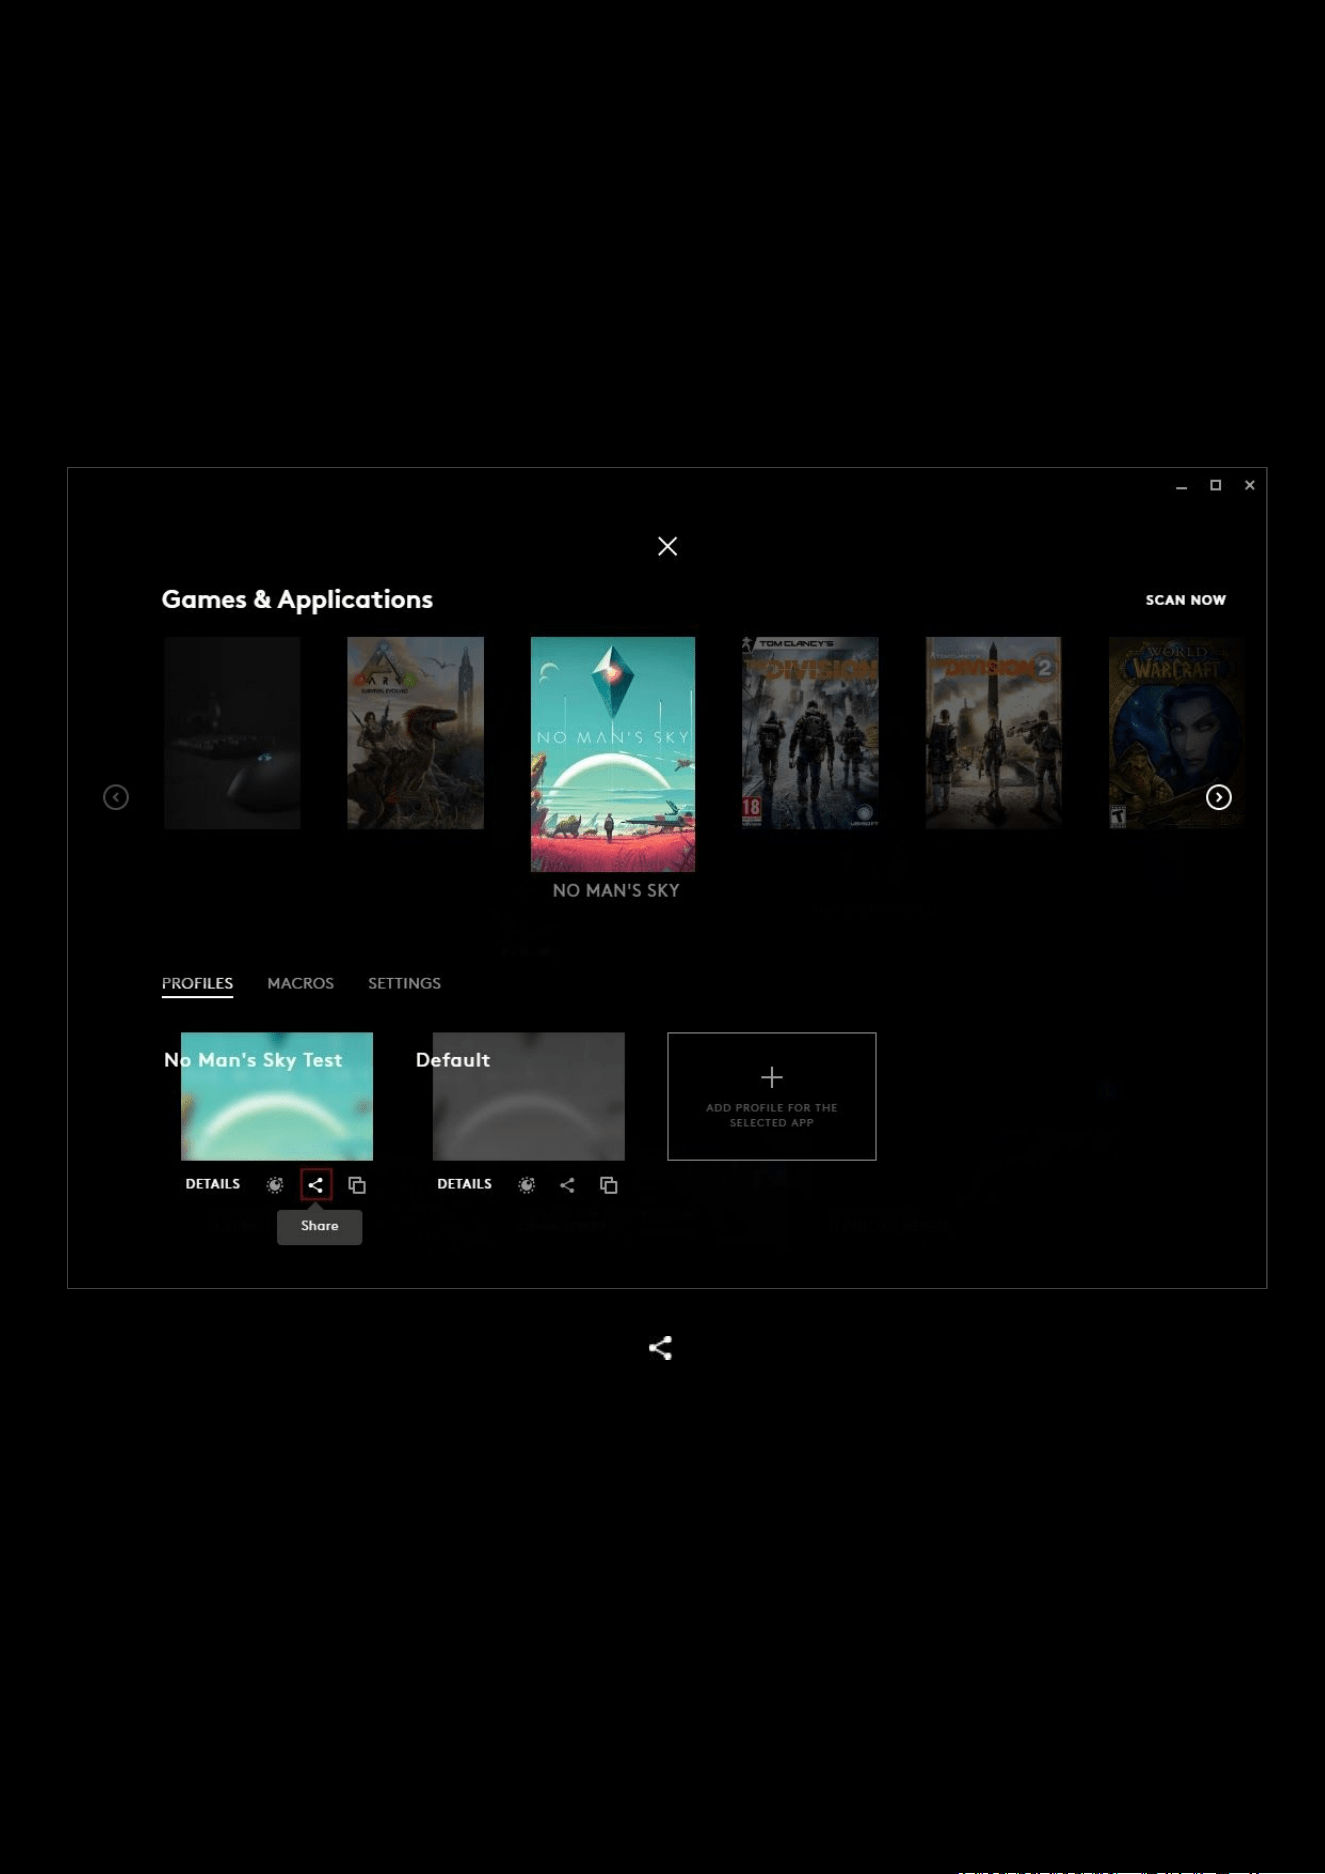
101
6. Sharing Profiles And Presets
If you have a great profile, lighting effect or Blue VO!CE EQ Preset, then you can share this within G HUB. You can
choose to have the upload as private (good for when you want to keep your profiles and presets safe and available
anywhere!) or publicly where anyone can see and download your settings.
Sharing your profile
Your profile consists of assignments and any LIGHTSYNC settings your controllers are using.
One you have a profile you want to upload, click the share icon.
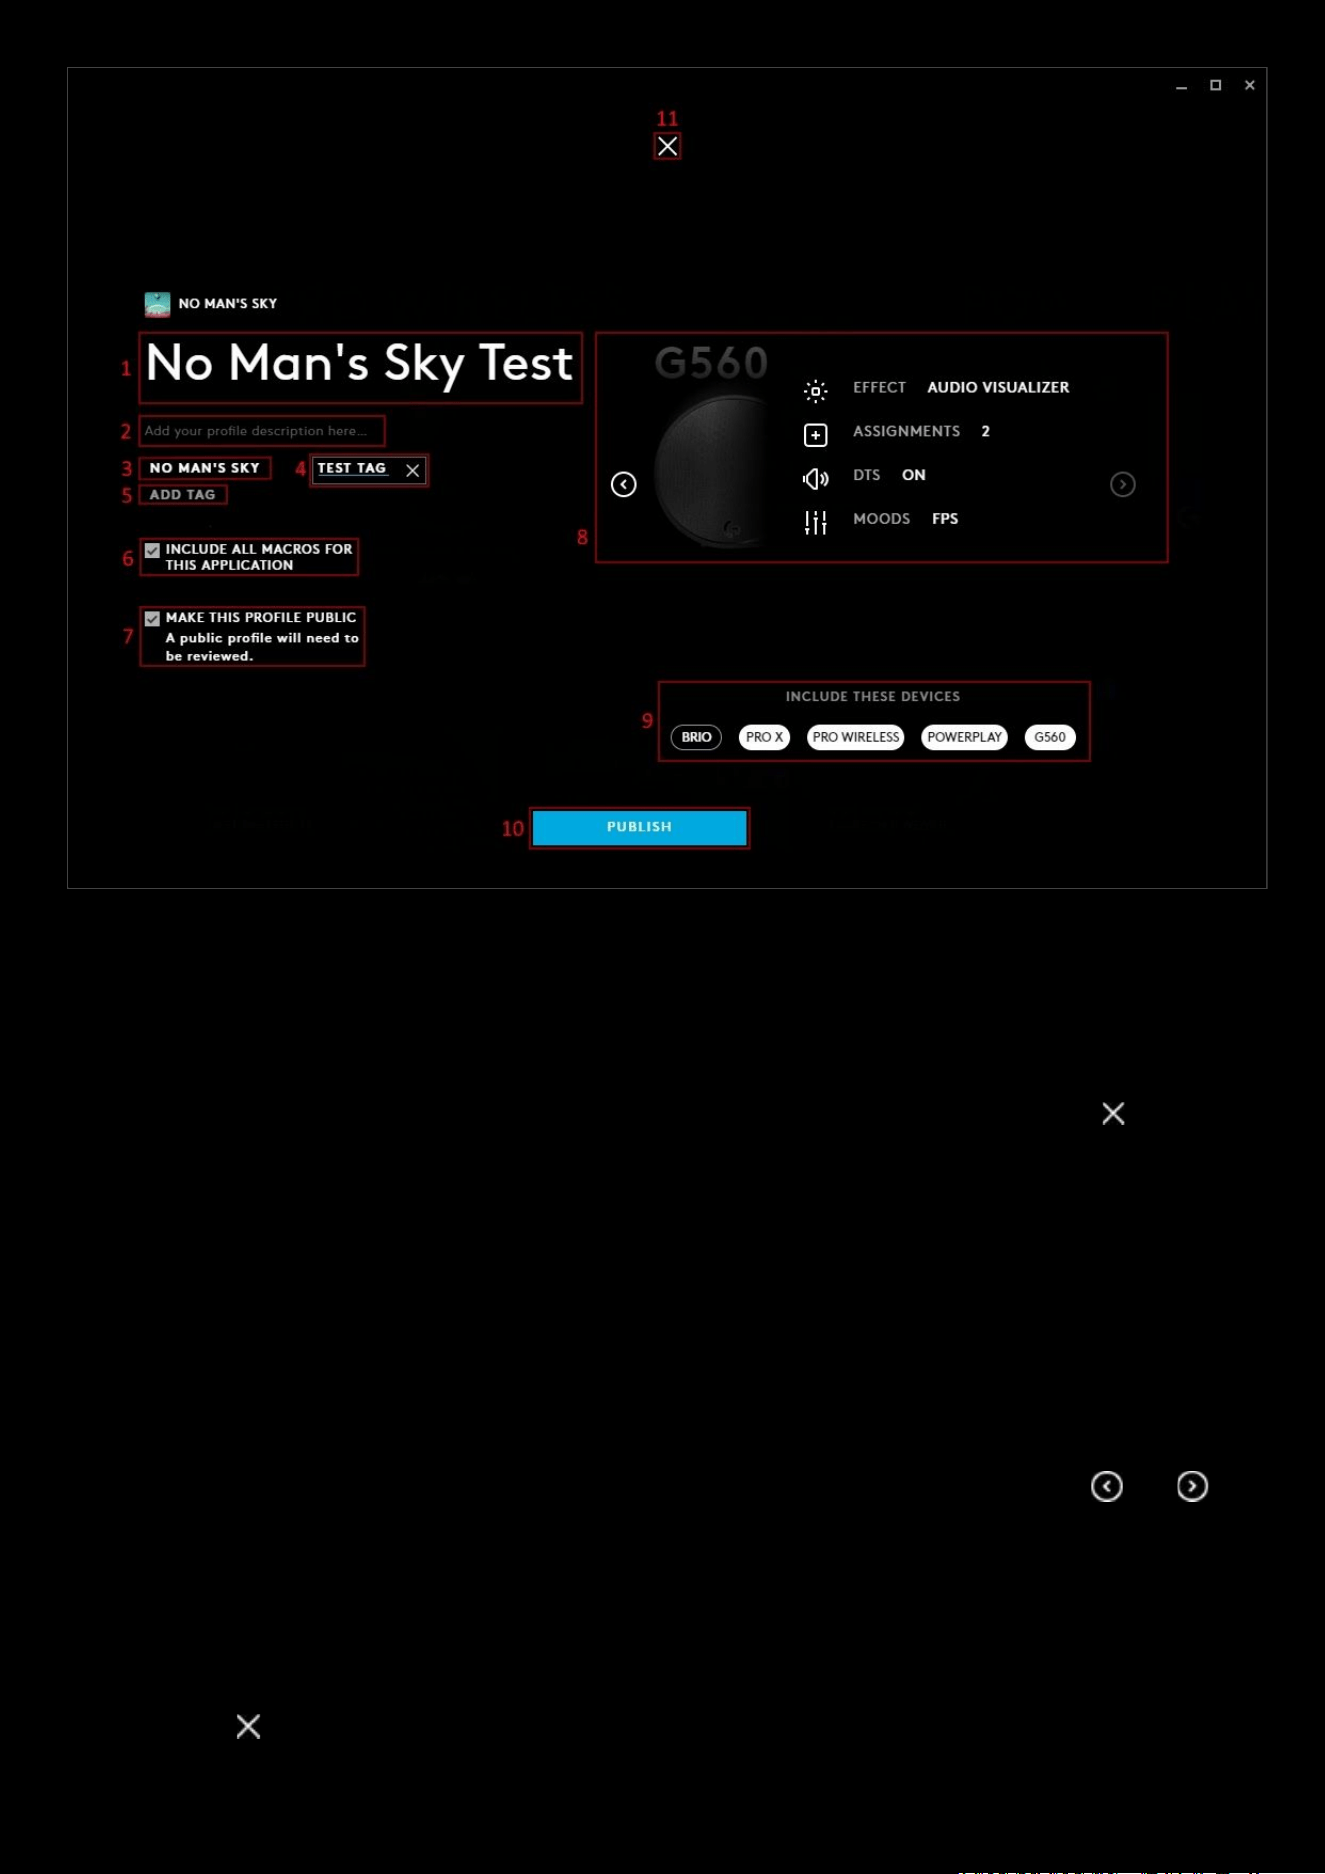
102
1. Profile Name. You can change the profile name here. If it shows DEFAULT, change the name and give it a
personal touch.
2. Click here to add a description of the profile. This is a good place to showcase your profile and any special
features you have included in the assignments and lighting!
3. TAG. Any tags you have created will be shown here. You can have more than one!
4. Editing the tag. This is an example of clicking the ADD TAG button and editing the tag. Click the delete the
new tag.
5. ADD TAG. Click this to add a tag.
6. INCLUDE ALL MACROS FOR THIS APPLICATION. Have this ticked if you want to include all the Macros for the
profile.
Note:
Including all
Macros for this application adds all the macros from other
User Profiles
assigned to the main
Game/Application Profile
.
7. MAKE THIS PROFILE PUBLIC. By default this will be private and only available for you to download. If you check
the public box then the profile will be viewable on the G HUB Profile Download Page
.
8. Mini Carousel. This shows all the devices associated to the profile and their settings. Click the and
arrows to scroll through your devices.
9. INCLUDE THESE DEVICES. The list of devices that are currently assigned with the Profile you are about to
upload. If you don’t want to include a device, click the name icon and it will go from white to black.
10. PUBLISH. Once you are ready, click PUBLISH. Private profiles are automatically approved and available for
download. For public, the profile will be subject to review before being available on the G HUB Profile
Download Page
11. Click the to cancel the share and take you back to the Games & Applications tab.
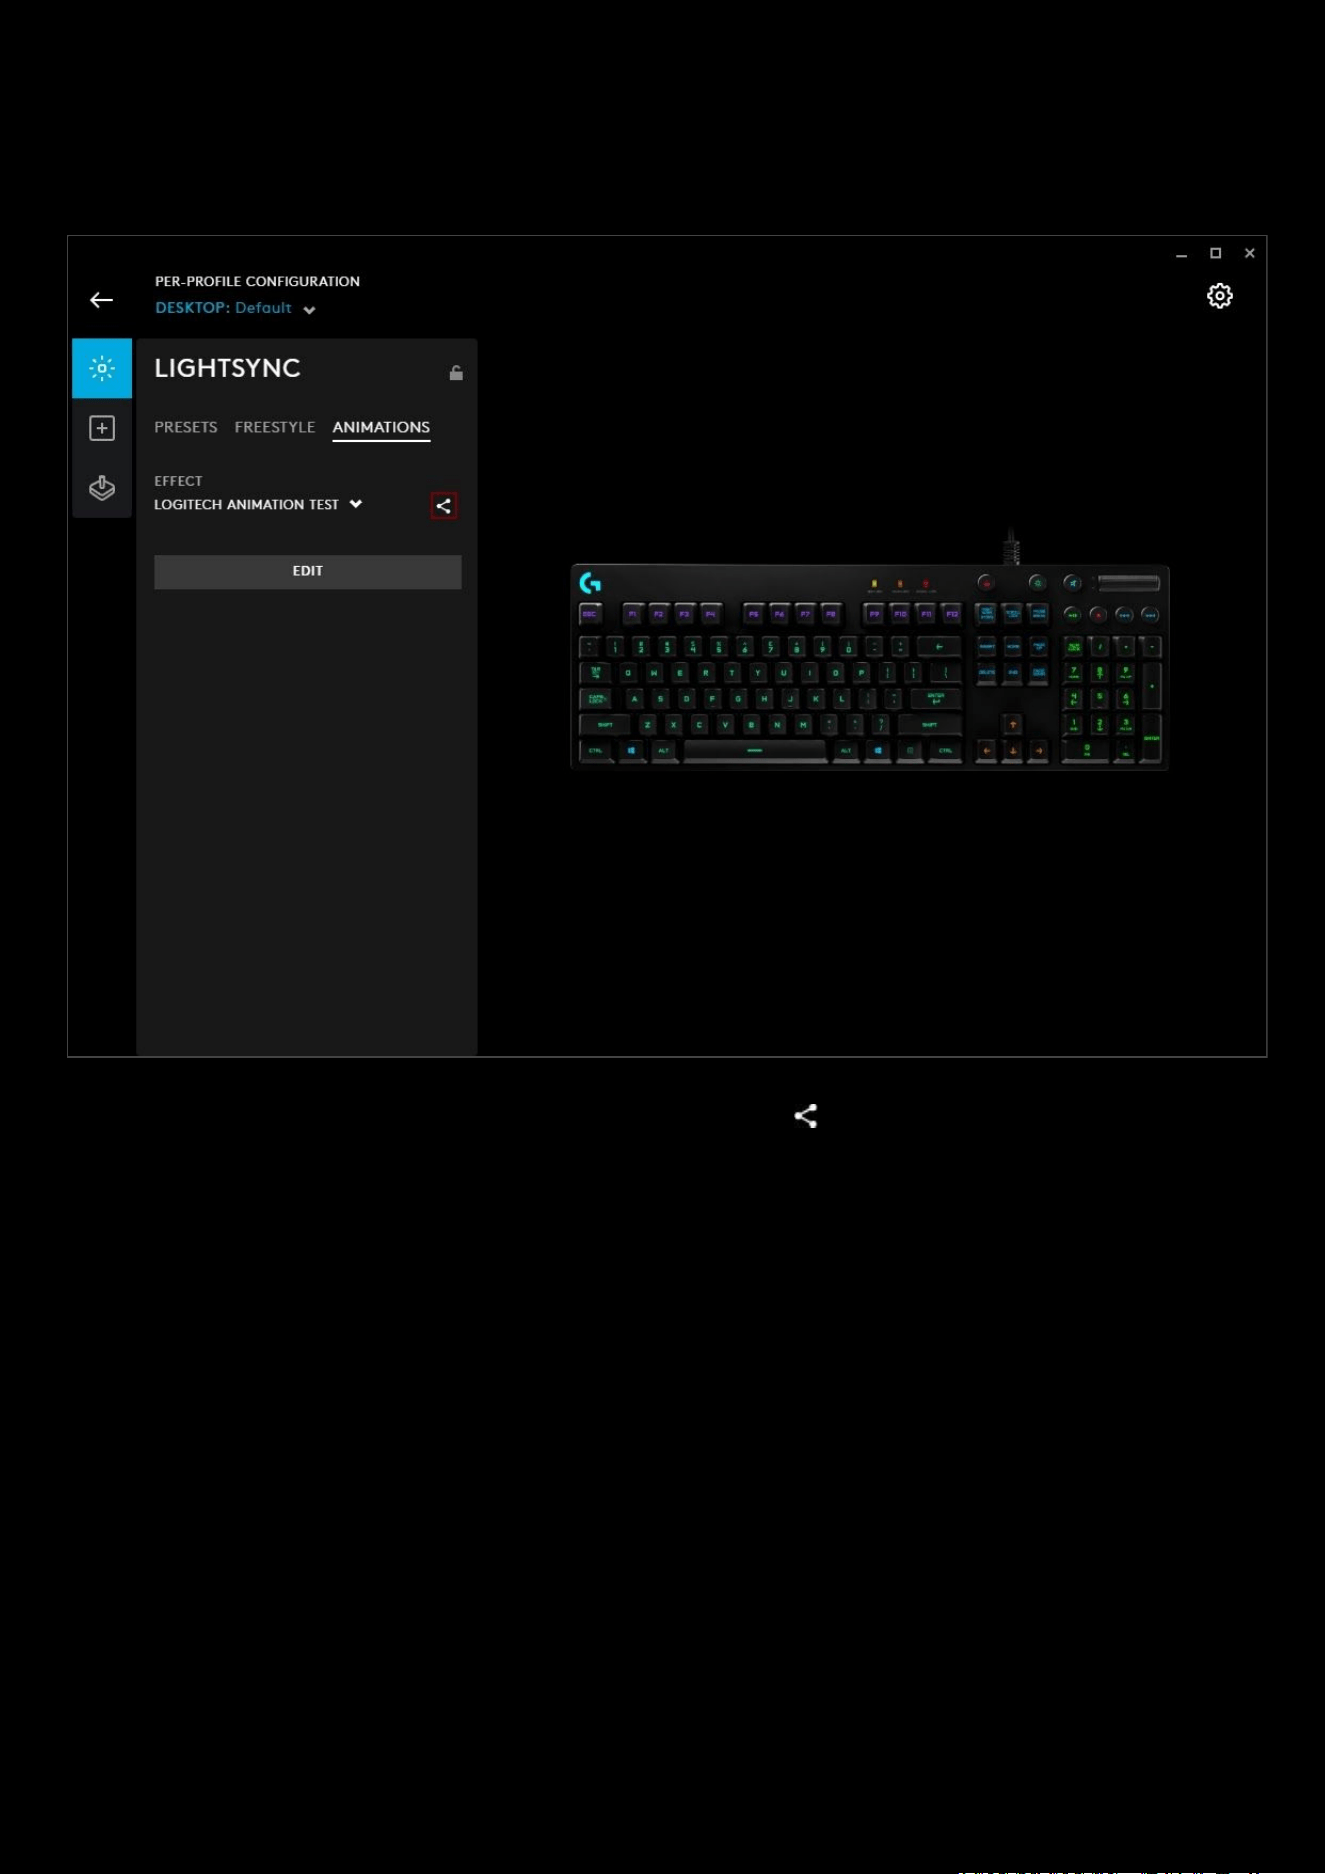
103
Sharing your LIGHTSYNC Animation
You can share any of your created LIGHTSYNC Animations.
Once you have edited your Animation and ready to share, click the share button to the right of your Animation.
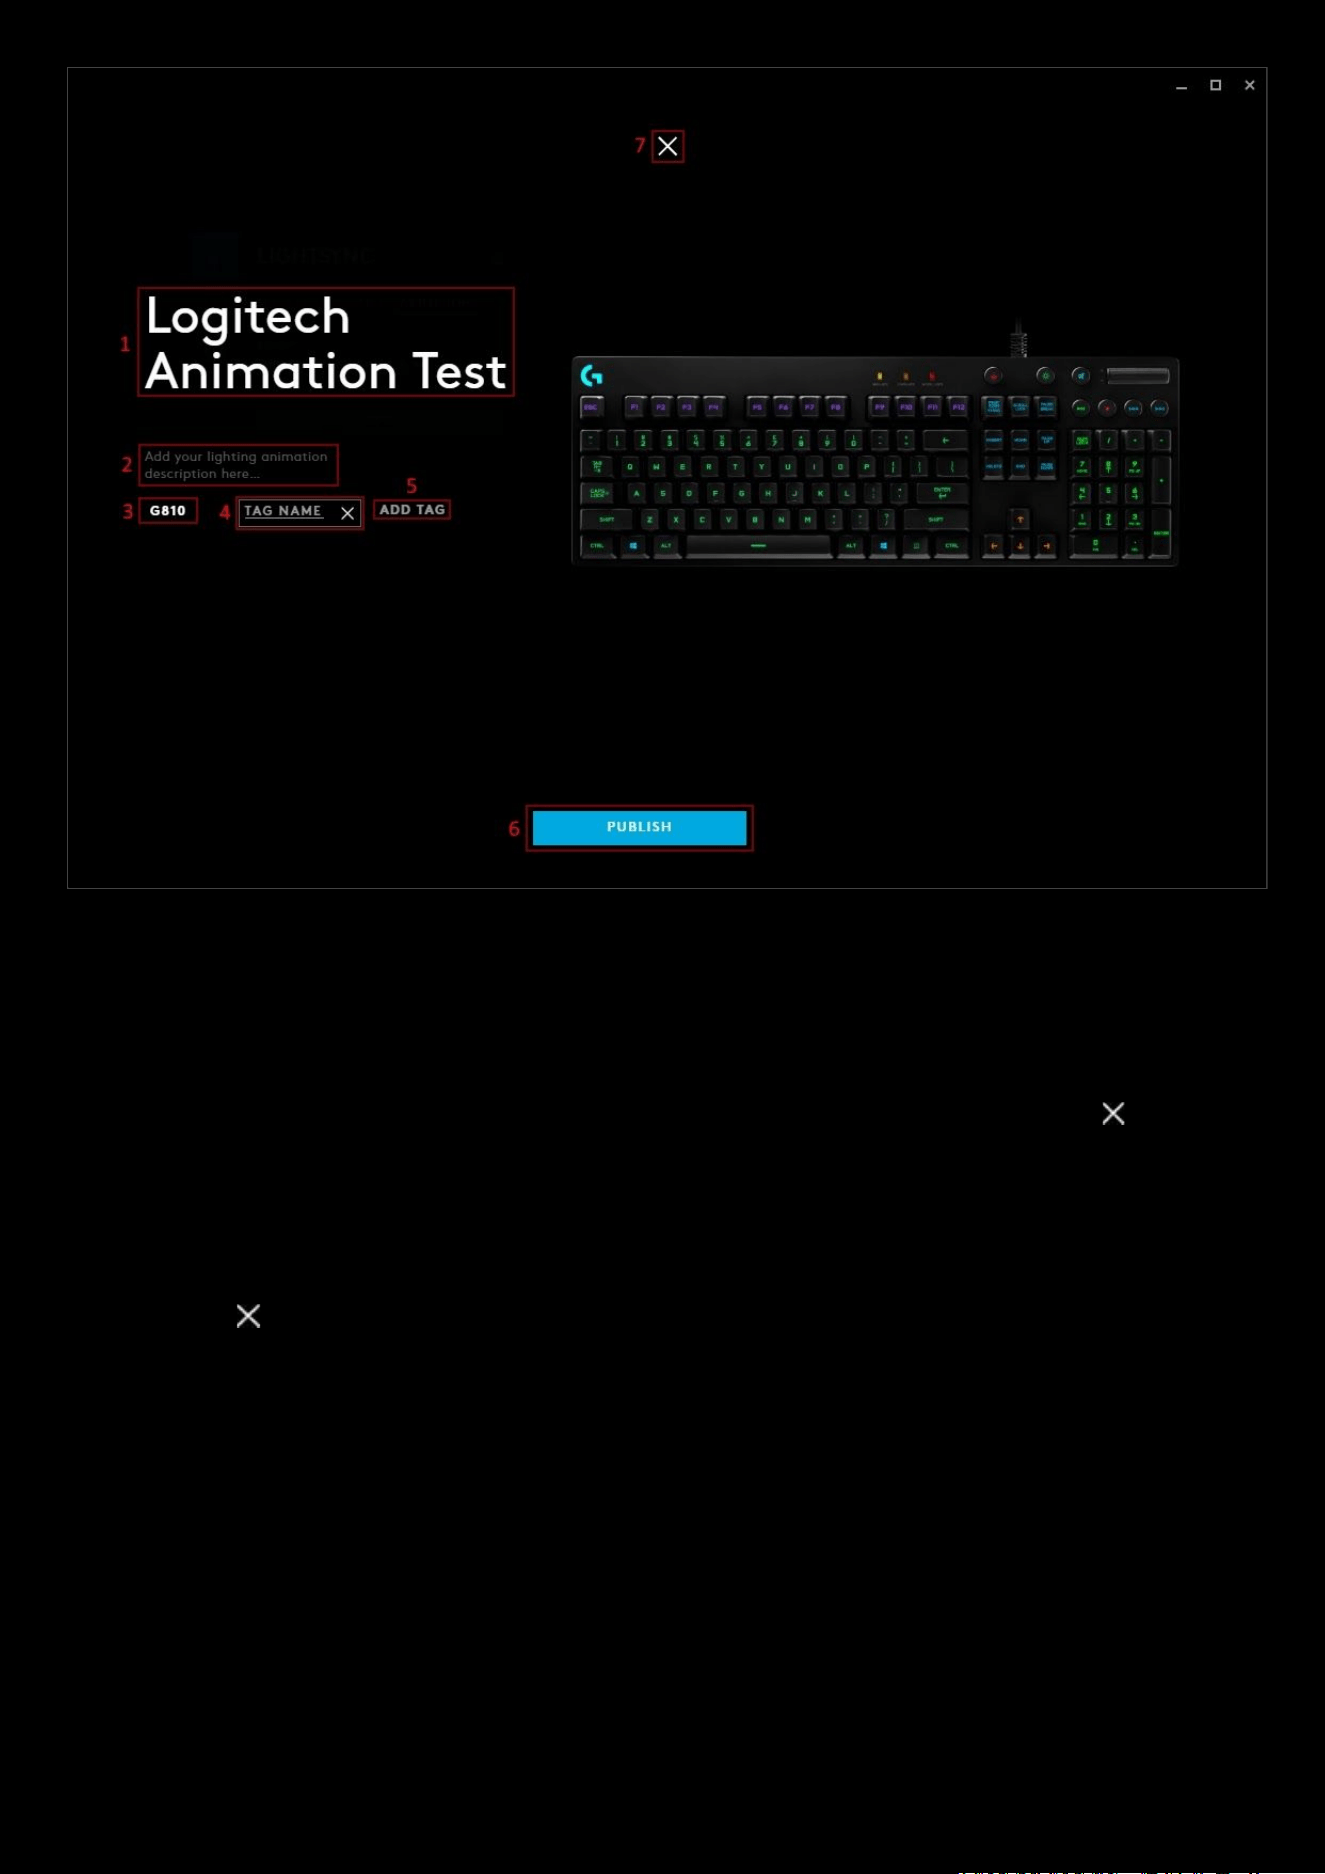
104
1. Profile Name. You can change the profile name here. If it shows DEFAULT, change the name and give it a
personal touch.
2. Click here to add a description of the profile. This is a good place to showcase your profile and any special
features you have included in the assignments and lighting!
3. TAG. Any tags you have created will be shown here. You can have more than one!
4. Editing the tag. This is an example of clicking the ADD TAG button and editing the tag. Click the delete the
new tag.
5. ADD TAG. Click this to add a tag.
6. PUBLISH. Once you are ready, click PUBLISH. Private Lighting Effects are automatically approved and available
for download. For public, the profile will be subject to review before being available on the G HUB Lighting
Effects Download Page
7. Click the to cancel the share and take you back to the LIGHTSYNC tab.
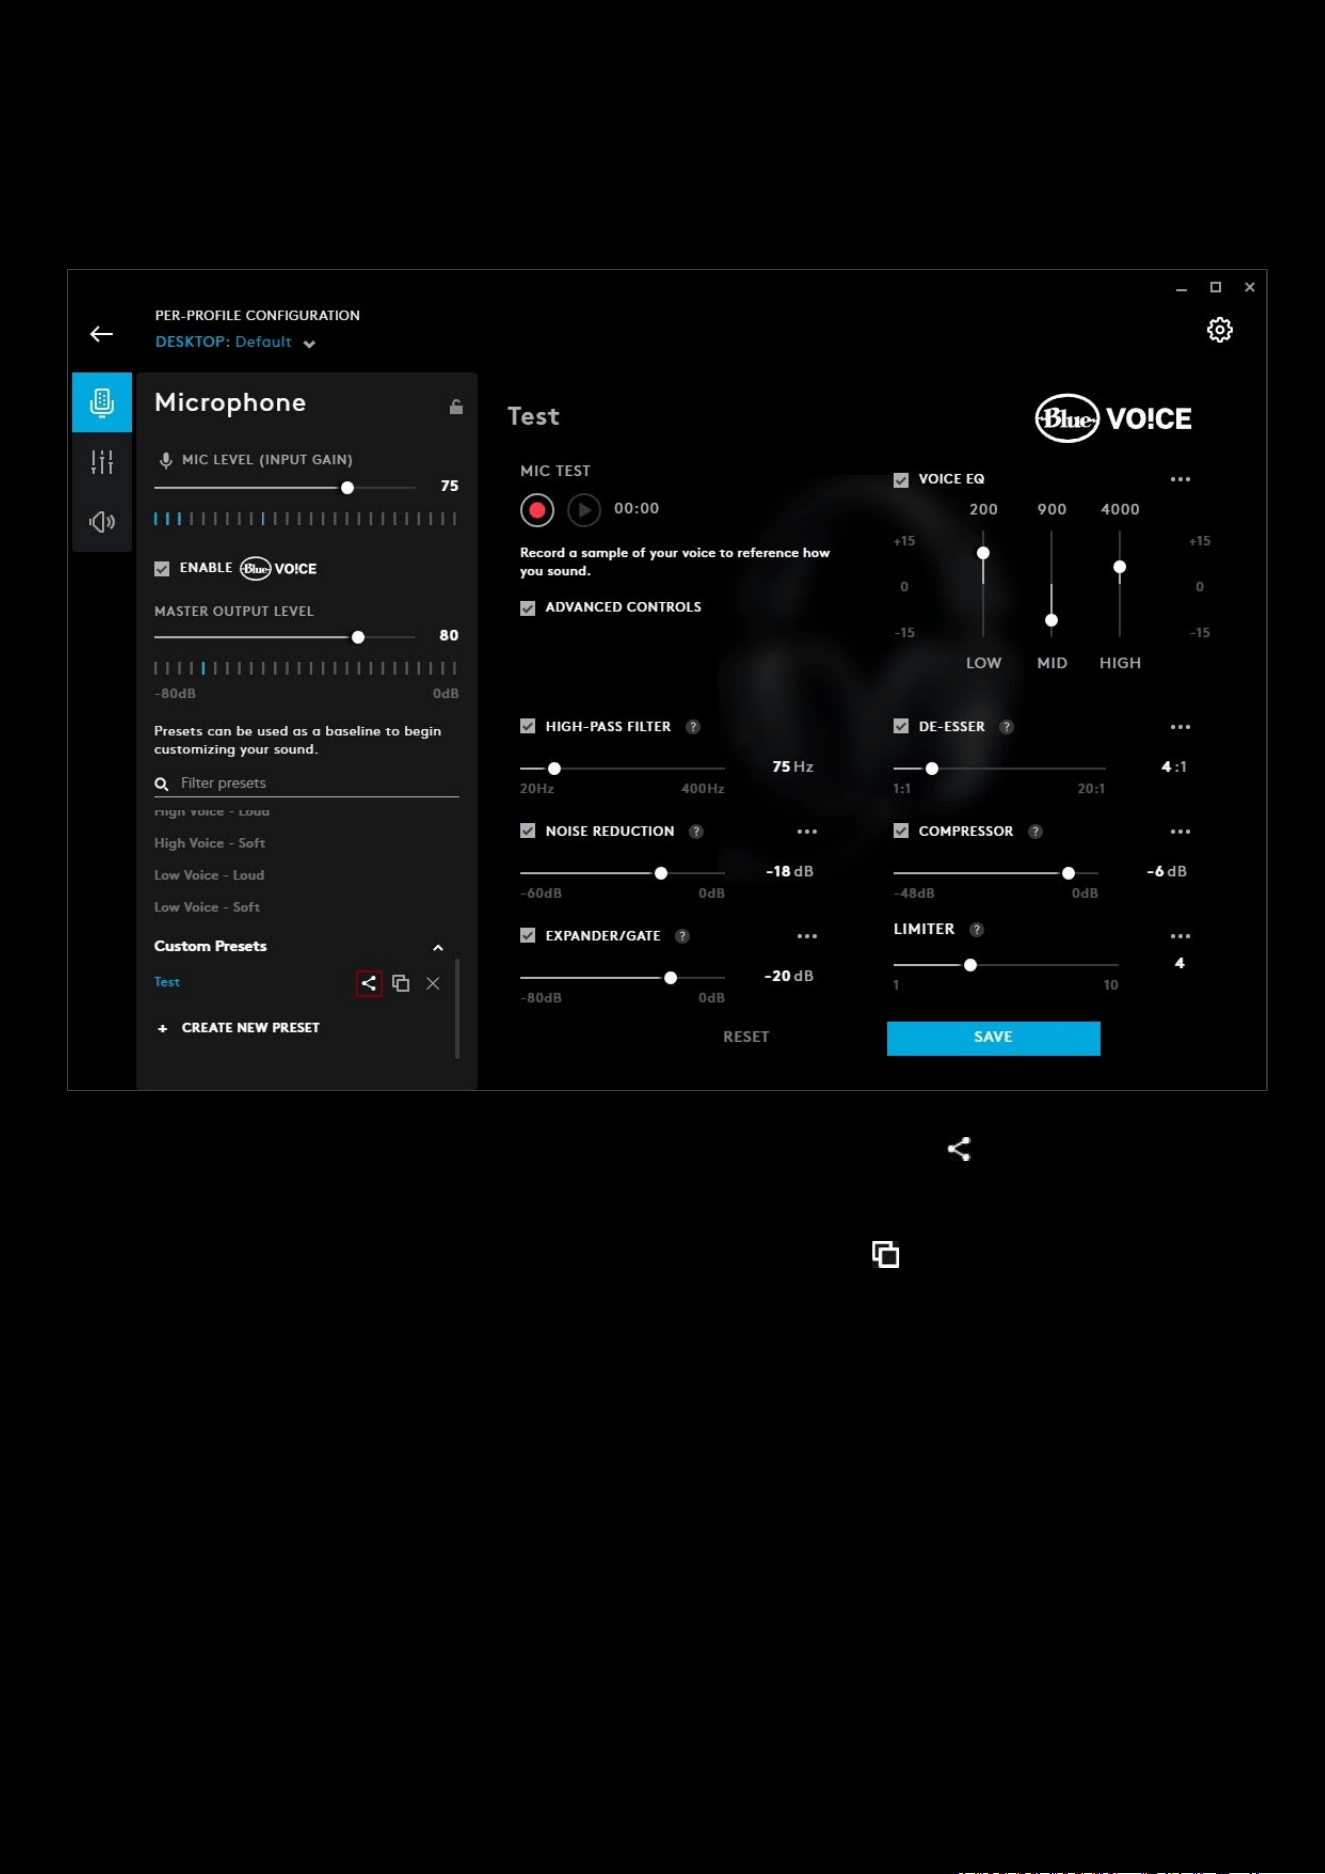
105
Sharing your Blue VO!CE Preset
Your Blue VO!CE Custom Presets can be shared online for other users to apply. Or for you to share your own copy
online.
When you have your Blue VO!CE Preset configured and ready for sharing, click the share button to the right of your
custom preset.
Note:
If you want to base your preset on a preloaded one, you can first duplicate that preset, it will appear in the
Custom Presets section, modify it, then share.

106
1. Profile Name. You can change the profile name here.
2. Click here to add a description of the profile. This is a good place to showcase your profile and any special
features you have included in the preset
3. TAG. Any tags you have created will be shown here. You can have more than one!
4. Editing the tag. This is an example of clicking the ADD TAG button and editing the tag. Click the delete the
new tag.
5. ADD TAG. Click this to add a tag.
6. CANCEL. Click this to cancel the publish
7. MAKE THIS PRESET PUBLIC. By default this will be private and only available for you to download. If you check
the public box then the preset will be viewable on the G HUB Preset Download Page
8. PUBLISH. Once you are ready, click PUBLISH. Private presets are automatically approved and available for
download. For public, the preset will be subject to review before being available on the G HUB Presets
Download Page
9. Click the to cancel the share and take you back to the Microphone tab.
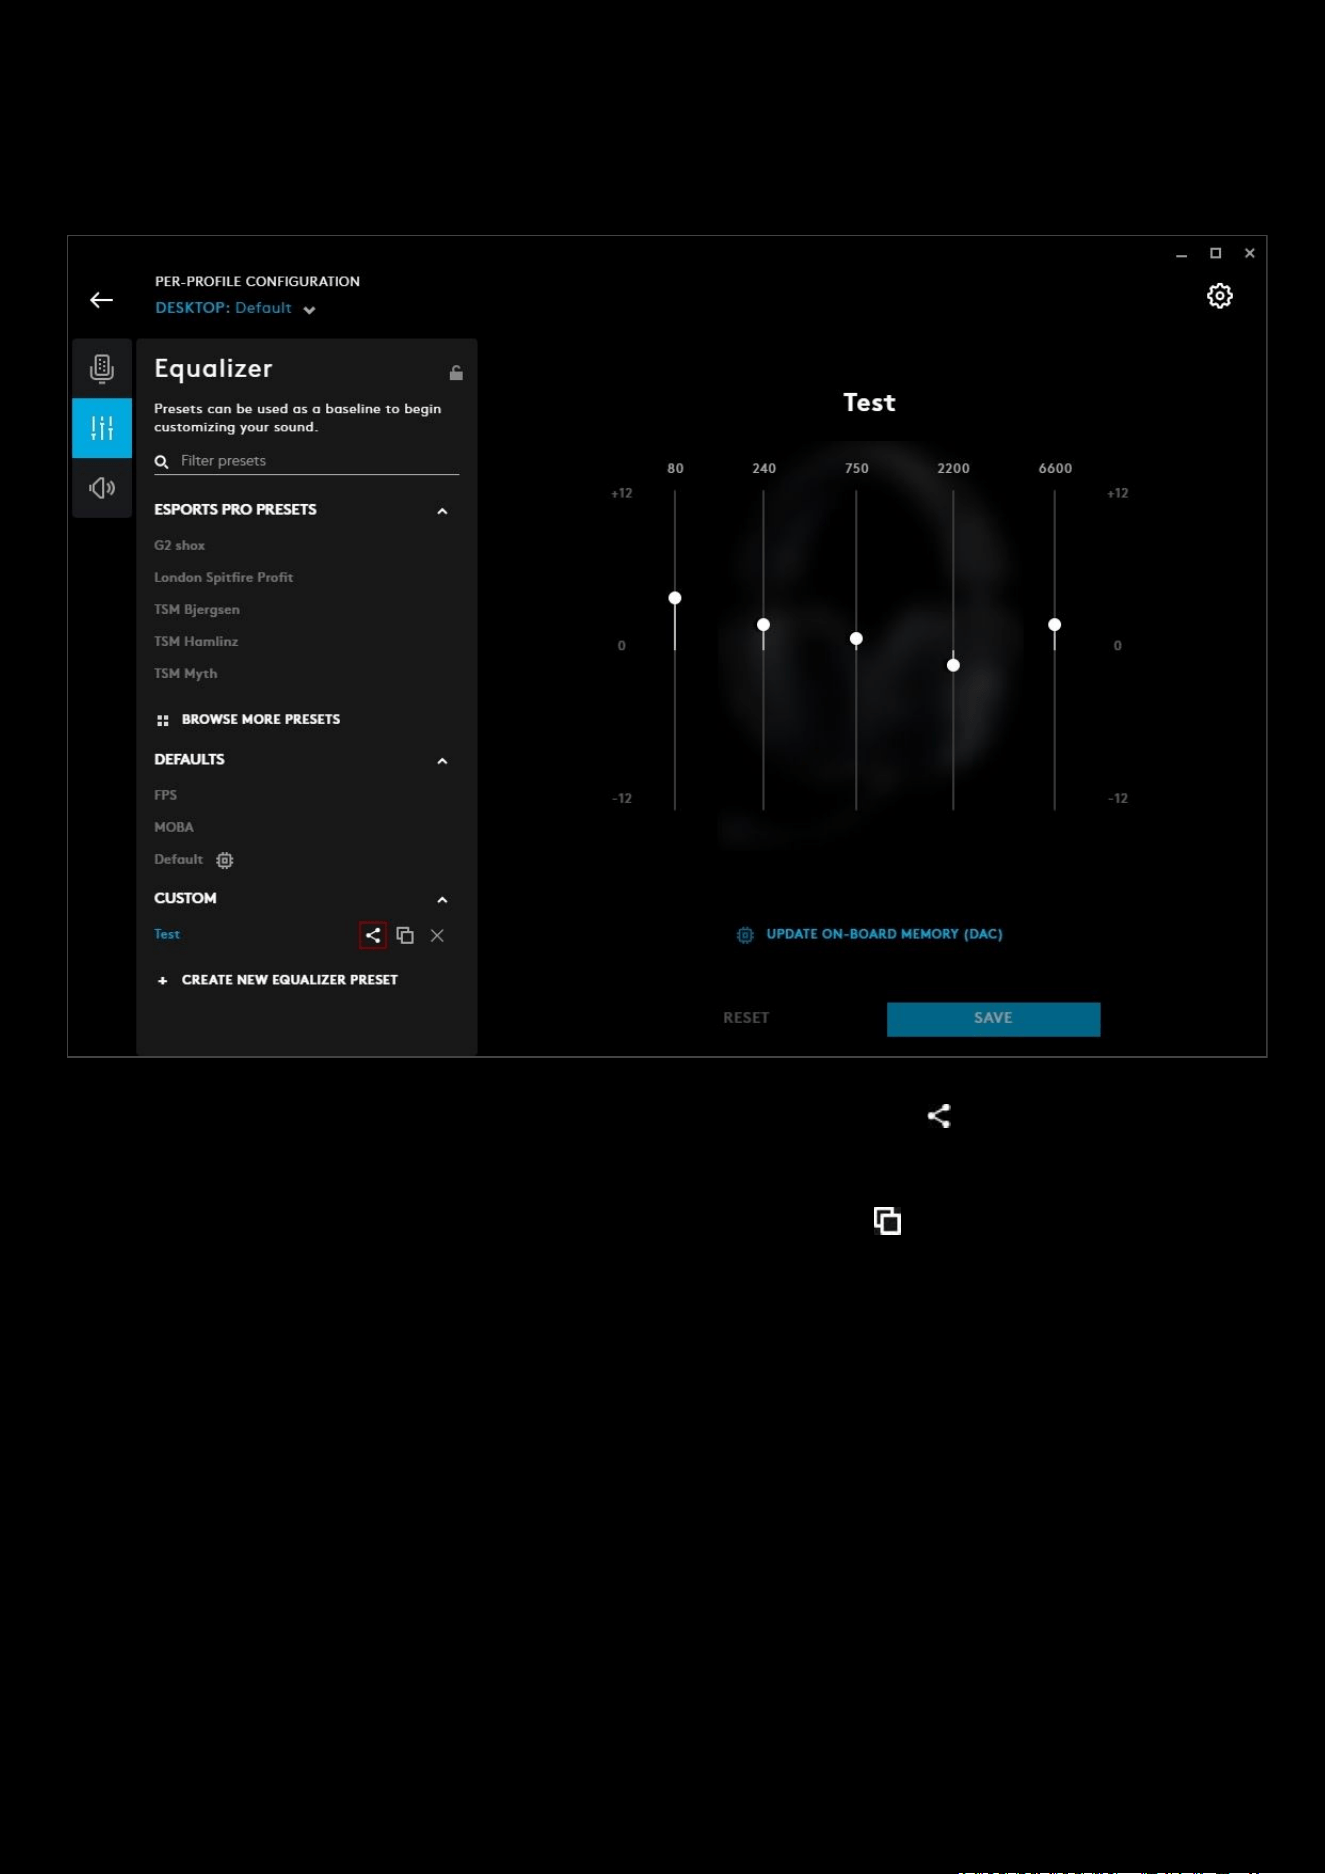
107
Sharing your Equalizer Preset
Share your EQ Preset with the community or for your own use!
When you have your Equalizer Preset configured and ready for sharing, click the share button to the right of your
custom preset.
Note:
If you want to base your preset on a preloaded one, you can first duplicate that preset, it will appear in the
CUSTOM section, modify it, then share.
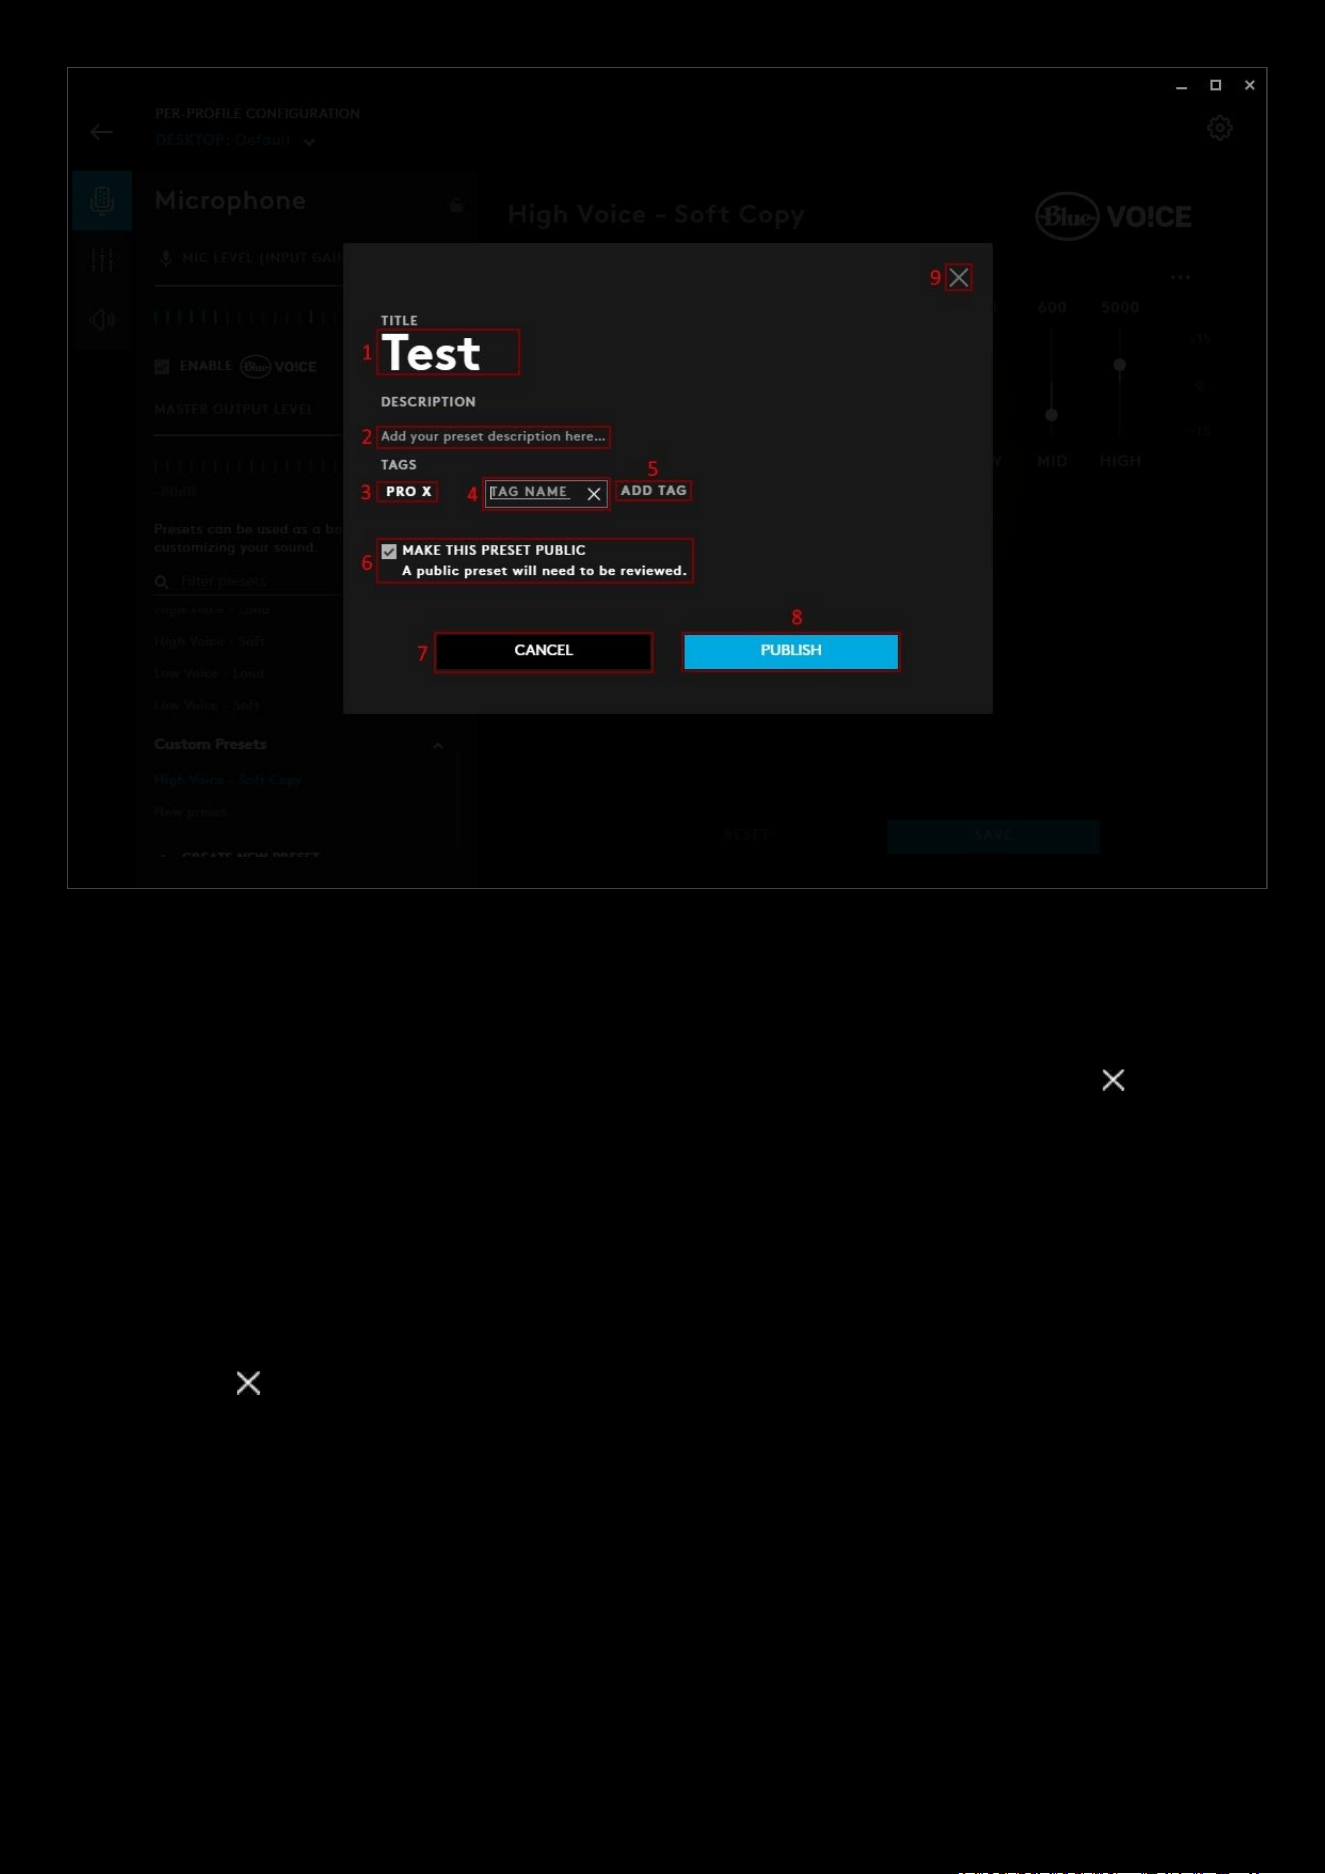
108
1. Profile Name. You can change the profile name here.
2. Click here to add a description of the profile. This is a good place to showcase your profile and any special
features you have included in the preset
3. TAG. Any tags you have created will be shown here. You can have more than one!
4. Editing the tag. This is an example of clicking the ADD TAG button and editing the tag. Click the delete the
new tag.
5. ADD TAG. Click this to add a tag.
6. CANCEL. Click this to cancel the publish
7. MAKE THIS PRESET PUBLIC. By default this will be private and only available for you to download. If you check
the public box then the preset will be viewable on the G HUB Preset Download Page
8. PUBLISH. Once you are ready, click PUBLISH. Private presets are automatically approved and available for
download. For public, the preset will be subject to review before being available on the G HUB Presets
Download Page
9. Click the to cancel the share and take you back to the Equalizer tab.
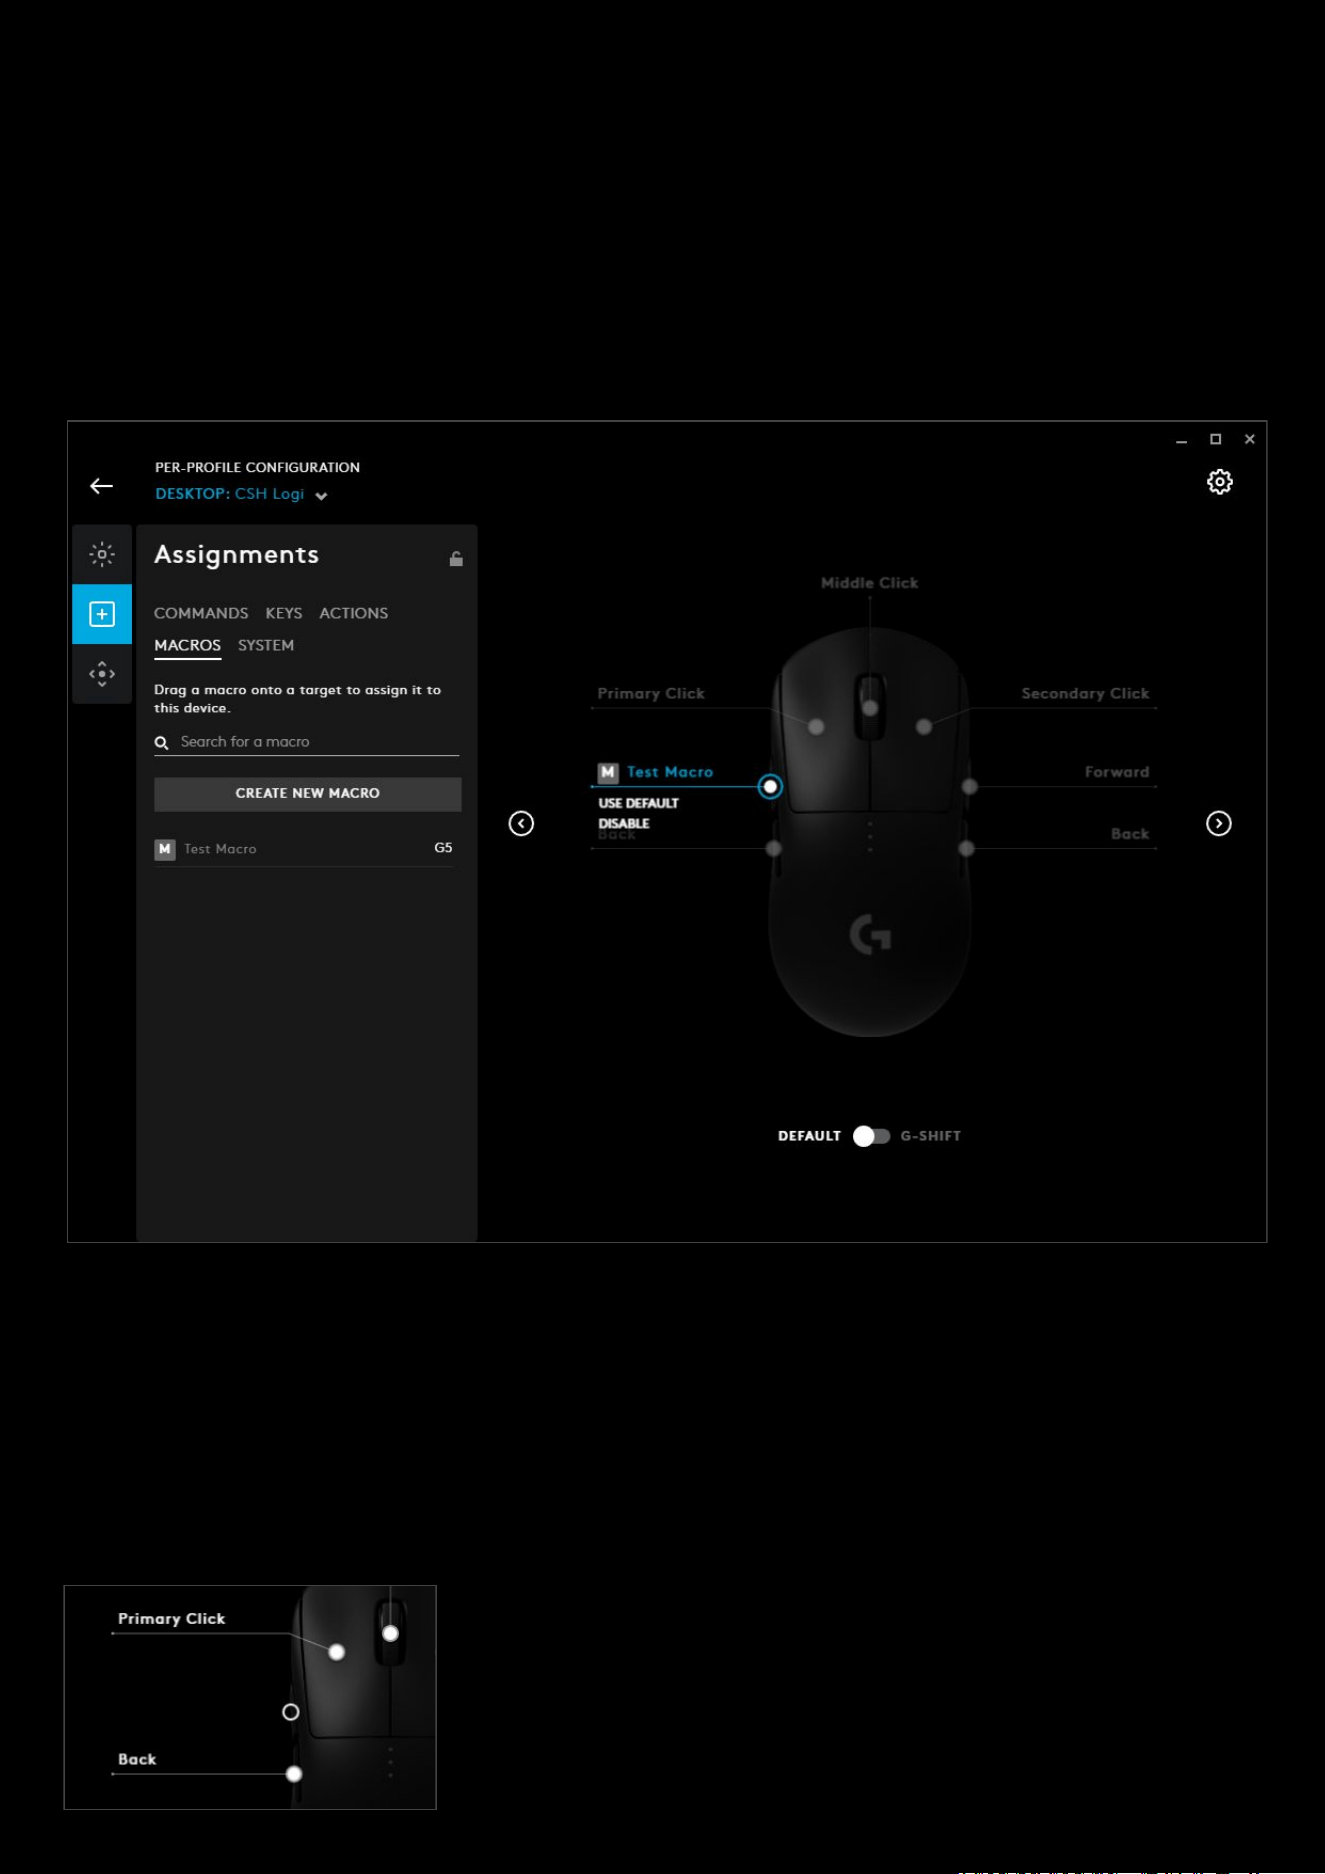
109
7. Tips and Frequently Asked Questions
How to reset commands or disable buttons
In the assignments section, we covered how to assign a command to a button. But if you want to remove that
assignment or even disable a button then this guide will show you how:
To remove the binding, click on the button or the command name on the line. You will see two options:
A. USE DEFAULT. Selecting this will reset the button/key back to factory default, with no programming. If it is one
of the five buttons on a mouse (LMB/RMB/MMD/Forwards/Back) then it will behave as normal. Otherwise it
will be a non programmed G Key as default.
B. DISABLE. Selecting this will disable the button/key completely. This means it will not output anything, even if
it's one of the five buttons on a mouse (LMB/RMB/MMD/Forwards/Back). This can be useful where you don't
want to knock that button by accident.
As you can see, when disabled, the button/key will have a clear circle and no
entry. To re-enable the button/key, click on the circle and you will have 1
option:
A. USE DEFAULT

110
Selecting this will reset the button/key back to factory default
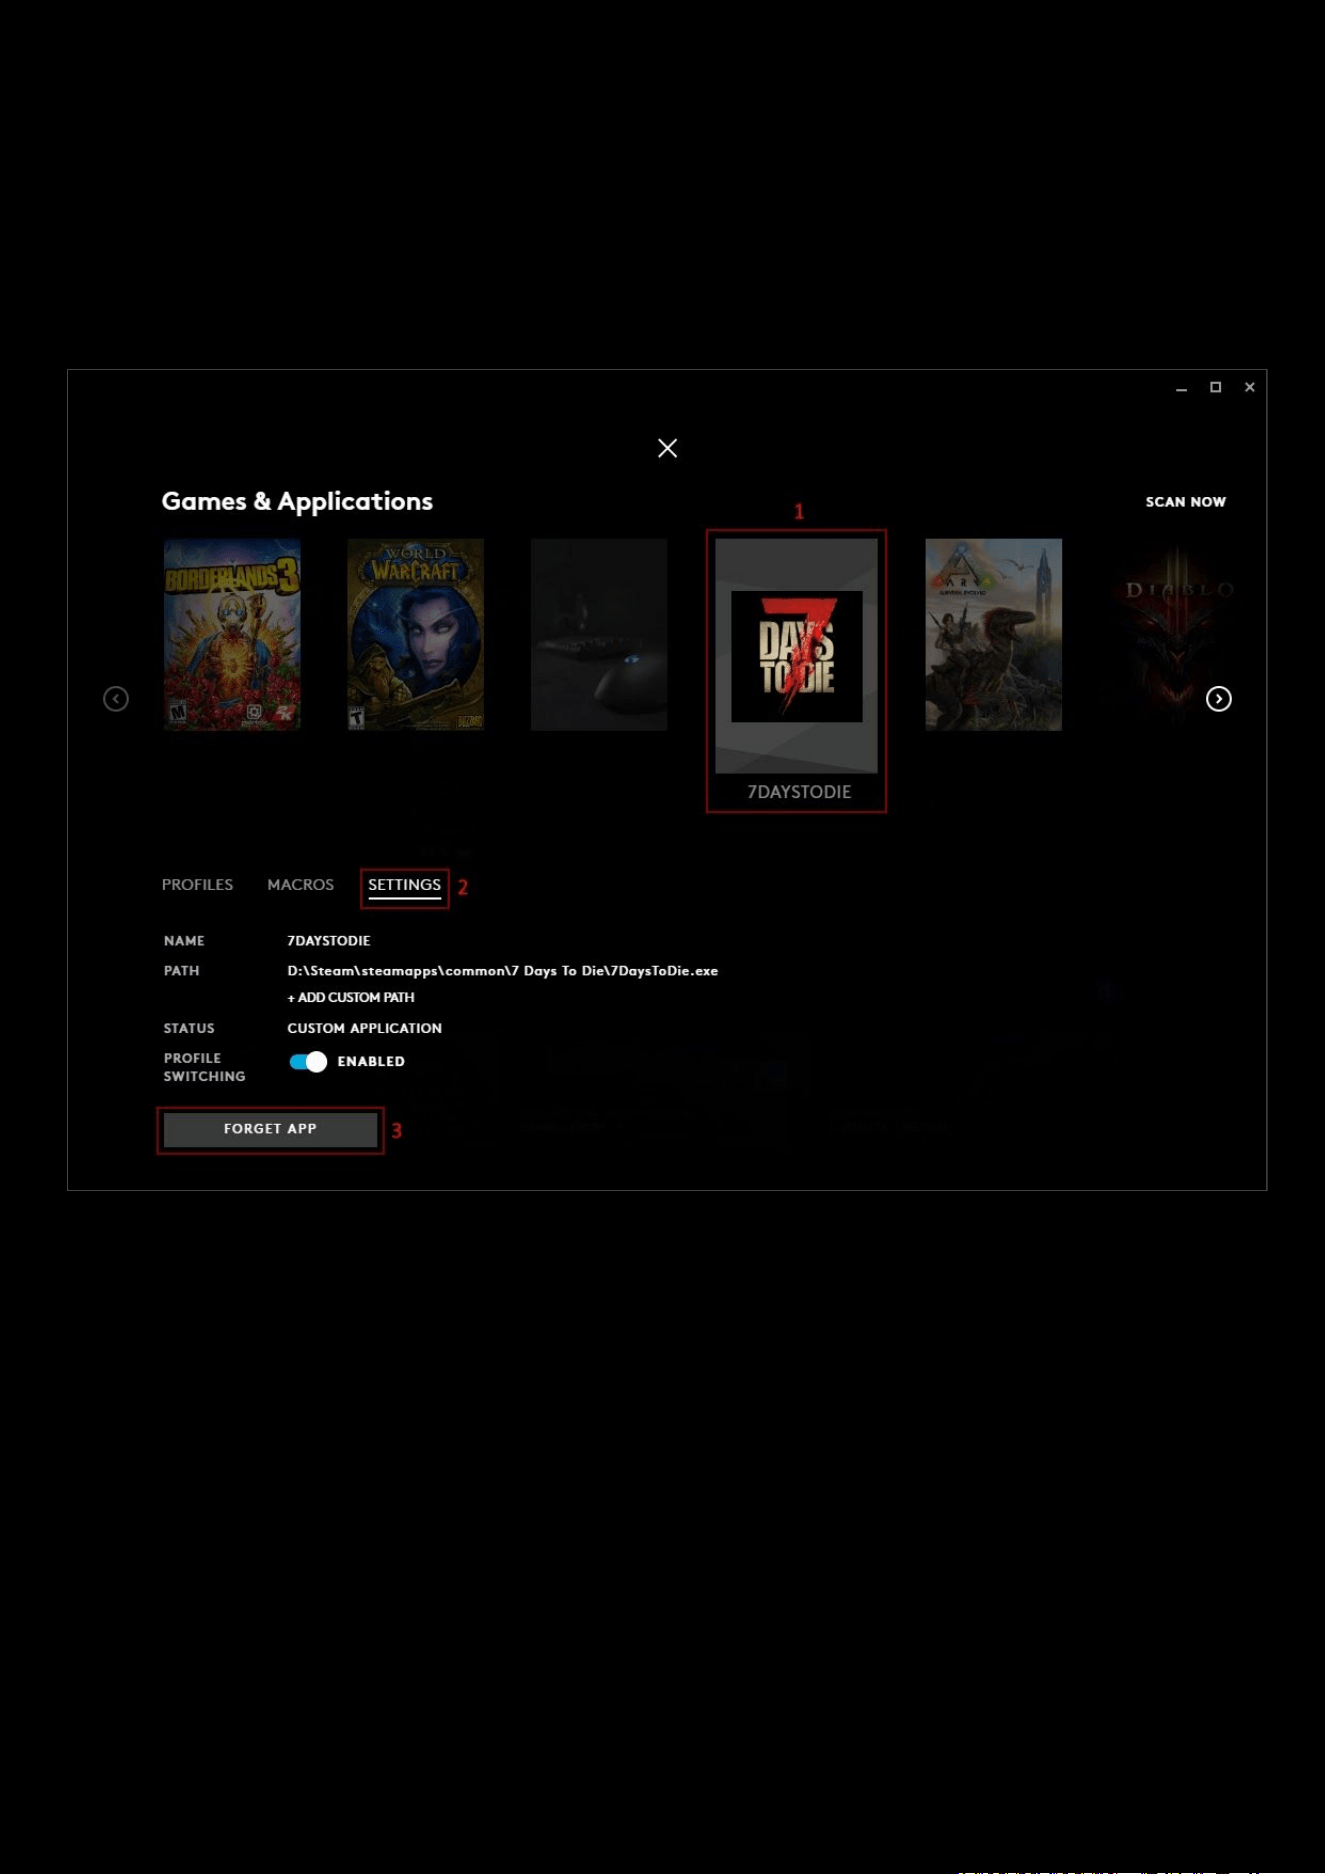
111
Delete games and applications from the App list
If you have games and applications in your App list that you've manually added, or if they're no longer installed on your
computer, you can manually delete them from the App list.
NOTE:
The DESKTOP APP and Default profile associated with it cannot be deleted. You can only delete apps detected by
SCAN NOW if they appear as Uninstalled in STATUS.
1. Select an APP you have added to the list.
2. Click on Settings
3. Click FORGET APP
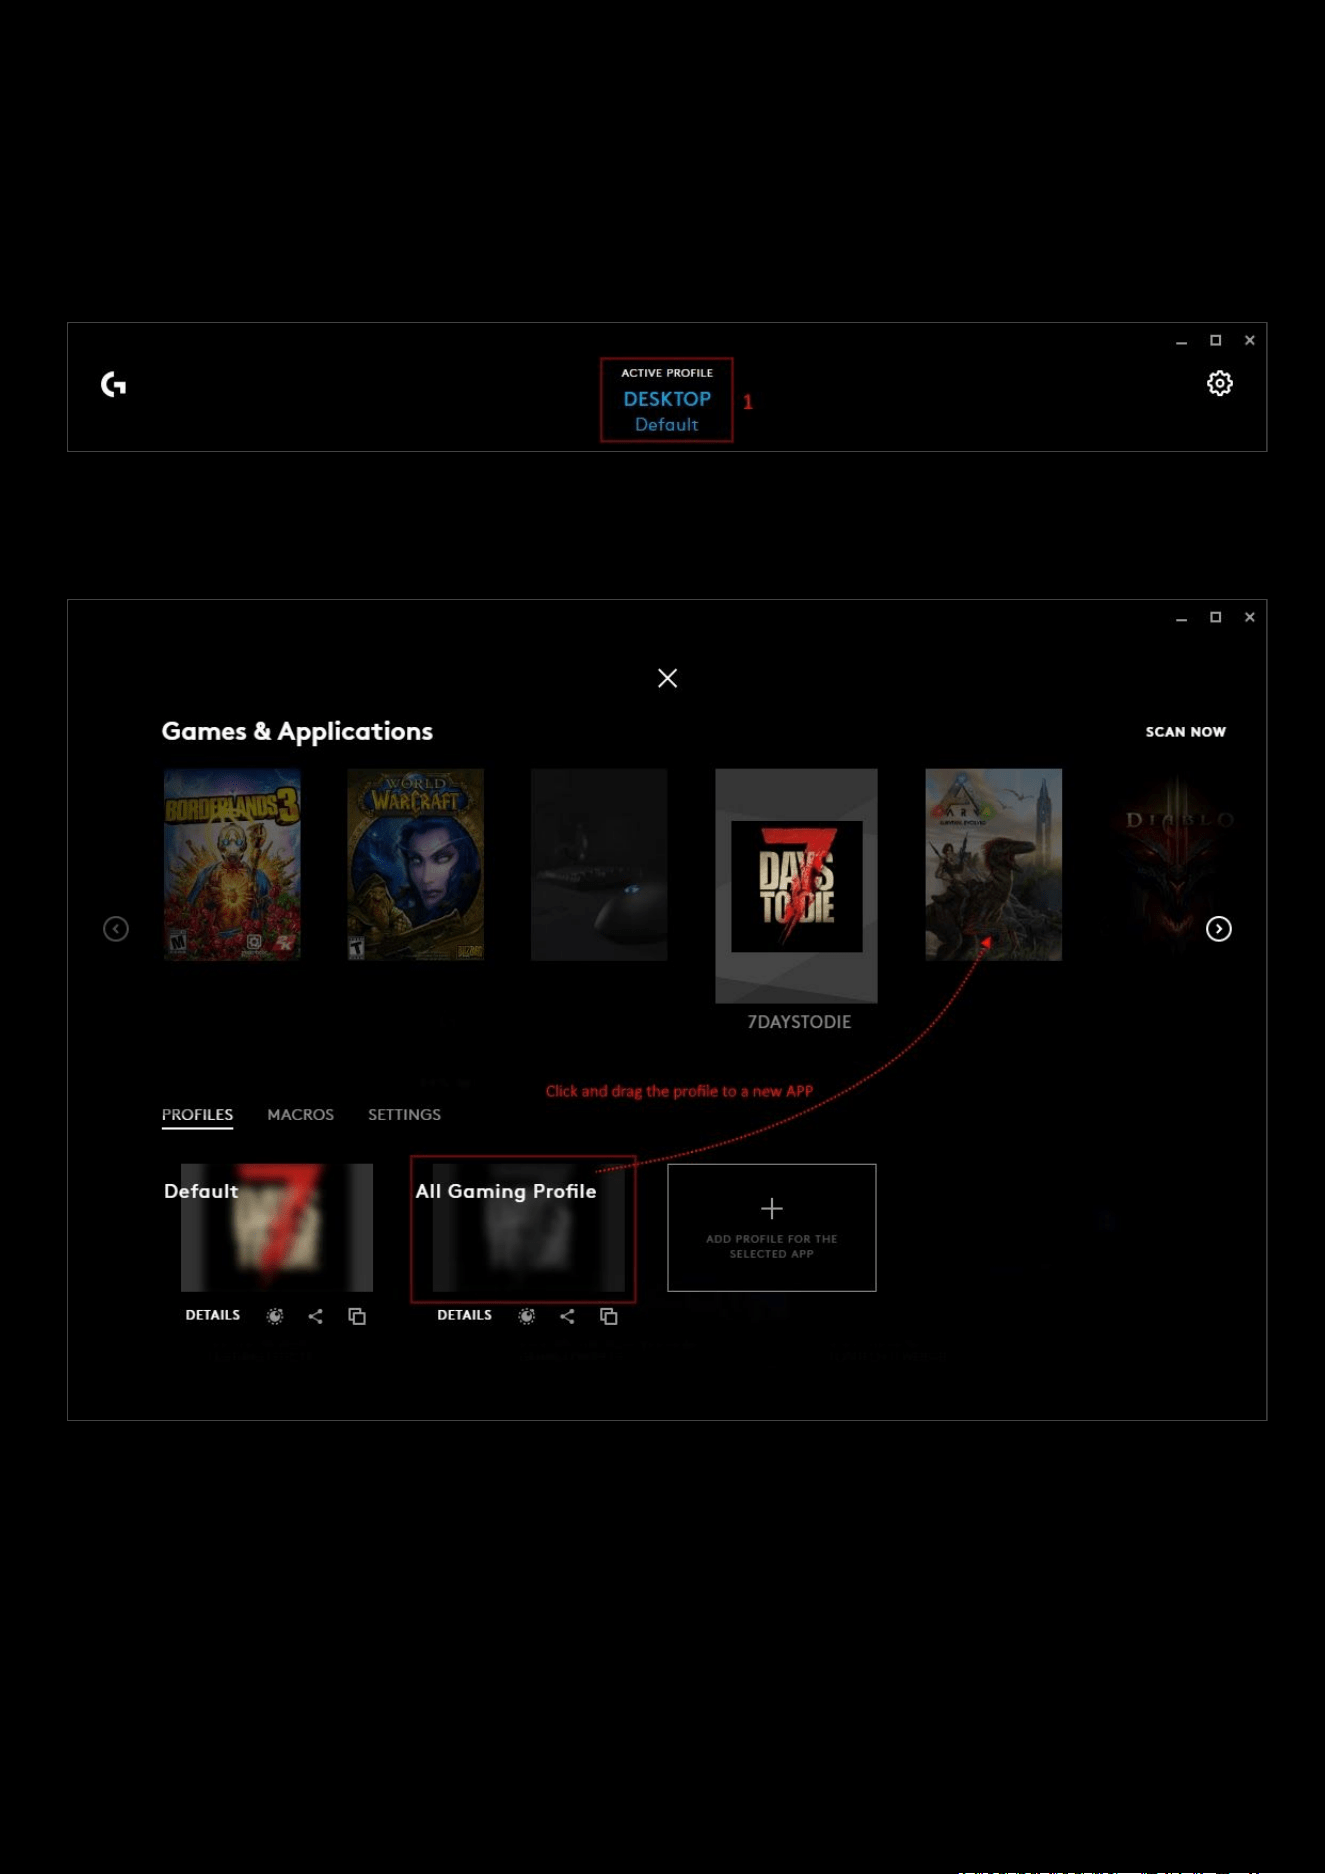
112
How to duplicate profiles and macros to another game or application
If you have a profile an/or macros that you want to use with another app, you can copy them over. The following steps
show you how:
1. Open G HUB and click on the profile on the top of the home page. The Games & Application profile page opens.
2. Select the profile you want to duplicate, then click and drag the profile onto the app you want to use it with. In
the image below, the 7 Days To Die ‘All Gaming Profile’
has been dragged onto the Ark Evolved Game.
3. Click on the target app (Ark Evolved in the example) to see the duplicated profile. The All Gaming Profile now
also appears in the Ark Evolved Game, as shown below:
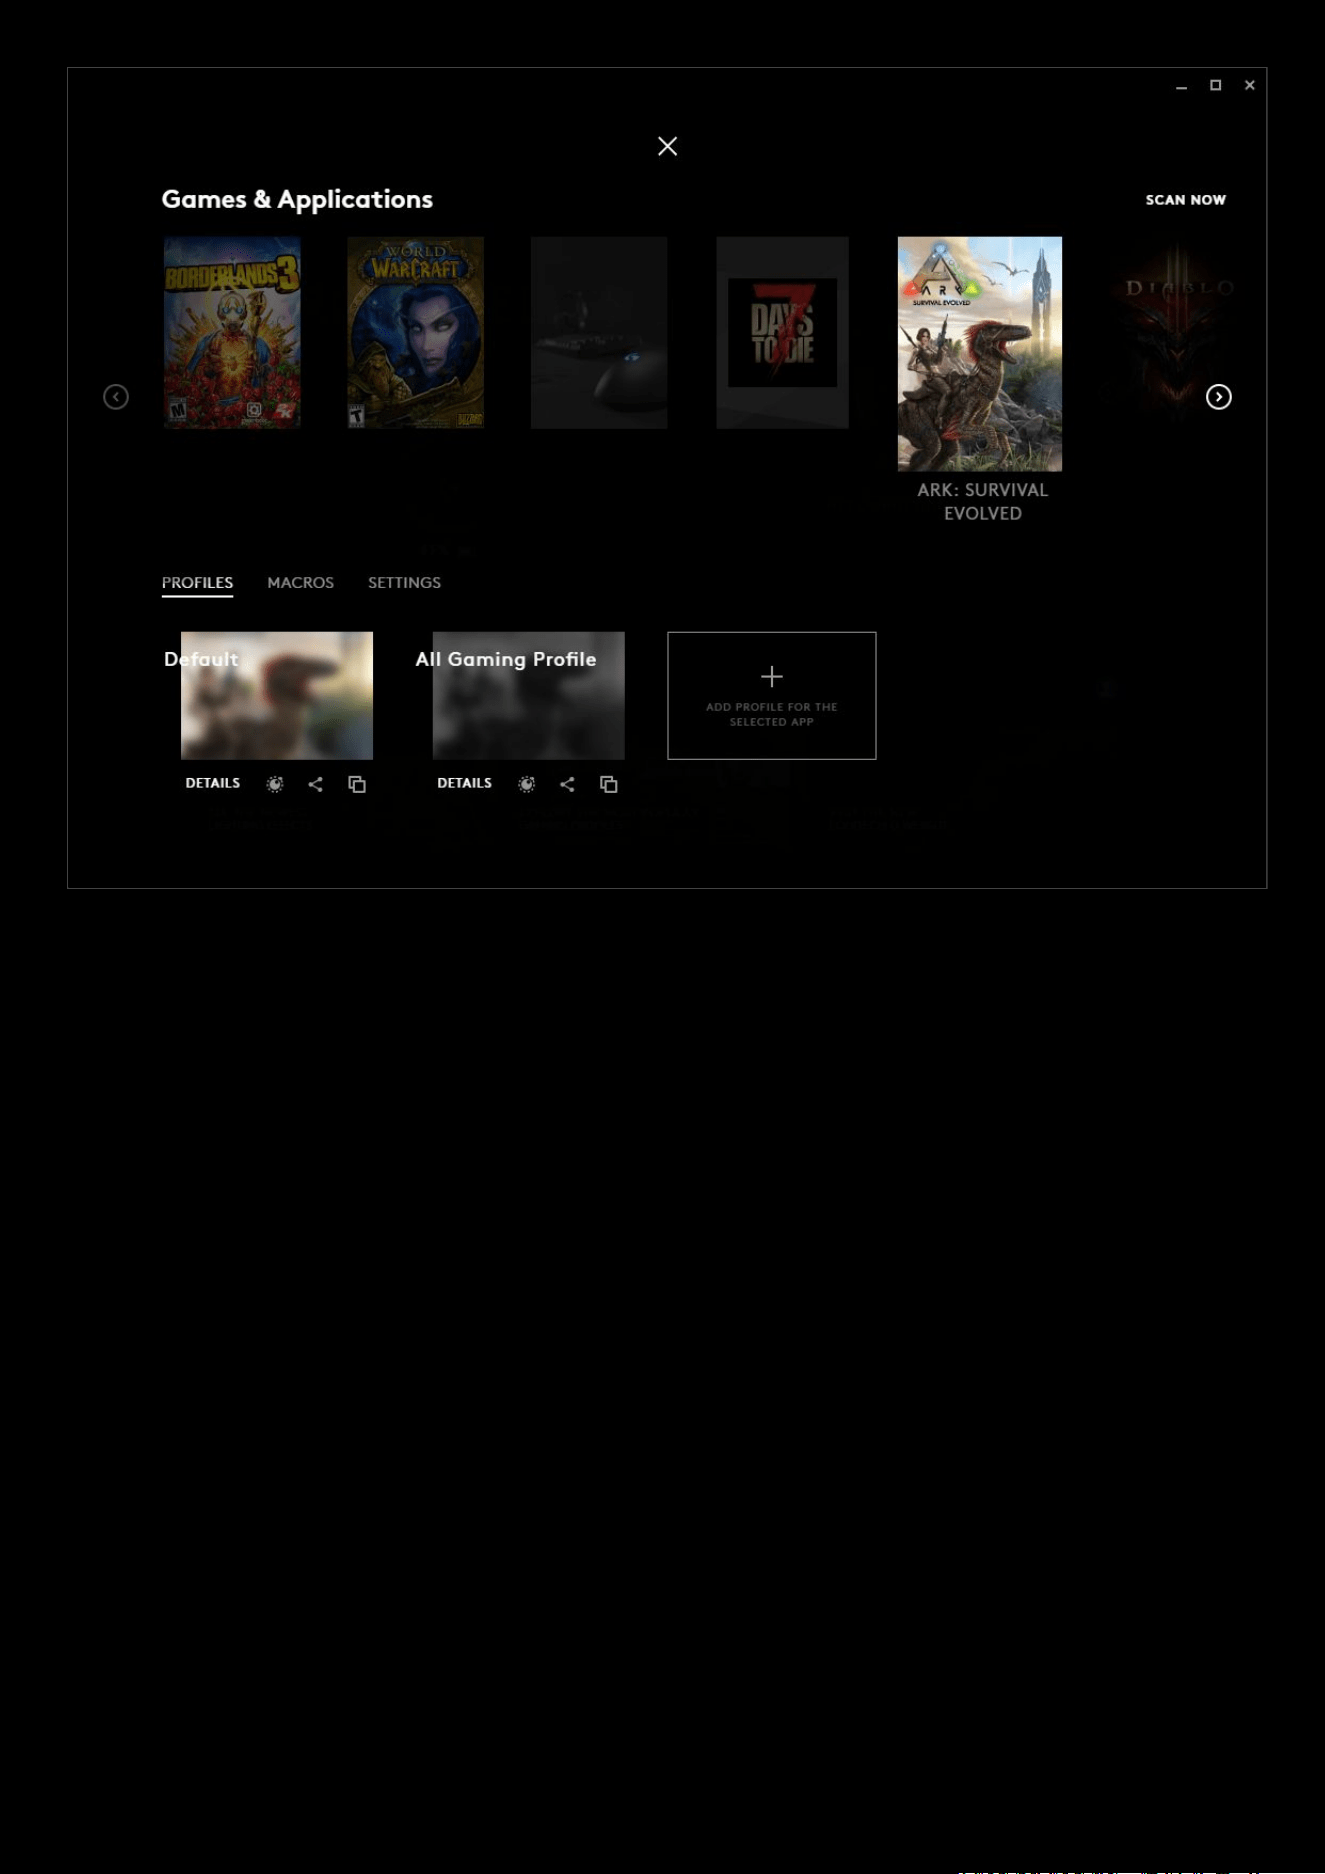
113
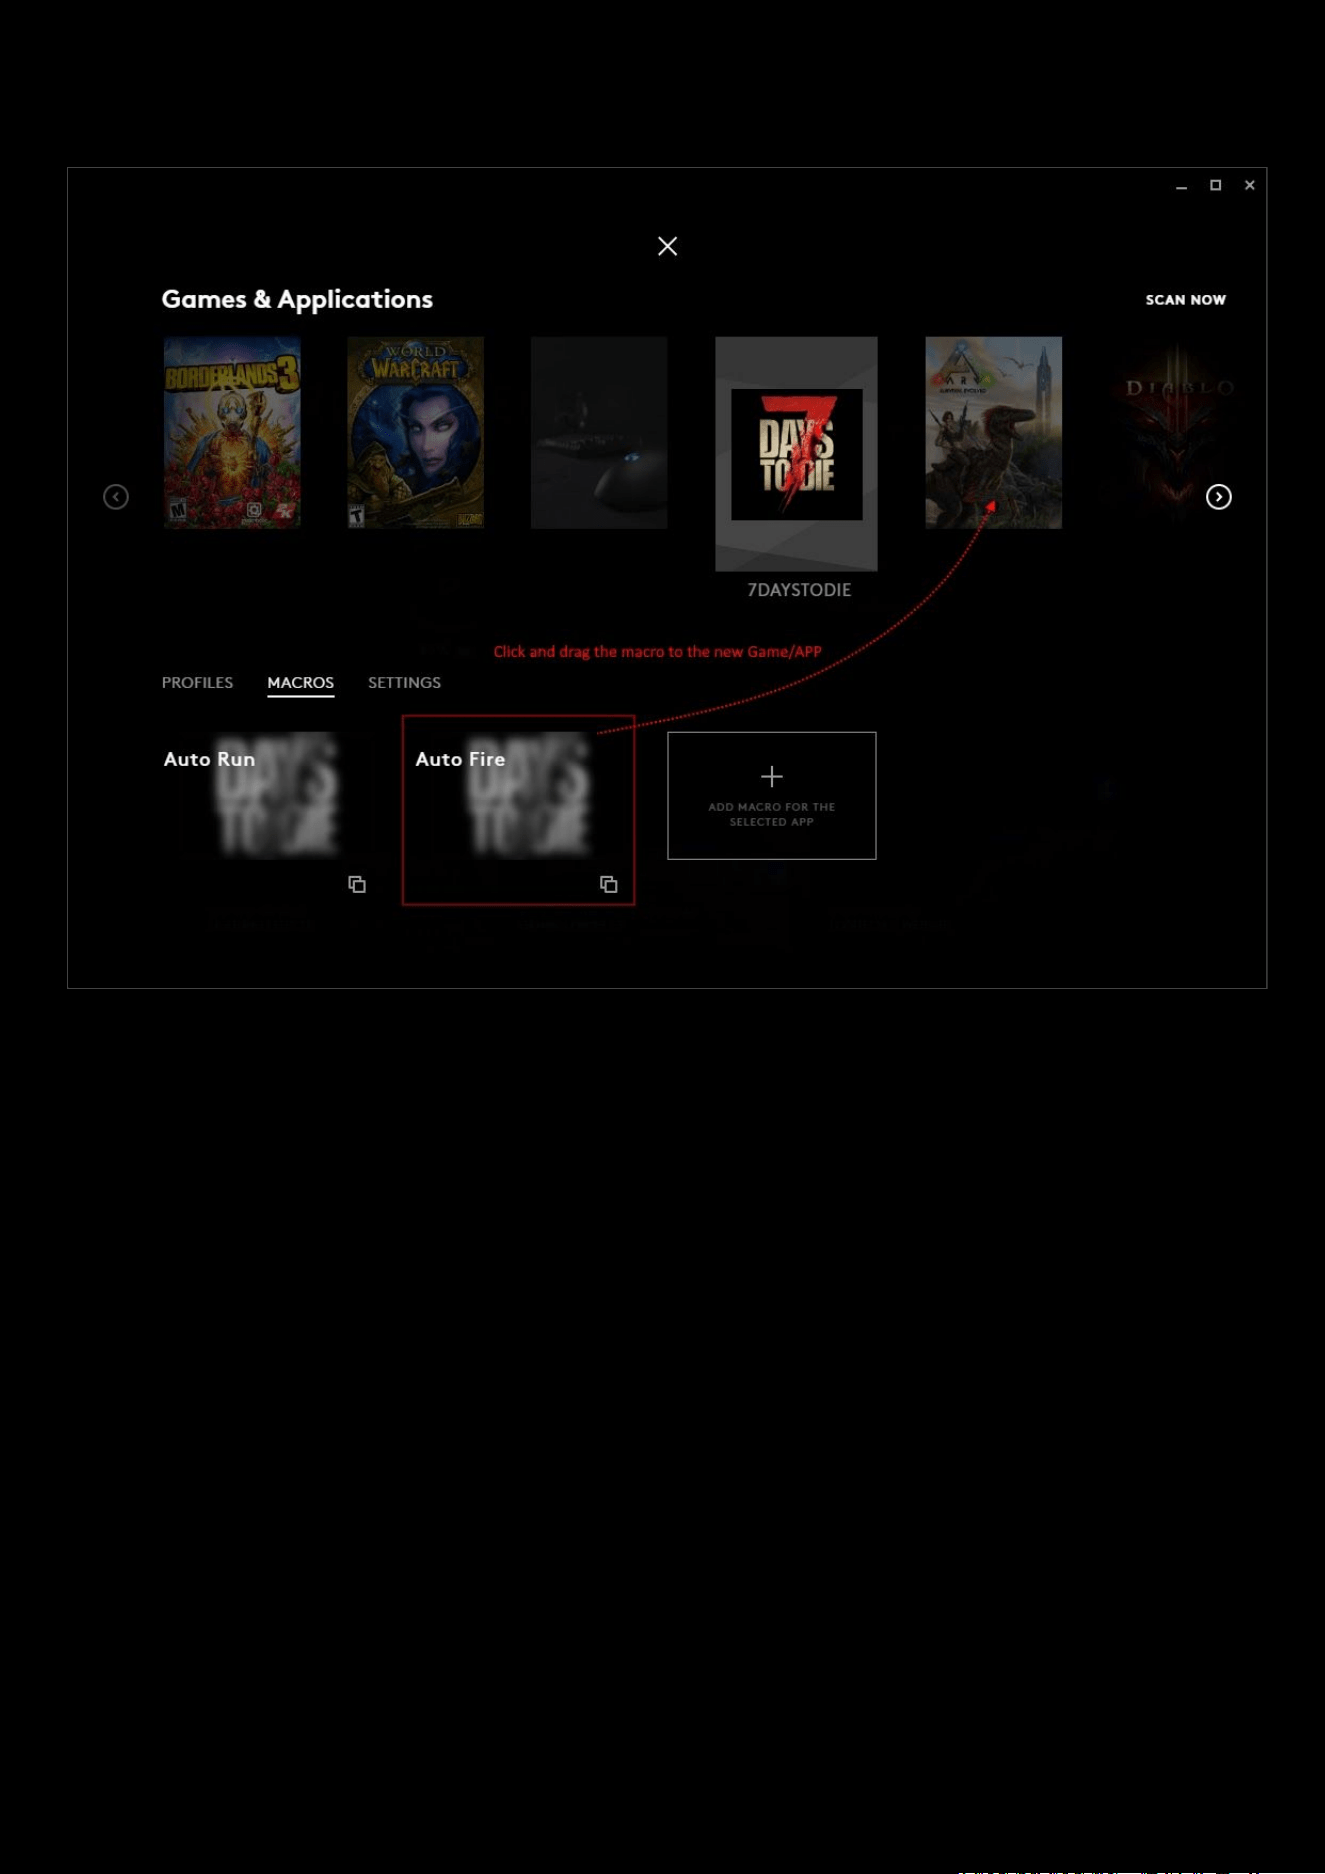
114
The same method can be used to copy macros over too. Select which macro you want to copy across by click and
dragging it to another Game/APP
You can then check in the other game APP that it has copied over. Repeat the process for all the macros you want to
duplicate.
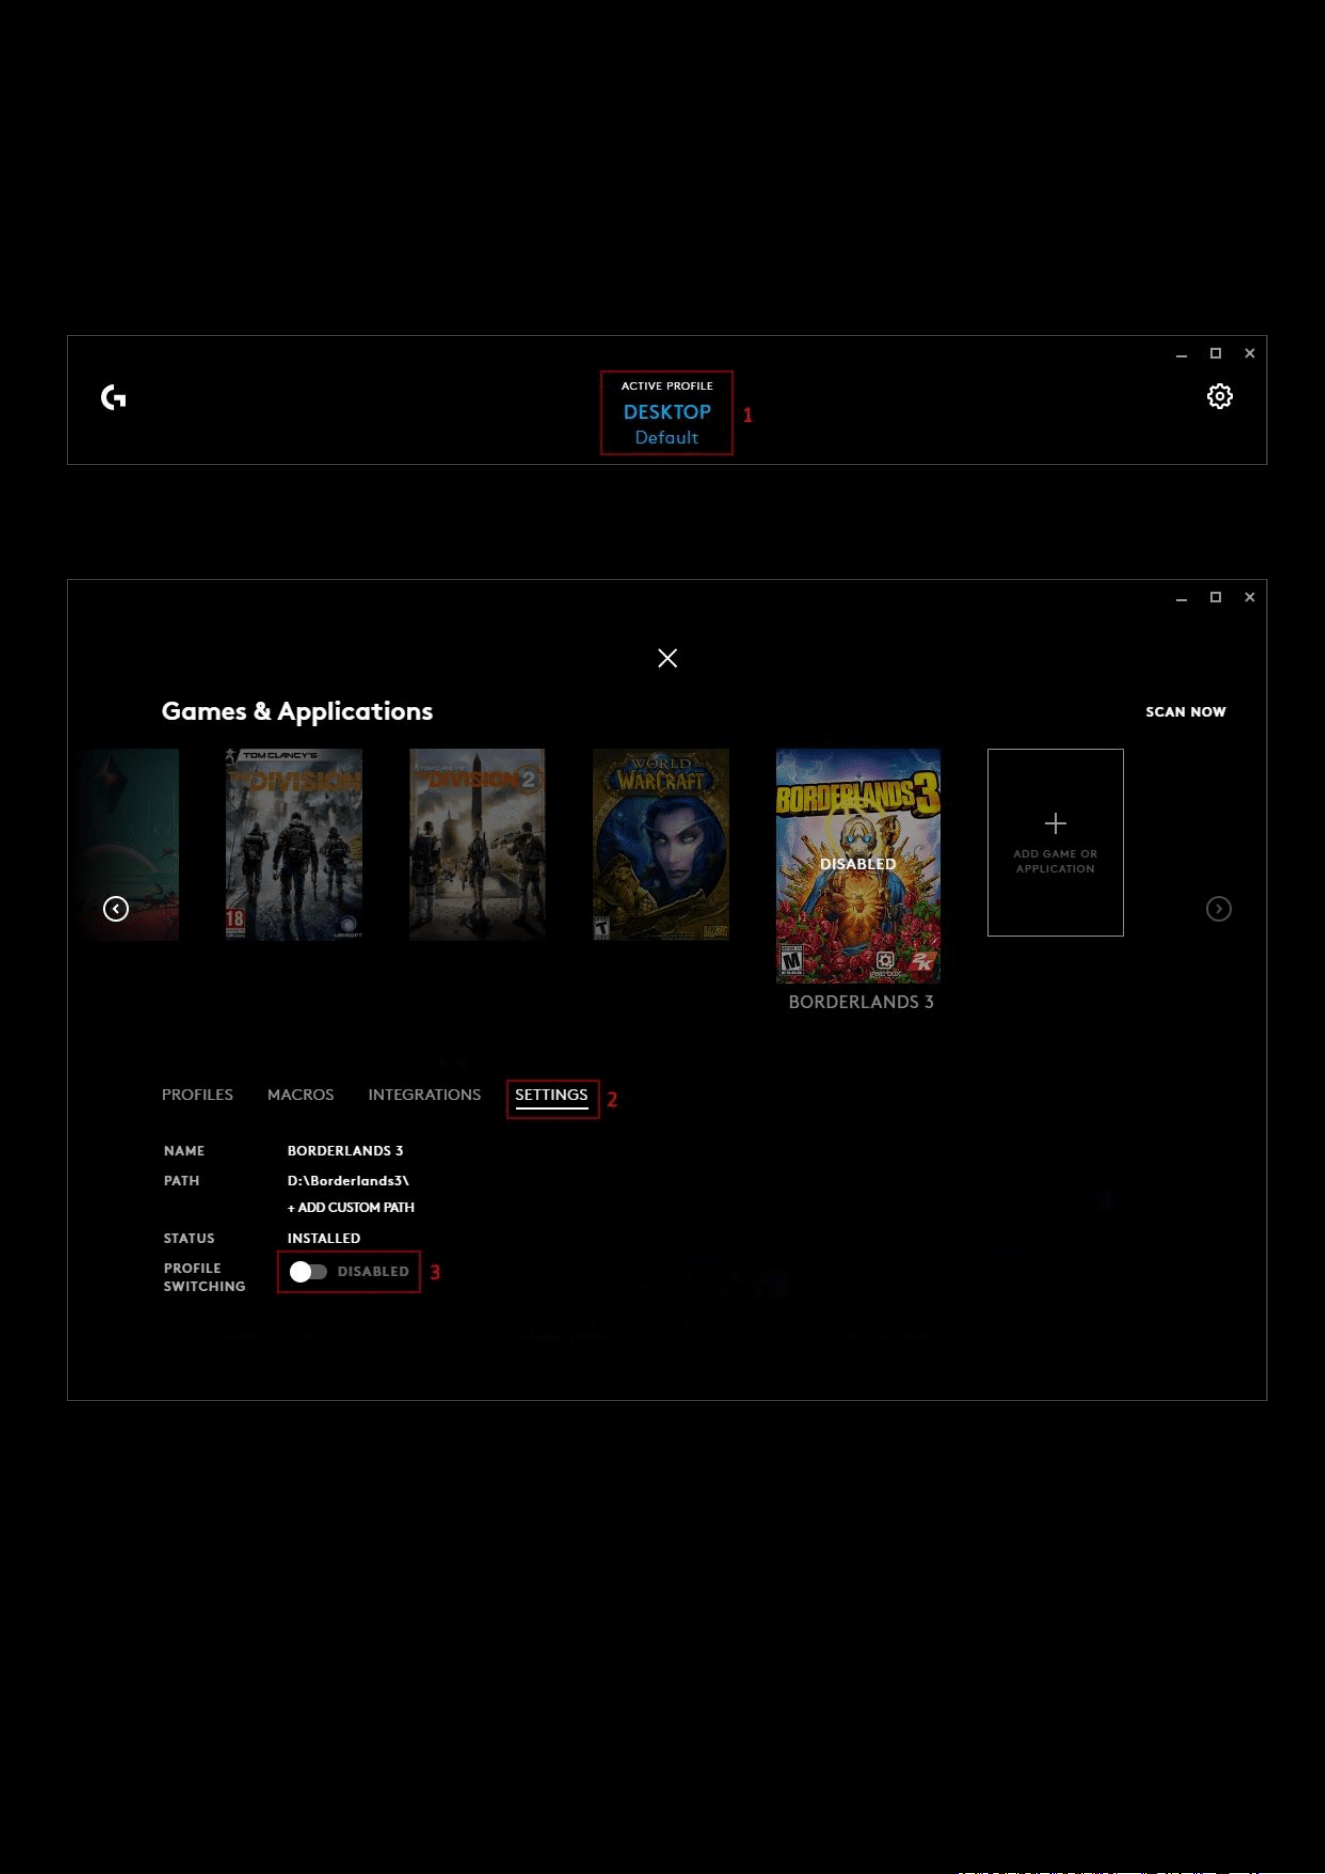
115
How to blacklist a Game/APP from profile switching
If you have a game or application installed but don’t want to activate the profile for it, you can blacklist it and turn off
the app. Here’s how:
1. Open G HUB and click on the profile on the top of the home page. The Games & Application profile page opens.
2. Select the Game/APP you want to blacklist and then click on the SETTINGS tab to bring up the details.
3. Click the profile switching toggle to DISABLED.
NOTE ON STATUS
: The status of the APP/Game has no effect on the profile switching, this tells you how the Game/APP
was added. The 2 statuses can be:
A. INSTALLED. Installed by G HUB when it was installed or a SCAN NOW was run. This Game/APP can then also
have built in integration or custom commands.
B. CUSTOM APPLICATION. Added by the user using the + ADD GAME OR APPLICATION button.
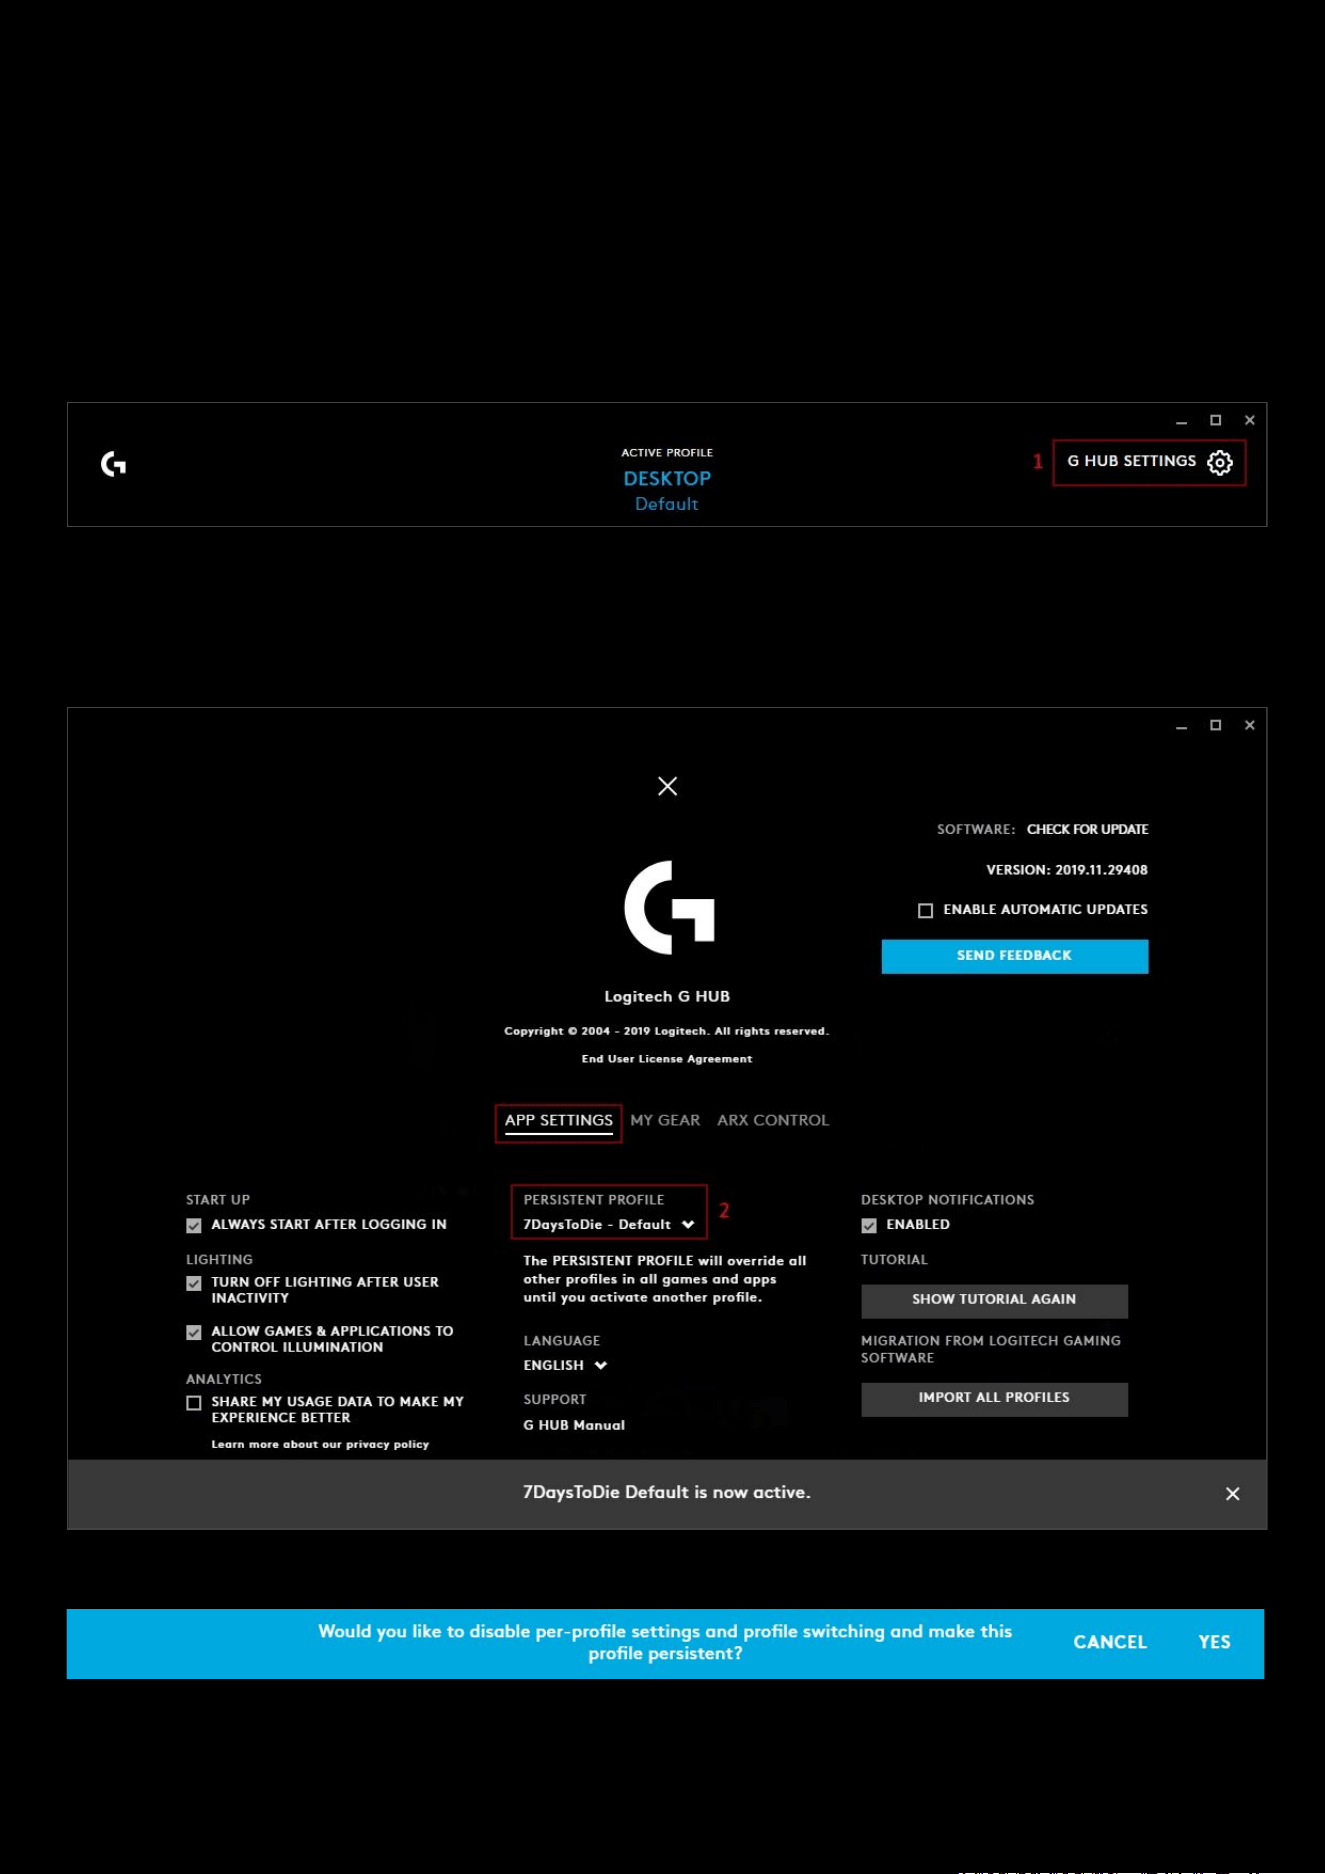
116
How to lock a profile for all games and applications
Typically, when G HUB is first installed, your Desktop default profile might be the persistent profile, until you start
creating some new profiles and you remove this lock so profile switching is activated.
To force one profile to always be running and not to profile switch, follow these steps:
1. On the Home page, click the Settings (gear) icon in the top right corner. The Global Settings page will open.
2. In the APP SETTINGS tab, look for PERSISTENT PROFILE. If no profile is selected as persistent, then NONE will be
shown. Click the drop-down arrow to show the current list of APPs and the profiles associated with them. Select
the profile you want to be persistent. In the example we have chosen the default profile of 7 Days to Die.
NOTE
: You will get a warning message asking:
Click
YES to this to apply the setting or cancel to not make any changes.
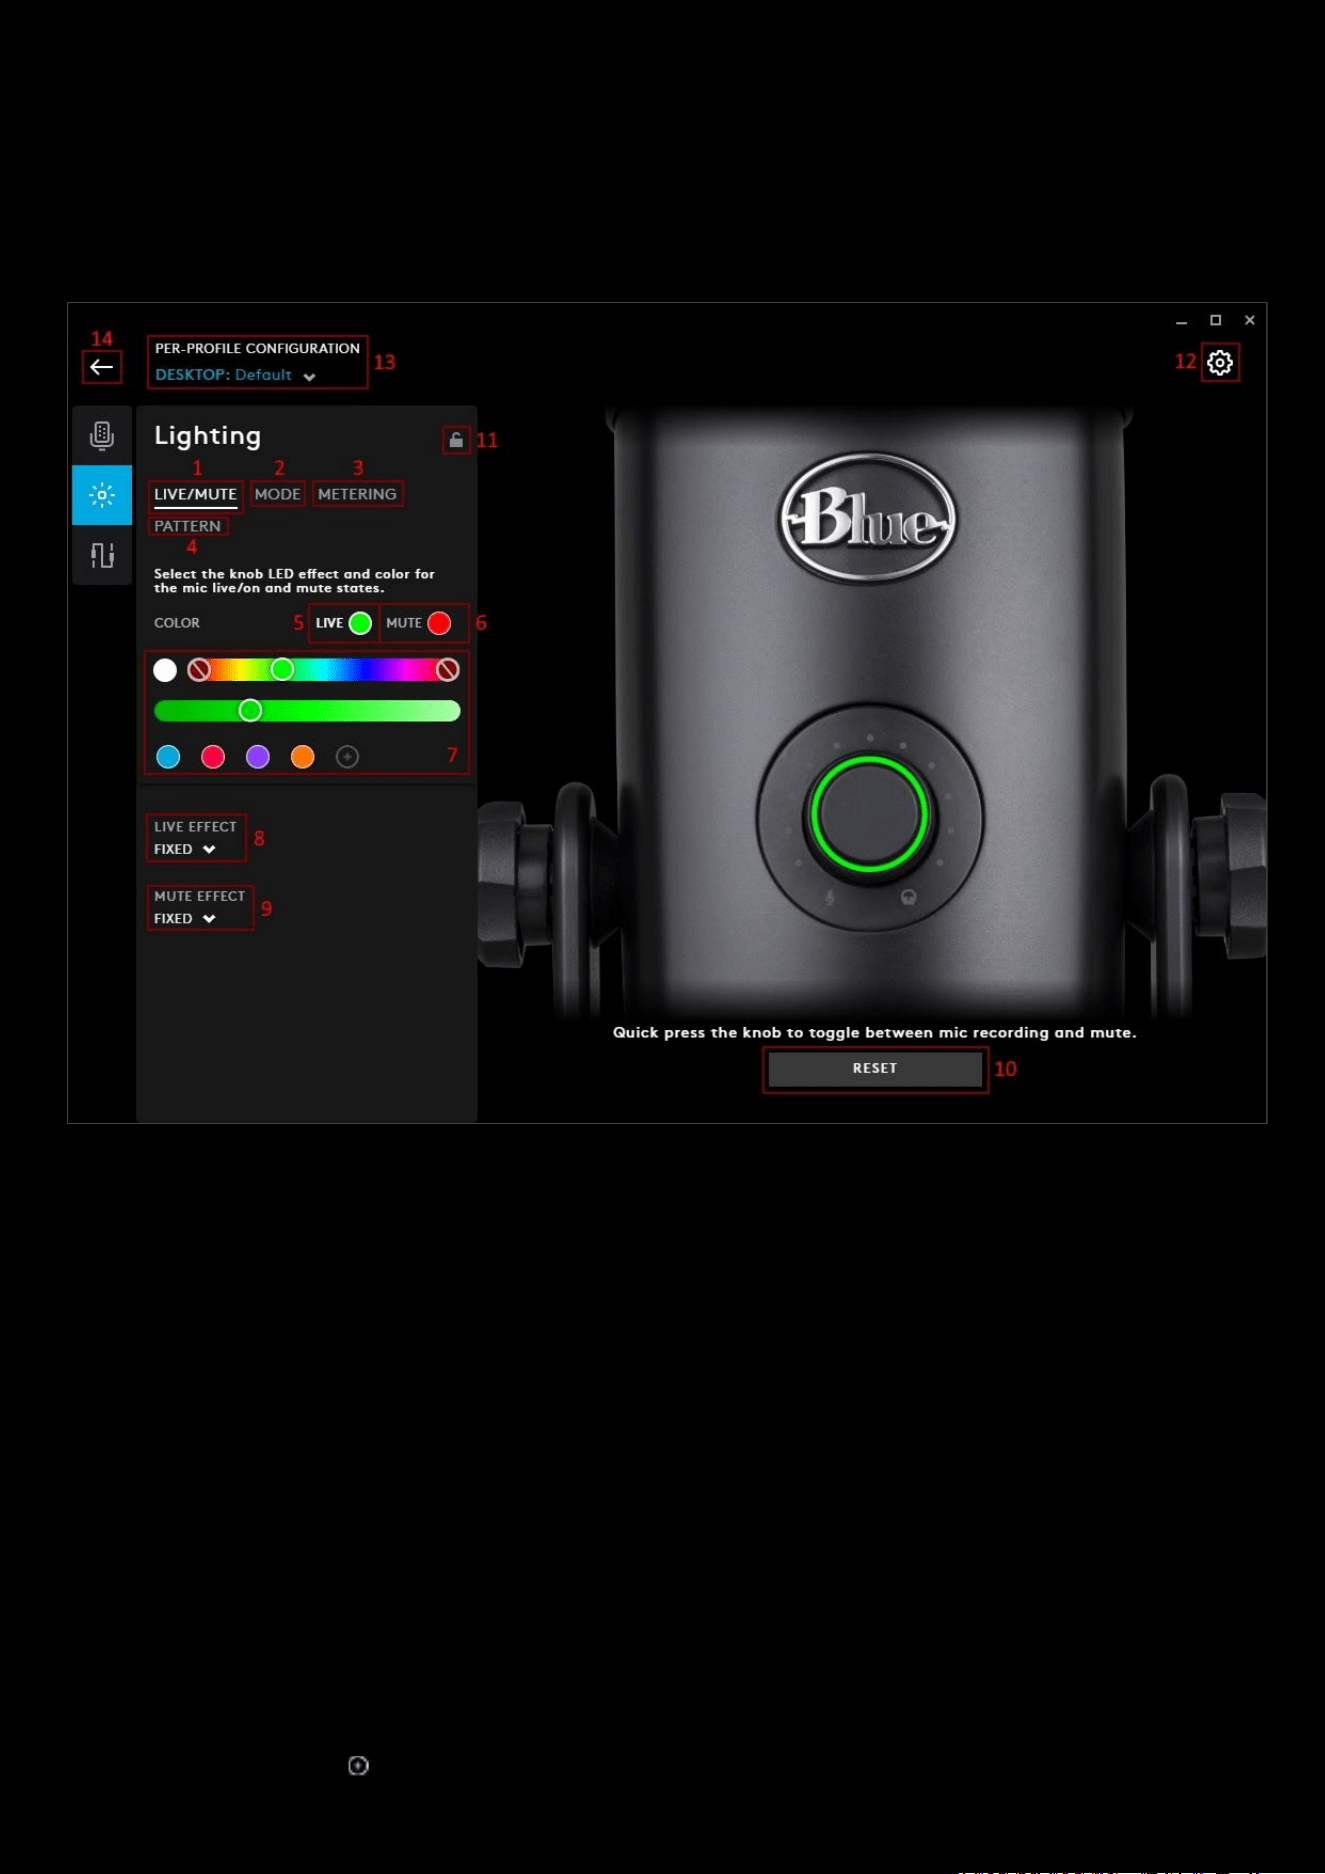
117
How to configure your Yeti X Lighting
The Yeti X Microphone has a variety of lighting configurations you can customise to personalise your microphone.
From the main window select the Yeti X and then click on the Lighting
tab:
1. LIVE/MUTE. This tab configures the ring on the volume dial. This has 2 modes; LIVE and MUTE. Press the
button to toggle between modes.
2. MODE. This tab configures the ring of dots around the volume dial. There are 3 modes you can configure;
MICROPHONE
, HEADPHONE and DIRECT MONITORING.
3. METERING. The LED metering colours are the dynamic dota around the dial in the microphone mode. These
indicate the current mic volume detection.
4. PATTERN. The rear of the Yeti X has the pattern button which can cycle between 4 modes; STEREO, OMNI,
CARDIOID and BIDIRECTIONAL. You can configure each modes colour.
LIVE MUTE:
Switch between live and mute with a quick press of the knob.
5. LIVE. Click LIVE to change the colour of the ring whilst the mic is live. You can then select a new swatch or
create another (
7)
6. MUTE. Click MUTE to change the colour of the ring whilst the mic is muted. You can then select a new swatch
or create another (7)
7. COLOR. The palette can configured to your preferences. You can change the hue and brightness with the 2
sliders. Click on the to add your favourite color to the swatch list.
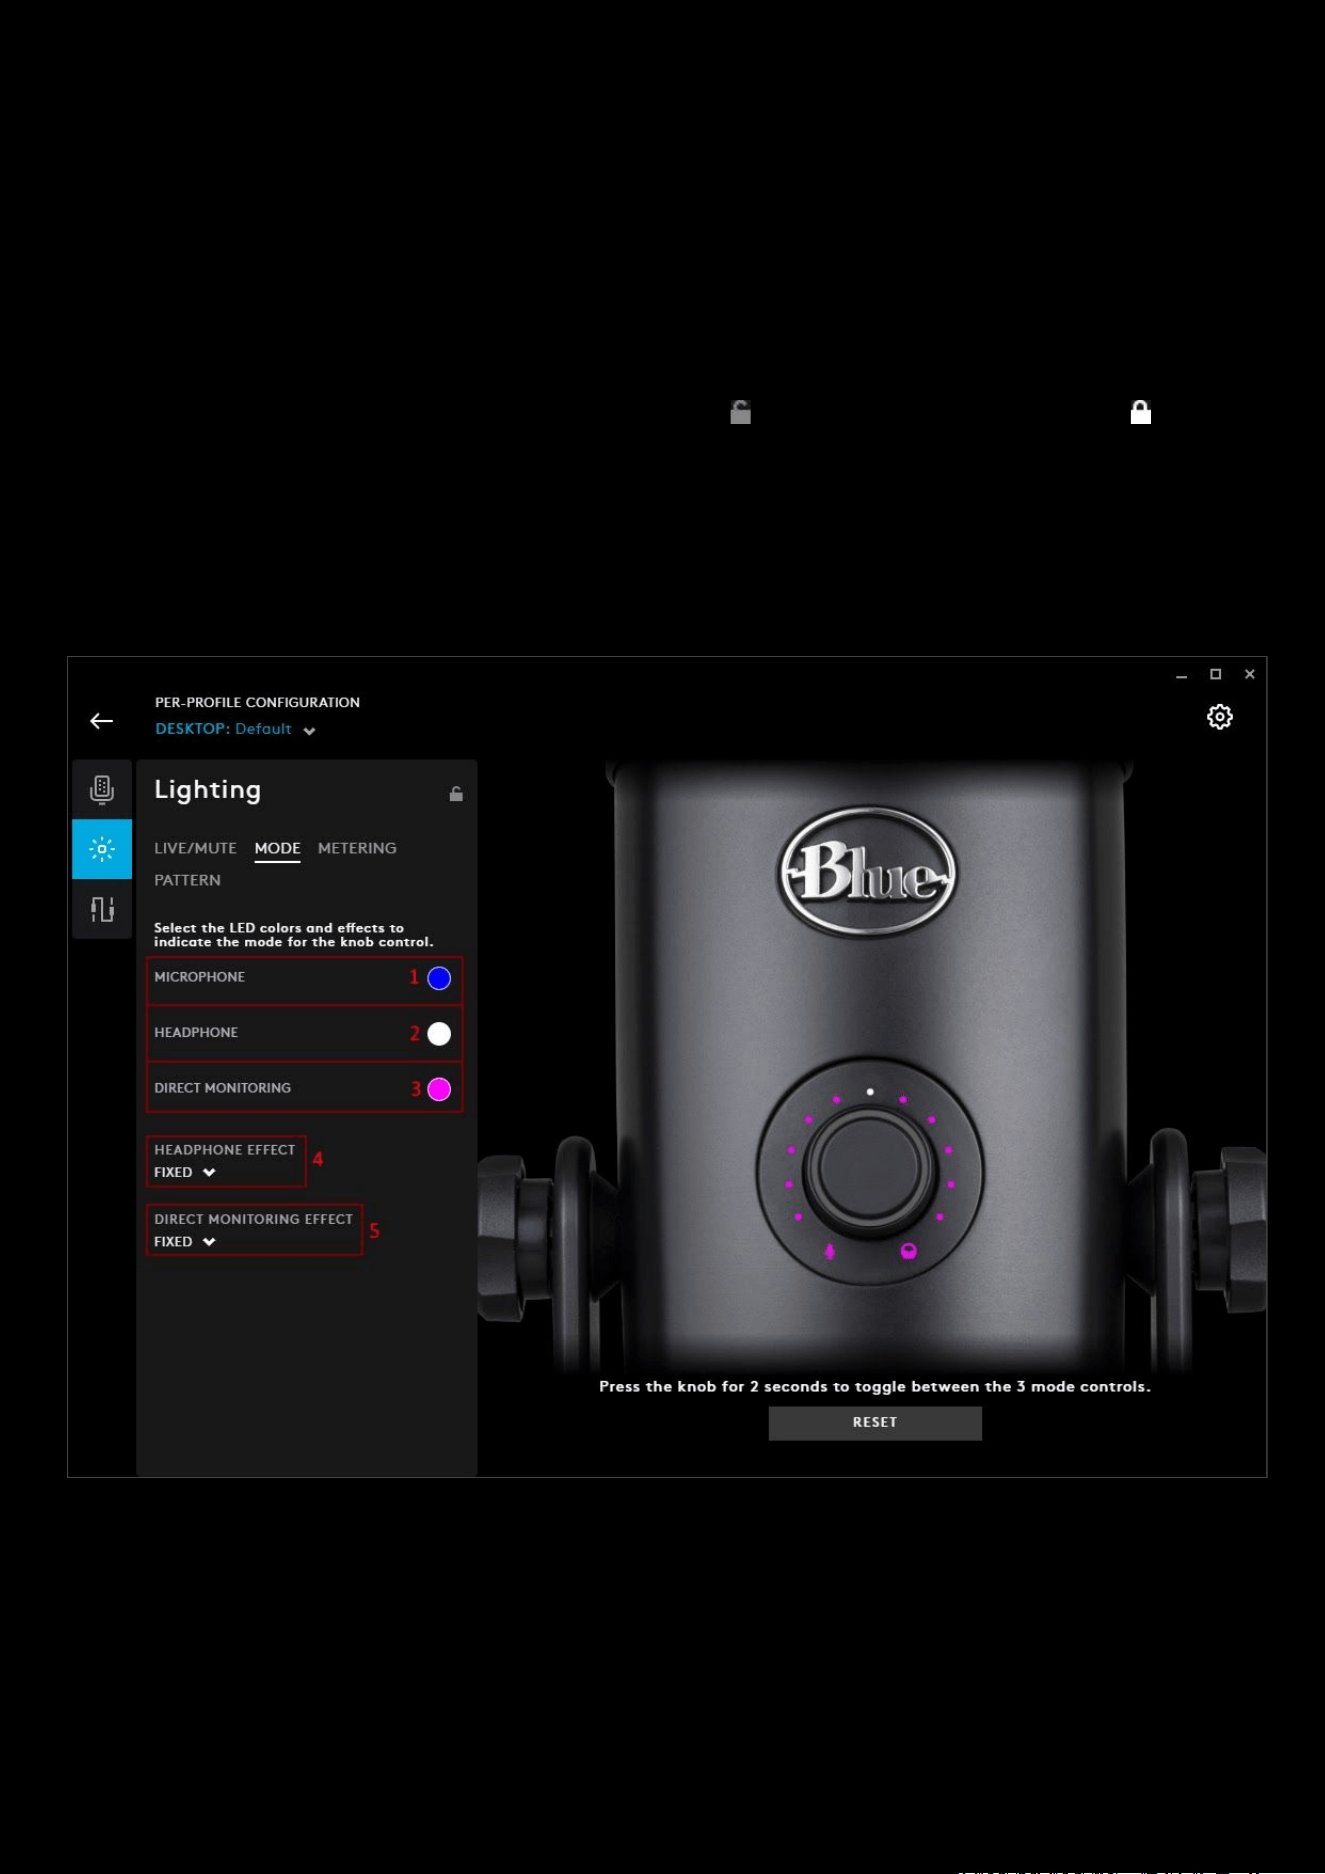
118
8. LIVE EFFECT. Choose between FIXED and BREATHING for the ring whilst the mic is live. For Breathing, use the
SPEED slider to adjust how quickly the effect happens. With 1000ms (1s) is the quickest and 20000ms (20s) is
the slowest.
9. MUTE EFFECT. Choose between FIXED and BREATHING for the ring whilst the mic is muted
10. RESET. Click RESET to revert back to the default colour settings. For Breathing, use the SPEED slider to adjust
how quickly the effect happens. With 1000ms (1s) is the quickest and 20000ms (20s) is the slowest.
11. Per-profile LIGHTSYNC lock. Click to make LIGHTSYNC persistent across all profiles. This locks/unlocks the
lighting settings to be the same for all profiles.
12. GEAR SETTINGS. Click this to take you to the Gear Settings page
13. PROFILE SELECTOR. Use the drop down to change the User Profile you want to configure for. Also it will
indicate if the profile is in a PER-PROFILE CONFIGURATION or in a PERSISTENT CONFIGURATION
14. BACK ARROW. Click the arrow to take you back to the Homepage.
MODE
Switch between the 3 modes by pressing and holding the knob for 2 seconds. The modes will cycle from MICROPHONE
> HEADPHONE > DIRECT MONITORING > MICROPHONE
1. MICROPHONE. Click MICROPHONE to change the colour of the LEDs for the microphone gain. The color palette
will expand, select a new colour using the Hue and Brightness sliders or select a different swatch.
NOTE
: By default in this mode, the metering level will be typically shown. Turn the knob to see the microphone gain.
After 2 seconds it will default back to the metering
2. HEADPHONE. Click HEADPHONE to change the colour of the LEDs for the headphone gain. The color palette
will expand, select a new colour using the Hue and Brightness sliders or select a different swatch
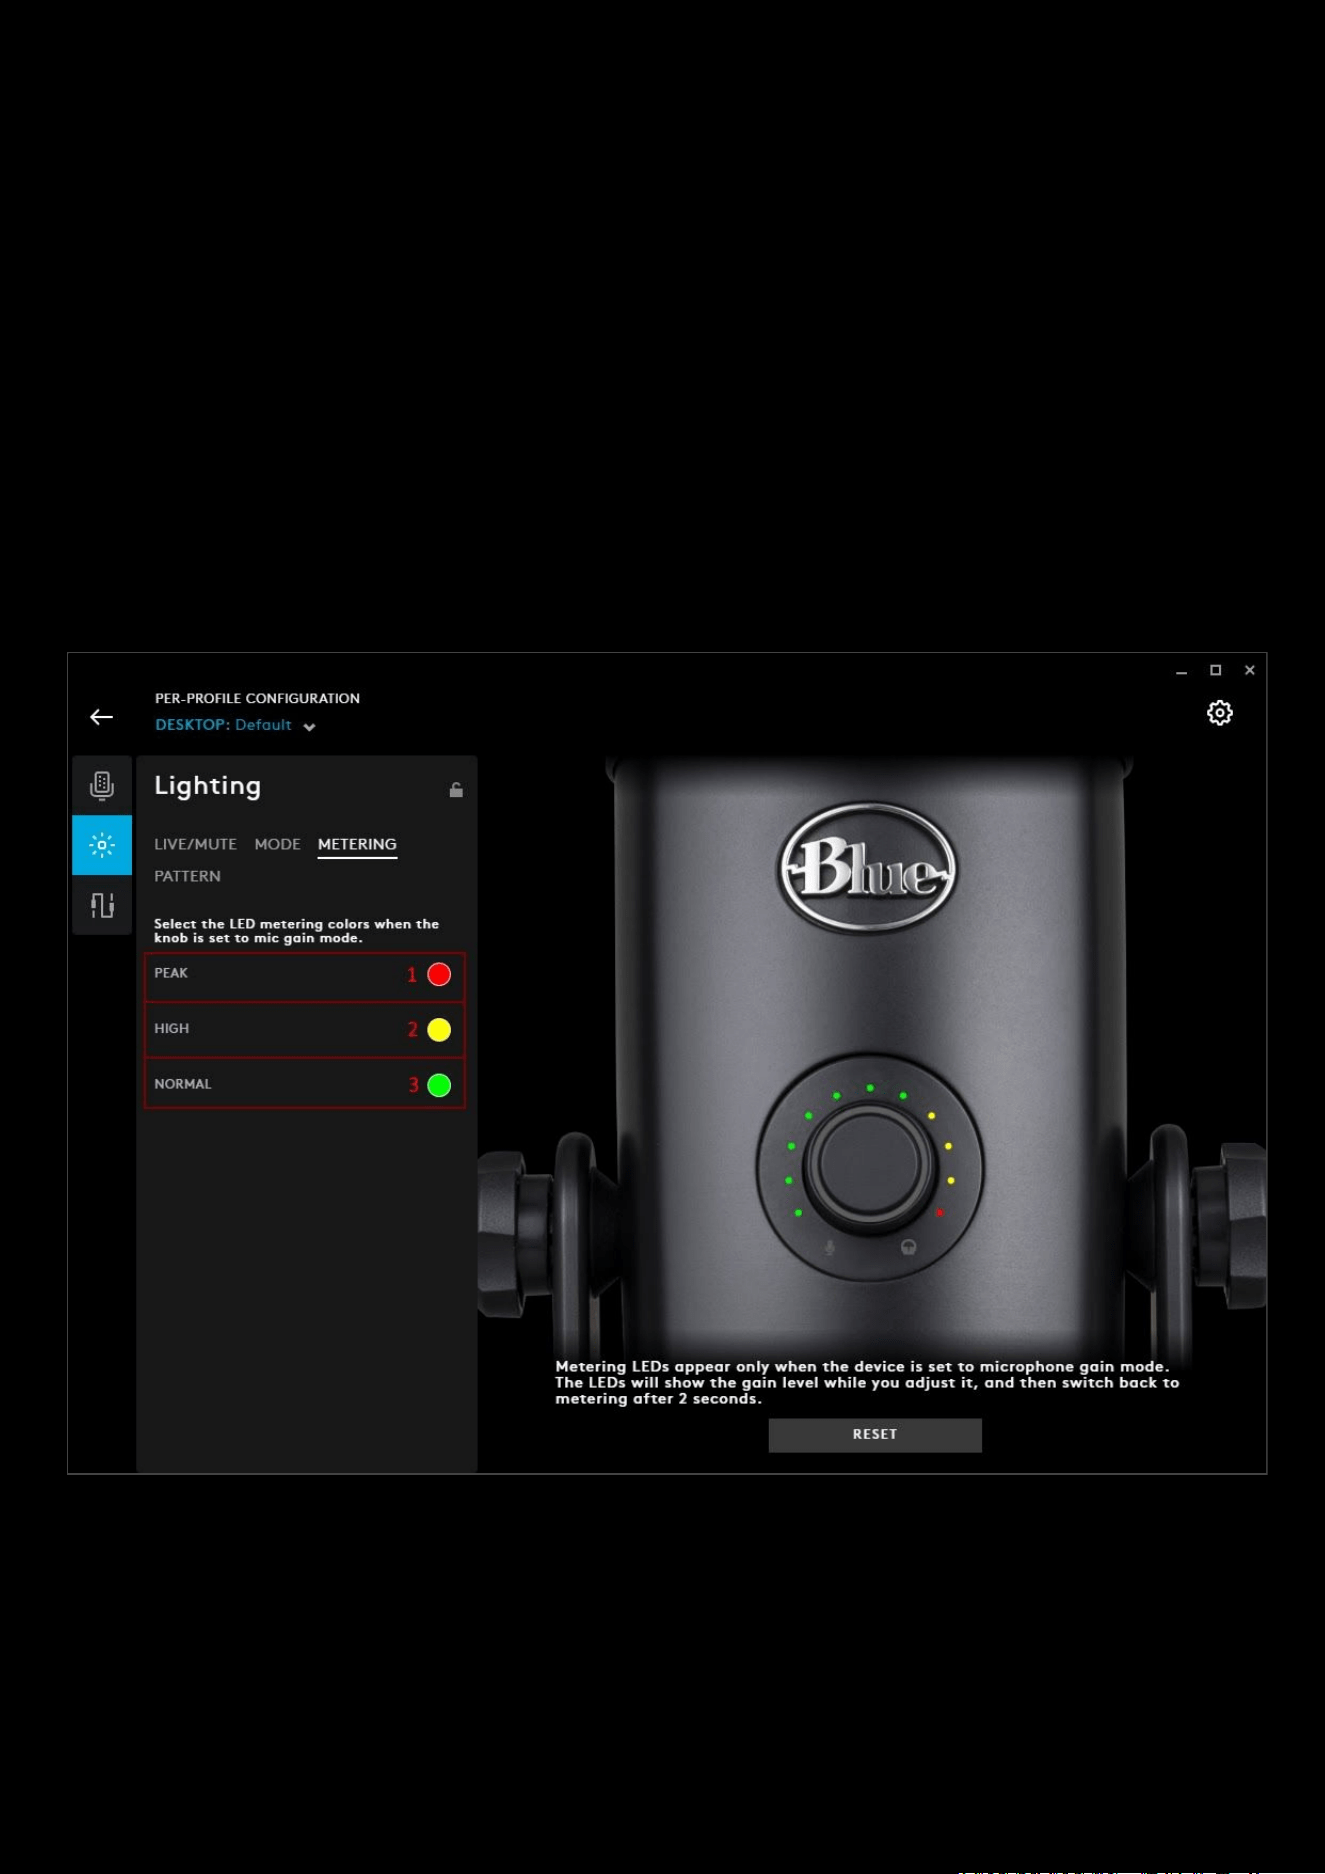
119
3. DIRECT MONITORING. Click DIRECT MONITORING to change the colour of the LEDs for the direct monitoring
gain. The color palette will expand, select a new colour using the Hue and Brightness sliders or select a different
swatch
4. HEADPHONE EFFECT. Choose between FIXED and BREATHING for the headphone gain. For Breathing, use the
SPEED slider to adjust how quickly the effect happens. With 1000ms (1s) is the quickest and 20000ms (20s) is
the slowest.
5. DIRECT MONITORING EFFECT. Choose between FIXED and BREATHING for the direct monitoring blend. For
Breathing, use the SPEED slider to adjust how quickly the effect happens. With 1000ms (1s) is the quickest and
20000ms (20s) is the slowest.
NOTE
: For
MICROPHONE MODE
, there is no effect you can choose, as it will default back to default monitoring after 2
seconds. The effect is
FIXED
.
METERING
Metering LEDs appear when the device is set to the MICROPHONE gain mode. The LEDs will show the gain level while
you adjust it, and then switch back to METERING after 2 seconds
1. PEAK. Click PEAK to change the colour of the LEDs for the metering peak. The color palette will expand, select a
new colour using the Hue and Brightness sliders or select a different swatch
2. HIGH. Click HIGH to change the colour of the LEDs for the metering high levels. The color palette will expand,
select a new colour using the Hue and Brightness sliders or select a different swatch
3. NORMAL. Click NORMAL to change the colour of the LEDs for the metering during normal levels. The color
palette will expand, select a new colour using the Hue and Brightness sliders or select a different swatch
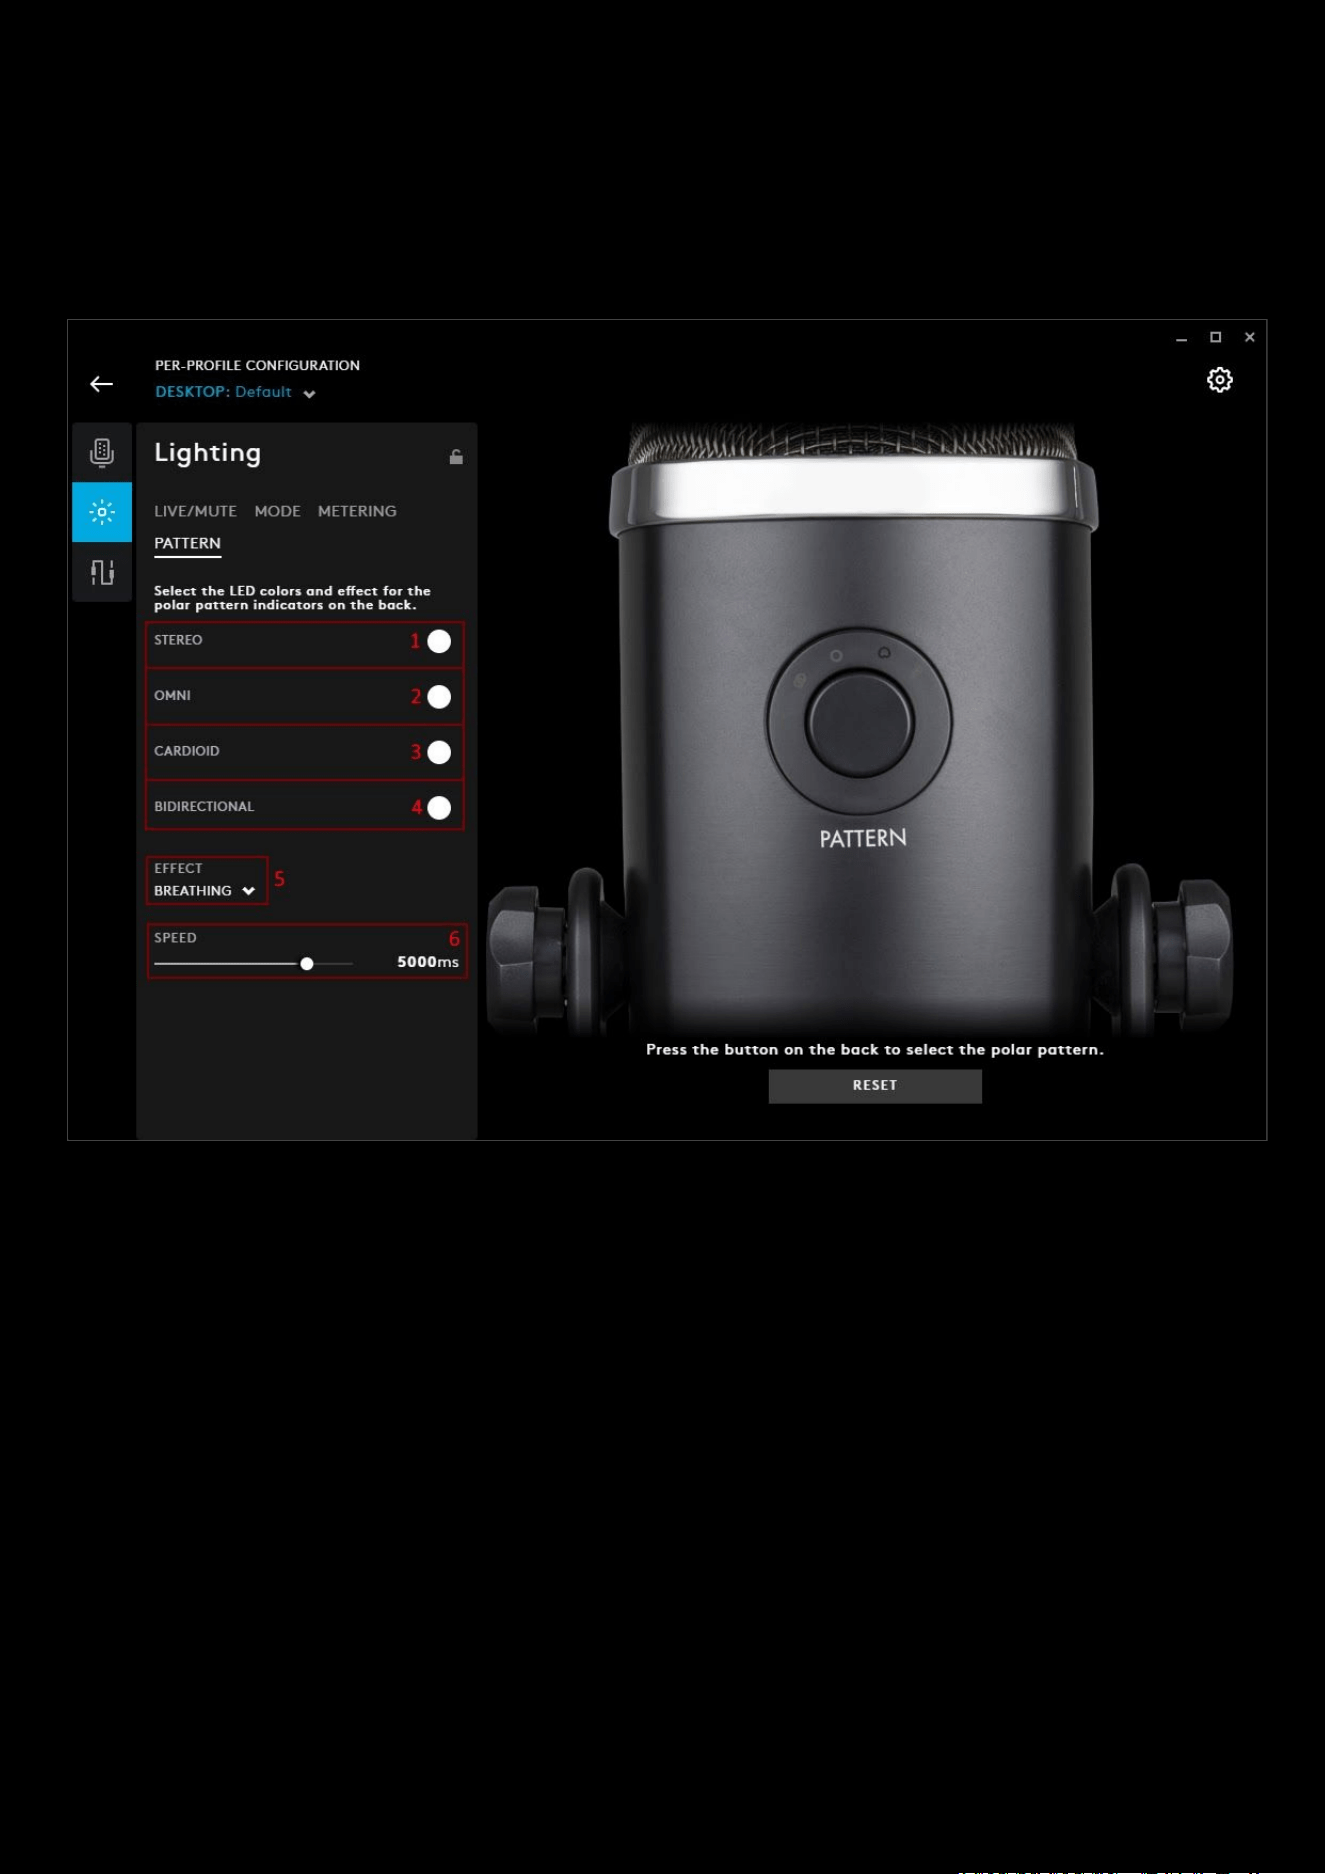
120
NOTE: You can change the color of the LEDs but you can't change which LEDs are assigned to PEAK, HIGH and NORMAL.
So for example, PEAK will always be the 11th METERING LED.
PATTERN
Press the PATTERN button at the back of the device to cycle between the 4 polar patterns: STEREO > OMNI > CARDIOID
> BIDIRECTIONAL > STEREO
1. STEREO. Click STEREO to change the colour of the stereo polar pattern indicator. The color palette will expand,
select a new colour using the Hue and Brightness sliders or select a different swatch
2. OMNI. Click OMNI to change the colour of the omni polar pattern indicator. The color palette will expand,
select a new colour using the Hue and Brightness sliders or select a different swatch
3. CARDIOID. Click CARDIOID to change the colour of the cardioid polar pattern indicator. The color palette will
expand, select a new colour using the Hue and Brightness sliders or select a different swatch
4. BIDIRECTIONAL. Click BIDIRECTIONAL to change the colour of the bidirectional polar pattern indicator. The
color palette will expand, select a new colour using the Hue and Brightness sliders or select a different swatch
5. EFFECT. Choose between FIXED or BREATHING for all polar patterns. If you select BREATHING, then the SPEED
slider will appear.
6. SPEED. Use the SPEED slider to adjust how quickly the effect happens. With 1000ms (1s) is the quickest and
20000ms (20s) is the slowest.

121
How to check your profile activation path and troubleshoot profile switching
G HUB (Windows)
This FAQ covers some issues we see when profiles do not activate when the game/APP is running.
Checking the path of your executable
Some games have a launcher app which has a different executable to the actual game. This can cause some problems
with profile activation, where the profile is activating during the launcher but not when the game is running.
How to check the path
Sometimes we see the launcher for a game is one path and then the actual game executable is another path. So
selecting the launcher one might not work in the long run.
The easiest way is to check the game process with Task Manager
1. Run the APP/game you want to check
2. Once you are in the main APP GUI/playing screen: open Task Manager by pressing CTRL+ALT+DEL and selecting
Task Manager
3. Right click the process that matches your APP/game and choose Open File Location
4. This will run Explorer and open the folder location to the executable. Make a note or copy the path in the profile
settings so you can use this in G HUB’s profile settings
How to add a path to an existing profile
1. Go to the profile page and click on the APP/Game you want to modify
2. With that APP/game highlighted, click the SETTINGS tab
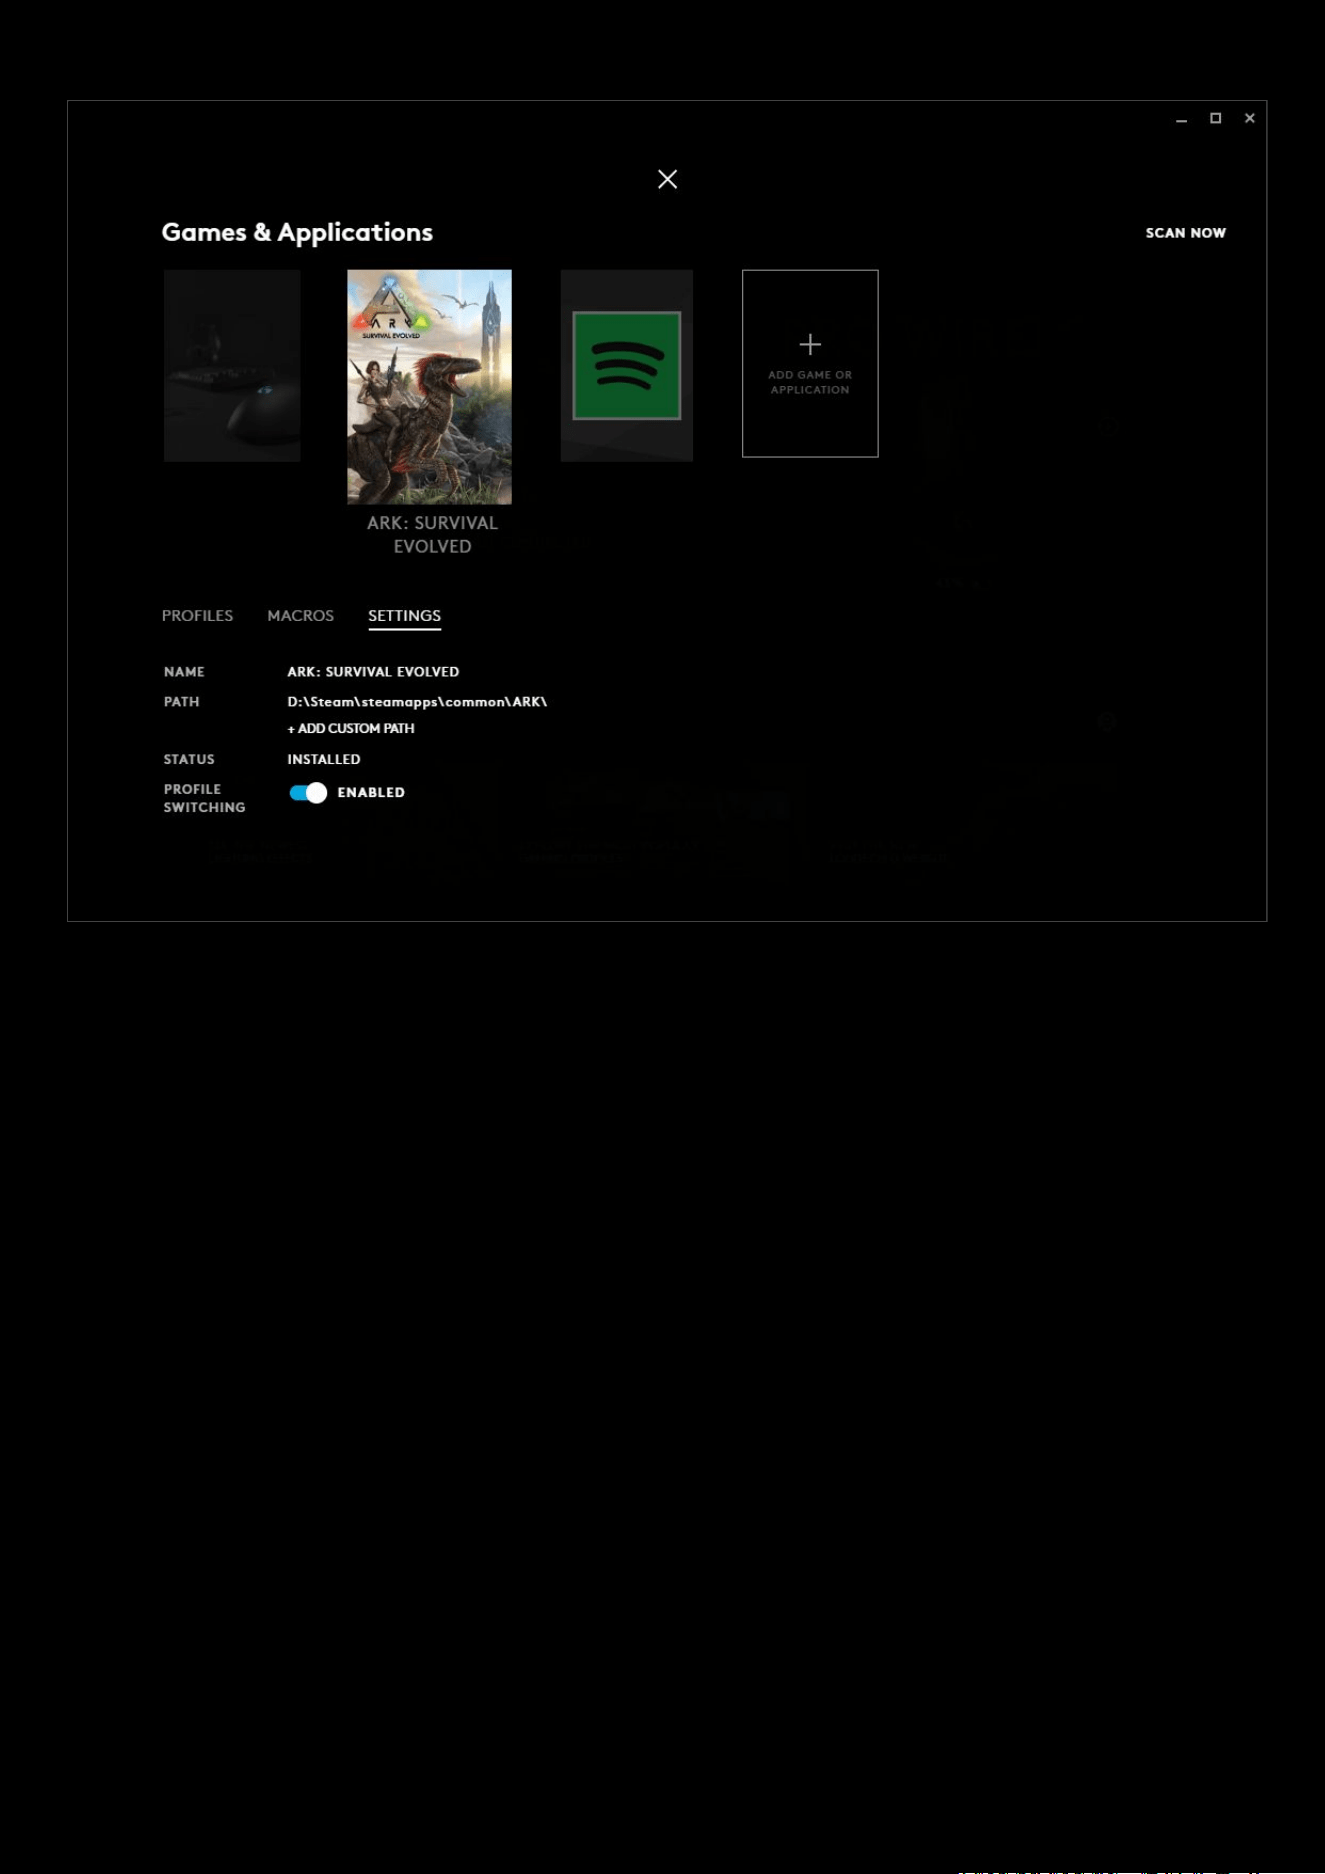
122
You will see the settings information for that profile:
If you look at the PATH
, you can see what executables will activate the profile. If the one you need isn't there, click
+ADD CUSTOM PATH
, use Explorer to navigate to the correct .exe and click the executable to add. You can add more
than 1 path for each Game/APP
NOTE:
You can have more than 1 path in the list and this can be helpful if you have a profile that you want to activate in
multiple APPs.
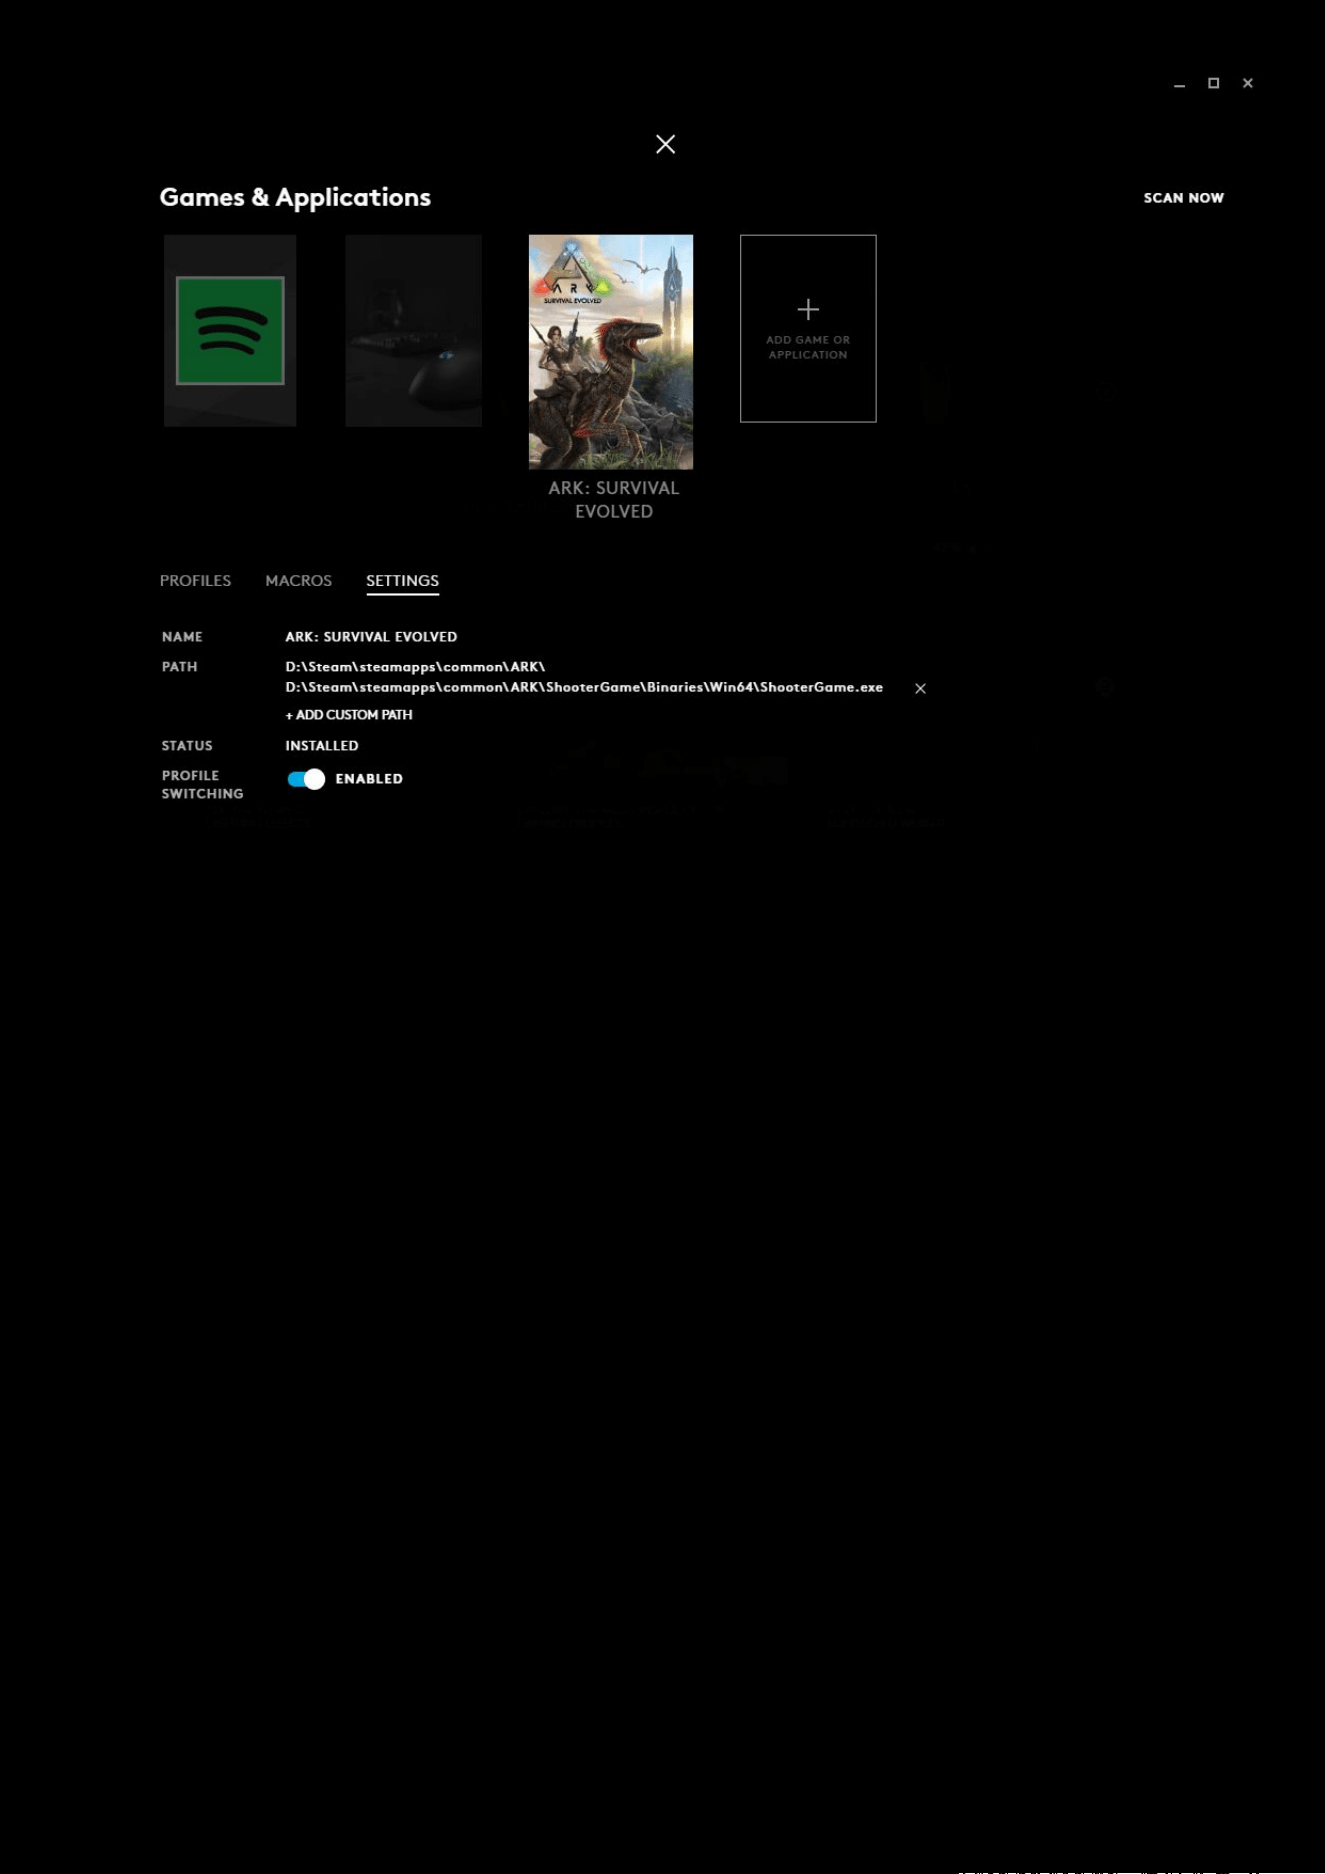
123
You can see in this example we have added another path. This can be especially useful when you
move Steam installation folders for example.