Loading ...
Loading ...
Loading ...
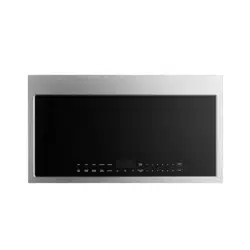
A7. CONNECTING DUCTWORK
House Duct
1. Extend the house duct down to connect to the exhaust adapter.
2. Seal exhaust duct joints using furnace duct tape for high temperature applications
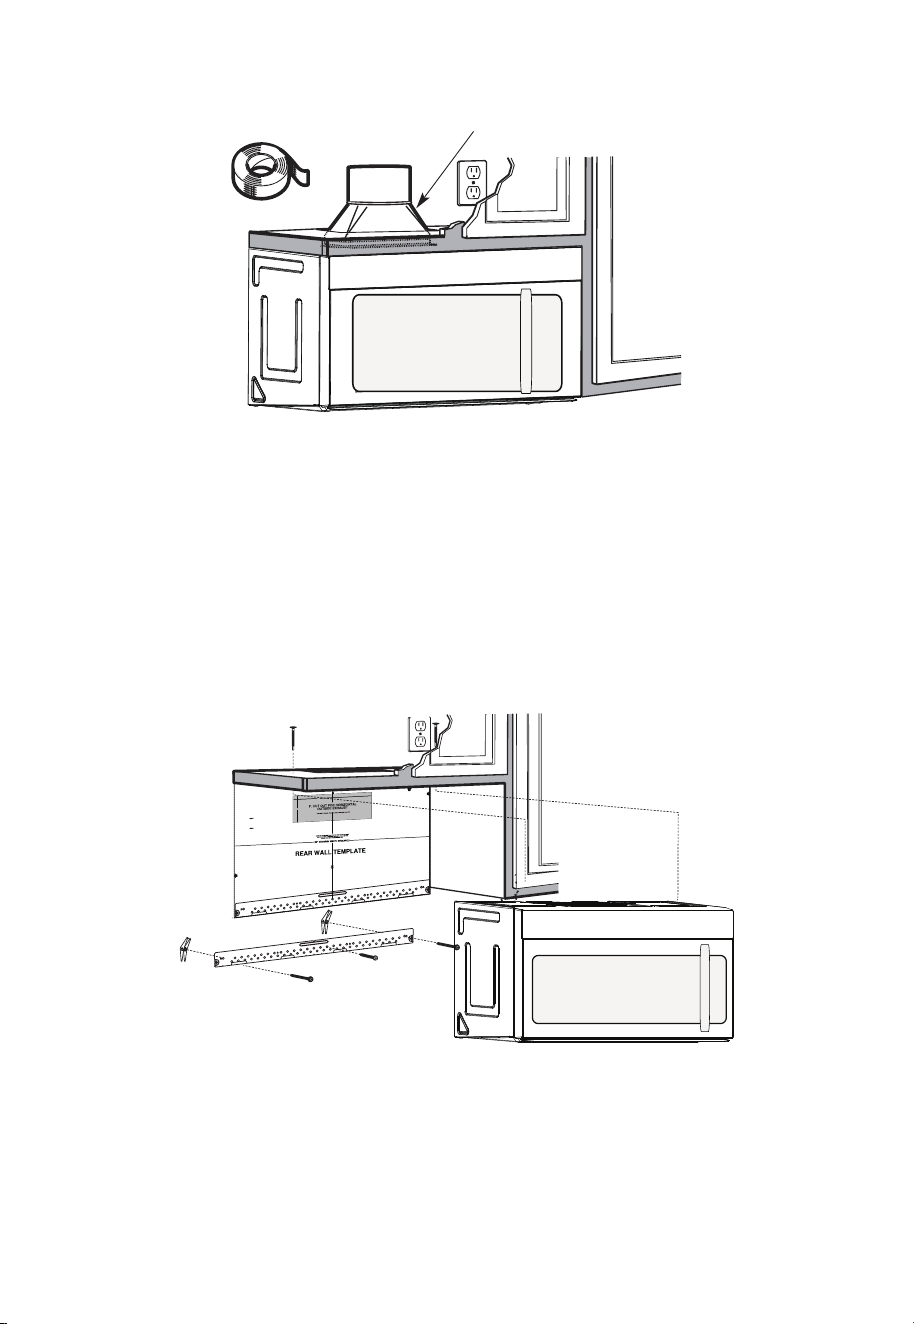
B. OUTSIDE BACK EXHAUST (Horizontal Duct)
INSTALLATION OVERVIEW
B1. Prepare Rear Wall
B2. Remove Blower Plate
B3. Attach Mounting Plate to Wall B4. Prepare Top Cabinet
B5. Adjust Blower
B6. Mount the Microwave Oven
12"
4"
NO
TE
:
REA
D AND F
O
I
T
I
S
V
ER
Y
LLO
I
W
MPO
T
HE
R
D
TA
NT
T
O
IRECTIO
IN THE INSTALLAT
I
O
N
I
NSTRU
CTI
O
N
N
S
S
B
EF
O
RE PR
O
H
T
HTI
W
GN
I
DE
E
C
IS
REAR WA
L
L TEM
PL
A
TE
.
ll Te
mpl
a
te
s
er
v
es
t
o
p
1
ou
a
. Us
mo
u
tle
t.
nti
n
e
a l
T
h
is
R
ea
g
p
r
W
l
a
a
t
e
a
nd
to
lo
ca
te
th
e h
or
iz
o
s
o
n
itio
t
a
n
l e
t
h
xh
e b
au
o
st
t
t
o
m
ioned
to
chec
k tha
t
th
e
t
e
m
pl
at
e
is
p
osit
pl
ark
hol
es
to
ali
gn
wi
th holes
i
n t
he
L
ocat
mounting
RTANT
e and m
:
ate
.
IMP
O
E
AT LEA
THE
CENT
HE LO
CATIO
L
O
C
AT
ERL
INE
ST
.
O
NE STUD
ON EI
F
O
E
DISR
EH
T
SP
AC
E
AREA.
MAR
KT
D TOGGLE
BO
NF
LT
S
O
I
N
R 2 ADD
I
T
THE MO
IO
UN
NA
T
ING
L, EV
EN
L
P
LATE
Y
Trim the
r
e
ar wa
l
l tem
plat
e a
long
the
dott
e
d l
in
e.
k
h
ole
s
to
alig
n w
ith hole
s
in t
he
moun
ti
n
g
Loca
t
e a
n
d
mar
O
RTAN
T
plate.
:
IMP
AT LEA
T
HE CENT
HE
L
O
CATIO
SP
LOCA
T
E
ERLI
N
E
.
I
E
NO
D
U
TSE
NO T
S
T
H
E
R S
ID
E OF
AR
E
A.
MA
RK
ACED
T
T
OG
G
LE B
O
N
F
O
LTS IN
R 2 ADD
I
TION
T
H
E
M
O
UN
A
TING
L,
EV
ENL
P
LATE
Y
Trim the rear
w
al
l t
e
m
pl
a
t
e
a
long
t
he dotted
li
n
e.
3/8"
TO
EDGE
2. L
o
c
c
c
u
a
te
r
a
e
a
t
e
ly
v
nd
el
.
m
a
r
k a
t leas
t
o
d
u
t
s
e
n
o
n
th
r
o t
f
el
e
i
ght
si
d
e of
th
e c
ent
e
r
line
.
r
It is im
port
a
nt
to
us
e
at
l
ea
st
o
n
e
wo
od
sc
rew
mo
ro
unte
d
wa
v
fi
e.
r
M
ml
y
ar
i
k
n
t
a
w
s
o
a
t
ud
d
diti
to
s
up
p
ona
l,
ev
or
en
t
the
w
ly
s
e
pa
ight
ced
e mic
f
e
o
r
s
i
n
t
he
t
h
s
e
u
m
p
pl
ar
k
ied to
ed
l
o
g
c
g
le bo
l
ati
on
t
s
s
.
.
Wh
er
e t
her
e is
lo
o
f
a
c
th
3. Dr
a
th
s
i
tio
at
ll
tu
n
h
d
s
ol
d
ri
l
l
a
3/1
6"
h
ol
e fo
r
w
oo
d
sc
r
e
ws.
F
o
r
h
ol
es
do
,
ht
i
w
p
u
e
a
st
u
d,
d
ril
l
5
/8
" h
ol
es
fo
r
e b
o
n
o
lts
t
li
n
.
NO
T
t
oggl
IN
STAL
L
T
H
E
MO
U
N
TI
NG
PL
ATE
AT
4.
R
e
T
m
HI
S
T
D
O
th
IME.
e te
o
v
e
mpla
te fr
omth
e r
ea
r
wall
.
5.R
e
v
ie
w
the In
s
ta
ll
a
tsnIn
o
i
t r
uc
t
i
on b
o
o
k
for y
o
ur
ins
ta
lla
t
io
n s
it
ua
tio
n
.
Dar
le
vu
el
t
a
ala
ho
japa
raco
ns
ul
tar
la
v
e
rs
i
ón
en
Espa
ño
l.
IMPORTANT NOTES:
1. Make sure the screws for the blower motor and blower plate are securely tightened
when they are reinstalled. This will help pre-vent excessive vibration.
2. Make sure the motor wiring has been properly routed and se-cured and that the wires
are not pinched.
EN-33
Loading ...
Loading ...
Loading ...