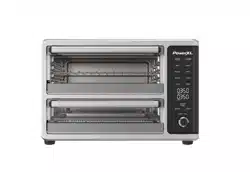
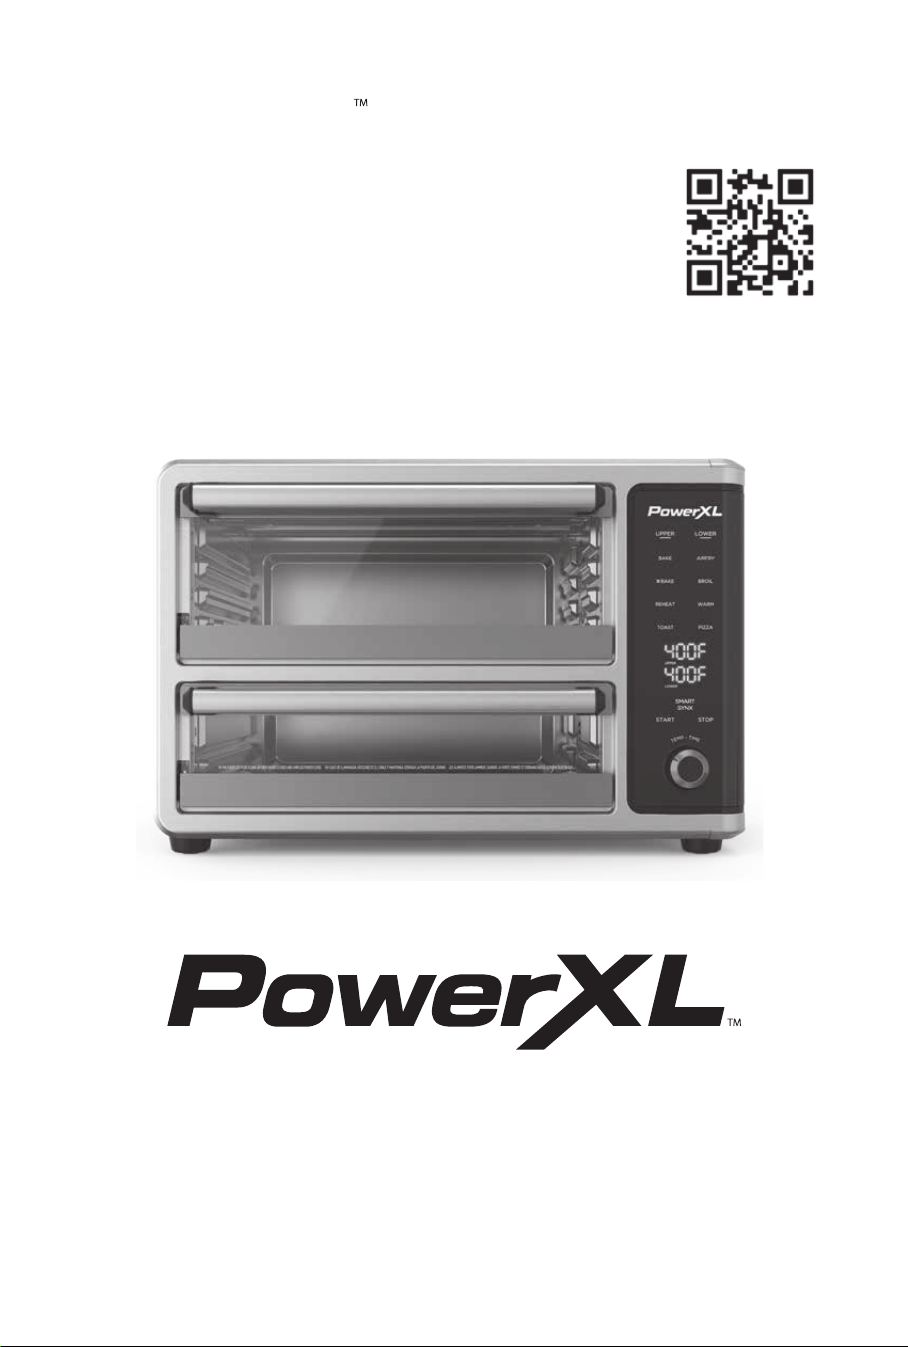
SmartSynx
Dual Door Oven
Horno de Doble Puerta
OWNER’S MANUAL
MANUAL DE USO Y CUIDADO
MODEL/MODELO:
TO67D5-2SP
Product may vary slightly from what is illustrated.
El producto puede variar ligeramente de lo que se ilustra.
Scan the code for more recipes
Escanea el código para más recetas
TO67D5-2SP_30986_ES_IB_D.indd 1TO67D5-2SP_30986_ES_IB_D.indd 1 7/2/24 8:23 AM7/2/24 8:23 AM

2
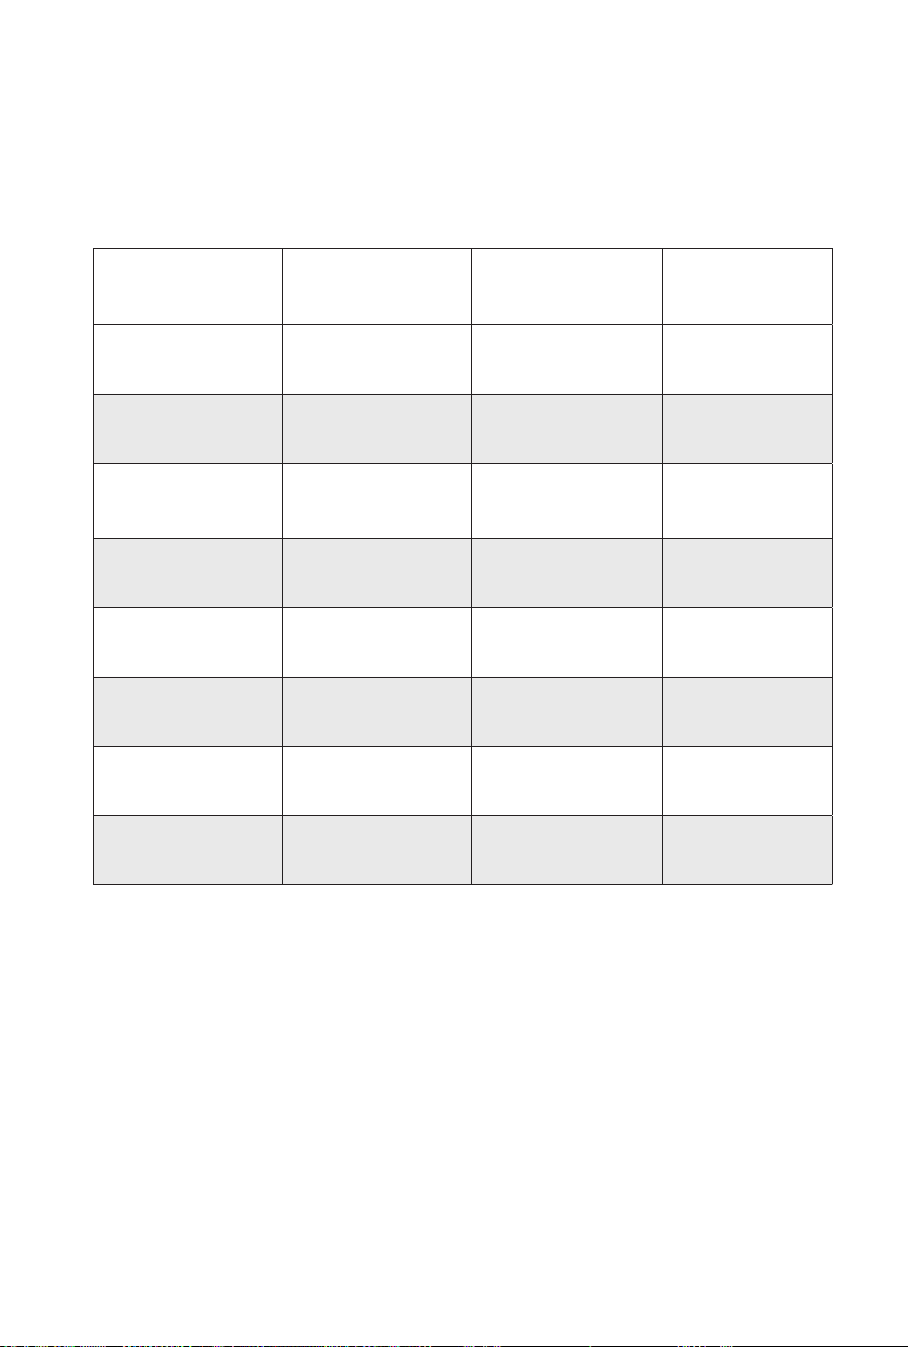
Table of Contents
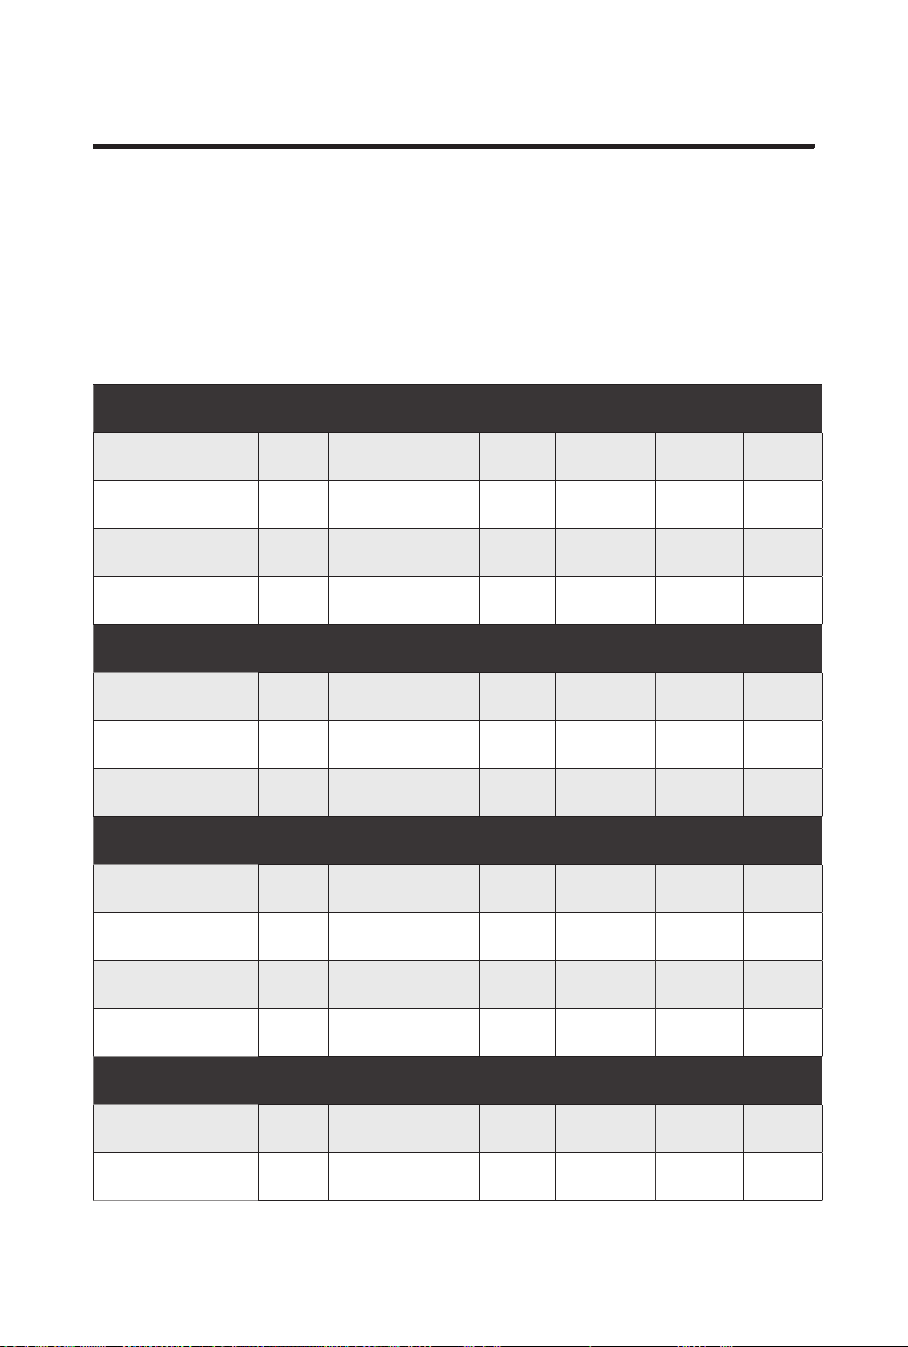
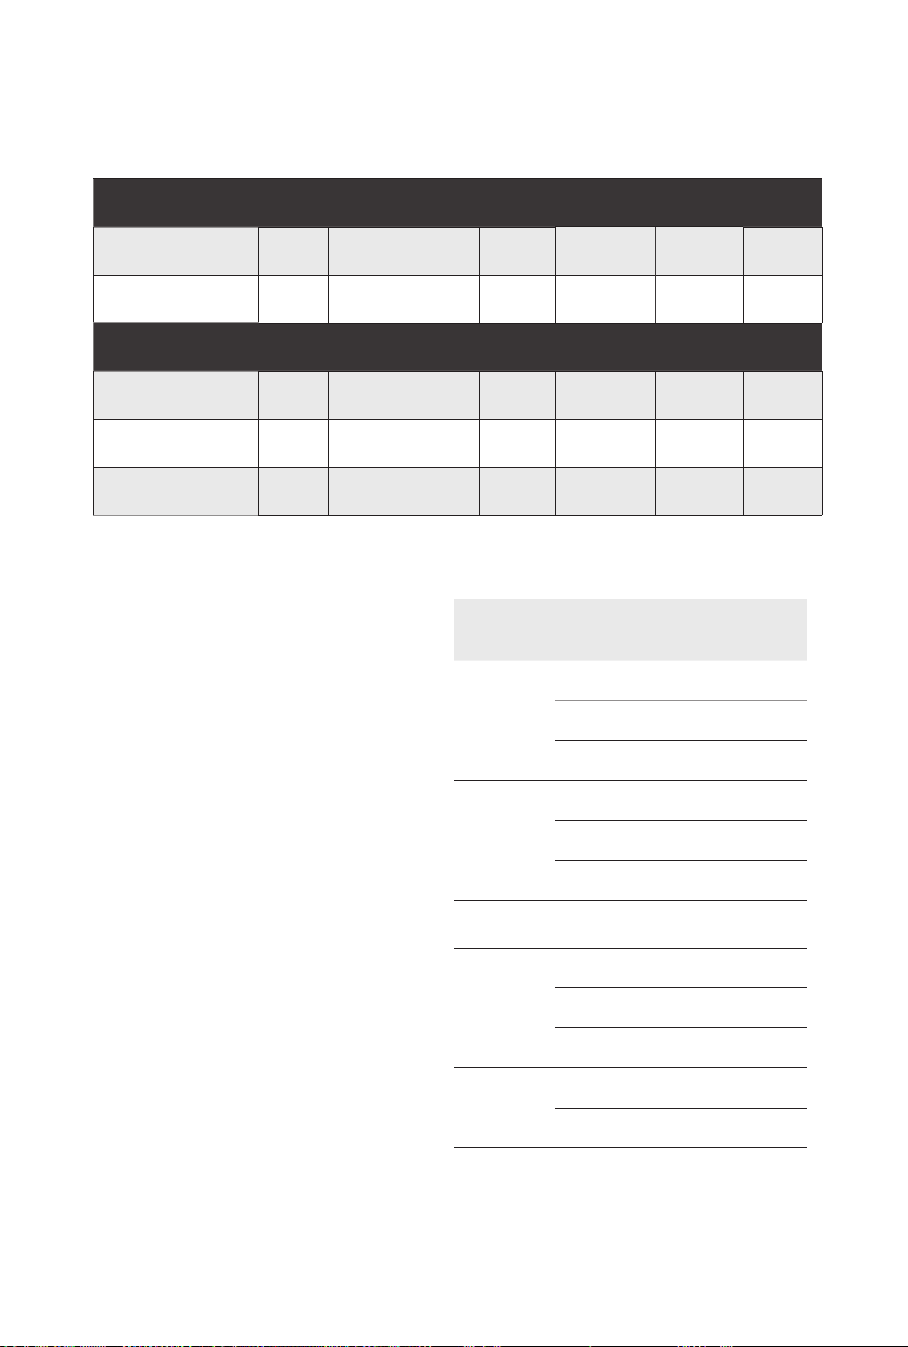
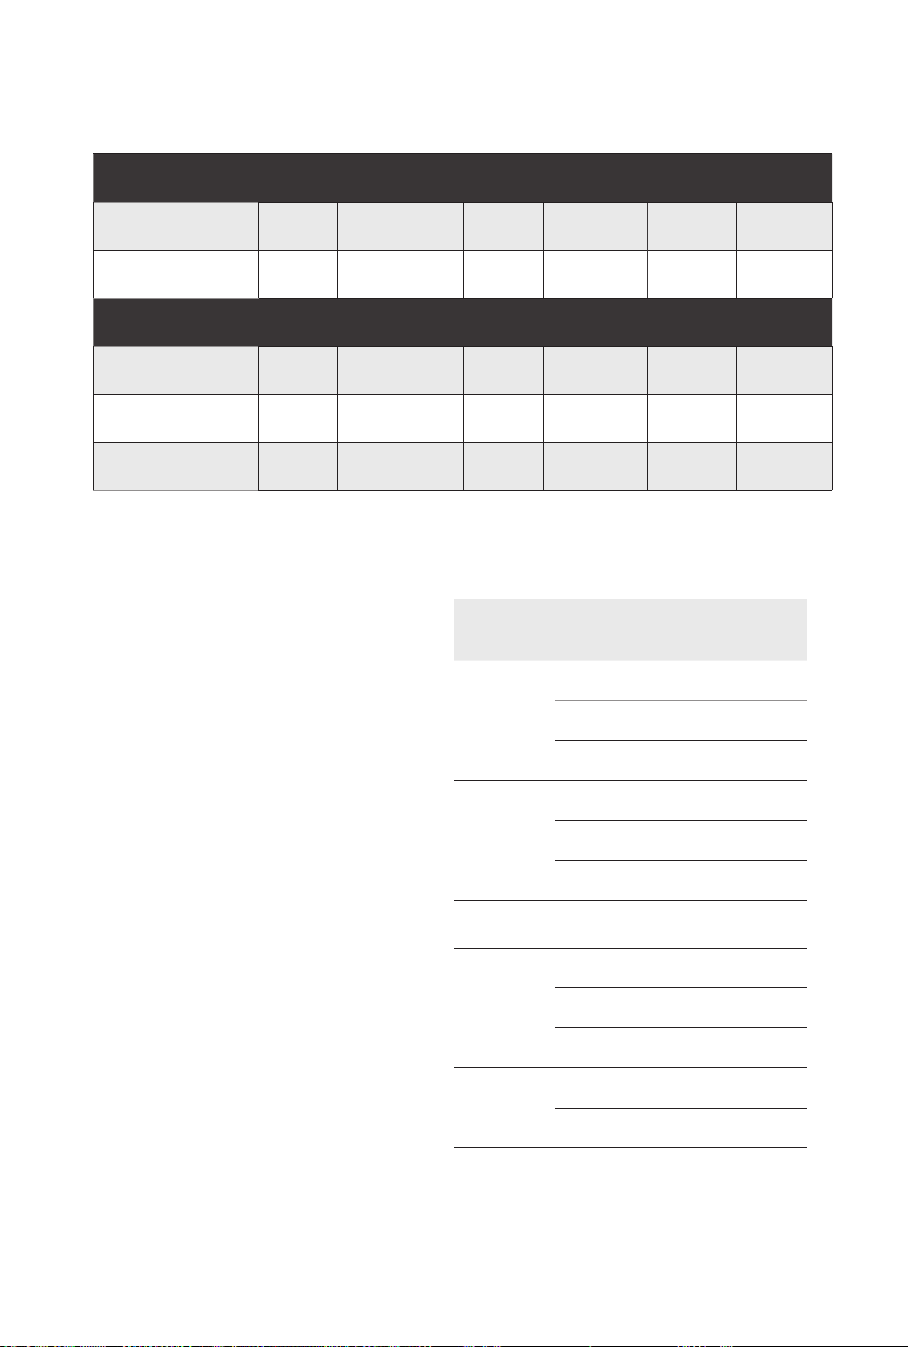
Appliance Specications
Model Numbers
TO67D5-2SP
Wattage
1750W
Temperature Range
150° F–450° F
Exterior Dimensions
18.54” (W) x 16.09” (D) x 12.38” (H)
Upper Oven Dimensions
12.7” (W) x 13” (D) x 4.96” (H)
Lower Oven Dimensions
12.7” (W)” x 13” (D) x 3.79” (H)
Power Cord Length
24”
Plug Type
3-prong
IMPORTANT SAFEGUARDS ....................................................3
Quick Start Guide ................................................................6
Parts & Accessories ............................................................10
Using the Control Panel ....................................................12
Instructions for Use ...........................................................14
General Cooking Guidelines ..............................................16
Cleaning & Storage ...........................................................18
Troubleshooting ...............................................................19
TO67D5-2SP_30986_ES_IB_D.indd 2TO67D5-2SP_30986_ES_IB_D.indd 2 7/2/24 8:23 AM7/2/24 8:23 AM

3
1. READ ALL INSTRUCTIONS.
2. This appliance is not intended for use by
people (including children) with reduced
physical, sensory, or mental capabilities or lack
of experience and knowledge unless they are
given supervision or instruction concerning
use of the appliance by a person responsible
for their safety.
3. Close supervision is necessary when any
appliance is used by or near children.
4. DO NOT place on or near a hot gas or electric
burner or in a heated oven.
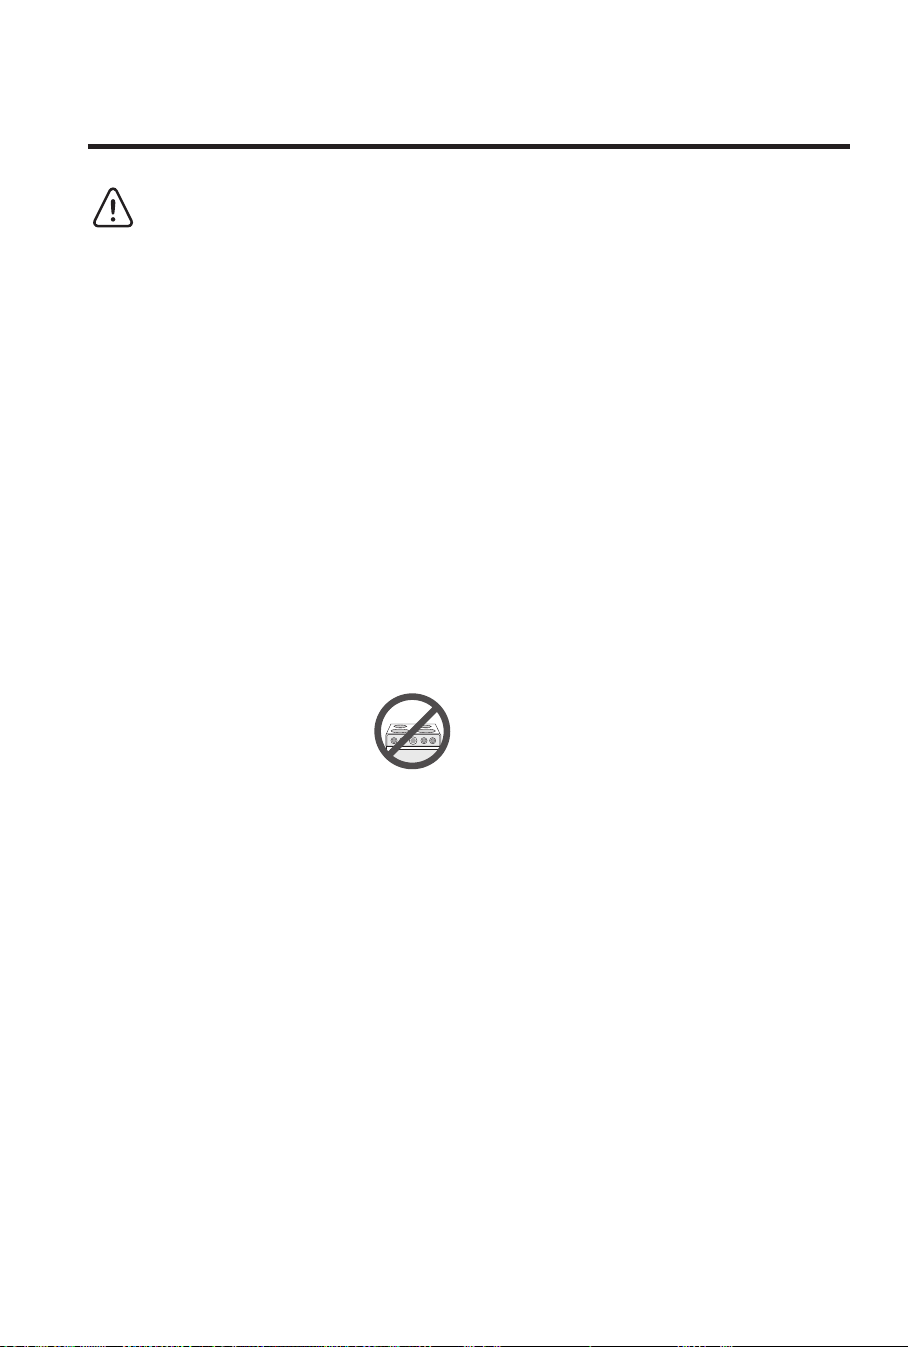
5. DO NOT place your appliance on a
cooktop even if the cooktop is cool
because you could accidentally
turn the cooktop on, causing a
re, damaging the appliance, your
cooktop, and your home.
6. DO NOT place or use this appliance
near water.
7. When cooking, DO NOT place the appliance
against a wall or within 5inches of other
appliances. DO NOT place anything on top of
the appliance.
8. A re may occur if this appliance is covered
by or touching ammable material, including
curtains, draperies, walls, and the like, when
in operation.
9. DO NOT use outdoors.
10. DO NOT place the appliance in any container
or small conned space while the appliance is
heated or in operation.
11. ALWAYS operate the appliance on a
horizontal surface that is level, stable, and
noncombustible with adequate space for
airow.
12. Before using your appliance on any
countertop surface or other fragile surface,
such as a glass tabletop, check with your
countertop manufacturer or installer for
recommendations about using appliances
on your surfaces. Some manufacturers and
installers may recommend protecting your
surface by placing a hot pad or trivet under
the appliance for heat protection. Your
manufacturer or installer may recommend
that hot pans, pots, or electrical appliances
should not be used directly on top of the
countertop. If you are unsure, place a trivet or
hot pad under the appliance before using it.
13. DO NOT operate any appliance if it has a
damaged cord or plug, if it is not working
properly, or if it has been damaged or
dropped. Return the appliance to an
authorized service facility for examination,
repair, or adjustment.
14. This appliance should be serviced only
by qualied service technicians. Contact
Customer Service using the information
located on the back of this manual.
15. NEVER immerse the main unit housing in
water. If the appliance falls or accidentally
becomes immersed in water, unplug
the appliance from the electrical outlet
immediately. Do not reach into liquid if the
appliance is plugged in and immersed.
16. To protect against electrical shock, DO NOT
immerse the cord or plugs or expose the
electrical components to water or other liquid.
17. DO NOT plug in the power cord or operate
the appliance controls with wet hands.
18. To disconnect, press the Stop Button to turn
the appliance off and then remove the plug
from the electrical outlet.
WARNING
When using electrical appliances, basic safety precautions should be followed,
including the following:
PREVENT INJURIES!
CAREFULLY READ ALL INSTRUCTIONS BEFORE USE!
IMPORTANT SAFEGUARDS
TO67D5-2SP_30986_ES_IB_D.indd 3TO67D5-2SP_30986_ES_IB_D.indd 3 7/2/24 8:23 AM7/2/24 8:23 AM

4
19. MAKE SURE the appliance is properly
plugged into a dedicated electrical outlet
without any other appliances on the
same outlet.
20. Keep the appliance and its power cord out of
the reach of children when it is in operation or
in the cooling down process.
21. NEVER connect this appliance to an
external timer switch or separate remote-
control system.
22. NEVER plug the appliance into an outlet below
the surface where the appliance is placed.
23. DO NOT let the power cord hang over
the edge of a table or counter or touch
hot surfaces.
24. DO NOT clean with metal scouring pads.
Pieces can break off the pad and touch
electrical parts, creating risks of electric shock.
25. Should the appliance emit smoke, UNPLUG
IMMEDIATELY and wait for smoking to
stop before handling the appliance. Allow
the appliance to cool and wipe excess oil and
grease from the appliance.
26. Cooking appliances should be positioned
in a stable location with the handles (if any)
positioned to avoid the spillage of hot liquids.
27. NEVER operate the appliance unattended.
28. NEVER rest anything on the appliance’s door
while it is open.
29. DO NOT leave the appliance’s door open for
an extended period.
30. ALWAYS ensure that nothing is protruding
out of the appliance before closing the
appliance’s door.
31. ALWAYS close the appliance’s door gently;
NEVER slam the door closed. ALWAYS use
the handle when opening and closing the
appliance’s door.
32. NEVER operate the appliance with the
door open. The use of accessory attachments
not recommended by the appliance
manufacturer may cause injuries.
33. Avoid touching moving parts.
34. Unplug the appliance from the electrical
outlet when not in use and before cleaning.
Allow 30minutes to cool before handling,
putting on or taking off parts, cleaning,
or storing.
35. DO NOT cover the air vents. Doing so will
prevent even cooking and may overheat or
damage the appliance.
36. When in operation, hot air and steam are
releasedthrough the Hot Air Outlet Vent.
KEEPYOUR HANDS AND FACE at a safe
distance from the Hot Air Outlet Vent and
keepthe Vent clear of obstructions.
37. While cooking, the internal temperature
of theappliance reaches several hundred
degreesFahrenheit. To avoid personal injury,
NEVER place your hands inside the appliance
unless it is thoroughly cooled.
38. The appliance’s outer surfaces and accessories
may become hot during use. WEAR OVEN
MITTS when handling the appliance during
and after use and to protect against hot steam
and air released when opening the appliance.
39. DO NOT touch hot surfaces. Use handles
orknobs.
40. EXTREME CAUTION must be used when
moving an appliance containing hot oil
or other hot liquids or when removing
accessories or disposing of hot grease.
This appliance is not intended for deep-
frying food.
41. Oversized food, metal foil packages, or
utensilsMUST NOT be inserted in the
appliance as they may involve a risk of re or
electric shock. DO NOT overll the appliance.
42. DO NOT store any materials other than
manufacturer-recommended accessories in
this appliance when not in use.
43. EXTREME CAUTION should be exercised
when using containers constructed of
materials other than metal and glass.
44. DO NOT place any of the following materials
in the appliance: paper, cardboard, or plastic.
45. NEVER pour oil into the appliance or
accessories. Fire and personal injury
could result.
46. DO NOT cover the Drip Tray or any part
of the oven with metal foil. This will cause
overheating of the oven.
47. DO NOT use aerosol cooking sprays. These
sprays will build up on cookware and become
difcult to remove while reducing the nonstick
cooking performance.
48. DO NOT expose the appliance to corrosive
chemicals or vapors.
49. DO NOT use sharp utensils with the
appliance. These implements can damage the
appliance’s protective nonstick coating.
TO67D5-2SP_30986_ES_IB_D.indd 4TO67D5-2SP_30986_ES_IB_D.indd 4 7/2/24 8:23 AM7/2/24 8:23 AM

5
SAVE THESE INSTRUCTIONS –
FOR HOUSEHOLD USE ONLY
Extension Cord
1. A short power supply cord is provided to reduce
the risk resulting from becoming entangled in or
tripping over a longer cord.
2. Extension cords are available and may be used if
care is exercised in their use.
3. If an extension cord is used:
a. The marked electrical rating of the extension
cord should be at least as great as the
electrical rating of the appliance;
b. If the appliance is of the grounded type, the
extension cord should be a grounding-type
3-wire cord.
c. The cord should be arranged so that it will
not drape over the countertop or tabletop
where it can be pulled on by children or
tripped over unintentionally.
Electric Power
This appliance should be operated on a dedicated
electrical outlet. If the electrical outlet is overloaded
with other appliances, your new appliance may not
operate properly.
Automatic Shut-Off
The appliance has a built-in shut-off device that
will automatically shut off the appliance when the
cooking time has completed. You can manually
switch off the appliance by pressing the Stop Button.
The fan might continue running for 10–20seconds
to cool down theappliance.
Overheating Protection
Should the inner temperature control system fail,
the overheating protection system will be
activated and the appliance will not function.
Should this happen, unplug the appliance and
contact customer service using the information in
the back of this manual.
50. This appliance is for home use only. If the
appliance is used improperly or for professional
or semi-professional purposes or if it is not
used according to the instructions in the user
manual, the guarantee becomes invalid and
Empower Brands, LLC will not be held liable
for damages. DO NOT use this appliance for
anything other than its intended use.
51. Children should be supervised to ensure that
they do not play with the appliance.
52. The appliance is not intended to be operated
by means of an external timer or separate
remote-control system.
TO67D5-2SP_30986_ES_IB_D.indd 5TO67D5-2SP_30986_ES_IB_D.indd 5 7/2/24 8:23 AM7/2/24 8:23 AM
6
Pick an Oven
QUICK START GUIDE
Upper Oven
Lower Oven
Both!
Three rack locations with eight cooking functions.
If you’re only cooking in one chamber, use this one.
It is also the best oven for baked items like desserts, pastries, and pizza.
Two rack locations with six cooking functions.
This chamber is great for cooking sides while your main course cooks and
is especially good for air frying.
SmartSynx
TM
: Finish cooking in both ovens at the same time.
You can also cook in both ovens at the same time without using the
SmartSynx
TM
feature.
Upper
Lower
TO67D5-2SP_30986_ES_IB_D.indd 6TO67D5-2SP_30986_ES_IB_D.indd 6 7/2/24 8:23 AM7/2/24 8:23 AM
7
Pick a Function
QUICK START GUIDE
Bake
Great for cooking baked goods, like
cakes and casseroles, without using the
convection fan.
Air Fry
Surrounds food like French fries, chicken
wings, and onion rings with a vortex of
heat to get similar results to deep frying
without using all the oil.
Convection Bake
Bakes food while cycling the fan on and o
– perfect for food like cookies and pastries.
Broil
Especially good for broiling fish and food
with cheese on top, like garlic bread, from
the top at a high heat.
Reheat
Reheats leftovers quickly and evenly.
Warm
Keeps your food warm. When cooking in
both ovens, use the lower oven for WARM
function.
Toast*
Toasts bread, bagels, and more to your
desired level.
Pizza*
Cooks fresh or frozen pizza with gooey
cheese and golden crust.
* The toast and pizza functions are only
available in the Upper Oven.
TO67D5-2SP_30986_ES_IB_D.indd 7TO67D5-2SP_30986_ES_IB_D.indd 7 7/2/24 8:23 AM7/2/24 8:23 AM
8
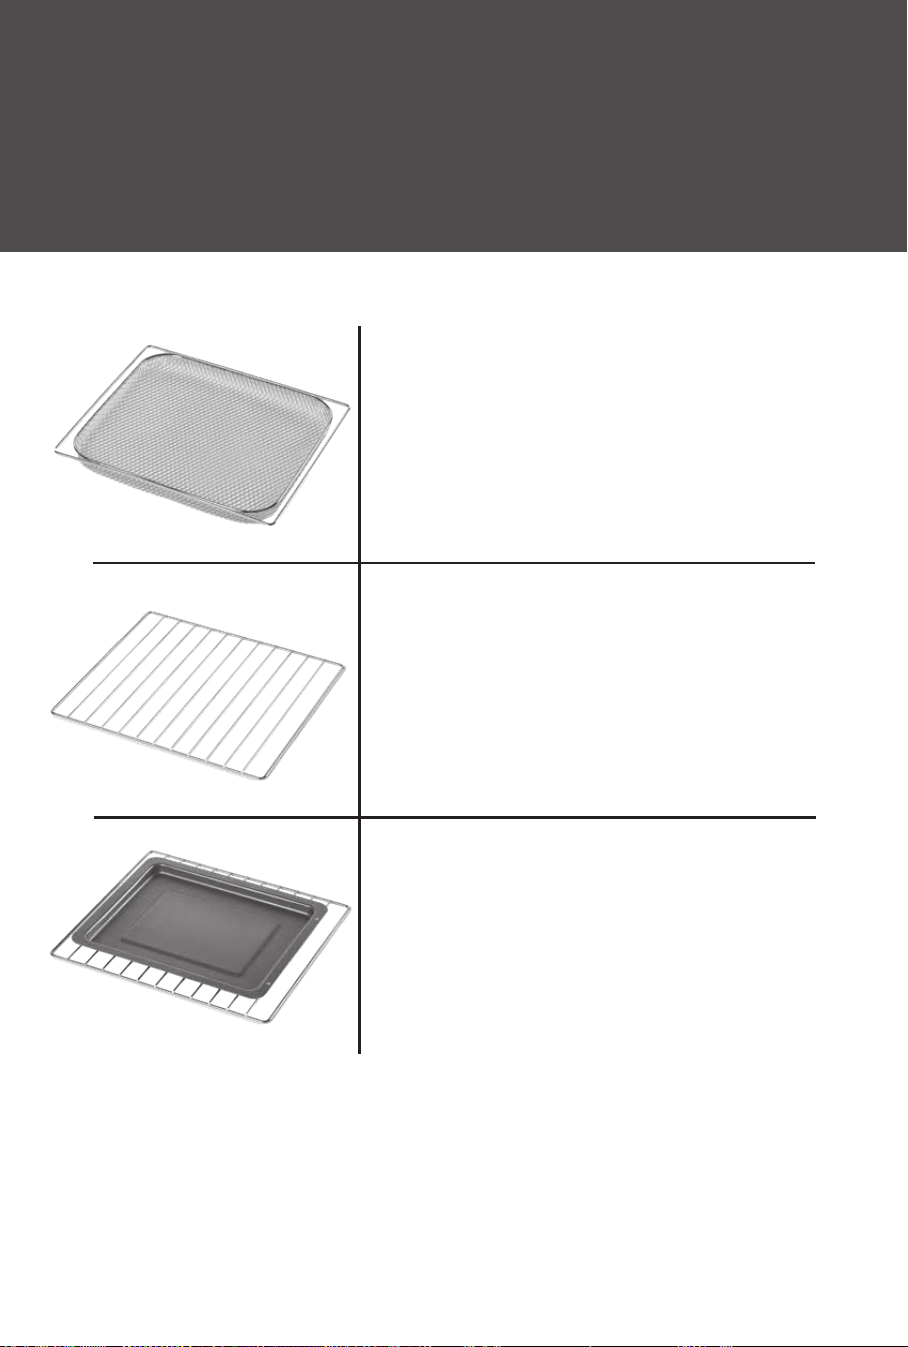
Pick The Best Accessory
QUICK START GUIDE
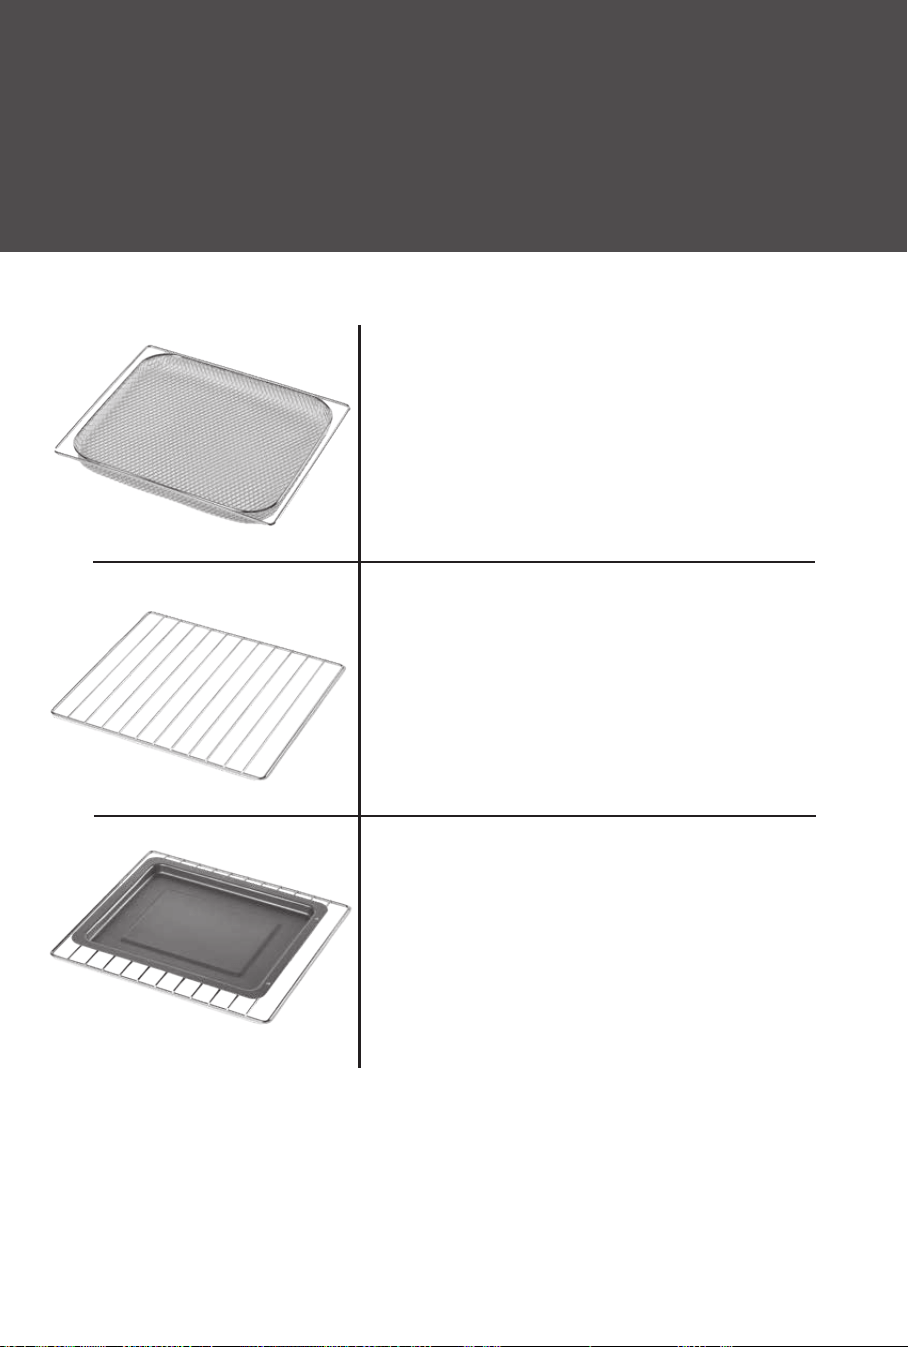
Crisper Tray
The holes in the mesh Crisper Tray let you
surround your food with hot air.
Best Used with Functions: Air Fry
Optimal Rack Locations:
Upper Oven: Middle
Lower Oven: Top
Baking Pan
Sits on top of the Oven Rack.
Best Used with Functions: Bake, Convection
Bake, Pizza
Optimal Rack Locations:
Upper Oven: Middle
Lower Oven: Bottom
Oven Rack
Traditional oven-style cooking rack.
Best Used with Functions: Warm, Broil, Reheat,
Toast
Optimal Rack Locations:
Upper Oven: Top (Broil Only), Middle, Bottom
Lower Oven: Top (Broil Only), Bottom
TO67D5-2SP_30986_ES_IB_D.indd 8TO67D5-2SP_30986_ES_IB_D.indd 8 7/2/24 8:23 AM7/2/24 8:23 AM

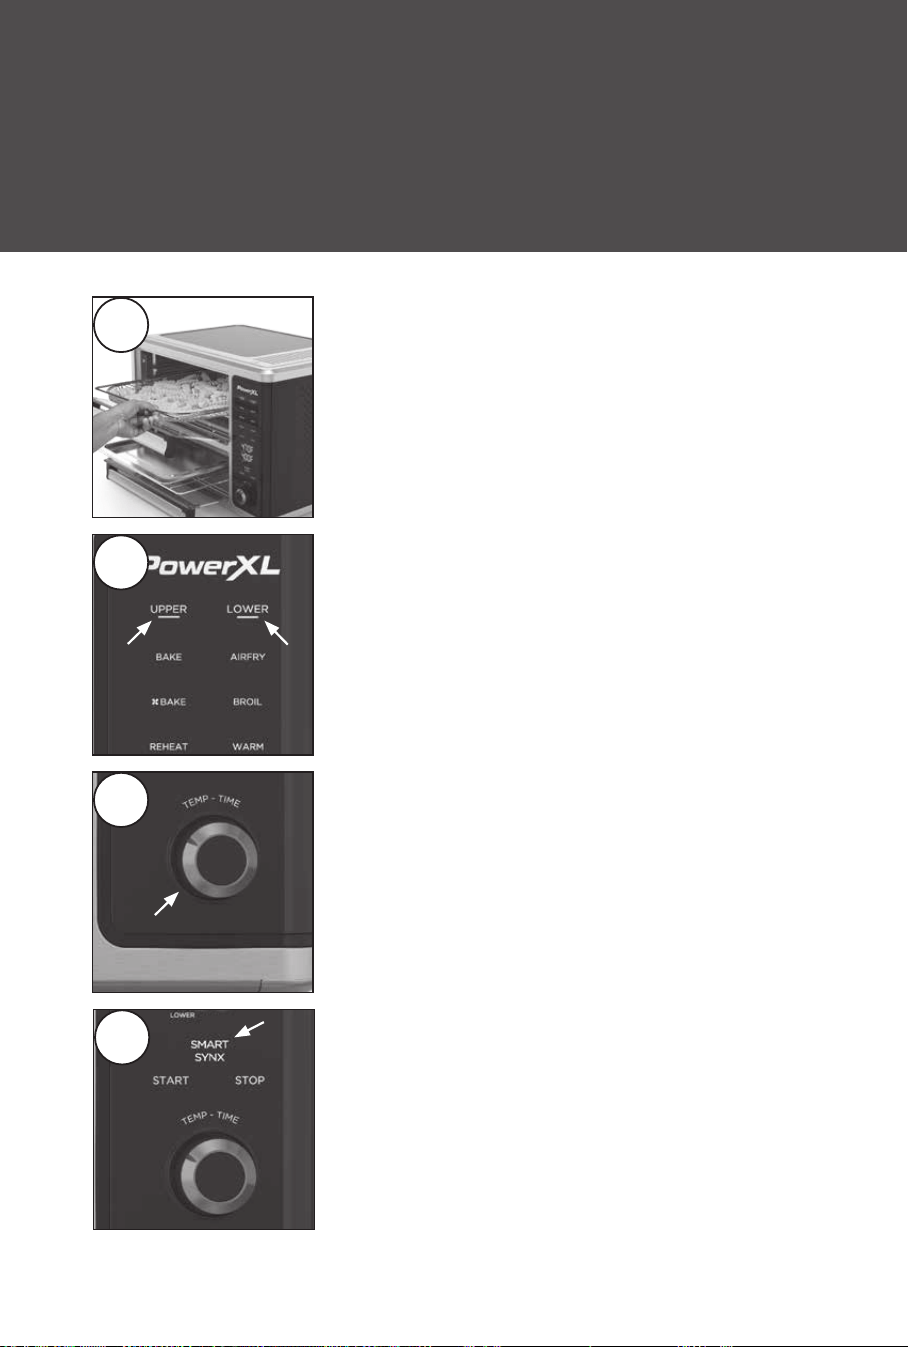
9
Cook Your First Meal with SmartSynx
TM
Technology!
QUICK START GUIDE
Place food on the accessories that best suit your
recipe. Slide the accessories into the optimal rack
locations in each oven.
1
See the “Instructions for Use” section for detailed operating instructions.
If you want to adjust the cooking time or
temperature, turn the Control Knob to adjust.
Press the Control Knob to toggle between the
cooking time and temperature.
TIP: Cooking times can vary slightly when cooking
in both ovens at once. When cooking in both ovens
simultaneously, add a few minutes to the cooking
time and keep an eye on your food while it cooks.
3
Press the Upper Oven Button. Then, press your
desired cooking function for the Upper Oven.
Press the Lower Oven Button. Then, press your
desired cooking function for the Lower Oven.
2
Press the SmartSynx
TM
Button to start the cooking
process. The oven with the longer cooking time
will start cooking first. When the cooking times of
both chambers are the same, the second oven will
begin cooking. Both ovens will finish cooking at the
same time.
4
TO67D5-2SP_30986_ES_IB_D.indd 9TO67D5-2SP_30986_ES_IB_D.indd 9 7/2/24 8:23 AM7/2/24 8:23 AM
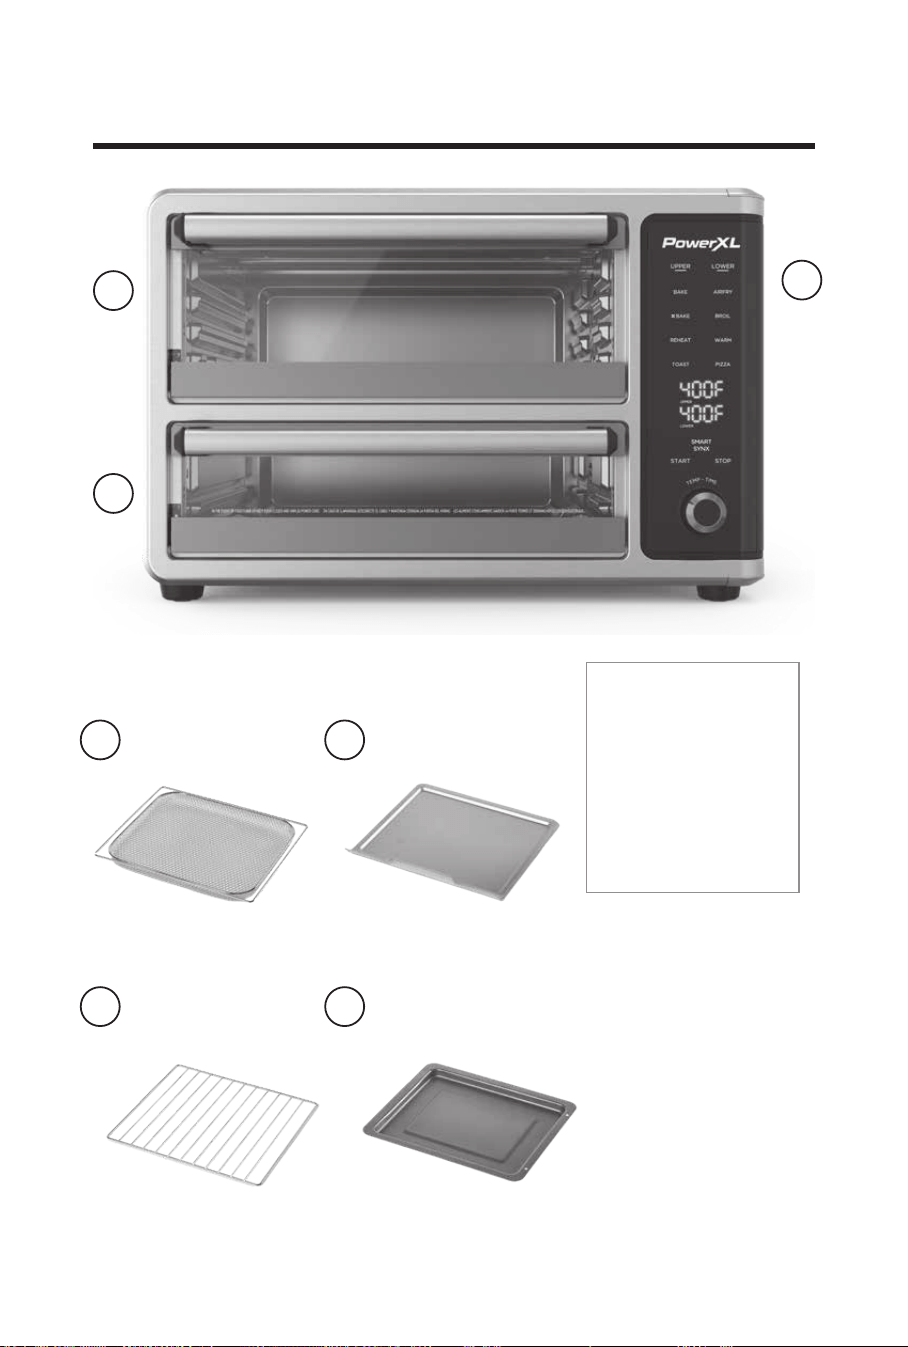
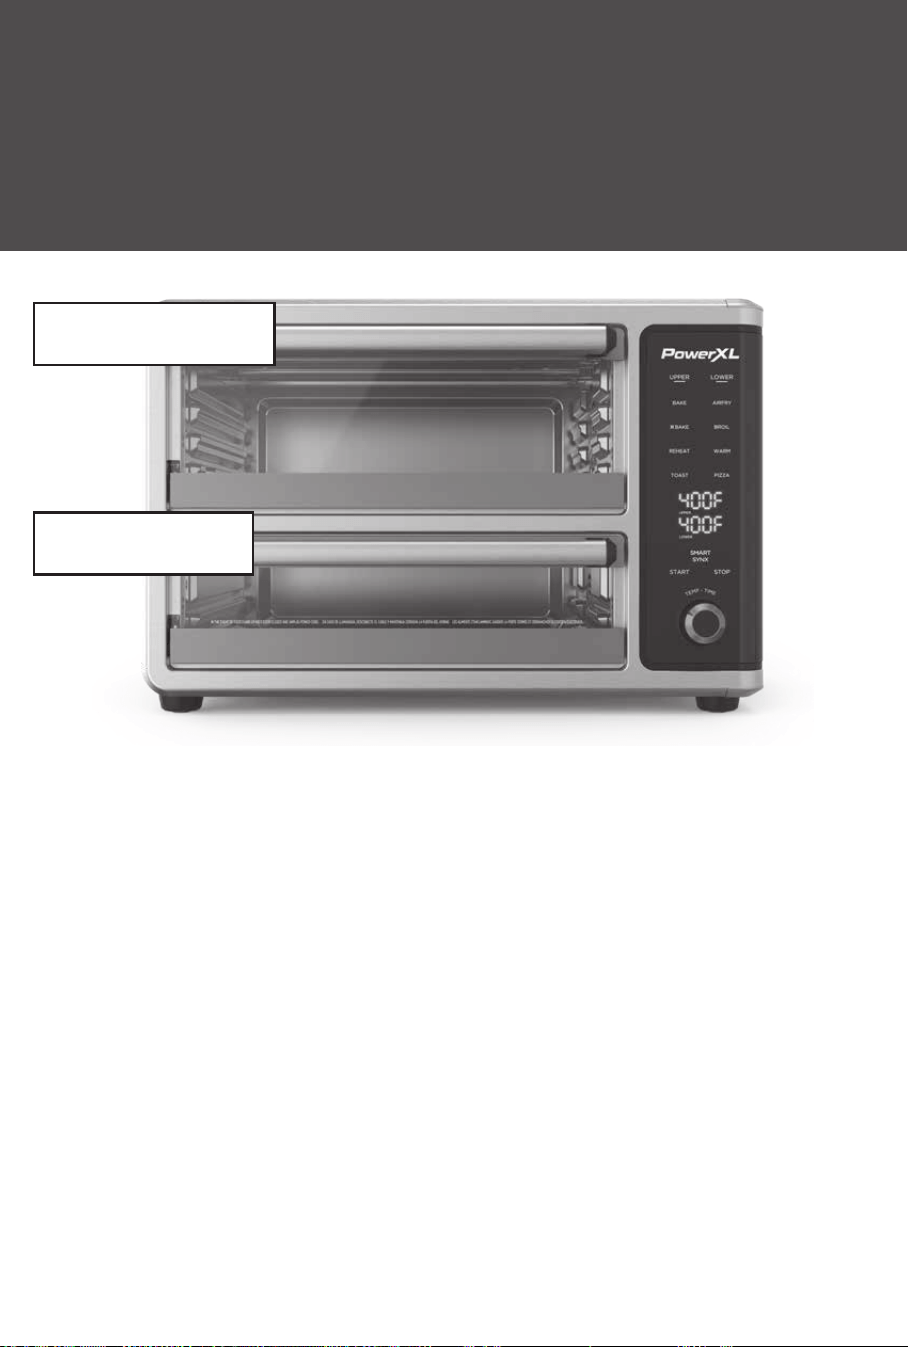
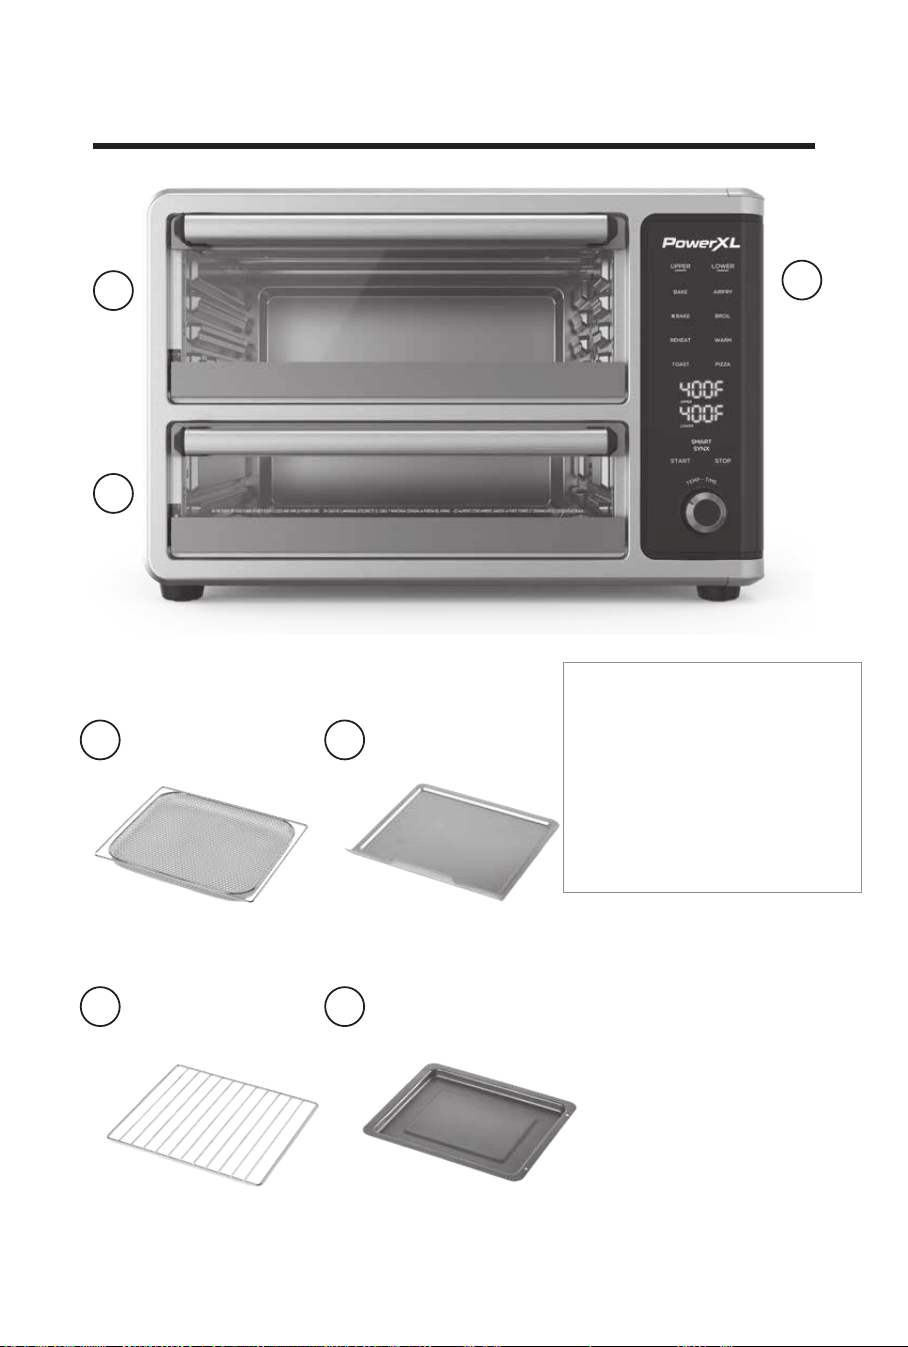
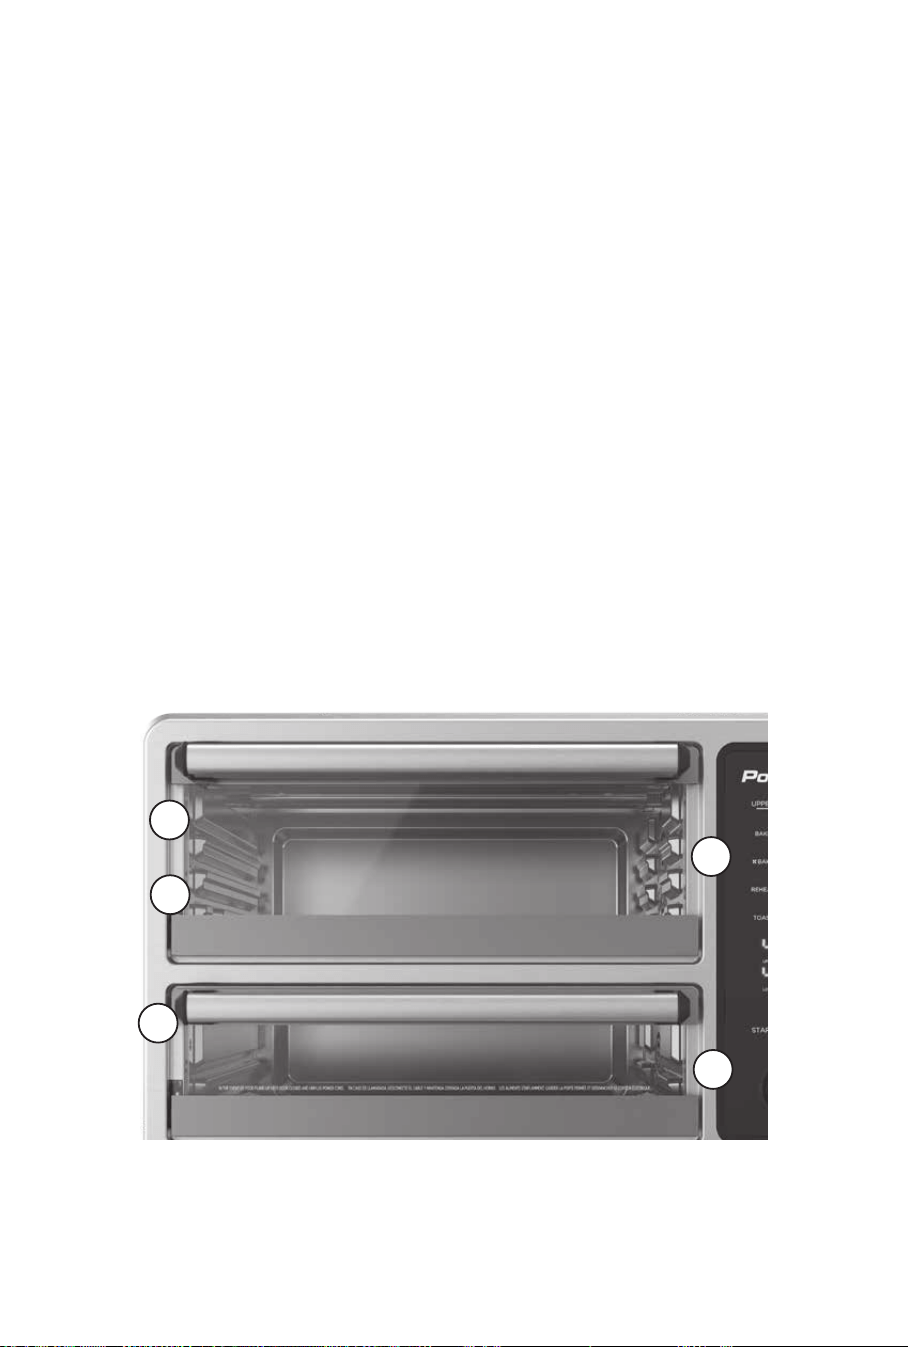
10
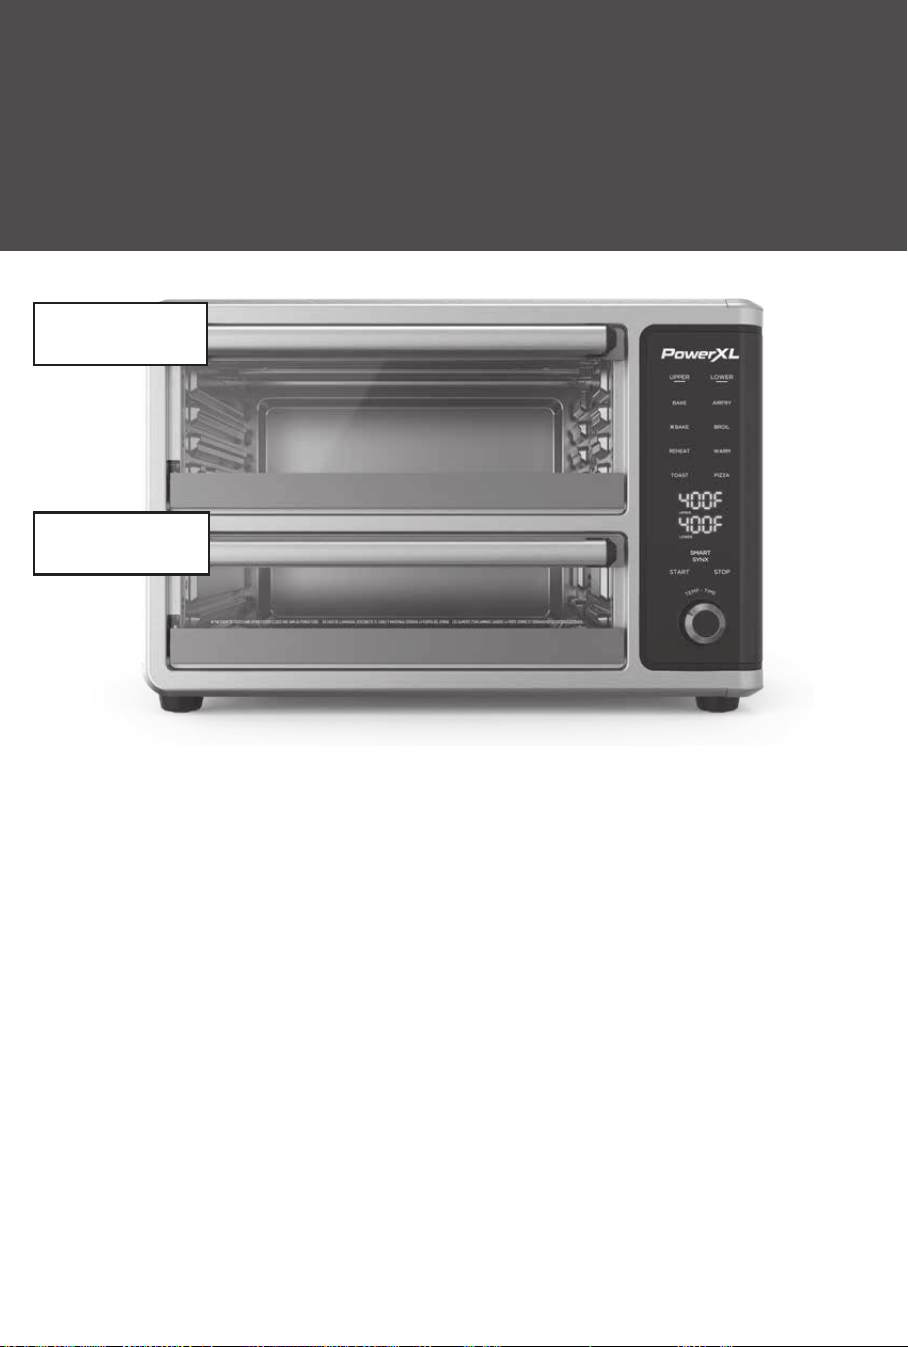
Parts & Accessories
1. UPPER OVEN
2. LOWER OVEN
3. CONTROL PANEL
4. CRISPER TRAY
5. DRIP TRAY
6. OVEN RACK
7. BAKING PAN
1
2
3
7
5
6
4
Accessories
TO67D5-2SP_30986_ES_IB_D.indd 10TO67D5-2SP_30986_ES_IB_D.indd 10 7/2/24 8:23 AM7/2/24 8:23 AM
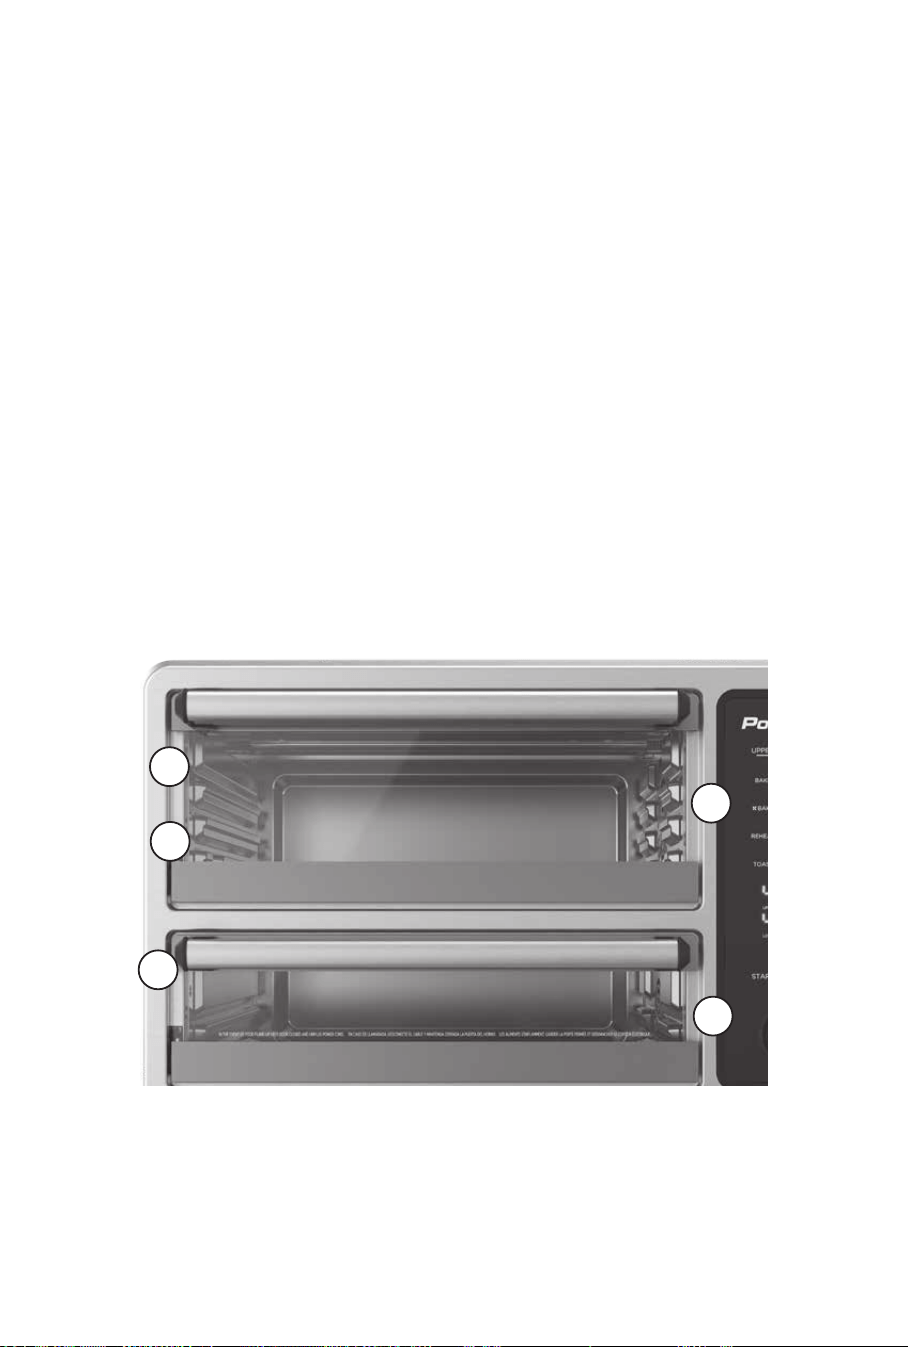
11
Drip Tray
Each oven has its own Drip Tray. A Drip Tray should always be placed at the bottom of each oven. In the Upper Oven,
the Drip Tray slides underneath the bottom heating elements. In the Lower Oven, the Drip Tray sits on the bottom of
the oven.
Crisper Tray
The Crisper Tray slides into the rack locations in the ovens. For the Upper Oven, the Crisper Tray should be used in
the top of middle rack location. For the Lower Oven, the Crisper Tray should be used in the top rack location.
Oven Rack
The Oven Rack slides into the rack locations in the ovens. The Oven Rack can be used with any rack location (the
top rack location should only be used when using the Broil function).
Baking Pan
The Baking Pan must be placed on an Oven Rack. Use the Baking Pan when cooking food that can drip onto the
heating elements.
Using the Accessories
1
2
3
1
2
Rack Locations
TO67D5-2SP_30986_ES_IB_D.indd 11TO67D5-2SP_30986_ES_IB_D.indd 11 7/2/24 8:23 AM7/2/24 8:23 AM
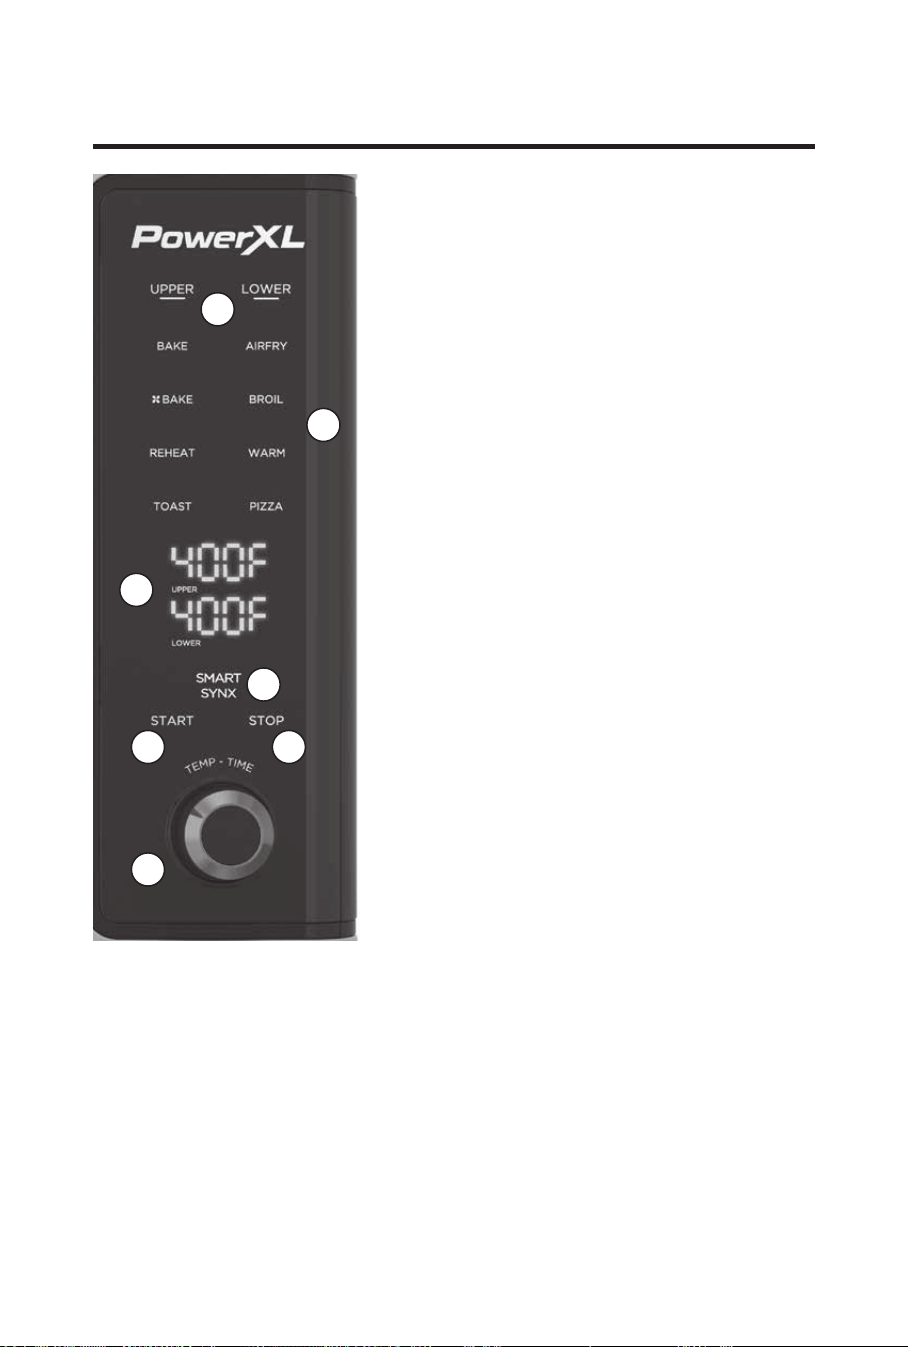
12
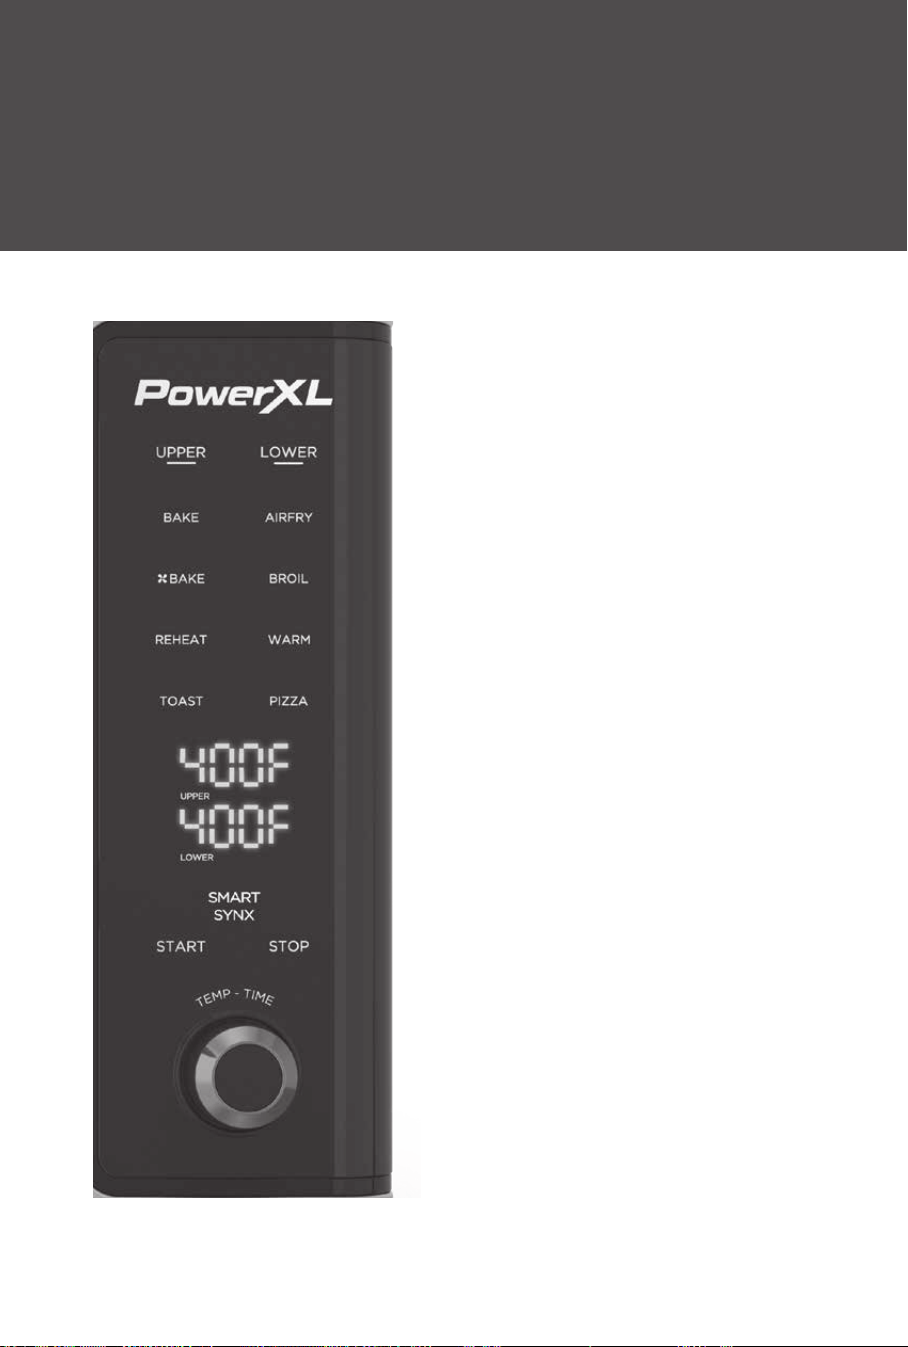
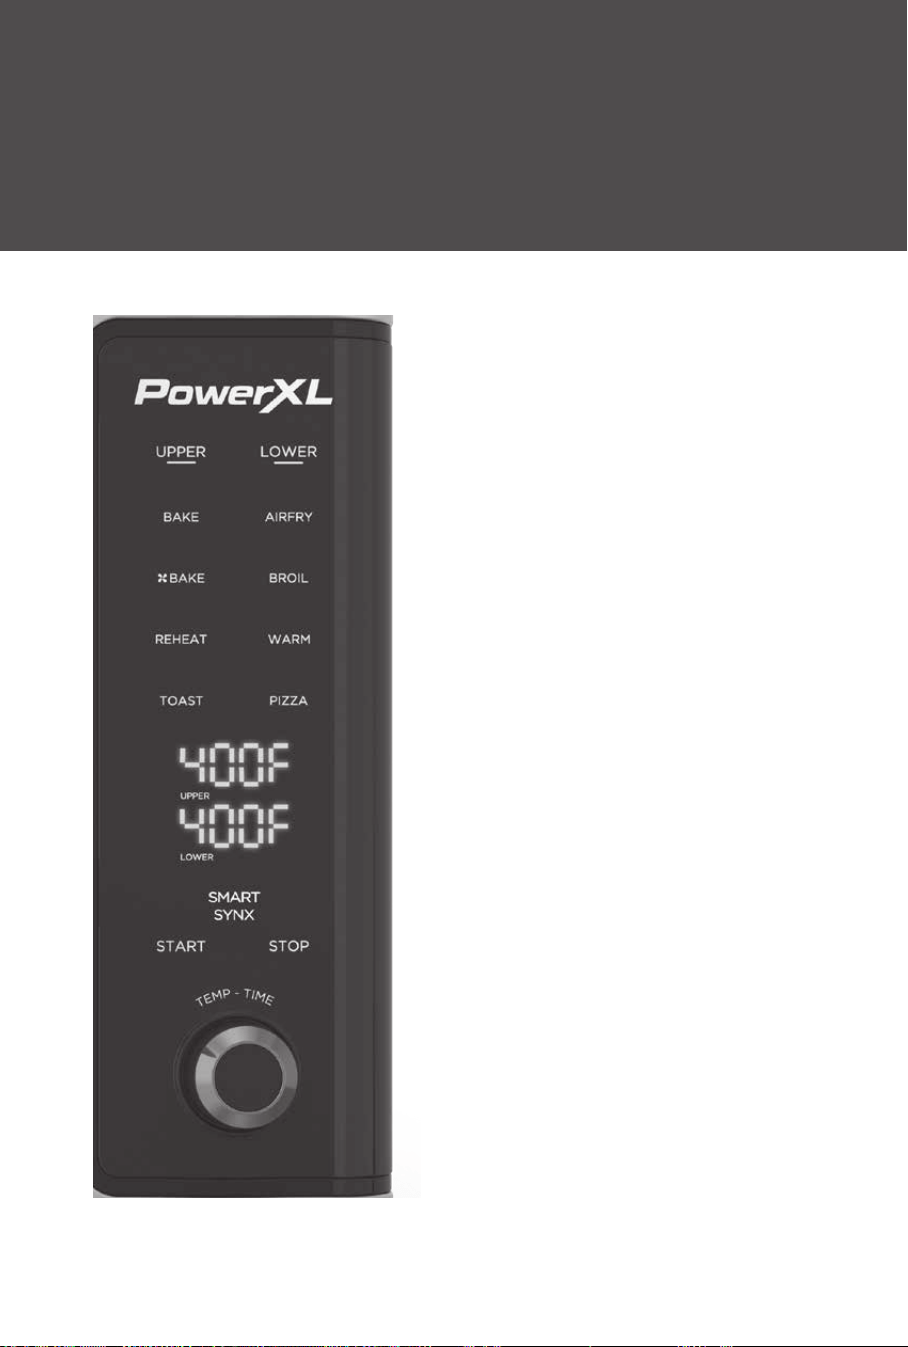
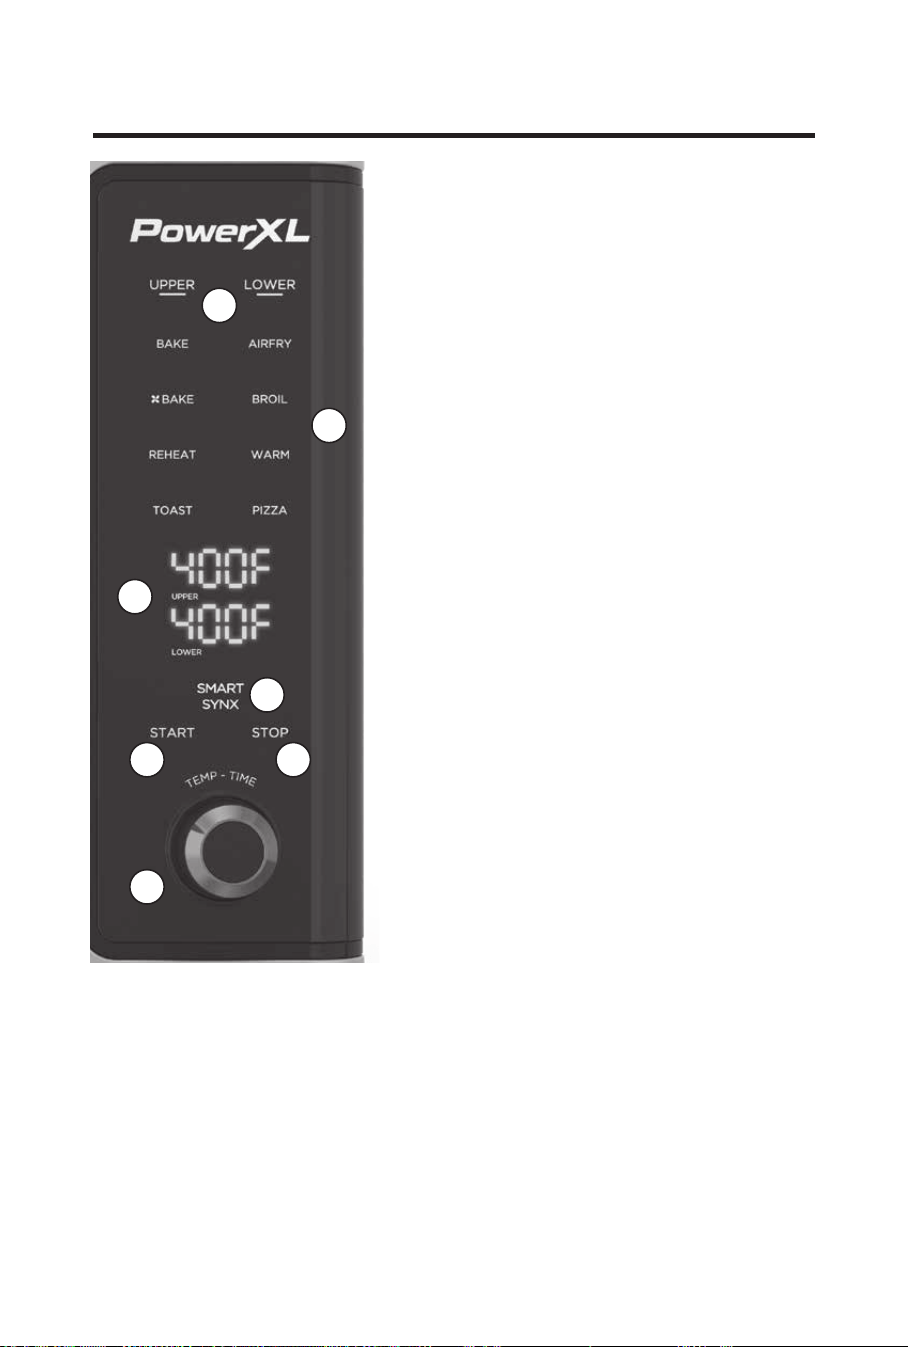
Using the Control Panel
1. TIME AND TEMPERATURE DISPLAYS Displays the
cooking time and temperature of the associated
oven. Press UPPER or LOWER and then press the
control knob at the bottom to alternate between
showing time and temperature for that oven.
2. START BUTTON
Once a cooking time and temperature have
been selected, press UPPER or LOWER button
and then press START button to begin cooking in
that associated oven. The START button will only
illuminate once a function has been selected.
3. STOP BUTTON
Press the STOP button to stop the cooking in the
oven selected on the control panel. Press and hold
the STOP button for 3 seconds to stop cooking in
both chambers.
4. CONTROL KNOB
Press the Control Knob to alternate between
displaying the cooking time and temperature. Turn
the Control Knob to adjust the setting displayed
on the Time and Temperature Display. To change
the temperature mode between Fahrenheit and
Celsius, press the knob down for 5 seconds until
the display shows “F” or “C”. Then rotate the knob
to the right to change the setting.
5. SMARTSYNX
TM
BUTTON
When cooking food in both ovens, press the
SMARTSYNX
TM
Button instead of the START Button
to ensure that both ovens nish cooking at the
same time.
6. OVEN BUTTONS
Press the UPPER or LOWER Button to select an
oven. The word “UPPER” or “LOWER” will illuminate
when selected.
7. COOKING FUNCTION BUTTONS
Press one of the Cooking Function Buttons to
select a cooking function. The name of the function
will illuminate to show which function has been
selected. You can press the UPPER or LOWER
Button to show which cooking function is selected
for each oven.
1
2 3
4
5
7
6
NOTES:
• The Control Panel’s lights will darken while not in use. Press or turn a Control Knob to illuminate the
Control Panel.
• PrE: Oven is preheating and cooking timer will begin once preheat is complete. If using the PIZZA
function with SMARTSYNX
TM
feature, the oven will preheat the upper oven rst before starting
any cooking timer.
• Hold: When using the SMARTSYNX
TM
feature, the oven with the shorter cook time will display
HOLD until it begins its cooking cycle.
• Sh #: When toasting, the upper oven will show the letters Sh and a number which represents the
selected toast shade (1-7).
TO67D5-2SP_30986_ES_IB_D.indd 12TO67D5-2SP_30986_ES_IB_D.indd 12 7/2/24 8:23 AM7/2/24 8:23 AM
13
Note: The temperature settings cannot exceed 150 degrees between the two ovens.
1
The time can be set between 1 and 60 minutes for all cooking functions except toast.
2
Preheat: Some cooking functions have a built-in preheating feature. When you select one of these functions, “PrE” will
appear on the Time and Temperature Display while the appliance preheats. After preheating is complete, the cooking
timer will start counting down. The cooking time and temperature are not adjustable while the appliance is preheating.
3
The Toast and Pizza settings can only be used with the Upper Oven.
4
Upper oven temperature setting for WARM may be limited by lower oven temperature setting.
5
Lower oven cannot be used while toasting in upper oven.
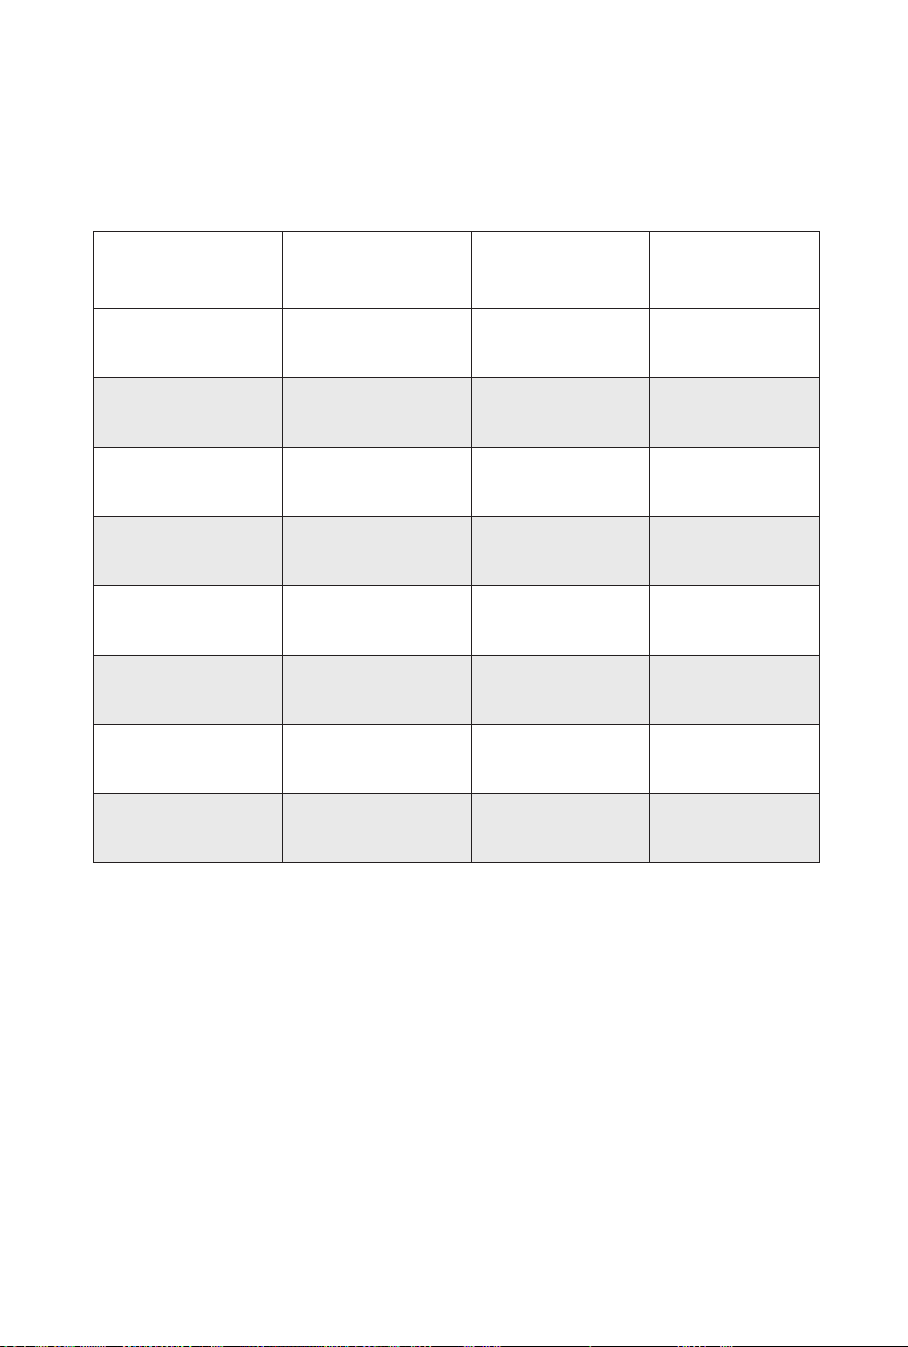
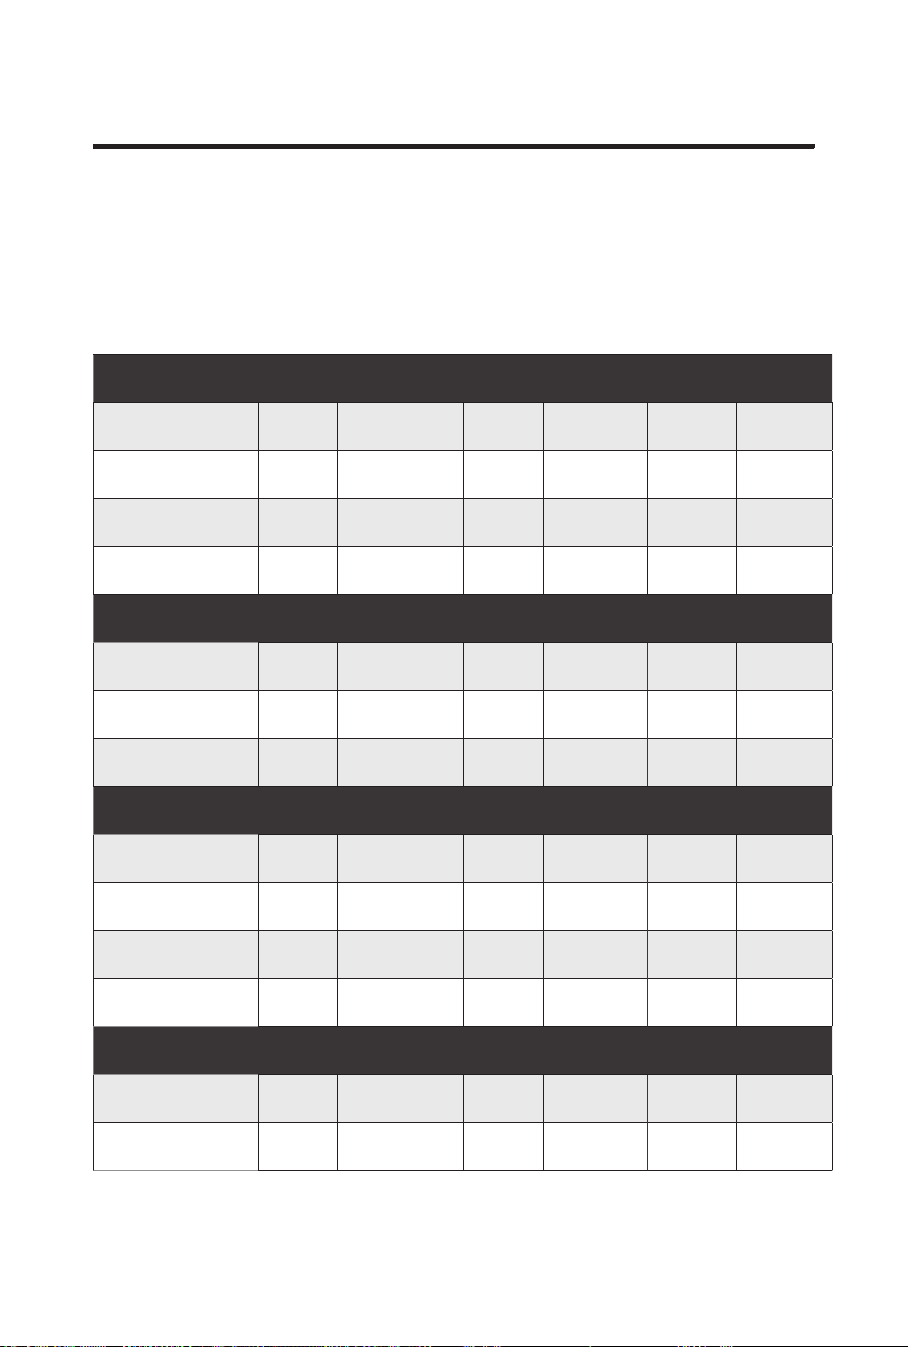
Function Chart
The Cooking Function Buttons set the appliance to a cooking time and temperature that is
generally appropriate for the selected type of cooking. As you become more familiar with
the appliance, you can adjust the set cooking time and temperature as needed.
Function Name Temperature
(Range)
Time
1
Preheat
2
Warm
4
150° F
(150° F–250° F)
30 mins.
No
Bake
350° F
(150° F–450° F)
15 mins.
Yes
Convection Bake
350° F
(150° F–450° F)
15 mins.
Yes
Broil
475° F
(400° F–500° F)
10 mins.
No
Air Fry
425° F
(350° F–450° F)
20 mins.
No
Reheat
425° F
(350° F–450° F)
5 mins.
No
Toast
3,5
Varies by selected
darkness level
Shade 4
(Range: 1–7)
No
Pizza
3
425° F
(350° F–450° F)
20 mins.
Yes
TO67D5-2SP_30986_ES_IB_D.indd 13TO67D5-2SP_30986_ES_IB_D.indd 13 7/2/24 8:23 AM7/2/24 8:23 AM

14
Instructions for Use
1. Read all material, warning stickers, and labels.
2. Remove all packing materials, stickers, and labels from the appliance.
3. Please go to www.prodprotect.com/powerxl to register your warranty.
4. Before initial use, wipe the inside and outside of the appliance with a warm,
moist cloth and mild detergent. Handwash all cooking accessories.
5. Place appliance on a heat-resistant surface or use heat protection. Do not
place the appliance on a surface that is not heat resistant. Ensure that the
appliance is used in an area with adequate air circulation. Do not place on the
stove top.
6. Before cooking food, preheat the appliance for a few minutes to allow the
appliance to burn off the manufacturer’s protective coating of oil. Wipe the
appliance with warm, soapy water and a dishcloth after this burn-in cycle.
Before First Use
1. Plug the appliance into a dedicated electrical outlet.
2. Place your ingredients on your chosen accessory. Slide the accessory into
one of the rack locations in one of the ovens. Close the appliance’s door.
TIP: If you are using a cooking function that includes preheating, you can add
food to the appliance after preheating has nished.
3. Press the Oven Button that matches the oven you want to use. Press one of
the Cooking Function Buttons. You can turn the Control Knob left or right to
adjust the cooking time and temperature if needed. Press the Control Knob
to alternate between the cooking time and temperature.
4. SMARTSYNX
TM
: If you are cooking food in both ovens and want the food
to nish cooking at the same time, press the SmartSynx
TM
Button instead of
pressing the Start Button. The oven with the longer cooking time will begin
cooking food rst, and 30 seconds before the cooking timers match, the
appliance will beep six times to let you know to add food to the second oven.
5. Press the Start Button to begin the cooking process. You can press the Stop
Button at any point to stop. Once stopped, pressing the Start Button again
will resume the cooking process.
NOTE: Pressing the Stop Button will only stop the cooking process in the
oven that is selected. Press and hold the stop button for 3 seconds to stop the
cooking processes in both chambers.
6. The appliance will beep when the cooking process is complete. The
accessories will be hot, so use heat-resistant oven mitts to transfer the
accessories to a heat-resistant surface.
Using the Appliance
TO67D5-2SP_30986_ES_IB_D.indd 14TO67D5-2SP_30986_ES_IB_D.indd 14 7/2/24 8:23 AM7/2/24 8:23 AM

15
• When cooking only one food, use the Upper Oven.
• You can cook almost any food that you would normally cook in an oven in this
appliance.
• To help ensure even cooking, do not overload your accessories with
food. Food should be cooked in a single layer. You can either divide your
ingredients between the two ovens or cook multiple batches of food.
• Cooking times can vary slightly when cooking in both chambers at once
compared to cooking in only one chamber. When cooking food in both
chambers simultaneously, add a few minutes to the cooking time and keep
an eye on your food while it cooks.
• When using the Baking Pan, rst slide an Oven Rack into an oven. The Baking
Pan sits on the Oven Rack.
• Use the Baking Pan when cooking food that can drip onto the heating
elements.
• Use premade dough to prepare lled snacks quickly and easily. Premade
dough also requires a shorter cooking time.
• Adding a bit of vegetable oil to breaded items can help produce a crispier
result. When adding oil, do so immediately before cooking and add only a
small amount onto the breaded items.
Shaking Food
To ensure even cooking while air frying, you can turn your food over halfway
through the cooking process.
1. Select the oven that contains the food you want to turn and press the Stop
Button to stop the cooking process.
2. Use oven mitts to remove the accessories and food. Place the accessories
and food on a heat-resistant surface.
3. Turn over the ingredients in the Crisper Tray.
4. Return the accessories to the appliance. Close the door. Press the Start Button
to resume the cooking process.
Tips
TO67D5-2SP_30986_ES_IB_D.indd 15TO67D5-2SP_30986_ES_IB_D.indd 15 7/2/24 8:23 AM7/2/24 8:23 AM
16
General Cooking Guidelines
NOTE: Keep in mind that these settings are guidelines. Since ingredients differ
in origin, size, shape, and brand, we cannot guarantee the best settings for
your ingredients. When cooking in both ovens, add a little time and monitor your
food near the end of the cooking cycle.
Food Size Temperature
Cook
Time Preheat
Shake
or Flip
Spray
with
Oil
FROZEN FOOD
Frozen pizza 425° F
10-15
mins.
French fries 400° F
20-24
mins.
Sweet potato fries 400° F
20-24
mins.
Chicken nuggets 400° F
14-16
mins.
CHICKEN
Breaded cutlets 6 oz 400° F
10-15
mins.
Wings 400° F
20-24
mins.
Chicken breast 6 oz 400° F
12-16
mins.
BEEF
Burgers 6 oz 400° F
10-14
mins.
Hot dogs 8 pc 375° F
5-8
mins.
NY strip steaks 8 oz 400° F
12-16
mins.
Meatballs, 1 inch 1.5 lb 375° F
10-15
mins.
PORK
Pork chops 400° F
12-16
mins.
Sausages 350° F
15-20
mins.
TO67D5-2SP_30986_ES_IB_D.indd 16TO67D5-2SP_30986_ES_IB_D.indd 16 7/2/24 8:23 AM7/2/24 8:23 AM
17
Internal Temperature
Meat Chart
Food Type
Internal
Temp.*
Beef & Veal
Ground 160° F
Steaks, roasts: medium 145° F
Steaks, roasts: rare 125° F
Chicken &
Turkey
Breasts 165° F
Ground, stuffed 165° F
Whole bird, legs,
thighs, wings
165° F
Fish &
Shellsh
Any type 145° F
Lamb
Ground 160° F
Steaks, roasts: medium 140° F
Steaks, roasts: rare 130° F
Pork
Chops, ground, ribs,
roasts
160° F
Fully cooked ham 140° F
Use this chart and a food
thermometer to ensure that meat,
poultry, seafood, and other cooked
food reach a safe minimum internal
temperature.
*For maximum food safety, the
U.S. Department of Agriculture
recommends 165° F for all poultry;
160° F for ground beef, lamb, and
pork; and 145° F, with a 3-minute
resting period, for all other types of
beef, lamb, and pork. Also review the
USDA Food Safety Standards.
Food Size Temperature
Cook
Time Preheat
Shake
or Flip
Spray
with
Oil
FISH
Salmon lets 6 oz 390° F
12-16
mins.
Shrimp (16–20 size)
12 oz 390° F
10-15
mins.
VEGETABLES
Asparagus 1 lb 380° F
8-12
min
Broccoli 8 oz 380° F
10-15
min
Corn on the cob 2 pc 380° F
8-12
min
TO67D5-2SP_30986_ES_IB_D.indd 17TO67D5-2SP_30986_ES_IB_D.indd 17 7/2/24 8:23 AM7/2/24 8:23 AM

18
Cleaning & Storage
Clean the appliance after each use. Some of the accessories are coated with a
special nonstick surface. Never use abrasive cleaning materials or utensils on these
surfaces.
1. Unplug the Power Cord from the electrical outlet and be certain the appliance
is thoroughly cooled before cleaning.
2. Wipe the outside of the appliance, including the glass on the doors, with a
warm, moist cloth and mild detergent.
3. Clean the glass inside the appliance with a warm, moist cloth and mild
detergent. Use hand protection in case the inside of the appliance is still hot.
4. Clean the accessories, including the Drip Tray, with hot water, a mild detergent,
and a nonabrasive sponge. The accessories are dishwasher safe, but hand-
washing is recommended. For difcult-to-remove food, soak in hot, soapy
water for 10 minutes.
5. Clean the inside of the appliance with hot water, a mild detergent, and a
nonabrasive sponge.
6. Rinse the appliance with a clean, damp cloth. Use a clean, dry cloth to dry the
appliance interior. Do not leave standing water in the appliance.
7. Once dry, make sure to return the Drip Trays to the bottom of the ovens.
8. If any other service needs to be performed, contact Customer Service.
Place the cooled, dry appliance in a clean, dry place. Do not stack objects on top of
the appliance.
Storage
Cleaning
TO67D5-2SP_30986_ES_IB_D.indd 18TO67D5-2SP_30986_ES_IB_D.indd 18 7/2/24 8:23 AM7/2/24 8:23 AM

19
Troubleshooting
Symptom Possible Cause Solution
The appliance
does not work.
The appliance is not plugged in. Plug the power cord into an outlet.
The appliance is plugged into an
outlet that is shared with other
devices.
Plug the appliance into a dedicated
electrical outlet.
The appliance might have been
turned off. If the Stop Button is
pressed while cooking, the cooking
process will be stopped.
Press the Start Button with the
appropriate oven selected to resume
cooking.
Food is not
cooked.
Too much food is cooking at once.
Use smaller batches for more even
cooking.
The temperature is set too low.
Raise the cooking temperature and
continue cooking.
Food is in the wrong oven.
When cooking in only one oven, use
the Upper Oven. Make sure you set the
cooking time and temperature for the
Upper Oven.
Food is not fried
evenly.
Some types of food cook more
evenly when turned over halfway
through the cooking process.
See “Shaking Food” in the “Instructions
for Use” section.
Smoke coming
from appliance
Too much oil is being used. Wipe down to remove excess oil.
The accessories or appliance
have residue from the
previous operation.
Clean appliance and accessories after
each use.
Liquid is dripping onto the
heating elements.
Use the Baking Pan when cooking food
that can drip onto the heating elements.
TO67D5-2SP_30986_ES_IB_D.indd 19TO67D5-2SP_30986_ES_IB_D.indd 19 7/2/24 8:23 AM7/2/24 8:23 AM

20
Contenido
Especicaciones del Aparato
Números de Modelos
TO67D5-2SP
Vatios
1750W
Temperatura disponible
150° F–450° F
Dimensiones Externas
18.54” (W) x 16.09” (D) x 12.38” (H)
Dimensiones del horno superior
12.7” (W) x 13” (D) x 4.96” (H)
Dimensiones del horno inferior
12.7” (W)” x 13” (D) x 3.79” (H)
Longitud del cable de alimentación
24”
Tipo de enchufe
3-contactos
Medidas de Seguridad Importantes ...................................21
Guía de Inicio Rápido ........................................................24
Piezas y Accesorios ............................................................28
Uso del Panel de Control ...................................................30
Instrucciones de Uso .........................................................32
Guías Generales de Cocción ...............................................34
Cuidado y Limpieza ..........................................................36
Resolución de Problemas ..................................................37
TO67D5-2SP_30986_ES_IB_D.indd 20TO67D5-2SP_30986_ES_IB_D.indd 20 7/2/24 8:23 AM7/2/24 8:23 AM
21
1. LEA TODAS LAS INSTRUCCIONES.
2. Este aparato no está diseñado para ser
utilizado por personas (incluyendo los
niños) con su capacidad física, sensorial o
mental reducida, o falta de experiencia y
conocimiento, a no ser que hayan recibido
supervisión o instrucción acerca del aparato
por una persona responsable de su seguridad.
3. Todo aparato eléctrico utilizado en la presencia
de los niños o por ellos mismos requiere la
supervisión de un adulto.
4. NO coloque el aparato sobre o cerca de una
hornilla caliente eléctrica o de gas o adentro de
un horno caliente.
5. NO coloque su aparato sobre una
estufa, aun cuando la estufa esté
fría, ya que la podría encender por
accidente, provocando un incendio
que dañaría el aparato, su estufa y su hogar.
6. NO coloque ni utilice este aparato cerca del
agua.
7. Cuando cocine, NO coloque el aparato contra
una pared ni a 5 pulgadas de otros aparatos.
NO coloque ningún artículo encima del
aparato.
8. Podría ocurrir un incendio cuando el aparato
está funcionando y se cubre o entra en
contacto con cualquier material inamable,
incluso las cortinas, las paredes o materiales
simirales.
9. NO utilice el aparato a la intemperie.
10. NO coloque el aparato en ningún recipiente
ni espacio pequeño limitado mientras esté
caliente o funcionando.
11. SIEMPRE use el aparato en una supercie
horizontal nivelada, estable e incombustible
con espacio suciente para que circule el aire.
12. Antes de utilizar su producto sobre cualquier
supercie de mostrador, o cualquier otra
supercie frágil, como una mesa de vidrio,
consulte con el fabricante o instalador del
mostrador para obtener recomendaciones
sobre el uso de electrodomésticos en sus
supercies. Algunos fabricantes e instaladores
pueden recomendar proteger su supercie,
colocando una almohadilla resistente al
calor o un salvamanteles debajo del aparato
para protegerlo contra el calor. Su fabricante
o instalador puede recomendar que no se
utilicen sartenes calientes, ollas o aparatos
eléctricos directamente sobre el mostrador.
Si no está seguro, coloque un salvamanteles
o almohadilla resistente al calor debajo del
aparato antes de utilizarlo.
13. NO utilice ningún aparato con un
cable o enchufe dañado, si no funciona
correctamente, o esté dañado o caído.
Devuelva el aparato a un centro de servicio
autorizado para que lo examinen, reparen o
ajusten.
14. Todo servicio del aparato debe ser realizado
solamente por un representante de servicio
autorizado. Comuníquese con Servicio de
Atención al Cliente, utilizando la información
localizada al nal de este manual.
15. NUNCA sumerja la unidad en agua. Si el
aparato se cae o se sumerje en agua por
accidente, desenchúfelo inmediatamente
del tomacorriente. No introduzca su mano
dentro del agua si el aparato está enchufado
y sumergido.
16. A n de protegerse contra una descarga
eléctrica y lesiones personales, NO sumerja el
cable, los enchufes ni el aparato en agua ni en
ningún otro líquido.
17. NO enchufe el cable de alimentacion ni
use los controles del aparato con las manos
mojadas.
ADVERTENCIA
Cuando se utilizan aparatos eléctricos, se deben seguir precauciones de seguridad
básicas, incluyendo las siguientes:
¡EVITE LESIONES!
LEA CUIDADOSAMENTE TODAS LAS INSTRUCCIONES ¡ANTES DE UTILIZAR!
MEDIDAS DE SEGURIDAD IMPORTANTES
TO67D5-2SP_30986_ES_IB_D.indd 21TO67D5-2SP_30986_ES_IB_D.indd 21 7/2/24 8:23 AM7/2/24 8:23 AM

22
18. Para desconectar, presione el botón Stop
(detener) para apagar el aparato y después
retirar el enchufe del tomacorriente.
19. ASEGÚRESE de que el aparato esté
enchufado correctamente a un tomacorriente
independiente sin ningún otro aparato
enchufado al mismo tomacorriente.
20. Mantenga el aparato y su cable de
alimentación alejado de los niños cuando
esté funcionando o enfriandose.
21. NUNCA conecte este aparato a un interruptor
de temporizador externo o sistema de control
remoto por separado.
22. NUNCA enchufe el aparato a un
tomacorriente situado debajo de la supercie
donde se ha colocado.
23. NO permita que el cable cuelgue del borde
de la mesa o del mostrador ni que entre en
contacto con supercies calientes.
24. NO utilice estropajos de bras metálicas para
limpiar el horno. Las bras metálicas podrían
desprenderse y entrar en contacto con las
piezas eléctricas del aparato, creando el riesgo
de una descarga eléctrica.
25. Si el aparato emite humo, DESENCHÚFELO
INMEDIATAMENTE y espere a que deje de
emitir humo antes de manipularlo. Permita
que el aparato se enfríe y limpie el exceso de
aceite y grasa.
26. Los aparatos de cocción deben colocarse
en lugar estable con las asas (si las tiene)
colocadas de manera para evitar derrames de
líquidos calientes.
27. NUNCA utilice el aparato sin supervisión.
28. NUNCA deje descansar ningún objeto sobre
la puerta del aparato cuando esté abierta.
29. NO deje la puerta del aparato abierta por
largo tiempo.
30. SIEMPRE asegúrese de que nada sobresalga
del aparato antes de cerrar la puerta.
31. SIEMPRE cierre suavemente la puerta;
NUNCA la cierre bruscamente. SIEMPRE use
el asa para abrir y cerrar la puerta.
32. NUNCA use el aparato con la puerta abierta.
El uso de accesorios no recomendados por
el fabricante del aparato puede ocasionar
lesiones personales.
33. Evite tocar las piezas móviles.
34. Desenchufe el aparato del tomacorriente
cuando no esté en uso y antes de limpiarlo.
Espere 30 minutos para que el aparato
se enfríe antes de manipularlo, instalare
o retirarle piezas y antes de limpiarlo o
guardarlo.
35. NO cubra las salidas de aire. El hacerlo, podría
prevenir la cocción uniforme y sobrecalentar o
dañar el aparato.
36. Mientras el aparato funciona, aire caliente
y vapor se escapan a través de las salida de
aire caliente. MANTENGA SUS MANOS
Y LA CARA a una distancia segura de las
salidas de aire. No cubra la salida de aire
caliente y mantenga la salida de aire libre de
obstrucciones.
37. Durante la cocción, el aparato alcanza una
temperatura interna de varios cientos de
grados Fahrenheit. Para evitar una lesión
personal, NUNCA coloque las manos dentro
del aparato a menos que se haya enfriado
completamente.
38. Las supercies exteriores del aparato y los
accesorios pueden calentarse durante el uso.
USE GUANTES DE HORNO para manipular
el aparato durante y después del uso y para
protegerse contra el vapor y aire caliente que
se escapa al abrirse el aparato.
39. NO toque las supercies calientes. Utilice
mangos o perillas.
40. Se debe utilizar PRECAUCIÓN EXTREMA
al mover de un lugar a otro un aparato que
contenga aceite u otros líquidos calientes o
al retirar los accesorios o desechar la grasa
caliente. Este aparato no está diseñado para
freír alimentos en aceite abundante.
41. NO DEBE insertar alimentos demasiado
grandes ni paquetes de papel de aluminio o
utensilios en el aparato, ya que esto podría
crear un riesgo de incendio o descarga
eléctrica. NO llene en exceso el aparato.
42. NO guarde ningún material, excepto los
recomendados por el fabricante, en este
aparato cuando no esté en uso.
43. Proceda con PRECAUCIÓN EXTREMA
cuando utilice recipientes fabricados de
materiales distintos del metal o vidrio.
MEDIDAS DE SEGURIDAD IMPORTANTES
TO67D5-2SP_30986_ES_IB_D.indd 22TO67D5-2SP_30986_ES_IB_D.indd 22 7/2/24 8:23 AM7/2/24 8:23 AM

23
GUARDE ESTAS INSTRUCCIONE –
SÓLO PARA USO DOMÉSTICO
Cable de Extensión
1. Un cable de alimentación corto es provisto para
reducir el riesgo de enredarse o tropezar con un
cable más largo.
2. Existen cables de extensión y se pueden utilizar
si se toma el cuidado debido en su uso.
3. Si se utiliza un cable de extensión:
a. La clasicación eléctrica marcada del cable
de extensión debe ser, como mínimo, igual
a la clasicación eléctrica del aparato;
b. Si el aparato es de conexión a tierra, el cable
de extensión debe ser un cable de tres
alambres de conexión a tierra.
c. El cable se debe acomodar de manera que
no cuelgue del mostrador o de la mesa para
evitar que los niños tiren del mismo o que
alguien se tropiece sin darse cuenta.
Energía Eléctrica
Este aparato se debe utilizar en un tomacorriente
independiente. Si el tomacorriente está
sobrecargado con otros aparatos eléctricos, su nuevo
aparato podría no funcionar correctamente.
Apagado Automático
Este aparato cuenta con un dispositivo integrado
que apaga automáticamente el aparato cuando
el tiempo de cocción termina. Puede apagar
manualmente el aparato presionando el botón
Stop (detener). El ventilador continúa funcionando
durante 10 a 20 segundos para enfriar el aparato.
Protección Contra
Sobrecalentamiento
Si el sistema de control de temperatura interior falla,
el sistema de protección contra sobrecalentamiento
se activa y el aparato deja de funcionar. Si esto
sucede, desenchufe el aparato. Espere a que el
aparato y comuníquese con servicio al cliente,
utilizando la información localizada al nal de este
manual.
44. NO introduzca los siguientes materiales en el
aparato: papel, cartón o plástico.
45. NUNCA vierta aceite en el aparato o sus
accesorios. Esto podría resultar en un incendio
y lesiones personales.
46. NO cubra la bandeja de goteo ni ninguna otra
pieza del aparato con papel de aluminio. Esto
provoca sobrecalentamiento del aparato.
47. NO utilizar aerosoles para cocinar. Estos
aerosoles se acumulan en los utensilios de
cocina y son difíciles de eliminar, al tiempo
que reducen el rendimiento de la cocción
antiadherente.
48. NO exponga el aparato a químicos corrosivos
o vapores.
49. NO utilice utensilios alados en este aparato.
Estos pueden dañar la capa antiadherente del
aparato.
50. Este aparato es para uso doméstico solamente.
Si el aparato se utiliza inadecuadamente
o para propósitos profesionales o
semiprofesionales o si no se utiliza de acuerdo
a las instrucciones del manual del usuario, la
garantía se anulará y Empower Brands, LLC no
será responsable por los daños. NO utilice el
aparato para otro n que no sea para el que
ha sido diseñado.
51. Los niños deben ser supervisados para
asegurar que no juegen con el aparato.
52. Este aparato no está diseñado para utilizarse
con un temporizador externo o sistema de
control remoto separado.
TO67D5-2SP_30986_ES_IB_D.indd 23TO67D5-2SP_30986_ES_IB_D.indd 23 7/2/24 8:23 AM7/2/24 8:23 AM
24
Elija un Horno
GUÍA DE INICIO RÁPIDO
Horno Superior
Horno Inferior
¡Ambos!
Tres posiciones de parrilla con ocho funciones de cocción. Si solo va
a cocinar en una cavidad, use ésta. También es el mejor horno para
productos horneados como postres, pasteles y pizzas.
Dos posiciones de parrilla con seis funciones de cocción.
Esta cavidad es ideal para cocinar acompañantes mientras se cocina su
plato principal y es especialmente buena para freír con aire.
SmartSynx
TM
(Sincronización Inteligente): Termine de cocinar en ambos
hornos al mismo tiempo. También puede cocinar en ambos hornos al
mismo tiempo sin usar la función SmartSynx
TM
Tecnología.
Superior
Inferior
TO67D5-2SP_30986_ES_IB_D.indd 24TO67D5-2SP_30986_ES_IB_D.indd 24 7/2/24 8:23 AM7/2/24 8:23 AM
25
Elija una Función
GUÍA DE INICIO RÁPIDO
Bake (hornear)
Ideal para cocinar alimentos horneados, como tortas
y cacerolas, sin usar el ventilador de covección.
Air Fry (freír con aire)
Rodea alimentos como papas fritas, alas de pollo y
aros de cebolla con un vórtice de calor para obtener
resultados similares a los de la fritura en aceite
abundante, sin utilizar todo el aceite.
Convection Bake
(hornear por convección)
Hornea los alimentos mientras el ventilador se
enciende y aaga—perfecto para alimentos como
galletas y pasteles.
Broil (dorar)
Especialmente bueno para dorar pescado y alimentos
con queso por encima, como el pan de ajo, desde
arriba a temperatura alta.
Reheat (recalentar)
Recalienta las sobras de manera rápida y uniforme.
Warm (calentar)
Mantiene calientes sus alimentos. Cuando cocine en
ambos hornos, use el horno inferior para la función
WARM.
Toast (tostar)*
Tuesta pan, bagels y más al nivel deseado.
Pizza*
Cocina pizza fresca o congelada con queso derretido
y una corteza crujiente.
*Las funciones tostar y pizza sólo están disponibles en el
horno superior.
TO67D5-2SP_30986_ES_IB_D.indd 25TO67D5-2SP_30986_ES_IB_D.indd 25 7/2/24 8:23 AM7/2/24 8:23 AM
26
Elija el Mejor Accesorio
GUÍA DE INICIO RÁPIDO
Bandeja para Freír
Los orificios de la bandeja para freír de malla
permiten rodear stus alimentos con aire
caliente. Se usa mejor con las funciones:
Air Fry (freír con aire)
Posiciones óptimas de la parrilla:
Horno superior: en el medio
Horno inferior: parte superior
Bandeja para hornear
Se coloca encima de la parrilla del horno
Se usa mejor con las funciones: Bake (hornear),
Convection Bake (hornear por conveccion),
Pizza
Posiciones óptimas de la parrilla:
Horno superior: en el medio
Horno inferior: parte inferior
Parrilla del horno
Parrilla de cocción tradicional para horno
Se usa mejor con las funciones: Warm (calentar), Broil
(dorar), Reheat (recalentar), Roast (rostizar), Toast (tostar)
Posiciones óptimas de la parrilla:
Horno superior: parte superiora (solo para dorar), en el
medio, parte inferior
Horno inferior: parte superior (solo para dorar), parte inferior
TO67D5-2SP_30986_ES_IB_D.indd 26TO67D5-2SP_30986_ES_IB_D.indd 26 7/2/24 8:23 AM7/2/24 8:23 AM
27
¡Cocine su Primera Comida con SmartSynx
TM
Tecnología!
GUÍA DE INICIO RÁPIDO
Coloque los alimentos en los accesorios adecuados
para su receta. Deslice los accesorios dentro de
cada horno, en las posiciones óptimas de la parrilla.
Presione el botón UPPER (horno superior). Después
presione la función de cocción deseada para el
horno superior.
Presione el botón LOWER (horno inferior). Después
presione la función de cocción deseada para el
horno inferior.
Si desea ajustar el tiempo o la temperatura de
cocción, gire la perilla de control para ajustar.
Presione la perilla de control para alternar entre el
tiempo y la temperatura de cocción.
Consejo: Los tiempos de cocciónpueden variar
ligeramente cuando se cocina en ambos hornos a
la vez. Cuando cocine simultáneamente en ambos
hornos, añada unos pocos minutos al tiempo de
cocción y vigile sus alimentos mientras se cocinan.
Presione el boton SmartSynx
TM
(sincronización
inteligente) para iniciar el proceso de cocción.
Cuando los tiempos de cocción de ambas
cavidades sean iguales, el segundo horno
comenzará a cocinar. Ambos hornos terminarán de
cocinar al mismo tiempo.
Ver la sección “Instruciones de Uso” para instrucciones detalladas.
1
3
2
4
TO67D5-2SP_30986_ES_IB_D.indd 27TO67D5-2SP_30986_ES_IB_D.indd 27 7/2/24 8:23 AM7/2/24 8:23 AM
28
Piezas y Accesorios
1. HORNO SUPERIOR
2. HORNO INFERIOR
3. PANEL DE CONTROL
4. BANDEJA PARA FREÍR
5. BANDEJA DE GOTEO
6. PARRILLA DEL HORNO
7. BANDEJA PARA HORNEAR
Accesorios
1
2
3
7
5
6
4
TO67D5-2SP_30986_ES_IB_D.indd 28TO67D5-2SP_30986_ES_IB_D.indd 28 7/2/24 8:23 AM7/2/24 8:23 AM
29
Bandeja de Goteo
Cada horno cuenta con su propia bandeja de goteo. Una bandeja de goteo siempre se debe colocar en la
parte inferior de cada horno. En el horno superior, la bandeja de goteo se desliza debajo de los elementos de
calentamiento. En el horno inferior, la bandeja de goteo se coloca sobre la parte inferior del horno.
Bandeja para Freír
La bandeja para freír se desliza en las posiciones de parrilla dentro de los hornos. Para el horno superior, la bandeja
para freír se debe usar en la posición de parrilla en el medio. Para el horno inferior, la bandeja se debe utilizar en la
posición de parrilla en la parte superior.
Parrilla del Horno
La parrilla del horno se desliza en las posiciones de parrilla dentro de los hornos. La parrilla del horno se puede
utilizar en cualquier posición de parrilla (la posición de parrilla de la parte superior solo la debe usar cuando utilice
la función Broil (dorar).
Bandeja para Horner
La bandeja para hornear debe colocarse sobre una parrilla del horno. Use la bandeja para hornear cuando cocine
alimentos que pueden gotear sobre los elementos de calor.
Uso de los Accesorios
Posiciones de la Parrilla
1
2
3
1
2
TO67D5-2SP_30986_ES_IB_D.indd 29TO67D5-2SP_30986_ES_IB_D.indd 29 7/2/24 8:23 AM7/2/24 8:23 AM
30
Uso del Panel de Control
1. PANTALLAS DE TIEMPO Y TEMPERATURA Muestran
el tiempo y temperatura de cocción del horno
adecuado. Presione UPPER (superior) o LOWER
(inferior) y luego presione la perilla de control en la
parte inferior para alternar entre mostrar el tiempo y la
temperatura de ese horno.
2. BOTÓN START (INICIAR)
Una vez que seleccione un tiempo y temperatura de
cocción, presione el botón UPPER o LOWER y luego
presione el botón START (iniciar) para comenzar a
cocinar en ese horno asociado. El botón START solo se
ilumina cuando se selecciona una función.
3. BOTÓN STOP (DETENER)
Presione el botón STOP (detener) para detener la
cocción en el horno seleccionado en el panel de
control. Mantenga presionado el botón de parada
durante 3 segundos para detener la cocción en ambas
cámaras.
4. PERILLA DE CONTROL
Presione la perilla de control para alternar entre mostrar
el tiempo de cocción y la temperatura. Gire la perilla de
control para ajustar la conguración que aparece en la
pantalla de hora y temperatura. Para cambiar el modo
de temperatura entre Fahrenheit y Celsius, presione
la perilla hacia abajo durante 5 segundos hasta que la
pantalla muestre “F” o “C”. Luego gire la perilla hacia la
derecha para cambiar la conguración.
5. BOTÓN SMARTSYNX
TM
Cuando cocine alimentos en ambos hornos, presione
el botón SMARTSYNX
TM
en lugar del botón START para
asegurar que ambos hornos terminen de cocinar al
mismo tiempo.
6. BOTONES DEL HORNO
Presione el botón UPPER o LOWER para seleccionar
un horno. La palabra “UPPER” o “LOWER” se ilumina
cuando se selecciona.
7. BOTONES DE FUNCIÓN DE COCCIÓN
Presione uno de los botones de función de cocción
para seleccionar una función de cocción. El nombre
de la función se ilumina para mostrar la función
seleccionada. Puede presionar el botón UPPER o
LOWER para mostrar la función seleccionada para cada
horno.
1
2 3
4
5
7
6
NOTAS:
• Las luces del panel de control se oscurecen cuando no está en uso. Presione o gire la perilla de
control para iluminar el panel de control.
• PrE: El horno se está precalentando y el cronómetro de cocción comenzará una vez que se complete
el precalentamiento. Si usa la función PIZZA con la función SMARTSYNX
TM
, el horno precalentará
primero el horno superior antes de iniciar cualquier temporizador de cocción.
• Hold: Cuando se utiliza la función SMARTSYNX
TM
, el horno con el tiempo de cocción más corto
mostrará HOLD hasta que comience su ciclo de cocción.
• Sh #: Al tostar, el horno superior mostrará las letras Sh y un número que representa el tono de tostado
seleccionado (1-7).
TO67D5-2SP_30986_ES_IB_D.indd 30TO67D5-2SP_30986_ES_IB_D.indd 30 7/2/24 8:23 AM7/2/24 8:23 AM
31
Nota: Los ajustes de temperatura no pueden exceder 150 grados entre los dos hornos.
1
El tiempo de cocción se puede ajustar entre 1 a 60 minutos para todas las funciones de cocción, excepto la función Toast
(tostar).
2
Precalentar: Algunas de las funciones de cocción cuentan con una función de precalentamiento integrada. Cuando
selecciona una de estas funciones, las letras “PrE” aparecen en la pantalla de tiempo y temperatura mientras el aparato
se precalienta. Una vez que termine el precalentamiento, el temporizador comienza un conteo regresivo. El tiempo y
temperatura de cocción no son ajustables mientras el aparato se esté precalentando
3
Las funciones Grill (asar a la parrilla), Toast (tostar) y Pizza solo se pueden usar con el horno superior.
4
La conguración de temperatura superior del horno para WARM puede estar limitada por la conguración de temperatura
más baja del horno.
5
El horno inferior no se puede utilizar mientras se tuesta en el horno superior.
Tabla de Funciones
Los botones de función de cocción ajustan el aparato a un tiempo y una temperatura de
cocción que es generalmente adecuado para el tipo de cocción seleccionado. A medida
que se famirialice con el aparato, podrá ajustar el tiempo y la temperatura de cocción
según sus necesidades.
Nombre de
Función
Temperatura
(Gama)
Tiempo
1
Precalentar
2
Calentar
4
150° F
(150° F–250° F)
30 minutos
No
Hornear
350° F
(150° F–450° F)
15 minutos
Si
Hornear por
Convección
350° F
(150° F–450° F)
15 minutos
Si
Dorar
475° F
(400° F–500° F)
10 minutos
No
Freír con Aire
425° F
(350° F–450° F)
20 minutos
No
Recalentar
425° F
(350° F–450° F)
5 minutos
No
Tostar
3,5
Varía de acuerdo al
nivel de oscuridad
seleccionado
Sombra 4
(Rango de ajuste: 1–7)
No
Pizza
3
425° F
(350° F–450° F)
20 minutos
Si
TO67D5-2SP_30986_ES_IB_D.indd 31TO67D5-2SP_30986_ES_IB_D.indd 31 7/2/24 8:23 AM7/2/24 8:23 AM

32
Instrucciones de Uso
1. Lea todo el material, etiquetas adhesivas y cualquier otra etiqueta.
2. Retire todo material de empaque, las etiquetas adhesivas y cualquier otra
etiqueta del aparato.
3. Visite www.prodprotect.com/powerxl para registrar su garantía.
4. Antes del primer uso, limpie el interior y exterior del aparato con un paño
húmedo, caliente y detergente suave. Lave a mano todos los accesorios de
cocció n.
5. Coloque el aparato sobre una supercie resistente al calor o use protección
contra el calor. No coloque el aparato sobre una supercie no resistente al
calor. Asegúrese de utilizar el aparato en un área con suciente espacio para
circular el aire. No lo coloque sobre una estufa.
6. Antes de cocinar los alimentos, precaliente el aparato por unos minutos para
permitir que queme la capa de aceite protectora del fabricante. Después
que termine el proceso de quemado, limpie el aparato con agua caliente
jabonosa y un paño de cocina.
Antes del Primer Uso
1. Enchufe el aparato a un tomacorriente independiente.
2. Coloque los ingredientes en el accesorio elegido. Deslice el accesorio en
una de las posiciones de parrilla. Cierre la puerta del aparato.
CONSEJO: Si utiliza una función de cocción que incluye precalentamiento,
puede añadir los alimentos al aparato cuando termine el ciclo de
precalentamiento.
3. Presione el botón del horno que corresponda al horno que desea usar.
Presione uno de los botones de función de cocción. Puede girar la perilla de
control hacia la izquierda o derecha para ajustar el tiempo y temperatura de
cocción, si es necesario. Presione la perilla de control para alternar entre el
tiempo y la temperatura de cocción.
4. Función SMARTSYNX
TM
: Cuando cocina los alimentos en ambos hornos y
desea que los alimentos se terminen de cocinar al mismo tiempo, presione el
botón SmartSynx
TM
en lugar de presionar el botón Start (iniciar). El horno con
el tiempo de cocción más largo comenzará a cocinar primero y 30 segundos
antes de que los temporizadores se alineen, el aparato emite 6 bips para
dejarle saber que debe añadir los alimentos al segundo horno.
5. Presione el botón Start (iniciar) para comenzar el proceso de cocción.. Puede
presionar el botón Stop (detener) en cualquier momento para detener el
proceso. Una vez detenido, presionando de nuevo el botón Start (iniciar)
reaunudará el proceso de cocción.
NOTA: Al presionar el botón Stop (detener) solo se detendrá el proceso
de cocción en el horno seleccionado. Mantenga presionado el botón Stop
(detener) durante 3 segundos para detener los procesos de cocción en
ambas cámaras.
Uso del Aparato
TO67D5-2SP_30986_ES_IB_D.indd 32TO67D5-2SP_30986_ES_IB_D.indd 32 7/2/24 8:23 AM7/2/24 8:23 AM

33
• Para cocinar un solo alimento, use el horno superior.
• En este aparato puede cocinar casi cualquier alimento que normalmente
cocinaría en un horno tradicional.
• Para ayudarle a asegurar una cocción uniforme, no llene en exceso sus
accesorios. Los alimentos deben cocinarse en una sola capa. Puede
dividir sus ingredientes entre los dos hornos o cocinar múltiples tandas de
alimentos.
• Los tiempo de cocción pueden variar cuando cocina en ambas cavidades a
la vez, comparado a cocinar en una sola cavidad. Cuando cocine en ambas
cavidades a la vez, añada unos minutos al tiempo de cocción y supervise sus
alimentos mientras se cocinan.
• Cuando use la placa para asar a la parrilla, deje la placa dentro del aparato
mientas el aparato se precalienta. La placa debe estar caliente cuando se
añaden los alimentos.
• Cuando use la bandeja para hornear, primero deslice una parrilla del horno
dentro del horno. La bandeja para hornear se coloca sobre la parrilla del
horno.
• Use la bandeja para hornear cuando cocine alimentos que puedan gotear
sobre los elementos de calentamiento.
• Use masa precocinada para preparar aperitivos rellenos de forma rápida y
sencilla. La masa precocinada también requiere un tiempo de cocción más
corto.
• Añadir un poco de aceite vegetal a los alimentos empanizados puede
ayudar a producir resultados más crujientes. Cuando añada aceite, hágalo
inmediatamente antes de cocinar y solo añada una cantidad pequeña sobre
los alimentos empanizados.
Cómo Agitar los Alimentos
Para asegurar una cocción unifome al freír con aire, puede voltear sus alimentos
a mitad del proceso de cocción.
1. Seleccione el horno que contiene el alimento que desea voltear y presione el
Botón Stop (detener) para detener el proceso de cocción.
2. Use guantes de horno para retirar los accesorios y los alimentos. Coloque los
accesorios y los alimentos sobre una supercie resistente al calor.
3. Voltee los ingredientes en la bandeja para freír.
4. Vuelva a colocar los accesorios en el aparato. Cierre la puerta. Presione el
botón Start (iniciar) para reanudar el proceso de cocción.
Consejos
6. El aparato emite un bip cuando termina el proceso de cocción. Los
accesorios están calientes, use guantes de horno para transferir los
accesorios a una supercie resistente al calor
TO67D5-2SP_30986_ES_IB_D.indd 33TO67D5-2SP_30986_ES_IB_D.indd 33 7/2/24 8:23 AM7/2/24 8:23 AM
34
Guías Generales de Cocción
NOTA: Tenga en cuenta que estos ajustes son orientativos. Dado que los
ingredientes difieren en origen, tamaño, forma y marca, no podemos garantizar los
mejores ajustes para sus ingredientes. Cuando cocine en ambos hornos, agregue
un poco de tiempo y controle sus alimentos cerca del nal del ciclo de cocción.
Alimento Tamaño Temperatura
Tiempo de
Cocción Precalentar
Agitar o
Voltear
Rociar con
Aceite
ALIMENTO CONGELADO
Pizza congelada 425° F
10-15
mins.
Papas fritas 400° F
20-24
mins.
Papas fritas de batata
o boniato
400° F
20-24
mins.
Nuggets de pollo 400° F
14-16
mins.
POLLO
Chuletas empanizadas 6 onzas 400° F
10-15
mins.
Alas 400° F
20-24
mins.
Pechuga de pollo 6 onzas 400° F
12-16
mins.
CARNE DE RES
Hamburguesas 6 onzas 400° F
10-14
mins.
Perros calientes 8 piezas 375° F
5-8
mins.
Bistec estilo NY strip
(del lomo corto)
8 onzas 400° F
12-16
mins.
Albóndigas de 1
pulgada
1.5 libra 375° F
10-15
mins.
CERDO
Chuletas de cerdo 400° F
12-16
mins.
Salchichas 350° F
15-20
mins.
TO67D5-2SP_30986_ES_IB_D.indd 34TO67D5-2SP_30986_ES_IB_D.indd 34 7/2/24 8:23 AM7/2/24 8:23 AM
35
Tabla de Temperatura
Interna para Carne
Alimento Tipo
Temp.
Interna*
Carne
de res y
ternera
Molida 160° F
Bistecs, asados:
término medio
145° F
Bistecs, asados:
crudos
125° F
Pollo y pavo
Pechugas 165° F
Molido, rellenado 165° F
Aves enteras, piernas,
muslos
165° F
Pescado y
mariscos
Cualquier tipo 145° F
Cordero
Molido 160° F
Bistecs, asados:
término medio
140° F
Bistecs, asados:
crudos
130° F
Cerdo
Chuletas, molido,
costillas
160° F
Jamón cocinado 140° F
Use esta tabla y un termómetro de
cocina para asegurarse de que la
carne, las aves, los mariscos y otros
alimentos cocinados alcancen una
temperatura interna mínima segura.
*Para máxima segurida de los
alimentos, el Departamento de
Agricultura de los Estados Unidos
(USDA por sus siglas en inglés)
recomienda una temperatura de 165°
F para todas las aves; 160° F para
carne de res molida, ternera y cerdo y
145° F, con 3 minutos de reposo, para
todos los otros tipos de carne de res,
ternera y cerdo. Revise también las
normas de seguridad alimentaria del
USDA.
Alimento Tamaño Temperatura
Tiempo de
Cocción Precalentar
Agitar o
Voltear
Rociar con
Aceite
PESCADO
Filetes de salmón 6 onzas 390° F
12-16
mins.
Camarones
(16 a 20)
12 onzas 390° F
10-15
mins.
VEGETALES
Espárragos 1 libra 380° F
8-12
min
Brócoli 8 onzas 380° F
10-15
min
Maíz en mazorca 2 pieza 380° F
8-12
min
TO67D5-2SP_30986_ES_IB_D.indd 35TO67D5-2SP_30986_ES_IB_D.indd 35 7/2/24 8:23 AM7/2/24 8:23 AM

36
Cuidado y Limpieza
1. Desenchúfe el cable de
alimentación del tomacorriente
y asegúrese de que el aparato
esté completamente frío antes de
limpiarlo.
2. Limpie la supercie exterior del
aparato, incluso el vidrio de las
puertas, con un paño húmedo,
caliente y un detergente suave.
3. Limpie el vidrio adentro del aparato
con un paño húmedo, caliente y un
detergente suave. Use protección
para las manos en caso de que el
interior del aparato esté todavía
caliente.
4. Limpie los accesorios, incluyendo
la bandeja de goteo, con agua
caliente, un detergente suave y una
esponja no abrasiva. Los accesorios
son aptos para el lavaplatos, pero
se recomienda lavarlos a mano.
Para eliminar alimentos difíciles
de despegar, remójelos en agua
jabonosa, caliente por 10 minutos.
5. Limpie el interior del aparato con
agua caliente, un detergente suave
y una esponja no abrasiva.
6. Enjuague el aparato con un paño
húmedo y limpio. Use un paño seco
y limpio para secar el interior del
aparato. No deje agua estancada en
el aparato.
7. Una vez seco, asegúrese de volver a
colocar las bandejas de goteo en la
parte inferior de los hornos.
8. Si necesita cualquier otro servicio,
comuníquese con Servicio de
Atención al Cliente.
Coloque el aparato enfriado y seco en un lugar limpio y seco. No apile objetos
encima del aparato.
Almacenamiento
Limpieza
TO67D5-2SP_30986_ES_IB_D.indd 36TO67D5-2SP_30986_ES_IB_D.indd 36 7/2/24 8:23 AM7/2/24 8:23 AM

37
Resolución de Problemas
Síntoma Causa Posible Solución
El aparato no
funciona.
El aparato no está enchufado.
Enchufe el cable de alimentación a
un tomacorriente.
El aparato está enchufado a un
tomacorriente compartido con
otros dispositivos.
Enchufe el cable de alimentación a
un tomacorriente. independiente
Es posible que el aparato se
haya apagado. Si se presiona
el botón Stop (detener)
durante la cocción, el proceso
de cocción se detendrá.
Presione el botón Start (iniciar) con
el horno apropiado seleccionado
para reanudar la cocción.
Los alimentos
no se cocinan.
Se está cocinando demasiada
comida a la vez.
Use tandas más pequeñas para
una cocción más uniforme.
La temperatura está
demasiado baja.
Aumente la temperatura de
cocción y continue cocinando.
La comida está en el horno
equivocado.
Cuando cocine en un solo
horno, use el horno superior.
Asegúrese de ajustar el tiempo y
la temperatura de cocción para el
horno superior.
Los alimentos
no se fríen
uniformemente.
Algunos tipos de alimentos se
cocinan más uniformemente si
se voltean a mitad del ciclo de
cocción.
Ver “Cómo Agitar los Alimentos”
en la sección “Instrucciones de
Uso”.
Sale humo del
aparato.
Se ha utilizado demasiada
cantidad de aceite.
Limpie el aparato para eliminar el
exceso de aceite.
Los accesorios o el aparato
tienen residuos del proceso
anterior.
Limpie el aparato y los accesorios
después de cada uso.
Gotea líquido sobre los
elementos de calentamiento.
Use la bandeja para hornear
cuando cocine alimentos
que puedan gotear sobre los
elementos de calentamiento.
TO67D5-2SP_30986_ES_IB_D.indd 37TO67D5-2SP_30986_ES_IB_D.indd 37 7/2/24 8:23 AM7/2/24 8:23 AM

SmartSynx
Dual Door Oven
Horno de Doble Puerta
®registered trademark and
TM
trademark of Empower Brands, LLC.
®marca registrada y
TM
marca comercial por Empower Brands, LLC.
© 2024 Empower Brands, LLC. All rights reserved / Todos los derechos reservados.
Empower Brands, LLC, Middleton, WI 53562. 07/2024
Made in China.
Fabricado en China.
T22-9003562-D
30986 E/S
TO67D5-2SP_30986_ES_IB_D.indd 40TO67D5-2SP_30986_ES_IB_D.indd 40 7/2/24 8:23 AM7/2/24 8:23 AM