1
4 Way Smart Wi-Fi Extension
Model No. EXT1296
User Manual
IMPORTANT – RETAIN THESE INSTRUCTIONS FOR FUTURE REFERENCE
User Manual
4 Way Smart Extension Lead
2
4 Way Smart Wi-Fi Extension
Model No. EXT1296
User Manual
IMPORTANT – RETAIN THESE INSTRUCTIONS FOR FUTURE REFERENCE
Explanation of Symbols
The following warning symbols or words are used in this instruction manual:
Products labelled with UK Conformity Assessment identifies
products conforming to UK statutory requirements.
Products labelled with this symbol conform to applicable
provisions of the European Economic Area.
You should now recycle your waste electrical goods and in doing
so help the environment. This symbol means waste electrical
products at the end of their useful life should not be disposed of
with normal household waste and not sent to landfill. Please
ensure it is taken to a suitable facility for disposal. Check with
your Local Authority or retailer for recycling advice or visit
www.recycle-more.co.uk enter your postcode to find out your
nearest recycling site.
This symbol provides useful additional information on the
use of this product.
This symbol indicates that the supply uses an alternating current
mains supply.
3
4 Way Smart Wi-Fi Extension
Model No. EXT1296
User Manual
IMPORTANT – RETAIN THESE INSTRUCTIONS FOR FUTURE REFERENCE
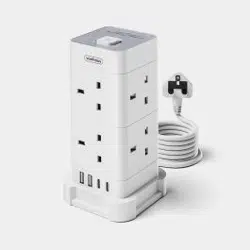
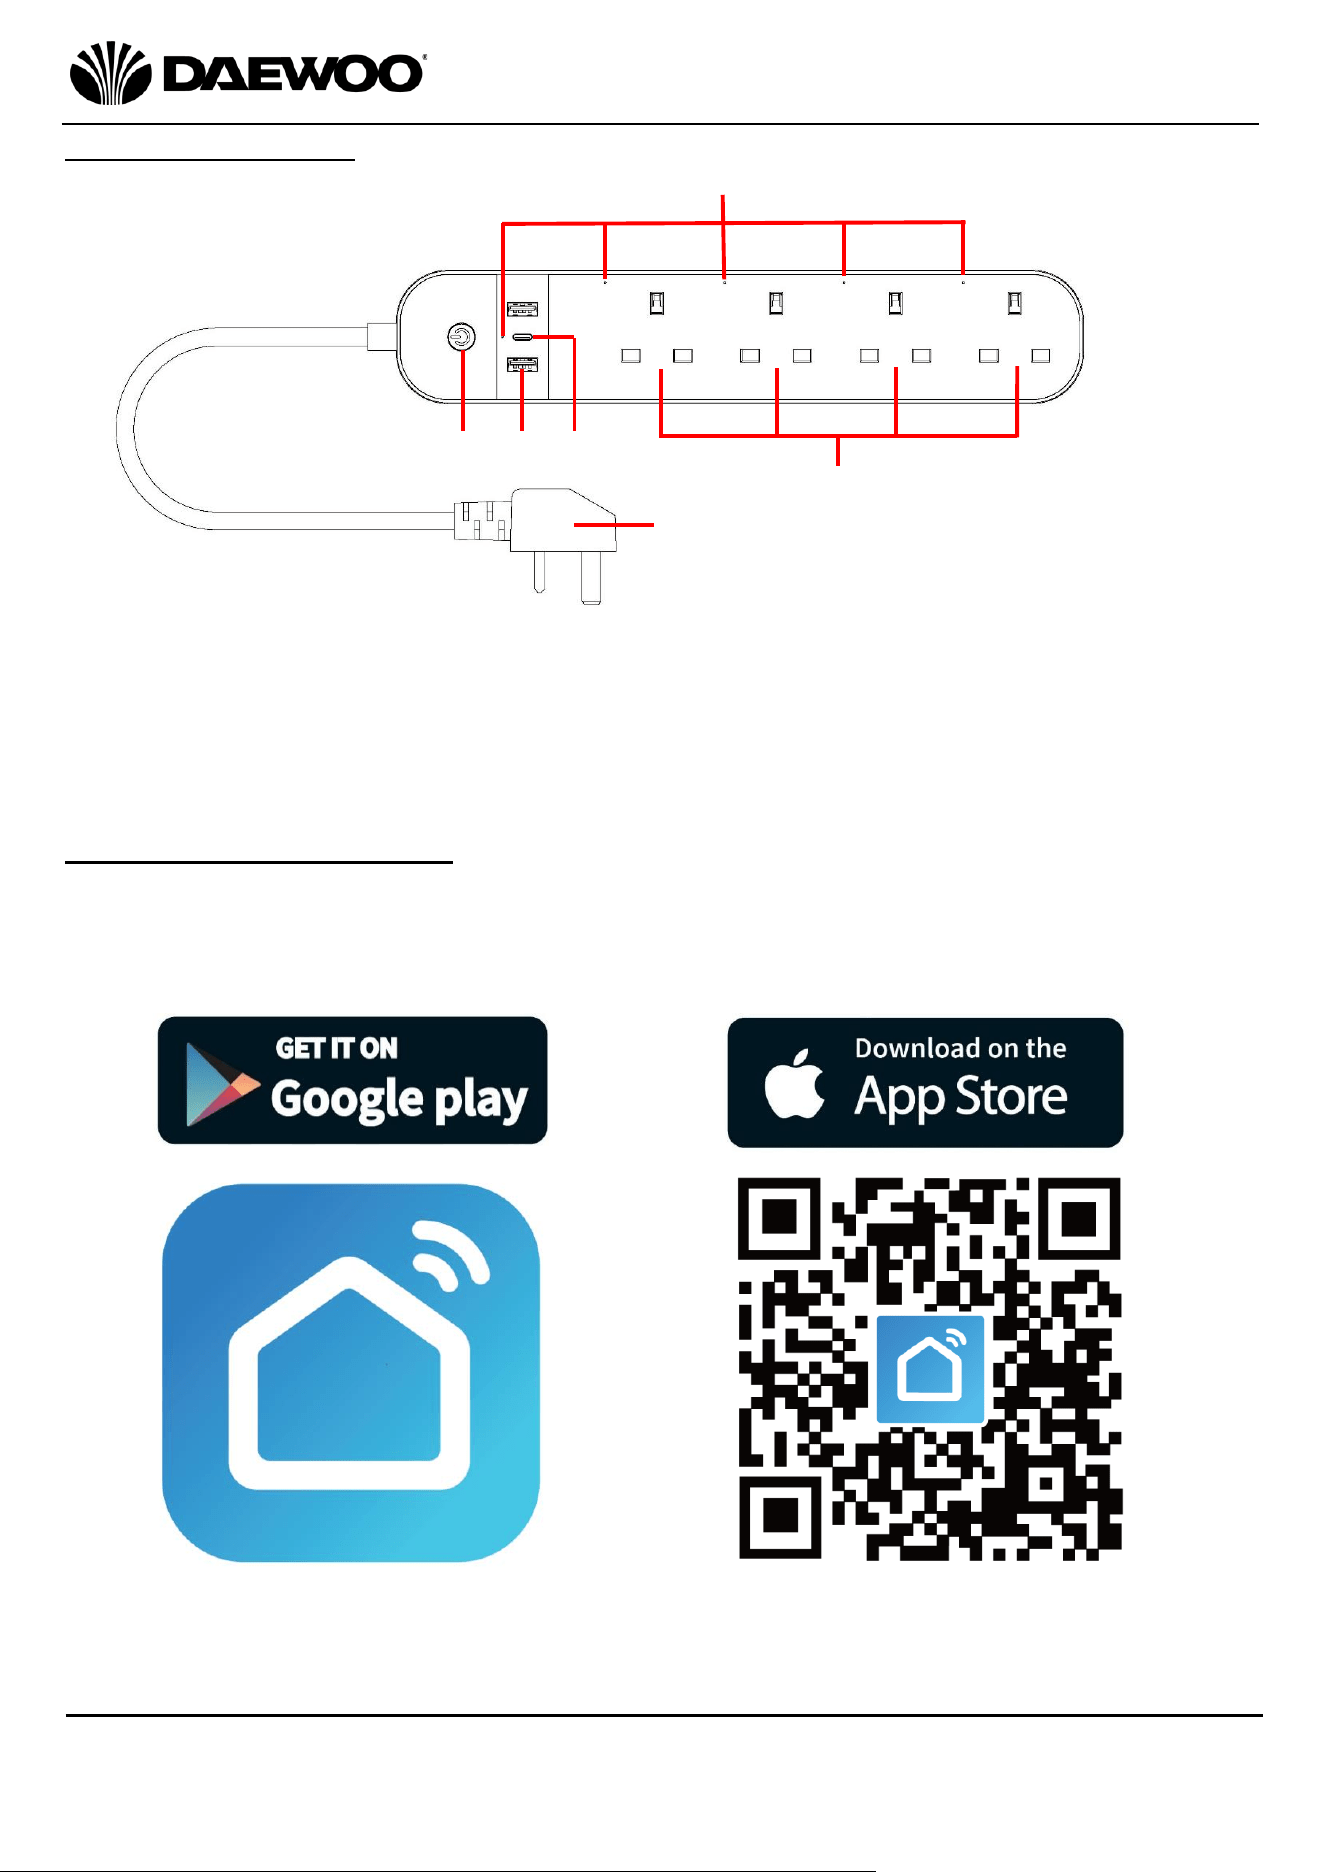
Description of Parts
Configuration Preparation
1. Using your smart phone, download the smart phone application either by
scanning the QR code below right or searching for Smart Life – Smart Living in
the Apple App Store for iPhones or in Google Play for Android phones.
1
3
5
4
1. On/Off Button (& LED)
2. USB A Type Ports (x2)
3. USB C Type Port
4. LED Indicator(s)
5. Wi-fi 13A Sockets
6. Mains Plug
6
2
iOS/Android App
Smart Life – Smart Living
4
4 Way Smart Wi-Fi Extension
Model No. EXT1296
User Manual
IMPORTANT – RETAIN THESE INSTRUCTIONS FOR FUTURE REFERENCE
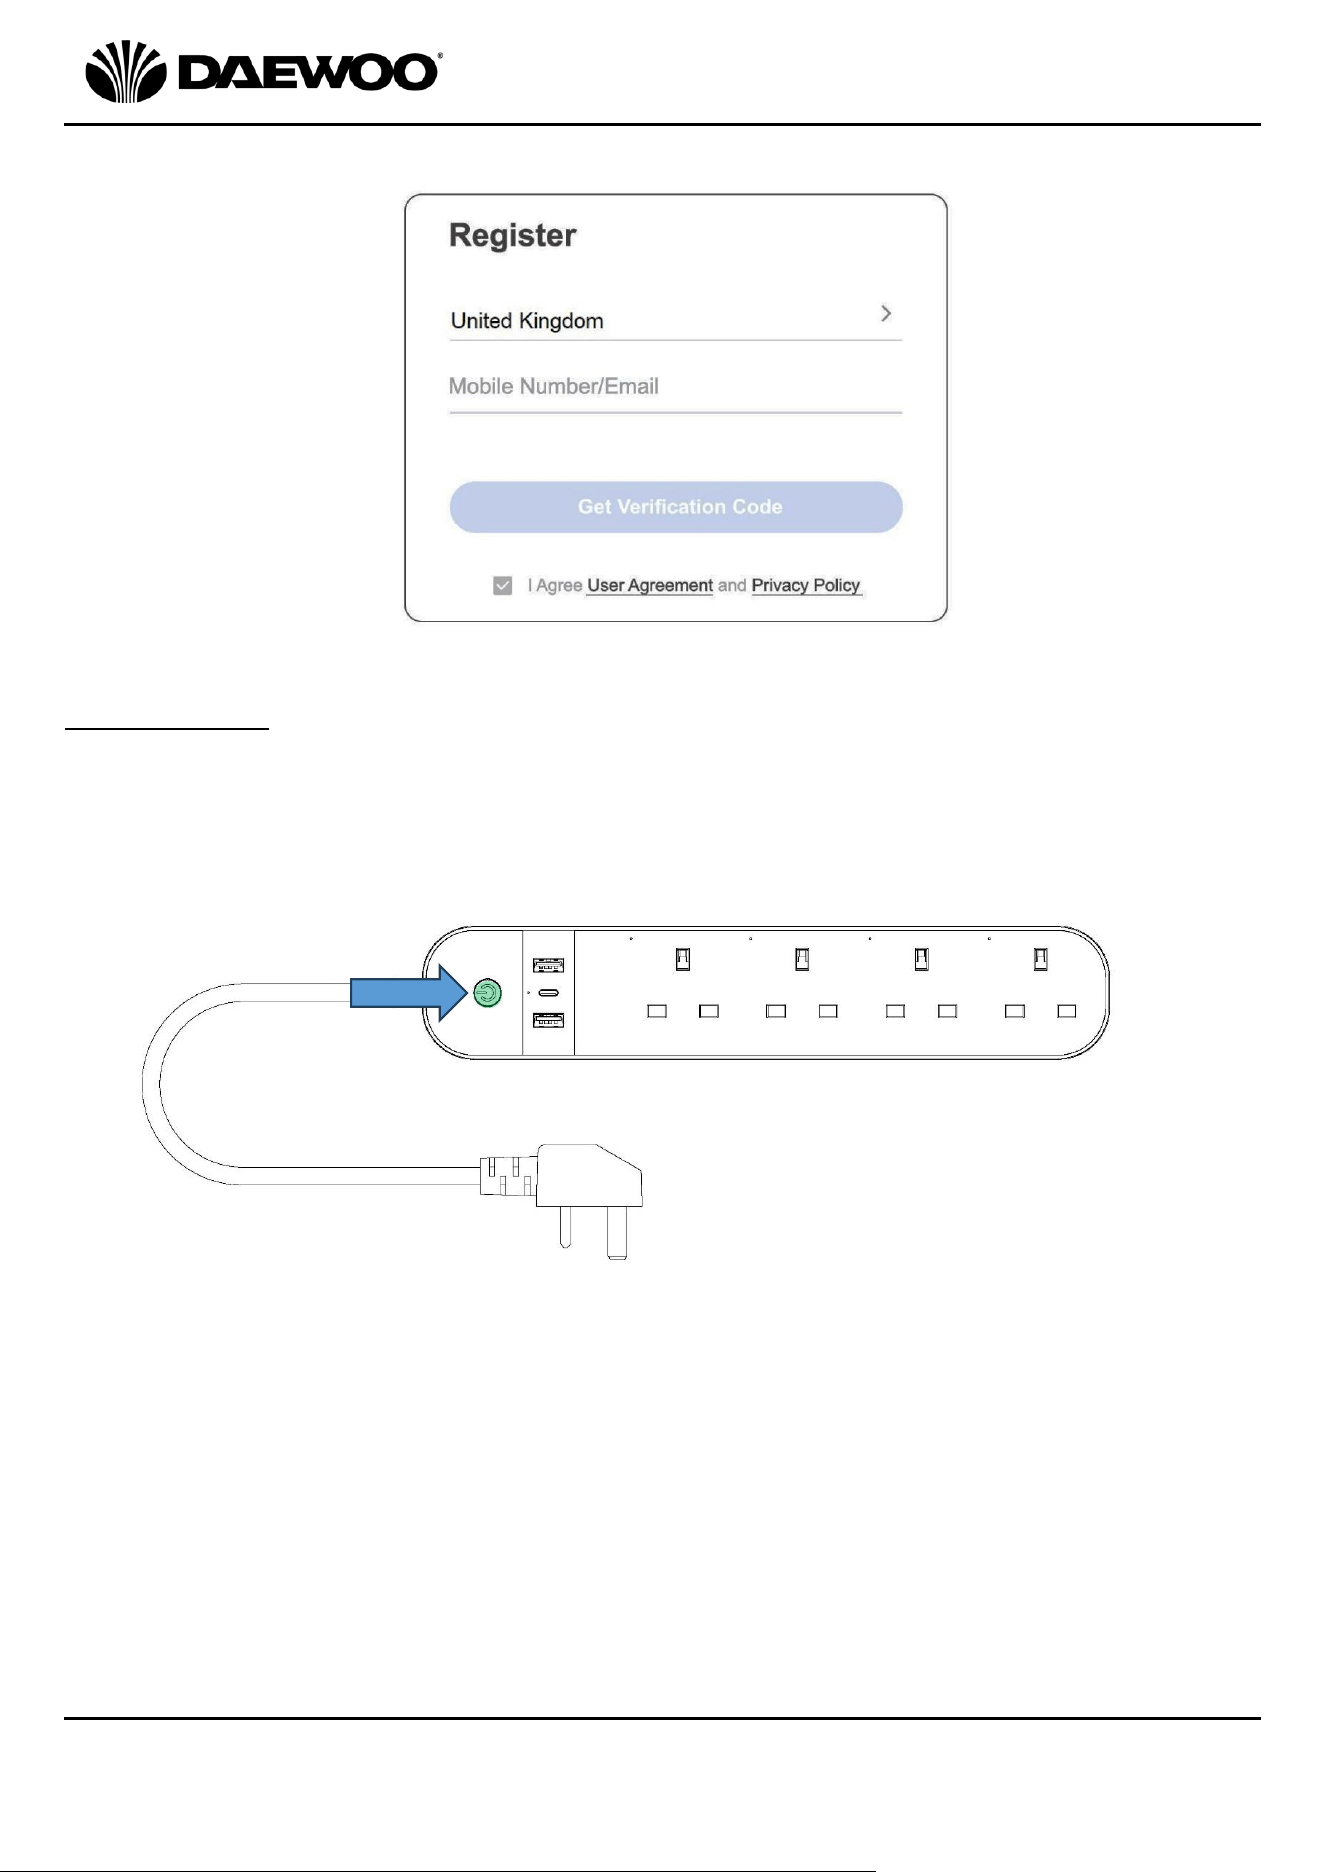
2. Launch the app and log in. However, new users will have to register a new
account as below:
Configuration
Plug the Mains Plug (6) of the Smart Extension Lead into the nearest socket and
press the On/Off Button (1) until the button starts flashing green as shown
below:
NOTE: If the LED fails to flash, try resetting the device – see ‘Resetting the Smart
Wi-fi Socket’ below:
5
4 Way Smart Wi-Fi Extension
Model No. EXT1296
User Manual
IMPORTANT – RETAIN THESE INSTRUCTIONS FOR FUTURE REFERENCE
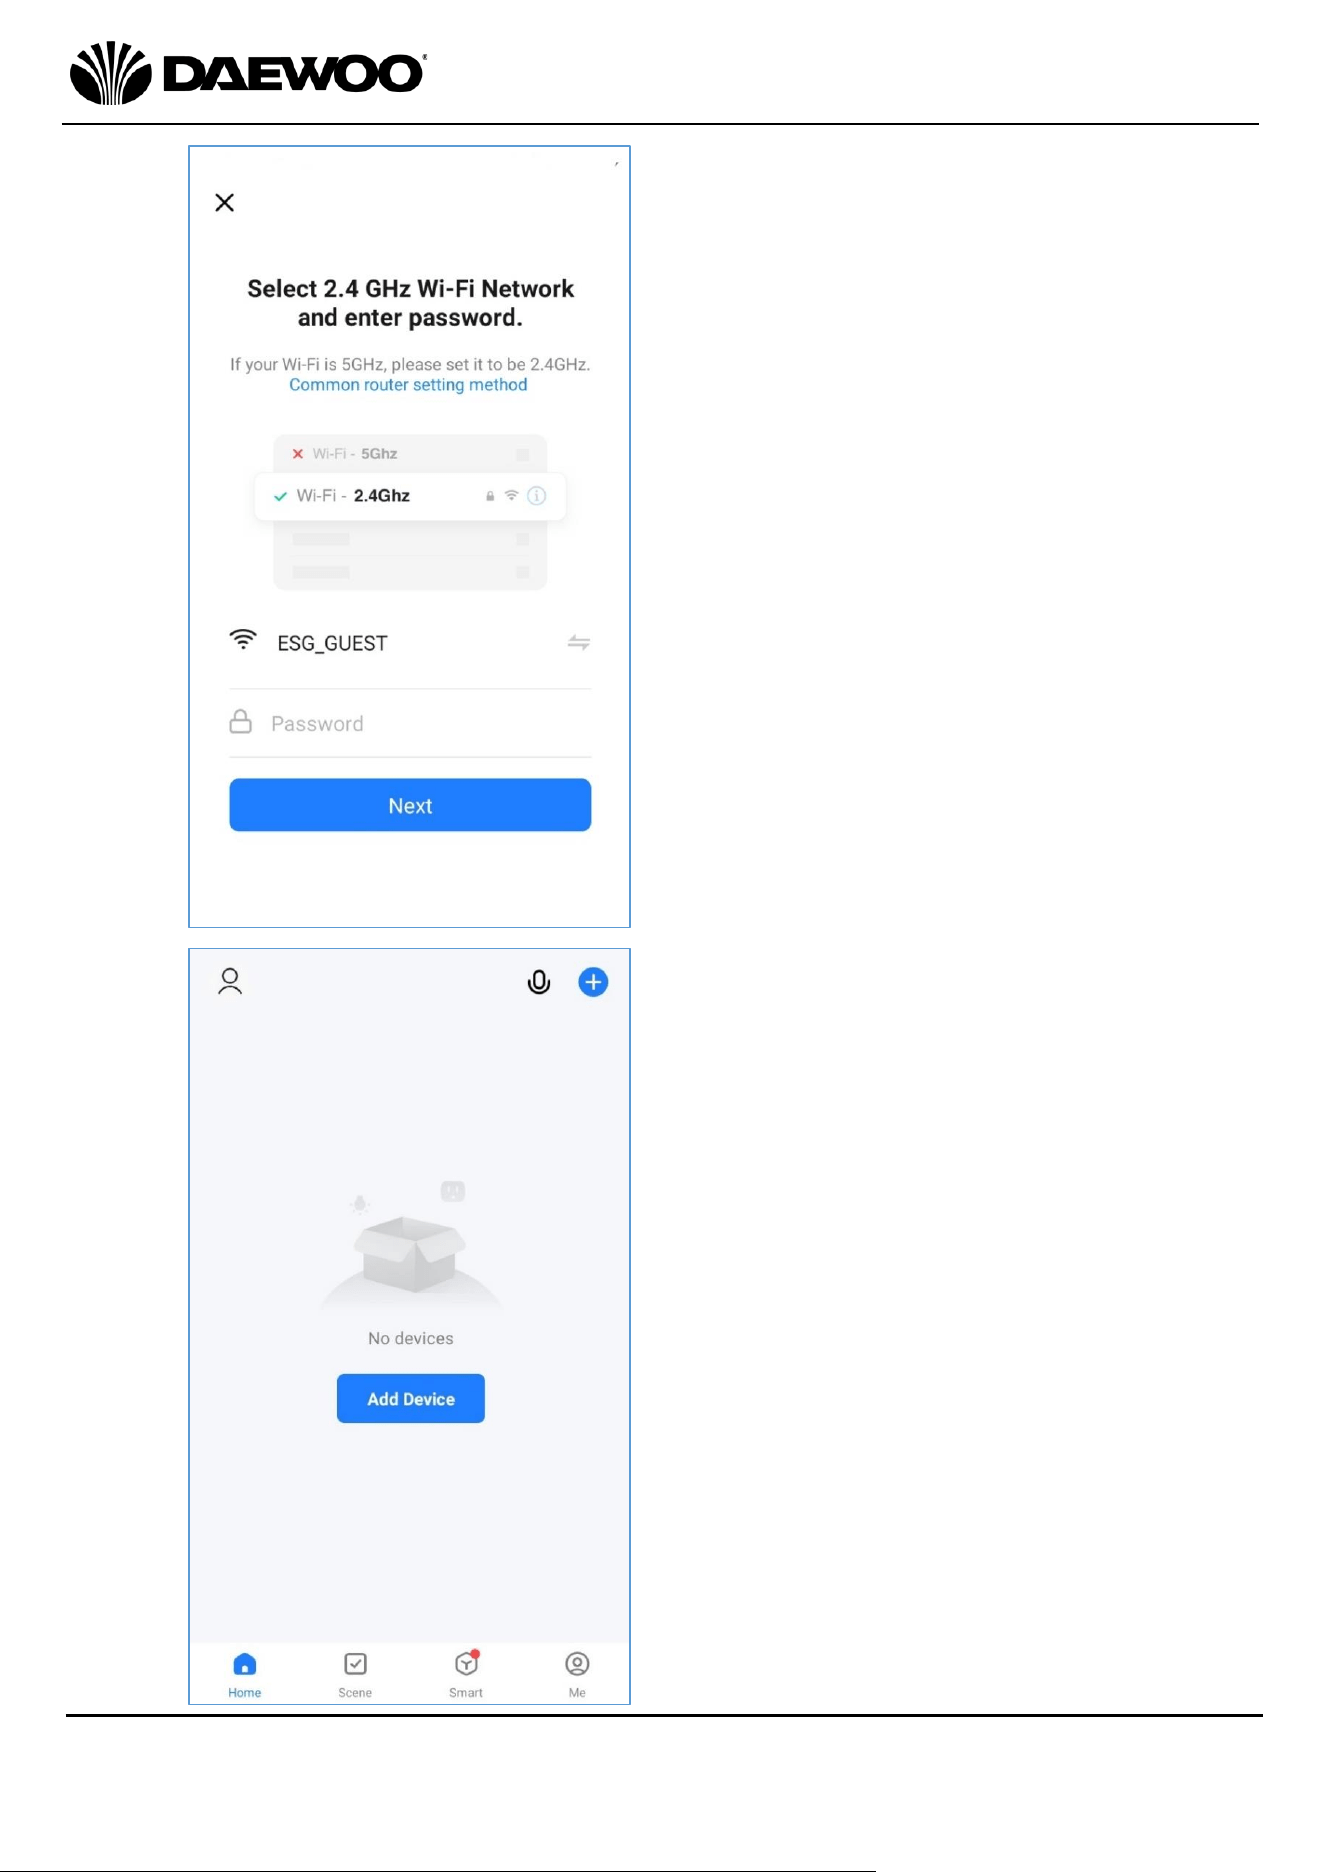
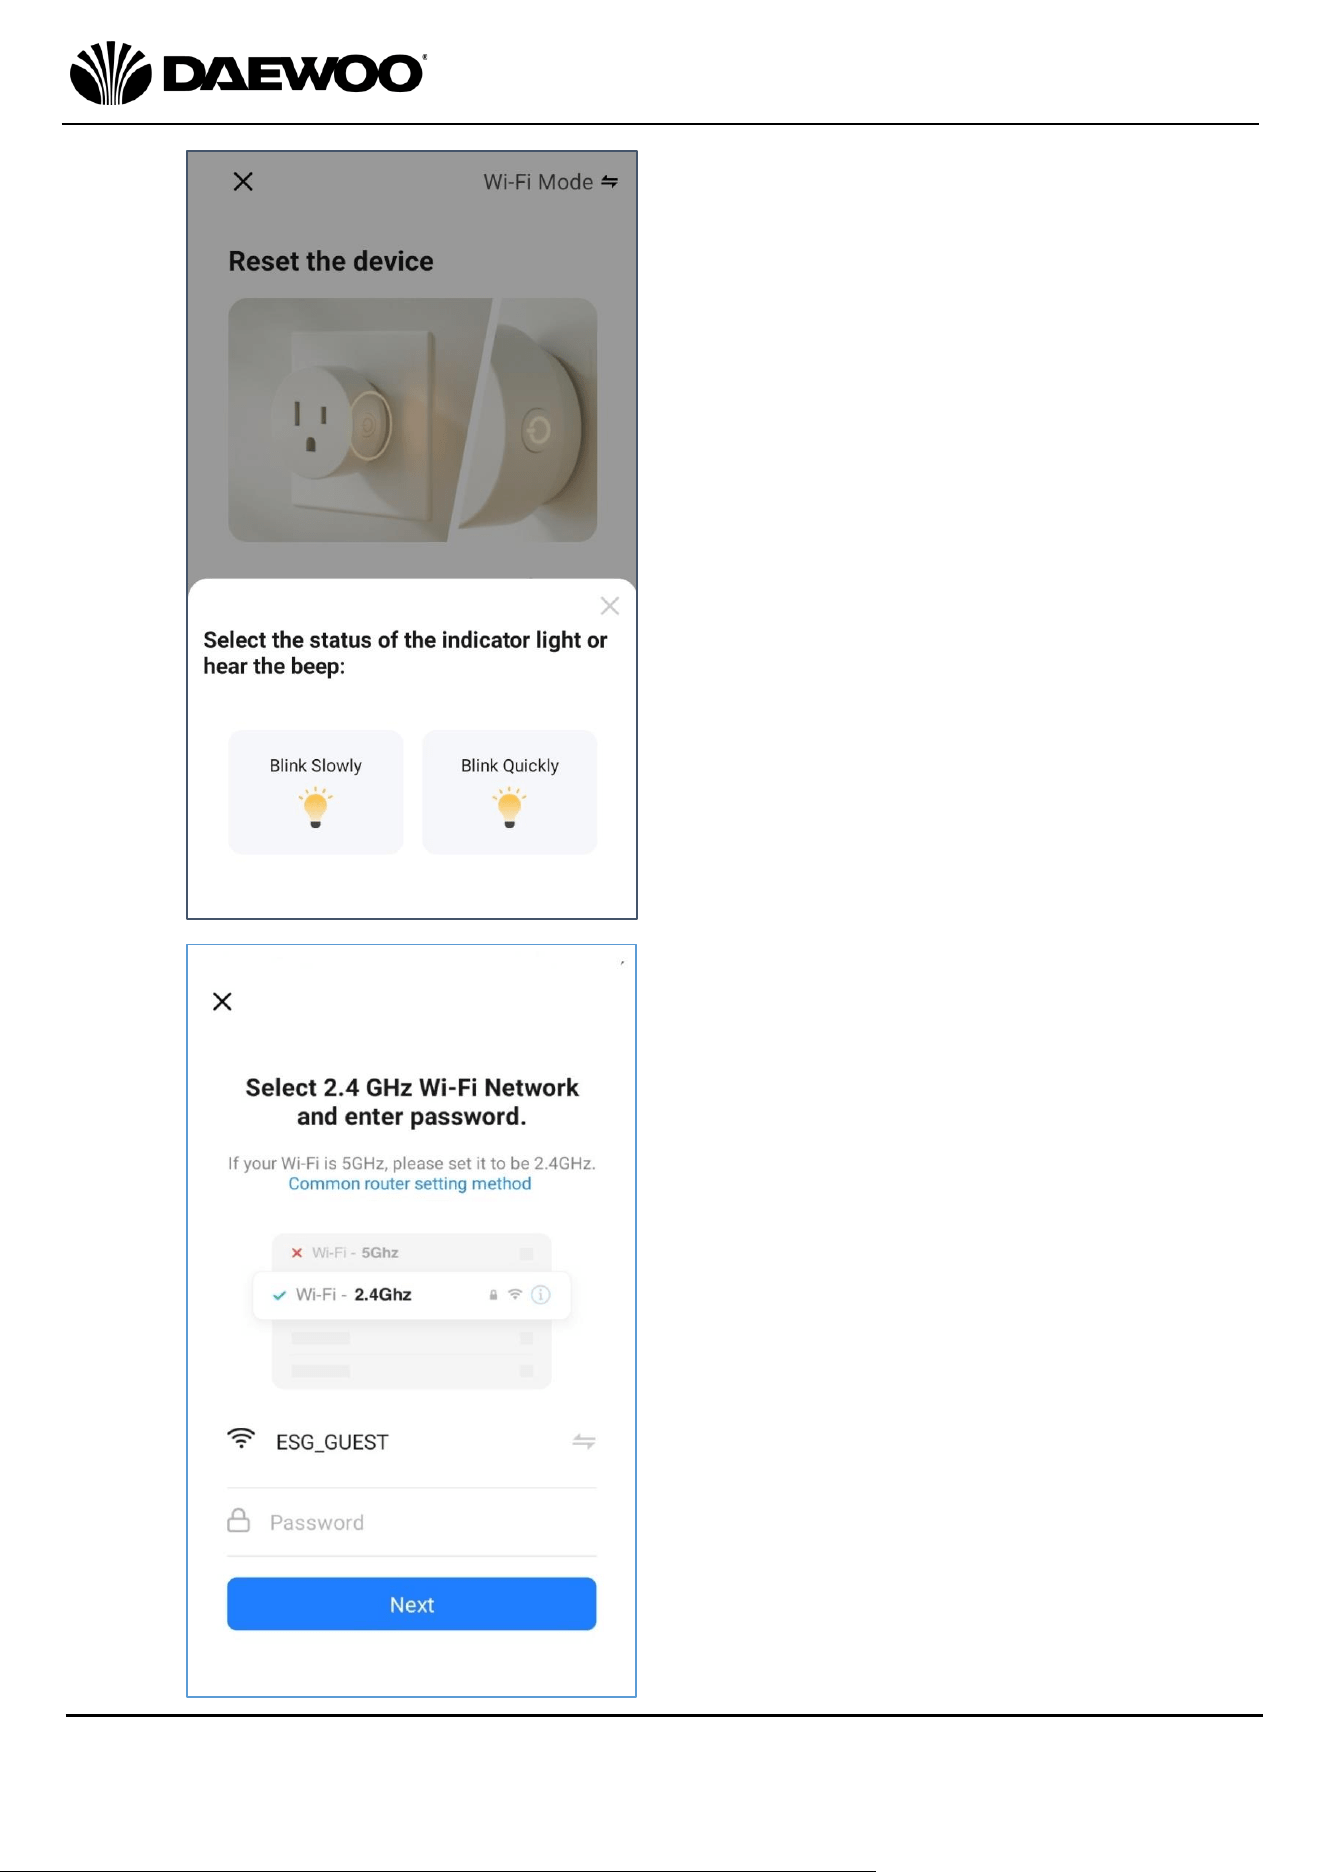
Select the Wi-fi hotspot
and input the password
to sign in and the App can
access the Wi-fi network.
Tap ‘Next’ after inputting
the password.
NOTE – the Wi-fi must be
2.4 GHz for the App to
operate.
The next page will prompt
you to add the smart
device – either press ‘Add
Device’ or tap ‘+’ on the
top right corner.
6
4 Way Smart Wi-Fi Extension
Model No. EXT1296
User Manual
IMPORTANT – RETAIN THESE INSTRUCTIONS FOR FUTURE REFERENCE
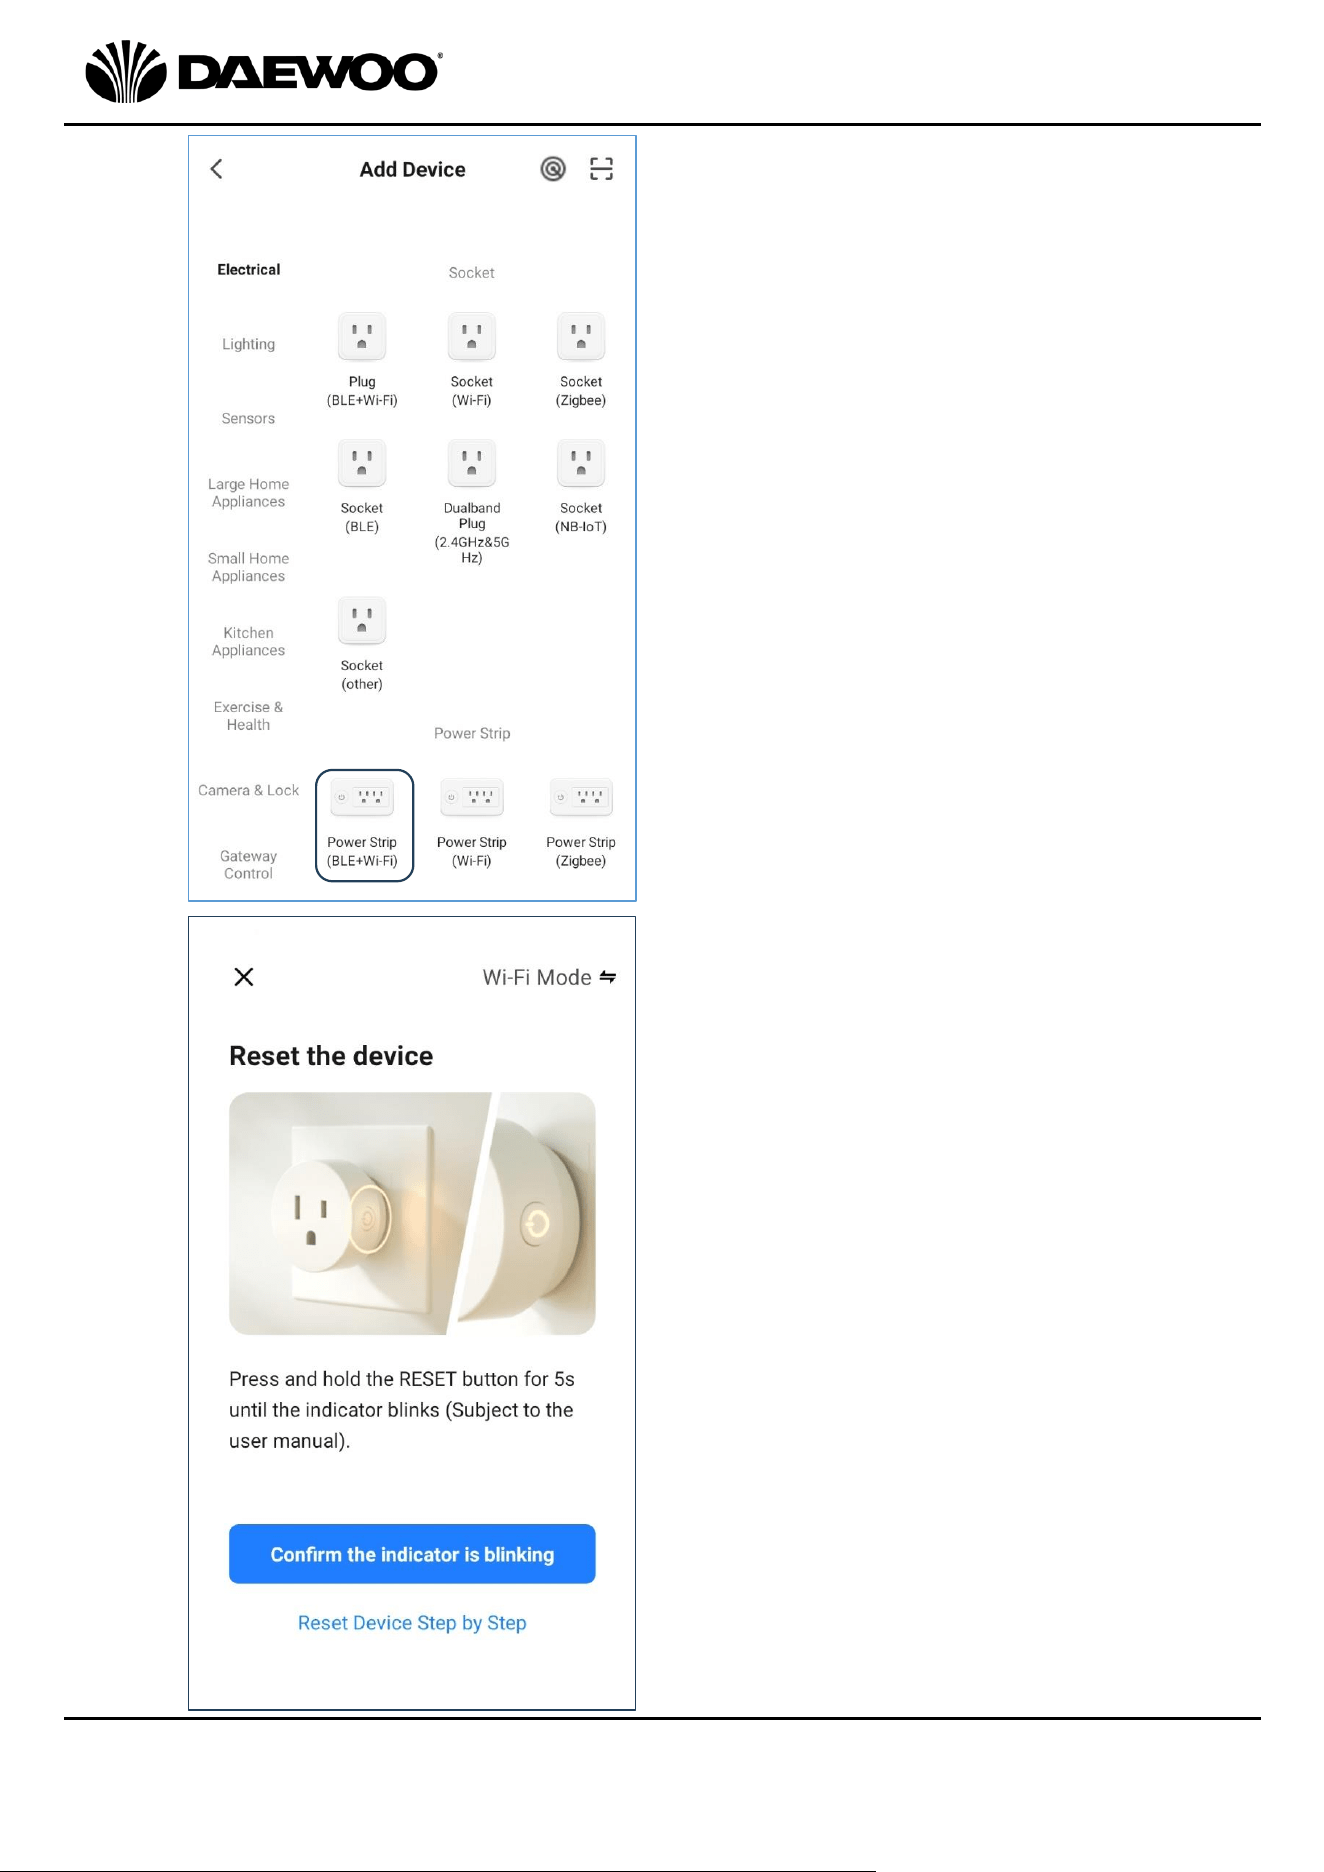
Next select the type of Wi-fi
socket.
Select ‘Power Strip (BLE+Wi-Fi)’
from the options as highlighted
left.
The next prompt is to
confirm the On/Off Button
(1) LED is still flashing.
If the button is flashing tap
‘Confirm the Indicator is
blinking’ to continue.
If the LED is not flashing the
device will need resetting
as follows:
Unplug the device from the
mains for 10 seconds and
then plug it back in again.
Press and hold the On/Off
Button (1) for 5 to 10
seconds to reset the device
until the LED flashes.
7
4 Way Smart Wi-Fi Extension
Model No. EXT1296
User Manual
IMPORTANT – RETAIN THESE INSTRUCTIONS FOR FUTURE REFERENCE
Your next prompt is to check
whether the LED is flashing
slowly or quickly. If the LED is
flashing quickly, tap ‘Blink
Quickly’ to proceed.
You will be asked to log on to
your Wi-fi again.
Select the Wi-fi hotspot and
input the password to sign in.
Tap ‘Next’ after inputting the
password.
8
4 Way Smart Wi-Fi Extension
Model No. EXT1296
User Manual
IMPORTANT – RETAIN THESE INSTRUCTIONS FOR FUTURE REFERENCE
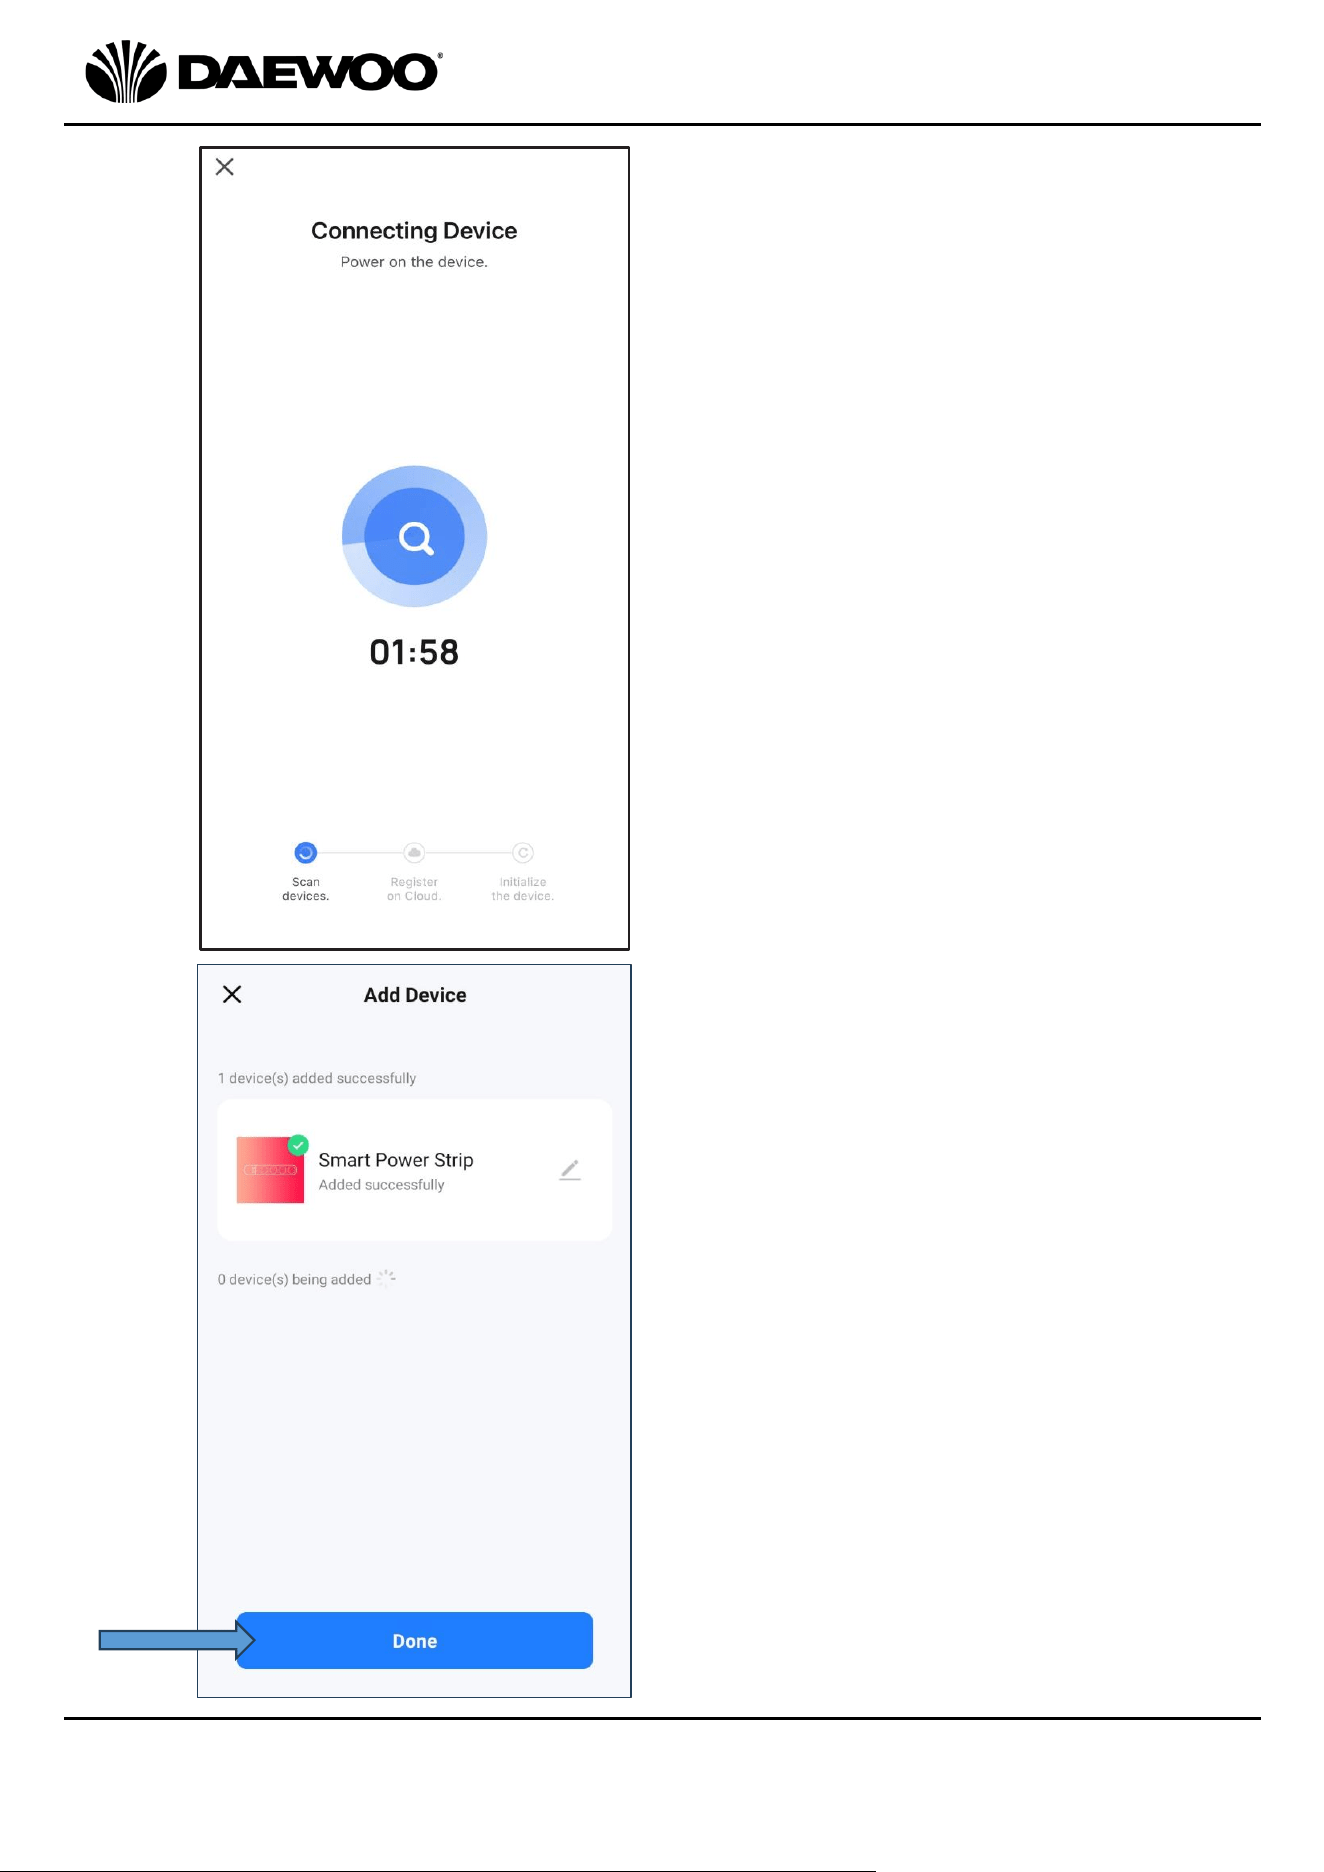
Left: The Smart Wi-Fi Socket
connecting to the App.
Left: Once your Smart Wi-fi
Socket has been fully
installed, tap ‘Done’
(arrowed left) which will
take you to the device’s
main control page below…..
9
4 Way Smart Wi-Fi Extension
Model No. EXT1296
User Manual
IMPORTANT – RETAIN THESE INSTRUCTIONS FOR FUTURE REFERENCE
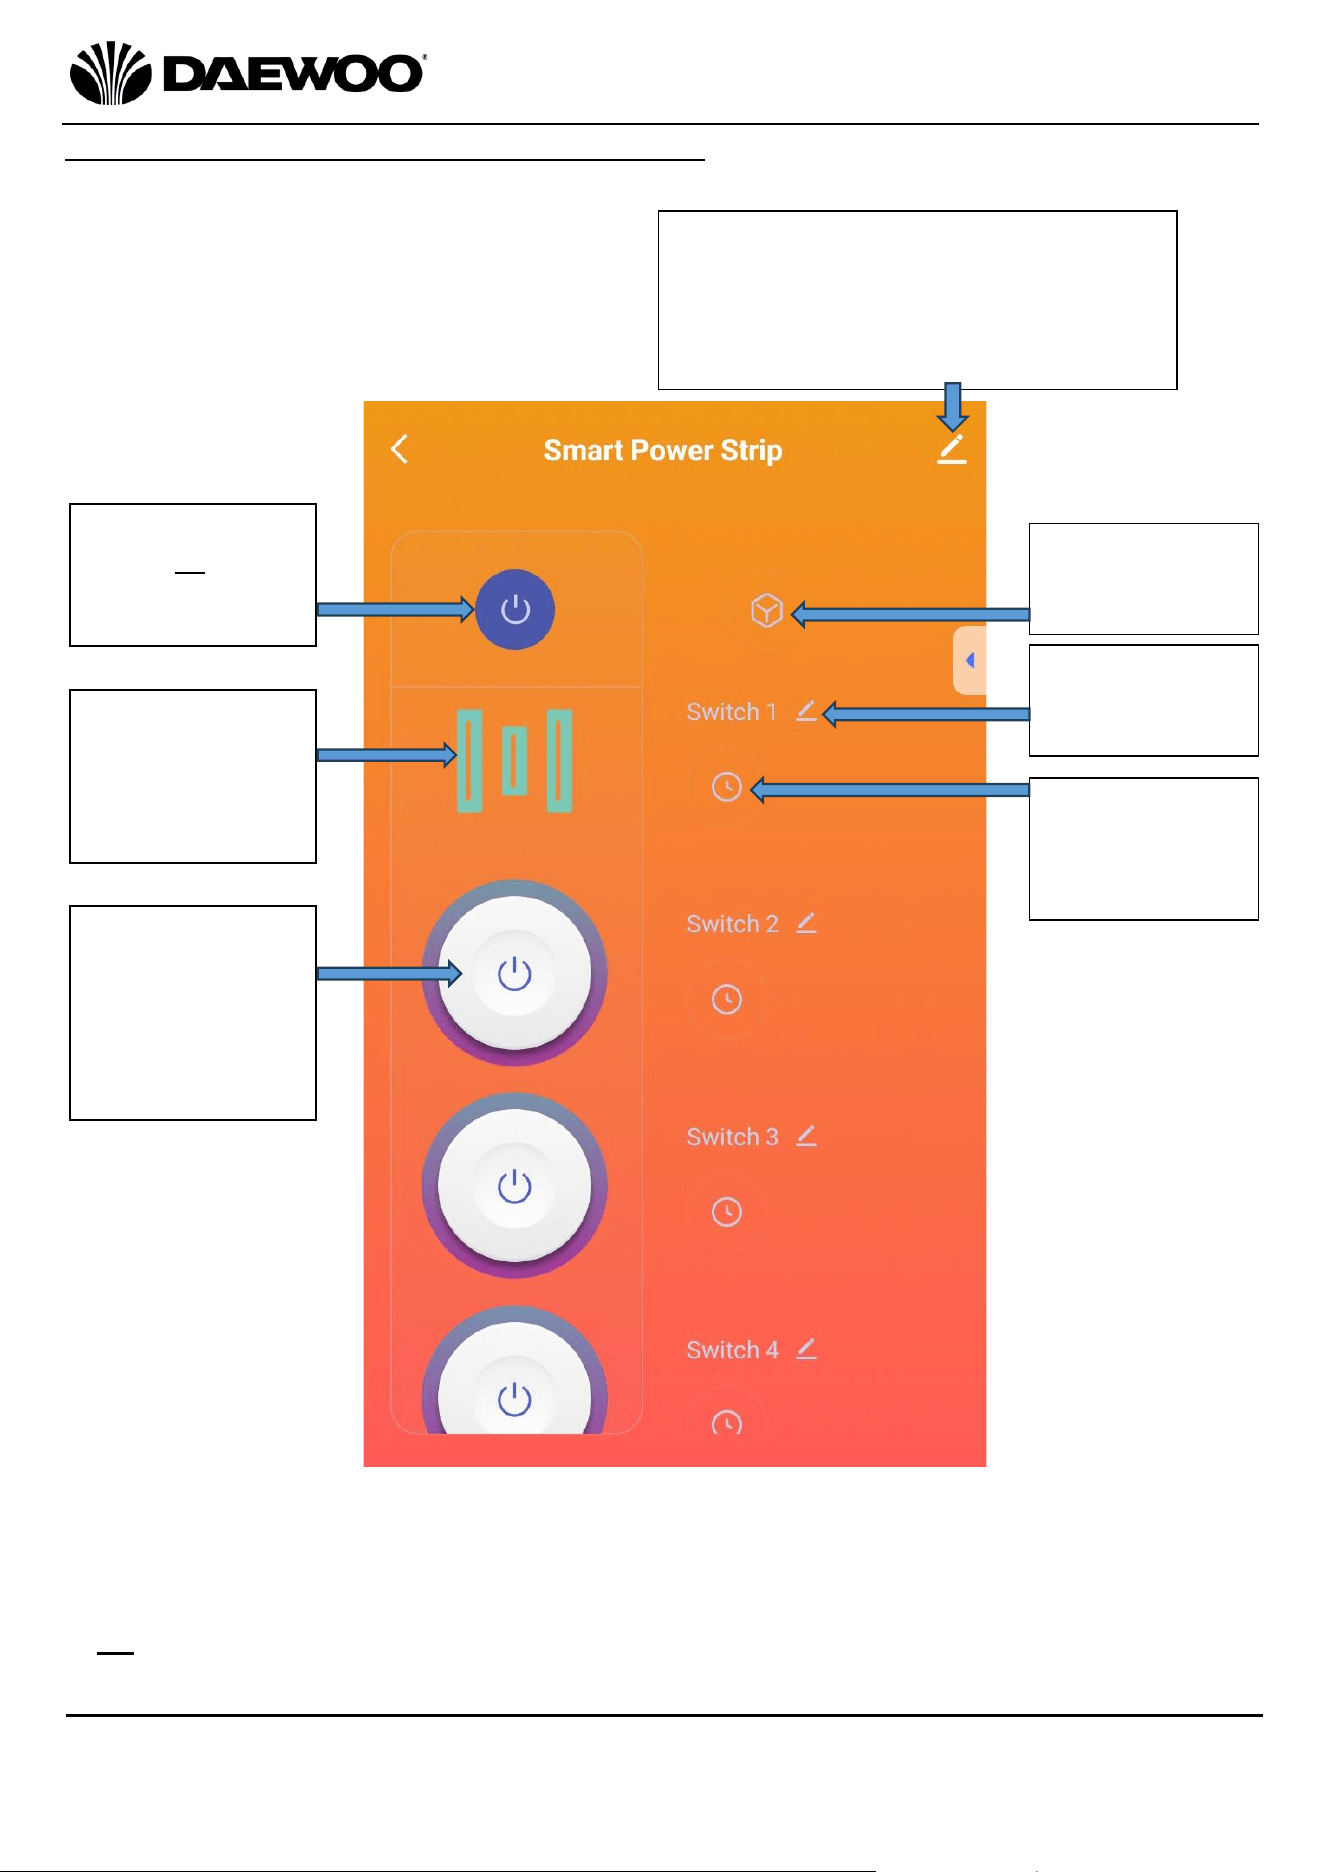
Using Your Smart Wi-fi Socket with the App
Here you will be able to control your Smart Wi-fi Socket from your smart device as
follows:
• Each of the Wi-fi 13A Sockets (5) can be turned on/off separately in the App.
The LED Indicator (4) will illuminate to show which socket is powered up.
• The A Type USB ports (2) and USB C Type Port (3) share same on/off control in
the App. The LED Indicator (4) will illuminate to show when the are powered.
• All the Wi-fi 13A Sockets (5) and USB ports (2 & 3) can be switched on/off
together in the App.
Tap this icon to
switch all the
sockets on and
off.
Tap this icon to
switch just the
USB (A & C)
sockets on and
off.
Tap the round
icons 2 to 5) to
individually
switch the 13A
mains sockets
on and off.
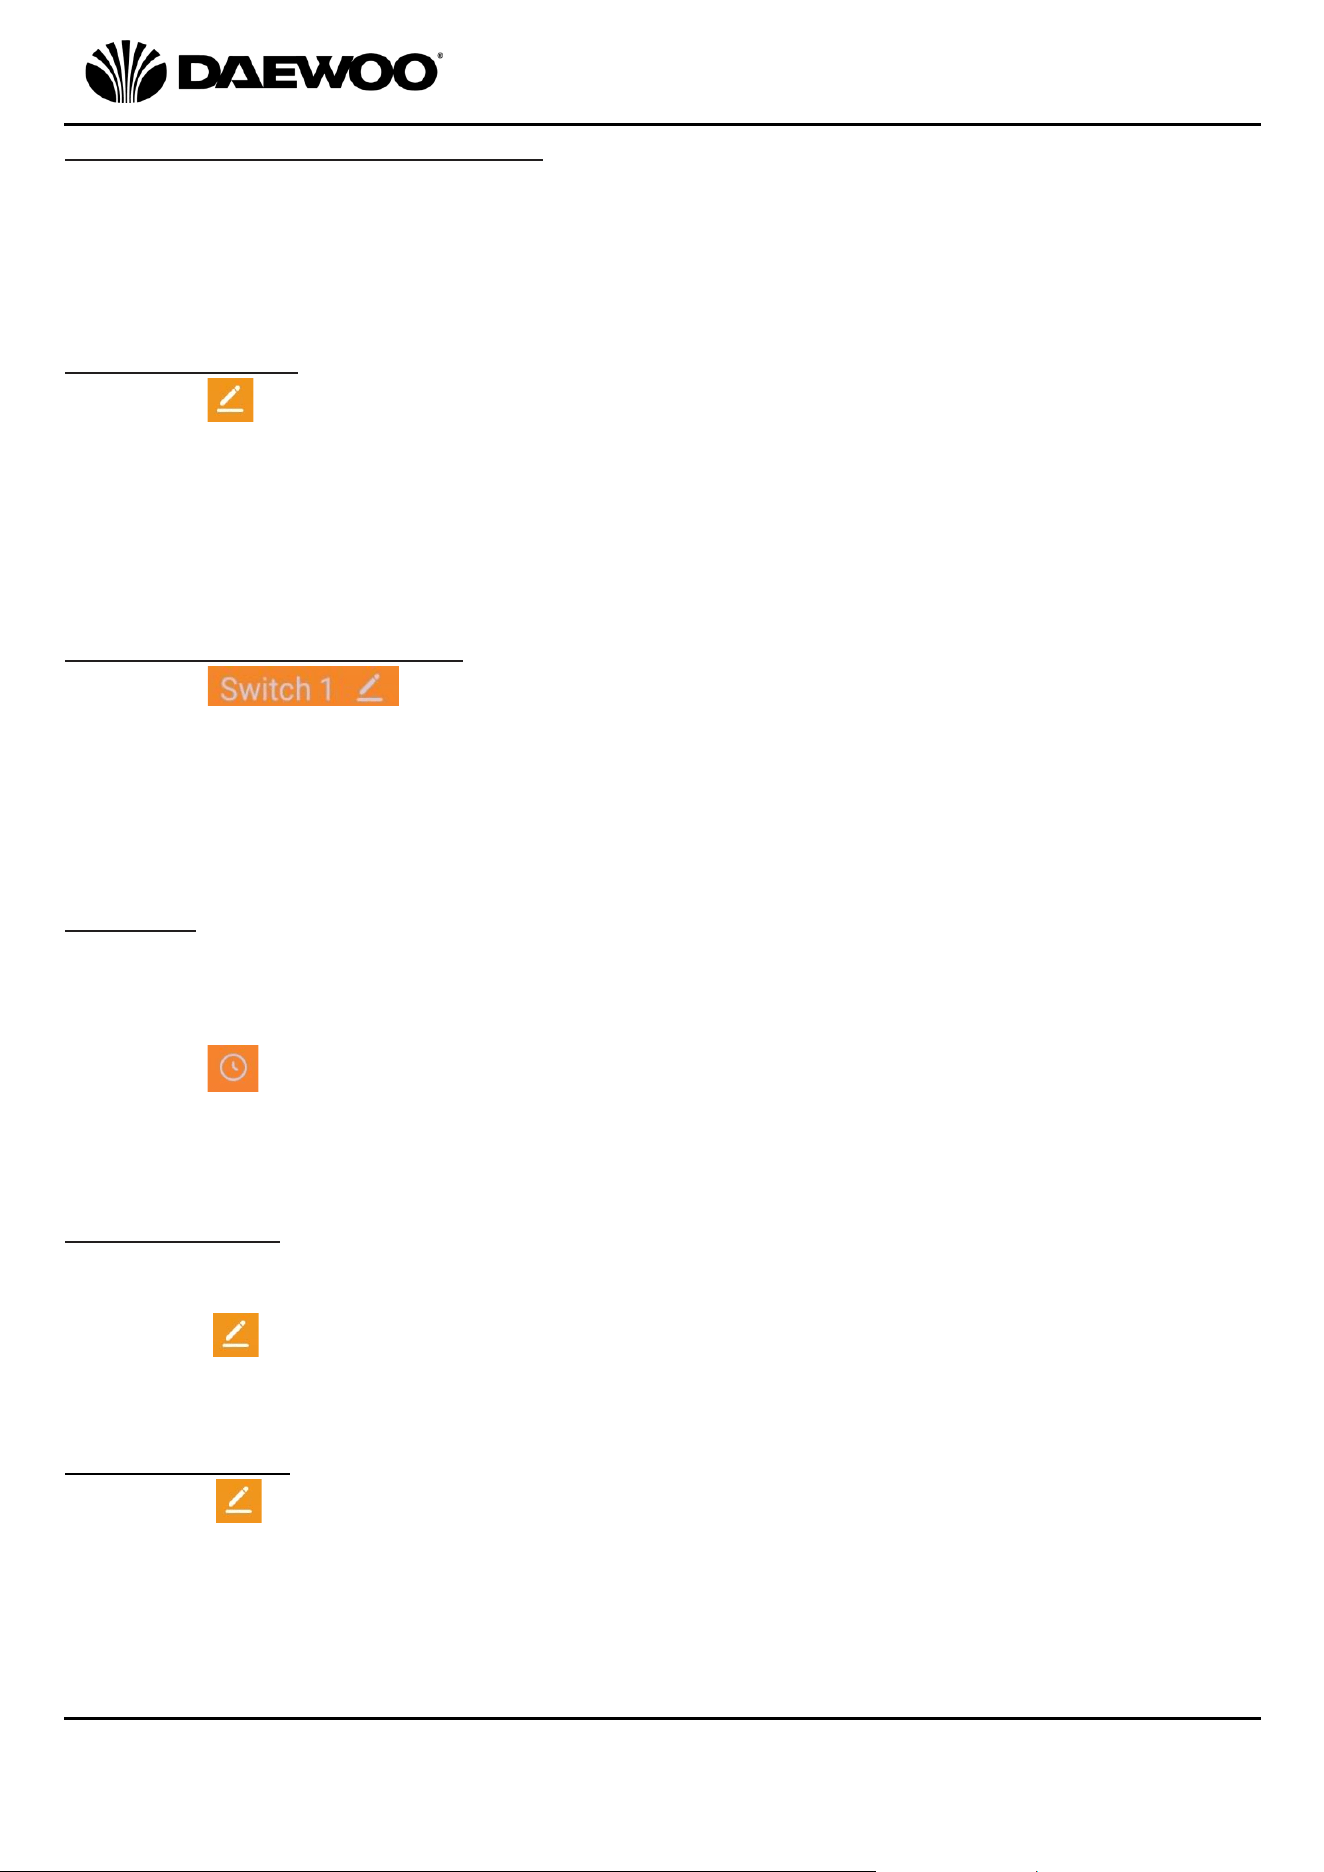
Tap this icon to
Rename a
Switch.
Tap this icon to
set up a
Schedule for a
switch.
Tap this icon to
enter the App
Settings.
Tap this icon for: Device Information
Share Device
Create Group
FAQs
Remove Device, etc.
10
4 Way Smart Wi-Fi Extension
Model No. EXT1296
User Manual
IMPORTANT – RETAIN THESE INSTRUCTIONS FOR FUTURE REFERENCE
Resetting the Smart Wi-fi Socket
• Unplug the Smart Wi-fi Socket from the mains wait 10 seconds and then plug it
back in again.
• Press and hold the On/Off Button (1) for 5 to 10 seconds to reset the device
until the LED flashes.
Sharing Devices
1. Tap
2. Select ‘Device Share’.
3. Select the device you wish to share.
4. Enter the telephone number, email address of the person you want to share
the device with.
Changing the Device Name
1. Tap
2. Modify Device Name and enter a new name for the switch.
NOTE If the Smart Wi-Fi Socket is going to be used with Amazon Echo
TM
, choose an
unambiguous, clear sounding name.
Schedule
Schedules can be used to turn devices on or off at preset times of the week. The
schedules can be once or repeat on certain days of the week.
To activate a schedule:
1. Tap
2. Set up the desired schedule at the top of the page.
3. Save the schedule once set up.
Device Update
New features maybe added to the firmware in your Smart Wi-Fi Socket.
To check for updates:
1. Tap
2. Tap ‘Device Update’.
Remove Device
1. Tap
2. Tap ‘Remove Device’ at the bottom of the page to remove the device.
11
4 Way Smart Wi-Fi Extension
Model No. EXT1296
User Manual
IMPORTANT – RETAIN THESE INSTRUCTIONS FOR FUTURE REFERENCE
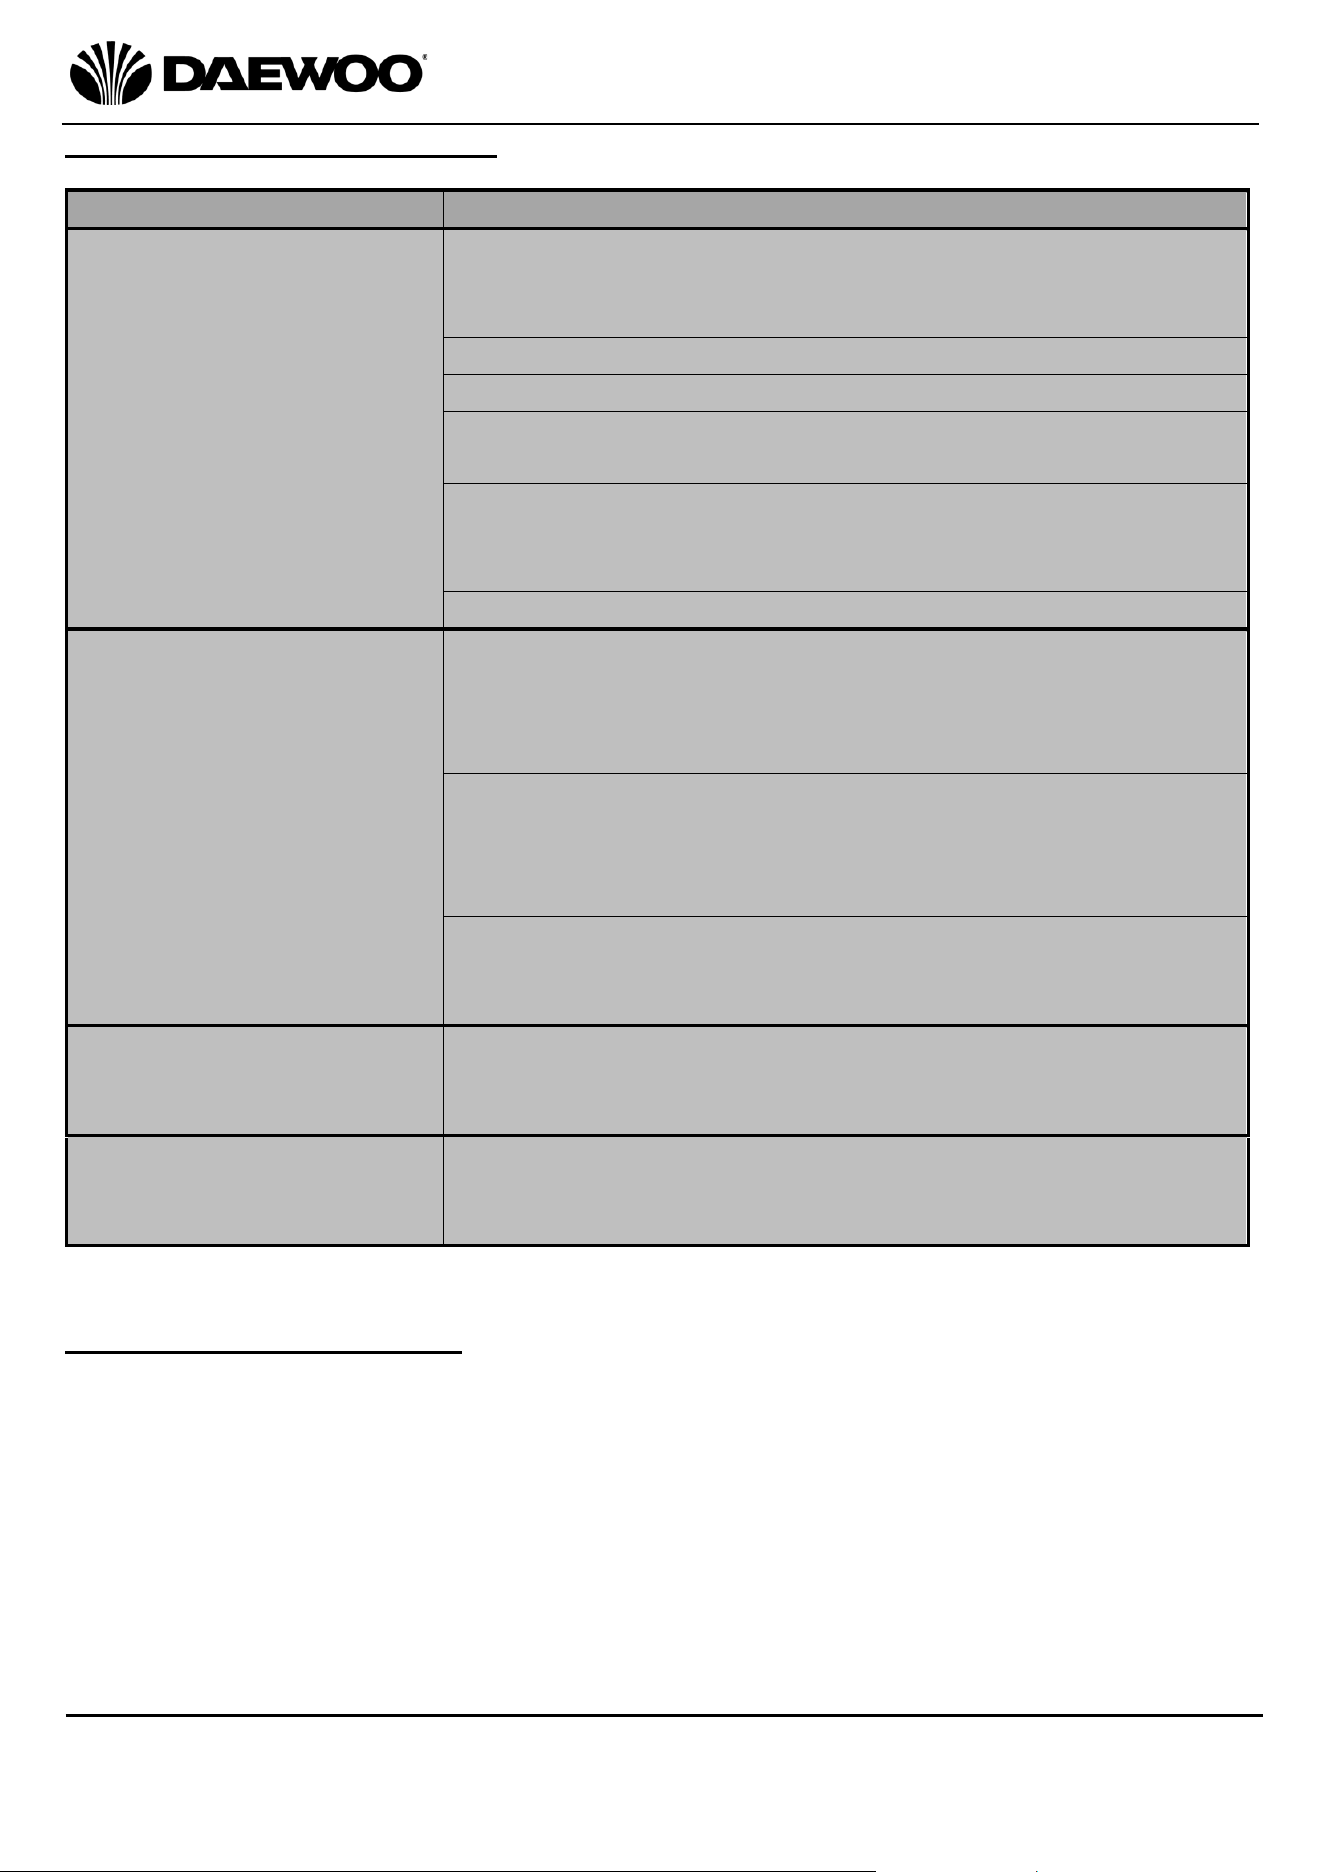
Wi-Fi Trouble Shooting Guide
Problem
Possible Cause and Solution
During the set-up, the
Smart Wi-fi Socket will
not connect to the Wi-Fi
network.
Check that you have the internet reception and your
smart device and the Smart Wi-fi Socket are
connected to the same Wi-Fi network.
Check that your Wi-Fi password is correct.
Check that no firewalls or other restrictions are set.
Check that the router is working with other products
e.g. TV, computer, etc.
Ensure that the Smart Wi-fi Socket, router and smart
device are all on the same Wi-Fi network and within
the signal range.
Reset the Wi-Fi module.
I cannot control the
Smart Wi-fi Socket with
my smart device.
The Smart Wi-fi Socket has been reset and/or the
smart device has lost control permission. Reconnect
your smart device to the Smart Wi-fi Socket using
the instructions above.
If after these steps you still cannot control the
Smart Wi-fi Socket with your smart device,
remove the Smart Wi-fi Socket from your device
list and reconnect.
Reset the Smart Wi-Fi Socket module by following
‘Resetting the Smart Wi-fi Socket’ found on page
10.
The LED indicator is
NOT blinking at all or is
blinking slowly.
Reset the Smart Wi-Fi Socket by following ‘Resetting
the Smart Wi-fi Socket’ found on page 10.
I need to pair a new
smart device with the
Smart Wi-fi Socket.
Only one smart device can be paired at any one time
– remove the existing device – see ‘Remove Device’
found on page 10.
Cleaning and Maintenance
Unplug the unit from the mains supply before cleaning.
Clean the surface of the unit with a damp cloth and mild detergent.
Do not use harsh or abrasive chemicals as this may damage the finish.
12
4 Way Smart Wi-Fi Extension
Model No. EXT1296
User Manual
IMPORTANT – RETAIN THESE INSTRUCTIONS FOR FUTURE REFERENCE
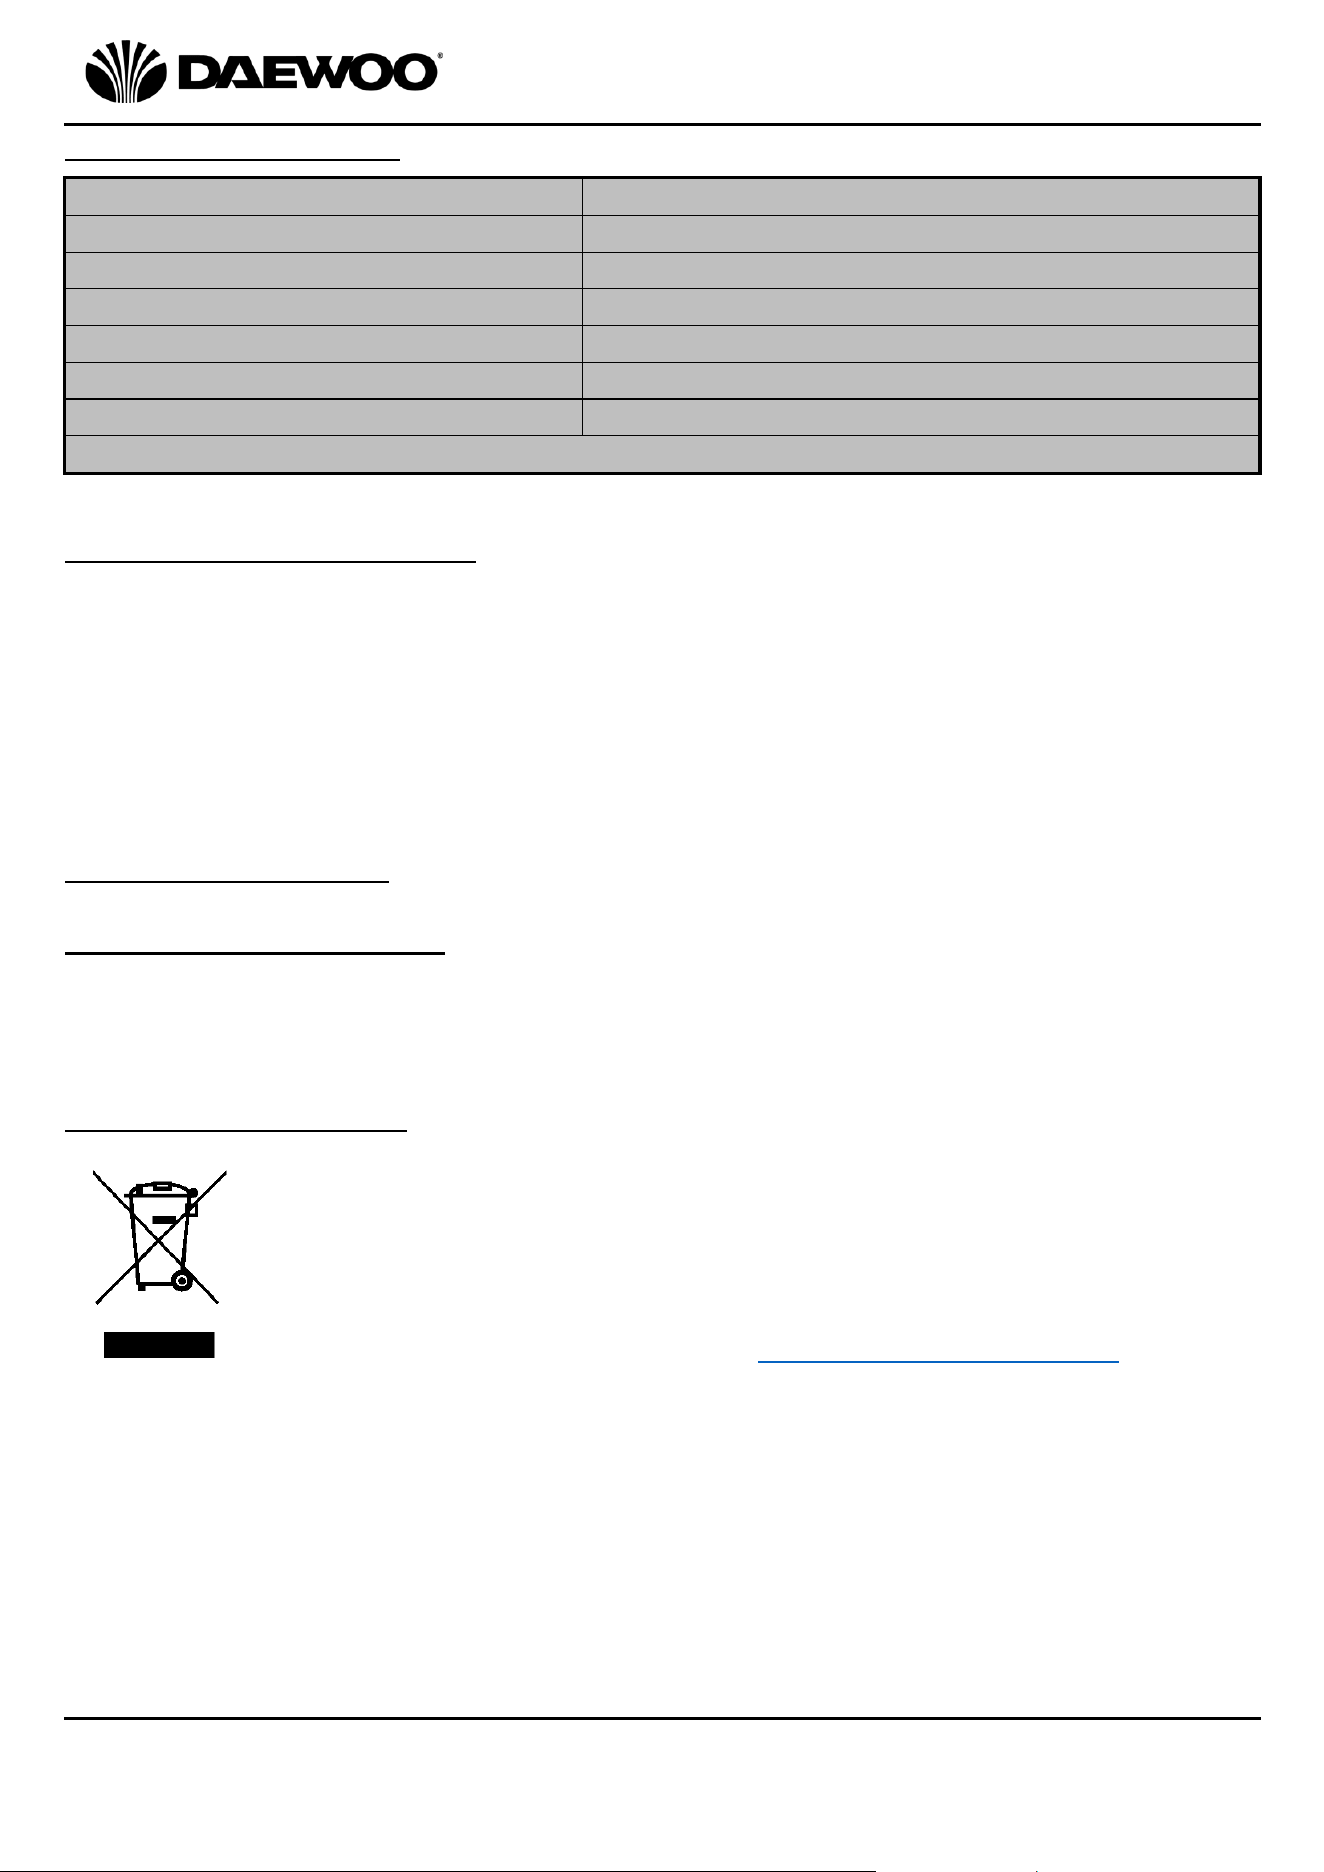
Technical Specification
Non-Rewireable Mains Plug
If your appliance is supplied with a non-rewireable plug fitted to the mains lead
and should the fuse needed replacing, you must use an ASTA approved one
(conforming to BS 1362 of the same rating). Never use a plug with the fuse cover
missing. If in doubt, consult a qualified electrician.
If you need to remove the plug -DISCONNECT FROM THE MAINS- and then cut it
off the mains lead and immediately dispose of it safely. Never attempt to reuse
the plug or insert it into a socket outlet as there is a danger of electric shock.
Recycling Information
Disposal of the Packaging
Dispose of paper and cardboard in appropriate paper re-cycling facilities.
Dispose of recyclable plastics in appropriate plastic re-cycling facilities.
Dispose of non-recyclable plastics in the appropriate plastics collection service.
Disposal of the Product
You should now recycle your waste electrical goods and in doing so
help the environment. This symbol means waste electrical products
at the end of their useful life should not be disposed of with normal
household waste and not sent to landfill. Please ensure it is taken to
a suitable facility for disposal. Check with your Local Authority or
retailer for recycling advice or visit www.recycle-more.co.uk, enter
your postcode to find out your nearest recycling site.
Model Number
EXT1296
Supply Voltage
220-240V~ 50/60Hz
Maximum Rated Power
3120W
Maximum Load
13A
Protection Class
I (This Appliance Must Be Earthed)
Wireless Type
Wi-fi 2.4GHz
USB A & C Outputs
5V @3A, 15W (maximum total)
This product conforms to the Radio Equipment Directive 2014/53/EU

13
4 Way Smart Wi-Fi Extension
Model No. EXT1296
User Manual
IMPORTANT – RETAIN THESE INSTRUCTIONS FOR FUTURE REFERENCE

14
4 Way Smart Wi-Fi Extension
Model No. EXT1296
User Manual
IMPORTANT – RETAIN THESE INSTRUCTIONS FOR FUTURE REFERENCE
WARRANTY
Thank you for purchasing your Daewoo product.
As part of our commitment to quality, we are offering you an extra 2 years warranty in
addition to your 1 year guarantee
Your Daewoo product is guaranteed for 1 year from the date of original purchase, with proof
of purchase or receipt. If any defect should occur due to faulty workmanship or material, your
faulty product should be returned to the place of purchase, replacement or refund is at the
discretion of the retailer.
The guarantee is subject to the following provisions:
•
The product must be correctly installed and operated in accordance with the
requirements contained in the instruction manual.
•
The product must be used solely for domestic purposes.
•
It does not cover general wear and tear, damage, misuse or any consumable parts.
•
The guarantee will be rendered invalid if the product is re-sold or has been damaged through
inexpert repair.
•
The guarantee is only valid within the UK and Eire.
Your standard 1 year guarantee will only be extended to the maximum available for your
individual product upon registration. (Note: products must be registered individually and
covers the main body and housing). If you do not register your product within 28 days of the
original purchase date, your product will only be guaranteed for 1 year.
To validate your extended 2 year warranty*please register your purchase online within 28
days of the original purchase date by registering at:
https://help.daewooelectricals.com
or
Contact Us (daewooelectricals.com)
*Your extended warranty is only valid with proof of purchase receipt and subject to the
conditions outlined above.
Daewoo is a registered trademark.
Produced and imported under licence by
Eurosonic Group Limited
Brightgate House
1 Brightgate Way
Manchester M32 0TB UK
EU Rep: EuroSonic Magppie (ESM) Ltd. Ireland D05 X006
www.esgltd.com