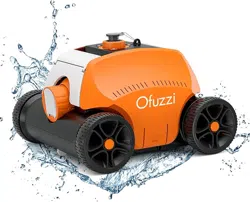
Thank you for purchasing Ofuzzi Cordless Robotic Pool Cleaner
If you have any questions or issues, please contact us for customer service.
User Manual
Cordless Robot ic Pool Cleaner
Model:Cyber 1000

Table of Contents
Import ant Precaut ions
I. Int roduct ion
II. Appearance&struct ure
III. Specifications
IV. Operat ion instruction
V. Trouble shooting
VI. Packing list
VII. Warranty
- 01 -
02
05
06
07
08
16
17
17

1.
2.
3.
4.
5.
6.
7.
8.
9.
10.
11.
12.
13.
14.
15.
16.
17.
18.
Important Precautions
Do not power on t he cleaner when it is out of t he wat er.
St rict ly prohibit using t he cleaner beyond its operat ing condit ions. Please read t he manual carefully, and use it according t o t he manual. We have no
responsibility for any loss or injury caused by improper use.
Use t he accessories recommended or sold by t he manufact urer only.
This model mainly applies to swimming pools with a flat floor.
The cleaner should not be used by children under t he age of 8 or people with ment al disorders. Please do so under t he supervision of t he guardian if
necessary. Please do not allow children to ride on it or play as a t oy.
Use t he original and aut horized power adapt er only.
It must be replaced by t he aft er-sale professionals if t he power line is damaged.
The power line must be connected t o a leakage protect ed and eart hed socket when charging.
Do not operate t he cleaner when t here are people in t he pool.
Always clean and wash the filter tray after use.
Power o the cleaner when maintaining, cleaning or not using it.
The cleaner should be st ored in a cool and ventilat ed place, away from direct sunshine.
Charge the baery under the permied condition. The cleaner should be stored in a cool place when charging, meanwhile do not place or be covered
wit h anyt hing t o prevent t he damage of int ernal elect rical components caused by overheat ing of t he power unit .
Only professionals can disassemble t he sealed driving kit of t he cleaner.
Close the pool filtration system before use.
The cleaner should be charged every t hree months if it needs t o be st ored for a long t ime. Please use t he original and aut horized adapter only to ensure
that the baery power is maintained at 40%-60%. The baery voltage will be lower than the over-discharge protection voltage due to the self-dis-
charge of baery if not charging the baery for a long time, which will lead to fatal damage to the baery if continuing too long. Please be careful.
Prohibit charging the baery under the condition of fire or extreme heat. Do not use or store the cleaner near the heat source.
Prohibit piercing t he cleaner shell wit h nails or ot her sharp objects, and prohibit hammering, impacting and t hrowing t he cleaner.
- 02 -
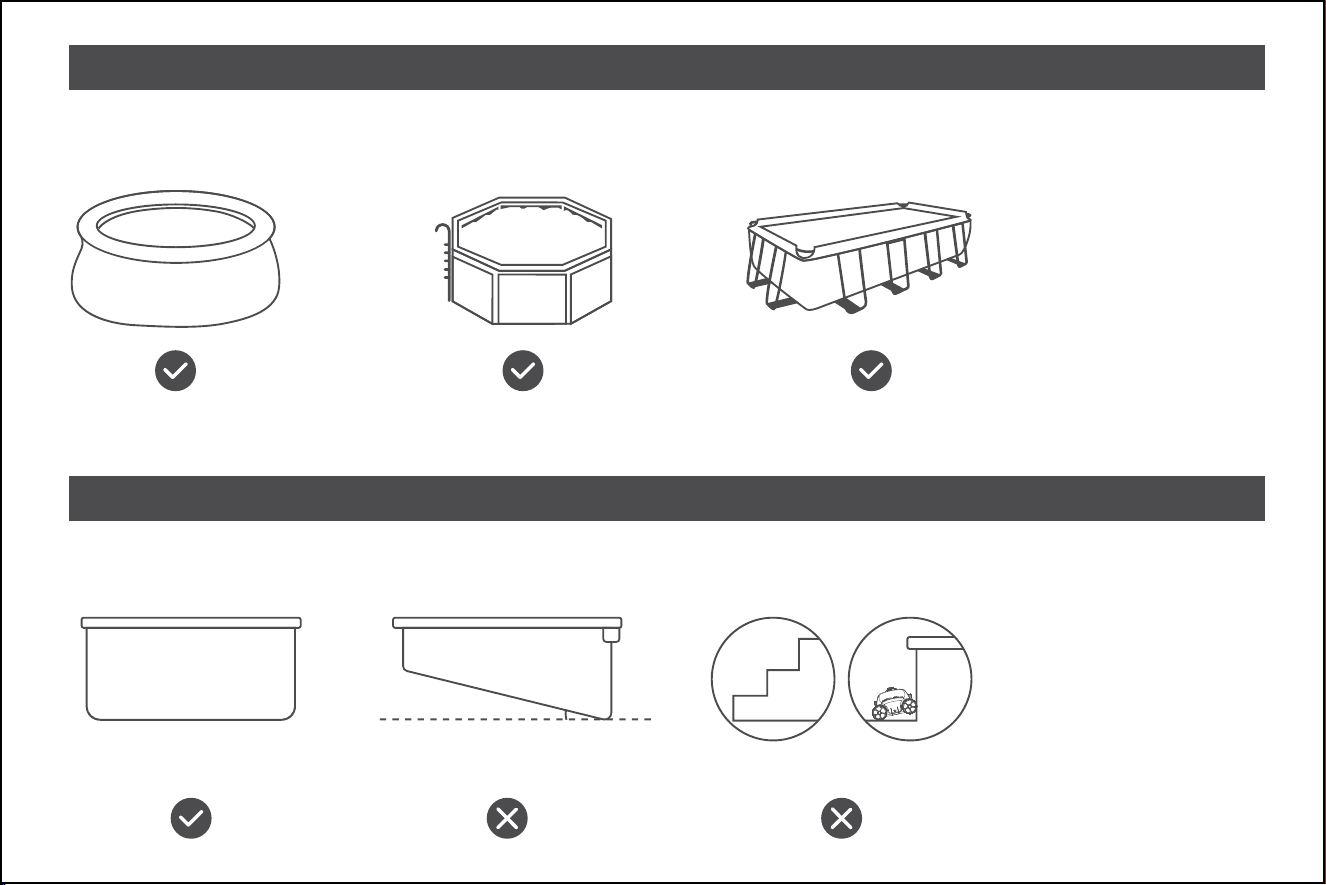
Ideal for Residential Flat Boom Pools
Please note t hat it ’s not an all-rounder
For all above / half above ground pools
For Inground Pools of Flat Boom (Water Depth < 6.56ft)
Not for deep shallow ends, Can’t climb walls or st airs
Warm Tips:Only suitable for flat-boom pools, not
climbing walls or slopes more t han 15 degrees.
15°
- 03 -
I.Introduction
The robot ic pool cleaner Cyber 1000 is a new type of rechargeable aut omat ic cleaning equipment for pools with t he funct ion of automat ic parking.
Please read this manual carefully before use.
- 04 -

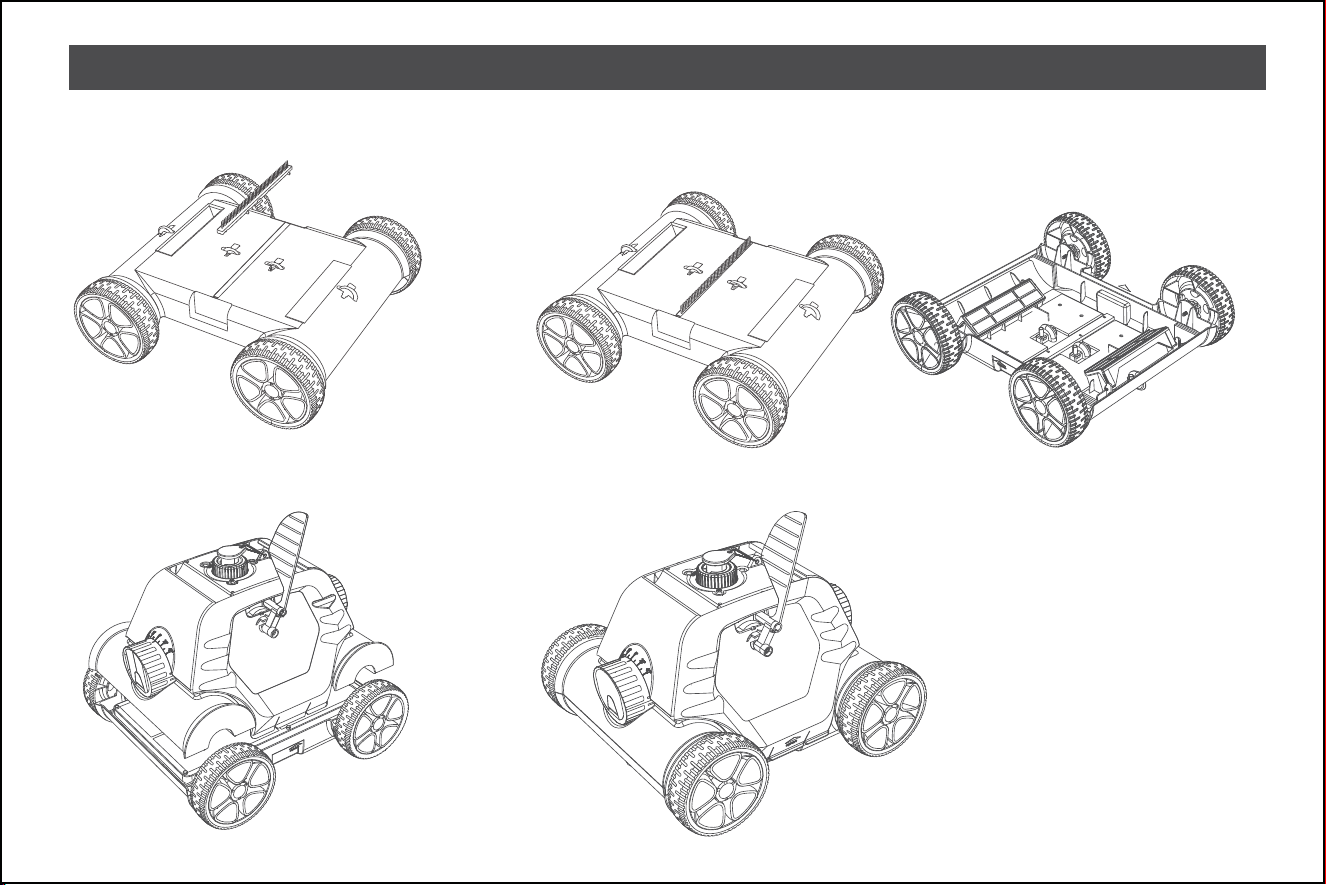
II.Appearance&structure
Charging port
protective cover
Swing plat e
Top cover
Filter t ray
Chassis
Brush
Suct ion adapter
Float ing handle
Hook
- 05 -
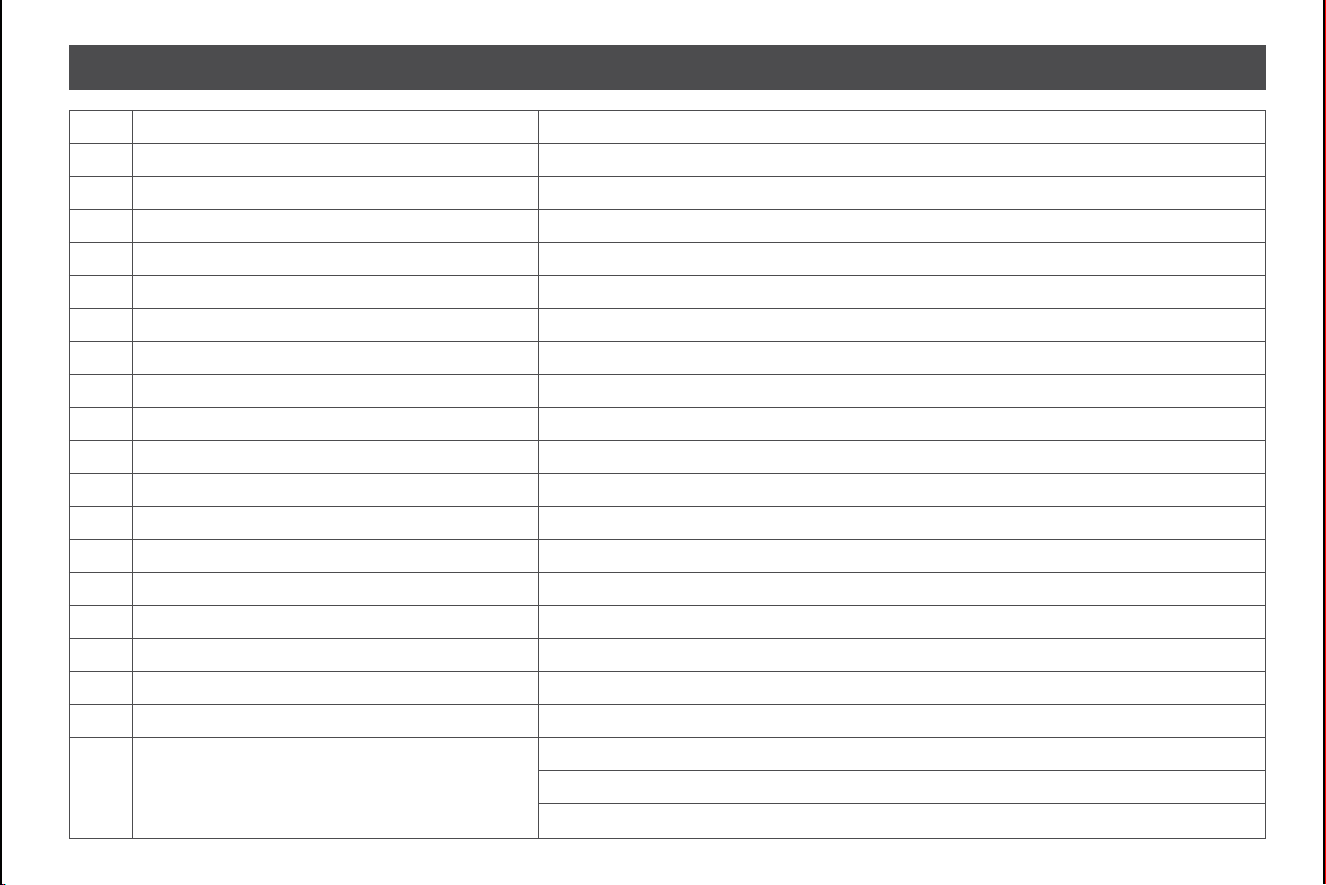
III.Specifications
1.
2.
3.
4.
5.
6.
7.
8.
9.
10.
11.
12.
13.
14.
15.
16.
17.
18.
19.
Name
Model
Rat ed input volt age/frequency of charger
Rat ed output volt age of charger
Rat ed output current of charger
Working power
Working t ime
Baery capacity
Charging t ime
Max. cleaning surface
Filter capacit y
Filter capability
Swimming pool slope
Pool wat er t emperat ure
Moving speed
IP Grade
Charging environment t emperature
Max. water depth
Storage condit ion
Cordless Robotic Pool Cleaner
Cyber 1000
100Vac-240Vac
12.6 V
3A
Appr. 50W
max. 95min for one cycle
5200mAh
2.5-3h
Appr. 908ft ² or 84m²
Appr. 2641us gal or 10m³/h
180μm
max. 15°
(50°F) - (95°F) /10℃-35℃
Appr. 52.4ft or 16m/min
IPX8 (main body)
(32°F) - (113°F) /0℃- 45℃
6.56ft or 2.0m
Short term (less than 1 month): (-4°F) - (+140°F) / (-20℃)-(+60℃) ≤ 75%RH
Medium term (less than 3 months): (-4°F) - (+113°F) / (-20℃)-(+45℃) ≤ 75%RH
Long term (more than 3 months): (-4°F) - (+68°F) / (-20℃)-(+20℃) ≤ 75%RH
- 06 -
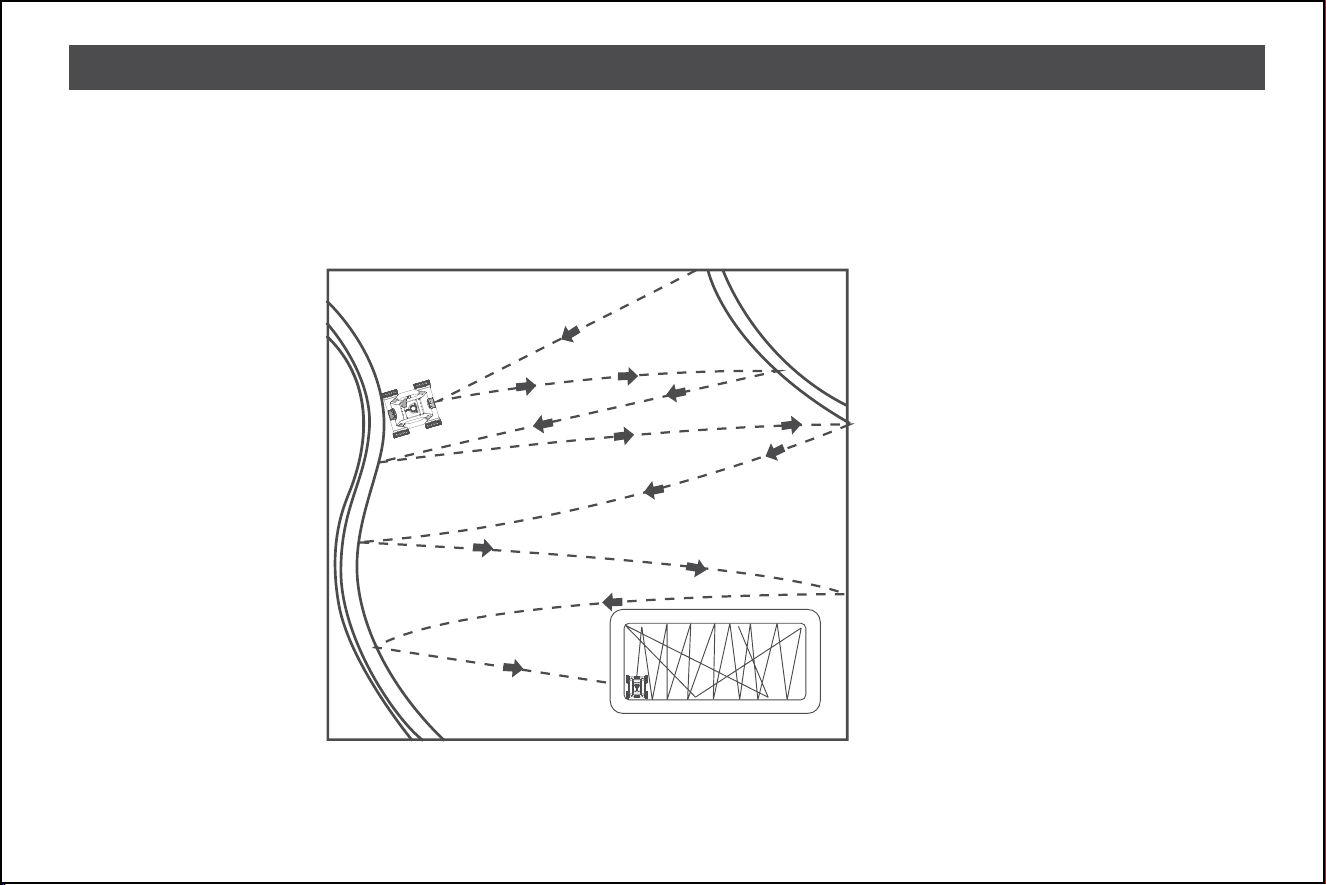
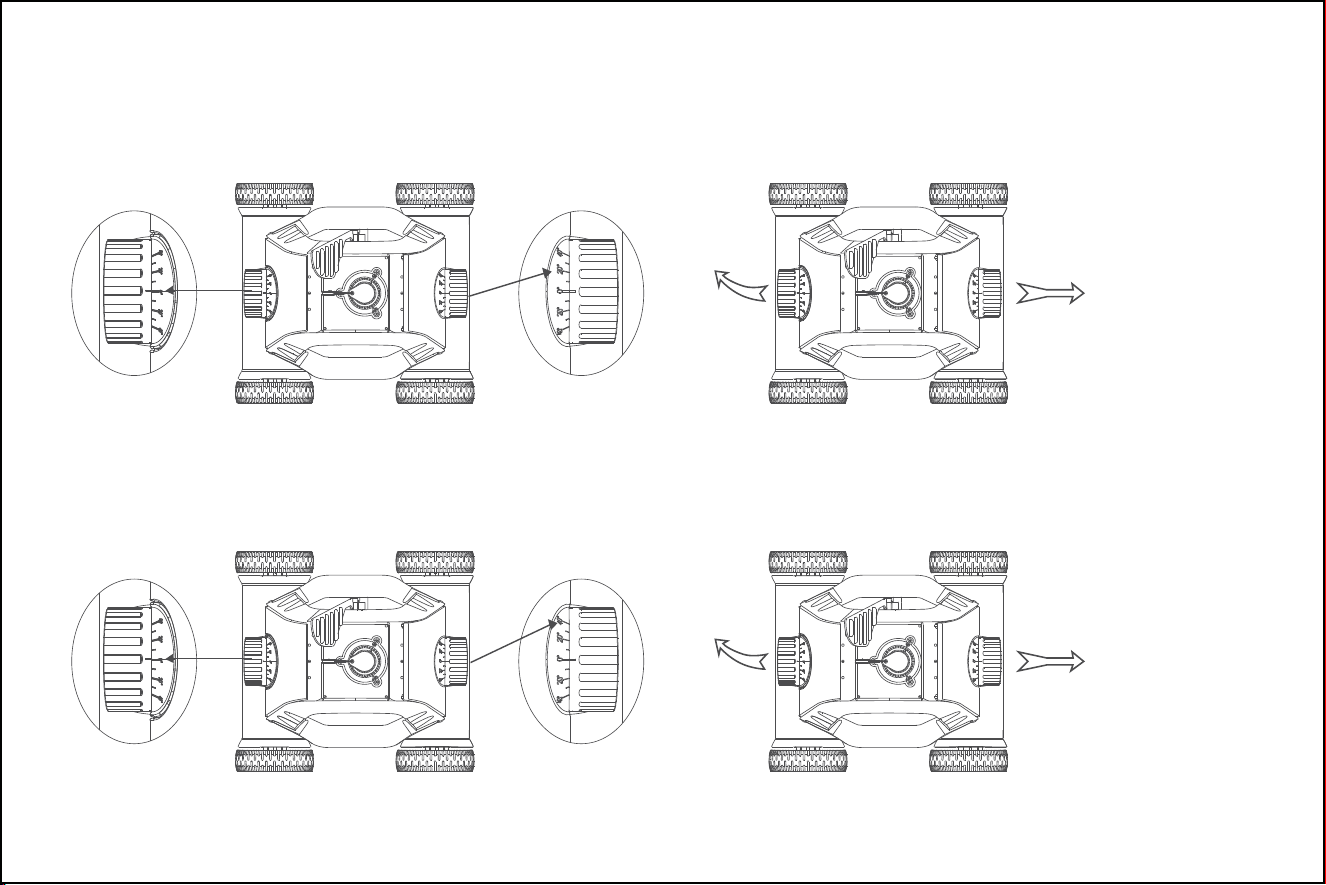
The nozzles of the cleaner are marked with angles (0°-40°).
The cleaner moves in an approximately straight line when the nozzle angle is 0°. The cleaner moves in a more curved line at a larger angle from 0°-40°.
Seing 1: default seing: 0°-20°, for most of pools.
Seing 2: 0°-40°, when seing 1 does not manage a full coverage of the pool.
IV. Operation instruction
1.
a.
b.
2.
Precaut ions
Inst all t he brush before use t o avoid possible dirt leaks.
Please ensure t hat t he top cover of t he cleaner is t ightly assembled t o its chassis.
Inst all t he swing plat e,The swing plate can be inst alled by insert ing it int o t he base.
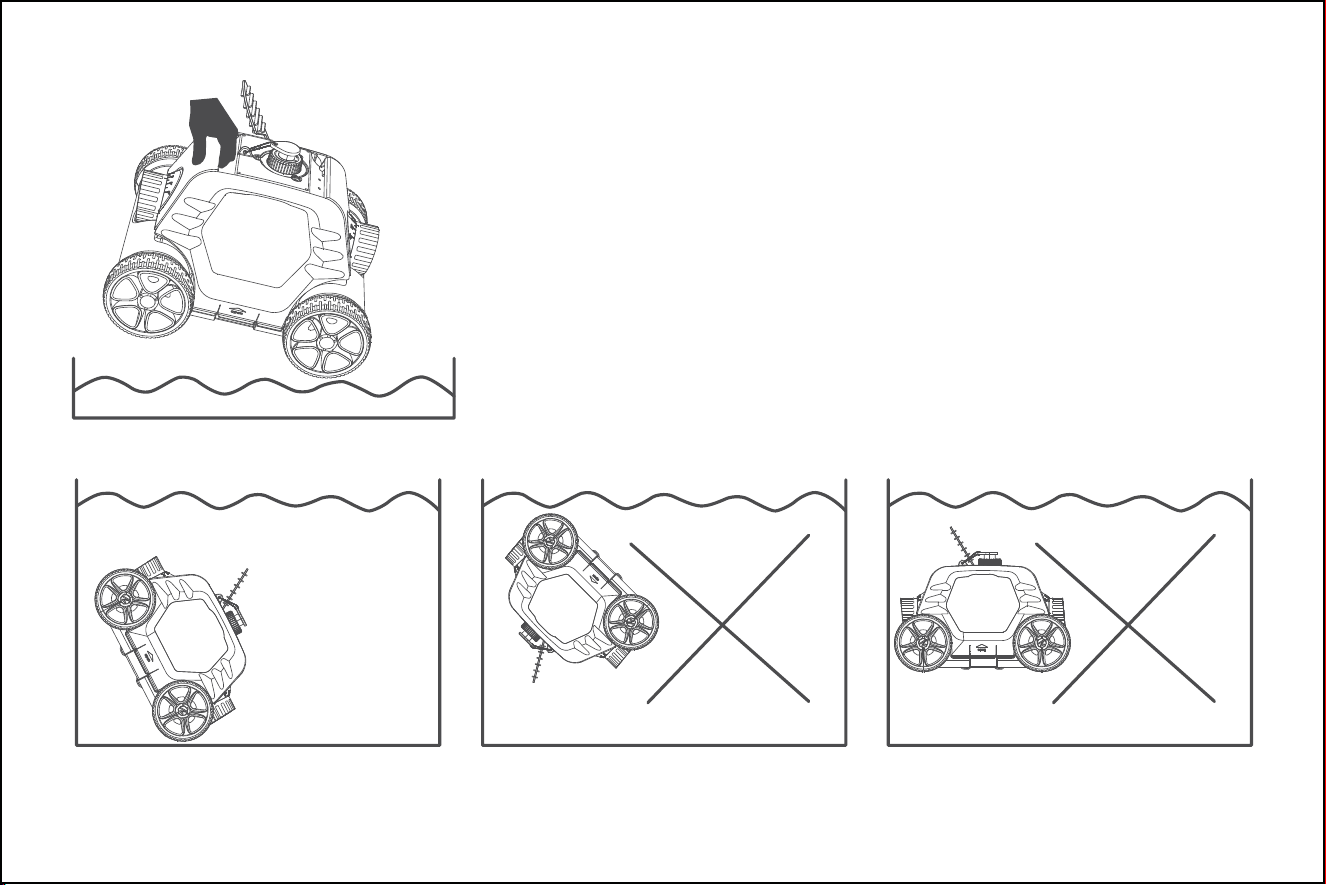
Put into or lift out of the pool with the cleaner boom towards the wall to avoid any possible scratches to the pool.
Power o the cleaner after use.
Do not touch the wall to avoid scratching the wall or damaging the cleaner when puing into or lifting out of the pool.
It is necessary to stay on the water surface for 10-15 seconds until water flows out from the cleaner to the pool before being placed on the ground
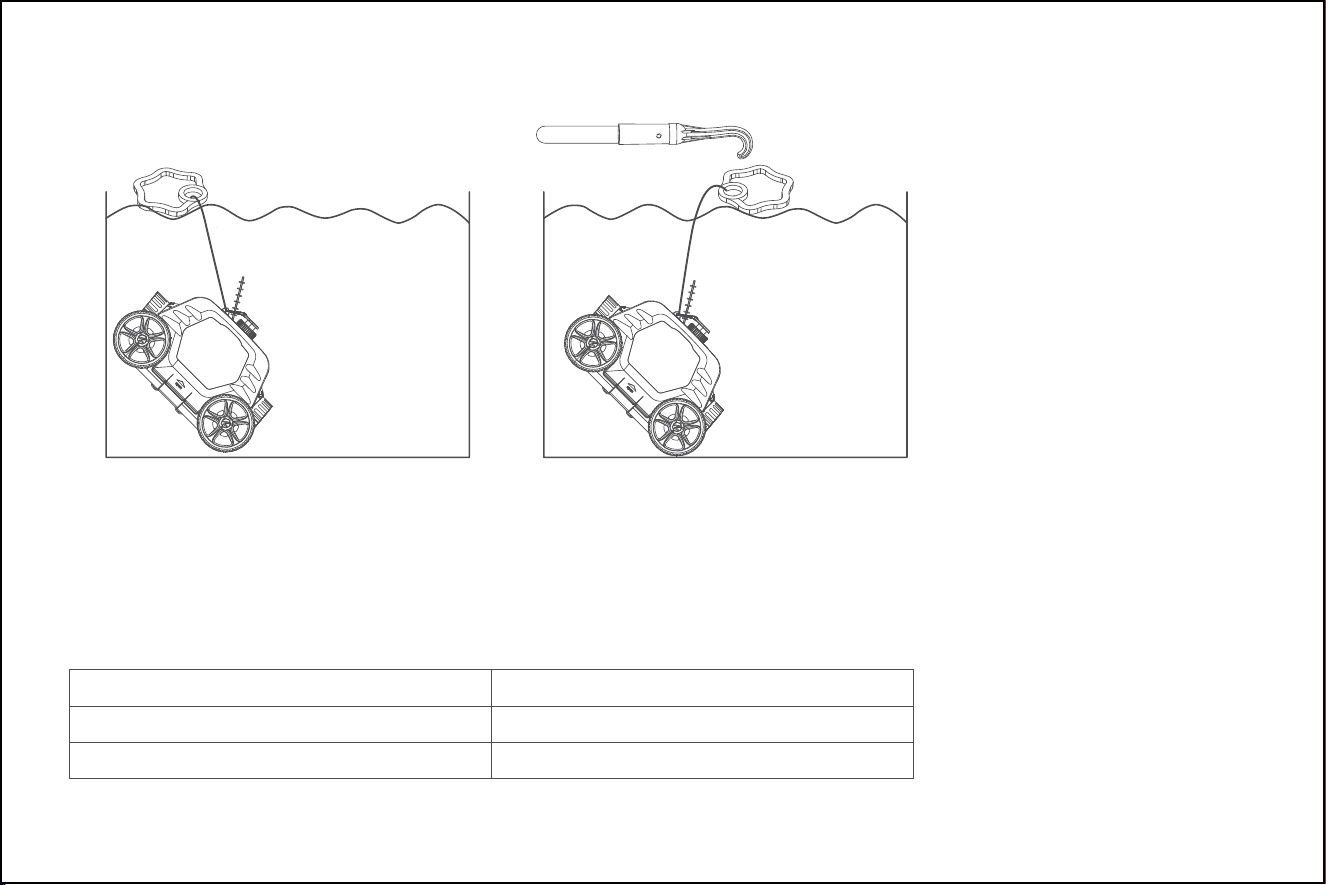
When the floating handle is far away form pool side, use the hook(pole is not included) to reach the floating handle.
Plug in the cleaner with the supplied adapter and charging line to charge the baery.
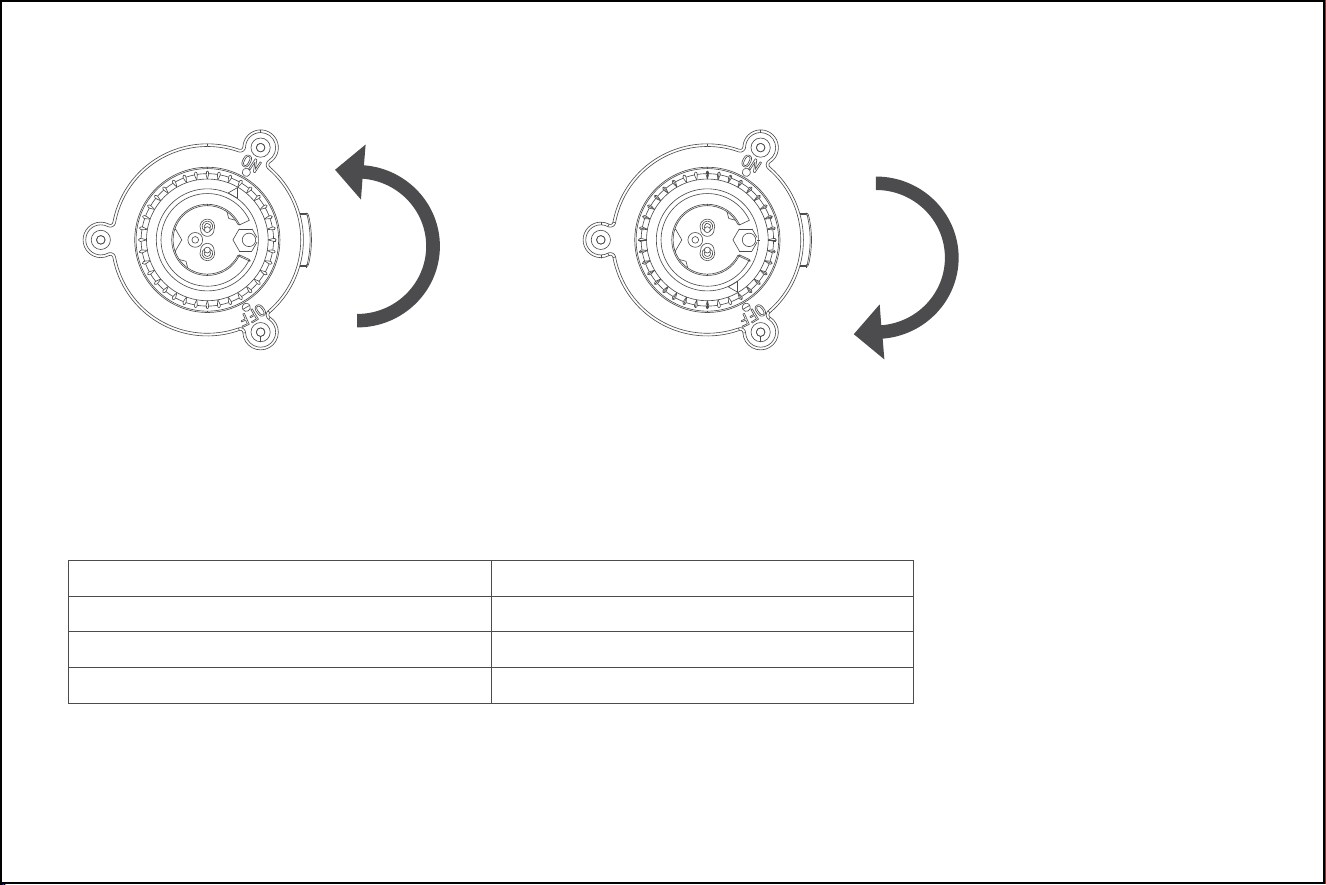
Turn the switch knob to power on or o the cleaner
cleaner begins to work, and the blue light flashes.
When baery power is low, the cleaner will move close to the pool wall. The indicator light is steady blue about 2 minutes and then flashes three times
3.
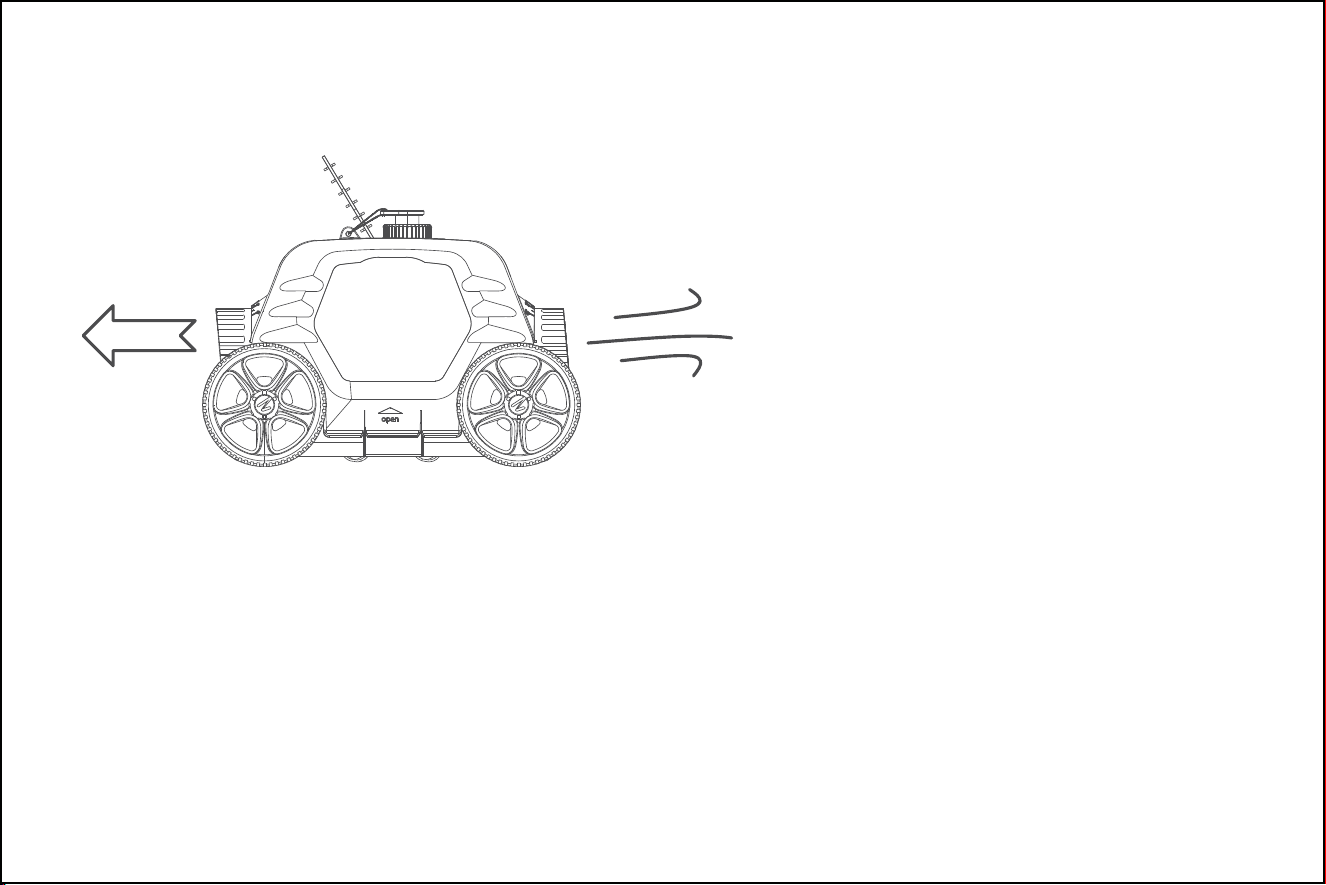
There are two nozzles on the cleaner, one of them opens once the other closes. Water flows out through the open nozzle to thrust the cleaner forward.
Seing nozzle angle and cleaner route
Seing 3: 20°-20°, for round pools.
Note: These are the recommended seings. Dierent seings may work beer for your pool.
4.
Clean the filter tray
5.
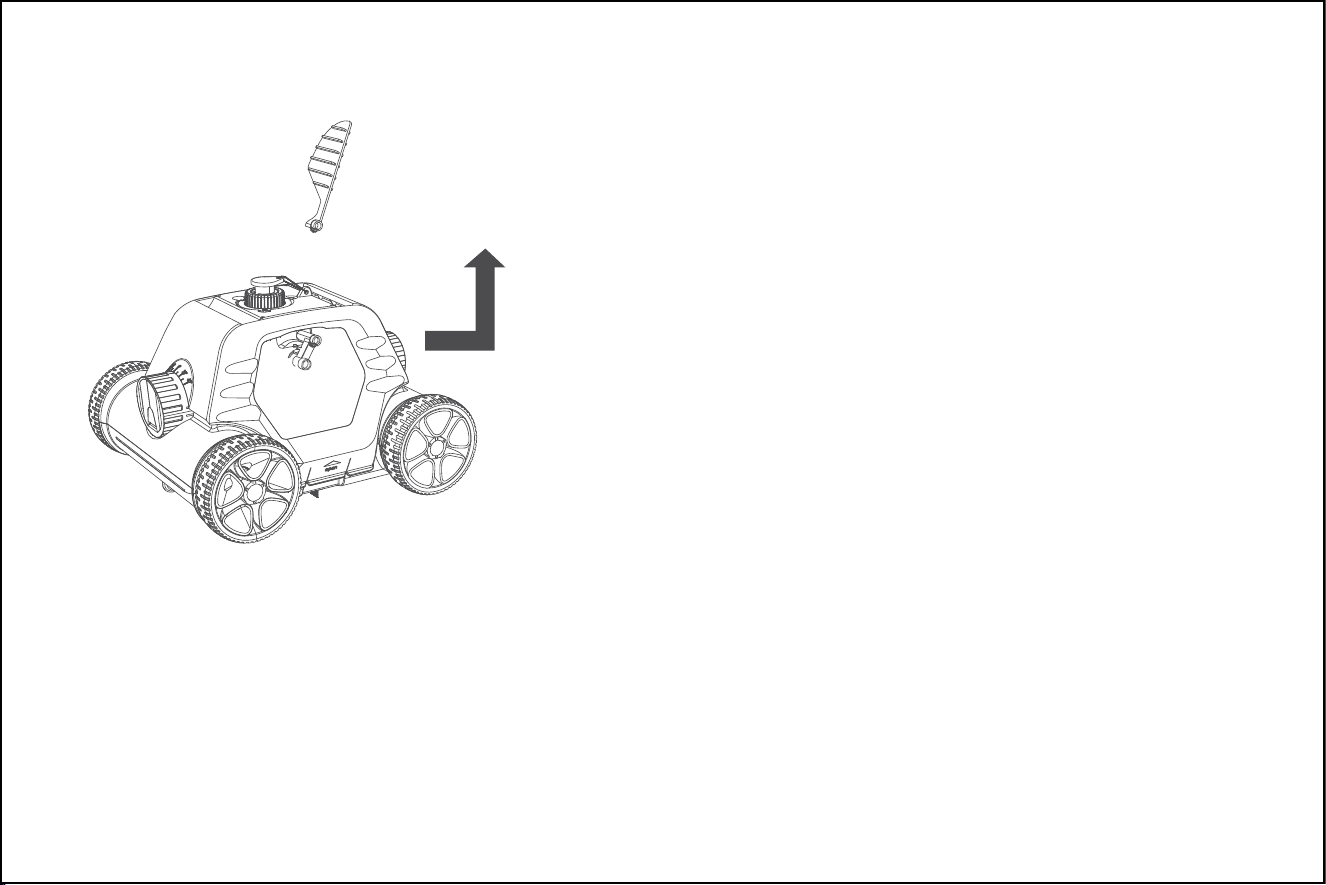
Installation and removal of swing plate
- 07 -
The nozzles of the cleaner are marked with angles (0°-40°).
The cleaner moves in an approximately straight line when the nozzle angle is 0°. The cleaner moves in a more curved line at a larger angle from 0°-40°.
Seing 1: default seing: 0°-20°, for most of pools.
Seing 2: 0°-40°, when seing 1 does not manage a full coverage of the pool.
1.
c.
d.
e.
f.
g.
2.
After t urning on, t he cleaner must be placed in t he pool within 20 seconds
Put into or lift out of the pool with the cleaner boom towards the wall to avoid any possible scratches to the pool.
The suct ion adapter is removable.
Power o the cleaner after use.
Do not touch the wall to avoid scratching the wall or damaging the cleaner when puing into or lifting out of the pool.
It is necessary to stay on the water surface for 10-15 seconds until water flows out from the cleaner to the pool before being placed on the ground
When the floating handle is far away form pool side, use the hook(pole is not included) to reach the floating handle.
Plug in the cleaner with the supplied adapter and charging line to charge the baery.
Turn the switch knob to power on or o the cleaner
cleaner begins to work, and the blue light flashes.
When baery power is low, the cleaner will move close to the pool wall. The indicator light is steady blue about 2 minutes and then flashes three times
3.
There are two nozzles on the cleaner, one of them opens once the other closes. Water flows out through the open nozzle to thrust the cleaner forward.
Seing nozzle angle and cleaner route
Seing 3: 20°-20°, for round pools.
Note: These are the recommended seings. Dierent seings may work beer for your pool.
4.
Clean the filter tray
5.
Installation and removal of swing plate
- 08 -
The nozzles of the cleaner are marked with angles (0°-40°).
The cleaner moves in an approximately straight line when the nozzle angle is 0°. The cleaner moves in a more curved line at a larger angle from 0°-40°.
Seing 1: default seing: 0°-20°, for most of pools.
Seing 2: 0°-40°, when seing 1 does not manage a full coverage of the pool.
1.
h.
i.
2.
a.
*
*
*
Put into or lift out of the pool with the cleaner boom towards the wall to avoid any possible scratches to the pool.
Power o the cleaner after use.
Do not touch the wall to avoid scratching the wall or damaging the cleaner when puing into or lifting out of the pool.
It is necessary to stay on the water surface for 10-15 seconds until water flows out from the cleaner to the pool before being placed on the ground
When the floating handle is far away form pool side, use the hook(pole is not included) to reach the floating handle.
Quick operation
Plug in the cleaner with the supplied adapter and charging line to charge the baery.
Turn t he switch knob t o OFF before charging.
Clean t he charging port before charging.
Keep t he machine charging port and t he adapt er dry when charging.
Adapter indicator
Red
Green
St at us
Baery is charging
Charging is finished
Turn the switch knob to power on or o the cleaner
cleaner begins to work, and the blue light flashes.
When baery power is low, the cleaner will move close to the pool wall. The indicator light is steady blue about 2 minutes and then flashes three times
3.
There are two nozzles on the cleaner, one of them opens once the other closes. Water flows out through the open nozzle to thrust the cleaner forward.
Seing nozzle angle and cleaner route
Seing 3: 20°-20°, for round pools.
Note: These are the recommended seings. Dierent seings may work beer for your pool.
4.
Clean the filter tray
5.
Installation and removal of swing plate
- 09 -
The nozzles of the cleaner are marked with angles (0°-40°).
The cleaner moves in an approximately straight line when the nozzle angle is 0°. The cleaner moves in a more curved line at a larger angle from 0°-40°.
Seing 1: default seing: 0°-20°, for most of pools.
Seing 2: 0°-40°, when seing 1 does not manage a full coverage of the pool.
1.
2.
Put into or lift out of the pool with the cleaner boom towards the wall to avoid any possible scratches to the pool.
Power o the cleaner after use.
Do not touch the wall to avoid scratching the wall or damaging the cleaner when puing into or lifting out of the pool.
It is necessary to stay on the water surface for 10-15 seconds until water flows out from the cleaner to the pool before being placed on the ground
When the floating handle is far away form pool side, use the hook(pole is not included) to reach the floating handle.
Plug in the cleaner with the supplied adapter and charging line to charge the baery.
ON
OFF
b.
*
c.
d.
e.
Turn the switch knob to power on or o the cleaner
Please put int o water within 20 seconds aft er t urning on.
Turn t he switch knob t o ON, t he cleaner is power-on and t he indicat or light is steady blue, t hen put it into wat er. About 15 seconds after power-on, t he
cleaner begins to work, and the blue light flashes.
When baery power is low, the cleaner will move close to the pool wall. The indicator light is steady blue about 2 minutes and then flashes three times
before t he cleaner complet ely st ops.
Indicators
Meaning
Switch on
Cleaner is working in t he pool
Cleaner is low baery or malfunction in the pool
St at us
Solid blue
Blue light slow flashing
Blue light fast flashing
3.
There are two nozzles on the cleaner, one of them opens once the other closes. Water flows out through the open nozzle to thrust the cleaner forward.
Seing nozzle angle and cleaner route
Seing 3: 20°-20°, for round pools.
Note: These are the recommended seings. Dierent seings may work beer for your pool.
4.
Clean the filter tray
5.
Installation and removal of swing plate
- 10 -
The nozzles of the cleaner are marked with angles (0°-40°).
The cleaner moves in an approximately straight line when the nozzle angle is 0°. The cleaner moves in a more curved line at a larger angle from 0°-40°.
Seing 1: default seing: 0°-20°, for most of pools.
Seing 2: 0°-40°, when seing 1 does not manage a full coverage of the pool.
1.
2.
Put into or lift out of the pool with the cleaner boom towards the wall to avoid any possible scratches to the pool.
Power o the cleaner after use.
Do not touch the wall to avoid scratching the wall or damaging the cleaner when puing into or lifting out of the pool.
It is necessary to stay on the water surface for 10-15 seconds until water flows out from the cleaner to the pool before being placed on the ground
When the floating handle is far away form pool side, use the hook(pole is not included) to reach the floating handle.
Plug in the cleaner with the supplied adapter and charging line to charge the baery.
Turn the switch knob to power on or o the cleaner
cleaner begins to work, and the blue light flashes.
When baery power is low, the cleaner will move close to the pool wall. The indicator light is steady blue about 2 minutes and then flashes three times
3.
There are two nozzles on the cleaner, one of them opens once the other closes. Water flows out through the open nozzle to thrust the cleaner forward.
Adjust t he nozzle by t urning it to cont rol t he cleaner rout e.
Functions and adjustment of nozzles
Seing nozzle angle and cleaner route
Seing 3: 20°-20°, for round pools.
Note: These are the recommended seings. Dierent seings may work beer for your pool.
4.
Clean the filter tray
5.
Installation and removal of swing plate
- 11 -
a.
The nozzles of the cleaner are marked with angles (0°-40°).
The cleaner moves in an approximately straight line when the nozzle angle is 0°. The cleaner moves in a more curved line at a larger angle from 0°-40°.
Seing 1: default seing: 0°-20°, for most of pools.
Seing 2: 0°-40°, when seing 1 does not manage a full coverage of the pool.
1.
2.
Put into or lift out of the pool with the cleaner boom towards the wall to avoid any possible scratches to the pool.
Power o the cleaner after use.
Do not touch the wall to avoid scratching the wall or damaging the cleaner when puing into or lifting out of the pool.
It is necessary to stay on the water surface for 10-15 seconds until water flows out from the cleaner to the pool before being placed on the ground
When the floating handle is far away form pool side, use the hook(pole is not included) to reach the floating handle.
Plug in the cleaner with the supplied adapter and charging line to charge the baery.
Turn the switch knob to power on or o the cleaner
cleaner begins to work, and the blue light flashes.
When baery power is low, the cleaner will move close to the pool wall. The indicator light is steady blue about 2 minutes and then flashes three times
3.
There are two nozzles on the cleaner, one of them opens once the other closes. Water flows out through the open nozzle to thrust the cleaner forward.
Running routeNozzle angle
Running routeNozzle angle
Seing nozzle angle and cleaner route
Seing 3: 20°-20°, for round pools.
Note: These are the recommended seings. Dierent seings may work beer for your pool.
4.
Clean the filter tray
5.
Installation and removal of swing plate
- 12 -

The nozzles of the cleaner are marked with angles (0°-40°).
The cleaner moves in an approximately straight line when the nozzle angle is 0°. The cleaner moves in a more curved line at a larger angle from 0°-40°.
Seing 1: default seing: 0°-20°, for most of pools.
Seing 2: 0°-40°, when seing 1 does not manage a full coverage of the pool.
1.
2.
Put into or lift out of the pool with the cleaner boom towards the wall to avoid any possible scratches to the pool.
Power o the cleaner after use.
Do not touch the wall to avoid scratching the wall or damaging the cleaner when puing into or lifting out of the pool.
It is necessary to stay on the water surface for 10-15 seconds until water flows out from the cleaner to the pool before being placed on the ground
When the floating handle is far away form pool side, use the hook(pole is not included) to reach the floating handle.
Plug in the cleaner with the supplied adapter and charging line to charge the baery.
Turn the switch knob to power on or o the cleaner
cleaner begins to work, and the blue light flashes.
When baery power is low, the cleaner will move close to the pool wall. The indicator light is steady blue about 2 minutes and then flashes three times
3.
There are two nozzles on the cleaner, one of them opens once the other closes. Water flows out through the open nozzle to thrust the cleaner forward.
Running route
Nozzle angle
Seing nozzle angle and cleaner route
Seing 3: 20°-20°, for round pools.
Note: These are the recommended seings. Dierent seings may work beer for your pool.
4.
a.
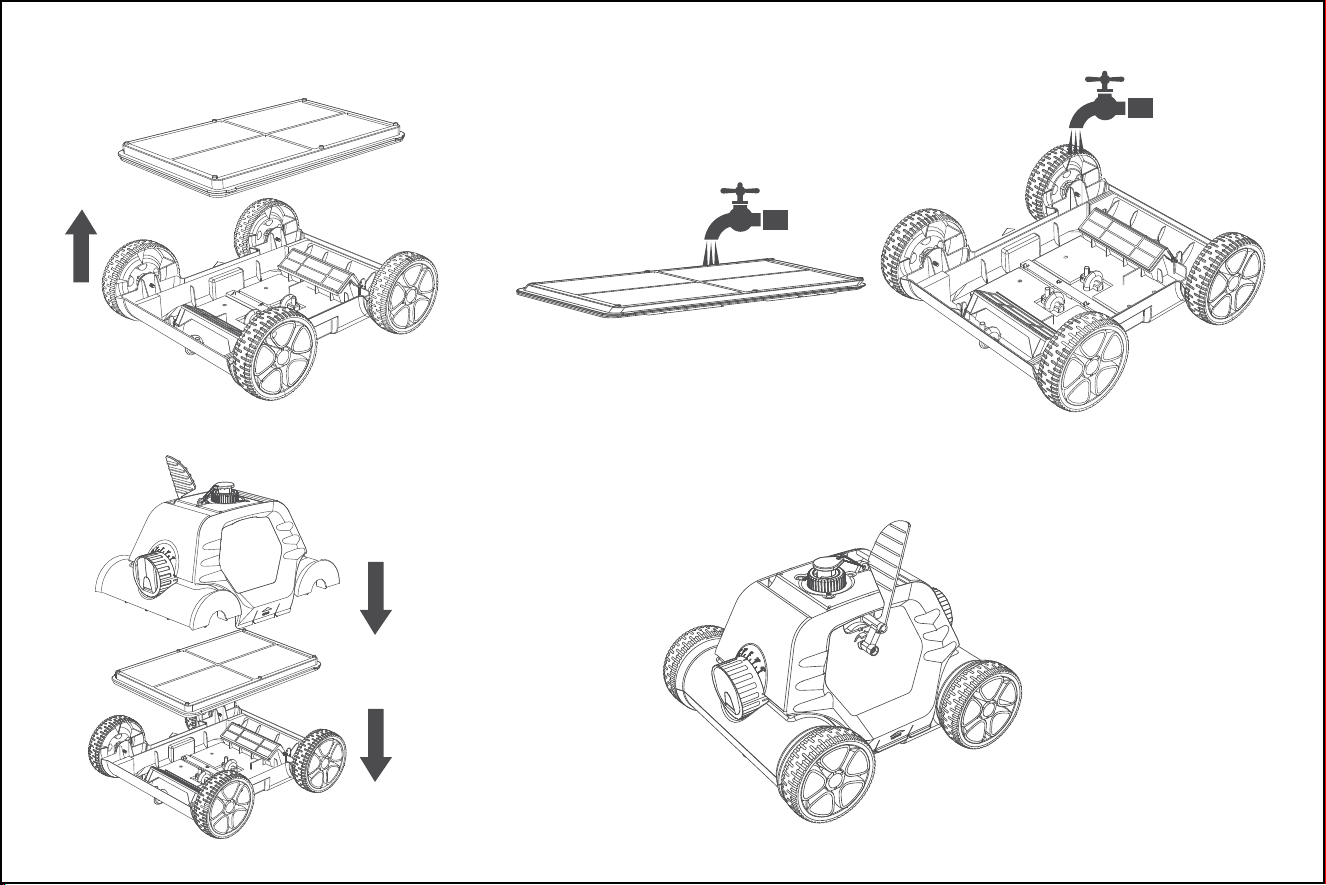
Clean the filter tray
Open t he cleaner by t he clips
5.
Installation and removal of swing plate
- 13 -
The nozzles of the cleaner are marked with angles (0°-40°).
The cleaner moves in an approximately straight line when the nozzle angle is 0°. The cleaner moves in a more curved line at a larger angle from 0°-40°.
Seing 1: default seing: 0°-20°, for most of pools.
Seing 2: 0°-40°, when seing 1 does not manage a full coverage of the pool.
1.
2.
Put into or lift out of the pool with the cleaner boom towards the wall to avoid any possible scratches to the pool.
Power o the cleaner after use.
Do not touch the wall to avoid scratching the wall or damaging the cleaner when puing into or lifting out of the pool.
It is necessary to stay on the water surface for 10-15 seconds until water flows out from the cleaner to the pool before being placed on the ground
When the floating handle is far away form pool side, use the hook(pole is not included) to reach the floating handle.
Plug in the cleaner with the supplied adapter and charging line to charge the baery.
Turn the switch knob to power on or o the cleaner
cleaner begins to work, and the blue light flashes.
When baery power is low, the cleaner will move close to the pool wall. The indicator light is steady blue about 2 minutes and then flashes three times
3.
There are two nozzles on the cleaner, one of them opens once the other closes. Water flows out through the open nozzle to thrust the cleaner forward.
Seing nozzle angle and cleaner route
c.Clean the filter tray and chassis
b.Take out the filter tray
d.Reassemble t he cleaner e.Clap on t he clips
Seing 3: 20°-20°, for round pools.
Note: These are the recommended seings. Dierent seings may work beer for your pool.
4.
Clean the filter tray
5.
Installation and removal of swing plate
- 14 -
The nozzles of the cleaner are marked with angles (0°-40°).
The cleaner moves in an approximately straight line when the nozzle angle is 0°. The cleaner moves in a more curved line at a larger angle from 0°-40°.
Seing 1: default seing: 0°-20°, for most of pools.
Seing 2: 0°-40°, when seing 1 does not manage a full coverage of the pool.
1.
2.
Put into or lift out of the pool with the cleaner boom towards the wall to avoid any possible scratches to the pool.
Power o the cleaner after use.
Do not touch the wall to avoid scratching the wall or damaging the cleaner when puing into or lifting out of the pool.
It is necessary to stay on the water surface for 10-15 seconds until water flows out from the cleaner to the pool before being placed on the ground
When the floating handle is far away form pool side, use the hook(pole is not included) to reach the floating handle.
Plug in the cleaner with the supplied adapter and charging line to charge the baery.
Turn the switch knob to power on or o the cleaner
cleaner begins to work, and the blue light flashes.
When baery power is low, the cleaner will move close to the pool wall. The indicator light is steady blue about 2 minutes and then flashes three times
3.
There are two nozzles on the cleaner, one of them opens once the other closes. Water flows out through the open nozzle to thrust the cleaner forward.
Seing nozzle angle and cleaner route
Seing 3: 20°-20°, for round pools.
Note: These are the recommended seings. Dierent seings may work beer for your pool.
4.
Clean the filter tray
5.
The swing plate can be removed by poking t he base buckle out wards and inst alled by inserting it into t he base.
Installation and removal of swing plate
- 15 -
V.Trouble shooting
Symptom
Possible reason
Solut ion
The cleaner does not work and t he indicat or
light slowly flashes.
The cleaner does not work and t he indicat or
light rapidly flashes.
The cleaner does not work and t he indicat or
light does not work.
The adapter indicator light does not work.
The cleaner does not have a full coverage of pool.
The working t ime of t he cleaner cannot reach
95 min
The cleaner cannot reach t he shallow wat er area
from t he deep water area
Pool water filtration system is open.
Not fully charged
The pool slopes more t han 15 degree.
Warm Tips:Only suitable for flat-boom pools, not
climbing walls or slopes more t han 15 degree.
Fully charge the cleaner (needs to last 2.5-3 hours)
Turn o water filtration system
Adjust nozzle to increase angle of deflection
Adjust nozzle angle
Contact after- sale service
Charge the baery and power on the cleaner to watch whether
the indicator light is on. If not , contact aft er-sale service.
Contact after- sale service
Charge the baery
Special pool shape
Unsuit able nozzle angle
Adapter damage
Baery protection
Internal fault
Low remaining baery capacity
- 16 -