718
Good to know – Driver’s Manual
WKD 982 00 20 18 718

1
Porsche, the Porsche Crest, 718, PCCB,
PCM, PDK, PSM, PTM, Tequipment and other
designations are registered trademarks of
Dr. Ing. h.c. F. Porsche AG.
Printed in Germany.
Reprinting, even of excerpts, or duplication
of any type is only permissible with the written
authorisation of Dr. Ing. h.c. F. Porsche AG.
© Dr. Ing. h.c. F. Porsche AG
Porscheplatz 1
70435 Stuttgart
Germany
Equipment and on-board literature
Because our vehicles undergo continuous
development, equipment and specifications may
not be as illustrated or described by Porsche in
this manual. Items of equipment are sometimes
optional or vary depending on the country in which
the vehicle is sold. For more information on retrofit
equipment, please contact your Porsche partner.
Because of different legal requirements in
individual countries, the equipment in your vehicle
may vary from that described in this manual.
Should your Porsche be fitted with any equipment
not described in this manual, your Porsche
partner will be glad to provide information
concerning correct operation and care of the
items concerned.
Always keep the on-board literature in the vehicle
and hand it over to the new owner if you sell the
vehicle.
Should you have any questions, suggestions or
ideas regarding your vehicle or the on-board
literature:
Dr. Ing. h.c. F. Porsche AG
Vertrieb Customer Relations
Porscheplatz 1
70435 Stuttgart
Germany
Warnings and symbols
Various types of warnings and symbols are used
in this Driver’s Manual.
b Conditions that must be met in order to use a
function.
e Instruction that you must follow.
1. If an instruction comprises several steps,
these are numbered.
f Notice on where you can find further important
information on a topic.
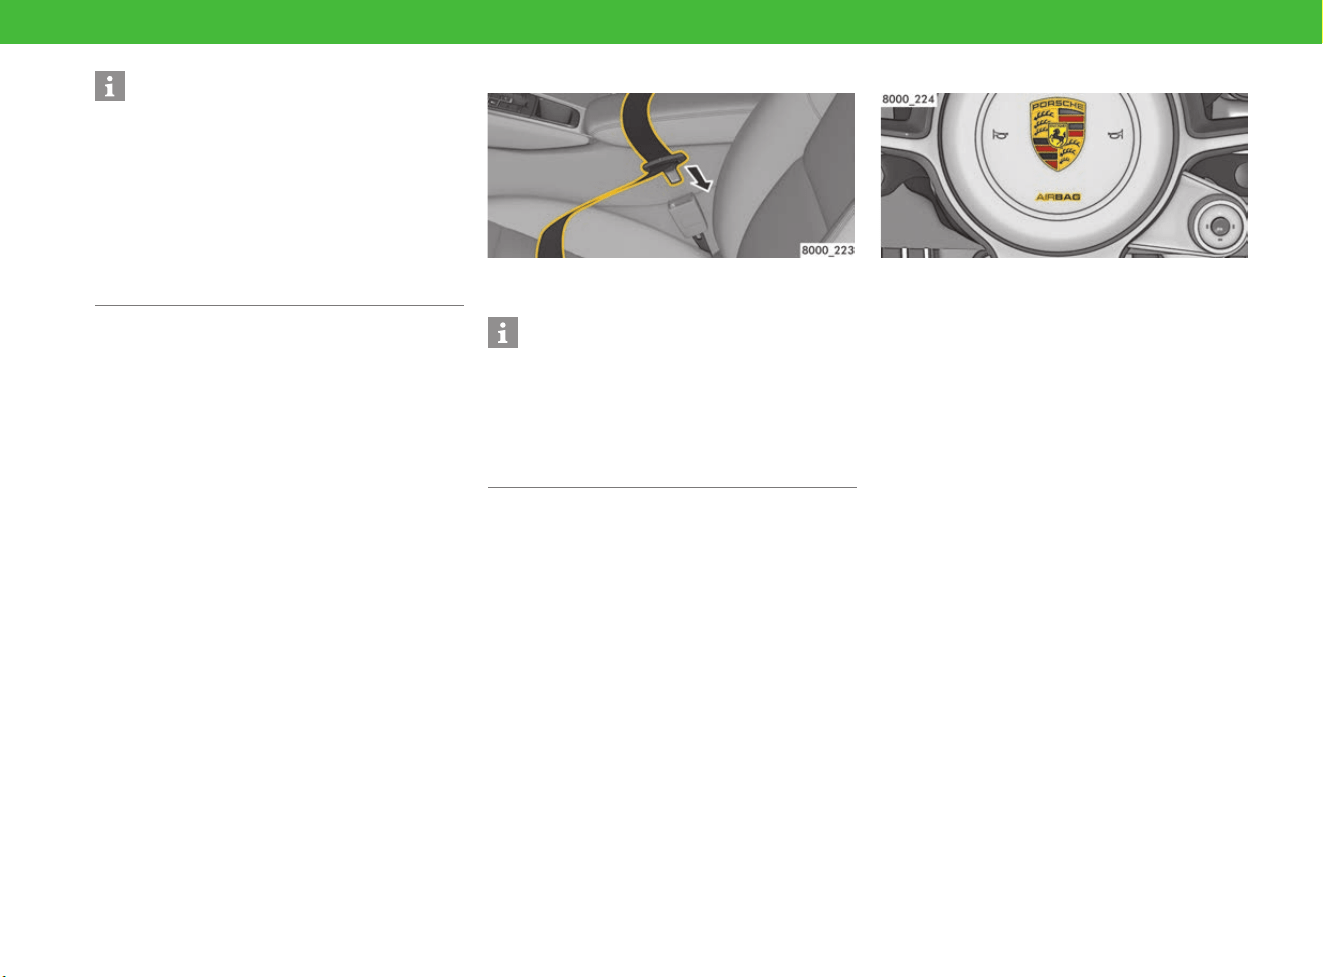
Airbag warning sticker
Taiwan only:
f According to Taiwan related regulations,
“DO NOT carry babies, infants and children
on the front passenger seat”.
f Refer to chapter “Child Restraint Systems
(Child Seats)” on page 78
WKD 982 00 20 18 02/17
DANGER
Serious injury or death
Failure to observe warnings in the “Danger”
category will result in serious injury or death.
WARNING
Possible serious injury
or death
Failure to observe warnings in the “Warning”
category can result in serious injury or death.
CAUTION
Possible moderate or
minor injury
Failure to observe warnings in the “Caution”
category can result in moderate or minor injuries.
NOTICE
Failure to observe warnings in the “Notice”
category can result in damage to the vehicle.
Information
A
dditional information is indicated by “Information”.
DANGER
Child restraint system
on passenger seat
If a child restraint system is fitted on the
passenger’s seat, there is a risk of serious or fatal
injury from the passenger airbag triggering.
e Never use a rearward-facing child restraint
system on the passenger’s seat with the front
airbag activated as it poses a risk of injury
and death to the child.
e Refer to chapter “Child Restraint Systems
(Child Seats)” on page 78.
2
Layout of the Manual
Contents
More Safety and
More Driving Pleasure Overview Illustrations Practical Tips
Gain an overview and find the topics
you are looking for.
f Page 3 onwards.
Find out how to enjoy your driving
pleasure safely.
f Page 5 onwards.
Familiarise yourself with
components and controls.
f Page 17 onwards.
Browse through and gain additional
information about new functions.
f Page 27 onwards.
Topics from A – Z Technical Data Index
Find out how components and
controls work and how to operate
them.
f Page 31 onwards.
Look for specific figures.
f Page 305 onwards.
Get straight to the information you
are looking for.
f Page 321 onwards.

3
Contents
Contents
More Safety and
More Driving Pleasure...............................5
Overview Illustrations
Centre Console.............................................20
Control Panel................................................21
Driver’s Cockpit ............................................18
Entering Text and Characters in the PCM........26
Overhead Console ........................................22
PCM Controls ...............................................23
PCM Drives ..................................................24
PCM Operating Principle................................25
Steering Wheel and Instrument Panel..............19
Practical Tips ...........................................27
Opening and Locking
Central Locking ............................................71
Convertible Top ............................................90
Driver’s Key................................................102
Garage Door Opener...................................117
Luggage Compartment Lid ..........................144
Windows ....................................................298
Air Conditioning and Ergonomics
Air Conditioning System (Manual)....................41
Airbag Systems ............................................45
Automatically Controlled
2-Zone Air Conditioning..................................53
Child Restraint Systems (Child Seats)..............78
Heated Rear Window/
Exterior Mirror Heating ................................121
Mirrors.......................................................153
Personal Settings........................................188
Seat Belts ..................................................211
Seats .........................................................213
Steering Wheel ...........................................234
Sun Visors..................................................237
Driving and Driver Assistance Systems
Adaptive Cruise Control (ACC) ........................32
Alarm System ...............................................47
Auto Start Stop Function................................50
Brakes .........................................................63
Cruise Control...............................................97
Driving Data Display (Trip Information)...........105
HOLD Function: Drive-Off Assistant,
Standstill Management ................................122
Instrument and Interior Lighting ....................123
Lane Change Assist (LCA) ............................130
Lights ........................................................135
ParkAssist ..................................................185
Porsche Active Suspension Management
(PASM) .......................................................191
Porsche Car Connect ..................................192
Porsche Stability Management (PSM)............195
Porsche Track Precision App .......................198
Porsche Vehicle Tracking System
(PVTS Plus).................................................199
Rear Wing...................................................208
Speed Limit Display.................................... 221
Sport Chrono Mode Switch ......................... 223
Sport Chrono Stopwatch............................. 226
SPORT Mode ............................................. 220
Sports Exhaust System............................... 231
Starting and Stopping the Engine................. 232
Theft Protection ......................................... 248
Transmission ............................................. 251
Transmission and
Chassis Control Systems ............................ 256
Windscreen Wipers..................................... 300
Instrument Panel and
Multi-Function Display
Instrument Panel ........................................ 125
Multi-Function Display ................................. 157
Vehicle Settings using the
Multi-Function Display ................................. 263
Warning and Information Messages ............. 278
Entertainment and Communication
Operating the Porsche Communication
Management (PCM) .................................... 176
Media........................................................ 148
Radio ........................................................ 204
Telephone.................................................. 238
Voice Control ............................................. 271
Navigation and Connectivity
Operating the Porsche Communication
Management (PCM) .................................... 176
Apple
®
CarPlay ............................................ 48
Connectivity................................................. 87
Device Manager ......................................... 100
Navigation ................................................. 167
Porsche Connect App ................................. 193

4
Contents
Luggage and Transport
Cupholders...................................................99
Electrical Socket.........................................106
Luggage Compartment ...............................140
Smoker’s Package...................................... 219
Storage ..................................................... 235
Mobility and Minor Repairs
Battery.........................................................59
Brake Fluid...................................................62
Care ............................................................65
Coolant........................................................95
Diagnostic Socket....................................... 101
Engine Oil................................................... 107
Fire Extinguisher ......................................... 109
Flat Tyre .................................................... 110
Fuses ........................................................113
Headlights..................................................120
Jack and Lifting Platform .............................128
Jump-Lead Starting .....................................129
Measurement on the Test Stand ..................147
Refuelling ...................................................209
Selector Lever Emergency Release..............217
Towing and Tow-Starting .............................249
Tyres and Wheels .......................................257
Washer Fluid............................................... 297
Wiper Blades ..............................................304
Technical Data ....................................... 305
Index .......................................................321
More Safety and More Driving Pleasure
5
More Safety and
More Driving Pleasure
Your Porsche: Extreme performance, extreme
sportiness. It’s exciting, there’s no question.
But only if you can remain relaxed whatever the
situation. Therefore, for us safety is also a matter
of ultimate quality.
And here we tell you what you can do to stay safe
on the road in your Porsche.
Perfect technology:
a prerequisite for your safety
High-quality materials and excellent workmanship
keep your car on the road for many years to
come. But your care and attentiveness are
essential if the vehicle is to manage what it
promises. That way, you will also be able to rely on
your Porsche in critical situations.
Checking for damage and correct
operation
A vehicle with technical defects can behave in an
unexpected way, which may cause an accident.
e Check your vehicle regularly (at least once a
month and before any long journey), to ensure
it is in good technical condition. In particular,
pay attention to the following:
– Tyres are not damaged, have the right
pressure and sufficient tread
– Headlights, brake lights and direction
indicators all work
– Aerodynamic components are undamaged
– Wiper blades are intact
– Windows are unobstructed without any
cracks or damage to the glass
– Exterior and interior mirrors are intact and
correctly positioned
– Radar sensor of adaptive cruise control
(ACC) is intact with no cracks or damage
– Cooling air ducts, sensors and cameras
are not covered (e.g. with film, stone
guards, number plate holders)
e Only use telephones or 2-way radios inside the
vehicle with an external antenna connected, so
as not to exceed the limits for electromagnetic
radiation in the vehicle.
Checking tyres for damage
Damaged tyres may burst while you are driving.
You may lose control of the vehicle.
e Depending on how often you drive and the
conditions, check tyres regularly – at least
once a month – for foreign bodies, nicks, cuts,
cracks and bulges. Remember to also check
the side walls of the tyres.
e If in doubt, have the tyres and the entire wheel
checked by a qualified specialist workshop.
e Do not continue driving with damaged tyres.
Have damaged tyres replaced immediately:
Visit a qualified specialist workshop. Porsche
recommends a Porsche partner as they have
trained workshop personnel and the necessary
parts and tools.
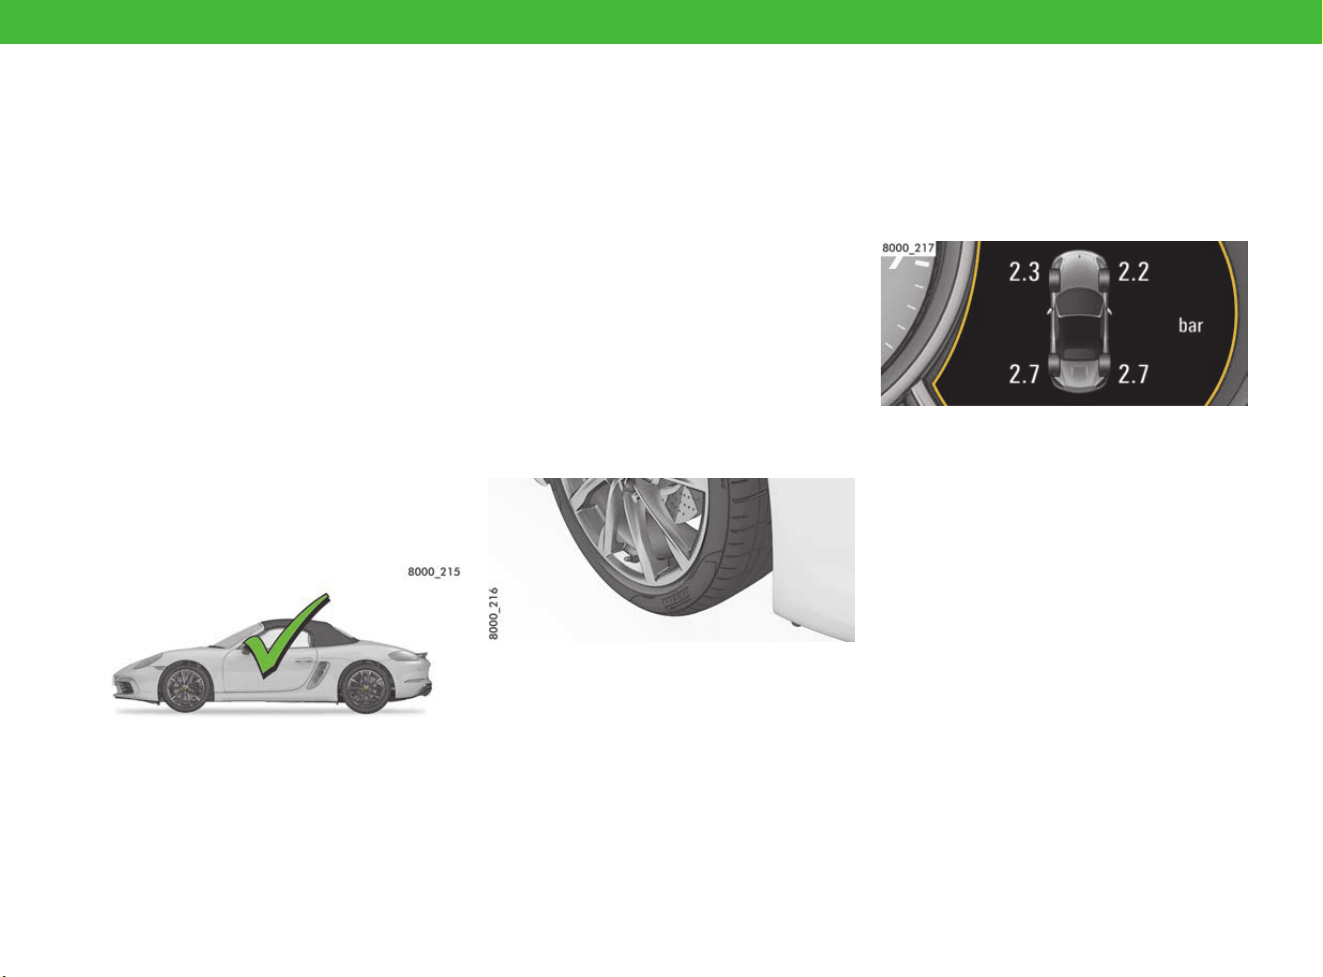
Adjusting the tyre pressure
Low or high tyre pressure irreparably damages
the tyre and the wheel, lengthens the braking
distance and greatly increases the risk of an
accident. If the tyre pressure is too low, fuel
consumption can increase noticeably.
e Adapt the tyre pressure to the fitted tyres.
f Refer to chapter “Tyre pressure” on page 313.
e Make sure that the settings in the TPM menu
on the multi-function display correspond to the
tyres fitted on the vehicle.
f Refer to chapter “TPM menu (TPM – Tyre
Pressure Monitoring)” on page 162.
e If a red tyre pressure warning appears on the
multi-function display: Stop immediately in a
suitable place and check tyres for damage.
Do not continue driving with damaged tyres.
If necessary, remedy the damage with tyre
sealant.
f Refer to chapter “Flat Tyre” on page 110.
More Safety and More Driving Pleasure
6
Checking the lights
If lights are faulty, your vehicle is in the dark and
hard to see in conditions of poor visibility. Other
drivers will see you too late and you could be
involved in an accident.
e Check that all lights are working, and have
defective lights repaired immediately. The
lights to check are:
– Parking light, dipped beam, driving lights,
high beam
– Direction indicators, brake lights, reversing
lights
– Fog lights
Checking aerodynamic components
Damaged or missing aerodynamic components
(e.g. rear wing or underbody panels) impair
vehicle handling.
e Inspect your vehicle for signs of damage.
e Have damaged or missing components
replaced immediately.
Keeping windows and wiper blades
clean and in good working order
Dirty windows and defective wiper blades impair
your view and dramatically increase the risk of
accident.
e Keep the vehicle and windows clean.
e Thaw frozen wiper blades and detach them
from the windscreen.
e Replace wiper blades regularly, and at the
latest if they leave streaks on the windscreen.
f Refer to chapter “Wiper Blades” on page 304.
Maintenance and modifications only by
qualified specialist workshops
Any modification to the vehicle can adversely
affect or even disable safety functions. Unskilled
maintenance work performed during the warranty
period may invalidate your right to claim under
warranty.
e Have all maintenance and all modifications to
the vehicle performed solely by a qualified
specialist workshop. This ensures that the
vehicle will remain reliable and safe to drive,
and will not suffer consequential damage.
Porsche recommends a Porsche partner as
they have trained workshop personnel and the
necessary parts and tools.
Spare parts for your Porsche
e Only use genuine Porsche spare parts for your
vehicle, or spare parts of an equivalent quality
that have been manufactured according to the
specifications and production requirements of
Porsche. This ensures that the vehicle will
remain reliable and safe to drive, and will not
suffer consequential damage. You can obtain
these parts from a Porsche partner or a
qualified specialist workshop.
Porsche recommends a Porsche partner as
they have trained workshop personnel and the
necessary parts and tools.
e
Only use accessories that are from the Porsche
Tequipment range or have been tested and
approved by Porsche. For information on
Porsche Tequipment: Contact your Porsche
partner.
More Safety and More Driving Pleasure
7
Loading, safety systems,
children in the vehicle:
know-how for Porsche drivers
With your Porsche, you can accelerate to over
100 km/h (62 mph) in just a few seconds. With
this much power at your disposal, you should do
everything to ensure safety before you set off.
Therefore, put the same passion into getting
ready for a trip as you do into driving.
Your lifesaver: Using seat belts correctly
Seat belts can only protect you from injury if they
are used correctly and in good working order.
e Always make sure that seat belts fit snugly,
including on short trips.
e Only ever use one seat belt per occupant.
e Remove bulky items of clothing, such as winter
coats.
e Do not lay seat belts over breakable or hard
objects such as glasses or ball-point pens.
e Make sure seat belts are not twisted.
e Always make sure unused seat belts are
completely retracted.
e If an occupant is pregnant, position the
horizontal belt section below the belly and the
shoulder belt snugly over the chest.
e Have worn or damaged belts, buckles and
fastenings replaced.
f Refer to chapter “Seat Belts” on page 211.
Airbag system
Airbag systems can perform their safety function
only if all passengers are wearing seat belts and
are sitting in the correct position. Objects and
luggage must be stowed safely.
e Make sure that there are no persons, animals
or objects between occupants and the area
into which the airbag inflates.
e Keep a distance from the airbags, e.g. do not
lean against the inside of the doors. Always
keep your feet in the footwell when driving. Do
not put feet on the dashboard or seat surface.
Airbags that have been tampered with do not offer
any protection. They may either not trigger or be
triggered in an uncontrolled manner. Uncontrolled
triggering can cause serious injuries.
e Do not use protective seat covers.
e Do not attach any additional trim or stickers to
the steering wheel or in the vicinity of the
passenger airbag, side airbags or head
airbag.
e Do not route any cables of additional electrical
equipment in the vicinity of the airbag wiring
harnesses.
e Do not remove any airbag components, e.g.
steering wheel, front seats, headliner.
e Do not modify the wiring or components of the
airbag system.
f Refer to chapter “Airbag Systems” on
page 45.
Information
If other spare parts or accessories are used,
Porsche refuses to accept liability for any damage
caused by their use.
Even if the supplier of other spare parts of
accessories is a recognised supplier, the safety of
your vehicle may still be compromised.
Using spare parts or accessories that are not
approved by Porsche may invalidate your vehicle
warranty.
Information
Even at 30 km/h (20 mph), serious injuries are
possible if you are not wearing a seat belt. Safety
systems only protect you when working in
combination. For example, airbags can only
provide the right protection if the seat belt is also
put on correctly.
More Safety and More Driving Pleasure
8
Securing all objects in the passenger
compartment
An unsecured or incorrectly positioned load in the
passenger compartment can be hurled around the
interior as a result of braking, changing direction
or an accident. This can endanger and injure
vehicle occupants.
e Always secure items for transport.
e Always stow loads securely, e.g. in the
luggage compartment.
e Stow small items in storage compartments
and close them all. Never let objects protrude
from storage compartments.
e Never place objects on top of the dashboard.
e Do not transport heavy objects in open
storage compartments.
e Tell all your passengers about the safety
measures.
For correctly loading your Porsche and stowing
items:
f Refer to chapter “Stowing loads” on page 140.
Avoiding the risk of pinching/crushing
Persons or animals can get caught or crushed if
they are in the range of movement of the vehicle
parts below. These parts include the following,
among others:
– Adjustable front seats
– Doors
– Windows
– Flaps and lids
– Lids of storage compartments
e When moving these vehicle parts, make sure
that no persons or animals are in the range of
movement.
Supervise children’s behaviour
Often, children are unable to weigh up risks or
behave correctly in dangerous situations.
Children may inadvertently trigger automatic
settings, such as the seat adjustment, and injure
themselves. Children cannot free themselves from
the vehicle in emergency situations, such as a
build-up of heat in a closed vehicle. This can be
life-threatening, especially for small children.
e Keep children away from live or hot parts such
as the tailpipe.
e Keep toxic materials, such as tyre sealant or
engine oil, out of reach of children.
e Do not leave children in the vehicle unattended.
Using a child restraint systems safely
Child restraint systems can only work if they are
correctly installed.
e Only use child restraint systems that are
approved for your Porsche.
e Before you use a child restraint system:
Read and follow the instructions for the child
restraint system, as well as this manual.
f Refer to chapter “Child Restraint Systems
(Child Seats)” on page 78.
Information
In the event of a collision at 50 km/h (30 mph), for
example, unsecured objects can be flung forwards
with a force up to 50 times their weight. For
example, a 1.5 litre bottle of water has a force of
75 kg as it flies through the interior.
More Safety and More Driving Pleasure
9
Safe and competent driving:
always make the right decision
Your Porsche is an all-rounder. From Launch
Control to the emergency braking function – once
you let it loose, anything is possible. However, at
the end of the day, you are responsible for keeping
your power house under control.
Avoid distractions
If you use the PCM or other components in the
vehicle while you are driving, you are distracted
from the traffic and may not react in time to
dangerous situations. For your safety, some
functions are only available when the vehicle is
stationary.
e Never change mirror, seat or steering wheel
positions while driving. The seat or steering
wheel may move further than you intended.
You may lose control of the vehicle. Set the
mirror, seat and steering wheel to the correct
position before you set off.
e Only use the multi-function steering wheel,
radio, navigation system, etc. while driving if
the traffic situation permits. If in doubt, stop.
e Do not use mobile phones or other mobile
devices while driving.
e Always use hands-free equipment.
e Do not reach through the steering-wheel
spokes while driving. You will not be able to
react quickly enough to danger.
Be aware of braking behaviour in rain
and snow
In heavy rain, while driving through water or after
leaving a car wash, a film of water may form on
the brakes, delaying the braking action and
requiring increased pressure on the brake pedal.
Moreover, after a long drive in wintry road
conditions, a coating may form on brake discs and
pads that significantly reduces friction and
therefore also the braking action.
e Dry the brakes by frequent braking,
particularly before you park the vehicle. This
will prevent corrosion.
e Corroded brakes have a tendency to “judder”.
If braking comfort is noticeably impaired, have
the brake system checked.
Suitable tyres and appropriate driving
style
f Refer to chapter “Tyres and Wheels” on
page 257.
Responding correctly to uneven running or
vibrations
Damage to tyres or the vehicle can cause uneven
running or vibrations while driving. You may lose
control of the vehicle.
e Reduce your speed immediately, but without
braking sharply.
e Stop the vehicle and check the tyres. If you
cannot find a cause for the problem, continue
driving carefully and have the problem fixed.
Visit a qualified specialist workshop. Porsche
recommends a Porsche partner as they have
trained workshop personnel and the necessary
parts and tools.
More Safety and More Driving Pleasure
10
Keeping tyres in safe condition
Damaged tyres can burst, especially at high
speeds. Prevent damage to tyres by driving in a
manner that protects your tyres.
e Cross kerb edges slowly and at right angles if
possible.
e Avoid driving over steep or sharp kerbs.
Running in new tyres
New tyres do not yet have maximum adhesion to
the road surface and tend to slip.
e Run in new tyres at a moderate speed for the
first 200 km (125 miles).
Driving with winter tyres
Winter tyres are subject to maximum speeds.
If you exceeding the permitted maximum speed,
a tyre may burst.
e Always observe the permitted maximum speed
of the tyre you are using.
e Affix a sticker showing the permitted maximum
speed in the driver’s field of vision. Observe
country-specific laws.
e Setting the permitted maximum speed as the
speed limit on the multi-function display:
f Refer to chapter “Setting the speed limit” on
page 161.
Driving with summer tyres
Noises may occur when parking or manoeuvring
at outside temperatures below 15 °C.
e Change to winter tyres when outside
temperatures are below 7 °C.
Getting to know assistance systems and
their limitations
Your Porsche is equipped with assistance systems
that enhance your safety and driving comfort.
None of these systems can overcome the laws of
physics governing the movement of vehicles.
e Do not be tempted to take greater risks with
your safety. Assistance systems cannot
reduce the risk of accidents caused by an
inappropriate driving style.
e Assistance systems are no substitute for your
careful attention. Always remain attentive so
that you can react appropriately to the traffic
situation.
e Familiarise yourself with assistance systems
before you use them.
Here you can find the assistance systems at
a glance:
Page
Anti-lock Brake System (ABS) 196
HOLD function 122
Porsche Active Suspension
Management (PASM)
191
Porsche Stability Management (PSM) 195
Porsche Torque Vectoring (PTV) 256
PADM 256
Tyre Pressure Monitoring (TPM) 162
Lane Change Assist (LCA) 130
Automatic headlights,
Dynamic high beam
135
Park Assist, reversing camera 185
Cruise control 97
Adaptive cruise control (ACC) 32
Speed limit display 221
Navigation system 167
More Safety and More Driving Pleasure
11
Emergency braking function
You can carry out full braking with the electric
parking brake, if the conventional foot brake is
defective, for example.
This emergency braking function has very high
braking power, which can present a danger to
traffic behind you.
e Only use the emergency braking function in an
emergency, not for normal braking.
e For emergency braking, press and hold
switch . To stop braking, release the switch.
f Refer to chapter “Brakes” on page 63.
Driving off with Launch Control
When driving off with Launch Control activated,
the vehicle accelerates very quickly. In certain
circumstances (poor road conditions, lack of
attention, etc.) you may lose control of the vehicle
or endanger other road users.
e Only use Launch Control on public roads if road
and traffic conditions permit.
e Do not endanger other road users when driving
off with Launch Control.
Responding correctly to warning signals
If the sensors detect malfunctions or defective
parts, your vehicle warns you using lights or
messages. If you ignore the vehicle’s warning
signals, this can increase the risk of accidents and
injuries.
e Familiarise yourself with the meaning of
warning lights and messages before driving,
so that you can take the appropriate action to
a warning. Stop driving if necessary.
f Refer to chapter “Warning and indicator lights”
on page 126.
f Refer to chapter “Warning and Information
Messages” on page 278.
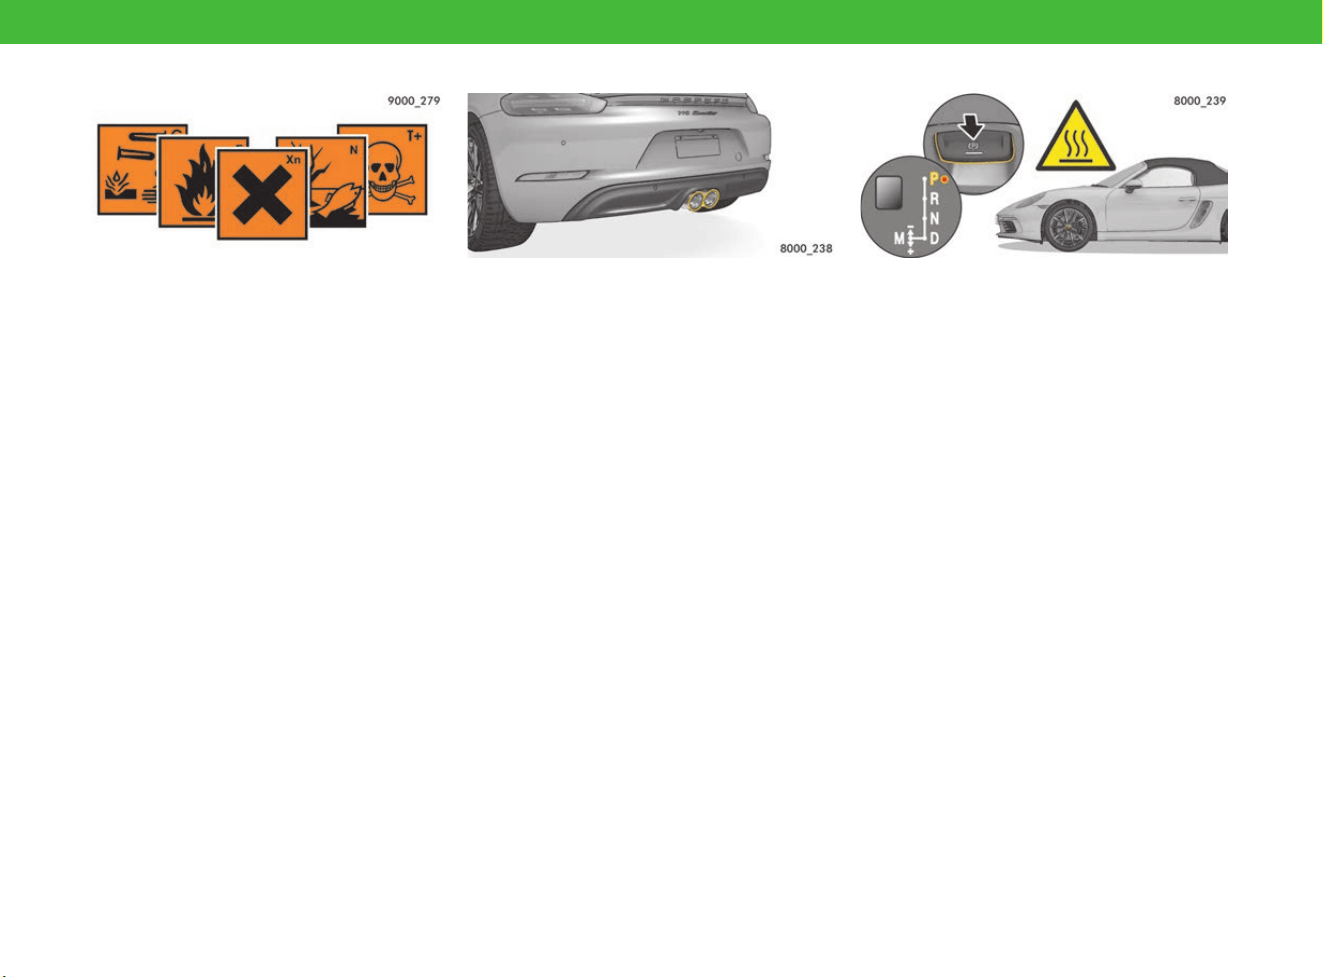
Dangers when refuelling
Fuel is highly flammable, and can deflagrate or
explode. In addition, fuel and fuel vapours are
harmful to health.
e Fire, naked flames and smoking are prohibited
when refuelling.
e Do not inhale fuel vapours.
e Do not let fuel come into contact with skin or
clothing.
f Refer to chapter “Refuelling” on page 209.
If a fuel can carried in the vehicle is damaged in an
accident, fuel may escape and ignite or explode.
e Do not carry fuel cans in the vehicle.
More Safety and More Driving Pleasure
12
Hazardous fluids
Not just fuel – engine and transmission oil, battery
acid, coolant and brake fluid are also hazardous to
health.
e Only work on the vehicle in the open or in
well-ventilated spaces.
e Label fluid containers appropriately and store
out of reach of children.
e Dispose of residues in an environmentally
friendly manner and in accordance with
regulations.
Engine oil can ignite. Cloths containing residues of
engine oil that are thrown away or stored without
ventilation can ignite by themselves and cause a
fire.
e Soak up spilled engine oil with cloths.
e Keep cloths saturated with engine oil in a
ventilated place until they are disposed of.
Toxic exhaust gases
Exhaust gas contains colourless and odourless
carbon monoxide, which is toxic even in low
concentrations.
e Switch off the engine when the vehicle is
stationary. Never leave the engine running
unnecessarily in confined spaces.
e Perform work with the engine running only in
the open or with suitable extraction systems
for the exhaust gases.
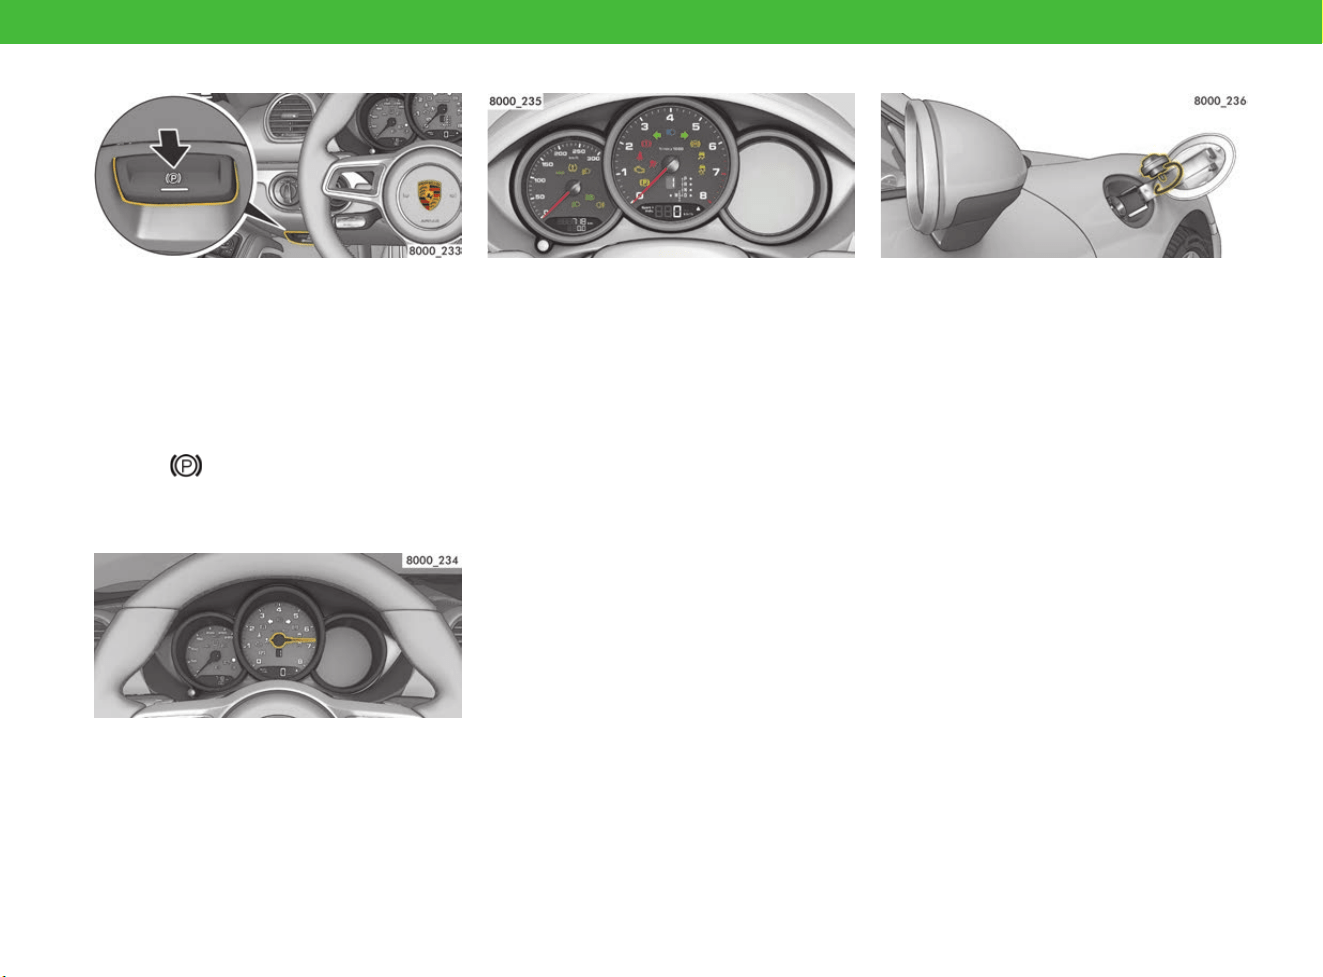
Parking the vehicle safely
If the vehicle is not parked correctly, it can roll
away uncontrolled, endangering people or
causing material damage.
Before you leave the vehicle:
e Activate the electric parking brake.
e Vehicles with PDK: Move the selector lever to
position P.
If selector-lever position P is flashing in the
instrument panel, the parking lock is not
correctly engaged. In this case, move the
selector lever to position R, then move it to
position P once more.
e Vehicles with manual transmission: Engage
first or reverse gear.
The exhaust system is very hot when the engine is
running and for a while after the engine has
stopped. Risk of burns and fire!
e Do not park your vehicle in places where
combustible materials, such as dry grass or
leaves, can come into contact with the hot
exhaust system.
e If you are standing behind the vehicle, maintain
a safe distance from the tailpipes.
e Make sure that children do not burn
themselves on the tailpipes.
More Safety and More Driving Pleasure
13
Being prepared for all eventualities:
safety in the event of a breakdown
or emergency
If you break down, pay attention to this
information –
for your own safety!
Do not use voice control in an
emergency
In emergency situations, stress may cause your
voice to change so that voice control does not
recognise your instructions.
e Do not use voice control in an emergency.
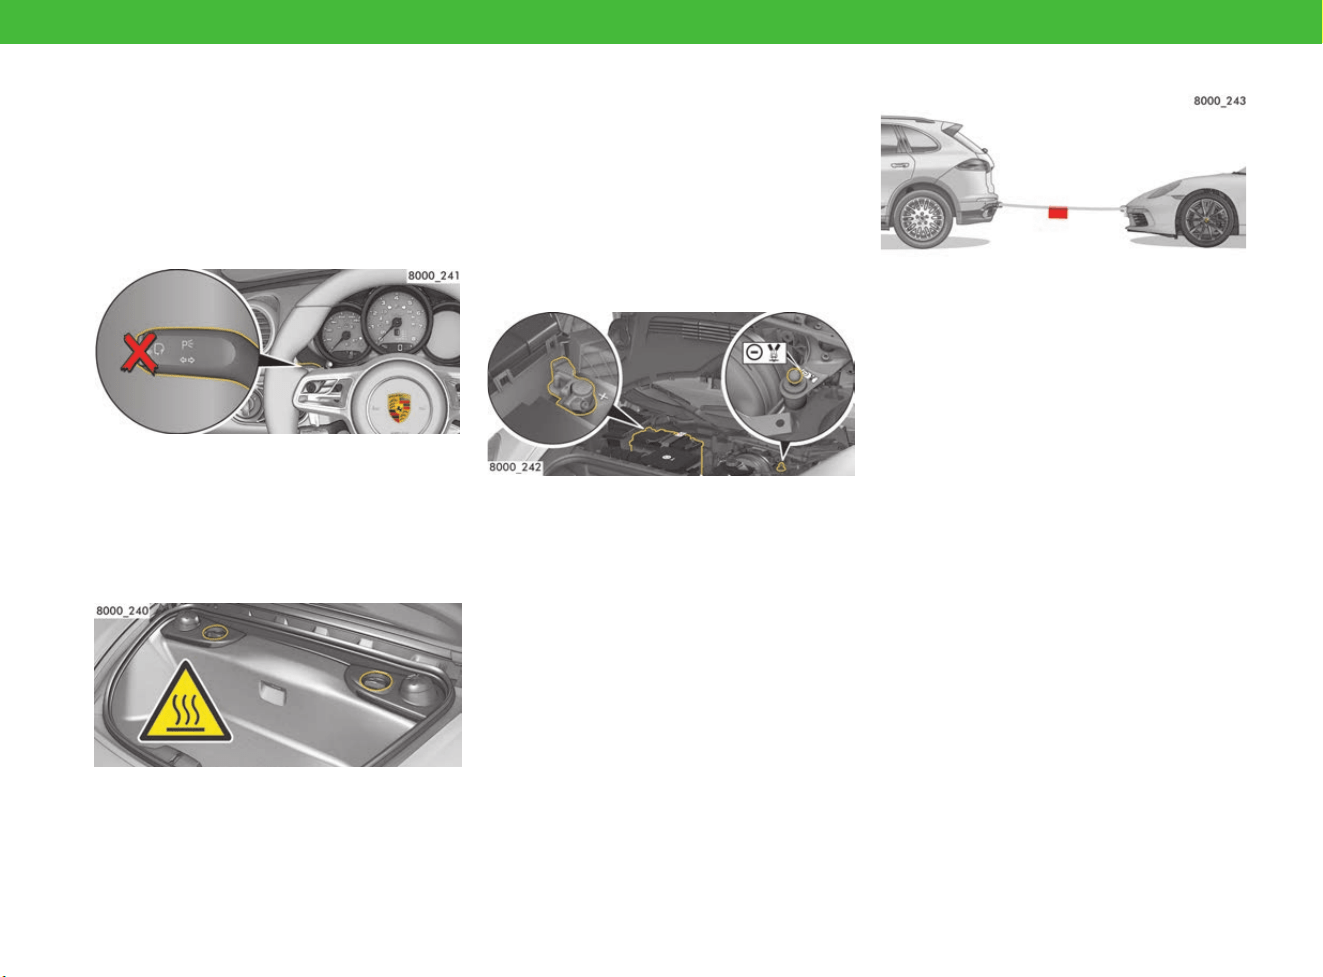
Caution when working in the engine
compartment
The engine and adjacent components, the exhaust
system and the coolant become very hot when the
engine is running.
The coolant tank is pressurised. Hot coolant
can spray out suddenly if the coolant tank is not
opened with care.
e Take care when working near hot vehicle parts,
particularly the engine and the exhaust system.
e Top up coolant only with the engine stopped
and ignition switched off.
e Do not open the cap on the coolant reservoir
when the engine is hot. Wait until the coolant
temperature gauge displays a temperature
below 60 °C.
f Refer to chapter “Coolant” on page 95.
Jump-lead starting
Unsuitable jump leads or an incorrect starting
procedure can cause a short circuit and lead to a
fire. A highly explosive gas mixture can form
around the battery during jump-lead starting.
In addition, there are risks of injury in the engine
compartment due to battery acid and parts that
may start up automatically, such as radiator fans.
Before jump-lead starting:
f Refer to chapter “Jump-Lead Starting” on
page 129.
Towing
There is an increased risk of accident when
towing. Power assistance may not be available, so
that steering requires greater effort. If the brake
booster has failed, you will need a lot of force for
braking.
e Exercise the utmost caution when towing if the
engine has stopped or if power assistance or
the brake booster has failed.
e Do not allow vehicles with defective brakes to
be towed.
e
During towing and recovery by a towing vehicle,
pay attention to the limited ground clearance.
f Refer to chapter “Towing and Tow-Starting” on
page 249.
More Safety and More Driving Pleasure
14
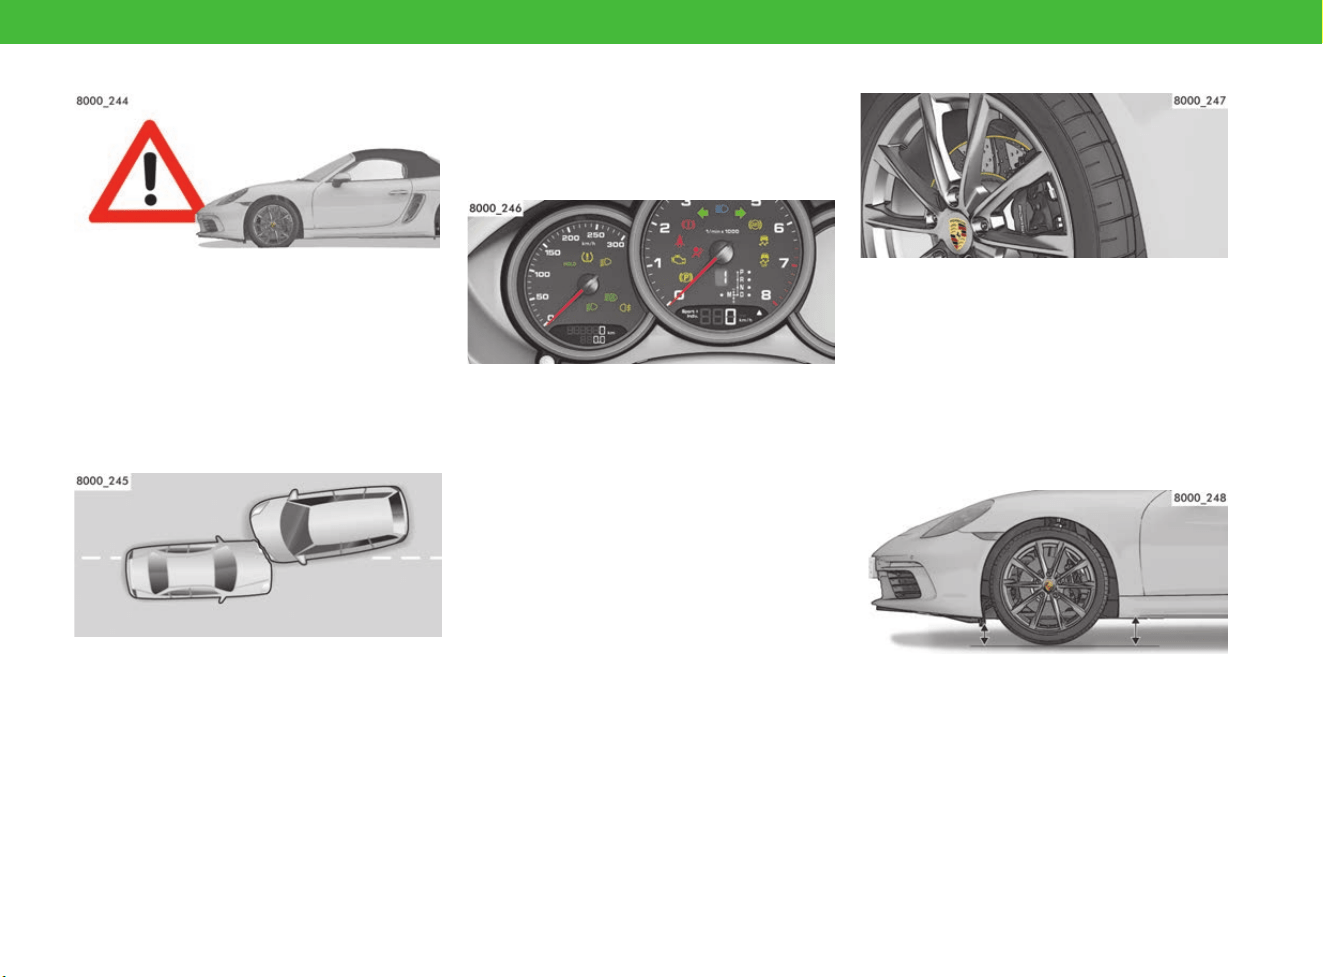
Flat tyre
If you drive with damaged tyres, depending on
your speed it may not be possible to steer the
vehicle safely.
e Never continue driving with a flat tyre.
e Park the vehicle correctly and safely, and have
the problem fixed.
f Refer to chapter “Flat Tyre” on page 110.
After a collision
After a collision, the safety systems may no longer
be operational (e.g. seat-belt pretensioners and
airbags). The safety systems can then no longer
protect you.
e Have safety systems checked, even if they
have not been triggered.
e Have triggered safety systems replaced.
Visit a qualified specialist workshop. Porsche
recommends a Porsche partner as they have
trained workshop personnel and the necessary
parts and tools.
Before driving off:
important information on your
Porsche
Running in the vehicle
In a new vehicle, the moving parts first have to
be run in with each other. The first 3,000 km
(1,865 miles) are required for this. The oil and
fuel consumption may be somewhat higher than
normal during this time.
Drive as follows during the running-in period:
e Preferably take longer trips. If possible, avoid
frequent cold starts with short distances.
e Do not participate in motor racing events,
sports driving schools, or similar.
e Avoid high speeds of over 4,000 revolutions
per minute. Drive at low speeds when the
engine is cold.
Running in new brake pads
New brake pads and brake discs have to be
“bedded in” and therefore only attain optimum
friction when the vehicle has covered several
hundred miles.
The somewhat reduced braking action requires
greater force when pressing the brake pedal. This
is also the case whenever the brake pads or brake
discs are replaced.
Paying attention to ground clearance
The vehicle has low ground clearance and can
therefore easily touch the ground.
e Avoid steep ramps.
e Drive carefully in the following situations:
– Steep uphill and downhill slopes, e.g. in
multi-storey car parks
– Kerbs
– Uneven road surfaces
– Lifting platforms
More Safety and More Driving Pleasure
15
Before driving on race circuits
Compared with driving on roads, driving on race
circuits involves disproportionately high vehicle
loads, which pure race vehicles are able to
withstand thanks to short maintenance and
component reconditioning intervals. This includes
carrying out checks and replacing individual
components where necessary after each race
circuit session, through to overhauling entire
assemblies after a specified period.
e Always make enquiries about the current
stipulations before driving on race circuits:
Contact your Porsche partner.
Brake system
Brake fluid absorbs moisture from the air over
time. This absorption of water lowers the boiling
point and can considerably impair braking
efficiency at high temperatures.
Brake pads and brake discs are subjected to very
high stress when driving on a race circuit.
e If the brake fluid is more than 12 months old:
Replace brake fluid before driving on a race
circuit.
e Have the brake pads and brake discs checked
for wear before and after driving on race
circuits.
Tyres
Tyres are also subjected to very high stress when
driving on a race circuit.
e Have tyres checked for wear before and after
driving on race circuits.
e Do not fit racing tyres. Racing tyres are not
approved by Porsche.
Engine oil
e Check the engine oil level before and after
driving on race circuits.
f Refer to chapter “Measuring and displaying
engine oil level” on page 160.
f Refer to chapter “Selecting and topping up
engine oil” on page 107.
Before driving abroad
Not all Porsche models are sold in all countries. As
a result, individual spare parts may not be
available, or the Porsche partner may not be able
to carry out all repair work.
Clarify the following points before driving abroad:
– Can the vehicle be repaired if it breaks down?
– Does the vehicle require technical
adjustments?
– Is the fuel octane rating sufficient?
– Do the headlights need to be changed to
left/right-hand traffic?
f If so, Refer to chapter “Converting headlights
for left or right-hand traffic” on page 267.
Data processing in the vehicle
Electronic control units are installed in your
vehicle. Some of these are required for the
operational safety of your vehicle, while others
provide assistance while driving (driver assistance
systems). In addition, your vehicle has comfort or
entertainment functions, which are also controlled
by electronic control units.
Storing technical data in the vehicle
Electronic control units have data memories that
can temporarily or permanently store technical
information about vehicle status, component
stress, servicing requirements, events or faults.
Generally, this technical information documents
the status of a component, module, system or
environment, such as:
– Operating state of system components
(e.g. fill levels)
– Status messages about the vehicle or its
individual components (e.g. wheel revolutions,
speed, deceleration, lateral acceleration)
– Malfunctions and faults in important system
components (e.g. lights, brakes)
– Information about events that can damage the
vehicle
– The vehicle’s response in special driving
situations (e.g. triggering an airbag, activation
of the stability control system)
– Environmental conditions (e.g. temperature)

More Safety and More Driving Pleasure
16
In addition to providing the actual control unit
function, this data is used to detect and correct
faults and enables the manufacturer to optimise
vehicle functions. Most of this data is volatile and
is only processed in the vehicle itself. Only a small
amount of the data is stored in event or fault
memories. In addition, your vehicle has comfort or
entertainment functions, which are also controlled
by electronic control units.
Reading out technical data
When having your vehicle serviced, service
network employees (e.g. workshops, breakdown
services, manufacturers) can read out the
technical information from the vehicle. Services
include repairs, service processes, warranty
cases and quality assurance measures, for
example.
The data is read out using a legally required
connection for OBD (“On-board diagnose”) in the
vehicle. The data is collected, processed and
used by the relevant service network personnel
and may be sent to Porsche in order to comply
with product monitoring obligations or to improve
quality for example. Fault and event memories in
the vehicle can be reset by a service centre during
repairs or servicing.
Using functions in the vehicle
Depending on the selected equipment, you can
add information yourself, such as multimedia and
address book data or navigation destinations as
well as other settings in the comfort and
Infotainment functions of the vehicle. This data
can be stored locally in the vehicle or may be on a
device you have connected to the vehicle (e.g.
smartphone, USB stick or MP3 player). If this data
is stored in the vehicle, you can delete it at any
time. This data is only sent to third parties at your
request and particularly while using online
services, only in accordance with the settings you
have selected.
If your vehicle has the required equipment, you
can control your connected smartphone or
another mobile device using the controls
integrated in the vehicle. Picture and sound from
your smartphone can be output via the multimedia
system. Certain information can also be
transferred to your smartphone. This includes
general vehicle information or position data, for
example, depending on the type of integration.
This allows optimal use of selected apps on the
smartphone, e.g. for using a navigation system or
playing music. The smartphone cannot be used to
actively access vehicle data. The type of further
data processing is determined by the supplier of
the app you are using.
Whether and which settings you can configure for
this depends on the app and the operating system
on your smartphone.
Using online services
If your vehicle has a wireless network connection,
this can be used to exchange data between your
vehicle, the surrounding area and other systems.
You can connect to the wireless network via the
send and receive unit in the vehicle or via your
connected mobile devices (e.g. smartphones).
Online functions can be used via this wireless
network connection. These include online services
and applications/apps that are available to you
through Porsche or other providers.
For Porsche online services, the various functions
are described at a suitable place (e.g. the Porsche
Connect website) and the related data protection
legislation information is provided. Personal data
can be used for the provision of online services.
The required data exchange takes place over a
protected connection, e.g. with the Porsche
IT systems set up for this purpose. The collection,
processing and use of personal data for purposes
other than the provision of services only occurs
when permitted by law or with your consent.
Usually, you can activate or deactivate the (often
fee-based) services and functions and in some
cases, even the entire data connection in the
vehicle. This does not apply to legally required
functions and services, in particular.
If there is a possibility of using online services
from other providers, these are the responsibility
of the respective provider and are subject to the
data protection requirements and terms of use of
that provider. Porsche does not have any influence
over data exchanged in these cases. Given this,
please contact the respective service provider to
find out about the type, scope and purpose of the
collection and use of personal data for third-party
services.

17
Overview Illustrations
On the following pages, you will find overview
illustrations of all areas of the vehicle, with a brief
explanation. Please refer to the page indicated for
further information.
Driver’s Cockpit
18
Driver’s Cockpit
A Door opener f p. 72
B Memory buttons for personal
settings
f p. 188
C Exterior mirror adjustment f p. 153
D Light switch f p. 135
E Ignition lock f p. 232
F Overhead console f p. 22
G Power windows f p. 298
H Electric parking brake f p. 63
I Release for front/rear luggage
compartment lid
f p. 144
J Steering wheel adjustment f p. 234
K Seat adjustment f p. 213
Steering Wheel and Instrument Panel
19
Steering Wheel and
Instrument Panel
A PDK shift paddles f p. 253
B Indicators and high beam f p. 138
C Speedometer
Warning and indicator lights
f p. 125
f p. 126
D Tachometer
Warning and indicator lights
f p. 125
f p. 126
E Multi-function display
Warning and information
messages
f p. 125
f p. 278
F Windscreen wipers f p. 300
G Cruise control
ACC
f p. 97
f p. 32
H Diagnostic socket f p. 101
I Multi-functional buttons for
telephone, radio,
multi-function display
f p. 157
J Steering wheel heating f p. 234
K Horn
L Control stalk for multi-function
display (vehicles without multi-
function steering wheel)
f p. 157
M Mode switch f p. 223
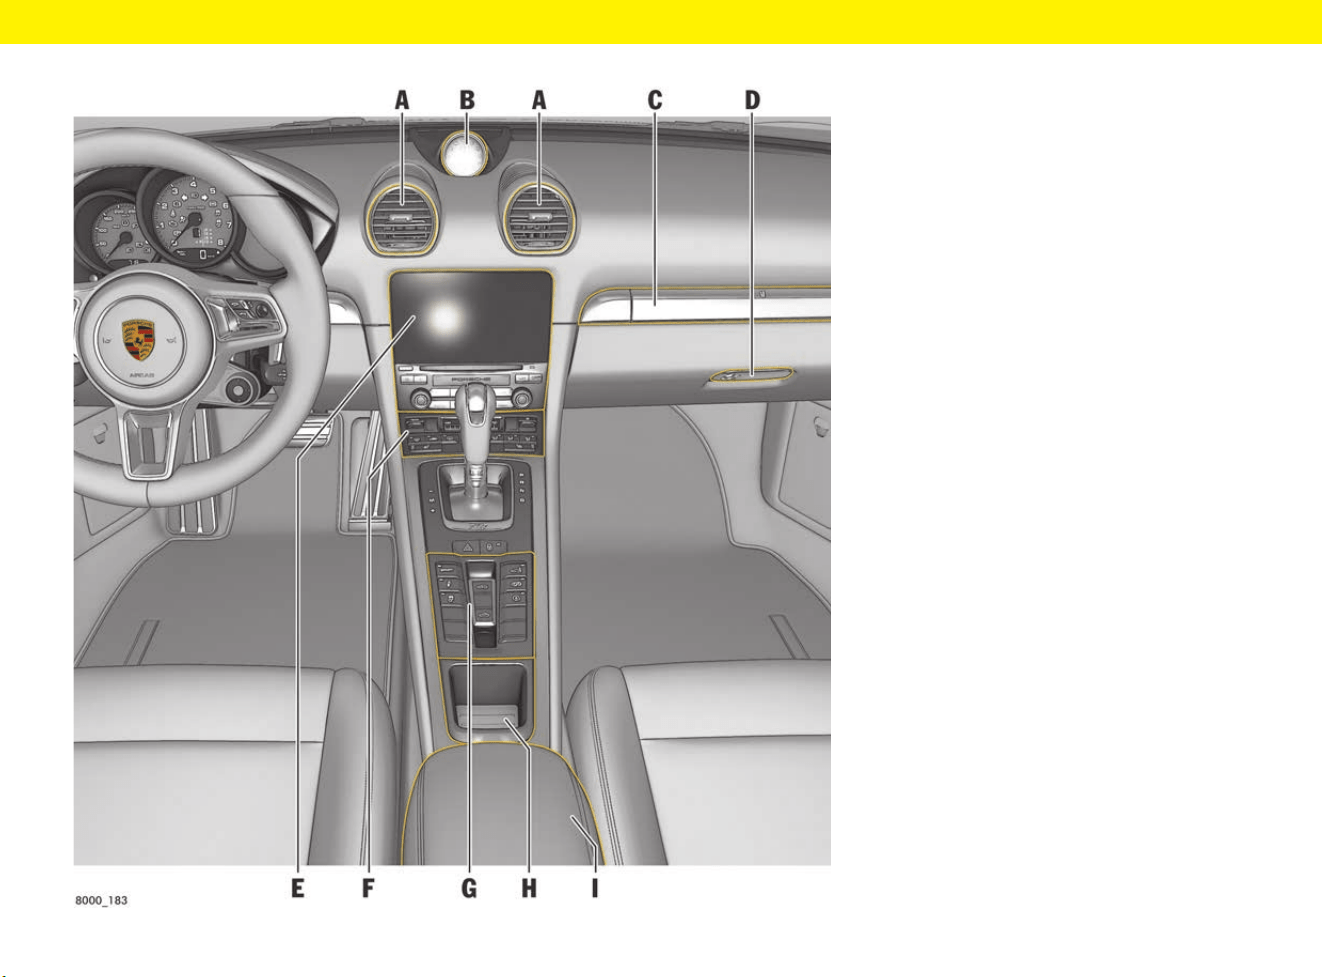
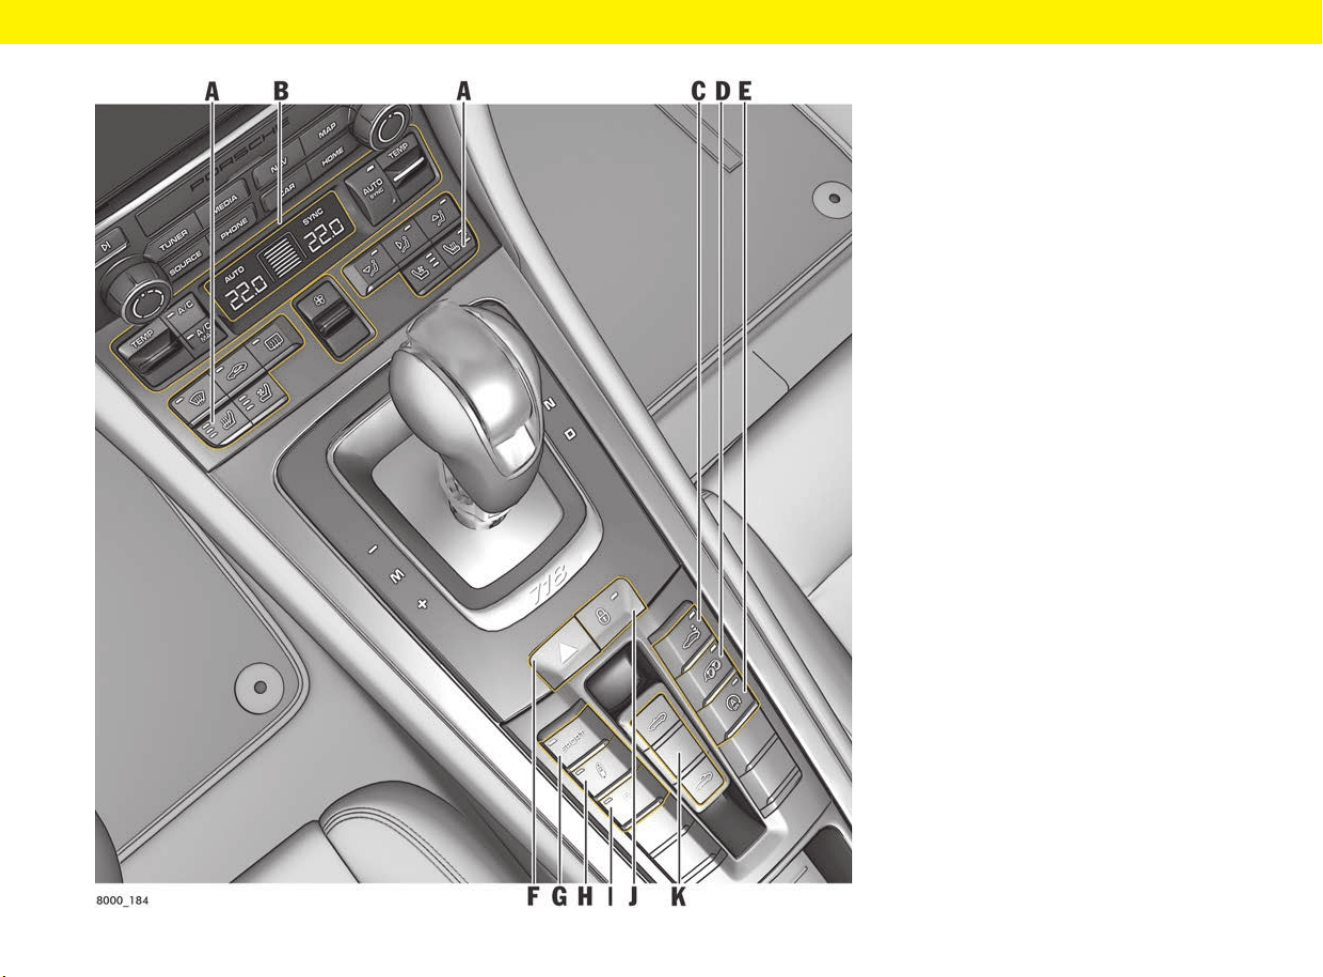
Control Panel
21
Control Panel
A Seat heating/seat ventilation f p. 216
B Air-conditioning control panel f p. 53
C Rear wing f p. 208
D Sports exhaust system f p. 231
E Auto Start Stop f p. 50
F Hazard warning lights f p. 139
G SPORT mode
(depending on equipment)
f p. 220
H Porsche Active Suspension
Management (PASM)
f p. 191
I Porsche Stability Management
(PSM)
f p. 195
J Central locking f p. 71
K Convertible top control panel f p. 90
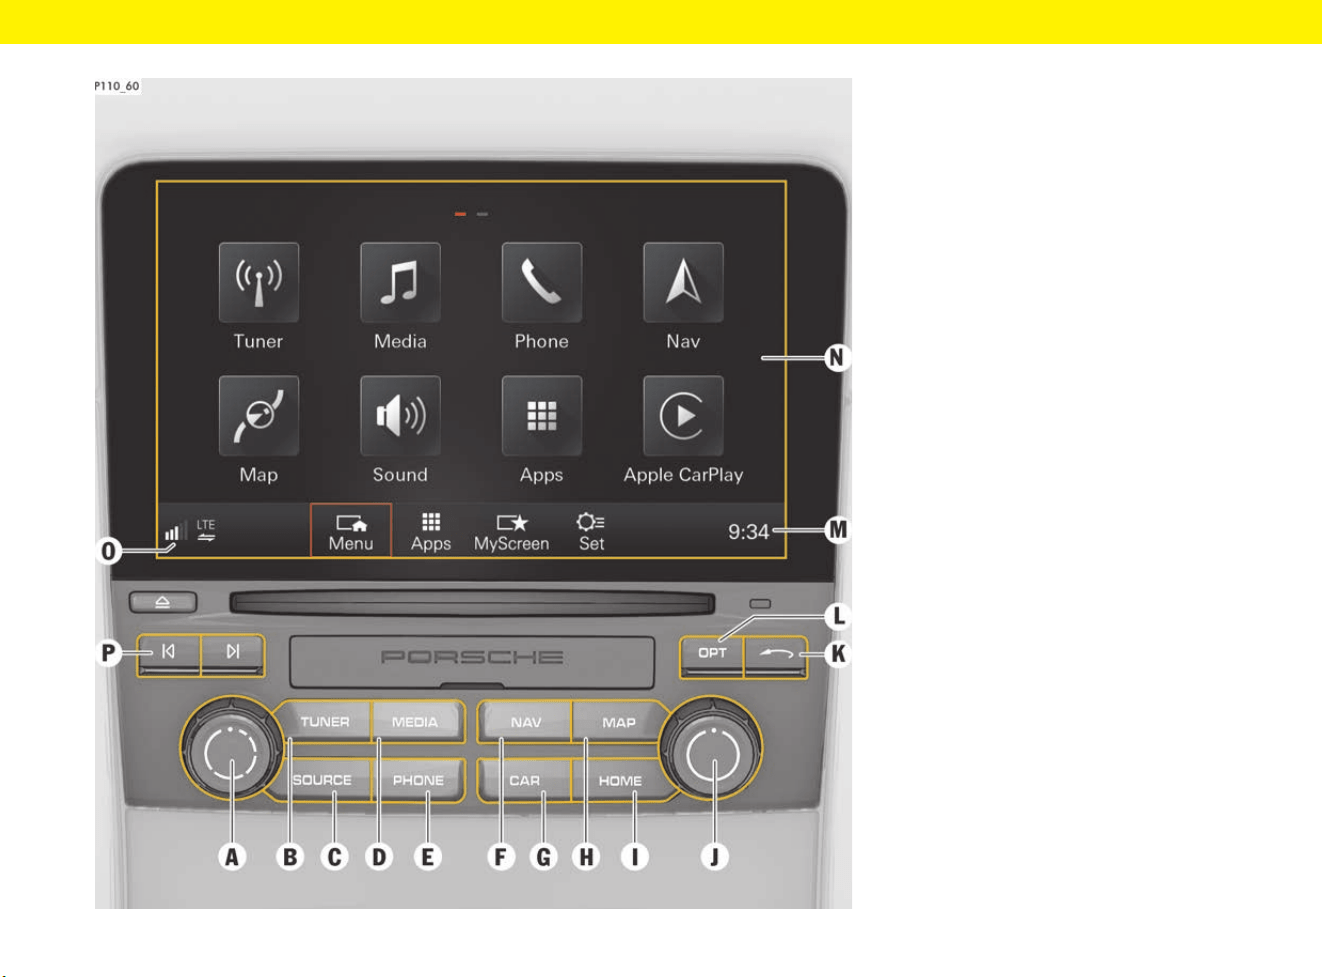
PCM Controls
23
PCM Controls
A Set volume, switch PCM on and off f p. 184
B Radio f p. 204
C Media and radio sources f p. 148
D Music and videos f p. 148
E Telephone, messages and e-mails f p. 238
F Navigation f p. 167
G Vehicle and system settings f p. 183
H Map and traffic announcements f p. 172
I Main menus, sound settings,
Porsche Connect App,
Porsche Connect Services,
Apple
®
CarPlay,
MyScreen
f p. 184
f p. 193
f p. 88
f p. 48
f p. 180
J Rotary push button
(for operating the PCM)
f p. 179
K Back button: Reverse last
instruction, interrupt selection or
go up a level in the menu
L Settings depending on main menu,
sound settings
M Set time f p. 177
N Touchscreen
(for operating the PCM)
f p. 178
O Device Manager
(connect telephone, set up wireless
Internet access, connect
Bluetooth
®
devices, view
connection status of Apple
®
CarPlay and Porsche Connect App)
f p. 100
P Skip buttons (set track/station)
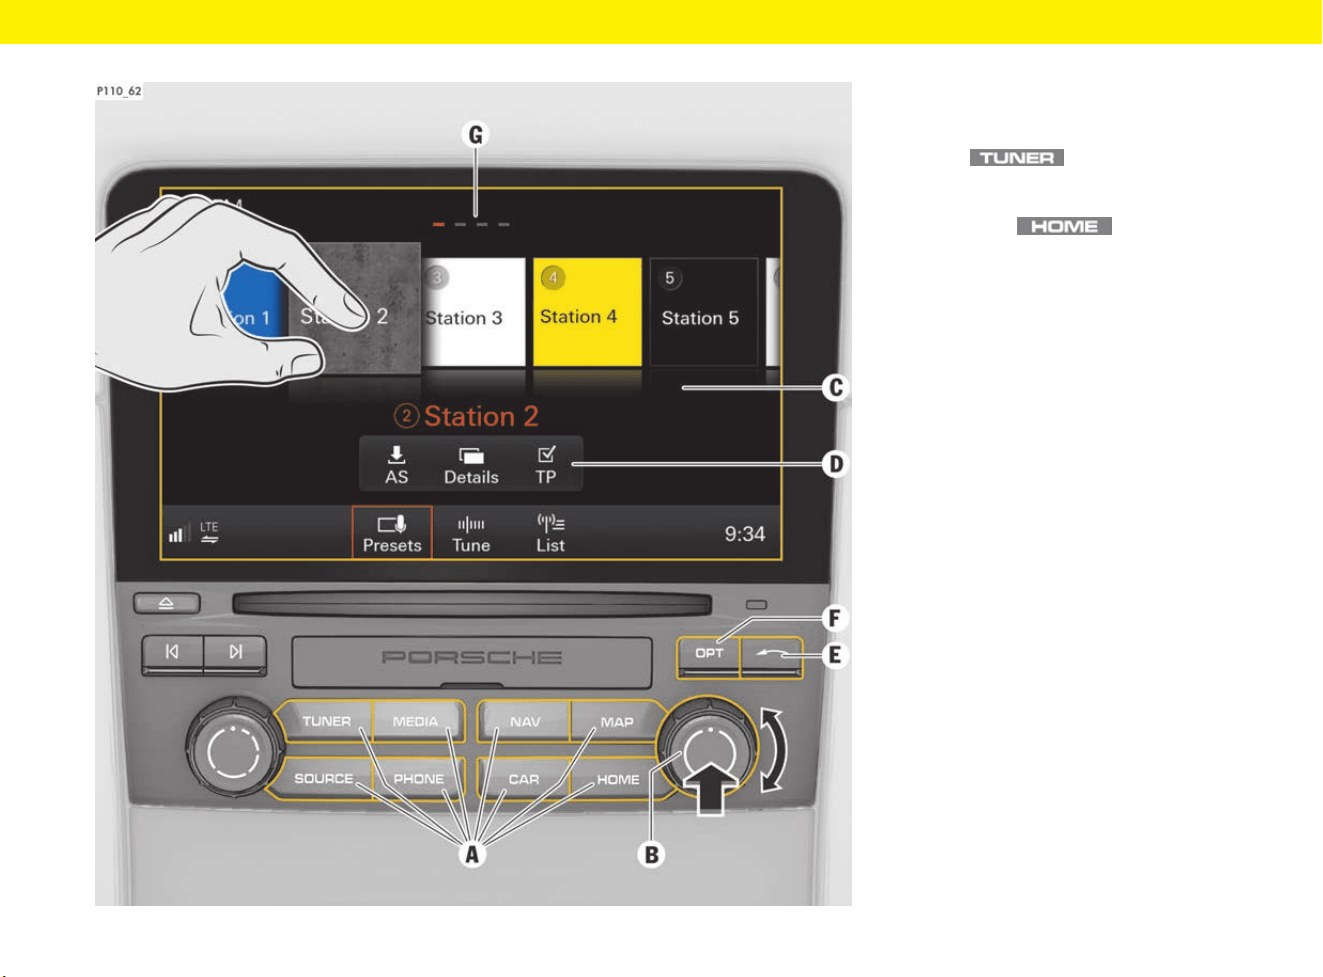
PCM Operating Principle
25
PCM Operating Principle
A Open main menu
e Press button
(e.g. )
– or –
Select function in
main menu .
B Rotary push button for PCM
operation
e Turn rotary push button B to
select function.
e Press rotary push button B to
confirm your selection.
f p. 179
C Touchscreen for PCM operation
e Tap (tap lightly with your finger)
e Long press (touch and hold)
e Scroll (swipe vertically)
e Swipe (swipe horizontally)
e Drag & drop (touch objects,
drag them to wherever you
want and let go)
e Zoom (move two fingers apart
or closer together)
f p. 178
D Open controller functions
(if approach sensor is activated,
simply move your hand closer to
the PCM)
f p. 178
E Back button: Reverse last
instruction, interrupt selection or
go up a level in the menu
F Settings depending on main menu,
sound settings
G Show other pages: View other
pages by swiping horizontally
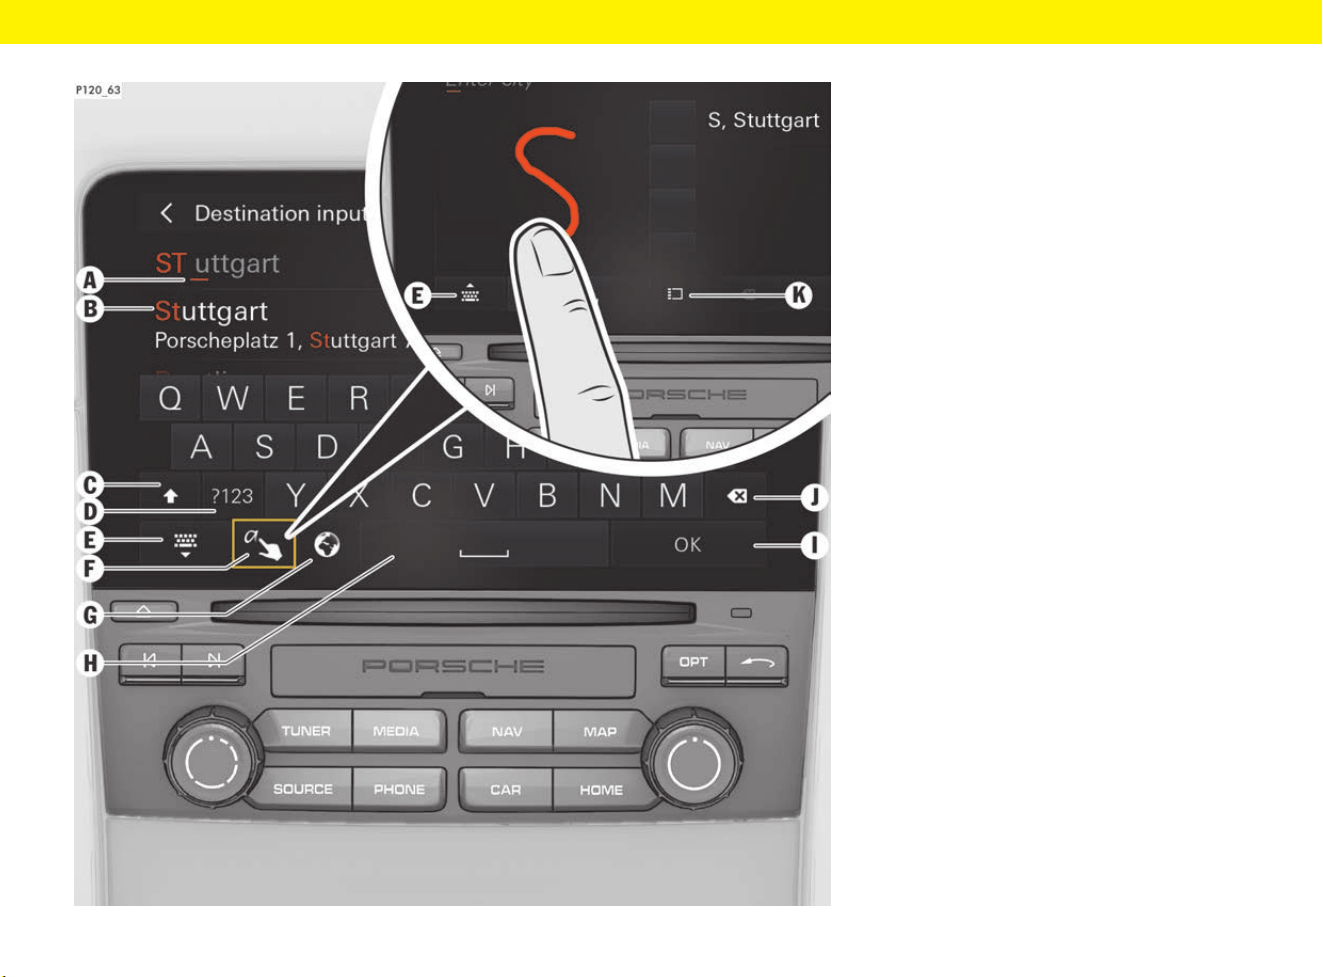
Entering Text and Characters in the PCM
26
Entering Text and Characters
in the PCM
A Current cursor position f p. 179
B List of suggestions f p. 179
C Toggle between upper and
lower case
f p. 179
D Toggle between entry of letters,
numbers and special characters
f p. 179
E Show or hide keyboard f p. 179
F Handwriting recognition
(enter letters or characters
using the touchscreen)
f p. 179
G Adapt keyboard (availability
dependent on country)
f p. 179
H Insert space (handwriting
recognition: Swipe finger across
touchscreen from left to right)
f p. 179
I Confirm entry f p. 179
J Delete entry (handwriting
recognition: Swipe finger across
touchscreen from right to left)
f p. 179
K Handwriting recognition:
Show/hide alternative letters or
characters
f p. 179

27
Practical Tips
On the following pages, you will find practical tips
on the selected area of your vehicle.
Practical Tips
28
Practical Tips
Air conditioning
Connectivity
Topic
Tip
Switching the upper ventilation
panel on and off
In vehicles with 2-zone air conditioning, the upper ventilation panel can be switched on and off in the multi-function
display under Vehicle e Settings e Air conditioning e Ventilation field.
Automatically adjusting the fresh air
supply depending on the air quality
In vehicles with 2-zone air conditioning, automatic air recirculation can be switched on and off in the multi-function
display under Vehicle e Settings e Air conditioning e Auto air circ.
Air-conditioning settings
for lone drivers
If you are travelling alone in the vehicle, it makes sense to use the driver’s side air-conditioning settings for the
entire vehicle.
e Press and hold button on the air-conditioning control panel until SYNC appears in the air-conditioning
display.
Topic
Tip
Opening the Device Manager The Device Manager centrally manages connections (e.g. connecting telephone or Bluetooth
®
audio players,
connecting the PCM to an external WiFi hotspot, using Apple
®
CarPlay and the Porsche Connect App).
e Select symbol or (depending on the connection status) in the footer of the PCM.
– or –
button e button e Device manager
Establishing a data connection via
a WiFi hotspot or mobile phone
The PCM can also access a WiFi hotspot (e.g. public hotspot or the mobile phone’s personal hotspot) to establish
a data connection.
e Set the PCM as required via button e button e SET PHONE e WiFi settings e
Use external data connection.
Practical Tips
29
Multi-function steering wheel
Navigation
Voice control
Topic
Tip
Assigning the ◊ button of
the multi-function sports
steering wheel
The ◊ button of the multi-function sports steering wheel can be individually assigned desired functions of
the multi-function display and the PCM.
Select the desired functions on the multi-function display:
Vehicle e Settings e Steering wheel op. e ◊ key e PCM function or Cluster function
Topic
Tip
Finding or entering a destination You can enter or search for your desired destination using the Search or Online search function.
The Search function accesses the PCM’s internal database. Use the Online search function to search
for destinations on the Internet.
e Press button e Search or Online search e Enter search term (e.g. city, street, name) and
select the desired entry from the list e Start .
Speed limit display The speed limit display in the PCM can be enabled by pressing button e button e
SET Map e General settings e Show speed limits.
In addition, speed limits can also be shown in the lower status area of the multi-function display:
Vehicle e Settings e Display e Upper line e Speed limit.
Topic
Tip
Activating voice control The button on the left-hand control stalk on the steering wheel initiates different functions depending on the
application:
– Short press: Voice control of the PCM is activated.
– Long press: Siri
®
voice recognition is activated (only in conjunction with Apple
®
CarPlay).
Voice control by the passenger The hands-free microphone for voice control is pointed towards the driver’s side. Therefore, only the driver should
use the voice control.
Practical Tips
30
Refuelling
Phone
Central locking
Topic
Tip
Indication of filler flap location The arrow in the fuel gauge points towards the side of the vehicle on which the filler flap is located.
f Refer to chapter “Instrument Panel” on page 125.
Topic
Tip
Supported Bluetooth
®
profiles To view a list of profiles used by the mobile phone, press button e button e
SET PHONE e Bluetooth e Bluetooth devices e Select relevant device e Details.
In addition, pay attention to the information in the mobile phone operating instructions.
Switching between two
connected mobile phones
If a mobile phone is already connected to the PCM, a second mobile phone can also be connected to the PCM
and the user can switch between the two mobile phones.
e button e Select or in the headline.
Transferring contacts on
a mobile phone to the PCM
Regardless of which mobile phone is connected or whether a SIM card is used, contacts can be transferred from
a mobile phone that is in range of the PCM via Bluetooth
®
.
e button e e SET PHONE e Contacts e Transfer contacts e
Select the mobile phone you wish to use for transferring contacts.
Topic
Tip
When unlocking the vehicle,
only one door is unlocked
The setting for locking and unlocking the doors has been changed.
All doors can be opened irrespective of the selected setting.
e Press button on the driver’s key twice within 5 seconds.
The setting can be changed on the multi-function display via Vehicle e Settings e Locking.

31
Topics
On the following pages you will find topics listed in
alphabetical order.
32
Adaptive Cruise Control (ACC)
A
B
C
D
E
F
G
H
I
J
K
L
M
N
O
P
Q
R
S
T
U
V
W
X
Y
Z
Adaptive Cruise Control
(ACC)
b Vehicles with PDK.
Adaptive cruise control (ACC) maintains any
selected speed between approx. 30 and
210 km/h (20 and 130 mph) when driving on open
roads without you having to use the accelerator.
If a vehicle travelling ahead of you in the same lane
is detected as driving slower than the selected
speed, adaptive cruise control will automatically
maintain a set distance from the vehicle in front.
Adaptive cruise control slows your vehicle down if
the distance to the vehicle ahead becomes too
short and accelerates your vehicle if the distance
increases.
Radar sensor
Adaptive cruise control uses a radar sensor
located in the middle of the front apron (arrow).
Fig. 1: Location of radar sensor
WARNING
Lack of attention
The increased comfort offered by the adaptive
cruise control must not induce you to take risks
with your safety. The driver remains responsible
when driving, e.g. keeping a safe distance or
driving at an appropriate speed, regardless of
the adaptive cruise control. The system is no
substitute for the driver’s attention.
e Drive with extreme care.
e Brake the vehicle immediately with the
footbrake if the deceleration of the adaptive
cruise control is not sufficient.
e Make sure that you can resume control of the
vehicle at all times.
WARNING
Unsafe traffic situation
and unfavourable road
conditions
If the current situation does not permit driving
safely at a constant speed at an adequate
distance from the vehicle in front, use of the
adaptive cruise control may lead to an accident.
e Do not use the adaptive cruise control in heavy
traffic, in road works, in towns, on twisting
roads or under unfavourable road conditions
(e.g. wintry or wet conditions or varying road
surfaces).
WARNING
Failure of adaptive
cruise control to detect
vehicles or objects
Adaptive cruise control will not detect stationary
or slow-moving vehicles, pedestrians, objects on
the road, oncoming vehicles in the same lane or
cross traffic.
e Intervene yourself if necessary.
e Always keep the direction of travel in your field
of view.
Information
e Always keep the radar sensor clean and free of
ice and snow to ensure that it is fully functional.
For car care instructions:
f Refer to chapter “Care” on page 65.
WARNING
Impaired radar sensor
vision
Radar sensor vision can be impaired by rain, snow,
ice or heavy spray. Vehicles in front will not be
detected properly or may not be detected at all.
e Do not use adaptive cruise control under these
conditions.
33
Adaptive Cruise Control (ACC)
A
B
C
D
E
F
G
H
I
J
K
L
M
N
O
P
Q
R
S
T
U
V
W
X
Y
Z
Exceptions
Adaptive cruise control may be deactivated
automatically if the radar sensor is very dirty or is
covered in ice or by an obstacle, in unfavourable
weather conditions (heavy rain) or when driving
through tunnels.
A message indicating that ACC is not available
appears on the multi-function display.
f Refer to chapter “Warning and Information
Messages” on page 278.
Operating principle of adaptive
cruise control (ACC)
No vehicle detected in front –
Open road driving
Adaptive cruise control regulates the speed of the
vehicle. The set desired speed is maintained
constantly.
Vehicle detected in front – Follow mode
If a vehicle travelling ahead of you in the same lane
is detected as driving slower than the selected
desired speed, adaptive cruise control will
automatically maintain a set distance from the
vehicle in front.
If the vehicle in front stops, adaptive cruise control
will slow your vehicle down to a stop provided this
is possible within the control limits of the system.
Adaptive cruise control actively keeps the vehicle
at a standstill.
If the vehicle in front drives off, automatic speed
control and distance control can be resumed.
Overruling
The speed of the vehicle can be increased at any
time by pressing the accelerator.
If the vehicle is travelling faster than the speed set
by the adaptive cruise control (ACC), adaptive
cruise control is deactivated.
A message indicating that ACC is inactive appears
on the multi-function display. The desired stored
speed is retained.
After the accelerator pedal is released, the ACC
accelerates to the desired speed if there is no
vehicle in front and controls the distance if there is
a vehicle in front.
For information on ACC operating states:
f Refer to chapter “Operating states when
adaptive cruise control (ACC) is switched on”
on page 34.
Operating adaptive cruise control
(ACC)
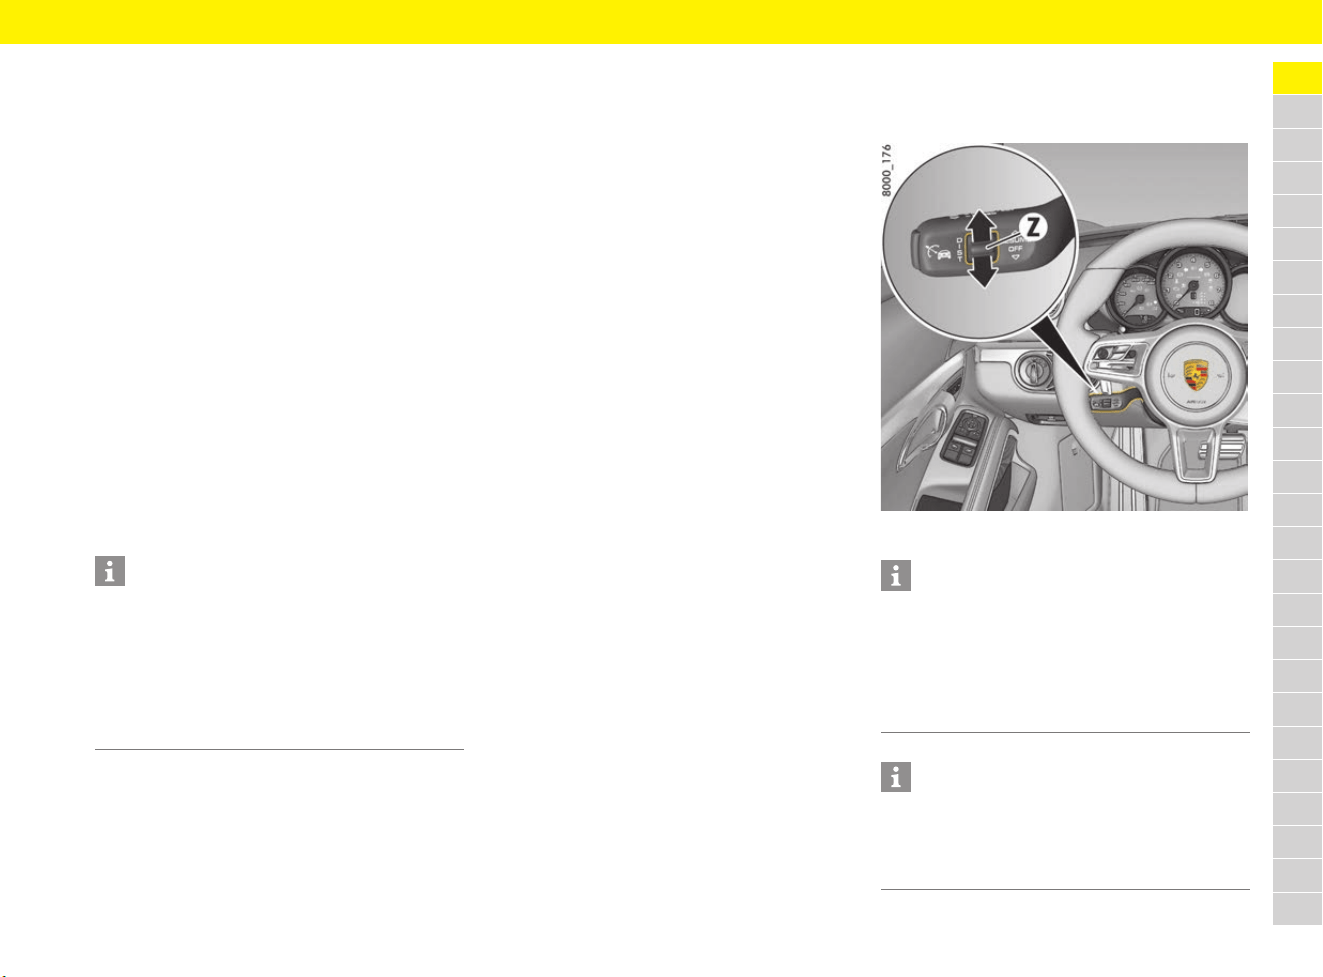
Fig. 2: Control stalk for adaptive cruise control (ACC)
R Switching ACC on/off
1 Setting/increasing the desired speed
2 Reduce desired speed
3 Interrupt (OFF)
4 Return to set speed (RESUME)
Information
You can intervene manually at any time by
pressing the brake or accelerator.
34
Adaptive Cruise Control (ACC)
A
B
C
D
E
F
G
H
I
J
K
L
M
N
O
P
Q
R
S
T
U
V
W
X
Y
Z
Display of adaptive cruise control
(ACC)
All important information, messages and warnings
for adaptive cruise control are displayed on the
multi-function display in the ACC main menu.
Fig. 3: ACC on the multi-function display
When adaptive cruise control is switched on, the
status display B appears at the bottom left of the
multi-function display.
The status display B turns orange when adaptive
cruise control is active.
The status display B is grey when adaptive cruise
control is inactive.
Switching adaptive cruise control
(ACC) on and off
Switching adaptive cruise control (ACC)
on
e Press button R on the control stalk.
The grey status display appears on the multi-
function display.
Adaptive cruise control is ready.
Switching adaptive cruise control (ACC)
off
e Press button R on the control stalk.
A message that ACC is switched off appears
on the multi-function display.
The stored desired speed is deleted.
The desired distance is reset to the default
value.
Operating states when adaptive
cruise control (ACC) is switched on
There are 3 possible operating states when
adaptive cruise control is switched on.
Adaptive cruise control (ACC) active
Adaptive cruise control automatically regulates
the speed and distance from the vehicle in front.
The status display B turns orange.
Adaptive cruise control (ACC) ready
Cruise control and distance control is inactive
after pressing the brakes or interrupting by
pressing the control stalk down (position 3, OFF).
The stored desired speed and selected desired
distance are retained.
The status display B turns grey.
For information on resuming cruise control and
distance control:
f Refer to chapter “Resuming cruise control and
distance control – RESUME” on page 37.
Adaptive cruise control (ACC) passive
Cruise control and distance control are inactive
after the accelerator is pressed.
A message indicating that ACC is in passive mode
appears on the multi-function display.
The stored desired speed and selected desired
distance are retained.
The status display B turns grey.
Adaptive cruise control is active again after you
release the accelerator.
A Desired distance from the vehicle ahead
B Status display and desired speed
C Vehicle detected in front
D Current distance from vehicle in front
E Current speed of vehicle in front
F Bar display showing speed control range
(0 – 210 km/h (0 – 130 mph))
G Current speed
If adaptive cruise control is switched on
and no desired speed is stored, the
cruise control symbol appears but the
desired speed field remains blank.
If a desired speed is stored and no vehicle
was detected in front, the cruise control
symbol and the desired speed are
displayed.
If a desired speed is stored and a vehicle
was detected in front, a vehicle symbol
and the desired speed are displayed.
35
Adaptive Cruise Control (ACC)
A
B
C
D
E
F
G
H
I
J
K
L
M
N
O
P
Q
R
S
T
U
V
W
X
Y
Z
Setting and changing the desired
speed
b Adaptive cruise control is switched on.
b Vehicle is moving.
b No stationary objects are detected in front.
Setting the desired speed
1. Press the control stalk on the steering wheel
forward (Fig. 2 on page 33, 1).
The current driving speed is stored as the
desired speed, which will be maintained
automatically (within the control range of
approx. 30 to 210 km/h (20 to 130 mph)),
and appears orange in status display B.
The red triangle G under the progress bar for
the speed control range shows the speed of
your vehicle.
2. Release the accelerator pedal.
The desired speed is maintained automatically
unless a vehicle travelling in front is detected
as driving slower than the desired speed.
Increasing the desired speed
e Briefly press the control stalk on the steering
wheel forward (Fig. 2 on page 33, position 1).
The desired speed is increased in steps of
1 km/h (1 mph).
– or –
Press the control stalk on the steering wheel
forward and keep it pressed (position 1).
The desired speed is increased in steps of
10 km/h (5 mph).
The status display B shows the new desired
speed.
The red triangle G under the progress bar for
the speed control range shows the speed of
your vehicle.
Reducing the desired speed
e Briefly pull the control stalk on the steering
wheel towards the steering wheel (Fig. 2 on
page 33, position 2).
The desired speed is decreased in steps of
1 km/h (1 mph).
– or –
Pull the control stalk on the steering wheel
towards the steering wheel and keep it pulled
(position 2).
The desired speed is decreased in steps of
10 km/h (5 mph).
The status display B shows the new desired
speed.
The red triangle G under the progress bar for
the speed control range shows the speed of
your vehicle.
Setting the desired distance
The desired distance from the vehicle in front can
be set in four stages.
Fig. 4: Setting the desired distance
Information
If your vehicle is stopped and you press the control
stalk forward (position 1), a message that ACC
cannot be activated when parked appears on the
multi-function display.
If a stationary object was detected in front, a
message also appears on the multi-function
display.
Information
When you are setting the desired distance, the
“ACC” main menu for adaptive cruise control is
displayed temporarily on the multi-function display.
When you first actuate the rocker switch Z, the
“ACC” main menu appears without changing the
desired distance.
Information
The distance depends on the driving speed.
The slower the vehicle is travelling, the shorter the
distance and the faster the vehicle is travelling,
the longer the distance.
36
Adaptive Cruise Control (ACC)
A
B
C
D
E
F
G
H
I
J
K
L
M
N
O
P
Q
R
S
T
U
V
W
X
Y
Z
Increasing the desired distance
e Press the rocker switch Z upwards.
More orange segments are shown in the
desired distance display A.
Reducing the desired distance
e Press the rocker switch Z downwards.
Fewer orange segments are shown in the
desired distance display A.
Displaying the distance from the vehicle
in front
If a vehicle is detected in front, the vehicle symbol C
appears on the multi-function display or in the
status display B.
The grey area D shows the current distance from
the vehicle in front (Fig. 3 on page 34).
Automatic braking to a standstill
If the vehicle in front stops, your vehicle will slow
down and come to a stop within the control limits
of the system if adaptive cruise control is active.
The indicator light on the instrument panel
lights up.
The vehicle is actively held stationary.
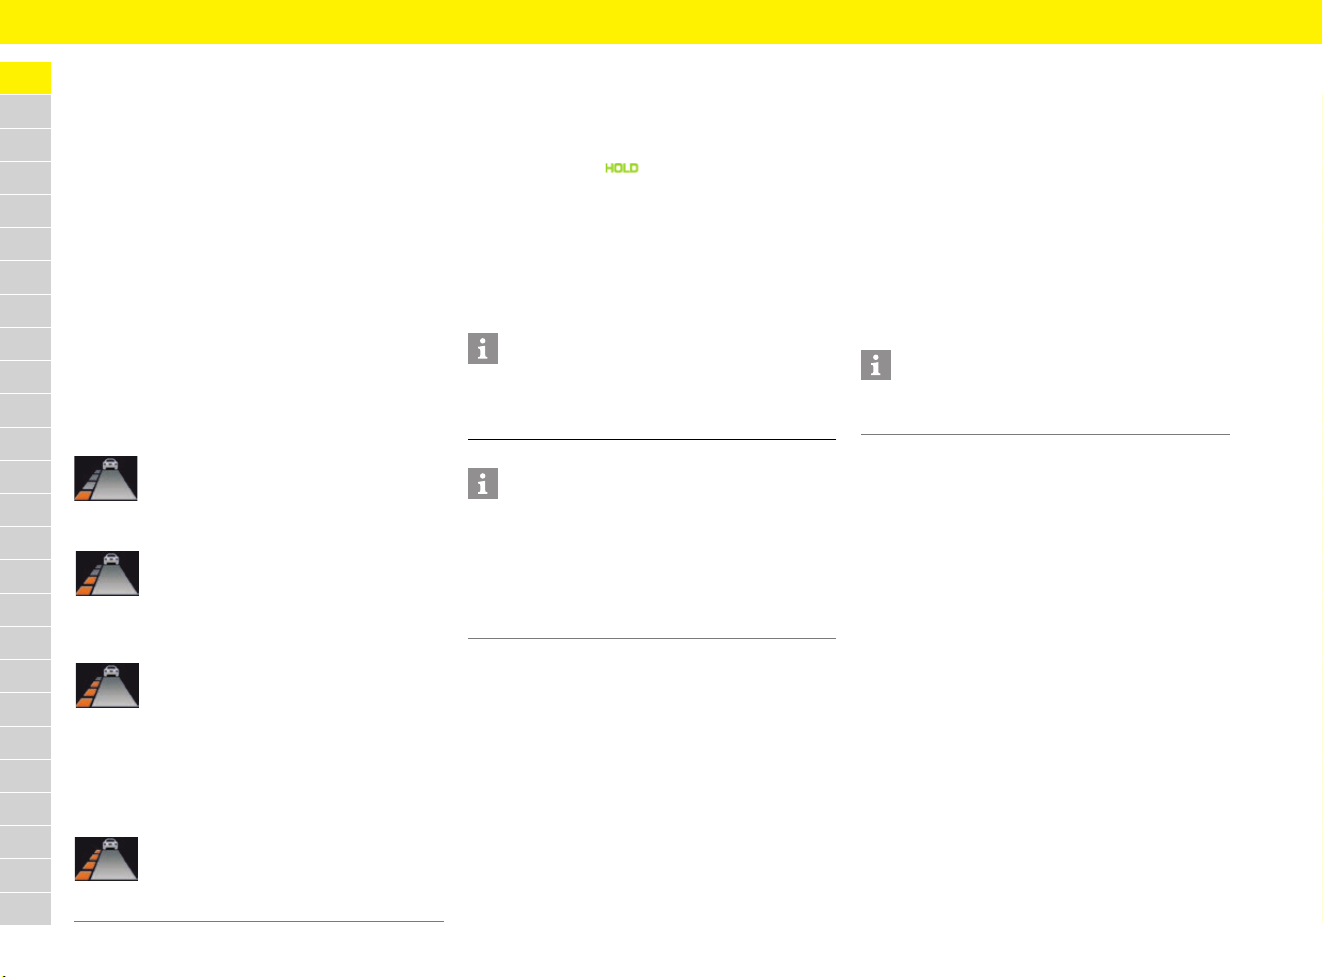
For information on the HOLD function:
f Refer to chapter “HOLD Function: Drive-Off
Assistant, Standstill Management” on
page 122.
Driving off again
The vehicle can be driven off again after being
stopped and speed and distance control will be
resumed, depending on the operating state of the
adaptive cruise control system.
Adaptive cruise control (ACC) active
e Press the control stalk on the steering wheel
up (position 4, RESUME).
– or –
Press the accelerator pedal briefly.
The vehicle resumes driving automatically.
Adaptive cruise control (ACC) ready
Automatic speed and distance control can only be
resumed when your vehicle is moving.
1. Drive off normally.
2. Press the control stalk on the steering wheel
up (position 4, RESUME).
– or –
Set or change the desired speed.
Suitable for speedy driving in lines of
traffic. The time headway is 1 second.
This corresponds to appr
ox. 33 metres
at a speed of 120 km/h (75 mph).
Suitable for steady driving in lines
of traffic. The time headway is
1.3 seconds. This corresponds to
approx. 43 metres at a speed of
120 km/h (75 mph).
Preset distance
Corresponds to the general
recommendation of the road traffic
safety regulation (“two seconds time
headway”). The time headway is
1.8 seconds. This corresponds to
approx. 60 metres at a speed of
120 km/h (75 mph).
Suitable for driving on country roads.
The time headway is 2.3 seconds.
This corresponds to approx. 77 metres
at a speed of 120 km/h (75 mph).
Information
Depending on the traffic flow, e.g. slow-moving
traffic, stopping is initiated by a slow creeping
phase, which ends with the vehicle at a standstill.
Information
When adaptive cruise control is operating normally
or when the HOLD function is active, the brake
pedal may feel different and you may hear
hydraulic noises.
This behaviour is normal for the system. It is not a
fault.
Information
Your vehicle will not drive off if the vehicle
detected in front is stationary.

37
Adaptive Cruise Control (ACC)
A
B
C
D
E
F
G
H
I
J
K
L
M
N
O
P
Q
R
S
T
U
V
W
X
Y
Z
Interrupting and resuming cruise
control and distance control
Interrupting cruise control and distance
control – OFF
e Press the brake pedal.
– or –
Press the control stalk on the steering wheel
down (position 3, OFF).
Adaptive cruise control is inactive.
The stored desired speed and selected
desired distance are retained.
The status display B changes from orange to
grey.
Resuming cruise control and distance
control – RESUME
e Push the control stalk on the steering wheel up
(position 4, RESUME).
The vehicle accelerates to the stored desired
speed unless a vehicle travelling in front is
detected as driving slower than the desired
speed, and the distance from this vehicle is
less than the set desired distance.
The status display B changes from grey to
orange.
– or –
Press the control stalk on the steering wheel
up and keep it pressed (position 4, RESUME).
The vehicle accelerates faster to the desired
speed that was stored.
Warning messages
Fig. 5: Warning message on the multi-function display
Takeover prompt in active control mode
(ACC active)
If adaptive cruise control detects that braking
assistance is required on the part of the driver,
a warning signal sounds and a warning message
appears on the multi-function display.
Exceptions for adaptive cruise
control (ACC)
Adaptive cruise control is not available in the
following cases:
– Ignition off
– PSM off
– Open driver’s door and driver’s seat belt not
fastened
– Steering wheel at full lock, e.g. when parking
or manoeuvring
– Activated electric parking brake
– Selector lever in N, R or P
– Uphill or downhill gradients of more than 20 %
If one of these exceptions occurs when adaptive
cruise control is switched on, adaptive cruise
control will be switched off.
A corresponding message will then appear on the
multi-function display.
Traffic situations in which vehicles
cannot be reliably detected
The radar sensor for adaptive cruise control scans
a narrow, cone-shaped area in front of your vehicle.
Detection can be limited or unreliable, depending
on the traffic situation and the size of the vehicle
in front. The system may brake too late or
unexpectedly.
Stationary vehicles are not detected. The system
cannot respond to stationary vehicles.
e Drive with extreme care.
e Slow down if necessary.
Information
If speed and distance control was interrupted by
moving the control stalk to position 3 (OFF), it can
only be resumed when the vehicle is moving and
no stationary objects are detected in front.
WARNING
Inadequate braking
power during automatic
braking by the adaptive
cruise control
In this case, the braking power of the adaptive
cruise control is not sufficient to prevent a
collision.
e Brake immediately.
38
Adaptive Cruise Control (ACC)
A
B
C
D
E
F
G
H
I
J
K
L
M
N
O
P
Q
R
S
T
U
V
W
X
Y
Z
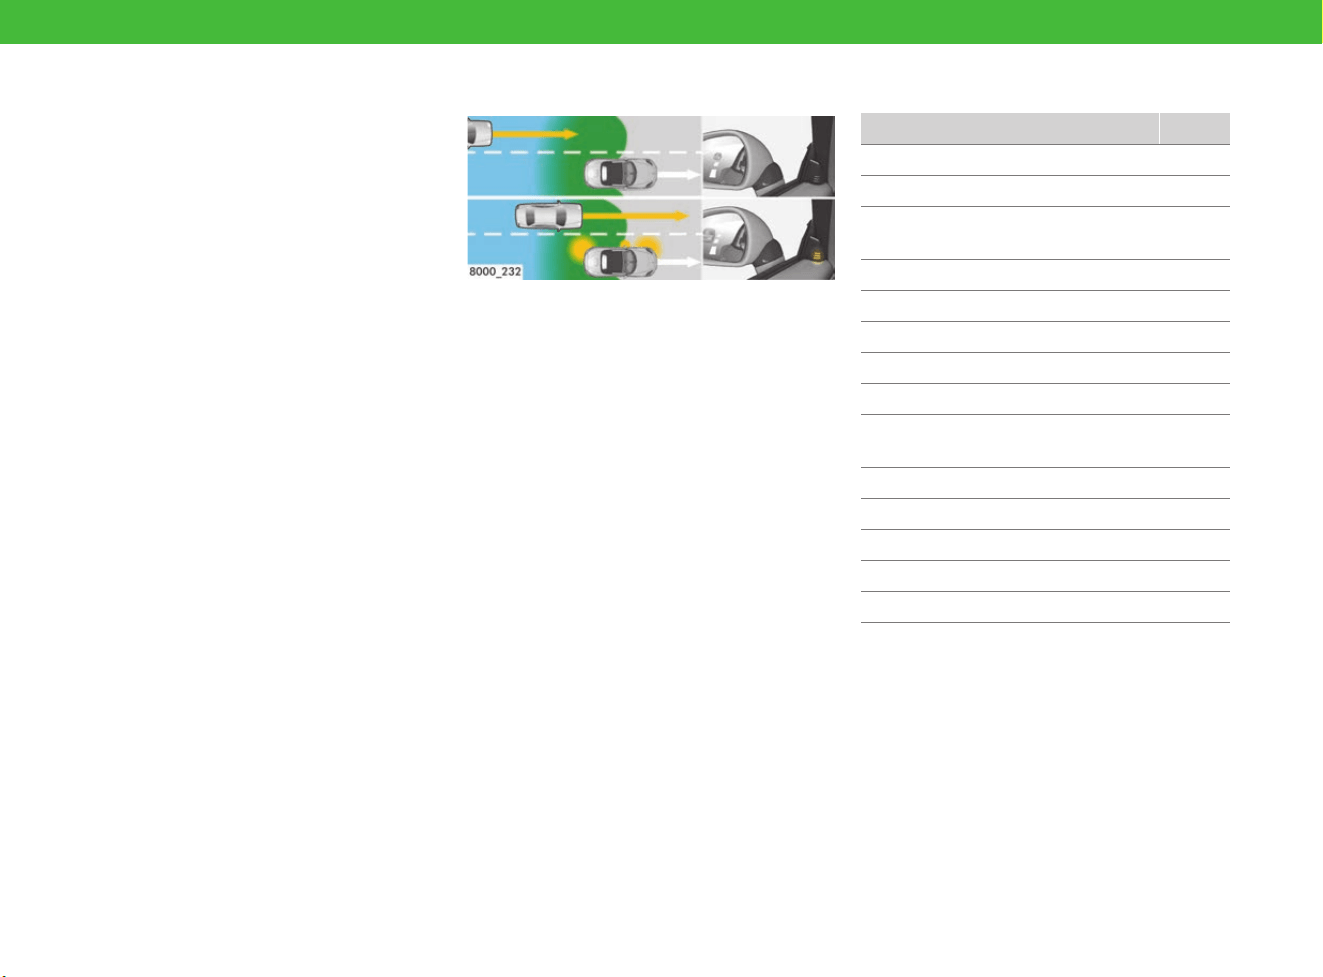
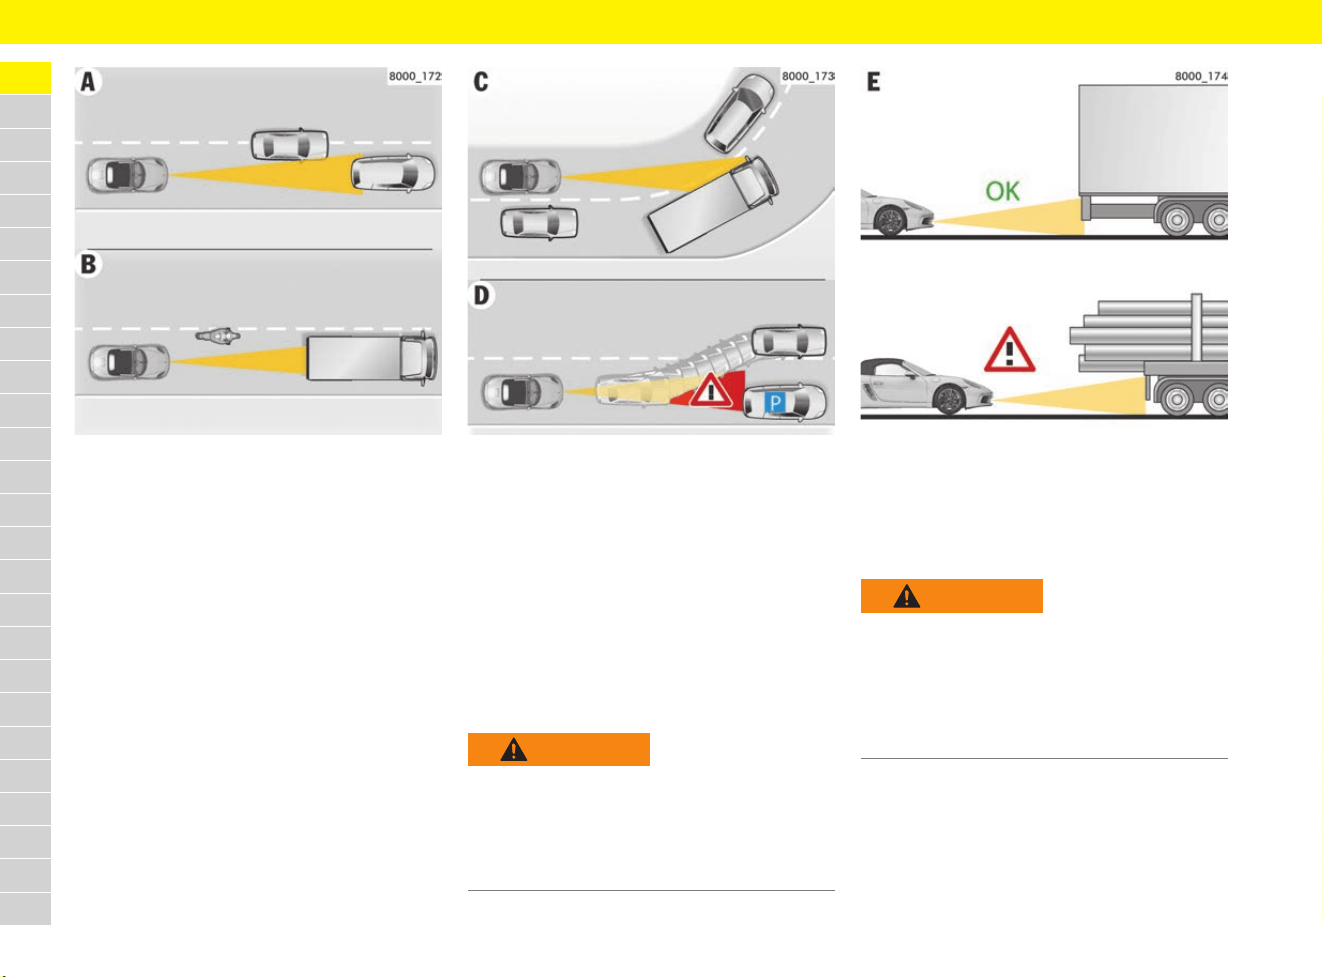
Fig. 6: Vehicles cutting in, narrow vehicles
A – Vehicles changing lanes/cutting in
If other vehicles are moving in and out of your
lane, they will only be detected when they are fully
in your lane.
B – Vehicles with a small cross-section/
narrow vehicles
Narrow or small vehicles will not be detected or
will be detected too late.
Fig. 7: Cornering and stationary vehicles
C – Driving into and out of bends
When driving into and out of bends, vehicles will
not be detected or will be detected too late, or
adaptive cruise control will react to vehicles in
adjacent lanes.
D – Stationary vehicles
A stationary vehicle that appears suddenly in the
detection field of the radar sensor, e.g. after a
vehicle in front changes lanes, will not be detected
by adaptive cruise control.
Fig. 8: Vehicles with large overhangs
E – Vehicles with large overhangs
The tail of the vehicle will not be detected
correctly on vehicles with large overhangs,
e.g. timber lorries.
WARNING
Adaptive cruise control
does not detect a
stationary vehicle
Stationary vehicles are not detected by the radar
sensor of the adaptive cruise control.
e Drive with extreme care.
e Slow down if necessary.
WARNING
Tail of vehicle in front
not detected correctly
If there is a vehicle in front with a long overhang,
the radar sensor of the adaptive cruise control
is not able to detect the tail of the vehicle or will
misjudge the distance.
e Drive with extreme care.
e Slow down if necessary.
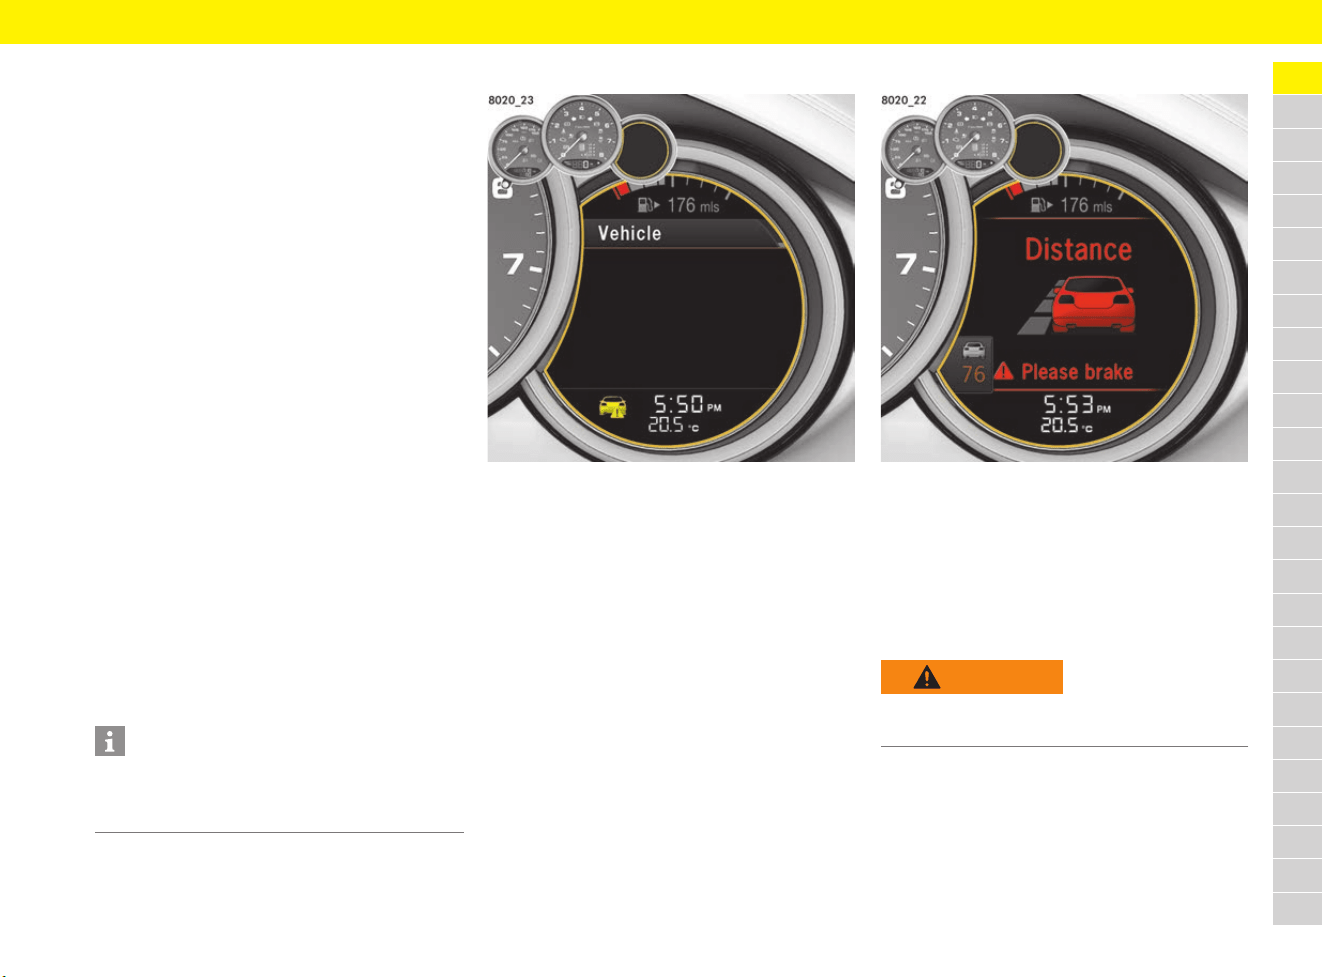
39
Adaptive Cruise Control (ACC)
A
B
C
D
E
F
G
H
I
J
K
L
M
N
O
P
Q
R
S
T
U
V
W
X
Y
Z
Porsche Active Safe (PAS)
The adaptive cruise control sensor is used for
Porsche Active Safe (PAS) functions.
These include:
– Brake system prefilling
Prefilling of the brake system if the radar sensor
detects that the vehicle is coming critically
close to a moving obstacle in order to improve
braking response.
– Brake Assist
In the event of an emergency braking operation
where the pedal force is insufficient, brake
assist provides the braking pressure
necessary for maximum deceleration at all
4 wheels.
The activation threshold of the Brake Assist
function is reduced if the sensor detects that
the vehicle is coming critically close to a
moving obstacle. The activation threshold of
the Brake Assist is reduced in three stages,
depending on how critical the danger situation
is.
– Targeted braking
If the radar sensor detects that the vehicle is
coming critically close to a moving obstacle
and, at the same time, that the brakes are not
being applied hard enough, brake pressure
can be increased accordingly. The vehicle can
be fully braked if necessary.
Latent warning (visual)
Fig. 9: Visual latent warning
If the vehicle is driving too close to the vehicle in
front for a long time, a latent warning (yellow
pictogram) appears on the multi-function display
to warn the driver, in order to avoid a collision if
the vehicle in front brakes.
e Maintain a greater distance from the vehicle in
front if necessary.
Prewarning (visual and acoustic)
Fig. 10: Prewarning
If the radar sensor detects that the vehicle is
coming critically close to and is very likely to
collide with an obstacle moving in front, a visual
and acoustic prewarning is emitted.
In this dangerous situation, the driver can still
prevent a collision by taking the appropriate
action.
Information
All Porsche Active Safe (PAS) functions are
active at speeds of more than approx. 30 km/h
(20 mph).
WARNING
Insufficient distance
Risk of collision with the vehicle in front.
e Brake immediately.
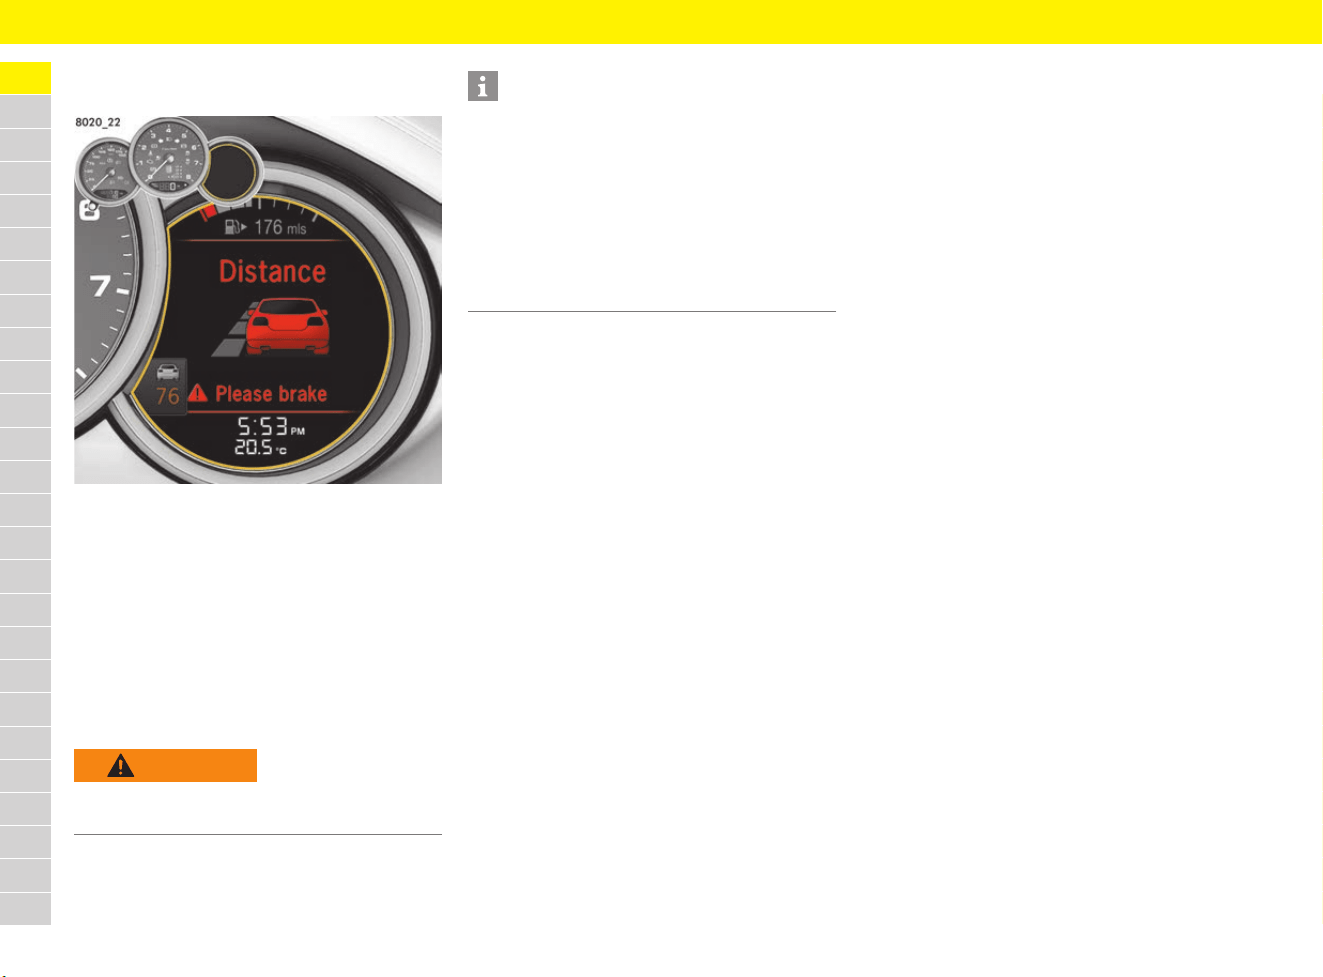
40
Adaptive Cruise Control (ACC)
A
B
C
D
E
F
G
H
I
J
K
L
M
N
O
P
Q
R
S
T
U
V
W
X
Y
Z
Acute warning
(visual, acoustic and braking jolt)
Fig. 11: Prewarning
If the driver does not react to the prewarning by
braking, this is quickly followed by an acute
warning, which involves a braking jolt in addition to
the visual and acoustic warning.
A braking jolt is initiated by means of a very rapid
build-up of brake pressure in order to draw the
driver’s attention to the traffic situation.
In this dangerous situation, the driver can still
prevent a collision by taking the appropriate
action.
Switching Porsche Active Safe (PAS)
warnings on/off
The latent warning and prewarning functions are
off as standard, whereas the acute warning
function is active. To switch on the latent warning
and prewarning on the multi-function display:
f Refer to chapter “Switching Porsche Active
Safe (PAS) off and on” on page 266.
WARNING
Insufficient distance
Risk of collision with the vehicle in front.
e Brake immediately.
Information
The situations described below lead to the
assumption that the driver is driving carefully and
the prewarning and acute warning functions are
disabled:
– The driver is driving around tight bends.
– The driver is braking.
– The driver is accelerating sharply –
this action is interpreted as an active
driving request (e.g. overtaking).
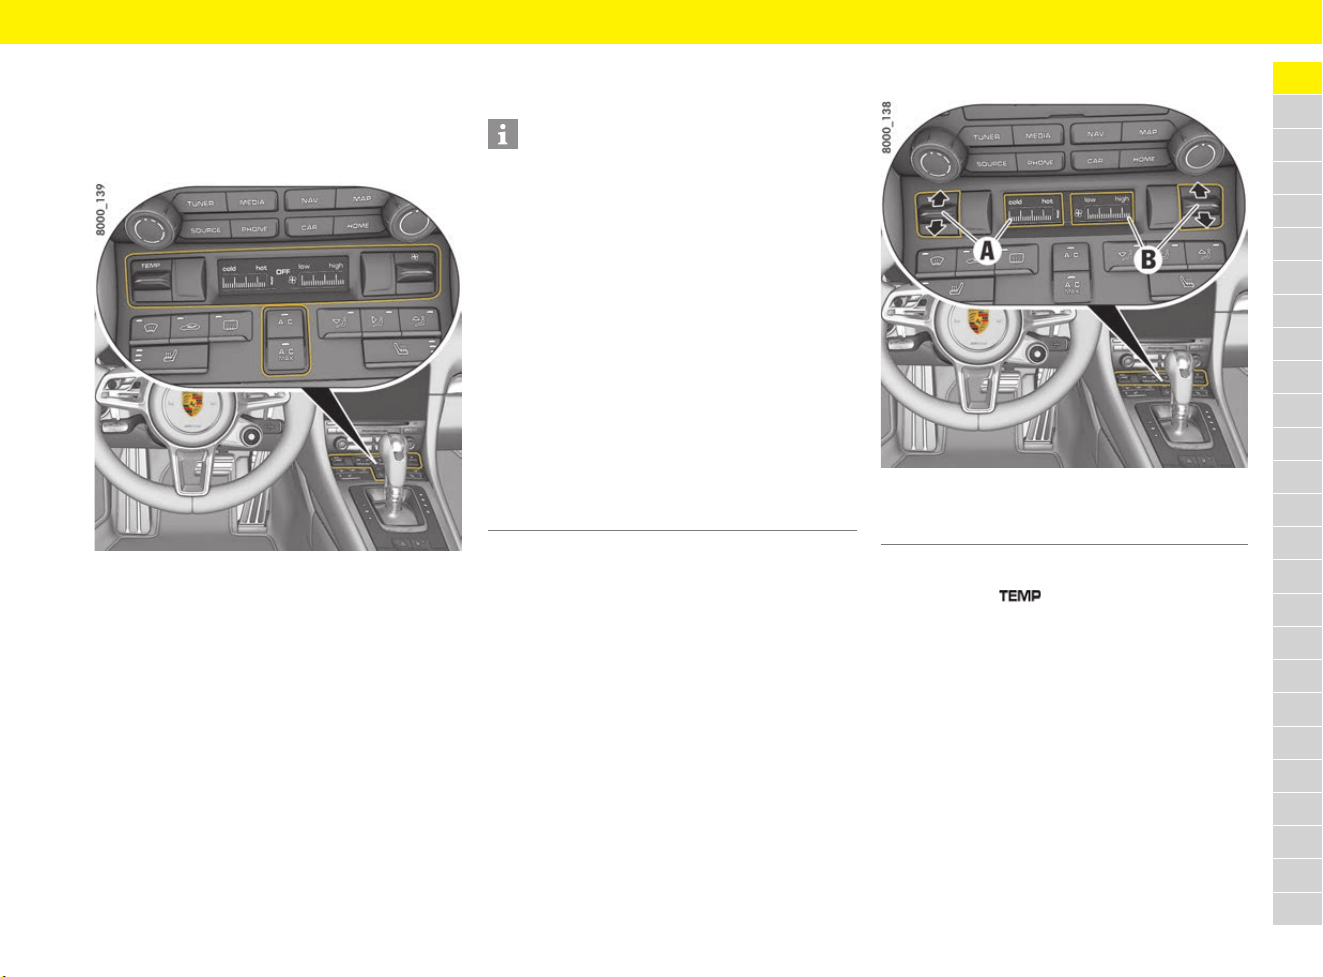
41
Air Conditioning System (Manual)
A
B
C
D
E
F
G
H
I
J
K
L
M
N
O
P
Q
R
S
T
U
V
W
X
Y
Z
Air Conditioning System
(Manual)
General information
Fig. 12: Air-conditioning control panel
The air quantity, air distribution and temperature
can be set manually on the manual air-conditioning
system.
Cooling function
The cooling function cools and dries the air.
Set temperature
Fig. 13: Setting the temperature and air quantity
Increasing and decreasing temperature
e Push button up or down.
If all bars can be seen, the temperature is set
to maximum heat (hot).
If no bars can be seen, the temperature is set
to maximum coldness (cold).
Information
– The cooling function may switch off briefly to
ensure sufficient engine cooling if the engine is
operating under extreme load.
It switches off automatically at temperatures
below approx. 2 °C and cannot be switched on,
even manually.
– The cooling function operates most effectively
with the windows closed. If heat accumulates
in the passenger compartment, briefly open
the windows to ventilate the interior.
– Depending on the outside temperature and
humidity, condensation can escape under the
vehicle. This is quite normal and is not a
defect.
– If the battery voltage is too low, the fresh-air
blower and cooling function are restricted
initially and then switched off.
A Set temperature
B Setting air quantity
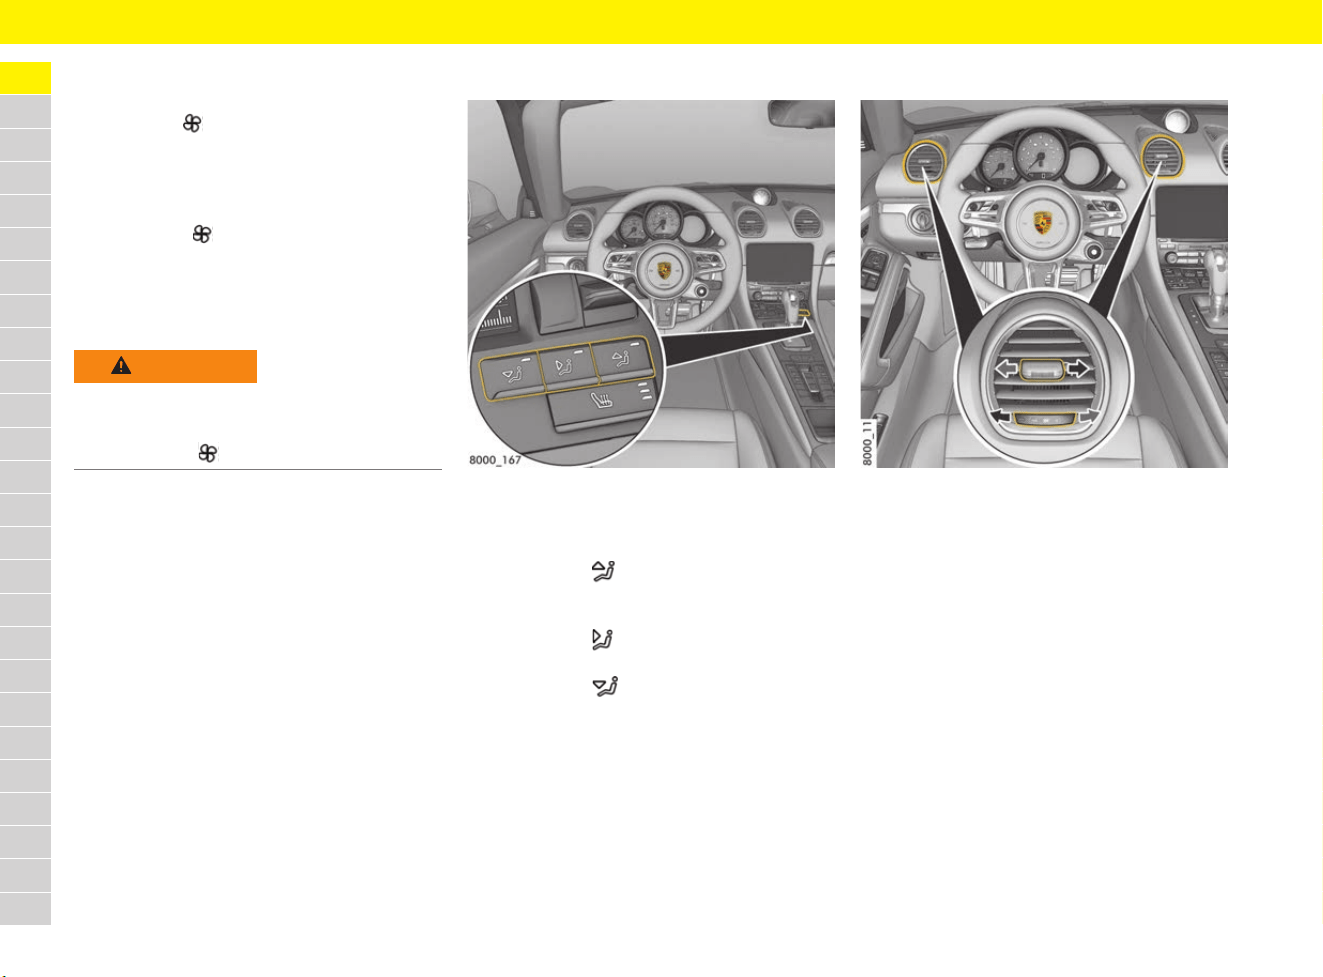
42
Air Conditioning System (Manual)
A
B
C
D
E
F
G
H
I
J
K
L
M
N
O
P
Q
R
S
T
U
V
W
X
Y
Z
Setting air quantity
The selected air quantity is shown in a bar display
next to button . The more bars that are
displayed, the more air flows into the passenger
compartment.
Increasing and decreasing air flow
e Push button up or down.
If the air quantity was reduced so much that
OFF appears on the air-conditioning display,
the outside-air supply is interrupted and the
air-conditioning system is switched off.
Setting air distribution
Fig. 14: Air distribution buttons
Set air distribution
b Air vents opened.
e Press button .
The air flows to the windscreen and the side
windows.
e Press button .
The air flows from the central and side vents.
e Press button .
The air flows to the footwell.
The indicator light on the respective button
comes on.
Adjusting air vents
Fig. 15: Adjusting air vents
Opening and closing air vents
e Turn thumbwheel on the air vent clockwise or
anti-clockwise.
Changing air flow direction
e Swivel vent vanes in the desired direction.
WARNING
Impaired vision with
air quantity OFF
The windows can mist up if the air quantity setting
is OFF.
e Press button up (increase air quantity).
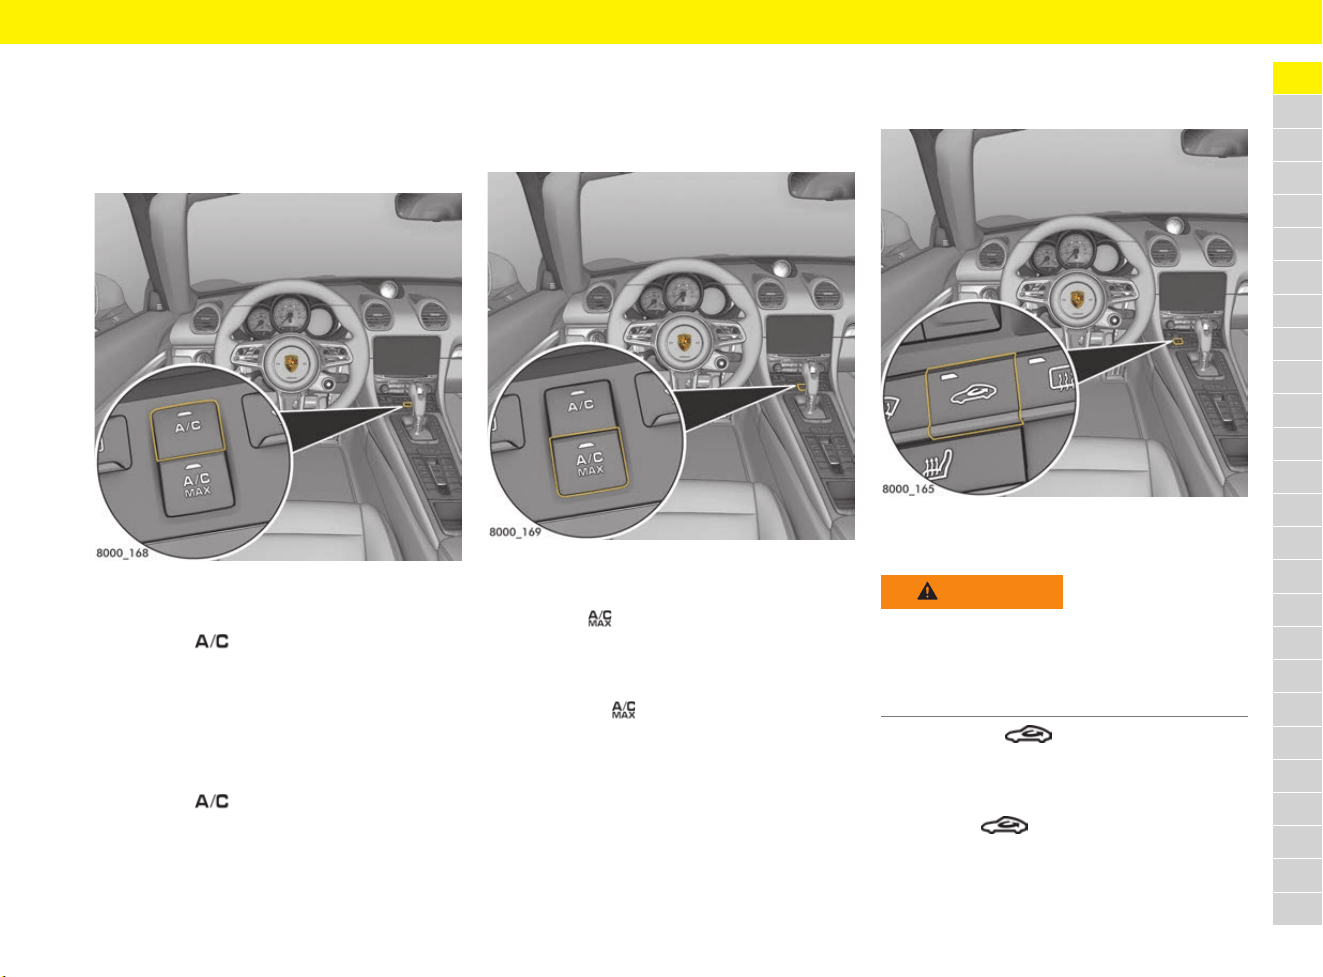
43
Air Conditioning System (Manual)
A
B
C
D
E
F
G
H
I
J
K
L
M
N
O
P
Q
R
S
T
U
V
W
X
Y
Z
Switching cooling function on
and off
If you wish to cool the passenger compartment to
a temperature lower than the outside temperature,
the cooling function must be activated.
Fig. 16: Switching cooling function on and off
Switching cooling function on
e Press the button.
The indicator light on the button lights up.
The cooling function is activated.
Switching cooling function off
The cooling function can be switched off, to save
fuel, for example.
e Press the button.
The indicator light on the button goes out.
The cooling function is deactivated.
Switching maximum cooling output
on and off – A/C MAX mode
In A/C MAX mode, the passenger compartment is
cooled at maximum power.
Fig. 17: Activating maximum cooling output
Switching on maximum cooling output
e Press the button.
The indicator light on the button lights up.
Switching off maximum cooling output
e Press button .
The indicator light on the button goes out.
Switching air-recirculation mode
on and off
Fig. 18: Air-recirculation mode button
Switching on air-recirculation mode
e Press button .
The indicator light on the button lights up.
Switching off air-recirculation mode
e Press the button.
The indicator light on the button goes out.
WARNING
Impaired vision in
air-recirculation mode
In air recirculation mode, the windows may mist
up.
e Do not switch on air-recirculation mode for an
extended period.
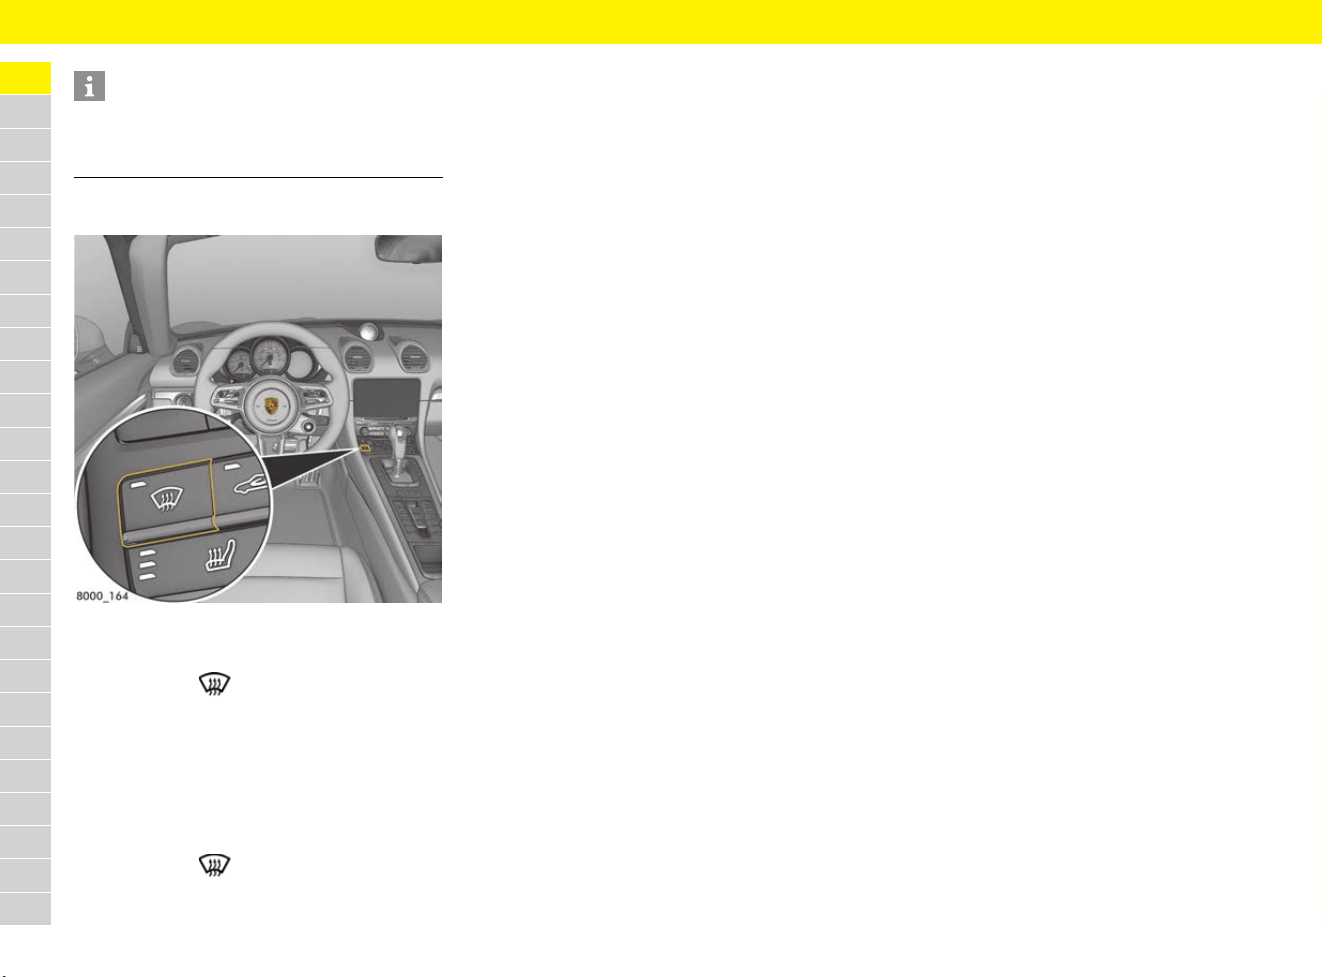
44
Air Conditioning System (Manual)
A
B
C
D
E
F
G
H
I
J
K
L
M
N
O
P
Q
R
S
T
U
V
W
X
Y
Z
Defrosting windscreen
Fig. 19: Defrost windscreen button
Switching defrost mode on
e Press button .
The indicator light on the button lights up.
The air flows to the windscreen and the front
side windows.
The windscreen is demisted or defrosted as
quickly as possible.
Switching defrost mode off
e Press button .
The indicator light on the button goes out.
Information
If the cooling function is switched off manually or
automatically, air-recirculation mode ends after
approx. 3 minutes.
45
Airbag Systems
A
B
C
D
E
F
G
H
I
J
K
L
M
N
O
P
Q
R
S
T
U
V
W
X
Y
Z
Airbag Systems
Choosing the right seat position
Function
In conjunction with the seat belts, the airbags are
a safety system designed to provide the vehicle
occupants with maximum protection from injury in
an accident.
Airbags protect the head, pelvis and upper body,
whilst simultaneously damping the motion of the
driver and passengers in the impact direction in
the event of frontal impact or side impact.
The front airbags are installed under the padded
steering wheel on the driver’s side and in the
dashboard on the passenger’s side.
The side airbags are located on the side of the
seat in the side pieces.
The head airbags are installed on the side in the
door trim.
The relevant airbags are triggered depending on
the angle and force of impact.
Responding to the warning light
Faults are indicated by the red airbag warning
light in the tachometer.
e Consult a qualified specialist workshop in the
following cases:
– The warning light does not come on when the
ignition is switched on.
– or –
– The warning light does not go out when the
ignition is on.
– or –
– The warning light comes on while driving.
Porsche recommends a Porsche partner as they
have trained workshop personnel and the
necessary parts and tools.
DANGER
Incorrect seat position
or incorrectly stowed
load
Airbag systems can perform their safety function
only if all passengers are wearing seat belts and
are sitting in the correct position. Objects and
luggage must be stowed safely.
e Always fasten seat belts.
e Make sure that there are no persons, animals
or objects between the driver or passengers
and the area into which the airbag inflates.
e Always hold the steering wheel by the outer
rim.
e For airbags to give effective protection, they
must be a certain distance from the driver or
passengers.
Select a seat position that is not unnecessarily
close to the airbags.
Do not lean against the inside of the doors
(side airbag inflation area).
e Objects must not protrude out of the door
storage compartments. Keep the door
storage compartment closed while driving.
e Do not transport heavy objects on or in front of
the seats.
e Do not place objects on top of the dashboard.
e Keep the glove box closed while driving.
e Always keep your feet in the footwell when
driving. Do not put feet on the dashboard or
the seat cushion.
e Share all the information in this section with
your passengers.
DANGER
Malfunction due to
airbags that have been
tampered with
Airbags that have been tampered with do not offer
any protection. They may either not trigger or be
triggered in an uncontrolled manner. Uncontrolled
triggering can cause serious injuries.
e Do not modify the wiring or components of the
airbag systems.
e Do not route any cables of additional electrical
equipment in the vicinity of the airbag wiring
harnesses.
e Do not attach any additional trim or stickers
to the steering wheel or in the vicinity of the
passenger airbag, side airbags or head
airbag.
e Do not use protective seat covers.
e Do not remove airbag components.
DANGER
Already triggered airbag
systems cannot be
activated
Airbag systems can be triggered only once.
e Have triggered airbag systems replaced
immediately.
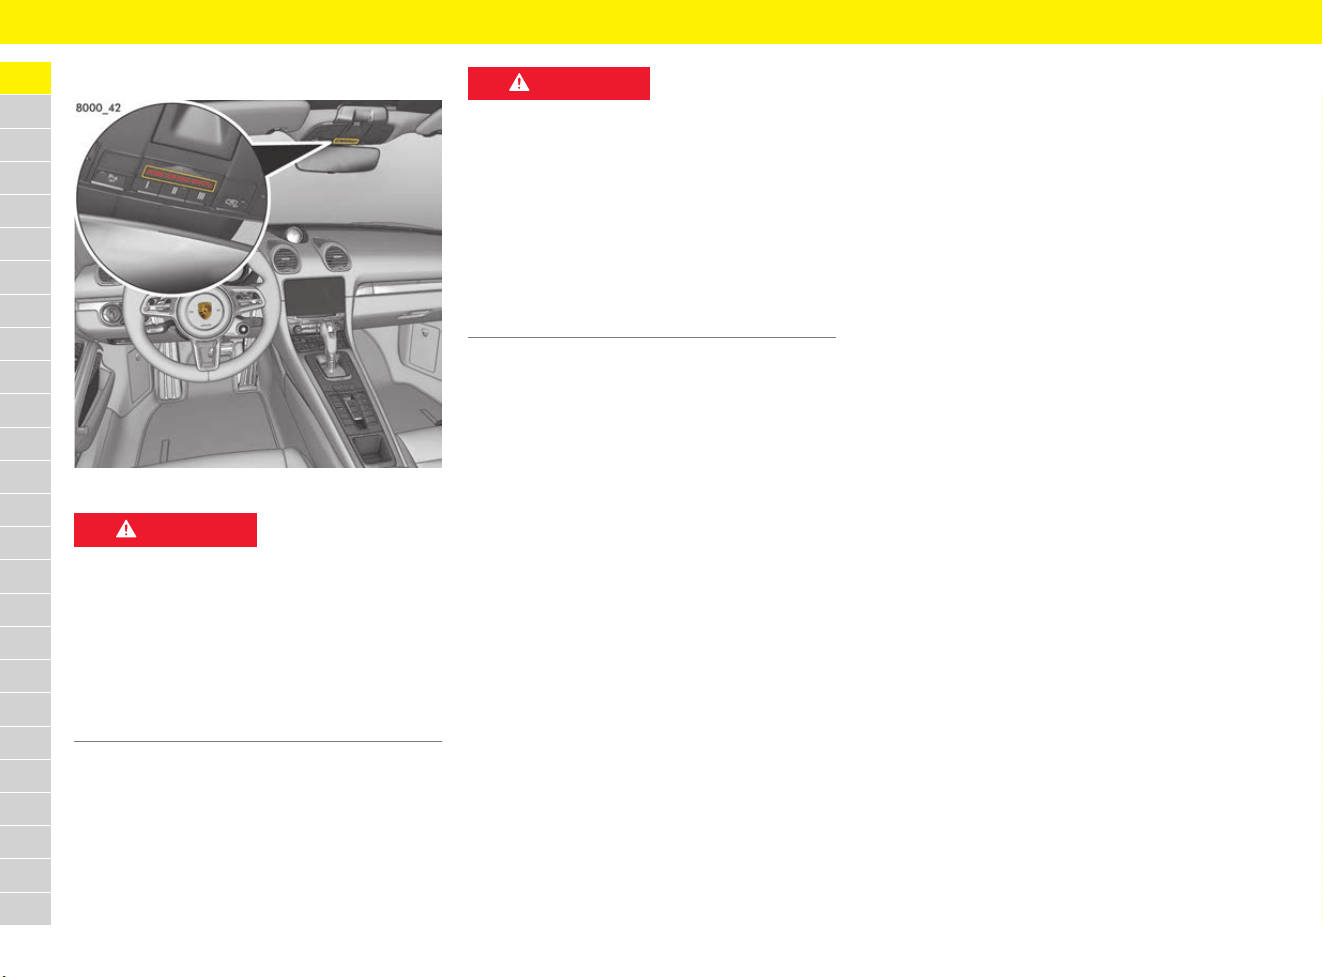
46
Airbag Systems
A
B
C
D
E
F
G
H
I
J
K
L
M
N
O
P
Q
R
S
T
U
V
W
X
Y
Z
Switching off the passenger airbag
Fig. 20: PASS AIR BAG OFF indicator
The driver’s key switch for switching off the
passenger airbag, the PASS AIR BAG OFF
indicator and the ISOFIX restraint system are only
installed in certain equipment versions. They can
be retrofitted.
f Refer to chapter “Switching passenger airbag
on and off – PASS AIR BAG OFF indicator” on
page 84.
DANGER
Passenger airbag
switched off
If the passenger airbag remains switched off after
removal of the child restraint system, it will not be
triggered in an accident.
e Only switch off the passenger airbag if a child
restraint systems is fitted on the passenger
seat.
e Switch the passenger airbag back on once the
child restraint system has been removed.
DANGER
Failure or malfunction of
the passenger airbag
If the PASS AIR BAG OFF indicator does not light
up when the ignition is on and the passenger
airbag has been switched off, there could be a
fault in the system.
e Do not install any child restraint systems on the
passenger seat.
e Visit a qualified specialist workshop. Porsche
recommends a Porsche partner as they have
trained workshop personnel and the necessary
parts and tools.

47
Alarm System
A
B
C
D
E
F
G
H
I
J
K
L
M
N
O
P
Q
R
S
T
U
V
W
X
Y
Z
Alarm System
The alarm system monitors the following alarm
contacts:
– Alarm contacts in doors, luggage
compartment lids and headlights.
– Interior surveillance: Movement in the interior
when the vehicle is locked, e.g. attempted
theft after breaking a window.
– Inclination sensor (country-specific equipment:
Tilting of the vehicle (e.g. attempt to tow the
vehicle)).
If one of these alarm contacts is triggered, the
alarm horn sounds for approx. 30 seconds and
the hazard warning lights flash.
After a 5-second pause, the alarm is triggered
again. This cycle is repeated up to 10 times
(depending on the country).
Switching the alarm system on
and off
e The alarm system is activated when the vehicle
is locked.
e The alarm system is deactivated when the
vehicle is unlocked.
Switching off a triggered alarm
system
e Unlock the vehicle
– or –
Switch on the ignition.
Switching off interior surveillance
and inclination sensor
If persons or animals are remaining in the locked
vehicle or the vehicle is being transported on a
train or ship, for example, the interior surveillance
system and inclination sensor must be switched
off temporarily.
f Refer to chapter “Locking doors” on page 73.
e Inform any persons remaining in the vehicle
that the alarm system will be triggered if the
door is opened.
Function indication
In vehicles without Porsche Entry & Drive, the
locking condition is indicated by the light in the
central locking button flashing at different
intervals. In vehicles with Porsche Entry & Drive,
it is indicated by the indicator lights in the doors
flashing at different intervals.
Alarm system is activated
The indicator lights flash rapidly when the vehicle
is being locked, then flash in normal mode.
Alarm system is activated, interior
surveillance and inclination sensor are
switched off
The indicator lights flash rapidly while you are
locking the vehicle, go out for 10 seconds and
then flash in normal mode.
Faults in the central locking system and
alarm system
The indicator lights come on for 10 seconds, flash
briefly twice in succession for 20 seconds and
then flash in normal mode.
Information
Depending on the country, the alarm system is
automatically activated 30 seconds after closing
the last door or the luggage compartment lid if the
driver’s key is removed from the ignition lock. This
is the case even if the vehicle has not been locked.
The interior surveillance system and the inclination
sensor are switched off. If a door or luggage
compartment lid is opened, the alarm is triggered.
e Always lock the vehicle when leaving it.
e Inform any persons remaining in the vehicle
that the alarm system will be triggered if the
door is opened.
To deactivate the triggered alarm system:
e Unlock the vehicle or switch on the ignition.
Information
If you unlock the vehicle with the emergency key in
the door lock, you must switch the ignition on
within 15 seconds of opening the door in order to
prevent the alarm system from being triggered.
The time it takes to trigger the alarm system
differs from country to country.
Information
The interior surveillance system and inclination
sensor remain switched off if the vehicle was
locked automatically 30 seconds after unlocking
because no door was opened.
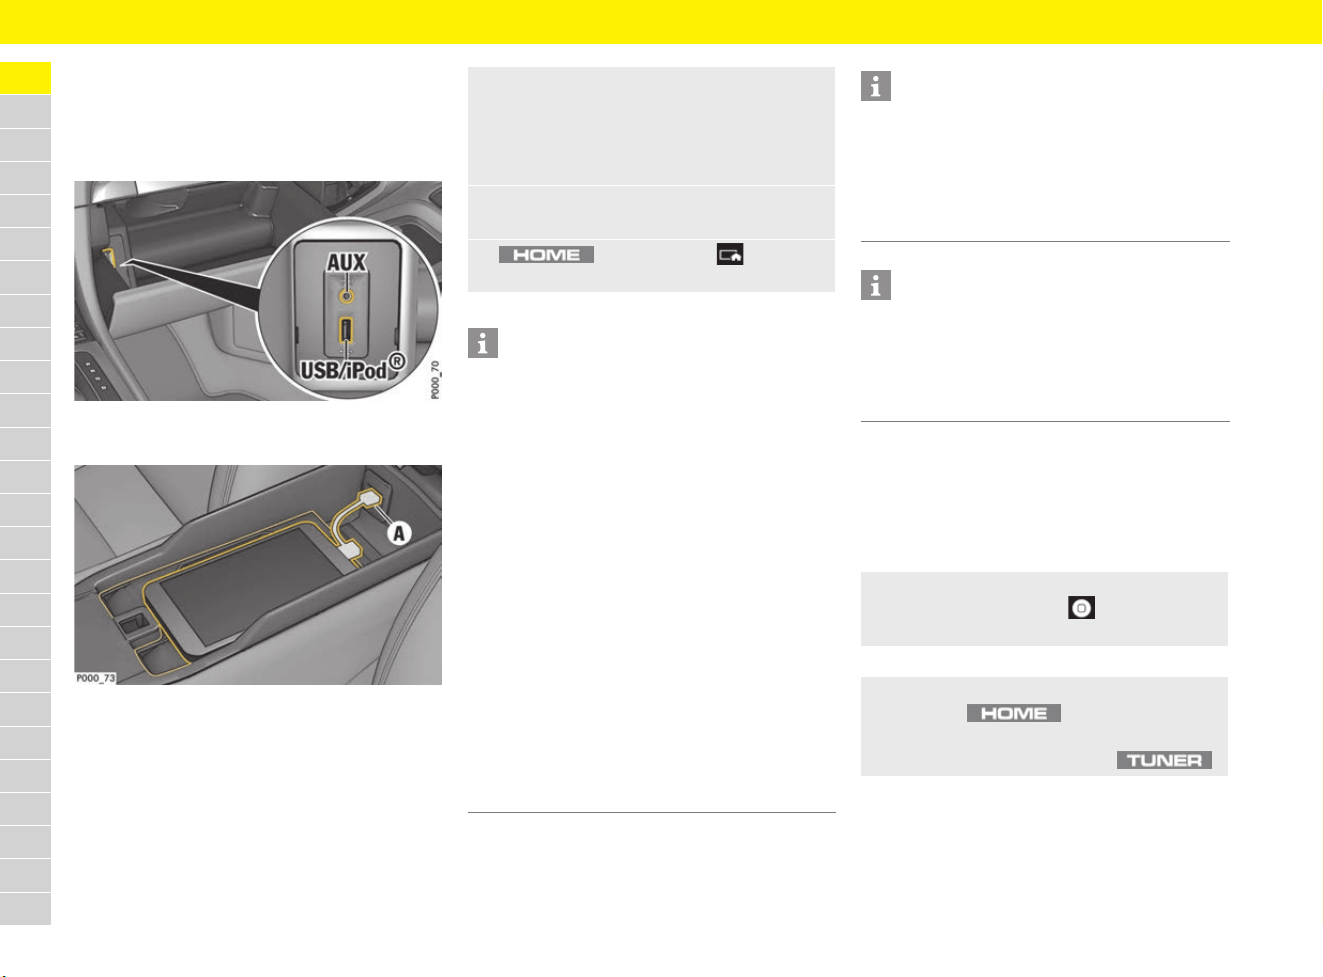
48
Apple
®
CarPlay
A
B
C
D
E
F
G
H
I
J
K
L
M
N
O
P
Q
R
S
T
U
V
W
X
Y
Z
Apple
®
CarPlay
Opening Apple
®
CarPlay in the
PCM
Fig. 21: USB port and equipment-dependent AUX port in
the glove box
Fig. 22: USB port in centre console
b iPhone 5
®
or later, iOS
®
7.1 or higher.
b Siri
®
and Apple
®
CarPlay have been enabled in
the settings of the iPhone
®
you are using.
Operating Apple
®
CarPlay with the
PCM
All available apps can be used via the
touchscreen, the rotary push button and the Back
button of the PCM.
1. Connect iPhone
®
to the USB port in the
centre console or in the glove box, depending
on equipment (see Fig. 22).
f Refer to chapter “Connecting an external
device via USB or AUX” on page 182
2. Confirm that you wish to use Apple
®
CarPlay.
Available apps are displayed.
3. button e Menu e
Apple CarPlay
Information
– We recommend that you install the latest iOS
®
version.
– Only the apps on the iPhone
®
that are
supported by Apple
®
CarPlay are displayed.
For information on supported apps:
f got to www.apple.com/ios/carplay.
– The displayed content and features of Apple
®
CarPlay are provided solely by the connected
iPhone
®
.
– If you use Apple
®
CarPlay, you can only use the
connected iPhone
®
for making calls. Mobile
phones that are connected to the PCM via
Bluetooth
®
are automatically disconnected. An
inserted SIM card cannot be used for making
calls while this app is in use.
– Some apps require an active data connection.
You may incur additional charges, depending
on your mobile phone tariff, and particularly if
using abroad. The use of a flat-rate data plan is
recommended.
Information
There is a USB port and – depending on
equipment – a universal Audio (AUX) port in the
glove box, and another USB port in the centre
console. If a USB port is provided in the centre
console, Apple
®
CarPlay can only be used via this
port.
Information
For information on operating Porsche
Communication Management (PCM):
f Refer to chapter “Operating the Porsche
Communication Management (PCM)” on
page 176.
e To open the main menu in Apple CarPlay,
press the Home button on the
touchscreen of the PCM.
e To change to the main functions of the PCM,
press the button e Porsche.
– or –
Press any one-touch key (e.g. ).
49
Apple
®
CarPlay
A
B
C
D
E
F
G
H
I
J
K
L
M
N
O
P
Q
R
S
T
U
V
W
X
Y
Z
Operating Apple
®
CarPlay
using Siri
®
voice recognition
Activating Siri
®
b Siri
®
has been enabled in the settings of
the iPhone
®
you are using.
b The ignition and PCM are switched on.
b No telephone call is in progress.
b Parking aid is not active.
b PCM voice control is not active.
Fig. 23: Voice control button on the control stalk
Deactivating Siri
®
b Voice control is active and waiting for a voice
command.
Swapping between using the
iPhone
®
as an iPod
®
and
Apple
®
CarPlay
If the iPhone
®
is connected as an iPod
®
after it
has been connected to the USB port in the centre
console or the glove box, Apple
®
CarPlay cannot
be used.
You can swap between using the iPhone
®
as
an iPod
®
and Apple
®
CarPlay using the Device
Manager.
Fig. 24: Opening the Device Manager
1. Press and hold button
on the control stalk.
– or –
Press and hold the Home button
on the PCM touchscreen.
2. Say your desired voice command.
e Press button on the control stalk.
A fading acoustic signal sounds.
– or –
Say the voice command Cancel or End.
– or –
Press any button on the PCM.
The relevant function opens.
Information
Briefly pressing button on the control stalk
activates PCM voice recognition.
f Refer to chapter “Voice Control” on page 271.
1. Select or in the footer
(depending on the connection status).
2. Select Smartphone link.
3. Select the iPhone
®
you are using.
4. Select Use as iPod
– or –
Select Use with Apple CarPlay.

50
Auto Start Stop Function
A
B
C
D
E
F
G
H
I
J
K
L
M
N
O
P
Q
R
S
T
U
V
W
X
Y
Z
Auto Start Stop Function
The engine stops automatically when the vehicle is
stopped, e.g. at traffic lights or in a traffic jam,
if all preconditions for Auto Stop are met. The
engine can also stop automatically while the
vehicle is being brought to a stop at walking pace.
This way, the Auto Start Stop function helps to
save fuel.
The ignition stays on even when the engine is
switched off automatically. All safety functions
are still available.
Preconditions for Auto Stop
b Auto Start Stop function is switched on.
b Luggage compartment lids are closed.
b Engine, transmission and air conditioning are
at operating temperature.
b Vehicle has been driven at least at walking
pace since the last Auto Stop.
b Vehicles with PDK:
Brake pedal pressed
Selector lever in position D, N or manually
selected gear 1 or 2.
Driver’s door closed and selector lever in
position P.
b Vehicles with manual transmission:
Seat belt fastened and driver’s door closed.
Gear lever in neutral position and clutch pedal
not pressed.
Vehicles with manual transmission:
Auto Stop and Auto Start
Auto Stop
1. Brake the vehicle with the footbrake.
2. Put the gearshift lever in neutral.
3. Release the clutch pedal.
The engine stops.
Auto Start
b Seat belt fastened.
b Driver’s door closed.
e Press clutch pedal.
You can drive off normally.
Vehicles with PDK:
Auto Stop and Auto Start
Auto Stop
1. Brake the vehicle with the footbrake.
2. Keep the footbrake pressed.
– or –
While stationary, move selector lever to P.
Auto Start
b Selector lever in position P, D, N or manually
selected gear 1 or 2.
e Release the footbrake
(not in selector-lever position P).
– or –
Press the accelerator.
– or –
Move the steering wheel.
– or –
Move PDK selector lever to position R.
You can drive off normally.
Information
The engine will start automatically in certain
situations, e.g. if the vehicle starts rolling or to
ensure passenger comfort via air conditioning.
Information
Quickly flooring the pressed brake pedal while the
vehicle is stationary activates the HOLD function.
This keeps Auto Stop activated on the vehicle
without having to keep the brake pedal pressed.
f Refer to chapter “HOLD Function: Drive-Off
Assistant, Standstill Management” on
page 122.
The engine starts automatically when the
accelerator is pressed or when an engine start
is required.
Information
When adaptive cruise control (ACC) is switched on,
the engine stops automatically when the vehicle is
stationary if the vehicle in front also comes to a
standstill.
The vehicle is held by the HOLD function.

51
Auto Start Stop Function
A
B
C
D
E
F
G
H
I
J
K
L
M
N
O
P
Q
R
S
T
U
V
W
X
Y
Z
Reaction after leaving the vehicle
(selector-lever position P selected)
If you leave the vehicle (driver’s door open and
footbrake released) after Auto Stop and with the
PDK selector lever in position P – in order to open
the garage door, for example – the engine will not
start automatically.
If the driver enters the vehicle again at the latest
30 seconds after leaving it, (driver’s door closed
and brake actuated), Auto Start Stop mode is
resumed.
If one of these preconditions is not met, the engine
has to be started manually. A message stating
that the engine has to be started manually
appears on the multi-function display.
f Refer to chapter “Warning and Information
Messages” on page 278.
Reaction after leaving the vehicle
(selector-lever position D, M
or N selected)
If you leave the vehicle (driver’s door open and
footbrake released) after an Auto Stop with
the PDK selector lever in position D, M or N,
Auto Start will take place to remind the driver
that the Auto Start Stop function is still active.
The electric parking brake is also locked in
selector-lever position D or M.
The indicator light on switch and the brake
warning light light up.
f Refer to chapter “Warning and Information
Messages” on page 278.
Exceptions for the Auto Start Stop
Function
The Auto Start Stop function is not available in the
following situations, for example:
– SPORT/SPORT PLUS mode is active
– PSM off or PSM in SPORT mode
– While manoeuvring
– Air conditioning “Maximum cooling output” is
active
– “Windscreen defrost” function is active.
– At high altitudes
The Auto Start Stop function is available to a
limited extent in the following situations, for
example:
– Air conditioning or passenger compartment
heating on a high setting.
– Low battery charge
– Uphill or downhill gradients
– Internal vehicle test procedures,
e.g. automatic engine checks
– Very low or very high outside or battery
temperature
– Stop & go traffic with repeated short stopping
phases (depending on country)
Switching Auto Start Stop function
on and off
Fig. 25: Auto Start Stop button
Switching off
e Press the button.
The indicator light on the button lights up
The engine’s Auto Stop function is disabled.
Switching on
e Press the button.
The indicator light on the button goes out.
The engine stops automatically when the
vehicle stops.
Information
The engine will start automatically in certain
situations, e.g. if the vehicle starts rolling or to
ensure passenger comfort via air conditioning.
Information
If adaptive cruise control (ACC) is active, the
engine starts automatically if the vehicle in front
drives off.
Information
If one of these situations arises after an Auto Stop,
the engine can be restarted automatically.

52
Auto Start Stop Function
A
B
C
D
E
F
G
H
I
J
K
L
M
N
O
P
Q
R
S
T
U
V
W
X
Y
Z
Auto Start Stop function display
Fault reporting
In the event of a fault, a message stating that Start
Stop is deactivated appears on the multi-function
display.
e Have the fault corrected at a specialist
workshop. Porsche recommends a Porsche
partner as they have trained workshop
personnel and the necessary parts and tools.
Auto Stop and restart readiness
If the engine was stopped automatically by the
Auto Start Stop function and Auto Start is
possible, the indicator light on the multi-function
display lights up gr
een.
No Auto Stop or restart readiness
If Auto Stop is not possible or the engine cannot
be restarted after an Auto Stop, the indicator light
on the multi-function display lights up yellow when
the vehicle is stationary.
This may have the following causes:
– At least one precondition for Auto Stop has not
been met.
– or –
– At least one exception for Auto Start Stop is
present.
f Refer to chapter “Preconditions for Auto Stop”
on page 50.
f Refer to chapter “Exceptions for the Auto
Start Stop Function” on page 51.

53
Automatically Controlled 2-Zone Air Conditioning
A
B
C
D
E
F
G
H
I
J
K
L
M
N
O
P
Q
R
S
T
U
V
W
X
Y
Z
Automatically Controlled 2-Zone Air Conditioning
Brief overview
This brief overview does not replace the
comprehensive information provided under
“Automatically Controlled 2-Zone Air
Conditioning”. Safety instructions and warnings,
in particular, are not replaced by this brief
overview.
What do I want to do? What do I have to do? Page
Switch on automatic climate control Press button C. 54
Set temperature Left vehicle side: Press button A up (warmer) or down (colder).
Right vehicle side: Press button B up (warmer) or down (colder).
55
Set air quantity manually Press button G up (more) or down (less). 55
Set air distribution manually Air to windscreen and side windows: Press button D.
Air to central and side vents: Press the E button.
Air to footwell: Press button F.
55
Defrost windscreen Press button J. 58
Switch on heated rear window and
exterior mirror heating
Press button H. 121
Switch on air-recirculation mode manually Press button I. 57
54
Automatically Controlled 2-Zone Air Conditioning
A
B
C
D
E
F
G
H
I
J
K
L
M
N
O
P
Q
R
S
T
U
V
W
X
Y
Z
General information
Fig. 26: Air-conditioning control panel
Depending on factors such as sunlight and air
quality, the air-conditioning system adjusts the
preset interior temperature, air distribution and air
quantity fully automatically in automatic mode.
The temperature can be set individually for the
left and right air-conditioned areas.
Automatic mode is deactivated as soon as the
settings are adjusted manually. In this case,
automatic climate control still regulates the
functions that have not been modified manually.
Keeping sensors free
Fig. 27: Interior temperature sensor
To avoid impairing the performance of the air-
conditioning system:
e Do not cover or tape over the interior
temperature sensor for the air-conditioning
system.
Cooling function
The cooling function cools and dries the air.
Switching on automatic mode
The air-conditioned areas can be switched to
automatic mode.
e Press button on the air-conditioning
control panel.
The AUTO indicator on the air-conditioning
display lights up.
Temperature, air quantity and distribution are
automatically controlled.
Information
Additional air conditioning settings can be made
on the multi-function display:
f Refer to chapter “Setting air conditioning” on
page 269.
On vehicles with memory package, the air-
conditioning settings can be stored on the
respective driver’s key.
f Refer to chapter “Personal Settings” on
page 188.
Information
– The cooling function may switch off briefly to
ensure sufficient engine cooling if the engine is
operating under extreme load.
It switches off automatically at temperatures
below approx. 2 °C and cannot be switched on,
even manually.
– The cooling function operates most effectively
with the windows closed. If heat accumulates
in the passenger compartment, briefly open
the windows to ventilate the interior.
– Setting the temperature temporarily to a lower
or higher value does not cool or heat the
passenger compartment to the desired
temperature more quickly.
– Depending on the outside temperature and
humidity, condensation can escape under
the vehicle. This is quite normal and is not
a defect.
– If the battery voltage is too low, the fresh-air
blower and cooling function are restricted
initially and then switched off.
55
Automatically Controlled 2-Zone Air Conditioning
A
B
C
D
E
F
G
H
I
J
K
L
M
N
O
P
Q
R
S
T
U
V
W
X
Y
Z
Setting temperature
Fig. 28: Setting the temperature and air quantity
The temperature of each air-conditioned area
can be adjusted individually between 16.5 °C
and 29 °C.
Recommendation: 22 °C.
The selected temperature is shown on the display.
Increasing and decreasing temperature
e Press button for the relevant
air-conditioned area up or down.
If LO or HI appears on the display, the system is
operating at maximum cooling or heating power.
Automatic mode is switched off.
Setting air quantity
The selected air quantity is shown in a bar display
above button . The more bars that are
displayed, the more air flows into the passenger
compartment.
Increasing and decreasing air flow
e Push button up or down.
Pressing button switches back to automatic
mode.
If the air quantity was reduced so much that OFF
appears on the air-conditioning display, the
outside-air supply is interrupted and the
air-conditioning system is switched off.
Setting air distribution
Fig. 29: Air distribution buttons
Setting air distribution manually
b Air vents opened.
e Press button .
The air flows to the windscreen and the side
windows.
e Press button .
The air flows from the central and side vents.
e Press button .
The air flows to the footwell.
The indicator light on the respective button
comes on.
Information
If necessary, the automatic system can be
controlled manually. The manual setting is retained
until the appropriate function button is pressed
again or until button is pressed.
A Setting temperature of relevant air-conditioned area
B Setting air quantity
Information
– If one air-conditioned area is set to LO or HI
when SYNC mode is activated, the other
air-conditioned area is also set to LO or HI.
Pressing button adopts the default
temperature of 22 °C.
f Refer to chapter “Applying driver’s A/C
settings to the entire vehicle – SYNC mode”
on page 58.
WARNING
Impaired vision with
air quantity OFF
The windows can mist up if the air quantity setting
is OFF.
e Press button up (increase air quantity).
56
Automatically Controlled 2-Zone Air Conditioning
A
B
C
D
E
F
G
H
I
J
K
L
M
N
O
P
Q
R
S
T
U
V
W
X
Y
Z
Cancelling manual air distribution
e Press the relevant air distribution button again.
The indicator light in the corresponding button
goes off.
– or –
Press the button.
Air quantity and distribution are automatically
controlled.
Adjusting air vents
Fig. 30: Adjusting air vents
Opening and closing air vents
e Turn thumbwheel on the air vent clockwise or
anti-clockwise.
Changing air flow direction
e Swivel vent vanes in the desired direction.
Switching the upper ventilation
panel on and off
Fig. 31: Upper ventilation panel
The ventilation panel on top of the dashboard can
be activated or deactivated separately.
When the ventilation panel is switched off, the air
flow in the passenger compartment is less direct.
The air-conditioning system adjusts the air flow
quantity automatically.
For information on switching the upper ventilation
panel on and off:
f Refer to chapter “Setting air conditioning” on
page 269.
Switching cooling function on
and off
In automatic mode, the cooling function is always
activated. The cooling output is controlled fully
automatically.
f Refer to chapter “Switching on automatic
mode” on page 54.
Fig. 32: Switching cooling function on and off
Switching cooling function on
e Press button .
The indicator light on the button lights up.
– or –
Press the button.
The cooling function is activated.
Switching cooling function off
The cooling function can be switched off manually
to save fuel, for example.
e Press the button.
The indicator light on the button goes out.
The cooling function is deactivated.

57
Automatically Controlled 2-Zone Air Conditioning
A
B
C
D
E
F
G
H
I
J
K
L
M
N
O
P
Q
R
S
T
U
V
W
X
Y
Z
Switching maximum cooling output
on and off – A/C MAX mode
In A/C MAX mode, the passenger compartment is
cooled at maximum power.
The interior temperature is not adjusted
automatically.
Fig. 33: Activating maximum cooling output
Switching on maximum cooling output
e Press the button.
The indicator light on the button lights up.
Switching off maximum cooling output
e Press the button.
The indicator light on the button goes out.
– or –
Press the button.
Switching air-recirculation mode
on and off
Fig. 34: Air-recirculation mode button
Switching on air-recirculation mode
manually
e Press the button.
The indicator light on the button lights up.
Switching off air-recirculation mode
manually
e Press the button.
The indicator light on the button goes out.
– or –
Press the button.
Setting automatic air-recirculation
mode
In automatic air-recirculation mode, the outside-air
supply is adjusted depending on the air quality.
Air-recirculation mode is deactivated automatically
at outside temperatures below approx. 5 °C to
prevent the windows from misting.
For information on setting automatic air-
recirculation mode:
f Refer to chapter “Setting air conditioning” on
page 269.
WARNING
Impaired vision in
manual air-recirculation
mode
In extended manual air recirculation mode, the
windows may mist up.
e Do not switch on manual air-recirculation mode
for an extended period.
Information
If the cooling function is switched off manually or
automatically, air-recirculation mode ends after
approx. 3 minutes.
Information
The recommended operating mode is automatic
air-recirculation mode (default setting).
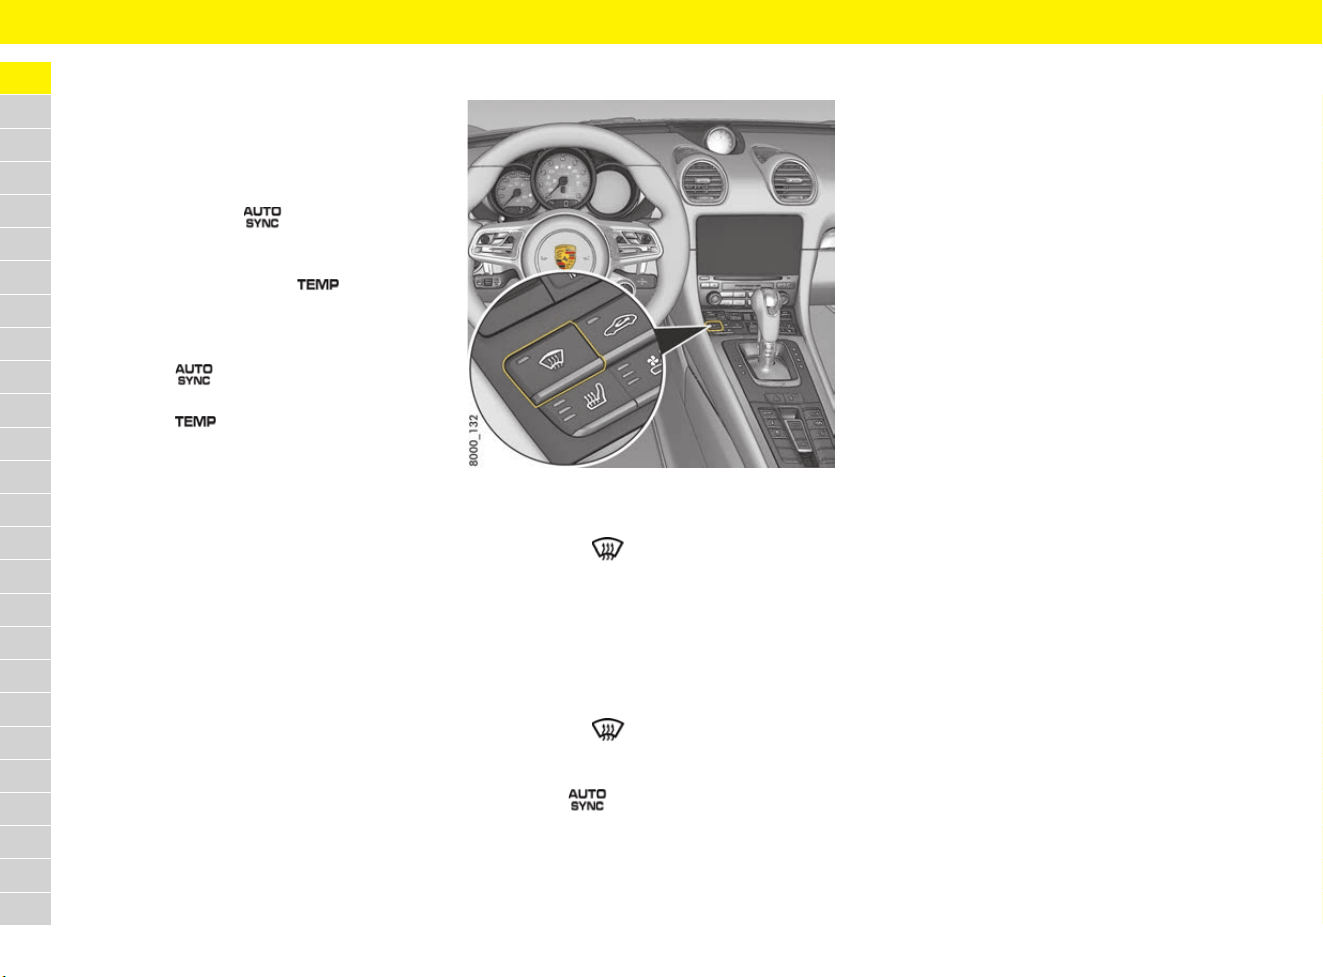
58
Automatically Controlled 2-Zone Air Conditioning
A
B
C
D
E
F
G
H
I
J
K
L
M
N
O
P
Q
R
S
T
U
V
W
X
Y
Z
Applying driver’s A/C settings to
the entire vehicle – SYNC mode
In SYNC mode, the driver’s A/C settings are
applied to the entire vehicle.
Switching on SYNC mode
e Press and hold the button until SYNC
appears in the air-conditioning display.
e Regulate the temperature on the driver’s and
passenger’s side using the button on the
driver’s side.
Switching off SYNC mode
e Press the button.
– or –
Press the button on the passenger’s
side.
The SYNC indicator on the air-conditioning
display goes out.
Adjusting air flow
There are three settings for adjusting the strength
of the air flow in automatic mode.
For information on adjusting the strength of the air
flow:
f Refer to chapter “Setting air conditioning” on
page 269.
Defrosting windscreen
Fig. 35: Defrost windscreen button
Switching defrost mode on
e Press button .
The indicator light on the button lights up.
The air flows to the windscreen and the front
side windows.
The windscreen is demisted or defrosted as
quickly as possible.
Switching defrost mode off
e Press button .
The indicator light on the button goes out.
– or –
Press the button.
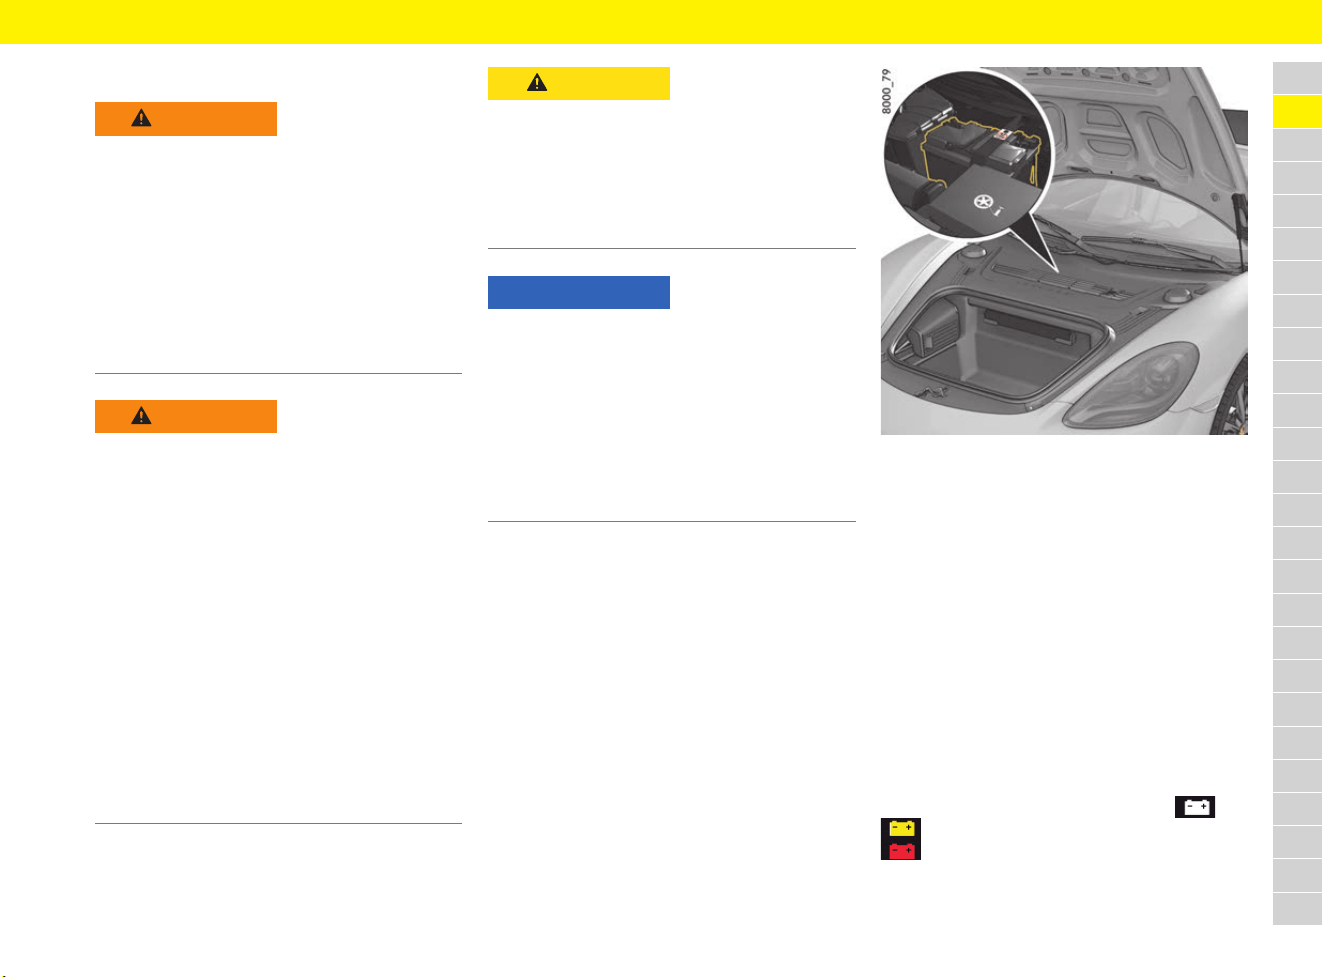
59
Battery
A
B
C
D
E
F
G
H
I
J
K
L
M
N
O
P
Q
R
S
T
U
V
W
X
Y
Z
Battery
Fig. 36: Battery
The battery is located under the plastic cover in
the front luggage compartment (Fig. 36).
For information on removing the plastic cover:
f Refer to chapter “Removing and stowing tyre
filling compressor” on page 141
.
e When jump-lead starting, never connect the
black negative cable directly to the battery.
Always connect the black negative cable to the
ground point B (Fig. 37 on page 61).
For information on jump-lead starting:
f Refer to chapter “Jump-Lead Starting” on
page 129.
Responding to warning messages
If the battery charge is low, the symbol or
appears on the multi-function display. The
symbol indicates a fault in the generator.
f Refer to chapter “Warning and Information
Messages” on page 278.
WARNING
Electric shock,
short circuit or fire
Contact with live parts of the vehicle may result
in an electric shock. Working on the vehicle’s
electrical system can cause a short circuit.
Such short circuits can cause a fire.
e Disconnect the negative terminal on the
battery during all work on the electrical
system.
e Ensure that tools or conductive jewellery
(rings, necklaces, watch straps) do not come
into contact with live parts of the vehicle.
WARNING
Fire or explosion
Many vehicle fluids are highly flammable, e.g. fuel,
engine oil and transmission oil. Fuel vapours can
ignite and explode. Highly explosive detonating
gas may be produced when charging lead-acid
batteries.
e Disconnect the negative terminal on the
battery during all work on the electrical
system.
e Avoid wiping the battery with a dry cloth in
order to avoid static charging.
e Before touching the battery, discharge any
static electricity by touching the vehicle.
e Do not smoke in the vicinity of the battery
and do not use naked flame. Also beware of
sparks, e.g. as a result of cable contact.
e Only work on the vehicle in the open or in
well-ventilated spaces.
CAUTION
Corrosive electrolyte
Lead batteries contain highly caustic battery acid
that can cause damage to the skin and clothing in
the event of contact.
e Wear safety gloves and eye protection.
e To prevent acid from leaking out, do not tilt the
battery.
NOTICE
Risk of short circuit, fire and damage to the
generator and electronic control units.
e Have the battery removed and installed only by
a qualified specialist workshop.
Porsche recommends a Porsche partner as
they have trained workshop personnel and the
necessary parts and tools.
e Disconnect the negative terminal on the battery
during all work on the electrical system.
60
Battery
A
B
C
D
E
F
G
H
I
J
K
L
M
N
O
P
Q
R
S
T
U
V
W
X
Y
Z
Heed safety symbols on the battery
Battery care
Laying up the vehicle
e If the vehicle is left for long periods in the
garage or workshop, the doors and lids of
the vehicle should be closed.
e Remove the driver’s key or disconnect the
battery if necessary. Switch off the ignition
on vehicles with Porsche Entry & Drive.
Read operating instructions
Wear eye protection
Keep children away
Danger of explosion
While the battery is being charged, a highly
explosive gas mixture is formed, so:
Fire, sparks, naked flames and
smoking are prohibited
Avoid causing sparks and short circuits
when handling cables and electrical
equipment.
Danger of caustic burns
Battery acid is highly caustic, so:
Wear safety gloves and eye protection.
Do not tilt the battery, or acid may spill
from the venting aperture.
First aid
If acid splashes into your eye, rinse
immediately for a few minutes with clean
water.
See a doctor immediately.
If acid splashes onto your skin or clothing,
neutralise immediately with soapsuds and
rinse with plenty of water.
If you accidentally drink acid, consult a
doctor immediately.
Disposal
Hand in the old battery at a battery
collection point.
Never dispose of an old battery with
domestic waste.
Information
Keep the battery fully charged to prevent it from
freezing. A discharged battery can freeze even
at 0 °C, but a fully charged one only freezes at
–40 °C.
What do
I want to
do?
What do I have to do?
Avoid
running
down the
battery
e Switch off unneeded electrical
loads on short trips.
e Switch off the ignition and pull
out the driver’s key when
leaving the vehicle.
e Avoid using the PCM when the
engine is not running.
Battery
care
e Keep battery surface clean and
dry.
e Make sure that terminal clamps
are firmly secured.
Prepare for
winter
driving
e Have the battery checked
before the start of winter.
Charge the
battery
e Never attempt to charge a
frozen or damaged battery.
f Refer to chapter “Charging the
battery” on page 61.
Information
When the battery is disconnected, the alarm
system ceases to function. If the vehicle was
locked before the battery was disconnected,
the alarm will be triggered when the battery
is reconnected.
f Refer to chapter “Alarm System” on page 47.
What do
I want to
do?
What do I have to do?
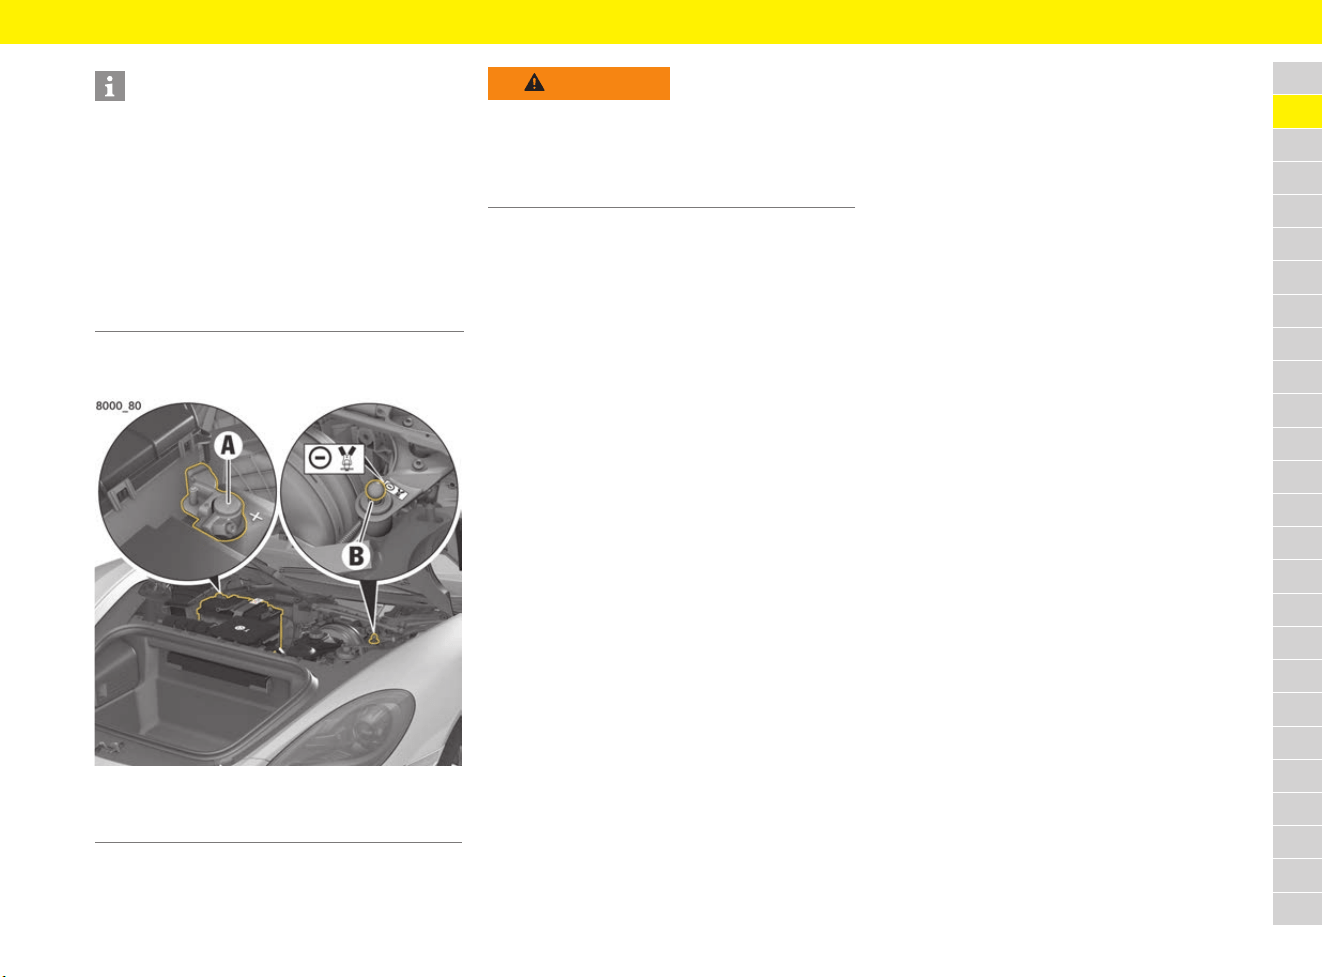
61
Battery
A
B
C
D
E
F
G
H
I
J
K
L
M
N
O
P
Q
R
S
T
U
V
W
X
Y
Z
Charging the battery
Fig. 37: Battery terminals
e Observe the instructions of the charger
manufacturer.
e Ensure adequate ventilation when charging the
battery.
1. Open front luggage compartment lid.
f Refer to chapter “Performing emergency
release of luggage compartment lid” on
page 146.
2. Remove cover in luggage compartment.
f To remove the cover: Refer to chapter
“Removing and stowing tyre sealing compound
or tool kit” on page 140.
3. Connect the red positive cable of the charger
to the positive terminal A of the battery.
4. Connect the black negative cable of the
charger to the ground point B.
5. Switch on the charger.
6. After charging the battery, first switch off the
charger and then disconnect it.
f Refer to chapter “Putting a vehicle into
operation after battery replacement” on
page 61.
e For recommendations on a suitable charger:
Contact your Porsche partner.
Replacing the battery
The details on the battery case cannot be used to
identify a comparable battery that meets all the
specific requirements of Porsche.
e Always use an AGM (Absorbent Glass Mat)
battery, which satisfies the vehicle’s specific
requirements, as a replacement. Porsche
recommends using a genuine Porsche battery.
e Observe the disposal instructions for batteries.
e Have the battery removed and installed only by
a qualified specialist workshop.
e After installation, new batteries must be
initialised in the control unit.
Visit a qualified specialist workshop. Porsche
recommends a Porsche partner as they have
trained workshop personnel and the necessary
parts and tools.
Putting a vehicle into operation
after battery replacement
After connecting the battery or charging a deeply
discharged battery, carry out the following steps:
1. Store the end position of the power windows.
f Refer to chapter “Storing end position of
windows” on page 299.
2. Teach tyres in the Tyre Pressure Monitoring
(TPM) system.
f Refer to chapter “TPM menu (TPM – Tyre
Pressure Monitoring)” on page 162.
Information
The battery still discharges even while your vehicle
is not in use.
e To maintain its function, charge the battery
approximately every 6 weeks or connect it to
a trickle charger suitable for AGM (Absorbent
Glass Mat) batteries.
Porsche recommends Porsche Tequipment
chargers and trickle chargers.
e Store a battery that has been removed in a
dark, cool place that is not exposed to frost.
A Positive terminal +
B Ground point –
WARNING
Charging a frozen or
damaged battery
If a frozen or damaged battery is charged, there is
a danger of explosion and chemical burns.
e Never attempt to charge a frozen or damaged
battery.
62
Brake Fluid
A
B
C
D
E
F
G
H
I
J
K
L
M
N
O
P
Q
R
S
T
U
V
W
X
Y
Z
Brake Fluid
Fig. 38: Brake fluid reservoir
Responding to warning message
If the brake fluid level is too low, the symbol
appears on the instrument panel and a message
is displayed on the multi-function display. In
combination with a larger pedal travel, the
illuminated symbol may also indicate a defect in
the brake system.
e Stop immediately in a suitable place and do not
continue driving.
e Visit a qualified specialist workshop. Porsche
recommends a Porsche partner as they have
trained workshop personnel and the necessary
parts and tools.
f Refer to chapter “Warning and Information
Messages” on page 278.
Checking the brake fluid level
e Read off the brake fluid level on the brake fluid
reservoir (Fig. 38). The fluid level must always
be between the MIN and MAX markings.
e Have the brake fluid topped up if the brake fluid
level is below the MIN marking:
Visit a qualified specialist workshop. Porsche
recommends a Porsche partner as they have
trained workshop personnel and the necessary
parts and tools.
Changing brake fluid
Regular checking and changing the brake fluid is
part of servicing.
f Refer to chapter “Before driving on race
circuits” on page 15.
63
Brakes
A
B
C
D
E
F
G
H
I
J
K
L
M
N
O
P
Q
R
S
T
U
V
W
X
Y
Z
Brakes
Electric parking brake
The electric parking brake acts on the rear wheels
and serves to secure the stationary vehicle.
Fig. 39: Electric parking brake switch
Applying the parking brake
e Press the switch.
The indicator light on switch and the brake
warning light light up.
For information on warning and indicator lights:
f Refer to chapter “Instrument Panel” on
page 125.
Releasing the parking brake manually
b Ignition switched on.
1. Press the brake pedal.
2. Pull switch .
The brake warning light goes out.
Releasing the parking brake
automatically
It is still possible to drive off normally even though
the parking brake is on.
b Engine is running.
b Driver’s door closed.
b Driver’s seat belt fastened.
The electric parking brake detects the driver’s
intention to drive off and releases automatically.
If one of these prerequisites is not satisfied, the
electric parking brake will not be released auto-
matically when the driver attempts to drive off.
A message appears on the multi-function display.
The brake warning light and the indicator light
on switch flash.
f Refer to chapter “Warning and Information
Messages” on page 278.
Automatic engagement of the parking
brake
b Vehicles with PDK
The electric parking brake engages if selector-
lever position D, R or M is selected when the
vehicle is stationary and the driver’s door is
opened.
The indicator light on switch and the
brake warning light in the instrument panel
come on.
For information on warning and indicator lights:
f Refer to chapter “Instrument Panel” on
page 125.
Activating the emergency braking
function
If the vehicle cannot be stopped by conventional
braking, you can decelerate sharply and stop the
vehicle using the electric parking brake.
e Press and hold switch .
The brake warning light and the indicator
light on switch flash.
To deactivate the emergency braking function:
e Release switch .
Responding to warning message
If the electric parking brake could not be applied
fully on the stationary vehicle, the indicator light on
switch and the brake warning light flash.
f Refer to chapter “Warning and Information
Messages” on page 278.
Information
Automatic engagement of the parking brake can
be overridden manually:
e Pull switch .
The parking brake remains released.
If engagement of the electric parking brake is
overridden, the function is only available after the
door has been opened again.
WARNING
Severe deceleration
Emergency braking takes place with very high
braking power. The following traffic may be
endangered and control over the vehicle may
be lost.
e Only use the emergency braking function in an
emergency situation.
e Do not use the emergency braking function to
stop the vehicle when driving normally.

64
Brakes
A
B
C
D
E
F
G
H
I
J
K
L
M
N
O
P
Q
R
S
T
U
V
W
X
Y
Z
Footbrake
e To relieve the brake system on downhill
stretches, change down to a lower gear in
good time (engine braking).
If engine braking is insufficient on downhill
slopes, operate the footbrake at intervals.
Continuous braking overheats the brakes and
reduces the braking effect.
For information on brake fluid and checking the
brake fluid level:
f Refer to chapter “Brake Fluid” on page 62.
Brake pads and brake discs
Wear on the brake pads and brake discs depends
to a great extent on the driving style and the
conditions of use and therefore cannot be
expressed in actual miles on the road.
The high-performance brake system is designed
for optimal braking effect at all speeds and
temperatures.
Certain speeds, braking forces and ambient
conditions (e.g. temperature and humidity) can
therefore cause the brakes to squeal.
Responding to warning message
If the wear limit of the brake pads is reached,
a warning message is displayed.
f Refer to chapter “Warning and Information
Messages” on page 278.
e Have brake pads replaced immediately.
Visit a qualified specialist workshop. Porsche
recommends a Porsche partner as they have
trained workshop personnel and the necessary
parts and tools.
Porsche Ceramic Composite Brake
(PCCB)
The high-performance brake system is designed
for optimal braking effect at all speeds and
temperatures.
Certain speeds, braking forces and ambient
conditions (e.g. temperature and humidity) can
therefore cause the brakes to squeal.
Wear on different components of the brake
system, e.g. brake pads or brake discs, depends
to a great extent on the individual driving style and
the conditions of use and therefore cannot be
expressed in actual miles on the road.
The values communicated by Porsche are based
on normal operation adapted to traffic. Wear
increases considerably when the vehicle is driven
on race tracks or as a result of aggressive driving.
e Before driving your vehicle in this way, ask your
Porsche partner about currently applicable
guidelines.
WARNING
Blocked pedals
Unsuitable or improperly secured floor mats or
objects can restrict pedal travel or hinder pedal
operation.
e Do not obstruct the pedal travel with floor mats
or other objects.
WARNING
No brake force boosting
The brake booster is ready for operation only
while the engine is running. If the engine is
switched off or there is a defect in the brake
booster, much greater force has to be applied
to the pedal when braking.
e Vehicles with defective brakes must not be
towed.
f Refer to chapter “Towing and Tow-Starting” on
page 249.
WARNING
Water film on the
brake disc
In heavy rain, while driving through water or after
leaving a car wash, the braking action may be
delayed and increased pressure may be required.
e Keep further back from the vehicle in front and
“dry” the brakes by applying them at intervals.
Make sure that the traffic behind you is not
affected.
WARNING
Reduced braking action
After a long drive over salted or gritted roads,
a coating may form on the brake discs and pads
that significantly reduces friction and therefore
also braking effect.
The brake discs will unavoidably start to corrode
if your vehicle is parked for an extended period.
The brakes will tend to “judder” as a result.
e To prevent corrosion of the brake discs, “brake
them dry” before parking the car (not on cars
with Porsche Ceramic Composite Brake).
e If braking comfort is noticeably impaired, it is
recommend that you have the brake system
checked by experts.
Visit a qualified specialist workshop. Porsche
recommends a Porsche partner as they have
trained workshop personnel and the necessary
parts and tools.

65
Care
A
B
C
D
E
F
G
H
I
J
K
L
M
N
O
P
Q
R
S
T
U
V
W
X
Y
Z
Care
Washing the vehicle
The best protection for the vehicle against the
damaging effects of the environment is frequent
washing and preservation. The longer road salt,
road dust, industrial dust, insect remains, bird
excrement and tree exudations (e.g. resin, pollen)
etc. are allowed to remain on the vehicle, the more
harmful their effect.
No vehicle or convertible top is absolutely
leak-proof. Water can sometimes leak into the
passenger compartment when cleaning the
vehicle/convertible top.
Observe the following points in order to ensure
that the vehicle is washed thoroughly without
damaging the paintwork:
e The underside of the vehicle should be
thoroughly washed at the end of the gritting
season at the latest.
e Wash the vehicle only at sites provided for this
purpose to prevent soot, grease, oil and heavy
metals from entering the environment.
e Do not wash the vehicle in direct sunlight or
when the body is hot.
e If washing by hand, use a car shampoo, plenty
of water and a soft sponge or washing brush.
Porsche recommends car care products from
Porsche Tequipment.
WARNING
Water film on
brake discs
After leaving a car wash, the braking action may
be delayed and increased foot pressure may be
required.
e Check the brakes after washing the vehicle.
e For this reason, keep further back from the
vehicle in front and “dry” the brakes by
applying them at intervals. Make sure that the
traffic behind you is not affected.
Information
Regular and skilled care helps to maintain the
value of your Porsche and can be a precondition
for the upholding of claims under the vehicle
warranty. Porsche recommends car care products
from Porsche Tequipment.
e Follow the instructions for use on the
packaging of care products.
e Keep care products out of reach of children.
e Dispose of care products in the correct
manner.
To ensure that the vehicle’s condition is expertly
checked and that the guarantee remains valid for
the full period: Contact your Porsche partner. The
Porsche partner will issue a Condition Report and
also certify this under “Long-life Guarantee
Condition Report” in the “Warranty & Maintenance”
booklet.
NOTICE
High-pressure cleaners and steam cleaners can
damage the following components:
– Convertible top (Boxster)
– Tyres
– Logos, emblems, decorative foils
– Painted surfaces
– Components and electrical components in the
engine compartment/technical equipment
space
– ParkAssist sensors
– Radar sensor for adaptive cruise control (ACC)
– Reversing camera
– Wiper blades
e Always read the operating instructions provided
by the equipment manufacturer.
e Do not use high-pressure cleaners or steam
cleaners to clean decorative film.
e Always observe a minimum distance of 50 cm
during cleaning.
e Never use high-pressure cleaners or steam
cleaners with a round-jet nozzle. A high-pressure
cleaner or steam cleaner fitted with a round-jet
nozzle will damage your vehicle. The tyres are
particularly susceptible to damage.
e Do not point the cleaning jet directly at any of
the aforementioned components.
e Before working in the engine compartment,
always switch the engine off and let it cool
sufficiently.
e Never point the cleaning jet directly at
openings, e.g. spark plug shafts and air cleaner
housing or at the air filter. Cover the openings
before cleaning.
NOTICE
When cleaning vehicles equipped with
Porsche Entry & Drive, the luggage compartment
lid may inadvertently open and water may get into
the luggage compartment.
e When cleaning the vehicle, keep the driver’s key
outside the range of the luggage compartment
lid sensor.

66
Care
A
B
C
D
E
F
G
H
I
J
K
L
M
N
O
P
Q
R
S
T
U
V
W
X
Y
Z
e To start washing the vehicle, wet the paintwork
thoroughly and rinse the heavy dirt off.
e After washing the vehicle, rinse it thoroughly
with water and rub it dry with chamois-leather.
Do not use the same chamois for rubbing dry
as you use for cleaning the windscreen and
windows.
Cleaning in car washes
See the following table to ensure that the vehicle
is washed safely and carefully in the car wash:
Cleaning the convertible top
(Boxster)
Observe the following for correct care and
cleaning:
e Do not wash the convertible top every time you
wash the vehicle. Normally, rinsing the
convertible top with clean water is sufficient.
e Never remove snow and ice with sharp-edged
objects.
e Brush dust off the convertible top in the
direction of the weave using a soft brush.
e Only if there is heavy dirt, moisten the
convertible top with lukewarm water and a
washing shampoo & convertible-top cleaner
and rub gently using a sponge or soft brush.
e Rinse the washing shampoo & convertible-top
cleaner thoroughly off the convertible top with
clean water. Porsche recommends car care
products from Porsche Tequipment.
e After washing, treat the convertible-top
covering at least once a year with a
convertible-top care product. Do not allow the
convertible-top care product to come into
contact with paint or glass. If it does come into
contact with paint, remove it immediately.
e If there is leakage in the convertible-top cover
or at its seams and folds, a special convertible-
top care product can be used. Please note the
information on the containers. Porsche
recommends car care products from Porsche
Tequipment.
e Remove bird excrement immediately. The acid
this contains makes the rubber swell, and the
convertible top will start to leak.
e Open the convertible top and convertible-top
element only when completely dry to prevent
stains and abrasion damage.
e Remove spots from the convertible-top
covering by rubbing carefully with a soft rubber
sponge.
NOTICE
Car washes may damage optional add-on parts or
parts that project beyond the contours of the
vehicle.
e Please consult the car wash operator before
using automatic car washes.
Risk What must be
observed?
Damage to the
convertible-top fabric
(Boxster)
e No hot wax
treatment.
Water gets into the
passenger
compartment through
a lowered window
(Boxster)
e Do not switch off
the ignition.
– or –
e Lock the vehicle.
Windscreen wipers
may start moving and
become damaged in
the car wash
e Switch off the
windscreen and
rear window wipers.
e Do not operate
headlight cleaning
system in car
washes.
Damage to external
parts
e Fold in exterior
mirrors.
e Retract the
extended rear wing.
Damage to wheels e Guide rail of the car
wash is sufficiently
dimensioned.
The wider the rim
and the lower the
tyre height, the
greater the risk of
damage.
Scratches on high-
gloss or silk-gloss
wheels
e Do not clean with
the wheel-cleaning
brushes in the car
wash.
NOTICE
The convertible top may be damaged by the
cleaning jet of the high-pressure cleaner,
unsuitable car washes or by the hot wax
treatment.
e Do not clean the convertible top with high-
pressure cleaning equipment.
e Use car washes with a wash programme for
cabriolet vehicles.
e No hot wax treatment.
Risk What must be
observed?
67
Care
A
B
C
D
E
F
G
H
I
J
K
L
M
N
O
P
Q
R
S
T
U
V
W
X
Y
Z
Caring for paintwork
Preserving paintwork
The paint surface becomes dull over time due to
weathering and therefore should be preserved
regularly with paint preservative after the vehicle
is washed. This keeps the paint shiny and elastic.
Dirt is prevented from adhering to the paint
surface and industrial dust is prevented from
penetrating the paint.
Polishing the paintwork
Only when the original shine can no longer be
obtained using preservatives should paint polish
be used to clean the paint. Porsche recommends
car care products from Porsche Tequipment.
Removing spots and stains
Remove tar spatters, traces of oil, insects, etc.
immediately using a suitable cleaning agent and
carefully wash the area afterwards as they may
discolour the paint following prolonged exposure.
Porsche recommends car care products from
Porsche Tequipment.
Repairing minor paint damage
e Have minor paint damage (cracks, scratches
or stone damage) repaired immediately
before corrosion begins.
Visit a qualified specialist workshop. Porsche
recommends a Porsche partner as they have
trained workshop personnel and the necessary
parts and tools.
If traces of corrosion have already formed, these
must be thoroughly removed. An anti-corrosion
primer must then be applied to these spots,
followed by top-coat paint.
Paint data can be found on the vehicle data
carrier.
f Refer to chapter “Vehicle identification data”
on page 306.
Cleaning windows
f Refer to chapter “Wiper Blades” on page 304.
Observe the following for correct cleaning:
e Clean all windows regularly, inside and out,
with window cleaner. Porsche recommends
car care products from Porsche Tequipment.
e Do not use the same chamois for painted
surfaces and for drying the windows.
Preservative residues could reduce
transparency.
e Remove insect residues with insect remover.
Porsche recommends car care products from
Porsche Tequipment.
Repairing the underbody
protection
The underside of the vehicle is lastingly protected
against chemical and mechanical effects.
Damage to the protective coating while driving
cannot be ruled out.
e Have the underside of the vehicle inspected at
regular intervals by an authorised Porsche
dealer and the protective coating restored as
necessary. Contact your Porsche partner.
NOTICE
Grains of dirt on the paint surface can damage the
paintwork if not cared for properly.
e Do not wipe dust off with a dry cloth.
NOTICE
The matt effect of components may be lost if not
cared for properly.
e Do not treat components painted in a matt
effect with preservatives or polishes.
Information
The front side windows have a water-repellent
(hydrophobic) coating, which prevents soiling of
the windows. This coating is subject to natural
wear and can be renewed.
e Visit a qualified specialist workshop. Porsche
recommends a Porsche partner as they have
trained workshop personnel and the necessary
parts and tools.
WARNING
Combustible materials
close to the exhaust
system
Additional rust protection agent or undersealing in
the area of the exhaust system can become too
hot when driving and catch fire.
e Do not apply additional undersealing or rust
protection agent on or near the exhaust
manifolds, exhaust pipes, catalytic converters
or heat shields.

68
Care
A
B
C
D
E
F
G
H
I
J
K
L
M
N
O
P
Q
R
S
T
U
V
W
X
Y
Z
Cleaning decorative film
Cleaning headlights, lights,
plastic components and surfaces,
radar sensor for adaptive cruise
control and vehicle cameras
Caring for wheels
Metal particles (such as brass or copper in brake
dust) must not remain too long on alloy wheels.
Contact corrosion can cause pitting.
Cleaners with an oxide-removing effect or wrong
pH value, as are commonly used for other metals,
as well as mechanical tools and products, will
damage the surface and are therefore unsuitable.
e Use only acid-free cleaners for alloy wheels
(pH value between 4 and 10). Products with
the wrong pH value can destroy the surface of
the wheels. Porsche recommends car care
products from Porsche Tequipment.
e If possible, wash the wheels every two weeks
with a sponge or washing brush. If the wheels
are exposed to road salt, grit or industrial dust,
weekly cleaning is necessary.
f Refer to chapter “Cleaning in car washes” on
page 66.
Cleaning door, roof, convertible top,
lids and window seals
Observe the following for correct cleaning:
e Wash dirt (e.g. abrasion, dust, road salt and
grit) from all seals regularly using warm soapy
water.
e If there is a risk of frost, protect the outer door
seals and the lid and flap seals against freezing
into place with a suitable care product.
Caring for leather
NOTICE
Risk of damage if the decorative film peels off
during cleaning.
e Do not use polish or hot wax.
e Do not use high-pressure cleaners or steam
cleaners.
e Use a soft sponge, neutral soap and plenty of
water.
NOTICE
Cleaning agents could seep into controls or
switches, for example, and damage them.
Unsuitable cleaning agents can damage the
plastic surface.
e Do not spray water and interior window cleaner
directly onto the interior plastic components.
e Use only clean water and a little dishwashing
liquid or interior window cleaner to clean
headlights, lights, plastic components and
surfaces, radar sensor for adaptive cruise
control and vehicle cameras. Use a soft
sponge or a soft, lint-free cloth for this
purpose.
e Never use other chemical cleaning agents or
solvents.
WARNING
Cleaning agent film on
brake discs
If cleaning agent (e.g. rim cleaner) comes into
contact with the brake discs, the film that forms
on the brake discs may reduce the braking effect.
e Make sure that no cleaning agent comes into
contact with the brake discs.
e If cleaning agent has come into contact with
the brake discs, clean the brake discs
thoroughly with a strong jet of water.
e Paying attention to any road users behind you,
dry the brake discs by applying the brakes.
NOTICE
The lubricant coating on the inner door seals may
be damaged by unsuitable cleaning and care
agents.
e Do not use any chemical cleaning agents or
solvents.
e Do not use any preservative agents.
NOTICE
Unsuitable cleaning and care agents and
inappropriate treatment may damage the leather.
e Do not use caustic cleaning agents or hard
cleaning aids.
e Ensure that perforated leather does not get wet
on the reverse side.
e Remove any drops of water immediately from
the leather.
69
Care
A
B
C
D
E
F
G
H
I
J
K
L
M
N
O
P
Q
R
S
T
U
V
W
X
Y
Z
Observe the following for correct care and
cleaning:
e Clean all types of leather regularly to remove
fine dust using a soft, damp, white woollen
cloth or a commercially available microfibre
cloth.
e Remove heavy contamination (not water or
moisture stains) with a leather cleaning agent.
Please note the instructions for use on the
containers. Porsche recommends car care
products from Porsche Tequipment.
e Treat cleaned leather only with a leather care
product. Porsche recommends car care
products from Porsche Tequipment.
Cleaning seats with seat ventilation
Stains resulting from rainwater or moisture may
occur on the perforated leather of the seats.
Removing water and moisture stains
b Seat heating and seat ventilation is switched
off.
b No direct sunlight is available.
1. Blot the entire seat and backrest surface using
a clean, absorbent sponge and distilled water.
Make sure that the perforated leather does not
get wet on its reverse side.
2. Allow the seat covering to dry completely at
room temperature out of direct sunlight.
Do not dry the seat covering by switching on
the seat heating and seat ventilation.
3. Once dry, wipe the seat covering with a dry,
lint-free cloth.
Cleaning carpet, floor mats
Observe the following for correct cleaning:
e Use a vacuum cleaner or a brush (not too soft)
for cleaning.
e Heavy dirt and stains can be removed with a
stain remover. Porsche recommends car care
products from Porsche Tequipment.
To protect carpets, the Porsche range of
accessories includes floor mats in the correct size
and with the appropriate fastening.
Cleaning airbag covers
Cleaning fabric linings
Fabric linings on pillars, roofliner and roll-up sun
visors, etc. must be cleaned using only suitable
cleaning agents, a suitable dry foam and a soft
brush.
Alcantara
®
care
Do not use leather care products to clean
Alcantara
®
. For regular care, it is sufficient to
clean the cover with a soft brush. Strong abrasion
or rubbing when cleaning will produce a lasting
change to the surface.
e In the case of light soiling, wet a soft cloth with
water or a neutral soap solution and wipe off
the dirt.
e If it is heavily soiled, wet a soft cloth with
lukewarm water or thinned white spirit and dab
the dirt from the outside in.
Cleaning the seat belts
Observe the following for correct cleaning:
e Use mild detergent for soiled belts.
e When drying, avoid direct sunlight.
e Only use suitable cleaning agents.
e Do not tint or bleach the belts. The belt fabric
could be weakened, thus affecting safety.
WARNING
Blocked pedals
Unsuitable or improperly secured floor mats can
restrict pedal travel or interfere with pedal
operation.
e Secure floor mats properly – do not place
them loosely on the floor.
DANGER
Improper cleaning
Unsuitable cleaning and care agents may penetrate
the airbag system and improper handing may
damage the airbag system. In the event of an
accident, the airbag systems may not be
triggered.
e Do not make any modifications whatsoever to
individual components, such as the covers of
the steering wheel, the dashboard, front seats
and door panels.
e Do not use cleaning agents or other liquids in
the area of the airbags.

70
Care
A
B
C
D
E
F
G
H
I
J
K
L
M
N
O
P
Q
R
S
T
U
V
W
X
Y
Z
Cleaning the PCM (Porsche
Communication Management)
Observe the following for correct cleaning:
e The screen is susceptible to scratching. From
time to time, clean the PCM carefully with a
dry, clean and soft cloth (microfibre cloth) or a
cleaning brush.
When cleaning, do not exert undue pressure on
the surface.
e Remove fingerprints with a slightly damp cloth
or a mild cleaning agent.
Laying up a vehicle
If the vehicle is to be laid up for a longer period of
time: Contact your Porsche partner. They will be
glad to give you information and advice about the
necessary measures, e.g. corrosion prevention,
care, maintenance and storage.
f Refer to chapter “Battery” on page 59.
For information on locking the vehicle when the
battery is disconnected:
f Refer to chapter “Performing emergency door
locking” on page 77.
NOTICE
Unsuitable cleaning and care agents may
penetrate the PCM and improper handling may
damage the PCM.
e Do not use solvents such as methylated spirits,
thinner, petrol, acetone, alcohol (ethanol,
methanol or isopropyl alcohol) or even scouring
agents to clean the PCM.
e Do not spray cleaning agents or other liquids
directly onto the PCM.
e Wipe the screen carefully using a damp cloth.
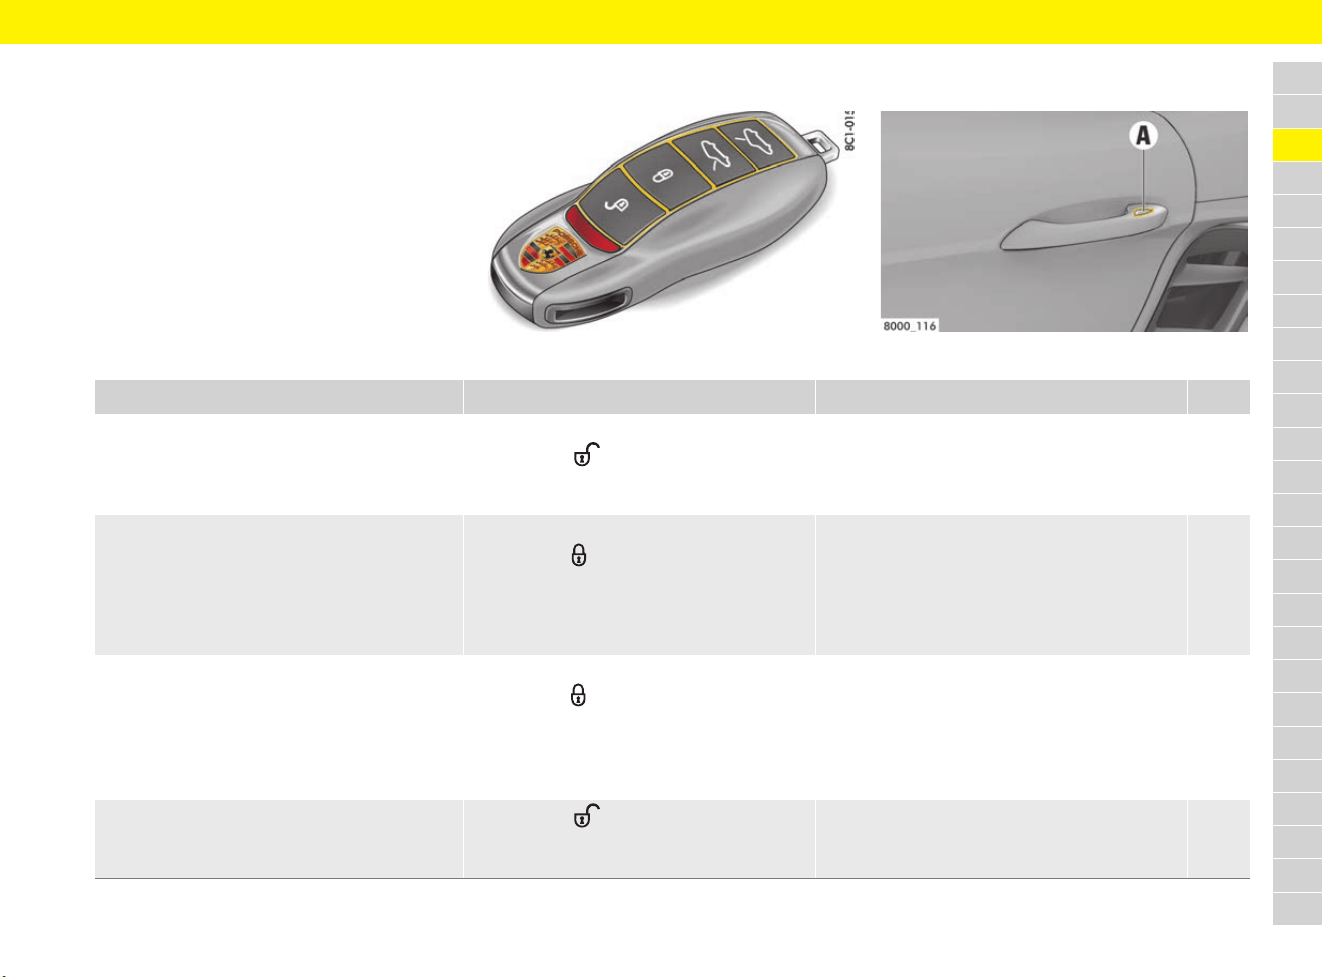
71
Central Locking
A
B
C
D
E
F
G
H
I
J
K
L
M
N
O
P
Q
R
S
T
U
V
W
X
Y
Z
Central Locking
Brief overview – opening and
locking doors from outside
Fig. 40: Driver’s key Fig. 41: Porsche Entry & Drive
This brief overview does not replace the complete
information provided under “Central locking
system”. Safety instructions and warnings, in
particular, are not replaced by this brief overview.
What do I want to do? What do I have to do? What happens? Page
Unlock With driver’s key:
e Press the button on the driver’s key.
With Porsche Entry & Drive:
e Grip the door handle fully.
The hazard warning lights flash once.
The doors can be opened.
72
Lock With driver’s key:
e Press the button on the driver’s key.
With Porsche Entry & Drive:
e Touch proximity sensor A on the door
handle.
The hazard warning lights flash twice. The doors
are locked, but can be opened from inside by
pulling the door opener.
Vehicles with interior surveillance: The doors
cannot be opened from inside by pulling the door
opener (SAFELOCK).
73
Lock if persons/animals are remaining in
vehicle on vehicles with interior surveillance:
– Deactivating SAFELOCK and
– switch off the alarm system’s interior
surveillance
With driver’s key:
e Press the button on the driver’s key
twice (within approx. 2 seconds).
With Porsche Entry & Drive:
e Touch proximity sensor A on the door
handle twice (within approx. 2 seconds).
The hazard warning lights flash slowly once.
The doors are locked, but can be opened from
inside by pulling the door opener.
73
Switch off the alarm system’s alarm sound e Press the button on the driver’s key.
– or –
Switch on ignition.
The alarm sound is switched off. 47

72
Central Locking
A
B
C
D
E
F
G
H
I
J
K
L
M
N
O
P
Q
R
S
T
U
V
W
X
Y
Z
Using the central locking system
Depending on equipment, the vehicle can be
unlocked and locked either with the driver’s key or
without a key by means of Porsche Entry & Drive.
The following are unlocked or locked together:
– Doors
– Filler flap
Using the driver’s key
e Use the button on the driver’s key.
With Porsche Entry & Drive
1)
Vehicle with Porsche Entry & Drive can be
unlocked and locked without using the driver’s
key. However, the driver’s key must always be
carried, e.g. in your trouser pocket.
To ensure that the vehicle cannot be unlocked and
started by unauthorised third parties,
Porsche Entry & Drive can be deactivated
temporarily on the driver’s key.
Deactivating Porsche Entry & Drive on
the driver’s key
1. Press button and keep it pressed.
2. At the same time, press the button
within 1 second and keep both buttons
pressed until the indicator light on the driver’s
key lights up continuously.
Deactivation at the driver’s key is confirmed
when the indicator light on the driver’s key
lights up continuously.
Porsche Entry & Drive is activated automatically
when you press the buttons on the driver’s key or
turn the control unit.
e Do not expose the driver’s key to a high level
of electromagnetic radiation. This can
adversely affect Porsche Entry & Drive.
Unlocking and opening doors
Setting door unlocking
Depending on the settings, either only the driver’s
door or also the passenger’s door is unlocked.
f Refer to chapter “Setting door locking options”
on page 269.
Both doors can be unlocked irrespective of the
selected setting:
e Press button on the driver’s key twice
within 5 seconds.
Unlocking the doors with the driver’s
key
Fig. 42: Unlocking the doors with the driver’s key
1. Press the button.
The hazard warning lights flash once.
The doors are unlocked.
2. Pull the door handle.
Information
The factory settings of the vehicle are described
in this section.
For information on modifying the unlocking and
locking settings:
f Refer to chapter “Setting door locking options”
on page 269.
1) The Porsche Entry & Drive System is state-of-the-art.
However, we cannot entirely rule out the possibility of
the key codes of the radio keys being intercepted and
used to open or steal the vehicle.
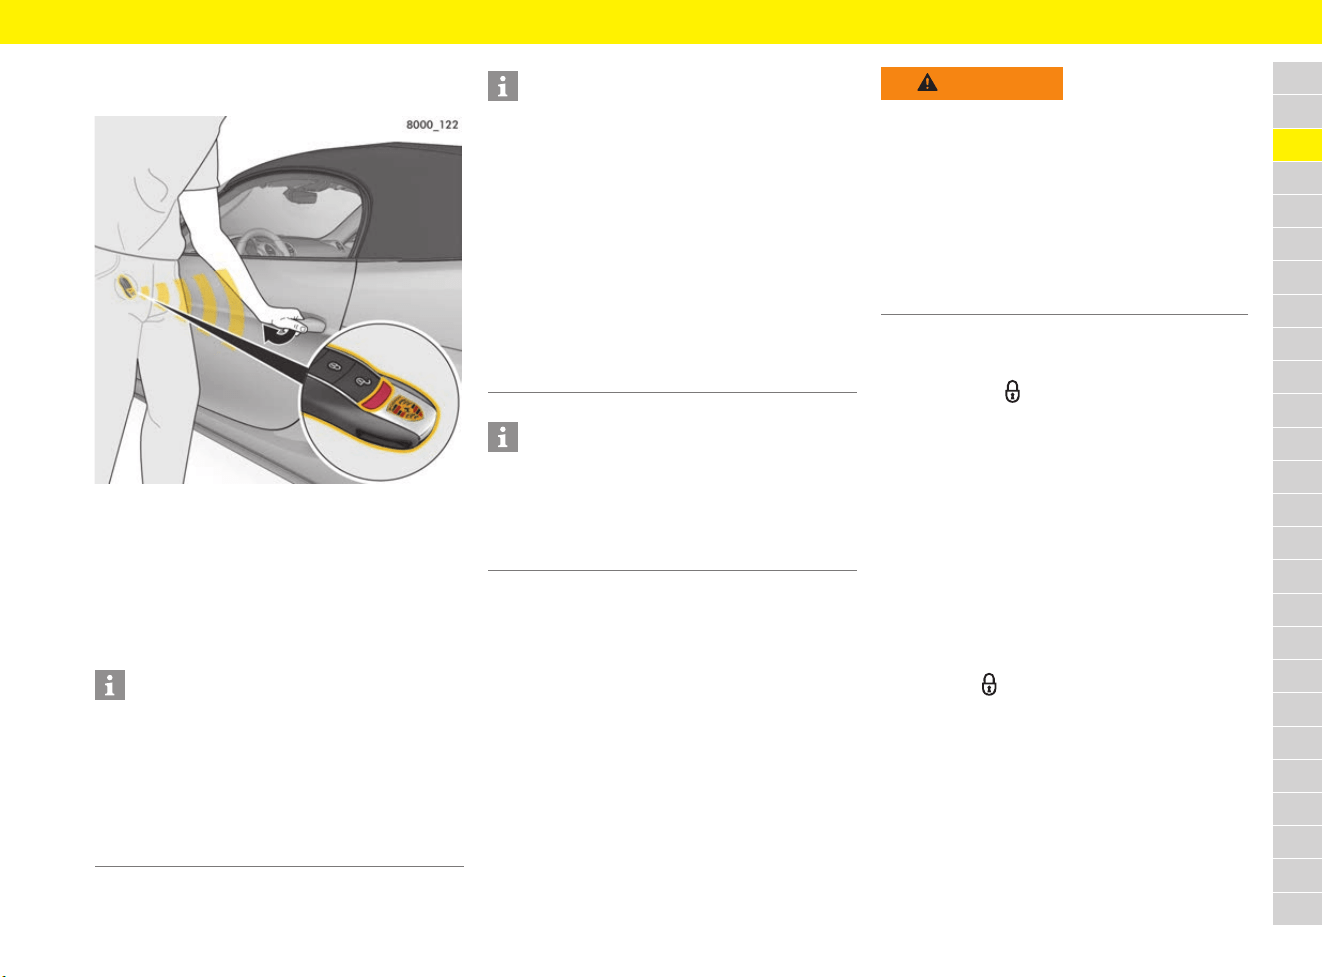
73
Central Locking
A
B
C
D
E
F
G
H
I
J
K
L
M
N
O
P
Q
R
S
T
U
V
W
X
Y
Z
Unlocking the doors with
Porsche Entry & Drive (keyless)
Fig. 43: Unlocking the doors with Porsche Entry & Drive
b Carry the driver’s key with you, e.g. in your
trouser pocket.
1. Grip the door handle fully.
The hazard warning lights flash once.
The doors are unlocked.
2. Pull the door handle.
Locking doors
Using SAFELOCK
SAFELOCK (on vehicles with interior surveillance)
disables the door openers and central locking
button on the locked vehicle in order to make
attempted break-ins more difficult.
Locking the doors with the driver’s key
1. Close the door.
2. Press button once.
The hazard warning lights flash twice.
On vehicles with interior surveillance
(SAFELOCK):
The doors cannot be opened from inside by
pulling the door opener.
On vehicles without interior surveillance:
The doors are locked, but can be opened from
inside by pulling the door opener.
– or –
If persons or animals are remaining in
the vehicle (deactivate SAFELOCK if the
vehicle is locked):
e Press the button twice within 2 seconds.
The hazard warning lights flash slowly once.
The doors are locked, but can be opened from
inside by pulling the door opener.
e Inform any persons remaining in the vehicle
that the alarm system will be triggered if the
door is opened.
Information
Operational readiness of Porsche Entry & Drive is
switched off after 96 hours for the driver’s door
and after 36 hours for the passenger’s door if the
vehicle is not unlocked within this time.
1. Pull the door handle once to activate the
system again.
2. Pull the door handle again to open the door.
Information
The vehicle is locked automatically after
30 seconds if no door or luggage compartment lid
is opened. The alarm system is activated.
Inclination sensor and interior surveillance system
are not activated (restricted anti-theft protection).
As a result, the doors can be opened from inside
by pulling the door opener.
e Inform any persons remaining in the vehicle
that the alarm system will be triggered if the
door is opened.
When locked again, the interior surveillance
system and inclination sensor are activated once
more.
Information
In the event of an accident in which the airbag is
triggered, the doors are unlocked automatically in
order to enable helpers to gain access to the
vehicle. Additionally, the hazard warning lights are
activated automatically.
WARNING
Locking the doors from
outside
No persons or animals should be left in the vehicle
when it is locked from the outside because the
doors and windows cannot be opened from the
inside (SAFELOCK) on vehicles with interior
surveillance. Locked doors make it more difficult
for helpers to access the inside of the vehicle in
the case of an emergency.
e Make sure that no persons or animals are
inside the vehicle when locking it.
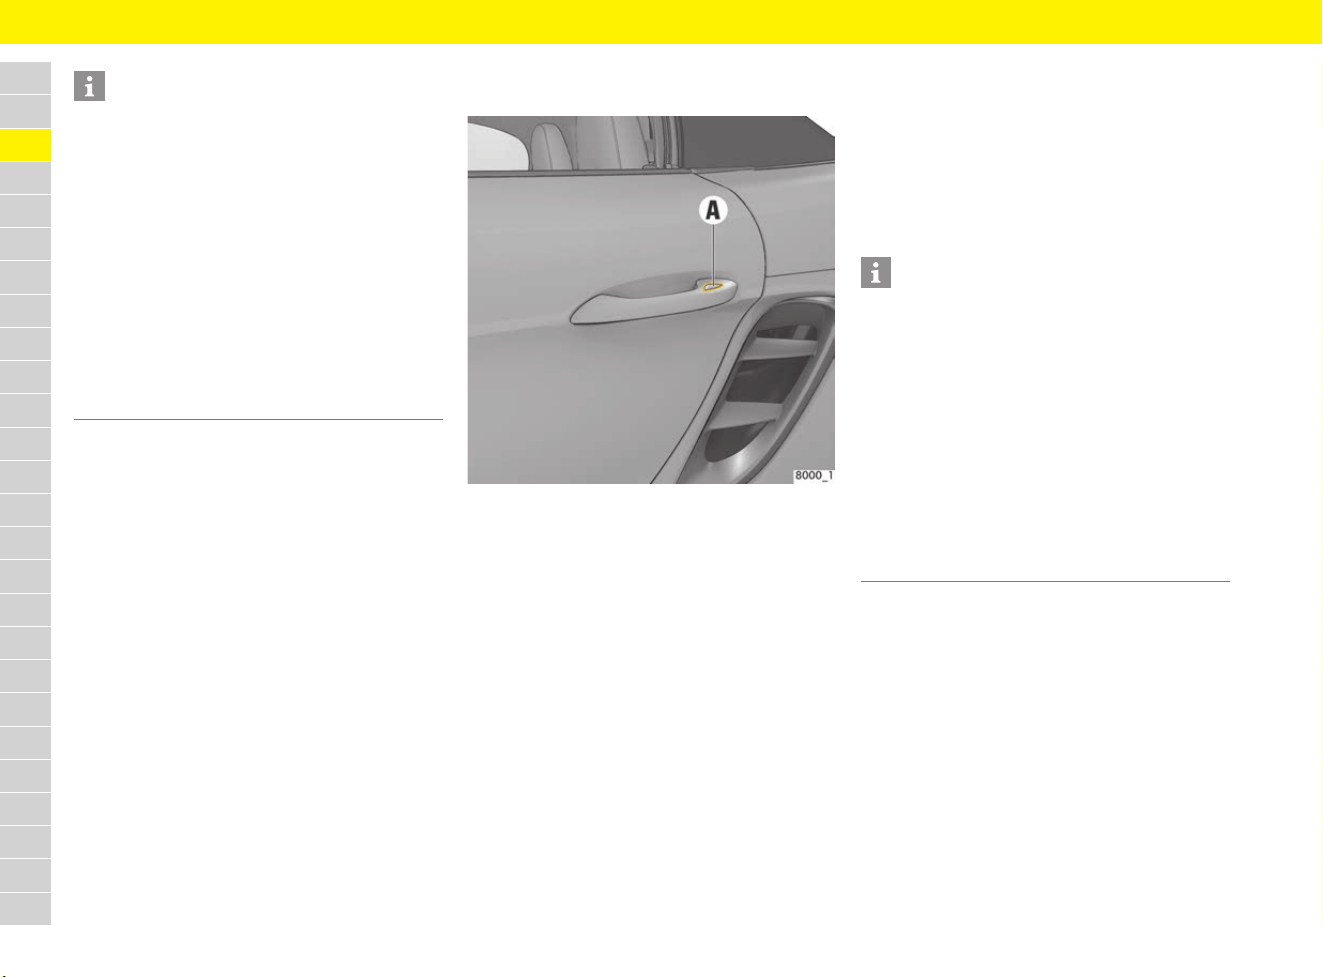
74
Central Locking
A
B
C
D
E
F
G
H
I
J
K
L
M
N
O
P
Q
R
S
T
U
V
W
X
Y
Z
Locking the doors with
Porsche Entry & Drive (keyless)
Fig. 44: Locking the doors with Porsche Entry & Drive
b Carry the driver’s key with you, e.g. in your
trouser pocket.
1. Close the door.
2. Touch proximity sensor A on the door handle.
The hazard warning lights flash twice.
On vehicles with interior surveillance
(SAFELOCK):
The doors cannot be opened from inside by
pulling the door opener.
On vehicles without interior surveillance:
The doors are locked, but can be opened from
inside by pulling the door opener.
– or –
If persons or animals are remaining in
the vehicle (deactivate SAFELOCK if the
vehicle is locked):
e Touch proximity sensor A on the door handle
twice within 2 seconds.
The hazard warning lights flash slowly once.
The doors are locked, but can be opened from
inside by pulling the door opener.
e Inform any persons remaining in the vehicle
that the alarm system will be triggered if the
door is opened.
Information
– The vehicle cannot be locked if the doors or
the luggage compartment lids are not fully
locked.
A warning signal sounds and a warning
message appears on the multi-function display;
the hazard warning lights do not flash.
– When locking with only the driver’s door
closed, the vehicle is pre-locked.
e Ensure that the driver’s key is not inside the
vehicle when locking the remaining open doors
or luggage compartment lids.
If the driver’s key is still in the vehicle, the
vehicle can only be unlocked with the second
key.
Information
– When locking, only the proximity sensor in the
door handle must be touched.
If the entire door handle is gripped, the vehicle
doors cannot be locked.
– The vehicle cannot be locked if the doors or
the luggage compartment lids are not fully
locked.
A warning signal sounds and a warning
message appears on the multi-function display;
the hazard warning lights do not flash.
– The driver’s key must be outside the vehicle
when locking the vehicle doors, otherwise the
vehicle doors cannot be locked.

75
Central Locking
A
B
C
D
E
F
G
H
I
J
K
L
M
N
O
P
Q
R
S
T
U
V
W
X
Y
Z
Opening and locking doors from
inside
Locking doors
Fig. 45: Central locking button
b Doors closed.
e Press button .
All doors are locked.
When the ignition is switched on, the indicator
light on the button lights up.
The doors can be opened from inside by
pulling the door opener.
Automatic door locking
When this function is enabled, the vehicle is locked
automatically when a speed of approx. 5 km/h
(3 mph) is exceeded.
f Refer to chapter “Setting door locking options”
on page 269.
Unlocking doors
e Press the button.
All doors are unlocked.
The indicator light on the button goes out.
Automatic door unlocking
Vehicles without Porsche Entry & Drive:
The vehicle is unlocked automatically when the
driver’s key is removed.
Vehicles with Porsche Entry & Drive:
The vehicle is unlocked automatically when the
driver’s door is opened.
f Refer to chapter “Setting door locking options”
on page 269.
Opening doors
Fig. 46: Opening doors from the inside
e Pull door opener A (Fig. 46).
Information
If the vehicle was locked using the driver’s key or
the emergency key, it cannot be unlocked with the
central locking button.
A Door opener
B Door storage compartment
Information
The doors, the front and rear luggage
compartment lids and the engine compartment lid
cannot be opened from the inside if the vehicle
was locked and SAFELOCK is activated.
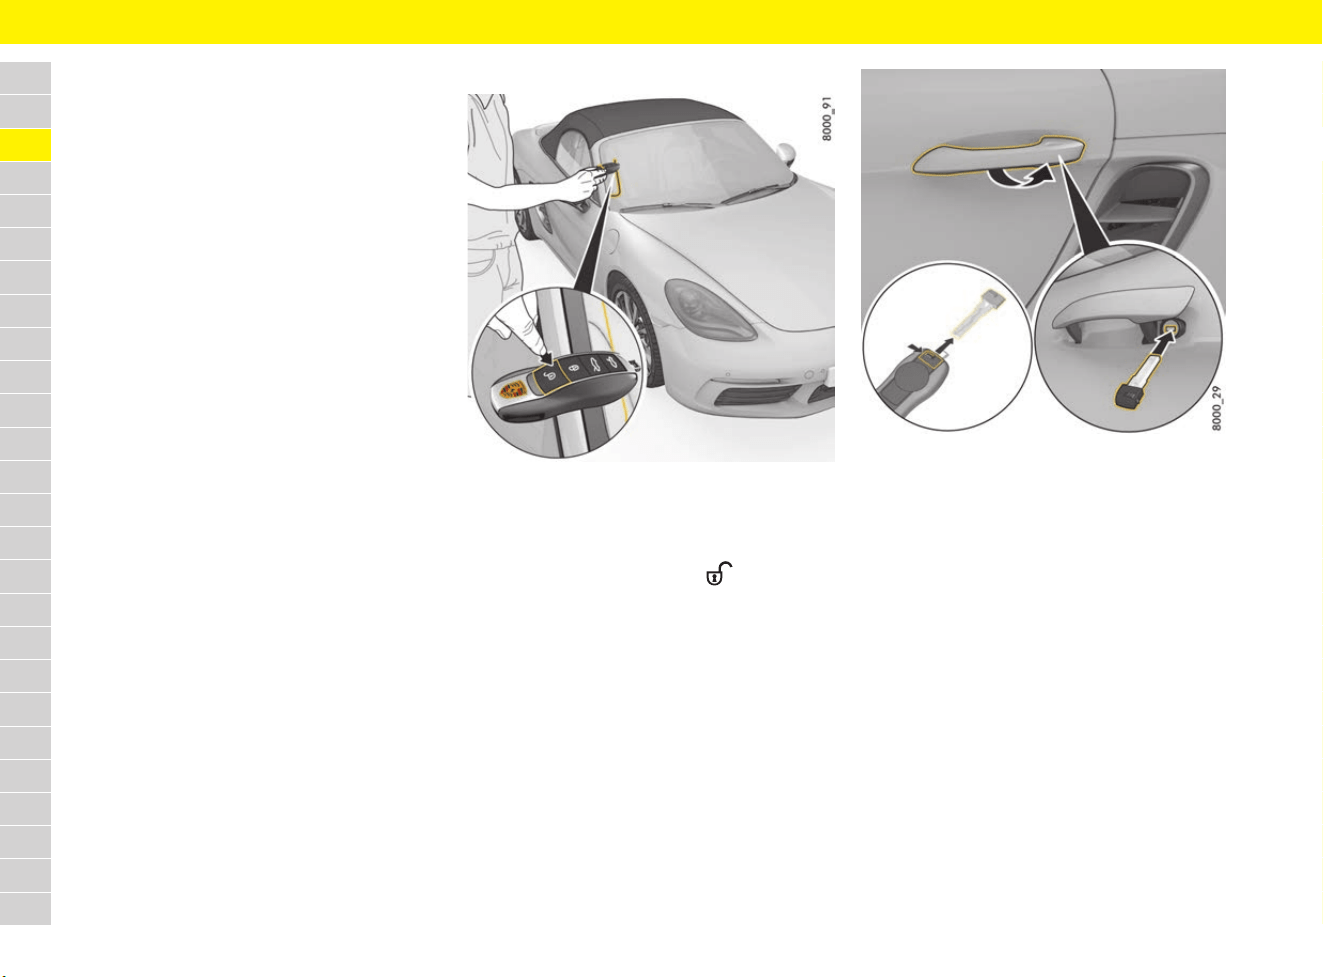
76
Central Locking
A
B
C
D
E
F
G
H
I
J
K
L
M
N
O
P
Q
R
S
T
U
V
W
X
Y
Z
Emergency door operation
If the driver’s key remote control does not work,
the doors can also be opened and closed without
the remote control.
A failure in the remote control can be caused by
the following:
– Radio waves can cause interference in the
transmission (also radio contact between the
driver’s key and vehicle in the case of
Porsche Entry & Drive).
Ensure that you do not store the driver’s key
together with electronic devices which are
switched on (e.g. mobile phone, notebook,
charging cable). Change where you keep the
driver’s key if necessary.
– A failure in the remote control can be caused
by a fault.
– The battery in the driver’s key may be flat
(Refer to chapter “Replacing battery in driver’s
key” on page 102).
Performing emergency door unlocking
Fig. 47: Emergency release in the event of a faulty remote
control
e Place the driver’s key at the outside edge of
the windscreen on the passenger side and,
at the same time, press the button
(Fig. 47).
If the vehicle still cannot be unlocked:
1. Remove the emergency key from the driver’s
key.
f Refer to chapter “Using emergency key” on
page 102.
Fig. 48: Door lock cylinder
2. Unlock and open the driver’s door with the
emergency key:
Lift and hold the door handle.
Insert the emergency key in the door lock, turn
90° clockwise and remove the emergency key
again (Fig. 48).
3. Release the door handle and open the door by
pulling the door handle again.
4. Switch on the ignition within 10 seconds to
prevent the alarm system from triggering.

77
Central Locking
A
B
C
D
E
F
G
H
I
J
K
L
M
N
O
P
Q
R
S
T
U
V
W
X
Y
Z
Further procedure for vehicles with
Porsche Entry & Drive:
If the ignition cannot be switched on or if
the engine does not start, the message
Key not found or key fault
Change key position will appear on the
multi-function display.
5. Turn control unit back to ignition lock
position 0.
6. Try to start the engine again.
If the engine cannot be started, the message
Key not found or key fault
Change key position appears again.
7. After approx. 1 second, the message
Operating part: turn left, pull off,
insert key appears.
8. Turn control unit back to ignition lock position
0 and remove it from the ignition lock.
f Refer to chapter “Performing emergency
release of driver’s key/control unit” on
page 103.
9. Switch the ignition on using the driver’s key
(not the emergency key).
Performing emergency door locking
1. Remove the emergency key from the
driver’s key.
f Refer to chapter “Using emergency key” on
page 102.
2. Open the driver’s door.
3. Lift the door handle on the driver’s door
(Fig. 48 on page 76).
Insert the emergency key in the door lock, turn
90° against the direction of travel and remove
the emergency key again.
Successful locking is indicated by the hazard
warning lights flashing twice.
4. Release the door handle and close the door.
The driver’s door is now locked.
5. For emergency locking of the passenger’s
door, insert the emergency key in the door
lock of the driver’s door again, turn it 90°
against the direction of travel and remove the
emergency key again.
The passenger’s door is now locked.
Information
If the central locking system is defective,
operating the door lock in the driver’s door will
lock all functioning locking elements of the central
locking system.
e Have faults in the central locking system
repaired.
e Visit a qualified specialist workshop. Porsche
recommends a Porsche partner as they have
trained workshop personnel and the necessary
parts and tools.

78
Child Restraint Systems (Child Seats)
A
B
C
D
E
F
G
H
I
J
K
L
M
N
O
P
Q
R
S
T
U
V
W
X
Y
Z
Child Restraint Systems
(Child Seats)
General safety instructions
Porsche recommends Porsche Tequipment child
restraint systems.
For information on installation options:
e Contact your Porsche partner.
f Refer to chapter “Use of child restraint
systems – secured with seat belt” on page 80.
f Refer to chapter “Use of recommended child
restraint systems – secured with ISOFIX
system” on page 82.
e Always switch off the seat heating if child
restraint systems are installed.
Fig. 49: Airbag warning sticker on the sun visor
e Never remove, deface or render illegible
sticker A with airbag warning and warning
signs.
DANGER
Improper use of the
child restraint systems
Risk of serious or fatal injury resulting from the
improper use of child restraint systems.
Child restraint systems that are not suitable for the
vehicle type or that are not properly installed in the
vehicle do not provide adequate protection in the
event of an accident.
e Always refer to the separate installation
instructions for your child restraint systems.
e Do not use child restraint systems on bucket
seats.
Refer to chapter “Installing child restraint
systems on different seat variants” on
page 84.
e When using a child restraint system, always
comply with the legal regulations that apply in
your country.
e
Use only child restraint systems recommended
by Porsche.
These restraint systems have been tested and
adjusted to suit the interior of Porsche vehicles
and the appropriate child weight classes.
Other systems have not been tested and could
present an increased risk of injury.
e Always switch off the passenger airbag
before using child restraint systems on the
passenger’s seat.
DANGER
Child restraint system
on passenger seat
The passenger airbag offers protection only for
persons of a certain minimum size and minimum
weight. If a child restraint system is fitted on the
passenger seat or the seated passenger is a
small or light person, there is a risk of serious or
fatal injury from the passenger airbag triggering.
e Always switch off the passenger airbag before
installing child restraint systems on the
passenger’s seat.
f Refer to chapter “Switching passenger airbag
on and off – PASS AIR BAG OFF indicator” on
page 84
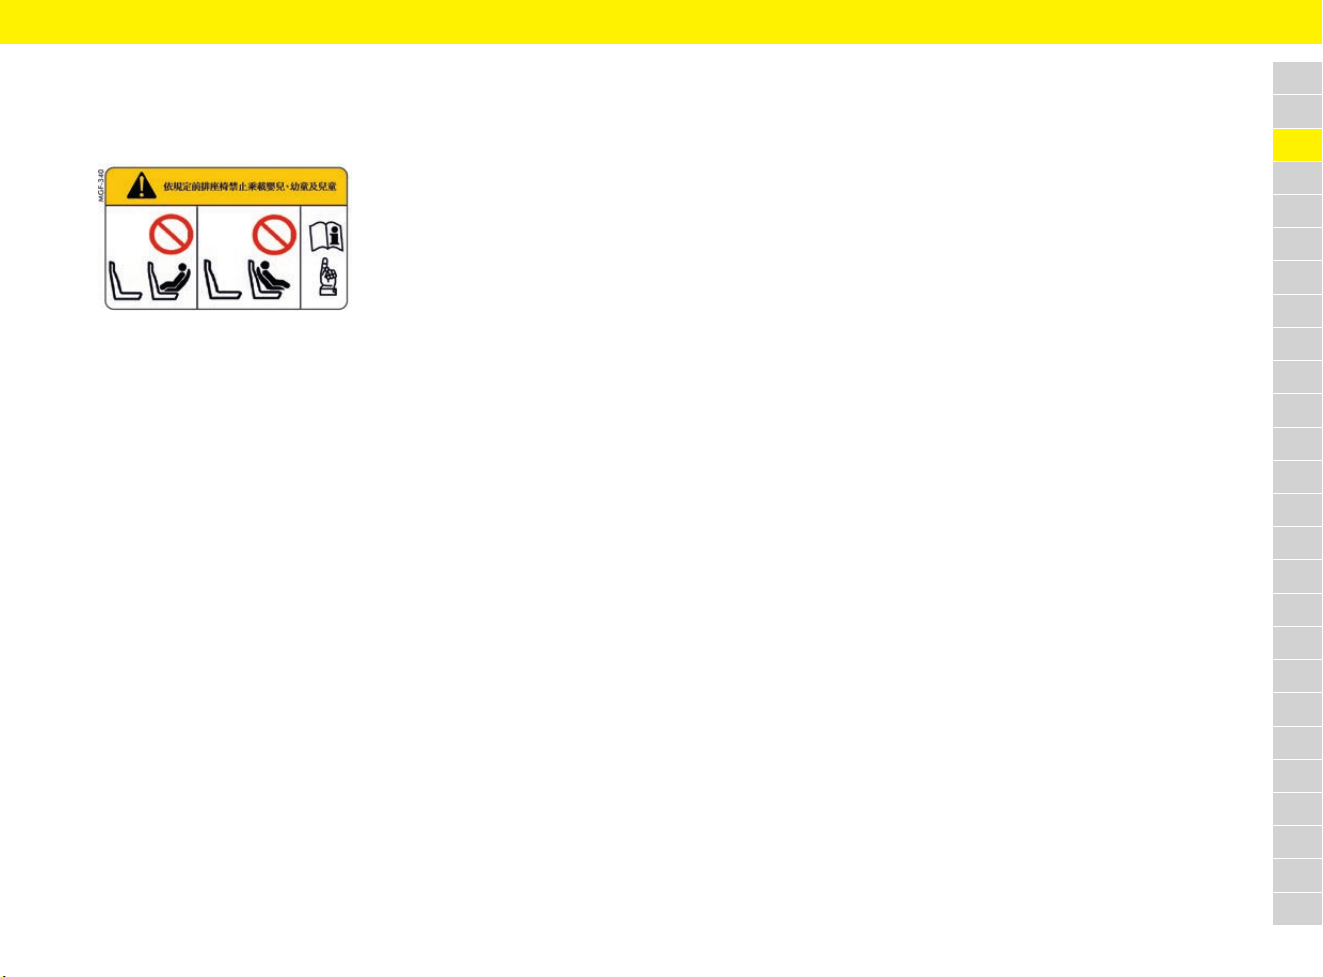
79
Child Restraint Systems (Child Seats)
A
B
C
D
E
F
G
H
I
J
K
L
M
N
O
P
Q
R
S
T
U
V
W
X
Y
Z
Taiwan only:
f According to Taiwan related regulations,
“DO NOT carry babies, infants and children
on the front passenger seat”.
Classification of child restraint
systems in weight classes
Children in group 0 and 0+: Up to 13 kg
Children in this group must be carried in a child
restraint system that is fitted facing backward.
Children in group I: 9 to 18 kg
Children in this group must be carried in
child restraint systems facing forward.
Children in group II: 15 to 25 kg
Children in this group must be carried in
child restraint systems facing forward.
Children in group III: 22 to 36 kg
Children in this group must be carried in
child restraint systems facing forward.

80
Child Restraint Systems (Child Seats)
A
B
C
D
E
F
G
H
I
J
K
L
M
N
O
P
Q
R
S
T
U
V
W
X
Y
Z
Use of child restraint systems – secured with seat belt
Recommended child restraint systems – secured with seat belt
Refer to chapter “Use of child restraint systems – secured with seat belt” on page 81.
Weight class Manufacturer Type Authorisation
number
Porsche
part number
Installation on passenger seat
Group 0 and 0+:
Up to 13 kg
Britax-Römer Porsche
Baby Seat G0+
E1 04301146 955.044.802.94 – Installed facing backward
– Adjust passenger seat to rear, upper position
– Only if passenger airbag is switched off
Group I:
9 to 18 kg
Britax-Römer Porsche
Junior Seat
ISOFIX G1
E1 04301199 955.044.802.88 – Installed facing forward
– Adjust passenger seat to rear, upper position
– Only if passenger airbag is switched off
Group II:
15 to 25 kg
Britax-Römer Porsche
Junior Plus
G2 + G3
E1 04301169 955.044.802.90 – Installed facing forward
– Adjust passenger seat to rear, upper position
– Only if passenger airbag is switched off
Group III:
22 to 36 kg
Britax-Römer Porsche
Junior Plus
G2 + G3
E1 04301169 955.044.802.90 – Installed facing forward
– Adjust passenger seat to rear, upper position
– Only if passenger airbag is switched off
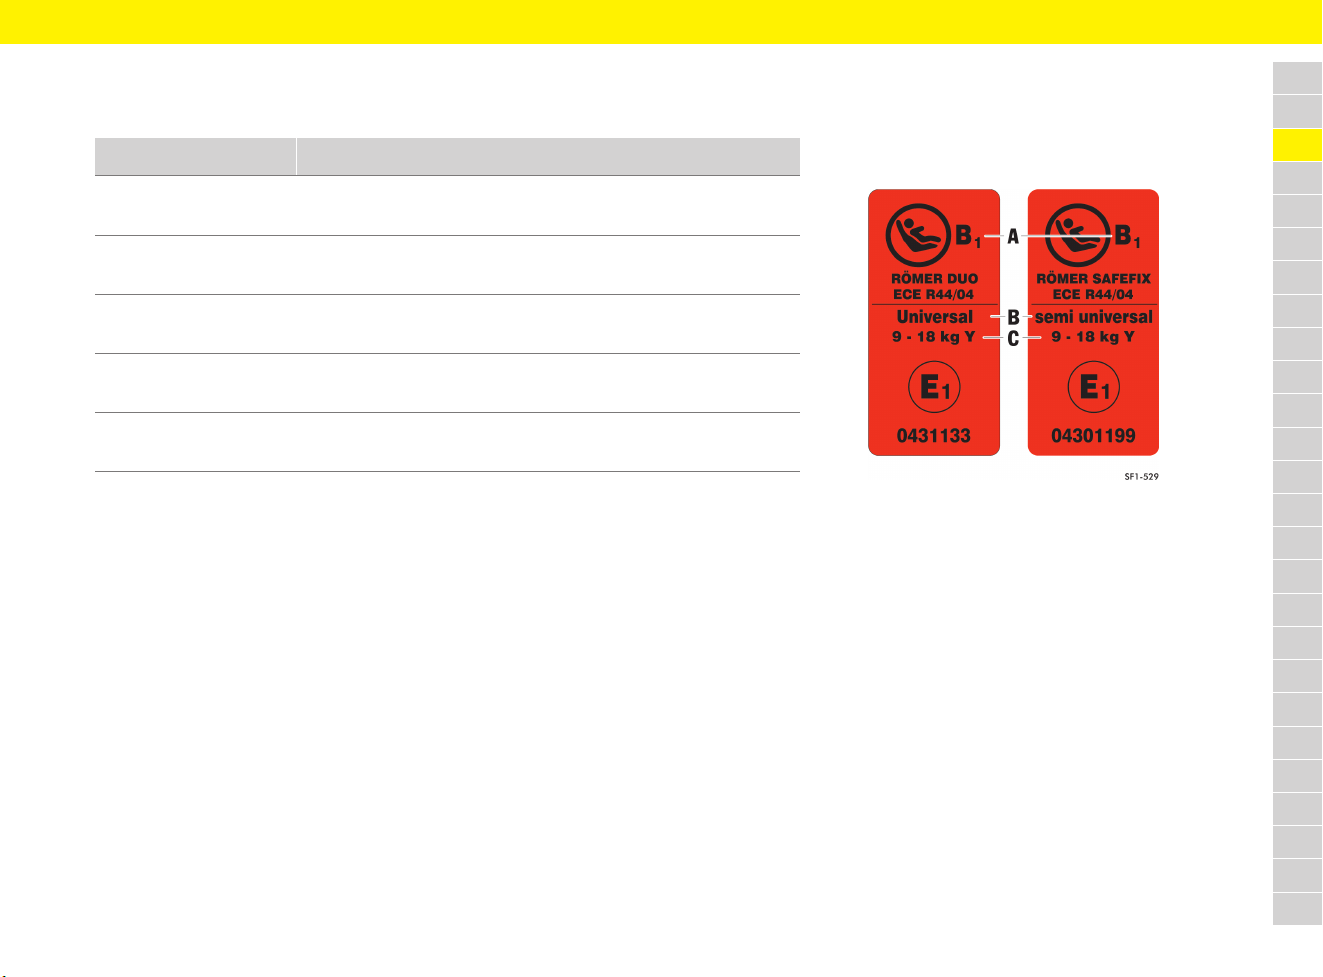
81
Child Restraint Systems (Child Seats)
A
B
C
D
E
F
G
H
I
J
K
L
M
N
O
P
Q
R
S
T
U
V
W
X
Y
Z
Use of child restraint systems – secured with seat belt
Overview of how child restraint systems secured with the seat belt can be used in accordance with standard ECE-R 16.
The marking “Universal” is shown on the orange ECE sticker on the child restraint system (Fig. 50).
X: Seat is not suitable for child restraint systems of this weight class.
U: Suitable for child restraint systems with the “Universal” category approved for use for this weight class.
L: Suitable for particular child restraint systems listed on page 80.
Weight class Child restraint system on passenger seat
1)
2)
Group 0:
Up to 10 kg
U/L
Fig. 50: ECE sticker
A Size category
B “Universal” or “semi universal” marking
C Weight class
Group 0+:
Up to 13 kg
U/L
Group I:
9 to 18 kg
U/L
Group II:
15 to 25 kg
U/L
Group III:
22 to 36 kg
U/L
1) Only if passenger airbag is switched off. Refer to the notes on installing child restraint systems on the passenger seat on page 80.
2) Adjust passenger seat to rear upper position.

82
Child Restraint Systems (Child Seats)
A
B
C
D
E
F
G
H
I
J
K
L
M
N
O
P
Q
R
S
T
U
V
W
X
Y
Z
Use of recommended child restraint systems – secured with ISOFIX system
Recommended child restraint systems – secured with ISOFIX system
Refer to chapter “Use of child restraint systems – secured with ISOFIX system” on page 83.
Weight class Manufacturer Type Authorisation
number
Porsche
part number
Installation on passenger seat
Group 0 and 0+:
Up to 13 kg
Britax-Römer Porsche
Baby Seat G0+
Only together
with:
ISOFIX base
E1 04301146 955.044.802.94
Only together
with:
955.044.802.95
– Installed facing backward
– Adjust passenger seat to rear, upper position
– Only if passenger airbag is switched off
Group I:
9 to 18 kg
Britax-Römer Porsche
Junior Seat
ISOFIX G1
E1 04301199 955.044.802.88 – Installed facing forward
– Adjust passenger seat to rear, upper position
– Only if passenger airbag is switched off
Group II:
15 to 25 kg
Britax-Römer Porsche
Junior Plus
ISOFIT
G2 + G3
E1 04301198 955.044.802.96 – Installed facing forward
– Adjust passenger seat to rear, upper position
– Only if passenger airbag is switched off
Group III:
22 to 36 kg
Britax-Römer Porsche
Junior Plus
ISOFIT
G2 + G3
E1 04301198 955.044.802.96 – Installed facing forward
– Adjust passenger seat to rear, upper position
– Only if passenger airbag is switched off

83
Child Restraint Systems (Child Seats)
A
B
C
D
E
F
G
H
I
J
K
L
M
N
O
P
Q
R
S
T
U
V
W
X
Y
Z
Use of child restraint systems – secured with ISOFIX system
Overview of how child restraint systems secured with ISOFIX system can be used in accordance with standard ECE-R 16.
The marking “Universal” or “semi universal” is shown on the orange ECE sticker on the child restraint system.
Weight class Size category Fixture ISOFIX attachment points on the passenger’s seat
1)
2)
3)
Baby carrier
(left or right-facing child
restraint systems)
F
G
ISO/L1
ISO/L2
X
X
Group 0: Up to 10 kg E ISO/R1 IL/SU
Group 0+: Up to 13 kg E
D
C
ISO/R1
ISO/R2
ISO/R3
IL/SU
IL/SU
X
Group I: 9 to 18 kg D
C
B
B1
A
ISO/R2
ISO/R3
ISO/F2
ISO/F2X
ISO/F3
IL/SU
X
IL/SU
IL/SU
IL/SU
Group II: 15 to 25 kg IL/SU
Group III: 22 to 36 kg IL/SU
1) Only if passenger airbag is switched off. Refer to the notes on installing child restraint systems on the passenger seat on page 82.
2) Adjust passenger seat to rear upper position.
3) In vehicles with ISOFIX anchorage system on the passenger seat, child restraint systems marked “semi universal” may be installed on the passenger seat.
Please refer to the vehicle list enclosed with the child restraint system and the child restraint systems recommended by Porsche on page 82.
X: Seat is not suitable for child restraint systems of this size category.
SU: The seat is suitable for fitting a child restraint system with an ISOFIX system that has the “semi universal” marking.
Please refer to the vehicle list provided with the child restraint system.
IL: Suitable for particular ISOFIX child restraint systems listed on page 82.
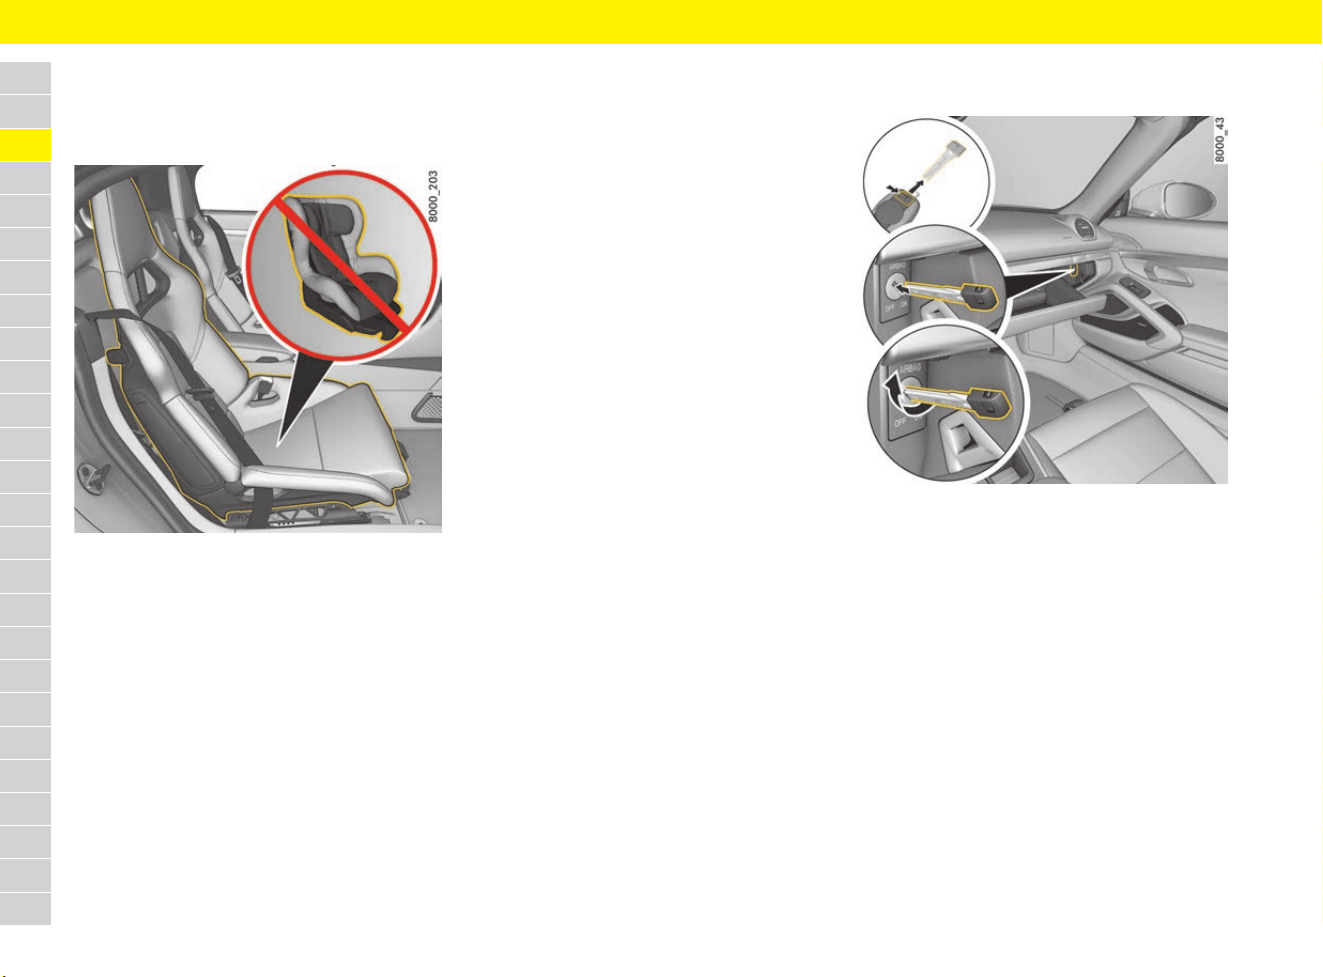
84
Child Restraint Systems (Child Seats)
A
B
C
D
E
F
G
H
I
J
K
L
M
N
O
P
Q
R
S
T
U
V
W
X
Y
Z
Installing child restraint systems
Installing child restraint systems on
different seat variants
Fig. 51: Bucket seat
Child restraint systems must not be used on
sports bucket seats (Fig. 51).
Recommended child restraint systems may be
used on all other seat variants.
f Refer to chapter “Seats” on page 213.
f Refer to chapter “Recommended child
restraint systems – secured with seat belt” on
page 80.
f Refer to chapter “Recommended child
restraint systems – secured with ISOFIX
system” on page 82.
Baby carriers
Left or right-facing child restraint systems from
size categories F and G (e.g. baby carriers) should
not generally be used on any of the seat variants.
f Refer to chapter “Use of child restraint
systems – secured with ISOFIX system” on
page 83.
Porsche recommends Porsche Tequipment child
restraint systems (e.g. Porsche baby seat ISOFIX
GO+).
f Refer to chapter “Recommended child
restraint systems – secured with seat belt” on
page 80.
f Refer to chapter “Recommended child
restraint systems – secured with ISOFIX
system” on page 82.
Switching passenger airbag on and off –
PASS AIR BAG OFF indicator
Fig. 52: Switching passenger airbag on and off
Taiwan only:
The key switch for switching the passenger airbag
on and off is not installed.
f According to Taiwan related regulations,
“DO NOT carry babies, infants and children
on the front passenger seat”.
1. Switch ignition off.
2. Open the glove box.
3. Remove the emergency key from the driver’s
key.
f Refer to chapter “Using emergency key” on
page 102.
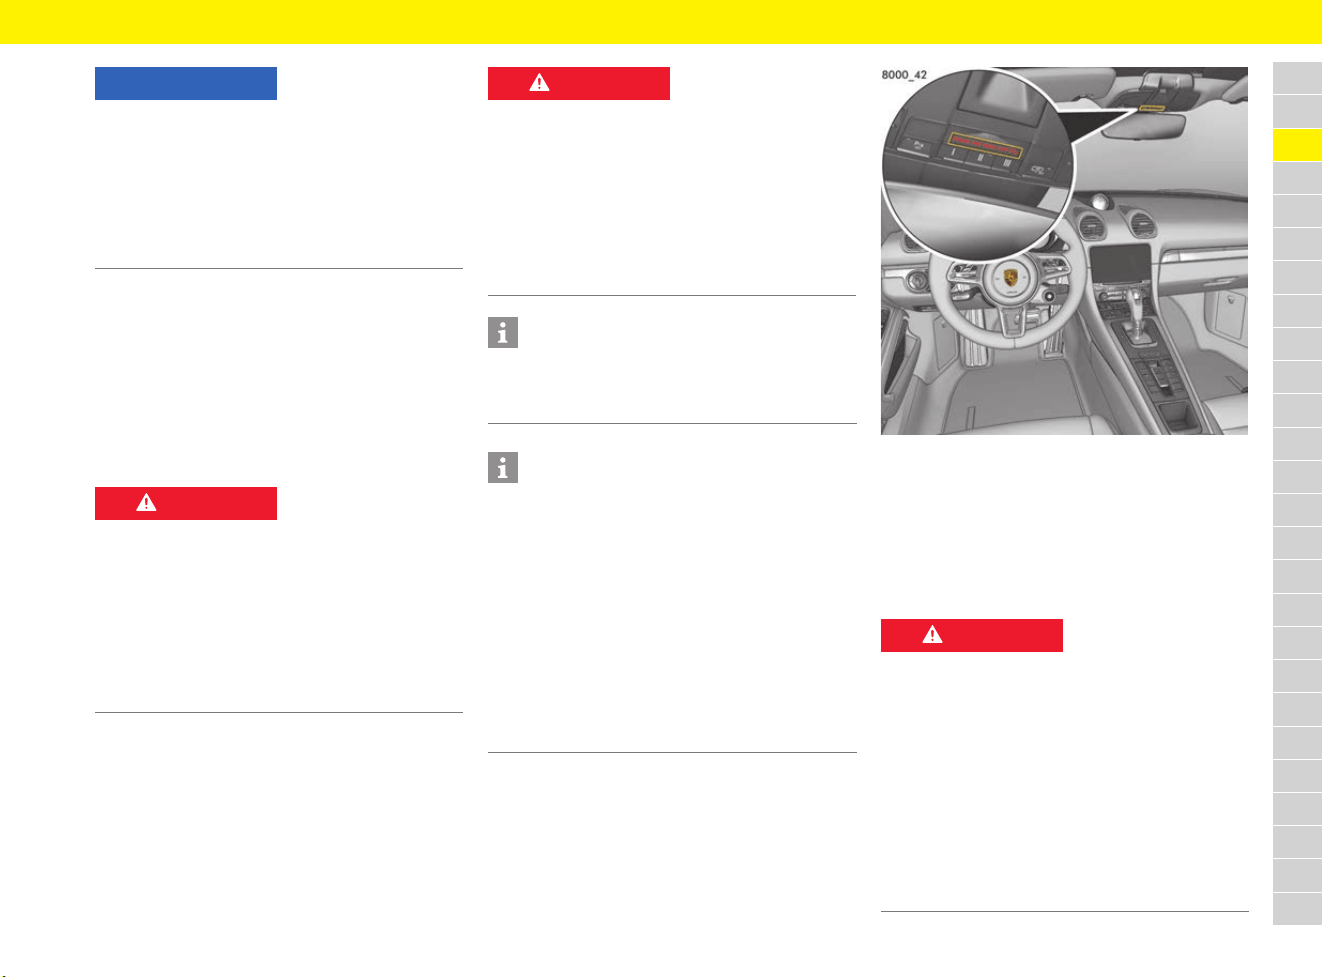
85
Child Restraint Systems (Child Seats)
A
B
C
D
E
F
G
H
I
J
K
L
M
N
O
P
Q
R
S
T
U
V
W
X
Y
Z
4. Insert the emergency key to the second point
of resistance in the key switch.
The emergency key bit should reach approx.
3/4 of the way into the key switch.
5. Using the emergency key, switch the
passenger airbag off (switch position OFF) or
on (switch position ON) without exerting
excessive force.
The PASS AIR BAG OFF indicator lights up.
6. Remove the emergency key from the key
switch.
7. Close the glove box.
If the airbag on the passenger’s side (seat 2) is
switched off, the PASS AIR BAG OFF indicator on
the overhead console remains continuously lit
when the ignition is switched on or the engine is
running.
Fig. 53: PASS AIR BAG OFF indicator
Taiwan only:
The PASSENGER AIRBAG OFF/ON warning
light is not installed.
According to Taiwan related regulations, “DO NOT
carry babies, infants and children on the front
passenger seat”.
NOTICE
Risk of damage to the key switch and airbag
system.
e Only turn the emergency key if it is inserted to
the second point of resistance in the key
switch.
e Only switch the passenger air bag on or off
when the ignition is switched off.
DANGER
Risk of serious or fatal
injury due to the
passenger airbag
triggering inadvertently
If the emergency key is left in the key switch
during driving, it may inadvertently turn in the key
switch due to vibration, possibly triggering the
airbag.
e Never leave the emergency key in the key
switch when driving.
DANGER
Passenger airbag
switched off
If the passenger airbag remains switched off after
removal of the child restraint system, it will not be
triggered in an accident.
e Only switch off the passenger airbag if a child
restraint systems is fitted on the passenger
seat.
e Switch the passenger airbag back on once the
child restraint system has been removed.
Information
When the passenger airbag is switched off, the
seat belt warning message for the passenger side
is also deactivated.
Information
The driver’s key switch for switching off the
passenger airbag, the PASS AIR BAG OFF
indicator and the ISOFIX restraint system on the
passenger seat are only installed in certain
equipment versions. They can be retrofitted (but
not to vehicles with bucket seats). The adjustment
range of the passenger seat backrest is restricted
when this equipment is installed.
e Visit a qualified specialist workshop. Porsche
recommends a Porsche partner as they have
trained workshop personnel and the necessary
parts and tools.
DANGER
Failure or malfunction of
the passenger airbag
If the PASS AIR BAG OFF indicator does not light
up when the ignition is on and the passenger
airbag has been switched off, there could be a
fault in the system.
e Do not install any child restraint systems on the
passenger seat.
e Have the fault corrected immediately. Visit a
qualified specialist workshop. Porsche
recommends a Porsche partner as they have
trained workshop personnel and the necessary
parts and tools.
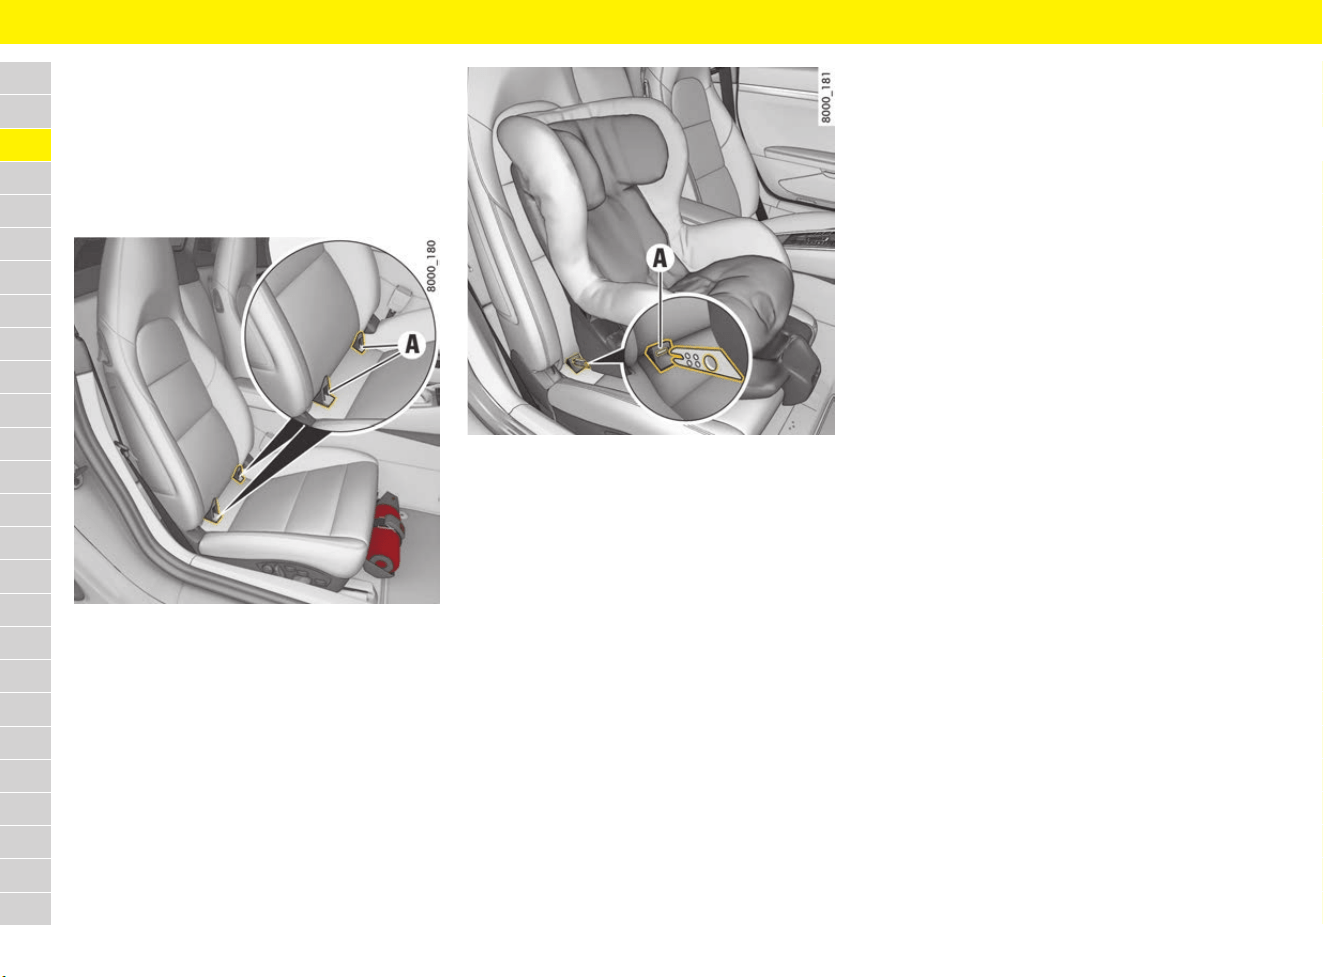
86
Child Restraint Systems (Child Seats)
A
B
C
D
E
F
G
H
I
J
K
L
M
N
O
P
Q
R
S
T
U
V
W
X
Y
Z
Installing child restraint systems with
ISOFIX system
f Refer to chapter “Recommended child
restraint systems – secured with ISOFIX
system” on page 82.
f Refer to the separate installation instructions
for your child restraint system.
Fig. 54: ISOFIX restraint system for passenger seat
The retaining lugs A of the ISOFIX child restraint
system anchorage points are located on the seat
surface of the passenger seat (depending on
equipment).
1. Switch off the passenger airbag with the
emergency key.
The PASS AIR BAG OFF indicator in the
overhead console must light up.
f Refer to chapter “Switching passenger
airbag on and off – PASS AIR BAG OFF
indicator” on page 84.
Fig. 55: Installation of child restraint system with ISOFIX
system
2. Secure the child restraint system in retaining
lugs A as described in the instruction manual
for the child restraint system.
3. Pull the child restraint system to check that
both anchorage points are properly engaged.
Taiwan only:
The ISOFIX restraint system is not installed on the
front passenger seat.
According to Taiwan related regulations, “DO NOT
carry babies, infants and children on the front
passenger seat”.
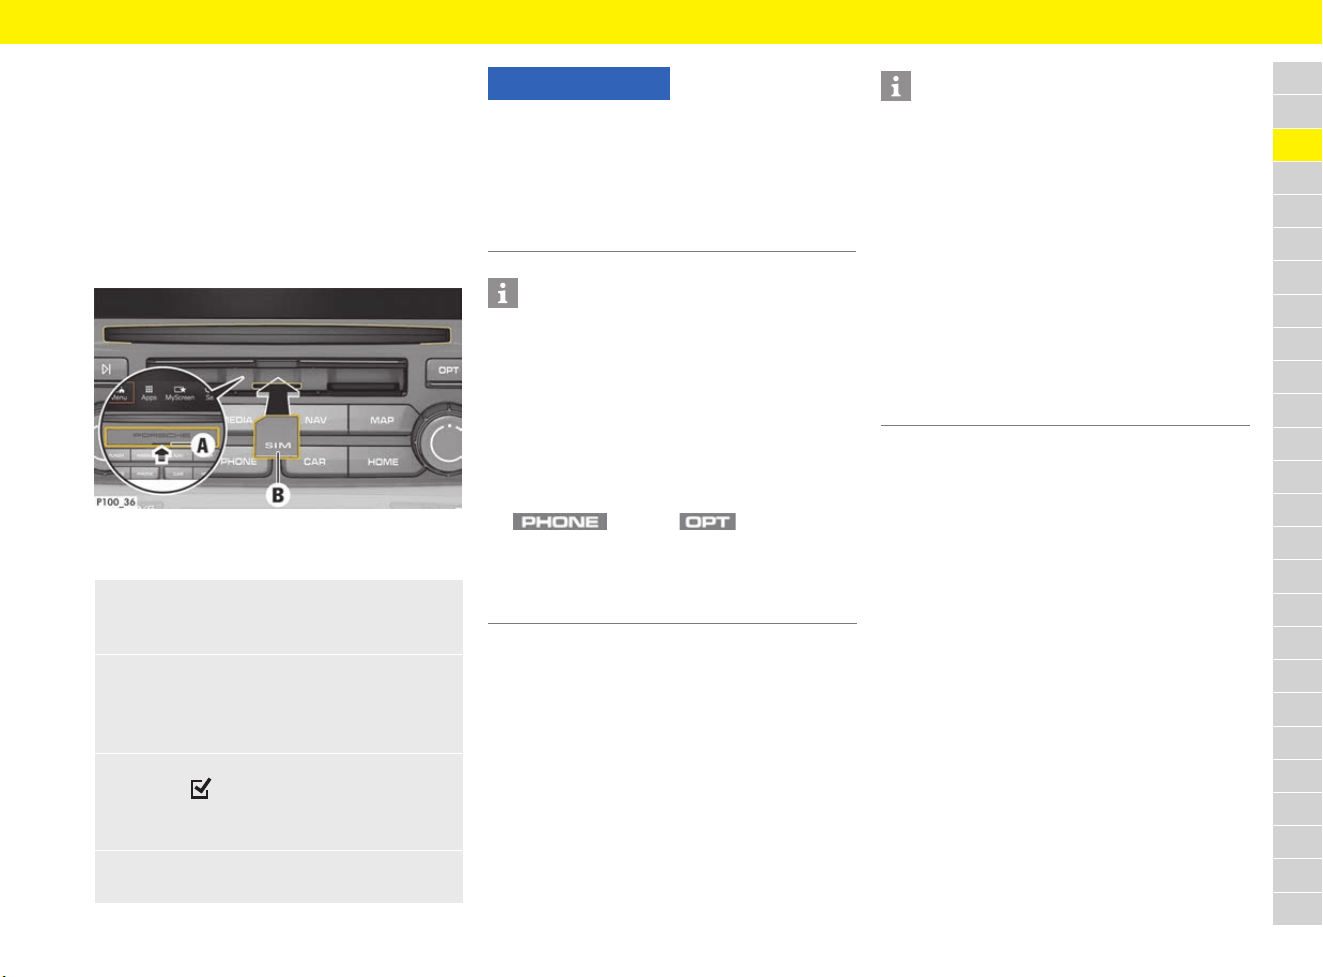
87
Connectivity
A
B
C
D
E
F
G
H
I
J
K
L
M
N
O
P
Q
R
S
T
U
V
W
X
Y
Z
Connectivity
Establishing data connection via
external SIM card
When an external SIM card is inserted, it
deactivates the function of the embedded SIM
(availability dependent on country). Additional
costs may be incurred for the data connection
(e.g. due to data roaming).
Fig. 56: Inserting and removing external SIM card
b SD and SIM card reader cover A is open.
For information on data connection settings:
f Refer to chapter “Configuring data
connections” on page 247.
For information on PIN settings for the SIM card
and other telephone settings:
f Refer to chapter “Changing phone settings” on
page 246.
For information on connecting a mobile phone to
the PCM using Bluetooth
®
:
f Refer to chapter “Telephone” on page 238.
1. Insert external SIM card B
(mini-SIM, dimensions: 25 x 15 mm) (missing
corner at front left, chip facing downwards).
2. SIM card with PIN:
a. Enter the PIN for the external SIM card
and confirm with OK.
b. Select Store PIN.
3. Select Enable to enable the data connection.
Activate Don’t ask again to disable the
repeated prompt.
The data connection is established.
e To remove the external SIM card, press on
the inserted card and remove it.
NOTICE
Risk of damage to PCM if SIM cards are not used
properly.
If a SIM card adapter is used, there is a risk of the
SIM card falling out of the adapter if shaken and
the card pieces remaining stuck in the PCM.
e Do not use adapters for SIM cards.
Information
If several access points are available, the message
Several access points (APN) are available.
Please select one. appears. A list of available
access points (APNs) is displayed.
e Select the desired access point (APN).
e If no access points are configured on the
external SIM card, find out the APN settings
from the mobile phone provider. To configure
the access point (APN) settings on the PCM:
button e button e
SET PHONE e Data connections e
Select Configure access point.
Use Reset access point configuration to
reset the settings.
Information
If a data connection cannot be established, check
the following:
– External SIM card has sufficient data volume
and is inserted correctly.
– External SIM card is not damaged and is
working properly.
– APN settings (Internet access) are correct.
The APN settings can be checked by contacting
the network operator.
– Abroad: Data roaming is allowed on the
external SIM card and enabled in the PCM.
– The vehicle is in an area with sufficient network
reception (not a coverage blackspot).
– Restart the PCM if necessary.
88
Connectivity
A
B
C
D
E
F
G
H
I
J
K
L
M
N
O
P
Q
R
S
T
U
V
W
X
Y
Z
Establishing data connection via
embedded SIM
(availability dependent on country)
b The SIM card reader is empty.
The data connection is established immediately
when the ignition is switched on.
For information on data connection settings:
f Refer to chapter “Configuring data
connections” on page 247.
Displaying data packages
Establishing a data connection via
external WiFi hotspot
b The SIM card reader is empty.
b Vehicles with embedded SIM
(availability dependent on country):
PCM phone is switched off.
f Refer to chapter “Changing phone settings”
on page 246.
For further information on WiFi settings:
f Refer to chapter “Configuring WiFi settings” on
page 247.
Using connectivity
Activating services in the Porsche
Connect portal
Before starting to use the Porsche Connect
services for the first time, they must be activated/
configured.
e Activate Porsche Connect services using the
Porsche Connect portal. For further information
on activating/configuring services:
f Visit www.porsche.com/connect.
Using services in the navigation system
and voice control system
b Data connection is successfully established via
the embedded SIM, an external SIM card or an
external WiFi hotspot.
f Refer to chapter “Connectivity” on
page 87.
– Load the Online search function for entering
navigation destinations as well as portal POIs
and other POI categories from the Porsche
Connect portal.
– Additional map display.
– Realtime traffic information about accidents,
roadworks, traffic flow information and other
incidents from the Internet.
– Dictate online language search as well as text
messages/e-mails.
Using services in the “Apps” menu
b Data connection is successfully established via
the embedded SIM, an external SIM card or an
external WiFi hotspot.
f Refer to chapter “Connectivity” on
page 87.
Information
If a data connection cannot be established,
check the following:
– The vehicle is in an area with sufficient network
reception (not a coverage blackspot).
– Restart the PCM if necessary.
e button e Apps e
Data packages
Information about the booked data package
is displayed.
1. button e button e
SET PHONE e WiFi settings
2. If necessary, activate WiFi function via
Activate WiFi.
3. Activate Use external data connection.
4. Select Connect external WiFi hotspot.
5. Search for a WiFi hotspot (e.g. public hotspot
or the mobile phone’s personal hotspot) and
enter the WiFi access data in the PCM. When
entering the data, pay attention to upper and
lower case.
A connection is established to the external
WiFi hotspot.
89
Connectivity
A
B
C
D
E
F
G
H
I
J
K
L
M
N
O
P
Q
R
S
T
U
V
W
X
Y
Z
For further information on the Porsche Connect
App functions:
f Refer to chapter “Porsche Connect App” on
page 193.
Porsche Connect login
A pairing code must be entered in the PCM
for some services in order to retrieve personal
settings from the Porsche Connect portal.
Porsche Connect logout
b A Porsche Connect user is created and
registered.
Updating contents
Displaying service information
Activating the PCM WiFi hotspot
(wireless Internet access)
Up to 8 WiFi devices can be connected to the
hotspot.
b Data connection is established via the external
SIM card or embedded SIM.
For further information on WiFi settings:
f Refer to chapter “Configuring WiFi settings” on
page 247.
e button e Apps
Available services are displayed.
Information
– The Porsche Connect services (including the
Car Connect services, but not the Safety and
Security services) offer a free inclusive period,
which varies in length for each services
package and country, but is always at least
3 months. Further information about the free
inclusive periods as well as subsequent costs
and information about the availability of
individual services for your country is available
online at www.porsche.com/connect or from
your Porsche partner.
–
Depending on the country, the Porsche Connect
Services can be used via the embedded SIM or
a data-enabled external SIM card. A separate,
fee-based contract with a mobile phone
provider is required for the external SIM card.
– You may incur additional charges when
receiving data packages from the Internet,
depending on your mobile phone tariff and
whether you are abroad. A flat-rate data plan
is recommended.
– The availability, scope and provider of the
services may vary depending on the country,
model year, device and tariff.
1. button e Apps e
button
2. Porsche Connect login e
Create new user e Enter pairing code.
3. Enter the pairing code that is displayed in
the Porsche Connect portal after you have
successfully activated/configured the
services.
1. button e Apps e
button
2. Porsche Connect logout
The user currently logged in is logged out.
e button e Apps e
button e Reload services
The contents of the purchased services
are updated.
e button e Apps e
button e Services information
Information about the services purchased
and contract duration is displayed.
Information
In order to activate a PCM WiFi hotspot via the
embedded SIM, a suitable data package must be
booked. The data package can be booked via the
Porsche Connect Store.
1. Select or in the footer
(depending on the connection status) e
Hotspot.
2. Confirm message by clicking OK.
WiFi access data of the PCM
(device name and WiFi password)
is displayed.
3. Enter the WiFi access data of the PCM into
the WiFi settings on the device.
A connection is established to the PCM’s
wireless Internet access.
Information
– You may incur additional charges when
receiving data packages from the Internet,
depending on your mobile phone tariff and
whether you are abroad. A flat-rate data plan
is recommended.
90
Convertible Top
A
B
C
D
E
F
G
H
I
J
K
L
M
N
O
P
Q
R
S
T
U
V
W
X
Y
Z
Convertible Top
f Refer to chapter “Care” on page 65.
f Refer to chapter “Warning and Information
Messages” on page 278.
Opening and closing the
convertible top
The front side windows are automatically opened
and automatically closed again during opening
and closing of the convertible top if
convertible top operation is continued after it has
reached its final position.
Opening and closing the convertible top
using the button in the vehicle interior
b Ignition is switched on.
b Maximum speed of up to approx. 50 km/h
(30 mph).
The opening/closing operation is interrupted
if the maximum speed is exceeded.
Fig. 57: Opening the convertible top with the button
Opening the convertible top (up to a speed of
approx. 10 km/h (6 mph), depending on
country)
e Pull and hold the button for opening the
convertible top continuously until the
convertible top has reached its final position or
until the windows are in the desired position.
The corresponding message on the multi-
function display goes out.
In the event of danger:
e Release the button.
Convertible top operation stops.
NOTICE
Risk of damage to convertible top and convertible-
top drive.
e Do not operate convertible top:
– At temperatures below 0 °C.
– When one side of the vehicle is on a kerb,
a lifting platform or a jack.
e Avoid frequent convertible top operation with
the engine off so that the vehicle battery does
not rapidly discharge.
e Only drive with the convertible top fully open or
closed.
e When opening or closing the convertible top,
ensure that there is sufficient clearance above
it (e.g. in the garage).
e To prevent damp stains and abrasion damage,
open the convertible top only when it is in a dry,
clean state.
e Park the vehicle in the shade if possible, since
continuous exposure to the sun attacks textiles,
rubber and paint.
e The convertible top may only be operated when
driving on a level road surface.
e Do not operate the convertible top in strong
winds or storms.
WARNING
Opening and closing
the convertible top
When opening and closing the convertible top,
parts of the body can become trapped between
the convertible-top mechanism or convertible-top
compartment lid and fixed vehicle parts.
e Make sure that nobody is at risk of injury
from the convertible-top mechanism or the
convertible-top compartment lid.
e Do not operate the convertible top with the
driver’s key if the vehicle is out of your sight.
e In order to interrupt convertible-top operation
in the event of danger, immediately release the
button or driver’s key button.
e Keep the covers of the vanity mirrors in the sun
visors closed when closing the convertible top.
91
Convertible Top
A
B
C
D
E
F
G
H
I
J
K
L
M
N
O
P
Q
R
S
T
U
V
W
X
Y
Z
Opening the convertible top at a speed from
approx. 10 km/h (6 mph) to approx. 50 km/h
(30 mph) (depending on country)
e Briefly pull the button for opening the
convertible top.
The convertible top opens automatically.
The corresponding message on the multi-
function display goes out.
In the event of danger:
e Pull the button again briefly.
Convertible top operation stops.
Fig. 58: Closing the convertible top with the button
Closing the convertible top
e Pull and hold the button for closing the
convertible top continuously until the
convertible top has reached its final position or
until the windows are in the desired position.
The corresponding message on the multi-
function display goes out.
In the event of danger:
e release the button.
Convertible top operation stops.
Closing convertible top using the
driver’s key (depending on the country)
1. Unlock the vehicle.
2. Press and hold the driver’s key button until
the convertible top has reached its end
position or until the windows are in the desired
position.
In the event of danger:
e release the button.
Convertible top operation stops.
Removing and installing wind
deflector
Installing outer wind deflector parts
Fig. 59: Installing outer wind deflector parts
1. Insert wind deflector part from the front at the
bottom into the roll-over bar.
2. Bend the wind deflector part slightly and
engage at the top in the roll-over bar.
3. Make sure that the wind deflector parts
engage completely in the roll-over bar.
Removing outer wind deflector parts
e Push the wind deflector part out of the roll-over
bars against the direction of travel, and remove.
NOTICE
e Make sure that all wind deflector parts are
properly and securely fastened, particularly
when driving with the convertible top open.
92
Convertible Top
A
B
C
D
E
F
G
H
I
J
K
L
M
N
O
P
Q
R
S
T
U
V
W
X
Y
Z
Installing centre wind deflector
Fig. 60: Installing centre wind deflector
e Insert wind deflector from above into
mounting A and then push successively
downwards until the wind deflector engages
audibly into place at the locking points B.
Removing centre wind deflector
e Press one of the locking points B and pull the
wind deflector upwards out of the mounting A.
Performing emergency operation
of convertible top
Checking the convertible top system
Before implementing emergency operation, check:
– Was the ignition switched on during operation
of the convertible top via the button?
– Are the fuses defective?
f Refer to chapter “Checking and changing
fuses” on page 113.
e Remove the driver’s key so that the wind
deflector and convertible top are not activated
unintentionally.
Step 1: Accessing the convertible top
drive
1. Move the driver’s and passenger’s seat
forward and fold the backrests forwards.
.
Fig. 61: Accessing the convertible top drive
2. Insert your hand between the gap in the carpet
(Fig. 61) and carefully pull out the carpeting
from below along the belt reel trim and fold
over.
Information
It is advantageous to remove the centre wind
deflector to ensure good ventilation in the
passenger compartment or of the rear window
when the convertible top is closed. This applies
in particular when the weather is wet and cold.
WARNING
Moving convertible top
parts during emergency
operation
e Always carry out emergency operation with the
greatest care.
e During emergency operation, do not operate
the convertible top using the button or driver’s
key.
NOTICE
Risk of damage to convertible top and
convertible-top drive.
e During or after emergency operation, do not
operate the convertible top using the button or
driver’s key.
e Drive slowly and carefully.
e Visit a qualified specialist workshop. Porsche
recommends a Porsche partner as they have
trained workshop personnel and the necessary
parts and tools.
CAUTION
Sharp edges
Sharp edges on the belt reel trim may cause
grazes or cuts to the skin.
e Exercise caution when handling these trims.
93
Convertible Top
A
B
C
D
E
F
G
H
I
J
K
L
M
N
O
P
Q
R
S
T
U
V
W
X
Y
Z
Step 2: Releasing convertible top drive
1. Take open-ended spanner (13 A/F) from the
tool kit.
f Refer to chapter “Removing and stowing tyre
sealing compound or tool kit” on page 140.
Fig. 62: Releasing convertible top drive
2.
Using the open-ended spanner, turn the
screw A clockwise through 360° approximately
three times until the guide pin B is in position C.
3. Repeat the procedure on the opposite side.
Step 3: Pulling the convertible top out of
the storage compartment
Fig. 63: Pulling the convertible top out of the storage
compartment.
e Enter the vehicle.
1. Lift the convertible top with one hand on the
right or left-hand side.
2. Grasp the convertible top at the centre with the
other hand.
3. Pull the convertible top out of the storage
compartment until it is approximately half
closed.
Step 4: Closing the convertible top
Fig. 64: Removing cover of convertible top lock
1. With an open-ended wrench, carefully lever the
plastic cover of the convertible-top lock out of
the locking points (Fig. 64), and remove.
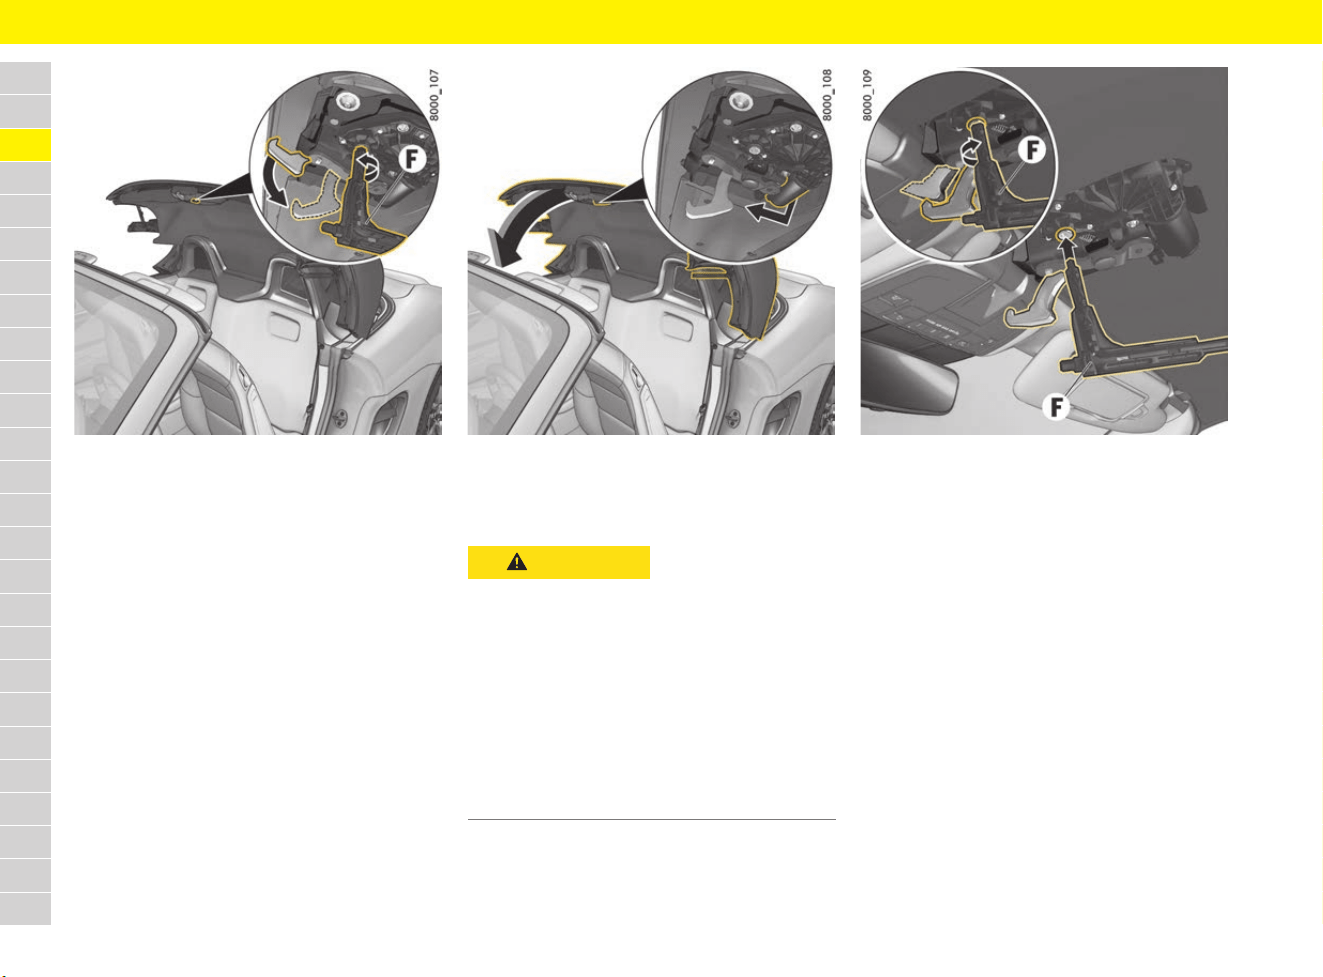
94
Convertible Top
A
B
C
D
E
F
G
H
I
J
K
L
M
N
O
P
Q
R
S
T
U
V
W
X
Y
Z
Fig. 65: Extending the convertible top latching hook
2. Remove the key F for emergency operation of
convertible top from the tool box.
f Refer to chapter “Removing and stowing tyre
sealing compound or tool kit” on page 140.
3. Insert the key F into the convertible top lock
(Fig. 65) and turn anti-clockwise until the
latching hook is fully extended (noticeable
resistance when turning).
Fig. 66: Pulling convertible top to windscreen frame
4. Using your hand, grasp the convertible top at
the convertible top motor (Fig. 66) and pull it
to the windscreen frame.
Fig. 67: Locking convertible top
5.
To fully close the convertible top, turn the key F
clockwise until the latching hook fully engages
in the catch and the convertible top is
completely closed (noticeable resistance when
turning Fig. 67).
CAUTION
Risk of injury due to
crushing during closing
If body parts are located within the range of
movement of the convertible top or in the area of
the convertible top lock during closing, there is a
risk of pinching or crushing.
e Pay attention to the following:
– that no persons are within the range of
movement of the convertible top during
closing.
– that hands cannot be pinched or crushed by
parts of the convertible-top lock.
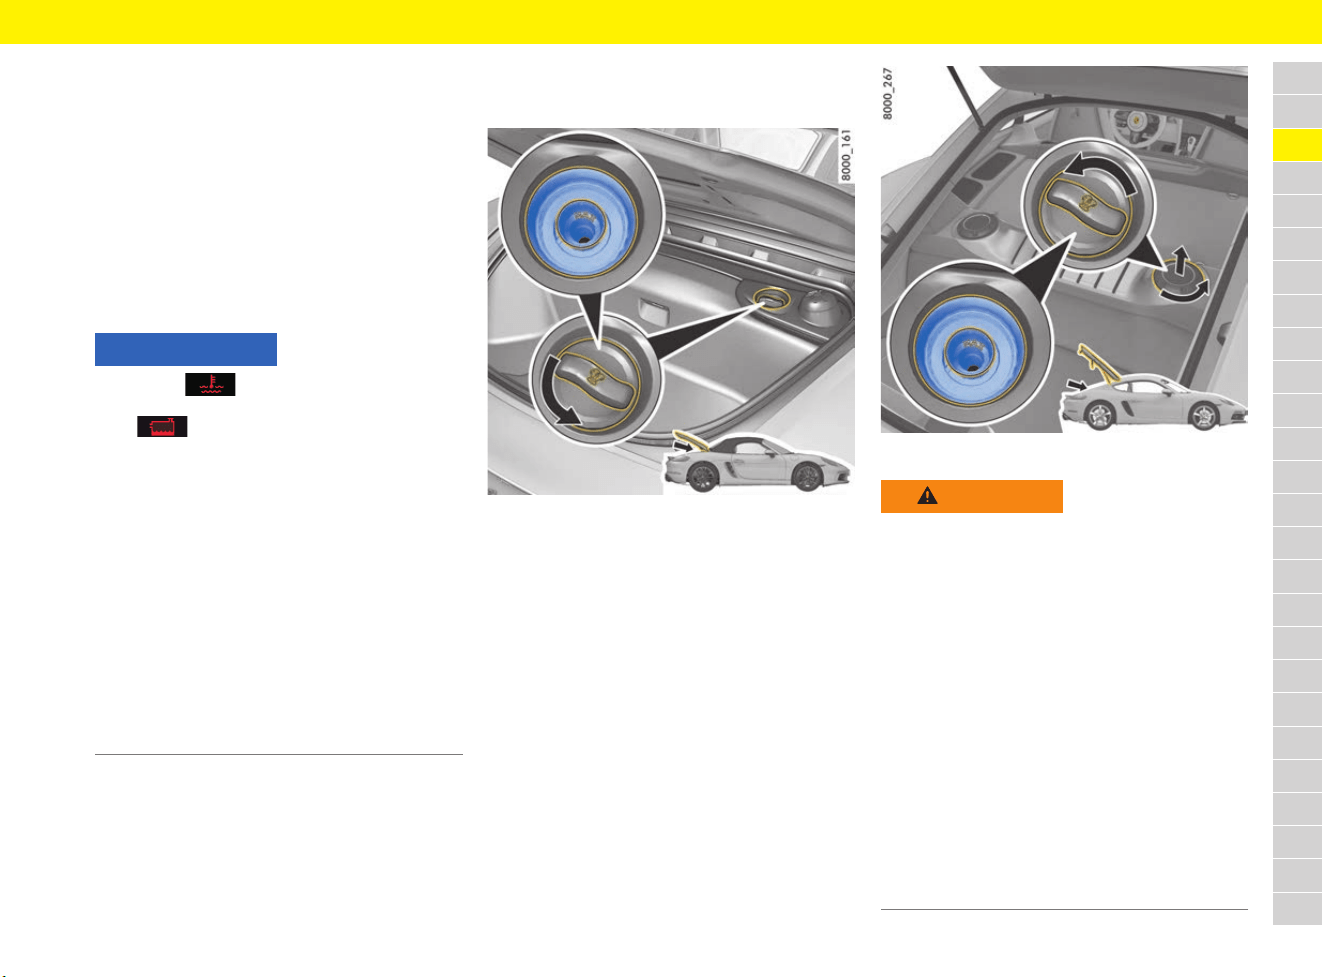
95
Coolant
A
B
C
D
E
F
G
H
I
J
K
L
M
N
O
P
Q
R
S
T
U
V
W
X
Y
Z
Coolant
The coolant provides year-round protection from
corrosion and freezing down to –37 °C.
Regular checking of the coolant level is part of
servicing.
e Use only antifreeze authorised by Porsche.
Porsche recommends Glysantin
®
G40
®
or
alternatively antifreeze in accordance with
G12++/VW TL 774-G
Responding to warning symbol
Checking coolant level and adding
coolant
Fig. 68: Boxster coolant reservoir
Fig. 69: Cayman coolant reservoir
NOTICE
The symbol appears on the multi-function
display if the coolant temperature is too high.
If the symbol appears, the coolant level is
too low.
If the vehicle continues to move after the red
warning message is displayed, there is a risk of
engine damage.
e Switch engine off and let it cool.
e Do not continue driving if the warning persists
even when the engine coolant level is correct.
Have the fault corrected.
Visit a qualified specialist workshop. Porsche
recommends a Porsche partner as they have
trained workshop personnel and the necessary
parts and tools.
f Refer to chapter “Warning and Information
Messages” on page 278.
WARNING
Hot engine parts and
hot coolant
The engine and adjacent components, the exhaust
system and the coolant become very hot when the
engine is running.
The coolant tank is pressurised. Hot coolant
can spray out suddenly if the coolant tank is not
opened with care.
e Take care when working near hot vehicle parts,
particularly the engine and the exhaust
system.
e Top up coolant only with the engine stopped
and ignition switched off.
e Do not open the cap on the coolant reservoir
when the engine is hot. Wait until the coolant
temperature gauge displays a temperature
below 60 °C.
f Refer to chapter “B – Coolant temperature” on
page 264.

96
Coolant
A
B
C
D
E
F
G
H
I
J
K
L
M
N
O
P
Q
R
S
T
U
V
W
X
Y
Z
b Vehicle is horizontal.
b Engine cold and coolant temperature gauge
below 60 °C.
b The symbol or with a message
requesting that the coolant be topped up
appears in the multi-function display.
b If the symbol or is not displayed
with a message requesting that the coolant be
topped up, only top up if no coolant is visible
at the base of the standpipe. The MAX marking
only applies during refilling itself as the level in
the standpipe drops after the engine is first
started.
1. Open the rear luggage compartment.
2. Cayman: Turn cap anticlockwise and remove
(Fig. 69).
3. Open cap on the coolant reservoir carefully
and allow any overpressure to escape.
4. Unscrew the cap completely.
5. Read off the engine coolant level. The coolant
level must be below the MAX marking.
(no coolant level visible at base of standpipe).
6. If necessary, top up the coolant to the MAX
marking, do not fill above the MAX marking.
Only add a mixture of antifreeze and distilled
water in equal parts.
The MAX marking only applies during refilling
itself as the level in the standpipe drops after
the engine is first started.
7. Screw the cap on the coolant reservoir closed
until it is felt to reach the end stop.
8. Cayman: Fit cap and turn clockwise (Fig. 69).
9. Have the cooling system checked.
Visit a qualified specialist workshop. Porsche
recommends a Porsche partner as they have
trained workshop personnel and the necessary
parts and tools.
Information
If pure water is added in an emergency, the mixing
ratio will have to be corrected.
A significant loss of coolant indicates a leak in the
cooling system.
e Eliminate the cause without delay. Visit a
qualified specialist workshop. Porsche
recommends a Porsche partner as they have
trained workshop personnel and the necessary
parts and tools.
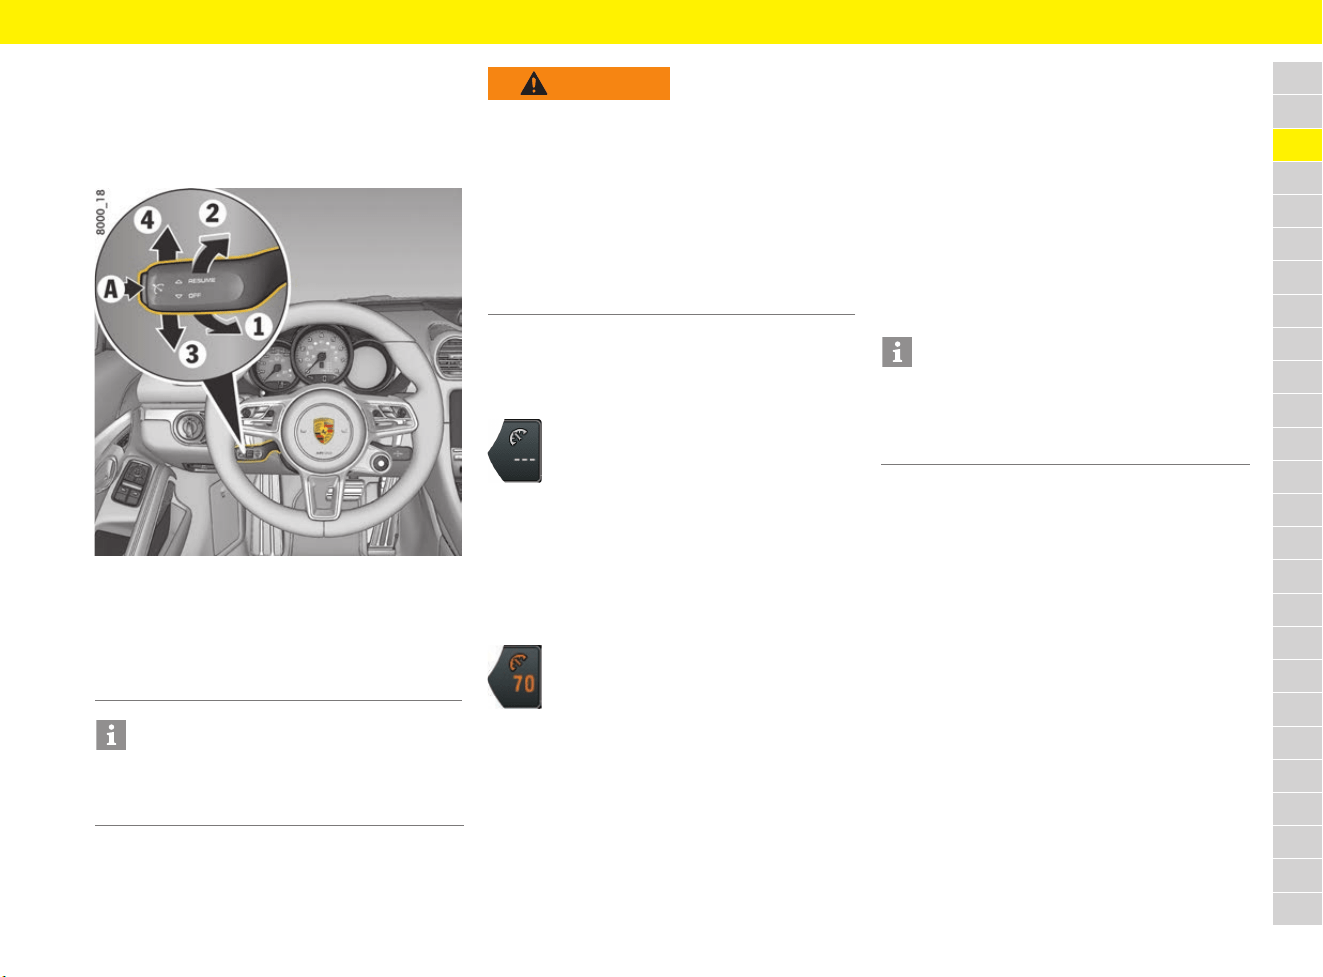
97
Cruise Control
A
B
C
D
E
F
G
H
I
J
K
L
M
N
O
P
Q
R
S
T
U
V
W
X
Y
Z
Cruise Control
Cruise control maintains the selected speed
between approx. 30 km/h and 240 km/h (20 mph
and 150 mph) without the accelerator having to
be used.
Fig. 70: Control stalk for cruise control
Switching cruise control readiness
on
e Press button A on the control stalk.
Maintaining and storing speed
1. Accelerate or decelerate to the desired speed
using the accelerator pedal.
2. Press the control stalk on the steering wheel
forward (position 1).
Changing speed
e To increase the speed, press the control stalk
on the steering wheel forwards (Fig. 70: 1).
Brief press = 1 km/h (1 mph),
press and hold = 10 km/h (5 mph)
e To reduce the speed, pull the control stalk
towards the steering wheel (Fig. 70: 2).
brief pull = 1 km/h (1 mph),
pull and hold = 10 km/h (5 mph)
The new desired speed is displayed on the
multi-function display.
Interrupting cruise control
operation – OFF
The speed driven before the interruption remains
stored in the memory and can be reactivated by
pressing the control stalk.
f Refer to chapter “Resuming the stored
speed – RESUME” on page 98.
e Press the control stalk down (Fig. 70: 3)
– or –
e Operate brake or clutch pedal.
– or –
e Move selector lever to N position.
A Switching cruise control on/off
1 Setting/increasing the desired speed
2 Reducing the desired speed
3 Interrupting cruise control operation (OFF)
4 Resuming the stored speed (RESUME)
Information
Active braking intervention is carried out
automatically to help maintain the pre-selected
speed (especially when driving downhill).
WARNING
Unsafe traffic situation
and unfavourable road
conditions
The use of cruise control can cause an accident
if the current driving situation is not conducive
to driving at a sufficient distance and constant
speed.
e Do not use cruise control in heavy traffic, on
twisting roads or under unfavourable road
conditions (e.g. wintry or wet conditions or
varying road surfaces).
Cruise control readiness
The grey symbol on the multi-function
display indicates readiness.
Desired speed
The current driving speed is displayed
under the cruise control symbol which
has now turned orange and is
automatically maintained.
Information
The speed can be increased as usual with the
accelerator pedal. This does not change the saved
value; the car returns to the stored speed when
you ease off the accelerator.

98
Cruise Control
A
B
C
D
E
F
G
H
I
J
K
L
M
N
O
P
Q
R
S
T
U
V
W
X
Y
Z
Cruise control operation is interrupted
automatically:
– If the set vehicle speed is exceeded by more
than approx. 25 km/h (16 mph) for over
20 seconds.
– If the actual vehicle speed falls below the set
vehicle speed by approx. 60 km/h (37 mph)
for longer than 60 seconds (e.g. gradients).
– If Porsche Stability Management (PSM)
intervenes for longer than 0.5 seconds.
Resuming the stored speed –
RESUME
e Press the control stalk up (Fig. 70: 4).
Cruise control accelerates/decelerates the
vehicle to the stored speed.
Switching cruise control readiness
off
e Press button A on the control stalk.
The memory is cleared and the readiness
symbol disappears.
Information
The stored speed is deleted by turning off the
ignition.
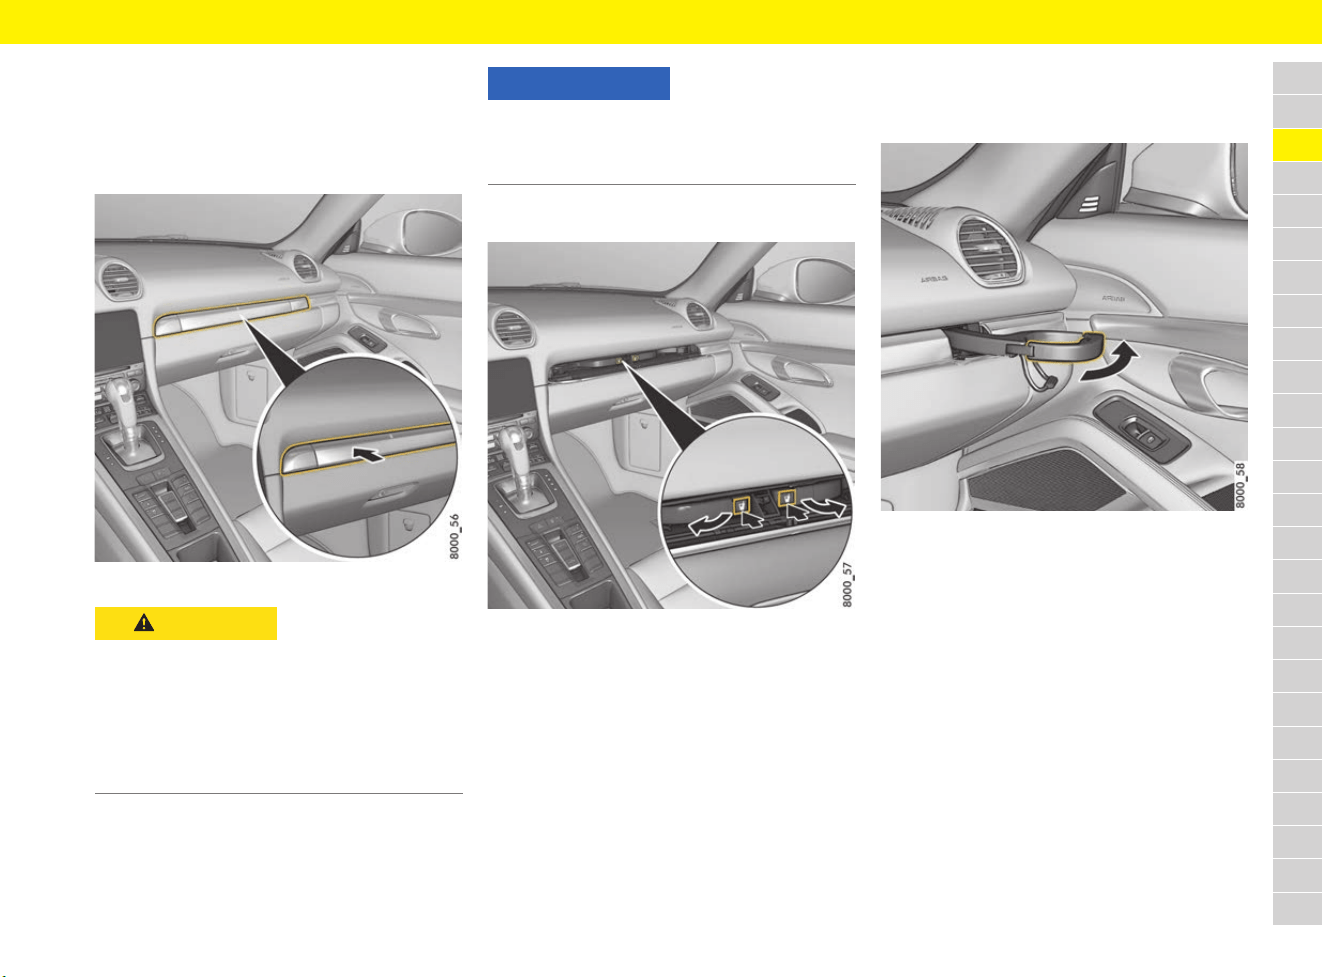
99
Cupholders
A
B
C
D
E
F
G
H
I
J
K
L
M
N
O
P
Q
R
S
T
U
V
W
X
Y
Z
Cupholders
Using cupholders
There are two folding cupholders behind the panel
above the glove box.
Fig. 71: Cupholder
Opening the cupholders
Fig. 72: Opening the cupholders
1. Press the cupholder panel (Fig. 71).
The panel opens.
2. Press the symbol for the left or right
cupholder.
The cupholder folds out.
3. Close the panel in the middle to secure the
cupholder.
Pulling cupholder out
The cupholders can be pulled out in order to fit
larger containers.
Fig. 73: Pulling cupholder out
1. Pull out the holder (Fig. 73).
2. Insert a cup/container.
3. Carefully press in the holder to adjust it to the
size of the cup/container.
Folding cupholder in
1. Push cupholder drawer in.
2. Open the panel in the middle.
3. Fold the cupholder in and engage it.
4. Close the panel in the middle.
CAUTION
Spilling hot beverages
Hot beverages can cause scalding if spilt.
e Only use containers that fit.
e Never put overfull containers in the cupholder.
e Not suitable for containers filled with hot
beverages.
e Keep the cupholders closed while driving.
NOTICE
Risk of damage due to beverages being spilt.
e Only use containers that fit.
e Never put overfull containers in the cupholder.
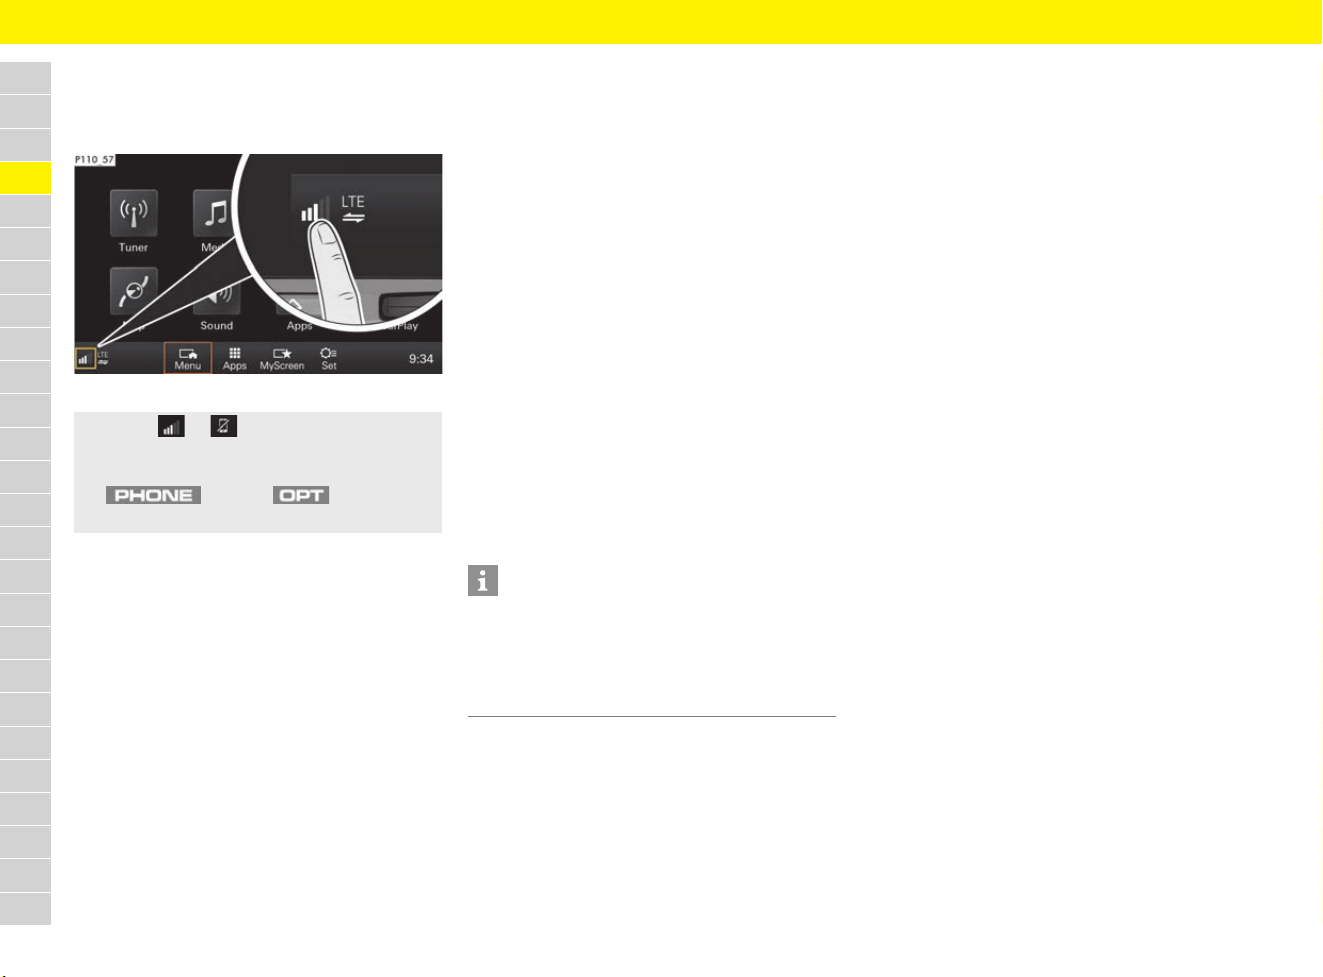
100
Device Manager
A
B
C
D
E
F
G
H
I
J
K
L
M
N
O
P
Q
R
S
T
U
V
W
X
Y
Z
Device Manager
Opening the Device Manager
Fig. 74: Opening the Device Manager
The following connections can be managed
centrally using the Device Manager:
– Telephone: Connect PCM to mobile phone via
Bluetooth
®
.
f Refer to chapter “Connecting mobile phone
via Bluetooth
®
(mobile phone preparation)”
on page 239.
f Refer to chapter “Connecting and using a
second mobile phone” on page 240.
– Bluetooth audio: Connect PCM to external
Bluetooth
®
media source.
f Refer to chapter “Connecting an external
device via Bluetooth
®
” on page 183.
– Data connection: Establish data connection
via the embedded SIM, an external SIM card or
external WiFi hotspot.
f Refer to chapter “Connectivity” on
page 87.
– Hotspot: Use the PCM’s wireless Internet
access.
f Refer to chapter “Activating the PCM WiFi
hotspot (wireless Internet access)” on
page 89.
– Porsche Connect App: Connect Porsche
Connect App to the PCM using WiFi.
f Refer to chapter “Porsche Connect App” on
page 193.
– Smartphone link: Use Apple
®
CarPlay.
f Refer to chapter “Apple
®
CarPlay” on
page 48.
Displaying connection status
f Refer to chapter “Displaying connection
status” on page 241.
e Select or in the footer
(depending on the connection status).
– or –
button e button e
Select Device manager.
Information
For information on operating Porsche
Communication Management (PCM):
f Refer to chapter “Operating the Porsche
Communication Management (PCM)” on
page 176.
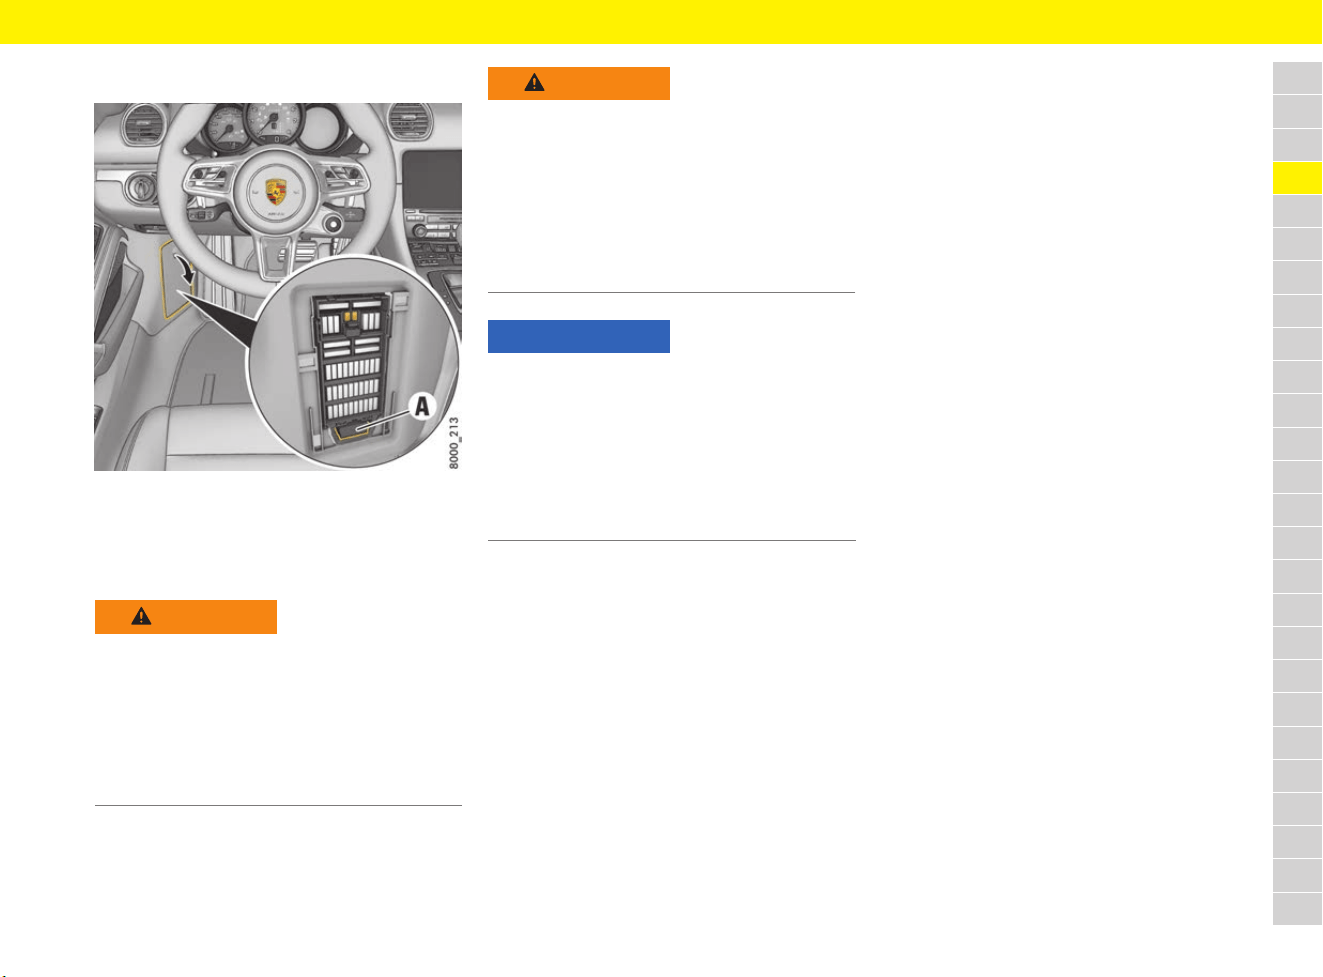
101
Diagnostic Socket
A
B
C
D
E
F
G
H
I
J
K
L
M
N
O
P
Q
R
S
T
U
V
W
X
Y
Z
Diagnostic Socket
Fig. 75: Diagnostic socket in the fuse box in the left
footwell
The diagnostic socket A is for connecting
diagnostic equipment in qualified specialist
workshops.
WARNING
Improper interventions
in the vehicle electrical
system
External equipment or devices (e.g. navigation
units, heads-up displays, etc.) connected to the
diagnostic socket can impair the function of the
vehicle systems.
e Do not connect any equipment or devices to
the diagnostic socket.
WARNING
Loose equipment/
devices or hanging
cables in the driver’s
footwell
Loose equipment/devices or hanging cables in
the driver’s footwell can obstruct clearance
around the pedals or become caught between
the pedals when braking or changing direction.
e Do not place any equipment/devices or cables
in the driver’s footwell.
NOTICE
Operating external equipment or devices (e.g.
navigation units, heads-up displays, etc.) from the
diagnostic socket when the ignition is switched off
will run down the battery. If the vehicle is parked
for an extended period, the battery can run down
fully and be damaged (exhaustive discharge).
e Do not connect any equipment or devices to
the diagnostic socket.
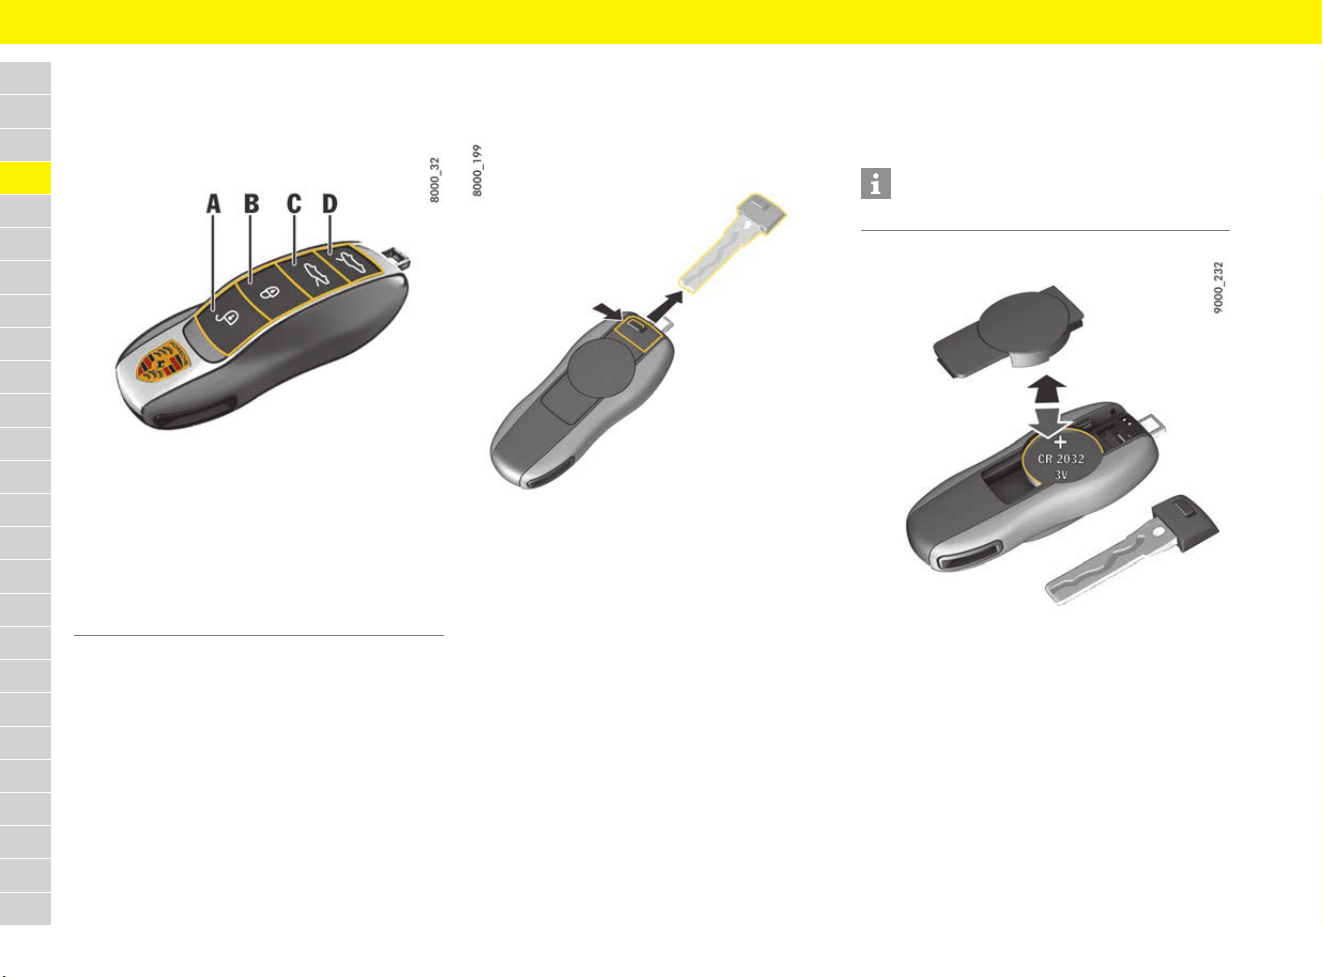
102
Driver’s Key
A
B
C
D
E
F
G
H
I
J
K
L
M
N
O
P
Q
R
S
T
U
V
W
X
Y
Z
Driver’s Key
Using driver’s key
Fig. 76: Driver’s key
There is always an emergency key integrated in
the driver’s keys. The driver’s keys can be used
to lock and unlock all the locks on the vehicle.
e Take care of your driver’s keys: do not part
with them except under exceptional
circumstances.
e Always remove the driver’s key and take it with
you even if you are only leaving the vehicle
briefly.
e Do not leave the driver’s key in the vehicle.
Using emergency key
Removing emergency key
Fig. 77: Removing emergency key
1. Push the release button to the side (Fig. 77).
2. Pull out the emergency key.
Inserting emergency key
e Push the emergency key into the driver’s key
until the release button audibly engages.
Replacing battery in driver’s key
If the battery in the driver’s key becomes too weak
and the battery needs replacing, a message
appears on the multi-function display.
Fig. 78: Changing battery
Changing battery (CR 2032, 3 V)
1. Remove the emergency key.
2. Lever off the cover on the back of the
driver’s key housing using a suitable object
(e.g. emergency key).
3. Change the battery (check polarity).
4. Re-fit cover and press together firmly.
5. Insert the emergency key.
A Unlock the vehicle
B Lock the vehicle
C Unlock front luggage compartment lid and doors
D Unlock rear luggage compartment lid and doors
Information
e Observe the disposal instructions for batteries.
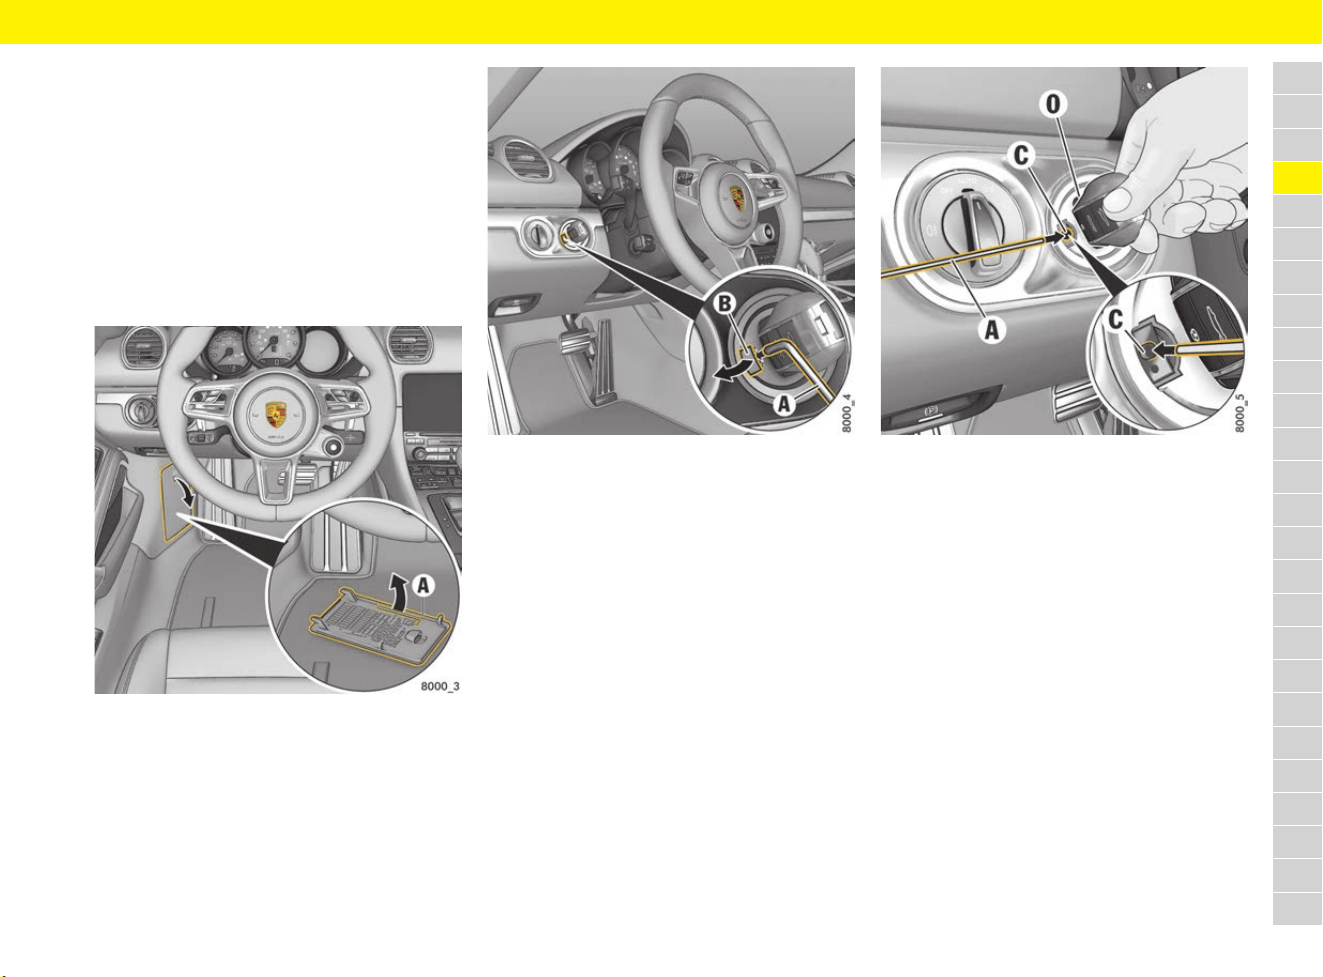
103
Driver’s Key
A
B
C
D
E
F
G
H
I
J
K
L
M
N
O
P
Q
R
S
T
U
V
W
X
Y
Z
Performing emergency release of
driver’s key/control unit
If the vehicle battery is flat, the driver’s key can be
removed only if emergency release is performed.
Interference in radio transmission between the
vehicle and driver’s key or a discharged driver’s
key battery can disable the Porsche Entry & Drive
comfort function.
In this case, the control unit can be removed from
the ignition lock and the vehicle can be started
using the driver’s key.
Fig. 79: Removing the metal hook
1. Grasp the fuse box cover on the driver’s side
at the handle and pull it off.
2. Unclip metal hook A on the inside of the fuse
box cover.
Fig. 80: Removing the plastic cover from the ignition lock
3. Use metal hook A to remove the plastic
cover B from the ignition lock.
4. Make sure that plastic cover B is not lost.
Fig. 81: Performing emergency unlocking
5. Turn control unit/driver’s key to ignition lock
position 0 (initial position).
6. Press metal hook A into opening C.
You will hear the driver’s key/control unit
unlocking.
7. Remove control unit/driver’s key in initial
position 0.
8. Re-fit the plastic cover B.

104
Driver’s Key
A
B
C
D
E
F
G
H
I
J
K
L
M
N
O
P
Q
R
S
T
U
V
W
X
Y
Z
Ordering and storing replacement
keys
Driver’s keys can only be ordered from a Porsche
partner. Sometimes, this may take a long time.
e Therefore always have a replacement key
available.
e Store the replacement key in a safe place, but
under no circumstances in or on the vehicle.
To teach a new driver’s key to the vehicle:
e Visit a qualified specialist workshop. Porsche
recommends a Porsche partner as they have
trained workshop personnel and the necessary
parts and tools.
e Teach all driver’s keys belonging to the vehicle
again.
Information
A total of eight driver’s keys can be taught.
Information
e If a driver’s key is lost or stolen, have a Porsche
partner disable this driver’s key in the vehicle
and change the mechanical locks if necessary.
e Inform the insurance company of any loss or
theft of driver’s keys or if extra or replacement
keys have been cut.
105
Driving Data Display (Trip Information)
A
B
C
D
E
F
G
H
I
J
K
L
M
N
O
P
Q
R
S
T
U
V
W
X
Y
Z
Driving Data Display
(Trip Information)
An array of driving data such as the journey time,
distance driven, average speed and average fuel
consumption is displayed in the trip menu.
Displaying driving data on
multi-function display
– Since: Driving data since the last vehicle start.
The driving data is reset automatically once
the vehicle has remained stationary for 2 hours
(with the ignition switched off).
– Total: The driving data is added progressively
until a reset is performed. The driving data is
retained even if the vehicle is parked for an
extended period (with the ignition switched off).
– To destination: If route guidance is active, the
driving data is calculated and displayed up to
the navigation destination.
Resetting driving data using the
multi-function display
– Since
– Total
– all: Reset the Since and Total driving data.
Displaying and resetting
driving data in the PCM
– Personal trip: The driving data can be
grouped into four data fields as required.
– Trip since: Driving data since the last vehicle
start. The driving data is reset automatically
once the vehicle has remained stationary for
2 hours (with the ignition switched off).
– Total trip: The driving data is added
progressively until a reset is performed. The
driving data is retained even if the vehicle is
parked for an extended period (with the ignition
switched off).
Setting the content of the personal
display in the PCM
The content of the individual data fields can be
configured individually in the Personal trip menu.
The user can choose between general information
such as the date, time and outside temperature or
arrival times, average speeds, fuel consumption
data and selected vehicle parameters in different
data fields from the navigation area.
Information
For information on operating Porsche
Communication Management (PCM):
f Refer to chapter “Operating the Porsche
Communication Management (PCM)” on
page 176.
For information on using the multi-function display:
f Refer to chapter “Operating multi-function
display without multi-function steering wheel”
on page 157.
f Refer to chapter “Operating multi-function
display with multi-function steering wheel” on
page 157.
1. Select Trip menu.
2. Select entry from the list:
1. Trip e Reset
2. Select entry from the list:
1. button e Trip
2. Browse (wipe) to desired view level:
3. Select Reset to reset the desired driving
data.
1. button e Trip e
Personal trip e Config
2. Select the data field you wish to modify.
3. Select the desired content for the data field.
Information
If the menu item Distance to next petrol station
is assigned to the data field, briefly pressing the
symbol displayed on the touchscreen starts route
calculation to this petrol station.
Select to start route guidance to this petrol station.
106
Electrical Socket
A
B
C
D
E
F
G
H
I
J
K
L
M
N
O
P
Q
R
S
T
U
V
W
X
Y
Z
Electrical Socket
Using the 12-volt plug socket
Electrical accessories can be connected to the
12-volt plug socket.
The 12-volt plug socket is located in the footwell
on the passenger’s side.
Connecting the charging adapter
Fig. 82: Charging adapter for 12-volt plug sockets and
cigarette lighter
Information
– The 12-volt plug socket and the connected
electrical accessories function even if the
ignition is switched off or the driver’s key is
removed.
If the engine is not running and the accessories
are switched on, the vehicle battery will be
discharged. The power supply is interrupted
after about 30 minutes to protect the vehicle
battery. If the load is to be switched on again,
the ignition must be switched on once.
– The maximum load capacity of a 12-volt plug
socket or cigarette lighter is 20 A but only if
one load is operating. Do not exceed a 10 A
load per 12-volt plug socket or cigarette lighter
if several loads are operating simultaneously.
– Unshielded devices and equipment can cause
interference to radio reception and
malfunctions in the vehicle electronics.
A Suitable charging adapter
B Unsuitable charging adapter
NOTICE
Risk of damage to the electrical system.
e Only use suitable charging adapters (A):
The distance X between the earth connection
and the upper edge of the charging adapter
must be less than approx. 16 mm.
e Unsuitable charging adapters (B) where the
distance X between the earth connection and
the upper edge is more than 16 mm can
damage the 12-volt plug sockets.
107
Engine Oil
A
B
C
D
E
F
G
H
I
J
K
L
M
N
O
P
Q
R
S
T
U
V
W
X
Y
Z
Engine Oil
Checking engine-oil level
The oil level should be checked regularly
(e.g. every time vehicle is refuelled).
f Refer to chapter “Before driving on race
circuits” on page 15.
Responding to oil level warning
If the oil level is too low, the symbol
or appears on the multi-function display
together with a warning message, indicating that
the engine must be topped up with oil immediately.
f Refer to chapter “Warning and Information
Messages” on page 278.
Reading off engine-oil level on
multi-function display
f Refer to chapter “Measuring and displaying
engine oil level” on page 160.
Selecting and topping up engine oil
Always observe the following points:
– Use only engine oils approved by Porsche.
Observe the service intervals.
– Oils approved by Porsche can be mixed with
each other.
– Do not mix with oil additives.
Selecting engine oil
Porsche recommends .
NOTICE
Risk of engine damage.
If the oil level has dropped below the minimum
mark, the engine will not be adequately lubricated.
e Check the oil level regularly.
e Do not allow the oil level to fall below the
minimum mark.
WARNING
Burning engine oil
Cloths containing residues of engine oil that are
thrown away or stored without ventilation can
ignite by themselves and cause a fire.
e Soak up spilled engine oil with cloths.
e Keep cloths saturated with engine oil in a
ventilated place until they are disposed of.
WARNING
Hot exhaust system
The engine, adjacent components and the exhaust
system become very hot when the engine is
running.
e Take care when working near hot vehicle parts,
particularly the engine and the exhaust system.
e Top up engine oil only with the engine stopped
and ignition switched off.
NOTICE
Insufficient or excessive engine oil will damage the
engine. Excessive engine oil may result in blue
smoke formation and cause long-term damage to
the catalytic converters.
e Do not allow the oil level to fall below the
minimum mark.
e Do not fill engine oil beyond the maximum mark.
In the event of overfilling, have the oil quantity
corrected at the next opportunity.
Visit a qualified specialist workshop. Porsche
recommends a Porsche partner as they have
trained workshop personnel and the necessary
parts and tools.
NOTICE
Risk of damage through overflowing engine oil.
The luggage compartment or items of luggage
may become soiled in this event.
e Take care not to soil the luggage compartment
or items of luggage when checking and topping
up engine oil.
Vehicle Approval SAE viscosity
class
All Porsche A40 SAE 0W-40
1)
SAE 5W-40
2)
SAE 5W-50
2)
1) For all temperature ranges.
2) For the temperature range above –25 °C.
Information
Generally, you can find details on the manufacturer
approvals on the oil containers or as a notice
displayed by the retailer. In order to find out the
approval status: Contact your Porsche partner.
108
Engine Oil
A
B
C
D
E
F
G
H
I
J
K
L
M
N
O
P
Q
R
S
T
U
V
W
X
Y
Z
Topping up engine oil
Fig. 83: Boxster oil filler opening
Fig. 84: Cayman oil filler opening
1. Read off the engine-oil level on the multi-
function display.
f Refer to chapter “Measuring and displaying
engine oil level” on page 160.
2. Open the rear luggage compartment.
3. Cayman: Turn cap anti-clockwise and remove.
4. Unscrew cap on the oil filler opening.
5. Add the quantity of engine oil shown on the
multi-function display.
Never add more than the indicated quantity of
engine oil. The difference between the
minimum and maximum mark is approx. 1 litre.
f Refer to chapter “Measuring and displaying
engine oil level” on page 160.
6.
Cayman: Fit cap first and then turn it clockwise.
7. Carefully close cap on the oil filler opening.
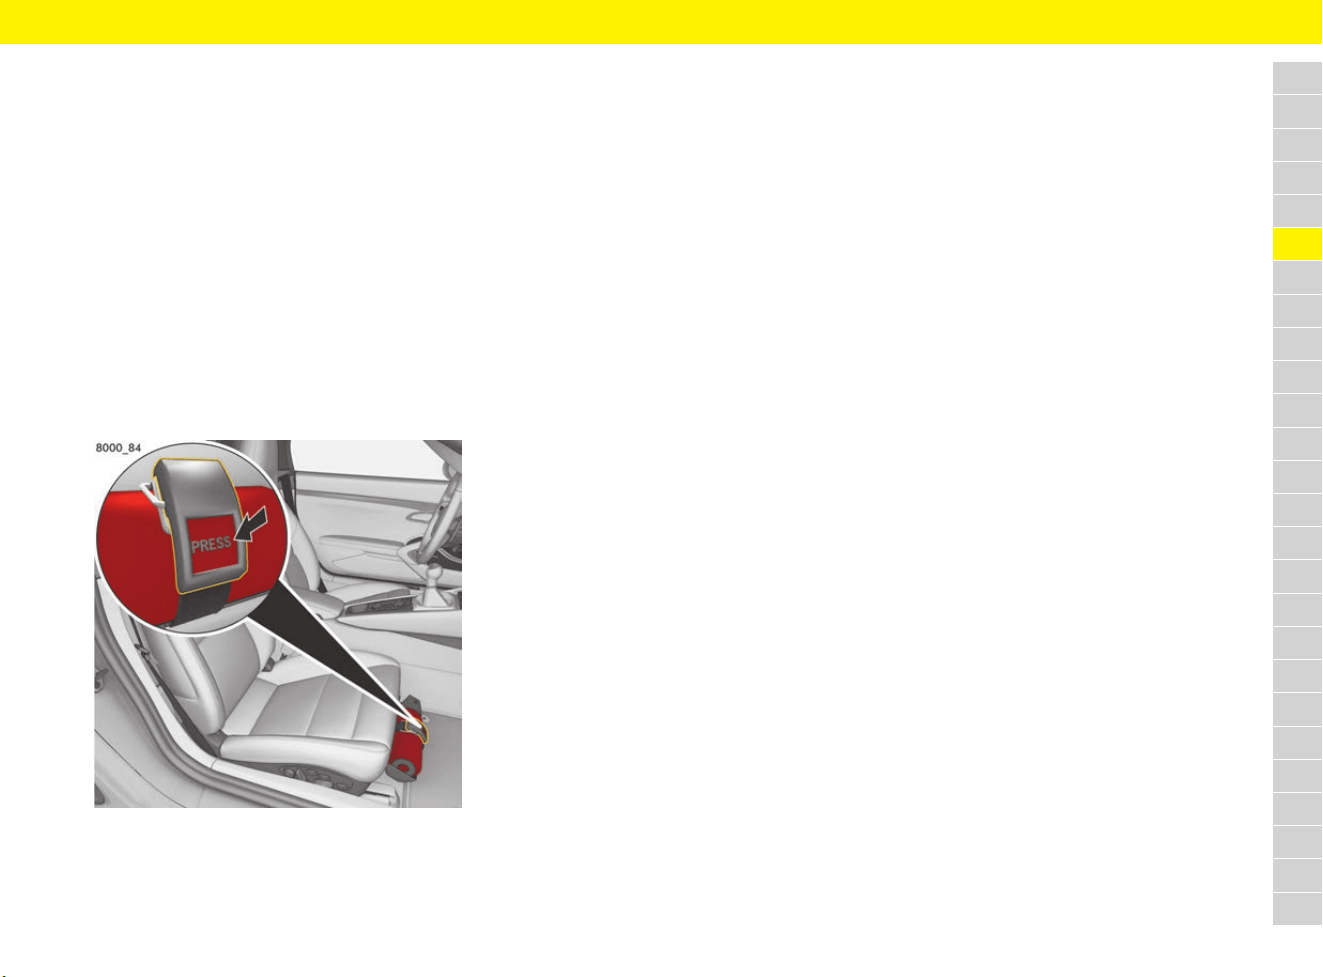
109
Fire Extinguisher
A
B
C
D
E
F
G
H
I
J
K
L
M
N
O
P
Q
R
S
T
U
V
W
X
Y
Z
Fire Extinguisher
In order to ensure correct, safe operation of the
fire extinguisher, observe the following points:
e Observe the fire extinguisher inspection
intervals. If the fire extinguisher is used after
its inspection interval has elapsed, it may not
work.
e Always read the operating instructions on the
fire extinguisher.
e Observe the fire extinguisher manufacturer’s
safety instructions on the label at the fire
extinguisher handle.
e The fire extinguisher should be checked to
ensure correct operation by a specialist
workshop every 1 – 2 years.
e Have the fire extinguisher refilled after use.
Fig. 85: Fire extinguisher under the passenger seat
Removing the fire extinguisher
In vehicles with a fire extinguisher, the extinguisher
is located under the front passenger seat.
e To remove the fire extinguisher in case of an
emergency, hold the extinguisher with one
hand and press the button PRESS on the fire
extinguisher holder with the other hand.

110
Flat Tyre
A
B
C
D
E
F
G
H
I
J
K
L
M
N
O
P
Q
R
S
T
U
V
W
X
Y
Z
Flat Tyre
Responding to warning message
If the symbol appears with a warning
message in the multi-function display, the Tyre
Pressure Monitoring system has detected a
severe pressure loss. Pressure loss can be an
indication of damage to the tyres.
e Stop in a suitable place and check the tyres
indicated for damage.
f Refer to chapter “Warning and Information
Messages” on page 278.
Park the vehicle in a safe place
1. Stop the vehicle as far away from the driving
lane as possible. The vehicle must be parked
on a firm and flat surface offering adequate
grip.
2. Switch hazard warning lights on.
3. Activate the electric parking brake.
4. Engage 1st gear.
– or –
Move the selector lever to position P.
5. Straighten the front wheels.
6. To lock the steering and prevent the engine
from being started: Remove the driver’s key.
Vehicles with Porsche Entry & Drive: Remove
control unit.
7. Get all passengers to leave the vehicle. When
doing so, pay attention to other traffic.
8. Set up the warning triangle at a suitable
distance.
9. Secure the vehicle to prevent it from rolling
away, e.g. by means of wedges under the
wheels on the opposite side.
Sealing defective tyres
In the event of a flat tyre, tyre damage can be
temporarily sealed using the tyre sealing
compound provided in the vehicle. The following is
required in order to seal a defective tyre properly:
– The tyre sealant set can be found in the front
luggage compartment and consists of:
– Filler bottle
– Filling hose
– Valve turner
– Replacement valve insert
– Sticker with the maximum permitted speed
– Operating instructions
f Refer to chapter “Removing and stowing
tyre sealing compound or tool kit” on
page 140.
– The compressor is located in the front
luggage compartment:
f Refer to chapter “Removing and stowing
tyre filling compressor” on page 141.
Filling in tyre sealant
WARNING
Temporarily repaired
tyres
If driving at an inappropriate speed or under
continuous load, damaged tyres with tyre sealing
compound can burst or lose pressure.
e Sealing the tyre with tyre sealing compound is
only an emergency repair to enable you to
drive to the nearest specialist workshop.
e Use the tyre sealing compound only for cuts or
punctures no larger than 4 mm.
e Never use the tyre sealing compound if the rim
is damaged.
e Have the tyre replaced by a specialist
workshop as soon as possible. Inform the
specialist workshop that the tyre contains
tyre sealing compound.
e Tyres must not be repaired.
e Avoid hard acceleration and high cornering
speeds.
e Do not drive any faster than the maximum
permitted speed of 80 km/h (50 mph).
f Observe the safety and operating instructions,
which can be found in the separate operating
instructions for the tyre sealing compound and
compressor.
WARNING
Flammable and harmful
sealant
The sealant is highly flammable and harmful to
health.
e Do not smoke in the vicinity of the tyre sealing
compound and do not use a naked light or
flame.
e Avoid contact with skin, eyes or clothing.
e Keep tyre sealant away from children.
e Do not inhale vapours.
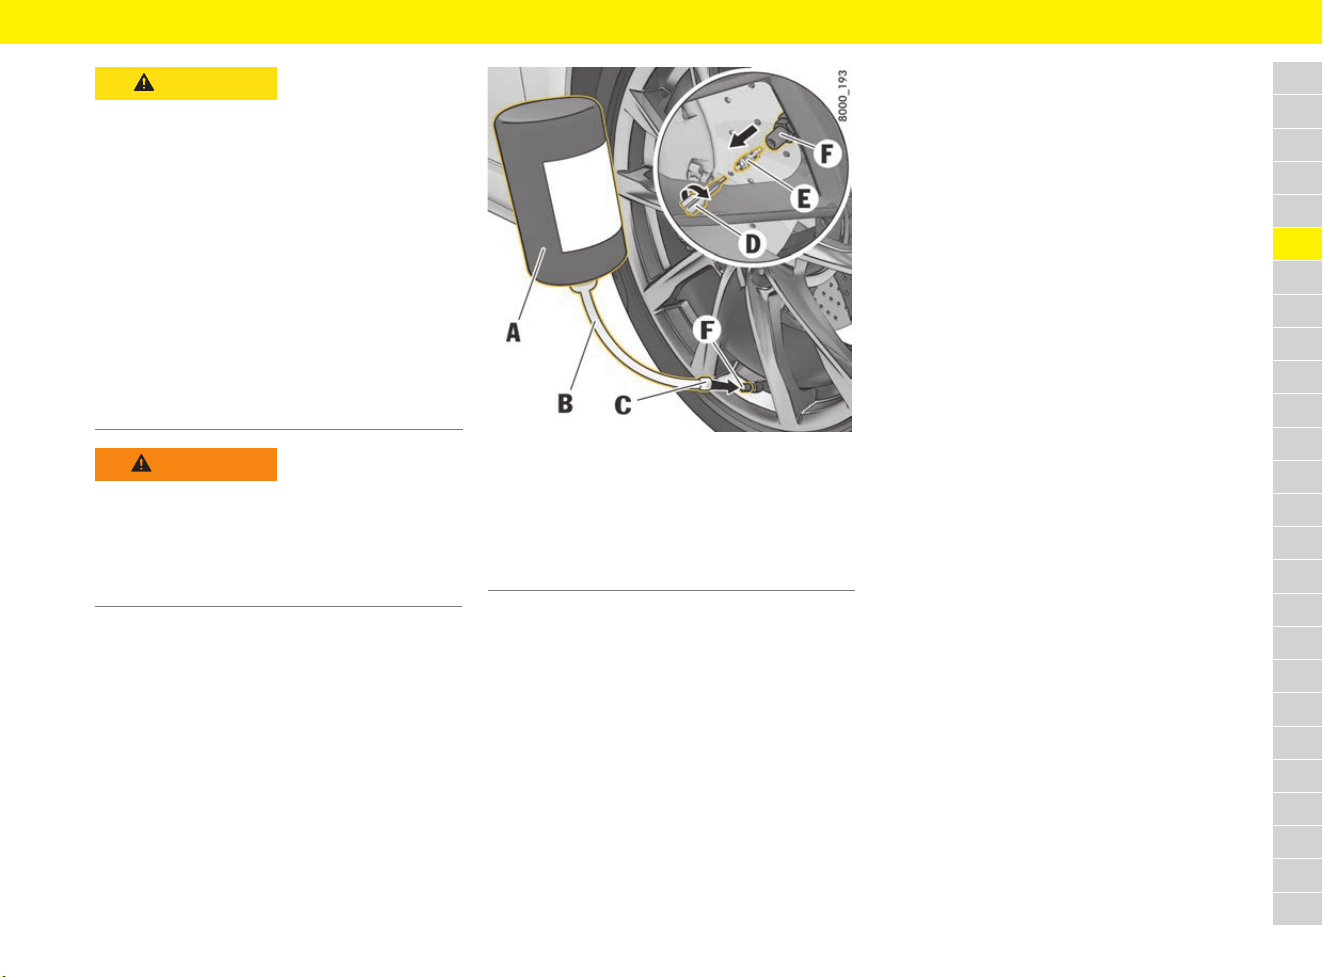
111
Flat Tyre
A
B
C
D
E
F
G
H
I
J
K
L
M
N
O
P
Q
R
S
T
U
V
W
X
Y
Z
Fig. 86: Filling in tyre sealant
Preparing to fill
1. Leave the object that caused the puncture in
the tyre.
2. Remove tyre sealing compound and the
enclosed sticker from the front luggage
compartment. The tyre sealing compound can
be found in the right-hand box in the luggage
compartment. The compressor is located
under the cover in the luggage compartment.
f Refer to chapter “Removing and stowing
tyre filling compressor” on page 141.
f Refer to chapter “Removing and stowing
tyre sealing compound or tool kit” on
page 140.
3. Stick the sticker in the driver’s field of vision.
Filling in tyre sealant
f Follow the separate operating instructions for
using the tyre sealing compound.
1. Shake filler bottle A.
2. Screw filler hose B onto the filler bottle.
The filler bottle is open.
3. Unscrew valve cap from the tyre valve F.
4. Remove valve insert E from the tyre valve with
valve turner D.
If a replacement valve insert is not available,
keep the valve insert in a clean, dry place.
5. Remove plug C from the filling hose B.
6. Push filler hose onto the tyre valve.
7. Hold the filler bottle higher than the level of the
tyre valve and squeeze it forcefully until the
bottle is completely emptied into the tyre.
8. Pull filler hose off the tyre valve.
9.
If available, screw the replacement valve insert
or alternatively valve insert E with valve turner D
firmly into the tyre valve.
Inflating the tyres
f Follow the operating instructions on the
compressor.
f Refer to chapter “Inflating tyres” on page 257.
1. Connect the compressor to a plug socket in
the vehicle and inflate the tyre to at least
2.5 bar (36 psi). If this tyre pressure cannot be
reached, the tyre is too severely damaged.
You may not continue driving with this tyre.
2. Screw valve cap onto the tyre valve F.
CAUTION
Contact with tyre
sealing compound
Irritation or allergic reactions following contact
with tyre sealing compound.
e Avoid contact with skin, eyes or clothing.
e If tyre sealing compound gets on your skin or
into your eyes, thoroughly rinse the affected
part of your body immediately with plenty of
water.
e Change soiled clothing immediately.
e See a doctor immediately in the event of an
allergic reaction.
e If tyre sealing compound is swallowed,
thoroughly rinse out your mouth immediately
and drink plenty of water. Do not induce
vomiting. See a doctor immediately.
WARNING
Pressure loss in tyre
A tyre pressure sensor soiled with tyre sealing
compound cannot correctly determine the tyre
pressure.
e When changing the defective tyre, also have
the tyre pressure sensor replaced.
A Filler bottle
B Filling hose
C Filling hose plug
D Valve turner
E Valve insert
F Tyre valve

112
Flat Tyre
A
B
C
D
E
F
G
H
I
J
K
L
M
N
O
P
Q
R
S
T
U
V
W
X
Y
Z
Checking pressure
e Check the tyre pressure after driving for
approx. 10 minutes.
If the tyre pressure is less than 1.5 bar (22 psi),
do not continue driving. If a value of more than
1.5 bar (22 psi) is indicated, correct the
pressure to the prescribed value.
f Refer to chapter “Tyre pressure” on
page 313.
Replacing the tyres
f Refer to chapter “Replacing tyres and wheels”
on page 259.
The tyre settings on the multi-function
display must be updated after changing a
wheel.
f Refer to chapter “TPM menu (TPM – Tyre
Pressure Monitoring)” on page 162.
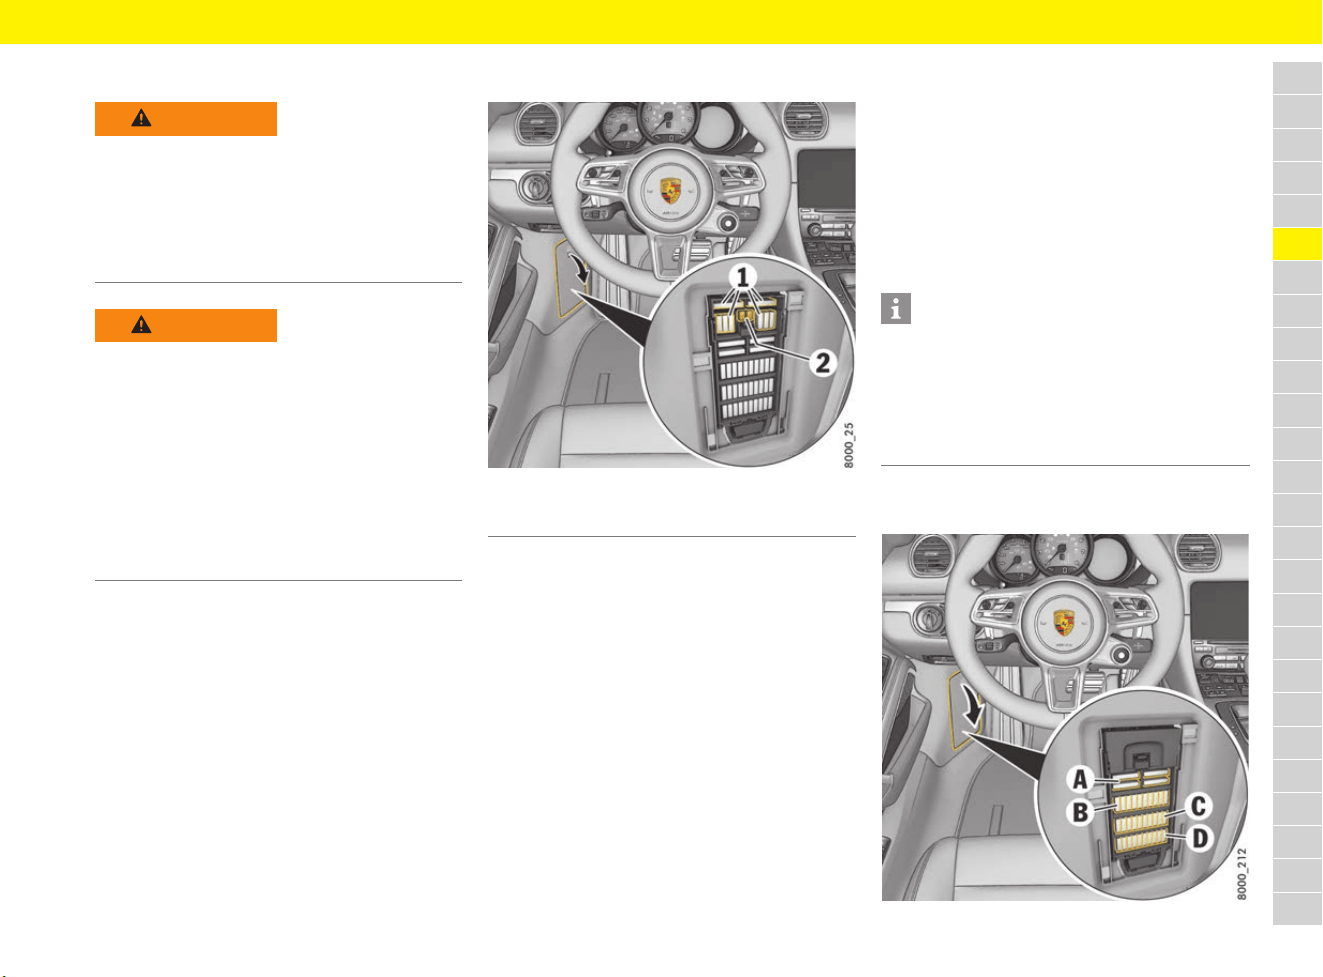
113
Fuses
A
B
C
D
E
F
G
H
I
J
K
L
M
N
O
P
Q
R
S
T
U
V
W
X
Y
Z
Fuses
Relays
Have a qualified specialist workshop check and
change relays.
Porsche recommends a Porsche partner as they
have trained workshop personnel and the
necessary parts and tools.
Checking and changing fuses
Fig. 87: Elements in the fuse box in the left footwell
In order to prevent damage to the electrical
system due to short circuits and overloads, the
individual circuits are protected by fuses. The fuse
boxes are located in the side walls of the driver’s
and passenger’s footwell respectively. The plastic
gripper and spare fuses can be found in both fuse
boxes under the top cover.
1. Switch off the load with the defective fuse if
possible.
2. Detach the plastic cover at the finger hole.
3. Remove the fuse from its slot using the yellow
plastic gripper 2 in order to check it. A blown
fuse can be identified by the melted metal strip.
4. Insert the new fuse. Only use fuses with the
same rating as replacements. Spare fuses 1
can be found in the left-hand fuse box, next to
the yellow plastic gripper 2.
Fuses on driver’s side
Fig. 88: Fuse carrier in the footwell on the driver’s side
WARNING
Short circuit
Working on the vehicle’s electrical system can
cause short circuits. Such short circuits can
cause a fire.
e Disconnect the negative terminal on the
battery during all work on the electrical
system.
WARNING
Improper intervention
and wrong accessories
Improper intervention in the fuse box and the use
of the wrong accessories can cause damage and
faults in electrical or electronic systems.
e Visit a qualified specialist workshop. Porsche
recommends a Porsche partner as they have
trained workshop personnel and the necessary
parts and tools.
e Use only accessories approved by Porsche.
For information on approved accessories:
Contact your Porsche partner.
1 Spare fuses
2 Plastic gripper
Information
If the same fuse blows repeatedly, the cause of the
fault must be corrected immediately.
e Visit a qualified specialist workshop. Porsche
recommends a Porsche partner as they have
trained workshop personnel and the necessary
parts and tools.

114
Fuses
A
B
C
D
E
F
G
H
I
J
K
L
M
N
O
P
Q
R
S
T
U
V
W
X
Y
Z
Row A
Row B
Row C
1 Lower left: Air-conditioner blower
(right-hand drive vehicles only)
40 A
2 Upper left: PSM control unit 40 A
3 Lower right: Adjusting seats and
driver seat control unit
25 A
4 Upper right: Boxster: Convertible top 40 A
1 Headlight adjustment for LHD/RHD
Front lid light
Front lid actuator
High beam headlight, left
Dipped beam headlight, left
Side marker light, front right
Direction indicator, rear left and
front left
40 A
2 Exhaust flap control
Raised brake light, rear wing
Rear lid actuator
Rear fog light, right
Brake light, left
Reversing light, left
Tail light, left
Daytime running light, left
15 A
3 Alarm horn 15 A
4 Interior lighting
Hall sensors
Orientation light
Heated rear window relay
Central locking LED
Door panels LED
Ambient light
Number plate light
Rear fog light, left
Raised brake light
Brake light, right
Reversing light, right
Tail light, right
Daytime running light, right
Cayman: Rear wiper electronics
activation
15 A
5 Fuel pump system relay and
control unit
20 A
6 Filler flap lock
Electric steering column lock
Terminal 30
Washer pump, front and rear
10 A
7 Not used
8 Air conditioning control unit 7.5 A
9 Not used
10 Steering column
Stopwatch
15 A
1 Centre console button panel
Gateway control unit
Diagnostic socket
Ignition lock
Steering column lock
Light switch
ERA-GLONASS control unit
(only left-hand drive, Russia)
Cayman: Luggage compartment light
10 A
2 Footwell lights
Electric ignition lock anti-removal lock
Direction indicator, front right and rear
right
Hazard warning light button LED
Electric ignition lock light
Side direction indicator,
front right and front left
High beam headlight, right
Dipped beam headlight, right
Side marker light, front left
40 A
3 VTS control unit 5 A
4 Horn 15 A
5 Filler flap
Rear wing control extend and retract
Boxster: Convertible-top lock closing
aid
Boxster: Opening and closing
convertible top compartment catch
30 A
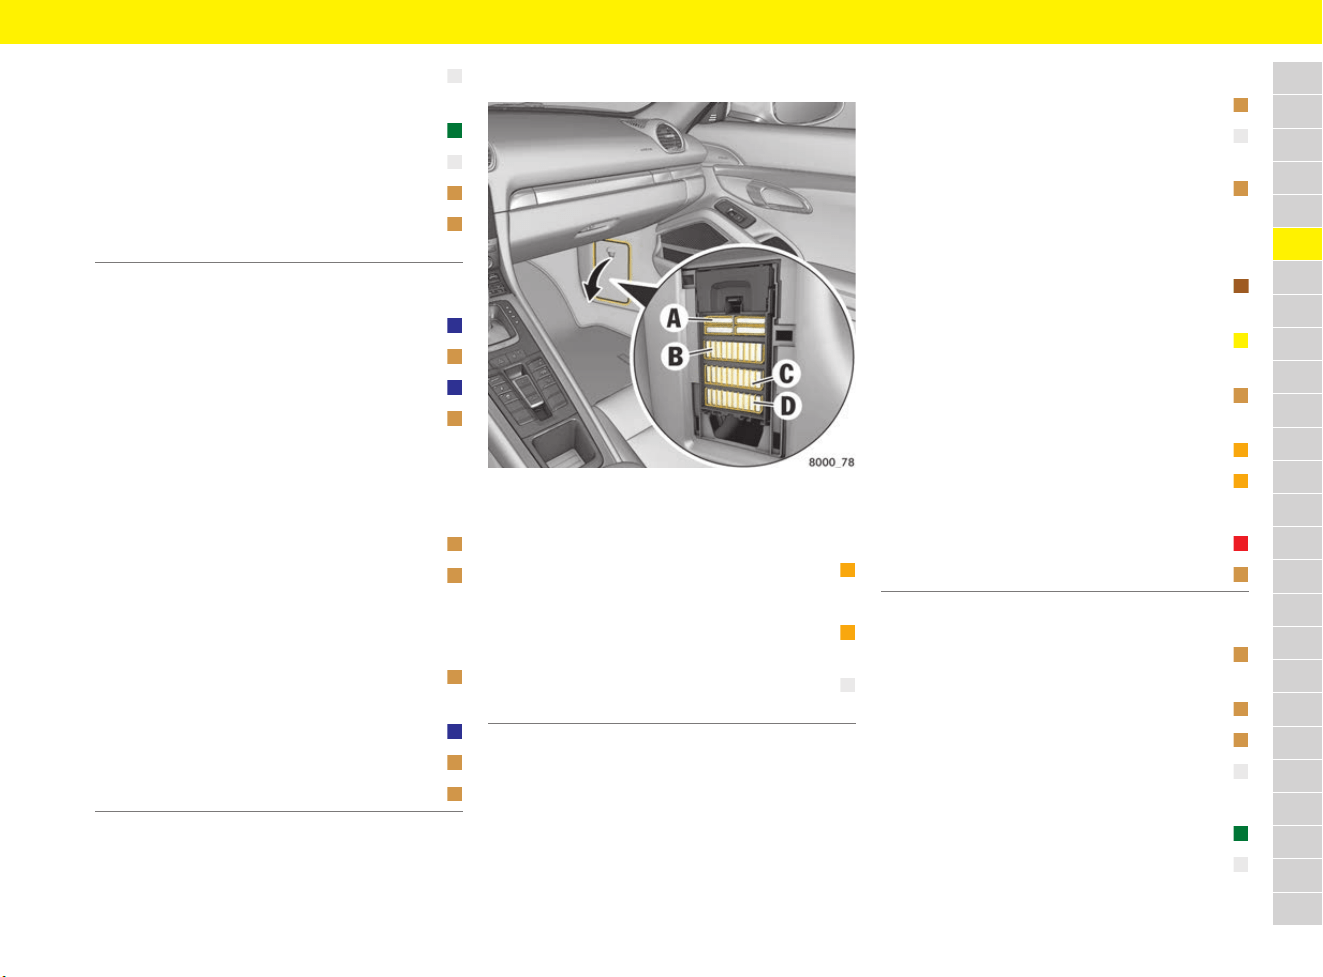
115
Fuses
A
B
C
D
E
F
G
H
I
J
K
L
M
N
O
P
Q
R
S
T
U
V
W
X
Y
Z
Row D
Fuses on passenger’s side
Fig. 89: Fuse carrier in the footwell on the passenger’s
side
Row A
Row B
Row C
6 Power window control unit, left
Door control unit, left
25 A
7 Headlight cleaning system 30 A
8 PSM control unit 25 A
9 Alarm siren 5 A
10 Passenger compartment monitoring
sensor
5 A
1 Cayman: Rear wiper 15 A
2 Garage door opener 5 A
3 Left headlight 15 A
4 Front camera control unit
PDC control unit
Gateway/diagnostic socket
Air quality sensor
Headlight control unit
5 A
5 PSM control unit 5 A
6 Steering column switching module
Electrical steering gear
Refrigerant pressure sensor
Radiator fan relay
5 A
7 Selector lever control unit
Clutch switch sensor
5 A
8 Right headlight 15 A
9 Interior mirror 5 A
10 Seat ventilation, left 5 A
1 Lower left: DC/DC converter PCM 40 A
2 Not used
3 Lower right: Fresh-air blower motor
and fan control (LHD only)
40 A
4 Upper right: Adjusting seats and
passenger seat control unit
25 A
1 Rain sensor 5 A
2 Air conditioning/seat heating
control unit
25 A
3 PCM components:
(reversing camera, antenna amplifier,
control unit display, USB hub, coupling
antenna, card reader)
5 A
4 Central computer with external
booster
7.5 A
Central computer with
internal booster
20 A
5 TPM control unit
Air conditioning control unit
5 A
6 Sound system amplifier 40 A
7 Burmester
®
subwoofer booster 40 A
8 Not used
9 Instrument cluster 10 A
10 Door handle proximity sensor 5 A
1 ERA-GLONASS TSX808 diagnostic
socket (only left-hand drive, Russia)
5 A
2 Electric parking brake switch 5 A
3 Overhead console 5 A
4 PDK control unit 25 A
5 Not used
6 Front wiper motor 30 A
7 Power window control unit, right
Right door control unit
25 A

116
Fuses
A
B
C
D
E
F
G
H
I
J
K
L
M
N
O
P
Q
R
S
T
U
V
W
X
Y
Z
Row D
8 Steering column adjustment 25 A
9 Not used
10 Not used
1 Airbag control unit
Seat occupancy detection control unit
5 A
2 PASM control unit 5 A
3 Not used
4 ACC control unit 5 A
5 Not used
6 Seat ventilation, right 5 A
7 Start-relevant loads
DME, PDK, VTS, ERA-GLONASS
control units (only left-hand drive,
Russia)
Rear BCM
ERA-GLONASS diagnostic socket (only
left-hand drive, Russia)
5 A
8 Not used
9 Centre console socket
Cigarette lighter
20 A
10 Socket in passenger footwell 20 A
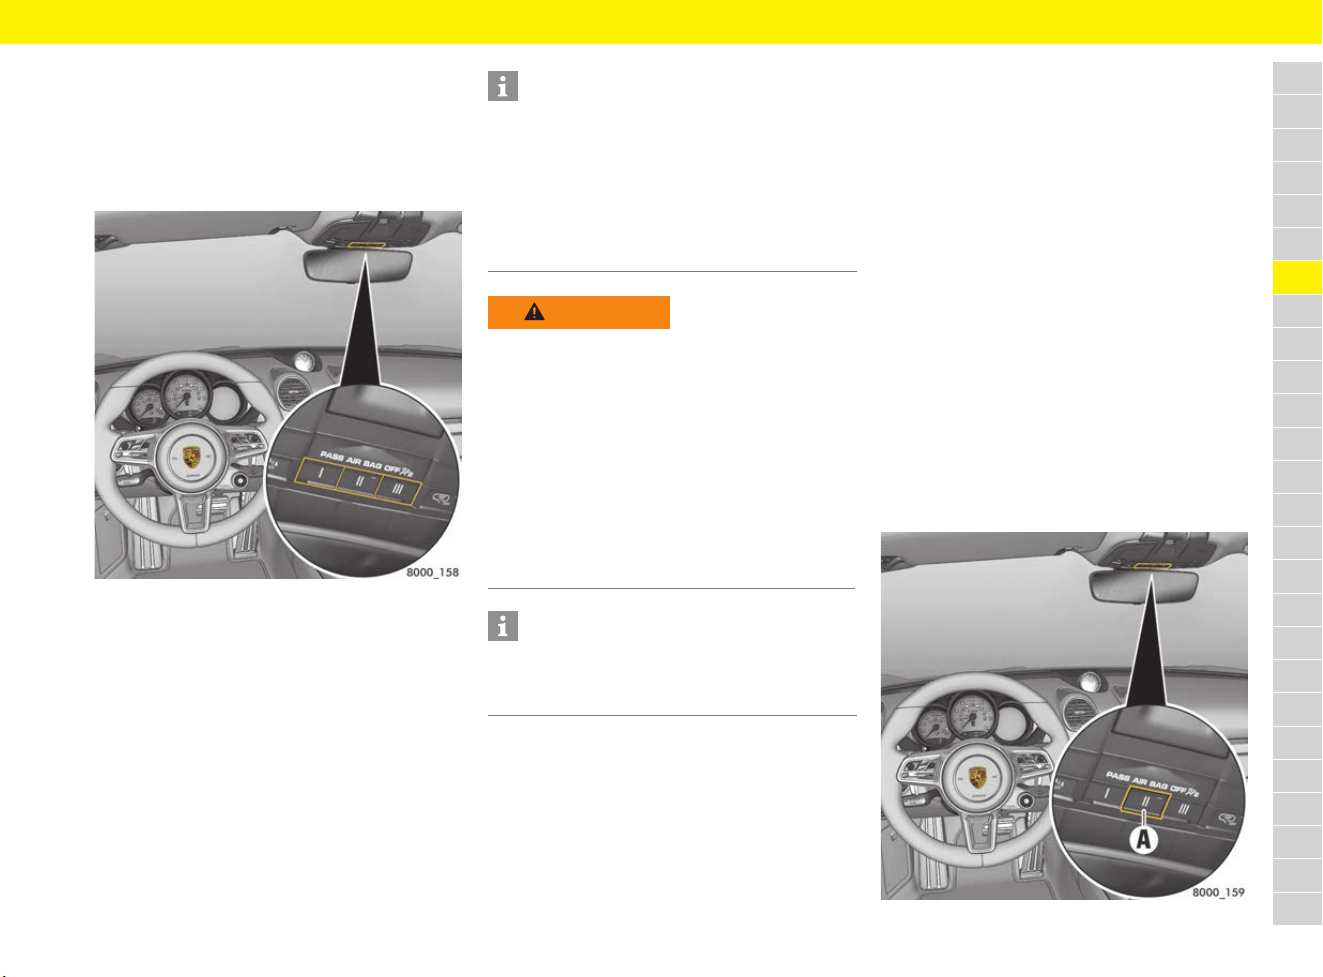
117
Garage Door Opener (HomeLink
®
)
A
B
C
D
E
F
G
H
I
J
K
L
M
N
O
P
Q
R
S
T
U
V
W
X
Y
Z
Garage Door Opener
(HomeLink
®
)
Using the garage door opener on
the vehicle
Fig. 90: Buttons on the HomeLink
®
system
With the HomeLink
®
system, remote-controlled
equipment (e.g. garage door/gate to your
property, security systems, house lights) can
be activated from inside the vehicle.
The HomeLink
®
system replaces up to three
different original remote controls. The signal for
a remote control can be assigned to one of the
three memory buttons on the overhead console.
The relevant device can then be operated via the
programmed button.
e Please read the instructions for the original
remote control.
Operating the garage door opener
b Ignition switched on.
b Vehicle aligned towards the receiver and within
range of the receiver (signal is transmitted
forwards in direction of travel).
e Press and hold the corresponding HomeLink
®
button on the overhead console.
During signal transmission, the indicator light A
on button II (Fig. 91) lights up.
Programming garage door opener
Programming of the HomeLink
®
system is carried
out from the overhead console and in the direct
vicinity of the vehicle front.
b Ignition switched on.
b Direction indicators switched off.
b Engine not running.
b Vehicle aligned towards the receiver and within
range of the receiver (signal is transmitted
forwards in direction of travel).
Fig. 91: Programming garage door opener
Information
For information on the compatibility of the
HomeLink
®
system on the vehicle with the
original hand transmitter:
f Contact your Porsche partner.
f Visit www.homelink.com or call the free
HomeLink
®
hotline (0)0800 046 635 465
or (0)08000 HOMELINK.
WARNING
Pinching, crushing or
knocking against the
operated equipment
Risk of accidents when using or programming the
garage door opener if persons or animals are
within the range of movement of the equipment
that is being operated.
e When using or programming the HomeLink
®
system, make sure that no persons, animals or
objects are within the range of movement of
the equipment that is being operated.
e Observe the safety notes for the original
remote control.
Information
e Before selling the vehicle, delete the
programmed signals for the garage door
opener.
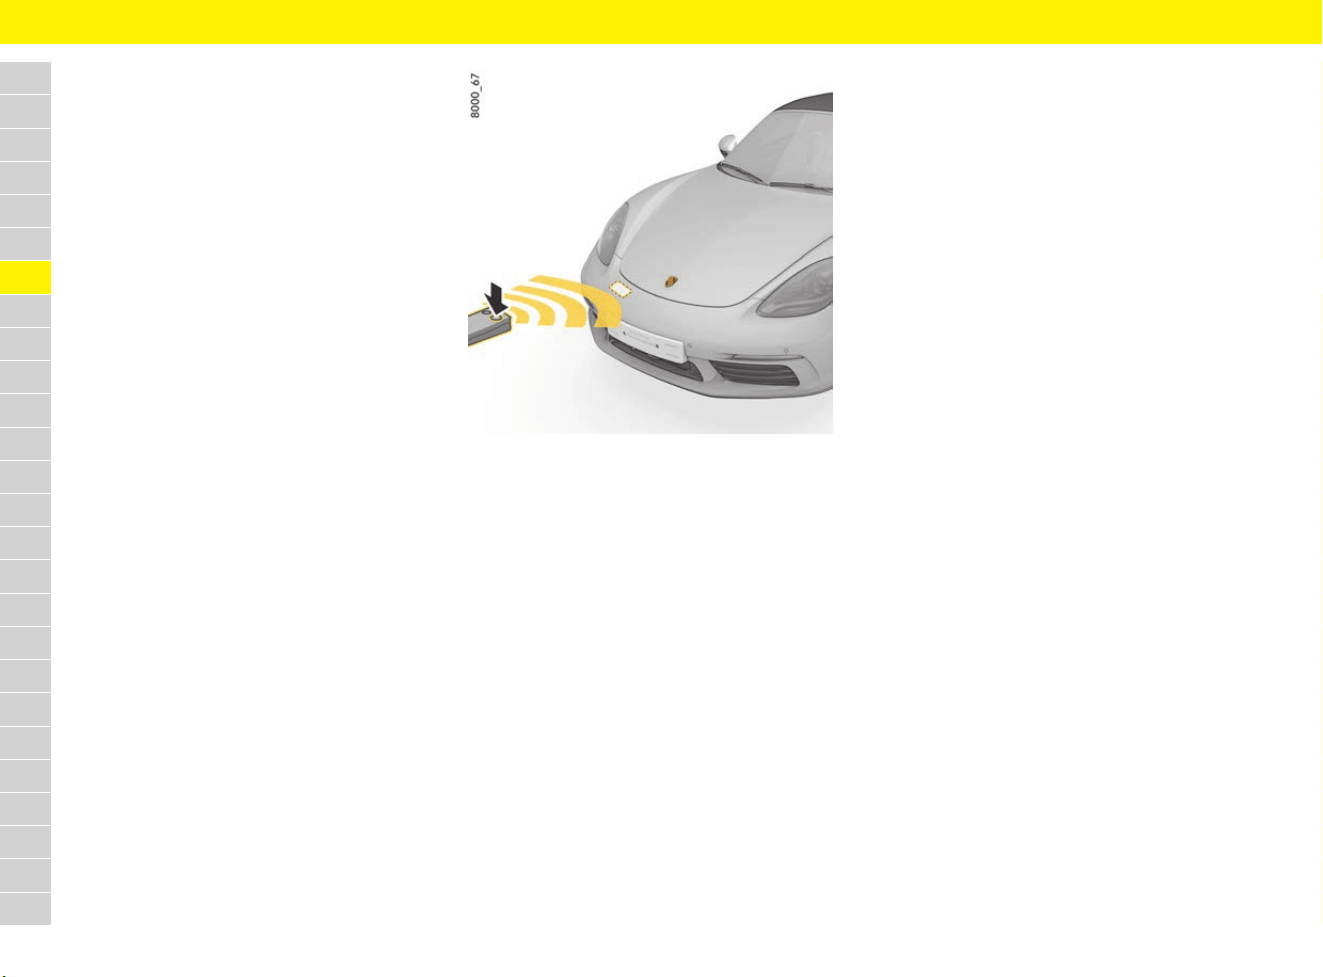
118
Garage Door Opener (HomeLink
®
)
A
B
C
D
E
F
G
H
I
J
K
L
M
N
O
P
Q
R
S
T
U
V
W
X
Y
Z
Deleting programmed signals from the
buttons
This process deletes the entire HomeLink
®
programming. It is not possible to individually
clear the programmed buttons.
e Do not repeat this process if you want to
assign additional signals to the buttons.
1. Keep the two outer buttons I and III on the
overhead console pressed for approx.
20 seconds until the indicator light A starts
to flash quickly.
2. Release the buttons.
The assignment of the HomeLink
®
buttons
is deleted. The HomeLink
®
buttons can be
reprogrammed.
Assigning garage door opener signal to
button – fixed code system
On the overhead console
1. Delete the standard factory-set codes before
programming for the first time.
f Refer to chapter “Deleting programmed
signals from the buttons” on page 118.
2. Press and hold the desired button on the
overhead console until the indicator light A
starts to flash slowly.
You now have 5 minutes to teach the button.
3. Stand in front of the vehicle with the original
remote control of the system to be
programmed.
Fig. 92: Positioning the original hand transmitter in front
of the vehicle
In front of the vehicle
4. Hold the original remote control approx. 20 cm
away from the marked position (Fig. 92) and
press and hold the transmit button (for more
than approx. 1 minute in some cases) until the
vehicle’s direction indicators flash on and off
three times or the indicator light A on the
overhead console starts flashing quickly.
The vehicle’s direction indicators flash three
times and the indicator light A flashes quickly
to confirm that the new signal has been
programmed successfully.
Several attempts with different distances
between the vehicle and the original remote
control may be necessary.
With some systems, the transmit button on the
original remote control may need to be pressed
again when the indicator light on the original
remote control goes out.
5. The vehicle’s direction indicators flash once
when the 5-minute teaching readiness period
has elapsed: Repeat steps 2 to 4.
6. To assign signals to the remaining buttons:
Repeat steps 2 to 4.
Assigning garage door opener signal to
button – changeable code system
With some systems, a changeable code also needs
to be programmed for the HomeLink
®
system.
A second person makes programming easier.
Identifying the changeable code
e Press and hold the previously programmed
HomeLink
®
button.
If the indicator light A flashes quickly and then
lights up continuously after approx. 2 seconds,
this means that the device has a changeable
code system.
f For information on synchronisation, please
also refer to the operating instructions for the
equipment being programmed.
Assigning garage door opener signal to
button
On the overhead console
1. Delete the standard factory-set codes before
programming for the first time.
f Refer to chapter “Deleting programmed
signals from the buttons” on page 118.
2. Press and hold the desired button on the
overhead console until the indicator light A
starts to flash slowly.
You now have 5 minutes to teach the button.
3. Stand in front of the vehicle with the original
remote control of the system to be
programmed.

119
Garage Door Opener (HomeLink
®
)
A
B
C
D
E
F
G
H
I
J
K
L
M
N
O
P
Q
R
S
T
U
V
W
X
Y
Z
In front of the vehicle
4. Hold the original remote control approx. 20 cm
away from the marked position (Fig. 92 on
page 118) and press and hold the transmit
button (for more than approx. 1 minute in
some cases) until the vehicle’s direction
indicators flash on and off three times or the
indicator light A on the overhead console
starts flashing quickly.
The vehicle’s direction indicators flash three
times and the indicator light A flashes quickly
to confirm that the new signal has been
programmed successfully.
Several attempts with different distances
between the vehicle and the original remote
control may be necessary.
With some systems, the transmit button on
the original remote control may need to be
pressed again when the indicator light on
the original remote control goes out.
5. The vehicle’s direction indicators flash once
when the 5-minute teaching readiness period
has elapsed: Repeat steps 2 to 4.
6. To assign signals to the remaining buttons:
Repeat steps 2 to 4.
7.
Locate the programming button on the receiver
of the system to be programmed, e.g. on the
motor unit of the garage door opener.
Synchronising the system
8. Press the programming button on the receiver
of the system to be programmed or get a
second person to press the button.
Then initiate the next step within approx.
30 seconds (depending on the system)
(a setting indicator is usually activated on the
motor unit).
9. Press the button you selected in step 2 on the
overhead console three times (on some
systems, you must press the button several
times to complete the setting process).
e Repeat steps 2 to 9 to assign signals to the
other buttons.
After completing programming, the system should
recognise the HomeLink
®
signal and launch as
soon as the memory button is pressed.
Reprogramming an individual button on
the keypad
A HomeLink
®
button can be individually
reprogrammed without deleting the rest of the
button assignments.
On the overhead console
1. Press and hold the desired button on the
overhead console until the indicator light A
starts to flash slowly.
You now have 5 minutes to teach the button.
2. Stand in front of the vehicle with the
original remote control of the system to
be programmed.
In front of the vehicle
3. Hold the original remote control approx. 20 cm
away from the marked position (Fig. 92 on
page 118) and press and hold the transmit
button (for more than approx. 1 minute in
some cases) until the vehicle’s direction
indicators flash on and off three times or the
indicator light A on the overhead console
starts flashing quickly.
The vehicle’s direction indicators flash three
times and the indicator light A flashes quickly
to confirm that the new signal has been
programmed successfully.
Several attempts with different distances
between the vehicle and the original remote
control may be necessary.
With some systems, the transmit button on the
original remote control may need to be pressed
again when the indicator light on the original
remote control goes out.
4. The vehicle’s direction indicators flash once
when the 5-minute teaching readiness period
has elapsed: Repeat steps 2 to 3.
5. To assign signals to the remaining buttons:
Repeat steps 2 to 3.
Information
If you have not been able to successfully assign
signals to the buttons even though you have
carefully followed the instructions in this section
and the operating instructions for the original
remote control:
e Contact your Porsche partner.
e
Make sure that the battery in the remote control
for the garage door opener is new. If the
battery voltage is inadequate, faults may occur
in signal transmission. The system in the
vehicle then learns the wrong code, which will
not be recognised reliably by the garage door
opening mechanism.

120
Headlights
A
B
C
D
E
F
G
H
I
J
K
L
M
N
O
P
Q
R
S
T
U
V
W
X
Y
Z
Headlights
Headlight adjustment
e Adjustment of the headlights should only be
performed at a qualified specialist workshop
with suitable adjustment equipment.
Porsche recommends a Porsche partner as
they have trained workshop personnel and the
necessary parts and tools.
Changing headlights with dynamic
cornering light for driving on the
left or right
b Vehicles with the Porsche Dynamic Light
System (PDLS) or the Porsche Dynamic Light
System Plus (PDLS Plus).
When you cross the border into a country where
traffic drives on the other side of the road, the
headlights must be converted in the multi-function
display. The dipped beam then lights symmetrically
and drivers of oncoming vehicles are not dazzled.
f Refer to chapter “Converting headlights for left
or right-hand traffic” on page 267.
Replacing light-emitting diodes
and long-life bulbs
Various lights, e.g. direction indicator lights,
gas-discharge headlights in Bi-Xenon headlights,
tail lights, number plate lights and interior lights
are equipped with light emitting diodes and
long-life bulbs.
The LEDs cannot be replaced individually.
Replacement of the long-life bulbs involves a
greater amount of installation work.
e Have defective LEDs and long-life bulbs
replaced at a qualified specialist workshop.
Porsche recommends a Porsche partner as
they have trained workshop personnel and the
necessary parts and tools.
NOTICE
Abrasion and excessive temperatures can
damage the headlights.
e Do not affix any coverings (e.g. stone guards
or films) in the area of the headlights.
Information
The headlights can mist up due to temperature
and humidity. This misting will disappear after you
have driven a sufficient distance.
e To ensure optimum ventilation, do not cover
the gap between headlight and body.
Information
After conversion, a message appears on the multi-
function display each time the ignition is switched
on.
e Readjust headlights on the return journey.
Information
Bi-Xenon headlights without dynamic cornering
light (PDLS/PDLS Plus) cannot be converted for
left or right-hand traffic. The light distribution of
this headlight type is homogeneous on both sides
of the road, which prevents dazzling of the
oncoming traffic.
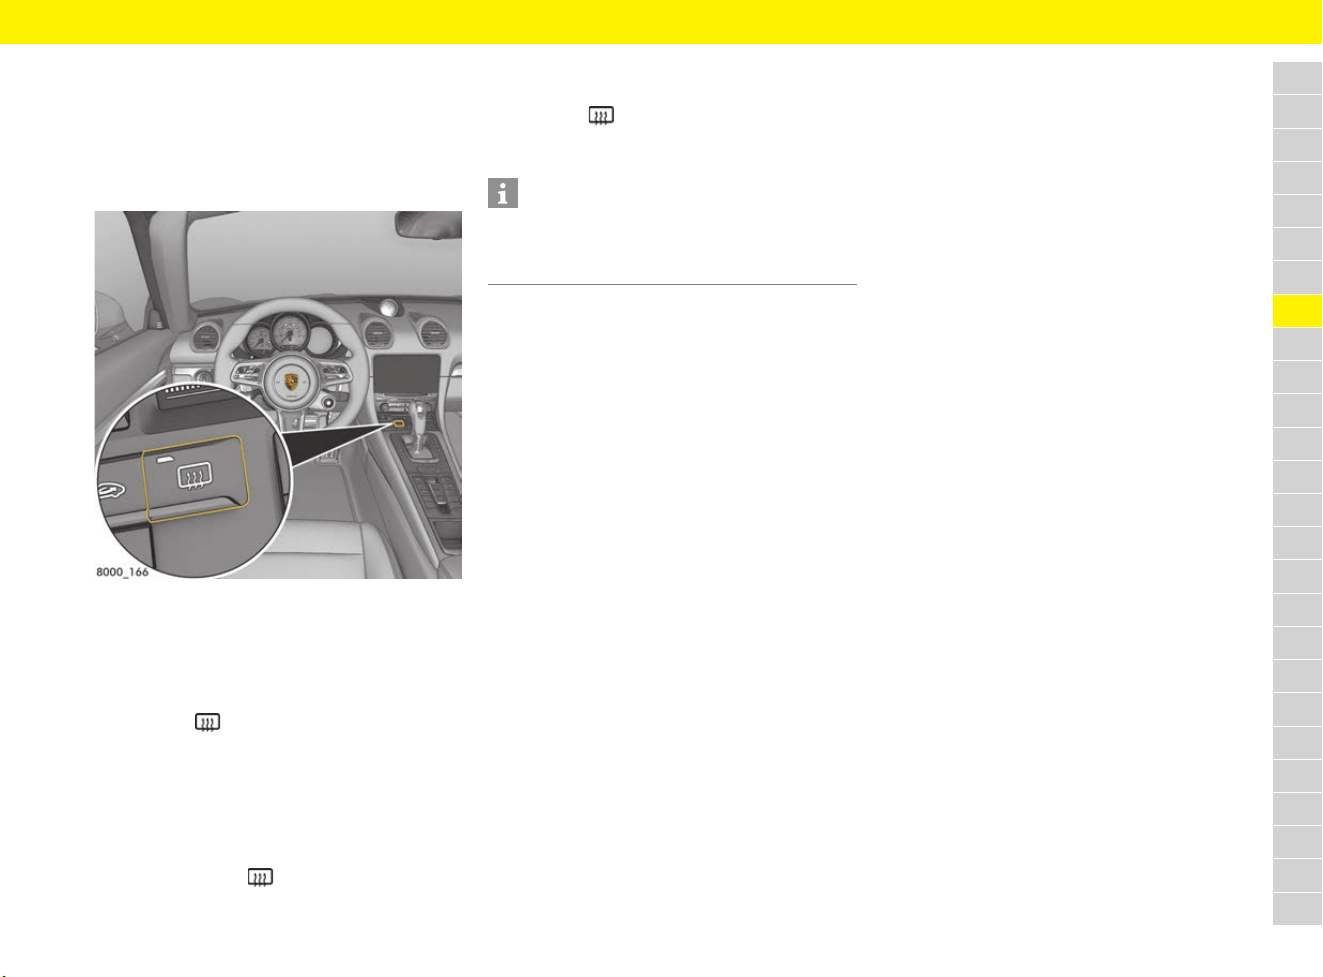
121
Heated Rear Window and Exterior Mirror Heating
A
B
C
D
E
F
G
H
I
J
K
L
M
N
O
P
Q
R
S
T
U
V
W
X
Y
Z
Heated Rear Window and
Exterior Mirror Heating
Heating rear window and exterior
mirrors
Fig. 93: Heated rear window and exterior mirror heating
button
Switching on heated rear window and
exterior mirror heating
b Engine is running.
e Press the button.
The indicator light on the button lights up.
Depending on the outside temperature, rear
window and exterior mirror heating switches off
automatically after approx. 5 to 20 minutes.
Switching back on
e Press the button again.
The indicator light on the button lights up
Switching off heated rear window and
exterior mirror heating
e Press the button.
The indicator light on the button goes out.
Information
If the battery voltage is too low, rear window and
exterior mirror heating is restricted initially and
then switched off.
122
HOLD Function: Drive-Off Assistant, Standstill Management
A
B
C
D
E
F
G
H
I
J
K
L
M
N
O
P
Q
R
S
T
U
V
W
X
Y
Z
HOLD Function:
Drive-Off Assistant,
Standstill Management
The HOLD function is an assistance function that
assists the driver when stopping and driving off on
upward slopes.
The vehicle is automatically prevented from rolling
back away from the desired direction of travel.
When the HOLD function is active, the indicator
light on the instrument panel comes on.
When adaptive cruise control is operating
normally, the HOLD function actively holds the
vehicle at a standstill following automatic braking.
If the driver’s seat belt is unfastened and the
driver’s door is opened while the HOLD function is
active, the electric parking brake is activated
automatically.
Driving off with Drive-Off Assistant
b Vehicles with manual transmission.
b Engine is running.
1. Hold the vehicle securely on the slope with the
footbrake.
2. Press the clutch pedal fully.
3. Engage a gear corresponding to the direction
of travel up the slope (1st gear or reverse
gear).
4. Release the footbrake while keeping the clutch
pedal pressed.
The vehicle is held on the slope to facilitate
driving off and prevent it from rolling back.
5. Drive off as usual.
Driving off with standstill
management
b Vehicles with PDK.
The vehicle is stopped and prevented from rolling
back away from the desired direction of travel
even without pressing the brake.
The HOLD function is only available in an active
transmission range (not P or N).
Information
If the vehicle is held on the slope by the electric
parking brake, drive off in the usual way.
The electric parking brake detects the driver’s
intention to drive off and is released automatically.
f Refer to chapter “Brakes” on page 63.
Information
The Drive-Off Assistant will not function in the
following cases:
– Clutch not pressed
– Vehicle not stationary
– Engine not running
– Gradients of less than 5 %
– Pressure on brake pedal too low
Information
The HOLD function can be activated, irrespective
of the gradient, by flooring the pressed brake
pedal while the vehicle is stationary. This prevents
the vehicle from moving without having to keep the
brake pedal pressed. A quick change of the PDK
selector-lever position does not deactivate the
HOLD function in this case.
WARNING
Slight rolling back on
uphill gradients
If the vehicle comes to a standstill on a steep uphill
gradient without operation of the footbrake by the
driver, the vehicle may roll back slightly before the
HOLD function is activated. In this situation, the
driver can reduce the roll-back by pressing the
footbrake.
e Assist holding of the vehicle by increasing the
braking force with the footbrake.
Information
When the HOLD function is active, the brake pedal
may feel different and you may hear hydraulic
noises.
This behaviour is normal for the system. It is not a
fault.
WARNING
Loss of control over the
vehicle
Responsibility for driving off on upward slopes
is still the driver’s, despite the HOLD function.
Assistance by the HOLD function is not always
guaranteed when stopping and driving off on a
slippery surface (e.g. on icy or loose surfaces).
In this case, the vehicle can slip.
e Always adjust your driving style to the driving
conditions and vehicle load. Use the footbrake
if necessary.
If the Drive-Off Assistant is not functioning, the
driver cannot be assisted when driving off on hills.
e Hold the vehicle with the footbrake.
123
Instrument and Interior Lighting
A
B
C
D
E
F
G
H
I
J
K
L
M
N
O
P
Q
R
S
T
U
V
W
X
Y
Z
Instrument and Interior
Lighting
Adjusting brightness of instrument
lighting
Fig. 94: Adjustment button
The lighting is automatically adjusted to the
ambient brightness via light sensors.
In addition, when the vehicle lighting is switched
on, the instrument and switch brightness can be
adjusted manually.
e Turn adjustment button A in the appropriate
direction and hold it until the desired
brightness has been reached.
Switching interior lighting on
and off
Fig. 95: Buttons for interior/reading lights
Switching interior/reading lights on and
off
e Press button A.
Adjusting brightness (dimming)
e Press and hold button A for at least 1 second
until the desired level of brightness is reached.
Switching automatic interior lighting on
and off
Depending on equipment, the automatic interior
lights can be switched on and off using button B
or in the menu of the multi-function display.
Using button B:
e Press button B.
When interior lighting is switched off, the
indicator light in the button lights up.
When interior lighting is switched on and once it
gets dark, the interior lighting is
– switched on: when a door is unlocked or
opened, or when the driver’s key is removed
from the ignition lock.
– switched off: when both doors have been
closed, after a delay of approx. 120 seconds.
The off delay time can be preset on the multi-
function display. The interior lighting goes out
as soon as the ignition is switched on or the
vehicle is locked.
On the multi-function display:
f Refer to chapter “Activating or deactivating
interior lights when the door is opened” on
page 268.
Switching off interior lighting to protect
battery
In darkness, the interior lighting is switched off
automatically approx. 15 minutes after the engine
stops to preserve the vehicle battery.
In daylight conditions, interior lights that were
switched on manually are switched off
automatically after approx. 1 minute.
WARNING
Adjusting the brightness
while driving
Adjusting the brightness while driving may cause
you to lose control of the vehicle.
e Do not reach through the steering wheel
spokes while driving.
A Button for interior/reading lights
B Switching automatic interior lighting on and off

124
Instrument and Interior Lighting
A
B
C
D
E
F
G
H
I
J
K
L
M
N
O
P
Q
R
S
T
U
V
W
X
Y
Z
Orientation lighting
Lights in the overhead console and at the ignition
lock help vehicle occupants to locate important
controls in the vehicle in darkness and ensure
better overall orientation. The lights are switched
on when the vehicle is unlocked and switched off
again automatically when the vehicle is locked.
The brightness of the orientation lighting is
adjusted (dimmed) on the multi-function display.
f Refer to chapter “Adjusting brightness of
orientation lighting” on page 268.
Ambient lighting
If the vehicle is driven at night, a discreet light
provides subtle illumination for the passenger
compartment. The ambient lighting is switched
off automatically when the vehicle is locked.
125
Instrument Panel
A
B
C
D
E
F
G
H
I
J
K
L
M
N
O
P
Q
R
S
T
U
V
W
X
Y
Z
Instrument Panel
Fig. 96: Displays on the instrument panel
A – Speedometer
B – Tachometer
The start of the red zone on the tachometer scale
is a visual warning of the maximum permissible
engine speed.
C – Multi-function display
f Refer to chapter “Multi-Function Display” on
page 157.
D – Reset button for trip counter,
instrument lighting and PCM brightness
setting
f Refer to chapter “Instrument and Interior
Lighting” on page 123.
E – Total distance and trip meter
The upper display counts the total mileage, the
lower display shows individual trips.
After exceeding 9,999 kilometres or 6,213 miles,
the trip display returns to “0”.
Resetting trip display manually:
e Press and hold the trip display reset button D
for approx. 1 second.
The trip display is reset to “0”.
F – Digital speedometer
G – Upshift indicator
The consumption-oriented upshift indicator lights
up – prompting you to shift up to the next-higher
gear – depending on the selected gear, engine
speed and accelerator pedal position.
The upshift prompt is only available in manual
selection mode.
e Change to the next-higher gear when the
upshift indicator lights up.

126
Instrument Panel
A
B
C
D
E
F
G
H
I
J
K
L
M
N
O
P
Q
R
S
T
U
V
W
X
Y
Z
H – Selector-lever position and engaged
gear display
I – Filler flap location indicator
The arrow is pointing towards the side of the
vehicle on which the filler flap is located.
J – Fuel gauge
The fuel gauge displays the contents of the tank
when the ignition is on.
f Refer to chapter “Refuelling” on page 209.
If the vehicle’s inclination changes (e.g. driving
uphill or downhill), minor deviations in the
indication may occur.
Fuel reserve warning
If there is less than a certain amount (which varies
depending on the model) remaining in the tank or
the minimum fuel range is exceeded, the warning
light lights up when the ignition is switched on or
the engine is running and a fuel range warning
message is displayed.
e Refuel at the next opportunity.
Warning and indicator lights
In the speedometer
NOTICE
A shortage of fuel may damage the emission
control system.
e Never drive the tank dry.
e If the warning light has come on or the fuel
range warning message has appeared, do not
take bends at high speed.
NOTICE
All the warning lights and some of the indicator
lights light up briefly when the ignition is switched
on. Faults are indicated by the warning lights.
Consult a qualified specialist workshop in the
following cases:
– The warning light does not come on briefly
when the ignition is switched on.
– The warning light lights up or flashes when the
engine is running or during driving.
Porsche recommends a Porsche partner as they
have trained workshop personnel and the
necessary parts and tools.
Information
The corresponding warning light only goes out
when the cause of the fault has been rectified.
HOLD function indicator light
Tyre pressure warning light
Causes of light flashing or staying on:
– Learning new fitted wheels (tyre
pressure sensors), as long as the
wheels have not yet been recognised
– Defect in Tyre Pressure Monitoring
(TPM) or a temporary fault
– Pressure loss in a tyre
e In the event of pressure loss:
Stop in a suitable place. Do not
continue driving.
f Refer to chapter “Warning and
Information Messages” on page 278.
f Refer to chapter “TPM menu (TPM –
Tyre Pressure Monitoring)” on
page 162.
PDLS warning light
Dipped beam indicator light
Dynamic high beam indicator light
Rear fog light indicator light
127
Instrument Panel
A
B
C
D
E
F
G
H
I
J
K
L
M
N
O
P
Q
R
S
T
U
V
W
X
Y
Z
In the tachometer
Sport/Sport+/Individual indicator light
Electric parking brake warning light
Emission control warning light
(Check Engine)
Causes of light flashing or staying on:
Malfunctions (e.g. engine misfiring) that
could increase pollutant emissions or
cause consequential damage.
e Reduce engine speed and load
immediately.
e If necessary, stop in a suitable safe
place. Make sure that combustible
materials such as dry grass or leaves
cannot come into contact with the hot
exhaust system.
e Initiate measures to resolve the
emission control fault:
f Refer to chapter “Warning and
Information Messages” on page 278.
Airbag warning light
Seat belt warning light
Brake warning light
Direction indicator, left
High beam indicator light
Direction indicator, right
ABS warning light
PSM warning light
PSM OFF warning light
128
Jack and Lifting Platform
A
B
C
D
E
F
G
H
I
J
K
L
M
N
O
P
Q
R
S
T
U
V
W
X
Y
Z
Jack and Lifting Platform
There are arrow markings on the side skirt in the
area of the jacking points.
Fig. 97: Front jacking point for lifting platform and jack
Fig. 98: Rear jacking point for lifting platform and jack
f Refer to chapter “Changing a wheel” on
page 260.
WARNING
Insufficiently secured
vehicle
A vehicle that is not secured or that is incorrectly
secured may move unintentionally or tip or fall off
lifting equipment, e.g. jack or lifting platform. This
can result in serious injuries and damage.
e The vehicle must be raised using the jack only
when on a solid and level surface.
e Raise the vehicle only at the prescribed jacking
points (Fig. 97, Fig. 98) on the vehicle
underbody.
e Always place the vehicle on solid supports
when carrying out work under the vehicle.
e Never start the engine once the vehicle is
raised. Engine vibration may cause the vehicle
to fall.
e When working on the engine while it is running,
always apply the electric parking brake and
move the gearshift lever into the neutral
position or the selector lever to the P position.
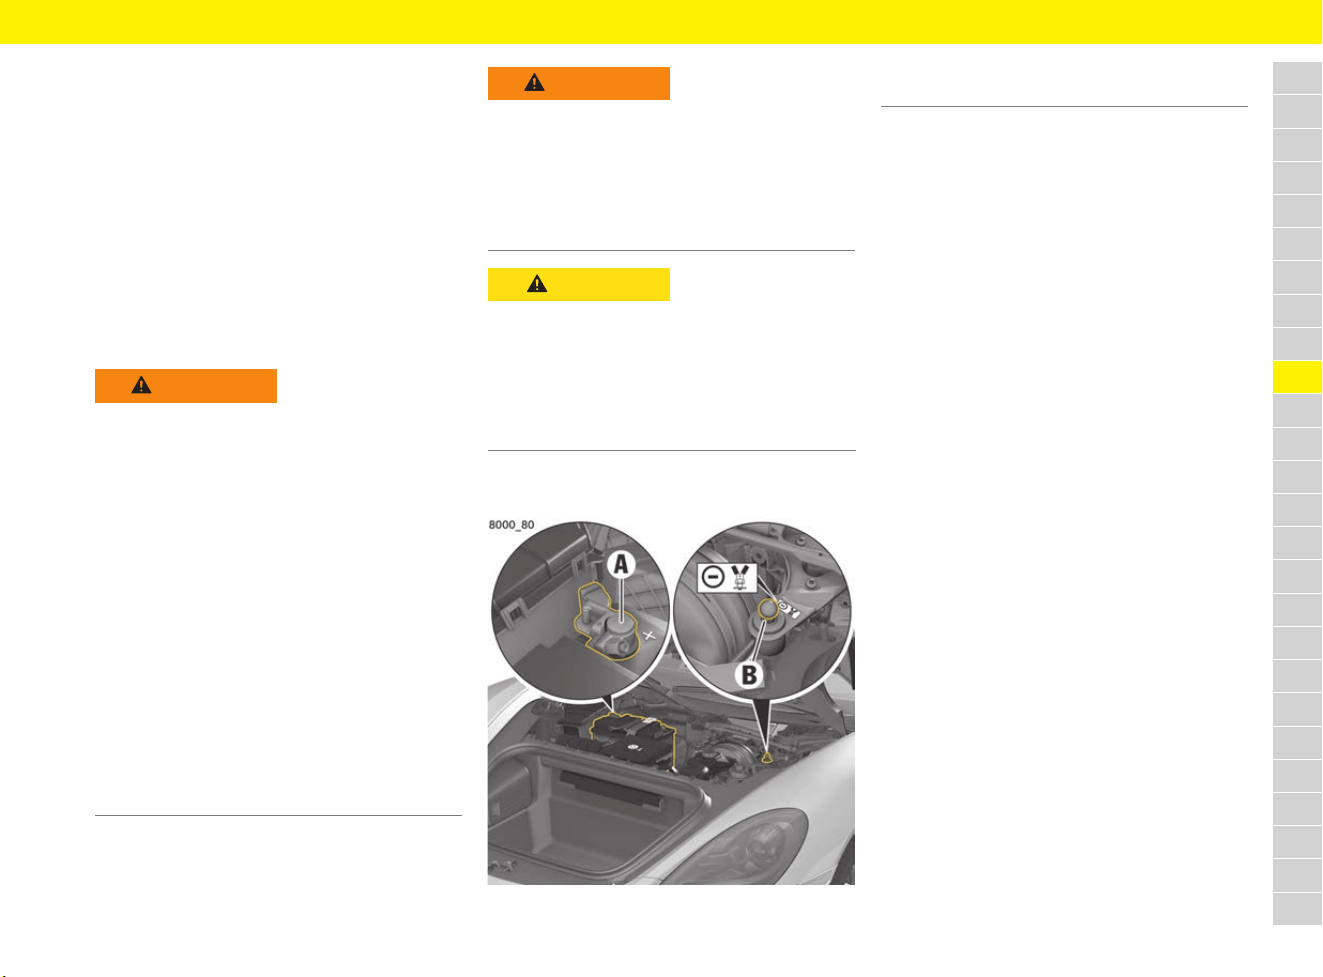
129
Jump-Lead Starting
A
B
C
D
E
F
G
H
I
J
K
L
M
N
O
P
Q
R
S
T
U
V
W
X
Y
Z
Jump-Lead Starting
If the battery is flat, another vehicle’s battery can
be used for starting and as an external power
supply with the help of jump leads. Both batteries
must be 12 V batteries. The capacity (Ah) of the
donor battery must not be substantially less than
that of the flat battery. The flat battery must be
connected correctly to the vehicle’s electrical
system.
f Refer to chapter “Battery” on page 59.
Repeated jump-lead starting under normal
operating conditions may indicate that the battery
is damaged.
Jump-lead starting
Fig. 99: Pole
1. Open front luggage compartment lid.
f Refer to chapter “Performing emergency
release of luggage compartment lid” on
page 146.
2. Remove cover in front luggage compartment.
f To remove the cover: Refer to chapter
“Removing and stowing tyre sealing
compound or tool kit” on page 140.
3. Connect the red positive cable to the positive
terminal A of the flat battery.
4. Connect the red positive cable to the positive
terminal of the donor battery.
5. Connect the black negative cable to the
negative terminal of the donor battery.
6. Connect the black negative cable to the
ground point B.
Never connect the black negative cable
directly to the battery.
7. Allow the engine of the donor vehicle to run at
a higher engine speed.
8. Start the engine. An attempted start using
jump leads should not last more than
15 seconds. Then wait for at least one
minute.
9. With engine running: First, disconnect the
black negative cable from the ground point B
then from the negative terminal on the donor
battery.
10. With engine running: Disconnect the red
positive lead from the positive terminal on the
donor battery first, then from the positive
terminal A on the flat battery.
WARNING
Unsuitable jump leads
and incorrect
procedures
A short circuit may be caused if unsuitable jump
leads are used or if jump-lead starting is not
performed properly. Such short circuits can cause
a fire.
e Use only standard jump leads with sufficient
cross section and completely insulated clamps.
Follow the instructions provided by the jump
lead manufacturer.
e The vehicles must not touch, otherwise current
might flow as soon as the positive terminals
are connected.
e Ensure that conductive jewellery (e.g. rings,
chains, watch straps) does not come into
contact with live parts of the vehicle.
e Never connect jump leads directly to the
battery. Always connect jump leads to the
jump-lead starting terminals.
WARNING
Jump-lead starting a
frozen or damaged
battery
When jump-lead starting a frozen or damaged
battery, there is a danger of explosion and
chemical burns.
e Never jump-lead start a frozen or damaged
battery.
CAUTION
Corrosive electrolyte
Lead batteries contain highly caustic battery acid
that can cause damage to the skin and clothing in
the event of contact.
e Wear safety gloves and eye protection.
e To prevent acid from leaking out, do not tilt the
battery.
A Positive terminal +
B Ground point –
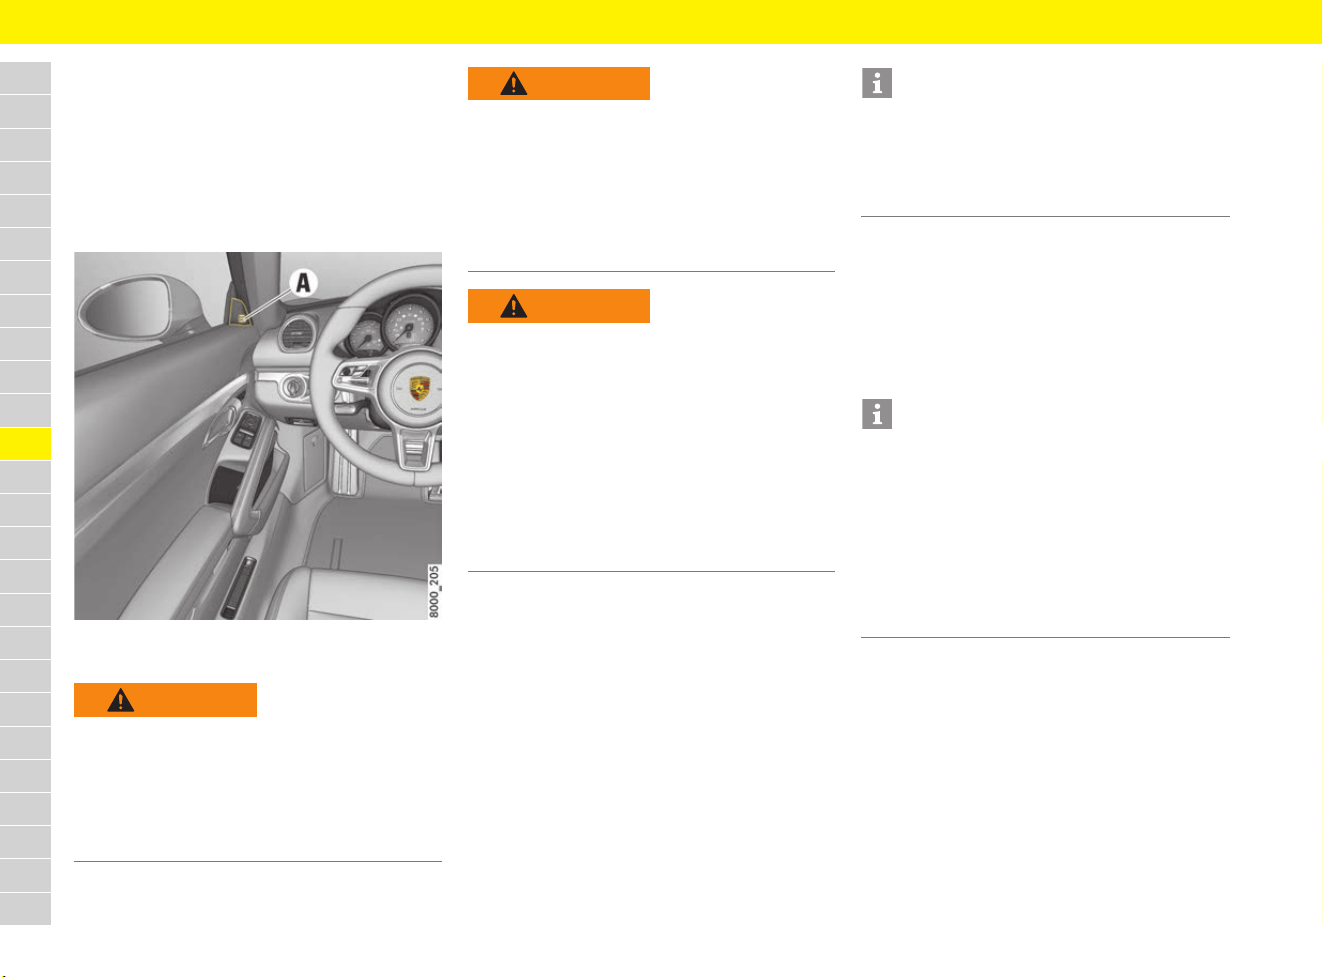
130
Lane Change Assist (LCA)
A
B
C
D
E
F
G
H
I
J
K
L
M
N
O
P
Q
R
S
T
U
V
W
X
Y
Z
Lane Change Assist (LCA)
Lane Change Assist (LCA) warns the driver about
vehicles approaching from behind or those in the
blind-spot. This applies when overtaking other
vehicles and when being overtaken. Integrated
warning indicators in both mirror attachment point
finishers light up as soon as a dangerous situation
is identified and changing lanes seems essential.
Fig. 100: Warning indicator A on the mirror attachment
point finisher
General information
– The system helps when driving at speeds
between approx. 30 km/h and 250 km/h
(20 mph and 156 mph).
– The warning indicator is designed so that it can
be noticed merely by glancing at the mirror
attachment point finisher.
– Lane Change Assist is not available if it detects
that the radar sensors for Lane Change Assist
are covered.
– The radar sensors can sometimes detect
other objects (e.g. high or raised crash
barriers), not just vehicles.
Activating and deactivating
Lane Change Assist
Lane Change Assist is activated and deactivated
in the multi-function display.
f Refer to chapter “Switching Lane Change
Assist (LCA) on and off” on page 266.
WARNING
Lack of attention
Even with Lane Change Assist, absolute care and
attention on the part of the driver is still required
while driving. Ultimately, the driver is still
responsible for changing lanes.
e Keep the direction of travel and the relevant
area around the vehicle in view at all times.
WARNING
Impaired radar sensor
vision
The view of the radar sensor can be reduced in
tight bends, when approaching crests and in
adverse weather conditions (rain, snow, ice, heavy
spray). Vehicles will not be detected properly or
may not be detected at all.
e Keep the direction of travel and the relevant
area around the vehicle in view at all times.
WARNING
Vehicles not detected
– Lane Change Assist cannot alert you in good
time to vehicles approaching at high speed
from behind or vehicles that are falling back.
– Lane Change Assist will not work in tight bends
(corner radius of less than approx. 100 m).
– Lane Change Assist will only alert you to
approaching vehicles or vehicles in the blind-
spot area when you are driving at approx.
30 km/h (20 mph) or faster.
e Keep the direction of travel and the relevant
area around the vehicle in view at all times.
Information
e If the positions of the radar sensors were
changed following a rear-impact collision, for
example, always have the Lane Change Assist
system checked at a specialist workshop for
safety reasons.
Information
To ensure that Lane Change Assist can work
properly:
e Do not cover the radar sensor area on the rear
bumper (Fig. 101) with objects (e.g. stickers).
Also remove any dirt, snow and ice from this
area.
e Do not cover the warning indicator on the
mirror attachment point finisher (e.g. with
stickers).
131
Lane Change Assist (LCA)
A
B
C
D
E
F
G
H
I
J
K
L
M
N
O
P
Q
R
S
T
U
V
W
X
Y
Z
Fig. 101: Radar sensors in the rear bumper
Operating principle
Lane Change Assist measures the distance and
speed difference of detected vehicles compared
to your vehicle using the radar sensors integrated
in the rear bumper. The radar sensors calculate an
area of around 70 m to the rear (approach zone)
and the blind-spot.
Whenever Lane Change Assist regards the speed
difference and distance as critical for changing
lanes, this is indicated on the relevant mirror
attachment point finisher.
Both sides of the vehicle are displayed separately.
This is how the warning indicator in the left mirror
attachment point finisher assists the driver when
changing to the left lane, for example.
If a vehicle regarded as critical has set its direction
indicator, the respective warning indicator on the
mirror attachment point finisher flashes brightly
and briefly several times.
When another vehicle is slowly overtaken (speed
difference of less than approx. 15 km/h (9 mph)),
the warning indicator lights up as soon as this
vehicle is in your blind-spot area and is detected
by Lane Change Assist. If there is a greater speed
difference, this is not indicated on the exterior
mirror.
Information and warning stage
Lane Change Assist has 2 warning indicator
stages that are activated accordingly depending
on whether the direction indicator was set or not.
Information stage
If the direction indicator is not set, Lane Change
Assist will inform you about detected vehicles that
will be regarded as critical for a possible lane
change. Whenever Lane Change Assist regards
the speed difference and distance of a detected
vehicle as critical, a weak light appears in the
warning indicator on the relevant mirror.
Warning stage
If the direction indicator is set and Lane Change
Assist has detected a vehicle on this side which it
regards as critical, the warning indicator on the
mirror attachment point finisher on this side will
start to flash brightly. When the warning stage
flashes brightly and briefly several times, this is an
indication for you to check the driving situation
again by looking in the exterior mirror and looking
over your shoulder.
Driving situations
The following driving situations describe possible
scenarios and the associated warning indicators
of Lane Change Assist.
Information
The radar sensors cover the adjacent lane to the
left and right. Other lanes are not covered by the
radar sensors.
Information
The brightness of the warning indicator on the
mirror attachment point finisher can be adjusted.
f Refer to chapter “Setting display brightness of
Lane Change Assist (LCA) on exterior mirror”
on page 267.
Information
– The faster a vehicle is approaching, the earlier
the warning indicator on the exterior mirror
lights up. You are alerted to all vehicles
detected by Lane Change Assist when they are
in the “blind-spot area” at the latest.
– Changing lanes can already be critical when
there are fast approaching vehicles if there is
still no indication on the mirror attachment
point finisher.

132
Lane Change Assist (LCA)
A
B
C
D
E
F
G
H
I
J
K
L
M
N
O
P
Q
R
S
T
U
V
W
X
Y
Z
Driving situation – vehicle approaching
fast
Fig. 102: Vehicle approaching fast
A – Warning indicator on the mirror
attachment point finisher does not light up
The sensors do not detect a vehicle. No lights on
the warning indicator on the exterior mirror.
B – Warning indicator lights up in information
stage
The sensors detect a fast approaching vehicle – in
the left lane in the example. This vehicle is already
regarded as critical for changing lanes due to the
significant speed difference even though it is still
a good distance away. The warning indicator on
the mirror attachment point finisher lights up.
C – Warning indicator flashes in warning stage
When the direction indicator is set to driving
situation B, the warning indicator on the mirror
attachment point finisher flashes briefly several
times. Lane Change Assist is telling you that you
may have overlooked a vehicle.
Driving situation – vehicle approaching
slowly
Fig. 103: Vehicle approaching slowly
A – Warning indicator on the mirror
attachment point finisher does not light up
The sensors detect a slowly approaching vehicle –
in the left lane in the example. Given the small
speed difference and the long distance, this is not
indicated on the mirror attachment point finisher.
B – Warning indicator lights up in information
stage
The slowly approaching vehicle is now closer. The
warning indicator on the mirror attachment point
finisher lights up.
Only when Lane Change Assist regards the speed
difference and distance as critical for changing
lanes will this be indicated on the mirror attachment
point finisher. You are alerted to all vehicles
detected by Lane Change Assist when they are in
the “blind-spot area” at the latest.
C – Warning indicator flashes in warning stage
When the direction indicator is set to driving
situation B, the warning indicator on the mirror
attachment point finisher flashes briefly several
times. Lane Change Assist is telling you that you
may have overlooked a vehicle.
Driving situation – vehicles falling back
slowly
Fig. 104: Vehicle falling back slowly
A – Warning indicator on the mirror
attachment point finisher does not light up
Lane Change Assist has not yet detected the
overtaken vehicle. No indication on the mirror
attachment point finisher.
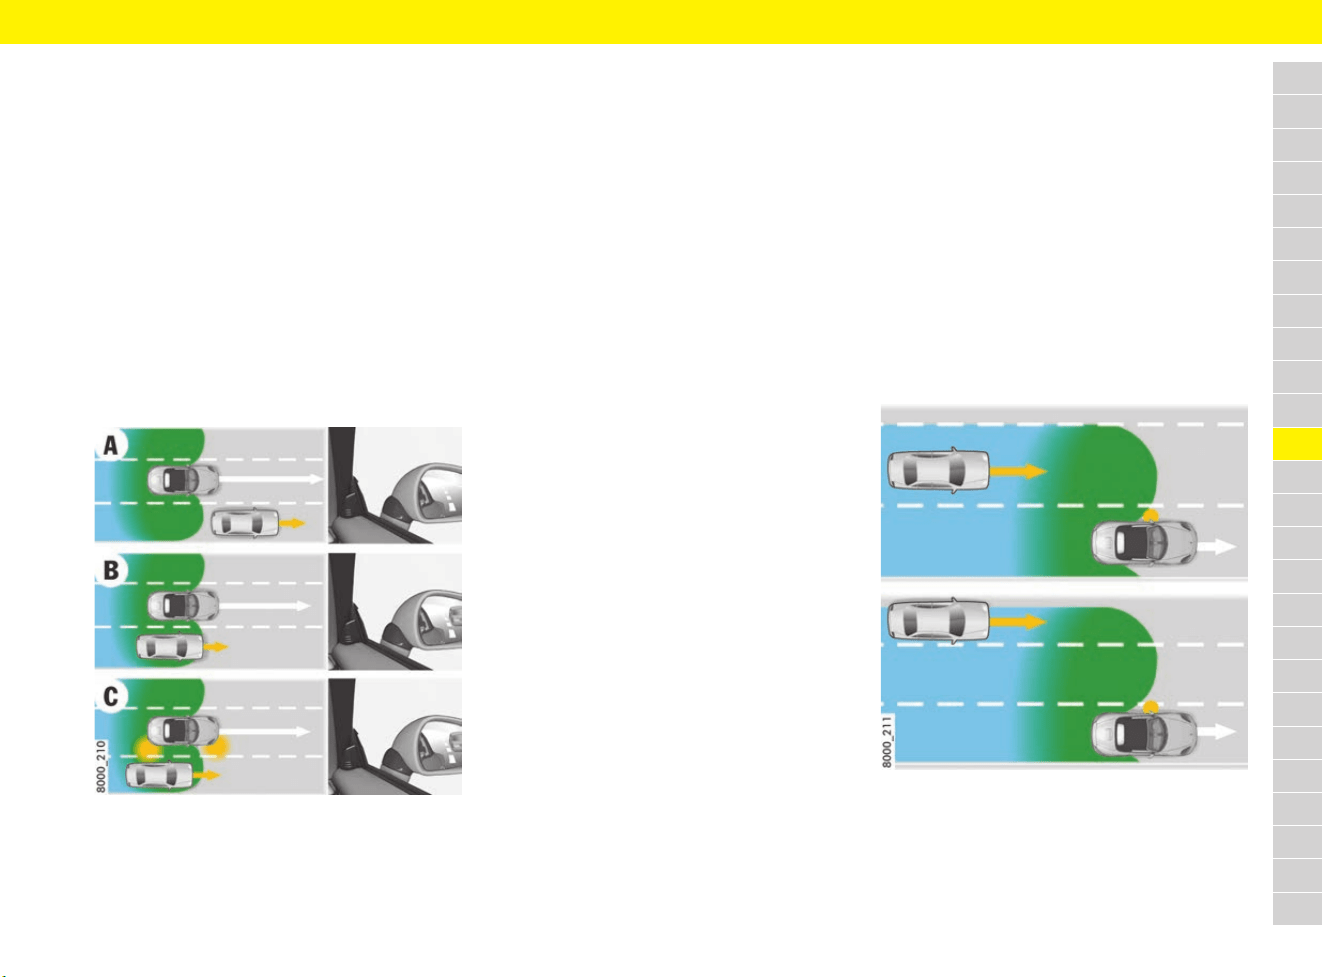
133
Lane Change Assist (LCA)
A
B
C
D
E
F
G
H
I
J
K
L
M
N
O
P
Q
R
S
T
U
V
W
X
Y
Z
B – Warning indicator lights up in information
stage
Lane Change Assist detects the vehicle that is
falling back slowly (speed difference of less than
approx. 15 km/h (9 mph)), in the right lane in the
example. The warning indicator on the mirror
attachment point finisher lights up.
C – Warning indicator flashes in warning stage
When the direction indicator is set to driving
situation B, the warning indicator on the mirror
attachment point finisher flashes briefly several
times. Lane Change Assist is telling you that you
may have overlooked a vehicle.
Driving situation – vehicles falling back
fast
Fig. 105: Vehicle falling back fast
A – Warning indicator on the mirror
attachment point finisher does not light up
Lane Change Assist has not yet detected the
overtaken vehicle. No indication on the mirror
attachment point finisher.
B – Warning indicator in the mirror
attachment point finisher does not light up
Lane Change Assist detects the vehicle that is
falling back fast (speed difference of more than
approx. 15 km/h (9 mph) – in the right lane in the
example – but does not regard it as critical for
changing lanes because it is falling back fast. No
indication on the mirror attachment point finisher.
C – Warning indicator in the mirror
attachment point finisher does not light up
When the direction indicator is switched to driving
situation B, there is still no indication on the mirror
attachment point finisher.
Driving around bends
When driving around a bend, Lane Change Assist
may react to a vehicle driving two lanes over from
you and the warning indicator on the exterior
mirror may light up.
Lane Change Assist cannot detect vehicles in tight
bends (corner radius of less than approx. 100 m).
e Be particularly careful when driving around
bends and when driving in lanes that are not of
standard width.
Lane width
The Lane Change Assist detection area covers the
two adjacent lanes (left and right) on lanes of
standard width regardless of whether you are
driving exactly in the middle or at the edge of the
lane.
When driving on narrow lanes, this area can cover
even more lanes, particularly when driving at the
edge of a lane. In situations like this, vehicles
driving two lanes over from you can also be
detected and Lane Change Assist could switch to
the information or warning stage.
Likewise, when driving on very wide lanes,
vehicles in the next lane may not be detected
because they are outside of the detection area.
Fig. 106: Lane width and detection area

134
Lane Change Assist (LCA)
A
B
C
D
E
F
G
H
I
J
K
L
M
N
O
P
Q
R
S
T
U
V
W
X
Y
Z
Setting the brightness of the
warning indicator on the mirror
attachment point finisher
The brightness of the warning indicator for both
the information stage and warning stage is
automatically adjusted according to the ambient
brightness.
The basic brightness can also be adjusted as
required on the multi-function display:
f Refer to chapter “Setting display brightness of
Lane Change Assist (LCA) on exterior mirror”
on page 267.
Information
Lane Change Assist is not active while you are
adjusting the brightness. The warning indicator
lighting up briefly should only help you set the
brightness.
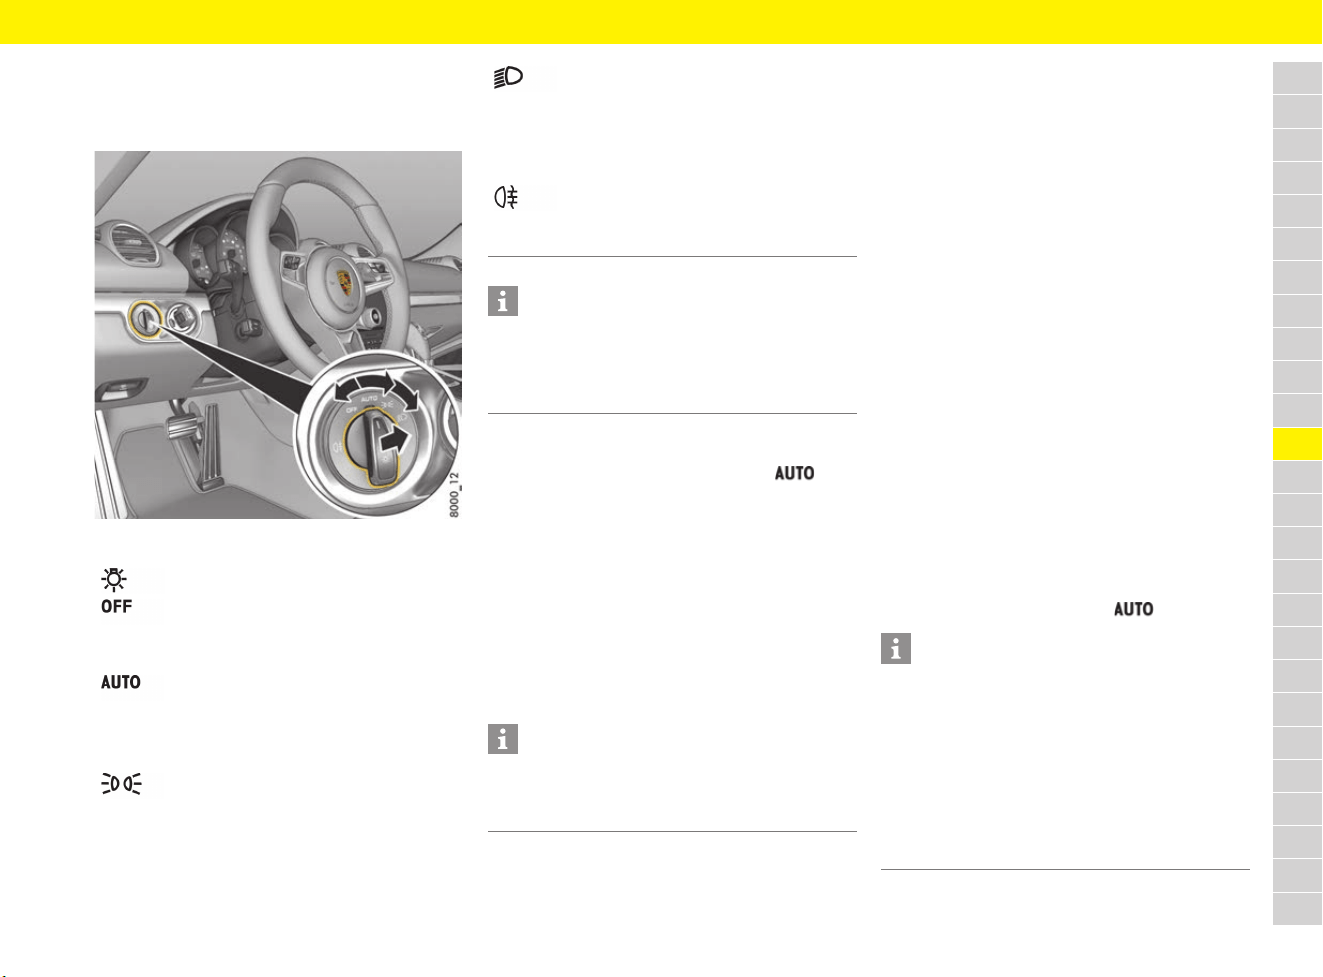
135
Lights
A
B
C
D
E
F
G
H
I
J
K
L
M
N
O
P
Q
R
S
T
U
V
W
X
Y
Z
Lights
Setting light switch
Fig. 107: Light switch
Dipped beam/driving light
If the light switch is set to the position , the
dipped beam is switched on automatically in the
following situations:
– Dusk
– Darkness
– Driving through tunnels
– Rain
– Motorway driving (on vehicles with Porsche
Dynamic Light System PDLS)
When the dipped beam is switched on, the
indicator light on the speedometer comes on.
Motorway function in daylight
The driving lights are switched on at speeds of
more than approx. 140 km/h (90 mph) under
bright conditions. When driving at a speed of less
than approx. 65 km/h (40 mph), the driving lights
are switched off after a delay of approx. 4 minutes,
depending on external lighting conditions.
Rain function
The driving light is switched on automatically after
five seconds of continuous wiper operation.
If the wipers have not been used for approx.
4 minutes, the driving lights are switched off,
provided the lighting conditions permit.
Automatic driving light assistant
The driving light (dipped beam) is switched on
and off automatically depending on the ambient
brightness.
The automatic headlights function also controls
the daytime running lights, automatic Coming
Home lights and the equipment-dependent
dynamic cornering light.
Activate automatic driving light assistant:
e Turn light switch to position .
Light switch
Light off
Daytime running lights are switched on
when the ignition is switched on.
Automatic driving light assistant
The daytime running lights are switched
on automatically during daylight when
the ignition is switched on.
Side lights
Number plate light, instrument lighting
and daytime running lights switched on.
Dipped beam/driving light
Only with ignition on. Fog lights,
motorway light, daytime running lights
and dynamic high beam are switched
off.
Rear fog light
Pull the switch in the dipped beam
position. Indicator light comes on.
Information
If the driver’s key is removed and the door is
opened when the lights are on, an audible signal
(gong) warns of possible battery discharge.
Depending on the country deviations are possible.
Information
Fog is not recognised.
e In the event of fog, switch on the driving light
manually.
Information
Despite possible support by the driving light
assistant, it is the responsibility of the driver to
switch on the driving light using the conventional
light switch in accordance with the relevant
national regulations.
Activating the headlights using the driving light
assistant therefore does not absolve the driver of
responsibility for correct operation of the driving
light.
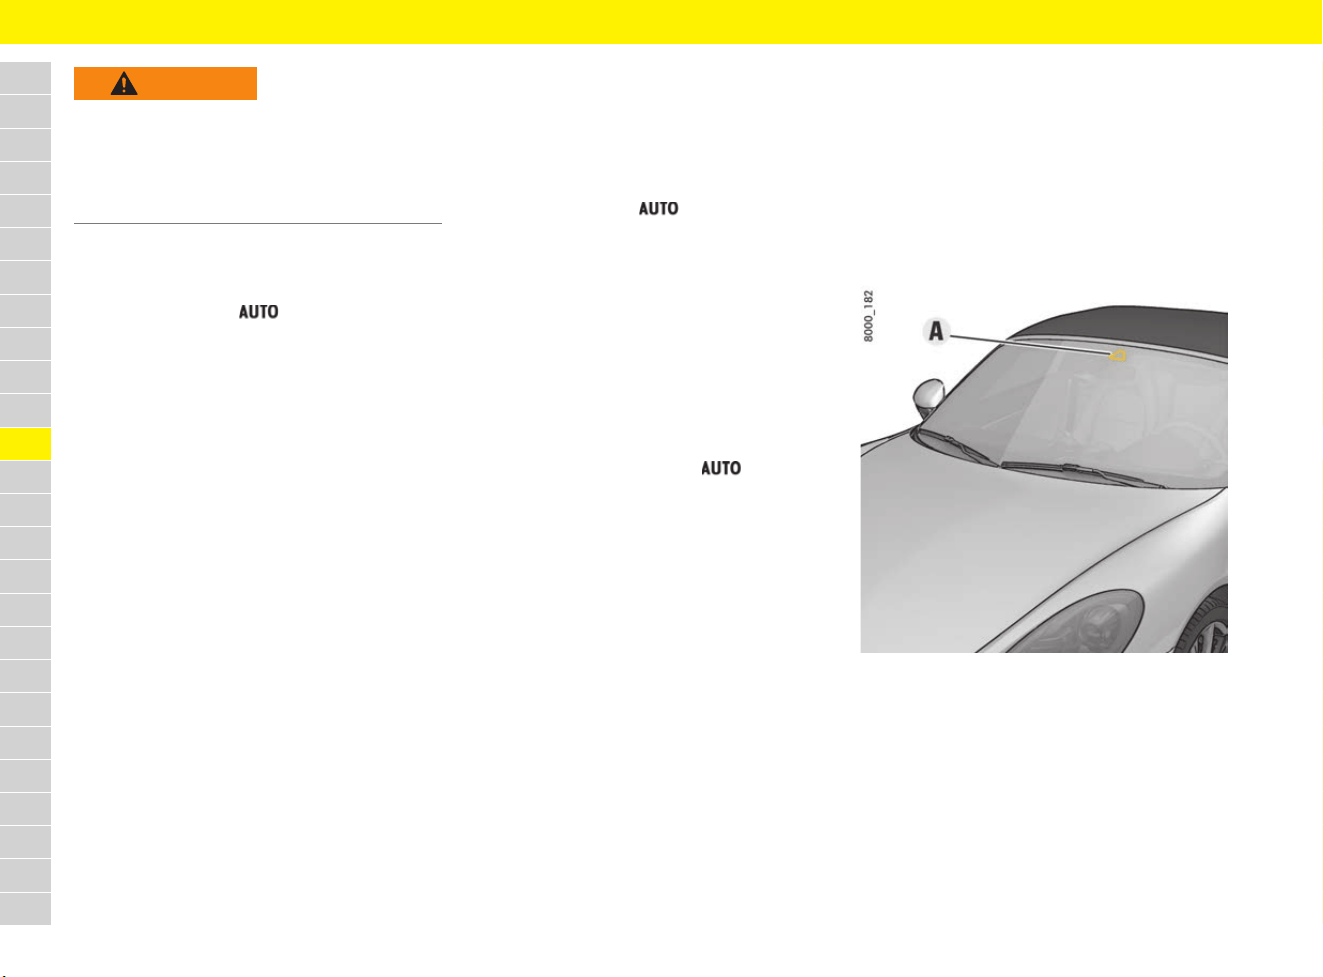
136
Lights
A
B
C
D
E
F
G
H
I
J
K
L
M
N
O
P
Q
R
S
T
U
V
W
X
Y
Z
Switching on Automatic
Coming Home lights
e Set light switch to .
The following lights remain switched on for a
certain period to allow you to get in and out of
the vehicle safely and with improved visibility in
darkness:
– Daytime running lights
– Door courtesy lights in the folded-out exterior
mirrors (on vehicles with electrically folding
mirrors)
– Rear side marker lights
– Number plate lights
Welcome Home function (off delay)
When the vehicle is locked, the lights remain
switched on for the duration of the off delay preset
on the multi-function display.
For information on adjusting the off delay of the
external lights on the multi-function display:
f Refer to chapter “Adjusting off delay of
exterior lights for Welcome Home and Entry
functions” on page 267.
Entry function/Exit function
When the vehicle is unlocked, the area around the
vehicle is illuminated for the duration of the off
delay preset on the multi-function display.
The lights are switched off in the following cases:
– Ignition is switched on.
– Light switch leaves position.
For information on adjusting the off delay of the
external lights on the multi-function display:
f Refer to chapter “Adjusting off delay of
exterior lights for Welcome Home and Entry
functions” on page 267.
Porsche Dynamic Light System
(PDLS)
Activation of the dynamic cornering light as well as
the motorway function in darkness:
e Turn light switch to position .
Dynamic cornering light
At speeds greater than approx. 8 km/h (5 mph),
the dipped beam headlight is swivelled in the
direction of the curve to illuminate the road more
clearly, depending on the speed of the vehicle and
the extent to which the steering wheel is turned. In
the event of a fault in the dynamic cornering light,
the PDLS warning light in the instrument panel
flashes.
f Refer to chapter “Warning and Information
Messages” on page 278.
Motorway function in darkness
The distribution characteristics of the driving light
change when driving in darkness at vehicle
speeds of more than approx. 130 km/h (80 mph).
The light beam becomes longer, thus the field of
vision increases.
Fog lights
When the fog lights are switched on, the driving
light distribution changes at speeds of less than
approx. 70 km/h (43 mph).
The light beam becomes wider, thus glare is
reduced.
Porsche Dynamic Light System
Plus (PDLS Plus)
Fig. 108: Camera position
WARNING
Driving without lights
If you drive without lights, this may significantly
restrict your visibility and also the ability of other
road users to see your vehicle.
e Always carefully monitor the automatic driving
light control.
137
Lights
A
B
C
D
E
F
G
H
I
J
K
L
M
N
O
P
Q
R
S
T
U
V
W
X
Y
Z
Dynamic high beam
With dynamic high beam, the camera A in the
vicinity of the interior mirror detects the light
sources of preceding and oncoming vehicles and
gradually adjusts the cut-off line of the driving
lights in several stages between dipped beam and
full high beam lighting. The stage is selected in
such a way that the cut-off line of the driving light
reaches to the next recognised vehicle.
The function is activated in darkness if the
following conditions are present:
b The light switch position is selected.
b Vehicle speed is more than approx. 60 km/h
(37 mph).
b Dynamic high beam is activated on the
multi-function display.
f Refer to chapter “Activating and
deactivating dynamic high beam” on
page 267.
b Dynamic high beam is switched on.
f Refer to chapter “Actuating high beam” on
page 138.
In order to avoid full high beam lighting within
built-up areas, dynamic high beam is not available
at speeds below approx. 35 km/h (22 mph).
In addition, full high beam lighting is automatically
switched to dipped beam if two or more street
lamps are recognised by the camera.
WARNING
Lack of attention
In spite of dynamic high beam, it is always the
driver’s responsibility to manually adapt high beam
according to light conditions, visibility and traffic
conditions during driving, for example. The system
is no substitute for careful attention on the part of
the driver. Manual intervention may be necessary
in the following situations:
– In adverse weather conditions such as rain,
fog, snow, ice or heavy spray.
– On roads where oncoming traffic is partly
obscured, e.g. motorways.
– Where there are poorly lit road users,
e.g. cyclists.
– On tight bends, or on sharp humps or dips.
– In poorly lit built-up areas.
– Where there are strong reflections e.g. signs.
– Where the windscreen in the camera area is
misted, dirty, icy or covered with stickers.
e Drive with extreme care.
e Always pay attention to the traffic situation and
the area around the vehicle.
e Adjust high beam manually where necessary
according to light, visibility and traffic
conditions.
Information
e To ensure that there is no interference with
camera operation:
Do not cover the camera area on the interior
mirror (see Fig. 108 on page 136) with objects
(e.g. stickers).
e The camera must always be kept free of dirt,
ice and snow to ensure that it can function
correctly.
f For car care instructions: Refer to chapter
“Care” on page 65.
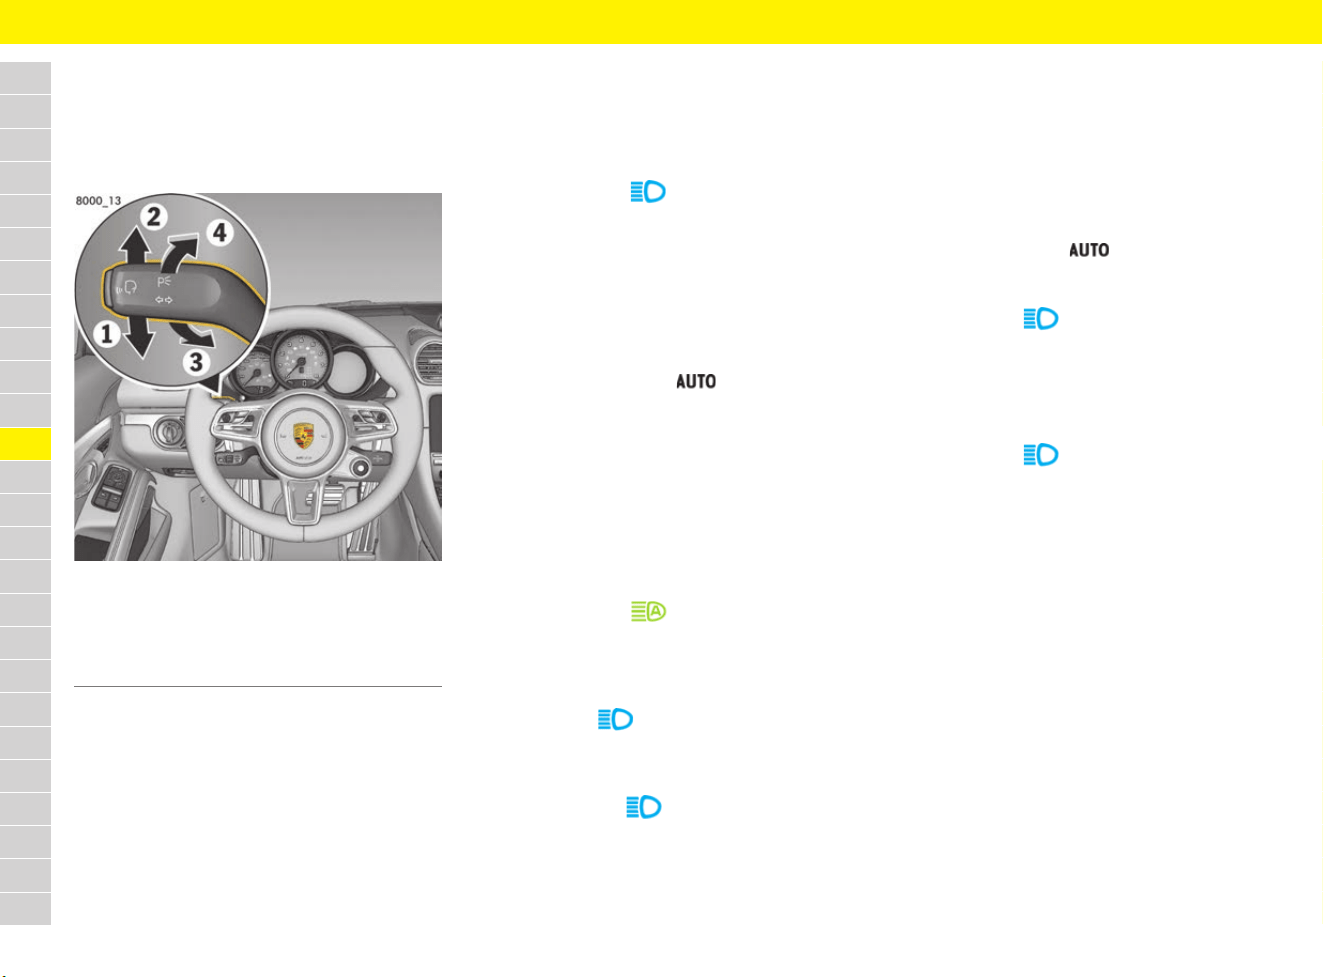
138
Lights
A
B
C
D
E
F
G
H
I
J
K
L
M
N
O
P
Q
R
S
T
U
V
W
X
Y
Z
Operating indicator and high beam
stalk
In addition the direction indicators and high beam,
the parking light and headlight flasher can also be
operated using the stalk.
Fig. 109: Indicator and high beam stalk
Operating direction indicators
e Push the stalk past pressure point 1 or 2.
The direction indicator remains active until the
stalk is returned to the initial position manually
or automatically due to steering wheel
movement.
e Push the stalk once to pressure point 1 or 2.
The direction indicators flash three times.
Actuating high beam
Switching high beam on and off
(vehicles WITHOUT dynamic high beam)
e Switching on: Press the stalk once to
pressure point 3.
The indicator light comes on.
e Switching off: Press the stalk once to
pressure point 4.
Activating and deactivating dynamic high
beam
The following conditions must be met before
dynamic high beam is activated:
b Darkness
b The light switch position is selected.
b Vehicle speed is more than approx. 60 km/h
(37 mph).
b Dynamic high beam is activated on the
multi-function display.
f Refer to chapter “Activating and
deactivating dynamic high beam” on
page 267.
e Activating: Press the stalk once to pressure
point 3.
The indicator light comes on. Changes
are made automatically in several stages
between dipped beam and full high beam
lighting.
If the high beam is partly or fully activated, the
indicator light comes on.
e Deactivating: Press the stalk once to
pressure point 4.
Dynamic high beam can only be deactivated if
the indicator light comes on.
Switching dynamic high beam on and off
manually
If the dynamic high beam was deactivated or if the
requirements for the dynamic high beam are not
met, high beam can be switched on and off
manually.
The following conditions must be met:
b Darkness
b The light switch position is selected.
e Switching on: Press the stalk twice to
pressure point 3.
The indicator light comes on.
e Switching off: Press the stalk once to
pressure point 4.
Operating the headlight flasher
e Press the stalk once to pressure point 4.
The indicator light comes on briefly.
Switching parking light on and off
b Ignition is switched off.
e Press the stalk past upper 2 or lower 1
pressure point to switch on the right or left
parking light.
If the parking light is switched on, a message
appears on the multi-function display after the
ignition is switched off and the door is opened.
f Refer to chapter “Warning and Information
Messages” on page 278.
1 Direction indicator, left
2 Direction indicator, right
3 High beam, dynamic high beam
4 Headlight flasher
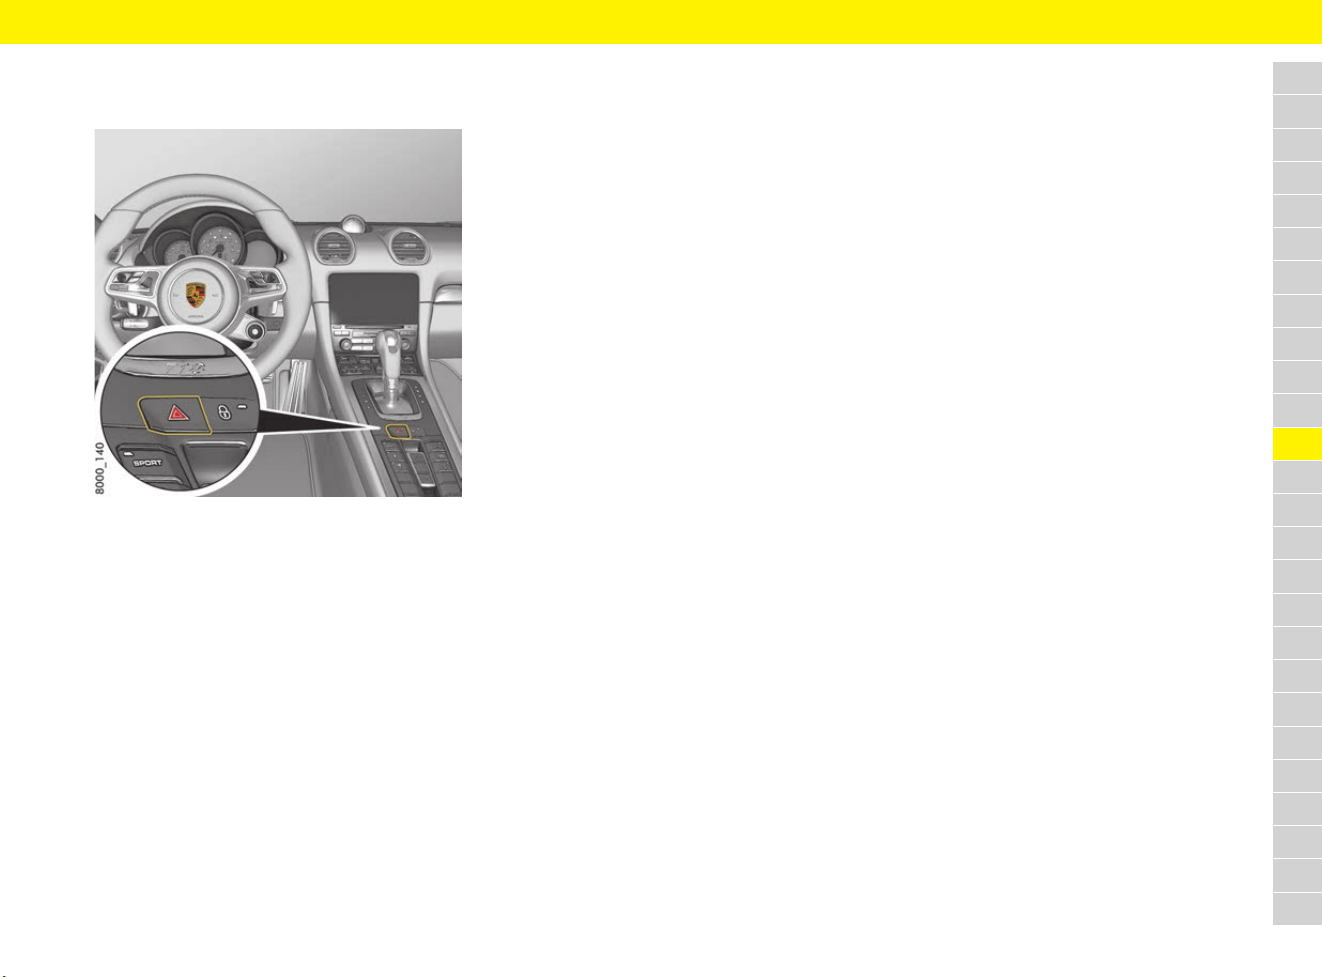
139
Lights
A
B
C
D
E
F
G
H
I
J
K
L
M
N
O
P
Q
R
S
T
U
V
W
X
Y
Z
Switching hazard warning lights on
and off
Fig. 110: Hazard warning light button on the centre
console
The hazard warning lights function even when the
ignition is switched off.
Switching hazard warning lights on
and off
e Press the hazard warning light button on the
centre console.
All direction indicators and the indicator light in
the button light up.
Deactivating hazard warning lights after
emergency braking
If the vehicle is travelling at a speed of more than
approx. 70 km/h (43 mph) and is braked fully to a
standstill, e.g. if the vehicle suddenly approaches
the end of a traffic jam, the hazard warning lights
are activated automatically and the brake light
flashes during braking.
e Press the hazard warning light button on the
centre console to deactivate the hazard
warning lights.
The hazard warning lights are deactivated
automatically when the vehicle begins to move
again.
Deactivating hazard warning lights after
accident
The hazard warning lights are activated
automatically in the event of an accident.
e To deactivate the hazard warning lights, switch
the ignition off and then on again.
Replacing light-emitting diodes
and long-life bulbs
Daytime running lights, front side lights, direction
indicator lights, gas-discharge bulbs in Bi-Xenon
headlights, tail lights, number plate lights,
additional brake light and interior lights are
equipped with light emitting diodes and long-life
bulbs.
The LEDs cannot be replaced individually.
Replacement of the long-life bulbs involves a
greater amount of installation work.
e Have defective LEDs and bulbs replaced in a
qualified specialist workshop. Porsche
recommends a Porsche partner as they have
trained workshop personnel and the necessary
parts and tools.

140
Luggage Compartment
A
B
C
D
E
F
G
H
I
J
K
L
M
N
O
P
Q
R
S
T
U
V
W
X
Y
Z
Luggage Compartment
Stowing loads
Removing warning triangle
The warning triangle is located on the back of the
front luggage compartment (Fig. 111, A),
depending on the country.
Securing and removing first aid kit
The first aid kit can be secured to the carpet
in the front luggage compartment (Velcro strip,
Fig. 112, B), depending on the country.
Removing and stowing tyre sealing
compound or tool kit
Fig. 111: Plastic box C containing tyre sealing
compound
Fig. 112: Plastic box D containing tool kit
Removing tyre sealing compound or
tool kit
e Grasp respective plastic box at the handle
recess and remove.
Stowing tyre sealing compound or
tool kit
1. Insert lug at the rear.
2. Engage the plastic box at the front.
WARNING
Changed vehicle
handling when vehicle is
loaded
Vehicle handling changes depending on the
vehicle load.
e Adapt driving style to the changed vehicle
handling.
e Do not exceed the maximum gross weight and
axle load.
f Refer to chapter “Weights” on page 309.
E Towing lug
F Tool set
G Adapter for security wheel bolts
H Key for emergency operation of convertible top
(718 Boxster)
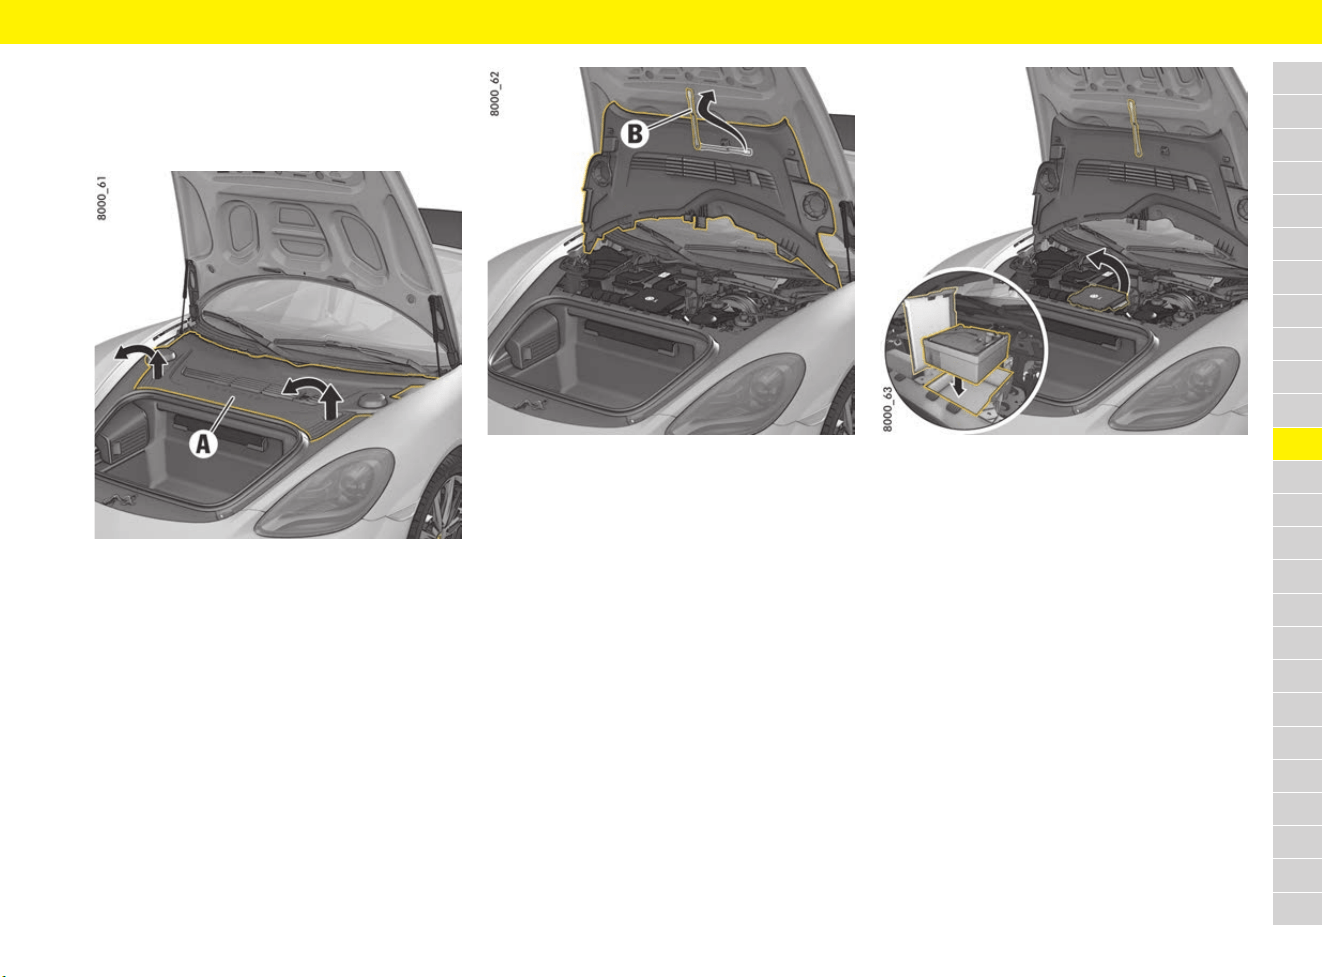
141
Luggage Compartment
A
B
C
D
E
F
G
H
I
J
K
L
M
N
O
P
Q
R
S
T
U
V
W
X
Y
Z
Removing and stowing tyre filling
compressor
Removing the tyre filling compressor
Fig. 113: Detaching and lifting plastic cover
1. Lift plastic cover A by the handle recesses
(arrows) until the latch audibly disengages.
2. Pull the plastic cover forwards slightly and lift
at the front.
Fig. 114: Attaching the plastic cover
3. Release retaining strap B on the underside of
the plastic cover and attach to the luggage
compartment lid.
Fig. 115: Opening storage compartment for tyre filling
compressor
4. Open the storage compartment for the tyre
filling compressor (Fig. 115).
5. Remove the tyre filling compressor from the
storage compartment.
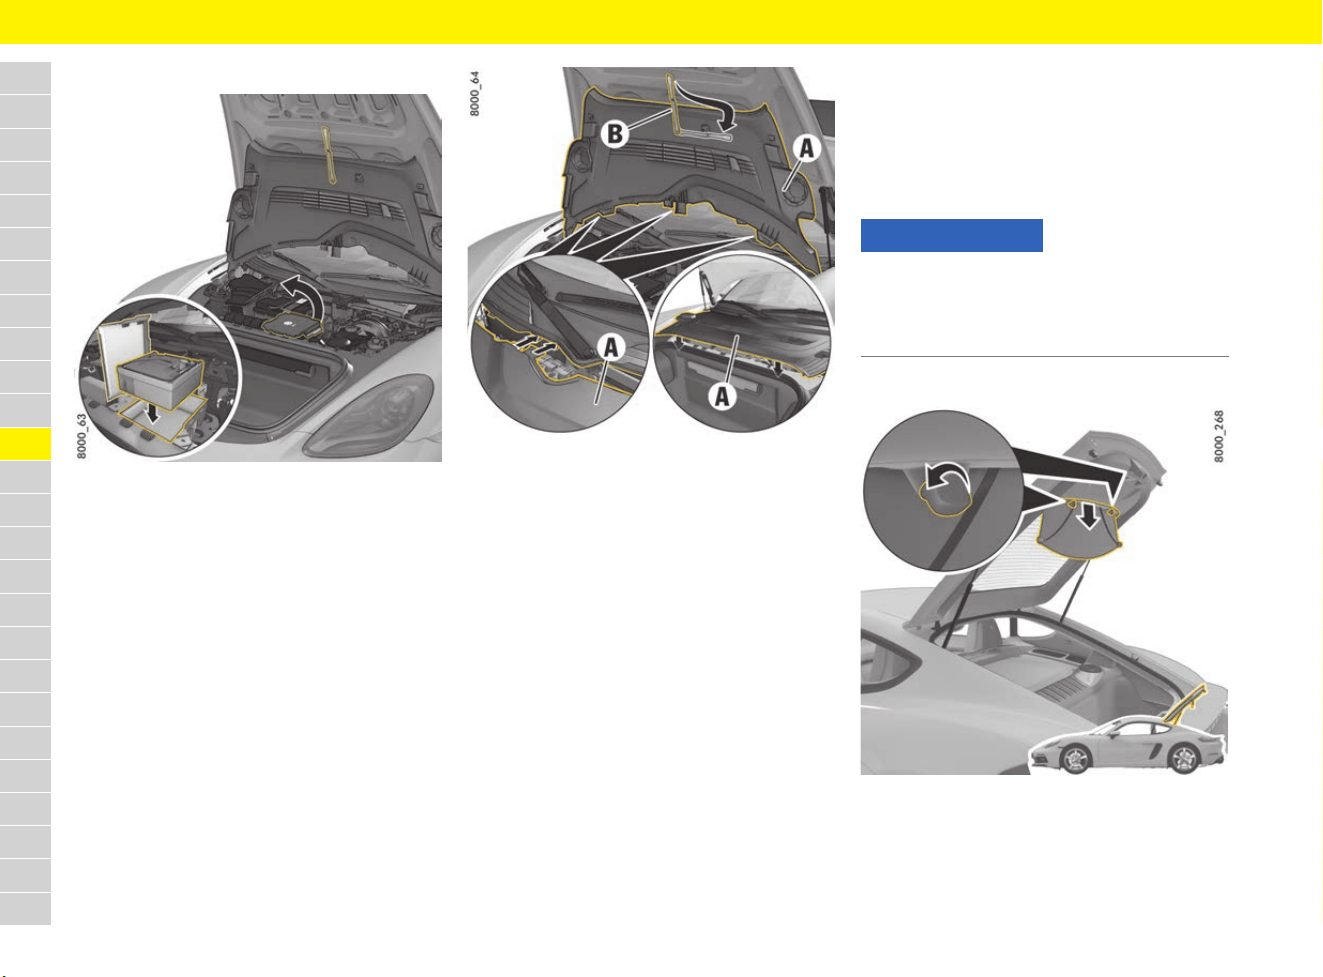
142
Luggage Compartment
A
B
C
D
E
F
G
H
I
J
K
L
M
N
O
P
Q
R
S
T
U
V
W
X
Y
Z
Stowing tyre filling compressor
Fig. 116: Replacing tyre filling compressor
1. Place the tyre filling compressor in the storage
compartment (Fig. 116).
2. Close the cover on the storage compartment.
Fig. 117: Closing the plastic cover
3. Unhook retaining strap B and engage in the
plastic cover.
4. Insert plastic cover A with the guides at the
rear edge and lay it on the holder. Lower the
plastic cover at the front.
5. Ensure that the centring pins on the underside
of the cover engage in the respective guides.
Press the cover downwards at the handle
recesses until the latch audibly engages.
Removing or installing the luggage
cover
b 718 Cayman
The luggage cover protects luggage in the rear
storage area from direct sunlight and curious
eyes.
Removing the luggage cover
Fig. 118: Removing the luggage cover
1. Hold luggage cover with one hand and turn
both turn-locks anticlockwise.
2. Remove the luggage cover using both hands.
NOTICE
Risk of damage to luggage cover from sharp-
edged or sliding pieces of luggage.
e Always remove luggage cover if pieces of
luggage might damage the luggage cover.
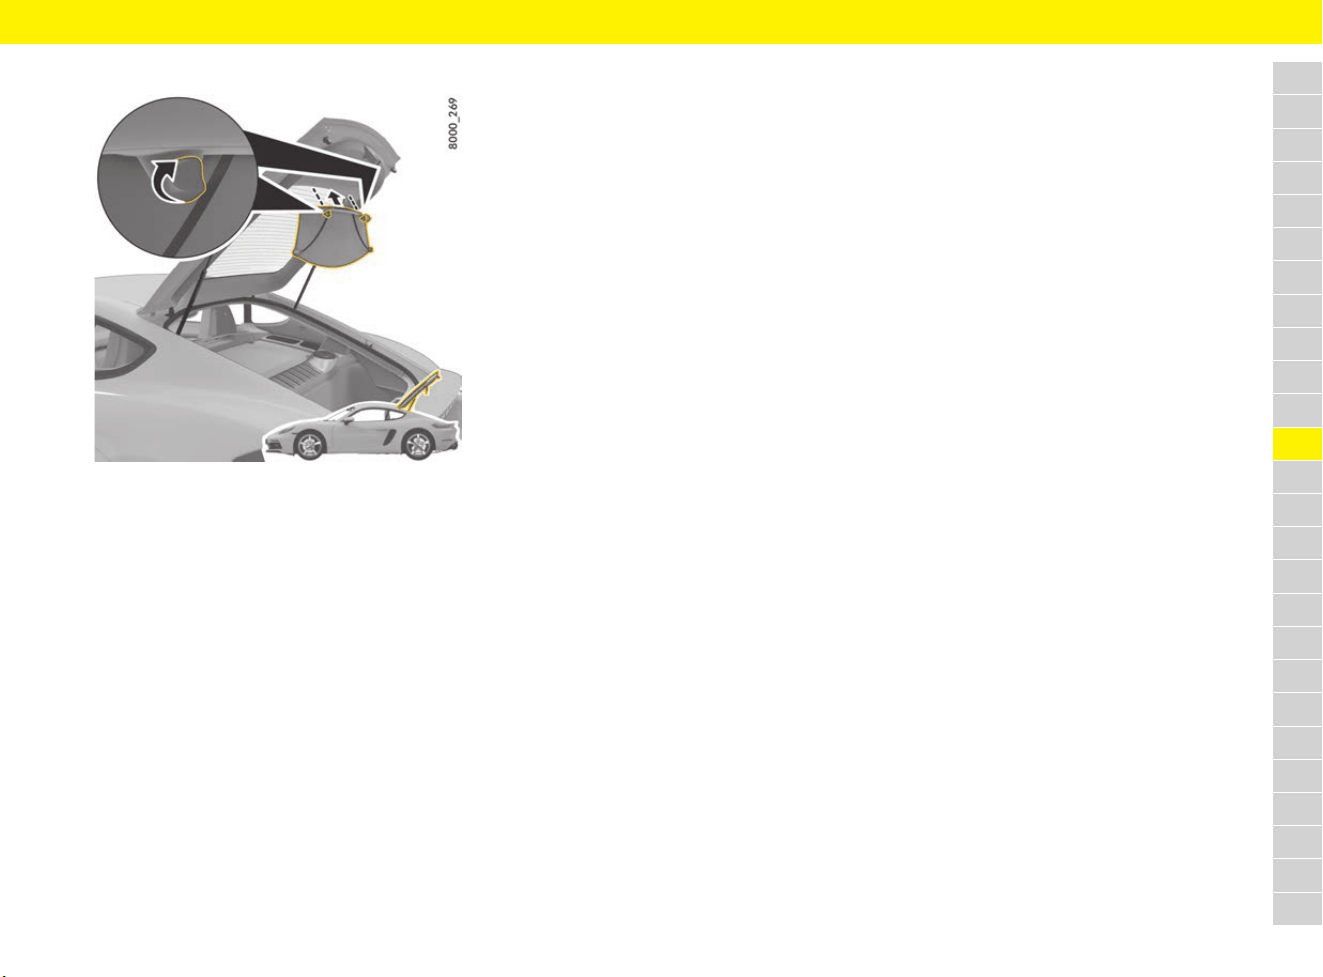
143
Luggage Compartment
A
B
C
D
E
F
G
H
I
J
K
L
M
N
O
P
Q
R
S
T
U
V
W
X
Y
Z
Installing the luggage cover
Fig. 119: Installing the luggage cover
e Insert luggage cover into the mounting with
both hands, hold it with one hand and turn both
turn-locks clockwise.
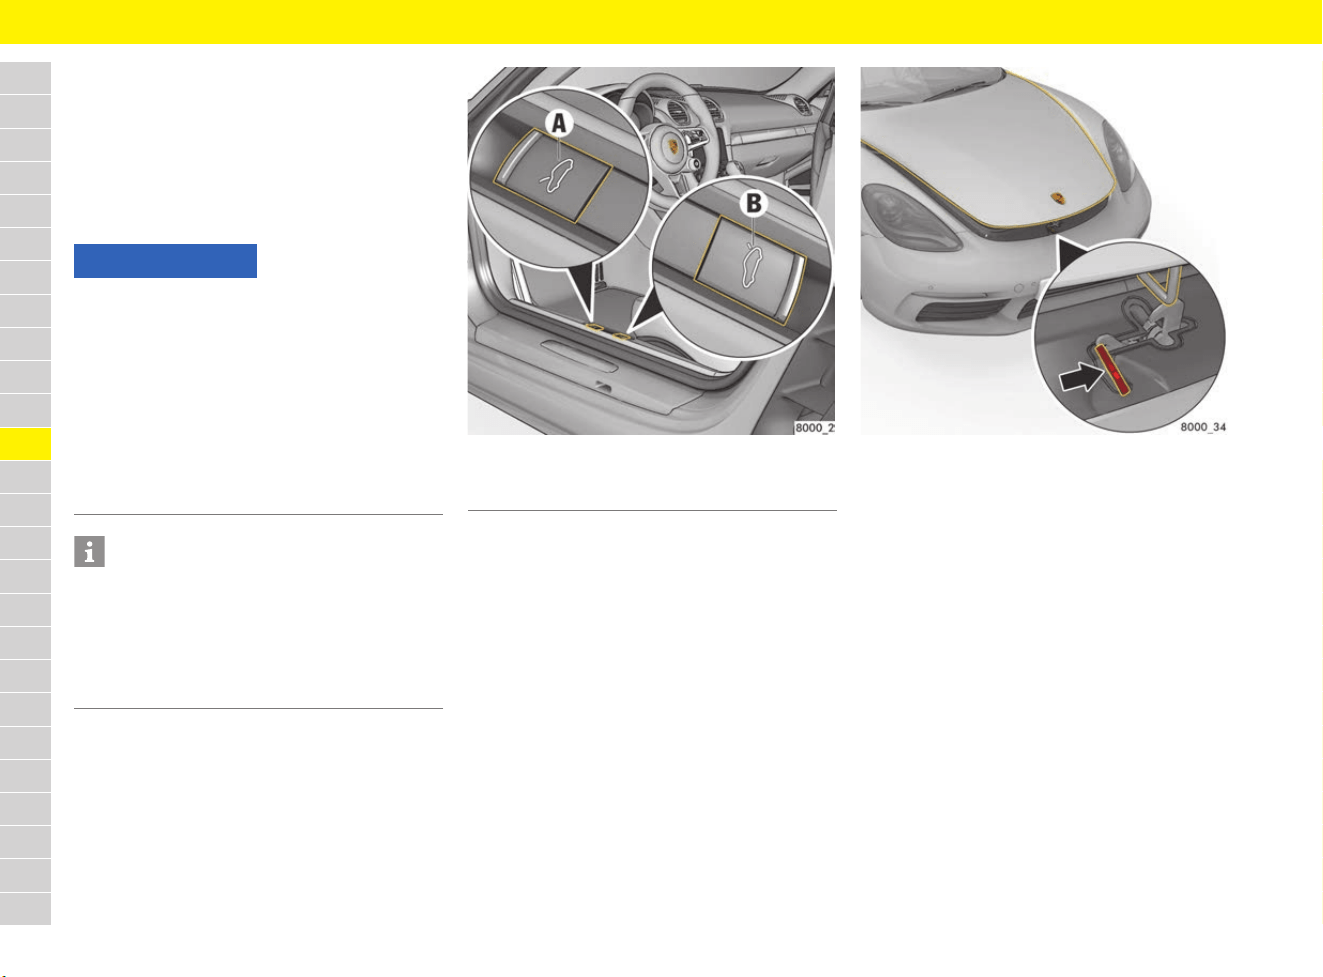
144
Luggage Compartment Lid
A
B
C
D
E
F
G
H
I
J
K
L
M
N
O
P
Q
R
S
T
U
V
W
X
Y
Z
Luggage Compartment Lid
Opening and Locking Luggage
Compartment Lids
Opening front luggage compartment lid
using button in passenger compartment
Fig. 120: Unlocking the front luggage compartment lid
1. Pull button A.
The lid is unlocked.
Fig. 121: Unlocking the front luggage compartment lid
2. Lift the lid up slightly and release the safety
latch (arrow).
3. Open the lid completely.
Opening rear luggage compartment lid
using button in passenger compartment
1. Pull button B.
The lid is unlocked.
2. Lift the lid up slightly and open fully.
Locking the rear luggage
compartment lid
b 718 Cayman
The luggage compartment lid can be locked in
2 positions while open.
e Position 1: Raise luggage compartment lid up
to pressure point.
e Position 2: Raise luggage compartment lid
beyond the pressure point.
NOTICE
Risk of damage to the luggage compartment lid or
windscreen wipers.
e Make sure that the windscreen wipers are not
folded forward when opening the luggage
compartment lid.
e Always switch off windscreen wipers before
opening the luggage compartment lid (wiper
switch in position 0).
f Refer to chapter “Operating the windscreen
wipers” on page 301.
Information
If the vehicle battery is discharged, the front
luggage compartment lid can only be opened by
connecting an external electrical power source.
f Refer to chapter “Performing emergency
release of luggage compartment lid” on
page 146.
A Front luggage compartment lid button
B Rear luggage compartment lid button
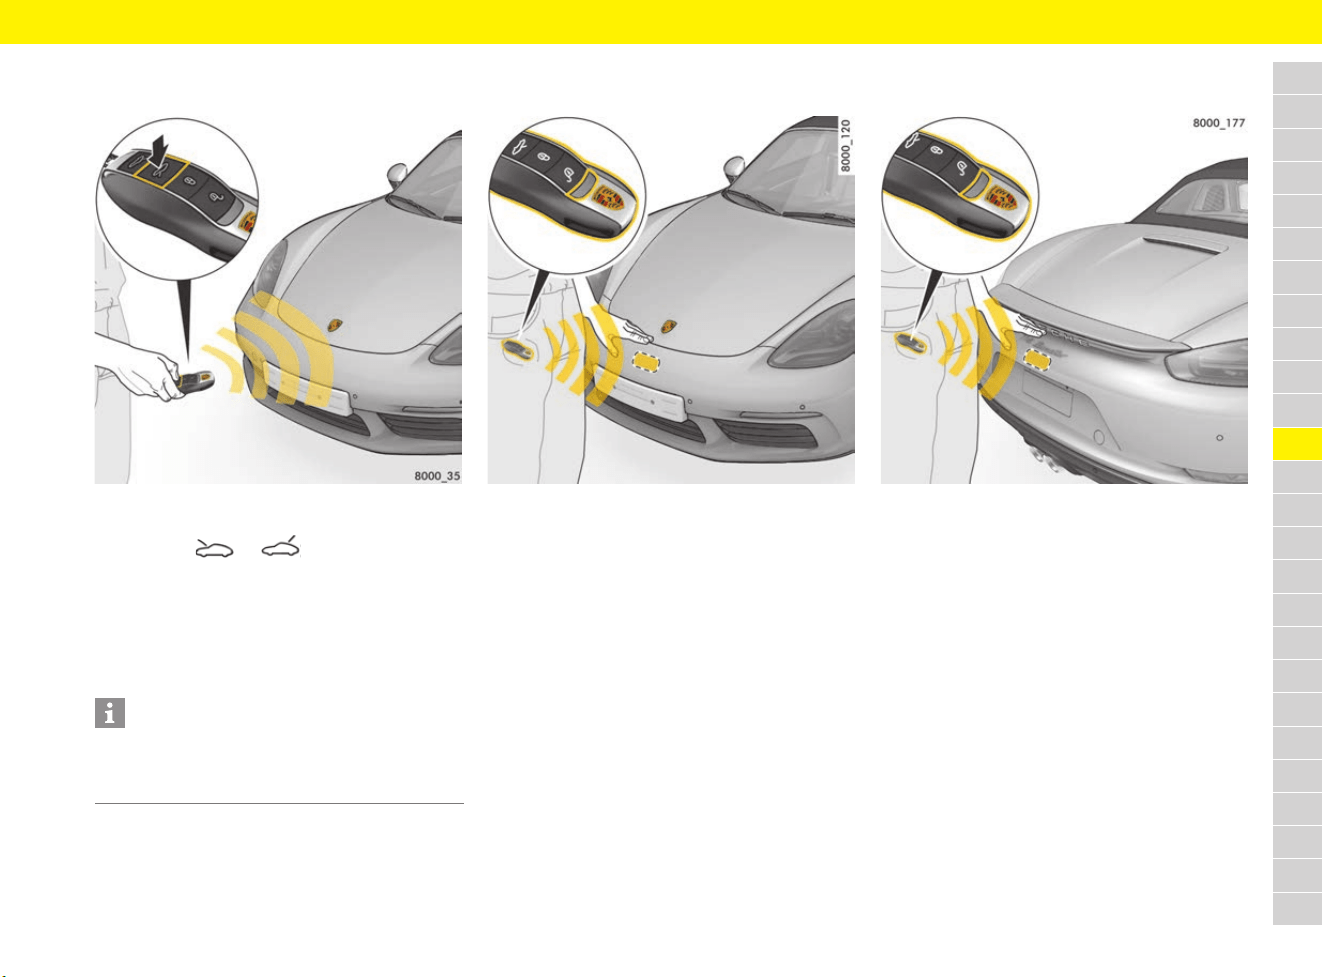
145
Luggage Compartment Lid
A
B
C
D
E
F
G
H
I
J
K
L
M
N
O
P
Q
R
S
T
U
V
W
X
Y
Z
Opening luggage compartment lids with
driver’s key
Fig. 122: Opening luggage compartment lid with
driver’s key
1. Press the or button.
The relevant lid is unlocked.
2. Lift up the lid slightly.
3. Front luggage compartment lid: release the
safety catch.
4. Open the lid completely.
Opening front luggage compartment lid
with Porsche Entry & Drive (keyless)
Fig. 123: Opening front luggage compartment lid with
Porsche Entry & Drive
b Driver’s key is located in the front area of the
vehicle.
1. Hold your hand between the Porsche Crest and
the number plate (Fig. 123).
The lid is unlocked.
2. Lift the lid up slightly and release the safety
latch.
3. Open the lid completely.
Opening rear luggage compartment lid
with Porsche Entry & Drive (keyless)
Fig. 124: Opening rear luggage compartment lid with
Porsche Entry & Drive
b Driver’s key is located in the rear area of the
vehicle.
1. Hold your hand between the rear wing and the
number plate (Fig. 124).
The lid is unlocked.
2. Lift the lid up slightly and open.
Closing luggage compartment lid
1. Lower the relevant lid and let it fall into the
lock. Push the lid closed with the palm of your
hand in the area of the lock.
2. Check that the lid has engaged correctly in the
lock.
3. If a lid is not closed properly, a message
appears on the multi-function display when
driving.
Information
When the luggage compartment lids are unlocked
using the driver’s key, the vehicle doors are also
unlocked.
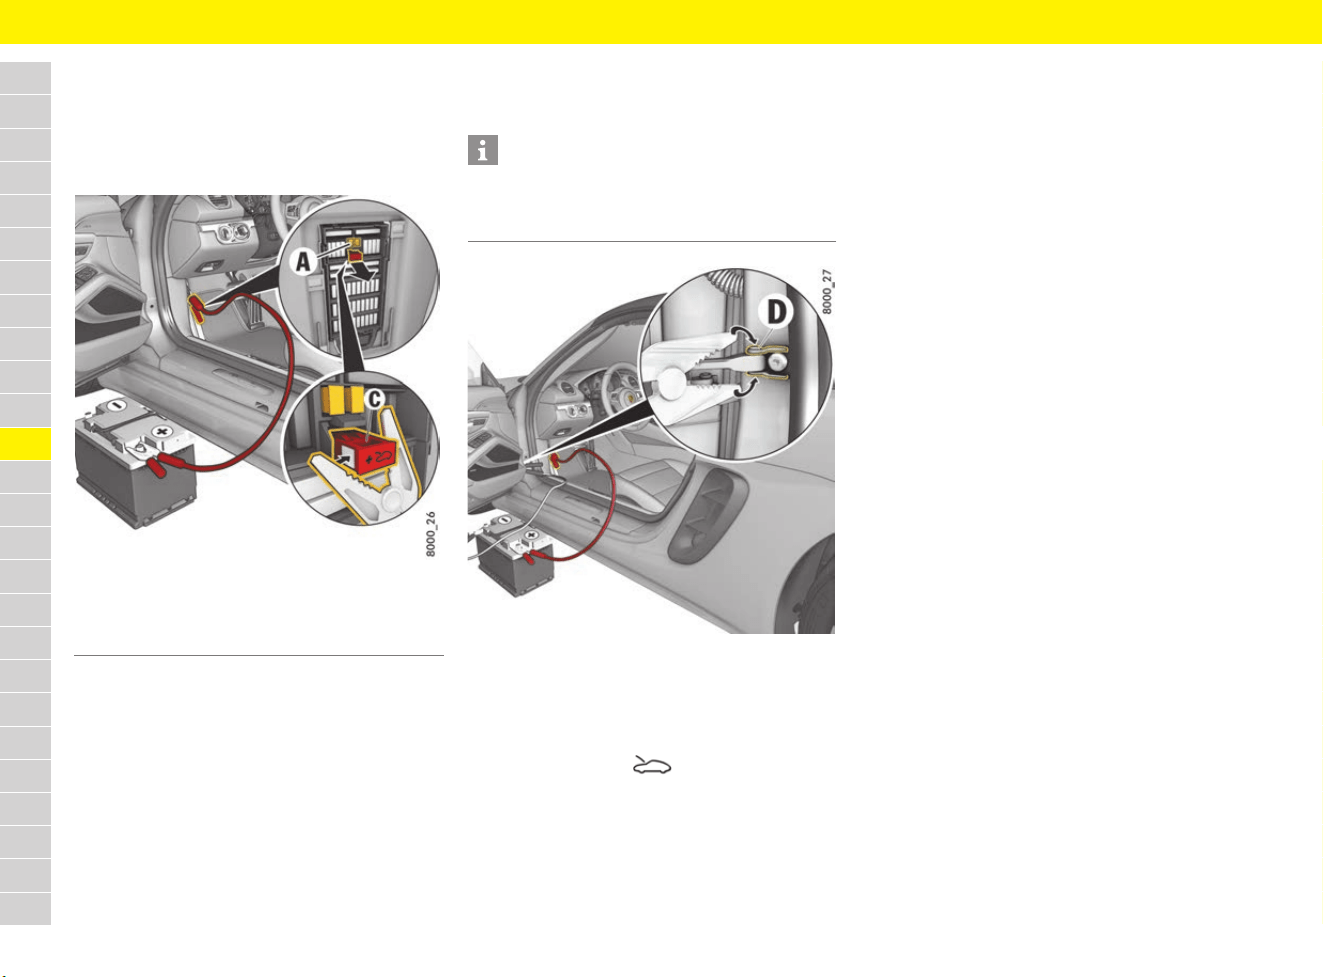
146
Luggage Compartment Lid
A
B
C
D
E
F
G
H
I
J
K
L
M
N
O
P
Q
R
S
T
U
V
W
X
Y
Z
Performing emergency release
of luggage compartment lid
If the battery is discharged, the front luggage
compartment lid can only be unlocked with the
aid of a donor battery.
Fig. 125: Performing emergency release of luggage
compartment lid – connecting positive terminal
1. Use the emergency key to unlock the vehicle at
the door lock.
f Refer to chapter “Using emergency key” on
page 102.
f Refer to chapter “Performing emergency door
unlocking” on page 76.
2. Remove the plastic cover from the left-hand
fuse box.
3. Pull out positive terminal C (red) in the fuse box
using the plastic gripper A (yellow).
4. Use the red jump lead to connect the positive
terminal of the donor battery to the positive
terminal C in the fuse box.
Fig. 126: Performing emergency release of luggage
compartment lid – connecting negative terminal
5. Use the black jump lead to connect the
negative terminal of the donor battery to the
door arrester D.
6. Press and hold the button on the driver’s
key for approx. 2 seconds.
The front luggage compartment lid is unlocked
and the alarm system is deactivated.
7. Disconnect the negative lead first, then the
positive lead.
8. Push positive terminal C (Fig. 125) into the
fuse box and fit the plastic fuse box cover.
A Plastic gripper (yellow)
C Positive terminal (red)
Information
If the vehicle was locked, the alarm horn from the
alarm system will sound when the negative
terminal is connected.

147
Measurement on the Test Stand
A
B
C
D
E
F
G
H
I
J
K
L
M
N
O
P
Q
R
S
T
U
V
W
X
Y
Z
Measurement on the
Test Stand
Performing test stand
measurement
Performance test
Performance tests on roller-type test stands are
not approved by Porsche.
Performing brake tests
e Perform brake tests only on roller-type test
stands.
The following limit values must not be exceeded:
– Test speed 7.5 km/h (4.7 mph)
– Test duration 20 seconds
Testing the electric parking brake
e Electric parking brake tests on the brake test
stand must only be performed with the
ignition switched on and with the manual
gearshift lever in neutral or with the
Porsche Doppelkupplung selector lever in
position N.
The vehicle switches automatically to brake test
stand mode, in which the electric parking brake
can be tested. A message appears on the multi-
function display in the instrument panel.
WARNING
Inhalation of toxic
exhaust gases
Risk of serious or fatal injury as a result of inhaling
toxic exhaust gases.
Exhaust gas contains colourless and odourless
carbon monoxide, which is toxic even in low
concentrations.
e Perform work with the engine running only in
the open or with suitable extraction systems
for the exhaust gases.
WARNING
Insufficiently secured
vehicle
A vehicle that is not secured or that is incorrectly
secured may move unintentionally or tip or fall off
lifting equipment, e.g. jack or lifting platform. This
can result in serious injuries and damage.
e The vehicle must be raised using the jack only
when on a solid and level surface.
e Raise the vehicle only at the prescribed jacking
points (Fig. 97 on page 128, Fig. 98 on
page 128) on the vehicle underbody.
e Always place the vehicle on solid supports
when carrying out work under the vehicle.
e Never start the engine once the vehicle is
raised. Engine vibration may cause the vehicle
to fall.
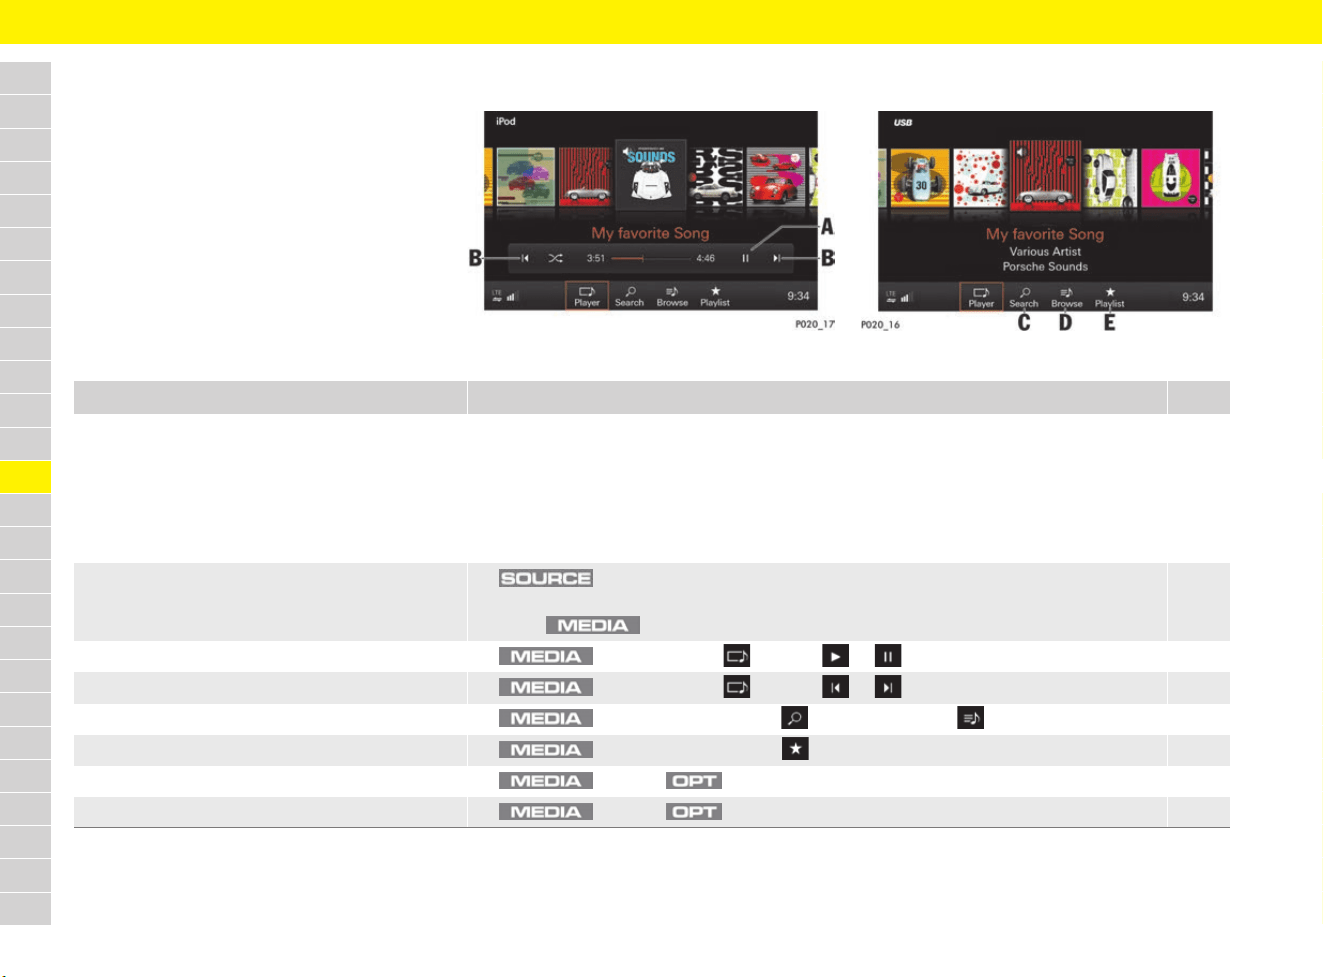
148
Media
A
B
C
D
E
F
G
H
I
J
K
L
M
N
O
P
Q
R
S
T
U
V
W
X
Y
Z
Media
Brief overview
This brief overview does not replace the complete
information provided under “Media”. Safety
instructions and warnings, in particular, are not
replaced by this brief overview.
For information on operating Porsche
Communication Management (PCM):
f Refer to chapter “Operating the Porsche
Communication Management (PCM)” on
page 176.
Fig. 127: Media source, e.g. iPod
®
Fig. 128: Media source, e.g. USB
What do I want to do? What do I have to do? Page
Play music and video files from an array of
media sources
e Insert a CD/DVD.
e Import media content to jukebox (internal memory).
e Insert an SD card.
e Connect an external device via USB or AUX (depending on equipment).
e Connect an external device via Bluetooth
®
.
e Open online radio services via Porsche Connect App.
181
151
182
182
183
193
Select media source e button e Select desired media source.
– or –
Press button repeatedly.
149
Play/pause music e button e Player e Select or (see A). 149
Jump forward/back during playback e button e Player e Select or (see B). 149
Search media library e button e Select Search (see C) or Browse (see D). 150
Open playlists e button e Select Playlist (see E). 151
Listen to similar music e button e button e More Like This 150
Import audio/video files to jukebox e button e button e Import to jukebox 151
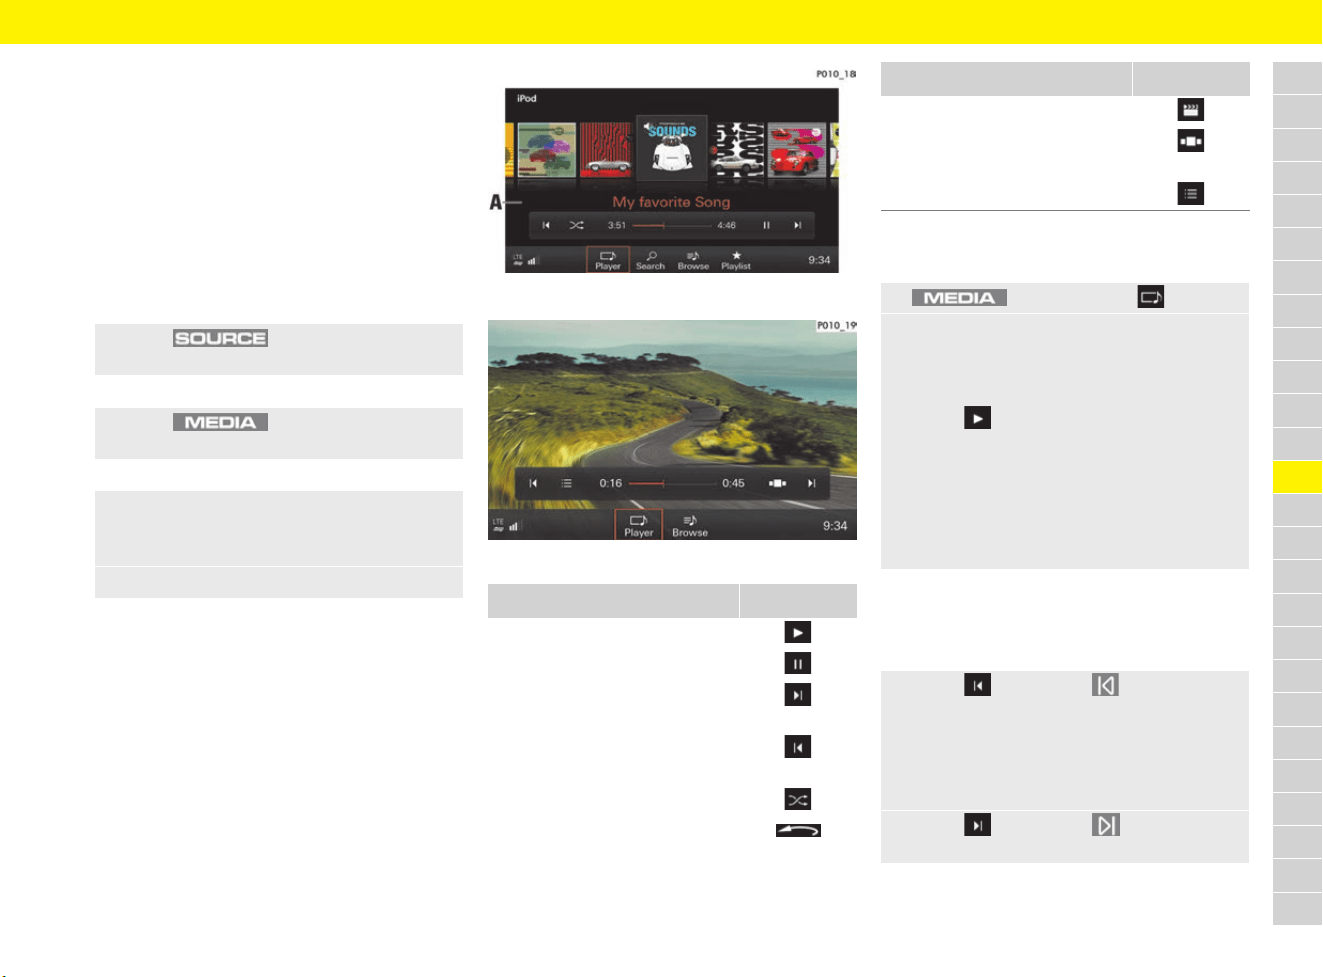
149
Media
A
B
C
D
E
F
G
H
I
J
K
L
M
N
O
P
Q
R
S
T
U
V
W
X
Y
Z
Inserting/connecting media
sources
f Refer to chapter “Loading the CD/DVD drive”
on page 181.
f Refer to chapter “Inserting an SD card” on
page 182.
f Refer to chapter “Connecting an external
device” on page 182.
Selecting media source
Playing media
Audio and video formats must meet certain
requirements to be played using the media
function. For information on supported media
and file formats:
f Refer to chapter “Porsche Communication
Management (PCM)” on page 315.
Fig. 129: Playing music
Fig. 130: Playing a video
Playing music
b Audio source is selected.
Jumping forward and back in a media
track
b Media source is selected.
e Press button and select the
desired media source.
– or –
e Press button until the desired
media source is selected.
– or –
1. Press the media source displayed in the
headline.
The available sources are displayed.
2. Select the media source.
Function Button
Playing media
Pausing media
Jump forward in media tracks/
next chapter
Jump back in media tracks/
previous chapter
Random music playback
Display coverflow view
Display video in full-screen mode
Open coverflow view or
available video source
Return to video main menu
1. button e Player
2. In coverflow view A (Fig. 129), swipe left
or right until the desired album is displayed
enlarged in the centre.
– or –
Select to play the album.
– or –
Select the album and desired music track.
If an audio source was selected, the first
track on the medium starts playing
automatically. When you use the jukebox,
the track that was played last is played.
e Select or press the button to jump
back.
If the media track has only just started, the
previous track is played. If the media track
has played for more than 3 seconds, the
current track starts again.
e Select or press the button to jump
forward.
Function Button
150
Media
A
B
C
D
E
F
G
H
I
J
K
L
M
N
O
P
Q
R
S
T
U
V
W
X
Y
Z
Fast forward or rewind
b Media source is selected.
Switching random playback on and off
b Media source is selected.
Viewing similar music
Repeating music tracks
b Media source is selected.
b Album or playlist is selected.
Playing videos
b Video source is selected.
Selecting tracks from active audio
source using multi-function display
For information on using the multi-function display:
f Refer to chapter “Operating multi-function
display without multi-function steering wheel”
on page 157.
f Refer to chapter “Operating multi-function
display with multi-function steering wheel” on
page 157.
Searching through media source
Searching for tracks or videos
b Media source is selected.
Browsing through media
b Media source is selected.
e Press and hold / or the
/ buttons until the desired
position is reached.
– or –
Slide the time bar to the desired position.
e Select .
Random playback is switched on.
e Press the button again to switch off random
playback.
1. Press button .
2. Select More Like This.
1. Press the button.
2. Select Repeat track.
Repeat mode appears in the headline.
e Press the button and select
Repeat off to switch off repeat mode.
e Select .
– or –
Select the desired video.
– or –
Select and the desired chapter.
e Select to return to the video main menu.
1. Select the Audio menu.
2. Select tracks from the active audio source
(e.g. disc).
1. Select Search .
2. Select Search and enter the desired track in
the free text search.
– or –
Select a category (Genres, Artists, Albums,
Tracks, Videos) to be used in the search.
3. Select the desired track.
1. Select Browse .
2. Select the desired folder and media track.
e Select the desired media folder in the
headline to navigate back to the folder
structure.

151
Media
A
B
C
D
E
F
G
H
I
J
K
L
M
N
O
P
Q
R
S
T
U
V
W
X
Y
Z
Opening playlists
Additional playlists are available for media playback,
depending on the media source selected.
Opening a playlist
b Audio source is selected.
– Current playback list: The folder structure
or track/chapter list for the selected source is
displayed.
– Last played
– Most played
– Track incl. star rating
Importing and deleting audio/video
files in jukebox
Audio and video files on a CD/DVD, USB flash
drive or SD card can be imported to the jukebox.
Importing current track or album
b The media source containing tracks or albums
to be copied to the jukebox is selected.
b Desired track or album is selected.
Importing folders or files
b Media source is selected.
Deleting media content from jukebox
b The jukebox is selected as a media source.
– Delete current track
– Delete current album
– Delete files/folders: Use Select/Deselect
to select files or folders and then press Delete
to confirm.
Displaying available and occupied
storage space
b The jukebox is selected as a media source.
Changing settings
General media settings
– Smartphone link: Manage smartphones
connected via USB.
– AUX: Switch universal, equipment-dependent
audio interface (AUX) on and off.
– Bluetooth audio: Switch the Bluetooth
®
connection on and off.
– Gracenote Online: Album covers are
downloaded when the function is activated and
the data connection is active.
– Bluetooth: Manage Bluetooth
®
functions and
devices.
f Refer to chapter “Deleting a Bluetooth
®
device or displaying Bluetooth
®
information” on page 240.
1. Select Playlist .
2. Select the desired option:
1. button e Import to jukebox
2. Select Import current track or
Import current album.
The track or album is imported.
1. button e Import to jukebox
2. Select Import files/folders.
All available folders and files are displayed.
3. Use Select/Deselect to select the desired
files or folders.
4. Select Copy to start importing media.
1. button e button e
Jukebox settings
2. Select the desired option:
1. button e button e
Jukebox settings
2. Select Source details.
1. button e button e
SET MEDIA
2. Select the desired option:

152
Media
A
B
C
D
E
F
G
H
I
J
K
L
M
N
O
P
Q
R
S
T
U
V
W
X
Y
Z
Video settings
b A DVD containing video files is inserted.
– Aspect ratio: Set the aspect ratio.
– Soundtrack: Set the soundtrack and tone
distribution.
– Subtitles: When the function is activated,
subtitles are displayed (if available).
– Child lock: To restrict the playback of video
files, enter a password and select OK to
confirm (default password: 1234).
– DVD safety level: Select a safety level.
If safety level 5 is selected, all DVDs from
safety level 1 – 5 are played. The playback
of DVDs with a higher safety level is
blocked. Select Level 0 if no safety
category is required.
– Change passcode: A new password can
be entered for the child lock.
1. button e button e
DVD settings
2. Select the desired option:
Information
– The child lock can be activated/deactivated
depending on the DVD inserted.
– If the child lock password has been entered
incorrectly three times:
e Porsche recommends a Porsche partner as
they have trained workshop personnel and the
necessary parts and tools.
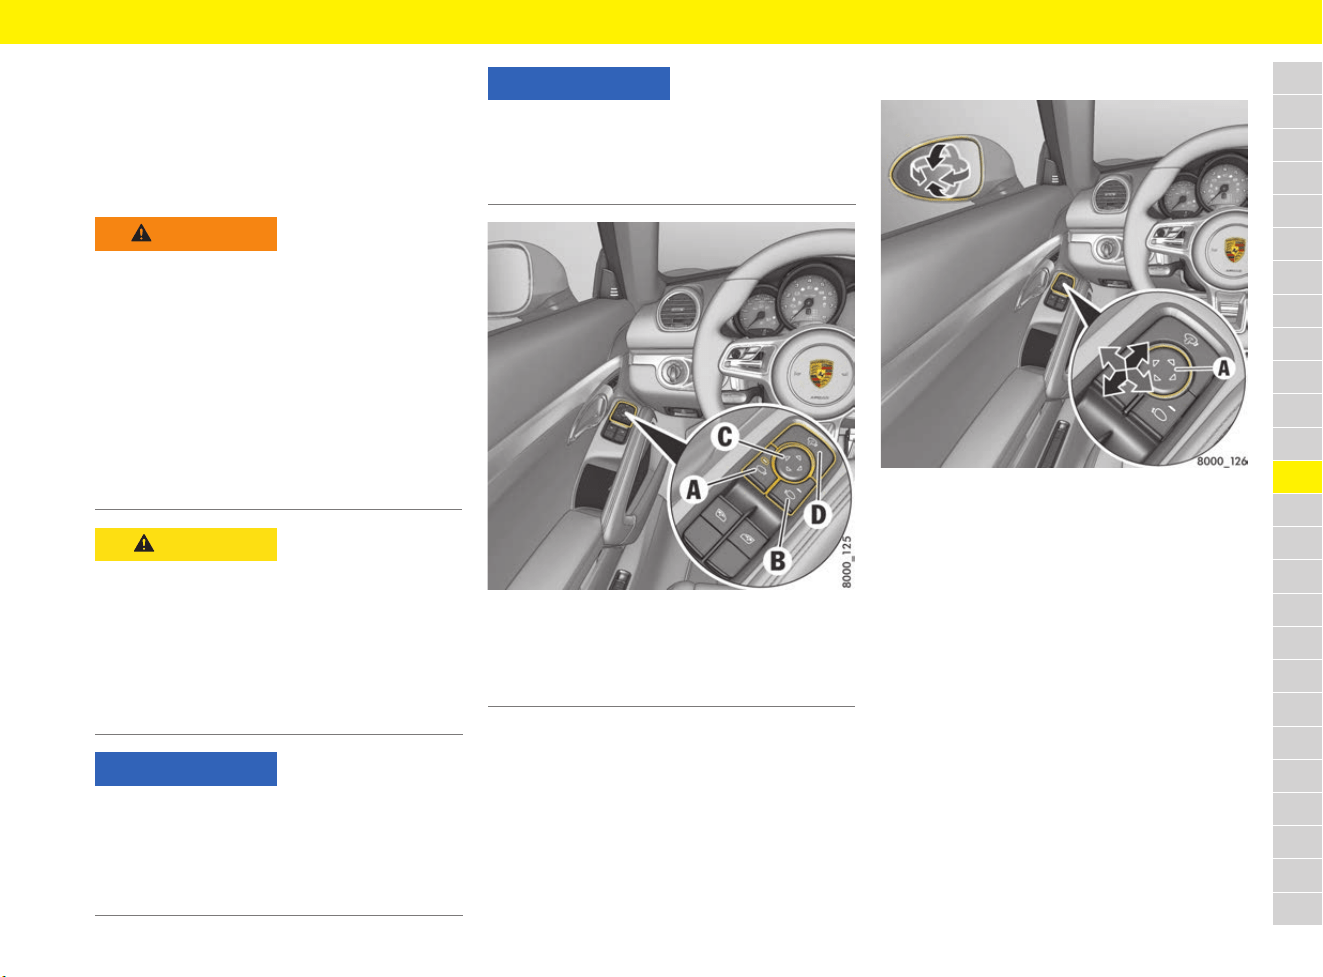
153
Mirrors
A
B
C
D
E
F
G
H
I
J
K
L
M
N
O
P
Q
R
S
T
U
V
W
X
Y
Z
Mirrors
Using the exterior mirrors
The convex mirror on the passenger’s side and
the aspherical mirror on the driver’s side provide
a larger field of view.
Fig. 131: Exterior mirror operation
Adjusting exterior mirrors
Fig. 132: Adjusting exterior mirrors
b Ignition switched on.
– or –
b Ignition switched off, driver’s or passenger’s
door not yet opened (for a maximum of
10 minutes).
1. Press button A for the driver’s side and
button B for the passenger’s side.
The indicator light on the selected button
comes on.
2. Move the exterior mirrors to the correct
position by pressing the adjustment button C.
If the electrical adjustment facility fails
e Adjust the mirror by pressing on the mirror
face.
WARNING
Assessment of the
traffic situation as a
result of distorted
representation of
surroundings in the
exterior mirrors
Vehicles or objects appear smaller in convex
mirrors and further away than they are in reality.
e Bear distortion in mind when estimating the
distance of vehicles behind you and when
reversing into a parking space.
e Use the interior mirror for judging distance as
well.
CAUTION
Electrolyte fluid may
escape if the mirror
glass is broken
Electrolyte fluid can leak from broken mirror glass.
This fluid irritates the skin and eyes.
e If the electrolyte fluid should come into contact
with the skin or eyes, rinse it off immediately
with clean water.
e Seek medical attention if necessary.
NOTICE
Risk of damage to paintwork, leather, plastic parts
and clothing.
Electrolyte fluid can be removed only while it is still
wet.
e Clean the affected parts with water.
NOTICE
Risk of damage to the exterior mirrors when
washing the vehicle in a car wash
e Fold in exterior mirrors before using the car
wash.
A Exterior mirror selection on the driver’s side
B Exterior mirror selection on the passenger’s side
C Adjusting exterior mirrors
D Folding exterior mirrors in and out
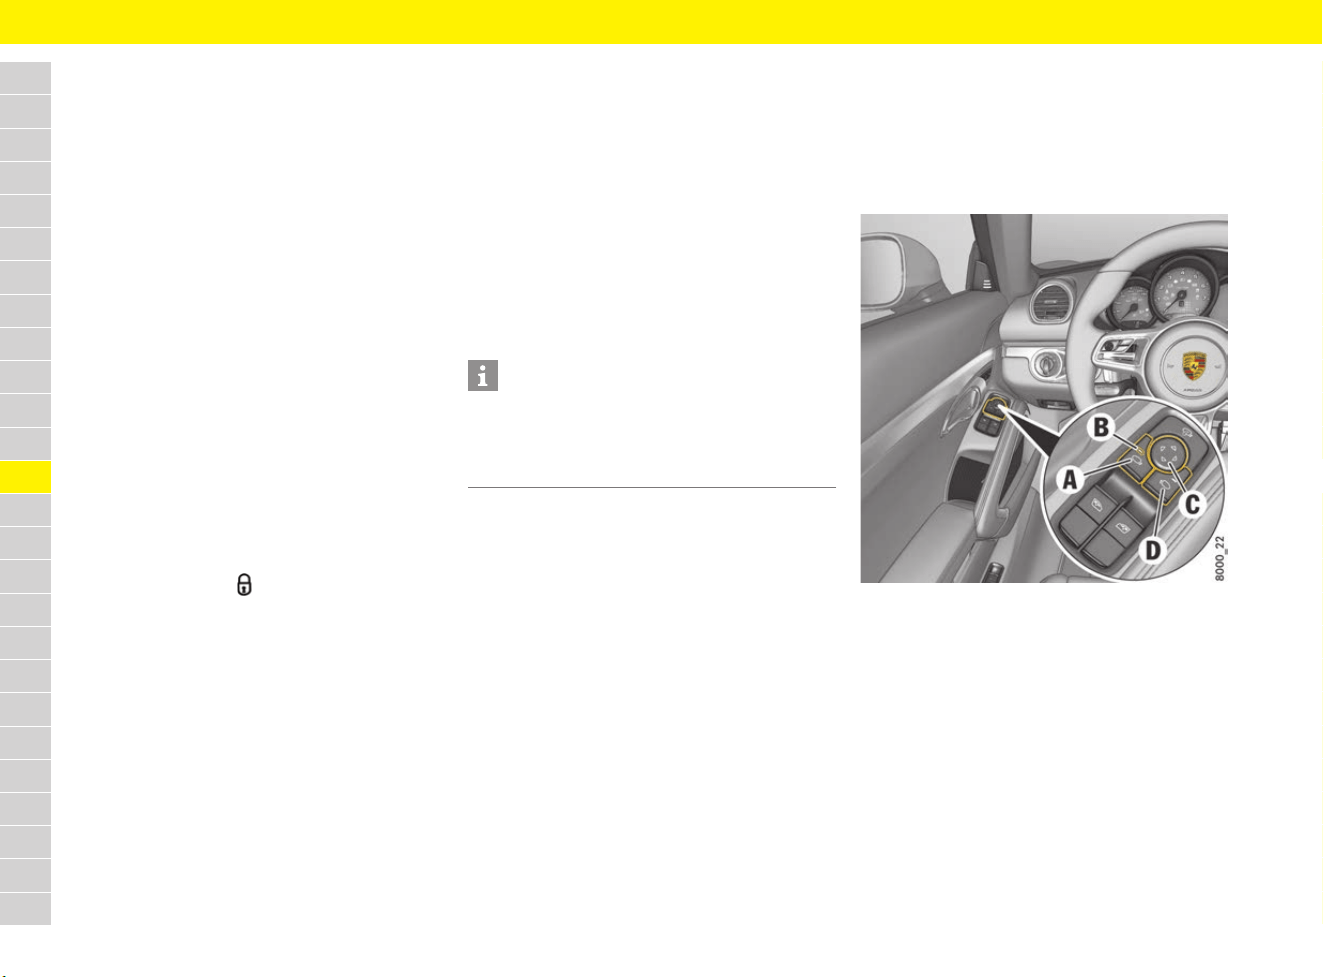
154
Mirrors
A
B
C
D
E
F
G
H
I
J
K
L
M
N
O
P
Q
R
S
T
U
V
W
X
Y
Z
Folding exterior mirrors in and out
Folding in exterior mirrors manually
e Swivel the mirror housing diagonally upwards
by hand as far as it will go.
Folding out exterior mirrors manually
e Swivel the mirror housing diagonally
downwards by hand as far as it will go.
Folding exterior mirrors in and out
electrically
b Maximum speed of approx. 50 km/h (30 mph).
e Press button D (see Fig. 131 on page 153).
Both exterior mirrors fold in or out.
If the electrical folding function fails
e Fold mirror in or out manually.
Folding exterior mirrors in and out from
the outside
The exterior mirrors can be folded in when the
vehicle is locked.
e Press and hold the button on the driver’s key
for at least 1 second.
On vehicles with Porsche Entry & Drive:
Touch the proximity sensor on the door handle
of the driver’s side for at least 1 second.
The exterior mirrors fold in.
Folding exterior mirrors out automatically
e Switch on ignition.
The exterior mirrors fold out automatically.
Folding exterior mirrors in and out
automatically
b Function activated.
f Refer to chapter “Switching automatic folding
of exterior mirrors off and on” on page 269.
Folding exterior mirrors in automatically
e Lock the vehicle.
The exterior mirrors fold in automatically.
Folding exterior mirrors out automatically
e Switch on ignition.
The exterior mirrors fold out automatically.
Storing exterior mirror settings
In vehicles with memory package, individual
exterior mirror settings can be stored on the
memory buttons on the driver’s door and on the
driver’s key.
f Refer to chapter “Personal Settings” on
page 188.
Switching automatic dimming
function of exterior mirrors on
and off
The exterior mirrors change to dimmed position
automatically in synchronisation with the interior
mirror.
f Refer to chapter “Switching automatic
dimming function of the interior mirror on and
off” on page 155.
Swivelling down mirror glass as
parking aid
On vehicles with memory package, the mirror on
the passenger’s side swivels down slightly to
show the kerb area when reverse gear is
engaged.
Fig. 133: Swivelling down mirror glass as parking aid
Swivelling down mirror glass
automatically
b Ignition switched on.
b Function activated.
f Refer to chapter “Lowering exterior mirror on
passenger’s side when engaging reverse
gear” on page 268.
Information
The exterior mirrors do not fold out automatically
after the ignition is switched on if they were folded
in manually beforehand using button D (Fig. 131
on page 153).
155
Mirrors
A
B
C
D
E
F
G
H
I
J
K
L
M
N
O
P
Q
R
S
T
U
V
W
X
Y
Z
Swivelling down mirror glass manually
1. Engage reverse gear.
Indicator light B on button A for adjusting the
exterior mirror on the driver’s side lights up.
2. Press button D for adjusting the exterior mirror
on the passenger’s side.
The mirror on the passenger’s side swivels
down.
Individually adjusting the position of the
lowered mirror glass:
e Move the exterior mirror glass to the correct
position by pressing adjustment button C.
In vehicles with memory package, this setting is
stored on the memory buttons in the driver’s door
or on the driver’s key.
For information on retrieving and storing vehicle
settings:
f Refer to chapter “Personal Settings” on
page 188.
Moving mirror to its initial position
The mirror swivels back to its initial position:
– after a certain time delay, if the vehicle is
shifted out of reverse gear, or
– immediately, if the vehicle reaches a speed of
more than 15 km/h (9 mph).
Moving the mirror glass on the passenger’s
side to its initial position manually:
e Press button A for the exterior mirror on the
driver’s side.
Dimming interior mirrors manually
Fig. 134: Dimming interior mirrors manually
When the mirror is being adjusted, the anti-dazzle
lever A must point towards the passenger
compartment.
e Basic setting – swivel lever towards the
passenger compartment.
e Anti-dazzle position – swivel lever towards the
windscreen.
Switching automatic dimming
function of the interior mirror
on and off
Fig. 135: Automatic dimming function of the interior
mirror
Switching on automatic anti-dazzle
function
e Press button B
Indicator light A lights up.
The interior mirror automatically changes to
anti-dazzle position or reverts to its normal
state depending on the light intensity.
Information
The interior mirror does not dim when reverse
gear is engaged or the interior lighting is switched
on.

156
Mirrors
A
B
C
D
E
F
G
H
I
J
K
L
M
N
O
P
Q
R
S
T
U
V
W
X
Y
Z
Switching off automatic anti-dazzle
function
e Press button B
Indicator light A goes out.
CAUTION
Electrolyte fluid may
escape if the mirror
glass is broken
Electrolyte fluid can leak from broken mirror glass.
This fluid irritates the skin and eyes.
e If the electrolyte fluid should come into contact
with the skin or eyes, rinse it off immediately
with clean water.
e Seek medical attention if necessary.
NOTICE
Risk of damage to paintwork, leather, plastic parts
and clothing.
Electrolyte fluid can be removed only while it is still
wet.
e Clean the affected parts with water.
Information
The incident light on the interior mirror must not be
restricted (e.g. by stickers on the rear window or
items of luggage in the luggage compartment or
on the luggage compartment cover). Likewise,
the incident light coming through the windscreen
to the front light sensor must not be restricted
(e.g. by stickers).
157
Multi-Function Display
A
B
C
D
E
F
G
H
I
J
K
L
M
N
O
P
Q
R
S
T
U
V
W
X
Y
Z
Multi-Function Display
Not all functions are described in detail in this
manual. The examples clearly demonstrate the
functional principle and clarify the menu structure.
Fig. 136: Position of the multi-function display
Operating multi-function display
without multi-function steering
wheel
Fig. 137: Functions of the control stalk on the steering
column
Selecting menus and functions/options
(scrolling)
e Press the control stalk downwards 3 or
upwards 4.
Confirming selection (Enter)
e Push control stalk forward 1.
Moving back one or several selection
levels
e Pull the control stalk towards the steering
wheel 2 once or several times.
Skipping to the first letters of the
desired entry in long telephone and
audio lists
e Press the control stalk downwards 3 or
upwards 4 and hold.
A letter selection screen appears.
e Select the desired first letters.
The marking skips to the first list entry
beginning with the selected letter.
Operating multi-function display
with multi-function steering wheel
Fig. 138: Function buttons on the multi-function steering
wheel
WARNING
Setting and operating
when driving
You may be distracted from paying attention to the
road if you set or operate the multi-function
display, multi-function steering wheel, radio,
navigation system, telephone or other equipment
when driving and control over the vehicle may be
lost.
e Operate the equipment when driving only if the
traffic situation allows you to do so safely.
e Carry out any complicated operating or setting
procedures only while the vehicle is stationary.
Information
The multi-function display is only active when the
ignition is on.
For safety reasons, some functions are only
available when the vehicle is stationary.

158
Multi-Function Display
A
B
C
D
E
F
G
H
I
J
K
L
M
N
O
P
Q
R
S
T
U
V
W
X
Y
Z
Increasing and decreasing the volume
e Turn volume control A upwards or downwards.
Switching mute on and off
e Press volume control A.
Selecting menus and functions/options
(scrolling)
e Turn rotary knob F upwards or downwards.
Skipping to the first letters of the desired
entry in long telephone and audio lists
e Quickly turn rotary knob F upwards or
downwards.
A letter selection screen appears.
e Select the desired first letters.
The marking skips to the first list entry
beginning with the selected letter.
Confirming selection (Enter)
e Press rotary knob F.
Activating the stored function
e Press ◊ button C.
The button can be assigned individually. Audio
source selection is preset by default.
For information on separate assignment of the
button:
f Refer to chapter “Changing button assignment
on multi-function steering wheel” on page 268.
Moving back one or several selection levels
e Press back button E.
Accepting telephone calls
e Press handset Pickup button B.
Ending or rejecting telephone calls
e Press handset hangup button D.
Areas on the multi-function display
Fig. 139: Areas on the multi-function display
A/D – Upper and lower status area
Basic information, such as the compass, time and
temperature are displayed in the upper and lower
status areas.
The status area display can be individually
adapted.
f Refer to chapter “Adapting appearance of
multi-function display” on page 263.
B – Title area with menu indicator
The menu item currently selected is displayed in
the title area.
The menu indicator (grey bar) on the right shows
the position of the current menu item in the overall
menu and displays the number of other menu
items on this menu level.
The wider the menu indicator, the fewer menu
items the current menu contains.
C – Information area
The information area displays the menu items
currently available for selection or after a menu
item is selected, information relating to this menu
item and other selection options.
Selecting options and activating
functions
A symbol positioned in front of an option indicates
whether the option is selected or a function is
activated.
Selecting one of several options
Activating and deactivating functions
Information
The Porsche communication systems cannot
be switched on and off using the multi-function
steering wheel.
Option is selected.
Option is not selected.
Function is activated.
Function is not activated.
159
Multi-Function Display
A
B
C
D
E
F
G
H
I
J
K
L
M
N
O
P
Q
R
S
T
U
V
W
X
Y
Z
Menu overview
On the multi-function display, vehicle information can be
viewed, audio sources (radio, CD, iPod
®
, etc.) controlled,
the oil level measured, the tyre pressure checked, the
stopwatch used or the navigation system operated,
depending on the vehicle equipment. You can also modify
different vehicle settings.
Certain menus are only available when the vehicle has
stopped, e.g. the adjustment menu for Tyre Pressure
Monitoring (TPM).
Menu What can I do? Page
e Vehicle e Info Display vehicle information (messages, service intervals) 160
e Vehicle e Oil level Measure and display engine oil level 160
e Vehicle e Limits Set the speed limit 161
e Vehicle e Settings e Display Adapt appearance of multi-function display 263
e Vehicle e Settings e Date & Time Adjust the time and date 265
e Vehicle e Settings e Assistance systems Adapt assistance systems 266
e Vehicle e Settings e Individual Adjust Individual drive mode 267
e Vehicle e Settings e Light & Visibility Adjust the exterior lights, interior lighting, visual aids for reversing and
windscreen wiper setting.
267
e Vehicle e Settings e Steering wheel op. e ◊ key Assign the ◊ button on the multi-function steering wheel 268
e Vehicle e Settings e Locking Adapt the unlocking and locking settings 269
e Vehicle e Settings e Air conditioning Adapt air-conditioning settings 269
e Vehicle e Settings e Volume Adjust volume of warning tones and ParkAssist 269
e Vehicle e Settings e Units Adapt units of measurement for vehicle displays 270
e Vehicle e Settings e Language Change the language 270
e Vehicle e Settings e Car Connect Stop communication between vehicle and Porsche Car Connect App 270
e Vehicle e Settings e Reset Reset vehicle to factory settings 270
160
Multi-Function Display
A
B
C
D
E
F
G
H
I
J
K
L
M
N
O
P
Q
R
S
T
U
V
W
X
Y
Z
Vehicle menu
Displaying messages
Pending warnings or vehicles messages are
displayed.
The warning message in the lower status area
indicates the number of pending warning
messages.
If several warning messages are pending, you can
browse through the message list.
Displaying service intervals
The display indicates when the next service is due.
Measuring and displaying engine oil
level
Displaying engine-oil level
b Vehicle is horizontal.
b Engine at operating temperature and stopped
for at least one minute.
e Audio Select radio station or track from the active audio source. 206/150
e Phone Use the telephone 243
e Map Show and adapt the map display 173
e Navigation Use the navigation system 169
e Trip Display and reset driving data
e TPM Display tyre pressure and adjust tyre settings 162
e Chrono Measure times with the stopwatch 227
e Gear shift assist Use the gear shift assist 165
e G-Force Display longitudinal and lateral acceleration forces 166
e ACC Use adaptive cruise control (ACC) 32
e Speed limit Display speed limits 221
Menu What can I do? Page
e Vehicle e Info e Messages
1. Vehicle e Info e Service interval
2. Select the desired service interval.
NOTICE
If the oil level has dropped below the minimum
mark, the engine will not be adequately lubricated.
This may result in engine damage.
e Regularly check the oil level.
e Do not allow the oil level to fall below the
minimum mark.
Information
Under certain circumstances, the oil level cannot
be displayed. Causes of this include:
– Engine is cold
– Vehicle parked following full-throttle operation
at high engine speeds
– Engine oil temperature too high
– Open rear luggage compartment lid.
A corresponding message appears on the
multi-function display.
e Vehicle e Oil level

161
Multi-Function Display
A
B
C
D
E
F
G
H
I
J
K
L
M
N
O
P
Q
R
S
T
U
V
W
X
Y
Z
Fig. 140: Oil-level gauge
If the display is green A, the oil level has reached
the maximum mark.
If the bottom tip of the display is yellow B, the oil
level has reached the minimum mark. A message
appears indicating that the oil level is low.
e Add the quantity of engine oil shown on the
multi-function display at the next opportunity.
e Never add more than the indicated quantity of
engine oil. The difference between the minimum
and maximum mark is approx. 1 litre.
If the bottom tip is red C, the oil level has dropped
below the minimum mark. A message appears
indicating that the oil level is too low.
e Do not continue driving.
e Add the quantity of engine oil shown on the
multi-function display immediately.
e Never add more than the indicated quantity of
engine oil. The difference between the
minimum and maximum mark is approx. 1 litre.
If the display is yellow up to the top edge D, this
indicates that the engine filling capacity has been
exceeded. This can cause damage to the vehicle.
If too much engine oil was added, a message
appears indicating that the oil level has exceeded
the maximum.
Have the oil level corrected at the next opportunity.
e Visit a qualified specialist workshop. Porsche
recommends a Porsche partner as they have
trained workshop personnel and the necessary
parts and tools.
Topping up engine oil
f Refer to chapter “Selecting and topping up
engine oil” on page 107.
Failure
If oil level measurement fails, a message appears
indicating that the oil measurement function is
faulty.
e Visit a qualified specialist workshop. Porsche
recommends a Porsche partner as they have
trained workshop personnel and the necessary
parts and tools.
Setting the speed limit
If a speed limit is preset and activated, a warning
message appears if the speed limit is exceeded.
A speed limit can be used to remind the driver to
keep to the maximum speed permitted for the tyre
type fitted to the vehicle, for example.
– Current speed: Set the current speed of the
vehicle.
– Manual: Set the desired speed value.
– Active:
Speed limit activated.
Speed limit deactivated.
Adjusting vehicle settings
f Refer to chapter “Vehicle Settings Using the
Multi-Function Display” on page 263.
Audio menu
f Refer to chapter “Selecting stations using the
multi-function display” on page 206.
f Refer to chapter “Selecting tracks from active
audio source using multi-function display” on
page 150.
Phone menu
f Refer to chapter “Using a phone via the
multi-function display” on page 243.
A Oil level OK – maximum reached
B Minimum oil level reached
C Oil level below minimum
D Oil level above maximum
1. Vehicle e Limits e Limit 1 or Limit 2
2. Select the desired limit.
162
Multi-Function Display
A
B
C
D
E
F
G
H
I
J
K
L
M
N
O
P
Q
R
S
T
U
V
W
X
Y
Z
Map menu
f Refer to chapter “Displaying and configuring
the map view via the multi-function display” on
page 173.
Navigation menu
f Refer to chapter “Entering destination via
multi-function display” on page 169.
f Refer to chapter “Starting and stopping route
guidance via multi-function display” on
page 170.
Trip menu
f Refer to chapter “Displaying driving data on
multi-function display” on page 105.
TPM menu
(TPM – Tyre Pressure Monitoring)
Tyre Pressure Monitoring offers the following
functions:
– Permanent monitoring of tyre pressure and
temperature.
–
Display of actual tyre pressure (actual pressure)
while driving.
– Tyre pressure warnings in two stages
(yellow and red warning).
– Vehicle is stationary: Display of pressure
deviation from the required pressure as well as
selected tyre type and comfort pressure.
Faults in Tyre Pressure Monitoring
system
In the event of faults, Tyre Pressure Monitoring
cannot monitor the tyre pressure.
The tyre pressure warning light on the
instrument panel lights up and a corresponding
message appears on the multi-function display.
WARNING
Incorrect tyre pressure
Low or high tyre pressure irreparably damages
the tyre and the wheel, lengthens the braking
distance and greatly increases the risk of an
accident.
In spite of the Tyre Pressure Monitoring system, it
is still the driver’s responsibility to ensure that the
tyres are inflated with the correct tyre pressure
and the settings in the TPM menu are correct.
e Adapt tyre pressure to the fitted tyres.
f Refer to chapter “Tyre pressure” on page 313.
e Make sure that the settings in the TPM menu
on the multi-function display correspond to the
tyres fitted on the vehicle.
After a wheel change, update the settings in
the TPM menu.
e The new tyre type and tyre size must be
selected in the multi-function display, even if
the settings for the newly fitted set of wheels
are the same as for the old wheels.
e Incomplete entries or selection of the wrong
tyres on the multi-function display affect the
accuracy of warnings and messages.
e If a red tyre pressure warning appears on the
multi-function display: Stop immediately in a
suitable place and check tyres for damage.
If necessary, remedy the damage with tyre
sealant.
f Refer to chapter “Flat Tyre” on page 110.
e Do not continue driving with defective tyres.
Have defective tyres replaced immediately.
Visit a qualified specialist workshop. Porsche
recommends a Porsche partner as they have
trained workshop personnel and the necessary
parts and tools.
e Do not drive with tyres in which the tyre
pressure drops again very quickly. In case
of doubt, have tyres checked by a qualified
specialist workshop.
Porsche recommends a Porsche partner as
they have trained workshop personnel and the
necessary parts and tools.
Information
Tyre Pressure Monitoring gives a warning about a
pressure drop caused by natural diffusion as well
as about a gradual loss of pressure caused by
foreign objects.
Tyre Pressure Monitoring cannot warn you about
tyre damage that occurs suddenly (e.g. flat tyre
due to unexpected external effects).
WARNING
Incorrect tyre pressure
163
Multi-Function Display
A
B
C
D
E
F
G
H
I
J
K
L
M
N
O
P
Q
R
S
T
U
V
W
X
Y
Z
e If the fault persists: Visit a qualified specialist
workshop. Porsche recommends a Porsche
partner as they have trained workshop
personnel and the necessary parts and tools.
Monitoring may be faulty in the following cases:
– If Tyre Pressure Monitoring is faulty.
– If wheel transmitters for Tyre Pressure
Monitoring are missing.
– During the learning phase after the tyre
settings have been updated.
– After a wheel change without updating the tyre
settings.
– If tyre temperatures are too high.
f Refer to chapter “Warning and Information
Messages” on page 278.
f Refer to chapter “Warning and indicator lights”
on page 126.
Viewing tyre pressure
Fig. 141: Tyre pressure display
The display of the actual pressure is only for
information. The tyre pressures change depending
on the temperature.
e Under no circumstances should the tyre
pressures be changed based on this display.
Viewing Fill info
Fig. 142: Example of pressure difference
b Vehicle is stationary.
The difference to the required pressure is displayed
on the relevant wheel.
Example: If –0.1 bar (–1.5 psi) is displayed for
the rear right wheel, 0.1 bar (1.5 psi) must be
added to this tyre.
The displayed pressures take into account the tyre
temperature.
e Always use the pressure difference from the
filling info display or from the corresponding
tyre pressure warning to correct the tyre
pressure.
If the tyres are not yet taught, the new required
pressures are displayed instead of the actual
pressure differences.
f Refer to chapter “Teaching the Tyre Pressure
Monitoring system” on page 164.
Information
After the ignition is switched on, the tyre pressures
will only be “taught” and displayed after the vehicle
is driven at a speed of approx. 25 km/h (16 mph).
Dashes (-.-) appear instead of the tyre pressures.
If the tyre is filled with at least 0.1 bar (1.5 psi), the
corresponding tyre pressure will be updated and
displayed.
If the tyre is filled with at least 0.1 bar (1.5 psi), the
corresponding tyre pressure will be updated and
displayed.
e Select the TPM menu.
e TPM e Fill info
164
Multi-Function Display
A
B
C
D
E
F
G
H
I
J
K
L
M
N
O
P
Q
R
S
T
U
V
W
X
Y
Z
Selecting tyre type
(type and size of fitted tyre)
b Vehicle is stationary.
Available settings and abbreviations:
– 18" Summer: 18" (S)
– 18" Winter: 18" (W)
– 19" Summer: 19" (S)
– 19" Winter: 19" (W)
– 20" Summer: 20" (S)
The selected setting appears as an abbreviation in
the Tyre type line in the TPM main menu.
Selecting comfort or standard pressure
b Vehicle is stationary.
– Comfort press.:
Comfort pressure is activated.
– Comfort press.:
Standard pressure is activated.
e Adapt the tyre pressures for comfort pressure
or standard pressure.
f Refer to chapter “Viewing Fill info” on
page 163.
f Refer to chapter “Comfort tyre pressure up to
270 km/h (165 mph)” on page 314.
Tyre pressure speed warning
If the maximum speed of the preset comfort
pressure is exceeded and/or the tyre pressure is
below a critical limit, a warning message appears
on the multi-function display.
Teaching the Tyre Pressure Monitoring
system
Tyre Pressure Monitoring begins to learn the tyres
after a wheel change, wheel transmitter replace-
ment or update of the tyre settings. During this
process, Tyre Pressure Monitoring recognises the
wheels and their locations. Position and pressure
information is displayed as soon as Tyre Pressure
Monitoring has assigned the wheels recognised as
belonging to the vehicle to the correct wheel
positions.
During teaching, the required pressures for cold
tyres (20 °C) are displayed in the fill info and the
message No monitoring of tyre pressure
System learns over 25 km/h (16 mph)
appears on the multi-function display.
The tyre pressure warning light in the
instrument panel remains lit until all wheels have
been taught.
f Refer to chapter “Warning and indicator lights”
on page 126.
Information
The available items depend on the model type. For
this reason, some of the selection options shown
here may not be available on the multi-function
display.
e Before fitting tyres with dimensions that are not
already stored in the multi-function display,
have the missing information added to the
multi-function display.
Visit a qualified specialist workshop. Porsche
recommends a Porsche partner as they have
trained workshop personnel and the necessary
parts and tools.
e Use only tyres approved by Porsche.
e TPM e Tyre type
e TPM e Comfort press.
Information
The tyre pressures can be reduced to increase
driving comfort.
If Comfort press. is selected, the Tyre Pressure
Monitoring system automatically uses lower
pressure values when monitoring tyre pressure.
WARNING
Driving at excessive
speeds when the
comfort pressure is
active
Driving at excessive speeds when the comfort
pressure is active will destroy the tyres and wheels.
e Reduce speed to below the displayed
maximum speed.
e Inflate the tyres to the standard tyre pressure
when driving at higher speeds.
f Refer to chapter “Warning and Information
Messages” on page 278.
165
Multi-Function Display
A
B
C
D
E
F
G
H
I
J
K
L
M
N
O
P
Q
R
S
T
U
V
W
X
Y
Z
Tyre pressure warnings
The tyre pressure warning light in the
instrument panel and a corresponding message
on the multi-function display warn about loss of
pressure in two stages (yellow and red tyre
pressure warning, depending on the amount of
pressure loss).
The yellow tyre pressure warning appears for
approx. 10 seconds when the vehicle is stationary
and the ignition has been switched off or when the
ignition is switched on again.
The yellow tyre pressure warning can be
acknowledged when the ignition is switched on.
The red tyre pressure warning also appears during
driving and can be acknowledged.
f Refer to chapter “Warning and Information
Messages” on page 278.
Chrono menu
f Refer to chapter “Sport Chrono Stopwatch” on
page 226.
Gear Shift Assist Menu
b Vehicles with manual transmission.
Fig. 143: Example of gear shift assist
In order to provide assistance during performance-
oriented driving, the upshift indicator is displayed.
The gearshift assist displays a prompt to shift to
the next-higher gear with a pre-indication via
segments that fill up. The sequence in which the
segments are filled with colour is white, yellow,
red.
Fig. 144: Example: higher gear
When all the segments are filled in red, a + sign
appears next to the engaged gear in the display as
a prompt to shift to the next-higher gear.
Information
The tyre pressure warning light goes out only
when the tyre pressure has been corrected.
e Select the Gear shift assist menu.
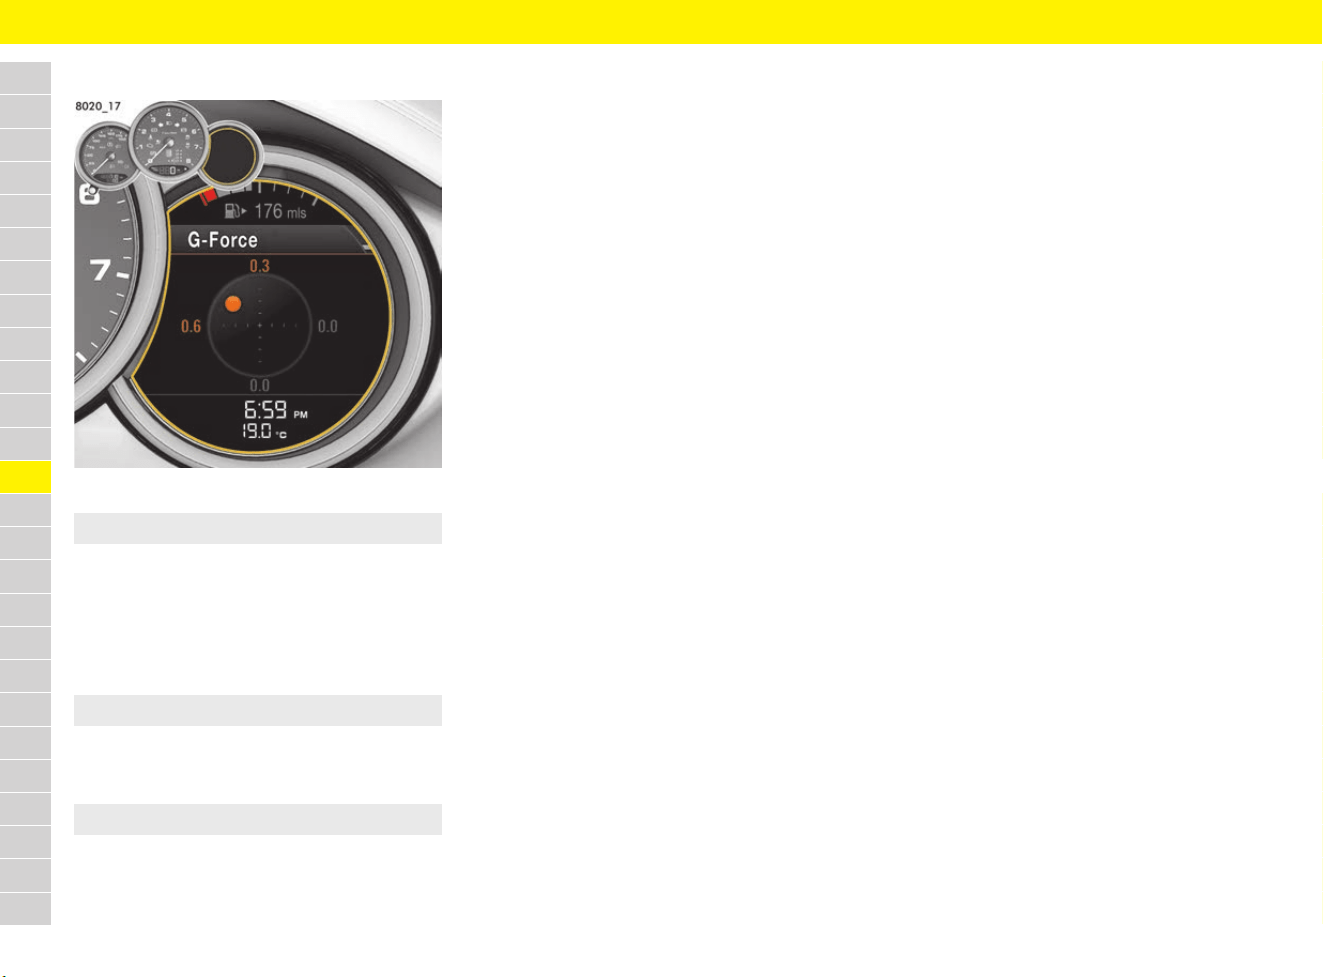
166
Multi-Function Display
A
B
C
D
E
F
G
H
I
J
K
L
M
N
O
P
Q
R
S
T
U
V
W
X
Y
Z
G-Force menu
Fig. 145: Example of acceleration forces
The current lateral and longitudinal acceleration
forces are shown graphically in the form of a
circular diagram.
Displaying maximum longitudinal and lateral
acceleration forces
Resetting maximum longitudinal and lateral
acceleration forces
Speed limit menu
f Refer to chapter “Speed Limit Display” on
page 221.
ACC menu
f Refer to chapter “Adaptive Cruise Control
(ACC)” on page 32.
e Select the G-Force menu.
e G-Force e Maximum g-force
e G-Force e Maximum g-force e Reset
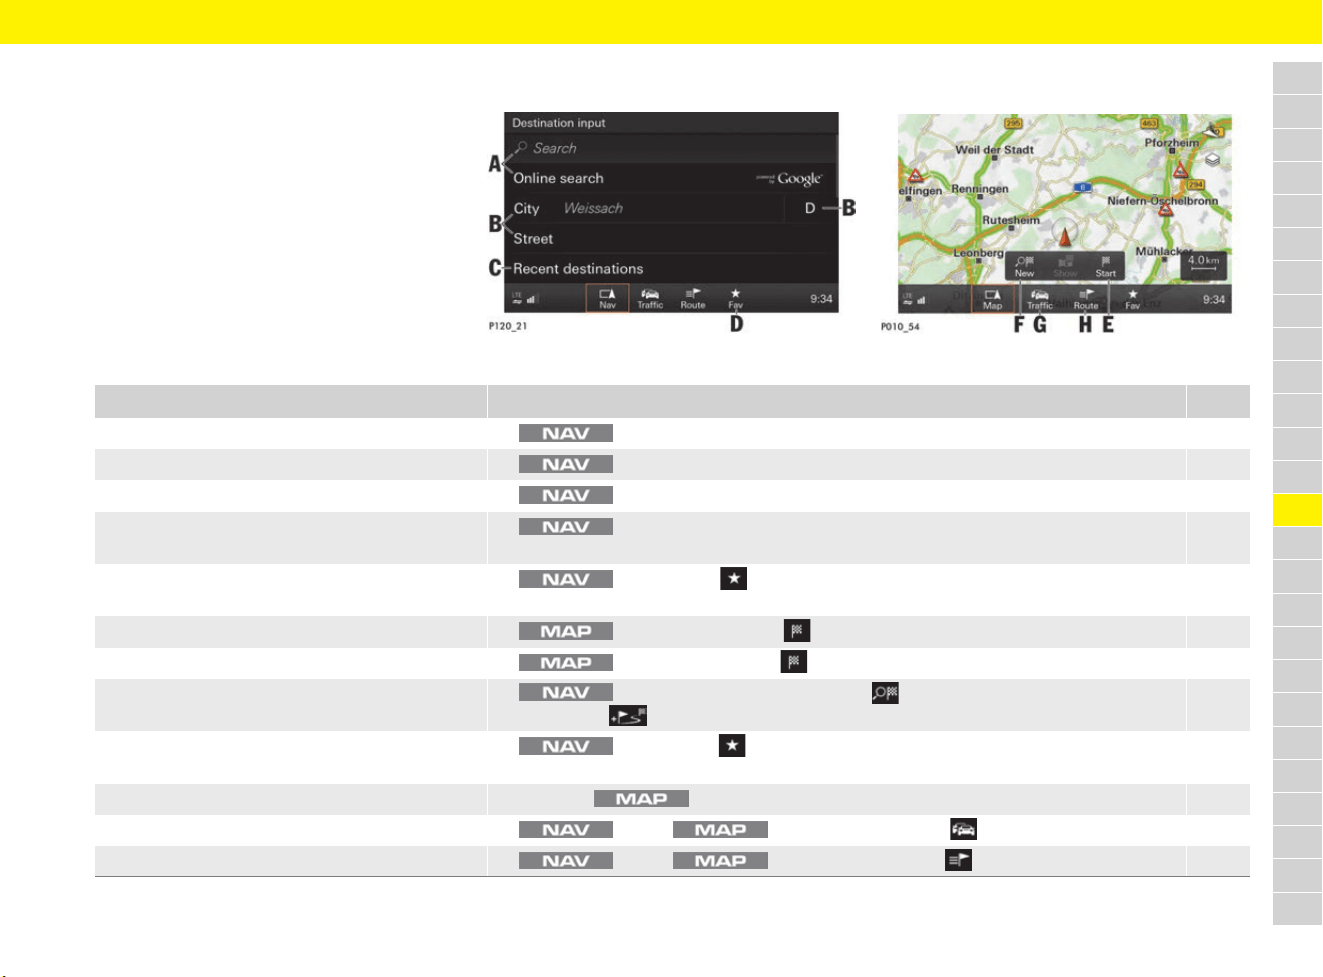
167
Navigation
A
B
C
D
E
F
G
H
I
J
K
L
M
N
O
P
Q
R
S
T
U
V
W
X
Y
Z
Navigation
Brief overview
This brief overview does not replace the complete
information provided under “Navigation”. Safety
instructions and warnings, in particular, are not
replaced by this brief overview.
For information on operating Porsche
Communication Management (PCM):
f Refer to chapter “Operating the Porsche
Communication Management (PCM)” on
page 176.
Fig. 146: Destination input
Fig. 147: Map view
What do I want to do? What do I have to do? Page
Search for a destination e button e Search or Online search (see A) e Enter/select destination. 168
Enter a destination address e button e City, Street or Country (see B) e Enter a destination address. 168
Select previous destination e button e Recent destinations (see C) e Select entry from list. 168
Enter point of interest e button e Points of interest e Select point of interest option e
Select point of interest.
169
Select destination from contacts e button e Fav (see D) e Browse (swipe) to Contacts page e
Select entry from list.
168
Start route guidance immediately e button e Select Start (see E). 170
Stop route guidance e button e Select Stop (see E). 170
Enter stopover/plan tour e button e Enter destination e New (see F) e Enter stopover e
Select Add .
169
Start stored tour e button e Fav (see D) e Browse (swipe) to Stored destinations page e
Tours e Select tour e Select Start.
169
Open map view e Press the button. 172
Display traffic info e button/ button e Select Traffic (see G). 173
Display and edit route e button/ button e Select Route (see H). 171
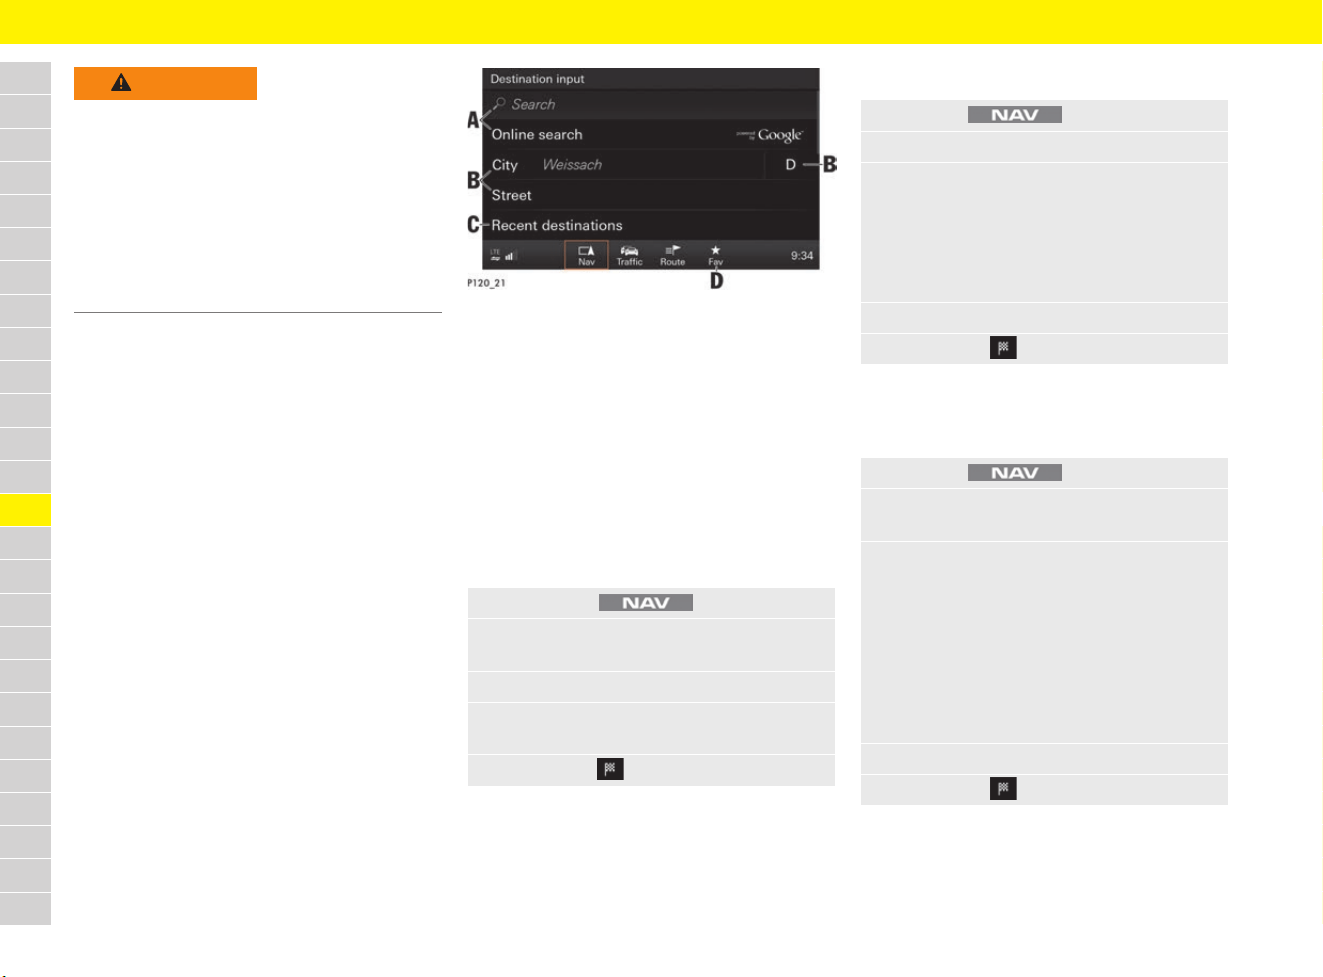
168
Navigation
A
B
C
D
E
F
G
H
I
J
K
L
M
N
O
P
Q
R
S
T
U
V
W
X
Y
Z
Fig. 148: Destination input
Searching for a destination
(search/online search)
When you are searching using the Search function,
the PCM’s internal database is accessed. Use the
Online search function to search for destinations
on the Internet.
b Online search: A data connection is
established for the online search.
f Refer to chapter “Connectivity” on
page 87.
Entering a destination address
Using stored destination or contact
(recent destinations)
WARNING
Risk of accidents
The Porsche navigation system guides you through
traffic and makes it easier for you to reach your
destination. If a recommended driving instruction
contradicts the applicable traffic regulations, the
Road Traffic Regulations always take precedence.
The driver is always responsible for road safety.
e Always pay attention to the traffic situation.
e Adapt your speed and driving style to the
visibility, weather, road and traffic conditions.
1. Press button .
2. Select Search or Online search
(see A Fig. 148).
3. Enter search term (e.g. city, street, name).
4. Select desired entry from the list of
suggestions.
5. Select Start .
1. Press the button.
2. Select City or Street (see B Fig. 148).
3. Enter address (city, street, house number,
point of interest).
Beside the City input field, the Country of
the current vehicle position is displayed.
If a destination abroad is to be entered, you
will need to select the destination country.
4. Select the desired entry from the list.
5. Select Start .
1. Press the button.
2. Select Recent destinations
(see C Fig. 148).
3. Browse (swipe) to desired page:
– Recent destinations: Recently used
destinations.
– Stored destinations: Destinations
stored as favourites. Refer to chapter
“Retrieving a stored destination
(favourite)” on page 170.
– Contacts: Stored contact addresses
on a connected phone.
4. Select entry from the list.
5. Select Start .
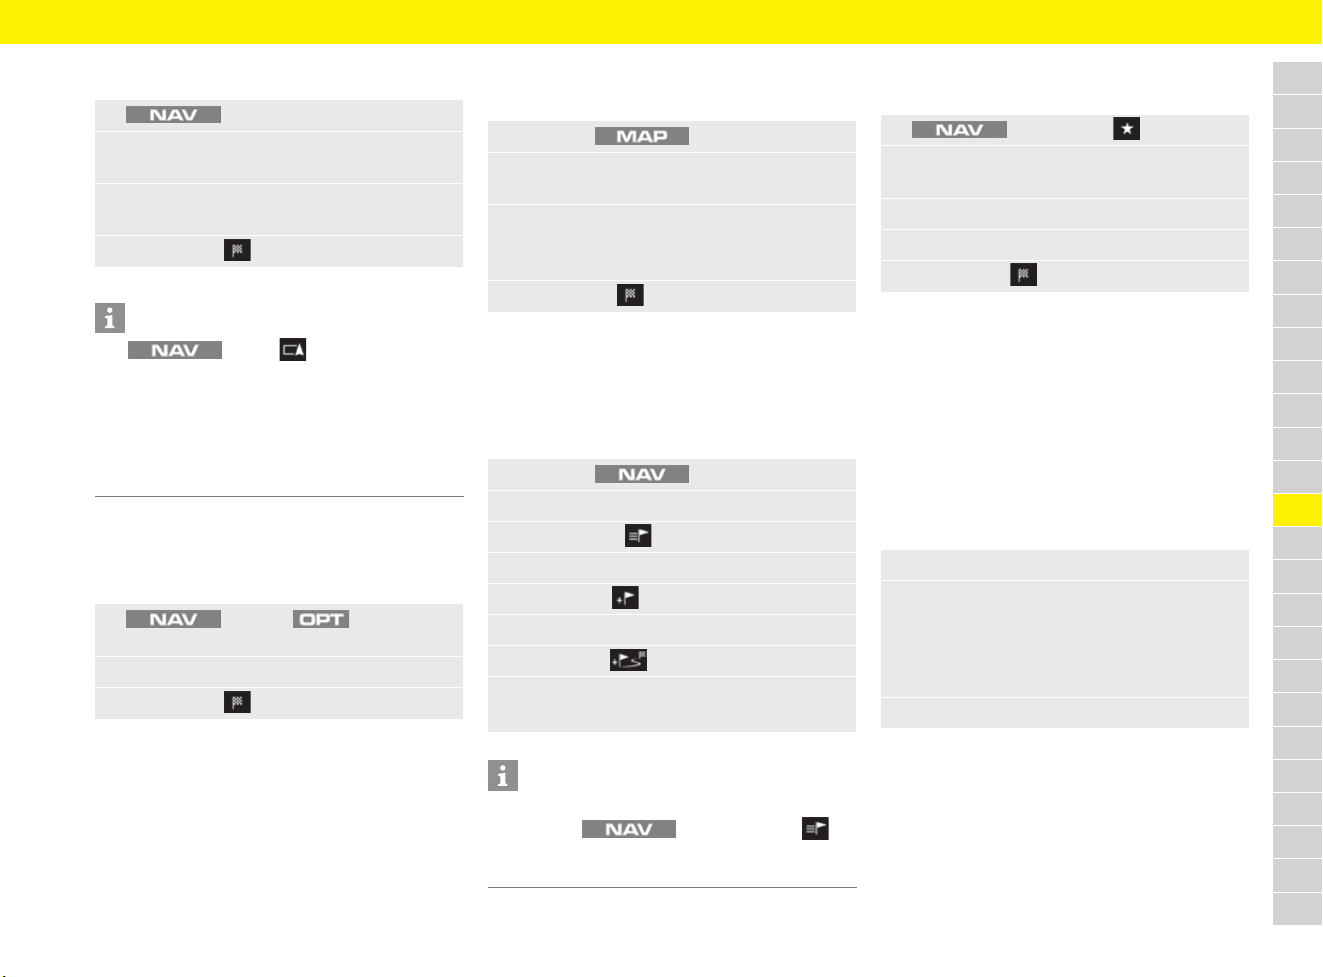
169
Navigation
A
B
C
D
E
F
G
H
I
J
K
L
M
N
O
P
Q
R
S
T
U
V
W
X
Y
Z
Entering point of interest
Entering destinations using
GPS coordinates
b Route guidance has not yet started.
Accepting destination from map
b Route guidance has not yet started.
Planning tour (entering stopover)
A tour consists of one destination and a minimum
of one and a maximum of 8 stopovers.
Entering and storing tour
Retrieving stored tour
b Tour is stored.
Entering destination via
multi-function display
For information on using the multi-function display:
f Refer to chapter “Operating multi-function
display without multi-function steering wheel”
on page 157.
f Refer to chapter “Operating multi-function
display with multi-function steering wheel” on
page 157.
1. e Points of interest
2. Select desired point of interest option
(e.g. Search around destination).
3. Enter or select point of interest category
or point of interest.
4. Select Start .
Information
Use e Nav e Points of
interest e Select desired point of interest option
(e.g. Search around destination) e
Portal List POIs to load other POI categories
from the Porsche Connect portal.
f Refer to chapter “Porsche Connect login” on
page 89.
1. button e button e
Enter GPS coordinates
2. Enter GPS coordinates and confirm with OK.
3. Select Start .
1. Press the button.
2. Select destination on the map (if necessary
by pressing the button for longer).
3. Select the destination displayed in the
headline.
Destination details are displayed.
4. Select Start .
1. Press the button.
2. Enter destination and start route guidance.
3. Select Route .
4. Select Tour.
5. Select New .
6. Enter stopover.
7. Select Add .
8. Enter tour name and confirm with OK.
Tour is stored.
Information
You can also reorganise the stopovers at a later
time. Select button e Route e
Tour, then press and hold the relevant stopover
and move to the desired position.
1. button e Fav
2. Browse (swipe) to
Stored destinations page.
3. Select Tours.
4. Select the desired tour.
5. Select Start .
1. Navigation e Destination input
2. Select the desired list:
– Recent destinations: Recently used
destinations.
– Stored destinations: Permanently
stored destinations.
3. Select entry from the list and start navigation.
170
Navigation
A
B
C
D
E
F
G
H
I
J
K
L
M
N
O
P
Q
R
S
T
U
V
W
X
Y
Z
Starting/stopping route guidance
Starting route guidance in the
Destination input menu
b Destination data is entered.
b Route guidance has not yet started.
Starting route guidance with the
destination input
b Destination data is entered.
b Route guidance has not yet started.
b Destination is displayed in detailed view.
Stopping route guidance in the
Destination input menu
b Route guidance is active.
Starting and stopping route guidance
via multi-function display
b Destination data is entered.
b Route guidance has not yet started.
– Start route guidance: Calculate route.
– Stop route guidance: Stop route guidance.
Storing destination and retrieving
stored destination (favourite)
Storing destination (favourite)
b Destination data is entered.
b Route guidance has not started.
Retrieving a stored destination
(favourite)
Deleting or editing destinations and
tours
e button e Start
e Select Start .
e button e Stop route guidance
– or –
Select Stop .
1. Select the Navigation menu.
2. Select the desired option:
1. Select Save .
2. Confirm destination name with OK.
Destination is stored.
– or –
Change destination name and confirm
with OK.
The destination is stored with the entered
name.
– or –
Select a name that has already been
assigned (e.g. Home) from the list and
confirm with OK.
The destination information for the existing
name is overwritten by the new information.
Information
Alternatively, a destination can also be stored
using the button e Fav e
Stored destinations e Save as favourite.
1. button or button e
Fav
2. Browse (swipe) to desired page:
– Recent destinations: Recently used
destinations.
– Stored destinations: Destinations or
tours stored as favourites.
– Contacts: Stored contact addresses
on a connected phone.
3. Select entry from the list.
Information
Select or button e
Fav e Stored destinations e
Portal Personal POIs to load other destinations
from the Porsche Connect portal.
f Refer to chapter “Porsche Connect login” on
page 89.
1. button or button e
Fav
2. Browse (swipe) to desired page:
– Recent destinations: Recently used
destinations.
– Stored destinations: Destinations
stored as favourites.
– Contacts: Stored contact addresses
on a connected phone.
3. Select entry from the list.
4. Press the button.
171
Navigation
A
B
C
D
E
F
G
H
I
J
K
L
M
N
O
P
Q
R
S
T
U
V
W
X
Y
Z
Displaying and editing route
b Route guidance has started.
– Route options:
– Route type: Setting for route calculation
specifications (fast, short, ecological).
– Avoiding options for route calculation:
Settings to avoid or include toll roads,
motorways, ferries/car trains, tunnels and
mountain passes when calculating the route.
– Dynamic reroute: To bypass tailbacks
and obstacles using dynamic traffic
management.
– Refer to traffic notices.
– List view: Next distinctive route points
(POIs, turning-off points) are displayed.
– Tour: Destinations and distances for the active
tour route guidance are displayed.
– Alternative routes: Here you can select
alternative routes to the current route
guidance route. To start an alternative route,
select Start .
Using smart routing
The PCM can learn frequently travelled routes and
suggest them as a destination for route guidance.
A smart route is created automatically as soon as
an identical route is travelled twice.
Activating smart routing
Accessing smart routing
b Smart routing is activated.
5. Select the desired option:
– Rename
– Delete
– Show favourite on map
Information
To delete all stored destinations or tours, select
button or button e
Fav e button before selecting an
entry from the list.
1. button or button e
Route
2. Select option and change settings:
1. button e button e
SET NAV / SET MAP
2. Select Smart routing.
The symbol is displayed at the top right
of the map. The PCM records frequently
travelled routes, regardless of whether route
guidance has started.
1. button or button e
Route e Smart routing
– or –
Select the button e
Symbol at the top right of the map.
2. Select the desired smart route from the list
of suggestions.
3. Select Start .
Information
– A maximum of 3 suggested smart routes are
available. Suggested routes are prioritised
according to how frequently an identical route
is travelled.
– The traffic situation for available smart routes
is displayed depending on the current vehicle
position.
– The PCM identifies whether the route is
travelled during the week or at the weekend.
Recorded smart routes are only displayed at
the appropriate time – either at the weekend or
during the week.
– Opening Smart routing stops active route
guidance.
Information
– When a smart route is selected, Delete
can only delete stored routes to the currently
displayed destination.
– Smart routes that have already been stored
remain stored even after the function is
deactivated and must be deleted manually.
– For information on deleting routes:
f Refer to chapter “Changing navigation
settings” on page 175.
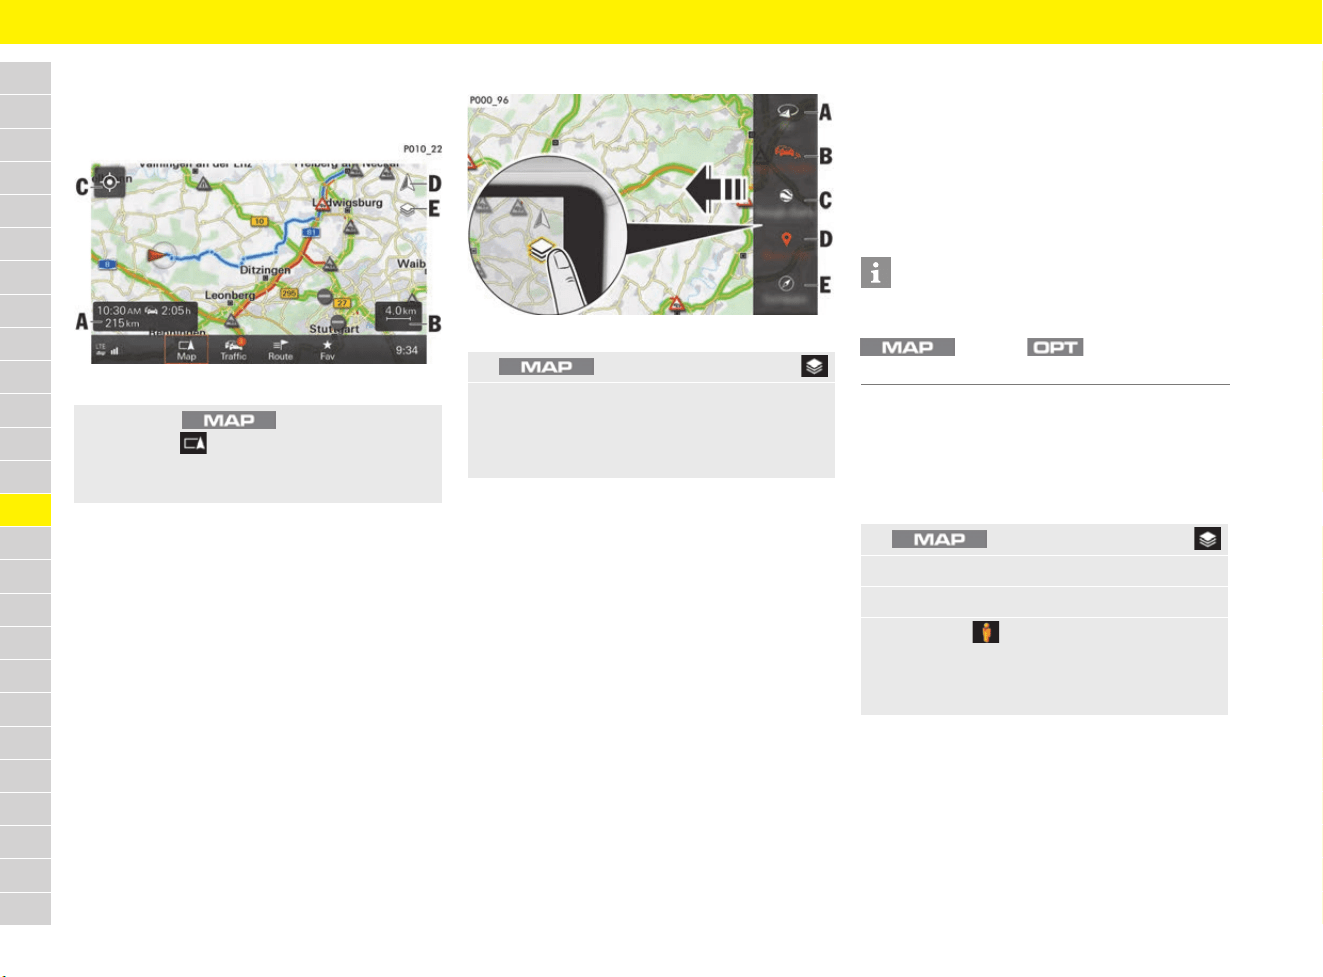
172
Navigation
A
B
C
D
E
F
G
H
I
J
K
L
M
N
O
P
Q
R
S
T
U
V
W
X
Y
Z
Opening and configuring map view
Opening map view
Fig. 149: Map view Map with display and function elements
– A: Route guidance information, duration and
distance to destination or arrival time.
– B: Switching between scale display and Auto
zoom.
– C: Centring vehicle position on a map.
– D: Selecting map orientation North or in
direction of travel.
– E: Opening map side menu.
f Refer to chapter “Configuring map content”
on page 172.
Configuring map content
Fig. 150: Map content incl. map side menu
b All map views that retrieve data from the
Internet require an active data connection.
f Refer to chapter “Connectivity” on
page 87.
Active map content is shown in red, inactive
content in white:
– A (3D): 3D view (otherwise 2D view).
– B (OnlineTraffic): Show/hide real-time traffic
information about accidents, roadworks,
traffic flow information and other incidents
from the Internet.
– C: Show/hide map display of online data with
360° panoramic view.
f Refer to chapter “Activating map view with
360° panoramic view” on page 172.
– D (Show POI): Show/hide points of interest on
the map.
– E (Compass): Show/hide compass on the
map.
– Weather: Show/hide weather information on
the map.
– Auto zoom: Show/hide Auto zoom function on
the map.
Activating map view with
360° panoramic view
b An active data connection is available.
b Vehicle is stationary (function is not available
when driving).
e Press the button.
The Map menu and a map view of the
current location and if applicable the route in
the current route guidance are displayed.
1. button e Select Side menu .
2. Select the desired map content.
If necessary, swipe down (scroll) within the
side menu using the rotary push button or the
touchscreen to display additional menus.
Information
The map side menu provides quick access
to functions that can also be set using the
button e button e
SET Map e Map view e Layers.
1. button e Select Side menu .
2. Activate map content (see C Fig. 150).
3. Set map scale to less than 100 m.
4. Select the symbol.
360° panoramic view is activated.
Using the touchscreen, you can explore the
environment step by step.
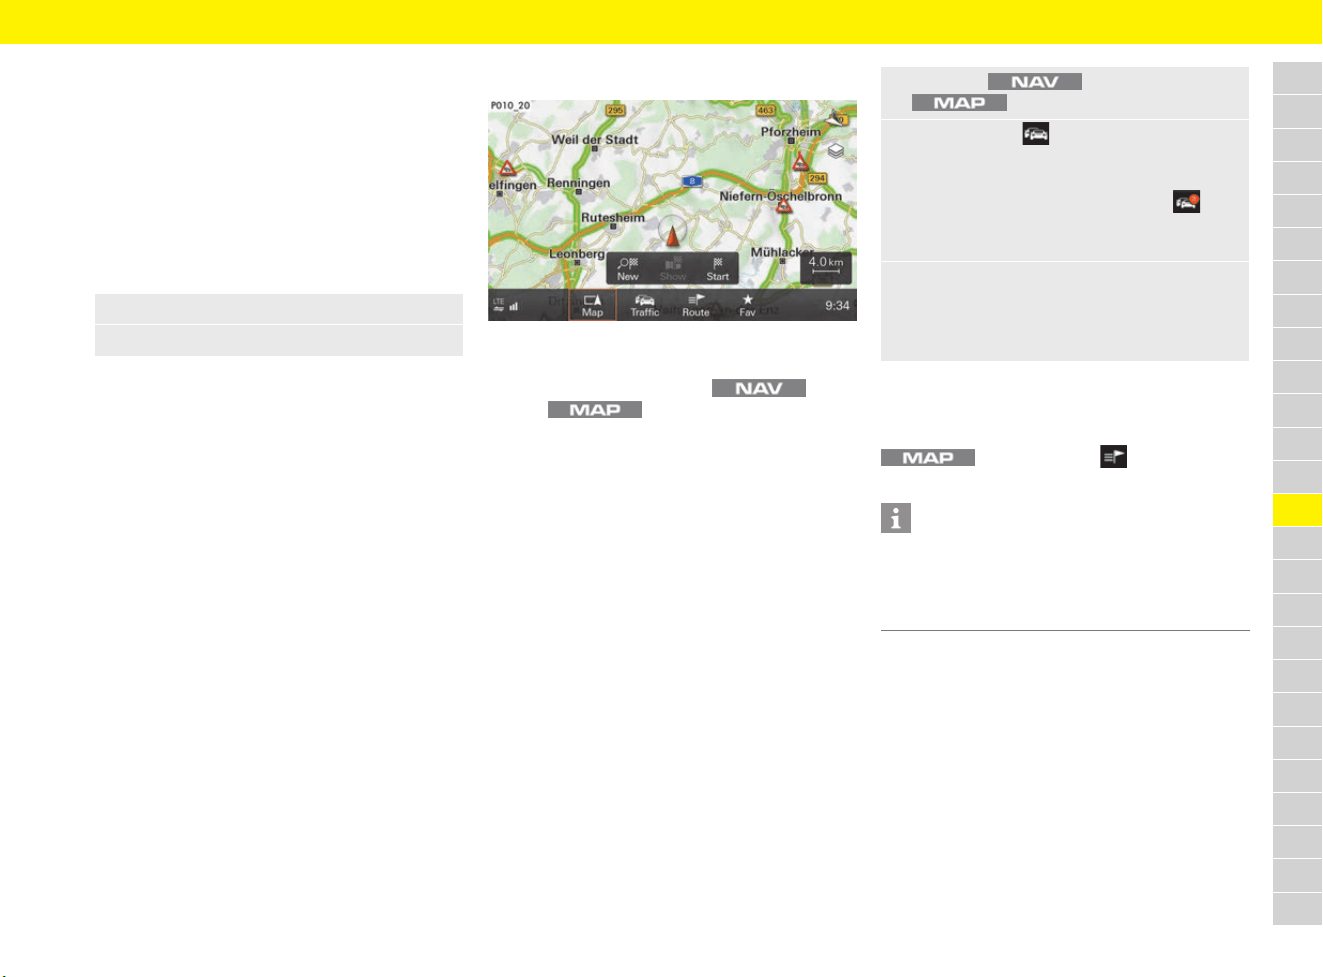
173
Navigation
A
B
C
D
E
F
G
H
I
J
K
L
M
N
O
P
Q
R
S
T
U
V
W
X
Y
Z
Displaying and configuring the map
view via the multi-function display
For information on using the multi-function display:
f Refer to chapter “Operating multi-function
display without multi-function steering wheel”
on page 157.
f Refer to chapter “Operating multi-function
display with multi-function steering wheel” on
page 157.
– Auto zoom: The scale of the map is set
automatically from the current position of the
vehicle to the next navigation manoeuvre point.
– 3D map: Three-dimensional map display.
– North up: The map always faces north.
– Manual zoom: Adjust the zoom factor for the
map display.
– Show destination: Select the navigation
destination as an enlarged section of the map.
– Show position: Select the current vehicle
position as an enlarged section of the map.
Displaying traffic info
Fig. 151: Displaying traffic info
You can retrieve traffic info on the current location
or on the selected route in the menu
and the menu.
The following information is displayed:
– Hatched areas: Identify the length of the traffic
disruption.
– Coloured warning symbol: An imminent traffic
disruption on the selected route. If route
guidance is not active, all current traffic
disruptions are highlighted in colour.
– Greyed-out warning symbol: Traffic disruptions
that are not on the selected route.
Traffic announcements help you to avoid tailbacks
and obstacles using dynamic traffic management.
The detour can be activated using the
button e Route e
Dynamic reroute.
1. Select the MAP menu.
2. Select the desired display option:
1. Press the button or the
button.
2. Select Traffic .
A list of all traffic announcements received is
displayed.
The number displayed in the Traffic menu
shows the number of traffic notices on the
selected route.
3. Select traffic announcement.
– or –
Select Show all traffic notices to display all
the traffic notices found.
Information
The radio stations are responsible for traffic
announcements. For that reason, no liability
can be accepted for the completeness and
correctness of the information.
174
Navigation
A
B
C
D
E
F
G
H
I
J
K
L
M
N
O
P
Q
R
S
T
U
V
W
X
Y
Z
Displaying realtime traffic information
b An active data connection is available.
f Refer to chapter “Connectivity” on
page 87.
The following traffic flow information is displayed:
– Green lines: Free-flowing traffic.
– Orange lines: Slow-moving traffic.
– Red lines: Tailbacks
f Refer to chapter “Configuring map content” on
page 172.
Offroad mode navigation
Offroad mode allows you to record a route (trace)
when travelling in non-digitised areas. This is done
by setting waypoints.
Activating and deactivating offroad
mode
Offroad mode allows you to navigate freely away
from listed streets and routes.
Starting recording and setting
waypoints
b Offroad mode is active.
Tracing waypoints
b Offroad mode is active.
– Trace forward: Waypoints are traced from
the starting point to the end point.
– Trace backward: Waypoints are traced from
the end point to the starting point.
– From start: Departure point is the starting
point.
– From here: Departure point is the current
vehicle position.
1. button e Select Side menu
2. Select OnlineTraffic.
Information
– The Porsche Connect services (including the
Car Connect services, but not the Safety and
Security services) offer a free inclusive period,
which varies in length for each services
package and country, but is always at least
3 months. Further information about the free
inclusive periods as well as subsequent costs
and information about the availability of
individual services for your country is available
online at www.porsche.com/connect or from
your Porsche partner.
–
Depending on the country, the Porsche Connect
Services can be used via the embedded SIM or
a data-enabled external SIM card. A separate,
fee-based contract with a mobile phone
provider is required for the external SIM card.
WARNING
Risk of accidents
Compass errors and malfunctions cannot be ruled
out due to system-related inaccuracies and
malfunction risks of satellite-based navigation.
The driver is always responsible for driving the
vehicle.
e Never rely solely on offroad navigation.
e Always pay attention to offroad conditions.
1. button e button e
SET NAV
2. Select Offroad mode and confirm the
prompt if necessary.
Offroad mode is activated/deactivated.
1. button e Start
2. Select Add .
The current waypoint is recorded. Additional
waypoints (up to a maximum of 10) can be
added.
3. To stop the recording, select Stop .
4. Select Save.
5. Enter a name and confirm with OK.
The entry is saved under e
Fav e Stored destinations e Tours.
1. Select button e Fav e
Stored destinations e Tours e
to call up the desired tour.
2. Select Start .
3. Select the desired option:
175
Navigation
A
B
C
D
E
F
G
H
I
J
K
L
M
N
O
P
Q
R
S
T
U
V
W
X
Y
Z
Changing navigation settings
– Location details: Current location information
is displayed.
–
Enter GPS coordinates: Enter GPS
coordinates
and confirm with OK.
– SET NAV
– Navigation announcement volume:
Adjust the volume of the navigation
announcements and switch the
announcement on or off.
– Smart routing: When the function is
activated, the PCM records frequently
travelled routes. Delete all deletes all
previously learned smart routes.
– Offroad mode: Activate/deactivate mode
(allows you to navigate freely even away
from recorded streets and routes).
f Refer to chapter “Offroad mode navigation”
on page 174.
– Navigation database update: Update
navigation database (country-dependent).
An active data connection is required for
online map update using Porsche Connect
services.
f Refer to chapter “Connectivity” on page 87
f Contact your Porsche partner.
– Low fuel warning: Show/hide fuel range
information.
– Hide navigation info: Show/hide
navigation information.
Changing map settings
– Map view: Adapt the map display (North up,
3D map, 3D buildings) and the map view.
– Zoom: Adaptation of scaling.
– Auto zoom: Automatic selection of zoom
level during active route guidance.
–
Junction zoom:
Automatic selection of
zoom level when approaching a junction
during active route guidance.
– Intersection detail map: Display of
more detailed driving instructions when
approaching a junction.
– Notices: Configuration of warnings when
approaching points of interest, low fuel level
and different country.
– Point of interest proximity warnings
– Low fuel warning
– Show country information
– General settings
– Day and night view: Switching between
day and night view.
– Show speed limits: When the function is
activated, speed limits are displayed in the
PCM. If the vehicle has a speed limit display
on the multi-function display, this menu item
is not shown and the speed limit is displayed
automatically.
f Refer to chapter “Speed Limit Display” on
page 221.
– Show footer: The touchscreen footer is
displayed in the map view.
– Show layer selection: Shows button for
the Layers side bar in the map view.
– Show time of arrival: Switches between
arrival time and remaining duration of trip.
– Trip duration to stopover: Displays time
and distance to stopover.
– Offroad mode: Activate/deactivate mode
(allows you to navigate freely even away from
recorded streets and routes).
f Refer to chapter “Offroad mode navigation”
on page 174.
1. button e button
2. Select the desired option:
1. button e button e
SET MAP
2. Select the desired option:
176
Operating the Porsche Communication Management (PCM)
A
B
C
D
E
F
G
H
I
J
K
L
M
N
O
P
Q
R
S
T
U
V
W
X
Y
Z
Operating the Porsche Communication Management (PCM)
Brief overview
This brief overview is not a substitute for the
complete information provided in “Operating the
Porsche Communication Management (PCM)”.
Safety instructions and warnings, in particular,
are not replaced by this brief overview.
Fig. 152: PCM
Fig. 153: Touchscreen, Home menu
What do I want to do? What do I have to do? Page
Switch on PCM e Switch on ignition or press volume control A.
Switch off PCM e Switch off ignition or press and hold volume control A.
Adjust the volume e Turn volume control A.
Mute the audio source e Briefly press volume control A.
Open main menu, e.g. radio e Press button e.g. .
View tone settings e button e button e SET SOUND e Volume or Sound 184
Open Device Manager/establish connection e Select or (see B) in the footer. 100/87
Change the date and time e Select time (see C) in the footer. 177
Open and configure MyScreen e button e MyScreen 180
Change system settings e button e Set 183
Play music from a CD/DVD or SD card e Insert CD/DVD or SD card e button e Select desired media source. 181
Play music from an external device e Connect external device via USB, AUX (depending on equipment) or Bluetooth
®
e
button e Select desired media source.
182
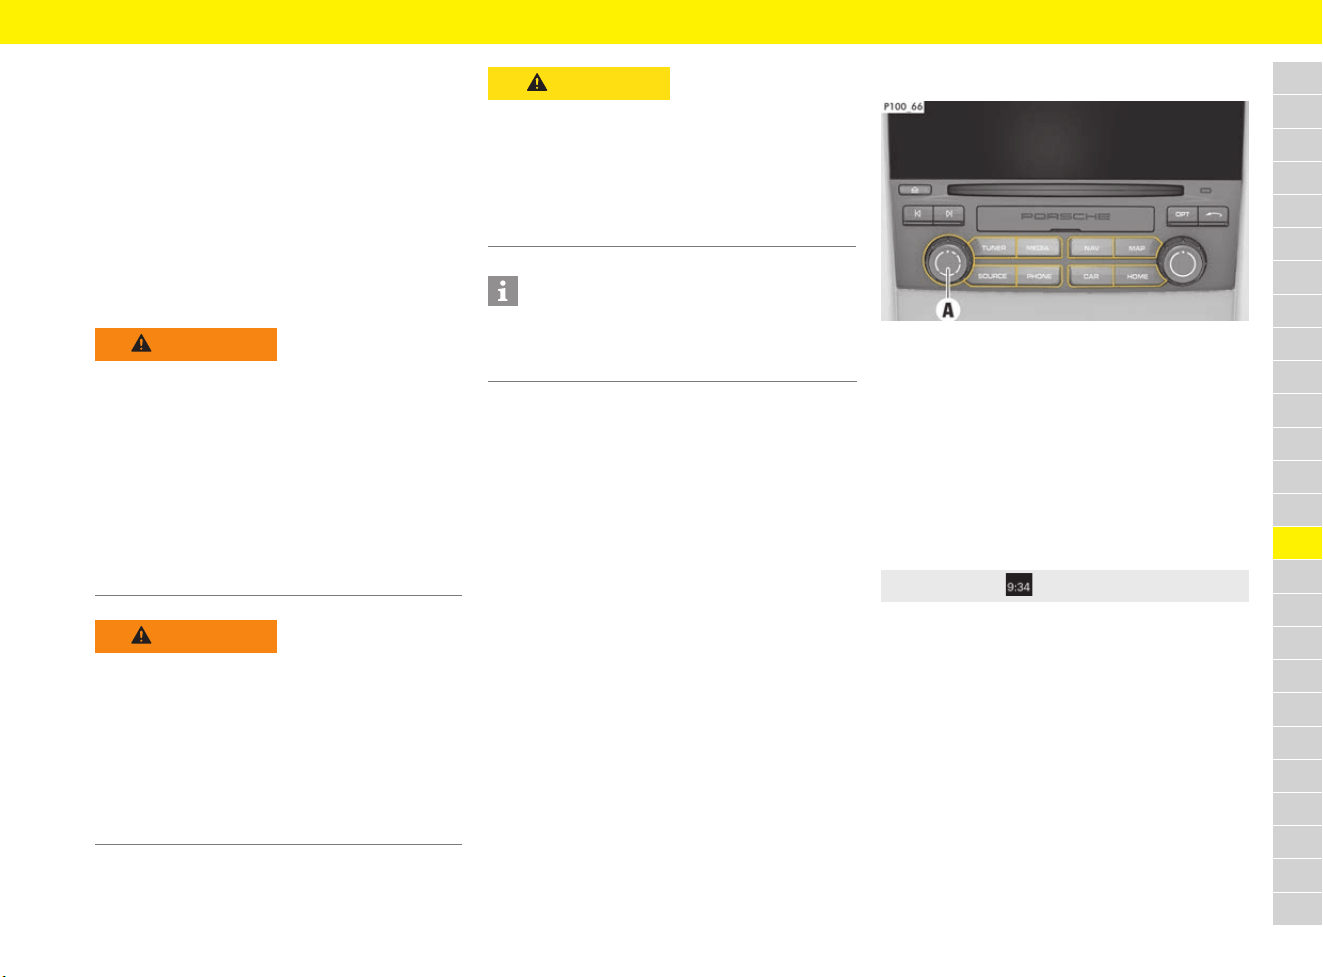
177
Operating the Porsche Communication Management (PCM)
A
B
C
D
E
F
G
H
I
J
K
L
M
N
O
P
Q
R
S
T
U
V
W
X
Y
Z
Important information on
operation
The Porsche Communication Management (PCM)
is the central control unit for the radio, sound
settings, the navigation system and for using
various media and the telephone.
For safety reasons, some functions are only
available when the vehicle is stationary.
To ensure that use of the PCM does not endanger
or injure anyone, always observe the following
safety instructions:
Switching the PCM on/off
Fig. 154: Switching the PCM on/off
e The PCM is activated when the ignition is
switched on.
e Irrespective of the ignition, the PCM can be
switched on and off by pressing and holding
the volume control A.
Setting the date and time
The time display provides rapid access to the date
and time settings.
f Refer to chapter “Changing general system
settings” on page 183.
WARNING
Risk of accidents
Operating the PCM may distract you from the
traffic.
e Only operate the PCM if the traffic situation
allows you to do so safely. If in doubt, stop in
a suitable place and operate the PCM while the
vehicle is stationary.
e Set the volume in such a way that acoustic
signals from outside, e.g. sirens from
emergency vehicles (e.g. police, ambulance)
can still be heard at all times.
WARNING
Risk of accidents
As a result of braking, rapid acceleration, changes
of direction or in an accident, unsecured or
incorrectly positioned devices can slip out of
place and endanger vehicle occupants.
e Do not transport objects unsecured in the
passenger compartment.
e Always keep storage compartments closed
while driving.
CAUTION
Danger of injury
Danger from invisible laser radiation if the housing
is opened or damaged.
e The PCM is a Class 1 laser product. Do not
open the housing. Any maintenance work
required must be performed solely by qualified
customer service specialists.
Information
To protect the battery, the PCM switches itself off
automatically a few minutes after the ignition is
switched off.
e Select Time in the footer.
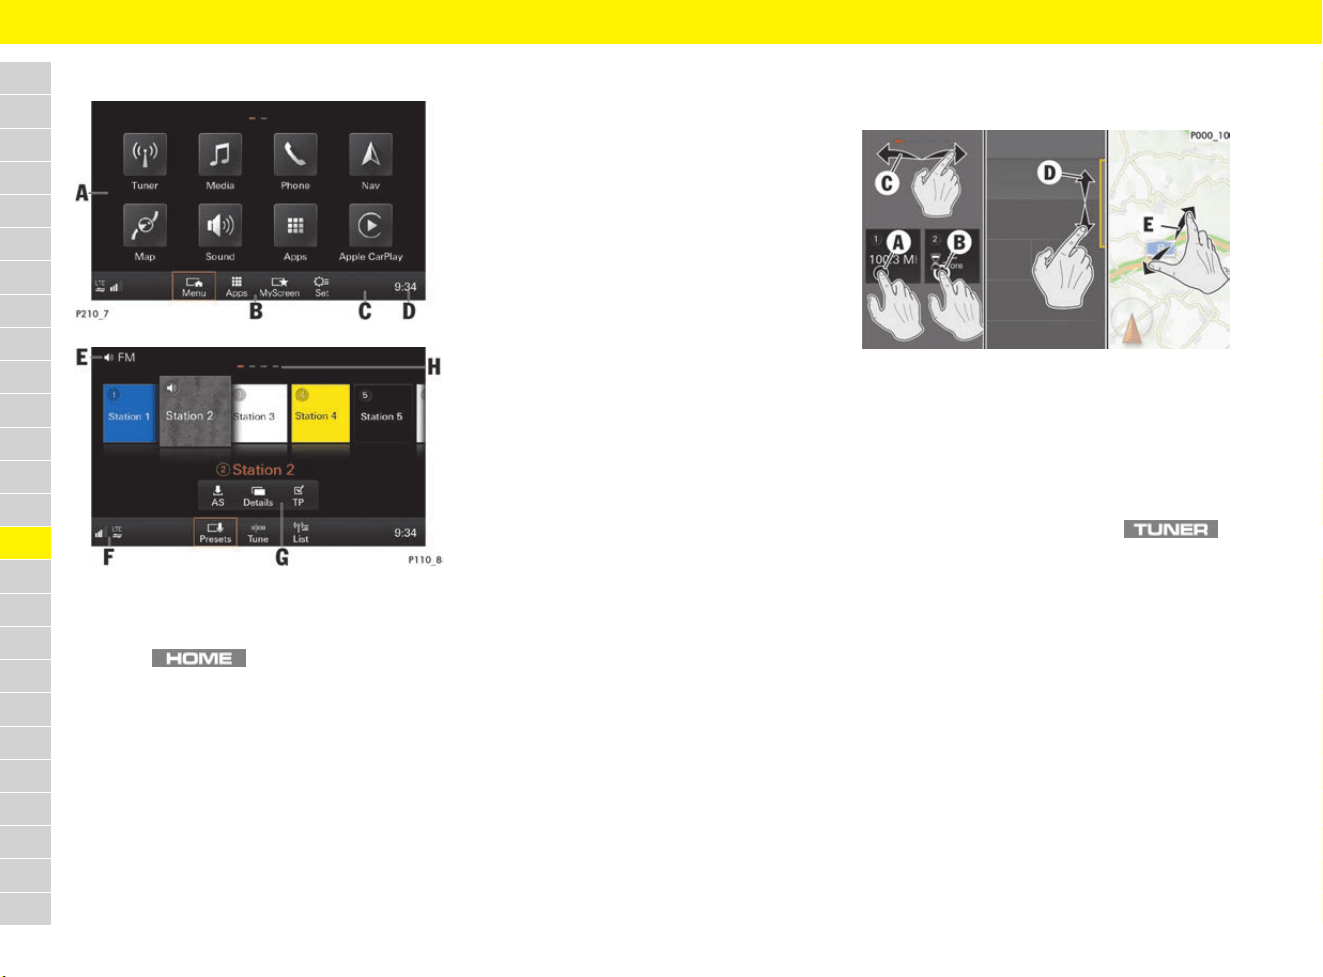
178
Operating the Porsche Communication Management (PCM)
A
B
C
D
E
F
G
H
I
J
K
L
M
N
O
P
Q
R
S
T
U
V
W
X
Y
Z
Touchscreen controls
Fig. 155: Touchscreen Controls
Operating the PCM with the
touchscreen
Fig. 156: Operating with the touchscreen
A Home screen
Shows available functions when
button is pressed.
B Functions of the active main menu
The toolbar offers different menus, depending
on which main menu is active.
C Footer
Functions of the active main menu, connection
symbols and the configurable temperature or
time display.
D Time or temperature display
f Refer to chapter “Setting the date and
time” on page 177.
E Headline
For example, displays selected radio or media
source.
F Opening the Device Manager
(connect telephone, display WiFi settings and
set up wireless Internet access, connect
Bluetooth
®
devices, view connection status of
Apple
®
CarPlay and Porsche Connect App).
f Refer to chapter “Device Manager” on
page 100.
G Controller
Shows additional functions when you
approach the touchscreen.
H Show other pages
Open other pages by scrolling (swiping).
A Touch (select)
Briefly touch the touchscreen with your finger.
Example: Select a function or check/uncheck
a box.
B Long press
Touch the touchscreen for longer. Example:
Save a station in the main menu .
C Swipe
Swipe the touchscreen horizontally with your
finger. Example: View other pages containing
radio stations.
D Scroll
Swipe the touchscreen vertically with your
finger. Example: Manually scroll through lists.
E Zoom
Move two fingers apart or closer together.
Tapping the touchscreen twice zooms in on
that section. Example: Zoom in on a map.
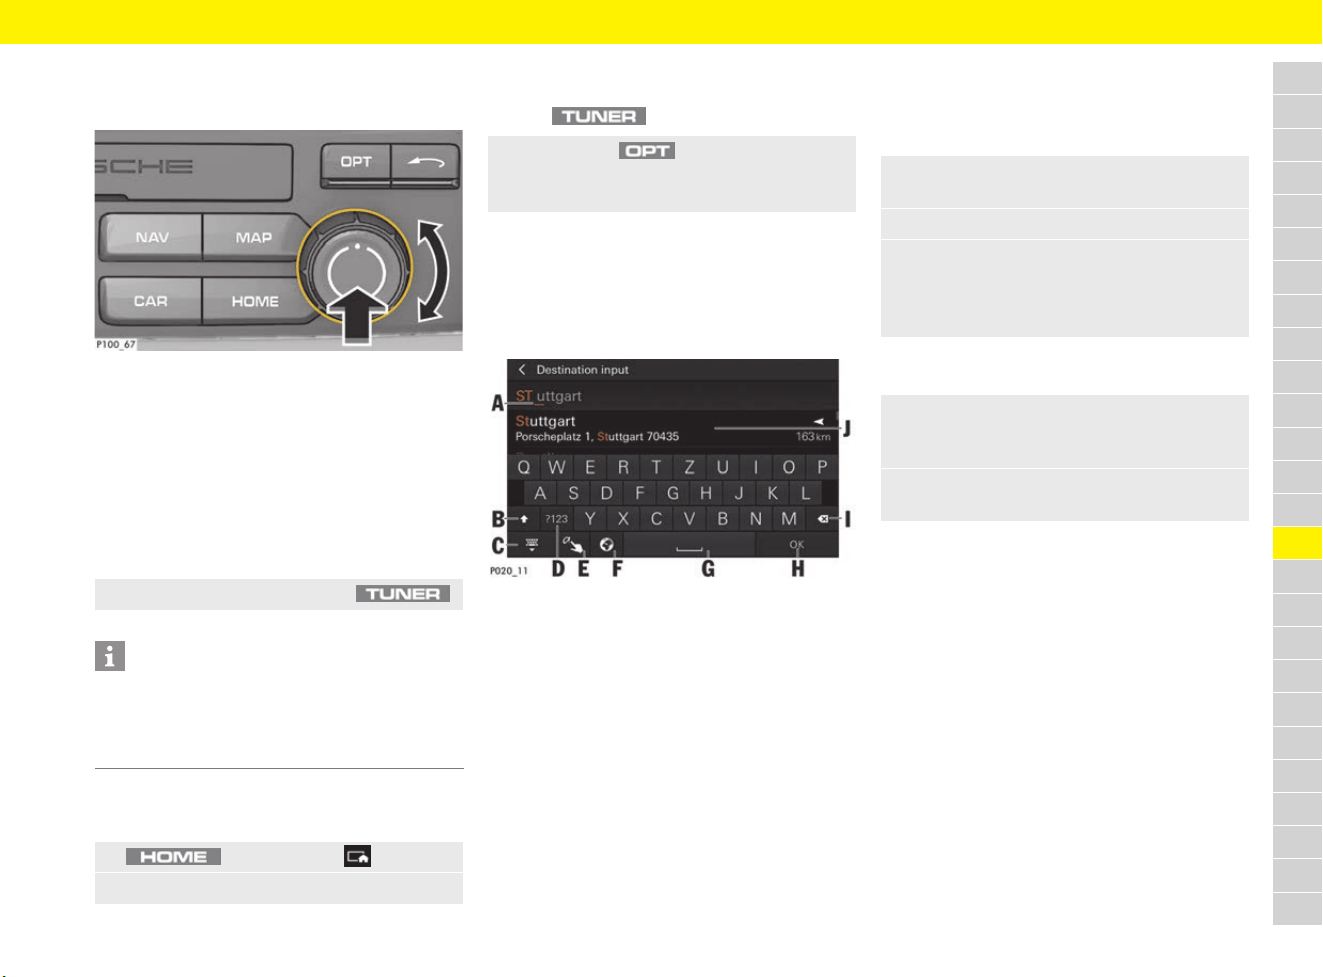
179
Operating the Porsche Communication Management (PCM)
A
B
C
D
E
F
G
H
I
J
K
L
M
N
O
P
Q
R
S
T
U
V
W
X
Y
Z
Operating the PCM with the rotary
push button
Fig. 157: Rotary push button
1. Turn the rotary push button until the desired
function is highlighted.
2. Press the rotary push button to activate the
highlighted function.
Opening menus
Opening a main menu directly
Opening the main menu via the Home
menu
Opening settings of the active function
b The desired main menu has been selected
(e.g. ).
Entering text and characters
As soon as you need to enter text or characters,
e.g. for entering a navigation destination or a
search term, an input field is displayed.
Fig. 158: Touchscreen keyboard
There are three options for entering text and
characters:
Entry using the keyboard
Entry using the rotary push button
e Press button on the PCM (e.g. ).
Information
You can change from one main menu to another at
any time. When you return to a main menu, the
contents that you had opened before leaving it are
displayed once more.
1. button e Menu
2. Select main menu (e.g. Tuner).
e Press button .
Settings and other functions of the relevant
are displayed.
A Current cursor position
B Switch caps lock on/off
(toggle between upper and lower case)
C Show and hide keyboard
D Toggle between entry of letters, numbers and
special characters
E Handwriting recognition (enter letters or
characters using the touchscreen)
F Adapt keyboard
(availability dependent on country)
G Insert space
H Confirm entry
I Delete entry
J List of suggestions
1. Select input field to open the touchscreen
keyboard.
2. Write your desired text or characters.
e To enter accents, umlauts, etc. press the
desired letters for longer.
A window then opens containing accents,
umlauts, etc. for these letters.
1. Turn the rotary push button (see Fig. 157)
until the desired letter or character is
highlighted.
2. Press the rotary push button to enter the
highlighted letter or character.
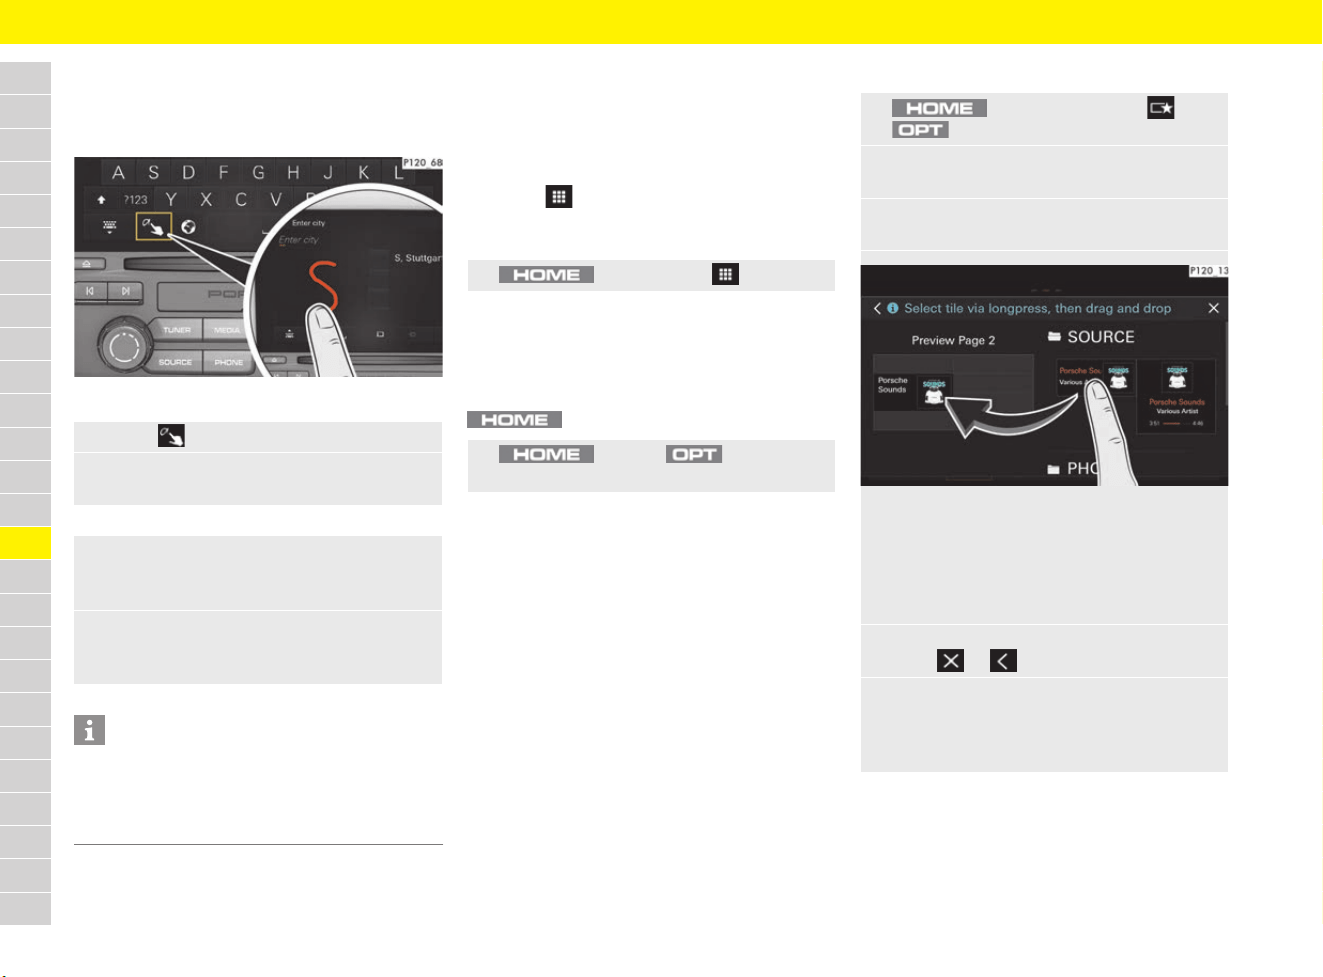
180
Operating the Porsche Communication Management (PCM)
A
B
C
D
E
F
G
H
I
J
K
L
M
N
O
P
Q
R
S
T
U
V
W
X
Y
Z
Freehand entry
Freehand entry has handwriting recognition and
enables you to write text and characters with your
finger.
Fig. 159: Freehand entry
Opening the Device Manager
f Refer to chapter “Device Manager” on
page 100.
Opening apps
The Apps menu provides access to Porsche
Connect services as well as Porsche Connect App
functions.
f Refer to chapter “Connectivity” on page 87.
Showing a background image
A background image can be show or hidden in the
menu.
Configuring MyScreen
In the MyScreen menu, you can group
touchscreen content from different categories
(e.g. NAV or PHONE) individually as you wish.
You can configure three different MyScreens in
total.
Creating MyScreen
For information on adding a phone favourite:
f Refer to chapter “Adding favourites in
MyScreen” on page 244.
1. Select to open the input field.
2. Write your desired text or characters with
your finger.
e To enter a space, swipe your finger from left
to right (with Arabic as the menu language:
note the writing direction).
e To delete an entry, swipe your finger from
right to left (with Arabic as the menu
language: note the writing direction).
Information
Text and numbers can also be entered using voice
control (e.g. for dialling a phone number or
entering a navigation destination).
f Refer to chapter “Voice Control” on page 271.
e button e Apps
e button e button e
Show background image
1. button e MyScreen e
button e SET MyScreen
2. Select MyScreen 1, MyScreen 2 or
MyScreen 3.
3. Select a category (e.g. SOURCE)
to fold down the list of available tiles.
Fig. 160: Configuring MyScreen
4. Click on, hold and drag the tile you require
into any container on the left-hand preview
side (drag & drop). The tile can be inserted
into the container as soon as a green edge
appears.
5. Exit the Configure MyScreen menu
using or .
e If you wish to remove a tile from the left-hand
preview side, drag the relevant tile from the
container using drag & drop or replace with
another tile.
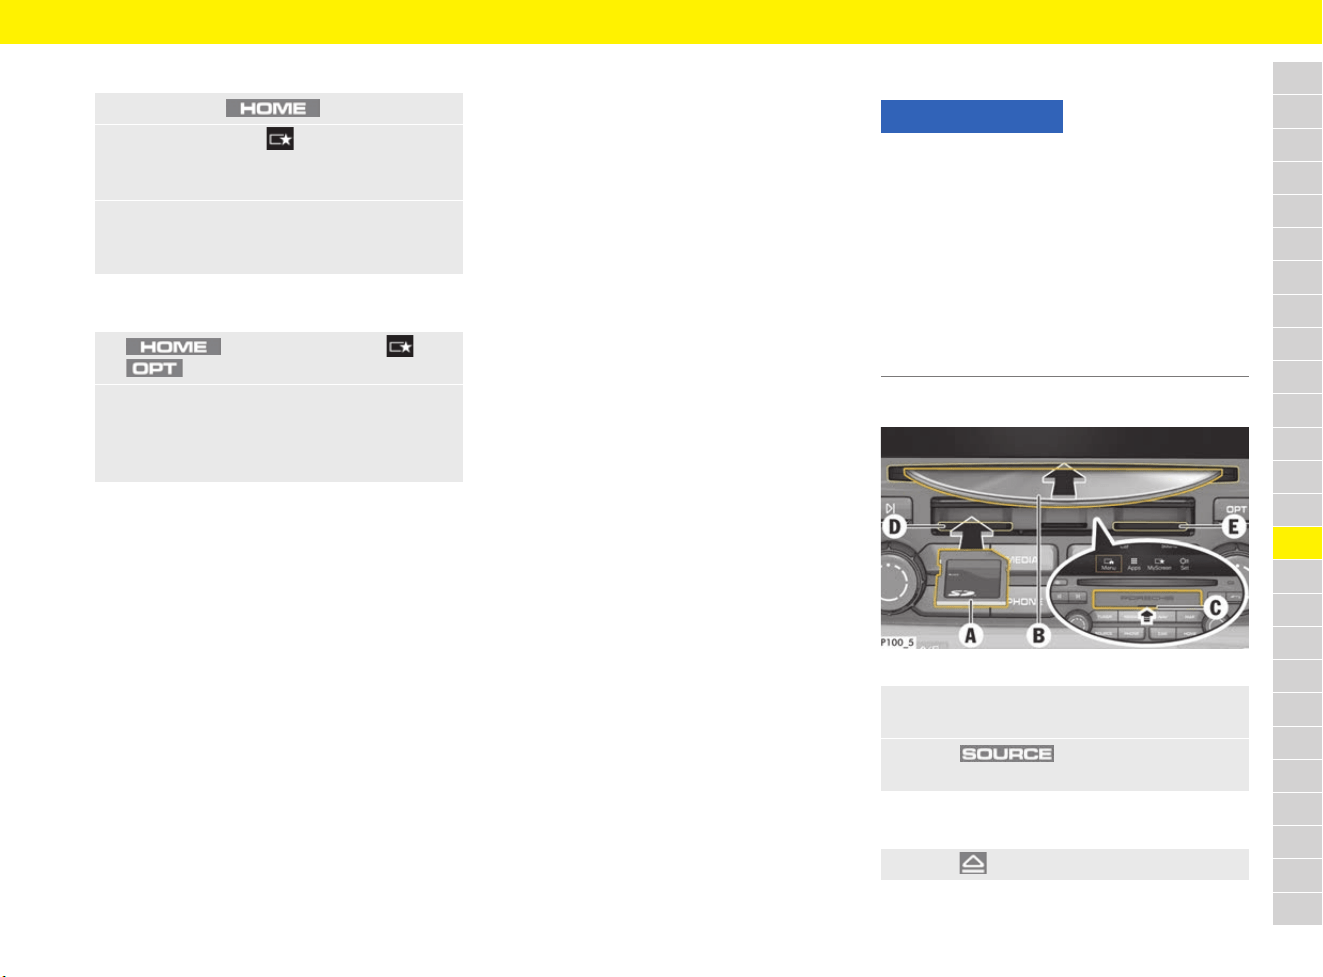
181
Operating the Porsche Communication Management (PCM)
A
B
C
D
E
F
G
H
I
J
K
L
M
N
O
P
Q
R
S
T
U
V
W
X
Y
Z
Opening MyScreen
Resetting MyScreen
Notes on drives and externally
connected devices
Information on supported media and file formats:
f Refer to chapter “Porsche Communication
Management (PCM)” on page 315.
– If a storage medium contains a lot of files,
folders or playlists, it may take longer to load
tracks the first time.
– Audio files are automatically displayed with
stored additional information (e.g. artists, title,
album cover) on playback. If this information is
not available on the medium in question, an
available Internet database is used. Despite
this, it may sometimes happen that individual
additional information is not displayed.
– Do not use USB extension cables or adapters.
These impair performance.
– USB hubs are not supported.
– Porsche will not assume any liability for
damaged or lost files or media. Never store
important data on SD cards, the Jukebox,
CDs/DVDs or portable playback devices.
– At unusually high or low outside temperatures,
playback of a CD/DVD may temporarily be
impossible. To protect the CD/DVD and the
scanning laser, a thermal protection circuit is
installed.
– The PCM may not always be able to play back
CDs/DVDs that have copy protection or do not
conform to the standard.
– You are basically only allowed to create copies
of CDs/DVDs for your own private use. Copied
CDs/DVDs that are passed on to third parties
are not covered by statutory exceptions to
copyright. Music tracks that were created as
MP3 files and can be played back in MP3 mode
are generally subject to copyright protection in
accordance with the applicable international
and national regulations. In many countries,
copies cannot be made, even for private use,
without the prior consent of the copyright
holder. Please observe the applicable copyright
legislation. If you yourself are a copyright
holder, e.g. for your own compositions and
recordings, or were granted these rights by a
copyright holder, these restrictions do not
apply. The prevailing legal position applies in all
cases.
Loading the CD/DVD drive
Inserting a CD/DVD
Fig. 161: Loading a CD/DVD or SD card
Removing a CD/DVD
1. Press button .
2. Select MyScreen .
The most recently activated MyScreen
is displayed.
e To switch between MyScreen 1,
MyScreen 2 and MyScreen 3, swipe left or
right until the relevant MyScreen is displayed.
1. button e MyScreen e
button e SET MyScreen
2. Select Reset MyScreen.
The content of MyScreen pages 2 and 3 is
deleted. The content of MyScreen page 1 is
reset to the default settings.
NOTICE
Risk of damage to PCM if CDs/DVDs are not used
properly.
e Only use round, standard CDs/DVDs with a
diameter of 12 cm.
e Only touch CD/DVD at the edges. Do not touch
the unwritten side.
e Keep CDs/DVDs clean, and clean if necessary.
e Do not stick anything to CDs/DVDs.
e Do not bend CDs/DVDs.
e Do not force CDs/DVDs into or out of the drive.
1. Insert the CD/DVD with the written side facing
up into slot B until it is automatically pulled in.
2. Press button and select the
desired media source.
e Press button and remove the CD/DVD.
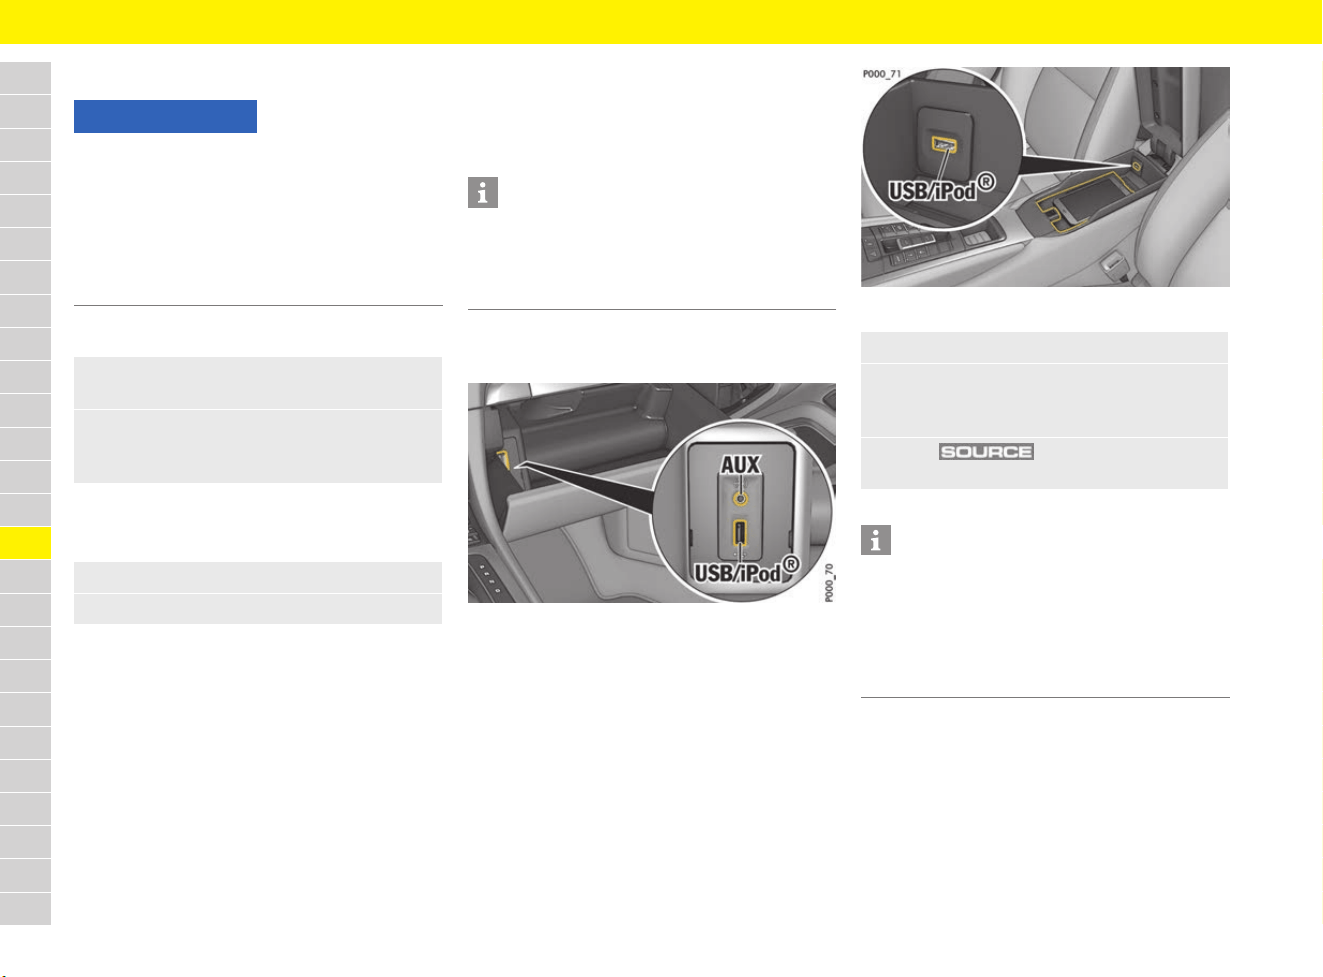
182
Operating the Porsche Communication Management (PCM)
A
B
C
D
E
F
G
H
I
J
K
L
M
N
O
P
Q
R
S
T
U
V
W
X
Y
Z
Inserting an SD card
Inserting an SD card
Removing an SD card
b SD and SIM card reader cover open.
Inserting and removing SIM cards
f Refer to chapter “Establishing data connection
via external SIM card” on page 87.
Connecting an external device
Information on supported media and file formats:
f Refer to chapter “Porsche Communication
Management (PCM)” on page 315.
Connecting an external device via USB
or AUX
Fig. 162: USB and universal, equipment-dependent audio
(AUX) ports in the glove box
Fig. 163: USB port in centre console
NOTICE
Risk of damage to PCM if SD cards are not used
properly.
If you use SD cards that are in more than one
piece, there is a risk of the SD card falling out of
the adapter if shaken, and individual card pieces
getting stuck in the SD card reader.
e Only use single-piece SD cards.
1. Use a finger nail to fold up the cover over the
slot C (Fig. 161).
2. Insert the SD card A into SD card reader 1
(see D) or 2 (see E) with the writing facing up,
until it locks into place.
1. Push the inserted card and remove it.
2. Close the SD and SIM card reader cover.
Information
With some external devices, it may be necessary
to adjust the volume separately.
1. Adjust the volume on the external device.
2. Set the desired volume on the PCM.
1. Open the glove box or centre armrest.
2. Connect an external device (e.g. iPod
®
,
USB flash drive) to the USB or equipment-
dependent audio (AUX) port.
3. Press button and select the
desired media source.
Information
There is a USB port and – depending on
equipment – a universal Audio (AUX) port in the
glove box, and another USB port in the centre
console. Apple
®
CarPlay can only be used via the
USB port in the centre console.
f Refer to chapter “Apple
®
CarPlay” on page 48.
183
Operating the Porsche Communication Management (PCM)
A
B
C
D
E
F
G
H
I
J
K
L
M
N
O
P
Q
R
S
T
U
V
W
X
Y
Z
Connecting an external device via
Bluetooth
®
For information on managing Bluetooth
®
devices:
f Refer to chapter “Deleting a Bluetooth
®
device
or displaying Bluetooth
®
information” on
page 240.
Changing general system settings
– Date and time
– Automatic time sync: Synchronise time,
date and summer time with GPS signal.
– Time
– Date
– Automatic time zone: In auto time mode,
the time zone is also set automatically.
– Time zone
– Time format
– Date format
– Units
– Speed
– Temperature
– Pressure (tyre pressure).
– Consumption
– Language: Select the system language.
– Voice control:
– Short dialogue: Voice control uses short
voice command texts.
– Help texts: Display of possible commands
with active voice control.
– Factory settings
– Factory settings: All set values are reset
to predefined values. Personal data is
retained.
– Vehicle handover: All set values are reset
to predefined values. All personal data, e.g.
address, destinations and phone numbers,
is deleted.
Changing the settings of the PCM
display
– Switch off display: Touchscreen is switched
off until the next time it is touched.
– Brightness
– Footer
– Temperature: Display of temperature in
the footer
– Time: Display of time in the footer
– Proximity sensor: Activate/deactivate
proximity sensors.
– Touch tone setting: Activate/deactivate a
confirmation tone when the screen is touched.
1. Select or in the footer
(depending on the connection status).
– or –
button e button e
Device manager
2. Select Bluetooth audio e
Search for new device.
A 6-digit Bluetooth
®
code is generated and
displayed in the PCM and on the mobile
phone.
3. Compare the Bluetooth
®
code in the PCM
and on the mobile phone.
4. If the Bluetooth
®
code in the PCM and on the
mobile phone match, confirm.
On mobile phones with a SIM Access Profile
(SAP), enter the PIN for the SIM card in the
PCM, if necessary.
If the device has been successfully
connected, it is displayed in the device
overview.
1. button e Set e System
– or –
button e Set e System
2. Select the desired option:
1. button e Set e
PCM display
– or –
button e Set e
PCM display
2. Select the desired option:
184
Operating the Porsche Communication Management (PCM)
A
B
C
D
E
F
G
H
I
J
K
L
M
N
O
P
Q
R
S
T
U
V
W
X
Y
Z
Changing the volume and tone
Adjusting the volume
You can adjust the volume by turning the volume
control A (see Fig. 154 on page 177).
Muting the audio source
Changing tone settings
– Bass: Increase or reduce base frequencies.
– Treble: Increase or reduce treble frequencies.
– Fader: Distribute volume between front and
rear loudspeakers.
– Balance: Distribute volume between left and
right loudspeakers.
Changing the volume settings
– Traffic announcements: Sets the increased
volume for traffic announcements.
– Navigation announcements: Set volume for
navigation instructions.
– Speed dependent volume: Adapt volume in
line with speed.
– AUX: Set volume for equipment-dependent
AUX audio playback.
– Bluetooth audio: Set volume for Bluetooth
®
audio playback.
– Microphone sensitivity: Modify microphone
sensitivity during an active call.
– Ringtone volume: Set ringtone volume for
incoming calls.
– Mute navigation during call: Do not play
navigation announcements when call is active.
– Touch tone setting: Activate/deactivate
confirmation tone when screen is touched.
– Signal tone for messages: Switch sound for
incoming text messages and e-mails on/off.
Changing Burmester
®
tone settings
– Pure: Purist, unchanged sound reproduction.
–
Smooth: Tone setting for relaxed long-duration
listening.
– Surround: Music playback with pronounced
spaciousness.
– Live: Spacious music playback with live
atmosphere.
– Position: Seat-specific tone adaptation.
– Sound conditioner: Adaptation of the sound
experience to ambient volume.
Changing BOSE
®
tone settings
– Surround: Music playback with pronounced
spaciousness.
– Linear: Change from bass-heavy tone setting
(Linear off) to a neutral, balanced tone (Linear
on).
– AudioPilot
®
: When this function is active, the
noise level in the passenger compartment is
monitored and audio playback optimised
accordingly.
e Briefly press volume control A
(see Fig. 154 on page 177).
The mute symbol can be seen in the
footer.
Driving recommendations, phone
conversations and traffic announcements
can still be heard.
e To cancel the mute function, briefly press or
turn volume control A again.
1. button e button e
SET SOUND e Sound
2. Select option and change setting:
1. button e button e
SET SOUND e Volume
2. Select the desired option:
1. button e button e
SET SOUND
2. Select Burmester.
3. Select the desired option:
1. button e button e
SET SOUND
2. Select BOSE.
3. Select the desired option:
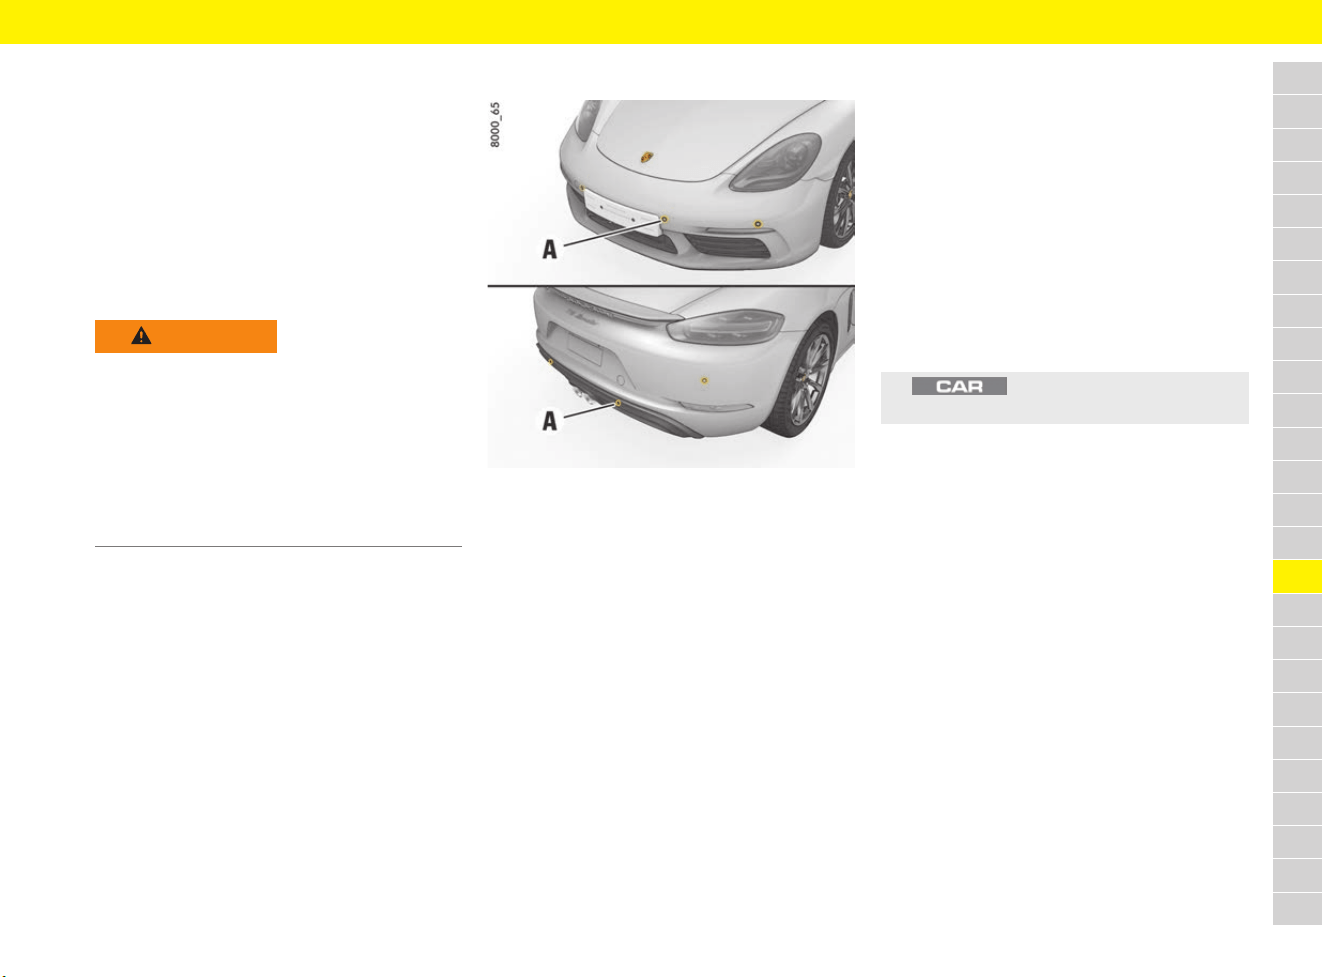
185
ParkAssist
A
B
C
D
E
F
G
H
I
J
K
L
M
N
O
P
Q
R
S
T
U
V
W
X
Y
Z
ParkAssist
When the driver is parking and manoeuvring the
vehicle, ParkAssist shows the distance between
the vehicle and an obstacle both visually
(depending on vehicle equipment) and
acoustically.
The visual ParkAssist parking aid is displayed on
the PCM. Obstacles in front of and behind the
vehicle are shown using different-coloured fields.
These fields show the shape of the obstacles and
their distance from the vehicle.
Distance measurement
Fig. 164: Ultrasonic sensors for distance measurement
The ultrasonic sensors A in the front and rear
bumper (depending on vehicle equipment) measure
the distance to the closest obstacle. A detected
obstacle is signalled by an intermittent tone.
The intervals decrease as the obstacle is
approached. If the distance drops to less than
approx. 30 cm, a continuous tone sounds.
Obstacles cannot be detected in the “blind” sensor
area (above and below the sensors, e.g. objects
hanging down or close to the ground).
The volume of the warning tones can be adjusted
on the multi-function display:
f Refer to chapter “Adjusting volume of warning
tones and ParkAssist” on page 269.
Activating ParkAssist
Activating automatically (up to a speed
of approx. 15 km/h (9 mph))
b Ignition is switched on.
b Reverse gear is engaged.
– or –
b Distance at the front is less than approx. 80 cm.
– or –
b ParkAssist detects that the vehicle is rolling
backwards.
Activating manually
WARNING
Lack of attention when
manoeuvring or parking
The increased comfort offered by ParkAssist must
not induce you to take any safety risk. Even when
using ParkAssist, the driver is still responsible for
taking due care when parking and when assessing
obstacles. The system cannot replace the driver’s
attention.
e Make sure that no persons, animals or
obstacles are within the manoeuvring area.
e button e Assist e
Display ParkAssist
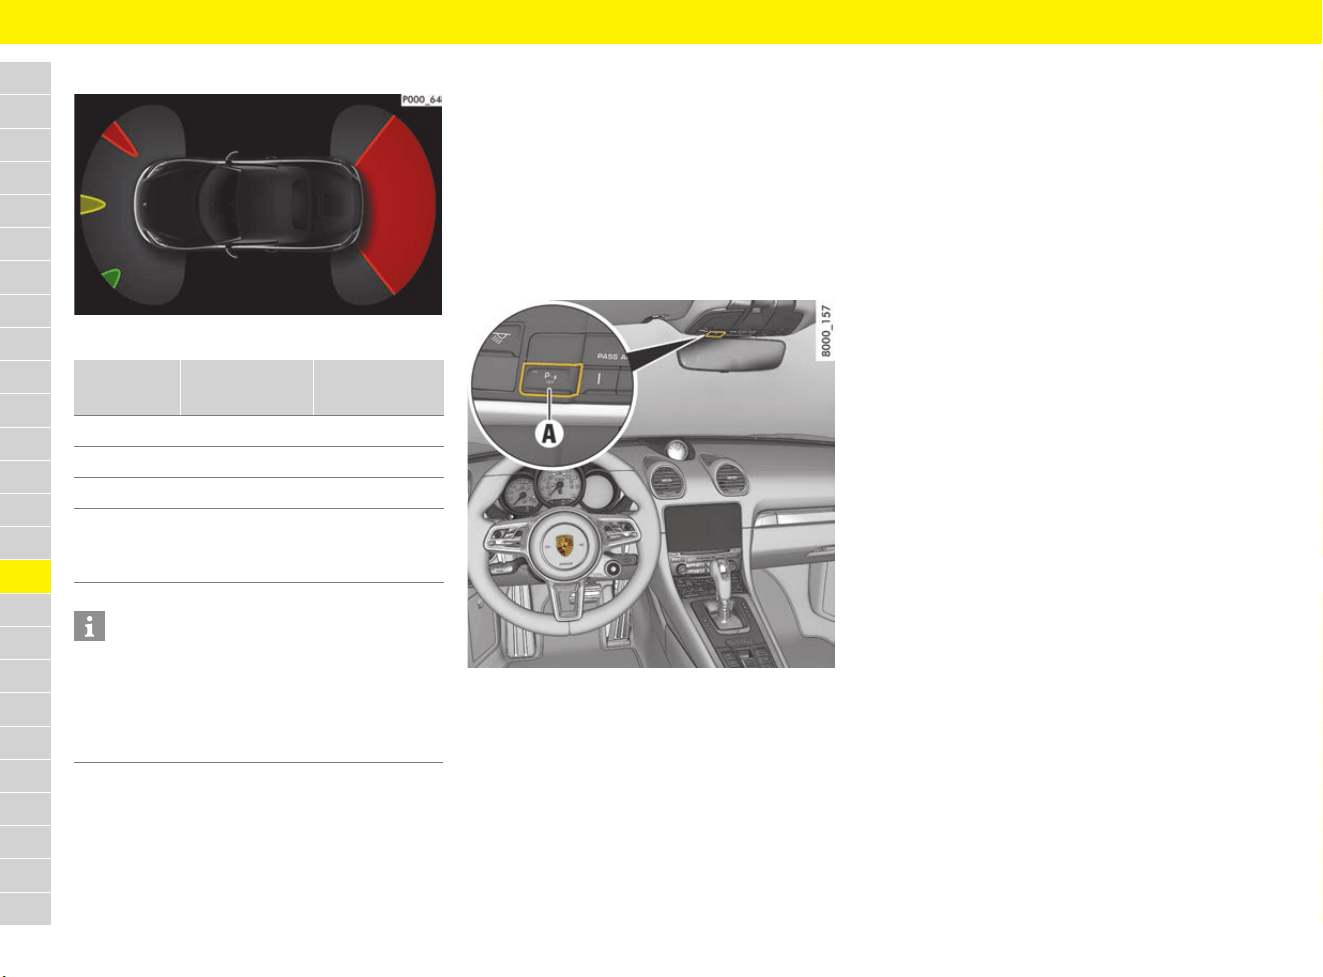
186
ParkAssist
A
B
C
D
E
F
G
H
I
J
K
L
M
N
O
P
Q
R
S
T
U
V
W
X
Y
Z
Display in the PCM
Fig. 165: Colour indicates distance
Deactivating ParkAssist
Deactivating automatically
b Switch from reverse gear to a forward gear
(after approx. 2 minutes if no obstacle has
been detected).
– or –
b Selector lever is in position P.
Deactivating manually
Fig. 166: Button on overhead console
e Press button A on the overhead console.
The indicator light on the button lights up
Nothing is displayed in the PCM. It is not
possible to manually reactivate the display in
the PCM.
Exceptions
Due to its design, ParkAssist cannot detect the
following things:
– sound-absorbing obstacles (e.g. wintry
conditions, powder snow, clothing made from
fabric or fur)
– sound-reflecting obstacles (e.g. glass surfaces
and flat painted surfaces)
– very thin obstacles (e.g. thin posts)
In addition, other ultrasonic sources (e.g.
pneumatic brakes of other vehicles, sweeping
machines and jack hammers) may interfere with
the detection of obstacles.
Maintenance notes
e The sensors must always be kept free of dust,
ice and snow in order to ensure that they are
fully functional.
e Do not damage sensors by abrasion or
scratching.
e Maintain sufficient distance when cleaning with
high-pressure cleaning equipment. The sensors
will be damaged if the pressure is too high.
e Structural changes to the vehicle, e.g. holders
for number plates/interchangeable number
plates or bent or inadequately secured number
plates, can have an adverse effect on the
system.
Colour Distance at
front
Distance at
the rear
green < 120 cm < 180 cm
yellow < 80 cm < 80 cm
red < 40 cm < 45 cm
red with
continuous
tone
< 30 cm < 30 cm
Information
For information on operating Porsche
Communication Management (PCM):
f Refer to chapter “Operating the Porsche
Communication Management (PCM)” on
page 176.

187
ParkAssist
A
B
C
D
E
F
G
H
I
J
K
L
M
N
O
P
Q
R
S
T
U
V
W
X
Y
Z
Reversing camera
Activating reversing camera
Automatically
b Reverse gear is engaged and ignition is
switched on.
– or –
b ParkAssist detects that the vehicle is rolling
backwards.
Manually
Deactivating reversing camera
Automatically
b Switch from reverse gear to a forward gear
(after approx. 2 minutes if no obstacle has
been detected).
– or –
b Selector lever is in position P.
e button e Assist e
Display ParkAssist
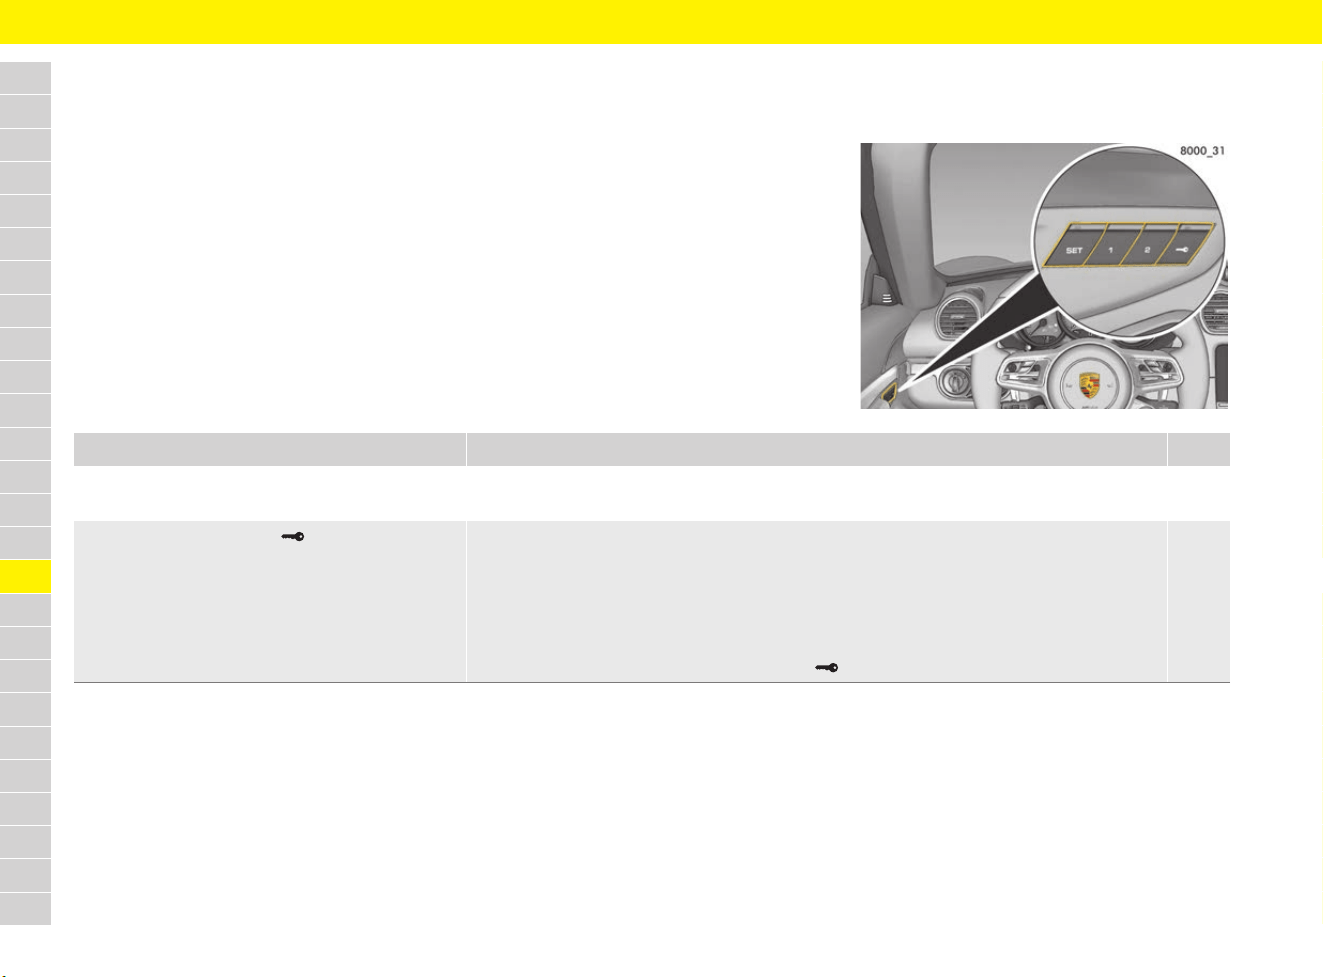
188
Personal Settings
A
B
C
D
E
F
G
H
I
J
K
L
M
N
O
P
Q
R
S
T
U
V
W
X
Y
Z
Personal Settings
Brief overview
This brief overview does not replace the complete information provided under “Personal Settings”.
Safety instructions and warnings, in particular, are not replaced by this brief overview.
Where can I store/retrieve personal settings? Which settings can I store/retrieve with the memory package? Page
Via the memory buttons 1 or 2 in the driver’s door. Ergonomic settings (depending on equipment)
– Driver’s seat, exterior mirrors, steering wheel
189
Via the driver’s key button in the driver’s door. Ergonomic settings (depending on equipment)
– Driver’s seat, exterior mirrors, steering wheel
Comfort settings (depending on equipment)
– Instrument panel
– Air-conditioning system
The settings are stored on driver’s key button in the driver’s door and on the driver’s key.
189
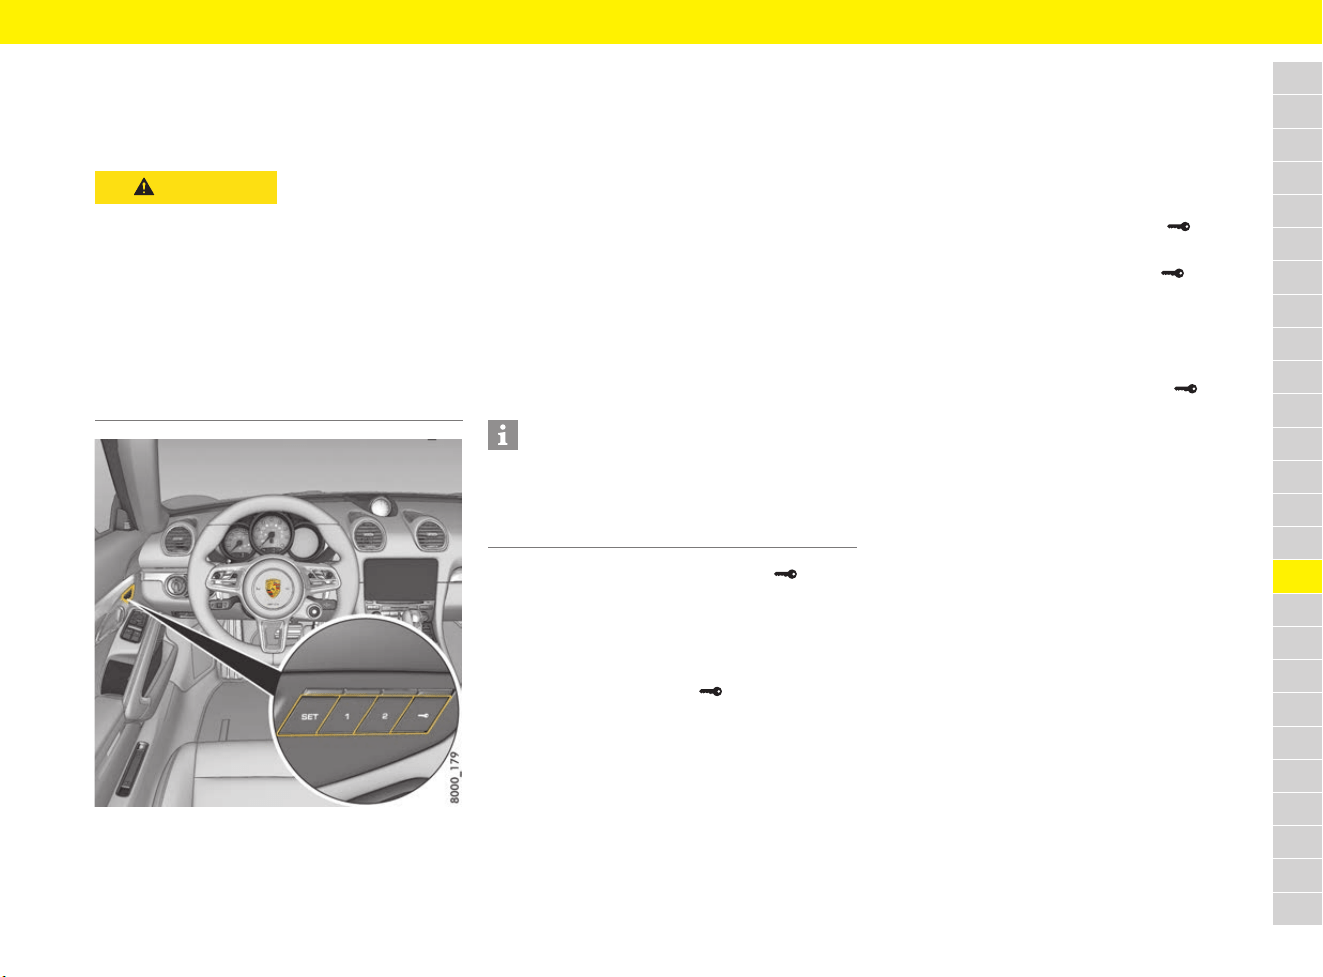
189
Personal Settings
A
B
C
D
E
F
G
H
I
J
K
L
M
N
O
P
Q
R
S
T
U
V
W
X
Y
Z
Storing and retrieving personal
settings
Memory package
Fig. 167: Driver’s door memory buttons
(memory package)
Depending on the equipment, the memory package
includes the storage of various settings on the
driver’s key and the memory buttons in the driver’s
door.
Ergonomic settings:
– Driver’s seat
– Steering wheel
– Exterior mirror
Comfort settings:
– Instrument panel
– Air-conditioning system
Storing settings on the driver’s key
Ergonomic and comfort settings can be
individually assigned to the driver’s keys.
By pressing the driver’s key button in the
driver’s door
b Ignition is switched on.
1. Press the SET button.
The indicator light on the button lights up.
2.
Press driver’s key button within
10 seconds.
The ergonomic and comfort settings
(driver’s key-specific) are stored.
Storage is acknowledged acoustically and the
indicator light on the SET button goes out.
Retrieving settings from the driver’s key
Automatic retrieval through unlocking of the
vehicle
e Unlock the vehicle and open the driver’s door.
The current settings on the existing driver’s
key are retrieved.
By pressing the driver’s key button in the
driver’s door
e Press and hold driver’s key button until all
settings are retrieved.
– or –
b The ignition is switched off.
b The driver’s door is open.
e Briefly press the driver’s key button .
The current settings on the existing driver’s
key are retrieved.
Storing settings on memory buttons 1
and 2
Ergonomic settings can be assigned to memory
buttons 1 and 2 in the driver’s door.
b Ignition is switched on.
1. Press the SET button.
The indicator light on the button lights up.
2.
Press memory button 1 or 2 within 10 seconds.
The ergonomic settings are stored.
Storage is acknowledged acoustically and the
indicator light on the SET button goes out.
CAUTION
Retrieving automatic
settings for seats,
mirrors and steering
wheel
Parts of the body may be squeezed or crushed
if the settings are activated in an uncontrolled
manner.
e Automatic retrieval of the settings can be
cancelled if necessary by pressing a memory
button or any seat adjustment button.
e Do not leave children in the vehicle unattended.
Information
Individual memory information can be stored on a
total of four driver’s keys. If additional driver’s keys
are available, the memory information from the
key that was last taught on the vehicle is adopted.

190
Personal Settings
A
B
C
D
E
F
G
H
I
J
K
L
M
N
O
P
Q
R
S
T
U
V
W
X
Y
Z
Retrieving settings with memory
buttons 1 or 2
e Press and hold memory button 1 or 2 until all
settings are retrieved.
– or –
b The ignition is switched off.
b The driver’s door is open.
e Briefly press memory button 1 or 2.
The settings are automatically applied.
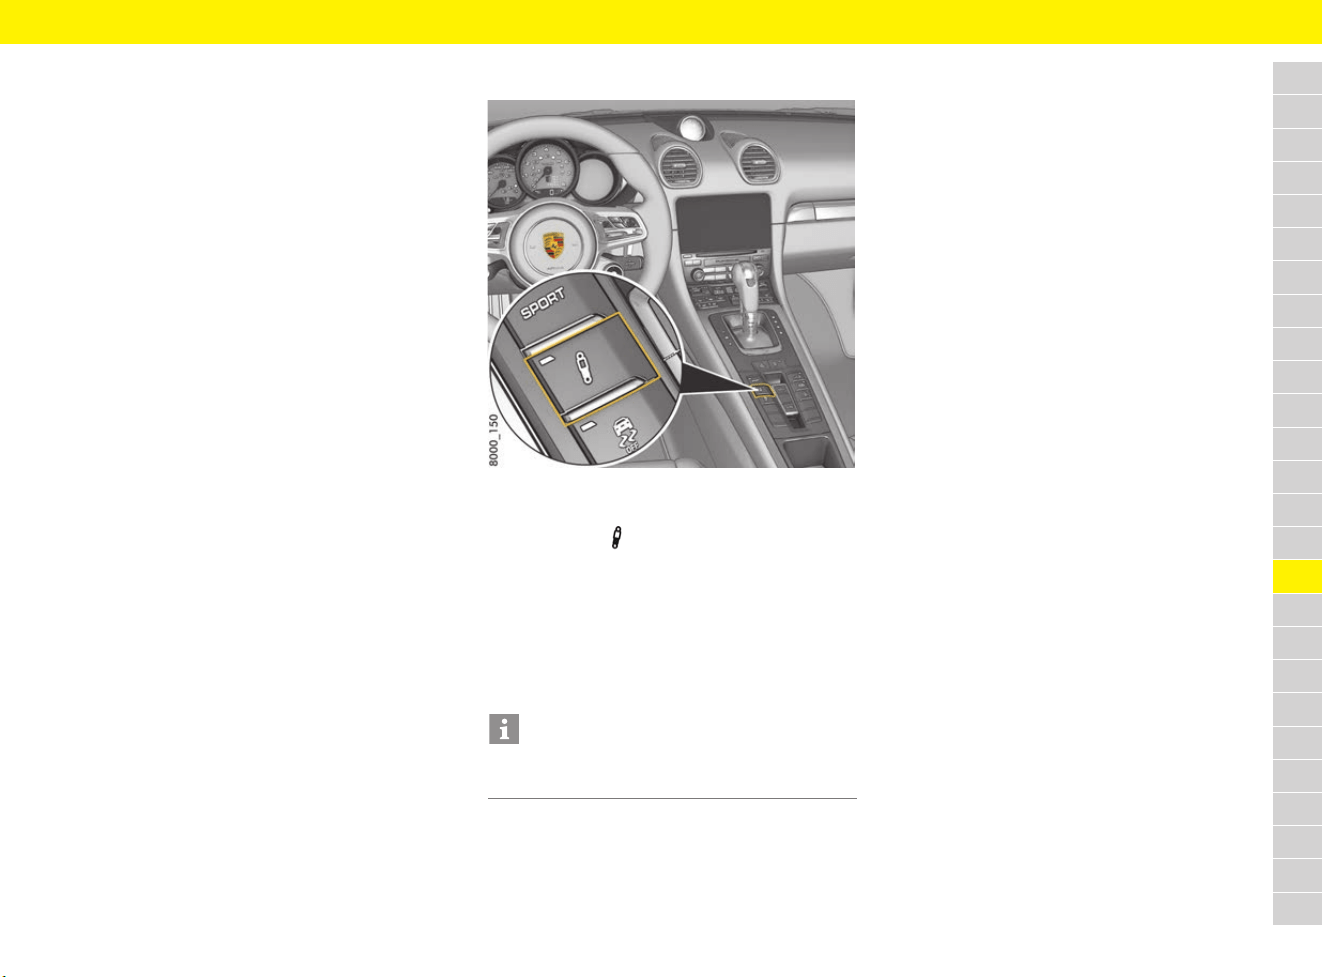
191
Porsche Active Suspension Management (PASM)
A
B
C
D
E
F
G
H
I
J
K
L
M
N
O
P
Q
R
S
T
U
V
W
X
Y
Z
Porsche Active Suspension
Management (PASM)
The PASM system actively adjusts the shock
absorbers. The adjustable damper system selects
the appropriate damping level for each wheel
according to the driving situation and driving
conditions. Driving safety, agility and comfort are
optimised.
Two different chassis setups can be selected at
the push of a button:
– “Normal chassis”
– “Sport chassis”
In Normal mode, the vehicle is in a sporty and
comfortable setup.
Sport mode offers very sporty shock absorber
tuning, e.g. for driving on the race circuit.
In addition to manual mode selection, PASM also
adjusts shock absorber tuning for either sporty or
comfort driving, depending on the driving situation.
Selecting PASM mode
Fig. 168: PASM button in the centre console
1. Switch on ignition.
2. Press button .
No indicator light comes on when
“Normal chassis” is selected (default setting).
One indicator light comes on when
“Sport chassis” is selected.
In addition, the selected chassis setup is
shown briefly on the multi-function display.
Responding to warning message
PASM faults are displayed on the multi-function
display.
For information on warning messages on the
multi-function display:
f Refer to chapter “Warning and Information
Messages” on page 278.
Information
The last selected chassis setup is stored in the
memory after the ignition is switched off.
192
Porsche Car Connect
A
B
C
D
E
F
G
H
I
J
K
L
M
N
O
P
Q
R
S
T
U
V
W
X
Y
Z
Porsche Car Connect
The Porsche Car Connect smartphone app can be
used to establish a connection with the vehicle
over the cellular network. This means that vehicle-
specific information can be retrieved directly via
the smartphone and selected settings can be
implemented on the vehicle using the app.
Detailed information on installation, the functions
and management of the Porsche Car Connect app
contract and services is available at
www.porsche.com/connect or from your Porsche
partner.
Disabling communication between
vehicle and app
Communication between your vehicle and the
Porsche Car Connect app can be disabled from
the multi-function display.
f Refer to chapter “Setting Porsche Car
Connect” on page 270.
WARNING
Setting and operating
when driving
Changing app settings or using the app while
driving can distract you from the traffic. You may
lose control of the vehicle.
e Operate and adjust settings only while the
vehicle is stationary.
Information
Since the Porsche Car Connect app can be used
to access vehicle-specific data and other
functions, we recommend that you protect this
data to prevent unauthorised access by third
parties.
Information
Use of the Porsche Car Connect app may incur
additional costs with your service provider since
the data is transmitted via mobile communications
networks.
193
Porsche Connect App
A
B
C
D
E
F
G
H
I
J
K
L
M
N
O
P
Q
R
S
T
U
V
W
X
Y
Z
Porsche Connect App
The Porsche Connect App enables you to transfer
personal POIs (points of interest) and destinations
from your mobile phone’s address book or
calendar to the PCM.
You can access music tracks with the music
streaming function – once the necessary apps
have been installed and you have created an
account.
Connecting Porsche Connect App
to PCM using WiFi and opening
in PCM
b Porsche Connect App is installed on your
mobile phone (Download from Apple
®
App
Store or GOOGLE
®
Play Store).
b Porsche Connect App has been started.
b WiFi is enabled on the mobile phone.
b WiFi is enabled on the PCM.
f Refer to chapter “Configuring WiFi settings”
on page 247.
Fig. 169: Opening the Device Manager
WARNING
Setting and operating
when driving
Changing app settings or using the app while
driving can distract you from the traffic. You may
lose control of the vehicle.
e Operate and adjust settings only while the
vehicle is stationary.
Information
For information on operating Porsche
Communication Management (PCM):
f Refer to chapter “Operating the Porsche
Communication Management (PCM)” on
page 176.
1. Open the Device Manager using or
in the footer (depending on the connection
status).
2. Establish connection via personal hotspot on
your mobile phone (There is no SIM card in
the SIM card reader. Vehicles with embedded
SIM (availability dependent on country):
PCM phone is switched off):
f Refer to chapter “Connectivity” on
page 87.
a. Activate personal hotspot on your mobile
phone.
b. Select Porsche Connect App e
Connect to external WiFi hotspot
in the Device Manager.
c. Enter the WiFi access data for the
personal hotspot (Hotspot name and
Hotspot password) in the WiFi settings
of the PCM.
– or –
Establish connection via WiFi hotspot
(wireless Internet access) in the PCM
(Data connection is established via external
SIM card or embedded SIM):
f Refer to chapter “Connectivity” on
page 87.
a. Select Porsche Connect App e
Configure WiFi hotspot in PCM
in the Device Manager.
b. Enter the PCM’s WiFi access data
(Hotspot name and Hotspot password)
in the WiFi settings of your mobile phone.
3. Press the button.
4. Select Apps .
The available content of the Porsche Connect
App is displayed.
Information
– You can also view the PCM’s WiFi access
data by pressing button e
button e SET PHONE e
WiFi settings e
Configure WiFi hotspot in PCM.
– For information on the Device Manager:
f Refer to chapter “Device Manager” on
page 100.
194
Porsche Connect App
A
B
C
D
E
F
G
H
I
J
K
L
M
N
O
P
Q
R
S
T
U
V
W
X
Y
Z
Transferring a navigation
destination and calendar entry
to the PCM
b Porsche Connect App is connected to the
PCM.
Playing Music using the PCM
b The separate music service app has been
downloaded and/or you are registered with the
music service.
f Please observe the information from the
provider of the music services.
b Porsche Connect App is connected to the
PCM.
1. In the app, select a navigation destination or
calendar entry.
a. Online search: Select destination using
the Online search function.
b. Contacts: Select contact incl. address
details.
c. Calendar: Select calendar incl. address
details.
d. Pictures: Select destination using a
stored picture.
2. Add the destination to the MyDestinations
favourites list using the symbol.
Entries that have already been added to
Favourites are marked by a check.
3. If the Porsche Connect App is connected to
the PCM, the content of MyDestinations is
transferred to the PCM.
If necessary, you may have to refresh the
PCM display manually using the
button e Apps .
4. Via button e Apps e
select MyDestinations or Calendar.
– or –
button e
Stored destinations e
Select MyDestinations.
5. Start route calculation to the transferred
destination.
e button e Apps e
Select desired music service.
– or –
button e
Select desired music service.
– or –
Keep pressing button until the
desired music service is displayed.
Information
In the menu under MyMusic, the
user can play existing playlists and tracks stored
offline, for example.

195
Porsche Stability Management (PSM)
A
B
C
D
E
F
G
H
I
J
K
L
M
N
O
P
Q
R
S
T
U
V
W
X
Y
Z
Porsche Stability
Management (PSM)
PSM is an active control system for stabilising the
vehicle in extreme driving situations. It is
automatically enabled when the engine starts.
PSM makes use of both the Automatic Brake
Differential (ABD) and Anti-slip Regulation (ASR)
systems, as well as the functions of the Anti-lock
Brake System (ABS) and engine drag torque
control system (MSR).
The events below inform the driver of PSM control
operations:
– PSM warning light on the instrument panel
flashes.
– Hydraulic noises can be heard.
– The vehicle decelerates and steering-wheel
forces are altered as PSM controls the brakes.
– Reduced engine power.
– The brake pedal pulsates and its position is
changed during braking.
To achieve full vehicle deceleration, the foot
pressure must be increased after the brake
pedal starts to pulsate.
Automatic Brake Differential (ABD)
If one wheel of a driven axle starts to spin, it is
braked so that the other wheel on the same axle
can be driven.
Anti-slip Regulation (ASR)
The Anti-slip Regulation system prevents the
wheels from spinning by adjusting the engine
power, thereby ensuring good lane-holding ability
and stable handling.
Engine drag torque control (MSR)
In conditions of excessive slip, the engine drag
torque control system prevents all driven wheels
from locking up when the vehicle is overrunning.
This is also the case for downshifts on a slippery
road.
Steering torque pulse
The steering torque pulse provides the driver with
steering assistance when braking on road
surfaces with differing friction values.
Additional steering forces also assist the driver
during countersteering.
Activating PSM Sport
b Vehicles with Sport Chrono package.
In PSM Sport operation, the system switches to
a particular sporty mode.
e Press the button briefly.
The indicator light on the button and the
PSM OFF warning light in the instrument panel
come on.
A message stating that PSM Sport is activated
appears on the multi-function display.
WARNING
Loss of control over
the vehicle
Despite the advantages of PSM, it is still the
driver’s responsibility to adapt his or her driving
style and manoeuvres in line with road and
weather conditions, as well as the traffic situation.
The increased safety that is provided should not
induce you to take greater risks with your safety.
The limits set by the physics of driving cannot be
overcome, even with PSM.
PSM cannot reduce the risk of accidents due to an
inappropriate speed.
WARNING
Limited PSM support
In PSM Sport mode, PSM support is limited in
critical driving situations outside the ABS control
range.
e PSM Sport should always be switched off
during “normal” driving.
196
Porsche Stability Management (PSM)
A
B
C
D
E
F
G
H
I
J
K
L
M
N
O
P
Q
R
S
T
U
V
W
X
Y
Z
Switching off PSM
Fig. 170: PSM OFF button in the centre console
e Briefly press the button (vehicles with
Sport Chrono package: press button for at
least 2 seconds).
PSM is switched off after a short delay.
The indicator light on the button and the
PSM OFF warning light in the instrument
panel come on.
A warning stating that PSM is switched off
appears on the multi-function display.
However, it may be advantageous to switch off
PSM temporarily in exceptional situations:
– On a loose surface and in deep snow.
– When “rocking the vehicle free”.
Switching PSM back on
e Press the button.
PSM is active immediately.
The indicator light on the button and the
PSM OFF warning light on the instrument
panel go out.
A message stating that PSM is switched on
appears on the multi-function display.
Responding to warning message
For information on the PSM warning light :
f Refer to chapter “Warning and Information
Messages” on page 278.
ABS brake system
(Anti-lock Brake System)
ABS ensures:
– Full steering control: The vehicle remains
steerable.
– Good driving stability: No skidding due to
locked wheels.
– Optimum braking distance: Shorter stopping
distance in most cases.
– Prevention of wheel locking: No flat spots on
the tyres.
WARNING
No PSM assistance
When PSM is switched off, PSM support is no
longer provided in critical driving situations
outside the ABS control range.
e PSM should always be switched on during
“normal” driving.
Information
When you brake in the ABS control range, the
vehicle is stabilised even when PSM is switched
off. One-sided spinning of the wheels is prevented,
even with PSM switched off.
Information
When PSM Sport mode is active, it is only possible
to switch to PSM OFF mode if the PSM was
activated beforehand.
WARNING
Loss of control over the
vehicle
Despite the advantages of ABS, it is still the
driver’s responsibility to adapt his or her driving
style and manoeuvres in line with road and
weather conditions, as well as the traffic situation.
The increased safety that is provided should not
induce you to take greater risks with your safety.
The limits set by the physics of driving cannot be
overcome, even with ABS.
ABS cannot reduce the risk of accidents due to an
inappropriate speed.

197
Porsche Stability Management (PSM)
A
B
C
D
E
F
G
H
I
J
K
L
M
N
O
P
Q
R
S
T
U
V
W
X
Y
Z
Function
The decisive advantage of ABS lies in the driving
stability and manoeuvrability of the vehicle in
hazardous situations.
ABS prevents locking of the wheels during full
braking, on almost all road surfaces, until just
before the vehicle stops.
ABS begins to control the braking process as
soon as a wheel shows a tendency to lock.
This controlled braking process is comparable
with extremely rapid cadence braking.
A pulsating brake pedal and a “juddering noise”
alert the driver to adapt his or her driving speed to
the road conditions.
If full braking is necessary:
e Fully depress the brake pedal during the entire
braking operation, even though the pedal is
pulsating. Do not reduce brake pressure.
Responding to warning message
For information on the ABS warning light :
f Refer to chapter “Warning and Information
Messages” on page 278.
Multi-collision braking
In the event of an accident, multi-collision braking
can help the driver to reduce the risk of skidding
and the danger of further collisions during the
accident by initiating braking automatically.
Preconditions
Multi-collision braking only works:
– in the event of front, side and rear-end
collisions.
– if the airbag control unit detects a
corresponding activation threshold during an
accident.
– if an accident occurs when the vehicle is
travelling at a speed of more than approx.
10 km/h (6 mph).
Exceptions
The following activities prevent automatic braking
in the event of an accident:
– if the driver presses the accelerator
noticeably.
– If the brake pressure produced when the driver
presses the brake pedal is stronger than the
brake pressure applied by the system.
Information
PSM automatically brakes the vehicle, provided
the hydraulic brake system, PSM and the electrical
system are not damaged and are still working
after the accident.
198
Porsche Track Precision App
A
B
C
D
E
F
G
H
I
J
K
L
M
N
O
P
Q
R
S
T
U
V
W
X
Y
Z
Porsche Track Precision App
The Porsche Track Precision app can be used to
connect to the vehicle via a wireless local network
(WiFi). This enables driving data to be displayed,
recorded and analysed directly on a smartphone.
For information on establishing a WiFi connection
in the PCM:
f Refer to chapter “Activating the PCM WiFi
hotspot (wireless Internet access)” on
page 89.
Detailed information on installation and the
functions of the Porsche Track Precision app is
available directly in the app and at
www.porsche.com or from your Porsche partner.
DANGER
Loss of control over the
vehicle
Driving at excessive speeds and risky manoeuvres
may lead to loss of control over the vehicle.
e Adapt your driving style and manoeuvres to
your personal ability, the road and weather
conditions, as well as the traffic situation.
e Only use the Porsche Track Precision app on
closed circuits away from public roads.
DANGER
Setting and operating
when driving
Changing app settings or using the app while
driving can distract you from the traffic. You may
lose control of the vehicle.
e Carry out operating and setting procedures only
while the vehicle is stationary.
Information
Since vehicle-specific data can be accessed
using the Porsche Track Precision app, it is
recommended to protect this data from
unauthorised access by third parties.

199
Porsche Vehicle Tracking System Plus (PVTS Plus)
A
B
C
D
E
F
G
H
I
J
K
L
M
N
O
P
Q
R
S
T
U
V
W
X
Y
Z
Porsche Vehicle Tracking
System Plus (PVTS Plus)
The PVTS Plus is a GSM/GPS-based tracking
system that allows a control centre to locate the
vehicle if it is stolen. It can then be found by the
authorities.
As soon as PVTS Plus detects a theft alarm, the
location of the vehicle in question is sent to the
control centre.
There are three different types of PVTS Plus
equipment:
– PVTS Plus with Driver Card:
– PVTS Plus with Remote Keypad:
– PVTS Plus without Driver Card/
without Remote Keypad
The PVTS Plus vehicle equipment depends on the
vehicle insurance and legal requirements in the
individual countries. Your Porsche partner will be
pleased to answer any questions you may have
about which PVTS Plus variant was installed in
your vehicle.
Scope of delivery and initial
activation
PVTS Plus is tested by your Porsche partner and
activated with the assistance of the vehicle’s
owner.
Following activation, you will be given important
details, such as the telephone number of your
local control centre and of your service provider.
Detailed information on activating the system is
available at www.porsche.com/connect or from a
Porsche partner.
Functions
The vehicle will only be located if it was stolen. For
this purpose, a text message is sent to the
specified mobile phone number. The location of
the vehicle is not specified in the text message for
safety reasons.
e Contact the control centre if your vehicle is
stolen. The theft must also be reported to the
relevant police authorities.
The following alarms can be set:
– Unauthorised movement of the vehicle:
The vehicle is moved when the ignition is
switched off. In vehicles with Driver Card/
Remote Keypad: the vehicle is moved without
the Driver Card/Remote Keypad.
– Sabotage: The PVTS Plus system was used
without authorisation.
– Break-in alarm: The alarm system was
triggered and is active for more than
15 seconds.
– Ignition lock alarm (for PVTS Plus with
Remote Keypad): The code is not entered on
the Remote Keypad within 3 minutes of
switching on the ignition.
– Code alarm (for PVTS Plus with Remote
Keypad): The wrong code was entered five
times in succession on the Remote Keypad.
Operating PVTS Plus
without Driver Card/
without Remote Keypad
When PVTS Plus is operated normally, no
intervention on your part is required.
Information
On vehicles with the smartphone app Porsche
Car Connect, some PVTS Plus settings can be
implemented directly using the app.
Detailed information on installation, the functions
and management of the contract is available at:
www.porsche.com/connect.
Information
– There is no guarantee that the theft of a vehicle
will always be detected.
– The PVTS Plus alarm can be triggered even if
the vehicle battery is flat.
For information on the battery:
f Refer to chapter “Battery” on page 59.
Information
– If the vehicle was stolen, the control centre can
prevent the engine from starting.
– In vehicles with the Porsche Car Connect
smartphone app, the app’s access to the
vehicle is blocked if the vehicle is stolen.
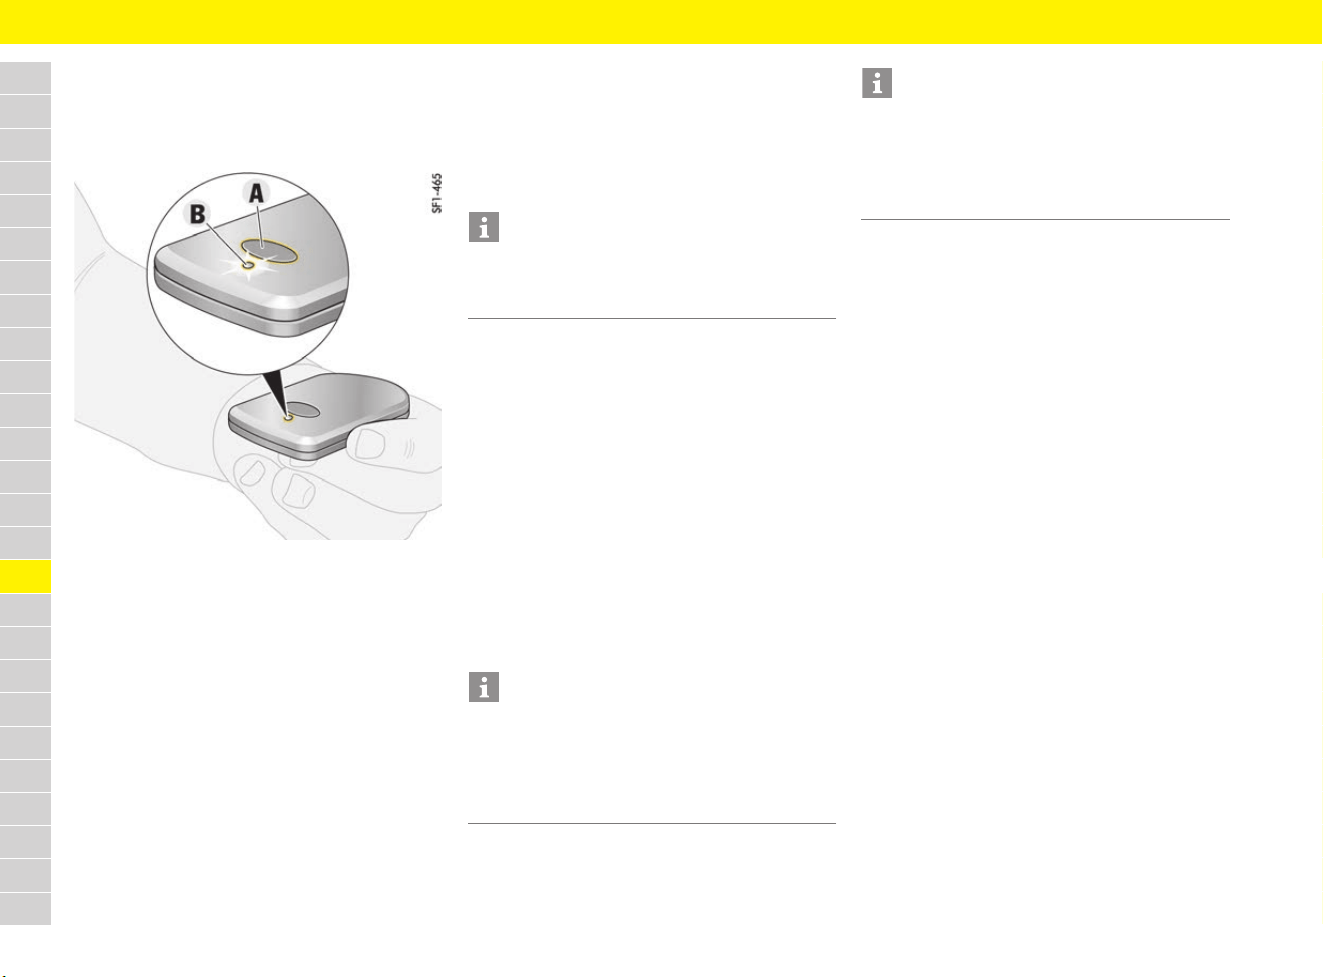
200
Porsche Vehicle Tracking System Plus (PVTS Plus)
A
B
C
D
E
F
G
H
I
J
K
L
M
N
O
P
Q
R
S
T
U
V
W
X
Y
Z
Operating PVTS Plus with
Driver Card
PVTS Plus can be deactivated automatically using
an activated Driver Card.
Fig. 171: Button A and indicator light B on the Driver Card
Switching on Driver Card
e Press button A on the Driver Card.
The indicator light B flashes quickly. After
releasing button A, the indicator light flashes
at intervals of approx. 3 seconds.
If the indicator light on an activated Driver Card
stops flashing either at 3-second intervals or when
you press button A on the Driver Card, the battery
is flat and must be replaced.
For information on changing the battery:
f Refer to chapter “Changing Driver Card/
Remote Keypad battery” on page 202.
Switching off Driver Card
e Press button A on the Driver Card and keep
it pressed for approx. 8 seconds until the
indicator light B goes out.
e Switch off the Driver Card if it is not used for a
long time in order to extend the battery life.
Activating PVTS Plus with Driver Card
e Switch off the ignition and take the Driver Card
with you when you leave the vehicle.
If the Driver Card is far enough away from the
vehicle, PVTS Plus will be activated after
approx. 70 seconds.
Theft of the vehicle can be detected.
Deactivating PVTS Plus with Driver Card
e Store the Driver Card in the centre console of
the vehicle or keep it on your person.
PVTS Plus will be deactivated if the activated
Driver Card is in the vehicle or in the immediate
vicinity of the vehicle.
Driver Card malfunction
In exceptional cases (e.g. interference from radio
waves), the Driver Card may not be detected.
A warning message appears on the multi-function
display.
e Press button A on the Driver Card to initiate
driver detection.
For information on warning messages on the multi-
function display:
f Refer to chapter “Warning and Information
Messages” on page 278.
Driver Card emergency deactivation
e If PVTS Plus cannot be deactivated using the
Driver Card (e.g. if the Driver Card battery is
flat or the Driver Card was lost), contact the
control centre and get the control centre
personnel to deactivate the system.
Information
During transportation by aircraft, the Driver Card
must be switched off in accordance with the
guidelines that apply to aircraft.
Information
– Do not put the Driver Card in the luggage
compartment or near metal, e.g. coins.
– Vehicles are very often stolen using stolen
driver’s keys. Do not attach the Driver Card
to the driver’s key.
Information
PVTS Plus can detect up to 7 Driver Cards per
vehicle. One active Driver Card must be present in
the vehicle. If you want to add, delete or replace a
Driver Card:
e Contact your Porsche partner.
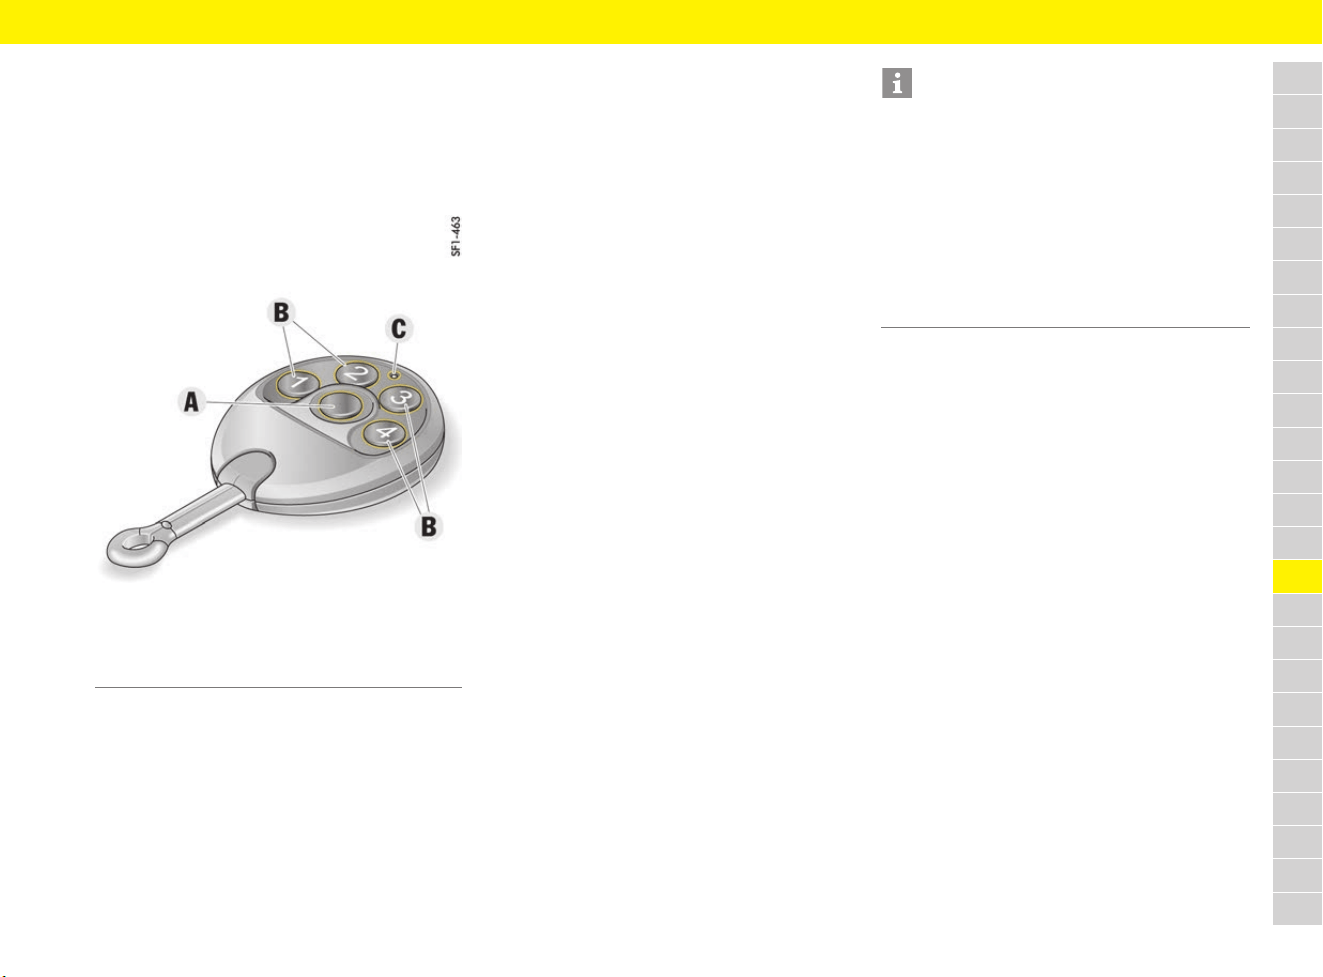
201
Porsche Vehicle Tracking System Plus (PVTS Plus)
A
B
C
D
E
F
G
H
I
J
K
L
M
N
O
P
Q
R
S
T
U
V
W
X
Y
Z
Operating PVTS Plus with
Remote Keypad
A code must be entered using the numeric keys
on the Remote Keypad in order to deactivate
PVTS Plus. You will receive the code in a text
message following activation of PVTS Plus.
Fig. 172: PVTS Plus Remote Keypad
Activating PVTS Plus with
Remote Keypad
e Switch off the ignition and take the Remote
Keypad with you when you leave the vehicle.
PVTS Plus is activated after approx. 3 minutes.
Theft of the vehicle can be detected.
Deactivating PVTS Plus with
Remote Keypad
1. Press button A.
The indicator light C on the Remote Keypad
starts to flash.
2. Enter the code using the numeric keys B and
press button A to confirm.
The indicator light goes out. PVTS Plus is
deactivated.
If the system is not deactivated after you enter the
code, repeat the process. An alarm is sent to the
control centre after 5 incorrect attempts.
If PVTS Plus is not deactivated within 3 minutes of
switching on the ignition, the alarm is sent to the
control centre. The control centre will then try to
contact you by phone.
If the correct code is not entered within approx.
1 minute of switching on the ignition, a warning
message appears on the multi-function display.
A warning message appears again after another
minute if the correct code is not entered in the
meantime.
For information on warning messages on the
multi-function display:
f Refer to chapter “Warning and Information
Messages” on page 278.
Remote Keypad emergency
deactivation
e If PVTS Plus cannot be deactivated using the
Remote Keypad (e.g. if the Remote Keypad
battery is dead or if the Remote Keypad was
lost), contact the control centre and get the
control centre personnel to deactivate the
system.
Transport
If the vehicle is transported with the ignition
switched off (e.g. on a ferry), transport mode
must be activated.
If the vehicle is not transported in transport mode,
the system can trigger a false alarm, for which
you will be billed (further information is available at
www.porsche.com/connect).
Activating and deactivating
transport mode
e Contact the control centre before transporting
the vehicle and when you have finished
transporting the vehicle.
A Programming button
B Numeric keys for entering the code
C Indicator light
Information
– If the code has to be changed (e.g. you have
forgotten the code or an unauthorised person
has gained access to the code), please
contact your service provider. The new code
will be sent in a text message to the specified
mobile phone number.
– PVTS Plus can detect up to 7 Remote Keypads
per vehicle. If you want to add, delete or
replace a remote control:
e Contact your Porsche partner.
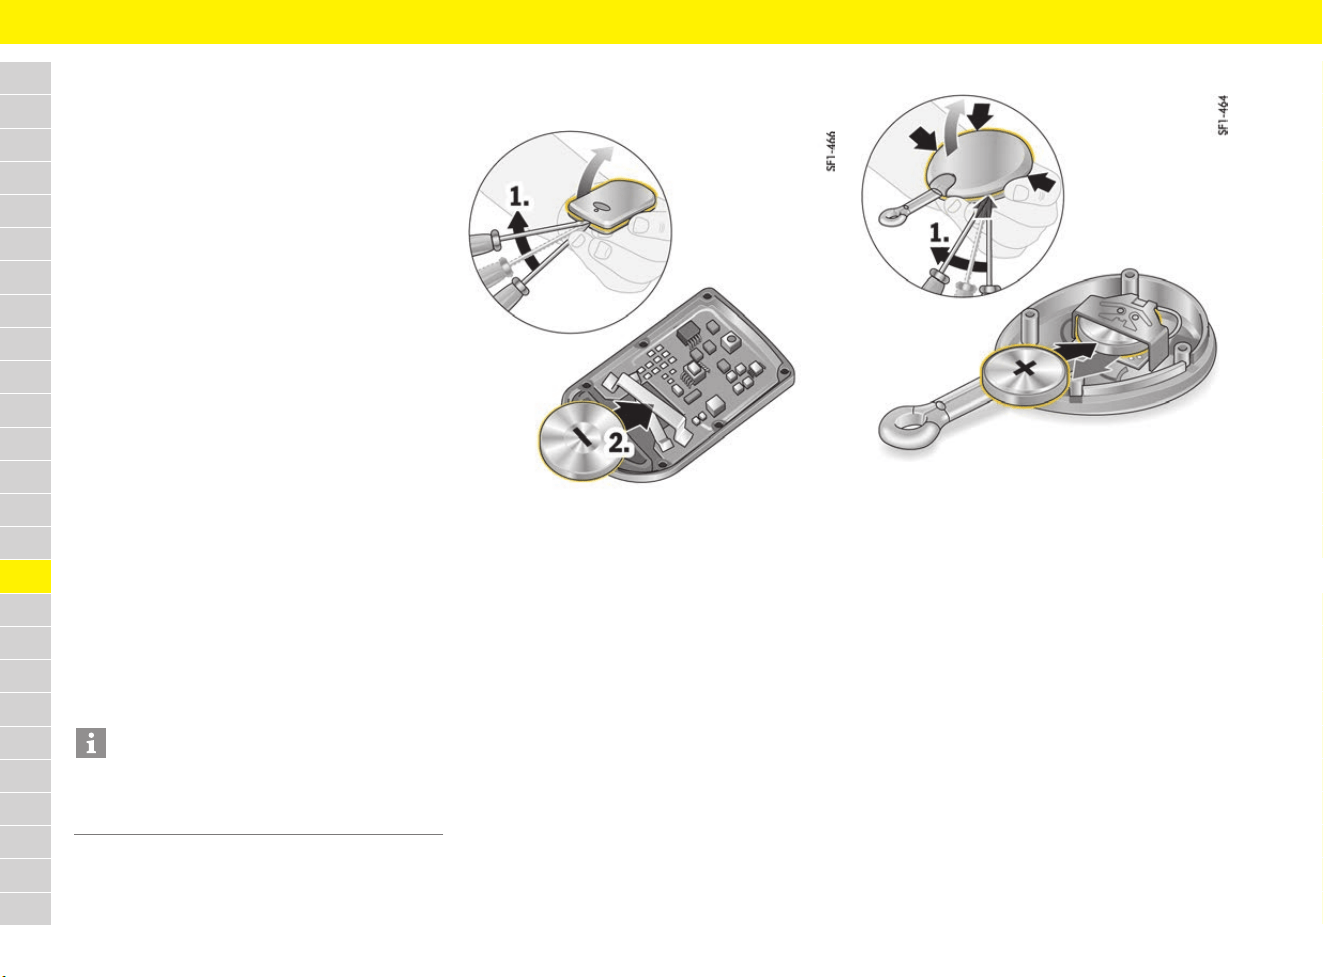
202
Porsche Vehicle Tracking System Plus (PVTS Plus)
A
B
C
D
E
F
G
H
I
J
K
L
M
N
O
P
Q
R
S
T
U
V
W
X
Y
Z
Servicing
PVTS Plus must be set to vehicle servicing mode
in the following situations:
– When customer service is required
(e.g. for regular servicing).
– When the vehicle battery is disconnected.
If the vehicle is not serviced in vehicle servicing
mode, the system can trigger a false alarm,
for which you will be billed (further information
is available at www.porsche.com/connect).
Activating and deactivating vehicle
servicing mode
e Contact the control centre before having the
vehicle serviced and after the vehicle has been
serviced.
e When your vehicle is being serviced, please
inform the relevant employee at the qualified
specialist workshop or the Porsche partner
that your vehicle is equipped with PVTS Plus.
In addition:
e PVTS Plus with Driver Card: Leave the Driver
Card in the passenger compartment during
servicing so that PVTS Plus is deactivated.
e PVTS Plus with Remote Keypad: Hand the
Remote Keypad over to the qualified specialist
workshop or the Porsche partner when your
vehicle is being serviced. Do not give them the
code.
Changing Driver Card/
Remote Keypad battery
Fig. 173: Changing Driver Card battery
If the battery in the Driver Card/Remote Keypad is
too weak, a text message will be sent
automatically to the specified mobile phone
number. A corresponding message will then
appear on the multi-function display.
f Refer to chapter “Warning and Information
Messages” on page 278.
Changing Driver Card battery
1. Switch off the Driver Card and carefully open it
using a suitable object (e.g. screwdriver).
f Refer to chapter “Switching off Driver Card”
on page 200.
2. Change the battery (check polarity).
3. Assemble the Driver Card and press it together
firmly.
Changing Remote Keypad battery
Fig. 174: Changing Remote Keypad battery
1. Carefully open the Remote Keypad using a
suitable object (e.g. screwdriver).
2. Change the battery (check polarity).
3. Assemble the Remote Keypad and press it
together firmly.
Declaration of Conformity
Porsche Vehicle Tracking System Plus (PVTS Plus)
complies with currently applicable European and
harmonised national standards and may be
operated by anyone in accordance with the
applicable EU directive. The equipment is fully
compliant with the electromagnetic compatibility
specifications that currently apply. Interference to
your equipment from other electrical/electronic
devices or equipment as well as faults on other
electrical/electronic devices or equipment caused
by your equipment are therefore largely avoided.
Information
Make sure that your Driver Card/Remote Keypad
ar
e handed back to you when your vehicle is
returned to you following servicing.

203
Porsche Vehicle Tracking System Plus (PVTS Plus)
A
B
C
D
E
F
G
H
I
J
K
L
M
N
O
P
Q
R
S
T
U
V
W
X
Y
Z
Driver Card/Remote Keypad
Vodafone Automotive SpA hereby declares that
devices 2781 and 8015 conform to the funda-
mental requirements of mandatory EC directives
on usage and in particular conform to the funda-
mental requirements and the other relevant regula-
tions stipulated in “R&TTE Directive 1999/5/EC”.
The devices are marked CE 0678.
Telematics unit
Vodafone Automotive SpA hereby declares that
the device ICD45 (2145) is fully compliant with the
basic requirements of applicable EC directives
and in particular with the basic requirements and
the other relevant regulations stipulated in the
“R&TTE Directive 1999/5/EC and ECE R10”.
The device has the E24 10R-04 1146 CE 0678
marking in accordance with the applicable
regulations.
GSM approval – country overview
(excerpt)
Albania, Andorra, Austria, Belgium, Bosnia-
Herzegovina, Bulgaria, Canada, China, Croatia,
Czech Republic, Cyprus, Denmark, Estonia,
Finland, France, Georgia, Germany, Great Britain,
Greece, Guernsey, Hungary, Iceland, Ireland,
Isle of Man, Italy, Jersey, Latvia, Lithuania,
Luxembourg, Macedonia, Malta, Moldova, Monaco,
Montenegro, Netherlands, Norway, Poland,
Portugal, Réunion, Romania, Russia, Serbia,
Slovakia, Slovenia, Sweden, Switzerland, Spain,
Turkey, USA.
Further information on the availability of the PVTS
can be found at www.porsche.com/connect.
Crash notification (emergency call)
b The Safety Services service is registered
(www.porsche. com/connect).
Under certain circumstances, data is sent to the
Porsche emergency call centre immediately after
an accident and is used to determine the required
rescue measures (current position of the vehicle,
chassis number, etc.).
If necessary, the contact person at the Porsche
emergency call centre will forward data to a public
emergency call centre. Depending on the country,
the contact person at the Porsche emergency call
centre can call the mobile phone number stored in
the customer portal.
Messages appear in the instrument cluster for the
various actions and if an emergency call cannot
be activated.
f Refer to chapter “Warning and Information
Messages” on page 278.
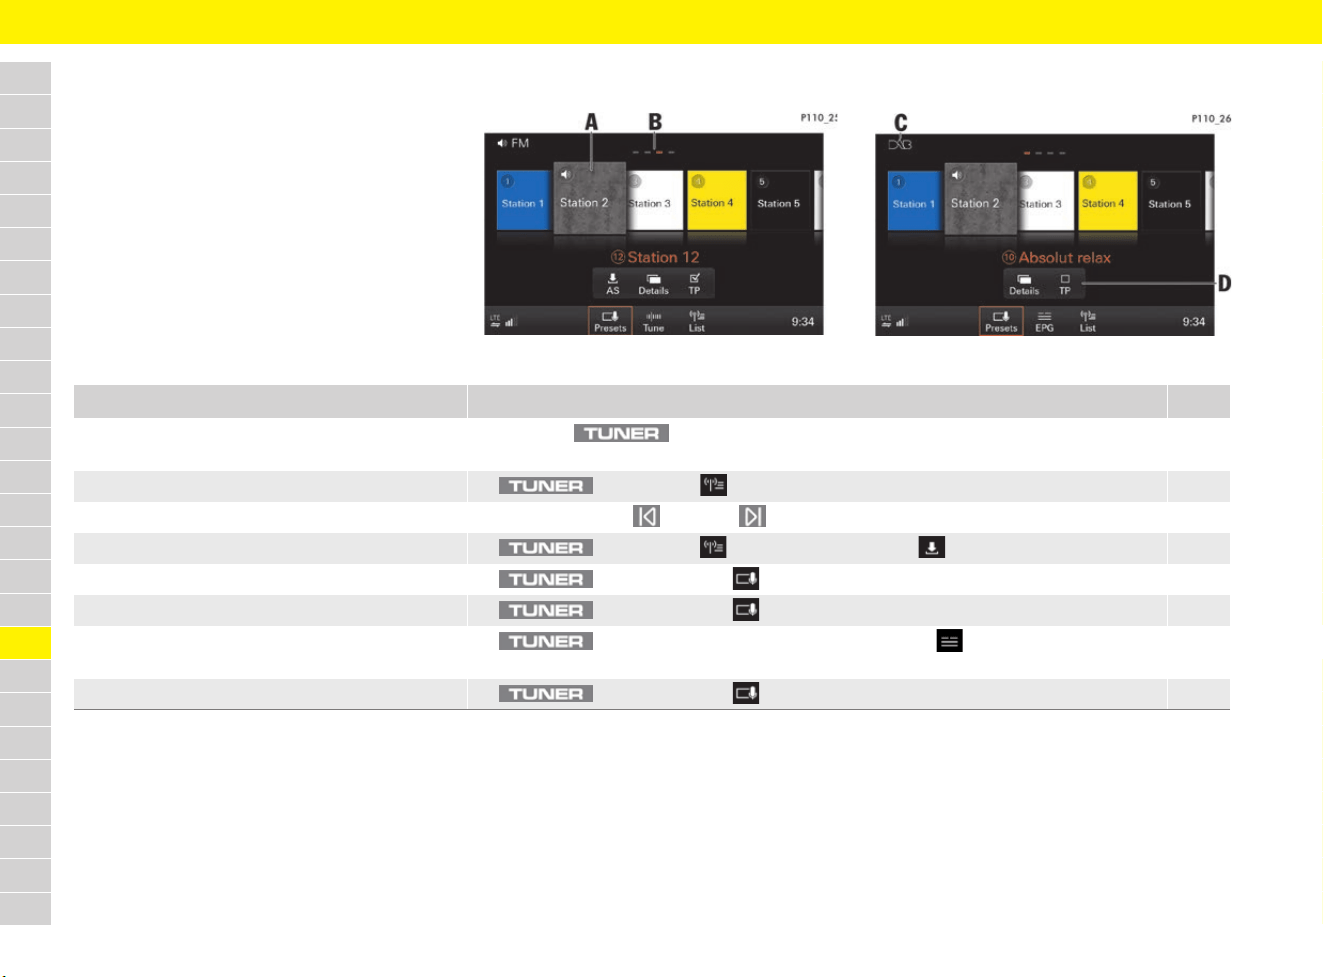
204
Radio
A
B
C
D
E
F
G
H
I
J
K
L
M
N
O
P
Q
R
S
T
U
V
W
X
Y
Z
Radio
Brief overview
This brief overview does not replace the complete
information provided under “Radio”. Safety
instructions and warnings, in particular, are not
replaced by this brief overview.
For information on operating Porsche
Communication Management (PCM):
f Refer to chapter “Operating the Porsche
Communication Management (PCM)” on
page 176.
Fig. 175: FM frequency range
Fig. 176: DAB frequency range
What do I want to do? What do I have to do? Page
Set the frequency range e Press the button until the required frequency range (AM, FM or DAB) is
displayed in the headline (see C).
205
Tune to stations from the station list e button e List e Select station. 205
Tune to stations using skip buttons e Repeatedly press button or button until the desired station is played.
Store stations from the station list e button e List. e Select station e Store e Select station button. 206
Tune to stored station e button e Presets e Select desired station button (see A). 205
Display station details e button e Presets e Select Details. 206
Retrieve programme guide (EPG) e button e select DAB frequency range e EPG e Details e
Select radio station.
207
Switch on/off traffic announcements e button e Presets e TP (on/off) (see D). 206
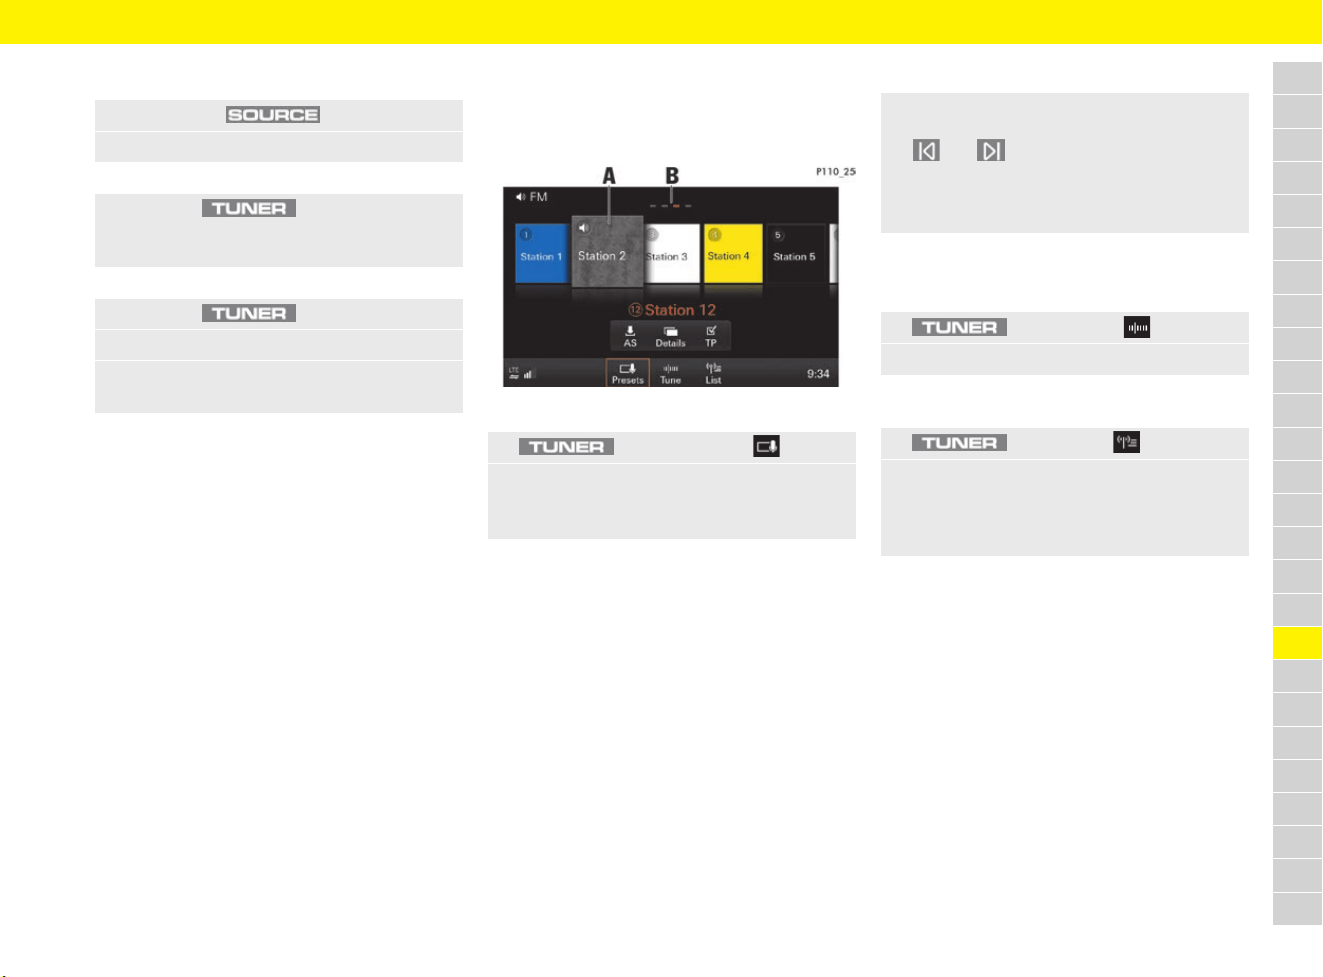
205
Radio
A
B
C
D
E
F
G
H
I
J
K
L
M
N
O
P
Q
R
S
T
U
V
W
X
Y
Z
Set the frequency range
The radio supports the FM, AM and DAB (digital
radio) frequency ranges.
The PCM receives programmes that are
transmitted over the DAB-, DAB+ and DMB
transmission standard.
Tuning to stations
Displaying and selecting stored stations
(presets)
Fig. 177: Station buttons (presets)
A total of 20 station buttons (presets) are available
and stations can be assigned to all of these.
Station buttons on the first three pages (to display
the currently selected page see B) can be freely
assigned. The 5 radio stations with the strongest
signals are automatically assigned to the station
buttons on the fourth page (“Best FM level”).
Tuning in stations using skip buttons
Tuning to stations manually
b The FM or AM frequency range is set.
Selecting stations from the station list
A special feature of the DAB radio frequency range
is its “ensembles”. An ensemble can include both
individual stations and groups of stations
(services).
All available stations and groups of stations with
the associated ensemble are displayed in the
DAB station list on the first page.
All available ensembles are displayed on the
second page. All available stations and groups of
stations in the selected ensemble are displayed by
selecting an ensemble.
1. Press button .
2. Select AM, FM or DAB.
– or –
e Press the button repeatedly
until the required frequency range (AM, FM
or DAB) is displayed in the headline.
– or –
1. Press the button.
2. Select the frequency range in the headline.
3. In the SOURCE menu, select the desired
frequency band AM, FM or DAB.
1. button e Presets
2. Select station.
The selected station button (e.g. A)
is highlighted.
e Regardless of the selected main menu,
you can tune in a station using the
and skip buttons.
The next/previous station from the station
list, the available frequency or the ensembles
are set.
1. button e Tune
2. Select the frequency using the frequency bar.
1. button e List.
2. Select station.
All stations that can currently be received are
displayed in the station list (a maximum of
100 entries).
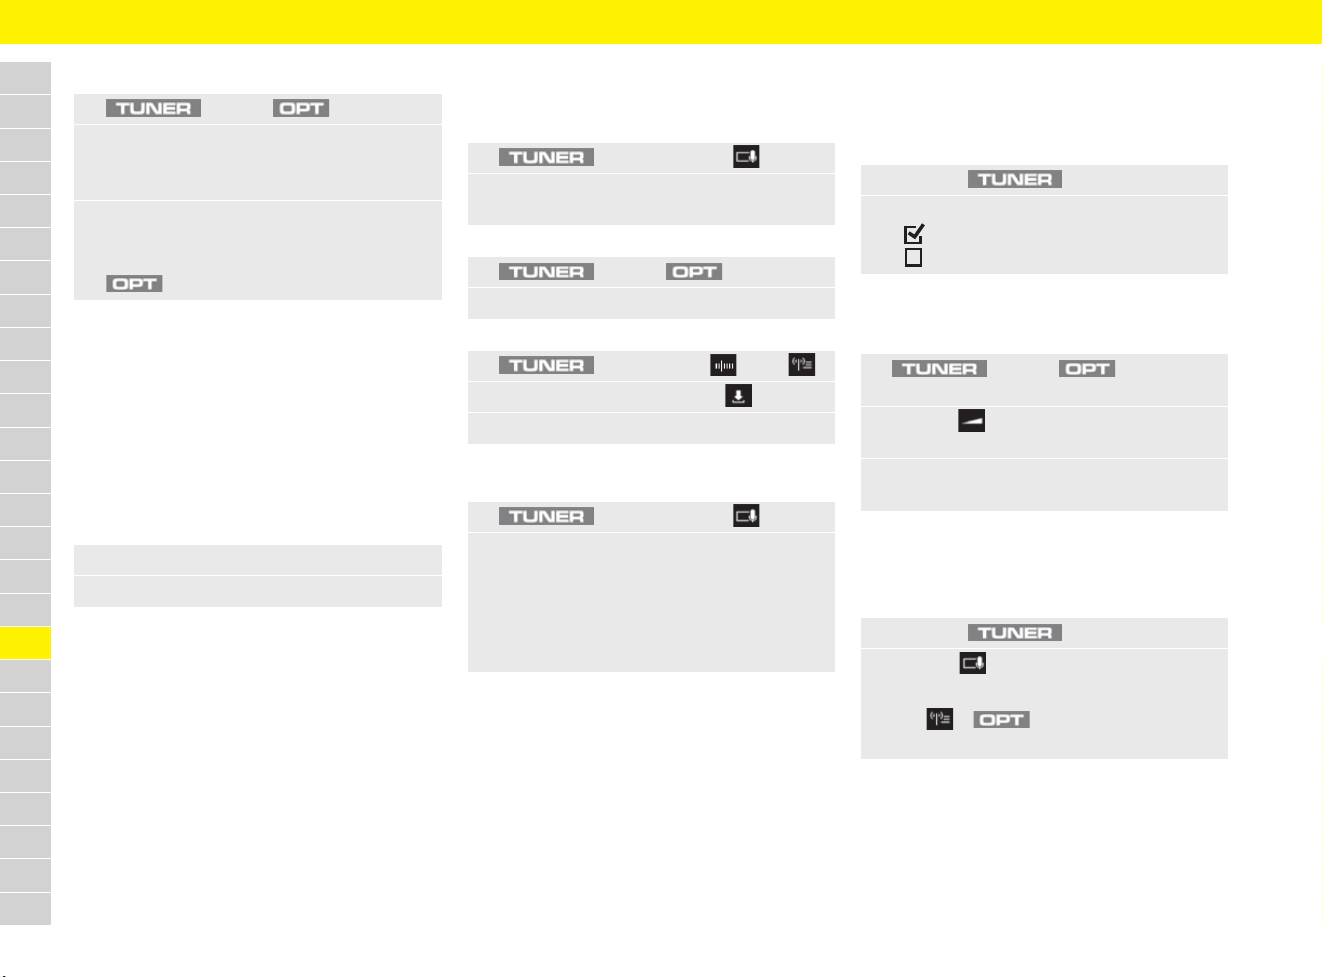
206
Radio
A
B
C
D
E
F
G
H
I
J
K
L
M
N
O
P
Q
R
S
T
U
V
W
X
Y
Z
Scanning and selecting stations
Selecting stations using the
multi-function display
For information on using the multi-function display:
f Refer to chapter “Operating multi-function
display without multi-function steering wheel”
on page 157.
f Refer to chapter “Operating multi-function
display with multi-function steering wheel” on
page 157.
Storing stations
Storing tuned stations
Storing station automatically
Tuning to traffic announcements
Activating/deactivating traffic
announcements
Setting the traffic announcement
volume
Displaying station information
Displaying station details
1. button e button
2. Select Start scan.
Each station that is found in the frequency
range is scanned for approx. 5 seconds.
3. Select Stop in the controller to stop at the
scanned station.
– or –
button e Select Cancel scan.
1. Select the Audio menu.
2. Select stations from the station list.
1. button e Presets
2. Press the desired station button for
3 seconds.
– or –
1. button e button
2. Store station e Select station button.
– or –
1. button e Tune / List.
2. Select station and then select .
3. Select the desired station button.
1. button e Presets
2. Press AS and keep it pressed for longer than
1 second.
The search starts. The 5 radio stations with
the strongest signals are stored on the
currently selected page and the station with
the strongest signal is set.
1. Press the button.
2. Select TP.
Traffic announcements are switched on.
Traffic announcements are switched off.
1. button e button e
SET SOUND
2. Volume e
Select Traffic announcements.
3. Set the desired volume using touchscreen
or the rotary push button.
1. Press the button.
2. Presets e Select Details.
– or –
List. e e Select Station details.
Programme-related information is displayed.
207
Radio
A
B
C
D
E
F
G
H
I
J
K
L
M
N
O
P
Q
R
S
T
U
V
W
X
Y
Z
Retrieving programme guide
(EPG – Electronic Programme Guide)
b The DAB frequency range is set.
Changing settings
– Radio text (FM, DAB): Switch radio text on/off.
– Station tracking (FM, DAB): If the function is
activated and the reception quality is poor in
the FM frequency range, the tuner tries to
switch to an alternative frequency for the
station that is tuned in. During a loss of
reception in the DAB frequency band, the radio
switches automatically to the station alternative
on the FM frequency band if this is available.
– Regional adaptation (FM): Some
programmes in the FM frequency range are
regionally divided and provide various regions
with regional programmes featuring different
content. When the function is switched on, you
cannot switch to alternative frequencies in the
regional area.
– Sort criteria
– Station name (FM, DAB): The station list is
sorted in alphabetical order.
– Frequency (FM, AM): The station list is
sorted in order of the stations in the
frequency band.
– Genre (FM, DAB): The station list is sorted
according to programme type or genre
(e.g.: pop, rock).
– Reception quality (FM, AM): The station
list is sorted according to the strength of
the station’s signal. Stations with good
reception are specified at the top of the list.
– Station display (FM)
– Station name: Station name is displayed.
– Frequency: Station frequencies are
displayed.
– Traffic announcements (AM, FM, DAB)
– Activate traffic announcements.
– Deactivate popup: No popup for new
traffic notice.
– Station image database (FM):
– Regions for station images: Adaptation
of regions for which station images should
be selected.
– Image database: Activate or hide station
images.
–
Extend frequency band (DAB): The frequency
range can be extended (L band). As a result,
any additional stations can be received.
Fixing station name
1. button e EPG
2. Select station.
Detailed programme information on the
selected radio station and on the current
and following stations is displayed.
1. button e button e
SET AM/SET FM/DAB
2. Select the desired option:
1. button e button
2. Select Fix name.
The name of the station currently displayed
can be fixed. Texts sent by the radio station
are therefore no longer displayed.
e To scroll through the texts again,
select Release name.

208
Rear wing
A
B
C
D
E
F
G
H
I
J
K
L
M
N
O
P
Q
R
S
T
U
V
W
X
Y
Z
Rear wing
The rear wing improves driving stability at high
speeds.
Automatic mode
The rear wing extends automatically at speeds
above approx. 125 km/h (77 mph) and retracts
again below approx. 80 km/h (50 mph).
If the automatic control system fails, a warning
message appears on the multi-function display.
f Refer to chapter “Warning and Information
Messages” on page 278.
Manual mode
Fig. 178: Button for rear wing in the centre console
When the ignition is on, the rear wing can be
extended and retracted manually using the button
in the centre console.
When the rear wing is in manual mode, the
indicator light on the button lights up.
Extending the rear wing manually
e Press the button briefly.
The rear wing extends.
The indicator light on the button lights up
The rear wing is in manual mode.
Manual retraction
0 – 15 km/h (0 – 9 mph):
e Press and hold button until the indicator
light on the button goes out.
Above 15 km/h (9 mph):
e Press the button briefly.
The indicator light goes out as soon as the
button is pressed.
The rear wing is in automatic mode.
WARNING
Failure of the
retractable rear wing
The warning message appearing in the multi-
function display indicates failure of the retractable
rear wing. Driving stability will be adversely
affected by increased rear axle lift at higher
speeds.
e Adapt your driving style and speed to the
changed driving behaviour.
e Have the fault corrected at a specialist
workshop.
Porsche recommends a Porsche partner as
they have trained workshop personnel and the
necessary parts and tools.
CAUTION
Extending and
retracting the rear wing
When extending or retracting the rear wing
manually when the vehicle is stationary, parts of
the body can get trapped between the moving
rear wing and fixed vehicle parts.
e Make sure that no persons or objects are
within the range of movement of the rear wing.
NOTICE
Risk of damage to rear wing.
e Do not pull or push the vehicle by the rear wing.
209
Refuelling
A
B
C
D
E
F
G
H
I
J
K
L
M
N
O
P
Q
R
S
T
U
V
W
X
Y
Z
Refuelling
When the ignition is on, the fuel level is displayed
on the instrument panel.
f Refer to chapter “J – Fuel gauge” on
page 126.
If there is less than a certain amount (which varies
depending on the model) remaining in the tank, the
warning light on the multi-function display in
the instrument panel lights up when the ignition is
switched on or the engine is running.
e Refuel at the next opportunity.
f Refer to chapter “Filling capacities” on
page 307.
Selecting suitable petrol
The engine is optimally designed for unleaded
fuels without metallic additives.
The engine is suitable for operation with fuel with
an ethanol content of up to 10 %. Use of fuels
containing ethanol can lead to increased fuel
consumption.
Using additives with inferior petrol
octane ratings
In some countries, the fuel’s deposition behaviour
may not meet requirements. In this case, the fuel
may be mixed with the additive sold and
recommended by Porsche after consulting a
Porsche partner:
Porsche part number 000 043 206 89.
e Observe the instructions and mixture ratios
given on the container.
e Observe service intervals and particularly
oil-change intervals.
WARNING
Risk of fire when
refuelling
Fuel is highly flammable, and can deflagrate or
explode.
e Fire, naked flame and smoking are prohibited
when handling fuel.
WARNING
Fuel vapours and skin
contact with fuel
Fuel and fuel vapours are harmful to health.
e Do not inhale fuel vapours.
e Avoid contact with skin or clothing.
Information
In some cases, fuels contain a high sulphur
content. Combustion in the engine can therefore
cause unpleasant odours under certain driving
conditions (so-called “rotten egg smell”). Porsche
is not responsible for this and it does not indicate
a defect in the vehicle.
NOTICE
Unsuitable fuels can damage the engine as well as
the fuel and exhaust system.
e Only use fuel according to the specification
below.
e No methanol-containing fuels.
Information
Information on the fuel octane rating can normally
be found on the pump. Petrol station attendants
can also provide information.
Model Recommended
fuel
Alternative
fuel
Octane rating of at least:
All: 98 RON/88 MON 95 RON/85 MON
Information
If the recommended fuel is not available,
unleaded fuels without metallic additives with
octane numbers of 91 RON/82.5 MON can be
used in an emergency. However, this could reduce
performance and increase fuel consumption.
e Use unleaded fuels without metallic
additives with octane numbers of at least
91 RON/82.5 MON.
e Do not drive at full throttle with an unleaded
fuel with octane numbers of 91 RON/
82.5 MON.
NOTICE
Non-approved additives can damage the engine,
fuel system and exhaust system.
e Use only additives approved by Porsche.
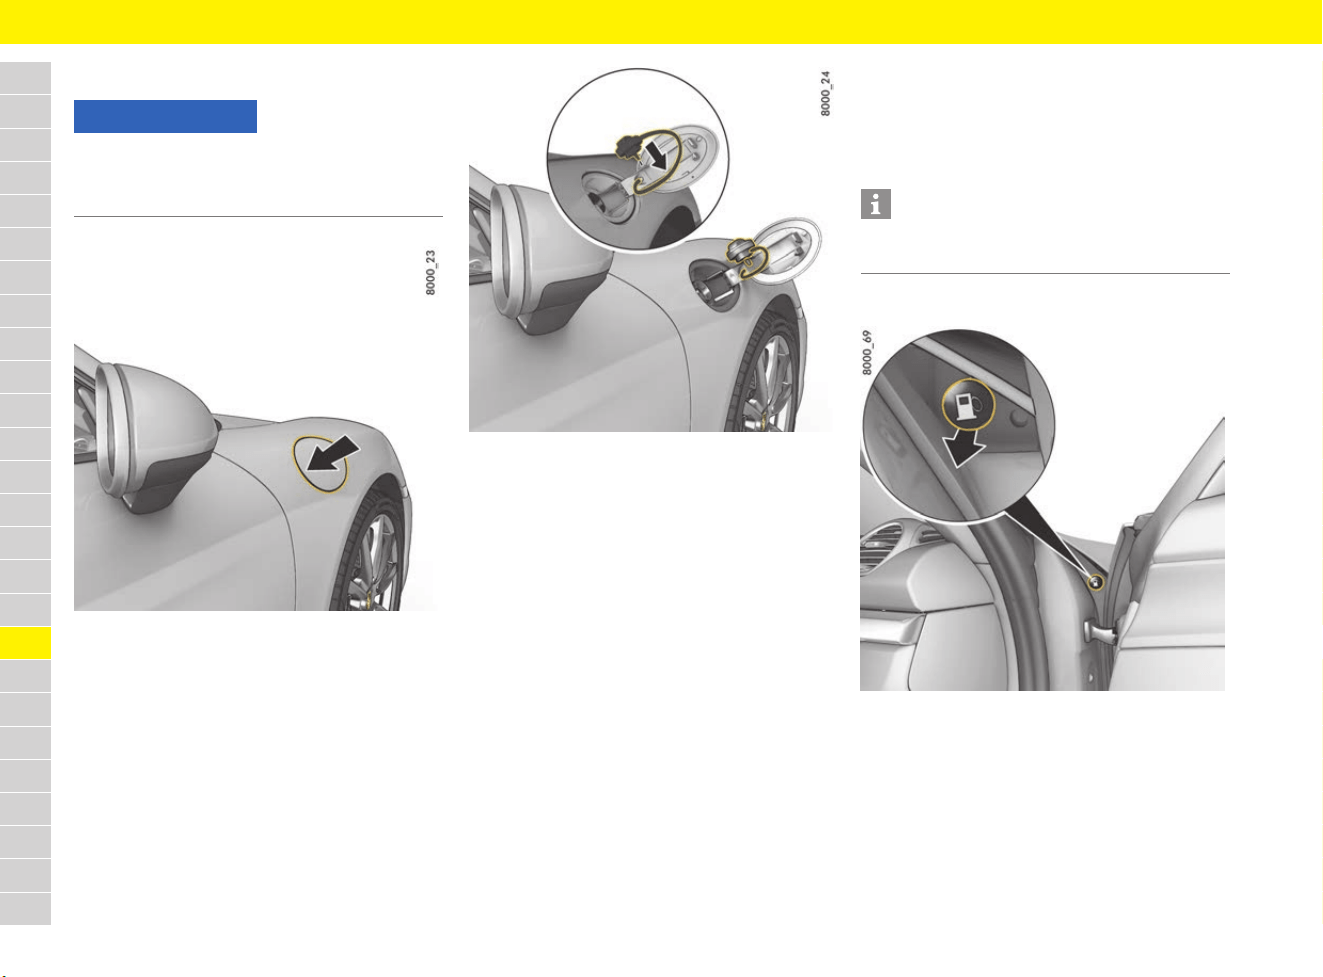
210
Refuelling
A
B
C
D
E
F
G
H
I
J
K
L
M
N
O
P
Q
R
S
T
U
V
W
X
Y
Z
Filling with fuel
Fig. 179: Opening the filler flap
Fig. 180: Opening the fuel cap
b Engine switched off.
b The ignition is switched off.
b Vehicle unlocked.
1. Open the filler flap by pressing on the rear part
of the filler flap (Fig. 179).
The fuel type to be used for the vehicle is
printed on a sticker on the inside of the filler
flap.
2. Slowly unscrew and remove the fuel cap.
3. Put the fuel cap into the holder (Fig. 180).
4. Insert the pump nozzle fully into the filler neck
with the handle pointing downwards.
5. Operate the pump nozzle and refuel the
vehicle. Do not add more fuel after the
automatic pump nozzle has switched off.
Fuel could spray back or could flow over
when heated.
f Refer to chapter “Filling capacities” on
page 307.
6. Replace the fuel cap immediately after
refuelling and screw it in until you hear and feel
it locking.
7. Close the filler flap and press on the rear of the
filler flap until it engages securely.
Filler flap emergency release
Fig. 181: Emergency operation of the filler flap
If the electrical release mechanism is faulty, the
filler flap can be opened manually:
1. Open the passenger’s door.
2. Pull the button in the right-hand door aperture
(Fig. 181).
The filler flap releases.
NOTICE
Decorative films may fade if they come into
contact with fuels.
e Wipe fuel off films immediately.
Information
If you lose the fuel cap, it must be replaced with an
original part only.
211
Seat Belts
A
B
C
D
E
F
G
H
I
J
K
L
M
N
O
P
Q
R
S
T
U
V
W
X
Y
Z
Seat Belts
Using seat belts correctly
Seat-belt pretensioners
Triggering of the seat-belt pretensioners depends
on the severity of the accident.
The seat-belt pretensioners are triggered:
– In the event of front and rear impact
– In the event of side impact
– If the vehicle turns over
Observe the seat belt warning light
and warning symbol
When the ignition is switched on, the red warning
light appears in the instrument panel for
several seconds as a function check.
The red warning light in the instrument panel
stays on until the seat belt on the driver’s side is
fastened.
In addition, a warning appears on the multi-
function display.
A warning signal sounds and the red warning
light in the instrument panel flashes when the
vehicle speed exceeds approx. 24 km/h (15 mph).
DANGER
Unfastened or
incorrectly used
seat belts
Seat belts offer no protection in an accident if they
are not worn. Incorrectly worn seat belts increase
the risk of injury in an accident.
e All occupants of the vehicle must wear a seat
belt for their own safety.
e Also give your passengers all the information
in this section.
e Never use one seat belt for two persons at the
same time.
e Remove any loose or bulky items of clothing
that prevent the seat belt from fitting correctly
and restrict your freedom of movement.
e Do not lay the seat belt across hard or
breakable objects (glasses, ball-point pens,
pipes, etc.).
These objects may present an additional risk
of injury.
e Belt straps must not be twisted or loose.
DANGER
Using damaged
seat belts
Damaged, heavily stressed or worn seat belts do
not offer adequate protection in the event of an
accident.
The seat belt pretensioner system can only be
triggered once; the system must then be replaced.
e Check all seat belts regularly for signs of
damage to the fabric, and check that the buckle
and attachment points function correctly.
e Protect seat-belt buckle from soiling and keep it
clean.
e Have seat belts that are damaged or have been
heavily stressed in an accident replaced
immediately.
The same applies to seat-belt pretensioner
systems and force limiters installed on the
seats which have been triggered.
In addition, have the anchor points of the seat
belts checked.
Visit a qualified specialist workshop. Porsche
recommends a Porsche partner as they have
trained workshop personnel and the necessary
parts and tools.
e Make sure the belts are fully retracted when not
in use to protect them from dirt and damage.
f Refer to chapter “Cleaning the seat belts” on
page 69.
Information
Smoke is released when the seat-belt
pretensioners are triggered. This does not
indicate a fire in the vehicle.
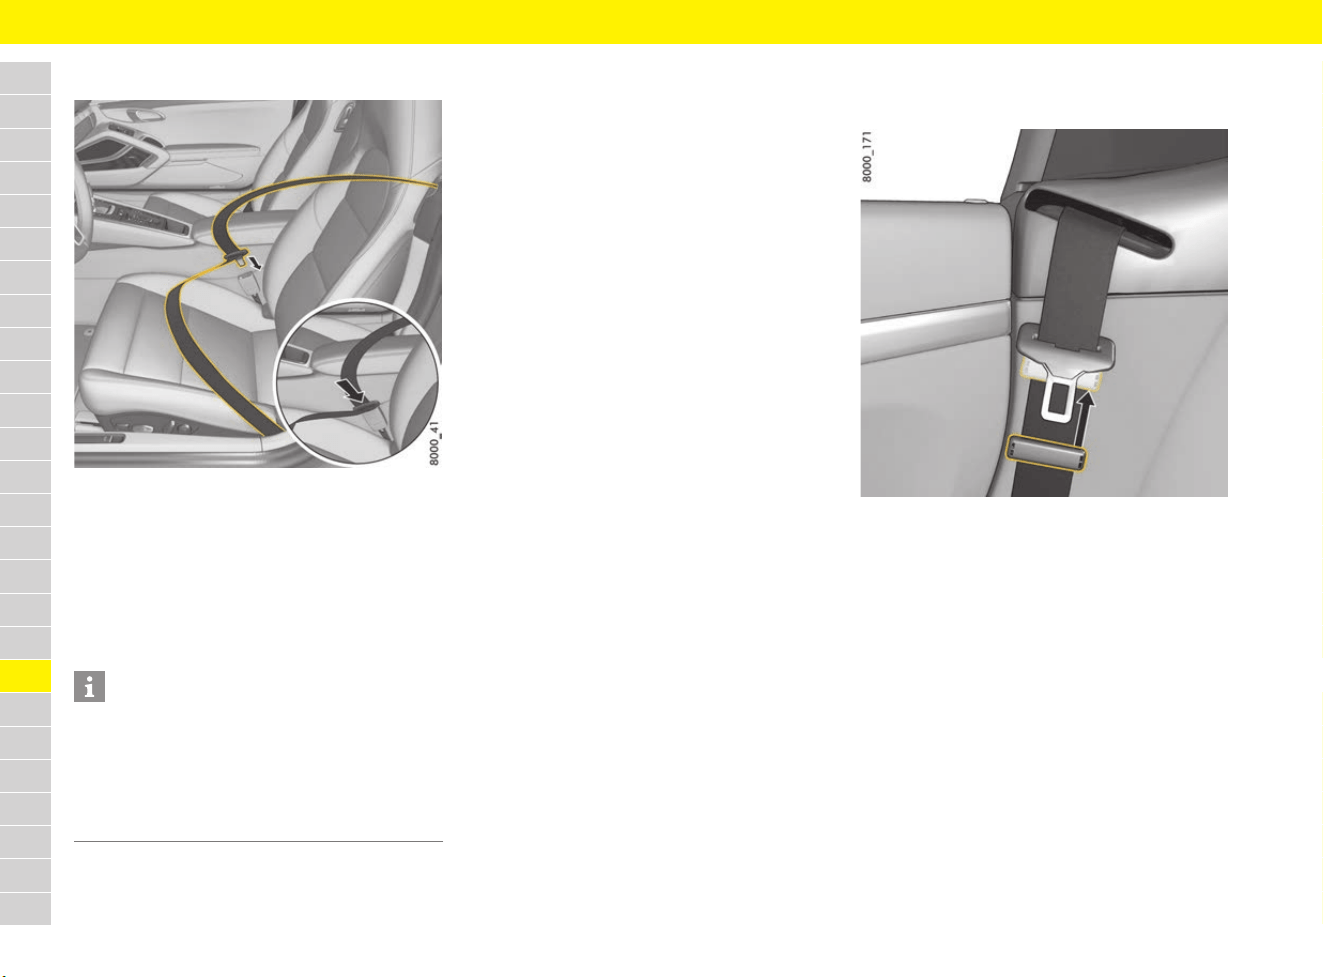
212
Seat Belts
A
B
C
D
E
F
G
H
I
J
K
L
M
N
O
P
Q
R
S
T
U
V
W
X
Y
Z
Fastening the seat belt
Fig. 182: Fastening the seat belt
1. Assume a comfortable sitting position.
2. Adjust the backrest so that the seat belt
always rests on your upper body and runs
across the middle of your shoulder.
3. Grasp the seat belt latch and pull the belt in a
slow, continuous motion across your chest and
lap.
4. Insert the belt latch into the appropriate seat-
belt buckle on the inboard side of the seat until
it locks securely with an audible click (Fig. 182).
5. Make sure that seat belt is not trapped or
twisted and that it does not rub on any sharp
edges.
6. Make sure that the horizontal section of the
belt always fits tight across the pelvis.
Therefore, after fastening the seat belt, always
pull the diagonal part of the belt upwards.
Pregnant women: position the lap belt as low
as possible across the pelvis, and ensure that
it is not pressing against the abdomen.
7. Also pull on the diagonal section of the belt
now and again during the journey to ensure
that the horizontal section remains tight.
Opening the seat-belt buckle and
removing the seat belt
Fig. 183: Removing the seat belt
1. Hold the belt latch.
2. Press the red button on the belt buckle.
3. Guide the belt latch to approx. 7 cm below the
deflection bracket of the retractor roller and
lock it using the plastic slide (Fig. 183).
The plastic slide serves to hold the belt latch in
an easily accessible position.
Information
The seat belt may be blocked if the vehicle is
standing at an angle or the seat belt is pulled out
using a jerking movement.
The seat belt can also jam when accelerating or
decelerating, when negotiating bends or on
inclines.
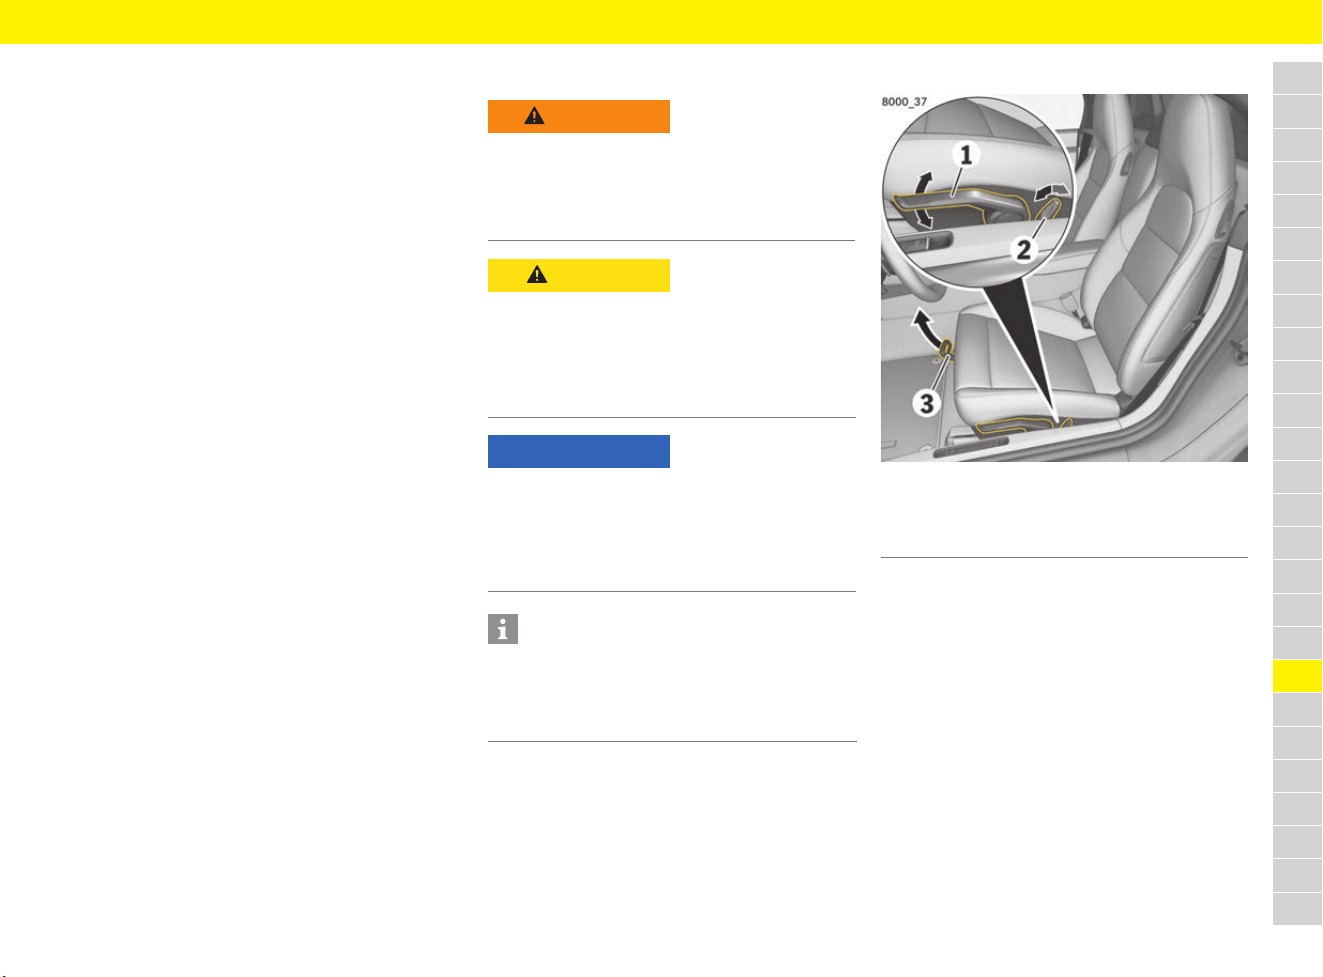
213
Seats
A
B
C
D
E
F
G
H
I
J
K
L
M
N
O
P
Q
R
S
T
U
V
W
X
Y
Z
Seats
Choosing the right seat position
A correct sitting position is important for safe and
fatigue-free driving. To adjust the position of the
driver’s seat, proceed as follows:
1. Adjust the seat height (not bucket seats) to
ensure you have enough headroom and a good
overview of the vehicle.
2. Adjust the seat’s fore-and-aft position so that
your legs are not fully straight and your foot is
touching the entire pedal surface when
pressing the pedals fully.
3. Grip the top half of the steering wheel. Set the
backrest angle (not bucket seat) and the
steering wheel position so that your arms are
almost outstretched. However, your shoulders
must still rest on the backrest.
4. Adjust the seat’s fore-and-aft setting if
necessary.
Adjusting the seat
Adjusting sports seat/sports seat plus
Fig. 184: Adjusting sports seat/sports seat plus
e Operate lever 1 until the desired seat height is
reached:
Upwards = seat moves upwards
Downwards = seat moves downwards
e Operate switch 2 until the desired backrest
angle is reached.
e Pull up locking lever 3, move seat to the
desired fore-and-aft position and release the
lever.
Check that the seat engages correctly.
WARNING
Adjusting the seat when
driving
The seat may move further than desired if you
attempt to adjust it whilst driving. You may lose
control of the vehicle.
e Do not adjust the seat while driving.
CAUTION
Seat adjustment
If persons or animals are within the range of
movement of the seat, there is a risk of parts of
the body being squeezed or crushed when you
adjust the seat.
e Adjust the seat so that no-one is put at risk.
NOTICE
Risk of damage to the headrests, roof and sun
visor.
e Set the seat position to ensure sufficient
clearance between the headrest, roof and sun
visor.
Information
The adjustment range of the passenger seat
backrest is restricted in vehicles with ISOFIX
anchorage systems for child restraint systems
on the passenger seat.
1 Seat height adjustment
2 Backrest angle adjustment
3 Fore-and-aft position adjustment
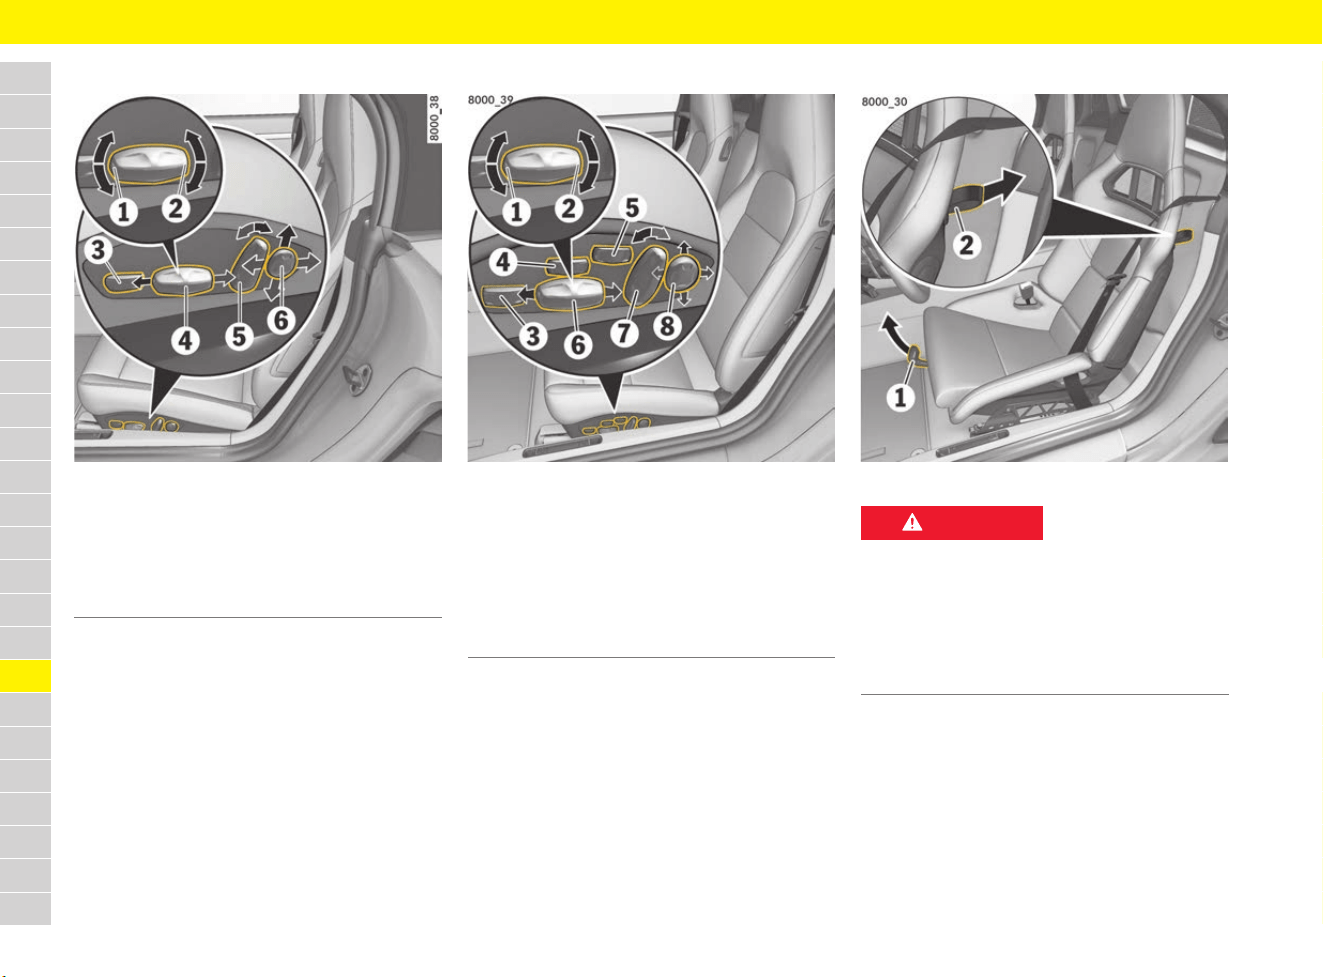
214
Seats
A
B
C
D
E
F
G
H
I
J
K
L
M
N
O
P
Q
R
S
T
U
V
W
X
Y
Z
Fully electrical sports seat adjustment
Fig. 185: Fully electrical sports seat adjustment
e Press each control in the direction indicated by
the arrows until the desired setting or the end
position is reached.
Adaptive sports seat plus adjustment
Fig. 186: Adaptive sports seat plus adjustment
e Press each control in the direction indicated by
the arrows until the desired setting or the end
position is reached.
Adjusting bucket seat
Fig. 187: Adjusting bucket seat
e Pull up locking lever 1, move seat to the
desired fore-and-aft position and release the
lever.
Check that the seat engages correctly.
1 Seat angle adjustment
2 Seat height adjustment
3 Thigh support adjustment
4 Fore-and-aft position adjustment
5 Backrest angle adjustment
6 Lumbar support adjustment
1 Seat angle adjustment
2 Seat height adjustment
3 Thigh support adjustment
4 Seat cushion side bolster adjustment
5 Seat backrest side bolster adjustment
6 Fore-and-aft position adjustment
7 Backrest angle adjustment
8 Lumbar support adjustment
DANGER
Use of child restraint
systems
Risk of serious or fatal injury resulting from the use
of child restraint systems on bucket seats.
Child restraint systems in the bucket seat do not
provide any protection in the event of an accident.
e Do not use child restraint systems on bucket
seats.
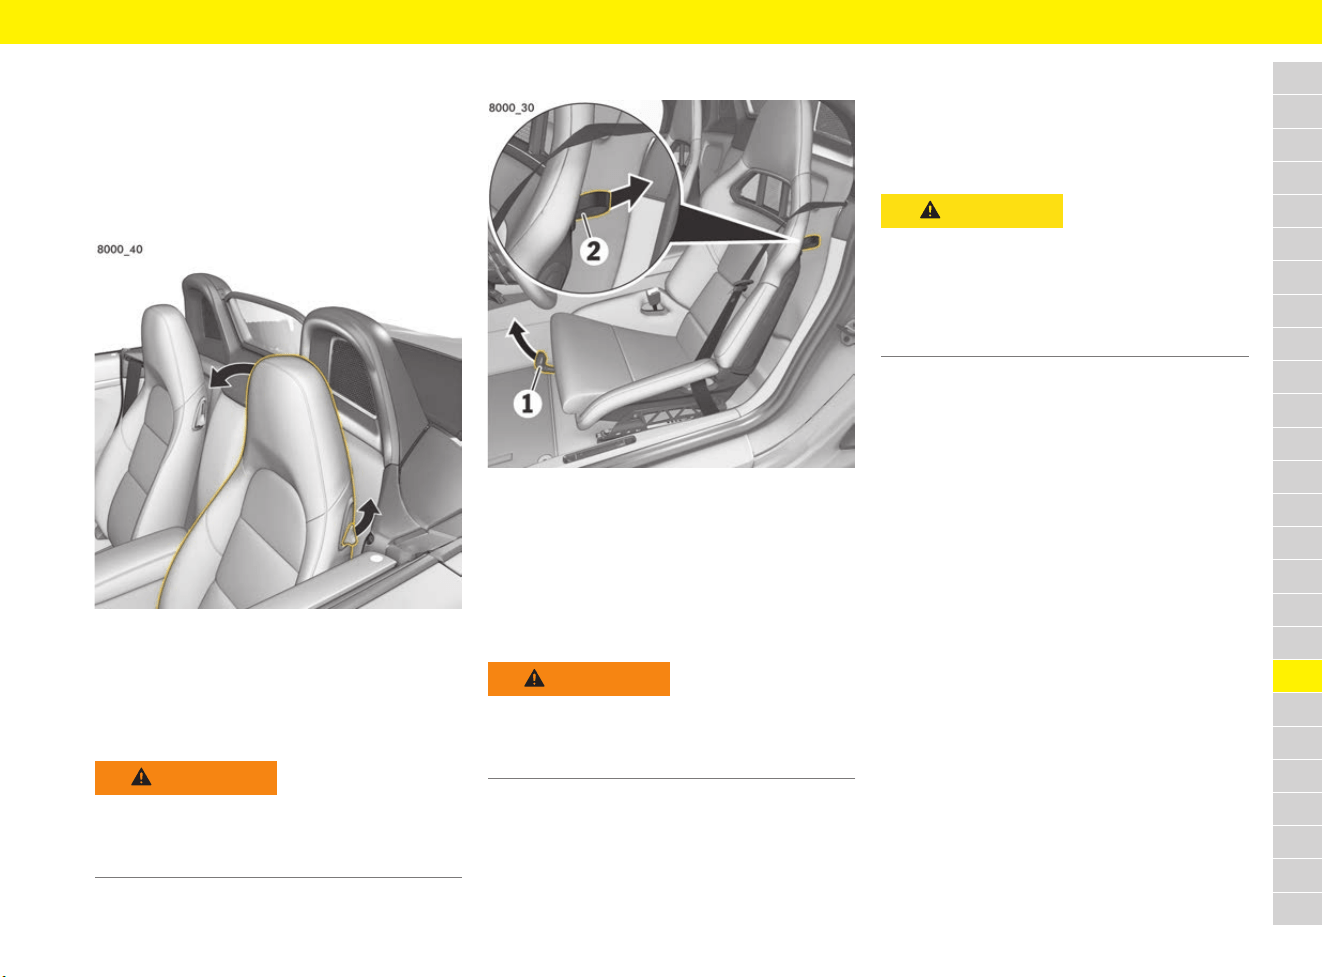
215
Seats
A
B
C
D
E
F
G
H
I
J
K
L
M
N
O
P
Q
R
S
T
U
V
W
X
Y
Z
Storing seat settings
For information on storing and retrieving the seat
settings:
f Refer to chapter “Personal Settings” on
page 188.
Folding down backrest
Fig. 188: Folding down backrest
Folding down backrest
e Pull up lever in the side part of the backrest
(Fig. 188) and fold the backrest forward.
Adjusting backrest to vertical position
e Tilt the backrest back and let it click into place.
Folding the bucket seat forward
Fig. 189: Folding the bucket seat forward
Folding the bucket seat backrest
forward
e Pull the loop 2 at the side of the backrest and
fold the backrest forward.
Adjusting the bucket seat backrest to
vertical position
e Tilt the backrest back and let it click into place.
Using the Easy Entry function
The Easy Entry function makes it easier to get in
and out of the vehicle.
f Refer to chapter “Switching Easy Entry off and
on” on page 269.
Leaving the vehicle
b Function activated.
Vehicles without Porsche Entry & Drive:
1. Remove the driver’s key.
The steering wheel moves upwards.
2. Open the driver’s door.
The driver’s seat moves to the rear.
Vehicles with Porsche Entry & Drive:
e Switch off the ignition and open the driver’s
door.
The steering wheel moves upwards.
The driver’s seat moves to the rear.
Entering the vehicle
b Function activated.
b Driver’s seat and steering wheel are at their
Easy Entry positions.
e Close the driver’s door and insert the driver’s
key or switch on the ignition in vehicles with
Porsche Entry & Drive.
Bring the driver’s seat and steering wheel to
their stored position.
WARNING
Backrest not engaged
Risk of injury if seat backrests are not engaged.
e Check that the seat backrest engages when
folding it back.
WARNING
Backrest not engaged
Risk of injury if seat backrests are not engaged.
e Check that the seat backrest engages when
folding it back.
CAUTION
Automatic adjustment of
driver’s seat
Persons behind the driver’s seat may be trapped
by the seat as a result of automatic adjustment of
the driver’s seat towards the rear.
e Switch off the Easy Entry function if there is a
person behind the driver’s seat.
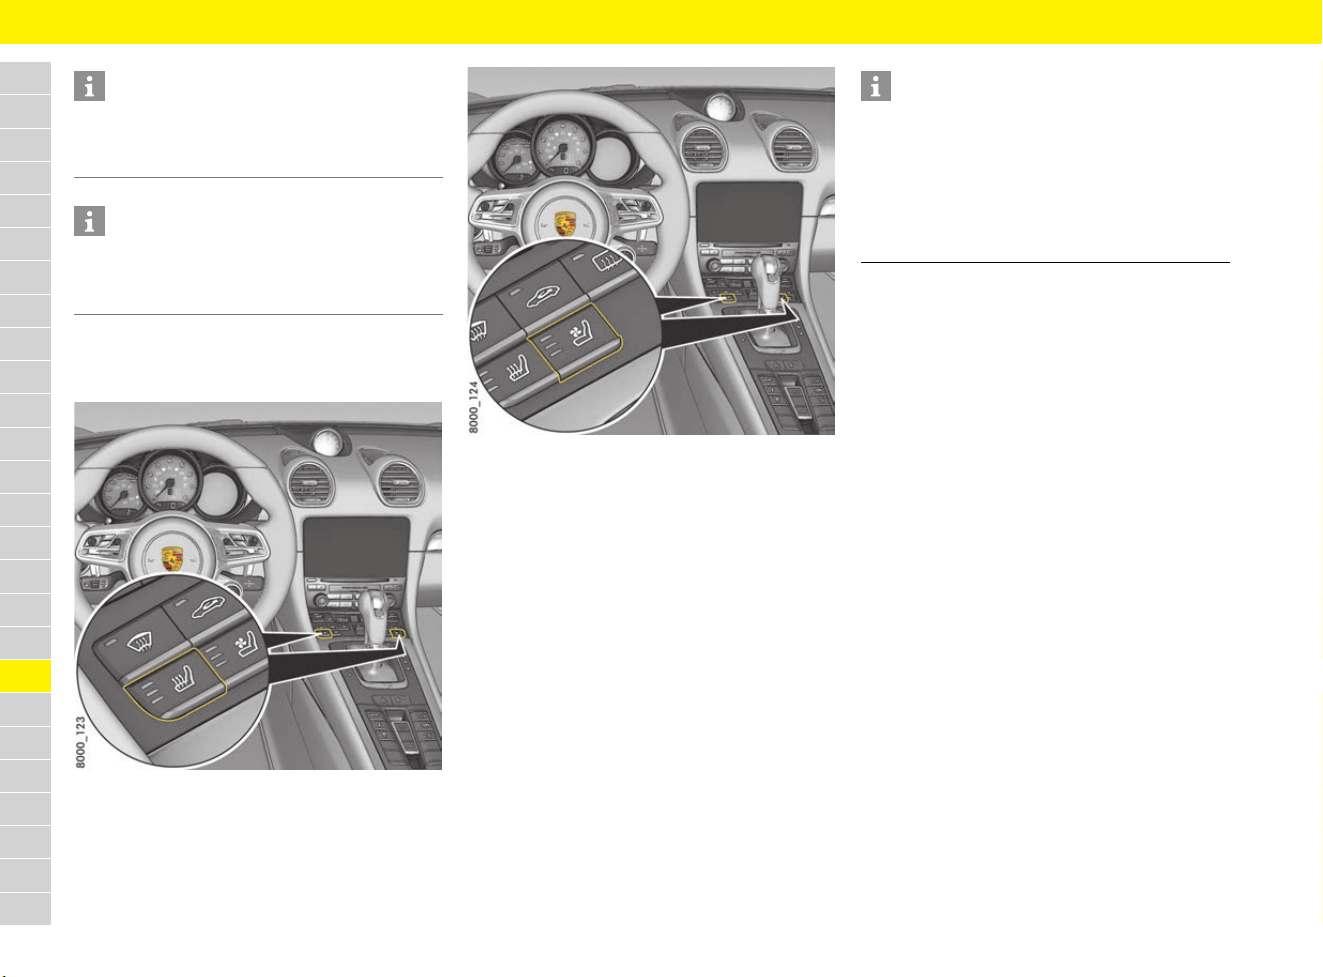
216
Seats
A
B
C
D
E
F
G
H
I
J
K
L
M
N
O
P
Q
R
S
T
U
V
W
X
Y
Z
Switching off seat heating/
seat ventilation
Fig. 190: Seat heating button
Fig. 191: Seat ventilation button
Switching on seat heating/
seat ventilation
b Engine is running.
e Press the corresponding button (repeatedly).
The number of illuminated lights indicates the
selected heating or ventilation setting.
Switching off seat heating/
seat ventilation
e Press the corresponding button (repeatedly)
until all the indicator lights go out.
Information
When the key is changed, the seat and steering
wheel move to the entry position stored on the
key.
Information
Manual intervention in the seat setting interrupts
the Easy Entry function.
e Adjust driving position manually.
Information
Seat heating is not available when the interior
temperature is high.
Seat ventilation is not available at interior
temperatures below 15 °C.
If the battery voltage is too low, seat heating/seat
ventilation is restricted initially and then switched
off.
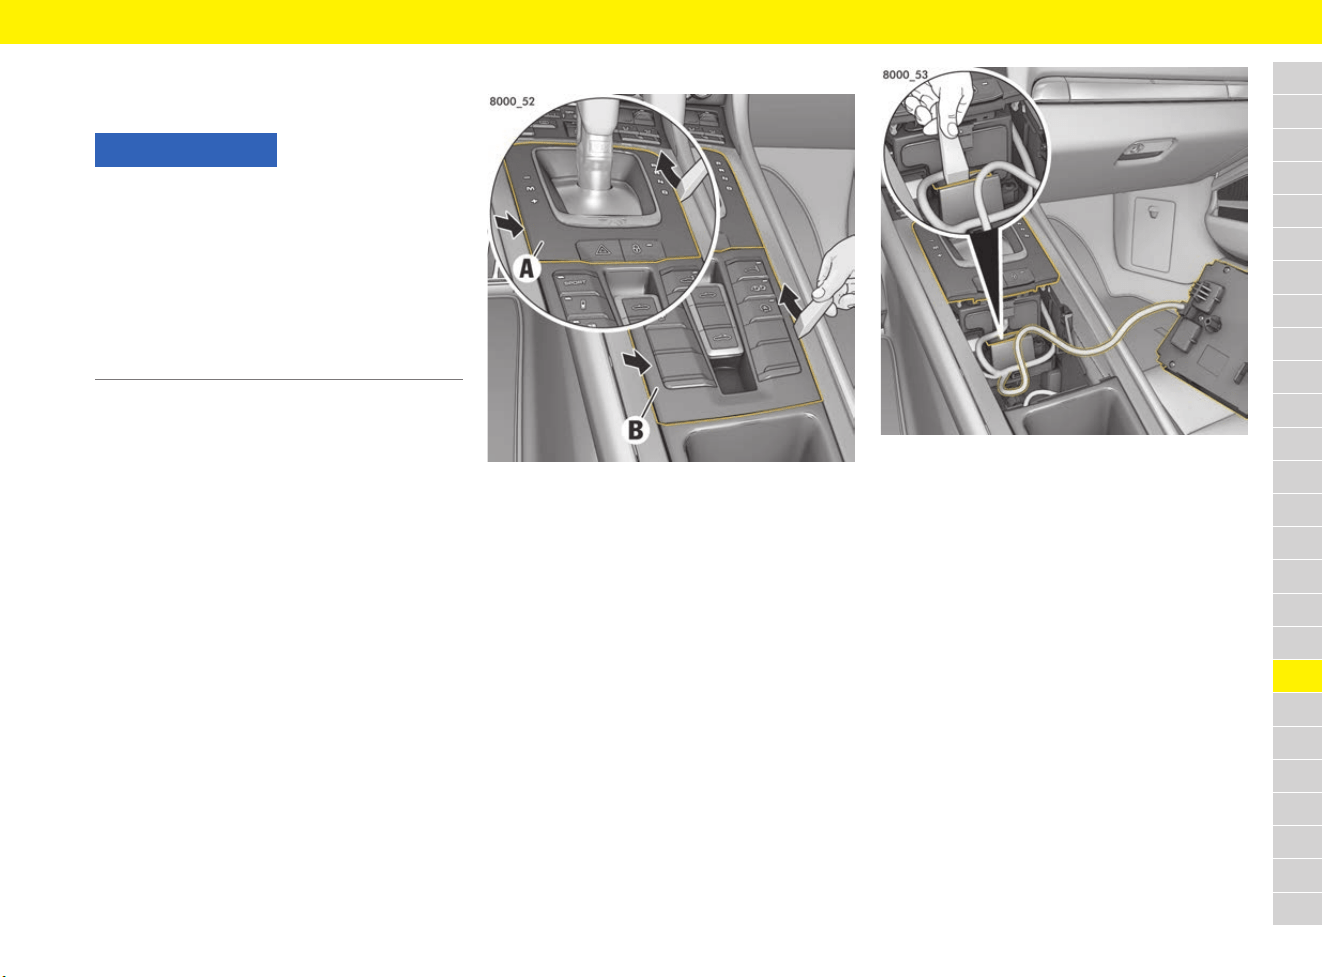
217
Selector Lever Emergency Release
A
B
C
D
E
F
G
H
I
J
K
L
M
N
O
P
Q
R
S
T
U
V
W
X
Y
Z
Selector Lever Emergency
Release
l
In the event of an electronics failure, emergency
release of the selector lever must be performed in
order to move the selector-lever to the N position
on vehicles with PDK.
Selector lever emergency release
Fig. 192: Removing the selector lever gate and switch
module
1. Remove the plastic wedge from the tool kit.
f Refer to chapter “Removing and stowing tyre
sealing compound or tool kit” on page 140.
2. Carefully lever out the rear part of the selector
lever gate A on both sides (arrows) using the
plastic wedge.
3. Carefully lever out the front part of the switch
panel B on both sides (arrow) using the plastic
wedge.
4. Remove the switch module B and place to one
side. The cable of the switch module must not
be under tension.
Fig. 193: Releasing selector lever lock
5. Push the selector lever lock downwards
and hold, then move the selector lever into
the N position.
NOTICE
In the case of emergency release of the selector
lever, the vehicle is not secured against rolling
away, endangering people or causing material
damage.
e Activate the electric parking brake and secure
the vehicle against rolling away (e.g. using a
wedge).
f Refer to chapter “Electric parking brake” on
page 63.
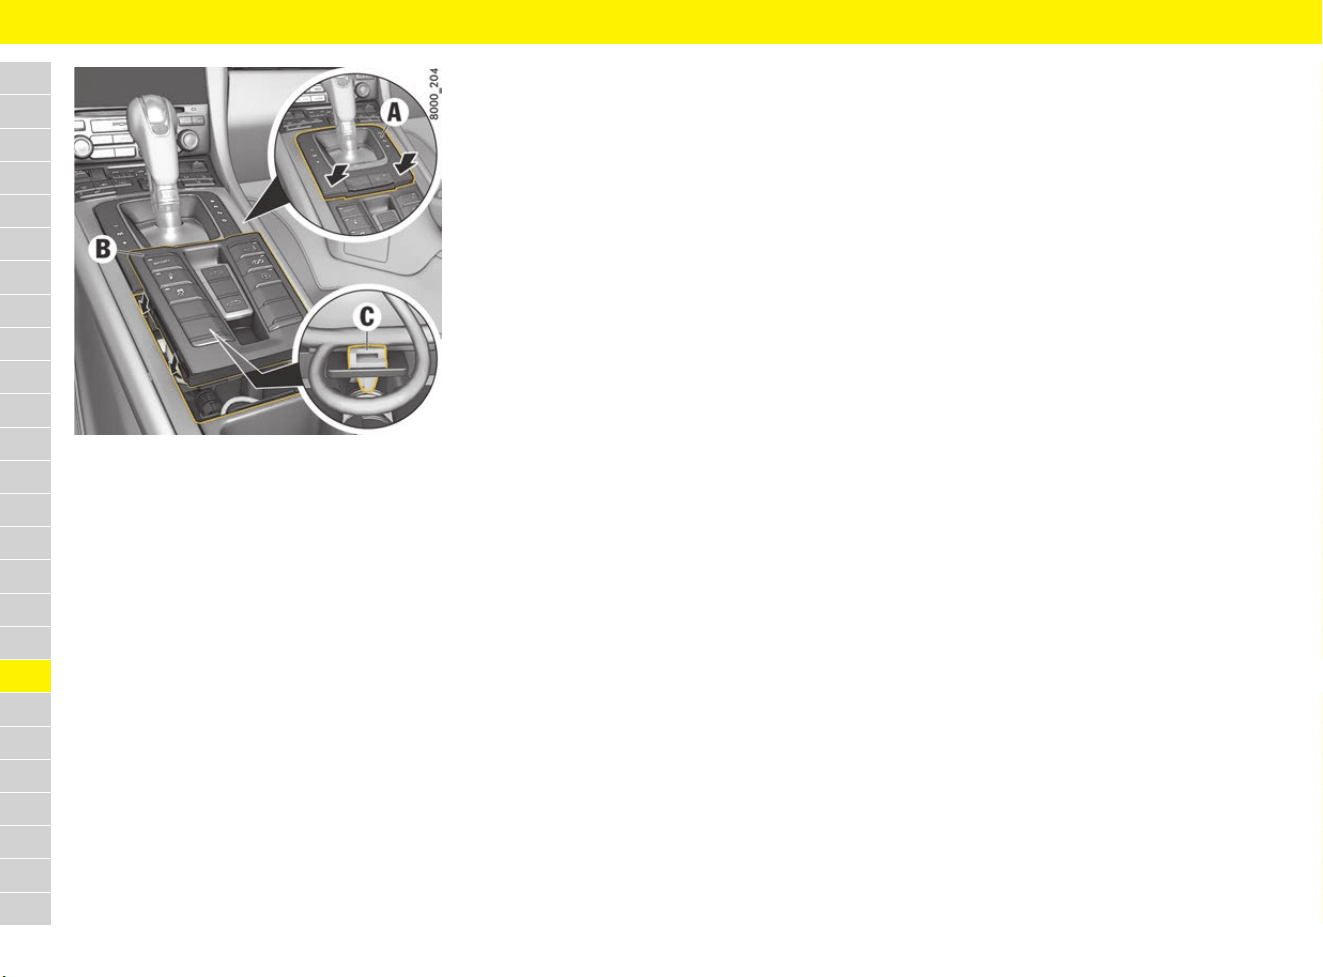
218
Selector Lever Emergency Release
A
B
C
D
E
F
G
H
I
J
K
L
M
N
O
P
Q
R
S
T
U
V
W
X
Y
Z
Fig. 194: Installing the switch module and selector lever
gate
Installing the switch module and
selector lever gate
1. Make sure that the cable clip C engages
correctly in the selector support. Then engage
the switch module B into the front guides, fully
insert the module and press downwards until it
engages securely.
2. Press down the selector lever gate A until it
engages securely.
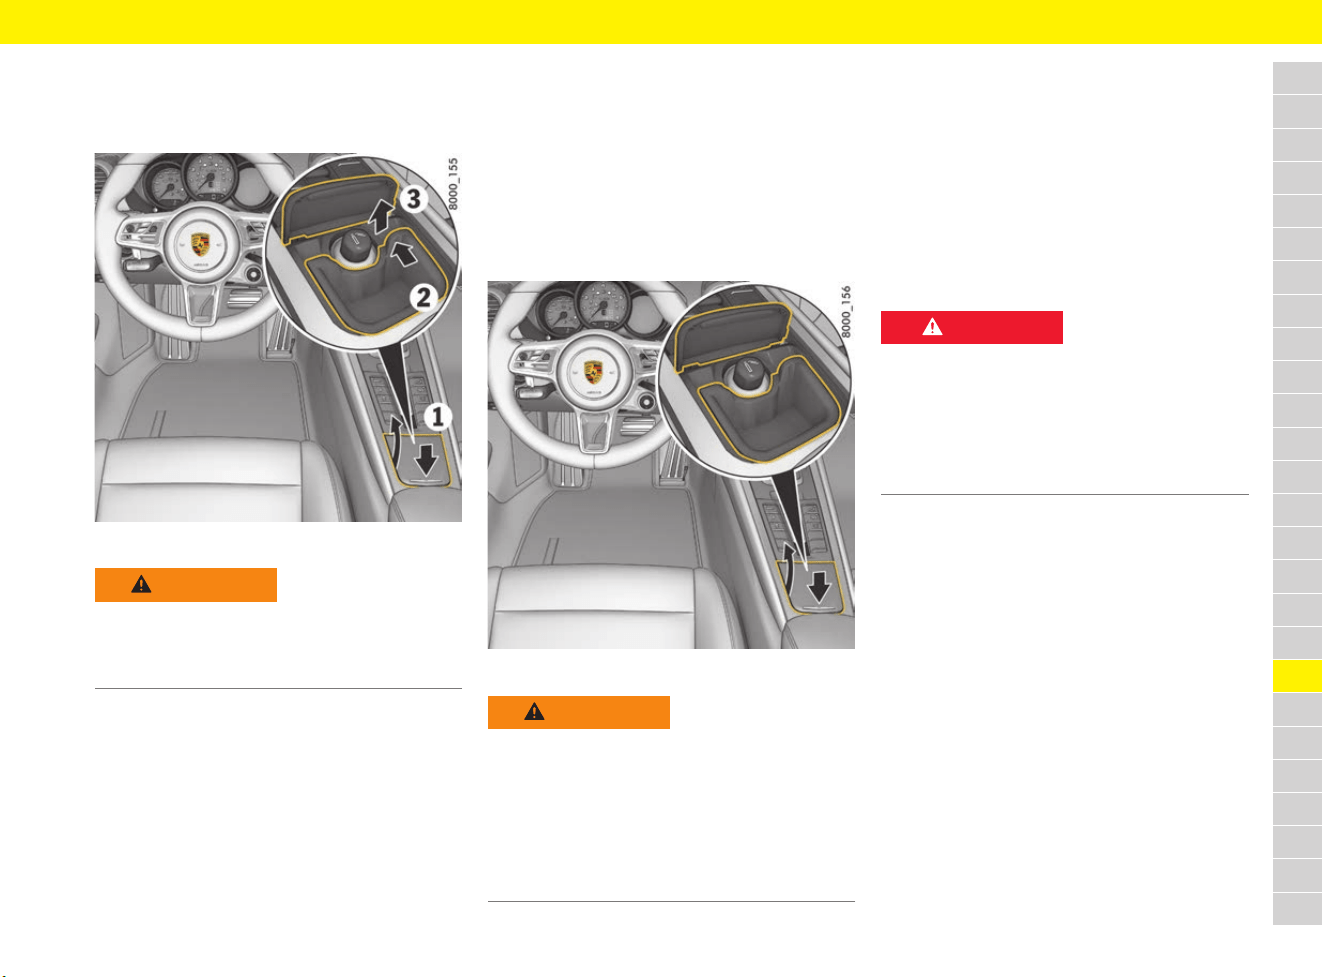
219
Smoker’s Package
A
B
C
D
E
F
G
H
I
J
K
L
M
N
O
P
Q
R
S
T
U
V
W
X
Y
Z
Smoker’s Package
Using the ashtray
Fig. 195: Opening and emptying the ashtray
Opening the ashtray
1. Press briefly on the ashtray lid (Fig. 195, 1).
The lid opens automatically.
Emptying the ashtray
2. To unlock, press ashtray insert forward at
the top right until you feel it disengage
(Fig. 195, 2 and 3).
3. Pull the ashtray insert up to remove it.
4. After emptying the ashtray insert, replace it
and push it down until you feel it engage.
Using the cigarette lighter
Fig. 196: Using the cigarette lighter
1. Press briefly on the ashtray lid (Fig. 196,
arrow).
2. Press the actuating button into the receptacle.
When the element is red hot, the cigarette
lighter will jump back to its initial position.
3. Remove the cigarette lighter.
For information on using charging adapters in the
cigarette lighters:
f Refer to chapter “Connecting the charging
adapter” on page 106.
WARNING
Danger of fire due
to ashtray
Waste paper in the ashtray can catch fire.
e Never use the ashtray to dispose of waste
paper.
WARNING
Hot cigarette lighter
The tip of the cigarette lighter becomes very hot
when it is used.
e Do not leave children in the vehicle unattended.
e Never touch the heating element or the sides
of the cigarette lighter.
e Only hold the hot cigarette lighter by the
actuating button.
DANGER
Danger of fire due to the
disposal of burning
cigars or cigarettes
Cigarettes or cigars can be blown into the air
inlets by the air flow and cause a fire in the engine
compartment.
e Do not throw burning cigarettes or cigars out
of the vehicle.
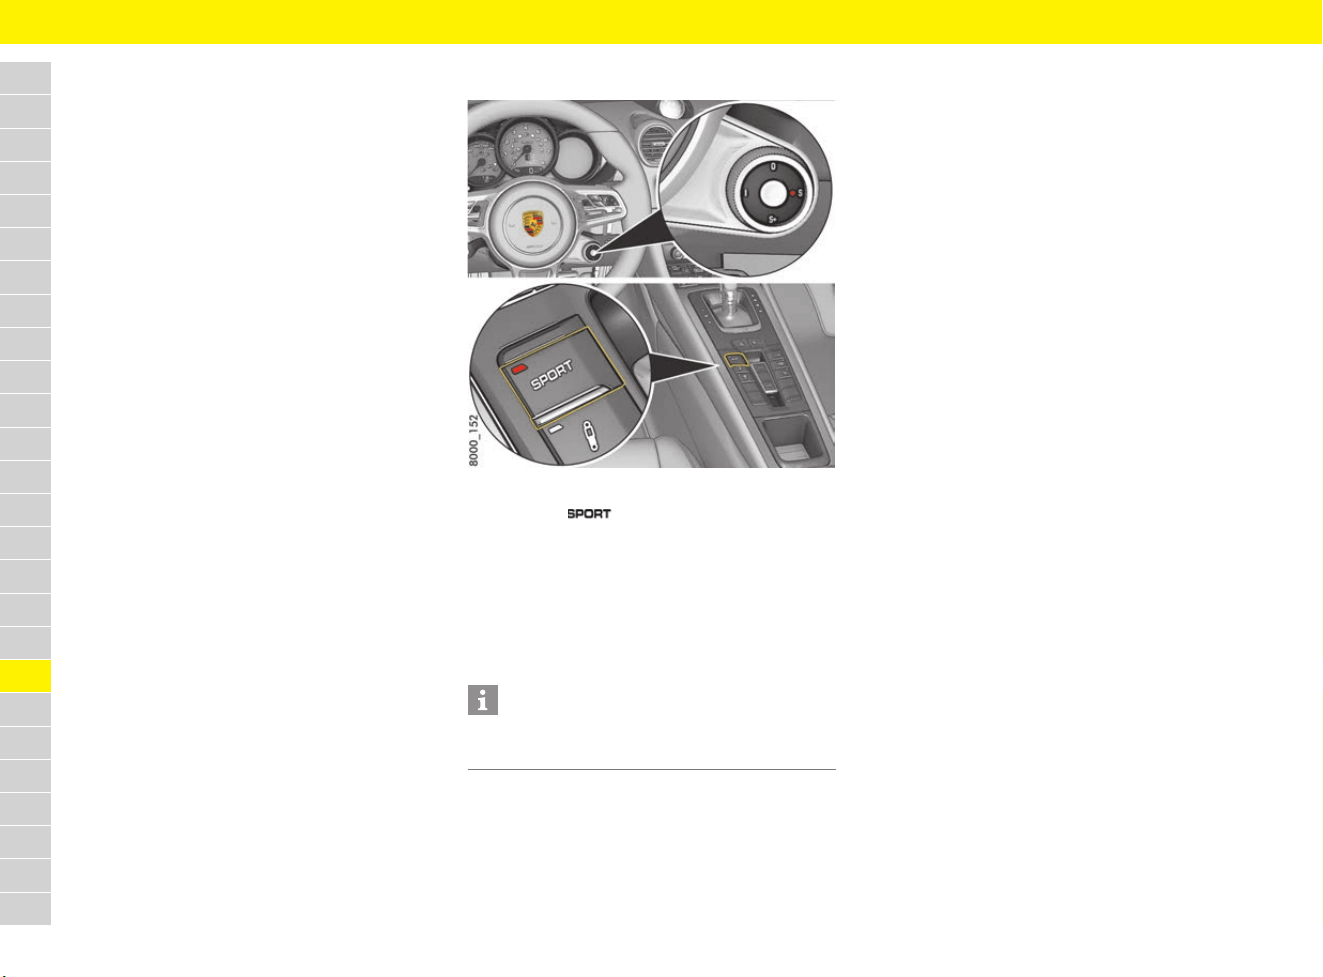
220
SPORT Mode
A
B
C
D
E
F
G
H
I
J
K
L
M
N
O
P
Q
R
S
T
U
V
W
X
Y
Z
SPORT Mode
The selectable chassis settings mean that the
vehicle can offer various modes for a sportier
overall setup.
SPORT mode adjusts the control systems more
in the direction of greater emotionality and
performance during everyday driving.
– The electronic engine management system
initiates more responsive control of the power
unit. The engine dynamics are more direct.
– Vehicles with PDK: A sporty gear-changing
map is enabled and the gear shifting times are
shorter.
– Auto Start Stop function is deactivated
automatically.
– The optional sports exhaust system is
activated automatically.
For information on vehicle setup in SPORT and
SPORT PLUS mode on vehicles with a Sport
Chrono package:
f Refer to chapter “Overview of vehicle setup in
the selected drive mode” on page 224.
Switching SPORT mode on and off
Fig. 197: Switching SPORT mode on and off
e Press the button or turn the mode
switch on the steering wheel to S (depending
on equipment).
When SPORT mode is switched on, the
indicator light on the button/switch lights up.
The word SPORT appears on the digital
speedometer.
Information
After the ignition is switched off, SPORT mode is
automatically reset to Normal mode.
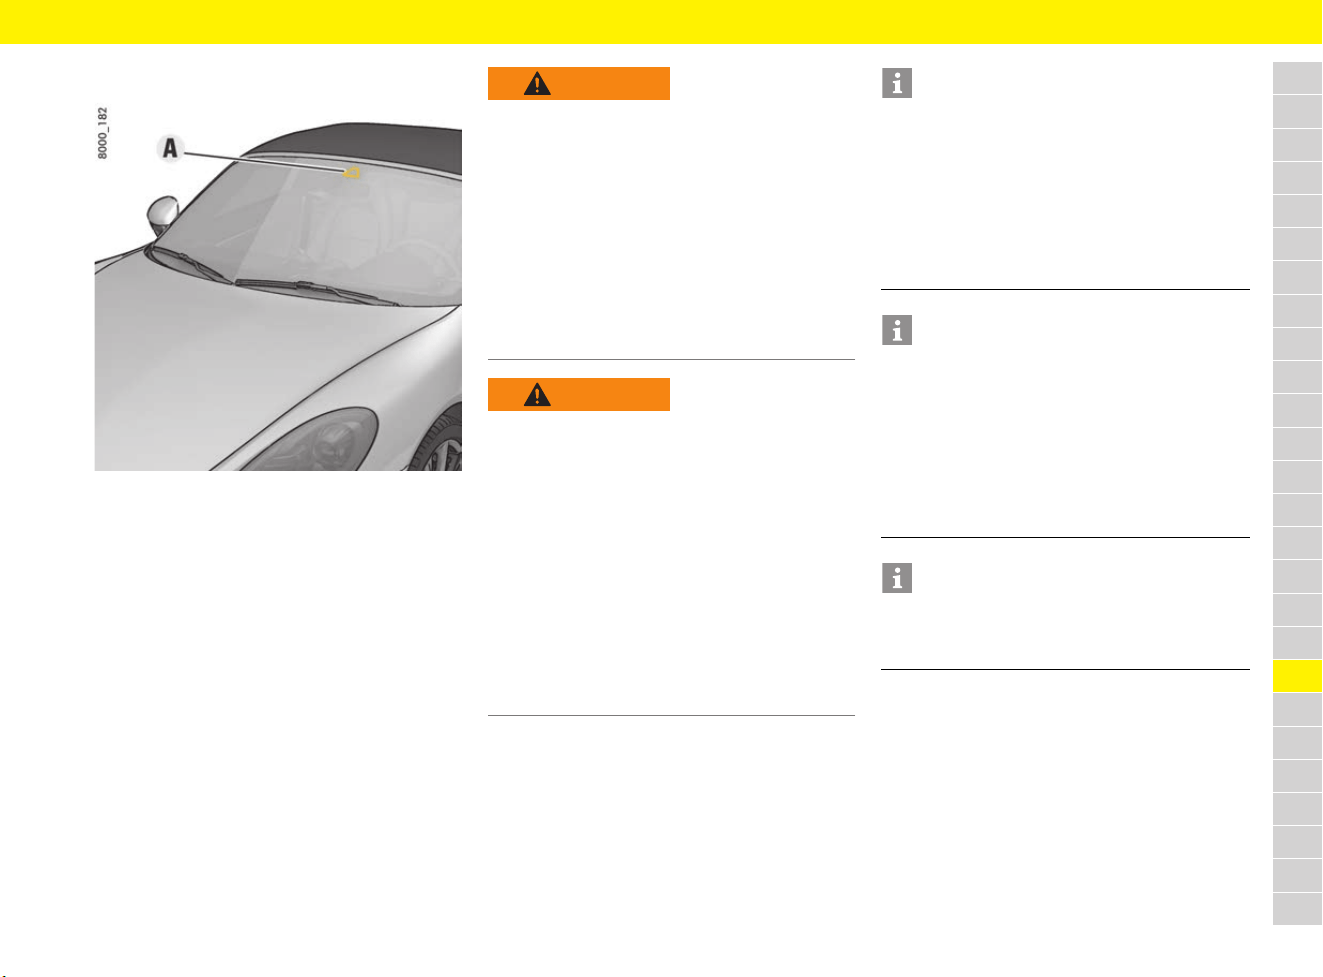
221
Speed Limit Display
A
B
C
D
E
F
G
H
I
J
K
L
M
N
O
P
Q
R
S
T
U
V
W
X
Y
Z
Speed Limit Display
Fig. 198: Camera position
Speed Limit Display uses the camera A to detect
speed limits as well as the start and end points of
no-overtaking zones.
Traffic signs are evaluated in combination with the
navigation system’s map data and shown in the
multi-function display.
If a speed limit is restricted to wet conditions,
a turn-off lane or a particular time, the additional
sign recognised will be compared with the
information provided by the vehicle (e.g. rain
sensor, navigation data and time).
Speed Limit Display is country-dependent and is
not available for all countries. For information on
Speed Limit Display in Porsche Communication
Management (PCM):
f Refer to chapter “Changing map settings” on
page 175.
WARNING
Lack of attention
The driver remains responsible when driving, e.g.
driving at an appropriate speed, regardless of
Speed Limit Display. The system is no substitute
for careful attention on the part of the driver.
Speed Limit Display provides no warning when
speeds are exceeded, nor does it adjust the
vehicle speed to preset speed limits.
e Drive with extreme care.
e Always pay attention to the traffic situation and
the area around the vehicle.
e Adapt your speed to traffic conditions.
WARNING
Failure of camera to
detect traffic signs
Camera vision can be impaired by various factors
(e.g. rain, snow, ice, heavy spray and oncoming
headlights). Sometimes the camera cannot detect
traffic signs or cannot detect them correctly.
When this happens, no speed limit or an incorrect
speed limit is displayed. Mounted traffic signs
always take priority over the speed limit displayed
on the multi-function display.
e Always pay attention to mounted traffic signs
when driving on public roads.
e Drive with extreme care.
e Always keep the direction of travel in your field
of view.
Information
Speed Limit Display is available in limited form in
the following situations for example:
– If the camera is very dirty, iced over or covered
(e.g. with stickers)
– In unfavourable weather conditions
(e.g. heavy rain).
– Excessive driving speed
– If traffic signs are covered or damaged
Information
To ensure that there is no interference with
camera operation:
e Do not cover the camera area on the interior
mirror (Fig. 198) with objects (e.g. stickers).
e The camera must always be kept free of dirt,
ice and snow.
For car care instructions:
f Refer to chapter “Care” on page 65.
Information
Should a traffic sign not be detected by the
camera, the speed limits stored in the navigation
system are automatically displayed.
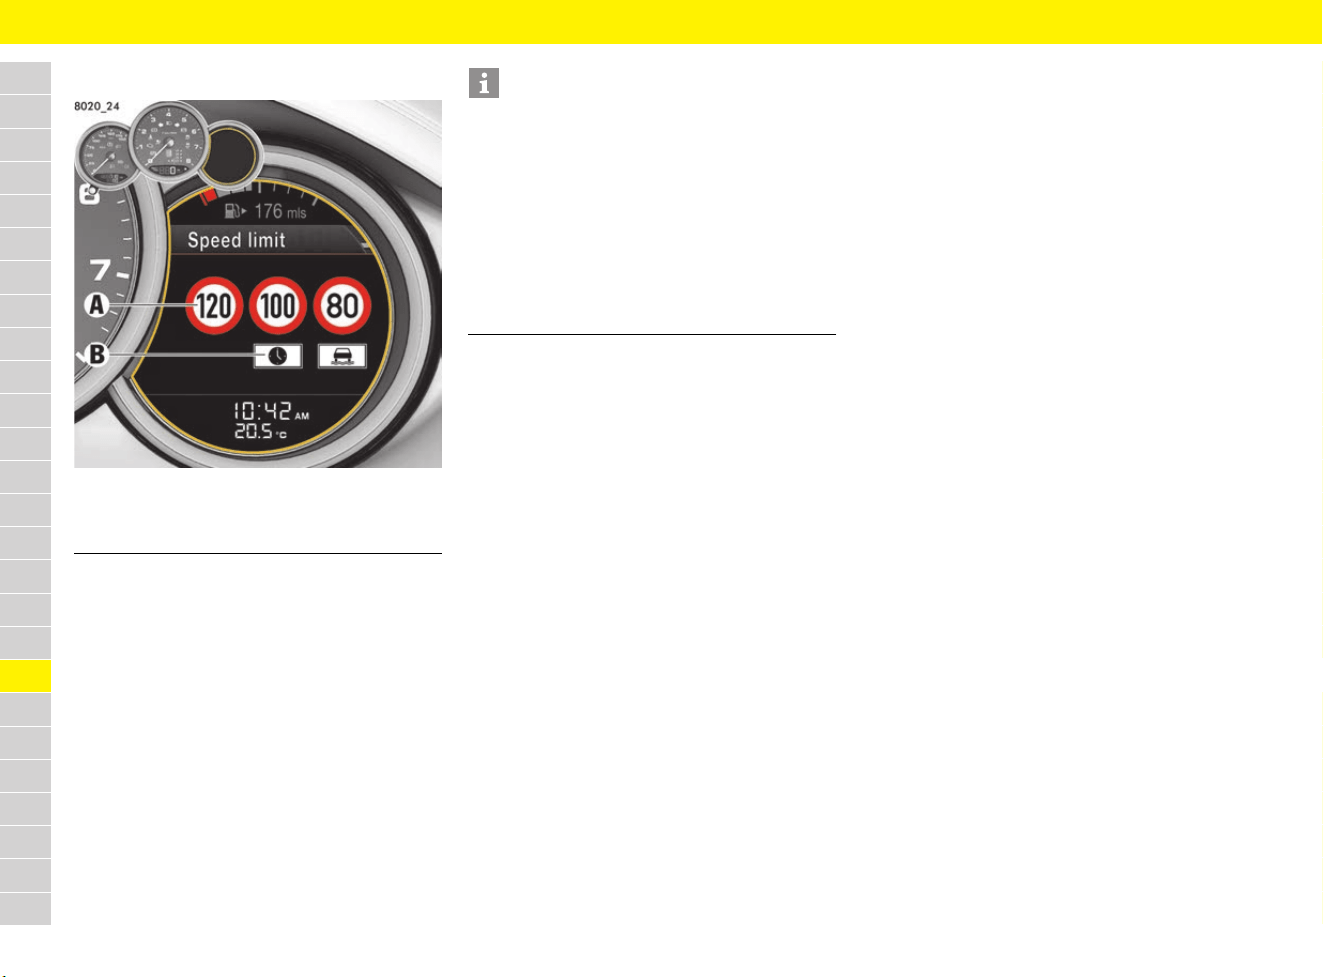
222
Speed Limit Display
A
B
C
D
E
F
G
H
I
J
K
L
M
N
O
P
Q
R
S
T
U
V
W
X
Y
Z
Displaying speed limits
Fig. 199: Speed limit on multi-function display
Up to three main traffic signs A including additional
signs B can be displayed in the “Speed limit”
main menu on the multi-function display. The
highest priority traffic sign is displayed on the left.
After the ignition is switched on, the most recent
speed limit in force appears on the multi-function
display.
If no speed limit is detected (e.g. on a motorway
that has no speed limit) or if the speed limit display
is not available in the current area, a message
appears on the multi-function display.
f Refer to chapter “Warning and Information
Messages” on page 278.
A Main traffic signs
B Additional signs
Information
– Speed Limit Display can be shown as a main
menu or in the upper status area on the multi-
function display.
f Refer to chapter “Adapting upper status
area” on page 263.
– In zones with traffic calming or home zones,
the display reads “5 km/h” (“3 mph”).
– At unsigned motorway and dual carriageway
entry and exit points, the relevant speed limit
for country roads is displayed.
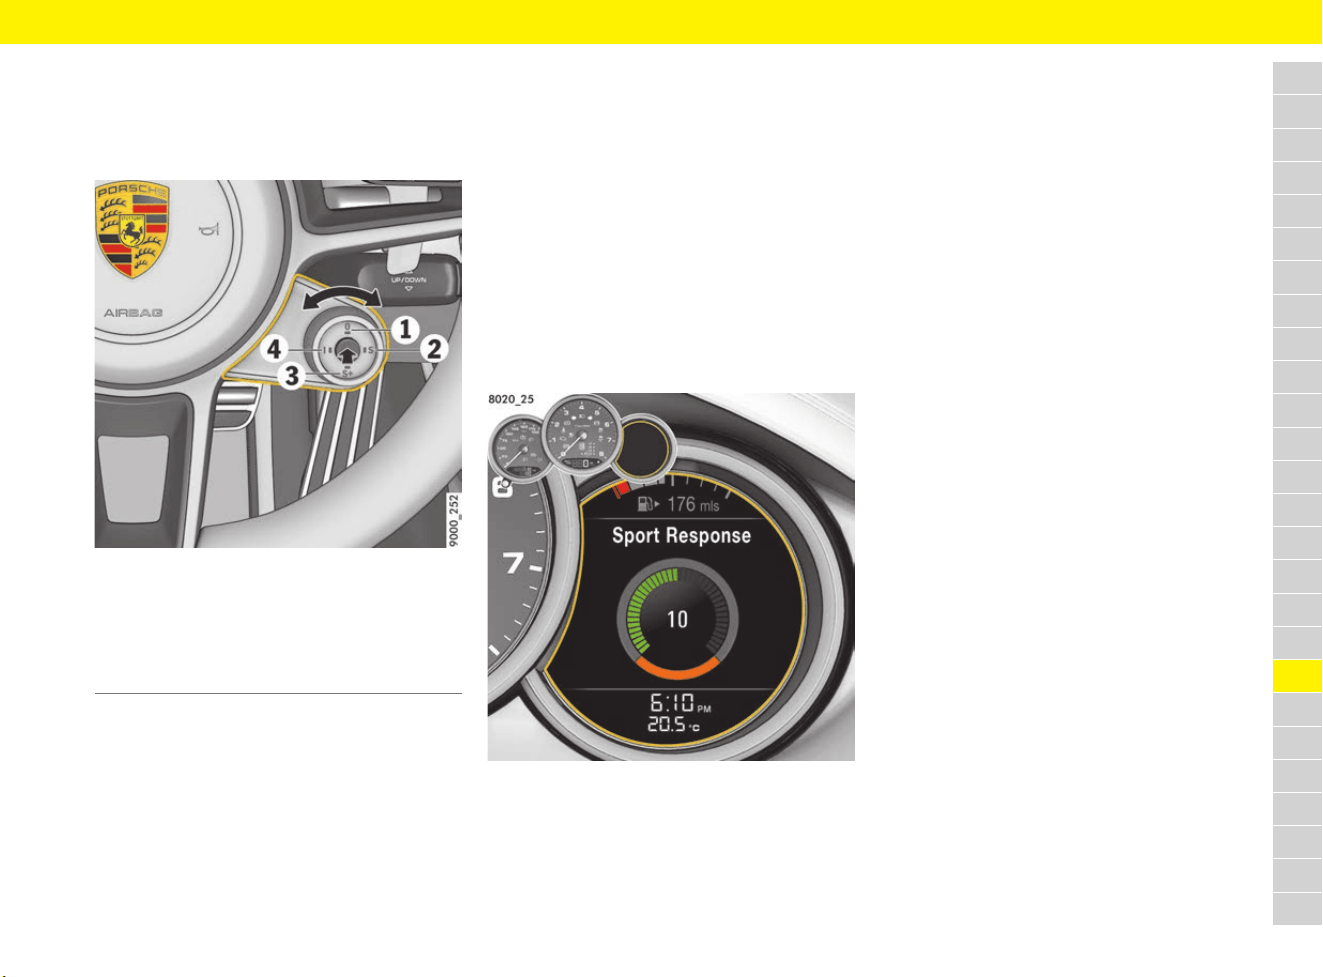
223
Sport Chrono Mode Switch
A
B
C
D
E
F
G
H
I
J
K
L
M
N
O
P
Q
R
S
T
U
V
W
X
Y
Z
Sport Chrono Mode Switch
Selecting the mode on the mode
switch
Fig. 200: Mode switch on the steering wheel
e Turn the mode switch to the left or to the right
to the desired drive mode.
The indicator light on the selected mode lights
up and a message appears on the multi-
function display.
For information on vehicle setup in the respective
mode:
f Refer to chapter “Overview of vehicle setup in
the selected drive mode” on page 224.
Configuring the individual mode
In individual mode, the settings for the PASM,
sports exhaust system, Auto Start Stop function
and rear wing can be combined individually based
on the Normal, SPORT or SPORT PLUS modes.
The saved combination can be retrieved again at
the next vehicle start by turning the mode switch.
For information on the configuration of the
individual mode on the multi-function display:
f Refer to chapter “Adjusting individual mode” on
page 267.
Using the SPORT Response mode
b Vehicles with PDK.
Fig. 201: SPORT Response display
Engine and transmission are time-controlled and
are set to maximum response in SPORT Response
mode:
– Faster boost pressure build-up
– PDK switches to a special gear-changing map
Activating SPORT Response mode
e Press the SPORT Response button.
The decreasing circle in the multi-function
display indicates how long the function is still
available. The vehicle then goes back to the
previously selected mode after approx.
20 seconds.
Deactivating SPORT Response mode
b SPORT Response mode active
e Press the SPORT Response button again.
Vehicle goes back to the previously selected
mode.
1 Normal mode
2 SPORT mode
3 SPORT PLUS mode
4 Individual mode
Switch centre SPORT Response button
224
Sport Chrono Mode Switch
A
B
C
D
E
F
G
H
I
J
K
L
M
N
O
P
Q
R
S
T
U
V
W
X
Y
Z
Overview of vehicle setup in the selected drive mode
Driving mode
Normal SPORT SPORT PLUS Individual SPORT Response
button
Drive
Response
Normal Sport Performance
Pre-selection:
Normal, SPORT or
SPORT PLUS
Performance
Rev-limiter
Normal Sport Sport Sport
Increasing idle speed
--- Active Active Active
Throttle blip during downshifting
Optimised engine sound in the
passenger compartment
Backfire
--- Active --- ---
Launch Control
--- --- Active Active
PDK
Normal Sport Performance SPORT Response
Auto Start Stop
Active --- --- Off/On ---
Chassis
Dynamic engine mounting Normal Sport Performance Pre-selection:
Normal, SPORT or
SPORT PLUS
Pre-selection:
Normal, SPORT or
SPORT PLUS
PTV
Normal Normal Sport
PASM Normal Normal Sport Sport chassis
PSM PSM SPORT function via the PSM button in the centre console
Other
Light systems
Normal Sport Sport
Pre-selection:
Normal, SPORT or
SPORT PLUS
Pre-selection:
Normal, SPORT or
SPORT PLUS
Adaptive cruise control
Sports exhaust system --- Active Active On/Off
Rear wing
depends on the driving speed
extended/
retracted

225
Sport Chrono Mode Switch
A
B
C
D
E
F
G
H
I
J
K
L
M
N
O
P
Q
R
S
T
U
V
W
X
Y
Z
Normal
The control systems work in a comfort-oriented
and economical interplay during everyday driving.
Sport
Moves the control systems further towards high
emotion and dynamism during everyday driving.
Performance
Maximum performance for race-circuit-like driving.

226
Sport Chrono Stopwatch
A
B
C
D
E
F
G
H
I
J
K
L
M
N
O
P
Q
R
S
T
U
V
W
X
Y
Z
Sport Chrono Stopwatch
You can use the Sport Chrono stopwatch to
measure any times, e.g. on the race circuit or
on work-related journeys. These times can be
recorded and evaluated.
The following information can be recorded and
evaluated:
– Lap number
– Lap distance
– Lap time
– Optional: various other data (such as vehicle
position, speed or the outside temperature)
During a recording the following can be displayed:
– Current lap number
– Fastest lap time and the current lap time
compared to it
– Percentage of distance travelled in related to a
reference lap
– Colour rating to indicate whether the current
lap time is quicker than, slower than or
identical to the current fastest lap.
– The residual range and the number of laps that
can still be driven with the current fuel level
– Storage time still remaining
– Optional: Track progress of current lap and the
reference lap
Stopwatch on the dashboard
Fig. 202: Sport Chrono stopwatch on the dashboard
The stopwatch has an analogue and a digital
display:
Analogue display
– Big pointer: seconds
– Small pointer: hours and minutes
The display re-starts at zero after 12 hours.
Digital display
– Seconds, 1/10 seconds and 1/100 seconds
The digital display and the multi-function display
can show up to 99 hours and 59 minutes.
Adjusting brightness of stopwatch
f Refer to chapter “Adjusting brightness of
instrument lighting” on page 123.
Switching stopwatch light on the
dashboard on and off
f Refer to chapter “Adjusting brightness of
instrument lighting” on page 123.
Displaying the time on the stopwatch
f Refer to chapter “Displaying time in stopwatch
on dashboard” on page 266.
Displaying stopwatch time
The lap time can be displayed at different
positions:
– In the Sport Chrono stopwatch on the
dashboard.
– In the Chrono menu on the multi-function
display.
– In the main menu under SC in
the PCM.
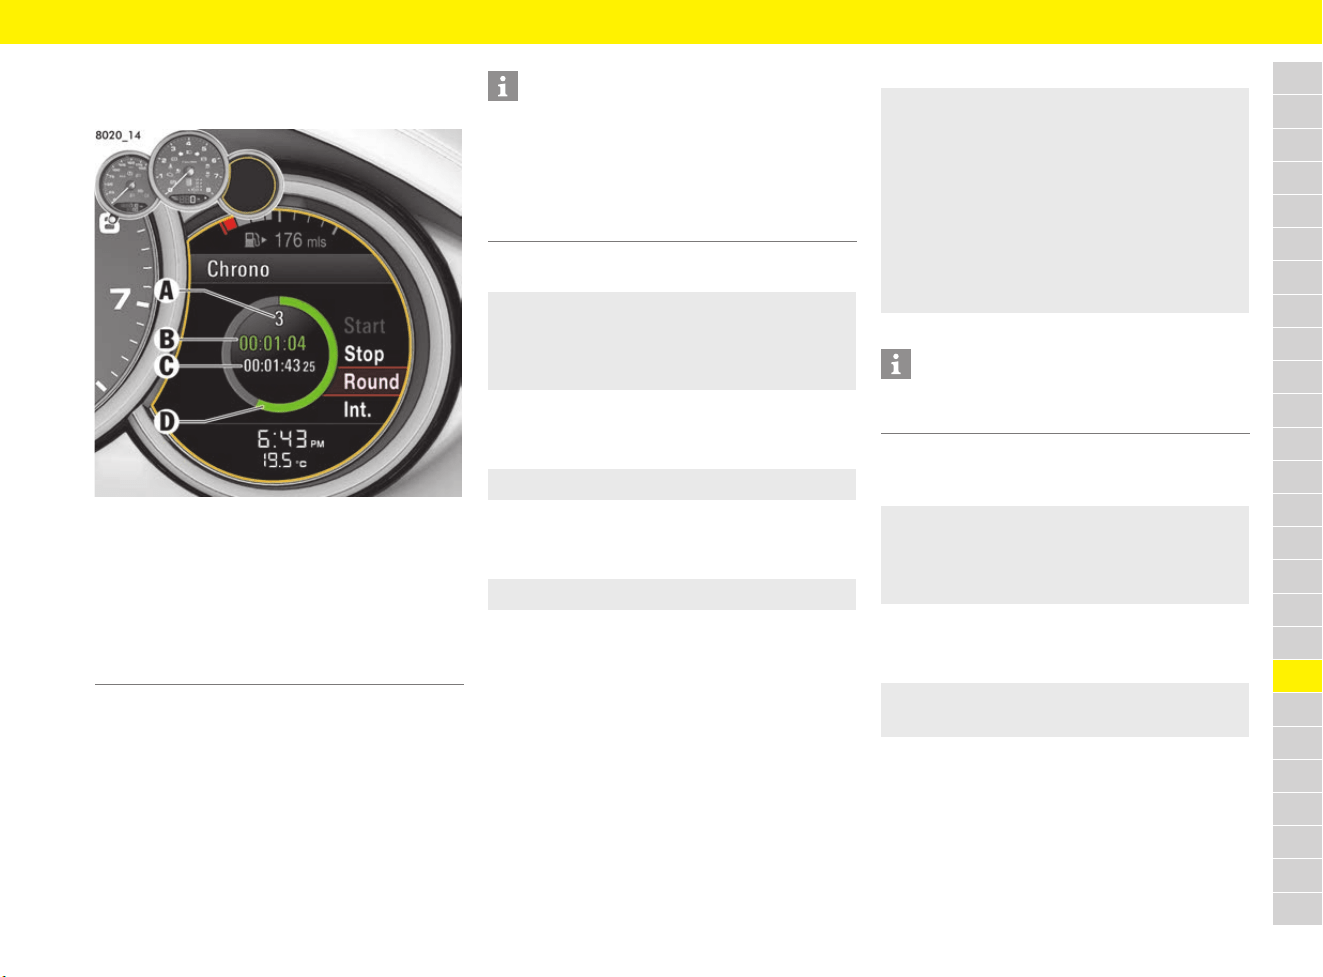
227
Sport Chrono Stopwatch
A
B
C
D
E
F
G
H
I
J
K
L
M
N
O
P
Q
R
S
T
U
V
W
X
Y
Z
Performing timing on the multi-
function display
Fig. 203: Chrono menu
Starting timing
Stopping timing
b Timing has started.
Continuing timing
b Timing was stopped.
Stopping lap/starting new lap
The current stopwatch time is stored as a lap time
while the stopwatch is still running.
b Timing has started.
Storing intermediate time
b Timing has started.
Resetting the stopwatch time
b Timing was stopped.
A Lap counter – current lap number
B Current lap time
(green: faster than the fastest lap,
yellow: identical to the fastest lap,
red: slower than the fastest lap)
C Fastest lap time
D Circle display (how much of the lap has been
completed compared to a reference lap)
Information
If you quit the Chrono menu while the stopwatch is
running, the timing will continue.
The stopwatch stops after the ignition is switched
off. If the ignition is switched on again within
approx. 4 minutes, the stopwatch will continue to
run.
e Chrono e Start
Data recording begins. If a reference lap has
not been stored yet, the first lap in the
recording will be used as a reference lap.
e Chrono e Stop
e Chrono e Stop e Cont.
e Chrono e Round
The lap counter value (Fig. 203, A) is incre-
mented by one. The time of the fastest
completed lap is stored as the fastest lap
time (Fig. 203, C). The current lap time
(Fig. 203, B) and the circle display
(Fig. 203, D) turn a different colour to
indicate whether the current lap time is faster
than, slower than or identical to the current
fastest lap.
Information
A maximum of 99 laps can be stored during each
session.
e Chrono e Int.
The intermediate time is displayed briefly
and is not stored. Timing continues in the
background.
e Chrono e Stop e Reset
All stopwatch time displays are reset to zero.
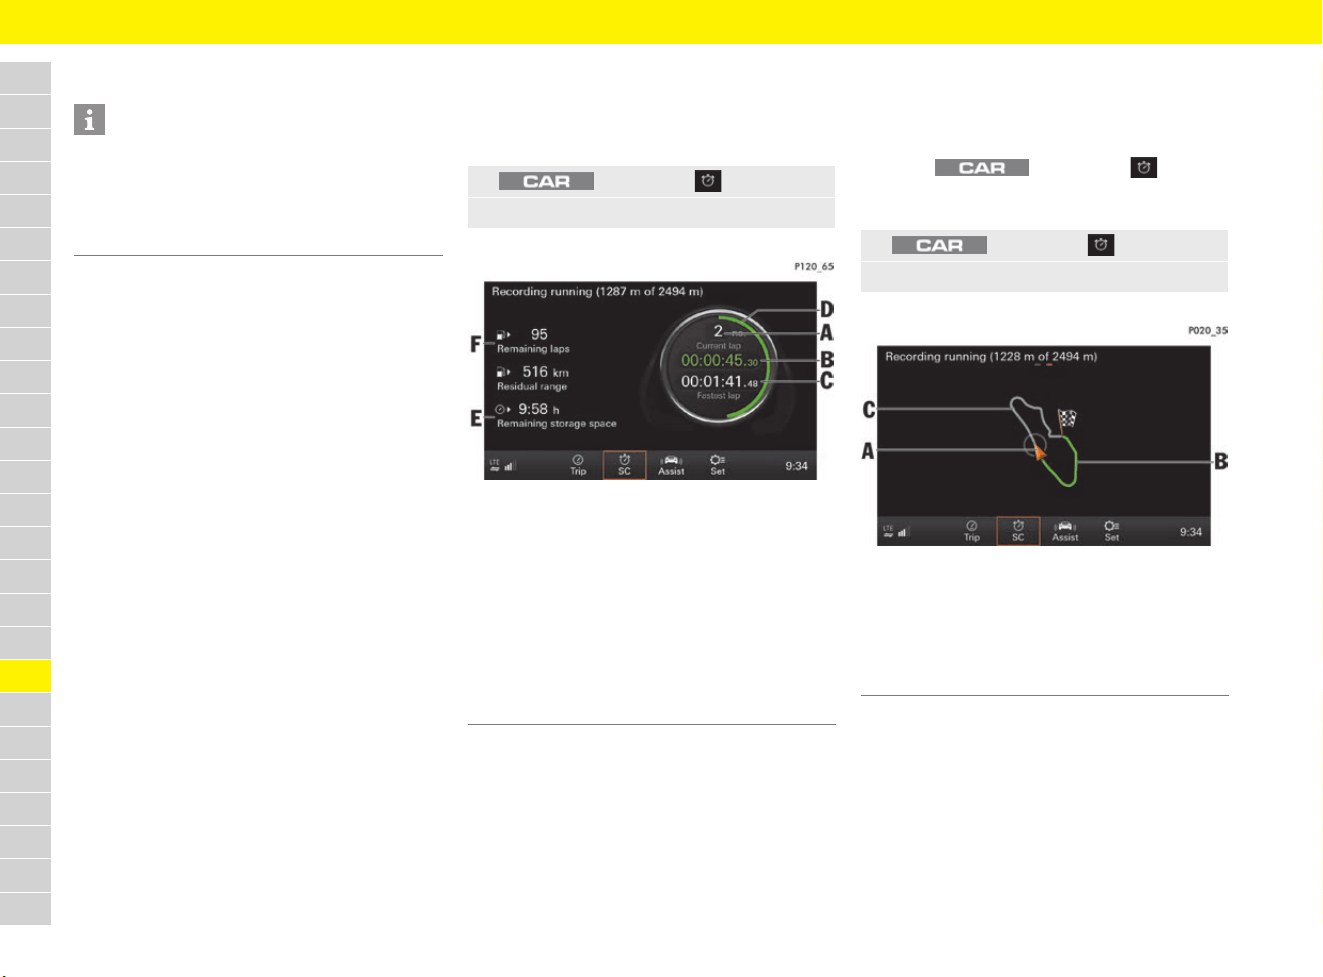
228
Sport Chrono Stopwatch
A
B
C
D
E
F
G
H
I
J
K
L
M
N
O
P
Q
R
S
T
U
V
W
X
Y
Z
Displaying timing in the PCM
Displaying stopwatch
b Timing has started.
f Refer to chapter “Starting timing” on
page 227.
Fig. 204: Stopwatch display (ongoing recording)
Displaying track progress
b Timing has started.
f Refer to chapter “Starting timing” on
page 227.
b Under button e SC e
SET Sport Chrono, the
Record additional data function is activated.
Fig. 205: Ongoing recording – track progress display
Information
For information on operating Porsche
Communication Management (PCM):
f Refer to chapter “Operating the Porsche
Communication Management (PCM)” on
page 176.
1. button e SC
2. Scroll (swipe) to stopwatch display.
A Lap counter – current lap number
B Current lap time
(green: faster than the fastest lap,
yellow: identical to the fastest lap,
red: slower than the fastest lap)
C Fastest lap time
D Circle display (how much of the lap has been
completed compared to a reference lap)
E Available remaining storage space
F The number of laps that can still be driven with the
current fuel level
1. button e SC
2. Scroll (swipe) to track progress display.
A Current vehicle position
B Current lap
(green: faster than the fastest lap,
yellow: identical to the fastest lap,
red: slower than the fastest lap)
C Reference lap (grey)
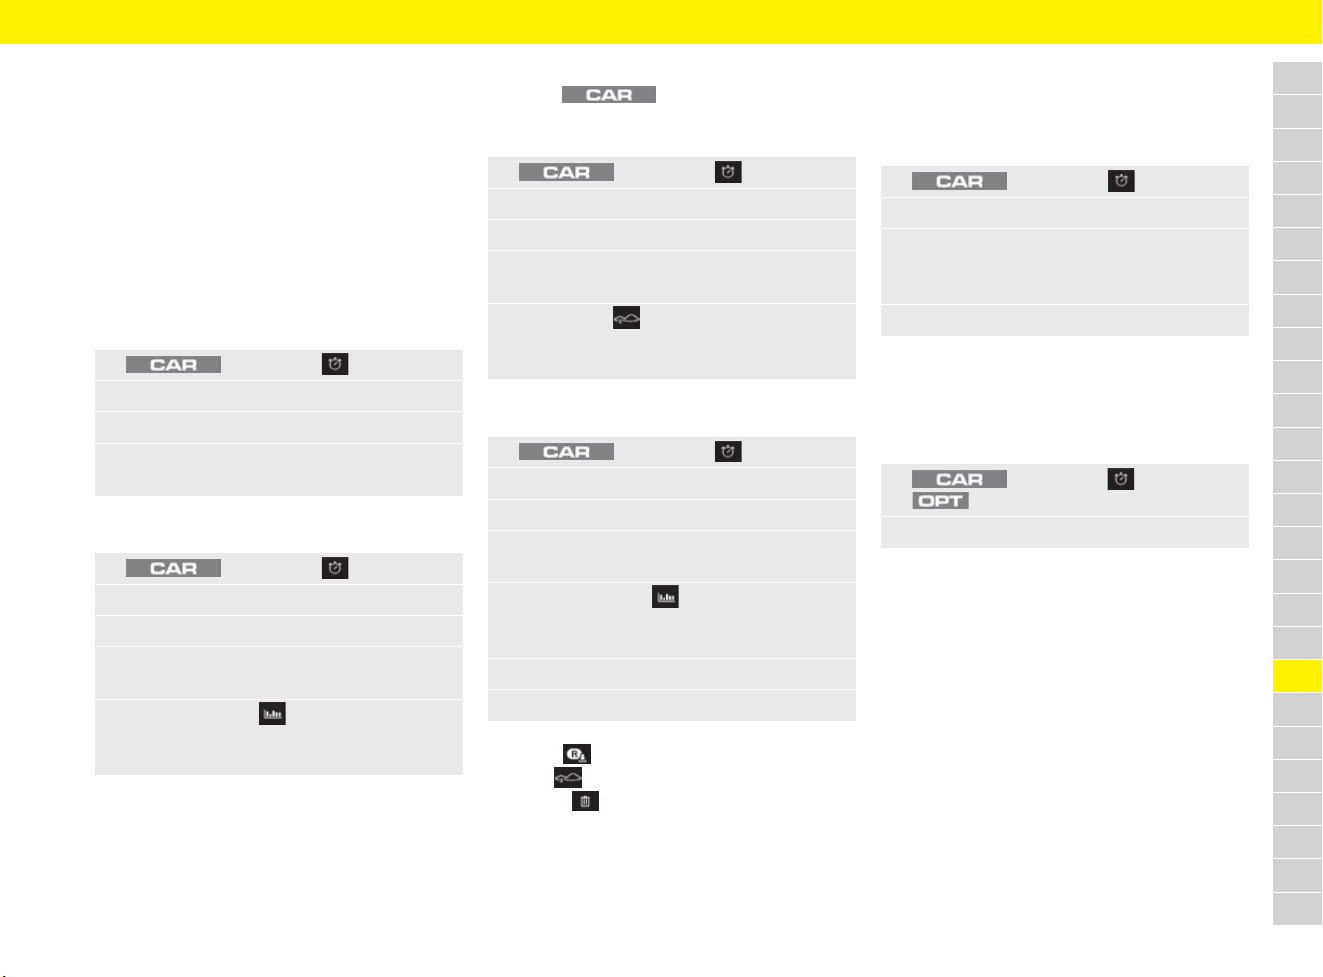
229
Sport Chrono Stopwatch
A
B
C
D
E
F
G
H
I
J
K
L
M
N
O
P
Q
R
S
T
U
V
W
X
Y
Z
Displaying and editing recordings
A maximum of 99 laps can be recorded during
each session. Provided a reference lap has not
been loaded already, the first lap of the recording
is used as the reference lap.
A maximum of 10 hours of recording time is
available.
Displaying recordings
b Timing is stopped.
f Refer to chapter “Stopping timing” on
page 227.
Displaying recording statistics
Displaying track progress of recording
b Under button e SC e
SET Sport Chrono, the Record additional
data function is activated.
Displaying and editing a lap
– Store : Storing a lap as the reference lap
– Map : Display track progress for lap
– Delete : Deleting the lap
Setting the reference lap
b Timing is stopped and reset.
f Refer to chapter “Performing timing on the
multi-function display” on page 227.
Entering settings in the PCM
Managing recordings and reference
laps
– Rename data: Reference laps and recordings
can be renamed.
– Transfer data: Recordings and reference laps
can be imported or exported with an SD card
or USB mass storage device:
– Import: To be able to import data, the data
must be saved on a storage device in the
SportChrono folder. Select the data to be
imported via Select and Deselect. Import
the selected data via Import.
– Export: Select the data to be exported via
Select and Deselect. Export the selected
data via Export.
– Delete data: Reference laps and recordings
can be deleted.
1. button e SC
2. Browse (swipe) to the Recordings page.
3. Select the Recordings folder.
4. To display a recording, select the desired
recording (e.g. recording 001).
1. button e SC
2. Browse (swipe) to the Recordings page.
3. Select the Recordings folder.
4. To display a recording, select the desired
recording (e.g. recording 001).
5. Select Statistics in the controller.
Information about the individual laps is
displayed.
1. button e SC
2. Browse (swipe) to the Recordings page.
3. Select the Recordings folder.
4. To display a recording, select the desired
recording (e.g. recording 001).
5. Select Map in the controller.
Information about the track progress
of the lap is displayed.
1. button e SC
2. Browse (swipe) to the Recordings page.
3. Select the Recordings folder.
4. To display a recording, select the desired
recording (e.g. recording 001).
5. Select Statistics in the controller.
Information about the individual laps is
displayed.
6. Select the desired lap.
7. Select the desired setting in the controller:
1. button e SC
2. Browse (swipe) to the Recordings page.
3. Select a desired reference lap under
Reference laps.
The desired reference lap is displayed.
4. Select Set Ref. in the controller.
1. button e SC e
button
2. Select the desired option:

230
Sport Chrono Stopwatch
A
B
C
D
E
F
G
H
I
J
K
L
M
N
O
P
Q
R
S
T
U
V
W
X
Y
Z
Other settings
–
Record additional data: Apart from lap length
and lap times, other driving data (such as
speed) can be stored at intervals of 1 second.
The track progress can also be shown on the
map.
f Refer to chapter “Displaying and editing
recordings” on page 229.
– Permitted delta distance: Indicates how
much the length of a lap may differ from the
length of the reference lap. Laps with greater
length deviations are not included in the
evaluation.
– Max. delta time for evaluation: Indicates
the maximum time difference with which laps
are evaluated as identical in speed (marked
yellow) during the recording.
1. button e SC e
button e SET Sport Chrono
2. Select the desired option:
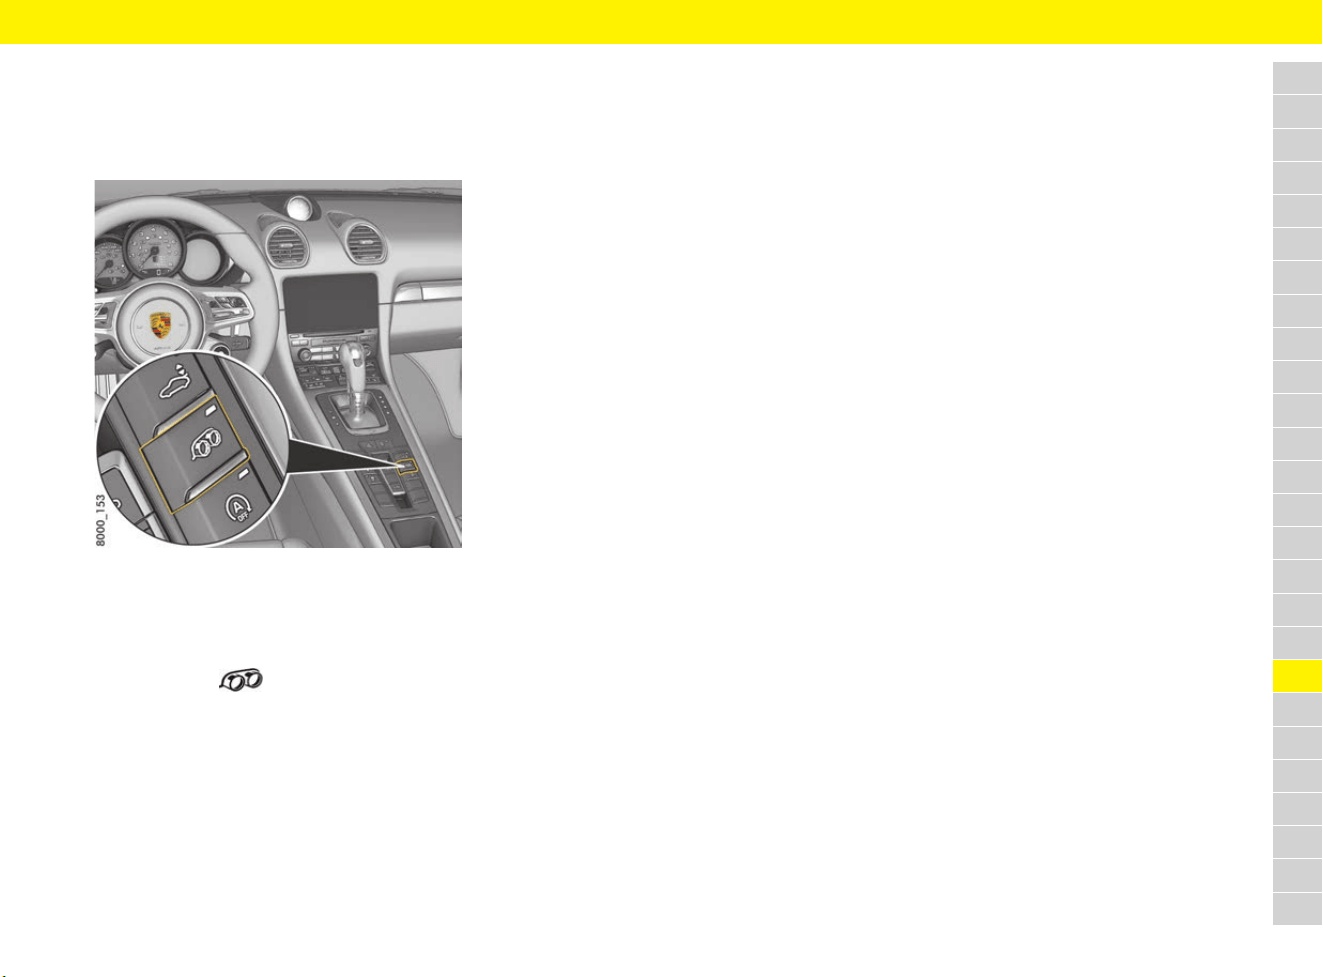
231
Sports Exhaust System
A
B
C
D
E
F
G
H
I
J
K
L
M
N
O
P
Q
R
S
T
U
V
W
X
Y
Z
Sports Exhaust System
Switching the sports exhaust
system on and off
Fig. 206: Button for the sports exhausts system in the
centre console
The sports exhaust system can be switched to
a sound-optimised mode when the ignition is
switched on.
e Press button .
When the sports exhaust system is switched
on, the indicator light on the button lights up.
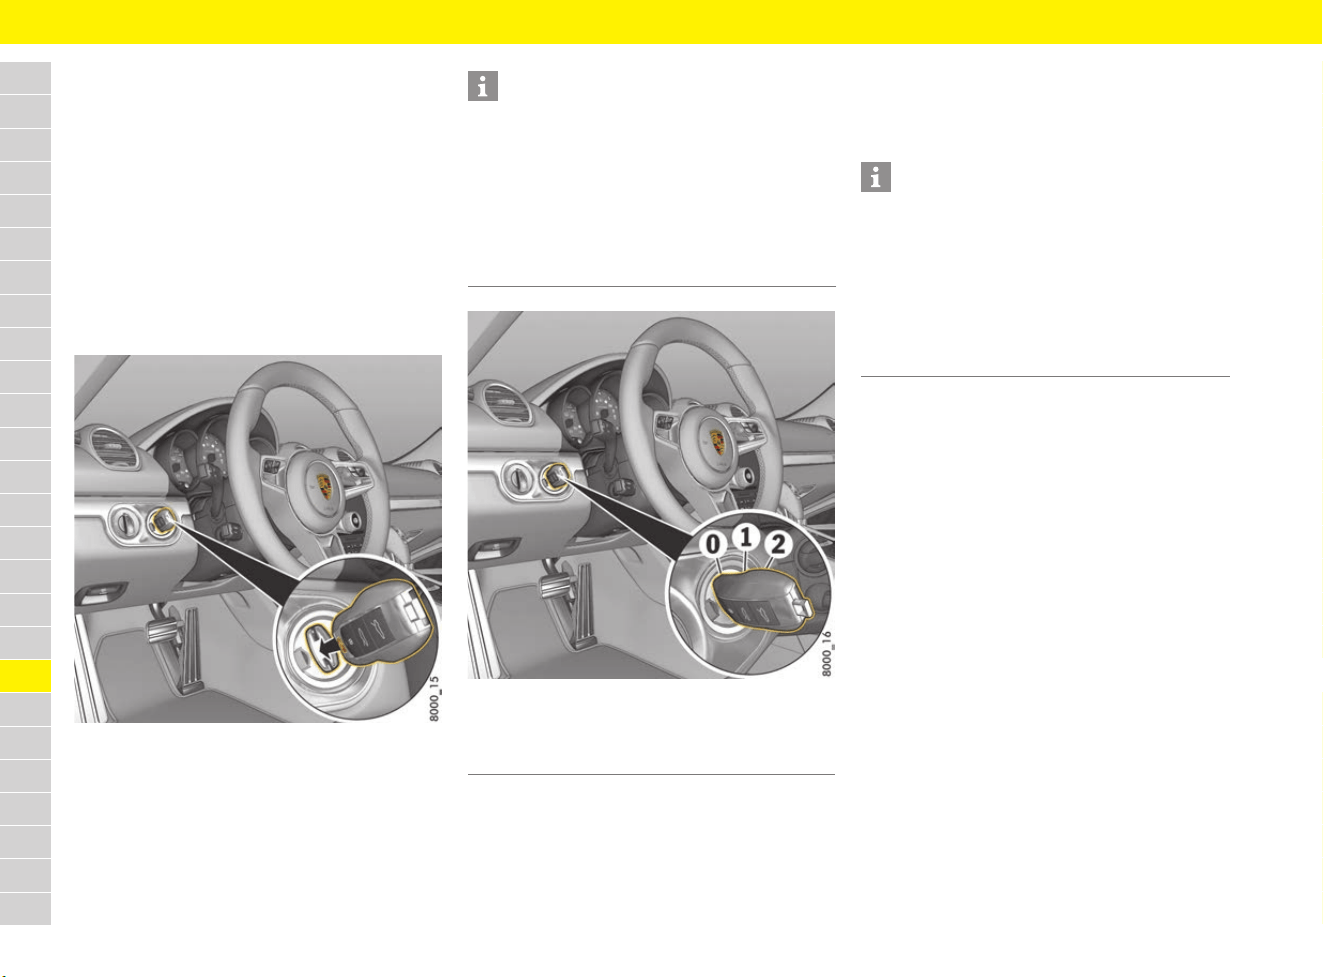
232
Starting and Stopping the Engine
A
B
C
D
E
F
G
H
I
J
K
L
M
N
O
P
Q
R
S
T
U
V
W
X
Y
Z
Starting and Stopping the
Engine
Ignition lock
The driver’s key is inserted into the ignition lock at
the left of the steering wheel.
On vehicles with Porsche Entry & Drive, you no
longer have to insert the driver’s key into the
ignition lock, but merely keep it with you. The
driver’s key is replaced by a control unit in the
ignition lock, which always remains in the ignition
lock, unless the vehicle is being towed.
Fig. 207: Inserting the driver’s key into the ignition lock
Fig. 208: Ignition lock positions
0 – Ignition off (initial position)
The engine and ignition are off in ignition lock
position 0. The driver’s key can be inserted and
removed in this position.
1 – Ignition on
Most of the electrical equipment can be switched
on. The warning lights on the instrument panel
light up for a lamp check.
2 – Start the engine
The driver’s key is reset automatically from
position 2 to position 1 when you start the engine.
Locking and unlocking steering
wheel
f Refer to chapter “Unlocking and locking the
steering column” on page 248.
Information
The vehicle battery discharges if the driver’s key is
left inserted.
If the vehicle battery is discharged, the driver’s key
can only be removed from the ignition lock if the
emergency operation is performed:
f Refer to chapter “Performing emergency
release of driver’s key/control unit” on
page 103.
0 Initial position
1 Ignition on
2 Start engine
Information
If no loads are switched on for 10 minutes after
switching on the ignition, the ignition must be
switched on again.
Turn the driver’s key to ignition lock position 0
(initial position) first.
The driver’s key cannot be removed when the
ignition is switched on or when the engine has
been started.

233
Starting and Stopping the Engine
A
B
C
D
E
F
G
H
I
J
K
L
M
N
O
P
Q
R
S
T
U
V
W
X
Y
Z
Starting the engine
1. Operate the footbrake.
2. Vehicles with manual transmission:
Fully depress the clutch pedal and hold.
3. Move gearshift lever into neutral or move
selector lever to the P or N position.
4. Do not press the accelerator pedal.
5. Turn the driver’s key or control unit
(Porsche Entry & Drive) to ignition lock
position 2. Do not operate the starter for
longer than approx. 10 seconds.
The starting procedure is carried out and
completed automatically as soon as ignition
lock position 2 (start engine) is reached.
e Repeat the starting procedure after approx.
10 seconds if necessary. Turn the driver’s key
back to ignition lock position 0 (initial position)
first.
Do not warm up the engine when stationary.
Drive off immediately. Avoid high revs and full
throttle until the engine has reached operating
temperature.
Stopping the engine
1. Stop the vehicle.
2. Turn the driver’s key or control unit to ignition
lock position 0.
e When leaving the vehicle, remove the driver’s
key, apply the electric parking brake and
engage selector-lever position P on vehicles
with PDK, or engage first gear or reverse gear
on vehicles with manual transmission.
WARNING
Inactive power steering
and brake booster
The power steering and brake booster are only
operational while the engine is running. If the
engine is switched off, much greater force is
suddenly required for turning the steering wheel or
braking.
e Only switch off the ignition when the vehicle is
stationary.
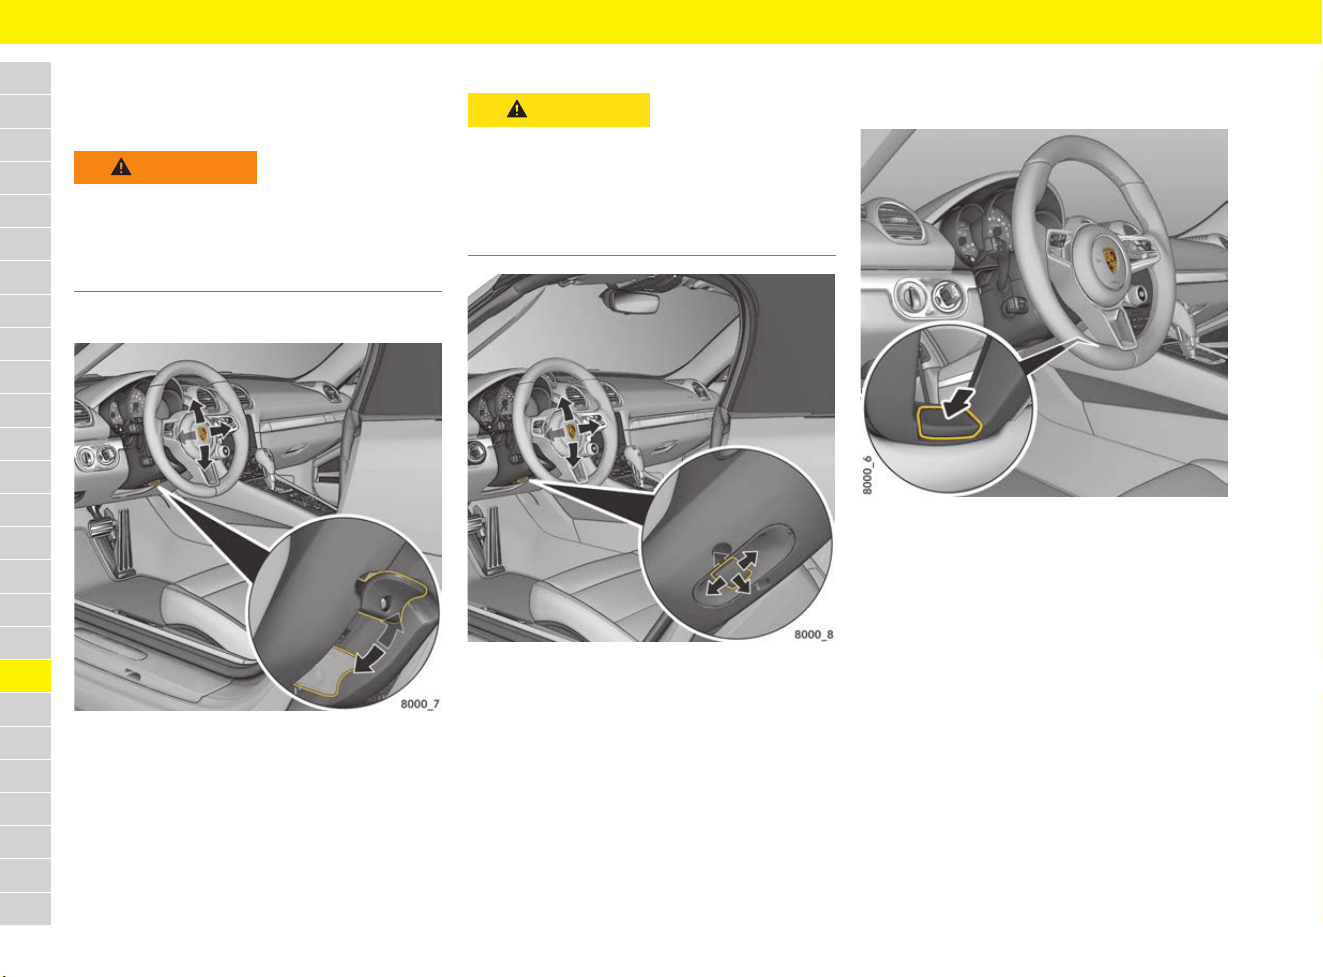
234
Steering Wheel
A
B
C
D
E
F
G
H
I
J
K
L
M
N
O
P
Q
R
S
T
U
V
W
X
Y
Z
Steering Wheel
Adjusting steering wheel
Adjusting steering wheel manually
Fig. 209: Steering wheel adjustment locking lever
1.
Insert the driver’s key fully into the ignition lock.
2. Push the locking lever downwards.
3. Adjust the steering wheel to suit the backrest
angle and seat position by moving up or down
and longitudinally.
4. Swivel the locking lever back until you feel it
engage.
Adjusting steering wheel electrically
Fig. 210: Steering wheel adjustment control switch
e Move the control switch under the steering
column in the relevant direction until the
desired setting is reached.
Storing steering wheel settings
On vehicles with memory package, the steering
wheel settings can be stored on the memory
buttons in the driver’s door and on the driver’s key.
f Refer to chapter “Personal Settings” on
page 188.
Switching steering wheel heating
on/off
Fig. 211: Heated steering wheel button
b Engine is running.
e Press the button on the central steering wheel
spoke (Fig. 211) until the message “Heated
steering wheel on” or “Heated steering
wheel off” appears briefly on the multi-function
display.
WARNING
Steering wheel
adjustment while driving
The steering wheel may move further than desired
if you attempt to adjust it while driving. You may
lose control of the vehicle.
e Do not adjust the steering wheel while driving.
CAUTION
Inadvertent retrieval of
memory settings
If persons or animals are within the range of
movement of the steering wheel, there is a risk
of parts of the body being squeezed or crushed
when you adjust the steering wheel.
e Do not leave children in the vehicle unattended.
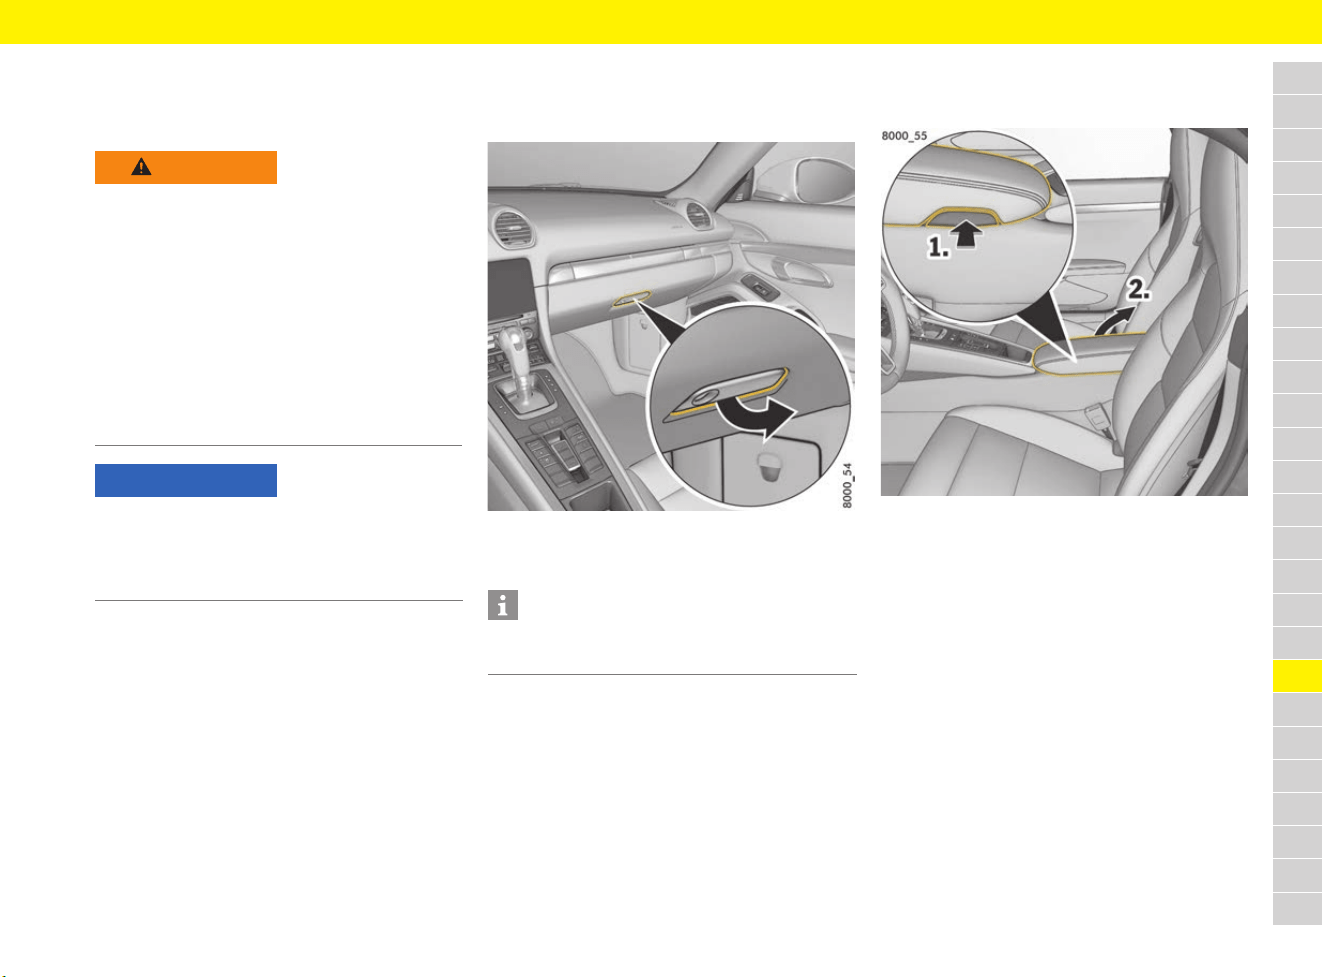
235
Storage
A
B
C
D
E
F
G
H
I
J
K
L
M
N
O
P
Q
R
S
T
U
V
W
X
Y
Z
Storage
Stowing objects
Depending on the vehicle equipment, the following
storage options may be available:
– Cupholders
– Glove box with pen holder
– Door storage compartments
– Storage compartment in door sill next to
passenger’s seat
– Storage compartment in centre console
armrest
– Storage net in the passenger’s footwell
– Clothes hook on back of seat backrests
Opening and closing the glove box
Opening the glove box
Fig. 212: Opening the glove box
e Pull the handle (Fig. 212) and open the lid.
Closing the glove box
e Always lock the handle with the emergency
key, to secure the contents from unauthorised
access.
f Refer to chapter “Using emergency key” on
page 102.
Opening the storage compartment
in the centre console armrest
Fig. 213: Opening the storage compartment in the centre
console armrest
e Press the button (Fig. 213) on the right-hand
side of the armrest.
The lid pops up automatically.
Depending on the country, the storage
compartment may contain a smartphone tray.
f Refer to chapter “Stowing a mobile phone
(country-dependant)” on page 246.
WARNING
Unsecured or
incorrectly positioned
objects
An unsecured or incorrectly positioned load can
slip out of place and endanger the vehicle
occupants as a result of hard braking, direction
changes or an accident.
e Do not transport items of luggage or objects
unsecured in the passenger compartment.
e Do not transport heavy objects in open
storage compartments.
e Always keep storage compartments closed
while driving.
NOTICE
Heavy and bulky objects can damage the storage
net.
e Do not place any heavy and bulky objects in the
storage net.
Information
There is a pen holder on the inside of the glove box
lid.
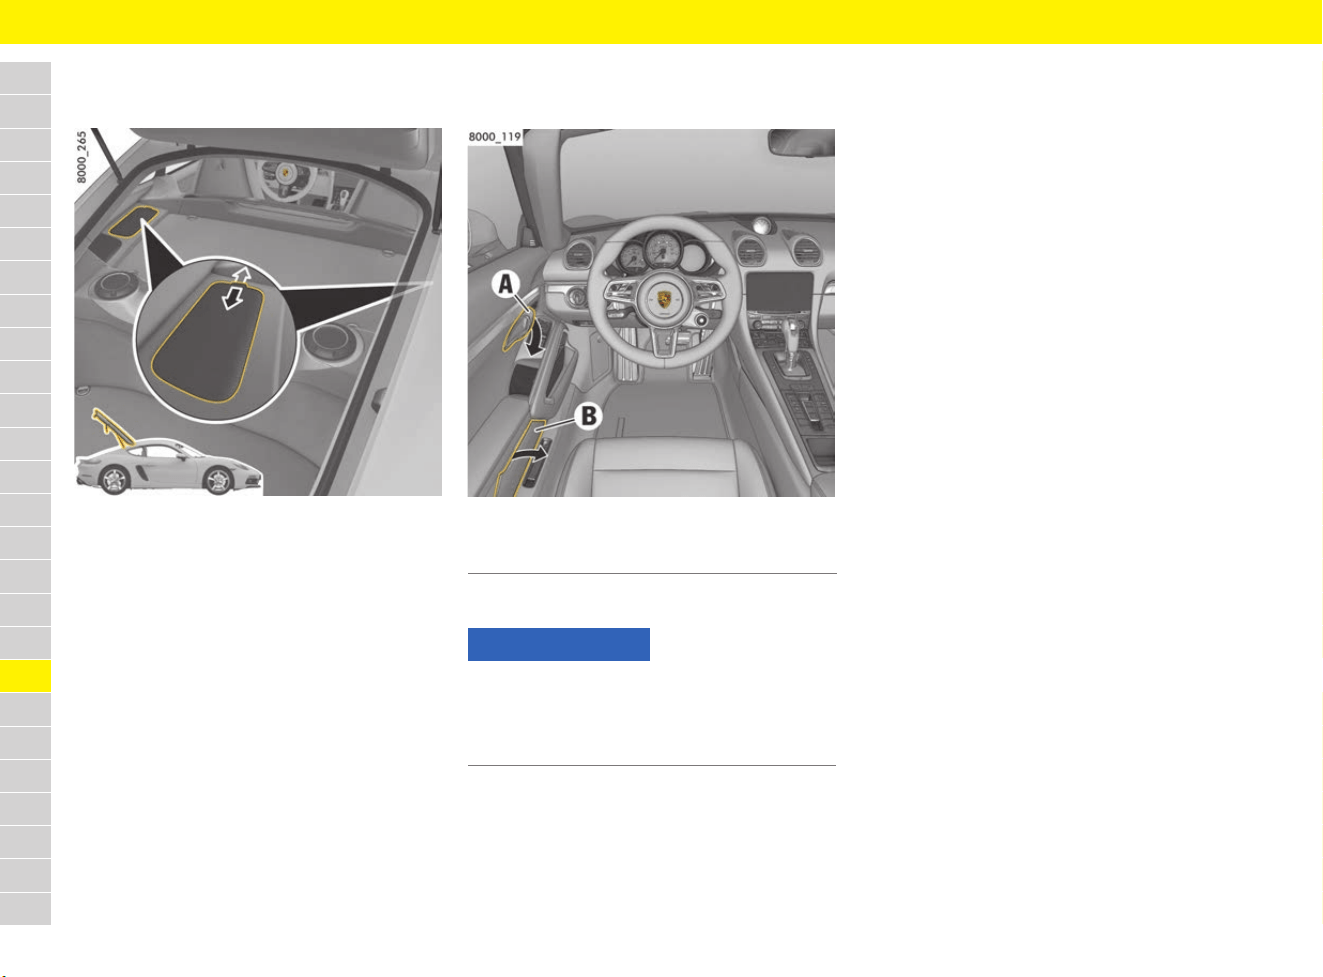
236
Storage
A
B
C
D
E
F
G
H
I
J
K
L
M
N
O
P
Q
R
S
T
U
V
W
X
Y
Z
Opening the side storage
compartments behind the seats
Fig. 214: Side storage compartment behind the seats
with retractable cover
Opening
e Pull the handle of the retractable cover
backwards in the direction of the arrow.
Closing
e Push the handle of the retractable cover
forwards in the direction of the arrow.
Opening door storage
compartments
Fig. 215: Door storage compartment
e Lift up the lid B (Fig. 215).
A Door opener
B Door storage compartment
NOTICE
Risk of damage to the door storage compartment
when closing the door.
e Close the lid of the storage compartment
before closing the door.
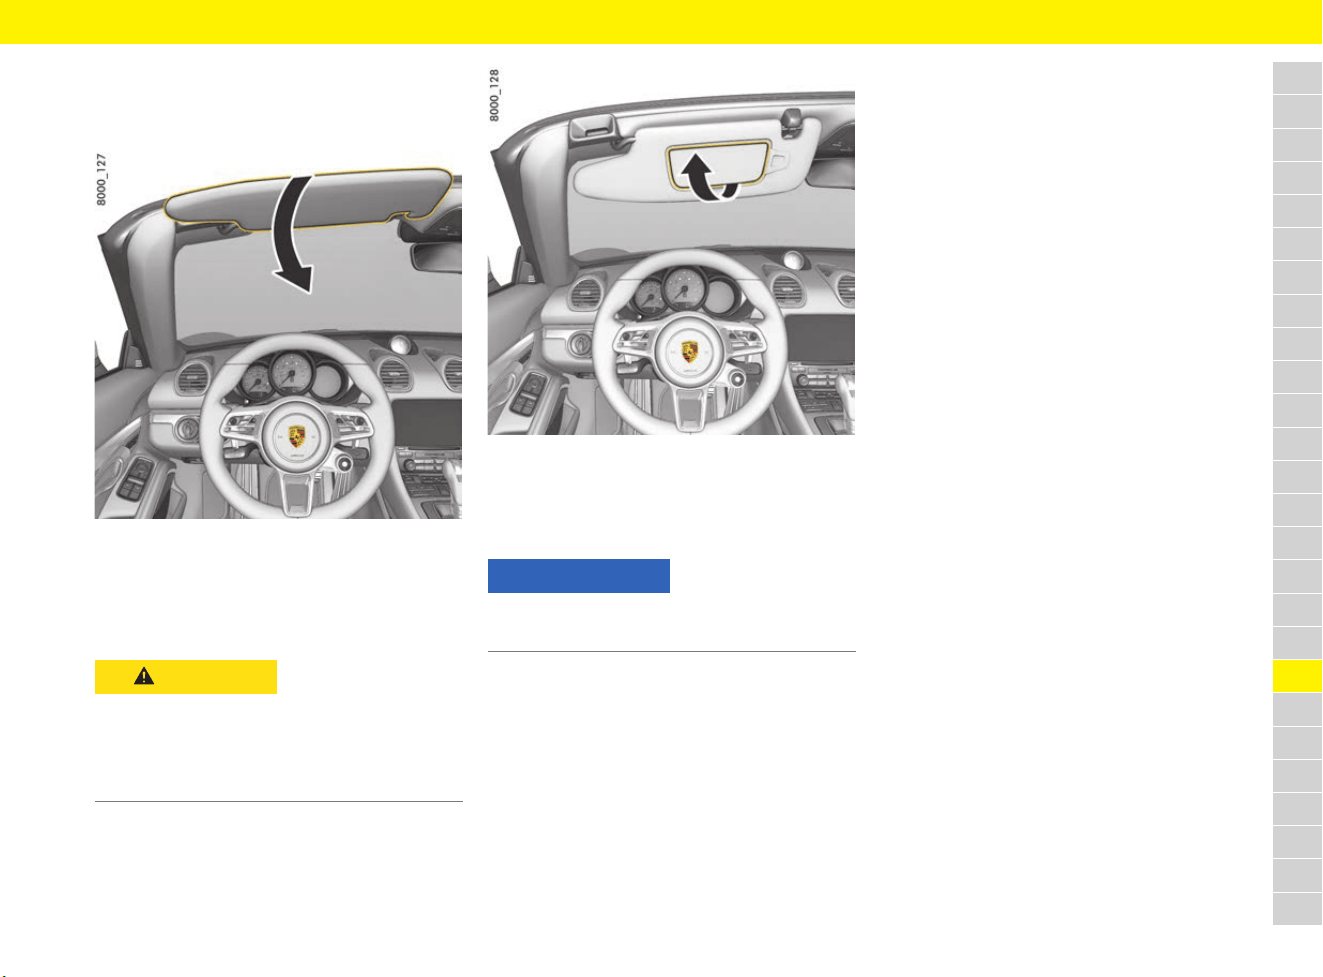
237
Sun Visors
A
B
C
D
E
F
G
H
I
J
K
L
M
N
O
P
Q
R
S
T
U
V
W
X
Y
Z
Sun Visors
Adjusting sun visor
Fig. 216: Adjusting sun visor
e Swivel the sun visor down to prevent glare
from the front.
Opening vanity mirror
Fig. 217: Opening vanity mirror
e Open the cover of the vanity mirror on the
inside of the sun visor.
The vanity mirror lighting is switched on.
CAUTION
Cover of vanity mirror
open
The mirror glass may break in the event of an
accident and may fall into the passenger
compartment if the cover is open.
e Keep the cover closed when driving.
NOTICE
Risk of damage to the vanity mirror cover.
e Do not force the cover beyond its end position.
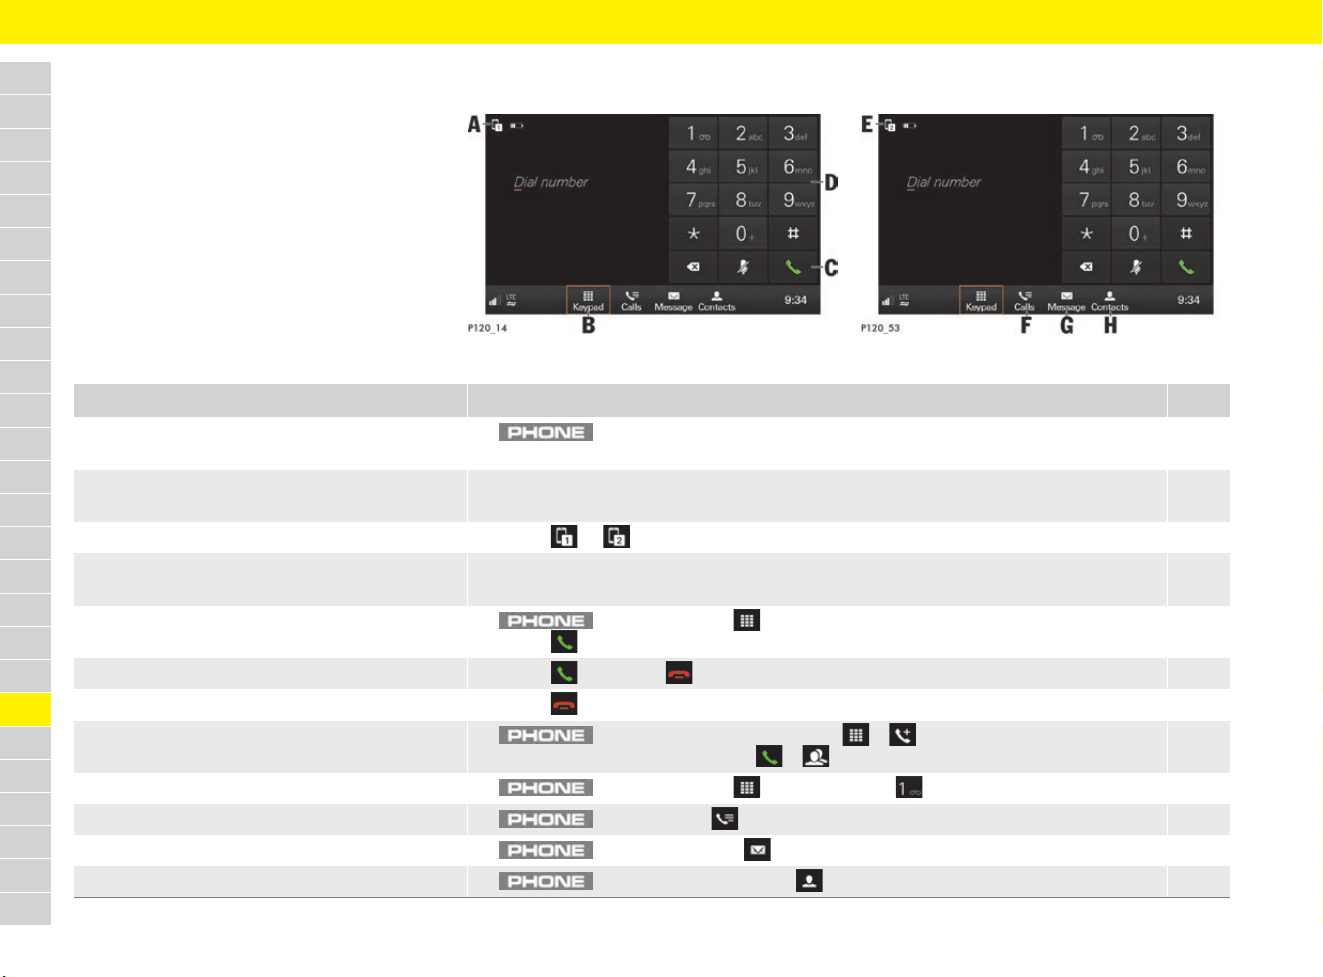
238
Telephone
A
B
C
D
E
F
G
H
I
J
K
L
M
N
O
P
Q
R
S
T
U
V
W
X
Y
Z
Telephone
Brief overview
This brief overview does not replace the complete
information provided in the chapter “Telephone”.
Safety instructions and warnings, in particular,
are not replaced by this brief overview.
For information on operating Porsche
Communication Management (PCM):
f Refer to chapter “Operating the Porsche
Communication Management (PCM)” on
page 176.
Fig. 218: Dialling a number (keypad)
Fig. 219: Dialling a number (keypad)
What do I want to do? What do I have to do? Page
Connect phone via Bluetooth
®
(mobile phone preparation)
e button e Connect phone e Search for new phone 239
Use PCM for making phone calls with
an external SIM card
e Insert a SIM card into the SIM card slot (missing corner front left, chip facing downwards) e
If necessary, enter PIN e Confirm data connection.
241
Switch between two connected mobile phones e Select or (see A and E) in the headline. 240
Establish a data connection (connectivity) e Establish a data connection via the embedded SIM, an external SIM card or
external WiFi hotspot.
87
Dial a number e button e Keypad (see B) e Enter the number using numeric field D e
Select (see C).
242
Accept/reject a call e Select Accept or Cancel. 242
End a call e Select in the footer or phone menu. 242
Start a conference call e button e Dial number e Keypad e e
Dial number of other participant e e
243
Listen to mailbox e button e Keypad e Press and hold . 242
Display call list e button e Calls (see F) e Select call list. 243
Display messages e button e Message (see G) e Text message or E-mail e Select folder. 244
Display a contact e button e Select Contacts (see H). 244
239
Telephone
A
B
C
D
E
F
G
H
I
J
K
L
M
N
O
P
Q
R
S
T
U
V
W
X
Y
Z
Connecting mobile phone
via Bluetooth
®
(mobile phone preparation)
Connecting a new mobile phone
b Mobile phone’s Bluetooth
®
function is
activated and visible to other devices.
b PCM’s Bluetooth
®
function is activated.
f Refer to chapter “Activating the PCM’s
Bluetooth
®
function” on page 239.
Activating the PCM’s Bluetooth
®
function
WARNING
Risk of accidents
Using mobile phones while driving may distract
from the traffic situation. You may lose control of
the vehicle.
e Always use hands-free equipment.
WARNING
Danger of injury
Mobile phones must be switched off in certain
danger areas, e.g. near petrol stations, fuel
depots, chemical plants and blasting work.
They may interfere with technical equipment.
e Always comply with instructions as well as
legal requirements and local restrictions.
Information
A list of selected compatible mobile phones is
available online at www.porsche.com.
1. button e Connect phone
– or –
Select or in the footer
(depending on the connection status) e
Phone.
2. Select Search for new phone and select
the mobile phone from the device list.
A 6-digit Bluetooth
®
code is generated and
displayed in the PCM and on the mobile phone.
3. Compare the Bluetooth
®
code in the PCM
and on the mobile phone.
4. If the Bluetooth
®
code in the PCM and on the
mobile phone match, confirm.
On mobile phones with SIM Access Profile
(SAP), enter the PIN for the external SIM card
in the PCM, if necessary.
When the phone is successfully connected,
the numeric input (menu Keypad ) is
displayed in the PCM.
Information
For mobile phones with Windows
®
and iOS
®
operating systems, we recommend initiating the
connection from the mobile phone:
e Search for available devices in the mobile
phone’s Bluetooth
®
menu. Press
button to make the PCM visible.
The display Connect phone must be visible
for the connection procedure.
e Select the PCM from the list of available
devices. The Bluetooth
®
device names of
the PCM can be displayed by selecting
button e button e
SET PHONE e Bluetooth e Bluetooth
name.
f Refer to chapter “Managing Bluetooth
®
functions and devices” on page 246.
1. button e button e
SET PHONE
2. Select Bluetooth e Activate Bluetooth to
switch on the PCM’s Bluetooth
®
function.
Information
In the case of a Bluetooth
®
connection, the mobile
phone can be connected to the PCM via the hands-
free profile (HFP) or the SIM access profile (SAP).
When using the hands-free profile, the PCM serves
as a Bluetooth
®
hands-free unit for the connected
mobile phone and, depending on the mobile
phone, is able to access the content of the phone
book, call lists and messages. It is therefore
possible, after stopping the vehicle, to transfer a
current call to the mobile phone and to continue it
outside the vehicle.
In contrast, when using the SIM access profile, the
SIM card of the mobile phone is connected to the
PCM directly via Bluetooth
®
. The mobile phone
thus makes the network access data available to
the PCM.
f More information on Bluetooth
®
profiles can
be found in the mobile phone operating
instructions.
240
Telephone
A
B
C
D
E
F
G
H
I
J
K
L
M
N
O
P
Q
R
S
T
U
V
W
X
Y
Z
Connecting to registered mobile phones
b Mobile phone’s Bluetooth
®
function is
activated and visible to other devices.
b PCM’s Bluetooth
®
function is activated.
f Refer to chapter “Activating the PCM’s
Bluetooth
®
function” on page 239.
b Mobile phone has already been connected to
the PCM once.
Connecting and using a second mobile
phone
b A mobile phone is already connected to the
PCM or the inserted SIM card is enabled to
make calls.
Deleting a Bluetooth
®
device or
displaying Bluetooth
®
information
Using PCM for making phone calls
with external SIM card
In some countries, the external SIM card can also
be used for making and receiving calls in addition
to establishing a data connection. The embedded
SIM cannot be used for making and receiving
calls.
For information on data connection:
f Refer to chapter “Connectivity” on page 87.
1. Select or in the footer
(depending on the connection status).
– or –
button e button e
Device manager
2. Select Telephone.
A list with a maximum of 20 registered mobile
phones will be displayed.
3. Select a mobile phone from the list.
The mobile phone is connected via
Bluetooth
®
.
1. Select or in the footer
(depending on the connection status).
– or –
button e button e
Device manager
2. Select Telephone 2.
3. Select a mobile phone from the list or
connect a new mobile phone.
f Refer to chapter “Connecting a new
mobile phone” on page 239.
Both connected mobile phones can receive
calls, but only the active mobile phone can
make calls.
e Select or (see A, Fig. 218 on
page 238) in the headline to switch between
the two connected mobile phones.
1. button e button e
SET PHONE e Bluetooth e
Bluetooth devices
2. Select a mobile phone from the list.
3. To delete a mobile phone from the
list of registered Bluetooth
®
devices,
select Delete.
– or –
To view information for a Bluetooth
®
device,
select Details.
Bluetooth
®
address, connection status and
available Bluetooth
®
profiles will be displayed.
– or –
To establish or disconnect a connection
between a Bluetooth
®
device and the PCM,
select Establish connection/Disconnect.
Information
After starting, the PCM attempts to restore the
previous device configuration automatically. If the
devices are not present in the vehicle, the system
searches for other known devices.
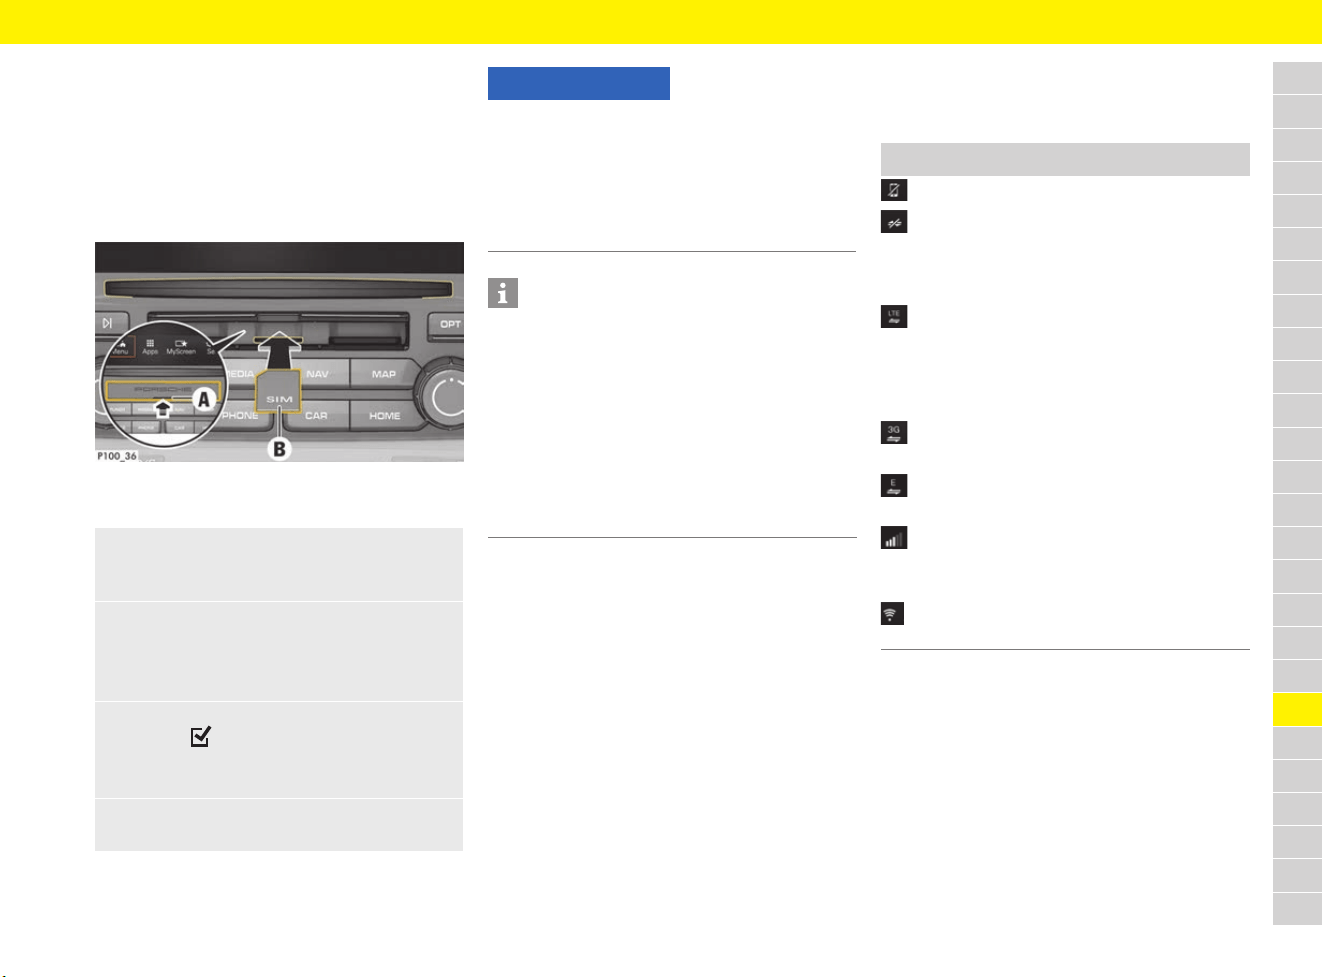
241
Telephone
A
B
C
D
E
F
G
H
I
J
K
L
M
N
O
P
Q
R
S
T
U
V
W
X
Y
Z
When an external SIM card is inserted, it
deactivates the function of the embedded SIM
(availability dependent on country). Additional
costs may be incurred for the data connection
(e.g. due to data roaming).
Inserting and removing external
SIM card
Fig. 220: Inserting and removing external SIM card
b SD and SIM card reader cover A is open.
Displaying connection status
Depending on the connection status, the following
displays may be shown in the footer:
Opening the Device Manager
f Refer to chapter “Device Manager” on
page 100.
1. Insert external SIM card B
(mini-SIM, dimensions: 25 x 15 mm) (missing
corner at front left, chip facing downwards).
2. SIM card with PIN:
a. Enter the PIN for the external SIM card
and confirm with OK.
b. Select Store PIN.
3. Select Enable to enable the data connection.
Activate Don’t ask again to disable the
repeated prompt.
The data connection is established.
e To remove the external SIM card, press on
the inserted card and remove it.
NOTICE
Risk of damage to PCM if SIM cards are not used
properly.
If a SIM card adapter is used, there is a risk of the
SIM card falling out of the adapter if shaken and
the card pieces remaining stuck in the PCM.
e Do not use adapters for SIM cards.
Information
– If the SIM card is used to make and receive
calls as well as for data connection, it occupies
one of the two slots available for mobile
phones. In this case, another mobile phone can
be connected and then the user can switch
between the mobile phone and SIM card.
– For information on PIN settings for the
SIM card:
f Refer to chapter “Changing phone settings”
on page 246.
Symbol Meaning
No phone connected.
External SIM card inserted or
connection via SIM Access Profile (SAP)
established. Data connection can be
established.
Data connection established via
embedded SIM, external SIM card
or connection via SIM Access Profile
(SAP), e.g. data connection via the
LTE mobile phone network.
Data connection via the UMTS/HSPA
mobile phone network (3G).
Data connection via the EDGE mobile
phone network (GSM).
Reception signal strength of the mobile
phone network for the telephone
function.
Data connection via external
WiFi hotspot.
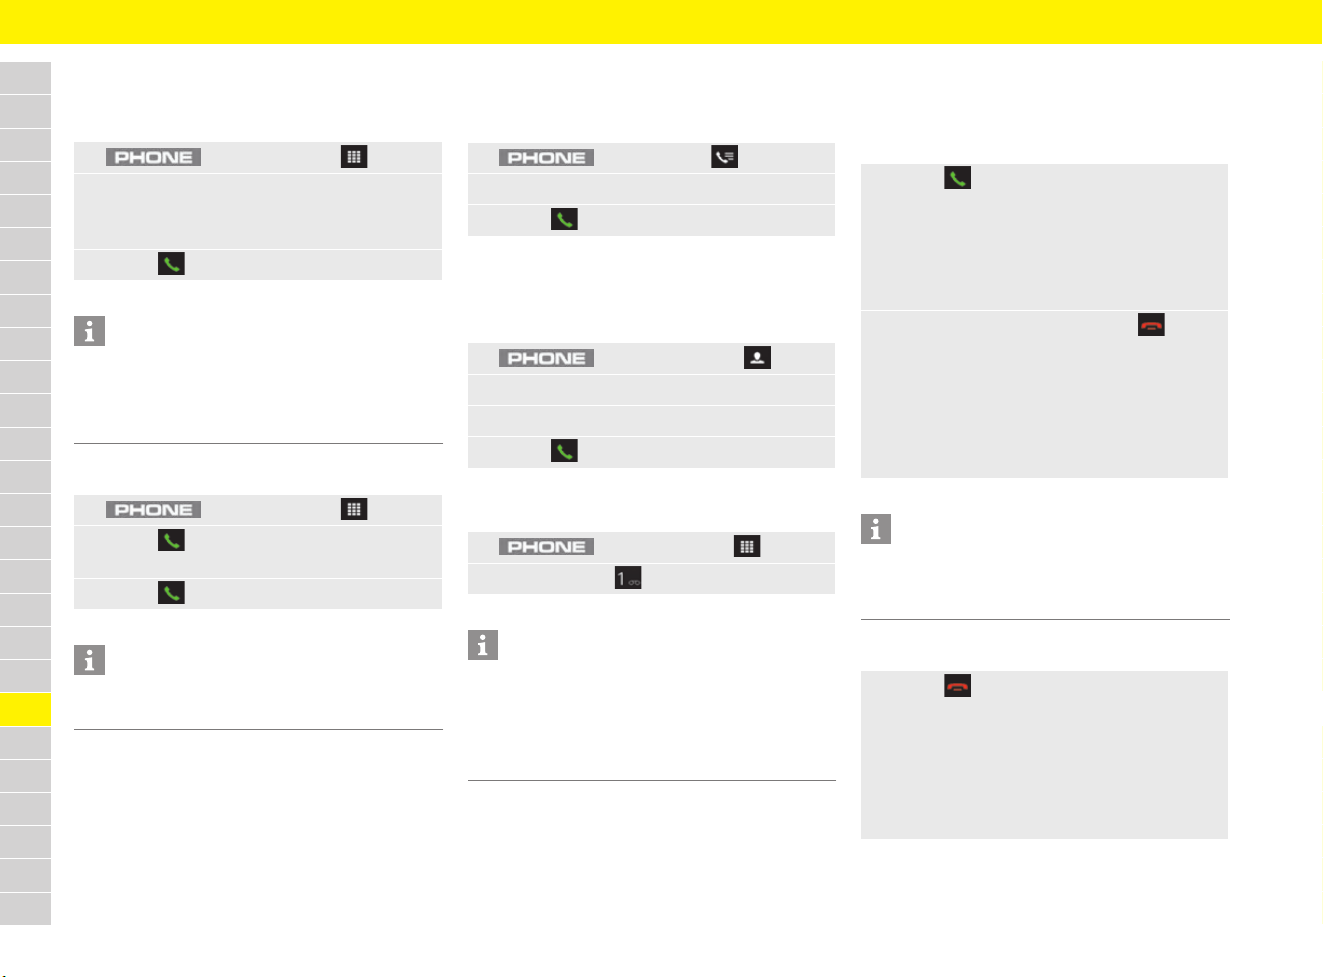
242
Telephone
A
B
C
D
E
F
G
H
I
J
K
L
M
N
O
P
Q
R
S
T
U
V
W
X
Y
Z
Dialling a phone number
Entering a phone number (keypad)
Open the redial feature
Calling a number from a call list
f Refer to chapter “Displaying call list” on
page 243.
Calling a number from the contacts
f Refer to chapter “Using contacts” on
page 244.
Listening to mailbox
Accepting and ending a call
Accepting/rejecting a call
b Call comes in.
Ending a call
1. button e Keypad
2. Enter a number via the numeric field.
If the phone number is already known, it is
offered for selection (vCard is displayed).
3. Select .
Information
DTMF tone (Dual Tone Multi Frequency) and
supplementary services (services that can be
called up via star and diamond codes) are
supported.
1. button e Keypad
2. Select to display the last phone number
dialled on the keypad.
3. Select .
Information
The redial memory is deleted after the ignition is
turned off.
1. button e Calls
2. Select desired call list and select entry.
3. Select .
1. button e Contacts
2. Search for and select the desired contact.
3. Dial the desired number.
4. Select .
1. button e Keypad
2. Press and hold to listen to mailbox.
Information
When the function is used for the first time, a
prompt to enter the mailbox number appears
once.
f Refer to chapter “Changing phone settings” on
page 246.
e Select Accept.
– or –
Press the Pickup button on the mobile phone.
– or –
Press the Pickup button on the steering
wheel.
e To reject the incoming call, press Reject.
– or –
Press the Hangup button on the mobile
phone.
– or –
Press the Hang-up button on the steering
wheel.
Information
If the “mute” or “conference” profiles are set on
the mobile phone, some devices do not sound a
ringtone on the PCM if a call is received.
e Select in the footer or phone menu.
– or –
Press the Hangup button on the mobile
phone.
– or –
Press the Hang-up button on the steering
wheel.
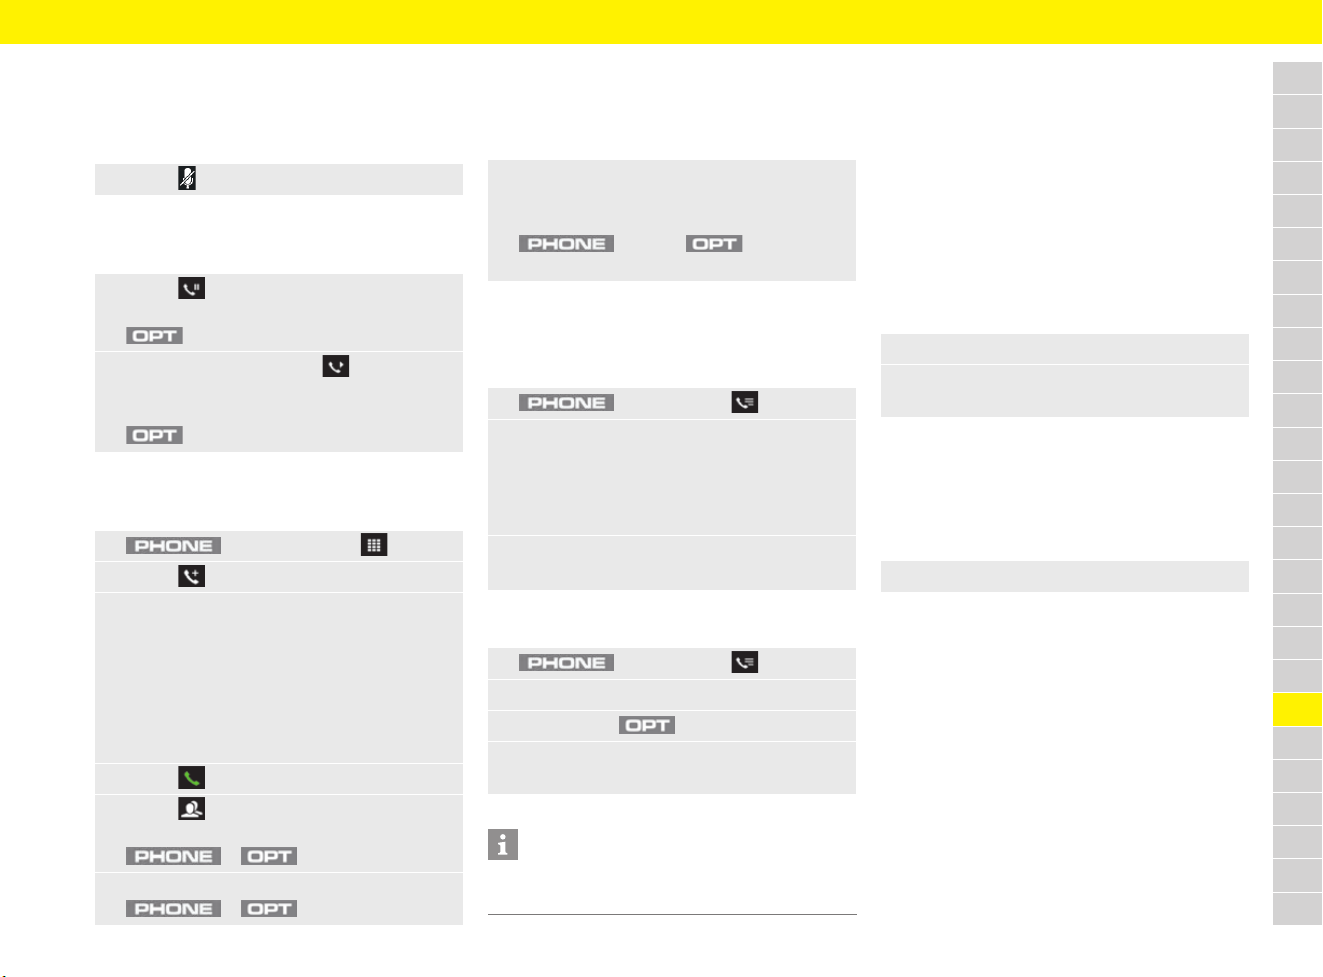
243
Telephone
A
B
C
D
E
F
G
H
I
J
K
L
M
N
O
P
Q
R
S
T
U
V
W
X
Y
Z
Functions during a phone call
Muting the microphone
b Phone call is active.
Holding a call
b Phone call is active.
Starting a conference call
b Phone call is active.
Switching between two conversations
(swapping)
b Phone call is active.
b Phone call is on hold.
Displaying call list
Displaying a call
Deleting a call
Using a phone via the
multi-function display
For information on using the multi-function display:
f Refer to chapter “Operating multi-function
display without multi-function steering wheel”
on page 157.
f Refer to chapter “Operating multi-function
display with multi-function steering wheel” on
page 157.
Dialling a phone number
– Phonebook
– Previous calls
Accepting or rejecting a call
b Call comes in.
– Accept call
– Reject call
e Select to mute the microphone.
e Select next to the display Connected.
– or –
button e Select Hold call.
e To resume the call, select next to the
display On hold.
– or –
button e Select Activate call.
1. button e Keypad
2. Select to add another conversation.
3. Add new conversation by:
Dialling a new number using the numeric field.
– or –
Selecting a phone number from the call list.
– or –
Selecting an existing contact from the
phonebook.
4. Select .
5. Select to activate the conference.
– or –
e e Conference
e To put the conference call on hold, select
e e Hold conference.
e Select the call on hold to activate it and to put
the previously active call on hold.
– or –
button e button e
Swap calls
1. button e Calls
2. Browse (swipe) to desired page:
– All calls
– Missed calls
– Outgoing calls
– Incoming calls
3. Select an entry from the call list.
The detailed view is displayed.
1. button e Calls
2. Select the desired call list and select a caller.
3. Press button .
4. To delete a call from the PCM call list,
select Delete call.
Information
Only calls that have been made from the vehicle
can be deleted.
1. Select menu Phone.
2. Search for the desired number in the list and
select an entry.
e Select menu Phone.
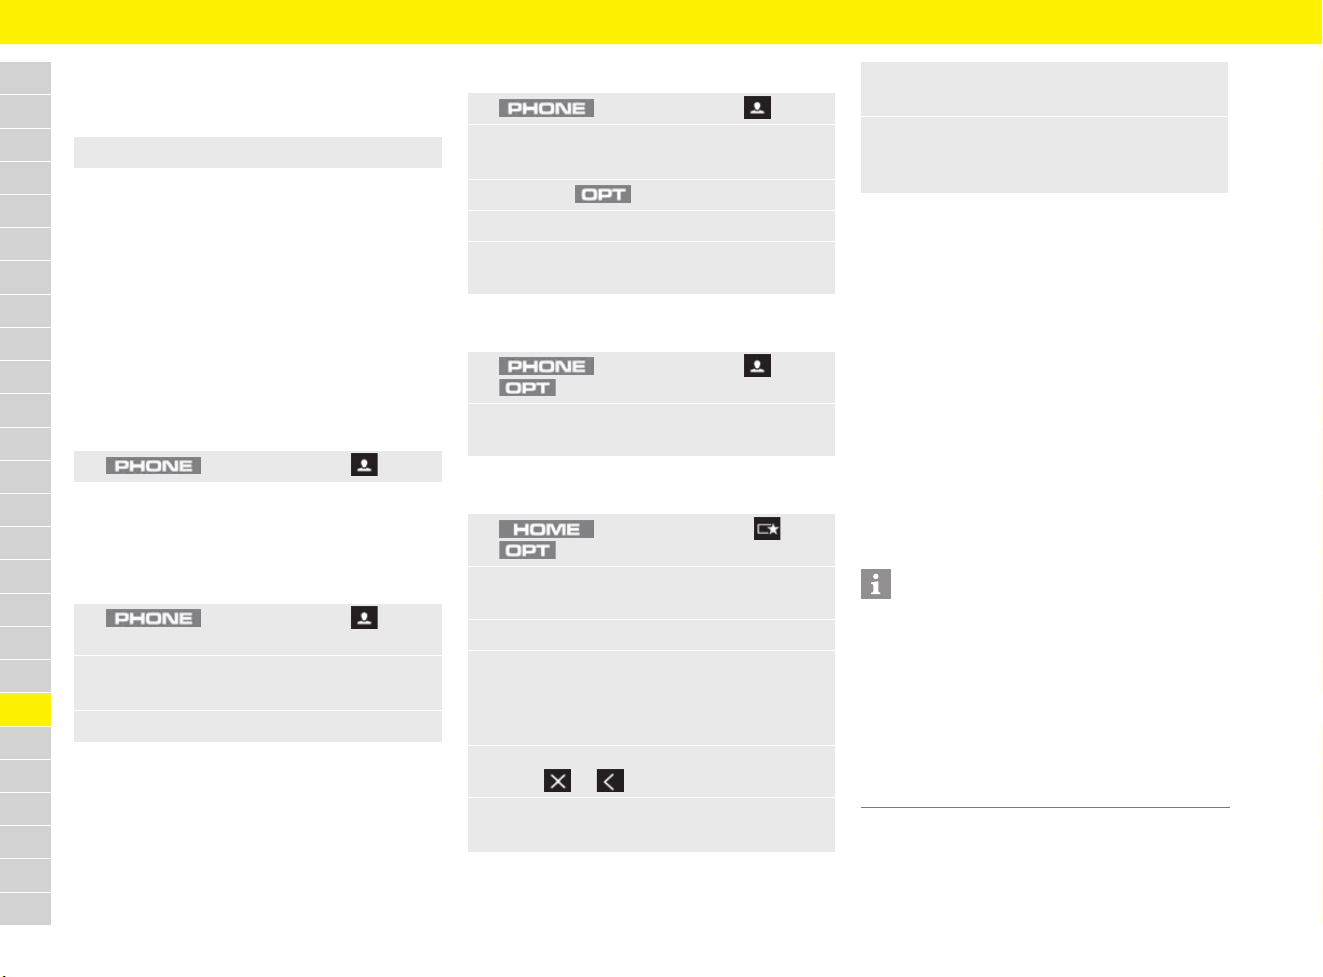
244
Telephone
A
B
C
D
E
F
G
H
I
J
K
L
M
N
O
P
Q
R
S
T
U
V
W
X
Y
Z
Making multiple calls simultaneously
and ending calls
b Active phone call.
– New call: Call a further participant during an
active phone call.
– Swap: Switching between participants in order
to make separate phone calls.
– Conference: Add a participant to a
conference call.
– End call: End the active phone call.
Using contacts
Displaying a contact
Finding a contact
The right alphabetical strip can be used to find the
desired contact from the first letter. Alternatively it
is possible to search by entering text.
Sending a contact
Sorting the contact list
Adding favourites in MyScreen
Deleting favourites in MyScreen
f Refer to chapter “Creating MyScreen” on
page 180.
Displaying and deleting messages
You can read text messages and e-mails, have the
messages read out to you or use the numbers
contained in the messages for making phone calls
using the Message function.
This function is only available if the mobile phone
supports Bluetooth
®
Message Access Profile. The
mobile phone may support the text message
function but not the e-mail function.
You will find further information on these settings
in the operating instructions for the mobile phone.
e Select menu Phone.
1. button e Contacts
1. button e Contacts e
Search for contact
2. Enter a name using the input field.
A list of results is displayed.
3. Select the desired entry.
1. button e Contacts
2. Select a contact.
Contact details are displayed.
3. Press the button.
4. Select Send as vCard.
5. Select send (SMS, e-mail) or memory option
(SD, USB) depending on availability.
1. button e Contacts e
button e Sort criteria
2. Select sorting sequence Surname,
first name or First name, surname.
1. button e MyScreen e
button e SET MyScreen
2. Select MyScreen 1, MyScreen 2 or
MyScreen 3.
3. Select category PHONE.
4. Drag & Drop the tile Smith, John into any
container on the left preview side. The tile can
be inserted into the container as soon as a
green edge appears.
5. Exit the Configure MyScreen menu
using or .
6. Select Touch here to select a contact.
Contact list is opened.
7. Select the desired contact.
Contact details are displayed.
8. Dial a phone number.
Contact is stored as a favourite in the
selected view.
Information
– If the connected mobile phone supports the
SIM access profile, the text message received
will be stored on the SIM card.
– If the mobile phone is only able to display the
text messages stored in the device memory,
the text messages received in the vehicle may
not appear in the mobile phone message list.
– Multimedia Messaging Service (MMS) is not
supported by the PCM.
245
Telephone
A
B
C
D
E
F
G
H
I
J
K
L
M
N
O
P
Q
R
S
T
U
V
W
X
Y
Z
Displaying text messages
Displaying e-mails
Listening to messages (text, e-mail)
Deleting messages (text, e-mail)
Writing messages
Writing text messages
Writing e-mails
1. button e Message e
Text message
2. e Select folder.
3. Select the desired text message.
1. button e Message e
E-mail
2. Select an e-mail account.
Inbox is opened. A maximum of 100 e-mails
are displayed.
3. If necessary, e Select folder.
4. Select the desired e-mail:
Information
The transfer of e-mails from several accounts to
the PCM is not supported by many mobile phones.
Often only the e-mails managed by the
manufacturer’s own app are transferred.
1. button e Message
2. Select Text message menu or E-mail menu.
3. e Select folder.
4. Select the desired text message or e-mail.
5. Select Read out .
1. button e Message
2. Select Text message menu or E-mail menu.
3. e Select folder.
4. Select the desired text message or e-mail.
5. Press the button.
6. Select Delete message.
Message will be deleted. For connections via
the SIM access profile, a text message
deleted in the PCM will also be deleted on the
mobile phone SIM card.
1. button e Message e
Text message
2. Select e New text message.
3. Enter the number of the recipient in the input
field.
– or –
Selecting an existing contact from the
phonebook.
4. Select text box.
5. Enter text using the input field and confirm
with Enter.
6. Select Send .
The message is sent.
1. button e Message e
E-mail
2. Select e New e-mail.
3. Enter the e-mail address of the recipient in the
input field.
– or –
Selecting an existing contact from the
phonebook.
4. Select text box (e.g. Subject).
5. Enter text using the input field and confirm
with Enter.
6. Select Send .
The e-mail is sent.
246
Telephone
A
B
C
D
E
F
G
H
I
J
K
L
M
N
O
P
Q
R
S
T
U
V
W
X
Y
Z
Stowing a mobile phone
(country-dependant)
Fig. 221: Smartphone tray
Depending on the equipment, a special
smartphone tray is installed in the centre console.
Its purpose is to connect to the vehicle’s external
antenna. It also has a USB port to charge the
mobile phone and to connect to the PCM.
Using the external antenna ensures less radiation
in the vehicle and better reception quality for a
mobile phone connected via Bluetooth
®
.
e Place the mobile phone with the display facing
upwards centrally onto the phone symbol in the
smartphone tray. Ensure that there are no
objects between the tray and the mobile
phone.
Charging a mobile phone
e Connect the mobile phone to the USB port A
using a USB charging cable.
Changing settings
Settings during a phone call
(private mode)
b Mobile phone is connected via Bluetooth
®
and
the hands-free profile (HFP).
b Call is established.
– Activate private mode: Call is being
transferred to phone from the hands-free
equipment.
Changing phone settings
– Switch off/on PCM phone: Switch the phone
module in the PCM on/off.
– Enable inserted SIM card for calls: Use
external SIM card inserted in the card reader
for calls (or only for data services).
– Network operator search: Select network
operator or activate automatic network
operator search.
– SIM card: Change the settings for the
inserted, external SIM card.
– Mailbox number: Display or change the
mailbox phone number for the connected
mobile phone.
– Serial number: Display IMEI serial number of
the PCM phone module.
Managing Bluetooth
®
functions
and devices
– Add new device: Search for new Bluetooth
®
device and register on the PCM.
– Bluetooth devices: Manage registered
Bluetooth
®
devices, connect PCM to
registered Bluetooth
®
device.
f Refer to chapter “Deleting a Bluetooth
®
device or displaying Bluetooth
®
information” on page 240.
– Activate/deactivate Bluetooth: Activate/
deactivate Bluetooth
®
function.
– Note: Don’t forget your phone: Activate a
reminder to a connected Bluetooth
®
device
when leaving the vehicle.
– Bluetooth name: Set Bluetooth
®
name of
the PCM.
Information
It is recommended that the keyboard/code lock
be activated before placing the mobile phone in
the tray.
1. button e button
2. Select the desired setting:
1. button e button e
SET PHONE e Phone
2. Select the desired setting:
1. button e button e
SET PHONE e Bluetooth
2. Select the desired setting:

247
Telephone
A
B
C
D
E
F
G
H
I
J
K
L
M
N
O
P
Q
R
S
T
U
V
W
X
Y
Z
Configuring WiFi settings
– Activate/deactivate WiFi: Switch WiFi
function of the PCM on/off.
– Configure WiFi hotspot in PCM: Display and
set up WiFi access data of the PCM. This data
is required to be able to connect a device (e.g.
mobile phone) to the PCM via WiFi and to use
the WiFi hotspot of the PCM.
– Use external data connection: To establish
a data connection to an external WiFi hotspot
(e.g. public hotspot).
– Connect to external WiFi hotspot: Search
for new WiFi hotspot and enter access data
for the external WiFi hotspot (user name and
password). When entering the data, pay
attention to upper and lower case.
f Refer to chapter “Establishing a data
connection via external WiFi hotspot” on
page 88.
Deleting external WiFi hotspot
Configuring data connections
– Data connections:
– On: Always allow data connections.
– Off: Data connections are switched off.
– Prompt: Before using the data connection,
a message will appear asking whether the
data connection should be allowed.
– Share data connection: Enable data
connection for WiFi devices.
– Roaming: Enable or block data connection in
foreign networks.
– Configure access point: Change network
access data for the data connection of the SIM
card (APN name, user name and password).
– Reset access point configuration: Reset
APN settings to factory settings.
f For information on APN settings: Refer to
chapter “Establishing data connection via
external SIM card” on page 87.
Managing contacts
– Contact memory: Display contact memory
used.
– Sort criteria: Sort contacts stored on the
mobile phone by surname or first name.
– Transfer contacts: Contacts on the SIM card
or on the mobile phone connected via
Bluetooth
®
can be manually transferred to
the PCM.
Changing tone settings
b Mobile phone is connected to the PCM or a
SIM card is inserted.
Possible setting options are:
– Select ringtone: Set the ringtone for the PCM
if the connected mobile phone does not
transmit the ringtone via Bluetooth
®
.
– Ringtone volume: Set ringtone volume.
– Microphone sensitivity: Set microphone
sensitivity for phone calls.
– Signal tone for messages: Set or switch off
signal tone for incoming messages.
Configuring call settings
b SIM card is inserted in the PCM or mobile
phone is connected via the Bluetooth
®
SIM
access profile.
– Call forwarding: Configure call forwarding.
– Call waiting: If you receive another call while
one is already active and the function is
activated, a call waiting signal will sound.
– Show own number: If the function is
activated, your phone number will be shown to
the person calling.
1. button e button e
SET PHONE e WiFi settings
2. Select the desired setting:
1. button e button e
Connections e Data connection
2. Select the icon for the WiFi hotspot
to be deleted.
1. button e button e
SET PHONE e Data connections
2. Select the desired setting:
1. button e button e
SET PHONE e Contacts
2. Select the desired setting:
1. button e button e
SET PHONE e Tone settings
2. Select the desired setting:
1. button e button
2. Select the desired setting:

248
Theft Protection
A
B
C
D
E
F
G
H
I
J
K
L
M
N
O
P
Q
R
S
T
U
V
W
X
Y
Z
Theft Protection
Theft protection
When leaving the vehicle, always:
e Close the windows.
e Close the convertible top.
e Activate the electric parking brake.
e Remove the driver’s key (switch ignition off
on vehicles with Porsche Entry & Drive).
e Close the glove box.
e Close all storage compartments.
e Remove valuables, vehicle registration
documents, telephone and house keys from
the vehicle.
e Close the luggage compartment lids.
e Lock the vehicle.
Immobiliser
There is a transponder (electronic component),
containing a stored code, in each driver’s key.
Before the ignition is switched on, the ignition lock
checks the code.
The immobiliser can be deactivated and the
engine started only using an authorised driver’s
key.
Unlocking and locking the steering
column
Vehicles without Porsche Entry & Drive
Unlocking the steering column automatically
e Unlock the vehicle with the driver’s key.
– or –
Insert driver’s key into the ignition lock.
Locking the steering column automatically
e Remove the driver’s key.
Vehicles with Porsche Entry & Drive
Unlocking the steering column automatically
e Open driver’s door using Porsche Entry & Drive.
– or –
Switch on ignition.
Locking the steering column automatically
e Open the driver’s door
(with the ignition switched off).
– or –
Lock the vehicle.
249
Towing and Tow-Starting
A
B
C
D
E
F
G
H
I
J
K
L
M
N
O
P
Q
R
S
T
U
V
W
X
Y
Z
Towing and Tow-Starting
Using a towing rope or towing bar
e For specifications and mounting instructions,
please refer to the manual from the accessory
manufacturer. Observe the manufacturer’s
safety and operating instructions.
e Observe the permissible towing force of the
towing rope or towing bar. The towing rope or
towing bar must be approved for the vehicle
weight. Never exceed the manufacturer’s
specifications.
e Vehicles with defective brakes must not be
towed.
Using a towing rope
e When towing a vehicle, first screw the towing
hook into the vehicle before attaching the
towing rope to the towing hook.
f Refer to chapter “Fitting the towing lug” on
page 250.
e Always keep the towing rope taut when towing.
Avoid jerky and sudden loads.
Using a towing bar
e Do not attach the towing bar diagonally
between the vehicles.
Tow-starting and push-starting the
Vehicle
e Vehicles with Porsche Doppelkupplung (PDK)
cannot be tow-started or push-started, nor
must this be attempted due to the risk of
serious damage to the transmission.
e Vehicles with manual transmission may only be
tow-started or push-started when the engine is
cold. If the engine is warm, unburnt fuel could
damage the catalytic converter.
Towing the vehicle
The towed vehicle must not be heavier than the
towing vehicle.
When the engine is not running, adequate
lubrication of the transmission is not guaranteed.
Observe the following points to avoid damage to
the transmission.
Important information for vehicles with PDK
e The vehicle must not be towed when the
Porsche Doppelkupplung (PDK) transmission
is in emergency operation mode (warning
message indicates transmission failure) or
if a selector lever emergency release was
performed. The vehicle must be transported
on a car transporter or on a trailer.
f Refer to chapter “Selector Lever Emergency
Release” on page 217.
Special note for vehicles with a faulty or fully
discharged battery
If the battery is defective or fully discharged, the
engine can only be started after the battery has
been replaced or by using jump leads.
f Refer to chapter “Battery” on page 59.
f Refer to chapter “Jump-Lead Starting” on
page 129.
Notes on towing a vehicle on all four wheels
e Switch on the ignition so that the brake lights
and direction indicator lights can operate and
the steering lock will not engage. The control
unit must be removed from the ignition lock
and the driver’s key inserted on vehicles with
Porsche Entry & Drive.
Notes on towing a vehicle on a single axle
e Switch ignition off. Leave the driver’s key in the
ignition lock so that the steering lock does not
engage. The control unit must be removed from
the ignition lock and the driver’s key inserted
on
vehicles with Porsche Entry & Drive.
f Refer to chapter “Performing emergency
release of driver’s key/control unit” on
page 103.
e Make sure that the vehicle has sufficient
lighting.
Information
e Always observe the laws governing towing and
tow-starting.
e Exercise extreme care when your vehicle is
being towed. Before starting off, both drivers
should familiarise themselves with the special
conditions that apply to tow-starting and
towing.
e In the case of a power failure or faults to the
electrical system, an external power source
may need to be connected in order to release
the electric parking brake or the steering
column lock.
WARNING
Increased steering and
braking forces as a
result of no power
assistance
No steering assistance is available on the towed
vehicle when its engine is not running. Increased
force is required for braking and steering.
e Exercise extreme care when your vehicle is
being towed.
250
Towing and Tow-Starting
A
B
C
D
E
F
G
H
I
J
K
L
M
N
O
P
Q
R
S
T
U
V
W
X
Y
Z
Towing the vehicle
e Vehicles with manual transmission: Put the
gearshift lever in neutral.
e Vehicles with PDK: Move selector lever to
position N. To properly engage selector-lever
position N on the display and on the selector
lever, start the engine once before towing the
vehicle. The vehicle can be towed as soon as
the selector lever is in position N and selector-
lever position N appears on the display.
e
Do not exceed the maximum speed of 50 km/h
(30 mph). Do not exceed a maximum towing
distance of 50 km (30 miles). For longer towing
distances, the vehicle must be transported
on a
car transporter or a trailer.
Pulling out a vehicle stuck in snow,
sand, etc.
e Always pull out the vehicle with the greatest
care.
e Do not pull out the vehicle abruptly or at an
angle.
e If possible, pull the vehicle out backwards in its
own tracks.
Using a towing lug
Fig. 222: Towing lug at rear
Fig. 223: Towing lug at front
Fitting the towing lug
The towing lug is stored in the tool kit.
f Refer to chapter “Removing and stowing tyre
sealing compound or tool kit” on page 140.
1. Press the lower edge on the front and the
upper edge on the rear of the plastic cover into
the bumper until it is released, or carefully
release the plastic cover using a suitable
object.
2. Pull the plastic cover out of the bumper and let
it hang by its thread.
3. Screw the towing lug A in anti-clockwise as far
as it will go (left-hand thread) and tighten hand-
tight.
Removing the towing lug
1. Screw out towing lug A clockwise (left-hand
thread).
2. Insert the front of the plastic cover into the
lower edge and the rear into the upper edge of
the opening.
3. Fold in the plastic cover and press on the edge
until it engages in the bumper.
4. Store the towing lug in the tool kit.
Transporting the vehicle on car
trains, ferries and car transporters
e Tie the vehicle down only at its wheels.
e Deactivate interior surveillance and the
inclination sensor.
f Refer to chapter “Switching off interior
surveillance and inclination sensor” on
page 47.
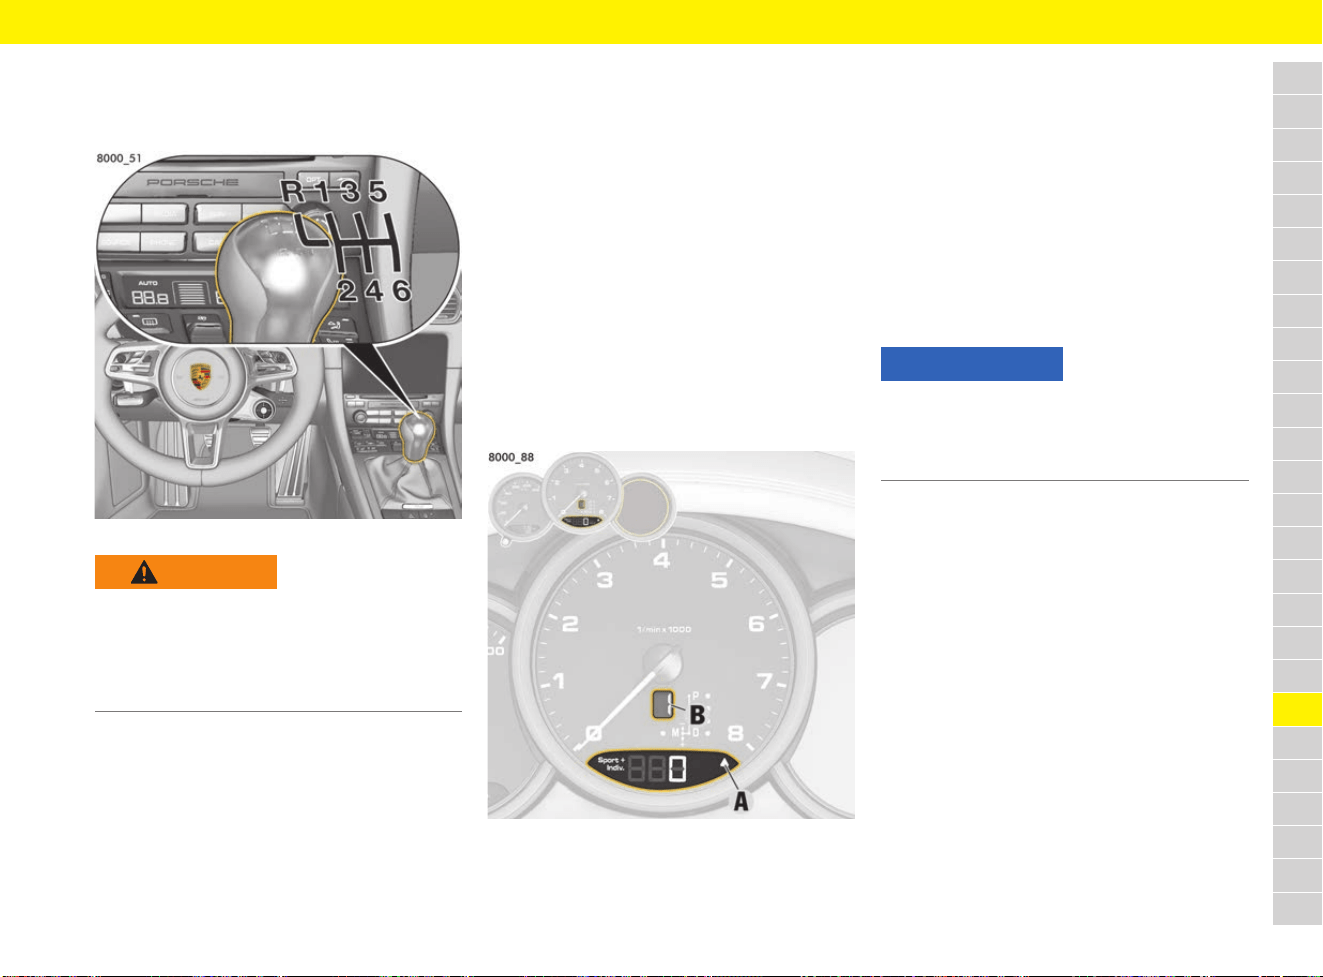
251
Transmission
A
B
C
D
E
F
G
H
I
J
K
L
M
N
O
P
Q
R
S
T
U
V
W
X
Y
Z
Transmission
Driving with manual transmission
Fig. 224: Shift pattern on gear lever
e When changing gears, always ensure that the
clutch pedal is fully depressed and the gear
has engaged fully.
e Select an appropriately low gear on upward
and downward slopes.
This will ensure optimum use of engine power
and engine braking
Shifting the transmission to neutral
The neutral position of the transmission is
between 3rd and 4th gear.
Engaging reverse gear
e Select reverse gear only when the vehicle is
stationary.
e Reverse gear can be engaged after moving the
gearshift lever to the left past the stop.
When reverse gear is selected and the ignition
is on, the reversing lights come on.
Displaying engaged gear
The gear display B in the tachometer indicates the
currently engaged gear.
Driving with upshift prompt
Fig. 225: Upshift indicator A and gear indicator B
The consumption-orientated upshift indicator A
helps the driver develop a fuel-saving driving style.
The upshift indicator lights up – prompting you to
shift up to the next-higher gear – depending on the
selected gear, engine speed and accelerator
pedal position.
e Change to the next-higher gear when the
upshift indicator lights up.
Observing permitted engine speed
e Change into a higher gear or ease off the
accelerator before the needle reaches the red
mark on the tachometer.
If the red zone is reached during acceleration, fuel
feed is interrupted.
Driving with Porsche
Doppelkupplung (PDK)
Porsche Doppelkupplung (PDK) is a seven-speed
transmission with an automatic and a manual
selection mode.
In automatic selection mode (selector-lever
position D), gear changing is automatic.
You can change temporarily from automatic to
manual mode using the shift paddles on the
steering wheel.
In manual selection mode (selector-lever
position M), you can change gear using the selector
lever or the shift paddles on the steering wheel.
You can change between selector-lever positions D
a
nd M as you wish while driving.
e Take care not to operate the shift paddles on
the steering wheel inadvertently in either
automatic or manual mode, thereby triggering
unintentional gear changes.
WARNING
Blocked pedals
Unsuitable or improperly secured floor mats or
objects can restrict pedal travel or hinder pedal
operation.
e Do not obstruct the pedal travel with floor mats
or other objects.
NOTICE
Risk of engine damage (overrevving) when shifting
down to a lower gear.
e Take care not to exceed the maximum
permitted engine speed when shifting down.
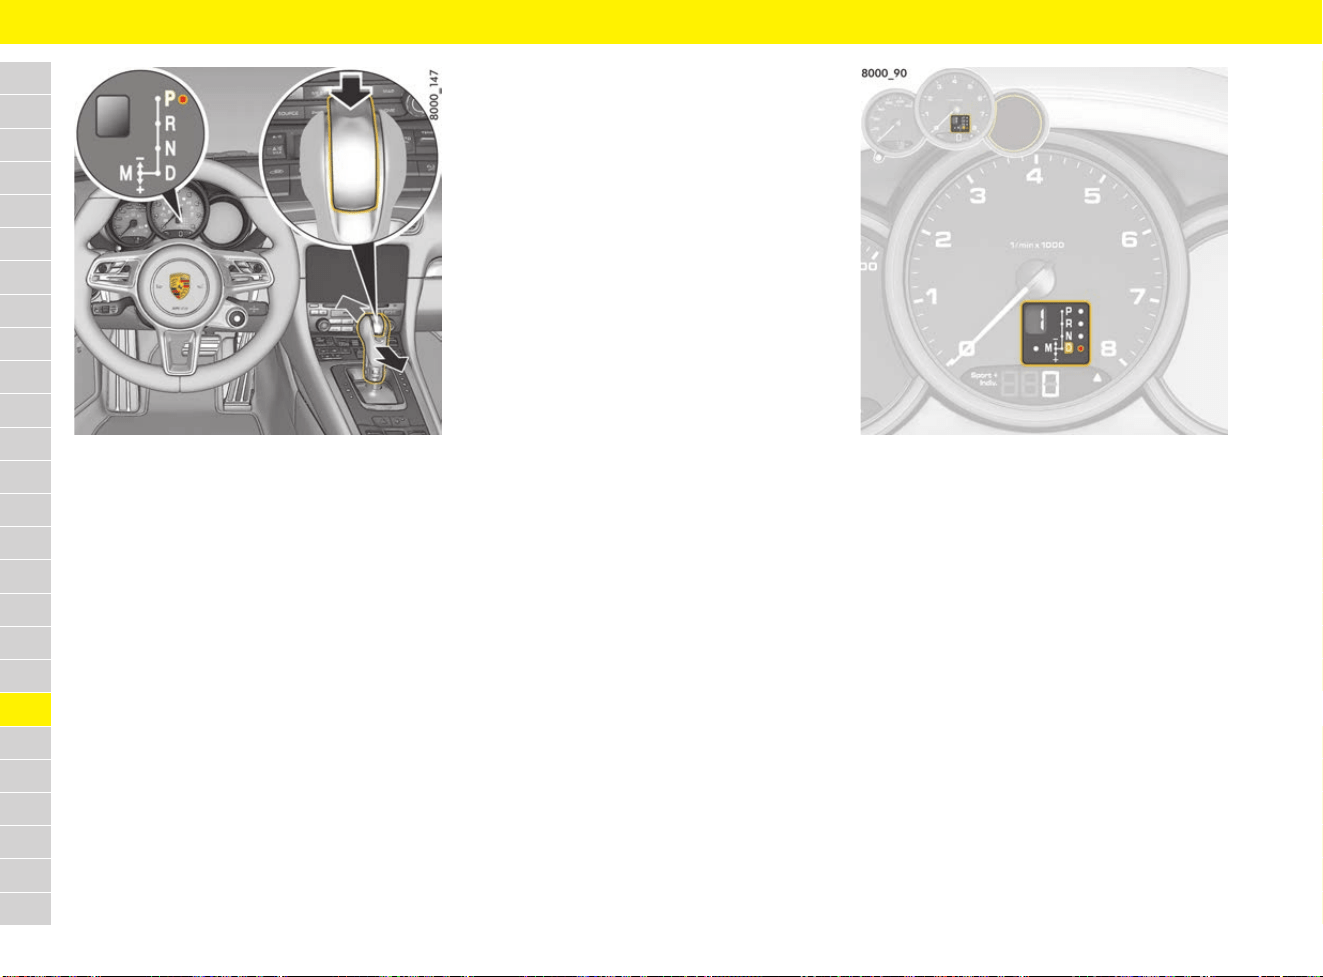
252
Transmission
A
B
C
D
E
F
G
H
I
J
K
L
M
N
O
P
Q
R
S
T
U
V
W
X
Y
Z
Fig. 226: Changing the selector-lever position
Changing the selector-lever position
The selector lever is blocked in the P position
when the ignition is switched off.
When the ignition is switched on, the selector lever
can be moved from position P and N only when
the release button is pressed, and when the brake
pedal is actuated.
Release button
The release button (arrow) in the selector lever
prevents the gear from being changed
unintentionally.
The release button must be pressed when shifting
to position R or P.
Starting the engine
The engine can be started only if the brake pedal
is actuated and the selector lever is in position P
or N.
Driving off in the vehicle
e Only select the desired position for driving off
(D, M or R) when the engine is idling and the
brake pedal is pressed.
e Since the vehicle crawls when in gear, only
release the brake if you intend to drive off.
Driving off on hills
The Drive-Off Assistant assists the driver when
driving off on hills. The vehicle is held on the slope
for a short time during the change from the brake
pedal to the accelerator to facilitate driving off
immediately after the brake is released.
f Refer to chapter “HOLD Function: Drive-Off
Assistant, Standstill Management” on
page 122.
Stopping vehicle
e For a brief stop (e.g. at a traffic light), leave the
selector lever in drive position and hold the
vehicle with the brake pedal.
e Do not hold the vehicle on a slope using the
accelerator. Use the brake pedal or the
electric parking brake instead.
e Before leaving the vehicle, always apply the
electric parking brake and move the selector
lever to position P.
Parking vehicle
e Go easy on the accelerator.
e When parking or manoeuvring in a small
space, control the speed by careful use of the
footbrake.
Fig. 227: Indicator for selector-lever position and
engaged gear
Reading indicator for selector-lever
position and engaged gear
When the engine is running, the display shows the
selector-lever position and engaged gear.
If the selector lever is between two positions, the
corresponding selector-lever position flashes and
a warning appears on the multi-function display.
Action required:
e Operate the footbrake and engage the
selector lever properly.
If the selector lever is inadvertently moved from P
or N into a gear (due to a fault or improper use)
without pressing the brake, this gear will also flash
on the display and no power transmission will
occur.
e To drive off, press the brake and move the
selector lever from P or N into the required
gear again.
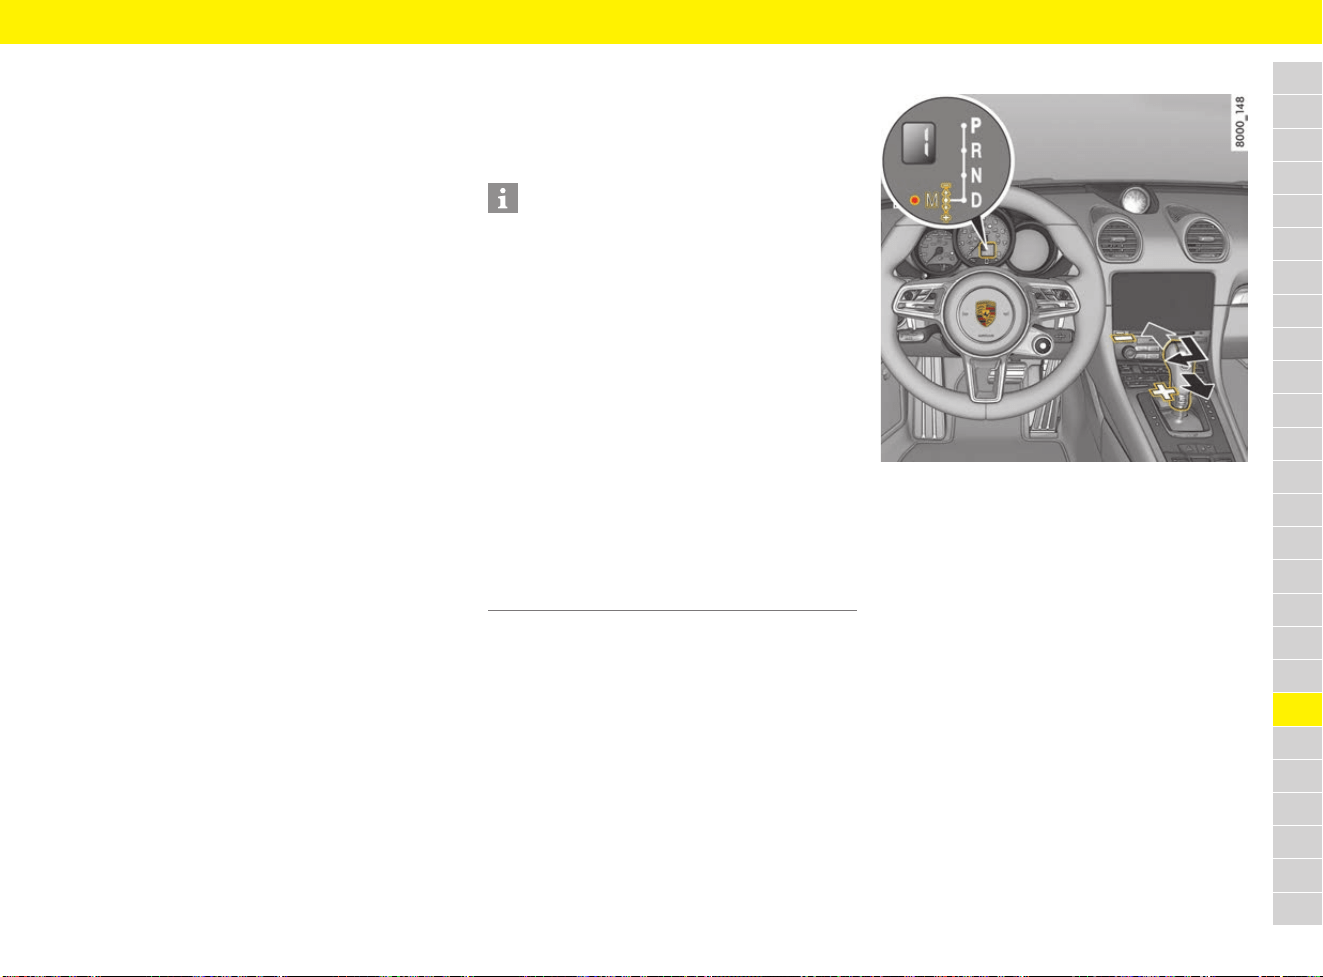
253
Transmission
A
B
C
D
E
F
G
H
I
J
K
L
M
N
O
P
Q
R
S
T
U
V
W
X
Y
Z
Selector-lever position R or D flashes in the
instrument panel
No power transmission occurs.
Effects:
– The selector lever was engaged without the
footbrake being depressed.
– The selector lever was moved to R above the
permissible limit speed.
Action required:
e Press the footbrake and engage the required
selector-lever position again from P or N.
Selector-lever positions
P – Parking lock
e Engage parking lock only when the vehicle is
stationary.
If selector-lever position P is flashing, the
parking lock is not engaged. The vehicle can
roll away.
Shift again from selector-lever position R to P.
Vehicles without Porsche Entry & Drive:
The driver’s key can be removed only in
selector-lever position P.
R – Reverse gear
e Select only if the vehicle is stationary and the
brake is applied.
N – Neutral
Selector lever position N must be selected for
towing or in car washes, for example.
e Only select the desired position for driving off
(D, M or R) when the engine is idling and the
brake pedal is actuated.
D – Automatic selection mode
e Engage selector lever position D for “normal”
driving.
The gears are shifted automatically according
to the accelerator position and speed.
M – Manual selection mode
Fig. 228: Manual selection mode
e Push selector lever from D to M position.
The currently engaged gear is retained when
you change from D to M.
If you change from M to D, the gear-changing map
suitable for your current driving style is selected
and the appropriate gear is selected.
Information
You can change temporarily from automatic
selection mode D to manual mode M using the
shift buttons on the steering wheel.
For example, in the following cases:
– Shifting down before bends
– Shifting down on downward slopes
(engine braking)
– Shifting down for brief spurts of acceleration
The manual selection mode is maintained in the
following cases:
– Overrun
– Stationary vehicle, e.g. at a junction
The system leaves manual selection mode in the
following cases:
– Automatically after approx. 6 seconds
(unless overrunning)
– After driving off
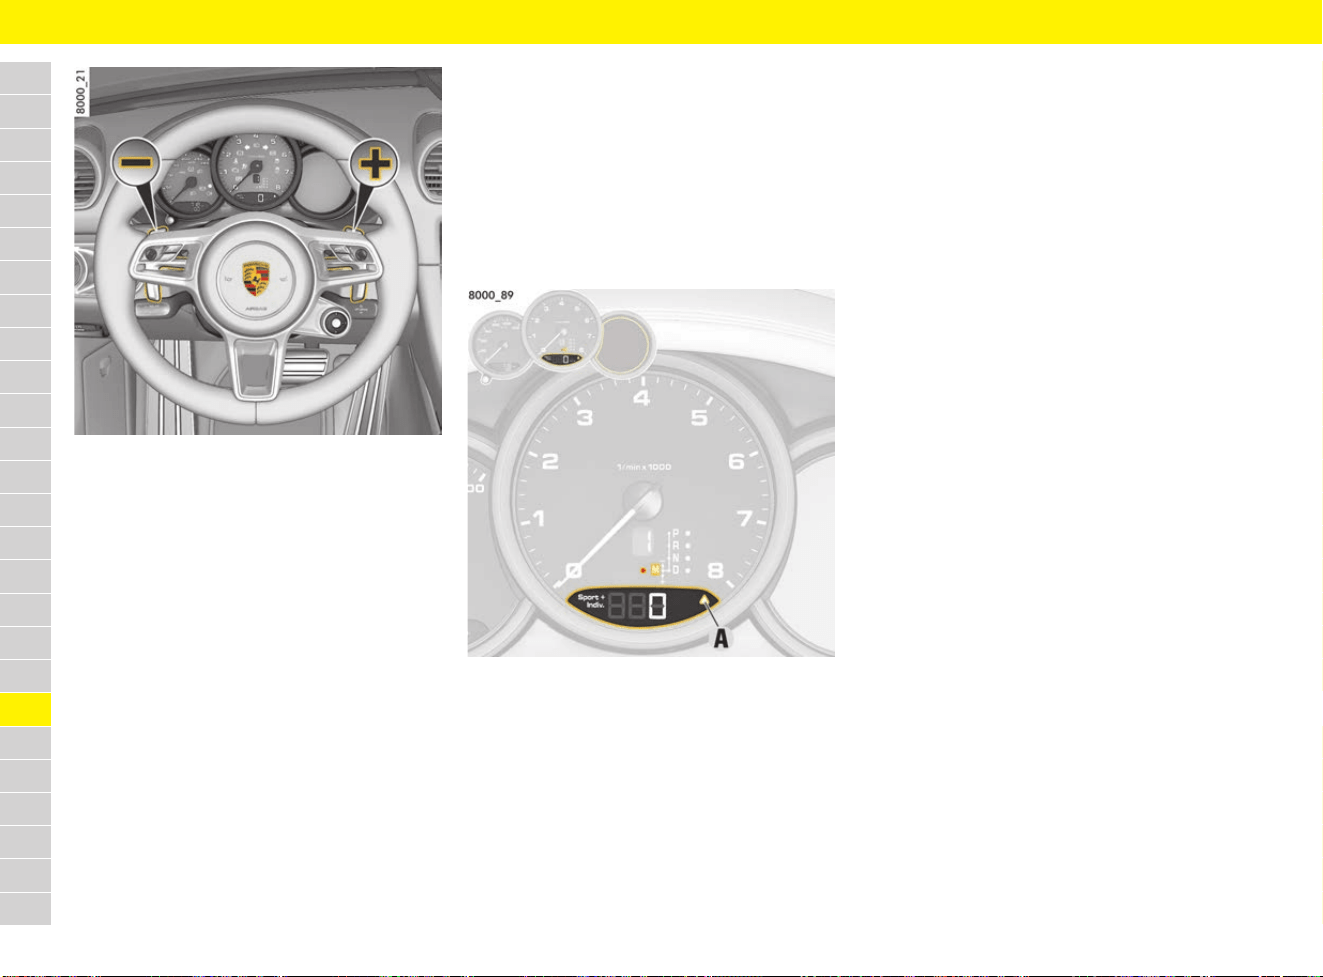
254
Transmission
A
B
C
D
E
F
G
H
I
J
K
L
M
N
O
P
Q
R
S
T
U
V
W
X
Y
Z
Fig. 229: Steering wheel with shift paddles
Shifting up using the selector lever or the
right “+” shift paddle
e Pull selector lever or right shift paddle.
Shifting down using the selector lever or the
left “–” shift paddle
e Press selector lever forward or pull left shift
paddle.
Shift to N – Neutral using the shift paddles
e Pull both shift paddles simultaneously and
release them again immediately.
The transmission shifts to N – Neutral.
The vehicle rolls with the engine disengaged
and at idle speed without engine braking
effect. The number in the gear indicator goes
out and the selector lever position flashes.
Pulling one of the shift paddles or actuating the
selector lever engages a gear again.
Upshift prompt for fuel-economy-optimised
driving
The consumption-orientated upshift indicator A
helps the driver develop a fuel-saving driving style.
The upshift indicator lights up – prompting you to
shift up to the next-higher gear – depending on the
selected gear, engine speed and accelerator
pedal position.
e Change to the next-higher gear when the
upshift indicator lights up.
Fig. 230: Upshift indicator A
Actuating kickdown function
The kickdown function is active in selector-lever
position D.
e For optimum acceleration, e.g. when
overtaking, quickly press the accelerator
pedal down as far as it will go (kickdown).
The transmission shifts down depending on the
speed of travel and engine speed.
Upshifts occur at the highest possible engine
speeds.
Driving in coasting mode
Coasting refers a vehicle driving with the engine
disengaged at idle speed without engine braking.
Designed to increase efficiency and driving
comfort, this standard function is activated
automatically. Coasting occurs when the
accelerator pedal is released completely in the
normal way. When the accelerator pedal is
pressed to accelerate the vehicle, the engine is
engaged again quickly and smoothly and coasting
stops.
Preconditions for automatic coasting mode
b Driving in selector lever position D.
b Cruise control is not active.
b Engine, transmission and battery are at
operating temperature.
b No severe uphill or downhill gradients.
Initiating coasting mode manually
Depending on the traffic, coasting can be initiated
manually and selectively through attentive driving
to increase efficiency. To do this, shift up manually
beyond the highest possible gear using the shift
paddle or the selector lever.
The same applies for the active use of the engine
brake, for example, when driving up to the vehicle
in front or a red traffic light. The efficient trailing
throttle fuel cutoff on the engine can be activated
by braking more heavily or actuating the shift
paddles or selector lever.

255
Transmission
A
B
C
D
E
F
G
H
I
J
K
L
M
N
O
P
Q
R
S
T
U
V
W
X
Y
Z
Driving off with Launch Control
b Vehicles with PDK.
Launch Control achieves maximum acceleration
from a standstill.
b Engine at operating temperature.
b SPORT PLUS mode activated.
1. Press the brake with your left foot.
2. Quickly press down the accelerator as far as it
goes and hold it down.
The engine speed will level off above approx.
6,000 rpm.
A message indicating that LAUNCH CONTROL
is active appears on the multi-function display.
3. Release the brake within a few seconds.
WARNING
Loss of control over the
vehicle or endangering
other road users
In certain circumstances (poor road conditions,
lack of attention, etc.) you may lose control of the
vehicle or endanger other road users.
e Only use Launch Control on public roads if road
and traffic conditions permit.
e Do not endanger other road users when driving
off with the Launch Control.
Information
Stress on components increases dramatically
when starting with maximum acceleration in
comparison with normal driving off.

256
Transmission and Chassis Control Systems
A
B
C
D
E
F
G
H
I
J
K
L
M
N
O
P
Q
R
S
T
U
V
W
X
Y
Z
Transmission and Chassis Control Systems
System/designation Scope
Page
PSM
Porsche Stability Management
– Driving stability control
– Anti-lock Brake System (ABS)
– Brake system prefilling
– Brake booster (Hydraulic Brake Assist)
– Automatic Brake Differential (ABD)
– Anti-slip Regulation (ASR)
– Engine drag torque control (MSR)
– Steering torque pulse
– HOLD function: Drive-Off Assistant on vehicles with manual transmission,
standstill management on vehicles with PDK
195
PASM
Porsche Active Suspension Management
– Shock absorber system with adaptive, continuous damper control 191
PADM
Porsche Active Drivetrain Mount
– Dynamic engine mountings automatically minimise perceptible vibration and vibration
of the entire drivetrain.
– When SPORT mode is switched on, a more rigid drivetrain/body connection is achieved
for a sporty driving style.
– When SPORT PLUS mode is switched on, an optimal drivetrain/body connection is achieved
for driving on racetracks.
--
PTV
Porsche Torque Vectoring
– Laterally dynamic braking intervention for more agile cornering
– Rear differential lock with fixed asymmetrical locking ratio
--
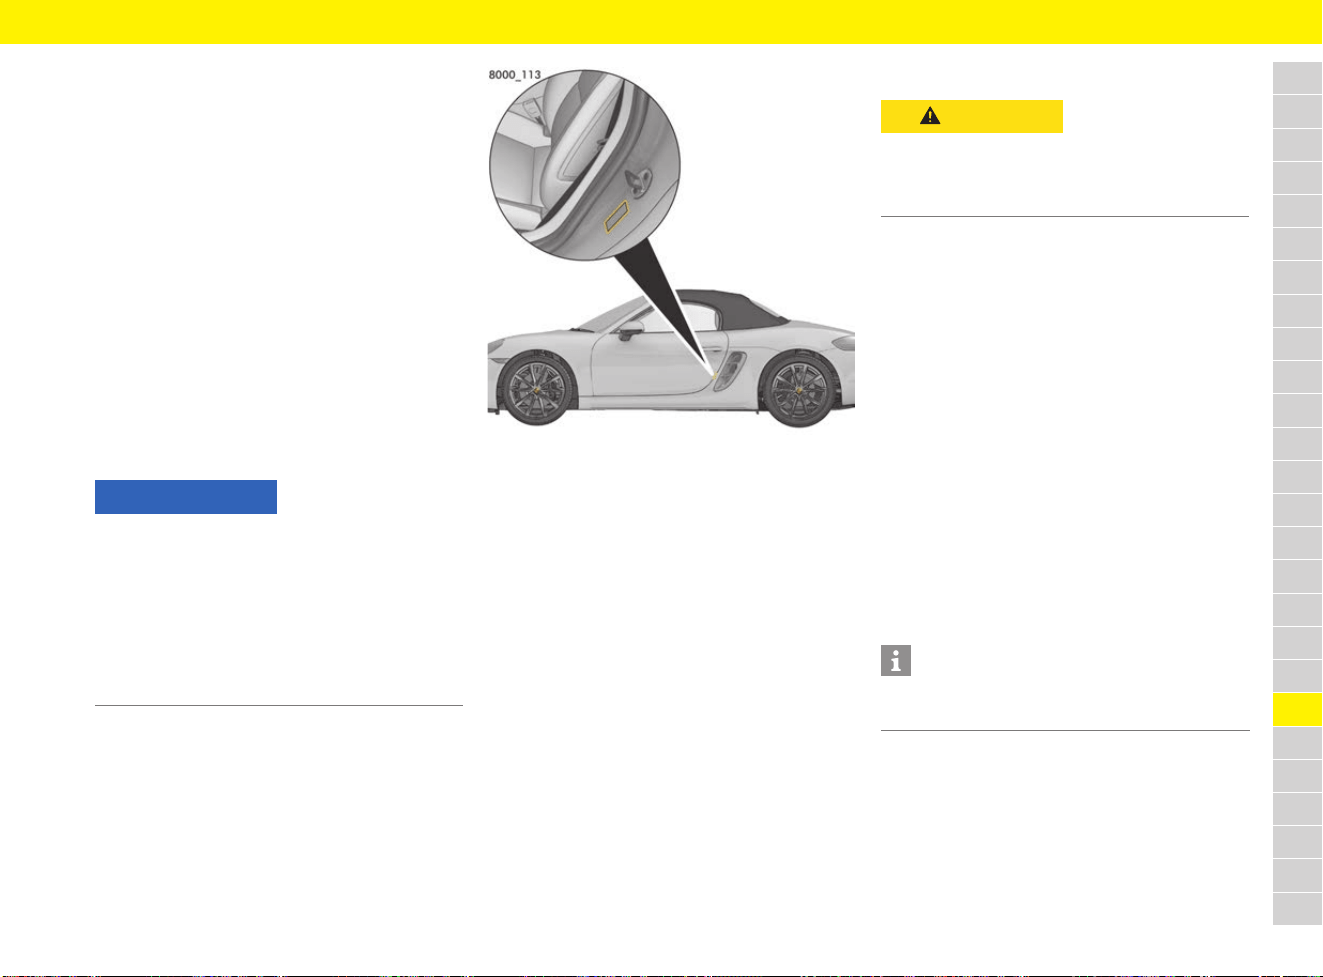
257
Tyres and Wheels
A
B
C
D
E
F
G
H
I
J
K
L
M
N
O
P
Q
R
S
T
U
V
W
X
Y
Z
Tyres and Wheels
In addition to correct tyre pressure and correct
chassis setup, the service life of tyres also
depends on driving style.
Abrupt acceleration, high cornering speeds and
heavy braking increase tyre wear. The tyre wear is
also greater at higher outside temperatures and
on rough road surfaces.
f Refer to chapter “Before driving on race
circuits” on page 15.
Maintaining load and speed
e Drive at the appropriate speed.
e Do not overload the vehicle.
f Refer to chapter “Weights” on page 309.
Checking tyre pressure
Fig. 231: Tyre pressure plate at the door sill area
The tyre pressure must match the prescribed
value. The tyre pressure is specified on the plate
at the door sill area on the driver’s side (Fig. 231)
and in the “Technical Data” on Page 313. These
values are for cold tyres (20 °C).
e Check the tyre pressure at least every 2 weeks
when tyres are cold.
f Refer to chapter “TPM menu (TPM – Tyre
Pressure Monitoring)” on page 162.
Inflating tyres
The compressor is located under the cover in the
front luggage compartment.
f Refer to chapter “Removing and stowing tyre
filling compressor” on page 141.
f Follow the operating instructions on the
compressor.
1. Screw the compressor’s filler hose onto the
tyre valve.
2. Connect the compressor to a plug socket in
the vehicle and switch on the compressor.
The tyre is inflated.
3. Check inflation pressure with the pressure
gauge. Then reduce tyre pressure or add more
air if necessary. Check the inflation pressure
again.
4. Switch off compressor.
5. Unscrew the compressor’s filling hose.
Reducing inflation pressure
1. Switch off compressor.
2. Open air bleed screw on the filling hose until
the correct inflation pressure is achieved.
NOTICE
Insufficient tyre pressure can cause tyres to
overheat and thus be damaged – even invisibly.
e Hidden tyre damage is not eliminated by
subsequently correcting the tyre pressure.
e Never let air out of hot tyres. When tyres are
warm, the tyre pressure is increased. This could
cause the tyre pressure to fall below the
prescribed value.
CAUTION
Hot filler hose
The compressor’s filler hose can become hot
during the inflation process and cause burns.
e Wear gloves.
Information
Tyre pressure can also be checked at petrol
stations and the tyres can be inflated there.

258
Tyres and Wheels
A
B
C
D
E
F
G
H
I
J
K
L
M
N
O
P
Q
R
S
T
U
V
W
X
Y
Z
Reading off inscription on tyres
Fig. 232: Inscription on tyres
The speed code letter F indicates the maximum
permitted speed for the tyre.
Reading off inscription on wheel
The information is inscribed on the back of the
spokes near the tyre valve.
Fig. 233: Inscription on wheel
Identifying tyre damage
In the case of the following tyre damage, the tyre
must be replaced for safety reasons:
– Tyre damage where the possibility of a ply
fracture cannot be ruled out.
– If the tyre has been thermally and mechanically
overloaded following a loss of pressure or
other previous damage.
A Nominal width in mm
B Cross-section ratio in %
C Belt type code letter
D Rim diameter in inches
E Load rating code number
F Speed code letter
H up to 210 km/h
(130 mph)
V up to 240 km/h
(150 mph)
W up to 270 km/h
(168 mph)
Y up to 300 km/h
(186 mph)
(Y) up to 300 km/h (186 mph) as for Y tyres.
Speeds of more than 300 km/h (186 mph)
are also possible at a maximum tyre load
capacity of 85 % (confirmation from tyre
manufacturer required for speeds of more
than 300 km/h (186 mph)).
A Rim width in inches
B Rim-flange contour code letter
C Symbol for drop-centre rim
D Rim diameter in inches
E Double hump
F Rim offset in mm
WARNING
Hidden tyre damage
and damage to rim
flange
Tyre damage can lead to tyres bursting, especially
at high speeds.
e Check tyres, including the sidewalls, regularly
for foreign bodies, nicks, cuts, cracks and
bulges.
e Cross kerb edges slowly and at right angles if
possible. Avoid heavy or sharp-angled impacts
against steep and sharp kerbs or against
sharp-edged objects (e.g. stones).
e If in doubt, have the wheel – particularly the
inner side – checked by an expert.
Visit a qualified specialist workshop. Porsche
recommends a Porsche partner as they have
trained workshop personnel and the necessary
parts and tools.
e Tyres must never be repaired under any
circumstances. Sealing the tyre with the tyre
sealant is only an emergency solution so you
can drive to the nearest workshop.
259
Tyres and Wheels
A
B
C
D
E
F
G
H
I
J
K
L
M
N
O
P
Q
R
S
T
U
V
W
X
Y
Z
Replacing tyres and wheels
e Switch off the ignition when changing a wheel.
e Basically, only tyres of the same make and with
the same specification number (e.g. “N0”,
“N1” etc.) can be fitted.
e Before having new tyres fitted, find out about
the current approval status: Contact your
Porsche partner.
e Only use tyre makes that have been tested and
approved by Porsche.
e The deviation in tread depth on an axle must
not be more than 30 %.
e Only use second-hand tyres if you know their
history.
e Always replace both tyres on an axle to prevent
different profile depths unnecessarily
influencing the handling of the vehicle.
e Tyres should only be fitted by professionals.
Visit a qualified specialist workshop. Porsche
recommends a Porsche partner as they have
trained workshop personnel and the necessary
parts and tools.
e Adapt your driving style to the changed vehicle
handling.
e Ensure that the wheels are compatible with the
TPM system in the vehicle. For information on
suitable wheels and TPM in the vehicle:
Contact your Porsche partner.
e When changing a tyre, check the battery
charge condition of the tyre pressure sensors:
Visit a qualified specialist workshop. Porsche
recommends a Porsche partner as they have
trained workshop personnel and the necessary
parts and tools.
Checking and replacing valves and
valve caps
e Only use genuine Porsche valves for Tyre
Pressure Monitoring (TPM).
e Check the valves whenever the tyres are
changed and replace them if necessary.
Porsche recommends a Porsche partner as
they have trained workshop personnel and the
necessary parts and tools.
Without valve caps, the valve is not protected from
dust and dirt and can therefore start to leak.
e To protect valve inserts from soiling, always
screw on valve caps tightly. Soiled valve
inserts can cause a gradual loss of air.
e Replace missing valve caps immediately.
e Use only plastic valve caps.
Using winter tyres
e Fit winter tyres in good time before the cold
season begins.
e Only use tyre makes that have been tested and
approved by Porsche.
e Before having new tyres fitted, find out about
the current approval status: Contact your
Porsche partner.
WARNING
Insufficient grip
In the initial period, tyres do not have their full
traction.
e During the first 200 km (125 miles), run in new
tyres only at a moderate speed to extend the
service life of the tyres and ensure maximum
performance.
Information
New wheels must be fitted with tyre pressure
sensors for Tyre Pressure Monitoring (TPM).
Information
If new tyres are fitted to only one axle, the different
tread depths on the two axles can cause a marked
change from the previous driving behaviour to
which you have become accustomed. This is
particularly true when new tyres are fitted to the
rear axle. The effect is reduced continuously,
however, as tyre mileage increases.
WARNING
Exceeding the
maximum permitted
speed
Exceeding the maximum permitted speed can
cause tyres to burst.
e Observe the maximum permitted speed for the
tyre.
e Winter tyres with a maximum permitted speed
rating that is lower than the specified
maximum vehicle speed may only be fitted if
they bear an M+S designation on the tyre
sidewall. All-season and all-terrain tyres are
also subject to speed limits and bear this
marking.
e Affix a sticker showing the maximum permitted
speed in the driver’s field of vision. Observe
country-specific laws.
e Setting the maximum permitted speed as the
speed limit on the multi-function display:
f Refer to chapter “Setting the speed limit” on
page 161.
260
Tyres and Wheels
A
B
C
D
E
F
G
H
I
J
K
L
M
N
O
P
Q
R
S
T
U
V
W
X
Y
Z
Using snow chains
Snow chains can be fitted to the rear axle only,
with the tyre/wheel combinations listed under
“Technical data” and marked for snow chain use.
e Use only the snow chains approved by Porsche
to guarantee sufficient clearance between the
wheel well and the chain.
f For information on approved snow chains:
Refer to chapter “Wheels and tyres” on
page 311.
e Before fitting chains, remove accumulated ice
and snow from the wheel well.
e Observe the applicable national regulations
regarding maximum speeds.
Checking tyre tread
e Check tyre tread regularly, particularly before
and after long journeys.
e Most tyres have integrated wear indicators in
the centre of the tread. These wear indicators
are located in the main tread channels and
display the minimum tread depth of 1.6 mm.
For safety reasons, replace the tyres before
the wear indicators appear. Winter tyres are no
longer suitable if their tread depth is less than
4 mm.
Measuring tyre tread depth
e Insert a commercially available tread depth
gauge or calliper in the tyre tread and measure
the tyre tread depth.
Storing wheels
e Always store wheels in cool, dry and dark
conditions. Tyres without rims should be
stored in a standing position.
e Do not store summer tyres or park vehicles
fitted with summer tyres at ambient
temperatures below –15 °C.
e Avoid contact with petrol, oil and grease.
e Tyres must not be more than 6 years old.
Chemical additives, which make the rubber in
the tyre elastic, lose their effect over the
course of time and the rubber becomes brittle.
The age of a tyre can be seen from the DOT
code on the tyre sidewall. If the last four
numbers are 3015, for example, the tyre was
manufactured in the 30th week of 2015.
Balancing wheels
As a precaution, have wheels with summer tyres
balanced in the spring, and those with M+S tyres
before winter.
e Visit a qualified specialist workshop. Porsche
recommends a Porsche partner as they have
trained workshop personnel and the necessary
parts and tools.
Changing a wheel
Information
At low temperatures, juddering noises caused by
the tyres can occur while manoeuvring the vehicle
or accelerating out of bends on both dry and wet
road surfaces.
The driving performance and comfort of summer
tyres deteriorate at temperatures below 7 °C.
Porsche therefore recommends changing to
winter tyres when temperatures fall below 7 °C.
Extremely low temperatures of below –15 °C
can cause permanent damage to summer tyres.
Winter tyres are no longer suitable if their tread
depth is less than 4 mm.
Information
Unevenly worn tyres suggest a defect on the
vehicle:
e Visit a qualified specialist workshop. Porsche
recommends a Porsche partner as they have
trained workshop personnel and the necessary
parts and tools.
WARNING
Working under the
vehicle
The vehicle can slip off the jack.
e Make sure that there is no one inside the
vehicle when jacking it up and changing the
wheel.
e Raise the vehicle only at the prescribed jacking
points on the vehicle underbody.
e Never jack up the vehicle when it is parked on
a surface that slopes up, down or to the side.
e Only use the jack to raise the vehicle when
changing a wheel.
e Always place the vehicle on solid supports if
work has to be carried out under the vehicle.
The car jack is not suitable for this purpose.
Information
The tools required for changing a wheel (jack,
wheel bolt wrench, assembly aids, etc.) are not
supplied as standard with the vehicle.
For information on the necessary tools: Contact
your Porsche partner.
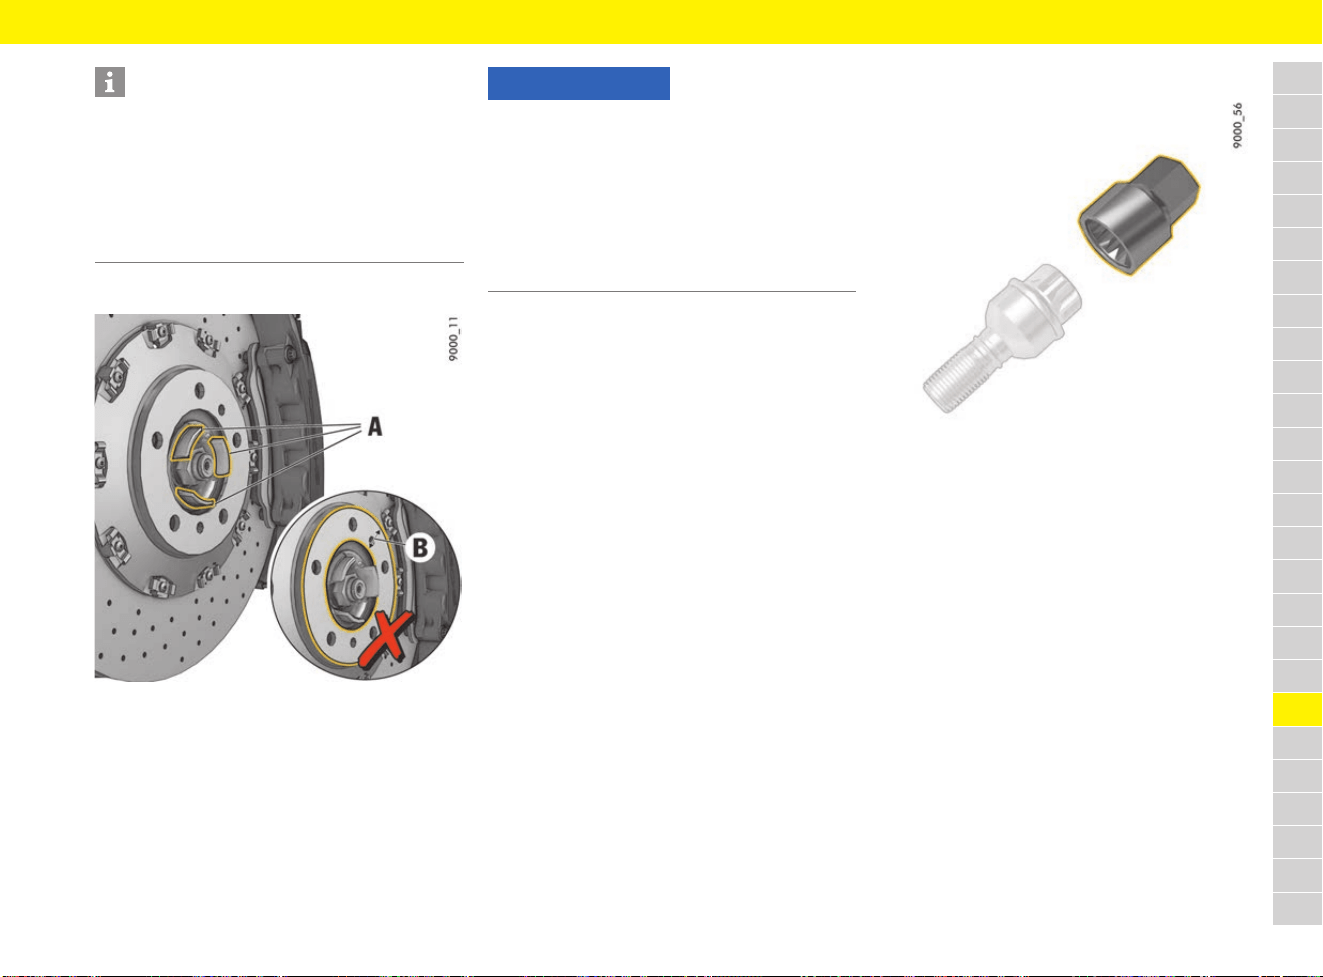
261
Tyres and Wheels
A
B
C
D
E
F
G
H
I
J
K
L
M
N
O
P
Q
R
S
T
U
V
W
X
Y
Z
Caring for wheel attachment faces
Fig. 234: Wheel attachment faces
Caring for wheel bolts
e Always clean the wheel bolts before fitting.
e Wheel bolts must not be greased.
e Replace damaged wheel bolts. Only use
genuine Porsche wheel bolts assigned
especially to this model, or wheel bolts of
similar quality which have been manufactured
according to Porsche specifications and
production requirements.
e Tighten wheel bolts with a tightening torque of
160 Nm (118 ftlb.).
Using security wheel bolts
Fig. 235: Adapter for security wheel bolts
The adapter for the security wheel bolts is in the
tool kit.
e To loosen and tighten the wheel bolt with anti-
theft protection, the adapter must be used
between the wheel bolt and the wheel bolt
wrench.
e When positioning the adapter, ensure that it
engages fully in the teeth of the wheel bolt.
Information
The tyre and wheel sizes are different on each of
the two axles.
When wheels are removed, mark the direction of
rotation and position of each wheel and fit the
wheels in accordance with this marking.
e Only use wheels/tyres with approved
dimensions for the relevant axle.
NOTICE
Risk of damage to the wheel and wheel
attachment face.
e The wheel attachment face B on the brake disc
and on the wheel itself must not be greased.
e Only the areas A may be greased. Grease these
areas very thinly with Optimoly
®
TA: Contact
your Porsche partner.
Do not use any other grease or paste.
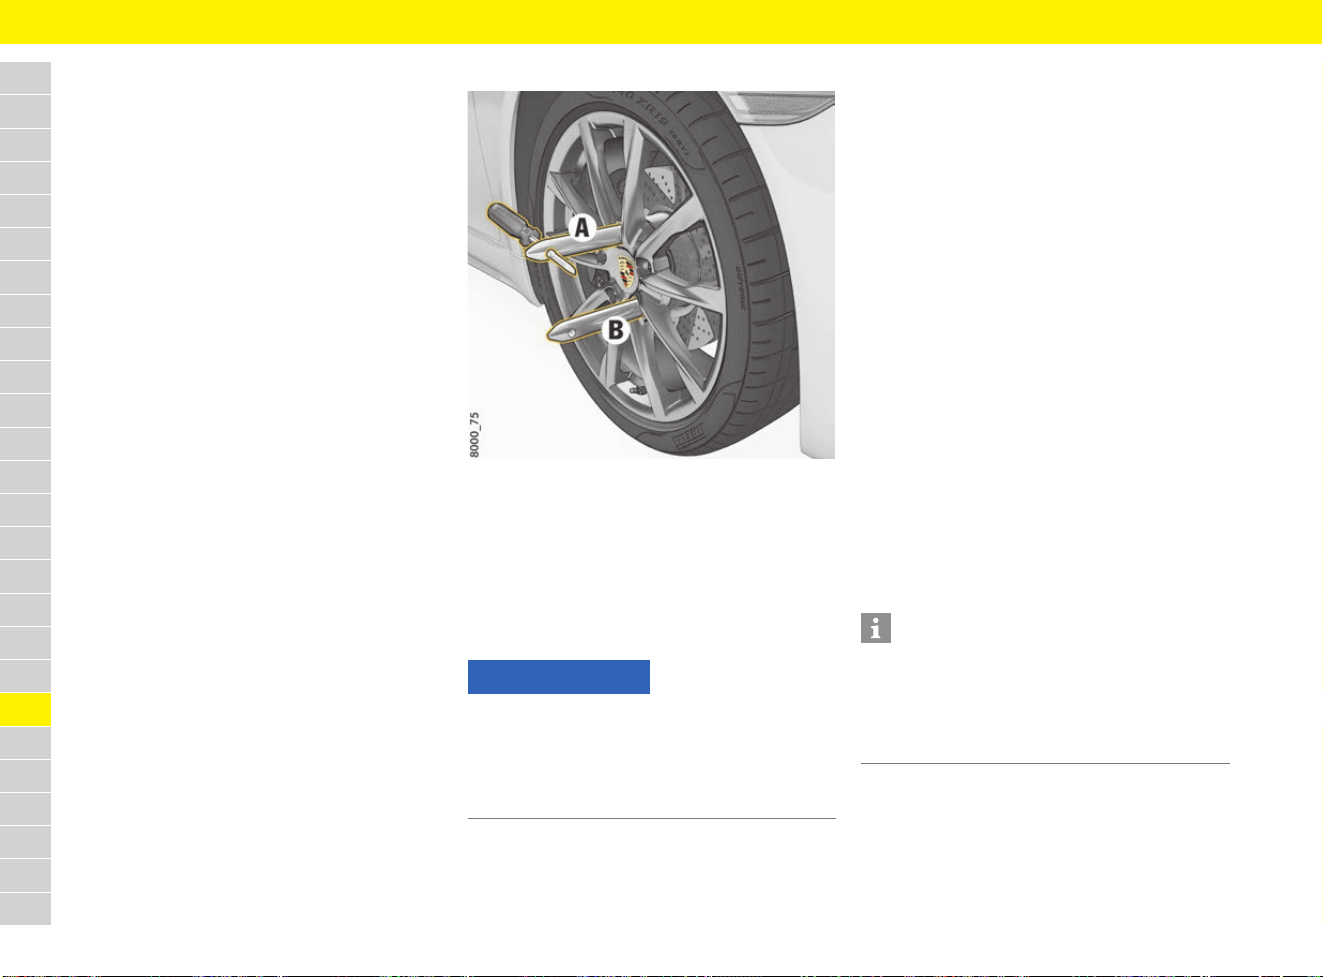
262
Tyres and Wheels
A
B
C
D
E
F
G
H
I
J
K
L
M
N
O
P
Q
R
S
T
U
V
W
X
Y
Z
Changing a wheel
Preparing the vehicle
1. Engage 1st gear.
– or –
Move the selector lever to position P.
2. Actuate the electric parking brake.
3. Remove the driver’s key.
Vehicles with Porsche Entry & Drive: Remove
control unit.
4. Secure the vehicle to prevent it from rolling
away, e.g. by means of wedges under the
wheels on the opposite side.
5. Slightly loosen the wheel bolts on the wheel to
be changed.
6. Lift the vehicle only at the specified jacking
points.
f Refer to chapter “Jack and Lifting Platform”
on page 128.
7. Raise the vehicle until the wheel lifts off the
ground.
Changing a wheel
Fig. 236: Assembly aid
1. For vehicles without PCCB: Remove wheel
bolt A (Fig. 236).
– or –
For vehicles with PCCB: Remove wheel bolts A
and B (Fig. 236).
2. Screw in assembly aid(s) instead of wheel bolts
(Fig. 236).
3. Remove the remaining wheel bolts.
4. Remove the wheel and fit a new wheel.
f Refer to chapter “Caring for wheel
attachment faces” on page 261.
f Refer to chapter “Caring for wheel bolts” on
page 261.
5. Insert wheel bolts and tighten in diagonally
opposite sequence.
6. Remove assembly aids and screw in remaining
wheel bolts.
Initially tighten wheel bolts only slightly in
diagonally opposite sequence so that the
wheel is centred.
7. Inflate the tyre if necessary.
f Refer to chapter “Tyre pressure” on
page 313.
8. Lower the vehicle fully and remove the jack.
9. Tighten the wheel bolts in diagonally opposite
sequence.
Immediately after changing a wheel, use
a torque wrench to check the prescribed
tightening torque of the wheel bolts
(160 Nm/118 ftlb.).
NOTICE
If a wheel is not changed correctly, the brake discs
may be damaged, particularly in vehicles with
PCCB.
e When changing a wheel, screw in the assembly
aids.
Information
Tyre Pressure Monitoring settings on the multi-
function display must be updated after a wheel
change.
f Refer to chapter “TPM menu (TPM – Tyre
Pressure Monitoring)” on page 162.

263
Vehicle Settings Using the Multi-Function Display
A
B
C
D
E
F
G
H
I
J
K
L
M
N
O
P
Q
R
S
T
U
V
W
X
Y
Z
Vehicle Settings Using the
Multi-Function Display
Different vehicle settings can be adjusted
depending on the model, country and equipment.
All available vehicle settings are listed here, but
they are not available in all models, countries and
equipment versions. For safety reasons, some
functions are only available when the vehicle is
stationary.
The vehicle settings remain stored after the
ignition is switched off.
On vehicles with memory package, the settings
can be stored on the memory buttons in the
driver’s door and on the driver’s key.
f Refer to chapter “Personal Settings” on
page 188.
Selection of options and activation
of functions
f Refer to chapter “Operating multi-function
display without multi-function steering wheel”
on page 157.
f Refer to chapter “Operating multi-function
display with multi-function steering wheel” on
page 157.
A symbol positioned in front of an option indicates
whether the option is selected or a function is
activated.
Selecting one of several options
Activating and deactivating functions
Configuring vehicle settings via the
PCM
Certain vehicle settings can also be configured via
the PCM.
Adapting appearance of
multi-function display
f Refer to chapter “Areas on the multi-function
display” on page 158.
Adapting upper status area
When the function is activated, the residual fuel
range is displayed.
Adapting information area
Fig. 237: Example configuration of information area
You can select four of the many items of vehicle
information for display in fields 1, 2, 3 and 4. One
item of vehicle information cannot be assigned to
several areas.
Option is selected.
Option is not selected.
Function is activated.
Function is not activated.
e button e Set e
Vehicle settings
e Vehicle e Settings e Display e
Upper line e Residual range
A Field 1: Boost pressure
B Field 2: Coolant temperature
C Field 3: Engine oil temperature
D Field 4: Engine oil pressure

264
Vehicle Settings Using the Multi-Function Display
A
B
C
D
E
F
G
H
I
J
K
L
M
N
O
P
Q
R
S
T
U
V
W
X
Y
Z
B – Coolant temperature
Bar in left area – engine cold
e Avoid high engine speeds and heavy engine
loading.
Bar in centre area – normal operating
temperature
Pointer may move up to the red area when the
engine is heavily loaded and outside temperature
is high.
Bar in red area – operating temperature too
high
If the coolant level is low, warning messages
may appear if the vehicle tilts at an extreme angle
(e.g. steep slopes) or generates high lateral
acceleration while travelling around long bends
(e.g. driving in circles). If the warning messages
do not disappear once the vehicle has assumed
“normal” operating state, check the coolant level.
f Refer to chapter “Checking coolant level and
adding coolant” on page 95.
C – Engine oil temperature
A warning message appears on the multi-function
display if the engine oil temperature is too high.
e Reduce engine speed and load immediately.
f Refer to chapter “Warning and Information
Messages” on page 278.
D – Engine oil pressure
The oil pressure is controlled as required and
should be at least 3.5 bar (51 psi) at an engine
speed of 5,000 rpm.
The engine oil pressure varies depending on the
engine speed, oil temperature and engine load.
– Battery voltage
– Boost pressure
– Oil pressure: Engine oil pressure
– Oil temperature: Engine oil temperature
– Coolant temp.: Coolant temperature
– Fuel Range
– Dst: Arrival: Arrival time and distance to
destination or stop
– Dst: Trip time: Trip time and distance to
destination or stop
– Compass
– GPS altitude: Height of vehicle above sea level
– Time
– Date
– Station/Track: current radio station or music
track
– Phone status: network strength or network
name
– Blank line: line remains empty
Adapting lower status area
– Time
– Temperature
– Time & Temp.
NOTICE
Risk of engine damage.
If the coolant temperature is too high, the coolant
temperature gauge needle moves to the
maximum mark. A warning message indicating
that the engine temperature is high appears on the
multi-function display and the warning light lights
up or flashes.
e If the red zone is reached, stop immediately
in a suitable place and switch off the engine.
Do not continue driving.
e Initiate measures to reduce the coolant
temperature:
f Refer to chapter “Warning and Information
Messages” on page 278.
NOTICE
Risk of engine damage.
If the oil pressure is too low, a warning message
appears on the multi-function display.
e If the oil pressure is too low, stop immediately
in a suitable place and switch off the engine.
Do not continue driving.
e Initiate measures to increase the oil pressure:
f Refer to chapter “Warning and Information
Messages” on page 278.
1. Vehicle e Settings e Display e
Vehicle menu e Field 1 or Field 2 or
Field 3 or Field 4
2. Select the desired display contents:
1. Vehicle e Settings e Display e Lower line
2. Select the desired display contents:

265
Vehicle Settings Using the Multi-Function Display
A
B
C
D
E
F
G
H
I
J
K
L
M
N
O
P
Q
R
S
T
U
V
W
X
Y
Z
Adapting the main menu
Certain items in the main menu can be hidden and
shown as required.
– Audio
– Phone
– Map
– Navigation
– Trip
– TPM
– Chrono
– Gear shift assist
– G-Force
– Speed limit
– ACC
Displaying PCM information temporarily
on the multi-function display
– Map pop-up: Navigation map appears
automatically when navigation information is
available.
– Navi pop-up: Navigation arrow appears
automatically when navigation information is
available.
– Phone pop-up: Information on incoming and
outgoing calls is displayed.
– Voice control: Help text appears when the
voice control button is pressed.
– Speed limit: Speed limit is displayed.
Adjusting brightness of multi-function
display
Switch help texts for a menu item on
and off
When the function is active and a menu item is
selected, help text is displayed for a few seconds.
Setting the date and time
The preset date and time displays are adopted in
all displays on the vehicle.
Setting the time
Setting the time format
– 12h: 12-hour format
– 24h: 24-hour format
Synchronising time automatically via
GPS signal
When the function is active, the time is
synchronised via the GPS signal.
1. Vehicle e Settings e Display e
Menu scope
2. Select the desired display contents:
1. Vehicle e Settings e Display e
PCM display
2. Select desired PCM information:
Information
On vehicles with a speed limit display, the Speed
limit menu item is not shown and the speed limit
is displayed automatically.
1. Vehicle e Settings e Display e Brightness
2. Select the desired brightness.
e Vehicle e Settings e Display e Help texts
1. Vehicle e Settings e Date & Time e
Time e Hour/Minute
2. Set the desired time.
1. Vehicle e Settings e Date & Time e
Time e Format
2. Select desired time format:
e Vehicle e Settings e Date & Time e
Time e Autom. time
Information
If the time is configured to synchronise via the GPS
signal, the time and date cannot be set manually.
Some setting options may be temporarily
unavailable, depending on satellite signal
reception.
266
Vehicle Settings Using the Multi-Function Display
A
B
C
D
E
F
G
H
I
J
K
L
M
N
O
P
Q
R
S
T
U
V
W
X
Y
Z
Displaying time in stopwatch on
dashboard
When the function is active, the time is displayed
in the stopwatch on the dashboard.
Setting the date
Setting the date format
– DD.MM.YYYY
– MM/DD/YYYY
– YYYY/MM/DD
Setting assistance systems
Switching Porsche Active Safe (PAS)
off and on
b Vehicles with adaptive cruise control (ACC).
When the function is active, all Porsche Active Safe
f
unctions are switched on.
f Refer to chapter “Porsche Active Safe (PAS)”
on page 39.
Prewarning prior to switching
Porsche Active Safe (PAS) off and on
b Vehicles with adaptive cruise control (ACC).
When the function is active, the latent warning and
prewarning for Porsche Active Safe are switched
on.
f Refer to chapter “Porsche Active Safe (PAS)”
on page 39.
Switching Lane Change Assist (LCA) on
and off
When the function is active, the information and
warning stage of the Lane Change Assist are
switched on.
e Vehicle e Settings e Date & Time e
Time - Chrono
1. Vehicle e Settings e Date & Time e
Date e Date
2. Set the desired date.
1. Vehicle e Settings e Date & Time e
Date e Format
2. Select the desired date format:
Information
The settings remain stored after the ignition is
switched on and off.
e Vehicle e Settings e Assist. systems e
Active Safe (PAS) e System on
When all Porsche Active Safe
functions are switched off, the grey
symbol appears in the status area on
the multi-function display.
Information
The latent warning and prewarning functions
are switched off by default. The acute warning
function is active and cannot be deactivated.
e Vehicle e Settings e Assist. systems e
Active Safe (PAS) e Prewarning on
e Vehicle e Settings e Assist. Systems e
Lane Changing Assist e System on
267
Vehicle Settings Using the Multi-Function Display
A
B
C
D
E
F
G
H
I
J
K
L
M
N
O
P
Q
R
S
T
U
V
W
X
Y
Z
Setting display brightness of Lane
Change Assist (LCA) on exterior mirror
– Low
– Medium
– High
The new brightness is displayed briefly during the
setting process. This is the level of brightness
displayed for the information stage. The brightness
of the warning stage depends on the brightness of
the information stage.
e Set the brightness of the information stage so
that you can clearly see the warning indicator
lighting up when you look in the exterior mirror,
but are not distracted when looking straight
ahead.
f Refer to chapter “Lane Change Assist (LCA)”
on page 130.
Adjusting individual mode
Various vehicle settings can be adjusted in
individual mode.
– Sport: When the function is active,
SPORT mode is activated.
– Sport Plus: When the function is active,
SPORT Plus mode is activated.
– : When the function is active,
Auto Start Stop function is activated.
– Sport chassis: When the function is active,
“Sport chassis” setup is activated.
– : When the function is active,
sports exhaust system is activated.
– Spoiler: When the function is active,
the rear wing is extended.
Adjusting lighting, windscreen
wiper and mirror
Adjusting off delay of exterior lights for
Welcome Home and Entry functions
f Refer to chapter “Switching on Automatic
Coming Home lights” on page 136.
Converting headlights for left or right-
hand traffic
b Vehicles with the Porsche Dynamic Light
System (PDLS) or the Porsche Dynamic Light
System Plus (PDLS Plus).
b Vehicle is stationary.
– Standard: Headlight position optimised for
right-hand traffic on left-hand drive vehicles
and left-hand traffic on right-hand vehicles.
– Inverted: Headlight position optimised for left-
hand traffic on left-hand drive vehicles and
right-hand traffic on right-hand vehicles.
Activating and deactivating dynamic
high beam
b Vehicles with Porsche Dynamic Light System
Plus (PDLS Plus).
When the function is active, the dynamic high
beam can be used.
f Refer to chapter “Dynamic high beam” on
page 137.
Information
The brightness of the warning indicator
(information stage and warning stage) is adjusted
automatically to the ambient brightness.
1. Vehicle e Settings e Assist. systems e
Lane Changing Assist e Brightness
2. Select the desired brightness.
1. Vehicle e Settings e Individual
2. Select the desired option:
1. Vehicle e Settings e Light & Visibility e
Exterior lights e Fade-out
2. Set the desired off delay.
1. Vehicle e Settings e Light & Visibility e
Exterior lights e L/R driving
2. Select the desired option:
Information
If the headlight position is set to Inverted, a
message indicating that the light has been
converted appears each time the ignition or
dipped beam headlights are switched on.
e Vehicle e Settings e Light & Visibility e
Exterior lights e Dyn. full beam

268
Vehicle Settings Using the Multi-Function Display
A
B
C
D
E
F
G
H
I
J
K
L
M
N
O
P
Q
R
S
T
U
V
W
X
Y
Z
Activating or deactivating interior lights
when the door is opened
When the function is active, the interior lights
switch on when the door is opened.
Adjusting brightness of orientation
lighting
Adjusting brightness of ambient lighting
Setting interior lighting off delay
Setting activation of the rear wiper
when reverse gear is engaged
– Automatic: The rear wiper performs a series
of wipes automatically when it is raining and
reverse gear is engaged.
– Manual: The rear wiper is not activated when
reverse gear is engaged.
Lowering exterior mirror on
passenger’s side when engaging
reverse gear
b Vehicles with memory package.
When the function is active, the exterior mirror on
the passenger’s side is lowered when reverse gear
i
s engaged.
Changing button assignment on
multi-function steering wheel
The ◊ button on the multi-function steering wheel
can be individually assigned the desired functions
in the multi-function display and PCM.
PCM function:
– Source change: Change audio source
– Voice control: Activate voice control
– Repeat instr.: Repeat voice instruction from
the navigation system
– Station/track <: Select previous radio station
or track
– Station/track >: Select next radio station
or track
– Map: Display navigation map in PCM
Cluster function:
– Start/Stop Chr.: Start or stop timing
– Vehicle menu: Display Vehicle menu
– Audio menu: Display Audio menu
– Phone menu: Display telephone menu
– Map menu: Display navigation map on the
multi-function display
– Navi menu: Display navigation menu
– Trip menu: Display Trip menu
– TPM menu: Display TPM menu
– Chrono menu: Display Sport Chrono menu
– ACC menu: Display ACC menu
– G-force menu: Display G-force menu
– Gear shift assist: Display gear shift assist
– Speed limit menu: Display traffic signs
e Vehicle e Settings e Light & Visibility e
Interior lights e when opening door
1. Vehicle e Settings e Light & Visibility e
Interior lights e Orientation
2. Select the desired brightness.
1. Vehicle e Settings e Light/Visibility e
Interior lights e Ambient light
2. Select the desired brightness.
1. Vehicle e Settings e Light/Visibility e
Inside light e Fade-out
2. Set the desired off delay.
1. Vehicle e Settings e Light & Visibility e
Wiper e Rear wiper
2. Select the desired option:
e Vehicle e Settings e Light & Visibility e
Reversing options e Lowering mirr.
1. Vehicle e Settings e Steering wheel op. e
◊ key e PCM function or Cluster function
2. Select the desired option:
Information
The speed limit menu item does not appear on
vehicles with speed limit display. The speed limit
is displayed automatically.
f Refer to chapter “Speed Limit Display” on
page 221.

269
Vehicle Settings Using the Multi-Function Display
A
B
C
D
E
F
G
H
I
J
K
L
M
N
O
P
Q
R
S
T
U
V
W
X
Y
Z
Setting door locking options
Setting door unlocking
– All doors: All doors are unlocked when the
vehicle is unlocked.
– Driver’s door: The driver’s door is unlocked
when the vehicle is unlocked.
Setting door locking
– Off: The doors are not locked automatically
after entering the vehicle.
– After ignition on: The doors are locked
automatically when the ignition is switched on.
– After driveaway: The doors are locked
automatically after driving off.
Switching automatic folding of exterior
mirrors off and on
When the function is active, the exterior mirrors
fold in automatically when the vehicle is locked.
Switching Easy Entry off and on
When the function is active, the driver’s seat
moves back and the steering wheel moves up to
make it easier to get in and out of the vehicle.
Switching auto memory on and off
When this function is active, the personal settings
are stored automatically on the driver’s key when
locking the vehicle.
f Refer to chapter “Storing and retrieving
personal settings” on page 189.
Setting air conditioning
b (on vehicles with 2-zone air conditioning)
Adjusting strength of air flow and air
quantity
– Soft: Recommended for passengers sensitive
to draughts with a preference for gentle air
conditioning.
– Normal: Default setting.
– Strong: Stronger ventilation in the passenger
compartment. The air flow is clearly noticeable.
Switching upper ventilation panel on
and off
When the function is active, the upper ventilation
panel on the dashboard is switched on.
Switching automatic air circulation
mode on/off
When the function is active, the fresh air supply is
adjusted depending on the air quality.
Adjusting volume of warning tones
and ParkAssist
– Loud
– Medium
– Low
1. Vehicle e Settings e Locking e
Door unlock
2. Select the desired option:
1. Vehicle e Settings e Locking e Door lock
2. Select the desired option:
e Vehicle e Settings e Locking e
Mirror retract
e Vehicle e Settings e Locking e
Comfort Entry
e Vehicle e Settings e Locking e
Auto memory
1. Vehicle e Settings e Air conditioning e
Air flow
2. Select the desired option:
e Vehicle e Settings e Air conditioning e
Vent. panel
e Vehicle e Settings e Air conditioning e
Auto air circ.
1. Vehicle e Settings e Volume e
ParkAssist or Warn. tones
2. Select the desired option:

270
Vehicle Settings Using the Multi-Function Display
A
B
C
D
E
F
G
H
I
J
K
L
M
N
O
P
Q
R
S
T
U
V
W
X
Y
Z
Setting units
Setting speedometer units
– km / km/h
– Miles / mph
Setting unit for temperature gauges
– °C
– °F
Setting unit for pressure gauges
– bar
– psi
Setting unit for fuel consumption display
– l/100 km
– mpg (US)
– mpg (UK)
– km/l
Changing the language
Setting Porsche Car Connect
When the function is active, communication
between the vehicle and Porsche Car Connect app
is suppressed. No vehicle-specific information is
transmitted to the Porsche Car Connect app. This
means that no vehicle settings can be configured
using the app.
If there is no active contract for the vehicle, the
Car Connect menu item is greyed out.
f Refer to chapter “Porsche Car Connect” on
page 192.
Visit www.porsche.com/connect or consult a
Porsche partner for further information.
Resetting to factory settings
1. Vehicle e Settings e Units e
Speedometer
2. Select the desired option:
Information
The unit is adjusted in the following displays:
– Total distance and trip displays
– Digital speedometer
– Multi-function display
– PCM
1. Vehicle e Settings e Units e Temperature
2. Select the desired option:
Information
The unit is adjusted in the following displays:
– Multi-function display
– PCM
1. Vehicle e Settings e Units e Pressure
2. Select the desired option:
Information
The unit is adjusted in the following displays:
– Multi-function display
– PCM
1. Vehicle e Settings e Units e Consumption
2. Select the desired option:
Information
The unit is adjusted in the following displays:
– Multi-function display
– PCM
1. Vehicle e Settings e Language
2. Select the desired language.
Information
The language is adjusted in the multi-function
display.
e Vehicle e Settings e Car Connect e
Privacy
Information
Even when the Privacy function is activated,
location information for the vehicle is transmitted
if the vehicle breaks down, if you make an
emergency call or if the vehicle is stolen.
e Please inform all individuals using the vehicle
that the Privacy function can be deactivated.
Information
Resetting to the factory settings deletes all
settings made in the multi-function display.
e Vehicle e Settings e Resetting e
Fact. settings e Yes
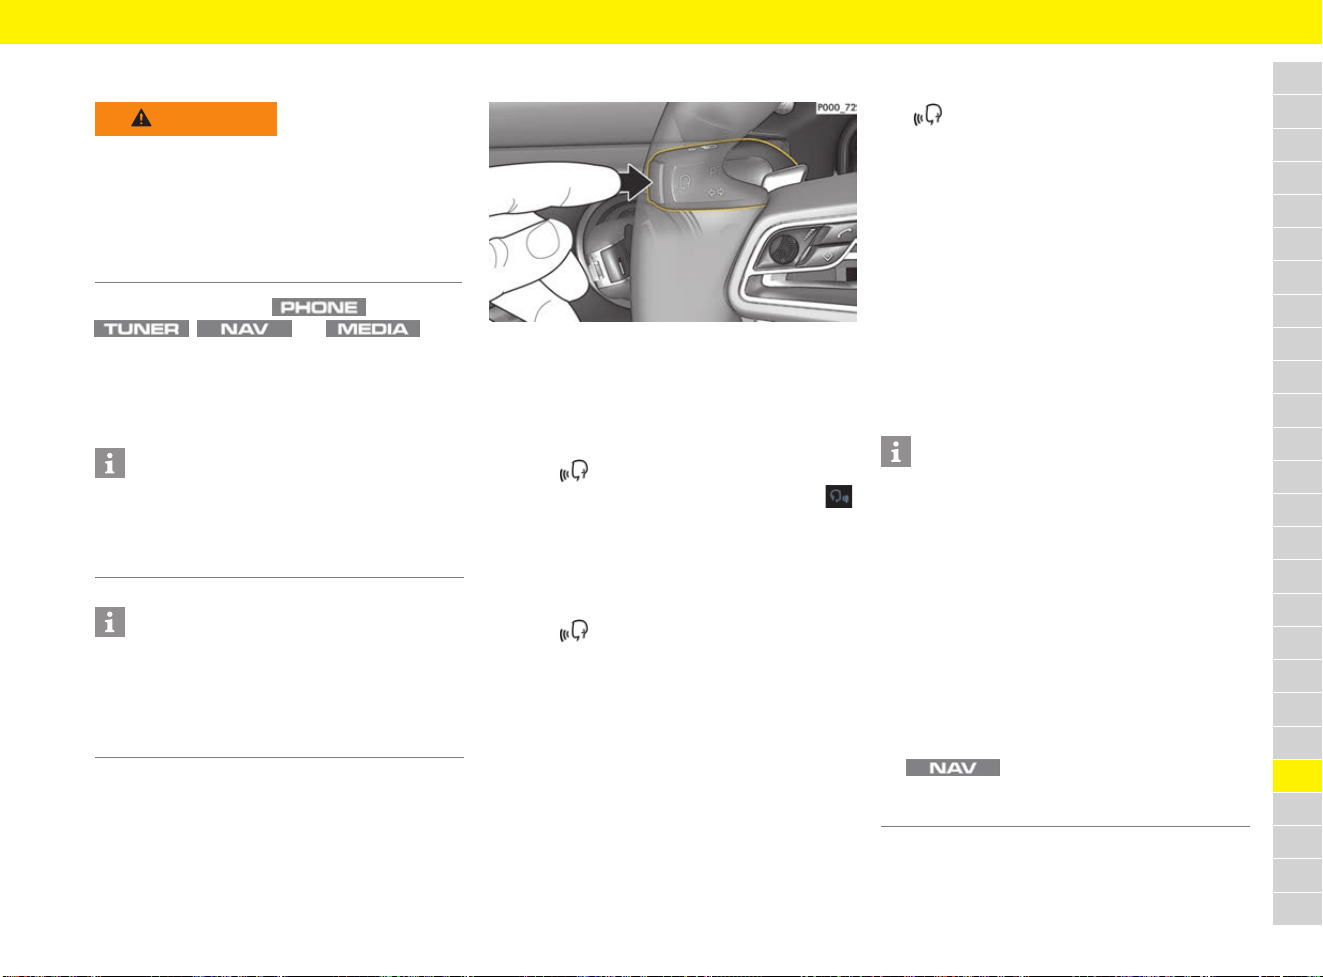
271
Voice Control
A
B
C
D
E
F
G
H
I
J
K
L
M
N
O
P
Q
R
S
T
U
V
W
X
Y
Z
Voice Control
Various functions in the ,
, and main
menus can be called up via voice command. Voice
control adjusts to the speaker and starts learning
from the first dialogue.
f Examples of voice commands from page 274.
Calling up voice control
Fig. 238: Voice control button on the control stalk
Activating voice control
b Ignition is switched on.
b No telephone call is in progress.
b Parking assistant is not active.
1. Press on the control stalk (Fig. 238).
A rising acoustic signal sounds and the icon
for v
oice control appears in the PCM.
2. Say the voice command.
Deactivating voice control
b Voice control is active.
e Press on the control stalk (Fig. 238).
A fading acoustic signal sounds.
– or –
e Say the voice command Cancel or End.
– or –
e Press any button on the PCM.
Other functions of the voice control
button
The (Fig. 238) button on the control stalk
initiates different functions depending on the
application:
– Activates voice control of the PCM by a brief
pressing.
– Activates the Siri
®
voice control system by a
longer press.
f Refer to chapter “Operating Apple
®
CarPlay
using Siri
®
voice recognition” on
page 49.
– Ends current announcements of the voice
control.
– Skips to the next part of the announcement.
– Interrupts the current dialogue.
WARNING
Risk of accidents
In emergency situations, do not use voice control
as your voice may change in stressful situations.
This can lead to the desired telephone connection
failing or not being established quickly enough
under certain circumstances.
e Dial the emergency number via the PCM.
Information
– The Sound and CAR main menus cannot be
operated via voice control.
– Voice control does not support all system
languages.
Information
For information on operating Porsche
Communication Management (PCM):
f Refer to chapter “Operating the Porsche
Communication Management (PCM)” on
page 176.
Information
– Navigation announcements and traffic
announcements are not given during a
dialogue.
– With voice control active, list entries can be
selected via voice control, via the rotary push
button or via the touchscreen.
–
If the spoken voice command is not understood
or if it cannot be interpreted, voice control
reacts with the question Excuse me? and the
voice command can then be repeated. The
PCM offers help after the second attempt.
– Depending on the selected menu language
and the country that was set (using the
button e Menu Destination
input), destinations may have to be spelled out
when inputting the destination.
272
Voice Control
A
B
C
D
E
F
G
H
I
J
K
L
M
N
O
P
Q
R
S
T
U
V
W
X
Y
Z
To ensure smooth communication with voice
control, pay attention to the following points:
– Speak clearly, distinctly and at normal volume.
Speak louder when travelling at a higher speed.
– Emphasise voice commands evenly without
long pauses.
– Do not speak if voice control is giving an
announcement.
– Reduce disruptive sounds caused by closing
doors, windows.
– Only the driver should operate voice control,
as the hands-free microphone is pointed
towards the driver’s side.
Adjusting voice control
– Short dialogue: With the function active, the
voice response involves short announcements.
– Help texts: When the function is active,
commands that can be spoken are displayed.
Call up help
Calling up the Visual input assistance
1. Press on the control stalk (Fig. 238 on
page 271).
A list with sample commands is displayed in
the PCM.
2. Select the icon in the footer of the PCM.
3. To display sample commands in each main
menu, select the icon or sample command
of the relevant main menu in the PCM.
Calling up acoustic input assistance
b Voice control is active.
e Say Help.
– or –
Say help on voice control.
– or –
Say, for example: help tuner, help media.
Input assistance is given in each main menu.
Saying voice commands
Basically, there are three types of voice
commands that can be given:
– Global voice commands
– General voice commands
– Dialogue-related voice commands
The displayed voice commands are a selection of
all available commands. The system also
recognises synonyms if there are any. For
example, instead of saying Call Smith you can
also say Phone Smith or Dial Smith.
f Examples of voice commands from page 274.
Saying global voice commands
All available voice commands that call up a
specific function are global voice commands.
Global voice commands can always be used
regardless of the selected main menu. This allows
the direct calling up of a function without having to
switch to the corresponding main menu
beforehand. If, for example, the NAV main menu
is active and the voice command Station e.g.
Radio station XY is said, the station mentioned
is called up.
Examples of global voice commands:
– Station e.g. Radio station XY
– Call e.g. Smith
1. button e Set e System e
Voice control
2. Select the desired setting:
Information
If the Help texts function is deactivated, the visual
input assistant can be displayed using the icon
in the headline.
f Refer to chapter “Adjusting voice control” on
page 272.

273
Voice Control
A
B
C
D
E
F
G
H
I
J
K
L
M
N
O
P
Q
R
S
T
U
V
W
X
Y
Z
Saying general voice commands
General voice commands can be said at any point
in the dialogue.
Examples of general voice commands:
– New entry Starts voice control again.
– Correction: If, for example, a telephone
number was given in several blocks
(e.g. 0711 911), voice command cancels
the block given last.
– Help: Input assistance with possible voice
commands is displayed.
– Cancel: The dialogue is aborted.
Saying dialogue-related voice
commands
Dialogue-related voice commands are needed as
soon as a dialogue is conducted with the PCM.
For example, these include the following voice
commands:
– Line 1
– Next page/previous page
– Yes/No
Use list by voice
Browse through a list
e To browse further/back through a list, say
Next page/previous page.
– or –
Using list via touchscreen or rotary push
button
Saying a list entry
You can say blue list entries. Otherwise, list entries
can be called up via the blue line numbers.
e Say the voice command Line 1.

274
Voice Control
A
B
C
D
E
F
G
H
I
J
K
L
M
N
O
P
Q
R
S
T
U
V
W
X
Y
Z
Voice commands for radio
Voice commands for media
What do I want to do?
What should I say?
Note
Switch reception range (Set/switch on) Tuner e.g. FM/AM/DAB
Select a station Select station You can only say stations that can be currently
received.
Tune to a station that can currently be received Station e.g. Station XY (tune in) You can only say stations that can be currently
received.
Enter a frequency Frequency e.g. 91.1 (select) Directly selecting a frequency, if necessary, causes
the reception range to change.
Call up help Help on tuner Acoustic help for the most important tuner
functions.
What do I want to do? What should I say? Note
Change the media source Select e.g. Disc/SD card/USB/AUX/
Jukebox/Bluetooth
Select an artist directly Play artist e.g. Allan Taylor
You can only say artists/albums/tracks/genres
available in the active media source.
Select an album directly Play album e.g. Songs for the Road
Select a track directly Play track e.g. Let the Music Flow
Select a genre directly Play genre e.g. Rock
Select music similar to what is now playing Play more like this
Call up help Help on media Acoustic help for the most important media
functions.
Use natural voice commands Example:
I would like to listen to the jukebox
I would like to listen to rock music
As an alternative to actual commands, the PCM can
detect natural voice commands (not available in all
languages).

275
Voice Control
A
B
C
D
E
F
G
H
I
J
K
L
M
N
O
P
Q
R
S
T
U
V
W
X
Y
Z
Voice commands for telephone
b The telephone is connected to the PCM.
f Refer to chapter “Telephone” on page 238.
What do I want to do?
What should I say?
Note
Open the redial feature Redial
Enter a phone number Dial number In the next step, the system asks for the telephone
number.
Call voice mail Call voice mail
Call a stored contact Call contact/display phonebook In the next step, the system asks for the name of the
contact.
Call up the call list Call list/missed calls/incoming calls/
dialled numbers
Voice commands lead to a global call list from which
an entry can be selected or called.
Call a stored contact Call e.g. Smith (mobile/private/
business/general)
If the contact is not unique, the command leads to
dialogue. You can say the first name, surname or both.
A specific telephone number of the contact can also be
selected.
Read out e-mails/text messages Read out (new) e-mails/
(new) test messages
b The connected mobile phone supports the
Bluetooth
®
Message Access Profile.
b An active data connection is available.
f Refer to chapter “Connectivity” on page 87.
These services are not available in all languages and
markets.

276
Voice Control
A
B
C
D
E
F
G
H
I
J
K
L
M
N
O
P
Q
R
S
T
U
V
W
X
Y
Z
Voice commands for navigation
Dictate text message/e-mail Dictate text message/Dictate E-Mail b The connected mobile phone supports the
Bluetooth
®
Message Access Profile.
b An active data connection is available.
f Refer to chapter “Connectivity” on page 87.
These services are not available in all languages and
markets.
Call up help Help on phone Acoustic help for the most important telephone
functions.
Use natural voice commands Example:
I would like to call John Smith
Call John Smith on the mobile phone
Who called me?
Dial the last number again
As an alternative to actual commands, the PCM can
detect natural voice commands (not available in all
languages).
What do I want to do?
What should I say?
Note
What do I want to do?
What should I say?
Note
Enter a new destination Take me to e.g. London, Downing Street 10/
Enter address/Enter new destination
Depending on which country is selected, you can
navigate by saying Take me to in one sentence or
step by step.
Select previous destination Recent destinations/Stored destinations
Select home/work as the destination Take me home/Take me to work Navigation to the stored address starts.
For information on how to save the address:
f Refer to chapter “Storing destination (favourite)”
on page 170.
Search for a destination or point of interest Search (point of interest) e.g.
Porsche Service
You can say brand names or POI categories
(e.g. find airport).
Search for a destination online Online search/Internet search b An active data connection is available.
f Refer to chapter “Connectivity” on page 87.
These services are not available in all languages and
markets.

277
Voice Control
A
B
C
D
E
F
G
H
I
J
K
L
M
N
O
P
Q
R
S
T
U
V
W
X
Y
Z
Select a country Enter country/Change country
Select a city Enter city
Search for a restaurant/rest area/toilet/cash
machine/petrol station
Next restaurant/rest area/toilet/ATM/
petrol station
Shows the respective search criterion nearby.
Start/stop route guidance Start/stop route guidance
Calculate remaining fuel Range/fuel range/tank information
Call up traffic information Traffic info b Route guidance is active.
Request arrival time Are we there yet/arrival time b Route guidance is active.
Calculate an alternative route/avoid traffic jam Calculate alternative routes/
avoid traffic jam
After alternative routes are calculated, you can
make a choice, for example, via Route 2 or via the
colour of the alternative route in the map display
such as green.
Call up help Help on navigation Acoustic help for the most important navigation
functions.
Use natural voice commands Example:
Take me to e.g. London, 10 Downing Street
Take me to the nearest restaurant
Take me home
Where is the next petrol station?
I have to refuel
Show me the map
Are there any traffic jams along the route?
As an alternative to actual commands, the PCM can
detect natural voice commands (not available in all
languages).
What do I want to do?
What should I say?
Note

278
Warning and Information Messages
A
B
C
D
E
F
G
H
I
J
K
L
M
N
O
P
Q
R
S
T
U
V
W
X
Y
Z
Warning and Information Messages
If a warning message appears, always refer to the corresponding chapters in this manual.
When certain warning lights come on, additional acoustic signals sound.
Warning messages only appear if all measurement prerequisites are met – all fluid levels should therefore be checked regularly.
Warning and information message categories
Red System failure or warning
Yellow Fault, system failure, information or instruction
White Fault, system failure, information or instruction
Safety
Instrument panel
display
Multi-function display message Meaning and action required
lights up Fasten seat belt
One or more seat belts are not fastened.
e Ensure that all vehicle occupants have fastened their seat belts.
Passenger airbag
on/off
Passenger airbag is switched on or off.
Airbag indicator
light fault
Service necessary
Airbag warning light has failed.
Possible to drive on.
e Adapt your driving style to the situation.
e Have the fault corrected at a qualified specialist workshop.*
Move steering wheel
Strain on the steering lock is too high.
Possible to drive on.
e Relieve the steering lock by turning the steering wheel to the left or right.
Steering wheel
locks with door locks
Steering lock is not active.
e Lock the vehicle to lock the steering wheel.
Power steering fail
More effort needed
Driving permitted
Power steering is not available.
Possible to drive on.
e Adapt your driving style to the situation.
e Have the fault corrected at a qualified specialist workshop.*
* Porsche recommends a Porsche partner as they have trained workshop personnel and the necessary parts and tools.
279
Warning and Information Messages
A
B
C
D
E
F
G
H
I
J
K
L
M
N
O
P
Q
R
S
T
U
V
W
X
Y
Z
Steering support limited
Drive with caution
Power steering is temporarily limited.
Possible to drive on.
e Adapt your driving style to the situation.
e Have the fault corrected at a qualified specialist workshop.*
lights up
Brake fluid level
Park vehicle safely
Brake fluid level is too low.
e Stop in a suitable place.
e Do not continue driving.
e Have the fault corrected at a qualified specialist workshop.*
lights up
Brake distribution fault
Park vehicle safely
Brake distribution is faulty.
e Stop in a suitable place.
e Do not continue driving.
e Have the fault corrected at a qualified specialist workshop.*
lights up
Brake cooling defect
Brake temperature is too high.
e Stop in a suitable place.
e Do not continue driving.
e Have the fault corrected at a qualified specialist workshop.*
lights up
ABS/PSM failure
Drive with caution
ABS or Porsche Stability Management (PSM) has failed.
Possible to drive on.
e Adapt your driving style to the situation.
e Have the fault corrected at a qualified specialist workshop.*
Change
brake pads
Driving permitted
Brake pads are worn.
e Have brake pads replaced immediately.
e Have the fault corrected at a qualified specialist workshop.*
flashes
Emergency braking
Electric parking brake is in emergency braking function.
Symbols go out after emergency braking.
lights up
Parking brake fault
Parking brake is faulty.
e Have the fault corrected at a qualified specialist workshop.*
Safety
Instrument panel
display
Multi-function display message Meaning and action required
* Porsche recommends a Porsche partner as they have trained workshop personnel and the necessary parts and tools.
280
Warning and Information Messages
A
B
C
D
E
F
G
H
I
J
K
L
M
N
O
P
Q
R
S
T
U
V
W
X
Y
Z
Electric parking brake
in service mode
Parking brake is in service mode.
e Have the fault corrected at a qualified specialist workshop.*
flashes
Release
parking brake
Parking brake is active.
e Pull the electric parking brake switch.
f Refer to chapter “Electric parking brake” on page 63.
lights up
Press
brake pedal
Parking brake is active.
e Press the brake pedal when releasing the electric parking brake.
Rain/light sensor failure
Service necessary
Rain/light sensor is defective.
e Switch on windscreen wiper and light manually.
e Have the fault corrected at a qualified specialist workshop.*
flashes
Adaptive headlight
control defective
Service required
Cornering lights are defective.
e Have the fault corrected at a qualified specialist workshop.*
lights up
Driving light
control defective
Service required
Driving light control is defective.
e Adapt your driving style to the situation.
e Have the fault corrected at a qualified specialist workshop.*
Headlight range
regulation defective
Service required
Headlight range regulation is defective.
e Adapt your driving style to the situation.
e Have the fault corrected at a qualified specialist workshop.*
flashes
Headlight
control defective
Service required
Headlight control defective.
e Adapt your driving style to the situation.
e Have the fault corrected at a qualified specialist workshop.*
Example:
Check front left indicator
Indicated light is defective.
e Have the fault corrected at a qualified specialist workshop.*
Full beam assist failure
Operate full beam manually
Service required
Full beam assistant fault.
e Actuate high beam manually.
e Have the fault corrected at a qualified specialist workshop.*
Safety
Instrument panel
display
Multi-function display message Meaning and action required
* Porsche recommends a Porsche partner as they have trained workshop personnel and the necessary parts and tools.
281
Warning and Information Messages
A
B
C
D
E
F
G
H
I
J
K
L
M
N
O
P
Q
R
S
T
U
V
W
X
Y
Z
Full beam assist
currently limited
No camera view
Clean if necessary
Full beam assistant temporarily not available due to camera fault.
e Clean the windscreen if necessary.
If the fault persists:
e Have the fault corrected at a qualified specialist workshop.*
PDLS+ currently limited,
no camera vision
Clean windscreen
Porsche Dynamic Light System Plus (PDLS Plus) temporarily not available due to
camera fault.
e Clean the windscreen if necessary.
If the fault persists:
e Have the fault corrected at a qualified specialist workshop.*
PDLS+ fault
Operate high beam
manually
Service required
Porsche Dynamic Light System Plus (PDLS Plus) fault.
e Have the fault corrected at a qualified specialist workshop.*
Side light on
Driving lights or parking lights on.
Parking light on
Left or right parking light on.
Wiper defective
Consult dealer
Wiper is defective.
e Adapt your driving style to the situation.
e Have the fault corrected at a qualified specialist workshop.*
lights up
Check tyres
Significant pressure loss in one or several tyres.
e Stop in a suitable place.
e Check the indicated tyre for damage.
f Refer to chapter “Identifying tyre damage” on page 258.
e Add sealant if necessary.
f Refer to chapter “Flat Tyre” on page 110.
e Set the correct tyre pressure at the next opportunity.
f Refer to chapter “Inflating tyres” on page 257.
Safety
Instrument panel
display
Multi-function display message Meaning and action required
* Porsche recommends a Porsche partner as they have trained workshop personnel and the necessary parts and tools.

282
Warning and Information Messages
A
B
C
D
E
F
G
H
I
J
K
L
M
N
O
P
Q
R
S
T
U
V
W
X
Y
Z
lights up
Refill tyre
Pressure loss in one or several tyres.
e Set the correct tyre pressure at the next opportunity.
f Refer to chapter “Inflating tyres” on page 257.
flashes or
lights up
Tyre pressure
monitoring fault
Service required
Fault in Tyre Pressure Monitoring (TPM) system.
Tyre pressure is not monitored.
e Have the fault corrected at a qualified specialist workshop.*
flashes or
lights up
Tyre pressure monitoring
temporatily inactive
Temporary fault in Tyre Pressure Monitoring (TPM) system.
Tyre pressure is not monitored.
e Have the fault corrected at a qualified specialist workshop.*
flashes or
lights up
No monitoring of
tyre pressure
System learns over
25 km/h (16 mph)
The Tyre Pressure Monitoring (TPM) system requires a certain amount of time to learn
the wheels.
During this time, the current tyre pressures are not available on the multi-function
display.
e Perform Tyre Pressure Monitoring again later.
flashes or
lights up
Tyre change?
Update settings
After the wheels have been changed, the tyre settings must be updated.
e Update tyre settings in the multi-function display.
f Refer to chapter “TPM menu (TPM – Tyre Pressure Monitoring)” on page 162.
lights up
Comfort pressure/
Tyre pressure
Reduce speed
Speed for set tyre inflation pressure has been exceeded.
e Reduce speed.
e Set the correct tyre pressure at the next opportunity.
f Refer to chapter “Inflating tyres” on page 257.
Safety
Instrument panel
display
Multi-function display message Meaning and action required
* Porsche recommends a Porsche partner as they have trained workshop personnel and the necessary parts and tools.

283
Warning and Information Messages
A
B
C
D
E
F
G
H
I
J
K
L
M
N
O
P
Q
R
S
T
U
V
W
X
Y
Z
Engine
Instrument panel
display
Multi-function display message Meaning and action required
Oil level below minimum
Refill oil immediately
The minimum oil level has been exceeded.
e Stop immediately in a suitable place and switch off the engine.
e Do not continue driving.
e Check whether there is an obvious oil leak on or under the vehicle. Do not continue
driving if there is an obvious oil leak.
e Select oil measurement on the multi-function display:
f Refer to chapter “Measuring and displaying engine oil level” on page 160.
e Add engine oil if necessary.
f Refer to chapter “Selecting and topping up engine oil” on page 107.
Oil level
above maximum
Consult dealer
Driving permitted
Engine oil level is above maximum.
e Have the fault corrected at a qualified specialist workshop.*
Oil level
measurement fault
Consult dealer
Driving permitted
Oil level measurement failure.
e Have the fault corrected at a qualified specialist workshop.*
Minimum Oil
level reached
Refill oil
Minimum oil level reached.
e Top up engine oil.
f Refer to chapter “Selecting and topping up engine oil” on page 107.
Oil level information
currently unavailable
Under certain circumstances, the oil level cannot be displayed. Causes of this include:
– Engine is cold.
– Vehicle parked following full-load operation at high engine speeds.
– Engine oil temperature too high.
e Perform oil level measurement again.
f Refer to chapter “Measuring and displaying engine oil level” on page 160.
* Porsche recommends a Porsche partner as they have trained workshop personnel and the necessary parts and tools.

284
Warning and Information Messages
A
B
C
D
E
F
G
H
I
J
K
L
M
N
O
P
Q
R
S
T
U
V
W
X
Y
Z
Oil pressure too low
Park vehicle safely
Engine oil pressure is too low.
e Stop immediately in a suitable place and switch off the engine.
e Do not continue driving.
e Check whether there is an obvious oil leak on or under the vehicle.
e Select oil measurement on the multi-function display:
f Refer to chapter “Measuring and displaying engine oil level” on page 160.
e Add engine oil if necessary.
f Refer to chapter “Selecting and topping up engine oil” on page 107.
e Do not continue driving if the warning message is displayed despite the oil level
being correct.
e Have the fault corrected at a qualified specialist workshop.*
Oil pressure
measurement fault
Driving permitted
Consult dealer
Oil pressure measurement failure.
Possible to drive on.
e Have the fault corrected at a qualified specialist workshop.*
Oil temperature
too high
Reduce engine load
Engine oil temperature is too high.
e Stop in a suitable place, switch off the engine and let it cool down.
e Do not continue driving.
e Select oil measurement on the multi-function display:
f Refer to chapter “Measuring and displaying engine oil level” on page 160.
e Add engine oil if necessary.
f Refer to chapter “Selecting and topping up engine oil” on page 107.
Oil temperature
gauge fault
Consult dealer
Driving permitted
Engine oil temperature gauge faulty.
Possible to drive on.
e Have the fault corrected at a qualified specialist workshop.*
Engine
Instrument panel
display
Multi-function display message Meaning and action required
* Porsche recommends a Porsche partner as they have trained workshop personnel and the necessary parts and tools.

285
Warning and Information Messages
A
B
C
D
E
F
G
H
I
J
K
L
M
N
O
P
Q
R
S
T
U
V
W
X
Y
Z
Coolant display at
maximum mark
Refill coolant
immediately
Stop driving
Coolant level is too low.
e Stop immediately in a suitable place, switch off the engine and let it cool down.
e Check coolant level and top up coolant if necessary.
f Refer to chapter “Checking coolant level and adding coolant” on page 95.
If the fault persists:
e Have the fault corrected at a qualified specialist workshop.*
Refill coolant
Be careful of
engine temperature
Coolant level is low.
e Check coolant level and top up coolant if necessary.
f Refer to chapter “Checking coolant level and adding coolant” on page 95.
If the fault persists:
e Have the fault corrected at a qualified specialist workshop.*
Coolant or engine oil
temperature display
at maximum mark
Engine over temp.
Park vehicle
to cool down
Coolant or engine oil temperature is too high.
e Stop immediately in a suitable place, switch off the engine and let it cool down.
e Check the radiators and air guides in and around the vehicle for obstructions.
e Check coolant and engine oil level:
f Refer to chapter “Checking coolant level and adding coolant” on page 95.
f Refer to chapter “Measuring and displaying engine oil level” on page 160.
e Top up coolant or engine oil if necessary.
If the fault persists:
e Have the fault corrected at a qualified specialist workshop.*
Coolant temp.
gauge fault
Driving permitted
Consult dealer
Coolant temperature gauge failure.
e Have the fault corrected at a qualified specialist workshop.*
Cooling system fault
Consult dealer
Service required
Cooling system fault.
e Have the fault corrected at a qualified specialist workshop.*
Engine
Instrument panel
display
Multi-function display message Meaning and action required
* Porsche recommends a Porsche partner as they have trained workshop personnel and the necessary parts and tools.
286
Warning and Information Messages
A
B
C
D
E
F
G
H
I
J
K
L
M
N
O
P
Q
R
S
T
U
V
W
X
Y
Z
Engine fan failure
Avoid full engine load
Driving permitted
Engine-compartment blower failure.
e Have the fault corrected at a qualified specialist workshop.*
Reduced power
Driving permitted
Consult dealer
Engine power is reduced.
Possible to drive on.
e Have the fault corrected at a qualified specialist workshop.*
Engine control fault
Consult dealer
Driving permitted
Engine control system is faulty.
Possible to drive on.
e Have the fault corrected at a qualified specialist workshop.*
Warning light on the
coolant temperature
gauge flashes
Engine control
system fault
Engine control system is faulty.
e Have the fault corrected at a qualified specialist workshop.*
Engine
Instrument panel
display
Multi-function display message Meaning and action required
* Porsche recommends a Porsche partner as they have trained workshop personnel and the necessary parts and tools.

287
Warning and Information Messages
A
B
C
D
E
F
G
H
I
J
K
L
M
N
O
P
Q
R
S
T
U
V
W
X
Y
Z
Vehicle
Instrument panel
display
Multi-function display message Meaning and action required
Alternator fault
Park vehicle safely
Generator fault.
e Stop in a suitable place and switch off the engine.
e Do not continue driving.
e Have the fault corrected at a qualified specialist workshop.*
Battery function limited
Consult dealer
Battery function is restricted.
Possible to drive on.
e Have the fault corrected at a qualified specialist workshop.*
Low battery
Start engine and run
for extended period
Battery charge is too low.
e Start the engine so that the battery can be charged.
Low battery
Power consumption
limited
Battery charge is too low.
Power supply to comfort features is deactivated to avoid running down the battery.
Possible to drive on.
Battery protection was
active during parking
Battery protection is or was active.
Consumers were deactivated when stationary to avoid running down the battery.
Possible to drive on.
Battery discharge
protection active
Capacity xx %
Battery discharging protection is or was active.
Consumers were deactivated in vehicle to avoid running down the battery.
Possible to drive on.
e Observe battery capacity. Charge the battery if necessary.
f Refer to chapter “Charging the battery” on page 61.
Recharge battery
Take care of polarity
Battery charge is too low.
e Charge the battery.
f Refer to chapter “Charging the battery” on page 61.
Please start engine
manually
e Start engine manually at the ignition.
* Porsche recommends a Porsche partner as they have trained workshop personnel and the necessary parts and tools.

288
Warning and Information Messages
A
B
C
D
E
F
G
H
I
J
K
L
M
N
O
P
Q
R
S
T
U
V
W
X
Y
Z
Selector-lever
position display
flashes
Engage gear selector
properly
Vehicles with PDK: Selector lever may be positioned between two settings.
e Engage selector lever properly.
Move gear lever
to position P
Vehicles with PDK: Move gear lever to position P before removing driver’s key or
stopping and securing the vehicle.
e Move gear lever to position P.
Move gear lever
to P or N
Vehicles with PDK: Engine can only be started in selector-lever position P or N.
e Move gear lever to P or N.
Press brake
Vehicles with PDK: Start possible only when brake pedal is pressed.
e Apply the footbrake when starting.
Selector-lever
position display
flashes
Gearbox failure
Park vehicle safely
Vehicles with PDK: Transmission failure.
Selector-lever position is no longer displayed on the instrument panel.
Vehicle can be driven only until it comes to a stop.
Do not continue driving.
e Stop immediately in a suitable place.
e Have the vehicle towed to a qualified specialist workshop.
f Refer to chapter “Towing and Tow-Starting” on page 249.
Gearbox is overheating
Park vehicle
to cool down
Vehicles with PDK: Transmission temperature is too high.
e Stop in a suitable place and let the transmission cool down.
e Have the fault corrected at a qualified specialist workshop.*
Selector-lever
position display
flashes
Possible R gear fault
Driving permitted
Vehicles with PDK: Transmission fault.
Reverse gear may not function.
Possible to continue driving with restricted gearshift comfort.
e Have the fault corrected at a qualified specialist workshop.*
Vehicle
Instrument panel
display
Multi-function display message Meaning and action required
* Porsche recommends a Porsche partner as they have trained workshop personnel and the necessary parts and tools.
289
Warning and Information Messages
A
B
C
D
E
F
G
H
I
J
K
L
M
N
O
P
Q
R
S
T
U
V
W
X
Y
Z
Gearbox
temperature too high
Reduce engine load
Vehicles with PDK: Transmission temperature is too high.
Possible to drive on. “Warning jerks” can be felt when driving off and the engine power
may be restricted.
e Stop in a suitable place.
e Reduce engine load.
e Do not hold the vehicle with the accelerator; use the brakes instead.
e Allow the engine to run in selector-lever position P or N until the warning
disappears.
Press
clutch pedal
Vehicles with manual transmission: Start possible only when clutch pedal is pressed.
e Press the clutch pedal when starting.
VTS armed, enter code
and acknowledge
Porsche Vehicle Tracking System (PVTS) is activated.
e To deactivate PVTS (Porsche Vehicle Tracking System), enter and confirm your
code using the numeric keys on the Remote Keypad.
VTS stepped-up, enter code
within X minutes
Porsche Vehicle Tracking System (PVTS) is activated.
e To deactivate PVTS (Porsche Vehicle Tracking System), enter and confirm your
code using the numeric keys on the Remote Keypad.
Theft attempt recognized,
VTS alarm active
Attempted theft detected.
e Contact control centre.
Remote Keypad
battery empty,
please replace
Remote Keypad battery is running low.
e Change the battery.
Emergency call
activated
An emergency call activated via the vehicle was confirmed by the SOC.
Emergency call fault
Consult dealer
Emergency call function is faulty.
e Have the fault corrected at a qualified specialist workshop.*
Emergency call failed
It was not possible to transfer an emergency call activated via the vehicle to the SOC.
Vehicle
Instrument panel
display
Multi-function display message Meaning and action required
* Porsche recommends a Porsche partner as they have trained workshop personnel and the necessary parts and tools.

290
Warning and Information Messages
A
B
C
D
E
F
G
H
I
J
K
L
M
N
O
P
Q
R
S
T
U
V
W
X
Y
Z
Emergency call
service contract expired
The service contract for the emergency call service has expired and can be extended
in the Porsche Service portal.
Driver Card
not recognised
Driver card was not detected.
e Activate driver card again using the key.
e Contact control centre if necessary.
Driver Card
battery empty,
please replace
Driver card battery is running low.
e Change the battery.
Outside temp. display
defective
Service necessary
Outside temperature indicator defective.
e Have the fault corrected at a qualified specialist workshop.*
Spoiler failure
Reduce speed
Driving stability is impaired.
e Adapt your driving style to the situation.
e Have the fault corrected at a qualified specialist workshop.*
Decrease speed
Move roof cover
to end position
e Open or close convertible top fully.
Roof cover
in service position
Car not ready
Convertible top is in service position.
e Exit service position.
Convertible hood is
opening/closing
Message goes out in end position.
Roof control fault
Service necessary
e Have the fault corrected at a qualified specialist workshop.*
Example:
Service in xxx km
e Bring the vehicle in for service no later than after the distance or time shown
has elapsed.
Vehicle
Instrument panel
display
Multi-function display message Meaning and action required
* Porsche recommends a Porsche partner as they have trained workshop personnel and the necessary parts and tools.

291
Warning and Information Messages
A
B
C
D
E
F
G
H
I
J
K
L
M
N
O
P
Q
R
S
T
U
V
W
X
Y
Z
Fuel gauge
warning light on
Please refuel
Fuel tank is empty.
e Refuel at the next opportunity.
f Refer to chapter “Refuelling” on page 209.
Fuel gauge fault
Service necessary
Fuel gauge fault.
e Have the fault corrected at a qualified specialist workshop.*
Doors/rear
hood open
e Close vehicle door or cover indicated.
Refill washer fluid
Washer fluid is empty.
e Refill washer fluid.
f Refer to chapter “Washer Fluid” on page 297.
Porsche Entry&Drive
fault
Porsche Entry & Drive fault.
e Have the fault corrected at a qualified specialist workshop.*
Key not found
or key fault
Change key position
Vehicles with Porsche Entry & Drive:
Key position fault.
e Carry driver’s key or change key position.
Remove key from boot
Vehicles with Porsche Entry & Drive:
Key is located in the luggage compartment.
e Retrieve key from luggage compartment.
Multiple keys
recognised in vehicle
Vehicles with Porsche Entry & Drive:
Several driver’s keys in the vehicle, e.g. in possession of passenger.
Vehicle
Instrument panel
display
Multi-function display message Meaning and action required
* Porsche recommends a Porsche partner as they have trained workshop personnel and the necessary parts and tools.
292
Warning and Information Messages
A
B
C
D
E
F
G
H
I
J
K
L
M
N
O
P
Q
R
S
T
U
V
W
X
Y
Z
Replace ignition
key battery
Battery in the driver’s key is flat.
e Replace battery.
f Refer to chapter “Replacing battery in driver’s key” on page 102.
Remove key
from ignition
e Remove the ignition key.
Operating part:
turn left, pull off,
insert key
Vehicles with Porsche Entry & Drive:
No key detected in vehicle.
Ignition cannot be switched on and engine cannot be started.
e Turn control unit back to ignition lock position 0 and remove it from the
ignition lock.
e Switch on the ignition using the driver’s key (not the emergency key).
Vehicle
Instrument panel
display
Multi-function display message Meaning and action required
* Porsche recommends a Porsche partner as they have trained workshop personnel and the necessary parts and tools.
293
Warning and Information Messages
A
B
C
D
E
F
G
H
I
J
K
L
M
N
O
P
Q
R
S
T
U
V
W
X
Y
Z
Driving systems
Instrument panel
display
Multi-function display message Meaning and action required
light up
PSM failure
Park vehicle safely
Porsche Stability Management (PSM) system fault.
e Stop in a suitable place.
e Do not continue driving.
e Have the fault corrected at a qualified specialist workshop.*
lights up
ABS/PSM failure
Consult dealer
Drive with caution
Porsche Stability Management failure.
Possible to drive on.
e Adapt your driving style to the situation.
e Have the fault corrected at a qualified specialist workshop.*
lights up PSM off Porsche Stability Management (PSM) was switched off.
PSM on Porsche Stability Management (PSM) was switched on.
flash PSM in diagnosis Porsche Stability Management (PSM) is in diagnostic test mode.
PADM disabled
Service required
Driving permitted
Porsche Active Drivetrain Mount (PADM) is deactivated.
e Adapt your driving style to the situation.
e Have the fault corrected at a qualified specialist workshop.*
* Porsche recommends a Porsche partner as they have trained workshop personnel and the necessary parts and tools.

294
Warning and Information Messages
A
B
C
D
E
F
G
H
I
J
K
L
M
N
O
P
Q
R
S
T
U
V
W
X
Y
Z
Chassis
system failure
Suspension system failure.
e Stop immediately in a suitable place.
e Do not continue driving.
e Have the fault corrected at a qualified specialist workshop.*
Suspension system fault
Drive with caution
Suspension system fault.
Vehicle handling may be affected.
e Adapt your driving style to the situation.
e Have the fault corrected at a qualified specialist workshop.*
Assistance systems /
camera fault
Service required
Assistance system or vehicle camera fault.
e Have the fault corrected at a qualified specialist workshop.*
Front camera
view limited
Clean if necessary
Assistance systems or camera temporarily unavailable due to weather conditions or
dirt on the windscreen.
e Clean the windscreen if necessary.
If the fault persists:
e Have the fault corrected at a qualified specialist workshop.*
Launch Control
activated
Launch Control is activated.
System fault
Driving permitted
Consult dealer
One or more electrical systems may have failed.
e Adapt your driving style to the situation.
e Have the fault corrected at a qualified specialist workshop.*
Instrument cluster/
Front Park Assist
audio fault
Service required
Acoustic warning and distance signals (e.g. for ParkAssist) are not available.
e Adapt your driving style to the situation.
e Have the fault corrected at a qualified specialist workshop.*
Driving systems
Instrument panel
display
Multi-function display message Meaning and action required
* Porsche recommends a Porsche partner as they have trained workshop personnel and the necessary parts and tools.
295
Warning and Information Messages
A
B
C
D
E
F
G
H
I
J
K
L
M
N
O
P
Q
R
S
T
U
V
W
X
Y
Z
Parking Assistant
audio fault
Service required
Acoustic warning and distance signals for ParkAssist are not available.
e Adapt your driving style to the situation.
e Possible problems when parking.
e Have the fault corrected at a qualified specialist workshop.*
ParkAssist
fault
ParkAssist is faulty.
e Adapt your driving style to the situation.
e Possible problems when parking.
e Have the fault corrected at a qualified specialist workshop.*
Distance
Please brake
Insufficient distance from vehicle in front.
e Adapt your driving style to the situation.
e Increase distance from vehicle in front.
ACC unavailable
Sensor dirty
Please clean
Adaptive cruise control (ACC) may be affected by weather conditions or by dirt on
the sensor at the front of the vehicle.
e Adapt your driving style to the situation.
e Sensor may need cleaning.
If the fault persists:
e Have the fault corrected at a qualified specialist workshop.*
ACC/PAS unavailable
Service required
Adaptive cruise control (ACC) fault.
e Adapt your driving style to the situation.
If the fault persists:
e Have the fault corrected at a qualified specialist workshop.*
ACC/Cruise control
not possible
Move gear selector
to D/M
Vehicles with PDK:
Adaptive cruise control (ACC) only possible in selector-lever position D or M.
e Move selector lever to position D or M.
Limit 1/2 exceeded Preset speed limit 1 or 2 has been exceeded.
Driving systems
Instrument panel
display
Multi-function display message Meaning and action required
* Porsche recommends a Porsche partner as they have trained workshop personnel and the necessary parts and tools.

296
Warning and Information Messages
A
B
C
D
E
F
G
H
I
J
K
L
M
N
O
P
Q
R
S
T
U
V
W
X
Y
Z
Speed limit disp.
currently limited
No camera view
Clean if necessary
Speed limit display is temporarily unavailable due to weather conditions or dirt on
the windscreen.
e Clean the windscreen if necessary.
If the fault persists:
e Have the fault corrected at a qualified specialist workshop.*
Speed limit display
currently limited
Navigation data reception is temporarily unavailable.
If the fault persists:
e Have the fault corrected at a qualified specialist workshop.*
Speed limit display
currently unavailable
Camera image evaluation is temporarily unavailable.
If the fault persists:
e Have the fault corrected at a qualified specialist workshop.*
Speed limit display fault
Service required
There is a fault on the camera or navigation system.
e Have the fault corrected at a qualified specialist workshop.*
Lane change assist
currently unavailable
Lane Change Assist (LCA) is temporarily unavailable due to weather conditions or
dust cloud.
Lane change assist
not available
Service required
Lane Change Assist (LCA) fault.
e Have the fault corrected at a qualified specialist workshop.*
Lane change assist
sensors blocked
Clean rear bumper
Lane Change Assist (LCA) sensors can be blocked by stickers, dirt or a build-up of ice,
for example.
e Sensor may need cleaning.
Driving systems
Instrument panel
display
Multi-function display message Meaning and action required
* Porsche recommends a Porsche partner as they have trained workshop personnel and the necessary parts and tools.
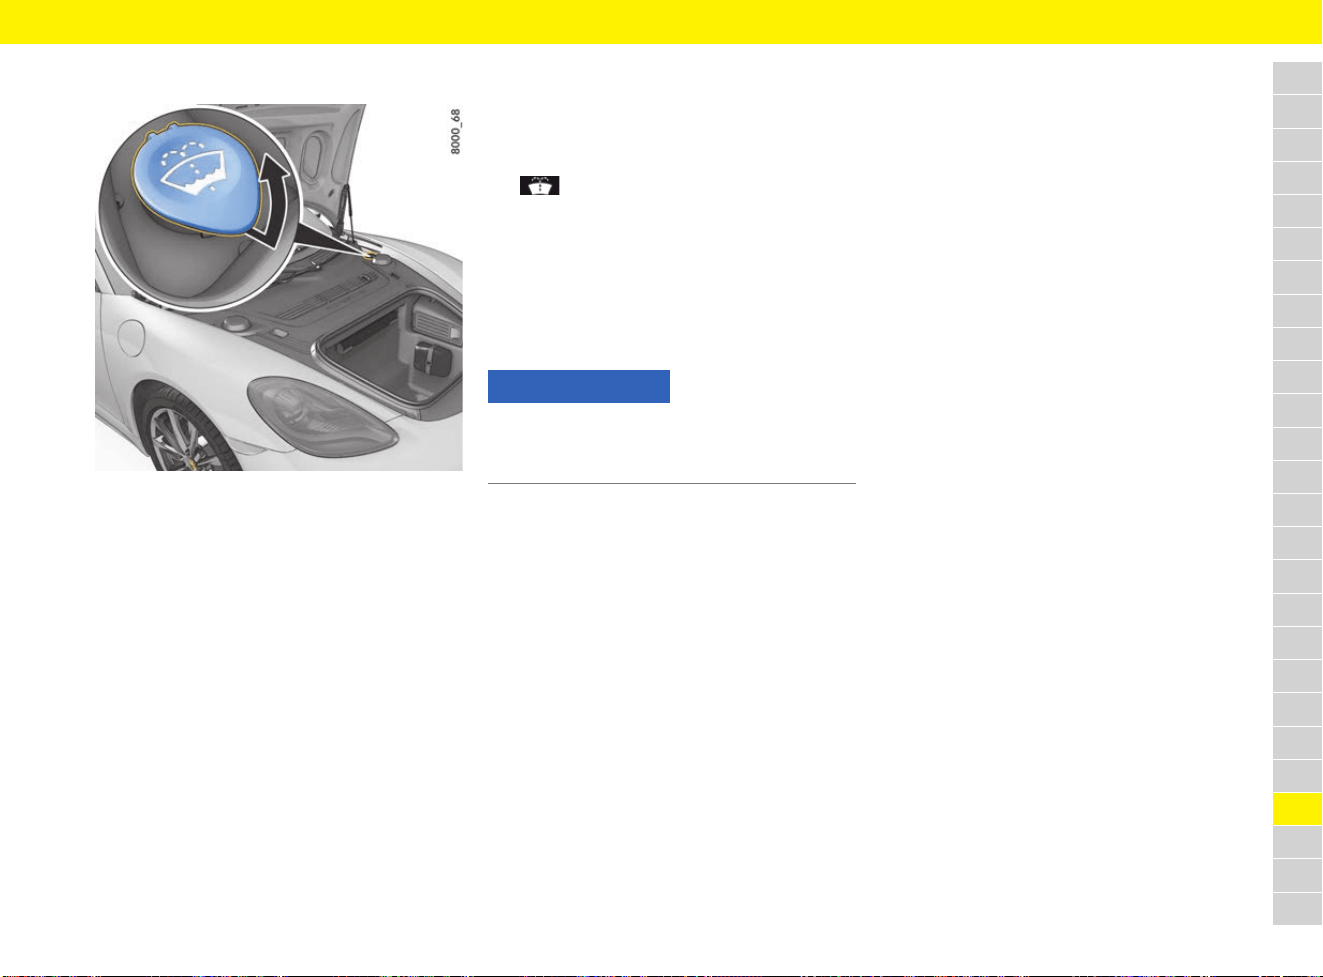
297
Washer Fluid
A
B
C
D
E
F
G
H
I
J
K
L
M
N
O
P
Q
R
S
T
U
V
W
X
Y
Z
Washer Fluid
Fig. 239: Washer fluid reservoir for windscreen and
headlights
Observe the following points:
e Depending on the season, mix the water with
the appropriate additives (window cleaner
concentrate, antifreeze). Always observe the
correct mixture ratio and follow all instructions
on the containers of the additives used.
– Summer: Fill with water and window cleaner
concentrate.
– Winter: Fill with water, antifreeze and window
cleaner concentrate.
Only use window cleaner concentrate that meets
the following requirements:
– Dilutability 1:100
– Phosphate-free
– Suitable for plastic headlight lenses
For information on windscreen washing
concentrates approved by Porsche: Contact your
Porsche partner.
Responding to warning message
The symbol appears on the multi-function
display of the instrument panel when the washer-
fluid level is low.
e Add washer fluid at the next opportunity.
f Refer to chapter “Warning and Information
Messages” on page 278.
Adding washer fluid
1. Open the cap of the washer fluid reservoir.
2. Add washer fluid.
f Refer to chapter “Filling capacities” on
page 307.
3. Close the cap carefully.
NOTICE
Risk of damage to the headlights
e Do not lean on the headlight when adding
washer fluid.
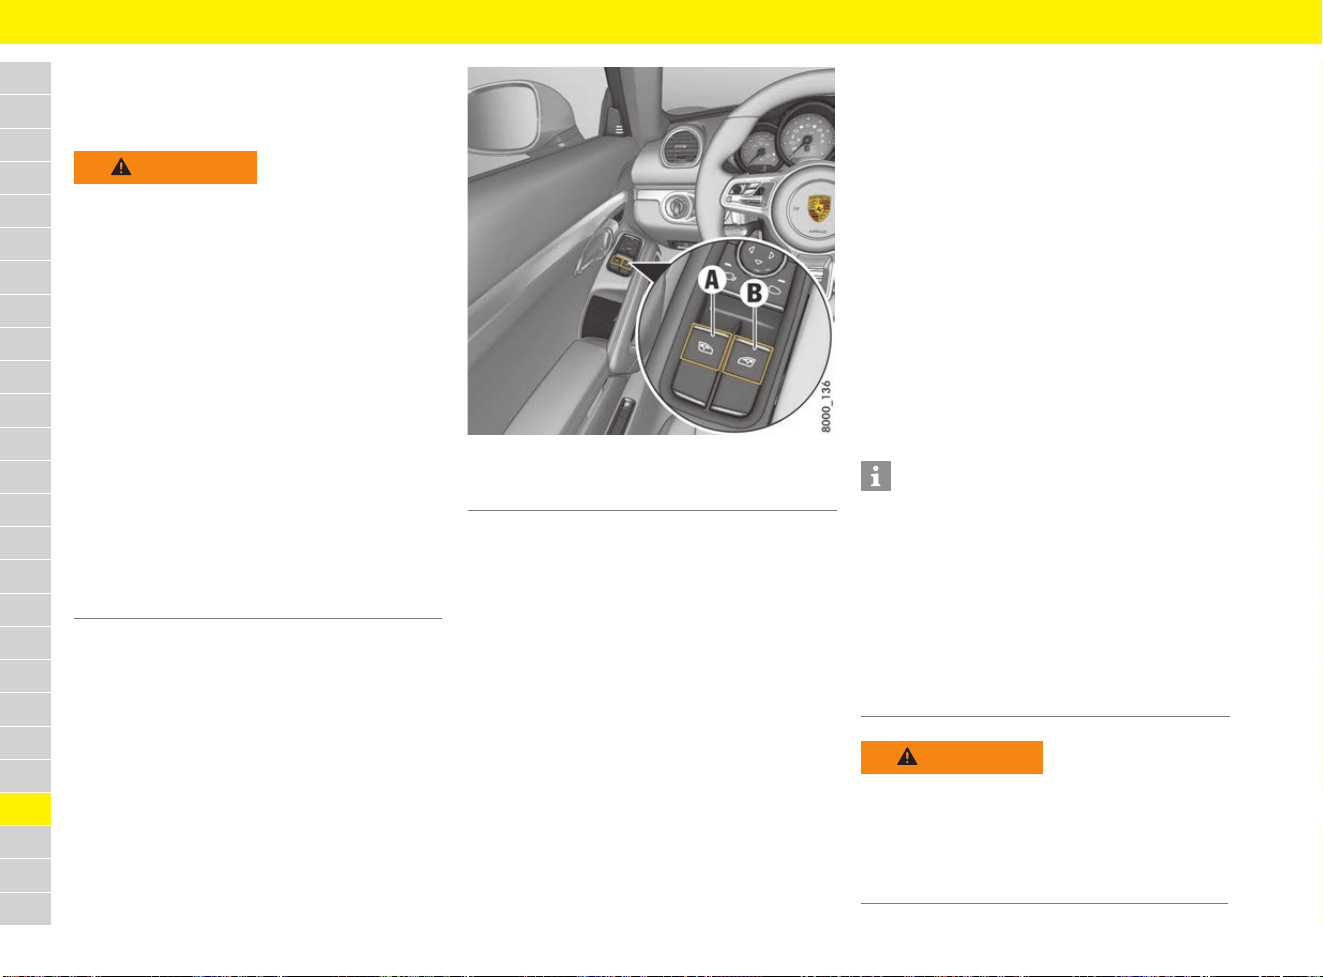
298
Windows
A
B
C
D
E
F
G
H
I
J
K
L
M
N
O
P
Q
R
S
T
U
V
W
X
Y
Z
Windows
Opening and closing windows
Fig. 240: Power window buttons in driver’s door
b Ignition is switched on.
– or –
b Ignition switched off for less than 10 minutes
and driver’s or passenger’s door not yet
opened.
Open window
e Press the rocker switch for the relevant
window until the window has reached the
desired position.
Close window
e Pull the rocker switch for the relevant window
until the window has reached the desired
position.
The rocker switches have a two-stage function.
When you actuate the buttons, both positions can
be felt clearly through resistance when pulling or
pressing.
First setting – manual operation
e Push or pull the relevant button to the first
setting.
The window is opened or closed manually.
The window stops when the button is released.
Second setting – one-touch operation
b Ignition switched on.
e Briefly push or pull the relevant button all the
way to the second setting.
The window is opened or closed completely.
e Actuate the button again to stop the window at
the desired position.
WARNING
Opening and closing the
windows
When opening or closing the windows, particularly
in one-touch mode, parts of the body may get
trapped between the moving window and fixed
vehicle parts.
e When opening and closing the windows, make
sure that no parts of the body can become
trapped between the moving window and fixed
vehicle parts.
e Always remove the driver’s key when leaving
the vehicle or switch the ignition off on vehicles
with Porsche Entry & Drive. Always take the
driver’s key with you when leaving the vehicle.
Uninformed persons could injure themselves
by operating the power windows.
e In the event of danger: immediately release the
button on the ignition key or the proximity
sensor in the door handle on vehicles with
Porsche Entry & Drive.
e Do not leave children in the vehicle unattended.
A Power window button, left
B Power window button, right
Information
If a door window is blocked by an object during
closing, it will stop and open again by several
centimetres.
If the window is blocked a second time within
approx. 10 seconds, one-touch operation is
disabled for this window.
The window can be closed manually. One-touch
operation is enabled again once the window has
been closed completely using the manual closing
function.
WARNING
Closing a window
manually
If one-touch operation is disabled after a window is
blocked, the window will close with its full closing
force when the manual closing function is used.
e Ensure that nobody can be pinched or crushed
when the windows close.
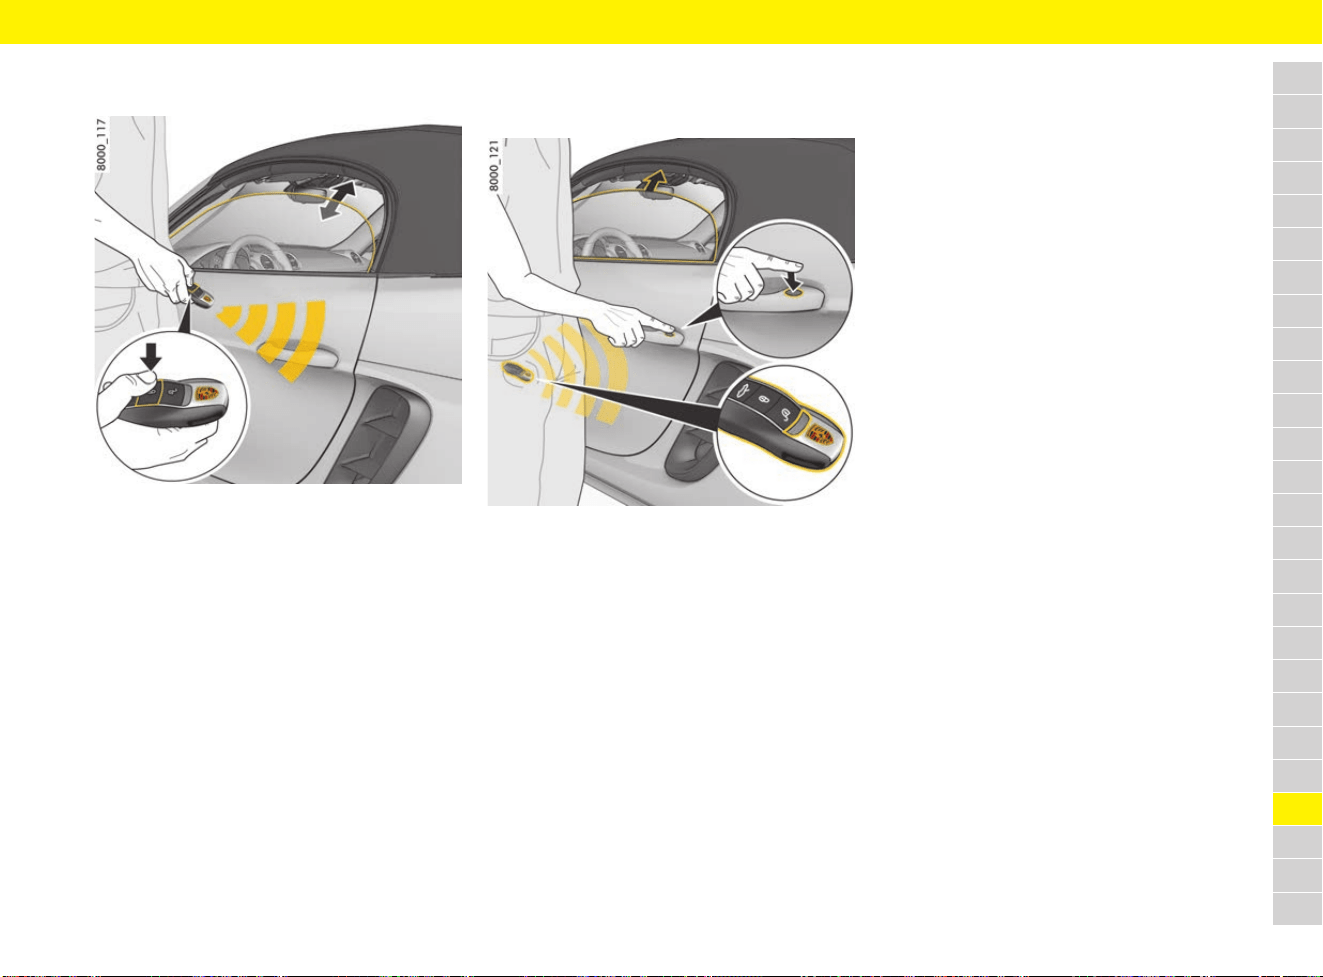
299
Windows
A
B
C
D
E
F
G
H
I
J
K
L
M
N
O
P
Q
R
S
T
U
V
W
X
Y
Z
Opening and closing windows with
driver’s key
Fig. 241: Opening and closing windows with driver’s key
e Press and hold the button for opening and
closing the vehicle on the driver’s key until the
windows have reached the desired position.
Closing windows using proximity sensor
on door handle
(vehicles with Porsche Entry & Drive)
Fig. 242: Closing windows using proximity sensor on
door handle (vehicles with Porsche Entry & Drive)
e Touch the proximity sensor on the door handle
when locking the vehicle until the windows
have reached the desired position.
Storing end position of windows
The end positions of the windows are lost when
the battery is disconnected and reconnected.
One-touch operation of the windows is disabled.
Perform these steps for all windows:
1. Close window completely once by pulling the
rocker switch to the second setting.
2. When the window is completely closed, briefly
pull the rocker switch to the second setting
again three times.
3. Open the window completely once by pressing
the rocker switch.
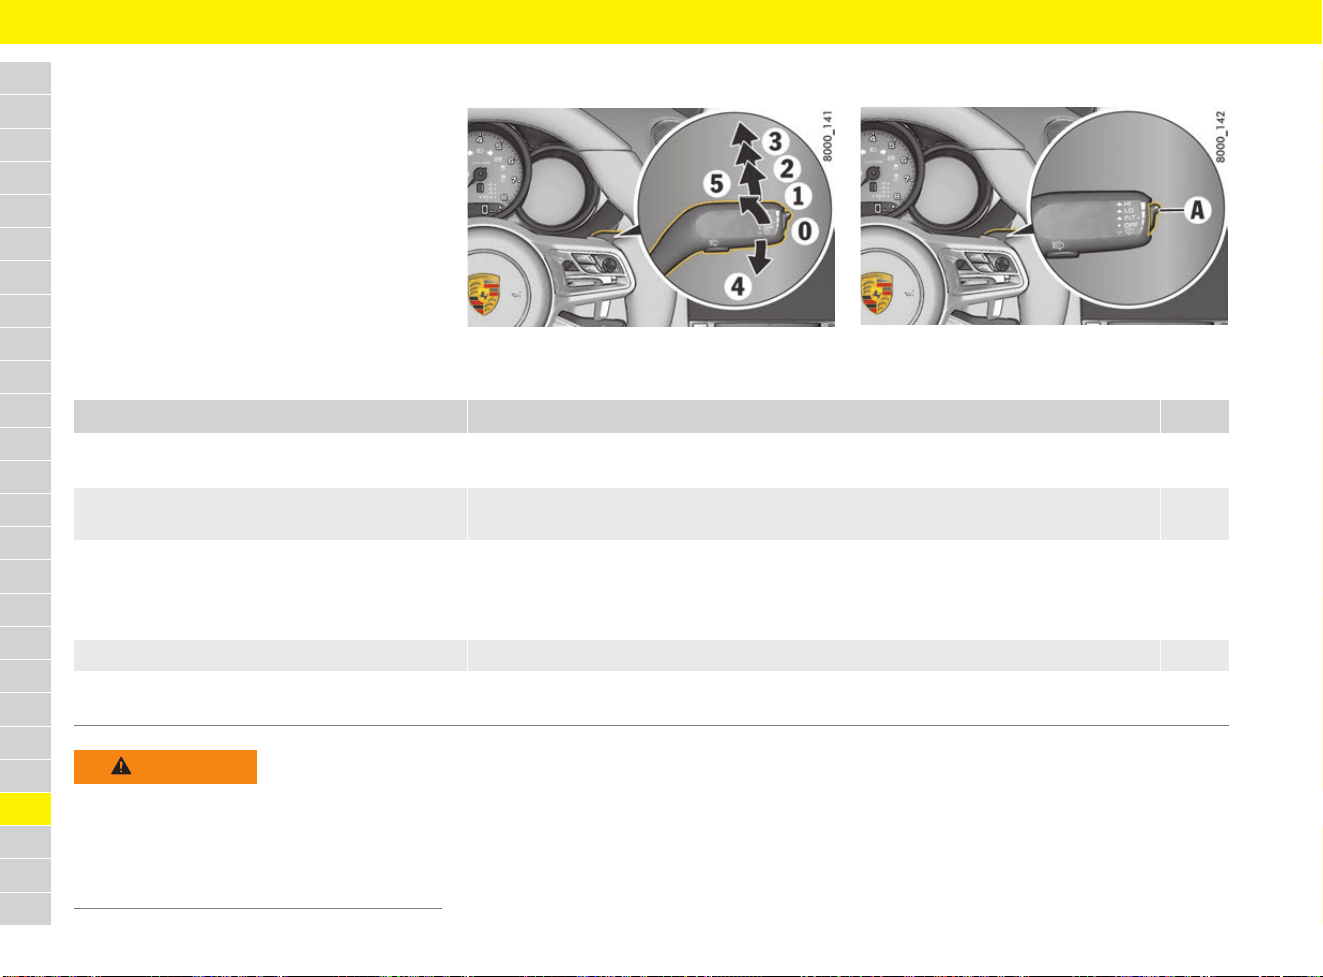
300
Windscreen Wipers
A
B
C
D
E
F
G
H
I
J
K
L
M
N
O
P
Q
R
S
T
U
V
W
X
Y
Z
Windscreen Wipers
Brief overview
This brief overview does not replace the complete
information provided under “Windscreen wipers”.
Warnings, in particular, are not replaced by this
brief overview.
Fig. 243: Windscreen wiper stalk
Fig. 244: Switch for rain sensor/intermittent operation
sensitivity (A)
What do I want to do? What do I have to do?
Page
Wipe automatically
(rain sensor/intermittent operation)
Press the stalk to detent position 1. 302
Set rain sensor/intermittent operation
sensitivity
Press switch A on the right of the stalk upwards (wipe more often) or
downwards (wipe less often).
302
Wipe Slow: Press the stalk to detent position 2.
Fast: Press the stalk to detent position 3.
Once: Press the stalk to position 4
(holding stalk in position 4 accelerates wiping action).
301
Spray and wipe Pull stalk towards the steering wheel at position 5 and hold. 301
Fold windscreen wipers out Switch off the ignition and press the wiper stalk downwards once 4.
Windscreen wipers move upwards by approx. 45°.
301
WARNING
Unintended wiping
In rain sensor operation, the windscreen wipers
wipe automatically if moisture is detected on
the windscreen.
e Always switch off the windscreen wipers
before cleaning the windscreen.
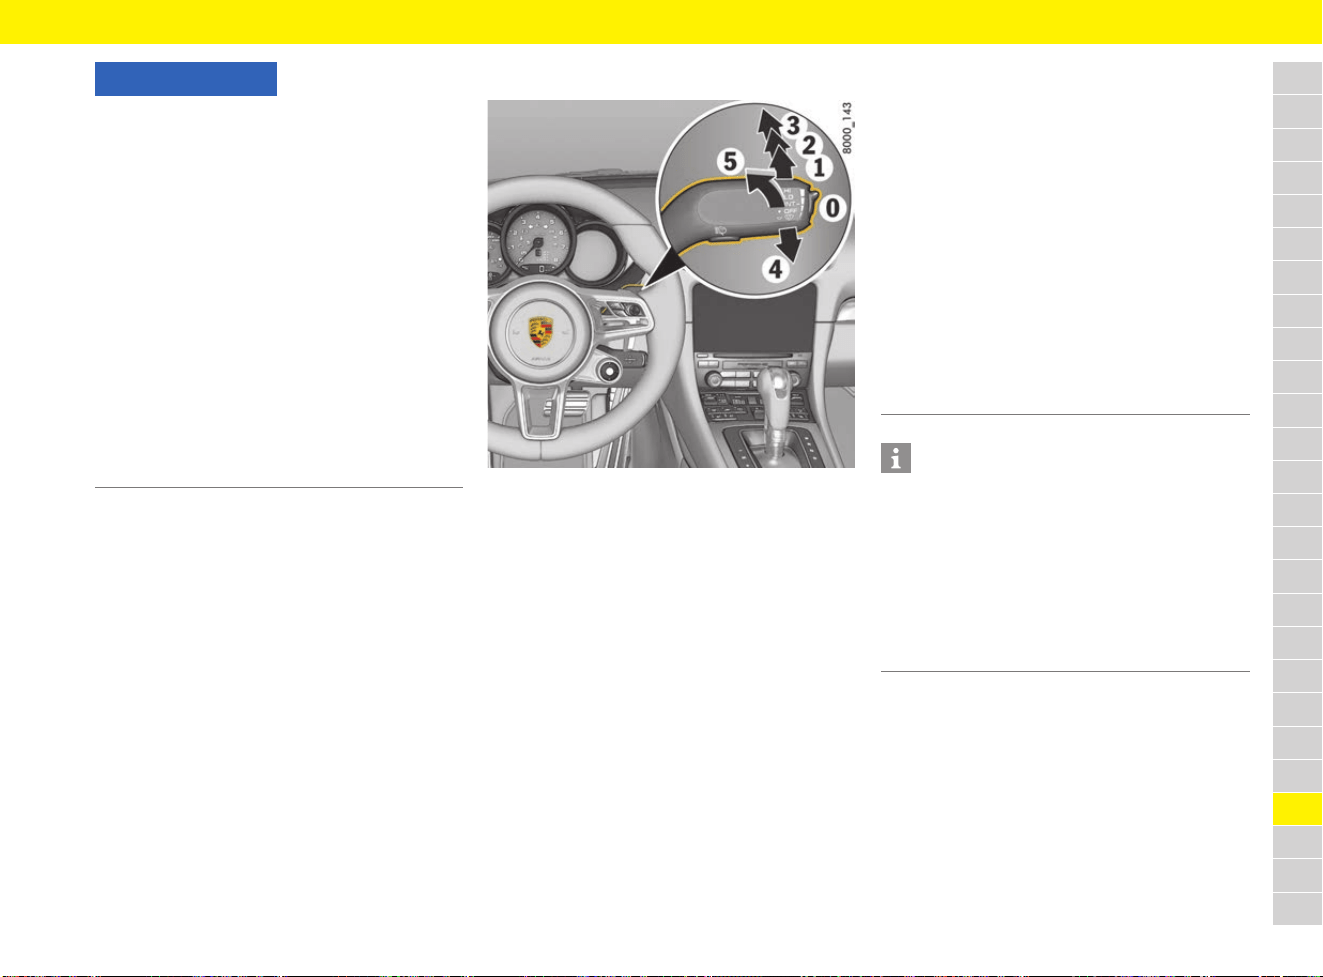
301
Windscreen Wipers
A
B
C
D
E
F
G
H
I
J
K
L
M
N
O
P
Q
R
S
T
U
V
W
X
Y
Z
Operating the windscreen wipers
Fig. 245: Windscreen wiper stalk
Fitting ice or sun shields and replacing
wiper blades
e Switch off the ignition and press the wiper stalk
downwards once 4.
Windscreen wipers move upwards by
approx. 45°.
NOTICE
Risk of damage to the windscreen and wiper
system.
e Only wipe the windscreen when sufficiently
wet, otherwise it could become scratched.
e Carefully detach frozen wiper blades from the
windscreen before driving.
e Do not operate a frozen headlight cleaning
system.
e Always switch off windscreen wipers in car
washes to prevent them wiping unintentionally
(rain sensor operation).
e Do not operate headlight cleaning system in
car washes.
e Always hold the wiper arm securely when
replacing the wiper blade.
e When replacing wiper blades, observe different
lengths of the wiper blades.
0 Windscreen wipers off
When the windscreen wipers or ignition are
switched off, the wipers move up slightly
from their normal position so that the wiping
edges are aligned correctly.
1 Rain sensor/intermittent operation
Windscreen wipers
e Press the wiper stalk upwards to the first
click.
2 Windscreen wipers slow
e Press the wiper stalk upwards to the
second click.
3 Windscreen wipers fast
e Press the wiper stalk upwards to the third
click.
4 One-touch function for windscreen
wipers
e Press the wiper stalk downwards.
The windscreen wipers carry out one
wiping cycle.
5 Windscreen wipers and washer system
e Pull wiper stalk towards the steering
wheel.
The washer system wipes and sprays
while the stalk is pulled towards the
steering wheel.
When the wiper stalk is released, a few
drying wipes are performed.
After every 10 wipes on the windscreen,
the headlights are cleaned automatically
as well.
Information
e If heavily soiled, repeat the wash process.
e Persistent dirt (e.g. insect remains) should be
removed regularly.
For information on car care:
f Refer to chapter “Care” on page 65.
Windscreen wiper blades that are in perfect
condition are vital for a clear view.
f Refer to chapter “Wiper Blades” on page 304.
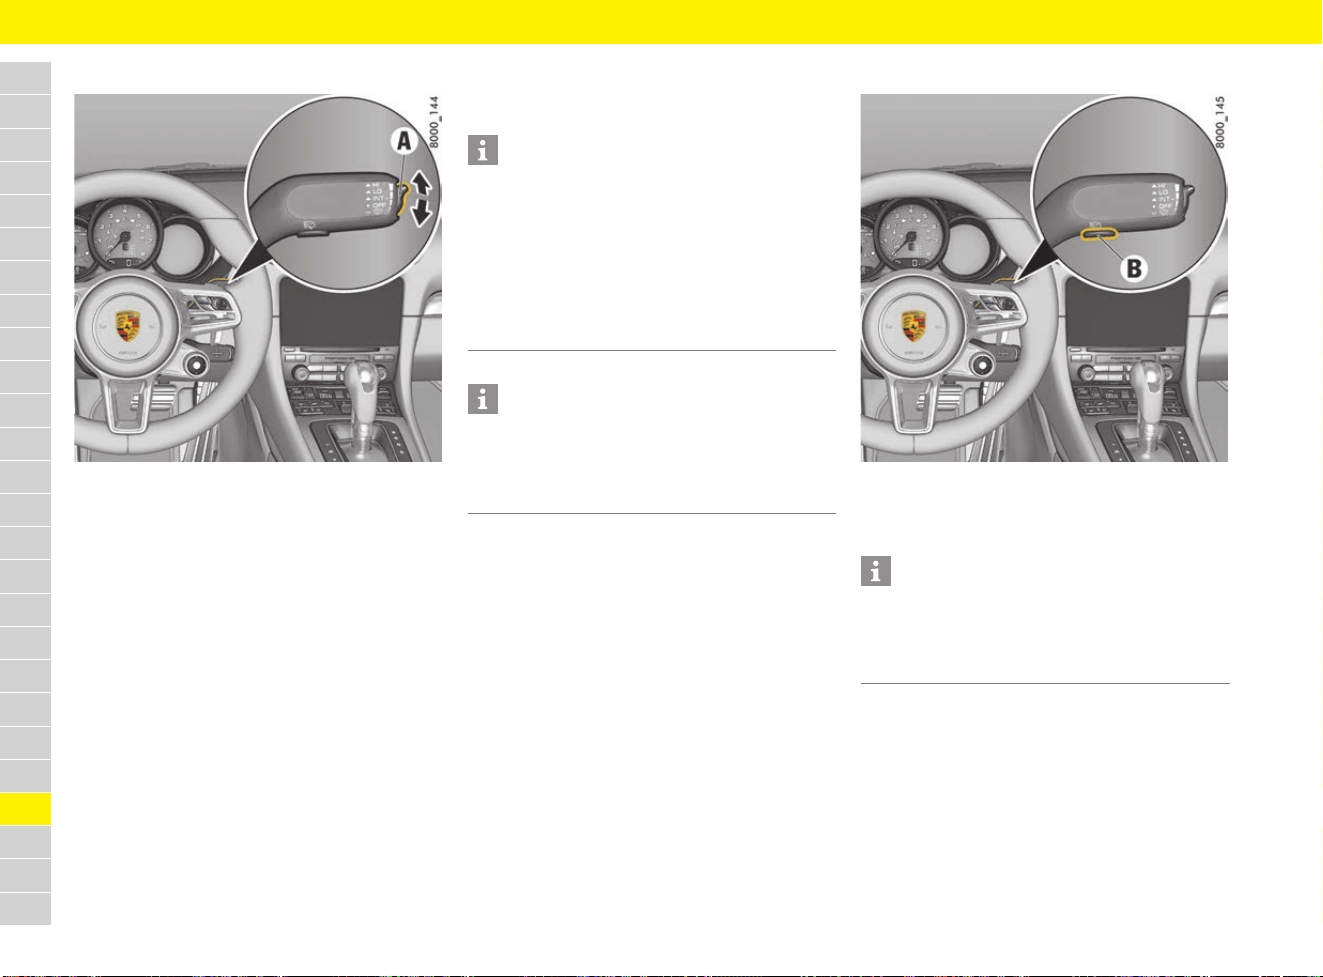
302
Windscreen Wipers
A
B
C
D
E
F
G
H
I
J
K
L
M
N
O
P
Q
R
S
T
U
V
W
X
Y
Z
Adjusting wipe interval
Fig. 246: Switch for rain sensor/intermittent operation
sensitivity
On vehicles without a rain sensor, the wipe interval
of the windscreen wipers can be adjusted to
4 settings:
Decreasing the wipe interval
e Press switch A upwards.
The setting is confirmed by one wipe of the
windscreen.
Increasing the wipe interval
e Press switch A downwards.
Adjusting rain sensor operation
For vehicles with a rain sensor, the amount of rain
on the windscreen is measured. The wipe interval
is automatically controlled accordingly.
Rain sensor operation is automatically activated at
speeds of less than approx. 4 km/h (2.5 mph) if
the windscreen wiper is switched on.
If you exceed a speed of approx. 8 km/h (5 mph),
the system switches to the preselected wiper
speed.
Adjusting the rain sensor sensitivity manually
The wiper speed can be set manually:
High sensitivity.
e Press switch A upwards.
The setting is confirmed by one wipe of the
windscreen.
Low sensitivity.
e Press switch A downwards.
Operating the headlight washer system
Fig. 247: Button for headlight washer system
b Dipped/high beam is activated.
e Press button B under the wiper stalk.
Information
– If the wiper stalk is already in position 1 when
the ignition is switched on, the rain sensor is
activated when the driving speed exceeds
approx. 4 km/h (2.5 mph).
– If the wiper stalk is already in position 2 or 3
when the ignition is switched on, the
windscreen wipers remain switched off until
the wiper stalk is actuated.
Information
The wiper is stopped when the luggage compart-
ment lid is opened.
e To switch on the wipers again, move the
windscreen wiper stalk upwards/downwards.
Information
After every 10 wipes on the windscreen,
the headlights are cleaned automatically as well.
The wipe count starts from zero again when the
dipped beam is switched off.
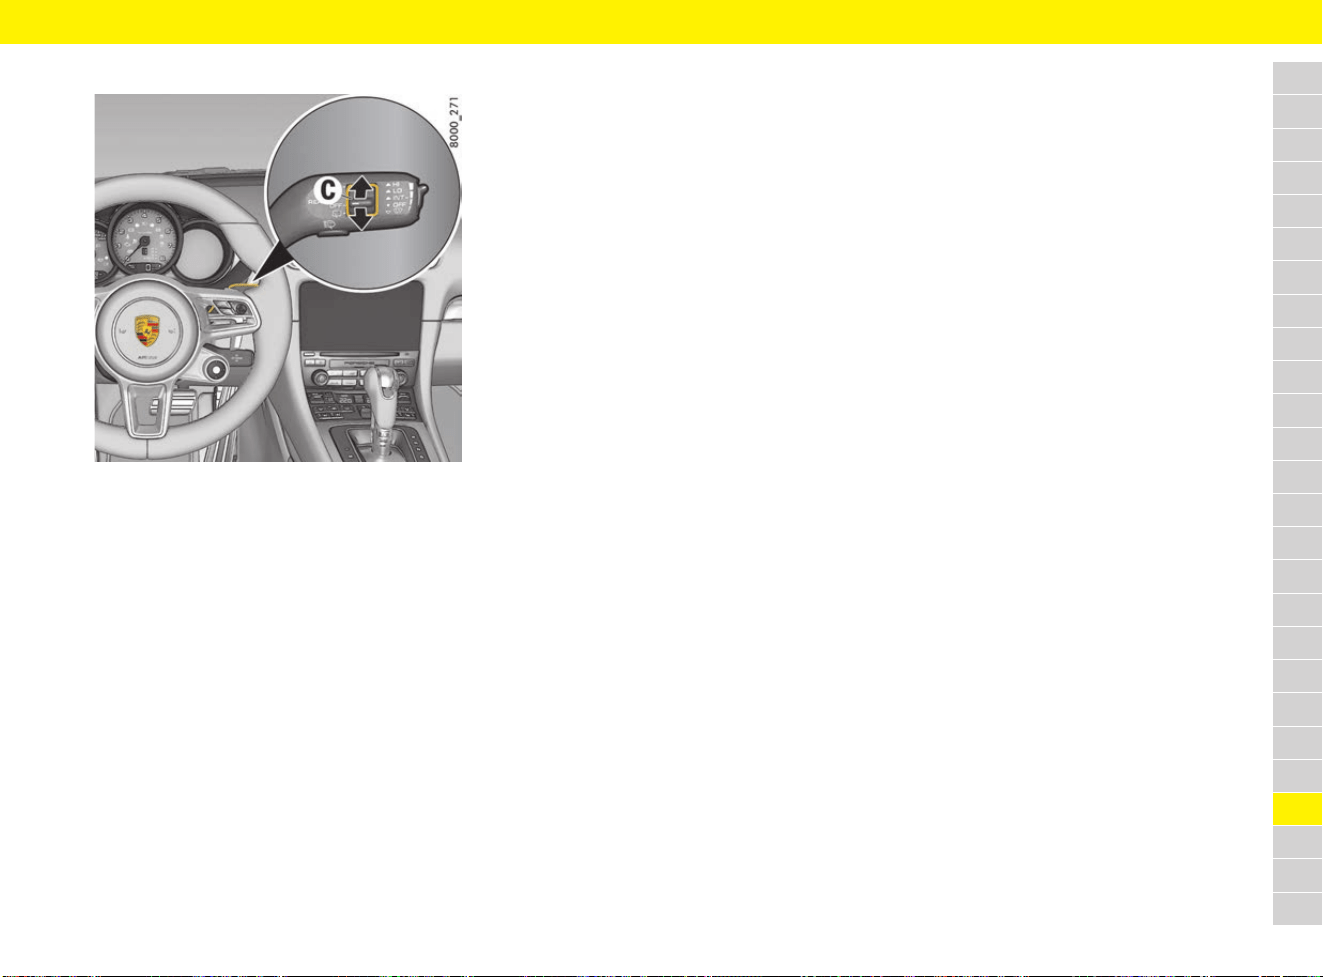
303
Windscreen Wipers
A
B
C
D
E
F
G
H
I
J
K
L
M
N
O
P
Q
R
S
T
U
V
W
X
Y
Z
Rear window wiper
Fig. 248: Button C for rear window wiper
b 718 Cayman, 718 Cayman S
Switching on intermittent operation of rear
window wiper
e Press button C upwards to position INT.
Switching off intermittent operation of rear
window wiper
e Press button C downwards to position OFF.
Manual wiping
e Press button C down from the OFF position or
up from the INT position and keep it pressed.
Switching on the rear window wiper when
reverse gear is engaged
In the multi-function display, you can configure the
rear wiper to automatically perform a series of
wipes when it rains or when the windscreen wipers
are used while reverse gear is engaged.
For information on configuring the automatic
function for activating the rear wiper when reverse
gear is engaged:
f Refer to chapter "Setting activation of the rear
wiper when reverse gear is engaged" on
page 268.
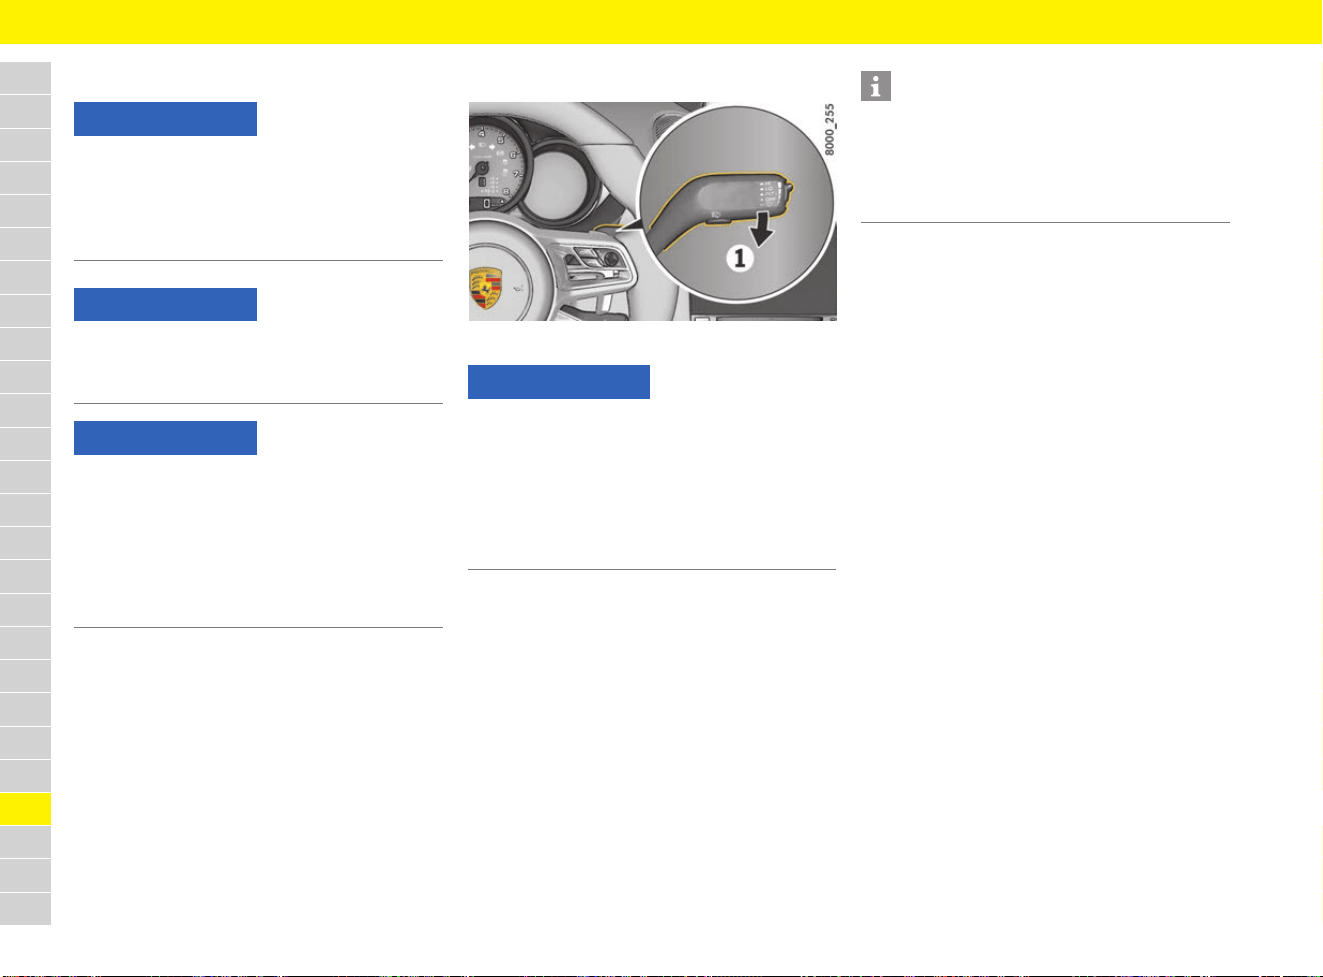
304
Wiper Blades
A
B
C
D
E
F
G
H
I
J
K
L
M
N
O
P
Q
R
S
T
U
V
W
X
Y
Z
Wiper Blades
Care of wiper blades
Windscreen wiper blades that are in perfect
condition are vital for a clear view.
e Clean the windscreen with window cleaner at
regular intervals (Refer to chapter “Cleaning
windows” on page 67), especially after
washing the vehicle in a car wash.
Porsche recommends car care products from
Porsche Tequipment.
e If extremely dirty (e.g. due to insect residues),
clean the windscreen using a sponge or cloth.
Replacing wiper blades
Fig. 249: Wiper stalk
The wiper blades should be replaced twice a year
(before and after the cold season) or if wiper
performance deteriorates or the blades are
damaged.
b The ignition is switched off.
1. Press the wiper stalk downwards (Fig. 249, 1)
once.
The windscreen wipers move upwards by
approx. 45°.
2. Replace the wiper blades according to the
separate instructions provided by the
manufacturer. Observe different lengths of
wiper blades when replacing.
NOTICE
If the wiper arm accidentally falls back onto the
windscreen, it can cause damage to the
windscreen.
e Always hold the wiper arm securely when
replacing the wiper blade.
NOTICE
The wiper blades can freeze at low temperatures.
e Thaw and release frozen wiper blades before
driving.
NOTICE
The graphite layer on the wiper blades may be
damaged if not cleaned properly.
e Ensure that the cleaning jet does not hit the
wiper blades.
e Do not clean wiper blades with a cloth or
sponge.
e Clean wiper blades with clear water only.
NOTICE
If they are not changed properly, the incorrectly
fitted wiper blades can come loose when the car
is moving.
e The wiper blades must engage properly in the
wiper arm.
e Check that the wiper blades are seated
securely.
Information
If necessary, contact a qualified specialist
workshop to perform the work.
Porsche recommends a Porsche partner as they
have trained workshop personnel and the
necessary parts and tools.

305
Technical Data
On the following pages, you will find the technical
data for your vehicle.
Technical Data
306
Technical Data
Vehicle identification data
Vehicle identification number
Fig. 250: Vehicle identification number
The vehicle identification number is located at the
bottom left behind the windscreen and under the
front passenger’s seat.
e When ordering spare parts, always quote the
vehicle identification number
Identification plate
Fig. 251: Identification plate fixing point
The identification plate is fixed to the door sill area
of the passenger’s door.
Tyre pressure plate
Fig. 252: Tyre-pressure plate fixing point
The tyre pressure plate is attached to the door sill
area of the driver’s door.
Vehicle data carrier
The vehicle data carrier is located in the “Warranty
and Maintenance” booklet. It contains all important
data about your vehicle.
This data carrier cannot be re-ordered if it is lost
or damaged.

Technical Data
307
Engine data
Filling capacities
e Only use fluids and fuels approved by Porsche. For further information: Contact your Porsche partner.
718 Boxster, 718 Cayman 718 Boxster S, 718 Cayman S
Number of cylinders 44
Displacement 1,988 cm
3
2,497 cm
3
Max. engine power as per ECE-R 85 220 kW (300 hp) 257 kW (350 hp)
At engine speed 6,500 rpm 6,500 rpm
Max. torque as per ECE-R 85 380 Nm 420 Nm
At engine speed 1,950 – 4,500 rpm 1,900 – 4,500 rpm
Engine oil consumption up to 0.8 l/1,000 km up to 0.8 l/1,000 km
Maximum permitted engine speed 7,500 rpm 7,500 rpm
Engine oil Change quantity with oil filter: approx. 5.7 litres
Porsche engine oil specification A40; SAE 0W-40, SAE 5W-40, SAE 5W-50
f Refer to chapter “Selecting and topping up engine oil” on page 107.
Fuel 718 Boxster, 718 Cayman: approx. 54 litres (optionally: approx. 64 litres), with a reserve
of approx. 8 litres
718 Boxster S, 718 Cayman S: Approx. 64 litres, with a reserve of approx. 8 litres
The engine is designed to provide optimum performance and fuel consumption if super
unleaded fuel without metallic additives in accordance with 98 RON/88 MON is used.
f Refer to chapter “Filling with fuel” on page 210.
Windscreen/headlight washer fluid Approx. 2.5 litres (approx. 5 litres with headlight washer)

Technical Data
308
Fuel consumption and CO
2
emissions
The specified values were determined using the stipulated measuring method (regulation (EC) 715/2007 in the currently valid version; and ECE-R 83 in
conjunction with ECE-R 101 in the currently valid versions). The information does not refer to an individual vehicle and does not form part of the product
offering. The information serves solely to permit comparison of the different vehicle types. For further information on the individual vehicles: Contact your
Porsche partner.
7
Vehicle type
Urban
(l/100 km)
Extra-urban
(l/100 km)
Combined
(l/100 km)
Total CO
2
(g/km)
Euro 6
718 Boxster with manual transmission 9.9 – 10.0 6.0 – 6.1 7.4 – 7.5 168 – 170
718 Boxster with PDK 9.0 – 9.1 5.7 – 5.8 6.9 – 7.0 158 – 160
718 Boxster S with manual transmission 10.7 – 10.8 6.5 – 6.6 8.1 – 8.2 184 – 186
718 Boxster S with PDK 9.5 – 9.6 6.0 – 6.1 7.3 – 7.4 167 – 169
718 Cayman manual transmission 9.9 – 10.0 5.9 – 6.1 7.4 – 7.5 168 – 170
718 Cayman PDK 9.0 – 9.1 5.7 – 5.8 6.9 – 7.0 158 – 160
718 Cayman S manual transmission 10.7 – 10.8 6.5 – 6.6 8.1 – 8.2 184 – 186
718 Cayman S PDK 9.5 – 9.6 6.0 – 6.1 7.3 – 7.4 167 – 169
Euro 5
718 Boxster with manual transmission 9.9 5.9 7.3 170
718 Boxster with PDK 8.9 5.5 6.8 158
718 Boxster S with manual transmission 10.7 6.4 7.9 184
718 Boxster S with PDK 9.4 5.7 7.2 167
718 Cayman manual transmission 9.9 5.9 7.3 170
718 Cayman PDK 8.9 5.5 6.8 158
718 Cayman S manual transmission 10.7 6.4 7.9 184
718 Cayman S PDK 9.4 5.7 7.2 167

Technical Data
309
Weights
Kerb weight as per EU Regulation 1230/2012, includes 75 kg driver and luggage share.
e Do not exceed the maximum gross vehicle weight rating and maximum permitted axle load. If additional accessories are installed, the maximum possible
payload will be reduced.
718 Boxster
manual
transmission
718 Boxster
PDK
718 Boxster S
manual
transmission
718 Boxster S
PDK
Kerb weight (depending on equipment)
per DIN 70020 1,335 kg – 1,435 kg 1,365 kg – 1,465 kg 1,355 kg – 1,445 kg 1,385 kg – 1,475 kg
as per EC Regulation 1230/2012 1,410 kg – 1,510 kg 1,440 kg – 1,540 kg 1,430 kg – 1,520 kg 1,460 kg – 1,550 kg
Maximum axle load, front 770 kg 775 kg 780 kg 785 kg
Maximum axle load, rear 915 kg 940 kg 915 kg 940 kg
Maximum gross weight 1,655 kg 1,685 kg 1,665 kg 1,695 kg
718 Cayman
manual
transmission
718 Cayman
PDK
718 Cayman S
manual
transmission
718 Cayman S
PDK
Kerb weight (depending on equipment)
per DIN 70020 1,335 kg – 1,435 kg 1,365 kg – 1,465 kg 1,355 kg – 1,445 kg 1,385 kg – 1,475 kg
as per EC Regulation 1230/2012 1,410 kg – 1,510 kg 1,440 kg – 1,540 kg 1,430 kg – 1,520 kg 1,460 kg – 1,550 kg
Maximum axle load, front 765 kg 770 kg 775 kg 780 kg
Maximum axle load, rear 930 kg 955 kg 930 kg 955 kg
Maximum gross weight 1,655 kg 1,685 kg 1,665 kg 1,695 kg

Technical Data
310
Dimensions
Driving performance
The specifications refer to a vehicle with DIN kerb weight without performance-reducing additional equipment (e.g. special tyres).
718 Boxster, 718 Boxster S 718 Cayman, 718 Cayman S
Length (depending on equipment) 4,379 mm 4,379 mm
Width 1,801 mm 1,801 mm
Width with exterior mirrors 1,994 mm 1,994 mm
Height at DIN kerb weight
depending on equipment
1,261 mm – 1,281 mm 1,275 mm – 1,295 mm
Ground clearance at DIN kerb weight
depending on equipment
112 mm – 131 mm 113 mm – 133 mm
Vehicle type Top speed Acceleration 0 – 100 km/h (0 – 62 mph)
(values in brackets relate to SPORT PLUS mode)
718 Boxster with manual transmission 275 km/h (171 mph) 5.1 s
718 Boxster with PDK 275 km/h (171 mph) 4.9 s (4.7 s)
718 Boxster S with manual transmission 285 km/h (178 mph) 4.6 s
718 Boxster S with PDK 285 km/h (178 mph) 4.4 s (4.2 s)
718 Cayman manual transmission 275 km/h (171 mph) 5.1 s
718 Cayman PDK 275 km/h (171 mph) 4.9 s (4.7 s)
718 Cayman S manual transmission 285 km/h (178 mph) 4.6 s
718 Cayman S PDK 285 km/h (178 mph) 4.4 s (4.2 s)

Technical Data
311
Wheels and tyres
Wheel and tyre sizes
Tyres approved by Porsche are the best possible tyres for your vehicle. The load capacity index (e.g. “94”) and classification letter (e.g. “Y”) for permitted
maximum speed are minimum requirements. When fitting new tyres or changing tyres:
f Refer to chapter “Tyres and Wheels” on page 257.
e Snow chains must only be fitted to the appropriately marked wheel and tyre sizes and only to the rear wheels.
Observe the applicable national regulations regarding maximum speeds when snow chains are fitted.
Only use Porsche approved fine-link edge chains.
e Before fitting different wheels and tyres, check the EU declaration of conformity to see if the desired wheel/tyre combination is permitted for your
particular vehicle. For further information: Contact your Porsche partner.
Tyre type Tyre size Wheel size Fitting snow chains
718 Boxster, 718 Cayman
Summer tyres
FA: 235/45 ZR 18 (94Y)
RA: 265/45 ZR 18 (101Y)
FA: 8J x 18, RO 57
RA: 9.5J x 18, RO 49
No
FA: 235/40 ZR 19 (92Y)
RA: 265/40 ZR 19 (98Y)
FA: 8J x 19, RO 57
RA: 10J x 19, RO 45
No
FA: 235/35 ZR 20 (88Y)
RA: 265/35 ZR 20 (95Y)
FA: 8J x 20, RO 57
RA: 10J x 20, RO 45
No
FA: 235/35 ZR 20 (88Y)
RA: 265/35 ZR 20 (95Y)
FA: 8.5J x 20, RO 57
RA: 10.5J x 20, RO 47
No
Winter tyres
FA: 235/45 R 18 94V M+S
RA: 265/45 R 18 101V M+S
FA: 8J x 18, RO 57
RA: 9.5J x 18, RO 49
Yes
FA: 235/40 R 19 92V M+S
RA: 265/40 R 19 98V M+S
FA: 8J x 19, RO 57
RA: 10J x 19, RO 45
No

Technical Data
312
FA = front axle, RA = rear axle, RO = rim offset
718 Boxster S, 718 Cayman S
Summer tyr
es
F
A: 235/40 ZR 19 (92Y)
RA: 265/40 ZR 19 (98Y)
F
A: 8J x 19, RO 57
RA: 10J x 19, RO 45
No
FA: 235/35 ZR 20 (88Y)
RA: 265/35 ZR 20 (95Y)
FA: 8J x 20, RO 57
RA: 10J x 20, RO 45
No
FA: 235/35 ZR 20 (88Y)
RA: 265/35 ZR 20 (95Y)
FA: 8.5J x 20, RO 57
RA: 10.5J x 20, RO 47
No
Winter tyres
FA: 235/45 R 18 94V M+S
RA: 265/45 R 18 101V M+S
FA: 8J x 18, RO 57
RA: 9.5J x 18, RO 49
Yes
FA: 235/40 R 19 92V M+S
RA: 265/40 R 19 98V M+S
FA: 8J x 19, RO 57
RA: 10J x 19, RO 45
No
Tyre type Tyre size Wheel size Fitting snow chains

Technical Data
313
Tyre pressure
These standard and comfort tyre pressures apply only to the tyre makes and types approved by Porsche for cold tyres (20 °C).
e Comfort pressure/standard pressure must be selected on the multi-function display and the tyre pressure adjusted.
f Refer to chapter “TPM menu (TPM – Tyre Pressure Monitoring)” on page 162.
f Refer to chapter “Tyres and Wheels” on page 257.
Standard tyre pressure
Tyres 718 Boxster,
718 Cayman
718 Boxster S,
718 Cayman S
FA RA FA RA
Summer tyres
235/45 ZR 18 / 265/45 ZR 18
2.0 bar
200 kPa
29 psi
2.0 bar
200 kPa
29 psi
––
Summer tyres
235/40 ZR 19 / 265/40 ZR 19
2.0 bar
200 kPa
29 psi
2.1 bar
210 kPa
30 psi
2.0 bar
200 kPa
29 psi
2.1 bar
210 kPa
30 psi
Summer tyres
235/35 ZR 20 / 265/35 ZR 20
2.3 bar
230 kPa
33 psi
2.3 bar
230 kPa
33 psi
2.3 bar
230 kPa
33 psi
2.3 bar
230 kPa
33 psi
Winter tyres
235/45 R 18 / 265/45 R 18
2.2 bar
220 kPa
31 psi
2.2 bar
220 kPa
31 psi
2.2 bar
220 kPa
31 psi
2.2 bar
220 kPa
31 psi
Winter tyres
235/40 R 19 / 265/40 R 19
2.2 bar
220 kPa
31 psi
2.2 bar
220 kPa
31 psi
2.2 bar
220 kPa
31 psi
2.2 bar
220 kPa
31 psi

Technical Data
314
Comfort tyre pressure up to 270 km/h (165 mph)
b Vehicles with “Comfort pressure” setting on the multi-function display.
b Vehicles with 20-inch summer tyres.
FA = front axle, RA = rear axle
WARNING
Low tyre pressure
The “Comfort press.” option is country-dependent and is not available for all countries.
Driving at high speed and low tyre pressure destroys the tyres.
e Only set comfort tyre pressure on vehicles with “Comfort pressure” setting in the multi-function display.
Tyres FA RA
Summer tyres
235/35 ZR 20 / 265/35 ZR 20
2.1 bar
210 kPa
30 psi
2.1 bar
210 kPa
30 psi

Technical Data
315
Porsche Communication Management (PCM)
Technical data: Audio and video files
Supported media SD cards up to 128 GB
DVD drive Audio CDs up to 80 min., CD ROMs up to 700 MB, DVD±R/RW, Standard Video DVD, Video DVD compatible DVD Audio
Portable players MTP Player, USB 2.0 devices of “USB Device Subclass 1 and 6” such as, for example, USB sticks,
USB MP3 players without special driver software, external USB Flash memory and hard drives
File system SD/SDHC/SDXC/MMC memory cards
USB mass storage exFAT, FAT or FAT32, NTFS file systems with a maximum of 4 partitions
DVD drive ISO9660, Joliet, UDF
Format MPEG-1/-2 Layer-3; Windows Media Audio 9 and 10; MPEG-2/-4; FLAC, MPEG-1/-2; ISO-MPEG4; DivX 3, 4 and 5; Xvid;
ISO-MPEG4 H.264 (MPEG4 AVC)M; Windows Media Video 9
File extension .mp3; .wma; .asf; .m4a; .m4b; .aac; .flac; .mpg; .mpeg; .avi; .mp4; .m4v; .mov; .wmv
Playlists .M3U; .PLS; .WPL; .M3U8; .ASX
Characteristics max. 320 kbit/s and 48 kHz sampling frequency; max. 2,000 kbit/s and 720x576 px. at max. 25 fps
Number of files DVD drive max. 1,000 files DVD
Jukebox (max. 10 GB storage space) max. 3,000 files can be copied.
USB mass storage and memory cards max. 10,000 files per medium, max. 1,000 files per directory/playlist
Metadata Album covers up to 800 x 800 pixels; GIF, JPG and PNG formats or via Gracenote
®
database
1)
1) Gracenote is a trademark or registered trademark of Gracenote in the United States and/or other countries.
Video DVD
region codes
Code 1: USA, Canada and US Colonies
Code 2: Europe, Greenland, South Africa, Egypt and the Middle East, Japan
Code 3: Southeast Asia, South Korea, Hong Kong, Indonesia, Philippines, Taiwan
Code 4: Australia, New Zealand, Mexico, Central America, South America
Code 5: Russia and other former countries of the Soviet Union, Eastern Europe, India, Africa
Code 6: People’s Republic of China
Code 8: International territory (cruise ships, aircraft)

Technical Data
316
Technical data: Connectivity
Mobile networks GSM/GPRS/EDGE: Dual Band, 900 MHz/1,800 MHz
UMTS/HSPA+: Triple band, 900 MHz (Band VIII)/1,800 MHz (Band III)/2,100 MHz (Band I)
LTE: Quad band, 800 MHz (Band 20)/900 MHz (Band 8) /1,800 MHz (Band 3)/2,600 MHz (Band 7)
WiFi IEEE 802.11a/b/g/n (2.4 GHz)
Bluetooth
®
Bluetooth
®
2.1, IEEE 802.15.1, Class 2, range approx. 10 m (33 ft.)
SIM card Mini-SIM, dimensions: 25 x 15 mm
Technical data: Radio
Frequency
ranges/standards
UKW (FM): 87.5 – 108 MHz (manual adjustment in 100 kHz stages)
MW (AM): 531 – 1,602 kHz (manual adjustment in 1 kHz stages)
Digital radio: DAB, DAB+, DMB; L-Band
Tuning grid
with automatic
station search
UKW (FM): 100 kHz
MW (AM): 9 kHz
Technical data: CD/DVD drive
General information At the time of manufacture, this laser product was manufactured in accordance with the German/international DIN EN 60825-1
Standard: 2008-05 and DHHS Rules 21 CFR Subchapter J, classified as a Class 1 laser product. The laser beam in this Class 1
laser product is so weak that it poses no risk under normal operating conditions. This product is designed so that the laser beam
is completely enclosed within the device.
Laser beam
output power
DVD: 0.68 mW
CD: 0.85 mW
Laser beam
wavelength
DVD: 665 nm
CD: 795 nm
Technical Data
317
Inspection marks and declarations
of conformity
European Union
Dr. Ing. h.c. F. Porsche AG hereby declares that
the radio and radar systems installed in the vehicle
conform to the basic requirements of the
applicable directives and the other relevant
stipulations, when used as intended.
Australia
Brazil
Hong Kong
HKCA 1035: Automotive radar: radio equipment
exempted from licensing.
Indonesia
21962/SDPPI/2011
34538/SDPPI/2014
Israel
Model name: TSSRE4Dg
Manufacturer: Huf Electronics Bretten
Japan
Japanese Radio Law Compliance. This device is
granted pursuant to the Japanese Radio Law.
This device should not be modified (otherwise the
granted designation number will become invalid).
Jordan
Type Approval No.: TRC/LPD/2009/15
Type Approval No.: TRC/LPD/2014/73
Malaysia
Continental
28416032 / 28416031
RAAW/33A/0512/S(12-0755)
Morocco
AGREE PAR L’ANRT MAROC
Numéro d’agrément : MR 5371 ANRT 2010
Date d’agrément : 02/02/2010
Numéro d’agrément : MR 9186 ANRT 2014
Date d’agrément : 22/04/2014
Technical Data
318
Mexico
Radar de largo alcance, 77GHz,
MARCA: BOSCH, MODELO: LRR3,
MoldaCOFETEL: (RCPBOLR09-0828)
IFETEL: RCPBOMP14-0922
Moldova
Oman
Oman - TRA/TA-R/2609/15
Philippines
Qatar
Approval Ref.: CRA/SA/2015/R-4714
Serbia
Singapore
Complies with IDA Standards DB01752.
Complies with IDA Standards DB03227.
South Africa
South Korea
This equipment has been approved under EMC
Registration as a Class B device (for domestic
use) and can be used in both residential and
commercial areas.
Taiwan
CCAB10LP3800T1
CCAK15LP0801T1
Regulations for the low-power radio wave radiation
devices:
Without permission, for the approved low-power
radio-frequency devices, any companies, firms or
users are not allowed to change the frequency
band, increase the power or change the
specifications and functionality of the original
design.
The low power radio-frequency devices are not
allowed to influence aircraft safety or interfere any
legal communications. In case any interference
phenomenon is detected, the use of this device
should stop immediately, and it is allowed to
continue to use until it is improved to be without
interference any more.
The term legal communications stated in last
paragraph refers to the operating radio
communication system which is in compliance
with the Regulations for the Telecommunications.
The low power radio-frequency devices should be
able to tolerate the interferences from any legal
communications or industrial, scientific and
medical radio wave radiation devices or equipment.
Ukraine
United Arab Emirates
TRA REGISTERED No: 0016889/09,
DEALER No: 0014972/08
TRA REGISTERED No: 0016889/09,
DEALER No: DA36785/14
TRA REGISTERED No: ER39135/15,
DEALER No: DA36785/14
TRA REGISTERED No: ER38964/15,
DEALER: HUF ELECTRONICS GmbH

Technical Data
319
Bluetooth
®
approval (extract)
– Albania
– Andorra
– Angola
– Aruba
– Australia
– Austria
– Bahamas
– Bahrain
– Barbados
– Belarus
– Belgium
– Belize
– Bolivia
– Bonaire
– Bosnia and Herzegovina
– Brazil
– Brunei
– Bulgaria
– Burkina Faso
– Canada
– Chile
– China
– Colombia
– Costa Rica
– Croatia
– Curacao
– Cyprus
– Czech Republic
– Denmark
– Dominican Republic
– Ecuador
– Egypt
– El Salvador
– Estonia
– Ethiopia
– Finland
– France
– French Guyana
– French Polynesia
– Gabon
– Germany
– Ghana
– Gibraltar
– Guadeloupe
– Guatemala
– Greece
– Greenland
– Hong Kong
– Hungary
– Iceland
– India
– Indonesia
– Ireland
– Iraq
– Israel
– Italy
– Ivory Coast
– Jamaica
– Japan
– Jordan
– Kenya
– Kosovo
– Kuwait
– Latvia
– Lebanon
– Lesotho
– Liberia
– Libya
– Liechtenstein
– Lithuania
– Luxembourg
– Macau
– Macedonia
– Madagascar
– Malaysia
– Malta
– Martinique
– Mauritius
– Mexico
– Monaco
– Mongolia
– Morocco
– Mozambique
– Netherlands
– New Caledonia
– New Zealand
– Nigeria
– Norway
– Oman
– Pakistan
– Panama
– Peru
– Poland
– Portugal
– Puerto Rico
– Qatar
– Reunion
– Romania
– Russia
– San Marino
– Saudi Arabia
– Senegal
– Serbia
– Singapore
– Slovakia
– South Africa
– Spain

Technical Data
320
– St. Lucia
– Sweden
– Switzerland
– Tahiti
– Taiwan
– Thailand
– United Arab Emirates
– United Kingdom
– Uruguay
– USA
– Venezuela
– Vietnam
– Yemen
– Zimbabwe
Recycling
End-of-life vehicle return
Only in European Union countries:
End-of-life Porsche vehicles can be scrapped by
Dr. Ing. h.c. F. Porsche AG free of charge in an
environmentally friendly way.
For vehicle return and for issuing the
corresponding certificate of destruction:
e Contact your Porsche partner.
Airbag and seat belt tensioner unit
Non-ignited gas generators, or whole vehicles or
assemblies with airbag and seat-belt tensioner
units must not be disposed of as “normal” scrap
or waste or put into any other form of end
storage.
For more information on proper disposal:
e Contact your Porsche partner.
Used batteries
Used batteries must not be disposed of as
“normal” scrap or waste or put into any other form
of end storage.
e Observe the local disposal instructions.
e Hand in used batteries at a battery collection
point.
For more information on proper disposal:
e Contact your Porsche partner.

321
Index
Index
A
A/C button
Air-conditioning system.................................... 43
, 56
A/C MAX button
Air-conditioning system.................................... 43
, 57
ABS (Anti-lock Brake System)
Functional description...........................................196
ACC
Adaptive cruise control...........................................32
Accepting and ending a call (phone) ..............................242
Activating SPORT Response .........................................223
Adaptive cruise control ..................................................32
Exceptions ............................................................37
Functional description.............................................32
Interrupting/resuming control..................................37
Operating principle.................................................33
Operating states ....................................................34
Porsche Active Safe ...............................................39
Radar sensor.........................................................32
Setting the desired distance ...................................35
Setting/changing the Desired Speed .......................35
Switching on/off ....................................................34
Adaptive light system, driving light assistant ..................135
Adjusting seat position .................................................213
Adjusting the tone and volume (PCM).............................184
Adjusting the volume and tone (PCM).............................184
Adjusting wipe interval .................................................302
Air vents
Adjusting ........................................................ 42
, 56
Opening/closing ............................................. 42
, 56
Airbag
Care instructions....................................................69
Disposal..............................................................320
Function ................................................................45
Installation position.................................................45
Safety notes ..........................................................45
Warning light on the tachometer..............................45
Airbag warning sticker
Taiwan only ...........................................................79
Air-conditioning compressor .................................... 41
, 54
Air-conditioning system
Automatic load switch-off .................................41, 54
Defrost windscreen................................................ 44
Defrosting windscreen ........................................... 58
Information on air-conditioning compressor .......41
, 54
Set temperature .................................................... 41
Setting air quantity ..........................................42
, 55
Setting automatic air-recirculation mode.................. 57
Setting temperature............................................... 55
Switching A/C MAX mode on/off.......................43
, 57
Switching A/C mode on/off ..............................43
, 56
Switching air-conditioning compressor on/off ....43
, 56
Switching air-recirculation mode on and off........43
, 57
Switching automatic mode on/off ........................... 54
Switching cooling function on/off ......................43
, 56
Switching maximum cooling output on/off .........43
, 57
Upper ventilation panel........................................... 56
Air-recirculation button.............................................43
, 57
Alarm system
Functional description ............................................ 47
Switching off interior surveillance and
inclination sensor................................................... 47
Switching on and off .............................................. 47
Alcantara®, care instructions......................................... 69
Alloy wheels
Care instructions ................................................... 68
Aluminium rims
Care instructions ................................................... 68
Antifreeze
In coolant.............................................................. 95
In washer fluid ..................................................... 297
Anti-lock Brake System (ABS)
Functional description .......................................... 196
App
Device Manager .................................................. 100
Porsche Car Connect........................................... 192
Porsche Connect................................................. 193
Apple® CarPlay
Opening in the PCM ............................................... 48
Siri® .................................................................... 49
Armrest
Opening the storage compartment........................ 235
Ashtray
Emptying ............................................................ 219
Opening.............................................................. 219
Assigning ◊ button.......................................................268
Assistance systems
Lane Change Assist (LCA) settings ........................266
Porsche Active Safe settings ................................266
AUTO (light switch).......................................................135
Driving light assistant ...........................................135
Auto Start Stop function
Display..................................................................52
Exceptions ............................................................50
Operating principle.................................................50
Preconditions ........................................................50
Starting engine automatically ..................................50
Stopping engine automatically.................................50
Switching on and off...............................................51
Automatic Coming Home lights.....................................136
Automatic driving light assistant....................................135
Automatic transmission................................................251
B
Baby carrier ..................................................................84
Baby seat .....................................................................84
Prescribed installation direction...............................79
Recommended child restraint systems ....................80
Switching passenger airbag on and off ....................84
Battery
Charging ...............................................................59
General information................................................59
Installation position.................................................59
Jump-lead starting................................................129
Procedure after connection.....................................61
Replacing ..............................................................59
Vehicle electrical system warning ..........................287
Warnings on the battery..........................................60
Belts
Care instructions....................................................69
Fastening ............................................................212
Notes..................................................................211
Opening belt buckle and removing the belt.............212
Seat-belt pretensioners.........................................211
Warning light on the tachometer............................211
Warning message ................................................211
Bluetooth®
Connecting phone ................................................239
Managing devices ................................................240

322
Index
Boxster
Convertible top care...............................................66
Opening/closing convertible top..............................90
Wind deflector .......................................................91
Brake fluid ....................................................................62
Brake pads
Warning message, brakes ......................................64
Brakes
Brake pad warning message...................................64
Footbrake .............................................................64
Multi-collision brake..............................................197
Test stand...........................................................147
Brief overview
Opening and closing the doors................................71
Bucket seat ................................................................214
C
Call list (phone)............................................................243
Car care
Airbags .................................................................69
Alcantara®............................................................69
Alloy wheels ..........................................................68
Car washing ..........................................................65
Fabric linings .........................................................69
Headlights, plastic components ..............................68
Laying up a vehicle ................................................70
Leather .................................................................68
Paintwork..............................................................67
Seals ....................................................................68
Seat belts .............................................................69
Underbody protection ............................................67
Use of high-pressure cleaning equipment.................65
Warnings...............................................................65
Wheel bolts .........................................................261
Windows ...............................................................67
Car washing.................................................................. 65
Care instructions
Airbags .................................................................69
Alcantara ..............................................................69
Alloy wheels ..........................................................68
Car washing ..........................................................65
Carpet ..................................................................69
Fabric linings .........................................................69
Floor mats.............................................................69
Laying up a vehicle ................................................70
Leather .................................................................68
Paintwork..............................................................67
PCM .....................................................................70
Seals ....................................................................68
Seat belts .............................................................69
Underbody protection ............................................ 67
Wheel bolts......................................................... 261
Windows............................................................... 67
Caring for paintwork...................................................... 67
Caring for wheels.......................................................... 68
Carpet, care instructions ............................................... 69
CarPlay®
Opening in the PCM ............................................... 48
Central locking
Brief overview ....................................................... 71
Functional description............................................ 72
Locking vehicle door with driver’s key
(remote control) .................................................... 73
Locking vehicle door with Porsche Entry & Drive...... 74
Opening and locking vehicle door from inside .......... 75
SAFELOCK............................................................ 73
Unlocking vehicle door with driver’s key
(remote control) .................................................... 72
Centre armrest
Opening the storage compartment ....................... 235
Changing bulbs........................................................... 139
Changing button assignment on multi-function
steering wheel ............................................................ 268
Chassis control systems
Overview (PSM, PASM, PADM, PTV) ...................... 256
Chassis number, position ............................................ 306
Chassis setup
Selecting ............................................................ 191
Check Engine (emission control)
Functional description.......................................... 127
Child restraint system
Installing with ISOFIX system .................................. 86
Switching passenger airbag on and off.................... 84
Child restraint systems
Taiwan related regulations ..................................... 79
Child seat..................................................................... 78
Recommended child restraint systems.................... 80
Switching passenger airbag on and off.................... 84
Cigarette lighter.......................................................... 219
Climate control ............................................................. 54
Clock
Sport Chrono stopwatch ...................................... 226
Closing
Locking vehicle door from inside ............................ 75
Vehicle door with Porsche Entry & Drive
(keyless) ............................................................... 74
windows using proximity sensor on door handle
(vehicles with Porsche Entry & Drive) .................... 299
With Porsche Entry & Drive .................................... 74
Clutch
Manual transmission.............................................251
Cockpit
Adjusting lighting .................................................123
Cooling system, coolant temperature gauge ..........264
Engine oil temperature gauge ...............................264
Fuel gauge ..........................................................126
Odometer............................................................125
Speedometer ......................................................125
Tachometer.........................................................125
Total distance and trip displays.............................125
Warning and indicator lights..................................126
Comfort pressure
Selecting.............................................................164
Speed warning.....................................................164
Technical data .....................................................314
Conference (phone) .....................................................243
Configuring
MyScreen (PCM) ..................................................180
Connect
Device Manager...................................................100
Porsche Car Connect app.....................................192
Porsche Connect App...........................................193
Porsche Connect login ...........................................89
Connecting an external device (PCM) ............................182
Connection Manager....................................................100
Contacts (phone) .........................................................244
Control systems
Overview (PSM, PASM, PADM, PTV).......................256
Controller (PCM) ..........................................................178
Convertible top
Care .....................................................................66
Emergency operation.............................................92
Opening/closing ....................................................90
Opening/closing with driver’s key
(remote control).....................................................91
Removing and installing wind deflector ....................91
Coolant
Antifreeze..............................................................95
Checking level .......................................................95
Cooling function
Air-conditioning system.................................... 43
, 56
Cooling system
Warning on multi-function display...........................285
Cornering light
Dynamic..............................................................136

323
Index
Courtesy lighting, entry function....................................136
Cruise control
Functional description.............................................97
Interrupting operation.............................................97
Storing speed........................................................97
Switching off .........................................................98
Switching on..........................................................97
Cupholder .....................................................................99
Cupholders ...................................................................99
D
Data carrier for vehicle data .........................................306
Data connection (PCM)
configure.............................................................247
Device Manager...................................................100
Establishing...........................................................87
Using WiFi hotspot .................................................87
WiFi settings........................................................247
Declaration of Conformity.............................................317
Defrosting windscreen ............................................ 44
, 58
Air-conditioning system.................................... 44
, 58
Device Manager ..........................................................100
Diagnostic socket................................................. 19
, 101
Dialling a number (phone) .............................................242
Digital speedometer ....................................................125
Direction indicator, switch ............................................138
Displacement
Technical data .....................................................307
Displaying average fuel consumption.............................105
Displaying average speed ............................................105
Displaying connection status (PCM)...............................241
Displaying distance......................................................105
Displaying driving data in the PCM ................................105
Displaying journey time ................................................105
Displaying route information (Navigation, PCM) ..............171
Displaying station information (radio).............................206
Displaying traffic info (Navigation, PCM).........................173
Disposal
Airbag.................................................................320
Seat-belt pretensioner ..........................................320
Door
Emergency locking ................................................ 77
Locking with driver’s key (remote control)................ 73
Locking with Porsche Entry & Drive (keyless) ........... 74
locking with Porsche Entry & Drive (keyless) ............ 74
Opening................................................................ 75
Opening and locking from inside ............................. 75
unlocking from the inside ....................................... 75
Unlocking with driver’s key (remote control)............. 72
Driver’s key ................................................................ 102
Driver’s key (remote control)
Emergency operation of key/control unit in
ignition lock ........................................................ 103
Opening/closing convertible top ............................. 91
Opening/closing windows
(without Porsche Entry & Drive)............................. 299
Replacing the battery........................................... 102
Unlocking vehicle door........................................... 72
Driving data on multi-function display ............................ 105
Driving light assistant
Dipped beam ...................................................... 135
Dynamic cornering light ....................................... 136
Switching on ....................................................... 135
Driving off
Assistance when driving off uphill.......................... 122
Launch Control.................................................... 255
PDK transmission standstill management .............. 122
Driving performance, Technical data............................. 310
Dynamic cornering light ............................................... 136
E
Electric parking brake
Automatic parking brake release upon driving off ..... 63
Emergency braking function ................................... 63
Operating.............................................................. 63
Releasing.............................................................. 63
Testing on brake test stand.................................. 147
Warning light ......................................................... 63
E-mails
Displaying and deleting ........................................ 244
Writing................................................................ 245
Embedded SIM ............................................................. 88
Emergency braking function........................................... 63
Emergency key........................................................... 102
Emergency operation
Filler flap............................................................. 210
of the convertible top............................................. 92
Emergency release
Of luggage compartment lid..................................146
Emission control (Check Engine)
Functional description...........................................127
Emission control warning light ......................................127
Emission values...........................................................308
Emissions ...................................................................308
Engaged gear indicator................................................126
Engine
Cooling system....................................................264
Measuring and displaying oil level..........................160
Oil-level gauge .....................................................160
Starting...............................................................233
Stopping .............................................................233
Stopping automatically
(Auto Start Stop function)........................................50
Technical data .....................................................307
Topping up oil......................................................107
Engine oil
Change quantity...................................................307
Checking level .....................................................160
Consumption .......................................................307
Filler opening .......................................................108
General information..............................................107
Level gauge.........................................................160
Oil pressure warning on multi-function display.........284
Oil-level gauge on the multi-function display ............161
Pressure gauge ...................................................264
Temperature gauge .............................................264
Topping up ..........................................................107
Entering a destination address (Navigation, PCM)...........168
Entering point of interest (Navigation, PCM) ...................169
Entry & Drive
Locking vehicle door with Porsche Entry & Drive ......74
Operating principle.................................................72
Entry function, courtesy lighting when
entering the vehicle .....................................................136
Exhaust system
Sport ..................................................................231
Exterior mirror
Adjusting .............................................................153
Adjusting as parking aid........................................154
Folding in/out ......................................................154
Storing settings (memory) ....................................154

324
Index
F
Fabric linings (care instructions)......................................69
Faults
Convertible top ......................................................92
Emergency operation of ignition key/
control unit in ignition lock ....................................103
Emergency operation of the filler flap ....................210
Power windows....................................................299
Warning and information messages.......................278
Filler flap
Indication of filler flap location...............................126
Filler flap, emergency operation....................................210
Filling and managing jukebox (PCM) ..............................151
Filling capacities
Coolant ...............................................................307
Engine oil ............................................................307
Fuel ....................................................................307
Overview of fluids and fuels ..................................307
Washer fluid ........................................................307
Fire extinguisher, storage location ................................109
First aid kit..................................................................140
Fitting ice or sun shields ..............................................301
Floor mats, care instructions..........................................69
Fluids and fuels
Engine oil ............................................................307
Fuel ....................................................................307
Washer fluid ........................................................307
Folding backrest forward or back .................................215
Footbrake
Safety notes..........................................................64
Front seat
Adjusting.............................................................213
Folding backrest forward or back..........................215
Fuel
Consumption .......................................................308
Fuel gauge ..........................................................126
Fuel reserve warning............................................ 126
Octane rating ......................................................209
Quality ................................................................209
Refuelling ............................................................209
Tank capacity ......................................................307
Fuel gauge..................................................................126
Fuel level indicator
Fuel gauge ..........................................................126
Fuse
Changing electric fuses ........................................113
G
Garage door opener
Assigning signal to button
(changeable code system) ................................... 118
Assigning signal to button (fixed code system)....... 118
Deleting programmed signals............................... 118
Operating ........................................................... 117
Programming...................................................... 117
Reprogramming .................................................. 119
Gear indicator
PDK transmission ................................................ 126
Gear shift assist.......................................................... 165
Generator
Vehicle electrical system warning ......................... 287
G-force display............................................................ 166
Glove box
Closing............................................................... 235
Locking .............................................................. 235
Opening.............................................................. 235
H
Handbrake (electric parking brake)
Automatic release ................................................. 63
Manual release...................................................... 63
Operating ............................................................. 63
Headlights
Care instructions................................................... 68
Changing to left/right-hand traffic ......................... 120
Operating washer system ............................302
, 303
High beam headlight
Switch ................................................................ 138
High beam stalk.......................................................... 138
High-pressure cleaning equipment
Instructions for use................................................ 65
HOLD function ............................................... 50
, 97, 122
Holding a call (telephone)............................................. 243
HomeLink®
Assigning signal to button
(changeable code system) ................................... 118
Assigning signal to button (fixed code system)....... 118
Deleting programmed signals............................... 118
Operating ........................................................... 117
Programming...................................................... 117
Horn ............................................................................ 19
Hotspot
Establishing data connection via external
WiFi hotspot.......................................................... 88
Using the PCM’s wireless Internet access................ 89
I
Identification number, position ......................................306
Identification plate, position..........................................306
Ignition lock
Emergency operation of the key............................103
Functional description ..........................................232
Immobiliser
Functional description ..........................................248
Indicator lights ............................................................126
Indicator stalk .............................................................138
Inserting and removing an SD card ...............................182
Inspection marks
Radio systems.....................................................317
Instrument cluster
Cooling system, coolant temperature gauge ..........264
Engine oil temperature gauge ...............................264
Fuel gauge ..........................................................126
Odometer............................................................125
Overview .............................................................125
Speedometer ......................................................125
Tachometer.........................................................125
Total distance and trip displays.............................125
Warning and indicator lights..................................126
Instrument lighting.......................................................123
Adjusting brightness.............................................125
Instrument panel
Adjusting lighting .................................................123
Cooling system, coolant temperature gauge ..........264
Engine oil temperature gauge ...............................264
Fuel gauge ..........................................................126
Odometer............................................................125
Overview .............................................................125
Speedometer ......................................................125
Tachometer.........................................................125
Total distance and trip displays.............................125
Warning and indicator lights..................................126
Interior lighting
Orientation lighting...............................................124
Switching on and off.............................................123
Interior mirror
Adjusting.............................................................155
dimming..............................................................155
Switching automatic anti-dazzle function on/off ......155
Internet
Establishing a data connection (PCM) ......................87
ISOFIX system
Prescribed installation direction of
child restraint systems ...........................................79
Recommended child restraint systems ....................82
Switching passenger airbag on and off ....................84

325
Index
J
Jack
Lifting the vehicle.................................................128
Jump-lead starting for flat battery .................................129
Jump-lead starting, external power supply .....................129
K
Key
Driver’s key .........................................................102
Locking vehicle door ..............................................73
Opening/closing convertible top..............................91
Removing emergency key.....................................102
Replacement keys................................................104
Storing and retrieving personal settings.................188
Unlocking vehicle door ...........................................72
L
Lane Change Assist (LCA) ............................................130
Setting display brightness on exterior mirror ..........267
Language
Changing on the multi-function display ...................270
Setting in the PCM ...............................................183
Lateral acceleration forces
Display................................................................166
Launch Control............................................................255
Laying up a vehicle ........................................................70
Leather, care instructions...............................................68
Left-hand traffic (changing headlights) ...........................120
Light switch
AUTO function......................................................135
Overview .............................................................135
Lights
Care instructions....................................................68
Changing bulbs....................................................139
Headlight flasher..................................................138
Motorway function................................................135
Rain function........................................................135
Switching on courtesy lighting when entering
the vehicle...........................................................136
Switching on when entering the vehicle..................136
Switching on when leaving the vehicle....................136
List (calls) ...................................................................243
Listening to mailbox (phone) .........................................242
Loading the CD/DVD drive............................................181
Loads
Stowing...............................................................140
Locking
Locking vehicle door from inside ............................ 75
Locking vehicle door with driver’s key
(remote control) .................................................... 73
Locking vehicle door with Porsche Entry & Drive...... 74
Vehicle door with driver’s key (remote control) ......... 73
Vehicle door with Porsche Entry & Drive
(keyless) ............................................................... 74
Locking the steering column ........................................ 248
Longitudinal acceleration forces
Display ............................................................... 166
Luggage compartment ................................................ 140
Closing ............................................................... 145
Emergency release.............................................. 146
Luggage cover.................................................... 142
Opening.............................................................. 144
Luggage compartment lid............................................ 144
Closing ............................................................... 145
Emergency release.............................................. 146
Opening.............................................................. 144
Luggage cover ........................................................... 142
M
Maintenance position................................................... 301
Maintenance work
Adding washer fluid ............................................. 297
Checking coolant level and adding coolant............... 95
Checking engine-oil level ...................................... 160
Topping up engine oil........................................... 107
Malfunctions
Storing end position of the windows...................... 299
Manual transmission
Upshift indicator .................................................. 251
Map (Navigation, PCM)
Accepting destination from map ........................... 169
Activating 360° panoramic view............................ 172
Configuring the map view on the
multi-function display............................................ 173
Opening and configuring map view........................ 172
Settings.............................................................. 175
Media (PCM)
Connecting an external device .............................. 182
Filling jukebox ..................................................... 151
Inserting and removing an SD card ....................... 182
Loading CDs/DVDs.............................................. 181
Opening a playlist ................................................ 151
Playing ............................................................... 149
Searching through media source .......................... 150
Selecting media source........................................ 149
Settings.............................................................. 151
Supported data formats .......................................315
Memory ......................................................................188
Memory package.........................................................188
Messages
Displaying and deleting.........................................244
Writing ................................................................245
Minor Repairs
In the event of a flat tyre.......................................110
Towing the vehicle ...............................................249
Mirrors
Adjusting exterior mirrors .....................................153
Adjusting exterior mirrors as parking aid................154
Exterior mirror heating .........................................121
Folding exterior mirrors in/out ..............................154
Storing exterior mirror settings (memory) ..............154
Switching automatic anti-dazzle function
on and off............................................................155
Vanity mirror........................................................237
Mobile data (connectivity) ...............................................87
Mobile phone
Connecting via Bluetooth® ...................................239
Displaying connection status.................................241
Stowing...............................................................246
Mode switch................................................................223
Multi-collision braking
Functional description...........................................197
Multi-function display
Browsing through long lists...................................157
Checking oil level .................................................160
Display areas.......................................................158
Driving data display (trip information) .....................105
Map view.............................................................173
Menu overview.....................................................159
Operating principle...............................................157
Operating with multi-function steering wheel ...........157
Retrieving vehicle information................................160
Selecting a radio station .......................................206
Selecting options and activating functions..............158
Sport Chrono.......................................................226
Tyre Pressure Monitoring......................................162
Tyre pressure warnings ........................................165
Using the phone...................................................243
Multi-function steering wheel
Assigning ◊ button ...............................................268

326
Index
Music (PCM)
Connecting an external device ..............................182
Filling jukebox......................................................151
Inserting and removing an SD card........................182
Loading CDs/DVDs ..............................................181
Opening a playlist ................................................151
Playing................................................................149
Searching through media source...........................150
Selecting media sources ......................................149
Settings ..............................................................151
Supported data formats .......................................315
MyScreen (PCM)
Adding phone favourites (PCM)..............................244
Configuring (PCM) ................................................180
N
Navigation
Accepting destination from map............................169
Activating 360° panoramic view ............................172
Configuring the map view on the
multi-function display............................................173
Displaying route information .................................171
Displaying traffic info............................................173
Entering a destination address..............................168
Entering point of interest ......................................169
Off-road mode .....................................................174
Opening and configuring map view ........................172
Searching for a destination
(search, online search) .........................................168
Settings ..............................................................175
Storing and using destination (favourite) ................170
Updating navigation database ...............................175
Using recent destinations .....................................168
Using smart routing .............................................171
Notes on PCM drives ...................................................181
O
Octane rating, petrol....................................................209
Odometer
Display................................................................125
Resetting ............................................................125
Off delay
Switching on........................................................136
Off-road mode
Navigation...........................................................174
Oil
Change quantity .................................................. 307
Checking level..................................................... 160
Consumption....................................................... 307
Filler opening ...................................................... 108
General information ............................................. 107
Level gauge ........................................................ 160
Oil pressure warning on multi-function display ........ 284
Oil-level gauge on the multi-function display ........... 161
Pressure gauge................................................... 264
Temperature gauge............................................. 264
Topping up ......................................................... 107
On-board computer
Browsing through long lists .................................. 157
Driving data display (trip information) .................... 105
Map view ............................................................ 173
Measuring oil level............................................... 160
Menu overview .................................................... 159
Multi-function display............................................ 157
Operating principle .............................................. 157
Operating with multi-function steering wheel .......... 157
Selecting a radio station ...................................... 206
Tyre Pressure Monitoring..................................... 162
Using the phone .................................................. 243
Online services
Establishing a data connection (PCM)...................... 87
Porsche Car Connect........................................... 192
Opening a playlist (PCM) .............................................. 151
Opening and closing
Convertible top ..................................................... 90
Windows............................................................. 298
Opening and locking
Brief overview ....................................................... 71
Locking vehicle door with Porsche Entry & Drive...... 74
Opening and locking vehicle door from inside .......... 75
Storing/retrieving personal settings...................... 188
Unlocking vehicle door with driver’s key
(remote control) .................................................... 72
With Porsche Entry & Drive .................................... 74
Operating the PCM
Brief overview ..................................................... 176
Entering text and characters ................................ 179
Switching on/off.................................................. 177
Touchscreen elements......................................... 178
Voice control....................................................... 271
with the rotary push button .................................. 179
with the touchscreen ........................................... 178
Orientation lighting ...................................................... 124
P
PADM .........................................................................256
Paintwork
Care instructions ...................................................67
Polishing ...............................................................67
Preserving.............................................................67
Removing spots and stains .....................................67
Repairing damage..................................................67
ParkAssist
Functional description ..........................................185
Parking
PDK ....................................................................252
Parking aid
Swivelling down mirror glass.................................154
Parking brake
Operating..............................................................63
Releasing ..............................................................63
Testing on brake test stand ..................................147
Parking/pulling out
Functional description, ParkAssist .........................185
PASM (Porsche Active Suspension Management)
Selecting chassis setup........................................191
PASS AIR BAG OFF indicator...........................................46
Passenger mirror
Adjusting.............................................................153
Adjusting as parking aid .......................................154
Folding in/out ......................................................154
PCCB (Porsche Ceramic Composite Brake)
General information................................................64
PCM
Apple® CarPlay .....................................................48
Care instructions ...................................................70
Configuring MyScreen ..........................................180
Connecting an external device ..............................182
Connectivity (data connection) ................................87
Displaying driving data (trip information) ................105
Inserting and removing an SD card........................182
Loading the CD/DVD drive....................................181
Media .................................................................148
Navigation...........................................................167
ParkAssist...........................................................185
Porsche Connect App...........................................193
Radio ..................................................................204
System settings...................................................183
Telephone ...........................................................238
Voice control .......................................................271

327
Index
PCM drives
Connecting an external device ..............................182
Inserting and removing an SD card........................182
Loading CDs/DVDs ..............................................181
Notes..................................................................181
PCM settings
Date and time......................................................177
General ...............................................................183
Map ....................................................................175
Media..................................................................151
Navigation ...........................................................175
Phone .................................................................246
Radio ..................................................................207
Volume and tone..................................................184
PCM system settings ...................................................183
PDK................................................................... 251
, 252
Shifting gears on the steering wheel......................253
Upshift indicator...................................................254
Petrol
Consumption .......................................................308
Fuel gauge ..........................................................126
Fuel reserve warning ............................................126
Octane rating.......................................................209
Quality ................................................................209
Refuelling ............................................................209
Tank capacity ......................................................307
Phone
Call list................................................................243
Conference .........................................................243
Connecting via Bluetooth® ...................................239
Contacts .............................................................244
Displaying and deleting messages.........................244
Displaying connection status.................................241
Listening to mailbox .............................................242
Stowing...............................................................246
Using via the multi-function display ........................243
Writing messages ................................................245
Phone (PCM)
Settings ..............................................................246
Playing tracks (PCM) ....................................................149
Playing videos (PCM)....................................................149
Porsche Active Safe.......................................................39
Porsche Active Suspension Management (PASM)
Functional description...........................................191
Porsche Car Connect...................................................192
Settings ..............................................................270
Porsche Ceramic Composite Brake (PCCB)
General information................................................64
Porsche Connect
Login ....................................................................89
Porsche Connect App.................................................. 193
Device Manager .................................................. 100
Porsche Doppelkupplung (PDK) .................................... 251
Selector-lever position ......................................... 252
Shifting gears on the steering wheel ..................... 253
Porsche Dynamic Light System (PDLS) ......................... 136
Porsche Dynamic Light System Plus (PDLS Plus) ........... 136
Porsche Entry & Drive
Locking vehicle ..................................................... 74
Operating principle ................................................ 72
Porsche Stability Management (PSM)
Functional description .......................................... 195
Switching off ....................................................... 196
Porsche Track Precision app ....................................... 198
Porsche Vehicle Tracking System (PVTS)
Changing Driver Card/Remote Keypad battery....... 202
Functional description .......................................... 199
Operating with Driver Card ................................... 200
Operating with Remote Keypad............................. 201
Operating without Driver Card/
without Remote Keypad ....................................... 199
Transport............................................................ 201
Power
Technical data..................................................... 307
Power windows
Closing windows using proximity sensor on door
handle (vehicles with Porsche Entry & Drive) .......... 299
Opening/closing windows with driver’s key
(remote control) .................................................. 299
Storing end position............................................. 299
Pressure
Tyres.................................................................. 312
PSM (Porsche Stability Management)
Functional description .......................................... 195
Switching off ....................................................... 196
PSM Sport.................................................................. 195
Switching on ...............................................195
, 196
PTV............................................................................ 256
Pulling out/parking
Functional description, ParkAssist......................... 185
PVTS (Porsche Vehicle Tracking System)
Changing Driver Card/Remote Keypad battery....... 202
Functional description .......................................... 199
Operating with Driver Card ................................... 200
Operating with Remote Keypad............................. 201
Operating without Driver Card/
without Remote Keypad ....................................... 199
Transport............................................................ 201
R
Radar sensor ................................................................32
Radio (PCM)
Displaying station information ...............................206
Set the frequency range .......................................205
Settings ..............................................................207
Storing stations ...................................................206
Traffic messages .................................................206
Tuning to stations ................................................205
Radio systems
Inspection marks .................................................317
Rain sensor operation ..................................................302
Rear fog light
Adjusting the driving light......................................136
Switching on........................................................135
Rear window wiper.......................................................303
Rear wing
Operating principle...............................................208
Refuelling....................................................................209
Indication of filler flap location...............................126
Relays
Replacing ............................................................113
Remote control ...........................................................102
Locking vehicle door ..............................................73
Opening/closing convertible top..............................91
Unlocking vehicle door ...........................................72
Removing or installing the luggage cover.......................142
Replacement keys .......................................................104
Restraint system for children
Installing with ISOFIX system ...................................86
Switching passenger airbag on and off ....................84
Retractable rear spoiler
Extending and retracting.......................................208
Right-hand traffic (changing headlights)..........................120
S
SAFELOCK ....................................................................73
Safety instructions
Warning sticker Taiwan only......................................1
Sealant/sealing set
For defective tyres ...............................................110
Seals, care instructions..................................................68
Searching for a destination (Navigation, PCM) ................168
Searching through source (PCM media).........................150

328
Index
Seat belts
Care instructions ...................................................69
Fastening ............................................................212
Notes .................................................................211
Opening belt buckle and removing the belt.............212
Seat-belt pretensioners ........................................211
Warning light on the tachometer............................211
Warning message ................................................211
Seat memory ..............................................................188
Seat-belt pretensioner
Disposal..............................................................320
Seat-belt pretensioners ................................................211
Seats
Adjusting seat position .........................................213
Adjusting the front seat ........................................213
Baby seat, baby carrier ..........................................84
Child restraint systems...........................................78
Folding backrest forward or back..........................215
Recommended child restraint systems ....................80
Storing/retrieving seat position.............................188
Selecting a source (PCM media) ...................................149
Selector lever emergency release.................................217
Selector-lever position display ............................. 126
, 252
Setting air quantity
Air-conditioning system.................................... 42
, 55
Setting automatic air-recirculation mode
Air-conditioning system...........................................57
Setting date and time (multi-function display) .................265
Setting fan
Air-conditioning system.................................... 42
, 55
Setting temperature
Air-conditioning system.................................... 41
, 55
Setting the date and time (PCM) ...................................177
Setting the time and date (PCM) ...................................177
Setting time and date (multi-function display) .................265
Settings
Adjusting on multi-function display .........................263
Retrieving when opening the vehicle ......................189
Storing on the key ...............................................188
Storing personal settings......................................188
Shifting gears
Gear shift assist...................................................165
Manual transmission ............................................251
Porsche Doppelkupplung (PDK) .............................251
Shift prompt ........................................................125
Showing a background image in the PCM......................180
Side lights
Switching on........................................................135
SIM card
Inserting and removing ........................................ 240
Siri®............................................................................ 49
Smartphone
Connecting via Bluetooth®................................... 239
Displaying connection status ................................ 241
Smartphone tray......................................................... 246
Smoker’s package ...................................................... 219
Snow chains
General information ............................................. 260
Socket (12 V) ............................................................. 106
Speed code letter on tyre............................................ 258
Speed limit display...................................................... 221
Displaying speed limits ........................................ 222
Speedometer ............................................................. 125
Sport Chrono
Activating SPORT Response ................................. 223
Displaying Sport Chrono stopwatch in the PCM...... 228
Selecting mode with mode switch......................... 223
Sport Chrono stopwatch ...................................... 226
Sport mode
Switching on/off.................................................. 220
SPORT PLUS .............................................................. 223
Sports exhaust system................................................ 231
Start Stop function........................................................ 50
Starting
Engine................................................................ 233
Steering lock .............................................................. 248
Steering wheel
Adjusting ............................................................ 234
Assigning ◊ button .............................................. 268
Steering lock ...................................................... 232
Switching heating on/off ...................................... 234
Stopping
Engine................................................................ 233
Stopping engine automatically
(Auto Start Stop function)....................................... 50
Stopwatch.................................................................. 226
Storage
Glove box ........................................................... 235
Opening storage compartment in front armrest ..... 235
Opening the side storage compartments
behind the seats.................................................. 236
Storage options .................................................. 235
Storage compartment
Glove box ........................................................... 235
In front armrest, opening ..................................... 235
Storage .............................................................. 235
to the side behind the seats, opening.................... 236
Storing
Personal settings .................................................188
Storing and using destination (favourite)
(Navigation, PCM) ........................................................170
Storing end position of power windows .........................299
Storing stations (radio).................................................206
Summer tyres
Changing tyres ....................................................260
Storage ..............................................................260
Sun visor ....................................................................237
Switching automatic anti-dazzle function on and off ........155
Switching exterior mirror heating on/off ........................121
Switching hazard warning lights on/off ..........................139
Switching heated rear window on/off ............................121
Switching off/on (PCM) ................................................177
Switching on air-recirculation mode
Air-conditioning system.................................... 43
, 57
Switching on/off (PCM) ................................................177
Switching seat heating on/off .......................................216
Switching seat ventilation on/off ...................................216
Switching steering wheel heating on/off ........................234
T
Tachometer
Display................................................................125
Tailback messages......................................................173
Taiwan only
Airbag warning sticker............................................79
Technical data
Comfort pressure ................................................314
Driving performance ............................................310
Engine ................................................................307
Fuel consumption.................................................308
Tyres, wheels ......................................................311
Weights...............................................................309
Telephone
Accepting and ending a call ..................................242
Connecting with a SIM card ..................................240
Dialling a number .................................................242
Holding a call.......................................................243
Test stands
Brake test ...........................................................147
Text messages
Displaying and deleting.........................................244
Writing ................................................................245
Theft protection ..........................................................248
Engine immobiliser,
steering column lock.............................47
, 199, 248

329
Index
Tightening torque
Wheel bolts .........................................................261
Tool kit
Removing and stowing .........................................140
Tools..........................................................................140
Torque
Tightening torque for wheel bolts ..........................261
Torque, Technical data.................................................307
Total distance and trip
Display................................................................125
Resetting.............................................................125
Towing
General information..............................................249
Towing lug...........................................................250
Using a towing rope or towing bar.........................249
Towing lug
In tool kit.............................................................140
TPM (Tyre Pressure Monitoring) ....................................162
Traffic (displaying traffic info)........................................173
Traffic announcements (radio) ......................................206
Traffic sign display ......................................................221
Transmission
Manual transmission.............................................251
Porsche Doppelkupplung (PDK) .............................251
Transmission and chassis control systems
Overview (PSM, PASM,PADM, PTV)........................256
Transport (on car trains, ferries, etc.)
Securing the vehicle.............................................250
Trip counter
Display................................................................125
Resetting.............................................................125
Tuning to stations (radio)..............................................205
Tyre filling compressor
Removing ............................................................141
Stowing...............................................................142
Tyre pressure
Comfort pressure ................................................164
Current settings...................................................162
Retrieving on multi-function display ........................162
Speed warning............................................ 164
, 165
System learning...................................................164
Technical data .....................................................313
Tyre pressure plate..............................................306
Warnings.............................................................165
Tyre Pressure Monitoring (TPM) ....................................162
Teaching .............................................................164
Tyre pressure plate..................................................... 306
Tyre pressure warning light.......................................... 126
Tyre sealant
Removing and stowing ......................................... 140
Tyre sealant/sealing set
For defective tyres .............................................. 110
Tyres
Changing ............................................................ 260
Fixing a flat tyre................................................... 110
Inscription on tyres .............................................. 258
Inscription on wheel ............................................. 258
Replacing tyres (general information) .................... 259
Sealant ............................................................... 110
Selecting comfort or standard pressure ................ 164
Setting the type and size on the
multi-function display............................................ 164
Snow chains (general information)......................... 260
Storage .............................................................. 260
Teaching new tyres in the
Tyre Pressure Monitoring (TPM) system ................ 164
Tightening torque for wheel bolts.......................... 261
Tyre pressure plate .....................................257
, 306
Winter tyres (general information) ......................... 259
U
Underbody protection, care instructions ......................... 67
Unlock
Unlocking vehicle door from inside.......................... 75
Unlocking vehicle door with driver’s key
(remote control) .................................................... 72
Unlocking
Retrieving personal settings from the key .............. 188
Unlocking and opening luggage
compartment lid .................................................. 144
Unlocking vehicle door from inside.......................... 75
Unlocking vehicle door with driver’s key
(remote control) .................................................... 72
Upper ventilation panel
Air-conditioning system .......................................... 56
Upshift prompt............................................................ 125
Using smart routing (Navigation, PCM) .......................... 171
V
Valves.........................................................................259
Vanity mirror ...............................................................237
Vehicle data ................................................................306
Vehicle door
Emergency locking.................................................77
Locking from inside................................................75
Locking with driver’s key (remote control) ................73
Locking with Porsche Entry & Drive (keyless) ...........74
locking with Porsche Entry & Drive (keyless).............74
Opening ................................................................75
Opening and locking from inside..............................75
unlocking from the inside........................................75
Vehicle information
Retrieving on multi-function display ........................160
Vehicle settings
Adapting appearance of multi-function display ........263
Adjusting individual mode......................................267
Adjusting lighting, windscreen wiper and mirror ......267
Adjusting on multi-function display .........................263
Adjusting volume of warning tones
and ParkAssist.....................................................269
Change the language ...........................................270
Changing button assignment on
multi-function steering wheel .................................268
Lane Change Assist (LCA) settings ........................266
Resetting to factory settings .................................270
Setting air conditioning.........................................269
Setting assistance systems ..................................266
Setting date and time ...........................................265
Setting door locking options .................................269
Setting Porsche Active Safe..................................266
Setting Porsche Car Connect ................................270
Setting units ........................................................270
Storing on person buttons ....................................188
Storing on the key................................................188
Ventilation panel
Upper ...................................................................56
Voice control
calling up ............................................................271
Siri®.....................................................................49
speed .................................................................272
Voice commands for media ..................................274
Voice commands for navigation.............................276
Voice commands for radio....................................274
Voice commands for telephone .............................275

330
Index
W
Warning and information messages
Driving systems...................................................293
Engine ................................................................283
Safety.................................................................278
Vehicle................................................................287
Warning lights .............................................................126
Warning messages
Tyre pressure......................................................165
Warning sticker
Taiwan only .............................................................1
Warning triangle ..........................................................140
Washer fluid
Antifreeze............................................................297
Filling capacity.....................................................307
Topping up..........................................................297
Washing the vehicle .......................................................65
Weights
Technical data .....................................................309
Welcome Home function
Switching on........................................................136
Wheel bolts.................................................................261
Wheels
Balancing ............................................................260
Changing.............................................................260
Fixing a flat tyre...................................................110
Inscription on tyres ..............................................258
Inscription on wheel .............................................258
Overview.............................................................311
Replacing tyres (general information).....................259
Rim offset ...........................................................311
Security wheel bolt (wrench socket) ......................261
Size....................................................................311
Snow chains (general information) .........................260
Storage ..............................................................260
Tightening torque.................................................261
Tyre pressure......................................................312
Tyre pressure plate..................................... 257
, 306
Tyre sealant ........................................................110
Wheel bolts (care instructions) ..............................261
Winter tyres (general information)..........................259
WiFi (PCM)
Connecting Porsche Connect App to PCM
using WiFi............................................................193
Establishing data connection via
external WiFi hotspot..............................................88
Settings ..............................................................247
Using the PCM’s wireless Internet access ................89
Wind deflector
Removing and installing ......................................... 91
Windows
Care instructions................................................... 67
Opening/closing with driver’s key
(remote control) .................................................. 299
Storing end position ............................................ 299
Windscreen washer system
Adding washer fluid ............................................. 297
Antifreeze ........................................................... 297
Filling capacity .................................................... 307
Windscreen wipers..............................................300
, 301
Care instructions................................................. 304
One-touch function............................................... 301
Rear window wiper .............................................. 303
Replacing wiper blades ........................................ 301
Switching on rain sensor...................................... 301
Windscreen wiper/washer system ........................ 301
Winter tyres
Changing tyres.................................................... 260
General information ............................................. 259
Wiper......................................................................... 301
Wiper blades
Care instructions................................................. 304
Replacing ........................................................... 304
Wrench socket for security wheel bolts
Using ................................................................. 261