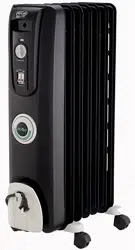
TRD40615EBK
ELECTRIC OIL FILLED RADIATOR
Instructions for use. Keep these instructions
Visit www.delonghi.com for a list of service centers near you
ELECTRIC CHARACTERISTICS
120 V~ 60 Hz 1500 W
RADIADOR ELÉCTRICO DE BAÑO DE ACEITE
Repase y guarde estas instrucciones.
Lea cuidadosamente este instructivo antes de usar su aparato.
Visite www.delonghi.com para ver la lista de centros de servicios
cercanos a usted.
CARACTERISTICAS ELECTRICAS:
120 V~ 60 Hz 1500 W

2
EN
ES
page 4 pág. 9
3
A
I
L
B
C
D
H
E
F
G
4
IMPORTANT
SAFEGUARDS
When using any electrical appliance, some basic safety
precautions should always be observed to reduce the risk
of re, electric shock, and/or injury to persons. Read all in-
structions carefully before using the appliance. Specically:
Danger!
Failure to observe the warning may result in life threatening
injury by electric shock.
- Do not operate any appliance with a dama-
ged cord or plug or after the appliance mal-
functions, has been dropped or damaged in
any manner.
If appliance has leaked any oil, discontinue
using the appliance and contact the service
centre as indicated in the instruction leaet.
Return appliance to authorized service faci-
lity for examination, electrical or mechanical
adjustment, or repair.
- This appliance is not intended for use in
bathrooms, laundry areas, or similar indo-
or locations. Never position the appliance
where it may fall into a bathtub or come in
contact with water.
- Use this appliance only as described in this
manual. Any other use not indicated by the
manufacturer may cause re, electric shock,
or injury to persons.
- CAUTION: To prevent electric shock, make
sure the wide prong of the plug is inserted
in the wide slot of the outlet.
-
Always use the appliance in an upright posi-
tion.
Important!
Failure to observe the warning could result in injury or
damage to the appliance.
- The appliance is not intended for use by
persons (including children) with reduced
physical, sensory or mental capabilities, or
lack of experience and knowledge, unless
they have been given supervision or instruc-
tion concerning use of the appliance by a
person responsible for their safety.
Children should be supervised to ensure that
they do not play with the appliance.
- Extreme caution is necessary when any ap-
pliance is used by or near children or invalids
and whenever the appliance is left operating
and unattended.
- Do not wrap the cord around the appliance
immediately after use.
- To prevent current overload and blown fu-
ses, make sure that no other appliance is
plugged into the same outlet or into another
outlet wired into the same circuit.
- If the power cord is damaged, to reduce the
risk of malfunction it must be replaced by
the manufacturer, its service agent, or a li-
censed and qualied professional.
- Do not use this appliance with an extension
cord or outlet strip. Connect the appliance
directly to a suitable outlet.
- Position the appliance so that the plug and
the outlet can be easily reached even after in-
stallation but not immediately under a xed
power socket.
Danger of burns!!
Failure to observe the warning could result in burns or
scalds.
- This appliance gets very hot when in use.
To prevent burns, do not touch hot surfaces
with bare skin. Use the handle when moving
the appliance. Keep all ammable materials,
such as furniture, pillows, bedding, paper,
clothing, and curtains at least 3 feet (90 cm)
from the front and top of the appliance, also
avoid contact with the sides and back.
- Do not run the power cord under carpeting.
Do not cover cord with throw rugs, runners,
or the like. Keep the cord away from any pas-
sageways where it could be tripped over.
- Do not insert or allow foreign objects to get
into the air intake or air outlet grille, as this
may cause electric shock or re, or damage
the appliance.
- To prevent a possible re, do not block air in-
5
take or air outlet grille in any way. Do not use
the appliance on soft surfaces, such as beds,
where the openings may become blocked.
- Do not cover the appliance while it is fun-
ctioning in order to avoid overheating and
the risk of re.
- The internal parts of the appliance can beco-
me very hot or produce sparks during opera-
tion. Do not use the appliance in areas where
gasoline, paints, or other ammable liquids
are used or stored.
- It is normal for appliance’s plug and cord to
feel warm to the touch. However, an exces-
sively hot or deformed plug or cord is not
normal and may be the result of a defective
electrical outlet. Defective outlets must be
replaced before using the appliance. Plug-
ging the appliance into a worn outlet may
result in overheating of the power cord or
may cause the risk of re.
- Do not place the appliance near a bed becau-
se objects such as pillows or blankets can fall
o the bed and be ignited by the appliance.
Please note:
This symbol indicates recommendations and important
information for the user.
- If your appliance is equipped with a
polyethylene tape used as a carry handle,
remove it before connecting appliance to
the outlet.
- Always disconnect the plug from the power
outlet when the appliance is not in use.
- Do not use the appliance outdoors.
-
To completely turn o the appliance, press
the POWER ON/STANDBY button, and then
unplug the appliance.
- Connect to properly polarized outlets only.
- Make sure that the plug is fully inserted into
the outlet. Wall outlets may deteriorate with
time, so check the plug periodically for signs
of overheating or deformation. If the outlet
has deteriorated, stop using it and have it
repaired.
- Check that neither the appliance nor the po-
wer cord have been damaged during ship-
ping.
- Make sure that no styrofoam or other pa-
cking materials remain in the appliance.
- Make sure that no pieces of polystyrene or
other packaging material have been left
between one element of the appliance and
another. It may be necessary to pass over the
appliance with a vacuum cleaner.
- The rst time the appliance is used, run it at
the maximum power for at least two hours.
During this time, ventilate the room thorou-
ghly to eliminate the “new” smell released
by the appliance. It is completely normal for
the appliance to emit “creaking” sounds the
rst time it is run.
- Extreme caution is necessary whenever the
appliance is left operating unattended.
- Do not open the appliance. No user-service-
able parts inside.
SAVE THESE
INSTRUCTIONS
THIS PRODUCT IS FOR HOUSEHOLD USE
ONLY
6
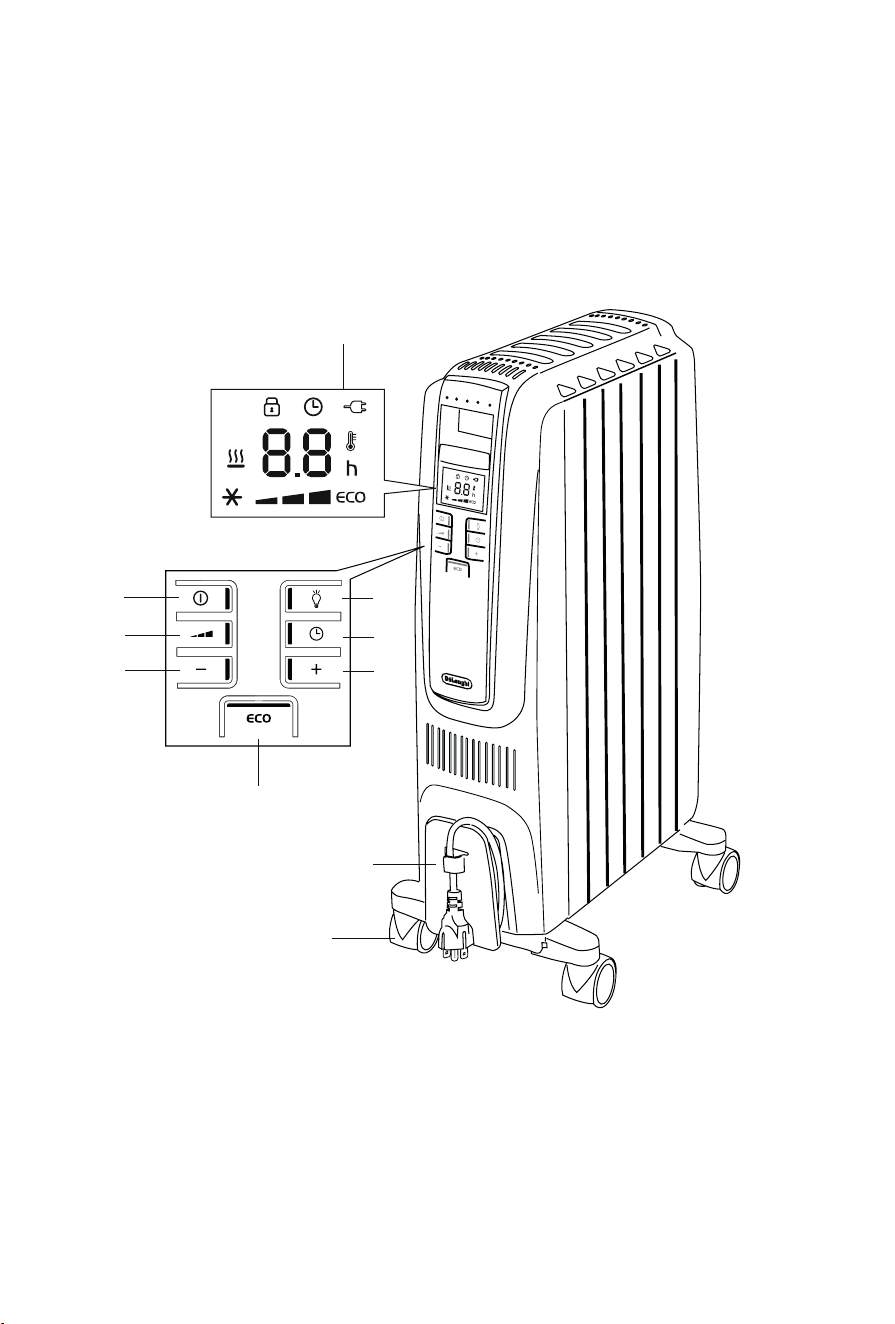
DESCRIPTION
A Display
B ON/Standby button
C Power setting button
D - Adjustment button
E + Adjustment button
F Timer button
G Brightness button
H ECO button
I Cord holder
L Wheel
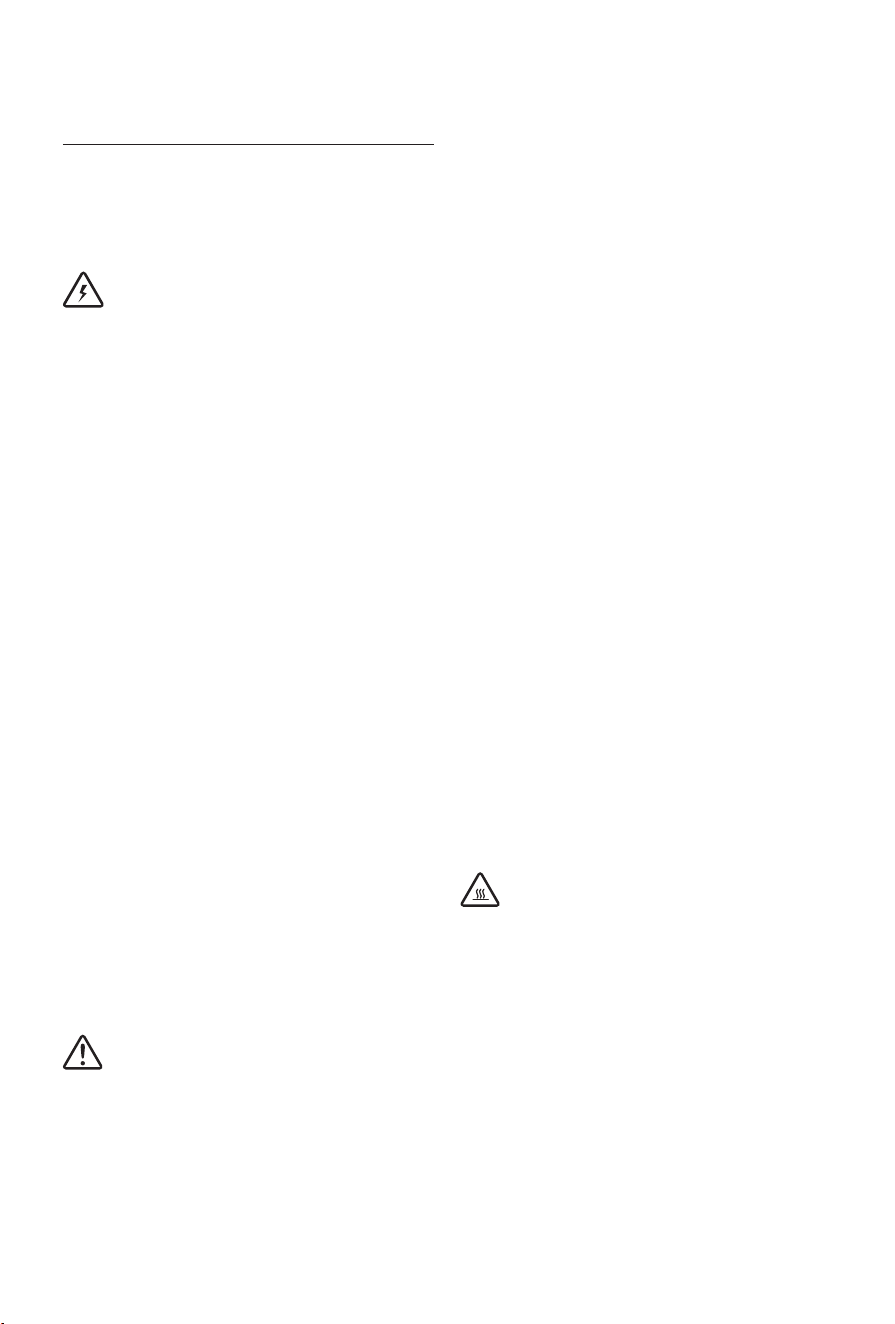
USE
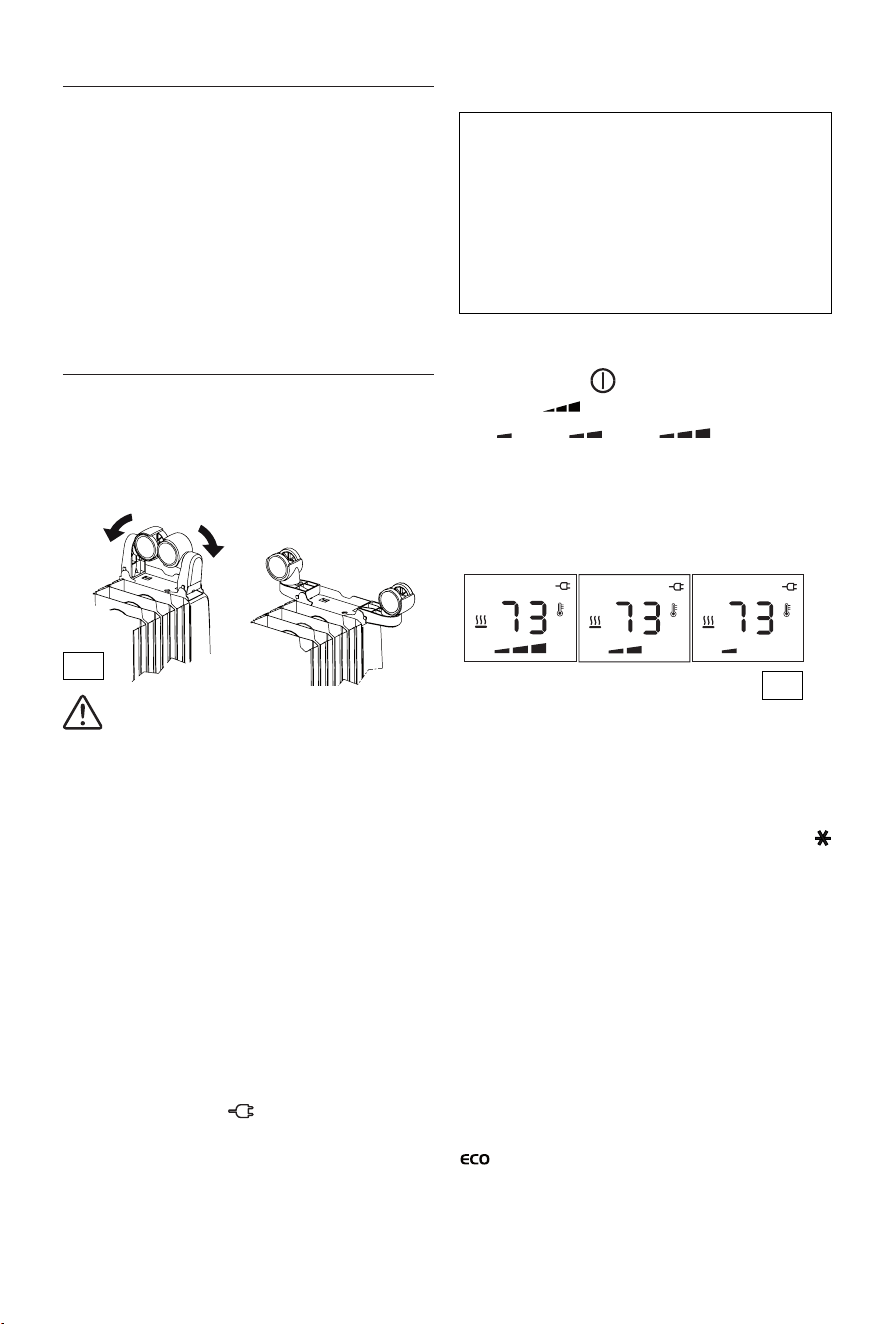
Fitting the wheels
Turn the appliance upside down on a rug or soft surface to
prevent damaging the paint nish. Fully unfold the wheels
by turning them outwards (Fig. 1). Turn the appliance back
to its upright position.
Important! Always operate the appliance in upright
position only (wheels on the bottom, controls on top). Any
other position could create hazardous situation.
Location
Place appliance on the oor beneath the coldest window
in the room, or any other location. Your appliance will re-
duce the eect of cold drafts. The appliance should not be
placed immediately below a power outlet. Do not use this
appliance in rooms with a oor area of less than 43 square
feet (4 sq. m.).
Power connection
The appliance must be connected to a properly polarized
household outlet in perfect working condition.
The appliance will be set in the standby condition.
The display will show the symbol. Keep loose clothing
or bedding, furniture and ammable material away from the
power outlet where the appliance is plugged in.
After an interruption of the power supply (power failure or
appliance unplugged) the unit goes always to standby .
When the unit is switched on by pressing the ON/Standby
button, the operating conditions will be same ones previously
set.
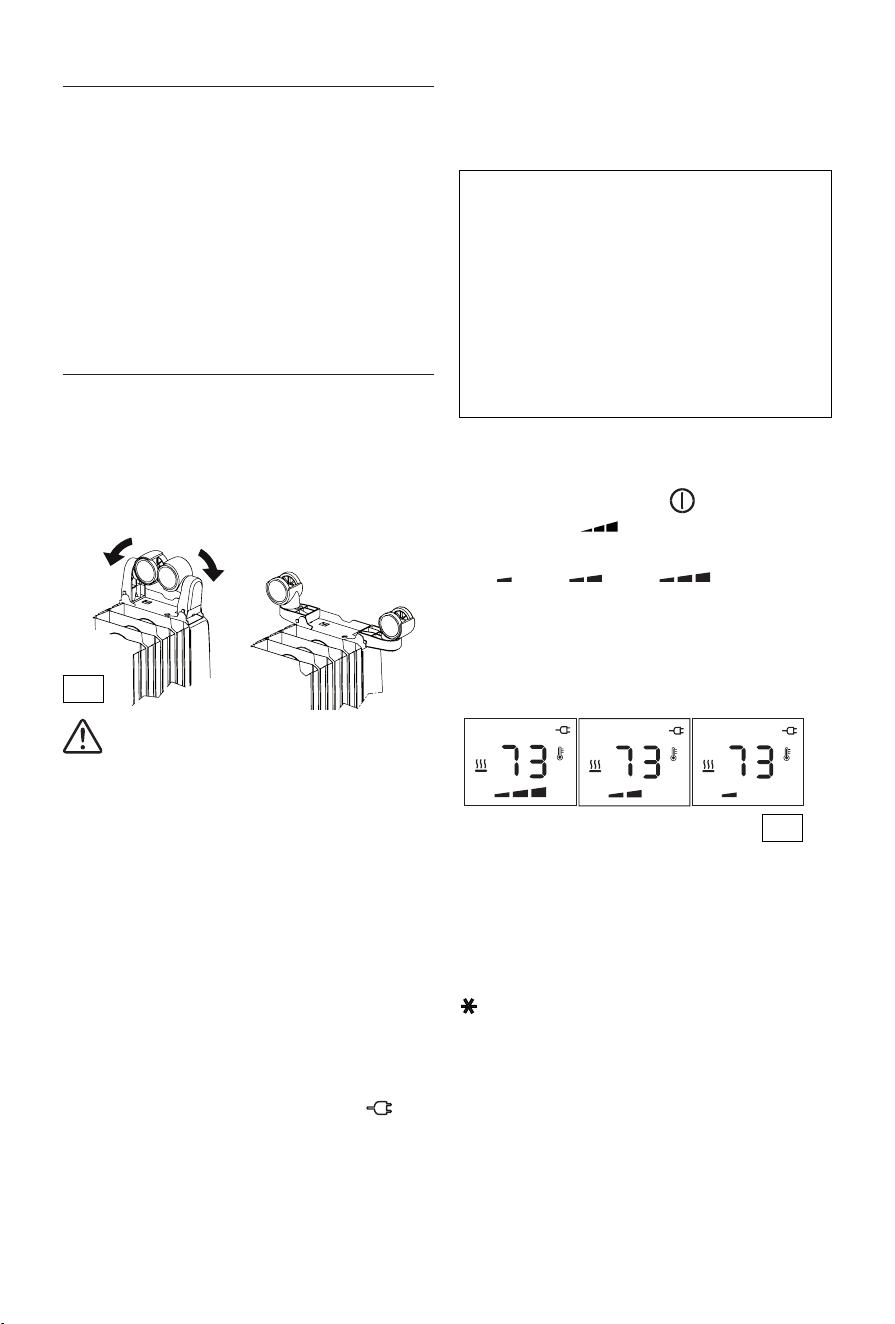
Heating function
To turn the appliance on, insert the plug into an electrical
outlet then press the (B) button.
Press button (C) to set the required power level:
MIN ( ); MED ( ); MAX ( ) (see g. 2).
To select the desired temperature, press button + or - (E
or D). By pushing the + or - button once, the temperature
(shown on the display) will increase or decrease by 1°F or 1°C.
Holding the + or - button depressed the value will increase
or decrease rapidly.
The appliance allows you to set a temperature of 41°F (5°C)
and a range from 50°F to 82°F (10°C to 28°C).
Anti-freeze function
Setting the temperature to 41°F (5°C), the appliance will
activate the Anti-freeze function. The display will show the
symbol, in this way the appliance will turn on automatically,
at the MAX power, only if the room temperature falls below
41°F (5°C), to help prevent freezing conditions. If you wish to
go back to the Heating function, press the "+" button once.
Note: in the Anti-freeze function the power level settings are
not able to be adusted. The unit will run at MAX.
ECO function
When this function is active the appliance automatically sets
the most appropriate power level to guarantee optimum
comfort while reducing energy consumption. To activate this
function press the "ECO" (H) button. The display will show
symbol. If the selected temperature is much higher
then the actual room temperature, the appliance will start
automatically and rapidly heat the room.
The appliance will automatically select the most convenient
Fig. 2
Fig. 1
Your product is equipped with a polarized alternating
current line plug (a plug having one prong wider than the
others). This plug will t into the power outlet only one
way. This is a safety feature. If you are unable to insert the
plug fully into the outlet, try reversing the plug. If the plug
should still fail to t, contact your electrician to replace
your obsolete outlet. Do not attempt to modify the plug to
bypass this safety feature.
7
power level (MAX-MED-MIN-OFF).
If MAX power level has been selected using the
button, the appliance will cycle between: MAX-MED-MIN-
OFF. If MED power level has been selected, the appliance will
cycle between: MED-MIN-OFF.
If MIN power level has been selected, the appliance will cycle
between: MIN-OFF.
Working indicator
The symbol indicates the heating status by means of its
colors.
RED: the unit is heating at the maximum power.
YELLOW: the unit is heating at the medium power.
GREEN: the unit is heating at the minimum power.
absent: the unit is not heating.
Brightness of the display
The appliance allows two dierent brightness settings for the
display. The highest is active when any key button is pressed.
After a few seconds of keyboard inactivity, the brightness
will decrease to the operating brightness level. This lower
level can be adjusted by means of the light button (G).
Press the light button repeatedly till the desired brightness is
reached. There are three brightness levels available.
Key lock
In order to avoid accidental operation, you can lock the
keyboard using the keylock function. To activate this function
press buttons + and - together for at least 3 seconds. The
display shows the symbol and a double acoustic signal
will be emitted. To deactivate the function, proceed in the
same way.
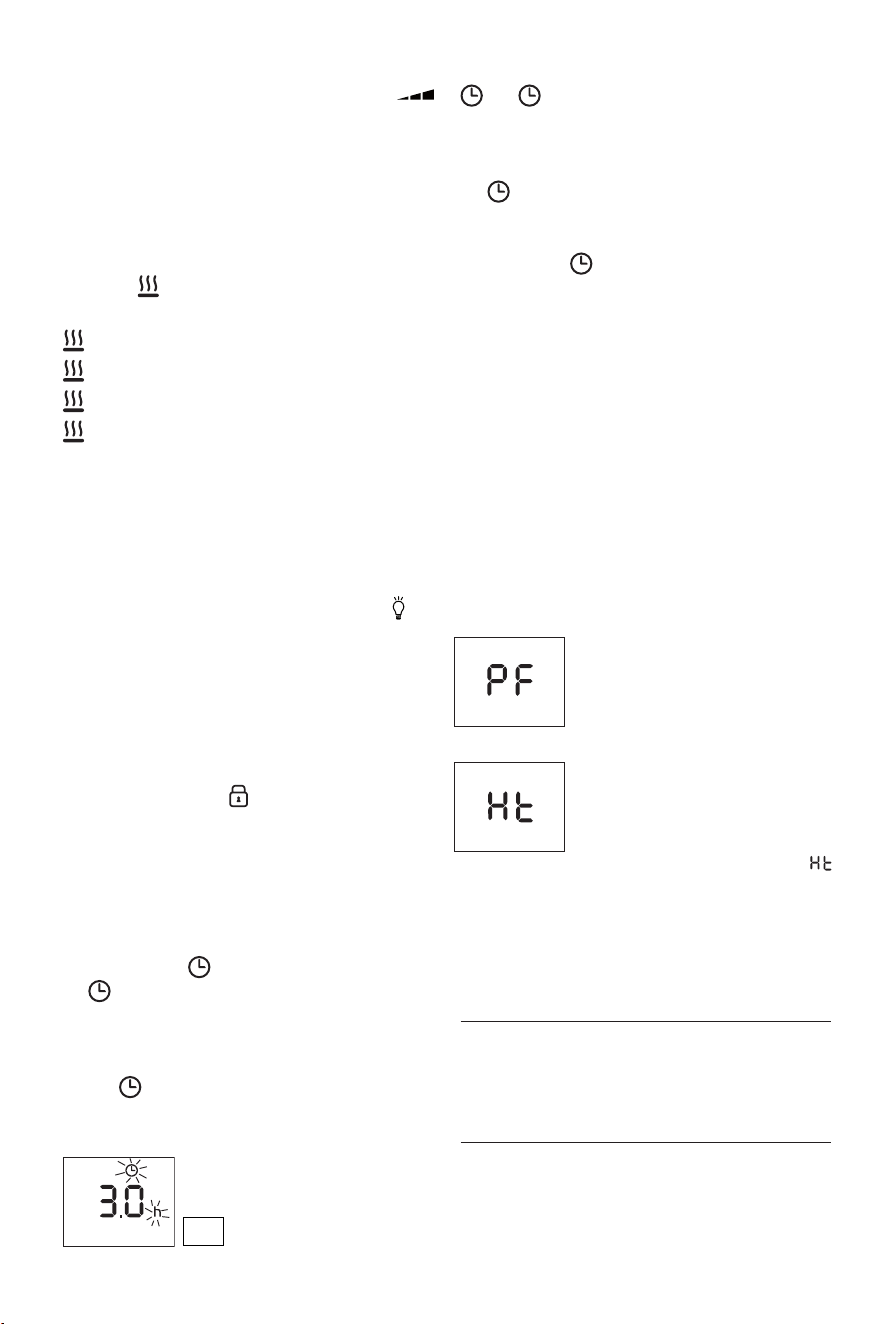
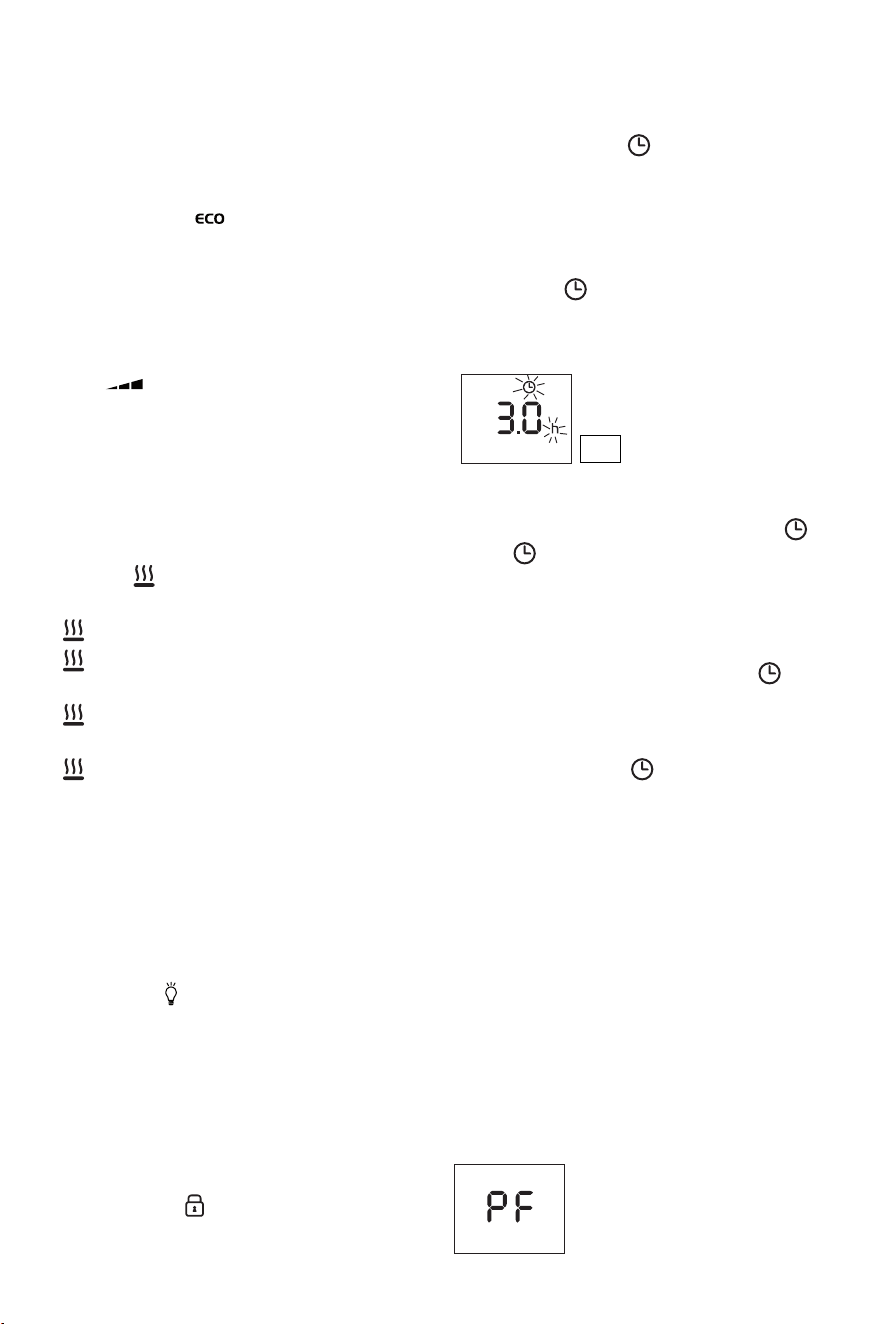
Timer function
This function can be activated in two dierent ways.
Delayed start: With the appliance in standby mode, press
the timer button (F) .
The symbol is displayed ashing together with the hours
left before the appliance comes on (see g. 3). Change the
hours using the + and - buttons, then wait a few seconds for
the program to be stored. The display will return to standby
and the symbols remains on. When the programmed
time has elapsed, the appliance will come on with the
previous settings.
Delayed stop: with the appliance on, press the timer button
. The symbol is displayed ashing together with the
hours left before the appliance goes to standby (see g. 3).
Change the hours using the + and - buttons, then wait a few
seconds for the program to be stored. The current settings
and symbol are displayed. At the end of the set time the
appliance switches to standby automatically. To go back to
operating without the timer, press the timer button twice.
The timer symbol disappears from the display.
Note: the time is settable from 0.5 to 24 hours.
Change of the temperature scale
The display can show the temperature in both °F and °C.
To select the desired temperature scale, when the unit is in
standby position, press and hold the "+" and "ECO" keys for
at least 10 seconds, then release.
The change of scale will be indicated by two short beeps.
Alarms
The appliance has a diagnostic system that makes it possible
to signal malfunctions.
In case of problems, the display will show an alarm message:
(Probe failure)
With this alarm the appliance does not
operate. Contact De'Longhi toll free
number.
(High temperature)
When the product’s internal temperature
is too high, the heating power will
progressively and automatically
be reduced. The display shows
intermittently till the internal temperature
is lowered. To help eliminate the cause
of this alarm, check that the unit is not
covered or obstructed.
SAFETY DEVICE
A safety device switches the appliance o in the event of
overheating. To restart the appliance,
contact the De'Longhi
toll free number.
MAINTENANCE AND SERVICE
Always remove the plug from the power outlet and allow the
appliance to cool. Wipe appliance with a soft damp cloth, do
not use detergents and abrasives.
Should the appliance not be in use over a certain length of
Fig. 3
8
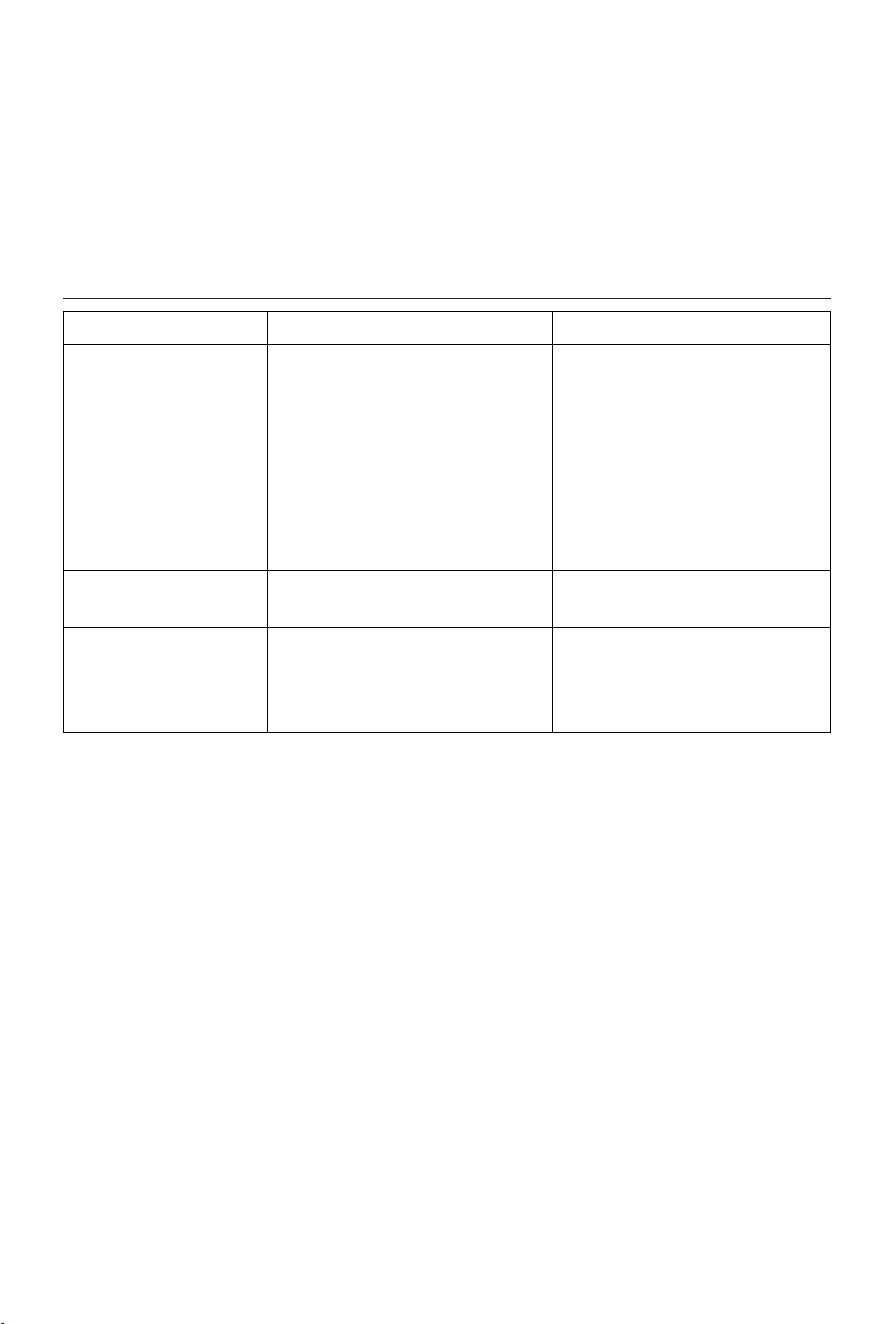
TROUBLESHOOTING
PROBLEM CAUSE SOLUTION
The appliance doesn't work Be sure it is plugged in and that the
electrical outlet is working.
Check for any obstruction.
The temperature may be set too low.
Plug into the power outlet.
Remove the obstruction and let the
appliance cool down. If the appliance
doesn't work please contact the De'Longhi
toll free number.
Set the temperature to a higher position.
Probe failure, the display
shows: PF
Contact the De'Longhi toll free number.
The display shows: Ht (High
temperature)
The unit is covered or obstructed. Check that the unit is not covered or
obstructed. When the product's internal
temperature decreases the alarm will
disappear.
time, wrap the cord around the cord holder and store it in a
dry place. This appliance has been built to give many years of
trouble free service. In case of malfunction or doubt, do not
try to repair the appliance by yourself: this may result in a
re hazard or electric shock.
Contact the De'Longhi toll free
number.
9
INSTRUCCIONES
IMPORTANTES
Al utilizar aparatos eléctricos, es oportuno adoptar siempre
algunas precauciones fundamentales para evitar el riesgo de
incendios, descargas eléctricas y/o lesiones. Lea atentamente
todas las instrucciones antes de utilizar el aparato.
Especícamente:
¡Peligro!
El incumplimiento de la advertencia puede ser causa de
lesiones provocadas por descargas eléctricas.
- No utilice ningún aparato con el cable o el
enchufe dañado o si funciona mal en caso
de que se haya dejado caer o si se ha dañado
de algún modo. Si el aparato pierde aceite,
no lo utilice y póngase en contacto con el
centro de servicio indicado en el folleto de
instrucciones. Lleve el aparato a un centro de
servicio autorizado para su revisión, ajuste de
las piezas eléctricas o mecánicas o reparación.
- EI aparato no está diseñado para su uso
en baños, lavaderos o sitios similares en
interiores.
Nunca coloque el aparato donde pudiese caer
dentro de una bañera o entrar en contacto con
agua.
- Utilice este aparato sólo como se describe
en este manual. Cualquier otro uso no
recomendado por el fabricante puede ser
causa de incendios, descargas eléctricas o
lesiones.
- ADVERTENCIA: A n de evitar descargas
eléctricas, asegúrese de que la espiga ancha
del enchufe se introduzca en la ranura ancha
del tomacorriente.
-
Use el radiador solo en posición vertical.
¡Importante!
El incumplimiento puede ser o es la causa de lesiones o de
desperfectos al aparato.
- El aparato no está diseñado para ser utilizado
por personas (incluyendo niños) con
capacidades físicas, sensoriales o mentales
disminuidas o que carezcan de experiencia
y conocimiento, a menos que lo hagan bajo
la supervisión o instrucción de una persona
responsable de su seguridad. Los niños deben
ser supervisados para asegurarse de que no
jueguen con el aparato.
- Es necesario tener mucho cuidado cuando
cualquier aparato sea utilizado por o se
encuentre cerca de niños o inválidos y siempre
que el aparato esté funcionando sin vigilancia.
- No enrolle el cable alrededor del aparato
inmediatamente después de utilizarlo.
- Para impedir corrientes de sobrecarga y que
se fundan los fusibles, asegúrese de que
ningún otro aparato esté conectado al mismo
tomacorriente o a otro tomacorriente del
mismo circuito.
- Si el cable de alimentación está dañado, para
reducir el riesgo de mal funcionamiento debe
ser reemplazado por el fabricante, su agente
de servicio o un profesional calicado y
autorizado.
- No utilice este aparato con un cable
de extensión o una tira con tomas de
tomacorriente. Conecte el aparato
directamente a un tomacorriente adecuado.
- Ponga el aparato de forma que el enchufe y el
tomacorriente queden al alcance fácilmente
después de la instalación, pero que no quede
inmediatamente debajo de un tomacorriente
jo.
¡Peligro de quemaduras!
La inobservancia de esta advertencia puede ser causa de
quemaduras.
- Este aparato se calienta durante el uso. Para
evitar quemaduras no toque las supercies
calientes con las manos desnudas. Utilice el
asa para mover el aparato. Conserve todo
objeto inamable, tal como mobiliario,
almohadas, cobertores, papel, vestidos y
cortinas, a una distancia de al menos 90 cm
(3 pies) desde la parte frontal y superior del
aparato, evitando además el contacto con los
costados y la parte posterior.
- No pase el cable de alimentación debajo de

10
las alfombras. No cubra el cable con tapetes,
recubrimientos o similares. Extienda el cable
lejos de los pasillos donde se pueda tropezar
con el mismo.
- No introduzca ni permita introducir cuerpos
extraños en las rejillas de admisión o salida de
aire, dado que ello puede producir descargas
eléctricas, incendios o daños al aparato.
- Para evitar el riesgo de incendios, no bloquee
ninguna rejilla de entrada o salida de aire. No
use el aparato sobre supercies suaves, tales
como camas, donde las aberturas pudieran
obstruirse.
- No cubra nunca el aparato mientras esté
funcionando para evitar sobrecalentamientos
y riesgos de incendios.
- Las piezas internas del aparato pueden
calentarse mucho o producir chispas
durante el funcionamiento. No utilice el
aparato en lugares donde se utilicen o
almacenen gasolina, pinturas u otros líquidos
inamables.
- Es normal que el enchufe y el cable del
aparato se sientan calientes al tacto. Sin
embargo, no es normal que haya enchufes
o cables excesivamente calientes, lo cual
puede ser resultado de un tomacorriente
eléctrico defectuoso. Los tomacorrientes
defectuosos deben reemplazarse antes de
utilizar el aparato. Conectar el aparato a un
tomacorriente dañado puede sobrecalentar el
cable de alimentación o provocar un incendio.
- No coloque el aparato cerca de camas
debido a que objetos tales como almohadas
o cobertores pueden caerse de la cama e
incendiarse por el aparato.
Nota:
Este símbolo destaca consejos e información importantes
para el usuario.
- Si su aparato tiene una cinta de polietileno
que se utiliza como asa para moverlo,
retírela antes de conectar el aparato a un
tomacorriente.
- Desconecte siempre el enchufe del
tomacorriente cuando no utilice el aparato.
- No utilice el aparato al aire libre.
- Para apagar totalmente el aparato, oprima el
botón
on/stand-by
y después desconecte el
aparato.
- Conecte el aparato solamente en
tomacorrientes debidamente polarizados.
- Asegúrese de que el enchufe esté
introducido totalmente en el tomacorriente.
Los tomacorrientes de pared pueden
deteriorarse con el tiempo, así que
verique periódicamente que el enchufe
no presente señales de sobrecalentamiento
o deformación. Si el tomacorriente está
deteriorado, deje de usarlo y mándelo reparar.
- Revise que ni el aparato ni el cable de
alimentación se hayan dañado durante el
transporte.
- Asegúrese de que no haya espuma de estireno
u otros materiales de empaque remanentes
dentro del aparato.
- Asegúrese de que no haya piezas de
poliestireno u otro material de empaque
remanente(s) entre los elementos del aparato.
Puede ser necesario pasar el aparato con una
aspiradora.
- La primera vez que utilice el aparato, hágalo
funcionar a su máxima potencia durante
al menos dos horas. Durante este tiempo,
ventile bien la habitación a n de eliminar el
olor “a nuevo” que desprende el aparato. Es del
todo normal que el aparato emita “crujidos” la
primera vez que se utiliza.
- Es necesario tener mucho cuidado cuando el
aparato está funcionando sin vigilancia.
- No abra el aparato. No intente reparar las
piezas internas.
GUARDE ESTAS
INSTRUCCIONES
ÚNICAMENTE PARA USO DOMÉSTICO
11
DESCRIPCIÓN
A Pantalla
B Botón de encendido-espera (stand-by)
C Botón de encendido
D Botón de disminución
E Botón de incremento
F Botón de temporizador
G Botón de brillo
H Botón de eco
I Soporte de cable
L Rueda
USO
Montaje de los pies
Voltee el aparato, apoyándolo sobre una alfombra o supercie
suave para no arruinar la pintura.
Gire hacia afuera los soportes de las ruedas hasta el nal de
la carrera (g. 1). Lleve de regreso el aparato a su posición
vertical.
¡Importante! Operar sólo en posición vertical (las
ruedas abajo, los controles arriba).
Posición
Ponga el aparato en el piso junto a la ventana más fría del
cuarto o donde usted guste. Su aparato reducirá el efecto de
corrientes de aire frío.
El aparato no debe estar colocado inmediatamente debajo de
un tomacorriente.
No utilice este aparato en habitaciones que tengan una su-
percie menor de 4 m
2
(43 square feet).
Conexión eléctrica
EI aparato debe conectarse a un tomacorriente polarizado
en perfecto estado. El aparato debe programarse estando en
modo de espera. La pantalla mostrará el símbolo .
Mantenga las telas o ropas de cama, mobiliario y objetos
inamables a distancia del tomacorriente donde esté
enchufado el aparato.
Después de una interrupción del suministro de energía
(interrupción de la corriente eléctrica o el aparato está
desenchufado) la unidad siempre se apaga.
Cuando la unidad se enciende al presionar el botón de
encendido/stand-by, las condiciones de funcionamiento
serán las mismas establecidas con anterioridad.
Función de calentamiento
Para encender el aparato, conectar el aparato a un
tomacorriente y presione el botón (B).
Presione el botón (C) para programar el nivel de
potencia requerido:
MIN ( ); MED ( ); MAX ( ) (ver gura 2).
Para seleccionar la temperatura deseada, presione el
botón + o – (E o D). Al oprimir una vez los botones + o -,
la temperatura (mostrada en la pantalla) se incrementará o
disminuirá en bloques de 1°F o 1°C. Manteniendo el botón +
o - apretado el valor incrementará o disminuerá rápidamente.
El aparato permite de seleccionar una temperatura de 41 ° C
(5 ° C) y una gama de 50 ° F a 82 ° F (10 ° C a 28 ° C).
Función de anticongelación
Programar la temperatura a 41°F (5°C), el aparato activará la
función de anticongelación. La pantalla mostrará el símbolo
, de esta manera el aparato se encenderá automáticamente,
a la máxima potencia, solo si la temperatura ambiente cae
debajo de 41°F (5°C), para evitar condiciones de congelación.
Si desea regresar a la función de Calentamiento, presione una
vez el botón "+".
Nota: en la función de anticongelación el nivel de potencia
no puede ser ajustado, el aparato funcionará a la potencia
MAX.
Fig. 1
Fig. 2
Su producto está equipado con un conector polarizado para
corriente alterna (un enchufe que tiene una espiga más
ancha que la otra). Este enchufe podrá introducirse en el
tomacorriente solo en una posición.
Esta es una medida de seguridad. Si no puede introducir
el enchufe hasta el fondo, intente invirtiendo el enchufe.
Si aún no puede introducir el enchufe correctamente,
póngase en contacto con un electricista para reemplazar
el enchufe obsoleto. No intente modicar el enchufe para
eludir esta medida de seguridad.
12
Función eco
Cuando esta función se encuentra activa, el aparato
programa automáticamente el nivel de potencia más
apropiado para garantizar la máxima comodidad, reduciendo
simultáneamente el consumo de energía. Para activar
esta función presione el botón “ECO” (H). La pantalla
mostrará el símbolo . Si la temperatura seleccionada
es mucho más alta que la temperatura ambiente actual, el
aparato comenzará automática y rápidamente a calentar la
habitación.
El aparato seleccionará automáticamente el nivel de potencia
más conveniente (MÁX-MED-MÍN-OFF).
Si se ha seleccionado el nivel de potencia MÁX utilizando el
botón , el aparato realizará un ciclo entre: MÁX-MED-
MÍN-OFF.
Si se ha seleccionado el nivel de potencia MED, el aparato
realizará un ciclo entre: MED-MÍN-OFF.
Si se ha seleccionado el nivel de potencia MÍN, el aparato
realizará un ciclo entre: MÍN-OFF.
Indicador de funcionamiento
El símbolo indica el estado de calentamiento por medio
de sus colores.
RED: la unidad se está calentando a la máxima potencia.
YELLOW: la unidad se está calentando a la máxima
potencia.
GREEN: la unidad se está calentando a la mínima
potencia.
ausente: la unidad no está calentando.
Brillo de la pantalla
El aparato permite dos diferentes brillos de la pantalla. El
brillo más intenso está activo cuando se presiona algún botón
principal.
Después de unos cuantos segundos de inactividad de
las teclas, el brillo disminuirá al nivel de brillo operativo.
Este menor nivel puede ajustarse por medio del botón
de iluminación (G). Presione varias veces el botón de
iluminación hasta alcanzar el brillo deseado (se encuentran
disponibles tres niveles de brillo).
Bloqueo de teclas
Con objeto de evitar un funcionamiento accidental, puede
bloquear las teclas utilizando la función de bloqueo de las
teclas. Para activar esta función presione al mismo tiempo
los botones + o – durante al menos 3 segundos. La pantalla
muestra el símbolo y se emitirá una señal acústica doble.
Para desactivar la función, proceda de la misma manera.
Función de temporizador
Esta función puede activarse de dos maneras.
Encendido retardado: Con el aparato en espera, presione el
botón de temporizador (F) .
El símbolo se muestra destellando conjuntamente con las
horas que quedan antes de que se encienda el aparato (ver
gura 3). Cambie las horas utilizando los botones + y -,
después espere unos cuantos segundos para memorizar
el programa. La pantalla regresará en modo de espera
y los símbolos permanecen encendidos. Cuando ha
transcurrido el tiempo programado, el aparato se encenderá
con la conguración anterior.
Delayed stop: Apagado retardado: con el aparato
encendido, presione el botón de temporizador . El
símbolo se muestra destellando conjuntamente con las
horas que quedan antes de que el aparato entre en modo
de espera (ver gura 3). Cambie las horas utilizando los
botones + y -, después espere unos cuantos segundos para
memorizar el programa.
Se muestran la conguración actual y el símbolo .
Al nal del tiempo programado, el aparato se pone en espera
automáticamente. Para regresar al funcionamiento sin el
temporizador, presione dos veces el botón de temporizador.
El símbolo de temporizador desaparece de la pantalla.
Nota: el tiempo es programable de 0.5 a 24 horas.
Cambio de la escala de temperatura
La pantalla puede mostrar la temperatura tanto en °F como
en °C. Para seleccionar la escala de temperatura deseada,
cuando la unidad se encuentra en modo de espera, presione y
mantenga oprimidas las teclas “+” y “ECO” durante al menos
10 segundos, soltando después. El cambio de escala será
indicado por dos señales acústicas cortas.
Alarmas
El aparato tiene un sistema autodiagnóstico que permite
reconocer los malos funcionamientos. En caso de problemas,
la pantalla mostrará algunos mensajes de alarma:
(Sonda defectuosa)
Con esta alarma el aparato no funciona.
Revise si el aparato está colocado
Fig. 3
13
correctamente. Contacte el Servicio al
cliente De'Longhi.
(Alta temperatura)
Cuando la temperatura interna del
producto es demasiado alta, la potencia
de calentamiento se reducirá progresiva y
automáticamente. La pantalla se muestra
intermitente hasta que la temperatura
interna del producto se reducirá. Para
eliminar la causa de esta alarma, revise
que no haya obstrucciones sobre la
unidad.
DISPOSITIVO DE SEGURIDAD
Un dispositivo de seguridad apaga el radiador en caso de
recalentamiento. Para encenderlo de nuevo, contacte el
número de teléfono gratuito Delonghi.
MANTENIMIENTOY SERVICIO
Desconecte el cordón eléctrico y permita que se enfrie el ra-
diador. Limpie el radiador con un trapo suave y húmedo, no
use detergentes ni cosas que lo puedan rayar. Si el radiador
no se usa por un período de tiempo manténgalo en un lugar
seco. Este aparato se ha fabricado para brindar muchos años
de servicio sin problemas. En caso de mal funcionamiento ó
de duda, no intente arreglar (reparar) el radiador por si mis-
mo. Contacte el número de teléfono gratuito Delonghi.
RESOLUCIÓN DE PROBLEMAS
PROBLEMA CAUSA SOLUCIÓN
El aparato no funciona Asegúrese de que está enchufado y de que
el tomacorriente está funcionando.
Revise si hay alguna obstrucción.
La temperatura pudo programarse
demasiado baja.
Enchufe al tomacorriente.
Retire la obstrucción y deje enfriar el
aparato. Si el aparato no funciona, por
favor contacte el número de teléfono
gratuito Delonghi.
Programe la temperatura en un nivel más
alto.
Sonda defectuosa, la pantalla
mostrará: PF
Contacte el número de teléfono gratuito
Delonghi.
La pantalla mostrará: Ht
(Alta temperatura)
Haya obstrucciones sobre la unidad. Revise que no haya obstrucciones sobre
la unidad. Cuando la temperatura interna
del producto se reducirá la alarma
desaparecerá.

5711011531 _00_0419
Printed in China
www.delonghi.com