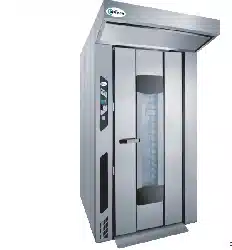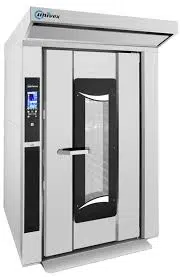
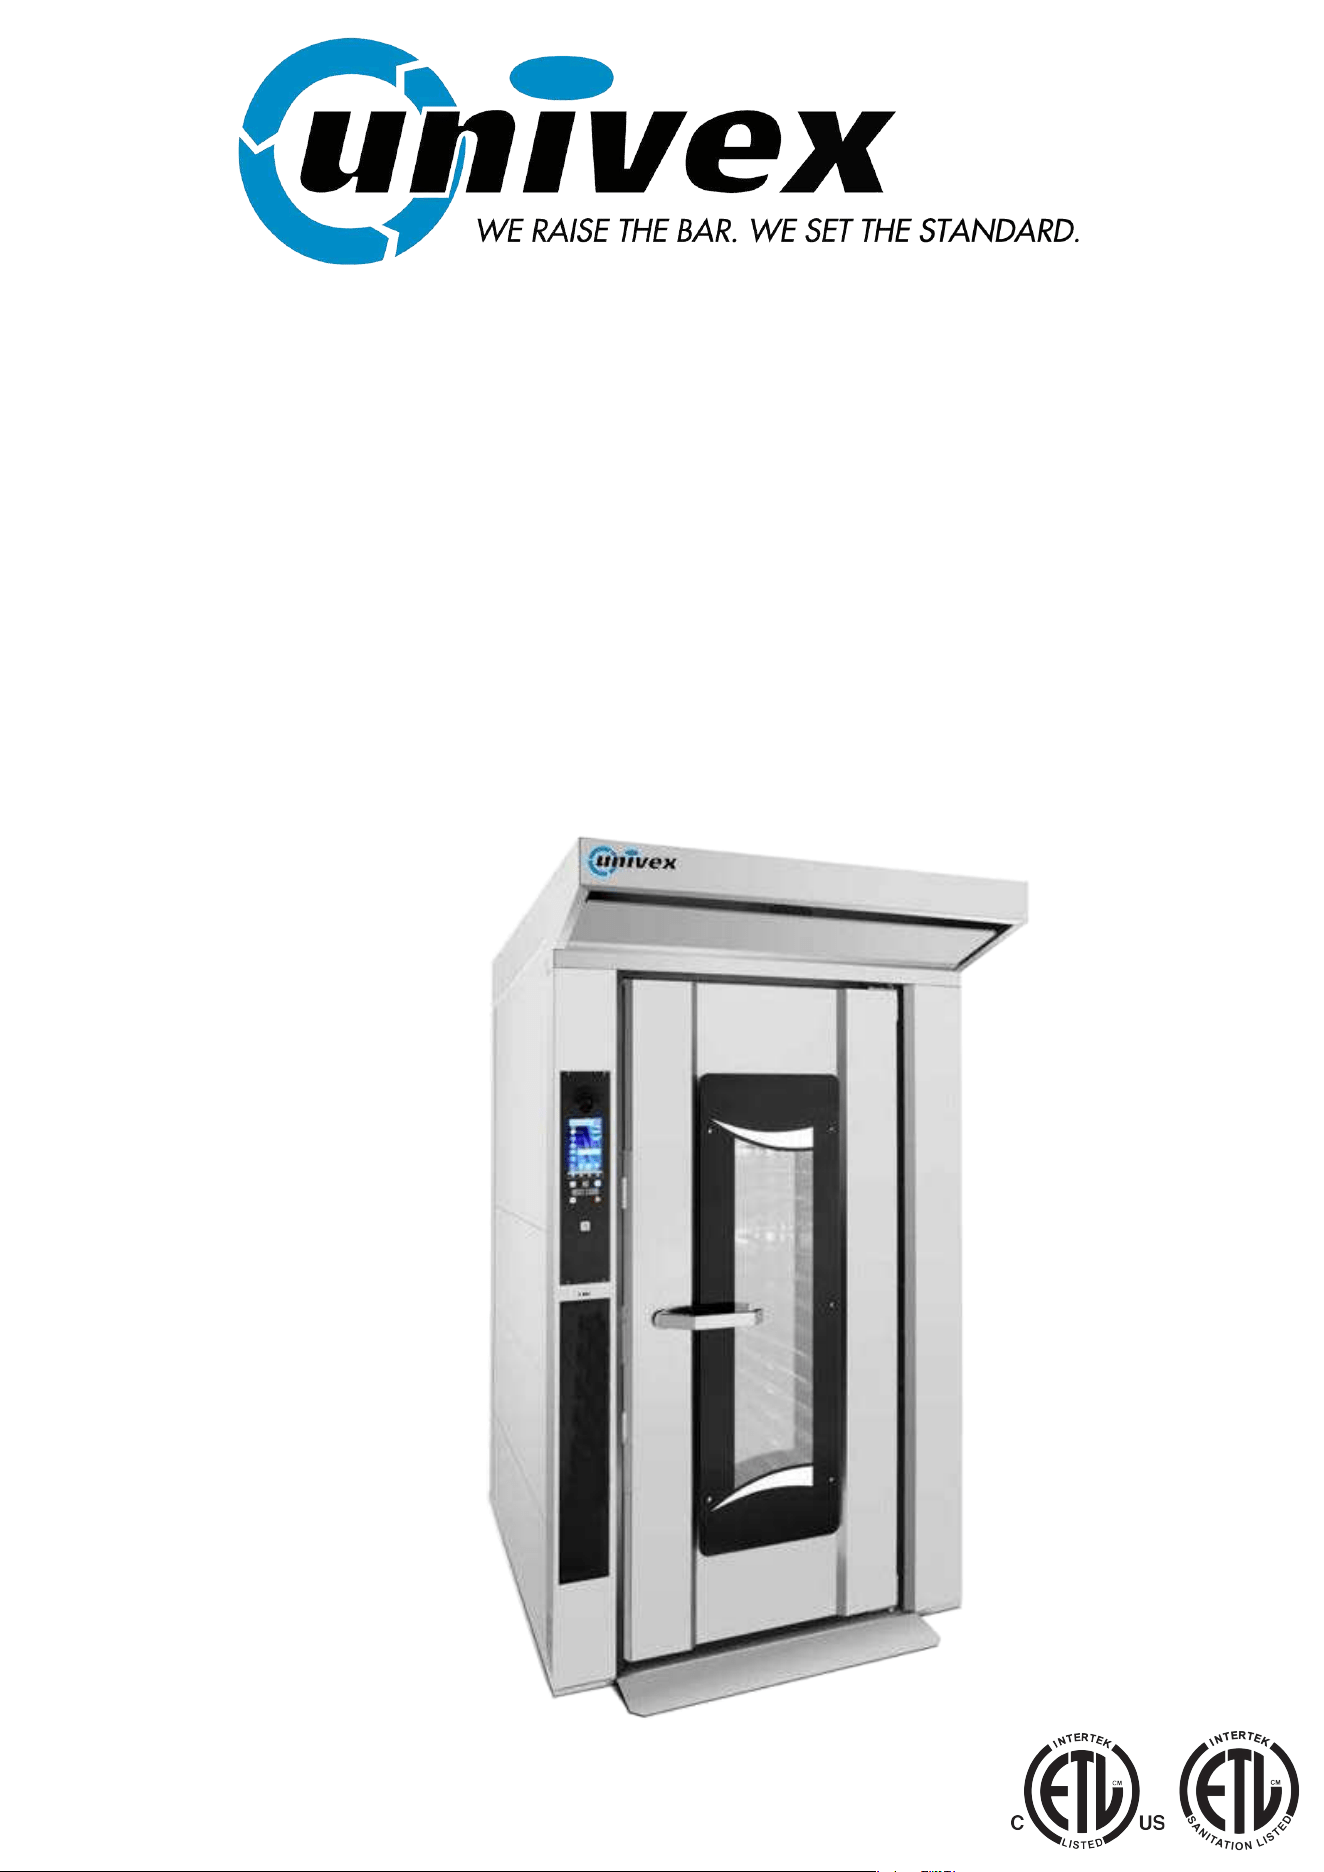
RDR-GAS
ROTATING DOUBLE RACK
BAKERY OVEN
Page 2
SAFETY WARNINGS
THIS MANUAL MUST BE RETAINED FOR FUTURE REFERENCE.
READ, UNDERSTAND AND FOLLOW THE INSTRUCTIONS AND
WARNINGS CONTAINED IN THIS MANUAL.
INSTRUCTIONS TO PURCHASER
IN THE EVENT A GAS ODOR IS DETECTED, SHUT DOWN UNITS
AT MAIN SHUTOFF VALVLE AND CONTACT LOCAL GAS
SUPPLIER TO OBTAIN INFORMATION REGARDING
INSTRUCTIONS TO BE FOLLOWED.
POST THESE INSTRUCTIONS IN A PROMINENT LOCATION.
WARNING
IMPROPER INSTALLATION, ADJUSTMENT, ALTERATION,
SERVICE OR MAINTENANCE CAN CAUSE PROPERTY
DAMAGE, INJURY OR DEATH.
READ THE INSTALLATION, OPERATION AND MAINTENANCE
INSTRUCTIONS THOROUGHLY BEFORE INSTALLATION OR
SERVICING THIS EQUIPMENT.
FOR YOUR SAFETY
DO NOT STORE OR USE GASOLINE OR OTHER FLAMMABLE
VAPORS OR LIQUID IN THE VICINITY OF THIS OR ANY OTHER
APPLIANCE.
Product: Date Of Purchase:
Serial: Purchase Order:
Model Location:
Date Installed: For Service,Call:

Page 3
INDEX
DECLARATION OF CONFORMITY ................................................................................................................... 4
GENERAL WARNINGS ...................................................................................................................................... 5
SHIPPING........................................................................................................................................................... 6
UNLOADING AND MOVING .............................................................................................................................. 7
CHECKING ......................................................................................................................................................... 7
STORAGE AND OUT OF SERVICE .................................................................................................................. 7
VIEW OF THE EQUIPMENTS ........................................................................................................................... 8
VOLUMES AND CONNECTIONS OF GAS VERSION OF UNIT ...................................................................... 8
LOCAL ................................................................................................................................................................ 9
WATER AND DRAINAGE CONNECTION ..................................................................................................... 100
ELECTRICAL CONNECTION ........................................................................................................................ 100
GAS CONNECTION ....................................................................................................................................... 111
GAS CONVERSION TABLE .......................................................................................................................... 111
BURNER......................................................................................................................................................... 111
STEAM DISCHARGE CONNECTION(1) ....................................................................................................... 122
EXHAUST DISCHARGE CONNECTION FOR GAS VERSION(2) ................................................................ 122
AIR FLOW ADJUSTMENT IN GAS VERSION .............................................................................................. 133
START-UP ...................................................................................................................................................... 144
USER INSTRUCTIONS .................................................................................................................................. 144
ROTARY RACK .............................................................................................................................................. 144
OPERATING INSTRUCTIONS ...................................................................................................................... 155
80P CONTROL PANEL ................................................................................................................................. 166
SWITCHING ON AND OFF: ........................................................................................................................... 166
SETTING THE LANGUAGE: .......................................................................................................................... 166
SETTING THE TIME: ..................................................................................................................................... 177
CHARACTERISTICS OF PROGRAMS IN PROGRESS-PREHEATING AND BAKING TIME EXTENSION:
........................................................................................................................................................................ 177
MANUAL BAKING MODE: ............................................................................................................................. 177
HOW TO SET A MANUAL PROGRAM: ........................................................................................................... 18
PROGRAM MODE (CUSTOMIZABLE PROGRAMMING): ............................................................................. 19
EXECUTING A CUSTOMIZED PROGRAM: .................................................................................................. 200
PRESET PROGRAMS: .................................................................................................................................. 200
VISION FULL TOUCH CONTROL PANEL ...................................................................................................... 21
SETTINGS MENU ............................................................................................................................................ 22
WORKING MODES: ......................................................................................................................................... 23
DETERGENT AND RINSE AID TO BE USED: .............................................................................................. 244
MANUAL PROGRAMMING:........................................................................................................................... 244
BAKING PARAMETERS: ............................................................................................................................... 266
MULTI-TIMER MODE: ...................................................................................................................................... 26
INFINITE TIME MODE: .................................................................................................................................... 29
EXECUTION OF A MANUAL PROGRAM ..................................................................................................... 300
EXECUTION OF A CHEF PROGRAM ............................................................................................................. 30
EXECUTION OF A RECIPE PROGRAM ....................................................................................................... 322
PROCEDURE TO DOWNLOAD THE RECIPES FROM BESTFOR WEBSITE ............................................ 344
ENABLING USB MENU: .................................................................................................................................. 37
HACCP – VISION FULL TOUCH ..................................................................................................................... 38
ABSENCE OF ELECTRICAL SUPPLY ............................................................................................................ 39
SOFTWARE UPGRADE .................................................................................................................................. 39
ALARM CODE .................................................................................................................................................. 39
ELECTRIC DIAGRAM .................................................................................................................................... 450
CLEANING AND CARE .................................................................................................................................. 454
CAUSES OF MALFUNCTION ........................................................................................................................ 454
TECHNICAL SERVICE .................................................................................................................................. 454
NOTES: .......................................................................................................................................................... 466
RDRG

Page 4
DECLARATION OF CONFORMITY
Conform To:
ANSI Z83.11 Issued: 2007/03/01 Ed:3 (R2011)(R2012) Gas Food Equipment; Addenda A -
2007 and Addenda B – 2009
Certified To:
CSA 1.8 Issued: 2007/03/01 Ed:3 (R2011)(R2012) Gas Food Equipment; Addenda A - 2007
and Addenda B – 2009
Conform To:
Commercial Cooking, Rethermalization and Powered Hot Food Holding and Transport
Equipment NSF/ANSI 4 Issue: 2009 + ADD1-12

Page 5
GENERAL WARNINGS
This manual must be delivered along with the appliance, and it must stay with it for the entire
duration of the appliance.
These instructions must be kept close to the equipment and in an easily accessible place to always
convenient consultation
Only qualified personnel may install, start and service the oven in compliance with these
manufacturer instructions and according to current regulations for each instance.
Water and waste connection shall comply with the applicable federal, state or local codes.
No safety or other devices must be moved, removed, deactivated or interrupted as this would void
the manufacturer’s warranty
Qualified personnel should subject the equipment to maintenance from the manufacturer at the
scheduled intervals.
The oven must be used solely for the purpose for which it was designed, built and protected, thus to
bake all types of bread and bakery products having a maximum size and weight compatible with the
baking pans and chambers. Any other use shall be deemed improper. It is not recommended for use
in baking products having high alcohol content.
Only properly trained personnel must use the oven.
The baking chamber and entire oven must be cleaned daily, not only to preserve its appearance but
also to ensure hygiene and proper functioning.
All connections (electrical power supply, gas and water supply for models that include the latter)
must be disconnected when the oven is not in use.
Non-original spare parts cannot ensure the smooth functioning and safety of the oven. Therefore,
you may be certain that the manufacturer or the manufacturer itself of the necessary quality only if
you contact personnel authorizes both spare parts and labor.
Do not store or use gasoline or other flammable vapors or liquids on the vicinity of this or any other
appliance.
Improper installation, adjustment, alteration, service or maintenance can cause property damage,
injury or death. Read this installation, operating and maintenance instruction thoroughly before
installing or servicing this equipment.
Keep the appliance area free and clear from combustibles.
The electrical diagram is either in the manual and located on top of the oven into the wiring box.
Installation must conform with local codes, or in the absence of local codes, with the National Fuel
Gas Code, ANSI Z223.1/NFPA 54, or the Natural Gas and Propane Installation Code CSA B149.1,
or as applicable, including: The appliance and its individual shutoff valve must be disconnected from
the gas supply piping system during any pressure testing of that system at test pressures in excess
of ½ psi (3.5kPa). The appliance must be isolated from the gas supply piping system by closing its
individual manual shutoff valve during any pressure testing of the gas supply piping system at the
test pressures equal to or less than ½ psi (3.5kPa ).
The appliance, when installed, must be electrically grounded in accordance with local codes, or in
the absence of local codes, with the National Electrical Code, ANSI/NFPA 70, or the Canadian
Electrical Code, CSA C22.2, as applicable.
In the event of a power failure, do not attempt to operate this device, shut off the oven power switch
to protect the electronics component when the power comes back.
Deactivate the equipment in the event of a malfunction or breakdown.
The water from the steam drain outlet is extremely hot and may cause serious burns.
RDRG
Page 6
SHIPPING
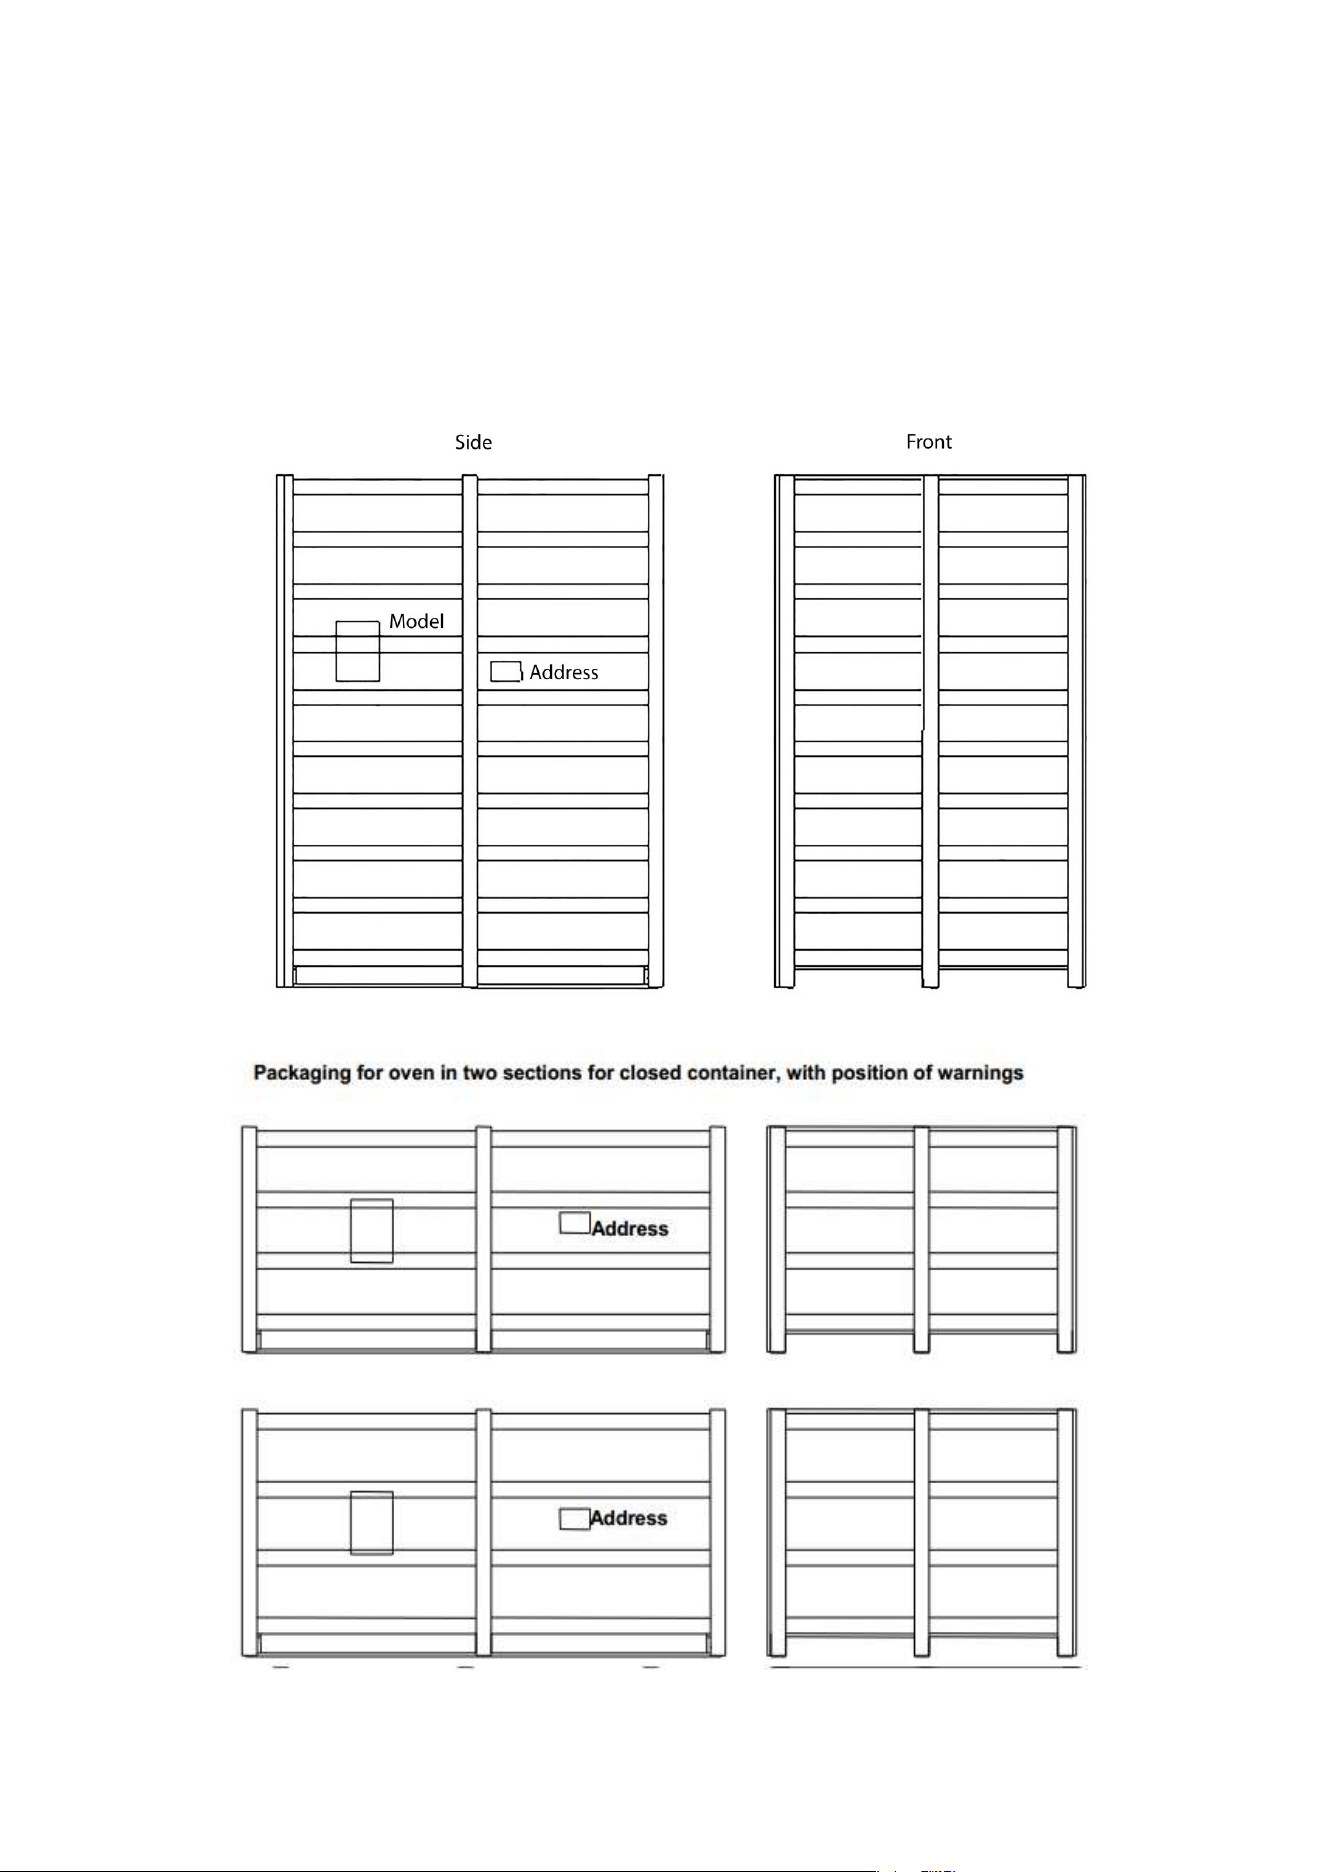
TRANSPORT
The oven is normally shipped in a wood crate, and resting on a platform that can be set on a pallet. The
single pieces are protected and placed inside the oven.
Packaging of assembled oven with position of warnings
RDRG
Page 7
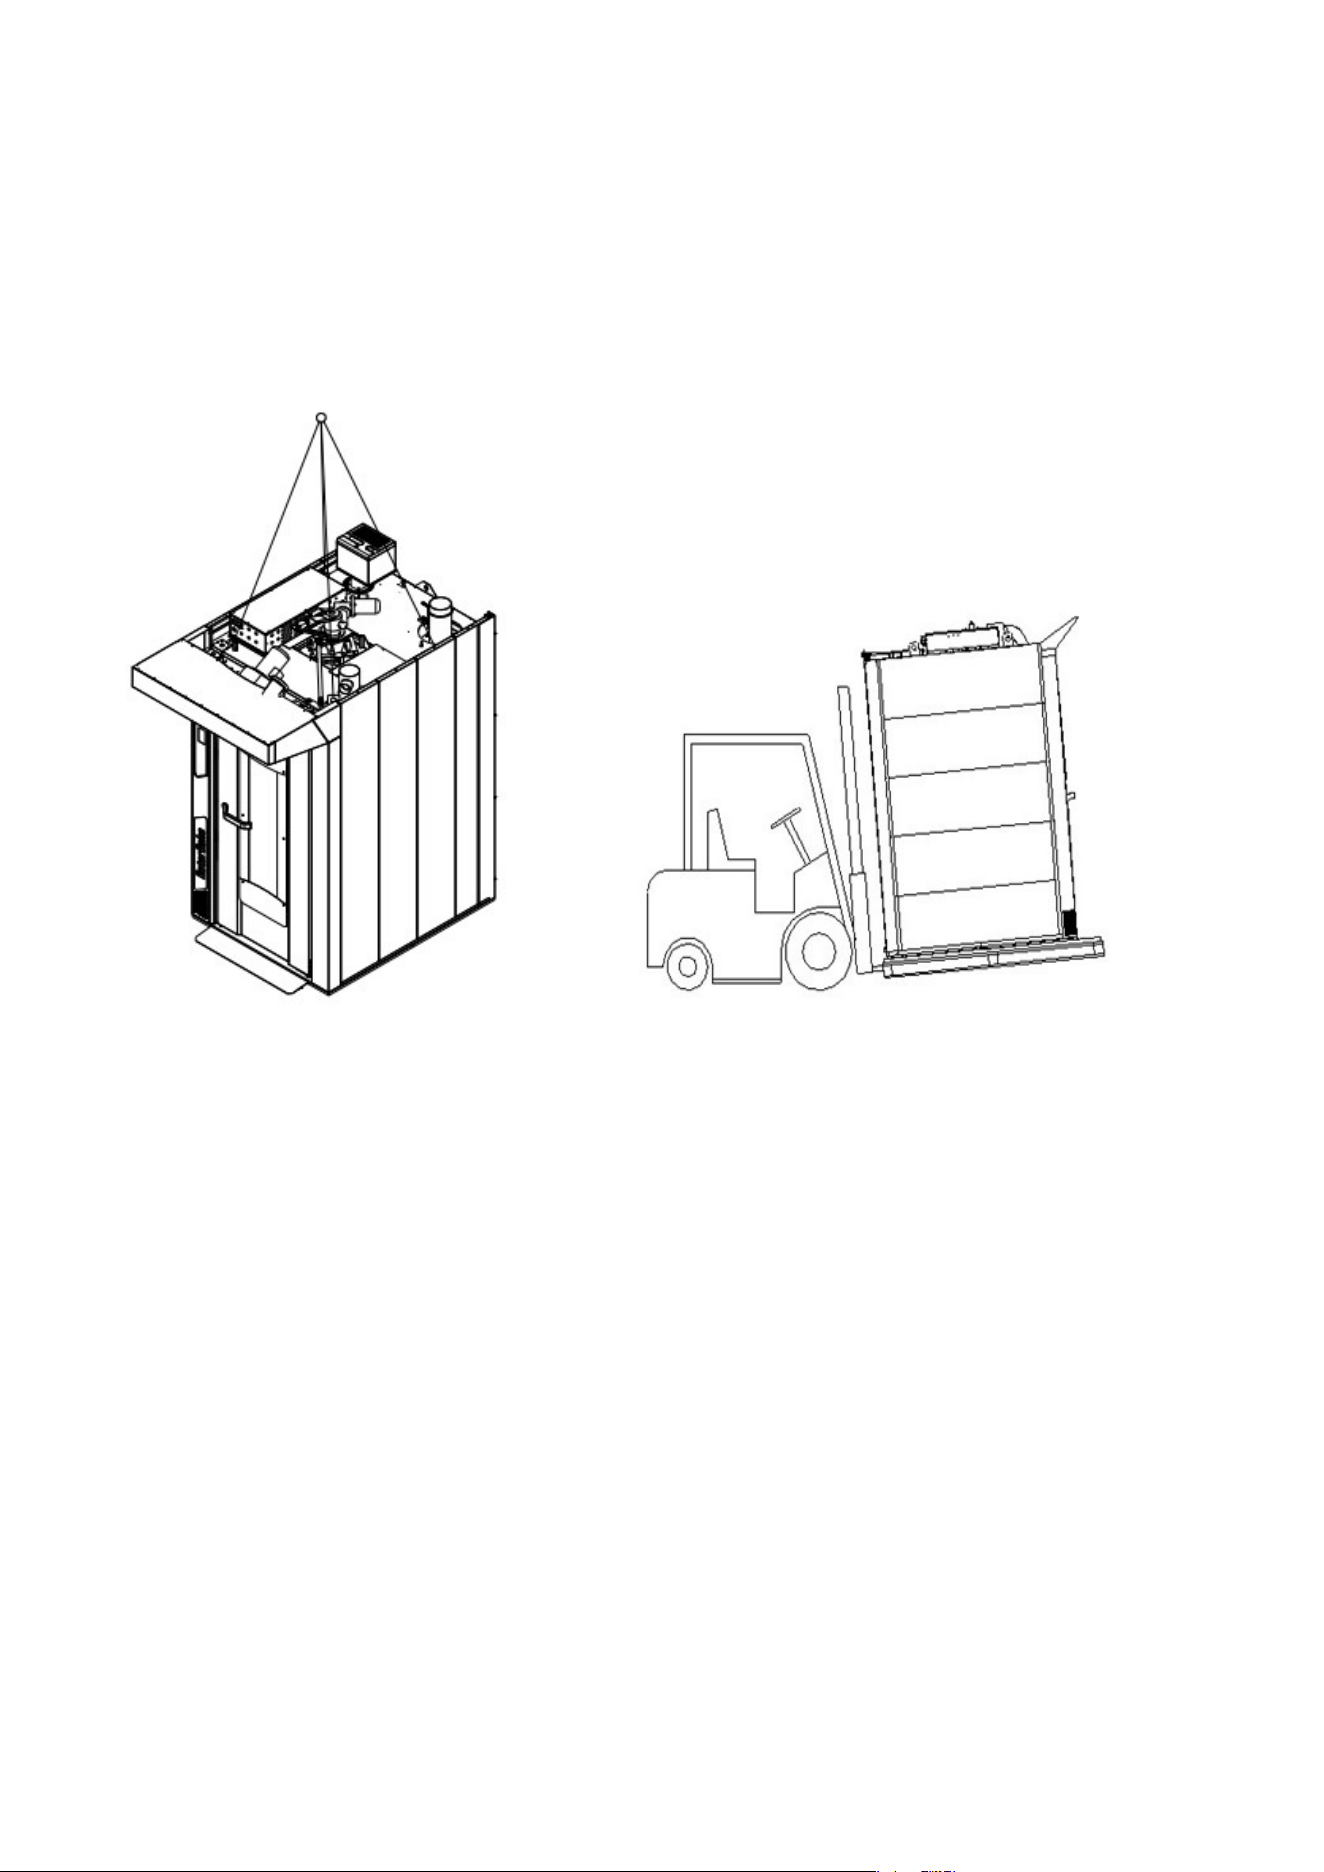
UNLOADING AND MOVING
The oven must be unloaded by means of a forklift, and moved internally by the same means or via
pallet changer when the oven is still resting on the skid.
Do not allow any part of your body to be under the oven during the lifting process.
Keep everyone clear from the oven if it should fall.
Upon receipt, before unpacking, check whether the packing appears to be damaged: if so, accept
the goods with reservations and provide photographic evidence of any obvious damage.
CHECKING
Check all parts of the oven after unpacking in search of any damage.
If shipping damage is found, follow the supply contract for the necessary steps in order to receive insurance
coverage.
STORAGE AND OUT OF SERVICE
STORAGE
The machine, as it is supplied, cannot be stacked on other ovens or on other goods without
providing adequate support or suitable covering to prevent damage of any kind.
The temperature in the place of storage should be between -10°C (14°F) and 70°C (158°F); climatic
conditions as regards humidity must never be such as to cause condensation.
In general, the oven has a degree of protection equivalent to IP44.
OUT OF SERVICE
When the machine is not in use for an extended period as in the case of summer holidays, extraordinary
maintenance, etc., proceed as follows:
- Disconnect the power, fuel and water supplies.
- Open the oven door slightly to allow some air to circulate inside and avoid the formation of mould inside
the oven. In providing the opening as described above, it may be advisable to install a screen to keep mice
out, with openings no larger than 2 inches.
RDRG
Page 8
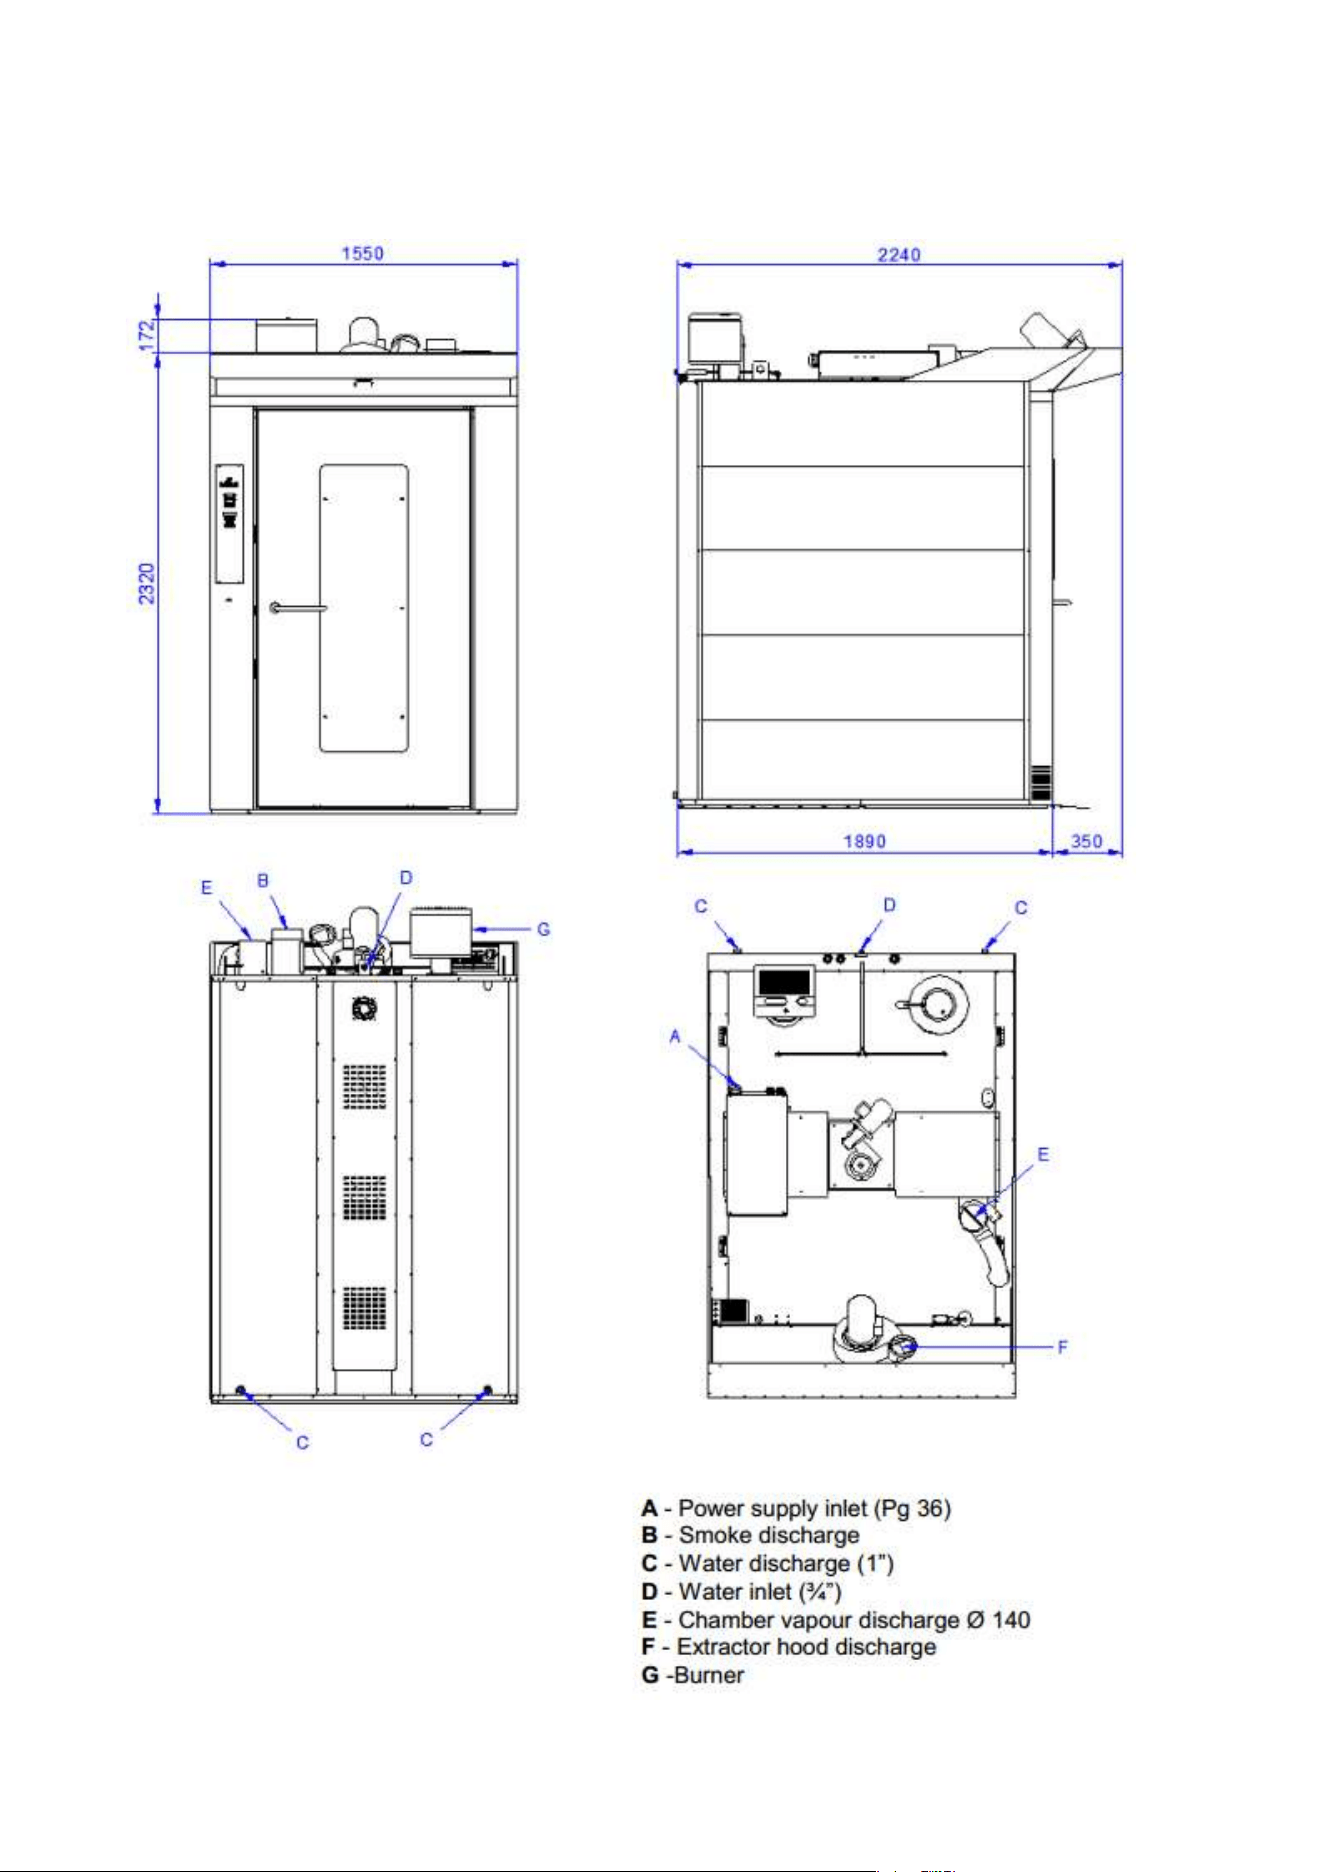
VIEW OF THE EQUIPMENTS
VOLUMES AND CONNECTIONS OF GAS VERSION OF UNIT
RDRG
Page 9
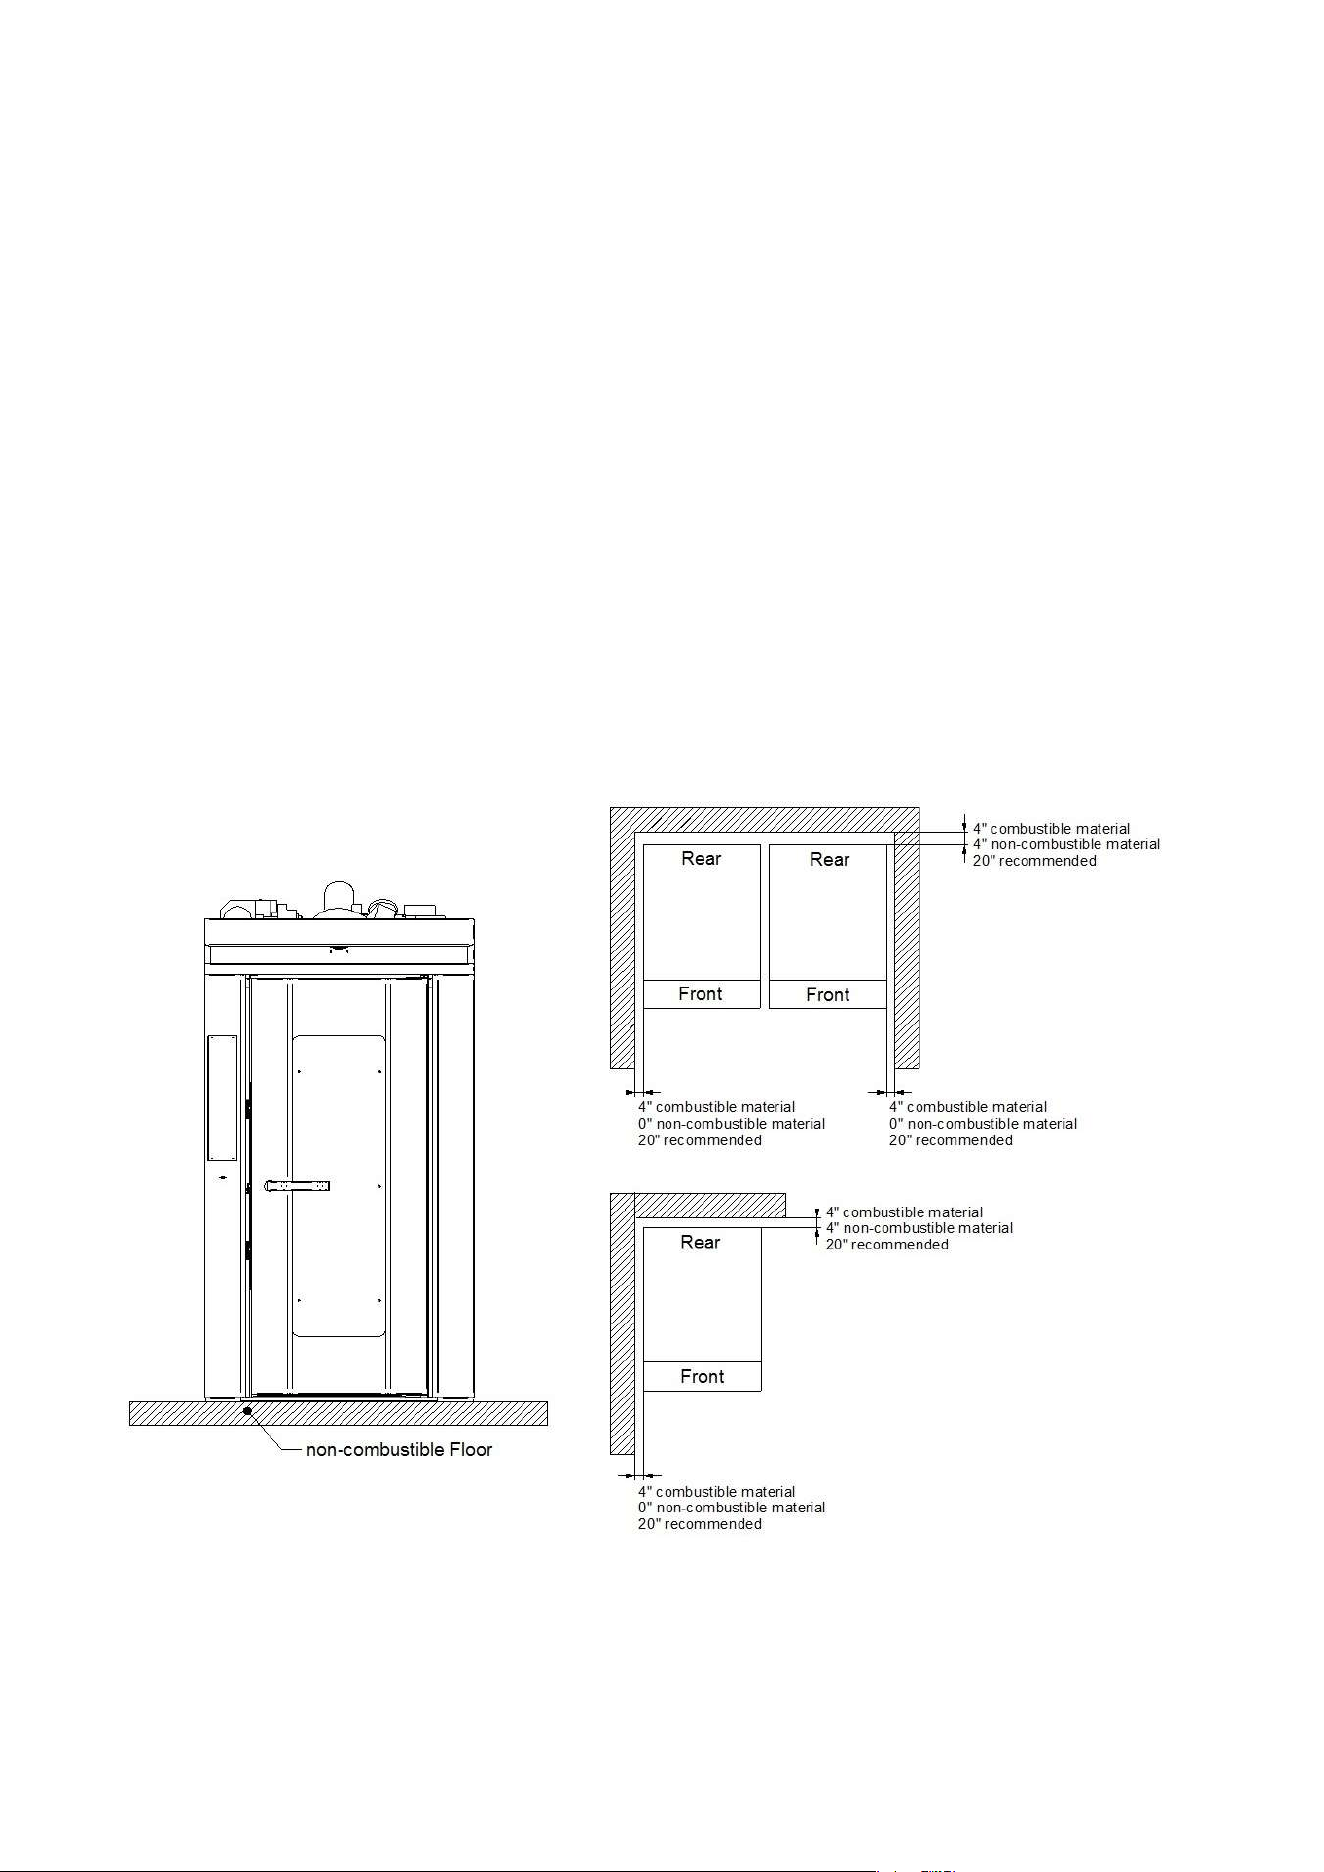
LOCAL
The equipment must be positioned in a well-ventilated place, preferably under a ventilation hood to
ensure rapid evacuation of cooking fumes. Observe the free areas required by current regulations for
both the supply of combustion air and evacuation of any gas leaks.
The room temperature of the installation site must not fall below 41°F (5°C) or rise above 104°F (40°C);
the air humidity must be between 40% and 75%. Other environmental conditions could negatively affect
equipment operation.
The equipment must be positioned only on non-combustible floors.
Clearance measures:
4 inches between the back of the oven and combustible materials.
4 inches between the side panels of the oven and combustible materials.
4 inches between the back of the oven and non-combustible materials.
0 inches between the side panels of the oven and non-combustible materials.
However, the manufacturer recommends a distance of 20 inches for convenient cleaning and
maintenance.
Make sure the equipment openings are not blocked or covered!
Fire regulations must be strictly observed and upheld.
RDRG

Page 10
WATER AND DRAINAGE CONNECTION
WARNING!
Installation of the unit must be done by personnel qualified to work with electricity and plumbing
improper installation can cause injury to personnel and /or damage to equipment.
Unit must be installed in accordance with all applicable codes.
A closure valve must be inserted between the equipment and the water mains. The upstream water
inlet must meet current regulations.
The water inlet and outlet are located at the back of the oven.
The water pressure must be within 50-300kPa range.
If the mains pressure does not fall within the range indicated below, a pressure reducer must be installed
upstream from the oven.
We recommend using softened water with a hardness level between 2 and 5°f.
We recommend a flexible hose to absorb small pressure peaks.
Run water through the pipes before making the connection.
Drainage takes place through a heat-resistant inflexible pipe
Drainage water should lead to the drainage system by constant descent, and with a funnel or siphon
inserted. It is forbidden to reduce the diameter of the pipe.
CAUTION!
Incorrect drainage may lead to unpleasant odors in the cooking chamber!
ELECTRICAL CONNECTION
WARNING!
Installation of the unit must be done by personnel qualified to work with electricity and plumbing
improper installation can cause injury to personnel and /or damage to equipment.
Unit must be installed in accordance with all applicable codes.
Check the oven setup, comparing the type of mains current and voltage available with the levels
shown on the serial plate.
Remove the terminal board cover, insert the cable in the holder and connect each wire to the
corresponding terminal.
Once the cable is connected to the terminal board, tighten the cable holder on the back of the
equipment and close the cover.
The appliance, when installed, must be electrically grounded in accordance with local codes, or in the
absence of local codes, with the National Electrical Code, ANSI/NFPA 70, or the Canadian Electrical Code,
CSA C22.2, as applicable.
The oven must also be included in an efficient equipotent system.
This connection is made using the special terminal marked with the symbol
, located at the back.

Page 11
GAS CONNECTION
CAUTION!
Only qualified and properly licensed personnel may carry out the connection to the gas
mains. The manufacturer declines any responsibility in the event of failure to observe this
restriction.
The correct operating manifold orifice pressure range for both natural and propane gas is 2.0" W.C.
(498.2Pa) Minimum to 4.0" W.C. (996.4Pa) Maximum.
The supply line pressure required for natural or propane is 5.5 W.C. (1370Pa) Minimum 14.0 W.C. Maximum
The connection must be made only after receiving approval from the utility company.
The gas line connection may be fixed or disconnecting. It must have a certified disconnect valve.
The valve must be in an easily accessible position and nearby the oven.
Any flexible hoses used must be made of stainless steels and comply with all applicable regulations.
It is strictly forbidden to reduce the gas inlet diameter.
Once the connection is complete, check the seal using a non-corrosive leak detector spray.
The use of open flames is strictly prohibited!
For further information please refer to the burner user’s manual.
GAS CONVERSION TABLE
Oven
Btu/h Burner
Orifice for NAT &
Manifold Press.
Orifice for LP &
Manifold Press.
T3,5 120000
HSG200 max 200 MBtu/h .227 @ 2.5” WC .180 @ 3.5” WC
T5 160000
HSG200 max 200 MBtu/h .332 @ 2” WC .246 @ 2.5” WC
T8 380000
HSG400 max 400 MBtu/h .468 @ 3.8” WC .332 @ 4.4” WC
T11 380000
HSG400 max 400 MBtu/h .468 @ 3.8” WC .332 @ 4.4” WC
T16 400000
HSG400 max 400 MBtu/h .468 @ 4” WC .332 @ 4.6” WC
BURNER
Please refer to the specific provisions made by the manufacturer.
The operations of
installation, calibration, testing and certification as regards the warranty, are
performed by the nearest service center designated by the burner manufacturer.
Before making any connection, ascertain that the burner is compatible with the fuel.
To prevent any risks due to gas leaks, we recommended installing a gas detector connected to an
intercept valve that will interrupt the flow of gas if necessary.
RDRG
Page 12
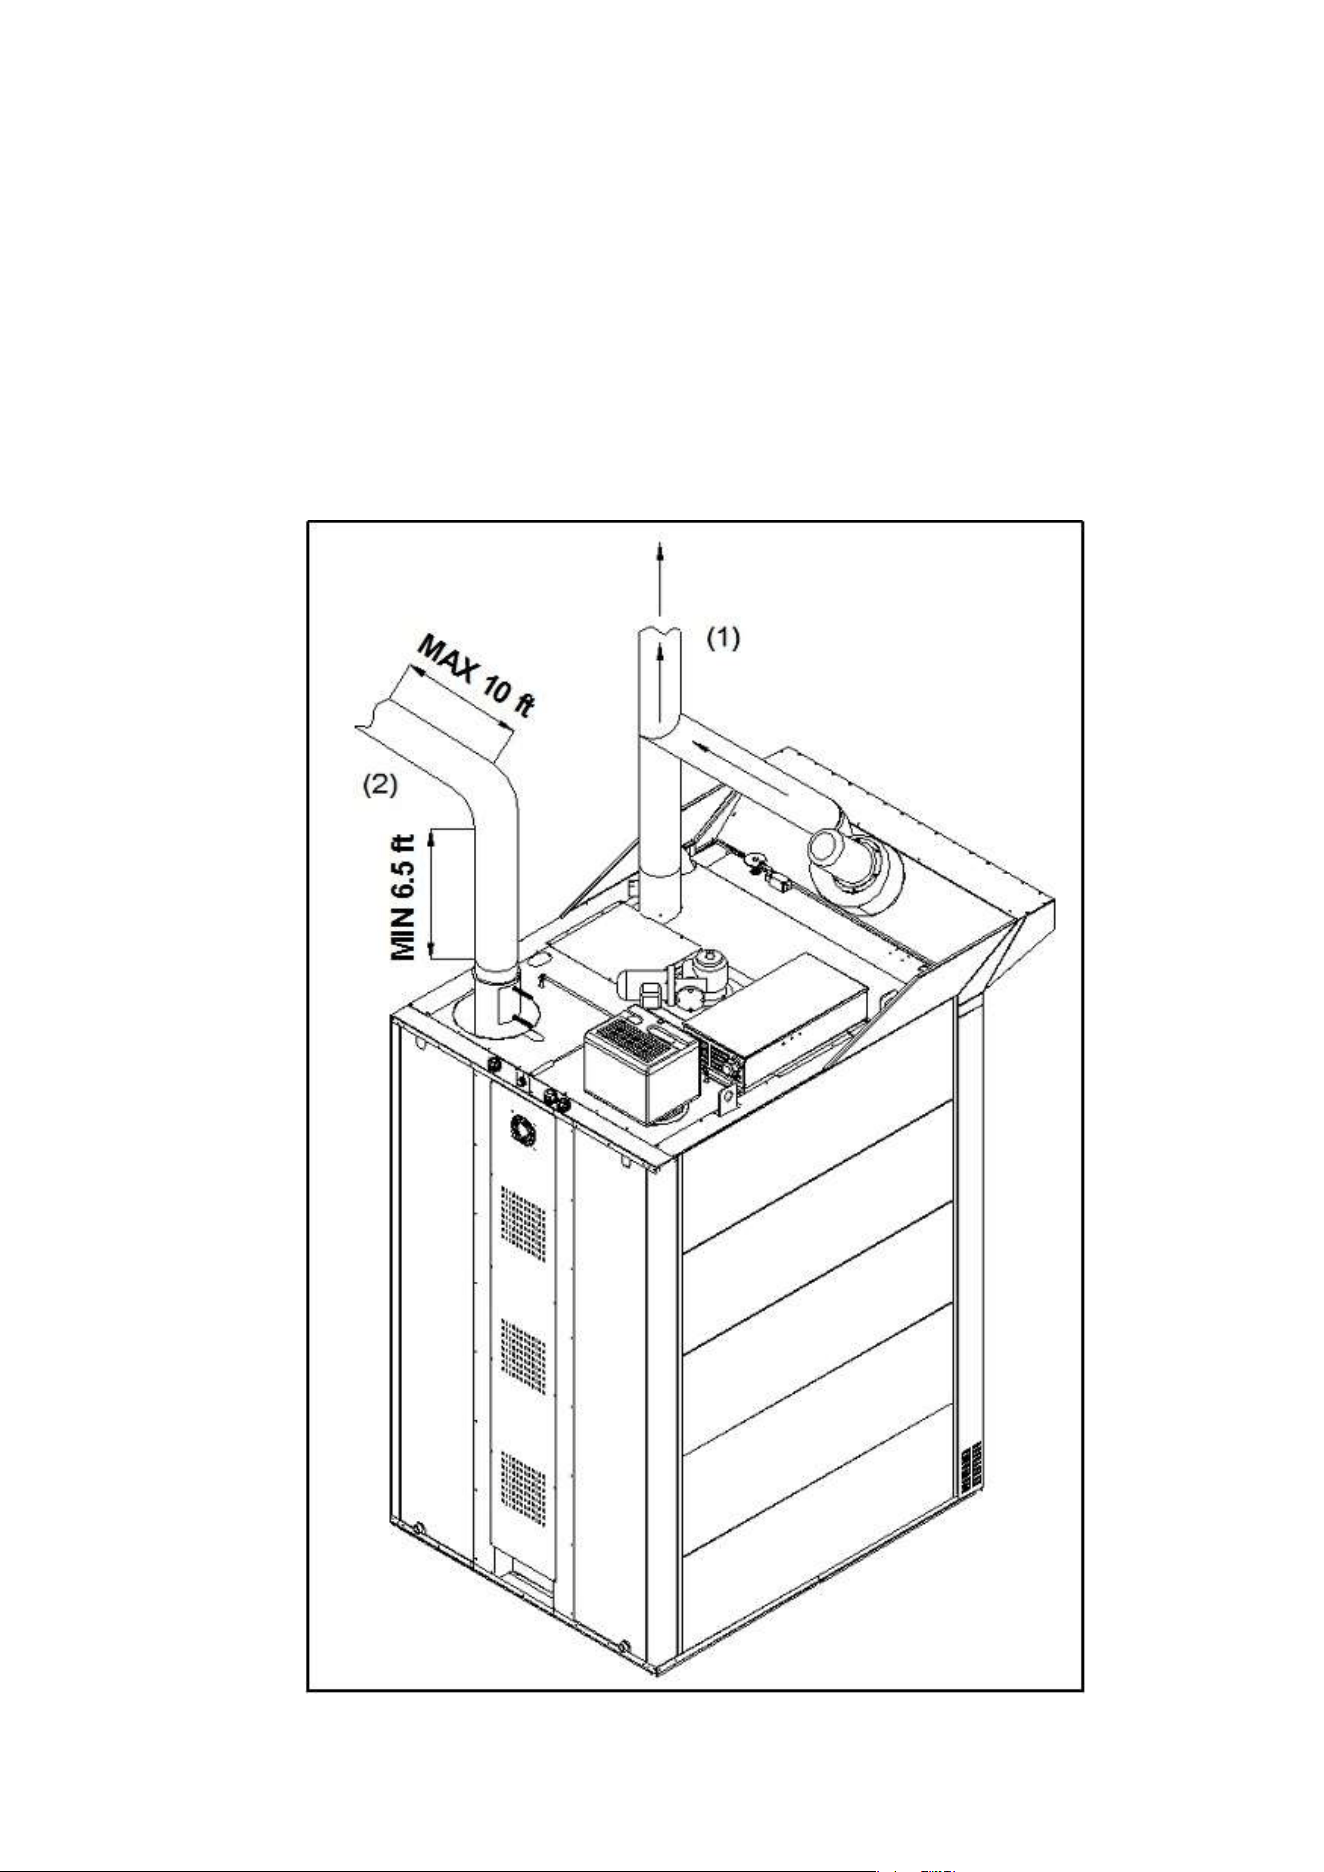
STEAM DISCHARGE CONNECTION(1)
The steam released from the cooking chamber is placed in the atmosphere through special steam ducts.
The steam ducts (exhaust hood and chimney) can be installed separate from one another, or they can be
combined in a single duct. The connection between the two ducts must necessarily be as shown in figure.
Other types of joints may compromise proper release of vapours.
At the base of every upwards section of the steam release duct, there must be a collection chamber and a
drain pipe for condensation. There must also be a suitable opening for cleaning and inspection.
EXHAUST DISCHARGE CONNECTION FOR GAS VERSION(2)
The length and shape of the discharge pipe affects the negative pressure in the combustion chamber. It is
advisable to run the pipes upwards for at least 2 metres. Nonetheless, check the negative pressure in the
combustion chamber, which should be between -1 and -4.
RDRG
Page 13
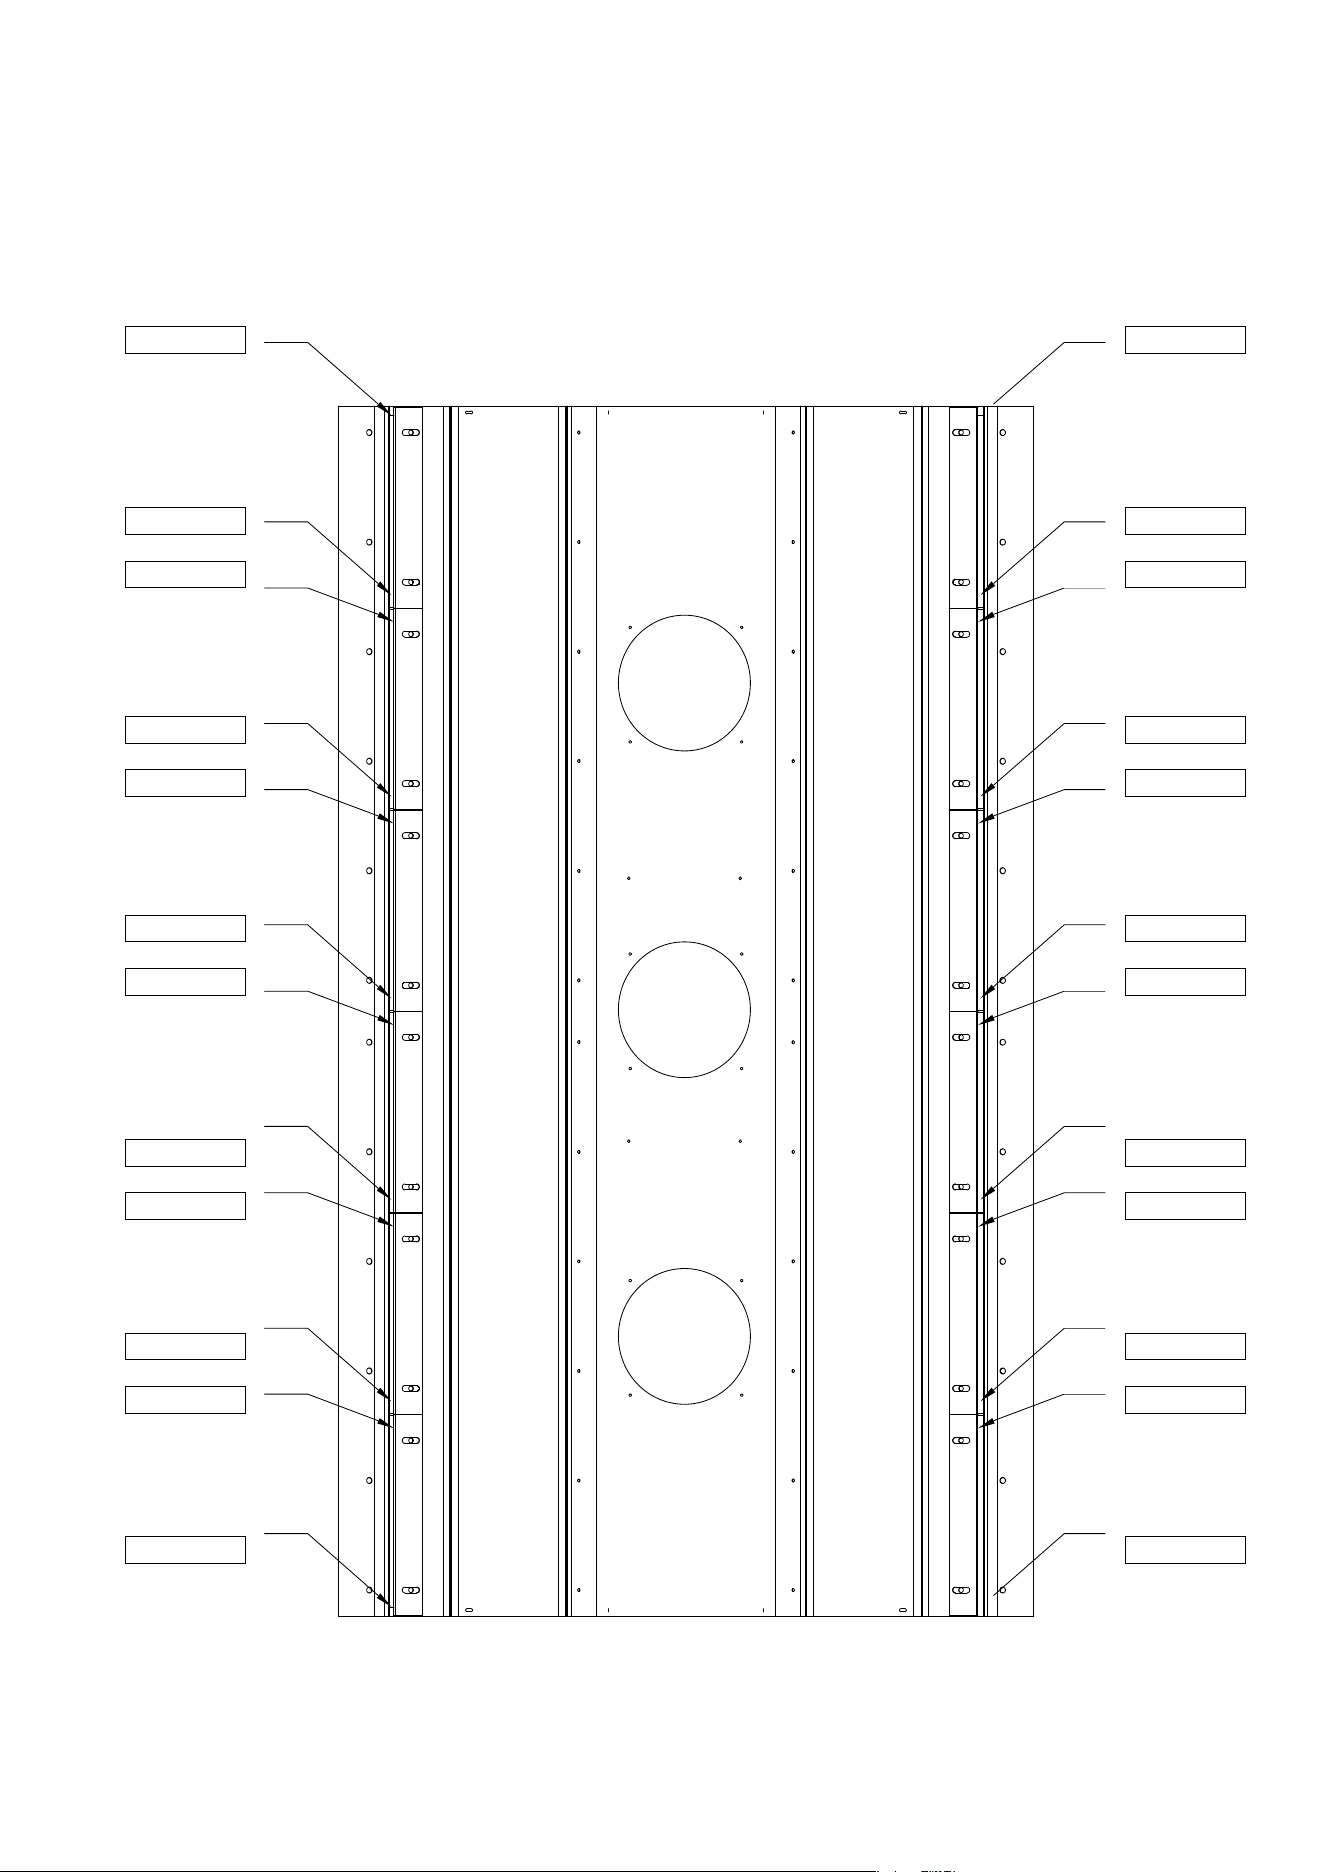
AIR FLOW ADJUSTMENT IN GAS VERSION
To obtain precise distribution and even cooking, adjust the air flow outlet shutters as follows:
Loosen the M8 nuts that hold the shutters inside the oven. Adjust the opening of the shutters as shown in the
table below. Tighten the nuts. Make sure that while doing so, the opening as in the table below is
maintained.
10mm 10mm
11mm 11mm
11mm 11mm
13mm 13mm
13mm 13mm
15mm 15mm
15mm 15mm
17mm 17mm
17mm 17mm
18mm 18mm
18mm 18mm
21mm 21mm
The above adjustments are those which are best for even cooking. If they are changed by unskilled or
unauthorized persons, this work is not covered by the guarantee.
RDRG

Page 14
START-UP
PRELIMINARY STEPS
CAUTION!
Make sure that:
All connections have been properly made;
The main power switch is on;
The gas cut-off valve is open;
The water cut-off valve is open;
All protective covering has been completely removed.
USER INSTRUCTIONS
The oven may be delivered to the user only after all tasks and checks described in this manual have been
completed.
Explain to the user how the equipment works, especially in terms of safety, using the instructions provided.
Point out to the user that any changes to the installation site that may affect the supply of combustion air
require that a specialized technician recheck its functions.
Recommend that the customer stipulate a maintenance contract with the customer service, as this type of
equipment requires at least one inspection per year.
ROTARY RACK
CAUTION!
Pay attention to hot surfaces when inserting or removing the rack!
Always wear oven mitts to avoid serious burns!
Insertion
A sound signal goes off at the end of the pre-heating time. (If you use it)
Start the insertion procedure performing the following operations in the order listed:
Open the door completely.
Push rack into oven make sure rack is locked into position.
Close and lock the door handle.
Removal
A sound signal goes off at the end of the baking time.
Start the removal procedure performing the following operations in the order listed:
Unlock and open the door partially to allow any residual steam to be eliminated by the suction unit.
Open the door completely and, wearing heat resistant gloves, extract the rack.
Close and lock the door.
RDRG

Page 15
OPERATING INSTRUCTIONS
USER SAFETY INSTRUCTIONS
WARNING!
The equipment is ready to be started only when all connections are completed.
The equipment may operate safely only when the instructions below are carefully followed.
The user may operate this equipment only after being duly instructed as to its use and operation.
Remove covers and panel doors only using tools must not be removed for any reason.
The equipment must not be used unsupervised!
The door becomes hot while the oven is working; use caution!
Proceed with caution when opening the door during operation and when the oven is hot; hot steam
may escape, keep your face and hands clear of the opening! All interior surfaces are very hot.
Do not touch anything without oven mitts.
When removing the rack or products from the rack, always wear oven mitts to avoid serious burns.
Protect the equipment from freezing.
Any work regarding installation, conversion to another type of gas, or repairs must be carried out by
qualified personnel and in compliance with current regulations. For this purpose, we recommend
stipulating a maintenance contract. Have specialized personnel from the manufacturer inspect the
equipment at least once a year.
The equipment must be cleaned daily. The equipment is not protected against sprayed water;
therefore, do not use water under pressure or direct sprays.
RDRG
Page 16
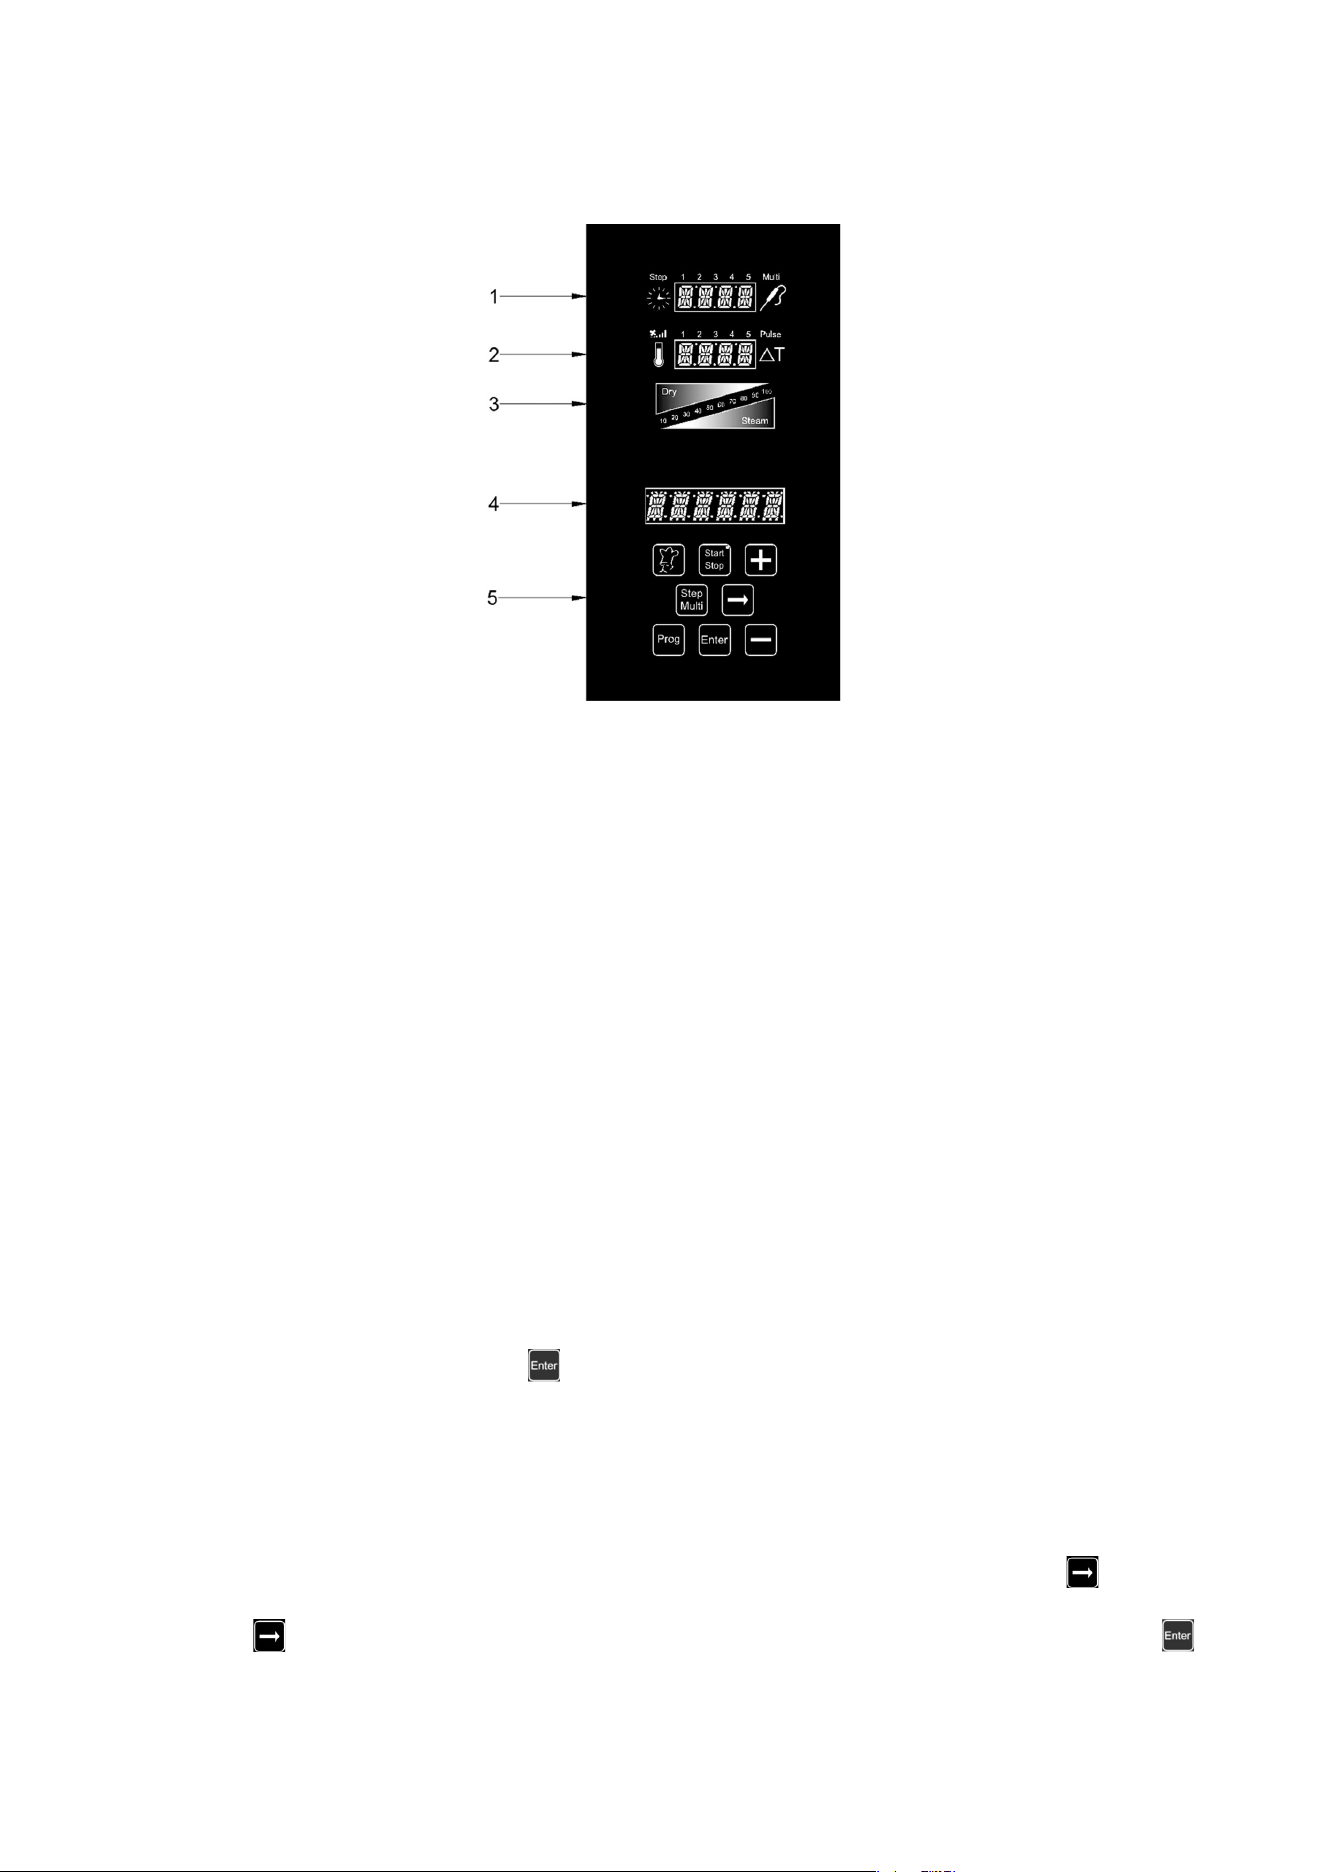
80P CONTROL PANEL
1. Time display and Multi-timer
2. Temperature display and fan speed
3. Climate graphic display (Dry – Steam)
4. Baking programss display
5. Programming keypad
SWITCHING ON AND OFF:
Once the oven has been supplied with electric power, press the “Start/Stop” key for 3 seconds. Wait for the
start-up operations to finish (the Bakeoff logo goes out on the "Programs" display, (4). To switch off the
electronic control of the oven, press the “Start/Stop” key again for 3 seconds.
Once switched on, the control displays the main menu, composed as follows:
Manual: manual baking mode.
Settings:
Language
Time
Functional parameters
Delayed start: this option allows you to set a predetermined time at which to start
a baking cycle.
scroll with the “+” and “-“ keys and press to access the selected menu.
SETTING THE LANGUAGE:
The first thing to do is to set your language, as described below:
Scroll through the Main Menu with the “+” key until reaching “Settings”. Enter the Menu with the key
Scroll through the Settings Menu again with the “+” key until reaching “Language”. Enter the selection by
pressing the key. Use the “+” and “-“ keys to select the desired language and confirm by pressing the
key.
RDRG

Page 17
SETTING THE TIME:
Scroll through the Main Menu with the “+” key until reaching “Settings”. Enter the Menu with the key
Scroll through the Settings Menu again with the “+” key until reaching “Time”. Enter the selection by pressing
the key.
Press the “+” key until the current time is displayed, then confirm by pressing the key.
CHARACTERISTICS OF PROGRAMS IN PROGRESS-
PREHEATING AND BAKING TIME EXTENSION:
The RotorBake Series 14 ovens have a high amount of programs, preset or fully customizable, to
cope optimally with any cooking needs, with any food product. Each of these programs will follow the
cooking cycle of the product step by step and automatically, responding promptly to all possible
situations of alarm in automatic or assisted mode, ideal for the user. One of these alarms is
programmed to report the over-temperature inside the oven chamber when a cooking program is
carried out. The alarm in question will be shown on display 4 and propose the execution of the
"Cool" cooling program. When the oven chamber has cooled down, you can proceed with setting the
execution of the desired cooking program.
The preheating phase, highlighted by "PRE" on the "Temperature" 2 display, brings the oven to a
temperature of about 54°F (30°C) higher than the value set in the first step of the program, to
compensate for the lowering of the temperature when the door is opened. The end of this phase is
reported on display 4 and it is accompanied by an acoustic signal and by the flashing of the lights
inside the chamber. Now you can place the product to be baked inside the oven and, when the oven
door is closed, the program will begin its baking cycle.
At the end of the baking cycle, the oven emits an acoustic signal. The time symbol flashes displaying
a countdown of two minutes, during which time you can extend the baking time as necessary.
During these two minutes you can open the oven door and check the cooking of the product. If the
product needs a cooking extension, use the "+" key to increase the time by one minute per push,
until the desired value has been reached. Press the key to restart the baking. If no extension is
made within the two minutes displayed, the oven terminates the baking cycle.
MANUAL BAKING MODE:
With this program, you can change the set parameters for a baking cycle in progress.
Programmable parameters in manual mode:
1. Baking time in hours and minutes. Multi-timer on cooking program.
2. Setting fan speed mode and semi-static baking mode.
3. Temperature of the cooking chamber.
4. Climate parameter in percentage (from 10% to 100%) of steam introduced (Steam), displayed in
red. In percentage (from 10% to 100%) of steam removed (Dry), displayed in blue.
RDRG
Page 18
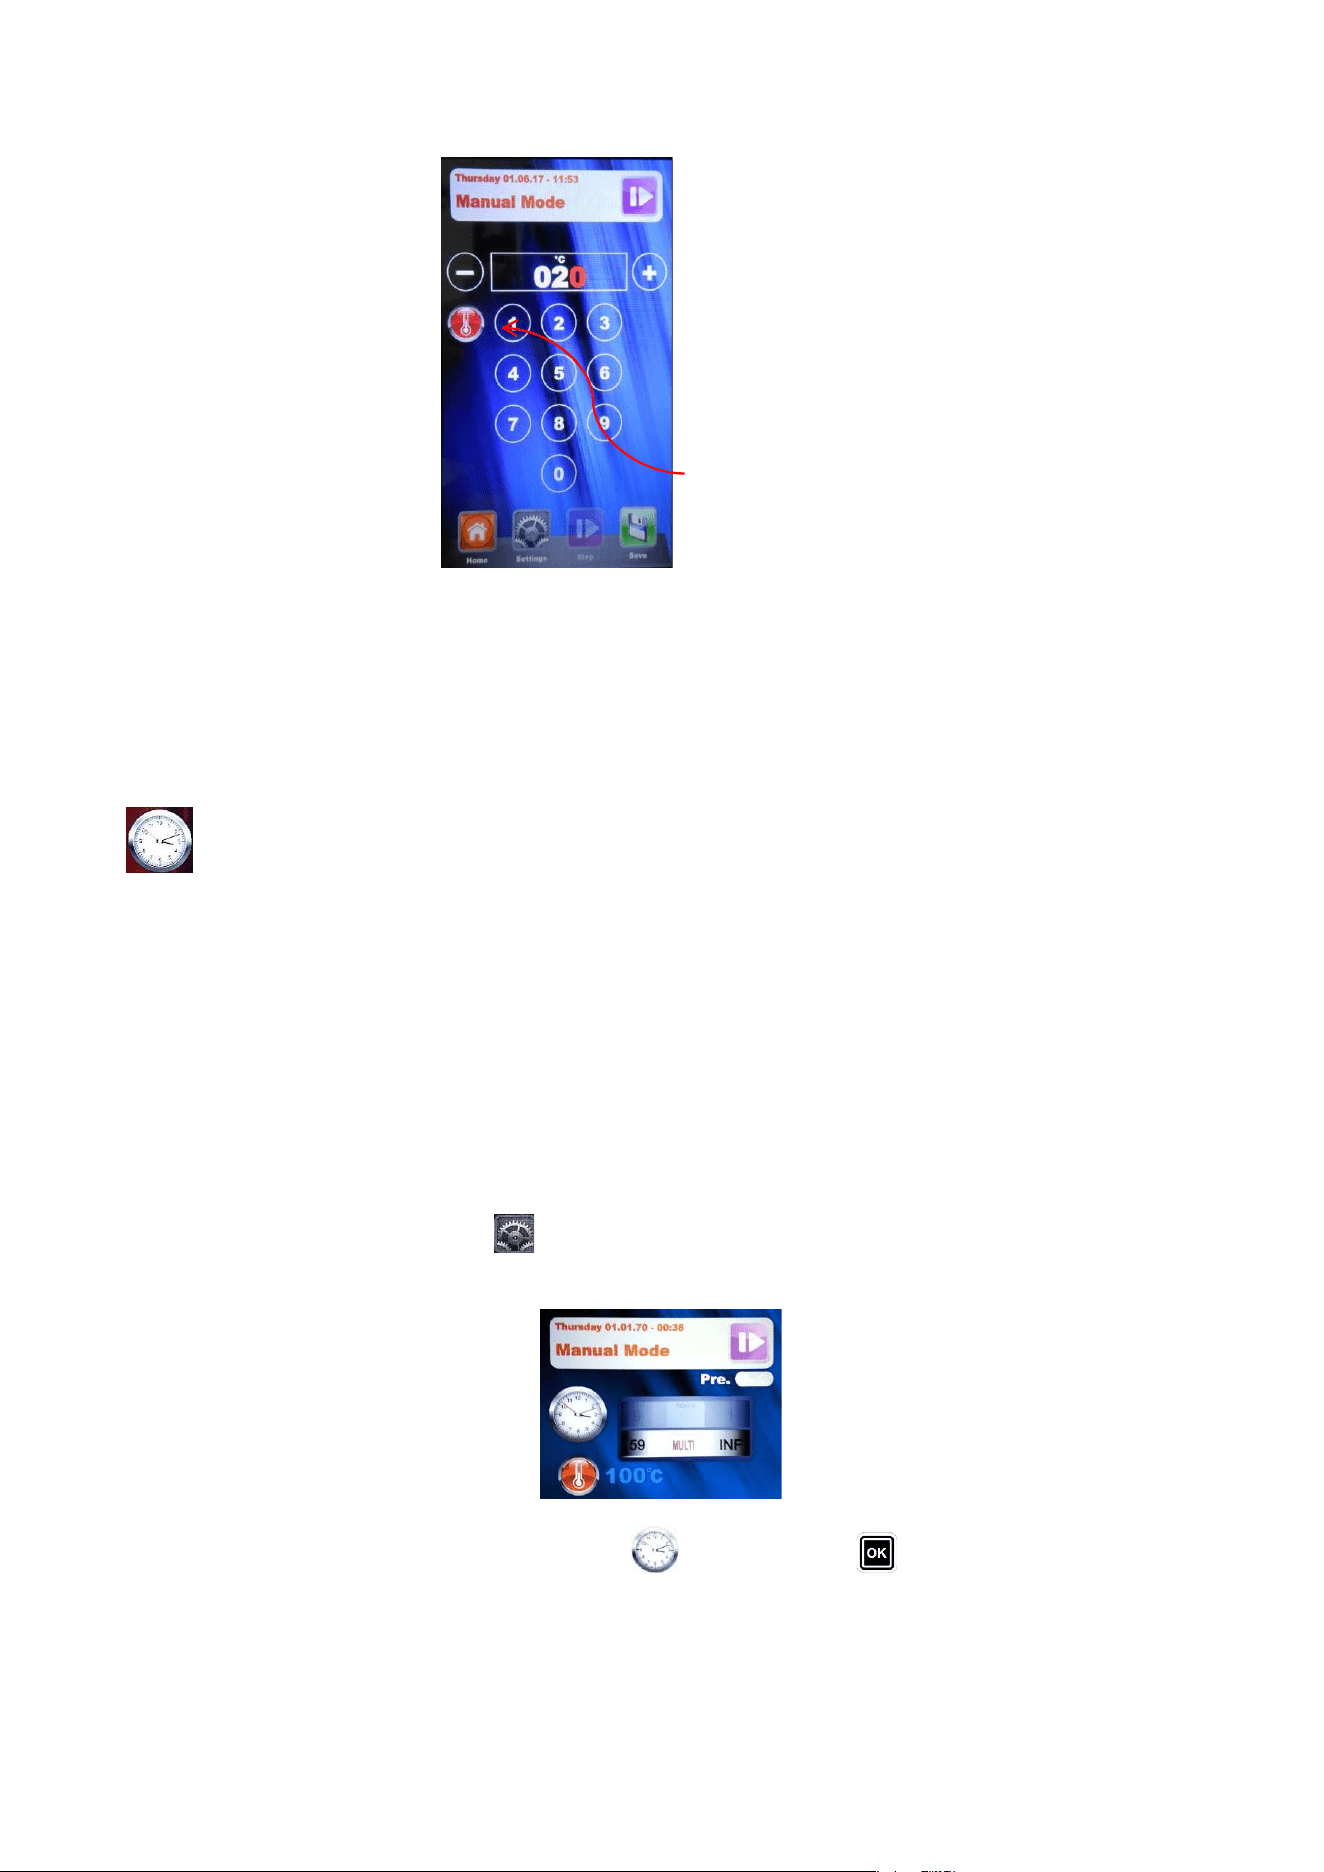
HOW TO SET A MANUAL PROGRAM:
From the Main Menu, go to “Manual” and press the key
Then press the key to enter the programming mode.
The first setting to appear is the preheating option. Scroll down the "+" and "-" keys to display "YES" or
"NO", depending on whether you want to preheat the oven before executing the set program. Press the
key to confirm the desired mode and jump to the next step.
1. Setting the cooking time or Multi-Timer mode:
The “clock” symbol (display 1) will begin to flash. Set the desired hours and minutes using the “+”
and “-“ keys. By pressing the “-“ key in addition to the value “0”, the time will be infinite. Press the
key to confirm the parameter.
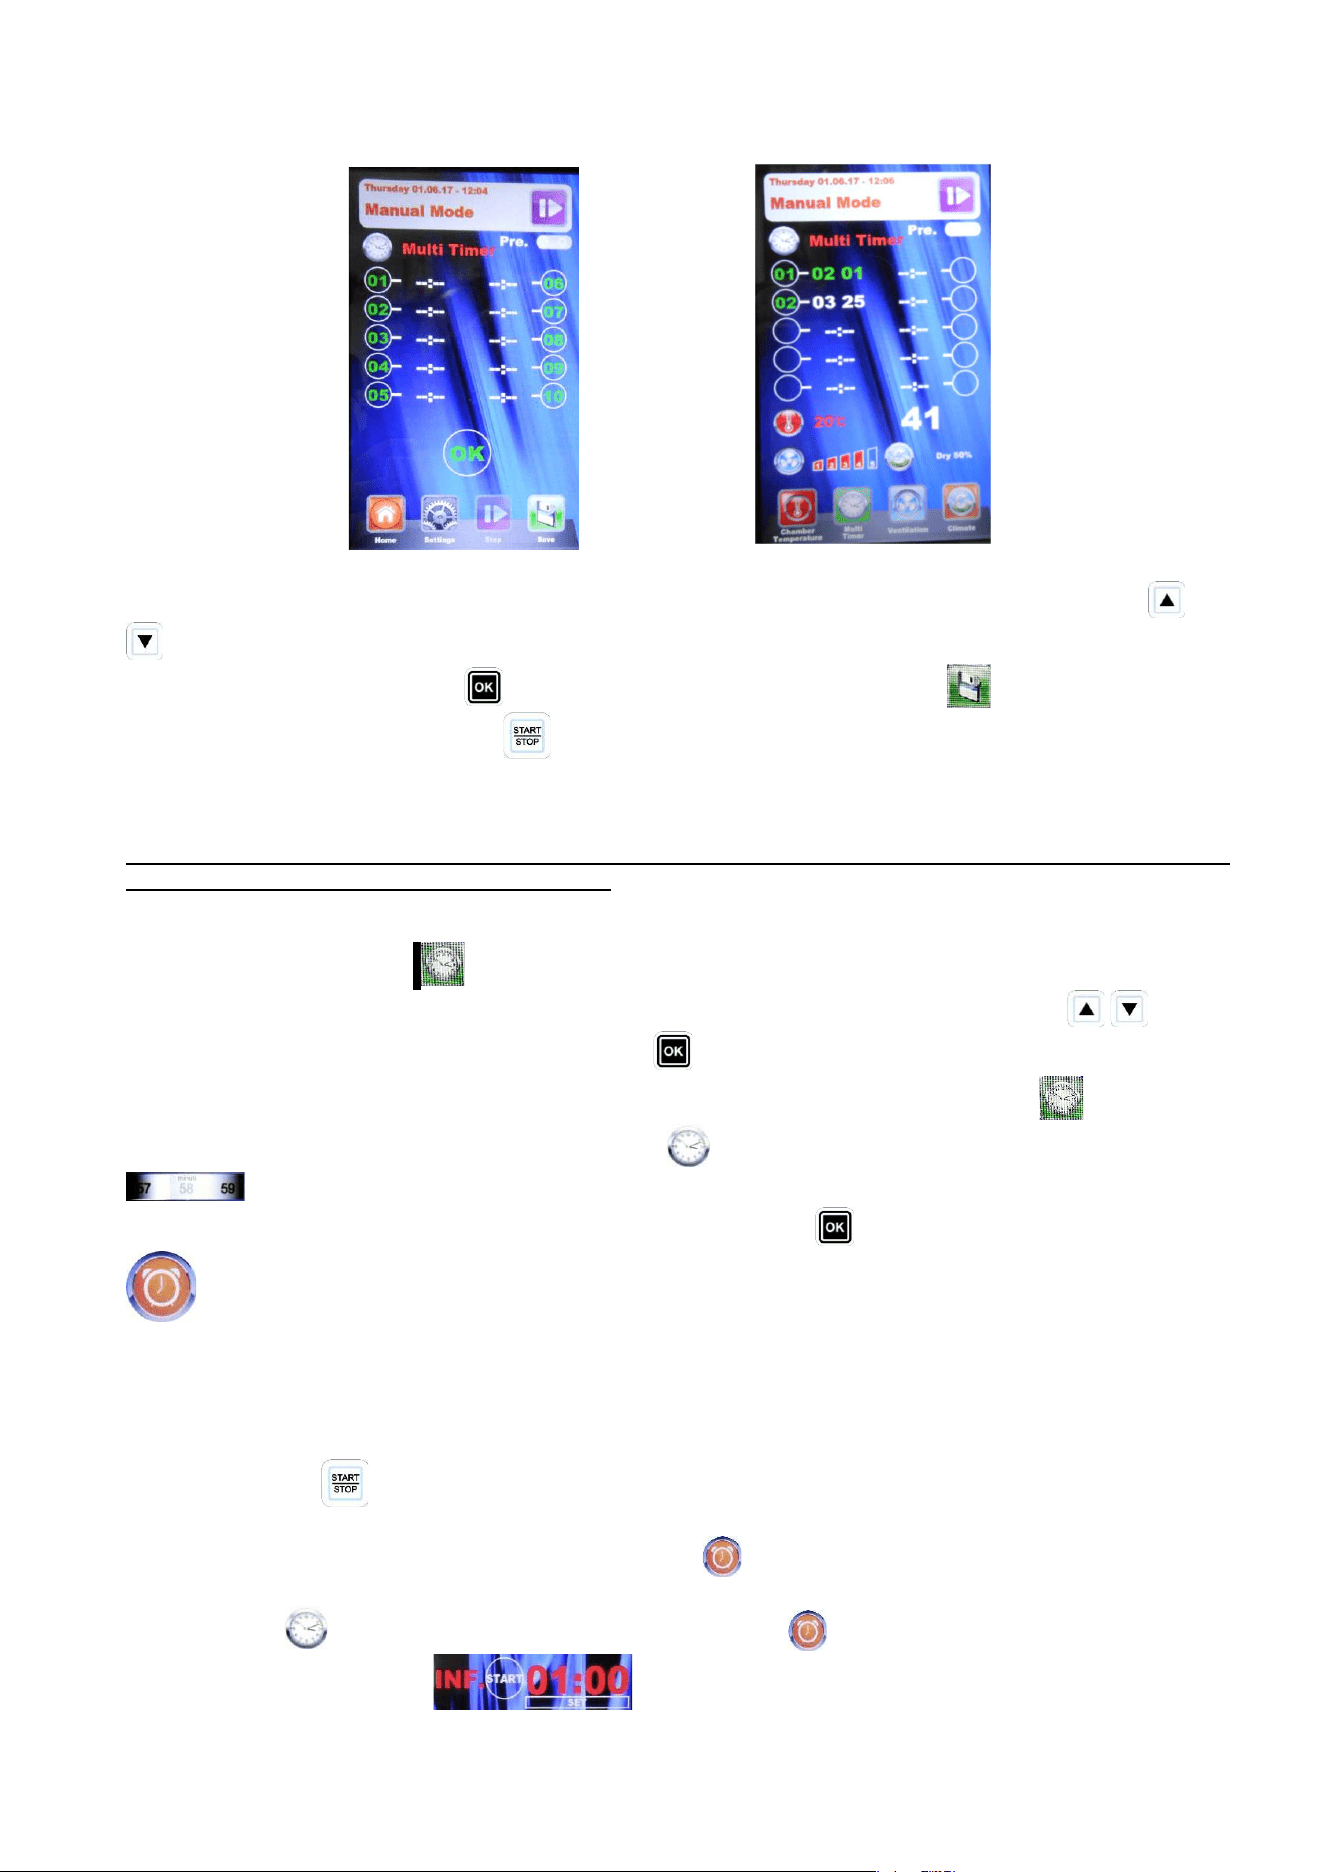
Multi-Timer mode:
You will have up to 10 programmable timers (depending on the pans), which will act solely and
exclusively on a single baking program (manual or preset). Useful for cooking different products at the
same temperature and climate, but with different times.
Press the "-" key beyond the value "0" to set the "infinite" mode. Press the key to enter the Multi-
Timer mode, signalled by the appearance of the word "Multi" beside display 1. Display 4 shows the
sequential number of the timer during programming. Use the "+" and "-" keys to set the desired
minutes and press the key. This will take you to the next timer to be set. Set the desired timers,
press to save the settings and jump to the next step. At the execution of the baking program, the
sequence of the set timers starts from the shorter setting.
At the end of each count, the lights inside the chamber are turned on and the buzzer is activated.
Open the door and remove the pan.
Please note that only when the door is closed, will the oven automatically resume baking by the
setting of the next timer. If the door is opened, the oven will remain in stand-by mode.
If necessary, you can add other timers during the baking program. Proceed as follows:
during the execution of the program, press the key until the first timer is available. Press the key
and, through the "+" and "-" keys, set the desired time for the additional timer. If you want to set other
timers, push the key and proceed as described above. If, on the other hand, you want to go back to the
current program with the additional changes made, press the key.
Note: to exit the Multi-Timer mode while cooking is in progress, press the key and set a specific
time you want. Press the key and the program will run in the traditional manual mode, resetting
the set timer and exiting the Multi-Timer mode.
2. Setting the fan speed:
After setting the time parameter, you will switch to the fan speed setting:
5 – high speed
4 – medium speed
3 – low speed
2 – medium semi-static speed
1 – low semi-static speed
RDRG
Page 19
The semi-static mode stops the fans when the temperature reaches the set-point and restarts them
every time the heating elements are on, keeping the temperature inside the cooking chamber
constant. In this mode, the cooking is comparable to the one made with a static oven.
Speed "5" "4" and "3" will be displayed in blue, while "2" and "1" will be in red. The semi-static mode
will be highlighted by the word "Pulse" on the display.
Use the "-" button to select the fan speed/mode and confirm using the key.
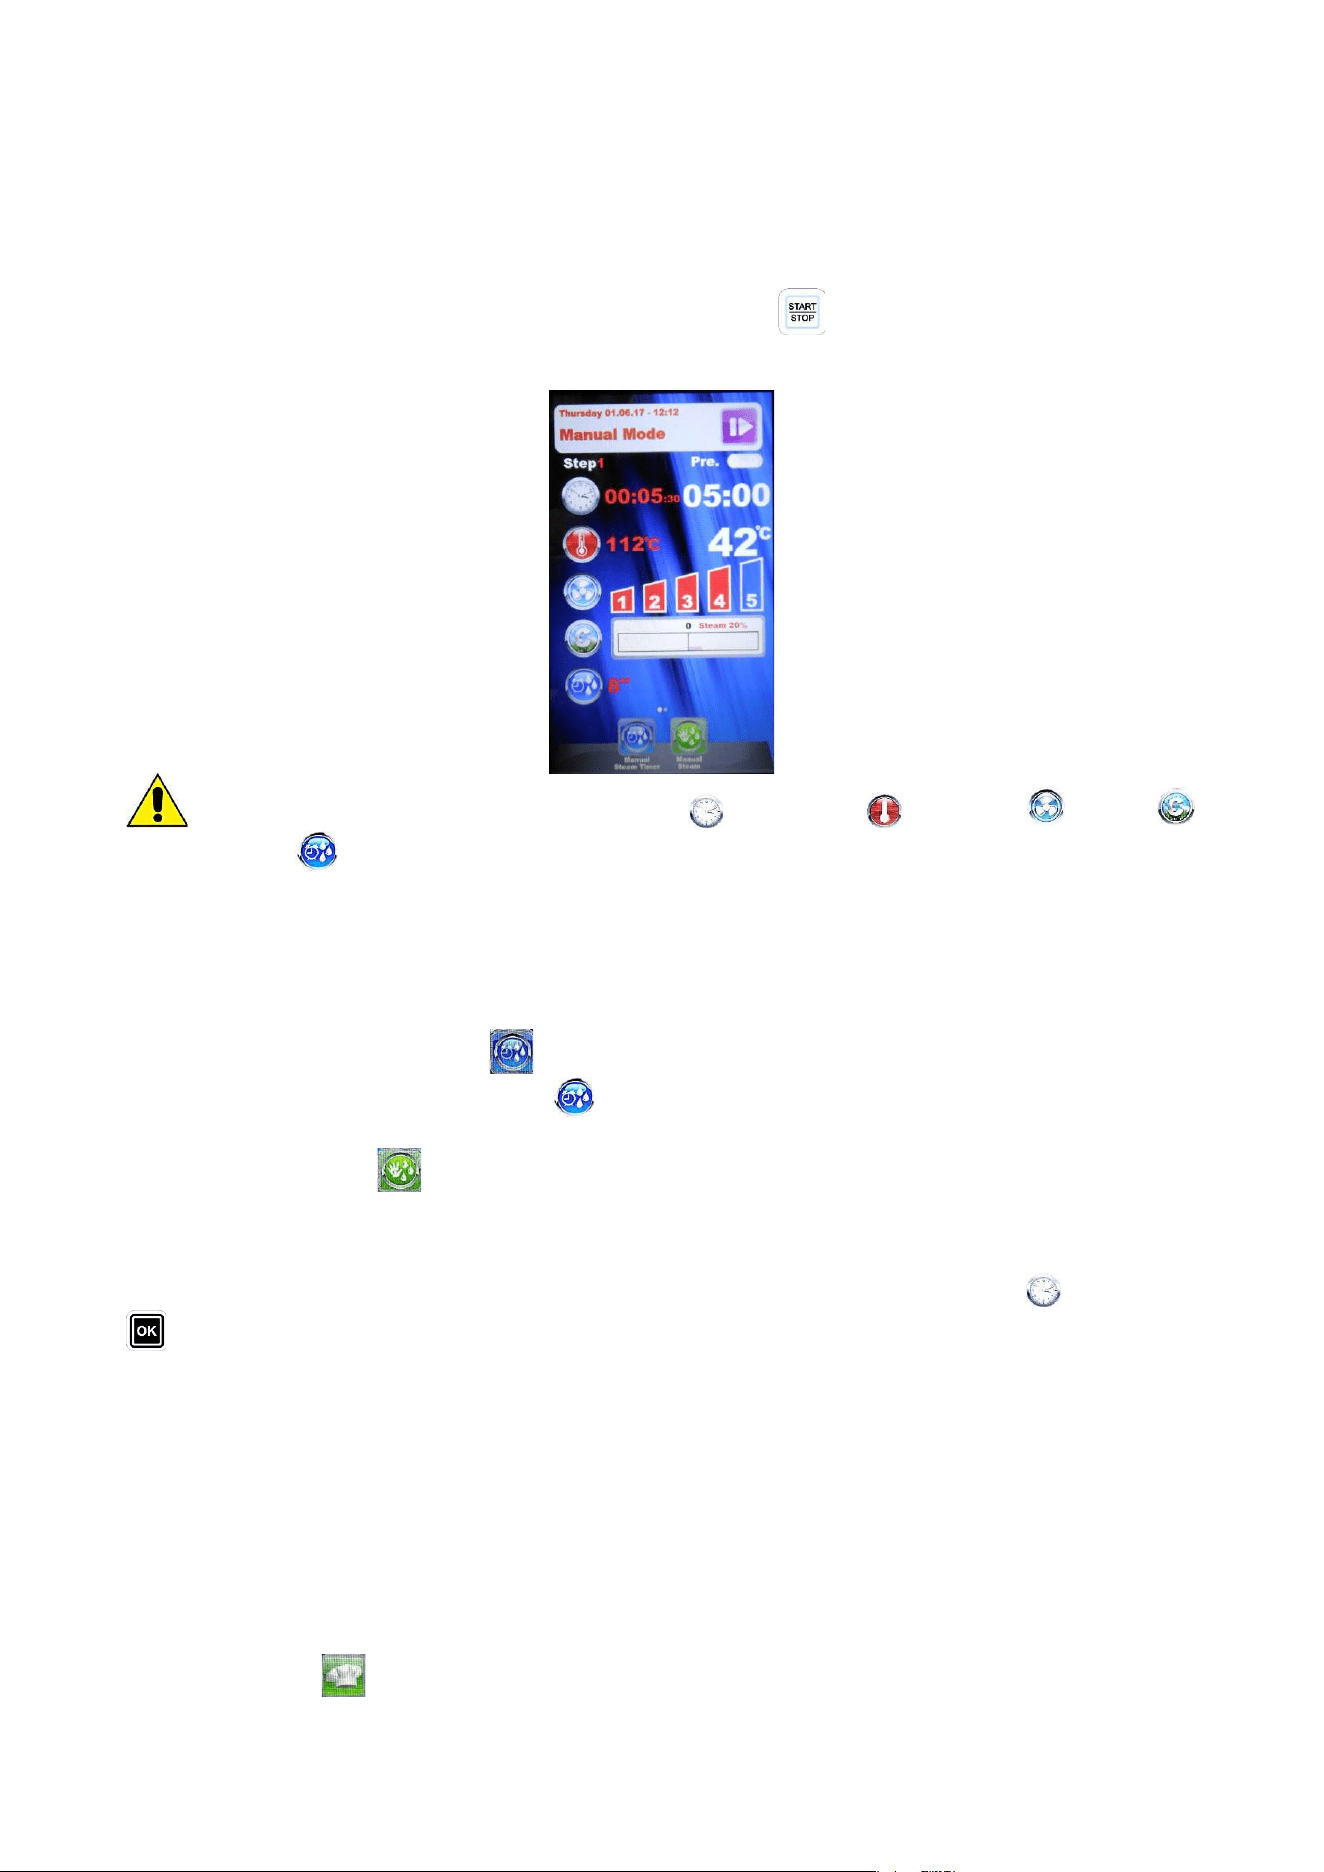
3. Setting the oven chamber temperature:
Now we are going to set the cooking temperature. The “temperature” symbol (display 2) will begin to
flash. Set the desired value using the “+” and “-“ keys. Press the key to confirm the parameter.
4. Setting the oven chamber climate:
After setting the temperature value, the legends “Dry” (blue) and “Steam” (red) flash in sequence on
display 3. Using the “+” key, you can increase the percentage value of steam injection during the
baking cycle. The numerical scale of display 3 will be red Using the “-“ key, you can decrease the
percentage value of steam injection during the baking cycle. The numerical scale of display 3 will be
blue. Once the desired climate has been set, confirm the parameter by pressing the key. Setting
the value at 0 (display flashing) excludes the Climate parameter from the programming.
Store all the settings by pressing and holding down the key for 3 seconds.
Now all the parameters for manual baking have been set. Press the key to start the program. The oven
begins its baking cycle with the preheating phase (if set during the programming phase). The end of this
phase will be indicated by an acoustic signal and the flashing of the lamps inside the chamber. Open the
door and place the product in the oven. Once the door has been closed, the actual baking cycle will begin.
You can stop the baking cycle before it's programmed to end simply by pressing the key for 3 seconds.
The set parameters can be changed at any time during the baking cycle (except during the preheating
phase). Press the key, change the desired value using the “+” and “-“ keys and confirm by pressing the
key. The changes will take effect immediately.
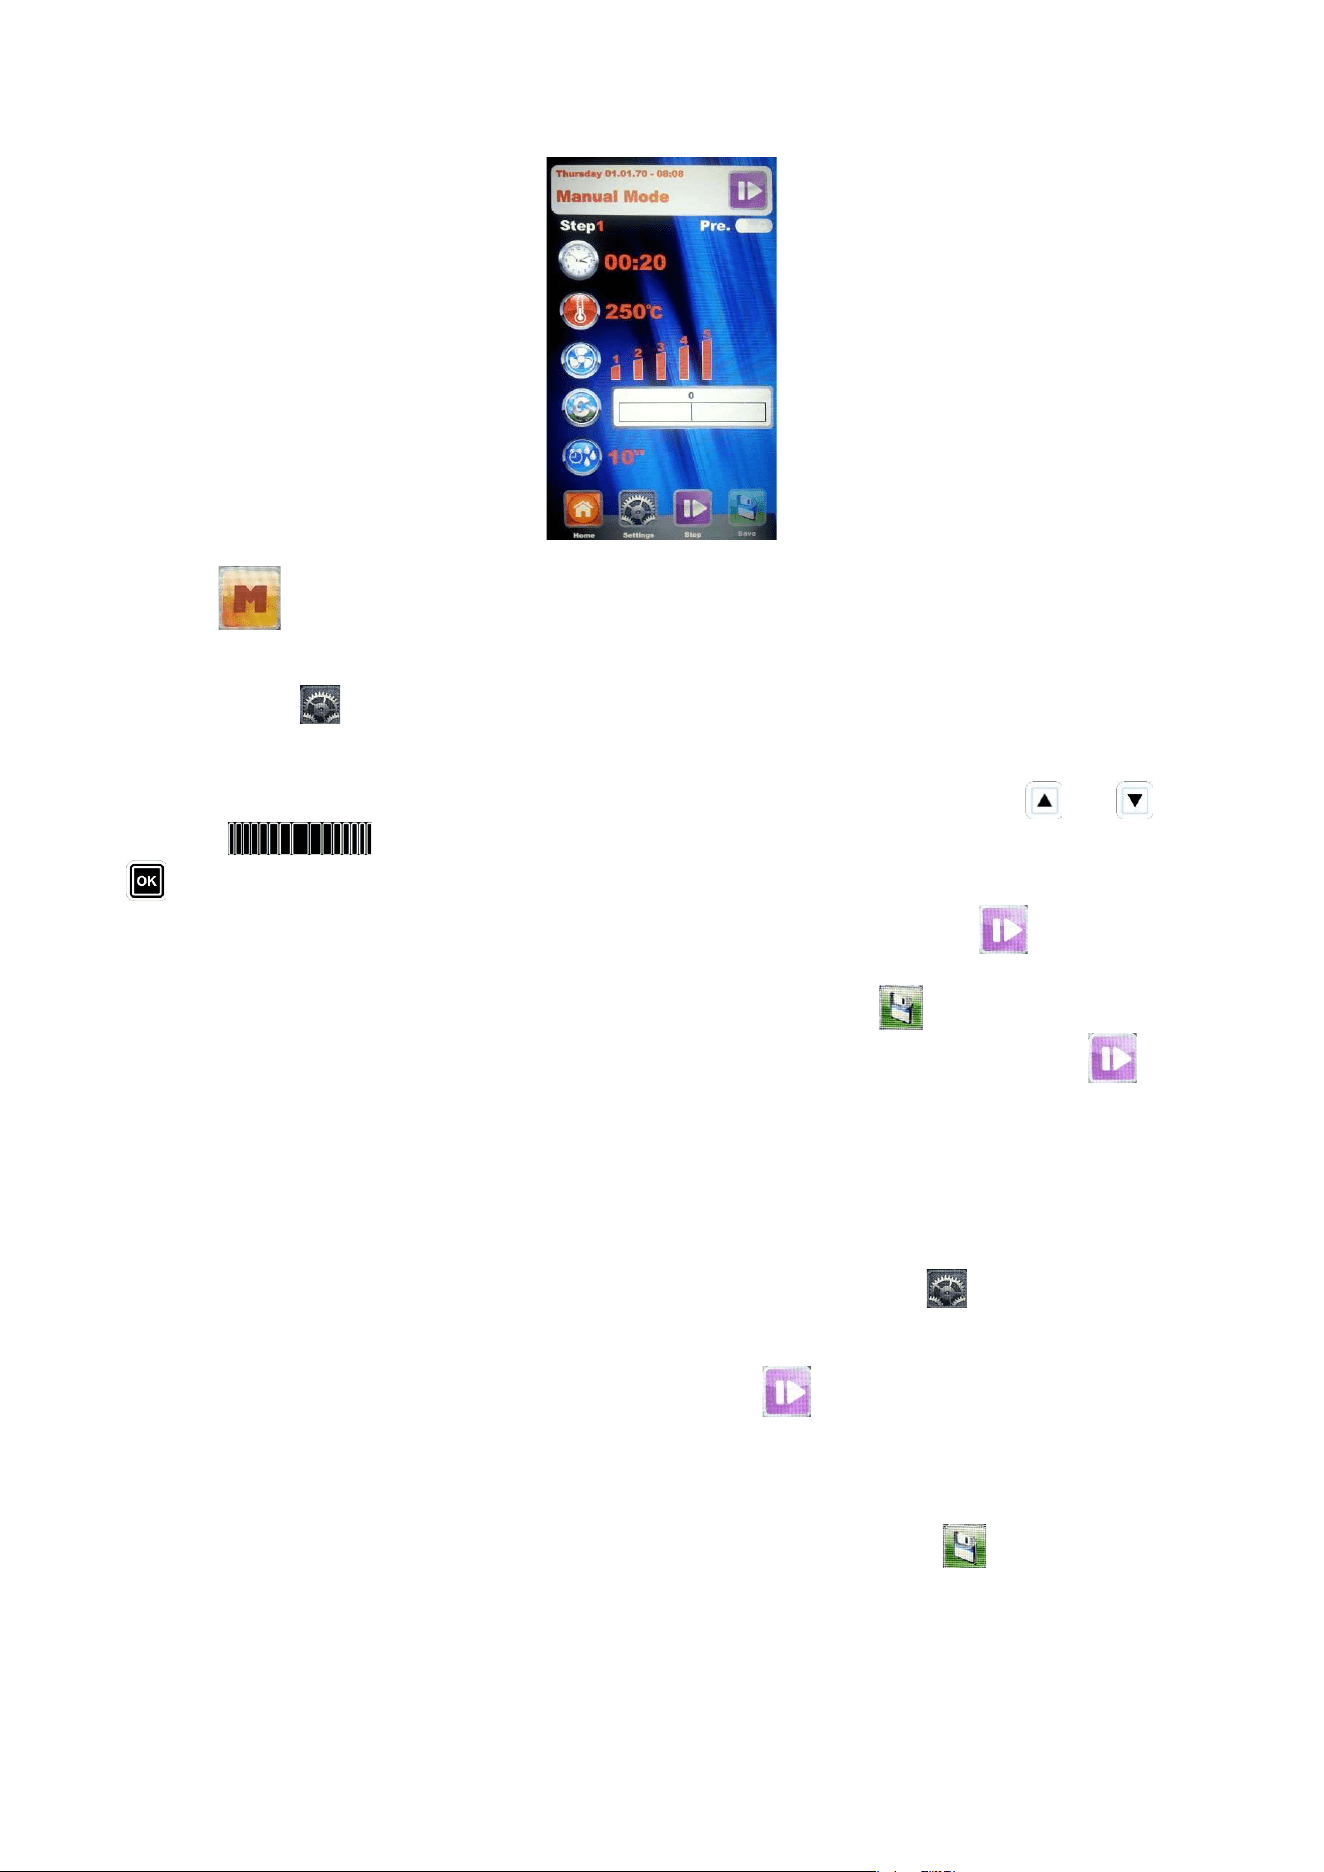
PROGRAM MODE (CUSTOMIZABLE PROGRAMMING):
The ovens of the Mistral Series allow you to store up to 60 baking programs, customized according to
the user's needs. Up to 5 Steps are available, each of which include: time, Multi-timer (if selected), fan
speed, temperature, and climate. At the start of the programmed baking cycle these steps will be
executed in sequence, thus dividing the program into true complete cooking phases.
To store a program, proceed as follows:
Press the key. Using the “+” and “-“ keys, select the first empty program. Confirm the operation
by pressing the key. The first option refers to the pre-heating: press the key and use "+" and
"-" to choose whether to include this phase in the program. Confirm the setting by pressing the
key.
RDRG

Page 20
Now you can start programming the Steps: the “Step 1” icon comes on to indicate the first sequence
of parameters that will make up the program. Set each parameter, confirming the value with the
key.
To move from one “Step” to another, press the key.
Once the setting of the desired Steps (max 5) has been completed, the program can be stored by
pressing the key for 3 seconds. The buzzer confirms the performed operation.
The next phase consists in naming the program which has just been stored. The legend “name”
appears on the display. Scroll through the letters using the “+” and “-“ keys, moving on to the next
one with the key. You will have 16 characters available. Once the procedure is finished, confirm
the operation by pressing the key for 3 seconds.
EXECUTING A CUSTOMIZED PROGRAM:
To execute a program stored by the user, proceed as follows:
Press the key and use the “+” and “-“ keys to select the desired program. Confirm the selection
by pressing the key. Then press the key to execute the baking program. During execution of
the program, the baking parameters will not be modifiable. You can stop the baking cycle before it's
programmed to end simply by pressing the key for 3 seconds.
To exit the menu, press the key. In this manner, you will return to the main menu of the control.
PRESET PROGRAMS:
The electronic control of the Mistral Series ovens contains 12 preset baking program which are suitable for
cooking various types of food. These programs can be called up using the following procedure:
Press the key and select the desired baking program using the “+” and “-“ keys. Confirm the
selection by pressing the key.
Select the degree of baking, increasing or decreasing it (using the keys “+” and “-“, within the range
permitted by the program), the baking parameter will flash as follows.
Thus using the “+” and “-“ keys, you can change the parameter set by the program.
Press the key to confirm the modification of the baking time. The aforesaid setting will be
effective for this baking cycle only. To make the program change permanent, on the other hand,
press the key for 3 seconds. The successful modification will be indicated by an acoustic signal.
To start execution of the program, press the key. During execution of the program, the baking
parameters will not be modifiable. You can stop the baking cycle before it's programmed to end
simply by pressing the key for 3 seconds.
To exit the menu, press the key. This way, you will return to the main menu of the control.
Depending on the cooking mode set in the program, during the cooking cycle of the oven, only the time (or
the temperature, in case of probe sensor) will be displayed on display 1.
RDRG
Page 21
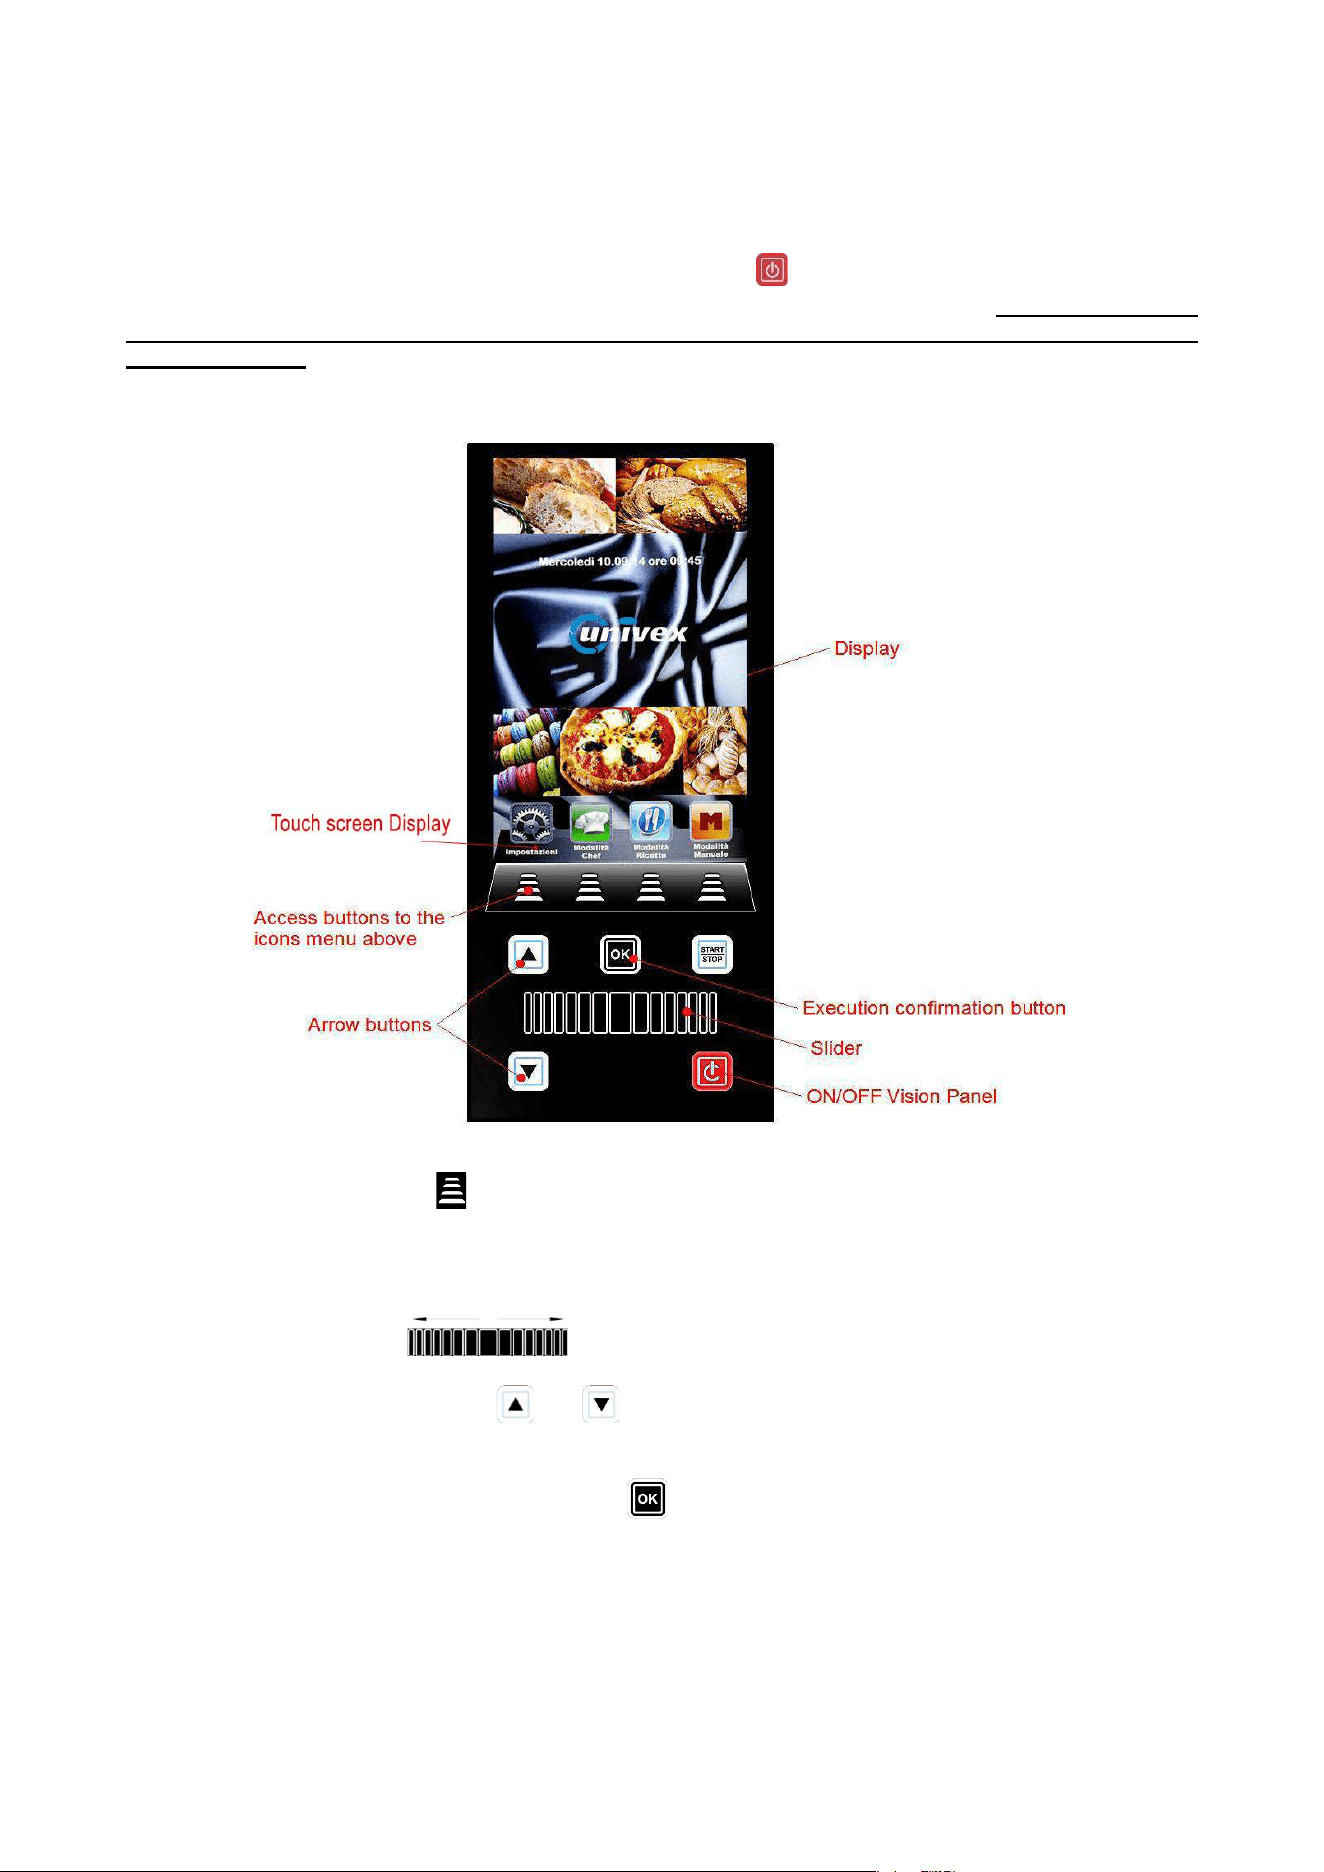
VISION FULL TOUCH CONTROL PANEL
Once the electrical connection is completed (see page 49), at the first power supply wait about a minute to
load the software. When the operation is completed the button will light indicating the possibility to turn
on the control panel. Press and hold the button for 3 seconds to turn on the oven.
Note: the software
loading operation occurs every time the machine is re-powered after a prolonged interruption of
electrical supply.
Now the Vision control panel is operating with the home screen below:
To interact with the interface, touch on the display the icon corresponding to the desired function.
Alternatively, press the buttons to access the menus indicated by their icon above.
To regulate the setting of the numerical parameters of every option to be set, scroll the further icons’ pages
(where available) and scroll the recipes books’ pages; touch the corresponding icon or area and scroll from right
to left up to the desired values.
Alternatively, use the Slider scrolling from right to left up to the desired values.
To pass to another function, touch on the display the icon corresponding to the new function.
Alternatively, use the arrows buttons and to pass to a function previous or following to the current one.
To confirm a setting or a parameter, press again the icon corresponding to that setting or to that parameter.
Alternatively, confirm every setting with the button .
Page 22
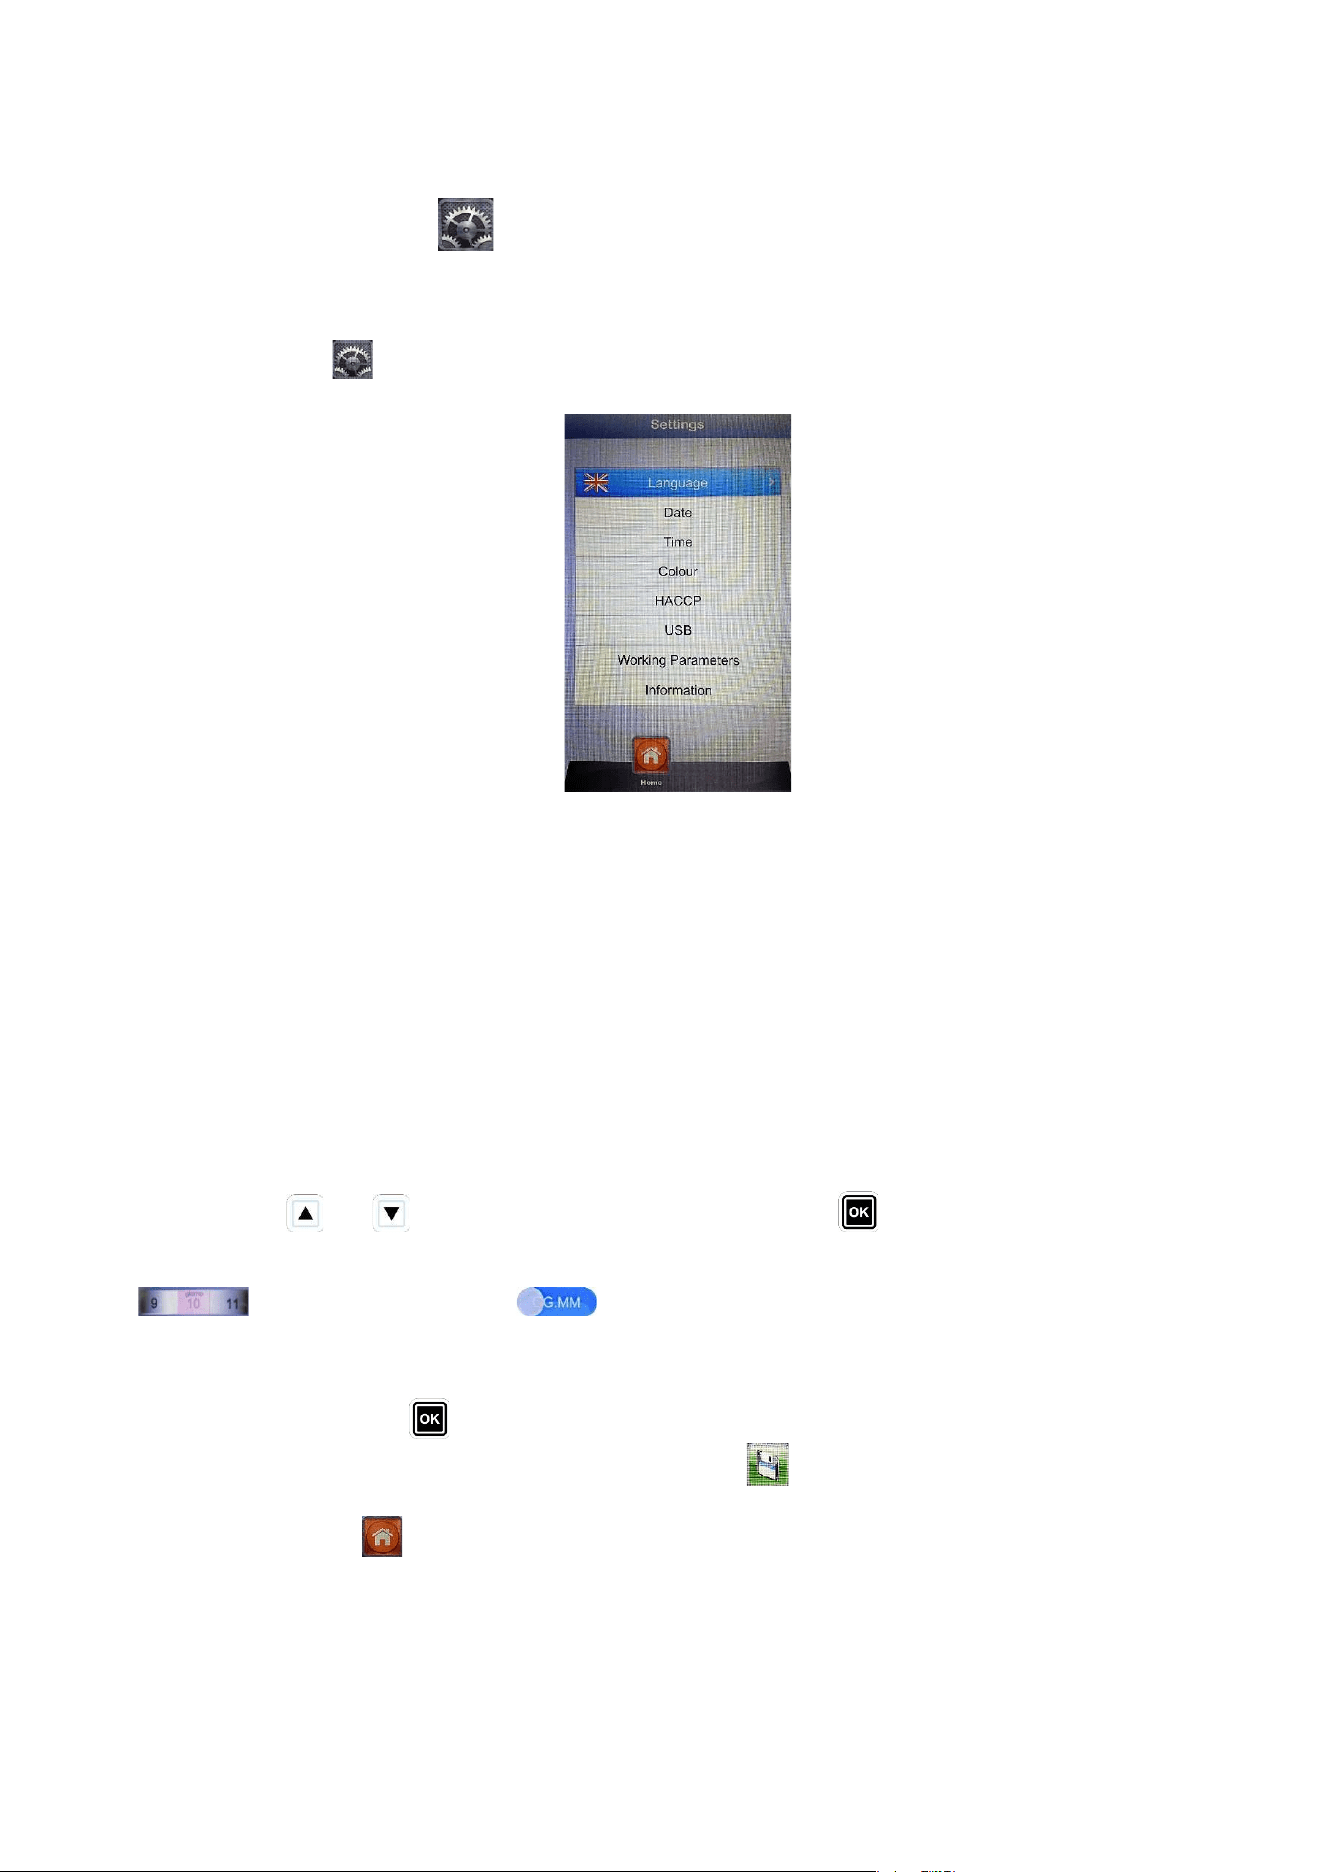
SETTINGS MENU
Access and set up of the main system settings.
By pressing the icon the User enters the following screen:
Language: User’s language setting
Date: Date setting
Time: Time setting
Colour: It allows to choose the background image of the display and the colours to be used
in the climate bar
HACCP: report of all performed registrations when the machine is used. It is possible to
export it on a USB key.
USB: disable/enable USB pen drive – enable password to access USB pen drive (access
to the menu with password)
Working parameters: set up of the underground functional parameters of the oven (access allowed only to
technical staff authorized with a password)
Information: Information on firmware version of the device and the expansion card
With the arrows and scroll until the chosen option. Confirm with .
Modify the parameters of the corresponding options by touching the multi value scrolling set up icon
or the slide selection icon ,dragging the finger towards right or left up to the desired value.
To confirm, press again the multi value scrolling set up icon or the slide selection icon.
Alternatively, use the Slider and the above-mentioned arrows to set up the various options. Confirm always
every setting with the button .
To save the parameters just inserted, press the button save otherwise the parameters will be brought
back to the values previous to the modification
By pressing the button the User gets back to the previous screen. Press more times to reach the main
screen.
RDRG

Page 23
WORKING MODES:
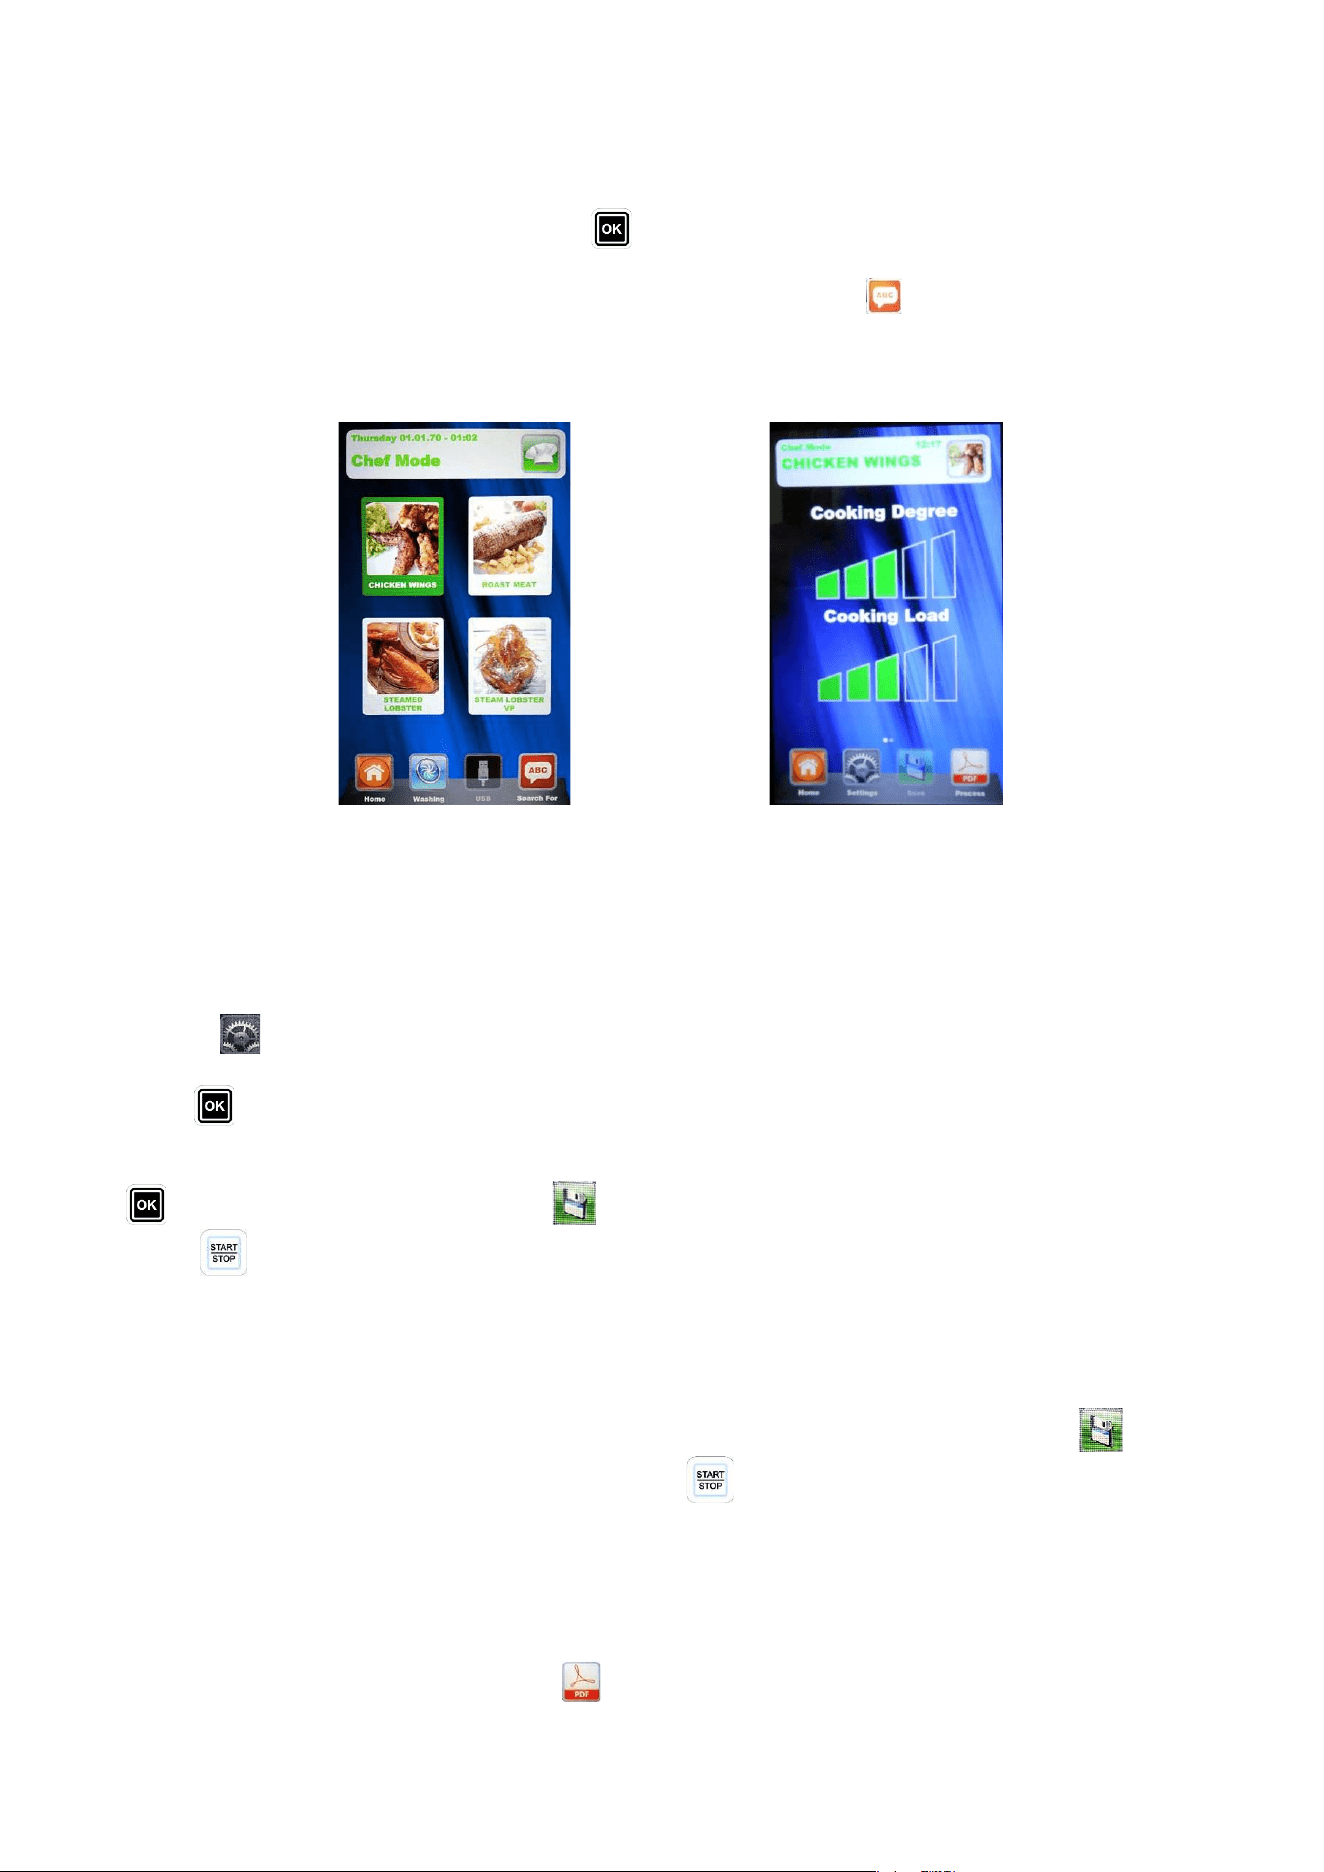
Chef Mode – in this menu it is possible to select various recipes setted and loaded in the Factory,
or downloaded from our website and loaded in the Vision Full Touch Panel with the USB key.
4 recipes per page will be visualized. Change the pages touching the display in any area designated to view
the recipes and scroll with the finger towards right or left. To select the desired recipe, press the
corresponding icon one time to indicate it and two times to select it. Alternatively, scroll the pages with the
Slider and select the desired recipe with the arrow buttons and . Confirm with the button .
Recipes Mode – in this menu it is possible to select various recipes saved by the User.
4 recipes per page will be visualized. Change the pages touching the display in any area designated to view
the recipes and scroll with the finger towards right or left. To select the desired recipe, press the
corresponding icon one time to indicate it and two times to select it. Alternatively, scroll the pages with the
Slider and select the desired recipe with the arrow buttons and . Confirm with the button .
Manual Mode – working mode completely free, manually managed by the operator by setting directly
the desired data.
To access the other available icons, touch the icons area and scroll from right to left.
Alternatively, scroll with the Slider to access the other available icons.
Cooling – in every working mode it is possible to access the Cooling menu. This program allows to
fast decrease the temperature in the oven baking chamber, with open door. Select the program by long
pressing the icon and start it with the button . The fans will be activated at the maximum speed to
rapidly cool the oven chamber. Once gained the desired result, press the button to stop the running
cycle.
Note: by selecting a saved program that requires a starting temperature much lower than the temperature
actually present in the oven chamber, the oven directly suggests the Cooling option that will stop
automatically when the suitable temperature for the previously selected program will be reached.
RDRG
Page 24
DETERGENT AND RINSE AID TO BE USED
BakeOff developed an innovative product serving both as detergent and rinse aid simultaneously.
In case a single product serving as detergent and rinse aid is used, insert both the suction pipes of
the washing system in the unique product container.
Alternatively, it is possible to use two different products to serve the two different functions. The following
products are tested and strongly recommended for optimal results:
Detergent: Johnson Diversey Suma Auto Oven Clean D9.10
Rinse aid: Johnson Diversey Suma Auto Oven Rinse D9.11
To contact the venues in the world of Johnson Diversey, refer to the following web site:
http://www.diversey.com/contact-us
The automatic washing system was designed and tested using these specific products. The
company shall not be responsible for eventual malfunctions due to the use of different products.
WASHING WARNINGS
It is possible to proceed with the washing cycle only if the oven is not in cooking phase and if the
products (detergent and rinse aide) are present in the circuit.
It is recommended to carry out the washing cycle when the oven is cool.
If the washing program is set up for the execution at an inappropriate oven chamber temperature,
the cooling program “Cool” will be automatically carried out. When the appropriate temperature will
be reached, the oven proceeds with the execution of the washing previously set.
During the execution of the washing program, the power board control is completely inhibited.
At the end of the washing program, absolutely dismantle the rotating nozzle in the chamber oven. DO
NOT PROCEED IN ANY WAY WITH THE EXECUTION OF COOKING PROGRAMS WITH THE
ROTATING NOZZLE INSTALLED IN THE OVEN CHAMBER or it is going to be irreparably damaged.
MANUAL PROGRAMMING:
Select the Manual menu . Following screen appears:
Page 25
– with this baking mode it is possible to divide the program to be saved into different baking
steps. It will be possible to set time, temperature, fan speed and climate in an independent way for each
step of the program, for a total of 10 steps for each program.
Press the button . The number corresponding to the Step to be programmed will light. Set the cooking
values for this Step pressing the icons corresponding to the single parameters. A second press on the
current icon (indicated) confirms the inserted data and pass to the following parameter. It is possible to save
the data also by pressing any other icon/parameter. Alternatively, with the arrow buttons and and
the Slider set the desired baking values for this Step and confirm each value with the button
. Once the last parameter has been set (Climate) it is possible to decide to save the program as a single
Step or add other Steps. To pass to the following Step press always the icon and repeat the
programming like before. Once all desired baking parameters are set, save the program as new recipe
(User), or execute it in a single mode (Manual), always by pressing the icon .
Hereinafter it will be possible to edit and modify every time the programmed Steps with the button and
pass from one Step to another always with the same button.
Elimination of a Step: If a Step in a program is not necessary it will be possible to cancel it with this simple
operation:
Enter the Step mode
After that enter the Setting mode
Scrol the Steps until reaching the one to be cancelled
Keep the button presed for 3 seconds
this Step will be cancelled and the numerical sequence of
the other steps that compose the program will be
automatically up-dated.
Save the operation with the button
ATTENTION: if the operation is not saved at the end of the cancellation of one or more Steps, the
modifications will be cancelled.
RDRG
Page 26
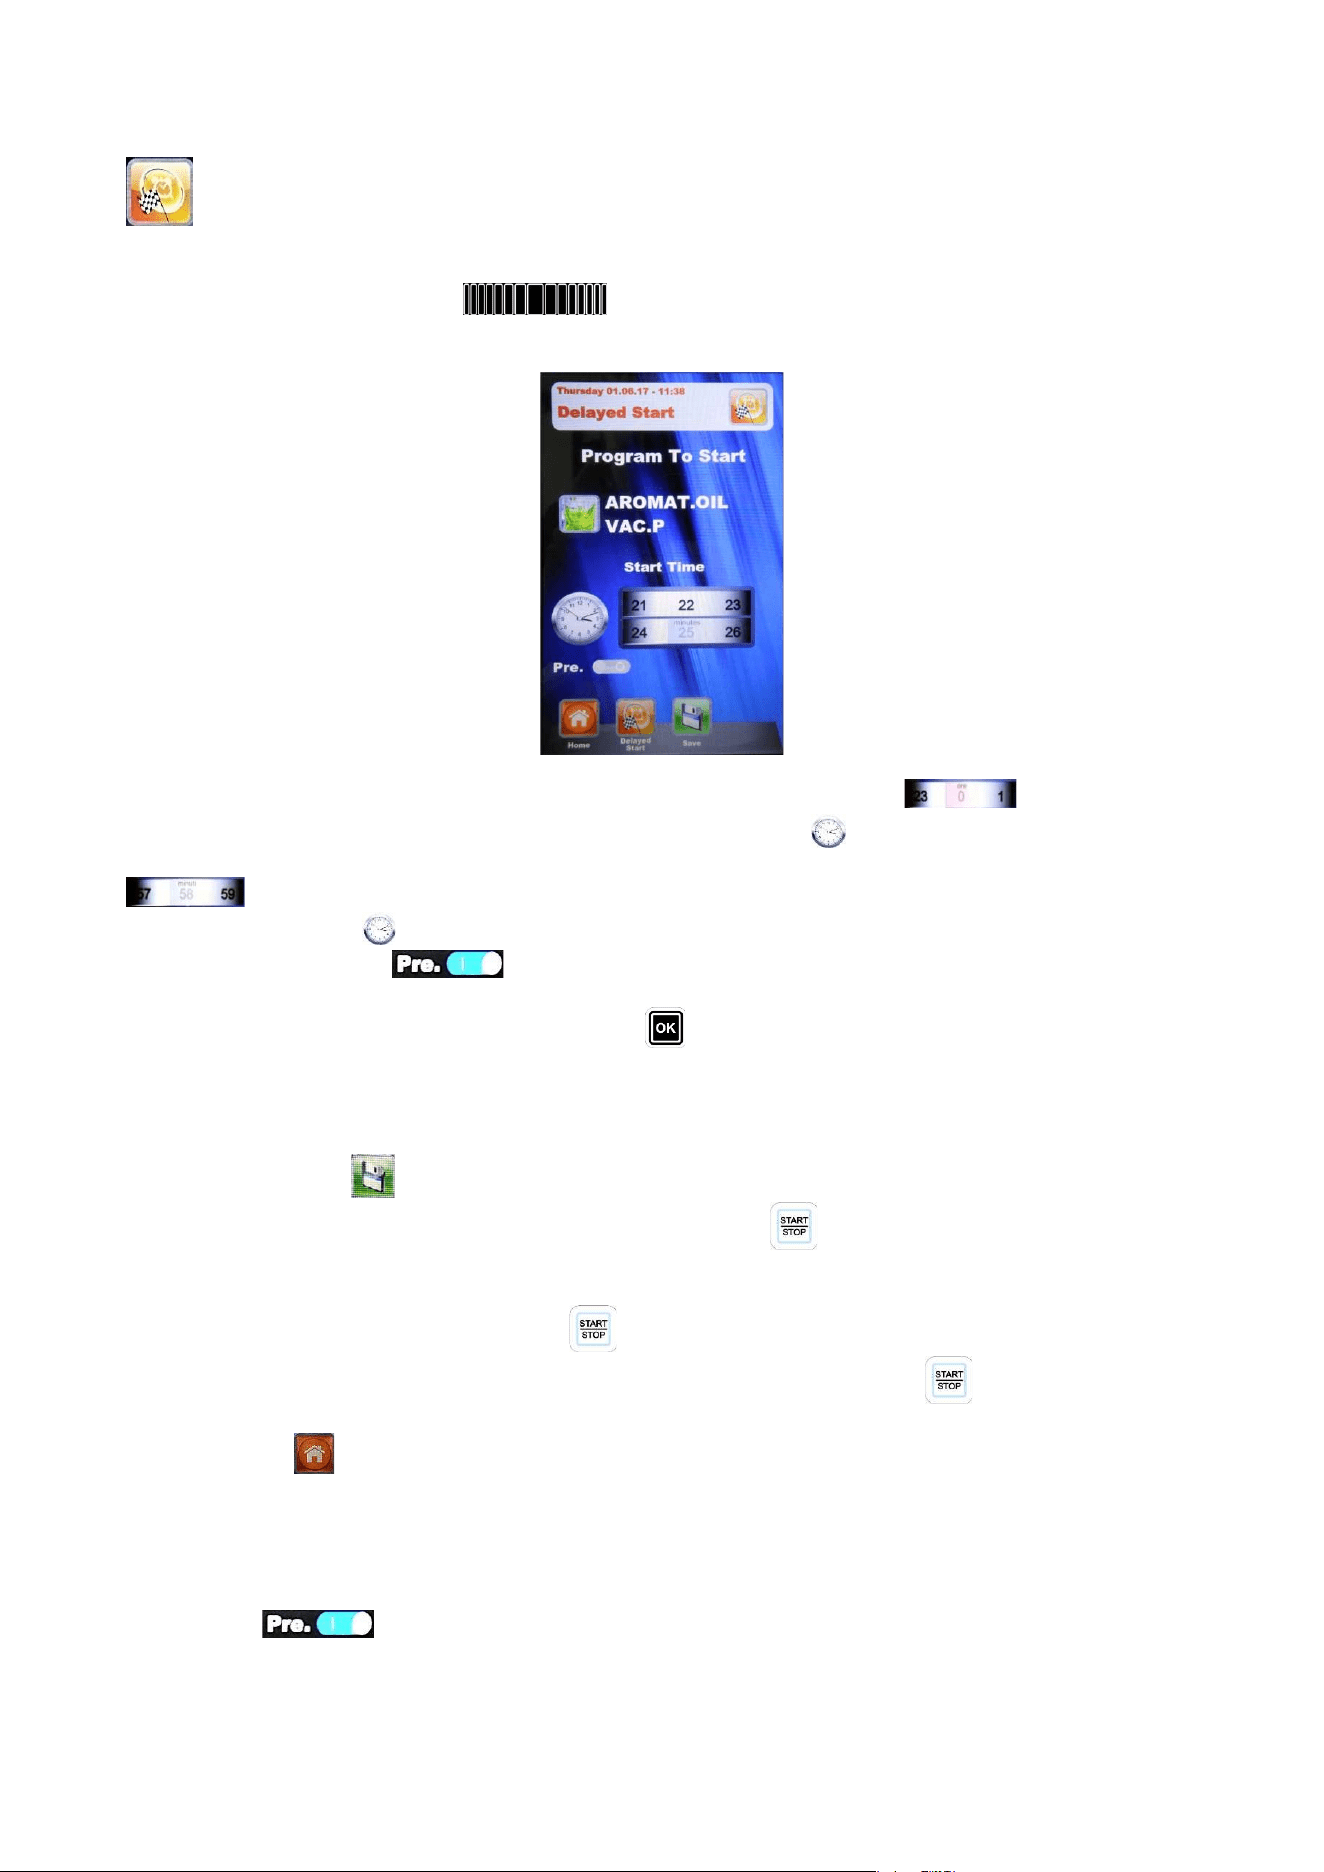
Delayed Start – in every baking mode (Chef, Recipes and Manual), it is possible to set the start of
the chosen baking program at a determined time. Select the desired baking program, touching the icons
area and scroll towards right or left to access to the other available icons and enter the menu Delayed Start.
Alternatively, scroll with the Slider and enter the menu Delayed Start. The following screen
will appear:
Modify the parameter “Hours” touching the multi value scrolling set up icon and dragging the
finger towards right or left up to the desired value. Press the icon to pass to the modification of the
“Minutes” parameter. Modify the “Minutes” parameter “Minutes” touching the multi value scrolling set up icon
and dragging the finger towards right or left up to the desired value. To set the preheating phase
di, press again the icon to enable the modification of the preheating parameter. Enable or disenable the
function pressing the icon and dragging the finger towards right or left up to the desired value.
Alternatively, with the Slider, set the desired time for the program start and, in case it is necessary, the pre-
heating phase. Confirm every setting with the button .
In case of “Night Cooking” with delayed start the preheating parameter must be disenabled because,
if it is enabled, it would inhibit the cooking phases following the preheating phase until the opening
and following closing of the oven door.
Save with the button . On the main screen the chosen program will appear together with the starting
time. Press, and keeping pressed for a few seconds, the button to start the countdown, at whose end
the program will start.
After the start of the countdown, all of the oven functions are inhibited and the control panel enters in
standby mode, indicated by the flashing icon .
It is possible to interrupt every time the delayed start by long pressing the button .
Press the button until coming back to the main screen Home.
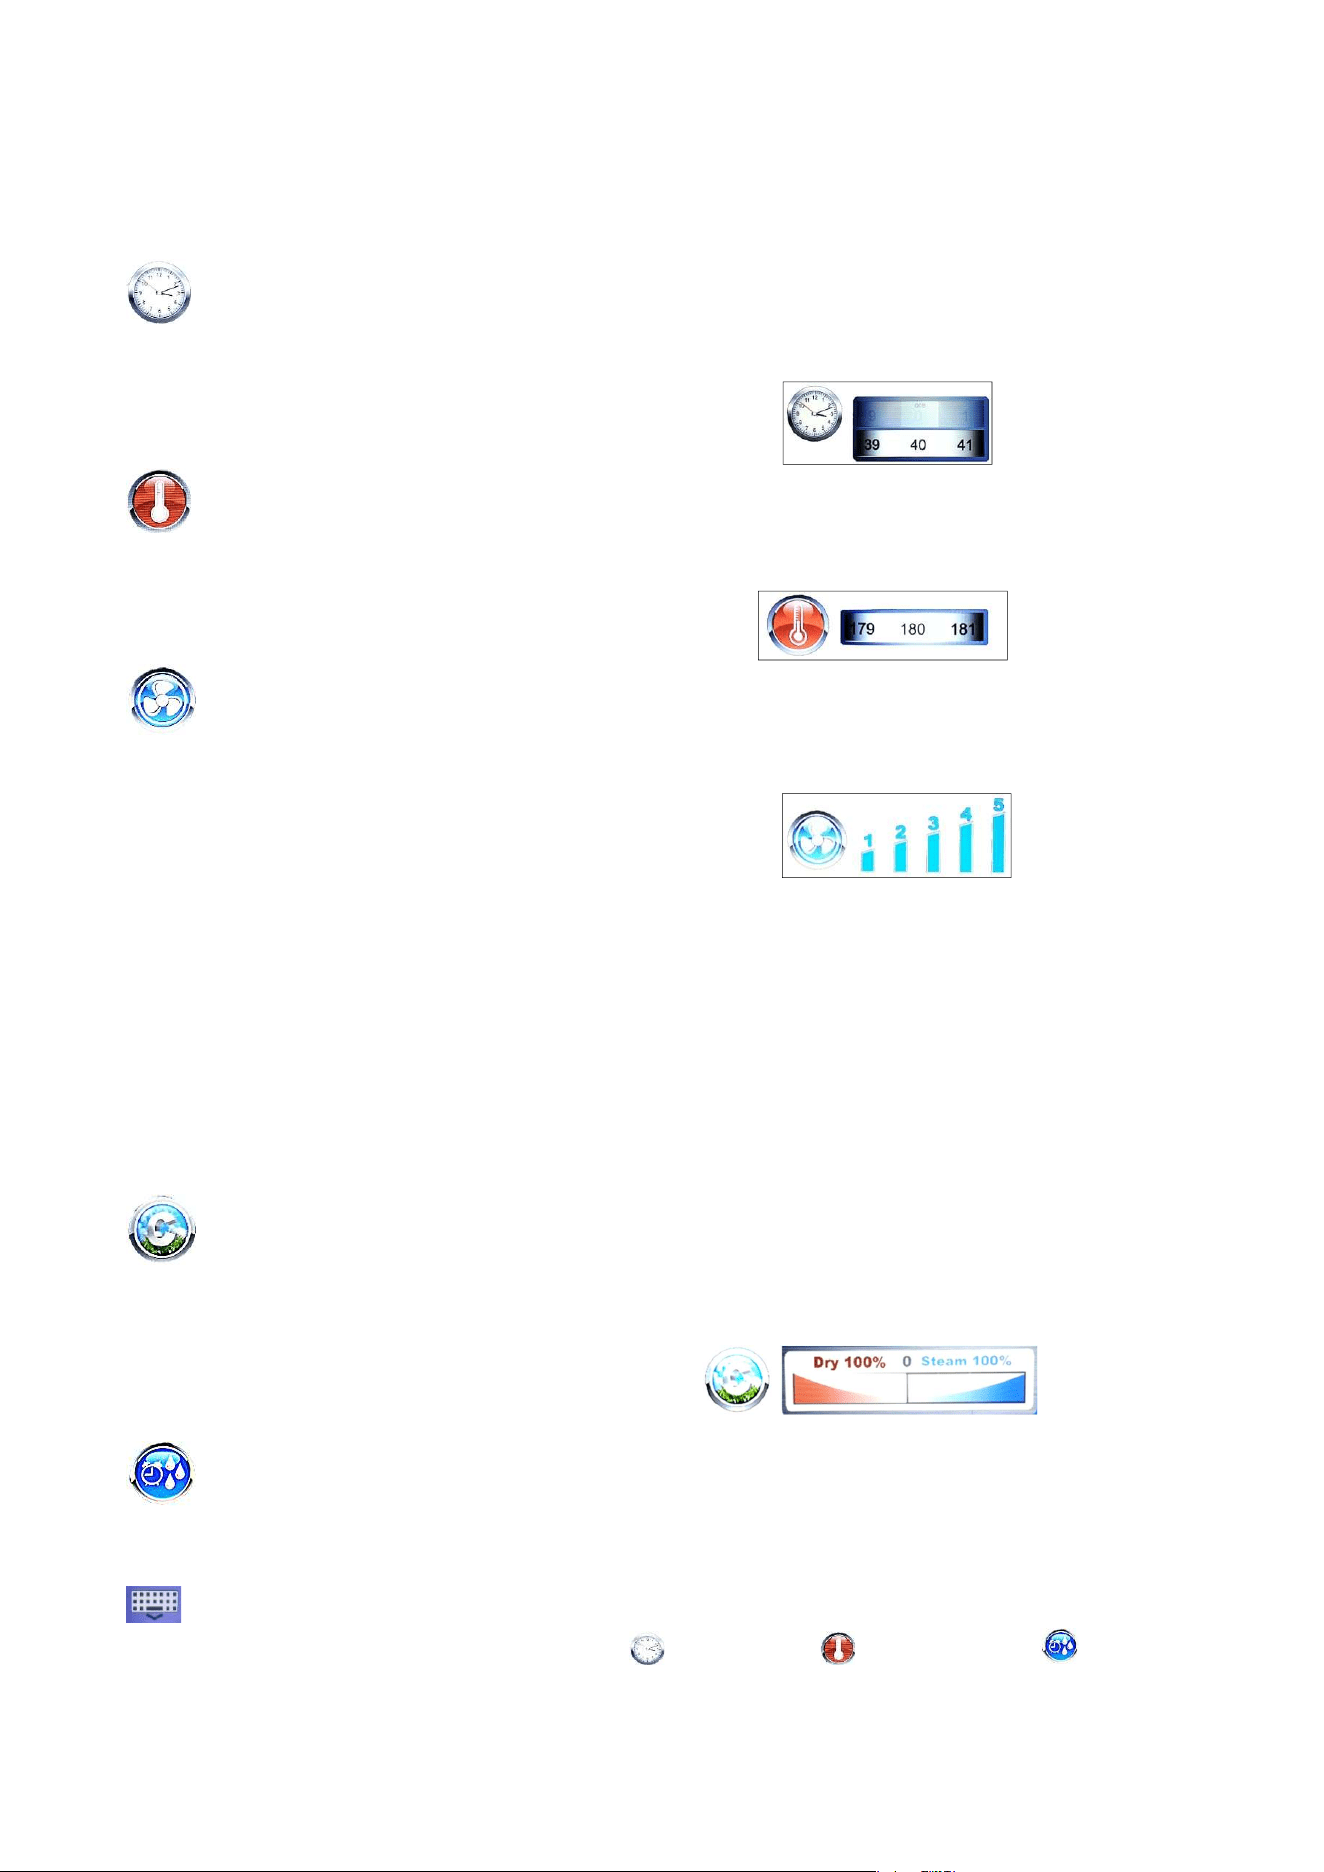
BAKING PARAMETERS:
Pre-heating: With the pre-heating phase the oven reaches a temperature of about 30° more than
the temperature value which is set in the first program baking step, in order to compensate the temperature
decrease when the door is opened to put the product in the oven. At the end of this phase an acoustic signal is
heard and the lights in the baking chamber flash. It is possible to put the product to be baked in the oven and
RDRG
Page 27
when the door will be closed, the program will start the baking cycle. This operation can be selected or
deselected accordingly to the User’s needs in the programming phase or while modifying a program.
Time parameter – it manages the various baking times and allows to set the Multi-Timer mode.
By scrolling until position INF, the time becomes endless.
Temperature parameter – it manages the temperature settings set up for a baking program
Fan Speed parameter – it manages the set up of the desired fan speed for the baking mode to be
used:
5 – high speed
4 – medium speed
3 – low speed
2 – medium speed, semi-static
1 – low speed, semi-static
The semi-static mode stops the fans once the set-point temperature is reached and reactivates them at
every starting of the heating elements, so that the temparature in the baking chamber remains constant. In
this mode the User will obtain a baking result comparable to a baking in a static oven. The use of the semi-
static mode will be underlined by the lighting of the writing “Pulse” on the display.
Climate parameter – this parameter manages the level of steam injection related to the baking
cycle, and will therefore create a dry or humid climate in the baking chamber accordingly to the User’s
needs.
Steam Injection parameter – this parameter allows to obtain a temporized steam injection in every
moment during the baking cycle on User’s request.
Insertion from keyboard – this option is available during the modification of the
parameters Time , Temperature , Steam injection . Touching the
icon, the following screen will be displayed, allowing the insertion of the
numerical values from keyboard.
RDRG
Page 28
To confirm the inserted value and go back to the previous
screen, press the icon corresponding to the parameter being
modified.
MULTI-TIMER MODE
Multi-Timer:
in this mode it is possible to find 10 programmable timers that will act only and exclusively on a single baking
program.
It is very useful to bake different products at the same temperature and climate but with different baking
times.
The oven will reach the set temperature and climate, then the timers will independently regulate the different
baking cycles. At the end of every single timer, the oven will continue to mark the following
timers, showing the flashing writing “Ready” on the ended one until the extraction of the corresponding tray.
When the last set timer will expire, the oven will continue keeping constant the values of temperature and
climate set during the programming phase.
In the “Manual” menu select Settings .
When the value time is reached, scroll with the Slider over the 0, so that the function Multi is visualized:
Confirm the selection touching again the icon time or with the button .
Icon corresponding
to the parameter
RDRG
Page 29
1 2
Fig. 1 – Set the desired timers (max 59 minutes each touching the corresponding number icon, confirming each
value pressing again the corresponding icon or the icon of another timer, or using the arrow buttons and
to confirm the data and pass to the following one. After setting the desired timers, press the icon OK on the
display or alternatively the button . After that, save all settings with the button . When the program will
start with the long press of the button , the timers will start counting (Fig. 2). The timer of a different colour
will be the first to end and will correspond to the tray number to be pulled out. At the end of each counting the
chamber lights light and the acoustic signal is activated. Open the door and pull out the tray.
ATTENTION: the baking with the next timer will start only when the door will be closed. If the door will
still be open, the oven will remain in stand-by.
During the baking program execution, it is possible to add other timers and modify the ones already set up by
pressing the button “Modify” . Touch the desired timer and modify the minutes parameter dragging the
finger from right to left. Alternatively select the timer to be modified using the by arrow buttons and
modifying the value using the slider. Press the button to confirm.
To remove the Multi mode from the program (also during a cooking program), press the icon and modify
the “Minutes” parameter corresponding to the icon touching the multi value scrolling set up icon
and dragging the finger towards right or left passing from the “Multi” mode to a specific time.
Alternatively modify the value using the slider and pressing the button to confirm.
INFINITE TIME MODE
Infinite time:
in this mode, there won’t be time countdown. It is very useful to cook or defrost the same kind of product
more times at the same temperature and climate with times decided arbitrarily by the professional. The oven
will reach the set temperature and climate, which will be kept until the manual interruption of program by long
pressing the button
A timer function i salso available, enabling by pressing the , which does not interact with the cooking
parameters with the scope to provide just a temporized acoustic signal. A new function will be displayed next
to the icon Time ; set the desired time and press again the icon to confirm the value. To start the
countdown press the icon start .At the end of the countdown an acoustic signal will be
emitted, which can be disabled pressing the icon stop.
RDRG
Page 30
EXECUTION OF A MANUAL PROGRAM
After having completed the Manual programming press the button to start the chosen baking cycle. On
the display following screen will appear:
After starting the programs the parameters Time , Temperature , Fan speed , Climate
,Steam injection , keep on being modifiable for the running program. Touch the corresponding icon to
access the modification of the parameter.
Touch the lower icons area and scroll towards right or left to access further parameters. Alternatively scroll
with the Slider.
With the icon Timer Manual Steam it is possible to send the steam injections seconds in the baking
chamber. In the parameter Steam injection
The icon Manual Steam acts like a real button to manually inject steam when the baking program is
running, accordingly to the User’s needs.
At the end of the cooking cycle cooking, it is suggested, for 2 minutes, the option for extending the cooking
program. If it is necessary, select the extension and his length. Confirm with the icon Time or the button
and the modifications will be immediately in force.
At the end of the baking cycle the oven suggests the baking time extension. The baking parameters will remain
the same.
At the end of the baking extension, the same extension option will be suggested again. If further baking is
necessary proceed as described here above, on the contrary the program will end.
EXECUTION OF A CHEF PROGRAM
Entering the menu screen n. 1 appears with the list of available recipes. 4 recipes will be displayed.
Change the pages touching the display in any area designated to view the recipes and scroll with the finger
RDRG
Page 31
towards right or left. To select the desired recipe, press the corresponding icon one time to indicate it and
two times to select it. Alternatively, scroll the recipes with the arrow buttons and the pages with the Slider.
Select the desired recipe and press the button .
It is also possible to search for the desired recipe by the Research function (See Research)
After that, screen n. 2 will appear, which suggests the two main parameters to proceed with the real baking
cycle.
1 2
Cooking degree: the Chef recipes are developed for a minimum baking suitable for the product to be
baked (baking degree to 0). It is possible to increase the baking time by operating in the related scale.
Cooking Load: the scale indicates the trays number in the oven. As pre-defined value at the first
selection, the program will consider n. 1 tray in the oven. Increase the parameter accordingly to the trays
number in the oven.
Press on to regulate the “Cooking degree”, increase or decrease the scale touching the
regulation area and dragging the finger towards right and left with the Slider. Confirm the value with the
button .
Now it is possible to regulate the “Cooking Load”. Increase or decrease the scale touching the
regulation area and dragging the finger towards right and left or with the Slider and confirm with the button
. Save the new settings with the button . Now the baking program can start by long pressing the
button . The baking cycle and all its phases will therefore begin.
When the same Chef recipe will be recalled, the Vision Full Touch control will suggest the last
settings regarding the Cooking Degree and the Cooking Load, the default ones and not the ones
previously set.
To save the cooking degree and cooking load settings just programmed, press the button before
starting the cooking program by long pressing the button .
At the following recall of the same Chef recipe, the Vision Full Touch control will suggest the cooking
Degree and the cooking Load saved, in any case modifiable.
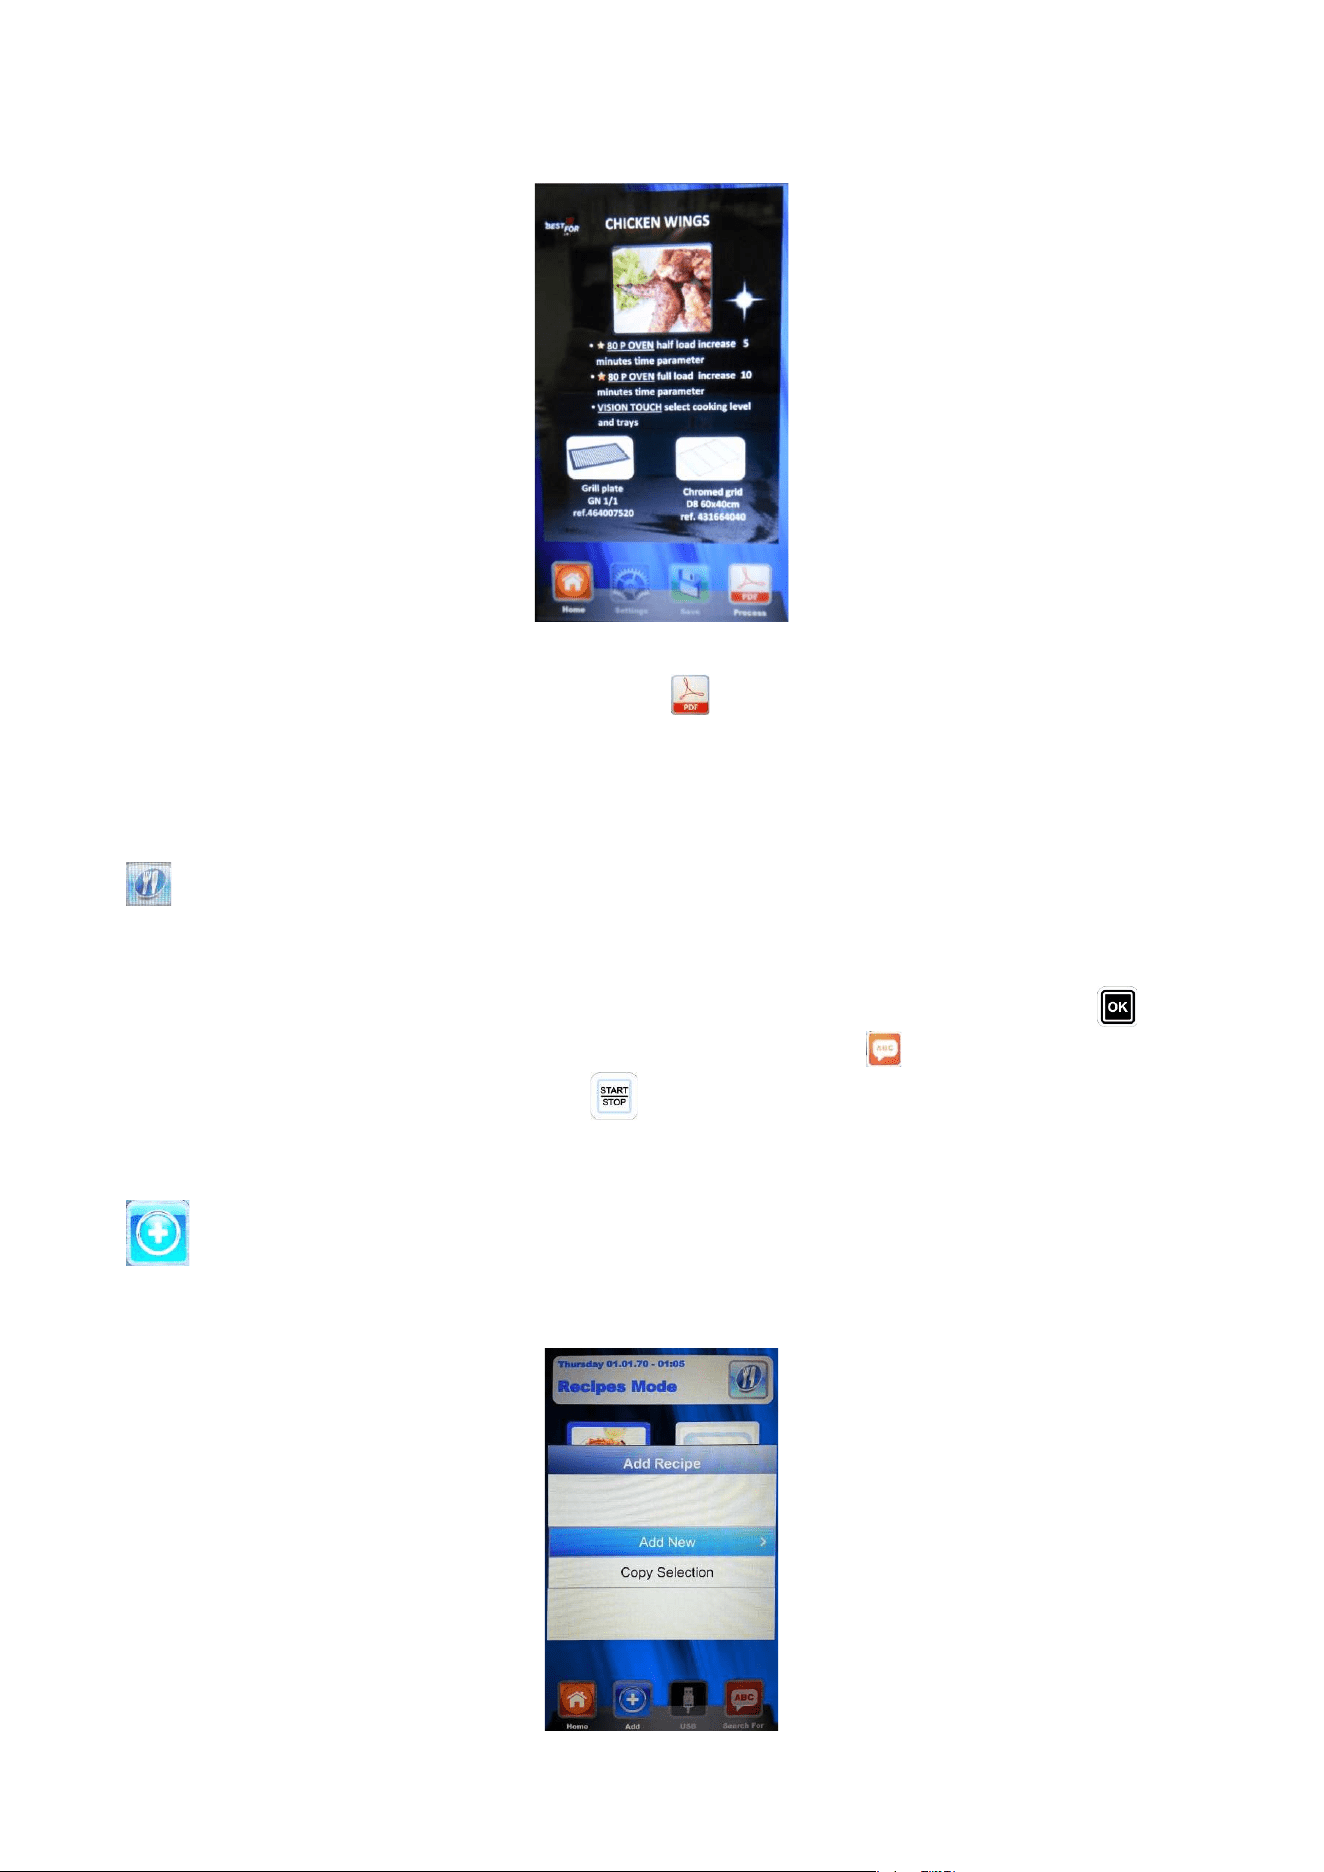
In the Chef mode it is also available the function to consultate the method in pdf format.
After selecting the recipe press the icon to access the description of the cooking method of the
corresponding recipe as shown in the following screen.
RDRG
Page 32
Scroll the pages of the method touching any viewing area of the pdf file and dragging the finger towards right
and left to move to another page. Touch again the icon to exit the reading mode.
EXECUTION OF A RECIPE PROGRAM
Entering this menu, it is possible to find all the recipes saved by the User with the programming in the
manual mode. 4 recipes per page will be shown. Change the pages touching the display in any area
designated to view the recipes and scroll with the finger towards right or left. To select the desired recipe,
press the corresponding icon one time to indicate it and two times to select it. Alternatively, scroll the recipes
with the arrow button and the pages with the Slider. Select the desired recipe and press the button .
It is also possible to search for the desired recipe by the function Research (See Research).
Start the program by long pressing the button . At the end of the cycle it will be possible to extend the
baking time if necessary, as explained for the execution in manual mode.
Add – in the Recipe mode it is possible to quickly add another customized recipe and save it with
name without going also in Manual mode. Enter the menu.
Following screen will be showed:
RDRG
Page 33
Now we can copy and rename a recipe (modifying it if necessary), or add a new one programming
every single parameter. At the end, save with name the new recipe:
Digit the letters simply touching the icon of the desired letter. Alternatively use the arrow buttons to move
through the lines and the Slider to scroll the specific letters. Confirm every digit with the button . At the
end, press the icon to save the name in the Recipes archive. Alternatively, press the button OK in the
keyboard and save the name in the recipes storage, always with the button .
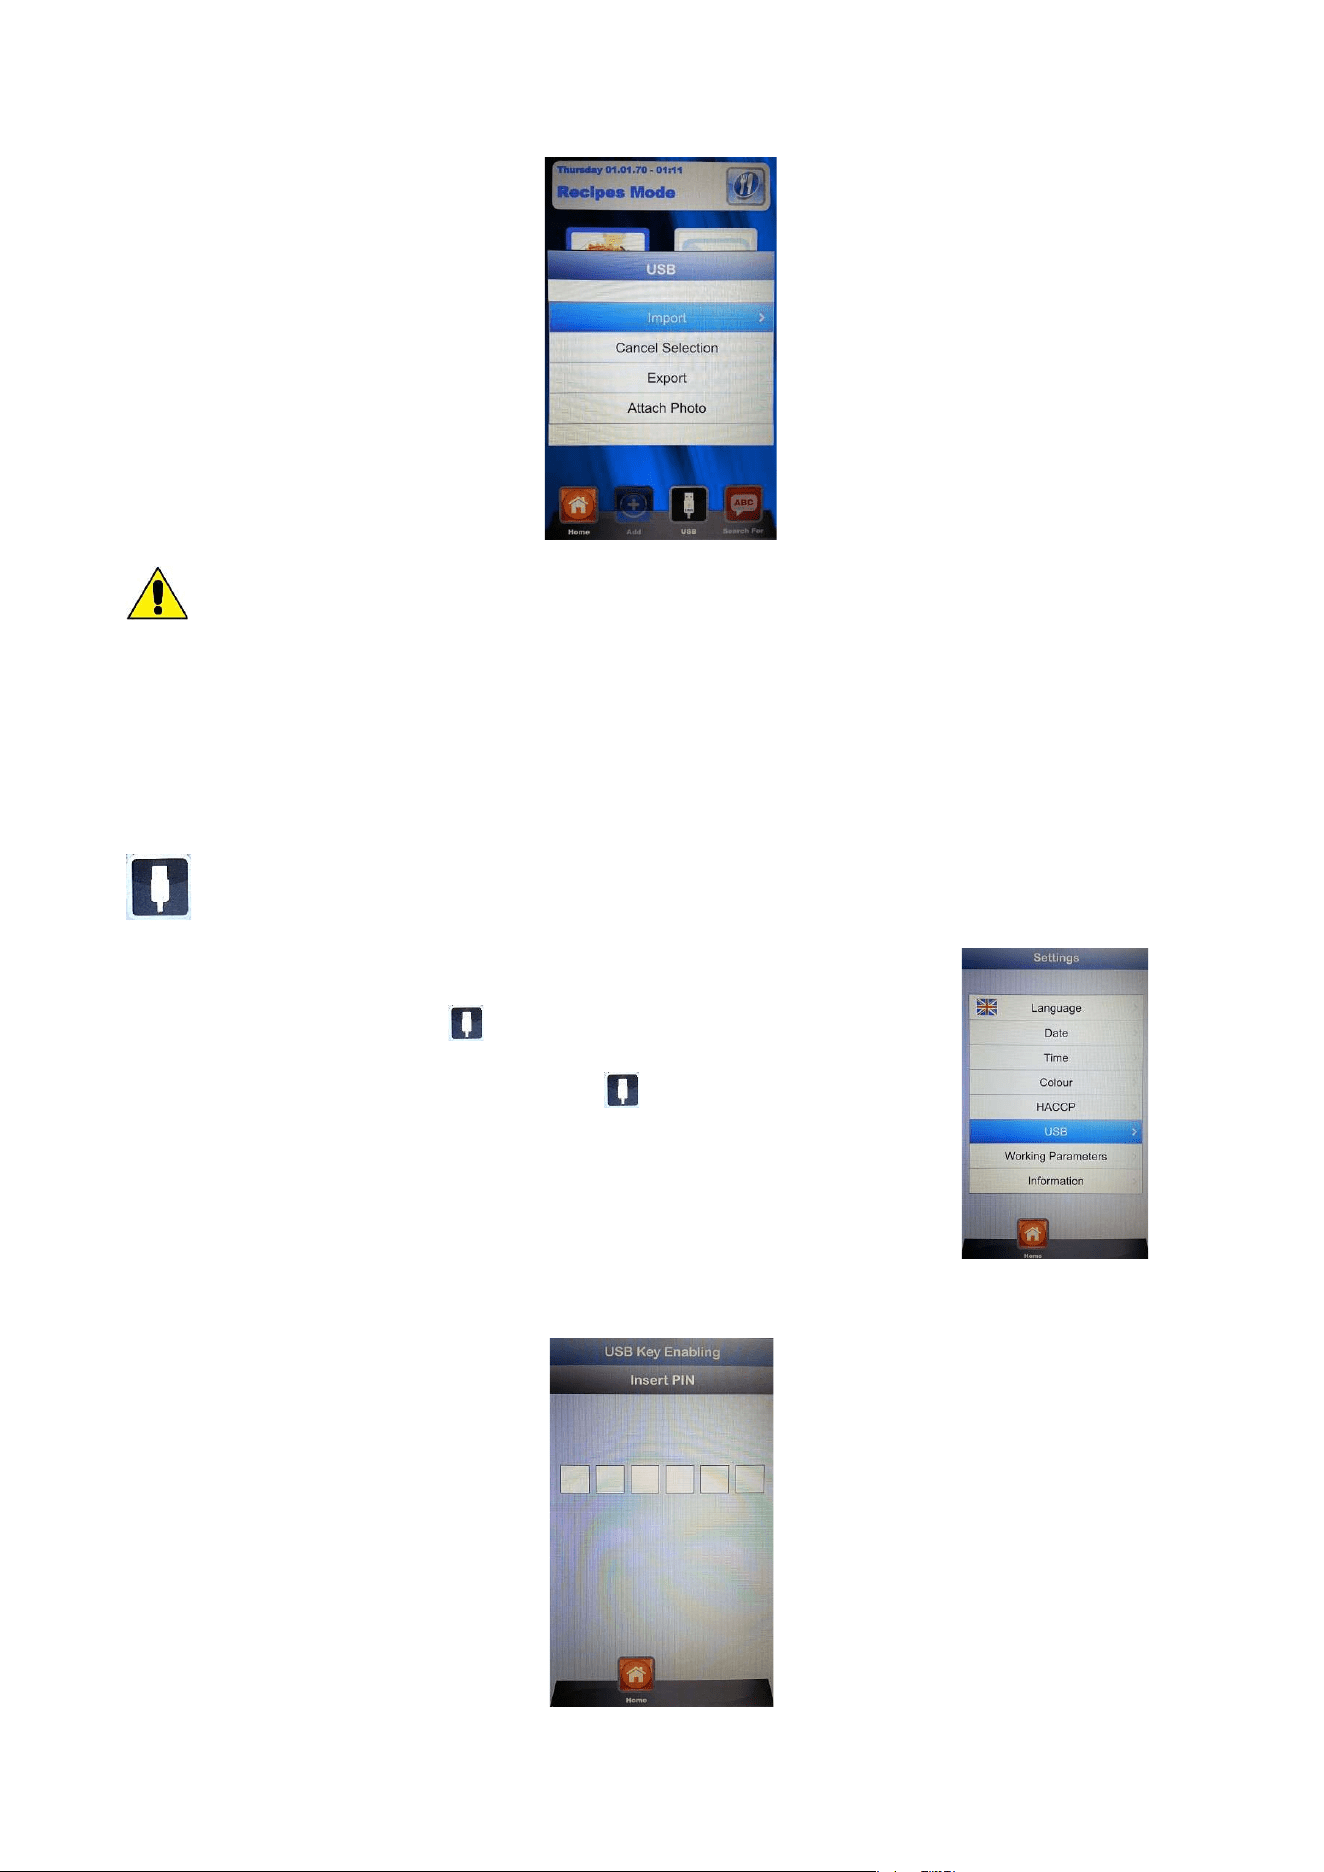
USB – import/export mode of baking programs.
In the “Settings” menu , it is possible to enable or disable completely the section that belongs to the USB
mode; it is also possible to protect the access recipes management with a password. Reed the paragraph
“Enabling USB menu” in the next chapter for all possible options.
The control is supplied with USB menu enabled by the Factory. To manage the recipes procedure act as
follow:
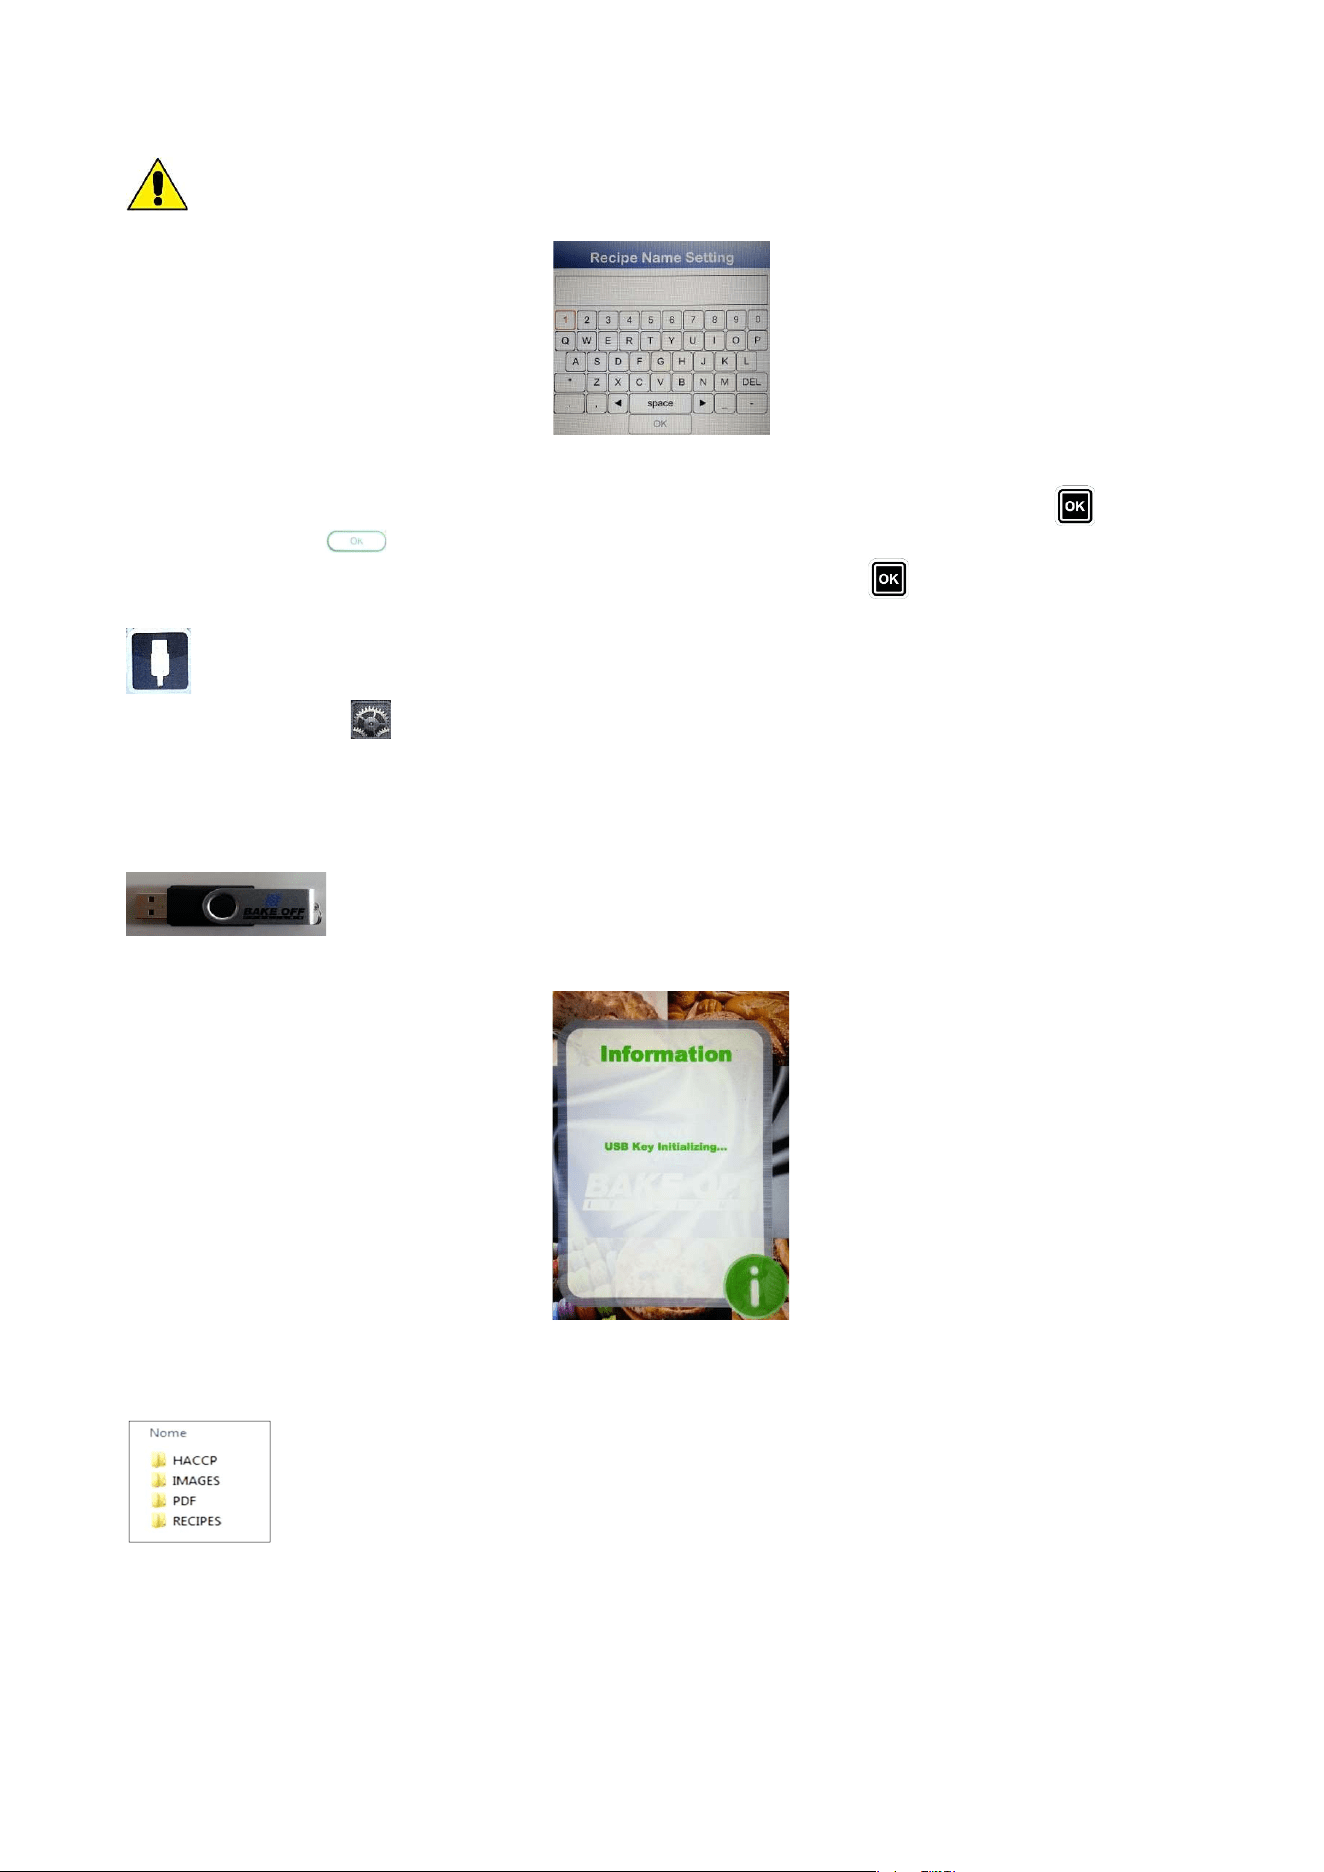
Insert the USB key in its housing above the display. At the first insertion, the key is
initialized and the pre-defined folder
BAKEOFF is automatically created (fig. 1).
1
When the initialization is completed, extract the key and insert it in the PC. In the BAKE OFF folder we find
the under-folder listed in the figure here under:
Folder that will contain the exported reports of the machine registrations
Folder that will contain the images to be associated to the recipes
Folder that will contain the PDF recipes files
Folder that will contain the saved recipes in .PPF format
RDRG
Page 34
PROCEDURE TO DOWNLOAD THE RECIPES FROM BESTFOR
WEBSITE
Enter the website:
www.bakeoff.it
Enter the reserved area: Recipe Area
Access the reserved area:
Access the reserved area
Insert the product code and the serial number to be found on
the oven.
Download the desired recipes files (recipes .ppf, images .Jpg, or Pdf). Now it
is possible to up-load the Chef recipes (file .ppf) in the folder Bakeoff\Recipes, the images in the folder
Bakeoff\Images, the Pdf files in the folder Bakeoff\PDF in the USB key.
Connect the USB kit to the Vision Full Touch control. The electronic control recognizes the unit automatically
and enables the managing menu, with which we will be able to import the downloaded recipes in the oven,
as explained in the next paragraph.
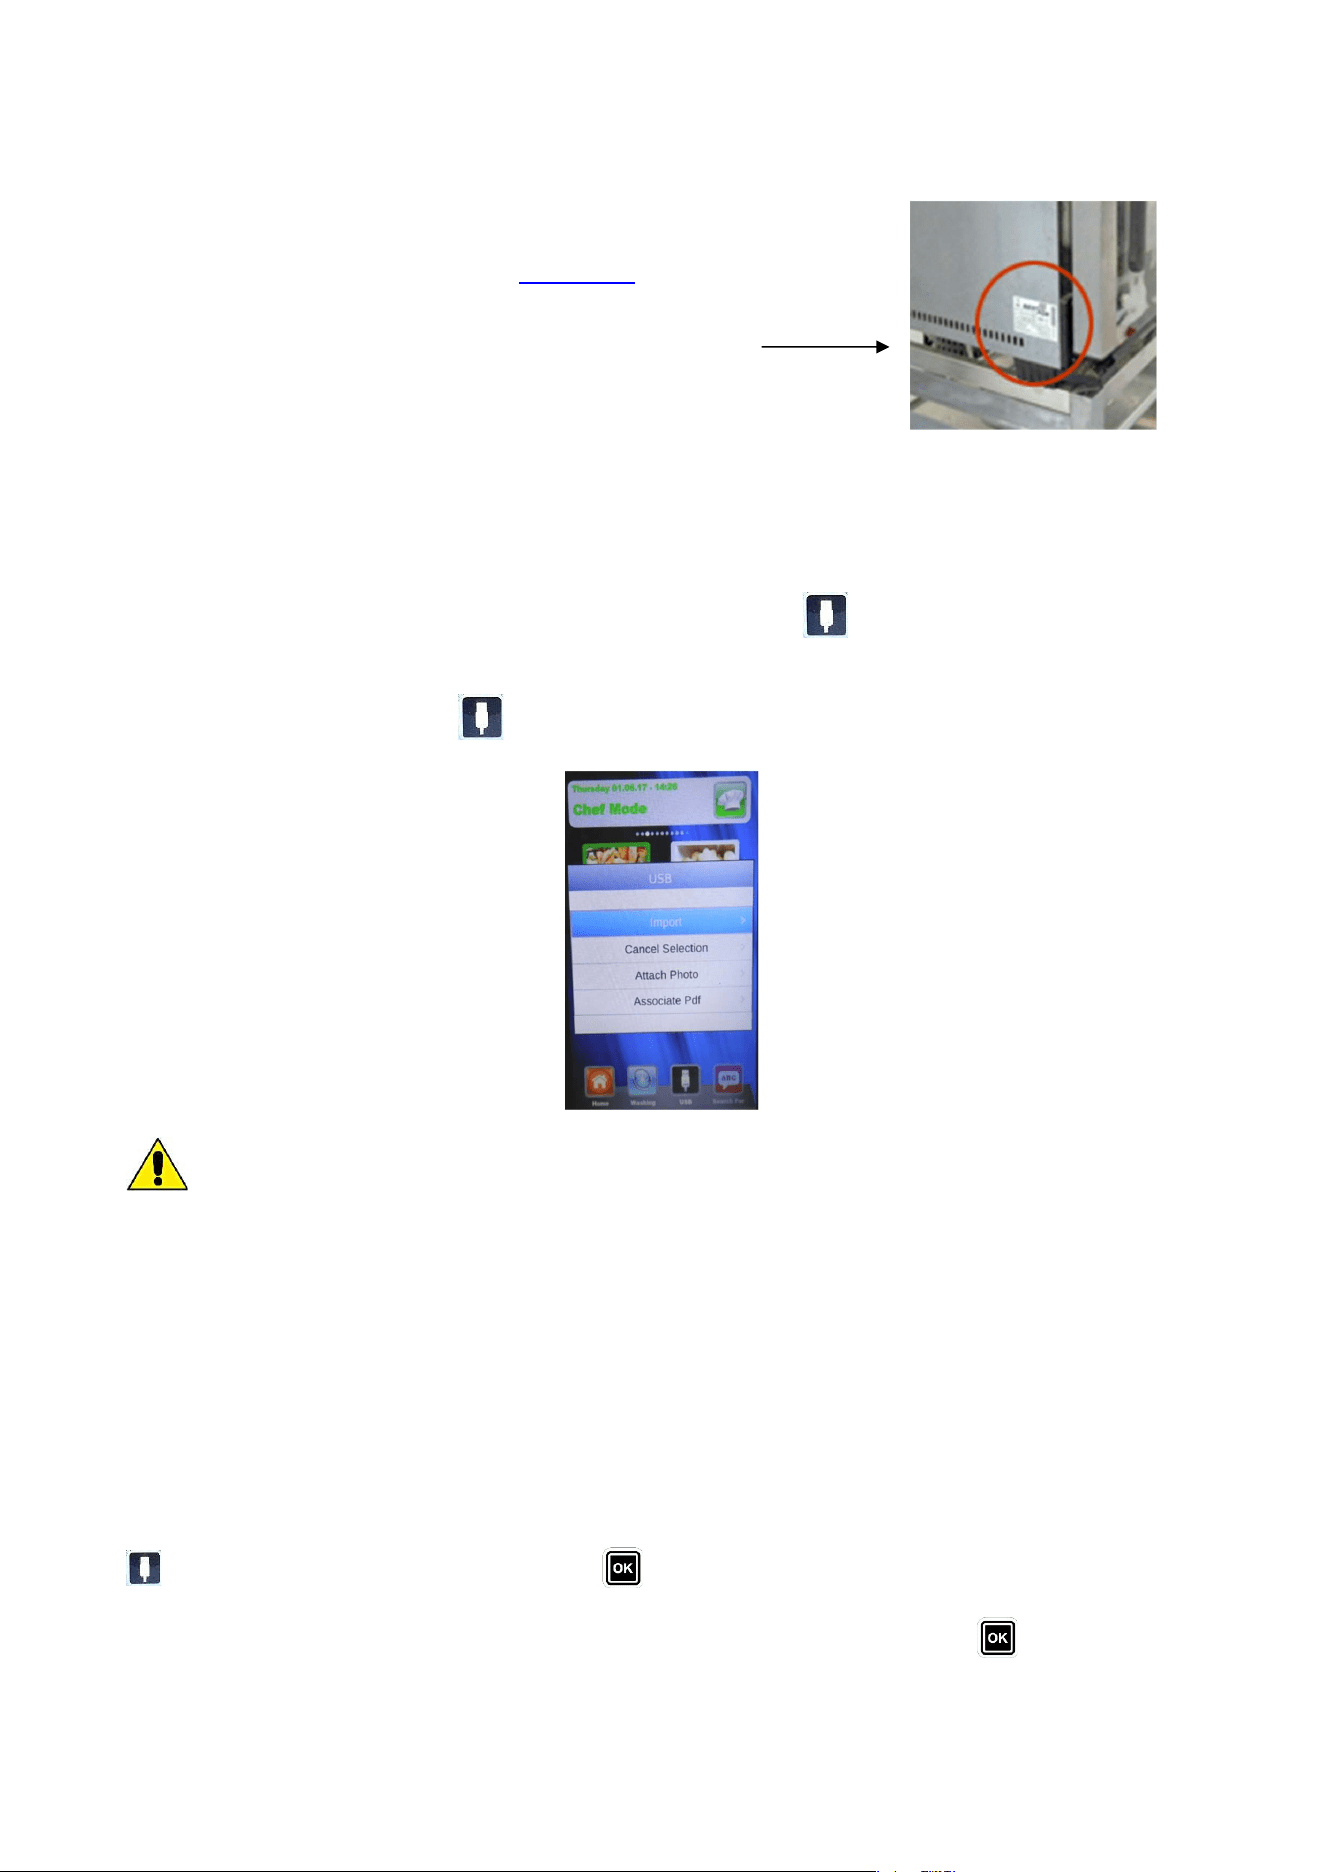
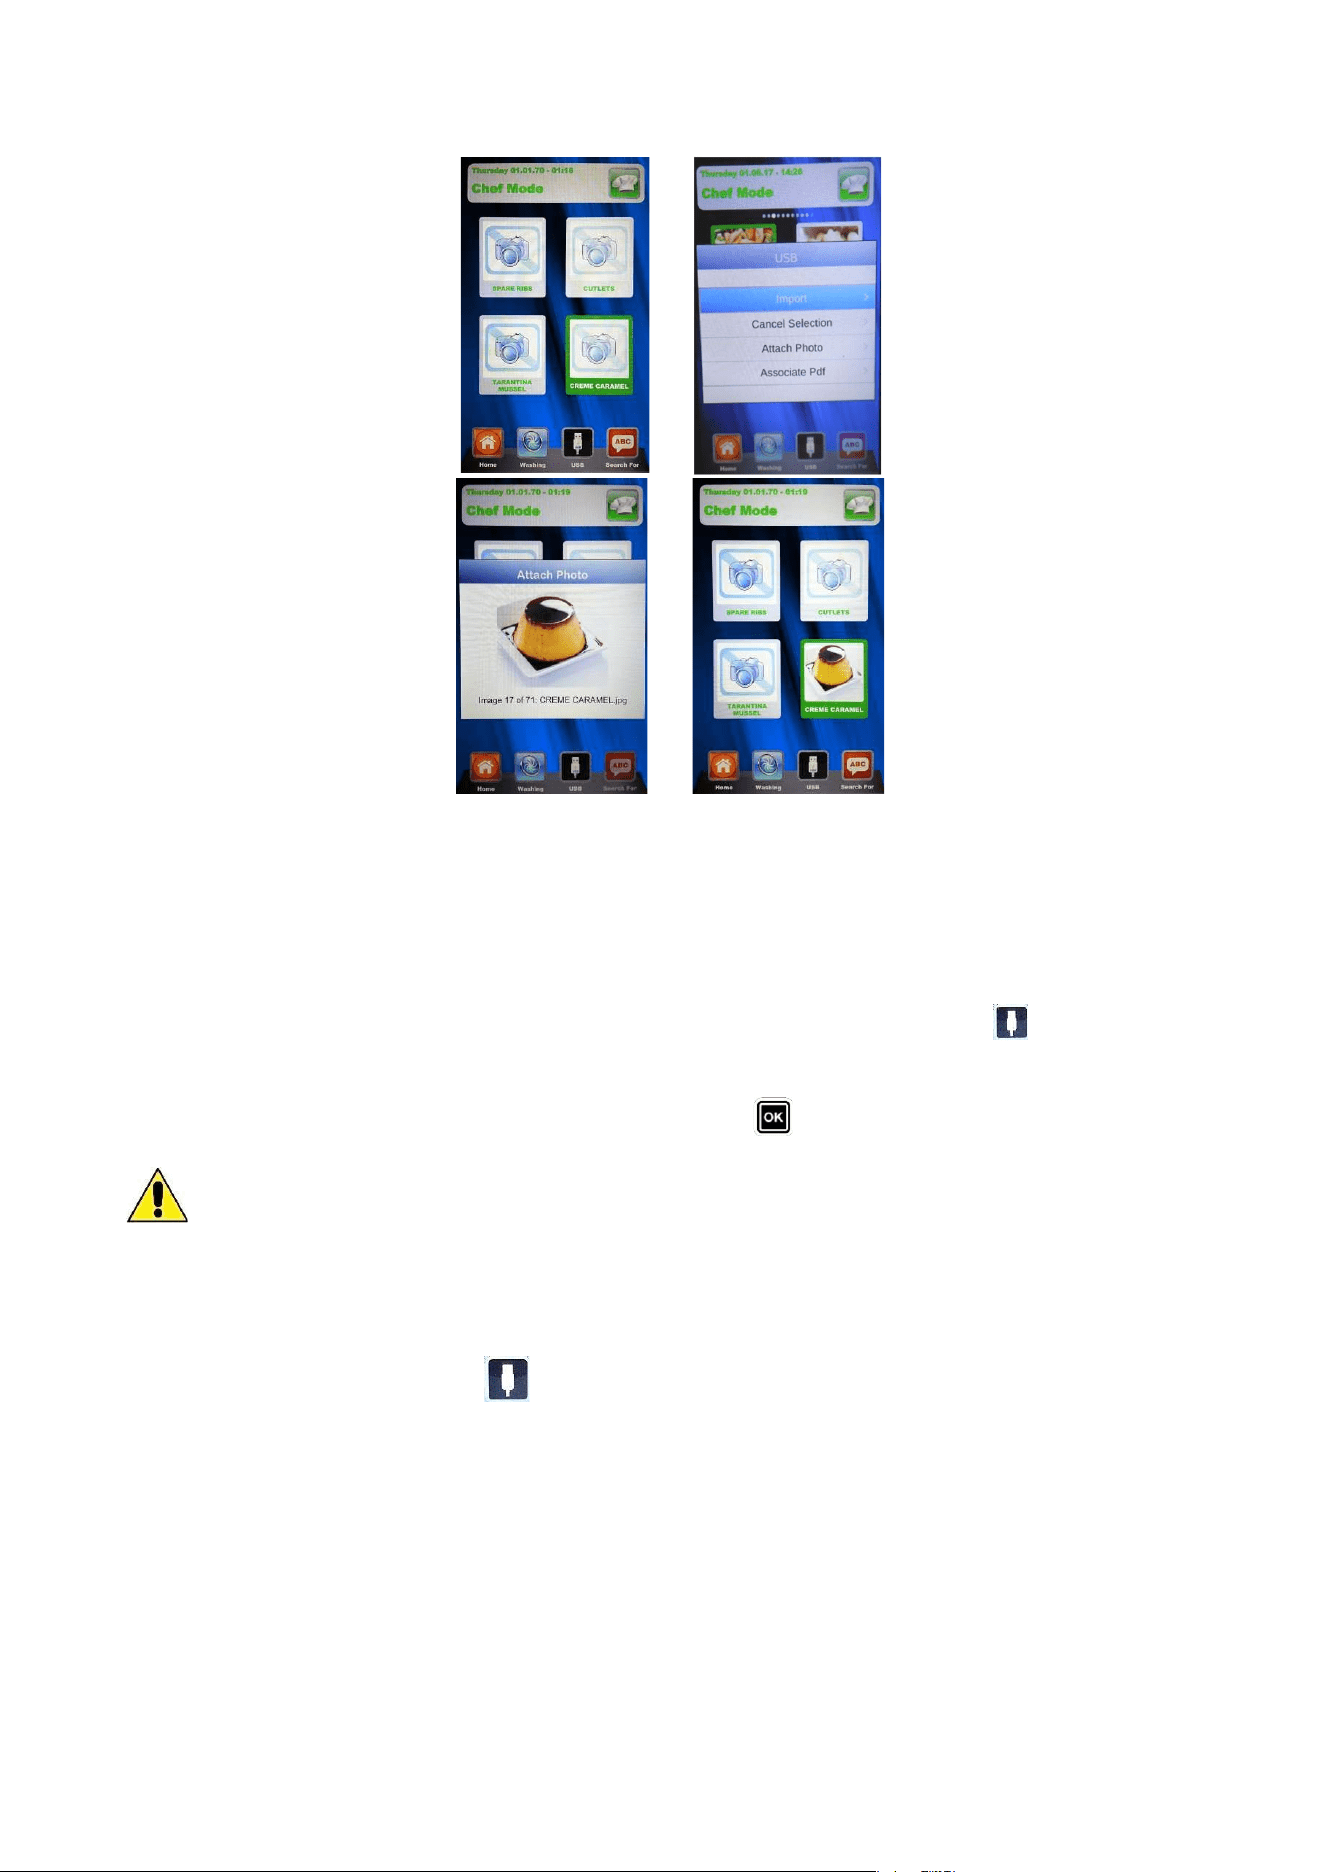
Now, in the “Chef” and “Recipes” mode of the Vision control the icon will be operating. It allows to
import the recipes and the recipes cover images in the oven, and to export from the oven the customized
recipes, saved by the User in the Manual programming mode (the saved files have the extension .PPF). In
the Chef mode, access the menu . You will access to the here under indicated screen:
we can choose among 4 options:
Import: to import automatically from the USB key all recipes present in the specific folder (downloaded from
our website).
Cancel selection: to cancel the selected recipes with the arrow buttons.
Attach photo: Option that allows, in case it is wished, to associate a picture to the selected recipe
so to identify the recipe itself (in 1:1 format with optimal advised dimensions 100KB – max 600KB).
to match pictures and recipes, proceed as showed (example in Chef mode):
In the Chef mode, select the recipe to which we want to match a picture (fig. 1). After that, enter the menu
, select the writing “Attach photo” and press (fig. 2)
Scroll the images which are showed touching them and dragging the finger towards right or left (or using the
slider) up to the desired one for our recipe (fig. 3). Press again the image or the button to confirm and the
picture will be matched to the recipe (fig. 4).
RDRG
Page 35
1 2
3 4
Attach photo: Option that allows to the selected recipe a cooking method in pdf
format (download on our website in a compatible optimized format).
To associate Pdf files to the recipes, proceed as shown below (example from Chef mode)
In Chef mode, go on the recipe to which match the Pdf method. Then, enter the menu , select the voice
“Associate Pdf”. Scroll the images corresponding to the available Pdf on the USB peripheral touching them
and dragging the finger towards right or left (or using the slider) up to the desired one for our recipe. Press
again the image corresponding to the desired Pdf or the button to confirm and the Pdf file of the method
will be matched to the recipe.
The end of each selected operation will be indicated by an acoustic signal.
In Recipes mode, access the menu . The here under indicated screen appears:
RDRG
Page 36
In comparison with Chef mode, in this menu it is possible also to export the recipes saved by the
User. The under menu “Export” allows to export all recipes in the folder of the Vision Full Touch panel, or
only the selected one.
The acoustic signal will inform about operation success.
After having completed the import or export operations, extract the USB key from the oven for other uses
such as: back-up storage on a PC or installation on another oven of the Vision series.
ENABLING USB MENU
As mentioned at the beginning in the previous chapter, follow this procedure to:
Enable or disable the USB menu
Protect with a password the access to the Menu , if the menu is enabled
From the Settings Menu in the Home Page, select the Menu USB
The following screen will appear:
RDRG
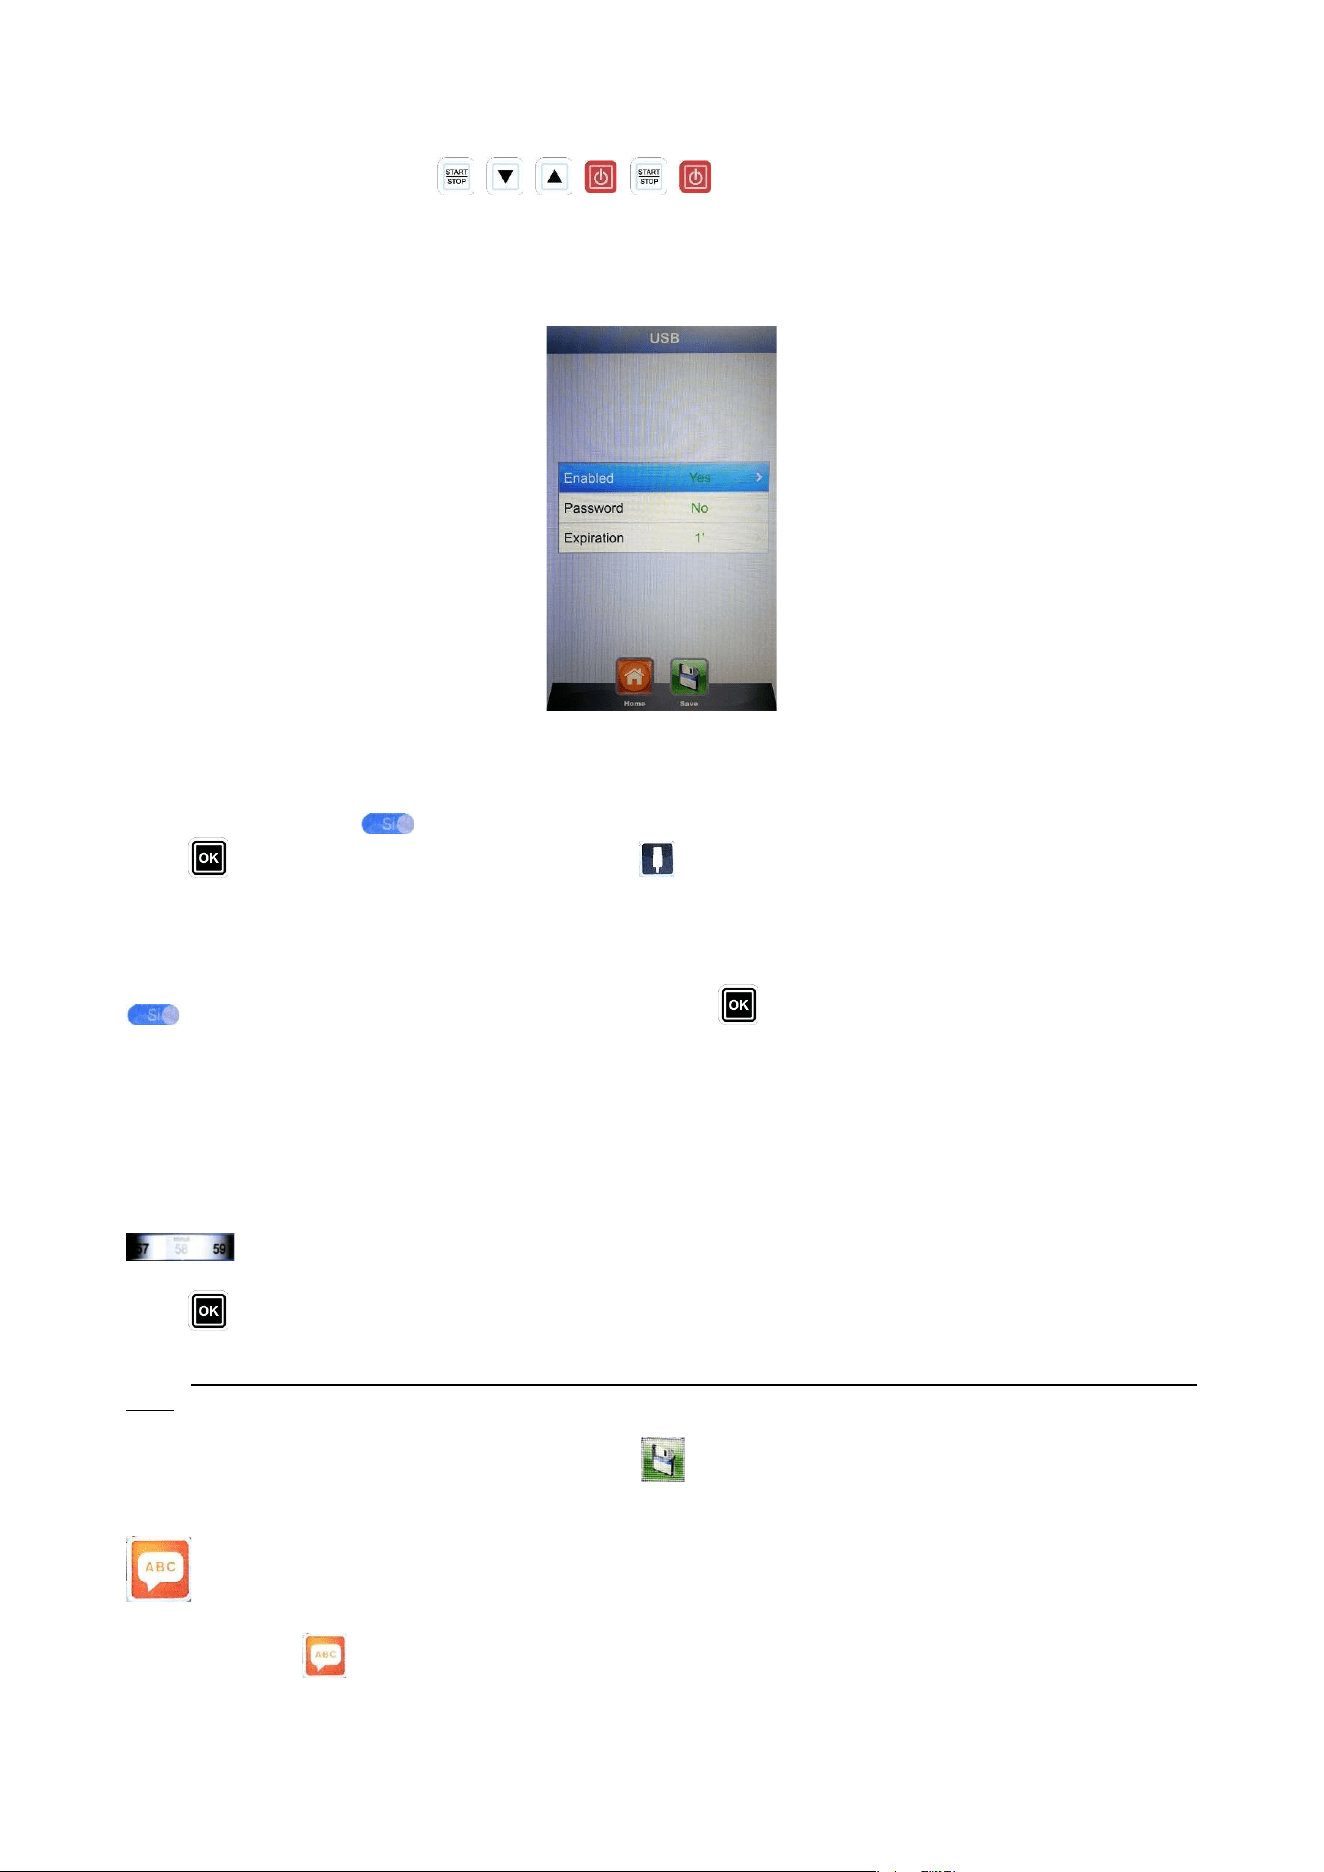
Page 37
Press in sequence the buttons:
The User enters the USB section setting menu. The next screen is the following:
Enabling: it allows to enable or disable the USB section in the Vision Full Touch control.
Select the desired option dragging the finger towards right or left up to the desired value and confirm
touching again the icon .Alternatively use the slider to select the desired option and confirm with the
button . In case the menu is disabled, the button disappears from the menus Chef and Recipes.
Password: it allows to protect with a password the access to the USB menu, if enabled. Select the desired
option dragging the finger towards right or left up to the desired value and confirm touching again the icon
.Alternatively use the slider and confirm with the button . In case of password enabling, the next
access to the USB menu is allowed only by typing the password (reported in the previous page).
Expiration date: when the password is enabled, the system allows to set for how many minutes it is
possible to access the USB menu (by extracting and re-inserting the key) without typing the password again.
After having extracted the key, the countdown starts and when it will be completed, at the next USB key
reinsertion, it will be necessary to type again the password to enter the USB menu. Select the expiration time
dragging the finger towards right or left up to the desired value and confirm touching again the icon
.
Alternatively, enter the option and scroll with the Slider until setting the desired minutes. Confirm with the
button .
Note: when the USB key is inserted, the countdown is suspended and the USB menu is accessible every
time.
At the end of all settings, save them with the button .
Research – very useful mode to filter the desired recipe when there are many recipes saved, both
imported or saved by the User.
Access the menu . Following screen will appear:
RDRG
Page 38
Digit the letters touching the corresponding button on the video, until composing the name of the desired
recipe or part of the name. Press the icon to confirm.
Alternatively, use the arrow buttons to move through the lines and the Slider to scroll the specific letters.
Confirm every digit with the button . At the end press the button OK in the keyboard and confirm always
with the button . Now the display will show the filtered recipes.
To do a new research press again the icon . To exit the Research mode press a second time the icon
leaving the textual research field in blank.
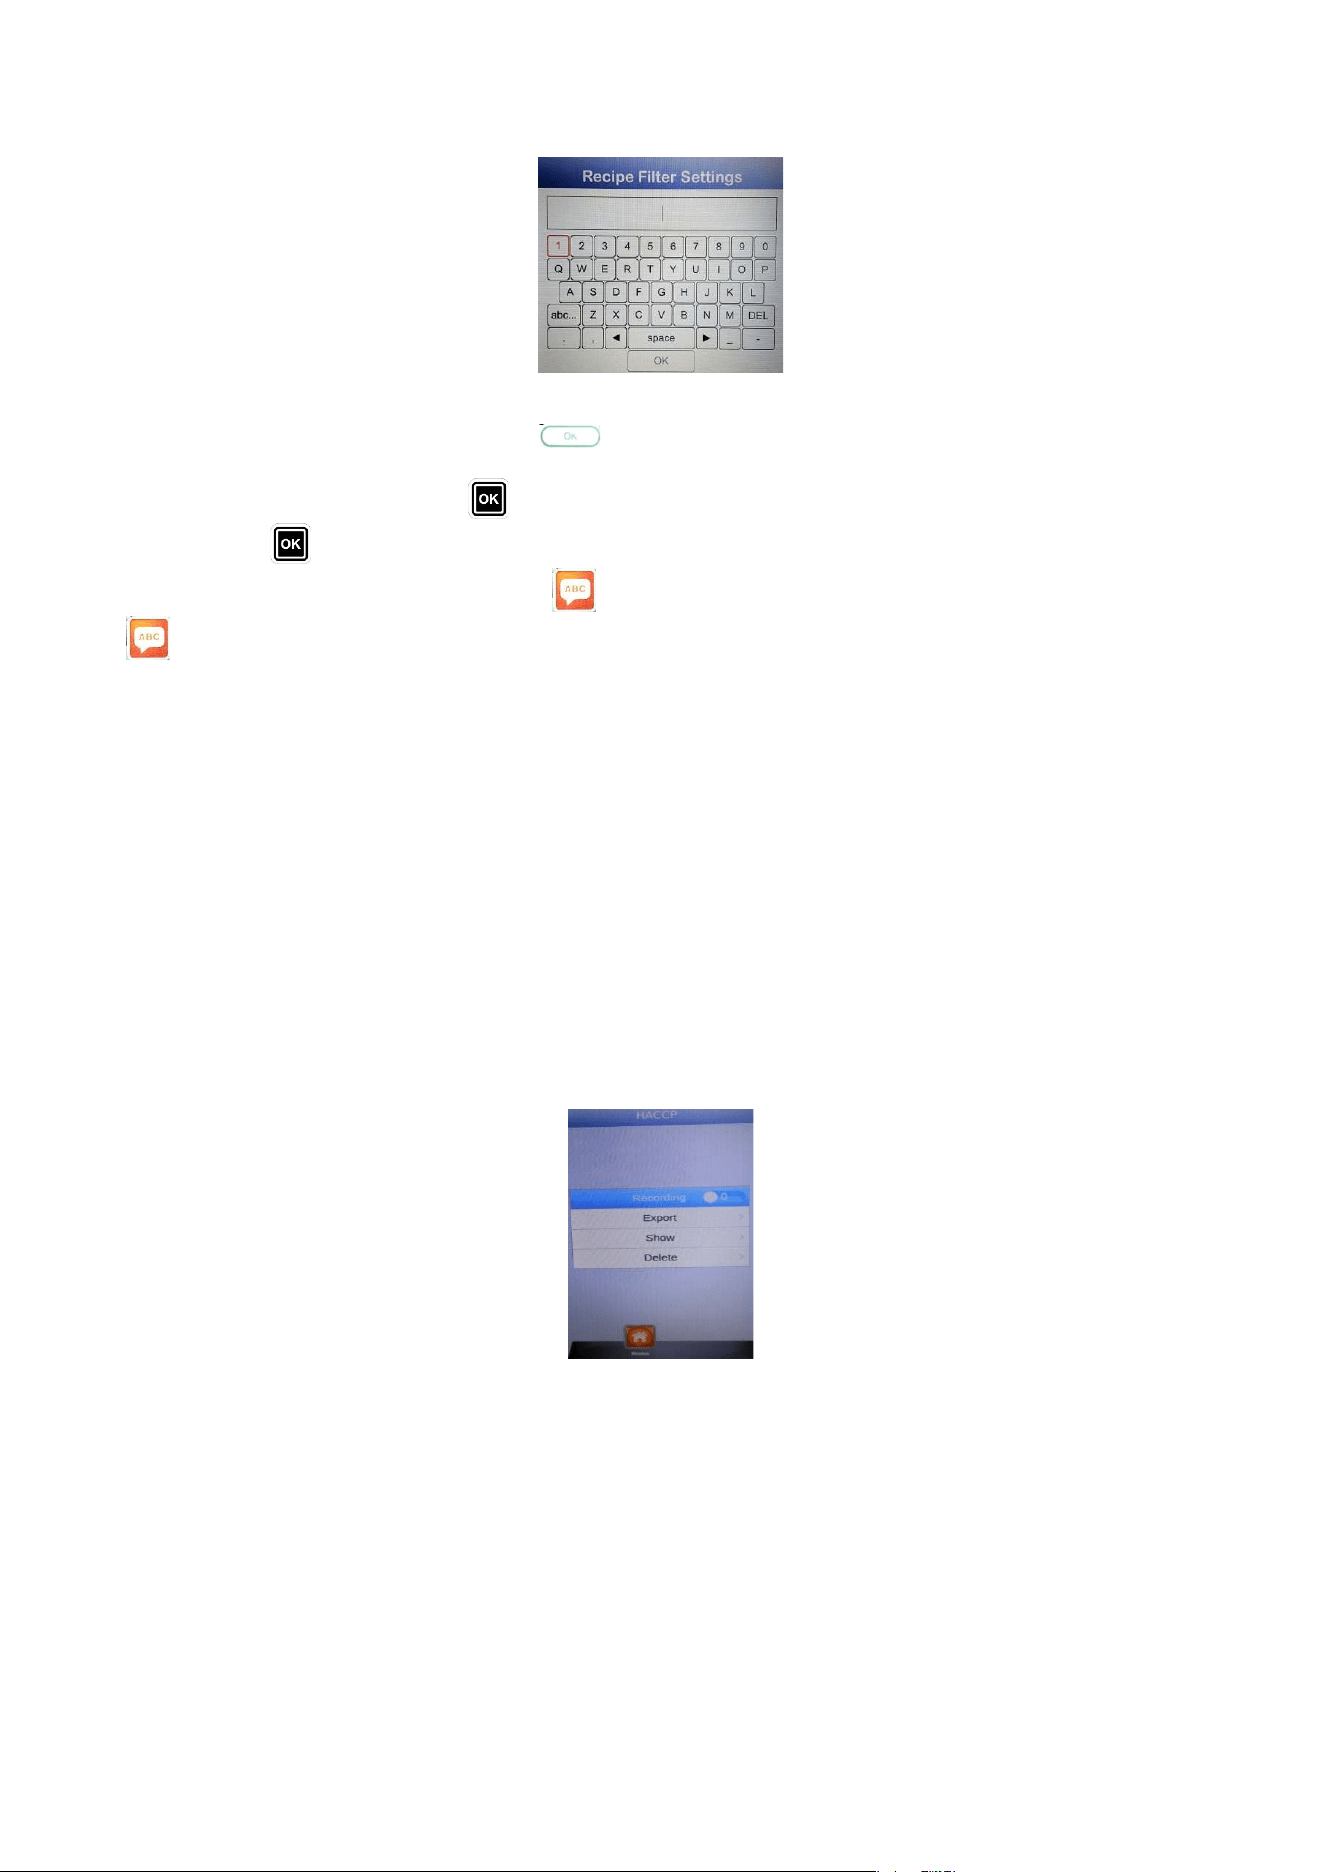
HACCP – VISION FULL TOUCH
HACCP – 80P
HACCP is the acronym of Hazard Analysis and Critical Control Points and basically consists in an self-
control system to be performed by every professional within the field of foods production in order to estimate
dangers and risks, and also to establish control measures to prevent any potential hygienical and sanitary
issue.
Interesting data are the regular records of all the cooking parameters, such as room temperature, heart
temperature, humidity degree, etc., and other parameters to record the start of the ovens cleaning processes
too.
Malfunctions of the oven may affect the cooking programs success and such irregularities can be caught by
analysing cooking logs.
From Settings Menu in the Home Page, select HACCP Menu
Recording: Enable / disable automatic record function of
HACCP data
Export: Exportation of the HACCP record data on a
usb key
Show: Viewing a record of the HACCP data saved
Delete: Deletion of HACCP data records
RDRG

Page 39
ABSENCE OF ELECTRICAL SUPPLY
In case of absence of electrical supply during a cooking program, the oven can resume and take to the end
the afore mentioned cooking program if the electrical supply is restored within a time limit of 5 minutes from
the interruption. After these 5 minutes the oven will interrupt the cooking program (also not recoverable after
a time that long) and will show the corresponding error message (see ALARM CODES)
SOFTWARE UPGRADE
Both the electronic tools (80P and Vision Full Touch) can be on site updated with the last release of the
available software after authorisation by the producing company.
In case of malfunctions due to software issues, contact our assistance service and verify with the
professional any possible software update available.
ALARM CODES:
The error messages provided by the electronic control in case of operating anomalies are
listed below. When one of the following errors is displayed, except for error 009 which
is self-resetting, you must contact your nearest customer service center.
Er. 001 = the power board gives no feedback
Er. 002 = wrong firm-ware
Er. 003 = probe alarm: a probe is disconnected or short-circuited
Er. 004 = heating element anomaly
Er. 005 = program memory not working
Er. 006 = program for delayed start removed after setting
Er. 007 = blackout error: the baking could not resume after a blackout
Er. 008 = no network synchronism: the frequency of the network is unstable, or the power board is faulty.
Er. 009 = motor thermal protection: the power board has blocked the oven because of excessive
heating of the motor. Once the anomaly is resolved, the oven returns operational
Er. 010 = auxiliary board 1, if present, does not answer
Er. 011 = auxiliary board 2, if present, does not answer
Er. 012 = auxiliary board 3, if present, does not answer
Er. 013 = auxiliary board 4, if present, does not answer
Er. 015 = the vacuum-sealed probe has been connected or disconnected during the cooking
program
Er. 016 = communication problem between display board and power board
Er. 017 = communication problem between display board and keyboard
In the presence of one or more errors, before proceeding to ask for assistance, it is recommended to shut
the electrical supply of the oven down for at least 2 minutes. Verify the presence of the irregularity once the
oven is turned on again and, if persistent, contact the assistance service specifying the corresponding error
code.
RDRG
Page 40
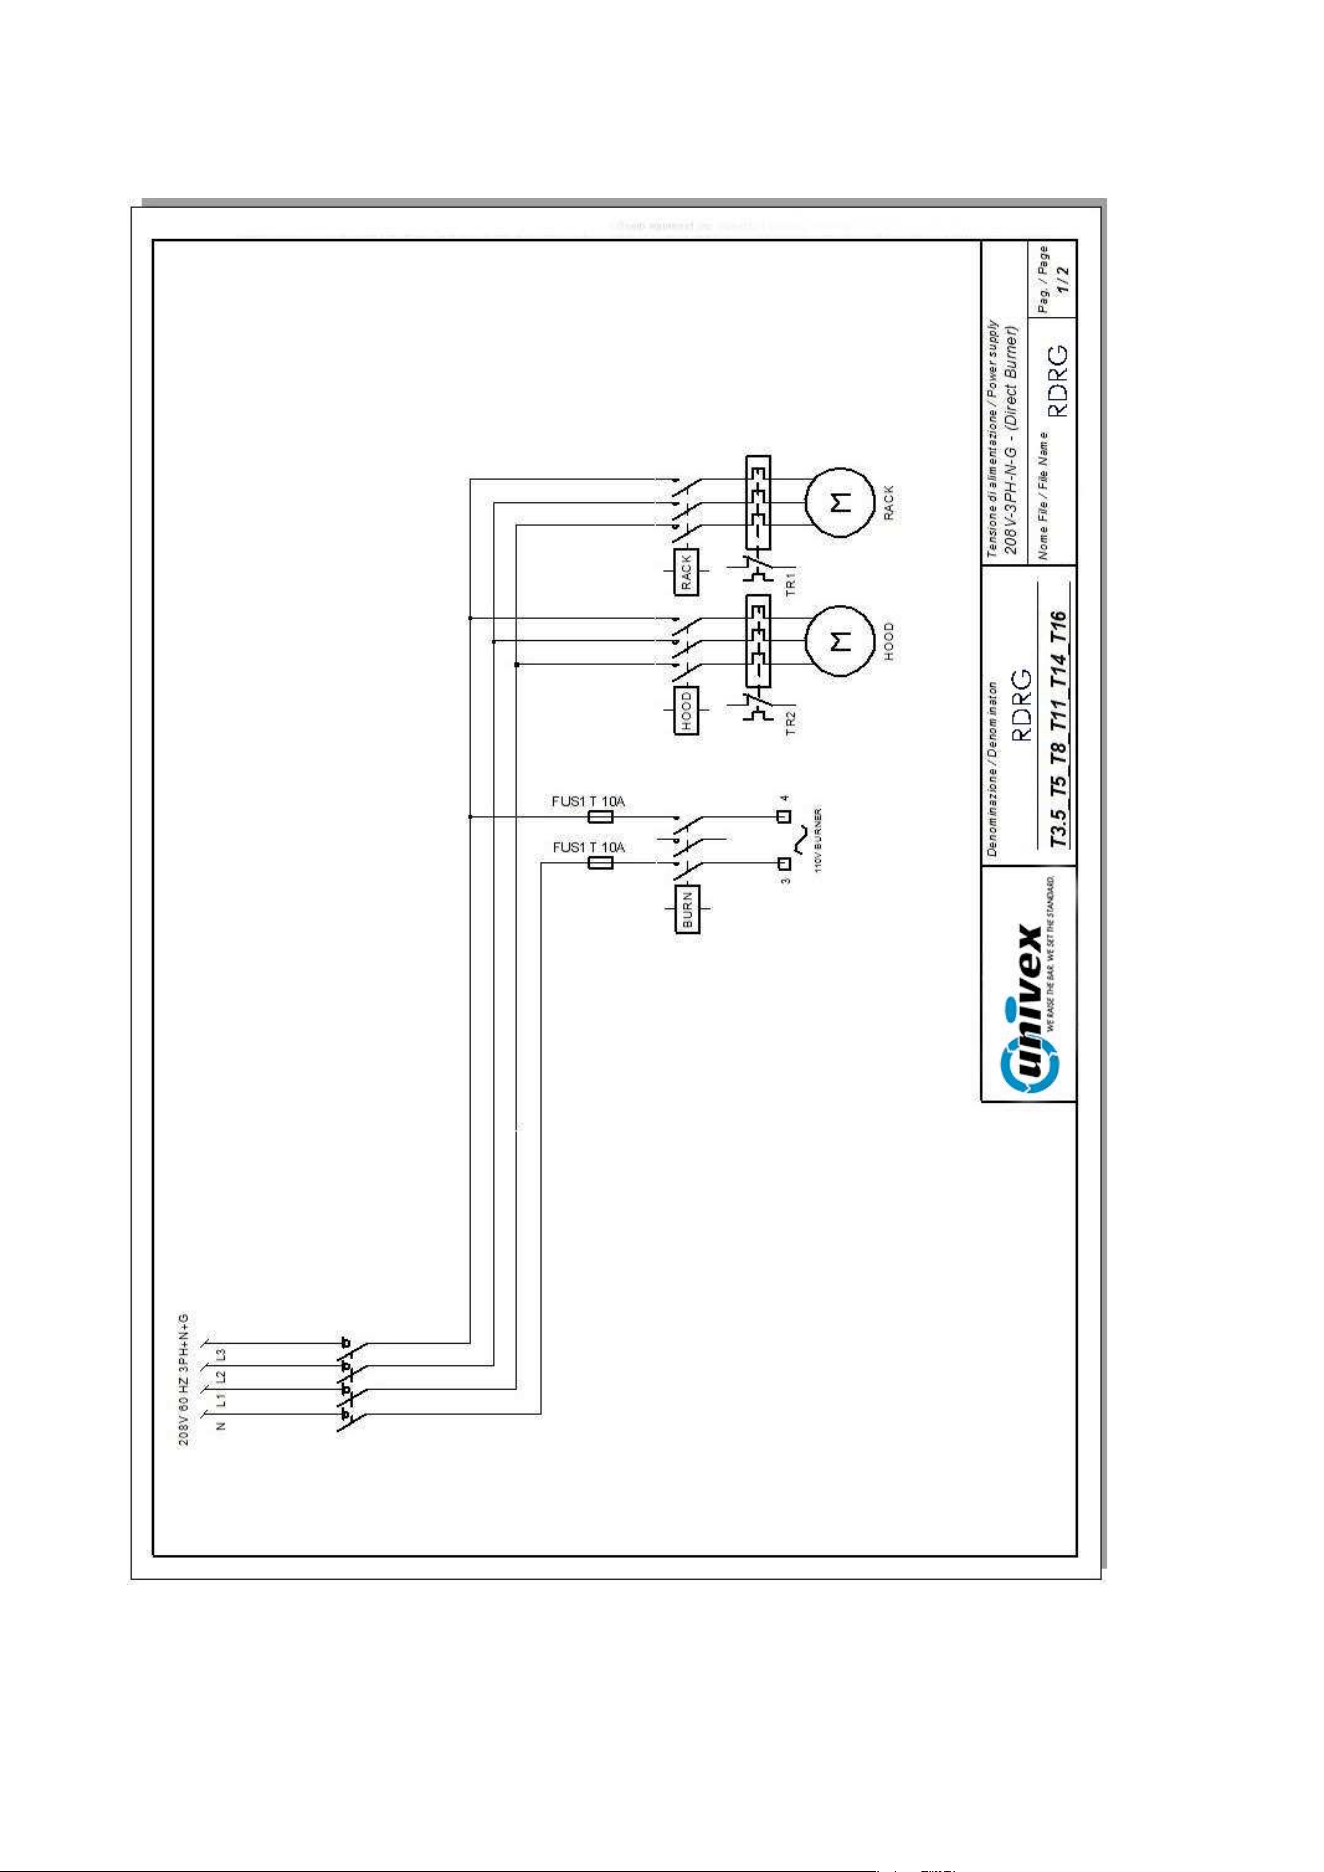
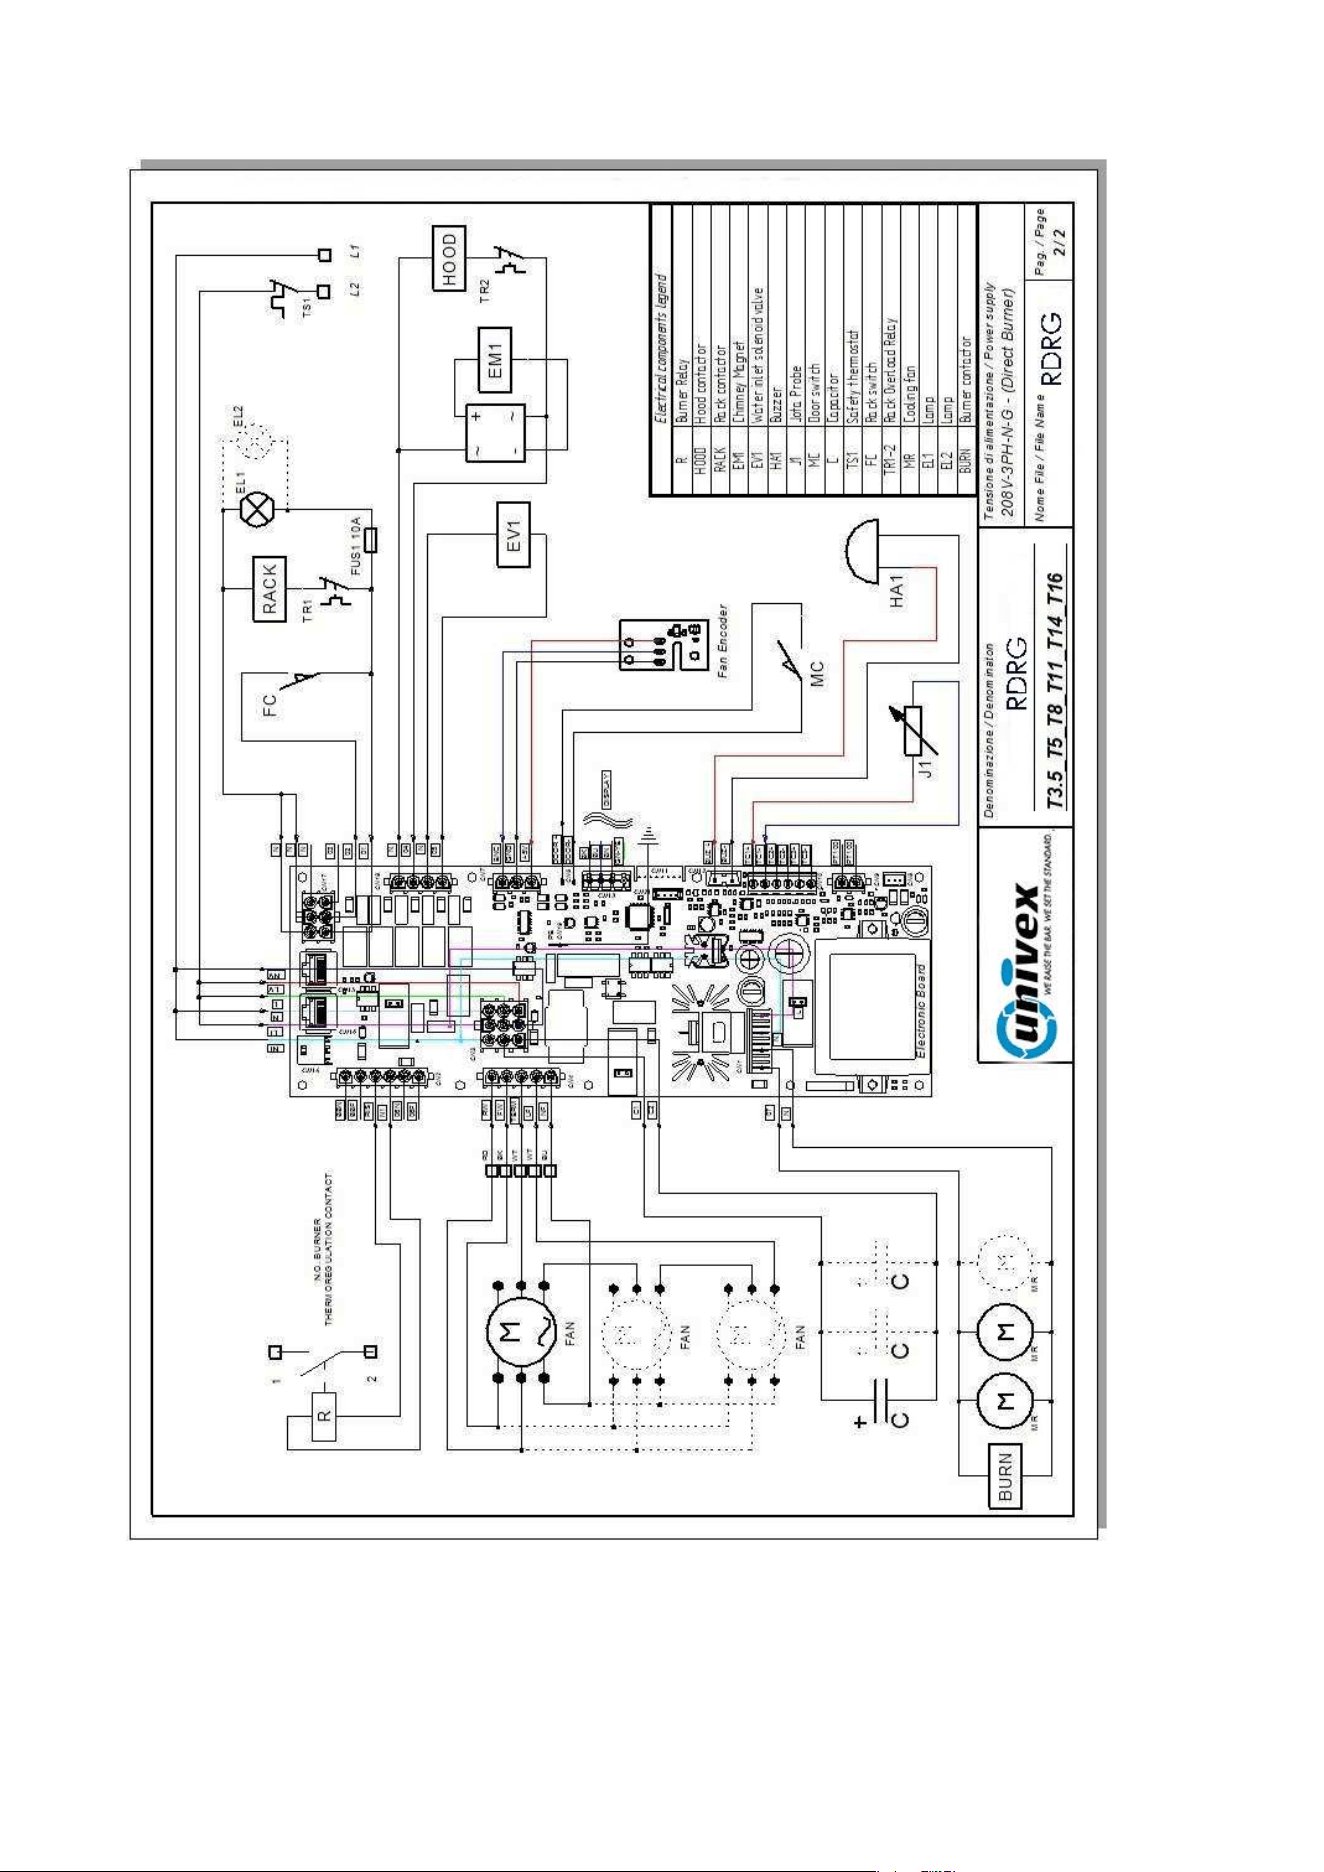
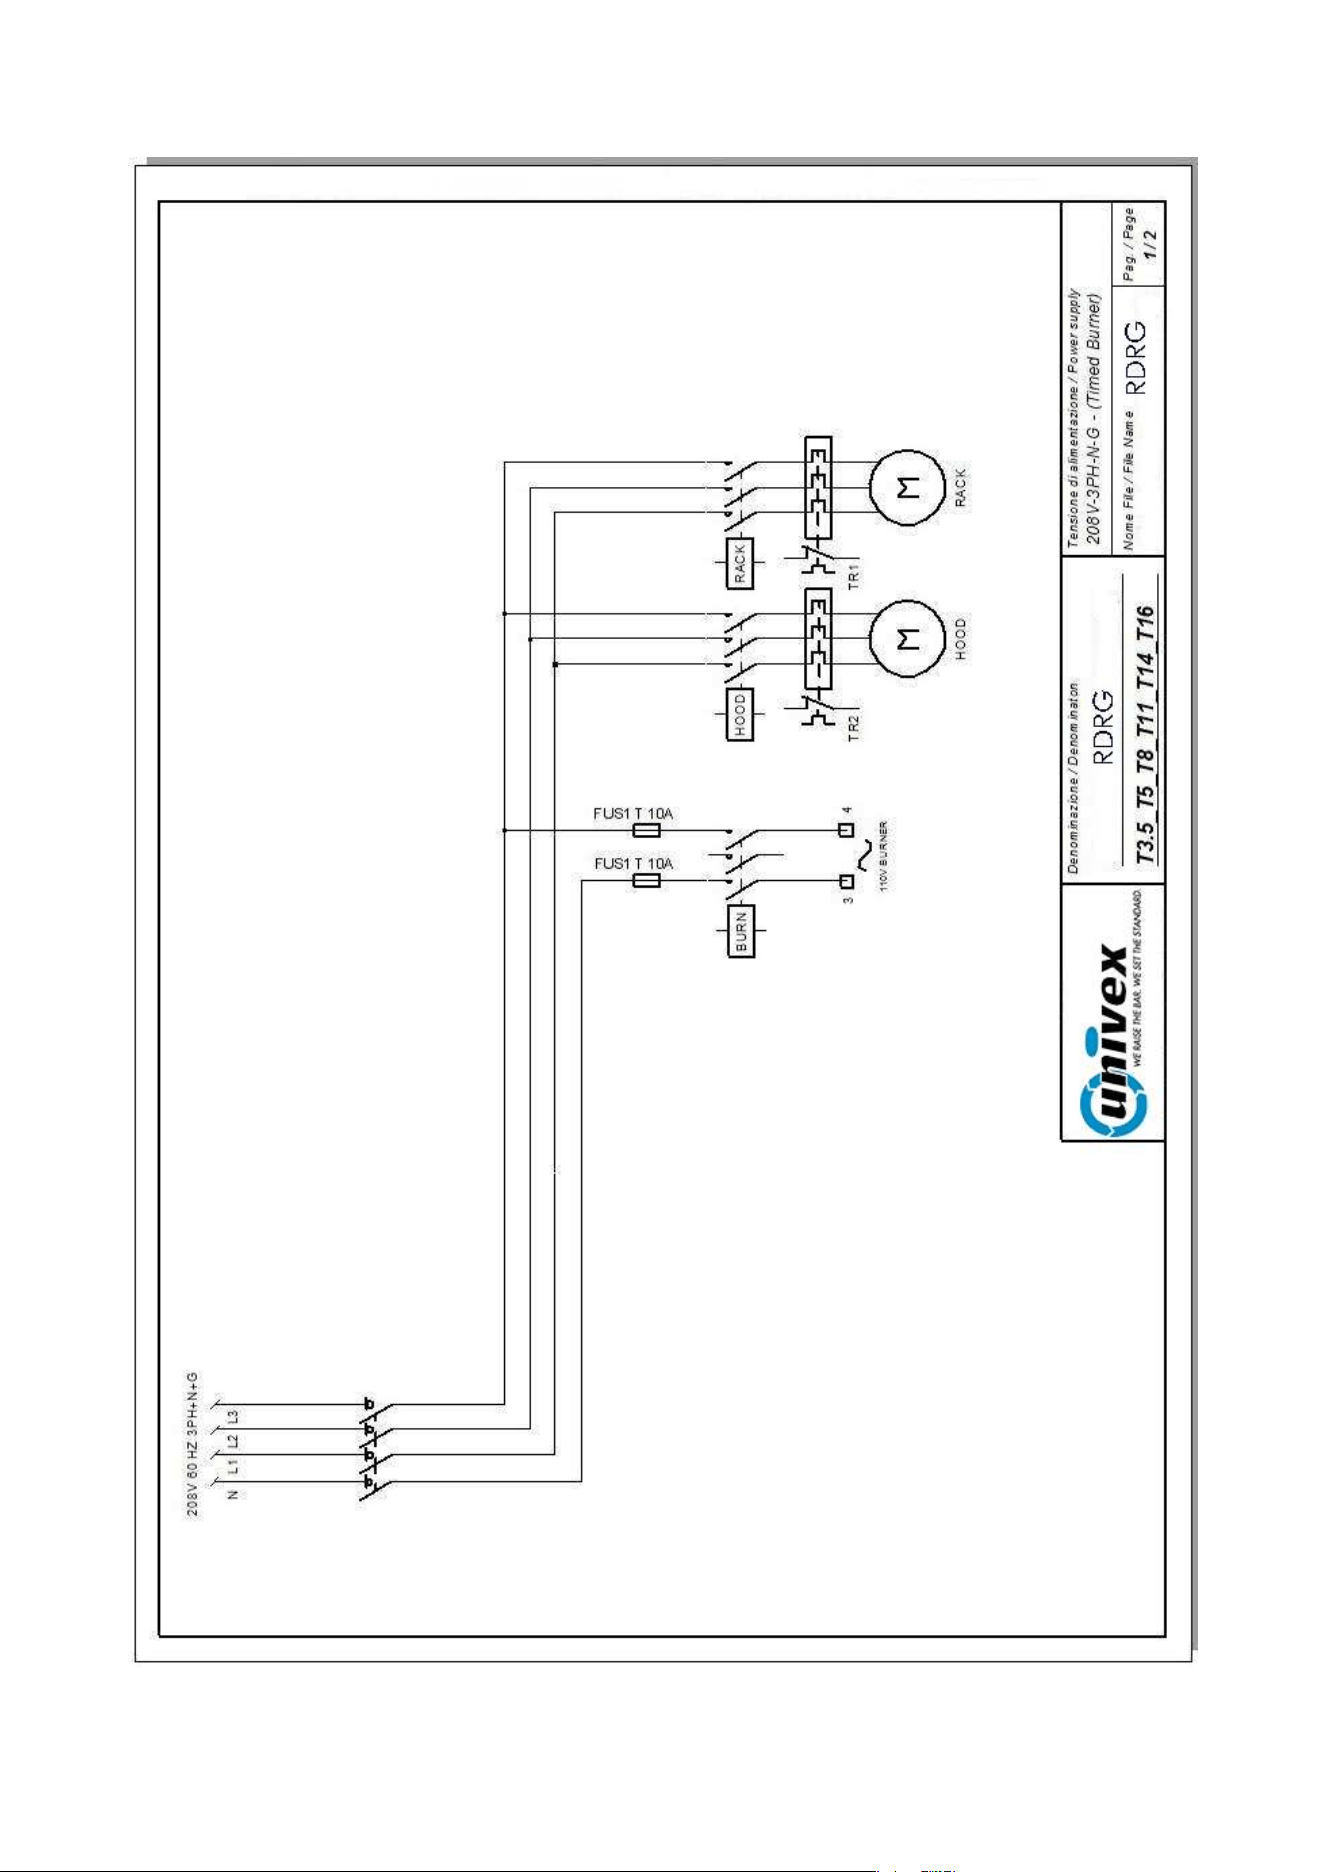
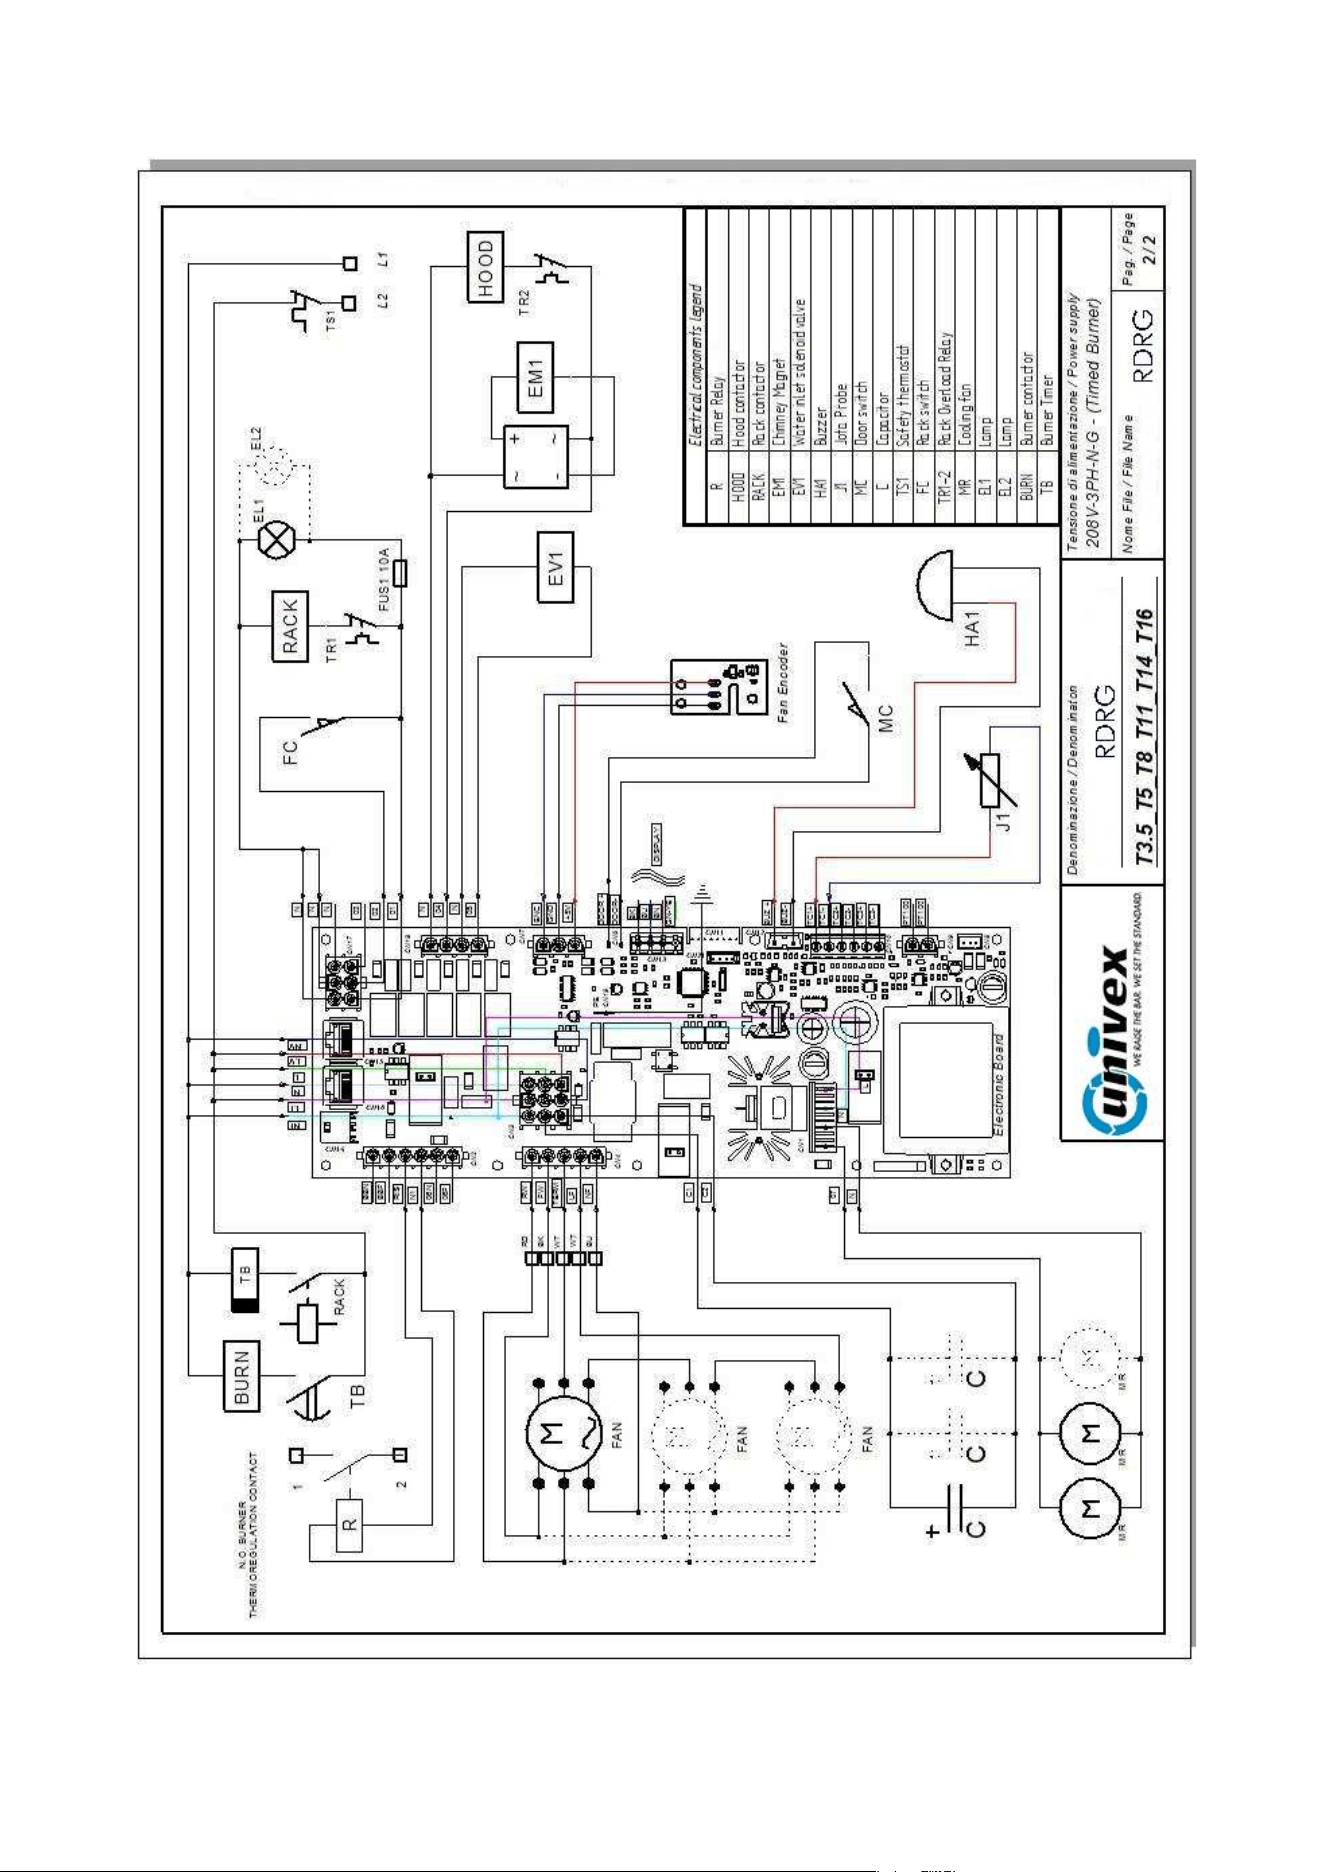
ELECTRIC DIAGRAM
Page 41
Page 42
Page 43

Page 44
CLEANING AND CARE
WARNING!
The equipment must never be cleaned using a high-pressure cleaner or direct water spray.
Cut off power to the oven when cleaning.
Clean the equipment only when cool.
Do not use cold water on the warm glass of the door.
The oven must be cleaned daily!
The outer steel surface of the oven may be cleaned using a damp cloth, with common household
cleansers if needed, then dried. We do not recommend using scratchy, abrasive or corrosive
products, which could damage the surfaces. Additional care may be taken by using products
specifically developed for cleaning steel. In this case, follow the label instructions for the product.
We recommend using specific oven cleaning products for cleaning the baking chamber. Here again,
follow the manufacturer’s directions for using the product.
Hazardous cleaning products must not be used for any reason.
WHAT TO DO IN CASE OF PROBLEMS
Even if the oven is being used correctly and there are problems with it, close all connections and contact an
authorized technician from the customer service centre.
WHAT TO DO IN CASE OF PROLONGED SHUTDOWN
If the unit is not going to be used for an extended period of time (seasonal closing, vacation, etc.), it is
advisable to clean it as described above and to dry it immediately. Disconnect the electrical devices, and
close the cut-off cocks upstream.
YEARLY MAINTENANCE
At least once a year, the oven should undergo maintenance. This should be scheduled through an
authorized customer service centre.
This periodic maintenance must include the following points:
- Operation of available devices
- Check of earthing of connection cable
- Check of water connections (loading and unloading)
- Lubricate the ratio motor
- Cleaning of steel gaskets for door seal
- Replacement of internal lights.
Parts are to be replaced only by personnel authorized by the manufacturer or by personnel who have been
properly trained for this purpose.
Spare parts must be ordered from the manufacturer!
RDRG

Page 45
CAUSES OF MALFUNCTION
ASSIGNED PERSONNEL
Any work on electrical or electronic components of the machine must be carried out only by qualified
personnel with good knowledge of the operation of the electrical parts and the necessary precautions to
handle them, in order to prevent injuries to themselves or others.
CART
The cart will not raise or turn if the motor protection in the electrical panel has tripped, or if the door handle
limit switch is defective or incorrectly positioned.
AIR CIRCULATION FAN
The air circulation fan will not start if the motor protection in the electrical panel has tripped, or if the door
handle limit switch is defective or incorrectly positioned.
VAPOUR EXTRACTOR
The vapour extractor will not work if:
- the motor protection in the electrical panel has tripped
- it turns in the wrong direction
- the intake grille is clogged
- the discharge pipe is clogged
INSUFFICIENT HUMIDIFICATION
- Scarce inlet of water in humidifiers due to pressure drop in mains or clogs in the humidification water
circuit.
- The temperature in the chamber is too low
WATER LEAKS
- Foreign bodies in the water inlet solenoid valve
LOSS OF HOT AIR WITH DOOR CLOSED
- Seal gaskets dirty or worn
UNEVEN COOKING
- The air circulation fan turns the wrong way
- The flow adjustment shutters are not oriented correctly
- Insufficient thermal power of burner
BREAD OPAQUE OR ROUGH
- Insufficient humidification
TECHNICAL SERVICE
For all causes of malfunctions, contact technical service.
TECHNICAL SERVICE FOR THE OVEN
- If the cause is due to malfunction of the oven, contact the retailer who sold the machine. Authorized
retailers are able to provide information on almost all marketed products, and they should be able to
provide advice on any problems you may be experiencing.
Assistance form technical service must be agreed upon based on the severity of the malfunction. Routine
maintenance will be scheduled in the medium term.
TECHNICAL SERVICE FOR THE BURNER
- If the cause is due to malfunction of the burner, refer to its documentation. If you do not find the answer
to your question, contact the technical service office of the company that provided the burner.
RDRG

Page 46
NOTES:
Considering that the manufacturer carries out on-going research to optimise its entire production range, in
terms of aesthetic and technical characteristics, the ovens and accessories are subject to feasible variations
without notice.
RDRG
Page 47
Phone: 603-458-7690 Address: P.O Box 1062, Windham NH, 03079