Perfect Aire, LLC
5401 Dansher Road
Countryside, IL 60625
1020_M398
DEHUMIDIFER
OWNER’S MANUAL

Page 1
Safety Precautions Page 2
Identication of Parts Page 5
Operating Instructions Page 7
Care and Maintenance Page 14
Troubleshooting Tips Page 15
CONTENTS
MODEL
2PFD22
2PFD35
2PFD50
2PFDP50
Page 2
SAFETY PRECAUTIONS
Read these safety precautions before installation and operation.
For your safety, it is important that you read and follow the instructions in this manual to minimize the risk of personal
injury, fi e or electrical shock.
California Proposition 65 Warning
WARNING: Cancer and reproductive harm - P65warningns.ca.gov
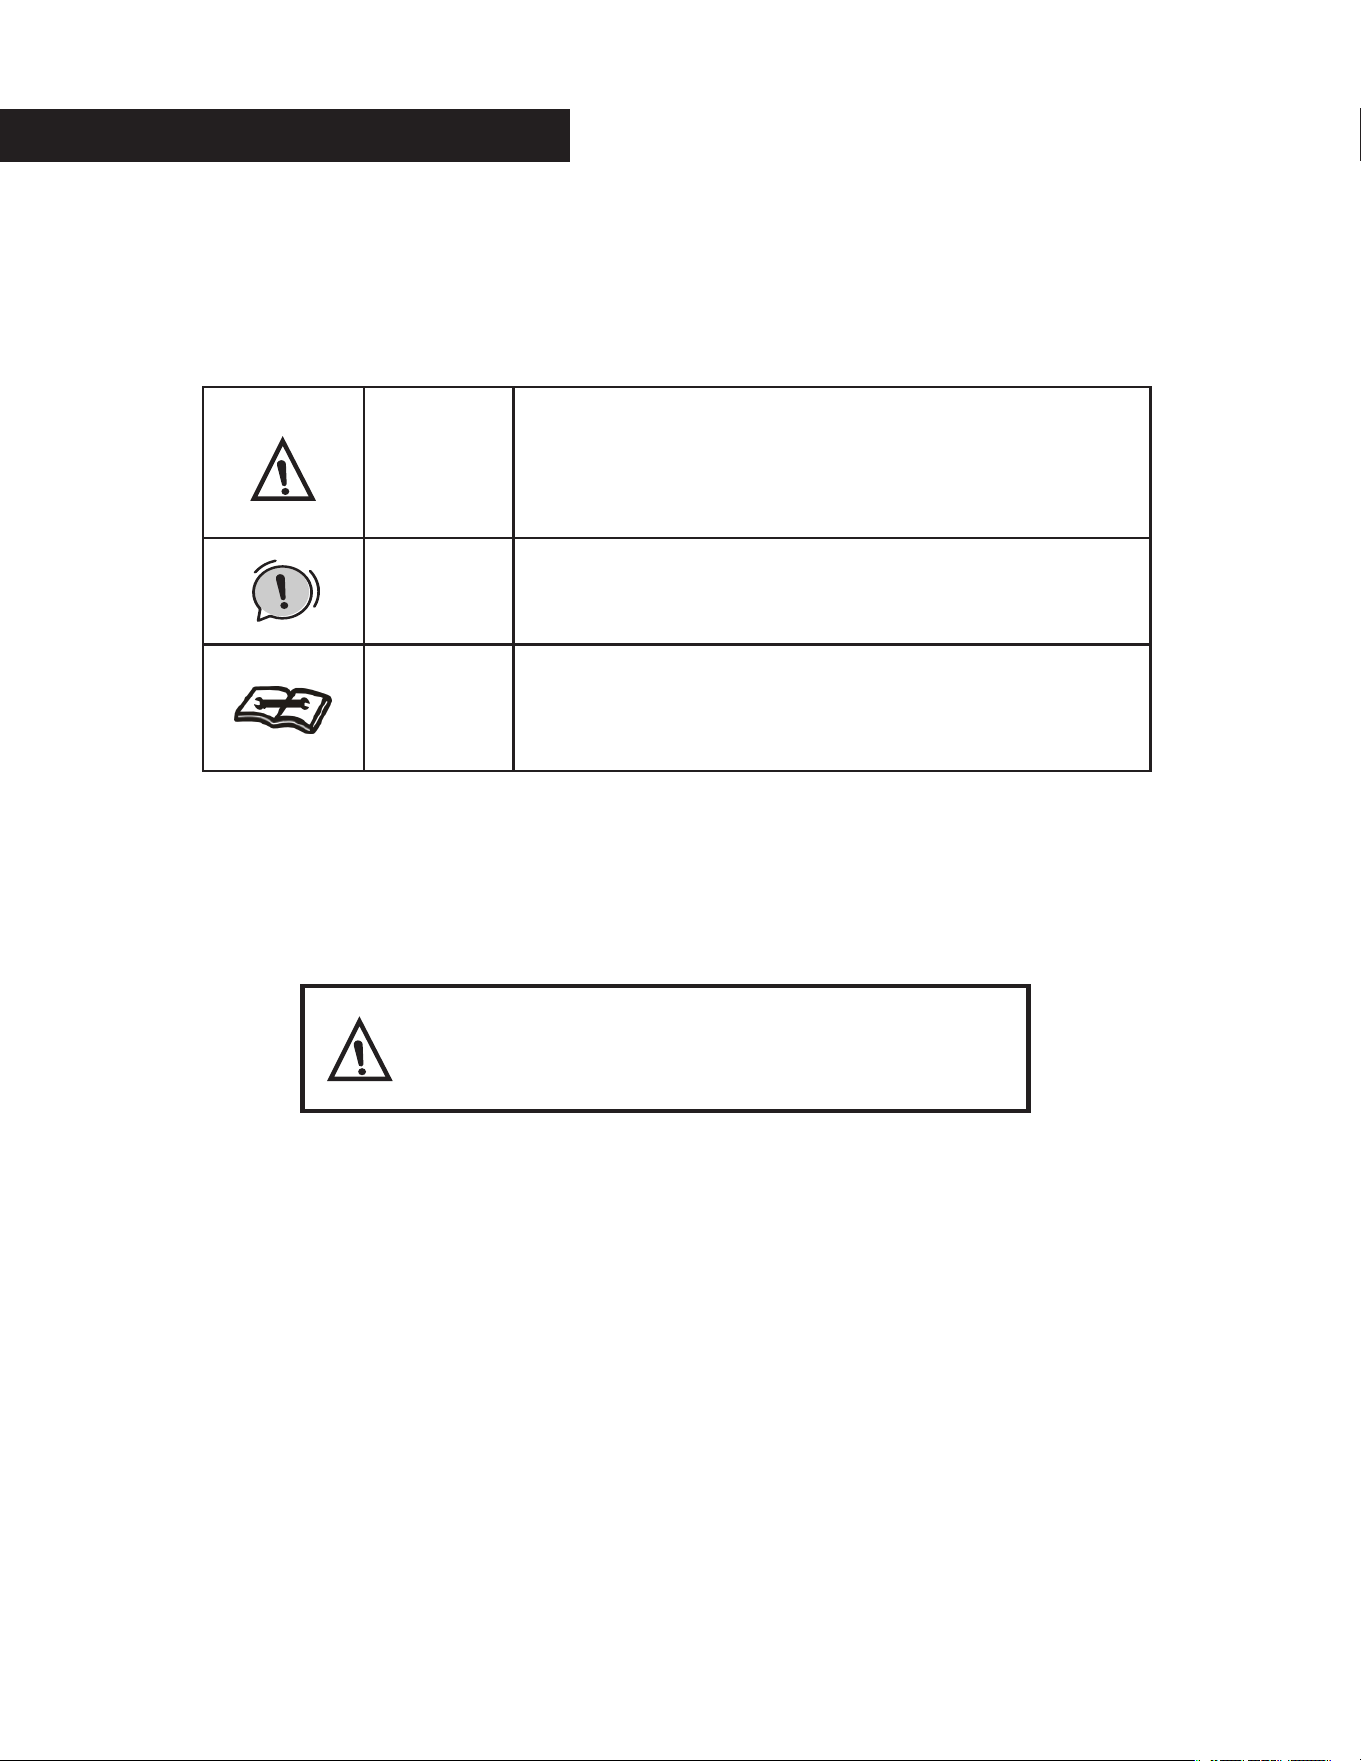
Warning
This symbol shows that this appliance uses a flammable
refrigerant. If a refrigerant leak occurs and is exposed to
an external ignition source, there is a risk of fi e.
This symbol shows that a service personnel should be
handling this equipment with reference to the installation
manual.
This symbol shows that the operation manual should be
read carefully.
Warning
Caution

Page 3
CAUTION
• This dehumidifier is intended for indoor esidential us only and should not be used for commercial or
industrial applications. Do not use outdoors
• Do not place the unit near a heat source or other heat generating appliances such as clothes dryer,
heater or radiator
• Do not attempt to disassemble or repair the unit by yourself.
• Do not use or store the dehumidifier near flammable gas or combustibles, such as gasoline, benzene
thinner, or other chemicals, etc.
• Do not drink or use the water collected from the unit.
• Do not remove the water bucket during operation.
• Do not use the unit in small cramped spaces that are not well ventilated
• Do not store or use in areas where water may splash onto the unit.
• Place the unit on a level, sturdy section of the floo .
• Do not cover the intake or exhaust openings.
• Never insert your finger or other fo eign objects into grills or openings. Take special care towarn chil-
dren of these dangers.
• Do not climb or sit on the unit.
• Always insert the filters secu ely. Clean filter once every two weeks.If water enters the unit, tu n the
unit off and disconnect the power , contact a qualified service technicia
• Do not place foreign objects on the unit.
• The dehumidifier must be operated in an enclosed a ea to be most effective
• Close all doors, windows and other outside openings to the room.
• When first using the dehumidifi , operate the unit continuously 24 hours. Make sure the plastic cover
on the continuous drain hose outlet is fitted p operly so there are no leaks.
• This unit is designed to operate with a working environment between 5 C/41 F and 32 C/90 F, and
between 30%(RH) and 80%(RH).

Page 4
WARNING: FOR YOUR SAFETY
• The dehumidifier should not be sto ed in a room with continuously operating ignition sources (for
example: open flames, an operating gas appliance or an operating electric heater)
• Do not pierce or burn this dehumidifier
• Be aware that the refrigerant contained within this dehumidifier is odorles
• Appliance should be installed, operated and stored in a room with a floor a ea larger than 50ft2.
• Compliance with national gas regulations shall be observed.
• Keep ventilation openings clear of obstruction.
• Servicing shall only be performed an authorized service provider recommended by the equipment
manufacturer.
• Maintenance and repair requiring the assistance of other skilled personnel shall be carried out under
the supervision of the person competent in the use of flammable efrigerants.
• Fluorinated greenhouse gases are contained in hermetically sealed
equipment. For specific information on the type, the amount and the CO2
equivalent in tons of the fluorinated g eenhouse gas(on some models), please
refer to the relevant label on the unit itself.
• Installation, service, maintenance and repair of this unit must be performed by
a certified technician
• Recycling must be performed by a certified technician
NOTE ABOUT FLUORINATED GASSES (NOT APLICABLE TO THE UNIT USING R290 REFRIGERANT)
Page 5
BEFORE YOU BEGIN
NOTE: All the illustrations in the manual are for explanation purpose only. Your dehumidifier may be slightly
different. The design specifications are subject to change without prior notice. Consult with the customer
service for details. The most up-to-date versions of the manual can be found on the service website. Please
check for the latest version.
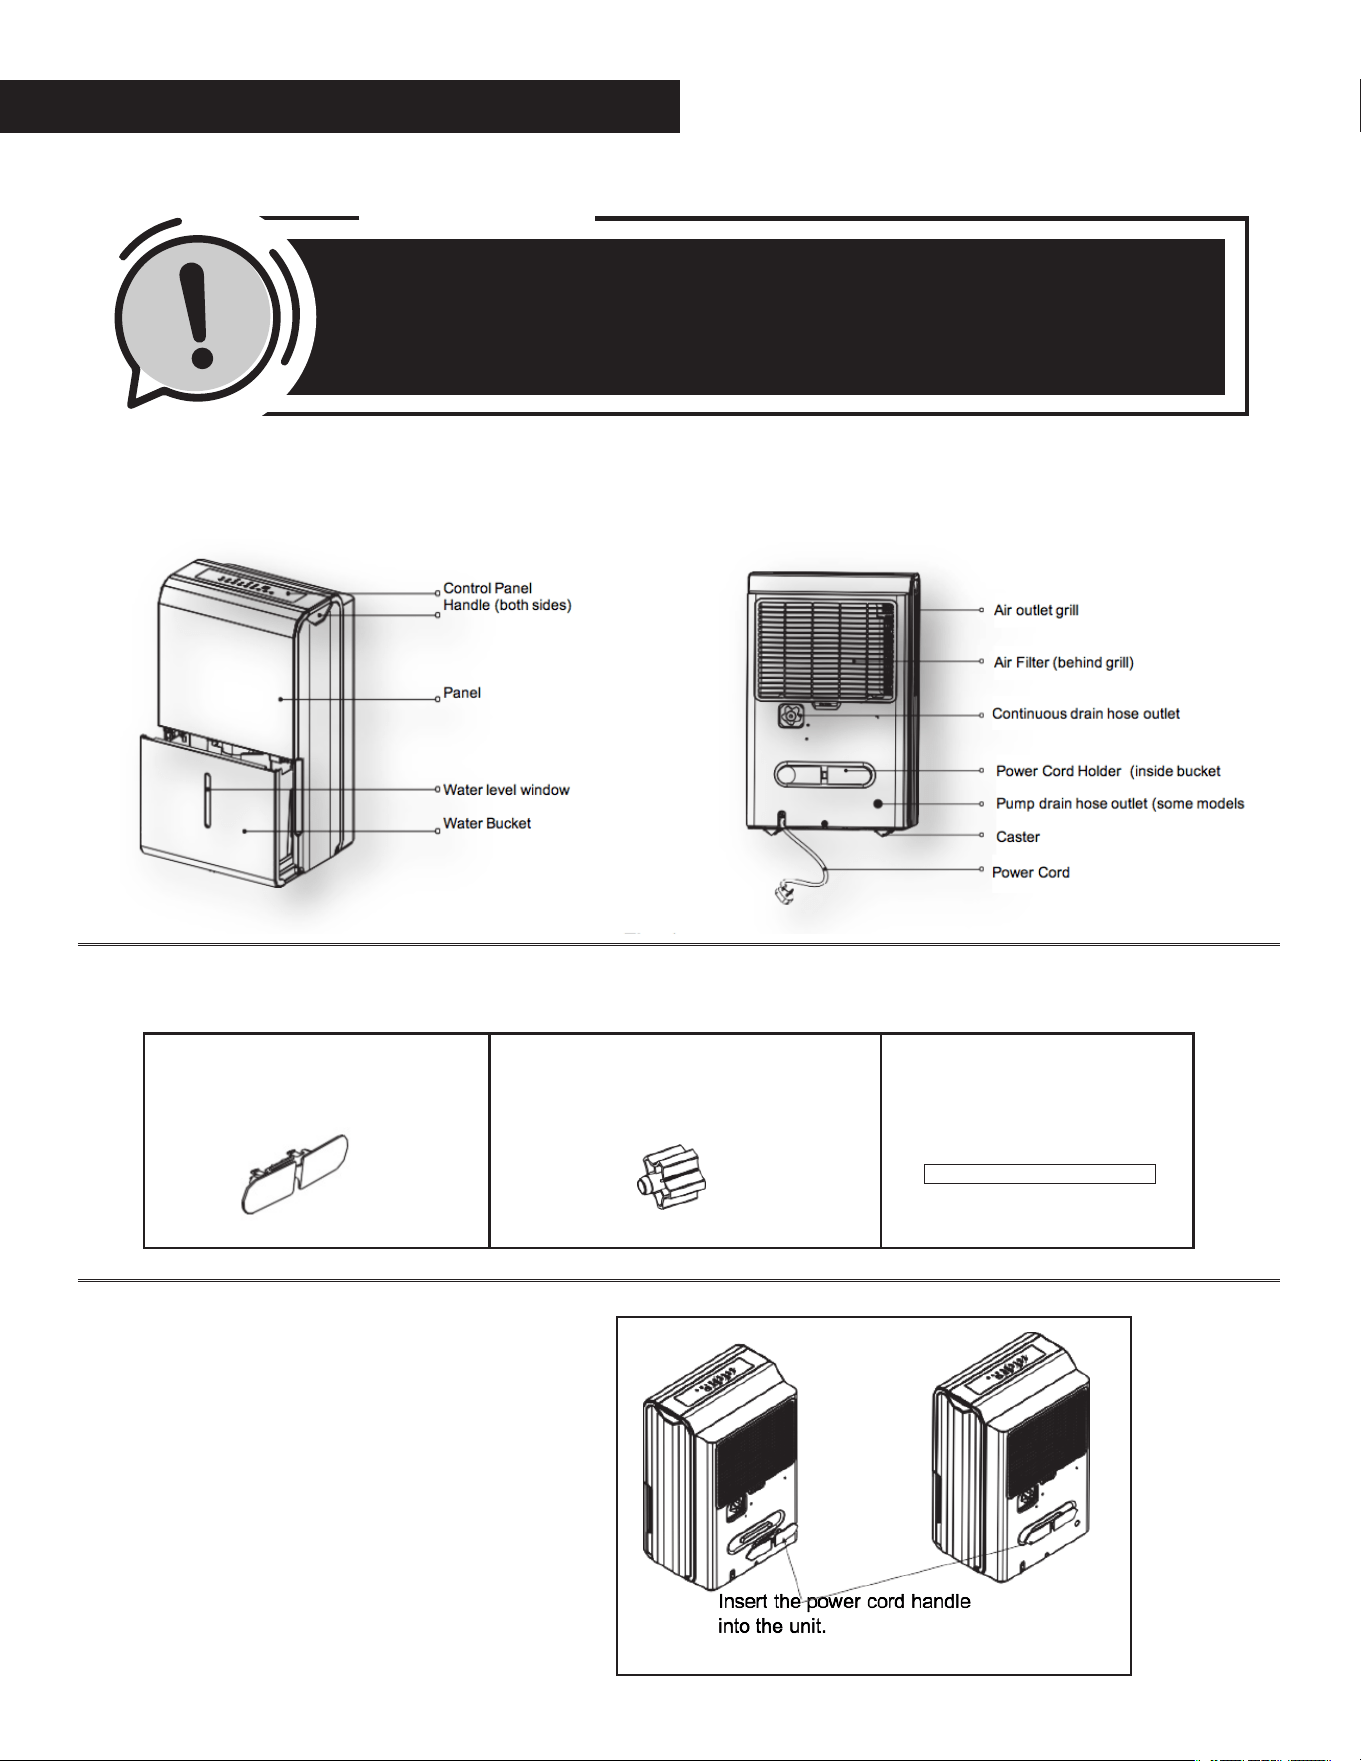
IDENTIFICATION OF PARTS
Accessories (shipped in the bucket of the unit)
Power Cord Holder Installation
Power Cord Holder (1PC) Female Threaded Connector (1PC)
(some models)
Pump Drain Hose
(1PC) (some models)
Fig 1
Fig 2
Fig 3
Page 6
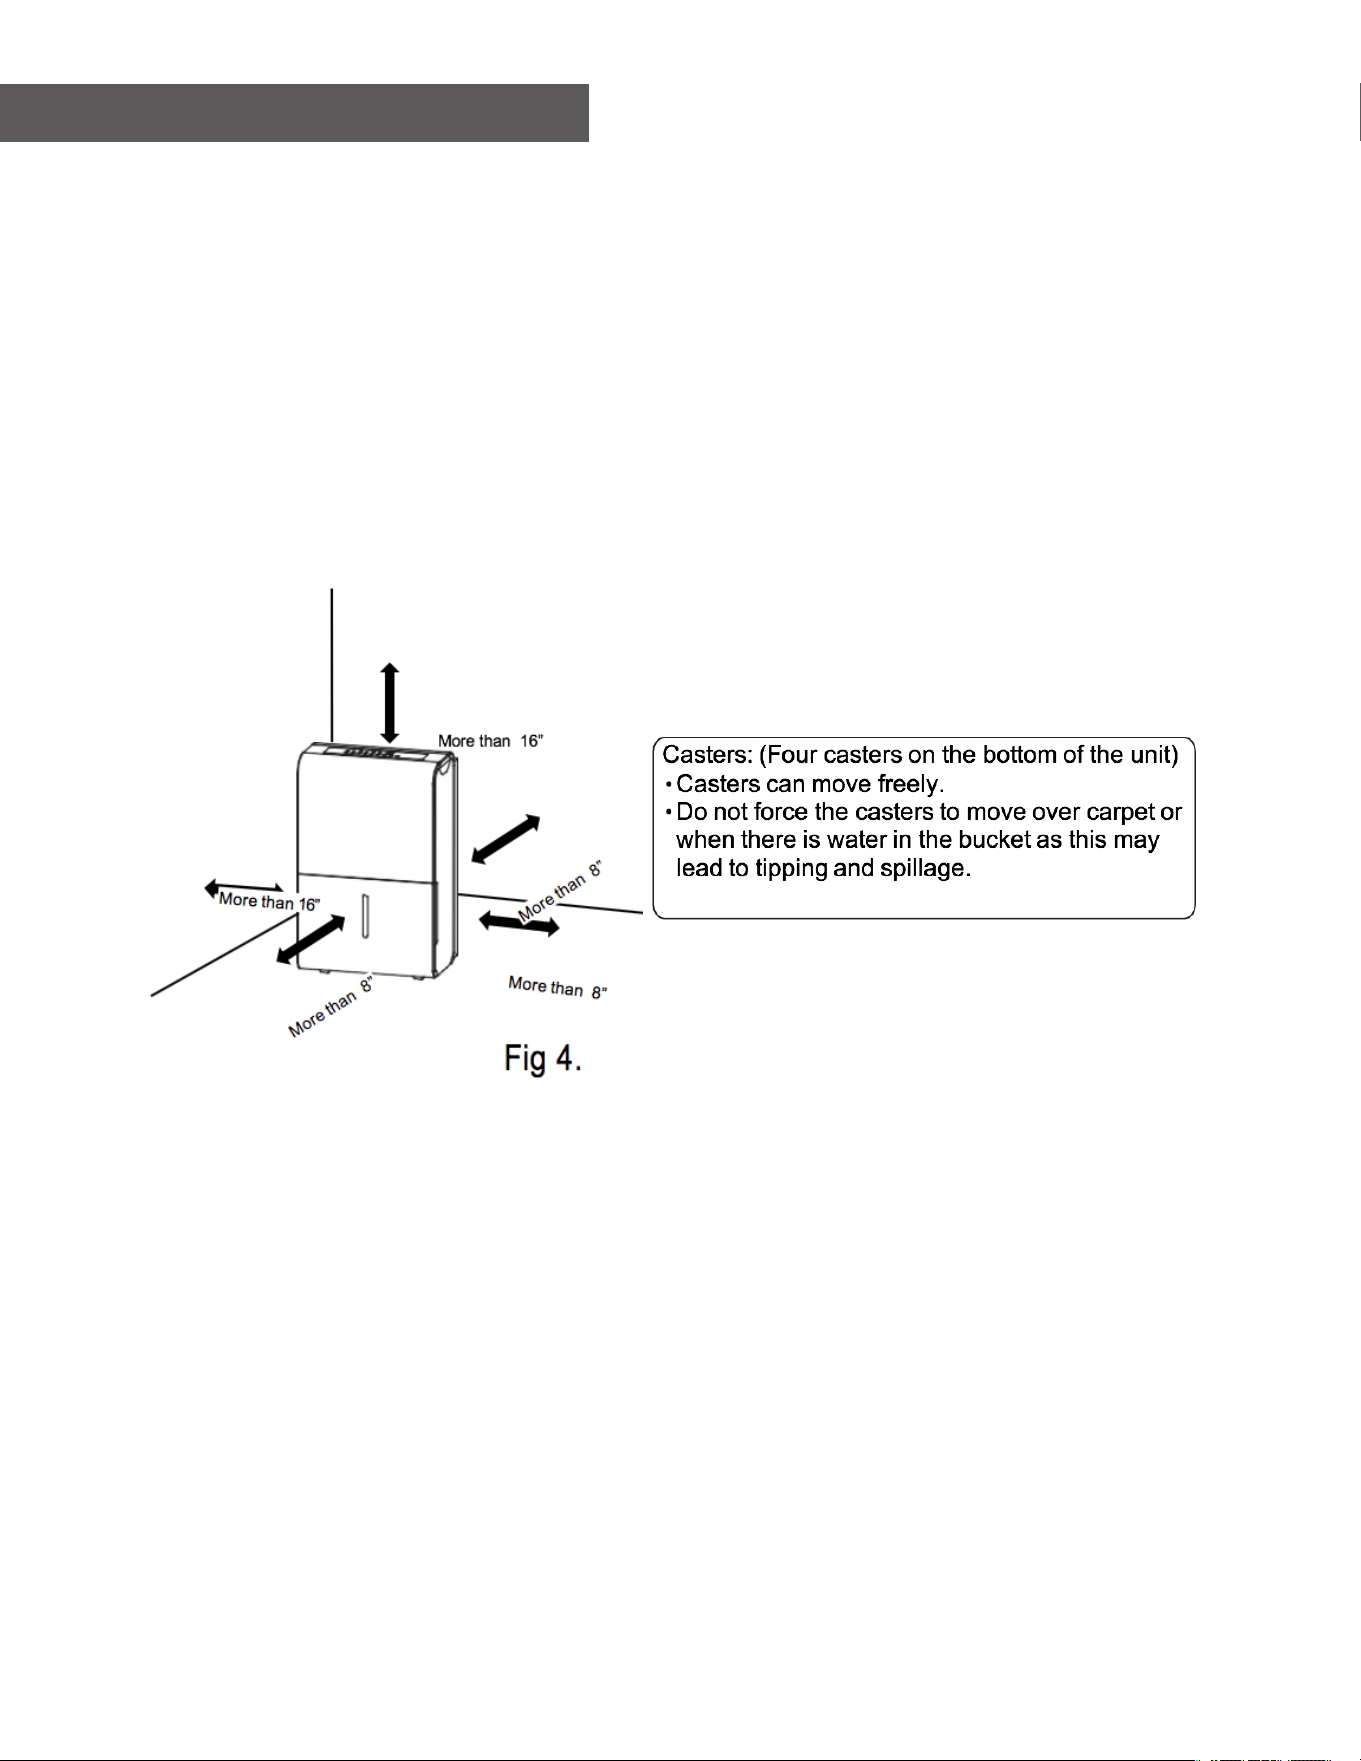
POSITIONING THE UNIT
This dehumidifier should not be used for comme cial or industrial applications.
Place the dehumidifier on a smooth, level floor s ong enough to support the unit with a full bucket of water.
For good air circulation, allow at least 8 inches of air space on all sides of the unit and a minimum of 16 inches
of air space at the air outlet (Fig. 4)
Place the unit in an area where the temperature will not fall below 410 F (50 C) because low temperature could
cause the coil the freeze.
Page 7
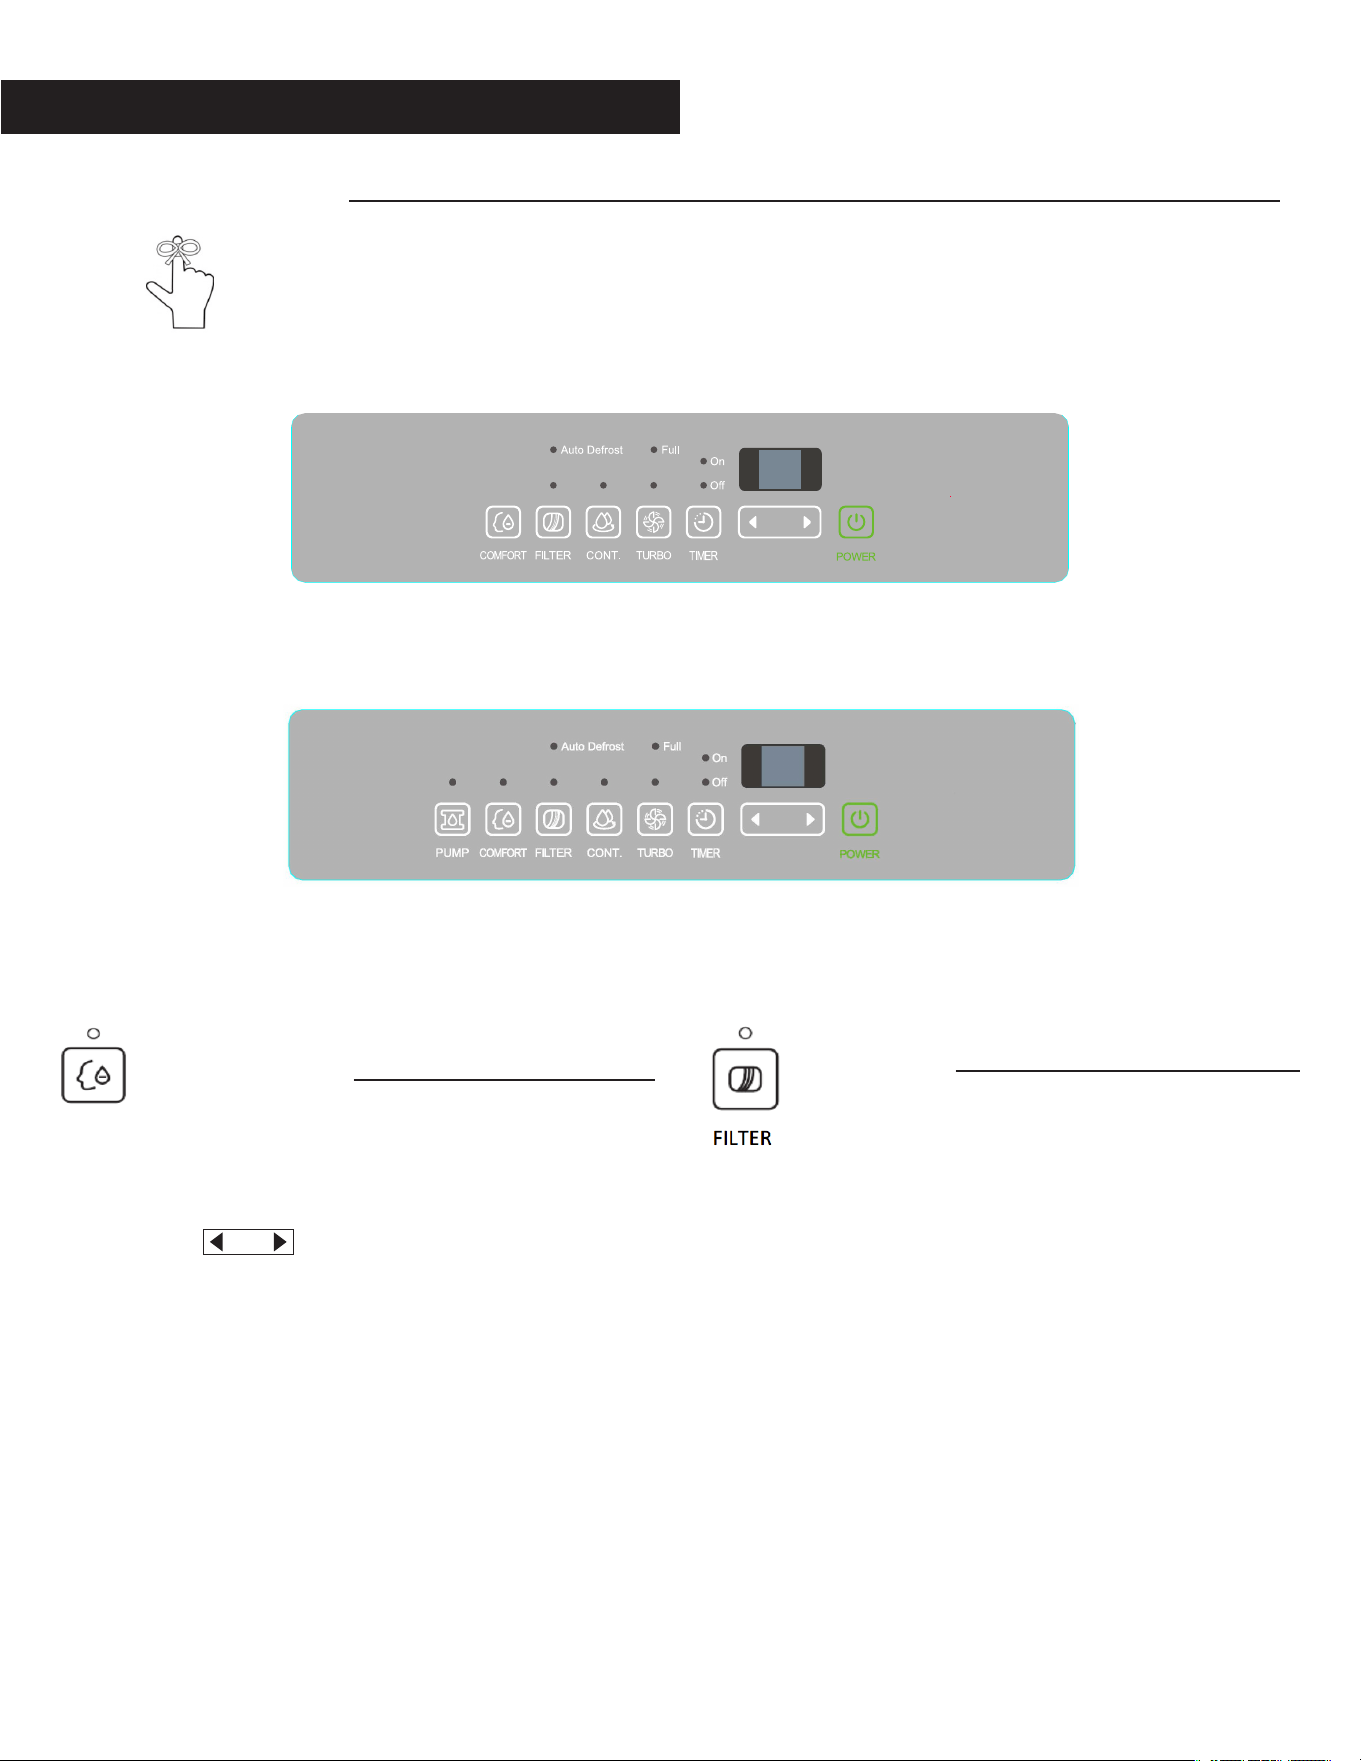
COMFORT Button
• This dehumidification setting automatically
keeps the humidity level in the room between
45%-55% relative humidity (based on room
temperature).
• When operating in this mode the touch pad
• ( ) will be deactivated and you will
NOT be able to set a desired humidity level.
FILTER Button
•
The FILTER light (clean filter indicator light)
will illuminate after 250 hours of fan motor
operation. This feature is a reminder to clean
the air filter for more efficient operation of t
dehumidifier.
• Reset the timer after cleaning the filter by
pressing and holding the FILTER button until
the light goes off
OPERATING INSTRUCTIONS
Control Panel Features:
Note: The following control panels are for explanation purpose only. The control panel of the unit
you purchased may be slightly diffe ent according to the models. Your machine may not contain
some indicators or buttons. The actual shape shall prevail.
COMFORT
2PFD22, 2PFD35, 2PFD50
2PFD
P50
Page 8
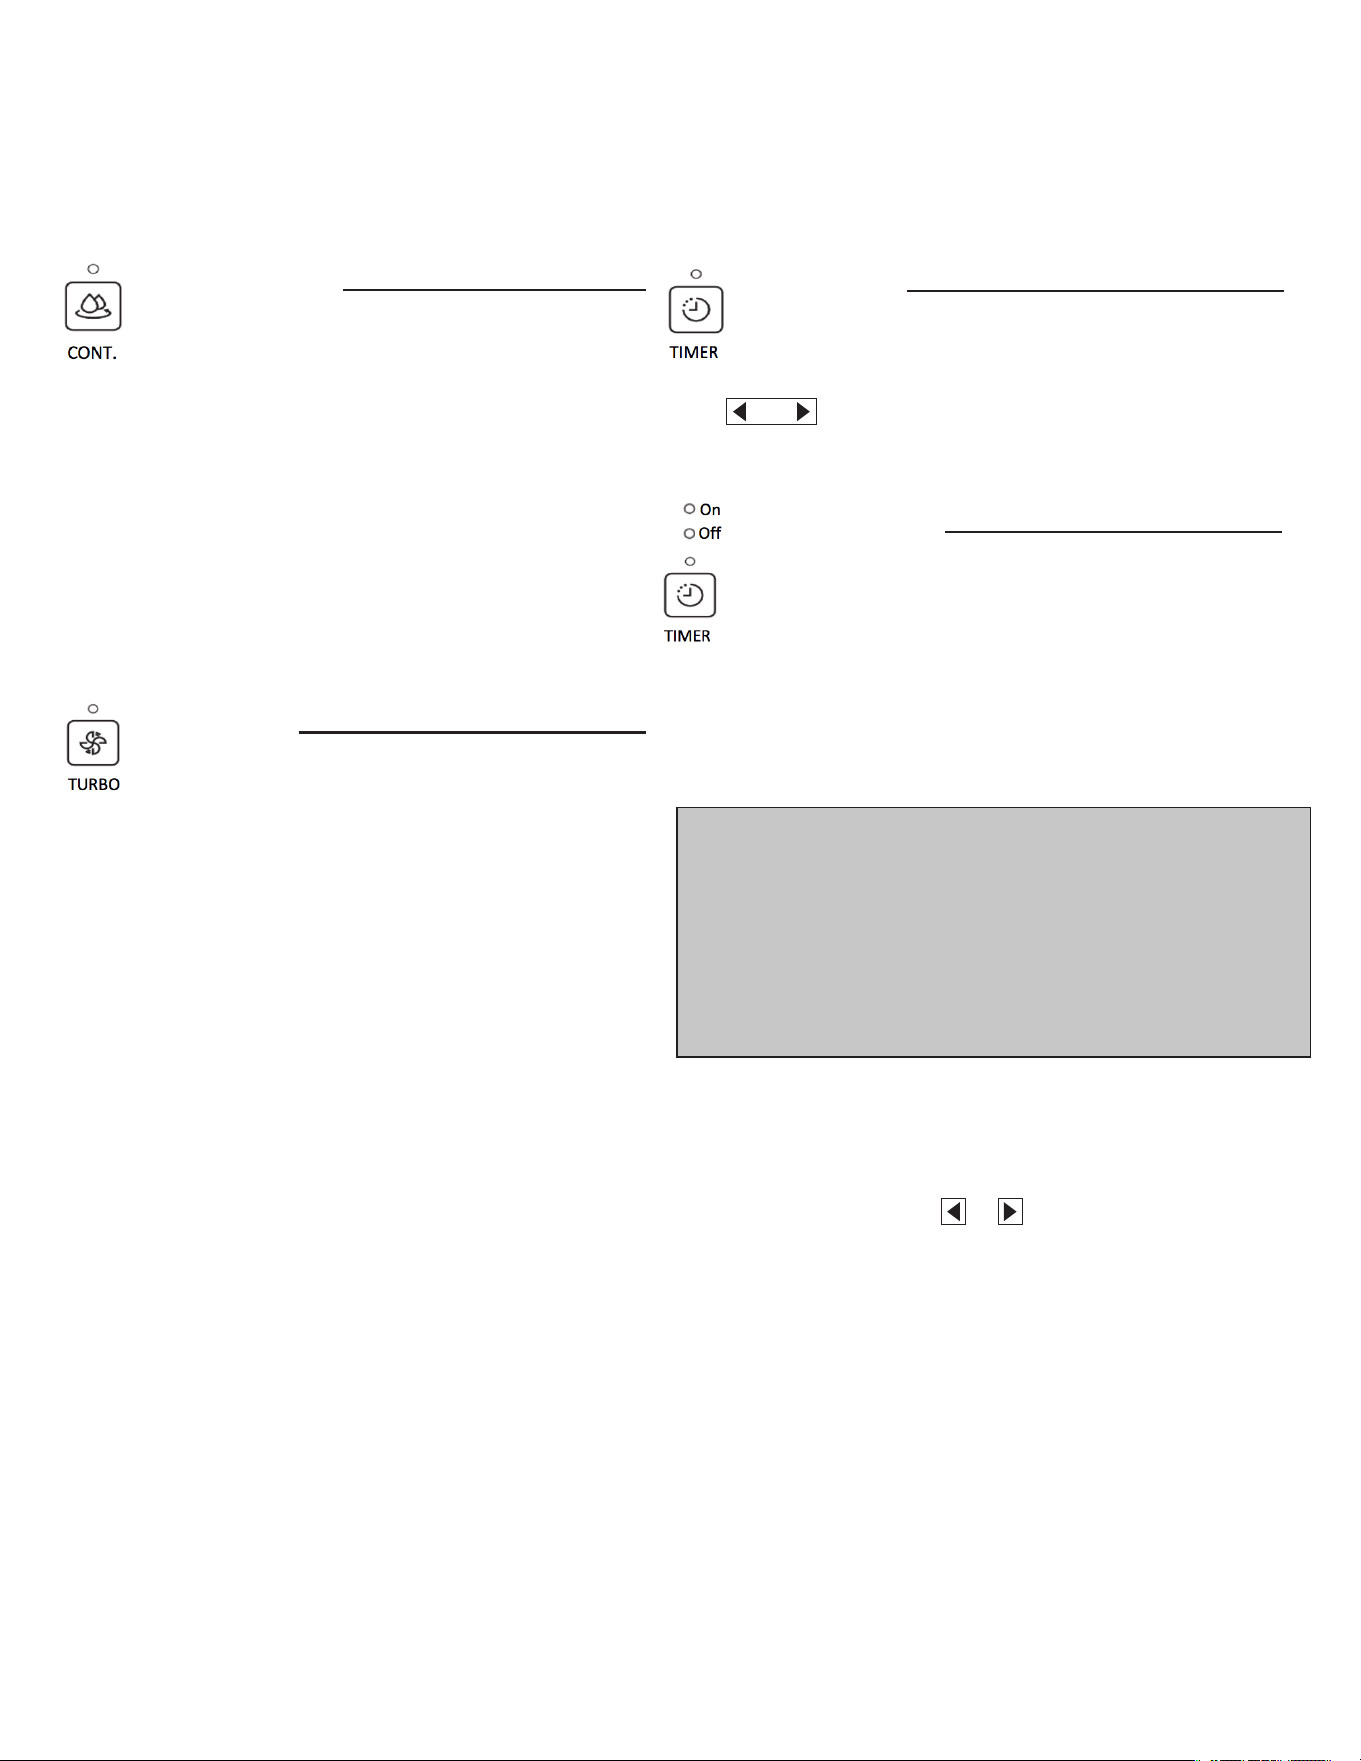
CONTINUE button
• Press to activate the continuous dehumidifying
operation.
• If the CONT. mode is selected the unit will
continue to dehumidify and will not be
controlled to a specific humidity setting.
• The humidity setting cannot be adjusted.
• To adjust the humidity sitting, press the CONT.
button to cancel the continuous mode.
TURBO button
• The Turbo button is to toggle between normal
fan speed and the highest fan speed (Turbo).
• Press to select either High or Normal fan
speed.
• Set the unit to turbo by pressing the TURBO
button (green light illuminated) for maximum
moisture removal.
• When the desired humidity level has been
reached, press the TURBO button once more
(green
• line will extinguish) to return to normal
operation.
TIMER button
Timer button is used in conjunction with the
(Humidity Control) buttons to initiate the
Auto start and Auto stop feature.
Setting the Timer
• The TIMER button can be used to set a desired
ON or OFF time for the dehumidifie . The
ON time or OFF time setting can only be set
in increments of 0.5 hr. up to 10 hrs. and 1hr
increments from 10 to 24 hrs.
• Press the TIMER button, the timer Off or On
indicator light illuminates. This indicates the
auto stop/start program is initiated.
• Press or hold the or button to change the
desired stop/start time by 0.5 hour increments,
up to 10 hours, then at 1 hour increments from
10 to 24 hours from the time the feature is set.
The control will count down the time remaining
until the dehumidifier stops/starts
Note:
• If the unit is off, the timer “On” indicator be the first to
illuminate.
• If the dehumidifier is on, the timer “Off” indicator will first
illuminate.
• Toggle between Timer On and Timer Off by pressing the TIMER
button.
Page 9
• Press the TIMER button again the timer On
indicator light illuminates. This indicates the auto
start program is initiated.
• Press or hold the or button to change the
desired start time by 0.5hour increments, up to
10 hours, then at 1 hour increments from 10 to 24
hours from the time the feature is set. The control
will count down the time remaining until starts.
• When the Timer On & Timer Off times a e set,
within the same program sequence, both On and
Off indicator lights will illuminate indicating both
On and Off times a e programmed.
• Turning the unit On or Off at any time or adjusting
the timer setting to 0.0 will cancel the Auto Start/
Stop function.
• If the water bucket is full and the LED display
window displays P2, the Auto Start/Stop function
will also be canceled.
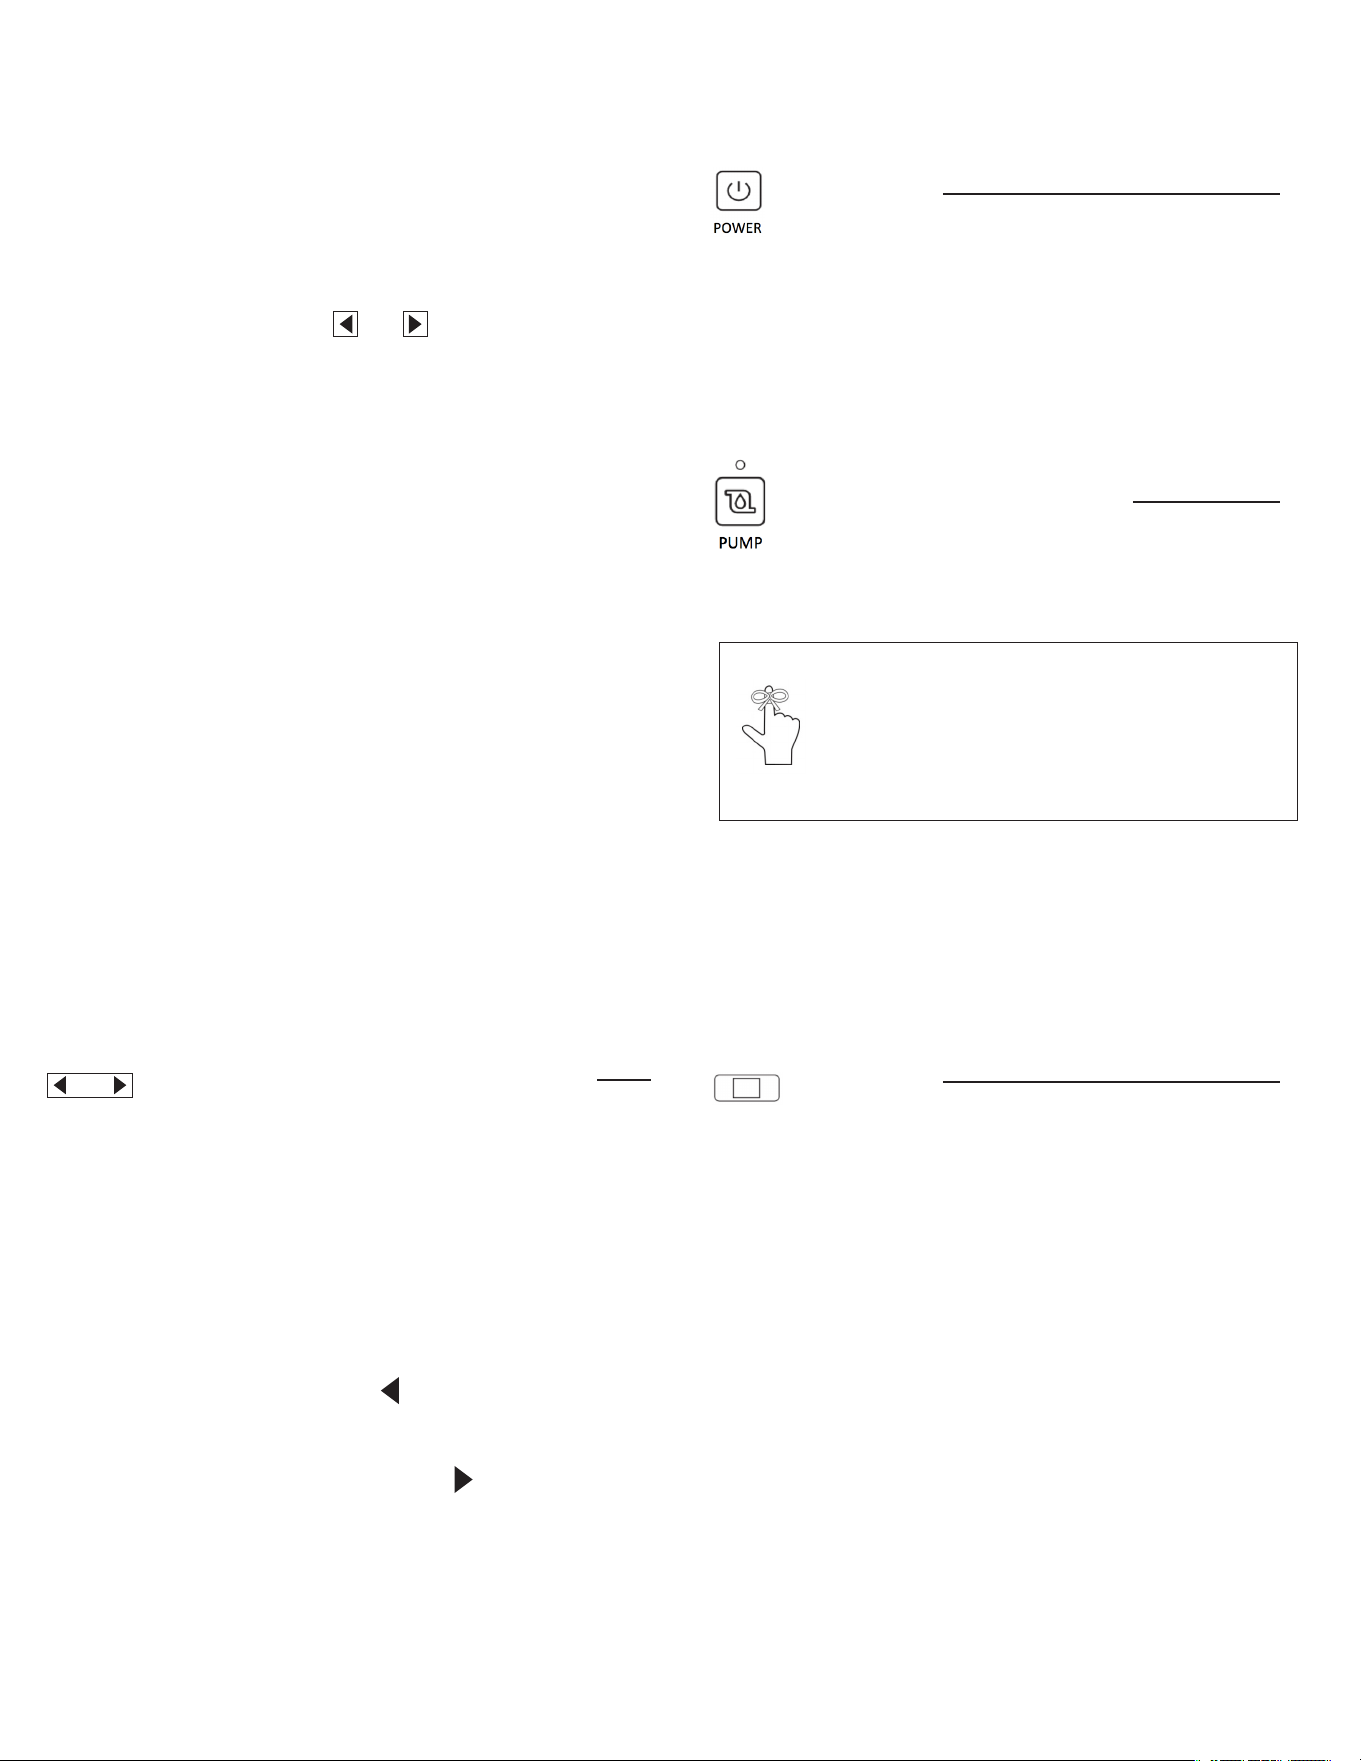
Humidity Set Control Left/Right (buttons)
• The humidity set control buttons are used to set
the desired humidity level.
• The humidity level can be set between 35% RH
(Relative Humidity) to 85% RH (Relative
• Humidity) in 5% increments.
• For drier air, press the button to the desired
lower RH % level.
• For more humid air, press the button to the
desired higher RH% level.
POWER button
• Press to turn the dehumidifier on and o
OPTIONAL FEATURES (Only available on SOME
Models)
PUMP button (on some models)
• Press to activate the pump operation.
• Refer to the next pages for removing the bucket
and discarding the collected water.
• Do not use this operation when the outdoor
temperature is at or below 32OF (0OC)
LED Display
Depending on the feature selected, the LED Display
will show the current relative humidity level in the
room ( 35% - 85%), the auto start/stop setting
(0.0~24) while setting the timer function, as well as
the desired humidity level setting for the dehumidifie .
The accuracy of the relative humidity reading in the
room is ±5% for humidity levels between 30% and
90%
Note: Make sure the pump drain hose is installed into
the unit and the continuous drain hose is disconnected
from the unit before the pump operation is activated.
When the bucket is full, the pump will start to operate.

Page 10
Bucket Full Light
The Full indicator light will be illuminated when
the bucket is full and ready to be emptied or if the
bucket was not put back in place correctly.
Auto Defrost
The unit will automatically enter auto defrost mode
when frost/ice builds up on the evaporator coils. The
compressor will cycle off and the fan will continue to
run until the frost disappears. During this operation
the Auto Defrost indicator light will be illuminated.
Auto Shut O
The dehumidifier shuts off when the bucket is full
or when the bucket is removed or is not replaced
in the proper position. The compressor will also
automatically shut off when the desi ed humidity
level is reached. The fan will continue to operate for
an additional 3 minutes.
Auto-Restart
In the event of an unexpected power interruption,
the unit will automatically restart with the previous
function setting once the power is restored.
OTHER FEATURES
FULL
AUTO DEFROST
Page 11
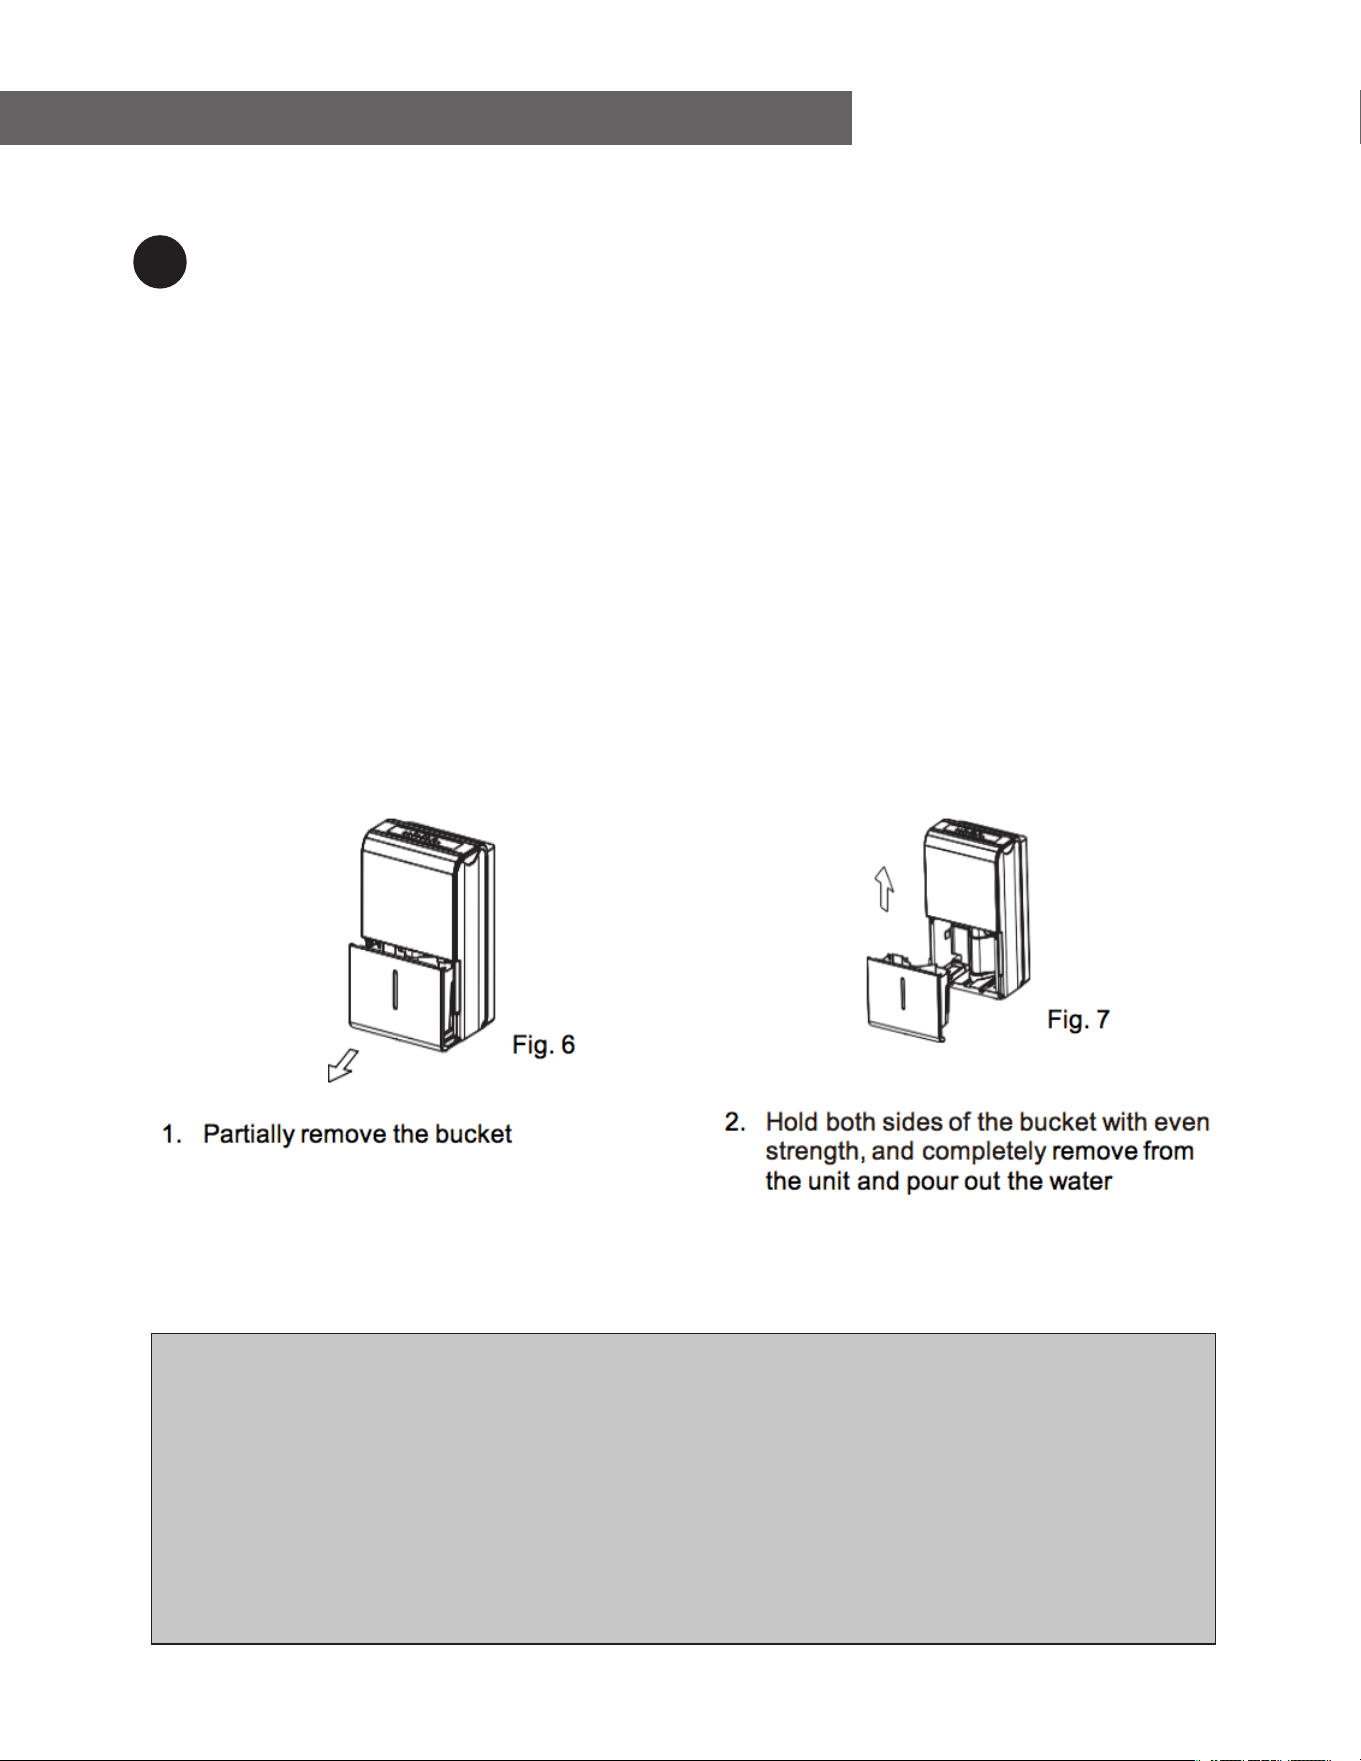
REMOVING THE COLLECTED WATER
There are three ways to remove collected water:
Using the bucket
• If the unit is off, and the bucket is full, the Full indicator light will illuminate
• If the unit is on and the bucket is full, the compressor and the fan will turn off, the Full indicator light
will light will illuminate and the LED display will show P2.
• Slowly pull out the bucket. Grip the left and right handles securely, and carefully pull out straight so
water does not spill. Do not put the bucket on the floor because the bottom of the bucket is uneven
and the water may spill.
• Throw away the water and replace the bucket.
• The bucket must be replaced correctly and securely seated for the dehumidifier to operate
• The machine will re-start when the bucket is returned to its correct position.
NOTE:
• When you remove the bucket, do not touch any parts inside the unit. Doing so may damage the product.
• Be sure to push the bucket gently all the way into the unit. Banging the bucket against anything or failing to push it in
securely may cause the unit not to operate.
• If the punp hose drops whe you remove the buscket, you must reinstall the pump hose propertly to the unit before
replacing the bucket into the unit.
• If there is some water in the unit after you remove the unit after you remove the bucket, you must dry it.
• If the bucket is removed while the unit is running, the compressor and the fan will turn off, the unit will beep 8 times
and the digital display will show P2.
• If the bucket is removed while the unit is turn off, the unit will beep 8 times and the digital display will show P2.
1
Page 12
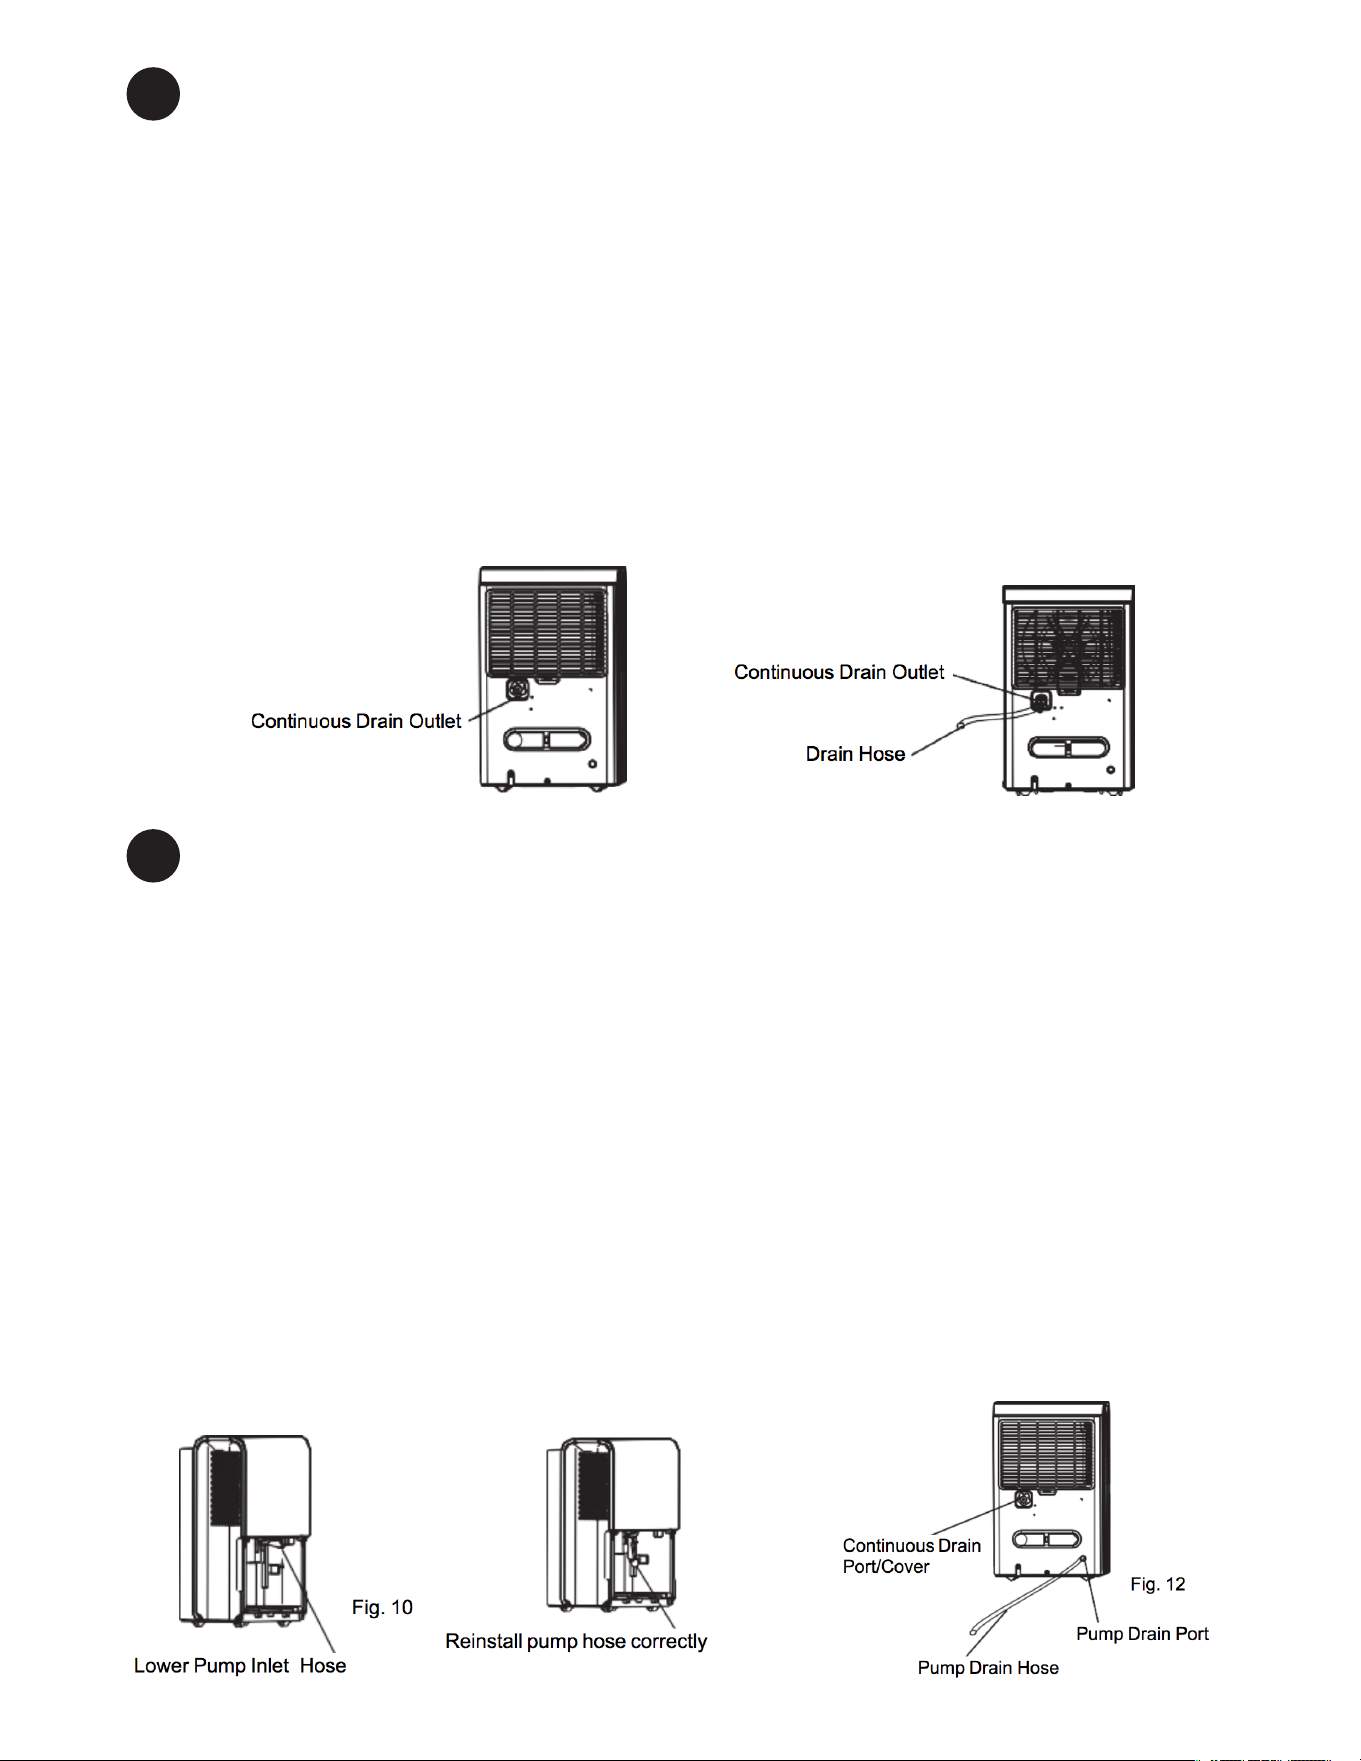
Continuous draining
• Water can be automatically emptied into a floor drain by attaching a drain hose (ld≥Φ5/16′′, not
included) with a female threaded end (ID:M=1′′, not included) to the drain outlet at the back of the
dehumidifier (See Fig. 8
• Remove the plastic cover from the continuous drain outlet at the back of the unit and set it aside.
• Connect the drain hose to the drain outlet of the unit and lead the drain hose to the floor drain or a
suitable drainage facility (See Fig. 9)
• Make sure the hose is secure and there are not leaks or kinks that will stop the water from flowing
• Make sure the hose is angled down or level to allow for good flow of water towa ds the outlet.
• Select the desired dehumidifier setting, humidity level and fan speed
Pump draining (on some models)
• Water can be automatically emptied into a floor drain or a suitable drainage facility by connecting the
pump drain hose(ΦOD=1/4′′, supplied) with the pump drain outlet as shown in Fig. 12 and using the
pump feature on the dehumidifie .
• If a continuous drain hose is being used, remove it from the unit and reinstall the plastic cover to the
continuous drain outlet.
• Connect the supplied the pump drain hose onto the pump drain hose outlet (See Fig 12.)
• Make sure the hose is pushed on to the pump drain outlet to a depth of at least 1/2 inch (approx. 15
mm).
• Direct the drain hose outlet a floor drain or a suitable drainage facilit .
• Press the PUMP button on the control panel to start the pump operation
• The pump will start when the bucket is full
2
3
Fig 11
Fig 9
Fig 8
Page 13
Note:
The pump may make a noticeable sound for 3~5 minutes on startup. It is a normal
phenomenon.
Note:
The pump operation light will blink will at 1Hz if there is an operational failure of the pump. Please turn
off the unit and unplug the power.
Check the following things:
• Clean pump filte
• Remove the bucket from the unit, take down the pump and clean the pump filte .
• Check that the pump drain hose is not kinked or blocked.
• Empty the water of the bucket.
• Reinstall the pump hose if it is disconnected from the unit and properly reinstall the bucket.
• Turn on the unit. If the error repeats, call for service.
• Empty the bucket once a week when using the pump drain feature.
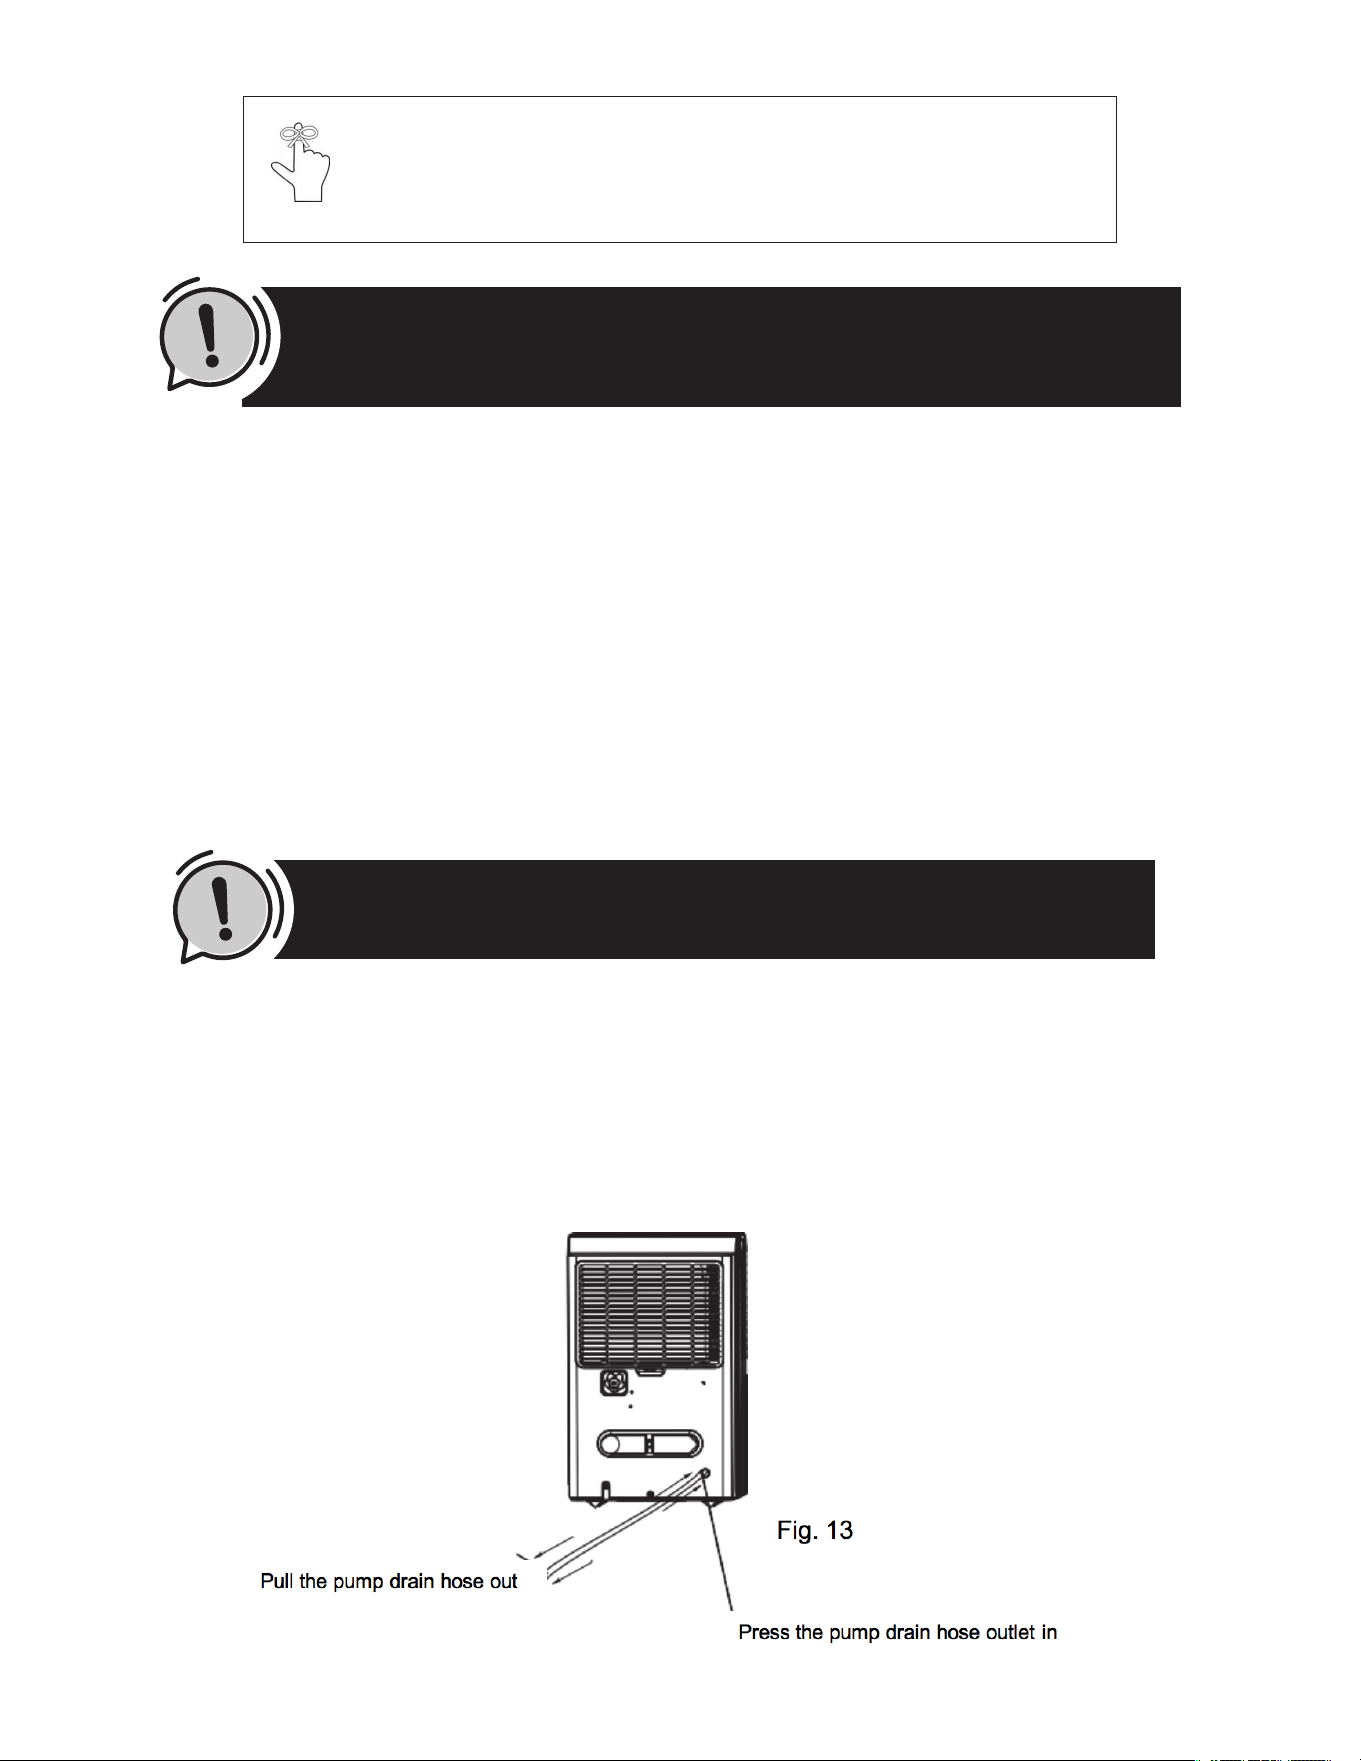
• When the pump drain feature is not being used, remove the pump drain hose from the outlet.
• Press the pump drain hose outlet in towards the unit and pull the drain hose out (See Fig.13).
• Be careful to prevent water from leaking onto the floo .
Note: Do not use this operation when the outdoor temperature is equal to or less than 0
o
C (32oF),
otherwise water will freeze inside the hose resulting in unit failure.
Page 14
Turn the dehumidier off and unplug it from the wall outlet before cleaning.
• Use water and a mild detergent. Do not use bleach or abrasives.
• Do not splash water directly onto the main unit. Doing so may cause an electrical shock, cause the insulation
to deteriorate, or cause the unit to rust.
• The air intake and outlet grilles get soiled easily; use a vacuum attachment or brush to clean.
• Every few weeks, clean the bucket to prevent growth of mold, mildew and bacteria.
• Partially fill the bucket with clean water and add a little mild dete gent.
• Swish it around in the bucket.
• Empty and rinse.
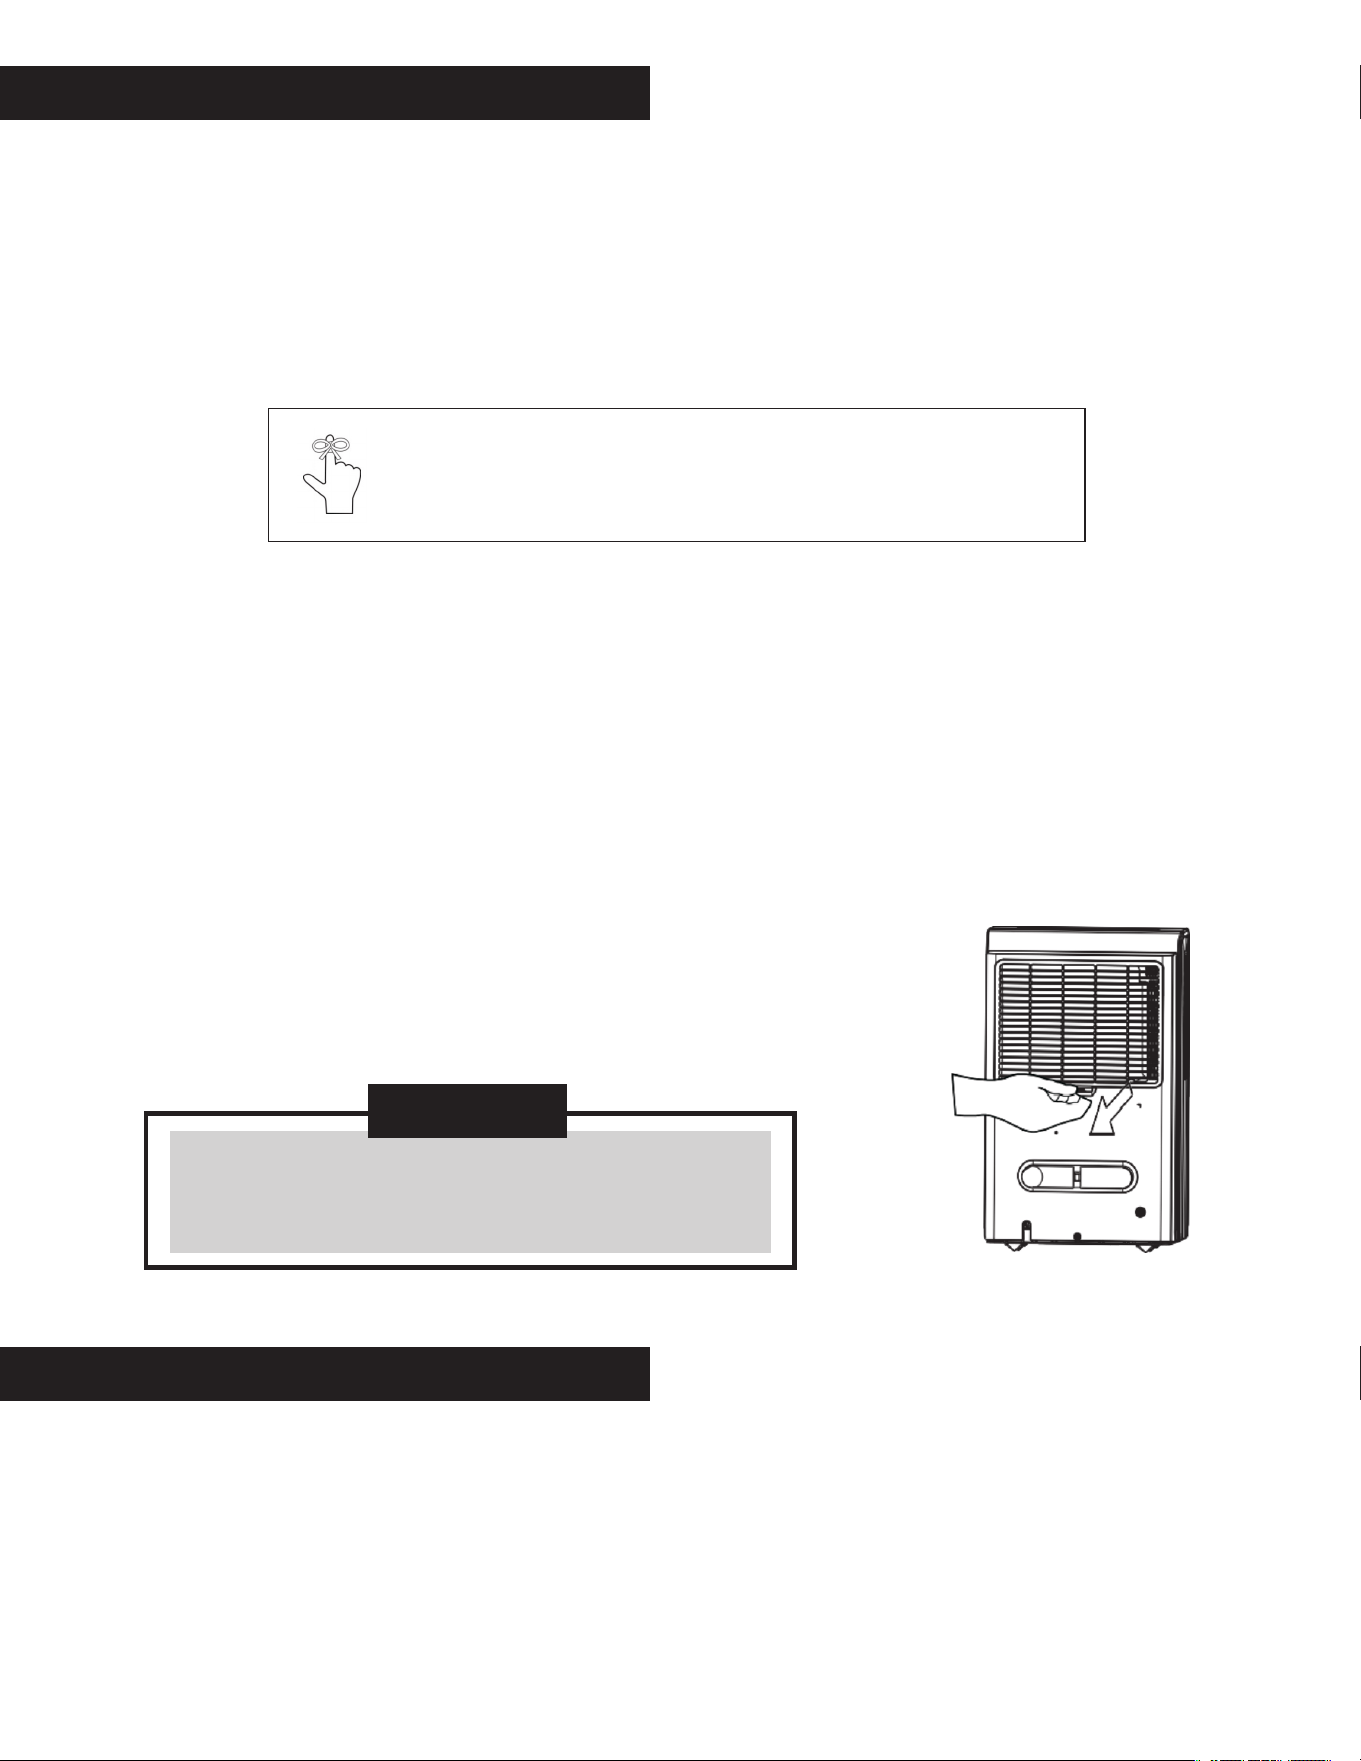
Cleaning the air lter
• The filter in integrated with the back panel of the unit and is not a separate item
• Remove the filter every two weeks based on normal operating conditions
• To remove the filte , pull filter outwa ds (See Fig. 14).
• Wash the filter with clean water then dr .
• Re-install the filte , replace Bucket.
CARE AND MAINTENANCE
C AUTION
Do not operate the dehumifier without a filter becaus
dirt and lint will clog it and reduce performance
Note:
Do not use a dishwasher to clean the bucket. After cleaning, the bucket must be
replaced and securely seated for the dehumidifier to operate.
PREPARING FOR STORAGE
When not using the unit for long time periods
• After turning off the unit, wait one day befo e emptying the bucket.
• Clean the main unit, water bucket and air filte .
• Wrap the cord with onto the power cord handle
• Cover the unit with a plastic bag.
• Store the unit upright in a dry, well-ventilated place.
Page 15
TROUBLESHOOTING TIPS
Before calling for service, review the chart below.
Problem
Unit does not start
Dehumidifier does not dry the air as it shoul
The unit makes a loud noise when operating
Frost appears on the coils
Water on floo
The pump operation on light blinks at 1Hz
ES- Tube Temperature sensor of the
evaporator error
AS-Humidity sensor error
P2-Bucket is full or bucket is not in right
position
Eb-Bucket is removed or not in right position
What to check
• ·Make sure the dehumidifier s plug is pushed completely into
the outlet.
• Check the house fuse/circuit breaker box.
• Dehumidifier has eached its preset level or bucket is full.
• Water bucket is not in the proper position.
• Did not allow enough time to remove the moisture.
• Make sure there are no curtains, blinds or furniture blocking the
front or back of the dehumidifie .
• The humidity control may not be set low enough.
• Check that all doors, windows and other openings are securely
closed.
• Room temperature is too low , below 5 oC(41o F).
• There is a kerosene heater or something giving off water vapor
in the room.
• The air filter is clogged
• The unit is tilted instead of upright as it should be.
• The floor surface is not level
• This is normal. The dehumidifier has Auto def ost feature.
• Hose to connector or hose connection may be loose.
• Intend to use the bucket to collect water, but the back drain
plug is removed.
• Clean the filter of the pump
• Check the pump hose does not link or block.
• Empty the water of the bucket.
• Unplug the unit and plug it back in. If error repeats, call for
service.
• Unplug the unit and plug it back in. If error repeats, call for
service.
• Empty the bucket and replace it in the right position
• Replace the bucket in the right position.
The design and specifications a e subject to change without prior notice. Consult with the sales agency or manufacturer
for details. Any updates to the manual will be uploaded to the service website, please check for the latest version.

844-4PA-AIRE | 844-472-2473
www.perfectaire.us
Perfect Aire, LLC
5401 Dansher Road
Countryside, IL 60625
Printed in China
1020_M398
