
MANUAL DE INSTRUCCIONES
Horno Sobremesa
N º
ºº
º
CHS G 2060 B
USO DOMÉSTICO SOLAMENTE
Lea el manual detenidamente antes de usar. Guárdelos para mayor referencia.

CONSIDERACIONES IMPORTANTES
Al usar un aparato eléctrico, siempre se deben seguir las precauciones básicas de seguridad,
incluidas las siguientes:
1.Lea todas las instrucciones.
2. No toque las superficies calientes. Use manijas o perillas.
3. Es necesaria una supervisión estricta cuando cualquier electrodoméstico es utilizado por niños o
cerca de ellos.
4. Para protegerse contra descargas eléctricas, no coloque ninguna parte del horno eléctrico en agua
u otro líquido.
5. No permita que el cable cuelgue del borde de la mesa o mostrador, ni que toque superficies
calientes.
6. No opere el electrodoméstico con el cable o enchufe dañado o después de que el electrodoméstico
no funcione correctamente, o haya sido dañado de alguna manera, devuelva el electrodoméstico
al Centro de servicio autorizado más cercano para su examen, reparación o ajuste.
7. El uso de accesorios no recomendados por el fabricante del electrodoméstico puede causar peligro
o lesiones.
8. Al operar el horno, mantenga al menos cuatro pulgadas de espacio en todos los lados del horno
para permitir una circulación de aire adecuada.
9. Desenchúfelo del tomacorriente cuando no esté en uso o antes de limpiarlo. Déjelo enfriar antes de
colocar o tomar piezas, o antes de limpiarlo.
10.Para desconectar, gire el control a STOP, luego desconecte el enchufe. Sujete siempre el enchufe,
pero nunca tire del cable.
11. No cubra la BANDEJA PARA MUCHAS ni ninguna parte del horno con papel de aluminio. Esto
puede causar sobrecalentamiento del horno.
12. No lo limpie con estropajos metálicos. Las piezas pueden desprenderse de la almohadilla y tocar
las partes eléctricas, creando un riesgo de descarga eléctrica.
13.Los alimentos de gran tamaño o los utensilios de metal no se deben insertar en un horno eléctrico,
ya que pueden provocar un incendio o riesgo de descarga eléctrica.
14.Puede producirse un incendio si el horno está cubierto o toca material inflamable, incluidas
cortinas, cortinas, paredes y similares, cuando está en funcionamiento. No almacene ningún artí
culo en el horno durante la operación.
15. Se debe tener extrema precaución cuando se usan recipientes construidos si no son de metal o
vidrio.
16. No coloque ninguno de los siguientes materiales en el horno: cartón, plástico, papel ni nada
similar.
17. No almacene ningún material, que no sean los accesorios recomendados por el fabricante, en
este horno cuando no esté en uso.
18. Siempre use guantes protectores para horno aislados al insertar o retirar artículos del horno
caliente.
19. Este electrodoméstico tiene una puerta de vidrio templado de seguridad. El vidrio es más fuerte
que el vidrio ordinario y más resistente a la rotura. El vidrio templado puede romperse, pero las
piezas no tendrán bordes afilados. Evite rayar la superficie de la puerta o mellar los bordes. Si la
puerta tiene un rasguño o una muesca, comuníquese con nuestra línea de atención al
consumidor antes de usar el horno.
20. No utilizar en exteriores.
21. No utilice el aparato para otro uso que no sea el previsto.
22. Este electrodoméstico es PARA USO DOMÉSTICO SOLAMENTE.
23. La temperatura de la puerta o la superficie exterior puede ser mayor cuando el aparato está
funcionando.
24. Proteger contra el daño por filo cuando la acción.
25. La temperatura de las superficies accesibles puede ser alta cuando el aparato está funcionando.
26. No descanse utensilios de cocina o platos para hornear en la puerta de vidrio.
27. Este electrodoméstico no está diseñado para ser utilizado por personas (incluidos niños) con
capacidades físicas, sensoriales o mentales reducidas o falta de experiencia y conocimiento, a
menos que hayan recibido supervisión o instrucciones sobre el uso del electrodoméstico por
parte de una persona responsable de su seguridad. .
28. Los niños deben ser supervisados para asegurarse de que no jueguen con el aparato.
29. El peso de los alimentos que se colocan en la bandeja de alimentos S3 / Rack de alambre no
puede superar los 3,0 kg.
30. Para electrodomésticos con accesorio tipo Y, si el cable de alimentación está dañado, debe ser
reemplazado por el fabricante, su agente de servicios o personas calificadas de manera similar
para evitar riesgos。
31. La superficie posterior de los electrodomésticos debe colocarse contra una pared.
32. ADVERTENCIA: este aparato incluye una función de calefacción. Las superficies, que no sean las
superficies funcionales, pueden desarrollar altas temperaturas. Dado que las temperaturas son
percibidas de manera diferente por diferentes personas, este dispositivo debe usarse con
PRECAUCIÓN. Sujete el aparato exclusivamente para sujetar superficies destinadas a sostener
y utilizar medidas de protección contra el calor como guantes de protección contra el calor o
soportes para ollas. Las áreas que no están destinadas a agarrar deben tener suficiente tiempo
para enfriarse.
33. No lo coloque sobre o cerca de un quemador de gas o eléctrico caliente, o en un horno caliente.
34. Se debe tener extrema precaución al mover un aparato que contenga aceite caliente u otros lí
quidos calientes.
35. Gire la perilla del temporizador a la posición "apagado" para apagar el aparato.
36. Los dispositivos no están destinados a ser operados por medio de un temporizador externo o un
sistema de control remoto separado
Las superficies pueden calentarse durante el uso.
PRECAUCIÓN: LAS SUPERFICIES DEL APARATO ESTÁN CALIENTES DESPUÉS DEL USO. SIEMPRE use
guantes protectores aislados para horno cuando toque el horno caliente o platos calientes y alimentos, o
cuando inserte o retire la rejilla, sartenes o platos para hornear.
GUARDA ESTAS INSTRUCCIONES
Antes de usar su Horno Sobremesa
1. Antes de usar su horno el
é
ctrico de convecci
ó
n por primera vez, aseg
ú
rese de:
2. 1. Desembale la unidad.
3. 2. Retire todos los bastidores y sartenes. Lave las parrillas y sartenes con agua jabonosa caliente o en el
lavavajillas.
4. 3. Seque completamente todos los accesorios y vuelva a armarlos en el horno. Conecte el horno a la toma de
corriente y estar
á
listo para usar su nuevo horno el
é
ctrico.
5. 4.Despu
é
s de volver a armar su horno, le recomendamos que lo haga funcionar a la temperatura MÁXIMA
durante aproximadamente 15 minutos para eliminar el aceite de embalaje que pueda quedar despu
é
s del env
í
o.
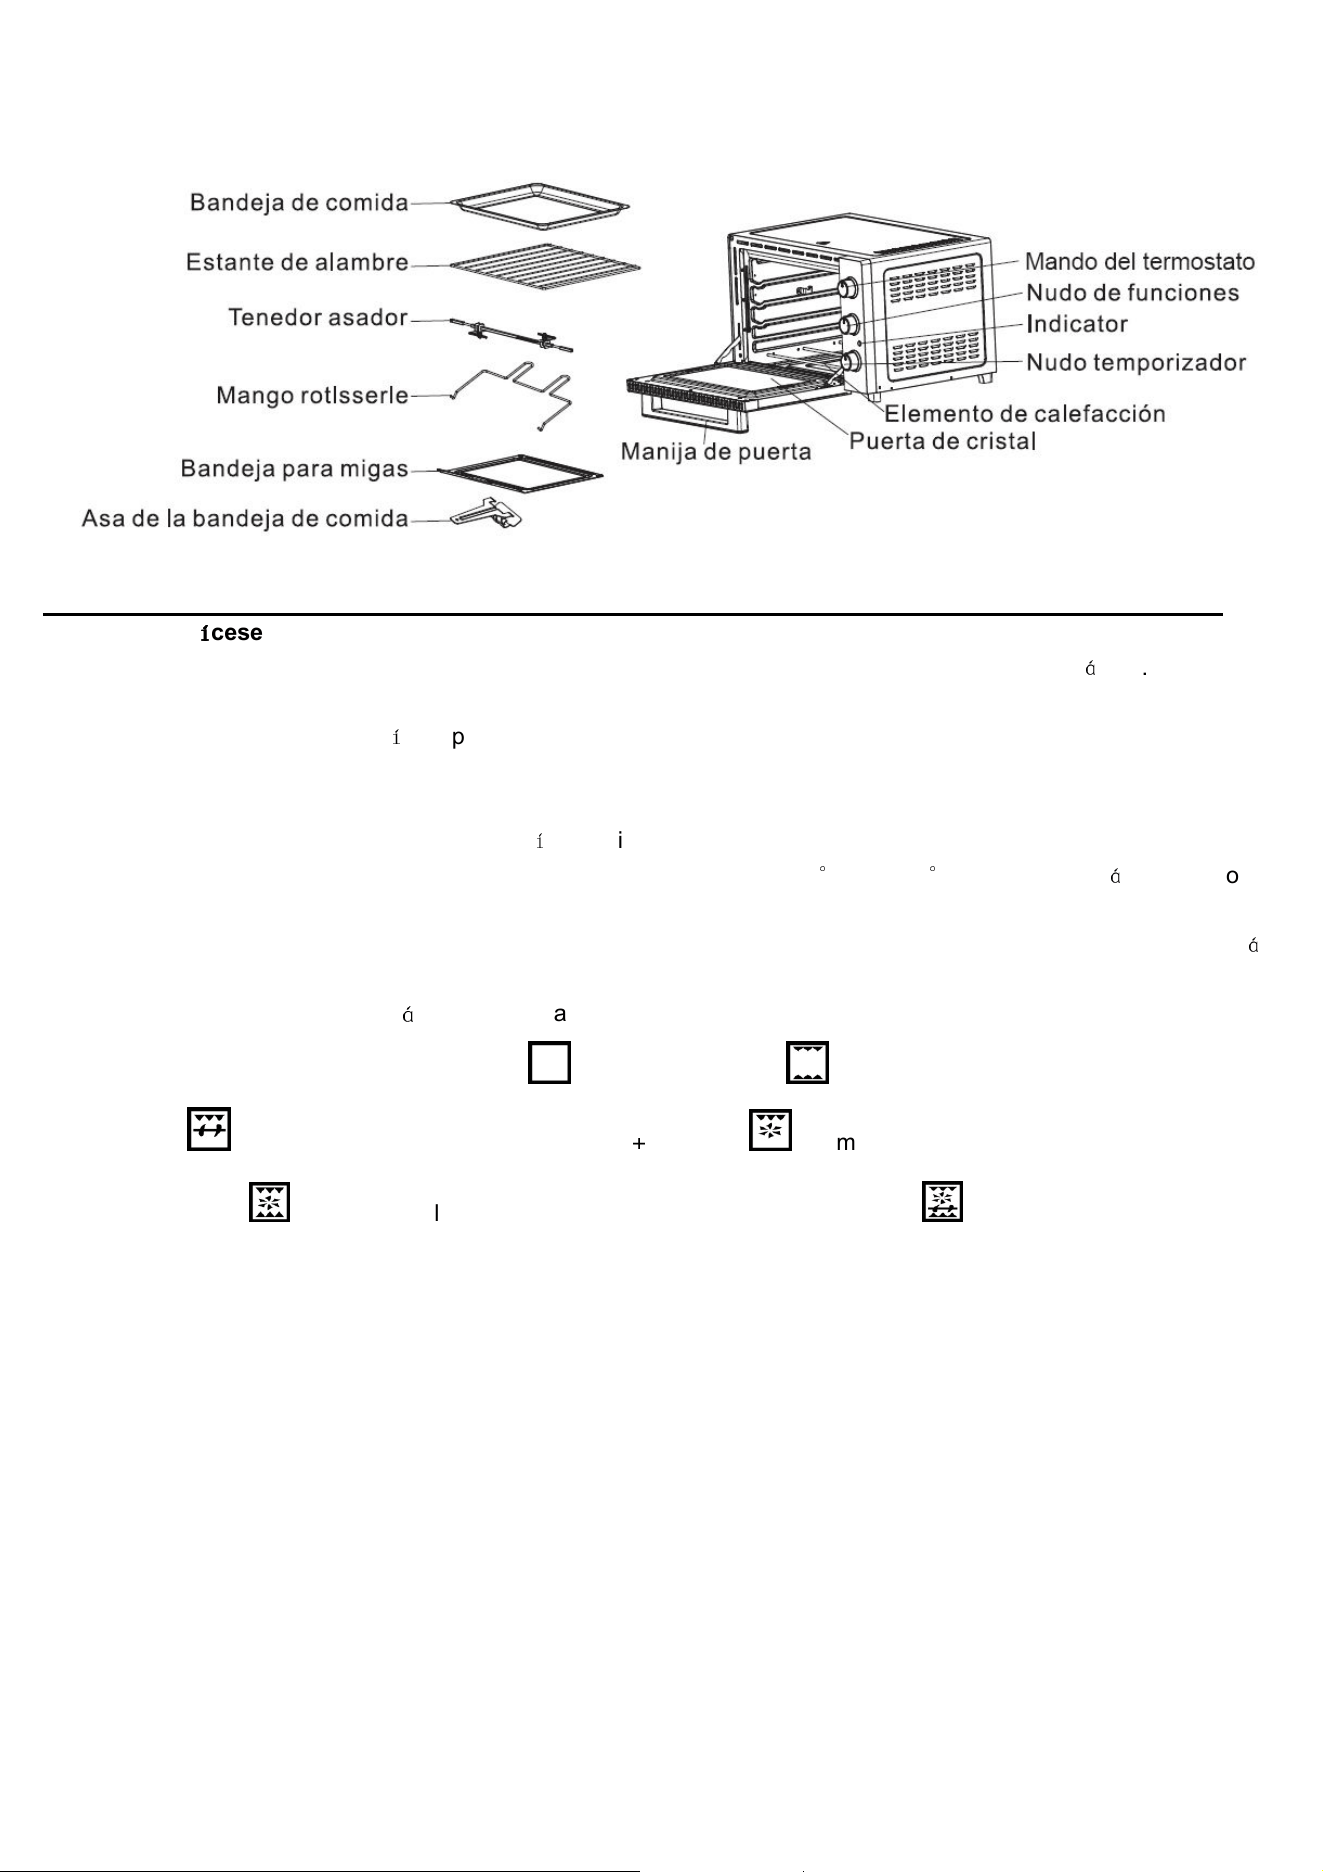
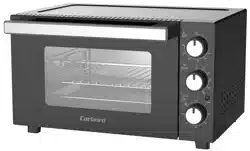
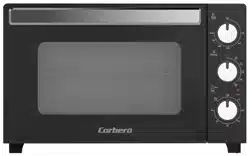
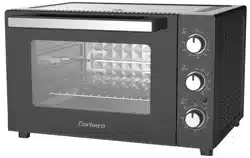
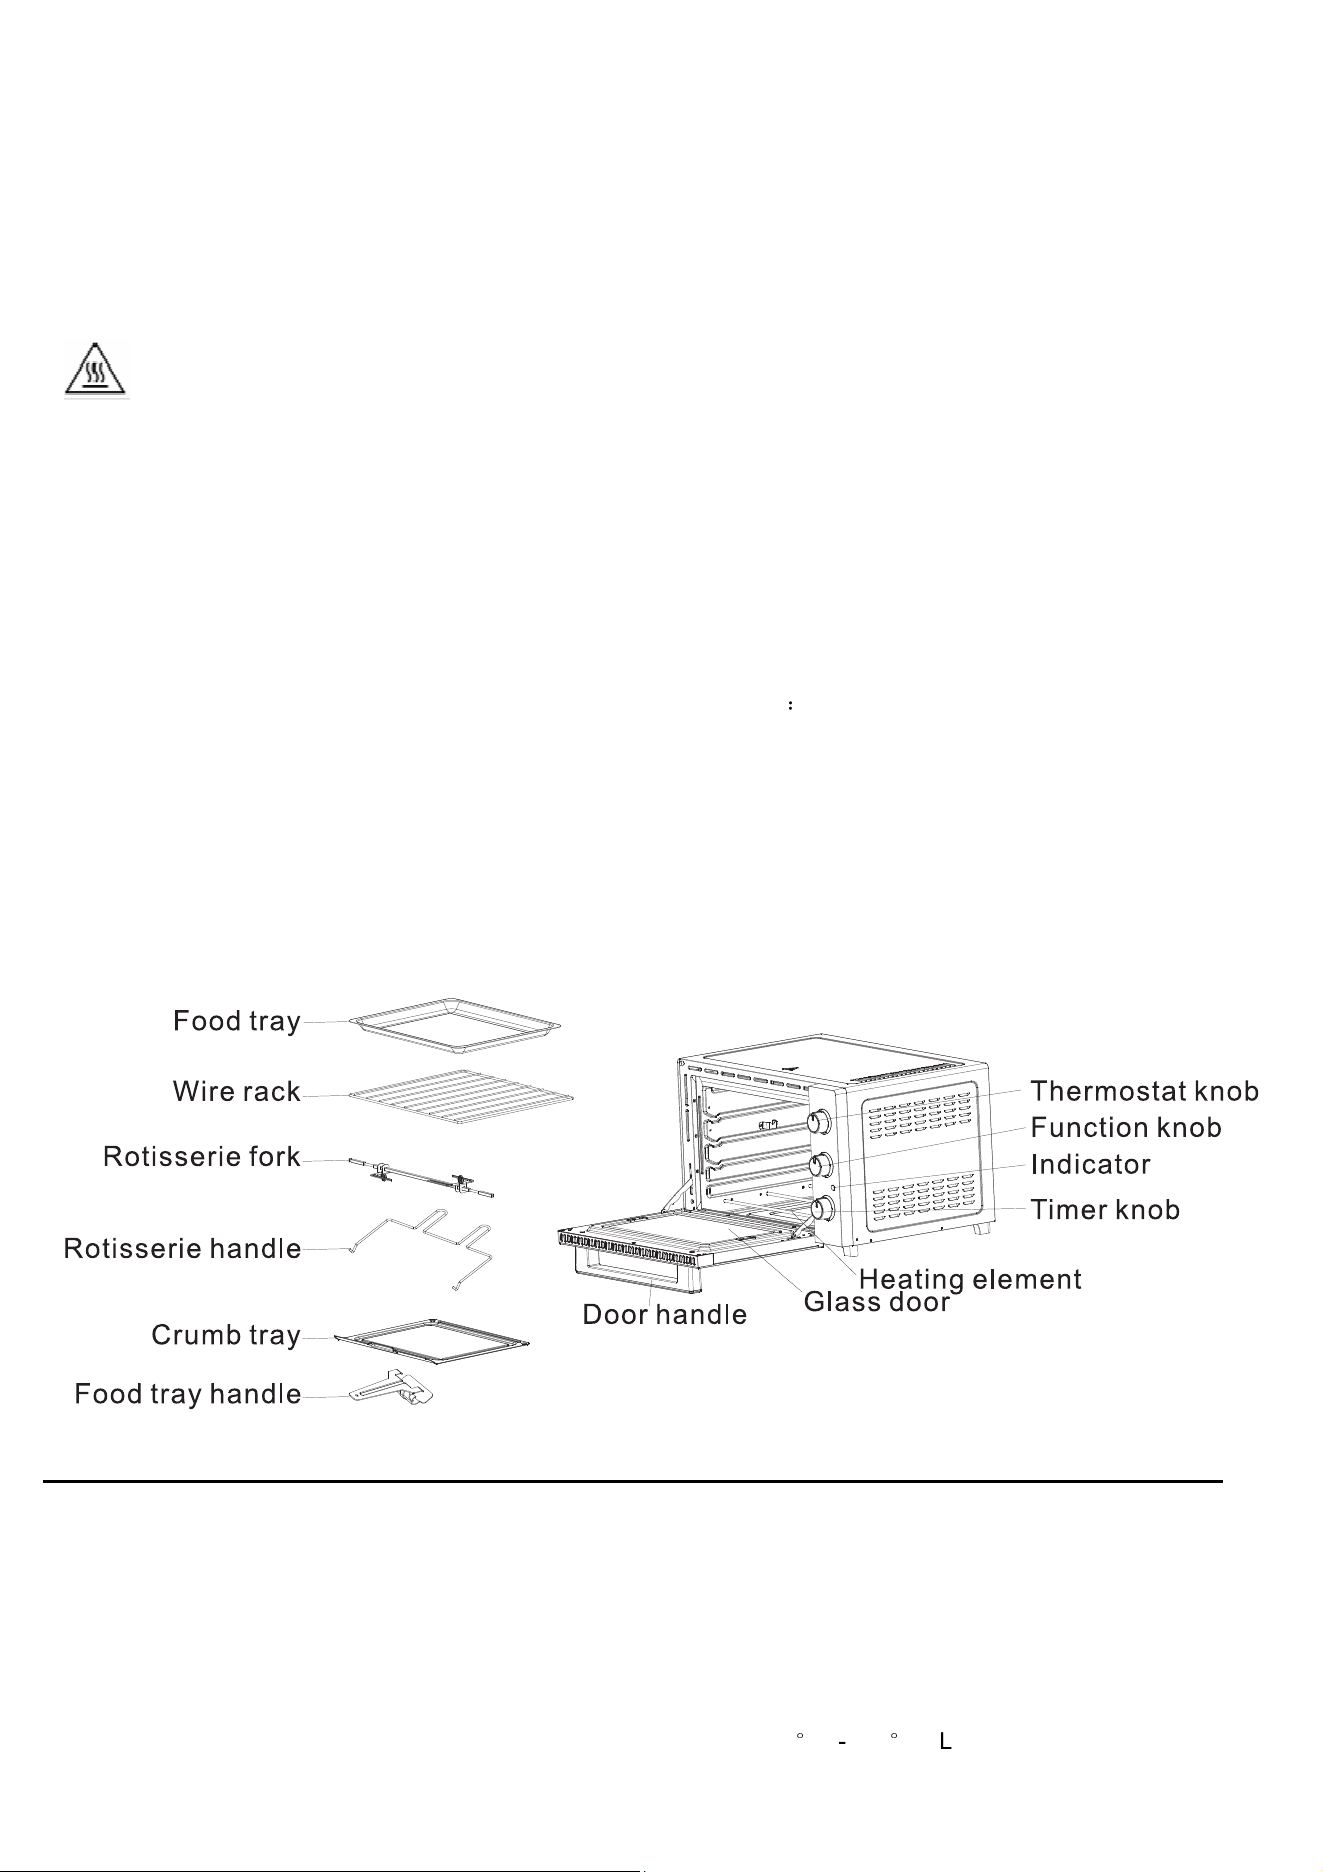
Componentes:
Usando su Horno Sobremesa
Familiar
í
íí
í
cese con las siguientes funciones y accesorios del horno antes del primer uso:
Rack Parrilla de alambre: Para tostar, hornear y cocinar en general en cacerolas y sartenes est
á
ndar.
Bandeja de comida: para usar en asar y asar carne, pollo, pescado y otros alimentos.
ForkTenedor de asador: Util
í
celo para asar una variedad de carnes y aves.
Mango de asador: le permite recoger el tenedor de asador.
Asa de la bandeja de comida: le permite recoger la rejilla o la bandeja.
Bandeja de migas: para recoger aceite ca
í
do o migas.
Kno Perilla del termostato: elija la temperatura deseada de baja-90
°
C-230
°
C (baja se est
á
cocinando a
temperatura ambiente).
Perilla del temporizador: gire el control hacia la izquierda (en sentido antihorario) y el horno se mantendr
á
encendido hasta que se apague manualmente. Para activar el temporizador, gire a la derecha (en sentido
horario) para otro uso. Sonar
á
una campana al final del tiempo programado.
Perilla de función: hay cinco modos ( modo de espera, elementos de calentamiento superior e
inferior, elementos calefactores superiores
+
asador elementos de calentamiento superiores +
convección,
elementos calefactores superiores e inferiores + convección, convección + asador)
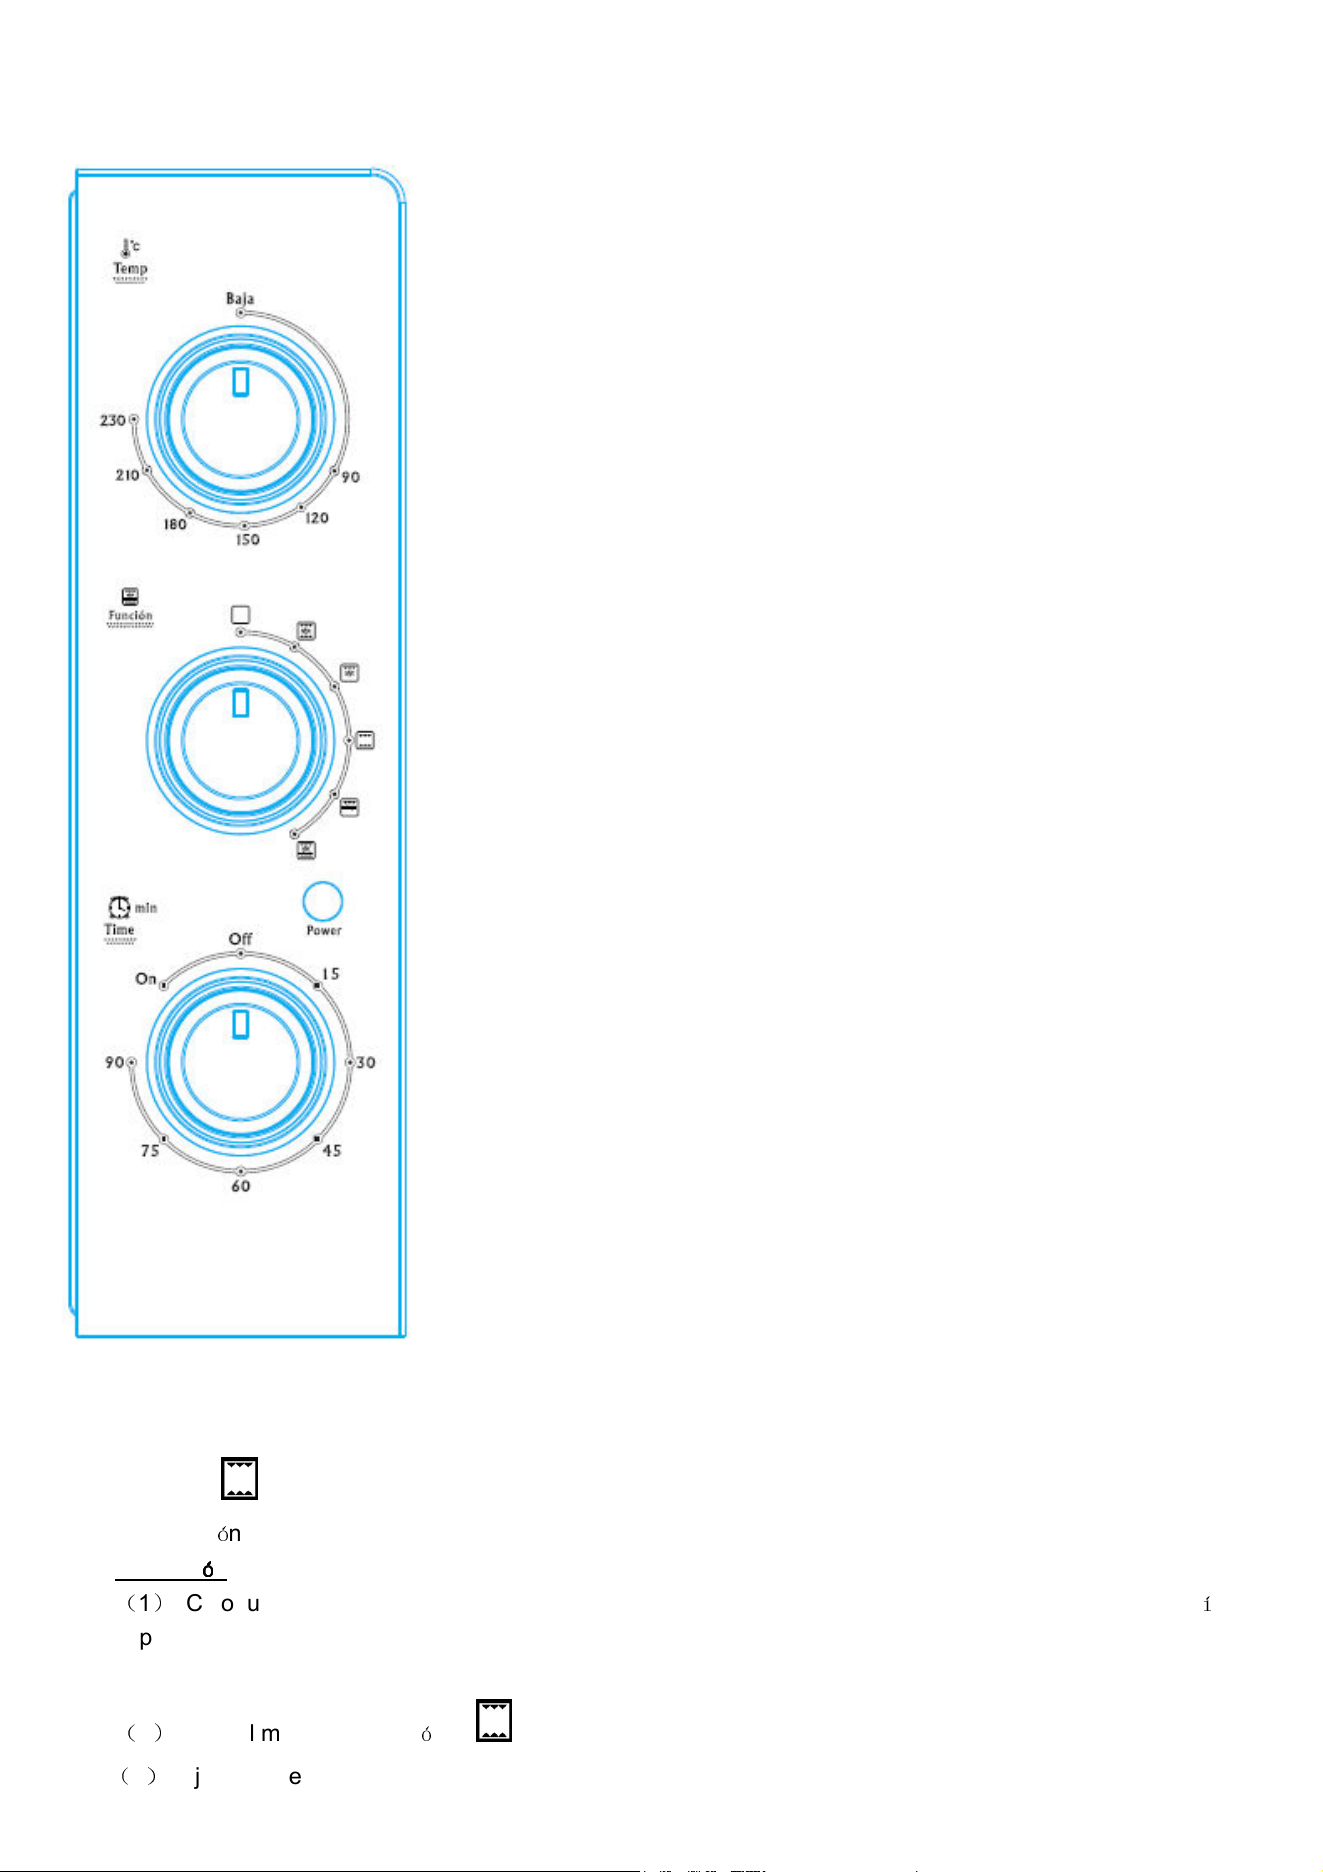
PANEL DE CONTROL
INSTRUCCIONES DE OPERACIÓN
1. FUNCIÓN
Esta funci
ó
n es ideal para cocinar pan, pizza y aves en general.
Operaci
ó
óó
ó
n
(
1
)
Coloque la comida a cocinar en la rejilla / bandeja de comida. Inserte el estante / bandeja en la gu
í
a de
soporte central
del horno
(
2
)
Gire el mando de funci
ó
n a
.
(
3
)
Ajuste la perilla del termostato a la temperatura deseada.
(
4
)
Ajuste la perilla del temporizador al tiempo de cocci
ó
n deseado.
(
5
)
Para revisar o retirar los alimentos, use un asa para ayudar a los alimentos a entrar y salir.
(
6
)
Cuando se completa el tostado, sonar
á
una campana y la perilla del temporizador volver
á
a la posici
ó
n de
apagado autom
á
ticamente. Abra la puerta por completo y retire la comida inmediatamente o el calor restante en
el horno continuar
á
tostando y secando la tostada.
PRECAUCIÓN: los alimentos cocinados, la rejilla met
á
lica y la puerta pueden estar muy calientes, manip
ú
lelos
con cuidado.
2. FUNCIÓN
&
Esta funci
ó
n es ideal para cocinar alitas de pollo, muslos de pollo y otras carnes.
Operaci
ó
óó
ó
n
(
1
)
Coloque la comida a cocinar en la rejilla / bandeja de comida. Inserte el estante / bandeja en la gu
í
a de
soporte central
del horno
(
2
)
Gire el mando de funci
ó
n a
&
(
3
)
Ajuste la perilla del termostato a la temperatura deseada.
(
4
)
Ajuste la perilla del temporizador al tiempo de cocci
ó
n deseado.
(
5
)
Para revisar o retirar los alimentos, use un asa para ayudar a los alimentos a entrar y salir.
(
6
)
Cuando se completa el tostado, sonar
á
una campana y la perilla del temporizador volver
á
a la posici
ó
n
de apagado autom
á
ticamente. Abra la puerta por completo y retire la comida inmediatamente o el calor restante en
el horno continuar
á
tostando y secando la tostada.
PRECAUCIÓN: los alimentos cocinados, la rejilla met
á
lica y la puerta pueden estar muy calientes, manip
ú
lelos con
cuidado.
3. FUNCIÓN
&
Esta funci
ó
n es ideal para cocinar pollos enteros y aves en general.
Nota: Todos los tiempos de tostado se basan en carnes a temperatura de refrigerador. Las carnes congeladas
pueden tomar bastante m
á
s tiempo. Por lo tanto, se recomienda el uso de un term
ó
metro para carne.
Uso del tenedor del asador: inserte el extremo puntiagudo del asador a trav
é
s del tenedor, asegur
á
ndose de
que los puntos del tenedor miren en la misma direcci
ó
n que el extremo puntiagudo del asador, desl
í
celo hacia
el cuadrado del asador y aseg
ú
relo con un tornillo. Coloque la comida para cocinar en el asador pasando el
asador directamente por el centro de la comida. Coloque el segundo fuerte en el otro extremo del asado o las
aves de corral. Verifique que la comida est
é
centrada en el asador. Inserte el extremo puntiagudo del asador
en el z
ó
calo de la unidad, ubicado en el lado derecho de la pared del horno. Aseg
ú
rese de que el extremo
cuadrado del asador descanse sobre el soporte del asador, ubicado en el lado izquierdo de la pared del horno.
Operaci
ó
óó
ó
n
(
1
)
Coloque la comida para cocinar en el tenedor del asador. Inserte el tenedor en el soporte de asador del
horno.
(
2
)
Gire el mando de funci
ó
n a
(
3
)
Ajuste la perilla del termostato a la temperatura deseada.
(
4
)
Ajuste la perilla del temporizador al tiempo de cocci
ó
n deseado.
(
5
)
Para revisar o retirar los alimentos, use un asa para ayudar a los alimentos a entrar y salir.
(
6
)
Cuando se completa el tostado, sonar
á
una campana y la perilla del temporizador volver
á
a la posici
ó
n
de apagado autom
á
ticamente. Abra la puerta por completo y retire la comida con la manija.
PRECAUCIÓN: los alimentos cocinados, el tenedor de metal y la puerta pueden estar muy calientes,
manip
ú
lelos con cuidado. No deje el horno desatendido.
USE INSTRUCCIONES DE MANTENIMIENTO
Este aparato requiere poco mantenimiento. No contiene partes reparables por el usuario. No intente repararlo usted
mismo. P
ó
ngase en contacto con un t
é
cnico calificado en reparaci
ó
n de electrodom
é
sticos si el producto requiere
servicio.
INSTRUCCIONES DE LIMPIEZA
PRECAUCIÓN: Para protegerse contra descargas el
é
ctricas, NO SUMERJA EL HORNO EN AGUA NI EN NINGÚN
OTRO LÍQUIDO.
Su horno tostador debe limpiarse regularmente para obtener el mejor rendimiento y una larga vida
ú
til. La limpieza
regular tambi
é
n reducir
á
el riesgo de incendio.
Paso 1. Retire el enchufe del tomacorriente. Deja que se enfr
í
e.
Paso 2. Retire la bandeja extra
í
ble para migas, la rejilla y la bandeja tirando del horno. L
í
mpialos con agua y jab
ó
n.
paño. Aseg
ú
rese de usar solo agua jabonosa suave.
Paso 3. Para limpiar el interior del horno, limpie las paredes del horno, la parte inferior del horno y la puerta de vidrio
con un paño h
ú
medo y jabonoso.
Repita con un paño seco y limpio.
Paso 4. Limpie el exterior del horno con un paño h
ú
medo.
PRECAUCIÓN: NO USE LIMPIADORES ABRASIVOS O ALMOHADILLAS METÁLICAS. Aseg
ú
rese de usar solo
agua jabonosa suave. Los limpiadores abrasivos, los cepillos de fregado y los limpiadores qu
í
micos dañar
á
n el
revestimiento de esta unidad. Las piezas pueden desprenderse y tocar partes el
é
ctricas que implican un riesgo de
descarga el
é
ctrica.
Paso 5. Permita que el aparato se enfr
í
e y seque por completo antes de guardarlo. Si almacena el horno por largos
per
í
odos de tiempo
aseg
ú
rese de que el horno est
é
limpio y libre de part
í
culas de alimentos. Guarde el horno en un lugar seco,
como en un
mesa o mostrador o estanter
í
a de armario. Aparte de la limpieza recomendada, no m
á
s mantenimiento por
parte del usuario
Deber
í
a ser necesario.
Cualquier otro servicio debe ser realizado por un representante de servicio autorizado.
ALMACENAR
Desenchufe la unidad, deje que se enfr
í
e y l
í
mpiela antes de guardarla. Guarde el horno el
é
ctrico en su caja en
un lugar limpio y seco. Nunca almacene el electrodom
é
stico mientras est
é
caliente o todav
í
a enchufado. Nunca
enrolle el cable firmemente alrededor del electrodom
é
stico. No ejerza presi
ó
n sobre el cable por donde ingresa a
la unidad, ya que podr
í
a causar que el cable se deshilache y se rompa.
SPECIFICATION:
Modelo CHS G 2060 B
Tensi
ó
n nominal
220V-240V
Frecuencia nominal 50-60Hz
Potencia nominal 2000W
Capacidad del horno
60litros
Solo para uso dom
é
stico, NO SUMERJA AGUA
Kurbin Lane S.L. Paseo del Ferrocarril 335 08860
Castelldefels (ESPAÑA)
INSTRUCTION MANUAL
Electric Oven
CHS G 2060 B
HOUSEHOLD USE ONLY
Please read the manual carefully before use. Keep them for further reference.

IMPORTANT SAFEGUARDS
When using an electrical appliance, basic safety precautions should always be followed, including the
following:
1. Read all instructions.
2. Do not touch hot surfaces.
Use handles or knobs.
3. Close supervision is necessary when any appliance is used by or near children.
4. To protect against electric shock, do not place any part of the electric oven in water or other liquid.
5. Do not let cord hang over edge of table or counter, or touch hot surfaces.
6. Do not operate appliance with damaged cord or plug or after the appliance malfunctions, or has been damaged
in any manner, return appliance to the nearest Authorized Service Center for examination, repair, or adjustment.
7. The use of accessory attachments not recommended by the appliance manufacturer may cause hazard or injury.
8. When operating the oven, keep at least four inches of space on all sides of the oven to allow for adequate air
circulation.
9. Unplug from outlet when not in use, or before cleaning. Let it to cool before putting on or taking parts, or before
cleaning.
10. To disconnect, turn the control to STOP, then unplug the plug. Always hold the plug, but never pull the cord.
11. Do not cover CRUMB TRAY or any part of the oven with metal foil. This may cause overheating of the oven.
12. Do not clean with metal scouring pads. Pieces can break off the pad and touch electrical parts, creating a risk of
electric shock.
13. Oversized foods or metal utensils must not be inserted in a electric oven as they may create a fire or risk of
electric shock.
14. A fire may occur if the oven is covered or touching flammable material, including curtains, draperies, walls, and
the like, when in operation. Do not store any item on the oven during operation.
15. Extreme caution should be exercised when using containers constructed if anything other than metal or glass.
16. Do not place any of the following materials in the oven: cardboard, plastic, paper, or anything similar.
17. Do not store any materials, other than manufacturer’s recommended accessories, in this oven when not in use.
18. Always wear protective, insulated oven mitts when inserting or removing items from the hot oven.
19. This appliance has a tempered, safety glass door. The glass is stronger than ordinary glass and more resistant to
breakage. Tempered glass can break, but the pieces will not have sharp edges. Avoid scratching door surface or
nicking edges. If the door gas a scratch or nick, contact our consumer relations line before using the oven.
20. Do not use outdoors.
21. Do not use appliance for other than intended use.
22. This appliance is for HOUSEHOLD USE ONLY.
23. The temperature of the door or the outer surface may be higher when the appliance is working.
24. Protect against hurt by sharp edge when action.
25. Temperature of accessible surfaces may be high when the appliance is operating.
26. Do not rest cooking utensils or baking dishes on glass door.
27.
This appliance is not intended for use by persons (including children) with reduced physical, sensory or mental
capabilities or lack of experience and knowledge, unless they have been given supervision or instruction
concerning use of the appliance by a person responsible for their safety.
28. Children should be supervised to ensure that they do not play with the appliance.
29. The weight of the food which is put on the S3 Food Tray/Wire Rack can not be over 3.0kg..
30. For appliance with type Y attachment, if the supply cord is damaged, it must be replaced by the manufacturer, its
services agent or similarly qualified persons in order to avoid a hazard
。
31. Rear surface of appliances should be placed against a wall.
32. WARNING: This appliance includes a heating function. Surfaces, other than the functional surfaces may develop
high temperatures. Since temperatures are perceived differently by different people, this device should be used
with CAUTION. Hold the appliance exclusively to grip surfaces intended to hold and use such heat protection
measures as heat protection Gloves or pot holders. Areas which are not intended to grips must be given
sufficient time to cool.
33. Do not place on or near a hot gas or electric burner, or in a heated oven.
34. Extreme caution must be used when moving an appliance containing hot oil or other hot liquids.
35. Turn the timer knob to “off” position to shut off the appliance.
36.appliances are not intended to be operated by means of an external timer or separate remote-control system
The surfaces are liable to get hot during use.
CAUTION: APPLIANCE SURFACES ARE HOT AFTER USE.ALWAYS wear protective, insulated oven gloves
when touching hot oven or hot dishes and food, or when inserting or removing rack, pans or baking dishes.
SAVE THESE INSTRUCTIONS
Before Using Your Electric Oven
Before using your convection electric oven for the first time, be sure to
:
1. Unpack the unit.
2. Remove all racks and pans. Wash the racks and pans in hot sudsy water or in dishwasher.
3. Thoroughly dry all accessories and re-assemble in oven. Plug oven into outlet and you are ready to use your new
Electric Oven.
4. After re-assembling your oven, we recommend that you run it at MAX temperature for approximately 15 minutes
to eliminate any packing oil that may remain after shipping.
COMPONENTS:
Using Your Electric Oven
Please familiarize yourself with the following oven functions and accessories prior to first use:
Wire rack: For toasting, baking, and general cooking in casserole dishes and standard pans.
Food Tray: For use in broiling and roasting meat, poultry, fish, and various other foods.
Rotisserie Fork: Use to roast a variety of meats and poultry.
Rotisserie Handle: Allow you to pick up rotisserie fork.
Food Tray Handle: Allow you to pick up rack or tray.
Crumb Tray: For collecting fallen oil or crumb.
Thermostat knob: choose desired temperature from low-90
°
C-230
°
C(Low is cooking at the room
temperature).
Timer knob: turn control to the left (counter - clockwise) and the oven will STAY ON until manually shut off. To
activate timer, turn to right (clockwise) for other use. A bell will sound at end of programmed time.
Function knob: there are five modes( standby mode, upper and lower heating elements, upper
heating elements
+
rotisserie upper heating elements + convection
,
upper and lower heating
elements +convection, convection + rotisserie)
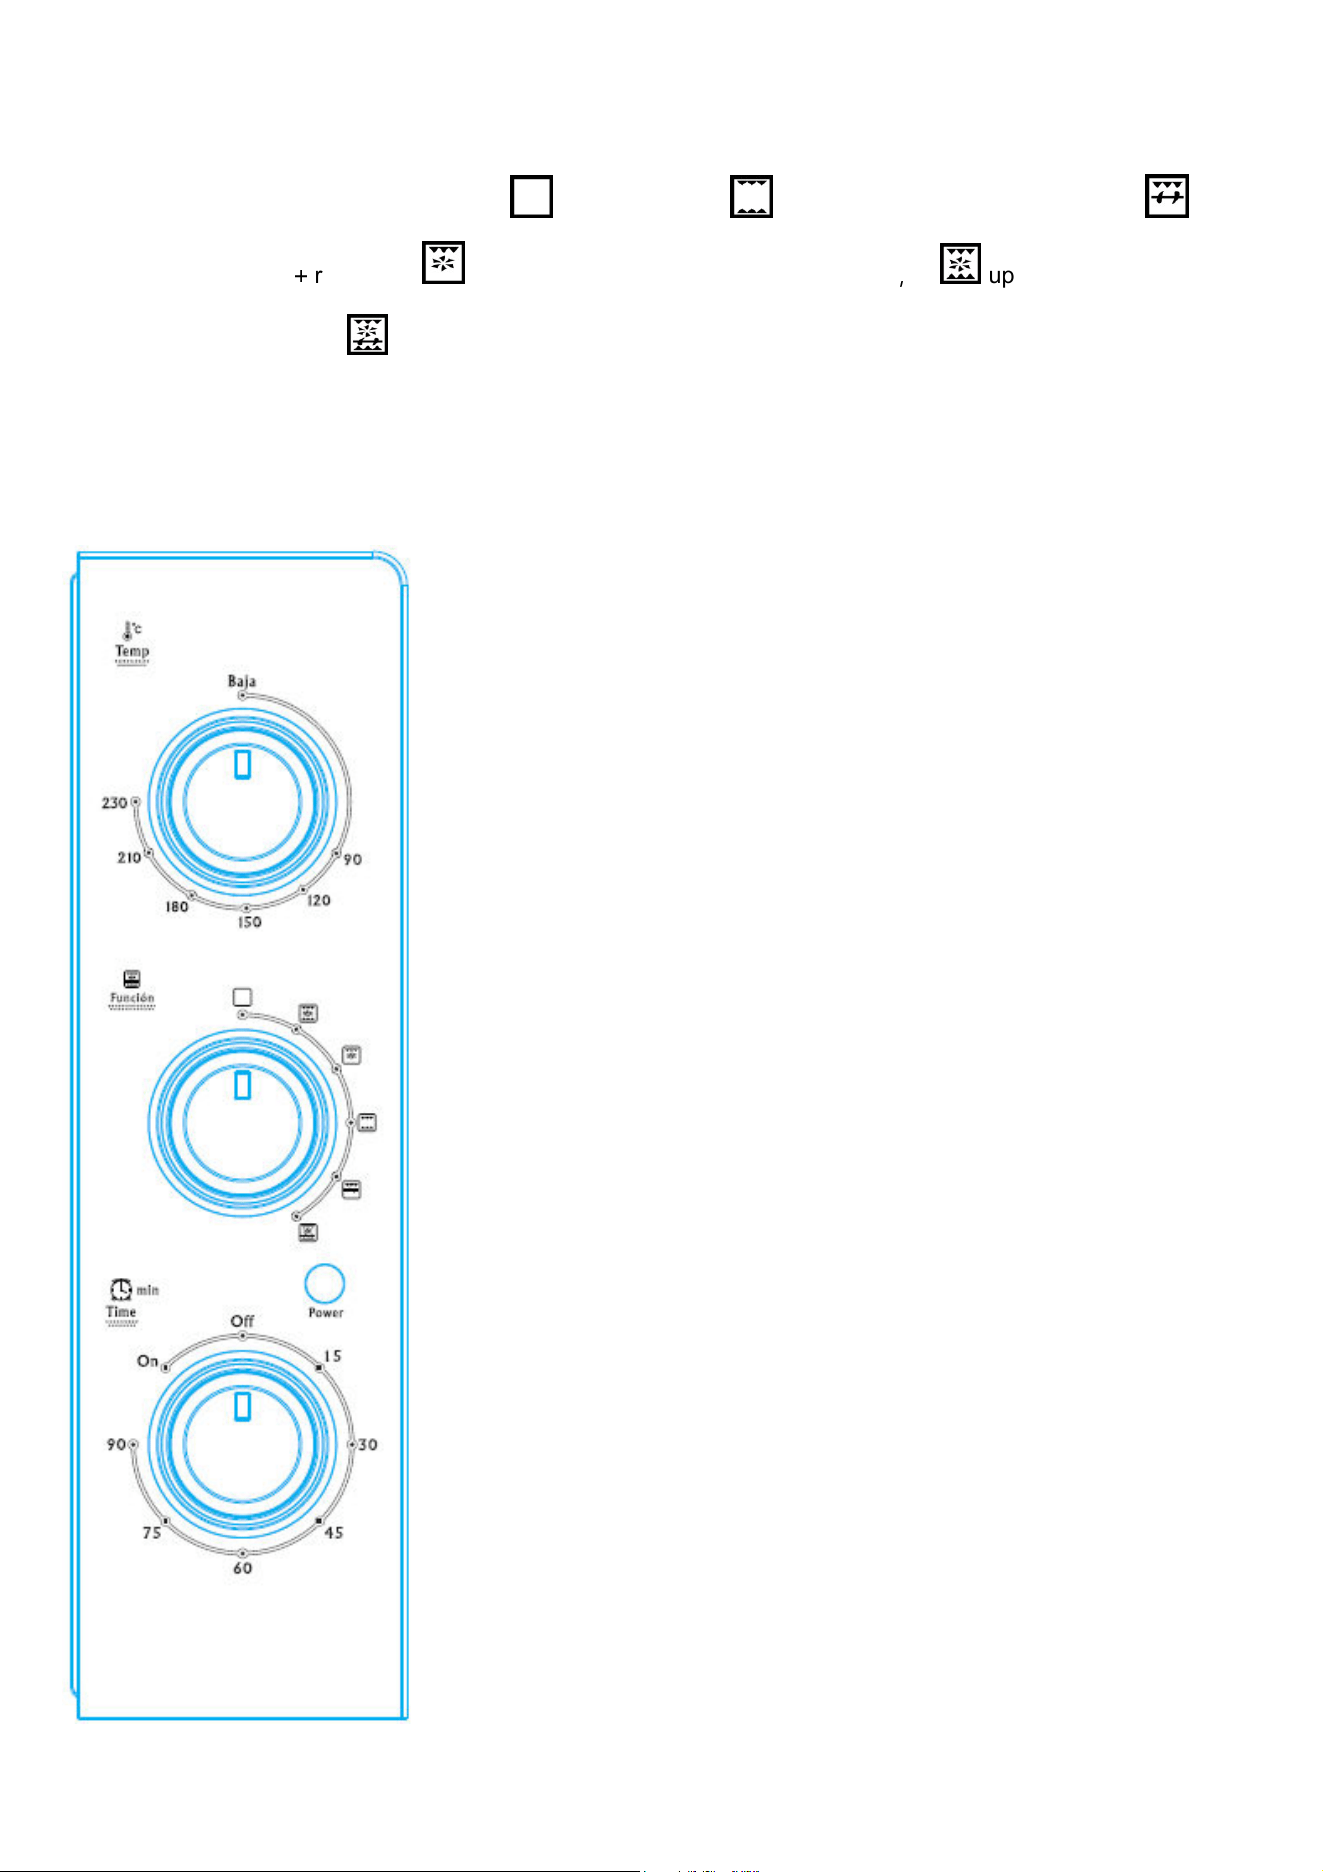
CONTROL PANEL
OPERATION INSTRUCTIONS
1. FUNCTION
This function is ideal for cooking bread, pizza, and fowl in general.
Operation
(
1
)
Place the food to be cooked on the Wire rack / food tray. Insert the rack/tray into the middle support guide
of the oven.
(
2
)
Turn the Function knob to
.
(
3
)
Set the Thermostat knob to the desired temperature.
(
4
)
Set the Timer knob to the desired cooking time.
(
5
)
To check or remove food ,use a handle to help side food in and out.
(
6
)
When toasting is complete, a bell will sound the Timer knob will back to off position automatically. Open
door completely and remove the food immediately or the heat remaining in the oven will continue to toast
and dry out your toast.
CAUTION: Cooked food, metal rack, and door can be very hot, handle with care.
2. FUNCTION
&
This function is ideal for cooking chicken wings, chicken legs and other meats.
Operation
(
1
)
Place the food to be cooked on the Wire rack / food tray. Insert the rack/tray into the middle support guide
of the oven.
(
2
)
Turn the Function knob to
&
(
3
)
Set the Thermostat knob to the desired temperature.
(
4
)
Set the Timer knob to the desired cooking time.
(
5
)
To check or remove food ,use a handle to help side food in and out.
(
6
)
When toasting is complete, a bell will sound the Timer knob will back to off position automatically. Open
door completely and remove the food immediately or the heat remaining in the oven will continue to toast
and dry out your toast.
CAUTION: Cooked food, metal rack, and door can be very hot, handle with care.
3. FUNCTION
&
This function is ideal for cooking whole chickens and fowl in general.
Note: All toasting times are based on meats at refrigerator temperature. Frozen meats may takes considerably
longer. Therefore, use of a meat thermometer is highly recommended.
Rotisserie fork use: insert pointed end of spit through fork, making sure points of fork face same direction as
pointed end of spit, slide towards square of spit and secure with thumbscrew. Place food to be cooked on spit by
running spit directly through center of food. Place second fort into other end of roast or poultry. Check that food
is centered on spit. Insert pointed end of spit into drive socket, located on right-hand side of oven wall. Make
sure the square end of spit rests on spit support, located on left-hand side of oven wall.
Operation
(
1
)
Place the food to be cooked on the rotisserie fork. Insert the fork into the spit support of the oven.
(
2
)
Turn the Function knob to
(
3
)
Set the Thermostat knob to the desired temperature.
(
4
)
Set the Timer knob to the desired cooking time.
(
5
)
To check or remove food ,use a handle to help side food in and out.
(
6
)
When toasting is complete, a bell will sound the Timer knob will back to off position automatically. Open
door completely and remove the food with handle.
CAUTION: Cooked food, metal fork, and door can be very hot, handle with care. Do not leave the oven
unattended.
USE MAINTENANCE INSTRUCTIONS
This appliance requires little maintenance. It contains no user serviceable parts. Do not try to repair it
yourself. Contact a qualified appliance repair technician if the product requires servicing.
CLEANING INSTRUCTIONS
CAUTION: To protect against electrical shock, DO NOT IMMERSE THE OVEN IN WATER OR ANY OTHER
LIQUIDS.
Your toaster oven should be cleaned regularly for best performance and long life. Regular cleaning will also reduce
the risk of fire hazard.
Step 1. Remove plug from electrical outlet. Allow it to cool.
Step 2. Remove the Removable Crumb Tray, Rack, Tray by pulling out of the oven. Clean them with damp, soapy
cloth. Make sure to only use mild, soapy water.
Step 3. To clean inside of oven, wipe the oven walls, bottom of oven, and glass door with a damp, soapy cloth.
Repeat with a dry, clean cloth.
Step 4. Wipe outside of oven with a damp cloth.
CAUTION: DO NOT USE ABRASIVE CLEANERS OR METAL SCOURING PADS. Make sure to only use mild,
soapy water. Abrasive cleaners, scrubbing brushes and chemical cleaners will damage the coating on this unit.
Pieces can break off the and touch electrical parts involving a risk of electrical shock.
Step 5. Allow the appliance to cool and dry completely before storing. If storing the oven for long periods of time
make certain that the oven is clean and free of food particles. Store the oven in a dry location such as on a
table or countertop or cupboard shelf. Other than the recommended cleaning, no further user maintenance
should be necessary.
Any other servicing should be performed by an authorized service representative.
TO STORE
Unplug unit, allow it to cool, and clean before storing. Store the Electric Oven in its box in a clean, dry place. Never
store appliance while it is hot or still plugged in. Never wrap cord tightly around the appliance. Do not put any stress
on the cord where it enters the unit, as it could cause the cord to fray and break.
SPECIFICATION:
Model CHS G 2060 B
Rated voltage 220V-240V
Rated frequency 50-60Hz
Rated power 2000W
Oven capacity 60Litres
Household use only , DO NOT IMMERSEIN WATER
Kurbin Lane S.L. Paseo del Ferrocarril 335 08860
Castelldefels (ESPAÑA)

CERTIFICADO DE GARANTÍA
Imprescindible la presentación de la factura de compra acompañada del presente certicado de garantía.
Riesgos cubiertos.
Este aparato está garantizado contra cualquier defecto de funcionamiento, siempre que se destine a uso doméstico,
procediéndose a su reparación dentro del plazo de garantía y sólo por la red de SAT autorizados.
Nuestros electrodomésticos Corberó cuentan con la garantía legal del fabricante que cubre cualquier avería o defecto durante36
meses, desde su fecha factura de 1 de enero del 2022. En caso de que fuera necesario, nosotros nos ocupamos de cualquier posible
incidencia siempre que se deba a un componente defectuoso o fallo de fabricación.
Excepciones de garantía.
• Que la fecha del certicado no coincida con la fecha de venta de la factura original.
• Averías producidas por golpe, por caída o cualquier otra causa de fuerza mayor.
• Si el apa
rato ha sido manipulado por personal no autorizado.
• Las averías producidas o derivadas como consecuencia de un uso inadecuado, por defectos de instalación,
por introducir modicaciones en el aparato que alteren su funcionamiento.
• Puestas en marcha, mantenimiento, limpiezas, componentes sujetos a desgaste, lámparas, piezas estéticas,
oxidaciones, plásticos, gomas, carcasas y cristales.
“ESTAS EXCEPCIONES ANULAN LA GARANTÍA, SIENDO LA REPARACIÓN CON CARGO AL CLIENTE”
Periodo amparado en aparatos según ley de garantias en la venta de bienes de consumo Ley vigente es “RD 7/2021”
Horario de atención Lunes a Viernes de 9h00 a 19h00. Teléfono de contacto_ 911 08 08 08 Mail de contacto_ [email protected] web_ www.corbero.es
Dirección de Servicio técnico oficial_Vidal i Ribes 8-10 08950 Esplugues de Llobregat Barcelona
Sevicio Técnico Ocial: 911 08 08 08
Los hornos microondas (a excepción de los integrables) y los hornos sobremesa en el caso de cualquier incidencia de
funcionamiento, deben de llevarse al servicio técnico más próximo por parte del cliente. No se recojen ni reparan en el
domicilio.
•
Garantía termos eléctricos. Garantía de 3 años incluyendo los costes de desplazamiento y mano de obra que
correspondan de la reparación del producto, teniendo que tener un mantenimiento una vez cada 12 meses.
Especialmente si Ud. ha instalado un aparato a gas, tenga presente como titular de la instalación, la obligatoriedad de
realizar una revisión completa de los equipos, (según Real Decreto 238 / 2013, del 5 Abril. RITE. IT3, M. Lo termos
eléctricos y calderas que incluyen depósitos acumuladores de agua caliente, para que se aplique la prestación de la
Garantía, es obligatorio que el ánodo de magnesio esté operativo y que realice la función de protección
adecuadamente. Para ello es recomendable que el ánodo se revise bianualmente por el Servicio Oficial y sea renovado
cuando fuera necesario. Periodicidad que deberá ser anual en aquellas zonas con aguas críticas (contenido de CaCO3
superiores a 200mg/L, es decir a partir de 20ºfH de dureza). Depósitos sin el correcto estado del ánodo de protección, no
tienen la cobertura de la garantía. Independientemente del tipo de depósito o producto, todas las válvulas de
sobrepresión de calefacción o a.c.s., deberán ser canalizadas para evitar daños en Ia vivienda por descargas de agua. La
garantía del producto no asume los daños causados por Ia no canalización del agua derramada por esta válvula.
•

CERTIFICATE OF GUARANTEE
The presentation of the purchase invoice accompanied by this guarantee certificate is essential.
Covered Risks.
This appliance is guaranteed against any malfunction, provided that it is intended for domestic use, proceeding to its repair within
the warranty period and only by the authorized SAT network.
Our Corberó appliances have the manufacturer's legal warranty that covers any breakdown or defect for 36 months, from the
invoice date of January 1, 2022. If necessary, we take care of any possible incident whenever it is due to a defective component or
manufacturing fault. Warranty Exceptions
Warranty Exceptions
•
That the date of the certificate does not coincide with the date of sale of the original invoice.
•
Faults produced by blow, by fall or any other cause of force majeure.
•
If the device has been manipulated by unauthorized personnel.
•
Faults produced or derived as a consequence of improper use, installation defects, or modifications to the device that
alter its operation.
•
Start-up, maintenance, cleaning, components subject to wear, lamps, aesthetic parts,
oxidation, plastics, rubbers, housings and crystals.
“THESE EXCEPTIONS VOID THE WARRANTY, THE REPAIR BEING CHARGED TO THE CUSTOMER”
Period covered in devices according to the law of guarantees in the sale of consumer goods Current law is “RD 7/2021”
Hours of operation Monday to Friday from9h00 a 19h00. Telephone contact_ 911 08 08 08 Contact email_ [email protected] web_ www.corbero.es
Official Technical Service Address_Vidal i Ribes 8-10 08950 Esplugues de Llobregat Barcelona
Official Technical Service: 911 08 08 08
Microwave ovens (with the exception of built-in ones) and tabletop ovens in the event of any incident of
operation, they must be taken to the nearest technical service by the customer. They are not collected or repaired at
home.
•
Electric thermos guarantee. 3-year warranty including travel and labor costs that correspond to the repair of the
product, having to have maintenance once every 12 months. Especially if you have installed a gas appliance, keep in
mind as the owner of the installation, the obligation to carry out a complete review of the equipment, (according to
Royal Decree 238 / 2013, of April 5. RITE. IT3, M. Lo thermos electrical and boilers that include hot water storage tanks,
for the benefit of the Guarantee to apply, it is mandatory that the magnesium anode is operational and that it performs
the protection function adequately.For this, it is recommended that the anode be checked biannually by the Official
Service and is renewed when necessary Periodicity that must be annual in those areas with critical waters (CaCO3
content greater than 200mg/L, that is, from 20ºfH of hardness) Deposits without the correct state of the protection
anode are not covered by the warranty Regardless of the type of tank or product, all heating or DHW overpressure
valves must be channeled to avoid damage and n the house due to water discharges. The product warranty does not
cover damages caused by not channeling the water spilled by this valve.
•