
ES10274
Buffet Server
Buffetwärmer
Serveur de buffet
Servidor de Bufé
Scaldavivande per Buffet
Podgrzewacz bufetowy do potraw
DEU office: FDS GmbH, Neuer Höltigbaum 36, 22143 Hamburg, Deutschland
ITA office: Milano
FRA office: Saint Vigor d'Ymonville
POL office: GdańskGBR office: IpswichAUS office: TruganinaUSA office: Fontana
THIS INSTRUCTION BOOKLET CONTAINS IMPORTANT SAFETY INFORMATION. PLEASE READ AND KEEP FOR FUTURE REFERENCE.

Before You Start
Please read all instructions carefully.
Retain instructions for future reference.
Separate and count all parts and hardware.
Read through each step carefully and follow the proper order.
We recommend that, where possible, all items are assembled near to the area in
which they will be placed in use, to avoid moving the product unnecessarily once
assembled.
Always place the product on a flat, steady and stable surface.
Keep all small parts and packaging materials for this product away from babies
and children as they potentially pose a serious choking hazard.
EN
DE
Bitte lesen Sie alle Anweisungen sorgfältig durch.
Bewahren Sie die Anweisungen zum zukünftigen Verwendung auf.
Überprüfen Sie, ob alle Teile und Zubehörteile vorhanden sind.
Lesen Sie jeden Schritt sorgfältig durch und befolgen Sie die richtige Reihenfolge.
Wir empfehlen, alle Teile möglichst in der Nähe des Aufstellungsortes zu
montieren, um unnötige Bewegungen nach der Montage zu vermeiden.
Stellen Sie den Artikel immer auf eine ebene, feste und stabile Fläche.
Halten Sie alle kleinen Teile und Verpackungsmaterialien fern von Babys und
Kindern, ansonsten besteht Erstickungsgefahr.
Vor dem Beginnen
FR
Veuillez lire attentivement toutes les instructions.
Conservez les instructions pour vous y référer ultérieurement.
Vérifiez toutes les pièces et les accessoires.
Lisez attentivement chaque étape et suivez l'ordre correct.
Nous recommandons que, dans la mesure du possible, tous les produits soient
assemblés à proximité de la zone où ils seront utilisés, afin d'éviter tout
déplacement inutile du produit une fois assemblé.
Placez toujours le produit sur une surface plane et stable.
Conservez toutes les petites pièces de ce produit et les matériaux d'emballage
hors de portée des bébés et des enfants, car ils pourraient présenter un risque
d'étouffement.
Lea atentamente todas las instrucciones.
Conserve las instrucciones para futuras consultas.
Separe y cuente todas las piezas y los accesorios.
Lea detenidamente cada paso y siga el orden correcto.
Recomendamos que, siempre que sea posible, todos los elementos se monten
cerca de la zona en la que se van a utilizar, para evitar mover el producto
innecesariamente una vez montado.
Coloque siempre el producto sobre una superficie plana, estable y firme.
Mantenga todas las piezas pequeñas y los materiales de embalaje de este
producto lejos de los bebés y los niños, ya que pueden representar un grave
riesgo de asfixia.
ES
Avant de Commencer
Antes de Empezar
02 03
Si prega di leggere attentamente tutte le istruzioni.
Conservare le istruzioni per riferimento futuro.
Separare e contare tutte le parti e gli accessori.
Leggere attentamente ogni passo e seguire l'ordine corretto.
Si consiglia, ove possibile, di assemblare tutti gli articoli vicino alla zona in cui
verranno posti in uso, per evitare di spostare inutilmente il prodotto una volta
assemblato.
Posizionare sempre il prodotto su una superficie piana, stabile.
Tenere tutte le piccole parti e i materiali di imballaggio di questo prodotto lontano
dalla portata di neonati e bambini, in quanto possono costituire un serio pericolo
di soffocamento.
Zapoznaj się z instrukcją.
Zachowaj instrukcję do wglądu.
Posortuj części i upewnij się, że zestaw jest kompletny.
Zapoznaj się ze sposobem montażu i postępuj zgodnie z instrukcją.
Zalecamy, aby montaż odbywał się możliwie najbliżej miejsca docelowego
położenia produktu, aby uniknąć niepotrzebnego przesuwania.
Upewnij się, że produkt znajdzie się na płaskiej i stabilnej po wierzchni.
Upewnij się, że materiały wykorzystane podczas pakowania produktu oraz jego
elementy znajdują się poza zasięgiem dzieci, gdyż stwarzają potencjalne ryzyko
zadławienia.
IT
PL
Prima di Iniziare
Zanim Zaczniesz
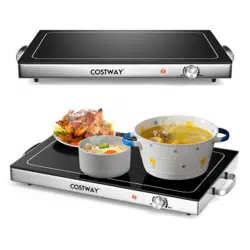
● Read all instructions carefully and keep them for future
reference.
● Remove all packaging.
● Assemble the buffet server by placing all of the serving trays
into the baking pan, and then placing the baking pan on top of
the warming tray.
● Place your buffet server on a flat, stable, heat resistant
surface.
● Place your precooked food items into each serving tray as
desired.
● With the temperature knob is set to the “OFF” position, plug
the power cord into a standard electrical outlet.
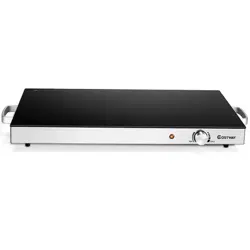
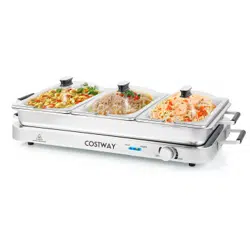
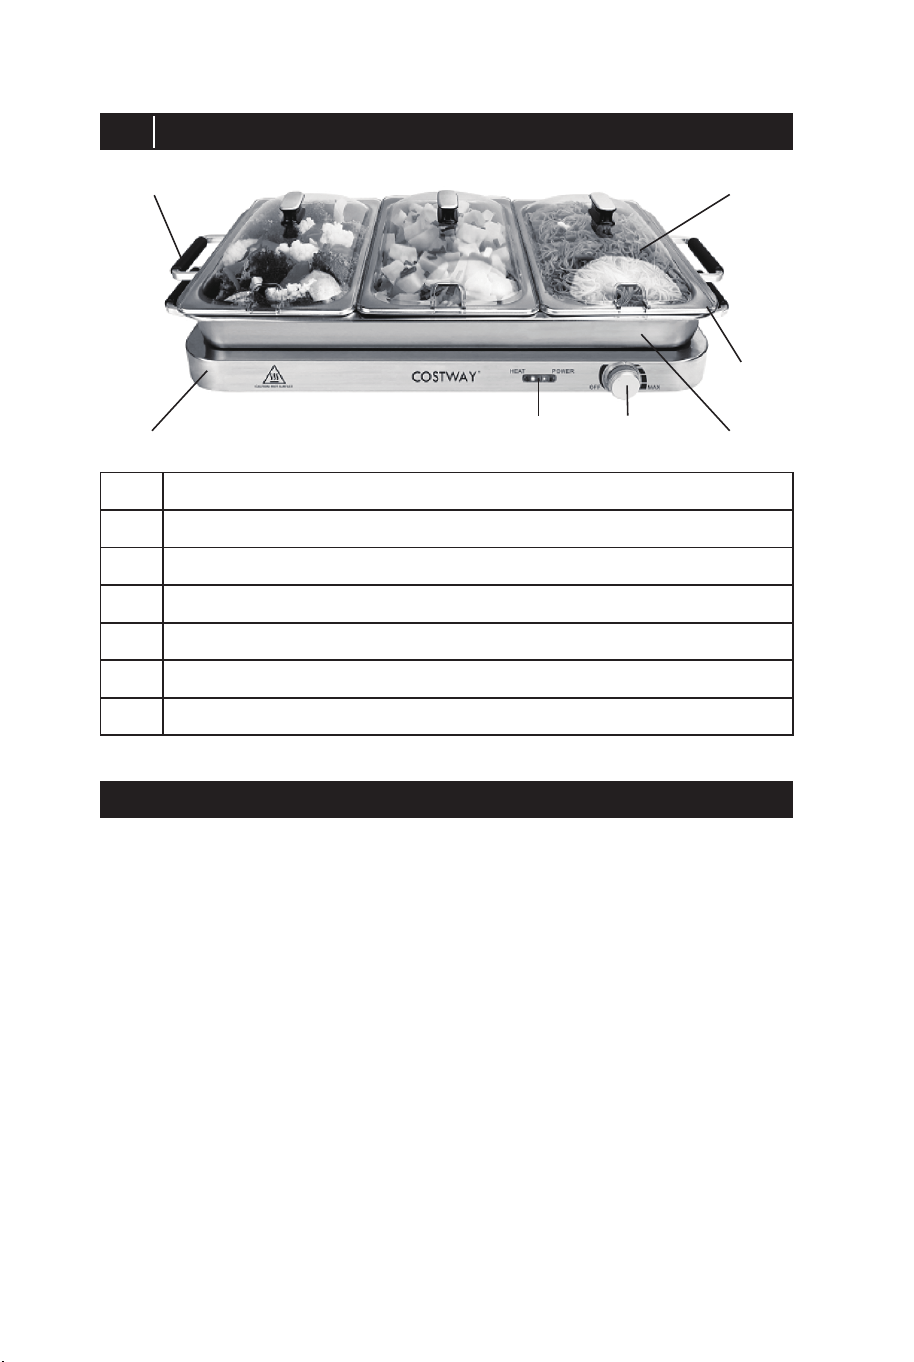
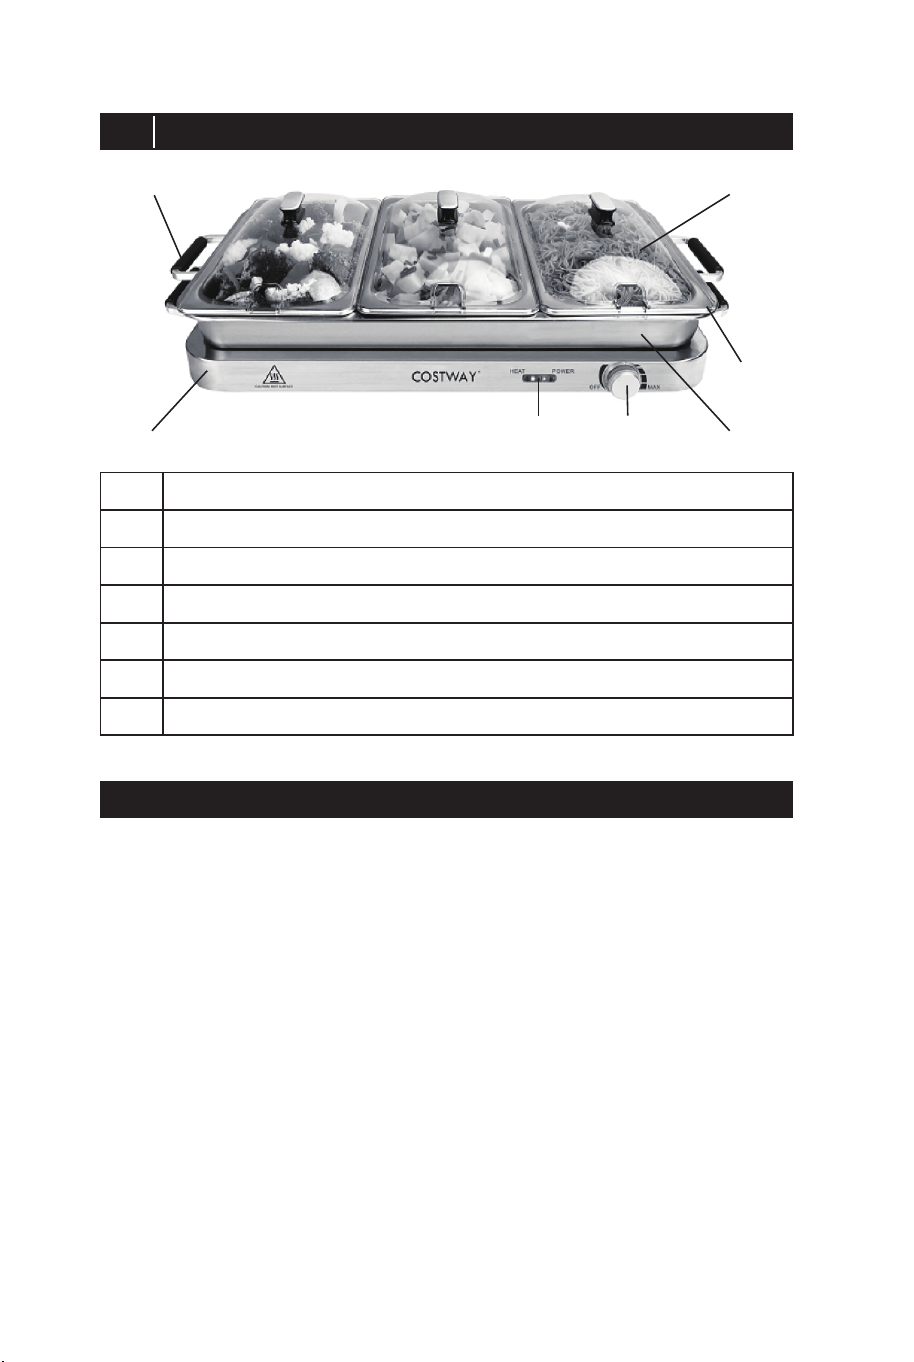
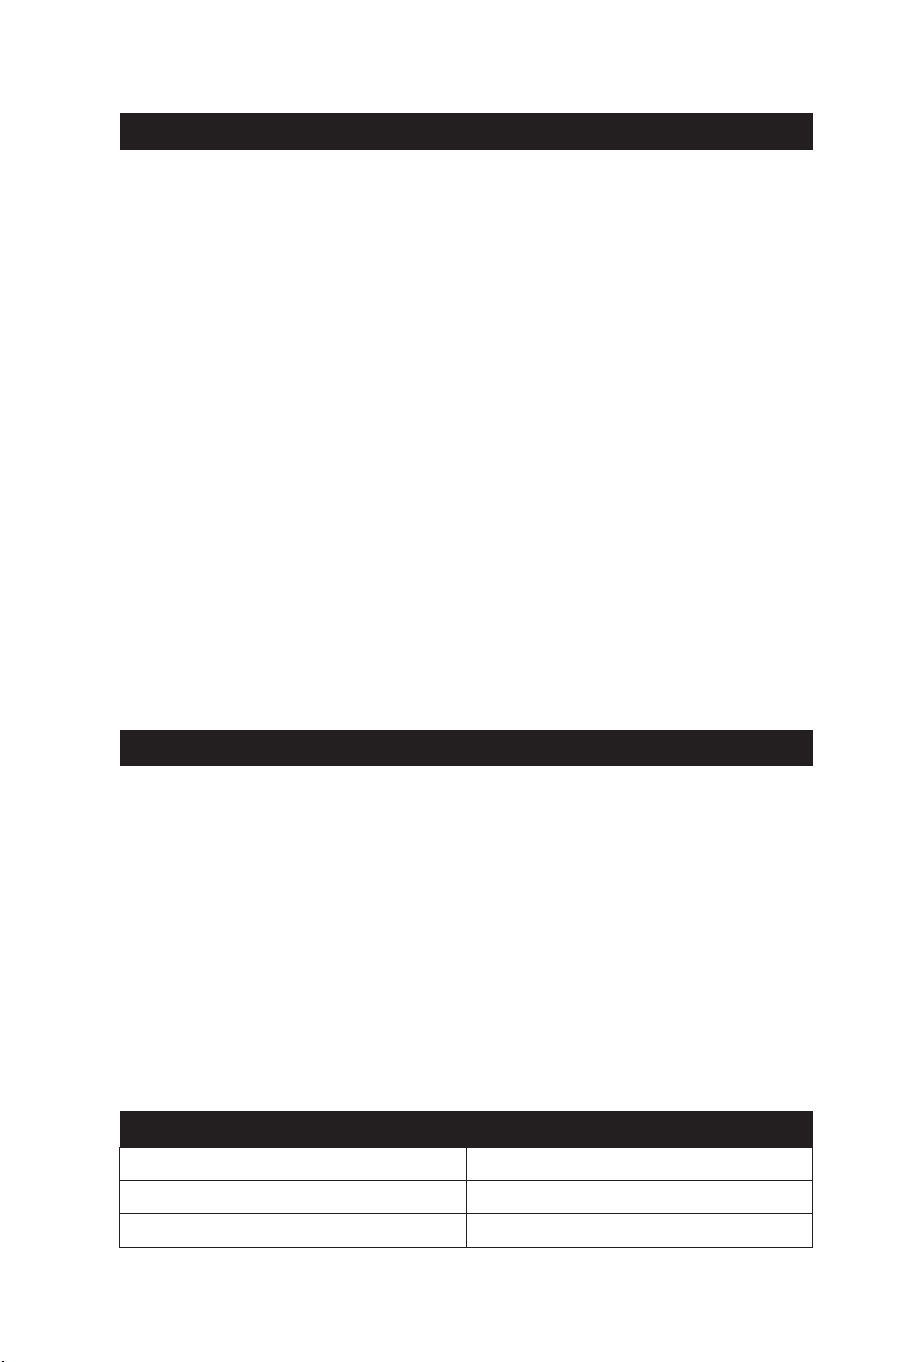
Description of parts
EN
Instructions for use
1
2
367
5
4
Lids with Slots
Serving Trays
8 L Baking Pan
Handles of Baking Pan with Silicone Grips
Warming Tray
Temperature Knob
Heat and Power Indicator Light
1
2
3
4
5
6
7
04 05
Si prega di leggere attentamente tutte le istruzioni.
Conservare le istruzioni per riferimento futuro.
Separare e contare tutte le parti e gli accessori.
Leggere attentamente ogni passo e seguire l'ordine corretto.
Si consiglia, ove possibile, di assemblare tutti gli articoli vicino alla zona in cui
verranno posti in uso, per evitare di spostare inutilmente il prodotto una volta
assemblato.
Posizionare sempre il prodotto su una superficie piana, stabile.
Tenere tutte le piccole parti e i materiali di imballaggio di questo prodotto lontano
dalla portata di neonati e bambini, in quanto possono costituire un serio pericolo
di soffocamento.
Zapoznaj się z instrukcją.
Zachowaj instrukcję do wglądu.
Posortuj części i upewnij się, że zestaw jest kompletny.
Zapoznaj się ze sposobem montażu i postępuj zgodnie z instrukcją.
Zalecamy, aby montaż odbywał się możliwie najbliżej miejsca docelowego
położenia produktu, aby uniknąć niepotrzebnego przesuwania.
Upewnij się, że produkt znajdzie się na płaskiej i stabilnej po wierzchni.
Upewnij się, że materiały wykorzystane podczas pakowania produktu oraz jego
elementy znajdują się poza zasięgiem dzieci, gdyż stwarzają potencjalne ryzyko
zadławienia.
IT
PL
Prima di Iniziare
Zanim Zaczniesz
● Read all instructions carefully and keep them for future
reference.
● Remove all packaging.
● Assemble the buffet server by placing all of the serving trays
into the baking pan, and then placing the baking pan on top of
the warming tray.
● Place your buffet server on a flat, stable, heat resistant
surface.
● Place your precooked food items into each serving tray as
desired.
● With the temperature knob is set to the “OFF” position, plug
the power cord into a standard electrical outlet.
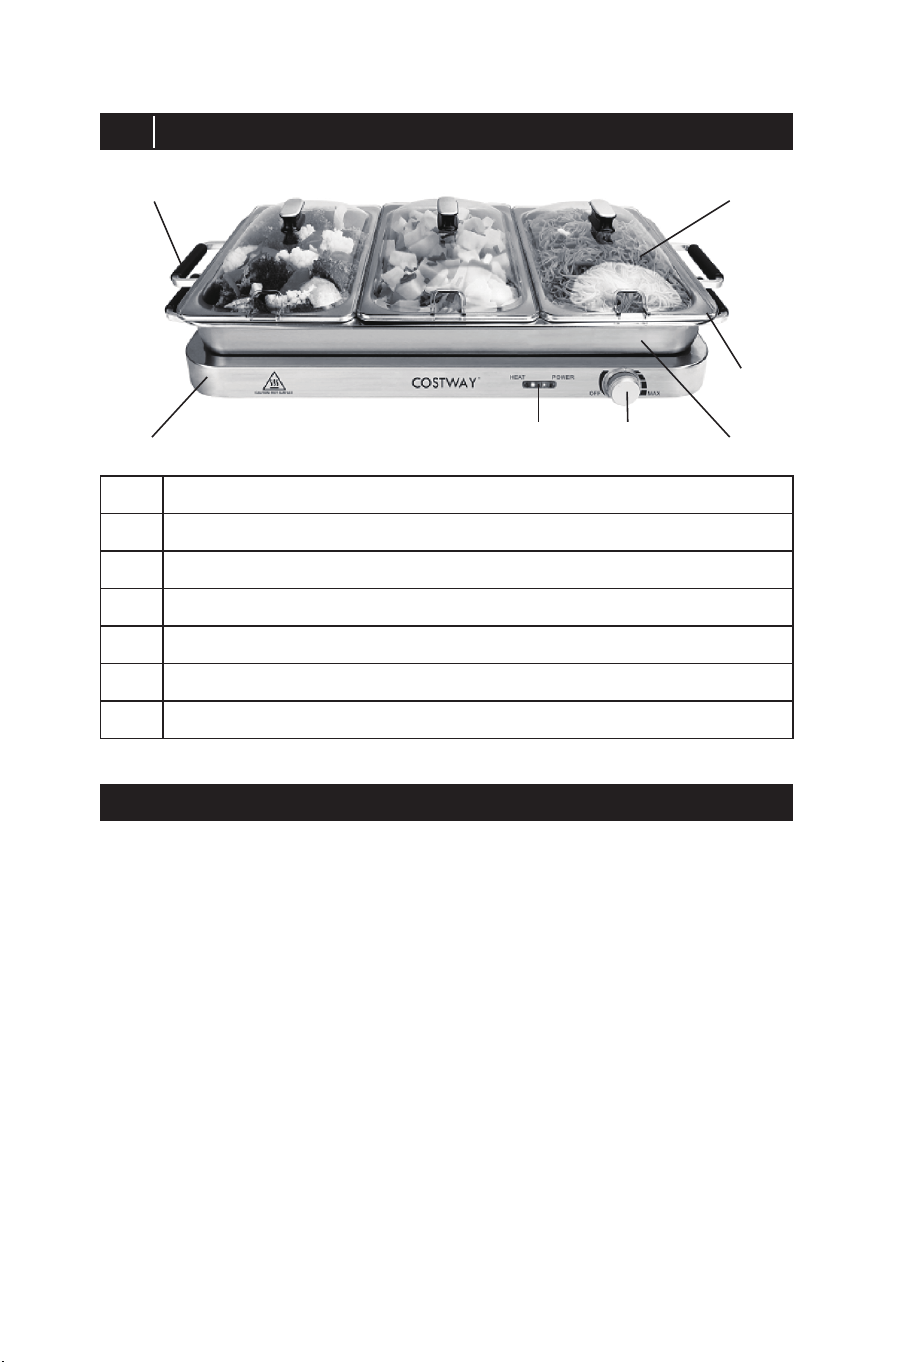
Description of parts
EN
Instructions for use
1
2
367
5
4
Lids with Slots
Serving Trays
8 L Baking Pan
Handles of Baking Pan with Silicone Grips
Warming Tray
Temperature Knob
Heat and Power Indicator Light
1
2
3
4
5
6
7
04 05

● Remove the Baking Pan, the 3 serving trays, and the lids.
● Clean and thoroughly dry the surface of the warming tray
before operating.
● Place precooked food items on the warming tray.
● Set the temperature setting to the “OFF” position and plug
the appliance into a standard electrical outlet.
● Set the temperature control to desired temperature.
● DO NOT LEAVE FOOD ON THE WARMING TRAY FOR
MORE THAN 3 HOURS.
● Once you are done using the Warming Tray, turn the
temperature setting to the “OFF” position and unplug the
power cord from the outlet.
● Remove any remaining food items from the Warming Tray.
● Let the tray cool down thoroughly. Then, clean and
thoroughly dry before storing or using again.
● When the unit is plugged into the electrical outlet, the green
“Power” indicator light illuminates; when a temperature setting
is selected, the red “Heat” indicator light will come on. The red
“Heat” indicator light will shut off when the desired
temperature setting has been reached. THIS DOES NOT
MEAN THE APPLIANCE IS OFF AND THE BUFFET
SERVER WILL STILL BE HOT.
● Place the Clear Dome Lids over your food when serving;
these lids come with slots so you can leave utensils for
serving in the trays without having to leave food uncovered.
● Adjust the temperature setting knob to the desired
temperature. The temperature can also be adjusted when
necessary.
● Once you are done using the Buffet Server, turn the
temperature setting to the “OFF” position.
● Unplug the power cord from the electrical outlet.
● Remove any remaining food from the buffet containers.
● Let the appliance completely cool down completely then
disassemble, clean and thoroughly dry all parts before storing
or assembling again for use.
● Clean all removable parts with warm, soapy water and dry
thoroughly with a soft cloth.
NOTE:
● Do not use the warming tray to cook or defrost food. Do
not place the clear dome lids directly onto the warming
tray during operation.
● Use caution when serving items on the warming tray as
the surface of the warming tray will be very hot.
DO NOT USE ABRASIVE CLEANERS AS THEY CAN
DAMAGE PARTS.
DO NOT IMMERSE THE BUFFET WARMER IN WATER OR
RUN WATER DIRECTLY ONTO BUFFET WARMER.
Tips of using the warming tray
● Make sure the baking pan and the warming tray are clean
and thoroughly dry. Place the baking pan on top of the
warming tray.
● Add your precooked food items to the baking pan.
● With the temperature setting in the “OFF” position, plug the
appliance into a standard electrical outlet.
● Set the temperature control knob to desired temperature.
Once you are done using the buffet server, turn the
temperature setting to the “OFF” position and unplug from the
outlet.
● Remove any remaining food from the baking pan.
● Let the warming tray and baking pan cool down thoroughly.
Then, clean and thoroughly dry them before storing or using.
Tips of using the baking pan with the warming tray
06 07
● Temperatures may fluctuate as the food is being served and the
contents of the large pan and / or buffet trays are emptied.
● You may adjust the temperature accordingly to avoid over or
under heating the prepared food.
● All foods have different consistencies and may require a lower or
higher setting to keep the food warm.
●ONLY THE BAKING PAN IS OVEN SAFE AND UP TO 180°C.
● You can also use water inside of the large pan when using the
buffet trays to distribute the heat more evenly without creating hot
spots in the buffet trays. This is especially effective when serving
sauces or creamy dishes.
● THE SILICONE GRIPS ON THE HANDLES ARE OVEN SAFE
ONLY UP TO 180°C.
● Always operate the appliance over a flat, stable, heat-resistant
surface.
● Extended use of the buffet server over long periods of time at high
temperatures may cause discoloration of the buffet trays and
scorching may occur on the warming tray.
● NEVER IMMERSE THE WARMING TRAY OR THE ELECTRICAL
CORD IN WATER OR ANY OTHER LIQUID!
● DO NOT USE ANY ABRASIVE SOAPS, DETERGENTS, OR
CLEANING MATERIALS TO CLEAN THIS APPLIANCE.
● ALWAYS MAKE SURE THE APPLIANCE IS OFF, UNPLUGGED
FROM THE ELECTRICAL OUTLET, AND COMPLETELY COOL
BEFORE CLEANING.
● Wash the clear dome lids, serving trays, and baking pan with
warm soapy water.
● Only the serving trays are dishwasher safe.
● DRY ALL PARTS THOROUGHLY BEFORE STORING OR USING
AGAIN.
Cleaning and Maintenance
Technical Data
Model Number
Power Supply
Power
ES10274
220-240V~50-60Hz
450W
Tips of helps
● Lesen Sie alle Anweisungen sorgfältig durch und bewahren
Sie sie zum späteren Nachschlagen auf.
● Entfernen Sie alle Verpackungen.
● Bauen Sie den Buffetwärmer zusammen, indem Sie alle
Serviertabletts in das Backblech legen und dann das
Backblech auf das Warmhalteblech stellen.
● Stellen Sie den Buffetwärmer auf eine flache, stabile und
hitzebeständige Oberfläche.
● Legen Sie Ihre vorgekochten Speisen wie gewünscht auf
die einzelnen Serviertablett.
● Stecken Sie das Netzkabel in eine normale Steckdose,
während der Temperaturregler auf "OFF" steht.
Gebrauchsanweisung
1
2
367
5
4
Deckel mit Schlitzen
Serviertabletts
8 L Backblech
Griffe des Backblechs mit Silikongriffen
Warmhalteschale
Temperaturregler
Hitze- und Betriebskontrollleuchte
1
2
3
4
5
6
7
Teileliste
DE
08 09

● Wenn das Gerät an die Steckdose angeschlossen ist,
leuchtet die grüne "Power"-Kontrollleuchte auf; wenn eine
Temperatureinstellung gewählt ist, leuchtet die rote
"Heat"-Kontrollleuchte auf. Die rote "Heat"-Anzeige leuchtet
schaltet sich aus, wenn die gewünschte Temperatur erreicht
ist. BEDEUTET DIES NICHT, DASS DAS GERÄT
AUSGESCHALTET IST UND DER BUFFETWÄRMER NOCH
HEISS IST.
● Legen Sie beim Servieren die durchsichtigen Kuppeldeckel
auf Ihre Speisen; diese Deckel sind mit Schlitzen versehen,
sodass Sie Utensilien zum Servieren in den Schalen ablegen
können, ohne dass die Speisen unbedeckt bleiben müssen.
● Stellen Sie den Temperaturregler auf die gewünschte
Temperatur ein. Die Temperatur kann bei Bedarf auch
nachgestellt werden.
● Wenn Sie den Buffetwärmer nicht mehr verwenden, stellen
Sie die Temperatureinstellung auf "OFF".
● Ziehen Sie den Netzstecker aus der Steckdose.
● Entnehmen Sie die restlichen Speisen aus den
Buffetbehältern.
● Lassen Sie das Gerät vollständig abkühlen, zerlegen Sie
dann alle Teile, reinigen und trocknen Sie sie gründlich, bevor
Sie sie aufbewahren oder wieder zusammenbauen und
verwenden.
● Alle abnehmbaren Teile mit warmem Seifenwasser reinigen
und mit einem weichen Tuch gründlich abtrocknen.
HINWEIS:
● Verwenden Sie die Warmhalteschale nicht zum Garen oder
Auftauen von Speisen. Legen Sie die durchsichtigen Kuppeldeckel
während des Betriebs nicht direkt auf die Warmhalteschale.
● Seien Sie vorsichtig, wenn Sie Speisen auf der Warmhalteschale
servieren, da die Oberfläche der Warmhalteschale sehr heiß sein
kann.
VERWENDEN SIE KEINE SCHEUERMITTEL, DA DIESE TEILE
BESCHÄDIGEN KÖNNEN.
TAUCHEN SIE DEN BUFFETWÄRMER NICHT IN WASSER EIN
UND LASSEN SIE KEIN WASSER DIREKT AUF DEN
BUFFETWÄRMER LAUFEN.
● Entfernen Sie das Backblech, die 3 Serviertabletts und die
Abdeckungen.
● Reinigen und trocknen Sie die Oberfläche der Warmhalteschale
vor der Inbetriebnahme gründlich ab.
● Vorgekochte Speisen auf die Warmhalteschale legen.
● Stellen Sie den Temperaturregler auf "OFF" und schließen Sie das
Gerät an eine normale Steckdose an.
● Den Temperaturregler auf die gewünschte Temperatur einstellen.
● LASSEN SIE DIE SPEISEN NICHT LÄNGER ALS 3 STUNDEN
AUF DER WARMHALTESCHALE LIEGEN.
● Wenn Sie die Warmhalteschale nicht mehr benutzen, schalten Sie
die Temperatureinstellung auf "AUS" und ziehen Sie den
Netzstecker aus der Steckdose.
● Entnehmen Sie die restlichen Lebensmittel aus der
Warmhalteschale.
● Lassen Sie die Schale gründlich abkühlen. Reinigen Sie sie und
trocknen Sie sie gründlich ab, bevor Sie sie aufbewahren oder
wieder verwenden.
● Vergewissern Sie sich, dass das Backblech und die
Warmhalteschale sauber und gründlich trocken sind. Stellen Sie das
Backblech auf die Warmhalteschale.
● Geben Sie die vorgekochten Lebensmittel in das Backblech.
● Stecken Sie den Stecker des Geräts in eine normale Steckdose,
während die Temperatur auf " OFF " eingestellt ist.
● Stellen Sie den Temperaturregler auf die gewünschte Temperatur
ein. Wenn Sie mit dem Buffet-Server fertig sind, schalten Sie die
Temperatureinstellung auf " OFF " und ziehen Sie den Stecker aus
der Steckdose.
● Entfernen Sie alle Speisereste aus dem Backblech.
● Lassen Sie die Warmhalteschale und das Backblech gründlich
abkühlen. Reinigen und trocknen Sie sie dann gründlich, bevor Sie
sie aufbewahren oder verwenden.
Tipps zur Verwendung der Warmhalteschale
Tipps zur Verwendung des Backblechs mit der Warmhalteschale
10 11

● Die Temperaturen können schwanken, wenn die Speisen serviert
werden und der Inhalt der großen Pfanne und/oder der
Buffetschalen geleert wird.
● Sie können die Temperatur entsprechend einstellen, um ein Über-
oder Unterhitzen der zubereiteten Speisen zu vermeiden.
● Alle Speisen haben eine unterschiedliche Konsistenz und
benötigen möglicherweise eine niedrigere oder höhere Einstellung,
um die Speisen warm zu halten.
● NUR DAS BACKBLECH IST BACKOFENFEST UND BIS ZU
180°C.
● Sie können auch Wasser in der großen Pfanne verwenden, wenn
Sie die Buffetschalen benutzen, um die Hitze gleichmäßiger zu
verteilen, ohne dass heiße Stellen in den Buffetschalen entstehen.
Dies ist besonders effektiv beim Servieren von Saucen oder
cremigen Gerichten.
● DIE SILIKONGRIFFE AN DEN GRIFFEN SIND NUR BIS ZU
180°C BACKOFENFEST.
● Betreiben Sie das Gerät immer auf einer ebenen, stabilen und
hitzebeständigen Oberfläche.
● Bei längerem Gebrauch des Buffet-Servers bei hohen
Temperaturen kann es zu Verfärbungen der Buffetschalen und zum
Anbrennen der Warmhalteschale kommen.
● TAUCHEN SIE DIE WARMHALTESCHALE ODER DAS
STROMKABEL NIEMALS IN WASSER ODER EINE ANDERE
FLÜSSIGKEIT EIN!
● VERWENDEN SIE ZUR REINIGUNG DES GERÄTS KEINE
SCHEUERMITTEL, WASCHMITTEL ODER REINIGUNGSMITTEL.
● VERGEWISSERN SIE SICH IMMER, DASS DAS GERÄT
AUSGESCHALTET, VON DER STECKDOSE GETRENNT UND
VOLLSTÄNDIG ABGEKÜHLT IST, BEVOR SIE ES REINIGEN.
● Waschen Sie die durchsichtigen Kuppeldeckel, Serviertabletts und
Backbleche mit warmer Seifenlauge.
● Nur die Serviertabletts sind spülmaschinenfest.
● TROCKNEN SIE ALLE TEILE GRÜNDLICH, BEVOR SIE SIE
AUFBEWAHREN ODER WIEDER VERWENDEN.
Reinigung und Wartung
Technische Daten
Modellnummer
Stromversorgung
Leistung
ES10274
220-240V~50-60Hz
450W
Tipps zur Hilfe
• Lisez attentivement toutes les instructions et conservez-les
pour toute référence ultérieure.
• Retirez tous les emballages.
• Assemblez le serveur de buffet en plaçant tous les plateaux
de service dans le moule, puis en plaçant le plateau de
cuisson sur le plateau chauffant.
• Placez votre serveur de buffet sur une surface plane, stable
et résistante à la chaleur.
• Placez vos aliments précuits dans chaque plateau de
service comme vous le souhaitez.
• Le bouton de température étant réglé sur la position « OFF
», branchez le cordon d'alimentation sur une prise électrique
standard.
Description des Pièces
FR
Instructions pour l’Utilisation
1
2
367
5
4
Couvercles avec fentes
Plateaux de service
8 L Plaque de cuisson
Poignées de la plaque de cuisson en silicone
Plateau chauffant
Bouton de température
Voyant de chauffe et d'alimentation
1
2
3
4
5
6
7
12 13

• Retirez le plateau de cuisson, les 3 plateaux de service et
les couvercles.
• Nettoyez et séchez soigneusement la surface du plateau
chauffant avant de le faire fonctionner.
• Placez les aliments précuits sur le plateau chauffant.
• Réglez la température sur la position « OFF » et branchez
l'appareil sur une prise électrique standard.
• Réglez la commande de température sur la température
souhaitée.
• NE LAISSEZ PAS LES ALIMENTS SUR LE PLATEAU
CHAUFFANT PENDANT PLUS DE 3 HEURES.
• Une fois que vous avez fini d'utiliser le plateau chauffant,
mettez le réglage de la température sur la position « OFF » et
débranchez le cordon d'alimentation de la prise.
• Enlevez les aliments restants du plateau chauffant.
•Laissez le plateau refroidir complètement. Ensuite,
nettoyez-le et séchez-le soigneusement avant de le ranger ou
de l'utiliser à nouveau.
• Lorsque l’appareil est branché sur la prise électrique, le
voyant vert « Power (Alimentation) » s’allume; lorsqu’un
réglage de température est sélectionné, le voyant rouge «
Heat (Chauffage) » s’allume. Le voyant rouge « Heat
(Chauffage) » s’éteint lorsque le réglage de température
souhaité a été atteint. CELA NE SIGNIFIE PAS QUE
L’APPAREIL EST ÉTEINT ET QUE LE SERVEUR DE
BUFFET SERA TOUJOURS CHAUD.
• Placez les couvercles à dôme transparent sur vos aliments
lorsque vous les servez ; ces couvercles sont dotés de fentes
qui vous permettent de laisser les ustensiles pour le service
dans les plateaux sans avoir à laisser les aliments à
découvert.
• Réglez le bouton de réglage de la température sur la
température souhaitée. La température peut également être
ajustée si nécessaire.
• Une fois que vous avez fini d'utiliser le serveur de buffet,
mettez le réglage de la température sur la position « OFF ».
• Débranchez le cordon d'alimentation de la prise électrique.
• Enlevez les aliments restants dans les récipients du buffet.
• Laissez l'appareil refroidir complètement puis démontez,
nettoyez et séchez soigneusement toutes les pièces avant de
le ranger ou de le remonter pour l'utiliser.
• Nettoyez toutes les pièces amovibles avec de l'eau chaude
savonneuse et séchez-les soigneusement avec un chiffon
doux.
REMARQUE :
• N'utilisez pas le plateau chauffant pour cuire ou décongeler
des aliments. Ne placez pas les couvercles transparents
directement sur le plateau chauffant pendant le
fonctionnement.
• Soyez prudent lorsque vous servez des aliments sur le
plateau chauffant, car sa surface est très chaude.
N'UTILISEZ PAS DE NETTOYANTS ABRASIFS CAR ILS
PEUVENT ENDOMMAGER LES PIÈCES.
NE PAS IMMERGER LE PLATEAU CHAUFFANT DANS
L'EAU OU FAIRE COULER DE L'EAU DIRECTEMENT SUR
LE PLATEAU CHAUFFANT.
Conseils d’utilisation du plateau chauffant
● Vérifiez que le plateau de cuisson et le plateau chauffant
sont propres et parfaitement secs. Placez le plateau de
cuisson sur le plateau chauffant.
● Ajoutez vos aliments précuits dans le plateau de cuisson.
● Avec le réglage de la température sur la position « OFF »,
branchez l'appareil sur une prise électrique standard.
● Réglez le bouton de réglage de la température sur la
température souhaitée. Une fois que vous avez fini d'utiliser le
serveur de buffet, mettez le réglage de la température sur la
position « OFF » et débranchez l'appareil.
● Retirez les aliments restants du plateau de cuisson.
● Laissez le plateau chauffant et le plateau de cuisson
refroidir complètement. Ensuite, nettoyez-les et séchez-les
soigneusement avant de les ranger ou de les utiliser.
Conseils d’utilisation du plateau de cuisson avec la plaque chauffante
14 15
● Les températures peuvent fluctuer au fur et à mesure que les
aliments sont servis et que le contenu de la grande poêle et/ou des
plateaux de buffet est vidé.
● Vous pouvez régler la température en conséquence pour éviter de
surchauffer ou de sous-chauffer les aliments préparés.
● Tous les aliments ont des consistances différentes et peuvent
nécessiter un réglage plus ou moins élevé pour maintenir les
aliments au chaud.
● SEUL LE PLATEAU DE CUISSON PEUT ALLER AU FOUR
JUSQU'À 180°C.
● Vous pouvez également utiliser de l'eau à l'intérieur de la grande
poêle lorsque vous utilisez les plateaux de buffet pour répartir la
chaleur de manière plus homogène sans créer de points chauds
dans les plateaux de buffet. Ceci est particulièrement efficace pour
servir des sauces ou des plats crémeux.
● LES POIGNÉES EN SILICONE NE VONT AU FOUR QUE
JUSQU'À 180°C.
● Faites toujours fonctionner l'appareil sur une surface plane, stable
et résistante à la chaleur.
● Une utilisation prolongée du serveur de buffet sur de longues
périodes à des températures élevées peut entraîner une
décoloration des plateaux du buffet et des brûlures peuvent
apparaître sur le plateau chauffant.
● NE JAMAIS IMMERGER LE PLATEAU CHAUFFANT OU LE
CORDON ÉLECTRIQUE DANS L'EAU OU TOUT AUTRE LIQUIDE !
● NE PAS UTILISER DE SAVONS ABRASIFS, DE DÉTERGENTS
OU DE PRODUITS DE NETTOYAGE POUR NETTOYER CET
APPAREIL.
● ASSUREZ-VOUS TOUJOURS QUE L'APPAREIL EST ÉTEINT,
DÉBRANCHÉ DE LA PRISE ÉLECTRIQUE ET COMPLÈTEMENT
REFROIDI AVANT DE LE NETTOYER.
● Lavez les couvercles à dôme transparent, les plateaux de service
et le moule de cuisson à l'eau chaude savonneuse.
● Seuls les plateaux de service peuvent être lavés au lave-vaisselle.
● SÉCHEZ SOIGNEUSEMENT TOUTES LES PIÈCES AVANT DE
LES RANGER OU DE LES RÉUTILISER.
Nettoyage et Entretien
Données Techniques
Numéro de modèle
Alimentation
Puissance
ES10274
220-240V~50-60Hz
450W
Conseils d’aide
● Lea atentamente todas las instrucciones y consérvelas para
futuras consultas.
● Retire todo el embalaje.
● Monte el servidor de bufé colocando todas las bandejas de
servicio en la bandeja de horno y, a continuación, coloque la
bandeja de horno encima de la bandeja de calentamiento.
● Coloque el servidor de bufé sobre una superficie plana,
estable y resistente al calor.
● Coloque sus alimentos precocinados en cada bandeja de
servir como desee.
● Con el mando de temperatura en la posición
"OFF"(APAGADO), enchufe el cable de alimentación a una
toma de corriente estándar.
Instrucciones de uso
1
2
367
5
4
Tapas con Ranuras
Bandejas de Servicio
Molde para Hornear de 8 L
Asas de Bandeja con Agarres de Silicona
Bandeja de Calentamiento
Botón de Temperatura
Indicador Luminoso de Calor y Potencia
1
2
3
4
5
6
7
Descripción de piezas
ES
16 17

● Cuando la unidad está enchufada a la toma de corriente, se
enciende la luz verde indicadora de " Power "(Encendido);
cuando se selecciona un ajuste de temperatura, se
encenderá la luz roja indicadora de " Heat " (Calor). La luz
roja indicadora de " Heat " (Calor). ESTO NO SIGNIFICA
QUE EL APARATO ESTÉ APAGADO Y EL SERVIDOR DE
BUFÉ SEGUIRÁ CALIENTE.
● Coloque las tapas de cúpula transparentes sobre la comida
cuando la sirva; estas tapas vienen con ranuras para que
pueda dejar utensilios para servir en las bandejas sin tener
que dejar la comida al descubierto.
● Ajuste el mando de ajuste de temperatura a la temperatura
deseada. La temperatura también se puede ajustar cuando
sea necesario.
● Una vez que haya terminado de utilizar el Servidor de Bufé,
gire el ajuste de temperatura a la posición "OFF"(APAGADO).
● Desenchufe el cable de alimentación de la toma de
corriente.
● Retire cualquier resto de comida de los recipientes del bufé.
● Deje que el aparato se enfríe completamente y, a
continuación, desmonte, limpie y seque bien todas las piezas
antes de guardarlas o volver a montarlas para su uso.
● Limpie todas las piezas desmontables con agua tibia y
jabón y séquelas bien con un paño suave.
NOTA:
No utilice la bandeja de calentamiento para cocinar o descongelar
alimentos. No coloque las tapas de cúpula transparentes
directamente sobre la bandeja de calentamiento durante el
funcionamiento.
Tenga cuidado al servir alimentos en la bandeja de calentamiento,
ya que la superficie de la bandeja estará muy caliente.
NO UTILICE LIMPIADORES ABRASIVOS YA QUE PUEDEN
DAÑAR LAS PIEZAS.
NO SUMERJA EL CALENTADOR DE BUFÉ EN AGUA NI DEJE
CORRER AGUA DIRECTAMENTE SOBRE EL CALENTADOR DE
BUFÉ.
● Retire la bandeja para hornear, las 3 bandejas para servir y las
tapas.
● Limpie y seque bien la superficie de la bandeja de calentamiento
antes de ponerla en funcionamiento.
● Coloque los alimentos precocinados en la bandeja de
calentamiento.
● Ajuste la temperatura en la posición "OFF"(APAGADO) y enchufe
el aparato a una toma de corriente normal.
● Ajuste el control de temperatura a la temperatura deseada.
NO DEJE ALIMENTOS EN LA BANDEJA DE CALENTAMIENTO
DURANTE MÁS DE 3 HORAS.
● Una vez que haya terminado de utilizar la bandeja de
calentamiento, gire el ajuste de temperatura a la posición
"OFF"(APAGADO) y desenchufe el cable de alimentación de la
toma de corriente.
● Retire los alimentos que queden en la bandeja.
● Deje que la bandeja se enfríe completamente. A continuación,
límpiela y séquela bien antes de guardarla o utilizarla de nuevo.
Consejos de uso de la bandeja de calentamiento
● Asegúrese de que el molde y la bandeja estén limpios y
completamente secos.
completamente secos. Coloque el molde sobre la bandeja.
● Añada los alimentos precocinados al recipiente.
● Con el ajuste de temperatura en la posición
"OFF"(APAGADO), enchufe el aparato a una toma de
corriente normal.
● Ajuste la perilla de control de temperatura a la temperatura
deseada. Cuando haya terminado de utilizar el servidor de
bufé, gire el ajuste de temperatura a la posición
"OFF"(APAGADO) y desenchufe el aparato.
● Retire los restos de comida de la bandeja.
● Deje que la bandeja se enfríe completamente. A
continuación, límpielos y séquelos bien antes de guardarlos o
utilizarlos.
Consejos para utilizar el molde con la bandeja de calentamiento
18 19
● Las temperaturas pueden fluctuar a medida que se sirve la
comida y se vacía el contenido de la olla grande y/o de las bandejas
de bufé.
Puede ajustar la temperatura en consecuencia para evitar calentar
demasiado o demasiado poco los alimentos preparados.
● Todos los alimentos tienen diferentes consistencias y pueden
requerir un ajuste más bajo o más alto para mantener la comida
caliente.
● SOLO EL MOLDE ES APTO PARA EL HORNO Y HASTA 180°C.
● También puede utilizar agua dentro de la sartén grande cuando
utilice las bandejas de bufé para distribuir el calor de forma más
uniforme sin crear puntos calientes en las bandejas de bufé. Esto es
especialmente eficaz cuando se sirven salsas o platos cremosos.
● LAS ASAS DE SILICONA SOLO SON APTAS PARA EL HORNO
HASTA 180°C.
● Utilice siempre el aparato sobre una superficie plana, estable y
resistente al calor.
● El uso prolongado del servidor de bufé a altas temperaturas
puede provocar la decoloración de las bandejas del bufé y
quemaduras en la bandeja de calentamiento.
● ¡NO SUMERJA NUNCA LA BANDEJA DE CALENTAMIENTO NI
EL CABLE ELÉCTRICO EN AGUA NI EN NINGÚN OTRO
LÍQUIDO!
● NO UTILICE JABONES ABRASIVOS, DETERGENTES O
MATERIALES DE LIMPIEZA PARA LIMPIAR ESTE APARATO.
● ASEGÚRESE SIEMPRE DE QUE EL APARATO ESTÁ
APAGADO, DESENCHUFADO DE LA TOMA DE CORRIENTE Y
COMPLETAMENTE FRÍO ANTES DE LIMPIARLO.
● Lave las tapas transparentes, las bandejas y el molde con agua
tibia y jabón.
● Sólo las bandejas de servir son aptas para el lavavajillas.
● SEQUE BIEN TODAS LAS PIEZAS ANTES DE GUARDARLAS O
UTILIZARLAS DE NUEVO.
Limpieza y Mantenimiento
Datos Técnicos
Número de Modelo
Fuente de Alimentación
Alimentación
ES10274
220-240V~50-60Hz
450W
Consejos de ayuda
● Leggere attentamente tutte le istruzioni e conservarle per
riferimenti futuri.
● Rimuovere tutti gli imballaggi.
● Assemblare lo scaldavivande per buffet posizionando tutti i
vassoi di servizio nella teglia, quindi mettere la teglia sopra il
vassoio di riscaldamento.
● Posizionare lo scaldavivande per buffet su una superficie
piana, stabile e resistente al calore.
● Sistemare i cibi precotti in ciascun vassoio di portata, come
desiderato.
● Con la manopola della temperatura impostata sulla
posizione "OFF", collegare il cavo di alimentazione a una
presa elettrica standard.
Istruzioni d’uso
1
2
367
5
4
Coperchi con fessure
Vassoi di servizio
Teglia da 8 L
Manici della teglia con impugnature in silicone
Vassoio di riscaldamento
Manopola della temperatura
Indicatore luminoso di calore e potenza
1
2
3
4
5
6
7
Descrizione delle parti
IT
20 21

● Quando l'unità è collegata alla presa elettrica, si accende la
spia verde "Power"; quando si seleziona un'impostazione di
temperatura, si accende la spia rossa "Heat". La spia rossa
"Heat" si spegne quando viene raggiunta la temperatura
desiderata. QUESTO NON SIGNIFICA CHE
L'APPARECCHIO SIA SPENTO E CHE LO
SCALDAVIVANDE PER BUFFET SIA ANCORA CALDO.
● Quando servire i cibi, mettere i coperchi a cupola
trasparenti; questi coperchi sono dotati di fessure per poter
lasciare gli utensili da servire nei vassoi senza dover lasciare i
cibi scoperti.
● Regolare la manopola di impostazione della temperatura
sulla temperatura desiderata. La temperatura può essere
regolata anche quando è necessario.
● Una volta terminato l'utilizzo dello scaldavivande per buffet,
portare l'impostazione della temperatura sulla posizione
"OFF".
● Scollegare il cavo di alimentazione dalla presa elettrica.
● Rimuovere i resti di cibo dai contenitori del buffet.
● Lasciare raffreddare completamente l'apparecchio, quindi
smontare, pulire e asciugare accuratamente tutte le parti
prima di riporlo o assemblarlo nuovamente per l'uso.
● Pulire tutte le parti rimovibili con acqua calda e sapone e
asciugare accuratamente con un panno morbido.
NOTA
● Non utilizzare il vassoio scaldavivande per cuocere o scongelare
gli alimenti. Non mettere i coperchi trasparenti a cupola direttamente
sul vassoio scaldavivande durante il funzionamento.
● Prestare attenzione quando si servono gli alimenti sul vassoio di
riscaldamento, poiché la superficie del vassoio è molto calda.
NON UTILIZZARE DETERGENTI ABRASIVI PERCHÉ
POTREBBERO DANNEGGIARE LE PARTI.
NON IMMERGERE LO SCALDAVIVANDE IN ACQUA E NON FAR
SCORRERE L'ACQUA DIRETTAMENTE SULLO
SCALDAVIVANDE.
● Rimuovere la teglia, i 3 vassoi di servizio e i coperchi.
● Pulire e asciugare accuratamente la superficie del vassoio
scaldavivande prima di metterlo in funzione.
● Mettere gli alimenti precotti sul vassoio scaldavivande.
● Impostare l'impostazione della temperatura sulla posizione "OFF"
e collegare l'apparecchio a una presa elettrica standard.
● Impostare il regolatore di temperatura sulla temperatura
desiderata.
● NON LASCIARE GLI ALIMENTI SUL VASSOIO DI
RISCALDAMENTO PER PIÙ DI 3 ORE.
● Una volta terminato l'utilizzo della vaschetta di riscaldamento,
portare l'impostazione della temperatura sulla posizione "OFF" e
scollegare il cavo di alimentazione dalla presa di corrente.
● Rimuovere gli alimenti rimasti dal vassoio di riscaldamento.
● Lasciare che il vassoio si raffreddi completamente. Quindi, pulirla
e asciugarla accuratamente prima di riporla o utilizzarla
nuovamente.
● Assicurarsi che la teglia e il vassoio di riscaldamento siano puliti e
ben asciutti. Posizionare la teglia sopra il vassoio di riscaldamento.
● Aggiungere gli alimenti precotti nella teglia.
● Con l'impostazione della temperatura in posizione "OFF",
collegare l'apparecchio a una presa elettrica standard.
● Impostare la manopola di regolazione della temperatura sulla
temperatura desiderata. Una volta terminato l'utilizzo del server per
buffet, portare l'impostazione della temperatura sulla posizione
"OFF" e staccare la spina dalla presa di corrente.
● Rimuovere i resti di cibo dalla teglia.
● Lasciare che il vassoio scaldavivande e la teglia si raffreddino
completamente. Quindi, pulirli e asciugarli accuratamente prima di
riporli o utilizzarli.
Consigli per l'utilizzo del vassoio scaldavivande
Suggerimenti per l'utilizzo della teglia con scaldavivande
22 23
● Le temperature possono variare durante il servizio e lo
svuotamento del contenuto del tegame e/o dei vassoi del buffet.
● È possibile regolare la temperatura di conseguenza per evitare di
riscaldare troppo o troppo poco i cibi preparati.
● Tutti gli alimenti hanno una consistenza diversa e possono
richiedere un'impostazione più bassa o più alta per mantenere il
cibo caldo.
● SOLO LA TEGLIA È SICURA PER IL FORNO FINO A 180°C.
● Quando si usano i vassoi da buffet, si può anche usare l'acqua
all'interno della padella grande per distribuire il calore in modo più
uniforme senza creare punti caldi nei vassoi da buffet. Ciò è
particolarmente efficace quando si servono salse o piatti cremosi.
● LE IMPUGNATURE IN SILICONE DEI MANICI SONO ADATTE
AL FORNO SOLO FINO A 180° C.
● Utilizzare sempre l'apparecchio su una superficie piana, stabile e
resistente al calore.
● L'uso prolungato del server per buffet a temperature elevate può
causare lo scolorimento dei vassoi del buffet e la formazione di
bruciature sul vassoio di riscaldamento.
● NON IMMERGERE MAI IL VASSOIO SCALDAVIVANDE O IL
CAVO ELETTRICO IN ACQUA O IN QUALSIASI ALTRO LIQUIDO!
● NON UTILIZZARE SAPONI, DETERGENTI O MATERIALI
ABRASIVI PER PULIRE QUESTO APPARECCHIO.
● ASSICURARSI SEMPRE CHE L'APPARECCHIO SIA SPENTO,
SCOLLEGATO DALLA PRESA DI CORRENTE E
COMPLETAMENTE FREDDO PRIMA DI PULIRLO.
● Lavare i coperchi a cupola trasparenti, i vassoi di servizio e la
teglia con acqua calda e sapone.
● Solo i vassoi di servizio sono lavabili in lavastoviglie.
● ASCIUGARE ACCURATAMENTE TUTTE LE PARTI PRIMA DI
RIPORLE O UTILIZZARLE NUOVAMENTE.
Pulizia e Manutenzione
Dati Tecnici
Numero del modello
Tensione
Potenza
ES10274
220-240V~50-60Hz
450W
Consigli di aiuto
● Uważnie przeczytaj całą instrukcję i zachowaj ją do
późniejszego wglądu.
● Usuń wszystkie materiały opakowaniowe.
● Skompletuj podgrzewacz, umieszczając 3 naczynia
serwisowe w brytfannie, a następnie ustawiając brytfannę na
płycie grzejnej.
● Ustaw podgrzewacz na płaskiej, stabilnej powierzchni
odpornej na działanie wysokiej temperatury.
● Umieść ugotowane dania w naczyniach serwisowych
według własnych preferencji.
● Upewnij się, że gałka regulacji temperatury znajduje się w
pozycji „OFF” (wyłączone) i podłącz wtyczkę do
standardowego gniazdka.
Instrukcja użytkowania
1
2
367
5
4
Przejrzyste pokrywy z otworami
Naczynia serwisowe
Brytwanna 8 l
Rączki brytfanny z silikonowymi uchwytami
Płyta grzejna
Gałka regulacji temperatury
Wskaźniki LED (zasilanie i podgrzewanie)
1
2
3
4
5
6
7
Opis elementów
PL
24 25

● Po podłączeniu podgrzewacza do gniazdka zapali się
zielona dioda z podpisem „Power” (zasilanie). Po ustawieniu
żądanej temperatury zapali się czerwona dioda z podpisem
„Heat” (podgrzewanie). Dioda zgaśnie, kiedy płyta grzejna
osiągnie ustawioną temperaturę. NIE OZNACZA TO, ŻE
PODGRZEWACZ JEST WYŁĄCZONY; PŁYTA, BRYTFANNA
I NACZYNIA WCIĄŻ BĘDĄ GORĄCE.
● Podczas serwowania potraw nakryj naczynia pokrywami.
Otwory w pokrywach pozwolą ci na pozostawienie w
naczyniach przyborów do nakładania bez konieczności
odkrywania dań.
● Ustaw gałkę na żądaną temperaturę. W razie potrzeby
możesz zmienić ustawienie.
● Po zakończeniu użytkowania podgrzewacza ustaw gałkę w
pozycji „OFF”.
● Wyjmij wtyczkę z gniazdka.
● Wyjmij resztki potraw z naczyń serwisowych.
● Odczekaj, aż podgrzewacz całkowicie wystygnie, a
następnie umyj ruchome elementy. Wysusz je dokładnie,
zanim schowasz urządzenie lub ponownie go użyjesz.
● Naczynia i brytfannę umyj ciepłą wodą z dodatkiem płynu
do naczyń, a następnie dokładnie wysusz miękką szmatką.
UWAGA:
● Nie używaj podgrzewacza do gotowania ani rozmrażania
potraw. Kiedy podgrzewacz jest włączony, nie odkładaj
pokryw bezpośrednio na płytę grzejną.
● Zachowaj ostrożność podczas serwowania potraw, gdyż
naczynia i płyta są bardzo gorące.
● NIE UŻYWAJ ŚRODKÓW DO SZOROWANIA, GDYŻ
MOGĄ ONE USZKODZIĆ POWIERZCHNIĘ NACZYŃ I
PŁYTY.
NIE ZANURZAJ PODGRZEWACZA W WODZIE I NIE
POLEWAJ GO.
● Zdejmij z płyty grzejnej brytfannę, 3 naczynia serwisowe i
pokrywy.
● Zanim włączysz urządzenie, umyj i dokładnie wysusz
powierzchnię płyty grzejnej.
● Umieść w naczyniach ugotowane potrawy, a następnie
ustaw naczynia na płycie.
● Ustaw gałkę w pozycji „OFF” i podłącz wtyczkę do
standardowego gniazdka.
● Ustaw żądaną temperaturę.
● NIE POZOSTAWIAJ POTRAW NA PODGRZEWACZU
DŁUŻEJ NIŻ PRZEZ 3 GODZINY.
● Po zakończeniu użytkowania ustaw gałkę w pozycji „OFF” i
wyjmij wtyczkę z gniazdka.
● Wyjmij resztki potraw z naczyń serwisowych.
● Odczekaj, aż podgrzewacz całkowicie wystygnie, a
następnie umyj ruchome elementy. Wysusz je dokładnie,
zanim schowasz urządzenie lub ponownie go użyjesz.
● Dokładnie umyj i wysusz płytę grzejną i brytfannę. Ustaw
brytfannę na płycie.
● Umieść w brytfannie ugotowane potrawy.
● Ustaw gałkę w pozycji „OFF” i podłącz wtyczkę do
standardowego gniazdka.
● Ustaw żądaną temperaturę. Po zakończeniu użytkowania
ustaw gałkę w pozycji „OFF” i wyjmij wtyczkę z gniazdka.
● Wyjmij resztki potraw z brytfanny.
● Odczekaj, aż podgrzewacz całkowicie wystygnie, a
następnie umyj brytfannę i płytę. Wysusz je dokładnie, zanim
schowasz urządzenie lub ponownie go użyjesz.
Używanie podgrzewacza
Używanie brytfanny
26 27
In case a return is required, the item must be returned in original box. Without this
your return will not be accepted.
DO NOT discard the box / original packaging.
Take a photo of the box markings.
Take a photo of the damaged part (if applicable).
Send us an email with the images requested.
A photo of the markings (text) on the side of the box is required in case a part is
needed for replacement. This helps our staff identify your product number to
ensure you receive the correct parts.
A photo of the damage is always required to file a claim and get your replacement
or refund processed quickly. Please make sure you have the box even if it is
damaged.
Email us directly from marketplace where your item was purchased with the
attached images and a description of your claim.
Falls eine Rücksendung erforderlich ist, muss der Artikel in der
Originalverpackung zurückgeschickt werden. Andernfalls wird Ihre Rücksendung
nicht angenommen.
Werfen Sie den Karton / die Originalverpackung NICHT weg.
Machen Sie ein Foto von der Beschriftung des Kartons.
Machen Sie ein Foto des beschädigten Teils (falls zutreffend).
Schicken Sie uns eine E-Mail mit dem gewünschten Foto.
Für den Fall, dass ein Ersatzteil benötigt wird, benötigen wir ein Foto der
Beschriftung (Text) auf der Seite des Kartons. So können unsere Mitarbeiter Ihre
Artikelnummer identifizieren und sicherstellen, dass Sie die richtigen Teile
erhalten.
Ein Foto des beschädigten Teils ist immer erforderlich, um eine Reklamation
einzureichen und eine schnelle Bearbeitung Ihres Ersatzteils oder Ihrer
Rückerstattung zu gewährleisten. Bitte stellen Sie sicher, dass Sie den Karton
haben, auch wenn er beschädigt ist.
Schicken Sie uns eine E-Mail direkt vom Marktplatz, auf dem Sie den Artikel
gekauft haben, mit den angehängten Fotos und einer Beschreibung Ihrer
Reklamation.
EN
DE
Return / Damage Claim Instructions
Rücksendung / Beschädigung Anweisungen
● Temperatura może ulegać zmianom w miarę serwowania potraw i
opróżniania naczyń i brytfanny.
● Możesz wyregulować temperaturę, aby uniknąć nadmiernego
podgrzania lub wystygnięcia potraw.
● Produkty żywnościowe mają różną konsystencję i mogą wymagać
różnych ustawień, aby zachować właściwą temperaturę.
● WYŁĄCZNIE BRYTFANNA NADAJE SIĘ DO PODGRZEWANIA
W PIEKARNIKU, DO TEMPERATURY 180°C.
● Używając naczyń serwisowych możesz nalać wody do brytfanny,
dzięki czemu ciepło będzie rozprowadzane bardziej równomiernie w
całej objętości naczyń. Jest to przydatne szczególnie w przypadku
serwowania sosów, zup i pureė.
● SILIKONOWE UCHWYTY MOGĄ ULEC USZKODZENIU W
PIEKARNIKU, W TEMPERATURZE POWYŻEJ 180°C.
● Zawsze ustawiaj podgrzewacz na płaskiej, stabilnej powierzchni
odpornej na działanie wysokiej temperatury.
● Po długim czasie użytkowania podgrzewacza lub w przypadku
ustawiania wysokich temperatur na dłuższe okresy naczynia i
brytfanna mogą się przebarwiać, a na płycie mogą pojawić się ślady
przypaleń.
● NIGDY NIE ZANURZAJ PODGRZEWACZA, JEGO PRZEWODU
ZASILAJĄCEGO ANI WTYCZKI W WODZIE ANI ŻADNEJ INNEJ
CIECZY!
● DO CZYSZCZENIA NIE UŻYWAJ ŚRODKÓW DO
SZOROWANIA, SILNYCH DETERGENTÓW I SZORSTKICH
MYJEK.
● PRZED PRZYSTĄPIENIEM DO CZYSZCZENIA UPEWNIJ SIĘ,
ŻE PODGRZEWACZ JEST WYŁĄCZONY, ODŁĄCZONY OD
GNIAZDKA I CAŁKOWICIE WYSTUDZONY.
● Pokrywy, naczynia serwisowe i brytfannę myj ciepłą wodą z
dodatkiem płynu do naczyń.
● W zmywarce możesz myć wyłącznie naczynia serwisowe.
● PRZED SCHOWANIEM PODGRZEWACZA LUB JEGO
PONOWNYM UŻYCIEM DOKŁADNIE WYSUSZ WSZYSTKIE
ELEMENTY.
Czyszczenie i konserwacja
Specyfikacja
Numer modelu
Zasilanie
Moc
ES10274
220-240V~50-60Hz
450W
Przydatne wskazówki
28 29
Instructions De Retour / Réclamation De Dommages
Dans le cas où un retour est requis, l'article doit être retourné dans sa boîte
d'origine. Sans cela, votre retour ne sera pas accepté.
NE PAS jeter la boîte/l'emballage d'origine.
Prenez une photo des marquages de la boîte.
Prenez une photo des dommages (le cas échéant).
Envoyez-nous un e-mail avec les images demandées.
Une photo des marquages (texte) sur le côté de la boîte est requise au cas où une
pièce serait nécessaire pour le remplacement. Cela aide notre personnel à
identifier votre numéro de produit pour s'assurer que vous recevez les bonnes
pièces.
Une photo des dommages est toujours requise pour déposer une réclamation et
obtenir rapidement votre remplacement ou votre remboursement. Assurez-vous
d'avoir la boîte même si elle est endommagée.
Envoyez-nous un e-mail directement depuis le marché où votre article a été
acheté avec les images ci-jointes et une description de votre réclamation.
Instrucciones de Devolución / Reclamación de Daños
En caso de que se requiera una devolución, el artículo debe ser devuelto en la
caja original. Sin esto su devolución no será aceptada.
NO deseche la caja/embalaje original.
Tome una foto de las marcas de la caja.
Tome una foto de las piezas dañadas (si procede).
Envíenos un correo electrónico con las imágenes solicitadas.
Se requiere una foto de las marcas (texto) en el lado de la caja en caso de que se
necesite una pieza para reemplazarla. Esto ayuda a nuestro personal a identificar
su número de producto para asegurarse de que recibe las piezas correctas.
Una foto de los daños es siempre necesaria para presentar una reclamación y
conseguir que su reemplazo o reembolso sea procesado rápidamente. Por favor,
asegúrese de tener la caja aunque esté dañada.
Envíenos un correo electrónico directamente desde el mercado donde se compró
su artículo con las imágenes adjuntas y una descripción de su reclamación.
FR
ES
Nel caso in cui sia richiesto un reso, l'articolo deve essere restituito nella scatola
originale. Senza la scatola originale il tuo reso non sarà accettato.
NON scartare la scatola / confezione originale.
Fare una foto dei contrassegni sulla scatola.
Fare una foto di Danno (se è applicabile).
Inviarci una mail con le immagini richieste.
È necessaria una foto dei contrassegni (testo) sul lato della scatola nel caso in
cui la parte debba essere sostituita. Questo aiuta il nostro staff a identificare il
numero del tuo prodotto per assicurarti di ricevere le parti corrette.
Una foto del danno è sempre necessaria per presentare un reclamo e ottenere
rapidamente la sostituzione o il rimborso. Assicurati di avere la scatola anche se
è danneggiata.
Inviarci un'e-mail direttamente dal mercato in cui è stato acquistato il tuo articolo
con le immagini allegate e una descrizione del tuo reclamo.
Jeśli chcesz zwrócić produkt, musi znajdować się on w oryginalnym opakowaniu.
Towar zwrócony w nieoryginalnym opakowaniu nie zostanie przyjęty.
Nie wyrzucaj oryginalnego opakowania.
Zrób zdjęcie oznaczeń na opakowaniu.
Zrób zdjęcie uszkodzonej części (jeśli dotyczy).
Skontaktuj się z nami.
Jeśli jakakolwiek część wymaga wymiany, zrób zdjęcie oznaczeń kodu produktu,
który znajduje się na opakowaniu. Pozwoli nam to zidentyfikować produkt i
dostarczyć ci właściwą część.
Jeśli chcesz złożyć reklamację, zrób zdjęcie uszkodzonej części. Pozwoli nam to
zatwierdzić reklamację i zlecić zwrot środków na twoje konto. Do złożenia
reklamacji potrzebne będzie oryginalne opakowanie.
Skontaktuj się z nami telefonicznie, mailowo lub poprzez formularz kontaktowy.
Załącz zdjęcia produktu i opis roszczenia.
IT
PL
Istruzioni Per La Restituzione / Reclamo Per Danni
Zwroty i reklamacje
30 31

ES10274
Buffet Server
Buffetwärmer
Serveur de buffet
Servidor de Bufé
Scaldavivande per Buffet
Podgrzewacz bufetowy do potraw
DEU office: FDS GmbH, Neuer Höltigbaum 36, 22143 Hamburg, Deutschland
ITA office: Milano
FRA office: Saint Vigor d'Ymonville
POL office: GdańskGBR office: IpswichAUS office: TruganinaUSA office: Fontana
THIS INSTRUCTION BOOKLET CONTAINS IMPORTANT SAFETY INFORMATION. PLEASE READ AND KEEP FOR FUTURE REFERENCE.