
Write the model and serial
numbers here:
Model # _________________
Serial # _________________
You can find them on a label
on the bottom of the disposer.
GE is a trademark of the General Electric Company. Manufactured under trademark license.
OWNER’S MANUAL
AND INSTALLATION
INSTRUCTIONS
DISPOSALL
®
49-4000291 Rev 0 12-23 GEA
SAFETY INFORMATION ..........3
USING THE DISPOSER ...........4
CARE AND CLEANING .............4
INSTALLATION
INSTRUCTIONS ...................5
TROUBLESHOOTING ............12
LIMITED WARRANTY ...........14
CONSUMER SUPPORT ..........16
Food Waste Disposer
ENGLISH/FRANÇAIS/
ESPAÑOL
GFC365
GFC565
GFC765
GFC1065

2 49-4000291 Rev 0
THANK YOU FOR MAKING GE APPLIANCES A PART OF YOUR HOME.
Whether you grew up with GE Appliances, or this is your first, we’re happy to have you in the family.
We take pride in the craftsmanship, innovation and design that goes into every GE Appliances
product, and we think you will too. Among other things, registration of your appliance ensures that we
can deliver important product information and warranty details when you need them.
Register your GE appliance now online. Helpful websites and phone numbers are available in the
Consumer Support section of this Owner’s Manual. You may also mail in the pre-printed registration
card included in the packing material.
49-4000291 Rev 0 3
IMPORTANT SAFETY INFORMATION
READ ALL INSTRUCTIONS BEFORE USING THE APPLIANCE
SAFETY INFORMATION
WARNING
For your safety, the information in this manual must be followed to minimize
the risk of fire, explosion, electric shock, and to prevent property damage, personal injury,
or death.
WARNING
WHEN USING YOUR ELECTRICAL APPLIANCES, BASIC SAFETY
PRECAUTIONS SHOULD BE FOLLOWED, INCLUDING THE FOLLOWING:
Ŷ 8VHWKLVDSSOLDQFHRQO\IRULWVLQWHQGHGSXUSRVHDV
described in this Owner’s Manual.
Ŷ 5HDGDOOWKHLQVWUXFWLRQVEHIRUHXVLQJWKHDSSOLDQFH
Ŷ 7RUHGXFHWKHULVNRILQMXU\FORVHVXSHUYLVLRQLV
required when a disposer is used near children.
Ŷ 'RQRWSXWILQJHUVRUKDQGVLQWRDZDVWHGLVSRVHU
Ŷ 7XUQWKHSRZHUVZLWFKWRWKH2))SRVLWLRQEHIRUH
DWWHPSWLQJWRFOHDUDMDPRUUHPRYHDQREMHFWIURP
the disposer.
Ŷ :KHQDWWHPSWLQJWRORRVHQDMDPLQDZDVWH
GLVSRVHUXVHDORQJZRRGHQREMHFWVXFKDVD
wooden spoon or the wooden handle of a broom or
mop.
Ŷ :KHQDWWHPSWLQJWRUHPRYHREMHFWVIURPDZDVWH
disposer, use long-handled tongs or pliers. If
the disposer is magnetically actuated, use only
nonmagnetic tools.
Ŷ 7RUHGXFHWKHULVNRILQMXU\E\PDWHULDOVWKDWPD\
be expelled by a waste disposer, do not put the
following into a disposer:
a. Clam or oyster shells
b. Caustic drain cleaners or similar products
c. Glass, china or plastic
d. Large whole bones
e. Metal, such as bottle caps, tin cans, utensils
or aluminum foil
f. Hot grease or other hot liquids
g. Whole corn husks
Ŷ :KHQQRWRSHUDWLQJDGLVSRVHUOHDYHWKHGUDLQ
VWRSSHULQSODFHWRUHGXFHWKHULVNRIREMHFWVIDOOLQJ
into the disposer.
Ŷ )RUSURSHUJURXQGLQJLQVWUXFWLRQVVHHWKH
CONNECTING ELECTRICITY portion of this
manual.
READ AND SAVE THESE INSTRUCTIONS
If you are not familiar with electrical power and procedures, call a qualified electrician.
WARNING
Improper connection of
the equipment-grounding conductor can
result in a risk of electric shock. Check
with a qualified electrician or serviceman
if you are in doubt as to whether the
appliance is properly grounded. Do
not modify the plug provided with the
appliance if it will not fit the outlet; have
a proper outlet installed by a qualified
electrician.
For Models Equipped with a Grounded Cord:
GROUNDING INSTRUCTIONS: 7KLVGLVSRVHUPXVW
be grounded to reduce the risk of electric shock in
the event of a malfunction or breakdown. Grounding
provides a path of least resistance for electric current.
7KLVGLVSRVHULVHTXLSSHGZLWKDFRUGKDYLQJDQ
equipment-grounding conductor and a grounding
SOXJ7KHSOXJPXVWEHSOXJJHGLQWRDQRXWOHWWKDWLV
properly installed and grounded in accordance with all
local codes and ordinances.
CONNECTING ELECTRICITY
Proper Disposal of your Appliance
Ŷ
'LVSRVHRIRUUHF\FOH\RXUDSSOLDQFHLQDFFRUGDQFHZLWK)HGHUDODQG/RFDO5HJXODWLRQV&RQWDFW\RXUORFDO
authorities for the environmentally safe disposal or recycling of your appliance.
Ŷ
Consider recycling options for your appliance packaging material.

4 49-4000291 Rev 0
READ ALL SAFETY INSTRUCTIONS BEFORE USING THIS DISPOSER.
7KLVGLVSRVHUXVHVDQWLMDPVZLYHOLPSHOOHUVWKDWPDNHDFOLFNLQJVRXQGDVWKH\VZLQJLQWRSODFH7KLVLQGLFDWHV
normal operation.
A. Remove the sink stopper and turn on a medium flow
of cold water.
B.7XUQWKHVZLWFKWR21
C.6FUDSHLQIRRGZDVWH7RVSHHGXSIRRGZDVWH
disposal, cut or break up large bones, rinds and cobs.
Large bones and fibrous husks require considerable
grinding time and are more easily thrown away with
RWKHUWUDVK'RQRWEHDODUPHGWKDWWKHGLVSRVHU
VORZVGRZQZKLOHJULQGLQJ7KHGLVSRVHULVDFWXDOO\
increasing torque (grinding power) and is operating
under normal conditions.
D. Before turning the disposer off, let the water and
the disposer run for approximately 25 seconds
DIWHUVKUHGGLQJVWRSV7KLVDVVXUHVWKDWDOOZDVWHLV
thoroughly flushed through the trap and drain.
E. 'RQRWXVHKRWZDWHUZKLOHUXQQLQJWKHGLVSRVHU&ROG
water will keep food waste and fats solid so they can
be flushed down the drain.
Helpful Hints
A. Be sure the disposer is empty before using the
dishwasher so it can drain properly.
B. You may want to leave the stopper in the drain when
QRWLQXVHWRSUHYHQWXWHQVLOVDQGIRUHLJQREMHFWVIURP
falling into the disposer.
C. 7KHGLVSRVHULVUXJJHGO\EXLOWWRJLYH\RX\HDUVDQG
years of trouble-free service. It will handle all normal
IRRGZDVWHV%87LWZLOOQRWJULQGDQGGLVSRVHVXFK
items as tin cans, bottles and bottle caps, glass,
china, leather, cloth, crockery, rubber, string, feathers,
RUFODPRUR\VWHUVKHOOV7KHVHDUHZDVWHPDWHULDOV
and belong in the trash can or trash compactor.
D.7263(('83)22':$67(',6326$/&XWRU
break up large bones, melon rinds, grapefruit skins
and corn cobs. Items such as large bones, fibrous
husks like lima bean pods and corn husks, require
FRQVLGHUDEOHFXWWLQJWLPH)RUWKLVUHDVRQ\RX
may prefer to place them in the trash can or trash
compactor.
Care and Cleaning
THE MOTOR IS PERMANENTLY LUBRICATED FOR LIFE. DO NOT ATTEMPT TO LUBRICATE YOUR
DISPOSER. 7KHGLVSRVHULVVHOIFOHDQLQJDQGVFRXUVLWVHOIZLWKHDFKXVH
Ŷ1(9(5SXWO\HRUFKHPLFDOFOHDQHUVLQWRWKHGLVSRVHU
as they cause serious corrosion of metal parts.
Ŷ<RXUGLVSRVHULVHTXLSSHGZLWKDUHPRYDEOHVSODVK
guard for ease of cleaning or replacement. Remove
WKHVSODVKJXDUGE\SXOOLQJLWRXWIURPWKHWRS7R
replace, insert into the sink flange and push down until
it is properly seated.
Ŷ,IDQRGRUGHYHORSVUXQRUDQJHRUOHPRQULQGV
through the disposer. A dozen ice cubes sprinkled with
a little household scouring powder will also work.
USING THE DISPOSER / CARE AND CLEANING
Using the Disposer / Care and Cleaning

49-4000291 Rev 0 5
Installation
Dryer
Instructions
If you have any questions, call GE Appliances at 800.GE.CARES
(800.432.2737)
or visit our Website at: GEAppliances.com
In Canada, call 800.561.3344
or visit www.GEAppliances.ca
BEFORE YOU BEGIN
Read these instructions completely and carefully.
FOR YOUR SAFETY
Read and observe all WARNINGS and CAUTIONS
shown throughout these instructions.
While performing installations described in this booklet,
gloves and safety glasses or goggles should be worn.
IMPORTANT – Observe all governing codes and
ordinances.
• Save these instructions for local inspector’s use.
• Note to Installer – Be sure to leave these
instructions with the consumer.
• Note to Consumer – Keep these instructions
for future reference.
• Skill level – Installation of this appliance requires
basic mechanical skills.
•3URSHULQVWDOODWLRQLVWKHUHVSRQVLELOLW\RIWKHLQVWDOOHU
WARNING
• )253(5621$/6$)(7<5HPRYHKRXVHIXVHRURSHQ
FLUFXLWEUHDNHUEHIRUHEHJLQQLQJLQVWDOODWLRQ'RQRWXVH
an extension cord or adapter plug with this appliance.
• )253(5621$/6$)(7<'RQRWSRVLWLRQ\RXUKHDG
or body under disposer; unit could fall during removal
or installation.
• 7KHLPSURSHUFRQQHFWLRQRIWKHHTXLSPHQWJURXQGLQJ
conductor can result in a risk of electric shock. Check
with a qualified electrician or service representative if you
are in doubt that the appliance is properly grounded.
• If house wiring is not 2-wire with ground, a ground
must be provided by the installer. When house wiring
LVDOXPLQXPEHVXUHWRXVH8//LVWHGDQWLR[LGDQW
compound and aluminum-to-copper connectors.
•3URGXFWIDLOXUHGXHWRLPSURSHULQVWDOODWLRQLVQRW
covered under the Warranty.

6 49-4000291 Rev 0
Installation Instructions
WHAT YOU WILL NEED
ƒ3KLOOLSVDQGIODWEODGH
screwdrivers
ƒ+DPPHU
ƒ1XW'ULYHU
ƒ&KDQQHOORFNSOLHUV
VOLSMRLQW
SOME TYPICAL INSTALLATIONS
*It is essential for the proper operation of the disposer that this dimension be 9”-12” to avoid standing water in disposer
motor housing.
)OH[LEOHGUDLQSLSHPD\EHQHFHVVDU\IRUWKLVDSSOLFDWLRQ
DIMENSIONS
ƒ+DFNVDZ
ƒ6DIHW\*ODVVHV
ƒ*ORYHV
ƒ3XWW\.QLIH
ƒ3OXPEHUV3XWW\
ƒ7DSH0HDVXUH
ƒ:RRGHQGRZHO
or steel punch
ƒ)OH[LEOH'UDLQ+RVH
ƒ+RVHFODPSV
Only needed if connecting
to a dishwasher:
ƒ)ODVKOLJKW
ƒ/LTXLGVRDSRU
SHWUROHXPMHOO\
5-3/16"
1-1/2"
8-1/2"
7-1/4"
4-1/2"
16-1/16"
5-9/16"
8-1/2"
8-1/2"8-1/2"
1-1/2"
6-3/16"
12-11/16"
4-1/2"
5-3/8"
GFC365
GFC565
GFC765
GFC1065
SINGLE BOWL
*Approx.
DOUBLE BOWL
CENTER OUTLET**
*Approx.
DOUBLE BOWL
END OUTLET**
*Approx.
49-4000291 Rev 0 7
Installation Instructions
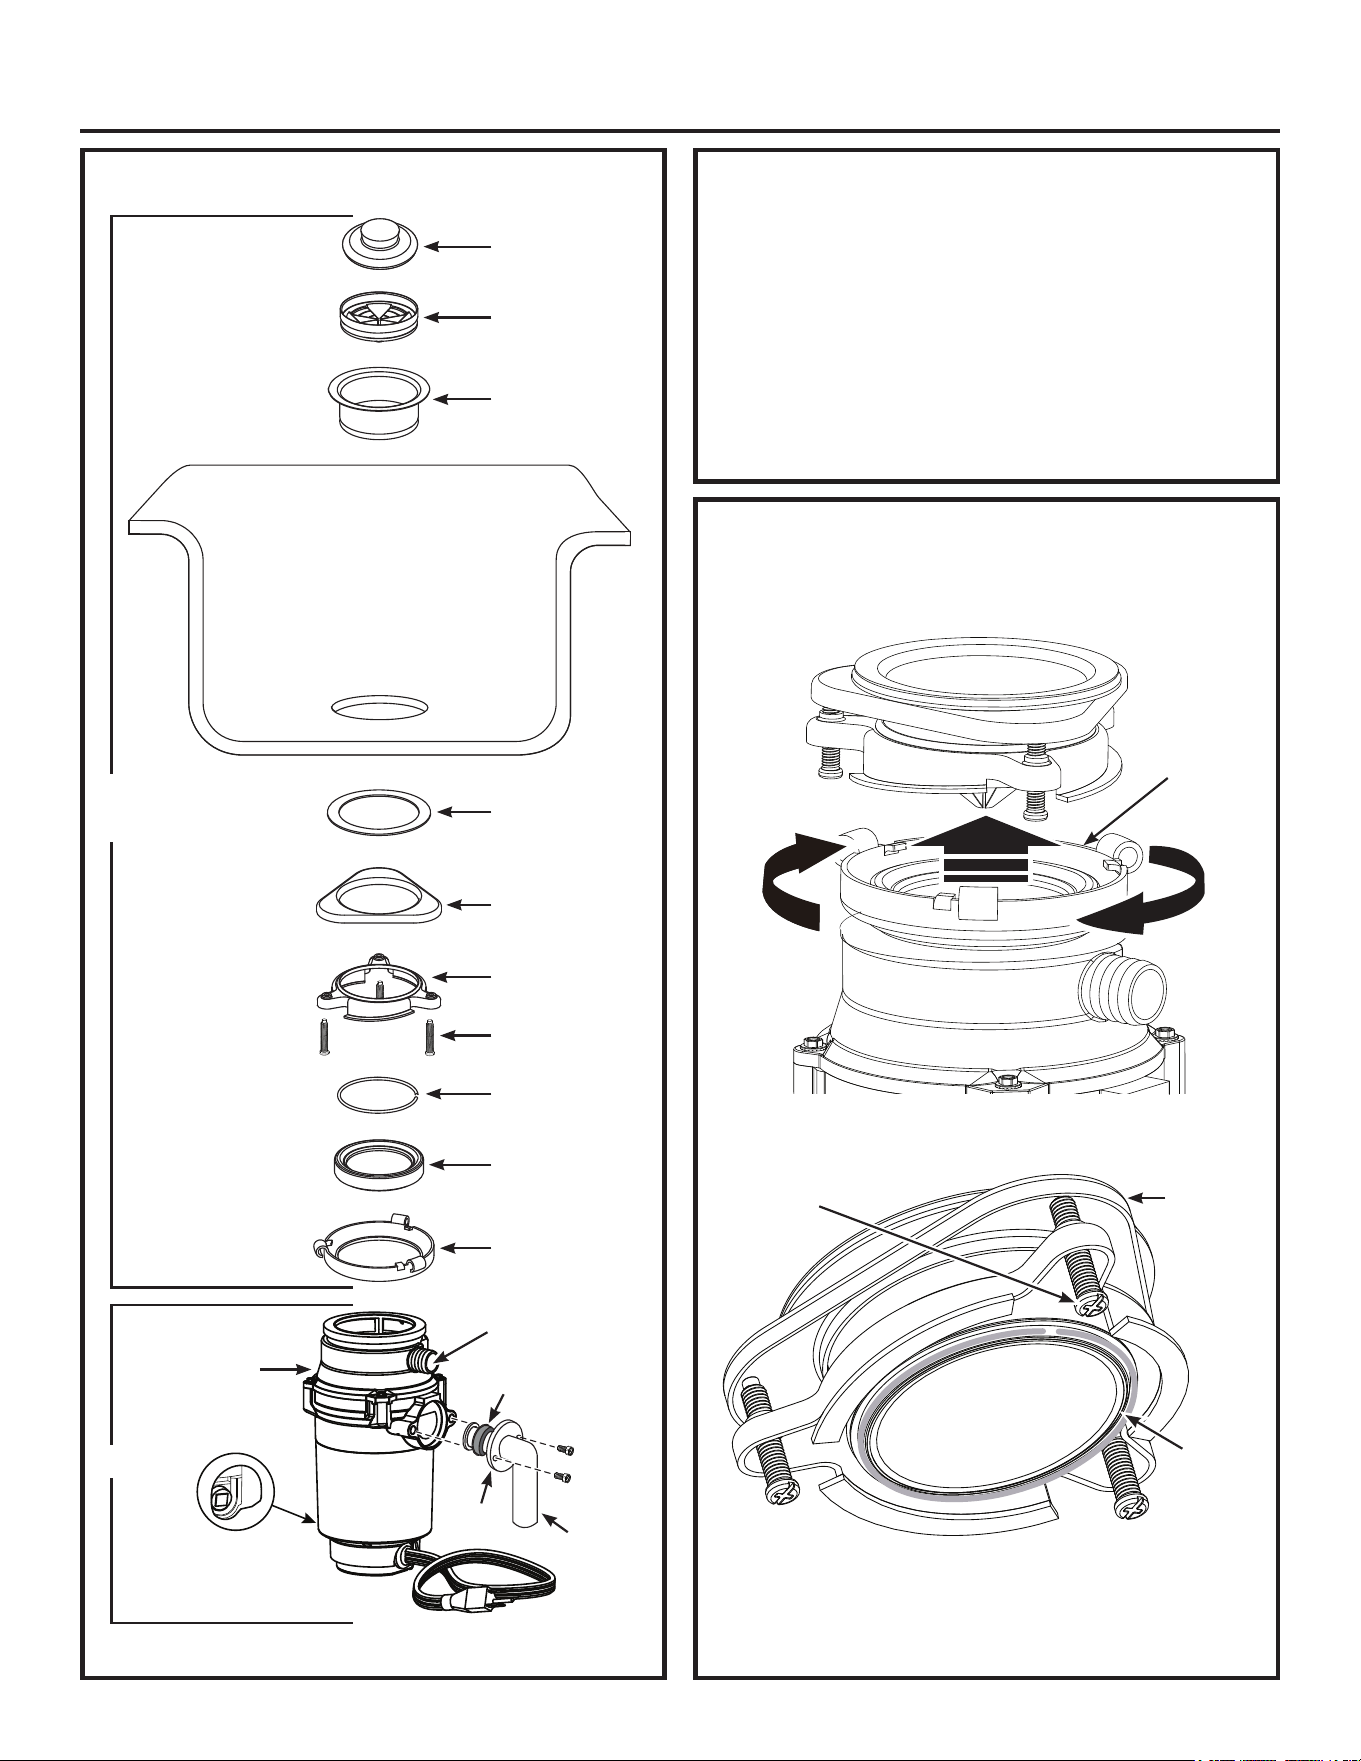
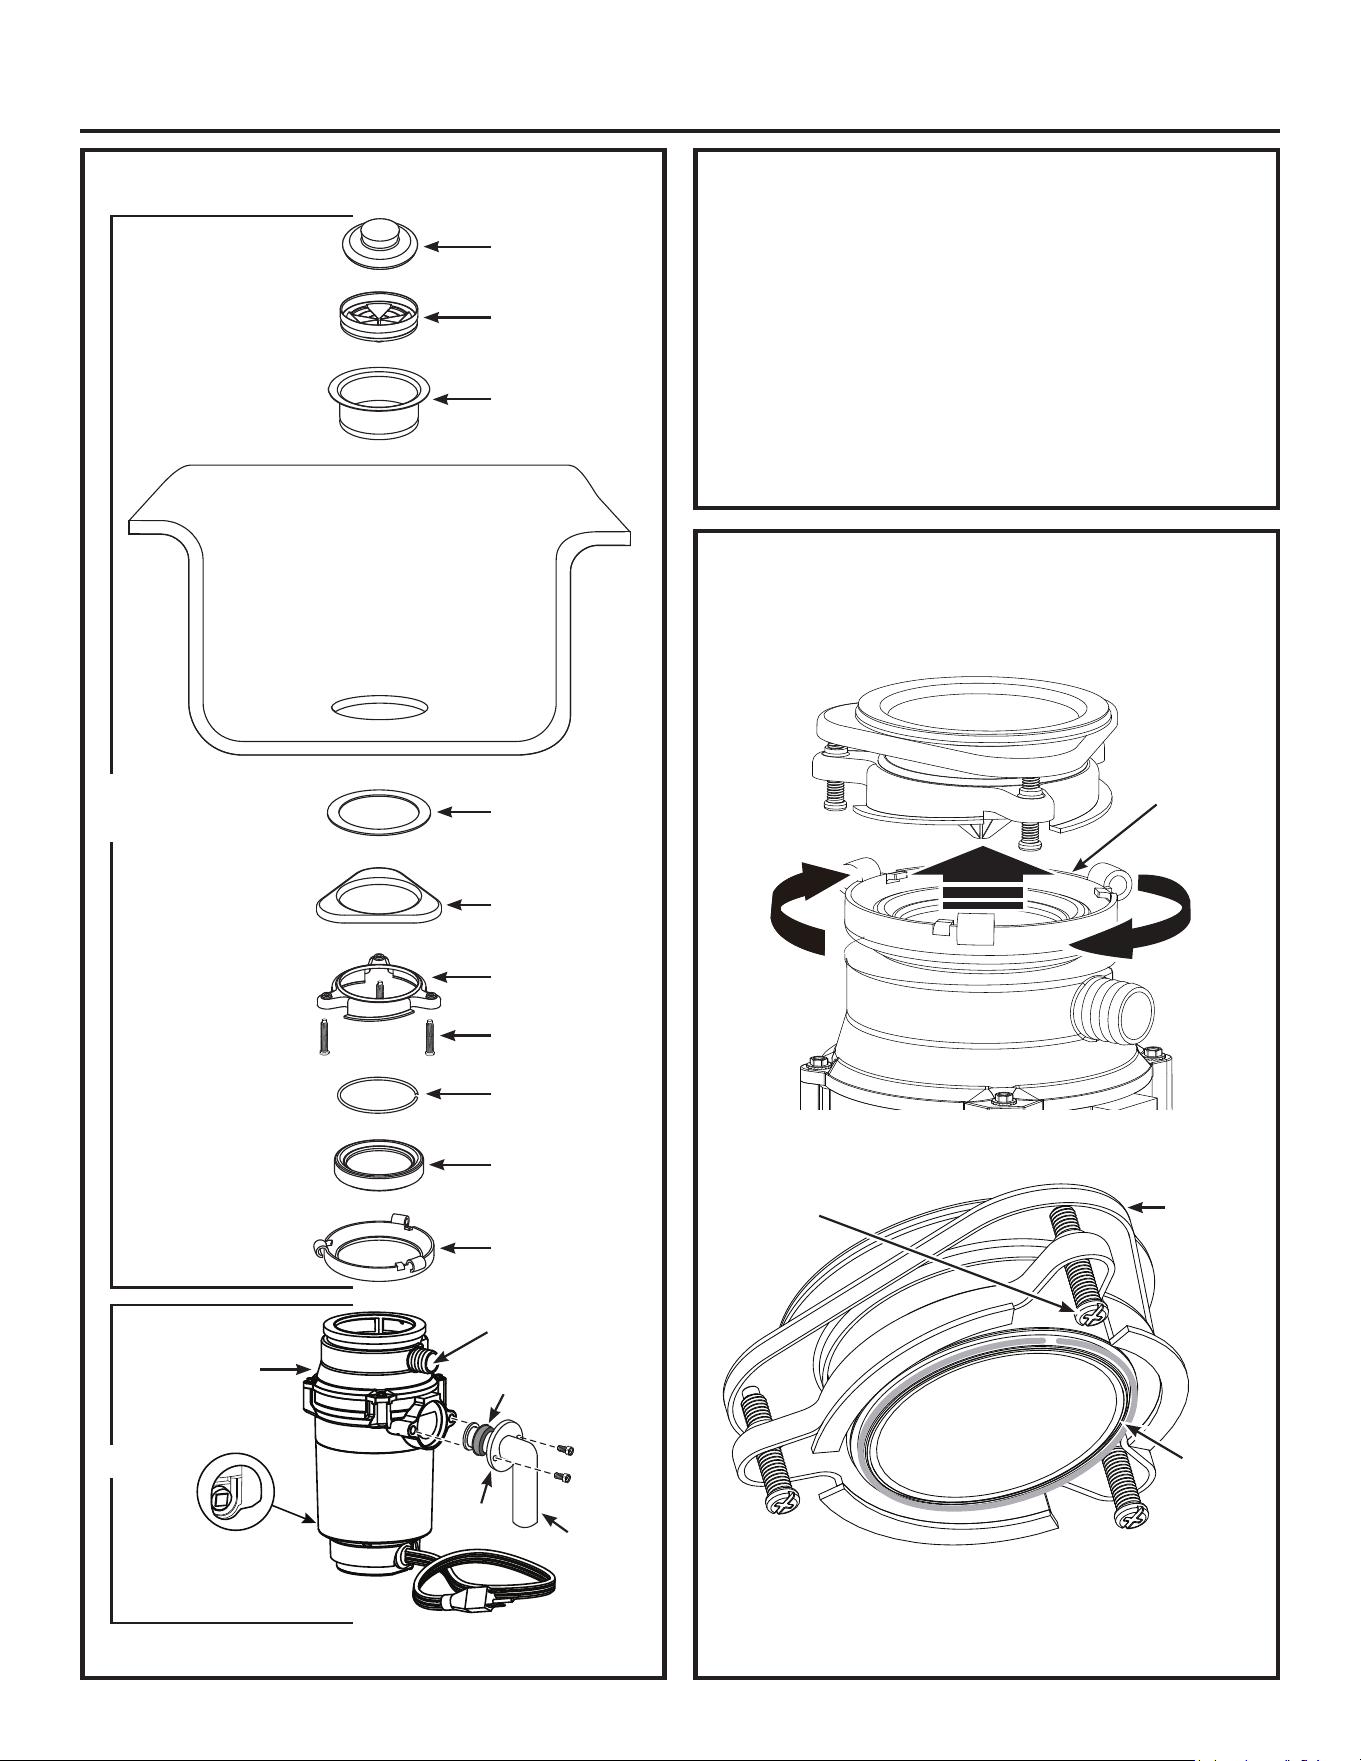
COMPONENTS
Sink
)ODQJH
Assembly
Stopper
Sink
)ODQJH
Sink
)LEHU
Gasket
6XSSRUW)ODQJH
8SSHU0RXQWLQJ
Ring
Screws (3)
Snap Ring
'LVSRVHU
Cushion Mount
Lower Mounting
Ring
'LVKZDVKHU
'LVFKDUJH,QOHW
Gasket
Screws
Reset Button
(Reach up and under
protective shield to press)
)ODQJH
'LVFKDUJH
Elbow
Hopper
PREPARATION
'LVFRQQHFWHOHFWULFDOSRZHUVXSSO\WRGLVSRVHU
2. Remove old disposer or sink flange assembly.
3. Inspect drain line. If it is heavily coated with
hardened grease and accumulations, rout out with a
plumber’s snake.
4. Remove old sealing materials and gasketing from
sink opening, both top and bottom.
NOTE:7RSDQGERWWRPRIVLQNVXUIDFHVPXVWEHFOHDQ
dry and free of any residue to prevent leaks.
Splash
Guard
3RZHU&RUG
(on some models)
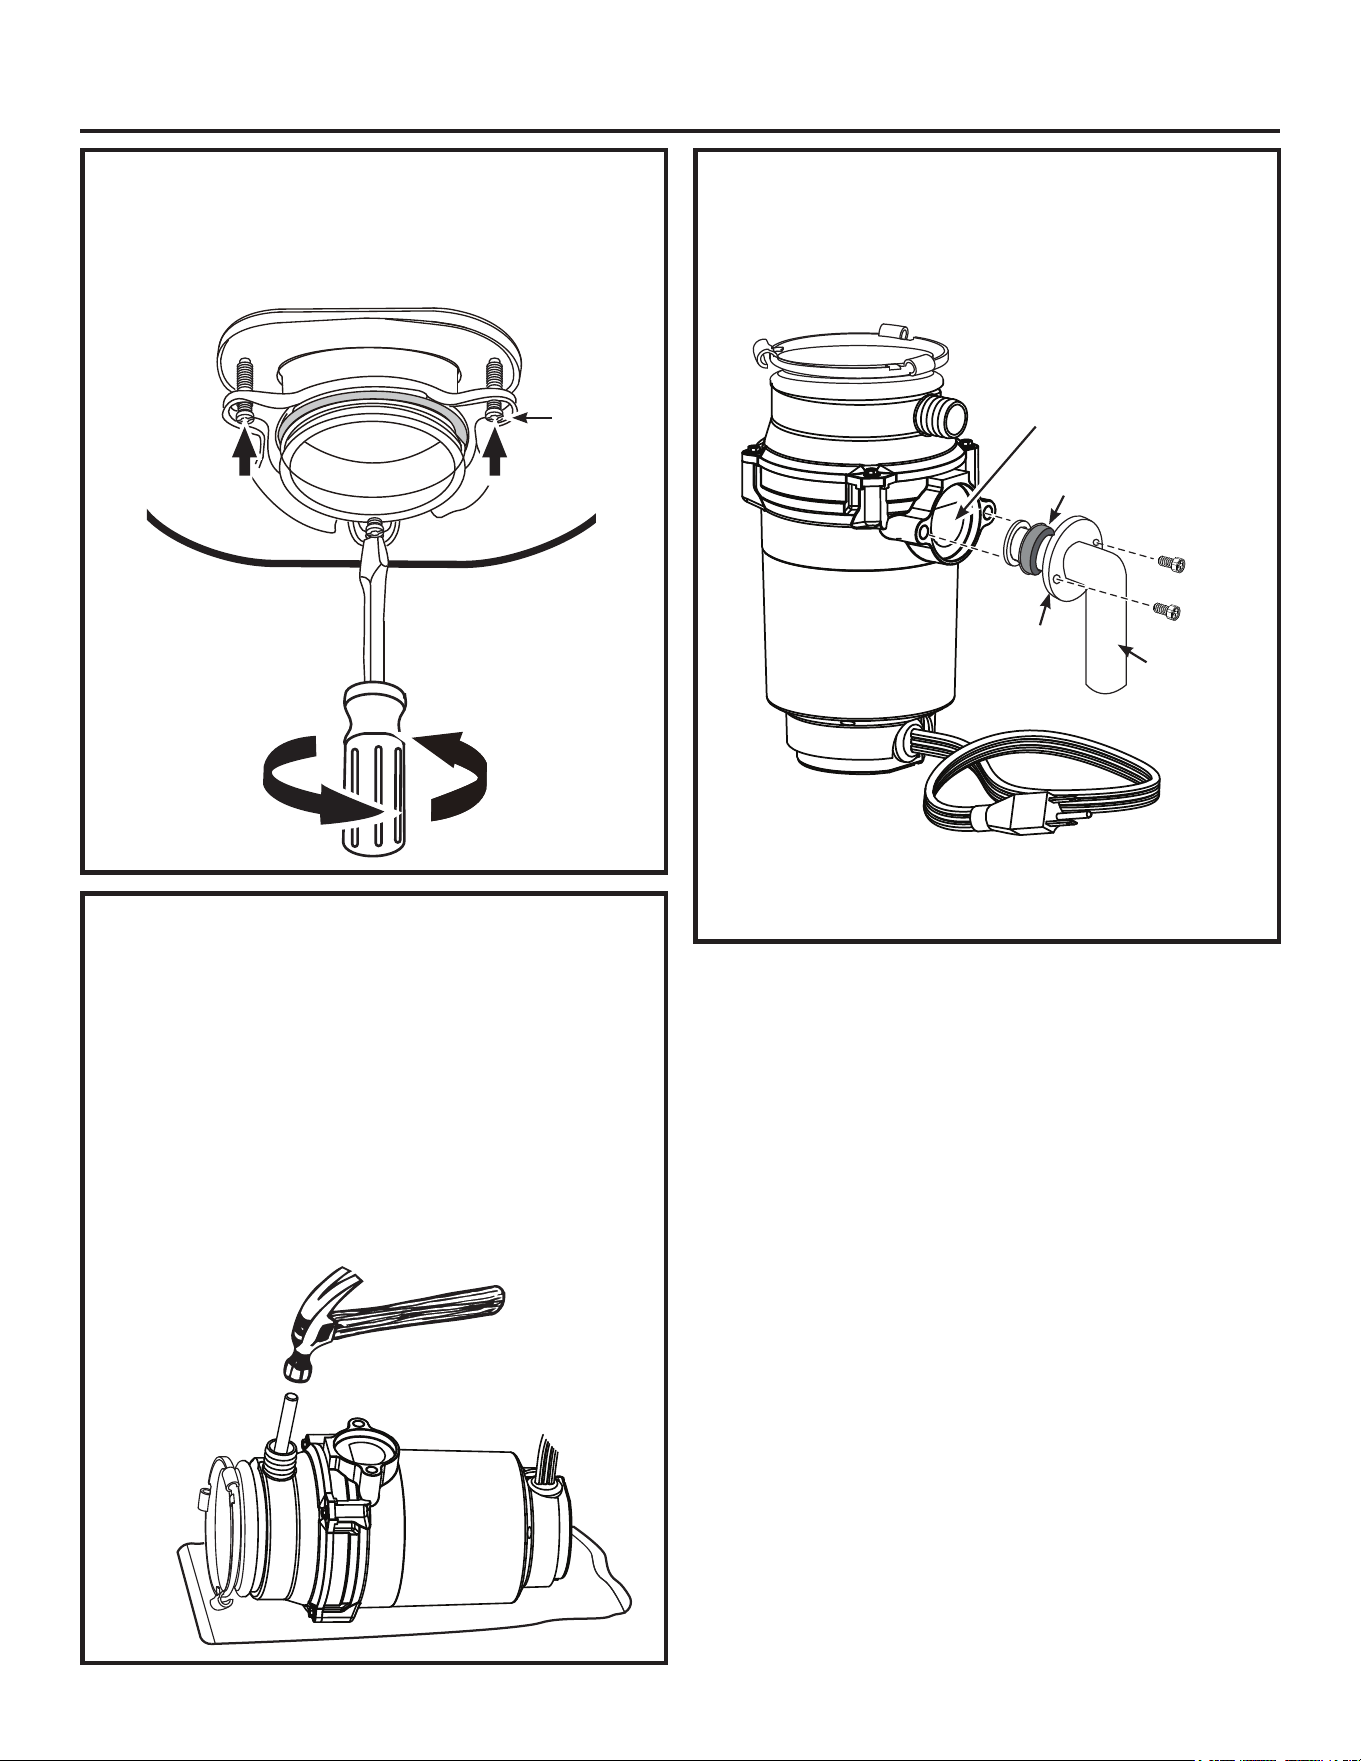
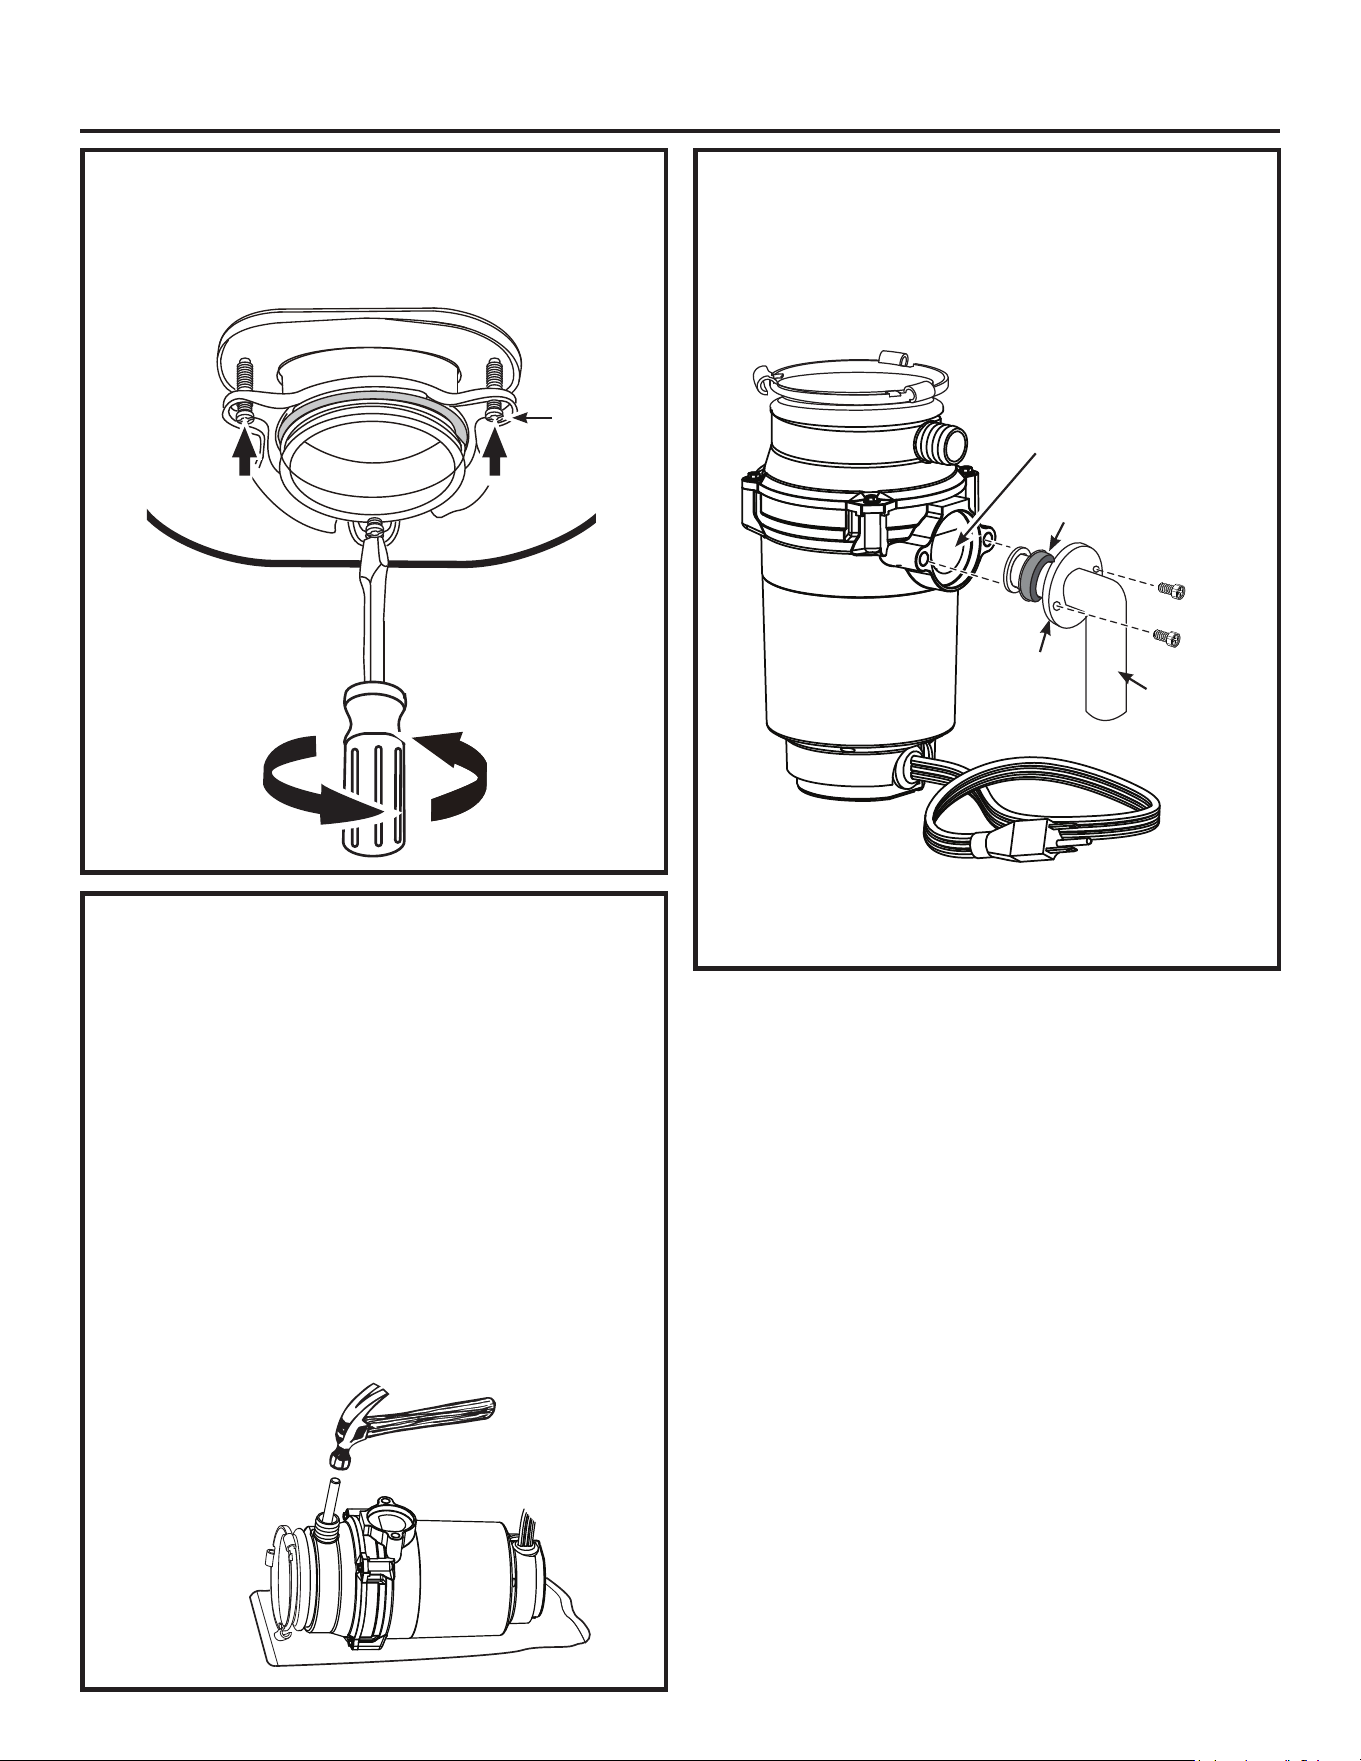
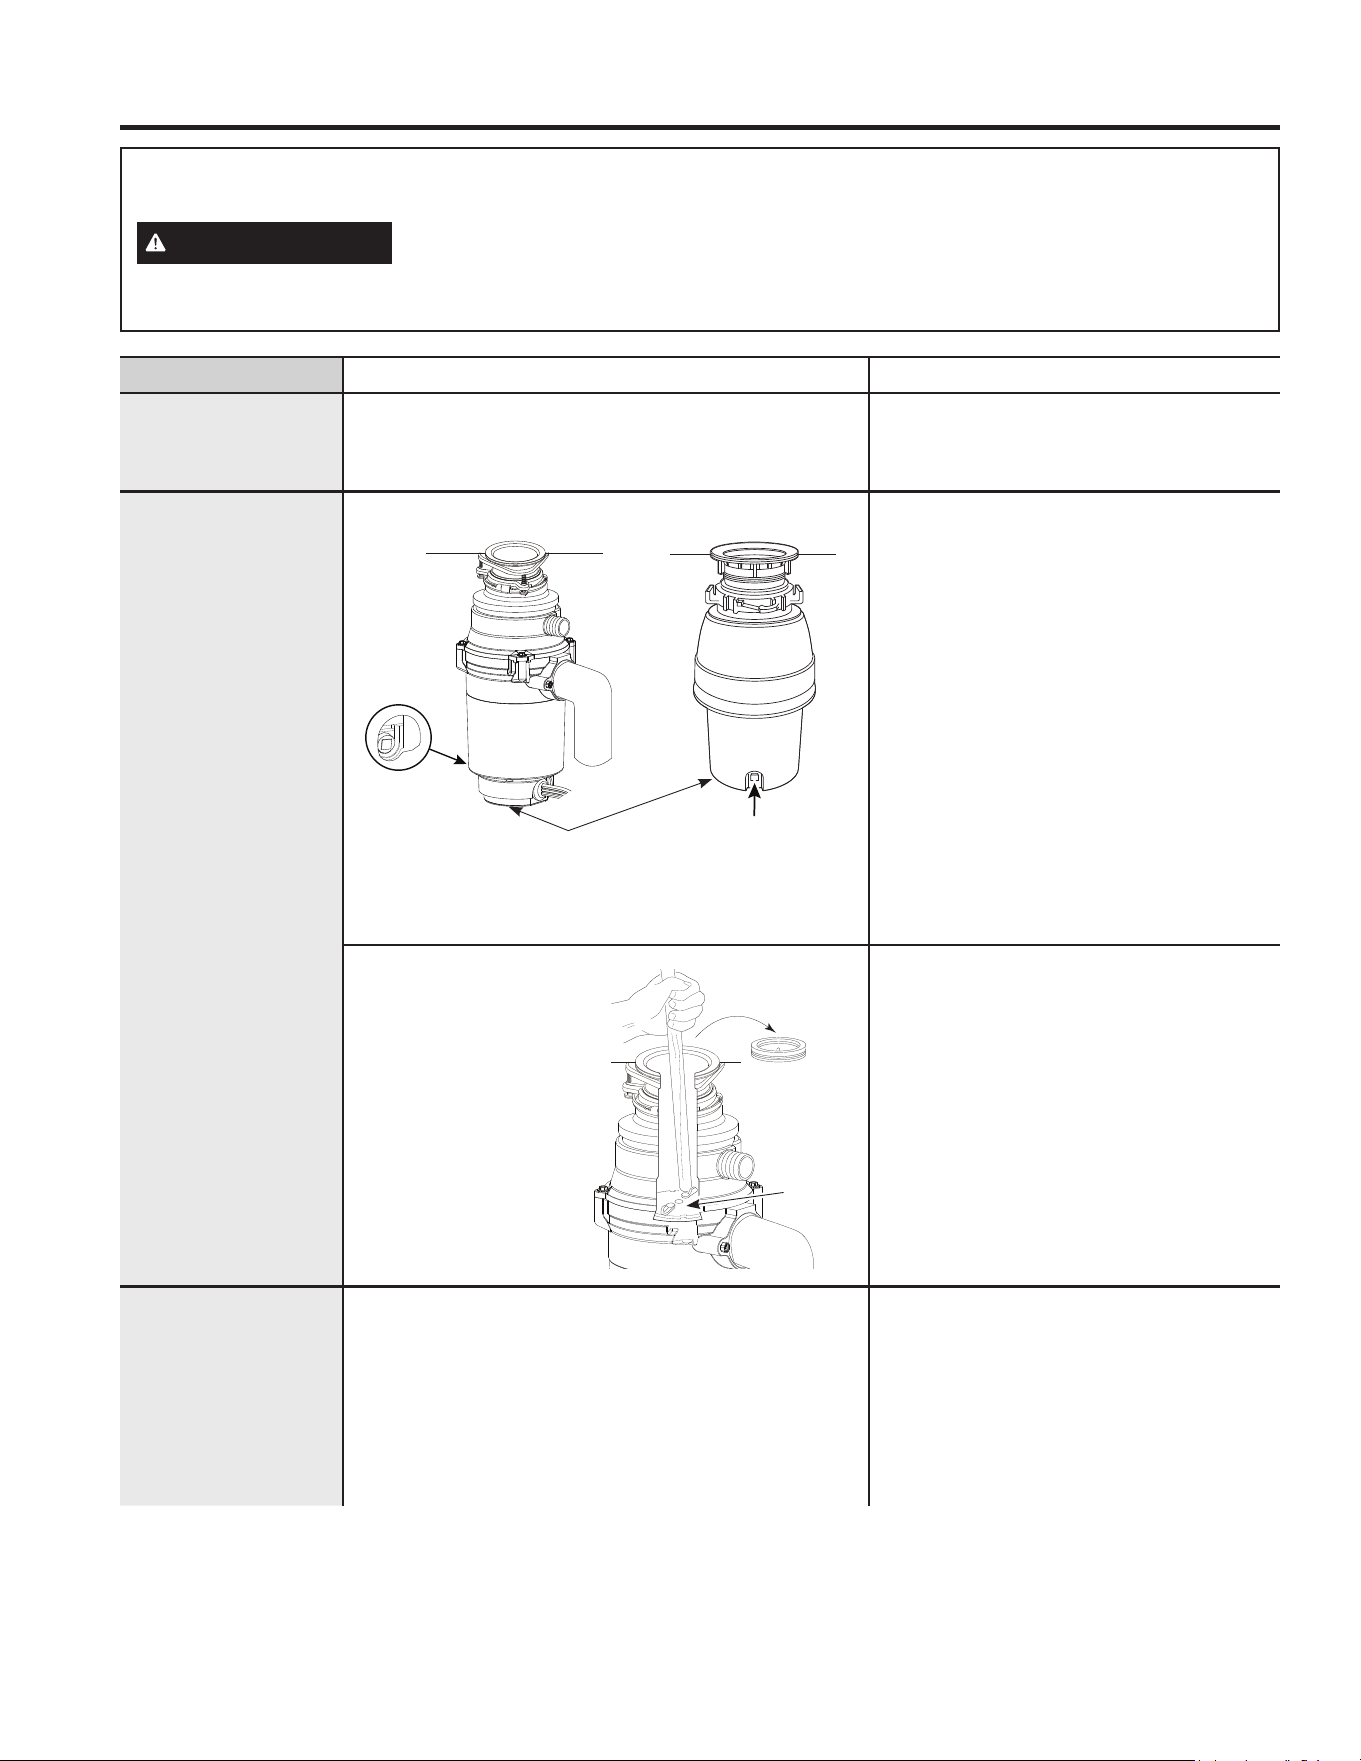
DISASSEMBLE TO INSTALL
7XUQWKHORZHUPRXQWLQJULQJFORFNZLVHXQWLOLW
releases and lift the entire hardware assembly from
the disposer.
2. Loosen the three screws from the upper mounting
ring and slide it toward the support flange.
3. Insert a flat blade screwdriver under the snap ring
and remove it.
4. Separate the upper mounting ring and support flange
from the sink flange.
Loosen
screws (3)
Remove
snap ring
Support
)ODQJH
Lower
Mounting
Ring
8 49-4000291 Rev 0
Installation Instructions
INSTALL THE UNDER SINK
MOUNTING HARDWARE
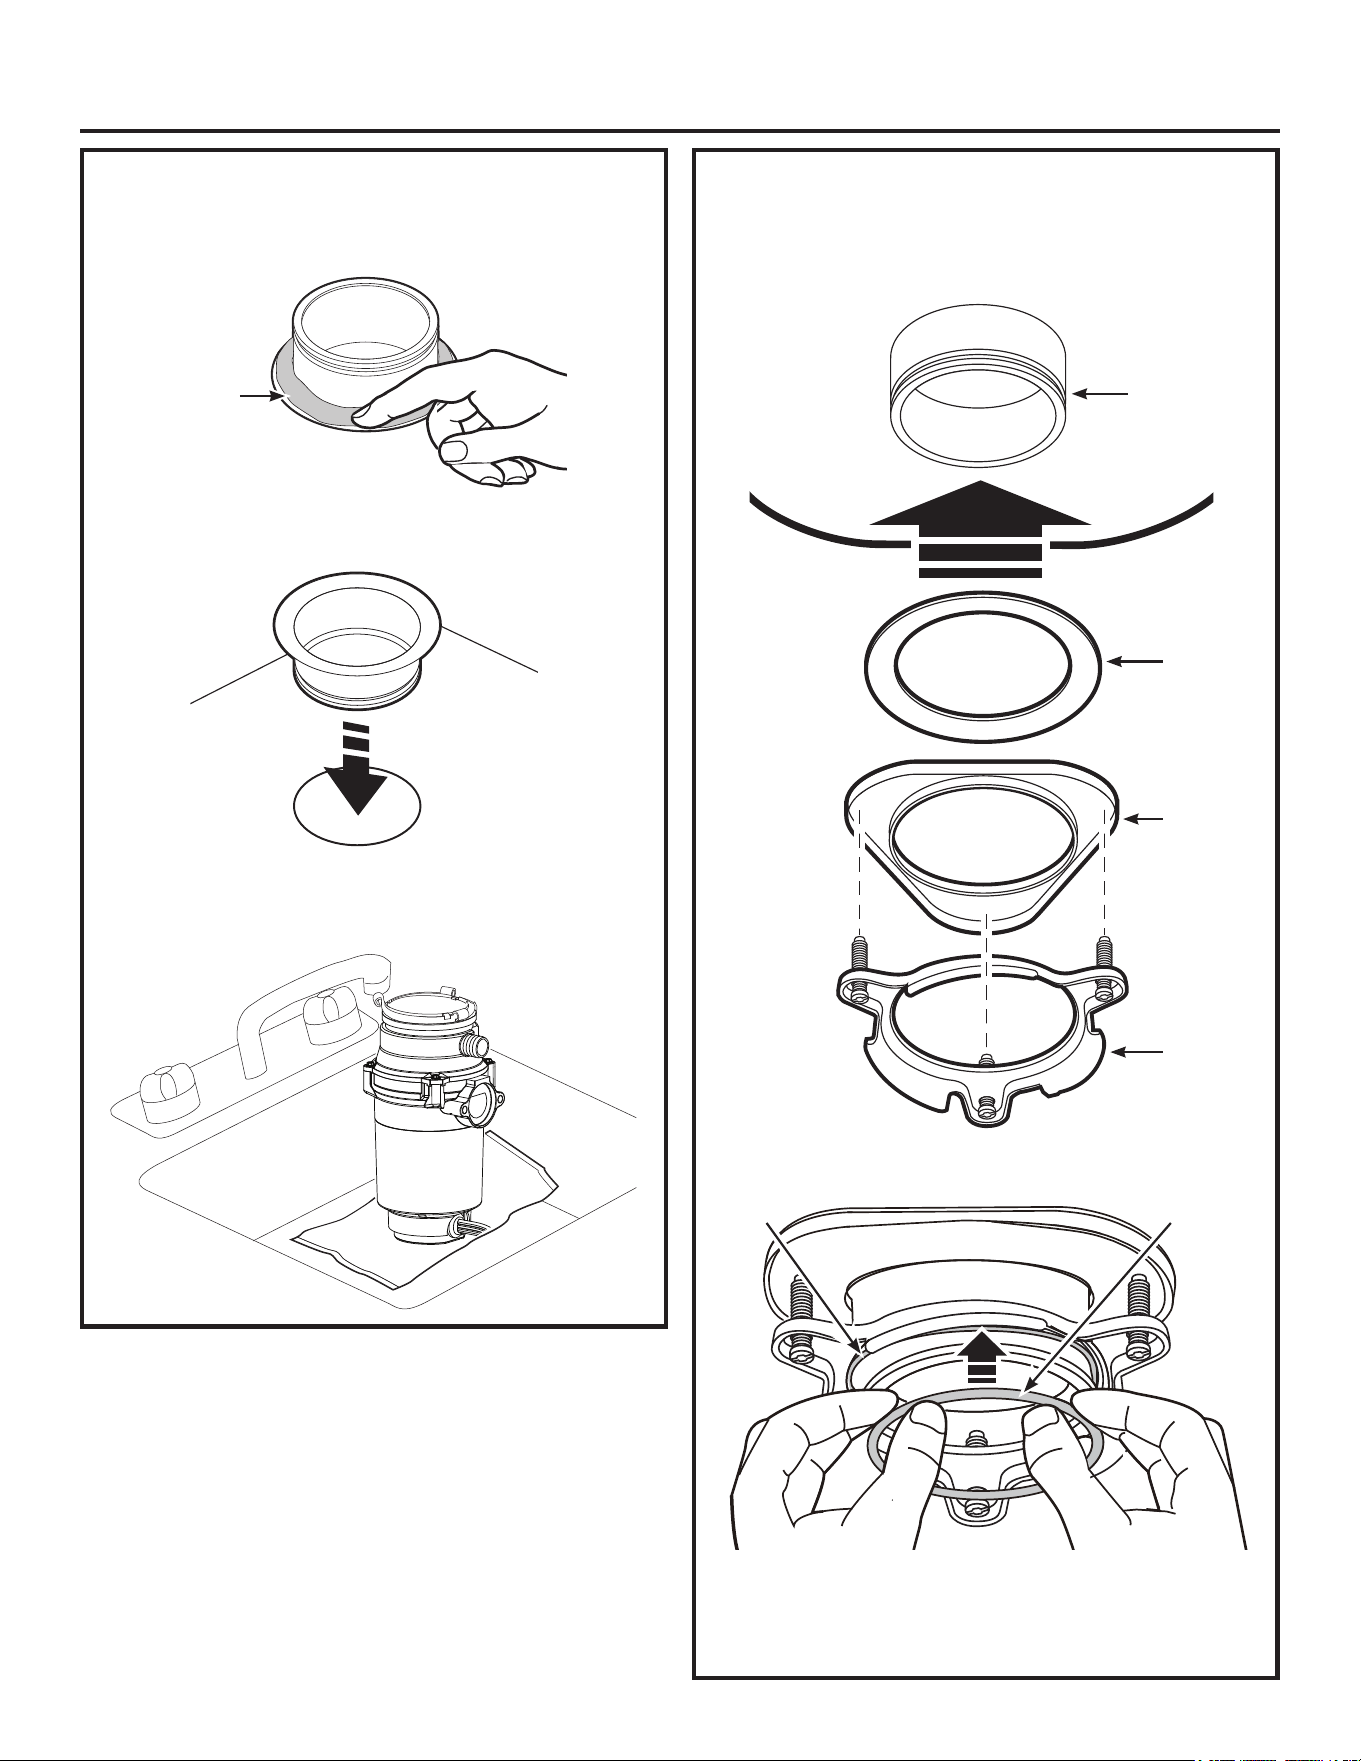
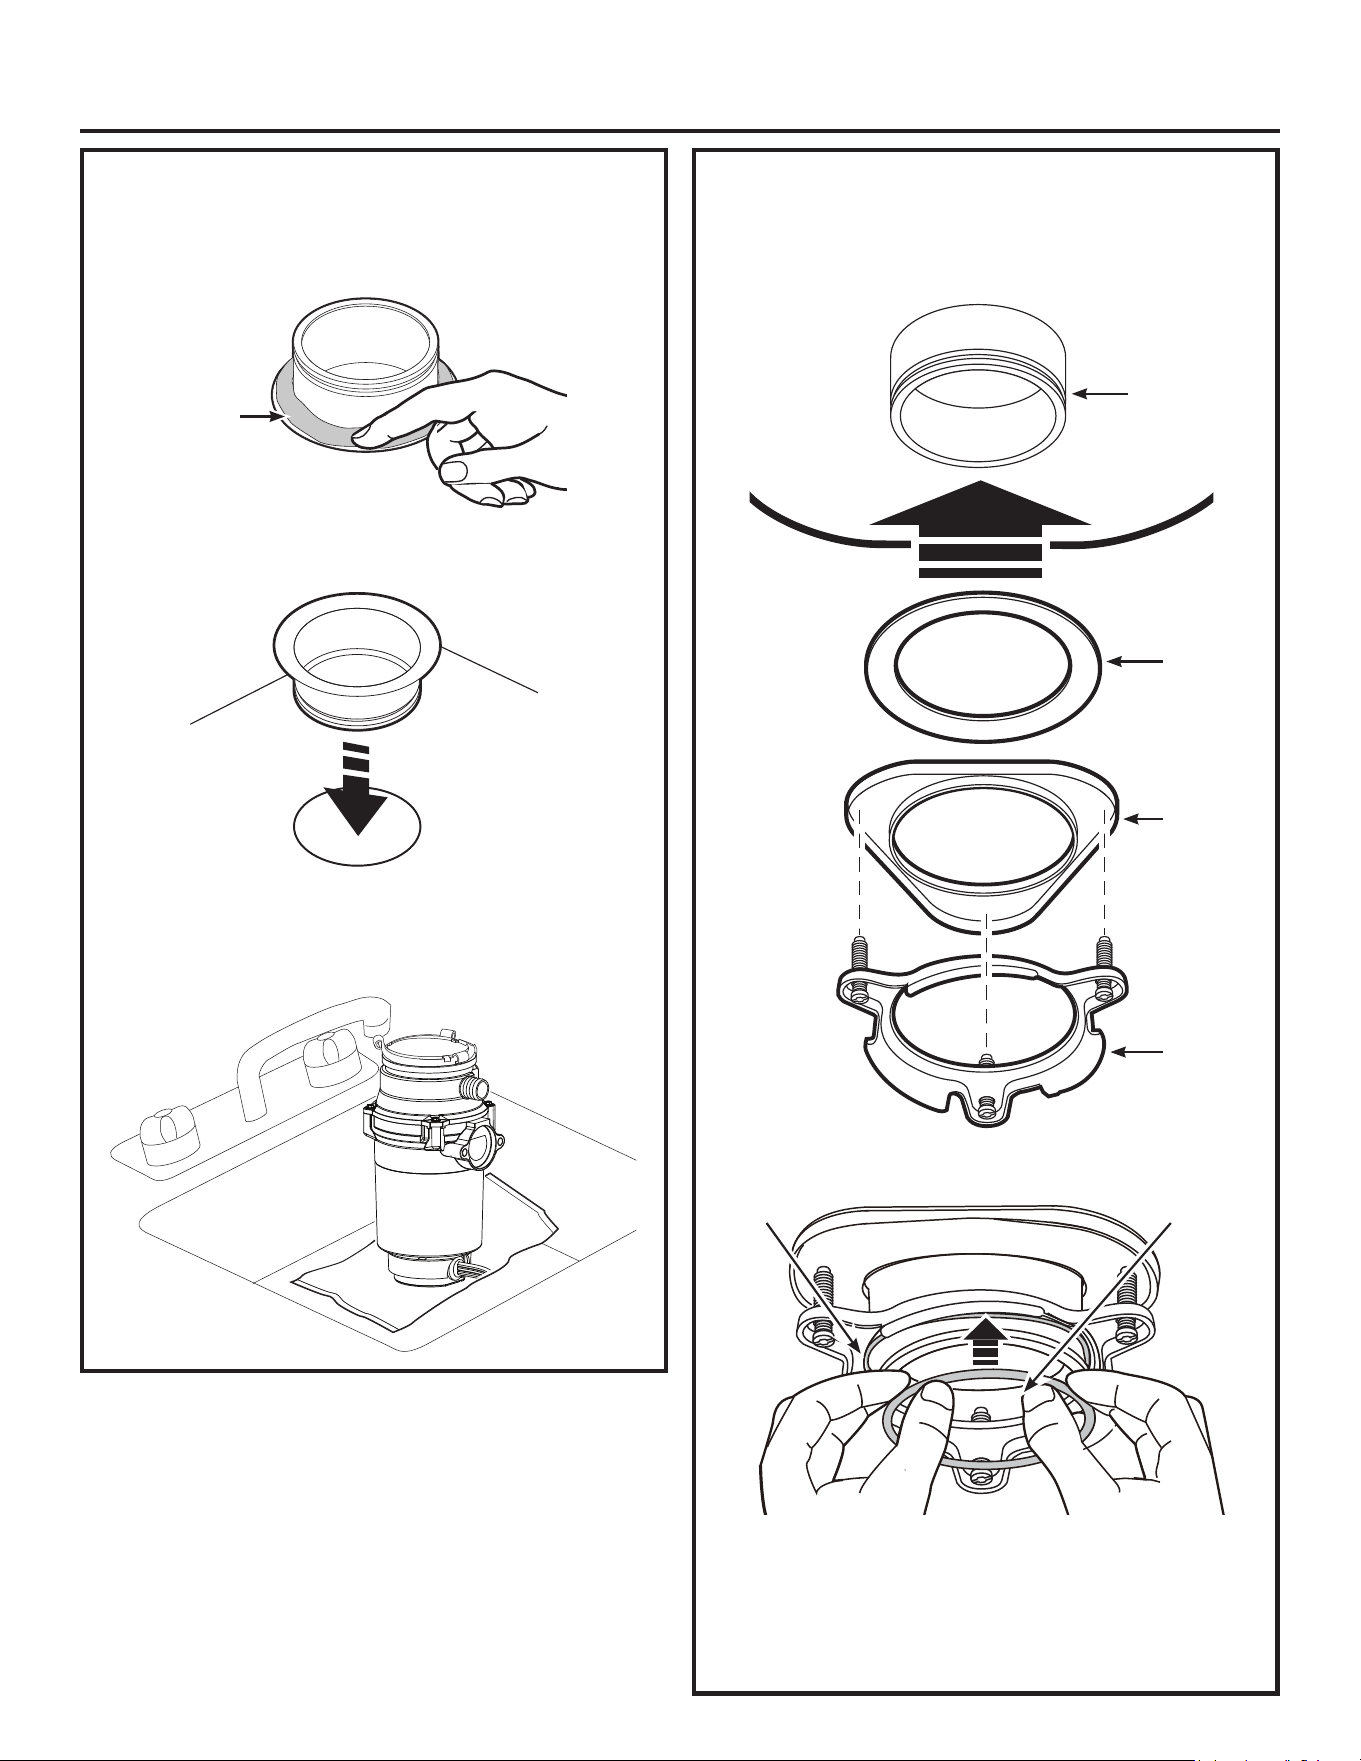
1. Assemble together the fiber gasket, support flange
and upper mounting ring onto the lower sink flange.
Secure the assembly in place on the sink flange by
inserting the snap ring into the sink flange snap groove.
IMPORTANT: Make sure the snap ring is secured into
place in the snap groove. If the snap ring is not secured
in the snap groove, trapping the assembled parts in
place, then the disposer cannot be properly installed.
)LEHU
Gasket
Support
)ODQJH
8SSHU
Mounting
Ring
Sink
)ODQJH
Snap RingGroove
INSTALL THE SINK FLANGE
1. Roll plumbers putty in a 3/8” thick rope, turn the sink
flange up-side-down and apply around the bottom of
the flange.
2. Install the sink flange into the sink opening by
pressing it in firmly and removing excess plumbers
putty.
3ODFHDWRZHORYHUWKHVLQNERWWRPDQGIODQJHDQG
weight the flange down to hold it in place while you
add the other mounting components.
3OXPEHUV
3XWW\
49-4000291 Rev 0 9
Installation Instructions
INSTALL THE UNDER SINK
MOUNTING HARDWARE (CONT.)
7LJKWHQWKHWKUHHXSSHUPRXQWLQJULQJVFUHZVLQWR
the support flange.
Screws (3)
IF CONNECTING TO A DISHWASHER
If you are connecting to a dishwasher, complete this step.
If a dishwasher is not to be connected, skip to ATTACH
THE DISCHARGE ELBOW section and continue.
• 6HWWKHGLVSRVHURQWKHIORRU3ODFHLWRQLWVVLGHRQD
SURWHFWHGVXUIDFH8VHDEOXQWLQVWUXPHQWVWHHOSXQFK
or wooden dowel), to knock out the entire dishwasher
GLVFKDUJHSOXJ'RQRWXVHDVFUHZGULYHURUVKDUS
instrument. When knockout plug falls into disposer, you
may remove it or simply grind it up when the disposer
LVXVHG7KLVZLOOQRWGDPDJHWKHGLVSRVHULQDQ\ZD\
but may take some time to grind, over the course of
several uses.
8VHDSXQFKRU
GRZHORQO\'RQRW
use a screwdriver or
sharp instrument.)
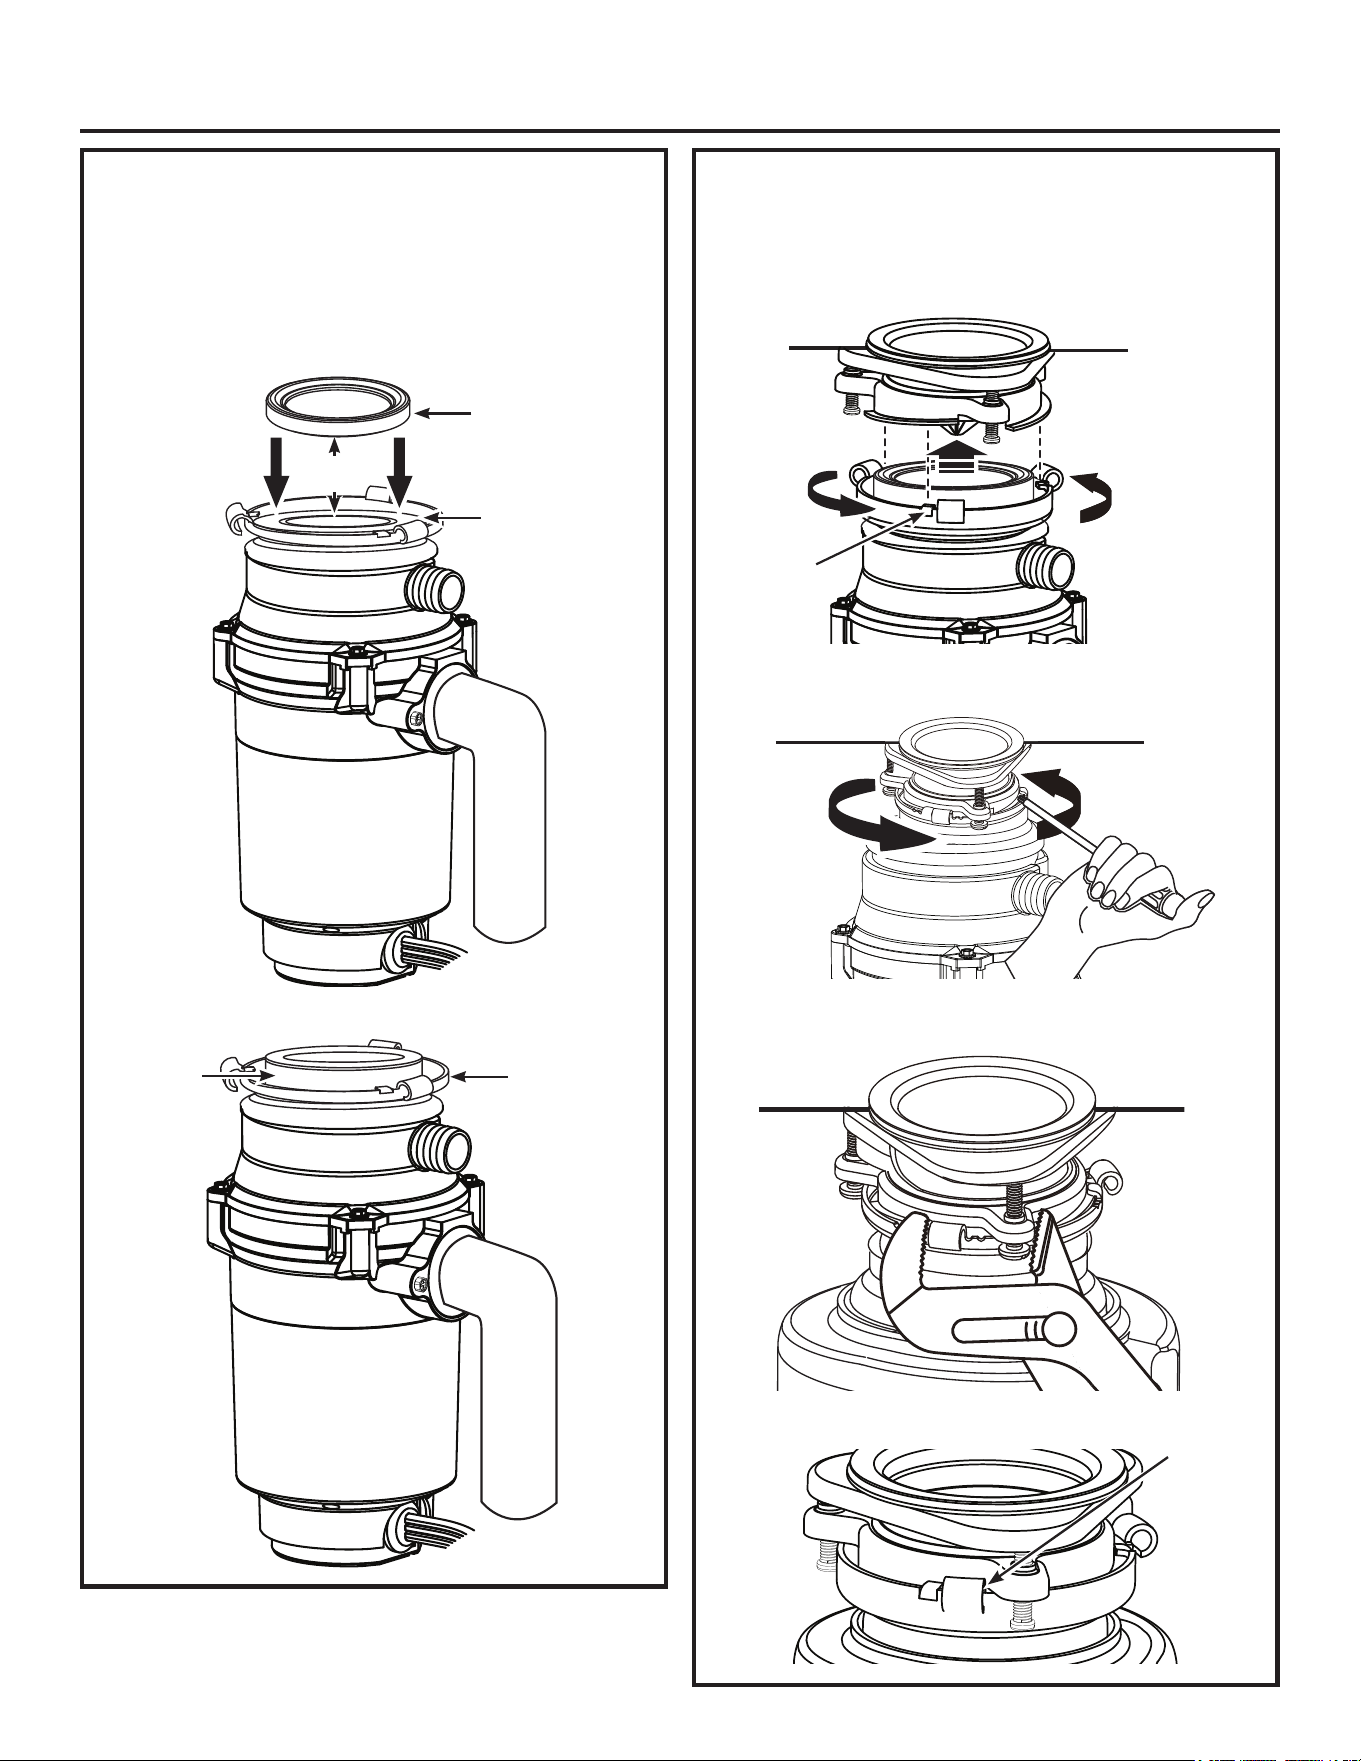
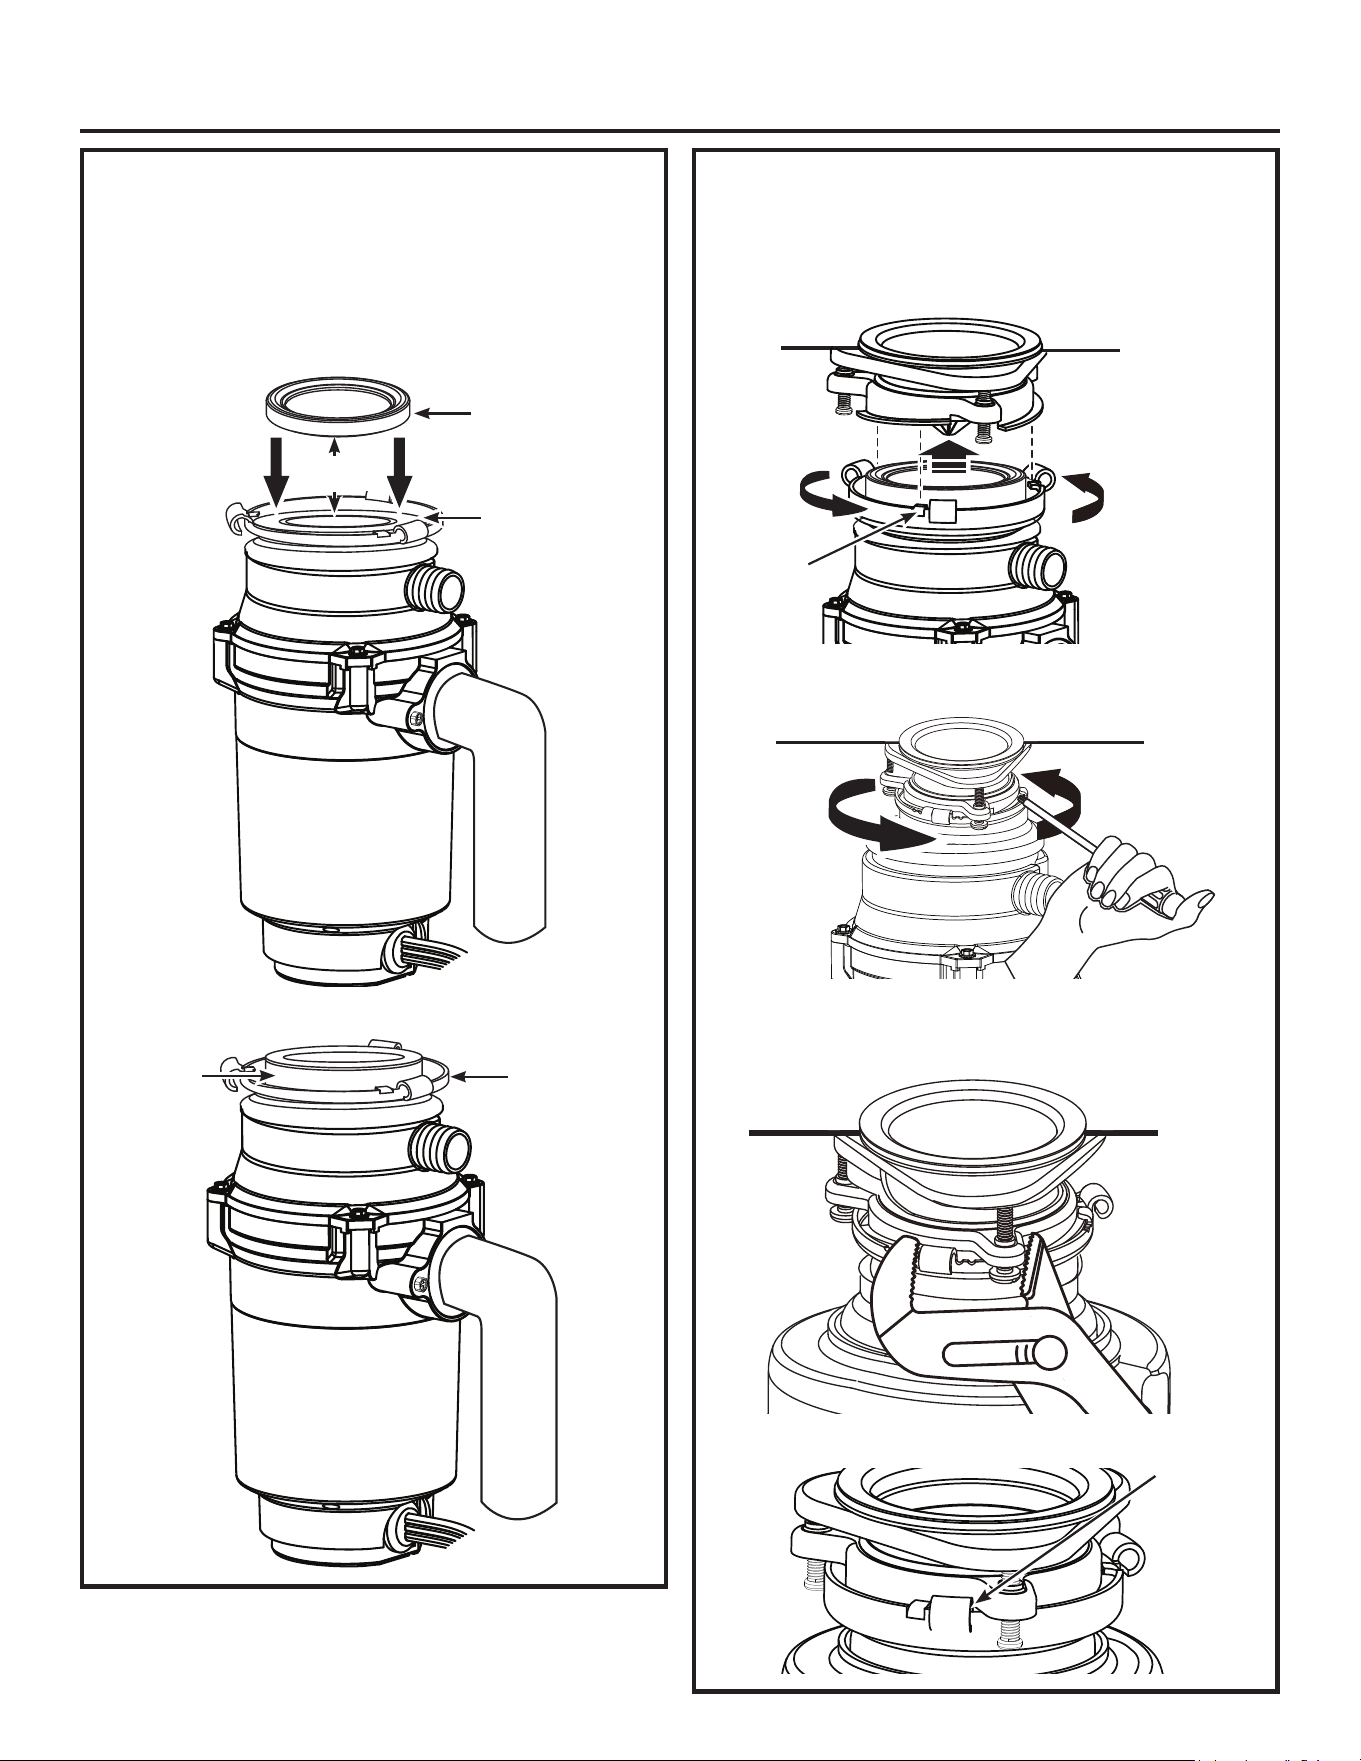
ATTACH THE DISCHARGE ELBOW
• Slide the discharge flange and then the discharge gasket
onto the discharge elbow. Insert the discharge elbow and
gasket into the disposer discharge outlet and attach the
flange assembly to the disposer with the two screws.
NOTE: Some installations may require a straight pipe
or flexible drain pipe connection. Consult a licensed
plumber as needed.
'LVFKDUJH2XWOHW
Gasket
Screws
)ODQJH
'LVFKDUJH
Elbow
10 49-4000291 Rev 0
Installation Instructions
MOUNT THE DISPOSER
IMPORTANT: Before performing this step, read it
completely to understand how the disposer is mounted.
1. Apply a small amount of liquid soap (or petroleum
MHOO\RQWRWKHERWWRPRIWKHFXVKLRQPRXQWDQGWR
the bottom of the the lower mounting ring to aid its
sliding and rotation onto the upper mounting ring.
2. Seat the cushion mount onto the top ring of the
disposer.
MOUNT THE DISPOSER (CONT.)
3. Lift and prop the disposer into place on the upper
mounting ring. Mount it by turning the lower mounting
ring until its tabs engage onto the slide ramps of the
upper mounting ring.
Insert a screwdriver into a lower hook and leverage it
counterclockwise into place.
Use channel lock pliers to fully lock the lower
mounting ring tabs onto the upper slide ramps.
Shown fully locked:
Sink
7RJHWKHU
when fully
locked
Cushion
Mount
Lower
Mounting
Ring
Apply
soap
Lower
Mounting
Ring
Cushion
Mount
Sink
Engage tabs onto
upper slide ramps
7DEV
7XUQWKHORZHU
mounting ring
to ramp it onto
the upper
mounting ring
Sink
49-4000291 Rev 0 11
Installation Instructions
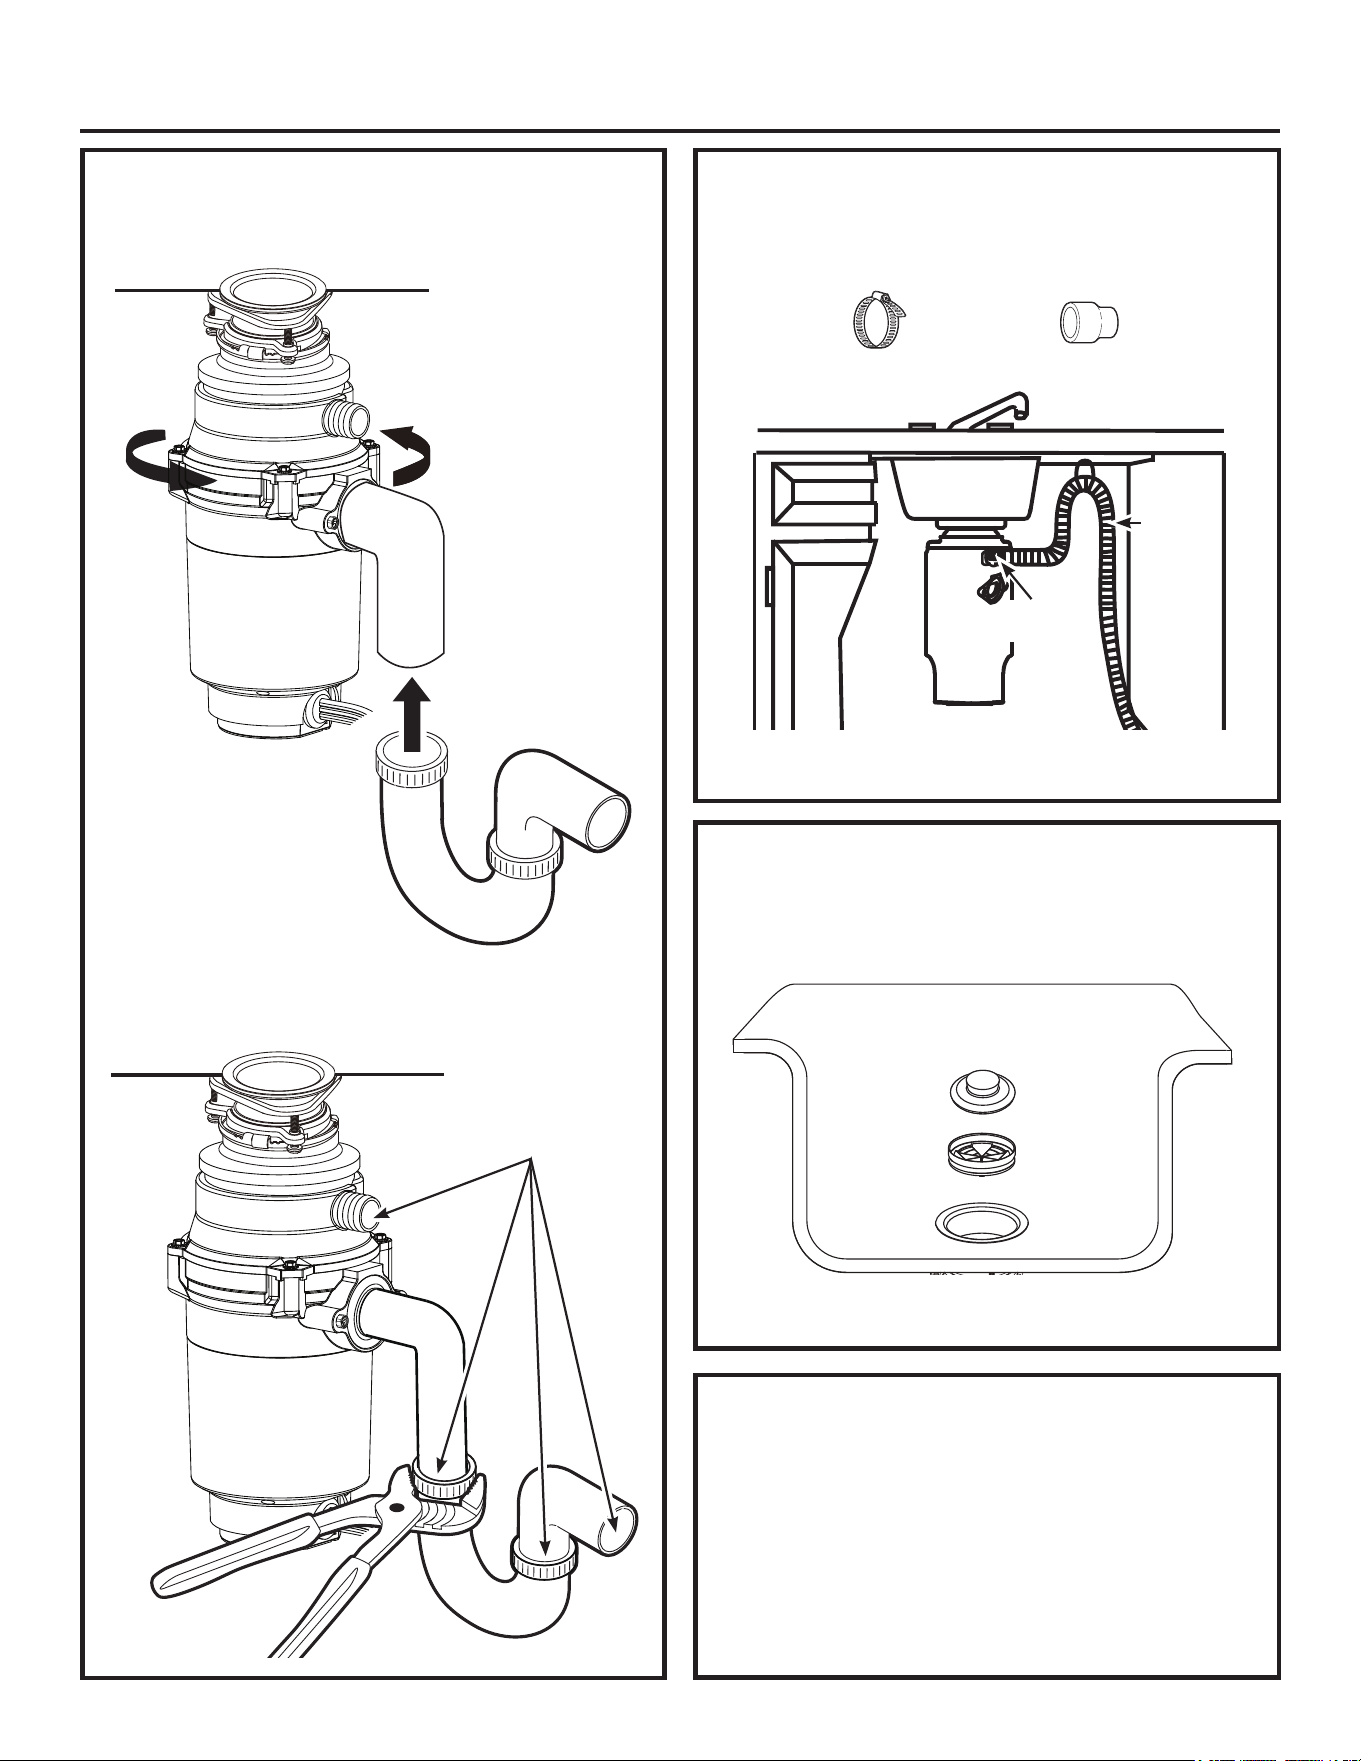
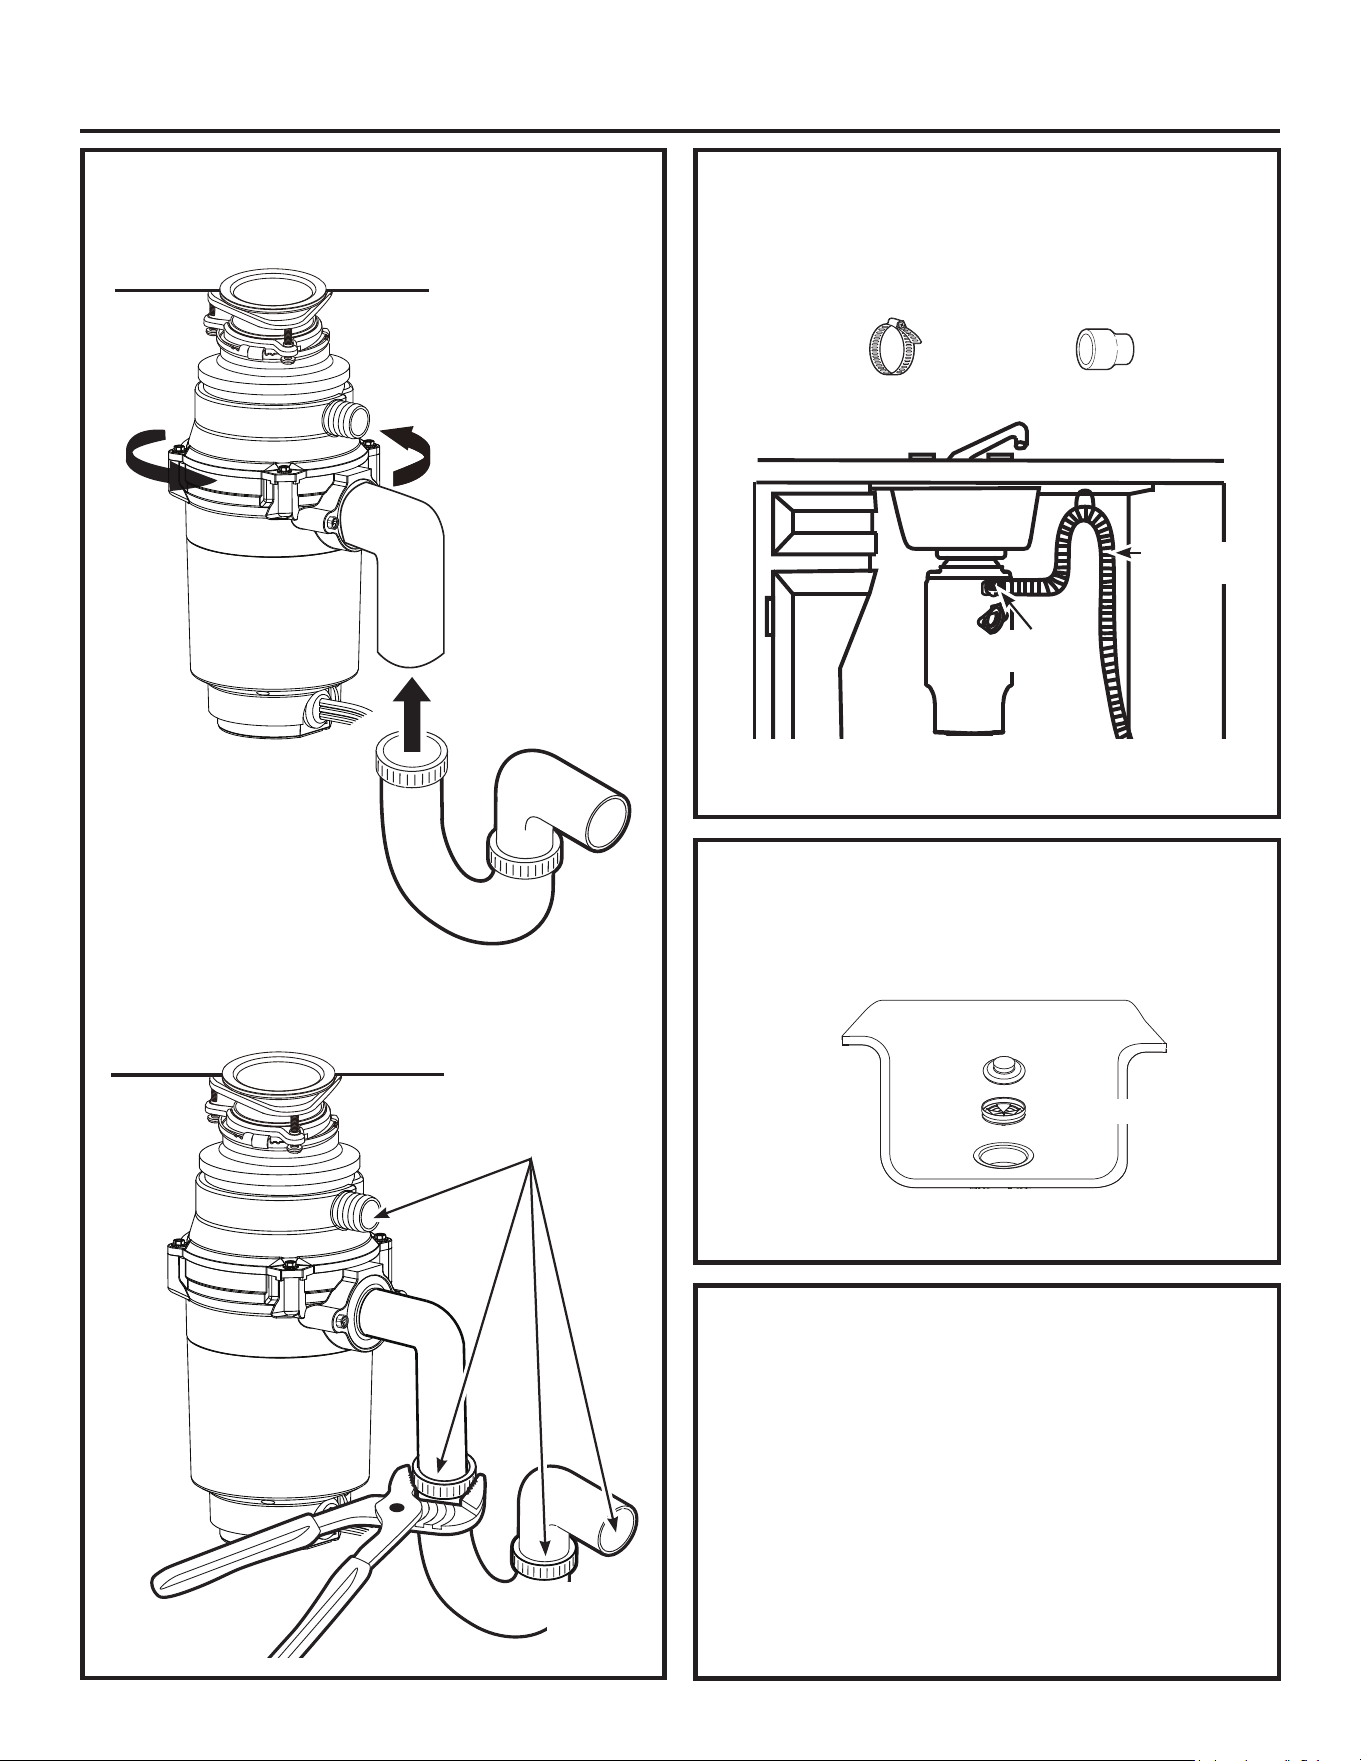
CONNECT PLUMBING
7XUQWKHGLVSRVHUXQWLOWKHGLVSRVHUGLVFKDUJHHOERZ
lines up with the outlet drain pipe.
2. Securely connect all plumbing, including the drain
pipe and the dishwasher drain (if used), observing all
codes and ordinances.
INSTALL SPLASH GUARD AND
STOPPER
• 3UHVVWKHVSODVKJXDUGLQWRSODFHLQWKHVLQNIODQJH
Insert the stopper over the splash guard.
NOTE: Both the splash guard and stopper may be
removed and cleaned as needed.
CONNECT POWER AND TEST FOR
LEAKS
• 3lug the disposer into an outlet that is properly
installed and grounded in accordance with all local
codes and ordinances.
• Run water to check the disposer for leaks 24 hours
after installation and first operation.
• Keep and refer to this Owner’s Manual for proper use
and care of this disposer.
Stopper
Splash
Guard
Sink
)ODQJH
Secure all plumbing
connections
Sink
Outlet
'UDLQ
3LSH
Rotate the disposer
as needed to align
with the drain pipe
Sink
Outlet
'UDLQ
3LSH
IF CONNECTING TO A DISHWASHER
• Connect the flexible drain hose to the dishwasher
discharge using a hose clamp. If the hose size is
different, you will need a stepped rubber adapter.
See the Installation Instructions that came with your
dishwasher for details.
Clamp
connection
)OH[LEOH
'UDLQ
Hose
Hose Clamp
Stepped Rubber Adapter
12 49-4000291 Rev 0
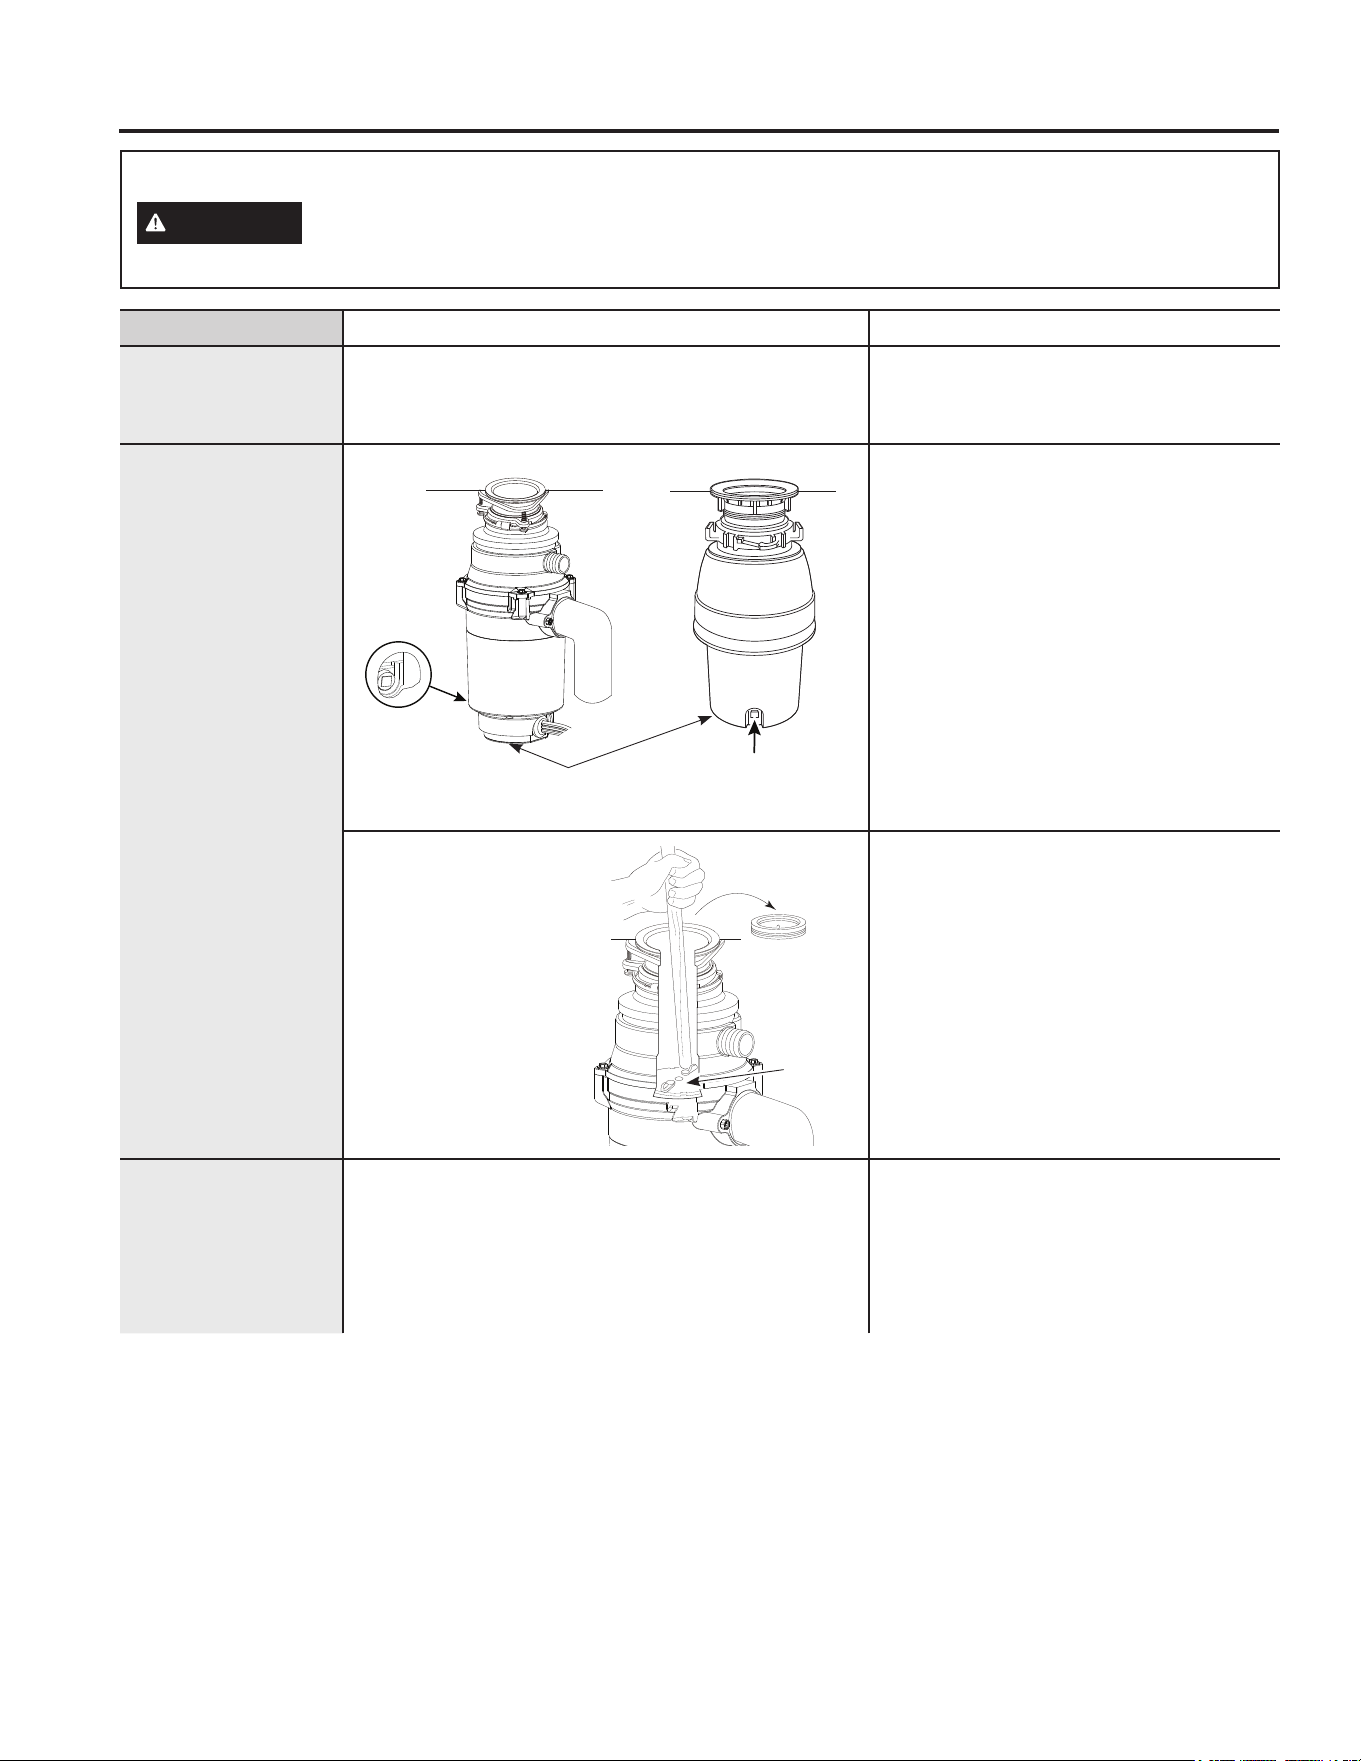
Problem Possible Cause What To Do
Loud noises (other
than those during
grinding of bones
and fruit pits)
6LOYHUZDUHERWWOHFDSRURWKHUIRUHLJQREMHFWKDVIDOOHQ
into the disposer
Remove the splash guard and remove the
REMHFWZLWKORQJKDQGOHGWRQJV5HSODFH
the splash guard.
Disposer does not
start
Reset button has been tripped With the splash guard removed, check to see
if the turntable will move freely using a broom
handle. If the turntable moves freely, replace
the splash guard and check the reset button
to see if it has been tripped.
7KHUHVHWEXWWRQ
is red, located opposite the discharge elbow,
near the bottom of the disposer behind
its protective shield.
Reach up and under
the protective shield and push the button
in until it clicks and remains depressed. If
the reset button has not been tripped, check
for a shorted or broken wire connecting to
the disposer. Check the electrical power
switch, fuse box or circuit breaker. If wiring
and electrical components are intact,
the unit may have internal problems that
require service or replacement.
7XUQWDEOHFDQQRWURWDWH If the turntable does not turn freely, check
IRUDQREMHFWORGJHGEHWZHHQWKHWXUQWDEOH
DQGWKHJULQGULQJ'LVORGJHWKHREMHFWE\
moving the turntable with a broom handle.
7KHQUHPRYHWKHREMHFW
,IQRIRUHLJQREMHFWLVSUHVHQWWKHUHPD\
be internal problems.
Disposer leaks If the leak is at the top, it may be caused by:
1. Improper seating of sink flange (gasket choice, putty,
or tightening.
2. Support ring not tightened properly.
'HIHFWLYHFXVKLRQPRXQW
If the leak is at the discharge elbow, leak may be
caused by improper tightening of elbow flange screws.
TROUBLESHOOTING TIPS
Troubleshooting Tips... Before you call for service
SAFETY NOTE: Before investigating, you must disconnect the power supply.
WARNING
Before resetting, disconnect the power supply-please see SAFETY NOTE above. The
overload control prevents the motor from operating should overloading occur. This feature
protects your house wiring and your disposer. When overloaded, the motor will stop automatically.
Remove
Splash
Guard
7XUQWDEOH
Reset Button
(Reach up and
under protective
shield to press)
Reset Button
(Reach up and under
protective shield to press)
6HULDO1R
(Located on the bottom
of the disposer)

49-4000291 Rev 0 13
Notes
NOTES
14 49-4000291 Rev 0
GE Appliances Limited Warranty (For customers in the United States)
GEAppliances.com
$OOZDUUDQW\VHUYLFHLVSURYLGHGE\RXU)DFWRU\6HUYLFH&HQWHUVRUDQDXWKRUL]HG&XVWRPHU&DUH
®
WHFKQLFLDQ7RVFKHGXOH
service online, visit us at GEAppliances.com/serviceRUFDOO*($SSOLDQFHVDW*(&$5(63OHDVH
have your serial number and your model number available when calling for service.
7KLVOLPLWHGZDUUDQW\LVH[WHQGHGWRWKHRULJLQDOSXUFKDVHUDQGDQ\VXFFHHGLQJRZQHUIRUSURGXFWVSXUFKDVHGIRUKRPHXVH
ZLWKLQWKH86$,IWKHSURGXFWLVORFDWHGLQDQDUHDZKHUHVHUYLFHE\D*($SSOLDQFHV$XWKRUL]HG6HUYLFHULVQRWDYDLODEOH
you may be responsible for a trip charge or you may be required to bring the product to an Authorized GE Appliances
Service location for service. In Alaska, the limited warranty excludes the cost of shipping or service calls to your home.
6RPHVWDWHVGRQRWDOORZWKHH[FOXVLRQRUOLPLWDWLRQRILQFLGHQWDORUFRQVHTXHQWLDOGDPDJHV7KLVOLPLWHGZDUUDQW\
JLYHV\RXVSHFLILFOHJDOULJKWVDQG\RXPD\DOVRKDYHRWKHUULJKWVZKLFKYDU\IURPVWDWHWRVWDWH7RNQRZZKDW\RXU
legal rights are, consult your local or state consumer affairs office or your state’s Attorney General.
Warrantor: GE Appliances, a Haier Company, Louisville, KY 40225
EXCLUSION OF IMPLIED WARRANTIES
Your sole and exclusive remedy is product repair as provided in this Limited Warranty. Any implied warranties,
including the implied warranties of merchantability or fitness for a particular purpose, are limited to one year or the
shortest period allowed by law.
What is not covered:
Ŷ
Service trips to your home to teach you how to use
the product.
Ŷ
Improper installation, delivery or maintenance.
Ŷ
)DLOXUHRIWKHSURGXFWLILWLVDEXVHGPLVXVHGRUXVHGIRU
other than the intended purpose or used commercially.
Ŷ
Replacement of house fuses or resetting of circuit
breakers.
Ŷ
3URGXFWVZKLFKDUHQRWGHIHFWLYHRUEURNHQRUZKLFK
are working as described in the Owner’s Manual.
Ŷ
'DPDJHWRWKHSURGXFWFDXVHGE\DFFLGHQWILUH
floods or acts of God.
Ŷ
Incidental or consequential damage caused by
possible defects with this appliance.
Ŷ
'HIHFWVRUGDPDJHGXHWRRSHUDWLRQLQIUHH]LQJ
temperatures.
Ŷ
'DPDJHFDXVHGDIWHUGHOLYHU\
Ŷ
3URGXFWQRWDFFHVVLEOHWRSURYLGHUHTXLUHGVHUYLFH
LIMITED WARRANTY
6WDSOH\RXUUHFHLSWKHUH3URRIRIWKHRULJLQDOSXUFKDVH
date is needed to obtain service under the warranty.
For the period of GE Appliances will replace
One Year
)URPWKHGDWHRIWKH
original purchase
7KHHQWLUHGLVSRVHULIWKHUHLVDGHIHFWLQPDWHULDOVRUZRUNPDQVKLSUHODWLQJWRIXQFWLRQDO
SDUWVRQO\DSSHDUDQFHSDUWVDUHH[FOXGHG'XULQJWKLVlimited one-year warranty,
GE Appliances will also provide, free of charge, all labor charges related to replacing the
original disposer along with the replacement disposer within the first year.
Additional One Year
)URPWKHGDWHRIWKH
original purchase
0RGHOV*)&,IWKHUHLVDGHIHFWLQPDWHULDOVRUZRUNPDQVKLSUHODWLQJWRIXQFWLRQDO
SDUWVRQO\DSSHDUDQFHSDUWVDUHH[FOXGHG'XULQJWKHone-year extended limited
warranty period, you will be responsible for all installation charges relating to the
replacement disposer.
Additional Four Years
)URPWKHGDWHRIWKH
original purchase
0RGHOV*)&,IWKHUHLVDGHIHFWLQPDWHULDOVRUZRUNPDQVKLSUHODWLQJWRIXQFWLRQDO
SDUWVRQO\DSSHDUDQFHSDUWVDUHH[FOXGHG'XULQJWKLVfour-year extended limited
warranty period, you will be responsible for all installation charges relating to the
replacement disposer.
Additional Six Years
)URPWKHGDWHRIWKH
original purchase
0RGHO*)&,IWKHUHLVDGHIHFWLQPDWHULDOVRUZRUNPDQVKLSUHODWLQJWRIXQFWLRQDO
SDUWVRQO\DSSHDUDQFHSDUWVDUHH[FOXGHG'XULQJWKLVsix-year extended limited
warranty period, you will be responsible for all installation charges relating to the
replacement disposer.
49-4000291 Rev 0 15
7KLVOLPLWHGZDUUDQW\LVH[WHQGHGWRWKHRULJLQDOSXUFKDVHUDQGDQ\VXFFHHGLQJRZQHUIRUSURGXFWVSXUFKDVHGLQ&DQDGD
for home use within Canada. If the product is located in an area where service by a GE Appliances Authorized Servicer is
not available, you may be responsible for a trip charge or you may be required to bring the product to an Authorized
GE Appliances Service location.
6RPHSURYLQFHVGRQRWDOORZWKHH[FOXVLRQRUOLPLWDWLRQRILQFLGHQWDORUFRQVHTXHQWLDOGDPDJHV7KLVOLPLWHGZDUUDQW\
JLYHV\RXVSHFLILFOHJDOULJKWVDQG\RXPD\DOVRKDYHRWKHUULJKWVZKLFKYDU\IURPSURYLQFHWRSURYLQFH7RNQRZZKDW
your legal rights are, consult your local or provincial consumer affairs office.
Warrantor: MC Commercial Inc., Burlington, ON, L7R 5B6
LIMITED WARRANTY
GE Appliances Limited Warranty (For customers in Canada)
6WDSOH\RXUUHFHLSWKHUH3URRIRIWKHRULJLQDOSXUFKDVH
date is needed to obtain service under the warranty.
EXCLUSION OF IMPLIED WARRANTIES
Your sole and exclusive remedy is product repair as provided in this Limited Warranty. Any implied warranties,
including the implied warranties of merchantability or fitness for a particular purpose, are limited to one year or the
shortest period allowed by law.
What is not covered:
Ŷ
Service trips to your home to teach you how to use
the product.
Ŷ
Improper installation, delivery or maintenance.
Ŷ
)DLOXUHRIWKHSURGXFWLILWLVDEXVHGPLVXVHGRUXVHGIRU
other than the intended purpose or used commercially.
Ŷ
Replacement of house fuses or resetting of circuit
breakers.
Ŷ
3URGXFWVZKLFKDUHQRWGHIHFWLYHRUEURNHQRUZKLFK
are working as described in the Owner’s Manual.
Ŷ
'DPDJHWRWKHSURGXFWFDXVHGE\DFFLGHQWILUH
floods or acts of God.
Ŷ
Incidental or consequential damage caused by
possible defects with this appliance.
Ŷ
'HIHFWVRUGDPDJHGXHWRRSHUDWLRQLQIUHH]LQJ
temperatures.
Ŷ
'DPDJHFDXVHGDIWHUGHOLYHU\
Ŷ
3URGXFWQRWDFFHVVLEOHWRSURYLGHUHTXLUHGVHUYLFH
GEAppliances.ca
$OOZDUUDQW\VHUYLFHLVSURYLGHGE\RXU)DFWRU\6HUYLFH&HQWHUVRUDQDXWKRUL]HG&XVWRPHU&DUH
®
WHFKQLFLDQ7RVFKHGXOH
service online, visit us at GEAppliances.ca/after-sales-supportRUFDOO*($SSOLDQFHVDW3OHDVHKDYH\RXU
serial number and your model number available when calling for service.
For the period of GE Appliances will replace
One Year
)URPWKHGDWHRIWKH
original purchase
7KHHQWLUHGLVSRVHULIWKHUHLVDGHIHFWLQPDWHULDOVRUZRUNPDQVKLSUHODWLQJWRIXQFWLRQDO
SDUWVRQO\DSSHDUDQFHSDUWVDUHH[FOXGHG'XULQJWKLVlimited one-year warranty,
GE Appliances will also provide, free of charge, all labor charges related to replacing the
original disposer along with the replacement disposer within the first year.
Additional One Year
)URPWKHGDWHRIWKH
original purchase
0RGHOV*)&,IWKHUHLVDGHIHFWLQPDWHULDOVRUZRUNPDQVKLSUHODWLQJWRIXQFWLRQDO
SDUWVRQO\DSSHDUDQFHSDUWVDUHH[FOXGHG'XULQJWKHone-year extended limited
warranty period, you will be responsible for all installation charges relating to the
replacement disposer.
Additional Four Years
)URPWKHGDWHRIWKH
original purchase
0RGHOV*)&,IWKHUHLVDGHIHFWLQPDWHULDOVRUZRUNPDQVKLSUHODWLQJWRIXQFWLRQDO
SDUWVRQO\DSSHDUDQFHSDUWVDUHH[FOXGHG'XULQJWKLVfour-year extended limited
warranty period, you will be responsible for all installation charges relating to the
replacement disposer.
Additional Six Years
)URPWKHGDWHRIWKH
original purchase
0RGHO*)&,IWKHUHLVDGHIHFWLQPDWHULDOVRUZRUNPDQVKLSUHODWLQJWRIXQFWLRQDO
SDUWVRQO\DSSHDUDQFHSDUWVDUHH[FOXGHG'XULQJWKLVsix-year extended limited
warranty period, you will be responsible for all installation charges relating to the
replacement disposer.

16 49-4000291 Rev 0
CONSUMER SUPPORT
Consumer Support
GE Appliances Website
+DYHDTXHVWLRQRUQHHGDVVLVWDQFHZLWK\RXUDSSOLDQFH"7U\WKH*($SSOLDQFHV:HEVLWHKRXUVDGD\DQ\GD\
of the year! You can also shop for more great GE Appliances products and take advantage of all our on-line support
VHUYLFHVGHVLJQHGIRU\RXUFRQYHQLHQFH,QWKH86GEAppliances.com
In Canada: GEAppliances.ca
Register Your Appliance
5HJLVWHU\RXUQHZDSSOLDQFHRQOLQHDW\RXUFRQYHQLHQFH7LPHO\SURGXFWUHJLVWUDWLRQZLOODOORZIRUHQKDQFHG
communication and prompt service under the terms of your warranty, should the need arise. You may also mail in the
SUHSULQWHGUHJLVWUDWLRQFDUGLQFOXGHGLQWKHSDFNLQJPDWHULDO,QWKH86GEAppliances.com/register
In Canada: GEAppliances.ca/after-sales-support
Schedule Service
Expert GE Appliances repair service is only one step away from your door. Get on-line and schedule your service at
\RXUFRQYHQLHQFHDQ\GD\RIWKH\HDU,QWKH86GEAppliances.com/service or call 800.432.2737 during normal
business hours.
In Canada: GEAppliances.ca/after-sales-support or call 800.561.3344.
Extended Warranties
3XUFKDVHD*($SSOLDQFHVH[WHQGHGZDUUDQW\DQGOHDUQDERXWVSHFLDOGLVFRXQWVWKDWDUHDYDLODEOHZKLOH\RXU
warranty is still in effect. You can purchase it on-line anytime. GE Appliances Services will still be there after your
ZDUUDQW\H[SLUHV,QWKH86GEAppliances.com/extended-warranty or call 800.626.2224 during normal business
hours.
In Canada: GEAppliances.ca/purchase-extended-warranty or call 866.277.9842.
Remote Connectivity
)RUDVVLVWDQFHZLWKZLUHOHVVQHWZRUNFRQQHFWLYLW\IRUPRGHOVZLWKUHPRWHHQDEOHLQWKH86YLVLWRXUZHEVLWHDW
GEAppliances.com/connect or call 800.220.6899.
In Canada: GEAppliances.ca/connected-appliances or call 800.220.6899
Parts and Accessories
Individuals qualified to service their own appliances can have parts or accessories sent directly to their homes
9,6$0DVWHU&DUGDQG'LVFRYHUFDUGVDUHDFFHSWHG2UGHURQOLQHWRGD\KRXUVHYHU\GD\
,QWKH86GEApplianceparts.com or by phone at 877.959.8688 during normal business hours.
In Canada: GEAppliances.ca/parts-filters-accessories or call 800.661.1616.
Instructions contained in this manual cover procedures to be performed by any user. Other servicing
generally should be referred to qualified service personnel. Caution must be exercised, since improper
servicing may cause unsafe operation.
Contact Us
If you are not satisfied with the service you receive from GE Appliances, contact us on our Website with all the
details including your phone number, or write to:
,QWKH86*HQHUDO0DQDJHU&XVWRPHU5HODWLRQV_*($SSOLDQFHV$SSOLDQFH3DUN_/RXLVYLOOH.<
GEAppliances.com/contact or call 800.626.2000
,Q&DQDGD'LUHFWRU&XVWRPHU5HODWLRQV
_
MC Commercial Inc.
_
6XLWH1RUWK6HUYLFH5RDG
_
%XUOLQJWRQ21//&
GEAppliances.ca/contact-us or call 877.994.5366

Inscrivez ici les numéros
de modèle et de série :
Modèle # ________________
Série # __________________
Vous pouvez les trouver sur une
étiquette au bas du broyeur.
DISPOSALL
®
49-4000291 Rev 0 12-23 GEA
CONSIGNES DE SÉCURITÉ ......3
UTILISATION DU BROYEUR .....4
ENTRETIEN ET NETTOYAGE ....4
INSTRUCTIONS
D’INSTALLATION .................5
CONSEILS DE DÉPANNAGE ....12
GARANTIE LIMITÉE .............13
SERVICE À LA CLIENTÈLE .....14
Broyeur de déchets alimentaires
GFC365
GFC565
GFC765
GFC1065
GUIDE DE
L’UTILISATEUR
ET INSTRUCTION
D’INSTALLATION
GE est une marque déposée de General Electric Company. Fabriqué sous licence de marque.

2 49-4000291 Rev 0
NOUS VOUS REMERCIONS D’ACCUEILLIR GE APPLIANCES CHEZ VOUS
Que vous ayez grandi avec GE Appliances ou qu’il s’agisse de votre première acquisition, nous
sommes heureux de vous accueillir dans notre famille.
Nous sommes fiers du savoir-faire, de l’innovation et de l’esthétique qui composent chaque appareil
GE Appliances, et nous pensons que vous le serez aussi. Dans cette optique, nous vous rappelons
que l’enregistrement de votre électroménager vous assure la communication de renseignements
importants sur le produit et la garantie lorsque vous en avez besoin.
Enregistrez votre électroménager GE en ligne dès maintenant. Des sites Web et des numéros de
téléphone utiles figurent dans la section Soutien au consommateur de ce manuel d’utilisation. Vous
pouvez aussi poster la fiche de garantie préimprimée incluse dans l’emballage.
49-4000291 Rev 0 3
LIRE ET
CONSERVEZ CES DIRECTIVES
CONSIGNES DE SÉCURITÉ IMPORTANTES
LIRE TOUTES LES CONSIGNES AVANT D’UTILISER L’APPAREIL
CONSIGNES DE SÉCURITÉ
AVERTISSEMENT
Pour votre sécurité, veuillez suivre les directives données dans le
présent manuel afin de réduire au minimum les risques d’incendie, d’explosion et de
chocs électriques et prévenir tout dommage et blessure grave ou mortelle.
AVERTISSEMENT
LORS DE L’UTILISATION D’APPAREILS ÉLECTRIQUES,
RESPECTEZ LES PRÉCAUTIONS ÉLÉMENTAIRES DE SÉCURITÉ, NOTAMMENT :
Ŷ1¶XWLOLVH]FHWDSSDUHLOTXHGDQVOHEXWGpFULWSDUOH
présent guide d’utilisation.
Ŷ/LVH]O¶HQVHPEOHGHVLQVWUXFWLRQVDYDQWG¶XWLOLVHU
l’appareil.
Ŷ Afin de réduire le risque de blessure, une surveillance
étroite est requise lorsque le broyeur est utilisé à
proximité d’enfants.
Ŷ1HSODFH]SDVOHVGRLJWVRXOHVPDLQVGDQVOH
broyeur de déchets.
ŶeWHLJQH]O¶DSSDUHLODYDQWGHWHQWHUGHGpERXFKHUOH
broyeur ou d’en retirer un objet.
Ŷ/RUVTXHYRXVWHQWH]GHGpERXFKHUOHEUR\HXUGH
déchets, utilisez un objet long et en bois, comme
une cuillère en bois ou un manche à balai en bois.
Ŷ3RXUWHQWHUGHUHWLUHUGHVREMHWVGXEUR\HXUGH
déchets, utilisez de longues pinces. Si le broyeur
est magnétisé, utilisez des outils amagnétiques.
Ŷ3RXUUpGXLUHOHVULVTXHVGHEOHVVXUHSURYRTXpHSDU
l’expulsion de matériaux du broyeur de déchets, ne
jetez pas les déchets suivants dans le broyeur :
a. coquilles d’huîtres ou de myes;
b. produits de débouchage caustiques ou similaires;
c. verre, porcelaine ou plastique;
d. gros os entiers;
e. métal, par exemple : boîtes de conserve,
canettes, ustensiles ou papier aluminium;
f. huile chaude ou autres liquides chauds;
g. épis de maïs entiers.
Ŷ/RUVTXHYRXVQ¶XWLOLVH]SDVOHEUR\HXUODLVVH]OH
bouchon du drain en place pour éviter d’y faire
tomber des objets.
Ŷ&RQVXOWH]OHVLQVWUXFWLRQVGpWDLOOpHVGHPLVH
à la terre à la section BRANCHEMENTS
ÉLECTRIQUES du présent guide.
Si vous n’êtes pas à l’aise avec les procédures et connexions électriques, faites appel
à un électricien qualifié.
AVERTISSEMENT
Une connexion
erronée du connecteur de mise à la terre
de l’appareil peut entraîner des risques
d’électrocution. Consultez un électricien
qualifié en cas de doute sur la mise à
la terre de l’appareil. N’altérez pas la
prise fournie avec l’appareil si elle ne
correspond pas à la prise murale. Le cas
échéant, faites installer une prise murale
adaptée par un électricien qualifié.
Pour les modèles équipés d’un câble de mise à la
terre :
INSTRUCTIONS DE MISE À LA TERRE : Ce broyeur
de déchets doit être mis à la terre afin de réduire
le risque de décharge électrique dans l’éventualité
G¶XQHGpIHFWXRVLWpRXG¶XQHSDQQH/DPLVHjODWHUUH
procure un trajet de moindre résistance pour le courant
électrique. Ce broyeur est équipé d’un cordon doté
G¶XQFRQGXFWHXUGHWHUUHHWG¶XQHILFKHGHWHUUH/D
fiche doit être branchée dans une prise correctement
installée et mise à la terre en conformité avec les
codes et règlements locaux.
BRANCHEMENTS ÉLECTRIQUES
Mise au rebut adéquate de votre électroménager
Ŷ
Veuillez jeter ou recycler votre électroménager conformément aux règlements fédéraux ou locaux. Communiquez
avec les instances locales pour en savoir plus sur la mise au rebut ou le recyclage de votre électroménager.
Ŷ
Considérez les options de recyclage des matériaux d’emballage de votre électroménager.

4 49-4000291 Rev 0
LIRE TOUTES LES CONSIGNES DE SÉCURITÉ AVANT D’UTILISER CE BROYEUR.
Ce broyeur utilise des roues pivotantes anti-blocage qui émettent un clic lorsqu’ils se mettent en place. Cela indique
un fonctionnement normal.
A. Retirer le bouchon de l’évier et faire couler de l’eau
froide avec un débit moyen.
B. Mettre l’interrupteur en position ON (Marche).
C.5DFOHUOHVGpFKHWVDOLPHQWDLUHV3RXUDFFpOpUHU
l’élimination des déchets alimentaires, couper ou
EULVHUOHVJURVRVFURWHVHWpSLV/HVJURVRV
et les coques fibreuses nécessitent un temps de
broyage considérable et sont plus facilement jetés
avec d’autres déchets. Ne pas s’inquiéter lorsque
le broyeur ralentit pendant le broyage. Cela
arrive parce que le broyeur augmente le couple
(puissance de meulage) et fonctionne dans des
conditions normales.
D. Avant d’éteindre le broyeur, laisser l’eau couler et le
broyeur fonctionner pendant environ 25 secondes
après les arrêts de déchiquetage. Cela permet de
s’assurer que tous les déchets sont complètement
évacués à travers le siphon et le drain.
E. Ne pas utiliser d’eau chaude pendant le
IRQFWLRQQHPHQWGXEUR\HXU/¶HDXIURLGHJDUGHUDOHV
déchets alimentaires et les matières grasses solides
afin qu’ils puissent être évacués.
Conseils utiles
A. Assurez-vous que le broyeur est vide avant
d’utiliser le lave-vaisselle afin qu’il puisse s’égoutter
correctement.
B. Vous pouvez laisser le bouchon dans le drain lorsqu’il
n’est pas utilisé pour empêcher les ustensiles et les
corps étrangers de tomber dans le broyeur.
C. /HEUR\HXUHVWFRQoXSRXUYRXVRIIULUGHVDQQpHV
et des années de service sans problème. Il traitera
tous les déchets alimentaires normaux, MAIS il ne
broiera et n’éliminera pas des articles comme des
boîtes de conserve, des bouteilles et des bouchons
de bouteilles, du verre, de la porcelaine, du cuir, du
tissu, de la vaisselle, du caoutchouc, de la ficelle,
des plumes, des coquilles de palourdes ou d’huîtres.
Ces types de déchets qui doivent être mis dans la
poubelle ou le compacteur à déchets.
D.3285$&&e/e5(5/¶e/,0,1$7,21'(6'e&+(76
$/,0(17$,5(6&RXSHURXFDVVHUOHVJURVRV
croûtes de melon, pelures de pamplemousse et les
pSLVGHPDwV/HVREMHWVFRPPHOHVJURVRVOHV
coques fibreuses comme les gousses des haricots
GH/LPDHWOHVIHXLOOHVGHPDwVH[LJHQWXQWHPSVGH
FRXSHFRQVLGpUDEOH3RXUFHWWHUDLVRQVLYRXVOH
désirez, vous pouvez les mettre dans la poubelle ou
le compacteur à déchets.
Entretien et nettoyage
LE MOTEUR EST LUBRIFIÉ EN PERMANENCE. NE PAS TENTER DE LUBRIFIER VOTRE BROYEUR.
/HEUR\HXUHVWDXWRQHWWR\DQWHWVHQHWWRLHDXWRPDWLTXHPHQWjFKDTXHXWLOLVDWLRQ
Ŷ1(-$0$,6PHWWUHGHODOHVVLYHRXGHSURGXLWVGH
nettoyage chimiques dans le broyeur, car ils causent
une corrosion grave des pièces métalliques.
Ŷ9RWUHEUR\HXUHVWPXQLG¶XQSDUHpFODERXVVXUHV
amovible pour faciliter le nettoyage ou le
remplacement. Retirer le pare-éclaboussures en le
WLUDQWGXKDXW3RXUOHUHPSODFHUO¶LQVpUHUGDQVOD
bride de l’évier et le pousser vers le bas jusqu’à ce
qu’il soit correctement installé.
Ŷ6LXQHRGHXUVHGpJDJHPHWWUHGHVpFRUFHVG¶RUDQJH
ou de citron dans le broyeur. Vous pouvez également
XWLOLVHUXQHGRX]DLQHGHJODoRQVVDXSRXGUpVG¶XQSHX
de poudre à récurer.
UTILISATION DU BROYEUR / ENTRETIEN ET NETTOYAGE
Utilisation du broyeur / Entretien et nettoyage

49-4000291 Rev 0 5
Instructions
BROYEUR
d’installation
Des questions? Appelez le 800.561.3344 ou Visitez notre site Web à l’adresse : www.electromenagersge.ca
AVANT DE COMMENCER
Lisez attentivement ces instructions, dans leur intégralité.
POUR VOTRE SÉCURITÉ
Veuillez lire et observer toutes les mises en garde AVERTISSEMENT
et ATTENTION données dans les présentes directives.
Pour effectuer l’installation décrite dans les présentes directives,
il faut porter des et gants ou des lunettes de sécurité.
IMPORTANT – Respectez toutes les normes et
réglementations en vigueur.
• Conservez les présentes instructions à l’attention de
l’inspecteur local.
• Remarque à l’installateur : Assurez-vous de
fournir les présentes instructions à l’utilisateur.
• Remarque à l’utilisateur : Conservez les présentes
instructions pour pouvoir vous y reporter ultérieurement.
• Niveau de compétence : /¶LQVWDOODWLRQGHFHWDSSDUHLO
requiert des compétences mécaniques de base.
•/DFRQIRUPLWpGHO¶LQVWDOODWLRQUHOqYHGHODUHVSRQVDELOLWp
de l’installateur.
AVERTISSEMENT
• 32859275(6e&85,7e3(56211(//((QOHYH]
le fusible ou déclenchez le disjoncteur au panneau de
distribution principal avant de commencer l’installation.
N’utilisez pas une rallonge électrique ou un adaptateur de
fiche avec cet appareil.
• 32859275(6e&85,7e3(56211(//(1HSODFH]
pas votre tête ou votre corps en dessous du broyeur; celui-ci
pourrait tomber pendant son retrait ou son installation.
• 8QEUDQFKHPHQWLQDGpTXDWGXFRQGXFWHXUGHPLVHjODWHUUH
peut présenter des risques de choc électrique. Si vous n’êtes
pas certain que l’appareil est correctement mis à la terre,
consultez un réparateur ou un électricien qualifié.
• Si le câblage électrique de la résidence n’est pas constitué
de deux fils plus un fil de mise à la terre, l’installateur doit
installer un fil de mise à la terre. Si le câblage électrique de la
résidence est en aluminium, utilisez un agent antioxydant et des
FRQQHFWHXUVSRXUUDFFRUGV©DOXPLQLXPFXLYUHªKRPRORJXpV8/
•
/HVGpIDLOODQFHVGXSURGXLWSURYRTXpHVSDUXQHLQVWDOODWLRQ
incorrecte ne sont pas couvertes par la garantie.

6 49-4000291 Rev 0
Instructions d’installation
MATÉRIAUX NÉCESSAIRES
ƒ7RXUQHYLVjODPHSODWH
et cruciforme
ƒ0DUWHDX
ƒ7RXUQHYLVjGRXLOOH
ƒ3LQFHPXOWLSULVHRUGLQDLUH
joint coulissant
QUELQUES INSTALLATIONS TYPIQUES
*
,OHVWHVVHQWLHOSRXUOHERQIRQFWLRQQHPHQWGXEUR\HXUTXHFHWWHGLPHQVLRQVRLWGHjSRD¿QG¶pYLWHUO¶HDXVWDJQDQWH
dans le boîtier du moteur du broyeur.
8QWX\DXGHYLGDQJHÀH[LEOHSHXWrWUHQpFHVVDLUHSRXUFHWWHDSSOLFDWLRQ
DIMENSIONS
ƒ6FLHjPpWDX[
ƒ/XQHWWHVGHVpFXULWp
ƒ&RXWHDXjPDVWLF
ƒ0DVWLFGHSORPEHULH
ƒ5XEDQjPHVXUHU
ƒ&KHYLOOHGHERLVRX
SRLQoRQG¶DFLHU
ƒ)OH[LEOHG¶pYDFXDWLRQ
ƒ%ULGHVSRXUIOH[LEOH
Nécessaire seulement si
raccordement à un lave-vaisselle :
ƒ6DYRQOLTXLGHRX
gelée de pétrole)
5-3/16"
1-1/2"
8-1/2"
7-1/4"
4-1/2"
16-1/16"
5-9/16"
8-1/2"
8-1/2"8-1/2"
1-1/2"
6-3/16"
12-11/16"
4-1/2"
5-3/8"
GFC365
GFC565
GFC765
GFC1065
ƒ/DPSHGHSRFKH
ƒ*DQWV
SINGLE BOWL
*Approx.
DOUBLE BOWL
CENTER OUTLET**
*Approx.
DOUBLE BOWL
END OUTLET**
*Approx.
&89(6,03/(
&89('28%/(
6257,(&(175$/(
&89('28%/(6257,(
'¶(;75e0,7e

49-4000291 Rev 0 7
Instructions d’installation
COMPOSANTS
%ULGH
d’évier
%RXFKRQ
Collet de
l’évier
Couler
-RLQWGH
¿EUHV
%ULGHGHVXSSRUW
Anneau de
montage supérieur
Vis (3)
Anneau de
retenue
%UR\HXU
Coussinet
Anneau de mon-
tage inférieur
Entrée de vidange
du lave-vaisselle
-RLQWG¶pWDQFKpLWp
Vis
%RXWRQGHUpLQLWLDOLVDWLRQ
(aller dans le haut et
sous l’écran de protection
pour presser.)
%ULGH
Coude
d’évacuation
7UpPLH
PRÉPARATION
1. Débrancher l’alimentation électrique du broyeur.
2. Retirer l’ancien broyeur ou la bride de l’évier.
3. Inspecter la conduite de vidange. S’il est fortement
recouvert de graisse durcie et de matières accumulées,
le déboucher avec un serpent de plombier.
4. Retirer les anciens matériaux d’étanchéité et de joint
de l’ouverture de l’évier, en haut et en bas.
REMARQUE :/HVVXUIDFHVVXSpULHXUHHWLQIpULHXUH
de l’évier doivent être propres, sèches et exemptes de
résidus afin de prévenir les fuites.
3DUHpFODERXVVXUHV
Cordon d’alimentation
(sur certains modèles)
DÉMONTER POUR INSTALLER
7RXUQH]O¶DQQHDXGHPRQWDJHGDQVOHVHQVGHVDLJXLOOHV
jusqu’à ce qu’il se dégage et soulevez l’assemblage en
entier pour le sortir du broyeur à déchets.
2. Desserrez les trois vis de l’anneau de montage
supérieur et glissez celui-ci vers la bride de support.
3. Insérez un tournevis à lame plate sous l’anneau de
retenue et retirez celui-ci.
4. Séparez l’anneau de montage supérieur et la bride
de support du collet de l’évier.
Desserrer
les vis (3)
Retirer
l’anneau
de retenue
%ULGHGH
support
Anneau de
montage
inférieur
8 49-4000291 Rev 0
Instructions d’installation
INSTALLER LA QUINCAILLERIE DE
MONTAGE DU DESSOUS D’ÉVIER
1. Assemblez le joint de fibres, la bride de support et
l’anneau de montage supérieur sur le collet d’évier
inférieur.
Fixez l’assemblage sur le collet d’évier en insérant
l’anneau de retenue dans le sillon de retenue du collet.
IMPORTANT : Assurez-vous que l’anneau de retenue
HVWELHQIL[pGDQVOHVLOORQ3RXUTXHOHEUR\HXUSXLVVH
être installé correctement, il est essentiel que l’anneau
de retenue soit solidement fixé dans le sillon de
retenue en immobilisant ainsi les pièces assemblées
dans leur position.
-RLQWGH
¿EUHV
%ULGHGH
support
Anneau de
montage
supérieur
Collet de
l’évier
Anneau
de
retenue
Sillon
de
retenue
INSTALLER LE COLLET DE L’ÉVIER
1. Roulez du mastic de plomberie en un cordon de 3/8
po d’épaisseur, retournez le collet d’évier à l’envers et
appliquez le mastic autour du bas du collet.
2. Installez le collet dans l’orifice de l’évier en le
pressant fermement et retirant l’excès de mastic.
3ODFH]XQHVHUYLHWWHVXUOHIRQGGHO¶pYLHUHWOHFROOHW
et mettez du poids sur le collet pour le maintenir en
place tandis que vous ajoutez les autres composants
du montage.
Mastic de
plomberie
49-4000291 Rev 0 9
Instructions d’installation
INSTALLER LA QUINCAILLERIE DE
MONTAGE DU DESSOUS D’ÉVIER
2. Serrez les trois vis de l’anneau de montage
supérieur dans la bride de support.
Vis (3)
POUR RACCORDEMENT AU LAVE-
VAISSELLE
Si vous raccordez le broyeur à un lave-vaisselle,
complétez cette étape. S’il n’y a pas de raccordement
au lave-vaisselle, allez à la section POSER LE COUDE
D’ÉVACUATION et poursuivez.
• 'pSRVH]OHEUR\HXUVXUOHSODQFKHU3ODFH]OHVXUOH
F{WpVXUXQHVXUIDFHSURWpJpH8WLOLVH]XQLQVWUXPHQW
QRQWUDQFKDQWSRLQoRQG¶DFLHURXFKHYLOOHGHERLVSRXU
défoncer le bouchon d’évacuation du lave-vaisselle
en entier. N’utilisez pas un tournevis ou un instrument
FRXSDQW/RUVTXHOHERXFKRQWRPEHGDQVOHEUR\HXU
vous pouvez le retirer sou simplement le broyer lors de
l’utilisation du broyeur. Cela ne vas pas endommager
le broyeur, mais il faudra peut-être plusieurs utilisations
pour broyer complètement le bouchon.
8WLOLVHUVHXOHPHQW
XQSRLQoRQRXXQH
cheville. (Ne pas
utiliser un tournevis
ou un instrument
tranchant.)
POSER LE COUDE D’ÉVACUATION
• Glissez la bride puis le joint d’étanchéité sur le coude
d’évacuation. Insérez le coude et le joint d’étanchéité
dans l’orifice d’évacuation du broyeur et fixez
l’assemblage de la bride sur le broyeur à l’aide des
deux vis.
REMARQUE : Certaines installations peuvent nécessiter
un raccordement par tuyau d’évacuation droit ou flexible.
Consultez un plombier agréé au besoin.
2UL¿FHG¶pYDFXDWLRQ
-RLQWG¶pWDQFKpLWp
Vis
%ULGH
Coude
d’évacuation
10 49-4000291 Rev 0
Instructions d’installation
MONTER LE BROYEUR
IMPORTANT : Avant d’exécuter cette étape, lisez-la en
HQWLHUDILQGHFRPSUHQGUHODIDoRQGRQWOHEUR\HXUHVWPRQWp
1.
Appliquez une petite quantité de savon liquide (ou
de gelée de pétrole) sur le bas du coussinet et le
bas de l’anneau de montage inférieur afin de faciliter
le glissement et la rotation sur l’anneau de montage
supérieur.
3ODFH]OHFRXVVLQHWVXUO¶DQQHDXVXSpULHXUGXEUR\HXU
MONTER LE BROYEUR (SUITE)
3.
Soulevez et appuyez le broyeur en place sur l’anneau de
montage supérieur. Montez-le en tournant l’anneau de
montage inférieur jusqu’à ce que les languettes s’insèrent
sur les rampes de glissement de l’anneau de montage
supérieur.
Insérez un tournevis dans un crochet inférieur et poussez
celui-ci en place dans le sens contraire des aiguilles.
8WLOLVH]XQHSLQFHPXOWLSULVHRUGLQDLUHSRXUYHUURXLOOHU
complètement les languettes de l’anneau de montage
inférieur sur les rampes de glissement supérieures.
Illustré complètement verrouillé :
Couler
Ensemble
lorsque
complètement
verrouillé
Coussinet
Anneau de
montage
inférieur
Appliquer
du savon
Anneau de
montage
inférieur
Coussinet
Couler
Insérer les languettes sur les
rampes de glissement
/DQJXHWWHV
(3)
7RXUQHUO¶DQQHDX
de montage
inférieur pour
la monter
sur l’anneau
de montage
supérieur
Couler
49-4000291 Rev 0 11
Instructions d’installation
RACCORDER LA PLOMBERIE
7RXUQH]OHEUR\HXUMXVTX¶jFHTXHOHFRXGH
d’évacuation s’aligne sur le tuyau d’évacuation de sortie.
2. Raccordez solidement toute la tuyauterie, y compris
le tuyau d’évacuation et le drain du lave-vaisselle (si
utilisé), en observant tous les codes et règlements.
INSTALLER LE PARE-ÉCLABOUSSURES
ET LE BOUCHON D’ÉVIER
• 3UHVVH]OHSDUHpFODERXVVXUHVHQSODFHGDQVOHFROOHW
d’évier. Insérez le bouchon dans le pare-éclaboussures.
REMARQUE : On peut retirer et nettoyer autant le
pare-éclaboussures que le bouchon d’évier au besoin.
BRANCHER L’ALIMENTATION
ÉLECTRIQUE ET TESTER
L’ABSENCE DE FUITES
• %UDQFKHUOHEUR\HXUGDQVXQHSULVHpOHFWULTXH
correctement installée et mise à la terre conformément
à tous les codes et règlements locaux.
• Faites circuler de l’eau pour vérifier l’absence de
fuites dans le broyeur 24 heures après l’installation et
le premier fonctionnement.
• Conservez et consultez ce manuel d’utilisation pour
un fonctionnement et un entretien appropriés de ce
broyeur à déchets.
%RXFKRQ
3DUHpFODERXVVXUHV
Collet de
l’évier
Fixer tous les
raccords
Couler
7X\DX[
d’évacuation
de sortie
7RXUQHUOHEUR\HXU
au besoin pour
aligner sur le tuyau
Couler
7X\DX[
d’évacuation
de sortie
SI RACCORDEMENT AU LAVE-VAISSELLE
• Raccorder le tuyau d’évacuation flexible à la décharge
du lave-vaisselle à l’aide d’un collier de serrage. Si la
taille du tuyau est différente, vous aurez besoin d’un
adaptateur en caoutchouc à paliers.
Voyez les instructions d’installation qui accompagnent
votre lave-vaisselle pour les détails.
Connexion
de la bride
Flexible
d’évacuation
%ULGHSRXUÀH[LEOH
Adaptateur en
caoutchouc à paliers
12 49-4000291 Rev 0
CONSEILS DE DÉPANNAGE
Conseils de Dépannage...Avant d’appeler un réparateur
REMARQUE RELATIVE À LA SÉCURITÉ : Avant de manipuler le broyeur pour rechercher une
panne, débranchez toujours l’alimentation.
AVERTISSEMENT
Avant la réinitialisation, débranchez l’alimentation. Voir la REMARQUE RELATIVE
À LA SÉCURITÉ ci-dessus. Le contrôle de surcharge protège le moteur des
opérations impliquant une surcharge. Cette fonctionnalité protège à la fois votre installation électrique et
votre broyeur. En cas de surcharge, le moteur s’arrête automatiquement.
Problème Causes possibles Correctifs
Bruits forts (autres
que ceux pendant le
broyage des os et
des piqûres de fruits)
Des couverts en argent, un bouchon de bouteille ou un
autre objet étranger est tombé dans le broyeur.
Retirer le pare-éclaboussures et retirer
l’objet avec des pinces à long manche
Remplacer le pare-éclaboussures.
Le broyeur ne
démarre pas
/HERXWRQGHUpLQLWLDOLVDWLRQDpWpGpFOHQFKp
8QHIRLVOHSDUHpFODERXVVXUHVUHWLUpYpULILHU
si la plaque tournante se déplace librement
à l’aide d’une poignée de balai. Si la plaque
tournante se déplace librement, remplacer le
pare-éclaboussures et vérifier si le bouton de
UpLQLWLDOLVDWLRQDpWpGpFOHQFKp/HERXWRQGH
réinitialisation est rouge, situé à l’opposé du
coude de décharge, près de la partie inférieure
du broyeur, derrière son écran de protection.
/HYHUHWSODFHUVRXVO¶pFUDQGHSURWHFWLRQ
et appuyer sur le bouton jusqu’à ce qu’il
s’enclenche et reste enfoncé. Si le bouton
de
réinitialisation n’a pas été activé, vérifier s’il
n’y a pas de fil court-circuité ou brisé relié au
broyeur. Vérifier l’interrupteur d’alimentation
électrique, le boîtier à fusibles ou le disjoncteur.
Si le câblage et les composants électriques
sont intacts, l’appareil peut avoir des problèmes
internes qui nécessitent une intervention
pour entretien ou un remplacement.
/DSODTXHWRXUQDQWHQHSHXW
pas tourner
Si la plaque tournante ne tourne pas
librement, vérifier si un objet est logé
entre la plaque tournante et l’anneau de
EUR\DJH'pORJHUO¶REMHWHQGpSODoDQWOD
plaque tournante à l’aide d’une poignée de
balai. Retirer ensuite l’objet.
S’il n’y a pas de corps étranger, il peut y
avoir des problèmes internes.
Fuites au niveau du
broyeur
Si la fuite se trouve en haut, elle peut être causée par
ce qui suit :
1. Fixation incorrecte de la bride de l’évier (choix du
joint, mastic ou serrage).
%DJXHGHVXSSRUWPDOVHUUpH
3. Support à coussin défectueux.
Si la fuite se trouve au niveau du coude de décharge,
elle peut être due à un mauvais serrage des vis de la
bride du coude.
Retirer le pare-
éclaboussures
3ODTXH
tournante
%RXWRQGH
réinitialisation
(lever et placer
sous l’écran de
protection pour
appuyer)
%RXWRQGHUpLQLWLDOLVDWLRQ
(lever et placer sous
l’écran de protection pour
appuyer)
Numéro de série
(situé au bas du
broyeur)
49-4000291 Rev 0 13
www.electromenagersge.ca
7RXWHVOHVUpSDUDWLRQVVRXVJDUDQWLHOLPLWpHVHURQWHIIHFWXpHVSDUQRVFHQWUHVGHUpSDUDWLRQRXQRVUpSDUDWHXUVDXWRULVpV
3RXUSODQLILHUXQVHUYLFHHQOLJQHUHQGH]YRXVVXUElectromenagersge.ca/fr/soutien/demande-de-service ou appelez le
800.561.3344. Veuillez fournir le numéro de série et le numéro de modèle lorsque vous appelez pour obtenir le service.
Cette garantie limitée est offerte à l’acheteur initial, ainsi qu’à tout propriétaire subséquent d’un produit acheté
au Canada en
vue d’une utilisation domestique au Canada. Si le produit se situe dans une zone où aucun
réparateur agréé
par GE Appliances n’est disponible, vous devrez peut-être assumer les frais de déplacement de
celui-ci ou apporter le
produit à un atelier de réparation agréé par GE Appliances.
'DQVFHUWDLQVeWDWVRXSURYLQFHLOHVWLQWHUGLWG¶H[FOXUHRXGHOLPLWHUOHVGRPPDJHVLQGLUHFWVRXDFFHVVRLUHV,OHVW
DORUVSRVVLEOHTXHOHVOLPLWDWLRQVRXH[FOXVLRQVFLGHVVXVQHV¶DSSOLTXHQWSDVGDQVYRWUHFDV/DSUpVHQWHJDUDQWLH
OLPLWpHYRXVFRQIqUHGHVGURLWVMXULGLTXHVVSpFLILTXHV9RXVSRXYH]EpQpILFLHUG¶DXWUHVGURLWVTXLYDULHQWG¶XQeWDW
RXG¶XQHSURYLQFHjO¶DXWUH3RXUFRQQDvWUHOHVGURLWVGRQWYRXVEpQpILFLH]FRPPXQLTXH]DYHFOHEXUHDXGHV5HODWLRQV
avec les
consommateurs de votre région ou de votre province.
Garant : MC Commercial Inc., Burlington, ON, L7R 5B6
EXCLUSION DES GARANTIES IMPLICITES :
9RWUHVHXOHWXQLTXHUHFRXUVHVWGHIDLUHUpSDUHUOHSURGXLWGDQVOHFDGUHGHFHWWHJDUDQWLHOLPLWpH7RXWHJDUDQWLH
implicite, incluant la garantie de qualité marchande ou d’adaptabilité du produit à un usage particulier, est limitée à
un an ou à la période la plus courte autorisée par la loi.
Ce qui n’est pas couvert :
Ŷ
7RXWHYLVLWHjYRWUHGRPLFLOHSRXUYRXVH[SOLTXHUOH
fonctionnement de l’appareil.
Ŷ
/¶LQVWDOODWLRQODOLYUDLVRQRXO¶HQWUHWLHQLQDGpTXDWVGH
l’appareil.
Ŷ
7RXWHGpIHFWXRVLWpGXSURGXLWDWWULEXDEOHjXQH
utilisation abusive ou inadéquate, s’il a été utilisé à
WRXWHDXWUHILQTXHFHOOHSRXUODTXHOOHLODpWpFRQoX
ou s’il a été utilisé à des fins commerciales.
Ŷ
/HUHPSODFHPHQWGHVIXVLEOHVRXOHUpHQFOHQFKHPHQW
des disjoncteurs de votre domicile.
Ŷ
/HVSURGXLWVTXLQHVRQWSDVGpIHFWXHX[RXEULVpV
ou qui fonctionnent tel que décrit dans le Manuel de
l’utilisateur.
Ŷ
7RXWGRPPDJHDXSURGXLWDWWULEXDEOHjXQDFFLGHQW
un incendie, une inondation ou une catastrophe
naturelle.
Ŷ
7RXWGRPPDJHDFFHVVRLUHRXLQGLUHFWFDXVpSDUGHV
défaillances possibles de l’appareil.
Ŷ
/HVGpIHFWXRVLWpVRXOHVGRPPDJHVFDXVpVSDUXQH
utilisation de l’appareil à des températures situées
sous le point de congélation.
Ŷ
7RXWGRPPDJHFDXVpDSUqVODOLYUDLVRQ
Ŷ
7RXWSURGXLWDXTXHOLOQ¶HVWSDVSRVVLEOHG¶DFFpGHU
pour effectuer les réparations nécessaires.
GARANTIE LIMITÉE
Garantie limitée de GE Appliances
$JUDIH]OHUHoXG¶DFKDWLFL3RXUREWHQLUOHVHUYLFHVRXV
garantie, vous devrez fournir la preuve de l’achat original.
Pendant la période de Nous remplacerons
Un an
À compter de la date
d’achat d’origine
/HEUR\HXUFRPSOHWV¶LO\DXQGpIDXWGDQVOHVPDWpULDX[RXODIDEULFDWLRQVHUDSSRUWDQW
aux pièces fonctionnelles seulement (les pièces d’apparence identique sont exclues).
Au cours de cette garantie limitée d’un an, GE Appliances fournira également,
gratuitement, tous les frais de main-d’œuvre liés au remplacement du broyeur ainsi que
le broyeur de remplacement au cours de la première année.
Une année de plus
À compter de la date
d’achat d’origine
Modèles GFC565 : S’il y a un défaut dans les matériaux ou la fabrication se rapportant
aux pièces fonctionnelles seulement (les pièces d’apparence identique sont exclues).
3HQGDQWODpériode de garantie limitée prolongée d’un an, vous serez responsable de
tous les frais d’installation liés au broyeur de remplacement.
Quatre ans de plus
À compter de la date
d’achat d’origine
Modèles GFC765 : S’il y a un défaut dans les matériaux ou la fabrication se rapportant
aux pièces fonctionnelles seulement (les pièces d’apparence identique sont exclues).
3HQGDQWODpériode de garantie limitée prolongée de quatre ans, vous serez
responsable de tous les frais d’installation liés au broyeur de remplacement.
Six ans de plus
À compter de la date
d’achat d’origine
Modèle GFC1065 : S’il y a un défaut dans les matériaux ou la fabrication se rapportant
aux pièces fonctionnelles seulement (les pièces d’apparence identique sont exclues).
3HQGDQWODpériode de garantie limitée prolongée de six ans, vous serez responsable
de tous les frais d’installation liés au broyeur de remplacement.

14 49-4000291 Rev 0
SOUTIEN AU CONSOMMATEUR
Soutien au consommateur
Site Web de GE Appliances
Vous avez une question ou vous avez besoin d’aide pour votre appareil électroménager? Visitez le site Web de
GE Appliances 24 heures par jour, tous les jours de l’année! Vous pouvez aussi y trouver d’autres formidables produits
GE Appliances et tirer avantage de tous nos services d’assistance en ligne. Au Canada : ElectromenagersGE.ca/fr
Enregistrez votre électroménager
(QUHJLVWUH]YRWUHQRXYHODSSDUHLOHQOLJQHDXPRPHQWTXLYRXVFRQYLHQWOHPLHX[/¶HQUHJLVWUHPHQWGHYRWUHSURGXLW
dans les délais prescrits permet une meilleure communication et un service rapide, selon les modalités de votre
garantie, si besoin est. Vous pouvez également envoyer par courrier la carte d’enregistrement pré-imprimée qui se
trouve dans l’emballage de votre appareil.
Au Canada : electromenagersge.ca/soutien-apres-vente
Service de réparation
8QVHUYLFHGHUpSDUDWLRQH[SHUW*($SSOLDQFHVVHWURXYHjTXHOTXHVSDVGHFKH]YRXV5HQGH]YRXVVXUQRWUHVLWH
et programmez, à votre convenance, une visite de réparation à n’importe quel jour de l’année.
Au Canada : electromenagersge.ca/soutien-apres-vente ou composez le 800.561.3344
Prolongation de garantie
3URFXUH]YRXVXQHSURORQJDWLRQGHJDUDQWLH*($SSOLDQFHVHWLQIRUPH]YRXVGHVUDEDLVVSpFLDX[HQYLJXHXUSHQGDQW
ODGXUpHGHYRWUHJDUDQWLH9RXVSRXYH]YRXVODSURFXUHUHQOLJQHHQWRXWWHPSV/HVVHUYLFHV*($SSOLDQFHVVHURQW
toujours disponibles après l’expiration de la garantie.
Au Canada : electromenagersge.ca/achat-dune-garantie-prolongee ou composez le 866.277.9842.
Connectivité à distance
3RXUGHO¶DVVLVWDQFHFRQFHUQDQWODFRQQHFWLYLWpDXUpVHDXVDQVILOSRXUOHVPRGqOHVpTXLSpVGHFHWWHIRQFWLRQYLVLWH]
notre site Web au electromenagersge.ca/connected-appliances ou composez le 800.220.6899.
Pièces et accessoires
/HVSHUVRQQHVD\DQWOHVFRPSpWHQFHVUHTXLVHVSRXUUpSDUHUHOOHVPrPHVOHXUVDSSDUHLOVSHXYHQWUHFHYRLU
directement à la maison des pièces ou accessoires (les cartes VISA, MasterCard et Discover sont acceptées).
Commandez en ligne 24 heures par jour.
Au Canada : electromenagersge.ca/pieces-filtres-et-accessoires ou composer le 800.661.1616.
Les instructions contenues dans le présent manuel comportent des procédures que tout utilisateur peut
effectuer. Les autres types de réparation doivent généralement être confiés à un technicien qualifié. Usez de
prudence : une réparation ou un entretien mal effectués peuvent rendre l’utilisation de l’appareil dangereuse.
Communiquez avec nous
Si vous n’êtes pas satisfait du service après-vente de GE Appliances, communiquez avec nous depuis notre site Web
en fournissant tous les détails dont votre numéro de téléphone, ou écrivez à :
Au Canada : Director, Customer Relations
|
MC Commercial Inc.
|
Suite 300, 5420 North Service Road
|
%XUOLQJWRQ21//&
electromenagersge.ca/contactez-nous ou composer le 877.994.5366

Escriba aquí los números de
modelo y serie:
Modelo # _______________
Serie # _________________
Se los encuentra en una etiqueta
en la parte inferior del
triturador.
DISPOSALL
®
49-4000291 Rev 0 12-23 GEA
INFORMACIÓN
DE SEGURIDAD ...................3
USO DEL TRITURADOR ..........4
CUIDADO Y LIMPIEZA ...........4
INSTRUCCIONES DE
INSTALACIÓN .....................5
CONSEJOS PARA SOLUCIÓN
DE PROBLEMAS .................12
GARANTÍA LIMITADA ...........13
SOPORTE AL CLIENTE ..........14
Triturador de residuos de comida
GFC365
GFC565
GFC765
GFC1065
MANUAL DEL
PROPIETARIO E
INSTRUCCIONES DE
INSTALACIÓN
GE es una marca registrada de General Electric Company. Fabricado bajo licencia de marca.

2 49-4000291 Rev 0
GRACIAS POR HACER QUE GE APPLIANCES SEA PARTE DE SU HOGAR.
Ya sea que haya crecido usando GE Appliances, o que ésta es su primera vez, nos complace
tenerlo en la familia.
Sentimos orgullo por el nivel de arte, innovación y diseño de cada uno de los electrodomésticos de
GE Appliances, y creemos que usted también. Entre otras cosas, el registro de su electrodoméstico
asegura que podamos entregarle información importante del producto y detalles de la garantía
cuando los necesite.
Registre su electrodoméstico GE ahora a través de Internet. Sitios Web y números telefónicos útiles
están disponibles en la sección de Soporte para el Consumidor de este Manual del Propietario.
También puede enviar una carta en la tarjeta de inscripción preimpresa que se incluye con
el material embalado.
49-4000291 Rev 0 3
INFORMACIÓN DE SEGURIDAD
LEA Y GUARDE ESTAS INSTRUCCIONES
INFORMACIÓN IMPORTANTE DE SEGURIDAD
LEA TODAS LAS INSTRUCCIONES ANTES DE USAR
ADVERTENCIA
Para su seguridad, siga las instrucciones de este manual a fin de
minimizar riesgos de incendio, explosión, descargas eléctricas, y para evitar daños en
su propiedad, lesiones personales o la muerte.
ADVERTENCIA
AL USAR SUS ELECTRODOMÉSTICOS, SE DEBERÁN SEGUIR
PRECAUCIONES BÁSICAS DE SEGURIDAD, INCLUYENDO LO SIGUIENTE:
Ŷ 8VHHVWHHOHFWURGRPpVWLFRVyORSDUDVXSURSyVLWR
original, como se describe en el Manual del Propietario.
Ŷ /HDWRGDVODVLQVWUXFFLRQHVDQWHVGHXVDUHVWH
electrodoméstico.
Ŷ $ILQGHUHGXFLUHOULHVJRGHOHVLRQHVVHUi
necesaria una supervisión de cerca cuando se
utilice un triturador cerca de los niños.
Ŷ 1RFRORTXHORVGHGRVQLODVPDQRVHQXQWULWXUDGRU
de desperdicios.
Ŷ &RORTXHHOLQWHUUXSWRUGHFRUULHQWHHQODSRVLFLyQ
OFF (Apagado) antes de intentar despejar un
atasco o de retirar un objeto del triturador.
Ŷ $OLQWHQWDUDIORMDUXQDWDVFRHQXQWULWXUDGRUGH
desperdicios, utilice un objeto largo de madera
tal como una cuchara de madera o la manija de
madera de una escoba o mopa.
Ŷ $OLQWHQWDUUHWLUDUREMHWRVGHOWULWXUDGRUGHGHVSHUGLFLRV
use pinzas o tenazas con manijas largas. Si el
triturador es accionado de forma magnética, use
herramientas no magnéticas únicamente.
Ŷ $ILQGHUHGXFLUHOULHVJRGHOHVLRQHVFDXVDGDV
por materiales que puedan ser expulsados por un
triturador de desperdicios, no coloque lo siguiente
en un triturador:
a. Valvas de almejas u ostras
E/LPSLDGRUHVGHGUHQDMHFiXVWLFRVRSURGXFWRV
similares
c. Vidrio, porcelana o plástico
d. Huesos grandes enteros
e. Metales, tales como tapas de botellas, latas,
utensilios o papel de aluminio
f. Grasa caliente u otros líquidos calientes
g. Hojas de maíz enteras
Ŷ &XDQGRQRXWLOLFHXQWULWXUDGRUGHMHHOWDSyQGH
drenaje en su posición y reduzca el riesgo de que
lo objetos caigan en el triturador.
Ŷ 3DUDDFFHGHUDLQVWUXFFLRQHVSDUDXQDFRQH[LyQD
tierra adecuada, consulte la sección de CONEXIÓN
DE LA ELECTRICIDAD de este manual.
Si no está familiarizado con la corriente eléctrica y sus procedimientos, comuníquese
con un electricista calificado.
ADVERTENCIA
Una conexión inadecuada
del conductor de conexión a tierra del equipo
podrá producir riesgos de descargas eléctricas.
Si tiene dudas de que el electrodoméstico se
encuentre conectado a tierra apropiadamente,
consulte a un electricista calificado o a personal
del servicio. No modifique el enchufe provisto
con el electrodoméstico si éste no coincide
con el tomacorriente; solicite la instalación
de
un tomacorriente apropiado a un electricista
calificado.
Para los Modelos Equipados con Cable a Tierra:
INSTRUCCIONES DE CONEXIÓN A TIERRA: Este
triturador deberá ser conectado a tierra a fin de reducir
el riesgo de descargas eléctricas en caso de una falla
GHIXQFLRQDPLHQWRRDYHUtD/DFRQH[LyQDWLHUUDEULQGD
un camino de menor resistencia para la corriente
eléctrica. Este triturador está equipado con un cable
con un conductor para la conexión a tierra del equipo
y un enchufe con conexión a tierra. El enchufe deberá
estar conectado a un tomacorriente instalado en forma
adecuada y con conexión a tierra de acuerdo con todos
los códigos y ordenanzas locales.
CONEXIÓN DE LA ELECTRICIDAD
Forma adecuada de descartar su electrodoméstico
Ŷ
'HVFDUWHRUHFLFOHVXHOHFWURGRPpVWLFRGHDFXHUGRFRQODV5HJXODFLRQHV)HGHUDOHV\/RFDOHV&RPXQtTXHVHFRQ
las autoridades locales para descartar o reciclar su electrodoméstico de forma ambientalmente segura.
Ŷ
Tenga en cuenta las opciones de reciclaje del material de embalaje de su electrodoméstico.

4 49-4000291 Rev 0
LEA TODAS LAS INSTRUCCIONES DE SEGURIDAD ANTES DE USAR ESTE TRITURADOR.
Este triturador utiliza paletas giratorias antiatasco que hacen un “clic” al girar en posición. Esto indica el
funcionamiento normal.
A. Retire el tapón del fregadero y abra el grifo de agua
fría hasta un flujo medio.
B.*LUHHOLQWHUUXSWRUDODSRVLFLyQ21HQFHQGLGR
C. Vierta residuos de comida. Para acelerar el
descarte de residuos de comida, corte o rompa
los raquis de maíz, las cortezas y los huesos
GHJUDQWDPDxR/RVKXHVRVJUDQGHV\ODV
cáscaras fibrosas requieren un tiempo de triturado
considerable y resulta más fácil eliminarlos con
RWURVGHVSHUGLFLRV1RVHDODUPHVLHOWULWXUDGRU
funciona de manera más lenta. De hecho, en este
caso el triturador aumenta la torsión (potencia de
triturado) y funciona en condiciones normales.
D. Antes de apagar el triturador, deje que corra el agua
y que funcione el triturador durante aproximadamente
25 segundos una vez finalizado el triturado. Esto
garantiza la eliminación de todos los residuos a
través del sifón y del drenaje.
E. 1RXVHDJXDFDOLHQWHGXUDQWHHOIXQFLRQDPLHQWRGHO
triturador. El agua fría mantiene la solidez de la grasa
y de los residuos de comida para poder eliminarlos
por el drenaje.
Consejos útiles
A. Asegúrese de que el triturador esté vacío antes de
usar el lavavajillas para que drene correctamente.
B. Es posible que desee dejar el tapón en el drenaje
cuando no esté usando el triturador para evitar que
caigan utensilios y objetos extraños en su interior.
C. El triturador tiene una estructura resistente para
ofrecer muchos años de funcionamiento sin
problemas. Funcionará con todo tipo de residuos de
comida comunes, PERO no triturará ni desechará
elementos como latas de aluminio, botellas y tapas,
vidrio, porcelana, cuero, telas, vajilla, goma, cuerda,
plumas ni conchas de ostras o almejas. Estos son
materiales de desecho y deben arrojarse al basurero
o compactador de basura.
D.3$5$$&(/(5$5(/'(6&$57('(5(6,'826
DE COMIDA: corte o rompa los raquis de maíz,
cáscaras de melón o toronja y huesos de gran
tamaño. Elementos como los huesos grandes,
las cáscaras fibrosas, como las vainas de frijol, y
los raquis de maíz requieren un tiempo de corte
considerable. Por este motivo, quizás prefiera
colocarlos en el basurero o compactador de basura.
Cuidado y limpieza
EL MOTOR ESTÁ PERMANENTEMENTE LUBRICADO DURANTE LA VIDA ÚTIL. NO INTENTE
LUBRICAR EL TRITURADOR. El triturador es autolimpiante y se limpia con cada uso.
Ŷ181&$YLHUWDOHMtDQLOLPSLDGRUHVTXtPLFRVHQHO
triturador, ya que pueden provocar una gran corrosión
de las partes metálicas.
Ŷ(OWULWXUDGRUFXHQWDFRQXQSURWHFWRUFRQWUD
salpicaduras desmontable para facilitar su limpieza
o reemplazo. Retire el protector contra salpicaduras
tirando desde la parte superior del mismo. Para
volver a colocarlo, insértelo dentro del aro del
fregadero y presione hacia abajo hasta que se asiente
correctamente.
Ŷ6LHPLWHPDORVRORUHVDUURMHFiVFDUDVGHOLPyQR
naranja al triturador. También sirve triturar una docena
de cubitos de hielo espolvoreados con un poco de polvo
limpiador.
USO DEL TRITURADOR / CUIDADO Y LIMPIEZA
Uso del triturador / Cuidado y limpieza
49-4000291 Rev 0 5
Instrucciones
Triturador
de instalación
Si tiene alguna pregunta, llame GE Appliances a 800.GE.CARES (800.432.2737) o visite nuestro sitio
Web en: GEAppliances.com
ANTES DE EMPEZAR
Lea estas instrucciones completa y cuidadosamente.
PARA SU SEGURIDAD
Lea y cumpla con todas las ADVERTENCIAS y
PRECAUCIONES que figuran en estas instrucciones.
Al realizar las instalaciones descriptas en este manual, se
deberán usar guantes y anteojos o gafas de seguridad.
IMPORTANTE – Observe todos los códigos y órdenes de ley.
• Guarde estas instrucciones para uso del inspector local.
•
Nota al instalador – Asegúrese de dejar estas
instrucciones con el consumidor.
•
Nota al consumidor – Conserve estas instrucciones
para referencia futura.
• Nivel de destreza – /DLQVWDODFLyQGHHVWHDSDUDWR
requiere de destrezas mecánicas básicas.
• /DLQVWDODFLyQDSURSLDGDHVODUHVSRQVDELOLGDGGHOLQVWDODGRU
ADVERTENCIA
• 3$5$6(*85,'$'3(5621$/4XLWHHOIXVLEOHRDEUDHO
LQWHUUXSWRUGHFLUFXLWRVDQWHVGHFRPHQ]DUODLQVWDODFLyQ1RXWLOLFH
un cable de extensión o un enchufe adaptador con este artefacto.
• 3$5$686(*85,'$'1RSRVLFLRQHVXFDEH]DRVX
cuerpo debajo del triturador; la unidad podrá caer durante
el retiro o la instalación.
• /DFRQH[LyQLQDGHFXDGDGHOFRQGXFWRUGHFRQH[LyQDWLHUUD
del equipamiento puede provocar un riesgo de descarga
eléctrica. Consulte a un electricista calificado o representante
de servicio técnico si tiene dudas sobre la correcta conexión
a tierra del aparato.
• Si el cableado doméstico no cuenta con un cable de 2
hilos con conexión a tierra, un instalador debe realizar una
conexión a tierra. Cuando el cableado doméstico es de
aluminio, asegúrese de usar un compuesto antioxidante y
FRQHFWRUHVGHDOXPLQLRDFREUHDSUREDGRVSRU8/
•/DIDOODGHOSURGXFWRGHELGRDXQDLQVWDODFLyQ
inadecuada no está cubierta por la garantía.

6 49-4000291 Rev 0
Instrucciones de instalación
ƒ*XDQWHV
ƒ/LQWHUQD
MATERIALES NECESARIAS
ƒ'HVWRUQLOODGRUHV3KLOOLSV
y de punta plana
ƒ0DUWLOOR
ƒ/ODYHGHWXHUFDV
ƒ$OLFDWHV&KDQQHO
/RFNSLQ]DV
ALGUNAS INSTALACIONES TÍPICAS
*3DUDHOFRUUHFWRIXQFLRQDPLHQWRGHOWULWXUDGRUHVIXQGDPHQWDOTXHWHQJDXQDGLPHQVLyQGH´D´D¿QGHHYLWDUTXH
el agua se estanque en la carcasa del motor.
3DUDHVWDDSOLFDFLyQHVSRVLEOHTXHVHUHTXLHUDXQDWXEHUtDGHGUHQDMHÀH[LEOH
DIMENSIONES
ƒ6LHUUDGH0DQRSDUD0HWDOHV
ƒ*DIDVGHVHJXULGDG
ƒ(VSiWXOD
ƒ0DVLOODGHSORPHUtD
ƒ&LQWDGHPHGLFLyQ
ƒ7DUXJRGHPDGHUDR
punzón metálico
ƒ0DQJXHUDGHGUHQDMHIOH[LEOH
ƒ$EUD]DGHUDVGHPDQJXHUD
Sólo necesarios si se conectará
a un lavavajillas:
ƒ-DEyQOtTXLGR
(o vaselina)
5-3/16"
1-1/2"
8-1/2"
7-1/4"
4-1/2"
16-1/16"
5-9/16"
8-1/2"
8-1/2"8-1/2"
1-1/2"
6-3/16"
12-11/16"
4-1/2"
5-3/8"
GFC365
GFC565
GFC765
GFC1065
SINGLE BOWL
*Approx.
DOUBLE BOWL
CENTER OUTLET**
*Approx.
DOUBLE BOWL
END OUTLET**
*Approx.
FREGADERO
6,03/(
)5(*$'(52'2%/(
&216$/,'$&(175$/
)5(*$'(52'2%/(&21
6$/,'$(1(/(;75(02
49-4000291 Rev 0 7
Instrucciones de instalación
COMPONENTES
Ensamblaje
del aro del
fregadero
Tapón
Pestaña del
lavabo
/DYDER
-XQWDGH
¿EUD
Pestaña del
soporte
Anillo de montaje
superior
Tornillos (3)
Anillo de retención
Triturador
Montaje
acolchonado
Anillo de montaje
inferior
Entrada de descarga
del lavavajillas
-XQWD
Tornillos
Botón de Reinicio
(alcance y cubierta de
protección inferior para
presionar
Flange
Codo de
descarga
Embudo
PREPARACIÓN
1. Desconecte la alimentación eléctrica del triturador.
2. Retire el ensamblaje del aro del fregadero o el
triturador viejo.
3. Inspeccione la tubería de drenaje. Si está muy
cubierta de grasa endurecida y acumulación de
residuos, elimínelos con un desatascador.
4. Retire el material sellador viejo y junta de la abertura
del fregadero, de las partes superior e inferior.
NOTA: las superficies inferiores y superiores del fregadero
deben estar limpias, secas y libres de residuos para evitar fugas.
Protector contra
salpicaduras
Cable de alimentación
(en algunos modelos)
DESENSAMBLE PARA LA INSTALACIÓN
1. Gire el anillo de montaje inferior en sentido horario
hasta que se libere y levante todo el ensamble del
equipamiento del triturador de desperdicios.
2. Afloje los tres tornillos del anillo de montaje superior
y deslice los mismos hacia la pestaña del soporte.
3. Inserte el destornillador de punta plana debajo del
anillo de retención y retire este último.
4. Separe el anillo de montaje superior y la pestaña de
soporte de la pestaña del lavabo.
$ÀRMHORV
tornillos
(3)
Retire el
anillo de
retención
Pestaña del
soporte
Anillo de
montaje
inferior
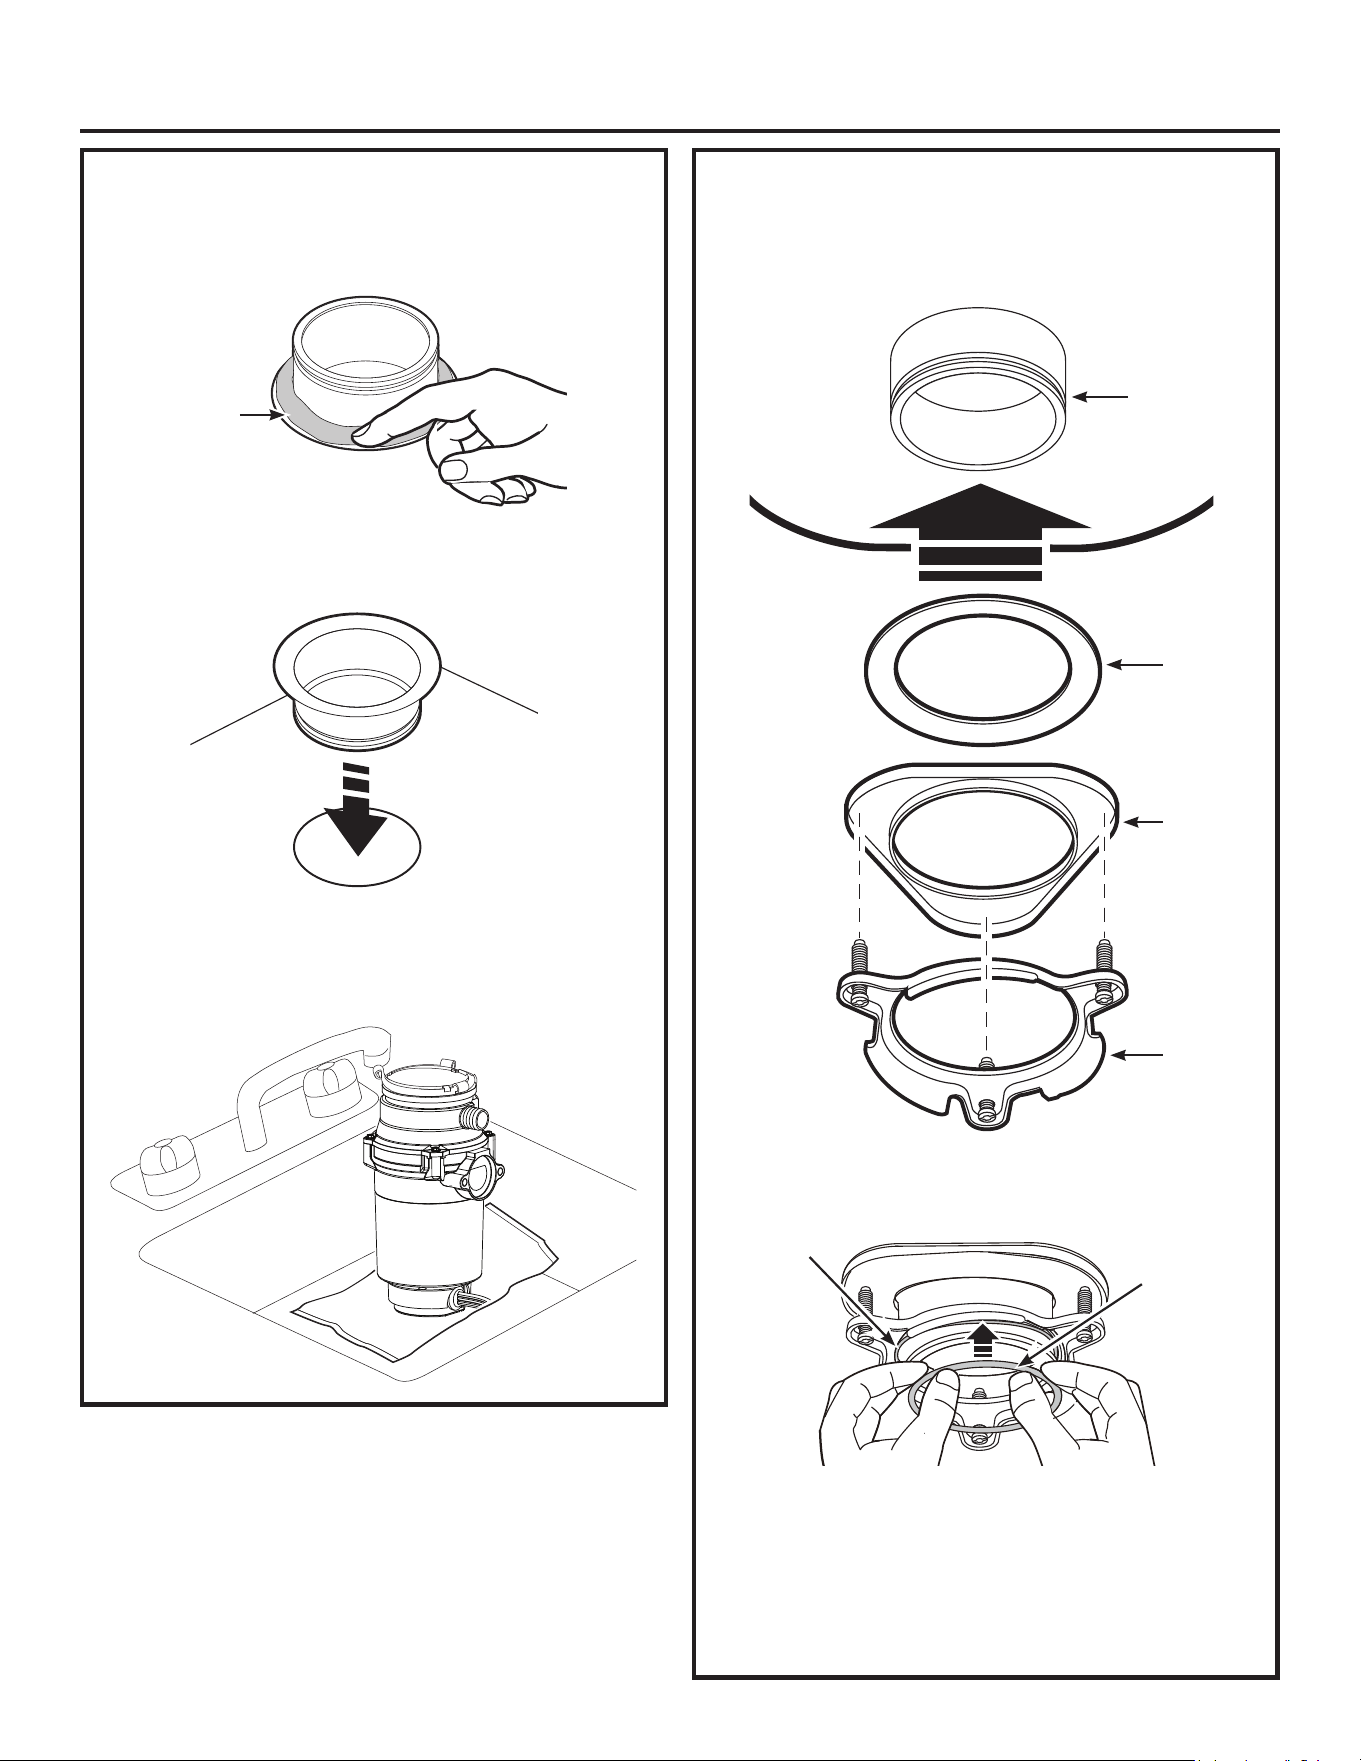
8 49-4000291 Rev 0
Instrucciones de instalación
INSTALE EL EQUIPAMIENTO DE
MONTAJE DEBAJO DEL LAVABO
1. Ensamble la junta de fibra, la pestaña del soporte
y el anillo de montaje superior sobre la pestaña del
lavabo inferior.
Asegure el ensamble en su posición sobre la pestaña
del lavabo, insertando el anillo de retención en la
ranura de retención de la pestaña del lavabo.
IMPORTANTE: Asegúrese de que el anillo de
retención esté asegurado en su posición sobre la
ranura de retención. Si el anillo de retención no está
asegurado sobre la ranura de retención, atrapando las
partes ensambladas en sus posiciones, entonces el
triturador de desperdicios no se podrá instalar de forma
correcta.
-XQWDGH
¿EUD
Pestaña del
soporte
Anillo de
montaje
superior
Pestaña
del lavabo
Anillo de
retención
Ranura
de
retención
INSTALE LA PESTAÑA DEL LAVABO
1. Coloque masilla de plomería sobre una cuerda de
3/8” de grosor, dé vuelta la pestaña del lavabo y
aplique la misma sobre la parte inferior de la pestaña.
2. Instale la pestaña del lavabo sobre la apertura del
lavabo, presionando la misma de manera firme y
retirado la masilla de plomería excedente.
3. Coloque una toalla sobre la parte inferior del lavabo
y sobre la pestaña, y sobrecargue la pestaña
para colocarla en su posición mientras agrega los
componentes de montaje restantes.
Masilla de
plomería
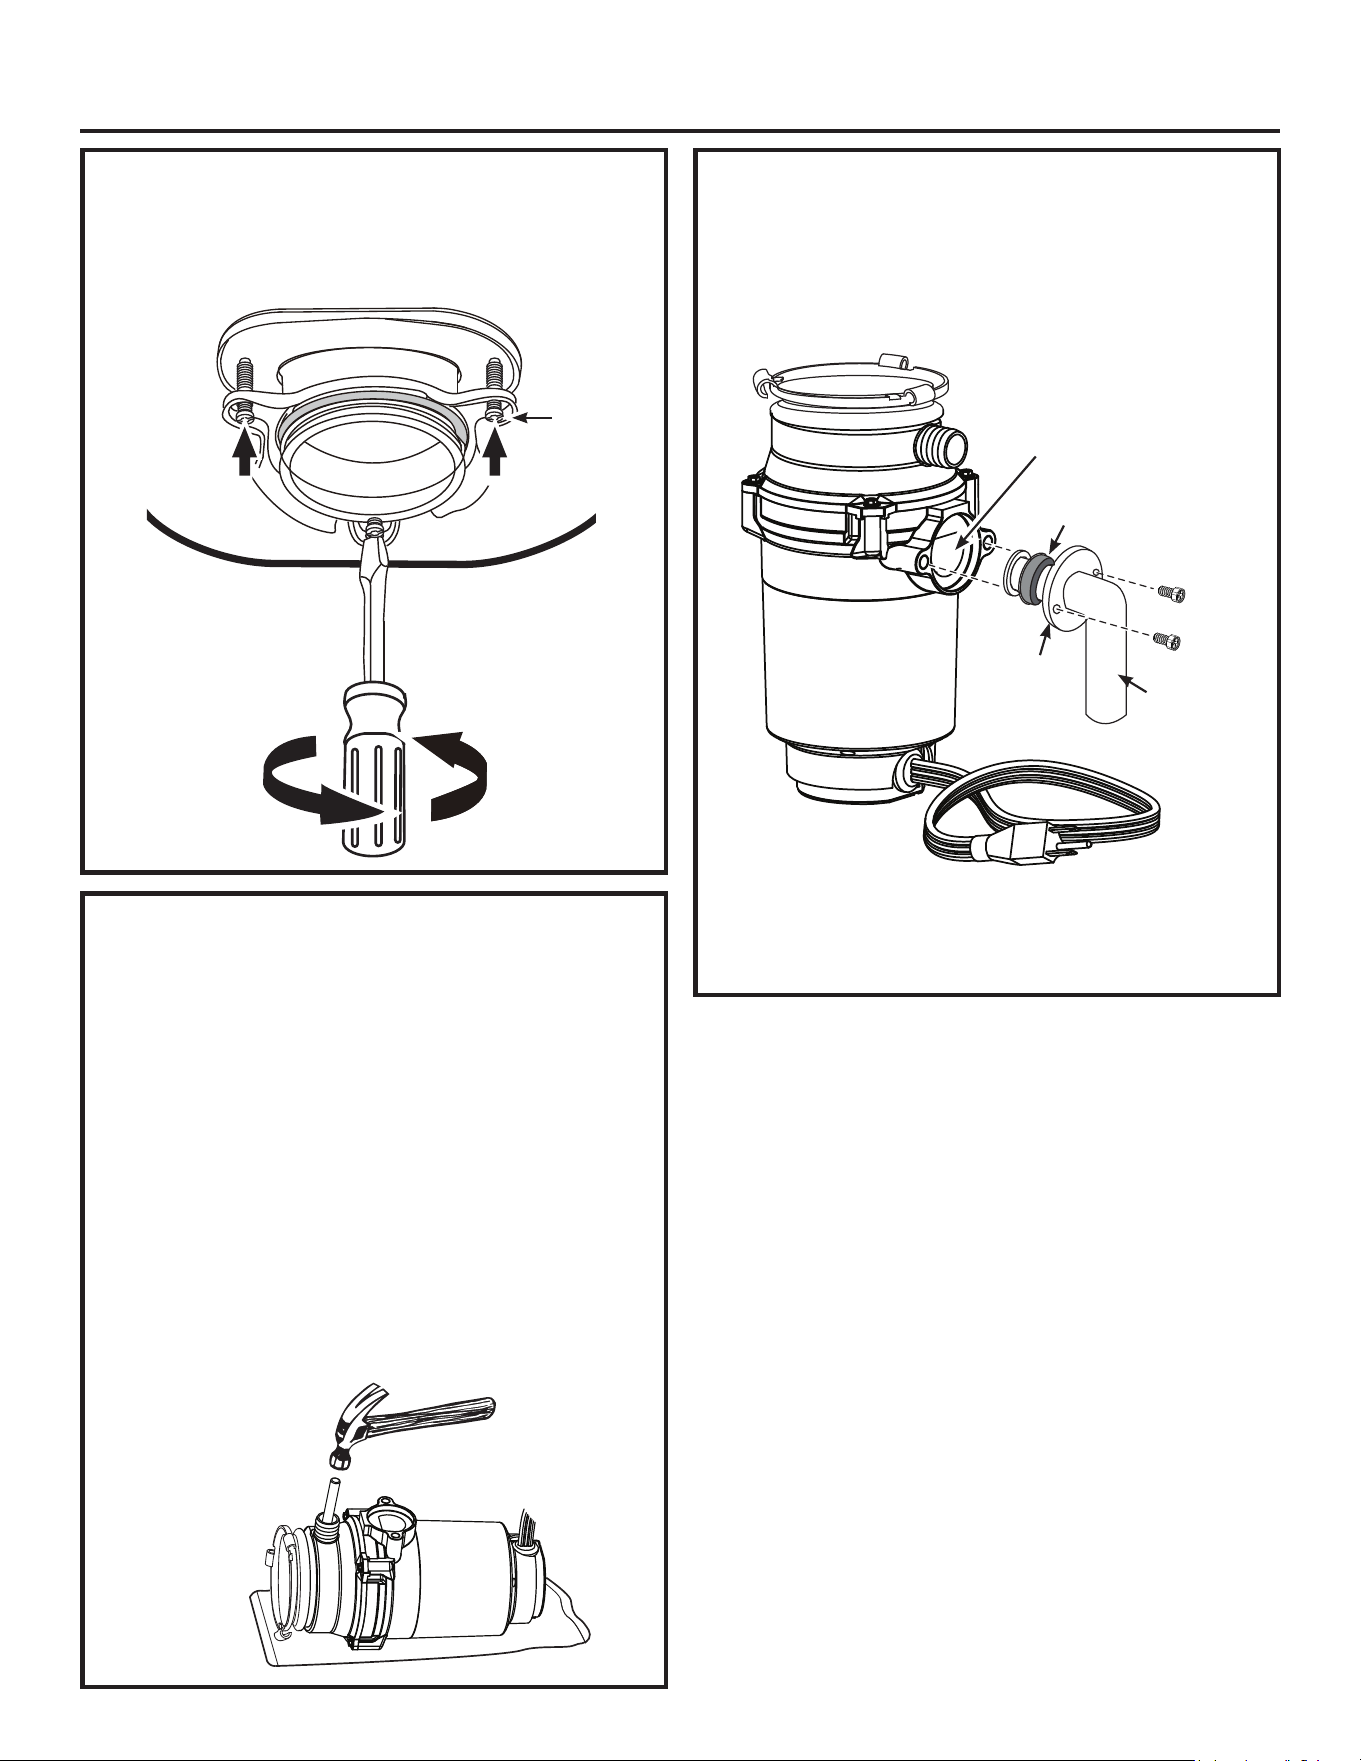
49-4000291 Rev 0 9
Instrucciones de instalación
INSTALE EL EQUIPAMIENTO DE
MONTAJE DEBAJO DEL LAVABO
2. Ajuste los tres anillos de montaje superior sobre la
pestaña de soporte.
Tornillos
(3)
SI SE REALIZARÁ LA CONEXIÓN A
UN LAVAVAJILLAS
Si realizará la conexión a un lavavajillas, complete este
paso. Si no se conectará un lavavajillas, vaya a la sección
³$'+(6,Ï1'(/&2'2'('(6&$5*$´\FRQWLQ~H
• Configure el triturador de desperdicios en el piso.
coloque el mismo de costado sobre una superficie
SURWHJLGD8VHXQLQVWUXPHQWRVLQILORSXQ]yQGHDFHUR
o tarugo de madera), para quitar totalmente el tapón de
GHVFDUJDGHOODYDYDMLOODV1RXVHXQGHVWRUQLOODGRURXQ
instrumento filoso. Cuando el tapón de bloqueo caiga en
el dispensador, podrá retirarlo o simplemente pulverizarlo
cuando el triturador de desperdicios se encuentre en
uso. Esto no dañará el triturador de desperdicios de
ninguna forma, pero es posible que lleve cierta cantidad
de tiempo pulverizar el mismo, a lo largo de varios usos.
ADHESIÓN DEL CODO DE DESCARGA
• Deslice la pestaña de descarga y la junta de descarga
sobre el codo de descarga. Inserte el codo de descarga
y la junta en la salida de descarga del triturador de
desperdicios y adhiera el ensamble de la pestaña al
triturador de desperdicios con los dos tornillos.
NOTA: Es posible que ciertas instalaciones requieran
una conexión con una tubería de desagüe recta o con
una tubería flexible. De ser necesario, consulte a un
plomero con licencia.
Salida de descarga
-XQWD
Tornillos
Pestaña
Codo de
descarga
8VHXQSXQ]yQR
tarugo únicamente.
1RXVHXQ
destornillador o un
LQVWUXPHQWR¿ORVR
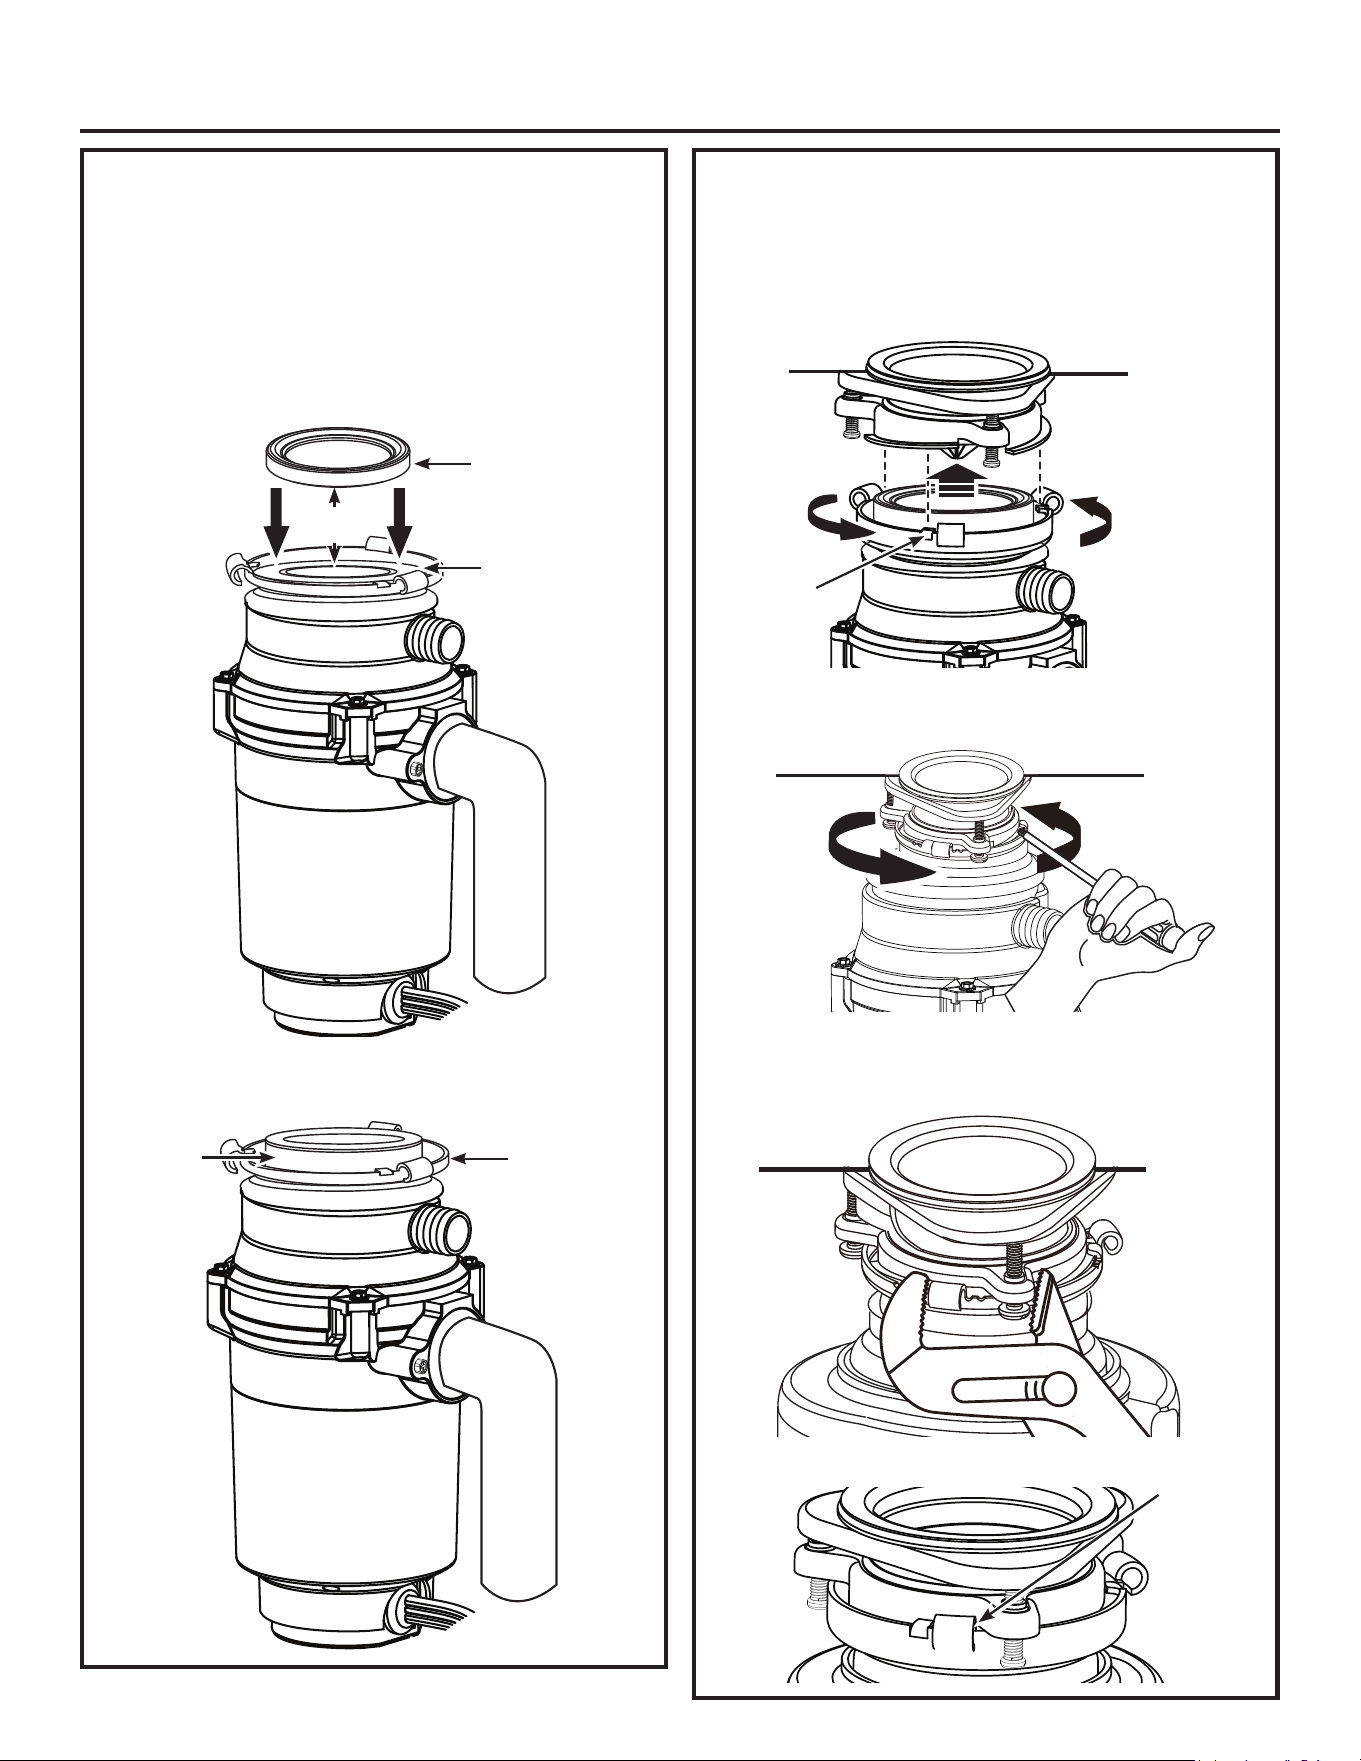
10 49-4000291 Rev 0
Instrucciones de instalación
MONTE EL TRITURADOR
IMPORTANTE: Antes de realizar este paso, lea el
mismo en su totalidad para entender cómo debe ser
montado el triturador de desperdicios.
1. Aplique una pequeña cantidad de jabón líquido
(o vaselina) sobre la parte inferior del montaje
acolchonado y sobre la parte inferior del anillo de
montaje inferior, como ayuda para el deslizamiento y
rotación sobre el anillo de montaje superior.
2. Apoye el montaje acolchonado sobre el anillo superior
del triturador de desperdicios.
MONTE EL TRITURADOR (CONT.)
/HYDQWH\DSXQWDOHHOWULWXUDGRUGHGHVSHUGLFLRVVREUH
su posición en el anillo de montaje superior. Monte
el mismo girando el anillo de montaje inferior hasta
que sus lengüetas se adhieran sobre las rampas de
deslizamiento del anillo de montaje superior.
Inserte el destornillador sobre el gancho inferior y
nivele este último en sentido antihorario sobre su
posición.
8VHODVSLQ]DVGHEORTXHRGHOFDQDOSDUDEORTXHDU
completamente las lengüetas del anillo de montaje
inferior sobre las rampas de deslizamiento superior.
Se muestra completamente bloqueado:
/DYDER
-XQWRV
cuando esté
completamente
bloqueado
Montaje
acolchonado
Anillo de
montaje
inferior
Aplique
jabón
Anillo de
montaje
inferior
Montaje
acolchonado
/DYDER
Adhiera las lengüetas
sobre las rampas de
deslizamiento superior
/HQJHWDV
(3)
Gire el anillo de
montaje inferior
para calzarlo
sobre el anillo
de montaje
superior
/DYDER
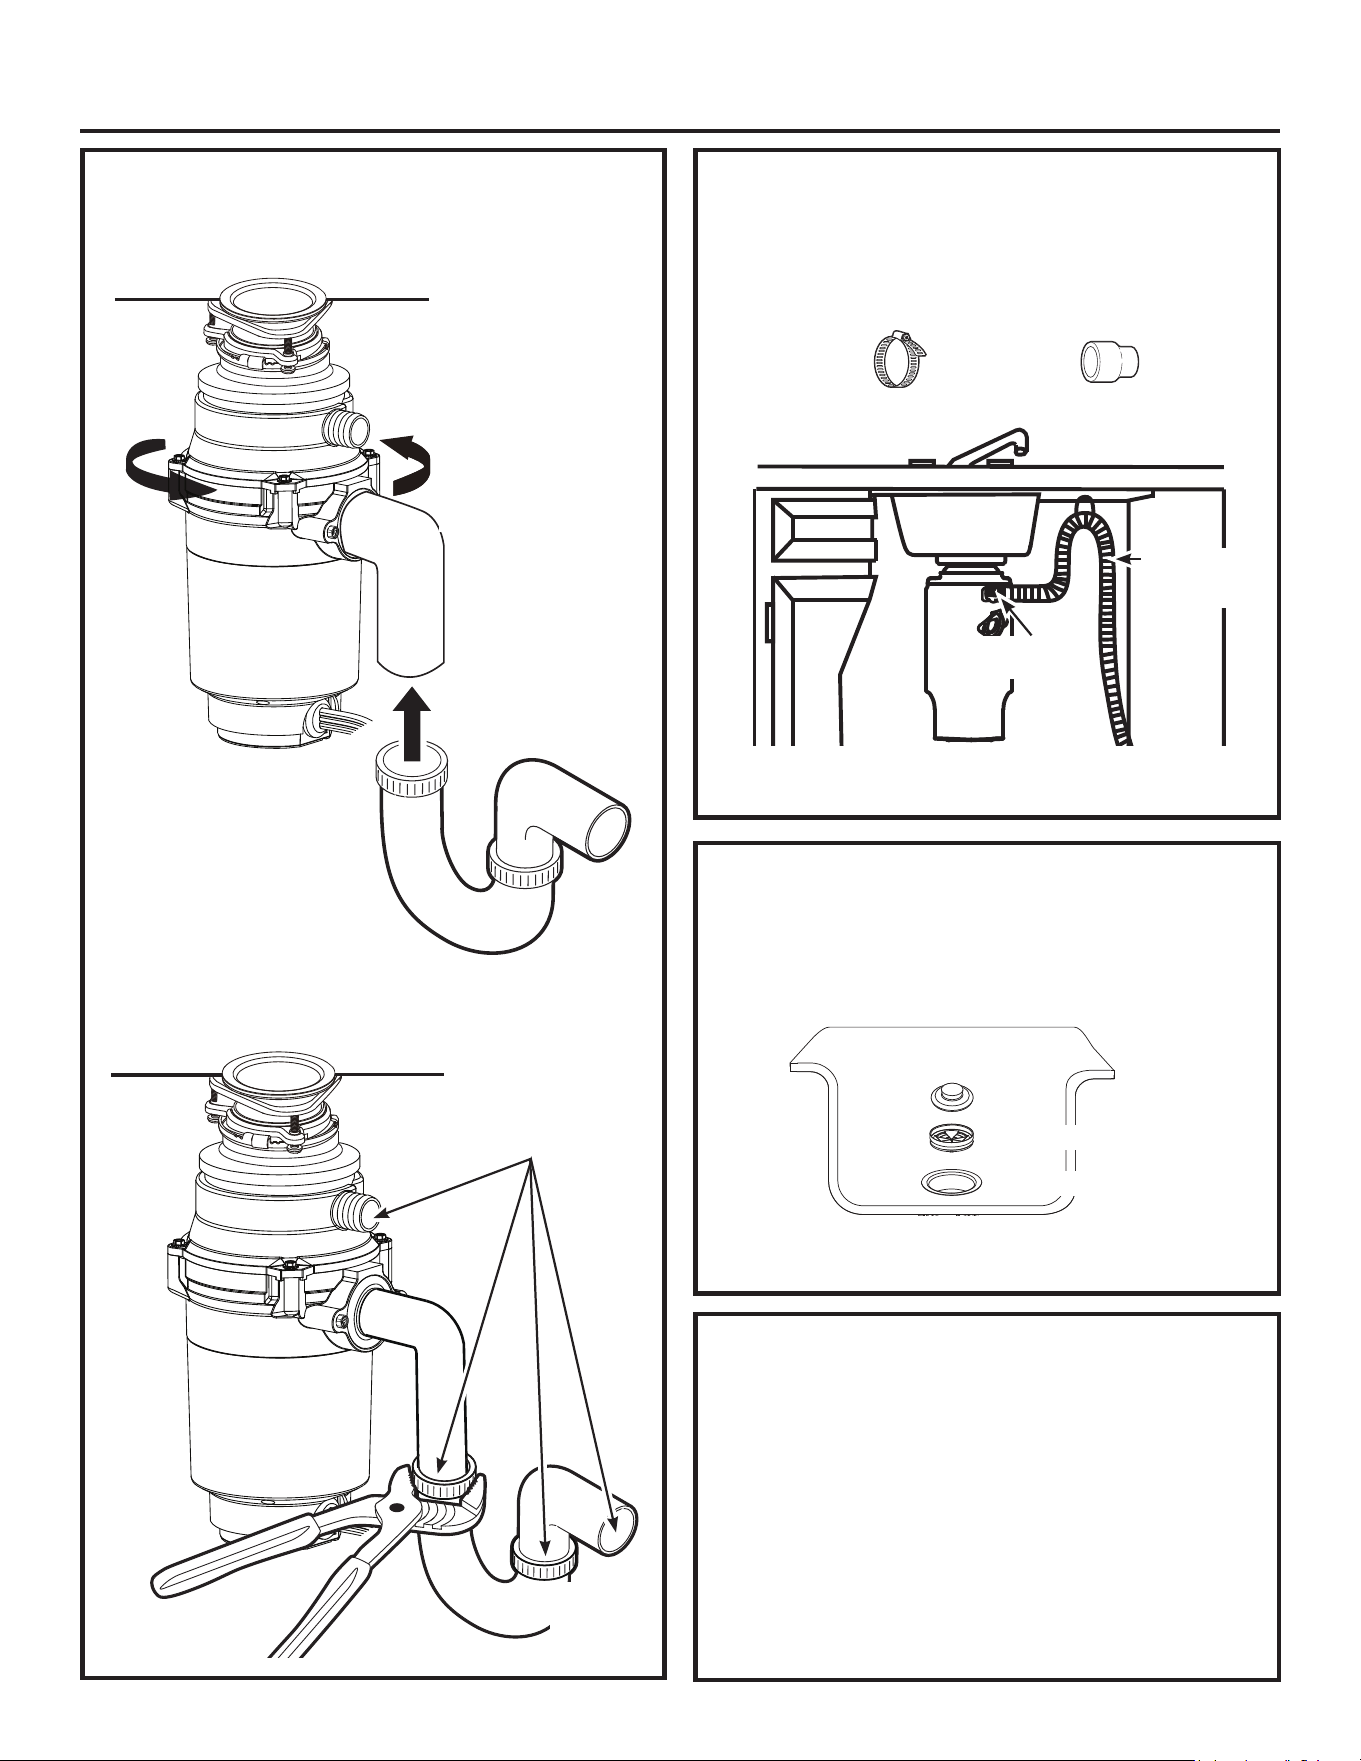
49-4000291 Rev 0 11
Instrucciones de instalación
CONEXIÓN DE LA PLOMERÍA
1. Gire el triturador de desperdicios hasta que su codo
de descarga se alinee con la tubería de desagüe de
salida.
2. De forma segura, conecte toda la tubería, incluyendo la
tubería de desagüe y el desagüe del lavavajillas (si está
en uso), cumpliendo con todos los códigos y ordenanzas.
INSTALE EL PROTECTOR CONTRA
SALPICADURAS Y EL TAPÓN
• Presione el protector contra salpicaduras sobre su
posición en la pestaña del lavabo. Inserte el tapón
sobre el protector contra salpicaduras.
NOTA: Tanto el protector contra salpicaduras como el
tapón se podrán retirar y limpiar cuando sea necesario.
CONECTE LA CORRIENTE Y
REALICE UN CONTROL DE
PÉRDIDAS
•
Enchufe el triturador de desperdicios en un tomacorriente
instalado en forma adecuada y con conexión a tierra de
acuerdo con todos los códigos y ordenanzas locales.
• Deje correr agua para controlar que no haya pérdidas
en el triturador de desperdicios 24 horas después de
su instalación y durante el primer uso.
• Guarde y consulte el Manual del Propietario para un uso
y cuidado adecuados del triturador de desperdicios.
Asegure todas las
conexiones de la tubería
/DYDER
Tubería de
Desagüe de
Salida
Gire el triturador de
desperdicios según sea
necesario para que se
alinee con la tubería de
desagüe.
/DYDER
Tubería de
Desagüe
de Salida
SI ESTÁ CONECTADO A UN
LAVAVAJILLAS
• Conecte la manguera de drenaje flexible a la descarga
del lavavajillas con una abrazadera. Si el tamaño de la
manguera es diferente, necesitará un adaptador de goma.
Para más detalles, consulte las Instrucciones de
Instalación provistas con su lavavajillas.
Conexión de
la abrazadera
Manguera
de drenaje
ÀH[LEOH
Abrazadera de
manguera
Adaptador de goma
Tapón
Protector contra salpicaduras
Pestaña del lavabo
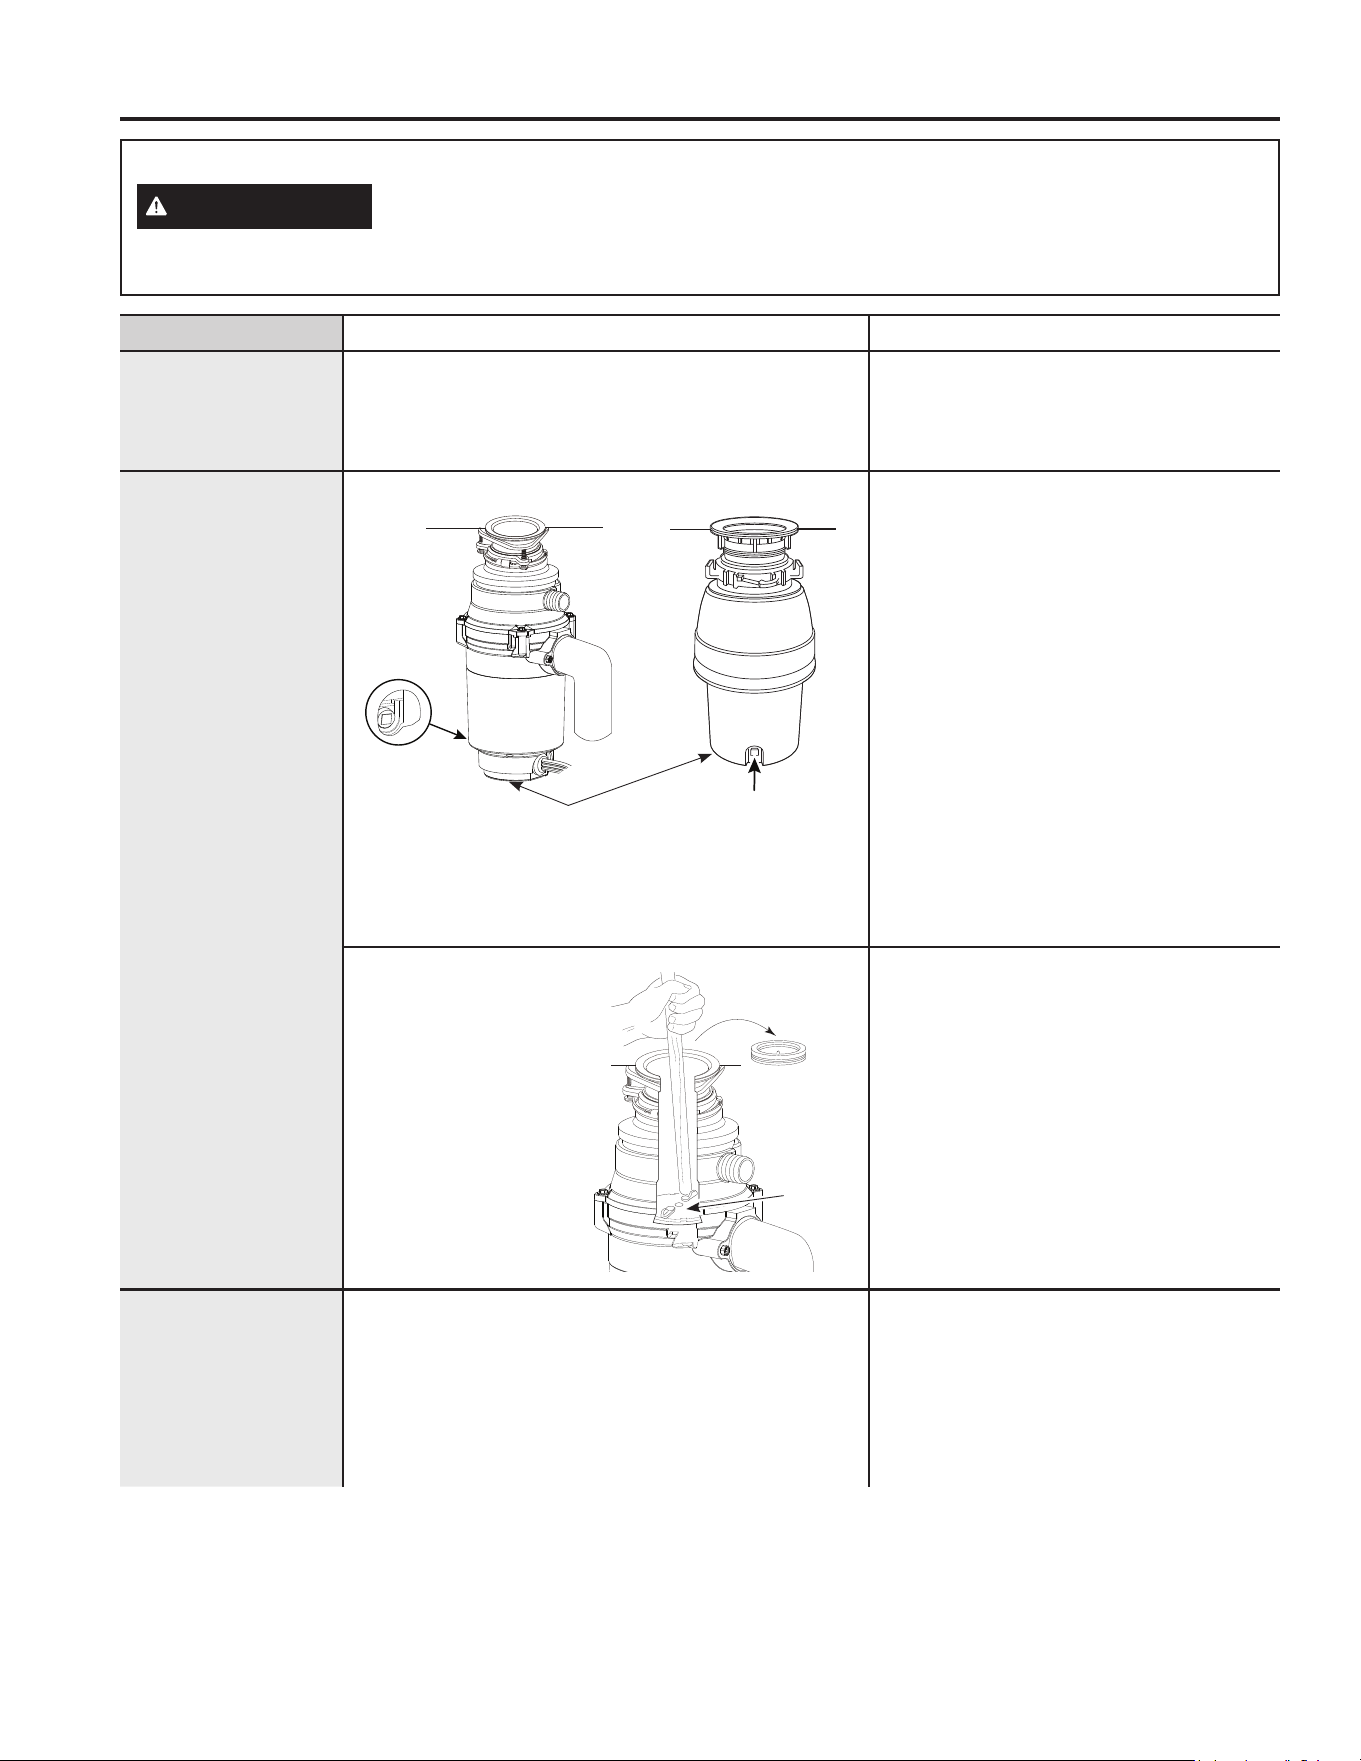
12 49-4000291 Rev 0
ANTES DE SOLICITAR EL SERVICIO TÉCNICO
Consejos para la solución de problemas
NOTA SOBRE SEGURIDAD: Antes de investigar, usted deberá desconectar el suministro de corriente.
Antes de realizar la reconfiguración, desconecte el suministro de corriente – por
favor consulte la NOTA SOBRE SEGURIDAD anterior. El control de sobrecarga
evita que el motor funcione en caso de sobrecarga. Esta función protege el cableado de su hogar y su
triturador. Cuando se encuentre sobrecargado, el motor se detendrá automáticamente.
ADVERTENCIA
Problema Causas posibles Solución
Ruidos fuertes
(distintos de los
ruidos durante el
triturado de huesos
y carozos de frutas)
Cubiertos, tapas de botellas u otros objetos extraños
cayeron dentro del triturador
Retire el protector contra salpicaduras y
retire el objeto usando tenazas con mango
largo. Vuelva a colocar el protector contra
salpicaduras.
El triturador no
enciende
El botón Reset (reinicio) se ha activado 8QDYH]TXHKD\DUHWLUDGRHOSURWHFWRUFRQWUD
salpicaduras, verifique si la placa giratoria
se mueve libremente usando el mango de
una escobilla. Si la placa giratoria se mueve
libremente, vuelva a colocar el protector
contra salpicaduras y verifique si el botón de
reinicio se ha disparado. El botón de reinicio
es rojo y está ubicado del lado opuesto al
codo de descarga, cerca de la parte inferior
del triturador, detrás de la cubierta protectora.
Acceda por la parte superior y debajo de la
cubierta protectora y presione el botón hasta
que haga “clic” y quede hundido. Si el botón
de reinicio no se ha disparado, verifique si
hay cables rotos o en cortocircuito conectados
al triturador. Verifique el interruptor de
alimentación eléctrica, la caja de fusibles o el
disyuntor. Si el cableado y los componentes
eléctricos están intactos, es posible que
la unidad tenga problemas internos que
requieran reparación o reemplazo.
/DSODFDJLUDWRULDQRSXHGH
girar.
Si la placa giratoria no gira libremente,
verifique si hay algún objeto alojado entre
la placa y el anillo de triturado. Desatasque
el objeto moviendo la placa giratoria con
HOPDQJRGHXQDHVFRELOOD/XHJRUHWLUHHO
objeto.
Si no hay objetos extraños, es posible que
haya problemas internos.
Fugas del triturador Si la fuga está en la parte superior, puede deberse a:
1. El aro del fregadero no está correctamente asentado
(opción de junta, masilla o ajuste).
2. El anillo de apoyo no está correctamente ajustado.
3. Montaje defectuoso de la amortiguación.
Si la fuga está en el codo de descarga, es posible que
se deba al ajuste incorrecto de los tornillos del aro del
codo.
Retirar el
protector contra
salpicaduras
Placa
giratoria
Botón Reset
(acceder por la
parte superior
y debajo de
la cubierta
protectora para
presionarlo)
Botón Reset
(acceder por la parte superior
y debajo de la cubierta
protectora para presionarlo)
1GHVHULH
(ubicado en la parte
inferior del triturador)
49-4000291 Rev 0 13
GARANTÍA LIMITADA
Garantía limitada de GE Appliances
Abroche su recibo aquí. Para acceder al servicio técnico de acuerdo con
la garantía deberá contar con la prueba de la fecha original de compra.
GEAppliances.com
Todo el servicio de garantía es provisto por nuestros Centros de Servicio de Fabricación, o un técnico autorizado de
Servicio al Cliente (Customer Care®). Para programar una visita del servicio técnico, visítenos a través de Internet en
GEAppliances.com/service, o llame GE Appliances al 800.GE.CARES (800.432.2737). Cuando llame para solicitar el
servicio, tenga los números de serie y modelo disponibles.
Esta garantía limitada se extiende al comprador original y a cualquier propietario subsecuente para productos
FRPSUDGRVSDUDXVRGRPpVWLFRGHQWUR(VWDGRV8QLGRV6LHOSURGXFWRHVWiVLWXDGRHQXQiUHDTXHQRGLVSRQHGH
servicio por parte de un proveedor de servicio autorizado de GE Appliances, podría tener que hacerse cargo de los
costes de envío o bien podría solicitársele que lleve el producto a un centro de servicio de GE Appliances autorizado
SDUDUHDOL]DUODUHSDUDFLyQ(Q$ODVNDODJDUDQWtDOLPLWDGDH[FOX\HHOFRVWRGHHQYtRRODVYLVLWDVGHVHUYLFLRDVXFDVD
Algunos estados no permiten la exclusión o limitación de daños imprevistos. Esta garantía limitada le da sus derechos
legales específicos, y es posible que usted tenga otros derechos legales que varian de estado a estado. Para
informarse de cuáles son sus derechos legales, consulte a su oficina de asuntos del consumidor local o estatal o
póngase en contacto con la Oficina de su Procurador General.
Garante: GE Appliances, a Haier company, Louisville, KY 40225
EXCLUSIÓN DE GARANTÍAS IMPLÍCITAS
6X~QLFD\H[FOXVLYDDOWHUQDWLYDHVODUHSDUDFLyQGHOSURGXFWRFRPRVHLQGLFDHQOD*DUDQWtD/LPLWDGD/DVJDUDQWtDV
implícitas, incluyendo garantías implícitas de comerciabilidad o conveniencia sobre un propósito particular, se
limitan a un año o al período más corto permitido por la ley.
Qué No Cubrirá GE Appliances:
Ŷ
Viajes del personal de servicio a su casa para
enseñarle cómo usar su producto.
Ŷ
Instalación, entrega o mantenimiento inapropiada.
Ŷ
Fallas del producto si es maltratado, mal usado, o
usado para un propósito diferente del que se creó o si
es usado para usos comerciales.
Ŷ
Cambio de los fusibles de su casa o reajuste del
circuito de interruptores.
Ŷ
Productos sin defectos o rotos, o los cuales se
encuentran funcionando como se indica en el Manual
del propietario.
Ŷ
Daños al producto causados por accidentes,
incendios, inundaciones o actos de la naturaleza.
Ŷ
Daños imprevistos resultantes causados por posibles
defectos con este electrodoméstico.
Ŷ
Defectos o daños debido a la puesta en
funcionamiento a temperaturas de congelación.
Ŷ
Daños causados después del envío.
Ŷ
Producto no accesible para facilitar el servicio
requerido.
Por el Período de Se sustituirá
Un Año
Desde la fecha de
compra original
El triturador en su totalidad si existe un defecto en los materiales o la mano de
obra relacionado con las piezas operativas únicamente (están excluidas las piezas
relacionadas con el aspecto). Durante esta garantía limitada de un año, GE Appliances
también proporcionará, sin cargo, todos los cargos por mano de obra relacionados con
el reemplazo del triturador junto con el triturador de repuesto durante el primer año.
Un año adicional
Desde la fecha de
compra original
Modelos GFC565: si existe un defecto en los materiales o la mano de obra relacionado con
las piezas operativas únicamente (están excluidas las piezas relacionadas con el aspecto).
Durante el período de garantía limitada extendida de un año, usted será responsable por
todos los cargos de instalación relacionados con el triturador de repuesto.
Cuatro años
adicionales
Desde la fecha de
compra original
Modelos GFC765: si existe un defecto en los materiales o la mano de obra relacionado con
las piezas operativas únicamente (están excluidas las piezas relacionadas con el aspecto).
Durante este período de garantía limitada extendida de cuatro años, usted será
responsable por todos los cargos de instalación relacionados con el triturador de repuesto.
Seis años adicionales
Desde la fecha de
compra original
Modelo GFC1065: si existe un defecto en los materiales o la mano de obra relacionado
con las piezas operativas únicamente (están excluidas las piezas relacionadas con el
aspecto). Durante este período de garantía limitada extendida de seis años, usted será
responsable por todos los cargos de instalación relacionados con el triturador de repuesto.

14 49-4000291 Rev 0
SOPORTE PARA EL CONSUMIDOR
Soporte para el Consumidor
Sitio Web de GE Appliances
¿Desea realizar una consulta o necesita ayuda con su electrodoméstico? ¡Intente a través del Sitio Web de
*($SSOLDQFHVODVKRUDVGHOGtDFXDOTXLHUGtDGHODxR8VWHGWDPELpQSXHGHFRPSUDUPiVHOHFWURGRPpVWLFRV
maravillosos de GE Appliances y aprovechar todos nuestros servicios de soporte a través de Internet, diseñados
para su conveniencia. GEAppliances.com
Registre su Electrodoméstico
£5HJLVWUHVXHOHFWURGRPpVWLFRQXHYRDWUDYpVGH,QWHUQHWVHJ~QVXFRQYHQLHQFLD8QUHJLVWURSXQWXDOGHVXSURGXFWR
permitirá una mejor comunicación y un servicio más puntual de acuerdo con los términos de su garantía, en caso
de surgir la necesidad. También puede enviar una carta en la tarjeta de inscripción preimpresa que se incluye con el
material embalado. GEAppliances.com/register
Servicio Programado
El servicio de reparación de expertos de GE Appliances está a sólo un paso de su puerta. Conéctese a través de
Internet y programe su servicio a su conveniencia cualquier día del año.
GEAppliances.com/service
o comuníquese al 800.432.2737 durante el horario de atención comercial.
Garantías Extendidas
Adquiera una garantía extendida de GE Appliances y conozca los descuentos especiales que están disponibles
PLHQWUDVVXJDUDQWtDD~QHVWiYLJHQWH/DSXHGHDGTXLULUHQFXDOTXLHUPRPHQWRDWUDYpVGH,QWHUQHW/RVVHUYLFLRV
de GE Appliances aún estarán allí cuando su garantía caduque.
GEAppliances.com/extended-warranty
o comuníquese al 800.626.2224 durante el horario de atención comercial.
Conectividad Remota
Para solicitar asistencia para la conectividad de red inalámbrica (para modelos con acceso remoto), visite nuestro
sitio web en GEAppliances.com/connect o comuníquese al 800.220.6899.
Piezas y Accesorios
Aquellos individuos calificados para realizar el servicio técnico de sus propios electrodomésticos podrán solicitar el
envío de piezas o accesorios directamente a sus hogares (se aceptan las tarjetas VISA, MasterCard y Discover).
Ordene hoy a través de Internet durante las 24 horas, todos los días. GEApplianceparts.com o de forma telefónica
al 877.959.8688 durante el horario de atención comercial.
Las instrucciones que figuran en este manual cubren los procedimientos que serán realizados por cualquier
usuario. Otros servicios técnicos generalmente deben ser derivados a personal calificado del servicio. Se
deberá tener cuidado, ya que una reparación indebida podrá hacer que el funcionamiento no sea seguro.
Contáctenos
Si no se encuentra satisfecho con el servicio que recibió de GE Appliances, comuníquese con nosotros a través de
nuestro sitio Web con todos los detalles, incluyendo su número telefónico, o escriba a:
*HQHUDO0DQDJHU&XVWRPHU5HODWLRQV_*($SSOLDQFHV$SSOLDQFH3DUN_/RXLVYLOOH.<
GEAppliances.com/contact o comuníquese al 800.626.2000