
the Toast Select
™
Luxe
Instruction Book - BTA735
BTA735_USC_IB_A18.indd 1 4/12/18 1:30 pm

2
BREVILLE
RECOMMENDS
SAFETY FIRST
At Breville we are very safety
conscious. We design and
manufacture consumer
products with the safety of you,
our valued customer, foremost
in mind. In addition we ask
that you exercise a degree of
care when using any electrical
appliance and adhere to the
following precautions.
IMPORTANT
SAFEGUARDS
READ ALL
INSTRUCTIONS BEFORE
USE AND SAVE FOR
FUTURE REFERENCE
• Carefully read all
instructions before
operating for the first
time and save for future
reference.
• Remove and safely
discard any packaging
materials and promotional
labels before using the
toaster for the first time.
• To eliminate a choking
hazard for young children,
remove and safely discard
the protective cover fitted
to the power plug of this
appliance.
• Do not place the toaster
near the edge of a bench
or table during operation.
Ensure the surface is level,
clean and free of water.
2 Breville Recommends
Safety First
9 Components
10 Functions
14 Care & Cleaning
Contents
BTA735_USC_IB_A18.indd 2 4/12/18 1:30 pm

3
• Always operate the toaster
on a stable, heat resistant
surface. Do not use on
a cloth-covered surface,
near curtains or other
flammable materials.
• A fire may occur if the
toaster is covered or
touching flammable
materials, including
curtains, draperies, walls
and the like, when in
operation.
• Curtains and other
flammable items can
catch fire if they are near
or above the toaster.
• Do not allow hot surfaces
of the toaster to come in
contact with countertops
or tables.
• Do not place the toaster
on or near a hot gas or
electric burner, or where
it could touch any other
source of heat.
• When operating the
toaster, keep a minimum
distance of 4" (10cm)
of space from the
surrounding sides and 8"
(20cm) above.
• Breville does not
recommend placing the
toaster in enclosed areas.
• Do not use the toaster on a
sink drain board.
• Do not move toaster while
in operation.
• Avoid contact with moving
parts.
• Ensure that bread to be
toasted is the correct size
for the toaster and does
not protrude above the
toasting slots. Ensure the
bread is not too thick or
long that it will jam or
wedge the bread carriage.
• Do not place toast directly
on top of toasting slots
to warm toast as this
may prevent correct air
circulation and damage
the appliance.
BTA735_USC_IB_A18.indd 3 4/12/18 1:30 pm

4
• Do not touch hot surfaces.
Toaster surfaces are
hot during and after
operation. To prevent
burns or personal injury,
always use protective hot
pads or insulated oven
mitts, or use handles or
knobs where available.
• Metal utensils such as
a knife, should not be
inserted into the toaster
to remove jammed toast,
bagels or any other items
from the toaster. This
can damage the heating
elements as well as lead to
electrocution.
• Do not attempt to
dislodge food when the
toaster is plugged in.
• Oversized foods, metal foil
packages, or utensils must
not be inserted into the
toaster as they may cause
a fire or risk of electric
shock.
• When heating toaster
pastries, always use the
lightest toast color setting.
• Do not use the toaster
without the slide out
crumb tray in place. Do
not allow crumbs to build
up in the crumb tray.
Failure to clean the crumb
tray regularly may result
in a fire hazard. To turn
the toaster off, remove
the power plug from the
power outlet.
• Always remove the power
plug from the power
outlet if the toaster is not
in use, before attempting
to move, before cleaning,
and when storing. Allow
to cool before putting on
or taking off parts.
• Do not use harsh abrasive,
caustic cleaners or oven
cleaners when cleaning
the toaster.
• Do not clean with metal
scouring pads. Pieces
can break off and touch
electrical parts, creating a
shock hazard.
BTA735_USC_IB_A18.indd 4 4/12/18 1:30 pm

5
• Strictly follow the care
and cleaning instructions
described in this book.
• The use of attachments
not sold or recommended
by Breville may cause fire,
electric shock or injury.
IMPORTANT
SAFEGUARDS
FOR ALL
ELECTRICAL
APPLIANCES
• To protect against electric
shock, do not immerse
cord, plug or appliance in
water or any other liquid.
• Do not let the cord
hang over the edge of
a bench or table, touch
hot surfaces, or become
knotted.
• Do not leave the appliance
unattended when in use.
• This appliance is not
intended for use by
persons (including
children) with reduced
physical, sensory or
mental capabilities,
or lack of experience
or knowledge, unless
they have been given
supervision or instruction
concerning use of the
appliance by a person
responsible for their
safety.
• Children should be
supervised to ensure
they do not play with the
appliance.
• This appliance is
recommended for
household use only. Do
not use this appliance
for anything other than
its intended use. Do not
use in moving vehicles
or boats. Do not use
outdoors.
BTA735_USC_IB_A18.indd 5 4/12/18 1:30 pm

6
• It is recommended to
regularly inspect the
appliance. Do not use
the appliance if the
power cord, power plug,
or appliance becomes
damaged in anyway.
Immediately cease
use and call Breville
Consumer Support for
examination, repair or
adjustment.
• This appliance is
equipped with a power
cord having a grounding
wire with a grounding
plug. The appliance must
be grounded using a
3-hole properly grounded
outlet. In the event of an
electrical short circuit,
grounding reduces the
risk of electrical shock.
• If the appliance is of
the grounded type, the
extension cord should be
a grounding 3-wire cord.
• If the power outlet is
a standard 2-prong
outlet, it is your personal
responsibility and
obligation to have it
replaced with a properly
grounded 3-prong power
outlet.
• Do not, under any
circumstances, cut or
remove the third (ground)
prong from the power
cord or use an adapter.
• Consult a qualified
electrician if the
grounding instructions
are not completely
understood, or if doubt
exists as to whether the
appliance is properly
grounded.
NOTE
This toaster is
electronically controlled
and will not operate until
the toaster is plugged
into a 110/120 volt power
outlet.
BTA735_USC_IB_A18.indd 6 4/12/18 1:30 pm

7
SHORT CORD
INSTRUCTIONS
Your Breville appliance is
fitted with a short power
supply cord as a safety
precaution to prevent
personal injury or property
damage resulting from
pulling, tripping or
becoming entangled with a
longer cord. Do not allow
children to use or be near
this appliance without
close adult supervision.
Longer detachable power
supply cords or extension
cords are not
recommended but may be
used if care is exercised. If
an extension cord is used,
(1) the marked electrical
rating of the cord set or
extension cord should be at
least as great as the
electrical rating of the
appliance, (2) the cord
should be arranged so that
it will not drape over the
countertop or tabletop
where it can be pulled on
by children or tripped over
unintentionally and (3) the
extension cord must
include a 3-prong
grounding plug.
BREVILLE ASSIST
®
PLUG
Your Breville appliance
comes with a unique
Assist™ Plug, conveniently
designed with a finger
hole in the power plug for
easy and safe removal from
the wall outlet. For safety
reasons it is recommended
you plug your Breville
appliance directly into its
own electrical outlet on a
dedicated circuit separate
from other appliances.
If the electric circuit is
overloaded with other
appliances, your appliance
may not function properly.
Use in conjunction with a
power strip or extension
cord is not recommended.
BTA735_USC_IB_A18.indd 7 4/12/18 1:30 pm

8
IMPORTANT
Never operate the toaster
on its side. Never add
any food substance to the
bread, bagel or any other
item prior to toasting
(such as butter, jelly or
marmalade). This may
cause a fire as well as lead
to electrocution.
This toaster is for toasting
bread, bagels, English
muffins and toaster
pastries only. Placing other
food items in the toaster
can cause a fire as well as
lead to electrocution.
FOR HOUSEHOLD USE ONLY
SAVE THESE INSTRUCTIONS
BTA735_USC_IB_A18.indd 8 4/12/18 1:30 pm
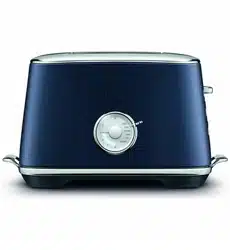
9
D
E
F
G
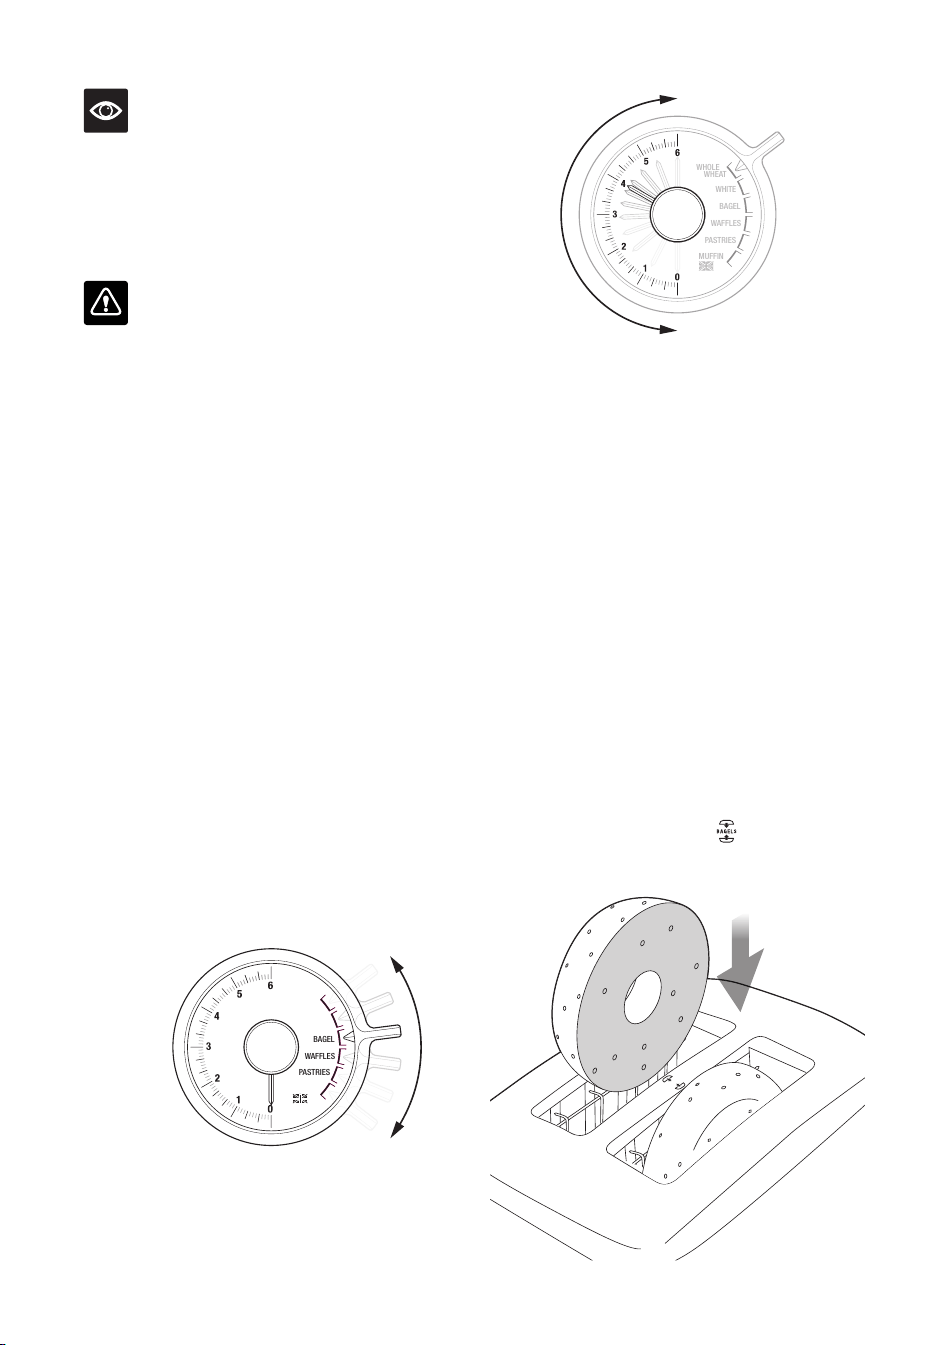
Components
A. Brownness Indicators
LEDs to indicate the brownness setting
and progress of your toasting.
B. Bread Selection Ring
Select your bread type to ensure
comparable brownness across all bread
types without the guess work.
The time taken to toast your bread depends
on the bread type. Select from Whole
Wheat, White, Bagel, Waffles, Pastries or
English Muffins to ensure you get the same
brownness level every time.
C. Brownness Selection Dial
Select how brown you like your toast,
setting ‘0’ (lightest) to ‘6’ (darkest).
D. 'LIFT & LOOK™' / High lift lever
Use the lever during the toasting cycle
to raise and lower the carriage so you
can check the toasting progress without
interrupting the toasting cycle. High lift
feature makes it easier to remove small
items such as bagels or English muffins.
E. 'A BIT MORE™'
If your toast comes up too light, one press
adds a little extra toasting time.
REHEAT button
If your toast has popped up and gone cold,
Press ‘reheat’ to warm it up again.
F. FROZEN button
Activates additional toasting time required
to toast frozen bread.
G. CANCEL button
Cancels the toasting cycle.
NOT SHOWN
Breville Assist™ Plug
A
C
B
BTA735_USC_IB_A18.indd 9 4/12/18 1:30 pm

10
Functions
NOTE
This toaster is electronically controlled and
will not operate until the toaster is plugged
into a 110 or 120V power outlet. Before
first use, remove any packaging material or
promotional labels attached to your toaster.
1. Insert the power plug into a 110 or 120V
power outlet. The Brownness Indicators
will illuminate from ‘0’ to ‘6’, and then align
to the selected browning setting (indicated
by the position of the Brownness Dial
and Brownness Indicators). The toaster
will revert to stand-by mode (Brownness
Indicators will dim) after a few minutes if
a button is not pressed or the dial is not
adjusted.
NOTE
When using the toaster for the first time, we
suggest toasting on the maximum setting
without bread. The toaster may emit a
thin smoke or distinct odor on initial use.
This is normal and not detrimental to the
performance of the toaster.
2. Place bread, bagels, etc into each of the
toasting slots. Ensure items for toasting are
not too large or too thick to fit in the toasting
slots.
3. Select the bread type in toasting slot using
the Bread Selection Ring.
NOTE
Various types of bread may require a
different browning setting. For example,
white light textured breads require less
toasting time, while heavier textured whole
wheat breads may require more toasting
time. Changing the Bread Selection Ring
accommodates for these changes without
changing the Brownness Selection Dial
so you always have the same browning no
matter what the bread type.
4. When using the Brownness Selection Dial,
align the needle with the desired browning
setting ‘0’ (lightest) to ‘6’ (darkest).
Indicators will illuminate and align to the
selected browning setting. The Brownness
setting is relative to each Bread Type so
there's no need to keep adjusting the setting
for different bread types if you have the
same brownness requirements.
NOTE
When toasting bread for the first time,
it is suggested to toast on browning setting
'3' (9 LED Indicators).
5. To start the toasting process, press the
lever down until it locks into place. The
Brownness Indicators will begin flashing
at “0” then start to gradually count up
indicating the level of brownness until it
reaches the selected browning setting.
6. Once the toasting cycle is complete the
carriage will move to the raised position.
Remove the toast. The brownness indicator
will re-illuminate to the previously selected
browning setting for a few minutes before
entering stand-by mode.
BTA735_USC_IB_A18.indd 10 4/12/18 1:30 pm
11
NOTE
To re-activate the toaster from stand-by
mode, press any button or adjust the
Brownness Dial. The Brownness Indicators
will re-illuminate.
WARNING
Do not leave the toaster unattended when in
use as toast may jam. In the unlikely event
that bread, bagels, English muffins or toaster
pastries become jammed in the toasting slots,
all the buttons and the LED toasting indicators
will flash and the elements will turn off.
Remove the power plug from the power outlet
and allow the toaster to cool completely before
carefully easing the bread out of the slots. Take
care not to damage the heating elements. Do
not use metal utensils.
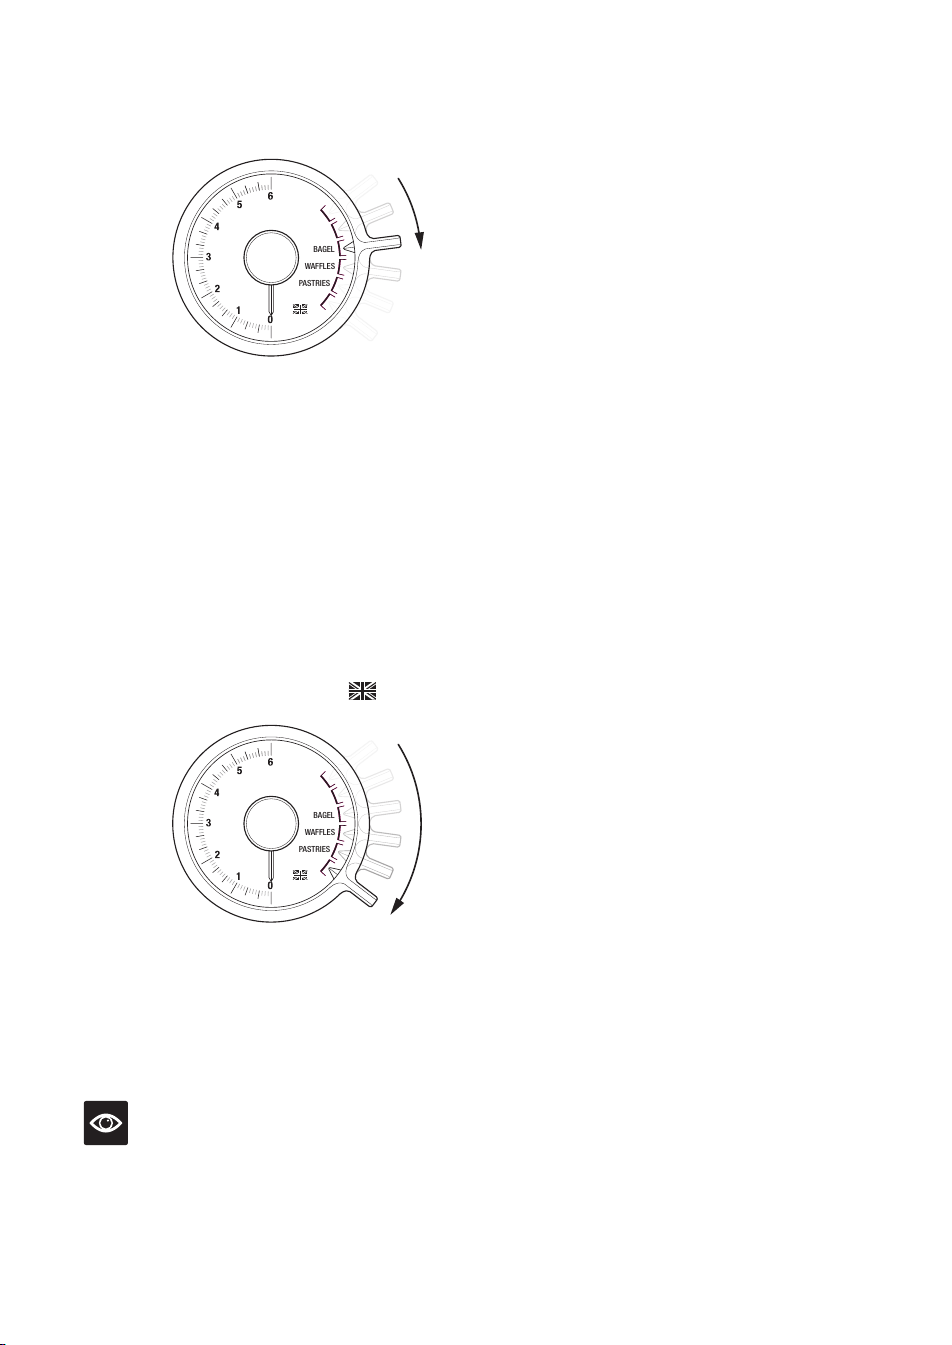
BREAD TYPE SELECTION
The bread selection feature changes the total
toasting time for each bread type, so you can
achieve the same brownness setting across
different bread types.
To toast different bread types
1. Place the bread into the toasting slots.
2. Adjust the Bread Selection Ring to bread
type in the toaster.
WHOLE
WHEAT
WHITE
MUFFIN
BAGEL
WAFFLES
PASTRIES
3. Select the desired browning setting by
adjusting the Brownness Selection Dial.
Brownness settings range from '0' (lightest)
to '6' (darkest).
WHOLE
WHEAT
WHITE
MUFFIN
BAGEL
WAFFLES
PASTRIES
4. To start the toasting process, press the lever
down until it locks into place.
5. The toasting cycle can be stopped at any
time by pressing the Cancel button.
BAGEL OR ENGLISH MUFFIN
SELECTION
Selecting the bagel or English muffin bread
type will adjust the total toasting time and also
activate additional heat to the middle heating
elements to perfectly toast the insides of your
bagels or muffins without burning the outsides.
To toast bagels:
1. Place the bagel into the toasting slots with
the inside of the bagel facing inwards as per
the bagel markings
on the top surface of
the toaster.
BAGEL
FLAT SIDE
FACING
INWARD
BA G E LS
BTA735_USC_IB_A18.indd 11 4/12/18 1:30 pm
12
2. Adjust the Bread Selection Ring to BAGEL.
WHOLE
WHEAT
WHITE
MUFFIN
BAGEL
WAFFLES
PASTRIES
3. Select the desired browning setting by
adjusting the Brownness Selection Dial.
Brownness settings range from '0' (lightest)
to '6' (darkest).
4. To start the toasting process, press the lever
down until it locks into place.
TO TOAST ENGLISH MUFFINS:
1. Place the English muffin into the toasting
slots with the inside of the muffin facing
inwards.
2. Adjust the Bread Selection Ring to
MUFFIN.
WHOLE
WHEAT
WHITE
MUFFIN
BAGEL
WAFFLES
PASTRIES
3. Select the desired browning setting by
adjusting the Brownness Selection Dial.
4. Press the lever down until it locks into place.
NOTE
It is normal for the outside heating elements
to appear off or on a lower power during the
BAGEL OR ENGLISH MUFFIN setting. This
ensures the inside toasts without burning the
outside.
A BIT MORE™ / REHEAT BUTTON
If your toast comes up too light, this button
adds a little extra toasting time. This feature
can be selected before, during or after the
toasting cycle and can be used with all Bread
Types and FROZEN functions.
To use this feature during the toasting cycle:
Press the A BIT MORE™ / Reheat button. The
button surround will illuminate white when
selected. The toasting time will automatically
increase but will not illuminate more
Brownness Indicators. The A BIT MORE™ /
Reheat function can be cancelled by pressing
the A BIT MORE™ / Reheat button again and
the original toasting cycle will continue.
To use this feature before or after the
toasting cycle:
Press the A BIT MORE™ / Reheat button.
The button surround will illuminate white
when selected. Press down the lever until it
locks into place. The Brownness Indicators will
automatically align with the lowest browning
setting then flash and count down for the
additional browning time.
FROZEN BUTTON
This feature activates additional toasting time
required to toast frozen bread.
To toast frozen bread:
1. Place the bread into the toasting slots.
2. Adjust the Bread Selection Ring to the
bread type that has been inserted in the
toasting slots.
3. Select the desired browning setting by
adjusting the Brownness Selection Dial.
Ranging from '0' (lightest) to '6' (darkest).
4. Press the FROZEN button and the button
surround will illuminate white.
5. To start the toasting process, press the lever
down until it locks into place. The toasting
time will automatically increase.
6. After the cycle has finished, the FROZEN
button will turn off.
BTA735_USC_IB_A18.indd 12 4/12/18 1:30 pm

13
NOTE
The FROZEN function can be cancelled by
pressing the FROZEN button again and the
original toasting cycle will continue.
LIFT & LOOK™ LEVER
This feature allows you to raise and lower the
carriage so you can check the toasting progress
without interrupting the toasting cycle. During
the toasting cycle, simply lift the lever to
view the toasting progress. Lower the lever
to continue the cycle or press the CANCEL
button to stop the cycle at any time.
HIGH LIFT LEVER
The lever can be lifted approximately 2cm
above the starting position. This raises the
carriage making it easier to remove smaller
items such as English muffins or bagels.
BTA735_USC_IB_A18.indd 13 4/12/18 1:30 pm

14
Care & Cleaning
1. Remove the power plug from the power
outlet. Allow the toaster to cool completely
before cleaning.
2. To clean any crumbs from the toaster,
remove the crumb tray (located under
the left hand side handle) by pulling it
outwards. Empty and replace the crumb
tray before using the toaster again. Replace
the crumb tray by sliding it inwards until it
locks into position.
3. To remove any additional crumbs caught
inside, turn the toaster upside down over a
bin and shake gently to free the crumbs.
DO NOT bang the toaster, this may damage
the elements or carriage mechanism.
4. Wipe the outside of the toaster with a
slightly dampened soft cloth and then dry it
with a soft dry cloth to dry completely.
NOTE
Do not clean with metal scouring pads. Pieces
can break off the pad and touch electrical parts
creating an electric shock hazard and damage
the finish of the toaster.
STORAGE
Remove the power plug from the power outlet.
Allow the toaster to cool completely before
storing. Follow the directions for cleaning and
store in an upright position on a flat surface on
a bench top or in an accessible cupboard.
Do not store anything on top of the toaster.
WARNING
Do not use the toaster without the slide-out
crumb tray in position. Do not allow crumbs to
build up in the crumb tray. Failure to clean the
crumb tray regularly may result in a fire hazard.
BTA735_USC_IB_A18.indd 14 4/12/18 1:30 pm

the Toast Select
™
Luxe
Manuel d'instructions - BTA735
BTA735_USC_IB_A18.indd 15 4/12/18 1:30 pm

16
BREVILLE VOUS
RECOMMANDE
LA SÉCURITÉ
AVANT TOUT
Chez Breville, la sécurité
occupe une place de choix.
Nous concevons et fabriquons
des produits de consommation
sans jamais perdre de vue la
sucurité de notre précieuse
clientèle. De plus, nous
vous demandons d'être très
vigilant lorsque vous utilisez
un appareil électrique et de
respecter les mesures de
sécurité qui suivent.
IMPORTANTES
MESURES DE
SÉCURITÉ
LISEZ TOUTES LES
INSTRUCTIONS
AVANT USAGE ET
SAUVEGARDEZ-LES À
TITRE DE RÉFÉRENCE
• Lisez attentivement toutes
les instructions avant de
faire fonctionner l'appareil
pour la première fois et
conservez-les à titre de
référence.
• Retirez et jetez en lieu
sûr tout le matériel
d'emballage et
toutes les étiquettes
promotionnelles avant
d'utiliser le grille-pain
pour la première fois,
• Pour éliminer les risques
de suffocation chez les
jeunes enfants, retirez
et jetez en lieu sûr le
capuchon protecteur
recouvrant la fiche de cet
appareil.
16 Breville vous recommande la
sécurité avant tout
23 Composants
24 Fonctions
28 Entretien et nettoyage
Table des
matières
BTA735_USC_IB_A18.indd 16 4/12/18 1:30 pm

17
• Ne placez pas le grille-
pain sur le bord d'un
comptoir ou d'une table
lorsqu'il est en marche.
Assurez-vous que la
surface est de niveau,
propre et sèche.
• Faites toujours
fonctionner le grille-pain
sur une surface stable
et résistant à la chaleur.
Ne l'utilisez pas sur une
surface recouverte de
tissu ou près des rideaux
ou de tout autre matériau
inflammable.
• Un incendie peut se
déclarer si le grille-pain
est couvert ou touche des
matériaux inflammables
comme des rideaux,
draperies, murs et autres
matériaux similaires
lorsqu'il est en marche.
• Les rideaux et autres
matériaux similaires
peuvent s'enflammer
s'ils sont au-dessus ou à
proximité du grille-pain.
• Ne laissez pas les surfaces
chaudes de l'appareil
entrer en contact avec un
comptoir ou une table.
• Ne placez pas le grille-
pain sur ou près d'un
brûleur à gaz, d'un élément
électrique ou à un endroit
où il pourrait toucher une
autre source de chaleur.
• Gardez un espace d'au
moins 10 cm (4 po) de
chaque côté de l'appareil et
20 cm (8 po) sur le dessus
lorsqu'il est en marche.
• Breville ne recommande
pas de placer le grille-pain
dans un espace clos.
• N'utilisez pas le grille-pain
sur l'égouttoir d'un évier.
• Ne déplacez pas le grille-
pain lorsqu'il est en
marche.
• Évitez de toucher les
pièces en mouvement.
• Assurez-vous que les
tranches de pain sont
de taille appropriée au
grille-pain et n'excèdent
pas la hauteur des fentes.
BTA735_USC_IB_A18.indd 17 4/12/18 1:30 pm

18
Assurez-vous que les
tranches ne sont ni trop
épaisses ni trop longues
pour éviter qu'elles restent
coincées dans le chariot.
• Ne placez pas le pain
directement sur les fentes
pour le réchauffer, car
cela pourrait entraver
la circulation de l'air et
endommager l'appareil.
• Les surfaces du grille-
pain demeurent chaudes
pendant et après le
fonctionnement, n'y
touchez pas. Afin d'éviter
les brûlures ou blessures,
utilisez toujours des
poignées isolantes ou
gants de cuisine, ou les
poignées de l'appareil (ou
boutons, le cas échéant).
• Les ustensiles en métal
comme les couteaux ne
doivent pas être insérés
dans les fentes du grille-
pain pour retirer les toasts,
bagels ou autre article
coincé. Cela pourrait
endommager les éléments
chauffants et provoquer
une électrocution.
• Ne tentez pas de déloger
les aliments coincés
lorsque le grille-pain est
branché.
• Les aliments
surdimensionnés, les
emballages en papier
aluminium ou les
ustensiles ne doivent
pas être insérés dans les
fentes du grille-pain, car
ils pourraient entraîner
un risque d'incendie ou
d'électrocution.
• Lorsque vous faites
chauffer des pâtisseries,
utilisez toujours le réglage
de coloration le plus bas.
• N'utilisez pas le grille-
pain sans le ramasse-
miettes bien en place.
Ne laissez pas de miettes
s'accumuler dans le
ramasse-miettes. Le
fait de ne pas nettoyer
le ramasse-miettes
régulièrement peut
provoquer un risque
d'incendie. Pour éteindre
le grille-pain, débranchez-
le de la prise électrique.
BTA735_USC_IB_A18.indd 18 4/12/18 1:30 pm

19
• Débranchez toujours le
grille-pain s'il n'est pas
utilisé ou avant de le
déplacer, le nettoyer ou le
ranger. Laissez-le refroidir
avant d'ajouter ou de
retirer les pièces.
• N'utilisez pas de
nettoyants abrasifs ou
corrosifs ni de nettoyants
pour le four pour nettoyer
le grille-pain.
• N'utilisez pas de tampons
à récurer métalliques, car
des morceaux peuvent
s'en détacher et toucher
les éléments électriques,
créant un risque
d'électrocution.
• Suivez à la lettre les
consignes d'entretien et
de nettoyage décrites
dans ce manuel.
• L'utilisation d'accessoires
non vendus ou
recommandés par Breville
peut causer un risque
d'incendie, d'électrocution
ou de blessures.
IMPORTANTES
MESURES DE
SÉCURITÉ POUR
TOUT APPAREIL
ÉLECTRIQUE
• Pour vous protéger contre
les risques d'électrocution,
n'immergez pas le cordon,
la fiche ou l'appareil lui-
même dans l'eau ou tout
autre liquide.
• Ne laissez pas le cordon
pendre d'un comptoir ou
d'une table, toucher des
surfaces chaudes ou se
nouer.
• Ne laissez pas l'appareil
sans surveillance lorsqu'il
est en marche.
BTA735_USC_IB_A18.indd 19 4/12/18 1:30 pm

20
• Cet appareil n'est pas
conçu pour être utilisé par
des personnes (y compris
des enfants) ayant des
capacités physiques,
sensorielles ou mentales
réduites, ou manquant
d'expérience ou de
connaissances, à moins
d'avoir été supervisées
ou initiées à l'usage
de l'appareil par une
personne responsable de
leur sécurité.
• Surveillez toujours les
enfants pour qu'ils ne
jouent pas avec l'appareil.
• Cet appareil est
recommandé pour
un usage domestique
seulement. Ne l'utilisez
pas à d'autres fins que
celles prévues, ni dans
un véhicule ou un bateau
en mouvement ou à
l'extérieur.
• Il est recommandé de
vérifier régulièrement
l'appareil. Ne l'utilisez
pas si le cordon
d'alimentation, la
fiche ou l'appareil sont
endommagés de quelque
façon que ce soit.
Cessez immédiatement
l'utilisation et appelez
l'équipe de soutien aux
consommateurs de
Breville pour le faire
vérifier, réparer ou ajuster.
• Cet appareil est muni d'un
cordon d'alimentation
relié à la terre et d'une
fiche reliée à la terre.
L'appareil doit être relié
à la terre par une prise à
3 orifices correctement
reliée à la terre. En cas
de court-circuit, la mise à
la terre réduira le risque
d'électrocution.
• Si l'appareil est relié à la
terre, la rallonge doit être
à 3 fils avec mise à la terre.
BTA735_USC_IB_A18.indd 20 4/12/18 1:30 pm

21
• Si la prise électrique est
standard à 2 orifices, il est
de votre responsabilité et
obligation de la remplacer
par une prise à 3 orifices
correctement reliée à la
terre.
• Ne tentez en aucune
circonstance de couper
ou de retirer la troisième
broche (mise à la terre) de
la fiche d'alimentation et
n'utilisez pas d'adaptateur.
• Consultez un électricien
qualifié si vous ne
maîtrisez pas parfaitement
les instructions de mise
à la terre ou si vous
doutez que l'appareil soit
correctement mis à la
terre.
NOTE
Ce grille-pain est contrôlé
électroniquement et ne
fonctionnera pas s'il n'est
pas branché dans une prise
électrique de 110-120 volts.
INSTRUCTIONS SUR LE
COURT CORDON
Votre appareil Breville est
muni d'un court cordon
d'alimentation très sécu-
ritaire qui prévient les
risques de blessures ou
dommages pouvant résul-
ter du fait de tirer, trébu-
cher ou s'enchevêtrer dans
un cordon plus long. Les
cordons d'alimentation dé-
tachables ou les rallonges
peuvent être utilisés avec
précaution. Si vous utilisez
une rallonge : (a) sa puis-
sance nominale doit être
équivalente ou supérieure
à la puissance nominale de
l'appareil; (2) la rallonge ne
doit pas pendre d'un comp-
toir ou d'une table où de
jeunes enfants pourraient
s'y suspendre ou trébu-
cher accidentellement; (s)
la rallonge doit être munie
d'une fiche à trois broches
reliée à la terre.
BTA735_USC_IB_A18.indd 21 4/12/18 1:30 pm

22
IMPORTANT
Ne faites jamais
fonctionner le grille-pain
sur le côté. Ne tartinez
jamais le pain de substance
alimentaire, comme du
beurre, de la gelée ou de
la marmelade, car cela
pourrait provoquer un
incendie ou entraîner une
électrocution.
Ce grille-pain sert
uniquement à griller le
pain, les bagels, les muffins
anglais et les tartelettes
pour grille-pain. Le fait de
griller d'autres aliments
peut provoquer un
incendie ou entraîner une
électrocution.
USAGE DOMESTIQUE SEULEMENT
CONSERVEZ CES INSTRUCTIONS
BTA735_USC_IB_A18.indd 22 4/12/18 1:30 pm

23
D
E
F
G
Composants
A. Indicateurs de coloration
Les indicateurs à DEL indiquent le réglage
de coloration et la progression du grillage.
B. Anneau de sélection du pain
Sélectionnez votre type de pain pour
assurer un grillage uniforme de tous les
types de pain, et ce, en toute facilité.
La durée de grillage dépend du type de
pain. Sélectionnez Whole Wheat, White,
Bagel, Waes, Pastries ou English Muns
(Bél entier, Blanc, Bagel, Gaufres, Tartelettes
pour grille-pain ou Muns anglais) pour
vous assurer d'obtenir le même grillage à
chaque fois.
C. Bouton sélecteur de coloration
Sélectionnez le degré de coloration de votre
pain. Les réglages vont de «0» (pâle) à «6»
(foncé).
D. «LIFT & LOOK™» / Levier à hauteur élevée
Utilisez le levier pendant le cycle de grillage
pour relever ou abaisser le chariot et vérifier
la progression du grillage sans interrompre
le cycle. La fonction de levier à hauteur
élevée facilite le retrait de petits articles
comme les bagels ou les muns
anglais.
E. «A BIT MORE™»
Si votre pain n'est pas assez grillé, une seule
touche prolongera quelque peu le temps de
grillage.
Touche «RÉCHAUFFER»
Si votre pain s'est relevé et a refroidi,
appuyez sur cette touche pour le réchauffer.
F. Touche «CONGELÉ»
Ajoute le temps additionnel requis pour
griller le pain congelé.
G. Touche «ANNULER »
Annule le cycle de grillage.
NON ILLUSTRÉE
Fiche Breville Assist™
A
C
B
BTA735_USC_IB_A18.indd 23 4/12/18 1:30 pm

24
Fonctions
NOTE
Ce grille-pain est contrôlé électroniquement
et ne fonctionnera pas s'il n'est pas branché
dans une prise électrique de 110/120 V.
Avant la première utilisation, retirez tout le
matériel d'emballage ou toutes les étiquettes
promotionnelles attachés à votre grillle-pain.
1. Insérez la fiche d'alimentation dans
une prise électrique de 110-120 V. Les
indicateurs de coloration s'allumeront de
«0» à «6», puis s'aligneront sur le réglage de
coloration sélectionné (tel qu'indiqué sur la
position du sélecteur et des indicateurs de
coloration). Le grille-pain passera en mode
veille (les indicateurs lumineux diminuent)
après quelques minutes, si une touche n'est
pas enfoncée ou que le sélecteur n'a pas été
réglé.
NOTE
Lorsque vous utilisez le grille-pain pour la
première fois, nous vous suggérons d'essayer
le réglage maximal sans pain. Une fine fumée
ou une odeur distincte peuvent s'en dégager.
Ceci est normal et ne nuit aucunement à la
performance de l'appareil.
2. Placez le pain, les bagels ou autres articles
dans les fentes de grillage. Assurez-vous que
les tranches ne sont pas trop grandes ou
épaisses pour convenir aux fentes.
3. Sélectionnez le type de pain en utilisant
l'anneau de sélection.
NOTE
Différents types de pain peuvent nécessiter
un réglage de coloration différent. Par
exemple, les pains blancs à texture légère
requièrent moins de temps de grillage que
les pains de blé entier à texture plus dense.
Le fait de déplacer l'anneau de sélection
permet ces modifications sans modifier
le sélecteur de coloration, afin que vous
obteniez toujours la même coloration, quel
que soit le type de pain.
4. Lorsque vous utilisez le bouton sélecteur de
coloration, alignez l'aiguille sur le réglage
désiré, de «0» (pâle) à «6» (foncé). Les
indicateurs s'allumeront et s'aligneront sur
le réglage de coloration sélectionné. Ledit
réglage est relatif à chaque type de pain.
Il n'est donc pas nécessaire de l'ajuster en
fonction des différents types de pain si vous
avez les mêmes exigences de coloration.
NOTE
Lorsque vous faites griller du pain pour
la première fois, il est suggéré d'utiliser le
réglage de coloration «3» (9 indicateurs
lumineux).
5. Pour démarrer, appuyez sur le levier jusqu'à
ce qu'il s'enclenche. Les indicateurs de
coloration commenceront à clignoter à
«0», puis suivront leur progression jusqu'au
réglage sélectionné.
6. Une fois le cycle de grillage terminé, le
chariot se relèvera. Retirez le pain grillé.
L'indicateur de coloration s'allumera au
réglage sélectionné précédemment pendant
quelques minutes avant de passer en mode
veille.
BTA735_USC_IB_A18.indd 24 4/12/18 1:30 pm
25
NOTE
Pour sortir du mode veille et réactiver le
grille-pain, appuyez sur n'importe quel
touche ou utilisez le bouton sélecteur de
coloration. Les indicateurs de coloration
s'allumeront à nouveau.
AVERTISSEMENT
Ne laissez pas le grille-pain sans surveillance
lorsqu'il est en marche, car les tranches de
pain grillé pourraient se coincer. Dans le cas
peu probable où le pain, les bagels, les muffins
anglais ou les tartelettes pour grille-pain se
coinceraient dans les fentes, toutes les touches
et les indicateurs à DEL clignoteront et les
éléments s'éteindront. Débranchez l'appareil
et laissez-le refroidir complètement avant de
retirer délicatement le pain des fentes. Veillez
à ne pas endommager les éléments chauffants.
N'utilisez pas d'ustensiles en métal.
SÉLECITON DU TYPE DE PAIN
La fonction de sélection du pain modifie la
durée totale de grillage pour chaque type de
pain, afin que vous puissiez obtenir la même
coloration, peu importe le type de pain.
Pour griller différents types de pain
1. Insérez le pain dans les fentes de grillage.
2. Réglez l'anneau de sélection au type de pain
que vous grillez.
WHOLE
WHEAT
WHITE
MUFFIN
BAGEL
WAFFLES
PASTRIES
3. Sélectionnez le réglage de coloration
désiré en utilisant le bouton sélecteur de
coloration. Les réglages vont de «0» (pâle) à
«6» (foncé).
WHOLE
WHEAT
WHITE
MUFFIN
BAGEL
WAFFLES
PASTRIES
4. Pour démarrer, appuyez sur le levier jusqu'à
ce qu'il s'enclenche.
5. Le cycle de grillage peut être arrêté en
tout temps en appuyant sur la touche
ANNULER.
SÉLECTION DE BAGEL OU MUFFIN
ANGLAIS
La sélection du type de pain (bagel ou muffin
anglais) réglera le temps total de grillage et
activera une chaleur supplémentaire sur les
éléments chauffants centraux pour griller
parfaitement l'intérieur de vos bagels ou
muffins anglais sans brûler l'extérieur.
Pour griller un bagel :
1. Placez le bagel dans les fentes de grillage
avec le côté coupé tourné vers l'intérieur, tel
qu'indiqué par la marque
sur le dessus
du grille-pain.
CÔTÉ
COUPÉ
VERS
L'INTÉRIEUR
BA G E LS
BTA735_USC_IB_A18.indd 25 4/12/18 1:30 pm
26
2. Réglez l'anneau de sélection à BAGEL.
WHOLE
WHEAT
WHITE
MUFFIN
BAGEL
WAFFLES
PASTRIES
3. Sélectionnez le réglage de coloration désiré
en utilisez le bouton sélecteur de coloration.
Les réglages vont de «0» (pâle) à «6»
(foncé).
4. Pour démarrer le processus de grillage,
appuyez sur le levier jusqu'à ce qu'il
s'enclenche.
POUR GRILLER UN MUFFIN ANGLAIS :
1. Placez le muffin anglais dans les fentes
de grillage avec le côté coupé tourné vers
l'intérieur.
2. Réglez l'anneau de sélection à
MUFFIN.
WHOLE
WHEAT
WHITE
MUFFIN
BAGEL
WAFFLES
PASTRIES
3. Sélectionnez le réglage de coloration
désiré en utilisant le bouton sélecteur de
coloration.
4. Appuyez sur le levier jusqu'à ce qu'il
s'enclenche.
NOTE
Il est normal que les éléments chauffants
extérieurs semblent éteints ou à peine allumés
pendant le réglage BAGEL ou MUFFIN
ANGLAIS. Cela permet de griller l'intérieur du
bagel sans brûler l'extérieur.
«A BIT MORE™ / RÉCHAUFFER»
Si votre pain n'est pas assez grillé, cette touche
prolongera quelque peu le temps de grillage.
Cette fonction peut être sélectionnée avant,
pendant ou après le cycle de grillage et s'utilise
pour toutes les fonctions de types de pain et la
fonction «CONGELÉ».
Pour utiliser cette fonction durant
le cycle de grillage :
Appuyez sur la touche A BIT MORE™ /
Réchauffer. Le contour de la touche s'allumera
en blanc. Le temps de grillage augmentera
automatiquement, mais les indicateurs de
coloration ne s'allumeront plus. La fonction A
BIT MORE™ / Réchauffer peut être annulée en
appuyant à nouveau sur la touche. Le cycle de
grillage initial se poursuivra.
Pour utiliser cette fonction avant ou après le
cycle de grillage :
Appuyez sur la touche A BIT MORE™ /
Réchauffer. Le contour de la touche s'allumera
en blanc. Appuyez sur le levier jusqu'à ce qu'il
s'enclenche. Les indicateurs de coloration
s'aligneront automatiquement sur le réglage
de coloration le plus bas, puis clignoteront;
le compte à rebours du temps de coloration
supplémentaire débutera.
TOUCHE «CONGELÉ»
Cette fonction ajoute le temps additionnel requis
pour griller le pain congelé.
Pour griller le pain congelé :
1. Placez le pain dans les fentes de grillage.
2. Réglez l'anneau de sélection au type de pain à
griller.
3. Sélectionnez le réglage de coloration désiré en
utilisant le bouton sélecteur de coloration. Les
réglages vont de «0» (pâle) à «6» (foncé).
4. Appuyez sur la touche CONGELÉ et le
contour s'allumera en blanc.
5. Pour démarrer le cycle de grillage, appuyez sur
le levier jusqu'à ce qu'il s'enclenche. Le temps
de grillage augmentera automatiquement.
6. À la fin du cycle, la touche CONGELÉ
s'éteindra.
BTA735_USC_IB_A18.indd 26 4/12/18 1:30 pm

27
NOTE
La fonction «CONGELÉ» peut être annulée en
appuyant à nouveau sur la touche CONGELÉ;
le cycle de grillage initial se poursuivra.
«LEVIER LIFT & LOOK™»
Cette fonction vous permet de relever
et d'abaisser le chariot afin de vérifier la
progression du grillage sans interrompre
le cycle. Pendant le grillage, il vous suffit de
soulever le levier pour voir la progression du
grillage. Abaissez-le pour poursuivre le cycle
ou appuyez sur ANNULER pour l'arrêter à tout
moment.
«HAUTEUR DE LEVIER ÉLEVÉE»
Le levier peut être relevé à environ 2 cm au-
dessus de sa position originale, permettant
de soulever le chariot, ce qui facilite le retrait
d'articles plus petits comme les muffins anglais
ou les bagels.
BTA735_USC_IB_A18.indd 27 4/12/18 1:30 pm

28
Entretien et
nettoyage
1. Débranchez le grille-pain et laissez-le
refroidir complètement avant de le nettoyer.
2. Pour enlever les miettes, retirer le ramasse-
miettes (logé sous la poignée gauche) en le
tirant vers vous. Videz le ramasse-miettes
et replacez-le avant d'utiliser à nouveau le
grille-pain. Réinsérez le ramasse-miettes
en le glissant vers l'avant jusqu'à ce qu'il
s'enclenche.
3. Pour dégager les miettes coincées à
l'intérieur, retournez le grille-pain au-dessus
d'une poubelle et secouez-le délicatement.
NE PAS COGNER le grille-pain, car cela
pourrait endommager les éléments ou le
mécanisme du chariot.
Essuyez l'extérieur du grille-pain avec un
chiffon doux et humide, puis séchez-le
complètement avec un chiffon doux et sec.
NOTE
Ne nettoyez pas le grille-pain avec des
tampons à récurer en métal, car des
morceaux peuvent s'en détacher et toucher
les pièces électriques, entraînant un risque
d'électrocution et endommageant le boitier de
l'appareil.
RANGEMENT
Débranchez le grille-pain et laissez-le refroidir
complètement avant de le ranger. Suivez les
consignes de nettoyage et rangez l'appareil à la
verticale sur une surface plane, un comptoir ou
dans une armoire accessible.
Ne rangez rien sur le dessus du grille-pain.
AVERTISSEMENT
N'utilisez pas le grille-pain sans le ramasse-
miettes en place. Ne laissez pas les miettes
s'accumuler dans le ramasse-miettes. Le défaut
de nettoyer régulièrement le ramasse-miettes
peut entraîner un riche d'incendie.
BTA735_USC_IB_A18.indd 28 4/12/18 1:30 pm

29
Notes
BTA735_USC_IB_A18.indd 29 4/12/18 1:30 pm

30
Notes
BTA735_USC_IB_A18.indd 30 4/12/18 1:30 pm

31
Notes
BTA735_USC_IB_A18.indd 31 4/12/18 1:30 pm

Breville, the Breville Logo, Master Every Moment, Toast Select, Lift & Look and A Bit More are trademarks of Breville Pty Ltd (“Breville”)
and Breville's products are distributed in the USA and Canada under license.
Breville, la Breville Logo, Master Every Moment, Toast Select, Lift & Look et A Bit More sont des marques de commerce de Breville Pty
Ltd ("Breville") et les produits Breville sont distribués aux États-Unis et au Canada sous licence.
Copyright Breville Pty. Ltd. 2018.
Due to continued product improvement, the products illustrated/photographed in this booklet may vary slightly from the actual product.
BTA735 USC A18
Web: www.breville.ca/supportWeb: www.brevilleusasupport.com
USA
Mail: Breville USA
19400 S. Western Ave
Torrance CA
90501-1119
Phone: 1-866-273-8455
1-866-BREVILLE
Canada
Mail: Breville Canada
9800 Boulevard Cavendish,
Suite 250, Saint-Laurent,
Québec, H4M 2V2
Phone:
1-855-683-3535
Breville Consumer Support
BTA735_USC_IB_A18.indd 32 4/12/18 1:30 pm