
BA8150
THIS INSTRUCTION BOOKLET CONTAINS IMPORTANT SAFETY INFORMATION.
PLEASE READ AND KEEP FOR FUTURE REFERENCE.
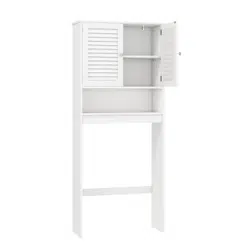
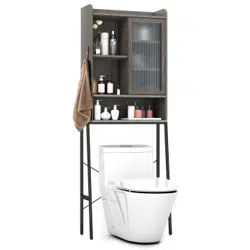
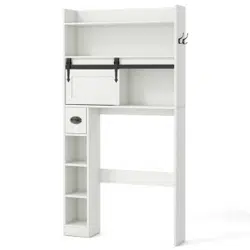
Over-the-toilet Storage Cabinet
Toilettenregal
Meuble de Rangement Au-Dessus des Toilettes
Armario sobre Inodoro
Mobile Sopra la Toilette
Szafka nad toaletę
DEU office: FDS GmbH, Neuer Höltigbaum 36, 22143 Hamburg, Deutschland
GBR office: FDS Corporation Limited,Unit 4, Blackacre Road, Great Blakenham,Ipswich, Ip6 0FL,United Kingdom
ITA office: Milano
FRA office: Saint Vigor d'Ymonville
POL office: GdańskAUS office: TruganinaUSA office: Fontana

Before You Start
Please read all instructions carefully.
Retain instructions for future reference.
Separate and count all parts and hardware.
Read through each step carefully and follow the proper order.
We recommend that, where possible, all items are assembled near to the area in
which they will be placed in use, to avoid moving the product unnecessarily once
assembled.
Always place the product on a flat, steady and stable surface.
Keep all small parts and packaging materials for this product away from babies
and children as they potentially pose a serious choking hazard.
EN
DE
Bitte lesen Sie alle Anweisungen sorgfältig durch.
Bewahren Sie die Anweisungen zum zukünftigen Verwendung auf.
Überprüfen Sie, ob alle Teile und Zubehörteile vorhanden sind.
Lesen Sie jeden Schritt sorgfältig durch und befolgen Sie die richtige Reihenfolge.
Wir empfehlen, alle Teile möglichst in der Nähe des Aufstellungsortes zu
montieren, um unnötige Bewegungen nach der Montage zu vermeiden.
Stellen Sie den Artikel immer auf eine ebene, feste und stabile Fläche.
Halten Sie alle kleinen Teile und Verpackungsmaterialien fern von Babys und
Kindern, ansonsten besteht Erstickungsgefahr.
Vor dem Beginnen
FR
Veuillez lire attentivement toutes les instructions.
Conservez les instructions pour vous y référer ultérieurement.
Vérifiez toutes les pièces et les accessoires.
Lisez attentivement chaque étape et suivez l'ordre correct.
Nous recommandons que, dans la mesure du possible, tous les produits soient
assemblés à proximité de la zone où ils seront utilisés, afin d'éviter tout
déplacement inutile du produit une fois assemblé.
Placez toujours le produit sur une surface plane et stable.
Conservez toutes les petites pièces de ce produit et les matériaux d'emballage
hors de portée des bébés et des enfants, car ils pourraient présenter un risque
d'étouffement.
Lea atentamente todas las instrucciones.
Conserve las instrucciones para futuras consultas.
Separe y cuente todas las piezas y los accesorios.
Lea detenidamente cada paso y siga el orden correcto.
Recomendamos que, siempre que sea posible, todos los elementos se monten
cerca de la zona en la que se van a utilizar, para evitar mover el producto
innecesariamente una vez montado.
Coloque siempre el producto sobre una superficie plana, estable y firme.
Mantenga todas las piezas pequeñas y los materiales de embalaje de este
producto lejos de los bebés y los niños, ya que pueden representar un grave
riesgo de asfixia.
ES
Avant de Commencer
Antes de Empezar
02 03
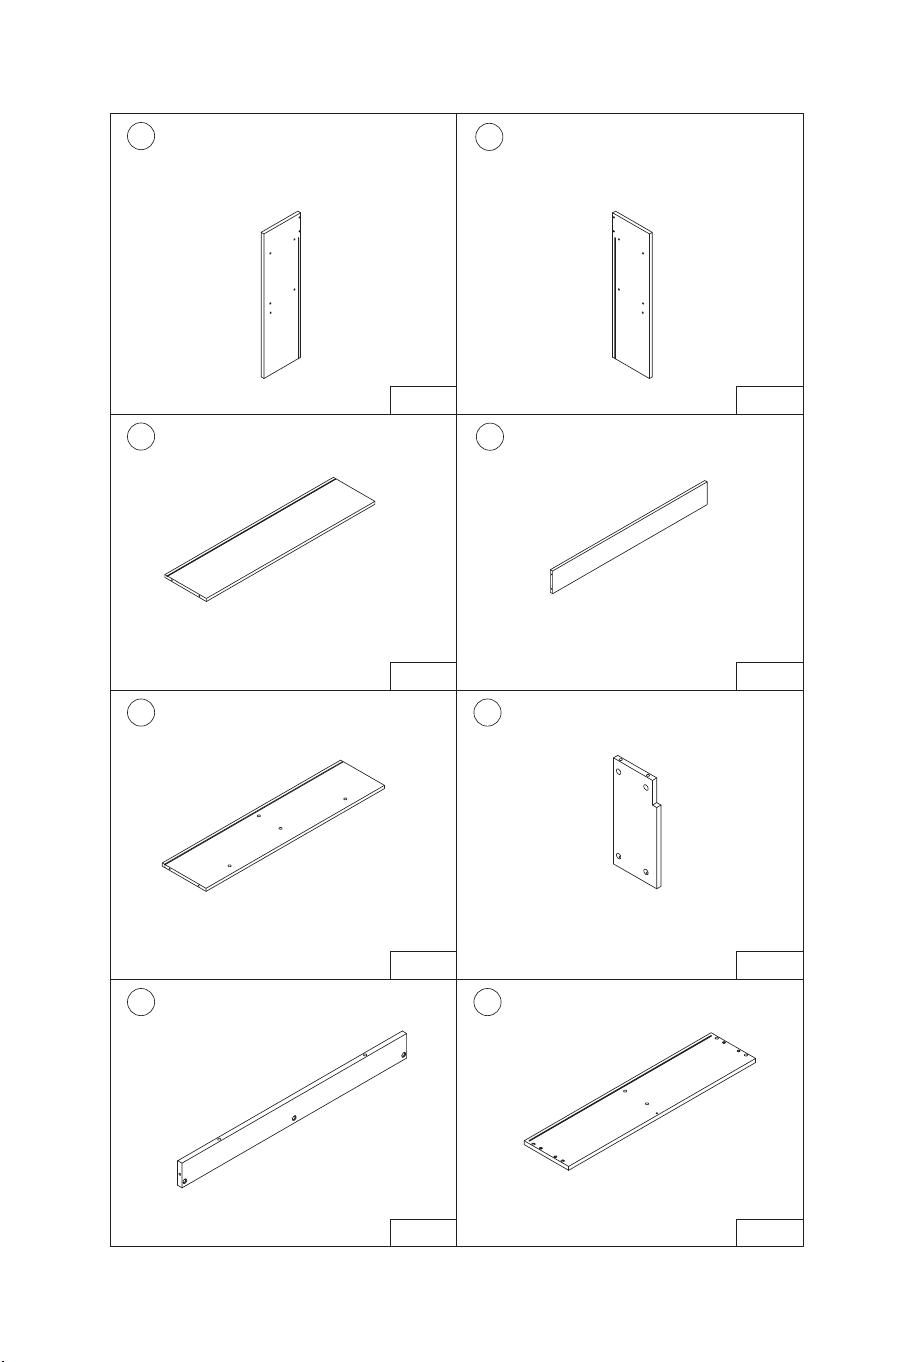
1 2
3 4
x1
5
x1
6
x1
7
x1
8
x1
x1 x1
x1
Si prega di leggere attentamente tutte le istruzioni.
Conservare le istruzioni per riferimento futuro.
Separare e contare tutte le parti e gli accessori.
Leggere attentamente ogni passo e seguire l'ordine corretto.
Si consiglia, ove possibile, di assemblare tutti gli articoli vicino alla zona in cui
verranno posti in uso, per evitare di spostare inutilmente il prodotto una volta
assemblato.
Posizionare sempre il prodotto su una superficie piana, stabile.
Tenere tutte le piccole parti e i materiali di imballaggio di questo prodotto lontano
dalla portata di neonati e bambini, in quanto possono costituire un serio pericolo
di soffocamento.
Zapoznaj się z instrukcją.
Zachowaj instrukcję do wglądu.
Posortuj części i upewnij się, że zestaw jest kompletny.
Zapoznaj się ze sposobem montażu i postępuj zgodnie z instrukcją.
Zalecamy, aby montaż odbywał się możliwie najbliżej miejsca docelowego
położenia produktu, aby uniknąć niepotrzebnego przesuwania.
Upewnij się, że produkt znajdzie się na płaskiej i stabilnej po wierzchni.
Upewnij się, że materiały wykorzystane podczas pakowania produktu oraz jego
elementy znajdują się poza zasięgiem dzieci, gdyż stwarzają potencjalne ryzyko
zadławienia.
IT
PL
Prima di Iniziare
Zanim Zaczniesz
04 05
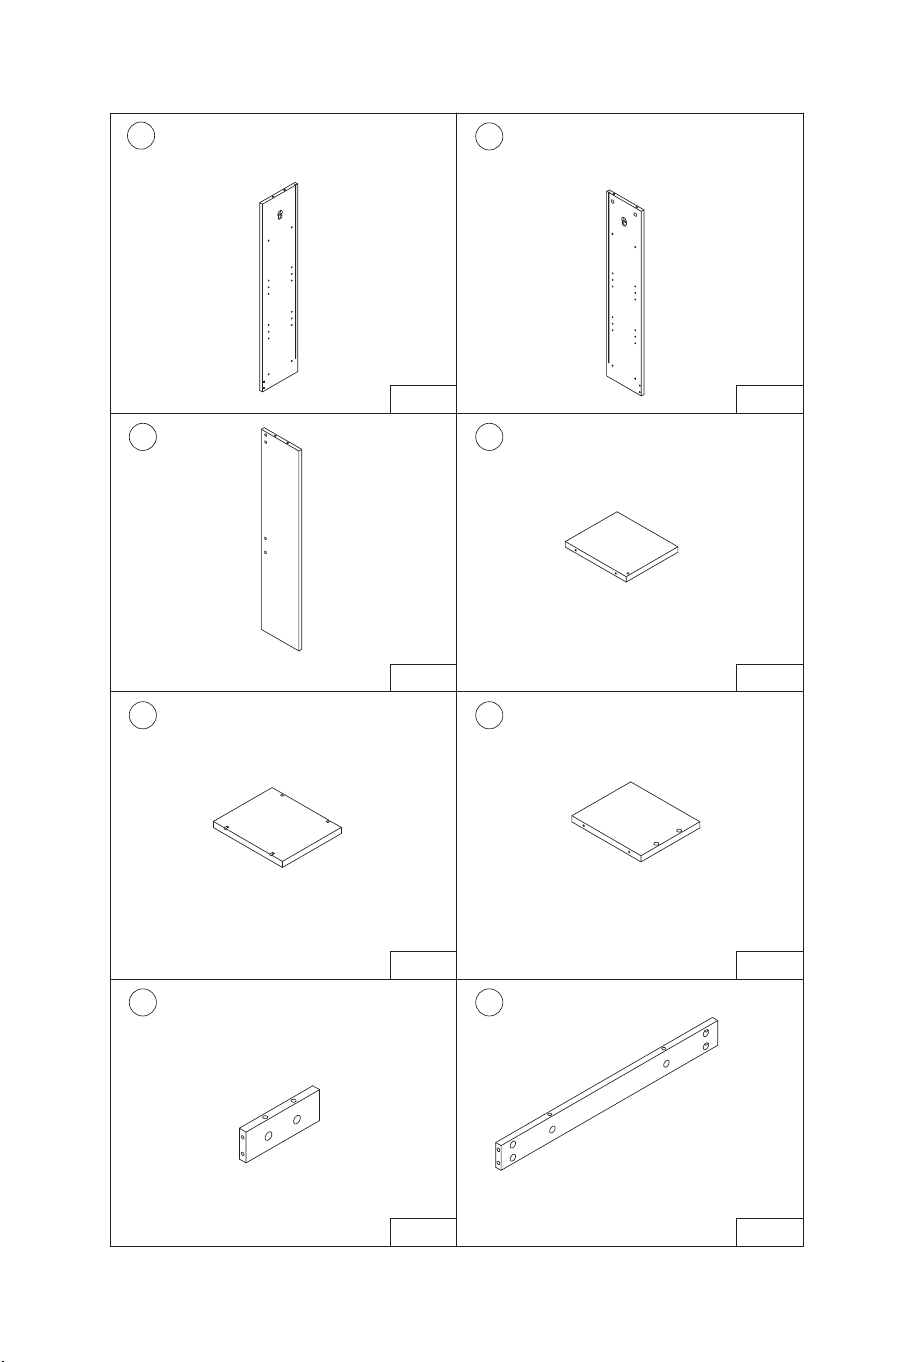
x1
x2 x1
x1
x1
x1
x1
x1
9
10
11 12
13 14
15 16
x1 x1
x1 x1
18
19 20
21 22
17
x1x1
06 07

x1
x2 x1
x1
x1
x1
x1
x1
9
10
11 12
13 14
15 16
x1 x1
x1 x1
18
19 20
21 22
17
x1x1
06 07
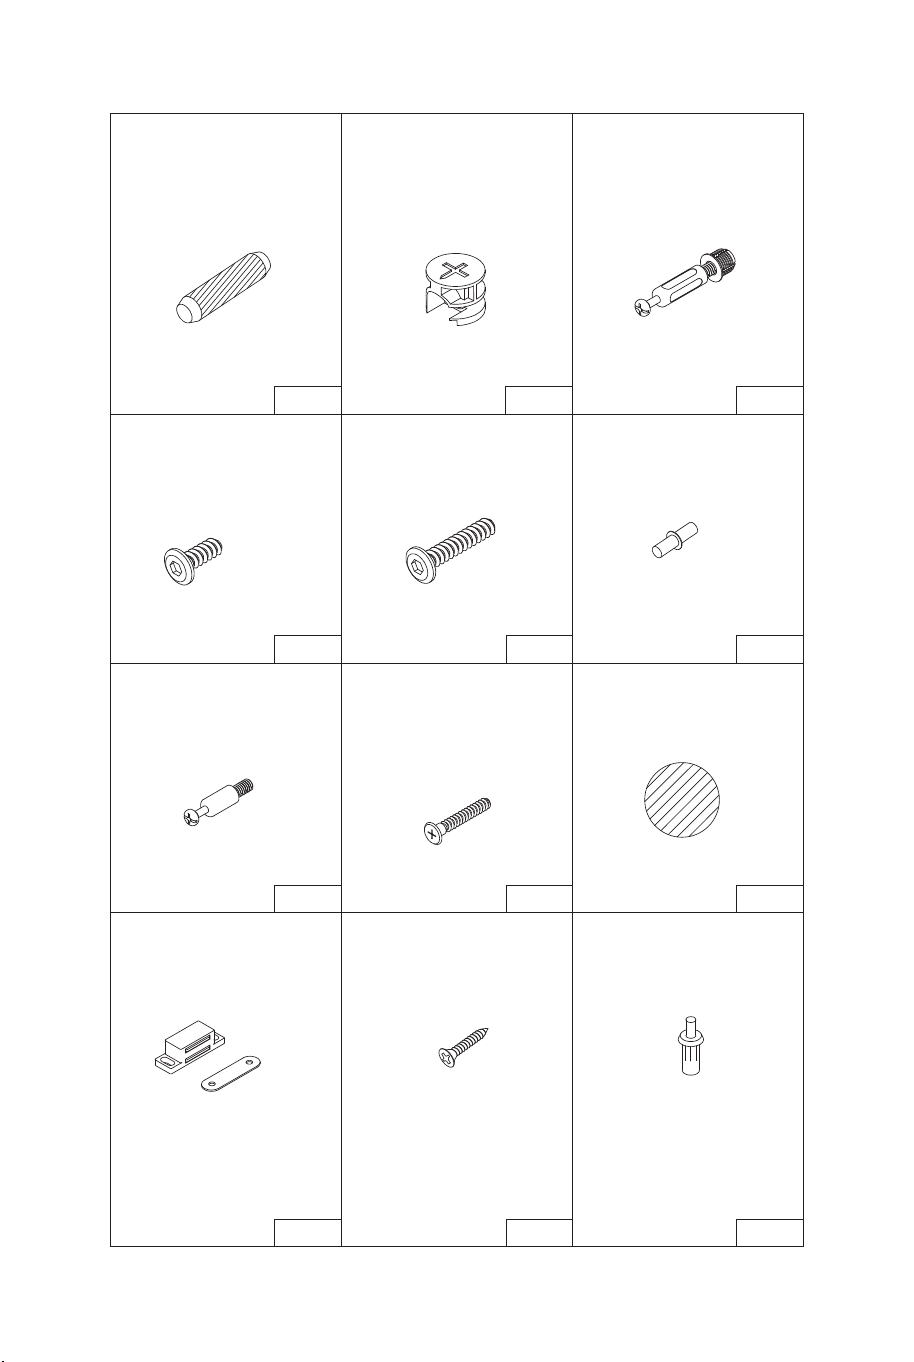
A
x6
φ8*30mm
B
C
x24
D E
φ15*12mm
x20
φ6*43mm
F
G
H
x3 x9
x1
J1
J2
x12
x46
K3*14mm
I
M6*12mm
x4
M6*25mm
x4
φ6*28mm
x24
M5*40mm
J K L
x2
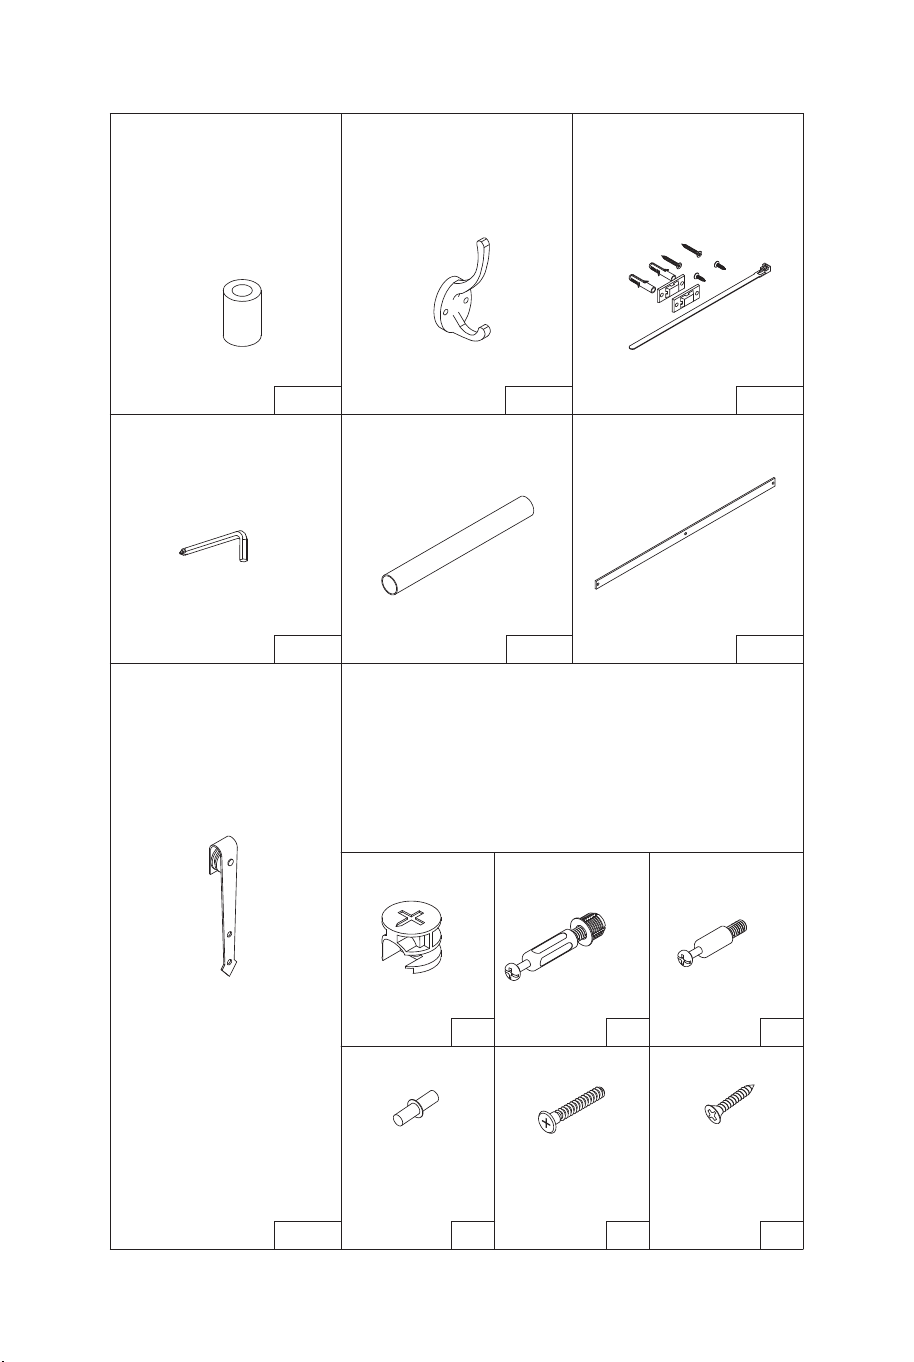
M
x3
N
O
x2
P
Q
x2
R
S
Spare Hardware
/Ersatz-Hardware
/Matériel de Rechange
/Accesorios de Repuesto
/Hardware di Ricambio
/Części zapasowe
x1
x2
x2
x1 x1
φ15*12mm
φ6*43mm
K3*14mm
x1 x1
φ6*28mm
x2x2
M5*40mm
x1
08 09
A
x6
φ8*30mm
B
C
x24
D E
φ15*12mm
x20
φ6*43mm
F
G
H
x3 x9
x1
J1
J2
x12
x46
K3*14mm
I
M6*12mm
x4
M6*25mm
x4
φ6*28mm
x24
M5*40mm
J K L
x2
M
x3
N
O
x2
P
Q
x2
R
S
Spare Hardware
/Ersatz-Hardware
/Matériel de Rechange
/Accesorios de Repuesto
/Hardware di Ricambio
/Części zapasowe
x1
x2
x2
x1 x1
φ15*12mm
φ6*43mm
K3*14mm
x1 x1
φ6*28mm
x2x2
M5*40mm
x1
08 09
C x 2
14
15
B
B
B
A
H
H
H
H
H
H
H
H
A
A
A
A
H
14
15
9
10
12
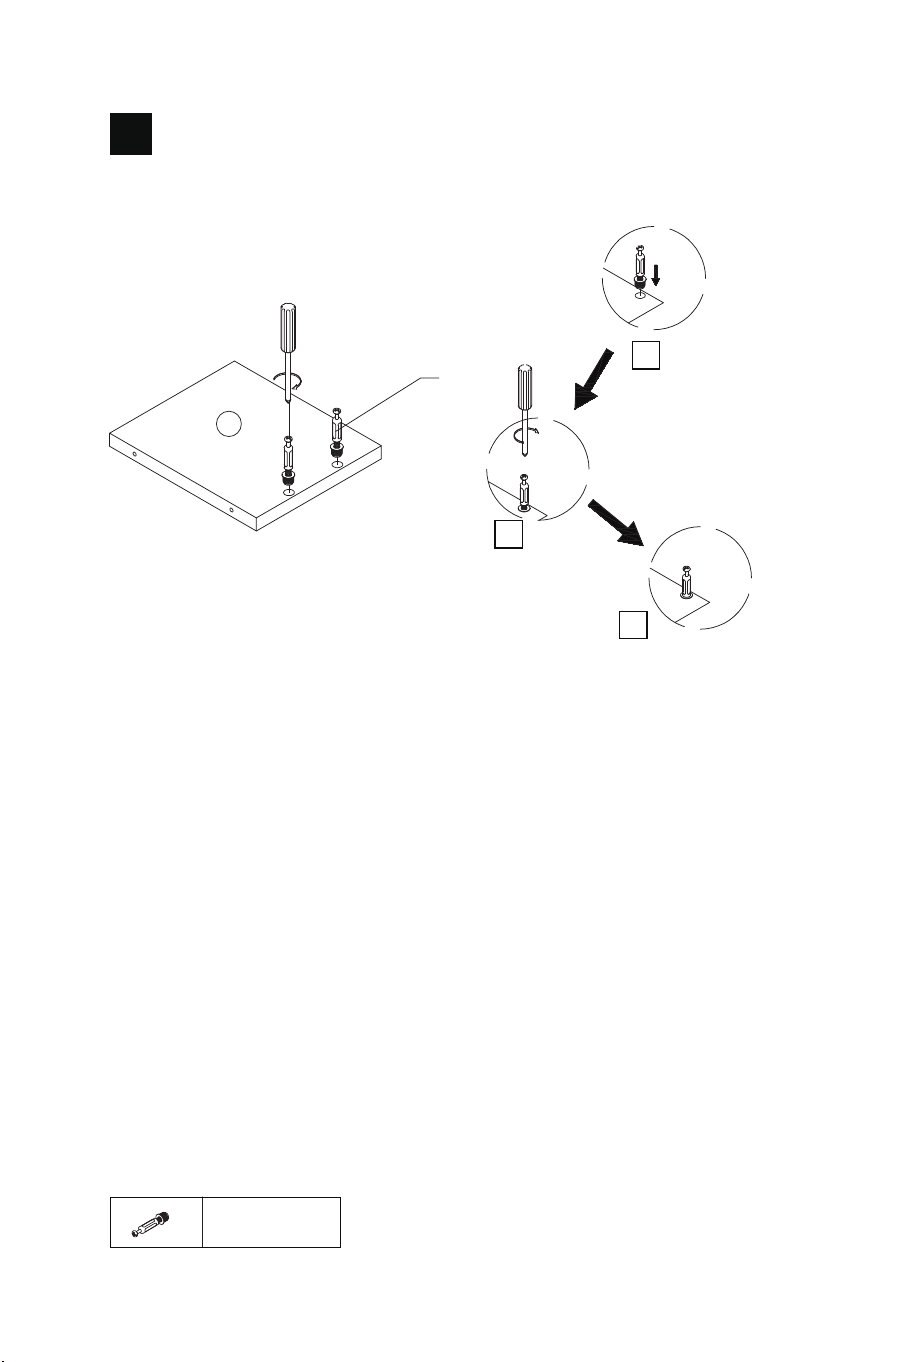
EN: Note: If the white plastic part can not be pressed in, use the tool
to knock down gently.
DE: Hinweis: Wenn sich das weiße Kunststoffteil nicht eindrücken
lässt, klopfen Sie es mit dem Werkzeug vorsichtig ein.
FR: Remarque: Si la partie en plastique blanc ne peut pas être
enfoncée, utilisez l'outil pour l'enfoncer doucement.
ES: Nota: Si la pieza de plástico blanca no puede introducirse a
presión, utilice la herramienta para golpearla suavemente.
IT: Nota: Se non è possibile premere la parte in plastica bianca,
utilizzare l'attrezzo per abbatterla delicatamente.
PL: Uwaga: Jeżeli nie da się wcisnąć białej plastikowej części, użyj
odpowiedniego narzędzia.
1
2
3
14
C
C
C
1
2
3
B x 2
H x 8
A x 4
10 11
C x 2
14
15
B
B
B
A
H
H
H
H
H
H
H
H
A
A
A
A
H
14
15
9
10
12
EN: Note: If the white plastic part can not be pressed in, use the tool
to knock down gently.
DE: Hinweis: Wenn sich das weiße Kunststoffteil nicht eindrücken
lässt, klopfen Sie es mit dem Werkzeug vorsichtig ein.
FR: Remarque: Si la partie en plastique blanc ne peut pas être
enfoncée, utilisez l'outil pour l'enfoncer doucement.
ES: Nota: Si la pieza de plástico blanca no puede introducirse a
presión, utilice la herramienta para golpearla suavemente.
IT: Nota: Se non è possibile premere la parte in plastica bianca,
utilizzare l'attrezzo per abbatterla delicatamente.
PL: Uwaga: Jeżeli nie da się wcisnąć białej plastikowej części, użyj
odpowiedniego narzędzia.
1
2
3
14
C
C
C
1
2
3
B x 2
H x 8
A x 4
10 11
20
14
9
10
C x 4
11
C
C
C
C
C
C x 4
C
C
C
C
10
4
5
6
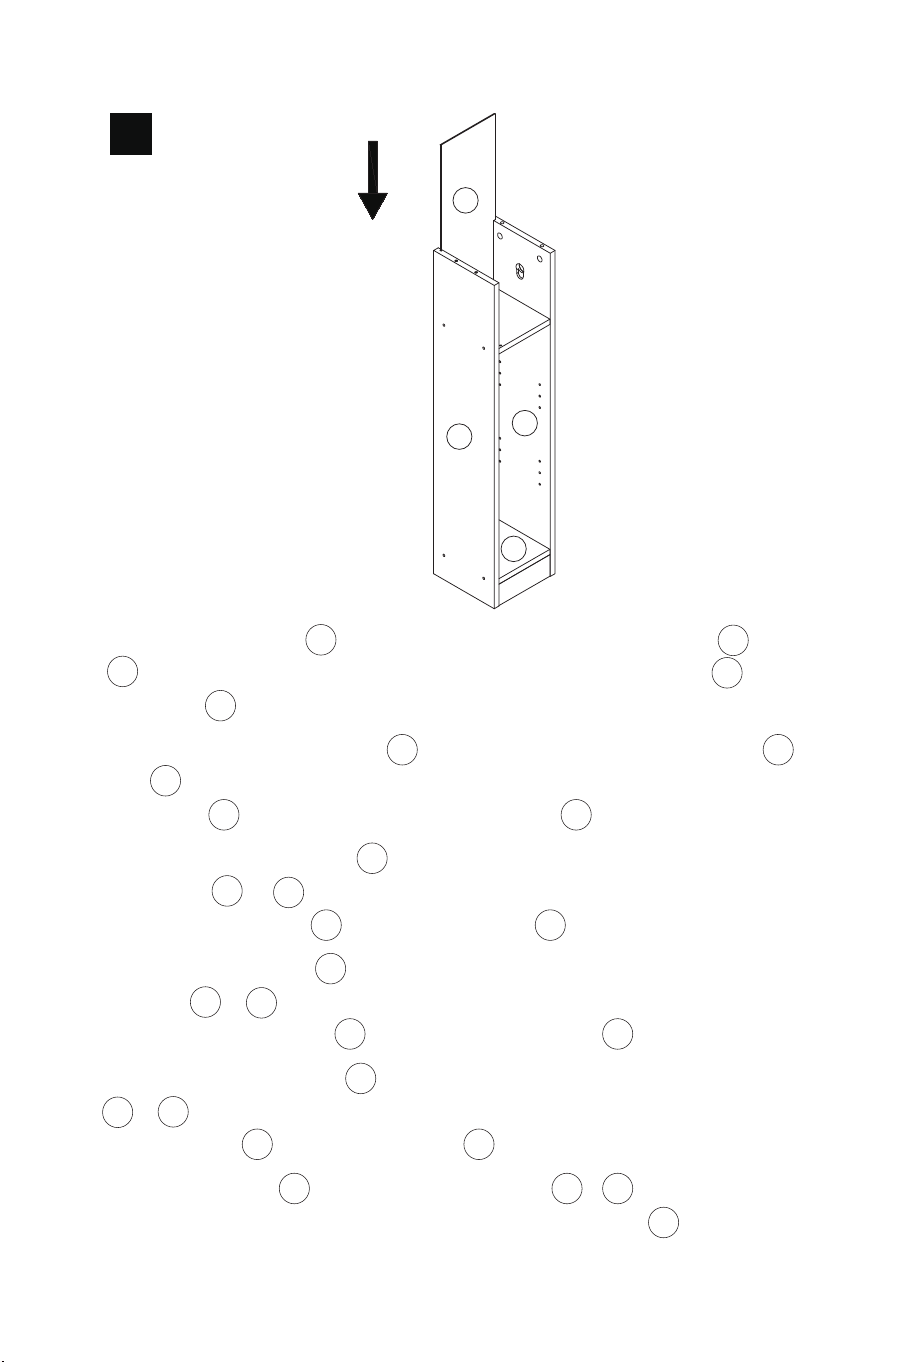
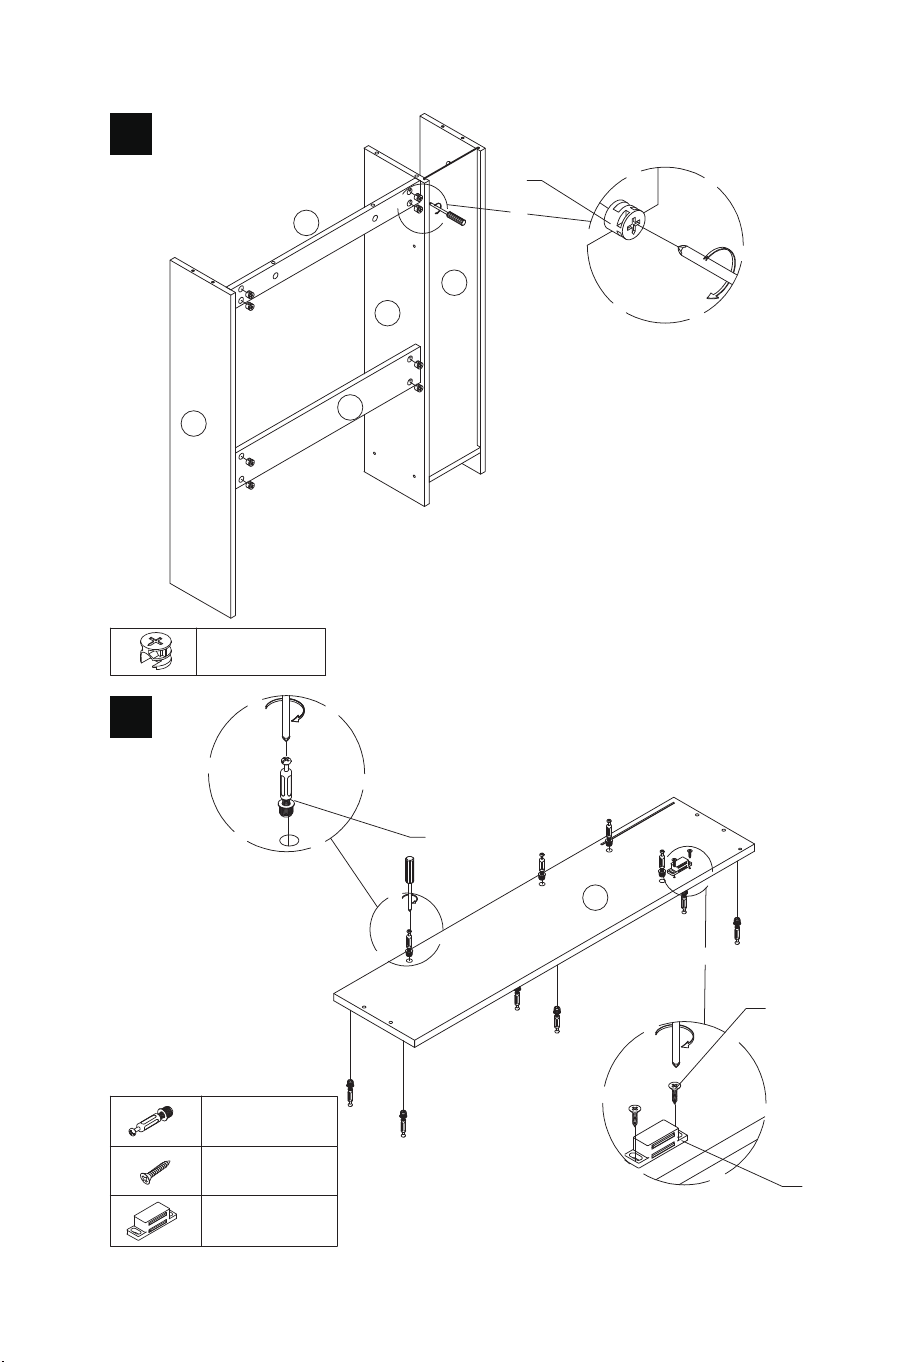
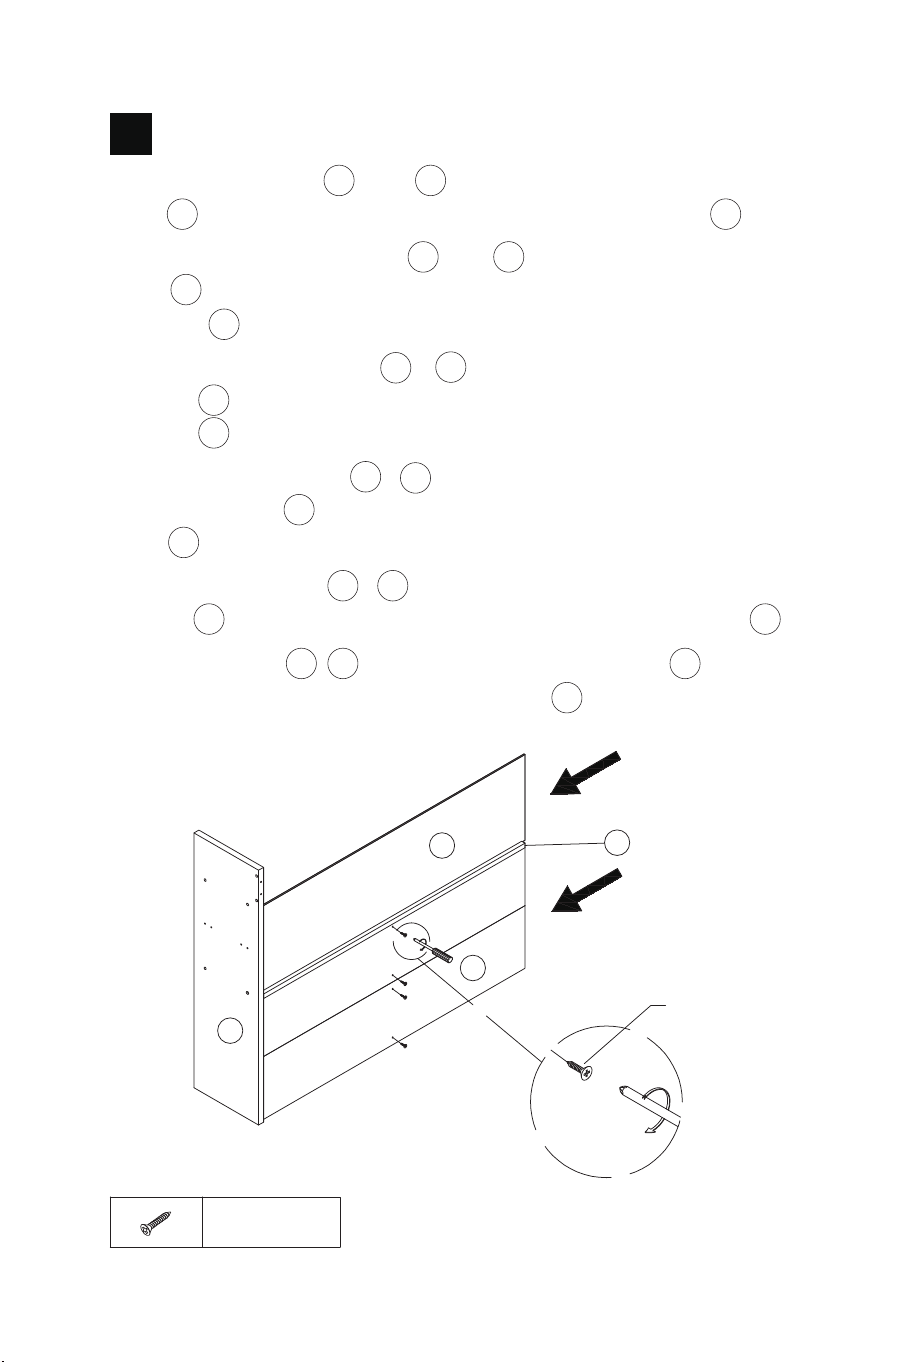
EN: Push the panel 20 to the bottom along the slots in panels 9 and
10 , noting that it also needs to snap into the slot in the panel 14 as
the panel 20 bottoms out.
DE: Schieben Sie die Platte 20 entlang der Schlitze in den Platten 9
und 10 nach unten und beachten Sie, dass sie auch in den Schlitz in
der Platte 14 einrasten muss, wenn die Platte 20 nach unten kommt.
FR: Poussez le panneau 20 vers le bas le long des fentes des
panneaux 9 et 10 , en notant qu'il doit également s'enclencher dans
la fente du panneau 14 lorsque le panneau 20 s'abaisse.
ES: Empuje el panel 20 hasta el fondo a lo largo de las ranuras de los
paneles 9 y 10 , teniendo en cuenta que también tiene que encajar
en la ranura del panel 14 a medida que el panel 20 toca fondo.
IT: Spingere il pannello 20 verso il fondo lungo le fessure dei pannelli
9 e 10 , tenendo presente che deve anche incastrarsi nella fessura
del pannello 14 mentre il pannello 20 si abbassa.
PL: Wsuń panel 20 w szczeliny w panelach 9 i 10 , pamiętając, że
musi on również zatrzasnąć się w szczelinie w panelu 14 .
12 13
20
14
9
10
C x 4
11
C
C
C
C
C
C x 4
C
C
C
C
10
4
5
6
EN: Push the panel 20 to the bottom along the slots in panels 9 and
10 , noting that it also needs to snap into the slot in the panel 14 as
the panel 20 bottoms out.
DE: Schieben Sie die Platte 20 entlang der Schlitze in den Platten 9
und 10 nach unten und beachten Sie, dass sie auch in den Schlitz in
der Platte 14 einrasten muss, wenn die Platte 20 nach unten kommt.
FR: Poussez le panneau 20 vers le bas le long des fentes des
panneaux 9 et 10 , en notant qu'il doit également s'enclencher dans
la fente du panneau 14 lorsque le panneau 20 s'abaisse.
ES: Empuje el panel 20 hasta el fondo a lo largo de las ranuras de los
paneles 9 y 10 , teniendo en cuenta que también tiene que encajar
en la ranura del panel 14 a medida que el panel 20 toca fondo.
IT: Spingere il pannello 20 verso il fondo lungo le fessure dei pannelli
9 e 10 , tenendo presente che deve anche incastrarsi nella fessura
del pannello 14 mentre il pannello 20 si abbassa.
PL: Wsuń panel 20 w szczeliny w panelach 9 i 10 , pamiętając, że
musi on również zatrzasnąć się w szczelinie w panelu 14 .
12 13
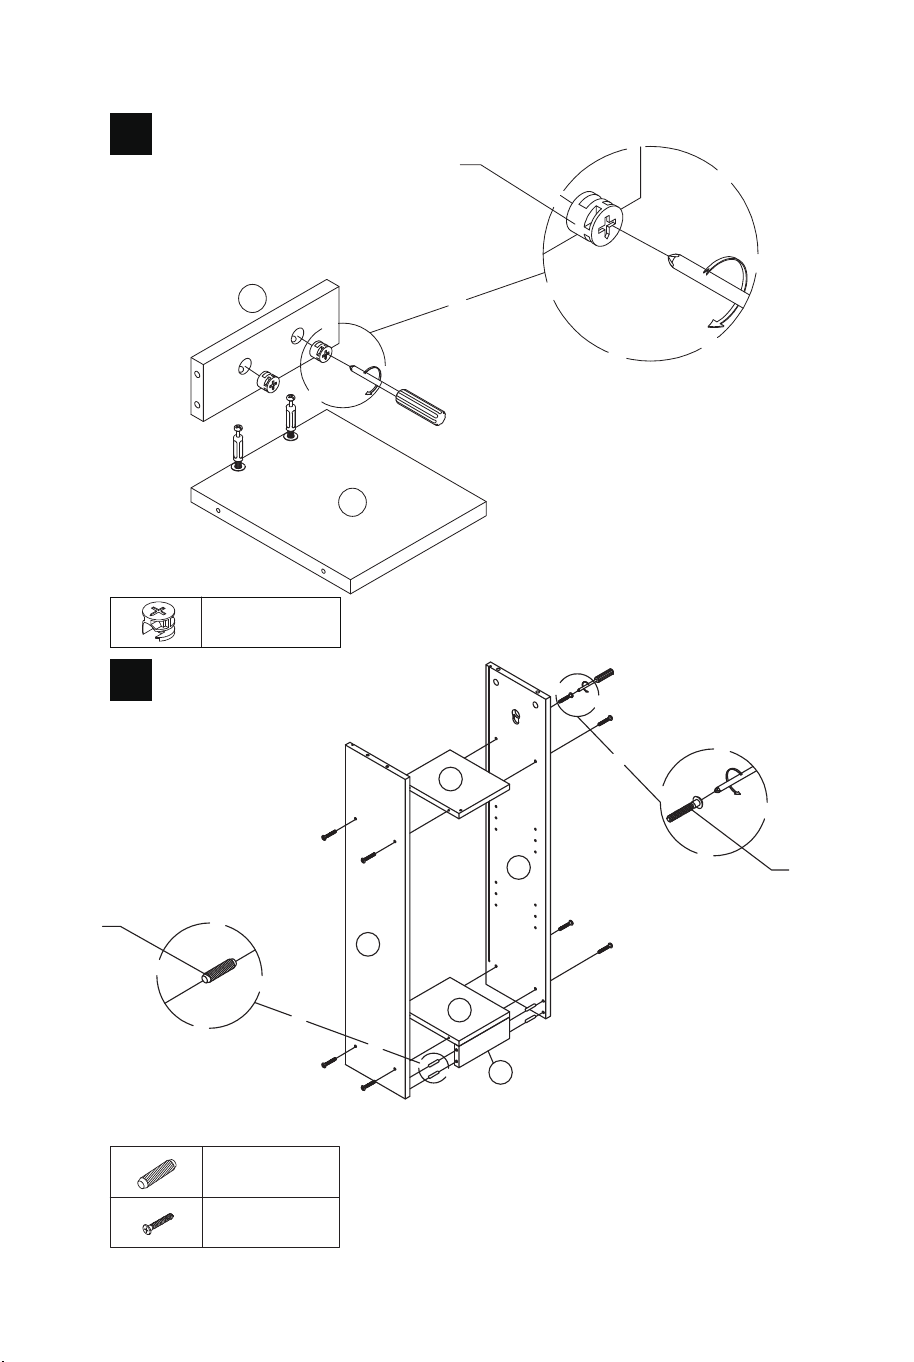
B x 8
J1 x 1
K x 2
C x 10
J1
8
C
C
C
C
C
C
C
C
C
C
C
K
J1
J1
B
B
B
B
B
B
B
B
B
11
10
17
16
9
B x 4
H x 4
B
B
B
B
H
H
H
H
8
16
11
10
9
20
7
9
8
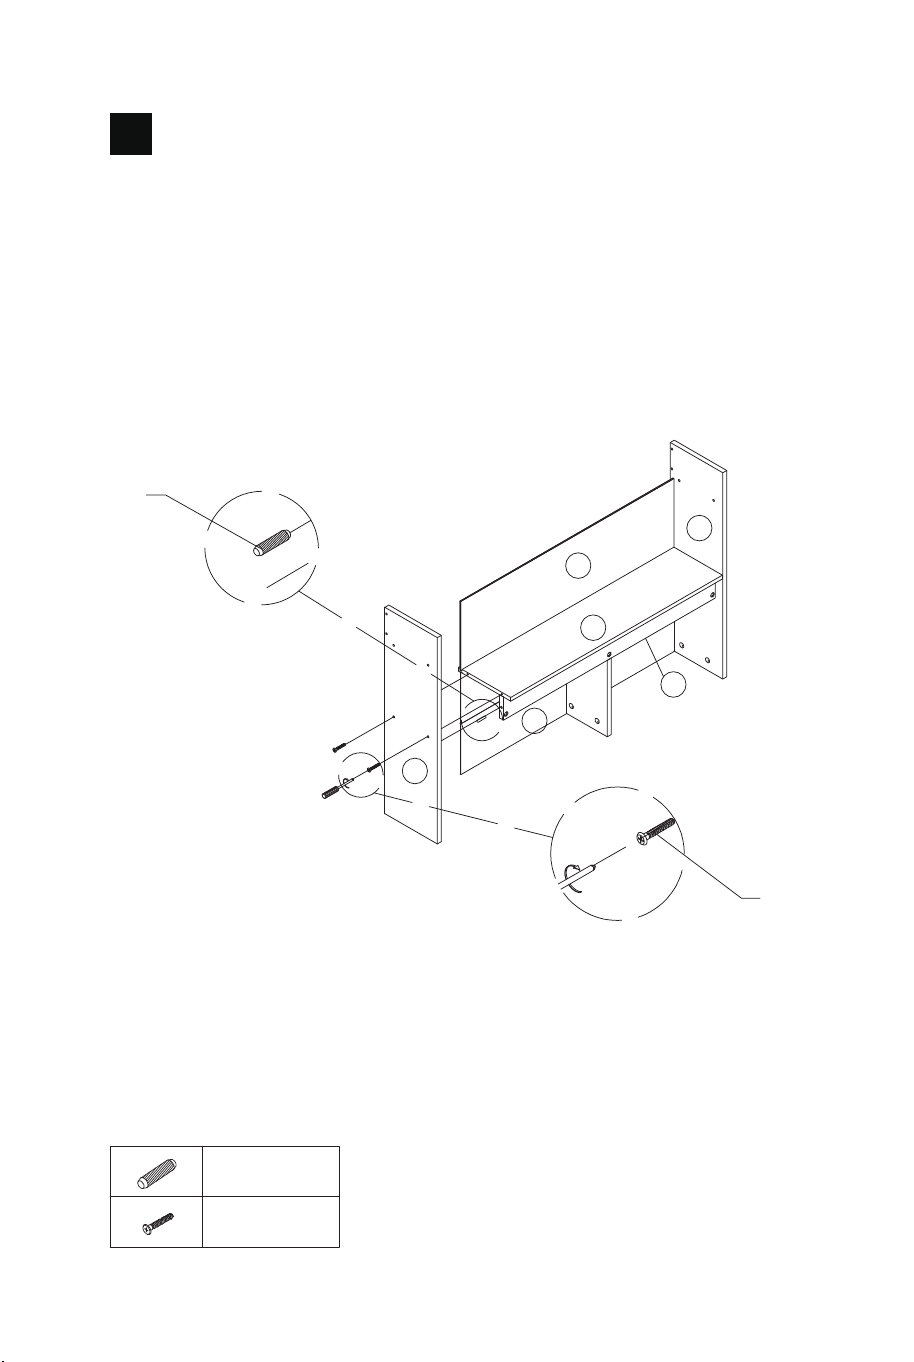
EN: Note the panel 20 needs to be snapped into the slot in the panel
8 .
DE: Beachten Sie, dass die Platte 20 in den Schlitz der Platte 8
eingerastet werden muss.
FR: Notez que le panneau 20 doit être encliqueté dans la fente du
panneau 8 .
ES: Tenga en cuenta que el panel 20 debe encajarse en la ranura
del panel 8 .
IT: Il pannello 20 deve essere incastrato nella fessura del pannello 8 .
PL: Należy pamiętać, że panel 20 musi zatrzasnąć się w szczelinie
w panelu 8 .
14 15
B x 8
J1 x 1
K x 2
C x 10
J1
8
C
C
C
C
C
C
C
C
C
C
C
K
J1
J1
B
B
B
B
B
B
B
B
B
11
10
17
16
9
B x 4
H x 4
B
B
B
B
H
H
H
H
8
16
11
10
9
20
7
9
8
EN: Note the panel 20 needs to be snapped into the slot in the panel
8 .
DE: Beachten Sie, dass die Platte 20 in den Schlitz der Platte 8
eingerastet werden muss.
FR: Notez que le panneau 20 doit être encliqueté dans la fente du
panneau 8 .
ES: Tenga en cuenta que el panel 20 debe encajarse en la ranura
del panel 8 .
IT: Il pannello 20 deve essere incastrato nella fessura del pannello 8 .
PL: Należy pamiętać, że panel 20 musi zatrzasnąć się w szczelinie
w panelu 8 .
14 15
G x 4
5
G
G
G
G
G
B x 4
5
6
7
B
B
B
B
B
H
H
H
A
A
5
7
6
2
H x 2
A x 1
10
11
12
16 17
G x 4
5
G
G
G
G
G
B x 4
5
6
7
B
B
B
B
B
H
H
H
A
A
5
7
6
2
H x 2
A x 1
10
11
12
16 17
K x 4
K
K
K
K
K
5
18
19
2
H x 2
A x 1
A
H
2
1
5
18
19
7
H
H
A
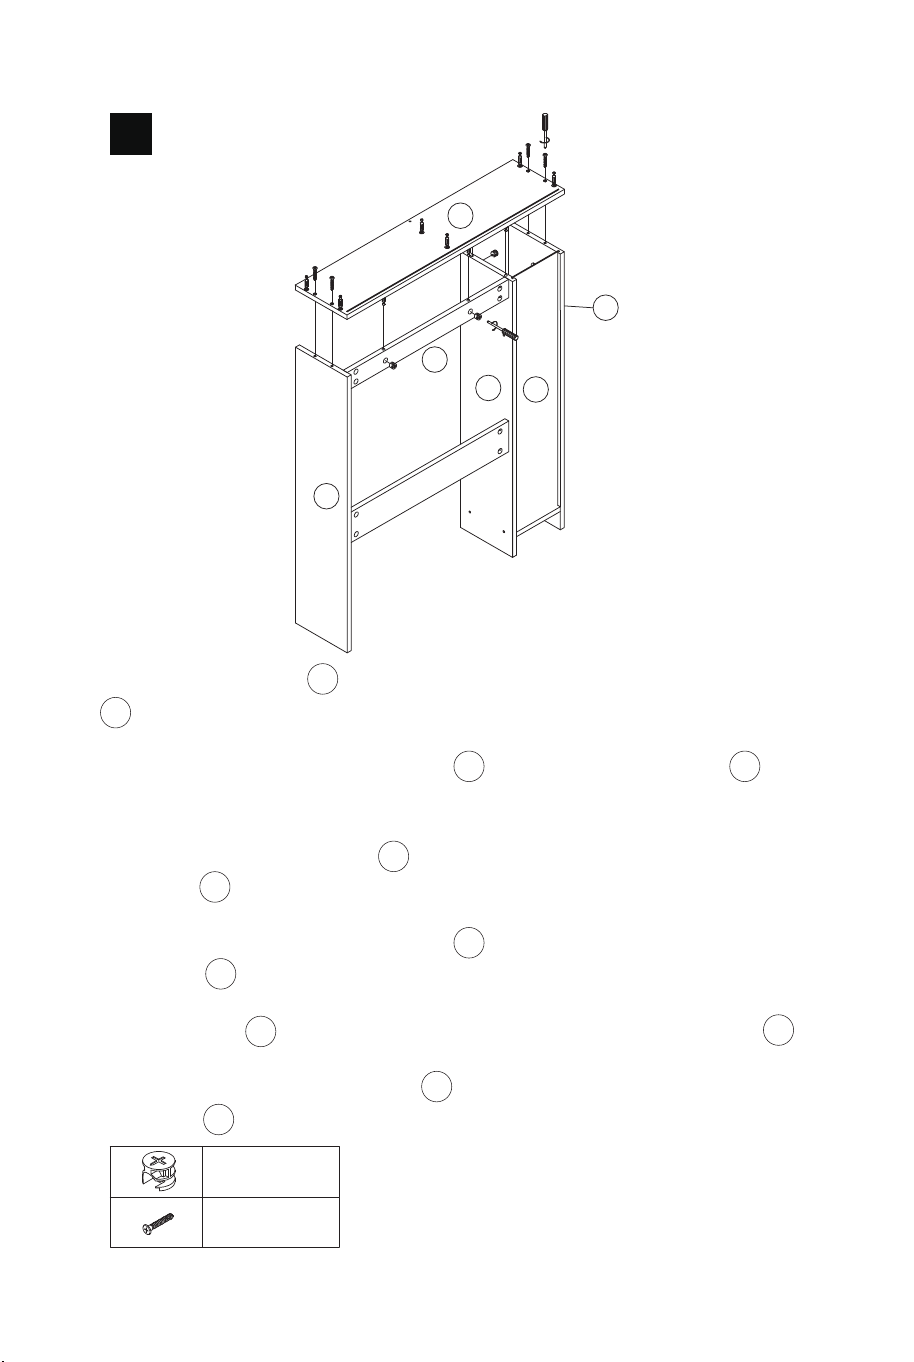
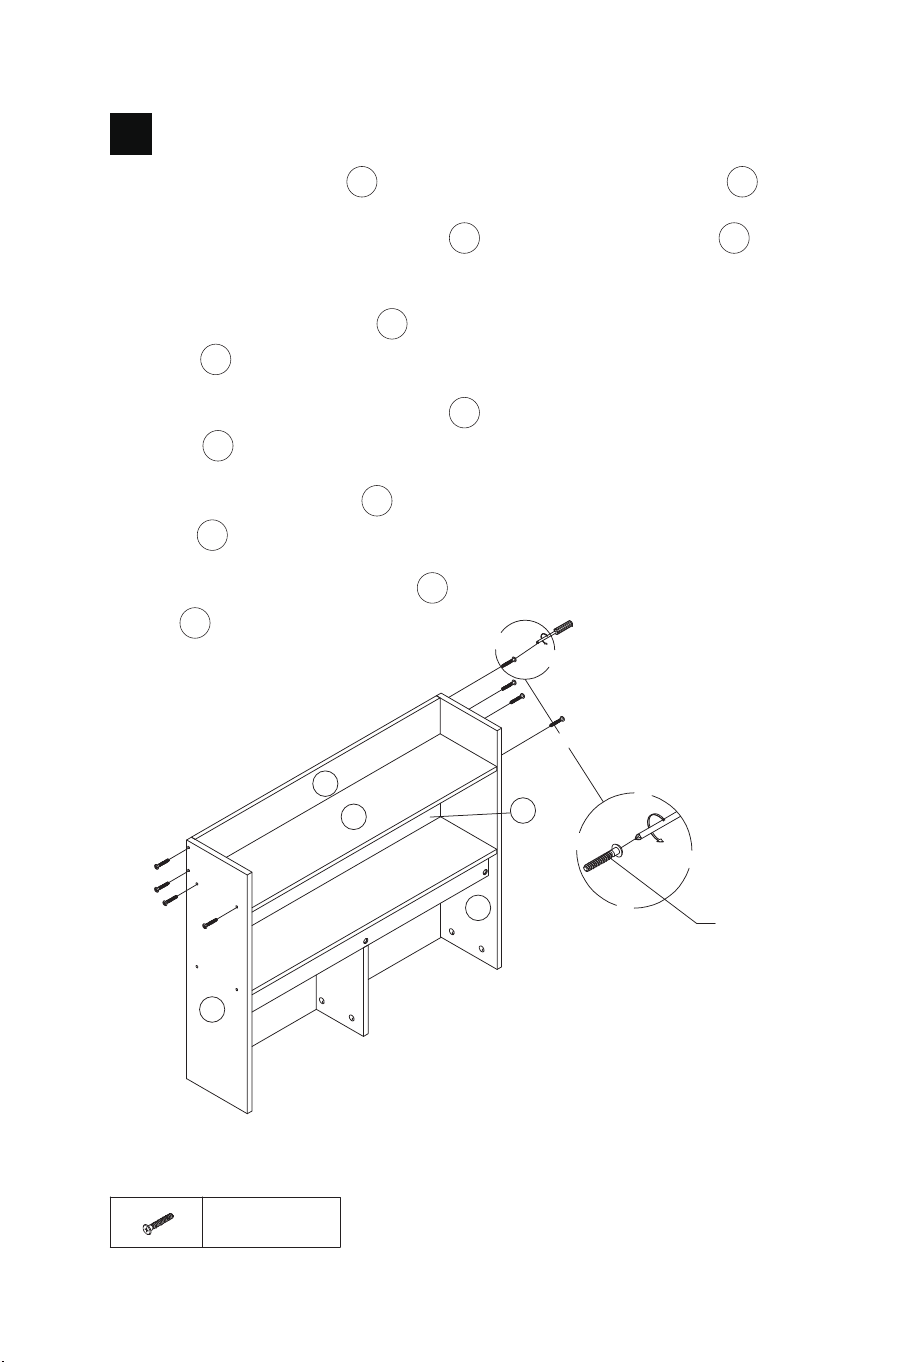
EN: Push the panels 18 and 19 to the bottom along the slots in the
panel 5 , and make sure they snap into the slot of the panel 2 .
DE: Schieben Sie die Platten 18 und 19 entlang der Schlitze in der
Platte 5 nach unten und achten Sie darauf, dass sie in den Schlitz
der Platte 2 einrasten.
FR: Poussez les panneaux 18 et 19 vers le bas, le long des fentes du
panneau 5 , et assurez-vous qu'ils s'enclenchent dans la fente du
panneau 2 .
ES: Empuje los paneles 18 y 19 hasta el fondo a lo largo de las
ranuras del panel 5 , y asegúrese de que encajan en la ranura del
panel 2 .
IT: Spingere i pannelli 18 e 19 verso il basso lungo le fessure del
pannello 5 e assicurarsi che si incastrino nella fessura del pannello 2 .
PL: Wsuń panele 18 i 19 w dół wzdłuż szczelin w panelu 5 . Upewnij
się, że zatrzasnęły się w szczelinie w panelu 2 .
13 14
18 19
K x 4
K
K
K
K
K
5
18
19
2
H x 2
A x 1
A
H
2
1
5
18
19
7
H
H
A
EN: Push the panels 18 and 19 to the bottom along the slots in the
panel 5 , and make sure they snap into the slot of the panel 2 .
DE: Schieben Sie die Platten 18 und 19 entlang der Schlitze in der
Platte 5 nach unten und achten Sie darauf, dass sie in den Schlitz
der Platte 2 einrasten.
FR: Poussez les panneaux 18 et 19 vers le bas, le long des fentes du
panneau 5 , et assurez-vous qu'ils s'enclenchent dans la fente du
panneau 2 .
ES: Empuje los paneles 18 y 19 hasta el fondo a lo largo de las
ranuras del panel 5 , y asegúrese de que encajan en la ranura del
panel 2 .
IT: Spingere i pannelli 18 e 19 verso il basso lungo le fessure del
pannello 5 e assicurarsi che si incastrino nella fessura del pannello 2 .
PL: Wsuń panele 18 i 19 w dół wzdłuż szczelin w panelu 5 . Upewnij
się, że zatrzasnęły się w szczelinie w panelu 2 .
13 14
18 19
B x 6
1
2
6
8
B
B
B
B
B
B
B
16
H x 8
H
H
H
H
H
H
H
H
H
18
3
4
1
2
15
EN: Note that the panel 18 needs to snap into the slot of panel 3 .
DE: Beachten Sie, dass die Platte 18 in den Schlitz der Platte 3
einrasten muss.
FR: Notez que le panneau 18 doit s'enclencher dans la fente du
panneau 3 .
ES: Tenga en cuenta que el panel 18 tiene que encajar en la ranura
del panel 3 .
IT: Notare che il pannello 18 deve incastrarsi nella fessura del
pannello 3 .
PL: Należy pamiętać, że panel 18 musi zatrzasnąć się w szczelinie w
panelu 3 .
20 21
22
9
12
8
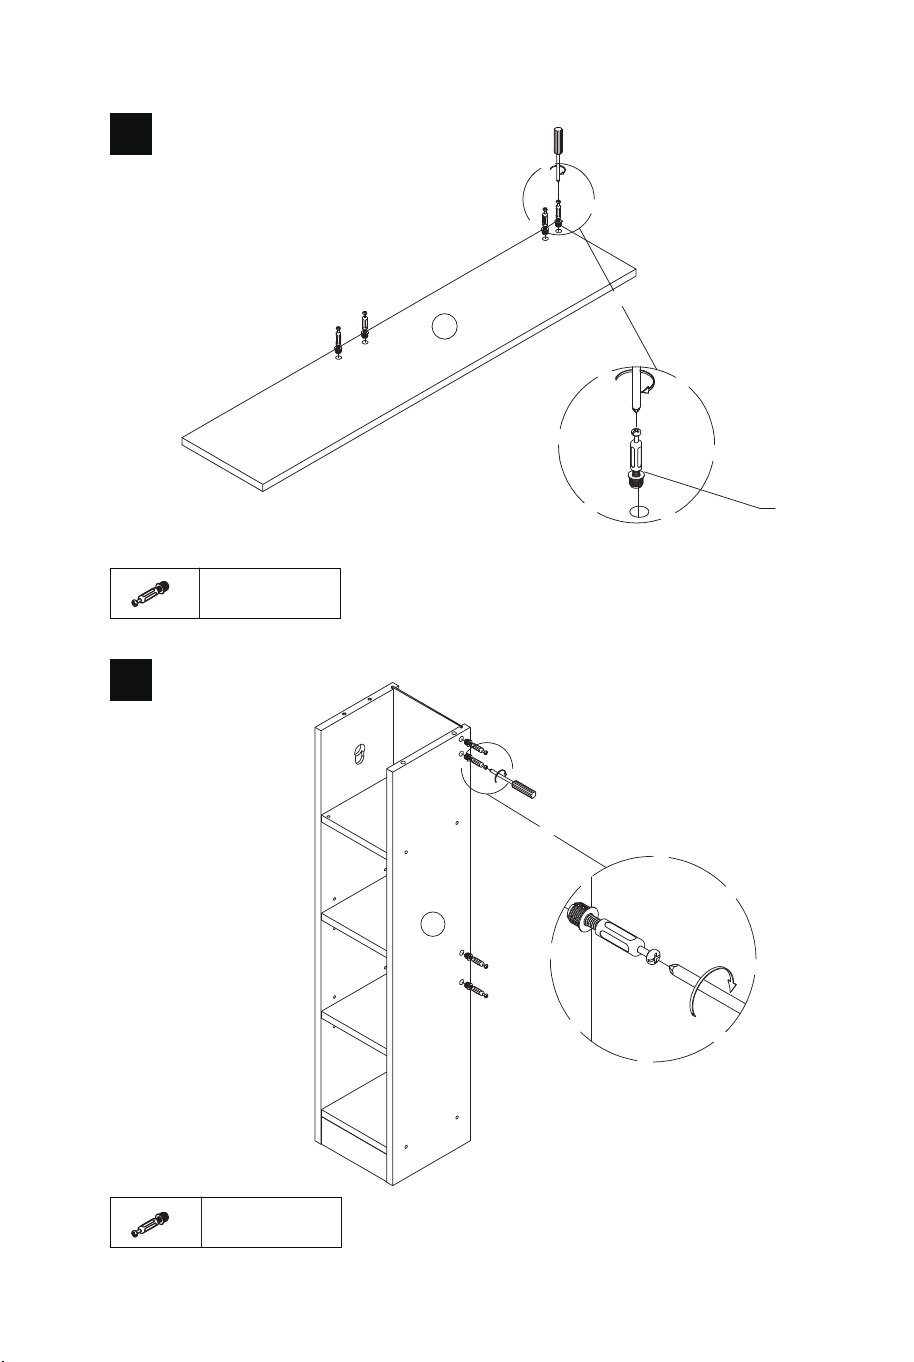
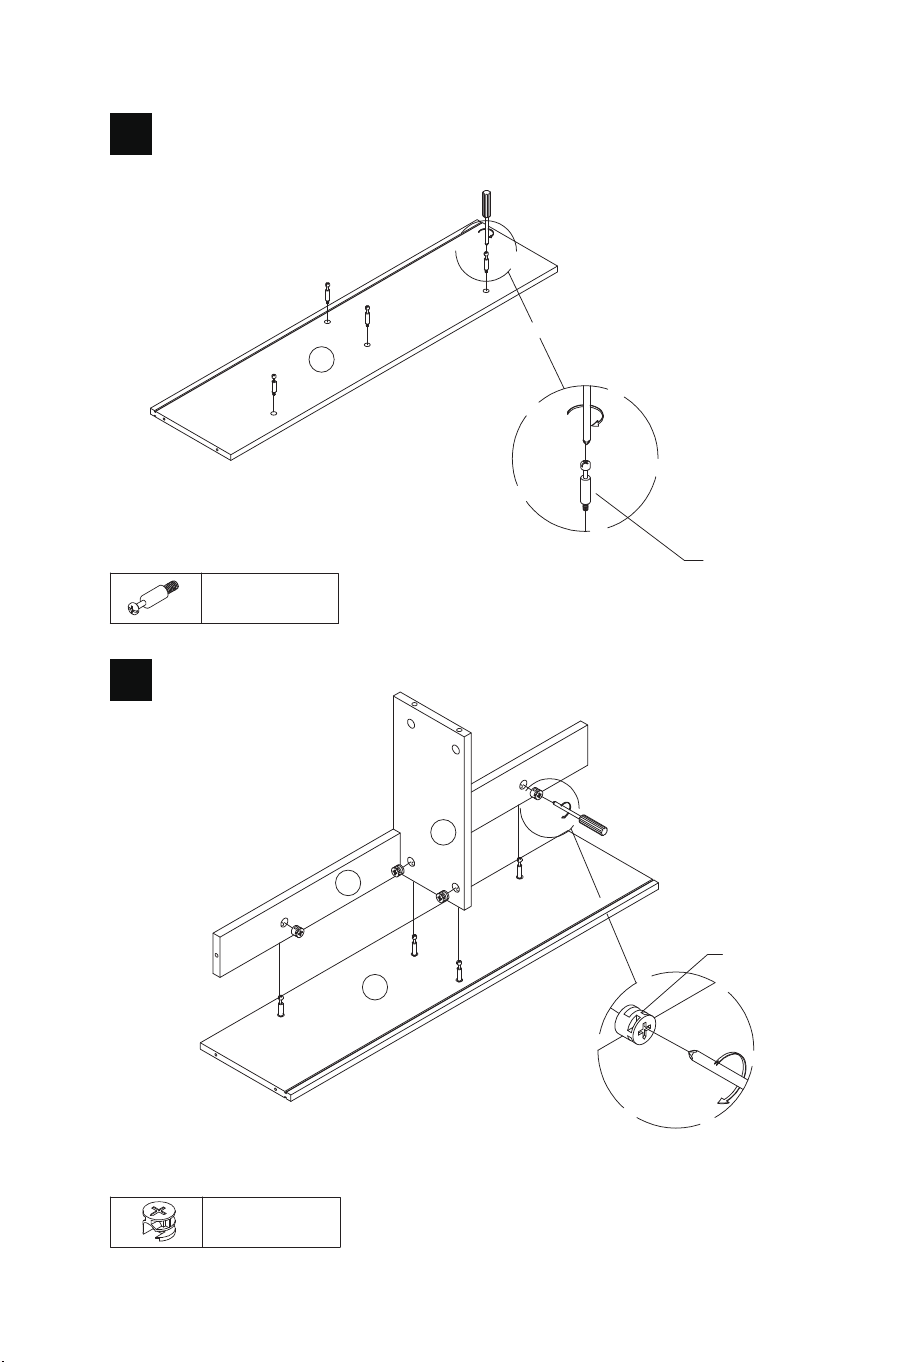
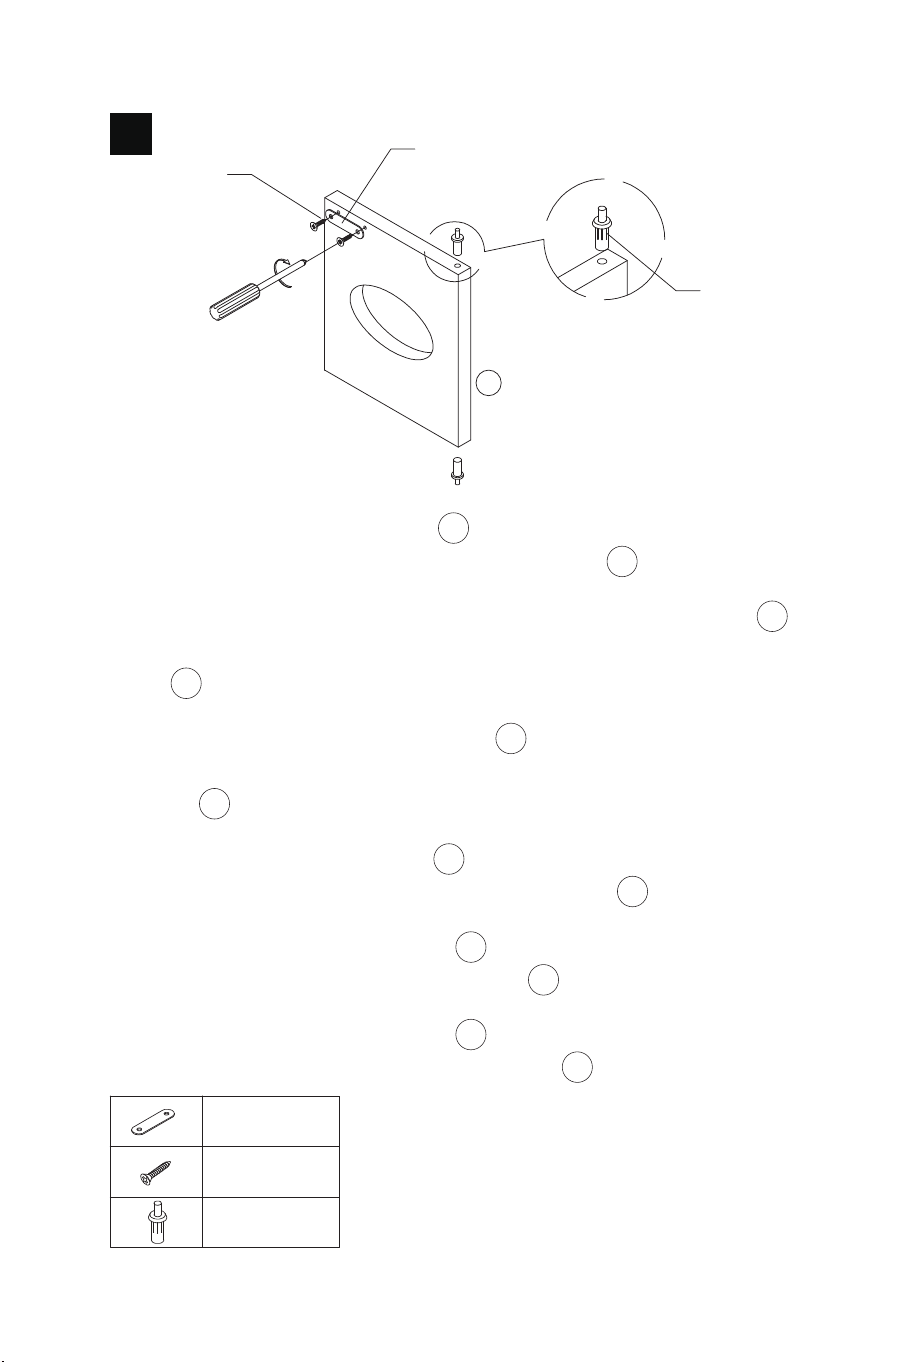
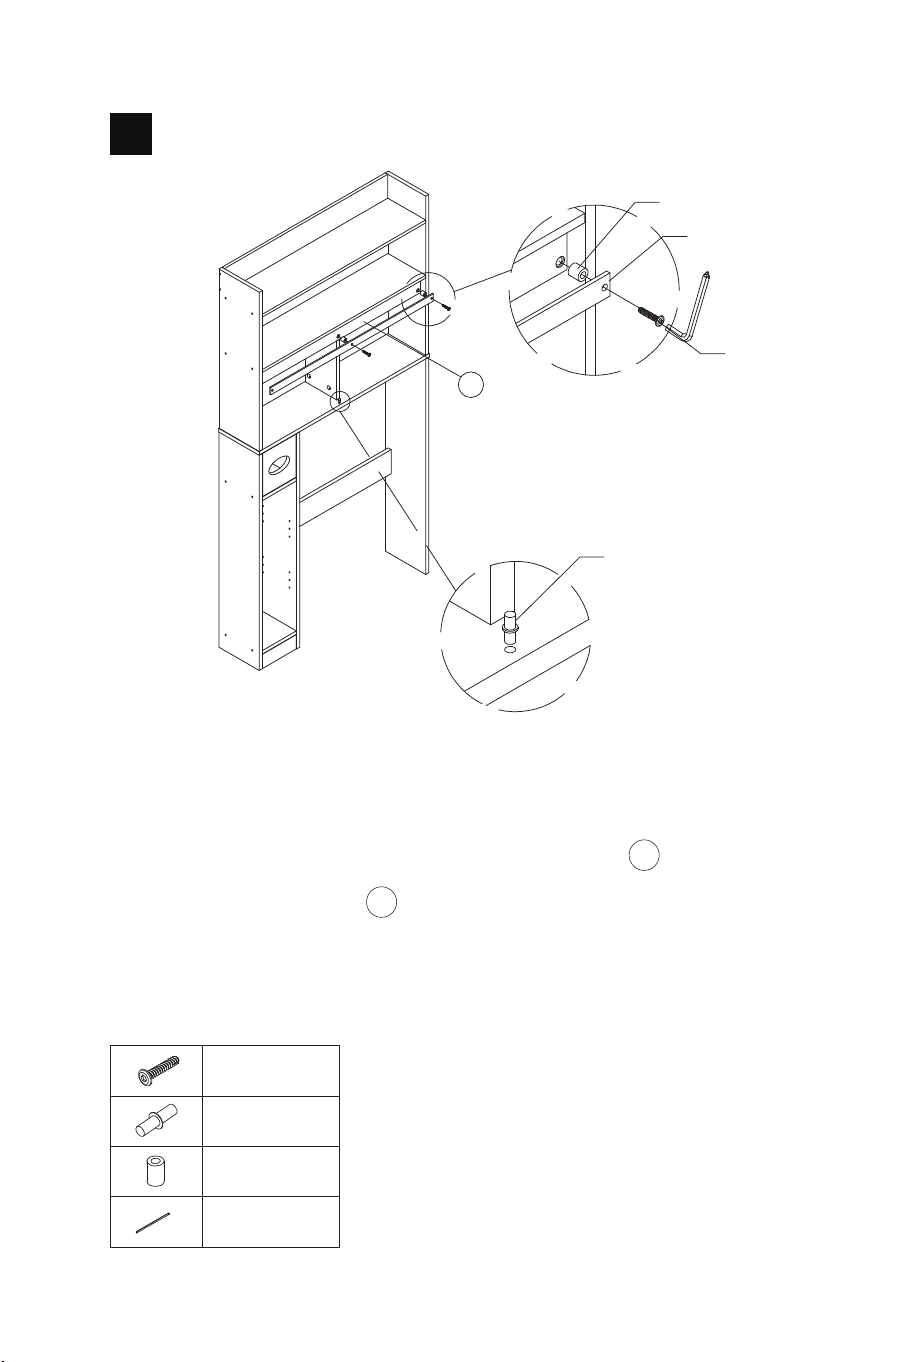
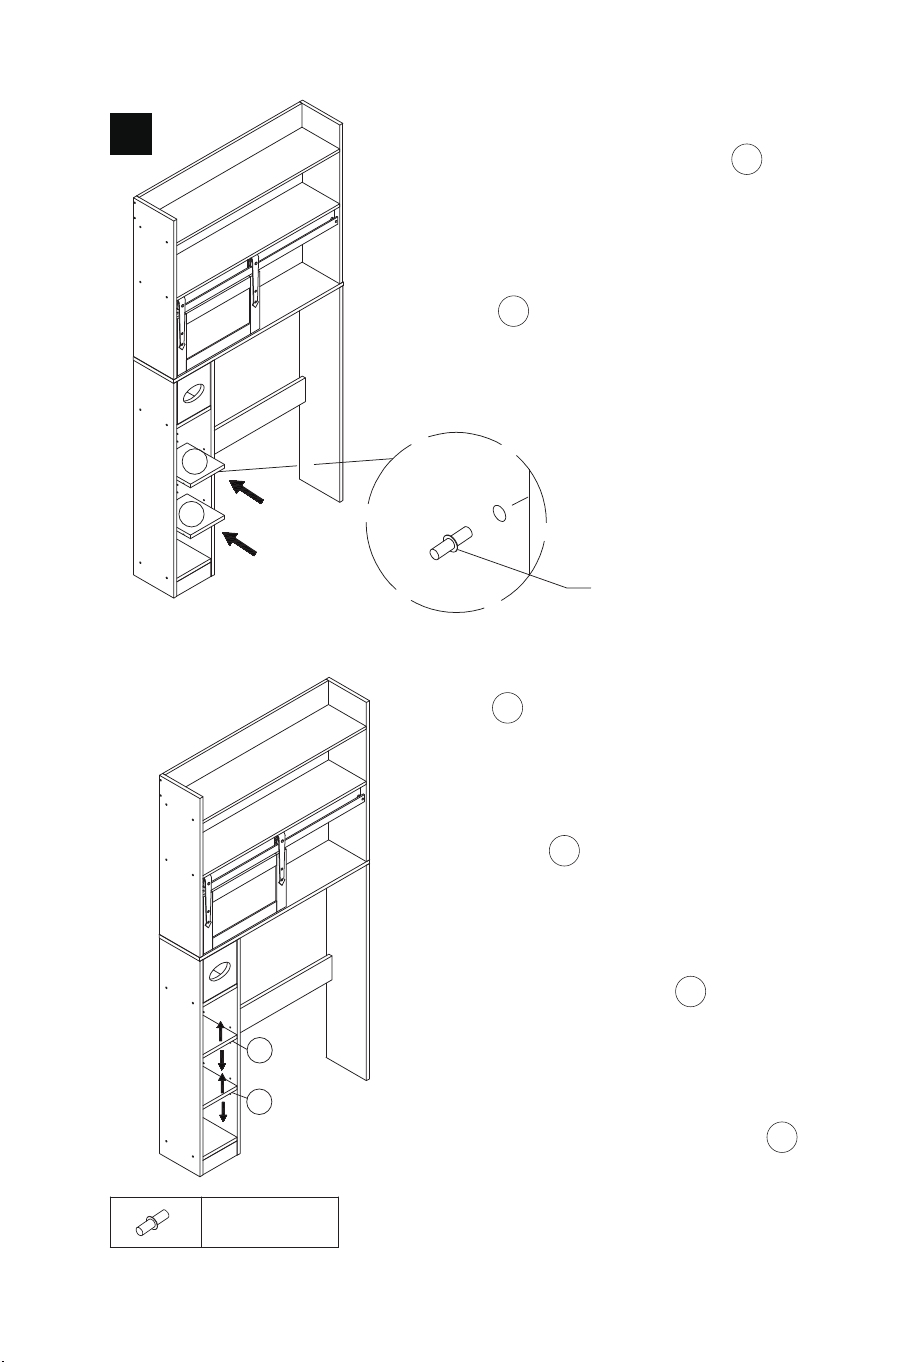
EN: Align the fitting L at the lower end of panel 22 with the hole in the
panel 12 , and then snap the fitting L at the upper end of panel 22 into
the corresponding hole in the panel 8 .
DE: Richten Sie den Beschlag L am unteren Ende der Platte 22 auf
das Loch in der Platte 12 aus, und lassen Sie dann den Beschlag L
am oberen Ende der Platte 22 in das entsprechende Loch in der
Platte 8 einrasten.
18
L x 2
J2 x 1
J2
K x 2
L
J2
K
K
K
J2
L
L
22
EN: Lock the part J2 to the panel 22 with screws K and press the 2
parts L into the upper and lower holes of the panel 22 .
DE: Befestigen Sie das Teil J2 mit den Schrauben K an der Platte 22
und drücken Sie die 2 Teile L in die oberen und unteren Löcher der
Platte 22 .
FR: Verrouillez la pièce J2 au panneau 22 à l'aide des vis K et
enfoncez les 2 pièces L dans les trous supérieurs et inférieurs du
panneau 22 .
ES: Bloquee la pieza J2 al panel 22 con tornillos K y presione las 2
piezas L en los orificios superior e inferior del panel 22 .
IT: Bloccare la parte J2 al pannello 22 con le viti K e premere le 2 parti
L nei fori superiore e inferiore del pannello 22 .
PL: Przymocuj część J2 do panelu 22 za pomocą śrub K. Umieść 2
części L w górnym i dolnym otworze w panelu 22 .
17
Press down
/Nach unten drücken
/Appuyez
/Presionar hacia abajo
/ Premere verso il basso
/Dociśnij w dół
Retractable
/Einziehbar
/Rétractable
/Retráctil
/Ritraibile
/Element chowa się
Release to spring back
up
/Loslassen, um wieder
aufzuspringen
/Relâchez pour remonter
/Soltar para volver a
subir
/Rilasciare per far risalire
la molla
/Naciśnij, aby element
wysunął się
22 23
22
9
12
8
EN: Align the fitting L at the lower end of panel 22 with the hole in the
panel 12 , and then snap the fitting L at the upper end of panel 22 into
the corresponding hole in the panel 8 .
DE: Richten Sie den Beschlag L am unteren Ende der Platte 22 auf
das Loch in der Platte 12 aus, und lassen Sie dann den Beschlag L
am oberen Ende der Platte 22 in das entsprechende Loch in der
Platte 8 einrasten.
18
L x 2
J2 x 1
J2
K x 2
L
J2
K
K
K
J2
L
L
22
EN: Lock the part J2 to the panel 22 with screws K and press the 2
parts L into the upper and lower holes of the panel 22 .
DE: Befestigen Sie das Teil J2 mit den Schrauben K an der Platte 22
und drücken Sie die 2 Teile L in die oberen und unteren Löcher der
Platte 22 .
FR: Verrouillez la pièce J2 au panneau 22 à l'aide des vis K et
enfoncez les 2 pièces L dans les trous supérieurs et inférieurs du
panneau 22 .
ES: Bloquee la pieza J2 al panel 22 con tornillos K y presione las 2
piezas L en los orificios superior e inferior del panel 22 .
IT: Bloccare la parte J2 al pannello 22 con le viti K e premere le 2 parti
L nei fori superiore e inferiore del pannello 22 .
PL: Przymocuj część J2 do panelu 22 za pomocą śrub K. Umieść 2
części L w górnym i dolnym otworze w panelu 22 .
17
Press down
/Nach unten drücken
/Appuyez
/Presionar hacia abajo
/ Premere verso il basso
/Dociśnij w dół
Retractable
/Einziehbar
/Rétractable
/Retráctil
/Ritraibile
/Element chowa się
Release to spring back
up
/Loslassen, um wieder
aufzuspringen
/Relâchez pour remonter
/Soltar para volver a
subir
/Rilasciare per far risalire
la molla
/Naciśnij, aby element
wysunął się
22 23

S x 2
D x 4
S
D
S
S
D
D
D
D
21
19
FR: Alignez le raccord L à l'extrémité inférieure du panneau 22 avec le
trou du panneau 12 , puis enclenchez le raccord L à l'extrémité
supérieure du panneau 22 dans le trou correspondant du panneau 8 .
ES: Alinee el accesorio L del extremo inferior del panel 22 con el
orificio del panel 12 y, a continuación, encaje el accesorio L del
extremo superior del panel 22 en el orificio correspondiente del
panel 8 .
IT: Allineare il raccordo L all'estremità inferiore del pannello 22 con
il foro nel pannello 12 , quindi far scattare il raccordo L all'estremità
superiore del pannello 22 nel foro corrispondente del pannello 8 .
PL: Dopasuj łącznik L na dole panelu 22 do otworu w panelu 12 .
Następnie umieść łącznik L na górze panelu 22 w odpowiednim
otworze w panelu 8 .
24 25
M x 2
E x 2
F x 1
R x 1
M
E
F
R
7
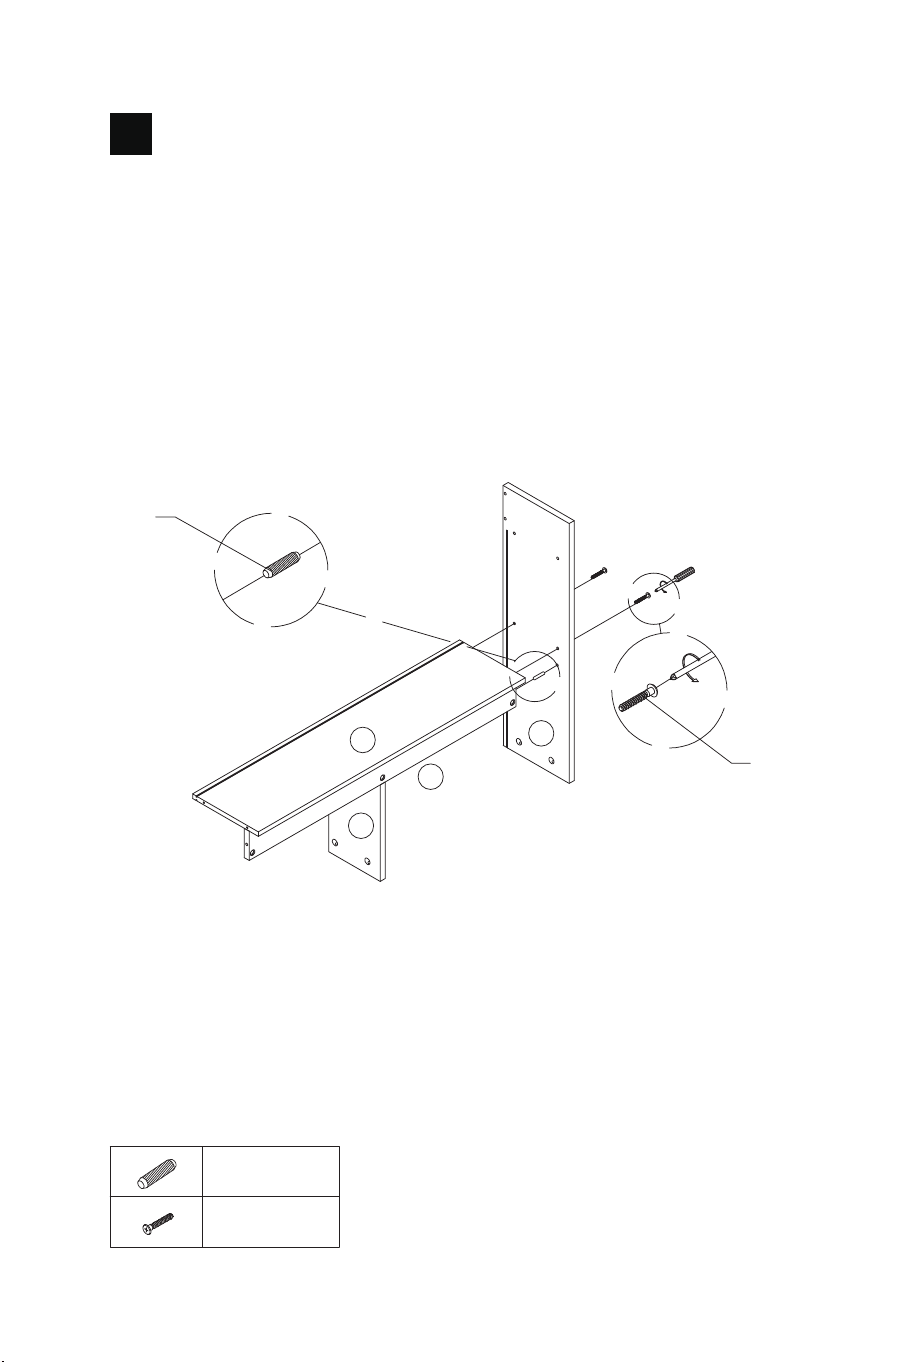
EN: Pass screws E through the holes of part R and then through the
holes of the fitting M to attach the part R to the panel 7 . Note that
the two holes of the panel 7 are fixed with screws first, leaving the
leftmost hole unfixed.
20
DE: Führen Sie die Schrauben E durch die Löcher des Teils R und
dann durch die Löcher des Beschlags M, um das Teil R an der Platte
7 zu befestigen. Beachten Sie, dass die beiden Löcher der Platte 7
zuerst mit Schrauben befestigt werden, während das ganz linke Loch
unbefestigt bleibt.
FR: Faites passer les vis E dans les trous de la pièce R, puis dans
les trous de la ferrure M pour fixer la pièce R au panneau 7 .
Notez que les deux trous du panneau 7 sont d'abord fixés avec
des vis, laissant le trou le plus à gauche non fixé.
ES: Pase los tornillos E por los orificios de la pieza R y luego por
los orificios del accesorio M para fijar la pieza R al panel 7 . Tenga
en cuenta que los dos orificios del panel 7 se fijan primero con
tornillos, dejando sin fijar el orificio situado más a la izquierda.
IT: Passare le viti E attraverso i fori del componente R e poi
attraverso i fori del raccordo M per fissare il componente R al
pannello 7 . Si noti che i due fori del pannello 7 vengono fissati
prima con le viti, lasciando il foro più a sinistra non fissato.
PL: Przełóż śruby E w otwory w części R, a następnie przez otwory
łącznika M, aby przymocować część R do panelu 7 . Należy
pamiętać, że dwa otwory w panelu 7 są najpierw mocowane za
pomocą śrub, natomiast lewy otwór pozostaje niezamocowany.
26 27

M x 2
E x 2
F x 1
R x 1
M
E
F
R
7
EN: Pass screws E through the holes of part R and then through the
holes of the fitting M to attach the part R to the panel 7 . Note that
the two holes of the panel 7 are fixed with screws first, leaving the
leftmost hole unfixed.
20
DE: Führen Sie die Schrauben E durch die Löcher des Teils R und
dann durch die Löcher des Beschlags M, um das Teil R an der Platte
7 zu befestigen. Beachten Sie, dass die beiden Löcher der Platte 7
zuerst mit Schrauben befestigt werden, während das ganz linke Loch
unbefestigt bleibt.
FR: Faites passer les vis E dans les trous de la pièce R, puis dans
les trous de la ferrure M pour fixer la pièce R au panneau 7 .
Notez que les deux trous du panneau 7 sont d'abord fixés avec
des vis, laissant le trou le plus à gauche non fixé.
ES: Pase los tornillos E por los orificios de la pieza R y luego por
los orificios del accesorio M para fijar la pieza R al panel 7 . Tenga
en cuenta que los dos orificios del panel 7 se fijan primero con
tornillos, dejando sin fijar el orificio situado más a la izquierda.
IT: Passare le viti E attraverso i fori del componente R e poi
attraverso i fori del raccordo M per fissare il componente R al
pannello 7 . Si noti che i due fori del pannello 7 vengono fissati
prima con le viti, lasciando il foro più a sinistra non fissato.
PL: Przełóż śruby E w otwory w części R, a następnie przez otwory
łącznika M, aby przymocować część R do panelu 7 . Należy
pamiętać, że dwa otwory w panelu 7 są najpierw mocowane za
pomocą śrub, natomiast lewy otwór pozostaje niezamocowany.
26 27
21
R
F
S
S
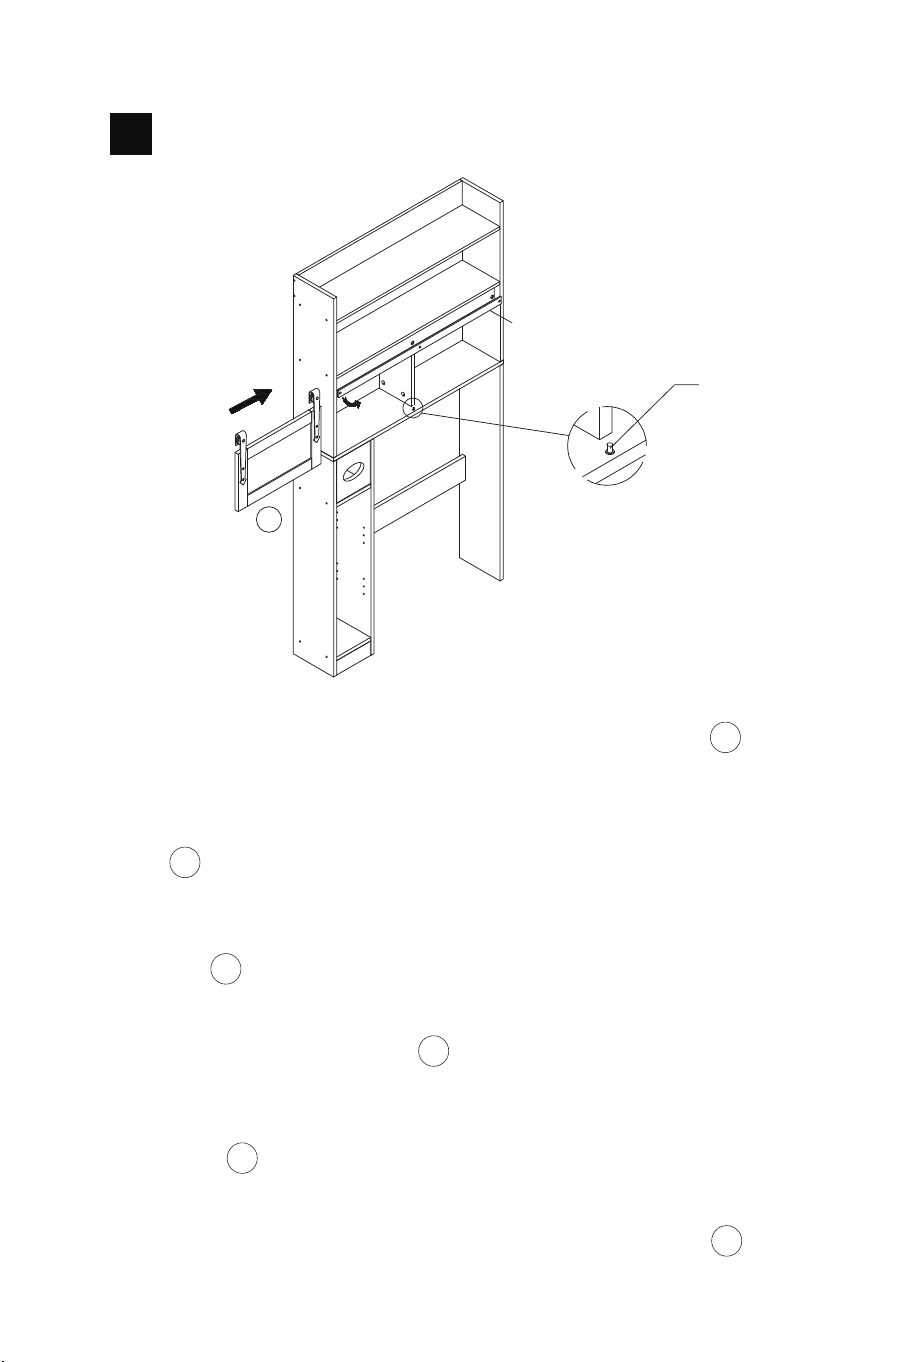
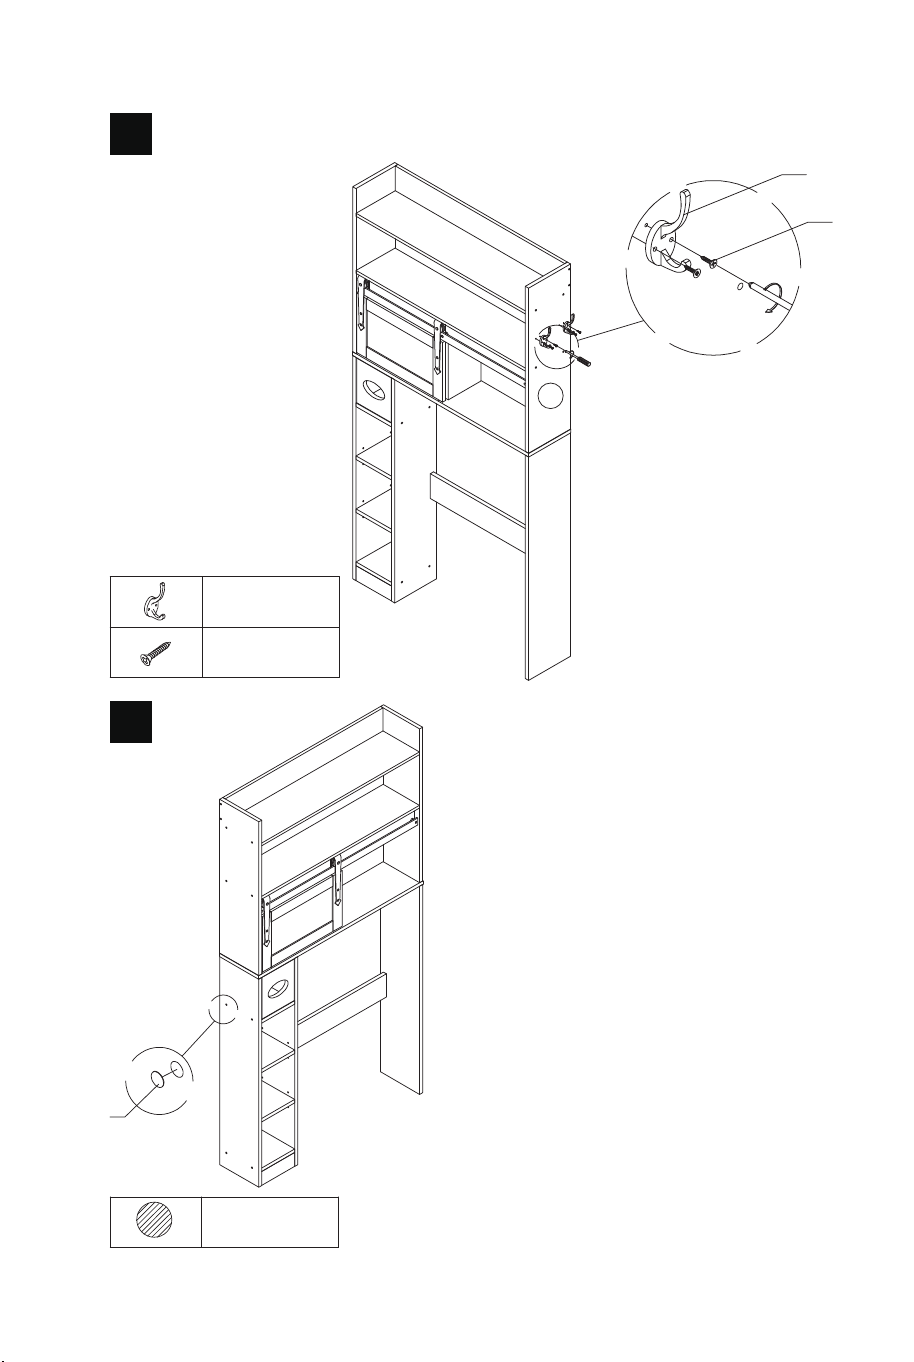
EN: Pull out the end of part R slightly, then hook the panel 21 onto
the part R and push it to the right until both hooks S are hooked
into the part R and the fitting F snaps into the bottom slot of the
panel 21 .
DE: Ziehen Sie das Ende von Teil R etwas heraus, haken Sie dann
die Platte 21 in das Teil R ein und schieben Sie sie nach rechts, bis
beide Haken S in das Teil R eingehakt sind und der Beschlag F in
den unteren Schlitz der Platte 21 einrastet.
FR: Tirez légèrement sur l'extrémité de la pièce R, puis accrochez
le panneau 21 à la pièce R et poussez-le vers la droite jusqu'à ce
que les deux crochets S soient accrochés à la pièce R et que le
raccord F s'enclenche dans la fente inférieure du panneau 21 .
21
ES: Tire ligeramente hacia fuera del extremo de la pieza R y, a
continuación, enganche el panel 21 en la pieza R y empújelo hacia
la derecha hasta que ambos ganchos S se enganchen en la pieza
R y el accesorio F encaje en la ranura inferior del panel 21 .
IT: Estrarre leggermente l'estremità della parte R, quindi
agganciare il pannello 21 alla parte R e spingerlo verso destra fino
a quando entrambi i ganci S sono agganciati alla parte R e il
raccordo F scatta nella fessura inferiore del pannello 21 .
PL: Lekko wyciągnij koniec części R, następnie zaczep panel 21 o
część R i popchnij ją w prawo, aż oba haczyki S zostaną
zaczepione o część R, a łącznik F zaskoczy w dolnym gnieździe
panelu 21 .
28 29

21
R
F
S
S
EN: Pull out the end of part R slightly, then hook the panel 21 onto
the part R and push it to the right until both hooks S are hooked
into the part R and the fitting F snaps into the bottom slot of the
panel 21 .
DE: Ziehen Sie das Ende von Teil R etwas heraus, haken Sie dann
die Platte 21 in das Teil R ein und schieben Sie sie nach rechts, bis
beide Haken S in das Teil R eingehakt sind und der Beschlag F in
den unteren Schlitz der Platte 21 einrastet.
FR: Tirez légèrement sur l'extrémité de la pièce R, puis accrochez
le panneau 21 à la pièce R et poussez-le vers la droite jusqu'à ce
que les deux crochets S soient accrochés à la pièce R et que le
raccord F s'enclenche dans la fente inférieure du panneau 21 .
21
ES: Tire ligeramente hacia fuera del extremo de la pieza R y, a
continuación, enganche el panel 21 en la pieza R y empújelo hacia
la derecha hasta que ambos ganchos S se enganchen en la pieza
R y el accesorio F encaje en la ranura inferior del panel 21 .
IT: Estrarre leggermente l'estremità della parte R, quindi
agganciare il pannello 21 alla parte R e spingerlo verso destra fino
a quando entrambi i ganci S sono agganciati alla parte R e il
raccordo F scatta nella fessura inferiore del pannello 21 .
PL: Lekko wyciągnij koniec części R, następnie zaczep panel 21 o
część R i popchnij ją w prawo, aż oba haczyki S zostaną
zaczepione o część R, a łącznik F zaskoczy w dolnym gnieździe
panelu 21 .
28 29

F x 8
F
13
13
13
13
EN: Multiple rows of holes are designed
for the fittings F, so that the panels 13 can
be adjusted up or down as required.
DE: Für die Beschläge F sind mehrere
Reihen von Löchern vorgesehen, so dass
die Platten 13 je nach Bedarf nach oben
oder unten verstellt werden können.
FR: Plusieurs rangées de trous sont
prévues pour les raccords F, afin que les
panneaux 13 puissent être ajustés vers le
haut ou vers le bas selon les besoins.
ES: Se han diseñado varias filas de
orificios para los accesorios F, de modo
que los paneles 13 puedan ajustarse
hacia arriba o hacia abajo según sea
necesario.
IT: Per i raccordi F sono previste più file
di fori, in modo che i pannelli 13 possano
essere regolati verso l'alto o verso il
basso a seconda delle esigenze.
PL: Dla łączników F przewidziano kilka
rzędów otworów, dzięki czemu panele 13
można regulować w górę lub w dół w
zależności od potrzeb.
23
M
E
R
DE: Führen Sie wie in SCHRITT 20 die Schrauben E durch die Löcher
des Teils R und dann durch die Löcher des Beschlags M, um das Teil
R an der Platte zu befestigen 7 .
FR: Comme dans la procédure de l'ÉTAPE 20, faites passer les vis E
dans les trous de la pièce R, puis dans les trous de la ferrure M pour
fixer la pièce R au panneau 7 .
ES: Como en el procedimiento PASO 20, pase los tornillos E por los
orificios de la pieza R y luego por los orificios del accesorio M para
fijar la pieza R al panel 7 .
IT: Estrarre leggermente l'estremità della parte R, quindi agganciare il
pannello 20 alla parte R e spingerlo verso destra fino a quando
entrambi i ganci S sono agganciati alla parte R e il raccordo F scatta
nella fessura inferiore del pannello 7 .
PL: Podobnie jak w KROKU 20, przełóż śruby E przez otwory części
R, a następnie przez otwory łącznika M, aby przymocować część R do
panelu 7 .
22
M x 1
E x 1
EN: As in the STEP 20
procedure, pass screws E
through the holes of part R and
then through the holes of the
fitting M to attach the part R to
the panel 7 .
30 31
I x 46
N x 2
K x 4
N
K
2
EN: The exposed hardware can be
covered with stickers I.
DE: Die freiliegende Hardware
kann mit Aufklebern I abgedeckt
werden.
FR: Le matériel exposé peut être
recouvert d'autocollants I.
ES: Los accesorios expuestos
pueden cubrirse con pegatinas I.
IT: Il hardware a vista può essere
coperto con adesivi I.
PL: Odsłonięte otwory można
okleić zaślepkami I.
24
25
I
Q x 1
9
26
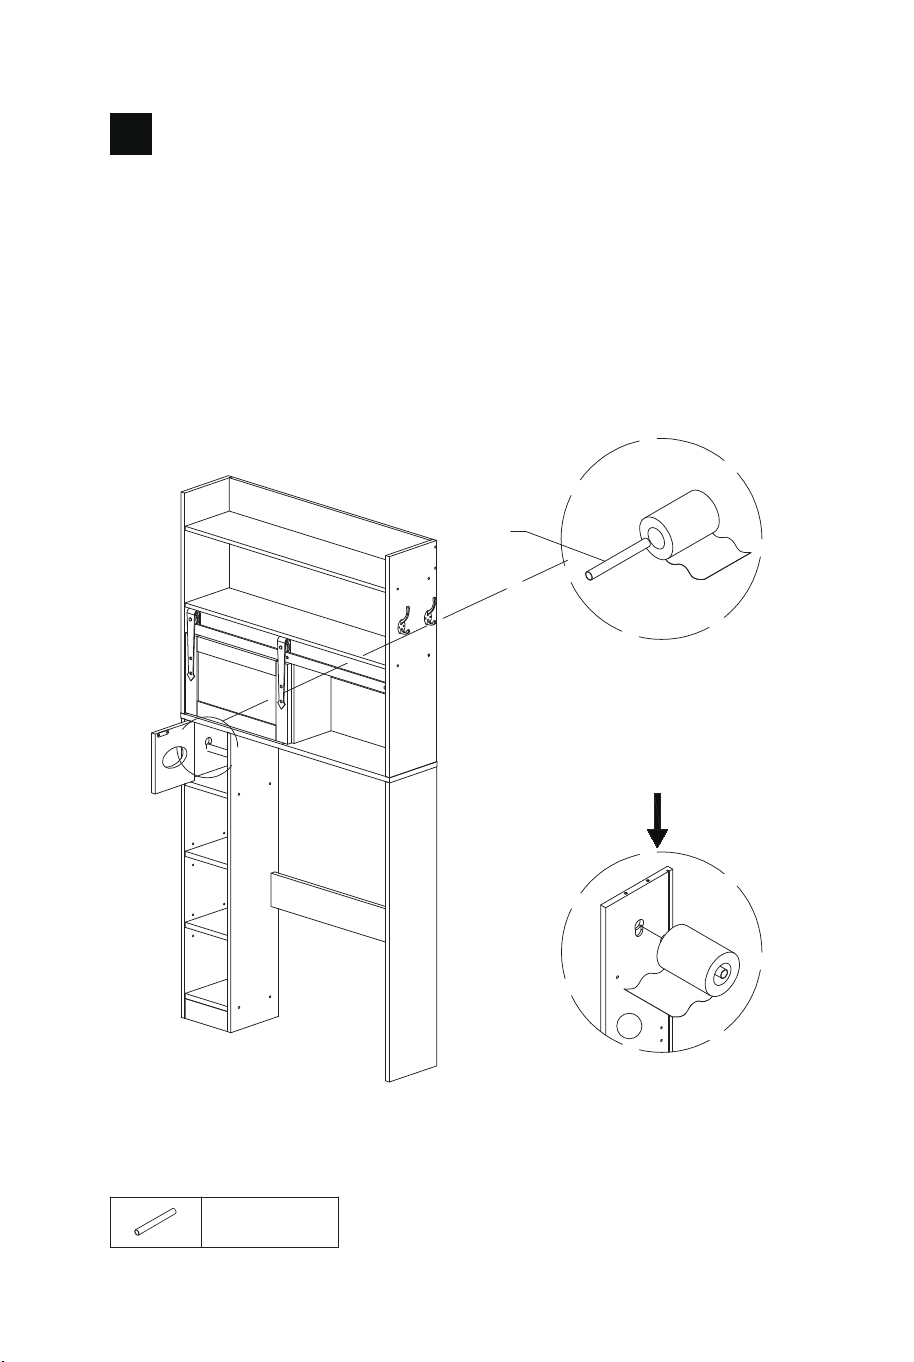
Insert the roll paper into the part Q first.
/Legen Sie das Rollenpapier zuerst in das Teil Q ein.
/Insérez d'abord le papier dans la partie Q.
/Inserte primero el rollo de papel en la pieza Q.
/Inserire prima il rotolo di carta nella parte Q.
/Najpierw załóż rolkę na część Q.
Q
32 33
I x 46
N x 2
K x 4
N
K
2
EN: The exposed hardware can be
covered with stickers I.
DE: Die freiliegende Hardware
kann mit Aufklebern I abgedeckt
werden.
FR: Le matériel exposé peut être
recouvert d'autocollants I.
ES: Los accesorios expuestos
pueden cubrirse con pegatinas I.
IT: Il hardware a vista può essere
coperto con adesivi I.
PL: Odsłonięte otwory można
okleić zaślepkami I.
24
25
I
Q x 1
9
26
Insert the roll paper into the part Q first.
/Legen Sie das Rollenpapier zuerst in das Teil Q ein.
/Insérez d'abord le papier dans la partie Q.
/Inserte primero el rollo de papel en la pieza Q.
/Inserire prima il rotolo di carta nella parte Q.
/Najpierw załóż rolkę na część Q.
Q
32 33

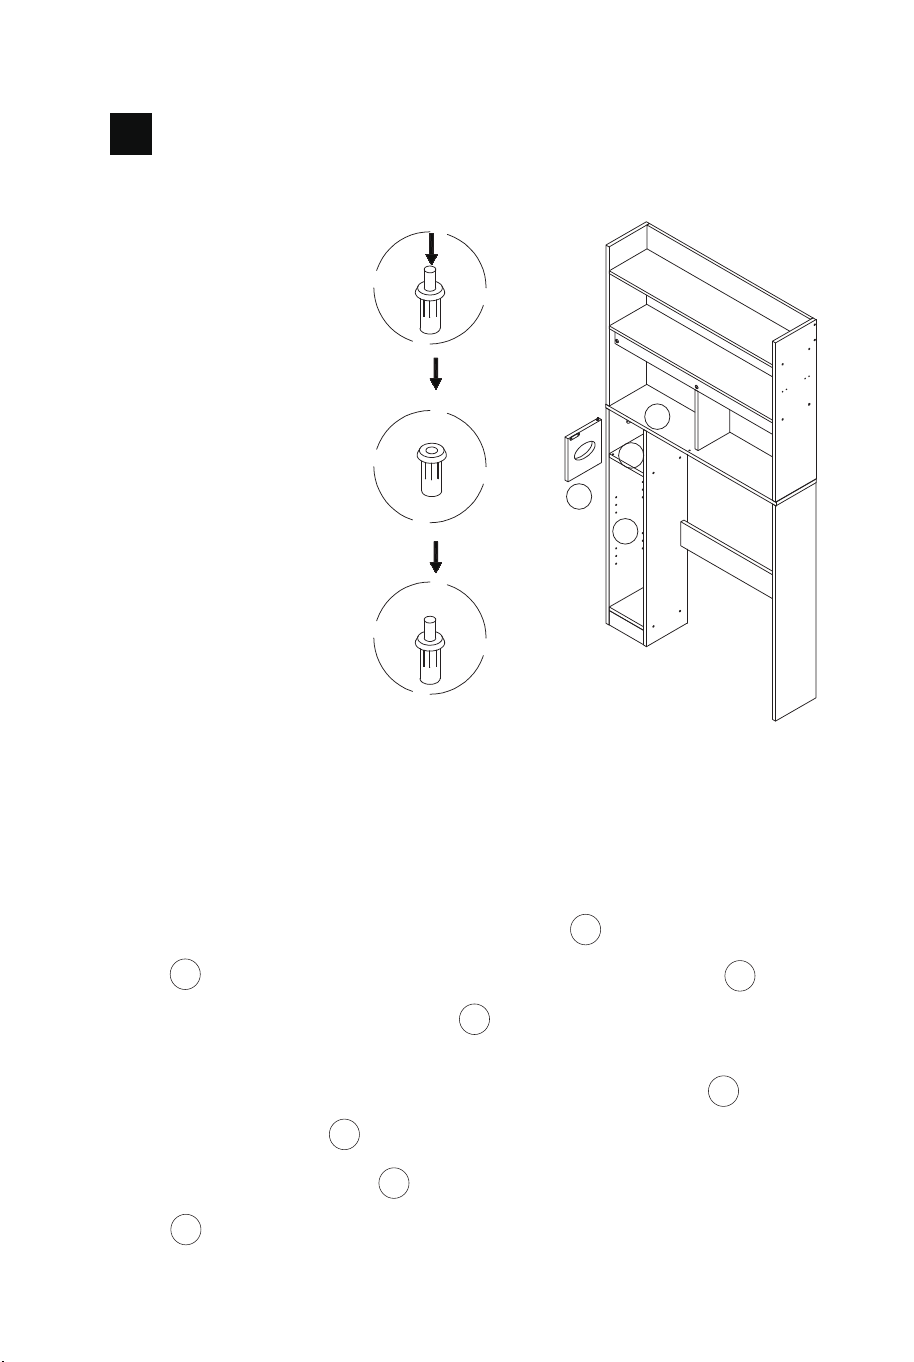
EN: Snap the part Q through the large holes in panels 9 and 10 ,
then down into the small holes. To replace the roll paper, simply lift the
part Q up and out of the large holes.
DE: Rasten Sie das Teil Q durch die großen Löcher in den Platten 9
und 10 und dann nach unten in die kleinen Löcher. Um das
Rollenpapier zu ersetzen, heben Sie das Teil Q einfach nach oben
und aus den großen Löchern heraus.
FR: Faites passer la pièce Q dans les grands trous des panneaux 9
et 10 , puis dans les petits trous. Pour remplacer le papier en rouleau,
il suffit de soulever la pièce Q et de la faire sortir des grands trous.
ES: Encaje la pieza Q a través de los orificios grandes de los paneles
9 y 10 , y luego hacia abajo en los orificios pequeños. Para sustituir
el rollo de papel, simplemente levante la pieza Q y sáquela de los
orificios grandes.
IT: Far passare la parte Q attraverso i fori grandi dei pannelli 9 e 10 ,
quindi scendere nei fori piccoli. Per sostituire la carta in rotoli, è
sufficiente sollevare la parte Q e farla uscire dai fori grandi.
PL: Przełóż część Q przez duże otwory w panelach 9 i 10 , a
następnie dociśnij w dół w małe otwory. Aby wymienić rolkę, wystarczy
podnieść część Q do góry i wyjąć ją z dużych otworów.
O x 2
WALL
/WAND
/MUR
/PARED
/MURO
/ŚCIANA
WALL
/WAND
/MUR
/PARED
/MURO
/ŚCIANA
1
2
O
O
27
34 35

FR: Instructions d'Installation:
1. Les sangles anti-basculement doivent être installées derrière les
panneaux de l'armoire 1 , 2 .
2. La hauteur des trous muraux doit être percée en fonction de la
hauteur des armoires, et installer l'ancrage en plastique (8*35MM).
3. Utilisez deux vis autotaraudeusesΦ3,5*40MM pour installer un
siège anti-basculement (44*20MM) au mur, puis utilisez deux vis
autotaraudeusesΦ3,5*20MM pour installer un dispositif
anti-basculement (44*20MM) à l'arrière du panneau 1 , et la même
méthode pour installer l'autre côté.
4. Enfin, reliez les deux dispositifs anti-basculement à l'aide d'un lien
et réglez l'écart.
5. Les sangles anti-basculement doivent être installées.
ES: Instrucciones de Montaje:
1. Las correas antivuelco deben instalarse en la posición detrás de los
paneles del armario 1 , 2 .
2. La altura de los agujeros de la pared debe ser perforada de
acuerdo con la altura de los armarios, e instalar el anclaje de plástico
(8*35MM).
3. Utilice dos tornillos autorroscantes Φ3,5*40MM para instalar un
asiento antivuelco (44*20MM) en la pared, luego utilice dos tornillos
autorroscantes Φ3,5*20MM para instalar un dispositivo antivuelco
(44*20MM) en la parte posterior del panel 1 , y el mismo método
para instalar el otro lado.
4. Por último, conecte los dos dispositivos antivuelco con una brida y
ajuste la separación.
5. Las correas antivuelco deben estar instaladas.
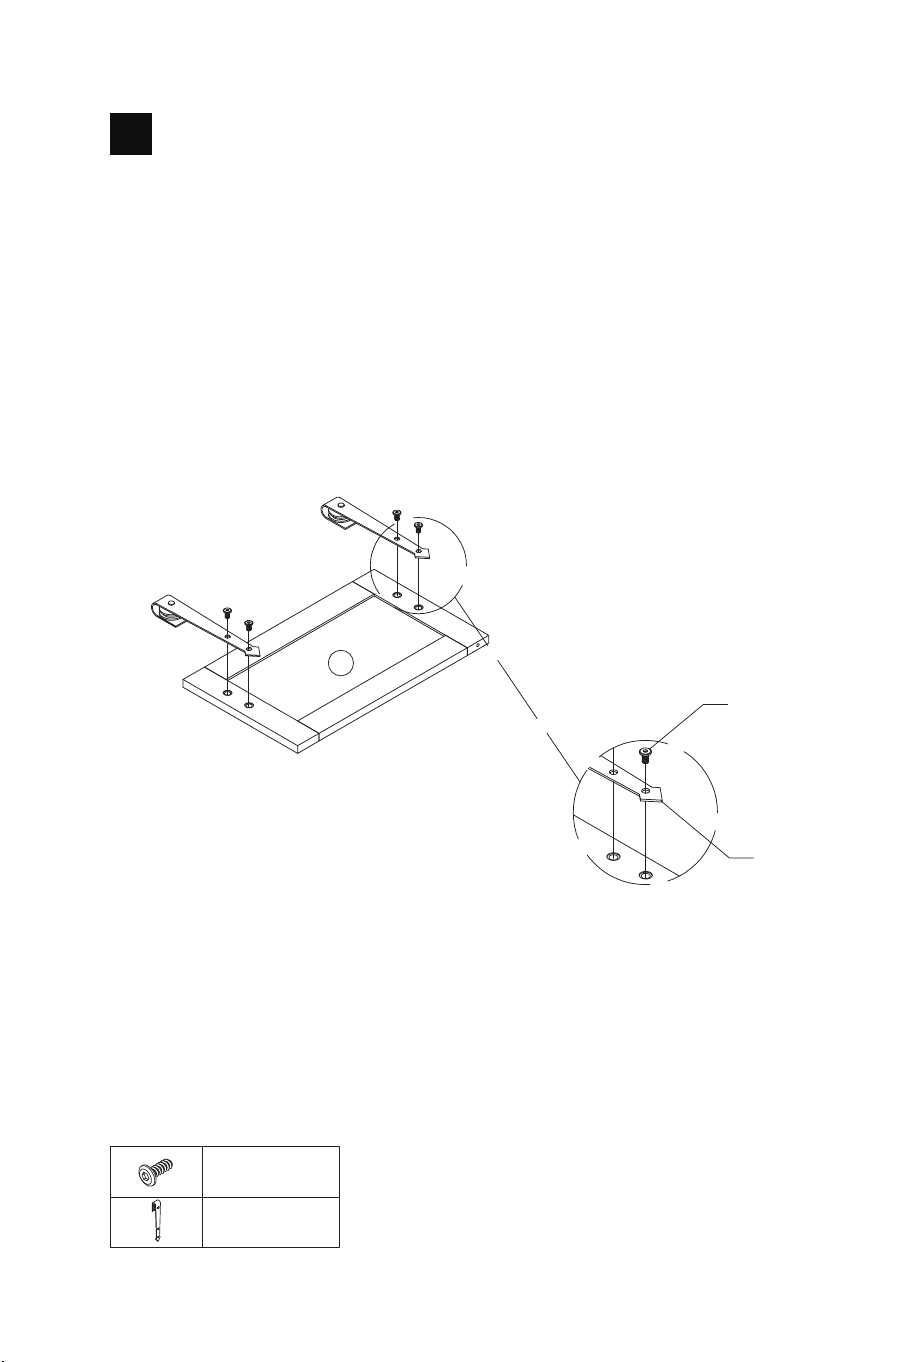
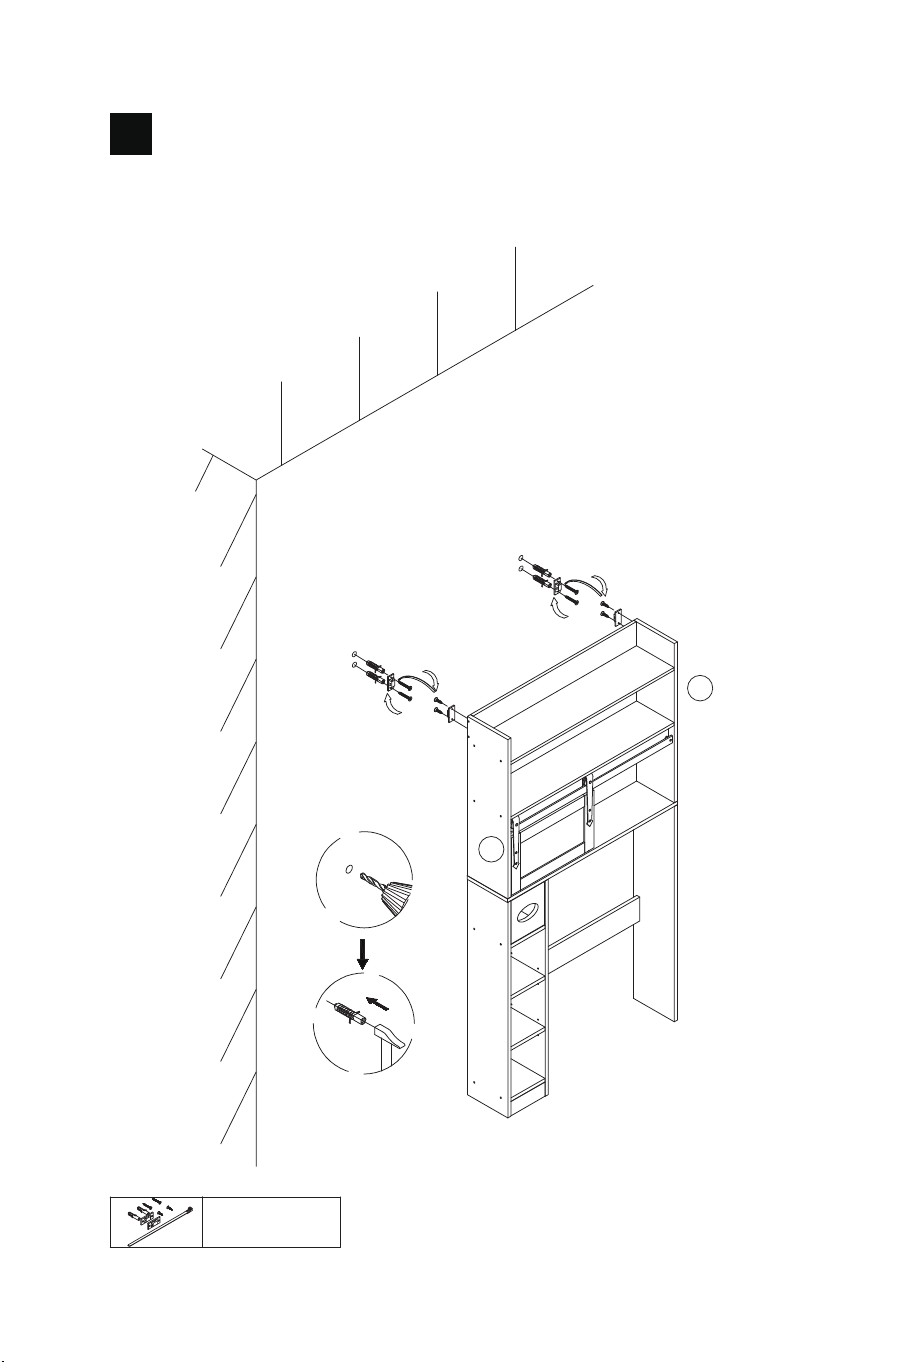
EN: Installation Instructions:
1. Anti-tipping straps need to be installed to the position behind the
cabinet panels 1 , 2 .
2. The height of the wall holes should be punched according to the
height of the cabinets, and install the plastic anchor (8*35MM).
3. Use two Φ3.5*40MM self-tapping screws to install an anti-tipping
seat (44*20MM) to the wall, then use two Φ3.5*20MM self-tapping
screws to install an anti-tipping device (44*20MM) to the back of the
panel 1 , and the same method to install the other side.
4. Finally, connect the two anti-tipping devices with a tie and adjust the
gap.
5. Anti-tipping straps must be installed.
DE: Installationsanweisungen:
1. Die Kippsicherungsbänder müssen an der Position hinter den
Schrankplatten 1 , 2 angebracht werden.
2. Die Höhe der Wandlöcher sollte entsprechend der Höhe der
Schränke gestanzt werden, und installieren Sie den Kunststoffanker
(8*35MM).
3. Verwenden Sie zwei Φ3,5*40MM selbstschneidende Schrauben,
um eine Kippsicherung (44*20MM) an der Wand zu installieren, dann
verwenden Sie zwei Φ3,5*20MM selbstschneidende Schrauben, um
eine Kippsicherung (44*20MM) an der Rückseite der Platte 1 zu
installieren, und die gleiche Methode, um die andere Seite zu
installieren.
4. Verbinden Sie schließlich die beiden Kippsicherungen mit einem
Band und stellen Sie den Abstand ein.
5. Die Kippsicherungsbänder müssen installiert werden.
36 37
FR: Instructions d'Installation:
1. Les sangles anti-basculement doivent être installées derrière les
panneaux de l'armoire 1 , 2 .
2. La hauteur des trous muraux doit être percée en fonction de la
hauteur des armoires, et installer l'ancrage en plastique (8*35MM).
3. Utilisez deux vis autotaraudeusesΦ3,5*40MM pour installer un
siège anti-basculement (44*20MM) au mur, puis utilisez deux vis
autotaraudeusesΦ3,5*20MM pour installer un dispositif
anti-basculement (44*20MM) à l'arrière du panneau 1 , et la même
méthode pour installer l'autre côté.
4. Enfin, reliez les deux dispositifs anti-basculement à l'aide d'un lien
et réglez l'écart.
5. Les sangles anti-basculement doivent être installées.
ES: Instrucciones de Montaje:
1. Las correas antivuelco deben instalarse en la posición detrás de los
paneles del armario 1 , 2 .
2. La altura de los agujeros de la pared debe ser perforada de
acuerdo con la altura de los armarios, e instalar el anclaje de plástico
(8*35MM).
3. Utilice dos tornillos autorroscantes Φ3,5*40MM para instalar un
asiento antivuelco (44*20MM) en la pared, luego utilice dos tornillos
autorroscantes Φ3,5*20MM para instalar un dispositivo antivuelco
(44*20MM) en la parte posterior del panel 1 , y el mismo método
para instalar el otro lado.
4. Por último, conecte los dos dispositivos antivuelco con una brida y
ajuste la separación.
5. Las correas antivuelco deben estar instaladas.
EN: Installation Instructions:
1. Anti-tipping straps need to be installed to the position behind the
cabinet panels 1 , 2 .
2. The height of the wall holes should be punched according to the
height of the cabinets, and install the plastic anchor (8*35MM).
3. Use two Φ3.5*40MM self-tapping screws to install an anti-tipping
seat (44*20MM) to the wall, then use two Φ3.5*20MM self-tapping
screws to install an anti-tipping device (44*20MM) to the back of the
panel 1 , and the same method to install the other side.
4. Finally, connect the two anti-tipping devices with a tie and adjust the
gap.
5. Anti-tipping straps must be installed.
DE: Installationsanweisungen:
1. Die Kippsicherungsbänder müssen an der Position hinter den
Schrankplatten 1 , 2 angebracht werden.
2. Die Höhe der Wandlöcher sollte entsprechend der Höhe der
Schränke gestanzt werden, und installieren Sie den Kunststoffanker
(8*35MM).
3. Verwenden Sie zwei Φ3,5*40MM selbstschneidende Schrauben,
um eine Kippsicherung (44*20MM) an der Wand zu installieren, dann
verwenden Sie zwei Φ3,5*20MM selbstschneidende Schrauben, um
eine Kippsicherung (44*20MM) an der Rückseite der Platte 1 zu
installieren, und die gleiche Methode, um die andere Seite zu
installieren.
4. Verbinden Sie schließlich die beiden Kippsicherungen mit einem
Band und stellen Sie den Abstand ein.
5. Die Kippsicherungsbänder müssen installiert werden.
36 37

In case a return is required, the item must be returned in original box. Without this
your return will not be accepted.
DO NOT discard the box / original packaging.
Take a photo of the box markings.
Take a photo of the damaged part (if applicable).
Send us an email with the images requested.
A photo of the markings (text) on the side of the box is required in case a part is
needed for replacement. This helps our staff identify your product number to
ensure you receive the correct parts.
A photo of the damage is always required to file a claim and get your replacement
or refund processed quickly. Please make sure you have the box even if it is
damaged.
Email us directly from marketplace where your item was purchased with the
attached images and a description of your claim.
Falls eine Rücksendung erforderlich ist, muss der Artikel in der
Originalverpackung zurückgeschickt werden. Andernfalls wird Ihre Rücksendung
nicht angenommen.
Werfen Sie den Karton / die Originalverpackung NICHT weg.
Machen Sie ein Foto von der Beschriftung des Kartons.
Machen Sie ein Foto des beschädigten Teils (falls zutreffend).
Schicken Sie uns eine E-Mail mit dem gewünschten Foto.
Für den Fall, dass ein Ersatzteil benötigt wird, benötigen wir ein Foto der
Beschriftung (Text) auf der Seite des Kartons. So können unsere Mitarbeiter Ihre
Artikelnummer identifizieren und sicherstellen, dass Sie die richtigen Teile
erhalten.
Ein Foto des beschädigten Teils ist immer erforderlich, um eine Reklamation
einzureichen und eine schnelle Bearbeitung Ihres Ersatzteils oder Ihrer
Rückerstattung zu gewährleisten. Bitte stellen Sie sicher, dass Sie den Karton
haben, auch wenn er beschädigt ist.
Schicken Sie uns eine E-Mail direkt vom Marktplatz, auf dem Sie den Artikel
gekauft haben, mit den angehängten Fotos und einer Beschreibung Ihrer
Reklamation.
EN
DE
Return / Damage Claim Instructions
Rücksendung / Beschädigung Anweisungen
IT: Istruzioni di Montaggio:
1. Le cinghie antiribaltamento devono essere installate nella posizione
dietro i pannelli del mobile 1 , 2 .
2. L'altezza dei fori a parete deve essere forata in base all'altezza dei
mobili e installare l'ancoraggio in plastica (8*35MM).
3. Utilizzare due viti autofilettanti Φ3,5*40MM per installare una sede
antiribaltamento (44*20MM) alla parete, quindi utilizzare due viti
autofilettanti Φ3,5*20MM per installare un dispositivo antiribaltamento
(44*20MM) sul retro del pannello 1 , e lo stesso metodo per installare
l'altro lato.
4. Infine, collegare i due dispositivi antiribaltamento con una fascetta e
regolare la distanza.
5. È necessario installare le cinghie antiribaltamento.
PL: Instrukcja montażu:
1. Paski zabezpieczające przed przewróceniem należy przymocować
za panelami 1 i 2 .
2. Wywierć w ścianie otwory zgodnie z wysokością szafki i zainstaluj
plastikowe kołki (8x35 MM).
3. Użyj dwóch wkrętów samogwintujących Φ3,5x40 MM, aby
zainstalować zabezpieczenie przed przewróceniem (44x20 MM) na
ścianie. Następnie użyj dwóch wkrętów samogwintujących Φ3,5x20
MM, aby zainstalować zabezpieczenie przed przewróceniem (44x20
MM) z tyłu panelu 1 . W ten sam sposób zamontuj elementy po
drugiej stronie.
4. Na koniec połącz obydwa zabezpieczenia przed przewróceniem
opaską zaciskową i wyreguluj odległość.
5. Zamocuj paski zabezpieczające przed przewróceniem.
38 39
Instructions De Retour / Réclamation De Dommages
Dans le cas où un retour est requis, l'article doit être retourné dans sa boîte
d'origine. Sans cela, votre retour ne sera pas accepté.
NE PAS jeter la boîte/l'emballage d'origine.
Prenez une photo des marquages de la boîte.
Prenez une photo des dommages (le cas échéant).
Envoyez-nous un e-mail avec les images demandées.
Une photo des marquages (texte) sur le côté de la boîte est requise au cas où une
pièce serait nécessaire pour le remplacement. Cela aide notre personnel à
identifier votre numéro de produit pour s'assurer que vous recevez les bonnes
pièces.
Une photo des dommages est toujours requise pour déposer une réclamation et
obtenir rapidement votre remplacement ou votre remboursement. Assurez-vous
d'avoir la boîte même si elle est endommagée.
Envoyez-nous un e-mail directement depuis le marché où votre article a été
acheté avec les images ci-jointes et une description de votre réclamation.
Instrucciones de Devolución / Reclamación de Daños
En caso de que se requiera una devolución, el artículo debe ser devuelto en la
caja original. Sin esto su devolución no será aceptada.
NO deseche la caja/embalaje original.
Tome una foto de las marcas de la caja.
Tome una foto de las piezas dañadas (si procede).
Envíenos un correo electrónico con las imágenes solicitadas.
Se requiere una foto de las marcas (texto) en el lado de la caja en caso de que se
necesite una pieza para reemplazarla. Esto ayuda a nuestro personal a identificar
su número de producto para asegurarse de que recibe las piezas correctas.
Una foto de los daños es siempre necesaria para presentar una reclamación y
conseguir que su reemplazo o reembolso sea procesado rápidamente. Por favor,
asegúrese de tener la caja aunque esté dañada.
Envíenos un correo electrónico directamente desde el mercado donde se compró
su artículo con las imágenes adjuntas y una descripción de su reclamación.
FR
ES
Nel caso in cui sia richiesto un reso, l'articolo deve essere restituito nella scatola
originale. Senza la scatola originale il tuo reso non sarà accettato.
NON scartare la scatola / confezione originale.
Fare una foto dei contrassegni sulla scatola.
Fare una foto di Danno (se è applicabile).
Inviarci una mail con le immagini richieste.
È necessaria una foto dei contrassegni (testo) sul lato della scatola nel caso in
cui la parte debba essere sostituita. Questo aiuta il nostro staff a identificare il
numero del tuo prodotto per assicurarti di ricevere le parti corrette.
Una foto del danno è sempre necessaria per presentare un reclamo e ottenere
rapidamente la sostituzione o il rimborso. Assicurati di avere la scatola anche se
è danneggiata.
Inviarci un'e-mail direttamente dal mercato in cui è stato acquistato il tuo articolo
con le immagini allegate e una descrizione del tuo reclamo.
Jeśli chcesz zwrócić produkt, musi znajdować się on w oryginalnym opakowaniu.
Towar zwrócony w nieoryginalnym opakowaniu nie zostanie przyjęty.
Nie wyrzucaj oryginalnego opakowania.
Zrób zdjęcie oznaczeń na opakowaniu.
Zrób zdjęcie uszkodzonej części (jeśli dotyczy).
Skontaktuj się z nami.
Jeśli jakakolwiek część wymaga wymiany, zrób zdjęcie oznaczeń kodu produktu,
który znajduje się na opakowaniu. Pozwoli nam to zidentyfikować produkt i
dostarczyć ci właściwą część.
Jeśli chcesz złożyć reklamację, zrób zdjęcie uszkodzonej części. Pozwoli nam to
zatwierdzić reklamację i zlecić zwrot środków na twoje konto. Do złożenia
reklamacji potrzebne będzie oryginalne opakowanie.
Skontaktuj się z nami telefonicznie, mailowo lub poprzez formularz kontaktowy.
Załącz zdjęcia produktu i opis roszczenia.
IT
PL
Istruzioni Per La Restituzione / Reclamo Per Danni
Zwroty i reklamacje
40 41

BA8150
THIS INSTRUCTION BOOKLET CONTAINS IMPORTANT SAFETY INFORMATION.
PLEASE READ AND KEEP FOR FUTURE REFERENCE.
Over-the-toilet Storage Cabinet
Toilettenregal
Meuble de Rangement Au-Dessus des Toilettes
Armario sobre Inodoro
Mobile Sopra la Toilette
Szafka nad toaletę
DEU office: FDS GmbH, Neuer Höltigbaum 36, 22143 Hamburg, Deutschland
GBR office: FDS Corporation Limited,Unit 4, Blackacre Road, Great Blakenham,Ipswich, Ip6 0FL,United Kingdom
ITA office: Milano
FRA office: Saint Vigor d'Ymonville
POL office: GdańskAUS office: TruganinaUSA office: Fontana