HEAVY-DUTY MOTORCYCLE CHAIN
SPLITTER & RIVETING TOOL SET
MODEL NO: SMC4
Thank you for purchasing a Sealey product. Manufactured to a high standard, this product will, if used according to these
instructions, and properly maintained, give you years of trouble free performance.
I
MPORTANT:
PLEASE READ THESE INSTRUCTIONS CAREFULLY. NOTE THE SAFE OPERATIONAL REQUIREMENTS, WARNINGS & CAUTIONS. USE
THE PRODUCT CORRECTLY AND WITH CARE FOR THE PURPOSE FOR WHICH IT IS INTENDED. FAILURE TO DO SO MAY CAUSE DAMAGE AND/OR
PERSONAL INJURY AND WILL INVALIDATE THE WARRANTY. KEEP THESE INSTRUCTIONS SAFE FOR FUTURE USE.
1. SAFETY
WARNING! Ensure Health and Safety, local authority and general workshop practice regulations are adhered to when using tools.
DO NOT use this tool if any parts are missing or damaged.
DO NOT use this tool for any purpose other than that for which it is designed.
Wear approved eye protection. A full range of personal safety equipment is available from your Sealey stockist.
Wear suitable clothing to avoid snagging. DO NOT wear jewellery and tie back long hair.
Maintain correct balance and footing, DO NOT over-reach. Ensure the floor is not slippery and wear non-slip shoes.
Keep children and other unauthorised persons away from the working area.
Keep yourself and tools away from hot engine parts.
Maintain the tool components in a good and clean condition for best and safest performance.
Replace or repair damaged parts. Use genuine parts only. Unauthorised parts may be dangerous and will invalidate the warranty.
Ensure that the motorcycle is standing on a level surface and that it is adequately supported on its own centre stand, or by other means,
before commencing any work.
Ensure that the motorcycle’s engine is turned off.
DO NOT use this tool when you are tired or under the influence of alcohol, drugs or intoxicating medication.
When work is completed, clean tools and replace in the carrying case and store in a safe, dry, childproof location.
DO NOT use power tools or extensions with these tools. Hand tighten only.
2. INTRODUCTION
Comprehensive set designed to shorten and lengthen motorcycle chains by removing or replacing links. Set is also ideal for use
on horticultural and agricultural machinery. Includes tools designed for riveting and a plate holder for connecting links accurately.
Suitable for use on 520, 525, 530 and 532 chains.
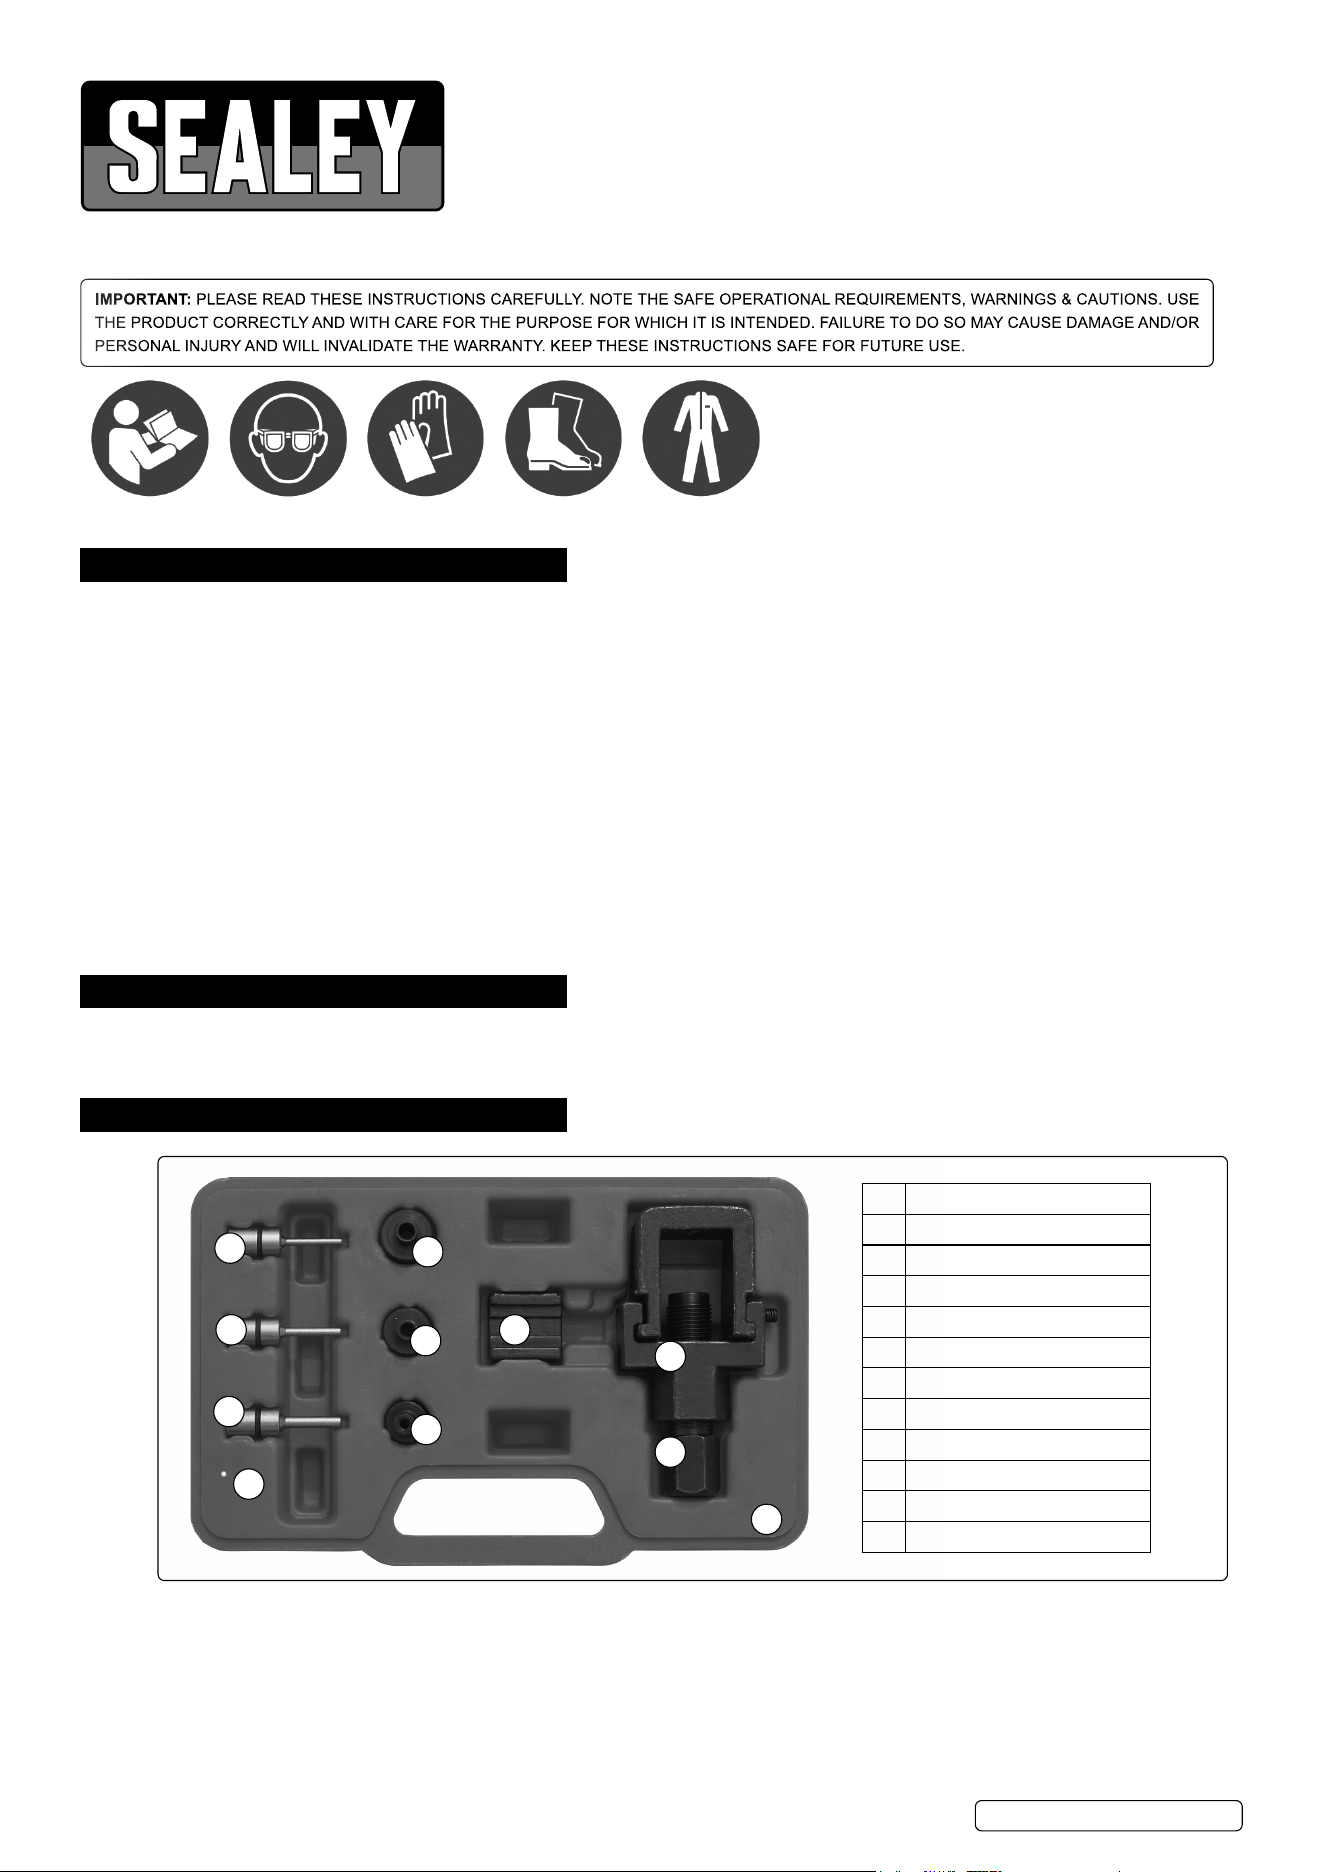
3. CONTENTS
Refer to
instructions
Wear eye
protection
Wear protective
gloves
Wear safety
footwear
Wear protective
clothing
1
2
5
6
8
10
11
9
7
# Description
1 Pin Holder
2 Main Body
5 Plate Holder
6 Pin 3mm
7 Anvil 3mm
8 Pin 4mm
9 Anvil 4mm
10 Pin 5mm
11 Anvil 5mm
12 Blow Mould Case
13 Ball Bearing
12
13
Original Language Version
© Jack Sealey Limited
SMC4 Issue 3 (4) 18/08/23
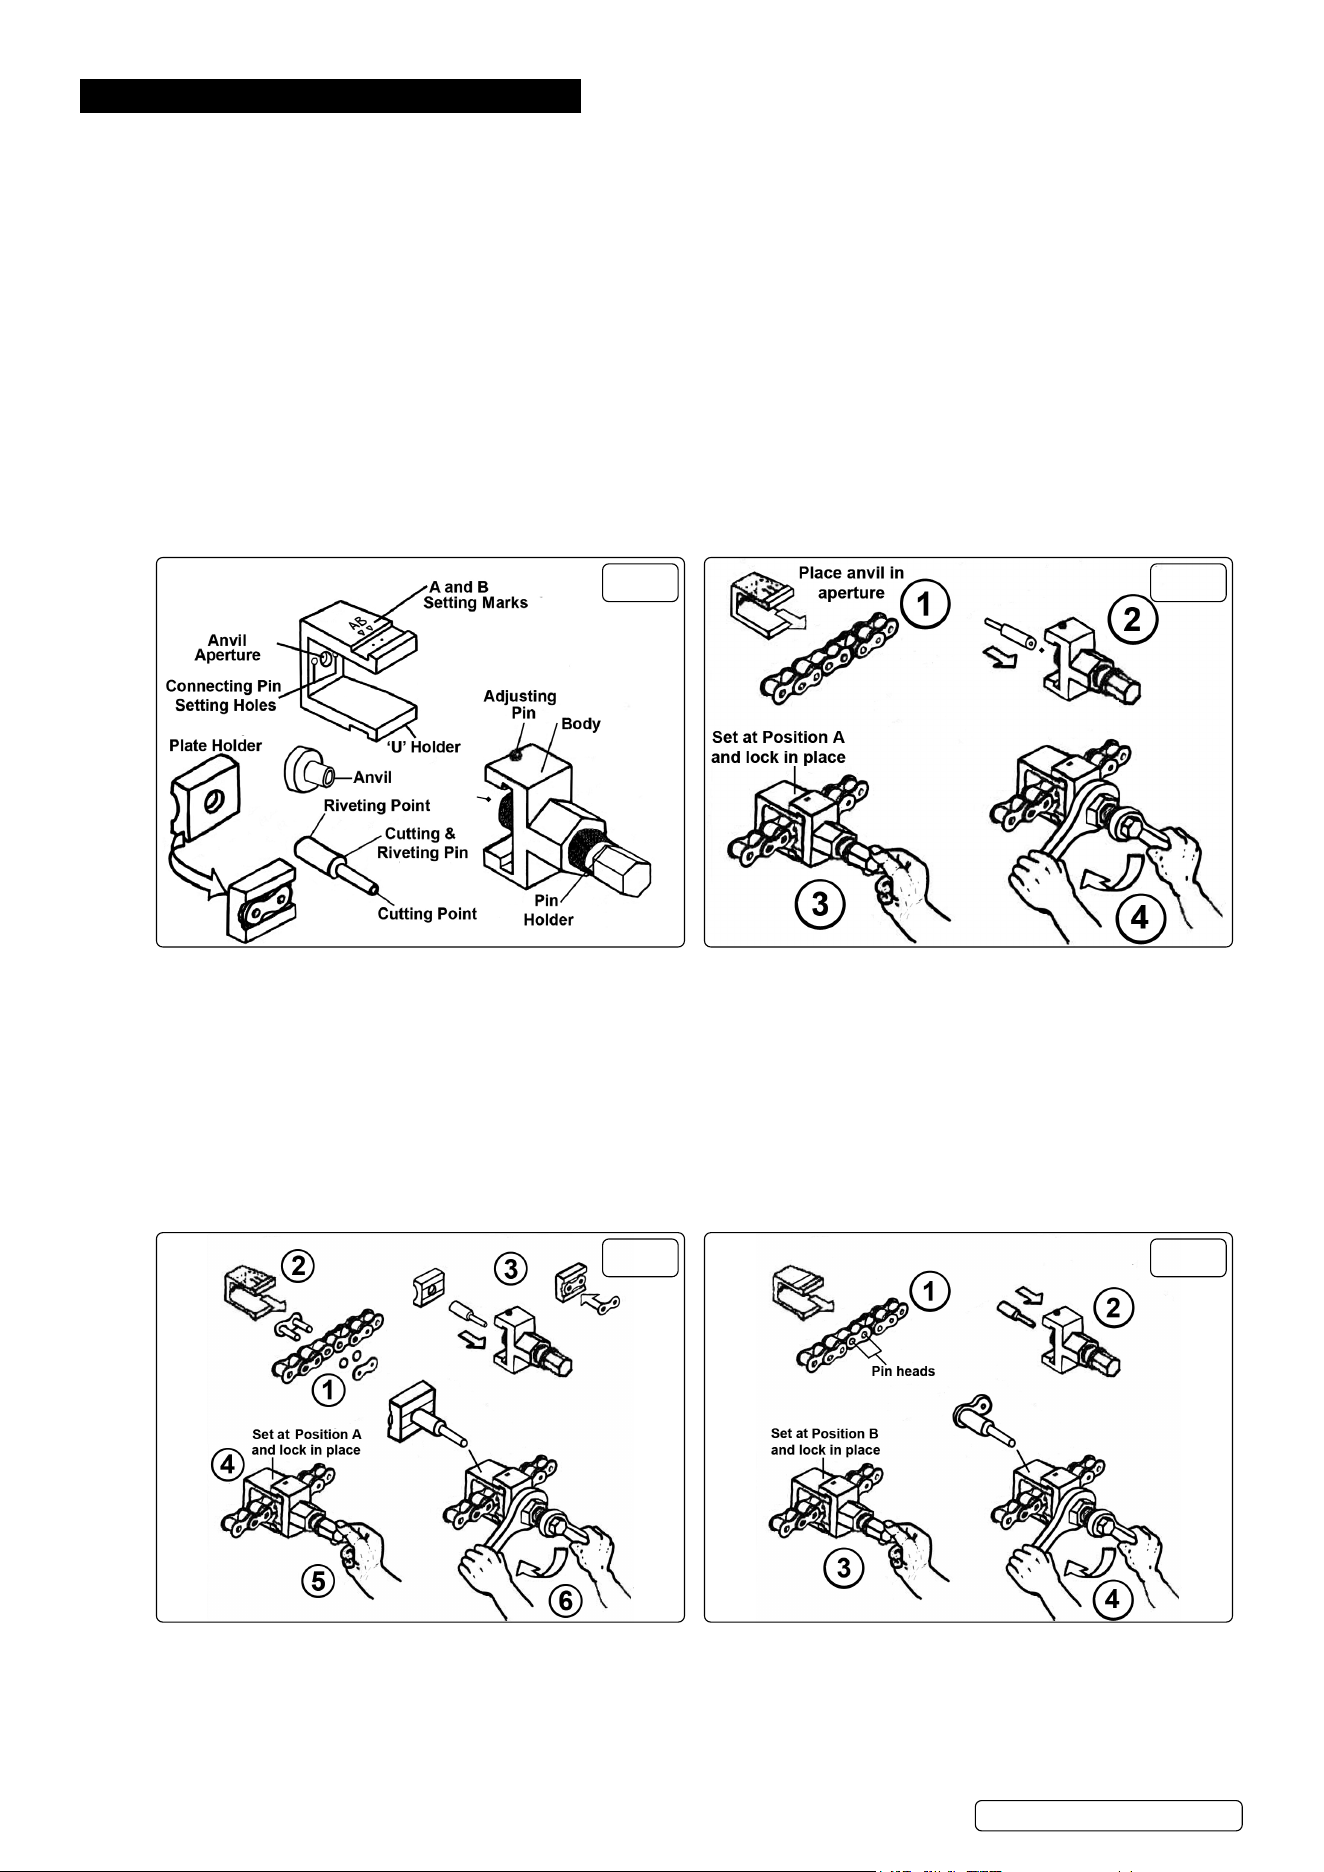
4. OPERATION
IMPORTANT: These instructions are provided as a guide only. Always refer to the motorcycle manufacturer’s service instructions, or
a proprietary manual, to establish the current procedure and data, also any warnings or cautions particular to the motorcycle. Before
commencing work, ensure that the tool is suitable for the selected chain size and connecting link. Ensure that the new connecting link is
of the same size and type as the chain to be connected. The pins in this set are consumable parts and therefore not covered by the warranty.
When selecting a pin, ensure that it is not too big for the chain pin, as it may jam in the chain, or too small, as it may break.
4.1. DISASSEMBLING A CHAIN
NOTE: Grind the rivet head on No. 520 and greater chains.
4.1.1. Place the ball bearing into the pin holder. Fit a suitably sized pin for the size of chain, into the pin holder (g.2.2). Ensure that it is
pushed fully home. Ensure that the pin holder is wound back into the body to allow enough space for it to t around the chain.
4.1.2. Position the matching sized anvil into the aperture in the U holder and place the U holder over the chain link to be removed (g.2.1).
4.1.3. Slide the pin holder body onto the U holder and tighten the securing screw in position A (g.2.3).
4.1.4. Ensure that the chain link is correctly positioned against the hole in the anvil at the rear of the U holder, and screw in the pin holder
until the pin is touching the face of the chain link pin to be removed. Check that everything is lined up.
4.1.5. Use a 27mm spanner to hold the pin holder body and a 19mm spanner to turn the pin holder. Turn the pin holder clockwise and
proceed to start pushing out the link pin from the chain. Re-check that all parts are lined up and that the pin is centred on the link pin.
Continue to push out the link pin (g.2.4).
Note: If excessive resistance is felt initially and there is diculty in turning the pin holder, the pin may be too large for the link pin. Try
one size smaller pin and anvil if possible.
FIG.1 FIG.2
4.2. PRESS FITTING LINK PLATE
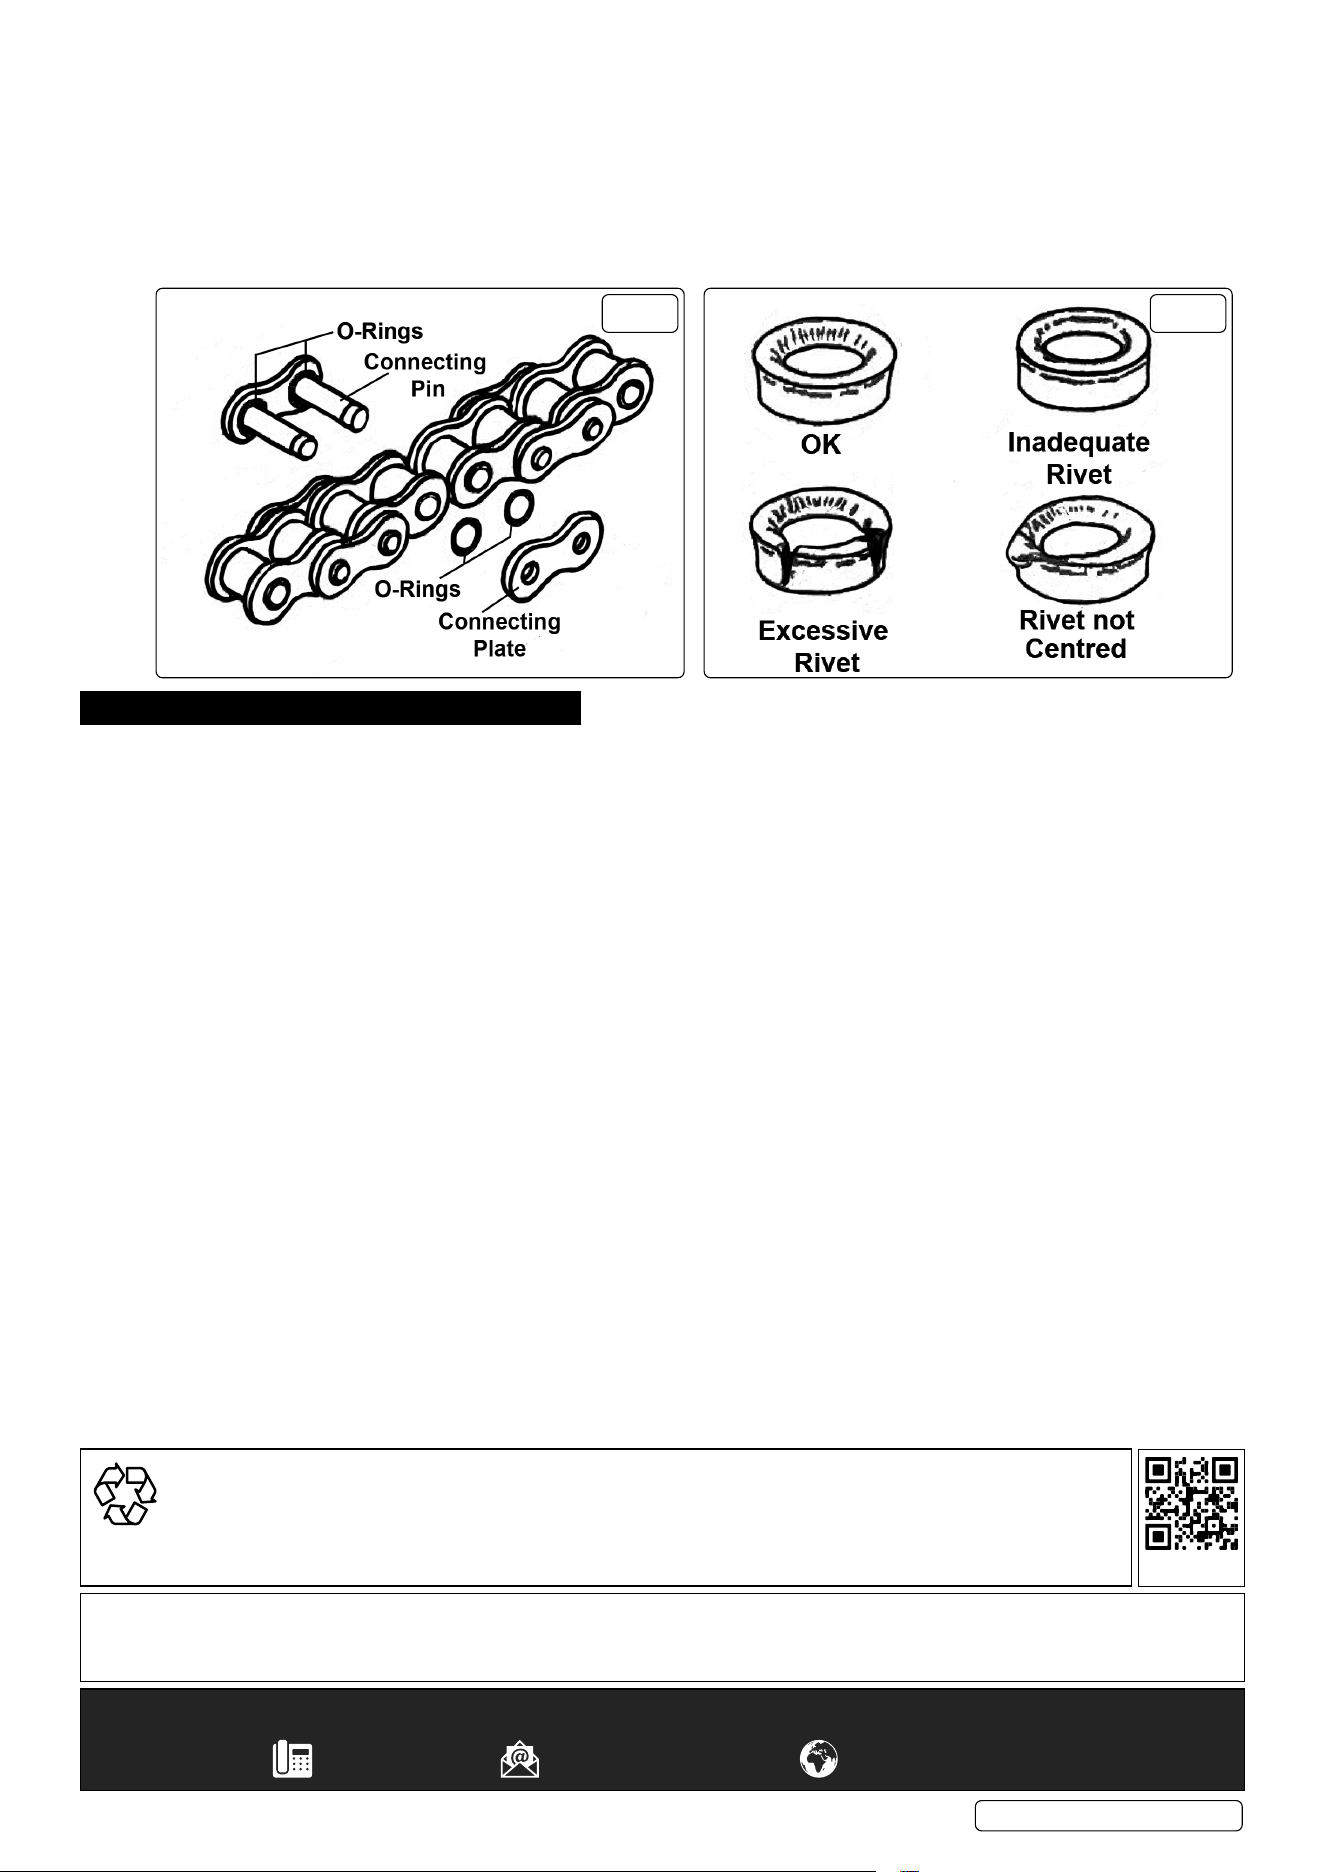
4.2.1. Connect the two ends of the chain with a new connecting link.
Note: Ensure that O rings are correctly positioned between the plates, and that the plates are adequately lubricated - see
manufacturer’s instructions (g.5).
4.2.2. Position the U holder over the link so that the end of the plate’s pins t into the 2 recesses (g.3.2).
4.2.3. Fit a suitably sized pin into the pin holder and position the plate holder over the end of the pin (g.3.3).
4.2.4. Slide the pin holder body onto the U holder and tighten the securing screw in position A (g.3.4).
4.2.5. Screw in the pin holder so that the plate holder is in contact with the new link (g.3.5).
4.2.6. Use a 27mm spanner to hold the pin holder body and a 19mm spanner to turn the pin holder. Turn the pin holder clockwise and
proceed to start push tting the link plate onto the pins (g.3.6). Back o the pin holder and remove the plate holder, then follow the
instructions for riveting in 4.3.3.
FIG.3 FIG.4
Ball
Bearing
Original Language Version
© Jack Sealey Limited
SMC4 Issue 3 (4) 18/08/23
4.3. RIVETING PINS
4.3.1. Loosen securing screw and reposition the pin holder body on the U holder in position B and re-tighten the securing screw (g.4.3).
4.3.2. Screw in the pin holder, ensuring that the riveting pin is positioned centrally onto one of the pin heads (g.4.1).
4.3.3. Use a 27mm spanner to hold the pin holder body and a 19mm spanner to turn the pin holder. Turn the pin holder clockwise and
start to push the riveting pin onto the pin. Keep checking to ensure that the riveting pin is centrally located on the pin and that it is
cleanly riveting it.
4.3.4. The rivet should be clean, centred and deep enough, see g.6.
4.3.5. When the rst pin has been riveted, undo the pin holder, re-position the chain so that the other pin is lined up with the riveting pin
and repeat the above procedure in 4.3.3.
FIG.5 FIG.6
5. MAINTENANCE
5.1. Clean the tools and lubricate threads before each use.
Original Language Version
© Jack Sealey Limited
Sealey Group, Kempson Way, Suffolk Business Park, Bury St Edmunds, Suffolk. IP32 7AR
01284 757500 sales@sealey.co.uk www.sealey.co.uk
ENVIRONMENT PROTECTION
Recycle unwanted materials instead of disposing of them as waste. All tools, accessories and packaging should be sorted,
taken to a recycling centre and disposed of in a manner which is compatible with the environment. When the product
becomes completely unserviceable and requires disposal, drain any fluids (if applicable) into approved containers and
dispose of the product and fluids according to local regulations.
Note: It is our policy to continually improve products and as such we reserve the right to alter data, specifications and component parts without prior notice.
Important: No Liability is accepted for incorrect use of this product.
Warranty: Guarantee is 12 months from purchase date, proof of which is required for any claim.
SMC4 Issue 3 (4) 18/08/23
REGISTER YOUR
PURCHASE HERE