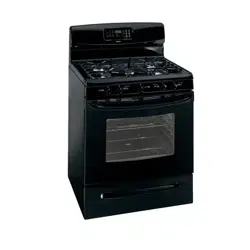
GAS RANGE
COCINA (ESTUFA) DE GAS
Models, Modelos: 362. 7262_, 7462#, 7562N
= color number, namero de color
63
f-
Z_
o
18305580Pt 46
(SR85059 363 JR
Printedn_a UnitedStates Sears, Roebuck and Co., Hoffman Estates, IL 60179 U.S,A. www.sears,com
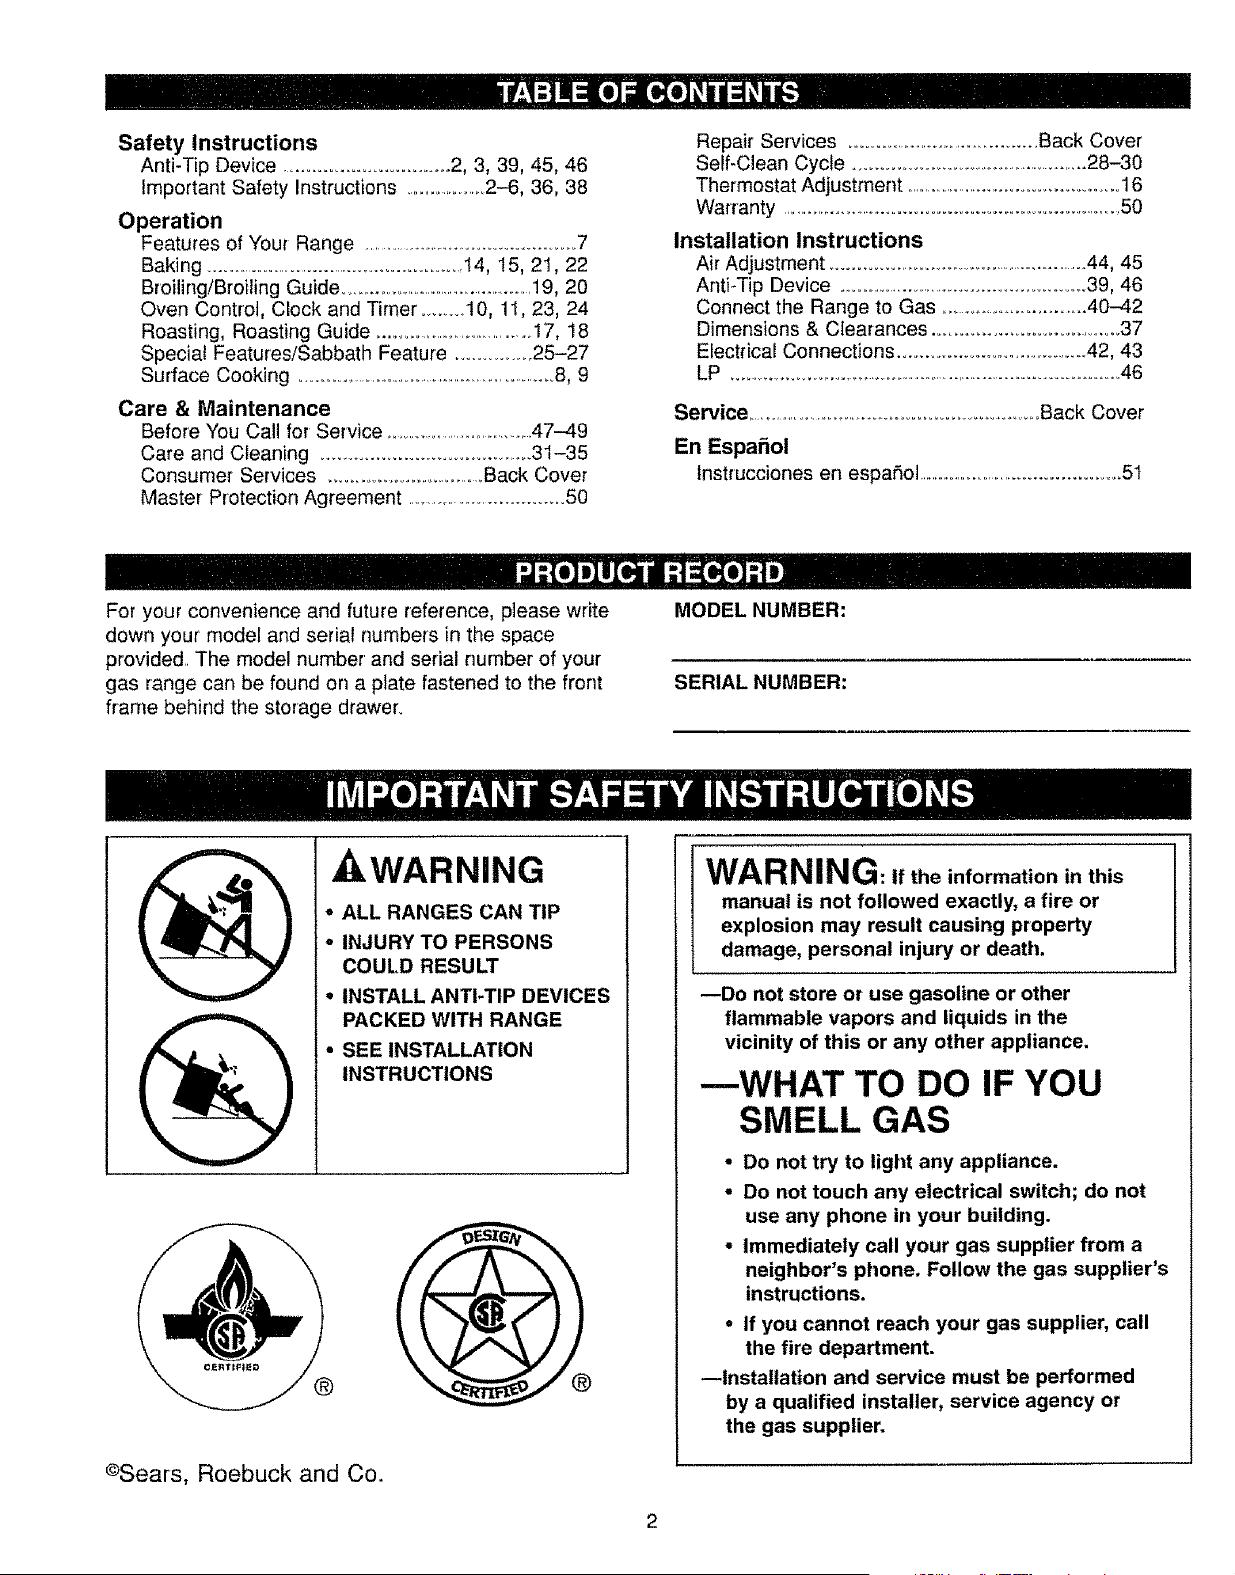
Safety Instructions
Anti-Tip Device ................................ 2, 3, 39, 45, 46
Important Safety Instructions .......................2-6, 36, 38
Operation
Features of Your Range .................................................7
Baking ........................................................14, 15, 21, 22
Broiling/Broiling Guide ...................................................19, 20
Oven Control, Clock and Timer ..........10, 11, 23, 24
Roasting, Roasting Guide .........................................17, 18
Special Features!Sabbath Feature .............. 25-27
Surface Cooking ....................................................................8, 9
Care & Maintenance
Before You Call for Service .....................................47-49
Care and Cleaning ..........................................31-35
Consumer Services .................................Back Cover
Master Protection Agreement ................................50
Repair Services ............................................Back Cover
Serf-Clean Cycle ........................................................28-30
Thermostat Adjustment ...................................................16
Warranty ................................................................................50
Installation Instructions
Air Adjustment ...................................................................44, 45
Anti-Tip Device ...........................................................39, 46
Connect the Range to Gas ....................................40-42
Dimensions & Clearances .................................... 37
Electrical Connections ...............................................42, 43
LP ..........................................................................................46
Service .............................................................................Back Cover
En Espafiol
lnstrucciones en espa_ol ..................................................51
For your convenience and future reference, please write
down your model and serial numbers in the space
provided,, The model number and serial number of your
gas range cart be found on a plate fastened to the front
frame behind the storage drawer:
MODEL NUMBER:
SERIAL NUMBER:
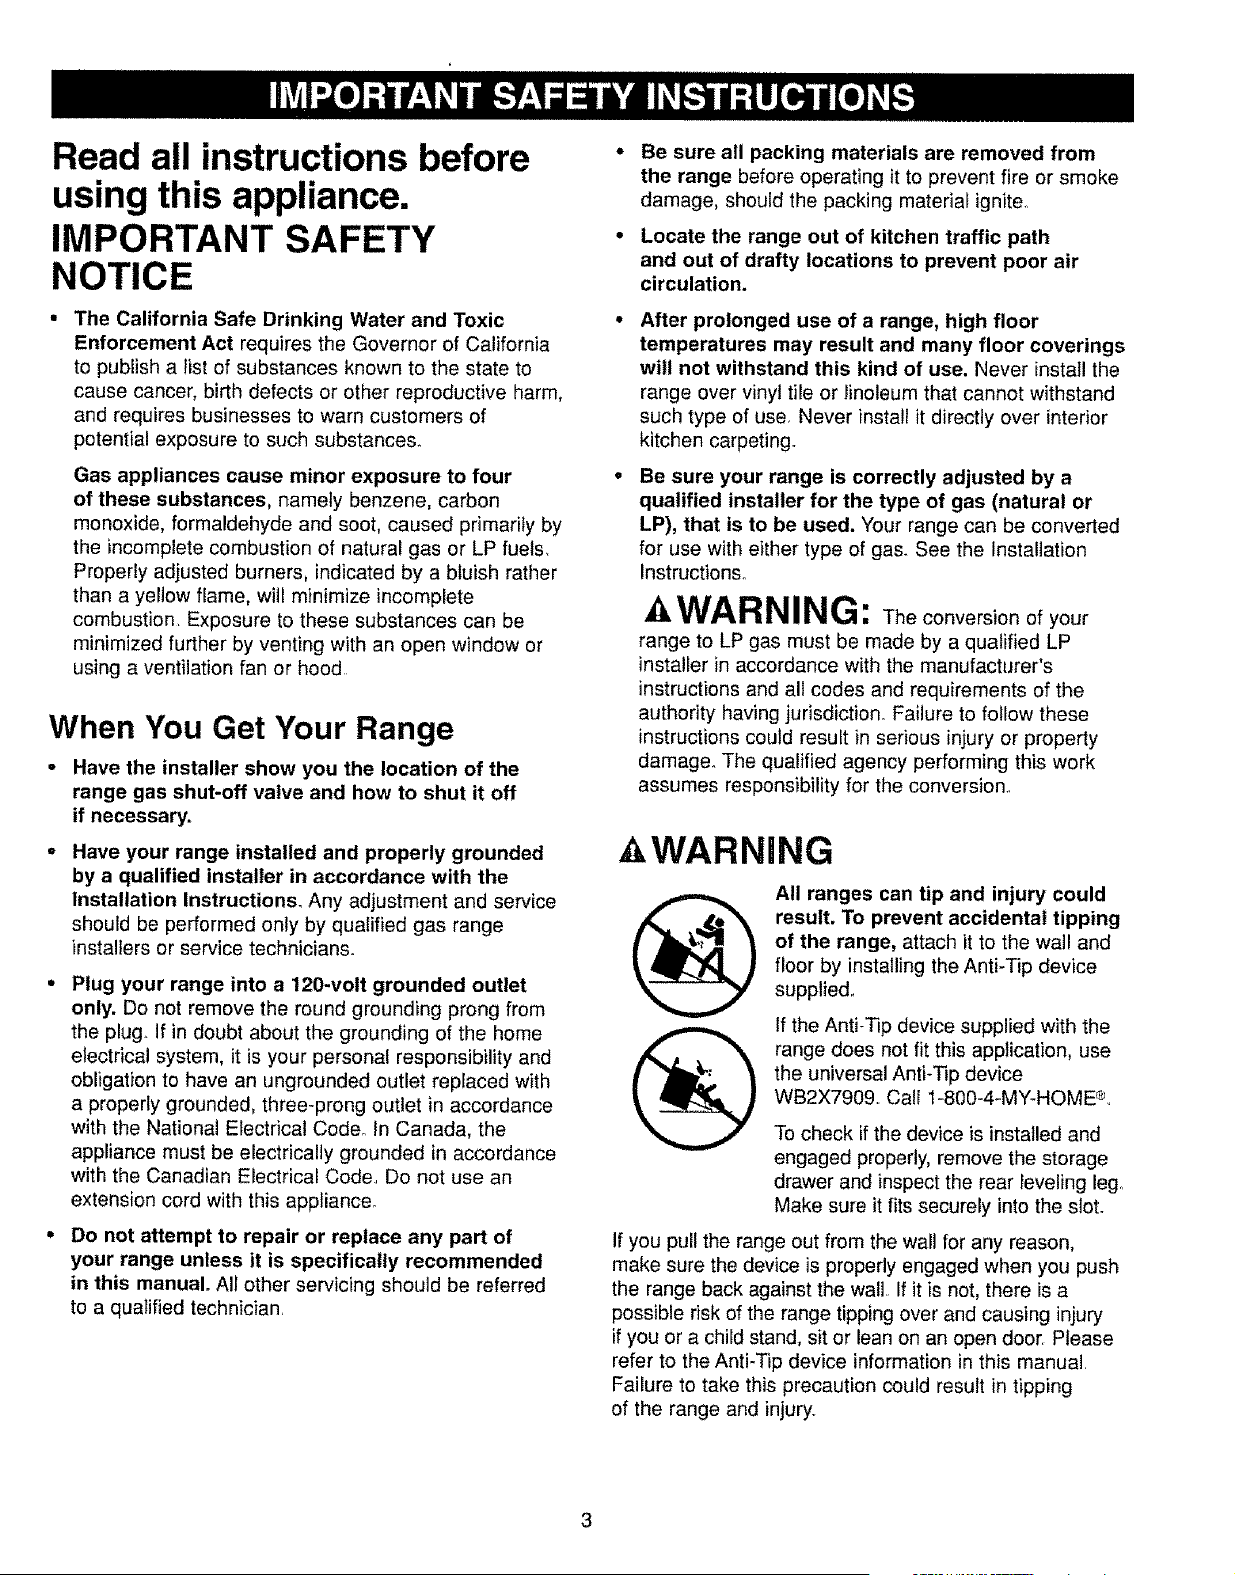
WARNING: Iftheinformationinthis
manual is not followed exactly, a fire or
explosion may result causing property
damage, personal injury or death.
WARNING
o ALL RANGES CAN TIP
o INJURY TO PERSONS
COULD RESULT
• INSTALL ANTI-TIP DEVICES
PACKED WITH RANGE
• SEE INSTALLATION
INSTRUCTIONS
® ®
©Sears, Roebuck and Co.
reDo not store or use gasoline or other
flammable vapors and liquids in the
vicinity of this or any other appliance.
---WHAT TO DO IF YOU
SMELL GAS
• Do not try to light any appliance.
• Do not touch any electrical switch; do not
use any phone in your building.
• Immediately call your gas supplier from a
neighbor's phone. Follow the gas supplier's
instructions.
• If you cannot reach your gas supplier, call
the fire department.
--Installation and service must be performed
by a qualified installer, service agency or
the gas supplier.
Read all instructions before
using this appliance.
IMPORTANT SAFETY
NOTICE
The California Safe Drinking Water and Toxic
Enforcement Act requires the Governor of California
to publish a list of substances known to the state to
cause cancer, birth defects or other reproductive harm,
and requires businesses to warn customers of
potential exposure to such substances.
Gas appliances cause minor exposure to four
of these substances, namely benzene, carbon
monoxide, formaldehyde and soot, caused primarily by
the incomplete combustion of natural gas or LP fuels.
Properly adjusted burners, indicated by a bluish rather
than a yellow flame, will minimize incomplete
combustion, Exposure to these substances can be
minimized further by venting with an open window or
using a ventilation fan or hood
When You Get Your Range
• Have the installer show you the location of the
range gas shut-off valve and how to shut it off
if necessary.
o Have your range installed and properly grounded
by a qualified installer in accordance with the
Installation Instructions_ Any adjustment and service
should be performed only by qualified gas range
installers or service technicians.
Plug your range into a 120-vott grounded outlet
only. Do not remove the round grounding prong from
the plug.. If in doubt about the grounding of the home
electrical system, it is your personal responsibility and
obligation to have an ungrounded outlet replaced with
a properly grounded, three-prong outlet in accordance
with the National Electrical Code° In Canada, the
appliance must be electrically grounded in accordance
with the Canadian Electrical Code., Do not use an
extension cord with this appliance°
Do not attempt to repair or replace any part of
your range unless it is specifically recommended
in this manual. All other servicing should be referred
to a quatified technician.
Be sure all packing materials are removed from
the range before operating it to prevent fire or smoke
damage, should the packing materiaf igniter
Locate the range out of kitchen traffic path
and out of drafty locations to prevent poor air
circulation.
After prolonged use of a range, high floor
temperatures may result and many floor coverings
will not withstand this kind of use. Never instatl the
range over vinyl tile or linoleum that cannot withstand
such type of use Never install it directly over interior
kitchen carpeting°
Be sure your range is correctly adjusted by a
qualified installer for the type of gas (natural or
LP), that is to be used. Your range can be converted
for use with either type of gas. See the Installation
Instructions°
WARNING: Theconversiooofyour
range to LP gas must be made by a qualified LP
installer in accordance with the manufacturer's
instructions and all codes and requirements of the
authority having jufisdiction. Failure to follow these
instructions could result in serious injury or property
damage. The qualified agency performing this work
assumes responsibility for the conversion.,
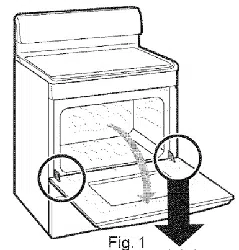
WARNiNG
All ranges can tip and injury could
result. To prevent accidental tipping
of the range, attach it to the wall and
floor by installing the Anti-Tip device
supplied.
If the Anti-Tip device supplied with the
range does not fit this application, use
the universal Anti-Tip device
WB2X7909.. Call 1-800-4-MY-HOME ®,
To check if the device is installed and
engaged properly, remove the storage
drawer and inspect the rear leveling leg.
Make sure it fits securely into the slot.
If you pull the range out from the wall for any reason,
make sure the device is properly engaged when you push
the range back against the wall if it is not, there is a
possible risk of the range tipping over and causing injury
if you or a child stand, sit or lean on an open door. Please
refer to the Anti-Tip device information in this manual.
Failure to take this precaution could result in tipping
of the range and injury..

Using Your Range
° Do not leave children alone or unattended where a
range is hot or in operation, They could be seriously
burned.
• Do not allow anyone to climb, stand or hang on
the door, storage drawer or cooktop. They could
damage the range and even tip it over, causing severe
personal injury_
• Let the burner grates and other surfaces cool
before touching them or leaving them where
children can reach them.
CAUTION: ITEMS OF INTEREST TO CHILDREN
SHOULD NOT BE STORED IN CABINETS ABOVE A
RANGE OR ON THE BACKSPLASH OF A RANGE m
CHILDREN CLIMBING ON THE RANGE TO REACH
ITEMS COULD BE SERIOUSLY INJURED.
Never wear loose-fitting or hanging garments
while using the appliance. Be careful when reaching
for items stored in cabinets over the cooktop_
Flammable material could be ignited if brought in
contact with flames or hot oven surfaces and may
cause severe burns.
Do not use water on grease fires. Never pick up a
flaming pan, Turn the controls off. Smother a flaming
pan on a surface unit by covering the pan completely
with a well-fitting lid, cookie sheet or flat tray. Use a
multi-purpose dry chemical or foam-type fire
extinguisher
Flaming grease outside a pan can be put out by
covering it with baking soda or, if available, by using
a multi-purpose dry chemical or foam-type fire
extinguisher=
Flame in the oven or storage drawer can be smothered
completely by closing the oven door or drawer and
turning the oven off or by using a multi-purpose dry
chemical or foam-type fire extinguisher.
Do not store flammable materials in an oven,
range storage drawer or near the cooktop.
Do not store or use combustible materials,
gasoline or other flammable vapors and liquids
in the vicinity of this or any other appliance.
Do not let cooking grease or other flammable
materials accumulate in or near the range.
• Cook meat and poultry thoroughly--meat to at
least an INTERNAL temperature of 160°F and poultry
to at teast an INTERNAL temperature of 180°E_
Cooking to these temperatures usually protects
against foodborne iltness.
• For your safety, never use your appliance for
warming or heating the room.
o Large scratches or impacts to glass doors can
lead to broken or shattered glass.
Surface Cooking
• Always use the LITE position when igniting the top
burners and make sure the burners have ignited.
= Never leave the surface burners unattended at high
flame settings. Boilovers cause smoking and greasy
spiliovers that may catch on fire.
• Adjust the top burner flame size so it does not
extend beyond the edge of the cookware. Excessive
flame is hazardous°
• Use only dry pot holders--moist or damp pot holders
on hot surfaces may result in burns from steam_
= Do not let pot holders come near open flames
when lifting cookware° Do not use a towel or other
bulky cloth in place of a pot holder.
• To minimize the possibility of burns, ignition of
flammable materials and spillage, turn cookware
handles toward the side or back of the range without
letting them extend over adjacent burners_
° Always turn the surface burners to OFF before
removing cookware.
• Carefully watch foods being fried at a high flame
setting,
° Never block the vents (air openings) of the range,
They provide the air inlet and outlet that are necessary
for the range to operate properly with correct
combustion_Air openings are located in the following
places:
--Oven vent at the rear of the cooktop.
--Air intake under the storage drawer_
--Air vent at the top of the oven door_
• Do not use a wok if the wok has a round metal ring
that is placed over the burner grate to support the
wok. This ring acts as a heat trap, which may damage
the burner grate and burner head Also, it may cause
the burner to work improperly. This may cause a carbon
monoxide level above that allowed by standards,
resulting in a health hazard.
• Foods for frying should be as dry as possible. Frost
on frozen foods or moisture on fresh foods can cause
hot fat to bubble up and over the sides of the pan°
• Use the least possible amount of fat for effective
shallow or deep fat frying. Filling the pan too full
of fat can cause spillovers when food is added,
• If a combination of oils or fats will be used
in frying, stir together before heating or as fats
melt slewly_
• Always heat fat slowly and watch as it heats.
• Use a deep-fat thermometer whenever possible to
prevent overheating fat beyond the smoking point.
• Never try to move a pan of hot fat, especially a deep
fat fryer° Wait until the fat is cool
o When using glass cookware, make sure it is designed
for top-of-range cooking
• Use proper pan size. Avoid pans that are unstable or
easily tipped_ Select cookware having flat bottoms targe
enough to properly contain food and avoid believers
and spiltovers and large enough to cover burner grates°
This wilt both save cleaning time and prevent
hazardous accumulations of food, since heavy
spattering or spillovers left on the range can ignite.
Use pans with handles that can be easily grasped
and will remain cool
Keep all plastics away from the top burners.
Do not leave plastic
items on the
cooktop--they may
melt if left too close
to the vent.
Do not leave any
items on the cooktop_ VentappearanceandFocatienvary
The hot air from the vent may ignite flammable items
and will increase pressure in closed containers, which
may cause them to bursL
To avoid the possibility of a burn, always be certain
that the controls for all burners are at the OFF
position and all grates are cool before attempting
to remove them.
When flaming foods are under the hood, turn the
fan off. The fan, if operating, may spread the flames.
If the range is located near a window, do not hang
long curtains that could bFowover the top burners and
create a fire hazard.
If you smell gas, turn off the gas to the range and call
a qualified service technician. Never use an open flame
to locate a leak
Baking, Broiling and Roasting
- Do not use the oven for a storage area, items stored
in the oven can ignite.
• Stand away from the range when opening the door
of a hot oven. The hot air and steam that escape
can cause burns to hands, face and eyes,
° Keep the oven free from grease buildup,
• Place the oven shelves in the desired position while
the oven is cool
• Pulling out the shelf to the shelf-stop is a
convenience in lifting heavy foods. It is also a
precaution against burns from touching hot
surfaces of the door or oven walls. The lowest
position is not designed to slide.
• Do not heat unopened food containers. Pressure
could build up and the container could burst,
causing an injury.
• Do not use aluminum foil anywhere in the oven
except as described in this guide. Misuse could
result in a fire hazard or damage to the range_
= Never use aluminum foil to line the oven bottom.
Improper use of foil could start a fire.
o When using cooking or roasting bags in the oven,
follow the manufacturer's directions
• Use only glass cookware that is recommended for
use in gas ovens.
° Always remove broiler pan from the oven as soon
as you finish broiling. Grease teft in the pan can
catch on fire if oven is used without removing the
grease from the broiler pan_
. When broiling, if meat is too close to the flame,
the fat may ignite. Trim excess fat to prevent
excessive flare-ups.
• Make sure the broiler pan is in place correctly to
reduce the possibility of grease fires,
• If you should have a grease fire in the broiler pan,
turn the oven off and keep the door closed to contain
fire until it burns out.
Self-Cleaning Oven
, Do not clean the door gaskeL The door gasket is
essential for a good seal Care should be taken not
to rub, damage or move the gasket
, Do not use oven cleaners. No commercial oven
cleaner or oven liner protective coating of any kind
should be used in or around any part of the oven_
Residue from oven cleaners will damage the inside
of the oven when the self-clean cycle is used
° Before self-cleaning the oven, remove the broiler pan,
broiler grid, all cookware and any aluminum foil from
the oven_
o Oven shelves should be removed from the oven
before beginning the self-clean cycle.
• Be sure to wipe up excess spillage before starting
the self-clean cycle.
• If the self-cleaning mode malfunctions, turn the
oven off and disconnect the power supply. Have
it serviced by a qualified technician
o Clean only parts listed in this Use and Care Guide.
° Keep the range clean and free of accumulations
of grease or spillovers, which may ignite.
SAVE THESE INSTRUCTIONS
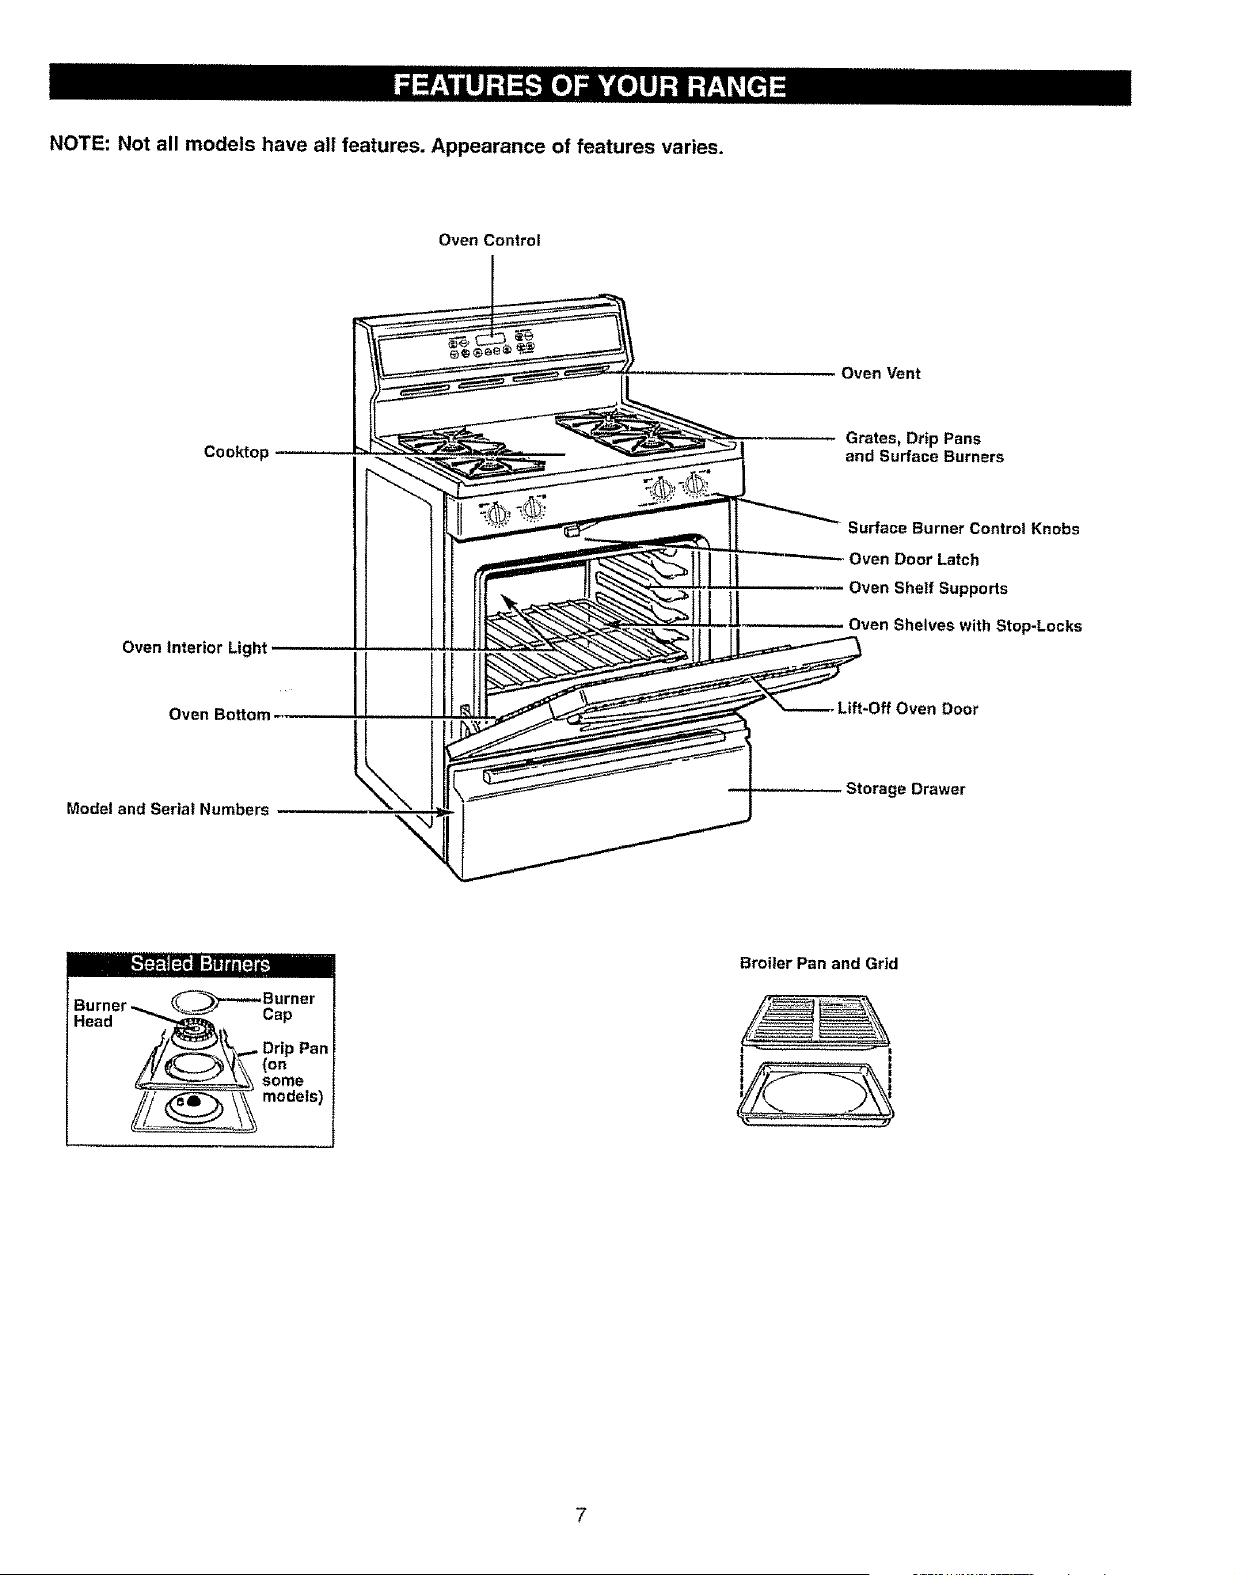
NOTE: Not all models have all features. Appearance of features varies.
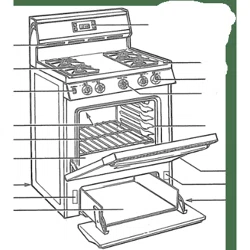
Oven Control
Oven Vent
Cooktop
Grates, Drip Pans
and Surface Burners
Oven Interior Light
Oven BoRom
Model and Serial Numbers
Surface Burner Control Knobs
Oven Door Latch
Oven Shelf Supports
Oven Shelves with Stop-Locks
Lift-Off Oven Door
Storage Drawer
_Burner
Burner _ _ ^
Head ----_ L;ap
Broiler Pan and Grid
I
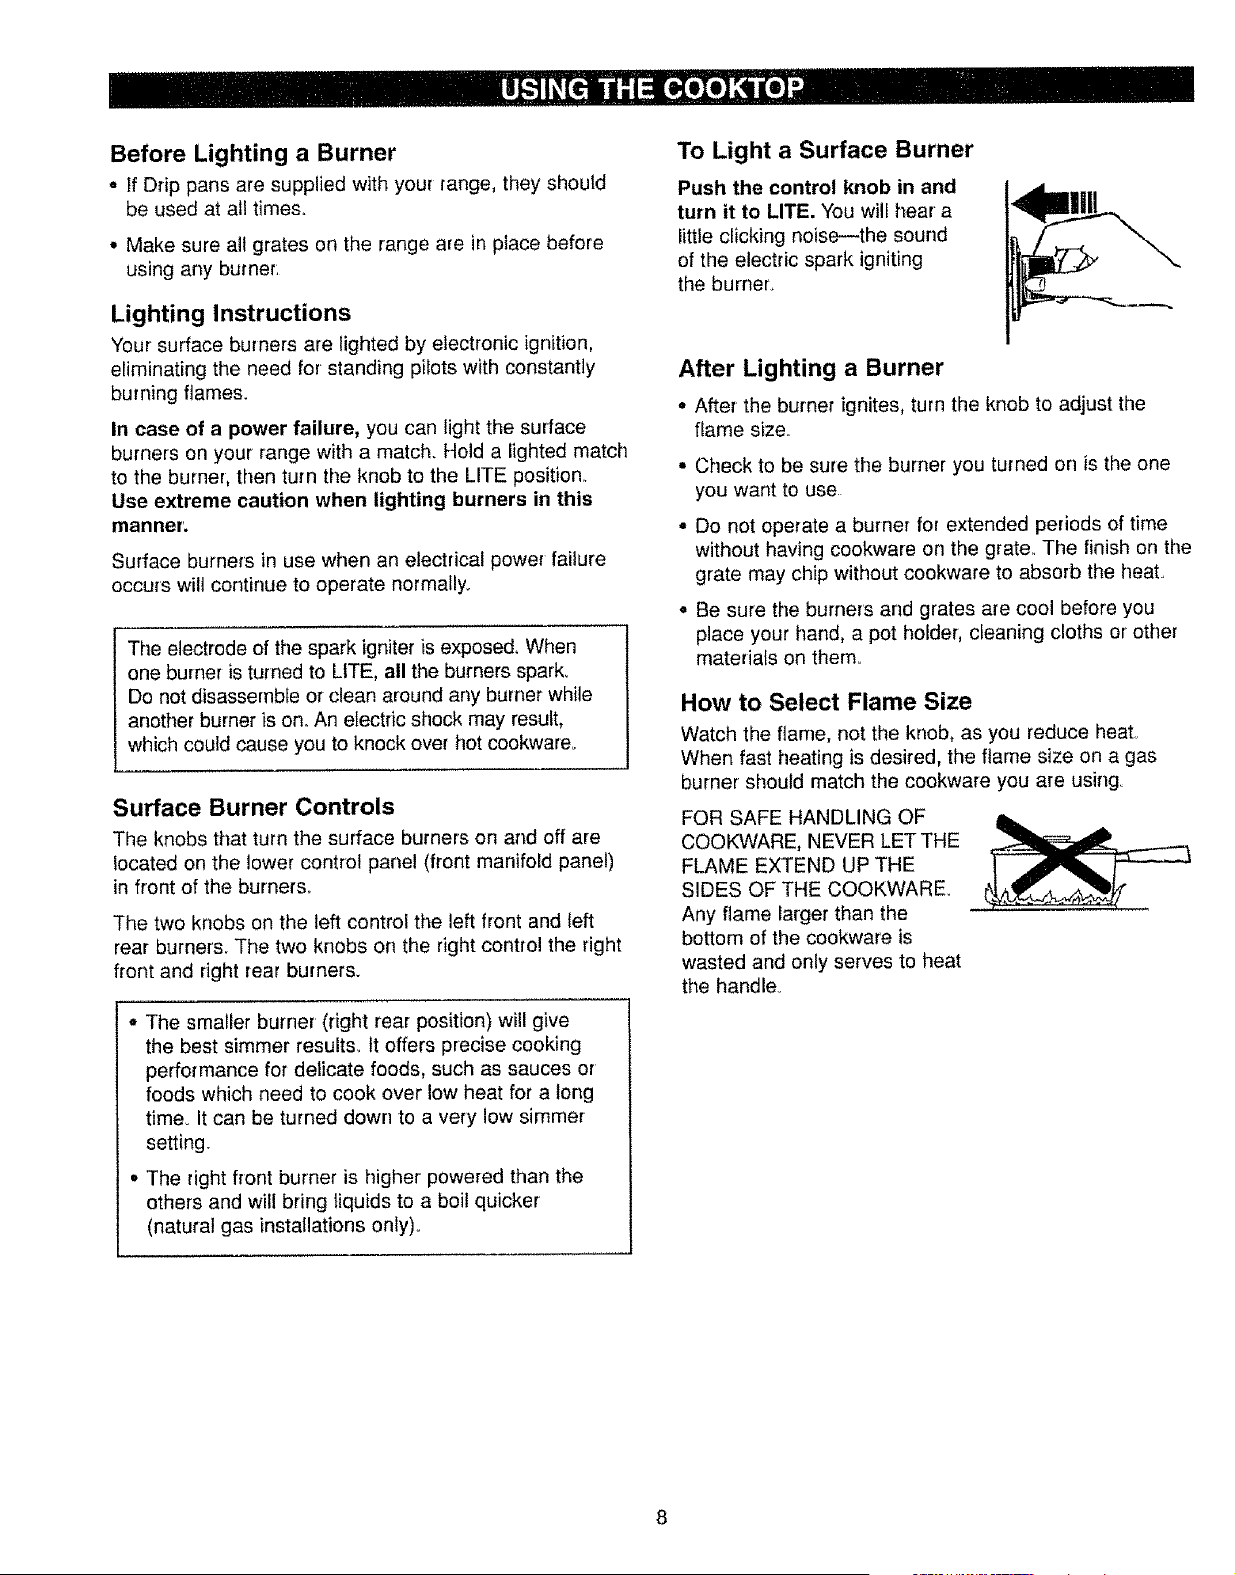
Before Lighting a Burner
• If Drip pans are supplied with your range, they shoutd
be used at all times,
• Make sure all grates on the range are in place before
using any burner:
Lighting Instructions
Your surface burners are lighted by electronic ignition,
eliminating the need for standing pilots with constantly
burning flames.
In case of a power failure, you can light the surface
burners on your range with a match. Hold a lighted match
to the burner, then turn the knob to the LITE position..
Use extreme caution when lighting burners in this
manner'.
Surface burners in use when an electrical power failure
occurs wilt continue to operate normally.
The electrode of the spark igniter is exposed, When
one burner is turned to LITE, all the burners spark.
Do not disassemble or clean around any burner while
another burner is on. An electric shock may result,
which could cause you to knock over hot cookwareo
Surface Burner Controls
The knobs that turn the surface burners on and off are
located on the lower control panel (front manifold panel)
in front of the burners..
The two knobs on the left control the left front and left
rear burner's_ The two knobs on the right control the right
front and right rear burners.
o The smaller burner (right rear position) wil! give
the best simmer results, tt offers precise cooking
performance for delicate foods, such as sauces or
foods which need to cook over low heat for a tong
time_ It can be turned down to a very low simmer
setting.
o The right front burner is higher powered than the
others and wil! bring liquids to a boil quicker
(natural gas installations onty)o
To Light a Surface Burner
Push the control knob in and
turn it to LITE. You will hear a
little clicking noise--the sound
of the electric spark igniting
the burner.
After Lighting a Burner
° After the burner ignites, turn the knob to adjust the
flame size..
• Check to be sure the burner you turned on is the one
you want to use
• Do not operate a burner for extended periods of time
without having cookware on the grate. The finish on the
grate may chip without cookware to absorb the heat°
° Be sure the burners and grates are cool before you
place your hand, a pot holder, cleaning cloths or other
materials on them..
How to Select Flame Size
Watch the flame, not the knob, as you reduce heat_
When fast heating is desired, the flame size on a gas
burner should match the cookware you are using
FOR SAFE HANDLING OF
COOKWARE, NEVER LET THE
FLAME EXTEND UP THE
SIDES OF THE COOKWARE.
Any flame larger than the
bottom of the cookware is
wasted and only serves to heat
the handle.
Top-of-Range Cookware
Aluminum: Medium-weight cookware is recommended
because it heats quickly and evenly. Most foods brown
evenly in an aluminum skillet° Use saucepans with tight-
fitting lids when cooking with minimum amounts of water+
Cast-Iron: If heated slowly, most skillets will give
satisfactory results,.
Enamelware: Under some conditions, the enamel
of some cookware may melt,, Follow cookware
manufacturer's recommendations for cooking methods,
Glass: There are two types of glass cookware--those
for oven use only and those for top-of-range cooking
(saucepans, coffee and teapots)+ Glass conducts heat
very slowly.
Heatproof Glass Ceramic: Can be used for either
surface or oven cooking, It conducts heat very slowIy
and cools very slowly. Check cookware manufacturer's
directions to be sure it can be used on gas ranges,
Stainless Steel: This metal alone has poor heating
properties and is usually combined with copper,
aluminum or other metals for improved heat distribution
Combination metal skillets generalty work satisfactorily if
used at medium heat as the manufacturer recommends.
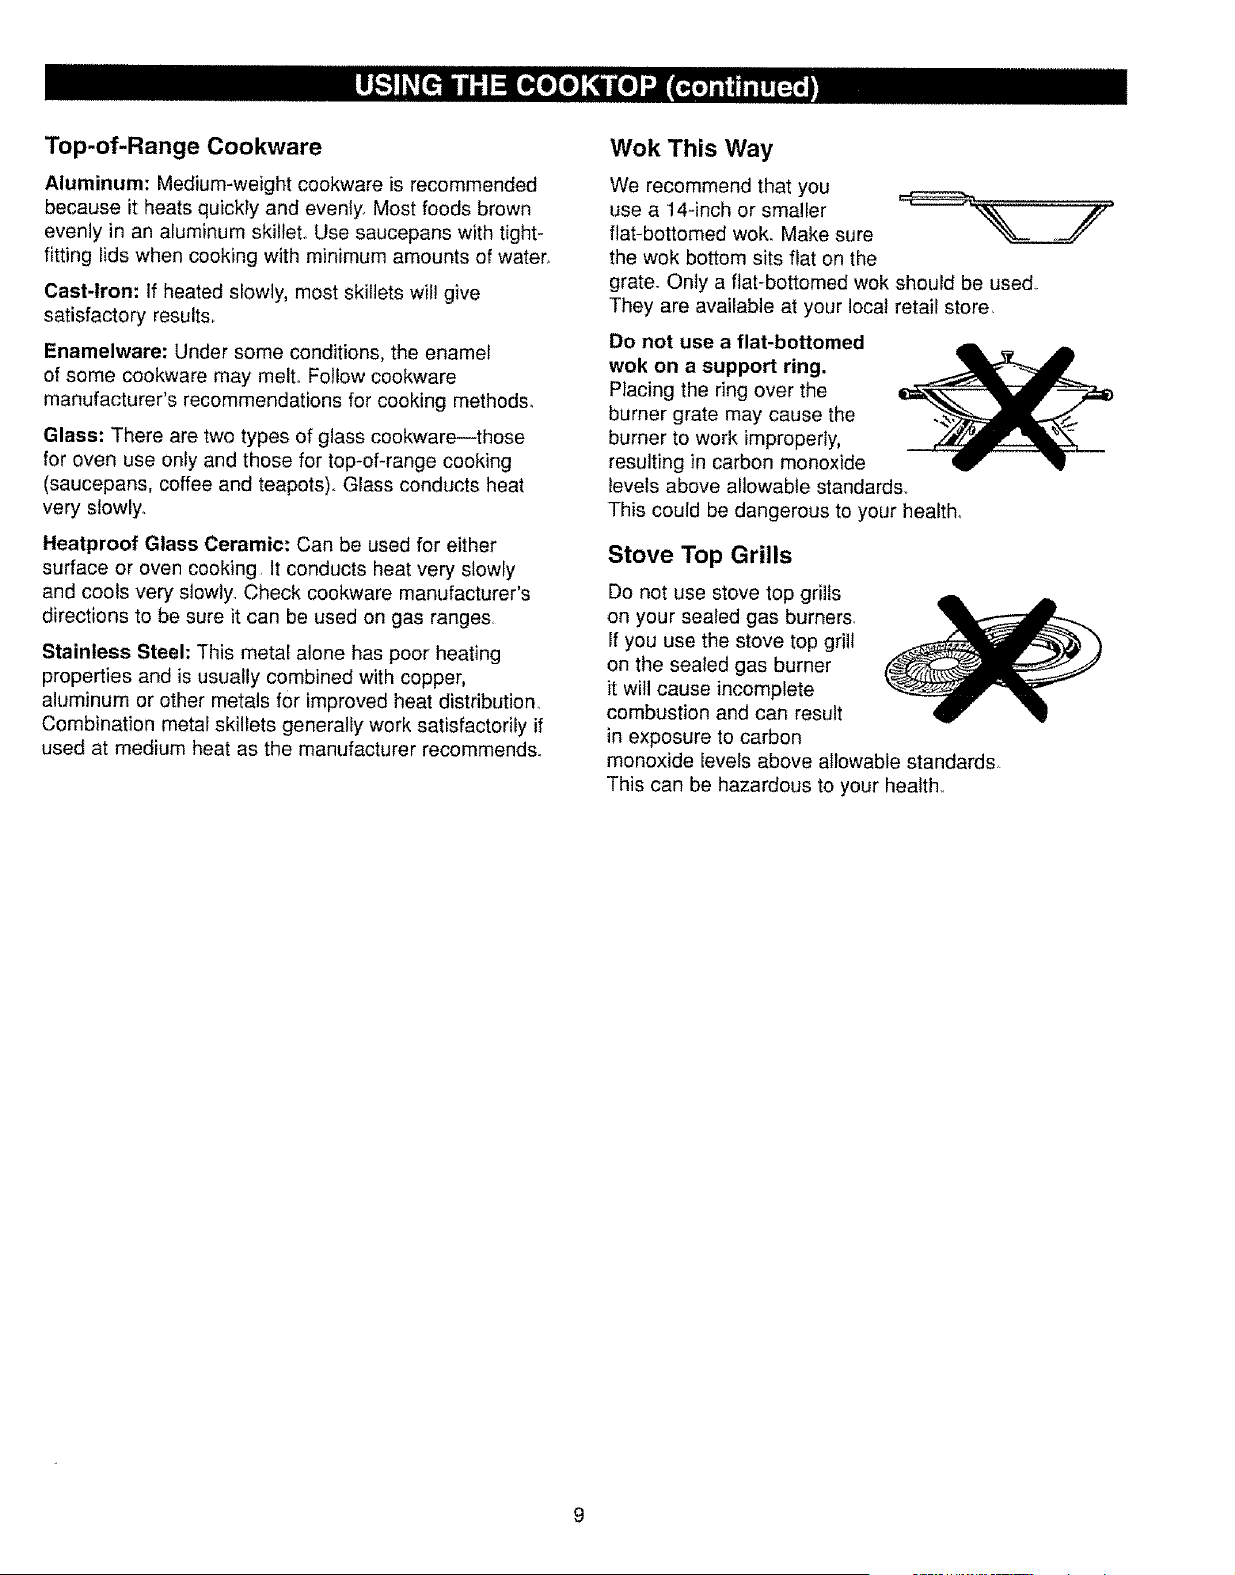
Wok This Way
We recommend that you
use a 14-inch or smaller
flat-bottomed wok. Make sure
the wok bottom sits flat on the
grate. Only a flat-bottomed wok should be used,
They are available at your local retail store+
Do not use a flat-bottomed
wok on a support ring.
Placing the ring over the
burner grate may cause the
burner to work improperly,
resulting in carbon monoxide
revels above allowable standards,,
This could be dangerous to your health_
Stove Top Grills
Do not use stove top grills
on your sealed gas burners,
If you use the stove top grill
on the sealed gas burner
it will cause incomplete
combustion and can result
in exposure to carbon
monoxide levels above allowable standards,
This can be hazardous to your health,+
q
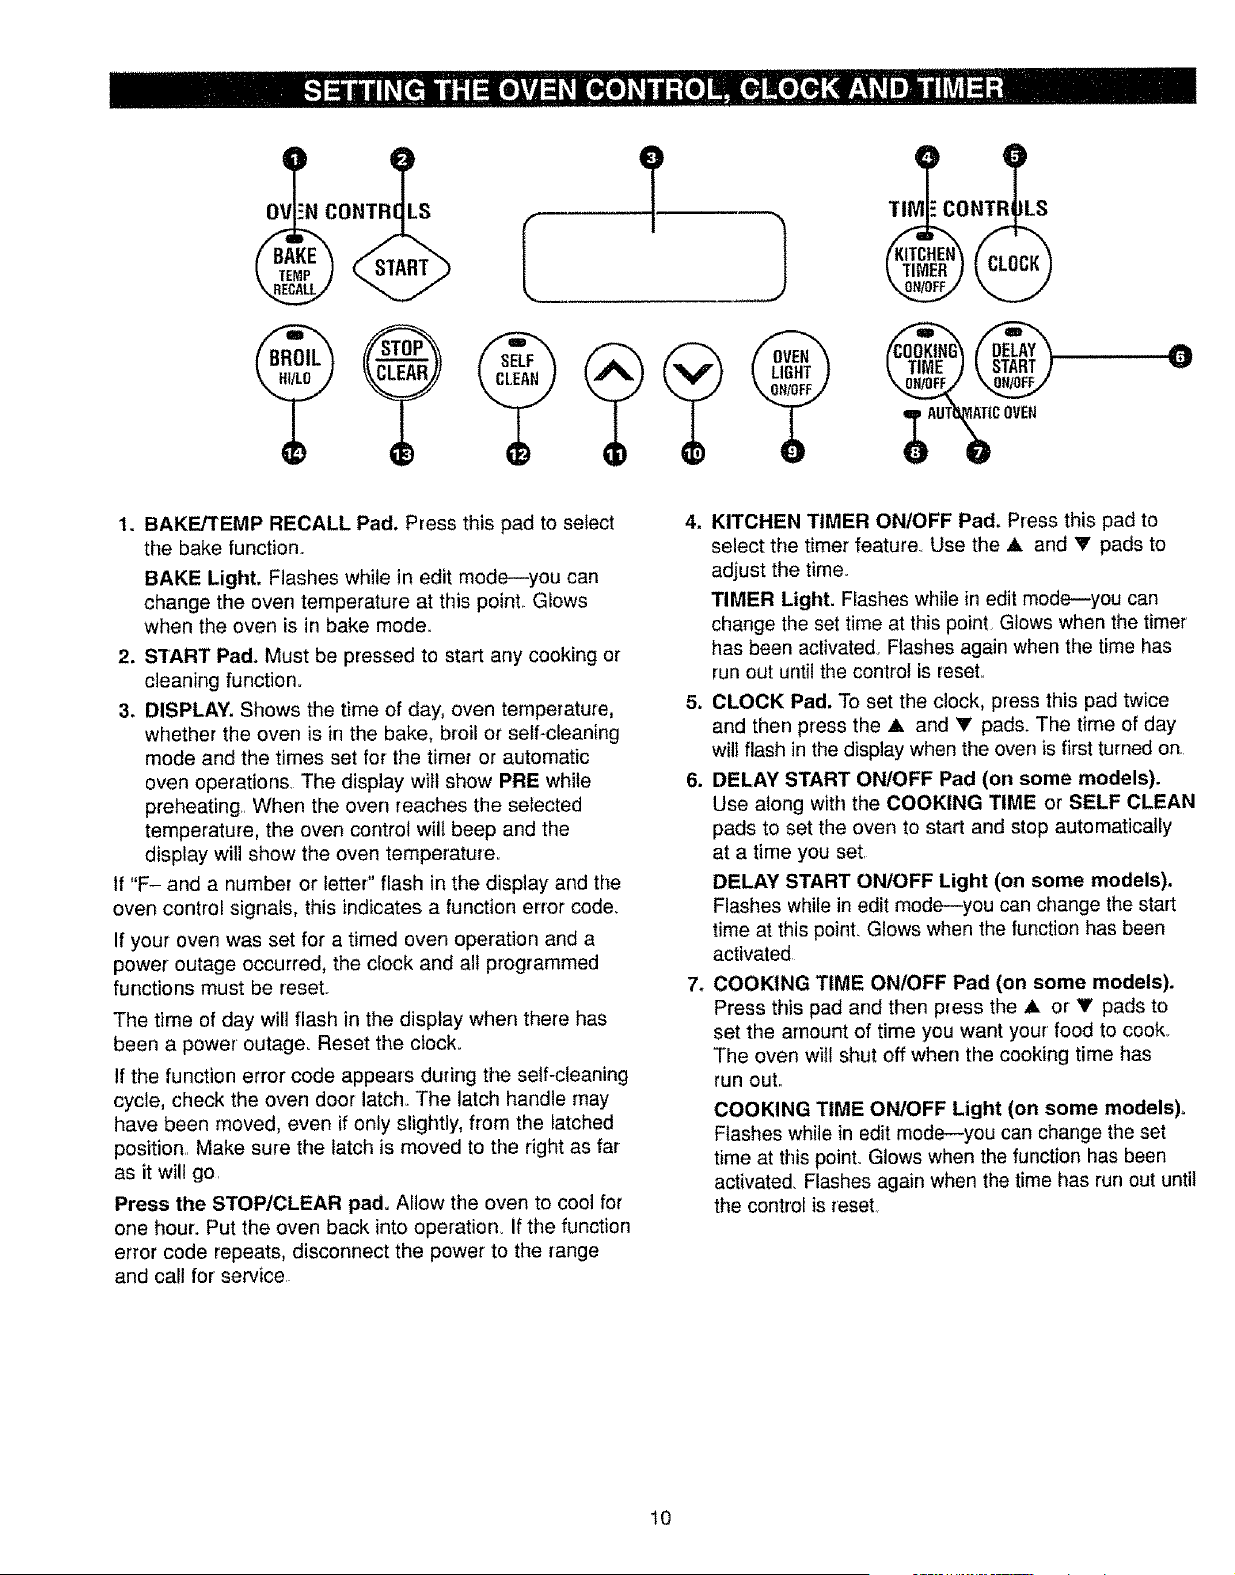
0U !N CONTRC LS
TIM CONTRIILS
W
C OVEH
1. BAKE/TEMP RECALL Pad. Press this pad to select
the bake function,.
BAKE Light. Flashes while in edit mode--you can
change the oven temperature at this peinL Glows
when the oven is in bake mode,
2. START Pad. Must be pressed to start arly cooking or
cleaning function°
3. DISPLAY. Shows the time of day, oven temperature,
whether the oven is in the bake, broil or self-cleaning
mode and the times set for the timer or automatic
oven operations. The display witt show PRE while
preheating, When the oven reaches the selected
temperature, the oven control wilt beep and the
display will show the oven temperature.
If "F- and a number or letter" flash in the display and the
oven control signals, this indicates a function error code.
If your oven was set for a timed oven operation and a
power outage occurred, the clock and all programmed
functions must be reset°
The time of day will flash in the display when there has
been a power outage. Reset the clock.
If the function error code appears during the self-cleaning
cycle, check the oven door latch. The latch handle may
have been moved, even if only slightly, from the latched
position. Make sure the latch is moved to the right as far
as it will go
Press the STOP/CLEAR pad. Allow the oven to cool for
one hour. Put the oven back into operation, if the function
error code repeats, disconnect the power to the range
and call for' service
4. KITCHEN TIMER ONtOFF Pad. Press this pad to
select the timer feature, Use the A and V pads to
adjust the time.
TIMER Light. Fiashes while in edit mode--you can
change the set time at this point, Glows when the timer
has been activated. Flashes again when the time has
run out until the control is reseL
5. CLOCK Pad. To set the clock, press this pad twice
and then press the A and V pads. The time of day
wilt flash in the display when the oven is first turned on.
6. DELAY START ON/OFF Pad (on some models).
Use along with the COOKING TIME or SELF CLEAN
pads to set the oven to start and stop automatically
at a time you set,
DELAY START ON/OFF Light (on some models).
Flashes while in edit mode--you can change the start
time at this poinL Glows when the function has been
activated
7. COOKING TIME ON/OFF Pad (on some models).
Press this pad and then press the A or V pads to
set the amount of time you want your' food to cook_
The oven will shut off when the cooking time has
run ouL
COOKING TIME ON/OFF Light (on some models)°
Flashes while in edit mode--you can change the set
time at this point. Glows when the function has been
activated Flashes again when the time has run out until
the control is reset
10
8. AUTOMATICOVENLight (onsomemodels).This
lightsanytimetheovenhasbeenprogrammedusing
theCOOKINGTIMEor DELAYSTARTfunctions
9. OVENLIGHTPad.Pressthispadtoturntheoven
lightonoroff.
10.V Pad,Shorttapstothispadwilldecreasethetime
ortemperaturebysmallamounts,Pressandholdthe
padtodecreasethetimeortemperaturebylarger
amounts,
11,A Pad,Shorttapsto thispadwillincreasethetime
ortemperaturebysmallamounts.Pressandholdthe
padto increasethetimeor temperaturebylarger
amounts.
12.SELFCLEANPad,Pressthispadtose{ecttheself-
cleaningfunction,.SeetheUsingtheSelf-Cleaning
Ovensection°
CLEANLight. Flasheswhilein editmode--youcan
changethelengthoftimefortheself-cleancycleat "
this point, Glows when the oven is in the self-clean
cycle. After the self-clean cycle, the light will turn off,
Unlatch the door,,
13. STOP/CLEAR Pad, Press this pad to cancel ALL
oven operations except the clock and timer.
14. BROIL, HI/LO Pad. Press this pad to select the broil
function,.
BROIL Light. Flashes while in edit mode--you can
switch from HI to LO BROIL at this point, Glows when
the oven is in broil mode,
Indicator Lights (on some pads). EDIT mode lasts
several seconds after the last pad press DELAY START
ON/OFF and COOKING TIME ON/OFF will be the only
pads lit if either of these options is selected, (Example:
DELAY START is selected with BAKE-the DELAY START
pad will remain lit until the clock reaches the pr:ogrammed
time, at whicl_ point it wilt turn off and the BAKErFEMP
RECALL pad light wiil Iight up),
11
Before Using Your Oven
Be sure you understand how to set the control properly.
Practice removing and replacing the shelves while the
oven is cool Read the information and tips on the
following pages. Keep this manual handy where you can
refer to it, especially during the first weeks of using your
new r'ange_
Electronic Ignition
The oven burner and broil burner are lighted by
electronic ignition.
To light either burner, use the oven control to select
BAKE or BROIL and set the desired temperature,. The
burner should ignite within 30-90 seconds.
After the oven reaches the selected temperature, the
oven burner repeatedly cycles--off completely, then on
with a full flame--to keep the oven temperature controlled
Power Outage
CAUTION: Do not make any attempt to operate the
electronic ignition oven during an electrical power
failure° The oven cannot be tit during a power failure,
Gas will not flow unless the glow bar is hoL
If the oven is in use when a power failure occurs, the
oven burner shuts off and cannot be re-lit until power
is restored,
Oven Vents
The oven is vented through duct openings at the rear of
the cooktop. Do not block these openings when cooking
in the oven--it is important that the flow of hot air from
the oven and fresh air to the oven burners be uninterrupted.
• The vent openings and nearby surfaces may
become hot° Do not touch them,
• Handles of pots and pans on the cooktop may
become hot if left too close to the vent.
Do not leave plastic
items on the
cooktop--they may
melt if left too close
to the vent.
Metal items will become
very hot if they are left on
the cooktop and could
cause burns,
Vent appearance and
location vary
Do not leave any items on the cooktop. The hot
air from the vent may ignite flammable items and will
increase pressure in closed containers, which may
cause them to bursL
Oven Light
Use the switch on the oven control to turn the oven light
on and off,
12
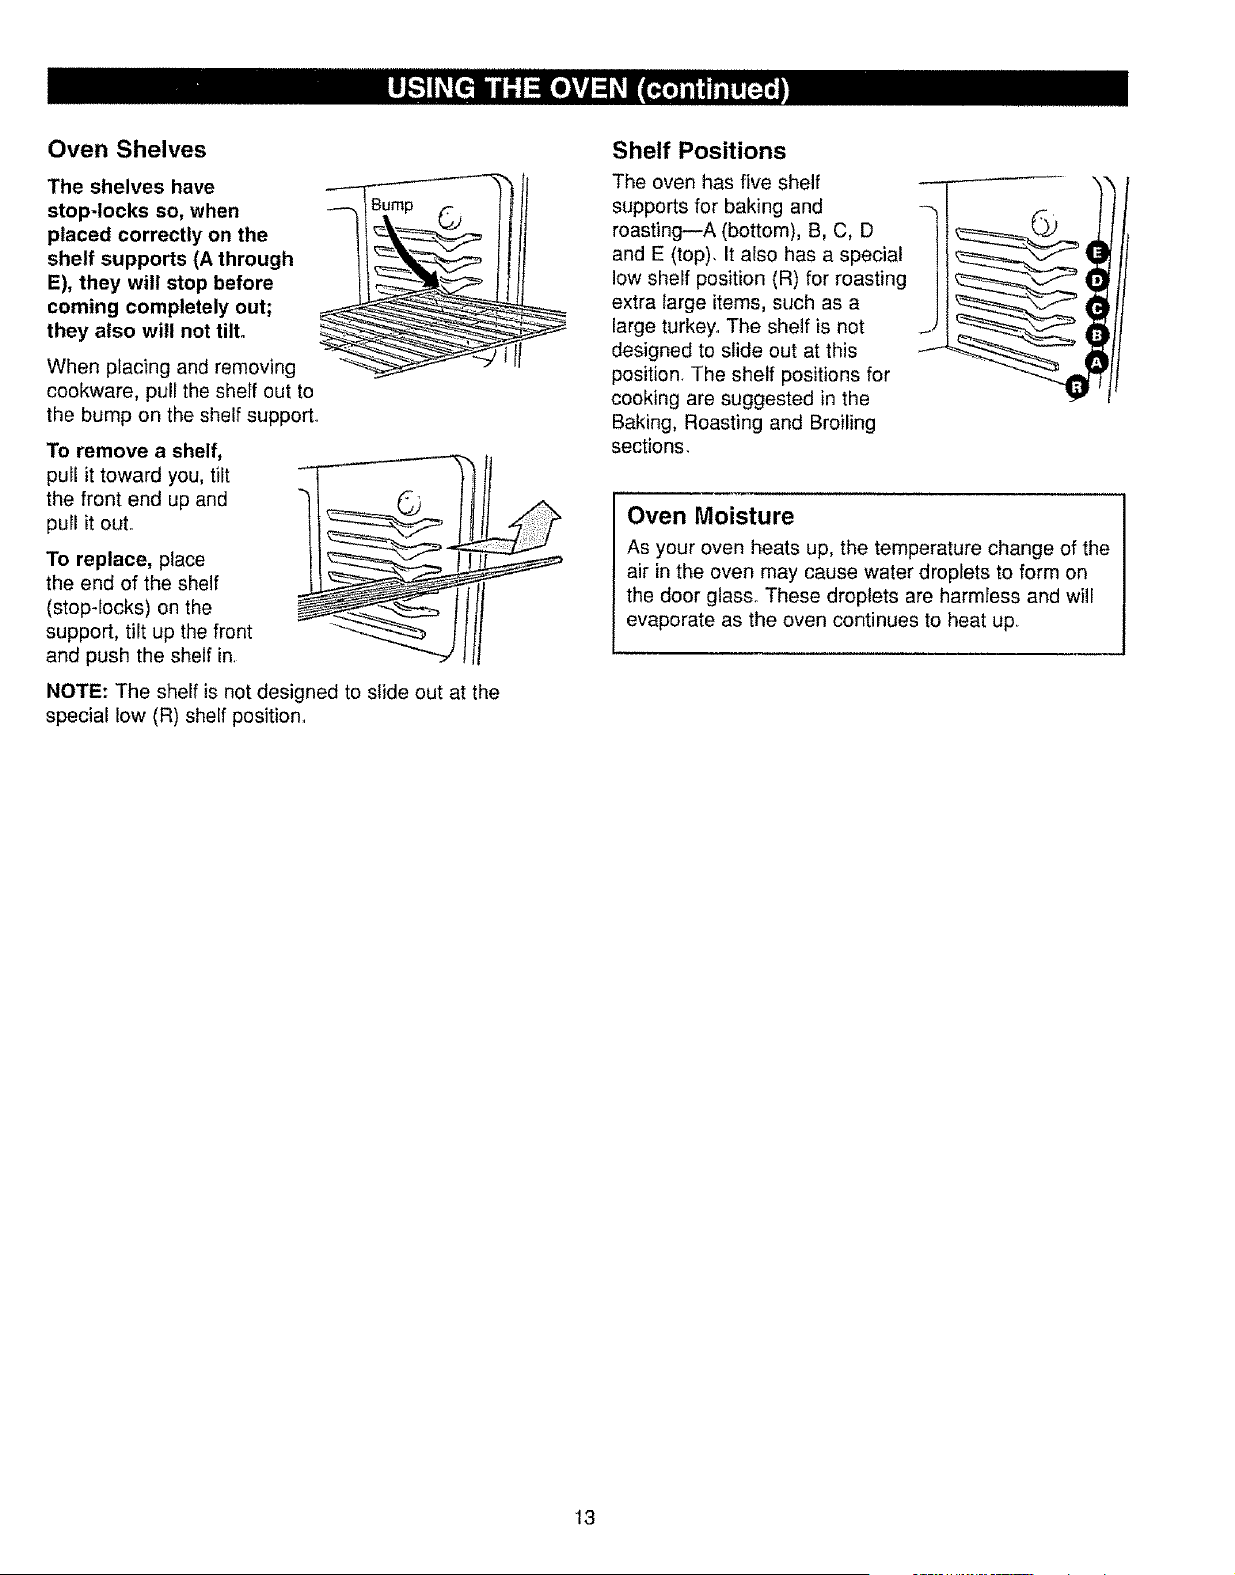
Oven Shelves
The shelves have
stop-locks so, when
placed correctly on the
shelf supports (A through
E), they will stop before
coming completely out;
they also will not tilto
When placing and removing
cookware, pull the sheff out to
the bump on the shelf support..
To remove a shelf,
pull it toward you, tilt
the front end up and _;
puFIit out..
To replace, place _
the end of the shelf
(stop-locks) on the
support, tilt up the front -_
and push the shelf in.
---.....
NOTE: The shelf is not designed to slide out at the
special low (R) shelf position..
Shelf Positions
The oven has five shelf
supports for baking and
roasting--A (bottom), B, C, D
and E (top). It also has a special
low shelf position (R) for roasting
extra large items, such as a
large turkey.. The shelf is not
designed to slide out at this
position The shelf positions for
cooking are suggested in the
Baking, Roasting and Broiling
sections.
q
q
Oven Moisture
As your oven heats up, the temperature change of the
air in the oven may cause water droplets to form on
the door glass. These droplets are harmless and will
evaporate as the oven continues to heat up.
13
Baking
Do not lock the oven door with the latch during
baking. The latch is used for self-cleaning only.
Your oven temperature is controlled very accurately
using an oven control system. It is recommended that
you operate the oven for a number of weeks to become
familiar with your new oven's performance. If you think
an adjustment is necessary, see the Adjust the Oven
Thermostat section,,
How to Set Your Range for Baking
To avoid possible burns, place the shelves in the
correct position before you turn the oven on.
1o Press the BAKE pad
2. Press the A or V pads until the desired temperature
is displayed_
3. Press the START pad1,
The oven will start automatically. The display will show
PRE while preheating° When the oven reaches the
selected temperature, the oven control will beep several
times and the display will show the oven temperature.
To change the oven temperature during BAKE cycle,
press the BAKE pad and then the ,L orV pads to get
the new temperature.,
4. Check food for doneness at minimum time on recipe.
Cook longer if necessary,,
5. Press the STOPtCLEAR pad when baking is finished
and then remove the food from the oven°
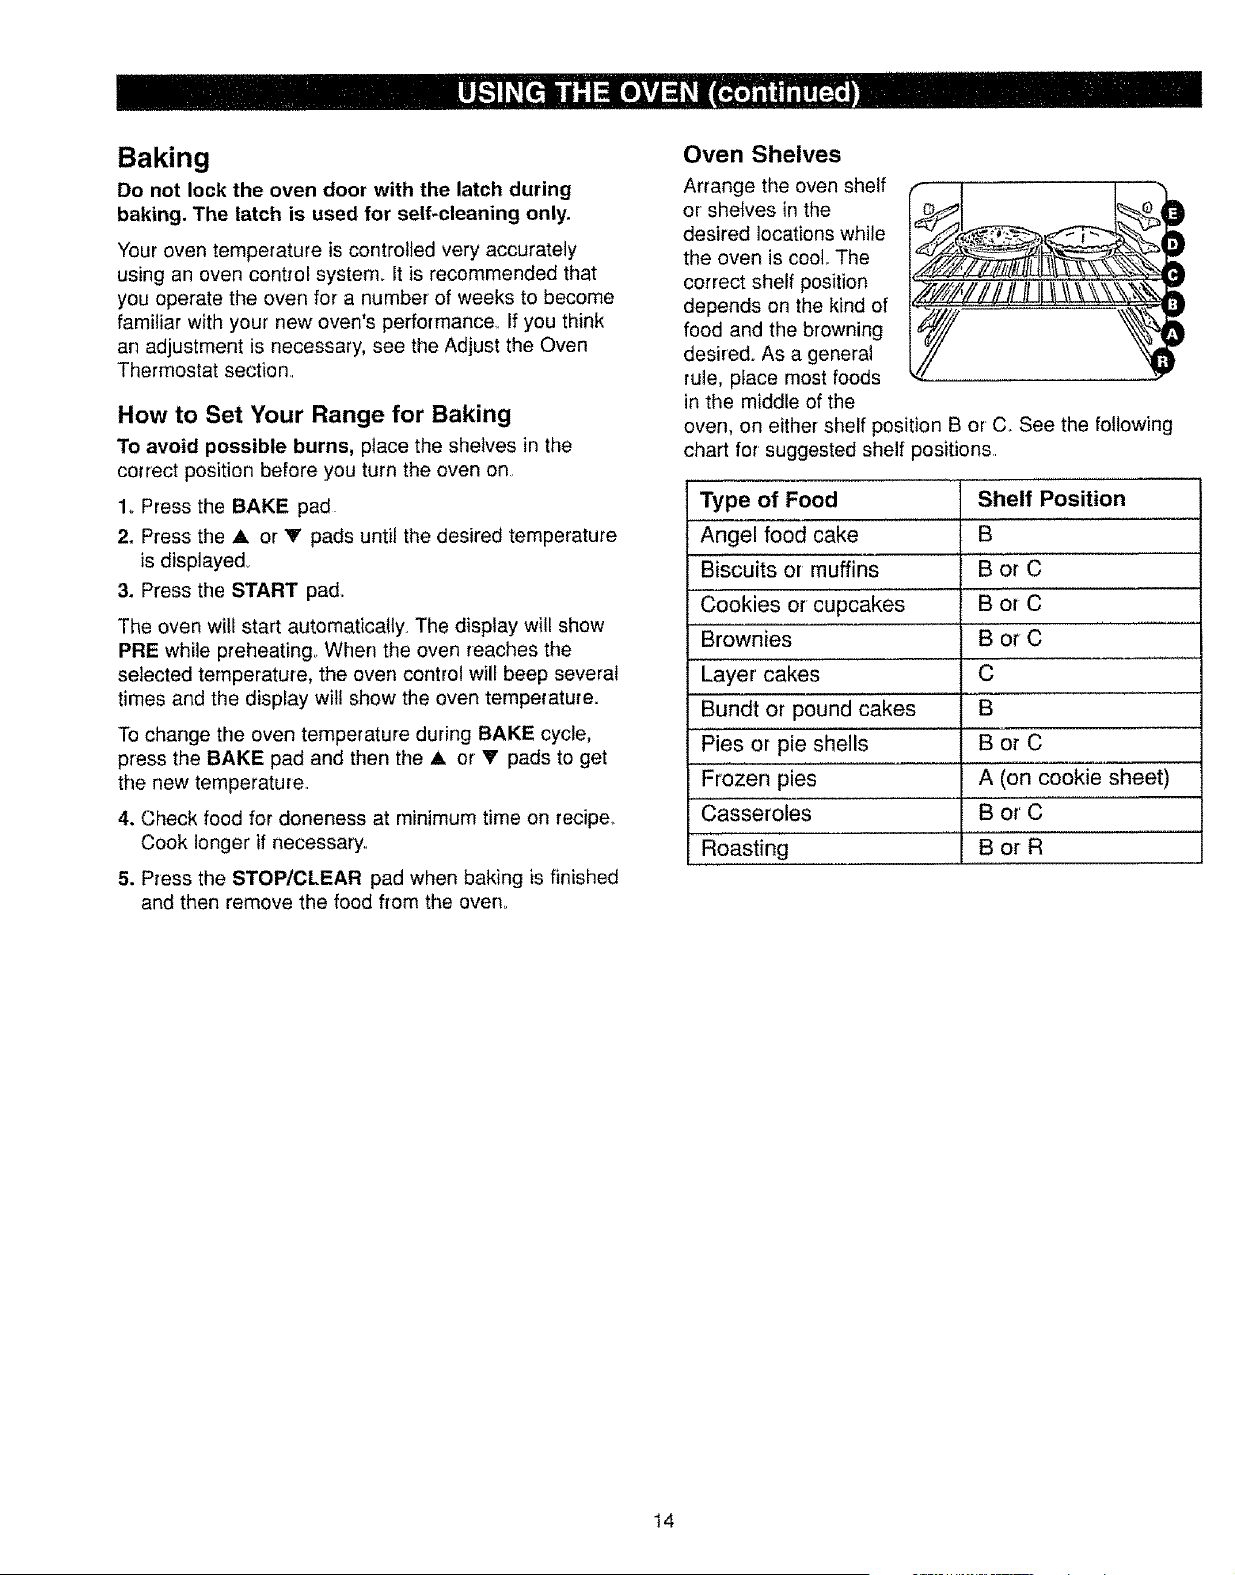
Oven Shelves
Arrange the oven shelf
or shelves in the
desired locations while
the oven is coot. The
correct shelf position
depends on the kind of
food and the browning
desired. As a general
rule, place most foods
in the middle of the
V '@
oven, on either shelf position B or C_ See the following
chart for suggested shelf positions
L
Type of Food
Angel food cake
Biscuits or muffins
Cookies or cupcakes
Brownies
Layer cakes
Bundt or pound cakes
Pies or pie shells
Frozen pies .................
Casseroles
Roasting
Shelf Position
B
BorC
Bor C
BorC
C
B
BorC
A (on cookie sheet)
BorC
BorR
14
Baking (continued)
Preheating
Preheat the oven if the recipe calls for it. Preheat means
bringing the oven up to the specified temperature before
putting the food in the oven To preheat, set the oven at
the correct temperature--selecting a higher temperature
does not shorten preheat time,,
Preheating is necessary for good results when baking
cakes, cookies, pastry and breads° For most casseroles
and roasts, preheating is not necessary For ovens without
a preheat indicator light or tone, preheat 10 minutes. After
the oven is preheated place the food in the oven as quickly
as possible to prevent heat from escaping.
Baking Pans
Use the proper baking pan_ The type of finish on the pan
determines the amount of browning that will occur..
• Dark, rough or dull pans absorb heat resulting in a
browner, crisper crusts Use this type for pies.
, Shiny, bright and smooth pans reflect heat, resulting
in a lighter, more delicate browning. Cakes and cookies
require this type of pan..
o Glass baking dishes also absorb heat. When baking in
glass baking dishes, the temperature may need to be
reduced by 25°F (13°C).
• If you are using dark non-stick pans, you may find that
you need to reduce the oven temperature 25°F (13°0)
to prevent over-browning.
Pan Placement
For even cooking and proper browning, there must be
enough room for air circulation in the oven.. Baking results
will be better if baking pans are centered as much as
possible rather than being placed to the front or to the
back of the oven.
Pans should not touch each other or the walls of the
oven. Allow 1- to 11A-inch (2.5- to 4-cm) space between
pans as well as from the back of the oven, the door and
the sides, If you need to use two shelves, stagger the
pans so one is not directly above the other.
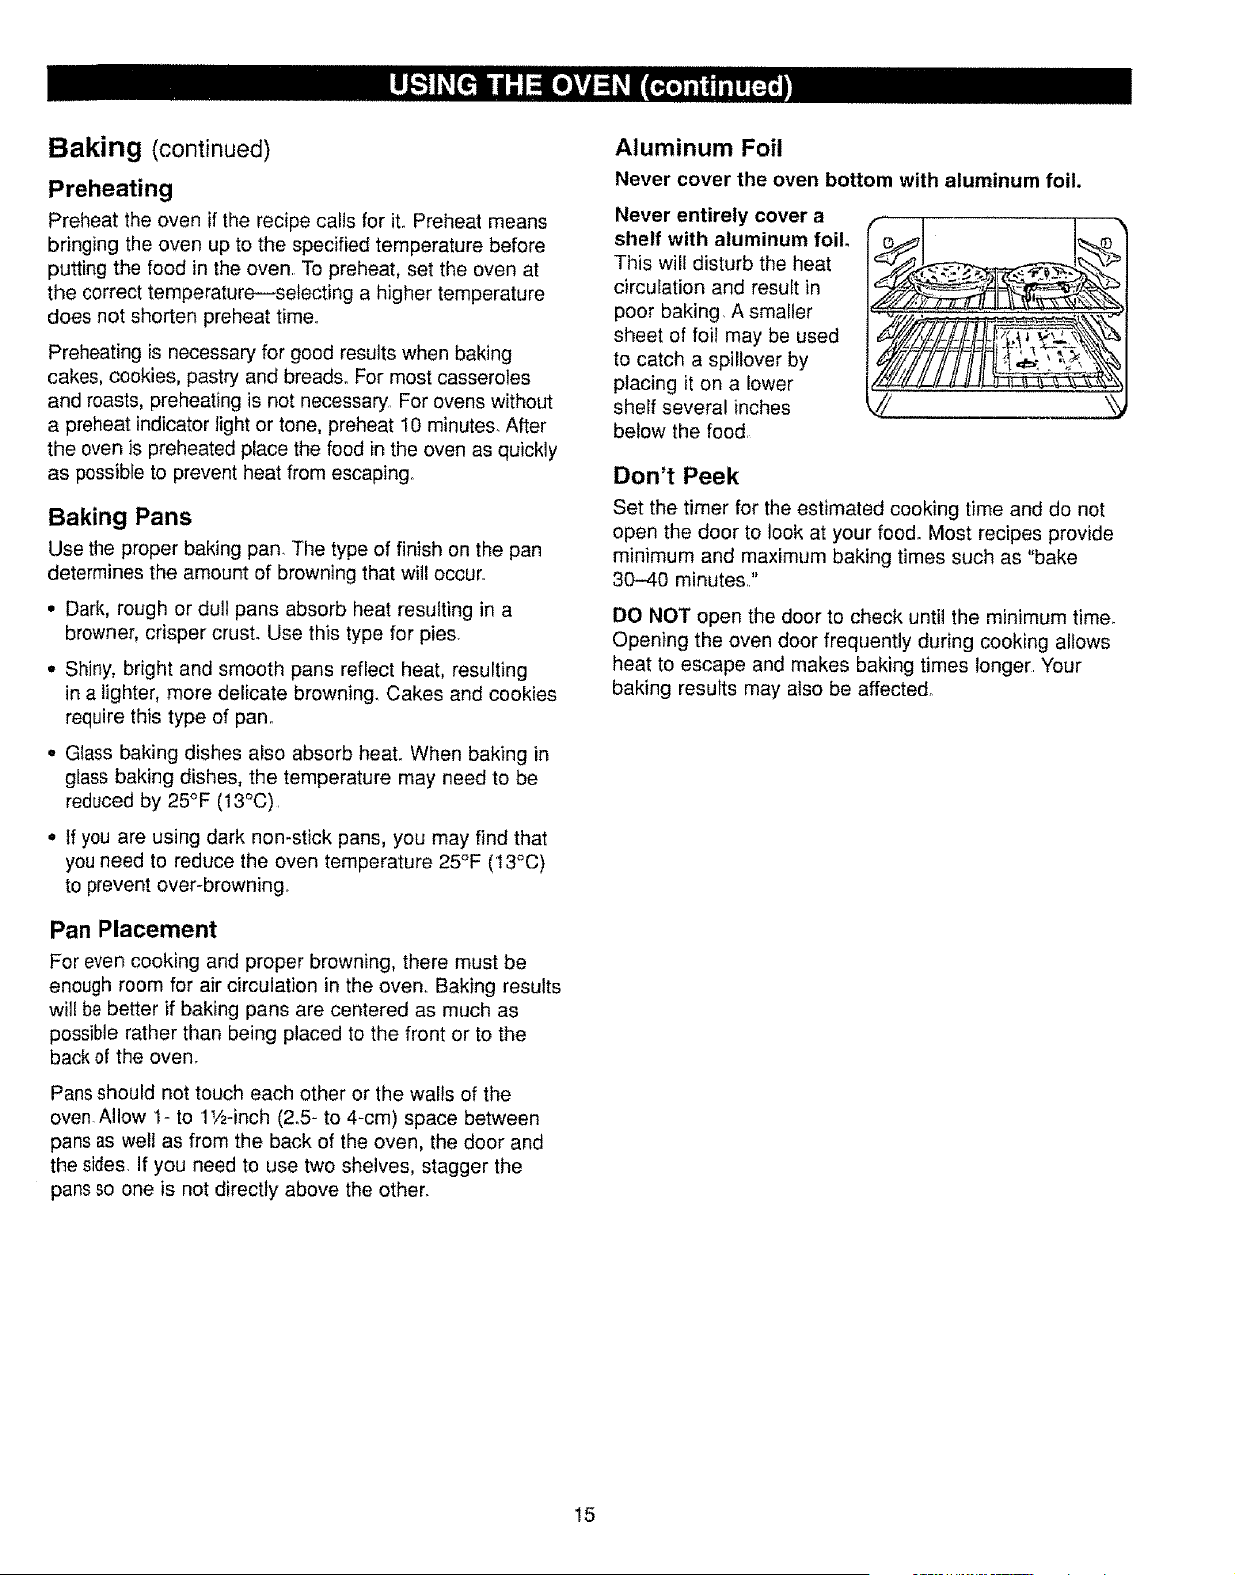
Aluminum Foil
Never cover the oven bottom with aluminum foil.
Never entirely cover a
shelf with aluminum foil.
This will disturb the heat
circulation and result in
poor baking, A smaller
sheet of foil may be used
to catch a spillover by
placing it on a iower
shelf several inches
below the food,
Don't Peek
Set the timer for the estimated cooking time and do not
open the door to look at your food. Most recipes provide
minimum and maximum baking times such as "bake
30-40 minutes.."
DO NOT open the door to check until the minimum time.
Opening the oven door frequently during cooking allows
heat to escape and makes baking times longer Your
baking results may also be affected_
15
Adjust the Oven Thermostat--
Do It Yourself t
You may feel that your new oven cooks differently
than the one it replaced. We recommend that you use
your new oven for a few weeks to become more familiar
with it, following the times given in your recipes as a
guide
If you think your new oven is cooking too hot or too
cold, you can adjust the thermostat yourself. If you
think it is too hot, adjust the thermostat to make it cooler_
If you think it is too cool, adjust the thermostat to make
it hotter
We do not recommend the use of thermometers,
such as those found in grocery stores, to check the
temperature setting of your new oven, These
thermometers may vary 20-40°F (11-22°C)
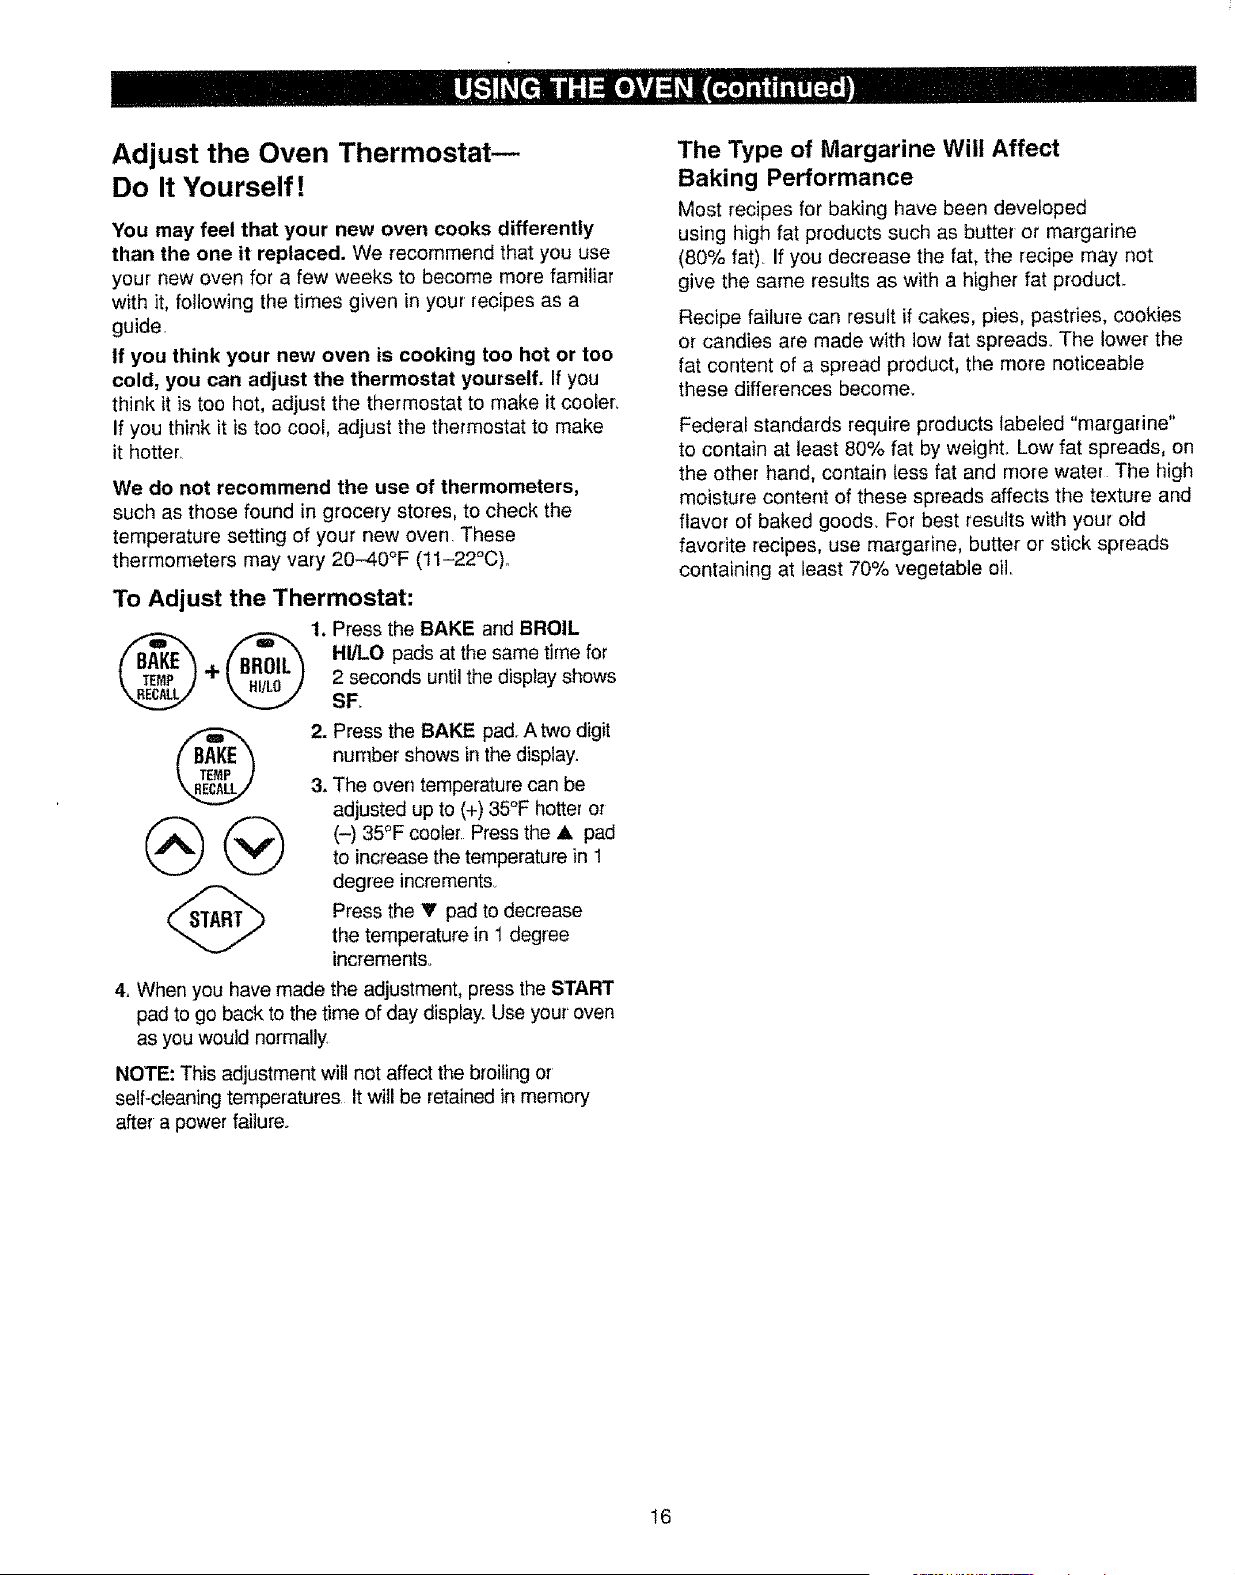
To Adjust the Thermostat:
2.
3,
Press the BAKE and BROIL
HI/LO pads at the same time for
2 seconds until the display shows
SF.
Press the BAKE pad Atwo digit
number shows in the display
The oven temperature can be
adjusted up to (+) 35°F hotter or
(-) 35°F cooler Press the A pad
to increase the temperature in 1
degree incrementsv
Press the V pad to decrease
the temperature in 1 degree
increments_
4, When you have made the adjustment, press the START
pad to go back to the time of day display. Use your oven
as you would normally
NOTE: This adjustment will not affect the broiling or
self-cleaning temperatures It will be retained in memory
after a power failure.
The Type of Margarine Will Affect
Baking Performance
Most recipes for baking have been developed
using high fat products such as butter or margarine
(80% fat). If you decrease the fat, the recipe may not
give the same results as with a higher fat producL
Recipe failure can result if cakes, pies, pastries, cookies
or candies are made with low fat spreads_ The lower the
fat content of a spread product, the more noticeable
these differences become.
Federal standards require products labeled "margarine"
to contain at least 80% fat by weighL Low fat spreads, on
the other hand, contain tess fat and more water The high
moisture content of these spreads affects the texture and
flavor of baked goods. For best results with your old
favorite recipes, use margarine, butter or stick spreads
containing at least 70% vegetable oil
16
Roasting
Do not lock the oven door with the latch during
roasting. The latch is used for self-cleaning only.
Roasting is cooking by dry heat_ Tender meat or poultry
can be roasted uncovered in your oven.. Roasting
temperatures, which should be low and steady, keep
spattering to a minimum.
The oven has a special low
shelf position (R) just above
the oven bottom. Use it
when extra cooking space
is needed, for example,
when roasting a large turkey°
The shelf is not designed to
slide out at this position.
Roasting is really a baking
procedure used for meats.
Therefore, the oven controls are set for Baking.
(You may hear a slight clicking sound indicating
the oven is working properly.)
Most meats continue to cook slightly while standing after
being removed from the oven,. Recommended standing
time for roasts is 10 to 20 minutes.. This allows the roasts
to firm up and makes them easier to carver The internal
temperature will rise about 5° to t0°F (3 ° to 6°C), If you
wish to compensate for the temperature rise, remove the
roast from the oven when its internal temperature is 5 ° to
10°F (3° to 6°C) less than the temperature shown in the
Roasting Guide,
Remember that food will continue to cook in the hot oven,
even after it has been turned off, and should be removed
when the desired internal temperature has been reached,.
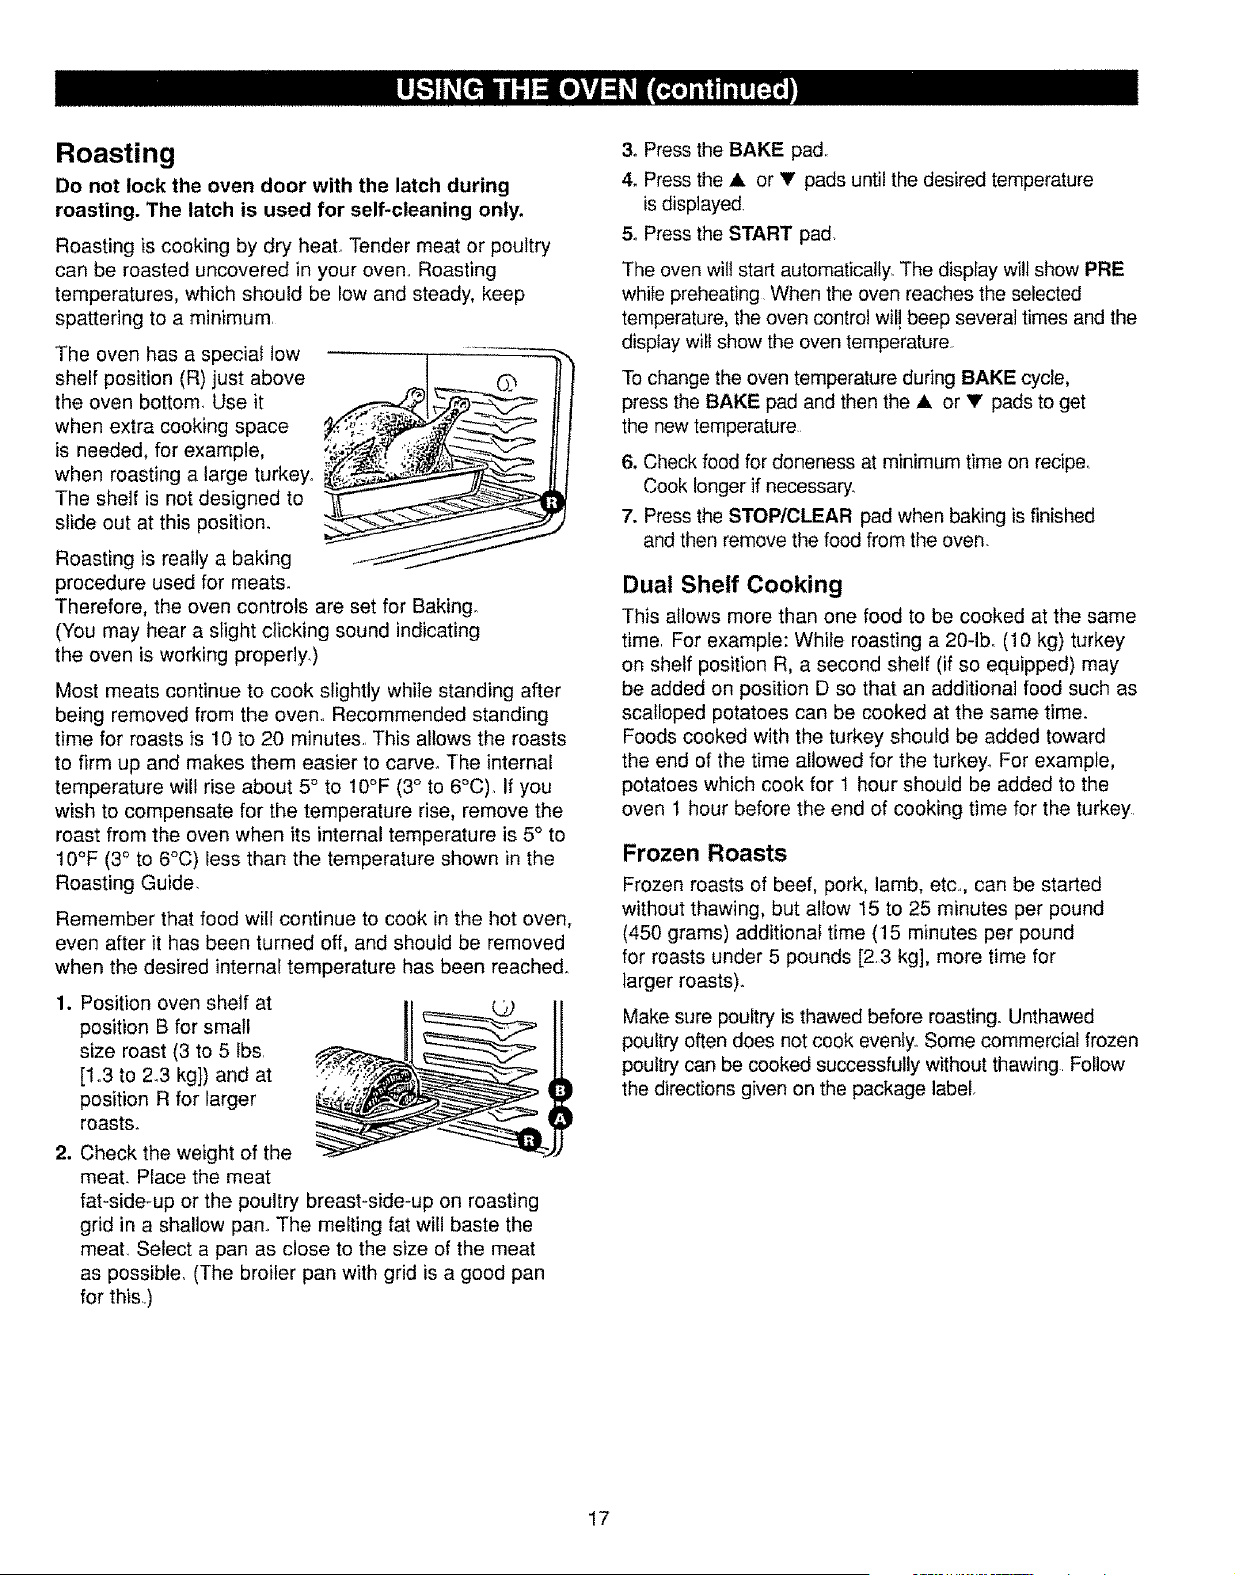
1. Position oven shelf at
position B for small
size roast (3 to 5 lbs.
[1,3 to 243 kg]) and at L
position R for larger
roasts. _-'-_
2. Check the weight of the
meat. Place the meat
fat-side-up or the poultry breast-side-up on roasting
grid in a shallow pan,.The melting fat will baste the
meat. Select a pan as close to the size of the meat
as possible. (The broiler pan with grid is a good pan
for this.)
3. Press the BAKE pad..
4. Press the A or V pads until the desired temperature
is displayed.
5. Press the START pad.
The oven will start automatically. The display will show PRE
whiIe preheating When the oven reaches the selected
temperature, the oven control wil! beep several times and the
display will show the oven temperature
To change the oven temperature during BAKE cycle,
press the BAKE pad and then the ,_ or V pads to get
the new temperature
6, Check food for doneness at minimum time on recipe.
Cook longer if necessary.
7. Press the STOP/CLEAR pad when baking is finished
and then remove the food from the oven.
Dual Shelf Cooking
This allows more than one food to be cooked at the same
time. For example: While roasting a 20-1bo(10 kg) turkey
on shelf position R, a second shelf (if so equipped) may
be added on position D so that an additional food such as
scalloped potatoes can be cooked at the same time.
Foods cooked with the turkey should be added toward
the end of the time allowed for the turkey° For example,
potatoes which cook for 1 hour should be added to the
oven 1 hour before the end of cooking time for the turkey.
Frozen Roasts
Frozen roasts of beef, pork, lamb, etc.,, can be started
without thawing, but allow 15 to 25 minutes per pound
(450 grams) additional time (15 minutes per pound
for roasts under 5 pounds [2,3 kg], more time for
larger roasts).
Make sure poultry is thawed before roasting. Unthawed
poultry often does not cook evenly.. Some commercial frozen
poultry can be cooked successfully without thawing. Follow
the directions given on the package label
17
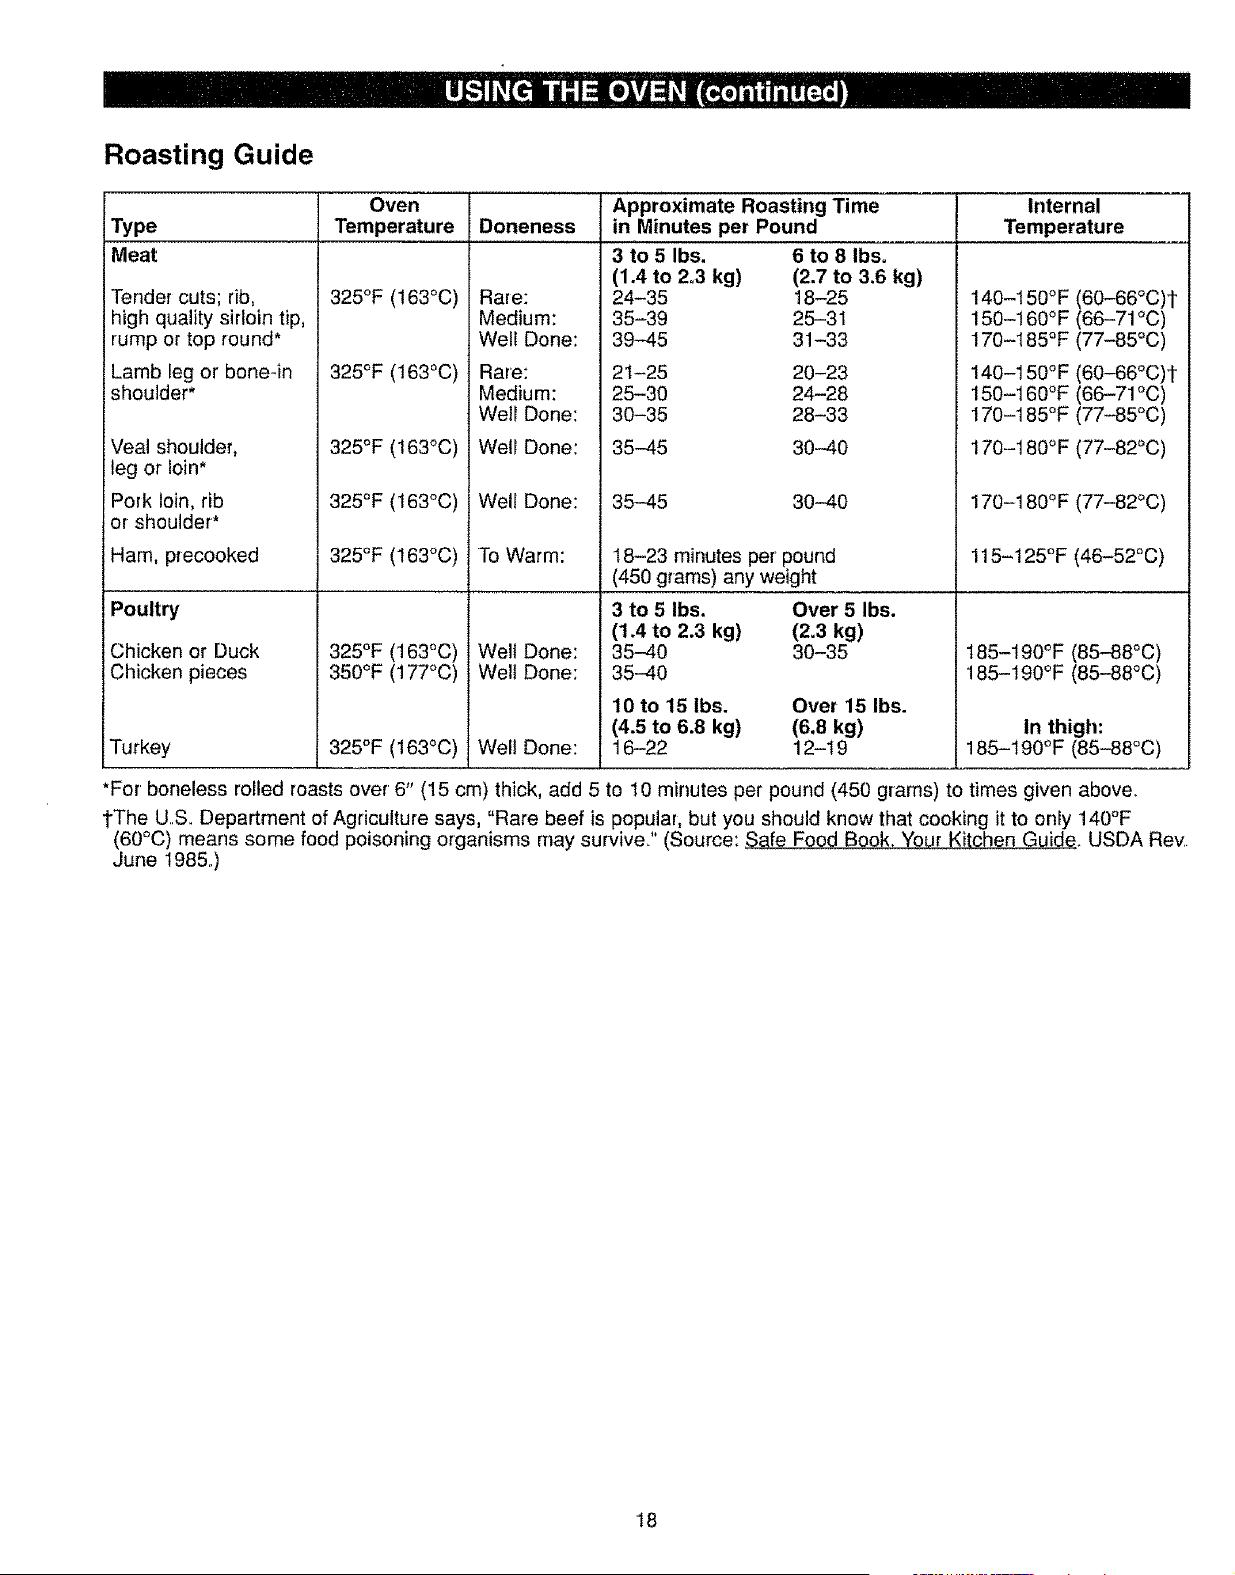
Roasting Guide
Oven Approximate Roasting Time Internal
Type Temperature Doneness in Minutes per Pound Temperature
Meat
Tender cuts; rib,
high quality sirloin tip,
rump or top round*
Lamb leg or boneqn
shoulder*
Veal shoulder,
leg or loin*
Pork loin, rib
or shoulder*
Ham, precooked
Poultry
Chicken or Duck
Chicken pieces
Turkey
325°F (163°C)
325°F (163°C)
325°F (I63°C)
325°F (163°C)
Rare:
Medium:
Well Done:
Rare:
Medium:
Well Done:
Well Done:
Well Done:
3 to 5 Ibs. 6 to 8 Ibs,
(1,4 to 2°3 kg) (2.7 to 3.6 kg)
24-35 18-25
35-39 25-31
39-45 31-33
2I -25 20-23
25-30 24-28
30-35 28-33
35-45 30-40
35-45 30-40
140-150 ° F
150-160 ° F
170-185°F
140-150 ° F
150-160°F
170-185°F
170-180 ° F
170-180 ° F
325°F (t63°C)
325°F (163°C)
350°F (177°C)
325°F (163°C)
18-23 minutes per' pound
(450 grams) any weight
To Warm:
3 to 5 Ibs. Over 5 Ibs.
(1.4 to 2.3 kg) (2.3 kg)
60-66°C)t
66-71°C)
77-85°C)
60-66°C)t
66-71°C)
77-85°C)
77-82°C)
77-82°C)
115-125°F (46-52°C)
Welt Done:
Well Done:
Well Done:
35-40 30-35
35-40
10 to 15 Ibs. Over 15 Ibs.
(4.5 to 6.8 kg) (6,8 kg)
16-22 12-19
t85-190°F (85-88°C
185-190°F (85-88°C
In thigh:
185-190°F (85-88°C
*For boneless rolled roasts over 6" (15 cm) thick, add 5 to 10 minutes per pound (450 grams) to times given above.
tThe US.. Department of Agriculture says, "Rare beef is popular, but you should know that cooking it to only 140°F
(60°C) means some food poisoning organisms may survive?' (Source: Safe Food Book. Your Kitchen Guide. USDA Re_.
June 1985..)
18
Broiling
Do not lock the oven door with the latch during
broiling. The latch is used for self-cleaning only.
Broiling is cooking food by direct heat from above the
food Most fish and tender cuts of meat can be broiled
Follow these directions to keep spattering and smoking
to a minimum/
It is recommended that meat be cooked to at least an
INTERNAL temperature of 160°F (71°C) and poultry to
at least an INTERNAL temperature of 180°F (82°C)
Cooking to these temperatures usually protects against
foodbome illness.
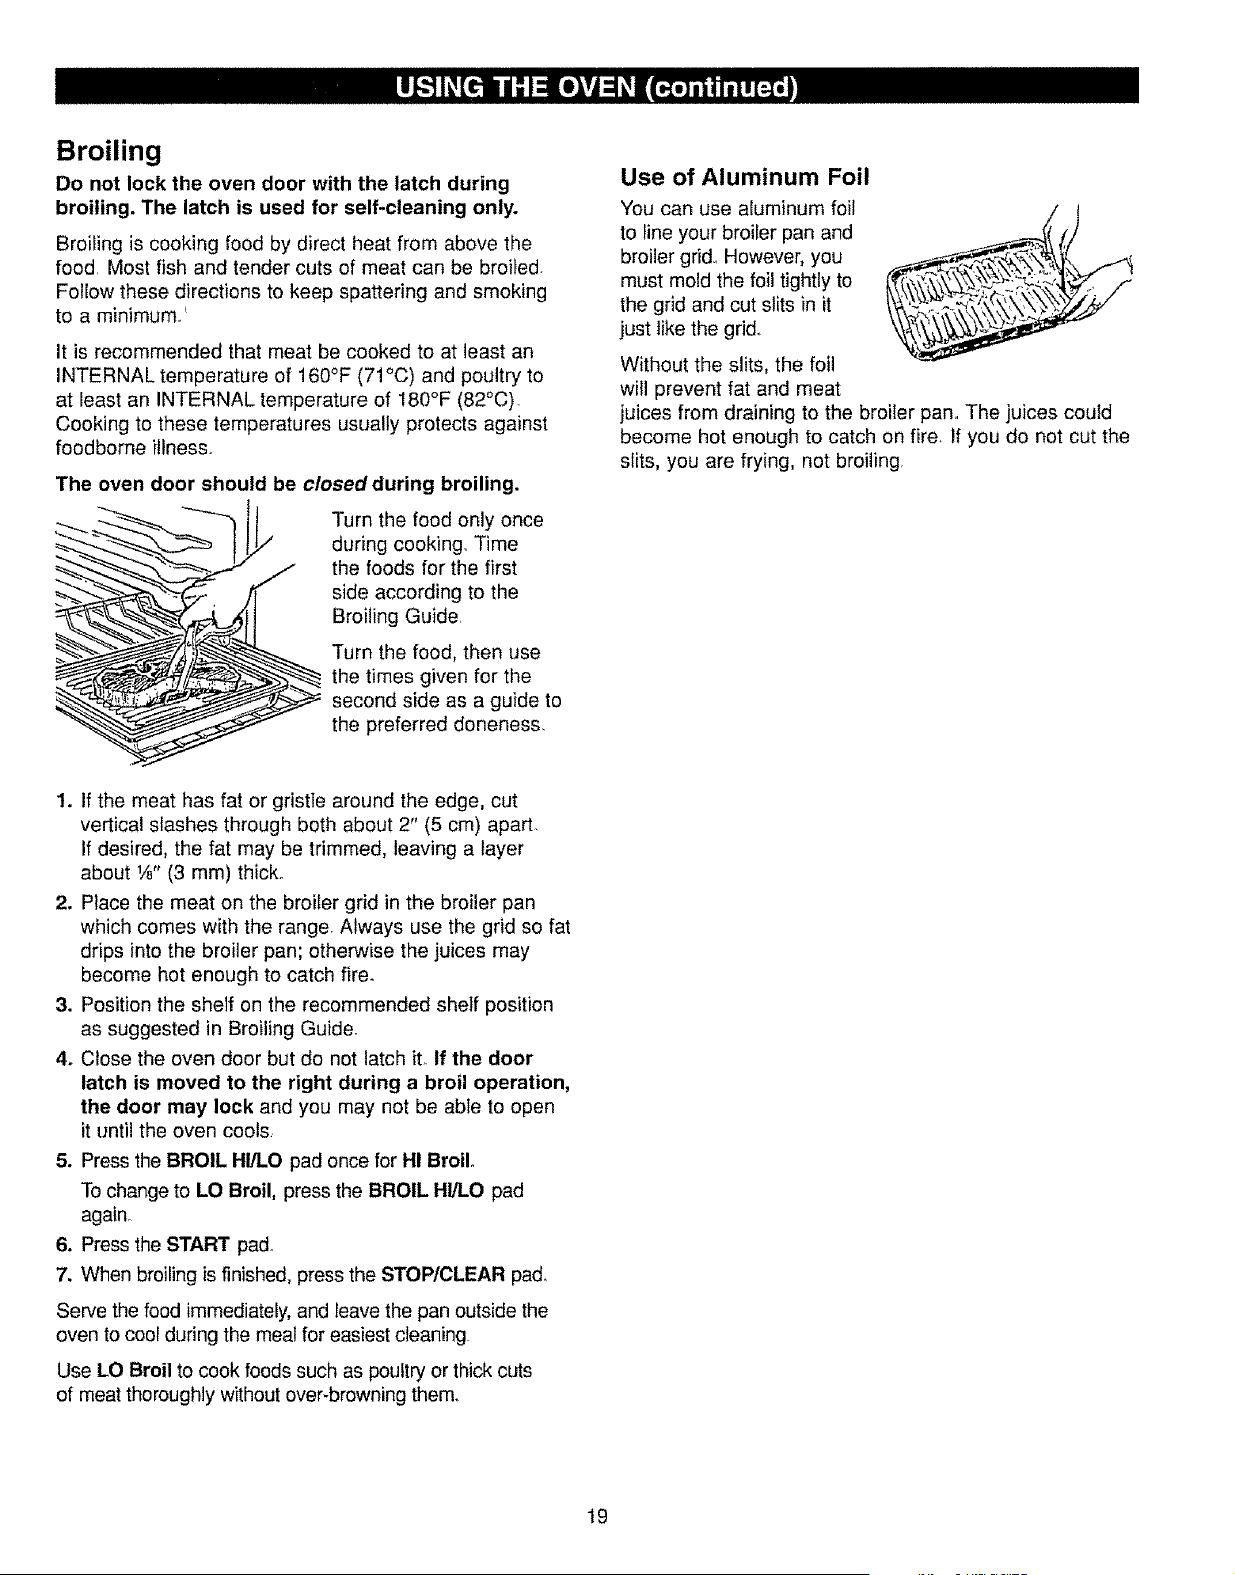
The oven door should be closed during broiling.
Turn the food only once
duringcooking_Time
the foods for the first
side according to the
Broiling Guide
Turn the food, then use
the times given for the
second side as a guide to
the preferred doneness.
Use of Aluminum Foil
You can use aluminum foil
to Iine your broiler pan and
broiler grid. However, you
must mold the foil tightly to
the grid and cut slits in it
just like the grid..
Without the slits, the foil
will prevent fat and meat
juices from draining to the broiler pan.. The juices could
become hot enough to catch on fire. If you do not cut the
slits, you are frying, not broiling.
1. If the meat has fat or gristle around the edge, cut
vertical slashes through both about 2" (5 cm) apart.
If desired, the fat may be trimmed, leaving a layer
about 1/8"(3 mm) thick.
2. Place the meat on the broiler grid in the broiler pan
which comes with the range. Always use the grid so fat
drips into the broiler pan; otherwise the juices may
become hot enough to catch fire.
3. Position the shelf on the recommended shetf position
as suggested in Broiling Guide.
4. Close the oven door but do not latch it_ If the door
latch is moved to the right during a broil operation,
the door may lock and you may not be able to open
it until the oven cools,
5. Press the BROIL HIILO pad once for HI Broil°
To change to LO Broil, press the BROIL HIP,-O pad
again°
6. Press the START pad.
7. When broiling is finished, press the STOP/CLEAR pad.
Serve the food immediately, and leave the pan outside the
oven to cool during the meat for easiest cleaning
Use LO Broil to cook foods such as poultry or thick cuts
of meat thoroughly without over-browning them.
19
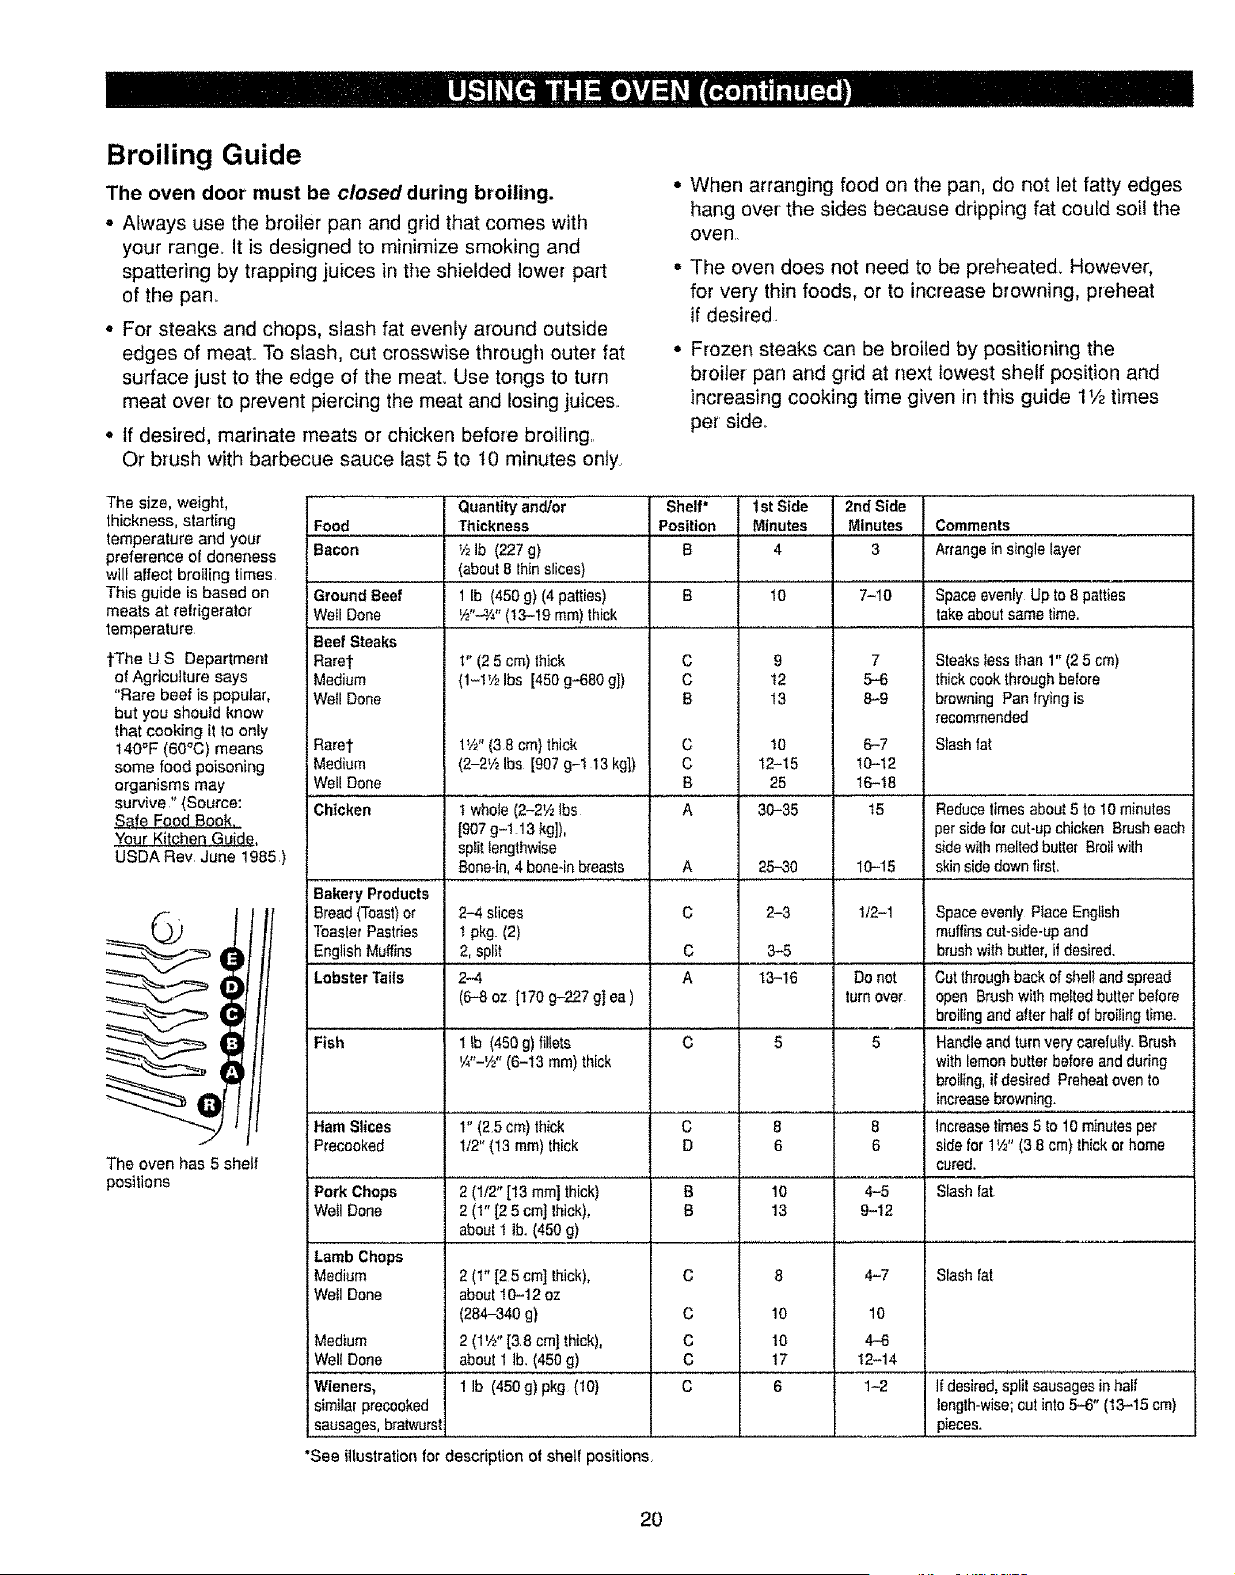
Broiling Guide
The oven door must be closed during broiling.
° Always use the broiler pan and grid that comes with
your range, it is designed to minimize smoking and
spattering by trapping juices in the shielded lower pat1
of the pan.
• For steaks and chops, slash fat evenly around outside
edges of meat. To slash, cut crosswise through outer fat
surface just to the edge of the meat.. Use tongs to turn
meat over to prevent piercing the meat and losing juices..
° If desired, marinate meats or chicken before broiling.
Or brush with barbecue sauce last 5 to t0 minutes ontyo
° When arranging food on the pan, do not let fatty edges
hang over the sides because dripping fat could soil the
oven
- The even does not need to be preheate& However,
for very thin foods, or to increase browning, preheat
if desired.
• Frozen steaks can be broiled by positioning the
broiler pan and grid at next lowest shelf position and
increasing cooking time given in this guide 11/2times
per sider
The size, weight,
thickness, starting
temperature and your
preference of doneness
will affect broiling times
This guide is based on
meats at refrigerator
temperature
tThe U S Department
of Agriculture says
"Rare beef is popular,
but you should know
that cooking it to only
140_'F (6O'_C) means
some food poisoning
organisms may
survive" {Source:
Safe Food Book.
Your Kitchen Guide.
USDA Rev June 1985)
The oven has 5 shelf
positions
Quantity and/or Shelf* 1st Side 2nd Side
Food Thickness Position Minutes Minutes Comments
Bacon V2Ib (227 g) B 4 3 Arrange in single layer
(about 8 thin slices)
1 lb (450 g) (4 patties) B 10 7-10 Space evenly Up to 8 patties
V_'-_/4" (t3-19 mm) thick take about same time.
Ground Beef
WeII Done
Beef Steaks
Rare1_
Medium
Well Done
Rare1"
Medium
Well Done
Chicken
t" (2 5 cm) thick
(1-1'/_zIbs [450 g-680 g])
Lamb Chops
Medium
Wet] Done
1V2"(38 cm} thick
(2-2_4 Ibs [907 g-t 13 kg])
c
c
B
C
C
B
A
9
12
13
!0
12-15
25
30-35
7
5-6
8-9
6-7
tO-12
16-18
t5
Steaks less than 1" (2 5 ore)
thick cook through before
browning Pan frying is
recommended
S_ash fat
I whole (2-2'/z lbs Reduce times about 5 to 10 minutes
[907 g-1 13 kg]), per side for cut-up chicken Brush each
sptit lengthwise side with melted butter Broii with
Bone.in, 4 boneqn breasts A 25-30 10-15 skin side down first.
Bakery Products
Bread (Toast)or 2-4 slices C 2-3 1/2-1 Space evenly Place Er_lish
Toaster Pastries 1 pk9- (2) muffins cut-side-up and
English Muffins 2, split C 3-5 brush with butter, if desired.
Lobster Tails 2-4 A 13-16 Do not Cut throughback of shell and spread
(6-8 oz [170 g-227 g] ea ) turn over open Brush with melted butter before
broiling and after half of bro[ting time.
Fish 1 tb (450 g) fillets C 5 5 Handle and turn very carefully. Brush
W'-W' (6-13 ram) thick with lemon bulter before and during
broiling, ifdesired Preheat ovento
increasebrowning.
Ham Slices 1" (2.5 cm) thick C 8 8 lncrease times5 to 10 minules per
Precooked 1/2" (13 ram) thick D 6 6 side for 1W' (3 8 cm) thick or home
cured.
Pork Chops 2 (1/2" [13 mint thick) B 10 4-5 Slash fat
We_l Done 2 (1" [2 5 cm] thick), B 13 9-12
about t lb. (450 g)
Slash fatc
c
c
c
c
4-7
10
4-6
12-14
1-2
8
10
10
17
6
2 (1"[25 em]Ihiek),
about 10-12 oz
(284-340 g)
2 (1'/2" [3 8 cm] thick),
about 1 Ib, (450 g)
1 Ib (450g) pkg (10)
Medium
Well Done
Wieners, ff desired, split sausages in half
similar precooked length-wise; cut into 5.-6" (13-15 ore)
sausages, bratwurst pieces.
"See illustration for description of shelf positions,
20
Timed Baking and Roasting
(on some models)
How to Time Bake or Roast
Do not lock the oven door with the latch during timed
baking° The latch is used for self-cleaning only.
The oven controt aIIows you to turn the oven on or off
automatically at specific times that you set,, Examples of
Immediate Start (oven turns on now and you set it to turn
off automatically) and Delay Start and Stop (setting the
oven to turn on automatically at a later time, cook for a
preset amount of time and then turn off automatically)
will be described,
NOTE: Before beginning, make sure the oven clock
shows the correct time of day. See the Using the Clock
and Timer section
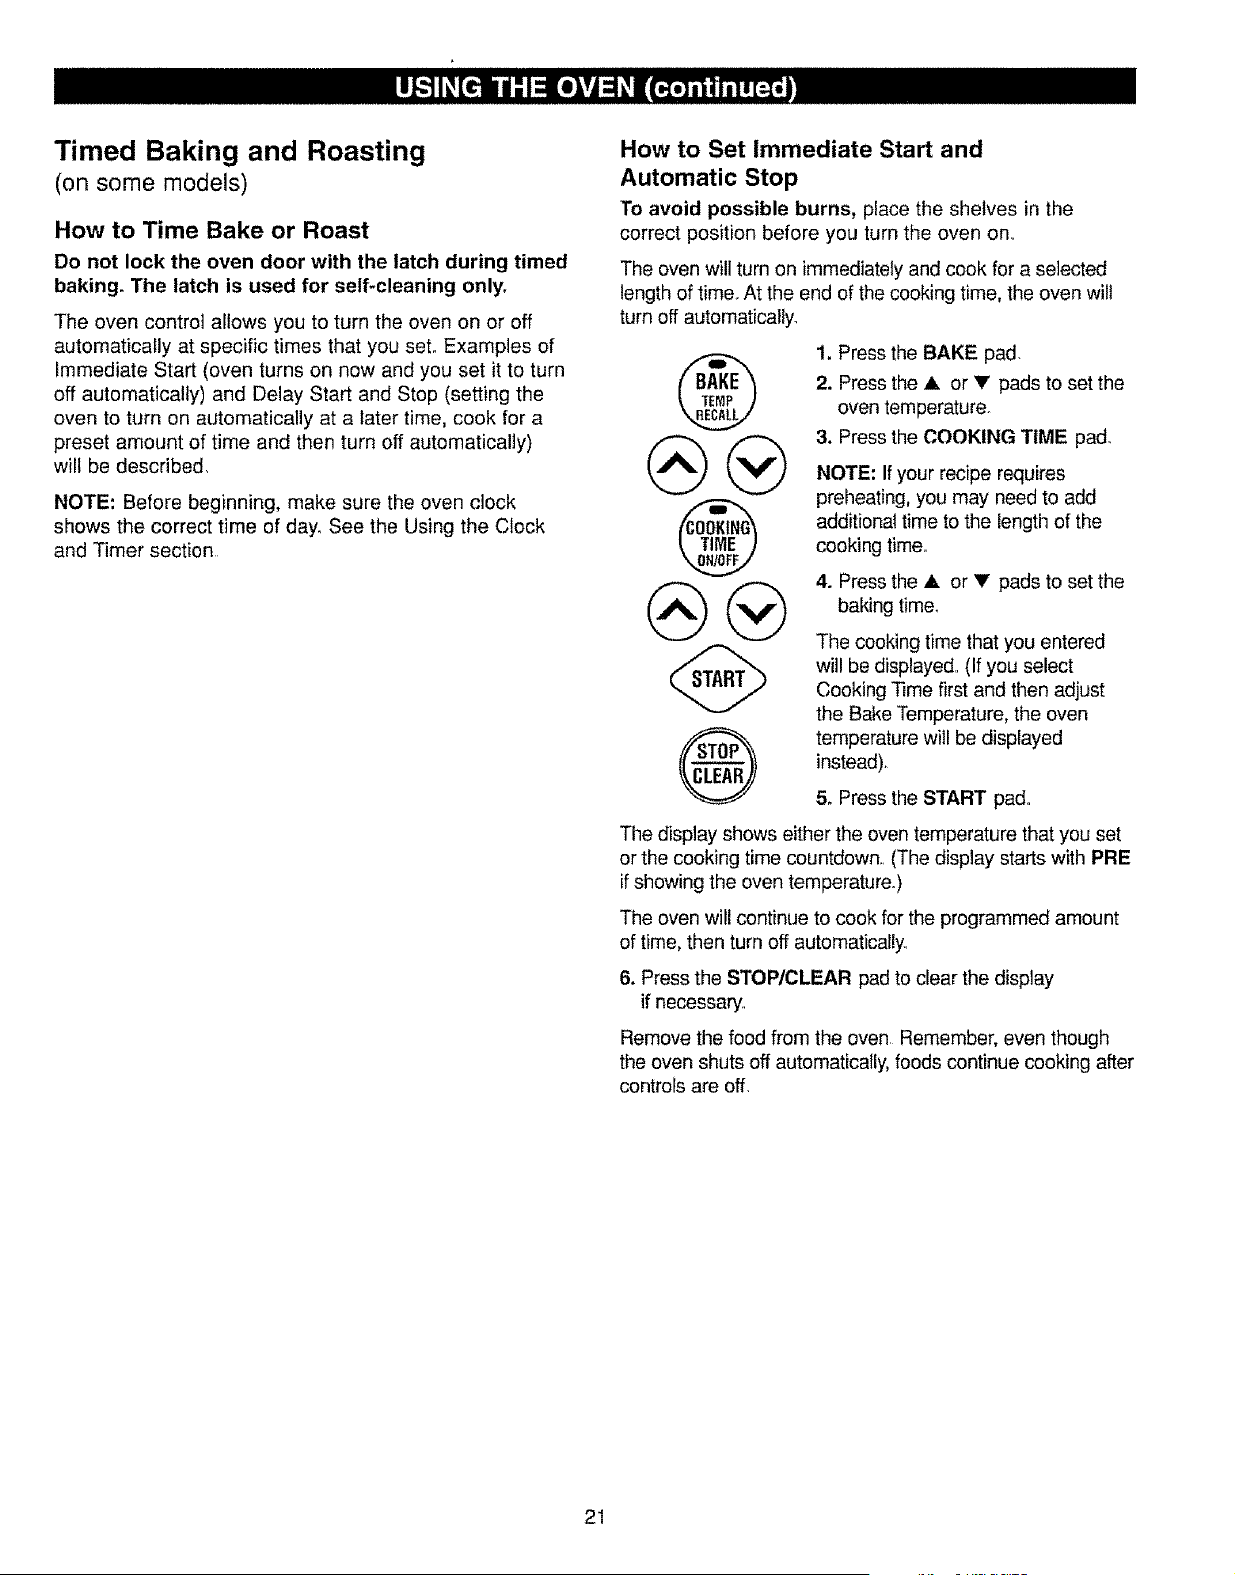
How to Set Immediate Start and
Automatic Stop
To avoid possible burns, place the shelves in the
correct position before you turn the oven on,,
The oven will turn on immediately and cook for a selected
length of time,,At the end of the cooking time, the oven wilt
turn off automatically.
@
®
1. Press the BAKE pad.
2. Press the A or V pads to set the
oven temperature_
3. Press the COOKING TIME pad_
NOTE: If your recipe requires
preheating, you may need to add
additional time to the length of the
cooking time,,
4. Press the ,_ or • pads to set the
baking time.
The cooking time that you entered
will be displayed,, (If you select
Cooking Time first and then adjust
the Bake Temperature, the oven
temperature will be displayed
instead).
5. Press the START pad,,
The display shows either the oven temperature that you set
or the cooking time countdown,, (The display starts with PRE
if showing the oven temperature.)
The oven will continue to cook for the programmed amount
of time, then turn off automaticaIly_
6. Press the STOP/CLEAR pad to clear the display
if necessary,,
Remove the food from the oven Remember, even though
the oven shuts off automatically, foods continue cooking after
controls are off,
21
Timed Baking and Roasting (continued)
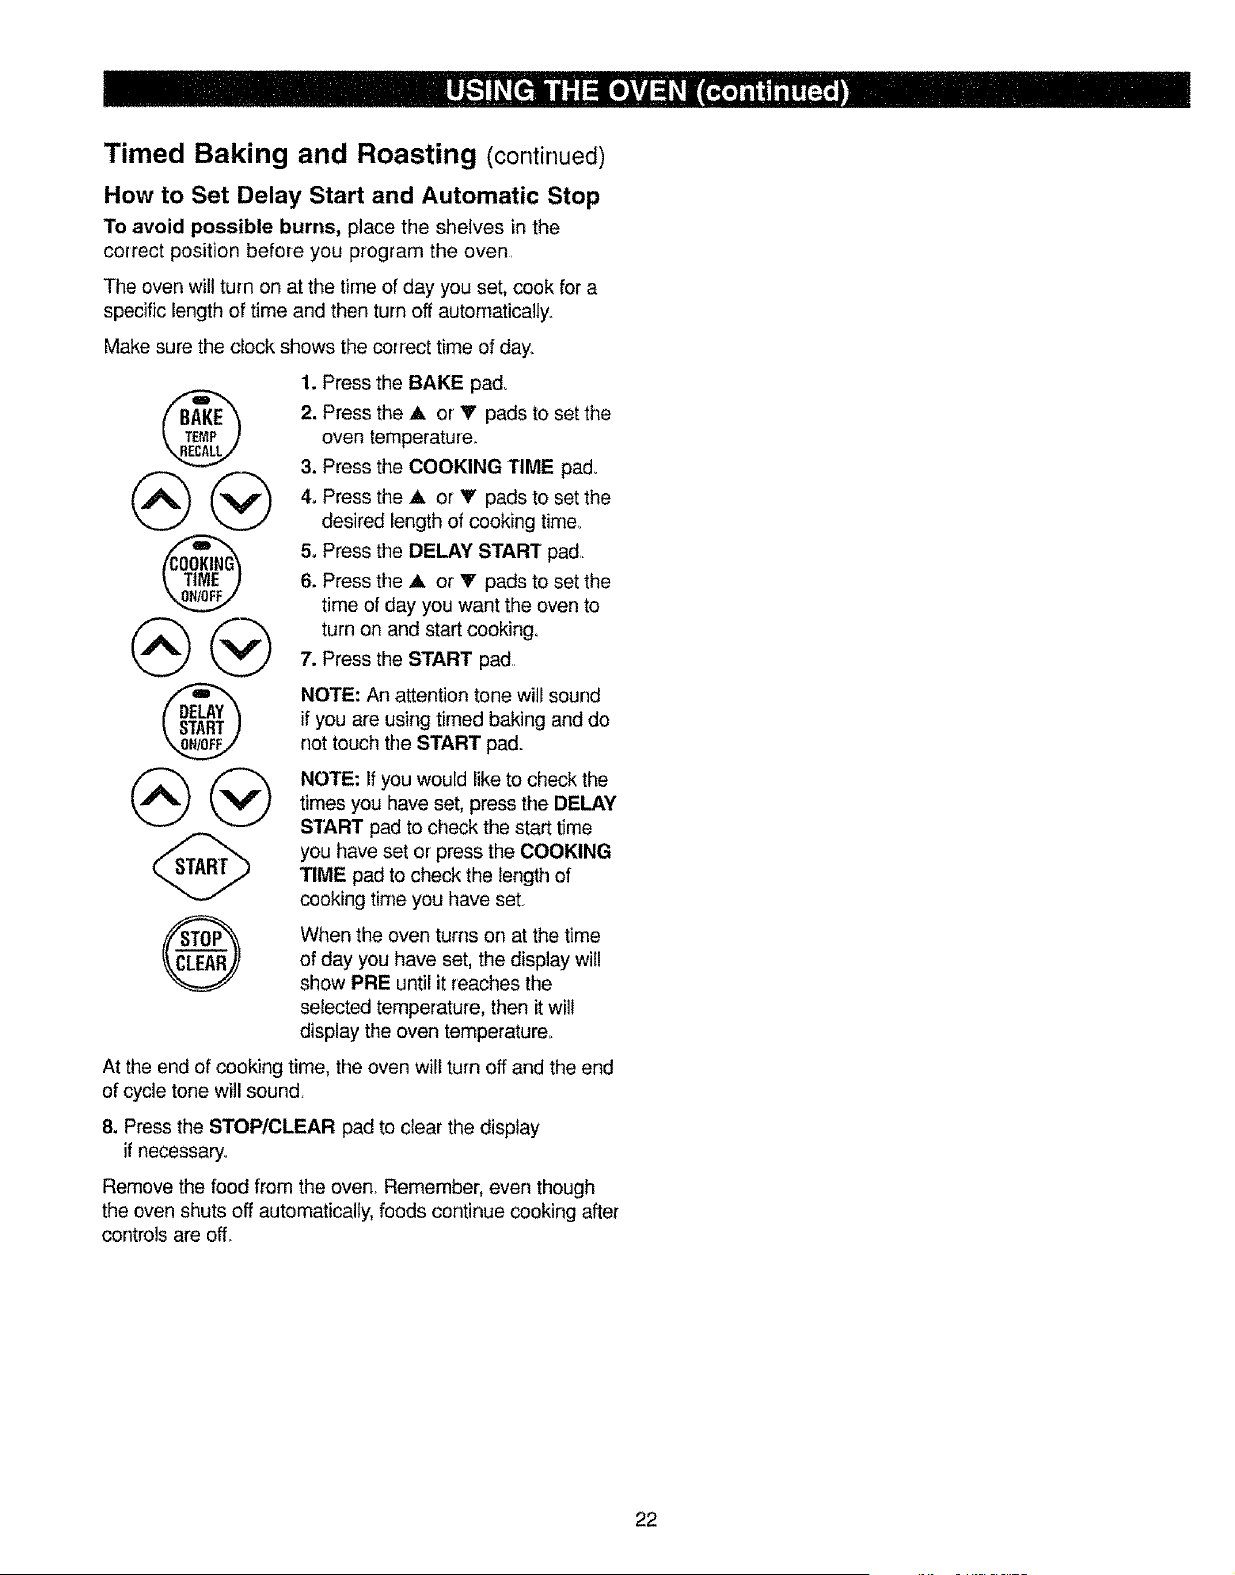
How to Set Delay Start and Automatic Stop
To avoid possible burns, place the shelves in the
correct position before you program the oven.
The oven will turn on at the time of day you set, cook for a
specific length of time and then turn off automatically.
Make sure the clock shows the correct time of day_
@
@@
®
@
®
1. Press the BAKE pad.
2. Press the ,& or V pads to set the
oven temperature_
3. Press the COOKING TIME pad°
4, Press the A or V pads to set the
desired length of cooking time.
5oPress the DELAY START pad,.
6. Press the A or v pads to set the
time of day you want the oven to
turn on and start cooking,
7. Press the START pad
NOTE: An attention tone wili sound
if you are using timed baking and do
not touch the START pad.
NOTE; if you would like to check the
times you have set, press the DELAY
SlART pad to check the start time
you have set or press the COOKING
TIME pad to check the length of
cooking time you have set.
When the oven turns on at the time
of day you have set, the display wil!
show PRE until it reaches the
selected temperature, then it wiU
display the oven temperature,.
At the end of cooking time, the oven will turn off and the end
of cycle tone will sound.
8. Press the STOP/CLEAR pad to clear the display
if necessary.
Remove the food from the oven, Remember, even though
the oven shuts off automatically, foods continue cooking after
controls are off.
22

To Set the Clock
The clock must be set to the correct time of day for the
automatic oven timing functions to work properly, The time
of day cannot be changed during a delayed cooking or a
delayed self-cleaning cycle,,
G
Make sure the clock is set
to the correct time of day
1. Press the CLOCK pad twice
2oPress the • or V pads,
If the • or V pads are not pressed
within one minute after you press the
CLOCK pad, the display reverts to
the original setting,, If this happens,
press the CLOCK pad twice and
reenter the time of day.,
3. Press the START pad until the
time of day shows in the display,
This enters the time and starts
the clock.,
To check the time of day when the display is showing other
information, simpiy press the CLOCK pad,. The time of day
shows until another pad is pressed.
To Turn Off the Clock Display
If you have several clocks in your kitchen, you may wish to
turn off the time of day clock display on your range°
1. Press the CLOCK pad once to turn off the time of day
display. Although you will not be able to see it, the clock
maintains the correct time of day
2oPress the CLOCK pad twice to recall the clock display,
To Set the Timer
The timer does not control oven operations., The maximum
setting on the timer is 9 hours and 59 minutes.
®
The timer is a minute
timer only, The
1. Press the KITCHEN TIMER
ON/OFF pad..
2. Press the • or V pads until the
amount of time you want shows in
the display, The maximum time
that can be entered in minutes is
59, Times more than 59 minutes
should be changed to hours and
minutes
If you make a mistake, press the
KITCHEN TIMER ON/OFF pad and
STOPtCLEAR pad does begin again.
not affect the timer
3o Press the START pad. The time will start counting down,
although the display does not change until one minute has
passed.
4. When the timer reaches :00, the control will beep 3 times
followed by one beep every 6 seconds until the KITCHEN
TIMER ON/OFF pad is pressed,
23
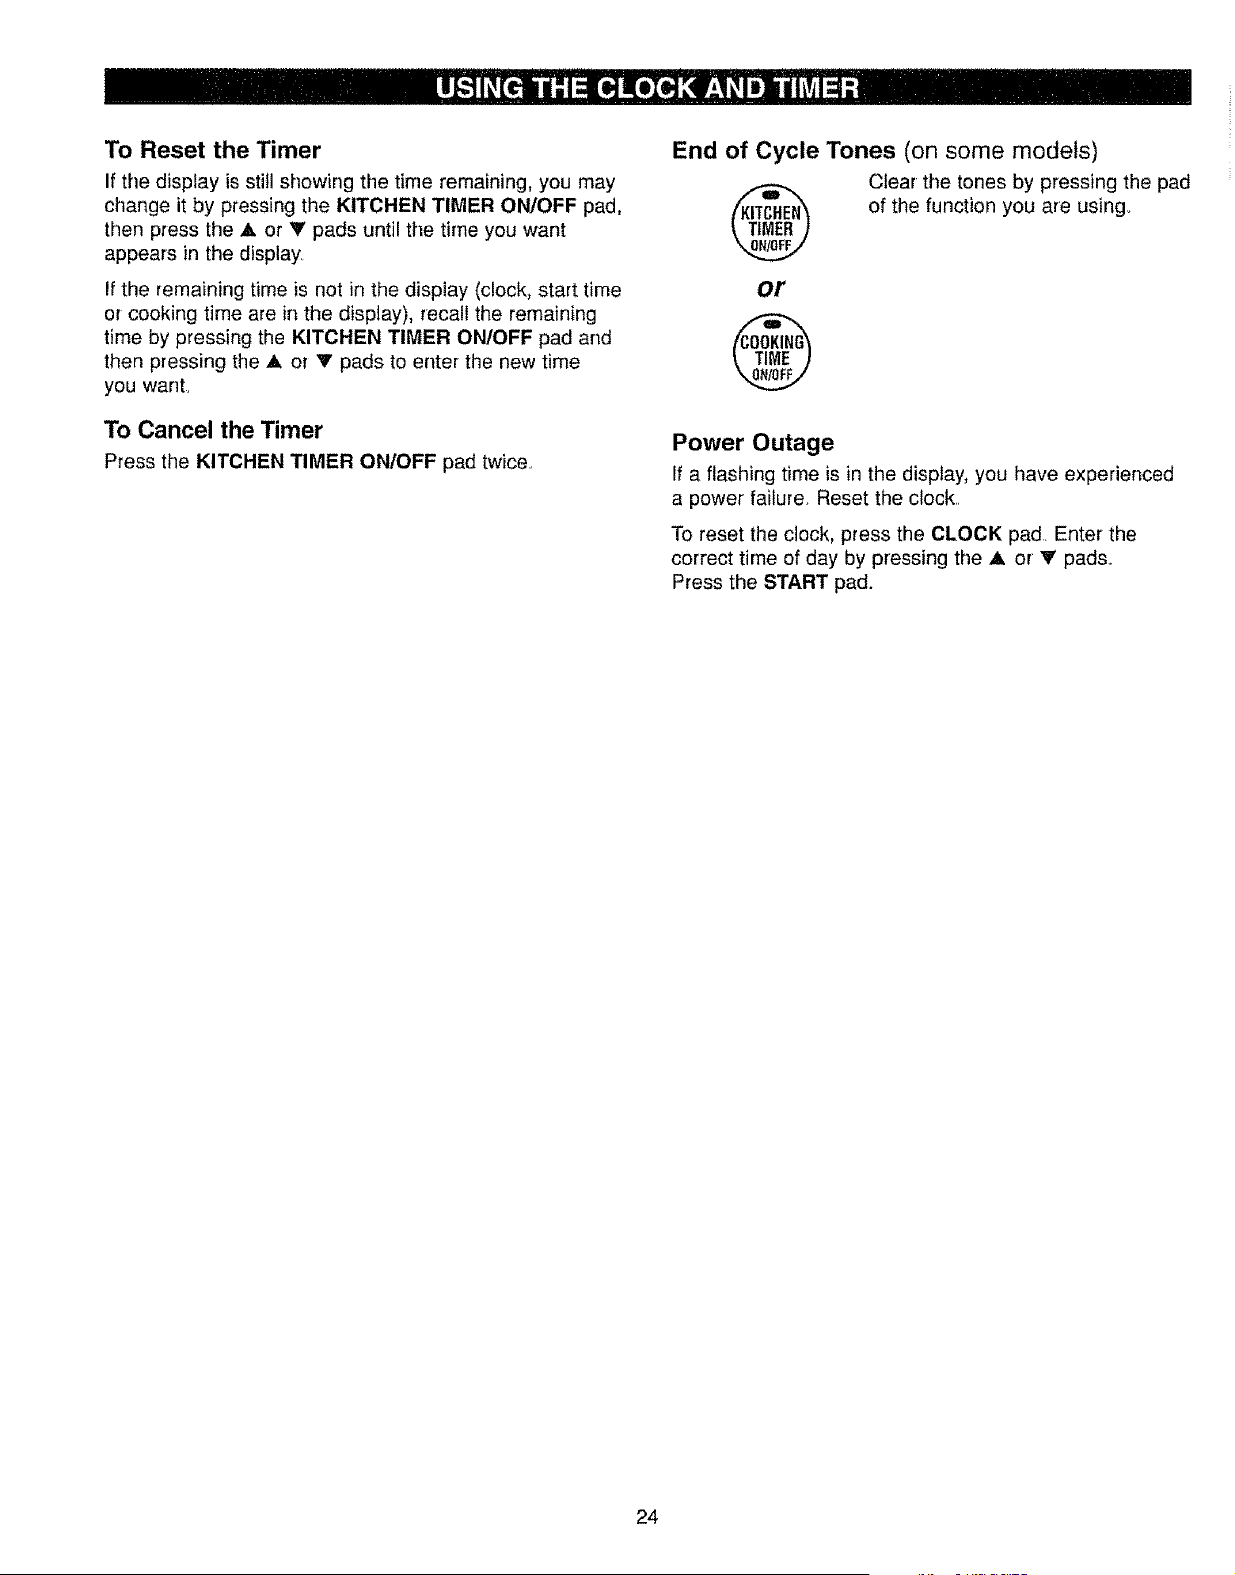
To Reset the Timer
If the display is still showing the time remaining, you may
change it by pressing the KITCHEN TIMER ON/OFF pad,
then press the _ or V pads until the time you want
appears in the display_
If the remaining time is not in the display (clock, start time
or cooking time are in the display), recall the remaining
time by pressing the KITCHEN TIMER ON/OFF pad and
then pressing the A or V pads to enter the new time
you want.
To Cancel the Timer
Press the KITCHEN TIMER ON/OFF pad twice,,
End of Cycle Tones (on some models)
Clear the tones by pressing the pad
of the function you are using.
or
Power Outage
If a flashing time is in the display, you have experienced
a power failure. Reset the clock..
To reset the clock, press the CLOCK pad Enter the
correct time of day by pressing the A or V pads_
Press the START pad.
24
Yournewpadcontrolhasadditionalfeaturesthatyou
maychoosetouse°Thefollowingarethefeaturesand
howyoumayactivatethem..
Thespecialfeaturemodescanonlybeactivatedwhile
thedisplayisshowingthetimeof day.Theyremainin the
control'smemoryuntilthestepsarerepeated,
Whenthedisplayshowsyourchoice,touchtheSTART
pad..Thespecialfeatureswiltremainin memoryaftera
powerfailure
NOTE:TheSabbathfeatureandtheThermostat
AdjustmentfeaturearealsoSpecialFeatures,butthey
areaddressedinseparatesections_
12 Hour Shut-Off
With this feature, should you forget and leave the oven
on, the control will automatically turn off the oven after
12 hours during baking functions or after 3 hours during
a broil function°
If you wish to turn OFF this feature, follow the steps
below.
1. Press the BAKE and BROIL
H!/LO pads at the same time
for 3 seconds until the display
shows SF.
2. Press the CLOCK pad. The
display will show ON (12 hour
shut-off), Press the CLOCK pad
repeatedly until the display
shows OFF (no shut-off)..
3. Press the START pad to
activate the no shut-off and leave
the control set in this special
features mode_
25

Designedfor useontheJewishSabbathandHolidays,
theSabbathfeaturecarlbeusedfor baking/roastingonly.
Itcannotbeusedforbroiling,self-cleaningorDelayStart
cooking
NOTE:Theoven light comes on automatically (on some
models) when the door is opened and goes off when the
door is closed. The bulb may be removed. See the Oven
Light Replacement section On models with a light switch
on the control panel, the oven light may be turned on and
left on_
How to Set for Regular Baking/Roasting
NOTE: To understand how the oven control works,
practice using regular baking (non-Sabbath) before
entering Sabbath mode.
Make sure the clock shows the correct time of day and
the oven is off_
(_ 4.
5.
7.
When the display shows D
the oven is set in Sabbath
When the display shews
c the oven is
baking;roasting
Press and hold both the BAKE
and BROIL HI/LO pads, at the
same time, until the display
shows SF_
Tap the CLOCK pad until
SAb appears in the display°
Press the START pad and _ will
appear in the display.
Press the BAKE pad_ No signal
will be given.
The preset starting temperature
will automatically be set to 350..°
Tap the A or V pads to increase
or decrease the temperature in
25° increments. The temperature
can be set between 170 ° and
550? No signal or' temperature
will be given.
Press the START pad.
After a random delay period of
approximately 30 seconds to
1 minute, D c will appear in the
display indicating that the oven
is baking!roasting If _ c doesn't
appear in the display, start again
at Step 4.
To adjust the oven temperature, press the BAKE pad
and tap the A or V pads to increase or decrease the
temperature in 25 ° increments Press the START pad.
NOTE: The STOP/CLEAR and COOKING TIME pads
are active during the Sabbath feature.
How to Set for Timed Baking/Roastingm
Immediate Start and Automatic Stop
NOTE: To understand how the oven control works,
practice using regular (non-Sabbath) Immediate Start and
Automatic Stop before entering Sabbath mode
Make sure the clock shows the correct time of day and
the oven is off
®
@
When the display shows D
the oven is set in Sabbath,
When Ihe display shows
c the oven is
baking/roasting
1. Press and hold both the BAKE
and BROIL HItLO pads, at the
same time, until the display
shows SF.
2. Tap the CLOCK pad until
SAb appears in the display.
3. Press the START pad and _ will
appear in the display,
4. Press the COOKING TIME pad°
5. Press the A or V pads to set
the desired Length of cooking
time between 1 minute and 9
hours and 59 minutes. The
cooking time that you entered
will be displayed.
6. P{ess the START pad,
7. Press the BAKE pad. No signal
will be given.
8. The preset starting temperature
will automatically be set to 350. °
Tap the A or V pads to
increase or decrease the
temperature in 25° increments.
The temperature can be set
between 170 ° and 550. °
No signal or temperature will
be given.
9. Press the START pad_
10. After a random delay period of
approximately 30 seconds to
1 minute, D c will appear in the
display indicating that the oven
is baking/roasting If _ c doesn't
appear in the display, start again
at Step 7
To adjust the oven temperature, press the BAKE pad
and tap the A or I' pads to increase or decrease the
temperature in 25 ° increments. Press the START pad.
When cooking is finished, the display will change from
c to D indicating that the oven has turned OFF but is
still set in Sabbath. Remove the cooked food.
26
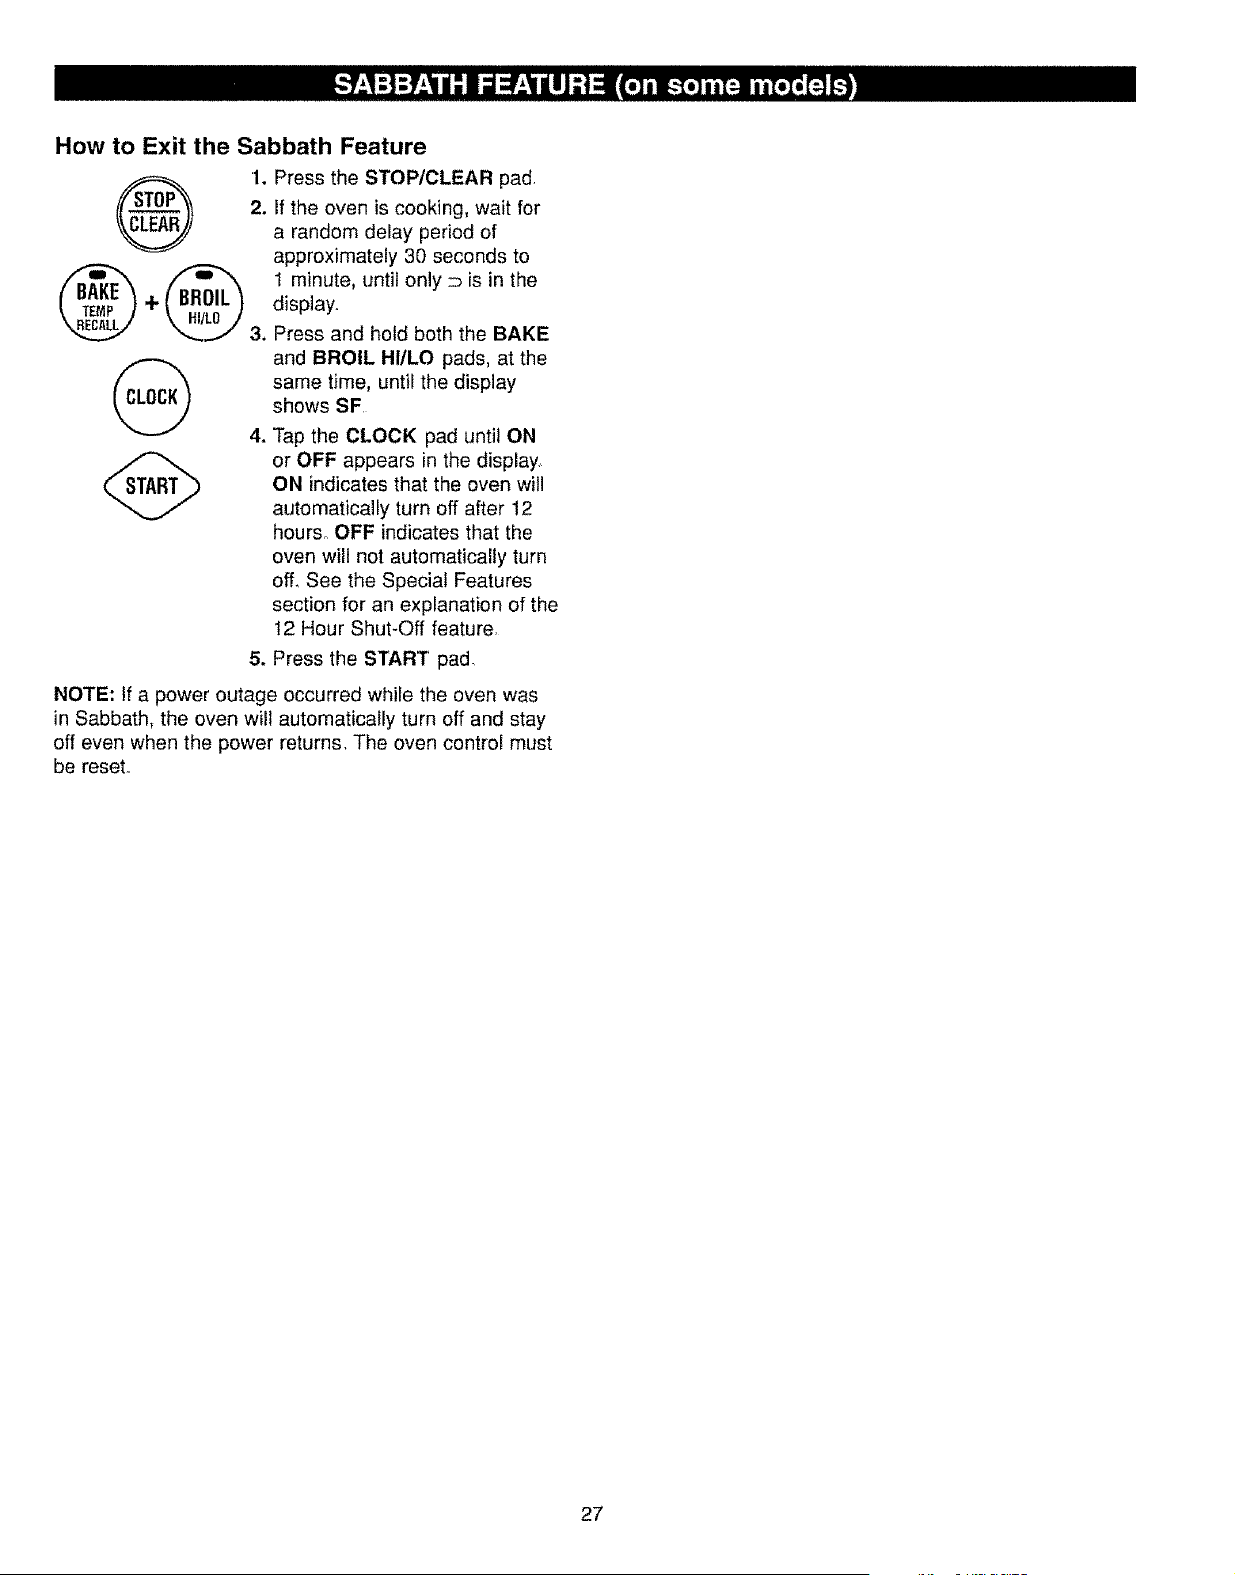
How to Exit the Sabbath Feature
®
G
1. Press the STOP/CLEAR pad.
2. If the oven is cooking, wait for
a random delay period of
approximately 30 seconds to
1 minute, until only D is in the
display.
3. Press and hold both the BAKE
and BROIL HI/LO pads, at the
same time, until the display
shows SF
4. Tap the CLOCK pad until ON
or OFF appears in the display,
ON indicates that the oven will
automatically turn off after 12
hours. OFF indicates that the
oven will not automatically turn
off. See the Special Features
section for an explanation of the
t2 Hour Shut-Off feature,
5. Press the START pad.
NOTE: If a power outage occurred whiie the oven was
in Sabbath, the oven will automatically turn off and stay
off even when the power returns, The oven control must
be reset.,
27
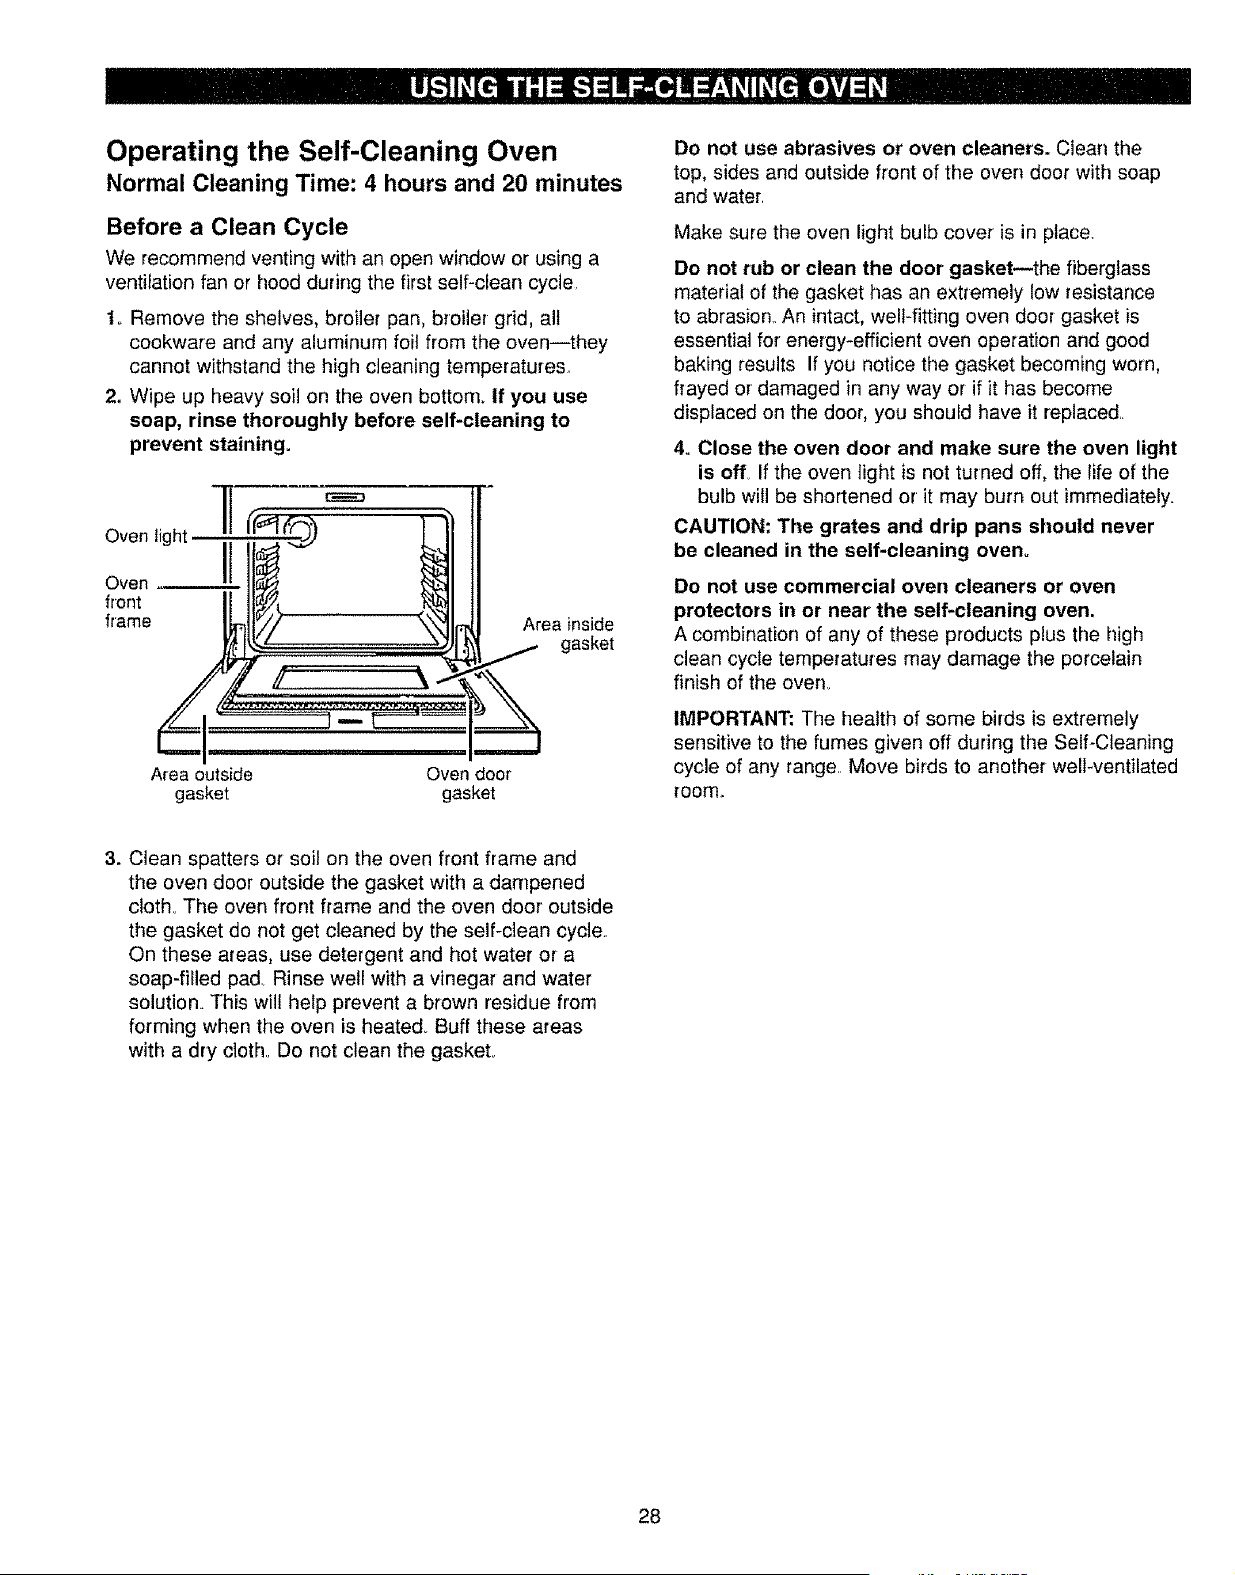
Operating the Self-Cleaning Oven
Normal Cleaning Time: 4 hours and 20 minutes
Before a Clean Cycle
We recommend venting with an open window or using a
ventilation fan or hood during the first self-clean cycle.
1. Remove the shelves, broiler pan, broiler grid, all
cookware and any aluminum foil from the oven--they
cannot withstand the high cleaning temperatures..
2, Wipe up heavy soil on the oven bottom_ If you use
soap, rinse thoroughly before self-cleaning to
prevent staining.
Oven ti ht 7[11(-r=_lFf--_''''._e_u } ]_
Area outside
gasket
Area inside
gasket
Oven door
gasket
Do not use abrasives or oven cleaners. Clean the
top, sides and outside front of the oven door with soap
and water,
Make sure the oven light bulb cover is in place.
Do not rub or clean the door gasket--the fiberglass
material of the gasket has an extremely low resistance
to abrasion.. An intact, well-fitting oven door gasket is
essential for energy-efficient oven operation and good
baking results If you notice the gasket becoming worn,
frayed or' damaged in any way or if it has become
displaced on the door, you should have it replaced..
4. Close the oven door and make sure the oven light
is off If the oven light is not turned off, the life of the
bulb will be shortened or it may burn out immediately.
CAUTION: The grates and drip pans should never
be cleaned in the self-cleaning oven_
Do not use commercial oven cleaners or oven
protectors in or near the self-cleaning oven.
A combination of any of these products plus the high
clean cycle temperatures may damage the porcelain
finish of the oven,
IMPORTANT: The health of some birds is extremely
sensitive to the fumes given off during the Self-Cleaning
cycle of any range,, Move birds to another well-ventilated
room,.
3. Clean spatters or soil on the oven front frame and
the oven door outside the gasket with a dampened
cloth. The oven front frame and the oven door outside
the gasket do not get cleaned by the self-clean cycle..
On these areas, use detergent and hot water or a
soap-filled pad Rinse well with a vinegar and water
solution. This will help prevent a brown residue from
forming when the oven is heated. Buff these areas
with a dry cloth Do not clean the gasket°
28
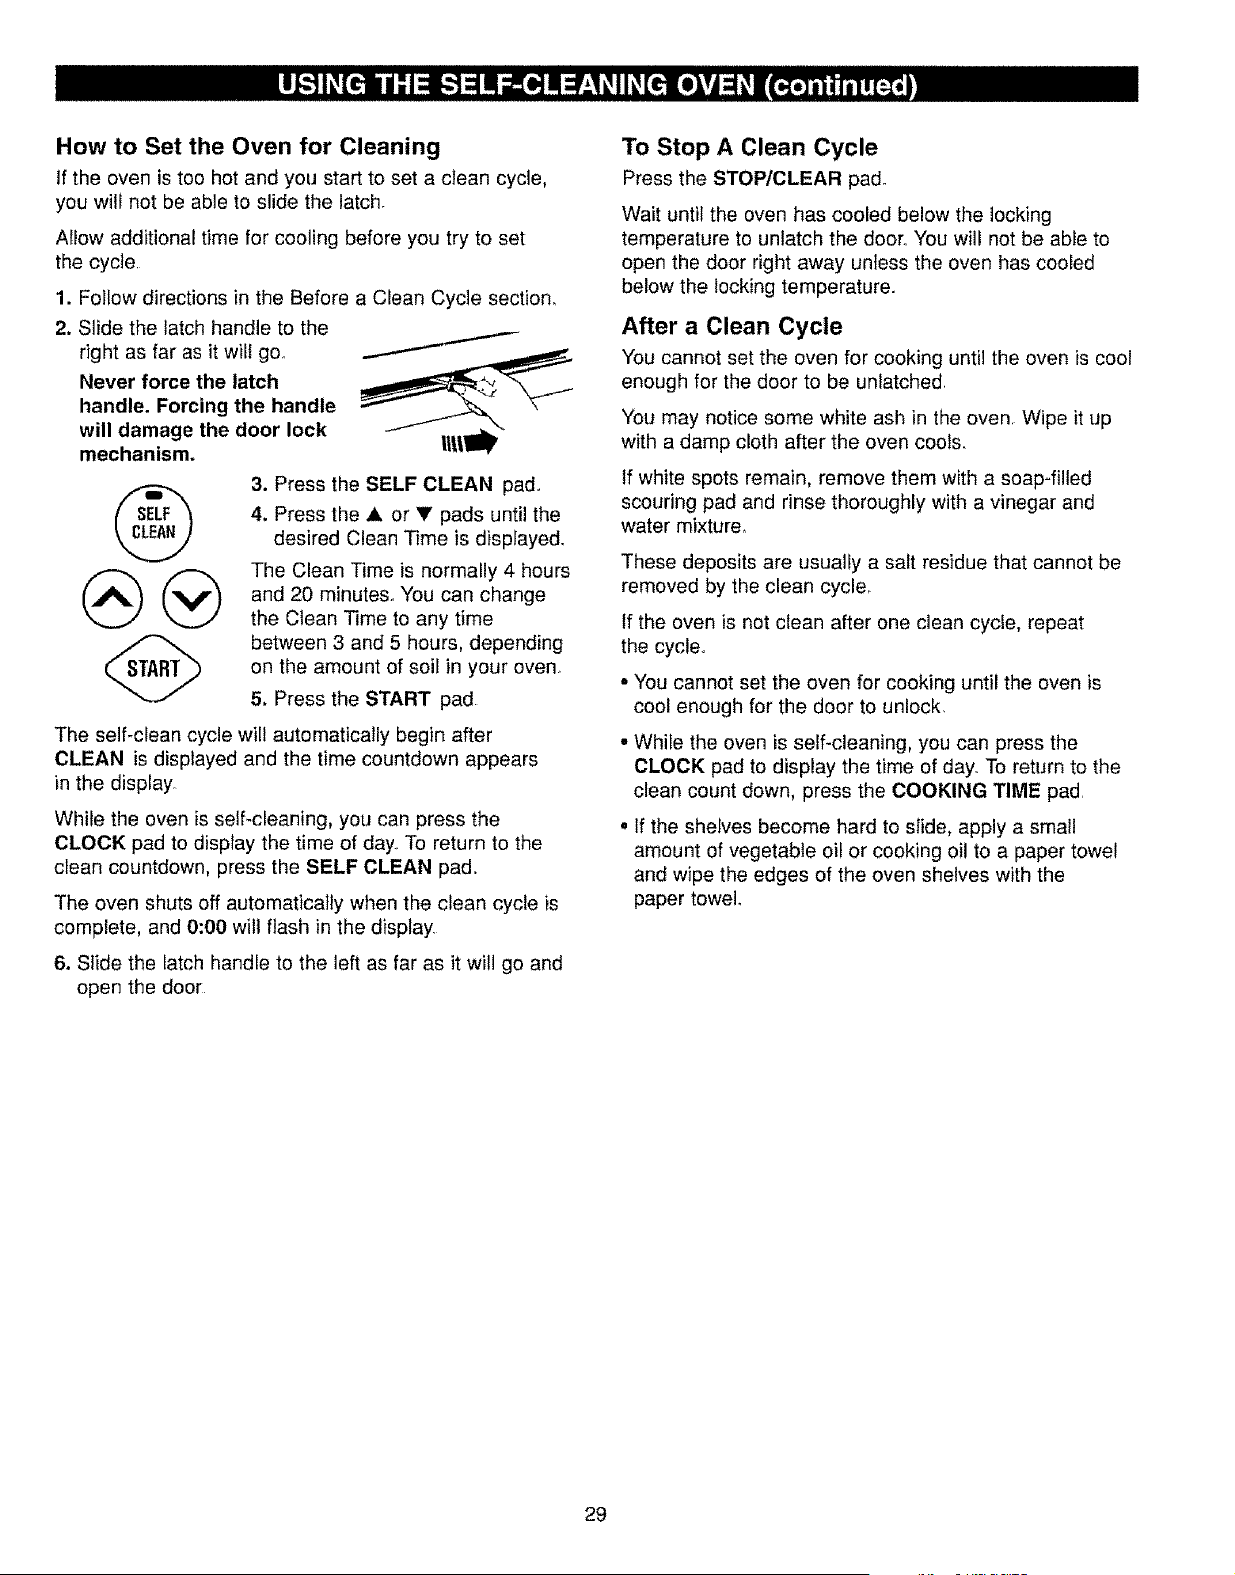
How to Set the Oven for Cleaning
If the oven is too hot and you start to set a clean cycle,
you will not be able to slide the latch.
Allow additional time for cooling before you try to set
the cycle
1. Follow directions in the Before a Clean Cycle section,
2. Slide the latch handle to the
right as far as it will go
Never force the latch
handle. Forcing the handle
will damage the door lock
mechanism.
@
3. Press the SELF CLEAN pad.
4, Press the A or Y pads until the
desired Clean Time is displayed.
The Clean Time is normally 4 hours
and 20 minutes You can change
the Clean Time to any time
between 3 and 5 hours, depending
on the amount of soi_ in your oven_
5. Press the START pad
The self-clean cycle will automatically begin after
CLEAN is displayed and the Lime countdown appears
in the display
While the oven is self-cleaning, you can press the
CLOCK pad to display the time of day To return to the
clean countdown, press the SELF CLEAN pad,
The oven shuts off automatically when the clean cycle is
complete, and 0:00 wilt flash in the display
6. Slide the latch handle to the left as far as it will go and
open the door
To Stop A Clean Cycle
Press the STOP/CLEAR pad°
Wait until the oven has cooled below the locking
temperature to unlatch the door You will not be able to
open the door right away unless the oven has cooled
below the tocking temperature.
After a Clean Cycle
You cannot set the oven for cooking until the oven is cool
enough for the door to be unlatched
You may notice some white ash in the oven Wipe it up
with a damp cloth after the oven cools.
tf white spots remain, remove them with a soap-filled
scouring pad and rinse thoroughly with a vinegar and
water mixture,
These deposits are usually a salt residue that cannot be
removed by the clean cycle_
If the oven is not clean after one clean cycle, repeat
the cycle.
• You cannot set the oven for cooking until the oven is
cool enough for the door to unlock.
• While the oven is self-cleaning, you can press the
CLOCK pad to display the time of day To return to the
clean count down, press the COOKING TIME pad
= If the shelves become hard to slide, apply a small
amount of vegetable oil or cooking oil to a paper towel
and wipe the edges of the oven shelves with the
paper towel°
29
Operating the Self-Cleaning Oven
(continued)
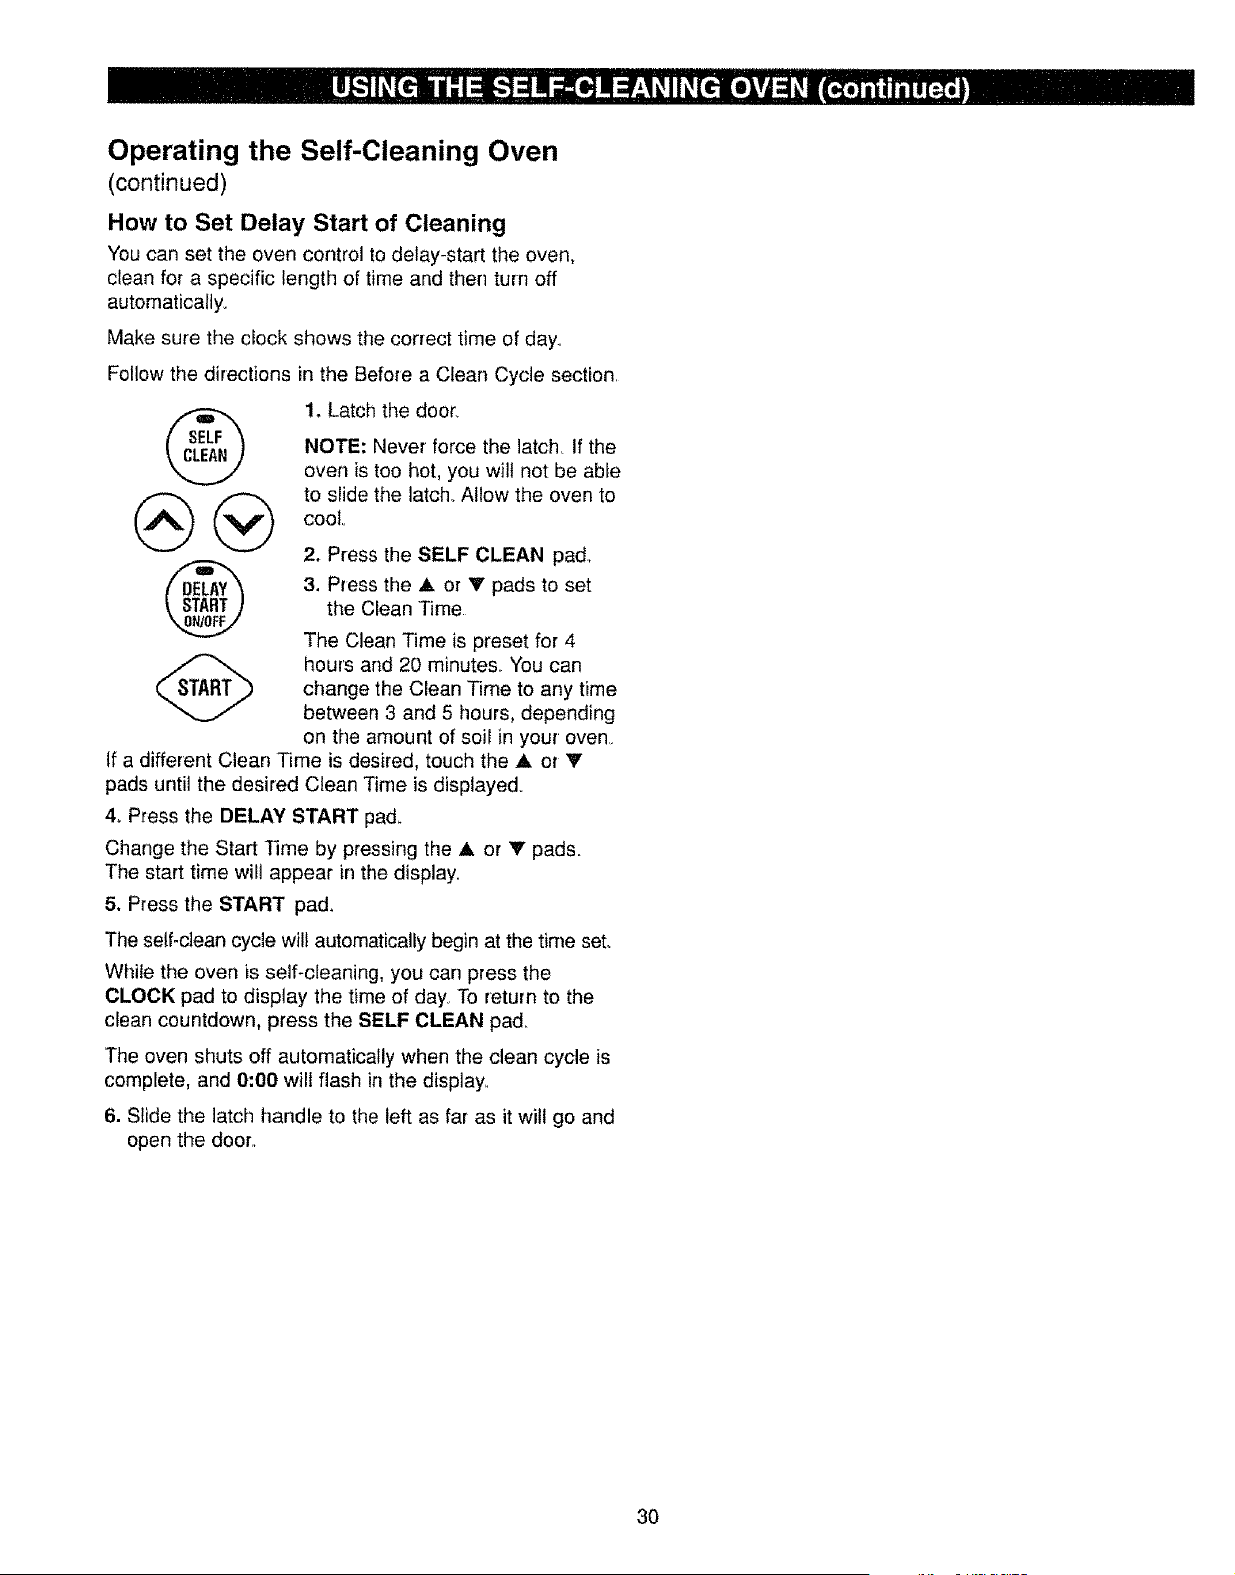
How to Set Delay Start of Cleaning
You can set the oven control to delay-start the oven,
clean for a specific length of time and then turn off
automaticalty_
Make sure the clock shows the correct time of day.
Follow the directions in the Before a Clean Cycle section.
®
@
1, Latch the door.
NOTE: Never force the latch. If the
oven is too hot, you wilt not be able
to slide the latch. Allow the oven to
cool
2, Press the SELF CLEAN pad._
3. Press the A. or V pads to set
the Clean Time
The Clean Time is preset for4
hours and 20 minutes.. You can
change the Clean Time to any time
between 3 and 5 hours, depending
on the amount of soil in your oven
If a different Clean Time is desired, touch the • or V
pads until the desired Clean Time is displayed.
4. Press the DELAY START pad.
Change the Start Time by pressing the A or V pads.
The start time will appear in the display.
5. Press the START pad.
The self-clean cycle will automatically begin at the time set.
While the oven is self-cleaning, you can press the
CLOCK pad to display the time of day. To return to the
dean countdown, press the SELF CLEAN pad,
The oven shuts off automatically when the clean cycle is
complete, and 0:00 wilt flash in the display.
6. Slide the latch handle to the left as far as it will go and
open the door..
3O
Proper care and cleaning are important so your range will
give you efficient and satisfactory service Follow these
directions carefully in caring for it to help assure safe and
proper maintenance°
BE SURE ELECTRICAL POWER IS DISCONNECTED
BEFORE CLEANING ANY PART OF YOUR RANGE.
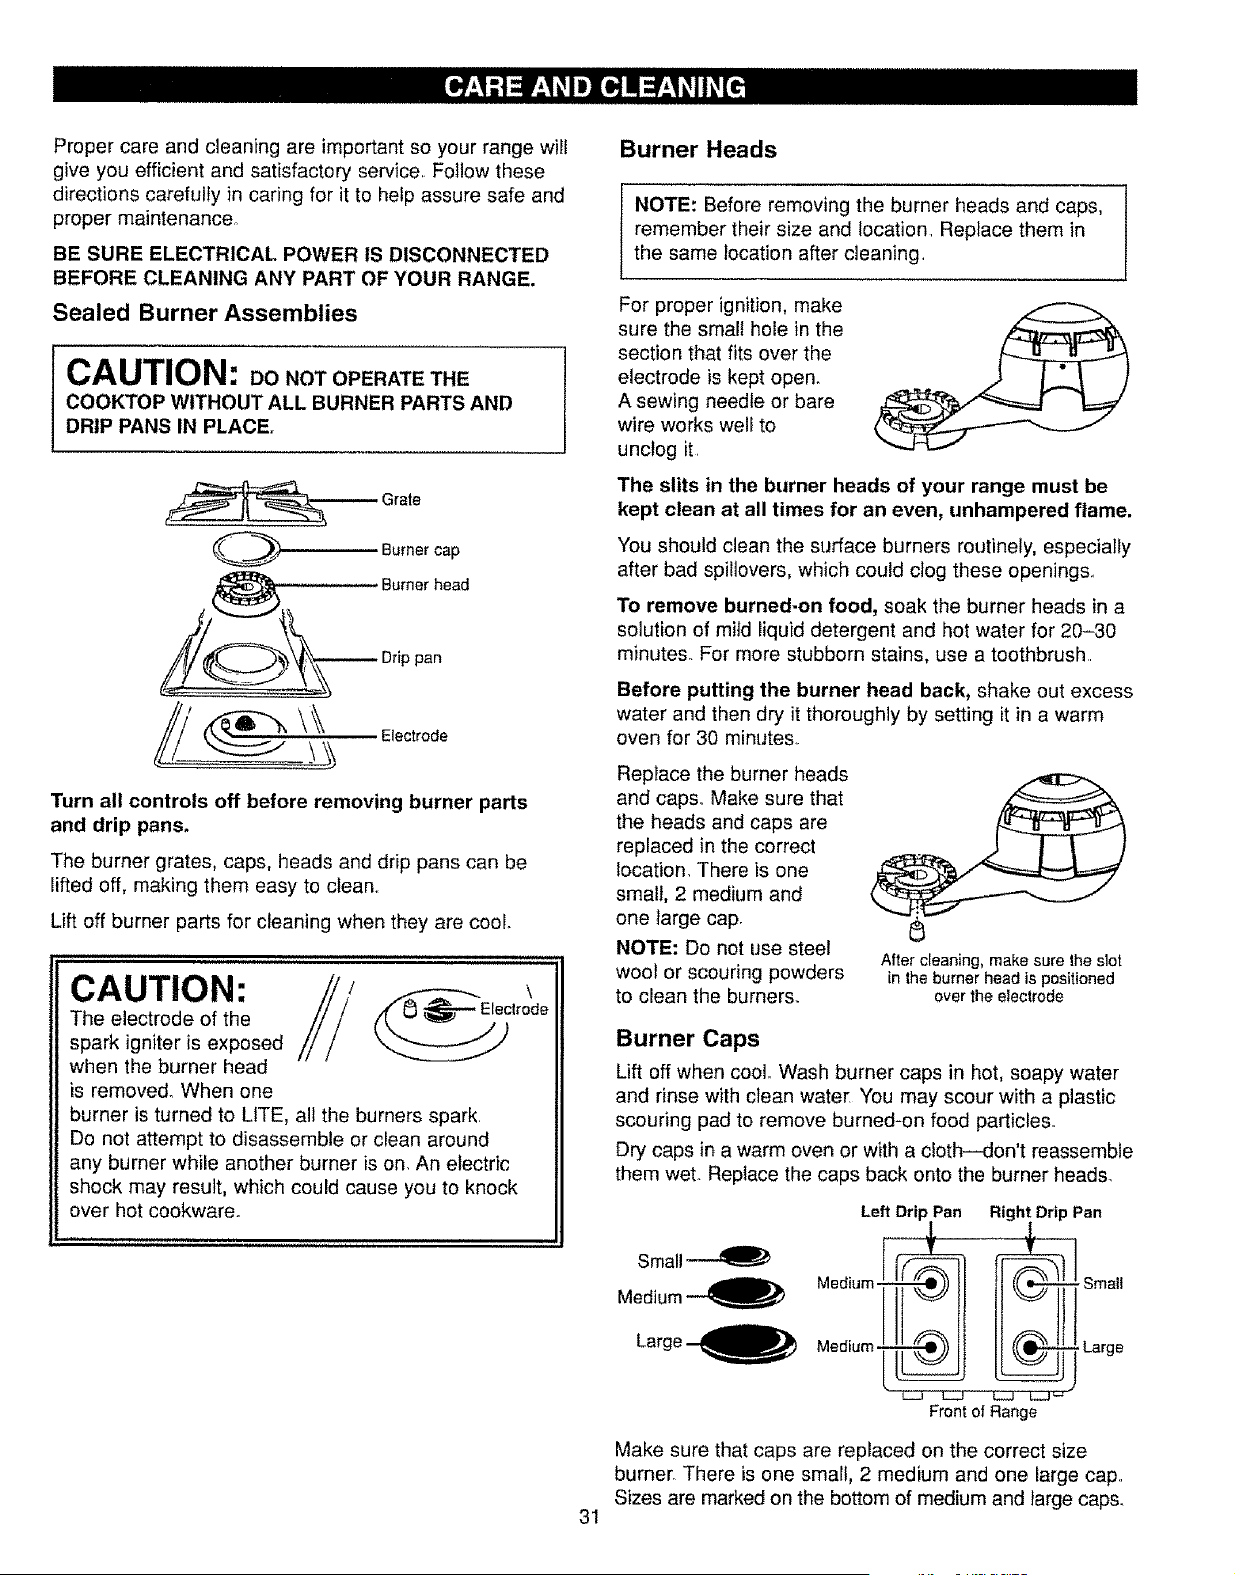
Sealed Burner Assemblies
CAUTION"
= DO NOT OPERATE THE
COOKTOP WITHOUT ALL BURNER PARTS AND
DRIP PANS IN PLACE.
Grate
Bumer cap
Burner head
Drip pan
Electrode
Turn all controls off before removing burner parts
and drip pans.
The burner grates, caps, heads and drip pans can be
lifted off, making them easy to clean
Lift off burner parts for cleaning when they are cool
CAUTION:
The electrode of the
spark igniter is exposed
when the burner head
is removed_ When one
burner is turned to LITE, all the burners spark,
Do not attempt to disassemble or clean around
any burner while another burner is on. An electric
shock may result, which could cause you to knock
over hot cookware.
Burner Heads
NOTE: Before removing the burner heads and caps,
remember their size and location Replace them in
the same location after cleaning
For proper ignition, make
sure the small hole in the
section that fits over the
electrode is kept open.
A sewing needle or bare
wire works well to
unclog it
The slits in the burner heads of your range must be
kept clean at all times for an even, unhampered flame.
You should clean the surface burners routinely, especially
after bad spillovers, which could clog these openings
To remove burned-on food, soak the burner heads in a
solution of mild liquid detergent and hot water for 20-30
minutes° For more stubborn stains, use a toothbrush
Before putting the burner head back, shake out excess
water and then dry it thoroughly by setting it in a warm
oven for 30 minutes
RepIace the burner heads
and caps Make sure that
the heads and caps are
replaced in the correct
location. There is one
small, 2 medium and
one Iarge cap
NOTE: Do not use steel
wool or scouring powders
to clean the burners.
After cleaning, make sure the slot
in the burner head is positioned
over the electrode
Burner Caps
Lift off when cool Wash burner caps in hot, soapy water
and rinse with clean water You may scour with a plastic
scouring pad to remove burned-on food particles
Dry caps in a warm oven or with a cloth--don't reassemble
them wet. Replace the caps back onto the burner heads.
Small
Left Drip Pan Right Drip Pan
Medium.
Front of Range
,Large
31
Make sure that caps are replaced on the correct size
burner. There is one small, 2 medium and one large cap
Sizes are marked on the bottom of medium and large caps.
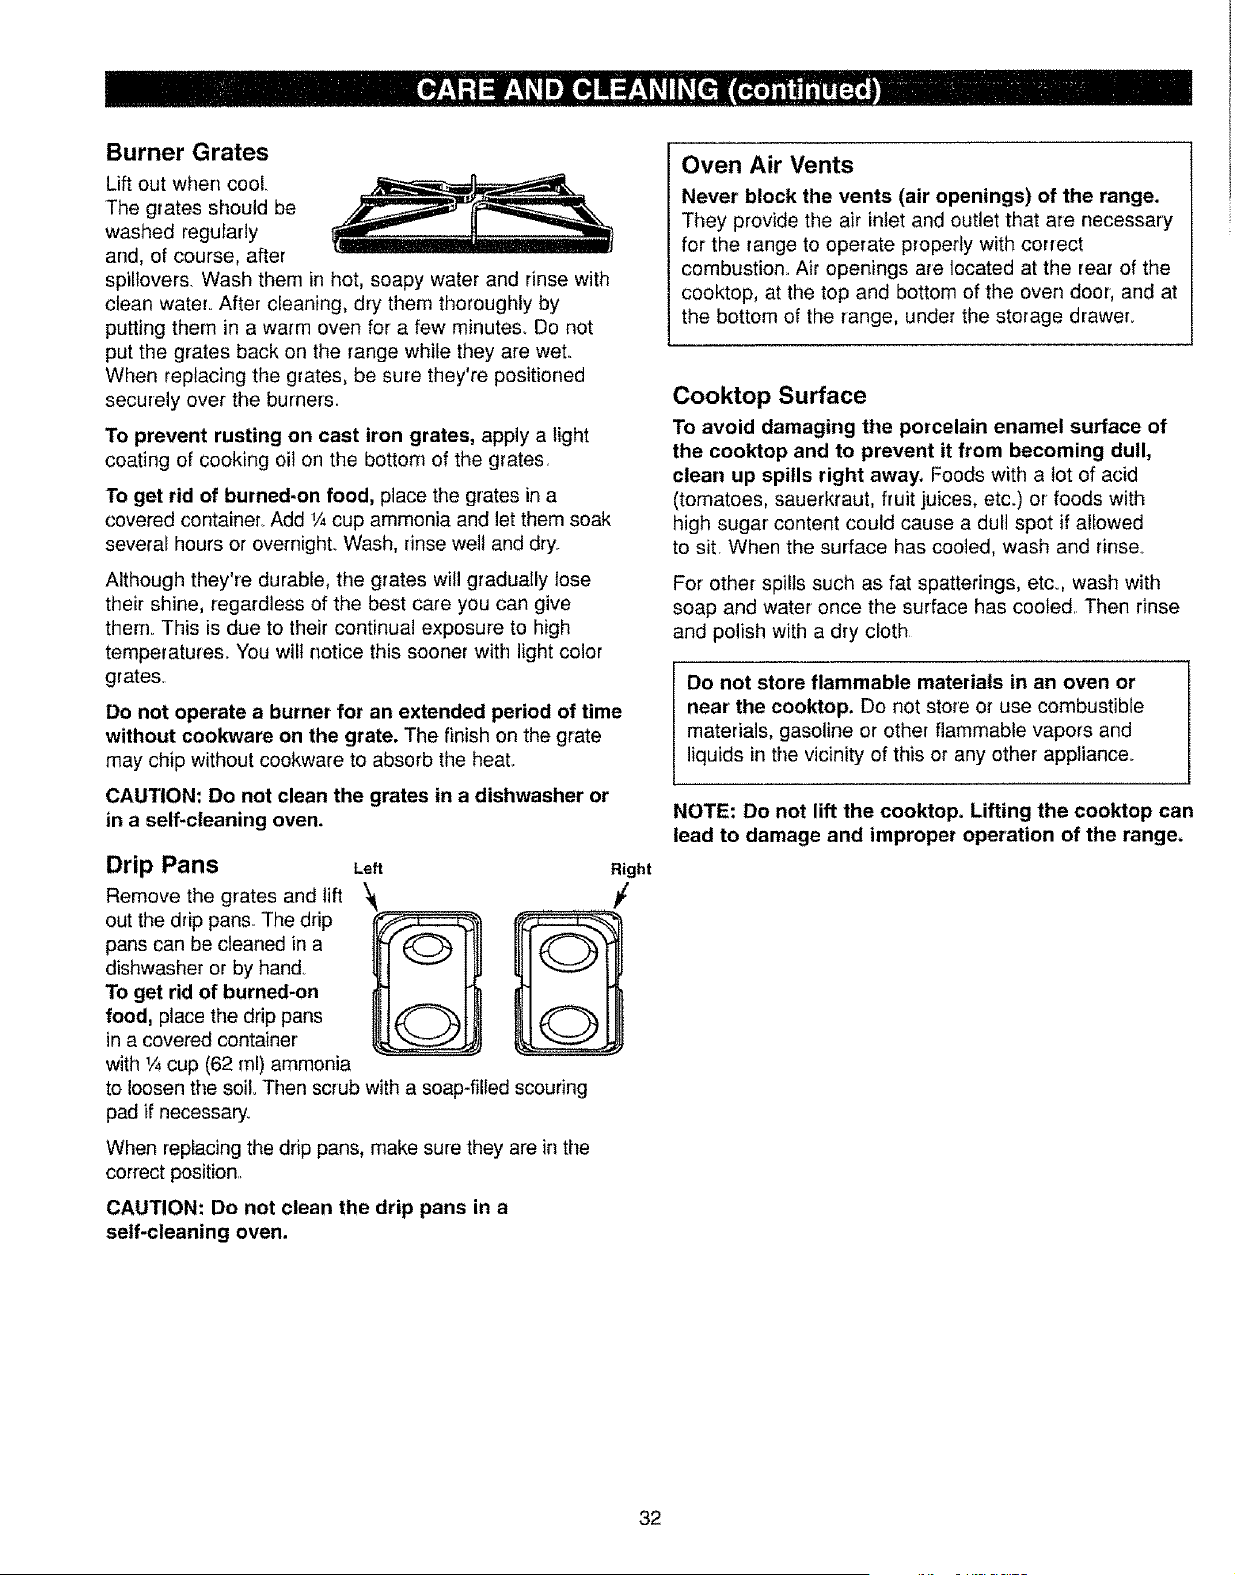
Burner Grates
Lift out when cool
The grates should be
washed regularly
and, of course, after
spillovers. Wash them in hot, soapy water and rinse with
clean water.. After cleaning, dry them thoroughly by
putting them in a warm oven for a few minutes_ Do not
put the grates back on the range white they are wet..
When replacing the grates, be sure they're positioned
securely over the burners.
To prevent rusting on cast iron grates, apply a light
coating of cooking oil on the bottom of the grates.
To get rid of burned*on food, place the grates in a
covered container. Add 1/_cup ammonia and let them soak
several hours or overnight. Wash, rinse well and dry.
Although they're durable, the grates will gradually lose
their shine, regardless of the best care you can give
therno This is due to their continual exposure to high
temperatures. You wilt notice this sooner with light color
grates.
Do not operate a burner for an extended period of time
without cookware on the grate. The finish on the grate
may chip without cookware to absorb the heat.
CAUTION: Do not clean the grates in a dishwasher or
in a self-cleaning oven.
Drip Pans Left
Remove the grates and lift \
out the drip pans.. The drip
pans can be cleaned in a
dishwasher or by hand_
To get rid of burned-on
food, place the drip pans
in a covered container
with 1/_cup (62 ml) ammonia
to loosen the soil Then scrub with a soap-filled scouring
pad if necessary.
When replacing the drip pans, make sure they are in the
correct position..
CAUTION: Do not clean the drip pans in a
self-cleaning oven.
Right
t
Oven Air Vents
Never block the vents (air openings) of the range.
They provide the air inlet and outlet that are necessary
for the range to operate properly with correct
combustion.. Air openings are located at the rear of the
cooktop, at the top and bottom of the oven door, and at
the bottom of the range, under the storage drawer.
Cooktop Surface
To avoid damaging the porcelain enamel surface of
the cooktop and to prevent it from becoming dull,
clean up spills right away. Foods with a lot of acid
(tomatoes, sauerkraut, fruit juices, etc.) or foods with
high sugar content could cause a du!l spot if allowed
to sit. When the surface has cooled, wash and rinse°
For other spills such as fat spatterings, etco, wash with
soap and water once the surface has cooled Then rinse
and polish with a dry cloth
Do not store flammable materials in an oven or
near the cool(top. Do not store or use combustible
materials, gasoline or other flammable vapors and
liquids in the vicinity of this or any other appliance.
NOTE: Do not lift the cooktop. Lifting the cooktop can
lead to damage and improper operation of the range.
32
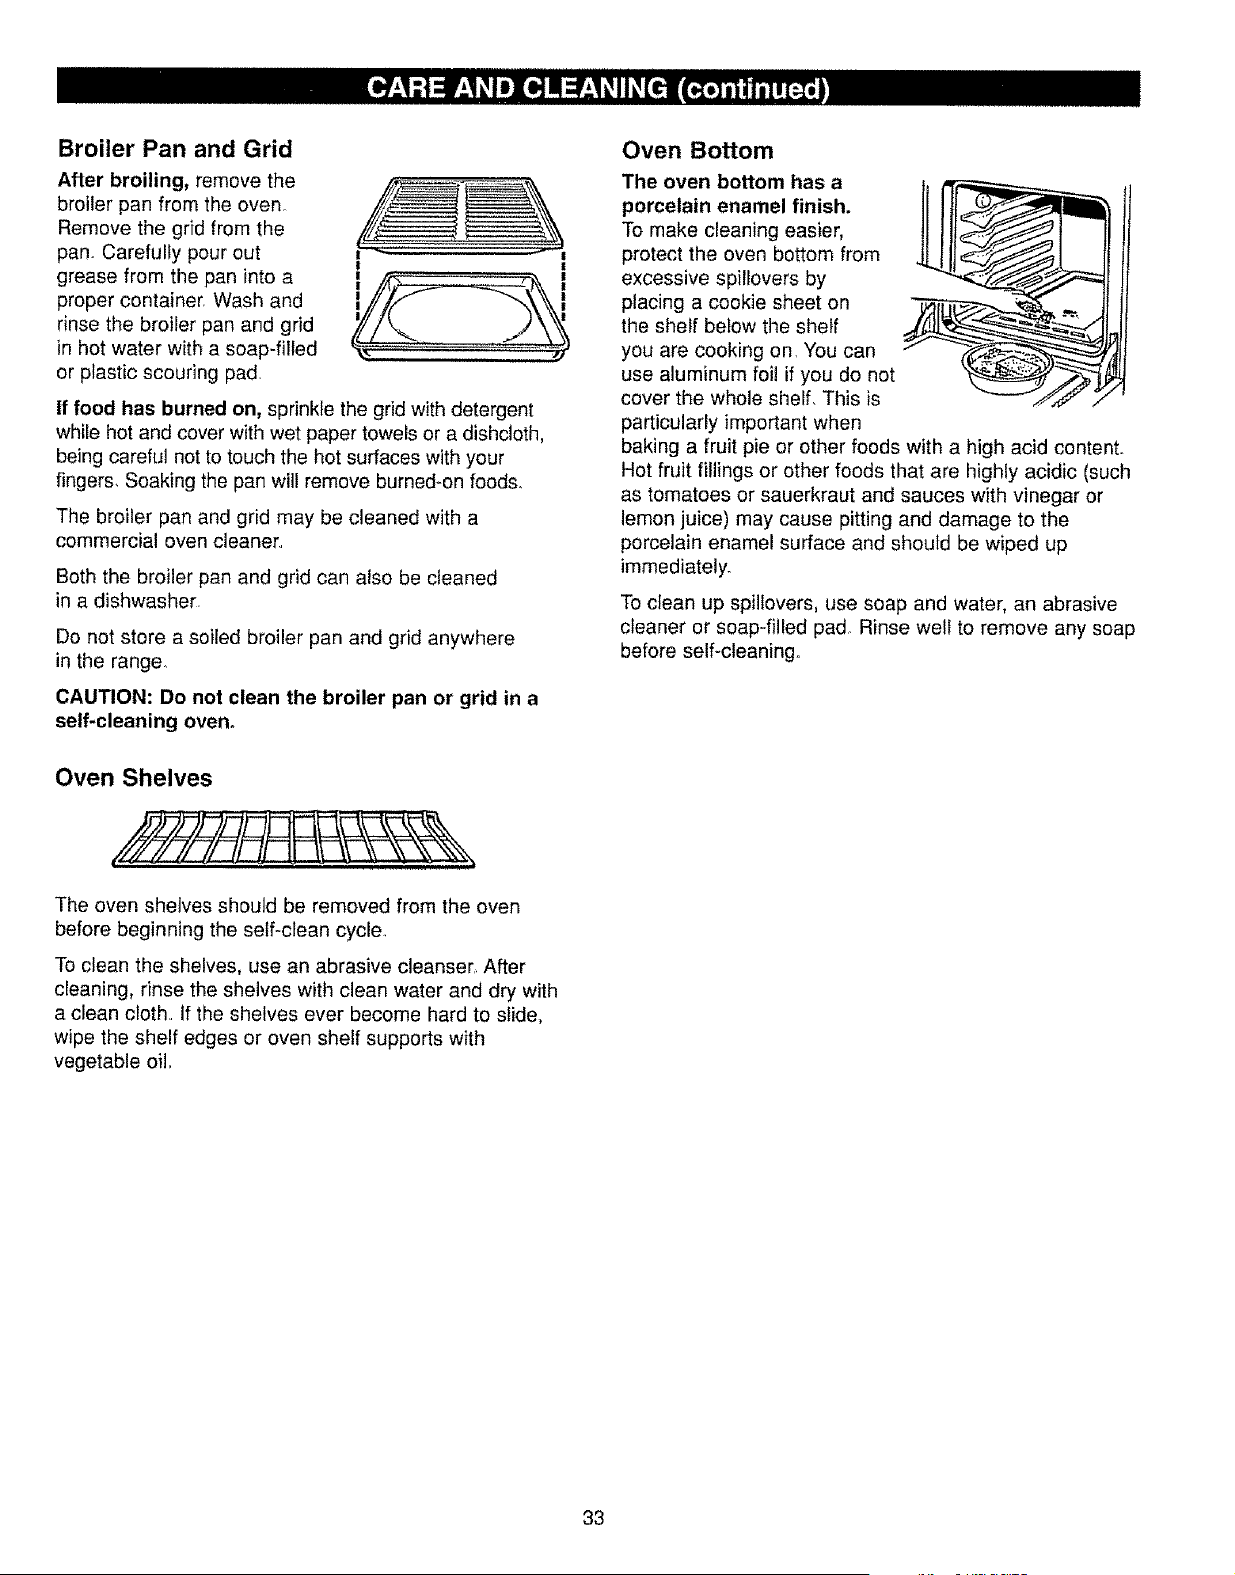
Broiler Pan and Grid
After broiling, remove the
broiler pan from the oven
Remove the grid from the
pan. Carefully pour out
grease from the pan into a
proper container. Wash and
rinse the broiler pan and grid
in hot water with a soap-filled
or plastic scouring pad.
! !
if food has burned on, sprinkle the grid with detergent
while hot and cover with wet paper towels or a dishcloth,
being careful not to touch the hot surfaces with your
fingers, Soaking the pan will remove burned-on foods_
The broiler pan and grid may be cleaned with a
commercial oven cleaner.,
Both the broiler pan and grid can also be cleaned
in a dishwasher.
Do not store a soiled broiler pan and grid anywhere
in the range.
CAUTION: Do not clean the broiler pan or grid in a
self-cleaning oven°
Oven Shelves
The oven shelves should be removed from the oven
before beginning the self-clean cycle_
To clean the shelves, use an abrasive cleanser After
cleaning, rinse the shelves with clean water and dry with
a clean cloth If the shelves ever become hard to slide,
wipe the shelf edges or oven shelf supports with
vegetable oil,,
Oven Bottom
The oven bottom has a
porcelain enamel finish.
To make cleaning easier,
protect the oven bottom from
excessive spillovers by
placing a cookie sheet on
the shelf below the shelf
you are cooking on. You can
use aluminum foi! if you do not
cover the whole shelf, This is ts
particularly important when
baking a fruit pie or other foods with a high acid content.
Hot fruit fillings or other foods that are highly acidic (such
as tomatoes or sauerkraut and sauces with vinegar or
lemon juice) may cause pitting and damage to the
porcelain enamel surface and should be wiped up
immediately_
To clean up spiltovers, use soap and water, an abrasive
cleaner or soap-filled pad° Rinse well to remove any soap
before self-cleaning,.
33
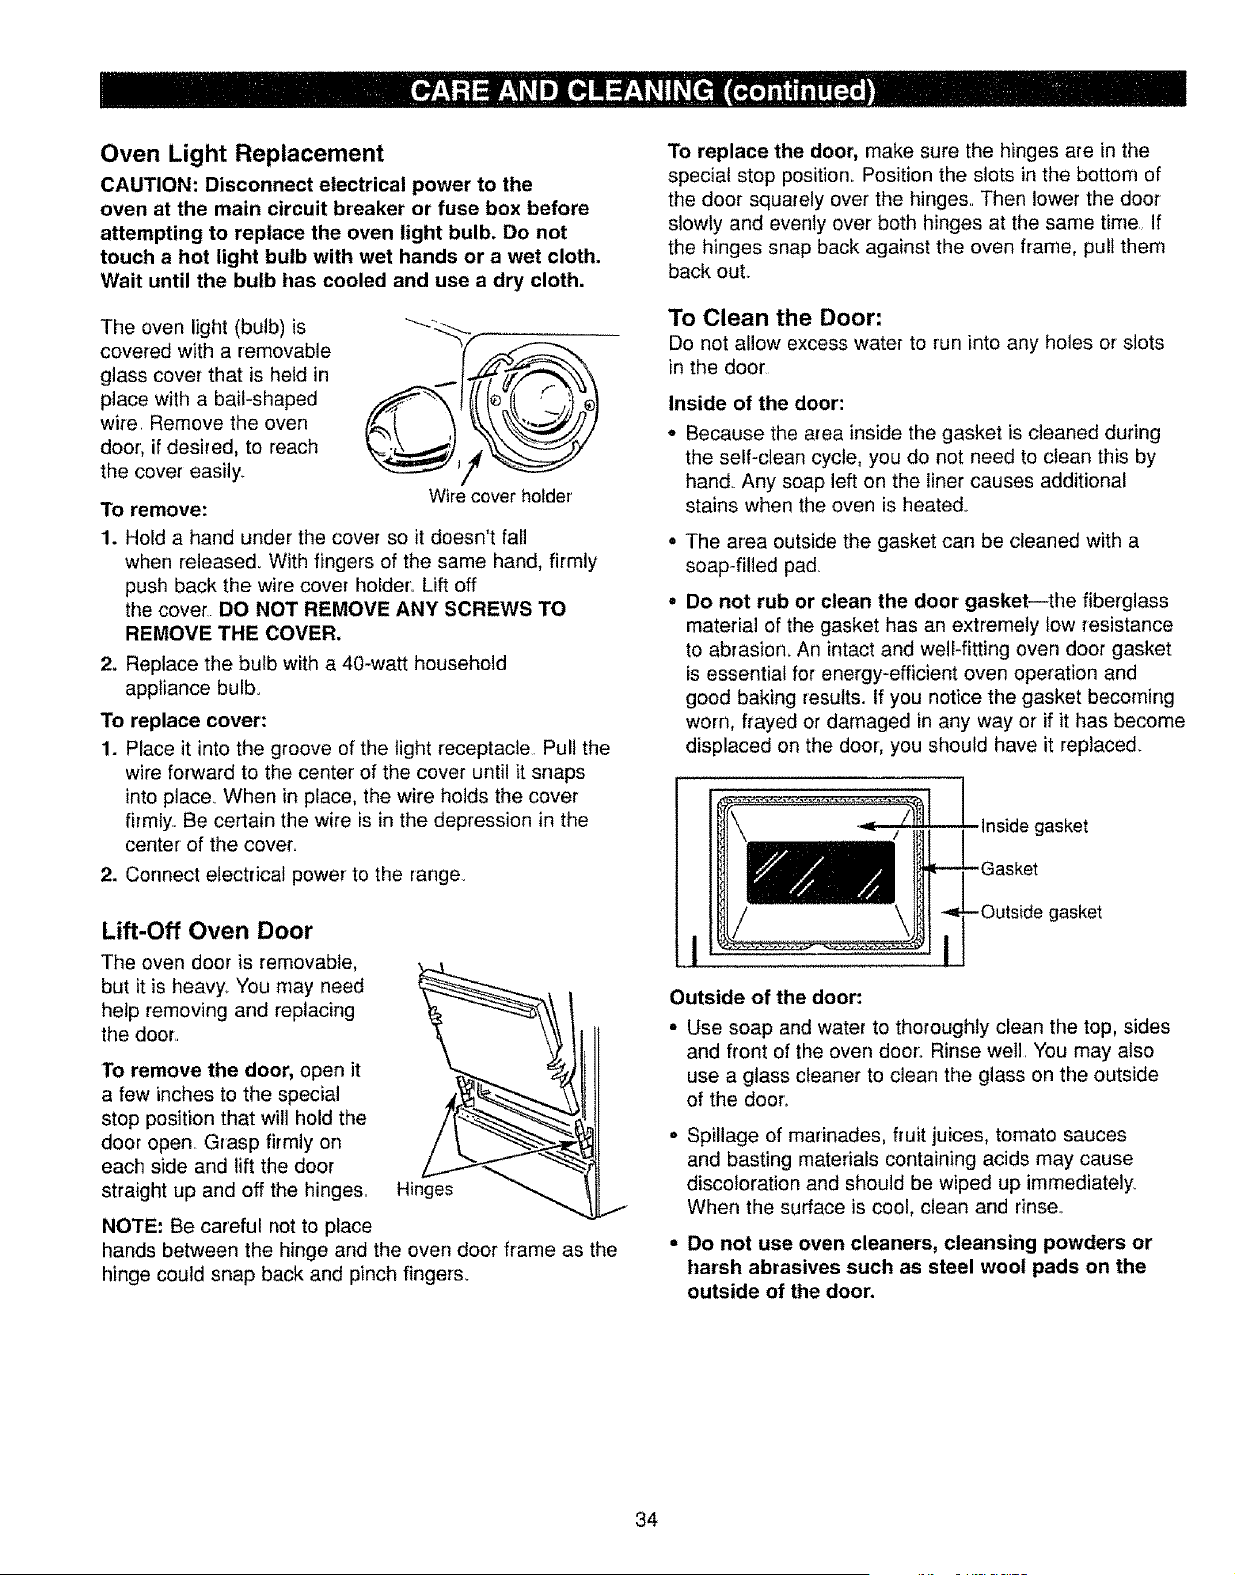
Oven Light Replacement
CAUTION: Disconnect electrical power to the
oven at the main circuit breaker or fuse box before
attempting to replace the oven light bulb. Do not
touch a hot light bulb with wet hands or a wet cloth.
Wait until the bulb has cooled and use a dry cloth.
The oven light (bulb) is
covered with a removable
glass cover that is held in
place with a bait-shaped
wire. Remove the oven
door, if desired, to reach
the cover easily.
To remove:
Wire cover holder
1. Hold a hand under the cover so it doesn't fall
when released. With fingers of the same hand, firmly
push back the wire cover holder.. Lift off
the cover DO NOT REMOVE ANY SCREWS TO
REMOVE THE COVER.
2. Replace the bulb with a 40-watt household
appliance bulb.
To replace cover:
1. Place it into the groove of the light receptacle Pull the
wire forward to the center of the cover until it snaps
into place_ When in place, the wire holds the cover
firmly. Be certain the wire is in the depression in the
center of the cover.
2. Connect electrical power to the range.
Lift-Off Oven Door
The oven door is removable,
but it is heavy_ You may need
help removing and replacing
the door..
To remove the door, open it
a few inches to the special
stop position that will hold the
door open_ Grasp firmly on
each side and lift the door
straight up and off the hinges.. Hinges
NOTE: Be careful not to place
hands between the hinge and the oven door frame as the
hinge could snap back and pinch fingers.
To replace the door, make sure the hinges are in the
special stop position. Position the slots in the bottom of
the door squarely over the hinges,. Then lower the door
slowly and evenly over both hinges at the same tirne, If
the hinges snap back against the oven frame, pull them
back out..
To Clean the Door:
Do not allow excess water to run into any holes or slots
in the door
Inside of the door:
Because the area inside the gasket is cleaned during
the self-clean cycle, you do not need to clean this by
hand. Any soap left on the liner causes additional
stains when the oven is heated.
The area outside the gasket can be cleaned with a
soap-filled pad.
Do not rub or clean the door gasket--the fiberglass
material of the gasket has an extremely low resistance
to abrasion, An intact and welkfitting oven door gasket
is essential for energy-efficient oven operation and
good baking results. If you notice the gasket becoming
worn, frayed or damaged in any way or if it has become
displaced on the door, you should have it replaced.
Inside gasket
gasket
Outside of the door:
• Use soap and water to thoroughly clean the top, sides
and front of the oven door: Rinse well You may also
use a glass cleaner to clean the glass on the outside
of the door.
Spillage of marinades, fruit juices, tomato sauces
and basting materials containing acids may cause
discoloration and should be wiped up immediately_
When the surface is cool, clean and rinse.,
= Do not use oven cleaners, cleansing powders or
harsh abrasives such as steel wool pads on the
outside of the door.
34

Lower Control Panel (Front Manifold Panel)
and Knobs
It's a good idea to wipe the control panel after each
use of the oven. Use a damp cloth to ctean or rinse. For
cleaning, use mild soap and water or a 50/50 solution of
vinegar and water. For rinsing, use clean water. Polish
dry with a soft cloth.
Do not use abrasive cleansers, strong liquid cleaners,
plastic scouring pads or oven cleaners on the control
panel--they will damage the finish.
Do not try to bend knobs by pulling them up or down
or by hanging a towel or other such loads. This can
damage the gas valve shaft.
The control knobs may be removed for easier
cleaning. To remove the knob, pull it straight off the stem
If knob is difficult to remove, place a towel or dishcloth
between the knob and control panel and pull gently.
Wash the knobs in soap and water, or in a vinegar and
hot water solution,,
Metal parts can be cleaned with soap and water. Do not
use steel wool, abrasives, ammonia, acids or commercial
oven cleaners.. Dry with a soft cloth.,
Removable Storage Drawer
The storage drawer is a good place to store cookware
and bakeware Do not store plastics and flammable
material in the drawer.
Do not overload the storage drawer, if the drawer is too
heavy, it may slip off the track when opened,
The storage drawer may be removed for cleaning under
the range. Clean the storage drawer with a damp cloth or
sponge. Never use harsh abrasives or scouring pads
To remove the storage drawer:
1. Pull the drawer straight
out until it stops_
2, Tilt the front of the
drawer up and free
of the range
To replace the
storage drawer:
1. Set the stops on the back of the drawer over the stops
in the range.
2. Slide the drawer evenly and straight back, so that the
rails in the range are engaged,
35
In the Commonwealth
of Massachusetts:
= This product must be installed by a licensed p_umber
or gas fitter°
• When using balFtype gas shut-off valves, they shall
be the T-handle type_
• A flexible gas connector, when used, must not
exceed 3 feet,
FOR YOUR SAFETY
If you smell gas:
1. Open windows.
2. Don't touch electrical switches.
3. Extinguish any open flame.
4. Immediately call your gas supplier.
FOR YOUR SAFETY
Do not store or use combustible materials, gasoline
or other flammable vapors and liquids in the vicinity
of this or any other appliance.
WARNING
Improper installation, adjustment, alteration, service
or maintenance can cause injury or property damage.
Refer to this guide. For assistance or additional
information, consult a qualified installer, service
agency, manufacturer (dealer) or the gas supplier:
Never' reuse old flexible connectors. The use of old
flexible connectors can cause gas leaks and personal
injury. Always use NEW flexible connectors when
installing a gas appliance.
CAUTION
Do not attempt to operate the oven of this range during
a power failure,
IMPORTANT
Remove all packing material and literature from oven
before connecting gas and electrical supply to range.
BEFORE YOU BEGIN
Read these instructions completely and carefully.
IMPORTANT: Savetheseinstructions
for the local electrical inspector's use.
INSTALLER: Leave these instructions
with the appliance after installation is completed.
CO NSUMER: Keep thisUseandCare
Guide and the Installation Instructions for future use=
This appliance must be properly grounded.
36
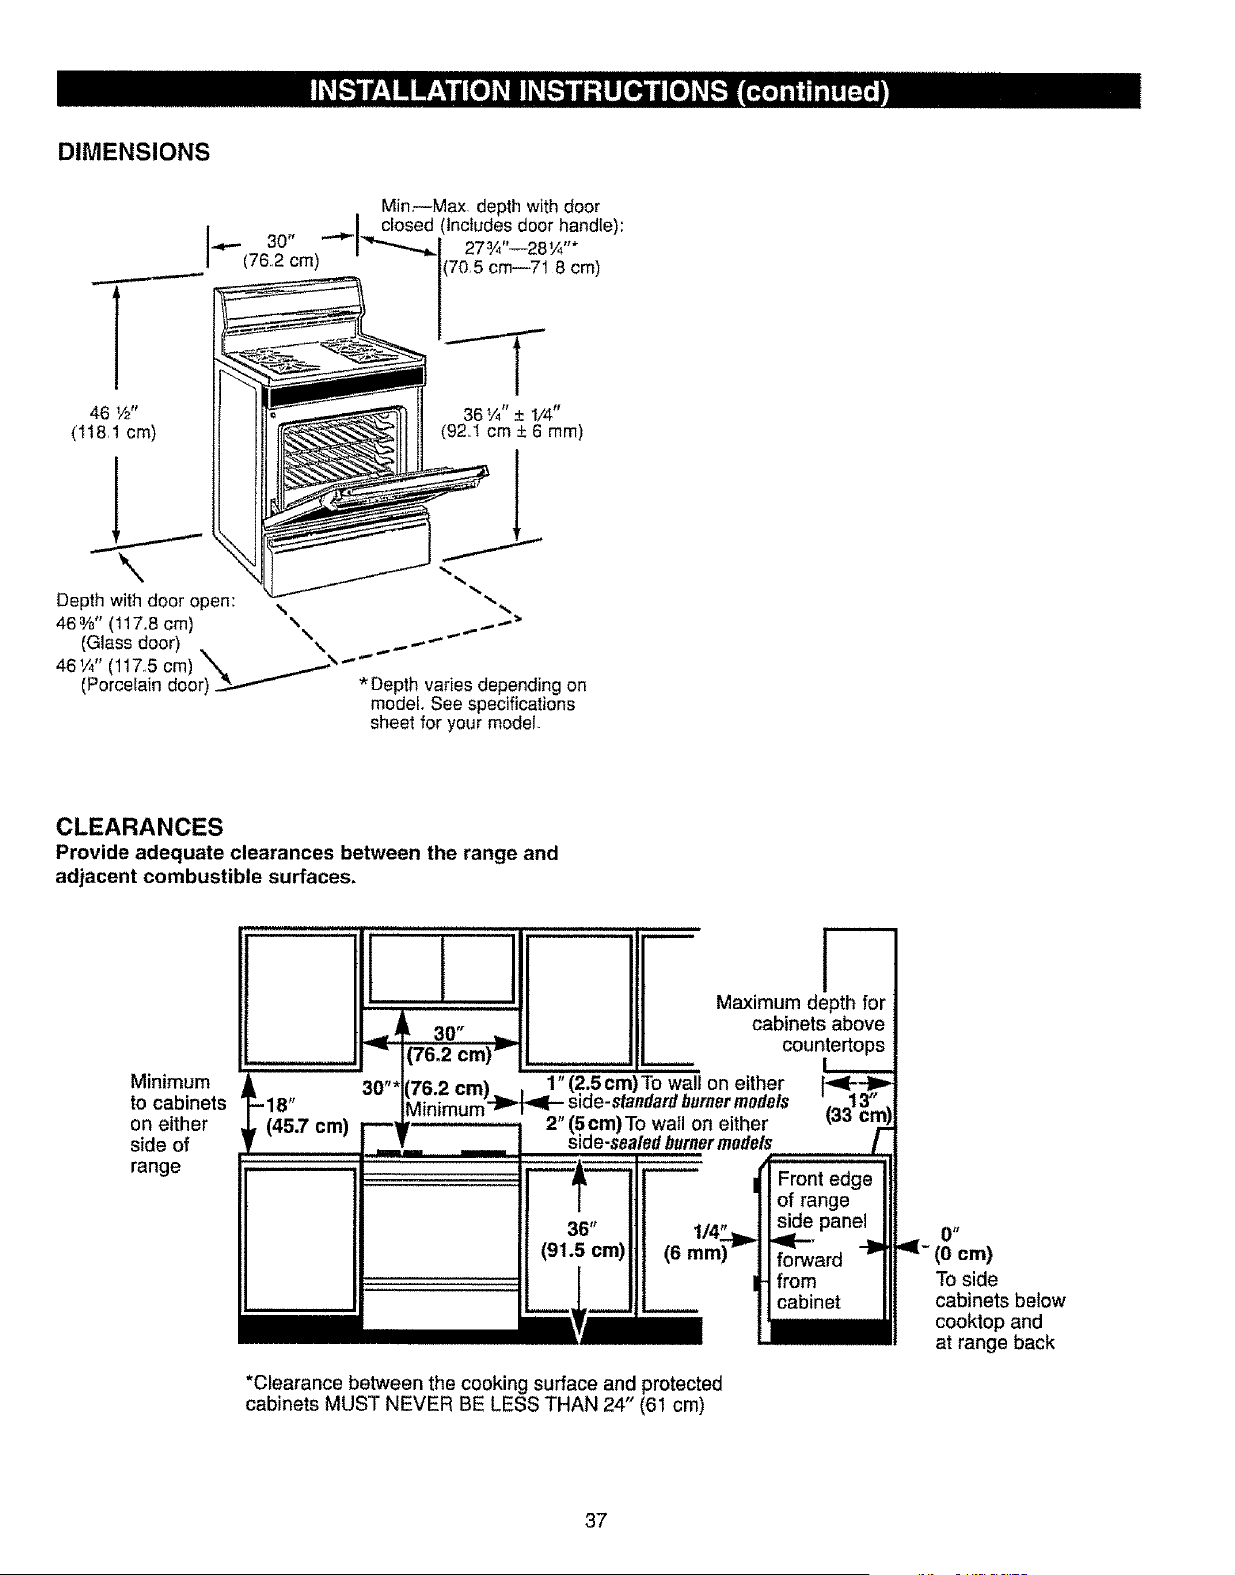
DIMENSIONS
Min=-Max depth with door
, I dosed (Includes door handle):
46 _/_" 36 t/4"_+1/4"
(t18,1 cm) (92.1 cm +-6 rnm)
I_
Depth withdeer open: .,, "-..
46%" (117.8 cm) ",
\
(Glass door) . k .,_,..---"
46_A'' (117,,5 cm) _. _......-_""'"
(Porcelain door) _ * Depth varies depending on
model. See specifications
sheet for your model.
CLEARANCES
Provide adequate clearances between the range and
adjacent combustible surfaces.
Minimum
to cabinets 18"
on esther _(45.7 cm)
side of
f
range
F--
Maximum depth for
_Jl. cabinets above
(76_'_30"_m)1_ countertops
30"* f76 2 cm_l , 1" (2.5 cm )To either
• " I--]1_ side-st_ nda mode
Mtn)mum _
N, 2" (5cm)To wall on either
............... side-sealed bumermodels
_A
f Front edge
of range
36" side panel
(91.5 cm) (6 forward
.............. _ from
cabinet
*Clearance between the cooking surface and protected
cabinets MUST NEVER BE LESS THAN 24" (61 cm)
0tl
cm)
To side
cabinets below
cooktop and
at range back
37
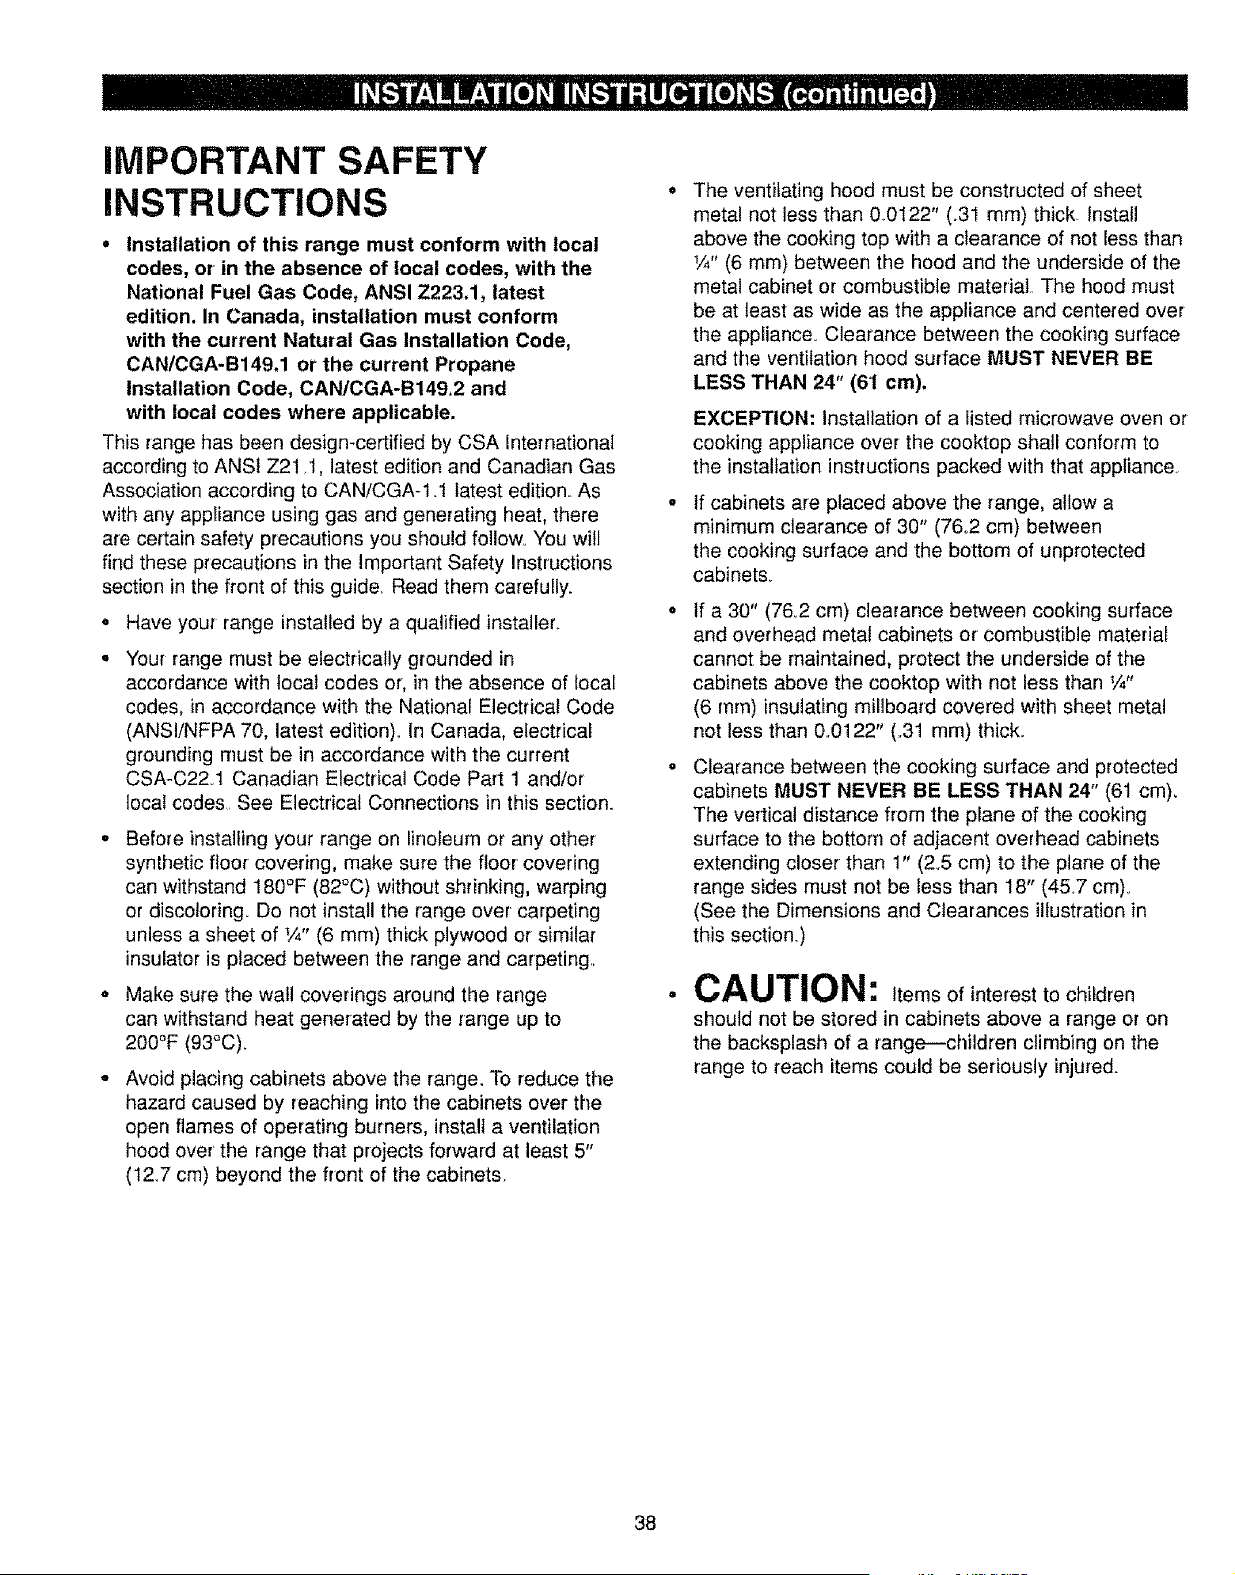
IMPORTANT SAFETY
INSTRUCTIONS
• installation of this range must conform with local
codes, or in the absence of local codes, with the
National Fuel Gas Code, ANSI Z223.1, latest
edition. In Canada, installation must conform
with the current Natural Gas Installation Code,
CANtCGA-B149.1 or the current Propane
Installation Code, CAN/CGA-B149,2 and
with local codes where applicable.
This range has been design-certified by CSA International
according to ANSi Z21.1, latest edition and Canadian Gas
Association according to CAN/CGA-1 ..1latest edition.. As
with any appliance using gas and generating heat, there
are certain safety precautions you should followHYou will
find these precautions in the Important Safety Instructions
section in the front of this guide, Read them carefully.
, Have your range installed by a qualified installer.
• Your range must be electrically grounded in
accordance with local codes or, in the absence of local
codes, in accordance with the National Electrical Code
(ANSI/NFPA 70, latest edition)_ In Canada, electrical
grounding must be in accordance with the current
CSA-022.1 Canadian Electrical Code Part 1 and/or
local codes. See Electrical Connections in this section°
o Before installing your range on linoleum or any other
synthetic floor covering, make sure the floor' covering
can withstand 180°F (82°0) without shrinking, warping
or discoloring Do not install the range over carpeting
unless a sheet of I/4" (6 ram) thick plywood or similar
insulator is placed between the range and carpeting,
* Make sure the wall coverings around the range
can withstand heat generated by the range up to
200°F (93°C).
° Avoid placing cabinets above the range. To reduce the
hazard caused by reaching into the cabinets over the
open flames of operating burners, install a ventilation
hood over' the range that projects forward at least 5"
(12,7 cm) beyond the front of the cabinets.
= The ventilating hood must be constructed of sheet
metal not less than 0.0122" (.31 ram) thick Install
above the cooking top with a clearance of not less than
W' (6 ram) between the hood and the underside of the
metal cabinet or combustible material The hood must
be at least as wide as the appliance and centered over
the appliance. Clearance between the cooking surface
and the ventilation hood surface MUST NEVER BE
LESS THAN 24" (61 cm).
EXCEPTION: Installation of a listed microwave oven or
cooking appliance over the cooktop shall conform to
the installation instructions packed with that appliance.
o If cabinets are placed above the range, allow a
minimum clearance of 30" (76°2 cm) between
the cooking surface and the bottom of unprotected
cabinets.
If a 30" (76°2 crn) clearance between cooking surface
and overhead metal cabinets or combustible material
cannot be maintained, protect the underside of the
cabinets above the cooktop with not less than V4"
(6 mm) insulating millboard covered with sheet metal
not less than 0.0122" (,31 ram) thick..
Clearance between the cooking surface and protected
cabinets MUST NEVER BE LESS THAN 24" (6t cm),
The vertical distance from the plane of the cooking
surface to the bottom of adjacent overhead cabinets
extending closer than 1" (2.5 cm) to the plane of the
range sides must not be less than 18" (45.7 cm)°
(See the Dimensions and Clearances illustration in
this section.)
CAUTION: Itemsofinteresttochildren
should not be stored in cabinets above a range or on
the backsplash of a rangeichildren climbing on the
range to reach items could be seriously injured.
38
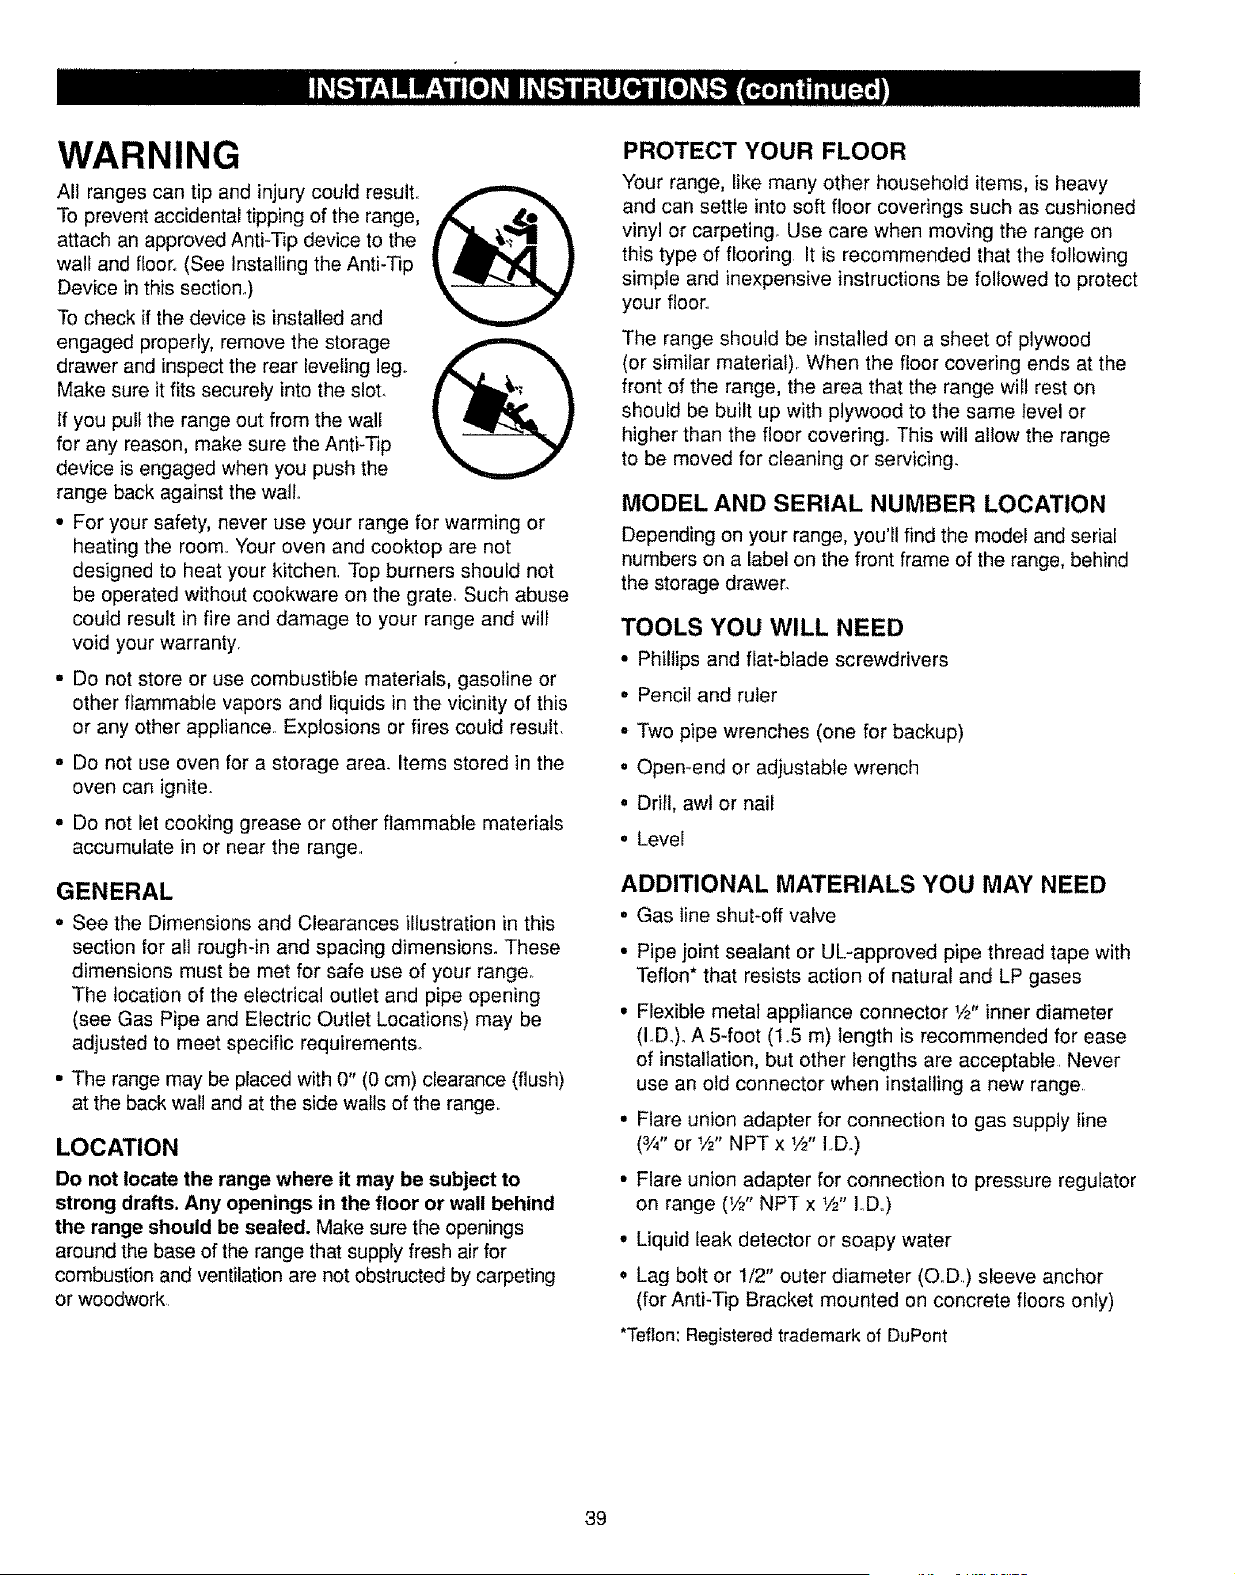
WARNING
All ranges can tip and injury could result..
To prevent accidental tipping of the range,
attach an approved Anti-Tip device to the
wall and floor° (See Installing the Anti-Tip
Device in this section..)
To check if the device is installed and
engaged properly, remove the storage
drawer and inspect the rear leveling leg..
Make sure it fits securely into the slot.
If you pull the range out from the wall
for any reason, make sure the Anti-Tip
device is engaged when you push the
range back against the wall..
• For your safety, never use your range for warming or
heating the room.. Your oven and cooktop are not
designed to heat your kitchen. Top burners should not
be operated without cookware on the grate. Such abuse
could result in fire and damage to your range and wilt
void your warranty.
,, Do not store or use combustible materials, gasoline or
other flammable vapors and liquids in the vicinity of this
or any other appliance Explosions or fires could result.
• Do not use oven for a storage area. items stored in the
oven can ignite.
• Do not let cooking grease or other flammable materials
accumulate in or near the range.
GENERAL
• See the Dimensions and Clearances illustration in this
section for all rough-in and spacing dimensions. These
dimensions must be met for safe use of your range..
The location of the electrical outlet and pipe opening
(see Gas Pipe and Electric Outlet Locations) may be
adjusted to meet specific requirements°
• The range may be placed with 0" (0 cm) clearance (flush)
at the back wall and at the side walls of the range..
LOCATION
Do not locate the range where it may be subject to
strong drafts. Any openings in the floor or wall behind
the range should be sealed. Make sure the openings
around the base of the range that supply fresh air for
combustion and ventilation are not obstructed by carpeting
or woodwork
PROTECT YOUR FLOOR
Your range, like many other household items, is heavy
and can settle into soft floor coverings such as cushioned
vinyl or carpeting. Use care when moving the range on
this type of flooring It is recommended that the following
simple and inexpensive instructions be followed to protect
your floor..
The range should be installed on a sheet of plywood
(or similar material). When the floor covering ends at the
front of the range, the area that the range will rest on
should be built up with plywood to the same level or
higher than the floor covering. This will allow the range
to be moved for cleaning or servicing.
MODEL AND SERIAL NUMBER LOCATION
Depending on your range, you'll find the model and serial
numbers on a label on the front frame of the range, behind
the storage drawer.
TOOLS YOU WILL NEED
• Phillips and flat-blade screwdrivers
° Pencil and ruler
- Two pipe wrenches (one for backup)
• Open-end or adjustable wrench
• Drill, awl or nail
° Level
ADDITIONAL MATERIALS YOU MAY NEED
• Gas line shut-off valve
° Pipe joint sealant or UL-approved pipe thread tape with
Teflon* that resists action of natural and LP gases
° Flexible metal appliance connector 1,_,,inner diameter
(ID_)_ A 5-foot (1.r5 m) length is recommended for ease
of installation, but other lengths are acceptable. Never
use an old connector when installing a new range.
• Flare union adapter for connection to gas supply line
(3/4"or t/2" NPT x 1/2"I.D.)
• Flare union adapter for connection to pressure regulator
on range (1/2"NPT x t/2" LDo)
• Liquid leak detector or soapy water
• Lag bolt or 1/2" outer diameter (O.D.) sleeve anchor
(for Anti-Tip Bracket mounted on concrete floors only)
•Teflon: Registered trademark of DuPont
39
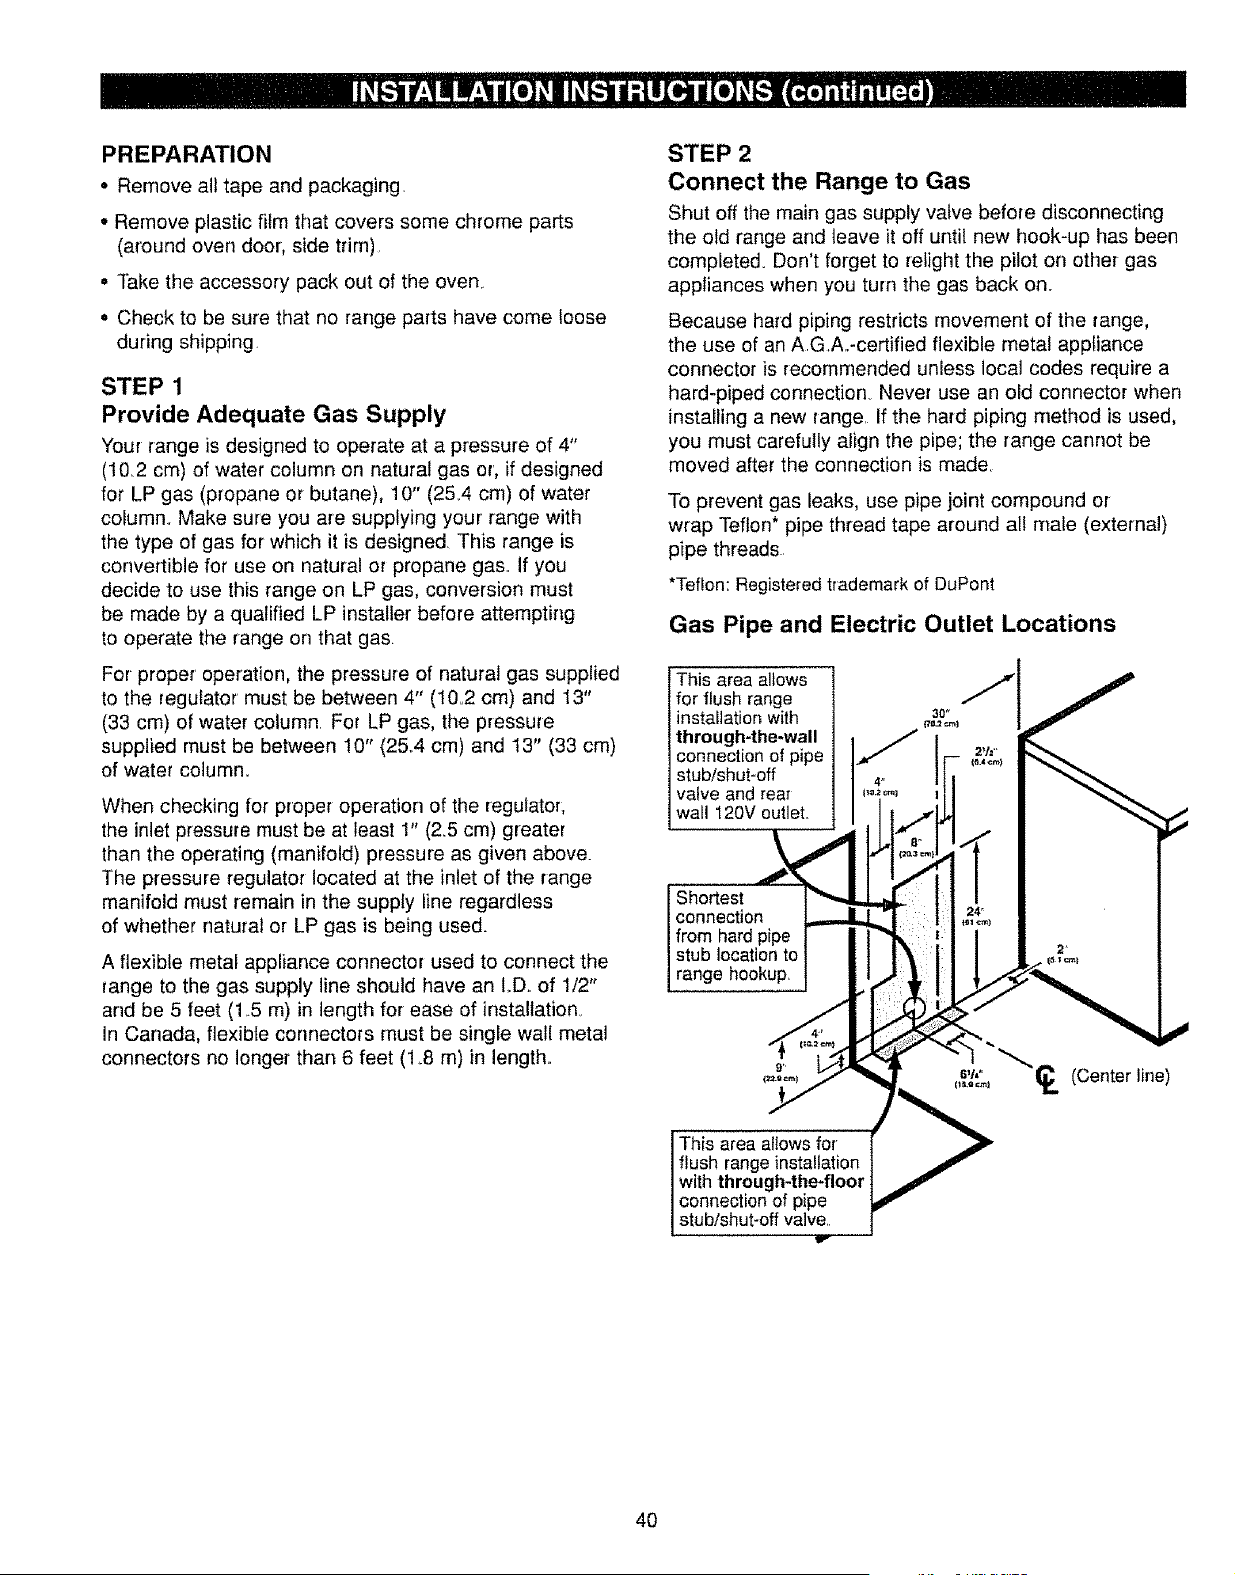
PREPARATION
• Remove all tape and packaging
• Remove plastic film that covers some chrome parts
(around oven door, side trim).
• Take the accessory pack out of the oven.
• Check to be sure that no range parts have come loose
during shipping
STEP 1
Provide Adequate Gas Supply
Your range is designed to operate at a pressure of 4"
(1&2 cm) of water column on natural gas or', if designed
for LP gas (propane or butane), 10" (2&4 cm) of water
column. Make sure you are supplying your' range with
the type of gas for which it is designed This range is
convertible for use on natural or propane gas° If you
decide to use this range on LP gas, conversion must
be made by a qualified LP installer before attempting
to operate the range on that gas.
For proper operation, the pressure of natural gas supplied
to the regulator must be between 4" (10..2 cm) and 13"
(33 cm) of water column For LP gas, the pressure
supplied must be between 10" (25.4 crn) and 13" (33 cm)
of water column.
When checking for proper operation of the regulator;
the inlet pressure must be at least 1" (2.5 cm) greater
than the operating (manifold) pressure as given above.
The pressure regulator located at the inlet of the range
manifold must remain in the supply line regardless
of whether natural or LP gas is being used.
A flexible metal appliance connector used to connect the
range to the gas supply line should have an I.D.. of 1/2"
and be 5 feet (1.5 m) in length for ease of installation.
In Canada, flexible connectors must be single wall metal
connectors no longer than 6 feet (1.8 m) in length..
STEP 2
Connect the Range to Gas
Shut off the main gas supply valve before disconnecting
the old range and leave it off until new hook-up has been
completed_ Don't forget to relight the pilot on other gas
appliances when you turn the gas back on.
Because hard piping restricts movement of the range,
the use of an AG A..-certified flexible metal appliance
connector is recornrnended unless local codes require a
hard-piped connection Never use an old connector when
installing a new range. If the hard piping method is used,
you must carefully align the pipe; the range cannot be
moved after the connection is made.
To prevent gas leaks, use pipe joint compound or
wrap Teflon* pipe thread tape around all male (external)
pipe threads
*Teflon: Registered trademark of DuPont
Gas Pipe and Electric Outlet Locations
This area allows
for flush range
installation with
through-the-wall
connection of pipe
stub!shut-off
valve and rear
wall 120V outleL
Shortest _._ =
connection ,,
from hard pipe
stub locationto
range hookup.
4' I
1 ' II
This area allows for
flush rangeinstallation
with through-the-floor
connection of pipe
stub/shut-off valve.:
30"
4O
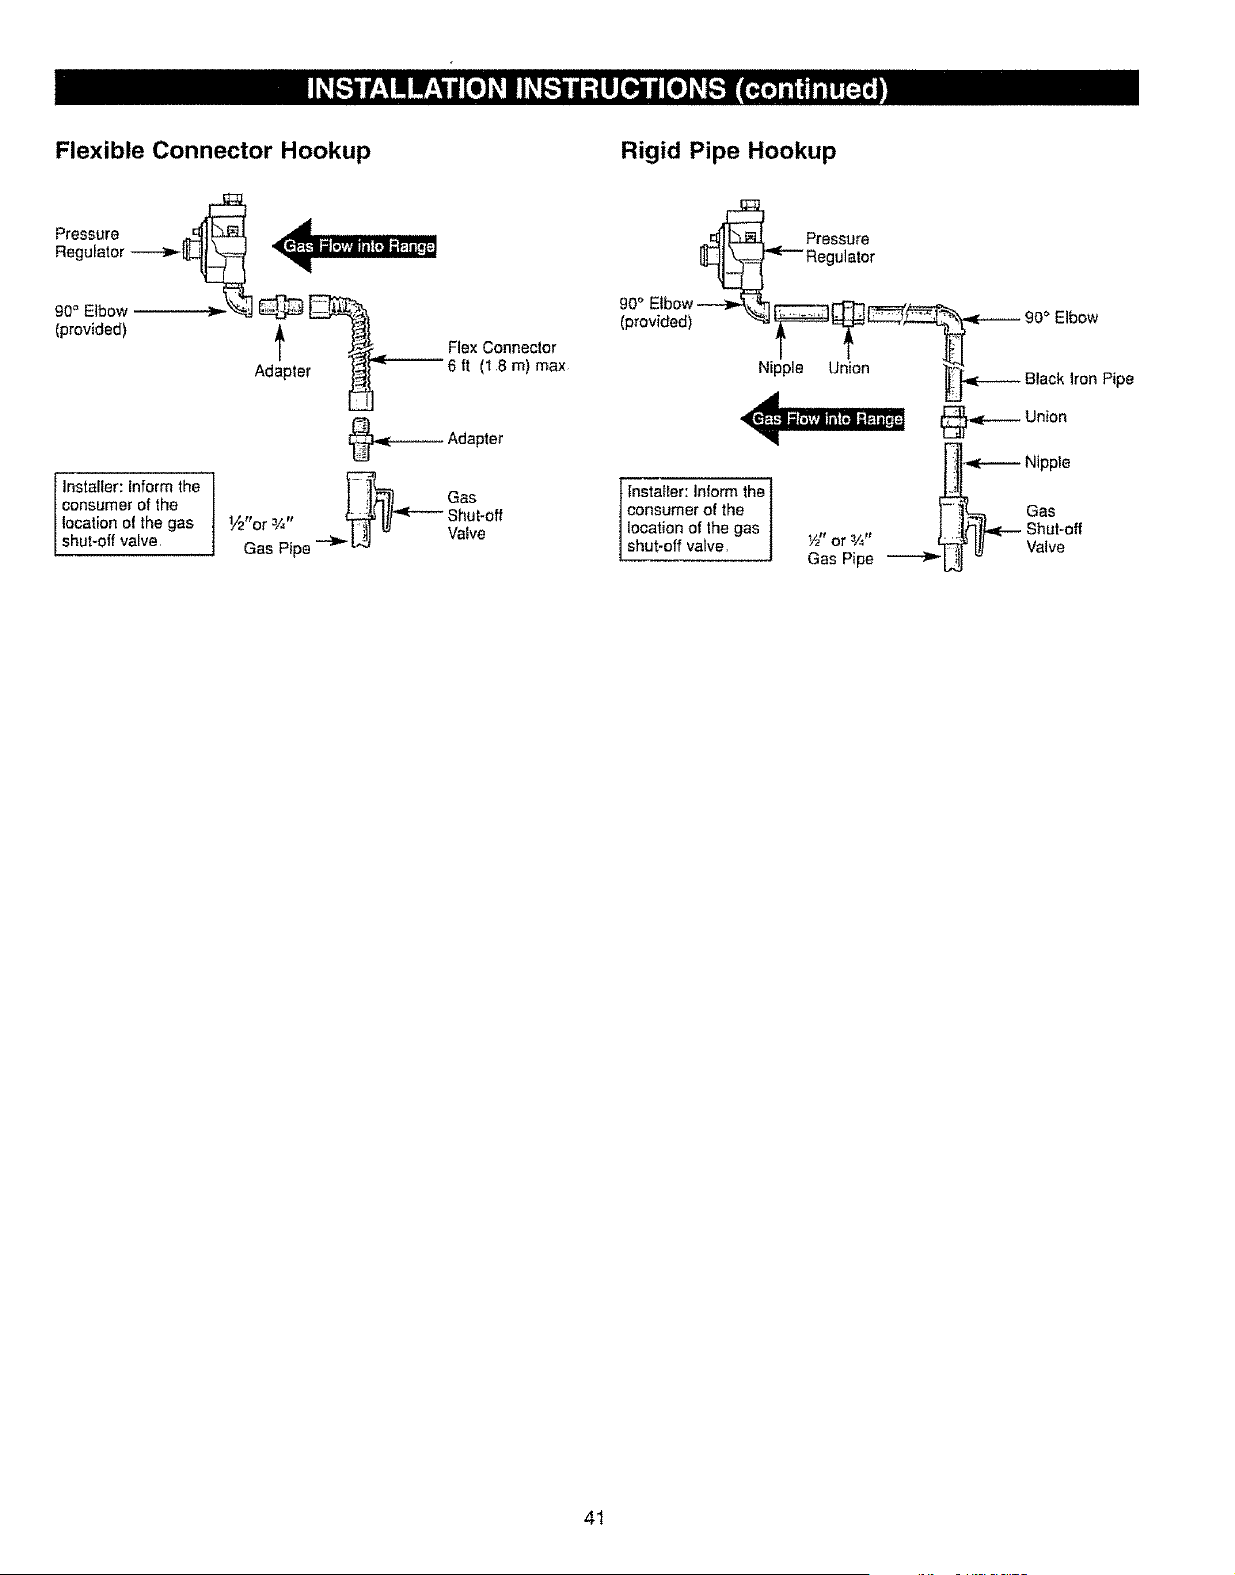
Flexible Connector Hookup Rigid Pipe Hookup
Pressure ,_
(provided)
installer: Inform the
consumer of the
location of the gas
shut-oil va ve,
@
t _ Flex Connector
Adapter __ 6 ft (1,8 m) max
L_.U
.---- Adapter
Gas
Valve
Elbow
Nipple Union
Iron Pipe
, __-Ooion
-,,le-_ Nipple
lnsta{ler: ]nlom'_the
consumer of the t _L_ Gas
location of the gas j ..!l_|_r,-- Shut-off
shut-off valve, Y_"or ¾" _.__.,_._ I_ Valve
Gas Pipe
41
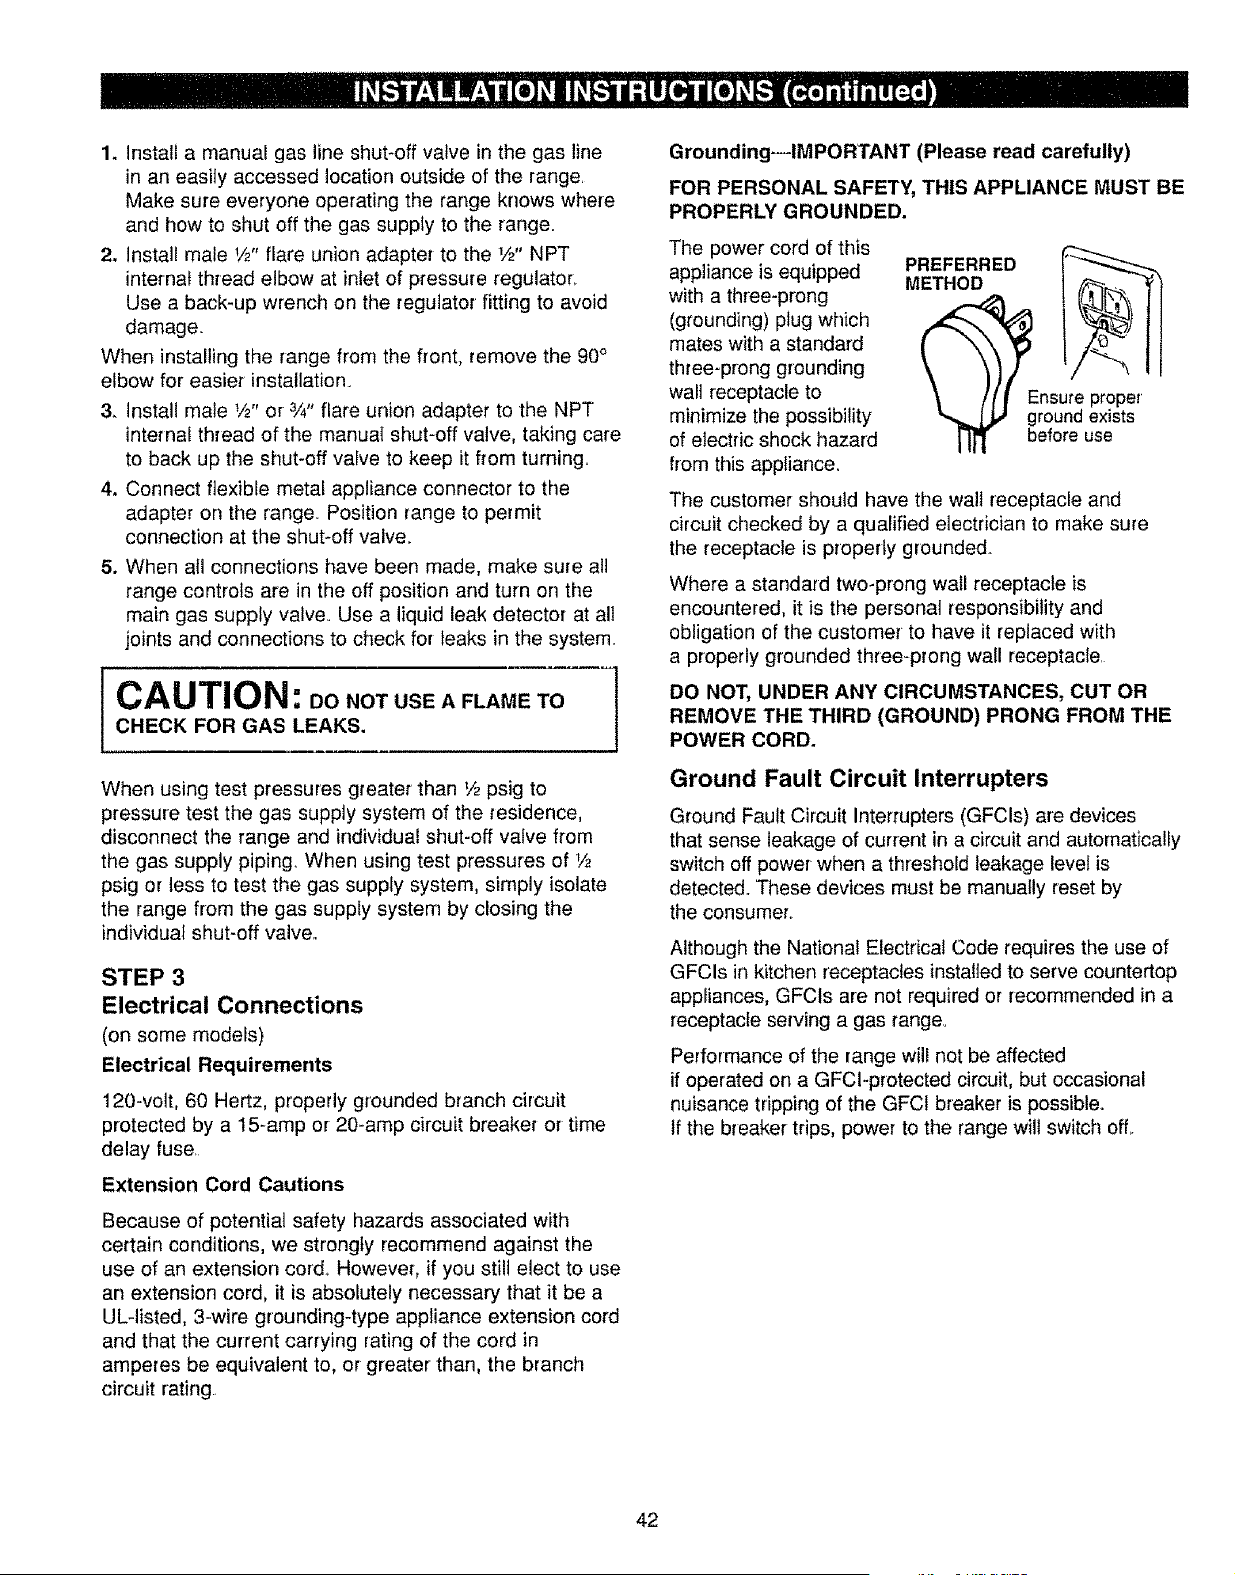
1. Installa manualgaslineshut-offvalveinthegasline
in aneasilyaccessedlocationoutsideof therange.
Makesureeveryoneoperatingtherangeknowswhere
andhowto shutoffthegassupplytotherange.
2. Installmale1/2"flareunionadaptertothe1/2"NPT
internalthreadelbowatinletof pressureregulator,.
Useaback-upwrenchontheregulatorfittingto avoid
damage..
Wheninstallingtherangefromthefront,remove the 90°
elbow for easier installation°
3. Install male W' or- 3A" flare union adapter to the NPT
internal thread of the manuaI shut-off valve, taking care
to back up the shut-off valve to keep it from turning.
4. Connect flexible metal appliance connector to the
adapter on the range_ Position range to permit
connection at the shut-off valve.
5. When all connections have been made, make sure all
range controls are in the off position and turn on the
main gas supply valve.. Use a liquid leak detector at all
joints and connections to check for leaks in the system.
I CAUT'ON =.DO NOTUSEA FLAMETO 1
CHECK FOR GAS LEAKS.
When using test pressures greater than V2psig to
pressure test the gas supply system of the residence,
disconnect the range and individual shut-off valve from
the gas supply piping. When using test pressures of V2
psig or tess to test the gas supply system, simply isolate
the range from the gas supply system by closing the
individuaf shut-off valve.
STEP 3
Electrical Connections
(on some models)
Electrical Requirements
120-volt, 60 Hertz, properly grounded branch circuit
protected by a 15-amp or 20-amp circuit breaker or time
delay fuse.
Extension Cord Cautions
Because of potential safety hazards associated with
certain conditions, we strongly recommend against the
use of an extension cord, However, if you still elect to use
an extension cord, it is absolutely necessary that it be a
UL-listed, 3-wire grounding4ype appliance extension cord
and that the current carrying rating of the cord in
amperes be equivalent to, or greater than, the branch
circuit rating
Grounding--IMPORTANT (Please read carefully)
FOR PERSONAL SAFETY, THIS APPLIANCE MUST BE
PROPERLY GROUNDED.
The power cord of this
appliance is equipped
with a three-prong
(grounding) plug which
mates with a standard
three-prong grounding
wall receptacle to
minimize the possibility
of electric shock hazard
from this appliance.
PREFERRED
METHOD I _r_..
"_ before use
The customer should have the walt receptacle and
circuit checked by a qualified electrician to make sure
the receptacle is properly grounded.
Where a standard two-prong wall receptacle is
encountered, it is the personal responsibility and
obligation of the customer to have it replaced with
a properly grounded three-prong wall receptacle.
DO NOT, UNDER ANY CIRCUMSTANCES, CUT OR
REMOVE THE THIRD (GROUND) PRONG FROM THE
POWER CORD.
Ground Fault Circuit Interrupters
Ground Fault Circuit Interrupters (GFCIs) are devices
that sense leakage of current in a circuit and automatically
switch off power when a threshold leakage level is
detected. These devices must be manually reset by
the consumer_
Although the National Electrical Code requires the use of
GFCIs in kitchen receptacles installed to serve countertop
appliances, GFCIs are not required or recommended in a
receptacle serving a gas range°
Performance of the range will not be affected
if operated on a GFCI-pretected circuit, but occasional
nuisance tripping of the GFCt breaker is possible.
If the breaker trips, power to the range wilt switch off.
42

A: Usage Situations Where Appliance Power Cord
Will Be Disconnected Infrequently.
TEMPORARY METHOD
(Adapter plugs not
permitted inCanada) _ _.
Align large prongs/slots_ _ ]
t
\ t _// _" Ensure proper ground
\ /[ [ and firm connection
1,,,,.._ before use
An adapter may be used only on a 15-amp circuit. Do not
use an adapter on a 20-amp circuit. Where local codes
permit, a TEMPORARY CONNECTION may be made to
a properly grounded two-prong wall receptacle by the use
of a UL-tisted adapter, available at most hardware stores.
The larger slot in the adapter must be aligned with the
larger slot in the wall receptacle to provide proper polarity
in the connection of the power cord.
CAUTION: Attaching the adapter ground
terminal to the wall receptacle cover screw does not
ground the appliance unless the cover screw is metal,
and not insulated, and the wall receptacle is grounded
through the house wiring. The customer should have
the circuit checked by a qualified electrician to make
sure the receptacle is properly grounded.
When disconnecting the power cord from the adapter,
always hold the adapter with one hand. tf this is not done,
the adapter ground terminat is very likely to break with
repeated use. Should this happen, DO NOT USE the
appliance until a proper ground has again been
established
B: Usage Situations Where Appliance Power Cord
Will Be Disconnected Frequently.
Do not use an adapter plug in these situations because
disconnecting of the power cord places undue strain on
the adapter and leads to eventual failure of the adapter
ground terminal. The customer should have the two-prong
wall receptacle replaced with a three-prong (grounding)
receptacle by a qualified electrician before using the
appliance
The installation of appliances designed for mobile home
installation must conform with the Manufactured Home
Construction and Safety Standard, Title 24 CFR, Part
3280 (formerly the Federal Standard for Mobile Home
Construction and Safety, Title 24, HUD, Part 280) or,
when such standard is not applicable, the Standard for
Manufactured Home Installations, latest edition
(Manufactured Home Sites, Communities and Set-Ups),
ANSI A225.1, latest edition, or with local codes. In
Canada, mobile home installation must be in accordance
with the current CAN/CSA Z240/Mtl Mobile Home
Installation Code.
Electric Disconnect Plug
This plug allows you to conveniently disconnect the range
from electrical power.
1. Locate disconnect plug on the range back.
2. Pinch sides of connector and pull out of range back
(
STEP 4
Seal the Openings
Seal any openings in the wall behind the range and in the
floor under the range when hookups are completed.
43
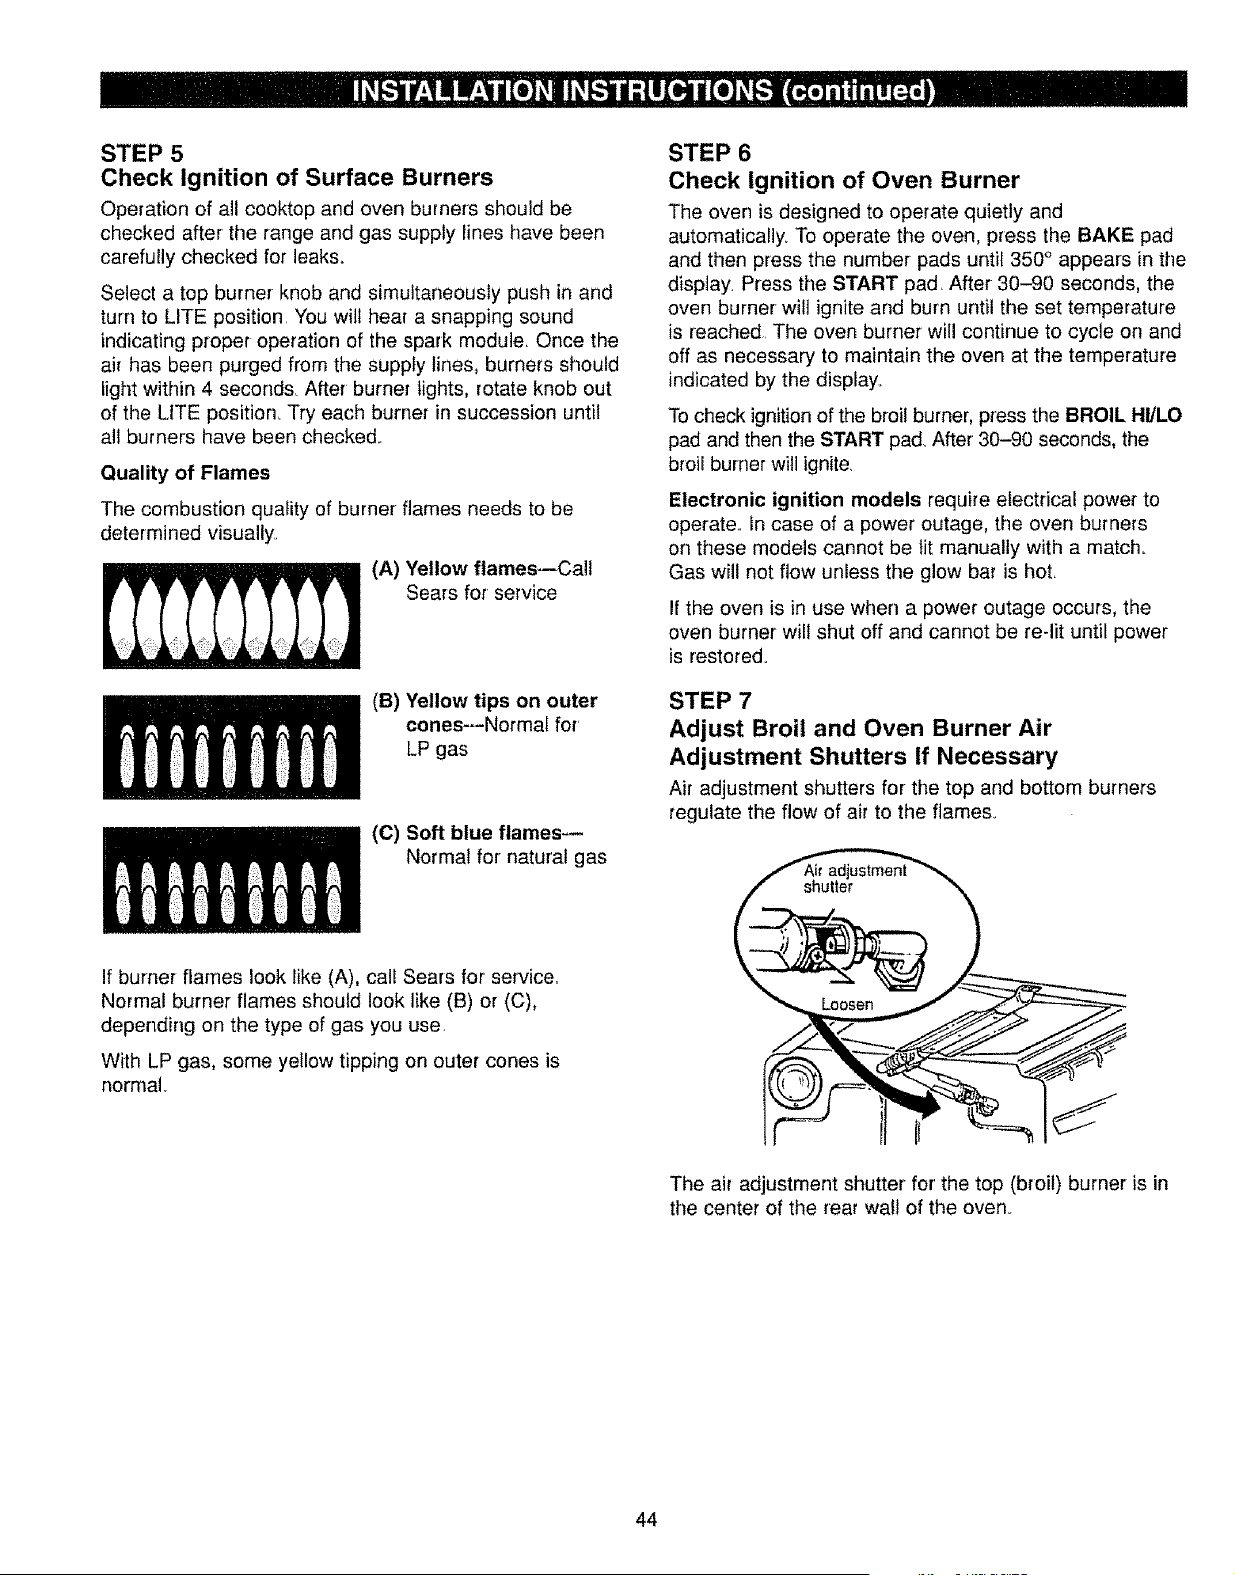
STEP 5
Check Ignition of Surface Burners
Operation of all cooktop and oven burners should be
checked after the range and gas supply lines have been
carefully checked for leaks.
Select a top burner knob and simultaneously push in and
turn to LITE position You wilt hear a snapping sound
indicating proper operation of the spark module. Once the
air has been purged from the supply lines, burners should
light within 4 second& After burner lights, rotate knob out
of the LtTE position. Try each burner in succession until
all burners have been checked.
Quality of Flames
The combustion quality of burner flames needs to be
determined visually,
(A) Yellow flames--Call
Sears for service
(B) Yellow tips on outer
cones--Normal for'
LP gas
(C) Soft blue flames--
Normal for natural gas
STEP 6
Check Ignition of Oven Burner
The oven is designed to operate quietly and
automatically, To operate the oven, press the BAKE pad
and then press the number pads until 350 ° appears in the
display. Press the START pad After 30-90 seconds, the
oven burner will ignite and burn until the set temperature
is reached The oven burner will continue to cycle on and
off as necessary to maintain the oven at the temperature
indicated by the display_
To check ignition of the broi! burner, press the BROIL HI/LO
pad and then the START pad After 30-90 seconds, the
broil burner witi ignite.
Electronic ignition models require electrical power to
operate., in case of a power outage, the oven burners
on these models cannot be tit manually with a match=
Gas will not flow unless the glow bar is hoL
If the oven is in use when a power outage occurs, the
oven burner wilt shut off and cannot be re-lit until power
is restored.
STEP 7
Adjust Broil and Oven Burner Air
Adjustment Shutters If Necessary
Air adjustment shutters for the top and bottom burners
regulate the flow of air to the flames.
If burner flames look like (A), call Sears for service.
Normal burner flames should look like (B) or (C),
depending on the type of gas you use
With LP gas, some yellow tipping on outer cones is
normal.
The air adjustment shutter for' the top (broil) burner is in
the center of the rear wall of the oven_
44
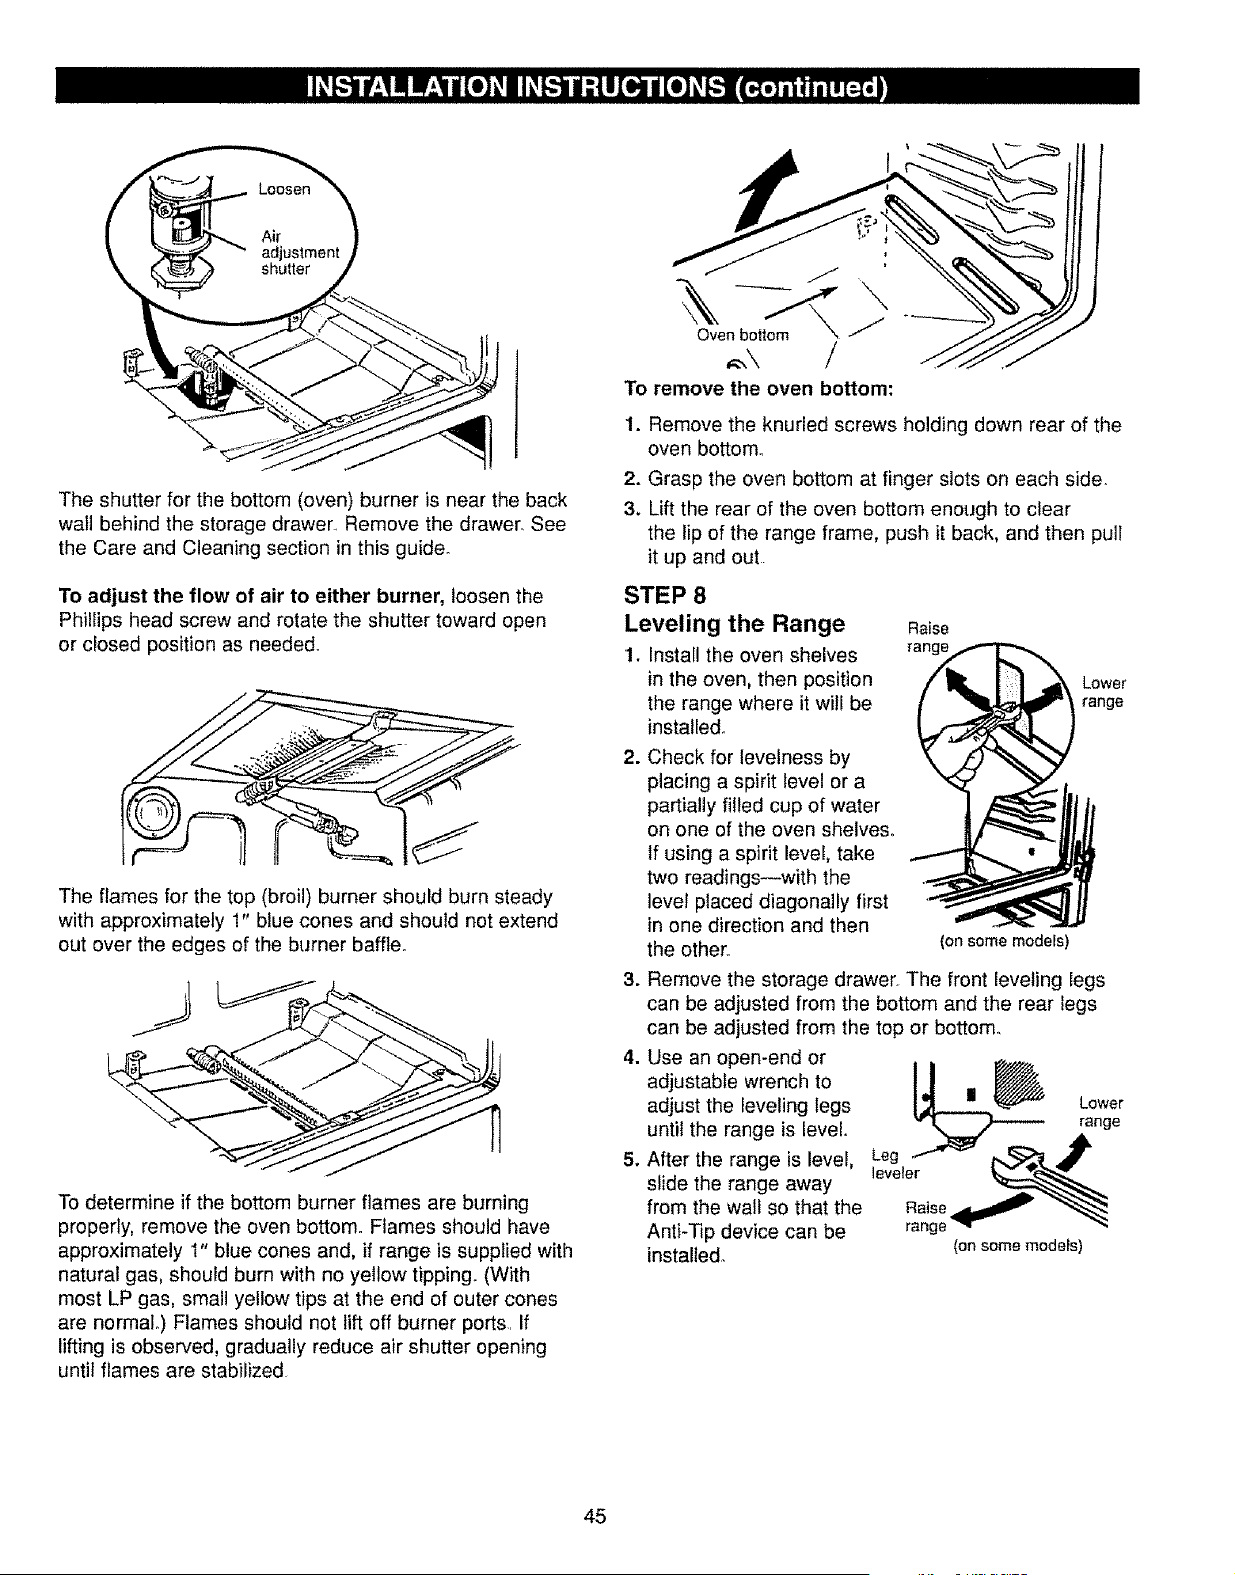
Theshutterforthebottom(oven)burneris neartheback
wallbehindthestoragedrawerRemovethedrawer.See
theCareandCleaningsectionin thisguide°
Toadjust the flow of air to either burner, loosen the
Philtips head screw and rotate the shutter toward open
or closed position as needed.
The flames for the top (broil) burner should burn steady
with approximately 1" blue cones and should not extend
out over the edges of the burner baffle.
To determine if the bottom burner flames are burning
properly, remove the oven bottom. Flames should have
approximately I" blue cones and, if range is supplied with
natural gas, should burn with no yellow tipping. (With
most LP gas, small yellow tips at the end of outer cones
are normal.) Flames should not lift off burner ports If
lifting is observed, gradually reduce air shutter opening
until flames are stabilized
To remove the oven bottom:
1. Remove the knurled screws holding down rear of the
oven bottom°
2. Grasp the oven bottom at finger slots on each side.
3. Lift the rear of the oven bottom enough to clear
the lip of the range frame, push it back, and then pull
it up and out
STEP 8
Leveling the Range
1. Install the oven shelves
in the oven, then position
the range where it will be
installed.
.
Check for levelness by
placing a spirit level or a
partially filled cup of water
on one of the oven shelves°
tf using a spirit level, take
two readings--with the
level placed diagonally first
in one direction and then
the other
(on some models)
Raise
range
Lower
range
3. Remove the storage drawer The front leveling Iegs
can be adjusted from the bottom and the rear legs
can be adjusted from the top or bottom
4. Use an open-end or __" AL°w_r
adjustable wrench to
adjust the leveling legs
until the range is level.
5, After the range is level, LeegelS"'-'=_ r,.__ _1_-
slide the range away
from the wall so that the
Anti-Tip device can be
installed. (onsomemodeFs)
45
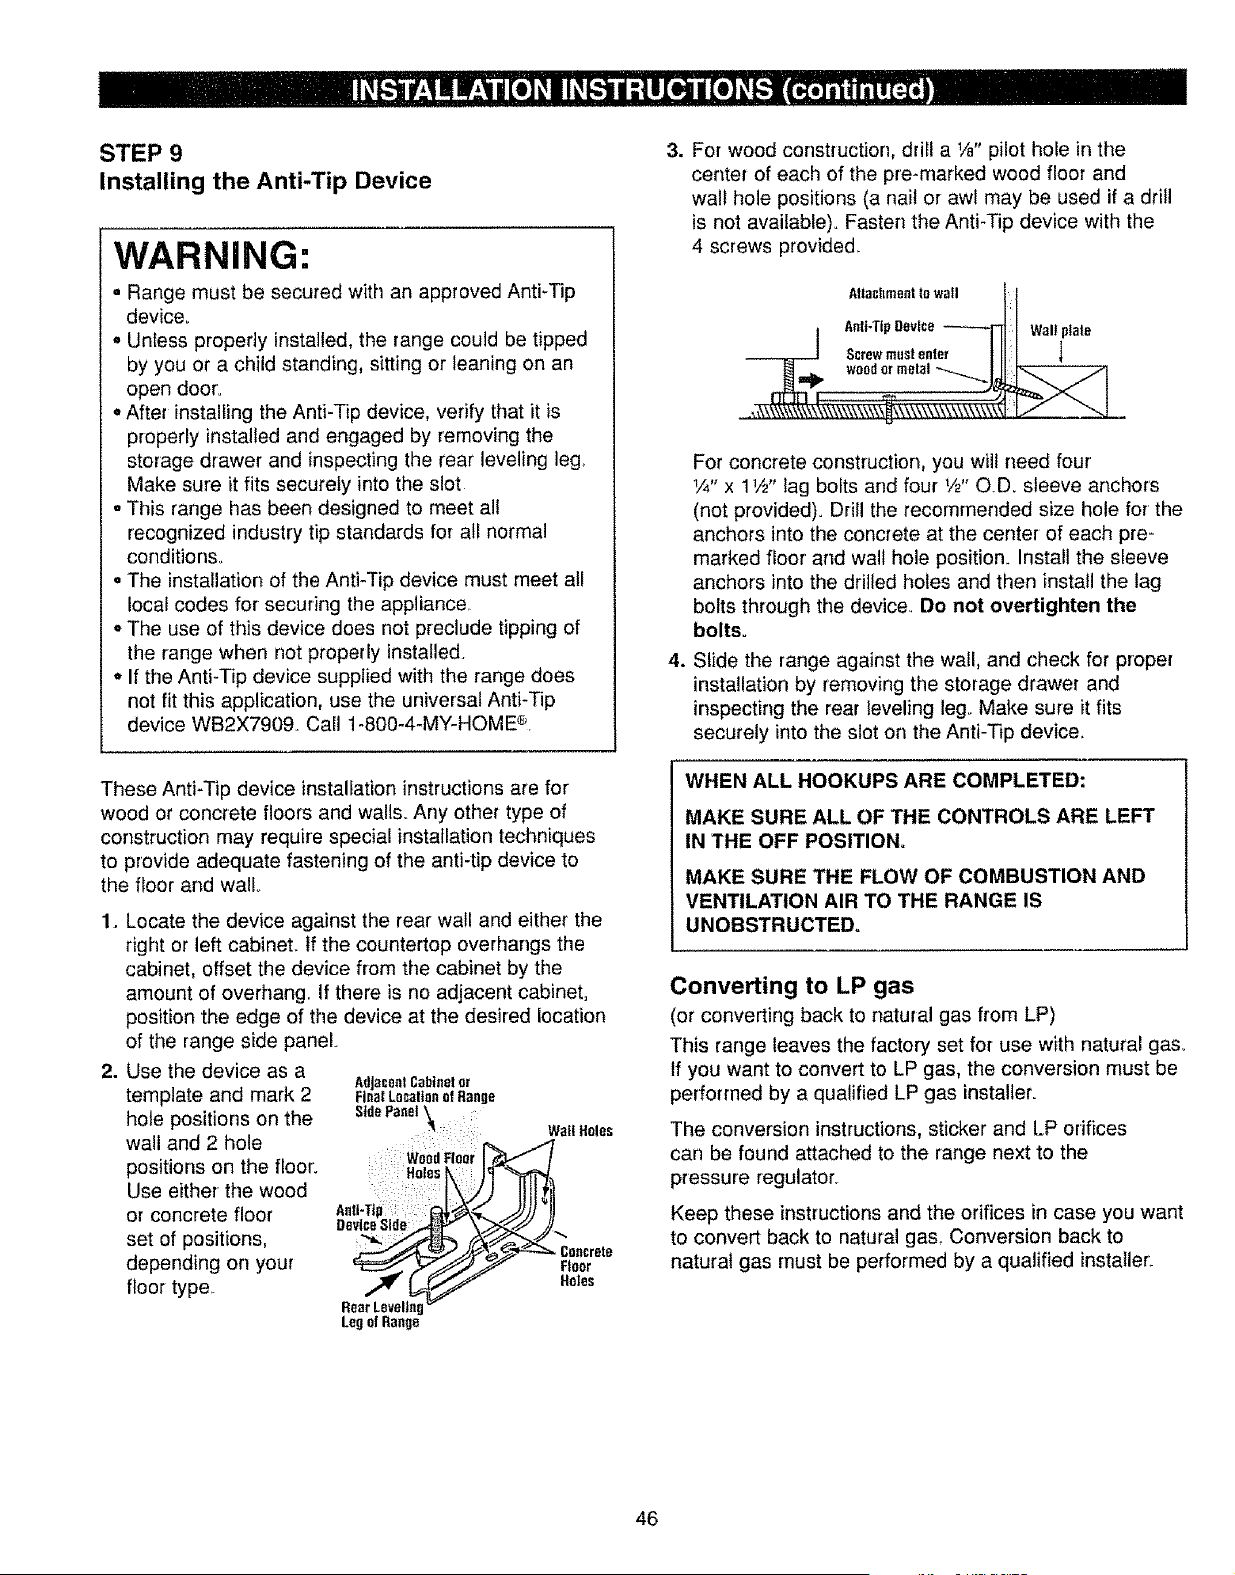
STEP 9
Installing the Anti-Tip Device
WARNING:
= Range must be secured with an approved Anti-Tip
device.
,, Uniess properly installed, the range could be tipped
by you or a child standing, sitting or leaning on an
open door°
o After installing the Anti-Tip device, verify that it is
properly installed and engaged by removing the
storage drawer and inspecting the rear leveling leg..
Make sure it fits securely into the slot
. This range has been designed to meet al!
recognized industry tip standards for all normal
conditions.
° The installation of the Anti-Tip device must meet all
local codes for securing the app]iance..
• The use of this device does not preclude tipping of
the range when not properly installed.
• If the Anti-Tip device supplied with the range does
not fit this application, use the universal Anti-Tip
device WB2X7909. Call 1-800-4-MY-HOME _'.
These Anti-Tip device installation instructions are for
wood or concrete floors and walis. Any other type of
construction may require special installation techniques
to provide adequate fastening of the anti-tip device to
the floor and wall..
1. Locate the device against the rear wail and either the
fight or left cabinet, if the countertop overhangs the
cabinet, offset the device from the cabinet by the
amount of overhang.. If there is no adjacent cabinet,
position the edge of the device at the desired location
of the range side panel.
2. Use the device as a
Adacenl Cabtnetor
template and mark 2 F na!LocalonorRange
hole positions on the StdePanel\
: WeltHoles
wall and 2 hole weea"'-F:ar_'_`'j/,nr I _'._f !
positions on the floor: Holesk = Iq-"_'_,,_J
Use either the wood .......
or concrete floor Aeri'Tl' ' =LqJ_k"J-,_j .-JJ)J_t
set of positions, _//__ Concrete
depending on your '_ _ Fleerfloor type. Holes
RearLeveling
Legof Range
3. For wood construction, drill a 1/e"pilot hole in the
center of each of the pre-marked wood floor and
wall hole positions (a nail or awl may be used if a drill
is not available)° Fasten the Anti-Tip device with the
4 screws provided..
AtlashmenHowall l:l
/ Anti-TipDevice NIJ Well plate
Screwmustenter fll I l
L-t,
,oo,o,oo,0,
J__J
.,_\\\\\\\\\_\\\\\\\\\\\\\\\\\_1_ LJ ".-.j.
.
For concrete construction, you will need four'
_,,_"x 11/2"lag boits and four V2" OD. sleeve anchors
(not provided). Drill the recomrnended size hole for' the
anchors into the concrete at the center of each pre-
marked floor and wall hole position. Install the sleeve
anchors into the drilled holes and then install the lag
bolts through the device, Do not overtighten the
bolts.
Slide the range against the wall, and check for proper
installation by removing the storage drawer and
inspecting the rear leveling leg_ Make sure it fits
securely into the slot on the Anti-Tip device.
WHEN ALL HOOKUPS ARE COMPLETED:
MAKE SURE ALL OF THE CONTROLS ARE LEFT
IN THE OFF POSITION°
MAKE SURE THE FLOW OF COMBUSTION AND
VENTILATION AIR TO THE RANGE IS
UNOBSTRUCTED.
Converting to LP gas
(or converting back to natural gas from LP)
This range leaves the factory set for use with natural gas_
If you want to convert to LP gas, the conversion must be
performed by a qualified LP gas installer.
The conversion instructions, sticker and LP orifices
can be found attached to the range next to the
pressure regulator.
Keep these instructions and the orifices in case you want
to convert back to natural gas, Conversion back to
natural gas must be performed by a qualified installer:
46
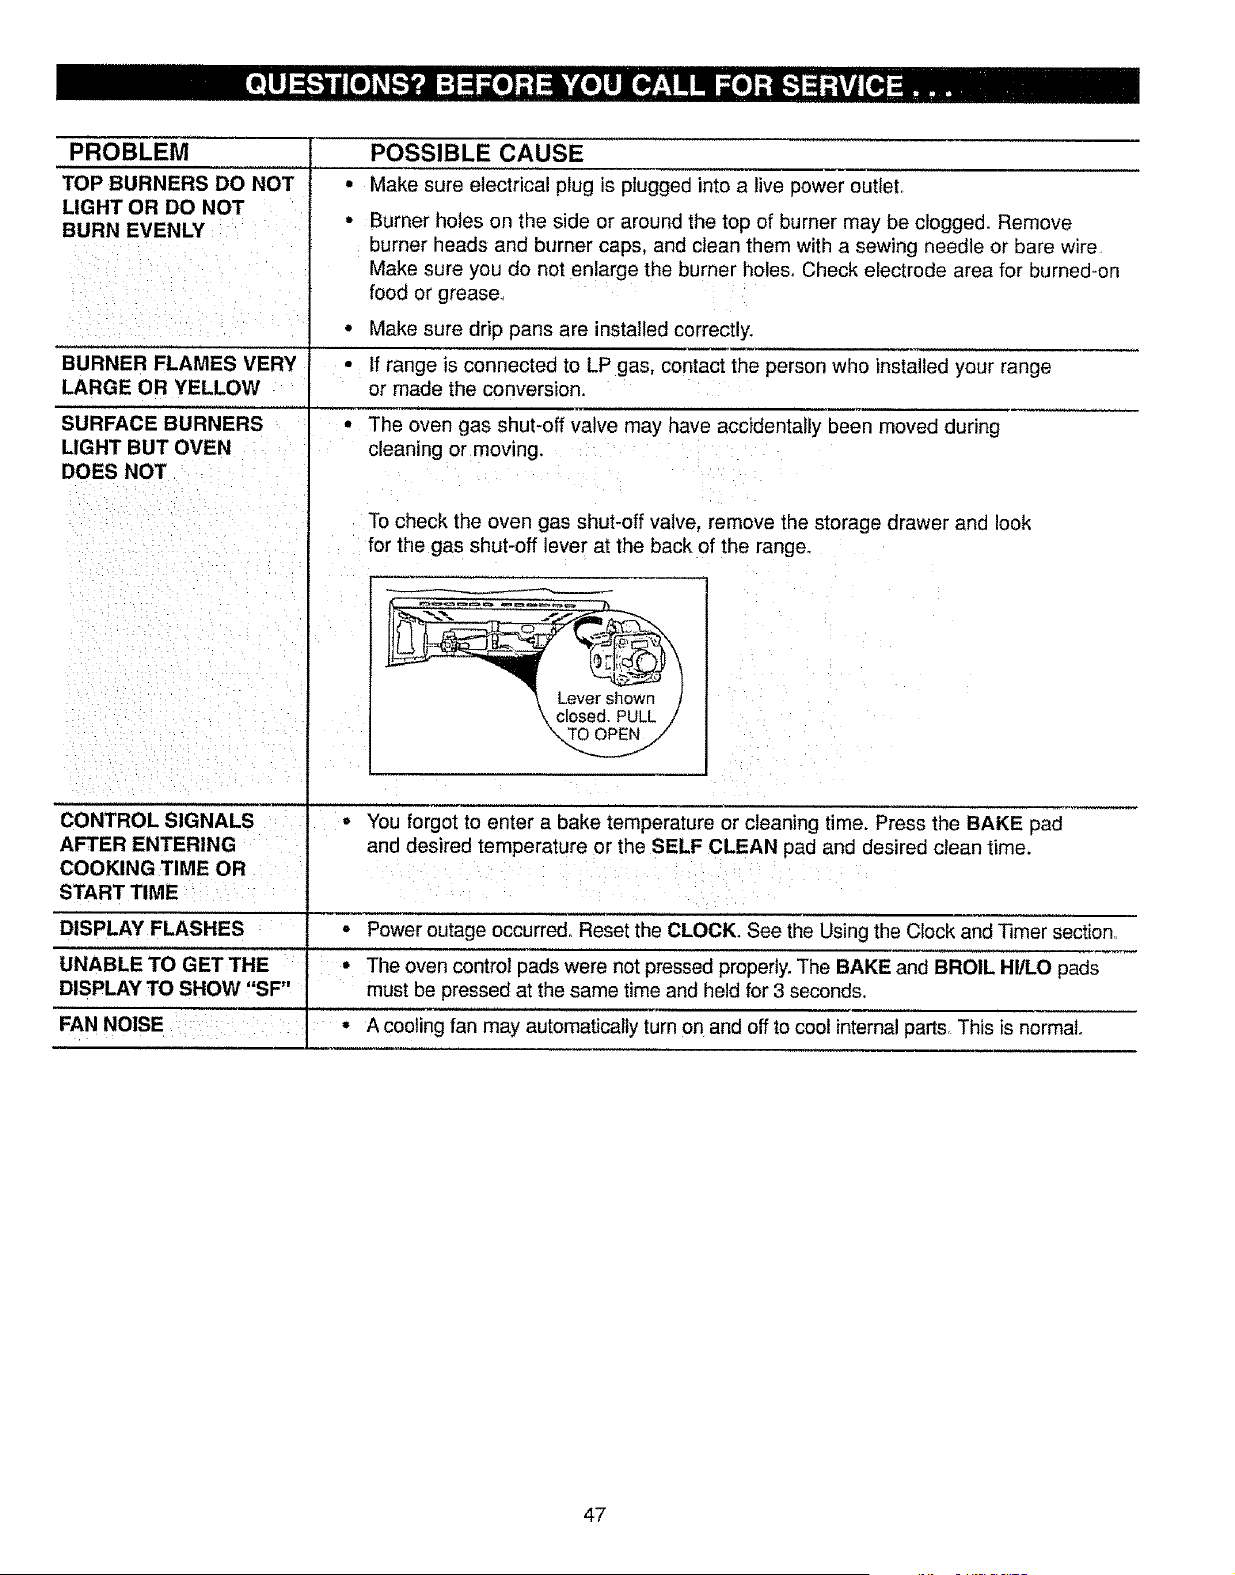
PROBLEM
TOP BURNERS DO NOT
LIGHT OR DO NOT
BURN EVENLY
BURNER FLAMES VERY
LARGE OR YELLOW
SURFACE BURNERS
LIGHT BUT OVEN
DOES NOT
CONTROL SIGNALS :
AFTER ENTERING
COOKING TIME OR
START TIME : :
DISPLAY FLASHES
UNABLE TO GET THE
DISPLAY TO SHOW "SF"
FAN NOISE : :
POSSIBLE CAUSE
• Make sure electrical plug is plugged into a live power outlet,
• Burner holes on the side or around the top of burner may be clogged. Remove
burner heads and burner caps. and clean them with a sewing needle or bare wire
Make sure you do not enlarge the burner holes, Check electrode area for burned-on
food or grease
• Make sure drip pans are installed correctly.
• If range is connected to LP gas, contact the person who installed your range
or made the conversion.
• The oven gas shut-off valve may have accidentally been moved during
cleaning or moving.
To check the oven gas shut-off valve, remove the storage drawer and look
for the gas shut-off lever at the back of the range_
\ closed. PULL /
i o You forgot to enter a bake temperature or cleaning time. Press the BAKE pad
and desired temperature or the SELF CLEAN pad and desired clean time.
: i
° Power outage occurred, Reset the CLOCK. See the Using the Clock and Timer section.
° The oven control pads were not pressed properly. The BAKE and BROIL HI/LO pads
must be pressed at the same time and held for 3 seconds.
• A cooling fan may automatically turn on and off to cool internal parts_ This is normal.
47
PROBLEM
CLOCK AND TIMER
DO NOT WORK
"FmAND A NUMBER"
FLASH IN THE DISPLAY
THE DISPLAY GOES
BLANK OR INDICATOR
LIGHTS COME ON WHEN
THE RANGE IS NOT IN USE
OVEN LIGHT DOES NOT
COME ON
SURFACE LIGHT
DOES NOT WORK
OVEN WILL NOT WORK
OVEN TEMPERATURE
TOO HOT OR TOO COLD
FOOD DOES NOT ROAST
OR BAKE PROPERLY
, _, : _i_ , _ • ,i _
OVEN SHELVES HAVE
BECOME DIFFICULT
TO SLIDE
"BURNING" or "OILY" ODOR
EMITTING FROM THE VENT
: .... i
POSSIBLE CAUSE
• Plug on the range is not completely inserted in the electrical outlet.
• Range electrical plug must be securely plugged into a live power outlet.
Check for blown fuse or tripped circuit breaker.
- Check for power outage_
• Review the Setting the Oven Control, Clock and Timer section of this guide.
• If the time display flashes "F--and a number", you have a function error code.
If a function error code appears during the self-cleaning cycle, check the oven
door latch. The latch may have been moved, even if only slightly, from the
latched position. Make sure the latch is moved to the right as far as it will go.
Press the STOP/CLEAR pad Allow the oven to cool for one hour.
Put the oven back into operation
° Disconnect all power to the range for 5 minutes and then reconnect power.
If the failure code repeats, then call fcr service.
• A fuse in your home may be blown or the circuit breaker tripped Replace the
fuse or reset the circuit breaker.
• The clock is turned off so that it does not show in the display. See the Using
the Clock and Timer section.
• Bulb may be loose or burned out°
° Electrical ptug must be plugged into aiive power outlet.
° Fluorescent bulb is loose or defective, Adjust or replace,
• Switch operating light is broken. Cal! for service.
• Plug on the range is not completely inserted in the electrical outlet.
= The circuit breaker in your house has been tripped, or a fuse has been blown,
• Door feft in lock position after self-cleaning.
• Oven controls not properly set,
• The oven thermostat needs adjustment, See the Adjust the Oven
Thermostat--Do FtYourself section.
° Oven controls not properly set. See the Baking or Roasting sections.
• Shelf position is not correct,
• Incorrect cookware or cookware of improper' size is being used_
• Oven thermostat needs adjustment, See the Adjust the Oven
ThermostatmDo It Yourself section.
° Clock not set correctly,
° Aluminum foil used improperly in the oven.
• Oven bottom not securely seated in position. See the Installation Instructions section.
• The shelves were cleaned in a self-clean cycle. To make the shelves slide
more easily, apply a small amount of vegetable oil to a paper towel and wipe the
edges of the oven shelves or the oven shelf supports with the paper towel,
° This is normal in a new oven and will disappear in time, To speed the process,
set a self-clean cycle for a minimum of 3 hours. See the Using the Self Cleaning
Oven section,
48
PROBLEM
FOOD DOES NOT
BROIL PROPERLY
OVEN WILL NOT .....
SELF-CLEAN
OVEN NOT CLEAN AFTER
CLEAN CYCLE
OVEN DOOR WILL
NOT UNLOCK : =
DOOR ACCIDENTALLY
LOCKED WHILE BAKING
STRONG ODOR
DRAWER DOES NOT SLIDE
SMOOTHLY OR DRAGS :
'!CRACKLING" OR
"POPPING" SOUND
i
EXCESSIVE SMOKING
POSSIBLE CAUSE
• Oven controls not properly set. See the Broiling section
• Oven door not closed,
• improper shelf position being used_ See the Broiling section
• Food is being cooked on a hot pan_
• Cookware is not suited for broiling
• Aluminum foil used on the broiler pan grid has not been fitted properly
and slit as recommended
• Oven bottom not securely seated in position. See the installation Instructions section
• Oven temperature is too high to set self-cleaning operation
Allow the range to cool to room temperature and reset the controls
° Oven controls not properly set. See the Using the Self Cleaning Oven section
• Door latch handle not moved all the way to the right.
• Oven controls not set properly See the Using the Self Cleaning Oven section
• Heavily soiled ovens require at least 5 hours of cleaning time
• Heavy spillovers should be cleaned up before starting clean cycle.
= The oven must cool below the locking temperature after the clean cycle
is complete. Do not lock door with door latch except when using the
self-clean feature or the oven may lock,
• Stop the self-clean cycle. See the Using the Self Cleaning Oven section..
, Improper air/gas ratio in oven..Adjust oven burner air shutter.
• An odor from the insulation around the oven liner is normal for the first few
times oven is used° This is temporary.
° The drawer is out of alignment. Fully extend the drawer and push it all the way
in. See the Care and Cleaning section_
• The drawer is overloaded or load is unbalanced.. Reduce the weight..
Redistribute the drawer contents.
This is the sound of the metal heating and cooling during both the cooking and
cleaning functions, This is normal°
Excessive soi_ left in the oven. Press the STOP/CLEAR pad. Open the windows
to rid the room of smoke, Wait until the light on the SELF CLEAN pad goes off,
Wipe up the excess soil and reset the clean cycle°
49
®
FREE-STANDING GAS
RANGE WARRANTY
f- FULL ONE-YEAR WARRANTY ON ALL PARTS
If, within one year from the date of installation, any part fails to function properly due to a defect in material or
workmanship, Sears will repair or replace it, at our option, free of charge.
If this product is subjected to other than private family use, the above warranty is effective for only 90 days.
WARRANTY SERVICE IS AVAILABLE BY CONTACTING SEARS SERVICE AT 1-800-4-MY-HOME ®.
This warranty applies only while this product is in use in the United States.
This warranty gives you specific legal rights, and you may also have other rights which vary from state to state..
Sears Roebuck and Co.. Dept. 817WA, Hoffman Estates, IL 60179
Master Protection Agreements
Congratulations on making a smart purchase Your new
Kenmore '_product is designed and manufactured for years
of dependable operation_ But like all products, it may
require preventive maintenance or repair from time to time_
That's when having a Master Protection Agreement can
save you money and aggravation.
Purchase a Master Protection Agreement now and protect
yourseff from unexpected hassle and expense.
The Master Protection Agreement also helps extend
the life of your new product. Here's what's included
in the Agreement:
V' Expert service by our 12,000 professional repair
specia{ists
v' Unlimited service and no charge for parts and labor
on all covered repairs
v' "No-lemon" guarantee---replacement of your covered
product if four or more product failures occur within
twelve months
V' Product replacement if your covered product can't
be fixed
v" Annual Preventive Maintenance Check at your
request--no extra charge
v' Fast help by phone--phone support from a Sears
technician on products requiring in-home repair, plus
convenient repair scheduling
t/' Power surge protection against electrical damage due
to power fluctuations
v' Rental reimbursement if repair of your covered product
takes longer than promised
Once you purchase the Agreement, a simple phone
call is all that it takes for you to schedule service=
You can call anytime day or night, or schedule a
service appointment online_
Sears has over 12,000 professional repair specialists,
who have access to over 4v5 million quality parts and
accessories. That's the kind of professionalism you can
count on to help prolong the life of your new purchase
for years to come. Purchase your Master Protection
Agreement todayl
Some limitations and exclusions apply.
For prices and additional information, call
1-800-827-6655.
Sears Installation Service
For Sears professional installation of home appliances,
garage door openers, water heaters and other major' home
items, in the U_SoA_call 1-800-4-MY-HOME ®.
5O
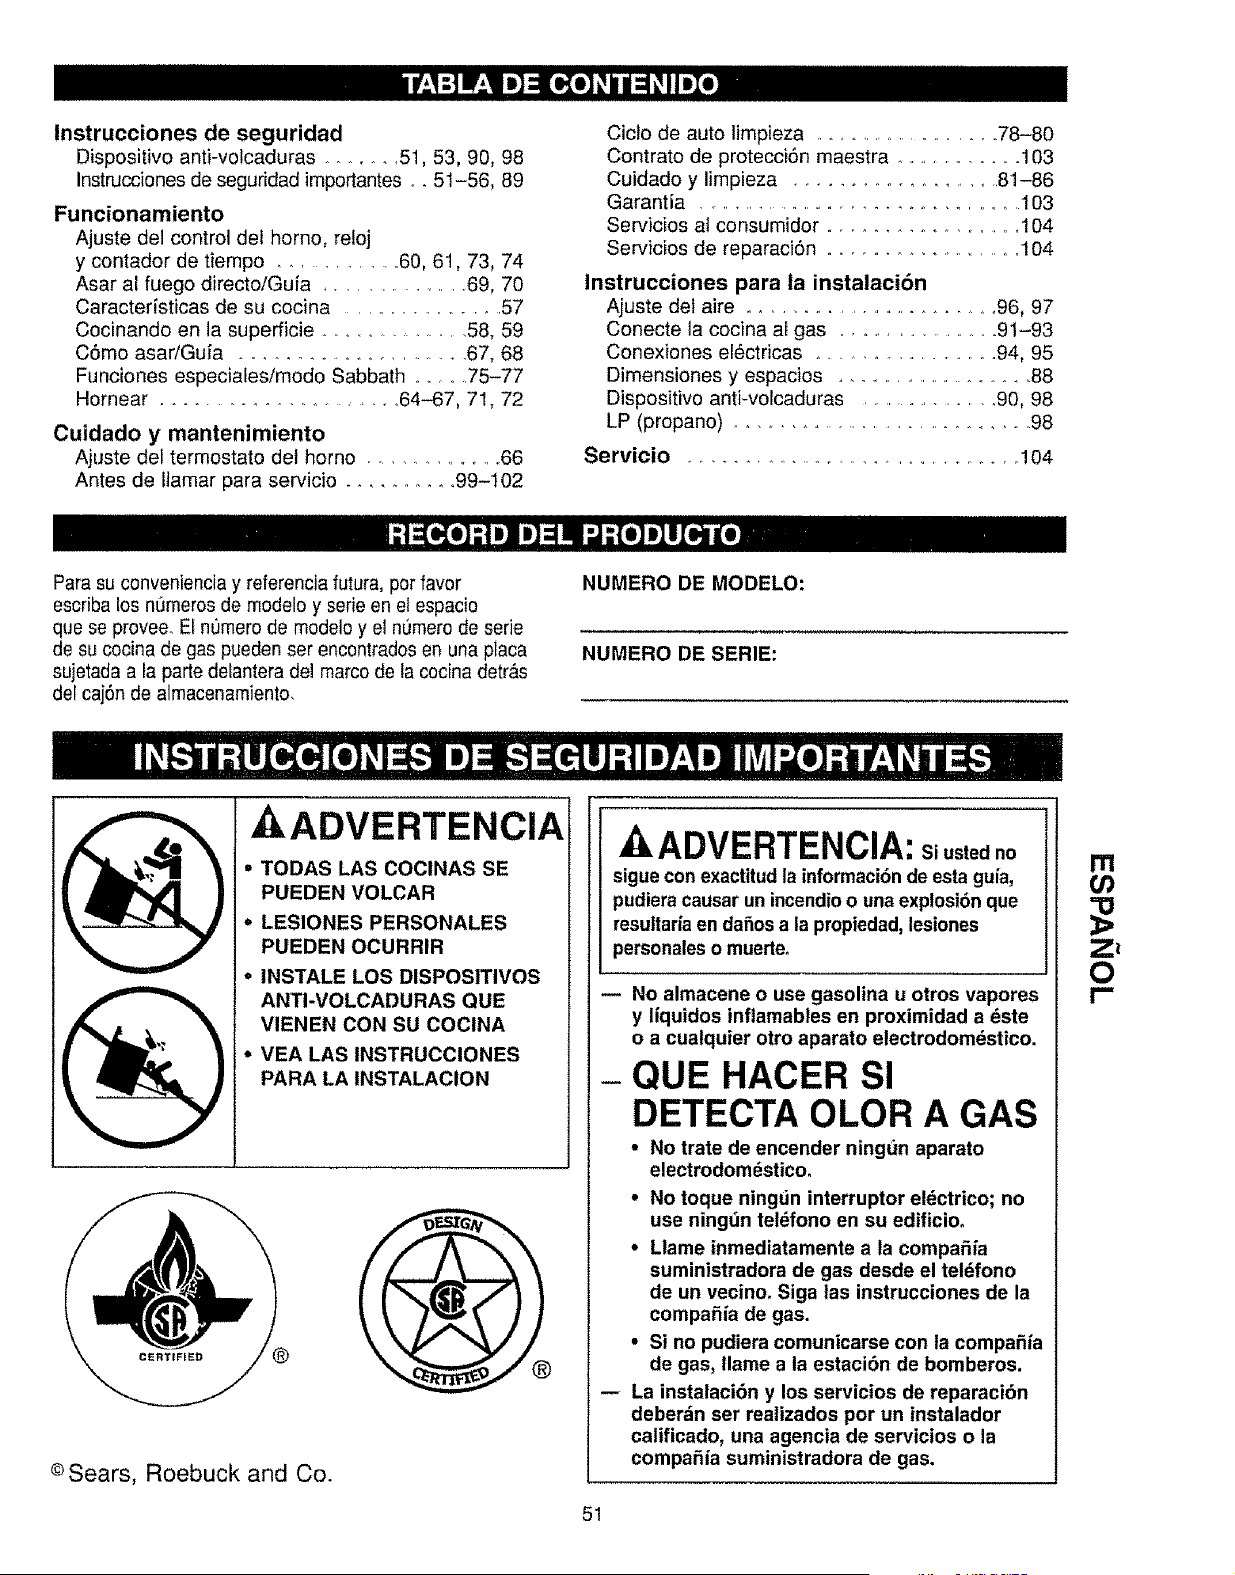
Instrucciones de seguridad
Dispositivo anti-volcaduras ........ 51, 53, 90, 98
Instrucciones de seguridad importantes ... 51-56, 89
Funcionamiento
Ajuste del control del homo, refoj
y contador de tiempo ............. 60, 61,73, 74
Asar al fuego directo!Gufa ............. 69, 70
Caracteristicas de su cocina .................. 57
Cocinando en la superficie ............... 58, 59
C6mo asar/Guia ...................... 67, 68
Funciones especialestmodo Sabbath ....... 75-77
Hornear ...................... 64--67, 71, 72
Cuidado y mantenimiento
Ajuste del termostato del homo .................... 66
Antes de ltamar para servicio ........... 99-102
Cicfo de auto limpieza ........................ 78-80
Contrato de protecci6n maestra ............... 103
Cuidado y limpieza ..................... 81-86
Garantia .................................... 103
Servicios al consumidor .................... 104
Servicios de reparaci6n ..................... 104
Instrucciones para la instalaci6n
Ajuste del aire .............................. 96, 97
Conecte la cocina al gas ................. 91-93
Conexiones el_ctricas .................... 94, 95
Dimensiones y espacios ........................ 88
Dispositivo anti-voFcaduras ................ 90, 98
LP (propano) ................................ 98
Servicio ..................................... 104
Para su conveniencia y referencia futura, pot favor
escriba los nt_merosde modelo y serie en el espacio
que se provee. El n0rnero de modelo y el numero de serie
de su cocina de gas pueden ser encontrados en una placa
sujetada a la parte defantera del marco de la cocina detr_.s
del caj6n de almacenamiento,
NUMERO DE MODELO:
NUMERO DE SERIE:
ADVERTENCIA
• TODAS LAS COClNAS SE
PUEDEN VOLCAR
• LESIONES PERSONALES
PUEDEN OCURRIR
• INS[ALE LOS DISPOSITIVOS
ANTI-VOLCADURAS QUE
VIENEN CON SU COCINA
• VEA LAS INSTRUCClONES
PARA LA INSTALACION
®
©Sears, Roebuck and Co.
ADVERTENCIA: siustedno
sigue con exactitud la informaci6n de esta guia,
pudiera causar un incendioo una explosi6n que
resultaria en da_os a la pmpiedad, lesiones
personales o muerte.
No almacene o use gasolina u otros vapores
y liquidos inflamables en proximidad a _ste
o a cualquier otro aparato electrodomdstico.
-QUE HACER SI
DETECTA OLOR A GAS
• No trate de encender ningun aparato
electrodomdstico.
• No toque ningLin interruptor eldctrico; no
use ningdn tel_fono en su edificioo
• Llame inmediatamente a la compafifa
suministradora de gas desde el teldfono
de un vecino. Siga las instrucciones de la
compafiia de gas.
• Si no pudiera comunicarse con la compafiia
de gas, llame a la estaci6n de bomberos.
-- La instalaci6n y los servicios de reparaci6n
deberdn ser realizados por un instalador
calificado, una agencia de servicios o la
compafiia suministradora de gas.
51
Ill
Z_
O
I"
Lea estas instrucciones
antes de usar este aparato,
AVISO iiViPORTANTE
DE SEGURIDAD
El California Safe Drinking Water and Toxic
Enforcement Act (Ley sobre Ios productos t6xicos
y de agua potable de California) requiere que el
gobernador de California publique una lista de
sustancias que el estado sabe causan c&ncer,
defectos de nacimiento u otros dafios de reproducci6n,
y requiere que los negocios les avisen a los clientes
contra la exposici6n potencial a tales sustancias..
Los aparatos de gas causan exposicibn minima a
cuatro de estas sustancias, tales como el benceno,
el mon6xido de carbono, el formaldehfdo y el hollin,
causados primordialmente pot la combusti6n
incompleta de gas natural o gas LP (Propano). Los
quemadores bien ajustados, indicados por una llama
azul en vez de una llama amadlla, minimizaran la
cornbusti6n incompletao La exposici6n a estas
sustancias puede minimizarse re&s, ventilando con
una ventana abierta o usando un ventilador o una
campana de ventilaci6n..
Cuando reciba su cocina
Pida que el instalador le muestre el lugar de la
vdlvula que corta el gas de la cocina y cbmo
apagarla si fuera necesario.
Haga que un instalador calificado instale y conecte
a tierra su cocina de acuerdo con las Instrucciones
para la instalaci6n. Cualquier ajuste o servicio debe
set completado s61o per instaladores de cocinas de
gas calificados o t_cnicos de servicio..
Enchufe su cocina a una toma de corriente de
pared conectada a tierra de 120 voltios, No quite la
punta redonda con conexi6n a tierra del enchufe,. Si
cabe duda de la conexi6n de tierra det sistema
el_ctrico de la casa, es su responsabilidad personal y
su obfigaci6n reemplazarta por un contacto adecuado
para tres puntas con conexi6n a tierra de acuerdo con
el National Electrical Code (C6digo el_ctrico nacional).
En Canad&, el aparato debe estar electricamente
cenectado a tierra de acuerdo con el Canadian
Electrical Code (C6digo et_ctrico de Canada).. No
use un cable de extensi6n con este aparato..
No trate de reparar o reemplazar ninguna parte
de su cocina a menos que se recomiende
especificamente en este manual. Todo otto servicio
se debe remitir a un t6cnico de servicio calificadoo
Asegurese de quitar todos los materiales de
envase de la cocina antes de operarla para evitar
incendio o dafios del humo, si los materiales de
envase se encendieran..
- Sitde la cocina fuera de las dreas muy transitadas
en la cocina y fuera de lugares ventilados para
evitar circulaci6n de aire inadecuadao
Despu6s del uso prolongado de una cocina, se
pueden producir temperaturas altas del piso y
muchos recubrimientos del suelo no pueden
resistir este tipo de uso. Nunca instale la cocina
sobre batdosas de vinilo o lin61eo porque no pueden
resistir este uso_ Nunca ta instale directamente sobre
la alfombra de cocina.
Asegdrese de que su cocina estd ajustada
correctamente por un t_cnico de servicio o
instalador calificado para el tipo de gas [natural o
LP (Propano)], que se va a usar. Su c0cina se puede
conver_:ir para uso con cualquier tipo de gas_ Consutte
Ia secci6n Instrucciones para ta instalaci6n..
ADVERTENCIA: Estosaiustes
deben ser completados por un t6cnico de servicio
calificado de acuerdo con Ias instrucciones del
fabricante y todos los c6digos y requisites de Ia
autoridad que tiene jurisdicci6n. No seguir estas
instrucciones podria resultar en heridas serias o dafios
a la propiedad. La agencia calificada que realice este
trabajo asume la responsabilidad de ta conversi6n=
52
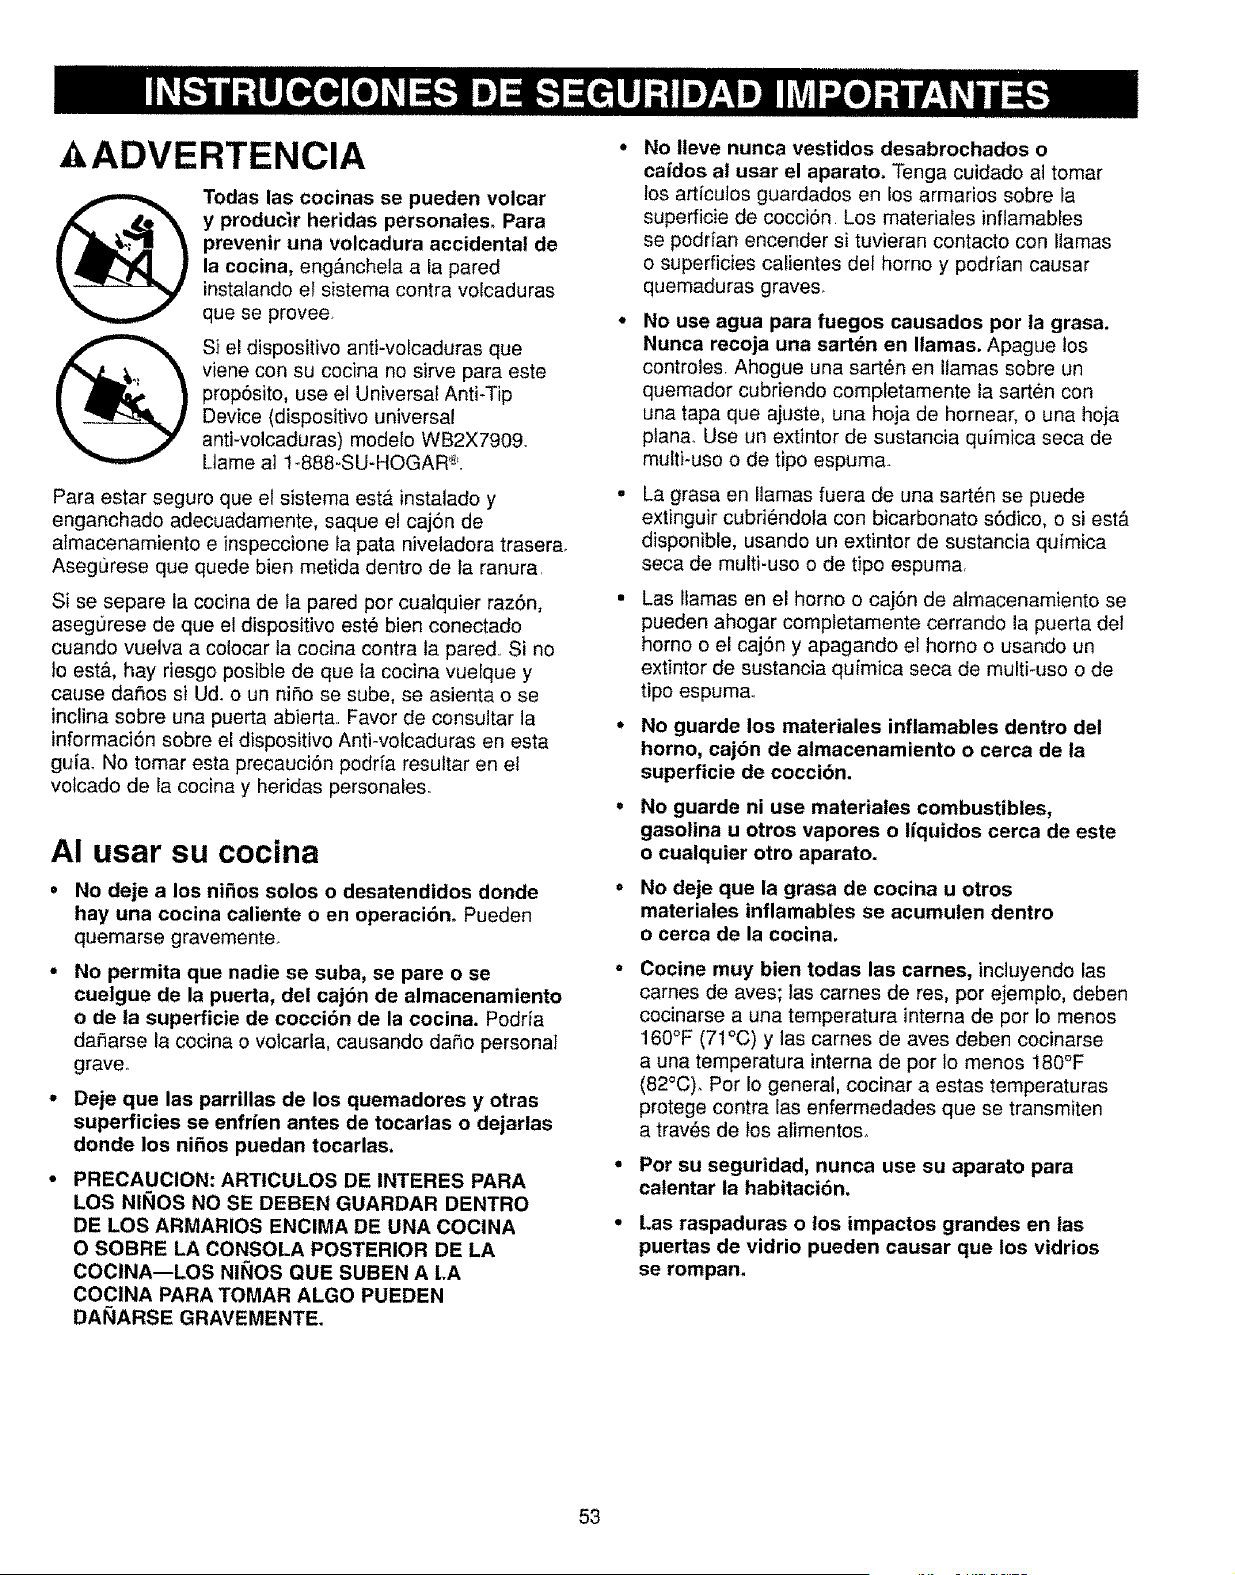
ADVERTENCIA
Todas las cocinas se pueden volcar
y producir heridas personales. Para
prevenir una volcadura accidental de
la cocina, eng&nchela a la pared
instalando el sistema contra volcaduras
que se provee
Si el dispositivo anti-volcaduras que
viene con su cocina no sirve para este
prop6sito, use el Universal Anti-Tip
Device (dispositivo universal
anti-volcaduras) modelo WB2X7909.
Ltame at 1-888-SU-HOGAR @.
Para estar seguro que el sistema esta instalado y
enganchado adecuadamente, saque el caj6n de
almacenamiento e inspeccione la pata niveladora trasera.
AsegL)rese que quede bien metida dentro de fa ranura.
Si se separe la cocina de la pared por cualquier raz6n,
aseg0rese de que el dispositivo est_ bien conectado
cuando vuelva a colocar la cocina contra la pared.. Si no
lo est&, hay riesgo posible de que ta cocina vuelque y
cause dafios si Ud. o un nifio se sube, se asienta o se
inclina sobre una puerta abierta. Favor de consultar la
informaci6n sobre el dispositivo Anti-volcaduras en esta
guia. No tomar esta precauci6n podfia resultar en el
volcado de la cocina y heridas personales.
AI usar su cocina
No deje a los nifios solos o desatendidos donde
hay una cocina caliente o en operaci6n. Pueden
quemarse gravemente_
No permita que nadie se suba, se pare o se
cueigue de la puerta, dei caj6n de almacenamiento
o de la superficie de cocci6n de la cocina. Podria
dafiarse la cocina o votcarla, causando dafio personal
grave.
Deje que las parrillas de los quemadores y otras
superficies se enfrfen antes de tocarlas o dejarlas
donde los ni_os puedan tocarlas.
PRECAUClON: ARTICULOS DE INTERES PARA
LOS NII_IOS NO SE DEBEN GUARDAR DENTRO
DE LOS ARMARIOS ENCIMA DE UNA COCINA
O SOBRE LA CONSOLA POSTERIOR DE LA
COCINA--LOS NII_IOS QUE SUBEN A LA
COC1NA PARA TOMAR ALGO PUEDEN
DAI_IARSE GRAVEMENTE.
No ileve nunca vestidos desabrochados o
caidos al usar el aparato. Tenga cuidado al tomar
los articulos guardados en los armarios sobre la
superficie de cocci6n Los materiales inflamables
se podrian encender si tuvieran contacto con llamas
o superficies calientes del homo y podrian causar
quemaduras grave&
No use agua para fuegos causados pot ta grasa.
Nunca recoja una sart_n en llamas. Apague los
controles Ahogue una sart6n en llamas sobre un
quemador cubriendo completamente la sarten con
una tapa que ajuste, una hoja de homear, o una hoja
plan& Use un extintor de sustancia quimica seca de
multi-uso o de tipo espuma..
La grasa en llamas fuera de una sart_n se puede
extinguir cubfi_ndola con bicarbonato s6dico, o si est&
disponible, usando un extintor de sustancia quimica
seca de multi-uso o de tipo espuma,
Las llamas en el homo o caj6n de almacenamiento se
pueden ahogar comptetamente cerrando la puerta del
homo o el caj6n y apagando el homo o usando un
extintor de sustancia quimica seca de multi-uso o de
tipo espuma,r
No guarde los materiales inflamables dentro del
homo, caj6n de almacenamiento o cerca de la
superficie de cocci6n.
No guarde ni use materiales combustibles,
gasolina u otros vapores o liquidos cerca de este
o cualquier otro aparato.
No deje que la grasa de cocina u otros
materiales inflamables se acumulen dentro
o cerca de la cocina.
Cocine muy bien todas las carnes, incluyendo las
cames de aves; Ias cames de res, por ejemplo, deben
cocinarse a una temperatura interna de pot Io menos
160°F (71°C) y tas carnes de aves deben cecinarse
a una temperatura intema de por Io menos 180°F
(82°C). Por Io general, cocinar a estas temperaturas
protege contra las enfermedades que se transmiten
a trav_s de los alimentos.
Pot su seguridad, nunca use su aparato para
calentar la habitaci6n,
Las raspaduras o los impactos grandes en las
puertas de vidrio pueden causar que los vidrios
se rompan.
53
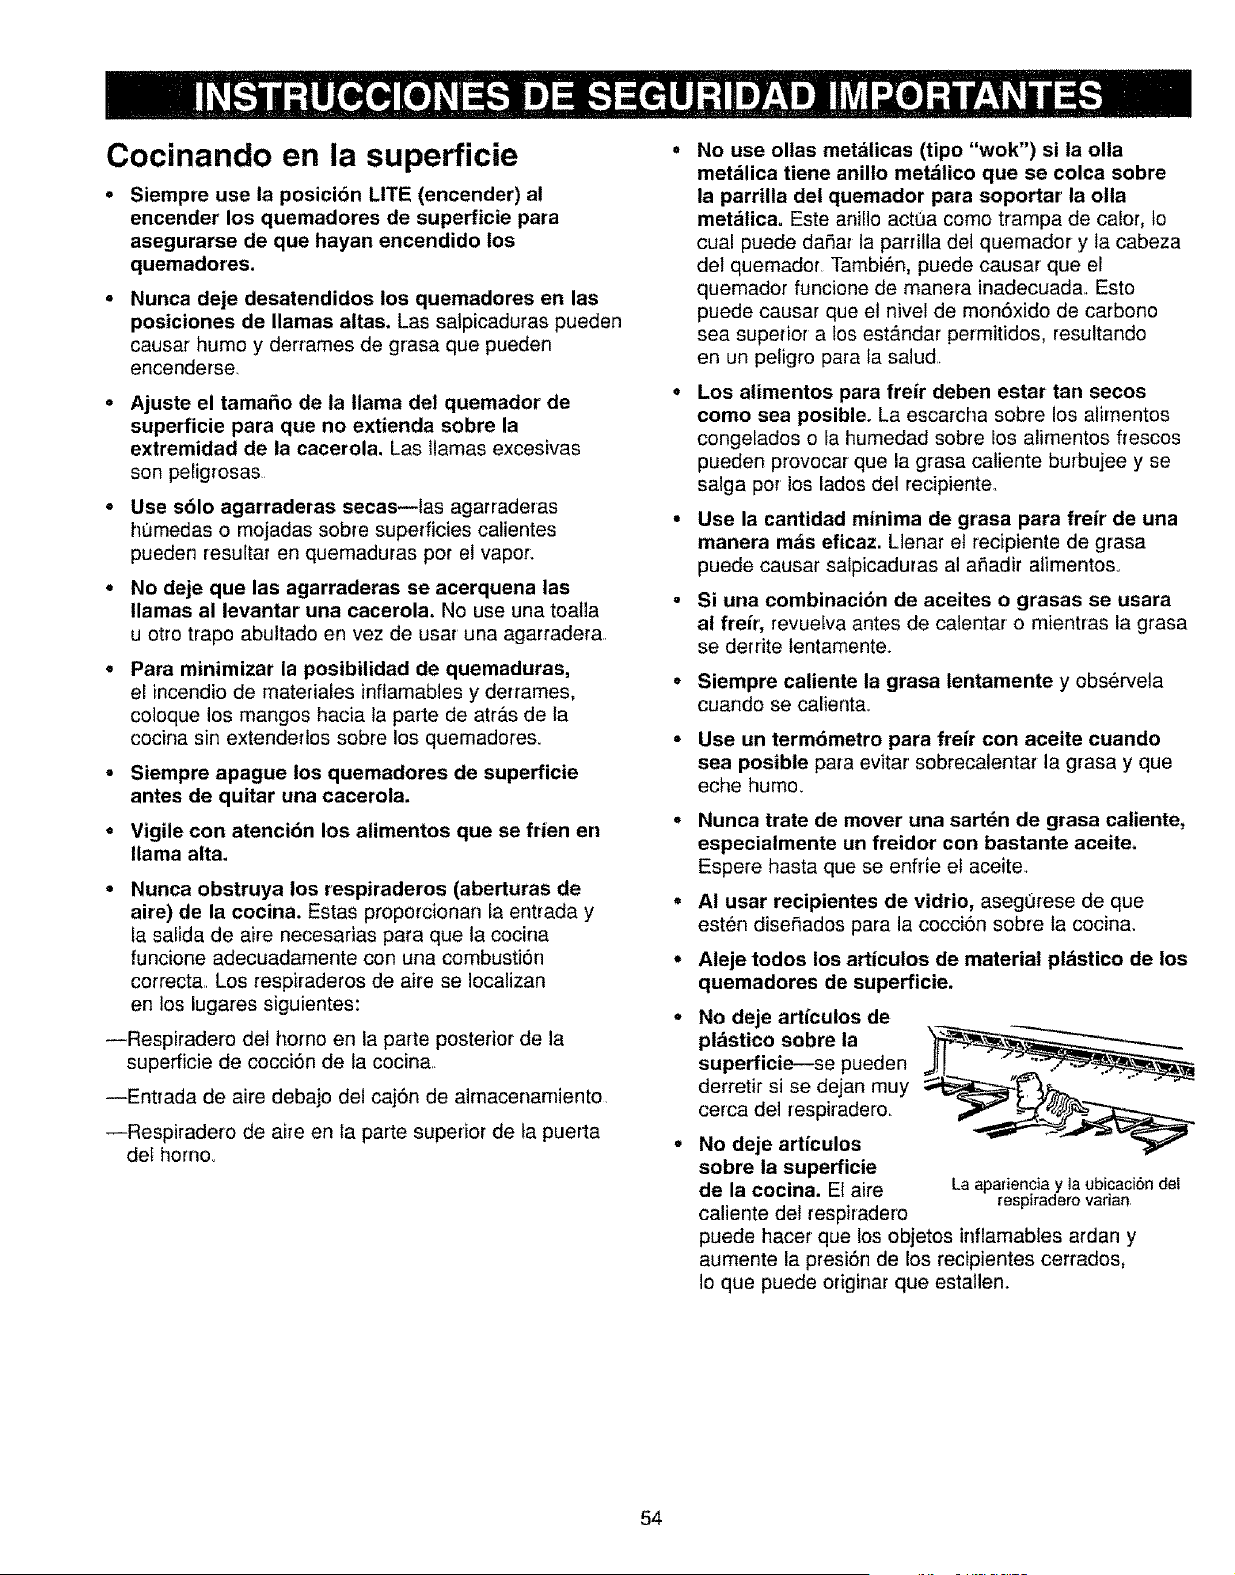
Cocinando en la superficie
• Siempre use la posici6n LITE (encender) al
encender los quemadores de superficie para
asegurarse de que hayan encendido los
quemadores,
Nunca deje desatendidos los quemadores en las
posiciones de llamas altas, Las salpicaduras pueden
causar humo y derrames de grasa que pueden
encenderse,
Ajuste el tama£m de la llama del quemador de
superficie para que no extienda sobre la
extremidad de la cacerola. Las llamas excesivas
son peligrosas
Use sblo agarraderas secas--las agarraderas
humedas o mojadas sobre superficies calientes
pueden resultar en quemaduras pot el vapor:
No deje que las agarraderas se acerquena las
llamas al levantar una cacerola, No use una toalla
u otto trepo abultado en vez de usar una agarradera,,
Para minimizar la posibilidad de quemaduras,
el incendio de materiales inflamables y derrames,
co]oque los mangos hacia ta parte de atr_,s de la
cocina sin extendedos sobre los quemadoreso
Siempre apague los quemadores de superficie
antes de quitar una cacerola.
VigUe con atenci6n los alimentos que se frien en
llama alta.
Nunca obstruya los respiraderos (aberturas de
aire) de la cocina. Estas proporcionan la entrada y
la salida de aire necesarias para que la cecina
funcione adecuadamente con una cembusti6n
correct& Los respiraderos de aire se Iocalizan
en los lugares siguientes:
--Respiradero del homo en la parte posterior de la
superficie de cocci6n de la cocin&
--Entrada de aire debajo del cajSn de almacenamiento,
_Respiradero de aire en la parte superior de la puerta
de[ homo°
No use ollas metdlicas (tipo "wok") si ta olla
met&lica tiene anillo metdlico que se colca sobre
la parrilla det quemador para soportar la olla
met_lica. Este anillo actOa como trampa de calor, to
cua! puede daSar la parrilla del quemador y la cabeza
del quemador, Tambi_n, puede causar que el
quemador funcione de manera inadecuada. Esto
puede causar que el nivel de mon6xido de carbono
sea supedor a los est_ndar permitidos, resultando
en un pefigro para fa salud,.
Los alimentos para freir deben estar tan secos
como sea posible. La escarcha sobre los alimentos
congelados o la humedad sobre los alimentos frescos
pueden provocar que la grasa catiente burbujee y se
salga pot los lados del recipiente,
Use la cantidad minima de grasa para freir de una
manera m_is eficaz. Llenar et recipiente de grasa
puede causar salpicaduras al a_adir alimentoso
Si una combinaci6n de aceites o grasas se usara
al freir, revuefva antes de calentar o mientras la grasa
se derrite lentamente.
Siempre caliente la grasa lentamente y obs_rveta
cuando se calienta,
Use un term6metro para freir con aceite cuando
sea posible para evitar sobrecalentar la grasa y que
eche humo,
Nunca trate de mover una sartdn de grasa catiente,
especialmente un freidor con bastante aceite.
Espere hasta que se enfrie el aceite.
AI usar recipientes de vidrio, asegOrese de que
est_n diseSados para la cocci6n sobre la cocina,
Aleje todos los articulos de material pldstico de los
quemadores de superficie.
No deje articulos de
pldstico sobre la
derretir si se dejan muy
cerca del respiradero,
No deje articulos
sobre la supefficie
de la cocina. Et aire La apariencia y la ubicacibn del
caliente det respiradero respiraderovadan
puede hacer que los objetos inflamabfes ardan y
aumente la presiSn de los recipientes cerrados,
Io que puede originar que estallen.
54
Cocinando en la superficie
(continucibn)
• Use el tamafio correcto de recipiente, Evite usar
los recipientes que no son estables o se vuelcan
fAcilmente. Seleccione los recipientes con fondo piano
bastante grandes para contener et alimento y evitar
las salpicaduras y derrames, y Io bastante grandes
para cubrir las parrillas de los quemadores. Esto
ahorrar& el tiempo de limpieza e impedir& la
acumulaci6n peligrosa de alimentos; las salpicaduras
o los derrames dejados sobre ta cocina pueden arder,
Use recipientes con mangos que se pueden agarrar
f&cilmente y que se mantengan frfos.
Para evitar la posibilidad de una quemadura,
siempre asegdrese de que los controles para
todos los quemadores estdn apagados y que todas
las parrillas de los quemadores est_n fr{as antes
de tratar de quitarlas.
• Cuando los alimentos incendiados estdn debajo de
la campana, apague et ventilador. El ventilador, si
esta funcionando, puede propagar las llamas.
Si la cocina estb Iocalizada cerca de la ventana, no
cuelgue las cortinas largas que podr{an ser Ilevadas
por el viento sobre los quemadores de superficie y
crear un peligro de incendio.
* Si huele a gas, apague el gas de la cocina y Ilame a
un tecnico calificado.. Nunca use una llama viva para
encontrar una fuga..
Hornear, asar al fuego directo
y asar
• No use el horno para guardar cosaso Los articulos
guardados en el horno se pueden quemar.
• Permanezca lejos de la cocina al abrir la puerta de
un horno caliente. El aire caliente y el vapor que
escapan pueden causar quemaduras en las
manos, la cara y los ojos.
• Mantenga el horno iimpio de la grasa que se
acumula.
• Coloque las parrillas del homo en las posiciones
deseadas mientras que el homo estd frio.
• Sacando la parrilla hasta la posici6n en que se
detiene podr_ levantar fdciimente los alimentos
pesados. Es tambidn una precauci6n contra
quemaduras al tocar tas superficies catientes de la
puerta o las paredes del homo. La posici6n mrs
baja no est_ diseSada para deslizarse.
• No caliente los recipientes sellados que contienen
comida. La presi6n podria aumentar y el recipiente
podria estallar, causando dahos,
• No use papel aluminio en ningrJn sitio del homo
excepto como se describe en este manual, El real
manejo podr{a resultar en un peligro de incendio o
da5o a la cocina_
= No se debe jamds utilizar papel de aluminio para
revestir la superficie inferior del homo. El uso
inapropiado de aluminio pudiera iniciar un
incendio.
= AI usar las bolsas de cocci6n o de asar en el
homo, siga las instrucciones del fabricante..
• Use s61o los recipientes de vidrio que se
recomiendan para uso en los hornos de gas.
° Siempre quite la bandeja del asador del homo tan
pronto como termine de asar. La grasa dejada en
la bandeja se puede encender si se usa el homo sin
quitar la grasa de la bandeja del asador.
• AI asar al fuego directo, si la came esta demasiado
cerca de la llama, la grasa puede encenderse.
Corte la grasa excesiva para evitar llamas altas.
• Aseg_3rese de que la bandeja del asador est6
colocada correctamente para reducir la posibilidad
de incendios causados por la grasa.
• Si hubiera un incendio causado por la grasa en la
bandeja del asador, apague el control de! homo y
mantenga cerrado la puerta del homo para contener
el fuego hasta que se apague.
55
Horno de auto limpieza
o No limpie la junta de la puertao La junta de la puerta
es esencial para un setlo hermetico. Tenga cuidado de
no frotar, daSar o mover la junta
• No use limpiadores para hornos. Ningun limpiador
comercial para hornos n1ningun revestimiento
protectivo de los bordes del homo de cualquier tipo se
deberia usar dentro o alrededor de cualquier parte deJ
homo.. El residuo de los limpiadores para hornos
da_ar_ el interior del homo cuando se use el ciclo de
auto limpieza._
° Antes de usar auto limpieza, remueva la bandeja del
asador, la parrilla, todos los instrumentos de cocci6n y
cualquier papel de atuminio del homo°
° Las parrillas del homo deberian ser removidos
del homo antes de empezar el ciclo de limpieza
autom_tica.
• Aseg_rese de timpiar tas salpicaduras excesivas
antes de iniciar el ciclo de auto limpieza.
° Si el ciclo de auto limpieza tuviera un fallo, apague
el homo y desconecte la corriente el_ctrica. Haga
que un t_cnico calificado to revise.
° Limpie s61o las partes enumeradas en este Guia
de uso y de cuidado.
= Mantenga la cocina limpia y fibre de
acumulaciones de grasa o salpicaduras, las cuales
se pueden encender.
GUARDE ESTAS INSTRUCCIONES
56
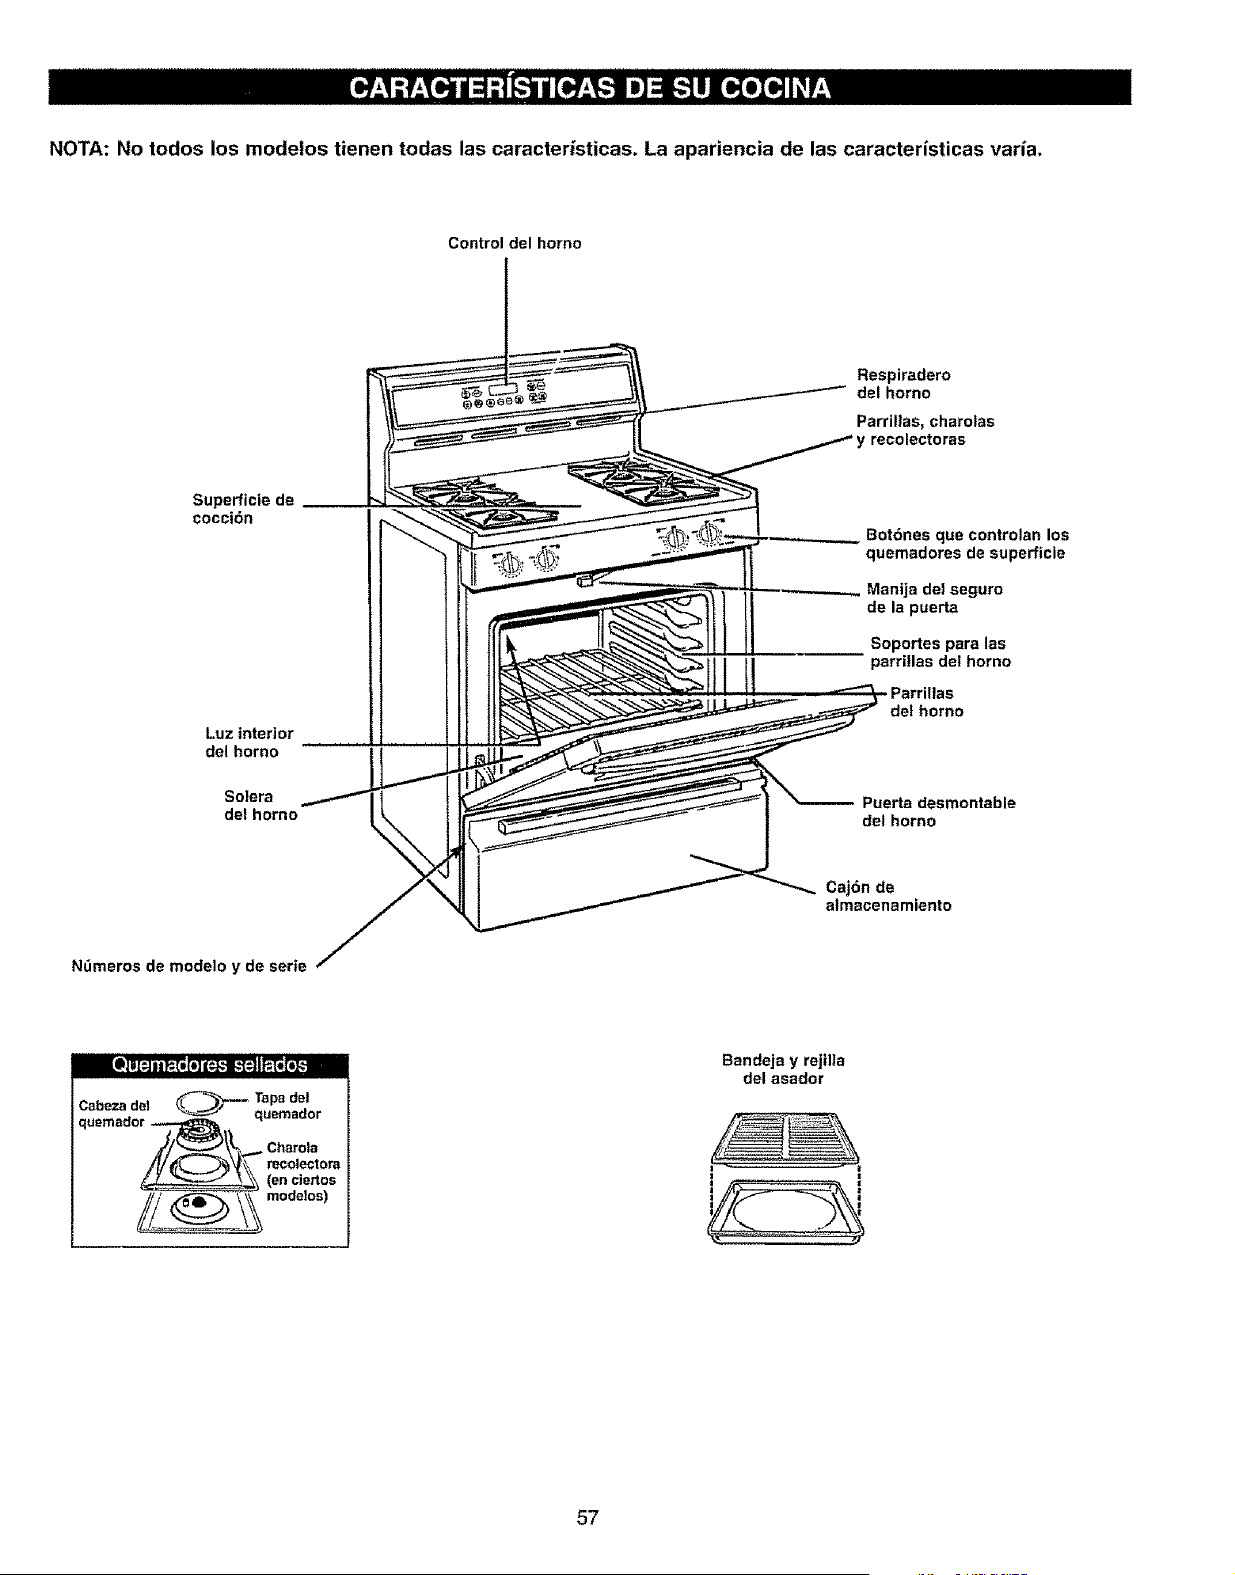
NOTA: No todos los modelos tienen todas las caracter/sticas. La apariencia de las caracteristicas varia.
Control del homo
Respiradero
del homo
Parril]as, charolas
recolectoras
Superficie de __
cocci6n
Luz interior
del homo
Bot6nes que controlan los
quemadores de superficle
Manija de! seguro
de la puerta
Soportes para las
parri|las del homo
Parrinas
del homo
Solera Puerta desmontable
del homo del homo
Caj6n de
almacenamiento
Nl]meros de modelo y de serie
__IF_I;1;!_I -.
Tapa
de!
Cabeza de! _"
quemador
Charola
recol_tora
(en clertos
modelos)
Bandeja y rejilla
del asador
I :: , ;
57
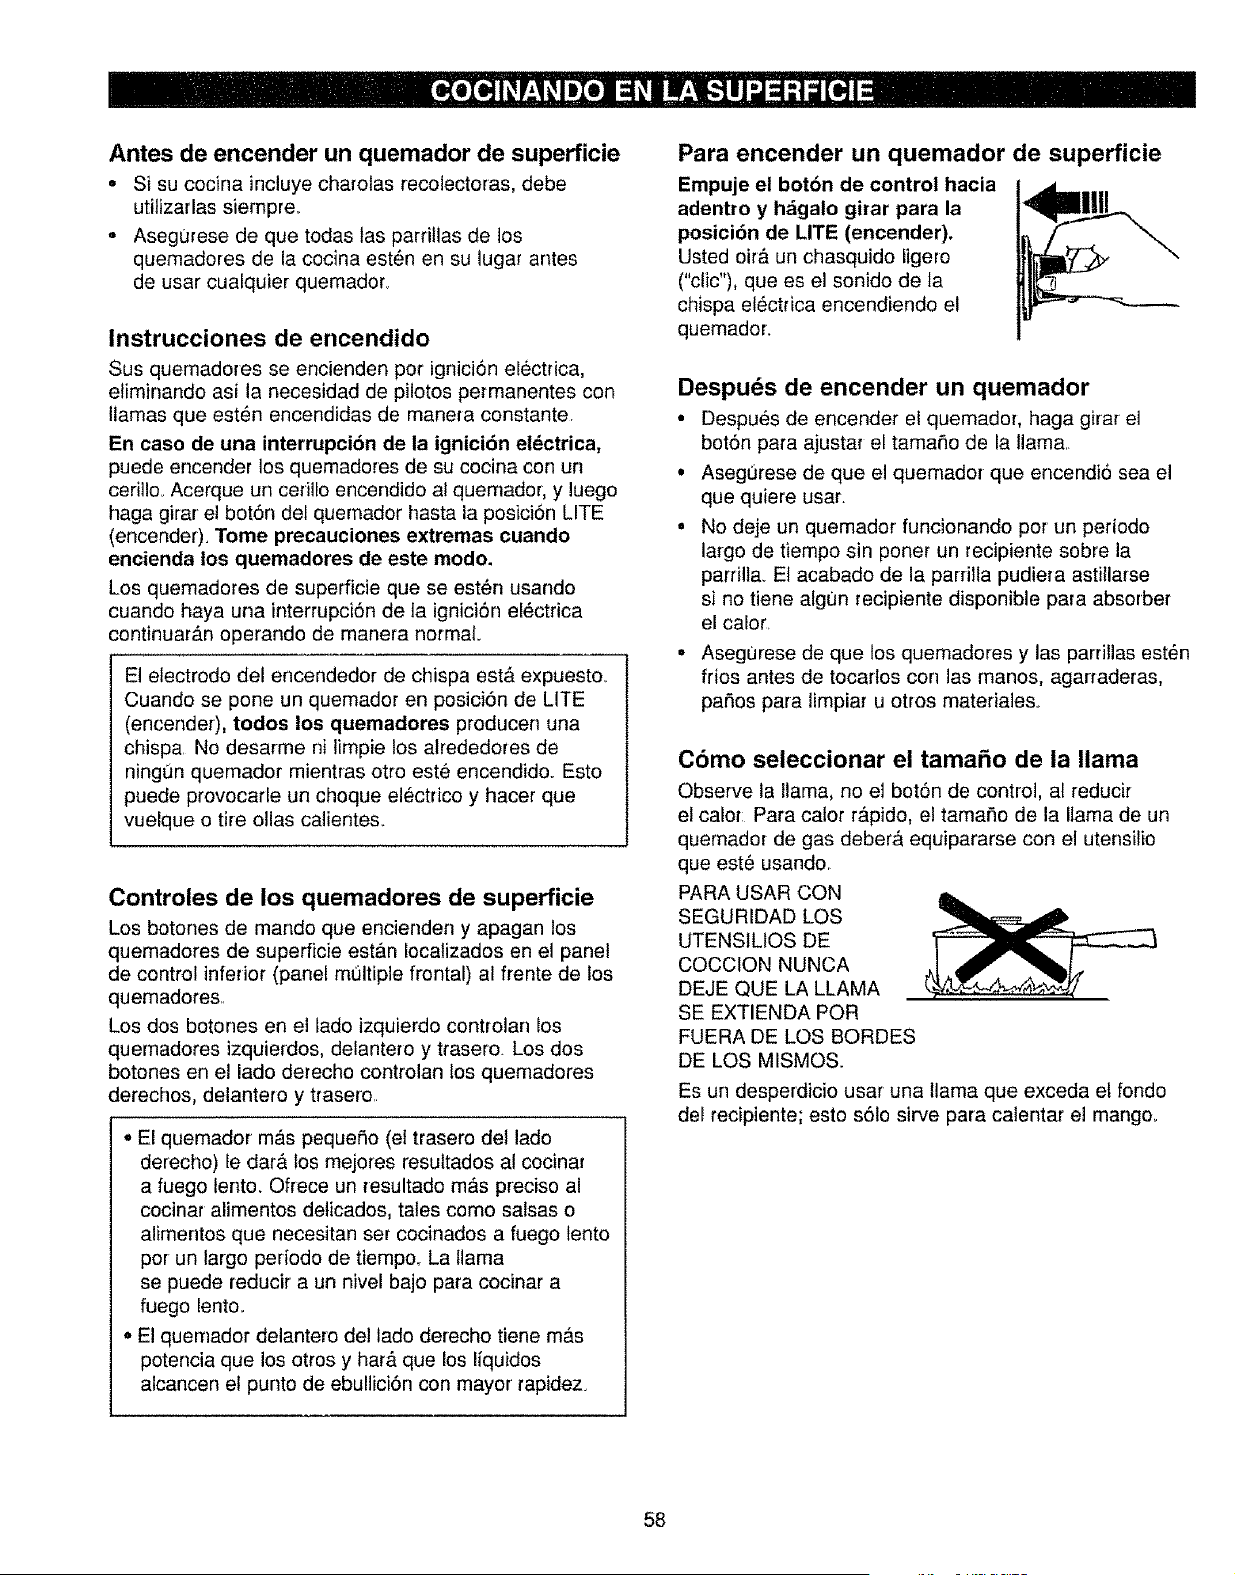
Antes de encender un quemador de superficie
• Si su cocina incluye charolas recolectoras, debe
utitizarlas siempre.
= Asegurese de que todas tas parriflas de los
quemadores de la cocina est6n en su lugar antes
de usar cualquier quemador_
Instrucciones de encendido
Sus quemadores se encienden por ignici6n electrica,
eliminando asi la necesidad de pilotos permanentes con
llamas que est6n encendidas de manera constante.
En caso de una interrupcion de la ignici6n el6ctrica,
puede encender los quemadores de su cocina con un
cerilloo Acerque un cerilto encendido al quemador, y luego
haga girar el botSn del quemador hasta la posiciSn LITE
(encender). Tome precauciones extremas cuando
encienda tos quemadores de este modo.
Los quemadores de superficie que se est6n usando
cuando haya una interrupciSn de ta ignici6n el6ctrica
continuar_.n operando de manera normal
El electrodo del encendedor de chispa est& expuesto_
Cuando se pone un quemador en posici6n de LITE
(encender), todos los quemadores producen una
chispa. No desarme ni limpie los alrededores de
ningun quernador mientras otto este encendidoo Esto
puede provocarie un choque el6ctdco y hacer que
vuelque o tire ollas calientes.
Controles de los quemadores de superficie
Los botones de mando que encienden y apagan los
quemadores de superficie estan Iocalizados en et panel
de control inferior (panel multiple frontal) al frente de los
quemadores.
Los dos botones en el lado izquierdo controlan los
quemadores izquierdos, delantero y trasero. Los dos
botones en el lado derecho controlan los quemadores
derechos, delantero y trasero.
. El quemador mas pequeSo (et trasero del lade
derecho) le dar& los mejores resultados al cocinar
a fuego lento. Ofrece un resultado m&s preciso al
cocinar alimentos deticados, tales como salsas o
alimentos que necesitan set cocinados a fuego lento
por un largo periodo de tiempo_ La llama
se puede reducir a un nivel bajo para cocinar a
fuego lento°
. El quemador delantero del lado derecho tiene ma.s
potencia que los otros y har& que los Ifquidos
alcancen et punto de ebulliciSn con mayor/apidez.
Para encender un quemador de superficie
Empuje el botbn de control hacia
adentro y h_galo girar para la
posici6n de LITE (encender).
Usted oir,_ un chasquido ligero
("clic"), que es el sonido de ta
chispa el6ctrica encendiendo el
quemador.
Despu6s de encender un quemador
• Despu6s de encender el quemadoh haga girar el
botSn para ajustar el tamale de la tlama..
° Asegurese de que el quemador que encendi6 sea el
que quiere usar_
= No deje un quemador funcionando pot un periodo
largo de tiempo sin poner un recipiente sobre la
parrilla_ Et acabado de la parrilla pudiera astHlarse
si no tiene atgun recipiente disponible para absorber
el calor.
• Asegurese de que tos quemadores y las parrillas est6n
frios antes de tocarlos con las manos, agarraderas,
paSos para limpiar u otros materialeso
Cbmo seleccionar el tama£m de la llama
Observe la llama, no el bot6n de control, al reducir
el calor: Para cator r_.pide, el tama_o de la llama de un
quemador de gas deber_ equipararse con el utensilio
que est6 usando..
PARA USAR CON
SEGURiDAD LOS
UTENSILtOS DE
COCCION NUNCA
DEJE QUE LA LLAMA
SE EXTIENDA POR
FUERA DE LOS BORDES
DE LOS MISMOS.
Es un desperdicio usar una llama que exceda el rondo
del recipiente; esto s61o sirve para catentar el mango°
58
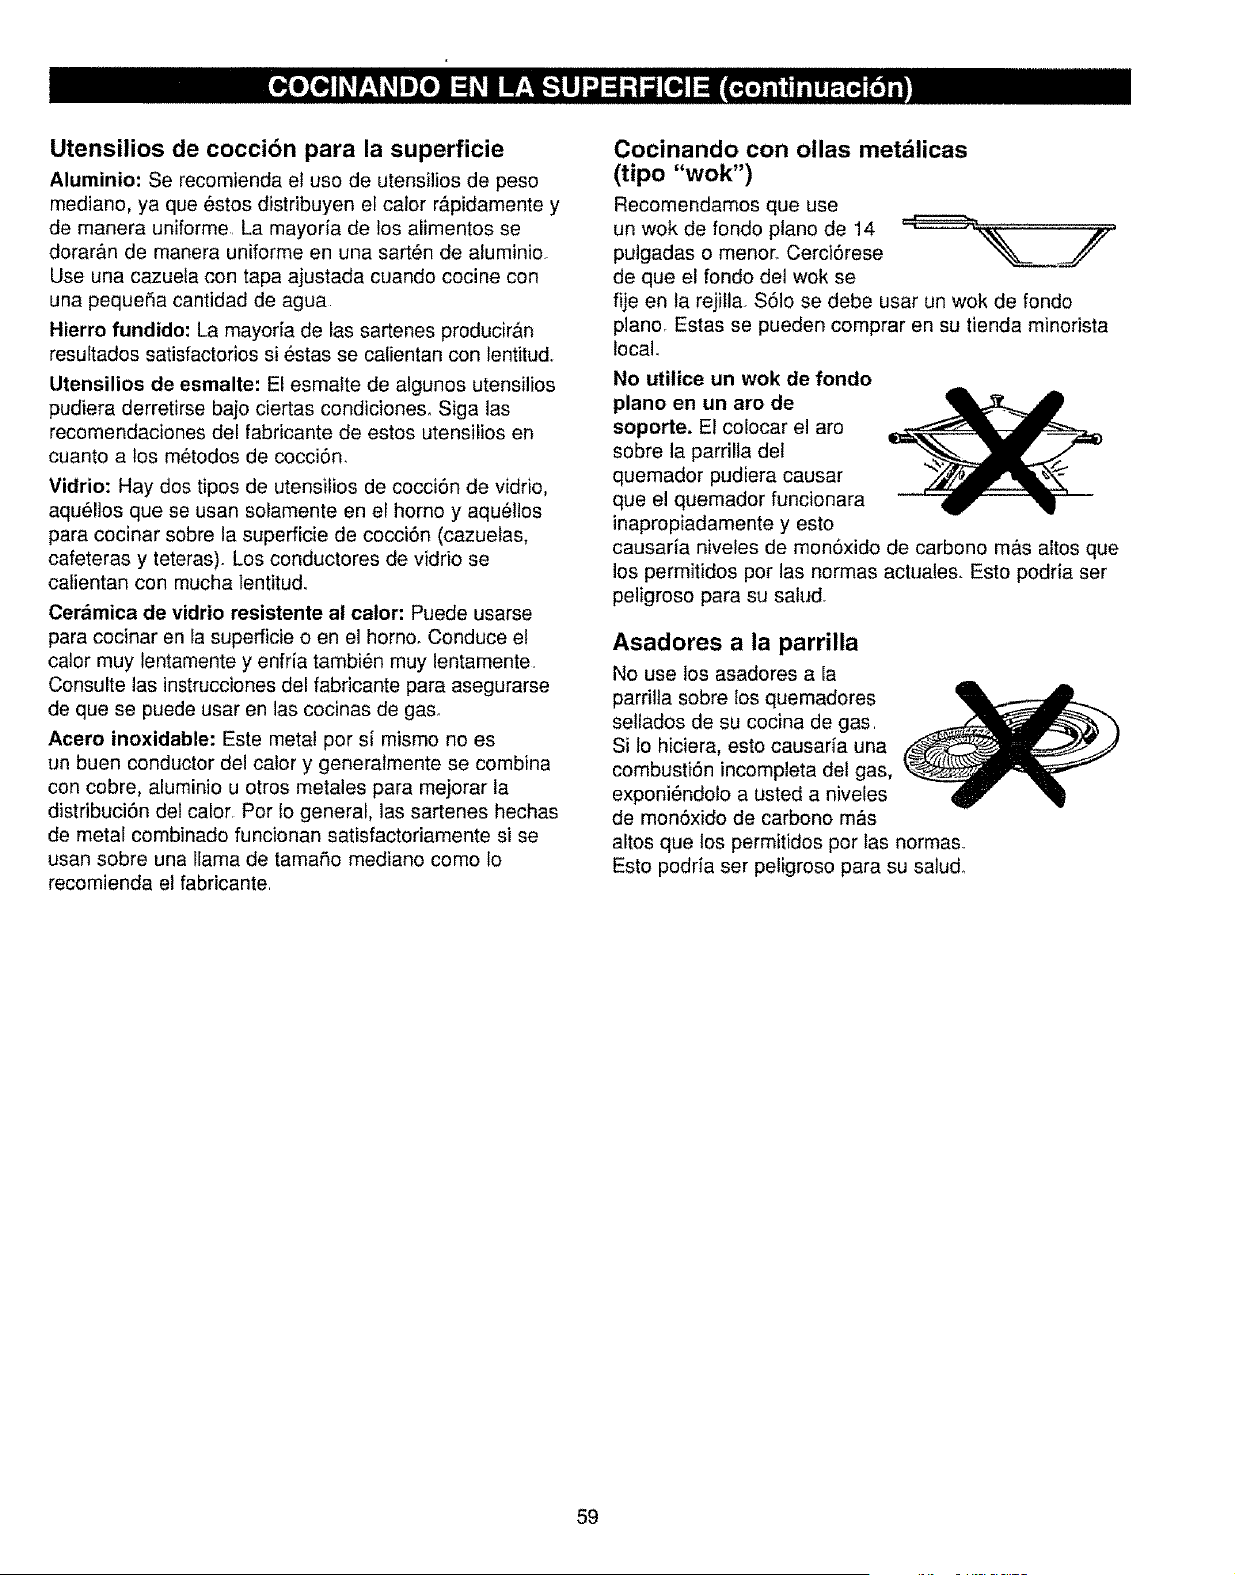
Utensilios de coccibn para la superficie
Aluminio: Se recomienda el uso de utensilios de peso
mediano, ya que estos distribuyen el calor r_pidamente y
de manera uniforme. La mayorfa de los alimentos se
dorar&n de manera uniforme en una sart_n de aluminio
Use una cazuela con tapa ajustada cuando cocine con
una pequeSa cantidad de agua
Hierro fundido" La mayoria de las sartenes producirAn
resultados satisfactorios si 6stas se calientan con tentitud.
Utensilios de esmalte: El esmalte de algunos utensilios
pudiera derretirse bajo ciertas condicioneso Siga las
recomendaciones del fabricante de estos utensilios en
cuanto a los metodos de cocciSn
Vidrio: Hay dos tipos de utensilios de cocciSn de vidrio,
aquellos que se usan solamente en el homo y aquel!os
para cocinar sobre la superficie de cocci6n (cazuelas,
cafeteras y teteras)o Los conductores de vidrio se
calientan con mucha lentitudo
Cer_mica de vidrio resistente al calor: Puede usarse
para cocinar en la superficie o en el homo° Conduce et
calor muy lentamente y enfria tambi6n muy lentamente.
Consulte las instruccionesdel fabricante para asegurarse
de que se puede usar en 1as cocinas de gas°
Acero inoxidable: Este metal por si mismo no es
un buen conductor del calory generalmente se combina
con cobre, aluminio u otros metales para mejorar la
distribuciSn del calor. Por 1o general, las sartenes hechas
de metal combinado funcionan satisfactoriamente si se
usan sobre una llama de tamaSo mediano como fo
recomienda el fabricante.
Cocinando con ollas met,_licas
(tipo "wok")
Recomendamos que use
un wok de fondo ptano de 14
pulgadas o menor. Cerci6rese
de que el fondo del wok se
fije en ta rejilla $61o se debe usar un wok de rondo
planor Estas se pueden comprar en su tienda minorista
local.
No utilice un wok de fondo
piano en un aro de
soporte. El colocar el aro
sobre la parrilla del
quemador pudiera causar
que el quemador funcionara
inapropiadamente y esto
causaria niveles de mon6xido de carbono m&s altos que
los permitidos por las normas actuales. Esto podria ser
peligroso para su salud
Asadores a la parrilla
No use los asadores a la
parrilta sobre los quemadores
sellados de su cocina de gas.
Si Io hiciera, esto causarfa una
combustiSn incompleta del gas,
exponi_ndolo a usted a niveles
de monSxido de carbono m&s
altos que los permitidos por tas normas.
Esto podda ser peligroso para su saludo
59
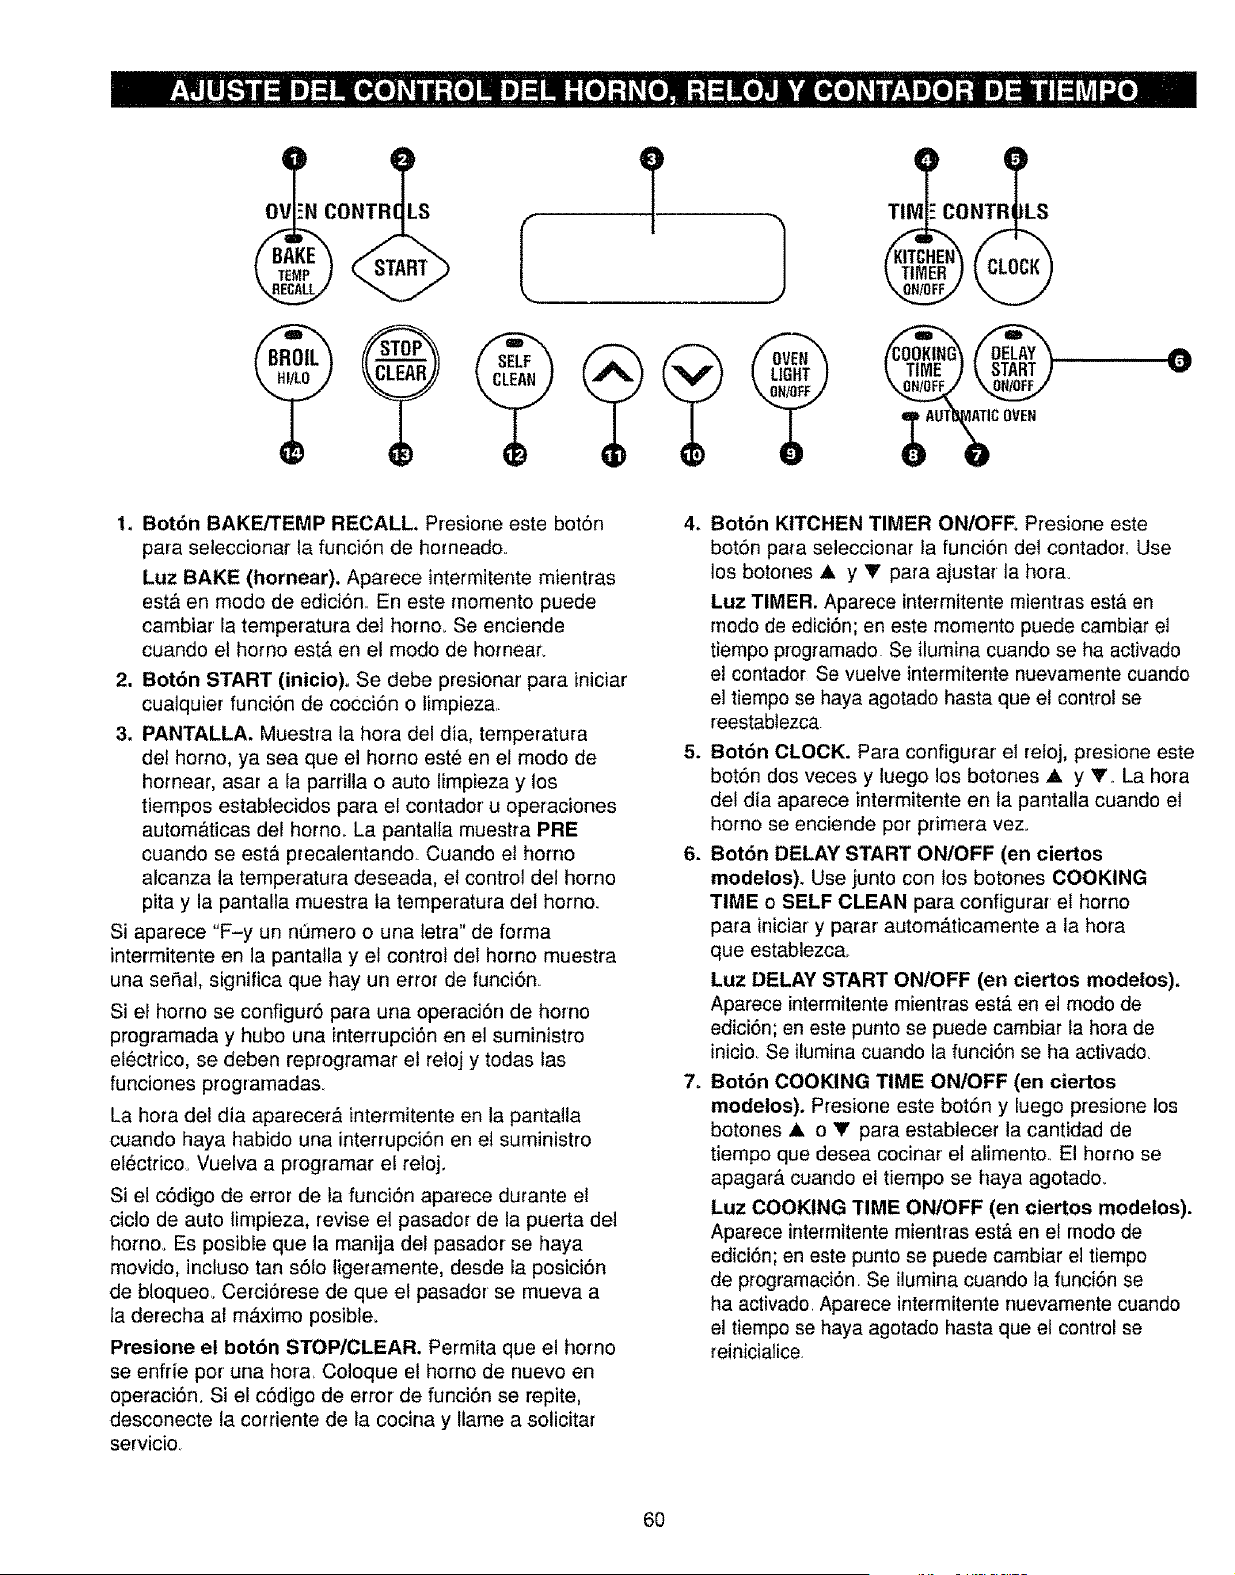
q
OV
i E)
!N CONTRC LS
q (D
TliVl CONTRI ILS
C OVEN
.0
1. Bot6n BAKE/TEMP RECALL. Presione este bot6n
para seleccionar ta funci6n de horneadoo
Luz BAKE (hornear). Aparece intermitente mientras
est_ en modo de edici6n. En este momento puede
cambiar la temperatura del horno. Se enciende
cuando el homo est& en el modo de hornear:
2. Botbn START (inicio). Se debe presionar para iniciar
cualquier funci6n de cocci6n o limpieza
3. PANTALLA. Muestra la hora del dia, temperatura
det homo, ya sea que el homo este en el modo de
hornear, asar a la parrflla o auto limpieza y los
tiempos establecidos para el contador u operaciones
autom&ticas del homo° La pantalla muestra PRE
cuando se esta precalentando Cuando el homo
alcanza la temperatura deseada, el control del homo
pita y la pantalla muestra fa temperatura det horno_
Si aparece "F-y un n0mero o una letra" de forma
intermitente en la pantalla y el control del horno muestra
una seSal, significa que hay un error de funci6n.
Si el homo se configur6 para una operaci6n de horno
programada y hubo una interrupci6n en el suministro
electrico, se deben reprogramar el reloj y todas las
funciones programadaso
La hora del dia aparecer_, intermitente en la pantalla
cuando haya habido una interrupci6n en el suministro
el_ctrico Vuelva a programar el retoj.
Si el c6digo de error de la funci6n aparece durante et
ciclo de auto limpieza, revise el pasador de la puerta del
homo. Es posible que la manija del pasador se haya
movido, incluso tan s6to ligeramente, desde la posici6n
de bloqueo> Cerci6rese de que el pasador se mueva a
la derecha at m_.ximo posibte.
Presione el botbn STOP/CLEAR. Permita que el horno
se enfrie por una hora Coloque el horno de nuevo en
operaci6n. Si el c6digo de error de funci6n se repite,
desconecte la corriente de la cocina y Ilame a solicitar
servicio
4. Bot6n KITCHEN TIMER ON/OFF. Presione este
bot6n para seleccionar la funci6n del contador. Use
los botches i y W' papa ajustar la hora.
Luz TIMER. Aparece intermitente mientras est& en
modo de edici6n; en este momento puede cambiar el
tiempo programado Se ilumina cuando se ha activado
el contador Se vuelve intermitente nuevamente cuando
el tiempo se haya agotado hasta que el control se
reestablezca
5. Bot6n CLOCK. Para configurar el reloj, presione este
bot6n dos veces y luego los botches A y V La hora
del dia aparece intermitente en la pantalla cuando el
homo se enciende per primera vezo
6. Bot6n DELAY START ON/OFF (en ciertos
modelos). Use junto con los botches COOKING
TIME e SELF CLEAN para configurar et horno
para iniciar y parar autom_.ticamente a la hora
que establezca
Luz DELAY START ON/OFF (en ciertos modelos).
Aparece intermitente mientras est_ en el modo de
edici6n; en este punto se puede cambiar la hora de
inicio Se ilumina cuando la funci6n se ha activado.
7. Bot6n COOKING TIME ON/OFF (en ciertos
modelos). Presione este bot6n y luego presione los
botones i o _' para establecer la cantidad de
tiempo que desea cocinar el alimento El homo se
apagar& cuando el tiempo se haya agotado.
Luz COOKING TIME ON/OFF (en ciertos modelos).
Aparece intermitente mientras est& en el rnodo de
edici6n; en este punto se puede cambiar el tiempe
de programaci6n Se ilumina cuando la funci6n se
ha activado Aparece intermitente nuevamente cuando
el tiempo se haya agotado hasta que el control se
reiniciatice
6O
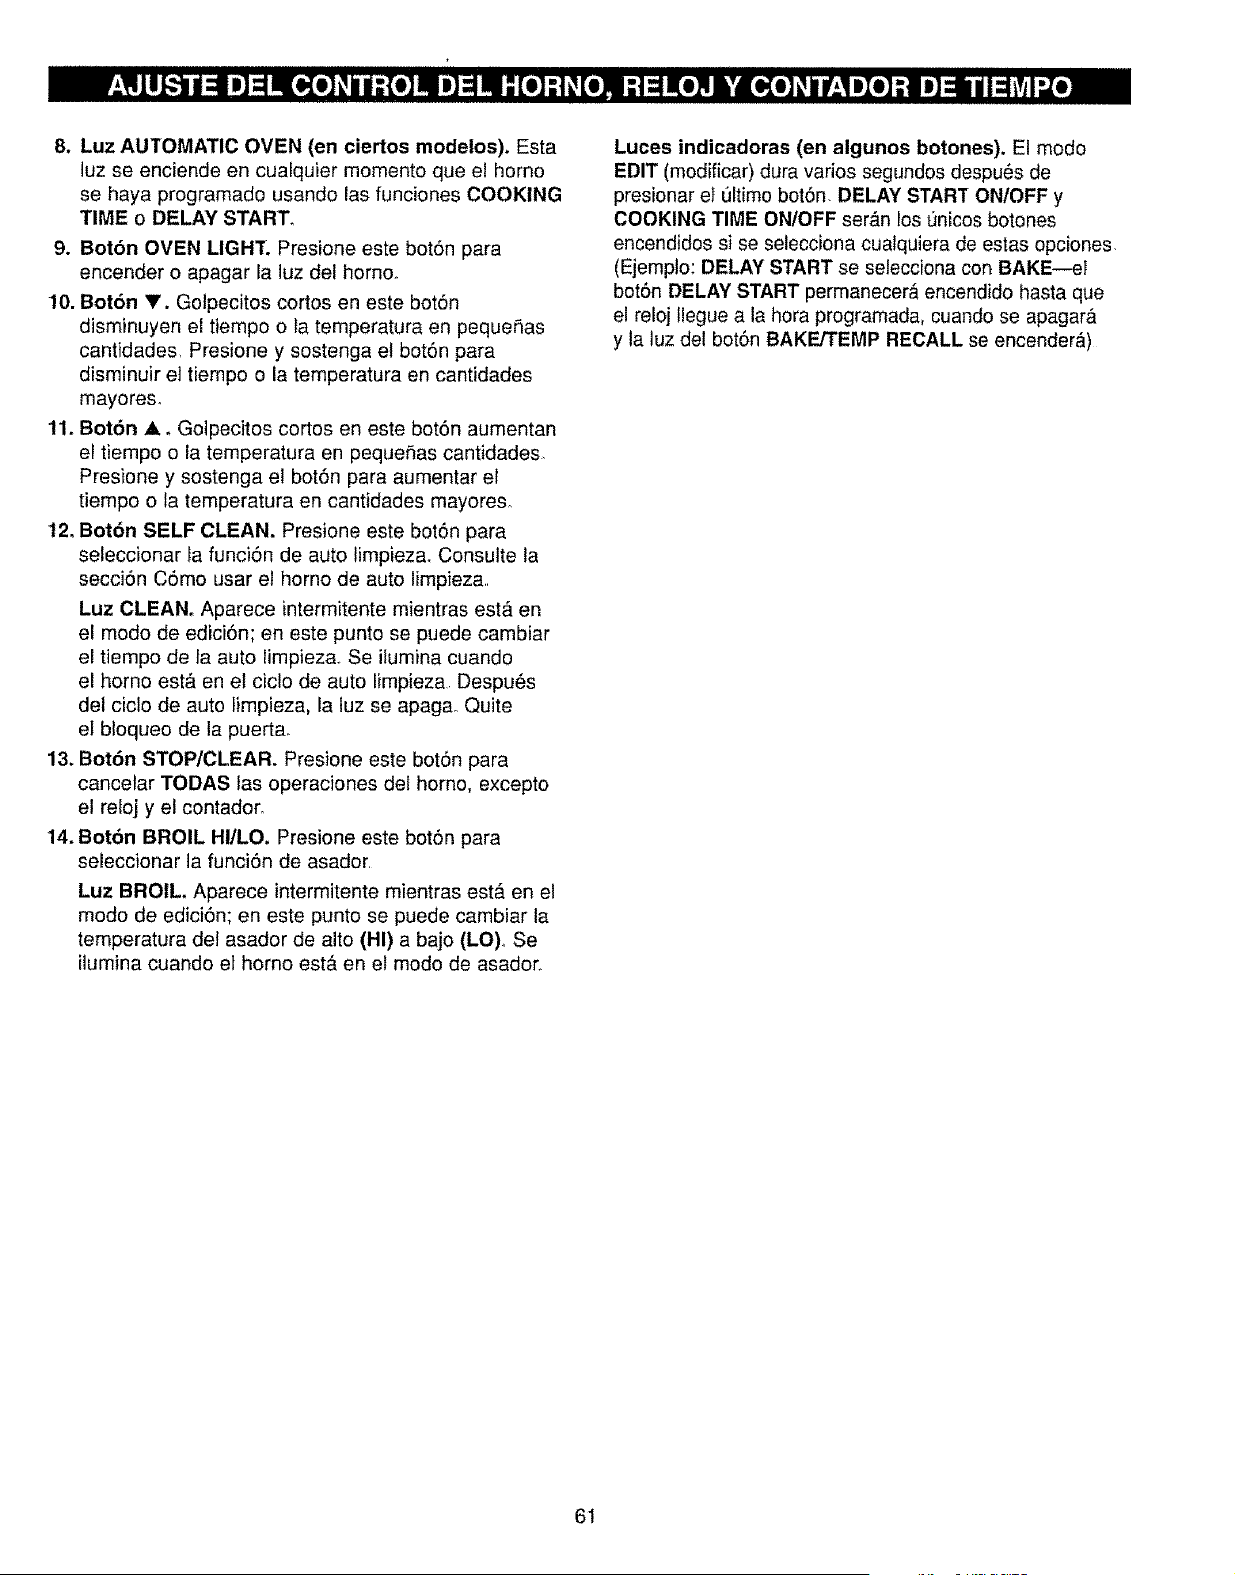
8. Luz AUTOMATIC OVEN (en ciertos modeios). Esta
luz se enciende en cualquier momento que el homo
se haya programado usando las funciones COOKING
TIME o DELAY START.
9. Botbn OVEN LIGHT. Presione este bot6n para
encender o apagar la luz del horno.
10. Bot6n V. Golpecitos cortos en este bot6n
disminuyen el tiempo o ta temperatura en pequeSas
cantidades, Presione y sostenga el bot6n para
disminuir et tiempo o la temperatura en cantidades
mayores.
11. Bot6n A° Gotpecitos cortos en este bot6n aumentan
el tiempo o ia temperatura en pequefias cantidades
Presione y sostenga el bot6n para aumentar el
tiempo o la temperatura en cantidades mayores.
t2. Bot6n SELF CLEAN. Presione este bot6n para
seleccionar fa funci6n de auto limpieza. Consulte la
secci6n C6mo usar el horno de auto limpieza..
Luz CLEAN° Aparece intermitente mientras est& en
el modo de edici6n; en este punto se puede cambiar
el tiempo de la auto limpieza. Se iiumina cuando
el homo est& en el cic!o de auto limpieza Despu6s
del ciclo de auto limpieza, la luz se apagao Quite
el bloqueo de la puerta_
13. Bot6n STOP/CLEAR. Presione este bot6n para
cancetar TODAS las operaciones del homo, excepto
el reloj y el contador.
14. Bot6n BROIL HIILO. Presione este bot6n para
seleccionar la funci6n de asador.
Luz BROIL. Aparece intermitente mientras est,. en el
modo de edicibn; en este punto se puede cambiar la
ternperatura del asador de alto (HI) a bajo (LO). Se
ilumina cuando el homo est& en el modo de asador.
Luces indicadoras (en algunos botones). El modo
EDIT (modificar) dura varios segundos despu6s de
presionar el Ultimo bot6n. DELAY START ON/OFF y
COOKING TIME ON/OFF ser_.n los t_nicosbotches
encendidos si se selecciona cualquiera de estas opciones
(Ejemplo: DELAY START se selecciona con BAKE--el
bot6n DELAY START permanecer_ encendido hasta que
el reloj llegue a la hora programada, cuando se apagara
y la luz del bot6n BAKE/TEMP RECALL se encender_)
61

Antes de usar su horno
Cerci6rese de que usted sabe c6mo fijar los controles
correctamente Practique quitar y cotocar las pardllas
cuando el horno est_ frio. Lea ta informaci6n y las
sugerencias en las p_.ginas siguientes, Conserve esta
guia a mano, en un lugar donde pueda consuttarla,
especialmente durante fas primeras semanas.
Ignicibn el_ctrbnica
El quemador del horno se enciende pot ignici6n
el_ctr6nica.
Para encender el quemador, use el control del homo
para seleccionar BAKE o BROIL y establecer la
temperatura deseada. El quemador deber#, encenderse
en los siguientes 30-90 segundos,
Despues de que el homo alcance la temperatura
seleccionada, el horno realiza un ciclo repetidamente--
se apaga completamente y luego se enciende con la
llama a toda intensidad--para mantener controlada
la temperatura del horno.
Interrupci6n del suministro eidctrico
PRECAUCION: No intente encender et horno de
ignici6n electr6nica durante un fallo del suministro
electrico.. No seth, posible encender el homo cuando
ocurra una intetrupci6n del suministro electrico. El
gas no circular& a menos que la barra incandescente
este caliente.
Si el homo est,. encendido cuando ocurre una
interrupci6n del suministro electrico, el quemador del
homo se apagar& automb.ticamente y este no se podr&
encender de nuevo hasta que regrese la electricidad.
Los respiraderos dei horno
El homo recibe ventilaci6n a trav6s de aberturas en
los conductos de la parte posterior de la superficie
de cocciSn. No bloquee estas aberturas cuando este
cocinando en el horno--es importante que no se
interrumpa la circulaciSn de aire caliente que sale
del homo y el aire fresco que va a los quemadores
del homo.
, Las aberturas det respiradero y las superficies
cercanas pudieran calentarse demasiado. No
las toque.
• Los mangos de las cazuelas y sartenes sobre
ta superficie de coccidn pudieran calentarse
demasiado si se dejan muy cerca del respiradero,
= No deje articulos de
pldstico sobre la
superficie de
coccibn--_stos
podrian derretirse si
se dejaran muy cerca
del respiradero.
La apariencia y la ubicaci6n
• Los articulos de metal det respiradero varian
se pondrdn calientes si
se dejan sobre la superficie de coccibn y podrian
causar quemaduras,
• No deje ningdn articulo sobre la superficie de
cocci6n. El aire caliente que sale por el respiradero
pudiera incendiar los articulos inflamables.. Tambien
pudiera causar un aumento de presi6n en los
recipientes cerrados, a tal punto que 6stos pudieran
reventarse..
Luz del horno
Use el interruptor del control del homo para encender
o apagar la luz.
62
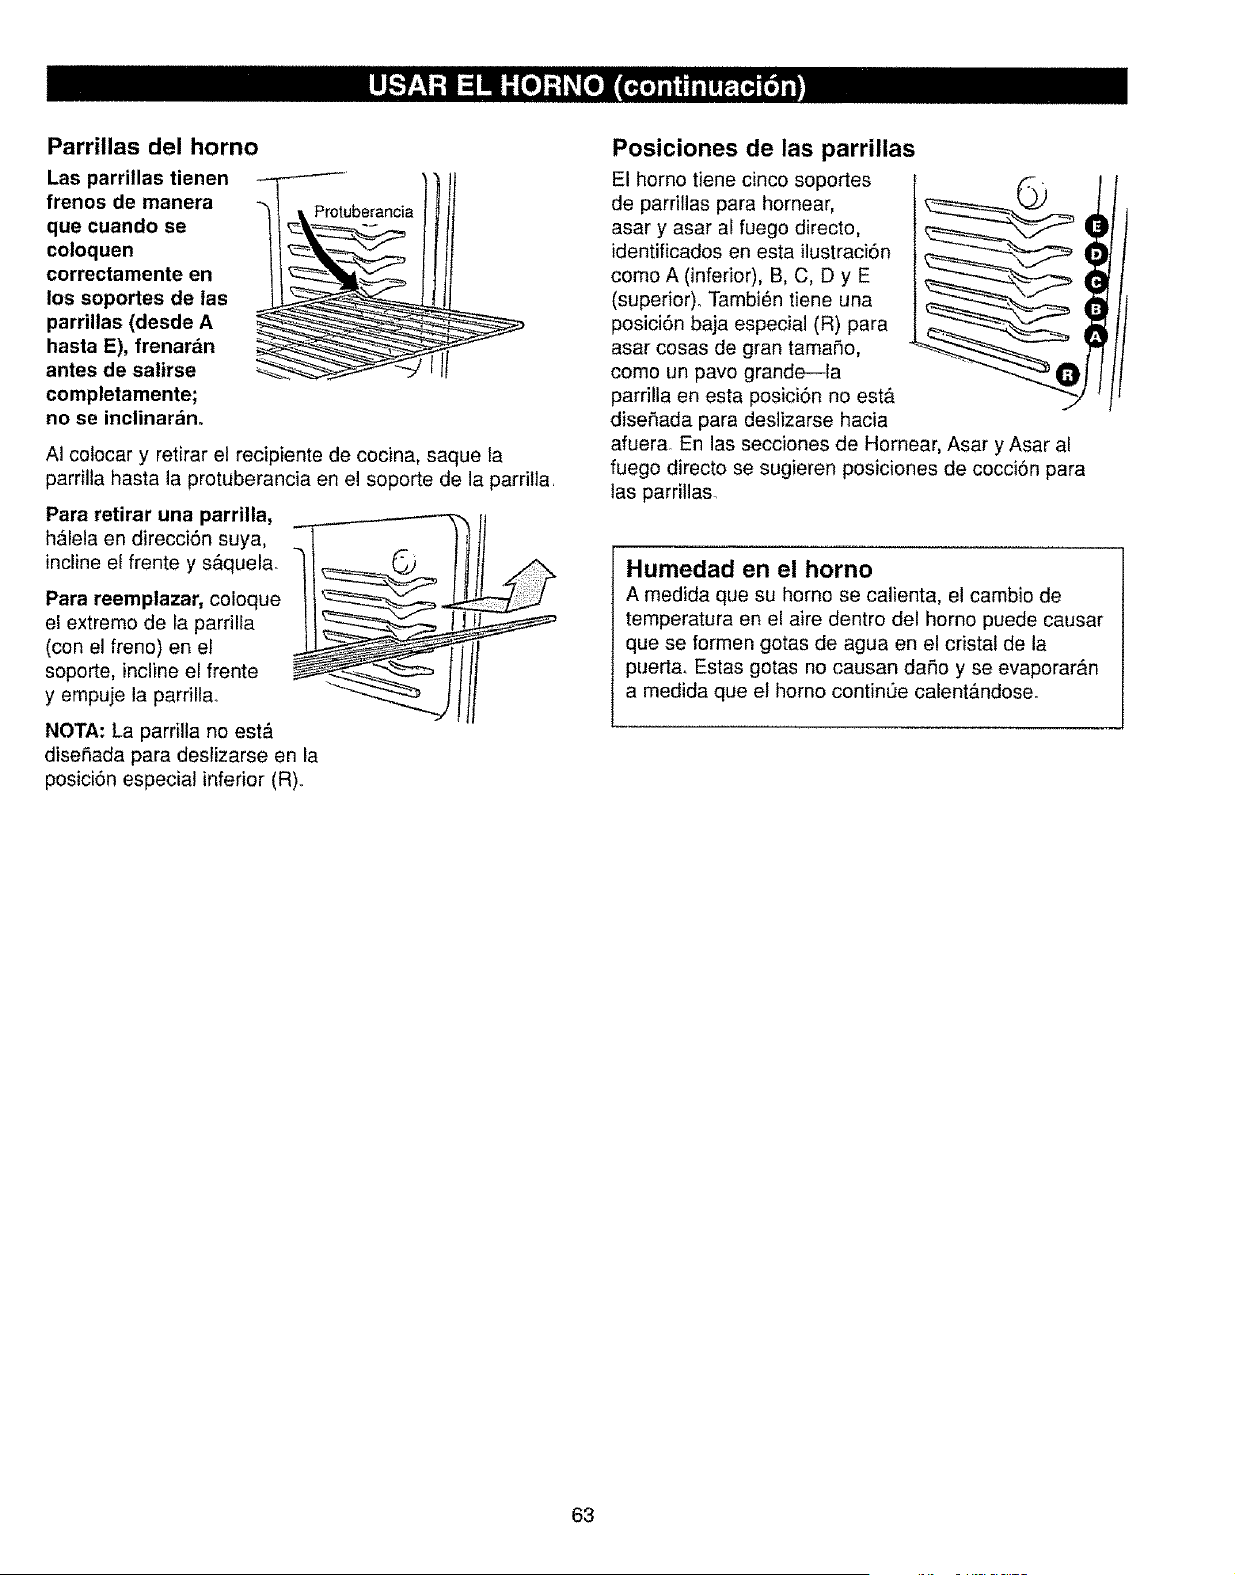
Parrillas del horno
Las parrillas tienen
frenos de manera
que cuando se
coloquen
correctamente en
los soportes de las
parrillas (desde A
hasta E), frenar_n
antes de salirse
completamente;
no se inclinar&n°
AI colocar y retirar el recipiente de cocina, saque la
parrilla hasta la protuberancia en el soporte de la parrilla.
Para retirar una parrilla,
h_lela en direcciSn suya,
incline ef frente y s&quela.
Para reemplazar, coloque
el extremo de fa parriHa
(con e] freno) en el
soporte, incline el frente
y empuje la parrillao
NOTA- La parfilla no est&
dise5ada para deslizarse en la
posiciSn especial inferior (R)..
Posiciones de las parrillas
El homo tiene cinco soportes
de parrillas para hornear,
asar y asar al fuego directo,
identificados en esta ilustraci6n
como A (inferior), B, C, D y E
(superior). Tambi_n tiene una
posiciSn baja especial (R) para
asar cosas de gran tamaSo,
como un pavo grande--la
pardlla en esta posiciSn no est&
diseSada para deslizarse hacia
afuera. En las secciones de Hornear, Asar y Asar al
fuego directo se sugieren posiciones de cocciSn para
las parrillaso
Humedad en el horno
A medida que su homo se calienta, el cambio de
temperatura en el aire dentro del homo puede causar
que se formen gotas de agua en e! cristaf de la
puerta. Estas gotas no causan daSo y se evaporar&n
a medida que el homo contin0e calent&ndose°
63
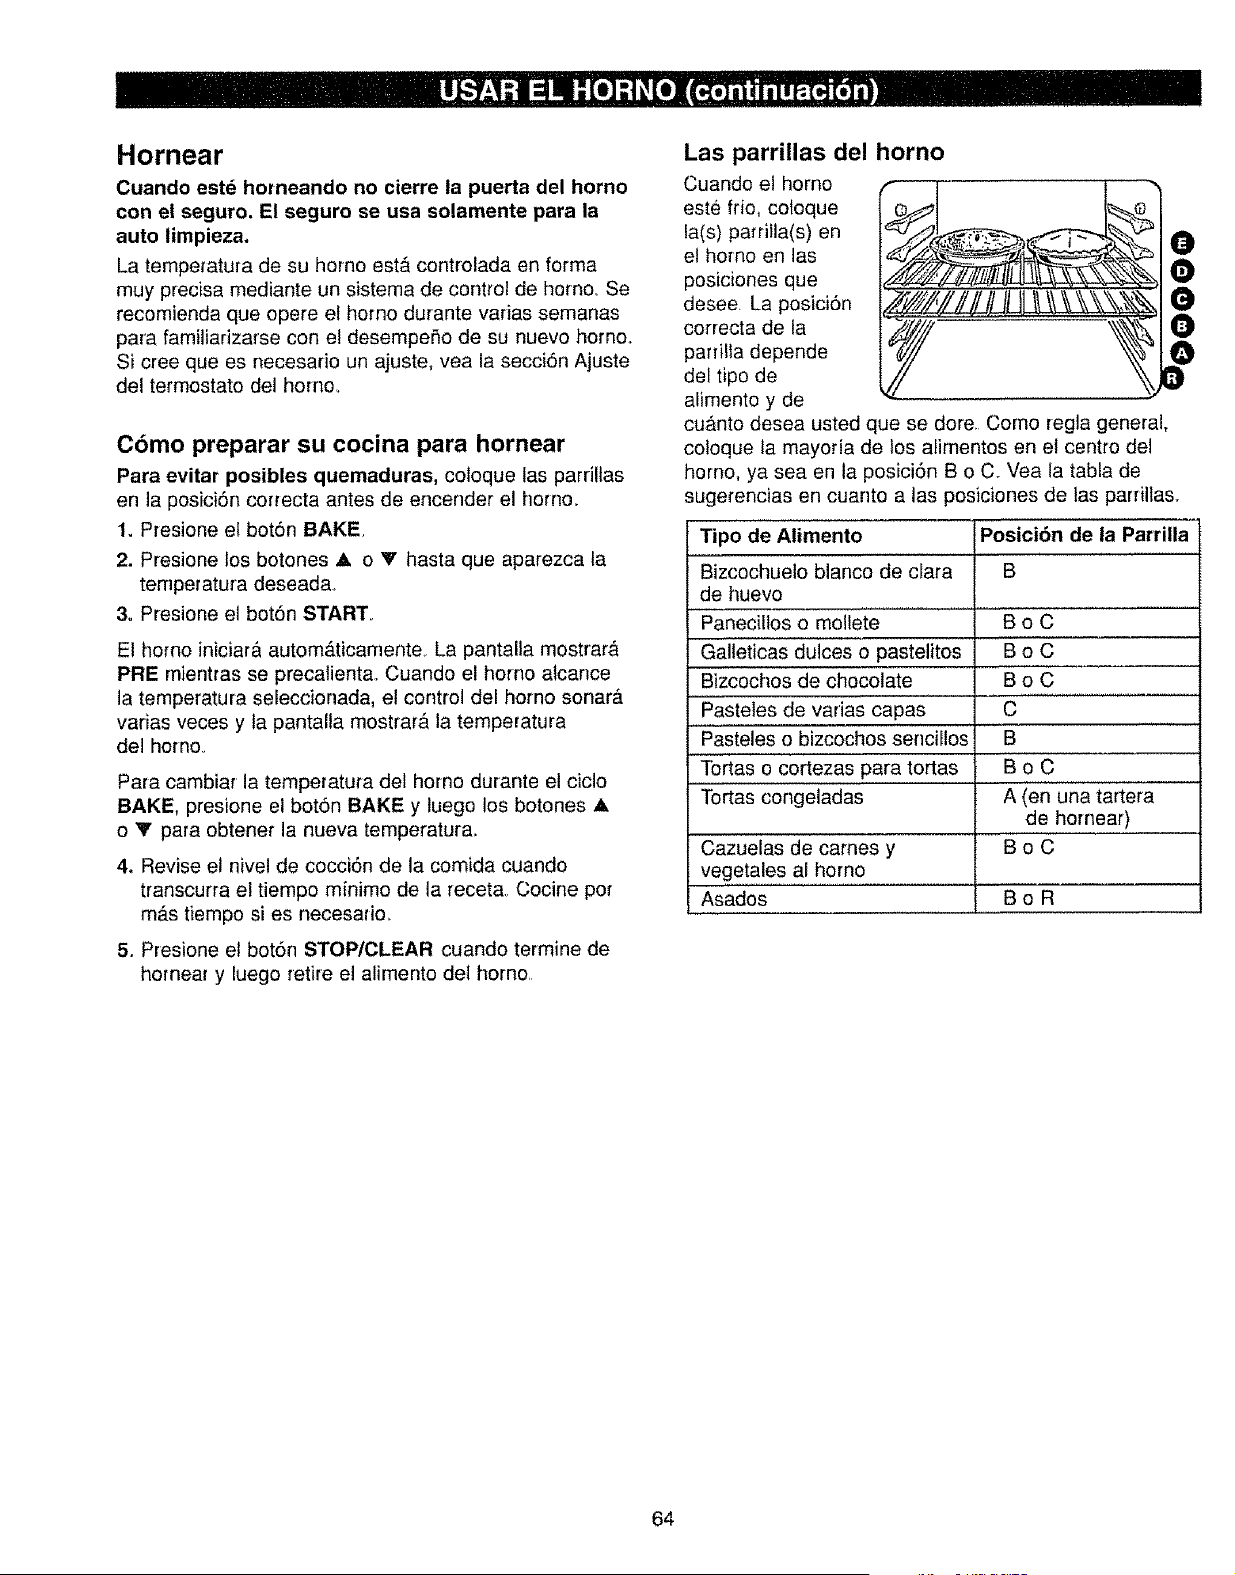
Hornear
Cuando est_ horneando no cierre la puerta del homo
con el seguro. El seguro se usa solamente para la
auto limpieza.
La tempetatura de su homo est_ controlada en forma
muy precisa mediante un sistema de control de horno. Se
recomienda que opere el homo durante varias semanas
para familiadzarse con el desempeAo de su nueve homo..
Si cree que es necesario un ajuste, vea la secci6n Ajuste
de! termostato del horno.
C6mo preparar su cocina para hornear
Para evitar posibles quemaduras, coloque las pardltas
en la posici6n correcta antes de encender el homo_
1_ Presione el bot6n BAKE.
2. Presione los botones A o V hasta que aparezca ta
temperatura desead&
3. Presione el bot6n START.
El homo iniciar& autom_.ticamente La pantalla mostrar&
PRE mientras se precalienta. Cuando el homo atcance
la temperatura seleccionada, el control del homo sonara.
varias veces y la pantalta mostrar,_ la temperatura
del horno_
Para cambiar la temperatura del homo durante el ciclo
BAKE, presione el botSn BAKE y luego los botones A
o Y para obtener la nueva temperatur&
4. Revise el nivel de cocciSn de la comida cuando
transcurra el tiempo minimo de la recet& Cocine per
m_s tiempo si es necesario..
5. Presione el bot6n STOP/CLEAR cuando termine de
homear y luego retire el alimento det homo
Las parrillas del horno
Cuando el homo
este frio, coloque
la(s) pa_riIla(s) en
el homo en las
posiciones que
desee La posiciSn
correcta de la
parrilfa depende
del tipo de
alimento y de
cuanto desea usted que se dore Come regla general,
coloque la mayoria de tos a_imentos en el centre del
homo, ya sea en la posiciSn B o C. Vea la tabia de
sugerencias en cuanto a las posiciones de tas parrilta&
Tipo de A|imento
Bizcochuelo blanco de clara
de huevo
Panecillos o mollete
Galleticas duices o pastelitos
Bizcochos de chocolate
Pasteles de varias capas
Pasteles e bizcochos senciIIos
Tortas o cortezas para tortas
Tortas congeladas
Cazuelas de cames y
vegetales ai homo
Asados
Posici6n de la Parrilla
B
BoC
BoC
BoC
C
B
BoC ............
A (en una tartera
de homear)
BoC
BoR
64
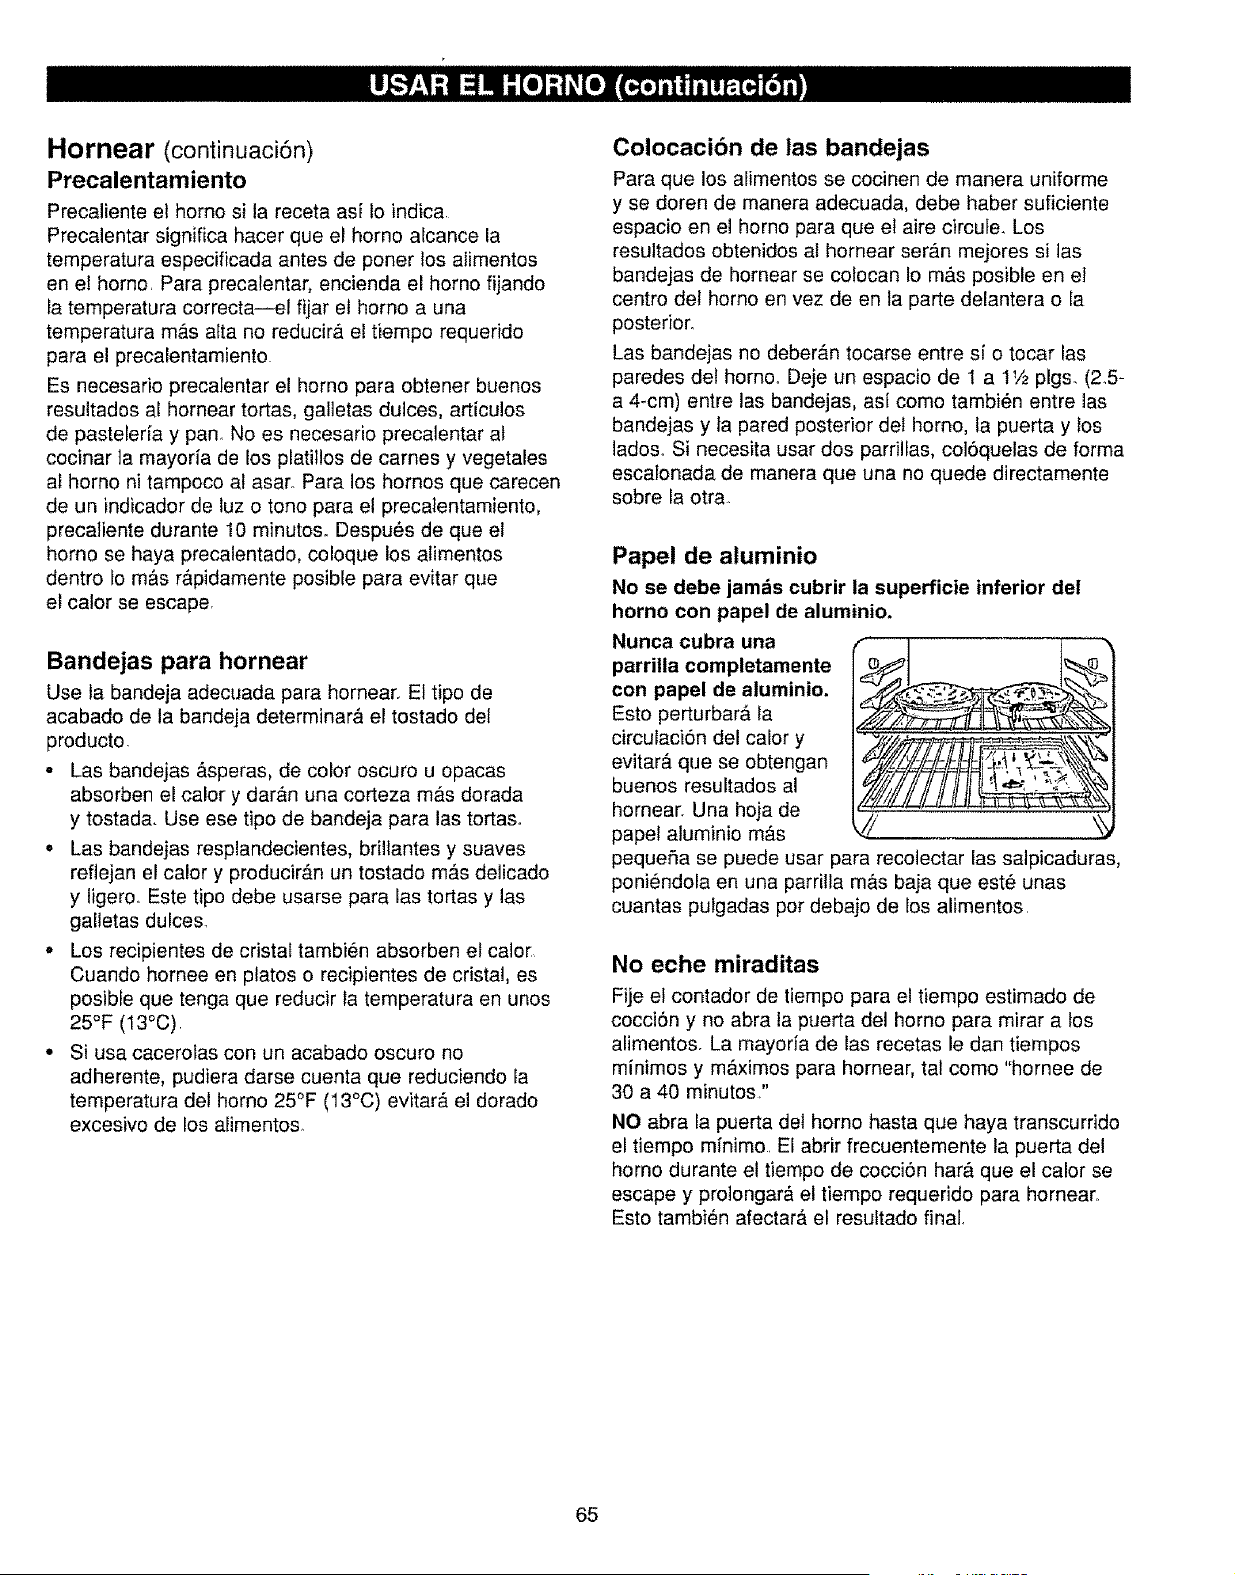
Hornear (continuaci6n)
Precanentamiento
Precaliente el homo si la receta asF Io indica
Precalentar significa hacer que el homo alcance la
temperatura especificada antes de poner los alimentes
en e! homo. Para precalentar, encienda el homo fijando
la temperatura correcta--el fijar el homo a una
temperatura m;_s alta no reducir_, el tiempo requerido
para el precalentamiento
Es necesario precalentar el homo para obtener buenos
resultados al hornear tortas, galletas dulces, articulos
de pastelerfa y pan No es necesario precalentar at
cocinar ta mayoria de los platillos de carries y vegetales
al homo ni tampoco al asar. Para los homos que carecen
de un indicador de luz o tono para el precalentamiento,
precaliente durante 10 minutoso Despu_s de que el
homo se haya precalentado, coloque los alimentos
dentro 1om_s r&pidamente posible para evitar que
el calor se escaper
Bandejas para hornear
Use la bandeja adecuada para homear. El tipo de
acabado de la bandeja determinar& el tostado del
producte.
= Las bandejas &speras, de color oscuro u opacas
absorben el ca!or y dar&n una corteza m&s dorada
y tostada. Use ese tipo de bandeja para las tortas.
• Las bandejas resplandecientes, brillantes y suaves
reflejan el calory producir_n un tostado mAs delicado
y ligere., Este tipo debe usarse para las tortas y las
galletas dulces.
- Los recipientes de cristal tambien absorben et calor,
Cuando hornee en platos o recipientes de cristal, es
posible que tenga que reducir la temperatura en unos
25°F (13°C).
• Si usa cacerolas con un acabado oscuro no
adherente, pudiera darse cuenta que reduciendo Ia
temperatura del homo 25°F (13°C) evitar#, el dorado
excesivo de los alimentos
Colocaci6n de las bandejas
Para que los alimentos se cocinen de manera uniforme
y se doren de manera adecuada, debe haber suficiente
espacio en el homo para que et aire circute. Los
resultados obtenidos al hornear seran mejores si las
bandejas de hornear se colocan I0 m&s posible en el
centro def homo en vez de en ta parte delantera o Ia
posterior.
Las bandejas no deber_n tocarse entre si o tocar las
paredes def homo° Deje un espacio de I a 11/2pigs. (2.5-
a 4-cm) entre las bandejas, asi como tambi_n entre las
bandejas y ]a pared posterior del homo, la puerta y tos
lados. Si necesita usar dos parrillas, col6quelas de forma
escalonada de manera que una no quede directamente
sobre la otra,
Papel de aluminio
No se debe jam_s cubrir la superficie inferior del
horno con papel de aluminio.
Nunca cubra una
parrilla completamente
con papel de aluminio.
Esto perturbar& la
circulaci6n del calor y
evitara, que se obtengan
buenos resultados al
hornear, Una hoja de
papet aluminio m_.s
peque_a se puede usar para recolectar Ias salpicaduras,
poni_ndoia en una parritla m&s baja que est_ unas
cuantas pulgadas por debajo de los alimentos.
No eche miraditas
Fije el contador de tiempo para el tiempo estimado de
cocci6n y no abra la puerta del homo para mirar a los
alimentos. La mayoria de las recetas le dan tiempos
minimos y m&ximos para hornear, tal corno "hornee de
30 a 40 minutos."
NO abra la puerta del homo hasta que haya transcurrido
el tiempo m[nimo. El abrir frecuentemente la puerta del
homo durante el tiempo de cocci6n har& que el calor se
escape y prolongar& el tiempo requerido para hornear
Este tambien afectar__el resultado final.
65
Ajuste el termostato del horno--
iHdgalo usted mismo!
Usted pudiera sentir que su nuevo homo cocina de
manera diferente al otto que ten_& Le recomendamos
que use su homo durante vatias semanas para que se
familiarice con este, tomando como guia los periodos de
tiempo que aparecen en sus receta&
Si tree que su nuevo homo es cocinando muy
caliente o muy frio, usted mismo puede ajustar et
termostato. Si cree que es muy caliente, ajuste el
termostato para hacerlo m&s frioo Si cree que es muy
fifo, ajuste el termostato para hacedo m&s catiente.
No recomendamos el uso de term6metros, tales como
los que se pueden encontrar en las tiendas de viveres,
para comptobar los puntos de fijaciSn de temperatura de
su nuevo homo. Estos termometros pudieran tenet una
variaci6n de 20-40°F (11-22°C)
Para ajustar el termostato:
1. Presione los botones BAKE y
/",_"_,,"_ BROIL HI/LO al mismo tiempo pot
+ _ 2 segundos hasta que la pantalla
muestre SF,
®
2, Presione el bot6n BAKE. Aparece
en ta pantalla un numero de dos
digito&
3, La temperatuta del homo se
puede ajustar hasta (+) 35°F m&s
caliente o (-) 35°F m_s frioo
Presione el bot6n A para
aumentar la ternperatura en
incrementos de 1 grado.
Presione el bot6n 'V" para disminuir
la temperatura en incrementos de
1 gtado,
4. Cuando haya hecho el ajuste, presione el bot6n START
para regresar a la hora del dia. Use el homo normalmente
NO1A: Este ajuste no afectar& las temperaturas para asar
o auto limpieza Se conservar#.n en la memoria despues de
una interrupciSn en el suministro electric&
El tipo de margarina afectard la calidad
del producto horneado
La mayoria de las tecetas para homear se han elaborado
usando productos de alto contenido de gtasa como, pot
ejemplo, mantequilla o margarina (80% de gtasa)_ Si
usted disminuye la cantidad de grasa, es posible que la
receta no d6 los mismos resultados que se obtienen con
un producto que tenga un contenido m&s alto de grasa.,
La receta puede no darle buenos resultados si los
pasteies, tortas, pastelitos, galletas o dulces se etaboran
con productos para untar que tengan un bajo contenido
de grasa. Mientras menor sea el contenido de grasa tal
producto para untar, m&s notables se harsh estas
diferencias.
Las notmas federales exigen que los productos
etiquetados como "rnargadna" contengan al menos 80%
de grasa por peso. Pot otra parte, las matedas para untar
que contienen poca grasa, contienen menos grasa y m&s
agua. El alto contenido de humedad de estas productos
para untar afecta la textura y el sabot de los alimentos
horneados. Para obtener mejores resultados con sus
antiguas recetas favoritas, use margarina, mantequilla o
ptoductos para untar que contengan al menos 70% de
aceite vegetal.
66
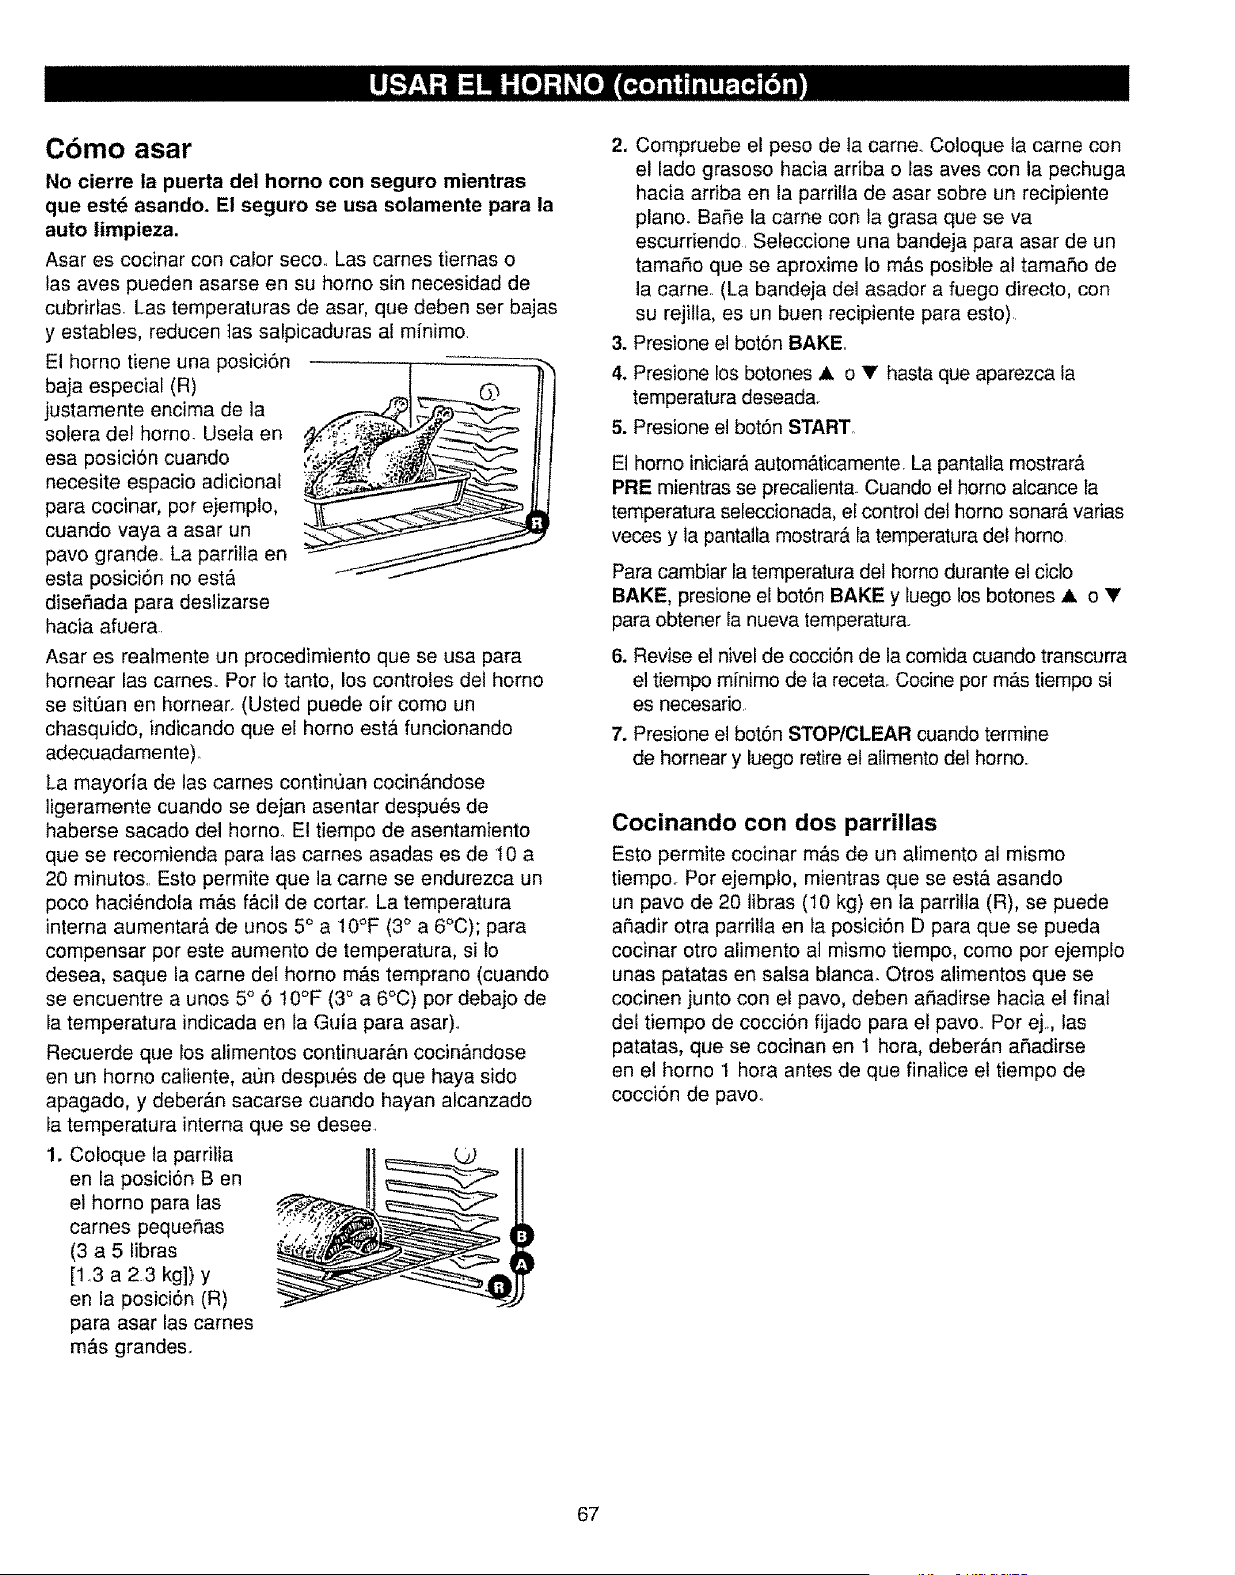
C6mo asar
No cierre la puerta del horno con seguro mientras
que estd asando. El seguro se usa solamente para la
auto limpieza.
Asar es cccinar con caior seco.. Las cames tiernas o
las ayes pueden asarse en su homo sin necesidad de
cubririas. Las temperaturas de asar, que deben ser bajas
y estables, reducen las salpicaduras a! minimo
El homo tiene una posiciSn
baja especial (R)
justamente encima de la
solera de_ homo. Useta en
esa posiciSn cuando
necesite espacio adicional
para cocinar, per ejemplo,
cuando vaya a asar un
pave grande,. La parrilia en
esta posici6n no est&
diseSada para deslizarse
hacia afuera.
Asar es realmente un procedimiento que se usa para
hornear las cames.. Per Io tanto, los controtes del homo
se sitt_an en hornear. (Usted puede oir come un
chasquido, indicando que el horno est& funcionando
adecuadamente).
La mayoria de las carnes contint_an cocinAndose
ligeramente cuando se dejan asentar despu_s de
haberse sacado del homo. Et tiempo de asentamiento
que se recomienda para las carnes asadas es de 10 a
20 minutes.. Esto permite que la came se endurezca un
poco haci_.ndola m_s f&cil de cortaro La temperatura
interna aumentar& de unos 5° a 10°F (3° a 6°C); para
compensar per este aumento de temperatura, si 1o
desea, saque ia came del homo m_.s temprano (cuando
se encuentre a unos 5° 5 10°F (3 ° a 6°C) per debajo de
la temperatura indicada en la Guia para asar)°
Recuerde que los alimentos continuar&n cocin&ndose
en un homo caliente, aun despu6s de que haya side
apagado, y deberan sacarse cuando hayan alcanzado
Ia temperatura interna que se desee_
1. Coloque la parrilla
en la posiciSn Ben
el homo para ias
carnes pequeSas
(3 a 5 libras
[1.3 a 2.3 kg]) y
en la posiciSn (R)
para asar las carnes
m&s grandes.
j
2. Compruebe el peso de la came.. Coloque la came con
el lade grasoso hacia arriba o las ayes con la pechuga
hacia ardba en la parrifla de asar sobre un recipiente
planoo BaSe la came con la grasa que se va
escurriendo. Seleccione una bandeja para asar de un
tamale que se aproxime Io m#.s posible a! tamaSo de
la came. (La bandeja del asador a fuego directo, con
su rejilla, es un buen recipiente para esto)
3. Presione el botSn BAKE
4. Presione los botones Jk o V hasta que aparezca la
temperatura deseada
5. Presione el botSn START.
El homo iniciar&autom_.ticamente. La pantatla mostrar&
PRE mientras se precalienta. Cuando el homo alcance la
temperatura seleccionada, el control del homo sonar& varias
veces y la pantalia mostrar_, ia temperatura del homo
Para cambiar ia temperatura del homo durante el ciclo
BAKE, presione el botSn BAKE y luego los botones ,& o V
para obtener Ia nueva temperatura.
6. Revise el nivel de cecciSn de la comida cuando transcurra
el tiempo minimo de la receta_ Cocine per m_s tiempo si
es necesario
7. Presione el botSn STOP/CLEAR cuando termine
de hornear y luego retire el alimento del horno.
Cocinando con dos parrillas
Esto permite cocinar m&s de un alimento al mismo
tiempo. Per ejemplo, mientras que se est& asando
un pave de 20 libras (10 kg) en ta parrilla (R), se puede
aSadir otra parrilla en la posici6n D para que se pueda
cocinar otro alimento a] mismo tiempo, come per ejemplo
unas patatas en salsa btanca. Otros alimentos que se
cocinen junto con el pave, deben aSadirse hacia et final
del tiempo de cocci6n fijado para el pave.. Per ej., las
patatas, que se cocinan en 1 hera, deber&n aSadirse
en el horno 1 hera antes de que finalice el tiempo de
cocciSn de pavoo
67
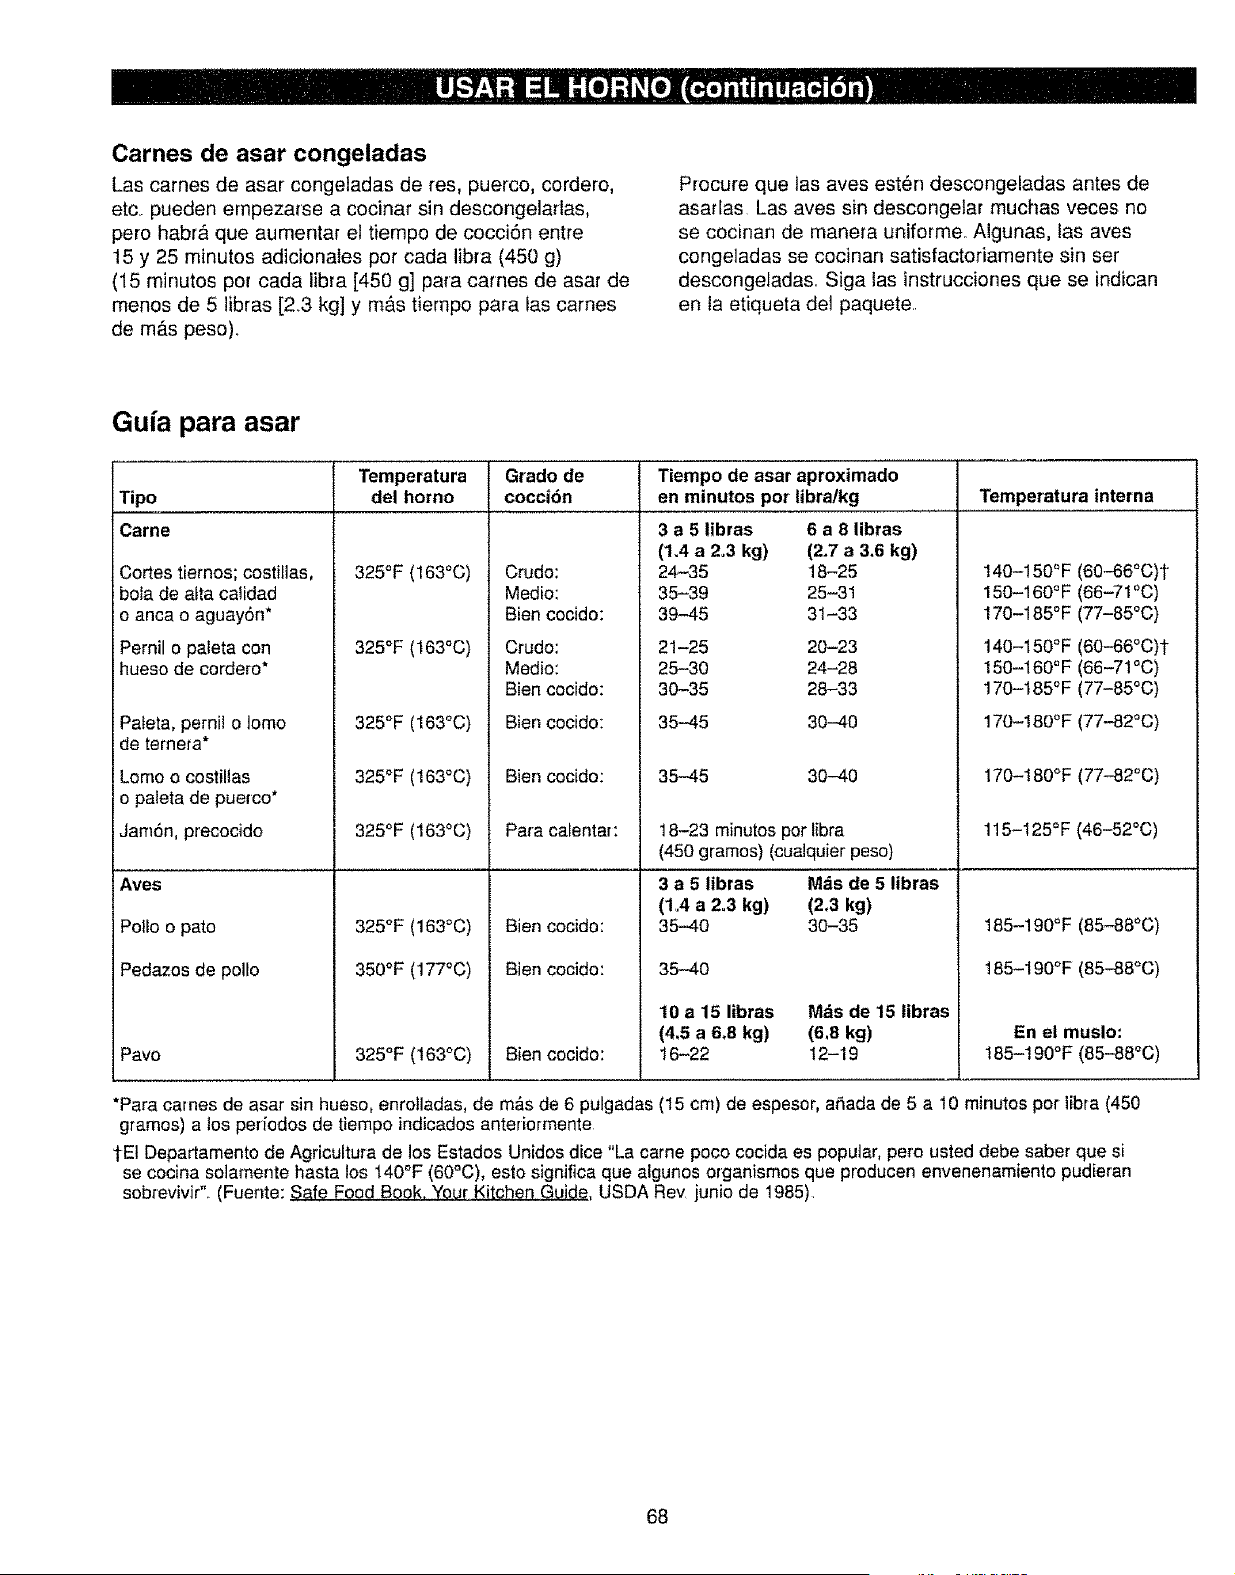
Carnes de asar congeladas
Las carnes de asar congeladas de res, puerco, cordero,
etc. pueden empezarse a cocinar sin descengelarlas,
pero habr& que aumentar el tiempo de cecci6n entre
15 y 25 minutos adicionales pot cada libra (450 g)
(15 minutos per cada libra [450 g] para carnes de asar de
menos de 5 libras [2_3 kg] y mb.s tiempo para las carnes
de m_.s peso).
Procure que tas aves est6n descongeladas antes de
asarlas Las ayes sin descongelar muchas veces no
se cocinan de mane[a uniforme. Algunas, las ayes
congeladas se cocinan satisfactoriamente sin ser
descongeladas, Siga las instrucciones que se indican
en la etiqueta de1 paquete,
Guia para asar
Temperatura Grado de Tiempo de asar aproximado
Tipo del homo coccibn en minutos pot libra/kg Temperatura interna
Came
Cortes tiernos; costillas,
boIa de alta calidad
o anca o aguaySn*
Pernil o paleta con
hueso de cordero*
Pateta, pernil o lomo
de terneta*
Lomo o costillas
o paleta de puerco*
JamSn, precocido
Aves
Polio o pato
Pedazos de polio
Pavo
325°F (163°C)
325°F (163°C)
325°F (163°C)
325°F (163°C)
Crudo:
Medio:
Bien cocido:
Crudo:
Medio:
Bien cocido:
Bien cocido:
Bien cocido:
3 a 5 libras 6 a 8 Ubras
(1,4 a 2.3 kg) (2.7 a 3.6 kg)
24-35 18-25
35-39 25-31
39-45 31-33
21-25 20-23
25-30 24-28
30-35 28-33
35-45 30-40
35-45 30-40
140-150°F (60-66_C)¢
150-160°F (66-71°C)
170-185°F (77-85°C)
140-150°F (60-66°C)t
150-160°F (66-71°C)
170-185°F(77-85°0)
170-180°F (77-82°C)
170-180°F (77-82°C)
325°F (163°C)
325°F(163°C)
350°F(177°C)
325°F (163°C)
Para calenta[:
Bien cocido:
Bien cocido:
Bien cocido:
18-23 minutos por libra
(450 gramos) (cualquierpeso)
3 a 5 libras Mds de 5 libras
(1.4 a 2.3 kg) (2.3 kg)
35-40 30-35
35-40
10 a 15 libras Mds de 15 libras
(4,5 a &8 kg) (6,8 kg)
16-22 12-19
115-125°F (46-52°C)
185-190°F (85-88°C)
185-190°F (85-88°C)
En el muslo:
t85-190°F (85-88°C)
*Para carnes de asar sin hueso, enrolladas, de m&s de 6 pulgadas (15 cm) de espesor, aiSada de 5 a 10 minutos pot libra (450
gramos) a los perfodos de tiempo indicados anteriormente
1-El Departamento de Agricultura de los Estados Unidos dice "La came poco cocida es popular, pero usted debe saber que si
se cocina solamente hasta los 140°F (60°C), esto significa que algunos organismos que producen envenenamiento pudieran
sobrevivir".. (Fuente: Safe Food Book. Your K_chen Guide, USDA Rev junio de 1985).
68
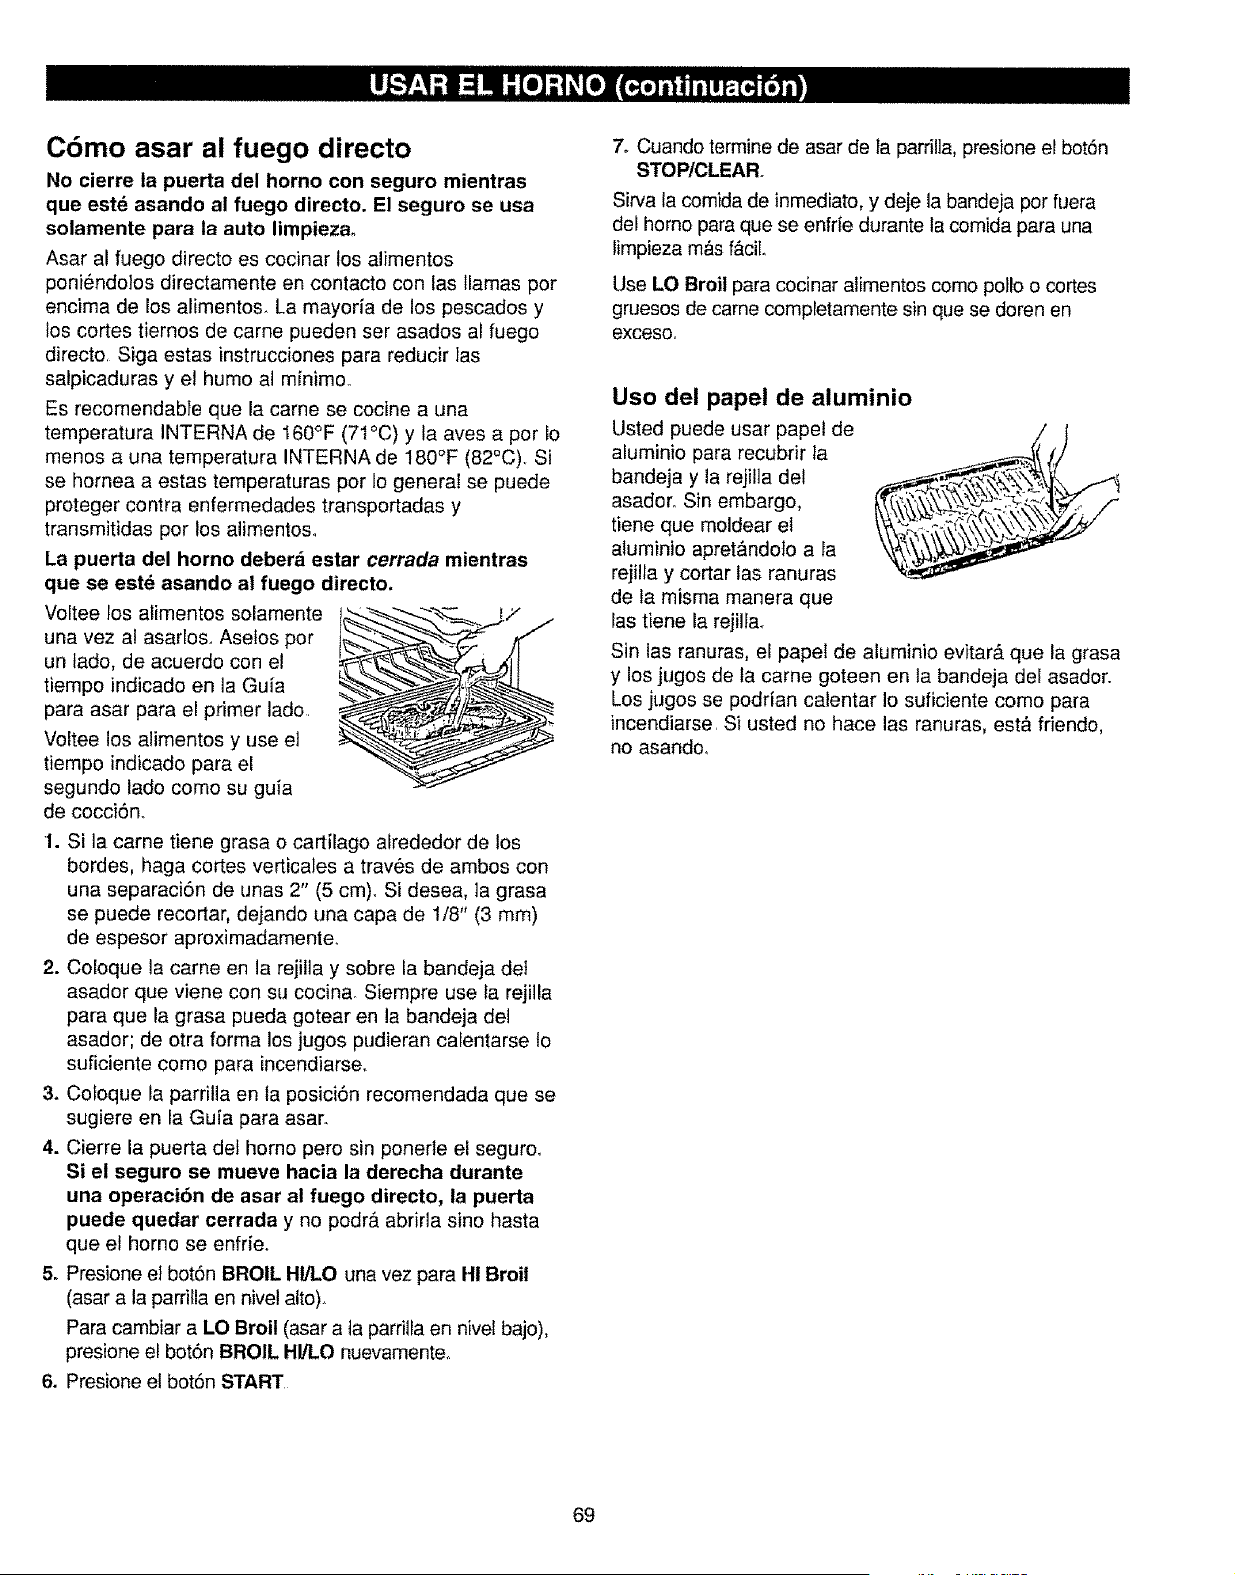
Cbmo asar al fuego directo
No cierre la puerta del horno con seguro mientras
que est_ asando al fuego directo. El seguro se usa
solamente para la auto limpieza.
Asar al fuego directo es cocinar los alirnentos
poni6ndolos directamente en contacto con las llamas por
encirna de los alimentos. La rnayerfa de los pescados y
los cortes tiernos de came pueden ser asados al fuego
directo, Siga estas instrucciones para reducir las
salpicaduras y el humo al minirno_
Es recornendable que la came se cocine a una
temperatura INTERNA de 160°F (7I°C) y la aves a por 1o
rnenos a una ternperatura INTERNA de 180°F (82°C). Si
se hornea a estas temperaturas por 1ogeneral se puede
proteger contra enfermedades transportadas y
transmitidas por los alimentoso
La puerta del homo deber& estar cerrada mientras
que se est6 asando al fuego directo,
Voltee los atimentos solamente
una vez al asarlos. Aselos per
un lado, de acuerdo con el
tiempo indicado en la Guia
para asar para el primer lado,
Voltee los alimentos y use el
tiernpo indicado para el
segundo lade corno su guia
de cocci6n.
1. Si la came tiene grasa o cartilago alrededor de los
bordes, haga cortes verticales a trav6s de arnbos con
una separaci6n de unas 2" (5 crn). Si desea, la grasa
se puede recortar, dejando una capa de 1/8" (3 mrn)
de espesor aproxirnadamente.
2. Coloque la came en la rejilla y sobre la bandeja det
asador que viene con su cocina. Siempre use la rejilla
para que la grasa pueda gotear en la bandeja del
asador; de otra forma los jugos pudieran cafentarse Io
suficiente como para incendiarse,.
3. Coloque la parrilla en la posici6n recornendada que se
sugiere en la Guia para asar,
4. Cierre la puerta del homo pero sin ponerle el seguro,
Si el seguro se mueve haeia la derecha durante
una operaci6n de asar al fuego directo, la puerta
puede quedar cerrada y no podr_ abrida sine hasta
que el homo se enfrie.
5. Presione el bot6n BROIL HI/LO una vez para Hi Broil
(asar a la parrilla en nivel alto).
Para cambiar a LO Broil (asar a ta parrilla en nivel bajo),
presione el bot6n BROIL HI/LO nuevamente.
6. Presione el botSn START
7. Cuando termine de asar de la parrilla, presione el bot6n
STOPICLEAR.
Sirva la cornida de inmediato, y deje la bandeja por fuera
del homo para que se enfde durante la comida para una
limpieza rn&s f&ciL
Use LO Broil para cocinar alimentos come potlo o cortes
gruesos de came completamente sin que se doren en
exceso,,
Use del papel de aluminio
Usted puede usar papel de
aluminio para recubrir ia
bandeja y la rejilta del
asadero Sin embargo,
tiene que rnoldear el
alurninio apret&ndofo a la
rejilla y cortar las ranuras
de la rnisma manera que
las tiene la rejill&
Sin las ranuras, el papel de aluminio evitar& que la grasa
y los jugos de la came goteen en la bandeja del asador.
Los jugos se podrian calentar Io suficiente como para
incendiarse Si usted no hace las ranuras, est_ friendo,
no asando_
69
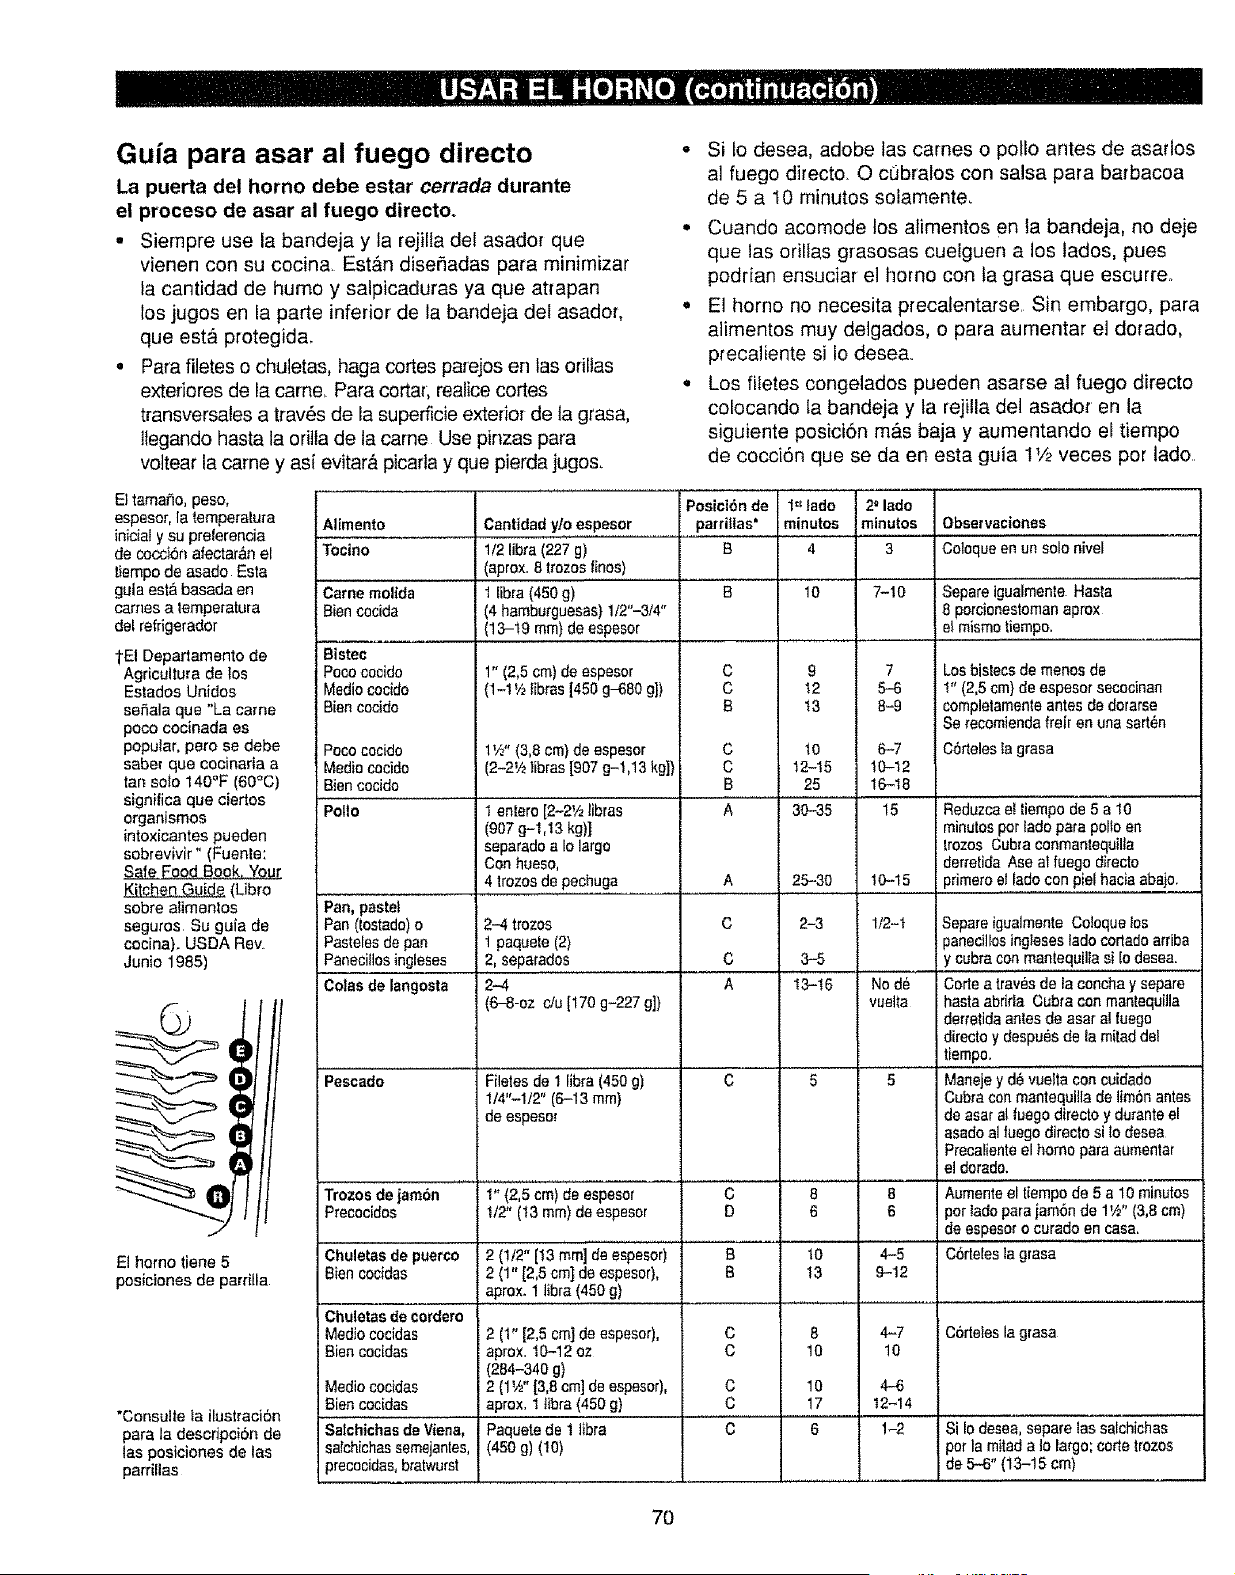
Gu/a para asar al fuego directs
La puerta del homo debe estar cerrada durante
el process de asar al fuego directoo
• Siempre use la bandeja y la rejiHa det asador que
vienen con su cocina. Est&n dise_adas para minimizar
la cantidad de humo y salpicaduras ya que atrapan
los jugos en la parte inferior de la bandeja del asador,
qua est& protegida.
o Para filetes o chuletas, haga cortes parejos en tas orilJas
exteriores de la carne_ Para cortar, realbe cortes
transversales a trav6s de la superficie exterior de ta grasa,
tlegando hasta la oritta de la came Use pinzas para
voltear la came y asi evitar& picada y que pierda jugos.
Si to desea, adobe las carnes o polio antes de asarlos
al fuego directo_ O cubralos con salsa para barbacoa
de 5 a 10 minutes solamente.
• Cuando acomode los alimentos en ia bandeja, no deje
que 1asorilias grasosas cuelguen a los tados, pues
podrian ensuciar el homo con la grasa que escurre.
, El homo no necesita precalentarse. Sin embargo, para
alimentos muy detgados, o para aumentar el dorado,
precaliente si io desea.
• Los fitetes congelados pueden asarse at fuego directo
colocando [a bandeja y ta rejilla del asador en la
siguiente posiciSn m&s baja y aumentando el tiempo
de cocciSn que se da en esta guia 1V2veces per lade
El tamaSo, peso,
espesor, la temperatura
iniciaty su preferencia
de cocciSn afectar&nel
tiempo de asado Esta
guta esta basada en
carries a tempe_atura
del refrigerador
tel Deparlamento de
Agricultura de Ios
Estados Unidos
sefiala que "La came
pace cocinada es
popular, pete se debe
sabe_ que cocinaria a
tan so_o 140°F (60°C)
significa que ciertos
organismos
intoxicantes pueden
sobrevivir" (Fuente:
Safe Food Book, Your
Kitchen Guide (Ubro
sobre alimentos
seguros Su guia de
cocina). USDA Rev
Junio 1985)
Aliments
Tocino
Came molfda
Bien cocida
Bistec
Pococscido
Mediococide
Biencocido
Poco cocido
Medio cocido
Bieneocido
Polio
Pan, pastel
Pan (tostado) o
Pasteles de pan
Panecilles ingleses
Co_as de langosta
Pescado
Trozos de jam6n
Precocidos
Cantidad y/o espesor
1/2 libra (227 g)
(aprox. 8 trozos fines) ..........
1 libra (450 g)
(4 hamburguesas) 1/2"-3/4"
(13-t9 mm) de espesor
1" (2,5 cm) de espesor
(1-1 y2fibras [450 g-680 g])
1_#' (3,8 cm} de espeser
(2-2V_ libras [907 g-1,13 kg])
1 entero [2-2V2 _ibras
(907 g-1,!3 kg)|
eeparado a Io largo
Con hueso,
4 lrozos de pechuga ............
2-4 trozos
1 paquete(2)
2, separados
2-4
(6-8-oz ciu [170 g-227 g])
Filetes de 1 libra (450 g)
1/4"-1/2" (6-13 ram}
de espesot
i'; (2,5 cm) de espesor
t/2" (I3 ram) de espesor
Posici6n de 1=_lads 2"lads
parrigas° minutes minutes Observacfones
B 4 3 Coloque en un solo nivel
10 ......7-10
C 9 7
C 12 5-6
B t3 8-9
C t0 6-7
C 12-t5 10-12
B 25 16-18
A 3O-35 15
A 25-30 10-15
C 2-3 1/2-t
C 3-5
A 13-t6 No de
vuel/a
c 5 5
C 8 8
D 6 6
Separe igualmente Hasta
8 porcionestoman aprox
i el mismo tiempo.
Los bislecs de menos de
t" (2,5 cm) de espesor secocinan
completamenteantes de dorarse
Se recomienda freir en una sart@n
Corteles la grasa
Reduzca el tiempo de 5 a _0
minutes per lade para polio en
trozos Gubra conmanlequilta
derretida Ase al fuego directo
primate el fade con piel hacia abajo.
Separe igualmente Co!oque los
panecillos ingleses lade cortado arriba
y cubra con manlequiUa si re desea.
Corte a tray,s de la concha y separe
hasta abrirta Cubta con mantequilla
derretida antes de asar a! fuego
directo y despu_s de ta mitad del
tiempo.. ....
Maneje y d_ vuelta con cuidado
Cubra con mantequitla de limSn antes
de asar a! fuego directo y du_ante el
asado al tuego directo si to desea
Precalienteel homo para aumentar
el dorado.
Aumente el tiempo de 5 a 10 minutes
per lade para jambn de 1'#' (3,8 cm)
de espeser o curado en casa.
C6rteles la grasa
El homo tiene 5 Chuletas de puerco 2 (1t2" [13 mini de espesor) B 10 4-5
posiciones de parrilla Bien cocidas 2 (1" [2,5 cm) de espesor), B 13 9-12
aprox. 1 libra (450 g)
Chuletas de corders
Medio cocidas 2 (1" [2,5 cm] de espeser), C 8 4-7 C6rteles la grasa
Bien cocidas aprox. 10-12 oz C 10 10
(254-340 g)
Medio cocidas 2 {1_" [3,8 cm] de espesor), C 10 4-6
Bien cecidas aprox. 1 Jibra (450 g) C 17 t 2-14
"Consulte ta iluslraciSn
para la descrJpciSn de Salchfchas de Viena, Paquete de 1 libra C 6 1-2 Si le desea, separe las salchichas
las posiciones de las saichichas semejantes, (450 g) (10) par la mitad a 1o largo;corse trozos
parrillas prececidas, bratwurst de 5-6" (13-15 am)
7O
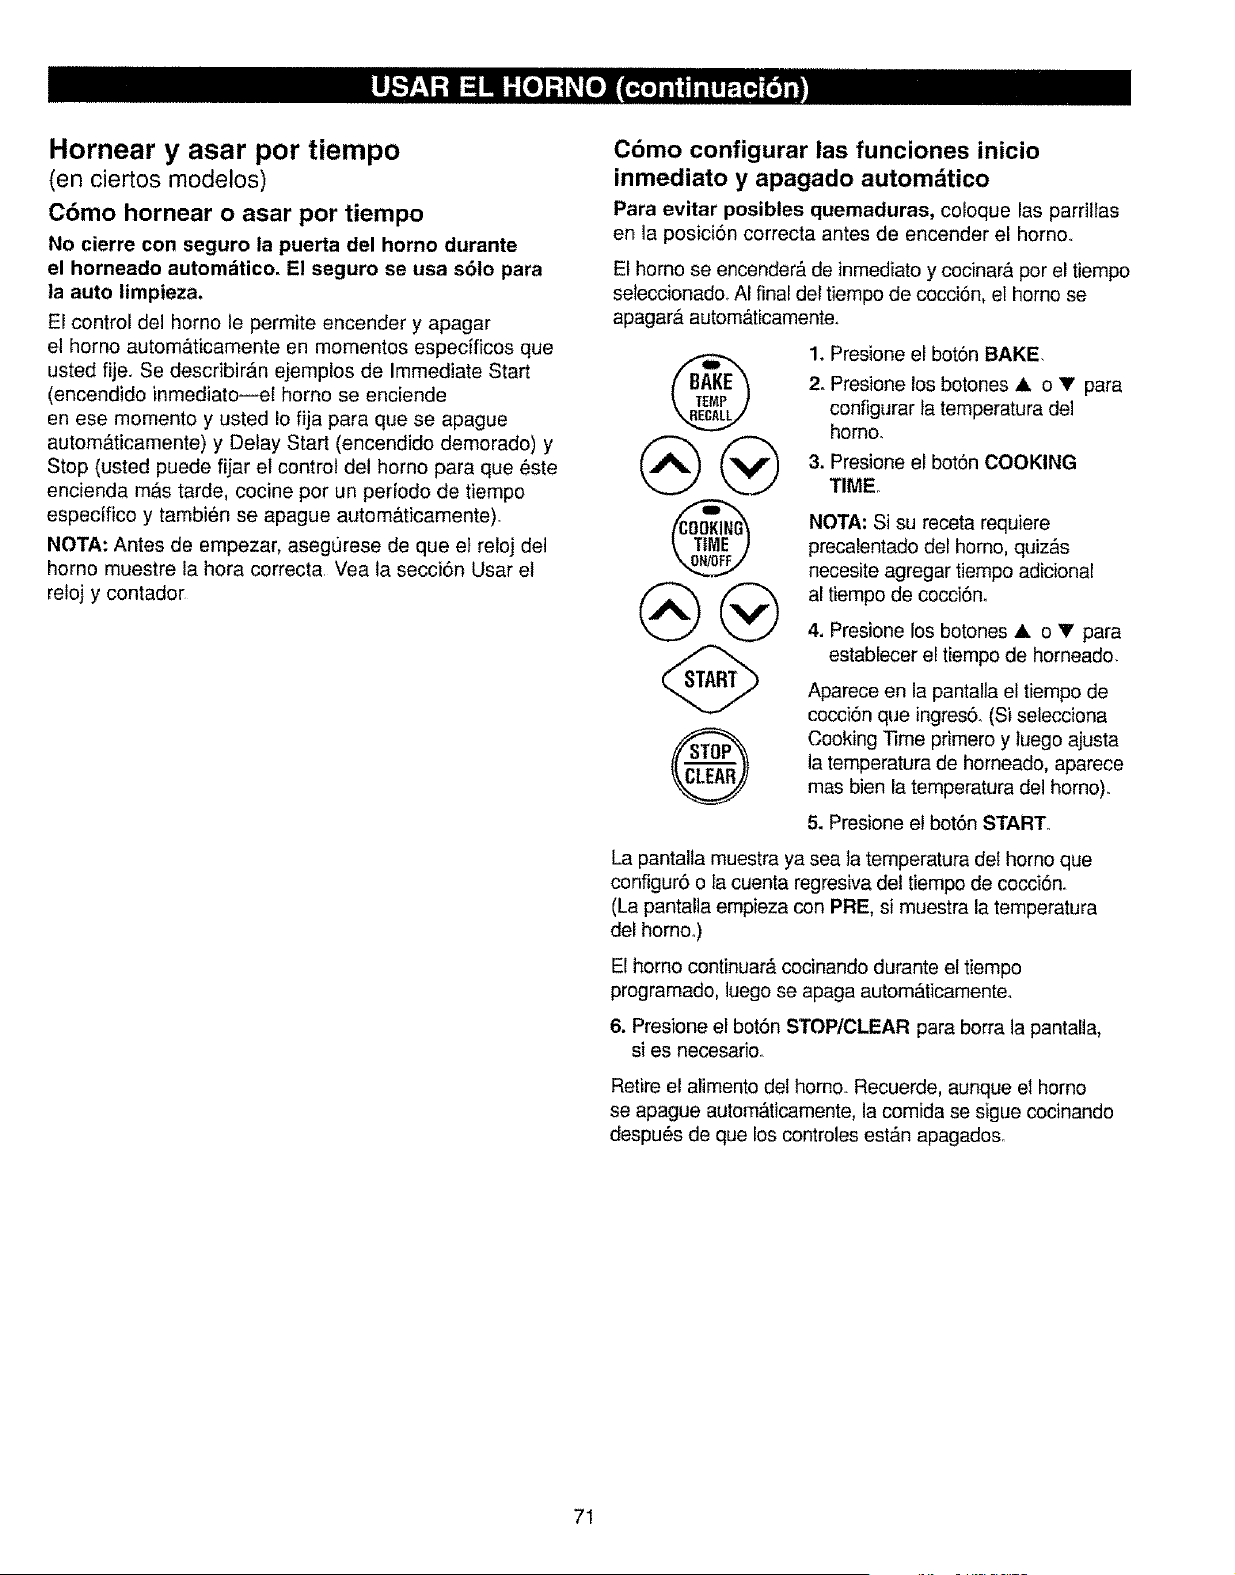
Hornear y asar por tiempo
(en ciertos rnodelos)
Cbmo hornear o asar por tiempo
No cierre con seguro la puerta del homo durante
el horneado automdtico. E! seguro se usa s61o para
la auto limpieza.
El control del homo te permite encender y apagar
el homo autom_ticamente en momentos especificos que
usted fije. Se describir_.n ejemplos de Immediate Start
(encendido inmediato--et homo se enciende
en ese momento y usted Io fija para que se apague
automb, ticamente) y Delay Start (encendido demorado) y
Stop (usted puede fijar el control del homo para que este
encienda mAs tarde, cocine pot un periodo de tiempo
especifico y tambi6n se apague autom_.ticamente)<
NOTA: Antes de empezar, asegurese de que et reloj del
homo muestre la hora correcta, Vea la secci6n Usar el
reloj y contador
Cbmo configurar las funciones inicio
inmediato y apagado automdtico
Para evitar posibles quemaduras, coloque las parrillas
en la posici6n correcta antes de encender el homo.,
El homo se encenderd de inmediato y cocinar& por el tiempo
seleccionado. AI final del tiempo de cocci6n, el homo se
apagarb, autom&tieamente.
®
®
®
1. Presione el bot6n BAKE.
2. Presione los botones i o V para
configurar la temperatura del
horno.
3. Presione el bot6n COOKING
TIMEo
NOTA: Si su receta requiere
precalentado del homo, quiz_s
necesite agregar tiempo adicional
al tiempo de cocci6n.
4, Presione los botones A. o V para
establecer el tiempo de horneado.
Aparece en la pantalla el tiempo de
cocci6n que ingres6. (Si selecciona
Cooking ]]me primero y luego ajusta
la temperatura de horneado, aparece
mas bien la temperatura del horno).
5. Presione el bot6n START.,
La pantalla muestra ya sea la temperatura del homo que
configur6 o la cuenta regresiva det tiempo de cocci6n.
(La pantalla empieza con PRE, si muestra la temperatura
del homo°)
El homo continuar#, cocinando durante el tiempo
programado, luego se apaga autom_ticamente°
6. Presione el botSn STOP/CLEAR para borra la pantalla,
si es necesario.
Retire el alimento del homo., Recuerde, aunque el homo
se apague autom&ticamente, la comida se sigue cocinando
despu_s de que los controles est&n apagados_
71
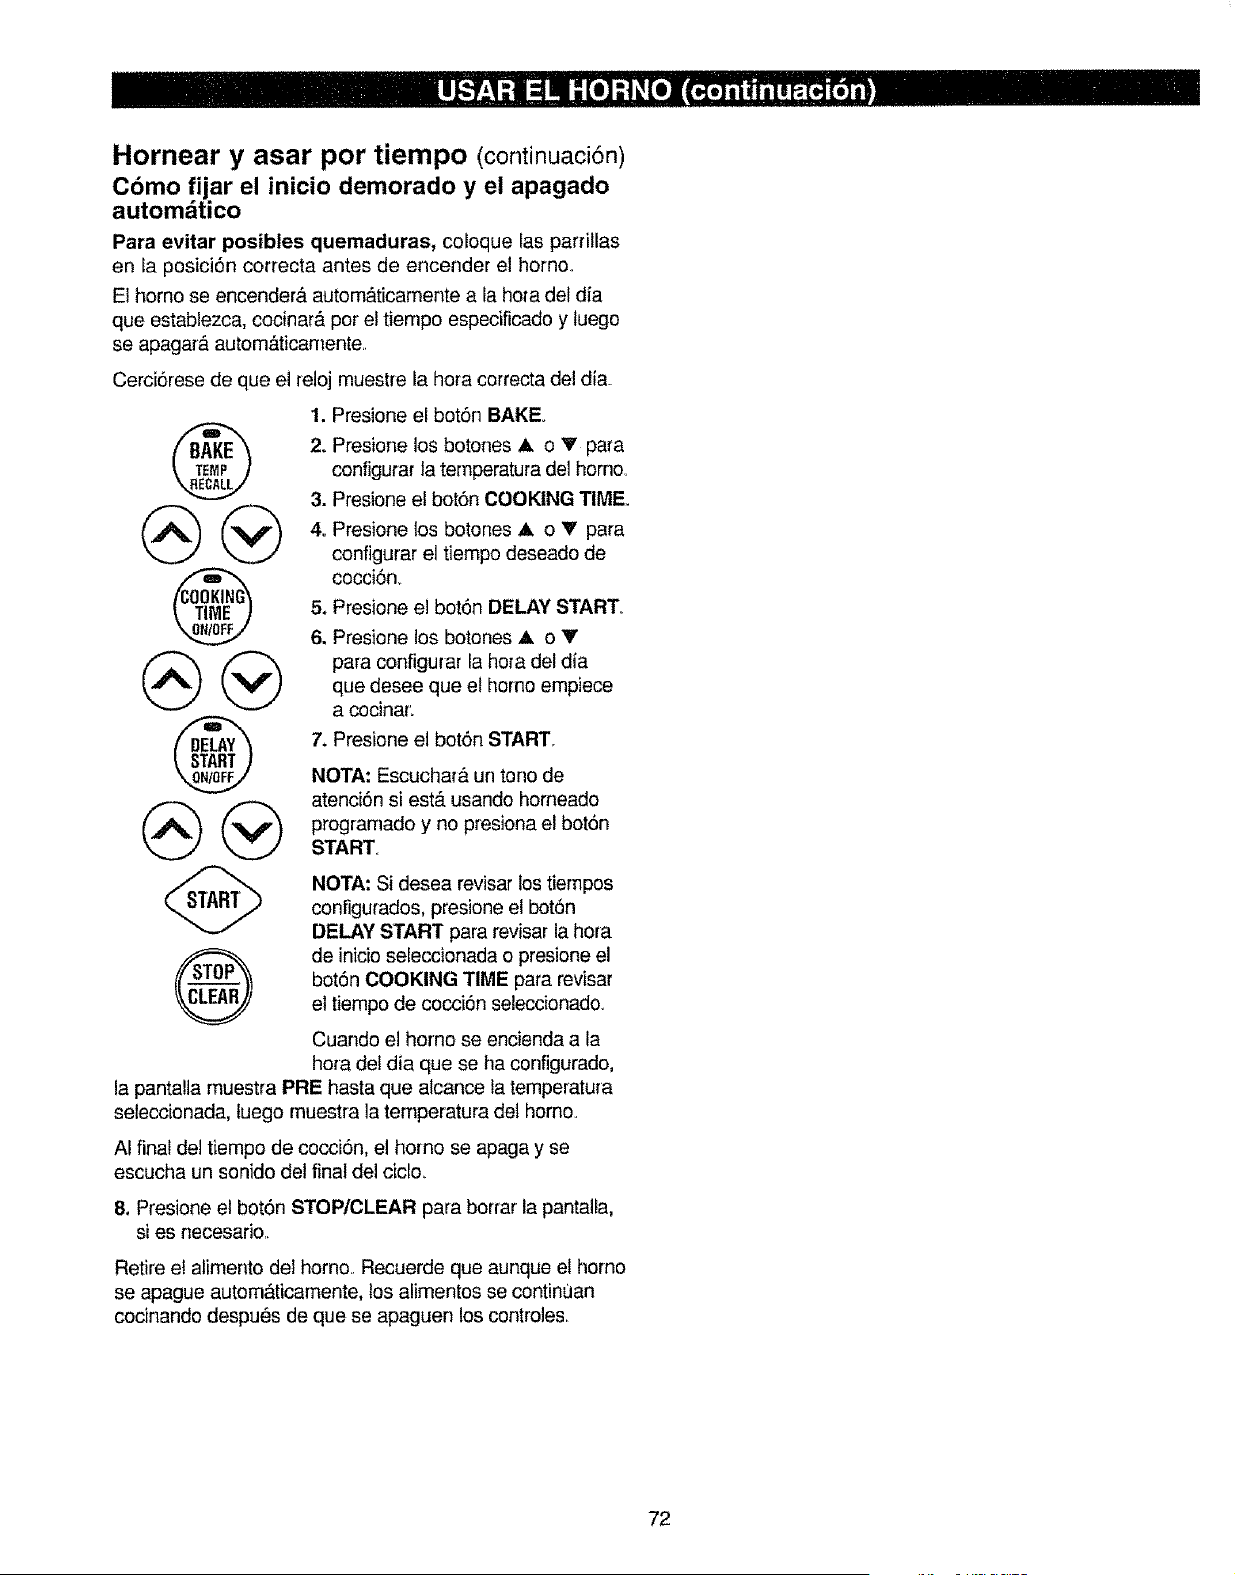
Hornear y asar por tiempo (continuaciSn)
Cbmo fijar el inicio demorado y el apagado
autom_tico
Para evitar posibles quemaduras, coloque Ias parrillas
en Ia posici6n correcta antes de encender el homo..
El homo se encender& autom&ticamente a la hota del dia
que establezca, cocinar& por el tiempo especificado y tuego
se apagarA autom,_ticamente..
Cerci6rese de que el reloj muestre la hora correcta del dia.
®
@@
@
®
1. Presione el botSn BAKE.
2. Presione los botches _, o V papa
configurar la temperatura del horno_
3. Presione el bot6n COOKING TIME.,
4. Presione los botones ,J, o _' para
configurar el tiempo deseado de
cocci6n.
5. Presione el bot6n DELAY START,,
6. Presione los botones A o Y
para configurar la hora del dia
que desee que el homo empiece
a coeinar.
7. Presione el bot6n START,_
NOTA: Escuchar& un tono de
atenci6n si est& usando homeado
programado y no presiona el botbn
START.
NOTA: Si desea revisar los tiempos
configurados, presione el bot6n
DELAY START para revisar la hora
de inicio seleccionada o presione el
bot6n COOKING TIME para revisar
el tiempo de cocci6n seleccionadoo
Cuando el homo se encienda a la
hora det dia que se ha configurado,
la panta!la muestra PRE hasta que alcance la temperatura
seleccionada, tuego muestra la temperatura del homo.
AI final del tiempo de cocci6n, el homo se apaga y se
escucha un sonido del final del ciclo.
8, Presione el bot6n STOP/CLEAR para borrar la pantalla,
si es necesario.,
Retire el alimento del horno_ Recuerde que aunque et homo
se apague autom;&ticamente, los alimentos se contint]an
cocinando despues de que se apaguen los controles_
72
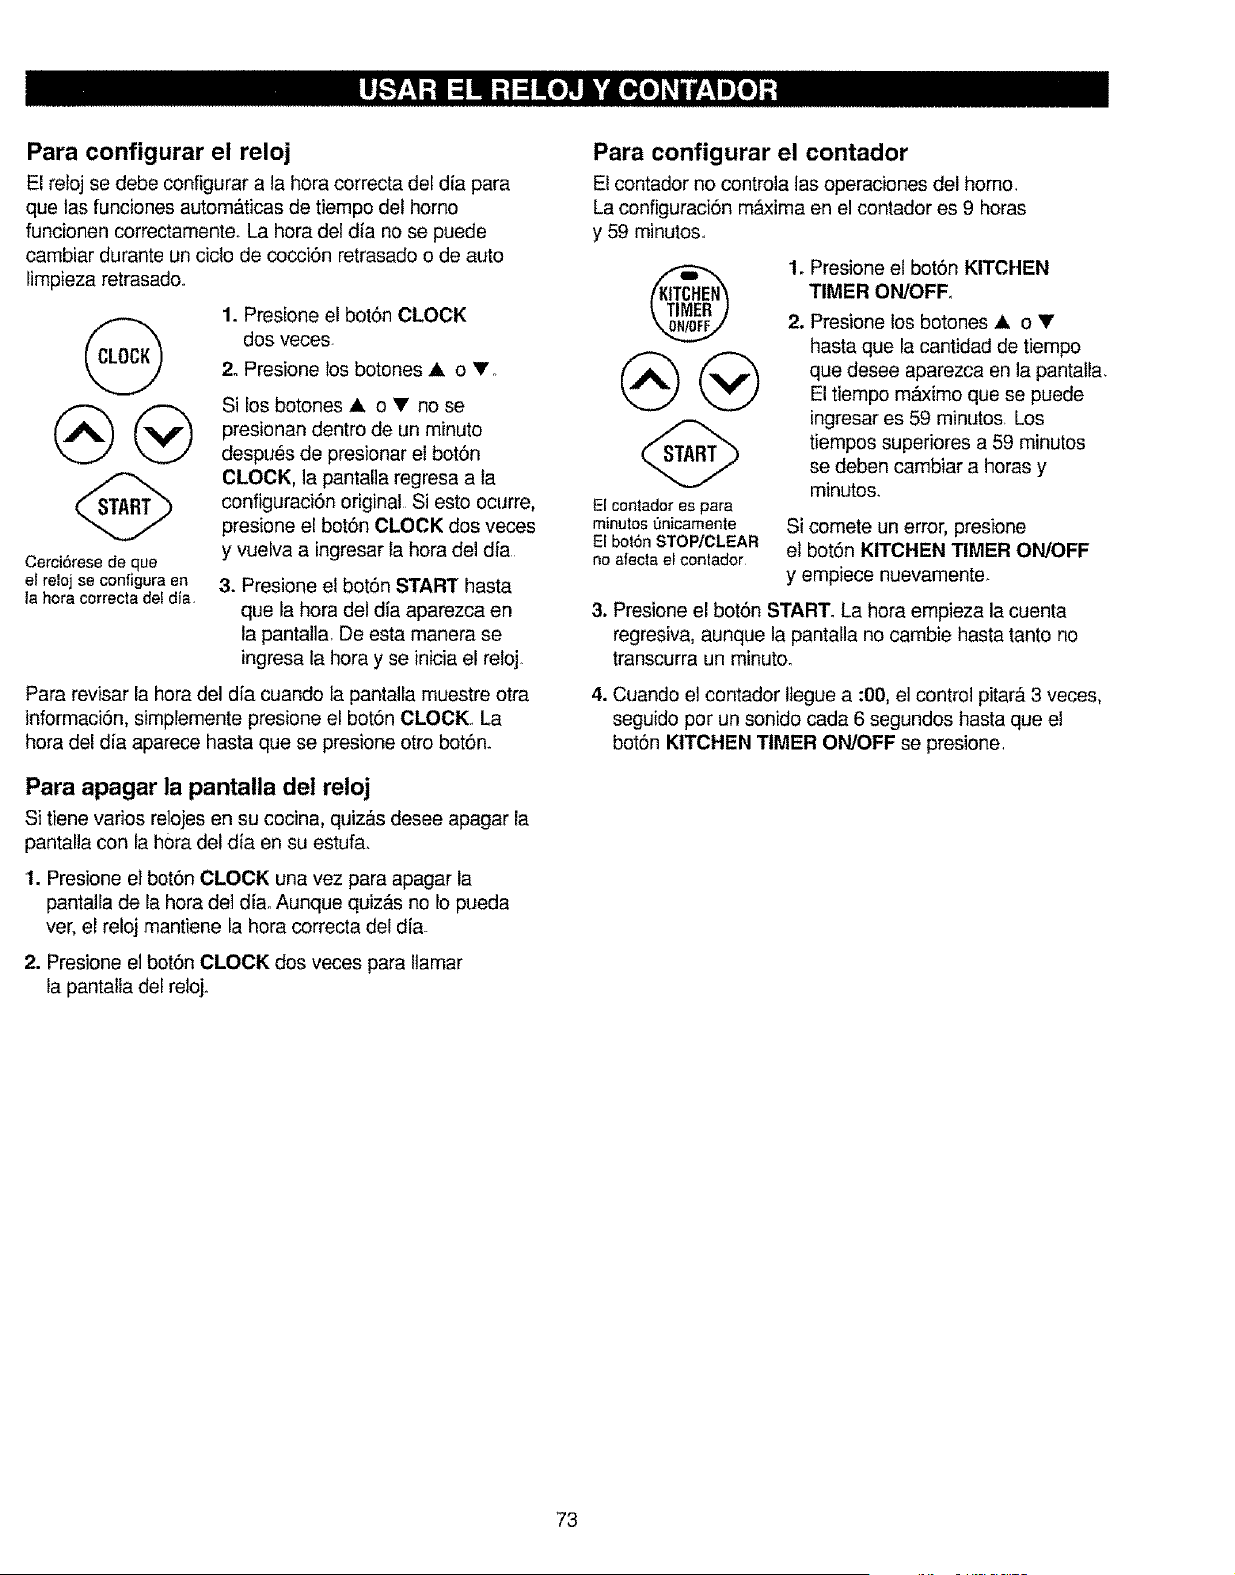
Para configurar el reloj
El reloj se debe configurar a la hora correcta del dia para
que las funciones autom&ticas de tiempo def homo
funcionen correctamente,, La hora del dia no se puede
cambiar durante un cicto de cocci6n retrasado o do auto
limpioza retrasado,,
Cerci6rese de que
el reloj se configura en
la hora correcta def dia,
1. Prosione el bot6n CLOCK
dos voces
2. Presione los botches A o V°
Si los botones _ o • no se
presionan dentro do un minuto
despu_s de presionar el bot6n
CLOCK, la pantalla regresa a la
configuraci6n original Si esto ocurre,
presione el bot6n CLOCK dos veces
y vuelva a ingresar la hora del dia
3. Presione el botSn START hasta
que la hora del dia aparezca en
la pantalia, De esta manera se
ingresa la hora y se inicia el reloj.
Para revisar la hora del dia cuando la pantalla muestre otra
informaci6n, simplemente presione el bot6n CLOCK. La
hora del dia aparece hasta que se presione otro bot6n.
Para apagar la pantalla del reloj
Si tieno varios relojes on su cocina, quiz&s desee apagar la
pantalla con la h0ra del d{a en su estufa.
1. Presione e; bot6n CLOCK una vez para apagar la
pantalla de la hora de] dia. Aunque quiz&s no fo pueda
ver, el reloj mantieno la hora correcta del dfa-
2. Presione ef bot6n CLOCK dos veces para Ilamar
la pantalta del reloj.
Para configurar el contador
El contador no controla Ias operaciones del homo,
La configuraci6n m_ima en el contador es 9 horas
y 59 minutos°
®
El contador es para
minutos t)nicamente
El bot6n STOPtCLEAR
no afecta el contador
1. Presione el bot6n KITCHEN
TIMER ON/OFF.,
2. Presione los botches ,& o •
hasta que la cantidad do tiempo
que desoe aparezca en la pantalla.
El tiempo m_b'<imoque se puode
ingrosares 59 minutos, Los
tiempos superiores a 59 minutos
se deben cambiar a horas y
minutos.
Si comete un error, presione
el bot6n KITCHEN TIMER ON/OFF
y empiece nuevamente.
3, Presione el bot6n START. La hora empieza la cuenta
regresiva, aunque la pantalla no cambie hasta tanto no
transcurra un minuto.
4. Cuando el contador Itegue a :00, e] control pitar& 3 veces,
seguido por un sonido cada 6 segundos hasta que el
bot6n KITCHEN TIMER ON/OFF se presione,
73
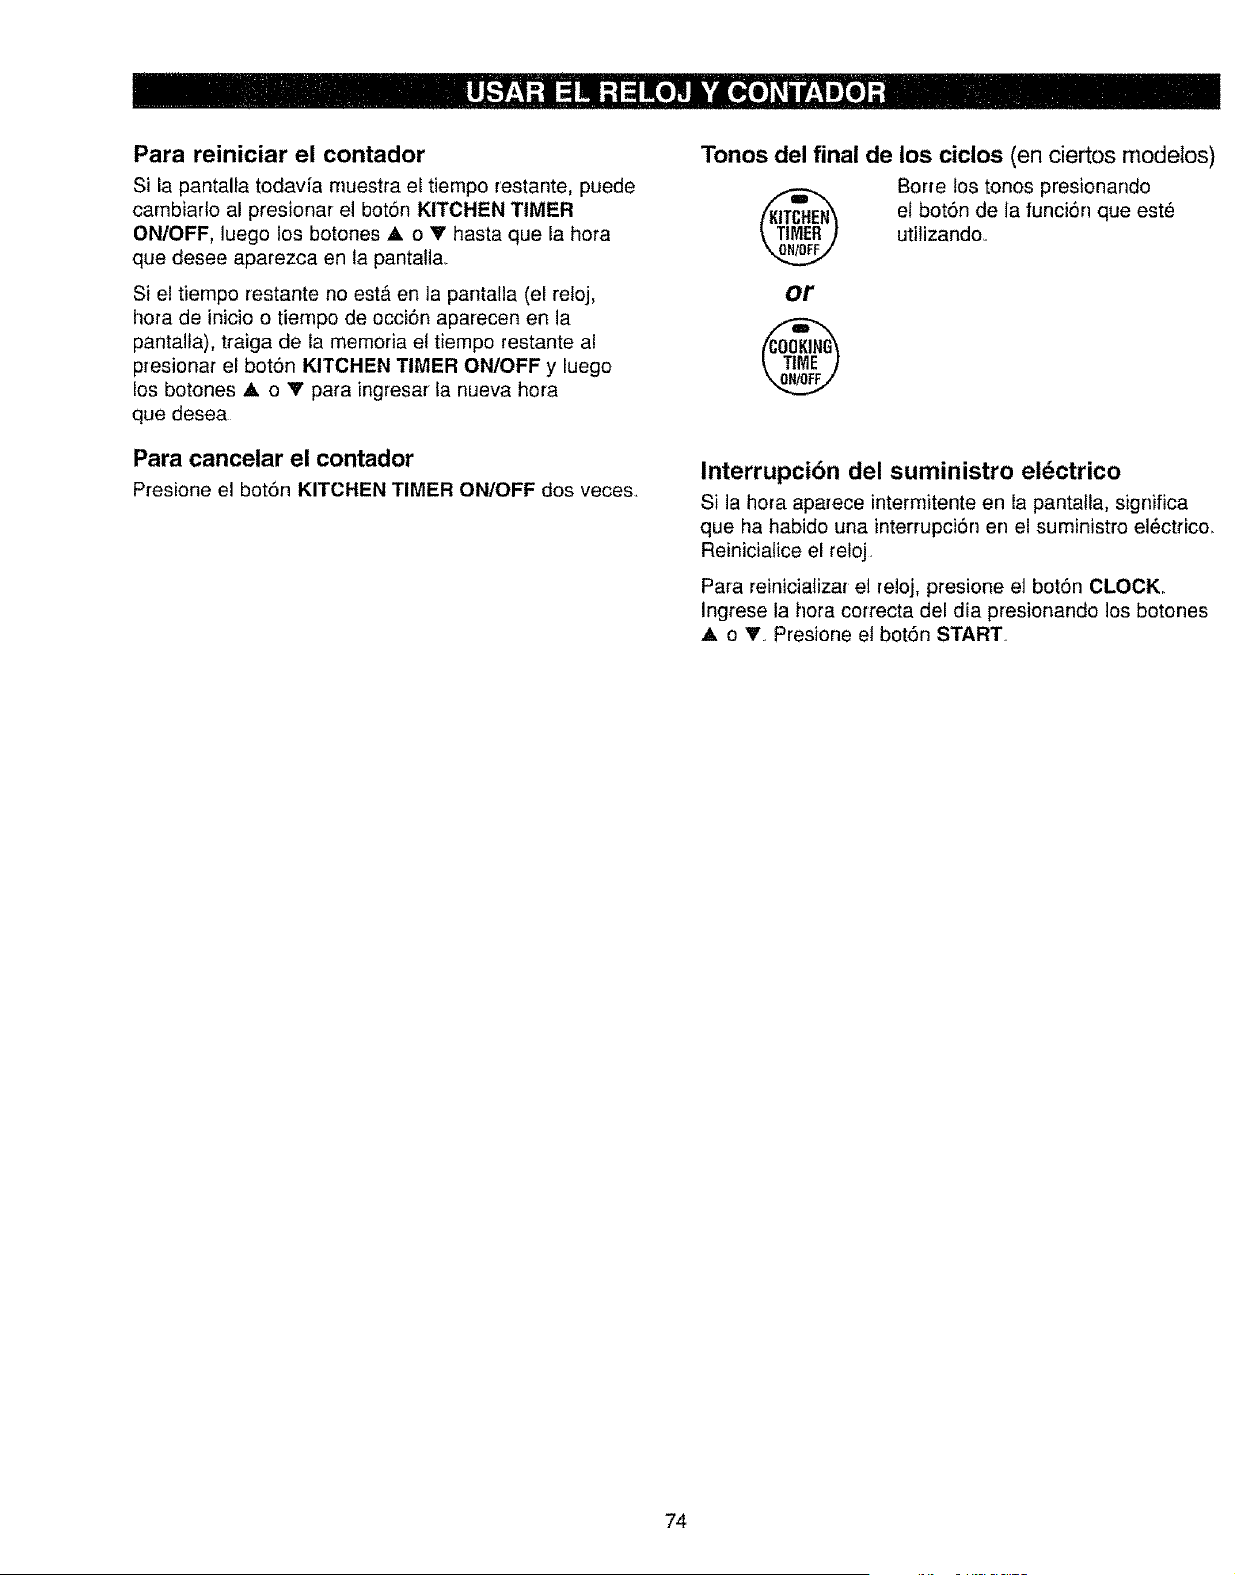
Para reiniciar el contador
Si la pantalta todavia muestra el tiempo restante, puede
cambiarlo al presionar el bot6n KITCHEN TIMER
ON/OFF, luego los botches A o V hasta que la hora
que desee aparezca en la pantalla..
Si el tiempo restante no est_ en la pantalla (eEreloj,
hora de inicio o tiempo de ocdSn aparecen en ]a
pantalla), traiga de la memoria el tiempo restante al
presionar el botSn KITCHEN TIMER ON/OFF y luego
Ios botches _, o V para ingresar Lanueva hora
que desea
Para cancelar el contador
Presione el botSn KITCHEN TIMER ON/OFF dos veces,
Tonos del final de los ciclos (en ciertos modelos)
Borre los tonos presionando
el bot6n de Ia funci6n que este
utitizandoo
or
®
Interrupcibn del suministro el_ctrico
Si ]a hora aparece intermitente en la pantalfa, significa
que ha habido una interrupci6n en el suministro el_ctdco,.
Reiniciatice el reloj.
Para reinicializar et re]oj, presione el bot6n CLOCK,,
Ingrese la hora correcta del dia presionando los botches
A o Y. Presione et bot6n START°
74
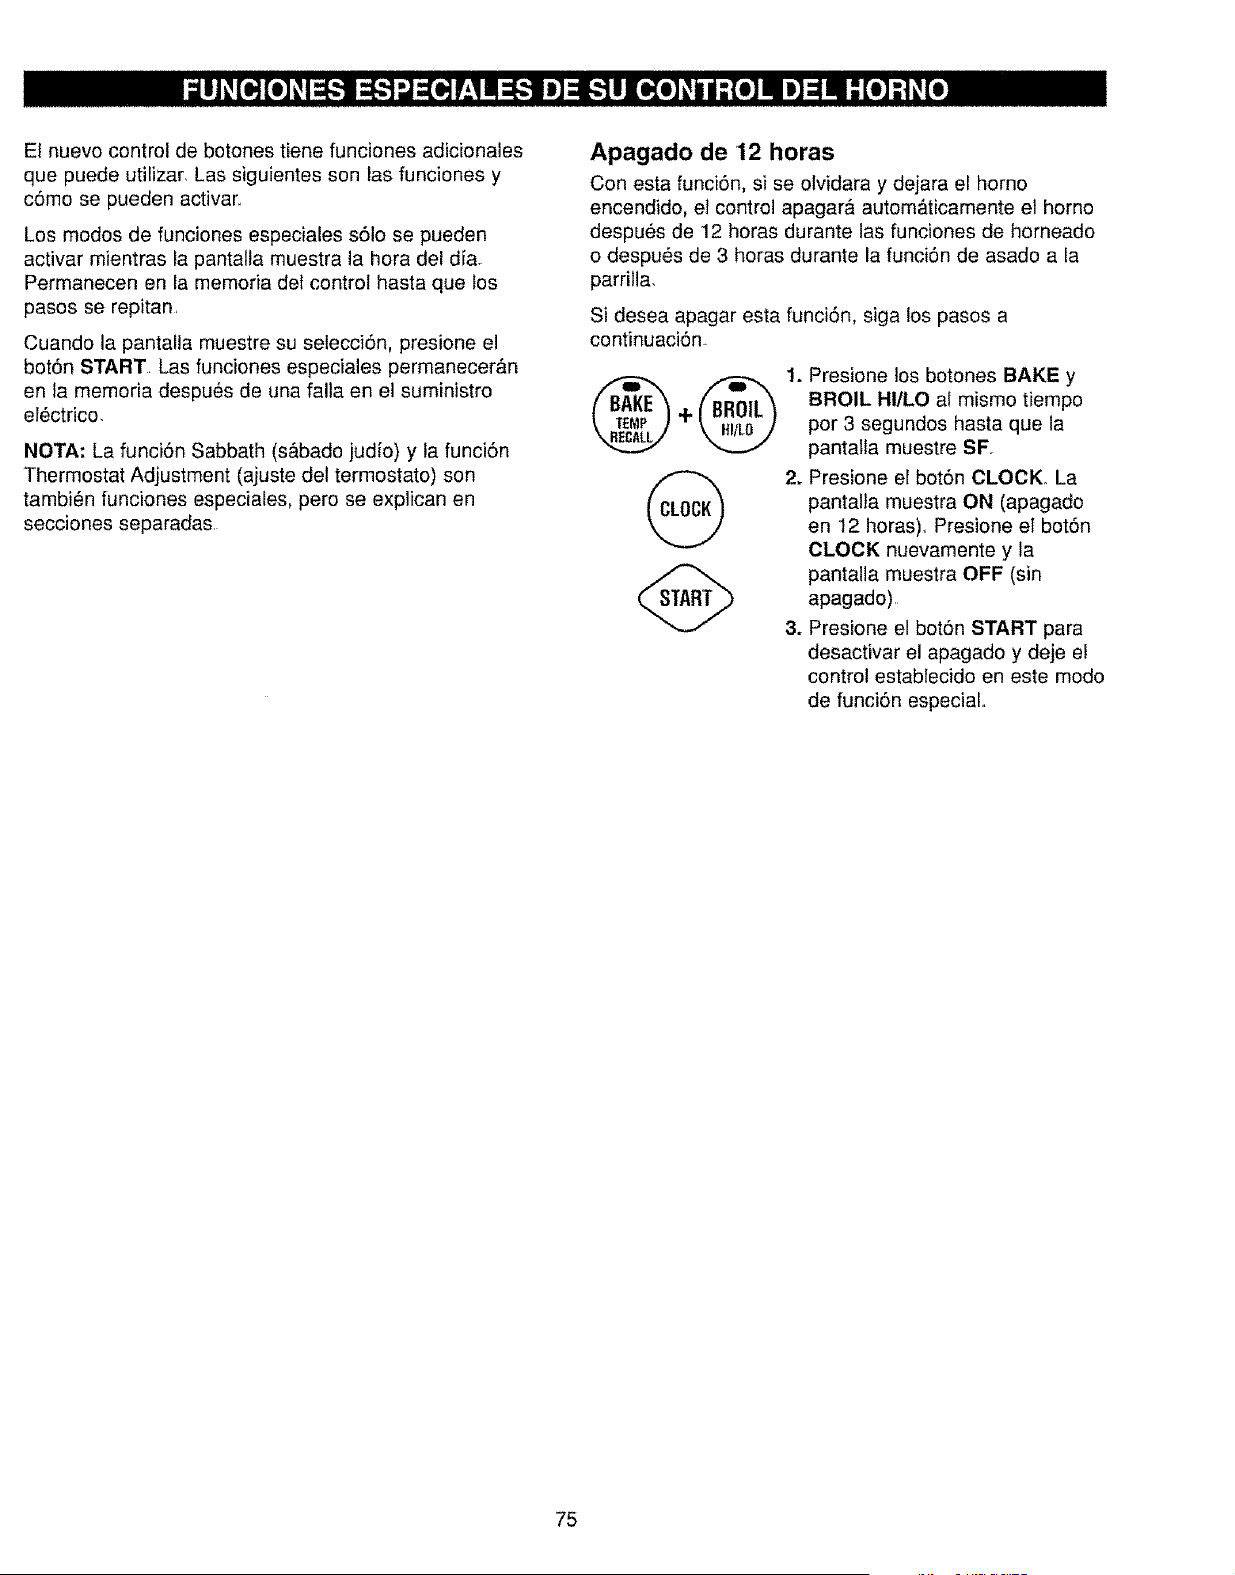
Elnuevocontroldebotonestienefuncionesadicionales
quepuedeutilizar.Lassiguientessonlasfuncionesy
c6mosepuedenactivar.,
Losmodosdefuncionesespecialess61osepueden
activarmientrasIapantallarnuestrala horadeldia_
Permanecenen la memoria det control hasta que los
pasos se repitan,
Cuando la pantaFla muestre su setecci6n, presione el
bot6n START. Las funciones especiales permanecer&n
en ta memoria despues de una falta en el suministro
el6ctrico,
NOTA: La funci6n Sabbath (s&bado judio) y la funci6n
Thermostat Adjustment (ajuste del termostato) son
tambi_n funciones especiales, pero se explican en
secciones separadas,
Apagado de 12 horas
Con esta funci6n, si se olvidara y dejara el homo
encendido, el control apagar,_ autom&ticamente el homo
despu_s de 12 horas durante las funciones de horneado
o despu_s de 3 horas durante la funci6n de asado a la
parrilla.
Si desea apagar esta funci6n, siga los pasos a
continuaci6n.
@+@
@
@
1. Presione los botones BAKE y
BROIL Ht/LO aI mismo tiempo
por 3 segundos hasta que la
pantalla muestre SF.
2. Presione el bot6n CLOCK,, La
pantalla muestra ON (apagado
en 12 horas). Presione el bot6n
CLOCK nuevamente y la
pantalla muestra OFF (sin
apagado)
3. Presione el bot6n START para
desactivar el apagado y deje el
control establecido en este modo
de funci6n especial.,
75

Disefiada para uso en ef Sabbath y los dias de fiesta jud[os,
la funciSn Sabbath se puede usar para homeado/asado
=3nicamente.No se puede usar para asado a la parfilla, auto
fimpiezao cocciSn de retrasar inicio (Delay Start).
NOTA: El homo se endende autom&ticamente (en algunos
modelos) cuando ta puerta se abra y se apaga cuando la
puerta se cierra. El foco se puede reemplazar: Consutte ta
secciSn Reemplazo de la luz del horno. En algunos modelos
con un interruptor de luz en et panel dei controL,el homo se
puede encender y dejar que permanezca encendido.
Cbmo configurar las funciones
Baking/Roasting (horneado/asado) normal
NOTA: Para entender c6mo funciona el controt del
horno, practique a usar el horneado normal (diferente
al Sabbath) antes de entrar al modo Sabbath
CerciSrese de que el reloj muestre la hora del dia
correcta y el homo est6 apagader
Presione y sostenga los botones
BAKE y BROIL HI/LO al mismo
tiempo, hasta que la pantalia
muestre SF.
G
®
@@
Cuando ]a pantalfa
muestra _ el homo est&
en modo Sabbath.,
Cuando la pantaHa
muestra D c el homo
est,. homeando/asando
2. Toque el botSn CLOCK hasta
que SAb aparezca en la pantall&
3. Presione el botSn START y el
signo D aparece en la pantalla.
4. Presione el botSn BAKE..
No hay serial
5. La temperatura de inicio
preestablecida se configurar&
autom&ticamente en 350°.
Presiones los botones ,L o V
para aumentar o disminuir _a
temperatura en incrementos de
25°.. La temperatura se puede
configurar entre 170 ° y 550°.
No aparece una seSal de
la temperatura.
6. Presione el bot6n START,
7. Despues de un p_riodo de
retraso a] azar de
aproximadamente 30 segundos
a 1 minuto, aparece D cen la
pantalla, indicando que e] homo
estA horneando/asando. Si D c no aparece en la pantalla,
inicie de nuevo en el paso 4.
Para ajustar la temperatura del herno, presione el bot6n
BAKE y toque tos botones A o V para aumentar o
disminuir {a temperatura en incrementos de 25°, Presione
el bot6n START_
NOTA: Los botones STOP/CLEAR y COOKING TIME
est_.n activos durante ta funciSn Sabbath.
76
Cbmo configurar la funcibn Baking/Roasting
(horneado/asado) programado--inicio
inmediato y apagado autom tico
NOTA: Para entender cSmo funeiona el control del homo,
practique el use de inicio inrnediato normal (diferente a
Sabbath) y apagado autom&ticamente antes de ingresar
a] medo Sabbath.
Cerci6rese de que el reloj muestre ]a hera correcta dei
dia y el homo este apagado.
_ !. Presione y sostenga los botones
@
BAKE y BROIL HI/LO, al
+ mismo tiempo, hasta que la
pantalla muestre SF.,
2.
3,
5.
®
6.
8o
®
@@
Cuando la pantalla 9.
muestra _ el homo est&
en modo Sabbath 10.
Cuando la pantalla
muestra _ c el homo
est& horneando/asando
Toque el bot6n CLOCK hasta
que SAb aparezca en la
pantallao
Presione et botSn START y
aparece en la pantaIla.
Presione el botSn COOKING TIME
Presiene los botones A o 'W'
para establecer et tiempo de
cocci6n deseado entre 1 minuto
y 9 horas y 59 minutos En la
pantalla aparece el tiempo de
cocci6n ingresado.
Presione et botSn START.
Presione et botSn BAKE
No aparece ninguna serial
La temperatura de inicio
preestablecida se configurar&
autom&ticamente en 350 °.
Presiones los botones A o V
para aumentar o disminuir la
temperatura en incrementos de
25% La temperatura se puede
configurar entre 170° y 550°_
No aparece una serial de
la temperatura.
Presione el botbn START.
Despues de un p6riodo de
retraso al azar de
aproximadamente 30 segundos
a 1 minuto, aparece D cen la
pantalia, indicando que el homo est& horneando/asandoo Si
c no aparece en la pantalla, inicie de nuevo en el paso 7.
Para ajustar la temperatura del homo, presione el botSn
BAKE y toque los botones A o 'V para aumentar o
disminuir la temperatura en incrementos de 25°., Presione
el bot6n START,
Cuando la cocci6n conctuya, ta pantalia cambiar_, de
D c a _ indicando que el homo se ha apagado pero que
todavia est_ en el medo Sabbath. Retire el aiimento cocinado.
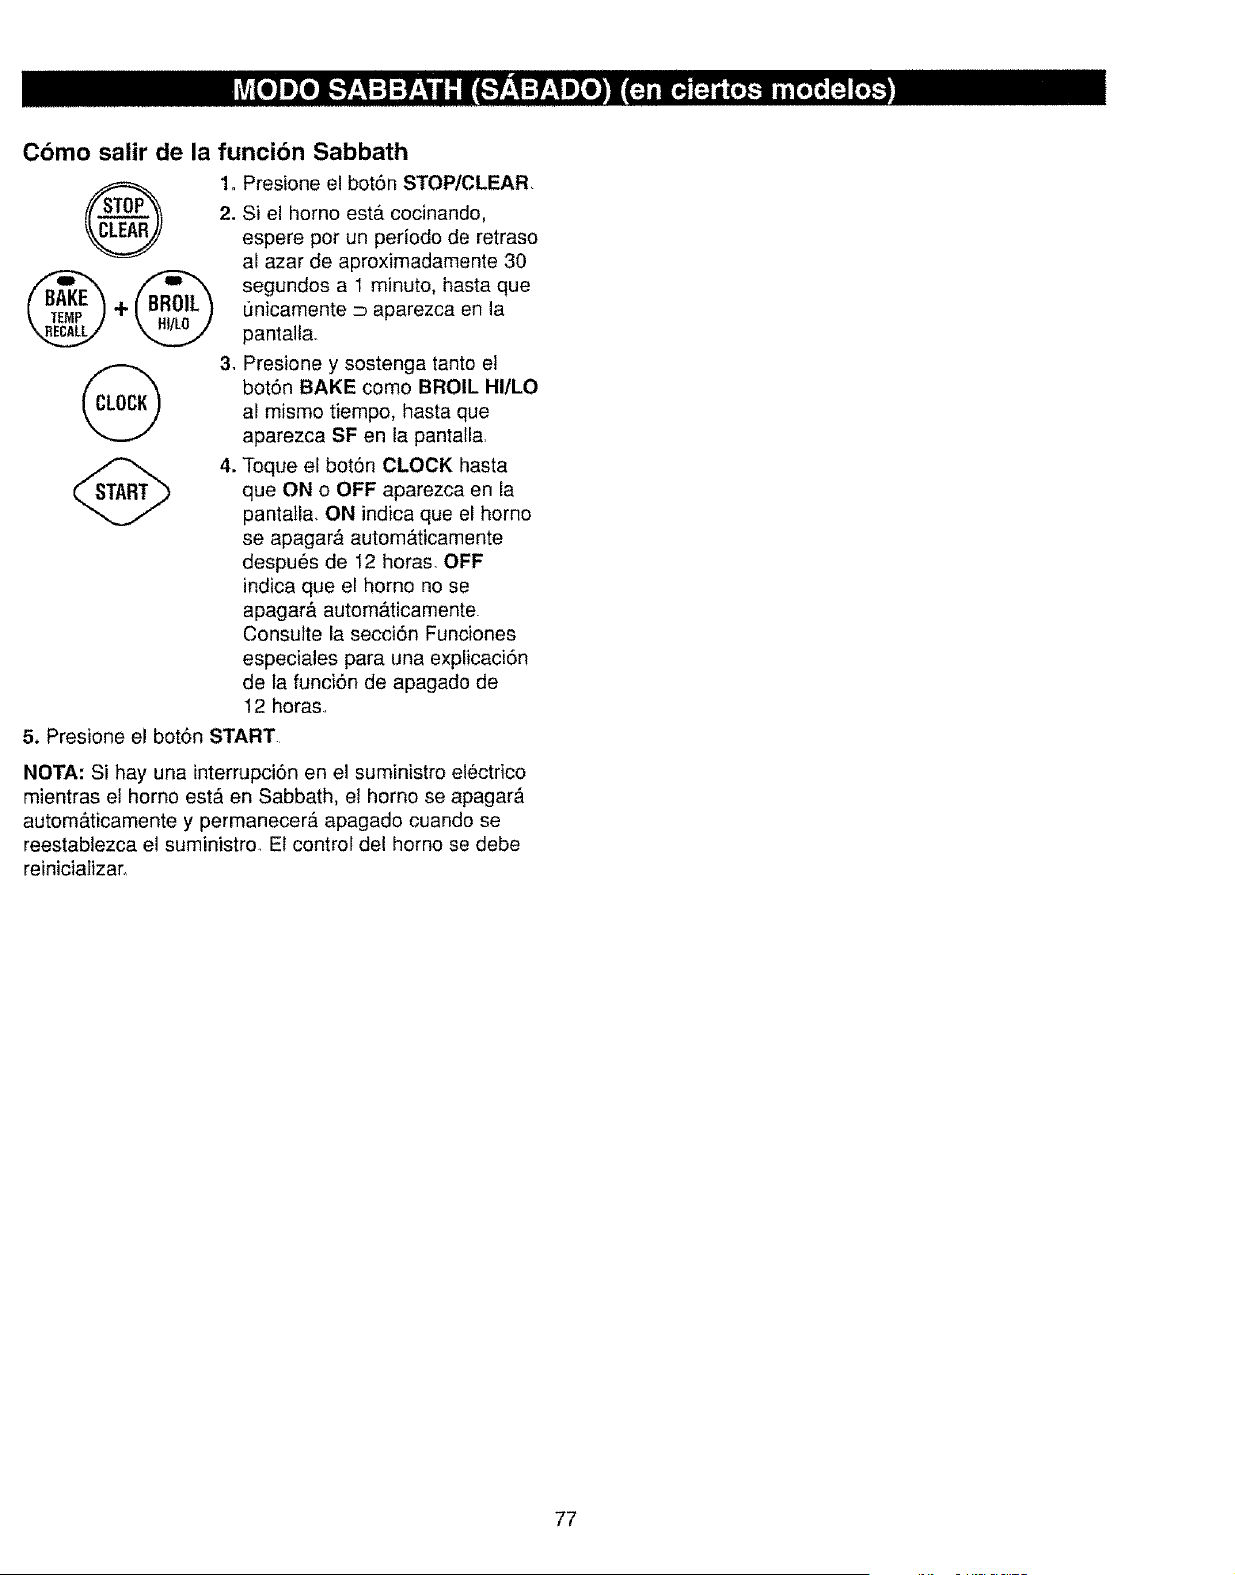
C6mo salir de la funcibn Sabbath
1. Presione e! bot6n STOP/CLEAR
2. Si el homo esta. cocinando,
3.
espere por un perfodo de retraso
al azar de aproximadamente 30
segundos a 1 minuto, hasta que
unicamente D aparezca en la
pantalla.,
Presione y sostenga tanto el
bot6n BAKE como BROIL HI/LO
al mismo tiempo, hasta que
aparezca SF en la pantalla,
4. Toque el bot6n CLOCK hasta
que ON o OFF aparezca en la
pantatla, ON indica que el homo
se apagar& autom&ticamente
despues de 12 horas. OFF
indica que el homo no se
apagar& autom#.ticamente
Consulte la secci6n Funciones
especiales para una explicaci6n
de la funci6n de apagado de
! 2 horas,,
5. Presione el bot6n START
NOTA: Si hay una interrupci6n en el suministro el6ctrico
mientras el homo est& en Sabbath, el homo se apagar&
autom&ticamente y permanecer_, apagado cuando se
reestablezca el suministro, Et control del homo se debe
reinicializar_
77
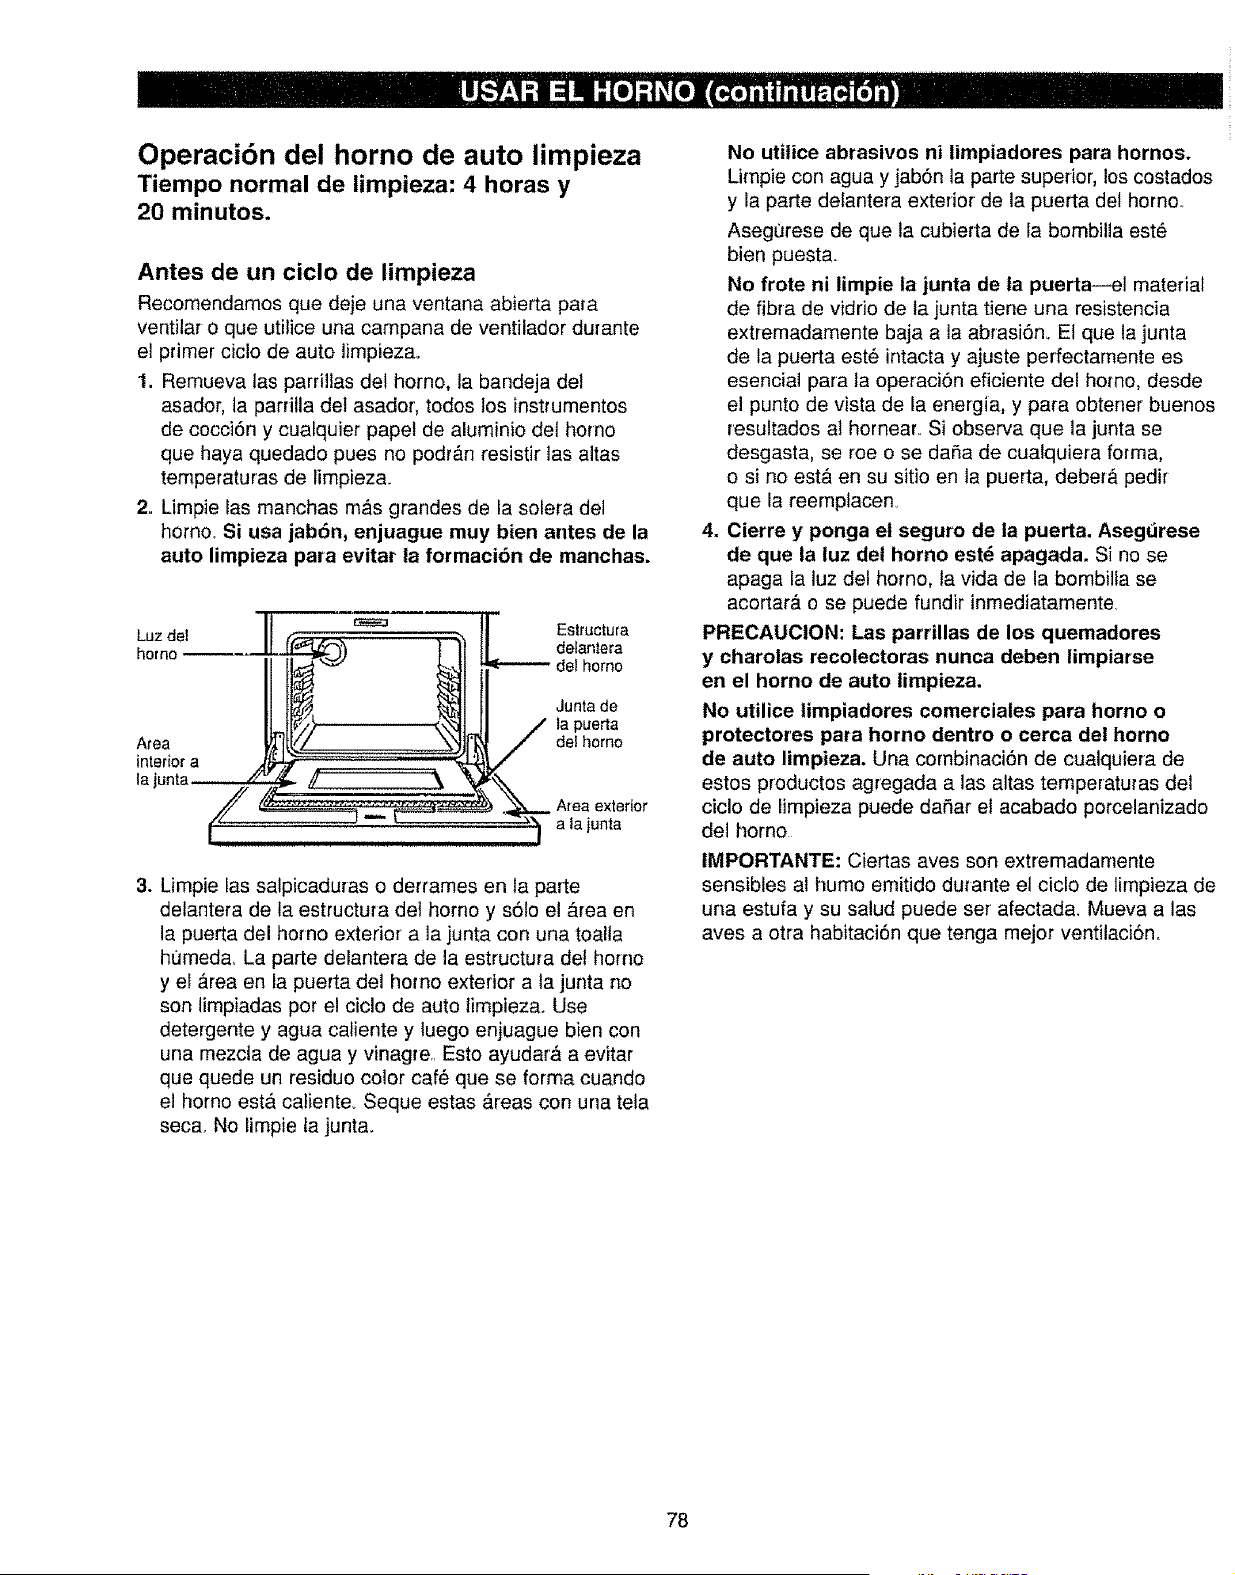
Operaci6n del horno de auto limpieza
Tiempo normal de iimpieza: 4 horas y
20 minutos.
Antes de un ciclo de limpieza
Recomendamos que deje una ventana abierta para
ventilar o que utilice una campana de ventilador durante
el primer ciclo de auto limpiezao
1. Remueva tas parrillas del homo, la bandeja del
asador, ta parritla del asador, todos los instrumentos
de cocci6n y cualquier papel de aluminio del horno
que haya quedado pues no podr&n resistir tas altas
tempetaturas de limpieza.
2o Limpie las manchas mas grandes de la solera del
homo° Si usa jab6n, enjuague muy bien antes de la
auto lirnpieza para evitar la formaci6n de manchas.
Luz del Estructura
homo delantera
Area
interbr a
la junta
Junta de
ta puerta
de! homo
Area exterior
a la junta
3. Limpie las salpicaduras o derrames en la parte
delantera de la estructura de{ homo y s6to el area en
la puerta del homo exterior a la junta con una toalta
humed& La parte delantera de la estructura del homo
y el &tea en la puerta dei homo exterior a ta junta no
son limpiadas por el ciclo de auto limpiez& Use
detergente y agua caliente y luego enjuague bien con
una mezcla de agua y vinagrer. Esto ayudar_ a evitar
que quede un residuo color caf_ que se forma cuando
el homo est& caliente_ Seque estas _.reas con una tela
seca. No limpie la junta.
No utilice abrasivos ni limpiadores para hornos.
Limpie con agua y jab6n la parte superior, los costados
y la parte detantera exterior de la puerta del homo..
Asegurese de que la cubierta de la bombilla est6
bien puesta.
No frote ni limpie la junta de ta puerta--e] material
de fibra de vidrio de la junta tiene una resistencia
extremadamente baja a la abrasi6no El que la junta
de la puerta este intacta y ajuste perfectamente es
esencial para la operaci6n eficiente del homo, desde
el punto de vista de la energia, y para obtener buenos
resultados al hornear. Si observa que la junta se
desgasta, se roe o se daSa de cualquiera form&
e si no esta en su sitio en la puerta, deber_, pedir
que la reemplacen_
4. Cierre y ponga et seguro de la puerta. Aseg_3rese
de que ta tuz del homo est_ apagada. Si no se
apaga la luz del homo, la vida de la bombilla se
acortar#, o se puede fundir inmediatamente.
PREOAUCION: Las parrillas de los quemadores
y charolas recolectoras nunca deben limpiarse
en el homo de auto timpieza.
No utilice timpiadores comerciales para homo o
protectores para horno dentro o cerca de! horno
de auto limpieza. Una combinaci6n de cualquiera de
estos productos agregada alas altas temperaturas del
ciclo de Iimpieza puede daSar el acabado porcelanizado
del homo
IMPORTANTE: Ciertas aves son extremadamente
sensibles al humo emitido durante el ciclo de limpieza de
una estufa y su salud puede set afectada. Mueva alas
aves a otra habitaci6n que tenga mejor ventilaci6no
78
C6mo preparar el horno para la limpieza
Si et homo est,_ demasiado caliente y usted empieza
a programar un ciclo de limpieza, no podr& des]izar
el seguro_
Deje tiempo adicional para que se enfrie antes de tratar
de empezar el ciclo.
1. Siga las instrucciones en la secci6n Antes de un ciclo
de limpieza_
2. Deslice fa manija del seguro
hacia Ia derecha hasta donde
sea posible,
Nunca fuerce la manija del
seguro. El hecho de forzar la |||l_
manija dafiar_ el mecanismo
det seguro.
®
3. Presione el botSn SELF CLEAN
4. Presiones los botches ,L o Y
hasta que aparezca el tiernpo de
timpieza deseado..
El tiempo de Iimpieza es
normalmente de 4 horas y 20
minutos. Puede cambiar el tiempo
de limpieza a cualquier tiempo
entre 3 y 5 horas, dependiendo de
la suciedad del horno_
5, Presione el botSn START.
El cicto de auto limpieza iniciarE autom_.ticamente
despu6s de que CLEAN aparezca en la pantalta y
empiece la cuenta regresiva.
Mientras el homo est_ en auto limpieza, puede presionar
el botSn CLOCK para visuatizar la hora del dia. Para
volver a la cuenta regresiva, presione el botSn SELF
CLEAN,
El homo se apaga autom_.ticamente cuando el ciclo
de limpieza se complete, y 0:00 aparezca en la pantalla
de manera intermitente.
6. Deslice la manija del pasador hacia la izquierda al
m&ximo posible y abra la puerta.
Para parar un ciclo de limpieza
Presione el bot6n STOP/CLEAR
Espere hasta que el homo se haya enfriado por debajo
de la temperatura del seguro antes de quitar el seguro.
No podr_, abrir la puerta de inmediato a menos que et
homo se haya enfriado por debajo de la temperatura
def seguro.
Despu6s de un cicio de limpieza
No es posible configurar el homo para cocinar hasta
tanto no este frio para que la puerta se pueda abrir
Es posible que observe ceniza blanca en el homo.
Limpie con un patio hL]medo despues de que el homo
se enfrie..
Si las manchas blancas persisten, retirelas con una
esponjilla con jabSn y enjuague por compteto con una
mezcla de agua y vinagre.
Estos dep6sitos son por Io general residuos de sal que
no se pueden limpiar durante el ciclo de limpieza.
Si el homo no est,. limpio despu6s de un ciclo de
limpieza, repita el cicloo
• No es posible configurar et homo para cocinar hasta
tanto no est6 frio para que Ia puerta se pueda abrin
• Mientras el homo est& en auto limpieza, puede
presionar el bot6n CLOCK para mostrar la hora det dia.
Para regresar a la cuenta regresiva de limpieza,
presione el bot6n COOKING TIME.
• Si se dificulta desfizar las parrillas, aplique una
cantidad pequefia de aceite vegetal o aceite de cocina
a una toalla de papel y limpie con esta los berries
de las parriltas del homo..
79

Operacibn del horno de auto limpieza
(continuaci6n)
C6mo demorar el inicio de la limpieza
Es posible configurar el control de1 homo para retrasar su
inicio, limpiar pot un tiempo especifico y luego apagarse
autom_.ticamente.
Cerci6rese de que et reloj muestra la hora cortecta del dia,
Siga las instrucciones en la secci6n Antes de un ciclo
de limpiezao
®
@
1. Cierre la puerta con el pasador_
NOTA: Nunca fuerce et pasador.
Si el homo est,, muy caliente, no
podr& deslizar eJ pasador_ Deje que
et horno se enfrie.
2. Presione el botbn SELF CLEAN
3. Presione los botches ._, o Y
para configurar et tiempo de
limpieza..
El tiempo de limpieza es
normalmente de 4 horas y 20
minutos_ Puede cambiar el tiempo
de limpieza a cualquier tiempo
entre 3 y 5 horas, dependiendo de la suciedad dei homo°
Si desea un tiempo de limpieza diferente, toque los
botches A o V basra que aparezca el tiempo de
limpieza deseadoo
4. Presione el bot6n DELAY START.
Cambie el tiempo de inicio presionando los botches A o
V. El tiempo de inicio aparece en la pantalla_
5. Presione el bot6n START.
Et ciclo de auto limpieza iniciar_t autom&ticamente a ta hora
programada_
Mientras el homo est_ en auto limpieza, puede presionar
el bot6n CLOCK para visualizar la hora del dia. Para
volver a la cuenta regresiva, presione el botSn SELF
CLEAN
El homo se apaga autom&ticamente cuando el ciclo
de limpieza se complete, y 0;00 aparezca en la panta]ta
de manera intermitente.
6. Deslice la manija del pasador hacia la izquierda al
m_.ximo posible y abra la puerta_
8O
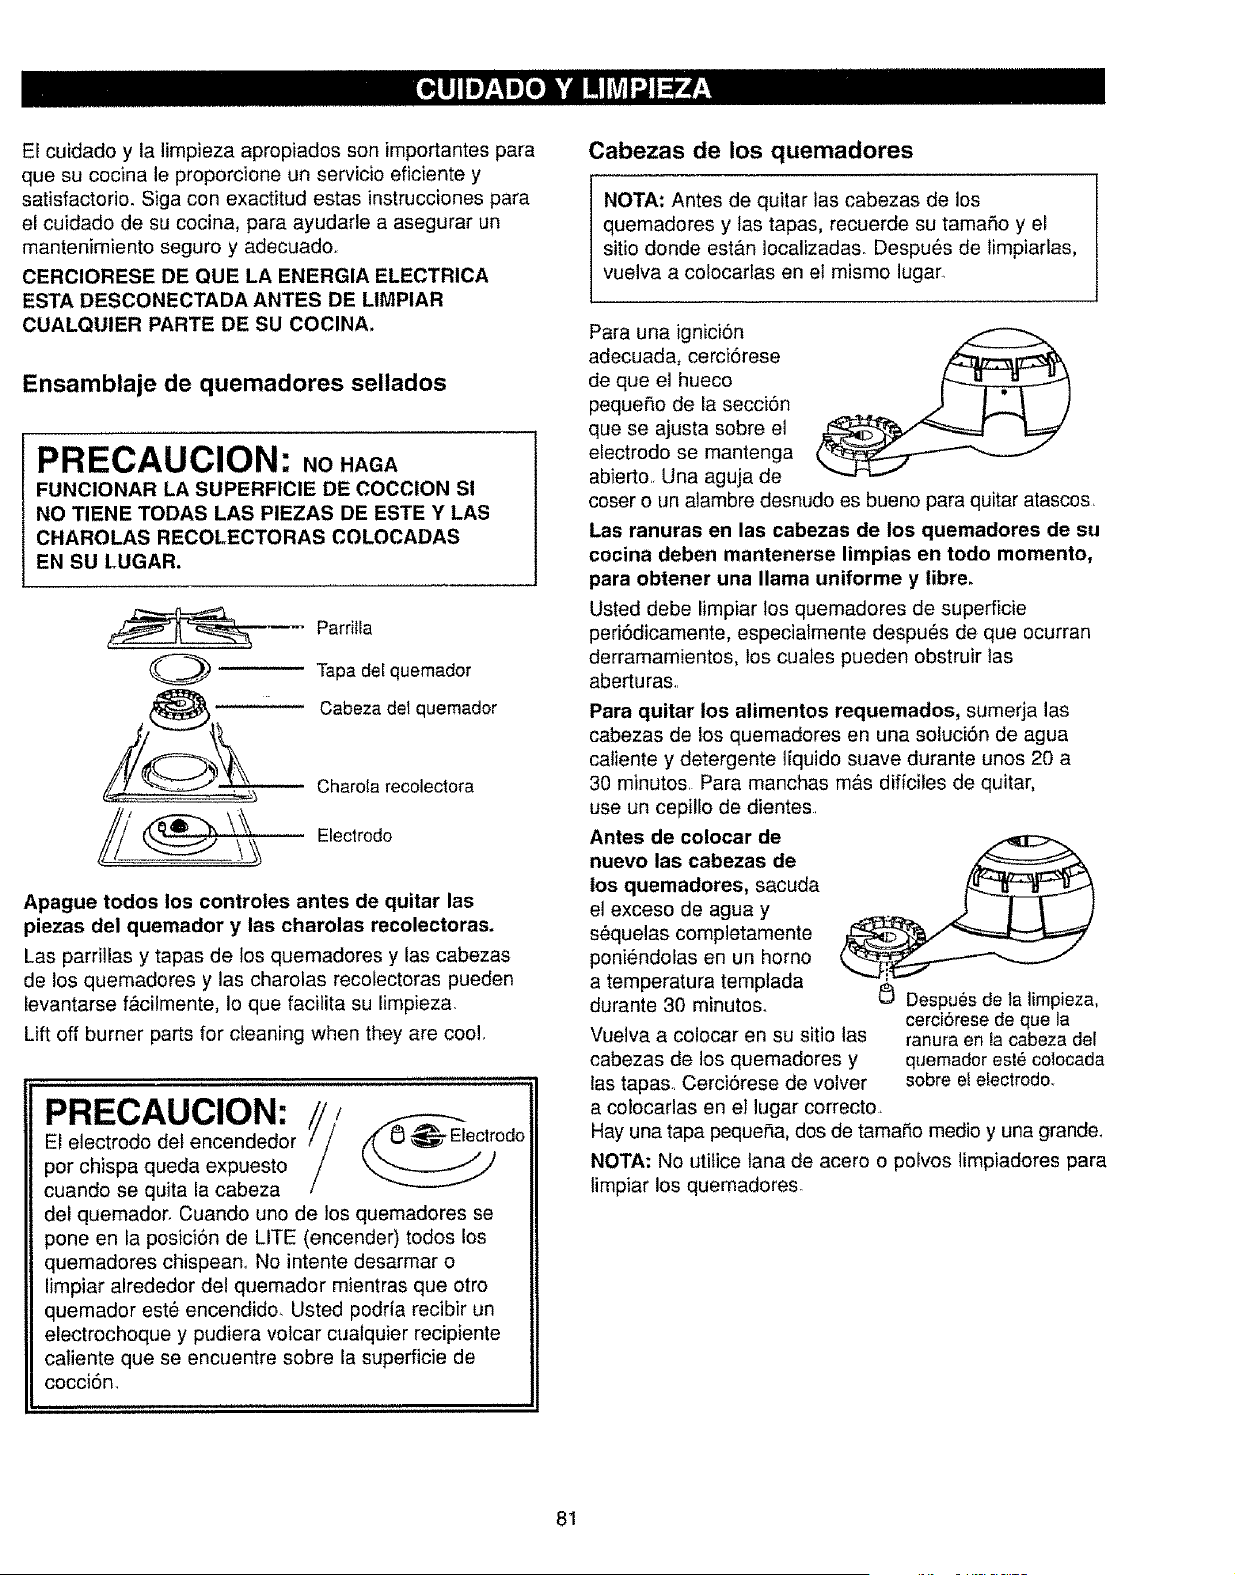
El cuidado y la limpieza apropiados son importantes para
que su cocina le proporcione un servicio eficiente y
satisfactorio. Siga con exactitud estas instrucciones para
el cuidado de su cocina, para ayudarle a asegurar un
mantenimientc seguro y adecuado,.
CERCIORESE DE QUE LA ENERGIA ELECTRICA
ESTA DESCONECTADA ANTES DE LIMPIAR
CUALQUIER PARTE DE SU COClNA,
Ensamblaje de quemadores sellados
PRECAUCION: NoHAGA
Fu.cno.A..ASUPE.F,C,EDECOCC,ONSa
NO TIENE TODAS LAS PIEZAS DE ESTE Y LAS
CHAROLAS RECOLECTORAS COLOCADAS
EN SU LUGAR.
O
--'---- Parriila
Tapa del quemador
Cabeza del quemador
Charola recolectora
..__ ;;_ Electrodo
Apague todos los controles antes de quitar las
piezas dei quemador y las charolas recolectoras.
Las parrillas y tapas de los quemadores y las cabezas
de los quemadores y las charolas recolectoras pueden
levantarse f&cilmente, Io que facitita su limpieza.
Lift off burner parts for cleaning when they are cool..
PRECAUCION:
El electrodo del encendedor
por chispa queda expuesto
cuando se quita la cabeza
dei quemador. Cuando uno de los quemadores se
pone en la posici6n de LITE (encender) todos los
quemadores chispeano No intente desarmar o
limpiar alrededor del quemador mientras que otro
quemador este encendido. Usted podrfa recibir un
electrochoque y pudiera volcar cualquier recipiente
caliente que se encuentre sobre la superficie de
cocci6n.
Cabezas de los quemadores
NOTA: Antes de quitar las cabezas de los
quemadores y tas tapas, recuerde su tamaSo y el
sitio donde est&n localizadas° Despu_s de limpiarlas,
vuelva a colocarlas en el mismo lugar.
Para una ignici6n
adecuada, cerci6rese
de que el hueco
pequefio de la secci6n
que se ajusta sobre el
electrodo se rnantenga
abierto. Una aguja de
coser o un alambre desnudo es bueno para quitar atascos.
Las ranuras en las cabezas de los quemadores de su
cocina deben mantenerse limpias en todo momento,
para obtener una llama uniforme y libre,
Usted debe limpiar los quemadores de superficie
peri6dicamente, especialmente despu_s de que ocurran
derramamientos, los cuales pueden obstruir las
aberturas,.
Para quitar los alimentos requemados, sumerja las
cabezas de los quemadores en una soluci6n de agua
caliente y detergente lfquido suave durante unos 20 a
30 minutos Para manchas m_s diffciles de quitar,
use un cepilfo de dientes.
Antes de colocar de
nuevo las cabezas de
los quemadores, sacuda
el exceso de agua y
s_quelas completamente
poni_ndolas en un homo
a temperatura templada
durante 30 minutos. _ Despu_s de la limpieza,
cerci6rese de que la
Vuelva a colocar en su sitio las ranura en ia cabeza del
cabezas de los quemadores y quemador est_ colocada
tas tapas, Cerci6rese de volver sobre e! electrodo.r
a cotocarlas en eI lugar correcto,
Hay una tapa pequefia, dos de tama_o medio y una grande,
NOTA: No utilice lana de acero o polvos limpiadores para
timpiar los quemadores.
81
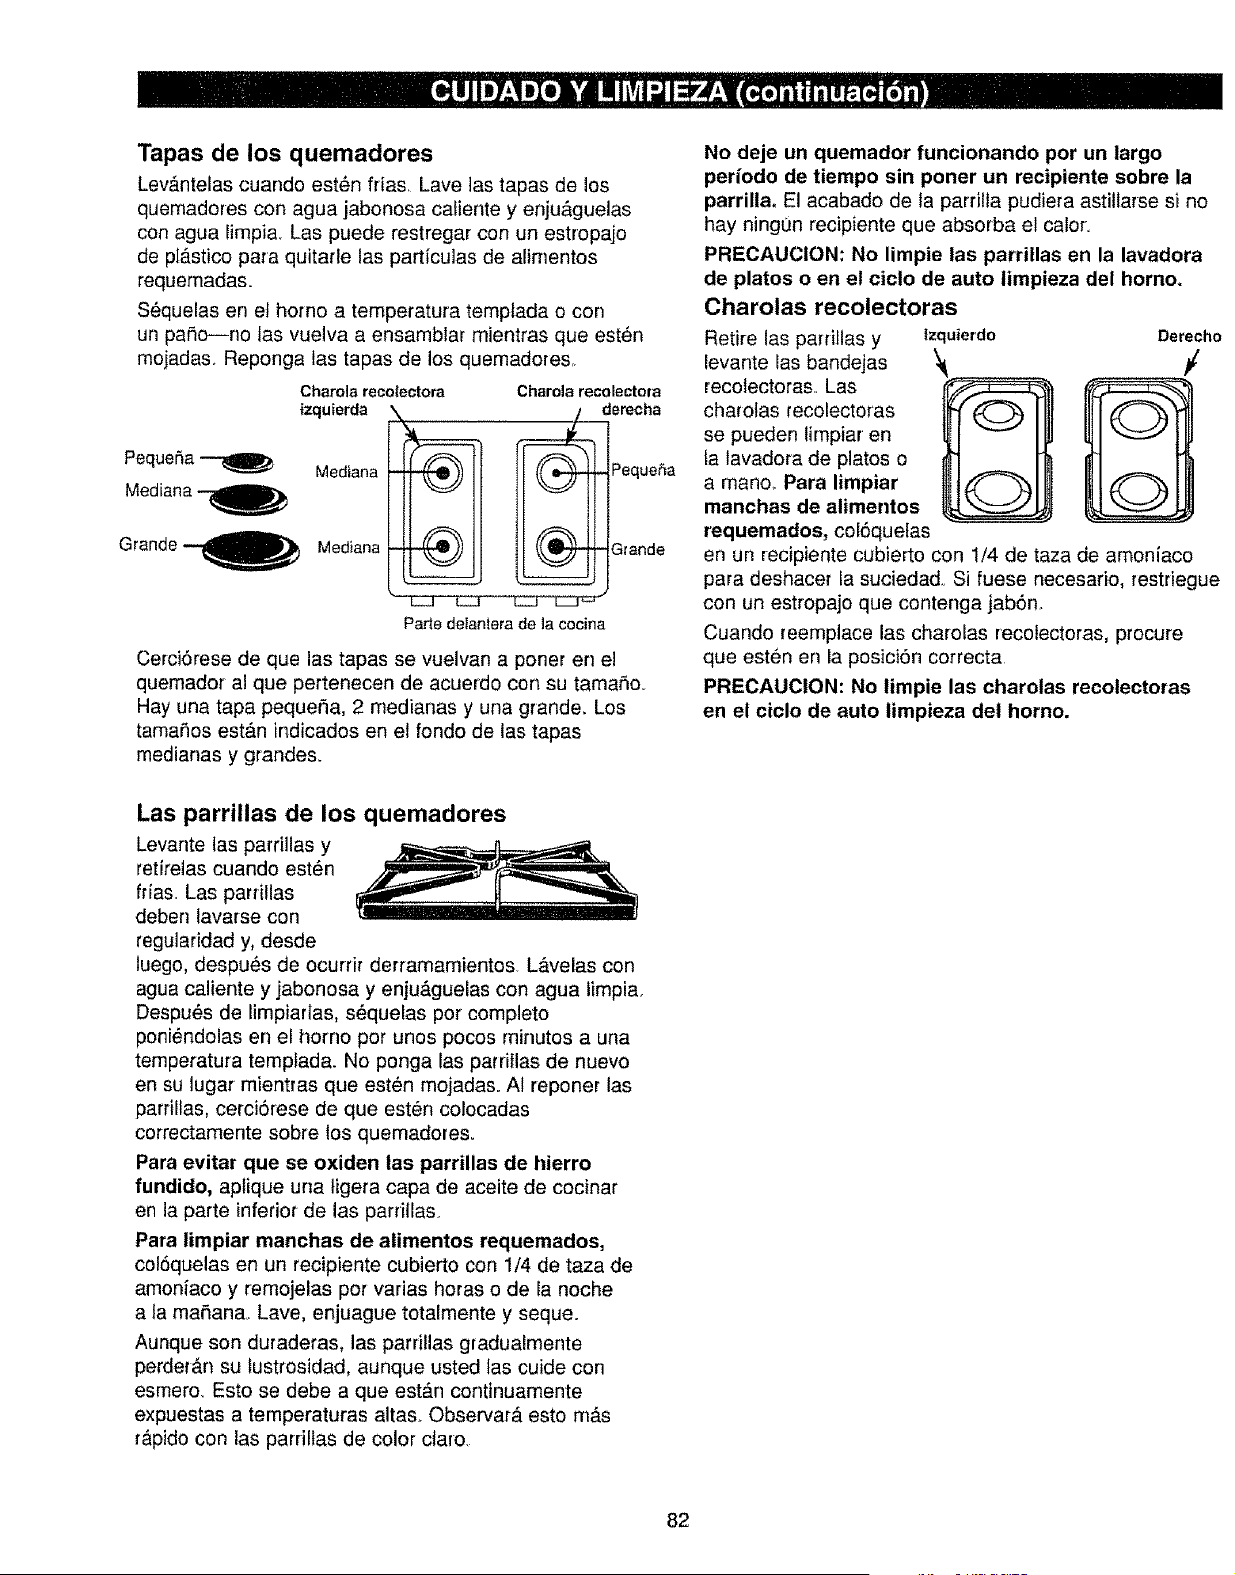
Tapas de los quemadores
LevD.ntetas cuando est6n frias Lave las tapas de los
quemadores con agua jabonosa caliente y enju&guelas
con agua limpia_ Las puede restregar con un estropajo
de pl_.stico para quitarle las part/culas de alimentos
requemadas.
S_quelas en el homo a temperatura templada o con
un paSo--no las vuelva a ensambtar mientras que esten
mojadas, Reponga las tapas de los quemadoreSr.
Pequer_a
Mediana
Charola recolectora
izquierda _
Mediana
Mediana
Charola recolectora
derecha
eque_a
_rande
Parle delanlera de la cocina
Cerci6rese de que las tapas se vuelvan a poner en el
quemador al que pertenecen de acuerdo con su tamaSo_
Hay una tapa pequeSa, 2 medianas y una grande, Los
tamafios est&n indicados en el rondo de las tapas
medianas y grandes.
No deje un quemador funcionando por un largo
periodo de tiempo sin poner un recipiente sobre la
parrilla. El acabado de la parrilla pudiera astillarse si no
hay ning0n recipiente que absorba et calor.
PRECAUCION: No limpie las parrillas en la lavadora
de platos o en el ciclo de auto iimpieza del homo.
Charolas recolectoras
Retire las parri[las y tzquierdo Derecho
levante las bandejas '_
recotectoras, Las
charolas recolectoras
se pueden limpiar en
ta tavadora de platos o
a mano,. Para limpiar
manchas de alimentos
requemados, col6quetas
en un recipiente cubierto con 1/4 de taza de amoniaco
para deshacer la suciedad., Si fuese necesario, restriegue
con un estropajo que contenga jab6n,,
Cuando reemplace las charolas recolectoras, procure
que esten en la posici6n correcta
PREOAUClON: No limpie las charolas recolectoras
en el ciclo de auto limpieza del homo.
Las parrillas de los quemadores
Levante tas parrillas y
retirelas cuando est_n
frias,, Las parrillas
deben lavarse con
regularidad y, desde
luego, despu_s de ocurrir derramamientos L&velas con
agua caliente y jabonosa y enju&guelas con agua limpia,
Despu_s de limpiadas, s_quelas pot completo
poniendolas en el homo pot unos pocos minutos a una
temperatura tempfada. No ponga las parriflas de nuevo
en su lugar mientras que esten mojadas. AI reponer las
parrillas, cerci6rese de que est_n colocadas
correctamente sobre los quemadores.
Para evitar que se oxiden las parrillas de hierro
fundido, aplique una tigera capa de aceite de cocinar
en ia parte inferior de las parrillas
Para limpiar manchas de alimentos requemados,
col6quelas en un recipiente cubierto con 1/4 de taza de
amonfaco y remojelas pot varias horas o de la noche
a ta maSana. Lave, enjuague totalmente y seque.
Aunque son duraderas, las parrillas gradualmente
perder&n su fustrosidad, aunque usted las cuide con
esmero_ Esto se debe a que est_.n continuamente
expuestas a temperaturas altas. Observar_ esto rn_s
r_pido con las parriltas de color claro,
82
Los respiradores del horno
Nunca bloquee los respiraderos (aberturas para la
circutaci6n del aire) de su cocina. Estos proveen la
entrada y salida de aire necesarias para que la cocina
pueda funcionar de manera adecuada con la
combusti6n correcta. Las aberturas de aire est&n
localizadas en la parte posterior de la superficie de
cocci6n, en las partes superiores e inferiores de la
puerta de] homo y en ta parte inferior de la cocina,
debajo del caj6n de almacenamiento.
Superficie de cocci6n
Para evitar que se dafie el acabado de esmalte
porcelanizado de la superficie de cocci6n y para
evitar que se tome opaco, timpie inmediatamente
cualquier derramamiento. Los alimentos que contienen
mucho _cido (tomates, col picada en salmuera, jugos de
fruta, etc,) o alimentos con un alto contenido de azucar
pudieran causar una mancha opaca si se dejan asentar.
Cuando la superficie se ha enfriado, Ifmpiela y
enju_.guela.
Para limpiar otros derramamientos como salpicaduras
de grasa, etc_, I&velas con jab6n y agua una vez que ta
superficie se haya enfriado. Entonces enju&guela y
sequela con un patio seco_
No almacene materiales inflamables dentro del
horno ni cerca de la superficie de cocci6n. No
almacene ni use materiales combustibles, gasolina
u otros vapores o liquidos inflamables alrededor
de 6ste o cualquier otro aparato electrodom6stico.
La bandeja y la rejilla del asador
Despu6s de asar ai fuego
directo, saque la bandeja
del homo Retire la rejilla de
la bandeja Vierta con
cuidado la grasa de la
bandeja en un reciplente
apropiado.. Lave y enjuague
la bandeja y la rejifla def
asador con agua caliente
usando un estropajo de
pl&stico o un estropajo que
contenga jab6n.
! !
Si los alimentos se han quemado y est&n
incrustados, rocie un poco de detergente sobre la rejilla
mientras esta est#. caliente y ct_brala con toallas de papel
mojadas o con una toaltita de lavar platos, teniendo
cuidado de no tocar superficies calientes con sus dedoso
El remojar Ia bandeja eliminar& los alimentos que se hart
quemado..
La bandeja del asador se puede limpiar con un limpiador
para hornos de tipo comercial
Tanto ta bandeja como ta rejilla del asador se pueden
limpiar en la lavadora de ptatos.
No atmacene la bandeja y ia rejilta del asador cuando
est_n sucias en ninguna parte de su cocina.
PRECAUCION: No lave la bandeja ni la rejilla del
asador en el ciclo de auto limpieza del homo.
NOTA: No levante la superficie de la cocina. Levantar
la superficie de la cocina puede causar dafios y una
operacibn inadecuada.
83
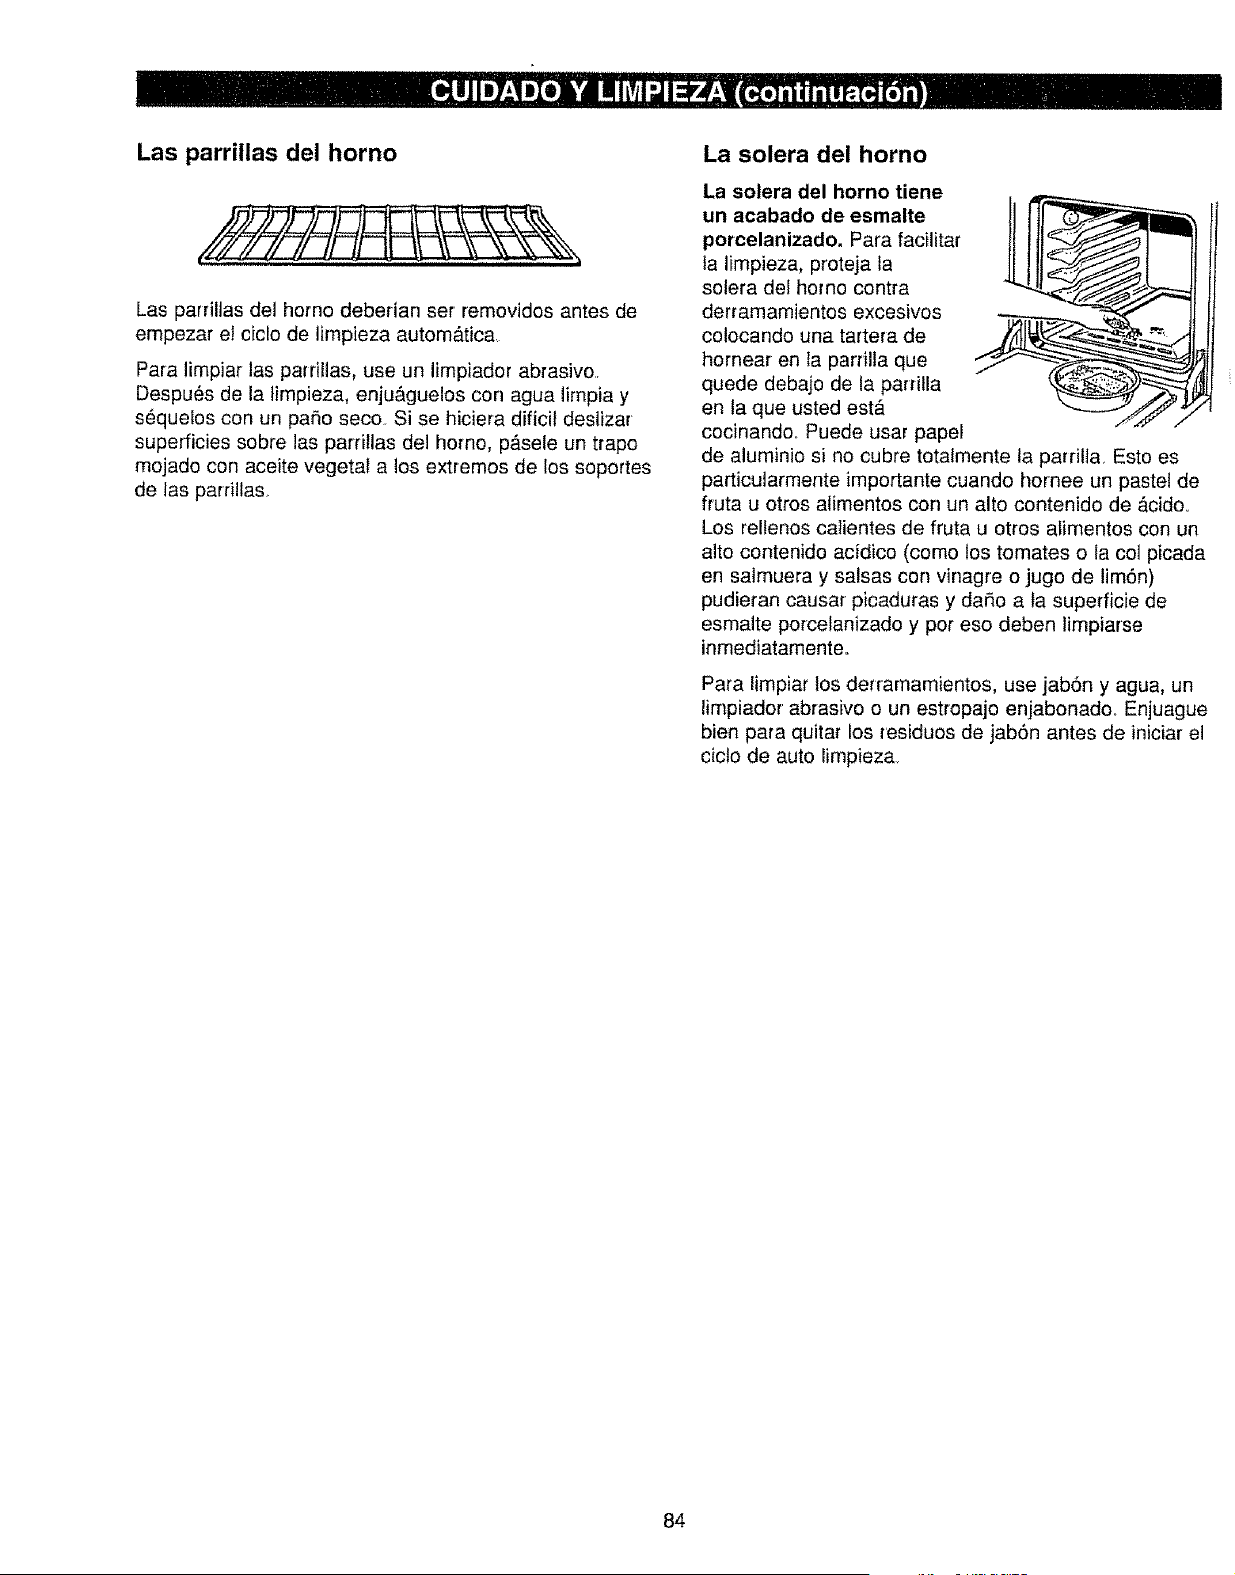
Las parrillas del horno
Las parriltas del homo deberian set removidos antes de
empezar el ciclo de limpieza autom&tica,
Para limpiar las parrillas, use un limpiador abrasive..
Despu6s de la limpieza, enju&guelos con agua limpia y
s_quelos con un paso seco. Si se hiciera dificil deslizar
superficies sobre las parritlas del homo, p_sele un trapo
mojado con aceite vegetal a los extremos de los soportes
de tas parrillas.
La solera dei horno
La solera del homo tiene
un acabado de esmalte
porcelanizado. Para facilitar
fa limpieza, proteja la
solera del homo contra
derramamientos excesivos
colocando una tartera de
hornear en ta parrilla que
quede debajo de la parrilla
en la que usted est&
cocinando.. Puede usar papel
de aluminio si no cubre totatmente la parrilta. Esto es
particularmente importante cuando hornee un pastel de
fruta u otros alirnentos con un alto contenido de ,_cidoo
Los rellenos calientes de fruta u otros alimentos con un
alto contenido acidico (como los tomates o la cot picada
en satrnuera y salsas con vinagre o jugo de lim6n)
pudieran causar picaduras y daSo a la superficie de
esmalte porcelanizado y pot eso deben limpiarse
inmediatamenteo
Para limpiar los derramamientos, use jab6n y agua, un
limpiador abrasivo o un estropajo enjabonado.. Enjuague
bien para quitar los residuos de jab6n antes de iniciar el
ciclo de auto limpieza_
84
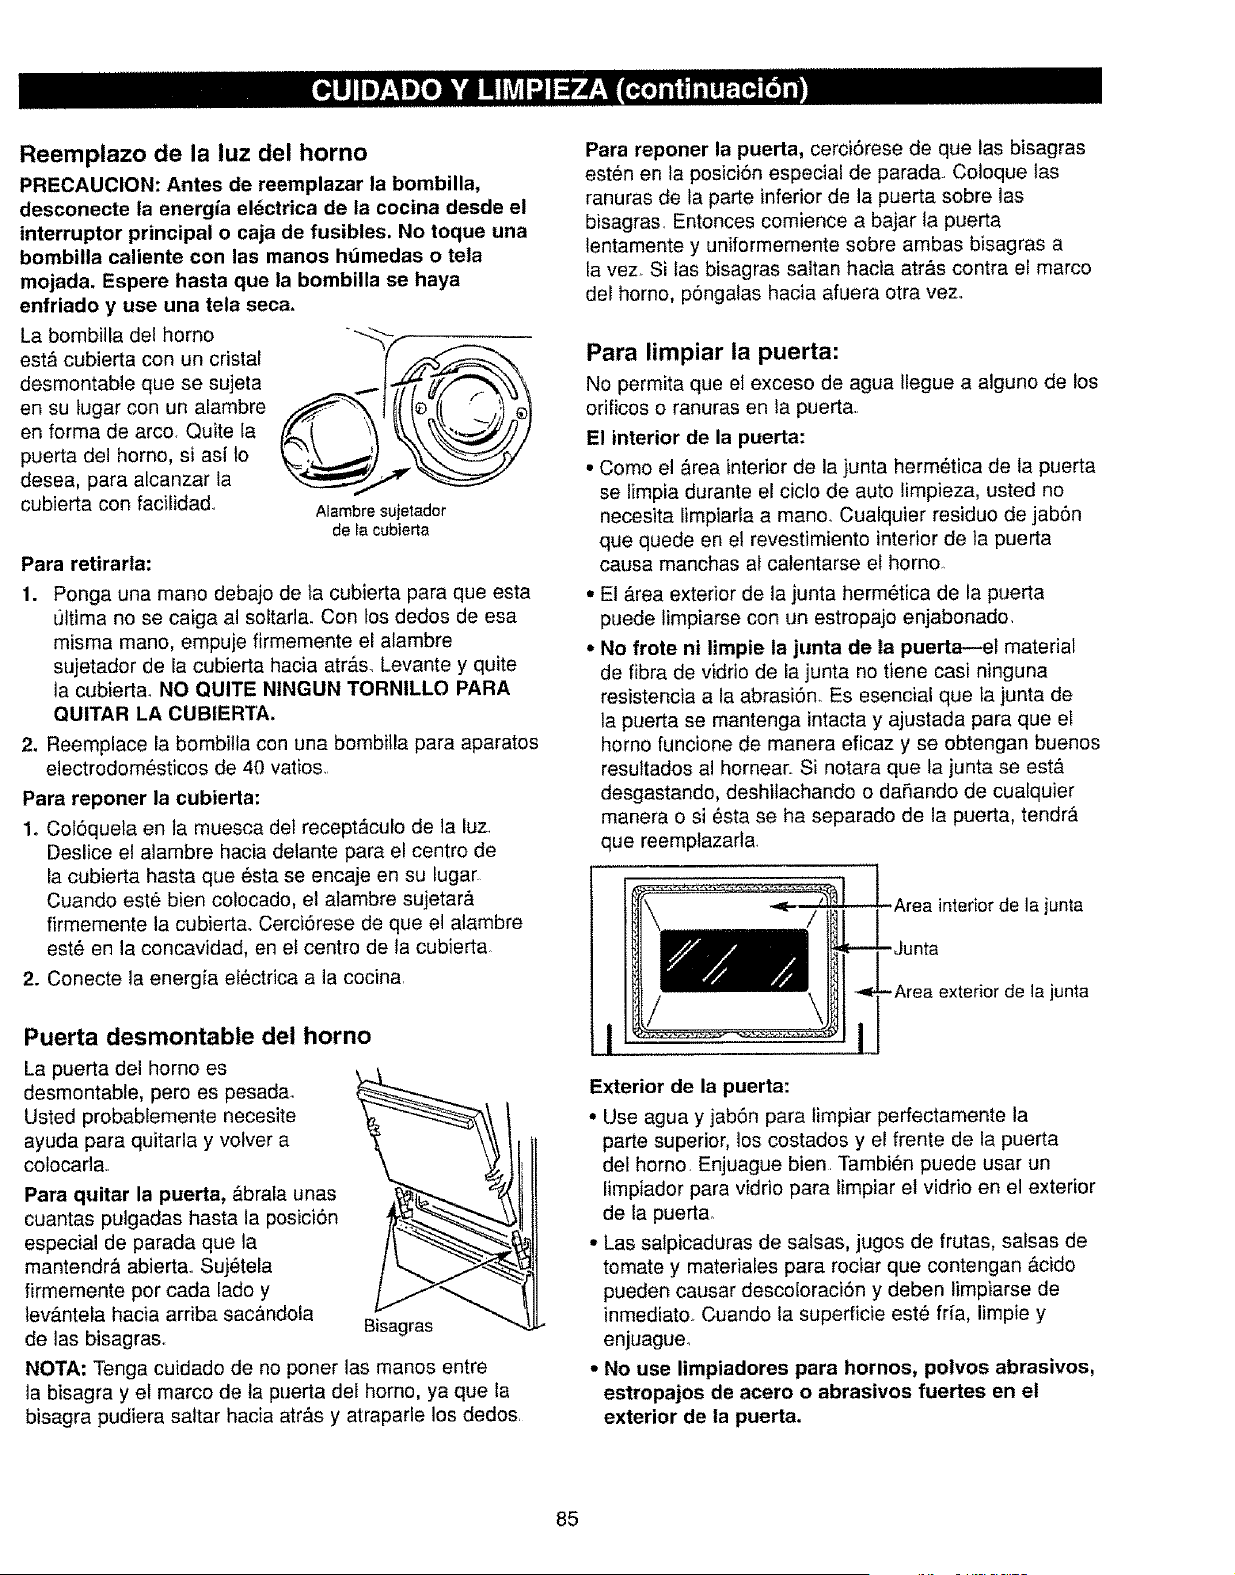
Reemplazo de la luz del horno
PRECAUCION: Antes de reemplazar la bombilla,
desconecte la energia el_ctrica de la cocina desde el
interruptor principal o caja de fusibles. No toque una
bombilla caliente con las manos h_3medas o tela
mojada. Espere hasta que la bombilla se haya
enfriado y use una tela seca.
La bombilla del homo
est& cubierta con un cristal
desmontable que se sujeta
en su lugar con un alambre
en forma de arco. Quite la
puerto del homo, si asi to
desea, para alcanzar ia
cubierta con facilidad..
Alambre sujetador
de fa cubierta
Para retirarla:
1. Ponga una mano debajo de ta cubierta para que esta
ultima no se caiga al soltarla. Con los dedos de esa
misma mano, empuje firmemente el alambre
sujetador de la cubierta hacia atr_.s_Levante y quite
la cubierta. NO QUITE NINGUN TORNILLO PARA
QUITAR LA CUBIER'fA,
2. Reemplace la bombilla con una bombitla para aparatos
electrodomesticos de 40 vatios..
Para reponer la cubierta:
1. Cof6quela en la muesca det recept_culo de ]a luz.
Deslice et alambre hacia delante para el centro de
la cubierta hasta que esta se encaje en su lugar.
Cuando est_ bien colocado, et alambre sujetar&
firmemente la cubierta. Cerci6rese de que el alambre
est6 en la concavidad, en el centro de la cubierta
2. Conecte la energia ef_ctrica a la cocina
Puerta desmontable del horno
La puerto del homo es
desmontable, pero es pesada_
Usted probablemente necesite
ayuda para quitarla y volver a
colocarla..
Para quitar la puerta, _.brala unas
cuantas pulgadas hasta la posici6n
especial de parada que la
mantendr& abierta. Suj6tela
firmemente por coda lado y
tev&ntela hacia arriba sac&ndola
de los bisagras. Bisagras
NOTA: Tenga cuidado de no poner los manos entre
ta bisagra y el marco de ta puerto del homo, ya que la
bisagra pudiera saltar hacia atr#.s y atraparle los dedos.
Para reponer la puerta, cerci6rese de que las bisagras
est6n en la posici6n especial de parada.. Coloque los
ranuras de la porte inferior de la puerto sobre las
bisagras. Entonces comience a bajar la puerto
lentamente y uniformemente sobre ambas bisagras a
la vez. Si los bisagras saltan hacia atr&s contra el marco
del homo, p6ngalas hacia afuera otra vez..
Para limpiar la puerta:
No permita que et exceso de agua Ilegue a alguno de los
orificos o ranuras en la puerta..
El interior de la puerto:
• Como el &rea interior de la junta herm_tica de la puerto
se limpia durante el ciclo de auto limpieza, usted no
necesita limpiarla a mano_ Cualquier residuo de jab6n
que quede en el revestimiento interior de ta puerto
causa manchas al calentarse el homo.
• El &rea exterior de la junta herm6tica de la puerto
puede limpiarse con un estropajo enjabonado.
• No frote ni limpie la junta de ta puerto--el material
de fibra de vidrio de la junta no tiene casi ninguna
resistencia a la abrasi6n. Es esencial que ta junta de
la puerto se mantenga intacta y ajustada para que el
homo funcione de manera eficaz y se obtengan buenos
resultados al hornear.. Si notara que la junta se est,.
desgastando, deshilachando o dafiando de cualquier
manera o si _sta se ha separado de la puerto, tendr#,
que reemplazarla.
Area interior de la junta
de ia junta
Exterior de la puerto:
• Use agua y jab6n para limpiar perfectamente la
porte superior, los costados y el frente de la puerto
deF homo. Enjuague bien. Tambi6n puede usar un
limpiador para vidrio para limpiar et vidrio en el exterior
de la puertao
• Los salpicaduras de salsas, jugos de frutas, salsas de
tomate y materiales para rociar que contengan &cido
pueden causar descoloraci6n y deben limpiarse de
inmediato_ Cuando la superficie est6 fria, limpie y
enjuague..
• No use limpiadores para hornos, polvos abrasivos,
estropajos de acero o abrasivos fuertes en el
exterior de la puerto.
85
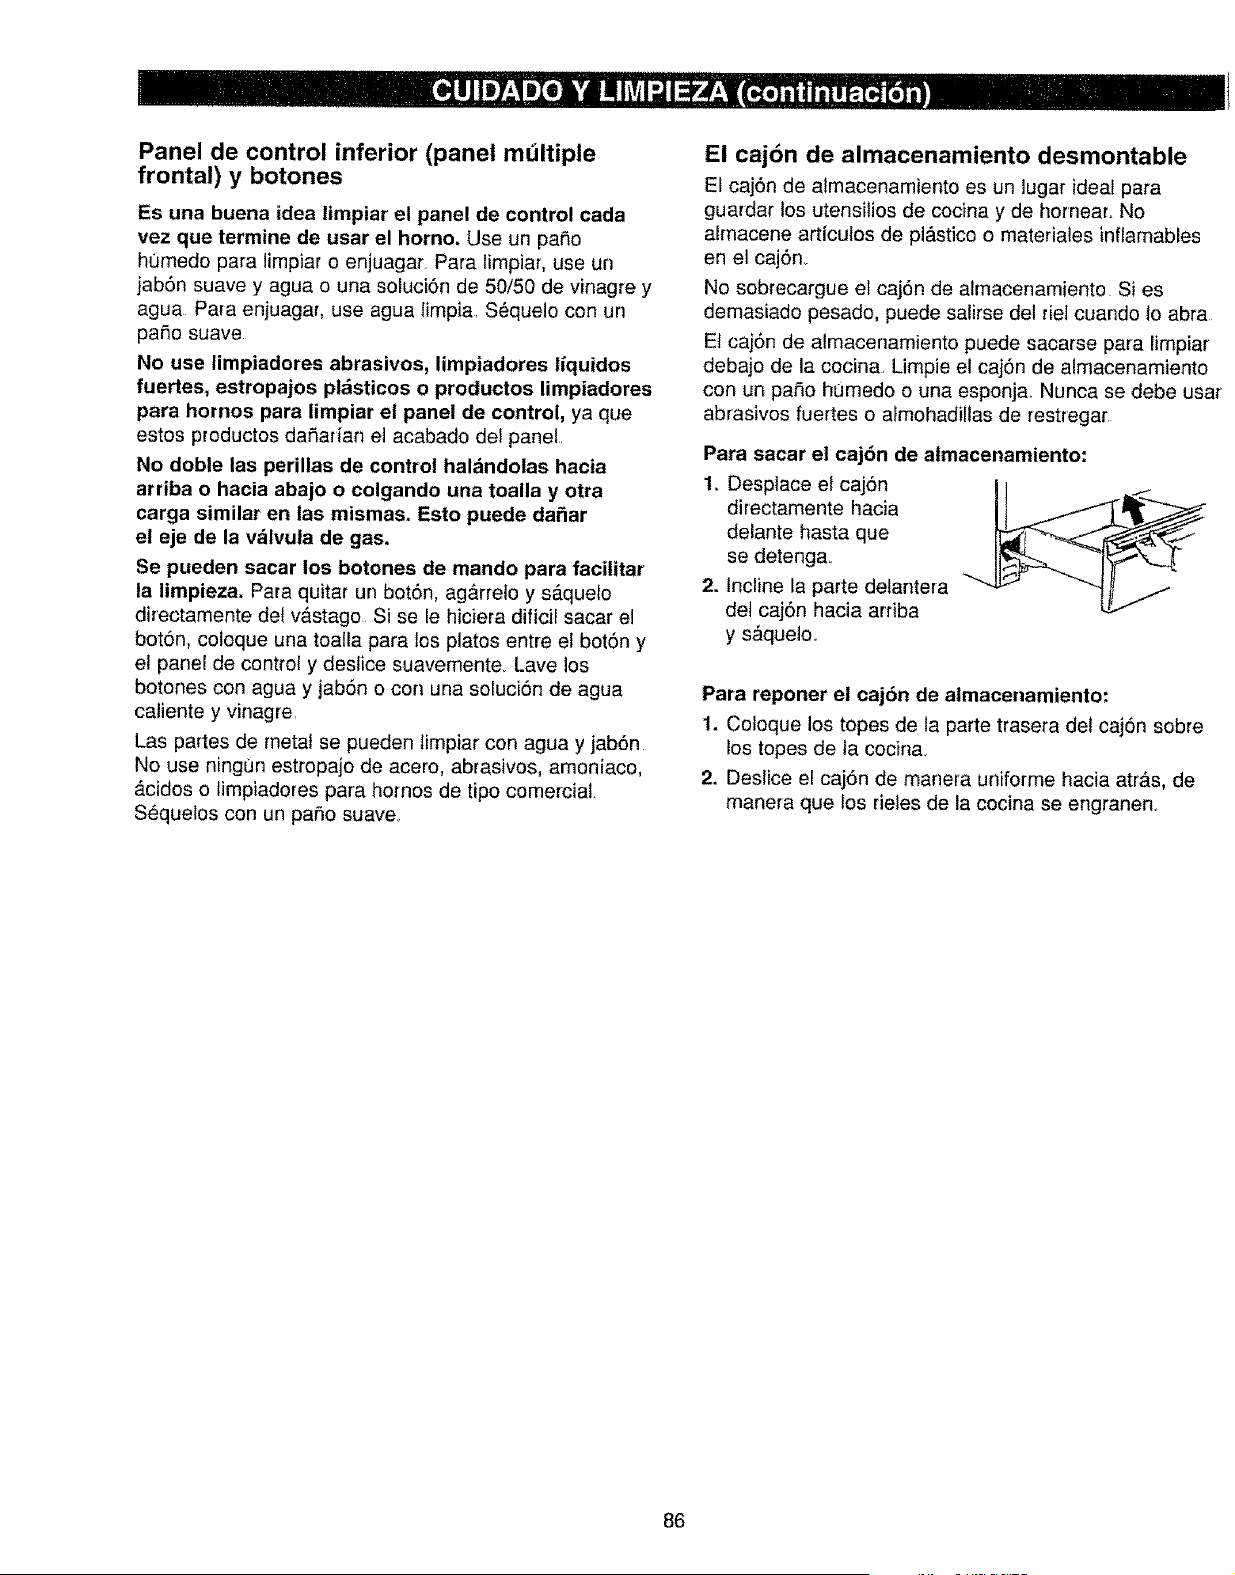
Panel de control inferior (panel multiple
frontal) y botones
Es una buena idea limpiar el panel de control cada
vez que termine de usar el homo. Use un patio
humedo para limpiar o enjuagar. Para limpiar, use un
jab6n suave y ague o una soluci6n de 50/50 de vinegre y
agua Para enjuagar, use agua limpia. S6quelo con un
patio suave
No use limpiadores abrasivos, limpiadores liquidos
fuertes, estropajos pl_sticos o productos limpiadores
pare hornos para limpiar el panel de control, ya que
estos preductes dafiafian el acabado del panel.
No doble las perillas de control halandolas hacia
arriba o hacia abajo o colgando una toalla y otra
carga similar en las mismas, Esto puede da_ar
el eje de la v,_lvula de gas.
Se pueden sacar los botones de mando para facilitar
la limpieza. Para quitar un bot6n, eg&rrelo y s_.quelo
directamente del v&stago Si se le hiciera dificil sacar el
bot6n, coloque una toalla pare los platos entre el bot6n y
el panel de control y deslice suavemente_ Lave los
botones con ague y jab6n o con una soluci6n de ague
caliente y vinagre.
Las partes de metal se pueden iimpiar con agua y jab6n
No use ningun estropajo de acero, abrasivos, amoniaco,
_.cidos o limpiadores pare homos de tipo comerciaL
S_quelos con un patio suave_
El cajbn de almacenamiento desmontable
El caj6n de almacenamiento es un lugar ideal para
guardar los utensiiios de cocina y de hornear. No
aimacene articutos de pt_stico o materiales inflamables
en el caj6n_
No sobrecargue el caj6n de almacenamiento Si es
demasiade pesado, puede salirse del riel cuando to abra
Ei caj6n de almacenamiento puede sacarse para limpiar
debajo de la cocina. Limpie et caj6n de almacenamiento
con un patio hOmedo o una esponja. Nunca se debe usar
abrasivos fuertes o armohadiltas de restregar
Para sacar el caj6n de almacenamiento:
directamente hacia
delante hasta que
se detengao
2. Incline la parte delantera
det cajbn hacia arfiba
y s&que]o_
Para reponer el caj6n de almacenamiento:
1. Coloque los topes de la parte trasera del caj6n sobre
los topes de ta cocina_
2. Deslice el caj6n de manera uniforme hacia atr_s, de
manera que los rieles de la cocina se engranen,,
86
En el estado de
Massachusetts:
• Este producto debe ser instalado por un plomero
o instalador de productos de gas licenciado.
• Cuando se encuentre usando v&lvulas de cierre
de bola, deben ser de! tipo de manija en T.
• Un conector de gas flexible, cuando se utilice,
no debe superar los 3 pies.
PARA SU SEGURIDAD
Si detecta olor a gas:
1. Abra ias ventanas.
2. No toque ningun interruptor el_ctrico.
3_Apague las llamas vivas.
4. Llame inmediatamente a la compafia
suministradora de gas.
PARA SU SEGURIDAD
No almacene ni use materiales combustibles,
gasolina u otros vapores o Ifquidos inflamables
en los alrededores de _ste o cualquier otto
aparato electrodomdstico.
ANTES DE COMENZAR
Lea estas instrucciones detenidamente y en
su totalidad.
IMPORTANTE: Guardeestas
instrucciones para el uso de los inspectores
el_ctricos locales.
INSTA LA DOR: Deje estasinstrucciones
junto con el aparato electrodomdstico cuando finalice
su instalaci6n.
CONSUMIDOR: Guarde este manual de
uso y cuidado y las instrucciones para la instalaci6n
para uso futuro. Este aparato electrodomdstico tiene
que ser conectado a tierra de manera adecuada.
ADVERTENCIA
La instalaci6n, ajuste, alteraci6n, servicios de
reparaci6n o mantenimiento inadecuados pueden
causar lesiones o dafios a la propiedad° Consulte
este manual. Para obtener asistencia o informacibn
adicional, consulte con un instatador calificado,
agencia de servicio, fabricante (distribuidor) o la
compafiia suministradora de gas.
Nunca se debe volver a utilizar los antiguos
conectores flexibles, El uso de dichos antiguos
conectores flexibles puede causar fuga de gas y
lesiones al individuo. AI efectuarse la instalaci6n de
un aparato electrodomdstico de gas, se debe siempre
utilizar NUEVOS conectores flexibles.
PRECAUCION
No intente hacer funcionar el horno de esta
cocina durante una interrupci6n del suministro
ei_ctrico.
IMPORTANTE
Retire del horno todos los materiales impresos y de
empaque antes de conectar los suministros del gas
y la electricidad a la cocina.
87
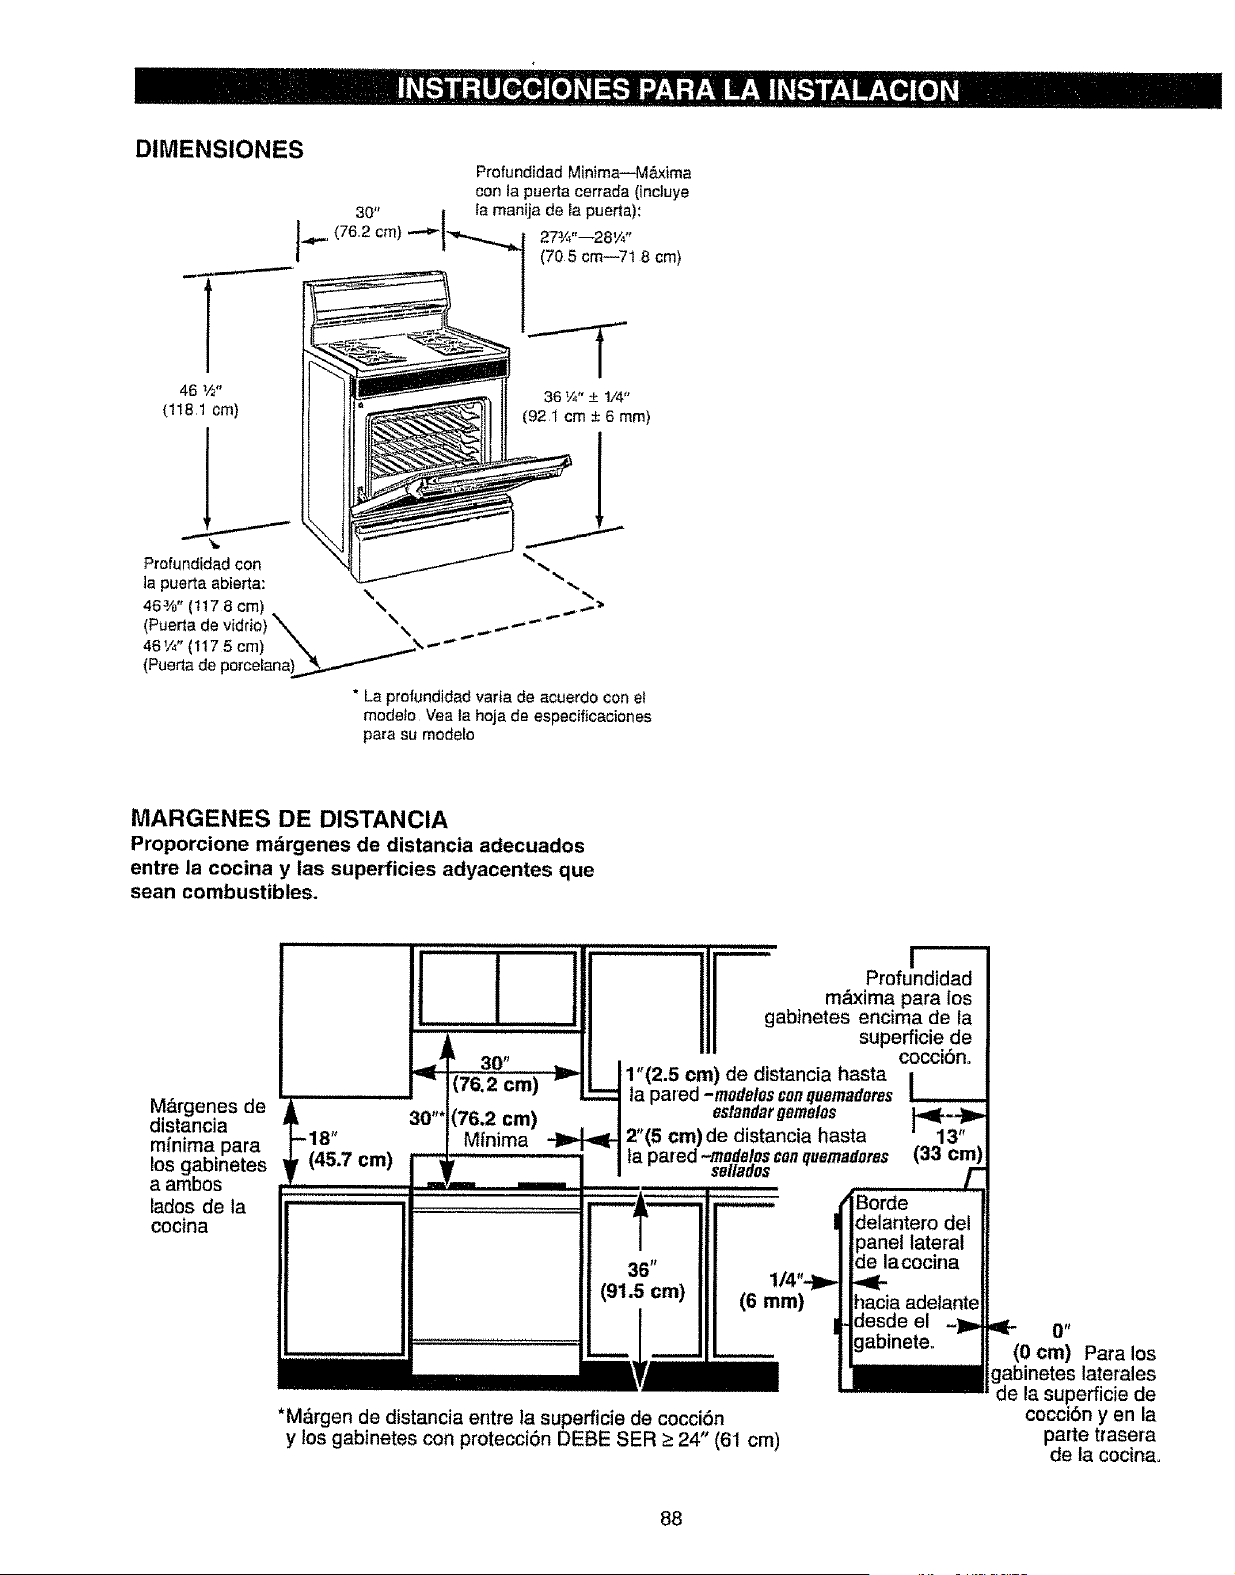
DIMENSIONES
Profundidad Minima--M&xima
con la puerta cerrada (incluye
30" I la manija de la puerta):
j._... (762 Crrl} ,""l_l_ 273/,.__28,A.
I (705 cm--71 8 cm)
--T
46 1/2" 36 V4"_+1/4"
(1t8t cm) (921 cm_+ 6 ram)
Profundidad con "_-.,
la puerta abierta: "...
46J/o" (117 8 cm) _. _...-._"
(Puerta de vidtio) _ \N ._-'" _ ""
46 ,/4" (117 5 ore) n#_tk j\ '" "_ '"
(Puerta de porcelana_
* La profundidad varia de acuerdo con et
modelo Vea ta hoja de especificaciones
para su modelo
MARGENES DE DISTANCIA
Proporcione m&rgenes de distancia adecuados
entre la cocina y ias superficies adyacentes que
sean combustibles.
Margenes de
distancia
minima para
los gabinetes
a ambos
lados de la
cocina
r-_ Profundidad
li | m&xima para los
H _ i I gabinetes encima de la
l superficie de
...,J 30" ,... cocci6no
-"' (76.2 cm) _ 1"(2.5 ca ) de distancia hasta
"-- la pared -modatosconquemaderesL,_
30" (76.2 cm) estandargemelos _
18" | Minima _ 2"(5 cm)de distancia hasta 13"
!_ (45,7 cm) ....... ta pared, ,modelosconquemadores (33 cm)J
sellaoos
T
36"
(91.5 cm) (6 mm)
I
*M_.rgen de distancia entre la superficie de cocci6n
y los gabinetes con protecci6n DEBE SER _>24" (61 cm)
Oft
(O cm) Para los
gabinetes laterales
de la superficie de
coccidn yen la
parte trasera
de la cocinao
88
INSTRUCCIONES
IMPORTANTES DE
SEGURIDAD
• La instalacibn de esta cocina de gas debe hacerse
de acuerdo con los cbdigos locales o, si no
existieran c6digos locales, de acuerdo con ta
edici6n mils reciente del National Fuel Gas Code
(C6digo Nacionai de Normas para instalaciones de
Gas), ANSI Z223J. En el Canad& la instalaci6n debe
hacerse de acuerdo con el Current Natural Gas
Installation Code (C6digo actual de Normas para
Instalaciones de Gas Natural), CAN/CGA-B149.1 o el
Current Propane installation Code (C6digo actual
de Normas para Instalaciones de Gas Propano),
CANtCGA-B149.2 y de acuerdo con los c6digos
locales si 6stos fuesen aplicables.
El fabricante de esta cocina ha sido certificado por CSA
Internacional de acuerdo con la edici6n mils reciente de
ANSI Z21 ,I y [a Canadian Gas Association (Asociaci6n
Canadiense de Gas) de acuerdo con la edici6n mils
reciente de CAN/CGA-I.1. Hay ciertas precauciones de
seguridad que usted debe observar con respecto a su
cocina, que son aplicables a cualquier aparato
electrodom6stico de gas que genere cator Encontrar&
estas precauciones en ta secci6n de 'tnstrucciones
importantes de seguridad' en la parte detantera de este
manual. L_aias cuidadosamente.
• Pida que su cocina sea instalada por un instalador o
t6cnico de servicio competente_
- Su cocina debe ser conectada electricamente a tierra
de acuerdo con los c6digos locales o, si no existieran
c6digos locales, de acuerdo con el National Electrica!
Code (C6digo Nacional de Normas para hstalaciones
El_ctricas) (la edici6n mils reciente del ANSI/NFPA 70).
En el Canad&, la instalaci6n et6ctrica a tierra debe
hacerse de acuerdo con ta Secci6n I del CSA C22.1
Current Canadian Electrical Code (C6digo actual de
Normas para Instalaciones EI6ctricas del Canad&
CSAC221) y/o los c6digos locales Vea 'Conexiones
el6ctricas' en esta secci6no
• Antes de instalar su cocina sobre un piso de linSleo o
cualquier otra clase de piso sint6tico, cerci6rese de que
este tipo de piso puede resistir temperaturas de 180°F
(82°C) sin encogerse, combarse o descolorarse. No
instale la cocina sobre ninguna alfombra a menos que
se haya colocado entre la cocina y la alfombra una
plancha de madera laminada de 1/4" (6 ram) de
espesor o cualquier otro aislador similar..
° Cerci6rese de que los revestimientos de las paredes
alrededor de ia cocina de gas puedan resistir el calor
generado por la cocina de hasta 200°F (93°C).
° Evite poner gabinetes encima de la cocina° Para evitar
el peligro que causarfa el tratar de alcanzar objetos
dentre de los gabinetes encima de la cocina cuando los
quemadores est_n funcionando, instale una campana
extractora de aire sobre la cocina que se proyecte
hacia adelante pot Io menos unas 5" (12o7 cm) m#,s
all& del frente de los gabinetes.
• La campana extractora debe estar construfda de hojas
met&ficas de un espesor no menor de 0..0122" (31
mm). Inst&lela encima de la superficie de cocci6n con
un margen de distancia no menor de 1/4" (6 mm) entre
la campana y el lado inferior del gabinete de metal o el
material combustible.. La campana debe ser al menos
tan ancha como el aparato electrodom6stico y debe
estar centrada encima del aparato. Los m&rgenes de
distancia entre la superficie de cocci6n y la superficie
de la campana de ventilaci6n NUNCA DEBERAN SER
MENORES DE 24" (6t cm.).
EXCEPCION: La instalaci6n de un homo microondas o
aparato electrodom6stico de cocci6n aprobado encima
de la superficie de cocci6n debe set realizada de
acuerdo con las instrucciones de instataci6n que vienen
con tal aparatoo
• Si se colocaran gabinetes encima de ta cocina, habr&
que dejar un margen minimo de distancia de 30"
(76°2 cm) entre la superficie de cocci6n y el rondo sin
protecci6n de los gabinetes..
• Si no se pudiera mantener un margen minimo de
distancia de 30" (7&2 cm) entre ta superficie de
cocci6n y Ios gabinetes de metal o materiales
combustibles, habr_, entonces que proteger la parte
inferior de !os gabinetes encima de la supefficie de
cocci6n con un aislante de cart6n duro de 1/4" (6 ram)
cubierto con hojas metalicas de un espesor no menor
de 0.0t22" (31 mm).
• Los mfirgenes de distanda entre la superficie de
cocci6n y los gabinetes protegidos NUNCA DEBERAN
SER MENORES DE 24" (61 cm), La distancia vertical
desde el piano de la superficie de cocci6n hasta el
fondo de los gabinetes adyacentes que se extiendan a
una distancia de menos de 1" (2.5 cm) de los Iados de
Ia cocina de gas, no debe ser menor de 18" (4&7 cm).
(Yea ]a i]ustraci6n de ]as 'Dimensiones y m_.rgenes de
distancia' en esta secci6n),,
PRECAUCION: Losarticulosquesean
de inter6s para los nitros no deben guardarse dentro de
los gabinetes situados encima de una cocina de gas ni
sobre el tablero posterior de eea cocina--fos ni_os que
se subieran a la cocina para tratar de alcanzar estos
articulos pudieran resultar gravemente lesionados.
89
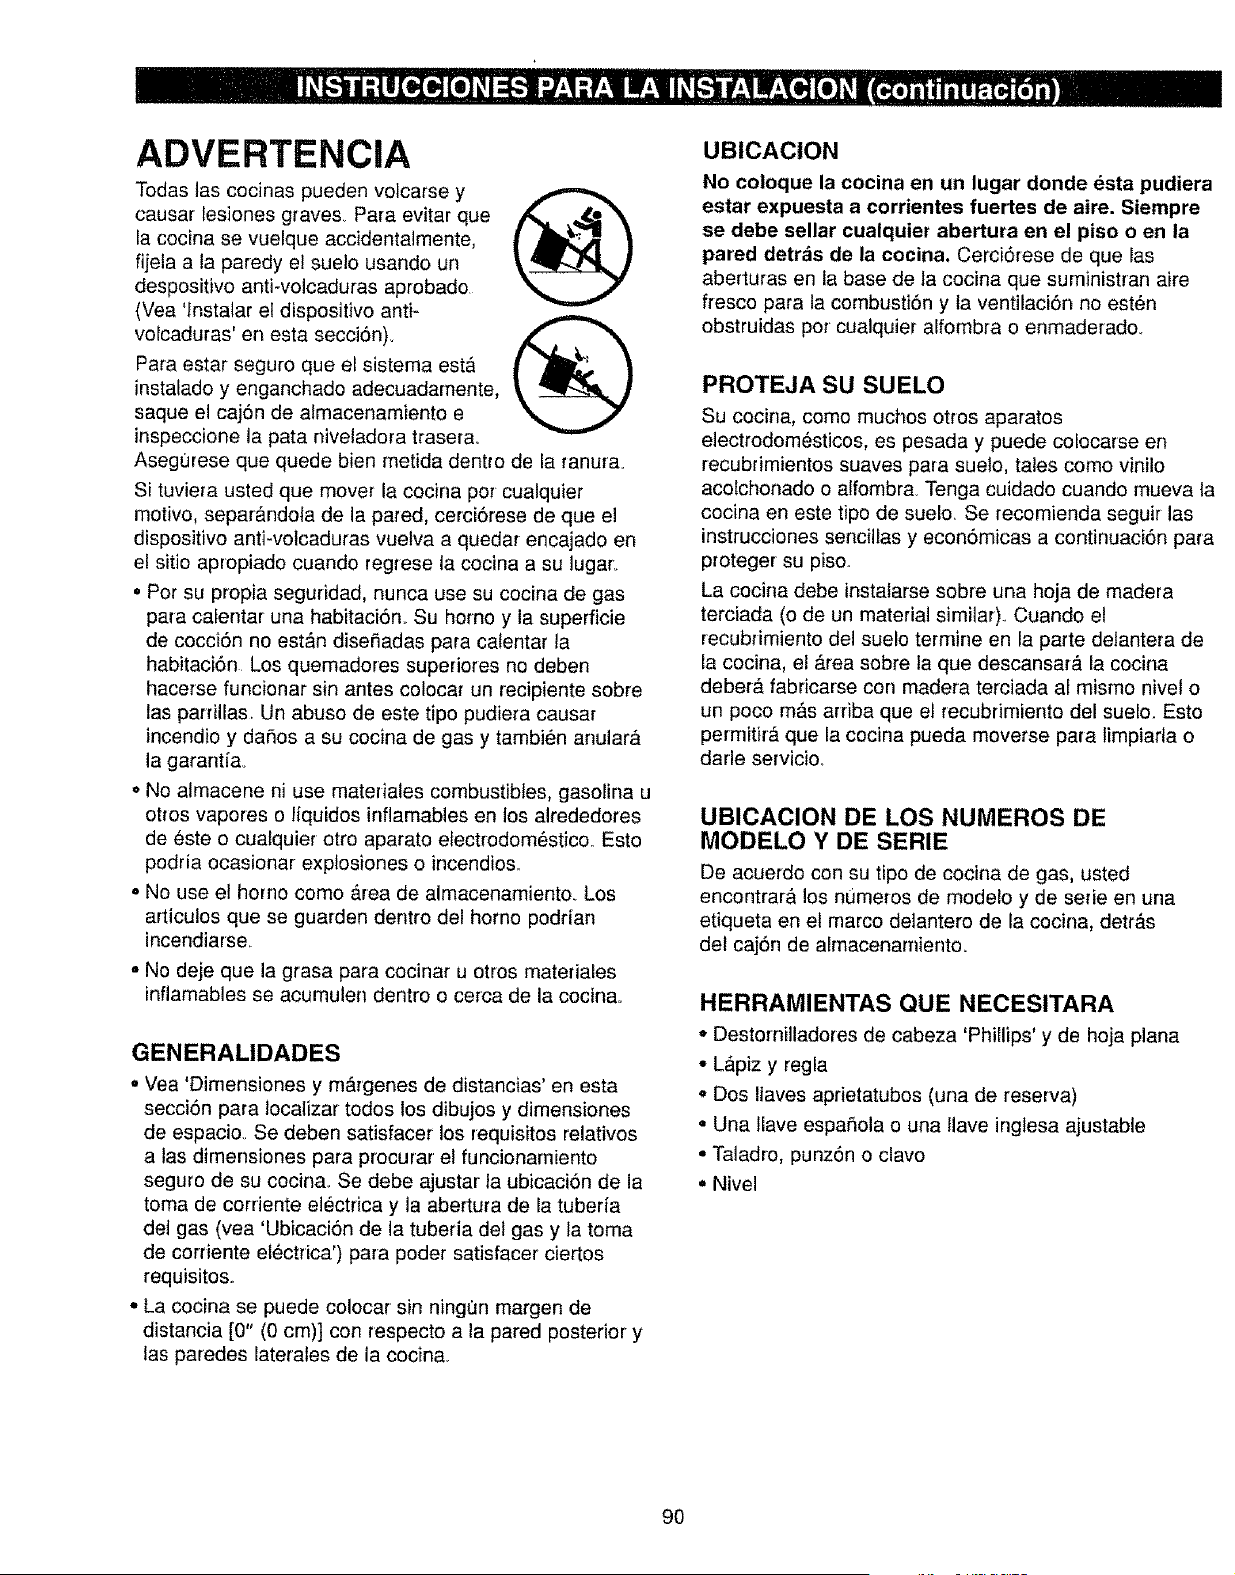
ADVERTENCIA
Todas tas cocinas pueden volcarse y
causar lesiones graves Para evitar que
la cocina se vuelque accidentalmente,
fijela a la paredy e! suelo usando un
despositivo anti-volcaduras aprobado
(Vea 'Instalar el dispositivo anti-
volcaduras' en esta secci6n).
Para estar seguro que el sistema est&
instalado y enganchado adecuadamente,
saque el caj6n de almacenamiento e
inspeccione la pata niveladora trasera.
Asegt3rese que quede bien metida dentro de la ranurao
Si tuviera usted que mover la cocina per cualquier
motive, separ_.ndola de la pared, cerci6rese de que el
dispositivo anti-votcaduras vuelva a quedar encajado en
e! sitio apropiado cuando regrese la cocina a su lugar:
o Per su propia seguridad, nunca use su cocina de gas
para calentar una habitaci6n. Su homo y ia superficie
de cocci6n no est_n diseSadas para catentar la
habitaci6n Los quemadores superiores no deben
hacerse funcionar sin antes colocar un recipiente sobre
las parrillas. Un abuse de este tipo pudiera causar
incendio y daSos a su cocina de gas y tambien anular&
la garanti&
• No almacene ni use materiales combustibles, gasolina u
otros vapores o liquidos inflamables en los alrededores
de este o cualquier otro aparato electrodom_stico. Esto
podria ocasionar explosiones o incendios..
• No use et homo come _.rea de almacenamiento. Los
articu!os que se guarden dentro del homo podrian
incendiarse
• No deje que la grasa para cocinar u otros materiales
inflamables se acumulen dentro o cerca de la cocina°
GENERALIDADES
• Vea 'Dirnensiones y m&rgenes de distancias' en esta
seccibn para localizar todos los dibujos y dimensiones
de espacio.. Se deben satisfacer los requisites relatives
a las dimensiones para precurar el funcionamiento
seguro de su cocina. Se debe ajustar la ubicaci6n de la
toma de corriente electrica y la abertura de la tuberia
det gas (vea 'Ubicaci6n de la tuberia det gas y la toma
de corriente electrica') para poder satisfacer ciertos
requisites.
• La cecina se puede colocar sin ningt]n margen de
distancia [0" (0 cm)] con respecto a la pared posterior y
las paredes laterales de la cocina.
UBICACION
No coioque la cocina en un lugar donde _sta pudiera
estar expuesta a corrientes fuertes de aire. Siempre
se debe sellar cualquier abertura en el piso o en la
pared detr_is de la cocina. Cerci6rese de que las
aberturas en la base de la cocina que suministran aire
fresco para la combusti6n y ta ventilaciSn no esten
obstruidas per cualquier alfombra o enmaderado_
PROTEJA SU SUELO
Su cocina, come muchos otros aparatos
electrodom_sticos, es pesada y puede colocarse en
recubrimientos suaves para suelo, tales come vinilo
acolchonado o alfornbra Tenga cuidado cuando mueva la
cocina en este tipo de suelo. Se recomienda seguir las
instrucciones sencillas y econ6micas a continuaci6n para
preteger su piso..
La cocina debe instalarse sobre una hoja de madera
terciada (o de un material similar). Cuando el
recubrimiento del suelo termine en la parte delantera de
la cocina, el Area sobre la que descansarb, la cocina
deber__ fabricarse con madera terciada ai mismo nivel o
un poco m&s arriba que el recubrimiento del suelo. Esto
permitirb, que la cocina pueda moverse para limpiarla o
darle servicio,
UBICACION DE LOS NUMEROS DE
MODELO Y DE SERIE
De acuerdo con su tipo de cocina de gas, usted
encontrar& los numeros de modelo y de serie en una
etiqueta en el marco delantero de la cocina, detr&s
del caj6n de almacenarniento.
HERRAMIENTAS QUE NECESITARA
° Destornilladores de cabeza 'Phillips' y de hoja plana
• L_piz y regla
,, Dos Ilaves aprietatubos (una de reserva)
* Una llave espa_fola o una llave inglesa ajustable
• Taladro, punz6n o clave
, Nivel
9O
MATERIALES ADICIONALES QUE PUDIERA
NECESITAR
• V&lvula de interrupci6n de la tinea del gas
• Un sellador para tuberias o cinta adhesiva con Teflon*
para roscados de tuberias, aprobada por UL, que
resista la acci6n del gas natural y del gas LP
(propano Ifquido)
° Conector de metal flexible para aparatos
electrodomesticos di&metro interior (D..I.)de 1/2" (1.3 cm),.
Se recomienda un largo de 5 pies (1.5 metros) para
facilitar la instalaci6n pero otros tamafios tambien son
aceptables. Nunca use un conector viejo cuando
instale una cocina de gas nueva.
• Adaptador abocinado de uni6n para la conexi6n a la
linea de suministro del gas 3/4" 6 1/2" NPT x 112" D.t.
[1.9 cm 6 1.3 cm NPT (est_.ndar nacional para roscas
de tubo) x 1,2 cm de di&metro interior],
• Adaptador abocinado de uni6n para la conexi6n al
regulador de presi6n en la cocina 1/2" NPT x 1/2" D.!.
(1.3 cm NPT x 1.3 cm de di&metro interior)
• Detector de fuga de liquido o agua jabonosa
• Perno de retraso o ancla de manga de 1/2" di,_metro
exterior (DOE.)(para montaje dispositivo anti-
volcaduras en pisos de concreto solamente)
•Teflon: Marca registrada de DuPont
PREPARACION
• Retire todas las cintas adhesivas y las envolturas
o Quite la pe!fcula pl&stica que cubre algunas partes
cromadas (la puerta def homo, el borde de los
costados).
• Saque el paquete de accesorios de dentro del horno,
° Compruebe para asegurarse que ninguna de las
piezas de la cocina de gas se hayan aflojade durante
el envio.
PASO 1
Provea un suministro adecuado de gas
Su cocina de gas est_ dise_ada para funcionar a una
presi6n de 4" (102 cm) de cotumna de agua para gas
natural o, si est#. disefiada para gas LP (propano o
butano), 10" (25.4 cm) de columna de agua. Cerci6rese
de que le estA suministrando a su cocina el tipo de gas
para el cual fue disefiada.. Esta cocina se puede adaptar
para que funcione con gas natural o gas propano. Si
usted decide usar esta cocina con gas propano, ta
conversi6n deber& ser hecha por un instalador
competente antes de que se intente poner a funcionar
esta cocina con ese tipo de gas.
Para un funcionamiento adecuado, la presi6n del gas
natural suministrado al regulador debe ser entre 4"
(102 cm) y 13" (33 cm) de columna de aguao Para el gas
LP, la presi6n suministrada debe ser entre 10" (25..4 cm)
y !3" (33 cm) de cotumna de agua..
Cuando vaya a comprobar el funcionamiento adecuado
del regutador, la presi6n de entrada tiene que ser por Io
menos de 1" (2,.5 cm) m_s que la presi6n de
funcionamiento (bifurcador) indicada anteriormente.
El regufador de presi6n Iocalizado a la entrada det
bifurcador de la cocina debe permanecer en la linea
de suministro sin importar qu_ tipo de gas, natural o LP,
se est& usando.
Para facilitar la instalaci6n, se debe tener un conector
de metal flexible para aparatos electrodom6sticos que
conecte la cocina a la linea de suministro de gas, con
un di,_metro interior de 1/2" I.D. (1.3 cm) y 5 pies (1.5 m)
de largo. En Canada., los conectores flexibles deben ser
conectores de metal simples de pared, no m&s largos
de 6 pies (1.8 m).
91
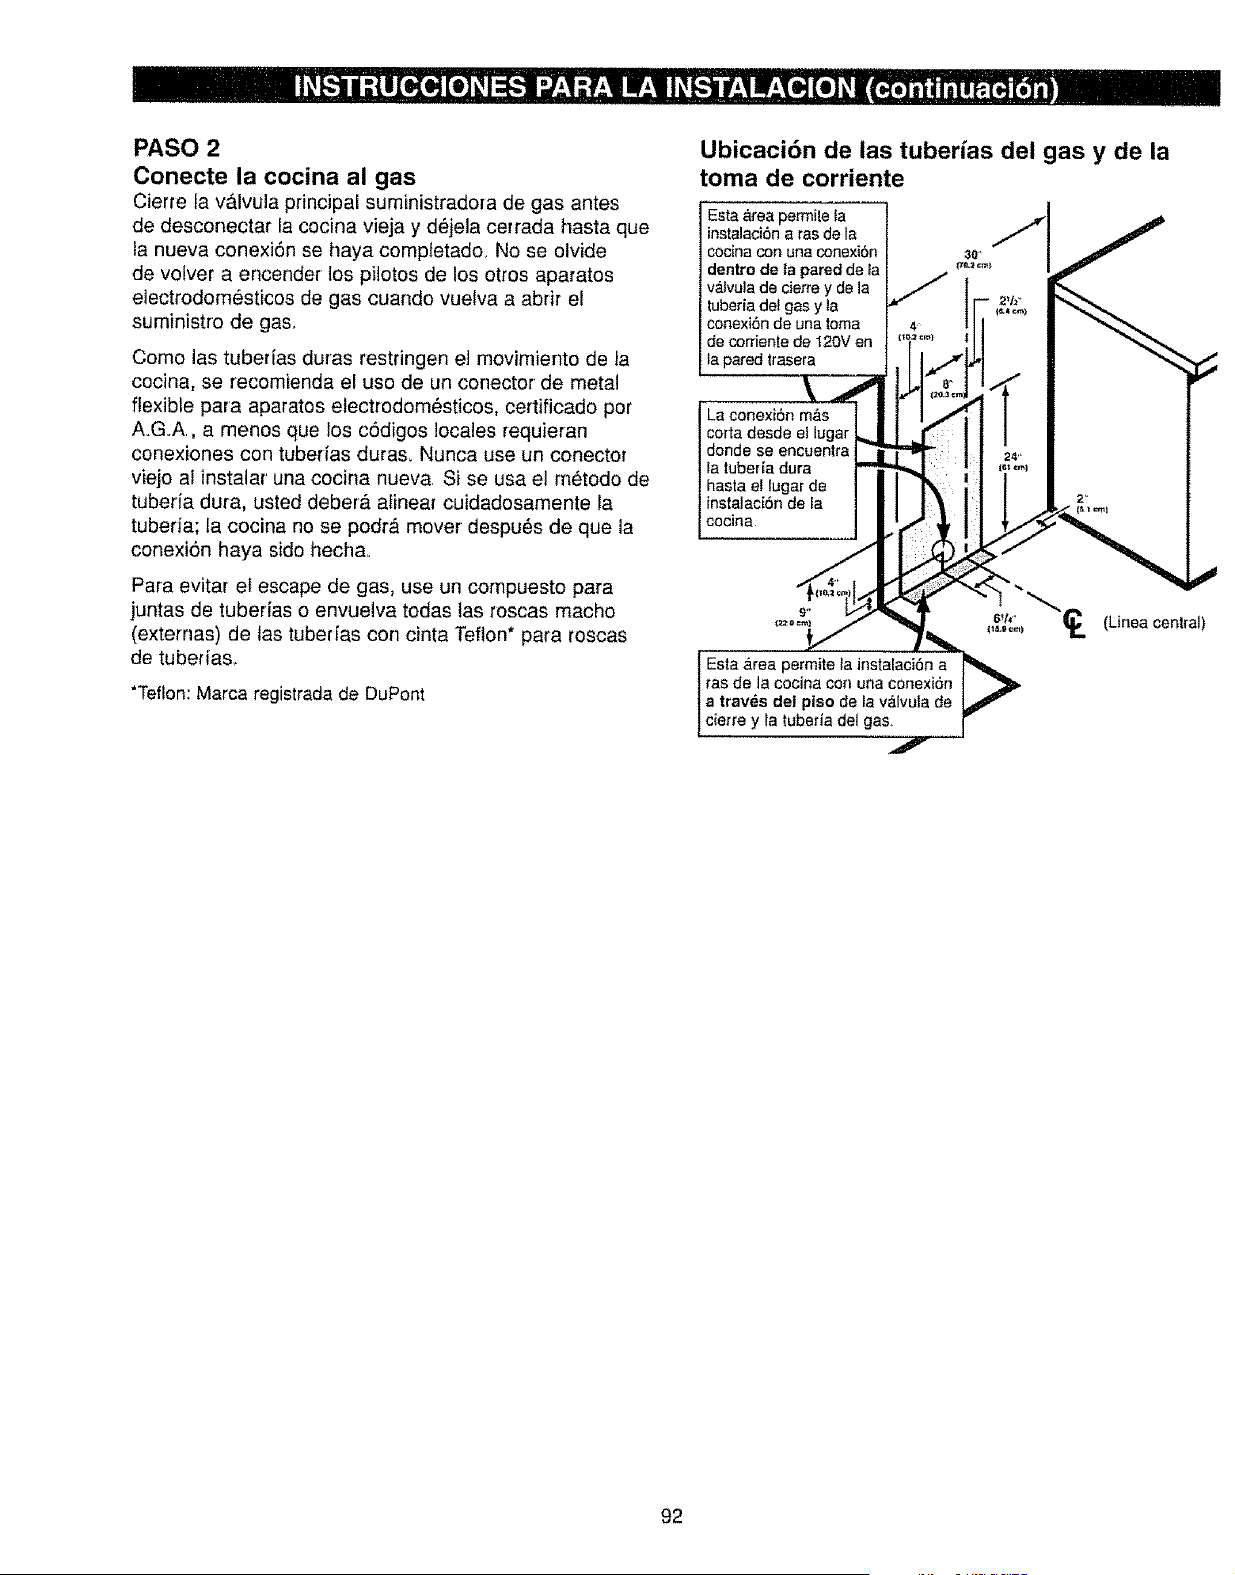
PASO 2
Conecte la cocina al gas
Cierre la v#,lvula principal suministradora de gas antes
de desconectar la cocina vieja y d_jela cerrada hasta que
la nueva conexi6n se haya completado, No se olvide
de votver a encender los pitotos de los otros aparatos
electrodom6sticos de gas cuando vuetva a abrir el
suministro de gas_
Come las tuber{as duras restringen et movimiento de la
cecina, se recomienda el uso de un conector de metal
flexible para aparatos electrodom#sticos, certificado por
AoG.A., a menos que los cSdigos locales requieran
conexiones con tuberias duras. Nunca use un conector
viejo al instalar una cocina nueva Si se usa el m_todo de
tuberia dura, usted deber_, alinear cuidadosamente la
tuberia; la cocina no se podr_ mover despu6s de que la
conexi6n haya sido hecha.
Para evitar el escape de gas, use un compuesto para
juntas de tuberias o envuelva todas las roscas macho
(extemas) de las tuberias con cinta Teflon* para roscas
de tubedas..
*Teflon: Marca registrada de DuPont
Ubicacibn de las tuber/as del gas y de la
toma de corriente
Esta &tea permile ta }
instalaci6n a ras de la !
cocina con una conexi6n I
dentro de la pared de la
valvulade cierrey dela |
tuberiadelgasy la
i conexi6nde unatoma I
idecorrientede t20Ven } l,_=
i la pared trasera _J t|
\ ll.
La conexi6n m,_s | t
corta desde el lugar l I .
donde se encuentra
la tuberia dura I_
hasta el lugar de I
instalaci6n de la II I
cocina
i
Esta area permite la instalaci6n a
ras de la cocina con una conexiSn
a tray,s de| piso de la v_lvula de
cierre y la luberia del gas,
92
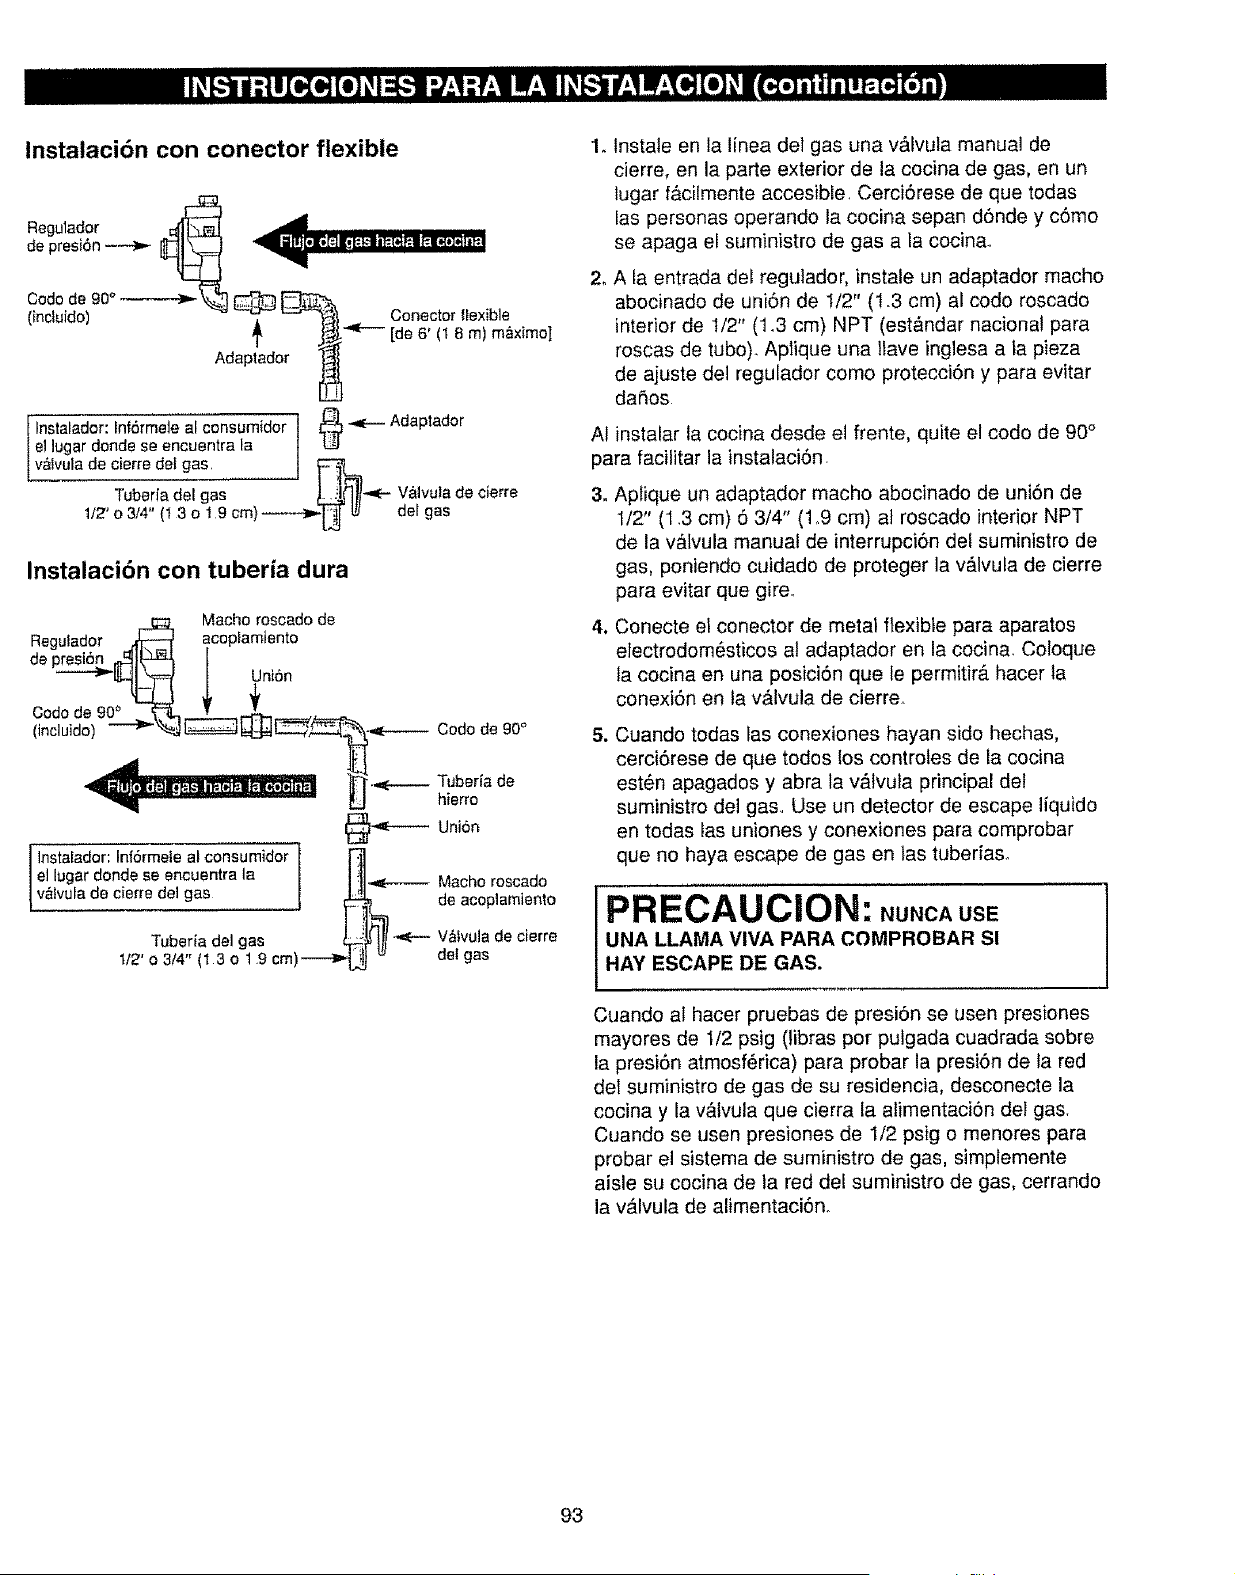
lnstalaci6n con conector flexible
Regulador ._
Codo de 90 ° _ \_._..@ _A
(inctuido) i _'-"t_'_ Conector flexible
f J:_"_'_-" [de 6' (t 8 rn) maximo]
Adaptador _
Instalador: Infdrmete al consurnidor _ -,,,,e-- Adaptador
el lugar donde se encuentra la
v&ivula de cierre del gas_
Tuberia del gas (1_jl_lt_ - V&lvula de cierre
1/2'o3/4"(I3o!9cm)--.--.-_,',_1_ del gas
Instalaci6n con tuberia dura
Macho roscado de
Regufador _ acopfamiento
de presi6n ,_ll_ [
----"'i'lJ_ I _ [ Uni6n
Codo de 90 ° [L_ |_ _t _ o
i .- _ ...... ]_.._,----- Tubeda de
_._r "_--_-_-'-------- _ hierro
'_'---- Uni6n
Instalador: InI6rmele at consumidor ] [_]
el lugar donde se encuentra la | I!t]
. _ Macho roscado
vafvufa de cierre del gas __ J _ de acoplamiento
I _l.hll
Tuberia del gas _'_ Ill _ V&lvula de cierre
t/2' o 3/4" (1 3 o t 9 cm)---4_ _ del gas
^
2_
tnstale en la linea del gas una v&lvula manual de
cierre, en la parte exterior de la cocina de gas, en un
lugar f&cilmente accesible Cerci6rese de que todas
las personas operando la cocina sepan d6nde y c6mo
se apaga ei suministro de gas a la cocina.
A ta entrada del regulador, instaie un adaptador macho
abocinado de uni6n de 1/2" (t.3 CA) al codo roscado
interior de I/2" (1 o3CA) NPT (est&ndar nacionat para
roscas de tubo). Aplique una }lave inglesa a la pieza
de ajuste del regulador como protecci6n y para evitar
daSos
AI instalar la cocina desde el frente, quite el code de 90°
para facilitar la instalaci6n,
3. Aptique un adaptador macho abocinado de uni6n de
1/2" (1.3 CA) 6 3/4" (1,9 CA) al roscado interior NPT
de la valvula manual de interrupci6n del suministre de
gas, poniendo cuidado de proteger la v&lvula de cierre
para evitar que gireo
4_
Conecte el conector de metal flexible para aparatos
etectrodom_sticos at adaptador en la cocina, Coloque
la cocina en una posici6n que fe permitir& hacer la
conexi6n en la v&lvula de cierre,
.
Cuando todas ias conexiones hayan sido hechas,
cerci6rese de que todos ios controles de la cocina
est_n apagados y abra la v&lvula principal del
suministro del gas, Use un detector de escape liquido
en todas las uniones y conexiones para comprobar
que no haya escape de gas en las tubedas°
PRECAUCION: ,U.CAuse
UNA LLAMA VIVA.PARA COMPROBAR S'
HAY ESCAPE DE GAS.
Cuando al hacer pruebas de presi6n se usen presiones
mayores de 112 psig (libras por pulgada cuadrada sobre
la presi6n atmesf6rica) para probar la presi6n de ta red
del suministro de gas de su residencia, desconecte la
cocina y la v,_tvula que cierra la alimentaci6n del gas,
Cuando se usen presiones de I/2 psig o menores para
probar el sistema de suministro de gas, simplemente
aisle su cocina de la red del suministro de gas, cerrando
la v_lvula de alimentaci6n.
93
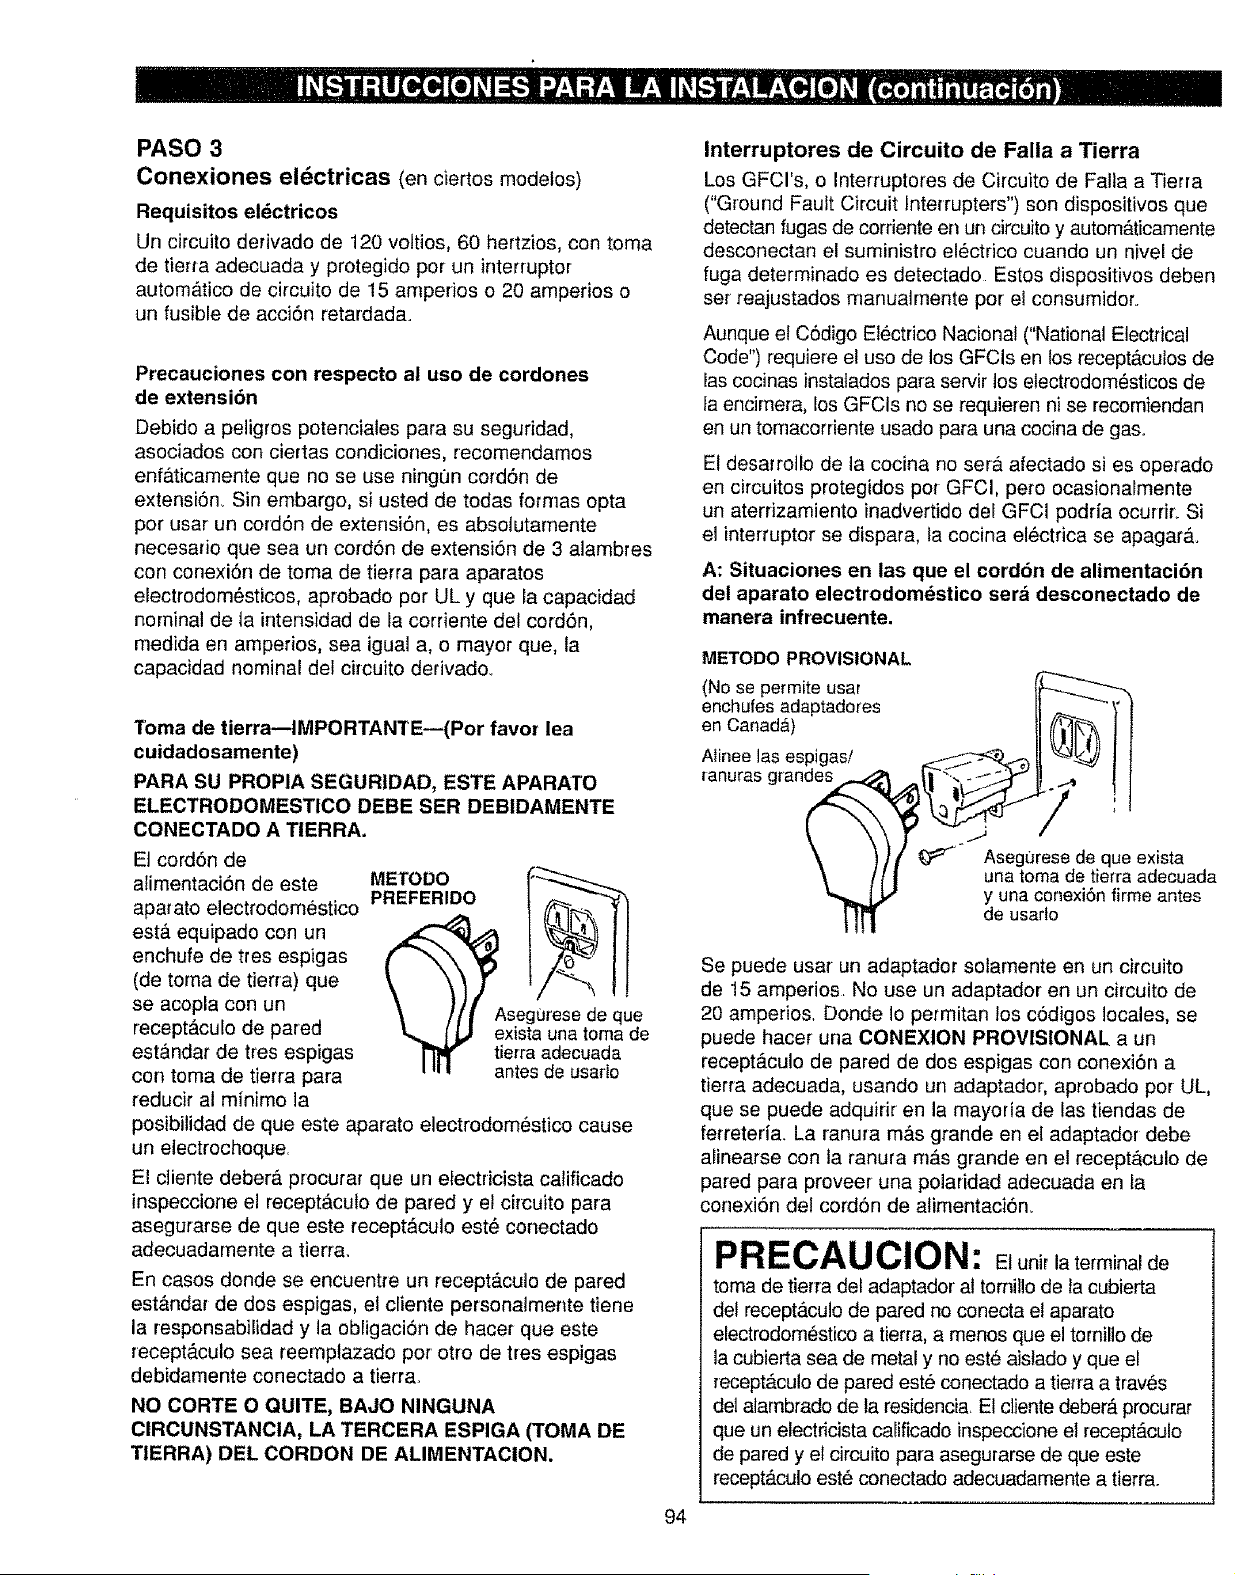
PASO 3
Conexiones el_ctricas (en ciertos modelos)
Requisites eldctricos
Un circuito derivado de 120 voltios, 60 hertzios, con toma
de tierta adecuada y protegido per un interrupter
autom&tico de circuito de 15 amperios o 20 amperios o
un fusible de acci6n retardada.
Precauciones con respecto al uso de cordones
de extensi6n
Debido a peligros potenciales para su seguridad,
asociados con ciertas condiciones, recomendamos
enfaticamente que no se use ningun cord6n de
extensi6n_ Sin embargo, si usted de todas forrnas opta
per usar un cord6n de extensi6n, es absolutamente
necesario que sea un cord6n de extensi6n de 3 alambres
con conexi6n de toma de tierra para aparatos
electrodom6sticos, aprobado per UL y que la capacidad
nominal de la intensidad de la cordente del cord6n,
medida en amperios, sea igual a, o mayor que, la
capacidad nominal del circuko derivado.,
Toma de tierra--IMPORTANTE--(Por favor lea
cuidadosamente)
PARA SU PROPIA SEGURIDAD, ESTE APARATO
ELECTRODOMESTICO DEBE SER DEBIDAMENTE
CONECTADO A TIERRA.
Et cord6n de
MErODO
alimentaci6n de este PREFERIDO | (_r-_._
estfi equipado con un
enchufe de tres espigas
(de toma de tierra) que
se acopla con un
recept_.cu!ode pared se e
,..j ) exista unatomade
estandar de tres espigas _ tierra adecuada
con toma de tierra para I tl, antes de usarto
reducir al minimo la
posibilidad de que este aparato electrodom_stico cause
un electrochoque
El cliente deberb, procurar que un electricista calificado
inspeccione el recept_cuto de pared y el circuito para
asegurarse de que este recept_ficulo est_ conectado
adecuadamente a tierra.
En casos donde se encuentre un recept_.culo de pared
est&ndar de dos espigas, el cliente personalmente tiene
la responsabilidad y la obligaci6n de hacer que este
recept&culo sea reemptazado por otro de tres espigas
debidamente conectado a tierra.
NO CORTE O QUITE, BAJO NINGUNA
CIRCUNSTANCIA, LA TERCERA ESPIGA (TOMA DE
TIERRA) DEL CORDON DE ALIMENTACION.
Interruptores de Circuito de Falla a Tierra
Los GFCI's, o Interruptores de Circuito de Falla a Tierra
("Ground Fault Circuit Interrupters") son dispositivos que
detectan fugas de corriente en un circuito y automaticamente
desconectan el suministro el_ctrico cuando un nivel de
fuga determinado es detectado Estos dispositivos deben
ser reajustados manualmente per el consumidor.
Aunque el C6digo Electrico Nacional ("National Electrical
Code") requiere el use de los GFCIs en los recept_culos de
las cocinas instatados para servir los electrodom6sticos de
fa encimera, los GFCIs no se requieren ni se recomiendan
en un tomacorriente usado para una cocina de gas.
El desarro]lo de ta cocina no ser_. afectado si es operado
en circuitos protegidos pot GFCl, pero ocasionalmente
un aterrizamiento inadvertido del GFCI podria ocurrir: Si
el interruptor se dispara, la cocina el_ctrica se apagar&
A: Situaciones en las que el cord6n de alimentaci6n
del aparato electrodom_stico ser& desconectado de
manera infrecuente.
METODO PROVISIONAL
(No se permite usar _
enchufes adaptadores _ '{
en Canada) _-"_ ]
Aiinee las espigas/ _ _._j I
,anuras g_-andes_ .,_l_h... _j _'_ ._ I
X ) )// _" Asegurese de que exista
\ / [ [ una tornade tierra adecuada
_"_._L.J" y una conexi6n firme antes
l][_ de usarlo
Se puede usar un adaptador solamente en un circuito
de 15 amperios No use un adaptador en un circuito de
20 amperios. Donde Io permitan los c6digos locales, se
puede hacer una CONEXlON PROVISIONAL a un
recept_tculo de pared de dos espigas con conexi6n a
tierra adecuada, usando un adaptador, aprobado por UL,
que se puede adquirir en la mayoria de las tiendas de
ferreteria. La ranura m&s grande en el adaptador debe
alinearse con la ranura m_.s grande en et recept_culo de
pared para proveer una polaridad adecuada en la
conexi6n del cord6n de atimentaci6n.
PRECAUCION: EJuni,laterminalde
toma de tierra del adaptador al tomillo de ta cubierta
del recept_.cu!o de pared no conecta el aparato
electrodorn_stico a tierra, a menos que el tomillo de
la cubierta sea de metal y no est6 aistado y que el
recept&culo de pared estd conectado a tierra a tray, s
dei alambrado de la residenda, El cliente deber& procurar
que un electricista califlcado inspeccioneel recept&cu!o
de pared yet circuito para asegurarse de que este
recept&culo est_ conectado adecuadamente a tierra.
94
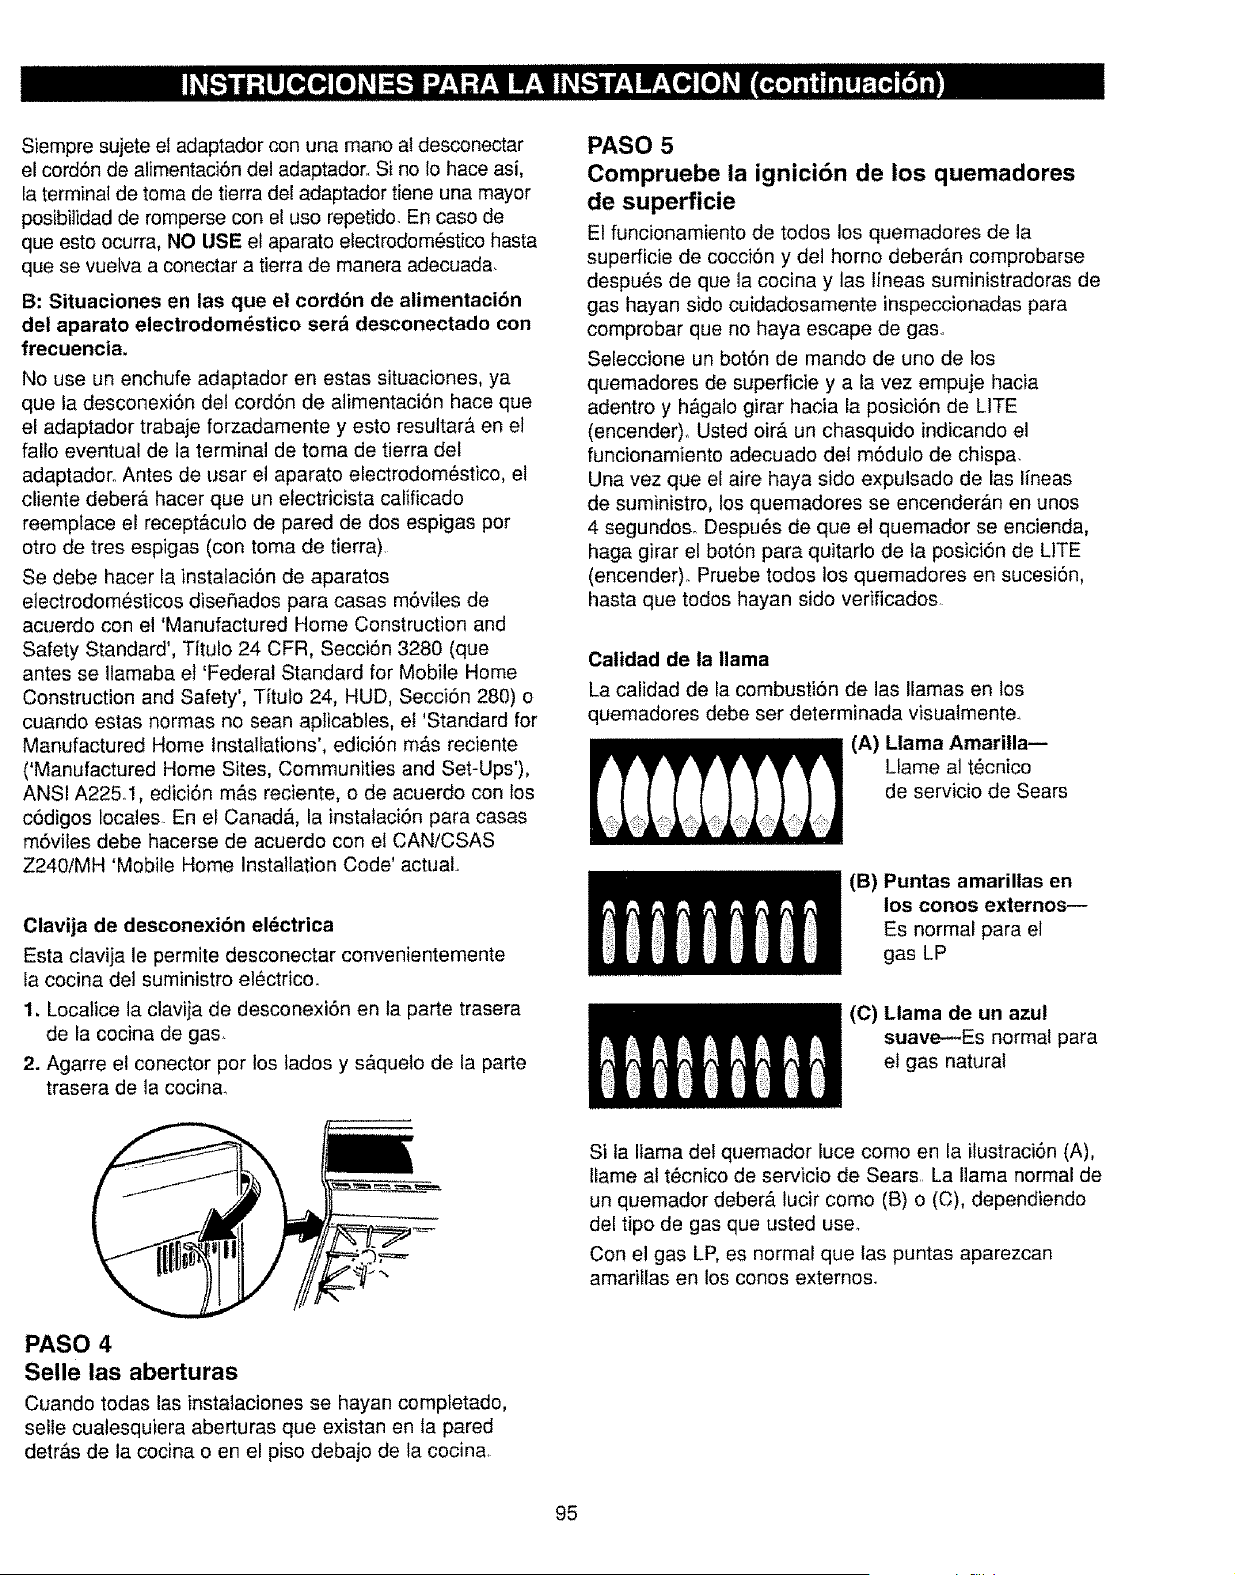
Siempresujeteel adaptadorconunamaneaIdesconectar
el cord6ndealimentaci6ndeladaptador..SinoIohaceasi,
laterminaldetomadetierradeladaptadortieneunamayor
posibilidadderomperseconetuserepetido.Encasede
queestoocurra,NOUSE el aparato electrodom_stico hasta
que se vuetva a conectar a tierra de manera adecuada.
B: Situaciones en las que el cord6n de alimentaci6n
del aparato electrodom_stico ser& desconectado con
frecuencia.
No use un enchufe adaptador en estas situaciones, ya
que la desconexi6n del cord6n de alimentaci6n hace que
el adaptador trabaje forzadamente y esto resultar& en el
fallo eventual de la terminal de toma de tierra del
adaptador.. Antes de usar el aparato electrodom_stico, el
cliente deber& hacer que un electricista calificado
reemplace el recept#,culo de pared de dos espigas per
otro de tres espigas (con toma de tierra).
Se debe hacer la instataci6n de aparatos
etectrodom6sticos disefiados para casas m6viles de
acuerdo con el 'Manufactured Home Construction and
Safety Standard', Tftulo 24 CFR, Secci6n 3280 (que
antes se Ilamaba el 'Federal Standard for Mobile Home
Construction and Safety', Titulo 24, HUD, Secci6n 280) o
cuando estas normas no sean aplicables, eI 'Standard for
Manufactured Home Installations', edici6n m&s reciente
('Manufactured Home Sites, Communities and Set-Ups'),
ANSI A225A, edici6n m&s reciente, o de acuerdo con los
c6digos locales. En el Canada, la instalaci6n para casas
m6viles debe hacerse de acuerdo con el CAN/CSAS
Z240/MH 'Mobile Home Installation Code' actual
Clavija de desconexi6n eldctrica
Esta clavija le permite desconectar convenientemente
la cocina del suministro electrico.
1. Localice la clavija de desconexi6n en ta parte trasera
de la cocina de gas.
2. Agarre el conector per los lades y s&quelo de la parte
trasera de la cocina_
PASO 4
Selle las aberturas
Cuando todas las instaiaciones se hayan comptetade,
selle cualesquiera aberturas que existan en la pared
detr&s de la cocina o en el piso debajo de la cocina<
PASO 5
Compruebe la ignici6n de los quemadores
de superficie
El funcionamiento de todos los quemadores de la
superficie de cocci6n y del homo deber&n comprobarse
despu_s de que la cocina y las lineas suministradoras de
gas hayan side cuidadosamente inspeccionadas para
comprobar que no haya escape de gas..
Seleccione un bot6n de mando de uno de los
quemadores de superficie y a la vez empuje hacia
adentro y h_galo girar hacia la posici6n de LITE
(encender). Usted oirA un chasquido indicando el
funcicnamiento adecuado del m6dulo de chispa.
Una vez que el aire haya side expulsado de las Iineas
de suministro, los quemadores se encender&n en unos
4 segundoso Despu_s de que el quemador se encienda,
haga girar el bot6n para quitarlo de ta posici6n de LITE
(encender). Pruebe todos los quemadores en sucesi6n,
hasta que todos hayan side verificados
Calidad de la llama
La calidad de la combusti6n de las llamas en los
quemadores debe ser determinada visualmente_
(A) Llama Amarilla=
Llame al t_cnico
de servicio de Sears
(B) Puntas amarillas en
los cones externos--
Es normal para el
gas LP
(C) Llama de un azul
suave--Es normal para
el gas natura!
Si ta llama del quemador luce come en la ilustraci6n (A),
Ilame al tecnico de servicio de Sears La llama normal de
un quemador deberA lucir come (B) o (C), dependiendo
del tipo de gas que usted use°
Con el gas LP, es normal que las puntas aparezcan
amarillas en los cones externos+
95
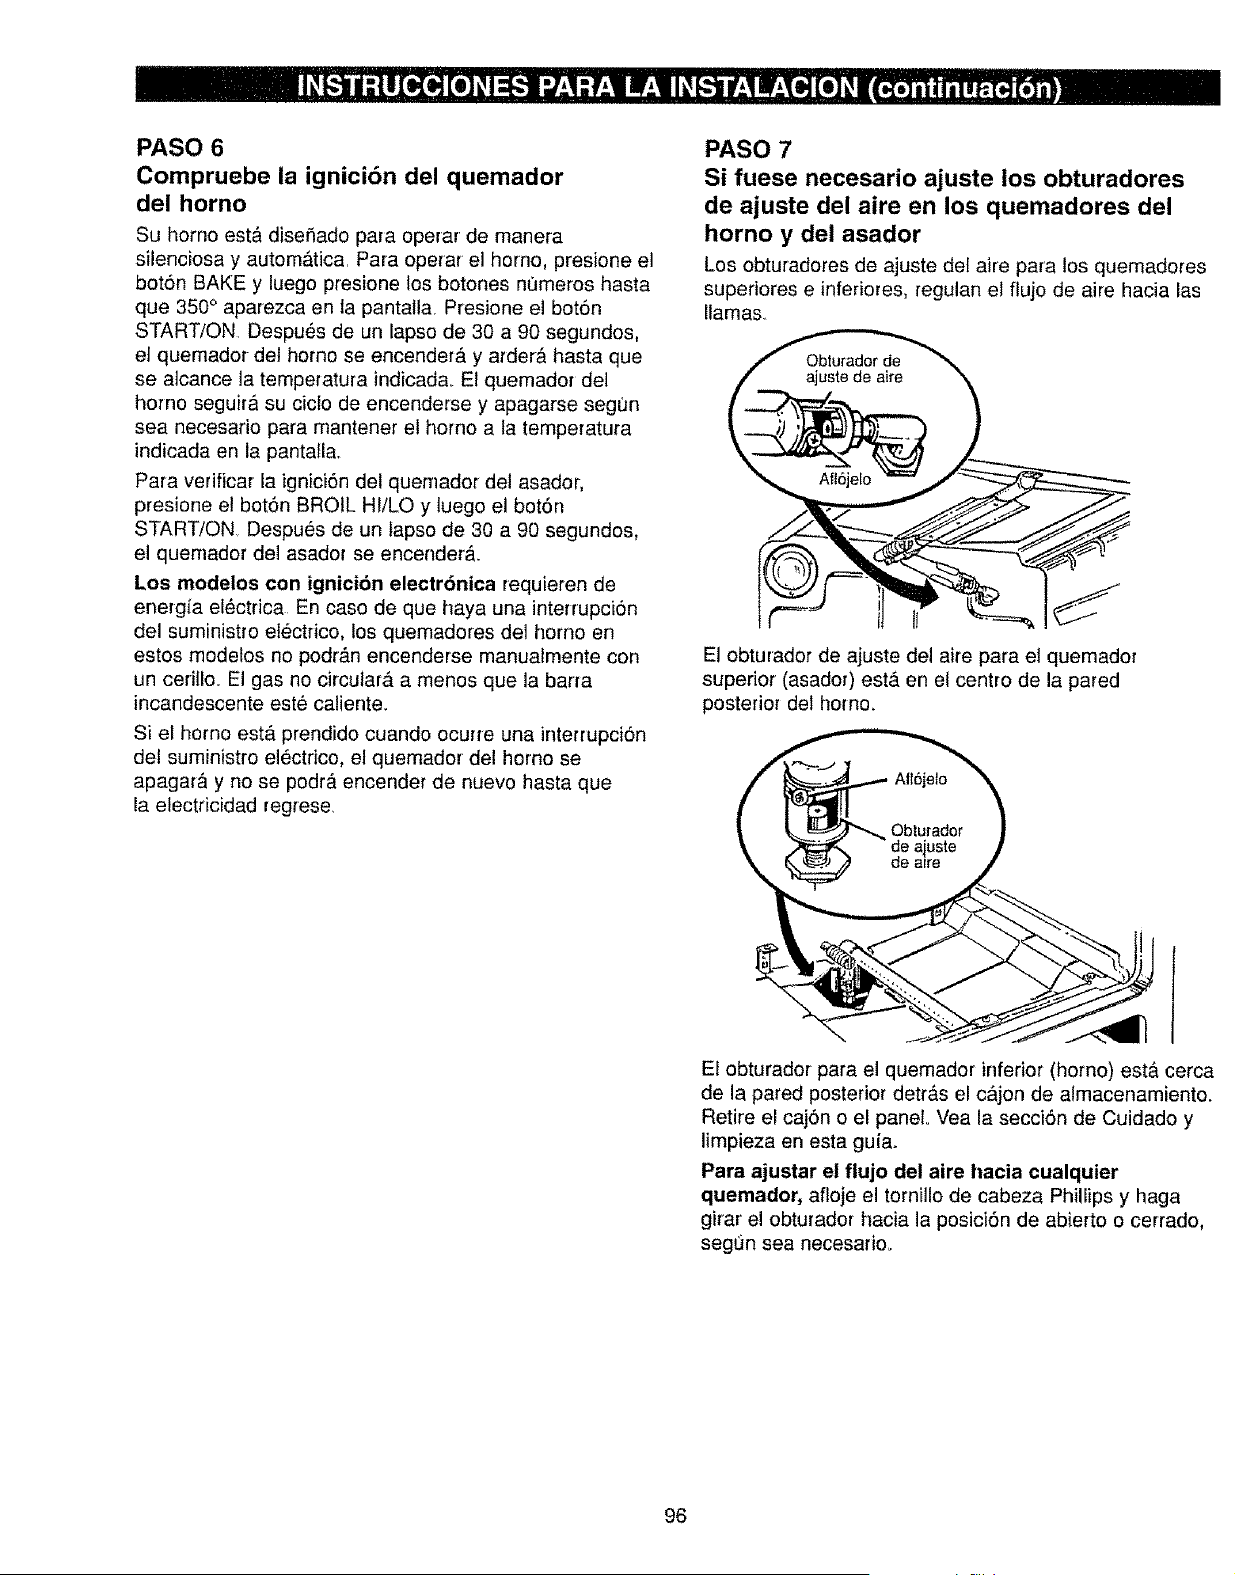
PASO 6
Compruebe ia ignici6n del quemador
del horno
Su homo est& diseSado para operar de manera
silenciosa y autom_tica. Para operar el horno, presione el
bot6n BAKE y luego presione los botones n_meros hasta
que 350 ° aparezca en la pantatla. Presione el bot6n
START/ON Despu6s de un lapso de 30 a 90 segundos,
et quemador del homo se encender& y arder& hasta que
se alcance la temperatura indicad& El quemador del
homo seguir,_ su ciclo de encenderse y apagarse segun
sea necesario para mantener el homo a la temperatura
indicada en la pantaH&
Para verificar la ignici6n del quemador del asador,
presione el botSn BROIL HI/LO y luego el bot6n
START/ON Despues de un lapso de 30 a 90 segundos,
el quemador de1 asador se encender&
Los modelos con ignici6n electr6nica requieren de
energ_a el_ctdca En caso de que haya una interrupci6n
del suministro electrico, los quemadores del homo en
estos modelos no podr&n encenderse manualmente con
un ceriflo. El gas no circular& a menos que la barra
incandescente est6 caliente.
Si el homo est,. prendido cuando ocurre una interrupcion
del suministro electrico, et quemador del homo se
apagara y no se pedrO,encender de nuevo hasta que
la electricidad regrese.
PASO 7
Si fuese necesario ajuste los obturadores
de ajuste del aire en los quemadores del
horno y del asador
Los obturadores de ajuste del aire para los quemadores
superiores e inferiores, regulan el flujo de aire hacia las
llamas,,
El obturador de ajuste del aire para el quemador
superior (asador) est,. en el centro de la pared
posterior del horno.
El obturador para el quemador inferior (homo) est& cerca
de la pared posterior detr&s el c&jon de almacenamiento.
Retire el cajdn o el panel° Vea la seccidn de Cuidado y
limpieza en esta guia.
Para ajustar el flujo del aire hacia cualquier
quemador, afloje el tornillo de cabeza Phillips y haga
girar el obturador hacia la posiciSn de abierto o cerrado,
segt_n sea necesario.
96
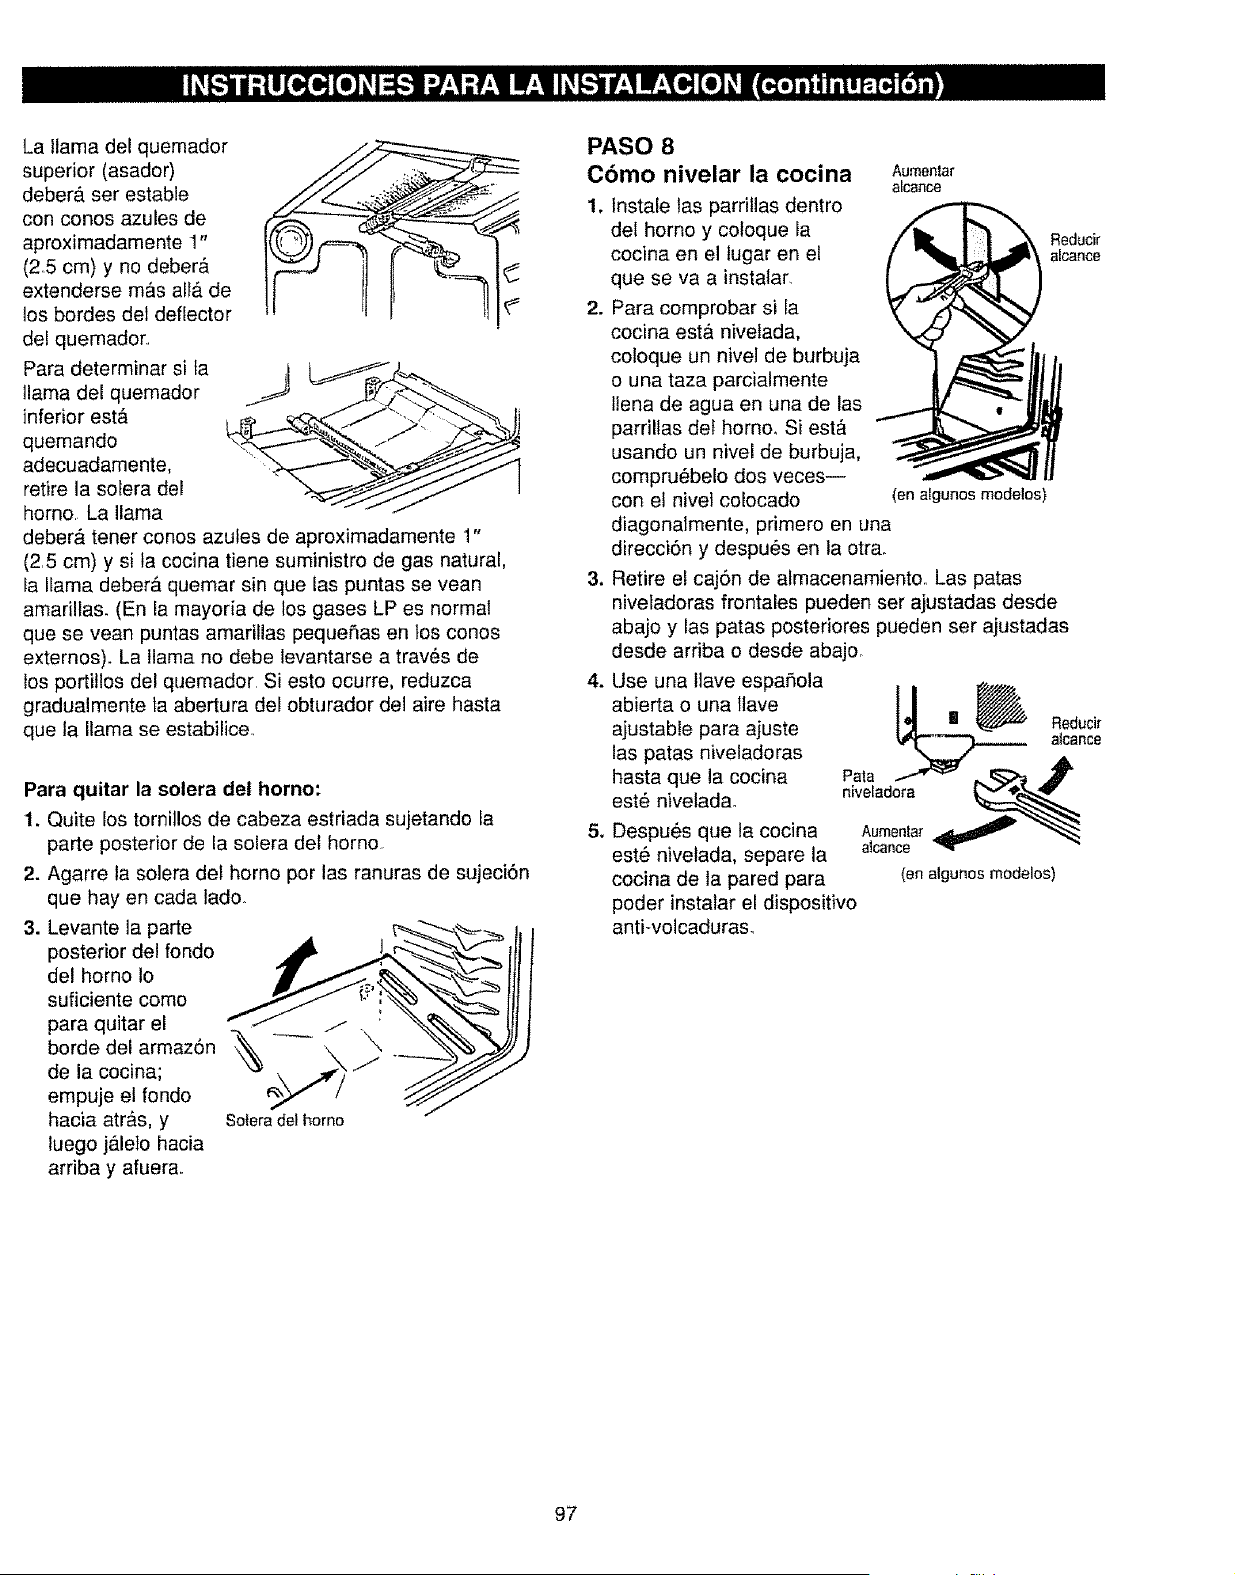
La llama del quemador
superior (asador)
deber& ser estable
con conos azules de
aproximadamente 1"
(2.5 cm) y no deber&
extenderse mas aiI& de
los bordes del deflector
del quemador..
Para determinar si ta
llama del quemador
inferior est,,
quemando
adecuadamente,
retire la solera del
homo. La llama
d
<>
deberA tener conos azules de aproximadamente 1"
(2.5 cm) y si ta cocina tiene suministro de gas natural,
fa llama deber& quemar sin que las puntas se vean
amarillas. (En la mayoria de los gases LP es normal
que se vean puntas amariHas pequeSas en los COHOS
externos). La llama no debe levantarse a trav6s de
los portillos del quemador Si esto ocurre, reduzca
gradualmente la abertura del obturador del aire hasta
que ta llama se estabilice
Para quitar la solera de! homo:
1. Quite los torniJ!os de cabeza estriada sujetando la
parte posterior de la solera det homo
2. Agarre la solera det homo por las ranuras de sujeci6n
que hay en cada lado.
3. Levante la parte
posterior del rondo .,_t, l_r'_._
de! homo Io
suficiente come
para quitar el
borde del armaz6n "_\ "",
de la cocina; _I,_ f/
empuje el fondo
hacia art&s, y Soleradelhomo
luego j_.leto hacia
arriba y afuera.
PASO 8
Cbmo nivelar la cocina Aumentar
alcance
1, Instale las parrillas dentro
del homo y coloque la
cocina en el lugar en el
que se va a instalar,
2. Para comprobar si ia
cocina est& nivetada,
coloque un hive] de burbuja
o una taza parcialmente
Ilena de agua en una de las
pardllas del horno_ Si est_
usando un nivel de burbuja,
compru_belo dos veces--
con el nivel colocado (enatgunosmodelos)
diagonalmente, primero en una
direcci6n y despu_s en ta otra.
3. Retire el caj6n de atmacenamiento.. Las patas
niveladoras frontales pueden ser ajustadas desde
abajo y las paras posteriores pueden ser ajustadas
desde arriba o desde abajoo
4. Use una tlave espaSola
abierta o una llave
ajustable para ajuste
las patas niveladoras
hasta que la cocina
est6 nivelada.
5. Despues que la cocina
est_ nivelada, separe la
cocina de ta pared para
Reducir
alcance
_l_i ID _ Reducir
alcance
Pa,a #
{en algunos modelos)
poder instalar el dispositivo
anti-volcaduraso
97
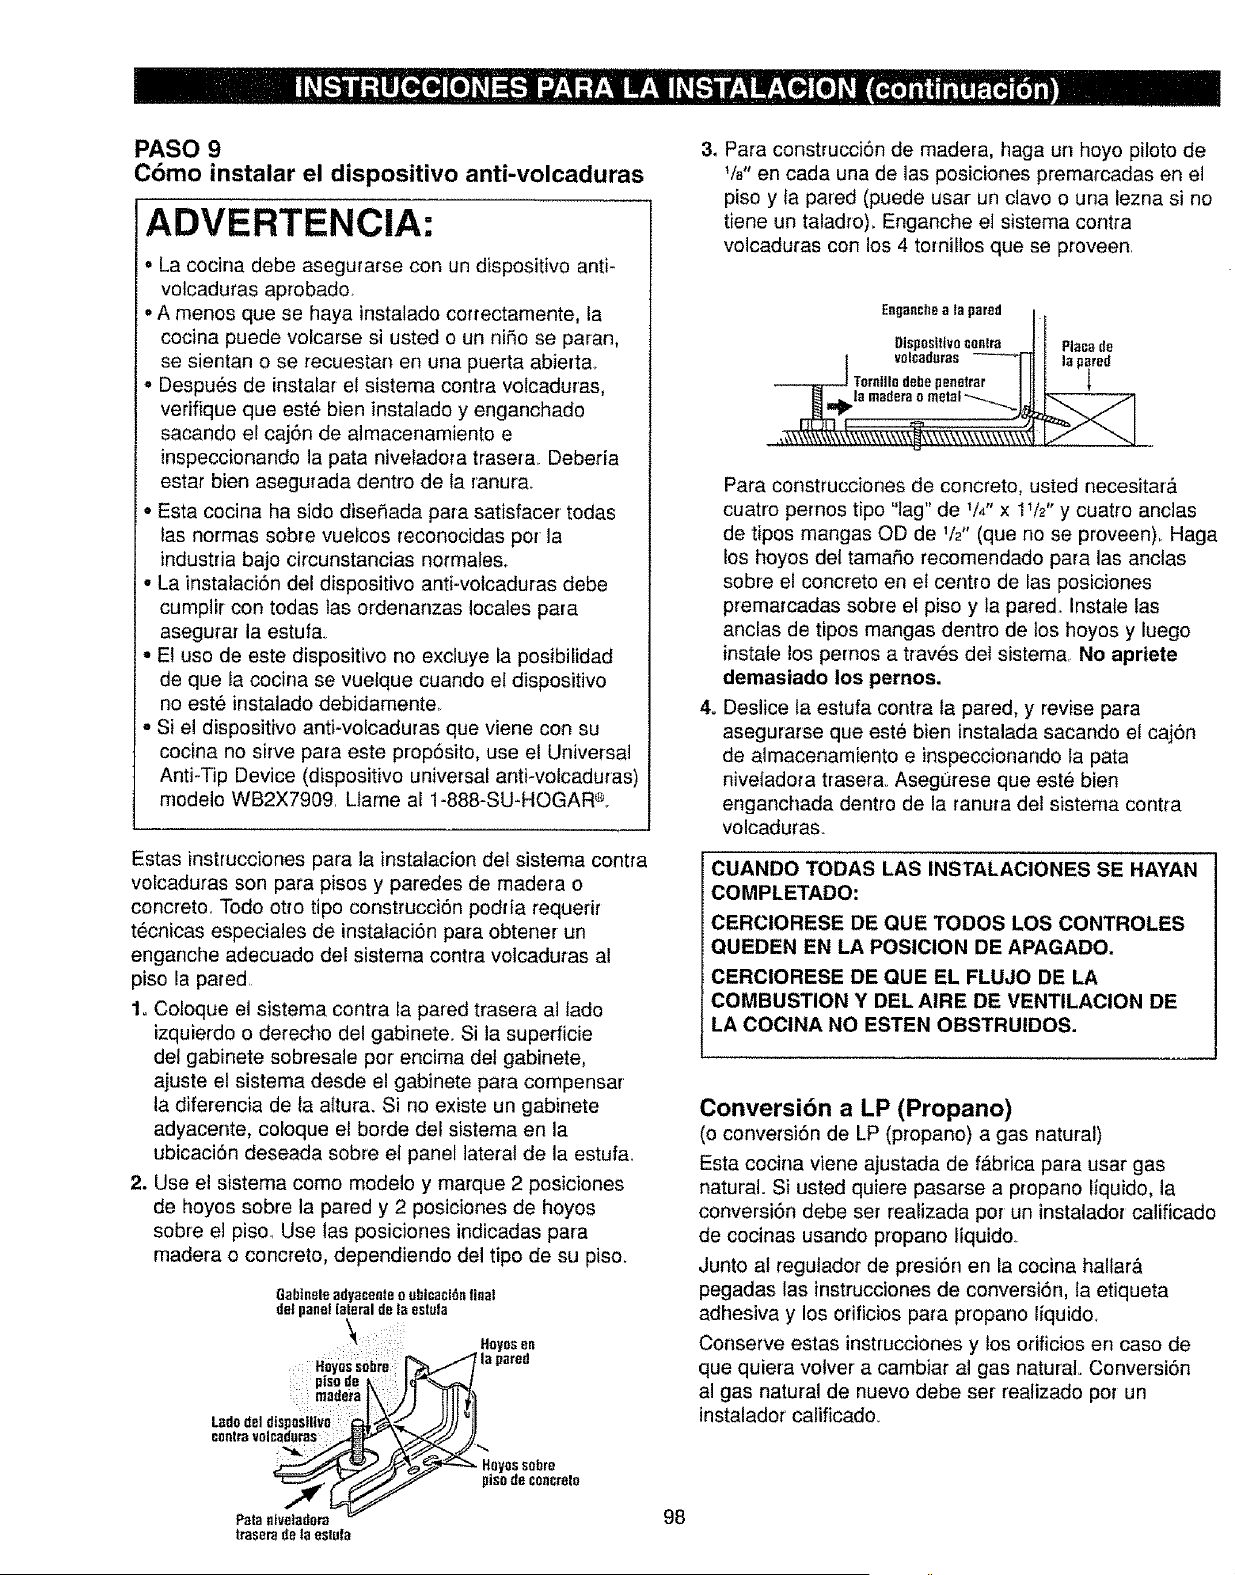
PASO 9
C6mo instalar el dispositivo anti-volcaduras
ADVERTENCIA:
• La cocina debe asegurarse con un dispositivo anti-
volcaduras aprobado.
oA manes qua se haya instalado cotrectamente, la
cocina puede volcarse si usted o un niho se paran,
se sientan o se recuestan en una puerta abierta.
o Despu_s de instalar el sistema centre volcaduras,
vefifique que este bien instatado y enganchado
sacando el caj6n de almacenamiento e
inspeccionando la pate niveladora trasera. Deberia
estar bien asegurada dentro de la ranura.
• Esta cocina ha side disehada para satisfacer todas
las normas sabre vuelcos reconocidas per la
industria bajo circunstancias normales,.
• La instalaci6n del dispositivo anti-votcaduras debe
cumplir con todas tas ordenanzas locales para
asegurar la estufa.
• El use de este dispositivo no excluye la posibilidad
de que la cocina se vuefque cuando ef dispositivo
no est6 instalado debidamente.
• Si el dispositivo anti-volcaduras que viene con su
cocina no sirve para este prop6sito, use el Universal
Anti-Tip Device (dispositivo universal anti-votcaduras)
modelo WB2X7909. Lfame al 1-888-SU-HOGAR_°
Estas instrucciones para la instatacion del sistema centre
volcaduras son para pisos y parades de madera o
concrete. Todo otro tipo construcci6n podda requefir
tecnicas especiales de instalaci6n para obtener un
enganche adecuado dee sisterna contra volcaduras al
piso la pared.
1. Coloque el sistema centre la pared trasera al lade
izquierdo o derecho del gabinete. Si la superficie
def gabinete sobresale per encima det gabinete,
ajuste el sistema desde el gabinete para compensar
la diferencia de la attura+ Si no existe un gabinete
adyacente, coloque el borde def sistema en la
ubicaci6n deseada sabre ef panel lateral de la estufa.
2. Use el sistema come modelo y marque 2 posiciones
de hayes sabre la pared y 2 posiciones de hayes
sabre el piso_ Use las posiciones indicadas para
madera o concrete, dependiendo del tipo de su piso.
3. Para construccibn de madera, haga un hoyo pilate de
VB" en cada una de las posiciones premarcadas en el
piso y fa pared (puede usar un clave o una lezna si no
tiene un taladro). Enganche el sistema contra
volcaduras con los 4 families qua se proveen
Engancheaapared I
L_ispasilivananlra _J Placede
/ v01cad_.tran----'1 IJ I la pared
.,_'(\%(\\\\\\\\\\\\\\\_\\\\\\',\\\_.\\\\\\'tlI/
Para construcciones de concrete, usted necesitar&
cuatro pemos tipo flag" de V4" x 1V2" y cuatro anclas
de tipos mangas OD de V_" (que no se proveen),, Haga
los hayes del tamaifio recomendado para las anctas
sabre el concrete en e! centre de las posiciones
premarcadas sabre el piso y ta pared, Instale tas
anclas de tipos mangas dentro de los hayes y luego
instale los pernos a trav6s del sistema, No apriete
demasiado los pernes.
4o Deslice ta estufa centre la pared, y revise para
asegurarse que est# bien instalada sacando et caj6n
de almacenamiento e inspeccionando la pate
niveladora trasera_ Asegurese que este bien
enganchada dentro de la ranura del sistema contra
volcaduras.
CUANDO TODAS LAS INSTALACIONES SE HAYAN
COMPLETADO:
CERCIORESE DE QUE TODOS LOS CONTROLES
QUEDEN EN LA POSIClON DE APAGADO.
CERCIORESE DE QUE EL FLUJO DE LA
COMBUSTION Y DEL AIRE DE VENTILAC|ON DE
LA COCINA NO ESTEN OBSTRUIDOS.
Conversibn a LP (Propane)
(o convetsi6n de LP (propane) a gas natural)
Esta cocina viene ajustada de f_brica pare usar gas
natural. Si usted quiere pasarse a p_opano liquido, la
conversi6n debe set realizada per un instalador calificado
de cocinas usando propane liquido.
Junto af regulador de presi6n en la cocina hallar&
pegadas las instrucciones de conversi6n, fa etiqueta
adhesiva y los orificios para propane liquido+
Conserve estas instrucciones y los orificios en case de
que quiera votver a cambiar al gas natural. Conversi6n
al gas natural de nuevo debeser realizado per un
instalador calificado.
98

PROBLEMA CAUSA POSIBLE
LOS QUEMADORES
DE SUPERFICIE NO
ENCIENDEN O NO
QUEMAN DE MANERA
UNIFORME
LA LLAMA DEL
QUEMADOR ES MUY
GRANDE O AMARILLA
LOS QUEMADORES
DE SUPERFICIE SE
ENCIENDEN PERO
NO EL HORNO
• Cerci6rese de que el enchufe el_ctrico este conectado en una
toma de corriente activa,
• Los huecos del quemador en el lado o alrededor de la superficie del quemador
pudieran estar obstruidos. Quite las cabezas de los quemadores y las tapas
de los quemadores y Iimpielos con una aguja de coser o un alambre desnudo.
Cerci6rese de no agrandar los huecos de tos quemadores. Inspeccione la Area
del electrodo para comprobar si hay alimentos o grasa requemados_
* CerciSrese que las charolas recolectoras hayan sido instaladas correctamente.
° Si la cocina est,. conectada al gas LP, p6ngase en contacto con ta persona
que instal6 su cocina o que hizo la conversi6n
° Es posibte que ta v&Ivula de cierre del gas del homo fuera accidentalmente
movida durante una limpieza ouna mudanza.
Para inspeccionar la v_.lvula de cierre del gas del homo, quite el caj6n
de almacenamiento y busque la patanca de interrupciSn dei gas
de fa parte trasera de la cocina.
_o_ _,_-,_ _,,
"_ t.a palanca se /
\ muestra cerra6a /
TIRE PARA /
SENALES DE CONTROL ° Olvid6 marcar una temperatura de hornear o tiempo de limpieza, Presione el
DESPUF-S DE MARCAR bot0n BAKE y ta temperatura deseada o el bot6n SELF CLEAN y el tiempo
TIEMPO DE COCCION deseado de limpieza°
O TIEMPO DE INICIO
PANTALLA INTERMITENTE • Hubo una interrupci6nen el fluido el_ctrico. Reinicie el relojo Consulte la secciSn
Usar el reloj y el contador.
NO PUEDE LOGRAR QUE • No se presionaron correctamente los botones de control Los botones BAKE y
LA PANTALLA MUESTRE "SF" BROIL HI/LO se deben presionar af mismo tiempo y sostenerse por 3 segundos_
RUIDO DEL VENTILADOR ° Un ventilador se puede apagar y encender autom,_ticamente para enfriar las partes
internas,. Esto es normal.
99
PROBLEMA
NO FUNCIONAN NI EL
RELOJ NI EL CONTADOR
DE TIEMPO
"F-- Y UN NUMERO"
DESTELLAN EN LA
VENTANILLA
LA PANTALLA SE PONE
EN BLANCO 0 LAS LUCES
INDICADORAS SE
ENClENDEN CUANDO
LA COCINA NO SE ESTA
USANDO
LA LUZ DEL HORNO
NO FUNCIONA
LA LUZ DE SUPERFICIE
NO FUNCIONA
EL HORNO NO FUNCIONA
i:
LA TEMPERATURA DEL
HORNO ES DEMASIADO
FRIA O CALIENTE
SE HACE DIF[ClL DESLIZAR
SUPERFICIES SOBRE LOS:
ESTANTES DEL HORNO
OLOR A QUEMADO O A ACEITE
QUE PROVENIENTE DEL
CONDUCTO DE VENTtLACION
CAUSA POSIBLE
• El enchufe de la cocina no est_ bien insertado en la toma de corriente.
= El enchufe ef_ctrico de la cocina tiene que estar conectado firmemente en una
toma de corriente activa. Compruebe para ver si hay algun fusible fundido
o si el interru ptor de circuito ha side trabado.
- Vedfique que no haya una falla en la energfa el_ctrica.
• Revise ta secci6n Ajuste del control del homo, reloj y contador de tiernpo.
= Si "F--y un n_mero" desteltan en la ventanilla que muestra la hera, hay un
cSdigo de error de funciSn, Si un c6digo de error de funciSn aparece durante el
cicto de auto limpieza, inspeccione el seguro de la puerta. La manija del seguro
pudiera haberse movido fuera de la posici6n de cierre, aunque haya side
ligeramente. AsegOrese de mover el seguro hacia la derecha, hasta el tope.
Presione el bot6n STOP/CLEAR Deje que el horno se enfrfe durante una hora,
Vuelva a hacer funcionar el horno.
= Desconecte el suministro de energfa de la cocina durante 5 minutes y entonces
vuelva!o a conectar. Si se repite et c6digo de fal!o, Ilame al t_cnico de servicio.
o Es posible que un circuito se haya fundido o se haya saltado et interrupter
de circuitos Reemplace el fusible o reiniciatice el interrupter de circukos.
• El reloj est,1 apagado para que no aparezca en la pantalla. Consulte la secci6n
Usar el relej y el contador,
• La bombilla puede estar floja o fundida
• El enchufe debe estar conectado a una toma de corriente activa.
° La bombitla fluorescente est_ floja o defectuosa. Aj_stela o reem pl_cela.
° El conm utador que hace funcionar la luz est_ rote. Ltame a un t_cnico de servicio.
° El enchufe de la cocina no est_ bie_ insertado en la toma de corriente.
• El interrupter autom&tico del circuito de su casa est,. trabado o se fundi6
un fusible.
• La puerta qued5 con el seguro puesto despu_s de la auto limpieza.
• Los controles del homo no est_.n programados de manera correcta.
• E! termostato necesita ajustes. Vea la secciSn Ajuste del termostato
del horno--H_,galo Ud. mismo.
° Los estantes fueron limpiados en un ciclo de limpieza autom&tica. Para hacer
que otras superficies se deslicen f_.cilmente sobre los estantes, aptique una
pequefia cantidad de aceite vegetal a una toalla de pape! y aplfquela a los
extremes de los estantes del homo o a los soportes de los estantes del homo.
• Esto es normal en un homo nuevo y desaparece con el tiempoo Para agilizar
el proceso, programe un ciclo de auto limpieza per un minimo de 3 horas.
Consulte la secciSn de Auto limpieza del homo.
100
PROBLEMA CAUSA POSIBLE
LOS ALIMENTOS NO SE • Los controtes del homo no se ban fijado de manera adecuad& Vea las secci6nes
ASAN NI SE HORNEAN de Hornear o Asar.
CORRECTAMENTE • La posicibn de la parrilla no es la correct&
• Se est_,n usando utensilios de cocina incorrectos o de un tamaSo inapropiado.
• El termostato del homo necesita ajuste Vea la secci6n de Ajustar el
termostato del horno--H&galo usted mismo.
• No se ha fijado bien la hora en el reloj,
• El papet de aluminio no se us6 apropiadamente en el horno.
• La solera del homo no est& asentado firmemente en su posiciSn Vea Jasecci6n
Instrucciones para la instalaci6n,,
LOS ALIMENTOS NO SE • Los controles del homo no est&n fijados bien,. Vea la secciSn de Asar al
ASAN AL FUEGO DIRECTO fuego directo.
COMO ES DEBIDO ° La puerta del homo no est& cerrada°
• Se est& usando la parritla en una posiciSn incorrect& Vea la secciSn de
Asar al fuego directo.
• Los alimentos se est_.n cocinando en una cazuela caliente.
• Los utensilios empleados no son los apropiados para asar al fuego directo,
• El papet de aluminio que se us6 para cubrir ta rejilla de la bandeja det asador no
se coloc5 correctamente ni tampoco se hicieron las ranuras seg0n se recomiend&
• La solera del homo no est& asentada firmemente en su posiciSn. Vea ta secciSn
Instrucciones para la instalaciSn,
EL ClCLO DE AUTO • La temperatura del homo est& muy alta para programar la funciSn de auto
LIMPIEZA DEL HORNO limpieza. Deje que la cocina se enfrie hasta alcanzar la temperatura ambiente
NO FUNCIONA y vuetva a fijar los controles.
• Los controles del homo no se fijaron adecuadamente Vea ta secciSn
Operaci6n del homo de auto limpiez&
• La manija del seguro de la puerta no est& at m_ximo hacia la derechao
NO SE PUEDE QUITAR o Et homo deber& enfriarse hasta alcanzar una temperatura m&s baja que la que
EL SEGURO A LA PUERTA tenia a ta hora del cierre No cierre la puerta con el seguro excepto cuando
DEL HORNO
EL HORNO NO ESTA
LIMPIO DESPUES DEL
CICLO DE LIMPIEZA
LA PUERTA DEL HORNO SE
CERRO ACCIDENTALMENTE
CON EL SEGURO
DURANTE EL HORNEADO
estd usando el cicio de auto limpieza, de Io contrario el horno pudiera
bloquearse.
• Los controles del homo no se fijaron adecuadamente. Vea la secci6n
OperaciSn del homo de auto limpieza,,
° Un homo que est_ extremadamente sucio requiere de 5 horas de limpieza.
• Los derramamientos excesivos deber&n limpiarse antes de comenzar el ciclo
de limpiez&
• Apague el cicto de auto limpiezao Vea la secci6n OperaciSn del homo
de auto limpiez&
101
PROBLEMA
OLOR FUERTE
EL CAJON NO SE DESLIZA
SUAVEMENTE O SE ATASCA
SONIDO CRUJIENTE
O DE ESTALLIDOS
HUMO EXCESIVO
CAUSA POSIBLE
= Una proporci6n inadecuada de aire/gas en el homo.. Ajuste el obturador
del aire del quemador de1 homo.
= Durante las primeras semanas de uso del homo cierto olor es normal,
debido al material aislador alrededor del revestimiento interior del horno.
Esto es temporal.
= E1 caj6n no est,_ alineado Extienda completamente et caj6n y emptijeto
totalmente hacia adentro. Vea la secci6n de Cuidado y Limpieza.
El caj6n est& sobrecargado o fa carga no estA equilibrada. Disminuya el peso.
Vuelva a distribuir el contenido del caj6n.
Este es el sonido del metal que se enfrfa y se calienta tanto durante la cocci6n
como durante la limpieza. Esto es normal
Qued6 suciedad excesivo en el homo° Presione el bot6n STOP/CLEAR. Abra las
ventanas para que el humo salga de la cocina. Espere hasta que la luz en el bot6n
SELF CLEAN se apague. Limpie el exceso de suciedad y reinicialice el cic]o
de limpieza. ....
102
®
GARANTIA PARA UNA
COCINA AUTONOMA
F
UN AI_IO COMPLETO DE GARANTIA PARA TODAS LAS PIEZAS
Si, dentro de un a_o a partir de la fecha de instalaci6n, cualquier parle funciona indebidamente a causa de un
defecto en materiales o fabricaci6n, Sears la reparar#, o la reemplazar& a nuestra discreci6n, sin costo alguno
para el comprador_
Si este producto se utiliza para otros fines que no sean el uso familiar privado, las garantias indicadas arriba
s6fo tendr&n vigencia durante 90 diaso
LA GARANT|A DE SERVIClO ESTA DISPONIBLE AL CON'TACTAR AL SERVlClO DE SEARS
AL 1-888-SU-HOGAR s_.
Esta garantia aplica 0nicamente mientras este producto se use en los Estados Unidos.
Esta garantia le otorga derechos legates especfficos y es posible que usted tenga tambi_n otros derechos que
varian de un estado a otto.
Sears Roebuck and Co.. Dept 817WA, Hoffman Estates, IL 60179
Contrato de proteccibn maestra
Felicitaciones por su compra inteligente_ Su nuevo producto
Kenmore '_ est,. disefiado y fabricado para muchos a_os de
operaci6n confiable.. Sin embargo, al igual que todes los
productos, puede requerir de mantenimiento o reparaci6n
preventivas en cualquier momentoo Es ahi cuando el
contrato de protecci6n maestra le puede ahorrar dinero
y molestiaSo
Adquiera un Contrato de protecciSn maestra ahora mismo
y prot#jase contra inconvenientes y gastos inesperados
El Contrato de protecci6n maestra tambi6n le ayuda a
ampliar la vida de su nuevo producto Lo siguiente es
Io que se incluye en el contrato:
v' Servicio experto por parte de nuestros 12 000
especialistas profesionales de reparaci6n
v" Servicio ilimitado sin costo por partes y mano de
obra en todas las reparaciones cubiertas
v' Garantfa totalireposici6n de su producto cubierto
si ocurren cuatro o m&s de cuatro fallas del producto
dentro de doce meses
v' Reposici6n del producto si el producto cubierto no se
puede reparar
_' Revisibn anual de mantenimiento preventivo a su
solicitud--sin cargo adicionai
v' Ayuda telefbnica r&pida--asistencia telef6nica de
parte de un t6cnico Sears sobre los productos que
requieren reparaci6n en casa, adem&s de una
conveniente programaci6n de reparaciones
v' Proteccibn contra descargas el6ctricas para dafios
debido a fluctuaciones el_ctricas
v' Reembolso pot alquiler si la reparaci6n del producto
cubierto toma m&s tiempo det prometido
Una vez adquiera et contrato, solo necesita una Ilamada
telef6nica para programar el serviciOo Puede llamar a
cualquier hera del dfa o de la noche o programar la cita
del servicio por InterneL
Sears cuenta con m&s de 12000 especialistas
profesionales de reparaci6n, quienes tienen acceso a m&s
de 4,5 millones de partes y accesorios de calidado Este es
el tipo de profesionalisme en el que puede contra para
ayudar a prolongar la vida de su nueva compra para los
aries venideros, iAdquiera el Contrato de protecci6n
maestra hoy mismo!
Aplican ciertas limitaciones y exclusiones.
Para precios e informaci6n adicional, Ilame
al '1-800-827-6655.
Servicio de instalacibn de Sears
Para la instalaciSn profesional garantizada de Sears
de electrodom6sticos, dispositivos para abrir puertas de
garaje, catentadores de agua y otros aparatos importantes
para el hogar, en los EE..UU..Itame al 1-800-4-MY-HOME ®.
103
'_ Your Home
For repair-in your home-of all major brand appliances,
lawn and garden equipment, or heating and cooling systems,
no matter who made it, no matter who sold it!
For the replacement parts, accessories and :::
owner's manuals that you need to do-it--yourself.
i
For Sears professional installation of home appliances
:i
and items like garage door openers and water heaters.
1-800-4-MY-HOME ® (1-800-469-4663)
Call anytime, day or night (U_S.A_ and Canada) :
;. www.sears.com www.sears.ca ........
...... Our Home ......
): :i
For repair of carry-in items like vacuums, lawn equipment, :::::
and electronics, call or go on-line for the location of your nearest
:= Sears Parts & Repair Center.
1 800 488 1222
Call anytime, day or night (U.S.A.. only)
ili_ii_!!_
11!;4:
www.sears,com
To purchase a protection agreement (U.S.A.)
or maintenance agreement (Canada) on a product serviced by Sears: :
Pars pedir servicio de reparaci6n
a domicilio, y para ordenar piezas:
1-888-SU-HOGAR sM
1-800-827-6655 (U.S.A,) 1-800-361-6665 (Canada)
: i
Au Canada pour service en fran(;ais: :
1-800-LE-FOYER Mc :
(1-888-784-6427)
(1-800-533-6937) =
www_sears,oa
$ ARS
® Regislered Trademark / T_ Trademark / sa Service Mark of Sears, Roebuck and Co
® Marca Registrada / TMMarca de F&brica / s_ Marca de Servicio de Sears, Roebuck and Co
Mo
_c Marque de commerce / Marque d_pos_e de Sears, Roebuck and Co © Sears, Roebuck and Co