Futuro Futuro
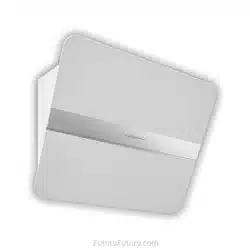
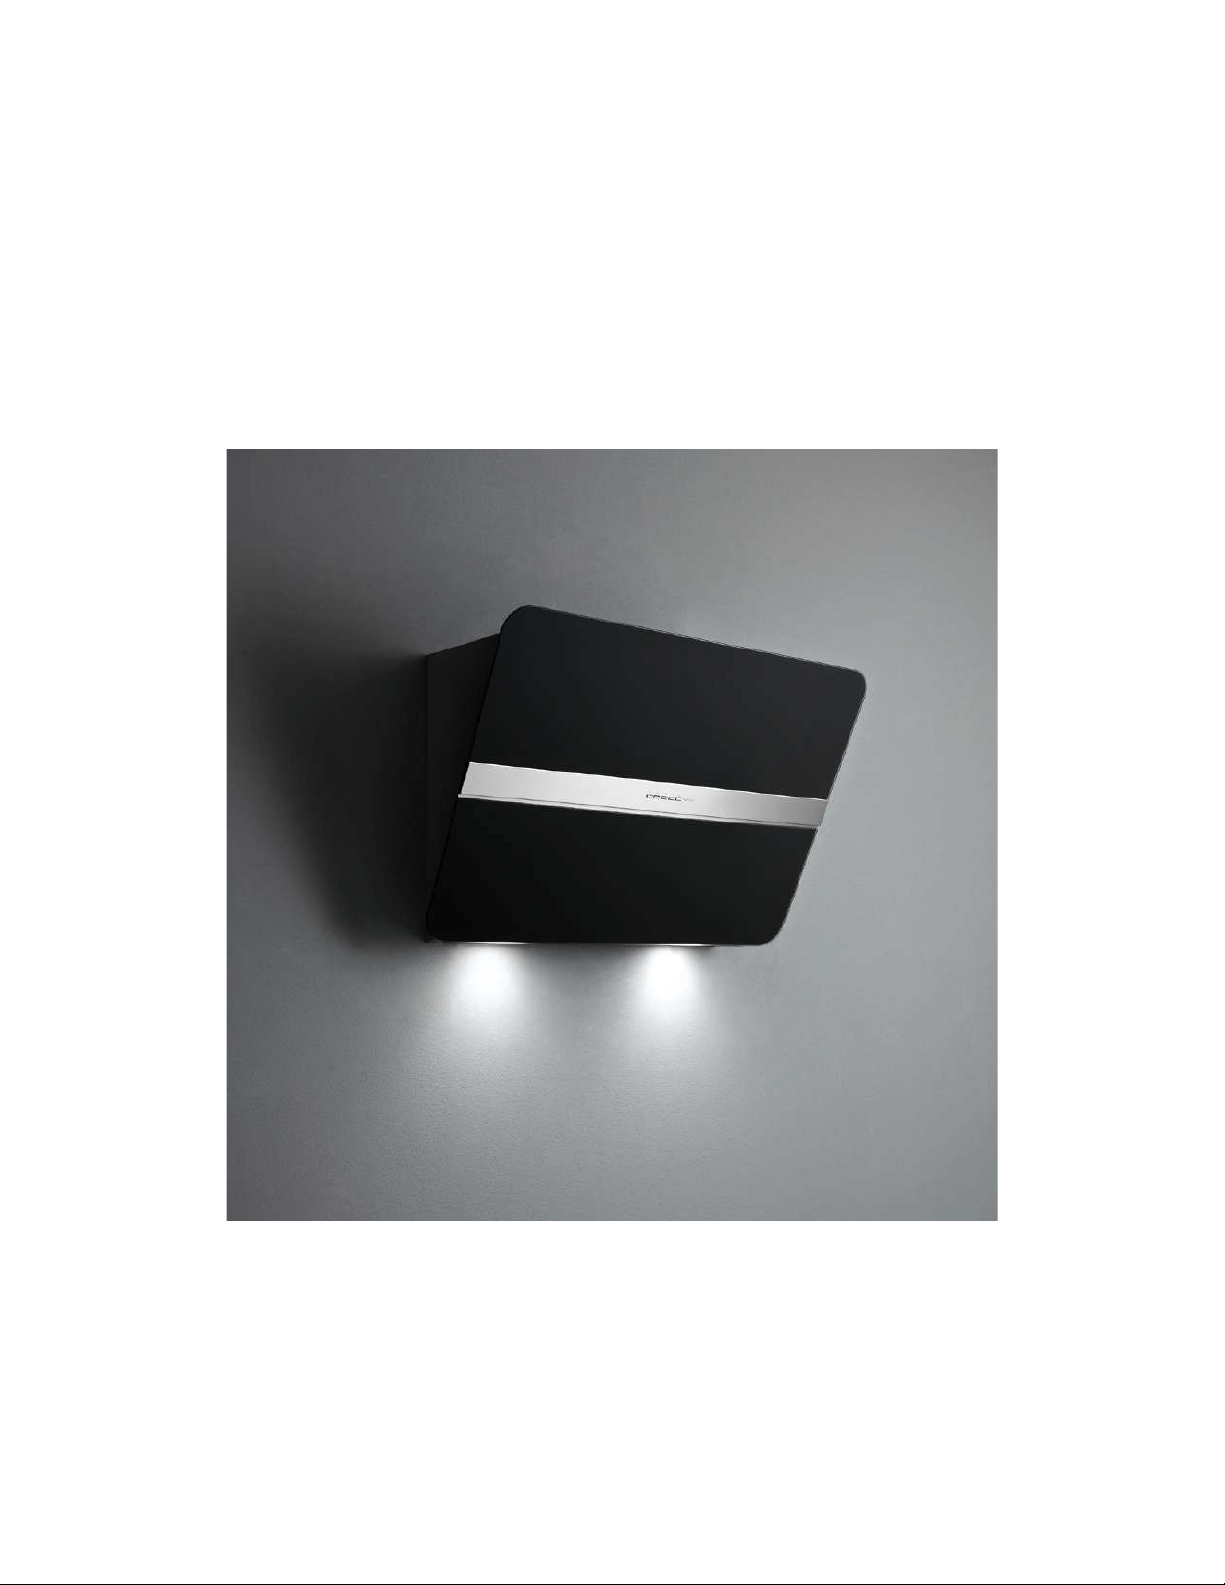
Folio
Designer Range Hood
Installation & User’s Manual
<O
'
'
'
'
'
'
'
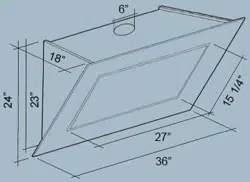
6”
6” diam.
6” diam.
6” diam.
4.13”
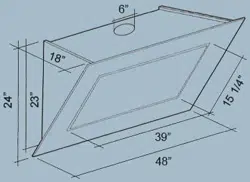
Overall Dimensions
20.7”
4.1”
General Components Location
11.3”
min. 12”
15.79”
13.75”
11.3”
14.3”
0.4”
20”
33.5”
4.2”
16”
27.6”
Weight: 55 lbs. (25 kg)
Must be attached to
load-bearing component
(joist/frame/plywood),
NOT to bare sheetrock.
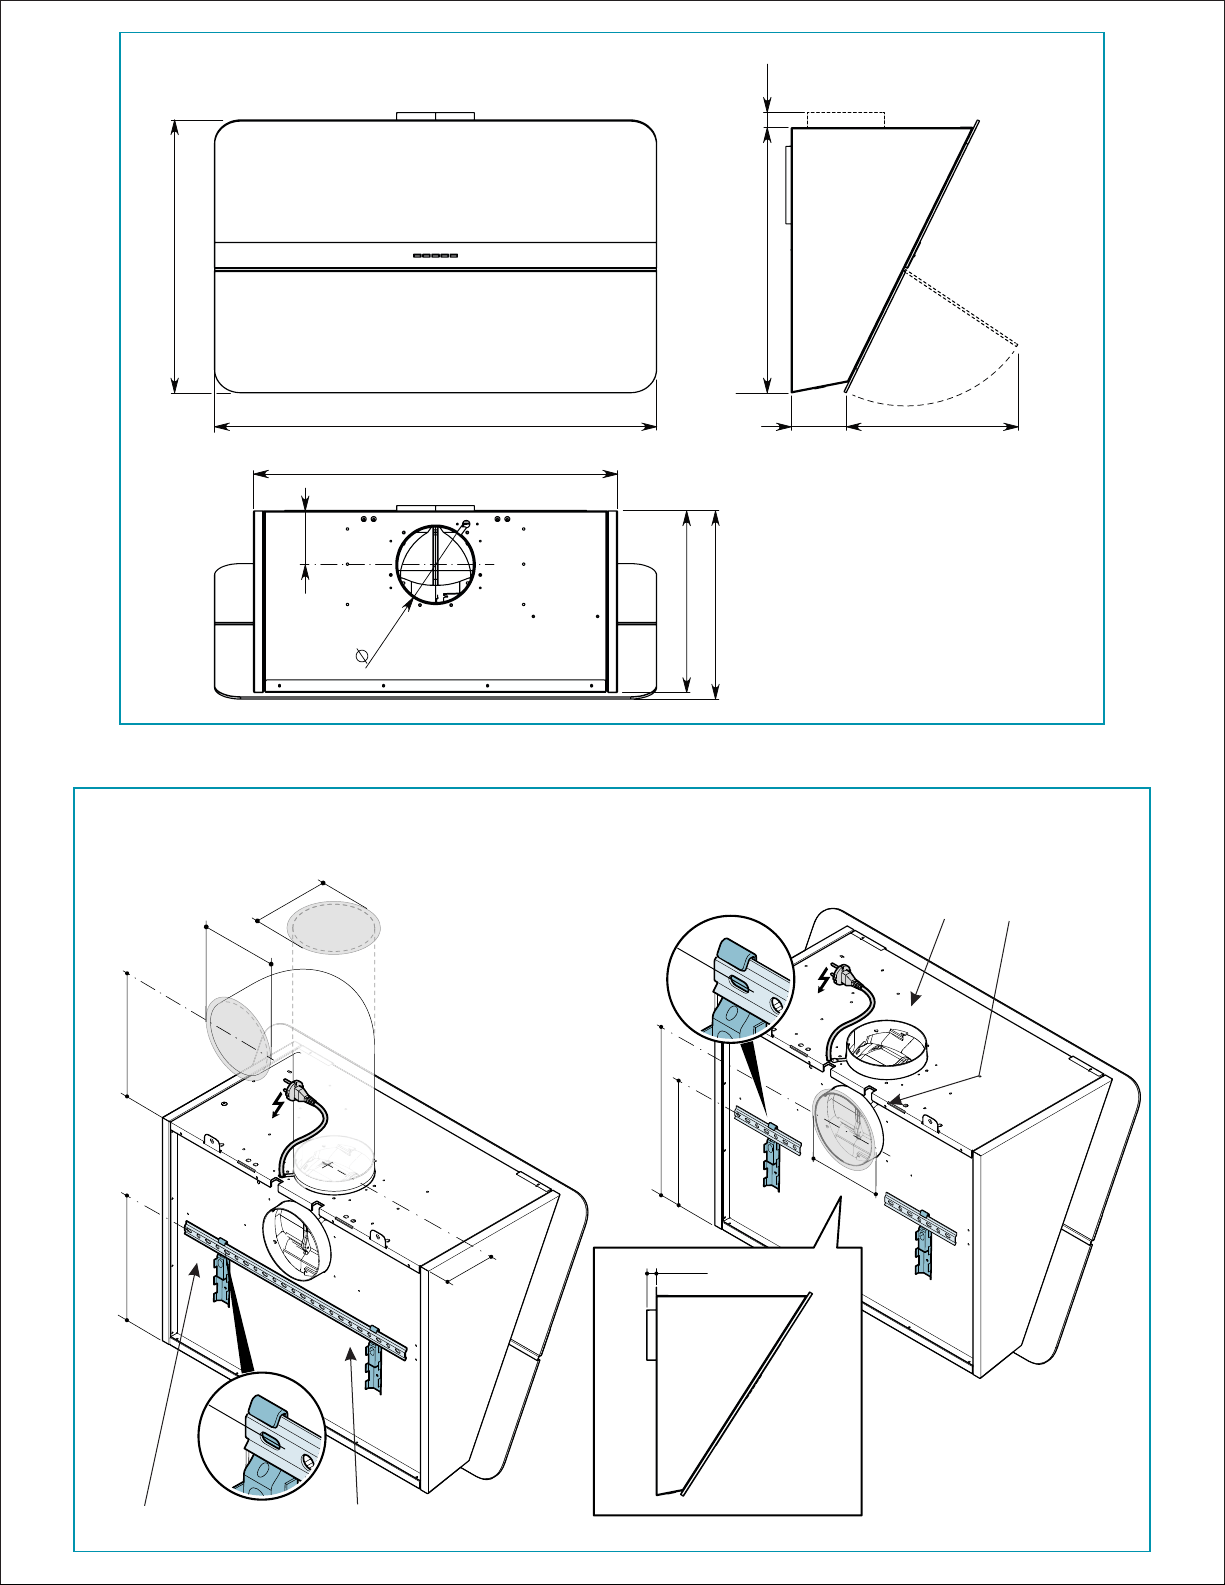
Duct Output Collar
Locations:
Top or Rear
0.4”
Mounting Bracket & Hooks
Ducted installation - vertical blower output
18”
11.3”
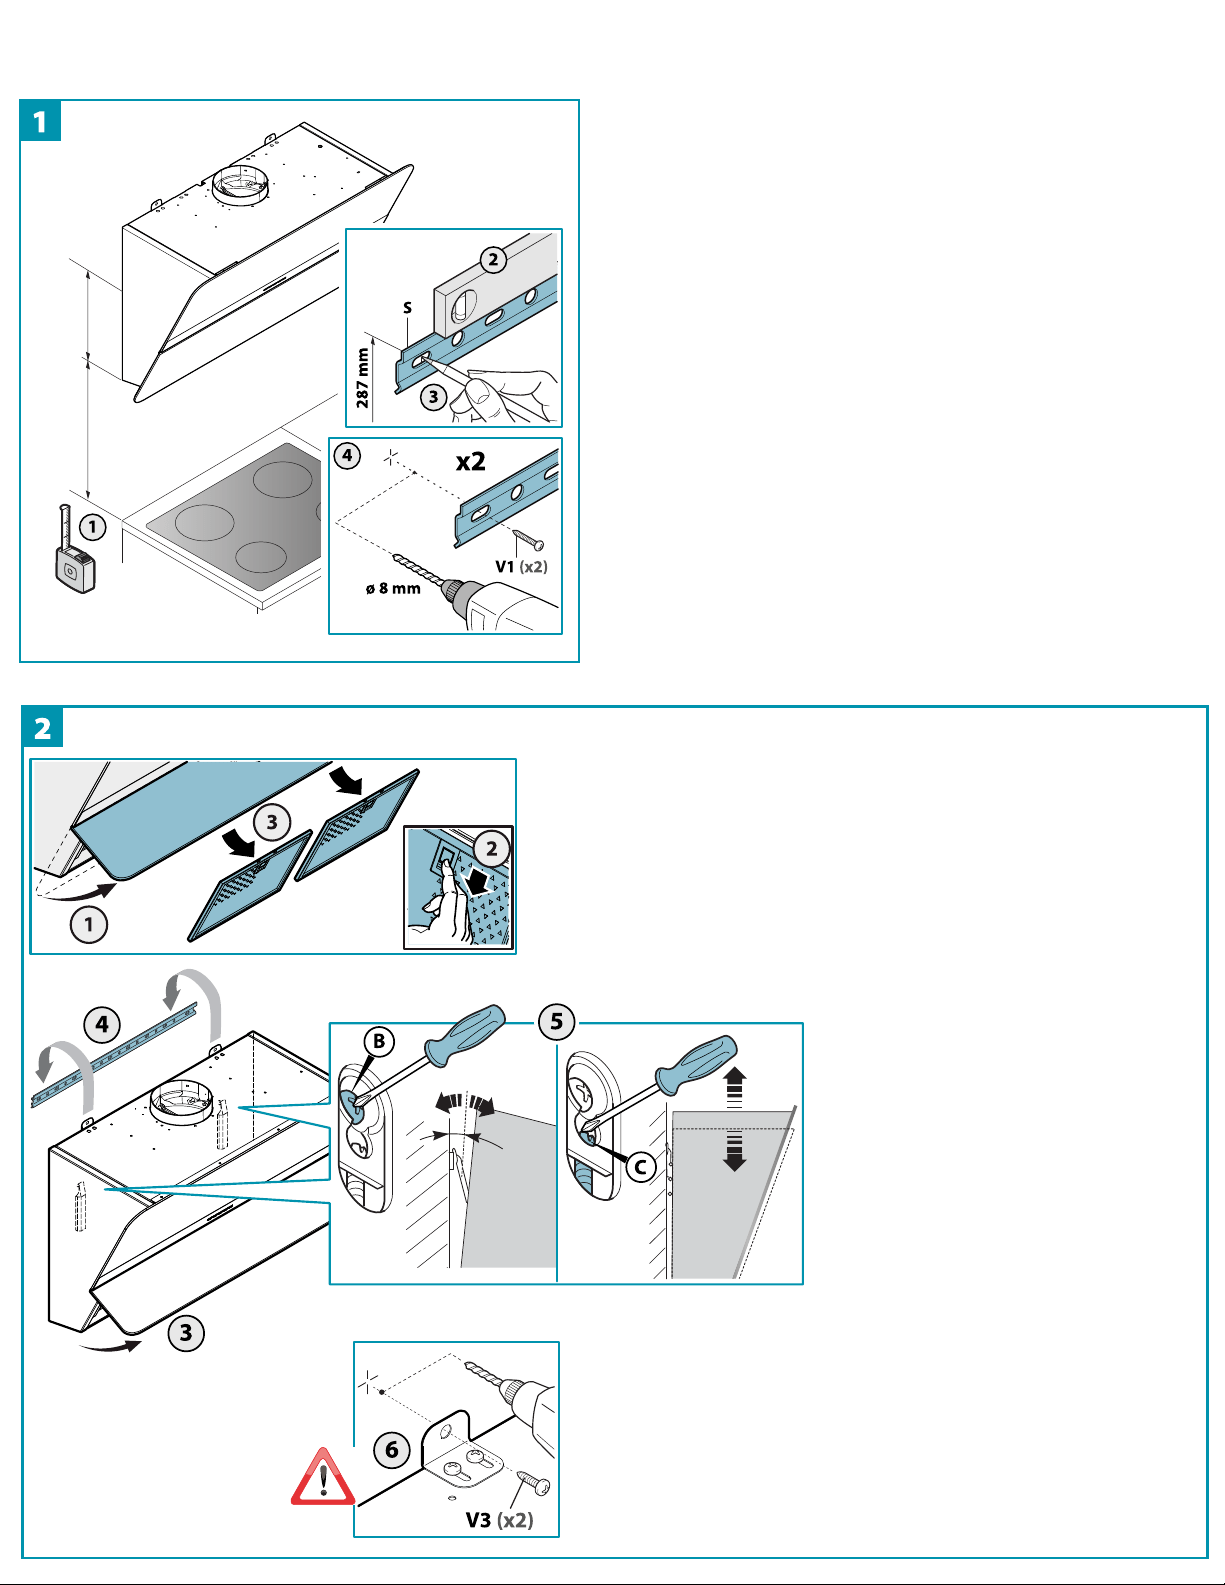
Mounting, Part I:
It is recommended for the center of the range hood
to be approximately 26” - 28” above the cooktop,
for best capture performance.
1.) Measure 16”-18” from the cooktop to the bottom
of the hood.
2.) Remove the mounting bracket from the hood, position
it on the wall, and ensure it’s level.
3.) Mark the location of the mounting screws. Note that
these LOAD-BEARING screws should be connected to
a stud, framework, or 3/4” plywood - NOT to bare sheetrock.
4.) Attach the bracket to the wall.
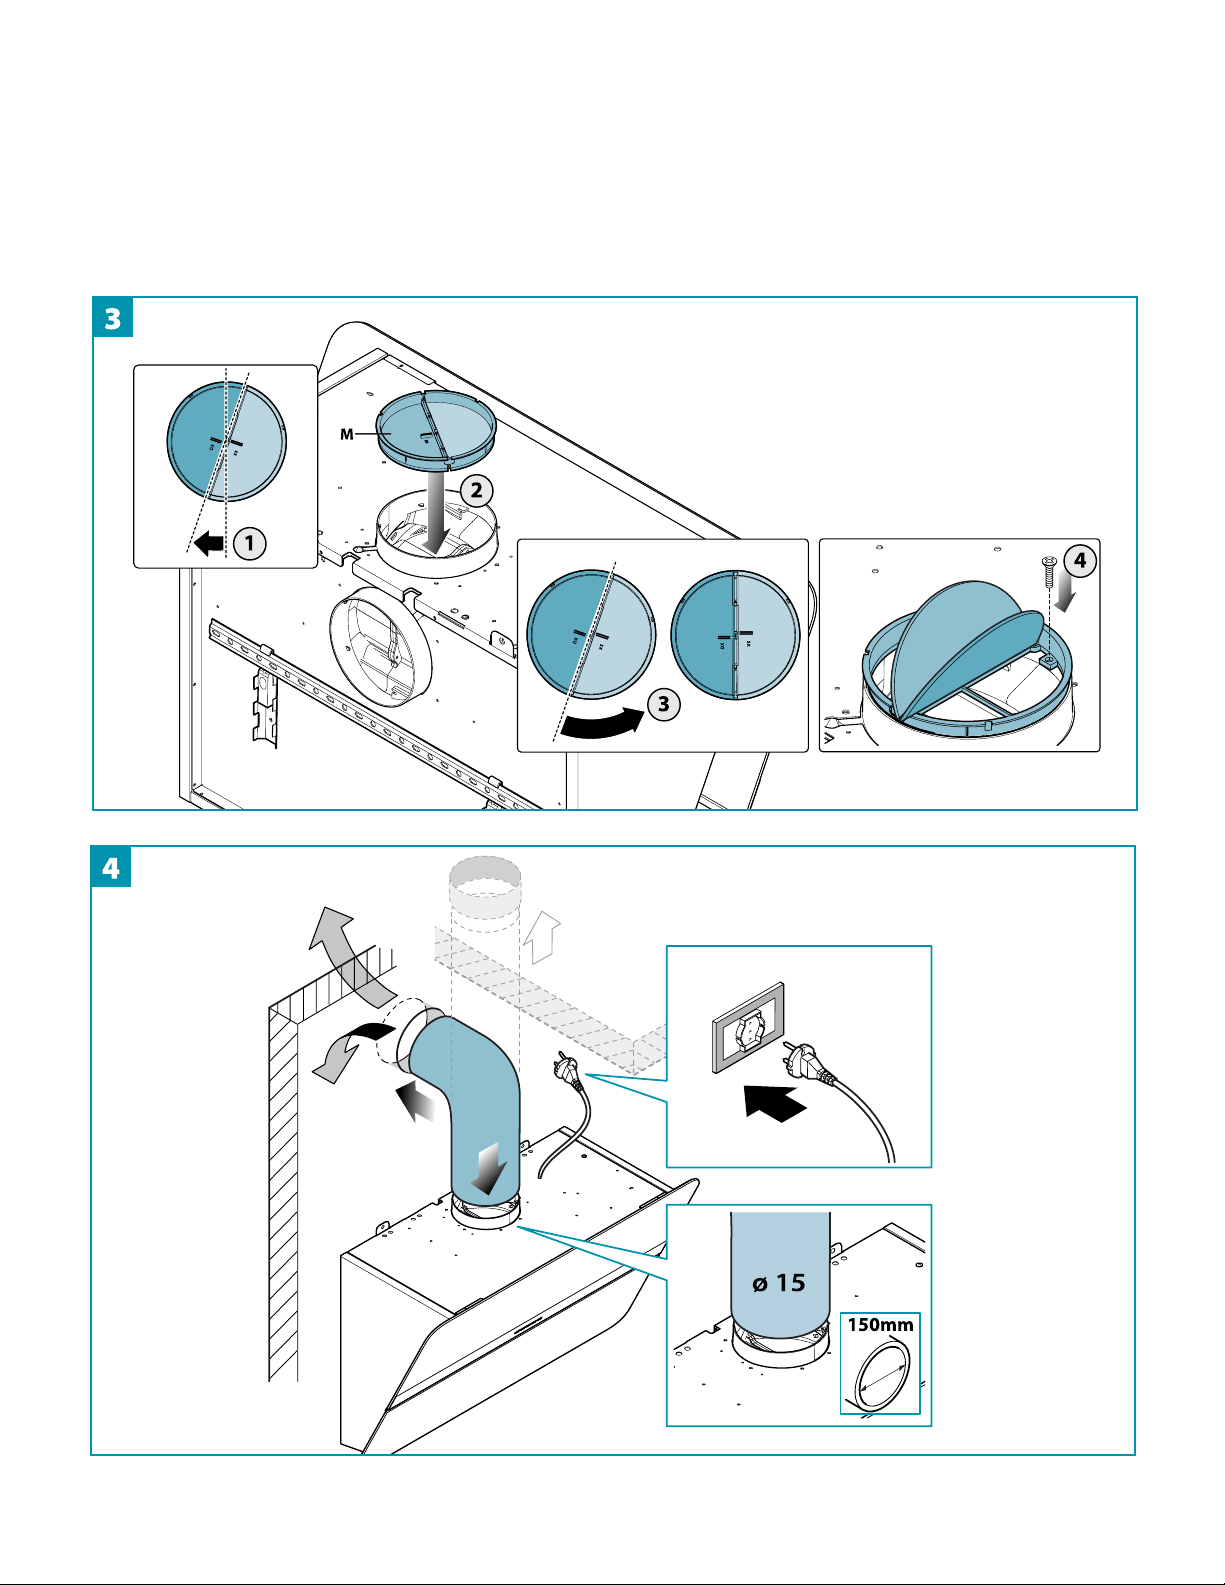
Mounting, Part II:
1-3.) Open the bottom panel, if installed, and remove the
metal lters, if present. Locate 2 the security L-brackets on top,
unscrew & remove them.
4.) Hang the range hood on the mounting bracket, making sure
to engage BOTH mounting hooks.
5.) If adjustment is necessary, each mounting hook has 2
adjustment screws - the upper screw (B) controls distance from
wall, the lower screw (C) controls vertical adjustment.
6.) Find the 2 security L-brackets that were removed
during Step 1-3, install them on top of the hood body,
and secure them to the wall.
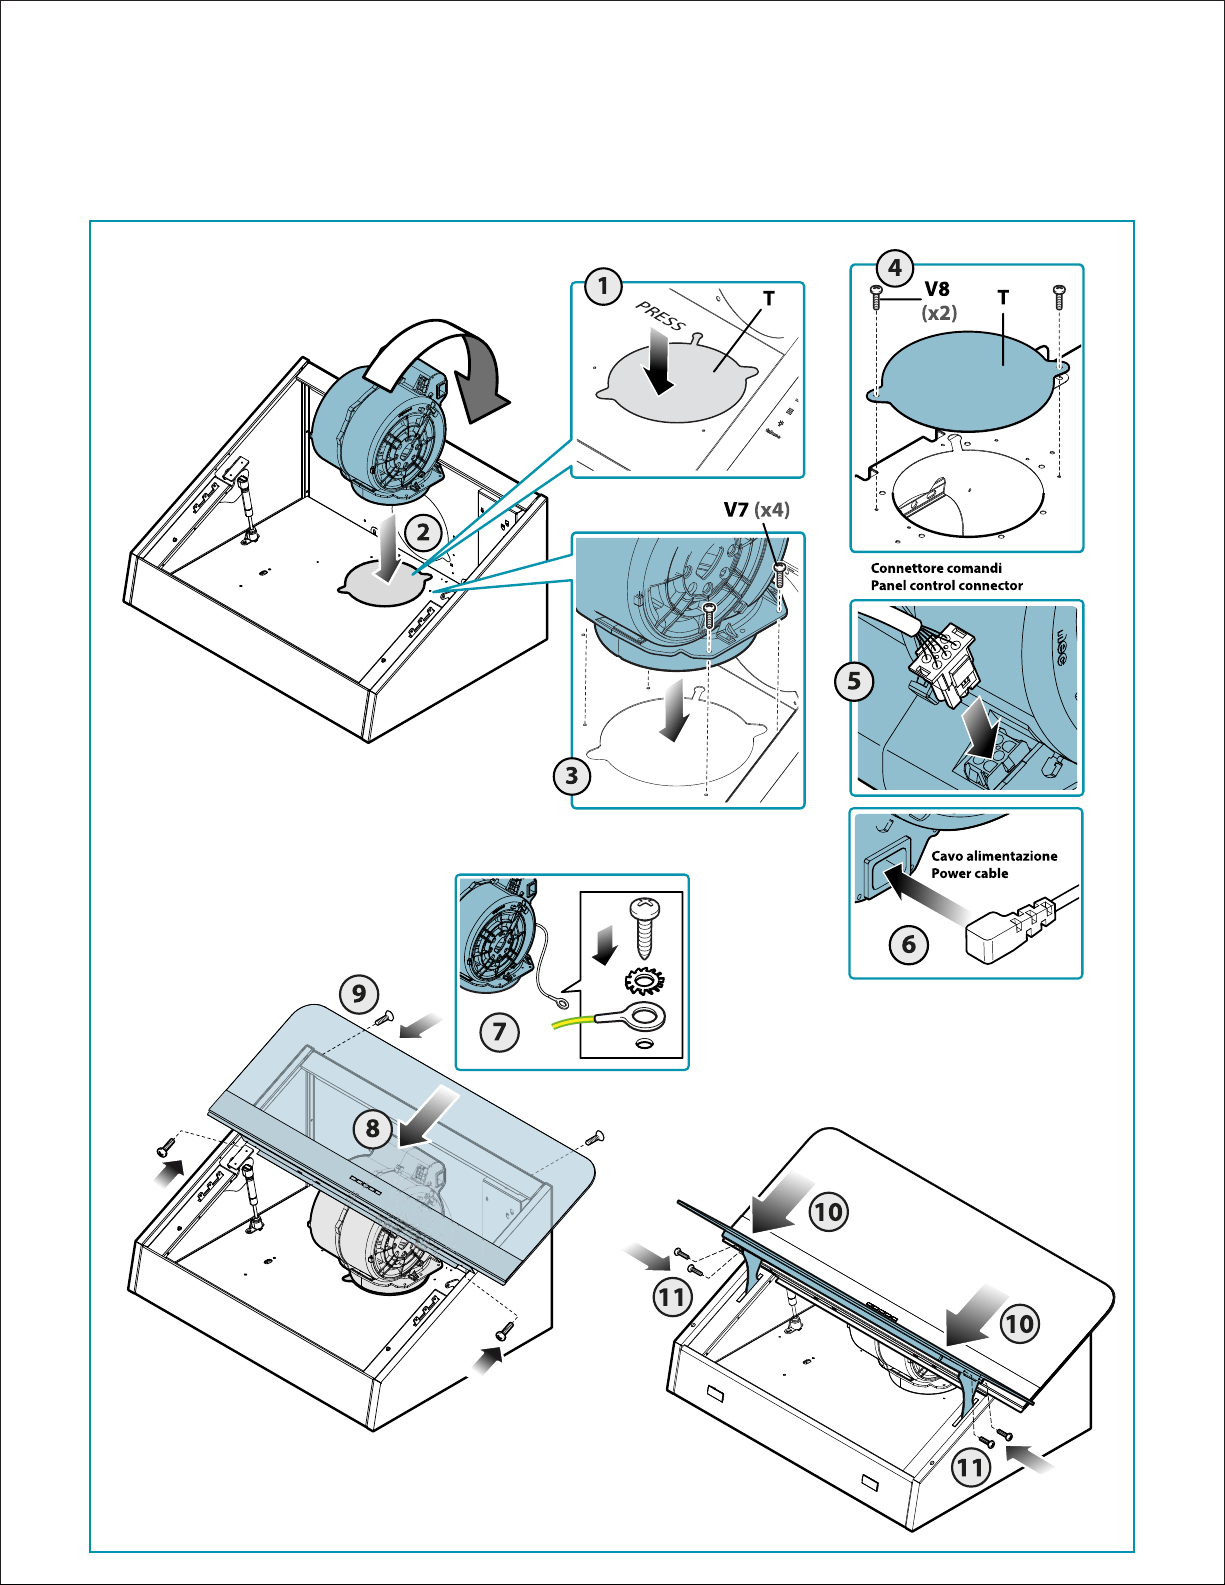
Backdraft Damper Installation
A backdraft damper is supplied with the range hood.
For DUCTED installation, it’s strongly recommended to DISCARD this damper, and use a damper built into the
end-cap (wall or roof cap).
For DUCTLESS installation: insert the damper as shown into the blower output collar, open the blades, and secure
the damper with the provided screw.4.) Attach the bracket to the wall.

V7
(x6) _
\ 0
~
'"
,:
,
®
i
Ducted installation - rear (horizontal) blower output
18”
11.3”
Mounting, Part I:
It is recommended for the center of the range hood
to be approximately 26” - 28” above the cooktop,
for best capture performance.
1.) Measure 16”-18” from the cooktop to the bottom
of the hood.
2.) Remove the mounting bracket from the hood, position
it on the wall, and ensure it’s level.
3.) Mark the location of the mounting screws. Note that
these LOAD-BEARING screws should be connected to
a stud, framework, or 3/4” plywood - NOT to bare sheetrock.
4.) Attach the bracket to the wall.
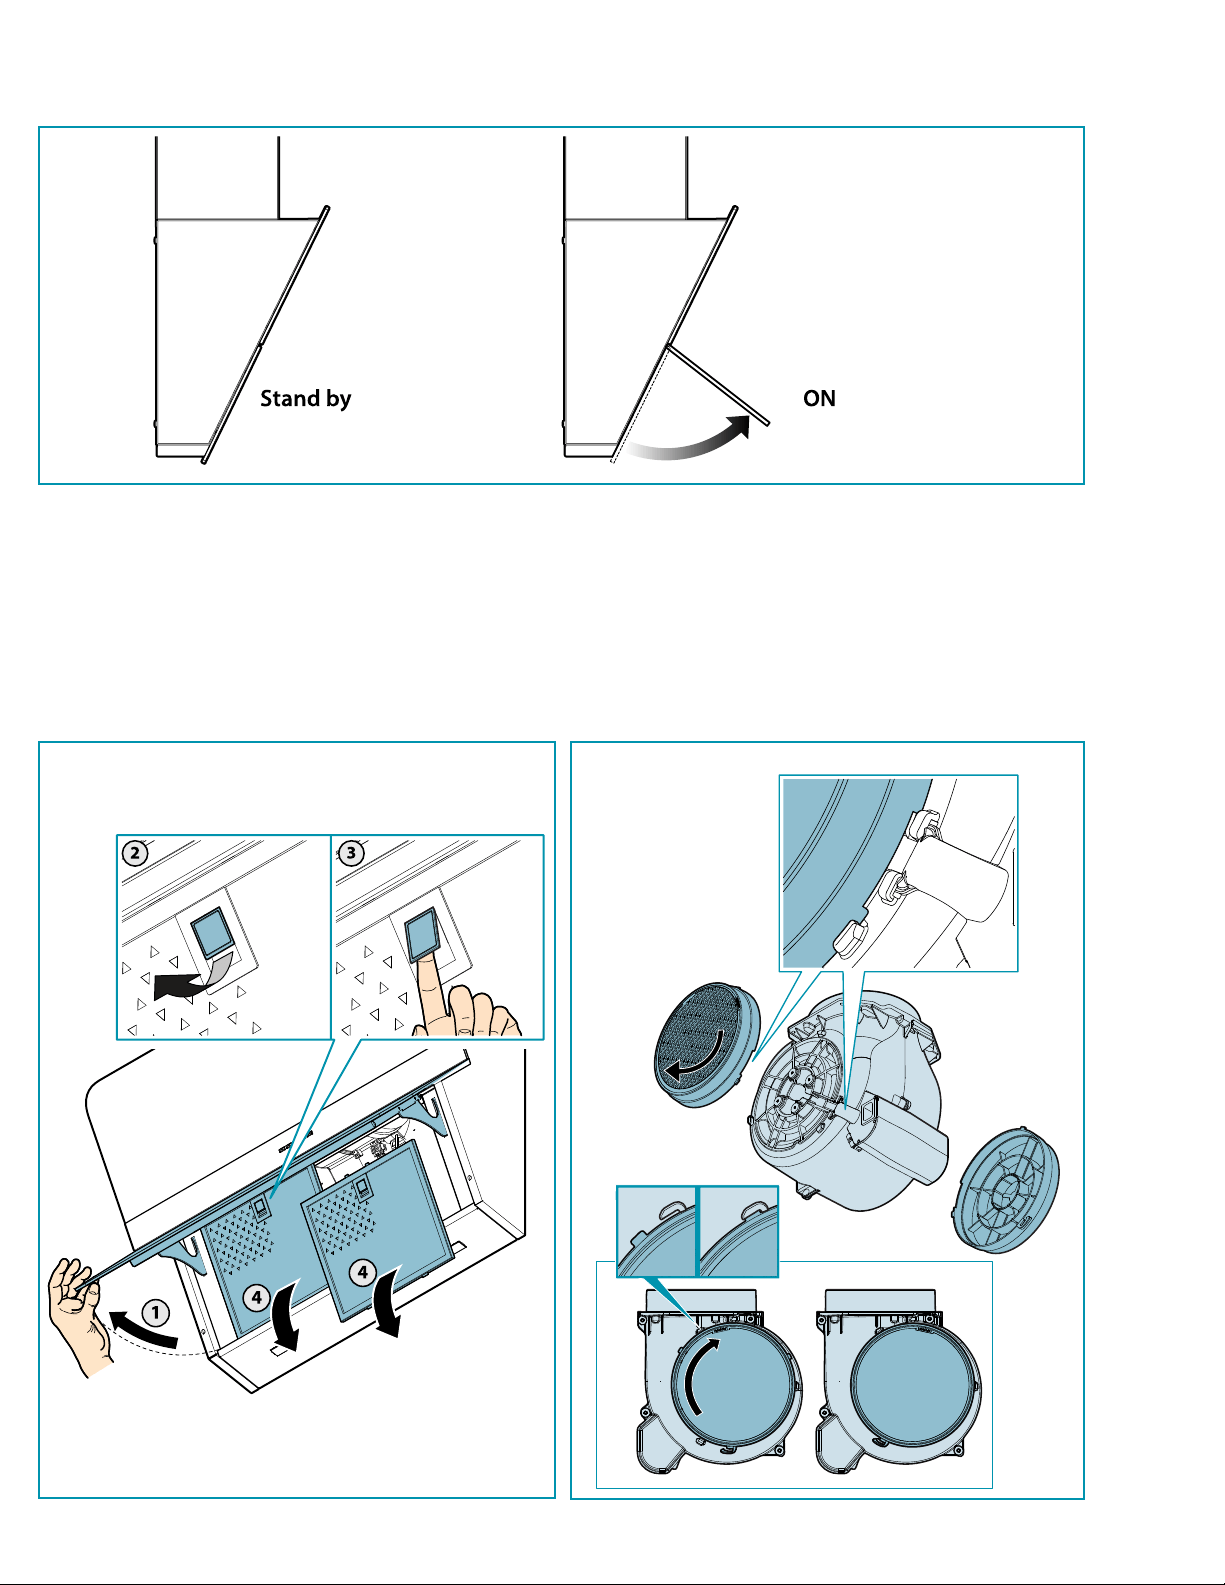
Mounting, Part II: Blower Removal
1-2.) Remove the indicated screws & remove bottom panel.
3-4.) Remove the indicated screws & remove top panel.
5.) Disconnect the control panel cable from blower.
6.) Disconnect the power cable from the blower.
7.) Disconnect the grounding wire from the hood backplate.
8.) Remove the 6 screws holding the blower.
Blower Motor Removal
vs
i (x2) T j
i !/
' "
' ' .
' '
' '
' '
J;
Ducted installation - rear (horizontal) blower output
Blower Motor Repositioning
Remove the blower, remove the knock-out plate (1), and re-install the blower in new direction,
repeating the steps described on the previous page in reverse.
ON
Bottom Panel Operation
Filters Installation
Metal Mesh Filters
Carbon (charcoal) Filters
For ducted AND ductless installation
ONLY for DUCTLESS installation
SAFETY
INSTRUCTIONS
AND
WARNINGS
&
Installation
operations
are
to
be
carried
out
by
skilled
and
qualified in-
stallers
in
accordance
with the
instruct
i
ons
in
this booklet
and
in
compli-
ance
wi
th
the
regulations
in
force.
DO
NOT
use
the
hood
if the
power
supply
cable
or
other
components
are
damaged:
di
sco
nn
ect the
hood
fro
m the electr
ica
l power sup
pl
y a
nd
con
tact the D
ea
ler
or
an
author-
i
se
d
Se
r
vici
ng
Deale
r for
re
pa
ir
s.
Do
not modify the
electrical.
mechanical
or
functional
structure
of the equipment.
Do
not
personally
try to
carry
out
repairs
or
replacements
. Interventions
carried
out
by
incompetent
and
unauthorised
persons
can
cause
serious
damage to the unit or
phys
i
cal
and
personal
harm
, not
covered
by
the Manufacturer's warranty.
WARNINGS
FOR
THE
INSTALLER
TECHNICAL
SAFETY
A.
£ll
Before
installing the
hood,
check
the integrity
and
function of
each
part.
Should
anomalies
be
noted,
do
not
proceed
with installation
and
contact
the Dealer.
Do
NOT
install
the
hood
if
an
aesthetic
(or
cosmetic)
defect
has
been
detected.
Put
it
back
into
its
original
package
and
contact
the dealer.
No
claim
can
be
made
for
aesthetic
(or
cosmetic)
defects
once
it
has
been
installed.
Du
ri
ng
i
nsta
ll
at
i
on,
al
ways
u
se
per
sona
l protective
eq
ui
pment
(e
.
g.:
Safety
sh
oes)
an
d adopt
prudent a
nd
pr
ope
r
co
nduc
t.
The
in
st
al
lation
ki
t
(screws
an
d
pl
u
gs)
su
ppl
ied
wi
th
the hood
is
o
nl
y to
be
u
sed
on m
asonry
wal
l
s:
in
case
of i
ns
ta
ll
ati
on on
wa
l
ls
of a di
ffe
rent m
ate
ri
al,
assess
oth
er
in
st
al
l
at
ion opti
ons
k
ee
pi
ng
in
mi
nd
th
e t
ype
of
wa
ll
surf
ace
and the
we
ight of the hood (indi
ca
ted on
page
2).
K
eep
in
m
in
d th
at
in
stal
lations wi
th
di
ffe
rent
types
of f
asteni
ng
syste
ms
fr
om th
ose
sup-
pl
ied,
or which are not
co
mp
li
an
t,
ca
n
ca
u
se
electri
ca
l
and
m
echanica
l
sea
l
danger.
Do not
in
stal
l t
he
hood
ou
tdoors a
nd
do not
ex
p
ose
it to at
mos
p
he
r
ic
el
eme
nts (r
ain,
wind,
et
c.).
ELECTRICAL
SAFETY
Befo
re in
sta
lli
ng
the h
oo
d, ch
eck
th
at
the el
ec
tri
ca
l ma
in
s power
su
pply
co
rr
espo
n
ds
with
wh
at
is
reported on the identification
pl
ate
located insi
de
the hood.
The
soc
ket u
se
d to
con
nect the
in
stal
led
eq
ui
pm
ent to the elect
ri
ca
l power
sup
pl
y mu
st
be wi
th
in
r
each:
otherwi
se,
in
stal
l a m
ai
ns switch to di
sco
nnect the
hood
when r
equi
r
ed.
Any
cha
n
ges
to the elect
ri
cal
syste
m mu
st
be ca
rri
ed out
by
a
qua
li
fi
ed electr
ic
i
an
.
The
m
ax
imum len
gt
h
of
the fiue
faste
nin
g s
cr
ews
(s
up
pli
ed
by
the
ma
nu
facturer)
mu
st
be
13 mm. U
se
of non-compliant
sc
r
ews
with th
ese
instructi
ons
can
lea
d to da
ng
er
of
an
el
ec
-
tr
ica
l nat
ur
e.
Do not try to
so
l
ve
the problem
yo
ur
se
lf in the
eve
nt
of
eq
uipment malfunction, but
co
ntact
the D
ea
ler or
an
autho
ri
se
d
Se
rvici
ng
D
epa
rt
me
nt
fo
r repair
s.
A.
£ll
When
installing
the
hood,
disconnect
the equipment
by
removing
the
plug
or
switching
off the
main
switch.
FUMES
DISCHARGE
SAFETY
A.
Do
no
connect
the equipment
to
discharge
pipes
of
fumes
produced
from
combustion
(for
example
boilers,
fireplaces,
etc
.).
£ll
Befo
re i
nsta
ll
in
g the hood,
ensure
that
al
l
sta
nd
ar
ds
in
fo
r
ce
r
ega
rd
in
g di
sc
har
ge
of a
ir
ou
t of
th
e
roo
m
have
b
een
co
mpl
ied
with.
USER
WARNINGS
These
warnings
have
been
drawn
up
for
your
personal
safety
and
those
of
others.
You
are therefore kindly
asked
to
read
the booklet carefully
in
its
entirety before
using
the or
cleaning
the equipment.
The
Manufacturer
declines
all
responsibility for
any
damage
caused
directly,
or
in-
directly, to
persons,
things
and
pets
as
a
consequence
of failing to
comply
with the
safety
warnings
indicated
in
this
booklet.
It
is
imperative that
this
instructions
booklet
is
kept together with the equipment for
any
future
consultation.
If the equipment
is
so
ld
or tr
ansfer
r
ed
to another
person,
make
su
re
that the booklet is
also
supp
li
ed
so
thatt
he
new
u
se
r
ca
n
be
m
ade
awa
re of the hood's
ope
ration
and
relative
wa
rn
ings.
Afte
r the
sta
in
le
ss
stee
l h
ood
h
as
b
ee
n i
nsta
ll
ed,
it
wil
l n
ee
d to be
cle
a
ned
to rem
ove
any
r
es
i
dues
remain
in
g
fro
m the protection adh
es
ive
as
we
ll
as
any
g
re
ase
and oil
stai
ns which, if
not rem
ove
d,
ca
n
ca
u
se
ir
r
ev
er
s
ib
le
da
m
age
to the h
ood
s
ur
face
.
To
prop
er
ly
clea
n the
un
it,
the m
an
ufact
ur
er r
eco
mmends us
in
g the sup
pl
ied
moi
st
wipes,
w
hi
ch
ar
e al
so
avai
l
ab
le
so
ld
se
p
arate
l
y.
I
ns
i
st
on
or
ig
in
al sp
are
pa
r
ts
.
INTENDED
USE
The
equipment
is
solely
intended to
be
used
to extract fumes generated
from
cook
-
ing
food
in
non-professional
domestic
kitchens:
any
other
use
is
improper.
Improper
use
can
cause
damage to
persons,
things,
pets
and
exempts
the Manufacturer
from
any
liability.
T
he
equipment
can
be
u
sed
by
ch
il
dren
over
the
age
of
8
an
d
by
pe
r
so
ns wi
th
red
u
ced
p
hysica
l,
senso
ry
an
d m
enta
l
ab
iliti
es,
or
with no
expe
ri
en
ce
or knowledg
e,
as
long as th
ey
do
so
und
er
supervisi
on
or after
havi
ng
rece
i
ved
relat
i
ve
in
st
ru
ctions
rega
rdi
ng
sa
fe
use
of
the
eq
ui
pme
nt and u
ndersta
ndi
ng
of the d
angers
con
nected to i
t.
Children
ar
e not to
pl
ay
with the equi
pm
en
t.
Cl
ean
in
g
an
d m
ai
nten
anc
e by the u
se
r m
ust
not be
ca
rried out
by
chi
ldren without su
pe
rvi
sio
n.
USE
AND
CLEANING
WARNINGS
&
Before
cleaning
or
carrying
out maintenance operations, di
sconnect
the
equipment
by
removing
the
plug
or
switching
off the
main
switch
.
.
Do not u
se
t
he
hood wi
th
wet ha
nd
s
or
ba
re fe
et.
Al
ways
ch
ec
k that a
ll
el
ec
tri
cal
par
ts
(light
s,
ex
tr
ac
tor
fa
n)
ar
e off when the
eq
uipm
en
t is
not
be
ing
used
.
T
he
m
axim
um
overa
ll
we
ight
of
any
o
bj
ec
ts
pl
aced
or hu
ng
(if appl
ica
b
le)
on the hood m
ust
not
exceed
1
.5
Kg.
Al
ways
su
pe
rvi
se
the cooking pr
ocess
duri
ng
the u
se
of d
eep
-fr
ye
rs:
Overheated
o
il
can
catch
fire
.
Do not l
eave
open,
unattended
fia
m
es
un
de
r
th
e
hood.
Do not prepare
food
ove
r an open
fi
ame
under the h
ood
.
N
eve
r
use
the hood without the metal
an
t
i-
gr
ease
fil
te
r
s:
in th
is
case,
gre
a
se
a
nd
dirt w
il
l
dep
os
it in the equipment a
nd
co
mpro
mi
se
i
ts
ope
ration.
Accessi
bl
e
pa
rts of the h
oo
d
can
be
hot when u
se
d
at
the
sa
me time
as
the cooki
ng
ap-
pli
an
ces
.
Do not
car
ry out
any
clea
ni
ng
op
erat
i
ons
when par
ts
of the hood are
st
ill
h
ot.
The
re
ca
n be a r
is
k of fire if
clea
nin
g
is
not
ca
rri
ed out
acco
r
di
ng to t
he
ins
truct
ions
a
nd
products indi
ca
ted in this boo
kl
e
t.
Di
sco
nnect the
ma
in
sw
i
tc
h wh
en
the
equ
ipment is not u
se
d
fo
r l
ong
pe
ri
ods
oft
im
e.
&
If other
appliances
that
use
gas
or
other
fuels
are
being
used
at the
same
time
(boiler,
stove,
fireplaces,
etc.),
make
sure
the
room
where the
fumes
are
discharged
is
well
-ventilated,
in
compliance
with the
local
regulations.
INSTALLATION
only intended for qualified personnel
A.
Before
installing the
hood,
carefully
read
the chapter '
SAFETY
IN-
STRUCTIONS
AND
WARNINGS'.
£ll
TECHNICAL
FEATURES
Th
e tech
ni
ca
l
spec
ifications are
exh
ibi
te
d on the l
abe
ls
locate
d i
nside
the h
oo
d.
POSITIONING
The
minimum
distance
between the highest part of the
cooking
equipment
and
the
lowest
part of the
hood
is
indicated
in
the installation
instructions
.
Genera
ll
y,
when
th
e hood is p
lace
d
ove
r
gas
cooker
s,
the distan
ce
must be
at
l
eas
t
65
cm
(25.
6
")
. However,
accord
i
ng
to an inter
preta
tion of st
an
dard EN
60335
-2-31 dated 11
-07
-
20
02 of
TC61
(sub
-cl
au
se
7.
12
.1
mee
ting
15
a
genda
item
10.
11
),
the minimum dist
ance
bet
ween
the cooker
an
d lower
pa
rt of t
he
ho
od
c
an
be r
educed
to t
he
quota reported
in
th
e installation
in
struction
s.
Sho
u
ld
the i
ns
tructi
ons
fo
r
th
e
gas
cooke
r specify a
gre
at
er
dis
tan
ce,
th
is
mu
st be tak
en
into
cons
id
e
rati
on
.
Do not i
nsta
ll
th
e h
oo
d outdoors and do not
expose
it to outdoor
env
i
ro
nm
en
t
(ra
in
, wind,
etc.).
The electric circuit to which the hood is to be connected
must be:
* In compliance with local electrical standards,
* Properly grounded,
* Dedicated, not shared with other appliances or dimmable lights.
ELECTRICAL
CONNECTION
(only
intended for qualified
personnel)
A
£ll
Disconnect
the equipment
from
electrical
mains
power
supply
before
carry-
ing
out
any
operations
on
the
hood.
Ensure
that the
wires
inside
the
hood
are
not
disconnected
or
cut:
in
the event of
damage,
contact
your
nearest
Servicing
Department.
Refer
to qualified
personnel
for
electrical
connections.
Connection
must
be
carried
out
in
compliance
with the
provisions
of
law
in
force.
Before
connecting the hood to the
elec
tr
ica
l
ma
i
ns
power
supp
l
y,
check
th
a
t:
vo
lta
ge
supply
corresponds
with
wha
t is reported
on
the
data
plate l
oca
t
ed
i
ns
id
e the
hood;
th
e electri
cal
sys
t
em
is
compliant
and
can
with
stand
the
lo
ad
(see
t
he
t
ec
h
nical
speci
fi-
cations
locate
d
in
s
id
e the
hood);
the power
supp
ly plug
and
cab
le do not come into contact with temperatur
es
exceed-
ing 10°c;
the power supply
sys
t
em
is
effecti
vely
and
proper
ly
connected to
earth
in
comp
lian
ce
with r
egu
lat
io
ns
in
force;
th
e
socket
used
to connect the
hood
is with
in
reac
h.
FUMES
DISCHARGE
EXTERNAL
EXHAUST
HOOD
(SUCTION)
In this
version
the
fumes
a
nd
vapours
are discharged outside through
the
exhaust
pipe.
To
this
end,
the hood outlet fitting must
be
con
nected
via
a
pipe,
to
an
ex
t
erna
l output.
HOOD
WITH
INTERNAL
RECIRCULATION
(FILTERING)
In this model, the
ai
r
passes
through the ch
arcoa
l filters to
be
puri
fi
ed
and
r
ecycled
in
the environment.
Ensure
that the active
ca
rb
on
filt
ers
are
assembled
into the h
ood,
if not,
in
sta
ll
them
as
indicated
in
the
assembly
ins
tr
uctions.
A
£ll
In this
version
the
chec
k
valve
must not
be
assemb
l
ed:
remove
it if it
is
on
the
air
outlet fitting of the motor.
ASSEMBLY
INSTRUCTIONS
only intended
for
personnel
qualified
&
The
hood
can
be
installed
in
various
configurations.
The
generic
assembly
steps
apply to
all
installations
; for
each
case
, follow
the
specific
steps
provided
for
the required installation.
OPERATION
WHEN
TO
TURN
ON
THE
HOOD?
Switch
on
the hood
at
le
ast
one
mi
nute
befo
re
sta
rting to cook to direct
fumes
and
vapours
towards the suction
surface
.
After
cook
in
g,
l
eave
the hood operating until complete extract
io
n of all
vapours
and
odours.
By
me
ans
of the
Timer
function, it is
possible
to
set
auto
sw
itch-off function whi
ch
w
il
l a
ll
ow
the hood to turn off automatica
ll
y after 15 minutes
of
operation.
WHICH
SPEED
IS
TO
BE
SELECTED?
1st
speed
:
ma
i
nta
i
ns
the cir
cu
lation of
clean
air
with low electricity consumpti
on.
2nd
speed:
normal
condit
ions
of u
se.
3rd
speed
:
presence
of
st
rong odours
and
vapou
r
s.
4th
speed:
ra
pid
disposa
l of odours
and
vapou
r
s.
WHEN
SHOULD
THE
FILTERS
BE
WASHED
OR
REPLACED?
Th
e
meta
l filters must
be
cl
eaned
every
30
hours
of operation.
The
active
carbon
fil
ters
must
be
replaced
every
3-4 months, depending
on
th
e
use
of the
hood.
For further details
see
the
"MAINTENANCE"
chap
.
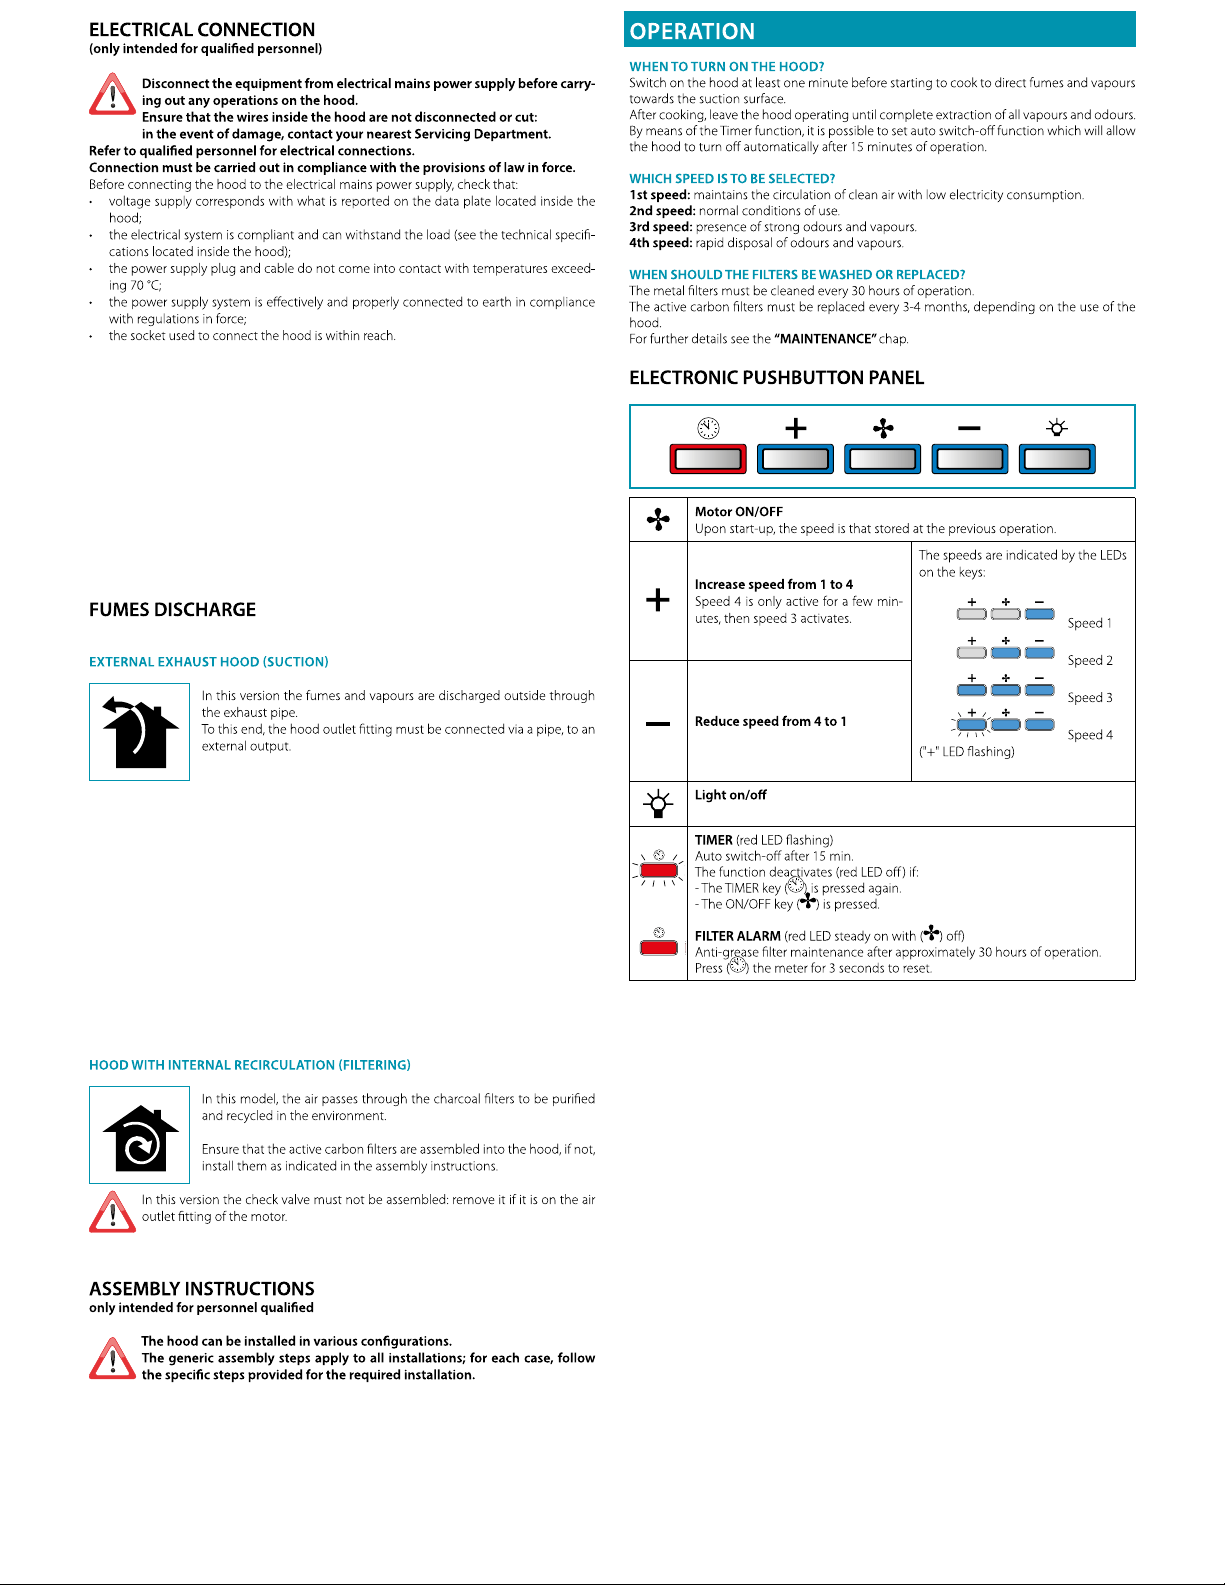
ELECTRONIC
PUSHBUTTON
PANEL
i
❖
+
-
~
\
~
/
=- -
I I \
\'
~
-
~
y
1 1
Motor
ON/OFF
Upon
start
-u
p,
the
speed
is
that
stored
at the pr
evious
operation.
+
1 1 1 1 1 1 i
T
he
spee
ds
are
i
ndica
ted
by
the
LEDs
on
the
keys:
Increase
speed
from
1 to 4
Speed
4 is o
nl
y
active
for a few mi
n-
utes,
then
speed
3
activates.
+ +
-
i=]t=)
-
Speed
1
+ +
-
c=]
--
Speed
2
+ +
-
---
Speed
3
Reduce
speed
from
4 to 1
\ + '
+
-
=--
--
/J
11'
Speed
4
("
+"
LED
flash
i
ng)
Light
on/off
TIMER
(red
LED
fl
ashing)
Auto
sw
itch-off after
15
min.
Th
e function
de~es
(r
ed
LED
off) if:
-
The
TIM
ER
key
~.' is
pressed
again.
-
The
ON/OFF
key
is
pressed.
FILTER
ALARM
(red
LED
steady
on
with (+, off)
Anti-g~se
fi
lter maintenance after approximately
30
hours
of operation.
Press
'··-'
the
me
te
r
fo
r 3
seco
nd
s to
reset.
The duct (air pipe) must have:
* A diameter of 6” throughout its entire run, including the end-cap (roof or wall cap).
* A slight slope downward in horizontal sections - to prevent condensation from
dripping back into the blower motor.
* Minimum number of angles & elbows, to minimize turbulence and loss of suction.
* Minimum required length to avoid vibrations / turbulence, which can affect
the performance of the hood as well as user’s comfort level.
MAINTENANCE
&
Before
cleaning
or
carrying
out maintenance
operations,
disconnect
the
equipment
by
removing
the plug
or
switching
off the
main
switch.
Do
not
use
detergents containing
abrasive,
acidic
or
corrosive
substances
or
abrasive
cloths.
Regu
la
r maintenance guarantees proper operation and performance over time.
Special attention
is
to
be paid
to
the
metal anti-grease
filters
: frequent cleaning
of
the
filters and
the
ir supports ensures
that
no
fiammable grease
is
accumulated.
CLEANING
OF
EXTERNAL
SURFACES
Yo
u
are
advised
to
clean
the
external surfaces
of
the
hoo
d at
least
once
every
15
days
to
preve
nt
oily substances and grease from sticking
to
them.
To
clean
the
brushed stainless
steel hood,
the
Manufacturer recommends using "Magic Steel" wipes.
Alternatively
and
for
all
the other
types
of
surfaces
,
it
can be cleaned using a
damp
cloth,
slightly moistened
with
mild, liquid detergent or denatured alcohol.
&
Complete cleaning by rinsing
we
ll and drying with soft cloths.
Do
not
use
too
much
moisture
or
water
around
the
push
button
control
panel
and
lighting
devices
in
order to prevent humidity
from
reaching
electronic
parts.
The
glass
panels can
only
be cleaned
with
specific, non-corrosive or non-abrasive deter-
gents
usi
ng a soft cloth.
The Manufacturer declines
all
responsibility for failure
to
comply
with
these inst
ru
ct
ions.
CLEANING
OF
INTERNAL
SURFACES
&
Do
not
clean
electrical
parts,
or
parts
related to the motor
inside
the
hood,
with
liquids
or
solvents.
For
the
internal metal parts,
see
the previous paragraph.
METAL
ANTI-GREASE
FILTERS
It
is
advised
to
frequently wash
the
metal filters
(at
least
once
a month)
lea
ving
them
to
soak
in boiling water and cleaning solution for 1 hour, taking care
not
to
bend
the
m.
Do
not
use
corrosive, acid or alkaline detergents.
Rinse
them
well and
wait
for them
to
be completely dry before reassembling them.
Washing in a dishwasher
is
permitted,
ho
wever,
it
may cause
the
filter material
to
darken:
to
reduce
the
poss
ib
il
ity
of
th
is
problem from happening,
use
low
-
tempe
ra
ture washes
(55°(
max.).
To
extract and insert the metal anti-grease filters
see
the assembly ins
truct
ions.
ACTIVE
CARBON
FILTERS
These filters retain the odours in
the
air
that
passes
through them. The purified air
is
recircu-
lated
into
the
environment.
The active carbon filters must be replaced
on
average every 3-4 months under normal con-
ditions
of
use.
See
assembly ins
truct
io
ns
to
replace
the
active carbon filters.
LIGHTING
The range hood
is
equipped with high efficiency,
low
consumption
LED
spotlights wi
th
an
extremely long life-span under normal
us
e conditions.
Should
the
LED
spotlight need
to
be replaced, proceed
as
shown in
the
figure.
0~
12V
DISPOSAL
AFTER
END
OF
USEFUL
LIFE
The crossed-out tra
sh
or refuse bin symbol
on
the
appliance means
that
the
product
is
WEEE,
i.e.
"Waste electrical and electronic equipment", accordingly it
must
not
be
disposed
ofwith regular
unsorted
waste
(i.e.
with "mixed
ho
use
-
hold waste"),
but
it must be disposed
of
separately
so
that
it
can undergo specif-
ic
processing for its
re
-us
e,
or
a specific treatment,
to
remove and safely dispose
of
any
substances
that
may be harmful
to
the
environment and remove the
ra
w materials
that
can
be recycled.
Pr
oper disposal
of
these products contributes
to
saving valuable resources and
avoid potential negative effects on personal health and
the
environment,
which
may be
caused by inappropriate disposal
of
waste.
You
are
kindly asked
to
contact your local authorities for further information regarding
the
designated waste collection poin
ts
nearest
to
you.
Pena
lt
ies
for
imp
ro
per disposal
of
such
waste can be applied in compliance with national regulatio
ns.
-
INFORMATION
ON
DISPOSAL
IN
EUROPEAN
UNION
COUNTRIES
The
EU
WEEE
Directive was implemented differently in each country, accordingly,
if
you wish
to
dispose
of
this appliance
we
suggest contacting your local authorities
or
dealer
to
find
out
what
the
correct
method
of
disposal
is
.
INFORMATION
ON
DISPOSAL
IN
NON-EUROPEAN
UNION
COUNTRIES
The crossed
-out
trash
or
refuse bin symbol is only valid in
the
European Union: if you wish
to
dispose
of
th
is
appliance in other countries, we suggest contacting your local authorities
or dealer
to
find
out
what
the
correct
method
of
disposal
is.
&
WARNING!
The Manufacturer reserves
the
right
to
make changes
to
the
equipment
at
any
time
and
without
prior notice.
Pr
inting, translation and reproduction, even part
ia
l,
of
this manual are
bound
by the Manufacturer's authorisation.
Technical information, graphic representations and specifications in this manual
are
for in-
formation purposes and cannot be divulged.
Th
is
manual
is
written in Itali
an.
The Manufacturer
is
not
responsible for any transcription
or translation errors.