Safety ° Assembly ° Operation ° Maintenance °Troubleshooting ° Parts Lists °Warranty
O P RA-rO R'S MANUAL
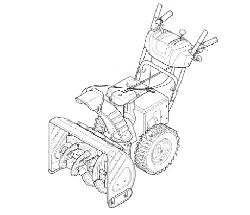
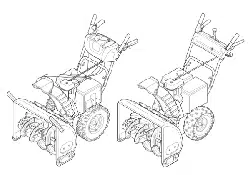
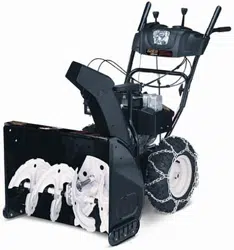
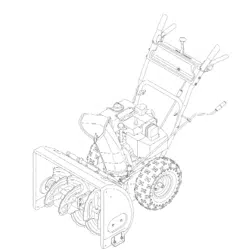
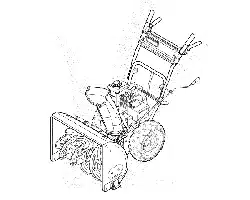
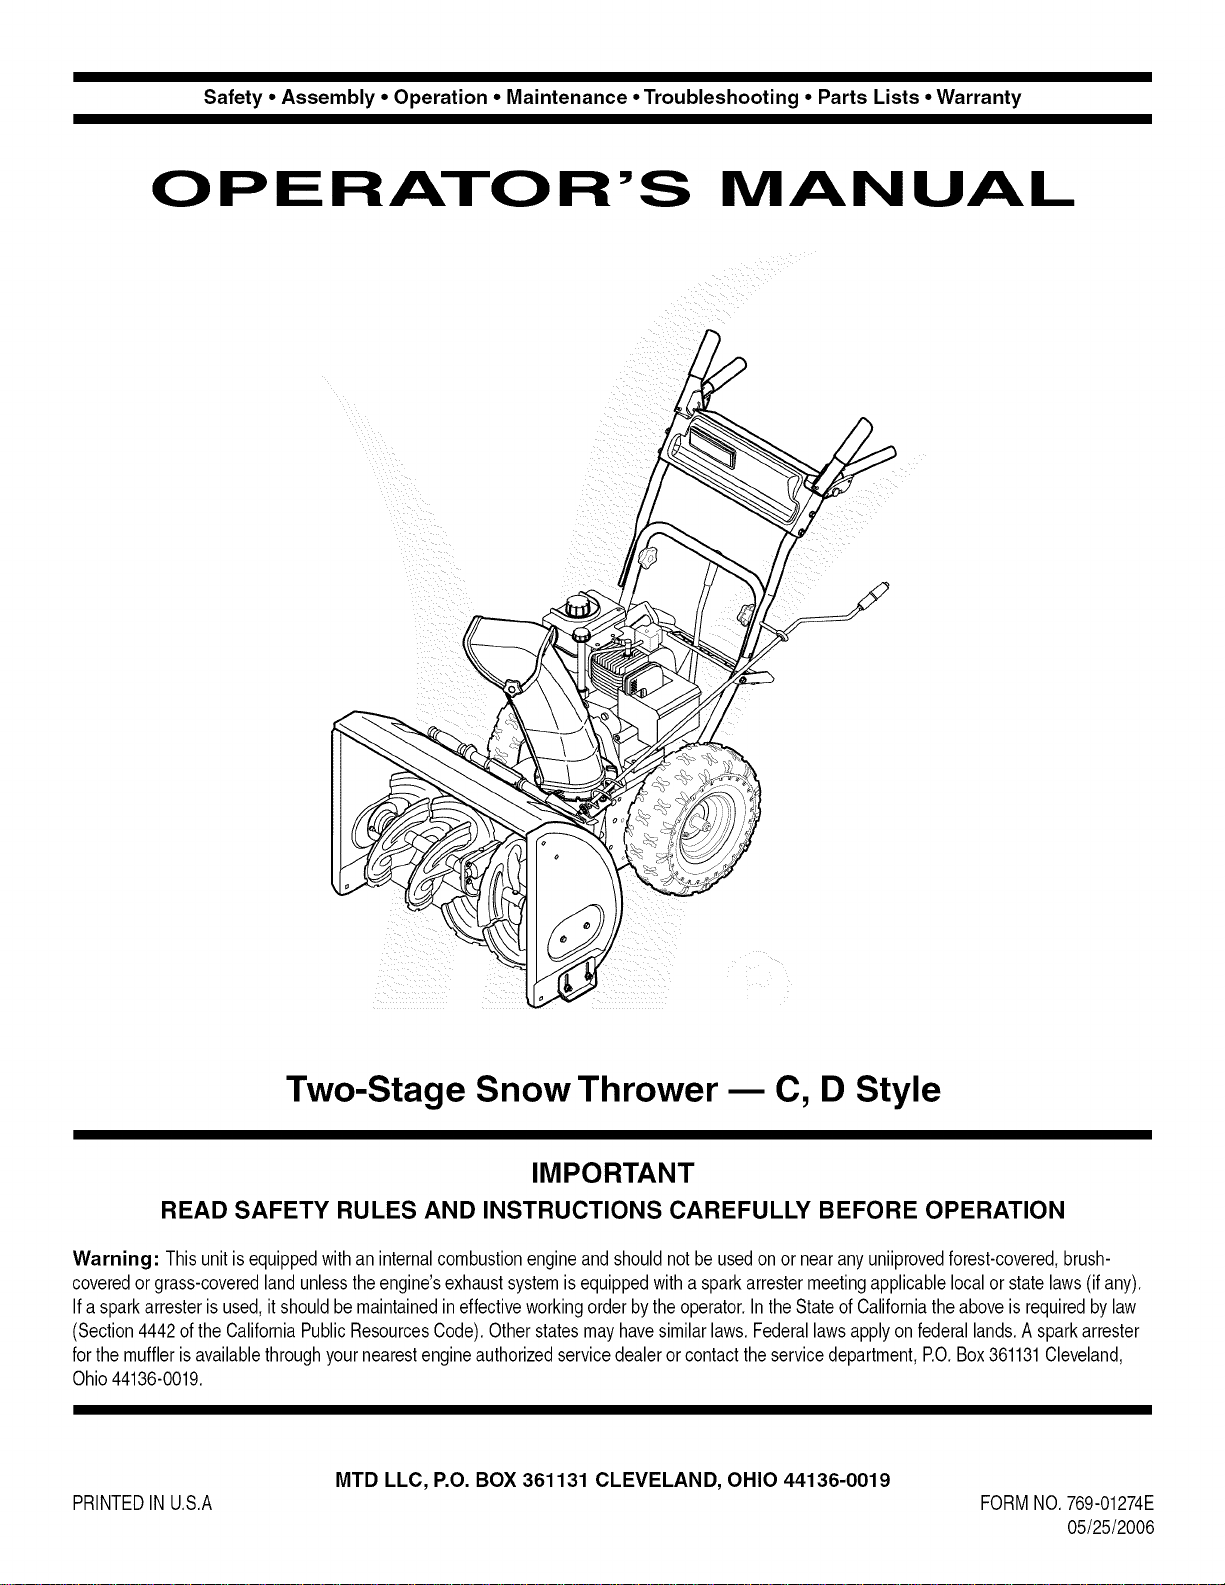
Two-Stage Snow Thrower m C, D Style
IMPORTANT
READ SAFETY RULES AND INSTRUCTIONS CAREFULLY BEFORE OPERATION
Warning: Thisunitisequippedwithan internalcombustionengineandshouldnotbeusedon or nearanyuniiprovedforest-covered,brush-
coveredor grass-coveredlandunlesstheengine'sexhaustsystemisequippedwithasparkattestermeetingapplicablelocalor statelaws(if any),
If a sparkarresterisused,it shouldbemaintainedineffectiveworkingorderbytheoperator,IntheStateofCaliforniatheaboveisrequiredbylaw
(Section4442oftheCaliforniaPublicResourcesCode),Otherstatesmayhavesimilarlaws,Federallawsapplyonfederallands,A sparkattester
forthemufflerisavailablethroughyournearestengineauthorizedservicedealerorcontacttheservicedepartment,P.O,Box361131Cleveland,
Ohio44136-0019,
PRINTEDIN U,S,A
MTD LLC, P.O. BOX 361131 CLEVELAND, OHIO 44136-0019
FORMNO,769-01274E
05/25/2006
This Operator's Manual is an important part of your new snow thrower. It will help you assemble,
prepare and maintain the unit for best performance. Please read and understand what it says.
Table of Contents
Safety Labels ...................................................... 3
Safe Operation Practices ................................... 4
Setting Up Your Snow Thrower .......................... 6
Operating Your Snow Thrower ........................... 8
MakingAdjustments ......................................... 12
Maintaining Your Snow Thrower ...................... 14
Off-Season Storage .......................................... 18
Trouble- Shooting ............................................. 19
Parts List ........................................................... 20
Warranty ............................................. Back Cover
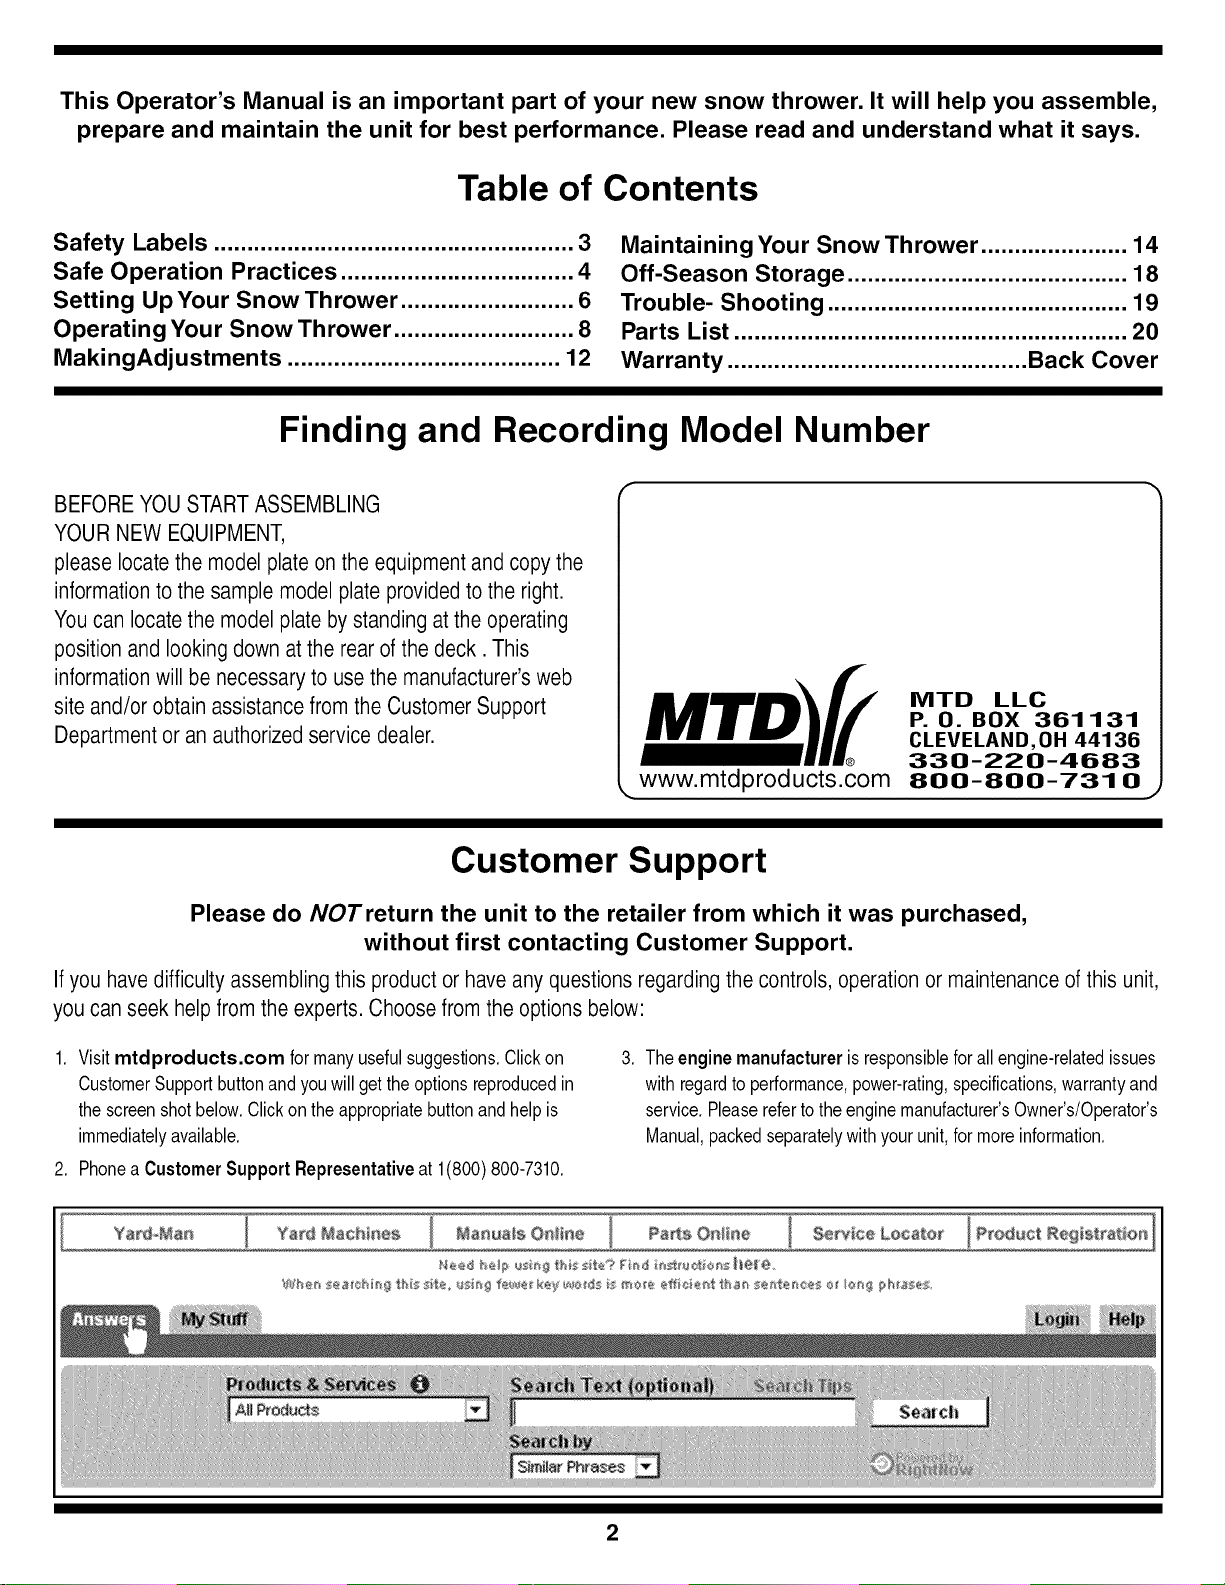
Finding and Recording Model Number
BEFOREYOU STARTASSEMBLING
YOURNEW EQUIPMENT,
please locatethe modelplate onthe equipmentand copythe
informationtothe samplemodel plate providedto the right.
Youcan locatethe modelplate by standingat theoperating
position andlookingdown atthe rear ofthe deck. This
informationwill be necessaryto usethemanufacturer'sweb
site and/or obtain assistancefrom the CustomerSupport
Departmentoran authorizedservice dealer.
,,www.mtdproducts.com
IVITD LLC
P. O. BOX 361131
CLEVELAND,OH 44136
330-220-4683
800-800-731 0
Customer Support
Please do NOTreturn the unit to the retailer from which it was purchased,
without first contacting Customer Support.
Ifyou have difficultyassemblingthis productorhave anyquestions regardingthe controls, operationor maintenanceofthis unit,
you canseek help from the experts.Choosefromthe options below:
1. Visitmtdproducts.com formanyusefulsuggestions.Clickon
CustomerSupportbuttonandyouwillgettheoptionsreproducedin
thescreenshotbelow.Clickontheappropriatebuttonandhelpis
immediatelyavailable.
2. Phonea Customer Support Representativeat 1(800)800-7310.
,
Theenginemanufactureris responsibleforallengine-relatedissues
with regardto performance,power-rating,specifications,warrantyand
service.Pleaserefertotheenginemanufacturer'sOwner's/Operator's
Manual,packedseparatelywithyourunit,formoreinformation.
2
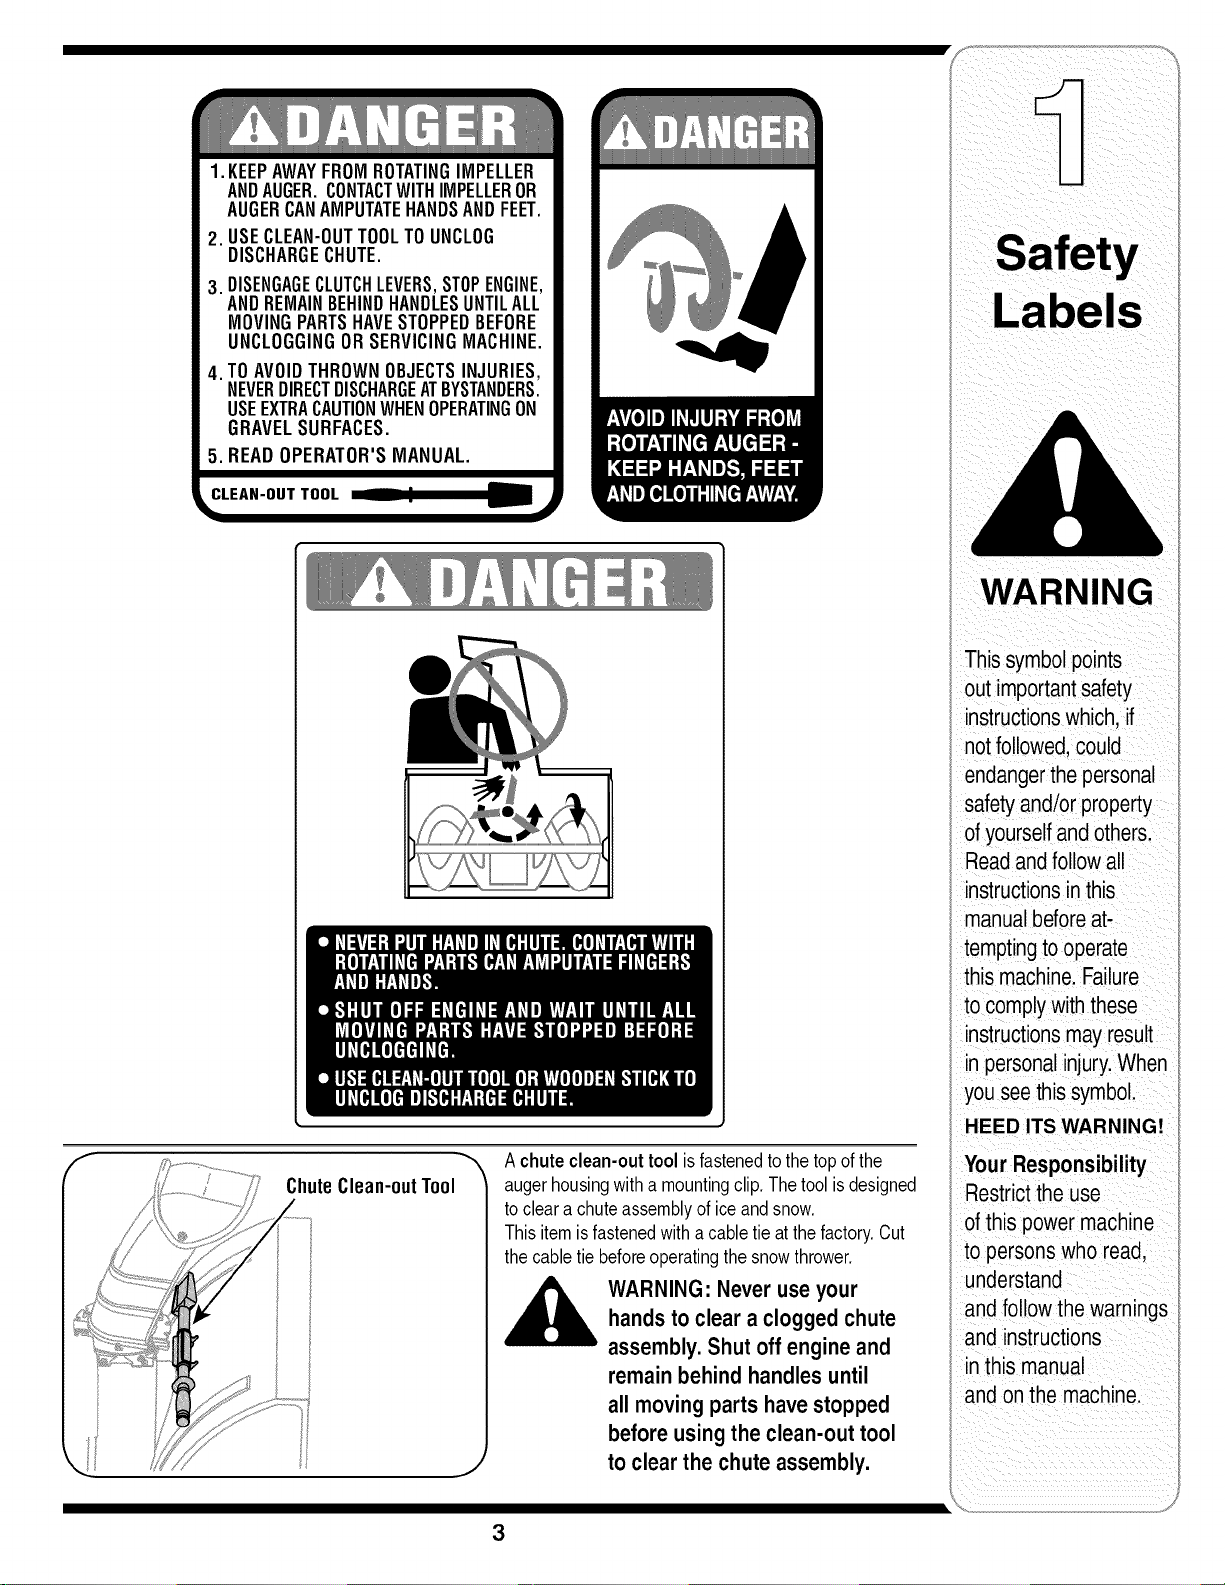
1.KEEPAWAYFROMROTATINGIMPELLER
ANDAUGER.CONTACTWITHIMPELLEROR
AUGERCANAMPUTATEHANDSANDFEET.
.
3.
.
USECLEAN-OUTTOOLTOUNCLOG
DISCHARGECHUTE.
DISENGAGECLUTCHLEVERS,STOPENGINE,
ANDREMAINBEHINDHANDLESUNTILALL
MOVINGPARTSHAVESTOPPEDBEFORE
UNCLOGGINGORSERVICINGMACHINE.
TOAVOIDTHROWNOBJECTSINJURIES,
NEVERDIRECTDISCHARGEATBYSTANDERS.
USEEXTRACAUTIONWHENOPERATINGON
GRAVELSURFACES.
5. READOPERATOR'SMANUAL.
_CLEAN-OUT TOOL I1_,
ChuteClean-outTool
J
Achuteclean-outtool isfastenedtothetopofthe
augerhousingwitha mountingclip. Thetoolisdesigned
tocleara chuteassemblyoficeandsnow,
Thisitemisfastenedwitha cabletieatthefactory.Cut
thecabletiebeforeoperatingthesnowthrower,
WARNING: Never use your
hands to clear a clogged chute
assembly. Shut off engine and
remain behind handles until
all moving parts have stopped
before using the clean-out tool
to clear the chute assembly.
WARNING
Thissymbolpoints
out importantsafety
instructionswhich,if
notfollowed,could
endangerthepersonal
safetyand/or property
of yourselfandothers.
Readand followall
instructionsinthis
manualbeforeat-
temptingto operate
this machine.Failure
to complywith these
instructionsmayresult
in personalinjury.When
youseethissymbol.
HEED ITS WARNING!
Your Responsibility
Restrictthe use
of this power machine
to personswho read,
understand
and follow thewarnings
and instructions
inthis manual
and onthe machine.
3
WARNING
Thissymbolpoints
outimportantsafety
instructionswhich,if
notfollowed,could
endangerthe personal
i safetyand/or property
i ofyourselfand others.
Readandfollowall
instructionsinthis
manualbeforeat-
temptingto operate
this machine.Failure
to complywiththese
i instructionsmay result
i inpersonalinjury.When
youseethis symbol.
i HEED ITS WARNING!
Your Responsibility
Restrictthe use
ofthis powermachine
to personswho read,
understand
andfollowthe warnings
and instructions
i inthis manual
and onthe machine.
WARNING: EngineExhaust,some of itsconstituents,andcertain vehiclecompo-
nentscontain or emit chemicals knownto Stateof Californiato cause cancer and
birth defectsor other reproductiveharm.
DANGER: This machinewas builtto beoperatedaccordingto the rulesfor safe operation in this
manual.As with anytypeof powerequipment,carelessnessor erroronthe part ofthe operatorcan
result inseriousinjury.This machine iscapableof amputatinghands andfeet andthrowing objects.
Failureto observethe followingsafety instructionscould resultinserious injury or death.
Training
1. Read,understand,andfollowall instructionsonthe 1.
machineandin themanual(s)beforeattemptingto
assembleand operate.Keepthismanualina safe placefor
futureandregularreferenceandfor orderingreplacement
parts. 2.
2. Befamiliarwithall controlsandtheirproperoperation.
Knowhowto stopthe machineanddisengagethemquickly.
3. Neverallowchildrenunder14yearsoldto operatethis
machine.Children14yearsoldandovershouldreadand
understandtheoperationinstructionsandsafetyrulesin 3.
thismanualandshouldbetrainedandsupervisedbya
parent.
4. Neverallowadultsto operatethis machinewithoutproper
instruction.
5. Thrownobjectscancauseseriouspersonalinjury.Plan 4.
yoursnow-throwingpatternto avoiddischargeof material
towardroads,bystanders,andthe like.
5.
6. Keepbystanders,helpers,pets,andchildrenatleast75
feetfromthe machinewhileit isin operation.Stopmachine
ifanyoneentersthearea. 6.
7. Exercisecautiontoavoidslippingor falling,especially 7.
whenoperatingin reverse.
8,
9.
Preparation
Thoroughlyinspectthe areawherethe equipmentisto be
used.Removealldoormats,newspapers,sleds,boards,
wires,and otherforeignobjects,whichcould betrippedover
orthrownbythe auger/impeller.
Alwayswearsafetyglassesor eyeshieldsduringoperation
andwhile performinganadjustmentorrepairto protectyour
eyes.Thrownobjectswhich ricochetcancause serious
injurytothe eyes.
Do notoperatewithoutwearingadequatewinterouter
garments.Do notwearjewelry,longscarves,orother
looseclothingwhichcouldbecomeentangledin moving
parts.Wearfootwearwhich willimprovefootingonslippery
surfaces.
Useagroundedthree-wireextensioncordand receptacle
forall unitswithelectric startengines.
Adjustcollectorhousingheighttocleargravelorcrushed
rocksurfaces.
Disengageallcontrolleversbeforestartingthe engine.
Neverattemptto makeanyadjustmentswhileengineis
running,exceptwherespecificallyrecommendedinthe
operator'smanual.
Letengineandmachineadjusttooutdoortemperature
beforestartingtoclearsnow.
Toavoidpersonalinjuryor propertydamageuseextreme
careinhandlinggasoline.Gasolineisextremelyflammable
andthe vaporsareexplosive.Seriouspersonalinjurycan
occurwhengasolineis spilledonyourselforyourclothes,
whichcanignite.Washyourskinand changeclothes
immediately.
a. Useonlyanapprovedgasolinecontainer.
b. Extinguishallcigarettes,cigars,pipesandothersources
ofignition.
c. Neverfuel machineindoors.
d. Neverremovegascap oradd fuelwhilethe engineis hot
or running.
e. Allowengineto coolat leasttwo minutesbeforerefuel-
ing.
f. Neveroverfillfueltank. Filltankto nomorethanY2-inch
belowbottomoffiller neckto providespacefor fuel
expansion.
g. Replacegasolinecap andtightensecurely.
h. Ifgasolineis spilled,wipeitoff theengineand equip-
ment.Movemachinetoanotherarea.Waitfiveminutes
beforestartingtheengine.
i. Neverstorethe machineorfuel containerinsidewhere
there isan openflame,sparkor pilotlight(e.g.furnace,
waterheater,spaceheater,clothesdryeretc.).
j. Allowmachinetocoolat leastfive minutesbefore
storing.
4

Operation
1. Donot puthandsorfeet nearrotatingparts,inthe
auger/impellerhousingor chuteassembly.Contactwiththe
rotatingpartscanamputatehandsandfeet.
2. The auger/impellercontrolleveris asafetydevice.Never
bypassitsoperation.Doingsomakesthe machineunsafe
andmaycausepersonalinjury.
3. The controlleversmustoperateeasilyin bothdirections
andautomaticallyreturntothe disengagedpositionwhen
released.
4. Neveroperatewitha missingor damagedchuteassembly.
Keepall safetydevicesin placeandworking.
5. Neverrunan engineindoorsor ina poorlyventilatedarea.
Engineexhaustcontainscarbonmonoxide,anodorlessand
deadlygas.
6. Donotoperatemachinewhile underthe influenceofalcohol
or drugs.
7. Mufflerandenginebecomehotandcan causeaburn.Do
nottouch.
8. Exerciseextremecautionwhenoperatingonor crossing
gravelsurfaces.Stayalertfor hiddenhazardsortraffic.
9. Exercisecautionwhenchangingdirectionandwhileoperat-
ingonslopes.
10.Planyoursnow-throwingpatternto avoiddischargetowards
windows,walls,carsetc.Thus,avoidingpossibleproperty
damageor personalinjury causedbyaricochet.
11.Neverdirectdischargeatchildren,bystanders,and petsor
allow anyonein frontofthe machine.
12.Donotoverloadmachinecapacity byattemptingto clear
snowattoofast ofa rate.
13.Neveroperatethis machinewithoutgoodvisibilityorlight.
Alwaysbesureofyourfootingand keepafirm holdonthe
handles.Walk,neverrun.
14.Disengagepowerto the auger/impellerwhentransportingor
notin use.
15.Neveroperatemachineat hightransportspeedsonslippery
surfaces.Lookdownandbehindand usecarewhen
backingup.
16.Ifthe machineshouldstartto vibrateabnormally,stopthe
engine,disconnectthesparkplugwireand groundit against
the engine.Inspectthoroughlyfordamage.Repairany
damagebeforestartingandoperating.
17.Disengageallcontrolleversandstopenginebeforeyou
leavethe operatingposition(behindthe handles).Wait
untilthe auger/impellercomestoa completestop before
uncloggingthe chuteassembly,makinganyadjustments,or
inspections.
18.Neverputyourhandin thedischargeor collectoropenings.
Alwaysusethe clean-outtoolprovidedtounclogthe dis-
chargeopening.Donot unclogchuteassemblywhileengine
isrunning.Shutoffengineand remainbehindhandlesuntil
all movingpartshavestoppedbeforeunclogging.
19.Useonlyattachmentsandaccessoriesapprovedbythe
manufacturer(e.g.wheelweights,tire chains,cabsetc.).
20. Ifsituationsoccurwhicharenotcoveredinthismanual,use
careand goodjudgment.Contactyourdealeror callthe
customerservice numberfoundonpagetwo.
Maintenance & Storage
1. Nevertamperwithsafetydevices.Checktheirproper
operationregularly.Refertothe maintenanceandadjust-
mentsectionsofthis manual.
2. Beforecleaning,repairing,or inspectingmachinedisen-
gageall controlleversandstopthe engine.Wait untilthe
auger/impellercometoa completestop. Disconnectthe
sparkplugwireand groundagainstthe engineto prevent
unintendedstarting.
3. Checkboltsand screwsfor propertightnessatfrequent
intervalstokeepthe machineinsafeworkingcondition.
Also,visuallyinspectmachineforanydamage.
4. Do notchangethe enginegovernorsettingor over-speed
theengine.Thegovernorcontrolsthemaximumsafe
operatingspeedoftheengine.
5. Snowthrowershaveplatesand skidshoesaresubjectto
wearanddamage.Foryoursafetyprotection,frequently
checkallcomponentsand replacewith originalequipment
manufacturer's(OEM) partsonly."Useof partswhichdo
notmeetthe originalequipmentspecificationsmayleadto
improperperformanceandcompromisesafety!"
6. Checkcontrolsperiodicallytoverify theyengageand
disengageproperlyandadjust,if necessary.Referto the
adjustmentsection inthisoperator'smanualfor instructions.
7. Maintainor replacesafetyandinstructionlabels,asneces-
sary.
8. Observeproperdisposallawsandregulationsfor gas,oil,
etc.toprotectthe environment.
9. Priorto storing,runmachineafew minutestoclearsnow
frommachineandpreventfreezeupof auger/impeller.
10.Neverstorethe machineorfuel containerinsidewhere
thereisan openflame,sparkor pilotlightsuchasa water
heater,furnace,clothesdryeretc.
11.Alwaysreferto theoperator'smanualforproperinstructions
onoff-seasonstorage.
Do not modify engine
Toavoidseriousinjuryordeath,donot modifyengineinany
way.Tamperingwiththegovernorsettingcan leadto arunaway
engineandcauseit tooperateatunsafespeeds.Nevertamper
withfactorysettingofenginegovernor.
Notice regarding Emissions
Engineswhicharecertifiedto complywithCaliforniaandfederal
EPAemissionregulationsforSORE(SmallOff RoadEquipment)
arecertifiedtooperateonregularunleadedgasoline,and may
includethefollowingemissioncontrolsystems:EngineModifica-
tion(EM)andThreeWayCatalyst(TWC)ifso equipped.
Your Responsibility
Restrictthe useofthispowermachineto personswhoread,un-
derstandand followthe warningsandinstructionsin thismanual
andonthe machine.
Practices
WARNING
Thissymbol points
out importantsafety
instructions,which if
notfollowed,could
endangerthe personal
safetyand/or property
of yourselfand others.
Readand followall
instructions inthis man-
ual beforeattemptingto
operatethis machine.
Failureto comply with
these instructionsmay
result inpersonalinjury.
Whenyou seethis
symbol.
HEED IT'S WARNING!
Your Responsibility
Restrictthe use
of this powermachine
to personswho read,
understand
andfollow the warnings
and instructions
in this manual
andon the machine.
5
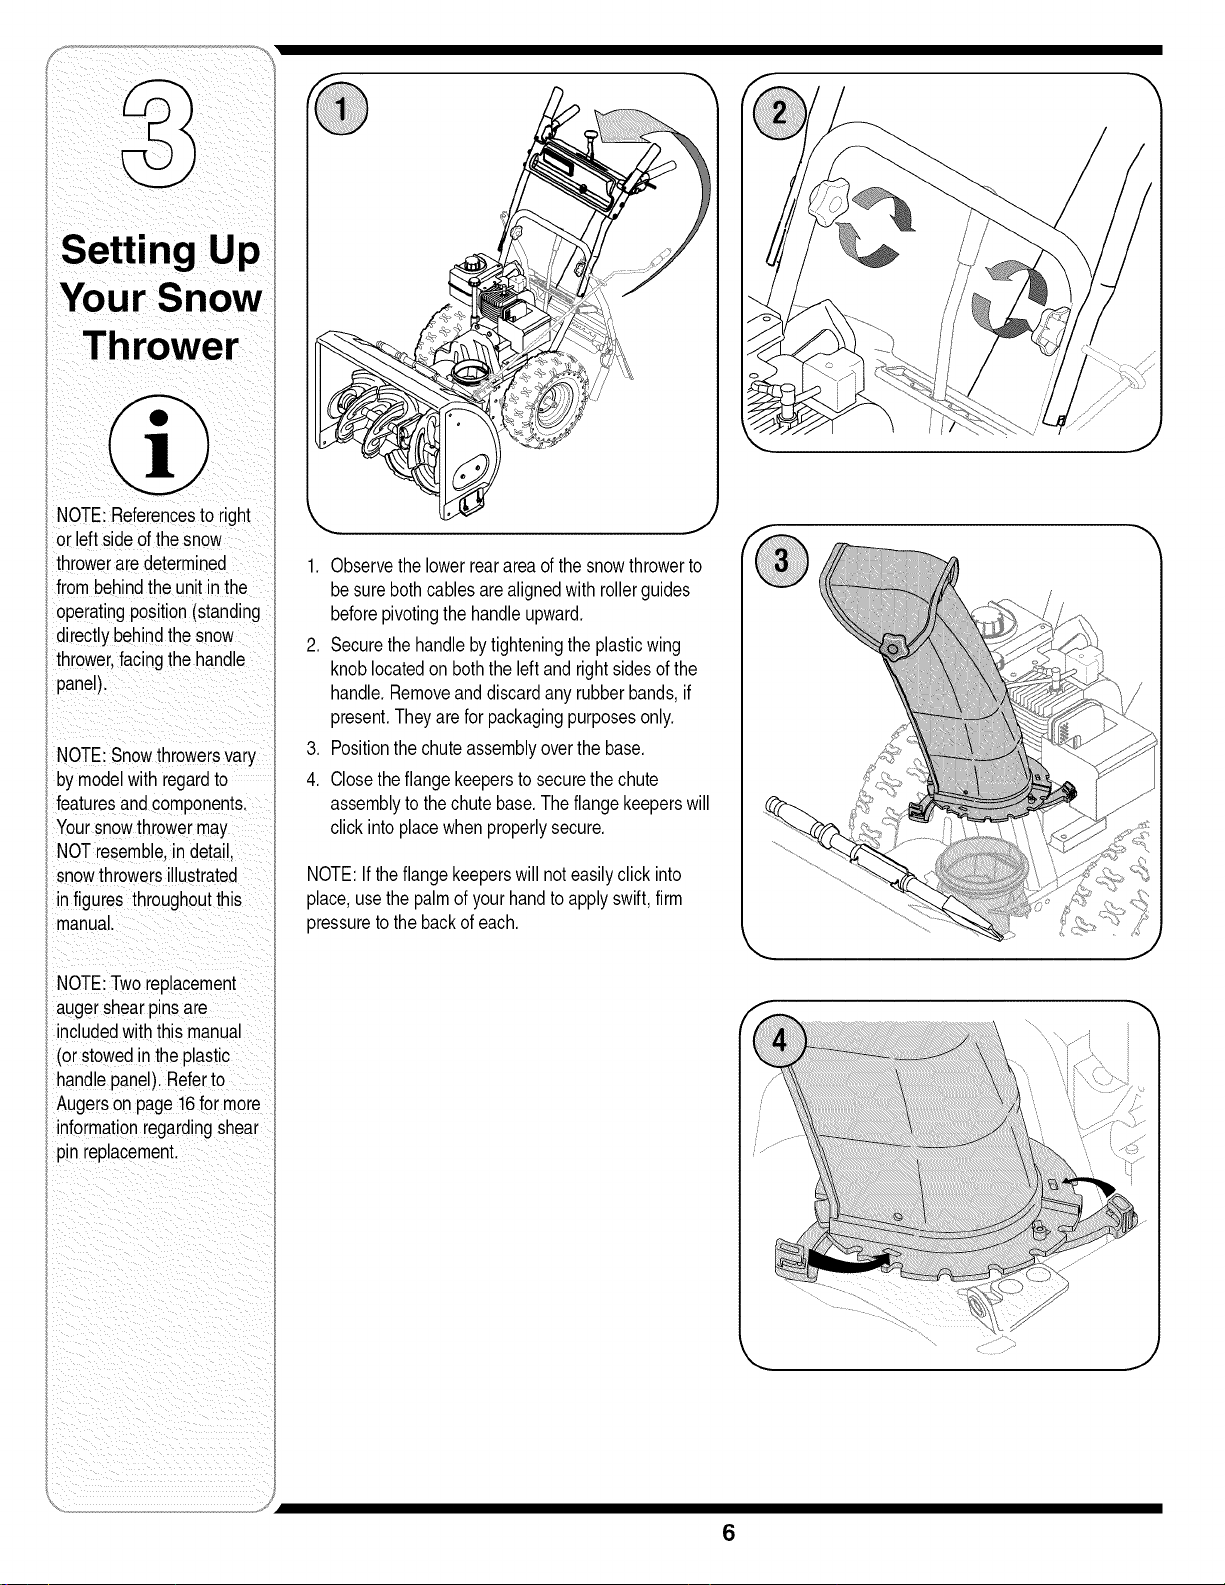
NOTE:Referencesto right
or leftsideofthesnow
throwerare determined
frombehindthe unitinthe
operatingposition(standing
directlybehindthesnow
thrower,facingthe handle
_panel).
!
NOTE:Snowthrowersvary
bymodelwith regardto
featuresandcomponents.
Yoursnowthrowermay
NOTresemble,in detail.
snowthrowersillustrated
infigures throughoutthis
manual.
NOTE:Tworeplacement
augershearpinsare
includedwiththis manual
(orstowedinthe plastic
handlepanel).Referto
i Augerson page16formore
informationregardingshear
pinreplacement.
1, Observethelowerrearareaofthesnowthrowerto
besurebothcablesarealignedwith rollerguides
beforepivotingthehandleupward,
2, Securethehandlebytighteningtheplasticwing
knoblocatedon boththeleftand rightsidesofthe
handle,Removeanddiscardanyrubberbands,if
present,Theyare forpackagingpurposesonly,
3, Positionthechuteassemblyoverthebase,
4, Closetheflangekeepersto securethechute
assemblytothechutebase,Theflangekeeperswill
clickintoplacewhenproperlysecure,
NOTE:Iftheflangekeeperswillnoteasilyclickinto
place,usethe palmofyourhandtoapplyswift,firm
pressuretothebackofeach,
6
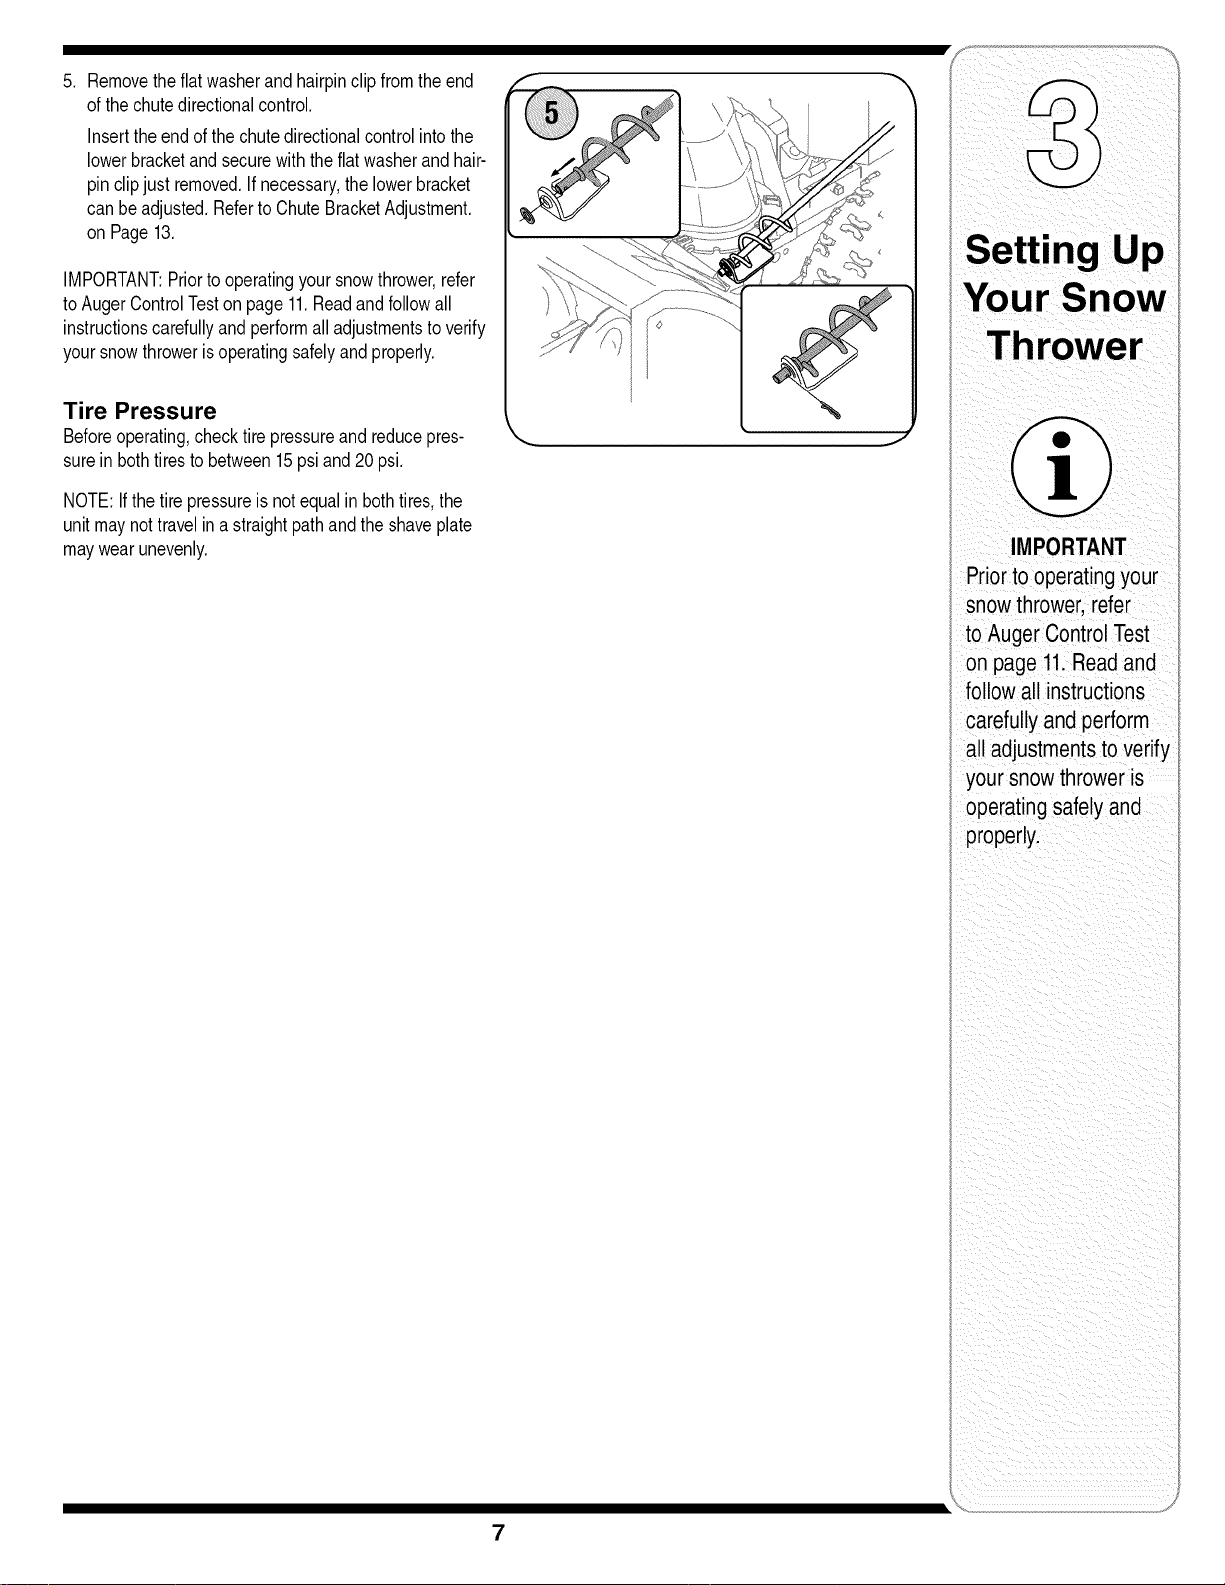
.
Removetheflatwasherandhairpinclipfromtheend
ofthechutedirectionalcontrol.
Inserttheendofthechutedirectionalcontrolintothe
lowerbracketand securewiththeflatwasherand hair-
pin clipjust removed.If necessary,thelowerbracket
canbeadjusted.Referto ChuteBracketAdjustment.
on Page13.
IMPORTANT:Priortooperatingyoursnowthrower,refer
toAugerControlTeston page11.Readandfollowall
instructionscarefullyandperformalladjustmentstoverify
yoursnowthrowerisoperatingsafelyand properly.
Tire Pressure
Beforeoperating,checktirepressureand reducepres-
surein bothtirestobetween15psiand20 psi.
NOTE:If thetirepressureisnotequalinbothtires,the
unitmaynottravelina straightpathandtheshaveplate
maywearunevenly.
IMPORTANT
Priorto operatingyour
snowthrower,refer
to Auger ControlTest
on page 11.Readand
fo lowall instructions
carefullyand perform
all adjustmentsto verify
your snowthrower is
operating safelyand
properly.
7
WARNING
Read, understand,
andfollow all instruc-
tions and warnings
onthe machineand
in this manual before
operating.
Useextreme care
when handling
gasoline.Gasoline is
extremelyflammable
and the vapors are
explosive.Neverfuel
the machineindoors
or while the engine
is hot or running.
Extinguishcigarettes,
cigars,pipesand
other sourcesof
ignition.
!;_ r;fl _'_ [<] E]
NOTE:Snowthrowersvary
bymodelwith regardto
featuresand components.
Yoursnowthrowermay
NOTresemble,indetail,
snowthrowersillustrated
infigures througboutthis
manual,
f
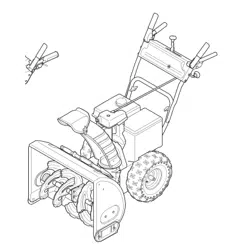
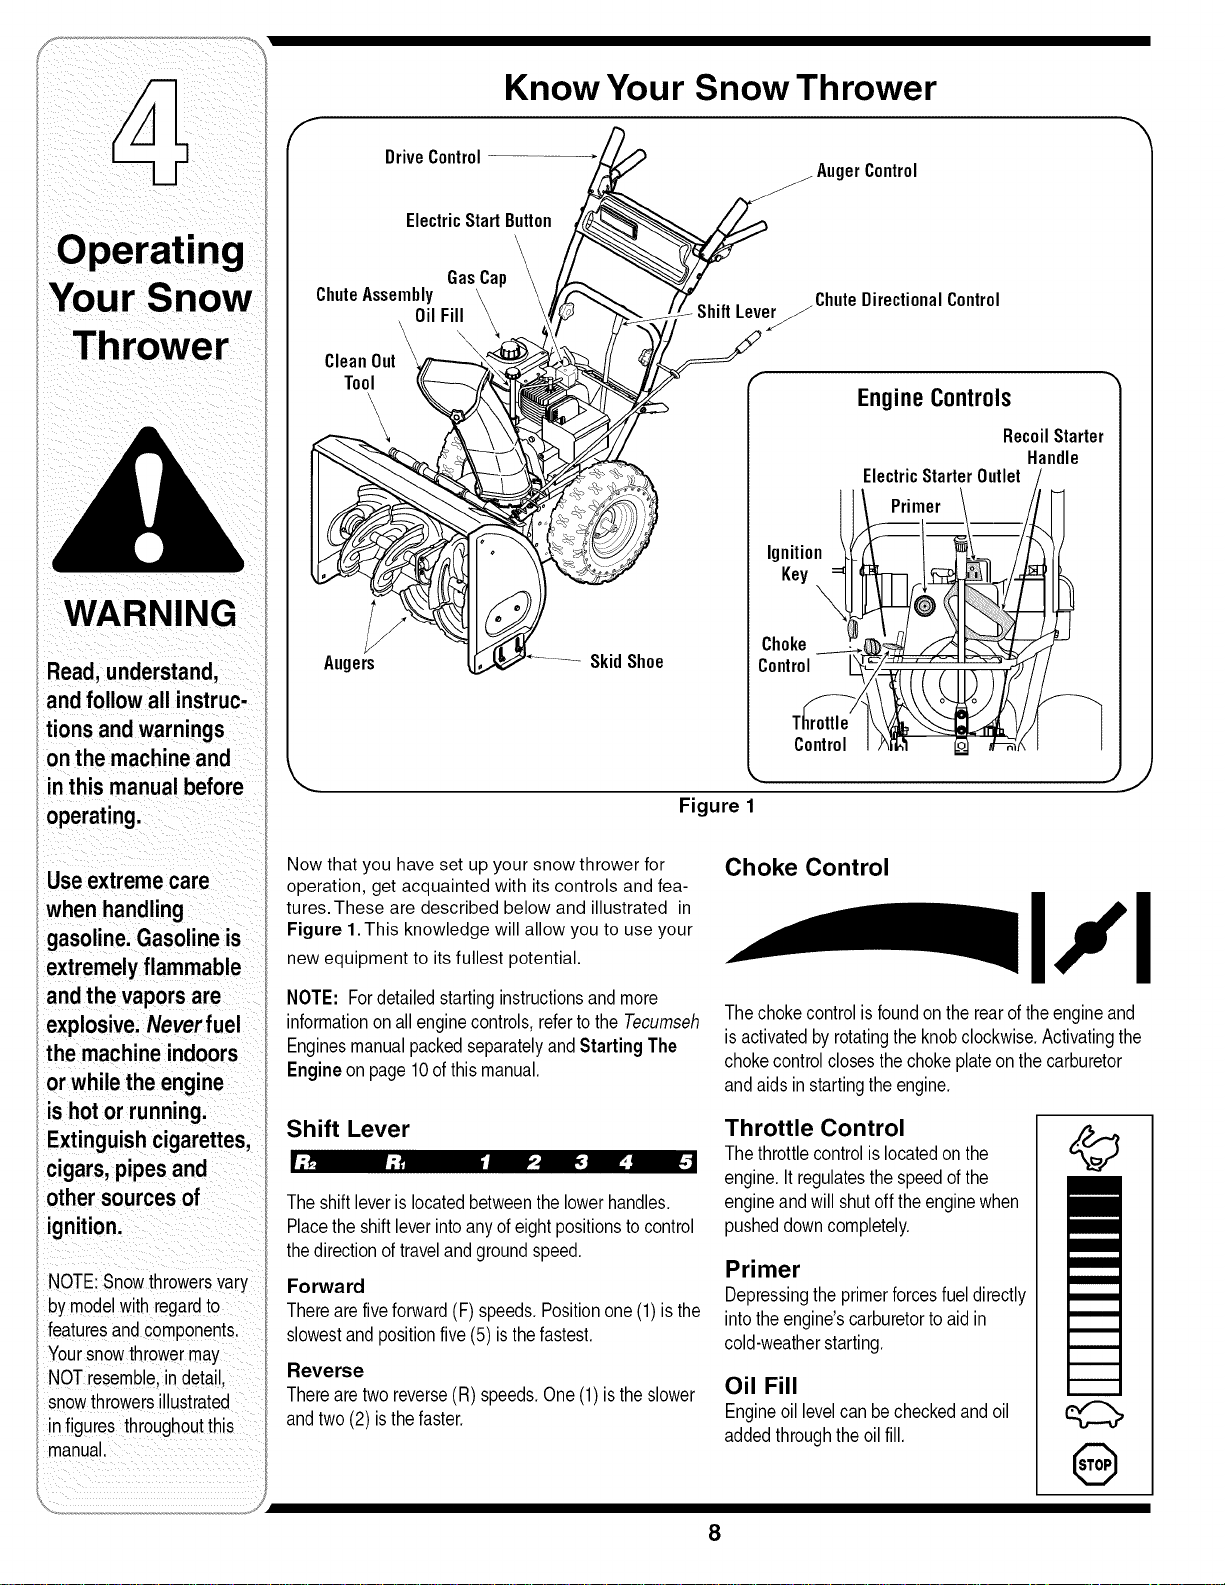
Know Your Snow Thrower
DriveControl
ElectricStartButton
ChuteAssembly
OilFill
CleanOut
Tool
Augers
GasCap
\
SkidShoe
z AugerControl
__t_ jChute DirectionalControl
Ignition
Key
\
Choke
Control
EngineControls
RecoilStarter
Handle
ElectricStarterOutlet
Primer
Control
Jj
Figure 1
Now that you have set up your snow thrower for
operation, get acquainted with its controls and fea-
tures. These are described below and illustrated in
Figure 1.This knowledge will allow you to use your
new equipment to its fullest potential.
NOTE: Fordetailedstartinginstructionsandmore
informationonall enginecontrols,refertothe Tecumseh
EnginesmanualpackedseparatelyandStarting The
Engine onpage10ofthismanual,
Shift Lever
Theshiftleverislocatedbetweenthelowerhandles,
Placetheshiftleverintoanyofeightpositionsto control
thedirectionoftravelandgroundspeed,
Forward
Therearefiveforward(F)speeds,Positionone(1)isthe
slowestandpositionfive(5) isthefastest,
Reverse
Therearetworeverse(R)speeds,One(1)istheslower
andtwo(2) isthefaster.
Choke Control
Thechokecontrolisfoundontherearoftheengineand
isactivatedbyrotatingtheknobclockwise,Activatingthe
chokecontrolclosesthechokeplateon thecarburetor
andaidsinstartingtheengine,
Throttle Control
Thethrottlecontrolis locatedon the
engine,Itregulatesthespeedofthe
engineandwillshutofftheenginewhen
pusheddowncompletely,
Primer
Depressingtheprimerforcesfueldirectly
intotheengine'scarburetortoaidin
cold-weatherstarting,
Oil Fill
Engineoil levelcanbecheckedandoil
addedthroughtheoil fill,
©
8
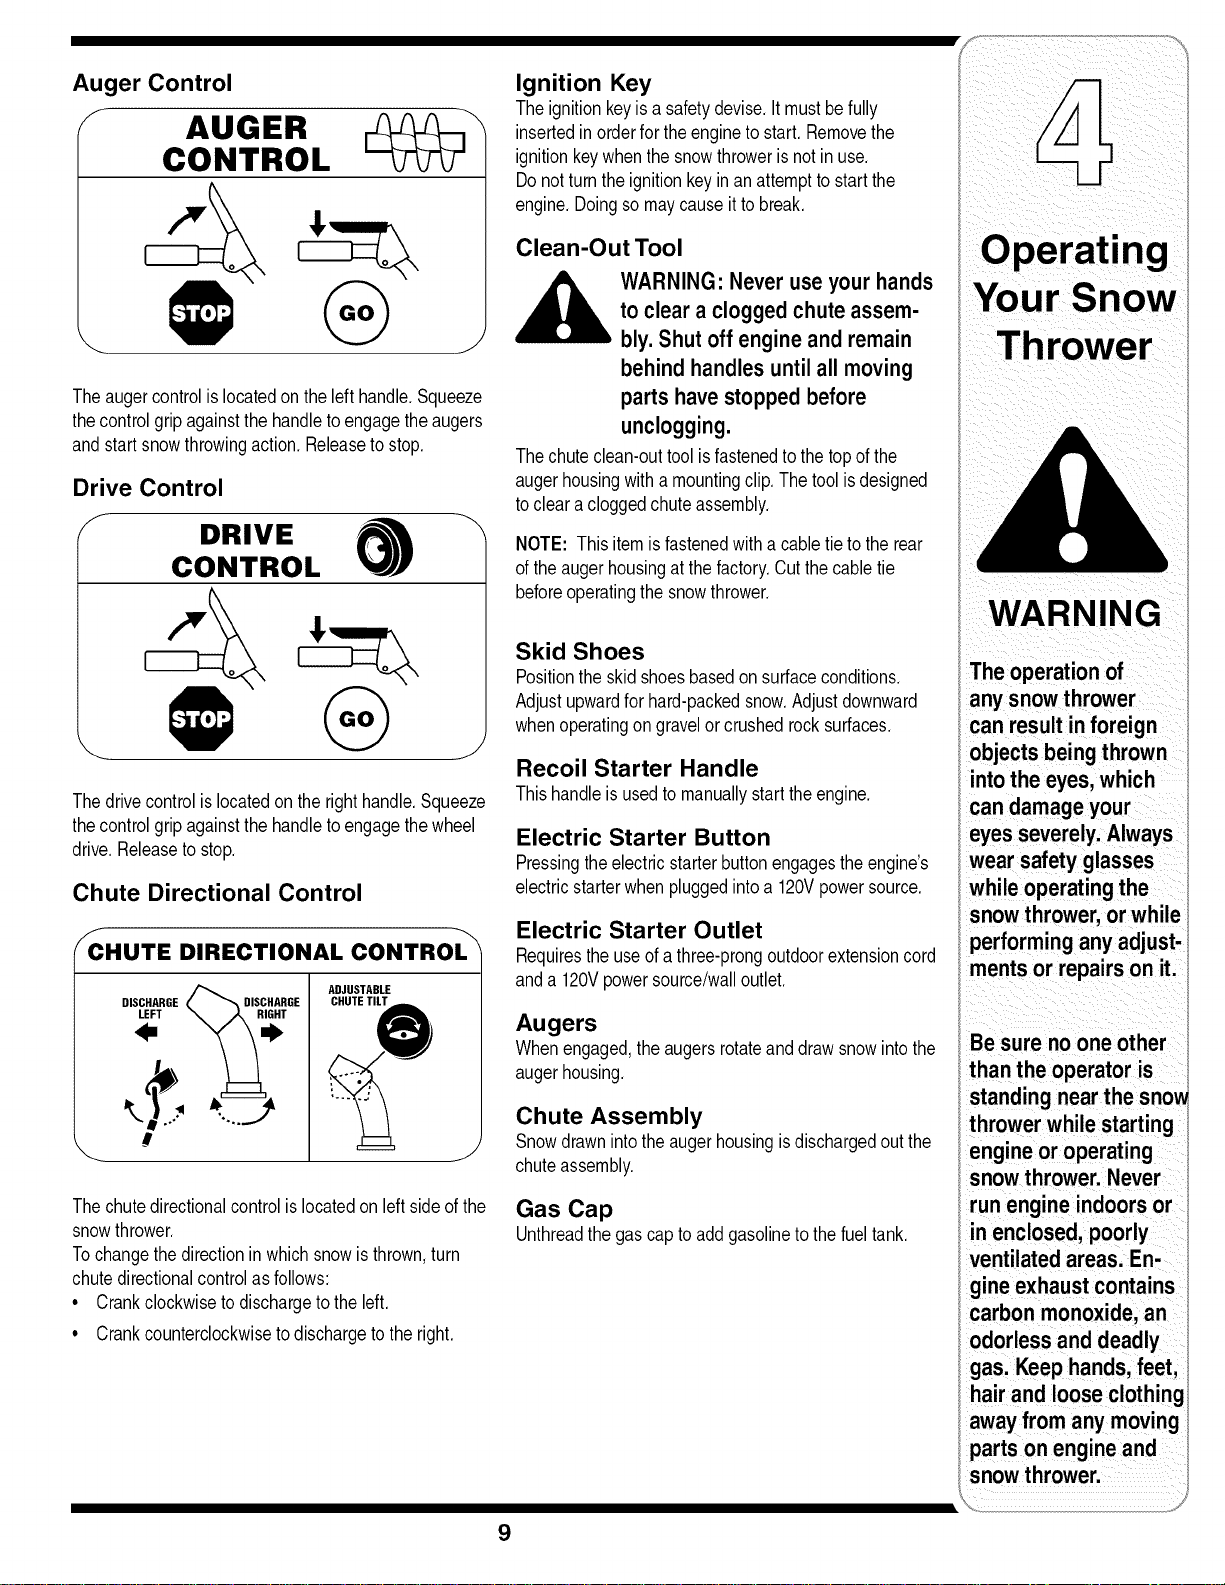
Auger Control
AUGER
CONTROL
Theaugercontrolislocatedontheleft handle.Squeeze
thecontrolgripagainstthehandletoengagetheaugers
andstartsnowthrowingaction.Releasetostop.
Drive Control
f DRIVE _
CONTROL
Thedrivecontrolislocatedontherighthandle.Squeeze
thecontrolgripagainstthehandletoengagethewheel
drive.Releasetostop.
Chute Directional Control
f
CHUTE DIRECTIONAL CONTROL
DISCHARGE _'_DISCHARGE
ADJUSTABLE
CHUTETILT
J
Thechutedirectionalcontrolislocatedon leftsideofthe
snowthrower.
Tochangethedirectionin whichsnowisthrown,turn
chutedirectionalcontrolasfollows:
• Crankclockwisetodischargeto theleft.
• Crankcounterclockwisetodischargetotheright.
Ignition Key
Theignitionkeyisa safetydevise.It mustbefully
insertedin orderfortheenginetostart.Removethe
ignitionkeywhenthesnowthrowerisnotinuse.
Donotturntheignitionkeyinan attempttostartthe
engine.Doingsomaycauseittobreak.
Clean-Out Tool
__lb ARNING"Never use your hands
to clear a clogged chute assem-
bly.Shutoff engineand remain
behind handles until allmoving
parts havestopped before
unclogging.
Thechuteclean-outtoolisfastenedto thetopofthe
augerhousingwitha mountingclip.Thetoolisdesigned
toclearacloggedchuteassembly.
NOTE: Thisitemisfastenedwitha cabletietotherear
oftheaugerhousingatthefactory.Cutthecabletie
beforeoperatingthe snowthrower.
Skid Shoes
Positiontheskidshoesbasedonsurfaceconditions.
Adjustupwardforhard-packedsnow.Adjustdownward
whenoperatingongravelorcrushedrocksurfaces.
Recoil Starter Handle
Thishandleis usedtomanuallystarttheengine.
Electric Starter Button
Pressingtheelectricstarterbuttonengagestheengine's
electricstarterwhenpluggedintoa 120Vpowersource.
Electric Starter Outlet
Requirestheuseofa three-prongoutdoorextensioncord
anda 120Vpowersource/walloutlet.
Augers
Whenengaged,theaugersrotateanddrawsnowintothe
augerhousing.
Chute Assembly
Snowdrawnintotheaugerhousingisdischargedoutthe
chuteassembly.
Gas Cap
Unthreadthegascapto addgasolinetothefueltank.
i
WARNING
The operation of
any snowthrower
can result inforeign
objects beingthrown
intothe eyes, which
can damage your
eyesseverely.Always
wear safety glasses
while operatingthe
snowthrower,or while
performing anyadjust-
ments or repairson it.
Besure no one other
thanthe operator is
standing near the sno_
throwerwhile starting
engineor operating
snowthrower. Never
run engineindoors or
in enclosed, poorly
ventilated areas. En-
gine exhaustcontains
carbon monoxide,an
odorless and deadly
gas. Keep hands,feet,
hairand looseclothinc
awayfrom any moving
parts on engineand
snowthrower.
9
WARNING
Read, understand,
andfollow all instruc-
tions and warnings
onthe machineand
in this manual before
operating.
Useextreme care
when handling
gasoline.Gasoline is
extremelyflammable
andthe vapors are
explosive.Neverfuel
the machineindoors
or while the engine
is hot or running.
Extinguishcigarettes,
cigars,pipes and
other sourcesof
ignition.
Ifyour home's
wiringsystem is nota
three-wire grounded
system,do not use
this electric starter
under anyconditions.
Ifyour home
electricalsystem
is grounded, buta
three-hole receptacle
is not available,do
not useyour snow
thrower'selectric
starter.
Gas & Oil Fill-Up
Servicetheenginewithgasolineandoil asinstructedin
the TecumsehEnginesmanualpackedseparatelywith
yoursnowthrower.Readinstructionscarefully,
StartingTheEngine
1, Attachsparkplugwireto sparkplug.Makecertain
themetalloopon theendofthe sparkplugwire
(insidetherubberboot)isfastenedsecurelyoverthe
metaltipon thesparkplug.
2, Makecertainboththeaugercontrolanddrivecontrol
arein thedisengaged(released)position,
3, Movethrottlecontrolupto FASTposition.Insert
ignitionkeyintoslot.Makesureitsnapsintoplace.
Donotattempttoturnthekey.
NOTE:Theenginecannotstartunlessthekeyis
insertedintoignitionswitch,
Electric Starter
1, Determinethatyourhome'swiringisa three-wire
groundedsystem,Ask a licensedelectricianifyou
arenotcertain.
WARNING:The optional electric
starter is equipped witha
groundedthree-wire power cord
and plug, and isdesigned to op-
erate on 120 volt AC household
current. Itmust be usedwith a
properly groundedthree-prong
receptacleat all times to avoid
the possibilityof electricshock.
Followall instructionscarefully
prior to operatingthe electric
starter.
If youhavea groundedthree-prongreceptacle,proceed
asfollows:
1, Plugtheextensioncordintotheoutletlocatedon
theengine'ssurface,Plugtheotherendofextension
cordintoa three-prong120-volt,grounded,ACoutlet
ina well-ventilatedarea.
2, RotatechokecontroltoFULLchokeposition(fora
coldenginestart),
NOTE:Iftheengineisalreadywarm,placechoke
controlin theOFFpositioninsteadof FULL.
3, Pushtheprimertwoor threetimesforcoldengine
start,makingsuretocoverventholein thecenterof
theprimerwhenpushing,
NOTE:DONOTuseprimertorestartawarmengine
aftera shortshutdown.
4, Pushstarterbuttontostartengine.
5, Oncetheenginestarts,releasestarterbutton.
6, Astheenginewarms,slowlyrotatethechokecontrol
totheOFFposition.If theenginefalters,quicklyrotate
thechokecontrolbacktoFULLandthenslowlyinto
theOFFpositionagain.
7, Whendisconnectingtheextensioncord,alwaysunplug
theendatthethree-prongwalloutletbeforeunplug-
gingtheoppositeendfromthesnowthrower,
Recoil Starter
1, RotatechokecontroltoFULLchokeposition(cold
enginestart),
NOTE:Iftheengineisalreadywarm,placechokecontrol
in theOFFpositioninsteadofFULL.
2, Pushtheprimertwo orthreetimesforcoldengine
start,makingsuretocoverventholein thecenterof
theprimerwhenpushing,
NOTE:DONOTuseprimertorestarta warmengineafter
a shortshutdown.
NOTE:Additionalprimingmaybe necessaryifthe
temperatureisbelow15oFahrenheit,
3, Grasptherecoilstarterhandleandslowlypulltherope
out,Atthepointwhereitbecomesslightlyharderto
pulltherope,slowlyallowtheropeto recoil.
4, Pullthestarterhandlewith afirm,rapidstroke,Donot
releasethehandleandallowit tosnapback,Keepa
firmholdonthestarterhandleandallowit toslowly
recoil,
,
Astheenginewarms,slowlyrotatethechokecontrol
totheOFFposition.If theenginefalters,quicklyrotate
thechokecontrolbacktotheFULLpositionandthen
slowlyintotheOFFpositionagain.
NOTE:Allowtheenginetowarmupforafewminutes
afterstarting.Theenginewillnotdevelopfullpoweruntilit
reachesoperatingtemperatures.
Stopping The Engine
Runenginefora fewminutesbeforestoppingto helpdry
offanymoistureontheengine.
10
Chute Clean-Out Tool
Thechuteclean-outtoolisconvenientlyfastenedtothe
rearoftheaugerhousingwitha mountingclip.Should
snowandicebecomelodgedin thechuteassembly
duringoperation,proceedasfollowstosafelycleanthe
chuteassemblyandchuteopening:
1. ReleaseboththeAugerControlandtheDriveControl.
2. Stoptheenginebyremovingtheignitionkey.
3. Removetheclean-outtoolfromtheclipwhichsecures
ittothe rearoftheaugerhousing.
4. Usetheshovel-shapedendof theclean-outtoolto
dislodgeandscoopanysnowandicewhichhas
formedinand nearthechuteassembly.
5. Refastentheclean-outtooltothemountingcliponthe
rearoftheaugerhousing,reinserttheignitionkeyand
startthesnowthrower'sengine.
6. Whilestandingintheoperator'sposition(behindthe
snowthrower),engagetheaugercontrolfora few
secondstoclearanyremainingsnowandicefromthe
chuteassembly.
To Engage Drive
WiththethrottlecontrolintheFast(rabbit)position,
moveshiftleverintooneofthesixforward(F)
positionsortwo reverse(R)positions.Selecta speed
appropriateforthesnowconditionsanda paceyou're
comfortablewith.
2. Squeezetheaugercontrolagainstthehandleandthe
augerswillturn.Releaseitandtheaugerswillstop.
3. Squeezethedrivecontrolagainstthehandlethe snow
throwerwillmove.Releaseit anddrivemotionwill
stop.
To Engage Augers
Toengagetheaugersandstartthrowingsnow,
squeezetheaugercontrolagainsttheleft handle.
Releaseto stoptheaugers.
Auger Control Test
Performthefollowingtestbeforeoperatingyoursnow
throwerforthefirsttimeandatthestartofeachwinter.
Checktheadjustmentoftheaugercontrolasfollows:
1. Whentheaugercontrolis releasedandin the
disengaged"up"position,thecableshouldhavevery
littleslack.It shouldNOTbetight.
2. Ina well-ventilatedarea,startthesnowthrowerengine
asinstructedonthe previouspage.Makesurethe
throttleissetin theFASTposition.
3. Whilestandingintheoperator'sposition(behindthe
snowthrower),engagetheauger.
4. Allowtheaugertoremainengagedforapproximately
ten(10)secondsbeforereleasingtheaugercontrol.
Repeatthisseveraltimes.
5. Withthethrottlecontrolin theFAST(rabbit)position
andtheaugercontrolinthedisengaged"up"position,
walktothefrontofthemachine.
6. Confirmthattheaugerhascompletelystopped
rotatingandshowsNOsignsofmotion.Iftheauger
showsANYsignsofrotating,immediatelyreturnto
theoperator'spositionandshutofftheengine.Wait
forALLmovingpartstostopbeforere-adjustingthe
augercontrol.
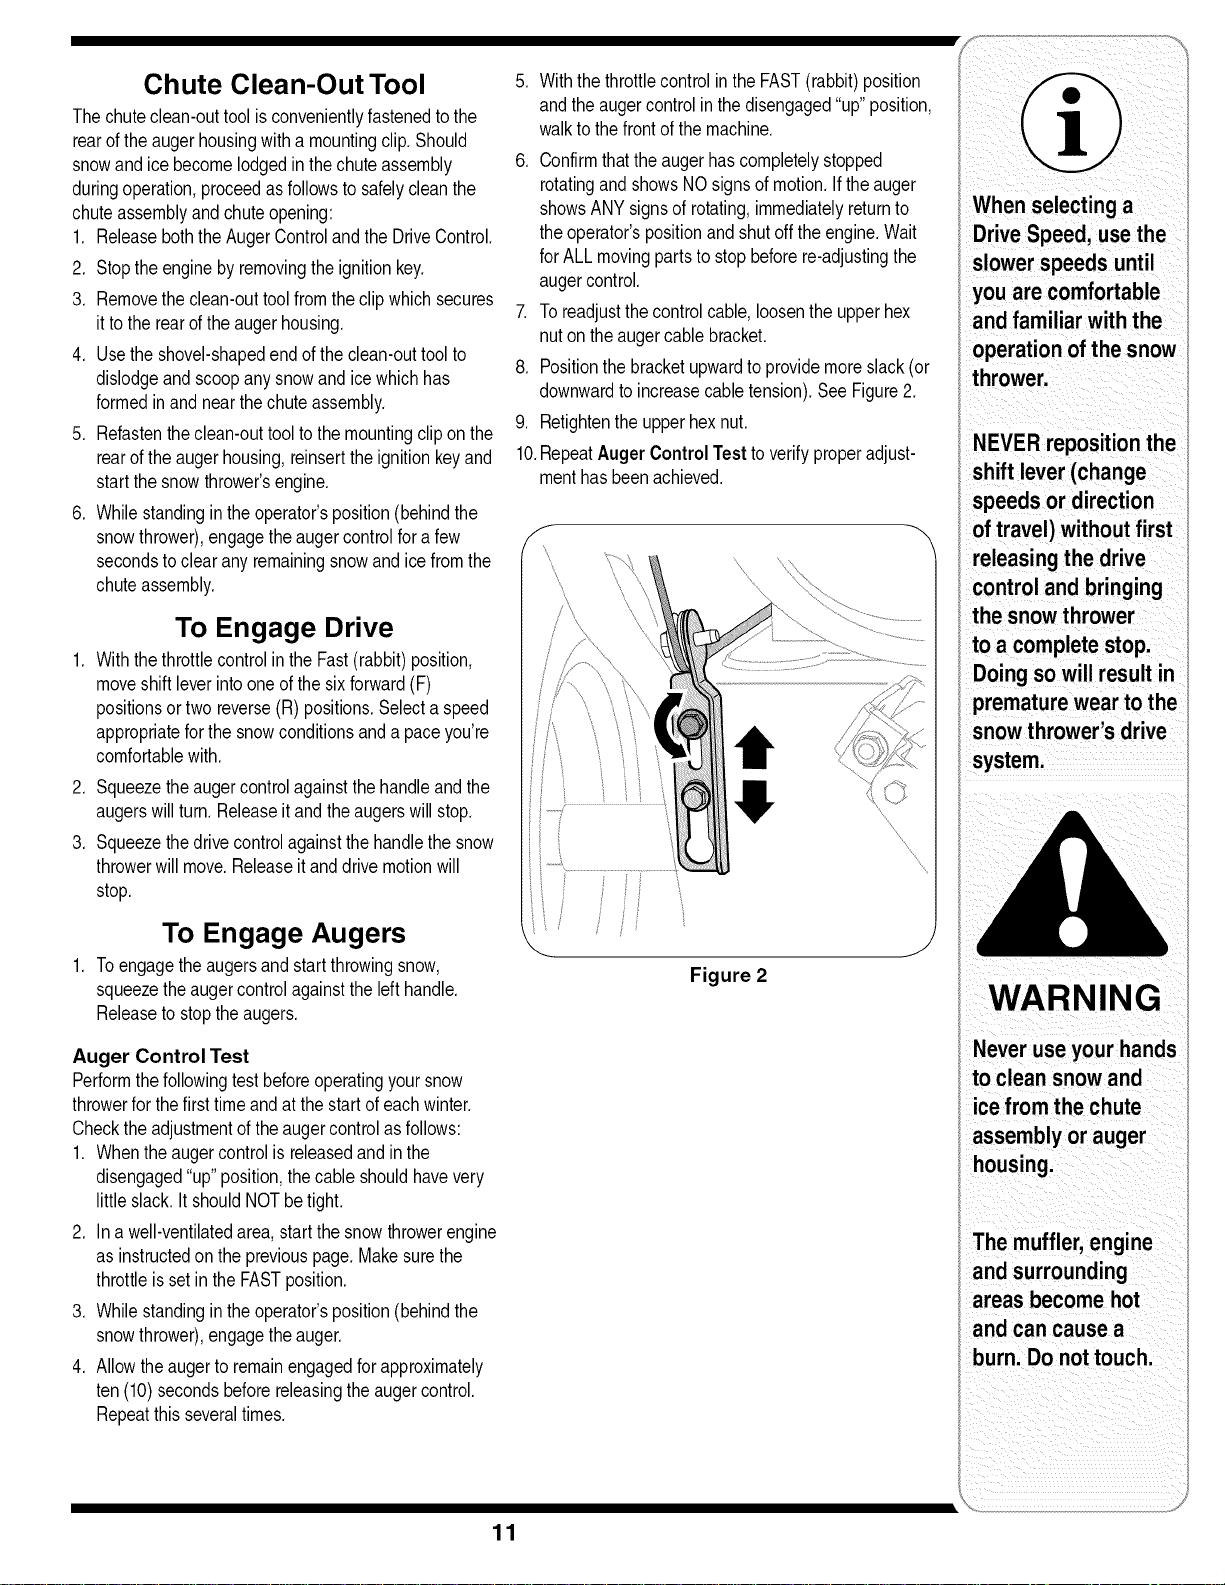
7. Toreadjustthecontrolcable,loosentheupperhex
nutontheaugercablebracket.
8. Positionthebracketupwardtoprovidemoreslack(or
downwardtoincreasecabletension).See Figure2.
9. Retightentheupperhexnut.
10.RepeatAuger Control Testtoverifyproperadjust-
menthasbeenachieved.
Figure 2
DriveSpeed, usethe
slowerspeeds until
you are comfortable
and familiar withthe
NEVER reposition the
shift lever (change
speeds or directior
of travel)without first
releasing the drive
controland bringing
the snowthrower
to a complete stop
Doingsowill resultin
prematurewear to the
snowthrower'sdrive
i
system,
WARNING
Never use your hands
to clean snow and
assembly or auger
The muffler,engine
areas become hot
burn, Donot touch,
11
WARNING
Read, understand,
andfollow all instruc-
tions and warnings
onthe machineand
in this manual before
operating.
Never attemptto
makeany adjust-
mentswhile the
engine isrunning,
exceptwhere speci-
fied in operator's
manual.
Auger Control
RefertoAugerControlTeston Page11to adjustthe
augercontrol.
Drive Control
Whenthedrivecontrolisreleasedandin thedisen-
gaged"up"position,thecableshouldhaveverylittle
slack.It shouldNOTbetight.
Checktheadjustmentofthedrivecontrolasfollows:
1. Withthedrivecontrolreleased,pushthesnow
throwergentlyforward.Theunitshouldrollfreely.
2. Engagethedrivecontroland gentlyattempttopush
thesnowthrowerforward.Thewheelsshouldnot
turn.Theunitshouldnotrollfreely.
3. Withthedrivecontrolreleased,movetheshiftlever
backand forthbetweenthe R2positionandtheF6
positionseveraltimes.Thereshouldbe noresistance
inthe shiftlever.
4. If anyoftheabovetestsfailed,thedrivecableisin
needof adjustment.Proceedasfollows:
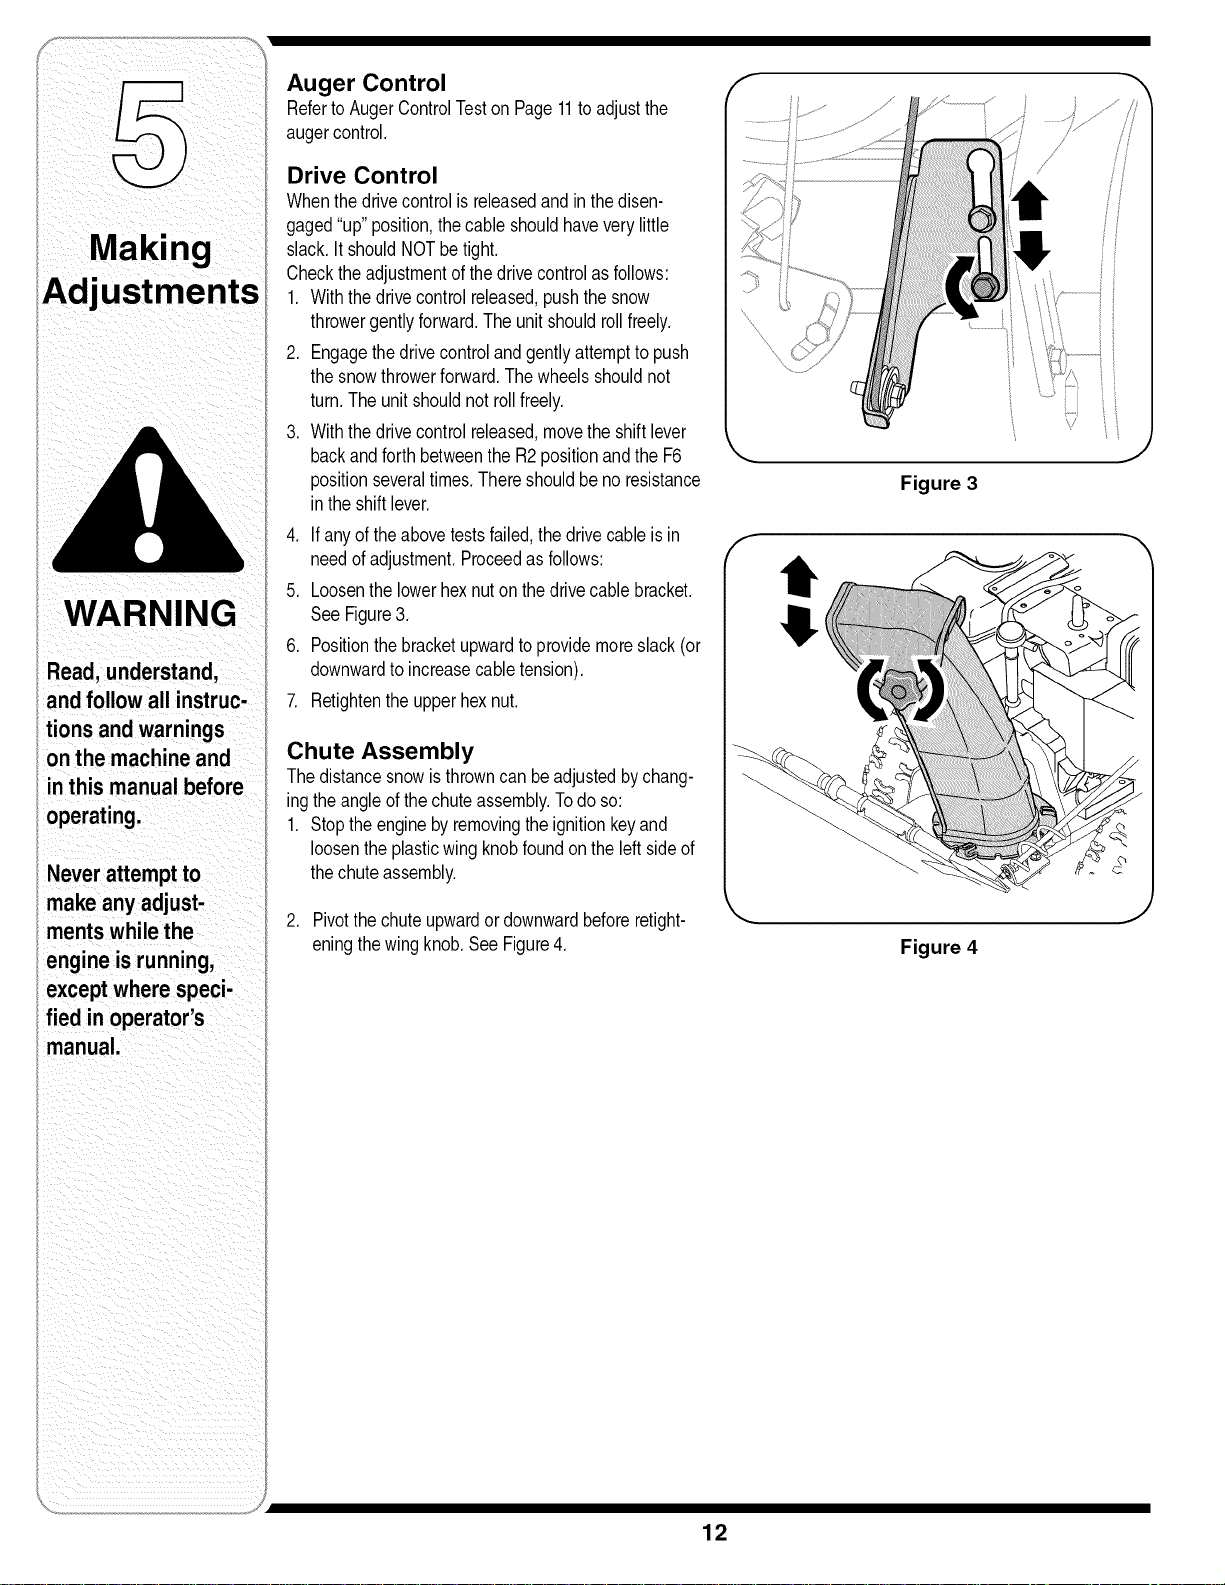
5. Loosenthelowerhexnutonthedrivecablebracket.
SeeFigure3.
6. Positionthebracketupwardtoprovidemoreslack(or
downwardto increasecabletension).
7. Retightentheupperhexnut.
Chute Assembly
Thedistancesnowisthrowncanbeadjustedbychang-
ingtheangleof thechuteassembly.Todo so:
1. Stoptheenginebyremovingtheignitionkeyand
loosenthe plasticwingknobfoundontheleft sideof
thechuteassembly.
2. Pivotthechuteupwardordownwardbeforeretight-
eningthewingknob.SeeFigure4.
Figure 3
Figure 4
12
i¸ i
J
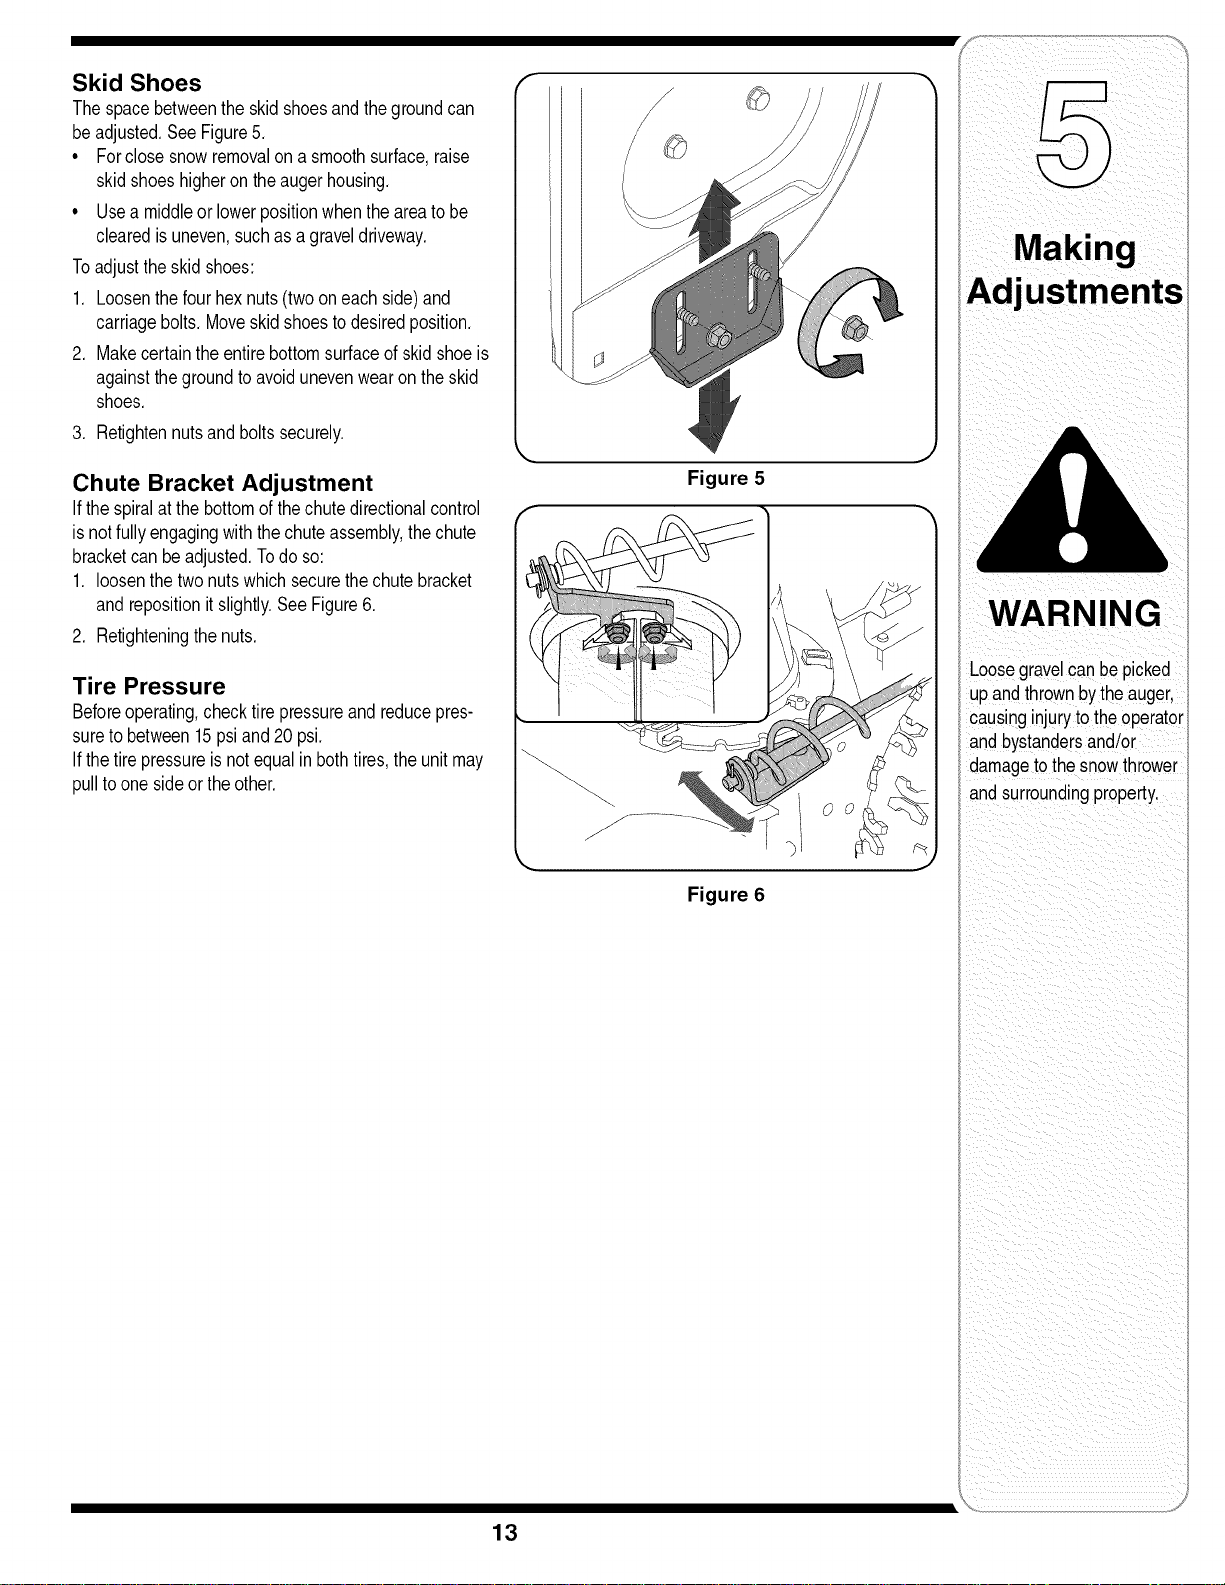
Skid Shoes
Thespacebetweentheskidshoesandthegroundcan
beadjusted.SeeFigure5.
• Forclosesnowremovalona smoothsurface,raise
skidshoeshigheron theaugerhousing.
° Usea middleor lowerpositionwhentheareatobe
clearedisuneven,suchasagraveldriveway.
Toadjusttheskidshoes:
1. Loosenthefourhexnuts(twooneachside)and
carriagebolts.Moveskidshoestodesiredposition.
2. Makecertaintheentirebottomsurfaceofskidshoeis
againstthegroundtoavoidunevenwearon theskid
shoes.
3. Retightennutsand boltssecurely.
Chute Bracket Adjustment
If thespiralat thebottomofthechutedirectionalcontrol
isnotfullyengagingwiththechuteassembly,thechute
bracketcanbeadjusted.Todo so:
1. loosenthetwo nutswhichsecurethechutebracket
andrepositionit slightly.See Figure6.
2. Retighteningthenuts.
Tire Pressure
Beforeoperating,checktirepressureandreducepres-
suretobetween15psiand 20psi.
If thetirepressureisnotequalin bothtires,theunitmay
pulltoonesideortheother.
/
/
/
/
Figure 5
Figure 6
WARNING
_oosegravelcanbe picked
Jpandthrownbytheauger,
causinginjurytotheoperator
andbystandersand/or
dar_agetothesnowthrower
andsurroundingproperty,
13
WARNI NG
repairing, orinspect,
Avoidoilspillage on
rubberfrictionwheel
and aluminumdrive
Platel
Engine
RefertotheseparateTecumsehEnginesmanual
packedwithyourunitforall enginemaintenance.
Lubrication
Engine
RefertotheseparateTecumsehEnginesmanual
packedwithyourunitforall enginelubricationinstruc-
tions.
Gear Shaft
Thegear(hex)shaftshouldbelubricatedatleastonce
a seasonor afterevery25 hoursofoperation.
1. Removethelowerframecoverbyremovingthetwo
screwswhichsecureit.
2. Applya lightcoatingofan all-weathermulti-purpose
greasetothehexshaft.SeeFigure7.
Wheels
Atleastoncea season,removebothwheels.Cleanand
coattheaxleswitha multipurposeautomotivegrease
beforereinstallingwheels.
Chute Directional Control
Oncea season,thejoystickshouldbelubricatedwith
petroleumjelly,linseedoil,mineraloil,paraffinwaxor
3-in-1oil.
Auger Shaft
Atleastoncea season,removetheshearpinson auger
shaft.Spraylubricantinsideshaft,aroundthe spacers.
Alsolubricatetheflangebearingsfoundateitherendof
theshaft.SeeFigure8.
Gear Case
Theaugergearcasehasbeenfilledwithgreaseatthe
factory.If disassembledforanyreason,lubricatewith
twoouncesofgrease(PartNumber737-0168).
NOTE:Donotoverfillthegearcase.Damagetothe
sealscouldresult.Besuretheventplugisfreeof
greasein orderto relievepressure.
Shave Plate and Skid Shoes
Theshaveplateand skidshoesonthebottomofthe
snowthroweraresubjecttowear.Theyshouldbe
checkedperiodicallyandreplacedwhennecessary.
Toremoveskidshoes:
1. Removethefourcarriageboltsandhexflangenuts
whichsecurethemtothesnowthrower.
2. Reassemblenewskidshoeswiththefourcarriage
bolts(twooneachside)andhexflangenuts.Refer
toFigure9.
Toremoveshaveplate:
1. Removethecarriageboltsand hexnutswhich
attachittothesnowthrowerhousing.
2. Reassemblenewshaveplate,makingsureheadsof
carriageboltsaretotheinsideofhousing.Tighten
securely.
Figure 7
I
Spacers
Figure 8
NOTE:Augersnotshownfor clarity,
Figure 9
J
14
/
J
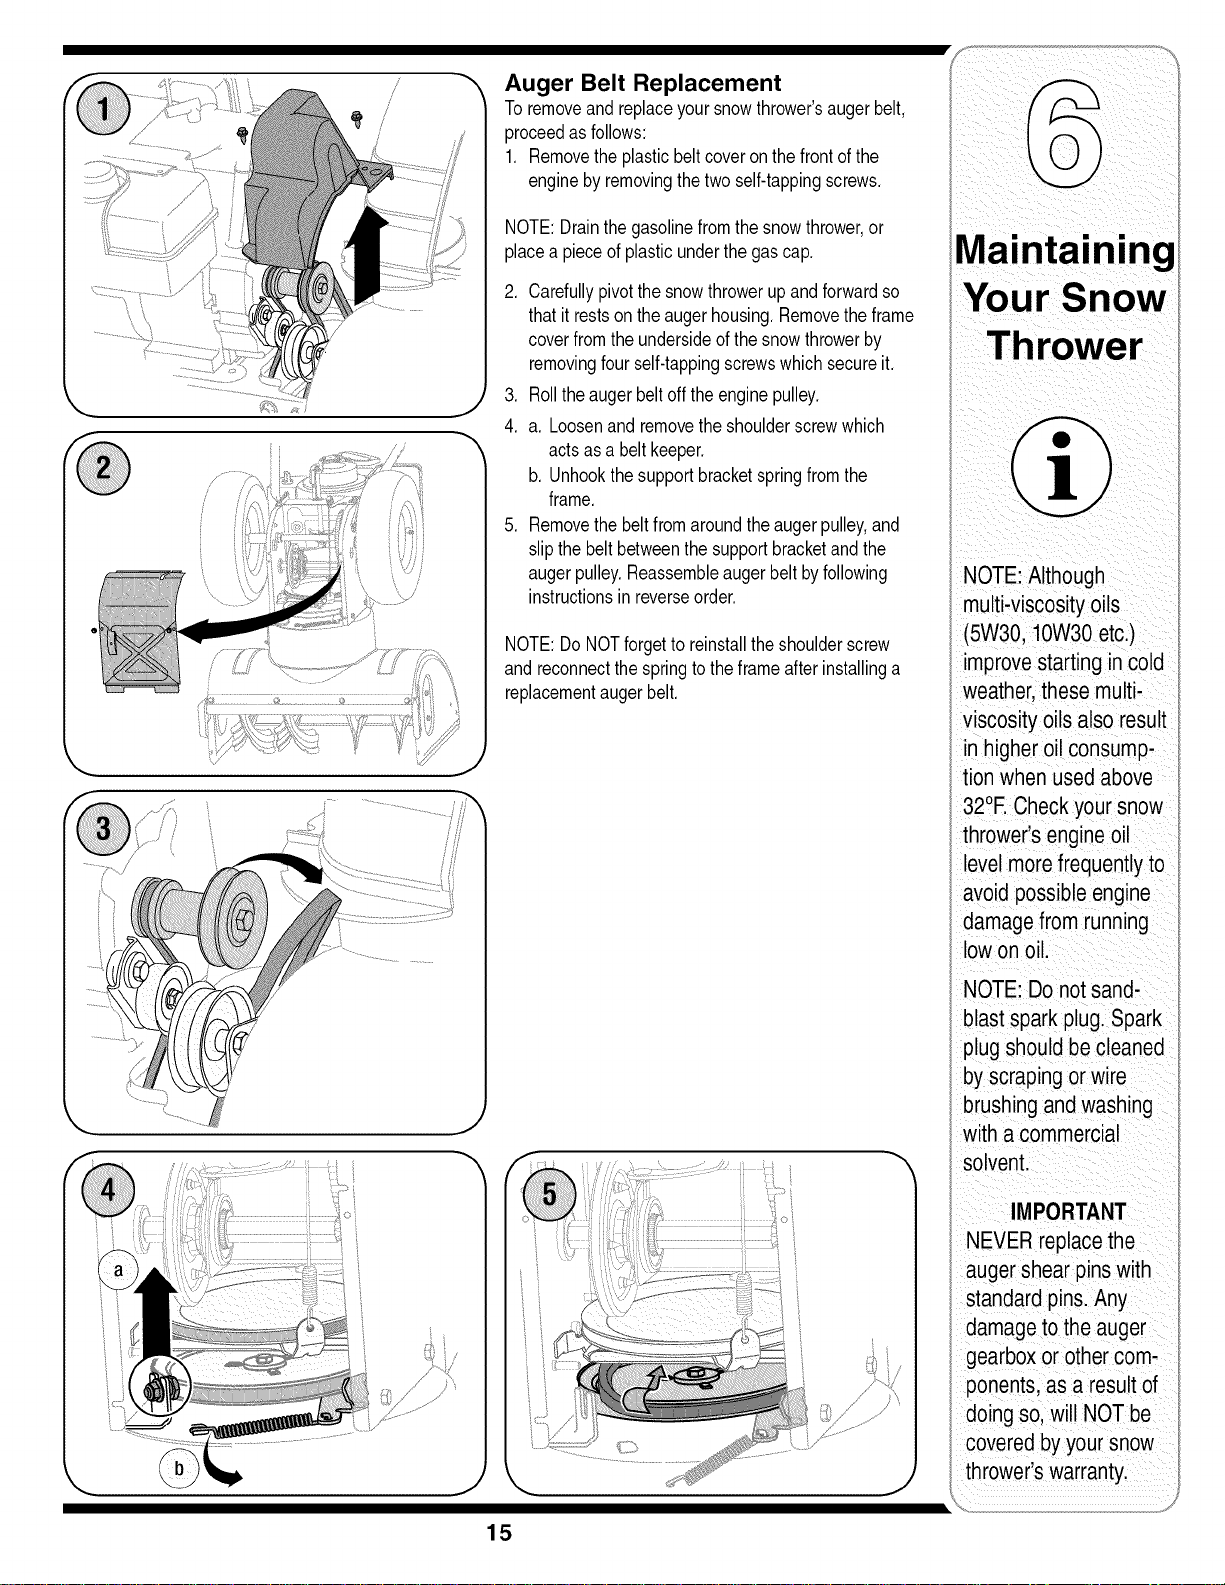
Auger Belt Replacement
Toremoveandreplaceyoursnowthrower'saugerbelt,
proceedasfollows:
1. Removethe plasticbeltcoveronthefrontofthe
enginebyremovingthetwoself-tappingscrews.
NOTE:Drainthegasolinefromthesnowthrower,or
placea pieceofplasticunderthegascap.
2. Carefullypivotthesnowthrowerup andforwardso
thatit restson theaugerhousing.Removetheframe
coverfromtheundersideofthesnowthrowerby
removingfourself-tappingscrewswhichsecureit.
3. Rolltheaugerbeltoff theenginepulley.
4. a. Loosenand removetheshoulderscrewwhich
actsasa beltkeeper.
b. Unhookthesupportbracketspringfromthe
frame.
5. Removethe beltfromaroundtheaugerpulley,and
slipthe beltbetweenthesupportbracketandthe
augerpulley.Reassembleaugerbeltbyfollowing
instructionsin reverseorder.
NOTE:DoNOTforgettoreinstalltheshoulderscrew
andreconnectthespringtotheframeafterinstallinga
replacementaugerbelt.
ntaining
SnoW
iiii _i_i_I _i_ i_ i
NOTE: Although
multi-viscosity(
(5W30.10W30 etc:
improve startingin cold
weather,
viscosity oilsalso result
in higher oi!consumpi
tion when usedabove
32°ECheck your snow
thrower!s engineoil
levelmore frequentlyto
gine
amage fromrunning
low onoil.
NOTE: Do not sand'
blast spark plug spark
plugshould becleaned
by scraping or wire
brushing and washing
with a commercial
NEVERreplace the
auger shearpinswith
standardpins,
e to theauger
earboxor othercom-
ponent& as a resultof
doing so, wil!NOTbe
covered byyour snow
throwerls Warranty,
15
NEVERreplace
theaugershear
pinswithanything
otherthanOEM
PartNo.738-04124
replacementshear
pins.Anydamageto
theaugergearbox
i orothercomponents
asaresultoffailing
todosowillNOTbe
coveredbyyoursnow
thrower'swarranty.
/
/
Augers
• Theaugersaresecuredtothespiralshaftwithtwo
shearpinsandcotterpins,If theaugershouldstrikea
foreignobjector icejam,thesnowthrowerisdesigned
sothatthepinsmayshear,RefertoFigure9,
If theaugerswillnotturn,checkto seeifthe pinshave
sheared,Onesetof replacementshearpinshasbeen
providedwiththesnowthrower.Whenreplacingpins,
sprayanoil lubricantintoshaftbeforeinsertingnew
pins,
Drive Belt Replacement
Toremoveand replaceyoursnowthrower'saugerbelt,
proceedasfollows:
1, Removetheplasticbeltcoveron thefrontofthe
enginebyremovingthetwoself-tappingscrews,
• Drainthegasolinefromthe snowthrower,or placea
pieceofplasticunderthegascap,
• Carefullypivotthesnowthrowerupand forwardso
thatit restson theaugerhousing,
2, Removetheframecoverfromtheundersideofthe
snowthrowerbyremovingfourself-tappingscrews
whichsecureit,
3, a, Grasptheidlerpulleyandpivotittowardtheright,
b, Rolltheaugerbeltoff theenginepulley,
c, Liftthedrivebeltoffenginepulley,
4, Slipthedrivebeltoff thepulleyandbetweenfriction
wheelandfrictionwheeldisc,
• Removeandreplacebeltinthe reverseorder,
f
J
16

Friction Wheel Removal
If thesnowthrowerfailstodrivewiththedrivecontrol
engaged,and performingthedrivecontrolcableadjust-
menton page14failsto correcttheproblem,thefriction
wheelmayneedtobe replaced,Followtheinstructions
below,Examinethefrictionwheelforsignsofwearor
crackingandreplaceifnecessary
• Placetheshiftleverin thirdForward(F3)position,
• Drainthegasolinefromthesnowthrower,or placea
pieceofplasticunderthegascap,
• Carefullypivotthesnowthrowerupandforwardso
thatit restson theaugerhousing,
1, a, Removetheframecoverfromtheundersideof
thesnowthrowerbyremovingfourself-tapping
screwswhichsecureit,
b, Removethe right-handwheelbyremovingthe
screwandbellwasherwhichsecureitto theaxle,
2, Carefullyremovethehexnutandwasherwhich
securesthehexshafttothesnowthrowerframeand
lightlytaptheshaft'sendtodislodgetheballbearing
fromthe rightsideoftheframe,
3, Carefullypositionthehexshaftdownwardandto
theleftbeforecarefullyslidingthefrictionwheel
assemblyoff theshaft,
NOTE:Ifyou'rereplacingthefrictionwheelassembly
asa whole,discardthewornpartandslidethenewpart
ontothehexshaft,Followthestepsabovein reverse
orderto reassemblecomponents.Ifyou'redisassem-
blingthefrictionwheeland replacingonlytherubber
ring,proceedasfollows:
4, Removethefourscrewswhichsecurethefriction
wheel'ssideplatestogether,
• Removethe rubberringfrombetweentheplates,
• Reassemblethesideplateswitha newrubberring,
• Slidethefrictionwheelassemblybackontothehex
shaftandfollowthestepsabovein reverseorderto
reassemblecomponents,
Maintaining
Your Snow
Whenreassembling
thefriction wheel as-
sembly,tighten each
screwonly one rota-
tion beforeturning the
wheelclockwise and
proceedingwiththe
nextscrew. Repeat
this processseveral
timesto ensurethe
platesare secured
with equalforce.
NEVERreplace
theauger shear
pinswithanything
otherthan OEM
PartNo.738-04124
replacementshear
pins.Any damageto
theauger gearbox
orother components
as a result offailing
to doso will NOTbe
coveredby yoursnow
thrower'swarranty.
17
WARNING
Neverstoresnowthrower
withfuelin tankindoors
i or in poorlyventilated
areas,wherefuel fumes
may reachanopenflame,
sparkorpilotlightas on
a furnace,waterheater,
clothesdryeror gas
appliance.
Drainfuel intoanapproved
containeroutdoors,away
ifrom anyopenflame. Be
certainengineiscool.
i Donotsmoke.Fuelleft
i in engineduringwarm
Iweatherdeterioratesand
;;willcauseserious
i startingproblems.
i Donotdraincarburetorif
usingfuel stabilizer.Never
i useengineorcarburetor
i cleaningproducts=nthe
Irue tankorpermanent
Idamagemayoccur.
Ifthe snowthrowerwillnotbe usedfor30 daysor longer,
or if itistheendofthesnowseasonwhenthelast pos-
sibilityofsnowisgone,theequipmentneedstobestored
properly.Followstorageinstructionsbelowtoensuretop
performancefromthesnowthrowerformanymoreyears.
Preparing Engine
,__ WARNING:Neverstoresnowthrower
withfuel in tankindoors orinpoorly
ventilatedareas,wherefuel fumes may
reachanopenflame,sparkor pilot
lightas ona furnace,waterheater,clothesdryeror
gasappliance.
NOTE:It isimportanttopreventgumdepositsfromform-
ingin essentialfuelsystempartsoftheenginesuchas
thecarburetor,fuelfilter,fuelhoseor tankduringstorage.
CAUTION:Alcoholblendedfuels(calledgasoholorusing
ethanolor methanol)canattractmoisturewhichleadsto
separationandformationofacidsduringstorage.Acidic
gascandamagethefuelsystemofanenginewhilein
storage.
.
3.
Toavoidengineproblems,thefuelsystemshouldbe
emptiedbeforestoragefor30daysorlonger.Follow
theseinstructionsto prepareyoursnowthrowerfor
storage:
WARNING:Drainfuel into an approved
container outdoors, awayfrom any
open flame.Be certain engine is cool.
Donot smoke. Fuelleft in engine dur-
ing warm weather deteriorates andwill cause serious
starting problems.
1. Removeall gasolinefromthecarburetorandthefuel
tankto preventgumdepositsfromformingon these
partsand harmingtheengine.
Runtheengineuntilthefueltankisemptyandit stops
due tolackoffuel.
Draincarburetorbypressingupwardon bowldrain,
locatedbelowthecarburetorcover(refertothe
Tecumsehenginemanualformoredetailedinstruc-
tion).
WARNING:Donotdraincarburetorif
usingfuel stabilizer.Neveruseengine
or carburetorcleaningproductsinthe
fuel tankor permanentdamagemay
occur.
NOTE:Fuelstabilizer(suchasSTA-BIL)isanaccept-
ablealternativein minimizingtheformationoffuelgum
depositsduringstorage.Addstabilizertogasolinein fuel
tankor storagecontainer.Alwaysfollowmixratiofoundon
stabilizercontainer.Runengineatleast 10minutesafter
addingstabilizertoallowitto reachthecarburetor.Donot
draincarburetorif usingfuelstabilizer.
.
Removethesparkplugand pourone(1)ounceof
engineoilthroughthesparkplugholeintothecylinder.
Coversparkplugholewitha ragandcranktheengine
severaltimestodistributetheoil.Replacesparkplug.
NOTE:Refertothe Tecumsehenginemanualfor more
informationonpreparingthesnowthrowerenginefor
storage.
Preparing Snow Thrower
• Whenstoringthesnowthrowerinan unventilatedor
metalstorageshed,careshouldbe takento rustproof
theequipment.Usinga lightoil or silicone,coatthe
equipment,especiallyanychains,springs,bearings
and cables.
• Removeall dirtfromexteriorofengineandequipment.
° Followlubricationrecommendationsin Maintenance
sectionofthis manual.
• Storeequipmentina clean,dryarea.
18
Problem Cause Remedy
En n f r 1 Chokenot nONposton 1 MovechoketoONposton
g e a stostat
2. Sparkplugwiredisconnected. 2. Connectwiretosparkplug.
31Fuel tankemptyoi Stalefuel• 31 Filltankwithclean,freshgasolinel
Enginenotpiirned. 41 Primeengineasinstructed
OPeratingYou[SnowTh[ovver_
5 Fa it s k lu 5 Clean,adjustgap,orreplace
: u y par p g: •
6. Blockedfuel linel 6, Cleanfue!line,
7i Safetykeynotin ignitionon enginel ! 7: insertkeyfu!!yintothe swi!ch;
Engineruns erratic 1, UnitrunningonCHOKE,
1, MovechokelevertoOFFposition,
2, Blockedfuellineor stalefuel,
3, Waterordirt infuelsystem,
4, Carburetoroutofadjustment,
2. Cleanfuelline;fill tankwithclean,
freshgasoline•
3. Drainfueltank.Refillwith
freshfuel•
4. ContactMTDServiceCenter.
Engine oVerheats 1 carburetornotadjustedproperly 1 contact MTDservicecenter
Excessive 1. Loosepartsordamagedauger. 1. Stopengineimmediatelyand
Vibration disconnectsparkplugwire.Tighten
all boltsandnuts,If vibration
continues,haveunitservicedbya
MTDServiceCenter.
Lossof power 1• Sparkplugwireloose. 1• Connectandtightensparkplug
wire.
2 Gasca- venthole-lu--ed 2• Removeiceandsnowfromgas
• _, v uu • I cap.Becertainventholeisclear.
I 3• ContactMTDServiceCenter.
3, Exhaustportplugged,
Unitfails 1. Drivecontrolcablein needofadjust- 1. Adjustdrivecontrolcable.Referto
to propel itself ment. "MakingAdjustments".
2, Drivebeltlooseor damaged. 2. Replacedrivebelt.
Unitfails 1• Chuteassemblyclogged. 1• Stopengineimmediatelyand
to d scharclesnow I disconnectsparkplugWire.Clean
v I chuteassembyand nsdeofauge
housingwith clean-outtoolora
stick
2• Foreignobjectlodgedin auger. 2, Stopengineimmediatelyand
disconnectsparkplugwire.
Removeobjectfromaugerwith
cean-outtoolora stick.
3• Augercontrolcableinneedofadjust- ^ ..........
L_ Heferto Augerbontro lest on
ment
• page11.
4 Augerbet looseor damaged
• • 4• Referto Maintenancesection.
5 Shearpin(s)sheared
I 5. Repacewthnewshearpn(s).
ili_iii/i_i/i!_i_/_ii/i i_i!/_ii_i_!!ii_
Shooting
NOTE:This section
addresses minor
service issues,For
furtherdetails,
a MTD authorized
service centeror call
1 (800)800,7310 for
assistance.
19
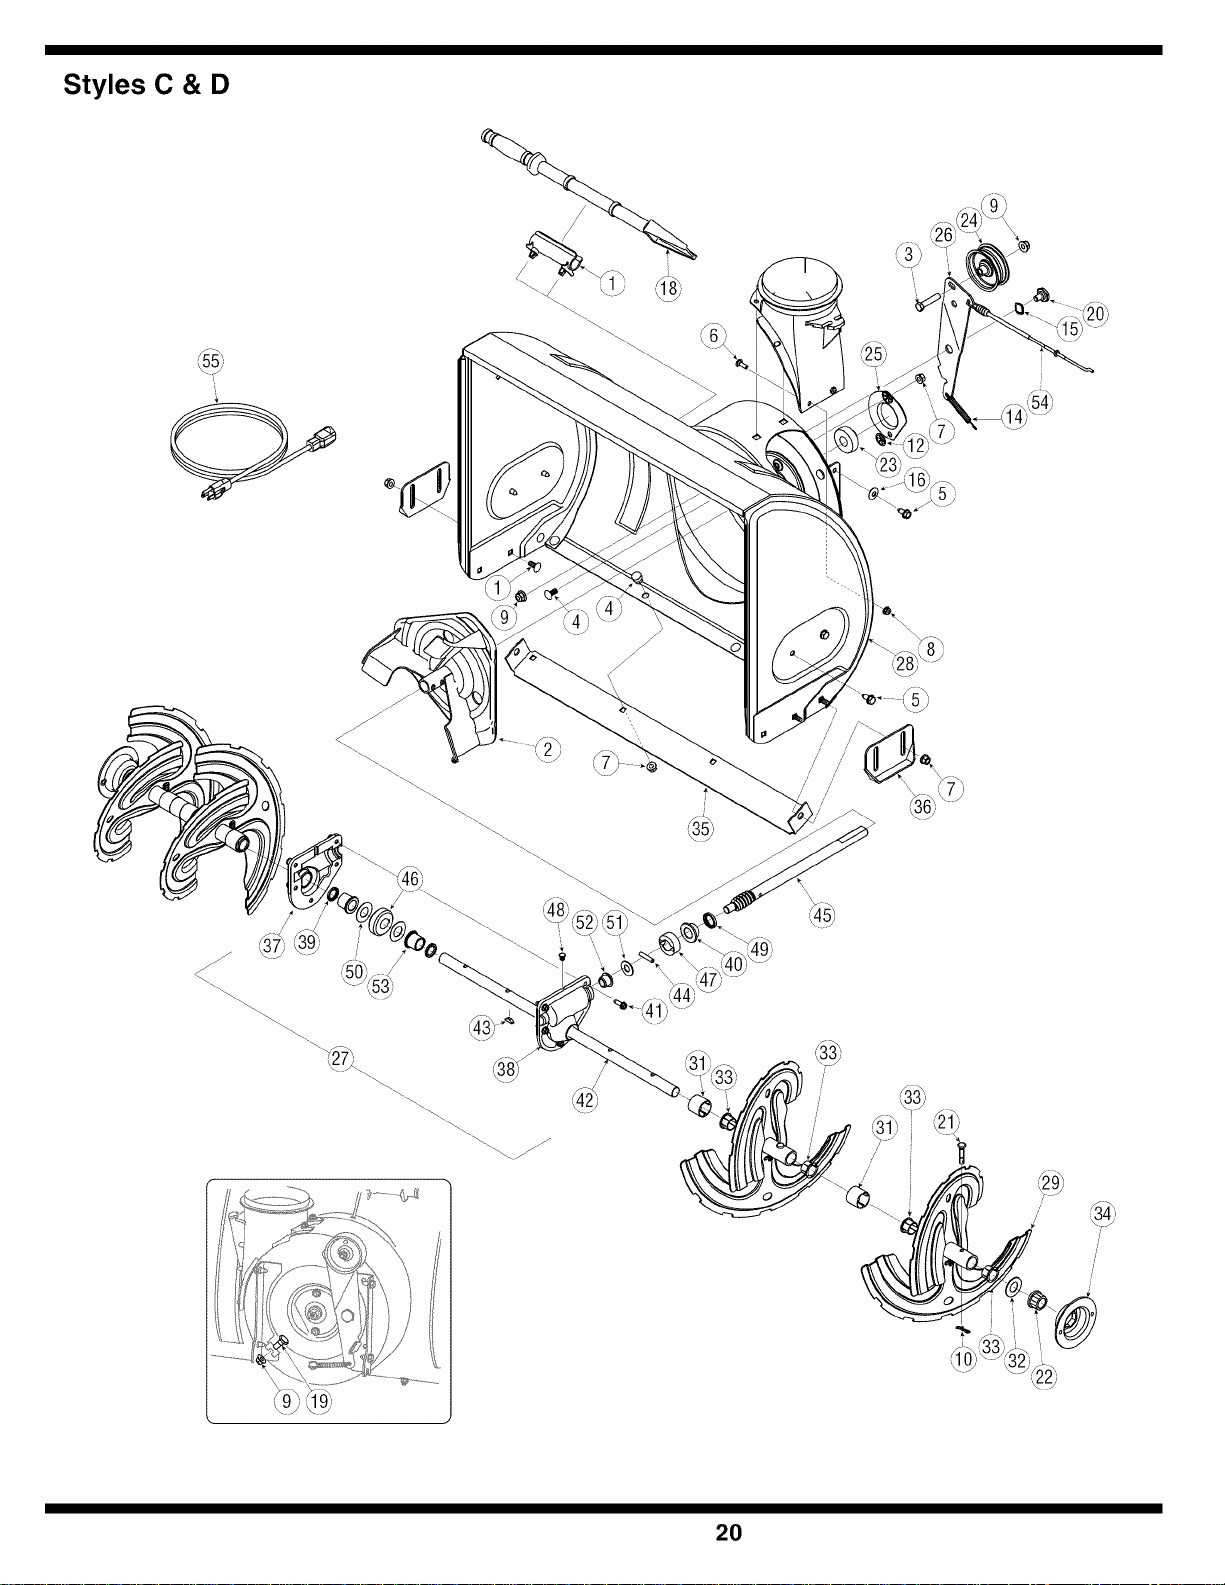
Styles C & D
i
/
20
1. 731-2635 SnowRemovalToolMount
2. 684-04057 ImpellerAssembly,12"Dia.
3. 710-0347 HexScrew,3/846, 1.75,Gr5
4. 710-0451 Bolt,Carriage,5/16-18,.750Grl
5. 710-0604A Screw,5/16-18,0.625
6. 710-0703 Screw,Carriage,1/4-20,.750,Gr5
7. 712-04063 Nut,FlangeLock,5/16-18,Nylon
8. 712-04064 Nut,FlangeLock,1/4-20,Nylon
9. 712-04065 Nut,FlangeLock,3/8-16,Nylon
10. 714-04040 CotterPin,Bow-tie
11. 725-0157 Cable,Tie,3/16x .05x 7.4
12. 726-04012 Nut,Push-on,.25Dia
13. 731-04705 Chute,Adapter5"Dia
14. 732-0611 Spring,Extension,.38ODx3.6
15. 736-0174 Washer,Wave,.625x .885x .015
16. 736-0242 Washer,Bell,.340x .872x .060
17. 736-0463 Washer,Flat,.25x .630x .0515
18. 731-2643 SnowRemovalTool
19. 738-0143 Screw,Shoulder,.498x .34,3/8-16
20. 738-0281 Screw,Shoulder,.625x .17,3/8-16
21. 738-04124A ShearPin,.25x 1.50
22. 741-0245 Bearing,HexFlangex .75ID
23. 741-0309 Bearing,Ball,.75IDx 1.85OD
24. 756-0981A FlatPulley,Idler, 2.75OD
25. 790-00075 Housing,Bearing,1.85ID
26. 790-00080 Bracket,AugerIdlerw/Brake
27. 618-04170 GearboxAssembly,Auger,22"
618-04171 GearboxAssembly,Auger,24"
618-04172 GearboxAssembly,Auger,26"
618-04173 GearboxAssembly,Auger,28"
28. 684-04067 HousingAssembly,Auger22"
684-04069 HousingAssembly,Auger24"
684-04071 HousingAssembly,Auger26"
684-04073 HousingAssembly,Auger28"
29. 684-04107 SpiralAssembly,LH
30. 684-04108 SpiralAssembly,RH
31. 731-04870" Spacer,1.25ODx.75 IDx 1.00
32. 736-0188 Washer,Flat,.76x 1.49x .06
33. 741-0493A Bushing,Flange,.80IDx .91OD
34. 790-00087A Housing,1"HexBearing
35. 790-00117 ShavePlate,2.25x21.66
790-00120 ShavePlate,2.25x23.66
790-00121 ShavePlate,2.25x25.66
790-00118 ShavePlate,2.25x27.66
36. 784-5580 SlideShoe
37. 719-0319 Housing,Auger,RH Reduced
38. 719-0320 Housing,Auger,LHReduced
39. 721-0179 Seal,Oil,.750ID
40. 741-0662 Bearing,Flange,.75x 1.0x .59
41. 710-0642 Screw,Self-tapping,1/4-20,0.750
42. 711-04286 Axle,Auger,22"
711-04285 Axle,Auger,24"
711-04284 Axle,Auger,26"
711-04283 Axle,Auger,28"
43. 714-0161 Key,Hi-pro3/16x 5/8
44. 715-04021 Pin,Dowel,.25ODx 1.2
45. 717-04126 Shaft,Worm.75OD
46. 717-0528A Gear,Worm20T
47. 718-04071 Collar,Thrust
48. 721-0325 Plug,1/4x.437
49. 721-0327 Seal,Oil,.75x 1x .131
50. 736-0351 Washer,Flat,.760IDx 1.50D
51. 736-3084 Washer,Flat,.51x 1.12
52. 741-0663 Bearing,Flange,.75x 1.0x .925
53. 741-0661A Bearing,Flange,.75x 1.00x.975
54. 746-04230 ClutchCable,Auger,47.23"
55. 629-0071 ExtentionCord,110V
* Nonefoundbetweenspiralsonmodelswith22-inchaugerhousing.
* Onefoundbetweenspiralson modelswith24-inchaugerhousing.
* Twofoundbetweenspiralsonmodelswith26-inchaugerhousing.
* Threefoundbetweenspiralson modelswith28-inchaugerhousing.
NOTE: Snowthrowerfeaturesandcomponentsvarybymodel.NOTall partslistedaboveandpictured
onthepreviouspageare standardequipment.
Ilustra'
_FACTORY PARTS
the webat
ii i _iI_ ii
21
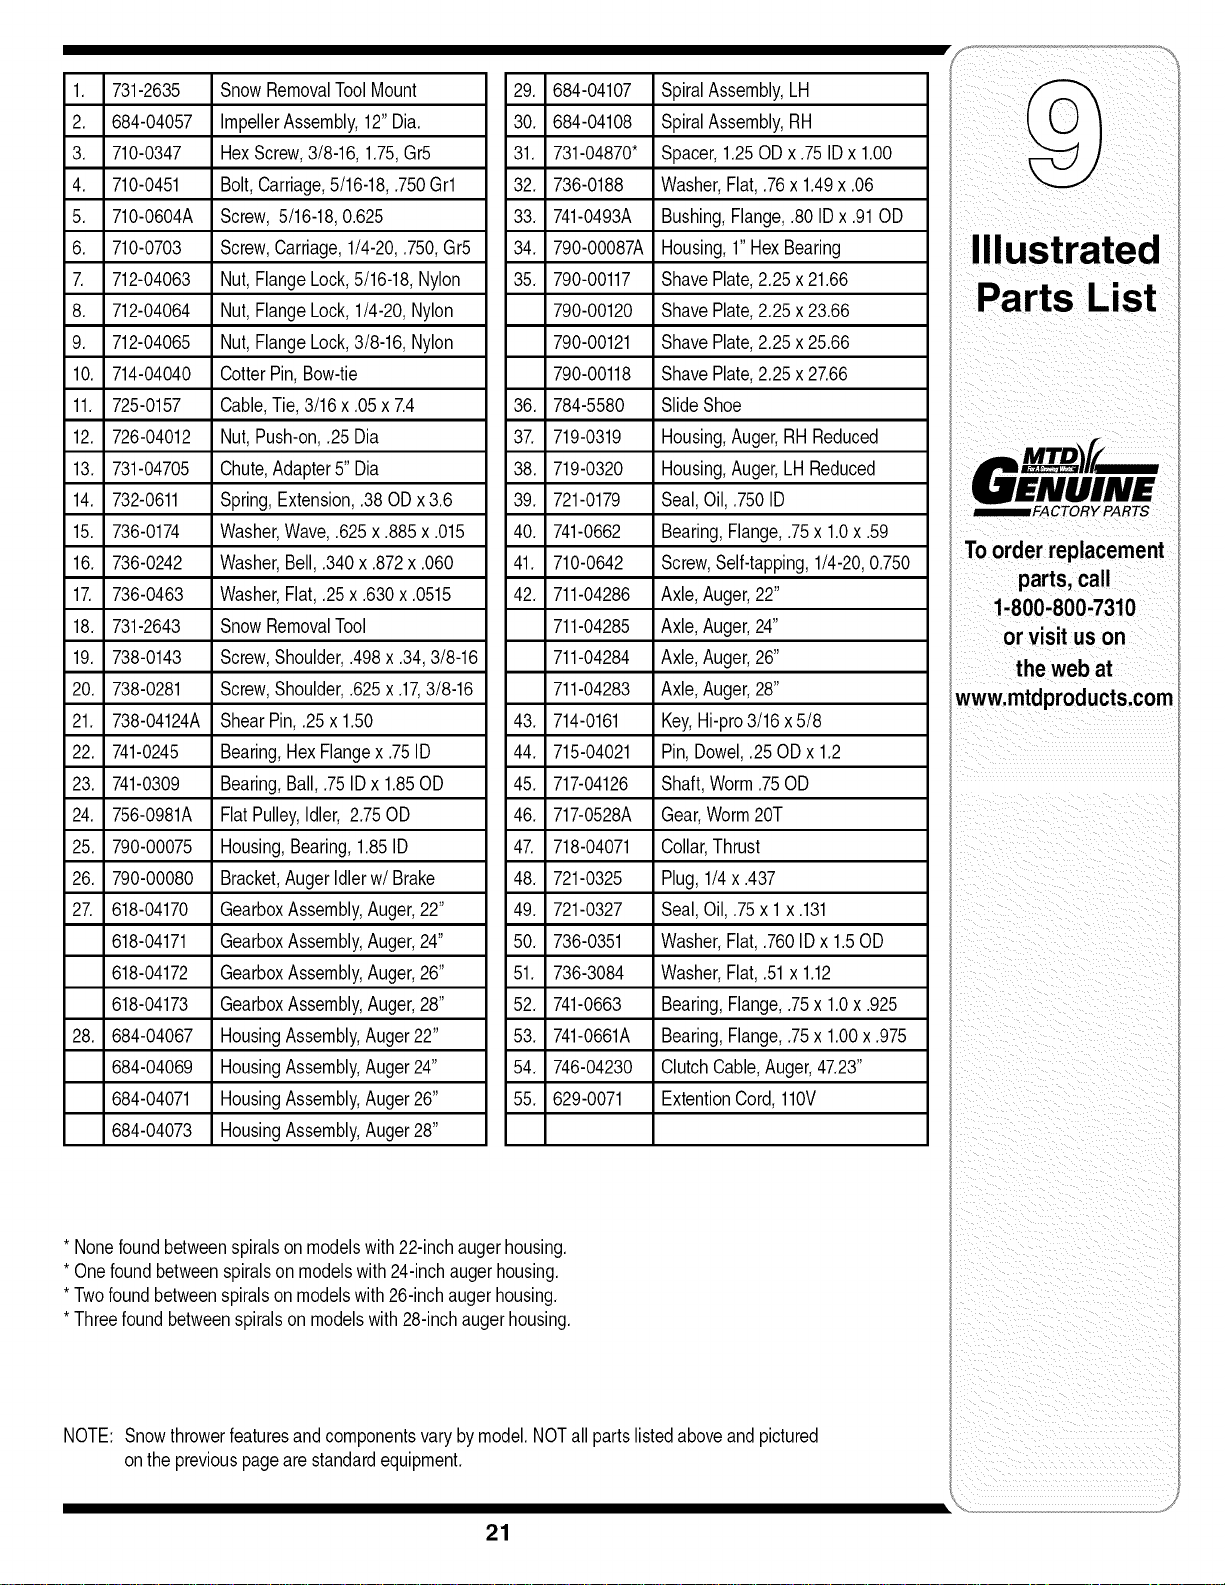
Styles C & D
%
/
/
/
22
1. 631-04133 HandleAss'y,LockLH
2. 631-04134A HandleAss'y,Lock,RH
3. 684-04106B HandleAss'y,EngagementLH
4. 684-04105A HandleAss'y,Engagement,RH
5. 710-0376 Screw,Self-tapping,5/16-18,.625
6. 710-0604A Screw,Self-tapping,5/16-18,1.0
7. 710-0606 Screw,Self-tapping,1/4-20,1.50
8. 710-1233 Screw,Machine,#10-24,1.375
9. 712-04063 Nut,FlangeLock,5/16-18,Nylon
10. 712-04064 Nut,FlangeLock,1/4-20,Nylon
11. 720-0223 Grip,0.5IDx3.45
12. 720-0274 Grip,1.0IDx 5.0
13. 732-04205 SpringLever,Shift
14. 735-0199A Bumper,Rubber,.62ODx .22
15. 736-3015 Washer,Flat,.469x.875x .105
16. 738-04122 Screw,Shoulder,1/4-20,.437
17. 747-04243 Lever,Shift
18. 790-00100 Panel,Handle,(nocutout)C-Style
790-00101 Panel,Handle,(w/cutout) D-Style
19. 790-00187A Panel,SpeedSelect(5 FW,2 RV)
20. 684-04104 CrankAssembly,Chute
21. 710-0449 Screw,Carriage,5/16-18,2.25
22. 710-1260A Screw,5/16-18,0.75,Gr5
23. 714-0104 Pin,Cotter,.072x 1.13
24. 720-0201A CrankKnob,1.0Dia.x 3.2, Black
25. 720-04072 KnobAssembly,Black,5/16-18
26. 726-0100 Cap,Push,3/8 Rod
27. 735-0234 Grommet,.44IDx .94ODx .50
28. 736-0185 Washer,Flat,.375x .738x .063
29. 736-0451 Washer,Saddle,320x .93x .060
30. 747-04263 EyeBolt,ChuteCrank
31. 749-04138 Handle,Lower
32. 749-04141 Handle,Upper,RH
33. 749-04142 Handle,Upper,LH
34. 731-04912A Chute,Lower,5.0Diameter
35. 710-0276 Bolt,Carriage,5/16-18,1.0
36. 710-04071 Bolt,Carriage,5/16-18,1.0
37. 710-0451 Bolt,Carriage,5/16-18,.750
38. 731-04426A Chute,Upper,w/Label
39. 725-04220 WireHarness,Lamp
40. 741-0475 Bushing,Plastic,.380
41. 784-5647 Bracket,ChuteCrank
42. 731-04869 Chute,FlangeKeeper
43. 747-1136 Retainer,Lens
44. 725-1658 Lamp,Halogen,12V,27W
45. 725-1672 LensAssembly,Lamp
NOTE:A lampcannotbeaddedto a unitthatdidcomecomefactory-equippedwitha lamp.
NOTE: Snowthrowerfeaturesandcomponentsvarybymodel.NOTall partslistedaboveandpictured
onthepreviouspageare standardequipment.
Ilustra'
_FACTORY PARTS
the webat
ii i _iI_ ii
23
Styles C & D
/
/
/
'L.!i:'
. J
24
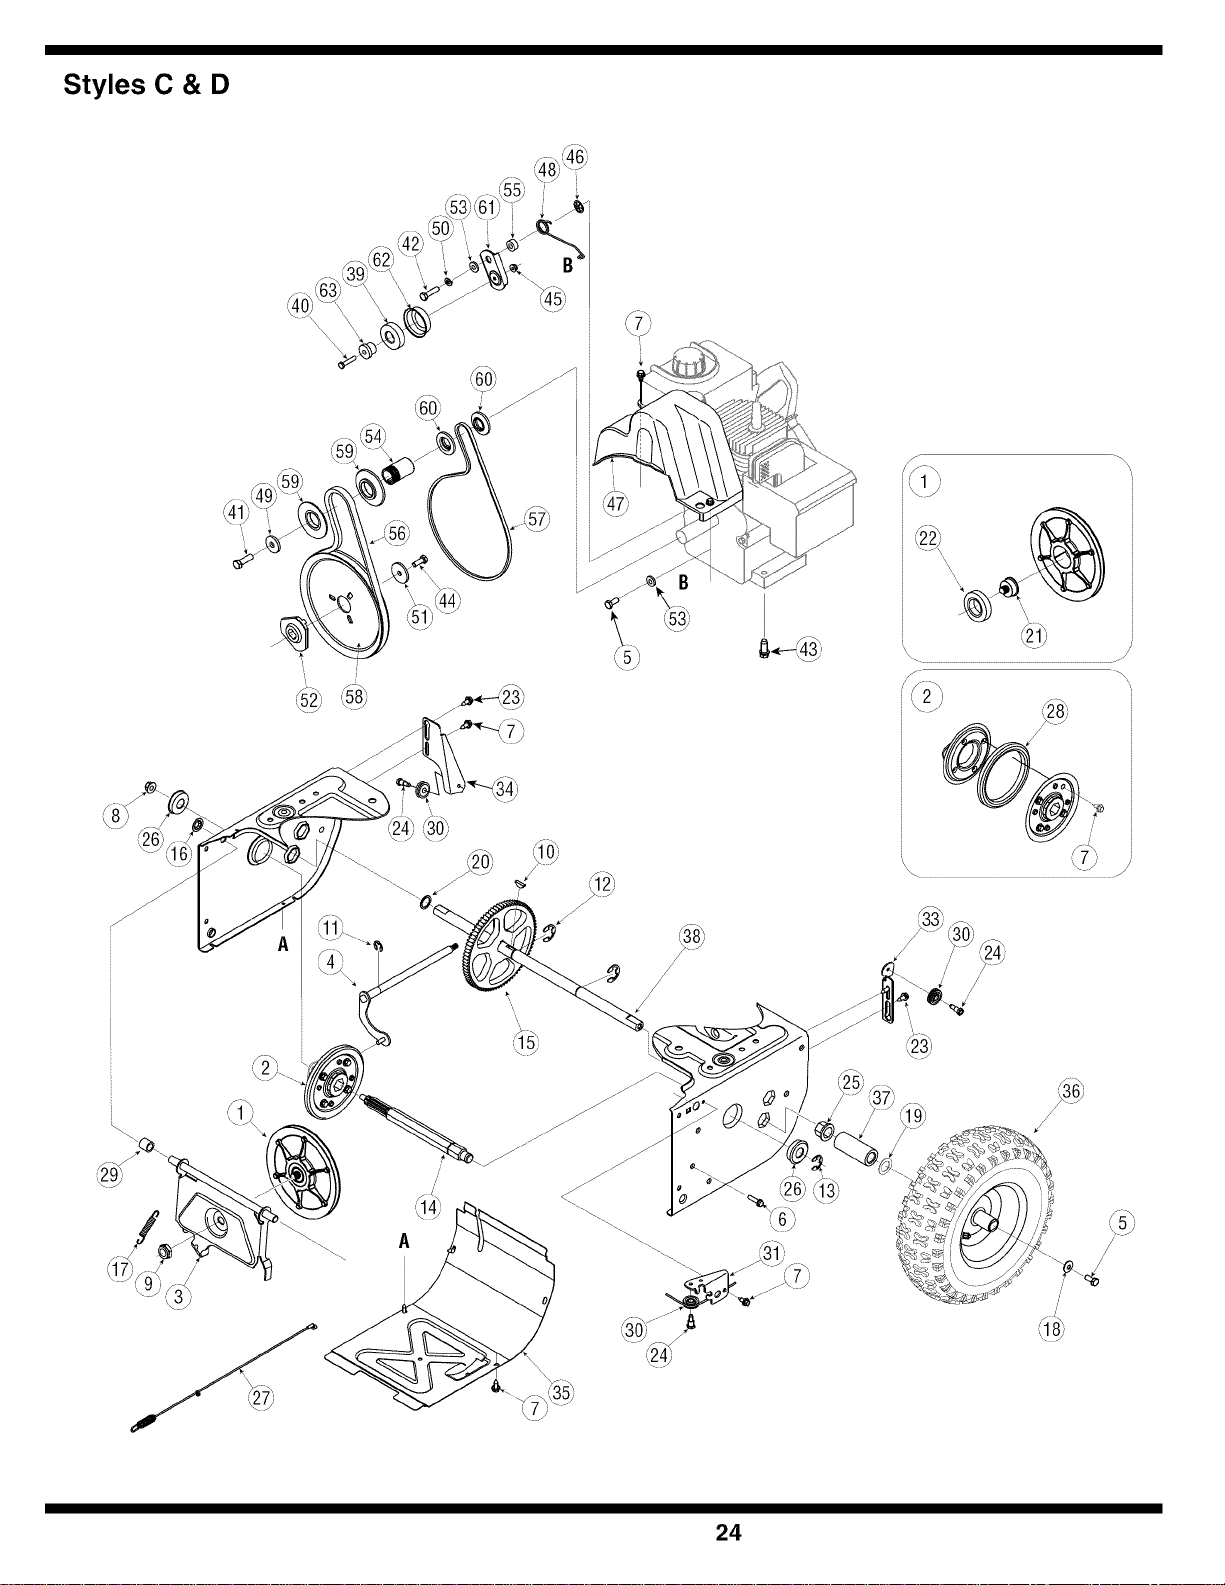
1. 656-04025A DiscAssembly,FrictionWheel
2. 684-04153 FrictionWheelAssembly,5.50D
3. 684-04154 SupportBracket,FrictionWheel
4. 684-04156 ShiftAssembly,Rod
5. 710-0627 HexScrew,5/16-24,.750,Gr5
6. 710-0788 Screw,1/4-20,1.000
7. 710-0896 Screw,1/4-14x.625
8. 712-04065 Nut,FlangeLock,3/8-16,Nylon
9. 712-0413 Nut,JamLock,5/8-18,Gr5,Nylon
10. 714-0126 Key,HiPro,3/16x 3/4Dia.
11. 716-0104 E-ring,.500Dia.
12. 716-0136 E-ring,Retaining,.875Dia.
13. 716-0231 E-ring,.750Dia.
14. 717-04209 HexShaft,.8125,7-Tooth
15. 717-04230 Gear,80-Tooth
16. 726-0221 SpeedNut,.500
17. 732-0264 ExtensionSpring
18. 736-0242 Washer,Bell,.340x .872x .060
19. 736-0287 Washer,Flat,.793x 1.24x .060
20. 736-04161 Washer,Flat,.75x 1.00x .060
21. 738-04164A Pin,FrictionDisc
22. 741-04098 BallBearing,30x 55x 13
23. 738-04184A Screw,Shoulder,.37x.105,1/4-20
24. 738-0924A Screw,1/4-28,.375
25. 741-0245 Bearing,HexFlangex .75ID
26. 741-0563 Bearing,Ball,17x40x 12
27. 746-04229 ClutchCable,Wheel,44.95"
28. 735-04054 Rubber,FrictionWheel,5.50D
29. 748-0190 Spacer,.508IDx .75ODx .68
30. 756-0625 Roller,Cable
31. 790-00096 FrontGuideBracket,AugerCable
32. 790-00180 Frame
33. 790-00206A GuideBracket,AugerCable
34. 790-00207A GuideBracket,DriveCable
35. 790-00226 Cover,Frame
36. SeeChart WheelAssembly
37. 731-04873 Spacer,1.25x .75x3.0
731-04877" Spacer,1.25x .75x 1.50
38. 738-04168 Axle,.75x 22"
39. 741-0919 Ball Bearing
40. 710-0106 HexScrew,1/4-20,1.25,Gr5
41. 710-0191 HexScrew,3/8-24,1.25,Gr8
42. 710-04520 HexScrew,5/16-24,1.25,Gr5
43. 710-0654A Screw,Seres,3/8-16,1.00
44. 710-1245B HexScrew,5/16-24,.875,Gr8
45. 712-04064 Nut,FlangeLock,1/4-20,Nylon
46. 726-04012 Nut,Push-on,.25Dia.
47. 731-04792A Cover,Belt
48. 732-04308 Spring,Torsion,.850IDx .354
49. 736-0247 Washer,Flat,.406x 1.25x .157
50. 736-0119 Washer,Lock.3125
51. 736-0505 Washer,Flat,.34x 1.50x .150
52. 748-04053 Pulley,Adapter,.75Dia.
53. 748-04112 Spacer,Shoulder,.317x .50x .102
54. 750-04303 Spacer,.875IDx 1.185OD
55. 750-04477 Spacer,.340x .750x .360
56. 754-04050 Belt,AugerDrive
57. 754-04088 Belt,WheelDrive
58. 756-04109 Pulley,AugerDrive,8.1x .5
59. 756-04113 Pulley,Half,Vx 2.600OD
60. 756-04179 Pulley,Half,1/4-Vx 1.50D
61. 790-00208 IdlerBracket,WheelDrive
62. 790-00230 Sleeve,BearingIdler
63. 750-04571 Spacer,Shoulder,.26x.79x .538
* Foundonmodelswith22-inchaugerhousingonly.
WheelAssembly
634-04144
634-04143
634-04142
Wheel Size
13x4
13x5
15x5
RimOnly
634-04151
634-04151
634-04151
TireOnly
734-1732
734-1527
734-1859
Valve Only
734-0255
734-0255
734-0255
NOTE: Snowthrowerfeaturesandcomponentsvarybymodel.NOTall partslistedaboveandpictured
onthepreviouspageare standardequipment.
Ilustra'
_FACTORY PARTS
the webat
ii i _iI_ ii
25

NOTES
26

NOTES
27
MANUFACTURER'S LIMITED WARRANTY FOR
ThelimitedwarrantysetforthbelowisgivenbyMTDLLCwithrespect
tonewmerchandisepurchasedandusedin theUnitedStates,its
possessionsandterritories.
"MTD"warrantsthisproductagainstdefectsin materialandworkman-
shipfora periodoftwo(2)yearscommencingonthedateoforiginal
purchaseandwill,at itsoption,repairor replace,freeofcharge,any
partfoundto bedefectiveinmaterialsorworkmanship.Thislimitedwar-
rantyshallonlyapplyifthisproducthasbeenoperatedand maintained
inaccordancewiththeOperator'sManualfurnishedwiththeproduct,
andhasnotbeensubjectto misuse,abuse,commercialuse,neglect,
accident,impropermaintenance,alteration,vandalism,theft,fire,water,
ordamagebecauseofotherperilor naturaldisaster.Damageresulting
fromthe installationor useofanypart,accessoryor attachmentnot
approvedby MTDforusewiththeproduct(s)coveredbythis manual
willvoidyourwarrantyastoanyresultingdamage.
Normalwearpartsarewarrantedto befreefromdefectsinmaterialand
workmanshipforaperiodofthirty(30)daysfromthedateof purchase.
Normalwearpartsinclude,butare notlimitedto itemssuchas: batter-
ies,belts,blades,bladeadapters,grassbags,riderdeckwheels,seats,
snowthrowerskidshoes,shaveplates,augerspiralrubberandtires.
HOW TO OBTAINSERVICE: Warrantyservice isavailable,WITH
PROOFOF PURCHASE,throughyour localauthorizedservice
dealer.Tolocate the dealer in yourarea, check yourYellowPages,
or contact MTD LLCat P.O.Box361131,Cleveland,Ohio 44136-
0019,or call 1-800-800-7310or 1-330-220-4683 or log on to our
Website at www.mtdproducts.com.
Thislimitedwarrantydoesnot providecoverageinthefollowingcases:
a. Theengineor componentpartsthereof.Theseitemsmaycarrya
separatemanufacturer'swarranty.Refertoapplicablemanufacturer's
warrantyfortermsandconditions.
b. Logsplitterpumps,valves,andcylindershavea separateoneyear
warranty.
c. Routinemaintenanceitemssuchaslubricants,filters,blade
sharpening,tune-ups,brakeadjustments,clutchadjustments,deck
adjustments,andnormaldeteriorationoftheexteriorfinishdueto
useor exposure.
d. Servicecompletedbysomeoneotherthananauthorizedservice
dealer.
e. MTDdoesnotextendanywarrantyforproductssoldor exported
outsideoftheUnitedStates,its possessionsandterritories,except
thosesoldthroughMTD'sauthorizedchannelsofexportdistribution.
f. ReplacementpartsthatarenotgenuineMTDparts.
g. Transportationchargesandservicecalls.
Noimplied warranty,including anyimplied warrantyofmer-
chantabilityoffitness for a particularpurpose,appliesafterthe
applicableperiodofexpresswrittenwarrantyaboveastothe
partsasidentified.Nootherexpresswarranty,whetherwrittenor
oral,exceptas mentionedabove,givenbyanypersonor entity,
includinga dealeror retailer,withrespecttoanyproduct,shall
bindMTD.Duringtheperiodofthewarranty,theexclusiveremedy
isrepairor replacementoftheproductas setforth above.
Theprovisionsasset forth inthiswarrantyprovidethesoleand
exclusiveremedyarisingfrom thesale.MTDshallnotbeliable
for incidentalor consequentiallossordamageincluding,without
limitation,expensesincurredfor substituteor replacementlawn
careservicesor for rentalexpensestotemporarilyreplacea
warrantedproduct.
Somestatesdo notallowtheexclusionor limitationofincidentalor
consequentialdamages,or limitationsonhowlongan impliedwarranty
lasts,sotheaboveexclusionsor limitationsmaynotapplytoyou.
Innoeventshallrecoveryofanykindbegreaterthantheamountofthe
purchasepriceof theproductsold.Alteration of safety featuresof
the product shall void this warranty. Youassumetheriskandliability
forloss,damage,or injurytoyouandyourpropertyand/ortoothersand
theirpropertyarisingoutofthemisuseor inabilitytousethe product.
Thislimitedwarrantyshallnotextendtoanyoneotherthantheoriginal
purchaserorto thepersonforwhomitwaspurchasedasa gift.
HOWSTATELAWRELATESTOTHISWARRANTY:This limited
warrantygivesyouspecificlegalrights,and youmayalsohaveother
rightswhichvaryfromstatetostate.
IMPORTANT:OwnermustpresentOriginalProofof Purchasetoobtain
warrantycoverage.
MTD LLC, P.O. BOX 361131 CLEVELAND, OHIO 44136-0019; Phone: 1-800-800-7310, 1-330-220-4683