

Safety • Assembly • Operation • Tips &Techniques • Maintenance • Troubleshooting • Parts Lists • Warranty
OF A O A AL
22=inch Rotary Mower- Model Series 080
iMPORTANT
READ SAFETY RULES AND iNSTRUCTiONS CAREFULLY BEFORE OPERATION
Warning: Thisunit is equippedwithan internalcombustionengineandshouldnot beusedon or nearany uniiprovedforest-covered,brush-
coveredor grass-coveredlandunlesstheengine'sexhaustsystemis equippedwitha sparkarrestermeetingapplicablelocalor statelaws(if any).
If a sparkarresteris used,it shouldbemaintainedineffectiveworkingorderby the operator.In theStateof Californiathe aboveis requiredbylaw
(Section4442of the CaliforniaPublicResourcesCode).Otherstatesmayhavesimilarlaws.Federallawsapplyonfederallands.A sparkarrester
for the muffleris availablethroughyour nearestengineauthorizedservicedealeror contactthe servicedepartment,RO.Box361131Cleveland,
Ohio44136-0019.
PRINTEDIN U.S.A
MTD LLC, P.O. BOX 361131 CLEVELAND, OHIO 44136-0019
FORMNO.770-10342G
9/27/2006

This Operator's Manual is an important part of your new lawn mower, it will help you assemble,
prepare and maintain the unit for best performance. Please read and understand what it says.
Table of Contents
Slope Gauge ........................................................ 3
Safe Operation Practices ................................... 4
Setup and Adjustment ....................................... 6
Operating Your Lawn Mower .............................. 8
Maintaining Your Lawn Mower ......................... 10
Troubleshooting ................................................ 12
Safety Labels .................................................... 13
Parts List ........................................................... 14
Warranty ............................................. Back Cover
MTDLLCreservesthe rightto changeproductspecifications,designs,andequipmentwithoutnoticeandwithoutincurringobligation.
Finding and Recording Model Number
BEFOREYOU BEGINTO ASSEMBLEYOURNEW
EQUIPMENT,pleaselocate the model plateon the
equipmentand copythe informationto the sample
model plateprovidedto the right.Youcanlocatethe
modelplatebystandingat the operatingpositionand
lookingdown atthe rearof the deck. This information
will benecessaryto use the manufacturer'sweb
site, to obtainassistancefrom the CustomerSup-
port Department,or when contactingan authorized
service dealer.
f
Model Number Serial Number
MTD LLC
P.O. BOX 361131
CLEVELAND, OH 44136
330-220-4683
, www.mtdproducts.com 800-800-731
Customer Support
Please do NOTreturn the unit to the retailer from which it was
purchased, without first contacting Customer Support.
If you havedifficulty assemblingthis productor have anyquestionsregardingthe controls,operation,or
maintenanceof this unit,youcan seek help from the experts.Choosefrom the optionsbelow:
= Visitwww.mtdproducts.com
• Call a CustomerSupport Representativeat 1-800-800-7310.
• The engine manufacturer isresponsiblefor all engine-relatedissueswith regardsto performance,power-
rating,specifications,warrantyand service.Pleasereferto the enginemanufacturer'sOwner's/Operator's
Manual,packedseparatelywith your unit,for more information.
2
z_
d_
o9
_D
_D
O
O
E
=5
O
d_
o6
d_ o3
o -5
O9 C5
d_ O3
C
_ o
_D
o_
E
O
_D
C5
c_ 0
o3
c_ _,_
c'_ _
!i!_i!il<
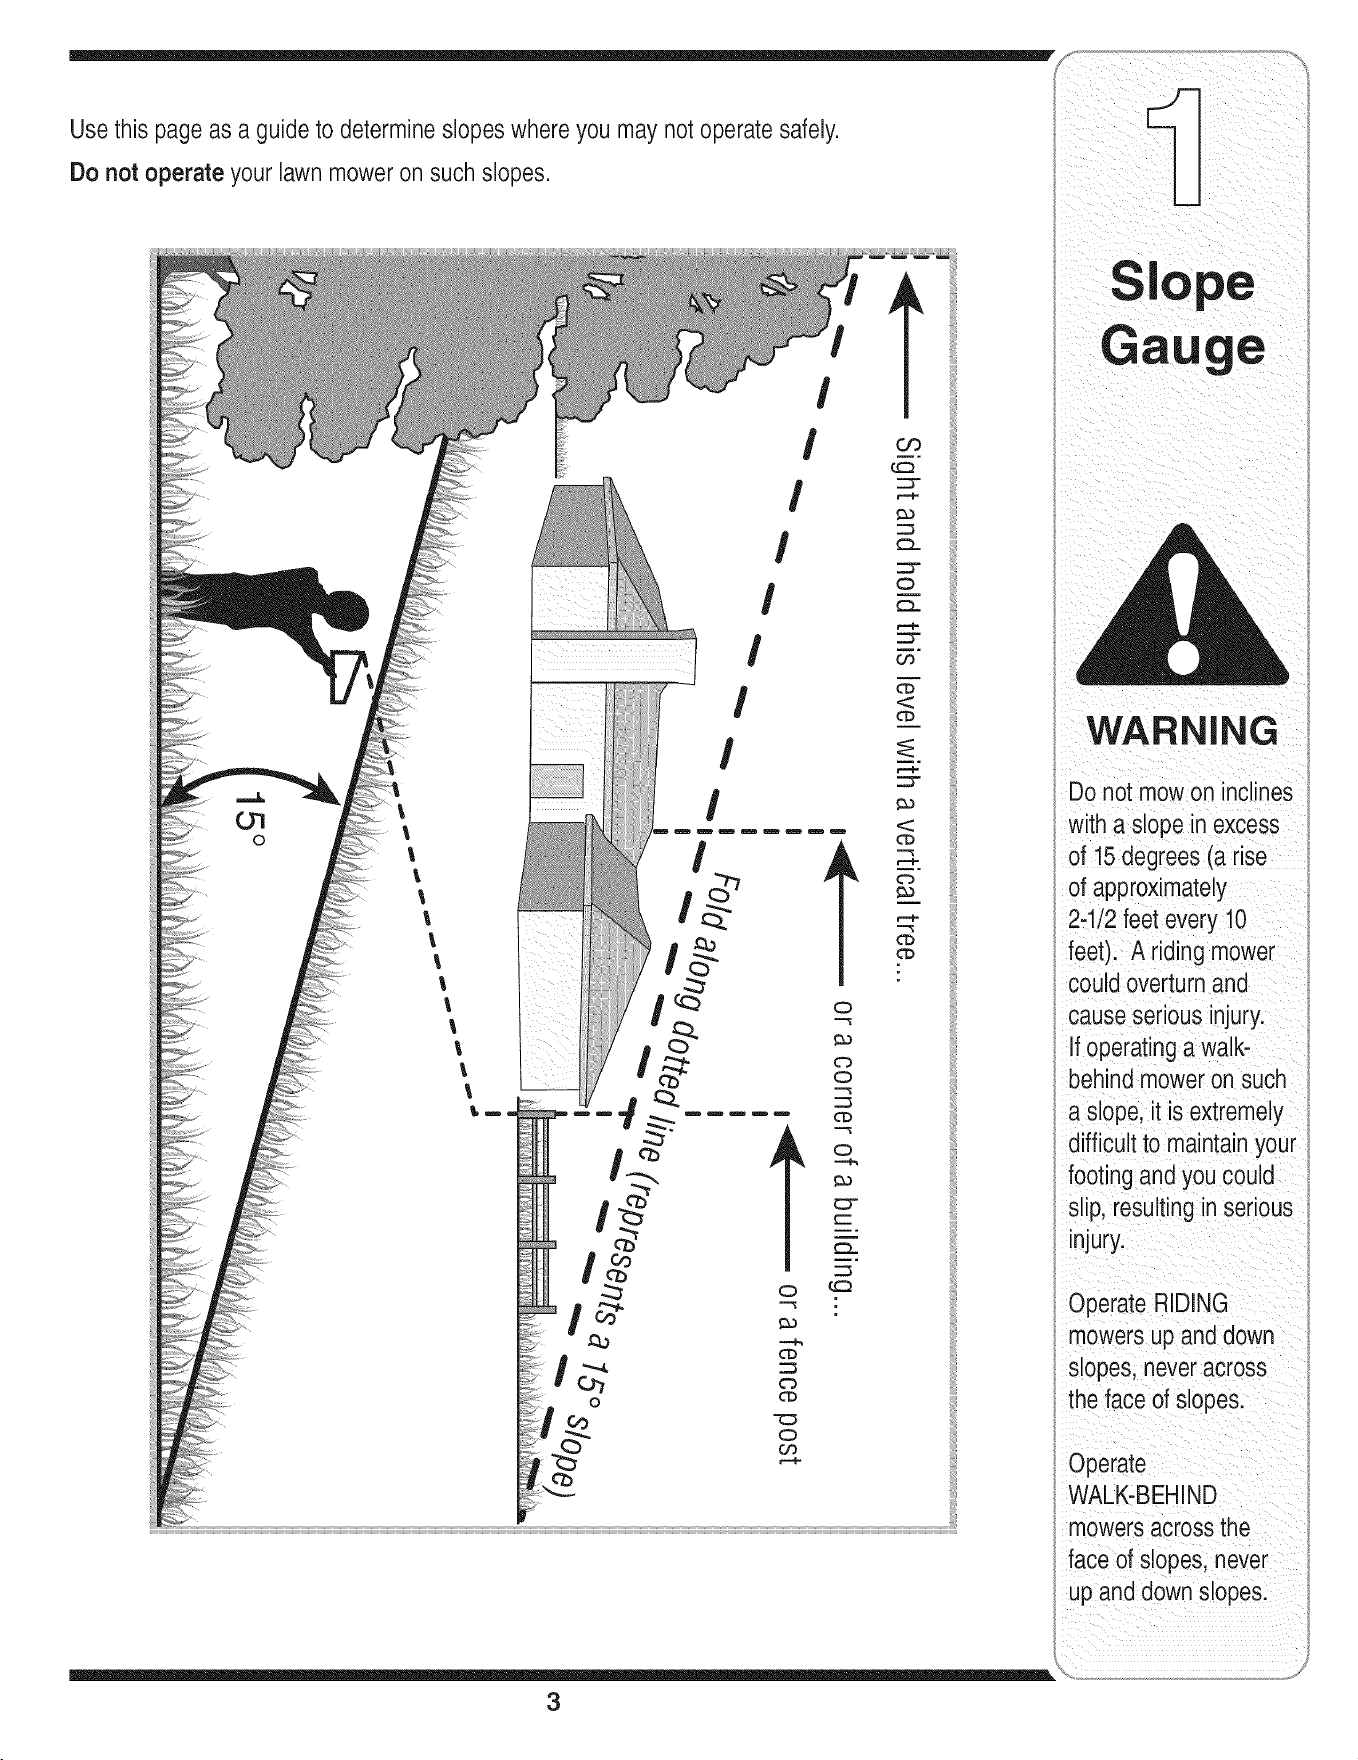
Sight and hold this levelwith a verticaltree...
_ or a corner of a building...
I
I
__ or a fence post
I
I I
-- fir_e (repros
_ _ er_ts a 15o
15°
_0
WARNING
This symbolpoints
out importantsafety
instructionswhich, if
notfollowed,could
endangerthe personal
i safetyand/or property
I ofyourselfand others.
Readandfollowall
instructionsinthis
manualbeforeat-
temptingto operate
i this machine. Failure
I to complywith these
instructionsmay result
i in personalinjury.When
you see this symbol.
i HEED ITS WARNING!
i Your Responsibility
Restrictthe use
of this power machine
to personswho read.
i understand
andfollow the warnings
and instructions
I.
=nthis manual
and on the machine.
WARNING: Engine Exhaust,some of its constituents, and certain vehicle compo-
nents contain or emit chemicals known to State of Californiato cause cancer and
birth defects or other reproductiveharm.
DANGER: This machine was built to be operated according to the rulesfor safe operation in this
manual.As with any type of powerequipment, carelessness or error on the part of the operator
can result in serious injury.This machine is capable of amputating hands and feet and throwing
objects. Failureto observethe following safety instructions could result in serious injury or death.
Children
Tragicaccidentscan occur ifoperatorisnotalert to presence
of children.Childrenare oftenattractedtomowerand mowing
activity.Theydonot understandthe dangers.Neverassume
thatchildrenwill remainwhereyoulastsawthem.
1. Keepchildrenoutof the mowingareaand underwatchful
careof a responsibleadultotherthanthe operator.
2. Bealert andturn moweroffif a childentersthearea.
3. Beforeand whilemovingbackwards,look behindanddown
forsmallchildren.
4. Useextremecare whenapproachingblindcorners,
doorways,shrubs,trees,or otherobjectsthat mayobscure
yourvisionof a child whomayrun intothe mower.
5. Keepchildrenawayfromhotor runningengines.Theycan
sufferburnsfroma hotmuffler.
6. Neverallowchildrenunder14yearsoldto operatea power
mower.Children14yearsoldand overshouldreadand
understandoperationinstructionsandsafetyrulesinthis
manualandshouldbetrainedandsupervisedbya parent.
General Operation
1. Readthis operator'smanualcarefullyin its entiretybefore
attemptingto assemblethis machine.Read,understand,
andfollowall instructionson the machineandin the
manual(s)beforeoperation.Becompletelyfamiliarwith
thecontrolsandthe properuseof this machinebefore
operatingit. Keepthis manualin a safeplaceforfuture
and regularreferenceand for orderingreplacementparts.
2. Thismachineis a precisionpieceof powerequipment,
nota plaything.Therefore,exerciseextremecautionat all
times.Yourunithas beendesignedto performonejob: to
mowgrass. Do notuseit for anyotherpurpose.
3. Neverallow childrenunder 14yearsold to operatethis
machine.Children 14yearsoldand overshould readand
understandthe instructionsinthis manualandshould
betrainedand supervisedby a parent.Onlyresponsible
individualswho arefamiliarwiththese rulesof safe
operationshould beallowedto usethis machine.
4. Thoroughlyinspectthe areawherethe equipmentis to
beused. Removeall stones,sticks,wire,bones,toys
andotherforeignobjects, whichcouldbetrippedover or
pickedup andthrownbythe blade.Thrownobjects can
causeseriouspersonalinjury.Planyour mowingpattern
to avoiddischargeof materialtowardroads,sidewalks,
bystandersandthe like.Also,avoiddischargingmaterial
againsta wallor obstruction,whichmaycausedischarged
materialto ricochetback towardthe operator.
5. Tohelpavoidbladecontact ora thrownobjectinjury,
stay inoperatorzone behindhandlesand keepchildren,
bystanders,helpersand petsat least75 feetfrom mower
whileit is inoperation.Stop machineifanyoneenters
area.
6. Alwayswearsafetyglassesor safetygogglesduringopera-
tionandwhile performinganadjustmentor repairto protect
youreyes.Thrownobjectswhich ricochetcancauseserious
injuryto the eyes.
7. Wearsturdy,rough-soledworkshoesand close-fitting
slacksandshirts. Shirtsand pantsthatcoverthe armsand
legs andsteel-toedshoesare recommended.Neveroperate
this machinein barefeet,sandals, slipperyor light-weight
(e.g.canvas)shoes.
8. Do notputhands orfeet nearrotatingparts or undercutting
deck.Contactwithblade canamputatehands andfeet.
9. A missingor damageddischargecovercancause blade
contactor thrownobject injuries.
10.Manyinjuriesoccuras a resultof the mowerbeing pulled
overthefoot duringa fall causedby slippingor tripping.
Do notholdon tothe mowerifyouare falling;releasethe
handleimmediately.
11.Neverpullthe mowerbacktowardyouwhileyou are
walking.If you must backthe mowerawayfroma wall or
obstructionfirstlook downand behindto avoidtrippingand
thenfollowthese steps:
a. Stepbackfrommowerto fully extendyourarms.
b. Be sure youare wellbalancedwithsurefooting.
c. Pullthe mowerbackslowly,no morethan halfway
towardyou.
d. Repeatthesestepsas needed.
12.Do notoperatethe mowerwhileunderthe influenceof
alcoholordrugs.
13.Do notengagetheself-propelledmechanismon unitsso
equippedwhilestartingengine.
14.The bladecontrolhandleis a safetydevice.Neverattempt
to bypassitsoperation.Doingso makesthe safetydevice
inoperativeandmayresult in personalinjurythrough
contactwiththe rotatingblade. Thebladecontrolhandle
mustoperateeasily in bothdirectionsandautomatically
returnto the disengagedpositionwhenreleased.
15.Neveroperatethe mowerinwet grass. Alwaysbe sure of
yourfooting. A slipand fall cancauseseriouspersonal
injury.If youfeel youare losingyourfooting,releasethe
bladecontrolhandleimmediatelyand the bladewillstop
rotatingwithinthreeseconds.
16.Mowonlyin daylightor goodartificiallight.Walk,neverrun.
17.Stopthe bladewhencrossinggraveldrives, walksor roads.
18.If the equipmentshouldstartto vibrateabnormally,stopthe
engineand check immediatelyfor the cause.Vibrationis
generallya warningof trouble.
4
19.Shutthe engineoff and waituntil the bladecomesto a
completestopbeforeremovingthe grasscatcherorunclog-
gingthe chute.
The cutting bladecontinuesto rotatefora few secondsafter
the engineis shutoff. Neverplaceany partof the body in
the bladeareauntil youare surethe bladehasstopped
rotating.
20.Neveroperatemowerwithoutpropertrail shield,discharge
cover,grasscatcher,bladecontrolhandleorothersafety
protectivedevicesin placeand working.Neveroperate
mowerwith damagedsafetydevices.Failureto doso can
result in personalinjury.
21.Mufflerand enginebecomehotandcan causea burn.Do
nottouch.
22.Only use partsandaccessoriesmadeforthis machineby
manufacturer.Failureto doso can resultin personalinjury.
23. Ifsituationsoccur whichare notcoveredinthis manual,
usecare and goodjudgment.Contactyour dealerfor
assistance.
Slope Operation
Slopesare a majorfactorrelatedto slip andfall accidents,which
canresult insevereinjury.Operationonslopesrequiresextra
caution.If youfeel uneasyona slope,do notmowit. Foryour
safety,use theslopegaugeincludedas part ofthis manualto
measureslopesbeforeoperatingthis uniton a slopedorhilly
area.Ifthe slopeis greaterthan 15degrees,do notmowit.
Do:
1. Mow acrossthefaceof slopes;neverupand down.Exercise
extremecautionwhenchangingdirectiononslopes.
2. Watchfor holes,ruts, rocks,hiddenobjects,or bumps
which cancauseyouto slipor trip. Tallgrasscan hide
obstacles.
3. Alwaysbesure of yourfooting.A slipand fallcan cause
serious personalinjury.If youfeel youare losingyour
balance,releasethe bladecontrolhandleimmediately,and
the bladewill stoprotatingwithin3 seconds.
Do Not:
1. Do notmow neardrop-offs,ditchesor embankments,you
could loseyourfootingor balance.
2. Do notmowslopesgreaterthan 15degreesas shownon
the slopegauge.
3. Do notmowonwet grass. Unstablefootingcouldcause
slipping.
Service
Safe Handling Of Gasoline:
1. Toavoidpersonalinjuryor propertydamageuse extreme
care in handlinggasoline.Gasolineis extremelyflammable
and thevaporsare explosive.Seriouspersonalinjury can
occur whengasolineisspilled onyourselfor your clothes,
which canignite.Washyourskin andchangeclothes
immediately.
2. Use onlyan approvedgasolinecontainer.
3. Neverfill containersinsidea vehicleor ona truck ortrailer
bed witha plasticliner.Alwaysplacecontainersonthe
groundawayfromyourvehiclebeforefilling.
4. Removegas-poweredequipmentfrom the truckor trailer
and refueliton theground.If this is not possible,then refuel
suchequipmenton atrailer witha portablecontainer,rather
than froma gasolinedispensernozzle.
5. Keepthe nozzlein contactwiththe rimof the fueltankor
containeropeningat all timesuntilfueling iscomplete.Do
not usea nozzlelock-opendevice.
6. Extinguishallcigarettes,cigars, pipesand othersources
of ignition.
7. Neverfuel machineindoorbecauseflammablevaporswill
accumulatein thearea.
8. Neverremovegas cap oradd fuel whileengineis hot or
running. Allowengineto cool at leasttwo minutesbefore
refueling.
9. Neveroverfill fueltank. Filltankto no morethan Y2inch
belowbottomof filler neckto providefor fuel expansion.
10.Replacegasolinecapandtightensecurely.
11.If gasolineis spilled,wipe itoff theengineand equipment.
Moveunitto anotherarea.Wait5 minutesbeforestarting
engine.
12.Neverstorethe machineorfuel containernearan open
flame,sparkor pilot light as ona water heater,space
heater,furnace,clothesdryeror othergas appliances.
13.Toreducefire hazard,keepmowerfree of grass, leaves,
orother debrisbuild-up.Clean up oil orfuelspillageand
removeanyfuel soakeddebris.
14.Allowa mowerto cool at least5 minutesbeforestoring.
GeneralService:
1. Neverrun an engineindoorsorin a poorlyventilatedarea.
Engineexhaustcontainscarbonmonoxide,anodorless
anddeadlygas.
2. Beforecleaning,repairing,or inspecting,makecertainthe
bladeandall movingparts havestopped.Disconnectthe
sparkplugwire andgroundagainstthe engineto prevent
unintendedstarting.
3. Checkthe bladeandenginemountingbolts atfrequent
intervalsfor propertightness.Also,visuallyinspectblade
fordamage(e.g.,bent,cracked,worn)Replacebladewith
theoriginalequipmentmanufacture's(O.E.M.)bladeonly,
listedin this manual."Useof partswhichdo notmeetthe
originalequipmentspecificationsmayleadto improper
performanceand compromisesafety!"
4. Mowerbladesare sharpandcan cut.Wrapthebladeor
weargloves,anduseextracautionwhenservicingthem.
5. Keepallnuts,bolts,andscrewstightto besurethe equip-
mentis insafeworkingcondition.
6. Nevertamperwithsafetydevices.Checktheir proper
operationregularly.
7. Afterstrikinga foreignobject,stopthe engine,discon-
nectthesparkplugwire andgroundagainsttheengine.
Thoroughlyinspectthe mowerfor anydamage.Repairthe
damagebeforestartingandoperatingthe mower.
8. Neverattemptto makea wheelor cuttingheightadjust-
mentwhilethe engineis running.
9. Grasscatchercomponents,dischargecover,andtrail
shieldaresubjectto wear anddamagewhichcould
exposemovingpartsor allowobjectsto bethrown.For
safetyprotection,frequentlycheck componentsand re-
placeimmediatelywithoriginal equipmentmanufacturer's
(O.E.M.)partsonly,listedin this manual."Useof parts
whichdo notmeetthe originalequipmentspecifications
mayleadto improperperformanceand compromise
safety!"
10.Do notchangetheenginegovernorsettingor over-revthe
engine.The governorcontrolsthe maximumsafeoperating
speedof theengine.
11.Maintainor replacesafetylabels,as necessary.
12.Observeproperdisposallawsand regulations.Improper
disposalof fluidsand materialscanharmtheenvironment.
Practices
WARNING
This symbol points
out important safety
instructions, which if
not followed, could
endangerthe personal
safety and/or property
of yourselfand others.
Readand follow all
instructions inthis man-
ual before attemptingto
operate this machine.
Failureto comply with
these instructionsmay
result in personal injury.
When you see this
symbol.
HEED iT'S WARNING!
Your Responsibility
Restrictthe use
of this power machine
to personswho read.
understand
and follow the warnings
and instructions
in this manua
and on the machine.
5
Your mower is
shipped with the
handle in the higher
height position.
Each end ofthe
lower handle must
be placed inthe
same position on the
mounting brackets.
IMPORTANT:This
unit isshippedwithout
gasoline or oil inthe
engine. Fill up gasoline
and oil as instructed in
the accompanyingen-
gine manual BEFORE
operatingyour mower.
NOTE: This Operator's
Manualcovers
several models. Lawn
Mowerfeatures vary by
model. Notall features
discussed (or engines
pictured) in this manual
are applicableto all
Lawn Mower models.
ol It
Figure 3=1
1. For shipping purposes, the chute deflectoron
your mower is held in an upright position bya
retainer.Removethe retainer asfollows:
a. Push chute deflector up towards engine.
Holding deflector in this position, remove
the retainerand discard. See Figure 3-1.
b. Lower the chute deflector carefully keeping
your fingers out of the way.
2. Perform the following sequence for handle
setup:
a. Lift the upperhandle up from folded
position A and pull it to extended position
B following the arrow in Figure 3-2. The
handle should click into this position.
b. Make sure the carriage bolt is seated
properly in the handle.Tightenwing nuts
securing upper handleto the lower handle.
3. If satisfiedwith height of handle,tighten wing
nuts at the ends of the lowerhandle shown in
Figure 3-3. Forconvenience of operating,you
may adjust the handle height asfollows:
a. Remove the wing nuts shown in Figure 3-3
and remove the lowerhandle.
,
b. Positioneach handle bracketstud into the
top hole in the lower handle.
c. Tighten the wing nuts.
Positionthe recoil starter by following the
steps below:
a. Hold the blade control against the upper
handle.
Figure 3=2
Figure 3=3
6
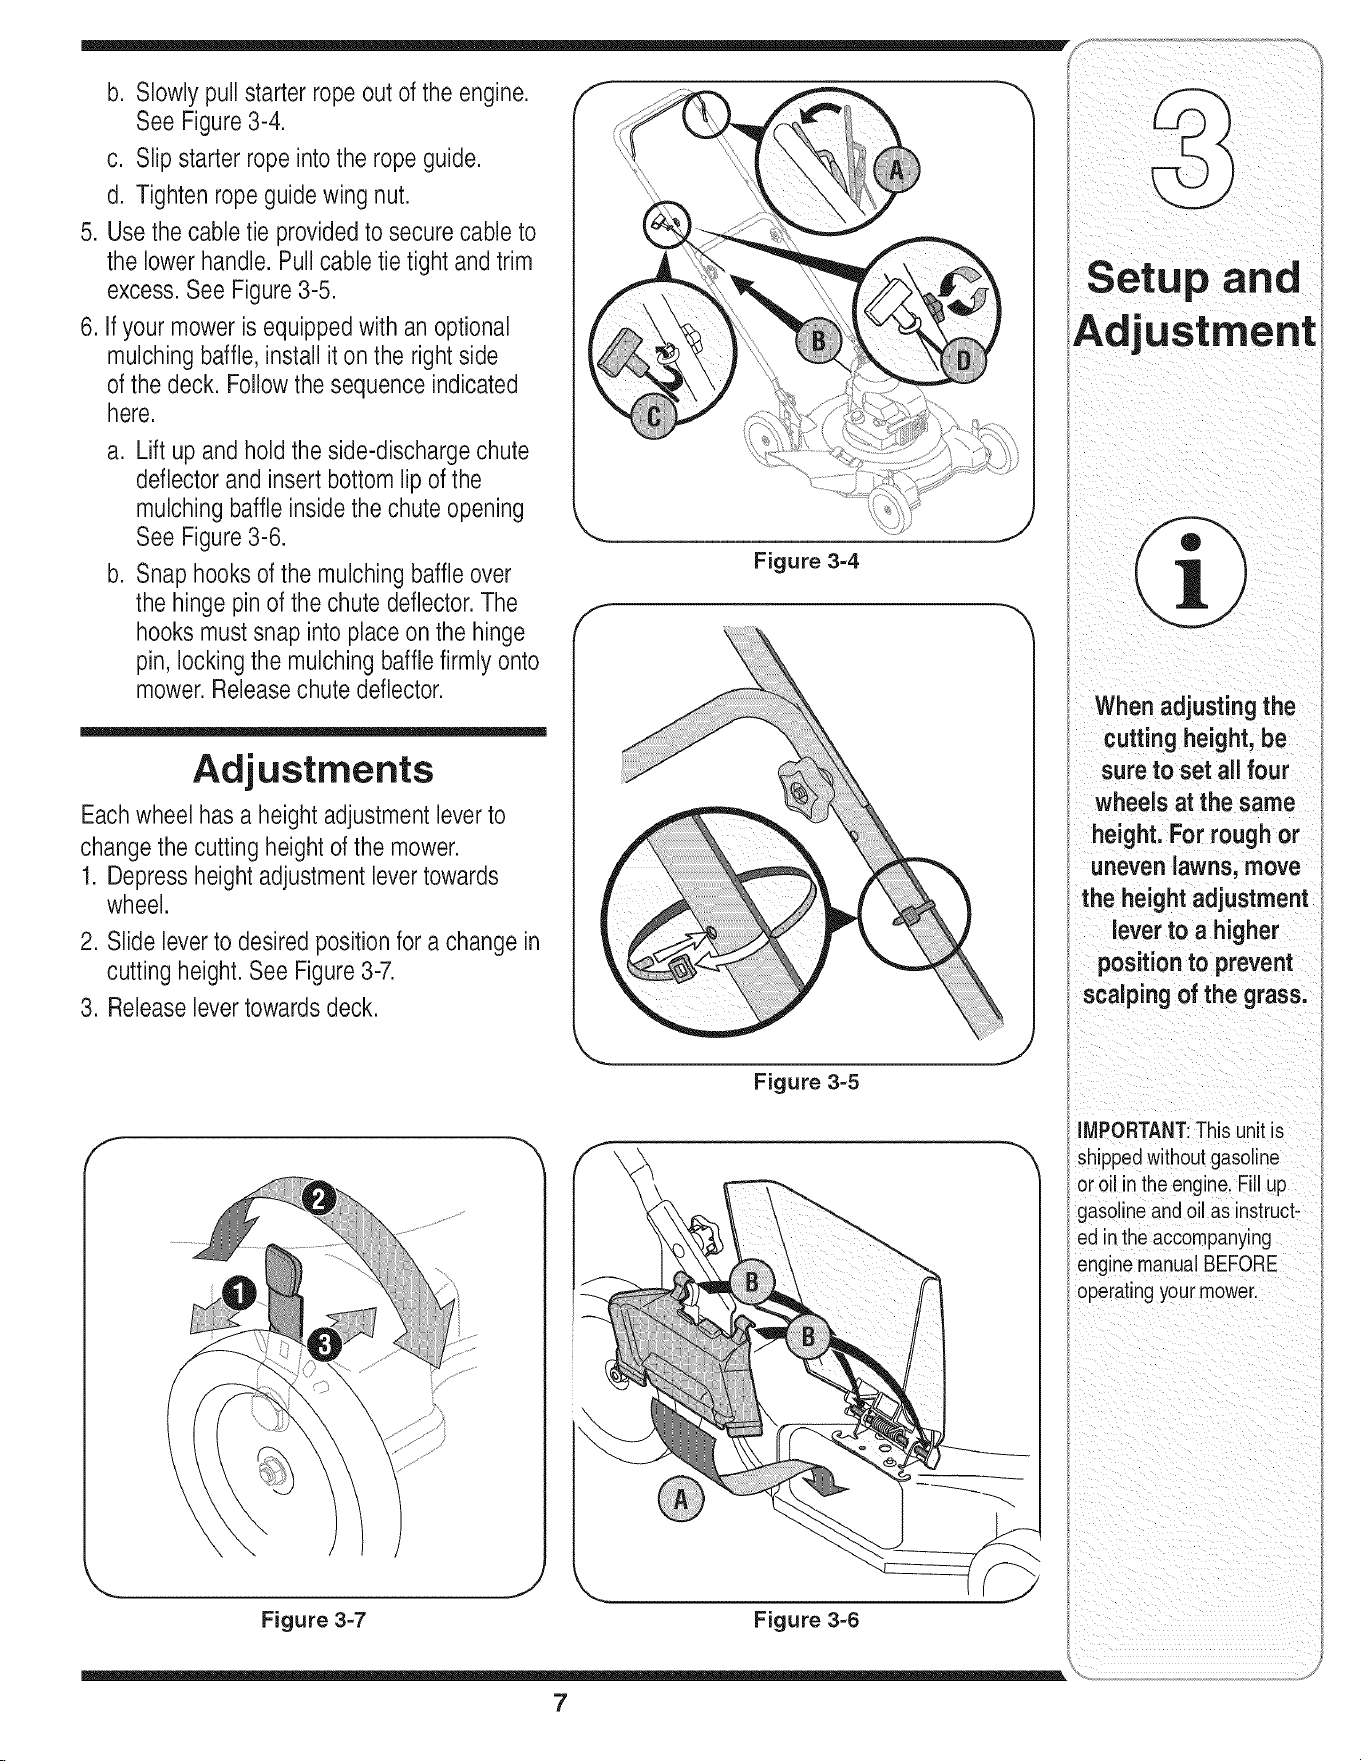
b. Slowlypullstarterropeoutoftheengine.
SeeFigure3-4.
c. Slipstarterropeintotheropeguide.
d. Tightenropeguidewingnut.
5. Usethecabletieprovidedtosecurecableto
thelowerhandle.Pullcabletietightandtrim
excess.SeeFigure3-5.
6.Ifyourmowerisequippedwithanoptional
mulchingbaffle,installitontherightside
ofthedeck.Followthesequenceindicated
here.
a. Liftupandholdtheside-dischargechute
deflectorandinsertbottomlipofthe
mulchingbaffleinsidethechuteopening
SeeFigure3-6.
b. Snaphooksofthemulchingbaffleover
thehingepinofthechutedeflector.The
hooksmustsnapintoplaceonthehinge
pin,lockingthemulchingbafflefirmlyonto
mower.Releasechutedeflector.
Adjustments
Each wheel has a height adjustment leverto
change the cutting height of the mower.
1. Depress height adjustment levertowards
wheel.
2. Slide leverto desired position for a change in
cutting height. See Figure 3-7.
3. Release levertowards deck.
f
Figure 3-4
J
Figure 3-5
J
AdjUStment
When adjusting the
cutting height, be
sureto set all four
wheels at the same
height. For roughor
uneven lawns,move
the height adjustment
leverto a higher
positionto prevent
scalpingof the grass.
f-
\
Figure 3-7 Figure 3-6
iMPORTANT:This unitis
shippedwithoutgasoline
or oilin the engine.Fillup
gasolineandoil as instruct-
ed inthe accompanying
eng qemanualBEFORE
operatingyourmower.
7
Your LaWn
owel
WARNING
The blade control
mechanism isa
safety device. Never
attempt to bypass its
operations.
Useextreme care
when handling
gasoline.Gasoline is
extremely flammable
and the vapors are
explosive. Neverfuel
the machine indoors
or while the engine
is hot or running.
Extinguish cigarettes,
cigars, pipes and
other sources of
ignition.
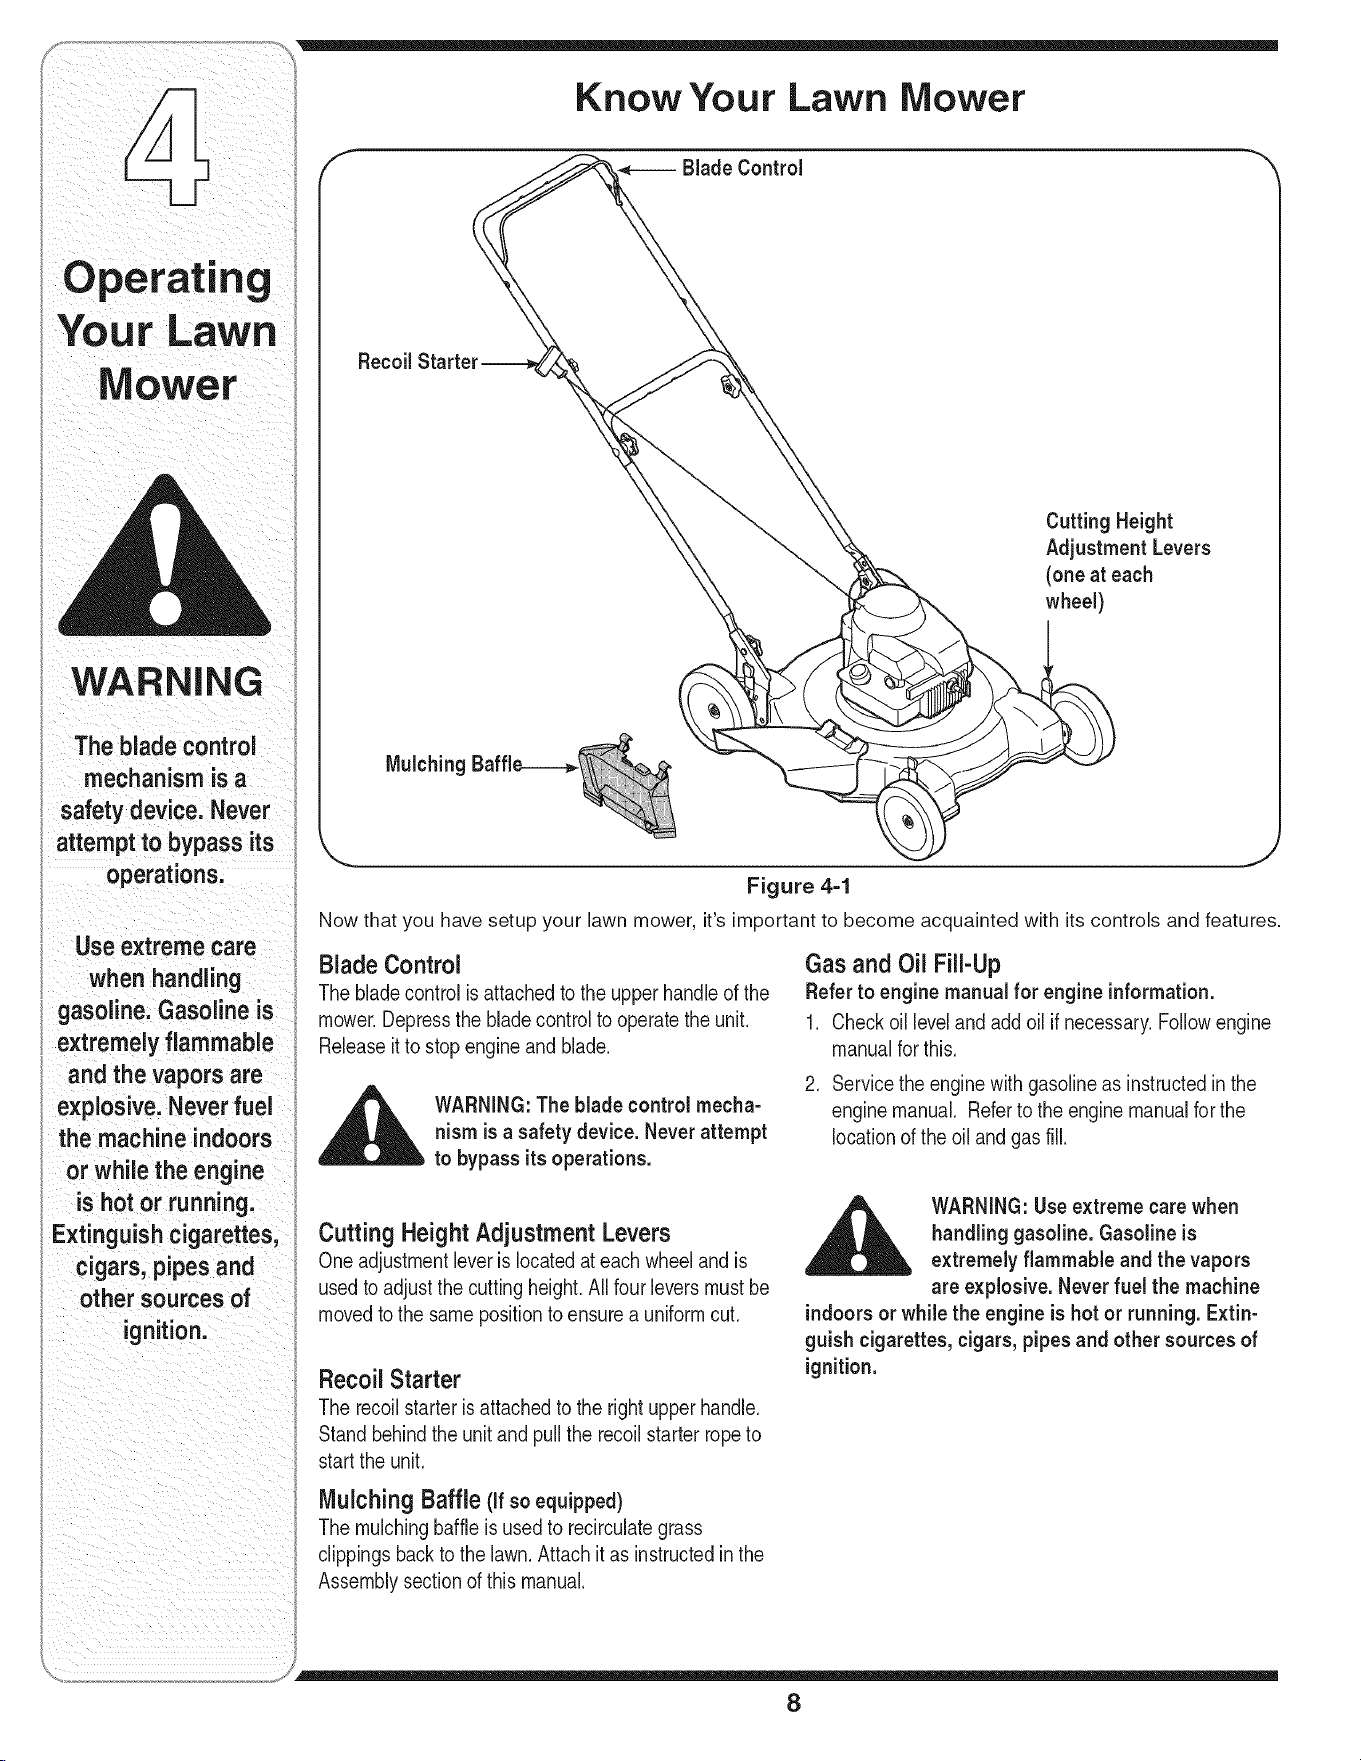
Know Your Lawn Mower
f BladeControl _'
Recoil
CuttingHeight
AdjustmentLevers
(oneat each
wheel)
Mulching
Figure 4-1
Now that you have setup your lawn mower, it's important to become acquainted with its controls and features.
Blade Control
The bladecontrolis attachedto the upperhandleof the
mower.Depressthe bladecontrolto operatethe unit.
Releaseit to stopengineandblade.
_ WARNING:Theblade control mecha-
nism is a safetydevice. Neverattempt
to bypass itsoperations.
Gas and Oil Fill-Up
Referto enginemanual for engineinformation.
1. Checkoillevelandaddoil if necessary.Followengine
manualfor this.
2. Servicethe enginewithgasolineas instructedinthe
enginemanual. Referto the enginemanualfor the
locationof the oilandgas fill.
Cutting Height Adjustment Levers
Oneadjustmentleveris locatedat eachwheelandis
usedto adjustthe cuttingheight.All fourleversmustbe
movedto the samepositionto ensurea uniformcut.
Recoil Starter
The recoilstarterisattachedto the rightupperhandle.
Standbehindthe unitand pullthe recoilstarterropeto
startthe unit.
Mulching Baffle (If soequipped)
The mulchingbaffleis usedto recirculategrass
clippingsbackto the lawn.Attach itas instructedinthe
Assemblysectionof thismanual.
WARNING:Useextremecarewhen
handlinggasoline. Gasoline is
extremely flammable and the vapors
areexplosive. Neverfuel the machine
indoorsor while the engine is hot or running. Extin-
guish cigarettes, cigars, pipesand other sources of
ignition.
8
WARNING:Theoperationofanylawn
AL mowercanresultinforeignobjects /A
beingthrownintothe eyes,whichcan /Zd L
damageyoureyesseverely.Always r.]
wearsafetyglasseswhileoperating the mower, or
whileperformingany adjustmentsor repairson it.
Starting the Engine
WARNING:Besure no one other than
the operatoris standing nearthe lawnmowerwhile starting engine or operat-
ingmower.Neverrun engine indoors
or in enclosed, poody ventilated
areas. Engineexhaust contains carbon monoxide,
an odorless and deadly gas. Keephands, feet, hair
and loose clothing awayfrom any moving partson
engine and lawn mower.
Note: Referto EngineManual for helpwith engine-
relatedoperations.
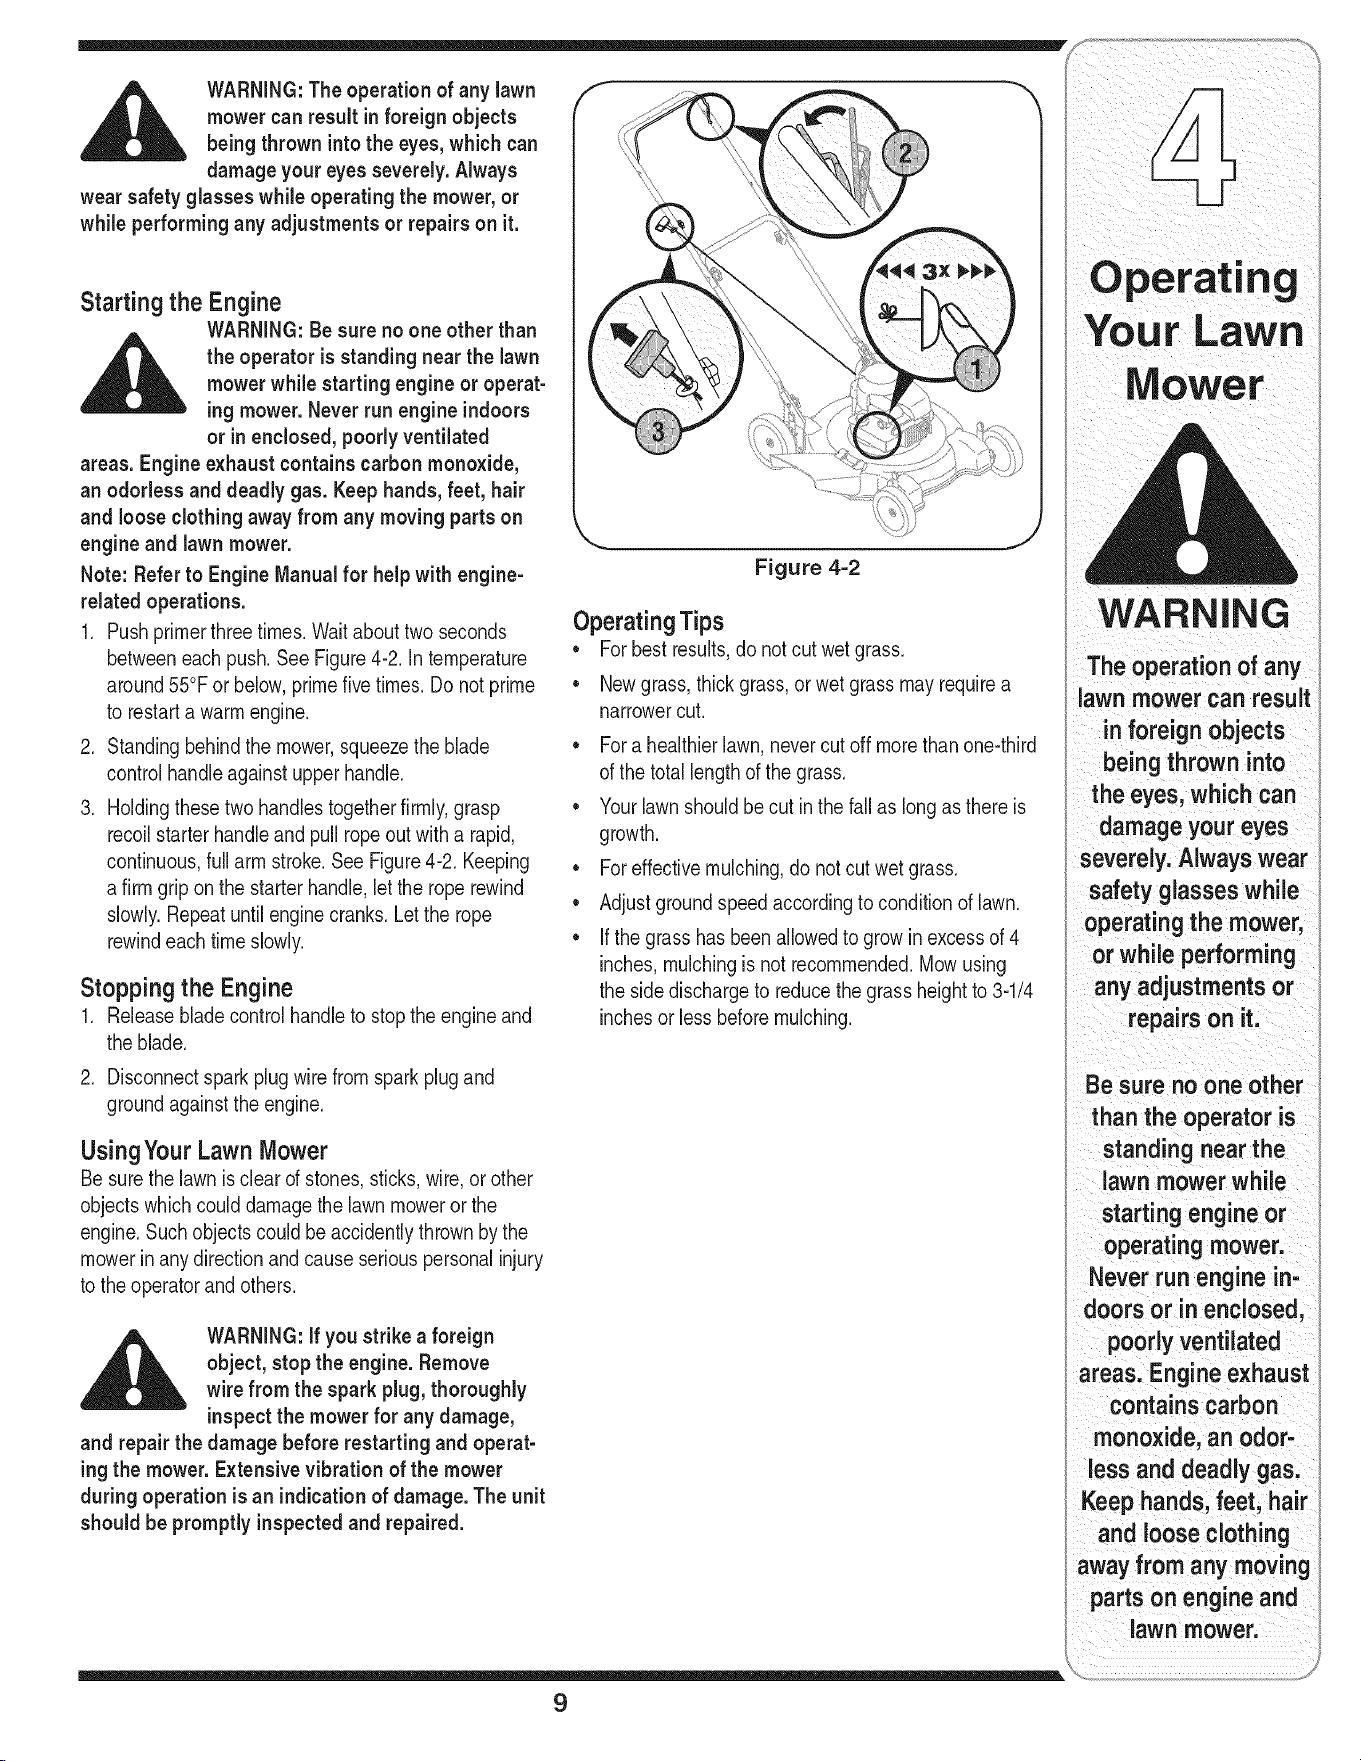
1. Pushprimerthreetimes.Waitabouttwo seconds
betweeneach push.SeeFigure4-2. Intemperature
around55°For below,primefivetimes.Do not prime
to restarta warmengine.
2. Standingbehindthe mower,squeezethe blade
controlhandleagainstupperhandle.
3. Holdingthesetwohandlestogetherfirmly,grasp
recoilstarterhandleandpull ropeout witha rapid,
continuous,full arm stroke.SeeFigure4-2. Keeping
afirm griponthe starterhandle,letthe roperewind
slowly.Repeatuntil enginecranks.Letthe rope
rewindeach timeslowly.
Stopping the Engine
1. Releasebladecontrolhandleto stopthe engineand
the blade.
2. Disconnectsparkplugwirefromsparkplugand
groundagainstthe engine.
UsingYour Lawn Mower
Besurethe lawn is clearof stones,sticks,wire,orother
objectswhichcoulddamagethe lawnmoweror the
engine.Suchobjectscouldbe accidentlythrownby the
mowerinany directionand causeseriouspersonalinjury
to the operatorandothers.
WARNING:If you strike a foreign
object, stop the engine.Remove
wire from the spark plug,thoroughly
inspectthe mower for any damage,
and repairthe damage before restarting and operat-
ingthe mower.Extensive vibration of the mower
during operation is an indicationof damage.The unit
should be promptlyinspectedand repaired.
Figure 4=2
Operating Tips
• Forbestresults,do not cutwetgrass.
• Newgrass,thickgrass,orwet grassmayrequirea
narrowercut.
• Fora healthierlawn,nevercutoff morethan one-third
of the totallengthof the grass.
• Yourlawnshouldbecut inthe fall as longas thereis
growth.
• Foreffectivemulching,donot cutwetgrass.
• Adjustgroundspeedaccordingto conditionof lawn.
• Ifthe grasshasbeenallowedto growin excessof 4
inches,mulchingis not recommended.Mowusing
the sidedischargeto reducethegrassheightto 3-1/4
inchesor lessbeforemulching.
Operating
owe r
The operation of any
lawn mower can result
in foreign objects
throwninto
the eyes; which can
severely. Always wear
operating the mower,
whileperformi"g
or
repairsOn
Be sureno one other
thantheoperator
standing nearthe
mower while
operating mower.
Never run engine in-
doors or in enclosed,
poorlyventilated
areas: Engine exhaust
contains carbon
monoxide, an odor' :
Keep hands, feet, hair
and loose clothing
away from any moving'
parts on engine and
lawn mowerl
9
WARNING
Always stopenginel
disconnect spark
plug, and ground
againstg ne
performing any type
of maintenance on
your machinel
Donot use a pressure
washerorgarden
hosetocleanyour
unitThesemayCause
damage to electric
components,sp nd es,
pulleysi bearings, or
the engine, The use
of water will result
in shortened life and
reduce serviceabilityi
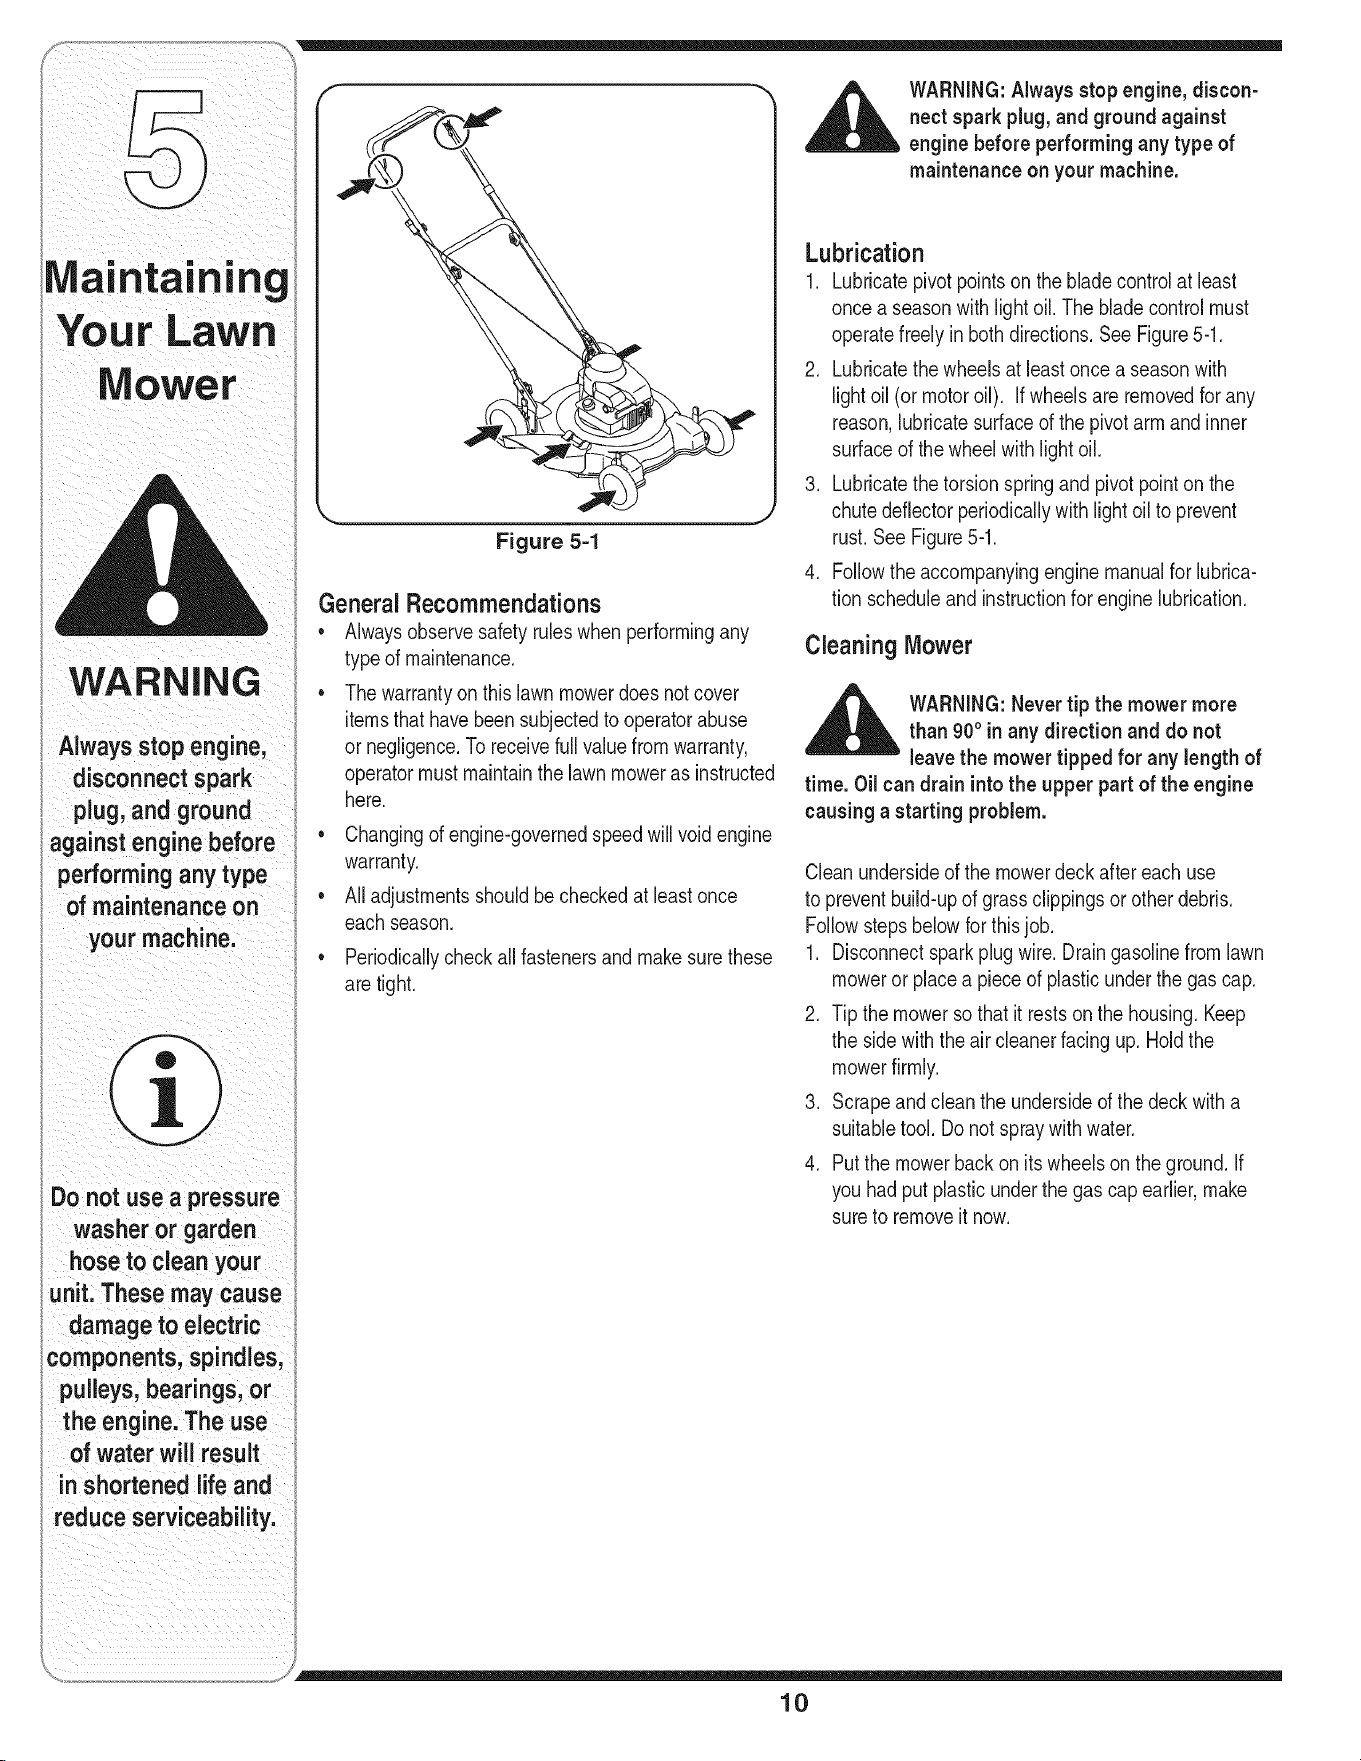
Figure 5=1
General Recommendations
• Alwaysobservesafetyruleswhen performingany
typeof maintenance.
• Thewarrantyon thislawnmowerdoesnot cover
itemsthathavebeensubjectedto operatorabuse
or negligence.To receivefull valuefromwarranty,
operatormustmaintainthe lawn moweras instructed
here.
• Changingof engine-governedspeedwill voidengine
warranty.
• Alladjustmentsshouldbecheckedat leastonce
eachseason.
• Periodicallycheckall fastenersand makesurethese
aretight.
,_ WARNING:Alwaysstopengine, discon-
nectsparkplug, and groundagainst
engine before performingany type of
maintenance on your machine.
Lubrication
1. Lubricatepivotpointson the bladecontrolat least
oncea seasonwithlightoil. The bladecontrolmust
operatefreelyinboth directions.SeeFigure5-1.
2. Lubricatethe wheelsat leastoncea seasonwith
lightoil (ormotoroil). If wheelsareremovedfor any
reason,lubricatesurfaceof the pivotarm andinner
surfaceof thewheelwithlight oil.
3. Lubricatethe torsionspringandpivotpointonthe
chutedeflectorperiodicallywith lightoilto prevent
rust.See Figure5-1.
4. Followthe accompanyingenginemanualfor lubrica-
tion scheduleandinstructionfor enginelubrication.
Cleaning Mower
,_ WARNING:Nevertip the mower more
than 90° inany direction and do not
leavethe mower tipped for any length of
time. Oil can drain intothe upper partof the engine
causing a starting problem.
Cleanundersideof the mowerdeckaftereachuse
to preventbuild-upof grassclippingsorotherdebris.
Followstepsbelowforthisjob.
1. Disconnectsparkplugwire.Draingasolinefromlawn
mowerorplacea pieceof plasticunderthe gascap.
2. Tip the mowerso that it restsonthe housing.Keep
the sidewiththe aircleanerfacingup. Holdthe
mowerfirmly.
3. Scrapeandcleanthe undersided the deckwitha
suitabletool.Do notspraywithwater.
4. Putthe mowerbackonits wheelsonthe ground.If
you hadput plasticunderthe gas capearlier,make
sureto removeit now.
10

BladeCare
_ ARNING:Whenremovingthe cutting
bladefor sharpeningor replacement,
protectyourhandswith a pairof heavy
glovesor use a heavyragto holdthe blade.
Periodicallyinspectthe bladeadapterfor cracks,
especiallyif you strikeaforeignobject.Replacewhen
necessary.Followthe stepsbelowfor bladeservice.
1. Disconnectsparkplugwirefromsparkplug.Turn
moweronitssidemakingsurethattheair filterand
the carburetorareup.
2. Removethe boltandthe bladebellsupportwhich
holdthe bladeandthe bladeadapterto the engine
crankshaft.SeeFigure5-2.
3. Removebladeandadapterfromthe crankshaft.
4. The bladecan besharpenedwithafile or ona
grindingwheel.Followthe originalangleandgrind
eachcuttingedgeequally.Donot attemptto sharpen
the bladewhile itisstillon the mower.
5. Placethe bladeon a roundshaftscrewdriverto check
for balance.Removemetalfromthe heavysideuntilit
balancesevenly.
__1= WARNING:An unbalancedblade will
cause excessivevibrationwhen rotating
at high speeds.It maycausedamageto
mower, and couldbreak causingpersonalinjury.
6. To reassemble,lubricatethe enginecrankshaftand
the innersurfaceof the bladeadapterwith lightoil.
Slidethe bladeadapterontothe enginecrankshaft.
7. Placethe bladeon theadaptersuchthatthe side
of the blademarked"Bottom"(orwithpart number)
facesgroundwhenthe mowerisintheoperating
position.Makesurethatthe bladeisalignedand
seatedon bladeadapterflanges.
8. Placebladebellsupportonthe blade.Alignnotches
onthe bladebellsupportwithsmallholesinblade.
9. Replacehexbolt andtightenhex boltto torque:450
in.Ibs.rain.,600in.Ibs. max.
Toensuresafeoperationof your mower,periodically
checkthe bladebolt for correcttorque.
tCranks'l_aft
_ BladeAdapter
Sell
Support
Figure 5=2
Off-Season Storage
The followingstepsshouldbetakento prepareyour lawn
mowerfor storage.
• Cleanandlubricatemowerthoroughlyas describedin
the lubricationinstructions.
Referto enginemanualfor correctenginestorage
instructions.
Coatmower'scutting bladewithchassisgreaseto
preventrusting.
• Storemowerin adry,cleanarea. Do notstorenextto
corrosivematerials,suchas fertilizer.
Whenstoringany typeof powerequipmentina poorly
ventilatedor metalstorageshed,careshouldbetakento
rust-proofthe equipment.Usinga light oilor silicone,coat
the equipment,especiallycablesandall movingpartsof
your lawnmowerbeforestorage.
11
MoWer
WARNING
When removing
the cutting blade
for sharpening or
replacement, protect
your hands with a
pairof heavy gloves
or use a heavy rag to
hold the blade.
An unbalanced blade
will cause excessive
vibration when rotat-
ing at high speeds, it
may cause damage
to mower, and could
break causing per-
sonal injury.
i i i_iii _i_'i__ii i/ ii _i_
For repairsbeyond
the minoradjustments
listedhere; contact
an authorized service
dealer'
ii ii i _ i i iii i !i_ ii _i
Problem Cause Remedy
I
Eng=nefalls to start 1. Biadecontroldlsengaged. 1, Engagebladecontrol.
21 spark plugWiredisconnected. 2, ConnectwiretOspark plug.
Fue!tankempty 0r sta!e!ueL Fil!tankwith C!eanl!resh gaso!inel
Enginenotchoked. & ,Chokeengineas instructedinthe
I I Operatingyour LawnMower section,
5. Faultyspark p!ug, 5. Clean adjustgap orreplace.
Blockedfuel iinel 61 clean fue!iinel
7 EngineflOoded:. 7 watafewmnutestOrestart butdo
notprime.
Enginerunserratic 1. Sparkplugwire loose.
2. Blockedfuel lineor stalefuel.
3. Ventingascap plugged.
4. Wateror dirt infuel system.
5. Dirtyair cleaner.
6. Carburetorout of adjustment.
1. Connect andtightensparkplugwire.
2. Cleanfuel line;fill tank withclean,
fresh gasoline.
3. Clearvent.
4. Drainfuel tank. Refillwithfresh fuel.
5. Referto enginemanual.
6. Referto enginemanual.
I
Eng ne overheats 1. Engineoil levellow. 1. Fillcrankcasewith properoil.
2. Air flow restricted. 2. Removeblowerhousingand clean.
r
3. Ca buretornot adjustedproperly. 3. Referto enginemanual
Occasional skips 1. Sparkpluggap tooclose. 1. Adjustgap to .030-inch.
(hesitates) at high speed 2. Carburetoridlemixtureadjustment 2. Referto enginemanual.
improperlyset.
Idles poorly 1. Sparkplugfouled,faultyor gaptoo wide. 1. Resetgapto .030-inchor replace
spark pug.
2 Carburetorimproperlyadjusted 2. Referto enginemanual.
3. Dirtyair cleaner. 3. Referto enginemanual•
Excessive Vibration 1. Cuttingbladelooseor unbalanced. 1. Tighten bladeandadapter.Balance
blade.
2. Bentcutting blade. 2. See anauthorizedservicedealer.
Mower will not mulch grass 1 Wetgrass• 1. Donot mowwhengrass is wet wait
until latertocut.
2. Excessivelyhighgrass. 2. Mowonce at a highcutting height,
then mowagainatdesirecJheight or
makea narrowercurt ngpath.
' 3. Dullblade. 3. Sharpenor replaceblade.
I
Uneven cut 1. Wheelsnotpositionedcorrectly. 1. Placeallfour wheelsin same
heightposition.
2. Dullblade. 2. Sharpenor replaceblade.
Subject to changewithout
notificationor obligation,
Images my not reflect your
exact model and are for
refe[ence purposes oniyl
12
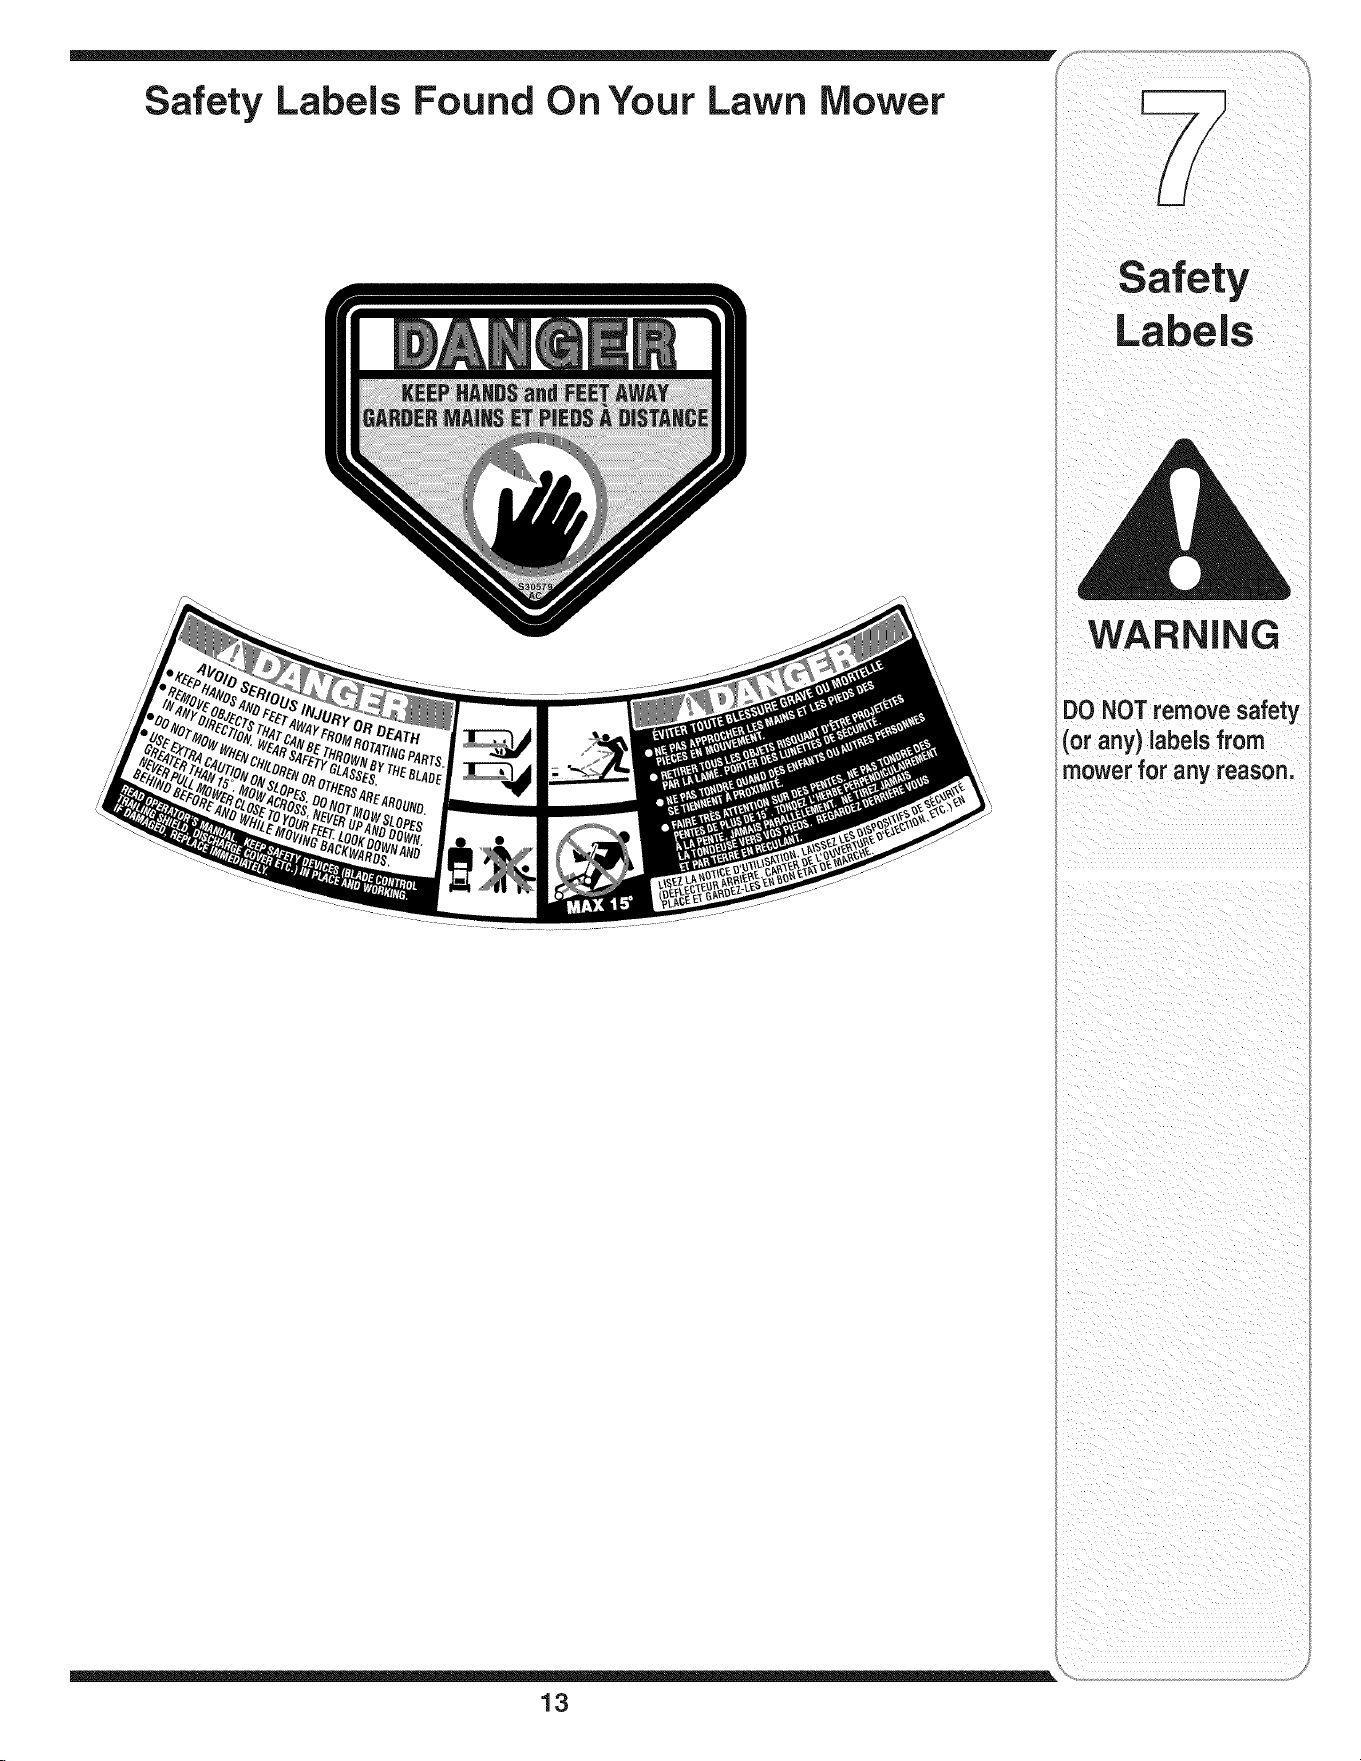
Safety Labels Found On Your Lawn Mower
13
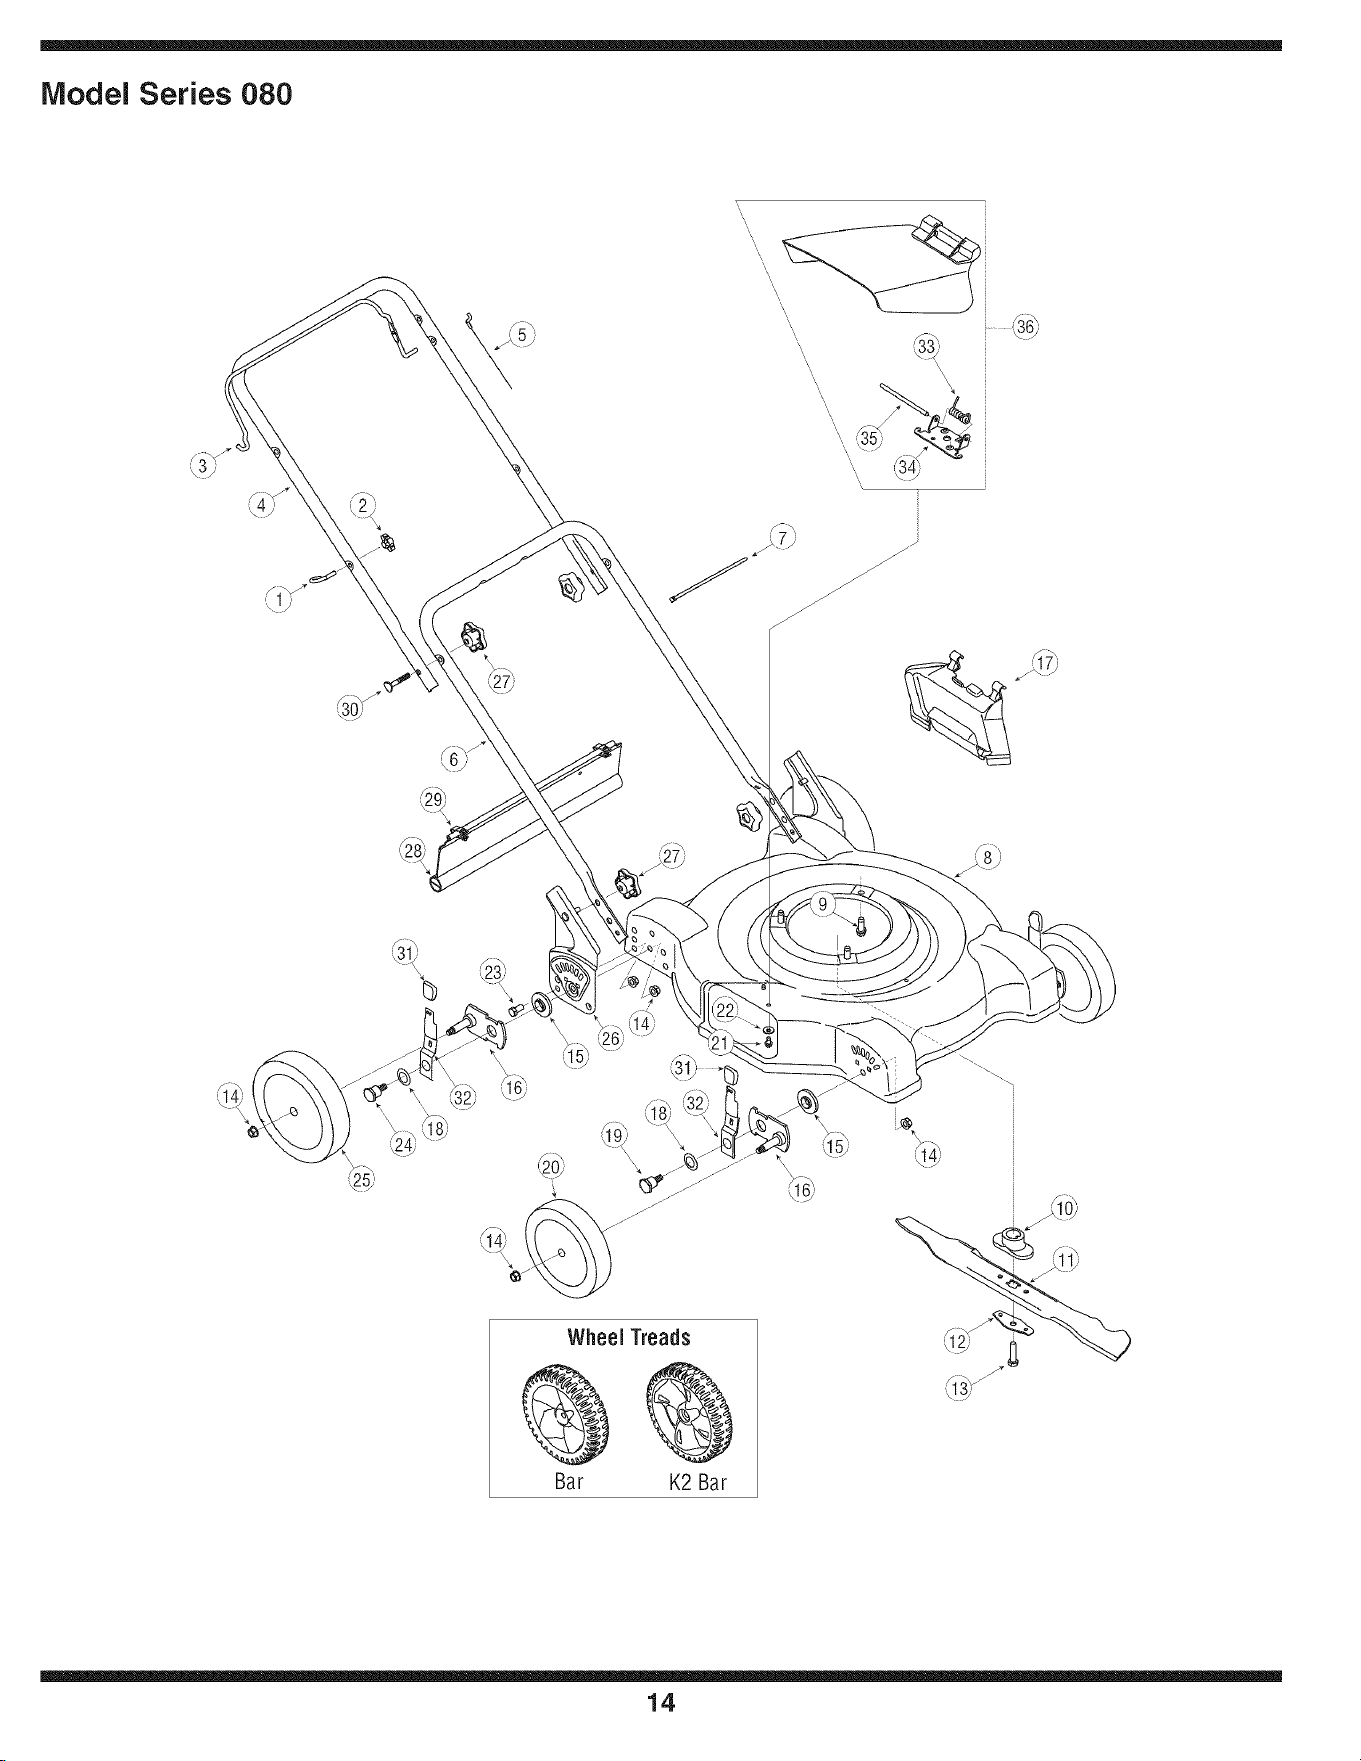
Model Series 080
WheelTreads
Bar K2Bar
14
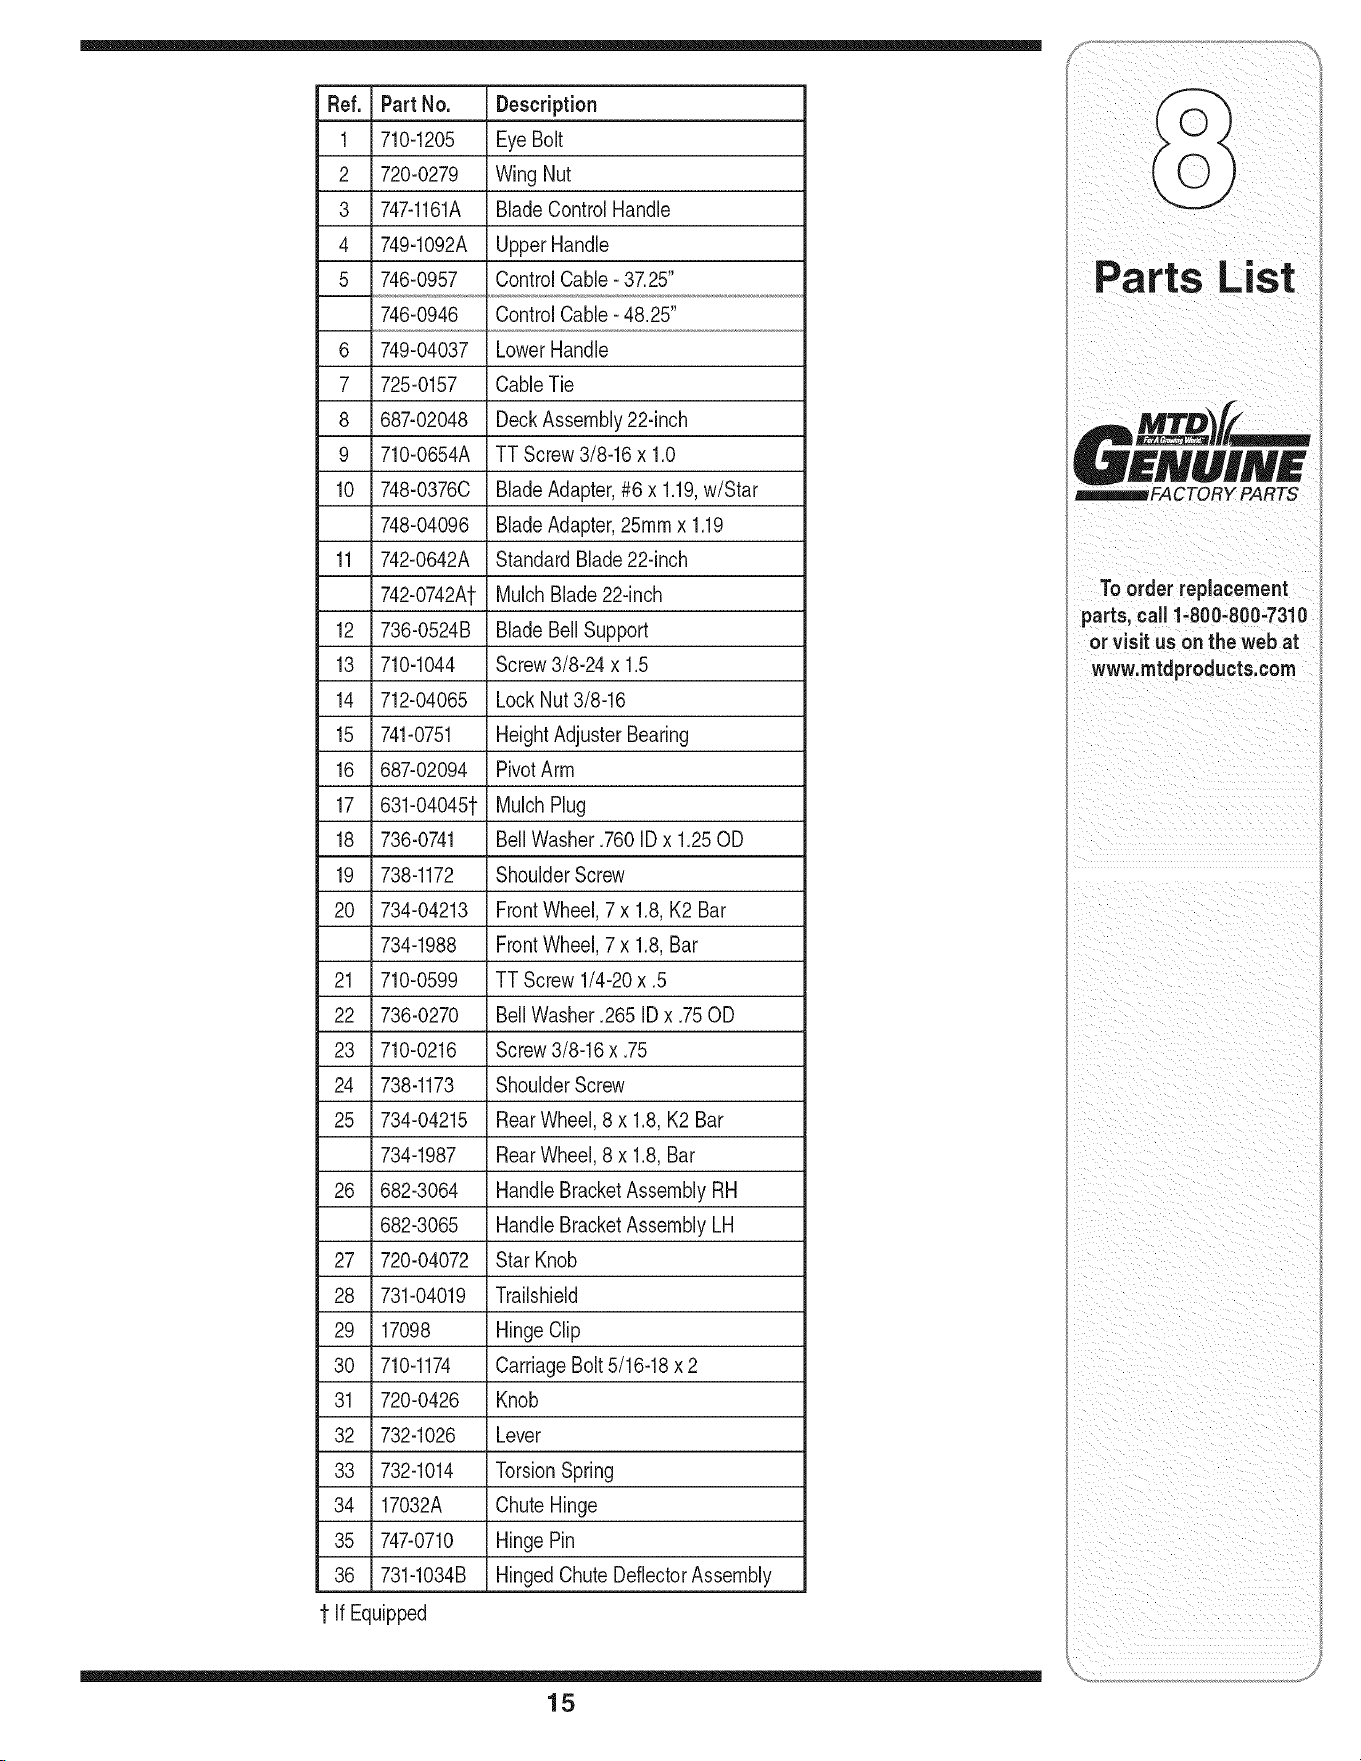
Ref.
1
2
3
4
5
6
7
8
9
10
11
12
13
14
15
16
17
18
19
2O
21
22
23
24
25
26
27
28
29
30
31
32
33
34
35
36
If
Part No.
710-1205
720-0279
747-1161A
749-1092A
746-0957
746-0946
749-04037
725-0157
687-02048
710-0654A
748-0376C
748-04096
742-0642A
742-0742At
736-0524B
710-1044
712-04065
741-0751
687-02094
631-04045t
736-0741
738-1172
734-04213
734-1988
710-0599
736-0270
710-0216
738-1173
734-04215
734-1987
682-3064
682-3065
720-04072
731-04019
17098
710-1174
720-0426
732-1026
732-1014
17032A
747-0710
731-1034B
Equipped
Description
EyeBolt
Wing Nut
BladeControlHandle
UpperHandle
ControlCable- 37.25"
ControlCable- 48.25"
LowerHandle
CableTie
DeckAssembly22-inch
TT Screw3/8-16x 1.0
BladeAdapter,#6 x 1.19,w/Star
BladeAdapter,25ramx 1.19
StandardBlade22-inch
MulchBlade22-inch
BladeBellSupport
Screw3/8-24x 1.5
LockNut3/8-16
HeightAdjusterBearing
PivotArm
MulchPlug
BellWasher.760IDx 1.25OD
ShoulderScrew
FrontWheel,7x 1.8,K2 Bar
FrontWheel,7x 1.8,Bar
TT Screw1/4-20x .5
BellWasher.265IDx .75OD
Screw3/8-16x .75
ShoulderScrew
RearWheel,8 x 1.8,K2Bar
RearWheel,8 x 1.8,Bar
HandleBracketAssemblyRH
HandleBracketAssemblyLH
StarKnob
Trailshield
HingeClip
CarriageBolt5/16-18x 2
Knob
Lever
TorsionSpring
ChuteHinge
HingePin
HingedChuteDeflectorAssembly
Parts List
CTORY PARTS
To order replacement
parts,call1-800-800-7310
or visit us onthe web at
www.mtdproducts.com
15

MANUFACTURER'S LiMiTED WARRANTY FOR
The limitedwarrantysetforthbelowisgivenby MTDLLCwithrespect
to newmerchandisepurchasedandusedin the UnitedStates,its
possessionsandterritories.
"MTD"warrantsthisproductagainstdefectsinmaterialandworkman-
shipfor a periodof two (2)yearscommencingonthe date of original
purchaseandwill,at itsoption,repairor replace,freeof charge,any
part foundto bedefectiveinmaterialsorworkmanship.Thislimitedwar-
rantyshallonlyapply if thisproducthasbeenoperatedand maintained
inaccordancewiththe Operator'sManualfurnishedwiththe product,
andhas notbeensubjectto misuse,abuse,commercialuse,neglect,
accident,impropermaintenance,alteration,vandalism,theft,fire,water,
ordamagebecauseof otherperilor naturaldisaster.Damageresulting
fromthe installationor useof any part,accessoryor attachmentnot
approvedby MTDfor use withthe product(s)coveredbythis manual
willvoid yourwarrantyas to any resultingdamage.
Normalwearpartsarewarrantedto befree fromdefectsinmaterialand
workmanshipfor a periodof thirty (30)daysfromthe dateof purchase.
Normalwearpartsinclude,butare notlimitedto itemssuchas: batter-
ies,belts,blades,bladeadapters,grassbags,riderdeckwheels,seats,
snowthrowerskidshoes,shaveplates,augerspiralrubberandtires.
HOW TO OBTAIN SERVICE: Warranty service is available,WITH
PROOFOF PURCHASE, through your local authorized service
dealer. To locate the dealer in your area, check your Yellow Pages,
or contact MTD LLC at RO. Box 361131,Cleveland, Ohio 44136-
0019, or call 1-800-800-7310or 1-330-220-4683 or log on to our
Web site at www.mtdproducts.com.
Thislimitedwarrantydoesnot providecoverageinthe followingcases:
a. Theengineor componentpartsthereof.Theseitemsmaycarrya
separatemanufacturer'swarranty.Refertoapplicablemanufacturer's
warrantyfor termsandconditions.
b. Logsplitterpumps,valves,andcylindershavea separateoneyear
warranty.
c. Routinemaintenanceitemssuchas lubricants,filters,blade
sharpening,tune-ups,brakeadjustments,clutchadjustments,deck
adjustments,andnormaldeteriorationof the exteriorfinishdueto
useor exposure.
d. Servicecompletedby someoneotherthananauthorizedservice
dealer.
e. MTDdoesnot extendanywarrantyfor productssoldor exported
outsideof the UnitedStates,its possessionsandterritories,except
thosesoldthroughMTD'sauthorizedchannelsof exportdistribution.
f. ReplacementpartsthatarenotgenuineMTDparts.
g. Transportationchargesandservicecalls.
No impliedwarranty,includingany impliedwarranty of mer-
chantabilityof fitness for a particular purpose,applies after the
applicable periodof express written warranty above as to the
partsas identified.No otherexpresswarranty, whetherwrittenor
oral, except as mentioned above,givenby any personor entity,
includinga dealeror retailer, withrespect to any product,shall
bindMTD.Duringthe periodof the warranty,the exclusiveremedy
isrepairor replacementof the productas setforth above.
Theprovisionsas set forth inthis warrantyprovidethe soleand
exclusiveremedy arising from the sale.MTDshallnot be liable
for incidentalor consequentiallossor damage including,without
limitation, expensesincurredfor substituteor replacementlawn
careservicesor for rentalexpensesto temporarily replacea
warranted product.
Somestatesdo notallowthe exclusionor limitationof incidentalor
consequentialdamages,or limitationsonhowlongan impliedwarranty
lasts,sothe aboveexclusionsor limitationsmaynot applyto you.
In noeventshallrecoveryof any kindbegreaterthanthe amountof the
purchasepriceof the productsold.Alterationof safetyfeatures of
the productshallvoid this warranty. Youassumethe riskandliability
for loss,damage,or injuryto you andyourpropertyand/orto othersand
theirpropertyarisingout of the misuseor inabilityto usethe product.
Thislimitedwarrantyshallnot extendto anyoneotherthan theoriginal
purchaserorto the personfor whomitwas purchasedas a gift.
HOWSTATELAWRELATESTOTHIS WARRANTY:This limited
warrantygivesyou specificlegalrights,and youmayalsohaveother
rightswhichvaryfromstateto state.
IMPORTANT:OwnermustpresentOriginalProofof Purchaseto obtain
warrantycoverage.
IViTD LLC, P.O. BOX 361131 CLEVELAND, OHiO 44136-0019; Phone: 1=800=800-7310, 1-330=220-4683

