en
USER MANUAL
Range Hood
Power supply: 120V
Rated power: 51.5W
Frequency: 60Hz
MODEL NUMBER
Free 3 months
extension
of the
original limited warranty
period!* Simply text a
picture of your proof of
purchase to:
1-844-224-1614
*The warranty extension is for the
three months immediately following
the completion of the product’s
original warranty period.
CVU30W4ABB
CVU36W4ABB
WARNING alerts you to situations that may
cause serious body harm, death or property
damage.
INTENDED FOR RESIDENTIAL COOKING USE ONLY
READ ALL INSTRUCTIONS BEFORE INSTALLATION AND USE
WARNING
CAUTION
IMPORTANT
IMPORTANT indicates installation, operation,
maintenance or valuable information that is not
hazard related.
TO REDUCE THE RISK OF FIRE, ELECTRIC SHOCK
OR INJURY TO PERSONS, OBSERVE THE
FOLLOWING:
1. Use this unit only in the manner intended by the manufacturer. If
you have questions, contact the manufacturer at the address or
telephone number listed in the warranty.
2. Before servicing or cleaning unit, unplug and switch power off at
service panel and lock service disconnecting means to
prevent power from being switched on accidentally. When the
service disconnecting means cannot be locked, securely fasten
a prominent warning device, such as a tag, to the service panel.
3. Installation work and electrical wiring must be done by
qualified personnel in accordance with all applicable codes and
standards, including fire-rated construction codes and
standards.
4. Sufficient air is needed for proper combustion and exhausting of
gases through the flue (chimney) of fuel burning equipment to
prevent backdrafting. Follow the heating equipment
manufacturer’s guidelines and safety standards such as
those published by the National Fire Protection Association
(NFPA) and the American Society for Heating, Refrigeration and
Air Conditioning Engineers
(ASHRAE) and the local code authorities.
5. When cutting or drilling into wall or ceiling, do not damage
electrical wiring and other hidden utilities.
6. Ducted fans must always be vented to the outdoors.
7. Do not use this unit with any solid-state speed control device.
8. TO REDUCE THE RISK OF FIRE , USE ONLY METAL
DUCTWORK.
9. This unit must be grounded. This appliance is equipped with a cord
having a grounding wire with a grounding plug. The plug must be
plugged into an outlet that is properly installed and grounded.
10. Do not use an extension cord. If the power supply cord is too short,
have a qualified electrician install an outlet near the appliance.
11. When applicable local regulations comprise more restrictive
installation and/or certification requirements, the aforementioned
requirements prevail on those of this document and the installer
agrees to conform to these at his own expense.
TO REDUCE THE RISK OF A RANGE TOP GREASE FIRE:
a) Never leave surface units unattended at high settings. Boilovers
cause smoking and greasy spillovers that may ignite. Heat oils
slowly on low or medium settings.
b) Always turn hood ON when cooking at high heat or when
flambeing food (i.e.: Crêpes Suzette, Cherries Jubilee,
Peppercorn Beef Flambé).
c) Clean ventilating fans frequently. Grease should not be allowed to
accumulate on fan, filters or in exhaust ducts.
d) Use proper pan size. Always use cookware appropriate for the
size of the surface element.
1.
For indoor use only.
2.
For general ventilating use only. Do not use to exhaust
hazardous or explosive materials and vapors.
3.
To avoid motor bearing damage and noisy and/or unbalanced impeller,
keep drywall spray, construction dust, etc. off power unit.
4.
Install the vent hood in a location away from strong drafts, such as
windows, door, and strong HVAC vent for best performance
5.
The minimum hood distance above cooktop must not be less than
25-5/8". For best capture of cooking impurities, the bottom of the hood
should be at a maximum of 29-1/2" above cooking surface.
6.
Two installers are recommended because of the large size and weight
of this unit.
7.
To reduce the risk of fire and to properly exhaust air, be sure to duct air
outside — Do not exhaust air into spaces within walls or ceiling or into
attics, crawl space or garage.
8.
Because of the high exhausting capacity of this unit, you should make
sure enough air is entering the house to replace exhausted air by
opening a window close to or in the kitchen.
9.
Always leave safety grills and filters in place. Without these
components, operating blowers could catch onto hair, fingers and loose
clothing.
10.
The vent hood and filters should be cleaned frequently.
WARNING WARNING
TO REDUCE THE RISK OF INJURY TO PERSONS IN
THE EVENT OF A RANGE TOP GREASE FIRE,
OBSERVE THE FOLLOWING*:
1. SMOTHER FLAMES with a close-fitting lid, cookie sheet or metal
tray, then turn off the burner. BE CAREFUL TO PREVENT BURNS. IF
THE FLAMES DO NOT GO OUT IMMEDIATELY, EVACUATE AND
CALL THE FIRE DEPARTMENT.
2. NEVER PICK UP A FLAMING PAN — You may be burned.
3. DO NOT USE WATER, including wet dishcloths or towels —This
could cause a violent steam explosion.
4. Use an extinguisher ONLY if:
A. You own a Class ABC extinguisher and you know how to
operate it.
B. The fire is small and contained in the area where it started.
C. The fire department has been called.
D. You can fight the fire with your back to an exit.
5. Based on “Kitchen Fire Safety Tips” published by NFPA.
CAUTION
SAVE THESE INSTURCTIONS
CAUTION indicates a potentially hazardous
situation which, if not avoided, may result in
minor or moderate injury.
2
5
MAIN PARAMETERS
Rated Voltage and Frequency
120V~ 60Hz , Motor Input Power: 50W
In certain circumstances electrical appliance may be a danger hazard.
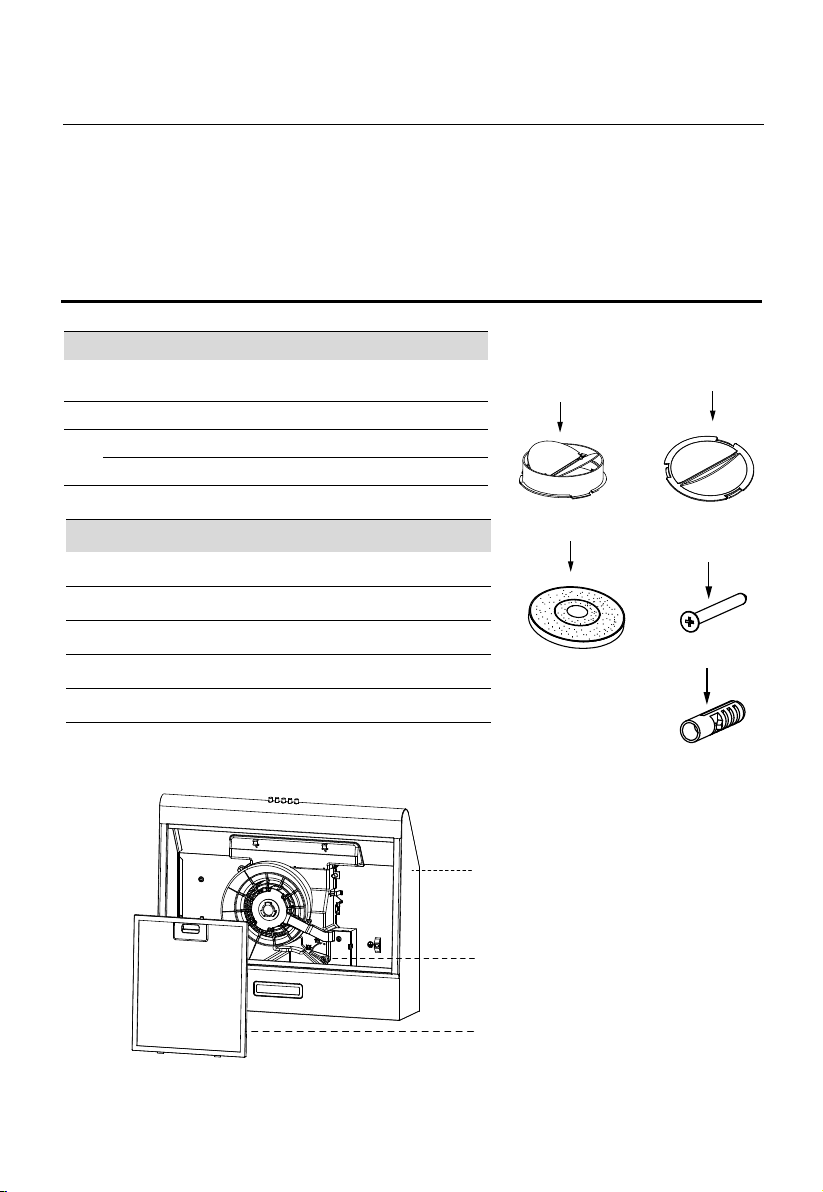
COMPONENTS
Ref. Product ComponentsQty.
1 1
Venting Knob
2
1
Main Body
Ref.
Qty
.
Installation Components
4 1 Carbon Filter (12173000000039)
5 1
Check Valve
6 1
Air Outlet Cap
7 4
8 4
Plastic Wall Plugs
6
5
7
4
8
3
Grease filter (30'')
Grease filter (36'')
2
3
Screws
M5 x 1.97''
1
2
3
3
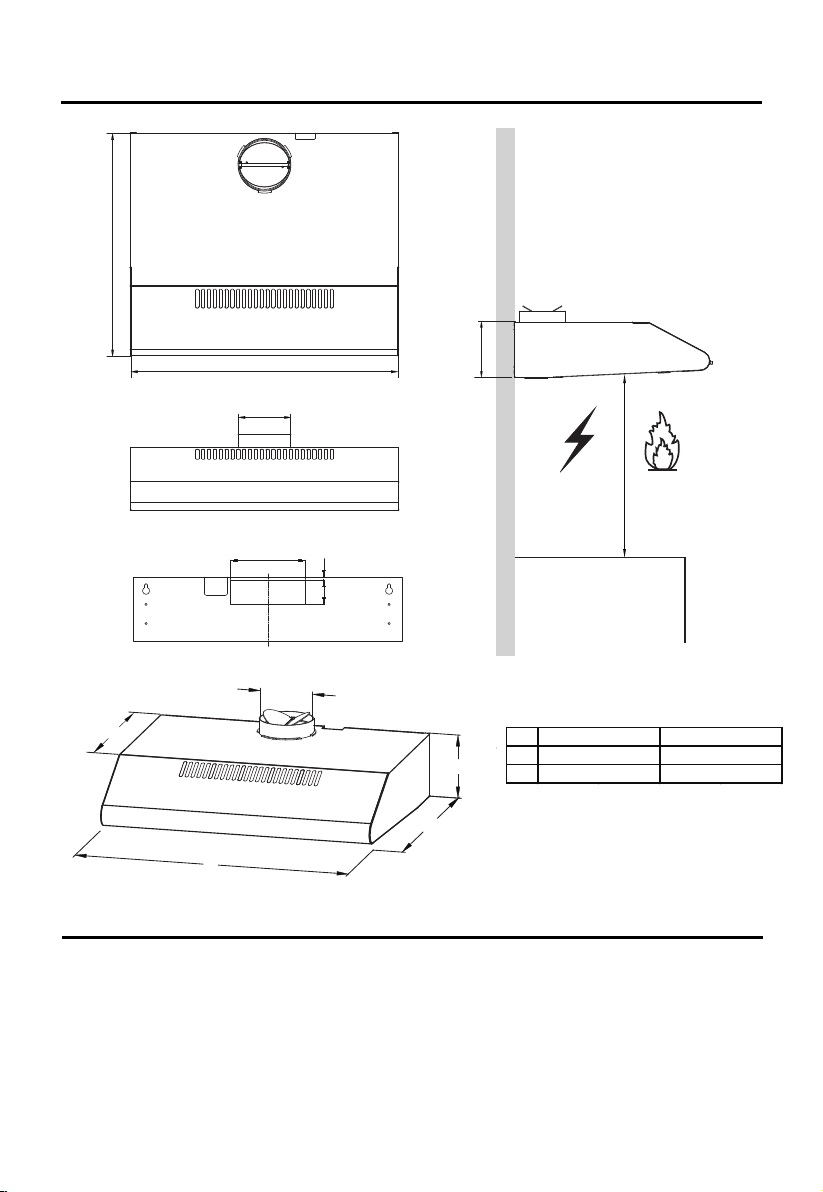
DIMENSIONS
unit:
inch
19.7"
Y
Ф
X
29.8''/35.3''
4.72''
Ф
4.72''
CVU30W4ABB
CVU36W4ABB
X
29.8''
35.3''
Y
5.5''
5.5''
19.7''
13.38
''
25.6’’ -29.5’’
5.5
''
6.5''
2.12''
0.23''
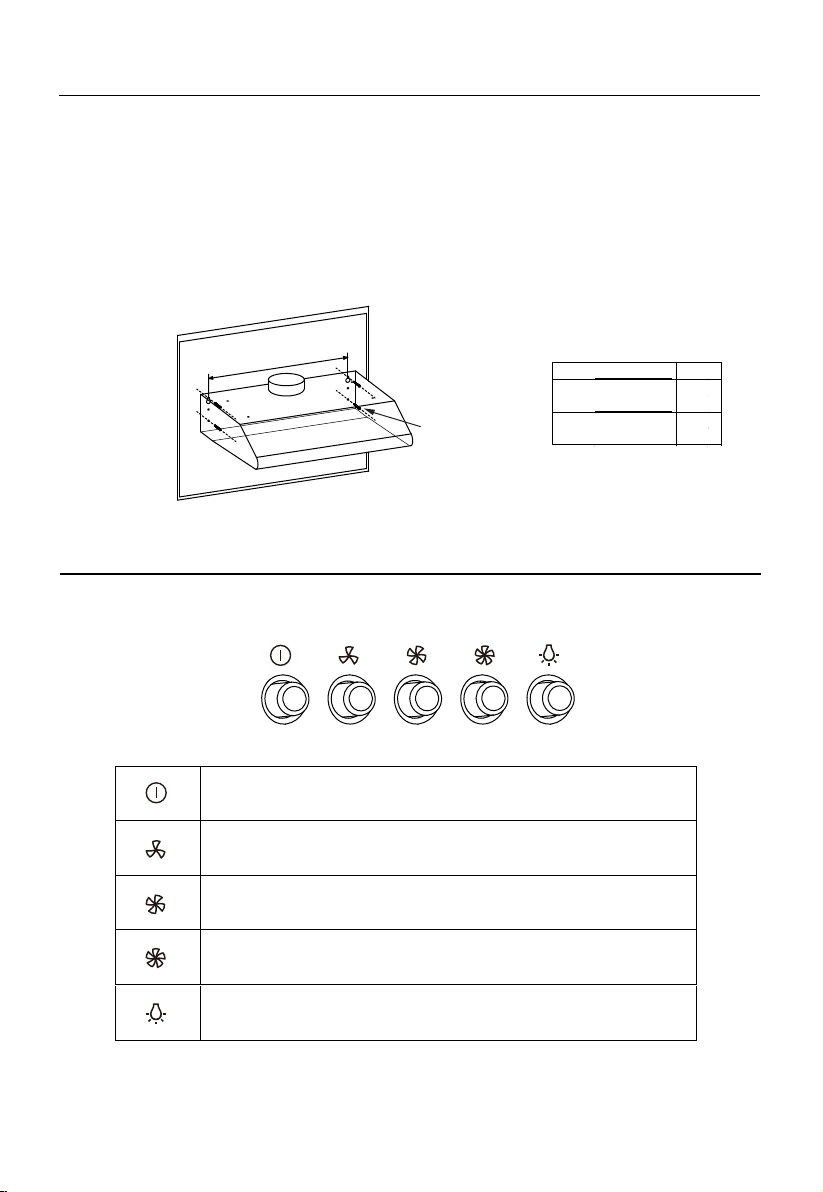
INSTALLATION
WALL DRILLING AND BRACKET FIXING
Please read the instructions carefully.
Unpack the canopy and check
that all functions are working. Ensure
that the voltage (V) and the frequency (Hz) indicated on the serial plate match the voltage
and frequency at the installation site.
4
7
Check that the area behind the installation surface to be drilled is clear
of any electrical cables or pipes, etc.
The stainless steel and glass surfaces of the canopy are very easily
damaged during installation if grazed or knocked by tools. Please take care to protect
the surfaces during installation.
Protect the cooktop surface below , to prevent damage occurring while
the wall canopy is being installed above.
The manufacturer shall not be liable for failure to observe all safety
regulations for the correct and normal operation of electrical parts.
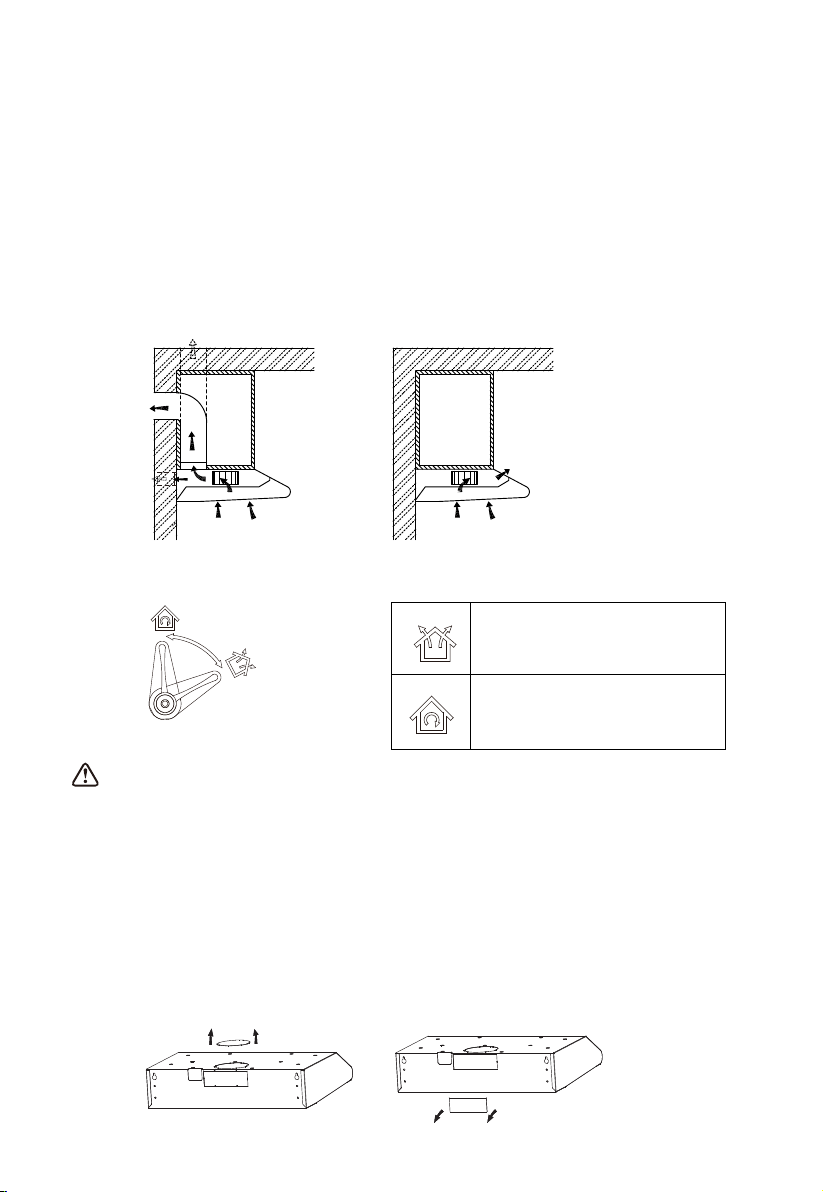
Choose a venting mode:
Extraction-air (out door)
venting option
Recirculation Venting option
Extraction-air mode: Turn
the venting knob here means
venting outside
Circulating-air mode: Turn the
venting knob here means
recirculaon
Venng knob posion
Information
Sufficient air is needed for proper combustion and exhausting of gases through the
flue (chimney) of fuel burning equipment to prevent back drafting. Ductless fans must
always be vented to the outdoors.
When assessing the air pressure, the entire ventilation system in the house/apartment
must be taken into account, e.g. hob and/or gas cooker, this rule does not apply.
Government regulations must be observed for the conveyance of exhaust air. If the
extractor hood is used in circulating air mode with activated carbon filter, there are no
operating restrictions.
If you choose extraction-air mode, there are two methods for ventilation, including
‘horizontal ventilation ‘ and ‘vertical ventilation‘. Please take out
the cover before using and install check valve in the hole.
The square air check valve for horizontal ventilation is not supplied.
5
8
Prepare the installation:
Ensure the power has been turned off before beginning this installation. Electrical
outlet must be located in an area that the power cord/plug can easily get routed to
and plugged into.
To install this hood you will require two assistants. You will need following tools and
material to complete this installation.
Tools you will need:
Drill appropriate to your wall
Phillips Screwdriver
Tape Measure
Hand Saw or Jig Saw
Installation work and electrical wiring must be
done by qualified person(s) in accordance
with all applicable codes and standards,
including fire rated construction.
Do not discharge the exhaust air into a flue
from other appliances burning gas or other
fuels.
Regulations concerning the discharge of air
have to be fulfilled.
The cooker hood must be placed at a
minimum distance of 25.6'' above the
cooking surface of a hob.
The cooker hood must be placed at a
maximum distance of 29.5'' above the
cooking surface of a hob.
Min.
Max.
29.8''/35.3''
25.6''
29.5''
Warning: Failure to install the screws or fixing device in accordance with these instructions
may result in electrical hazards.
Use the 4 screws to fix the cooker hood to a kitchen cupboard .Check that your fixings are
correctly located, by temporarily fitting the cooker hood. If correct, fit the unit into position.
Tighten the screws if necessary.
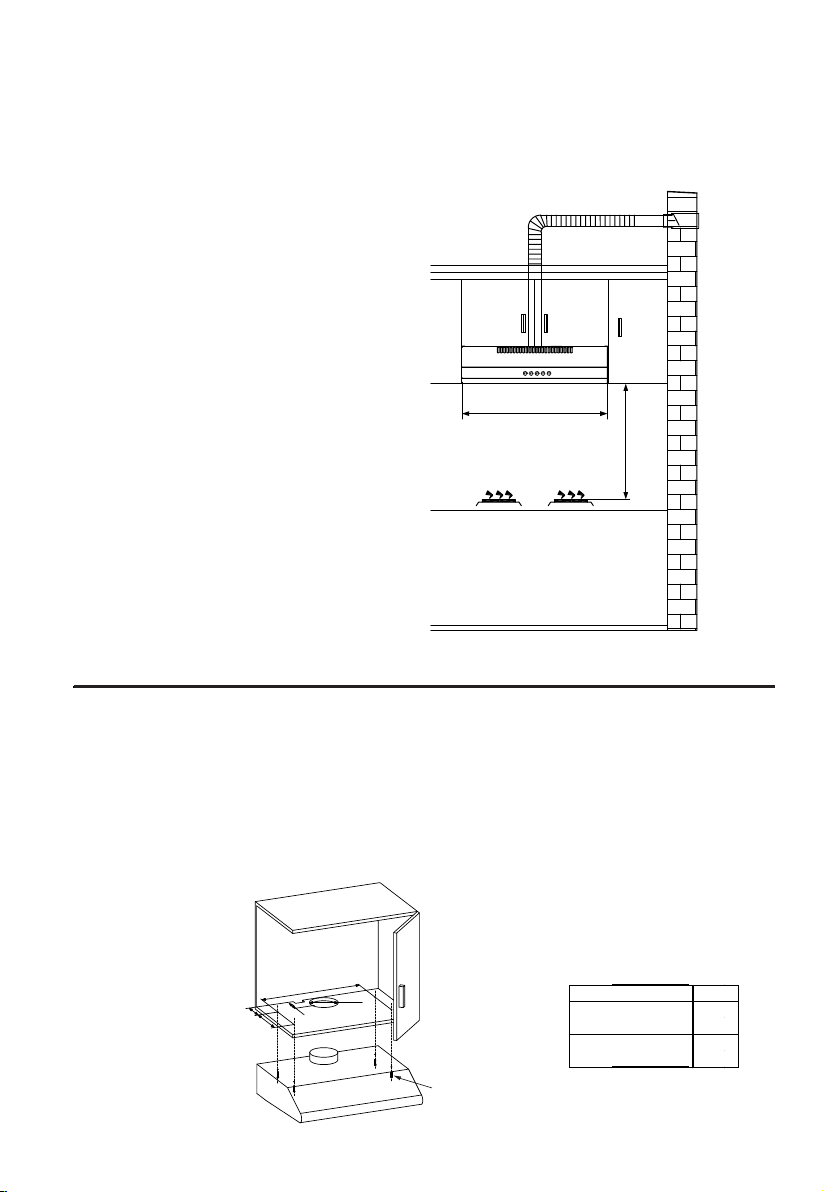
CUPBOARD MOUNTING INSTALLATION
ATTENTION: If your cooker hood works at circulating-air mode, it is not necessary to
drill 5.12'' diameter hole.
Drill a 5.12'' diameter, four 0.14'' diameter hole and a square hole match your plug
with the vent hole on the top of the cooker hood in the middle as below picture.
X
CVU30W4ABB
25''
27.4''
X
5.12''
2.76''
3.94''
7''
4×Screws(ST0.2"*1.93")
CVU36W4ABB
Use consumer model
6
9
To mount on the wall, drill two 3.94'' diameter holes 26.6'' or 27.4'' (depending on model.
See drawing and table below.)with the vent hole on the top of the cooker hood in the
middle as below picture. Make sure the hood is aligned directly over the hob.
Insert two plastics wall plugs(supplied) into the holes.
Insert two screws into the upper two plastic wall plugs and tighten them leaving 1.18''
protruding from the wall.
Mount the cooker hood onto the two screws and mark the bottom two screw positions.
Remove the hood and drill the bottom two screw holes and Insert the plastic wall plugs.
Mount the hood on the top screws, Insert the bottom screws and fully tighten all the screws.
Y
WALL MOU NTING INSTALLATION
4×Screws
(M5 x 1.97'')
Y
CVU30W4ABB
26.6''
27.4''
CVU36W4ABB
Use consumer model
OPERATION
ON/OFF LIGHTING
SWITCH: Press
on this switch to turn on the
lights,
and press
again to
turn them o
ff
.
OFF MOTOR SWITCH: Press on this switch to stop the motor
operation.
SPEED SWITCH: Press
on
this switch, the motor runs at LOW
speed.
SPEED SWITCH: Press
on
this switch, the motor runs at
MEDIUM
speed.
SPEED SWITCH: Press
on
this switch, the motor runs at HIGH
speed.
7
LIGHTING
LIGHT REPLACEMENT
11
CLEANING AND MAINTENANCE
Disconnect range hood from power supply before cleaning or servicing.
Cleaning the surface of hood frequently. Use mild soap or detergent to clean the hood.
Do not use harsh alkalis or abrasives.
Avoid the use of scouring powers or dishwasher compounds.
Grease filter may be washed using mild soap or detergent. (Heavy grease build-up may
not be cleaned easily and the filter may require replacement).
Charcoal filter cannot be cleaned and must be replaced regularly.
Information
Cleaning water must not enter into motor, control switch etc. electrical
parts.
It is recommended to clean the metallic filter every three months by carrying out the following
instruction:
Remove the metallic filter from the cooker hood and wash it in a solution of water and neutral
liquid detergent, leaving to soak.
Rinse thoroughly with warm water and leave to dry.
The metallic filter may alter in color after several washes. This is not cause for
customer complaint or replacement of metallic filter.
LED modules,
separete ballast
DSH-1.5-
S-33.2/120
VoltageMax power Picture ILCOS D codeLamp Cap
1.5W
Square/Diameter:33.2mmx120mm
17473000A00465
120V
Disconnect range hood from power supply
Remove the grease filter.
Remove the light by pushing it out from the hood body (this may require
pressure or force to be applied).
Disconnect the connector of the light.
Replace the light (17473000A00465) with a new one of the same
type,making sure that you connect the light with the light cable correctly.
Reconnect range hood to power supply.
8
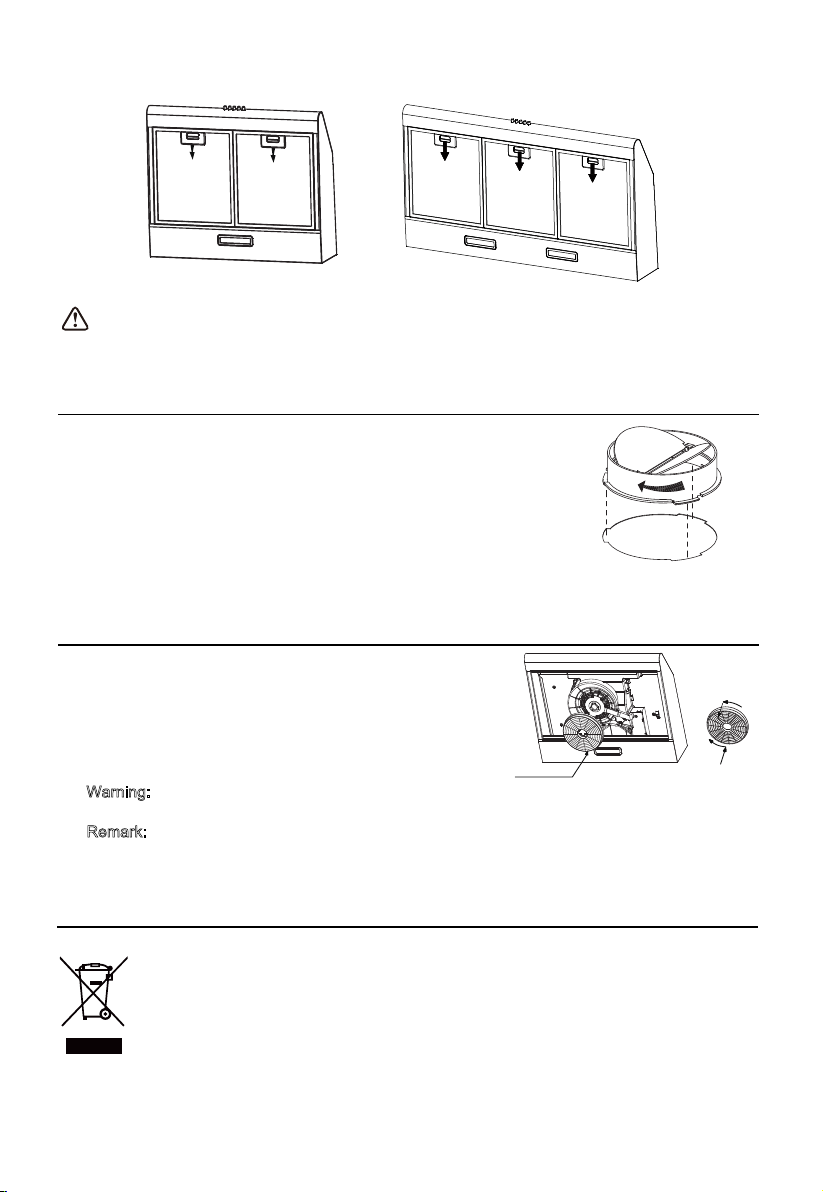
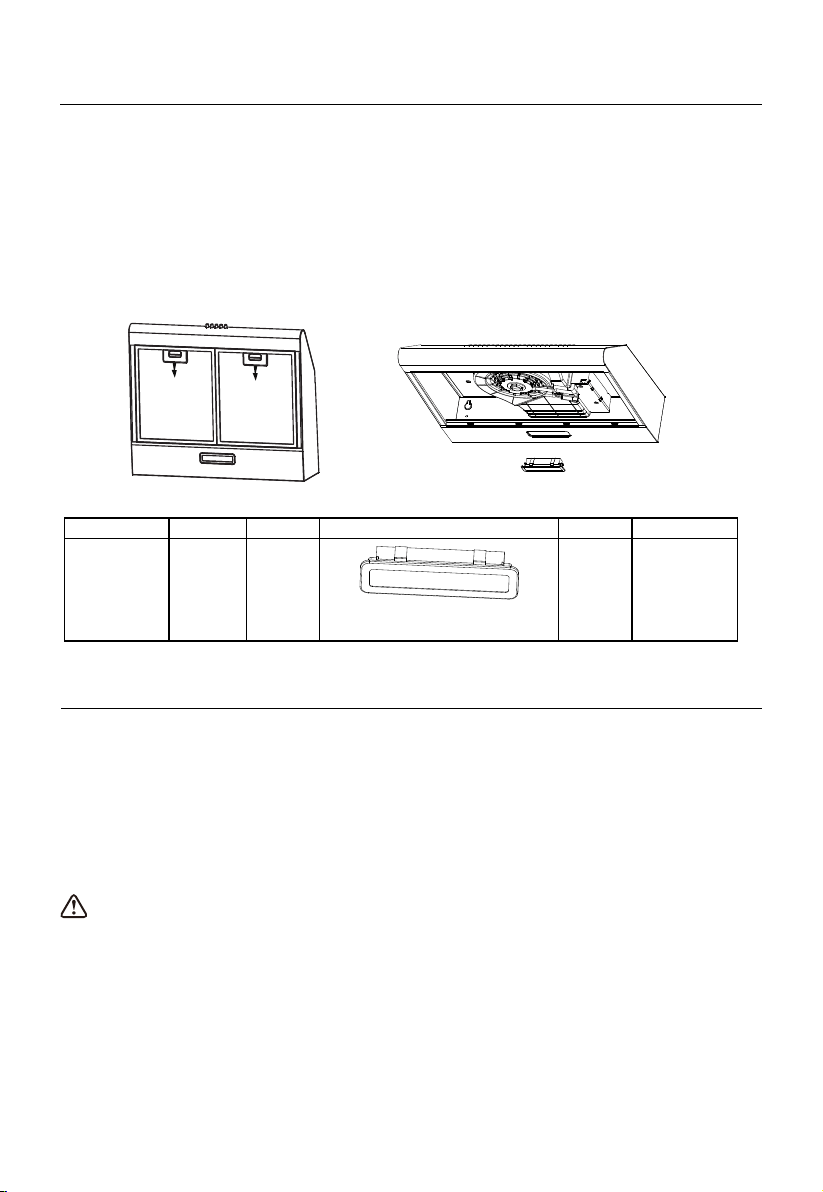
INSTALLING THE CARBON FILTER
zRemove the grease filter
CHECK VALVE INSTALLATION
Align check valve tabs with corresponding cut outs in
hood. Push down and turn check valve clockwise until
it locks in place.
Information
There is a fire risk if cleaning is not carried out in accordance with the instructions.
The charcoal filter is located over the motor.
Turn the filter counter clockwise to remove.
Replace a new carbon filter,apply
DISPOSAL OF OLD ELECTRICAL APPLIANCES
The European directive 2012/19/EU on Waste Electrical and Electronic Equipment (WEEE), requires that old
household electrical appliances must not be disposed of in the normal unsorted municipal waste stream. Old
appliances must be collected separately in order to optimize the recovery and recycling of the materials they contain,
and reduce the impact on human health and the environment.
The crossed out “wheeled bin” symbol on the product reminds you of your obligation, that when you dispose of the
appliance, it must be separately collected.
Consumers should contact their local authority or retailer for information concerning the correct disposal of their old
appliance.
reverse procedure for re installation.
Carbon Filt er
Warning: the carbon filter cannot be washed or recycled. It should be replaced after approximately
2-3 months of use..
Remark: Carbon filter is not supplied with your appliance.The service part number of carbon filter
is12173000000039.
Open
Close
9
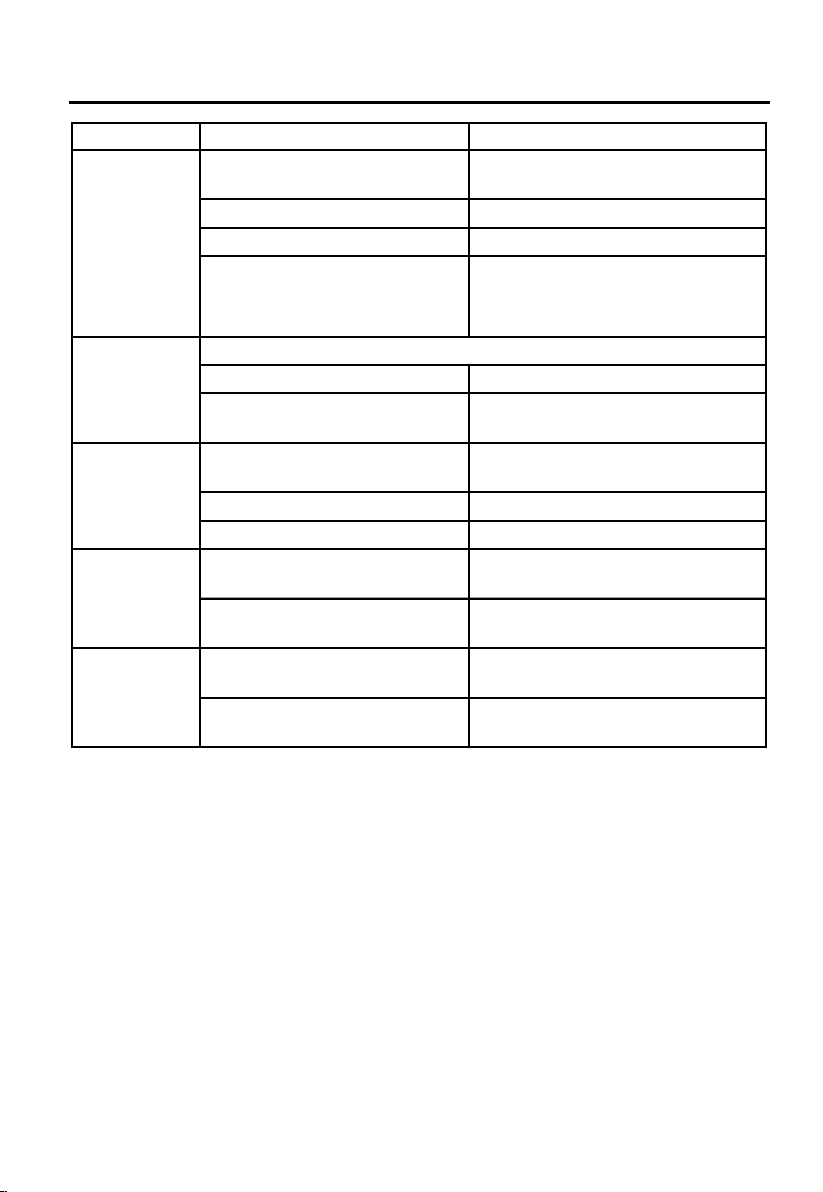
TROUBLE SHOOTING
Fault Cause Solution
Light on, but
motor does not
work
The blades are blocked.
The capacitor is damaged. Call Customer Support.
The motor is damaged.
Call Customer Support.
The internal wiring of motor is cut
off/ disconnected. An unpleasant
smell may be produced. Disconnect
power supply.
Call Customer Support.
Both light and
motor do not
work
Apart from
the above mentioned, check the following:
Light damaged.
Replace lights.
Power cord loose.
The motor is not tightly fastened.
The cooker hood is not tightly fixed.
The distance between the cooker
hood and the cooker top is too large.
Check power supply and house
electrical outlets.
Vibration
The blade, if damaged, can cause
vibrating.
Call Customer Support.
Call Customer Support.
Check installation.
Readjust the distance: see requirements
for minimum and max distance on page 7.
Insufficient
suction
The machine is
not level.
Disconnect power supply before
checking blades for obstruction.
Too much ventilation from open
doors or windows.
Choose a new place to install the
appliance or close some doors / windows.
The screws securing the hood into
the cabinet are not tight enough.
Tighten the screws securing the hood into
the cabinet and make it horizontal.
The screws securing the hood to
the rear wall are not tight enough.
Tighten the screws securing the hood to
the rear wall and make it horizontal.
10

Customer Service:
Phone: 8666464332
1 YEAR LIMITED WARRANTY
This is the only express warranty for this product and is in lieu of any other warranty or
condition.
This product is warranted to be free from defects in material and workmanship for a
period of one (1) year from the date of original purchase. During this period, your
exclusive remedy is repair or replacement of this product or any component found to be
defective, at our option; however, you are responsible for all costs associated with
returning the product to us and our returning the product or component under this
warranty to you. If the product or component is no longer available, we will replace with
a similar one of equal or greater value.
We exclude all claims for special, incidental, and consequential damages by breach of
express or implied warranty. All liability is limited to amount of the purchase price.
Every implied warranty, including any statutory warranty or condition of merchantability
RU¿WQHVVIRUSDUWLFXODUSXUSRVHLVGLVFODLPHGH[FHSWWRWKHH[WHQWSURKLELWHGE\ODZLQ
ZKLFKFDVHVXFKZDUUDQW\RUFRQGLWLRQLV limited to the duration of this written warranty.
7KLVZDUUDQW\JLYHV\RXVSHFL¿FOHJDOULJKWV<RXPD\KDYHRWKHUOHJDOULJKWVWKDWYDU\G
HSHQGLQJRQZKHUH\RXOLYH6RPHVWDWHVRU provinces do not allow limitations on
implied warranties or special, incidental consequential damages, so the foregoing
limitations may not apply to you.
This warranty does not cover wear from normal use or operation that does not comply
with the instruction manual or damages to the product resulting from accident, alteration,
abuse, or misuse. This warranty extends only to the original consumer purchaser or gift
recipient. Keep the original sales receipt, as proof of purchase is required to make a
warranty claim. This warranty is void if product is used for other than single-family
household use or subjected to any voltage and waveform other than as specified on the
label.Delivery and installation damage is not covered under warranty.
11

recommendations and instruction regarding installation, maintenance
The manufacturer shall decline all responsibility if the foregoing
and use are not observed and respected when using the cooker hood.
P/N:16173000A21833