

<RXUQHZZDVKLQJPDFKLQH
<RXKDYHFKRVHQD%RVFK ZDVKLQJ
PDFKLQH
3OHDVHWDNHDIHZPLQXWHVWRUHDGDQG
EHFRPHIDPLOLDUZLWKWKHDGYDQWDJHVRI
\RXUZDVKLQJPDFKLQH
7RPHHWWKHKLJKTXDOLW\GHPDQGV
UHTXLUHGE\%RVFKHYHU\ZDVKLQJ
PDFKLQHWKDWOHDYHVRXUIDFWRU\LV
FDUHIXOO\FKHFNHGWRHQVXUHWKDWLW
IXQFWLRQVFRUUHFWO\DQGLVLQSHUIHFW
FRQGLWLRQ
)RUPRUHLQIRUPDWLRQRQRXUSURGXFWV
DFFHVVRULHVUHSODFHPHQWSDUWVDQG
VHUYLFHVVHHRXUZHEVLWHZZZERVFK
KRPHFRP RUFRQWDFWRXUDIWHUVDOHV
VHUYLFHFHQWUHV
,IWKHRSHUDWLQJDQGLQVWDOODWLRQ
LQVWUXFWLRQVGHVFULEHGLIIHUHQWPRGHOV
DQ\GLIIHUHQFHVZLOOEHSRLQWHGRXWDWWKH
UHOHYDQWSRLQWVLQWKHWH[W
5HDGWKHVHRSHUDWLQJDQGLQVWDOODWLRQ
LQVWUXFWLRQVEHIRUHVZLWFKLQJRQWKH
ZDVKLQJPDFKLQH
*%VWDQGDUG
*%
*%
*%
*%
*%
*%7
*%
'LVSOD\UXOHV
::DUQLQJ
7KLVFRPELQDWLRQRIV\PERODQGVLJQDO
ZRUGLQGLFDWHVDSRVVLEO\GDQJHURXV
VLWXDWLRQ1RWKHHGLQJWKHZDUQLQJFDQ
FDXVHGHDWKRULQMXULHV
&DXWLRQ
7KLVVLJQDOZRUGLQGLFDWHVDSRVVLEO\
GDQJHURXVVLWXDWLRQ1RWKHHGLQJWKH
FDXWLRQFDQFDXVHSURSHUW\DQGRU
HQYLURQPHQWDOGDPDJH
1RWHWLS
,QIRUPDWLRQ DERXW WKH RSWLPXP XVH RI WKH
DSSOLDQFHDQ\RWKHUXVHIXOLQIRUPDWLRQ
DEF
7KH VWHSV DUH UHSUHVHQWHG E\ QXPEHUV RU
OHWWHUV
■
/LVWVDUHUHSUHVHQWHGE\DVPDOOER[RUD
GDVK

HQ
&RQWHQWV
HQ,QVWUXFWLRQ0DQXDODQG,QVWDOODWLRQ,QVWUXFWLRQV
8 ,QWHQGHGXVH
( 6DIHW\LQVWUXFWLRQV
&KLOGUHQSHRSOHSHWV
,QVWDOODWLRQ
2SHUDWLRQ
&OHDQLQJ0DLQWHQDQFH
7 (QYLURQPHQWDOSURWHFWLRQ
3DFNDJLQJXVHGDSSOLDQFH
7LSVRQHFRQRPLFDOXVH
5 3RVLWLRQLQJDQGFRQQHFWLQJ
,QFOXGHGZLWKWKHDSSOLDQFH
,QVWDOODWLRQ
6DIHW\LQVWUXFWLRQV
5HPRYLQJWKHIRDPEORFN
,QVWDOODWLRQVXUIDFH
,QVWDOODWLRQRQDEDVHRUDZRRGHQ
MRLVWIORRU
,QVWDOODWLRQRQDSODWIRUPZLWKGUDZHU
,QVWDOOLQJWKHDSSOLDQFHLQDNLWFKHQHWWH
5HPRYLQJWKHWUDQVSRUWORFNV
+RVHDQGFDEOHOHQJWKV
:DWHULQOHW
:DWHURXWOHW
$OLJQPHQW
(OHFWULFDOFRQQHFWLRQ
%HIRUHZDVKLQJIRUWKHILUVWWLPH
7UDQVSRUWDWLRQ
* *HWWLQJWRNQRZWKHDSSOLDQFH
$SSOLDQFH
&RQWUROSDQHO
'LVSOD\SDQHO
Z /DXQGU\
3URWHFWLQJ\RXUODXQGU\DQGDSSOLDQFH
6RUWLQJODXQGU\
P2YHUYLHZRISURJUDPPHV
6HOHFWDEOHSURJUDPPH
0 3URJUDPPHGHIDXOWVHWWLQJV
7HPSHUDWXUH
6SLQVSHHG
)LQLVKLQWLPH
\ $GGLWLRQDOSURJUDPPHVHWWLQJV
䗨爷6SHHG3HUIHFW
熓䦖叀(DV\LURQ
䀾窜伯3UHZDVK
侐仹6RDNLQJ
㒸儚伯5LQVHSOXV
㍥䖪乌5LQVHKROG
淈䇞0HPRU\
L'26VHWWLQJ
1 2SHUDWLQJWKHDSSOLDQFH
3UHSDULQJWKHDSSOLDQFH
6ZLWFKLQJRQWKHDSSOLDQFHVHOHFWLQJ
DSURJUDPPH
3ODFLQJODXQGU\LQWRWKHGUXP
0HDVXULQJDQGDGGLQJGHWHUJHQWDQG
FDUHSURGXFWV
6WDUWLQJWKHSURJUDPPH
&KLOGSURRIORFN
$GGLQJUHPRYLQJODXQGU\
&KDQJLQJWKHSURJUDPPH
&DQFHOWKHSURJUDPPH
3URJUDPPHHQGGXULQJULQVHKROG
3URJUDPPHHQG
5HPRYLQJODXQGU\VZLWFKLQJRIIWKH
DSSOLDQFH
a ,QWHOOLJHQWGRVLQJV\VWHP
)DPLOLDULVLQJ\RXUVHOIZLWKL'26
L'26'HWHUJHQWGUDZHU
%HIRUHVHWWLQJXSL'26
$XWRPDWLFGRVLQJ
L'266HWWLQJWKHFRQWHQWRIWKH ©å
GLVSHQVHU
L'266HWWLQJWKHGRVDJH
)LOOLQJWKHGLVSHQVHUV
0DQXDOGRVLQJ

HQ ,QWHQGHGXVH
(PSW\LQJWKHL'26GHWHUJHQWGUDZHU
FOHDQLQJWKHL'26GHWHUJHQWGUDZHU
DQGLWVKRXVLQJFOHDQLQJWKHL'26
SXPSXQLW
Q$SSOLDQFHVHWWLQJV
$FWLYDWLQJWKHVHWWLQJPRGH
&KDQJLQJWKHVLJQDOYROXPH
&KDQJLQJWKHEULJKWQHVVRIWKH
GLVSOD\SDQHO
6ZLWFKLQJWKHGUXPFDUHLQIRUPDWLRQ
VLJQDORQRII
([LWLQJVHWWLQJPRGH
H 6HQVRUV
8QEDODQFHGORDGGHWHFWLRQV\VWHP
$TXD6HQVRUV
2 &OHDQLQJDQGPDLQWHQDQFH
$SSOLDQFHKRXVLQJFRQWUROSDQHO
'UXP
'HVFDOLQJ
'UDLQSXPSLVEORFNHG
7KHGUDLQKRVHDWWKHVLSKRQLV
EORFNHG
)LOWHULQWKHZDWHUVXSSO\LVEORFNHG
3)DXOWVDQGZKDWWRGRDERXW
WKHP
(PHUJHQF\UHOHDVH
,QIRUPDWLRQRQWKHGLVSOD\SDQHO
)DXOWVDQGZKDWWRGRDERXWWKHP
4 $IWHUVDOHVVHUYLFH
[ &RQVXPSWLRQYDOXHV
J 7HFKQLFDOGDWD
8 ,QWHQGHGXVH
,QWHQGHGXVH
■ 7KLVDSSOLDQFHLVLQWHQGHGIRUSULYDWH
GRPHVWLFXVHRQO\
■ 'R QRW LQVWDOO RU RSHUDWH WKLV DSSOLDQFH
DQ\ZKHUHWKDWLVOLDEOHWRH[SHULHQFH
IURVW DQGRU RXWGRRU FRQGLWLRQV 7KHUH
LVDULVNWKDWWKHDSSOLDQFHZLOOEH
GDPDJHGLIUHVLGXDOZDWHULQLW
IUHH]HV,IKRVHVIUHH]HXSWKH\PD\
FUDFNEXUVW
■ 7KLVDSSOLDQFHPXVWRQO\EHXVHGIRU
ZDVKLQJGRPHVWLFODXQGU\FRQVLVWLQJ
RI PDFKLQHZDVKDEOH LWHPV DQG KDQG
ZDVKDEOHZRROOHQVVHHODEHORQ
LWHP8VLQJWKHDSSOLDQFHIRUDQ\
RWKHUSXUSRVHLVRXWVLGHRIWKHVFRSH
RILWVLQWHQGHGDSSOLFDWLRQDQGLV
IRUELGGHQ
■ 7KLVDSSOLDQFHLVVXLWDEOHIRU
RSHUDWLRQZLWKPDLQVZDWHUDQG
FRPPHUFLDOO\DYDLODEOHGHWHUJHQWV
DQGFDUHSURGXFWVPXVWEHVXLWDEOH
IRUXVHLQZDVKLQJPDFKLQHV
■ 7KLVDSSOLDQFHLVLQWHQGHGIRUXVHXS
WRDPD[LPXPKHLJKWRI PHWUHV
DERYHVHDOHYHO
%HIRUH\RXVZLWFKRQWKHDSSOLDQFH
&KHFNWKDWWKHUHLVQRYLVLEOHGDPDJHWR
WKHDSSOLDQFH'RQRWRSHUDWHWKH
DSSOLDQFHLILWLVGDPDJHG6KRXOG\RX
KDYHDQ\SUREOHPVSOHDVHFRQWDFW\RXU
VSHFLDOLVWGHDOHURURXUFXVWRPHUVHUYLFH
5HDGDQGIROORZWKHRSHUDWLQJDQG
LQVWDOODWLRQLQVWUXFWLRQVDQGDOORWKHU
LQIRUPDWLRQSURYLGHGZLWKWKLVDSSOLDQFH
5HWDLQWKHGRFXPHQWVIRUVXEVHTXHQW
XVHRUIRUVXEVHTXHQWRZQHUV

6DIHW\LQVWUXFWLRQV HQ
( 6DIHW\LQVWUXFWLRQV
6DIHW\LQVWUXFWLRQV
7KHIROORZLQJVDIHW\LQIRUPDWLRQ
DQGZDUQLQJVDUHSURYLGHGWR
SURWHFW\RXIURPLQMXU\DQGWR
SUHYHQW PDWHULDO GDPDJH WR \RXU
VXUURXQGLQJV
,WLVQHYHUWKHOHVVLPSRUWDQWWR
WDNHWKHQHFHVVDU\SUHFDXWLRQV
DQGWRSURFHHGZLWKFDUHZKHQ
LQVWDOOLQJPDLQWDLQLQJFOHDQLQJ
DQGRSHUDWLQJWKHDSSOLDQFH
&KLOGUHQSHRSOHSHWV
::DUQLQJ
5LVNRIGHDWK
&KLOGUHQDQGRWKHUSHRSOHZKR
DUHXQDEOHWRDVVHVVWKHULVNV
LQYROYHGZKHQXVLQJWKH
DSSOLDQFH PD\ LQMXUH WKHPVHOYHV
RUPD\ILQGWKHPVHOYHVLQOLIH
WKUHDWHQLQJ VLWXDWLRQV 7KHUHIRUH
SOHDVHQRWH
■ 7KHDSSOLDQFHPD\EHXVHG
E\FKLOGUHQRYHUWKHDJHRI
\HDUVDQGE\SHUVRQVZLWK
UHGXFHGSK\VLFDOVHQVRU\RU
PHQWDO FDSDFLW\ RU E\ SHUVRQV
ZLWKDODFNRIH[SHULHQFHRU
NQRZOHGJHDVORQJDVWKH\
DUHVXSHUYLVHGRUKDYH
UHFHLYHG LQVWUXFWLRQ RQ KRZ WR
XVHWKHDSSOLDQFHVDIHO\DQG
WKH\KDYHXQGHUVWRRGWKH
SRWHQWLDOULVNVRIXVLQJWKH
DSSOLDQFH
■ &KLOGUHQPXVWQRWSOD\ZLWK
WKLVDSSOLDQFH
■ 'RQRWDOORZFKLOGUHQWRFOHDQ
RUPDLQWDLQWKLVDSSOLDQFH
XQVXSHUYLVHG
■ .HHSFKLOGUHQXQGHU\HDUV
DQGSHWVDZD\IURPWKLV
DSSOLDQFH
■ 'RQRWOHDYHWKHDSSOLDQFH
XQDWWHQGHGZKHQFKLOGUHQRU
RWKHUSHRSOHZKRDUHXQDEOH
WRDVVHVVWKHULVNVDUHLQWKH
YLFLQLW\
::DUQLQJ
5LVNRIGHDWK
&KLOGUHQPD\ORFNWKHPVHOYHV
LQVLGHDSSOLDQFHVDQGILQG
WKHPVHOYHVLQDOLIHWKUHDWHQLQJ
VLWXDWLRQ
■ 'RQRWSRVLWLRQWKHDSSOLDQFH
EHKLQGDGRRUDVWKLVPD\
REVWUXFW WKH DSSOLDQFH GRRU RU
SUHYHQWLWIURPRSHQLQJ
FRPSOHWHO\
■ 2QFHDQDSSOLDQFHKDV
UHDFKHG WKH HQG RI LWV OLIH SXOO
WKHPDLQVSOXJIURPWKH
VRFNHW EHIRUHVHYHULQJWKH
PDLQV FDEOH DQG WKHQ GHVWUR\
WKHORFNRQWKHDSSOLDQFH
GRRU

HQ 6DIHW\LQVWUXFWLRQV
::DUQLQJ
5LVNRIVXIIRFDWLRQ
,IDOORZHGWRSOD\ZLWKWKH
SDFNDJLQJSODVWLF ILOP RU SDFNLQJ
FRPSRQHQWVFKLOGUHQPD\
EHFRPHFDXJKWLQWKHVHRUSXOO
WKHPRYHUWKHLUKHDGVDQG
VXIIRFDWH
.HHS SDFNDJLQJ SODVWLF ILOP DQG
SDFNLQJFRPSRQHQWVDZD\IURP
FKLOGUHQ
::DUQLQJ
5LVNRISRLVRQLQJ
'HWHUJHQWVDQGFDUHSURGXFWV
PD\UHVXOWLQSRLVRQLQJLI
FRQVXPHG
,IDFFLGHQWDOO\VZDOORZHGVHHN
PHGLFDO DGYLFH .HHS GHWHUJHQWV
DQGFDUHSURGXFWVRXWRIWKH
UHDFKRIFKLOGUHQ
::DUQLQJ
5LVNRIEXUQV
:KHQZDVKLQJDWKLJK
WHPSHUDWXUHVWKHJODVVLQWKH
DSSOLDQFHGRRUEHFRPHVKRW
6WRSFKLOGUHQIURPWRXFKLQJWKH
DSSOLDQFHGRRUZKHQLWLVKRW
::DUQLQJ
(\HVNLQLUULWDWLRQ
&RQWDFWZLWKGHWHUJHQWVRUFDUH
SURGXFWVPD\FDXVHH\HVNLQ
LUULWDWLRQ
5LQVHH\HVVNLQWKRURXJKO\LI
WKH\LWFRPHVLQWRFRQWDFWZLWK
GHWHUJHQWVRUFDUHSURGXFWV
.HHSGHWHUJHQWVDQGFDUH
SURGXFWVRXWRIWKHUHDFKRI
FKLOGUHQ
,QVWDOODWLRQ
::DUQLQJ
5LVNRIHOHFWULFVKRFNILUH
PDWHULDOGDPDJHGDPDJHWR
WKHDSSOLDQFH
,IWKHDSSOLDQFHLVQRWLQVWDOOHG
SURSHUO\WKLVPD\OHDGWRD
GDQJHURXVVLWXDWLRQ(QVXUH
WKH IROORZLQJ
■ 7KHPDLQVYROWDJHRQ\RXU
SRZHUVRFNHWPXVWPDWFKWKH
UDWHGYROWDJHVSHFLILHGRQWKH
DSSOLDQFHLGHQWLILFDWLRQ
SODWH7KHFRQQHFWHGORDGV
DQGWKHUHTXLUHGIXVH
SURWHFWLRQ DUH VSHFLILHG RQ WKH
LGHQWLILFDWLRQSODWH
■ 7KHPDLQVSOXJDQGWKH
SURWHFWLYHFRQWDFWVRFNHW
PXVWPDWFKDQGWKHHDUWKLQJ
V\VWHPPXVWEHFRUUHFWO\
LQVWDOOHG
■ 7KHLQVWDOODWLRQPXVWKDYHDQ
DGHTXDWHFURVVVHFWLRQ
■ 7KH PDLQV SOXJ PXVW EH IUHHO\
DFFHVVLEOHDWDOOWLPHV,IWKLV
LVQRWSRVVLEOHLQRUGHUWR
FRPSO\ZLWKWKHUHOHYDQW
VDIHW\UHJXODWLRQVDVZLWFK
DOOSROHGLVFRQQHFWLRQPXVW
EHEXLOWLQWRWKHSHUPDQHQW
LQVWDOODWLRQ LQ DFFRUGDQFH ZLWK
HOHFWULFDOLQVWDOODWLRQ
UHJXODWLRQV

6DIHW\LQVWUXFWLRQV HQ
■ ,IXVLQJDUHVLGXDOFXUUHQW
FLUFXLWEUHDNHURQO\XVHRQH
WKDWEHDUVWKHIROORZLQJPDUN
z7KHSUHVHQFHRIWKLV
PDUNLVWKHRQO\ZD\WREH
VXUHWKDWLWIXOILOVDOOWKH
DSSOLFDEOHUHJXODWLRQV
::DUQLQJ
5LVNRIHOHFWULFVKRFNILUH
PDWHULDOGDPDJHGDPDJHWR
WKHDSSOLDQFH
,IWKHDSSOLDQFHVPDLQVFDEOHLV
DOWHUHGRUGDPDJHGWKLVPD\
UHVXOWLQHOHFWULFVKRFNVKRUW
FLUFXLWLQJRUILUHGXHWR
RYHUKHDWLQJ
7KHPDLQVFDEOHPXVWQRWEH
NLQNHGFUXVKHGRUDOWHUHGDQG
PXVWQRWFRPHLQWRFRQWDFWZLWK
DQ\KHDWVRXUFHV
::DUQLQJ
5LVNRIILUHPDWHULDOGDPDJH
GDPDJHWRWKHDSSOLDQFH
7KHXVHRIH[WHQVLRQFRUGVRU
SRZHUVWULSVPD\UHVXOWLQILUH
GXHWRRYHUKHDWLQJRUVKRUW
FLUFXLWLQJ
&RQQHFW WKH DSSOLDQFH GLUHFWO\ WR
DQ HDUWKHG VRFNHW WKDW KDV EHHQ
FRUUHFWO\LQVWDOOHG'RQRWXVH
H[WHQVLRQFRUGVSRZHUVWULSVRU
PXOWLZD\FRXSOHUV
::DUQLQJ
5LVNRILQMXU\PDWHULDO
GDPDJHGDPDJHWRWKH
DSSOLDQFH
■ 7KHDSSOLDQFHPD\YLEUDWHRU
PRYHZKHQLQRSHUDWLRQ
SRWHQWLDOO\ UHVXOWLQJ LQ LQMXU\ RU
PDWHULDOGDPDJH
3ODFHWKHDSSOLDQFHRQD
FOHDQHYHQVROLGVXUIDFH
DQGXVLQJDVSLULWOHYHOWR
JXLGH\RXOHYHOLWZLWKWKH
VFUHZLQIHHW
Risk of injury/material damage/damage to the appliance!
■ ,I\RXWDNHKROGRIDQ\RIWKH
DSSOLDQFHVSURWUXGLQJSDUWV
HJWKHDSSOLDQFHGRRULQ
RUGHUWROLIWRUPRYHLWWKHVH
SDUWV PD\ EUHDN RII DQG FDXVH
LQMXU\
'RQRWWDNHKROGRIDQ\RIWKH
DSSOLDQFHV SURWUXGLQJ SDUWV LQ
RUGHUWRPRYHWKHDSSOLDQFH
::DUQLQJ
5LVNRILQMXU\
■ 7KHDSSOLDQFHLVYHU\KHDY\
/LIWLQJLWPD\UHVXOWLQLQMXU\
'RQRWOLIWWKHDSSOLDQFHRQ
\RXURZQ
Risk of injury!
■ 7KHDSSOLDQFHKDVVKDUS
HGJHV RQ ZKLFK \RX FRXOG FXW
\RXUKDQGV
'RQRWWDNHKROGRIWKH
DSSOLDQFHE\LWVVKDUSHGJHV
:HDUSURWHFWLYHJORYHVWROLIW
LW
Risk of injury!

HQ 6DIHW\LQVWUXFWLRQV
■ ,I WKH KRVHV DQG PDLQV FDEOHV
DUHQRWFRUUHFWO\URXWHGWKH\
PD\FRQVWLWXWHDWULSSLQJ
KD]DUGZKLFKPD\UHVXOWLQ
LQMXU\
5RXWH KRVHV DQG FDEOHV VXFK
WKDWWKH\GRQRWFRQVWLWXWHD
WULSSLQJKD]DUG
&DXWLRQ
0DWHULDOGDPDJHGDPDJHWR
WKHDSSOLDQFH
■ ,IWKHZDWHUSUHVVXUHLVWRR
KLJKRUWRRORZWKHDSSOLDQFH
PD\QRWEHDEOHWRRSHUDWH
SURSHUO\DQGLWPD\DOVR
UHVXOWLQPDWHULDOGDPDJHRU
GDPDJHWRWKHDSSOLDQFH
0DNHVXUHWKDWWKHZDWHU
SUHVVXUHLQWKHZDWHUVXSSO\
IDFLOLW\LVDWOHDVW
N3D EDU DQG GRHV QRW
H[FHHG N3D EDU
Material damage/damage to the appliance
■ ,IWKHZDWHUKRVHVDUHDOWHUHG
RU GDPDJHG WKLV PD\ UHVXOW LQ
PDWHULDOGDPDJHRUGDPDJH
WRWKHDSSOLDQFH
7KHZDWHUKRVHVPXVWQRWEH
NLQNHGFUXVKHGDOWHUHGRU
VHYHUHG
Material damage/damage to the appliance
■ 7KHXVHRIKRVHVVXSSOLHGE\
RWKHU EUDQGV WR FRQQHFW WR WKH
ZDWHUVXSSO\PD\UHVXOWLQ
PDWHULDOGDPDJHRUGDPDJH
WRWKHDSSOLDQFH
8VHWKHKRVHVVXSSOLHGZLWK
WKHDSSOLDQFHRUJHQXLQH
VSDUHSDUWKRVHVRQO\
Material damage/damage to the appliance
■ 7KHDSSOLDQFHLVVHFXUHGIRU
WUDQVSRUWDWLRQE\WUDQVSRUW
ORFNLQJGHYLFHV,IWKH
WUDQVSRUWORFNLQJGHYLFHVDUH
QRWUHPRYHGEHIRUHWKH
DSSOLDQFHLVRSHUDWHGWKLV
PD\UHVXOWLQGDPDJHWRWKH
DSSOLDQFH
,WLVLPSRUWDQWWRFRPSOHWHO\
UHPRYHDOOWUDQVSRUWORFNLQJ
GHYLFHVEHIRUHXVLQJWKH
DSSOLDQFHIRUWKHILUVWWLPH
0DNHVXUHWKDW\RXUHWDLQ
WKHVHWUDQVSRUWORFNLQJ
GHYLFHVVHSDUDWHO\,WLV
LPSRUWDQW WR UHILW WKH WUDQVSRUW
ORFNLQJGHYLFHVLIWKH
DSSOLDQFH LV WR EH WUDQVSRUWHG
LQRUGHUWRSUHYHQWWKH
DSSOLDQFHIURPEHLQJ
GDPDJHGLQWUDQVLW
2SHUDWLRQ
::DUQLQJ
5LVNRIH[SORVLRQVILUH
/DXQGU\WKDWKDVEHHQ
SUHWUHDWHGZLWKFOHDQLQJDJHQWV
WKDWFRQWDLQVROYHQWVHJVWDLQ
UHPRYHUFOHDQLQJVROYHQWPD\
FDXVHDQH[SORVLRQLQWKHGUXP
5LQVHWKHODXQGU\WKRURXJKO\
ZLWKZDWHUEHIRUHZDVKLQJLWLQ
WKHPDFKLQH

6DIHW\LQVWUXFWLRQV HQ
::DUQLQJ
5LVNRISRLVRQLQJ
3RLVRQRXVIXPHVPD\EHJLYHQ
RIIE\FOHDQLQJDJHQWVWKDW
FRQWDLQVROYHQWVHJFOHDQLQJ
VROYHQW
'RQRWXVHFOHDQLQJDJHQWVWKDW
FRQWDLQVROYHQWV
::DUQLQJ
5LVNRILQMXU\
■ ,I\RXVXSSRUW\RXUZHLJKWVLW
RQWKHDSSOLDQFHGRRUZKHQLW
LV RSHQ WKH DSSOLDQFH PD\ WLS
RYHUZKLFKPD\UHVXOWLQ
LQMXU\
'R QRW VXSSRUW \RXU ZHLJKW RQ
WKHDSSOLDQFHGRRUZKHQLWLV
RSHQ
Risk of injury!
■ ,I\RXFOLPERQWRWKH
DSSOLDQFHWKHZRUNWRSPD\
EUHDNZKLFKPD\UHVXOWLQ
LQMXU\
'RQRWFOLPERQWRWKH
DSSOLDQFH
Risk of injury!
■ ,I\RXUHDFKLQWRWKHGUXP
ZKLOH LW LV VWLOO URWDWLQJ \RX ULVN
LQMXULQJ\RXUKDQGV
:DLWXQWLOWKHGUXPKDV
VWRSSHGURWDWLQJ
::DUQLQJ
5LVNRIVFDOGLQJ
:KHQZDVKLQJDWKLJK
WHPSHUDWXUHVWKHUHLVDULVNRI
VFDOGLQJ LI \RX FRPH LQWR FRQWDFW
ZLWKKRWGHWHUJHQWVROXWLRQHJ
ZKHQGUDLQLQJKRWGHWHUJHQW
VROXWLRQLQWRDZDVKEDVLQ
'RQRWUHDFKLQWRWKHKRW
GHWHUJHQWVROXWLRQ
::DUQLQJ
(\HVNLQLUULWDWLRQ
'HWHUJHQWDQGFDUHSURGXFWV
PD\VSUD\RXWLIWKHGHWHUJHQW
GUDZHULVRSHQHGZKLOHWKH
DSSOLDQFHLVLQRSHUDWLRQ
5LQVHH\HVVNLQWKRURXJKO\LI
WKH\LWFRPHVLQWRFRQWDFWZLWK
GHWHUJHQWVRUFDUHSURGXFWV,I
DFFLGHQWDOO\VZDOORZHGVHHN
PHGLFDODGYLFH
&DXWLRQ
0DWHULDOGDPDJHGDPDJHWR
WKHDSSOLDQFH
■ ,I WKH DPRXQW RI ODXQGU\ LQ WKH
DSSOLDQFHH[FHHGVLWV
PD[LPXPORDGFDSDFLW\LW
PD\QRWEHDEOHWRRSHUDWH
SURSHUO\RUWKLVPD\UHVXOWLQ
PDWHULDOGDPDJHRUGDPDJH
WRWKHDSSOLDQFH
'RQRWH[FHHGWKHPD[LPXP
ORDGFDSDFLW\RIGU\ODXQGU\
0DNHVXUH\RXFRPSO\ZLWK
WKHPD[LPXPORDGFDSDFLWLHV
VSHFLILHGIRUHDFKRIWKH
SURJUDPV
Material damage/damage to the appliance
■ ,I \RX SRXU WKH ZURQJ TXDQWLW\
RI GHWHUJHQW RU FOHDQLQJ DJHQW
LQWRWKHDSSOLDQFHWKLVPD\
UHVXOWLQPDWHULDOGDPDJHRU
GDPDJHWRWKHDSSOLDQFH
8VH GHWHUJHQWVFDUH SURGXFWV
FOHDQLQJ DJHQWV DQG VRIWHQHUV
LQDFFRUGDQFHZLWKWKH
PDQXIDFWXUHUVLQVWUXFWLRQV

HQ 6DIHW\LQVWUXFWLRQV
&OHDQLQJ0DLQWHQDQFH
::DUQLQJ
5LVNRIGHDWK
7KHDSSOLDQFHLVSRZHUHGE\
HOHFWULFLW\7KHUHLVDULVNRI
HOHFWULFVKRFNLI\RXFRPHLQWR
FRQWDFWZLWKOLYHFRPSRQHQWV
7KHUHIRUHSOHDVHQRWH
■ 6ZLWFKRIIWKHDSSOLDQFH
'LVFRQQHFWWKHDSSOLDQFH
IURPWKHSRZHUVXSSO\SXOO
RXWWKHSOXJ
■ 1HYHUWDNHKROGRIWKHPDLQV
SOXJZLWKZHWKDQGV
■ :KHQUHPRYLQJWKHPDLQV
SOXJIURPWKHVRFNHWDOZD\V
WDNH KROG RI WKH SOXJ LWVHOI DQG
QHYHUWKHPDLQVFDEOH
RWKHUZLVHWKLVPD\GDPDJH
WKHPDLQVFDEOH
■ 'RQRWPDNHDQ\WHFKQLFDO
PRGLILFDWLRQV WR WKH DSSOLDQFH
RULWVIHDWXUHV
■ 5HSDLUVDQGDQ\RWKHUZRUN
RQ WKH DSSOLDQFH PXVW RQO\ EH
FRQGXFWHGE\RXUFXVWRPHU
VHUYLFHRUE\DQHOHFWULFLDQ
7KHVDPHDSSOLHVIRU
UHSODFLQJWKHPDLQVFDEOH
ZKHQQHFHVVDU\
■ 6SDUHPDLQVFDEOHVFDQEH
RUGHUHGIURPRXUFXVWRPHU
VHUYLFH
::DUQLQJ
5LVNRISRLVRQLQJ
3RLVRQRXVIXPHVPD\EHJLYHQ
RIIE\FOHDQLQJDJHQWVWKDW
FRQWDLQVROYHQWVHJFOHDQLQJ
VROYHQW
'RQRWXVHFOHDQLQJDJHQWVWKDW
FRQWDLQVROYHQWV
::DUQLQJ
5LVN RI HOHFWULF VKRFNPDWHULDO
GDPDJHGDPDJHWRWKH
DSSOLDQFH
,IPRLVWXUHSHQHWUDWHVWKH
DSSOLDQFHWKLVPD\FDXVHLWWR
VKRUWFLUFXLW
'RQRWXVHDSUHVVXUHZDVKHU
VWHDPFOHDQHUKRVHRUVSUD\
JXQWRFOHDQ\RXUDSSOLDQFH
::DUQLQJ
5LVNRILQMXU\PDWHULDO
GDPDJHGDPDJHWRWKH
DSSOLDQFH
7KHXVHRIVSDUHSDUWVDQG
DFFHVVRULHVVXSSOLHGE\RWKHU
EUDQGVLVGDQJHURXVDQGPD\
UHVXOWLQLQMXU\PDWHULDOGDPDJH
RUGDPDJHWRWKHDSSOLDQFH
)RU VDIHW\ UHDVRQV XVH JHQXLQH
VSDUHSDUWVDQGDFFHVVRULHV
RQO\

6DIHW\LQVWUXFWLRQV HQ
&DXWLRQ
0DWHULDOGDPDJHGDPDJHWR
WKHDSSOLDQFH
&OHDQLQJDJHQWVDQGDJHQWVIRU
SUHWUHDWLQJODXQGU\HJVWDLQ
UHPRYHUVSUHZDVKVSUD\VHWF
PD\ FDXVH GDPDJH LI WKH\ FRPH
LQWRFRQWDFWZLWKWKHVXUIDFHVRI
WKHDSSOLDQFH7KHUHIRUHSOHDVH
QRWH
■ 'RQRWDOORZWKHVHDJHQWVWR
FRPHLQWRFRQWDFWZLWKWKH
VXUIDFHVRIWKHDSSOLDQFH
■ &OHDQWKHDSSOLDQFHZLWK
QRWKLQJEXWZDWHUDQGDVRIW
GDPSFORWK
■ 5HPRYH DQ\ GHWHUJHQW VSUD\
RU RWKHU UHVLGXHV LPPHGLDWHO\

HQ (QYLURQPHQWDOSURWHFWLRQ
7 (QYLURQPHQWDOSURWHFWLRQ
(QYLURQPHQWDOSURWHFWLRQ
3DFNDJLQJXVHGDSSOLDQFH
'LVSRVHRISDFNDJLQJLQDQHQYLURQPHQWDOO\UHVSRQVLEOHPDQQHU
.HHS FKLOGUHQ DZD\ IURP WKH SDFNDJLQJ PDWHULDOV DQG SDFNDJLQJ PDWHULDOV DUH QRW WR\V
5HSURFHVVLQJDQGUHXVHRISDFNDJLQJPDWHULDOVDYHVUDZPDWHULDOVUHGXFLQJZDVWH
$OO SDFNDJLQJ PDWHULDOV XVHG DUH LQ OLQH ZLWK HQYLURQPHQWDO SURWHFWLRQ UHTXLUHPHQWV DQG
UHXVDEOH
1DPHDQGFRQWHQWRIKD]DUGRXVVXEVWDQFHVLQSURGXFWV
1RWH
$OO RI FRPSRQHQW SDUWV LQ WKH %6+ SURGXFWV WKDW IDOO LQWR WKH VDPH FDWHJRU\ DUH FRYHUHG
LQ WKH WDEOH DERYH WKH FRPSRQHQW SDUWV RI WKLV SURGXFW GHSHQG RQ WKH DFWXDO VLWXDWLRQ ,I
\RXKDYHDQ\TXHVWLRQVSOHDVHFRQWDFWXVE\GLDOOLQJWKHFXVWRPHUVHUYLFHQXPEHULQ
WKHSURGXFW
&RPSRQHQWQDPH
+D]DUGRXVVXEVWDQFH
/HDG
3E
0HU
FXU\
+J
&DG
PLXP
&G
+H[DYD
OHQWFKUR
PLXP
&U9,
3RO\EURPL
QDWHG
ELSKHQ\OV
3%%
3RO\EUR
PLQDWHG
GLSKHQ\O
HWKHUV
3%'(
3&% [ Û Û Û Û Û
'LVSOD\ [ Û Û Û Û Û
&RQWUROOHU [ Û Û Û Û Û
3RZHUFRUGDQG
FRQQHFWZLULQJ
KDUQHVV
[ Û Û Û Û Û
3XPSVDQGGULYHV [ Û Û Û Û Û
+RXVLQJ Û Û Û Û Û Û
'RRUDQGLWV
FRQVWLWXHQWSDUWV
[ Û Û Û Û Û
'UXPV\VWHP DQG LWV
FRQVWLWXHQWSDUWV
[ Û Û Û Û Û
:DWHUVXSSO\
FRPSRQHQWV
H[HPSWHGGU\HU
[ Û Û Û Û Û
7KLVWDEOHZDVGHYHORSHGDFFRUGLQJWRWKHSURYLVLRQVRI6-7
Û 7KHFRQWHQWRIVXFKKD]DUGRXVVXEVWDQFHLQDOOKRPRJHQHRXVPDWHULDOVRIVXFK
FRPSRQHQWLVEHORZWKHOLPLWUHTXLUHGE\*%7
[ 7KHFRQWHQWRIVXFKKD]DUGRXVVXEVWDQFHLQDFHUWDLQKRPRJHQHRXVPDWHULDOVRI
VXFKFRPSRQHQWLVEH\RQGWKHOLPLWUHTXLUHGE\*%7

(QYLURQPHQWDOSURWHFWLRQ HQ
7LSVRQHFRQRPLFDOXVH
■ $OZD\VILOOWKHDSSOLDQFHZLWKWKH
PD[LPXPDPRXQWRIODXQGU\IRUHDFK
SURJUDPPH
■ :DVKQRUPDOO\VRLOHGODXQGU\ZLWKRXW
SUHWUHDWLQJ
■ )RU OLJKW DQG QRUPDO VRLOLQJ LQ ODXQGU\
\RXFDQVDYHHQHUJ\DQGGHWHUJHQW
■ 7KHVHOHFWDEOHWHPSHUDWXUHVDSSO\WR
WKHFDUHODEHOVRQWKHWH[WLOHV7KH
WHPSHUDWXUHVLQWKHDSSOLDQFHPD\
GHYLDWHIURPWKLVVRWKDW\RXJHWWKH
RSWLPXPPL[RIHQHUJ\VDYLQJDQG
ZDVKLQJUHVXOWV
■ ,QIRUPDWLRQRQHQHUJ\DQGZDWHU
FRQVXPSWLRQ ~ 3DJH
7KHGLVSOD\VSURYLGHLQIRUPDWLRQ
DERXWWKHUHODWLYHOHYHORIHQHUJ\DQG
ZDWHUFRQVXPSWLRQLQWKHVHOHFWHG
SURJUDPPHV
7KHPRUHLQGLFDWRUOLJKWVOLJKWXSWKH
KLJKHUWKHSURJUDPPHVFRQVXPSWLRQ
7KLVHQDEOHV\RXWRFRPSDUHWKH
FRQVXPSWLRQOHYHOVRIWKHGLIIHUHQW
SURJUDPPHVZKHQFKRRVLQJ\RXU
SURJUDPPH VHWWLQJV DQG GHFLGH RQ DQ
HQHUJ\ DQG ZDWHUVDYLQJ SURJUDPPH
VHWWLQJIRUWKHVHOHFWHGSURJUDPPH
■ $XWRPDWLFVZLWFKRII,IWKH
DSSOLDQFHLVQRWRSHUDWHGIRUDSSUR[
PLQXWHVLWZLOODXWRPDWLFDOO\VZLWFK
RIIGHSHQGLQJRQWKHZDWHUOHYHO
LQVLGHRIDSSOLDQFHEHIRUHWKH
SURJUDPPHVWDUWVDQGDIWHUWKH
SURJUDPPHKDVHQGHG3UHVVWKH
SRZHU EXWWRQ # DJDLQWRVZLWFKRQWKH
DSSOLDQFH
■ ,IWKHODXQGU\ZLOOEHGULHGLQDGU\HU
VHOHFW WKH VSLQ VSHHG DFFRUGLQJ WR WKH
GU\HUPDQXIDFWXUHUVLQVWUXFWLRQV
,QGLFDWLYH6WDWHPHQWRI(QYLURQPHQW3URWHFWLRQRI3URGXFW
3OHDVHXVHDQGPDLQWDLQWKHSURGXFWDFFRUGLQJWRWKHLQVWUXFWLRQRIWKHPDQXDOWKH
SURGXFW PD\ KDUP WR HQYLURQPHQW DQG KXPDQ KHDOWK GXH WR LPSURSHU XWLOL]DWLRQ RU GLV
SRVDO
$FFRUGLQJWRWKHODZRI¶6WDWXWHRI5HFRYHU\DQG'LVSRVDORI:DVWH(OHFWULFDODQG
(OHFWURQLF3URGXFWV·3OHDVHKDQGLQWKHSURGXFWVWRWKHGLVSRVDOHQWHUSULVHVZKLFK
DUH TXDOLILHG ZKHQ \RX SODQ WR WKURZ LW 3OHDVH UHIHU WR WKH WDEOH DERYH IRU WKH LQIRUPD
WLRQDERXWWKHFRQWHQWRIUHOHYDQWWR[LFDQGKD]DUGRXVVXEVWDQFHV
HQ 3RVLWLRQLQJDQGFRQQHFWLQJ
5 3RVLWLRQLQJDQG
FRQQHFWLQJ
3RVLWLRQLQJDQGFRQQHFWLQJ
,QFOXGHGZLWKWKHDSSOLDQFH
1RWH &KHFNWKHDSSOLDQFHIRUWUDQVSRUW
GDPDJH1HYHUXVHDGDPDJHG
DSSOLDQFH,I\RXKDYHDQ\FRPSODLQWV
FRQWDFWWKHGHDOHUIURPZKRP\RX
SXUFKDVHG WKH DSSOLDQFH RU RXU FXVWRPHU
VHUYLFHV
'HSHQGLQJRQWKHPRGHO
,QDGGLWLRQ
DKRVHFODPSPPGLDPHWHU
DYDLODEOHIURPVSHFLDOLVWGHDOHUVLV
UHTXLUHGWRFRQQHFWWKHZDWHUGUDLQKRVH
WRDVLSKRQ
8VHIXOWRROV
■ 6SLULWOHYHOIRUDOLJQLQJ
■ :UHQFKZLWK
² :$) IRU ORRVHQLQJ WKH WUDQVSRUW
EUDFHVDQG
² :$)IRUDOLJQLQJWKHDSSOLDQFH
IHHW
,QVWDOODWLRQ
1RWH +XPLGLW\ LQ WKH GUXP LV FDXVHG E\
WKHILQDOLQVSHFWLRQ
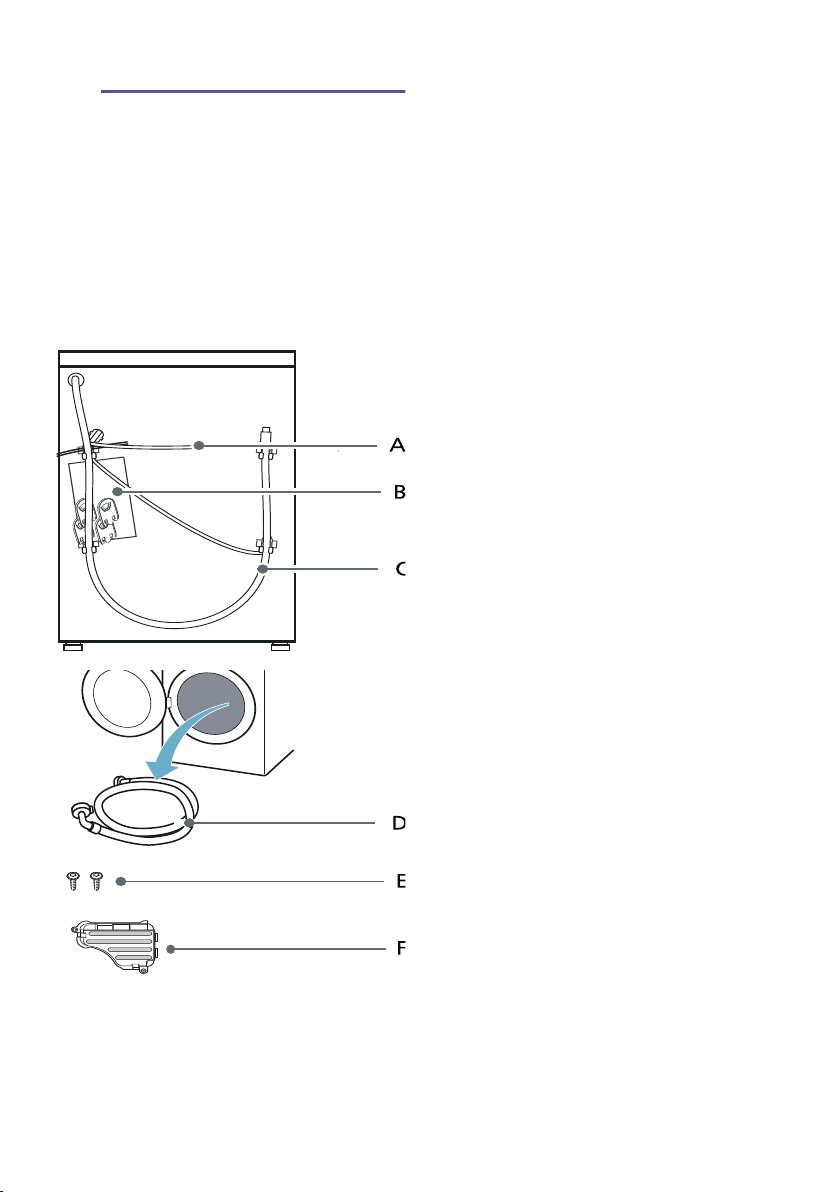
$ 0DLQVFDEOH
% %DJ
■ 2SHUDWLQJDQGLQVWDOODWLRQ
LQVWUXFWLRQV
■ :DUUDQW\
■ 6XSSOHPHQWDU\VKHHWIRUWKH
RSHUDWLQJDQGLQVWDOODWLRQ
LQVWUXFWLRQV
■ %RWWRPFRYHULQVWUXFWLRQ
■ +RPH&RQQHFW,QVWDOODWLRQ
*XLGHV
■ &RYHUFDSVIRURSHQLQJVDIWHU
WKH WUDQVSRUW EUDFHV KDYH EHHQ
UHPRYHG
& :DWHUGUDLQKRVH
' :DWHUVXSSO\KRVHRQVWDQGDUG
$TXD6HFXUHPRGHOV
( 6FUHZ
) %RWWRPFRYHU
3RVLWLRQLQJDQGFRQQHFWLQJ HQ
6DIHW\LQVWUXFWLRQV
::DUQLQJ
5LVNRILQMXU\
■ 7KHDSSOLDQFHLVYHU\KHDY\
%HFDUHIXOZKHQOLIWLQJWUDQVSRUWLQJ
WKHDSSOLDQFH
■ :KHQWKHDSSOLDQFHLVOLIWHGE\LWV
SURWUXGLQJSDUWVHJWKHDSSOLDQFH
GRRUWKHFRPSRQHQWVPD\EUHDNRII
DQGFDXVHLQMXULHV
'RQRWOLIWWKHDSSOLDQFHE\SURWUXGLQJ
SDUWV
■ ,IWKHKRVHDQGPDLQVFDEOHVDUHQRW
URXWHGSURSHUO\WKHUHLVDULVNRI
WULSSLQJDQGLQMXU\
/D\KRVHVDQGFDEOHVLQVXFKDZD\
WKDWWKHUHLVQRULVNRIWULSSLQJ
&DXWLRQ
'DPDJHWRWKHDSSOLDQFH
)UR]HQKRVHVPD\ULSEXUVW
'RQRWLQVWDOOWKHDSSOLDQFHLQDUHDV
H[SRVHGWRIURVWRURXWGRRUV
&DXWLRQ
:DWHUGDPDJH
7KHFRQQHFWLRQSRLQWVIRUWKHZDWHU
VXSSO\KRVHDQGZDWHUGUDLQKRVHDUH
XQGHUKLJKZDWHUSUHVVXUH7RSUHYHQW
OHDNV DQG ZDWHU GDPDJH \RX PXVW IROORZ
WKHLQVWUXFWLRQVLQWKLVVHFWLRQ
1RWHV
■ ,QDGGLWLRQWRWKHVDIHW\LQIRUPDWLRQ
OLVWHGKHUHWKHORFDOZDWHUDQG
HOHFWULFLW\VXSSOLHUPD\KDYHVSHFLDO
UHTXLUHPHQWV
■ ,ILQGRXEWKDYHWKHDSSOLDQFH
FRQQHFWHGE\DVSHFLDOLVW
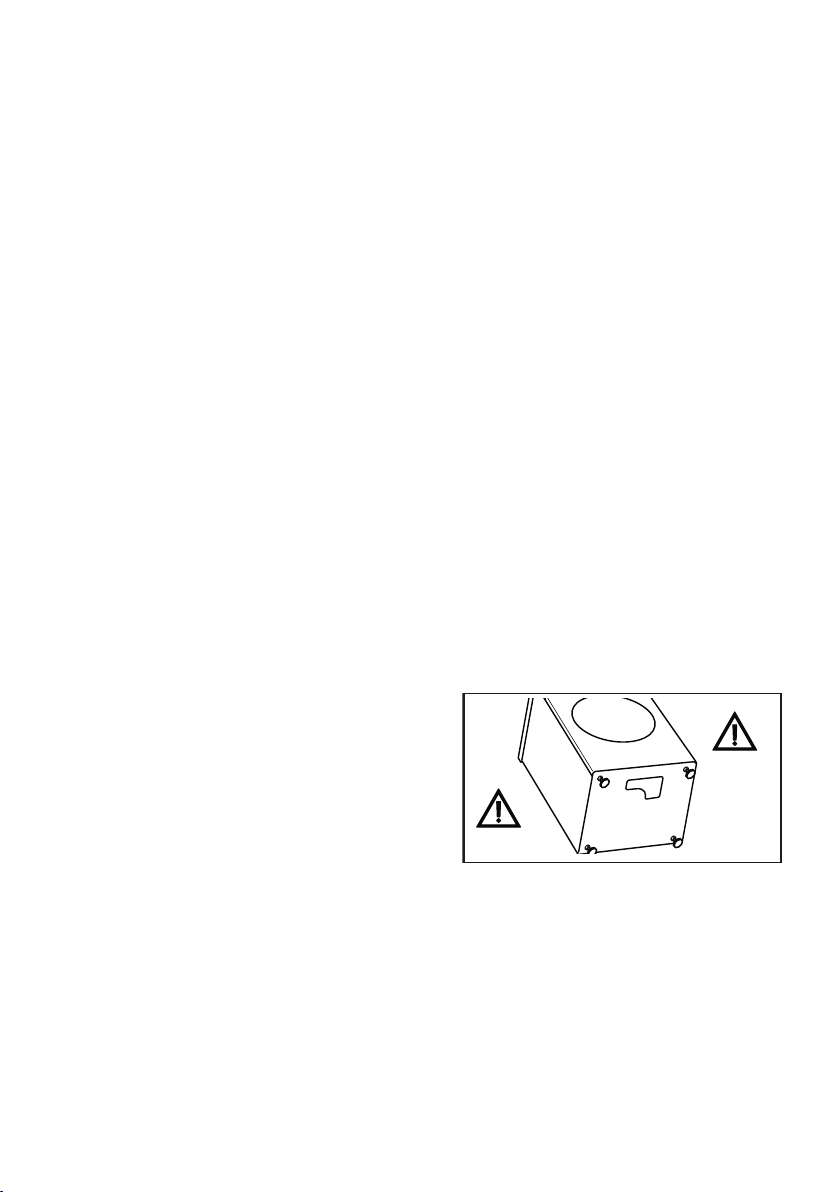
5HPRYLQJWKHIRDPEORFN
7KLVDSSOLDQFHLVVHFXUHGZLWKDIRDP
EORFNZKLFKKDVWREHUHPRYHGEHIRUH
XVLQJWKHDSSOLDQFHIRUWKHILUVWWLPH,ILQ
GRXEWSOHDVHFRQWDFWVSHFLDOLVW
&DXWLRQ
'DPDJHWRWKHDSSOLDQFH
,IWKHIRDPEORFNLVQRWUHPRYHGWKH
DSSOLDQFHPD\EHGDPDJHGZKHQLWLV
RSHUDWHG
%HIRUHXVLQJWKHDSSOLDQFHIRUWKHILUVW
WLPHPDNHVXUHWKDW\RXFRPSOHWHO\
UHPRYHWKHIRDPEORFN
::DUQLQJ
5LVNRILQMXU\GDPDJHWRWKH
DSSOLDQFH
7LOWLQJWKHDSSOLDQFHWRWKHUHDUPD\
UHVXOWLQLQMXU\DQGGDPDJHWRWKH
DSSOLDQFHLI\RXDFFLGHQWDOO\GURSWKH
DSSOLDQFH'RQRWWLOWWKHDSSOLDQFHRQ
\RXURZQDQGEHFDUHIXO
1RWH 5HPRYHWKHIRDPEORFNILUVW
EHIRUH\RXUHPRYHWKHWUDQVSRUWORFNV
1. 5HPRYHWKHIRDPEORFN
D 7LOWWKHDSSOLDQFHWRWKHUHDU
GHSHQGLQJRQWKHPRGHO
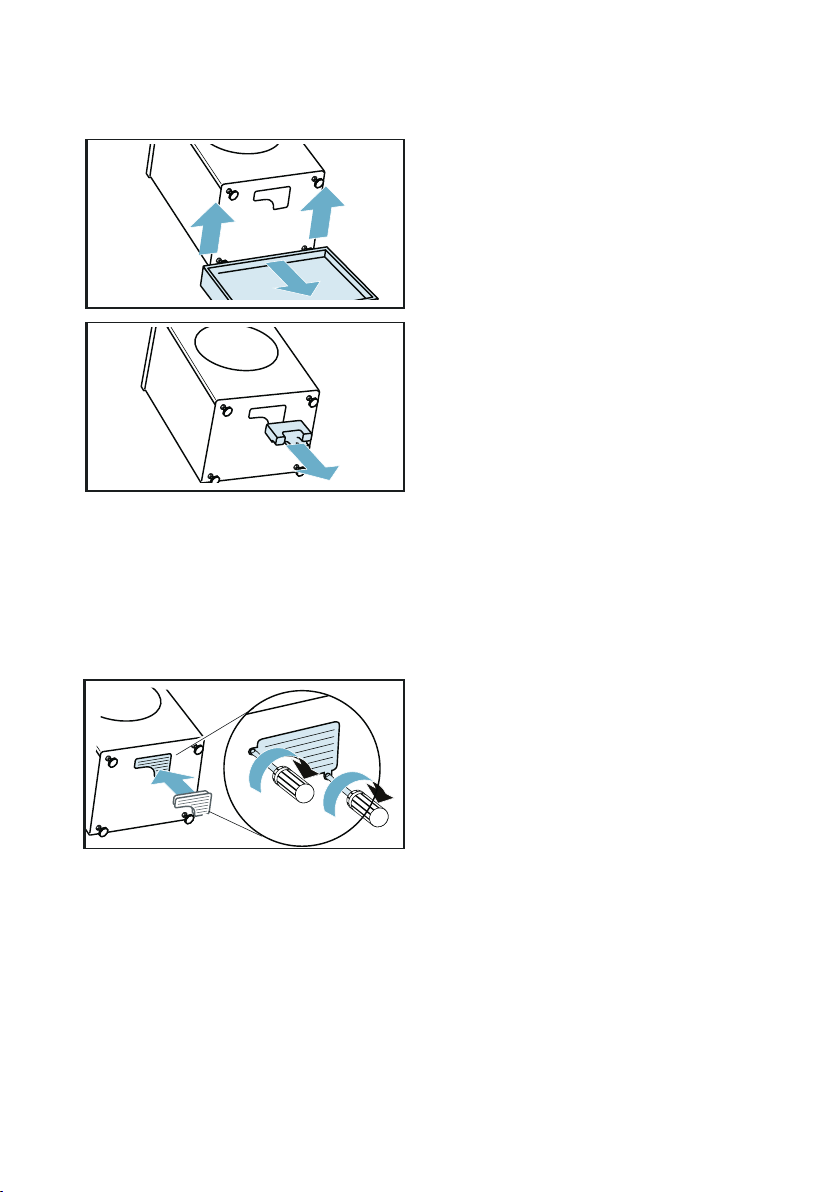
HQ 3RVLWLRQLQJDQGFRQQHFWLQJ
E 5HPRYHWKHIRDPEORFNDQG
ERWWRPSDG
2. )LWWKHERWWRPFRYHU<RXFDQILQGLW
LQWKHGUXP
/RFNWKHERWWRPFRYHUILUPO\LQSODFH
E\DSSO\LQJSUHVVXUHWRWKHVQDSLQ
KRRNV
1RWH ,IQHFHVVDU\VHFXUHERWWRP
FRYHUZLWKVFUHZV
,QVWDOODWLRQVXUIDFH
1RWH 7KHDSSOLDQFHPXVWEHVWDEOH
DOLJQHGVRWKDWLWGRHVQRWPRYHDURXQG
■ 7KHLQVWDOODWLRQVXUIDFHPXVWEHILUP
DQGOHYHO
■ 6RIWIORRUVIORRUFRYHULQJVDUHQRW
VXLWDEOH
,QVWDOODWLRQRQDEDVHRUD
ZRRGHQMRLVWIORRU
&DXWLRQ
'DPDJHWRWKHDSSOLDQFH
7KHDSSOLDQFHPD\ZDQGHUDQGWLS
WRSSOHIURPWKHEDVHZKHQVSLQQLQJ
7KHIHHWRIWKHDSSOLDQFHPXVWEH
VHFXUHGZLWKKROGLQJEUDFNHWV
2UGHUQR:0= :;
&= = ;
1RWH 2QZRRGHQMRLVWIORRUVLQVWDOOWKH
DSSOLDQFH
■ ,QDFRUQHULISRVVLEOH
■ 2QDZDWHUUHVLVWDQWZRRGHQERDUG
PLQPPWKLFNZKLFKLVVFUHZHG
WLJKWO\WRWKHIORRU
,QVWDOODWLRQRQDSODWIRUPZLWK
GUDZHU
3ODWIRUPRUGHUQR:0=:
:0=6:0=*
,QVWDOOLQJWKHDSSOLDQFHLQD
NLWFKHQHWWH
::DUQLQJ
5LVNRIGHDWK
7KHUHLVDULVNRIHOHFWULFVKRFNLI\RX
WRXFKOLYHFRPSRQHQWV
'RQRWUHPRYHWKHDSSOLDQFHFRYHULQJ
SODWH
1RWHV
■ 5HFHVVZLGWKRIFPUHTXLUHG
■ 2QO\LQVWDOOWKHDSSOLDQFHXQGHUQHDWK
DFRQWLQXRXVZRUNWRSWKDWLVVHFXUHO\
FRQQHFWHGWRDGMDFHQWFDELQHWV
'HSHQGLQJRQWKHPRGHO
3RVLWLRQLQJDQGFRQQHFWLQJ HQ
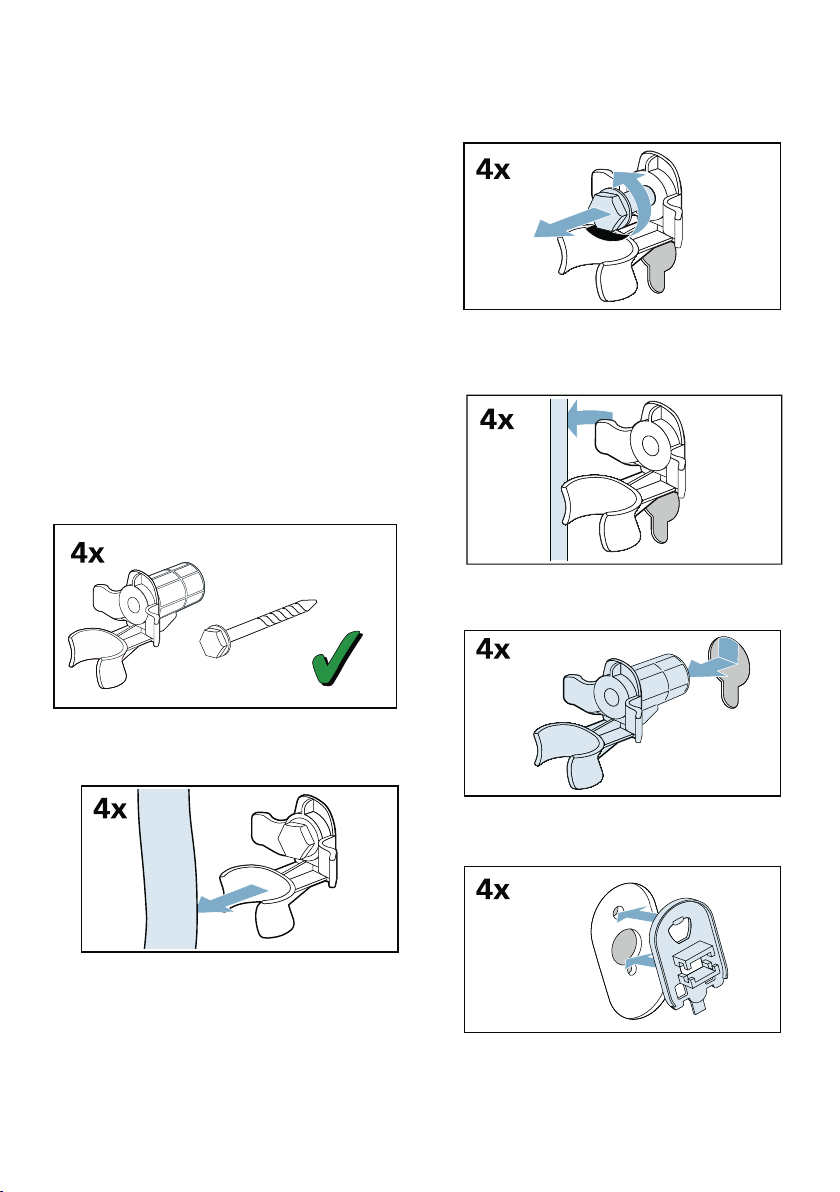
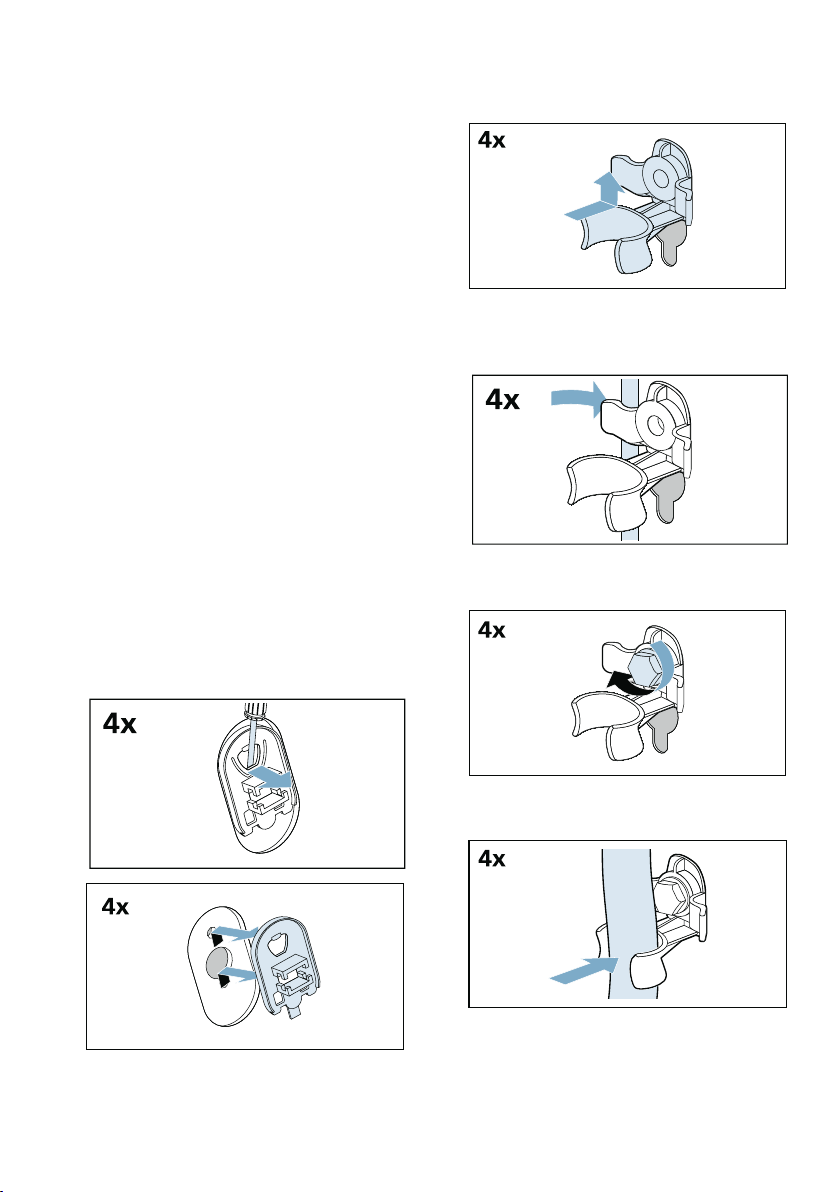
5HPRYLQJWKHWUDQVSRUWORFNV
&DXWLRQ
'DPDJHWRWKHDSSOLDQFH
■ 7KHDSSOLDQFHLVVHFXUHGIRU
WUDQVSRUWDWLRQ XVLQJ WUDQVSRUW ORFNV ,I
WKHWUDQVSRUWORFNVDUHQRWUHPRYHG
WKHDSSOLDQFHPD\EHFRPHGDPDJHG
ZKHQLWLVRSHUDWHG
%HIRUH XVLQJ WKH DSSOLDQFH IRU WKH ILUVW
WLPHPDNHVXUHWKDW\RXFRPSOHWHO\
UHPRYHDOOIRXUWUDQVSRUWORFNV.HHS
WKHORFNVLQDVDIHSODFH
■ 7RSUHYHQWWUDQVSRUWGDPDJHIURP
RFFXUULQJLIWKHDSSOLDQFHLVPRYHGDW
DODWHUGDWH\RXPXVWUHILWWKH
WUDQVSRUW ORFNV EHIRUH WUDQVSRUWLQJ WKH
DSSOLDQFH
1RWH .HHSWKHVFUHZVDQGVOHHYHVLQD
VDIHSODFH
1. 7DNHWKHKRVHVRXWRIWKHKROGHUV
2. 8QVFUHZ DQG UHPRYH DOO IRXU WUDQVSRUW
EUDFHVFUHZV
D 5HPRYHWKHPDLQVFDEOHIURPWKH
KROGHUV
E 5HPRYHWKHVOHHYHV
3. )LWWKHFRYHUV
HQ 3RVLWLRQLQJDQGFRQQHFWLQJ
4. /RFNWKHFRYHUVILUPO\LQSODFHE\
DSSO\LQJSUHVVXUHWRWKHVQDSLQ
KRRNV
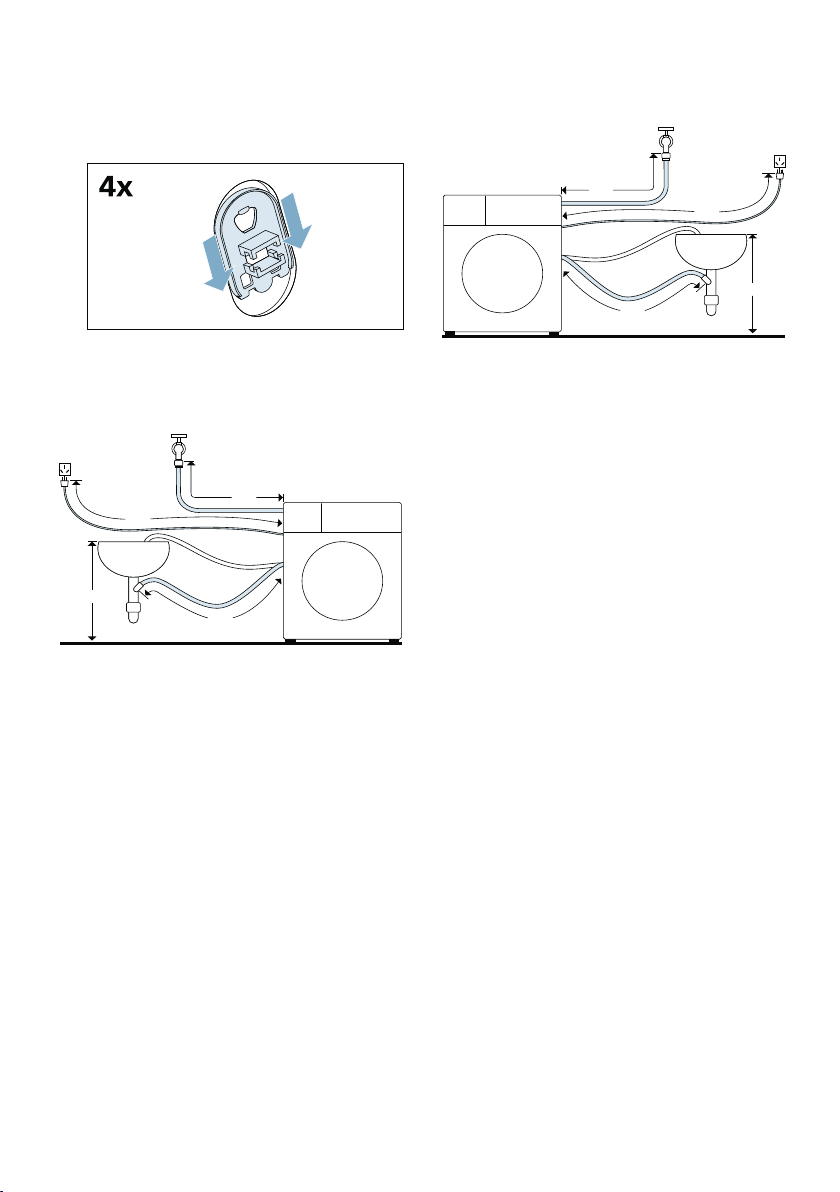
+RVHDQGFDEOHOHQJWKV
&RQQHFWLRQRQOHIWVLGH
RU
&RQQHFWLRQRQULJKWVLGH
1RWH ,IWKHKRVHKROGHUVDUHXVHGWKH
SRVVLEOHKRVHOHQJWKVDUHUHGXFHG
$YDLODEOHIURPGHDOHUFXVWRPHU
VHUYLFH
■ /RQJHUVXSSO\KRVHDSSUR[ P
■ $SSOLDQFH·VWDS
:DWHULQOHW
::DUQLQJ
5LVNRIGHDWK
7KHUHLVDULVNRIHOHFWULFVKRFNLI\RX
WRXFKOLYHFRPSRQHQWV
'RQRWLPPHUVHWKH$TXD6WRSVDIHW\
YDOYHLQZDWHULWFRQWDLQVDQHOHFWULF
YDOYH
'HSHQGLQJRQWKHPRGHO
2EVHUYHWKHIROORZLQJZKHQFRQQHFWLQJ
WKHDSSOLDQFH
( a FP
0 a FP
8 a FP
@ FPaFP
#
( aFP
0 a FP
8 a FP
@ FPaFP
#
3RVLWLRQLQJDQGFRQQHFWLQJ HQ
1RWHV
■ 2QO\ RSHUDWH WKH DSSOLDQFH XVLQJ FROG
PDLQVZDWHU
■ 'RQRWFRQQHFWWKHDSSOLDQFHWRWKH
PL[HUWDSRIDQXQSUHVVXULVHGKRW
ZDWHUERLOHU
■ 'RQRWXVHDXVHGVXSSO\KRVH2QO\
XVHWKHVXSSO\KRVHVXSSOLHGRURQH
WKDWZDVSXUFKDVHGIURPDQ
DXWKRULVHGVSHFLDOLVWUHWDLOHU
■ 'RQRWEHQGVTXDVKPRGLI\RUFXW
WKURXJKWKHZDWHUVXSSO\KRVH
RWKHUZLVHLWVVWUHQJWKLVQRORQJHU
JXDUDQWHHG
■ 2QO\ WLJKWHQ WKH VFUHZ FRQQHFWLRQV E\
KDQG,IWKHVFUHZFRQQHFWLRQVDUH
WLJKWHQHG WRR PXFK ZLWK D WRRO SOLHUV
WKHWKUHDGPD\EHGDPDJHG
2SWLPXP ZDWHU SUHVVXUH LQ WKH VXSSO\
QHWZRUN
$WOHDVW03DEDU
0D[LPXP03DEDU
:KHQ WKH WDS LV RSHQ WKH ZDWHU IORZ LV DW
OHDVWOPLQ
,I WKH ZDWHU SUHVVXUH LV KLJKHU WKDQ WKLV D
SUHVVXUHUHGXFLQJYDOYHPXVWEH
LQVWDOOHG
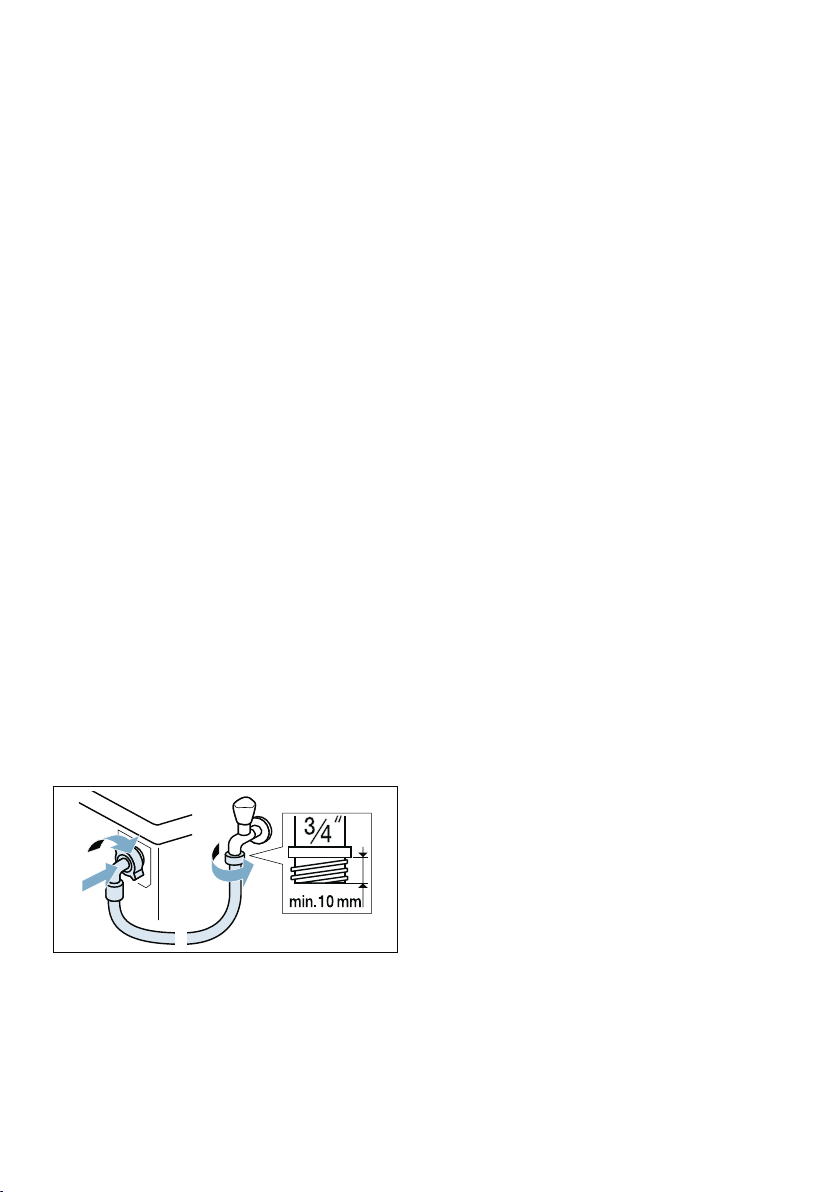
&RQQHFWLRQ
&RQQHFWWKHZDWHUVXSSO\KRVHWRWKH
ZDWHUWDSö PPDQGWRWKH
DSSOLDQFH
1RWH 7XUQ RQ WKH WDS FDUHIXOO\ FKHFNLQJ
WKHOHDNWLJKWQHVVRIWKHFRQQHFWLRQ
SRLQWV7KHVFUHZFRQQHFWLRQLVXQGHU
PDLQVZDWHUSUHVVXUH
:DWHURXWOHW
::DUQLQJ
5LVNRIVFDOGLQJ
:KHQ\RXDUHZDVKLQJDWKLJK
WHPSHUDWXUHV WKHUH LV D ULVN RI VFDOGLQJ LI
\RX FRPH LQWR FRQWDFW ZLWK KRW ZDWHU HJ
ZKHQGUDLQLQJKRWZDWHULQWRD
ZDVKEDVLQ
'RQRWUHDFKLQWRWKHKRWZDWHU
&DXWLRQ
:DWHUGDPDJH
:KHQZDWHULVEHLQJSXPSHGDZD\WKH
RXWOHWKRVHLVXQGHUZDWHUSUHVVXUHDQG
PD\VOLSRXWRIWKHZDVKEDVLQRU
FRQQHFWLRQSRLQW
6HFXUHWKHGUDLQKRVHVRWKDWLWFDQQRW
VOLSRXW
&DXWLRQ
'DPDJHWRWKHDSSOLDQFHIDEULFV
,IWKHHQGRIWKHGUDLQKRVHLVLPPHUVHG
LQWKHGUDLQHGZDWHUZDWHUPD\EH
VXFNHGEDFNLQWRWKHDSSOLDQFHDQGPD\
GDPDJHWKHDSSOLDQFHIDEULFV
0DNHVXUHWKDW
■ 7KHSOXJGRHVQRWEORFNGUDLQDJH
IURPWKHZDVKEDVLQ
■ 7KHHQGRIWKHGUDLQKRVHLVQRW
LPPHUVHGLQWKHGUDLQHGZDWHU
■ 7KHZDWHUGUDLQVDZD\TXLFNO\
HQRXJK
1RWHV
■ 'RQRWNLQNWKHZDWHUGUDLQKRVHRU
SXWVWUDLQRQLWOHQJWKZD\V
■ 7KHKHLJKWRIZDWHURXWOHWSODFHPHQW
0LQLPXPFPa 0D[LPXPFP
HQ 3RVLWLRQLQJDQGFRQQHFWLQJ
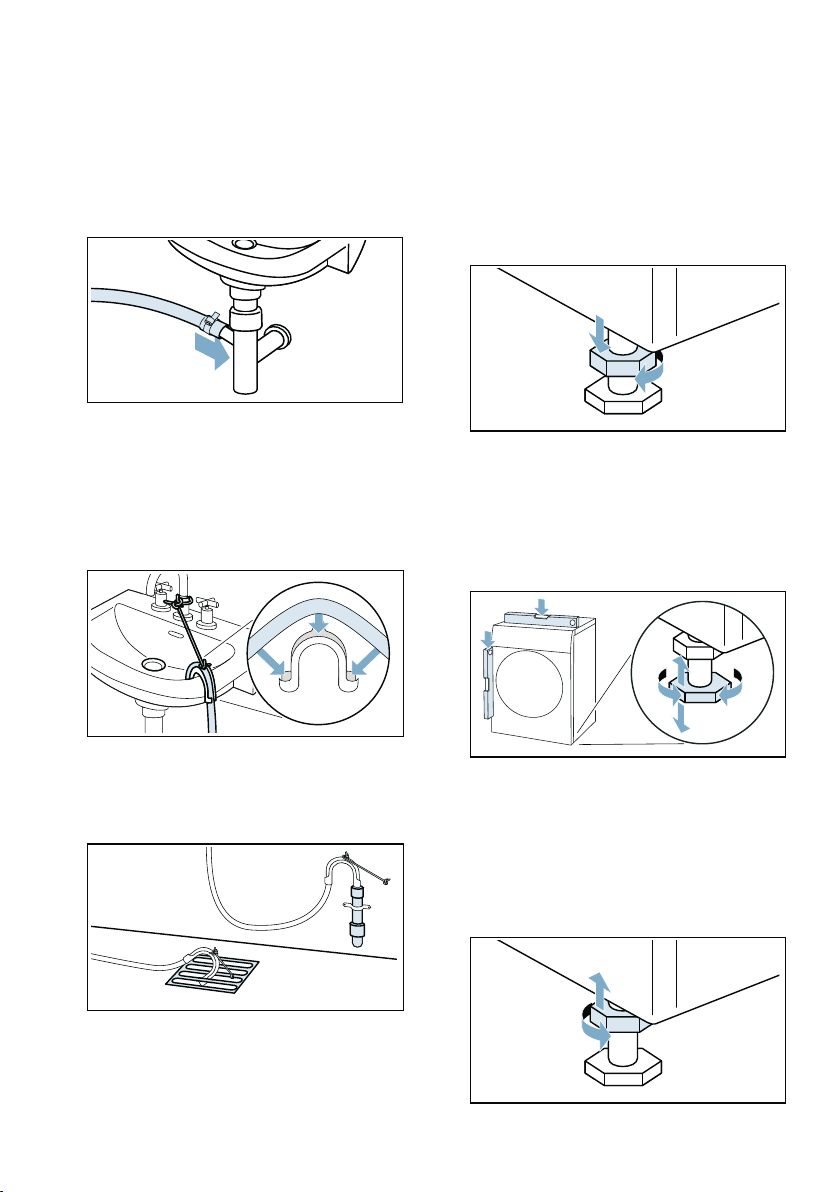
&RQQHFWLRQ
■ 'UDLQDJHLQWRDVLSKRQ
7KH FRQQHFWLRQ SRLQW PXVW EH VHFXUHG
XVLQJ D KRVH FODPS ZLWK D GLDPHWHU RI
PPDYDLODEOHIURPVSHFLDOLVW
GHDOHUV
■ 'UDLQDJHLQWRDZDVKEDVLQ
6HFXUHWKHRXWOHWKRVHVRWKDWLW
FDQQRWVOLSRXW
(OERZDYDLODEOHIURPDIWHUVDOHV
VHUYLFH
,QGLYLGXDOSDUWQXPEHU
■ 'UDLQDJHLQWRDSODVWLFSLSHZLWK
UXEEHUEXVKLQJRULQWRDGUDLQDJH
SLW
1RWH 7KH SODVWLF SLSH LV QRW VWDQGDUG
DFFHVVRU\DYDLODEOHIURPVSHFLDOLVW
GHDOHUV
$OLJQPHQW
/HYHOWKHDSSOLDQFHXVLQJDVSLULWOHYHO
,QFRUUHFWOHYHOOLQJPD\UHVXOWLQLQWHQVH
QRLVHYLEUDWLRQVDQGZDQGHULQJ
1. /RRVHQWKHORFNQXWVXVLQJDZUHQFK
E\WXUQLQJLWLQDFORFNZLVHGLUHFWLRQ
2. &KHFNWKHDOLJQPHQWRIWKHDSSOLDQFH
ZLWKDVSLULWOHYHODQGDGMXVWLWLI
QHFHVVDU\&KDQJHWKHKHLJKWE\
WXUQLQJWKHDSSOLDQFHIHHW
$OOIRXUDSSOLDQFHIHHWPXVWVWDQG
ILUPO\RQWKHJURXQG
3. 7LJKWHQWKHORFNQXWDJDLQVWWKH
KRXVLQJ
,QGRLQJVRKROGWKHIRRWWLJKWDQGGR
QRWDGMXVWLWVKHLJKW
7KHORFNQXWVRQDOOIRXUDSSOLDQFH
IHHWPXVWEHVFUHZHGWLJKWO\DJDLQVW
WKHKRXVLQJ

3RVLWLRQLQJDQGFRQQHFWLQJ HQ
(OHFWULFDOFRQQHFWLRQ
::DUQLQJ
5LVNRIGHDWK
7KHUHLVDULVNRIHOHFWULFVKRFNLI\RX
WRXFKOLYHFRPSRQHQWV
■ 1HYHUWRXFKRUKROGWKHPDLQVSOXJ
ZLWKZHWKDQGV
■ 2QO\SXOORXWWKHPDLQVFDEOHE\WKH
SOXJDQGQHYHUE\WKHFDEOHDVWKLV
FRXOGGDPDJHLW
2EVHUYHWKHIROORZLQJLQIRUPDWLRQDQG
HQVXUHWKDW
1RWHV
■ 7KHPDLQVYROWDJHDQGYROWDJH
LQGLFDWHGRQWKHDSSOLDQFHUDWLQJ
SODWHDUHWKHVDPH
7KH FRQQHFWHG ORDG DQG IXVH UHTXLUHG
DUHVSHFLILHGRQWKHUDWLQJSODWH
■ 7KH DSSOLDQFH LV RQO\ FRQQHFWHG WR DQ
DOWHUQDWLQJFXUUHQWYLDDSURSHUO\
LQVWDOOHGHDUWKHGVRFNHW
■ 7KHPDLQVSOXJILWVWKHVRFNHW
■ 7KHHDUWKLQJV\VWHPLVSURSHUO\
LQVWDOOHG
■ 7KH PDLQV FDEOH LV RQO\ UHSODFHG E\ D
TXDOLILHGHOHFWULFLDQLIWKLVLV
QHFHVVDU\5HSODFHPHQWPDLQV
FDEOHVDUHDYDLODEOHIURPWKHDIWHU
VDOHVVHUYLFH
■ 1RPXOWLSOHSOXJVFRXSOLQJVRU
H[WHQVLRQFDEOHVDUHXVHG
■ ,IDQHDUWKOHDNDJHFLUFXLWEUHDNHULV
XVHGRQO\DW\SHZKLFKGLVSOD\VWKLV
V\PEROLVXVHG z
2QO\WKLVV\PEROJXDUDQWHHV
FRPSOLDQFHZLWKWKHFXUUHQWO\
DSSOLFDEOHUHJXODWLRQV
■ 7KH PDLQV SOXJ FDQ EH DFFHVVHG DW DOO
WLPHV
■ 7KHPDLQVFDEOHLVQRWEHQW
VTXDVKHG PRGLILHG FXW WKURXJK RU LQ
FRQWDFWZLWKKHDWVRXUFHV
%HIRUHZDVKLQJIRUWKHILUVW
WLPH
7KH DSSOLDQFHZDVLQVSHFWHGWKRURXJKO\
EHIRUH OHDYLQJ WKH IDFWRU\ 7R UHPRYH DQ\
UHVLGXDOWHVWZDWHUUXQWKH 'UXP&OHDQ
SURJUDPPH WKH ILUVW WLPH ZLWKRXW ODXQGU\
1RWH
■ 7KH DSSOLDQFHPXVWKDYHEHHQ
LQVWDOOHGDQGFRQQHFWHGSURSHUO\
~ 3RVLWLRQLQJDQGFRQQHFWLQJ
RQ SDJH
■ 1HYHUVZLWFKRQDGDPDJHG
DSSOLDQFH
1. ,QVHUWPDLQVSOXJ
2. 7XUQWKHZDWHUWDSRQ
3. 3UHVVWKH #EXWWRQWLOOWKHLQGLFDWRU
ODPS OLJKWV XS UHOHDVH WKH EXWWRQ 7KH
DSSOLDQFHLVVZLWFKHGRQ
4. &ORVHWKHGRRU'R QRWORDGDQ\
ODXQGU\
5. 6HOHFWWKH 'UXP&OHDQ&
SURJUDPPH
6. 2SHQWKHGHWHUJHQWGUDZHU
7. 3RXUDSSUR[ OLWUHRIZDWHULQWRWKH
PDQXDOGRVLQJFRPSDUWPHQW
8. $GGVWDQGDUGGHWHUJHQWLQWRWKH
PDQXDOGRVLQJFRPSDUWPHQW
DFFRUGLQJWR PDQXIDFWXUHU·V
LQVWUXFWLRQVIRUOLJKWVRLOLQJ
1RWH 7R SUHYHQWRYHUVXGVLQJXVH
RQO\KDOIWKHUHFRPPHQGHGDPRXQW
RI GHWHUJHQW 'R QRW XVH DQ\ ZRROOHQV
RUPLOGGHWHUJHQWV
9. &ORVHWKHGHWHUJHQWGUDZHU
10. 6HOHFW A
11. :KHQ WKH SURJUDPPH HQGV SUHVV WKH
#EXWWRQWLOOWKHLQGLFDWRUODPSWXUQV
RIIUHOHDVHWKHEXWWRQ
<RXUDSSOLDQFHLVQRZUHDG\IRUXVH
HQ 3RVLWLRQLQJDQGFRQQHFWLQJ
7UDQVSRUWDWLRQ
HJZKHQPRYLQJKRPH
3UHSDUDWRU\ZRUN
1. 7XUQRIIWKHZDWHUWDS
2. 5HGXFHWKHZDWHUSUHVVXUHLQWKH
VXSSO\KRVH ~ 3DJH
3. 'UDLQDQ\UHVLGXDOZDWHU ~ 3DJH
4. 'LVFRQQHFWWKHDSSOLDQFHIURPWKH
PDLQV
5. 5HPRYHWKHKRVHV
6. (PSW\WKHGLVSHQVHUV
&DXWLRQ
5LVNRIGDPDJHWRWKHDSSOLDQFH
FDXVHG E\ GHWHUJHQWIDEULF VRIWHQHU
OHDNLQJIURPWKHGLVSHQVHUV
/HDNLQJGHWHUJHQWIDEULFVRIWHQHUFDQ
SUHYHQWWKHDSSOLDQFHIURPZRUNLQJ
FRUUHFWO\HJGXHWRGDPDJHWRWKH
HOHFWURQLFV
(PSW\WKHGLVSHQVHUVEHIRUH
WUDQVSRUWLQJWKHDSSOLDQFH
,QVWDOOLQJWKHWUDQVSRUWORFNV
1. 5HPRYHWKHFRYHUVDQGNHHSWKHPLQ
DVDIHSODFH
1RWH 8VHDVFUHZGULYHULI
QHFHVVDU\
2. ,QVHUWDOOIRXUVOHHYHV
D &OLSWKHPDLQVFDEOHVHFXUHO\LQ
WKHKROGHUV
E ,QVHUWDQGWLJKWHQWKHVFUHZV
F &OLSWKHKRVHVVHFXUHO\LQWKH
KROGHUV

3RVLWLRQLQJDQGFRQQHFWLQJ HQ
%HIRUHVZLWFKLQJRQWKHDSSOLDQFH
DJDLQ
1RWHV
■ 7KHWUDQVSRUWEUDFHV PXVWEH
UHPRYHG
~ 5HPRYLQJWKHWUDQVSRUWORFNV
RQ SDJH
■ 3RXUDSSUR[OLWUHRIZDWHULQWR
PDQXDOGRVLQJFRPSDUWPHQWVHOHFW
WKH 6SLQSURJUDPPHDQGVWDUW
7KLVZLOOSUHYHQWGHWHUJHQWIURP
IORZLQJVWUDLJKWLQWRWKHGUDLQGXULQJ
WKHQH[WZDVK
HQ *HWWLQJWRNQRZWKHDSSOLDQFH
* *HWWLQJWRNQRZWKHDSSOLDQFH
*HWWLQJWRNQRZWKHDSSOLDQFH
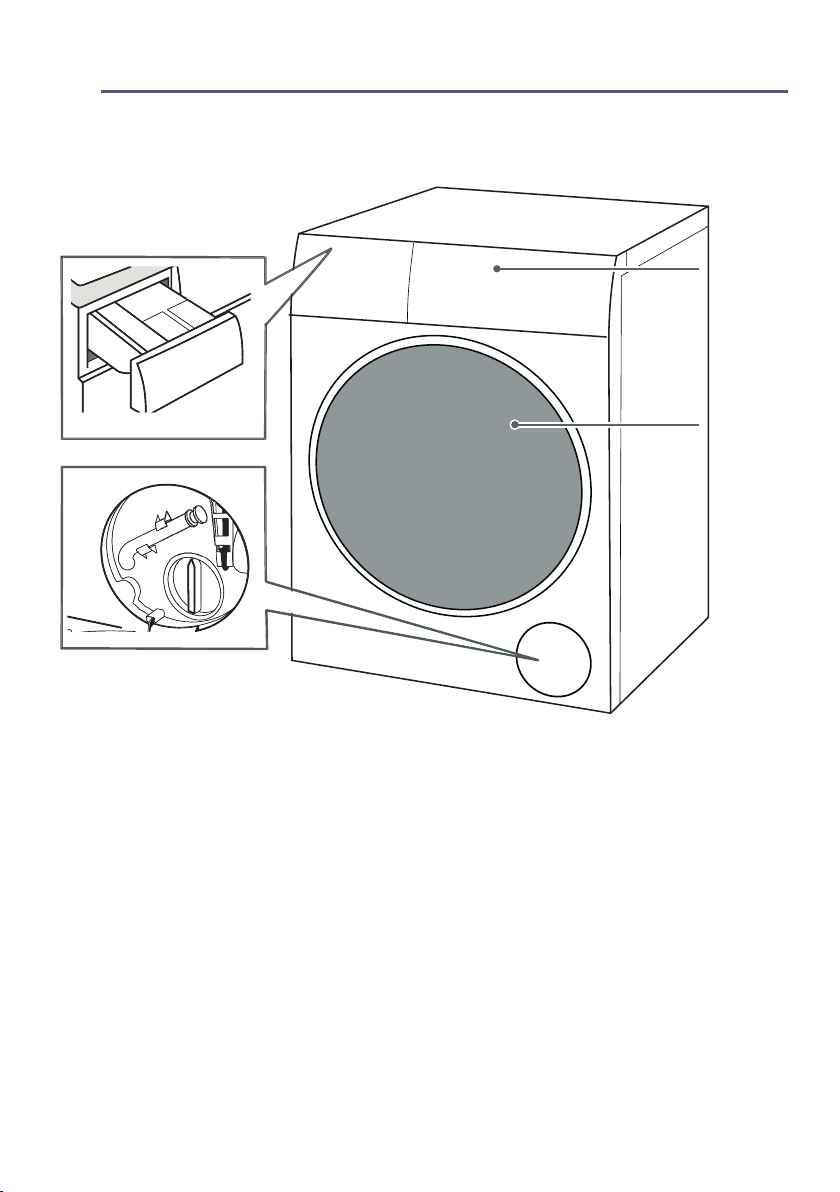
$SSOLDQFH
#
( 'HWHUJHQWGUDZHU
0 &RQWUROSDQHO
8 /RDGLQJGRRU
@ 6HUYLFHIODS
*HWWLQJWRNQRZWKHDSSOLDQFH HQ
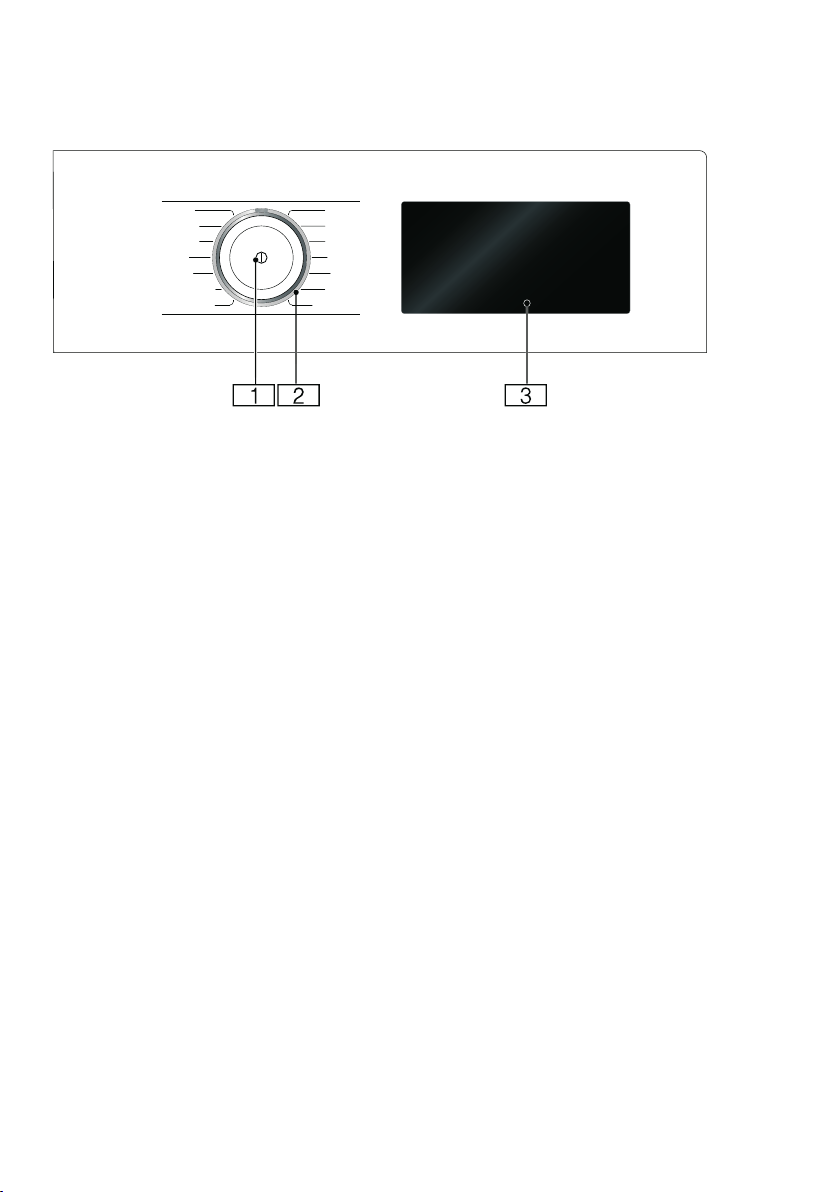
&RQWUROSDQHO
( 0DLQVZLWFK
<RX FDQ XVH WKH # EXWWRQWRVZLWFK
WKHDSSOLDQFHRQDQGRII
0 3URJUDPPHVHOHFWRU
<RXFDQWXUQWKHSURJUDPPH
VHOHFWRULQERWKGLUHFWLRQV
FORFNZLVHDQGDQWLFORFNZLVH
8 'LVSOD\SDQHO
HQ *HWWLQJWRNQRZWKHDSSOLDQFH
'LVSOD\SDQHO
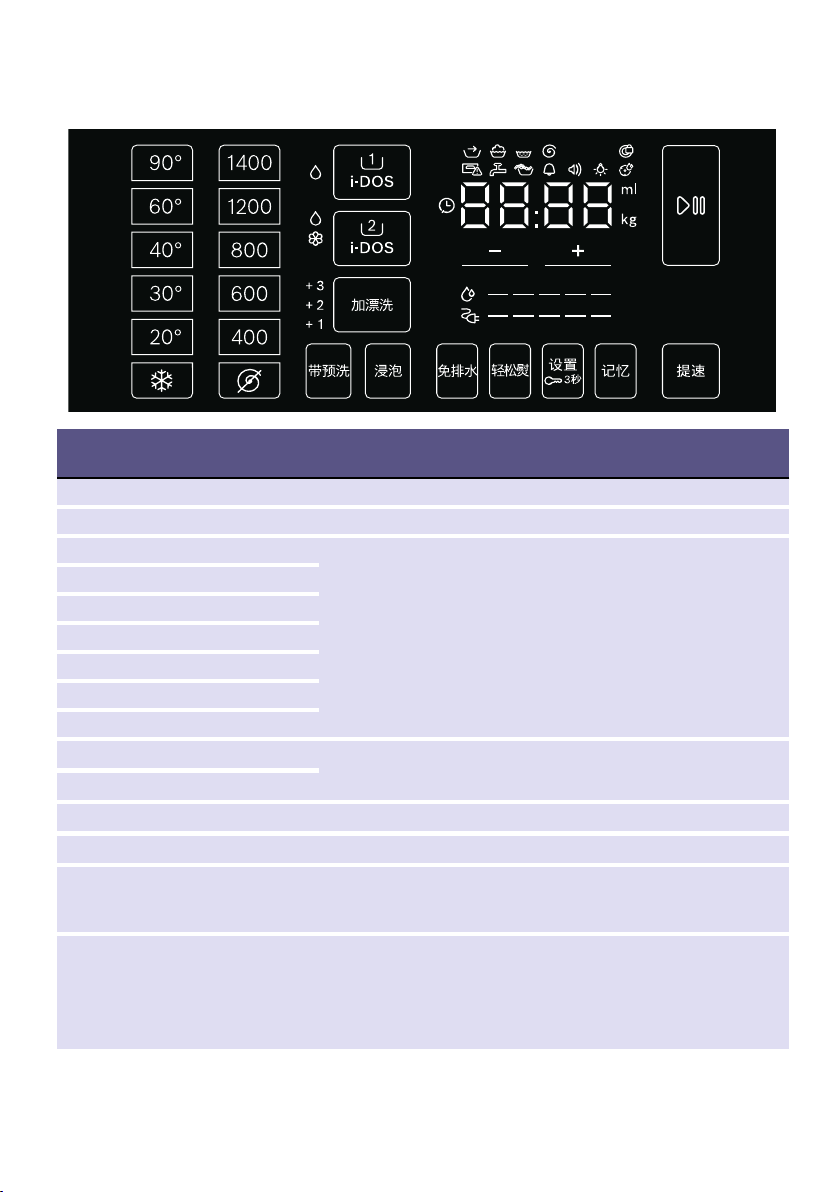
,QGLFDWRUVDQGEXWWRQVRQ
WKHFRQWUROSDQHO
6HWWLQJ
— 7HPSHUDWXUHLQ& — FROG
2 6SLQVSHHG 2 QRVSLQ
䗨爷6SHHG3HUIHFW
~ $GGLWLRQDOSURJUDPPHVHWWLQJVRQ SDJH
熓䦖叀(DV\LURQ
䀾窜伯3UHZDVK
侐仹6RDNLQJ
㒸儚伯5LQVHSOXV
㍥䖪乌5LQVHKROG
淈䇞0HPRU\
ý L'RV å L'26VHWWLQJ ~ 3DJH
þ L'RV Må
E寪 &KLOGSURRIORFN
A 6WDUW5HORDG
淖憆6HWWLQJ $SSOLDQFHVHWWLQJV,QIRUPDWLRQVLJQDORSHUDWLQJVLJ
QDOEULJKWQHVVRIWKHGLVSOD\SDQHOPHPRU\IXQFWLRQ
IRUGUXPFDUH
˜~ &KDQJHWKHVHWWLQJV
1RWH :KHUHWKHUHDUHPXOWLOHYHOVHWWLQJVSUHVVLQJ
DQGKROGLQJ ˜~ZLOOVFUROOWKURXJKDOOWKHVHWWLQJVDX
WRPDWLFDOO\ XQWLO WKH HQG 7RXFKLQJ LW DJDLQ ZLOO DOORZ \RX
WRFKDQJHWKHVHWWLQJVDJDLQ

*HWWLQJWRNQRZWKHDSSOLDQFH HQ
2WKHU LQGLFDWRUV ,QIRUPDWLRQRQ
é (QHUJ\FRQVXPSWLRQ
æ :DWHUFRQVXPSWLRQ
ã NO0 3URJUDPPHVWDWXV3UHWUHDWPHQWZDVKULQVHVSLQ
Õ 'RRUORFNHG
r 7DSRIIZDWHUSUHVVXUHWRRORZ
Å )RDPGHWHFWHG
Û 'UXP&OHDQUHPLQGHU
ÒÒ ÒÒ 3URJUDPPH GXUDWLRQ HJ )LQLVK LQ WLPH HJ ñ K UHFRP
PHQGHGORDGHJ NJSURJUDPPHVWDWXVHJ(QG

HQ /DXQGU\
Z /DXQGU\
/DXQGU\
3URWHFWLQJ\RXUODXQGU\DQG
DSSOLDQFH
&DXWLRQ
'DPDJHWRWKHDSSOLDQFHWH[WLOHV
)RUHLJQREMHFWVHJFRLQVSDSHUFOLSV
QHHGOHV QDLOV PD\ GDPDJH WKH ZDVKLQJ
RUFRPSRQHQWVRIWKHDSSOLDQFH
7KHIROORZLQJLQVWUXFWLRQVPXVWEH
REVHUYHGZKHQSUHSDULQJ\RXUODXQGU\
■ $OZD\VIROORZWKH PDQXIDFWXUHUV
LQVWUXFWLRQVZKHQGRVLQJ
DOO GHWHUJHQWVFOHDQLQJDLGVFDUH
SURGXFWVDQG FOHDQLQJDJHQWV
■ 'RQRWH[FHHGPD[LPXPORDG
2YHUILOOLQJZLOOLPSDLUWKHZDVKLQJ
UHVXOW
■ .HHSGHWHUJHQWVDQGDJHQWVIRUWKH
SUHWUHDWPHQWRIODXQGU\HJ VWDLQ
UHPRYHUSUHZDVKVSUD\V HWFDZD\
IURPWKHVXUIDFHVRIWKHDSSOLDQFH
8VLQJD GDPSFORWKLPPHGLDWHO\
UHPRYHDQ\ILQHVSUD\UHVLGXHDQG
RWKHUUHVLGXHRUGURSOHWV
■ (PSW\DQ\SRFNHWV5HPRYHDQ\
IRUHLJQREMHFWV
■ 5HPRYHPHWDOSDUWVSDSHUFOLSV
HWF
■ 7URXVHUVNQLWZHDUDQGNQLWWHG
WH[WLOHV HJ MHUVH\ JDUPHQWV 7VKLUWV
RUVZHDWVKLUWVVKRXOGEHWXUQHG
LQVLGHRXW
■ (QVXUHWKDWXQGHUZLUHGEUDVDUH
DSSOLDQFHZDVKDEOH
■ :DVK GHOLFDWHV LQ D QHW RU EDJ WLJKWV
XQGHUZLUHGEUDVHWF
■ &ORVH]LSVEXWWRQXSFRYHUV
■ %UXVK VDQG RXW RI SRFNHWV DQG FROODUV
■ 5HPRYHFXUWDLQILWWLQJVRUSODFHLQD
QHWEDJ
6RUWLQJODXQGU\
6RUW\RXUODXQGU\DFFRUGLQJWRWKHFDUH
LQVWUXFWLRQVDQGPDQXIDFWXUHUV
LQIRUPDWLRQ RQ WKH FDUH ODEHOV GHSHQGLQJ
RQ
■ 7\SHRIIDEULFILEUH
■ &RORXU
1RWH /DXQGU\PD\GLVFRORXU:DVK
ZKLWHDQGFRORXUHGLWHPVVHSDUDWHO\
:DVKQHZFRORXUHGLWHPVVHSDUDWHO\
WKHILUVWWLPH\RXZDVKWKHP
■ 6RLOLQJ
:DVKODXQGU\ZLWKWKHVDPHOHYHORI
VRLOLQJWRJHWKHU
² /LJKW1RQHHGWRSUHWUHDWDGMXVW
WKH 䗢爱 6SHHG3HUIHFW VHWWLQJ LI
QHFHVVDU\
² 1RUPDO
² +HDY\ /RDG OHVV ODXQGU\ QHHG WR
SUHWUHDWRUVRDNODXQGU\ILUVWO\
² 6WDLQV5HPRYHSUHWUHDWVWDLQV
ZKLOH WKH\ DUH IUHVK )LUVW GDE ZLWK
VRDS\ZDWHUGRQRWUXE7KHQ
ZDVKWKHLWHPVRIODXQGU\ZLWKWKH
DSSURSULDWHSURJUDPPH6WXEERUQ
RUGULHGLQVWDLQVFDQVRPHWLPHV
RQO\EHUHPRYHGE\ZDVKLQJ
VHYHUDOWLPHV
■ 6\PEROVRQWKHFDUHODEHOV
M 6XLWDEOHIRUQRUPDOZDVKLQJ
SURFHVV
HJ&RWWRQVSURJUDPPH
N $JHQWOHZDVKLQJSURFHVVLV
UHTXLUHG
HJ6\QWKHWLFVSURJUDPPH
O $QHVSHFLDOO\JHQWOHZDVKLQJ
SURFHVVLVUHTXLUHG
HJ'HOLFDWHV SURJUDPPH
W 6XLWDEOHIRUZDVKLQJE\KDQG
HJ W:RROSURJUDPPH
Ž 'RQRWPDFKLQHZDVK

2YHUYLHZRISURJUDPPHV HQ
P2YHUYLHZRISURJUDPPHV
2YHUYLHZRISURJUDPPHV
6HOHFWDEOHSURJUDPPH
3URJUDPPH7\SHRIZDVKLQJ 2SWLRQV,QIRUPDWLRQ
1DPHRIWKHSURJUDPPH
%ULHIH[SODQDWLRQRIWKHSURJUDPPHDQGIRU
ZKLFKIDEULFVLWLVVXLWDEOH
0D[ORDGDVNJ
GHSHQGLQJRQWKHPRGHODQGWKHSUR
JUDPPH
VHOHFWDEOHWHPSHUDWXUHDV&
VHOHFWDEOHVSLQVSHHGLQUSP
SRVVLEOHDGGLWLRQDOSURJUDPPHVHW
WLQJV
$XWRPDWLFGRVLQJ
'HVHOHFWDEOH è
QRWVHOHFWDEOH
&RWWRQV
+DUGZHDULQJIDEULFVKHDWUHVLVWDQWIDEULFV
PDGHRIFRWWRQRUOLQHQ
NJNJ
—&
USP
䗨爷6SHHG3HUIHFW
熓䦖叀 (DV\ LURQ 䀾窜伯 3UHZDVK
侐仹6RDNLQJ㒸儚伯5LQVHSOXV
㍥䖪乌5LQVHKROG淈䇞0HPRU\
å è © è
0L[
0L[HGORDGRIFRWWRQVDQGV\QWKHWLFIDEULFV
NJ
—&
USP
䗨爷6SHHG3HUIHFW
熓䦖叀 (DV\ LURQ 䀾窜伯 3UHZDVK
侐仹6RDNLQJ㒸儚伯5LQVHSOXV
㍥䖪乌5LQVHKROG淈䇞0HPRU\
å è © è
'HSHQGLQJRQWKHPRGHODQGWKHSURJUDPPH
5HGXFHGORDGZLWK 䗢爱 6SHHG3HUIHFWDGGLWLRQDOSURJUDPPHVHWWLQJ

HQ 2YHUYLHZRISURJUDPPHV
6\QWKHWLFV
7H[WLOHVPDGHRIV\QWKHWLFPDWHULDOVRU
EOHQGHGIDEULFV
NJ
—&
USP
䗨爷6SHHG3HUIHFW
熓䦖叀 (DV\ LURQ 䀾窜伯 3UHZDVK
侐仹6RDNLQJ㒸儚伯5LQVHSOXV
㍥䖪乌5LQVHKROG淈䇞0HPRU\
å è © è
'HOLFDWHV
)RUGHOLFDWHZDVKDEOHIDEULFVHJPDGHRI
VLONVDWLQV\QWKHWLFILEUHVRUEOHQGVHJVLON
EORXVHVVLONVFDUYHV
NJ
—&
2USP
熓䦖叀(DV\LURQ
䀾窜伯3UHZDVK侐仹6RDNLQJ
㒸儚伯5LQVHSOXV
㍥䖪乌5LQVHKROG淈䇞0HPRU\
å è © è
W:RRO
+DQGRUDSSOLDQFHZDVKDEOHIDEULFVWKDWDUH
PDGHRIZRRORUFRQWDLQZRRO
SDUWLFXODUO\JHQWOHZDVKSURJUDPPHWRSUH
YHQWODXQGU\IURPVKULQNLQJZLWKORQJHU
SDXVHVLQWKHSURJUDPPHGXULQJZKLFKWKH
LWHPVUHVWLQWKHZDWHU
NJ
—&
2USP
㍥䖪乌5LQVHKROG淈䇞0HPRU\
å © è
5LQVH
)RUULQVLQJZLWKDVXEVHTXHQWVSLQF\FOH
2USP
熓䦖叀(DV\LURQ
㒸儚伯5LQVHSOXV
㍥䖪乌5LQVHKROG淈䇞0HPRU\
å © è
6SLQ
)RU VSLQQLQJ ZLWK D VHOHFWDEOH VSLQ VSHHG DQG
VXEVHTXHQWGUDLQLQJ,I\RXKDYHVHOHFWHG 2
WKHZDWHULVRQO\GUDLQHGDIWHUULQVHSURFHVV
QRVSLQF\FOH
2USP
熓䦖叀(DV\LURQ淈䇞0HPRU\
å ©
3URJUDPPH7\SHRIZDVKLQJ 2SWLRQV,QIRUPDWLRQ
'HSHQGLQJRQWKHPRGHODQGWKHSURJUDPPH
5HGXFHGORDGZLWK 䗢爱 6SHHG3HUIHFWDGGLWLRQDOSURJUDPPHVHWWLQJ

2YHUYLHZRISURJUDPPHV HQ
'UXP&OHDQ
6SHFLDOSURJUDPIRUGUXPK\JLHQHRUIOXII
UHPRYDO'R QRWORDGDQ\ODXQGU\
& DQWLEDFWHULDOSURJUDP
& DQWLEDFWHULDOSURJUDPVSHFLDOGUXP
FOHDQLQJGHWHUJHQWFDQEHXVHG
— QRDQWLEDFWHULDOSURJUDPPHWRUHPRYH
KDLURUIOXIIIURPWKHWXE
7KHV\PERO ÛPHPRU\IXQFWLRQGUXPFDUH
IODVKHVLI\RXKDYHQRWXVHGDQ\SURJUDPPH
DWDWHPSHUDWXUHRI&RUKLJKHUIRUDQ
H[WHQGHGSHULRG
1RWHV
■ 6ZLWFKLQJWKHGUXPFOHDQLQIRUPDWLRQVLJ
QDORQRII
~ 6ZLWFKLQJWKHGUXPFDUHLQIRUPDWLRQ
VLJQDORQRIIRQ SDJH
■ $OZD\VIROORZWKH PDQXIDFWXUHUVLQVWUXF
WLRQVZKHQGRVLQJWKH GHWHUJHQW
NJ
—&&
USP
淈䇞0HPRU\
å ©
'RZQ
$SSOLDQFHZDVKDEOHIDEULFVVWXIIHGZLWK
GRZQVXFKDVSLOORZVDQGGXYHWVDOVRVXLWD
EOHIRULWHPVVWXIIHGZLWKV\QWKHWLFILEUHV
NJ
—&
USP
㒸儚伯5LQVHSOXV
㍥䖪乌5LQVHKROG淈䇞0HPRU\
å ©
3URJUDPPH7\SHRIZDVKLQJ 2SWLRQV,QIRUPDWLRQ
'HSHQGLQJRQWKHPRGHODQGWKHSURJUDPPH
5HGXFHGORDGZLWK 䗢爱 6SHHG3HUIHFWDGGLWLRQDOSURJUDPPHVHWWLQJ

HQ 2YHUYLHZRISURJUDPPHV
2XWGRRU
&RPELQHGSURJUDPPHIRUZDVKLQJPHP
EUDQHFRDWHG ZHDWKHUSURRI DQG RXWGRRU FORWK
LQJRUZDWHUUHVLVWDQWIDEULFVIROORZHGE\DQ
RSWLRQDOZDWHUSURRILQJF\FOH
1. 6HOHFWDSURJUDPPH
1RWH
■7RUXQDZDWHUSURRILQJF\FOHGR
QRWFKDQJHWKLVGHIDXOWVHWWLQJ7KHSUR
JUDPPHVWRSVEHIRUHWKHZDWHUSURRILQJ
F\FOH
■ ,I\RXRQO\ZDQWWRZDVKWKHODXQGU\
VHOHFWWKHVSLQVSHHGLIQHFHVVDU\7KH
SURJUDPPHZLOOWKHQQRWVWRSEHIRUHWKH
ZDWHUSURRILQJF\FOHDQGLQVWHDGUXQV
WKURXJKWRWKHHQGRIWKHSURJUDPPH
2. )RUZDVKLQJWKHODXQGU\XVHDVSHFLDO
GHWHUJHQWIRURXWGRRUWH[WLOHVDGGWKHFRU
UHFWGRVDJHWRWKHPDQXDOGRVLQJFRP
SDUWPHQWLQDFFRUGDQFHZLWKWKH
PDQXIDFWXUHUVLQVWUXFWLRQV7KRURXJKO\
FOHDQWKHFRPSDUWPHQWEHIRUHKDQG
3. 6WDUWWKHSURJUDPPH7KHSURJUDPPH
VWRSVEHIRUHWKHZDWHUSURRILQJF\FOH
GHSHQGLQJRQWKHVHWWLQJ
4. )RUZDWHUSURRILQJWKHODXQGU\DGGWKH
GRVDJHRIZDWHUSURRILQJDJHQWPD[
POWRWKHPDQXDOGRVLQJFRPSDUWPHQW
5. 3UHVVWKH AEXWWRQWRFRQWLQXHWKHSUR
JUDPPH$IWHUWUHDWWKHODXQGU\LQDFFRUG
DQFHZLWKWKHPDQXIDFWXUHUVLQVWUXFWLRQV
NJ
—&
USP
㒸儚伯5LQVHSOXV淈䇞0HPRU\
å ©
6XSHU·
([WUDVKRUWSURJUDPPHRIDSSUR[PLQ
XWHVVXLWDEOHIRUVPDOOLWHPVRIOLJKWO\VRLOHG
ODXQGU\
NJ
—&
USP
㒸儚伯5LQVHSOXV
㍥䖪乌5LQVHKROG淈䇞0HPRU\
å è © è
3URJUDPPH7\SHRIZDVKLQJ 2SWLRQV,QIRUPDWLRQ
'HSHQGLQJRQWKHPRGHODQGWKHSURJUDPPH
5HGXFHGORDGZLWK 䗢爱 6SHHG3HUIHFWDGGLWLRQDOSURJUDPPHVHWWLQJ

2YHUYLHZRISURJUDPPHV HQ
0\7LPH
0L[HGIDEULFVIRUOLJKWO\VRLOHGODXQGU\PDGH
RIFRWWRQDQGV\QWKHWLFV
7KH OHQJWK RI WKH ZDVK SURJUDPPH FDQ EH VHW
HDFKWLPH7KHPD[LPXPSURJUDPPHOHQJWK
LV PLQXWHV DQG LW FDQ EH UHGXFHG LQ PLQ
XWHLQFUHPHQWV
1RWHV
■ ,QFUHDVHWKHOHQJWKRIWKHZDVKSUR
JUDPPHORDGZLWK 㒲儔伩5LQVHSOXV
SURJUDPPHDGGLWLRQDOVHWWLQJ
■ 7KH )LQLVKLQWLPHSURJUDPPHGHIDXOW
VHWWLQJFDQQRWEHVHOHFWHGIRUWKLVSUR
JUDPPH
NJ
—&
USP
熓䦖叀(DV\LURQ
㒸儚伯5LQVHSOXV淈䇞0HPRU\
å è © è
$XWR6RIW
)RU FOHDQLQJ GHOLFDWH IDEULFV FRWWRQ V\QWKHWLF
ILEUHVLQRQHZDVKLQJF\FOH7KHSURJUDPPH
GHWHFWVWKHIDEULFW\SHDQGWKHGHJUHHRIVRLO
LQJDQGDXWRPDWLFDOO\DGMXVWVWKHZDVKLQJ
WLPHDQGZDWHUYROXPH
1RWH 7KHGHIDXOWWHPSHUDWXUHRIWKLVSUR
JUDPPHLV&
NJ
㍥䖪乌5LQVHKROG淈䇞0HPRU\
å è © è
$XWR
)RUFOHDQLQJKDUGZHDULQJIDEULFVFRWWRQ
V\QWKHWLFILEUHVLQRQHZDVKLQJF\FOH7KH
SURJUDPPHGHWHFWVWKHIDEULFW\SHDQGWKH
GHJUHHRIVRLOLQJDQGDXWRPDWLFDOO\DGMXVWV
WKHZDVKLQJWLPHDPRXQWRIGHWHUJHQWDQG
ZDWHUYROXPH
1RWH 7KHGHIDXOWWHPSHUDWXUHRIWKLVSUR
JUDPPHLV&
NJ
㍥䖪乌5LQVHKROG淈䇞0HPRU\
å è © è
3URJUDPPH7\SHRIZDVKLQJ 2SWLRQV,QIRUPDWLRQ
'HSHQGLQJRQWKHPRGHODQGWKHSURJUDPPH
5HGXFHGORDGZLWK 䗢爱 6SHHG3HUIHFWDGGLWLRQDOSURJUDPPHVHWWLQJ

HQ 3URJUDPPHGHIDXOWVHWWLQJV
0 3URJUDPPHGHIDXOW
VHWWLQJV
3URJUDPPHGHIDXOWVHWWLQJV
<RXFDQFKDQJHWKHGHIDXOWVHWWLQJVIRU
VHOHFWHGSURJUDPPHV7KHVHWWLQJVFDQ
EHFKDQJHGHYHQZKLOHWKHVHOHFWHG
SURJUDPPHLVUXQQLQJ7KHHIIHFWV
GHSHQGLQJRQWKHSURJUHVVRIWKH
SURJUDPPH
7HPSHUDWXUH
%HIRUHDQGDIWHUWKHSURJUDPPHVWDUWV
\RXFDQFKDQJHWKHWHPSHUDWXUHVHWWLQJ
GHSHQGLQJ RQ ZKDW VWDJH WKH SURJUDPPH
LVLQE\DGMXVWLQJWKHGHVLUHG
WHPSHUDWXUHRQWKHGLVSOD\
7KHPD[LPXPWHPSHUDWXUHWKDWFDQEH
VHWGHSHQGVRQWKHSURJUDPPHWKDWKDV
EHHQVHOHFWHG
6SLQVSHHG
'HSHQGLQJ RQ ZKDW VWDJH WKH SURJUDPPH
LVLQ\RXFDQFKDQJHWKHVSLQVSHHGLQ
USPUHYROXWLRQVSHUPLQXWHEHIRUHDQG
GXULQJWKHSURJUDPPHE\DGMXVWLQJWKH
GHVLUHGVSHHGRQWKHGLVSOD\
VHWWLQJ 2 2 µ1RVSLQµ7KHULQVLQJ
ZDWHU LV GUDLQHG EXW WKHUH LV QR ILQDO VSLQ
7KHODXQGU\VWD\VZHWLQVLGHWKHGUXP
HJIRULWHPVWKDWVKRXOGQRWEHVSXQ
<RXFDQVHOHFW´1RVSLQµWRSUHYHQW
FUHDVLQJLIWKHODXQGU\ZLOOQRWEHWDNHQ
RXW RI WKH DSSOLDQFH LPPHGLDWHO\ DIWHU WKH
SURJUDPPHKDVHQGHG
7KHPD[LPXPVSHHGWKDWFDQEHVHW
GHSHQGLQJRQWKHPRGHODQGWKH
SURJUDPPHWKDWKDVEHHQVHOHFWHG
)LQLVKLQWLPH
%HIRUHVWDUWLQJWKHSURJUDPPH\RX
FDQSUHVHOHFWWKHSURJUDPPHHQG
)LQLVKLQWLPHLQKK KRXU
LQFUHPHQWV XS WR D PD[LPXP RI KRXUV
7RGRWKLV
1. 6HOHFWDSURJUDPPHH[FHSW 0\
7LPH
SURJUDPPH
7KHSURJUDPPHGXUDWLRQLVGLVSOD\HG
IRU WKH VHOHFWHG SURJUDPPH HJ
KRXUVPLQXWHV
2. 7RXFKWKH ˜EXWWRQUHSHDWHGO\XQWLO
WKHUHTXLUHGQXPEHURIKRXUVLV
GLVSOD\HG
1RWH 7KHVHWWLQJYDOXHVDUH
LQFUHDVHGXVLQJWKH ˜EXWWRQDQG
GHFUHDVHGXVLQJWKH ~EXWWRQ
3. 7RXFKWKH AEXWWRQ
7KHSURJUDPPHVWDUWV
7KHVHOHFWHGQXPEHURIKRXUVHJ
KLVVKRZQLQWKHGLVSOD\SDQHODQG
FRXQWVGRZQXQWLOWKHSURJUDPPH
VWDUWV 7KH GXUDWLRQ RI WKH SURJUDPPH
LVWKHQGLVSOD\HG
1RWH 7KHOHQJWKRIWKHSURJUDPPHLV
DXWRPDWLFDOO\DGMXVWHGZKHQWKH
SURJUDPPHLVUXQQLQJ&KDQJHVWRWKH
SURJUDPPHGHIDXOWVHWWLQJVRU
SURJUDPPHDGGLWLRQDOVHWWLQJVPD\DOVR
FKDQJHWKHSURJUDPPHGXUDWLRQ
$IWHUVWDUWLQJWKHSURJUDPPHLID
´)LQLVKLQµWLPHKDVEHHQVHOHFWHGDQG
WKHSURJUDPPHKDVQRW\HWVWDUWHG\RX
FDQFKDQJHWKHSUHVHOHFWHGQXPEHURI
KRXUVDVIROORZV
1. 7RXFKWKH AEXWWRQ
2. 7RXFKWKH ˜RU ~EXWWRQWRFKDQJH
WKHQXPEHURIKRXUV
3. 7RXFKWKH AEXWWRQ
'HSHQGLQJRQWKHPRGHO

$GGLWLRQDOSURJUDPPHVHWWLQJV HQ
\ $GGLWLRQDO SURJUDPPH
VHWWLQJV
$GGLWLRQDOSURJUDPPHVHWWLQJV
1RWH <RXFDQILQGSRVVLEOHDGGLWLRQDO
SURJUDPPHVHWWLQJVLQWKHRYHUYLHZ
WKHVHGLIIHUGHSHQGLQJRQWKHPRGHO
%\VHOHFWLQJDGGLWLRQDOSURJUDPPH
VHWWLQJV\RXFDQEHWWHUDGDSWWKH
ZDVKLQJ SURFHVV WR \RXU LWHPV RI ODXQGU\
7KHVHWWLQJVFDQEHVHOHFWHGRU
GHVHOHFWHG GHSHQGLQJ RQ WKH SURJUHVV RI
WKHSURJUDPPH
7KHEXWWRQLQGLFDWRUODPSVOLJKWXSLID
VHWWLQJLVDFWLYDWHG
7KHVHWWLQJVDUHQRWUHWDLQHGDIWHUWKH
DSSOLDQFHLVVZLWFKHGRII
䗢爱 6SHHG3HUIHFW
:DVKLQJLQDVKRUWHUWLPHZKLOHDFKLHYLQJ
DZDVKLQJUHVXOWWKDWLVFRQVLVWHQWZLWK
WKHQRUPDOSHUIRUPDQFH
7RXFK 䗢爱 6SHHG3HUIHFWWRDFWLYDWH
RUGHDFWLYDWHLW
1RWH :LWKWKH 䗢爱 6SHHG3HUIHFW
DGGLWLRQDOSURJUDPPHVHWWLQJDFWLYDWHG
WKHPD[LPXPORDGRIZDVKLQJZLOOEH
UHGXFHG
熍䦐厺(DV\LURQ
$VSHFLDORSHUDWLRQXVLQJUHGXFHGVSLQ
VSHHGIROORZHGE\IOXIILQJWRKHOSUHGXFH
FUHDVLQJ
7RXFK 熍䦐厺(DV\LURQWRDFWLYDWHRU
GHDFWLYDWHLW
1RWH ,I 熍䦐厺(DV\LURQKDVEHHQ
DFWLYDWHG WKH ODXQGU\ ZLOO KDYH UHWDLQHG D
KLJKHUWKDQDYHUDJHOHYHORIPRLVWXUH
DIWHUVSLQQLQJ
䀸窖伩3UHZDVK
)RUKHDYLO\VRLOHGODXQGU\
1RWHV
■ ,I LQWHOOLJHQW GRVDJH LV VHOHFWHGWKH
GHWHUJHQWZLOOEHGLVSHQVHG
DXWRPDWLFDOO\ IRU WKH SUHZDVK DQG WKH
PDLQZDVK
■ ,I GRVLQJPDQXDOO\DOORFDWH
GHWHUJHQWWRWKHSUHZDVKDQGWKH
PDLQZDVK3ODFHGHWHUJHQWIRUWKH
SUHZDVK LQ WKH GUXP DQG DGG ZDVKLQJ
SRZGHUIRUWKHPDLQZDVKWRWKH
PDQXDOGRVLQJFRPSDUWPHQW
侊仳6RDNLQJ
%HIRUHWKHPDLQZDVKF\FOHVWDUWVWKH
ODXQGU\ UHPDLQV LQ WKH ZDWHU IRU ORQJHU WR
UHPRYHEDGVRLOLQJ7REHXVHGIRU
SDUWLFXODUO\VWXEERUQVRLOLQJ
1RWHV
■ ,I LQWHOOLJHQW GRVDJH LV VHOHFWHGWKH
GHWHUJHQWZLOOEHGLVSHQVHG
DXWRPDWLFDOO\IRUWKHVRDNLQJDQGWKH
PDLQZDVK
■ ,I GRVLQJPDQXDOO\SODFHGHWHUJHQW
LQWRPDQXDOGRVLQJFRPSDUWPHQW
■ 7RDYRLGGLVFRORXUDWLRQRQO\VRDN
ODXQGU\RIWKHVDPHFRORXUWRJHWKHU
㒲儔伩5LQVHSOXV
6HWWLQJVWKDWFDQEHVHOHFWHG
$GGLWLRQDOULQVHF\FOHVIRUSDUWLFXODUO\
VHQVLWLYHVNLQDQGRUIRUDUHDVZLWKYHU\
VRIWZDWHU
/RQJHUSURJUDPPHGXUDWLRQGXHWR
DGGLWLRQDOULQVHF\FOH
7KHQXPEHURIULQVHF\FOHVWKDWWKH
SURJUDPPH DFWXDOO\ UXQV GHSHQGV RQ WKH
QXPEHUWKDWLVVHWDVDEDVLFVHWWLQJIRU
WKHSURJUDPPH
ULQVHF\FOH
ULQVHF\FOHV
ULQVHF\FOHV

HQ 2SHUDWLQJWKHDSSOLDQFH
㍟䖤乆 5LQVHKROG
7KHODXQGU\UHPDLQVLQWKHULQVLQJZDWHU
DIWHULWKDVEHHQZDVKHG
7RXFK ㍟䖤乆 5LQVHKROGDQGDFWLYDWH
RUGHDFWLYDWHLW
1RWH ,I\RXKDYHVHOHFWHG ㍟䖤乆
5LQVHKROGWKHODXQGU\UHPDLQVLQWKH
ULQVLQJZDWHUDIWHULWKDVEHHQZDVKHG
<RXHLWKHUKDYHWRVSLQWKHODXQGU\RU
GUDLQWKHZDWHULQRUGHUWRHQGWKH
SURJUDPPH2QO\WKHQFDQ\RXUHPRYH
WKHODXQGU\
淂䇘0HPRU\
:LWKPHPRU\\RXFDQVDYHDVHOHFWHG
SURJUDPPHZLWK\RXUIDYRXULWHVHWWLQJV
7RVWRUH
1. 6ZLWFKRQWKHDSSOLDQFH
2. 6HOHFWDSURJUDPPH
3. ,IUHTXLUHGFKDQJHWKHSURJUDPPH
GHIDXOWVHWWLQJVDQGRUVHOHFW
SURJUDPPHDGGLWLRQDOVHWWLQJV
4. 7RXFKDQGKROG 淂䇘0HPRU\
EXWWRQIRUDSSUR[WKUHHVHFRQGV
7KHSURJUDPPHLVVDYHGLIDOORIWKH
VHWWLQJVIODVKEULHIO\
&DOOLQJ XSWRXFK 淂䇘 0HPRU\ EXWWRQ
EULHIO\DIWHU\RXVZLWFKRQWKHDSSOLDQFH
5HVHWWRXFKDQGKROG 淂䇘0HPRU\
EXWWRQDJDLQIRUDSSUR[WKUHHVHFRQGV
DIWHUVHOHFWLQJWKHQHZSURJUDPPHDQG
VHWWLQJV
L'26VHWWLQJ
<RXUDSSOLDQFHKDVDQLQWHOOLJHQWGRVLQJ
V\VWHP IRU OLTXLG GHWHUJHQW å DQG IDEULF
VRIWHQHU©
7KHRSWLPXPTXDQWLWLHVRIOLTXLG
GHWHUJHQWDQGIDEULFVRIWHQHUDUH
GLVSHQVHGDXWRPDWLFDOO\
<RX FDQ SUHVV ý L'RV å RU þ L'RV M
åWRDFWLYDWHRUGHDFWLYDWHDXWRPDWLF
GRVLQJDQGVHWWKHEDVLFGRVDJHV
~ ,QWHOOLJHQWGRVLQJV\VWHP
RQ SDJH
1 2SHUDWLQJWKH
DSSOLDQFH
2SHUDWLQJWKHDSSOLDQFH
3UHSDULQJWKHDSSOLDQFH
7KH DSSOLDQFH ZDV WHVWHG EHIRUH GHOLYHU\
7RUHPRYHUHVLGXDOZDWHUIURPWKHWHVW
SURFHGXUH WKH ILUVW ZDVK F\FOH VKRXOG EH
UXQZLWKRXWODXQGU\XVLQJWKH 'UXP
&OHDQSURJUDPPH
~ %HIRUHZDVKLQJIRUWKHILUVWWLPH
RQ SDJH
1RWHV
■ 1HYHUVZLWFKRQD GDPDJHG
DSSOLDQFH
■ ,QIRUPFXVWRPHUVHUYLFH
1. ,QVHUWPDLQVSOXJ
::DUQLQJ
5LVNRIGHDWKIURPHOHFWULFVKRFN
5LVNRIGHDWKLIOLYHSDUWVDUHWRXFKHG
² 1HYHUSXOORXWWKHPDLQVSOXJE\
WXJJLQJWKHSRZHUFRUG
² ,QVHUWSXOORXWWKHPDLQVSOXJZLWK
GU\KDQGVRQO\
2SHUDWLQJWKHDSSOLDQFH HQ
2. 7XUQWKHZDWHU WDS RQ
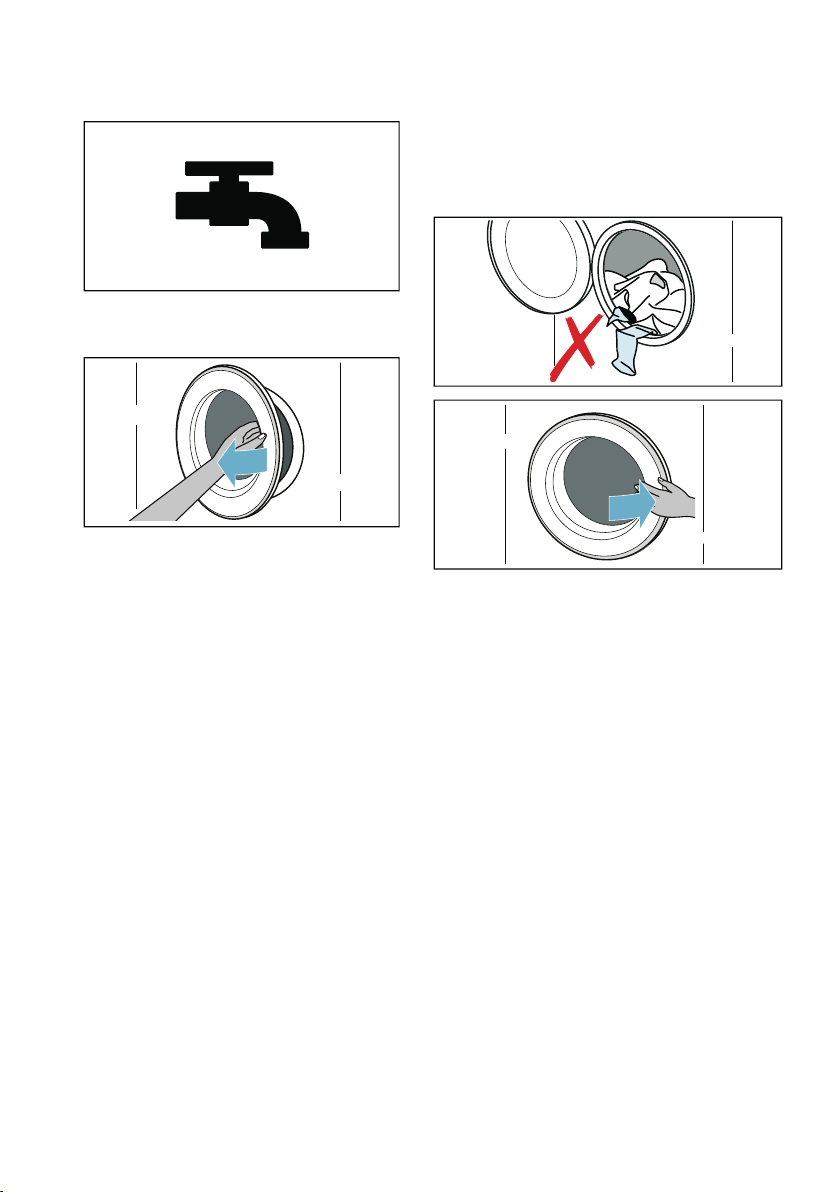
3. 2SHQWKH DSSOLDQFHGRRU
6ZLWFKLQJRQWKHDSSOLDQFH
VHOHFWLQJDSURJUDPPH
3UHVVWKH #EXWWRQWLOOWKHLQGLFDWRUODPS
OLJKWVXSUHOHDVHWKHEXWWRQ7KH
DSSOLDQFHLVVZLWFKHGRQ
7KH &RWWRQV SURJUDPPH RQO\ ZDVKLQJ
ZKLFKLVSUHVHWDWWKHIDFWRU\LVWKHQ
DOZD\VGLVSOD\HG
<RXFDQXVHWKLVSURJUDPPHRUVHOHFWD
GLIIHUHQWSURJUDPPH
1RWH ,I\RXKDYHDFWLYDWHGWKH
FKLOGSURRIORFN\RXKDYHWRGHDFWLYDWHLW
~ 3DJH EHIRUH\RXFDQVHWD
SURJUDPPH
3UHVHWWLQJVDQGPD[LPXPORDGDUH
LQGLFDWHGRQWKHGLVSOD\SDQHOIRUWKH
VHOHFWHGSURJUDPPH
3ODFLQJODXQGU\LQWRWKHGUXP
2SHQ WKH GRRU SODFH ODXQGU\ LQ WKH GUXP
PDNHVXUHWKDWQRLWHPVRIODXQGU\DUH
WUDSSHG EHWZHHQ WKH GRRU DQG WKH UXEEHU
VHDODQGFORVHWKHGRRU
1RWHV
■ 8QIROGDQGORDGSUHVRUWHGLWHPV
RI ODXQGU\0L[ODUJHDQGVPDOOLWHPV
:DVKLQJLWHPVRI GLIIHUHQWVL]H
GLVWULEXWHWKHPVHOYHVEHWWHUGXULQJ
WKH VSLQF\FOH,QGLYLGXDOLWHPV
RI ZDVKLQJ PD\ FDXVH DQ XQEDODQFHG
ORDG
■ 2EVHUYH WKH PD[LPXP VSHFLILHG ORDG
2YHUILOOLQJDGYHUVHO\DIIHFWVWKH
ZDVKLQJUHVXOWDQGSURPRWHV
FUHDVLQJ

HQ 2SHUDWLQJWKHDSSOLDQFH
0HDVXULQJDQGDGGLQJ
GHWHUJHQWDQGFDUHSURGXFWV
)RUWKHPDMRULW\RISURJUDPVRQ\RXU
DSSOLDQFHGHWHUJHQWDQGIDEULFVRIWHQHU
DUHGLVSHQVHGDXWRPDWLFDOO\LWLVD
IDFWRU\VHWWLQJIRUWKHVHSURJUDPVDQG
FDQEHFKDQJHG
~ $XWRPDWLFGRVLQJRQ SDJH
)RUSURJUDPVZLWKRXWLQWHOOLJHQWGRVLQJ
RULI\RXZLVKWRFRQWUROWKHGRVLQJ
\RXUVHOILQZKLFKFDVHGHDFWLYDWH
LQWHOOLJHQWGRVLQJ\RXZLOOQHHGWRDGG
GHWHUJHQWPDQXDOO\WRWKHPDQXDOGRVLQJ
FRPSDUWPHQW
~ 0DQXDOGRVLQJRQ SDJH
6WDUWLQJWKHSURJUDPPH
7RXFKDQGKROG AEXWWRQIRUa
VHFRQGVWKHQUHOHDVHWKHEXWWRQ7KH
SURJUDPPH VWDUWV DQG WKH DSSOLDQFH GRRU
LVORFNHG
7KH )LQLVKLQWLPHLVVKRZQLQWKH
GLVSOD\SDQHODQGFRXQWVGRZQXQWLOWKH
SURJUDPPHVWDUWV$IWHUWKHSURJUDPPH
KDVVWDUWHGWKHSURJUDPPHGXUDWLRQLV
GLVSOD\HG$QGWKHV\PEROVIRUWKH
SURJUDPPHSURJUHVVDUHOLJKWLQJXS
1RWH )RDPGHWHFWLRQ
,IWKHV\PERO ÅDOVROLJKWVXSLQWKH
GLVSOD\ SDQHO WKH DSSOLDQFH KDV GHWHFWHG
WRR PXFK IRDP GXULQJ WKH ZDVK F\FOH DQG
DXWRPDWLFDOO\DFWLYDWHGDGGLWLRQDOULQVH
F\FOHVWRUHPRYHWKHIRDP
&KLOGSURRIORFN
<RX FDQ ORFN WKH DSSOLDQFH WR SUHYHQW WKH
IXQFWLRQV\RXKDYHVHWIURPEHLQJ
FKDQJHGLQDGYHUWHQWO\7RGRWKLV
DFWLYDWHWKHFKLOGSURRIORFN
7RDFWLYDWHWKHFKLOGSURRIORFN
$IWHUWKHSURJUDPPHVWDUWV7RXFKDQG
KROGWKH E寤EXWWRQIRUVHFRQGV
■ EOLJKWVXS7KHFKLOGSURRIORFNLV
DFWLYDWHG
■ EIODVKHV,IWKHSURJUDPPHDQG
SURJUDPPHVHWWLQJVDUHDGMXVWHG
ZKLOHFKLOGSURRIORFNLVDFWLYDWHG
1RWH :KHQWKHSURJUDPPHHQGV (QG
LVGLVSOD\HG7KHGRRULVXQORFNHG E
UHPDLQ RQ WR UHPLQG \RX WR GHDFWLYDWH WKH
FKLOGSURRIORFN
7RGHDFWLYDWHWKHFKLOGSURRIORFN
7RXFKDQGKROGWKH E寤 EXWWRQXQWLO
WKHV\PERO EGLVDSSHDUV
$GGLQJUHPRYLQJODXQGU\
$IWHUVWDUWLQJWKHSURJUDPPH\RXFDQ
DGGRUUHPRYHODXQGU\LIQHFHVVDU\
7RXFKWKH AEXWWRQ7KHDSSOLDQFH
FKHFNVZKHWKHUUHORDGLQJLVSRVVLEOH
,IWKHIROORZLQJDSSHDUVRQWKHGLVSOD\
SDQHO
■ 7KHV\PERO ÕGLVDSSHDUVUHORDGLQJ
LVSRVVLEOH
■ 7KHV\PERO ÕOLJKWVXSUHORDGLQJLV
QRWSRVVLEOH
7R FRQWLQXH WKH SURJUDPPH WRXFK WKH
AEXWWRQ7KHSURJUDPPHFRQWLQXHV
DXWRPDWLFDOO\
2SHUDWLQJWKHDSSOLDQFH HQ
1RWHV
■ 'RQRWOHDYHWKHGRRURSHQIRUWRR
ORQJZKHQDGGLQJODXQGU\DVZDWHU
IURPWKHODXQGU\PD\OHDNRXW
■ )RUVDIHW\UHDVRQVWKHGRRUUHPDLQV
ORFNHGZKHQWKHZDWHUOHYHORU
WHPSHUDWXUH LV KLJK RU ZKLOH WKH GUXP
LV WXUQLQJ DQG LW LV QRW SRVVLEOH WR DGG
ODXQGU\GXULQJWKLVWLPH
&KDQJLQJWKHSURJUDPPH
,I \RX KDYH VWDUWHG WKH ZURQJ SURJUDPPH
E\PLVWDNH\RXFDQFKDQJHWKH
SURJUDPPHDVIROORZV
1. 7RXFKWKH AEXWWRQ
2. 6HOHFWDQRWKHUSURJUDPPH
3. $QGWRXFKWKH AEXWWRQDJDLQ7KH
QHZSURJUDPPHVWDUWVIURPWKH
EHJLQQLQJ
&DQFHOWKHSURJUDPPH
)RUSURJUDPPHVDWKLJKWHPSHUDWXUHV
1. 7RXFKWKH AEXWWRQ
2. 7RFRROGRZQODXQGU\6HOHFW 5LQVH
3. $QGWRXFKWKH AEXWWRQDJDLQ
)RUSURJUDPPHVDWORZWHPSHUDWXUHV
1. 7RXFKWKH AEXWWRQ
2. 6HOHFW 6SLQ
3. $QGWRXFKWKH AEXWWRQDJDLQ
3URJUDPPHHQGGXULQJULQVH
KROG
7KHV\PERO AIODVKHVRQWKHGLVSOD\
SDQHODQGWKHSUHVHWVSLQVSHHGDQG
UHPDLQLQJSURJUDPPHOHQJWKDUH
GLVSOD\HGIRUWKHVHOHFWHGSURJUDPPH
&RQWLQXHWKHSURJUDPPHE\
■ 7RXFKWKH AEXWWRQRU
■ &KDQJHWKHVSLQVSHHGLIQHFHVVDU\
DQGWKHQWRXFKWKH AEXWWRQDJDLQ
1RWH ,IWKHZDWHURQO\QHHGVWREH
GUDLQHGVHOHFWSURJUDPPH 'UDLQ
RU
WRXFK WKH A EXWWRQ DSSUR[ PLQXWH
DIWHU WKH SURJUDPPH VWDUWV EHIRUH WKH
VSLQ F\FOH EHJLQV 3UHVV WKH # EXWWRQ
WLOO WKH LQGLFDWRU ODPS WXUQV RII UHOHDVH
WKHEXWWRQ7KHSURJUDPPHLV
LQWHUUXSWHGDQGWKHGRRUORFNLV
UHOHDVHG7KHODXQGU\FDQEH
UHPRYHG
3URJUDPPHHQG
(QGOLJKWVXSRQWKHGLVSOD\SDQHODQG
ADQG ÕGLVSOD\VDUHRII
,I\RXKDYHVHOHFWHG 2WKHZDWHULVRQO\
GUDLQHG DIWHU ULQVH SURFHVV QR VSLQ F\FOH
5HPRYLQJODXQGU\VZLWFKLQJ
RIIWKHDSSOLDQFH
1. 3UHVVWKH #EXWWRQWLOOWKHLQGLFDWRU
ODPSWXUQVRIIUHOHDVHWKHEXWWRQ
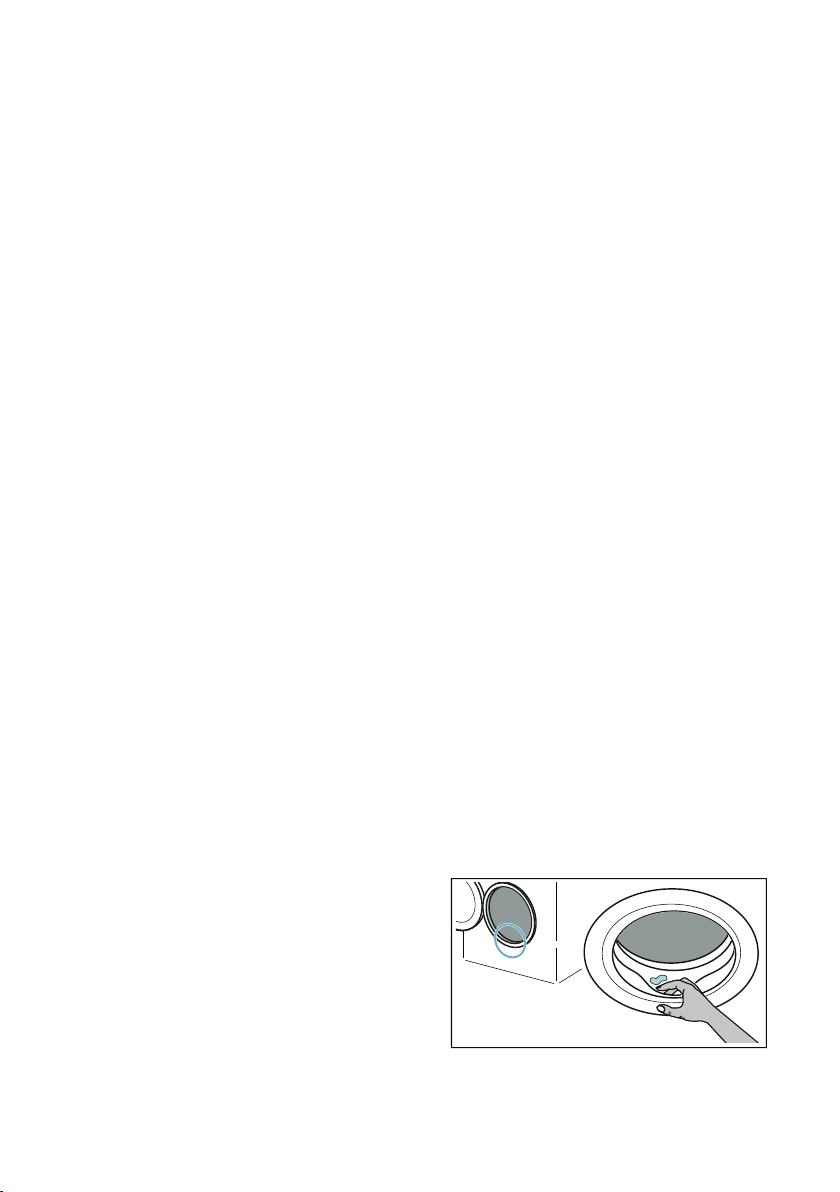
2. 2SHQWKHGRRUDQGUHPRYHWKH
ODXQGU\
3. 7XUQRIIWKHZDWHUWDS
1RWH 1RWUHTXLUHGIRU$TXD6WRS
PRGHOV
1RWHV
■ 'RQRWOHDYHDQ\LWHPVRIODXQGU\LQ
WKH GUXP 7KH\ PD\ VKULQN LQ WKH QH[W
ZDVKRUGLVFRORXUDQRWKHULWHP
■ 5HPRYHDQ\IRUHLJQREMHFWVIURPWKH
GUXPDQGWKHUXEEHUVHDO²ULVNRI
UXVWLQJ
■ :LSHWKHUXEEHUVHDOGU\
GHSHQGLQJRQWKHPRGHO
HQ ,QWHOOLJHQWGRVLQJV\VWHP
■ /HDYHWKHGRRUDQGGHWHUJHQWGUDZHU
RSHQVRWKDWDQ\UHVLGXDOZDWHUFDQ
HYDSRUDWH
■ $OZD\VZDLWXQWLOWKHSURJUDPPH
HQGVDVWKHDSSOLDQFHFRXOGVWLOOEH
ORFNHG7KHQVZLWFKWKHDSSOLDQFHRQ
DQGZDLWIRULWWRXQORFN
a ,QWHOOLJHQWGRVLQJ
V\VWHP
,QWHOOLJHQWGRVLQJV\VWHP
)DPLOLDULVLQJ\RXUVHOIZLWKL
'26
L'26 ,QWHOOLJHQW GRVLQJV\VWHP
<RXUDSSOLDQFHKDVDQLQWHOOLJHQWGRVLQJ
V\VWHPIRUOLTXLGGHWHUJHQWDQGIDEULF
VRIWHQHU
7KHRSWLPXPTXDQWLWLHVRIOLTXLG
GHWHUJHQWDQGIDEULFVRIWHQHUDUH
GLVSHQVHGDXWRPDWLFDOO\GHSHQGLQJRQ
WKHSURJUDPPHDQGVHWWLQJV
$XWRPDWLFGRVLQJLVDFWLYDWHGDWWKH
IDFWRU\ IRU DOO WKH GHVLJQDWHG SURJUDPPHV
DQGLWFDQEHDGMXVWHGWRVXLW\RXU
UHTXLUHPHQWV7KHVHWWLQJVDUHVDYHG
ZKHQWKHDSSOLDQFHLVVZLWFKHGRII
)RUSURJUDPPHVLQZKLFKDXWRPDWLF
GRVLQJLVQRWSRVVLEOH\RXFDQDGG
VXLWDEOHGHWHUJHQWWRWKHFRPSDUWPHQWLQ
WKHGHWHUJHQWGUDZHUIRUPDQXDOGRVLQJ
L'26'HWHUJHQWGUDZHU
%HIRUHVHWWLQJXSL'26
)ROORZWKHPDQXIDFWXUHUVLQVWUXFWLRQV
ZKHQFKRRVLQJ\RXUGHWHUJHQWDQGFDUH
SURGXFW:HUHFRPPHQGXVLQJHDV\
SRXUDOOSXUSRVHXQLYHUVDODQGFRORXU
OLTXLGGHWHUJHQWVIRUDOOPDFKLQH
ZDVKDEOH FRORXUHG LWHPV PDGH RI FRWWRQ
RUV\QWKHWLFIDEULFV
1RWHV
■ 2QO\XVHHDV\SRXUOLTXLGSURGXFWV
WKDWWKHPDQXIDFWXUHUUHFRPPHQGV
DGGLQJWRWKHGHWHUJHQWGUDZHU
■ :KHQFOHDQLQJWKHL'26GHWHUJHQW
GUDZHUHPSW\WKHGLVSHQVHU
FRPSOHWHO\DQGFOHDQLW ~ 3DJH
■ 'RQRWPL[GHWHUJHQWDQGIDEULF
VRIWHQHU
■ 'RQRWXVHSURGXFWVFRQWDLQLQJ
VROYHQWVFDXVWLFDJHQWVRUYRODWLOH
VXEVWDQFHVHJEOHDFK
■ 'R QRW XVH SURGXFWV WKDW KDYH H[SLUHG
RUDUHKLJKO\FRQJHDOHG
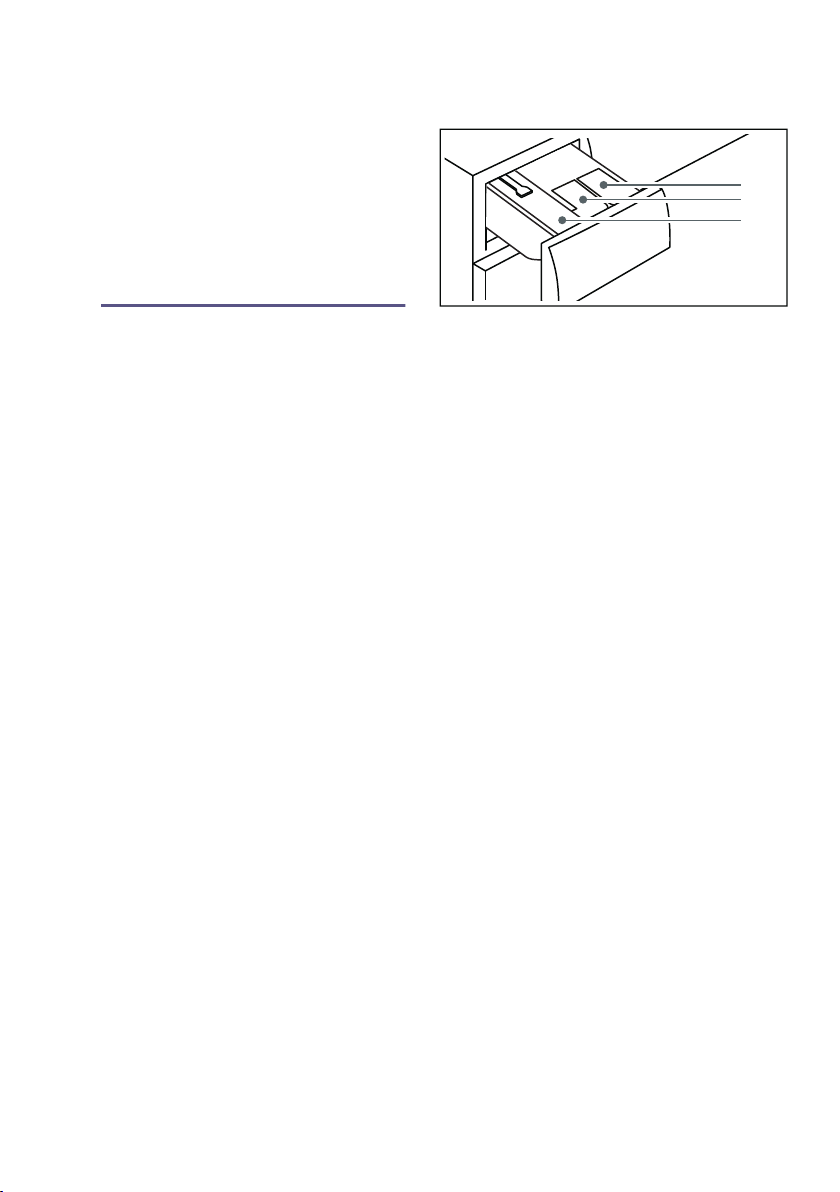
( åGLVSHQVHUIRUOLTXLGGHWHUJHQW
0 ©å GLVSHQVHU IRU IDEULF VRIWHQHU RU
OLTXLGGHWHUJHQWVHWWKHGLVSHQVHU
FRQWHQW ~ 3DJH
8 0DQXDOGRVLQJFRPSDUWPHQW

,QWHOOLJHQWGRVLQJV\VWHP HQ
$XWRPDWLFGRVLQJ
$XWRPDWLFGRVLQJFDQEHDFWLYDWHGRU
GHDFWLYDWHGIRUHDFKRIWKHGHVLJQDWHG
ZDVKSURJUDPPHVVHSDUDWHO\
$XWRPDWLF GRVLQJ FDQ DOVR EH DFWLYDWHG RU
GHDFWLYDWHGRQFHWKHSURJUDPPHKDV
VWDUWHGDOWKRXJKWKLVGHSHQGVRQZKLFK
VWDJHWKHSURJUDPPHLVLQ
7R DFWLYDWHGHDFWLYDWH WKH IXQFWLRQ SUHVV
ý L'RV åDQGRU þ L'RV Må
EULHIO\7KHVHWWLQJZLOOEHVDYHGXQWLOWKH
QH[WWLPHLWLVFKDQJHG
7LS ,Q DGGLWLRQ WR DXWRPDWLF GRVLQJ \RX
FDQDOVRDGGIXUWKHUODXQGU\FDUH
SURGXFWVVXFKDVVWDLQUHPRYHUVWDUFK
VRIWHQHURUEOHDFKWRWKHPDQXDOGRVLQJ
FRPSDUWPHQW7RSUHYHQWRYHUGRVLQJRU
IRDP EXLOGXS GR QRW DGG PRUH GHWHUJHQW
WRWKHPDQXDOGRVLQJFRPSDUWPHQW
1RWHV
■ 7RSURWHFW\RXUODXQGU\DXWRPDWLF
GRVLQJFDQRQO\EHXVHGZLWKFHUWDLQ
SURJUDPPHV
■ 3URJUDPVZLWKSUHZDVK
,I
DXWRPDWLFGRVLQJLVVHOHFWHG
GHWHUJHQWZLOOEHGLVSHQVHG
DXWRPDWLFDOO\IRUWKHSUHZDVKDQG
PDLQZDVKF\FOHV
L'266HWWLQJWKHFRQWHQWRI
WKH ©åGLVSHQVHU
'HIDXOWVHWWLQJIRUWKHGLVSHQVHUFRQWHQW
© å)DEULFVRIWHQHU©$OWHUQDWLYHO\
\RXFDQDOVRXVHWKLVGLVSHQVHUIRUD
VHFRQGOLTXLGGHWHUJHQW
6HWWKHGLVSHQVHUFRQWHQWDVIROORZV
1. 3UHVVDQGKROG þ L'RV MåIRU
DSSUR[VHFRQGV
2. $GMXVWWKHVHWWLQJXVLQJ þ L'RV M
å
åZLOODSSHDURQWKHGLVSOD\
1RWH ,I þ L'RV MåLVSUHVVHG
DJDLQ\RXFDQFKRRVHEHWZHHQ å
DQG ©
3. 7RH[LWVHWWLQJPRGHSUHVVDQGKROG
þ L'RV MåIRUDSSUR[VHFRQGV
RUZDLWIRUDVKRUWZKLOH
1RWH ,IERWKGLVSHQVHUVDUHILOOHGZLWK
OLTXLGGHWHUJHQWRQO\WKHGLVSHQVHUWKDW
ZDVDFWLYDWHGE\FKRRVLQJWKHL'26
EXWWRQLVXVHGGXULQJWKHZDVKF\FOH
L'266HWWLQJWKHGRVDJH
7KHEDVLFGRVDJHLVWKHUHFRPPHQGHG
GRVDJHIRUDW\SLFDOORDGRIKRXVHKROG
ODXQGU\FRPSULVLQJDSSUR[LWHPVRI
FORWKLQJ7KHTXDQWLW\RIGHWHUJHQWDQG
FDUHSURGXFWDFWXDOO\GLVSHQVHGLV
FDOFXODWHGXVLQJWKHEDVLFGRVDJHDQG
WKHDPRXQWRIODXQGU\ZKLFKLVGHWHFWHG
DXWRPDWLFDOO\
7KHEDVLFGRVDJHVIRUOLTXLGGHWHUJHQW
DQGIDEULFVRIWHQHUDUHVHWDWWKHIDFWRU\
<RXFDQLQGLYLGXDOO\DGMXVWWKHEDVLF
GRVDJHVIRUHDFKGLVSHQVHU
'HSHQGLQJRQWKHPRGHO

HQ ,QWHOOLJHQWGRVLQJV\VWHP
&KHFNZKHWKHUWKHSUHVHWEDVLF
GRVDJHVIROORZWKHPDQXIDFWXUHUV
UHFRPPHQGDWLRQVLQWHUPVRI
■ $ORDGRIDSSUR[LWHPVRIFORWKLQJ
■ )RUOLTXLGGHWHUJHQW²WKH QRUPDO
GHJUHHRIVRLOLQJDQGWKHUHOHYDQW
ZDWHUKDUGQHVV
■ )RUIDEULFVRIWHQHU²WKH PHGLXP
VRIWQHVV
5HIHUWRWKHSDFNDJLQJODEHORQ\RXU
OLTXLG GHWHUJHQWIDEULF VRIWHQHU RU DVN WKH
PDQXIDFWXUHUGLUHFWO\IRUWKLVLQIRUPDWLRQ
,IQHFHVVDU\DGMXVWWKHEDVLFGRVDJHVWR
WKHUHFRPPHQGHGORDGIRUWKHOLTXLG
GHWHUJHQWFDUH SURGXFW \RX DUH XVLQJ WKH
ZDWHUKDUGQHVVDQGRUWKHGHJUHHRI
VRLOLQJ
$GMXVWLQJWKHEDVLFGRVDJH
1. 3UHVVDQGKROG ý L'RV åDQGRU
þ L'RV MåIRUDSSUR[VHFRQGV
7KHEDVLFGRVDJHVHWWLQJZLOOEH
GLVSOD\HG
2. &KDQJHWKHVHWWLQJXVLQJ ˜~
3. 7RH[LWVHWWLQJPRGHSUHVVDQGKROG
ý L'RV åDQGRU þ L'RV MåIRU
DSSUR[VHFRQGVRUZDLWDSSUR[
VHFRQGV
1RWHV
■ 7KHFKDQJHVDUHDSSOLHGWRDOO
SURJUDPPHVLQZKLFKGRVLQJLV
SRVVLEOH
■ 7KHFKDQJHVDUHVDYHGXQWLOWKHQH[W
WLPHWKH\DUHFKDQJHGDQGDUH
UHWDLQHGHYHQDIWHUWKHDSSOLDQFHKDV
EHHQVZLWFKHGRII
)LOOLQJWKHGLVSHQVHUV
1RWHV
■ 6HHWKHLQVWUXFWLRQVLQFKDSWHU
~ %HIRUHVHWWLQJXSL'26
RQ SDJH
■ ,I åRU ©IODVKHVILOOWKHUHOHYDQW
GLVSHQVHU ~ 3DJH
)LOOWKHGLVSHQVHUVDVIROORZV
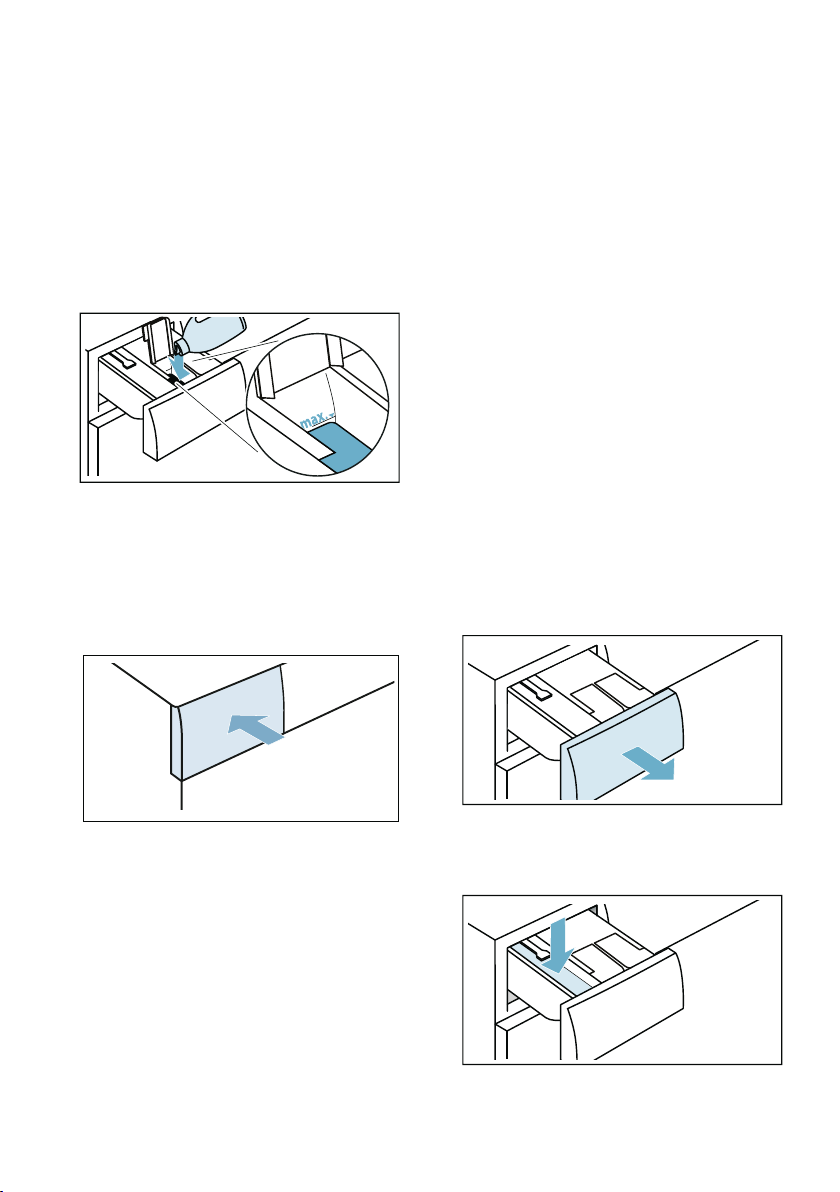
1. 3XOORXWWKHGHWHUJHQWGUDZHU
2. 2SHQWKHGLVSHQVHUOLGV
,QWHOOLJHQWGRVLQJV\VWHP HQ
3. 3RXUOLTXLGGHWHUJHQWDQGIDEULF
VRIWHQHULQWRWKHUHOHYDQWGLVSHQVHUV
1RWHV
² 'RQRWILOOWKHGLVSHQVHUVDERYH
WKH PD[PDUN
² )ROORZWKHLQVWUXFWLRQVLQFKDSWHUV
~ L'266HWWLQJWKHGRVDJH
RQ SDJH DQG ~ L'266HWWLQJ
WKHFRQWHQWRIWKH ©åGLVSHQVHU
RQ SDJH
4. &ORVHWKHGLVSHQVHUOLGV
1RWH 7RSUHYHQWWKHGHWHUJHQW
GU\LQJRXWRUGU\LQJXSGRQRWOHDYH
WKHGLVSHQVHUOLGVRSHQIRUDORQJ
SHULRGRIWLPH
5. 3XVKLQWKHGHWHUJHQWGUDZHU
1RWH :KHQUHILOOLQJWKHGLVSHQVHUV
DOZD\VXVHWKHVDPHW\SHRIOLTXLG
GHWHUJHQWRUIDEULFVRIWHQHU
'RQRWPL[GLIIHUHQWW\SHVRIOLTXLG
GHWHUJHQWRUIDEULFVRIWHQHUDVWKLVFDQ
IRUPOXPSVWKDWPD\EORFNWKHL'26
SXPSXQLW
,I \RX VZLWFK WR D GLIIHUHQW OLTXLG GHWHUJHQW
RUIDEULFVRIWHQHUW\SHPDQXIDFWXUHU
HWFHPSW\WKHUHOHYDQWGLVSHQVHU
FRPSOHWHO\DQGFOHDQLWEHIRUHKDQG
~ 3DJH
0DQXDOGRVLQJ
)RUSURJUDPPHVLQZKLFKDXWRPDWLF
GRVLQJLVQRWSRVVLEOHRUGHVLUDEOHRULQ
ZKLFKLWKDVEHHQGHDFWLYDWHG\RXZLOO
QHHGWRDGGGHWHUJHQWWRWKHPDQXDO
GRVLQJFRPSDUWPHQW
7KHGHWHUJHQWDQGRUFDUHSURGXFWLQWKLV
FRPSDUWPHQWLVGLVSHQVHGZKHQWKH
ZDVKF\FOHVWDUWV'RQRWDGGIDEULF
VRIWHQHU RU DQ\ RWKHU SURGXFWV WKDW VKRXOG
QRWEHXVHGXQWLOODWHULQWKHZDVKF\FOH
HJGXULQJULQVLQJ
1RWH 3URJUDPPHVZLWKSUHZDVK
:KHQDXWRPDWLFGRVLQJLVGHDFWLYDWHG
SODFH WKH GHWHUJHQW IRU WKH SUHZDVK LQ WKH
GUXP3RXUZDVKLQJSRZGHUIRUWKHPDLQ
ZDVKLQWRWKHPDQXDOGRVLQJ
FRPSDUWPHQW
'RVLQJDQGDGGLQJGHWHUJHQW
1RWH )LQGRXWWKHRSWLPXPGRVDJHIRU
GHWHUJHQWDQGFDUHSURGXFW
1. 3XOORXWWKHGHWHUJHQWGUDZHU
2. 3RXUODXQGU\GHWHUJHQWDQGRUFDUH
SURGXFWLQWRWKHPDQXDOGRVLQJ
FRPSDUWPHQW
'HSHQGLQJRQWKHPRGHO
HQ ,QWHOOLJHQWGRVLQJV\VWHP
3. 3XVKLQWKHGHWHUJHQWGUDZHU
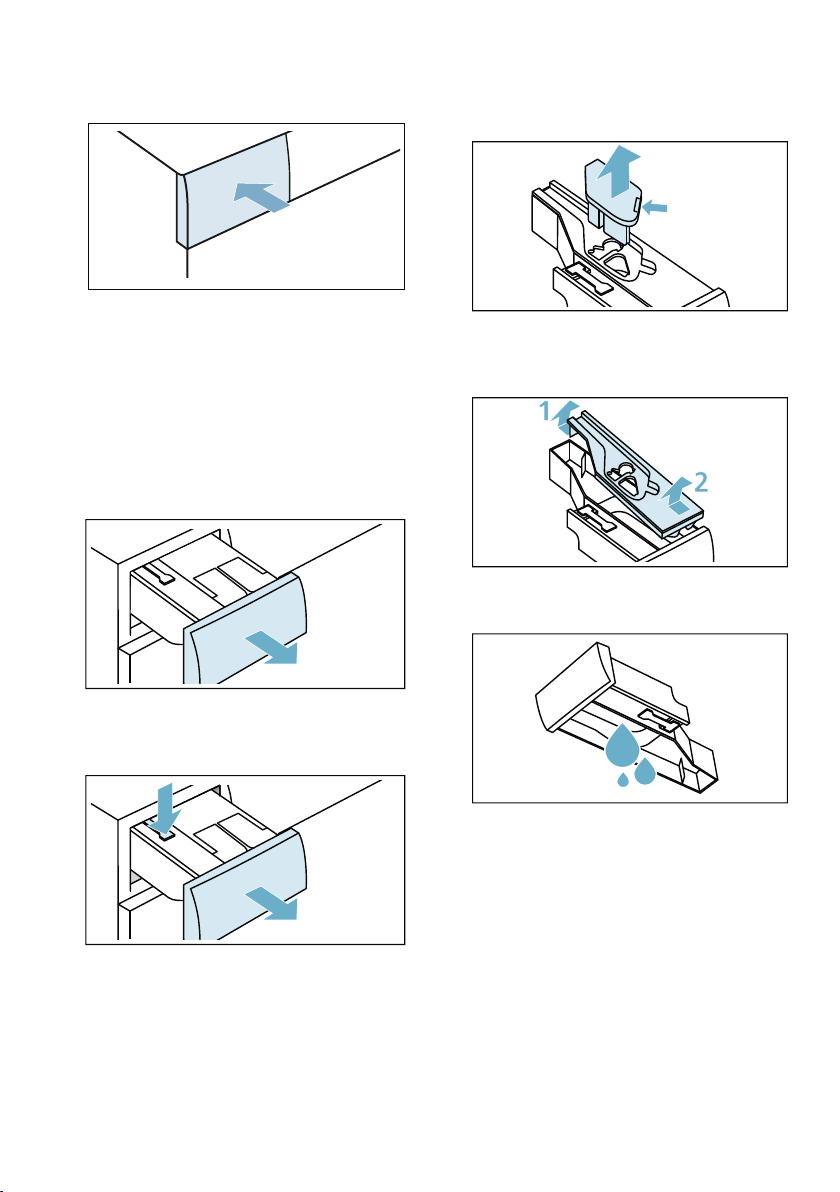
(PSW\LQJ WKH L'26 GHWHUJHQW
GUDZHUFOHDQLQJWKHL'26
GHWHUJHQWGUDZHUDQGLWV
KRXVLQJFOHDQLQJWKHL'26
SXPSXQLW
1. 6ZLWFKRIIWKHDSSOLDQFH
2. 3XOORXWWKHGHWHUJHQWGUDZHU
3. 3UHVV GRZQ WKH LQVHUW DQG UHPRYH WKH
GUDZHUFRPSOHWHO\
4. 3UHVVWKHSXPSXQLWLQVHUWDQG
UHPRYHLW
5. 8QFOLSWKHUHDUGHWHUJHQWGUDZHUOLG
DQGUHPRYHLW
6. (PSW\WKHGHWHUJHQWGUDZHU
,QWHOOLJHQWGRVLQJV\VWHP HQ
7. &OHDQWKHSXPSXQLWZLWKDGDPS
FORWK
&DXWLRQ
7KHSXPSXQLWFRQWDLQVHOHFWULFDO
FRPSRQHQWV7KHVHPD\EHGDPDJHG
LIWKH\FRPHLQWRFRQWDFWZLWKZDWHU
² 'RQRWFOHDQWKHSXPSXQLWLQWKH
GLVKZDVKHUDQGGRQRWLPPHUVHLW
LQZDWHU
² 3URWHFWWKHUHDUSOXJDJDLQVW
ZDWHUGHWHUJHQWDQGIDEULF
VRIWHQHUUHVLGXH
8. &OHDQWKHGUDZHULQVLGHVXUIDFHDQG
OLGVZLWKDVRIWGDPSFORWKRUDKDQG
VKRZHU
9. 'U\WKHGUDZHUOLGVDQGSXPSXQLW
DQGSXWWKHPEDFNWRJHWKHU
10. &OHDQWKHLQVLGHRIWKHGHWHUJHQW
GUDZHUKRXVLQJ
11. 3XVKLQWKHGHWHUJHQWGUDZHU

HQ $SSOLDQFHVHWWLQJV
Q$SSOLDQFHVHWWLQJV
$SSOLDQFHVHWWLQJV
<RXFDQFKDQJHWKHIROORZLQJVHWWLQJVLQ
WKHFRQWURODQGGLVSOD\SDQHO
■ 7KHYROXPHRIWKHLQIRUPDWLRQVLJQDO
HJDWWKHHQGRIWKHSURJUDPPH
■ 7KHYROXPHRIWKHRSHUDWLQJVLJQDOV
■ 7KHEULJKWQHVVRIWKHWRXFKGLVSOD\
■ 6ZLWFKLQJWKHGUXPFDUHLQIRUPDWLRQ
RQRII
<RX ZLOO QHHG WR DFWLYDWH WKH VHWWLQJ PRGH
LQRUGHUWRFKDQJHWKHVHVHWWLQJV
$FWLYDWLQJWKHVHWWLQJPRGH
1. 6ZLWFKRQWKHDSSOLDQFH7KHVHWWLQJV
IRUWKHFXUUHQWSURJUDPPHDUH
GLVSOD\HG
2. 7RXFKWKH 淐憀6HWWLQJEXWWRQ
7KHVHWWLQJPRGHLVDFWLYDWHGDQGWKH
GLVSOD\V IRU WKH LQIRUPDWLRQ VLJQDOV U DQG
WKHSUHVHWYROXPHOLJKWXS
<RXFDQQRZFKDQJHWKHVHWWLQJV
&KDQJLQJWKHVLJQDOYROXPH
7RGRWKLVWRXFK ˜ RU ~RQWKHWRXFK
GLVSOD\XQWLOWKHUHTXLUHGDGMXVWPHQW
YDOXHIRUWKHYROXPHRIWKH LQIRUPDWLRQ
VLJQDOVDSSHDUV
$GMXVWPHQWYDOXHV
([LWVHWWLQJPRGHRU
7RXFK 淐憀6HWWLQJEXWWRQDJDLQ7KH
GLVSOD\IRUWKH RSHUDWLQJVLJQDOV CDQG
WKHSUHVHWYROXPHOLJKWXS
7RXFK ˜ RU ~WRFKDQJHWKHDGMXVWPHQW
YDOXHDVDERYH
([LWVHWWLQJPRGHRU
&KDQJLQJWKHEULJKWQHVVRI
WKHGLVSOD\SDQHO
7RXFK 淐憀6HWWLQJEXWWRQDJDLQ7KH
GLVSOD\IRUWKHWRXFKGLVSOD\VEULJKWQHVV
BDQGWKHSUHVHWEULJKWQHVVOLJKWXS
&KDQJH WKH DGMXVWPHQW YDOXH E\ WRXFKLQJ
˜ RU ~
$GMXVWPHQWYDOXHV
([LWVHWWLQJPRGHRU
6ZLWFKLQJWKHGUXPFDUH
LQIRUPDWLRQVLJQDORQRII
7RXFK 淐憀6HWWLQJEXWWRQDJDLQ7KH
GLVSOD\IRUVZLWFKLQJWKHGUXPFDUH
LQIRUPDWLRQRQRII ÛOLJKWVXS
7RXFK ˜ RU ~WRVZLWFKRQRUVZLWFKRII
WKHGUXPFDUHLQIRUPDWLRQ
$GMXVWPHQWYDOXHV
([LWLQJVHWWLQJPRGH
7RH[LWDQGVDYHWKHVHWWLQJV
■ :DLWIRUDSSUR[VHFRQGVRU
■ 6ZLWFK RII WKH DSSOLDQFH 7KH VHOHFWHG
VHWWLQJVZLOOWDNHHIIHFWWKHQH[WWLPH
WKHDSSOLDQFHLVVZLWFKHGRQ
RII
TXLHW
0HGLXP
ORXG
YHU\ORXG
1RWYHU\EULJKW
1RUPDOOHYHORI
EULJKWQHVV
%ULJKW
9HU\EULJKW
©Ÿ 6ZLWFKRQ
©”” 6ZLWFKRII

6HQVRUV HQ
H 6HQVRUV
6HQVRUV
8QEDODQFHGORDGGHWHFWLRQ
V\VWHP
7KH DXWRPDWLF XQEDODQFHG ORDG GHWHFWLRQ
V\VWHPGHWHFWVLPEDODQFHVDQGHQVXUHV
HYHQGLVWULEXWLRQRIWKHODXQGU\E\
UHSHDWHGO\VWDUWLQJDQGVWRSSLQJGUXP
VSLQQLQJ
,IWKHODXQGU\LVH[WUHPHO\XQHYHQO\
GLVWULEXWHGWKHVSLQVSHHGLVUHGXFHGRU
WKHVSLQF\FOHLVQRWSHUIRUPHGIRUVDIHW\
UHDVRQV
1RWH 3ODFHODUJHDQGVPDOOLWHPVRI
ODXQGU\HYHQO\LQWKHGUXP
$TXD6HQVRUV
'HSHQGLQJRQWKHSURJUDPPHDQGPRGHO
'XULQJDULQVHF\FOHWKH$TXDVHQVRU
FKHFNVWKHWXUELGLW\RIWKHULQVLQJZDWHU
WXUELGLW\LVFDXVHGE\GLUWDQGGHWHUJHQW
UHVLGXH 7KH GXUDWLRQ DQG WKH QXPEHU RI
ULQVH F\FOHV GHSHQG RQ WKH WXUELGLW\ RI WKH
ZDWHU
2 &OHDQLQJDQG
PDLQWHQDQFH
&OHDQLQJDQGPDLQWHQDQFH
::DUQLQJ
5LVNRIGHDWK
7KHUHLVDULVNRIHOHFWULFVKRFNLIWRXFK
OLYHFRPSRQHQWV
3UHVVWKHEXWWRQ #DQGSXOORXWWKH
PDLQVSOXJ
&DXWLRQ
)LUHDQGH[SORVLRQKD]DUG
7R[LFYDSRXUVFDQEHSURGXFHGE\
FOHDQLQJDJHQWVWKDWFRQWDLQVROYHQWV
HJFOHDQLQJVROYHQW
'RQRWXVHFOHDQLQJDJHQWVWKDWFRQWDLQ
VROYHQWV
&DXWLRQ
7KHDSSOLDQFHPD\EHGDPDJHG
&OHDQLQJDJHQWVWKDWFRQWDLQVROYHQWV
HJFOHDQLQJVROYHQWFDQGDPDJH
VXUIDFHVDQGFRPSRQHQWVLQWKH
DSSOLDQFH
'RQRWXVHFOHDQLQJDJHQWVWKDWFRQWDLQ
VROYHQWV
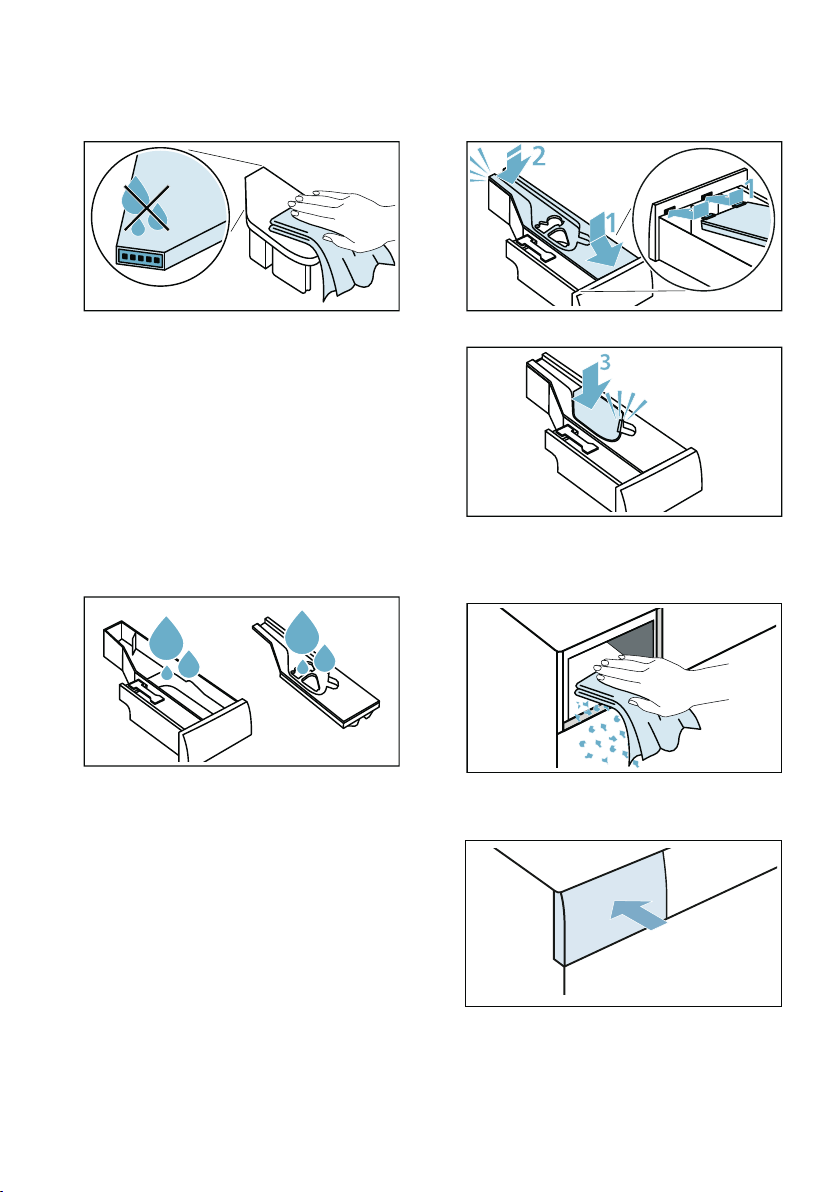
$SSOLDQFHKRXVLQJFRQWURO
SDQHO
■ 5HPRYHWKHGHWHUJHQWUHVLGXH
LPPHGLDWHO\
■ :LSHWKHKRXVLQJDQGWKHFRQWURO
SDQHOZLWKDVRIWGDPSFORWK
■ 'RQRWXVHDEUDVLYHFORWKVVSRQJHV
RU GHWHUJHQWV VWDLQOHVV VWHHO FOHDQHU
■ 'RQRWFOHDQWKHDSSOLDQFHZLWKD
ZDWHUMHW
HQ &OHDQLQJDQGPDLQWHQDQFH
'UXP
8VH FKORULQHIUHH FOHDQLQJ DJHQWV GR QRW
XVHVWHHOZRRO
,IWKHUHDUHRGRXUVLQWKHDSSOLDQFHRUWR
FOHDQWKHGUXPUXQWKH 'UXP&OHDQ
&SURJUDPPHZLWKRXWODXQGU\
'HVFDOLQJ
'HVFDOLQJVKRXOGQRWEHQHFHVVDU\LIWKH
GHWHUJHQWLVPHDVXUHGRXWFRUUHFWO\
+RZHYHULILWLVUHTXLUHGIROORZWKH
PDQXIDFWXUHUVLQVWUXFWLRQVIRUWKH
GHVFDOLQJDJHQW6XLWDEOHGHVFDOHUVFDQ
EHREWDLQHGYLDRXUZHEVLWHRUIURP
FXVWRPHUVHUYLFHV
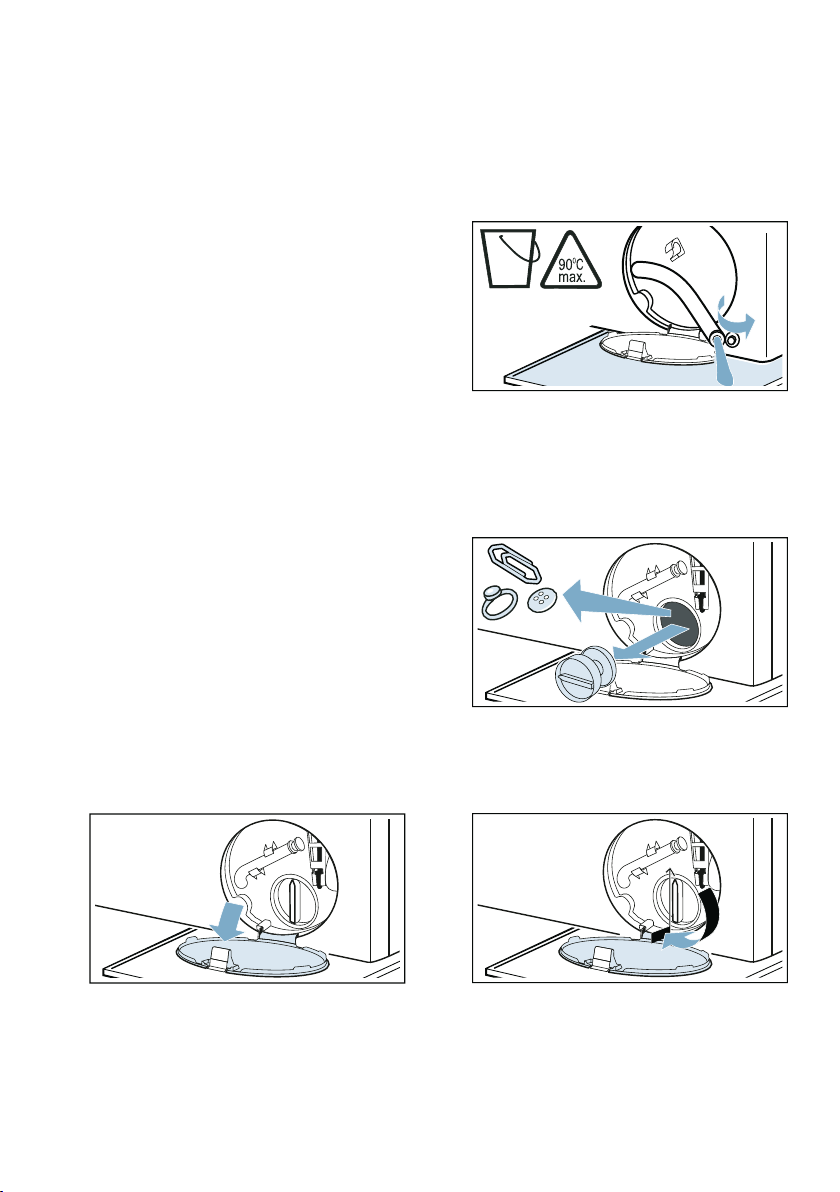
'UDLQSXPSLVEORFNHG
1RWH 7XUQWKHZDWHUWDSRIIWRSUHYHQW
PRUH ZDWHU IURP IORZLQJ LQ DQG WR HQVXUH
WKDWLWLVGUDLQHGYLDWKHSXPS
::DUQLQJ
5LVNRIVFDOGLQJ
:KHQ \RX ZDVK DW KLJK WHPSHUDWXUHV WKH
ZDWHUJHWVYHU\KRW,I\RXFRPHLQWR
FRQWDFWZLWKWKHKRWZDWHU\RXPD\EH
VFDOGHG
$OORZWKHZDWHUWRFRROGRZQILUVW
1. 3UHVVWKH #EXWWRQ3XOORXWWKH
PDLQVSOXJ
2. 2SHQWKHVHUYLFHIODS
3. 7DNHWKHGUDLQKRVHRXWRIWKH
UHWDLQHU
5HPRYH WKH VHDOLQJ FDS DQG SRXU WKH
ZDWHURXWLQWRDVXLWDEOHFRQWDLQHU
5HSODFH WKH VHDOLQJ FDS DQG SODFH WKH
GUDLQKRVHEDFNLQWKHUHWDLQHU
4. &DUHIXOO\XQVFUHZWKHSXPSFRYHU
UHVLGXDOZDWHUPD\OHDNRXW
&OHDQWKHLQWHULRUSXPSFRYHUWKUHDG
DQG SXPS KRXVLQJ 7KH LPSHOOHU LQ WKH
GUDLQSXPSPXVWEHDEOHWRURWDWH
5. 5HILWDQGVFUHZRQWKHSXPSFRYHU
7KHKDQGOHPXVWEHLQDYHUWLFDO
SRVLWLRQ
&OHDQLQJDQGPDLQWHQDQFH HQ
6. &ORVHWKHVHUYLFHIODS
1RWH 7R SUHYHQW XQXVHG GHWHUJHQW IURP
IORZLQJVWUDLJKWLQWRWKHGUDLQGXULQJWKH
QH[WZDVK3RXUOLWUHRIZDWHULQWR
PDQXDO GRVLQJ FRPSDUWPHQW DQG VWDUW WKH
6SLQSURJUDPPH
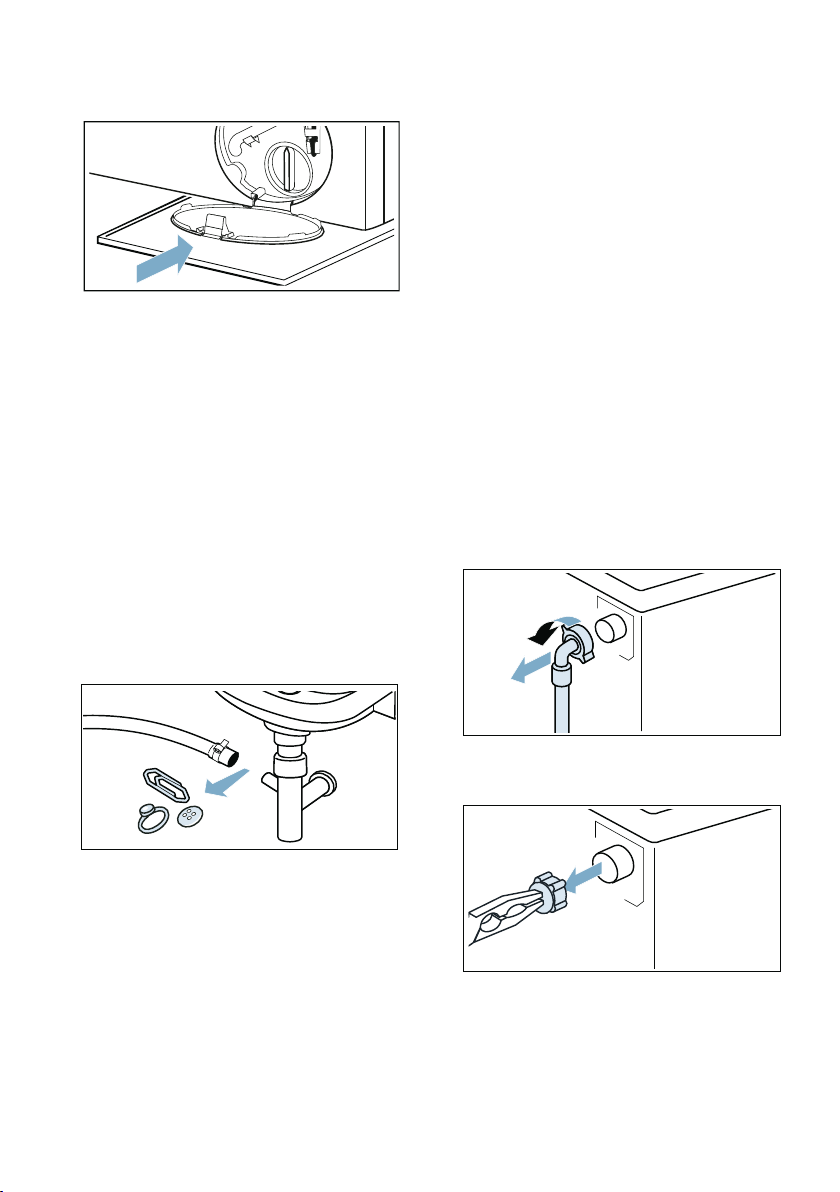
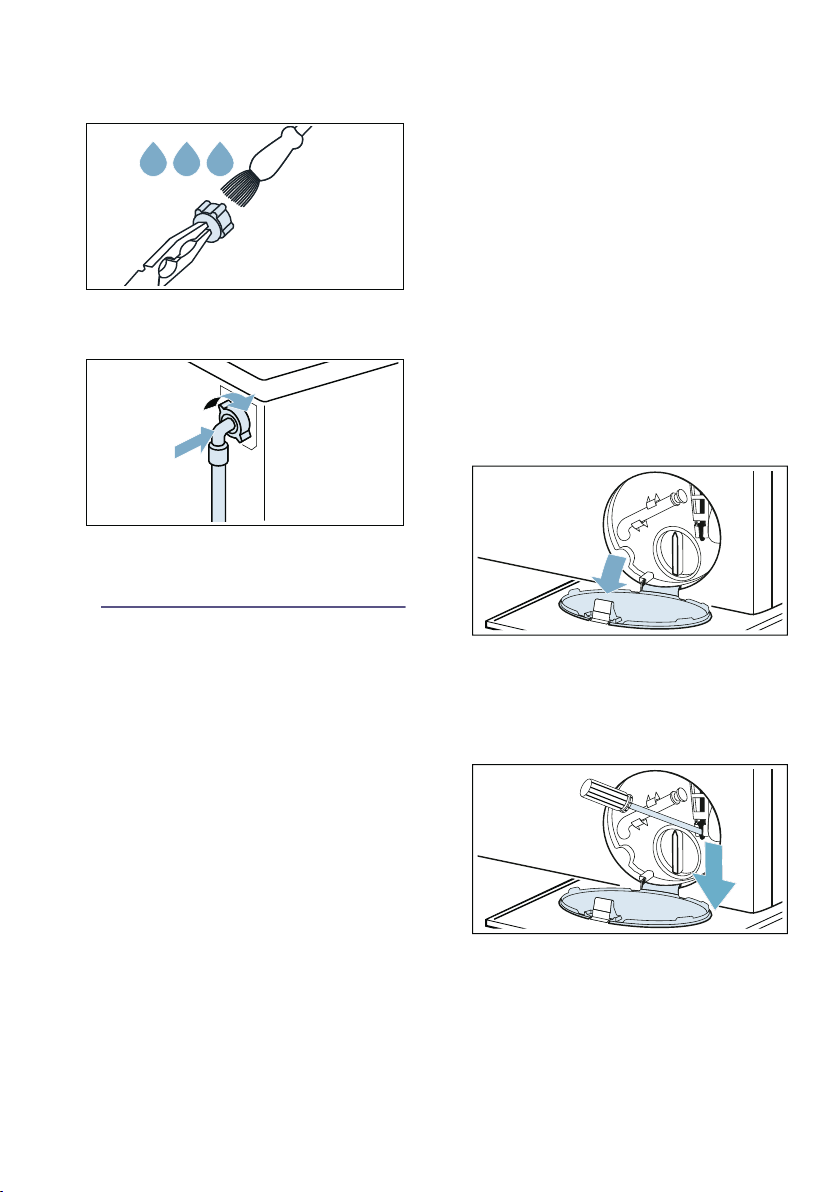
7KHGUDLQKRVHDWWKHVLSKRQ
LVEORFNHG
1. 3UHVVWKH #EXWWRQ3XOORXWWKH
PDLQVSOXJ
2. /RRVHQWKHKRVHFODPS&DUHIXOO\
UHPRYH WKH GUDLQ KRVH UHVLGXDO ZDWHU
PD\OHDNRXW
3. &OHDQWKHGUDLQKRVHDQGVLSKRQ
FRQQHFWLQJSLHFH
4. 5HDWWDFKWKHGUDLQKRVHDQGVHFXUH
WKHFRQQHFWLRQSRLQWXVLQJWKHKRVH
FODPS
)LOWHULQWKHZDWHUVXSSO\LV
EORFNHG
5HOHDVHZDWHUSUHVVXUHLQWKHVXSSO\
KRVH
1. 7XUQRIIWKHZDWHUWDS
2. 6HOHFWWKH &RWWRQVDFWLYDWH 䗢爱
6SHHG3HUIHFWVHWWLQJSURJUDPPH
1RWH ,I\RXUDSSOLDQFHZLWK
LQWHOOLJHQWGRVLQJV\VWHP
\RXDOVR
QHHGWRGHDFWLYDWHWKHLQWHOOLJHQW
GRVLQJV\VWHP
3. 6HOHFWWKH AEXWWRQ$OORZWKH
SURJUDPPHWRUXQIRUDSSUR[
VHFRQGV
4. 3UHVVWKHEXWWRQ #
5. 3XOORXWWKHPDLQVSOXJ
&OHDQWKHILOWHUV
1. 'LVFRQQHFWWKHKRVHIURPWKHUHDURI
WKHDSSOLDQFH
2. 8VHSOLHUVWRUHPRYHWKHILOWHU
'HSHQGLQJRQWKHPRGXOH
HQ )DXOWVDQGZKDWWRGRDERXWWKHP
3. &OHDQWKHILOWHUZLWKDVPDOOEUXVK
4. &RQQHFW WKH KRVH DQG FKHFN IRU OHDNV
3)DXOWVDQGZKDWWRGR
DERXWWKHP
)DXOWVDQGZKDWWRGRDERXWWKHP
(PHUJHQF\UHOHDVH
(JSRZHURXWDJHRULQWKHHYHQWRID
ORVVRISRZHU
7KHSURJUDPPHFRQWLQXHVZKHQWKH
SRZHUVXSSO\LVUHVWRUHG
+RZHYHULIWKHODXQGU\KDVWREH
UHPRYHGWKHDSSOLDQFHGRRUFDQEH
RSHQHGDVIROORZV
::DUQLQJ
5LVNRIVFDOGLQJ
:KHQ\RXDUHZDVKLQJDWKLJK
WHPSHUDWXUHV WKHUH LV D ULVN RI VFDOGLQJ LI
\RX FRPH LQWR FRQWDFW ZLWK KRW ZDWHU DQG
ODXQGU\
,ISRVVLEOHOHDYHLWWRFRROGRZQILUVW
::DUQLQJ
5LVNRILQMXU\
5HDFKLQJLQWRWKHGUXPZKLOHLWLVVWLOO
WXUQLQJPD\FDXVHKDQGLQMXULHV
'RQRWUHDFKLQWRWKHGUXPZKHQLWLV
WXUQLQJ
:DLWXQWLOWKHGUXPKDVVWRSSHGWXUQLQJ
&DXWLRQ
:DWHUGDPDJH
$Q\HVFDSLQJZDWHUPD\FDXVHZDWHU
GDPDJH
'RQRWRSHQWKHGRRULIZDWHUFDQEH
VHHQWKURXJKWKHJODVV
1. 3UHVVWKH #EXWWRQ3XOORXWWKH
PDLQVSOXJ
2. 2SHQWKHVHUYLFHIODS
3. 'UDLQWKHZDWHU ~ 3DJH
4. 3XOOWKHHPHUJHQF\UHOHDVH
GRZQZDUGVZLWKDWRRODQGUHOHDVH
7KHGRRUFDQWKHQEHRSHQHG

)DXOWVDQGZKDWWRGRDERXWWKHP HQ
,QIRUPDWLRQRQWKHGLVSOD\SDQHO
'LVSOD\ &DXVH5HPHG\
Õ ■ )ODVKHVIDVWVLJQDO7KHGRRUZDVRSHQHGDQGWKHZDWHU
OHYHOLVWRRKLJK&ORVHWKHGRRUFRQWLQXHWKHSURJUDPPHZLWK
AEXWWRQRUVHOHFW 6SLQ
■ )ODVKHV VORZO\ 7KH GRRU ORFN WHPSHUDWXUH LV WRR KLJK WR RSHQ
WKHGRRU:DLWDSSUR[VHFRQGVXQWLOWKHGRRUORFNWHPSHUD
WXUHFRROVGRZQ
r ■ )ODVKHVQRZDWHUVXSSO\:DWHUWDSWXUQHGRQ")LOWHULQWKH
ZDWHUVXSSO\LVEORFNHG"
~ )LOWHULQWKHZDWHUVXSSO\LVEORFNHGRQ SDJH
,I DQ DGGLWLRQDO ZDWHU ILOWHU KDV EHHQ LQVWDOOHG GHSHQGLQJ RQ WKH
PRGHOFKHFNIRUFRQWDPLQDQWVDQGFOHDQLIUHTXLUHG ~VHSD
UDWHLQVWDOODWLRQDQGFOHDQLQJLQVWUXFWLRQIRUZDWHUILOWHU
,VWKHVXSSO\KRVHNLQNHGRUWUDSSHG"
■ /LJKWVXS ORZZDWHUSUHVVXUH)RULQIRUPDWLRQRQO\7KLVZLOO
QRW DIIHFW WKH SURJUDPPH SURJUHVV 7KH SURJUDPPH GXUDWLRQ LV
H[WHQGHG
E寤OLJKWVXS 7KHFKLOGSURRIORFNLVDFWLYDWHG²GHDFWLYDWHLW
7KHV\PERO Û
IODVKHV
5XQWKH 'UXP&OHDQ SURJUDPPHWRFOHDQDQGFDUHIRUWKHGUXP
DQGWKHRXWHUWXE
1RWHV
■ 5XQWKHSURJUDPPHZLWKRXWODXQGU\
■ 8VHZDVKLQJSRZGHURUDGHWHUJHQWFRQWDLQLQJEOHDFK7RSUH
YHQWIRDPLQJRQO\XVHKDOIWKHDPRXQWRIGHWHUJHQWUHFRP
PHQGHGE\WKHGHWHUJHQWPDQXIDFWXUHU'RQRWXVHGHWHUJHQW
GHVLJQHGIRUZRROOHQVRUGHOLFDWHV
■ 6ZLWFKLQJWKHGUXPFDUHLQIRUPDWLRQVLJQDORQRII~ 3DJH
ÅOLJKWVXS 7RRPXFKIRDPKDVEHHQGHWHFWHGDQGDQDGGLWLRQDOZDVKF\FOH
KDVEHHQDFWLYDWHG$GGOHVVGHWHUJHQWWRWKHQH[WZDVKLQJF\FOH
ZLWKWKHVDPHORDG
ùOLJKWVXS 2QO\IRUSURJUDPPHVZLWKDXWRPDWLFGRVLQJDFWLYDWHG
■ 7KHGHWHUJHQWGUDZHUKDVQRWEHHQSXVKHGLQIXOO\3XVKWKH
GHWHUJHQWGUDZHULQIXOO\
■ 7KHSXPSXQLWLVQRWLQVHUWHG,QVHUWWKHSXPSXQLWLQWRWKH
GUDZHUOLG
å RU © LV IODVKLQJ 7KHUHLVQRWHQRXJKGHWHUJHQWVRIWHQHULQWKH åRU ©GLVSHQVHU
$GGPRUHGHWHUJHQWVRIWHQHULQWRWKHUHOHYDQWGLVSHQVHU
(
DOWHUQDWLQJZLWK
RU
7KHSXPSXQLWRIWKHDXWRPDWLFGRVLQJV\VWHPLVEORFNHG3UHVV
WKHEXWWRQ #WLOOWKHLQGLFDWRUODPSWXUQVRII&OHDQWKHSXPSXQLW
,I WKLV LQGLFDWRUV\PEROFRGH DSSHDUV DJDLQ FDOO RXU DIWHUVDOHV VHU
YLFH

HQ )DXOWVDQGZKDWWRGRDERXWWKHP
)DXOWVDQGZKDWWRGRDERXWWKHP
(
DOWHUQDWLQJZLWK
■ 'UDLQSLSHRUZDWHUGUDLQKRVHLVEORFNHG&OHDQWKHGUDLQSLSH
DQGWKHZDWHURXWOHWKRVH
■ 'UDLQSLSHRUZDWHUGUDLQKRVHLVFDXJKWRUMDPPHG(QVXUH
WKDWWKHGUDLQSLSHDQGZDWHUGUDLQKRVHDUHQRWNLQNHGRU
WUDSSHG
■ 7KHGUDLQSXPSLVEORFNHG
~ 'UDLQSXPSLVEORFNHGRQ SDJH
■ 7KHGUDLQKRVHDWWKHVLSKRQLVEORFNHG
~ 7KHGUDLQKRVHDWWKHVLSKRQLVEORFNHGRQ SDJH
■ 7KHZDWHUGUDLQKRVHLVFRQQHFWHGWRRKLJK,QVWDOOWKHZDWHU
RXWOHWKRVHDWDPD[LPXPKHLJKWRIPHWHU
(
DOWHUQDWLQJZLWK
6XLWDEOHIRU
VSHFLDOPRGHOV
7KHUH LV ZDWHU LQ WKH EDVH WURXJK WKH DSSOLDQFH LV OHDNLQJ 7XUQ RII
WKHWDS&DOOFXVWRPHUVHUYLFHV
2WKHUGLVSOD\V 3UHVV WKH EXWWRQ # WLOO WKH LQGLFDWRU ODPS WXUQV RII ZDLW IRU ILYH VHF
RQGVDQGWKHQVZLWFKLWRQDJDLQ,IWKHGLVSOD\DSSHDUVDJDLQFDOO
FXVWRPHUVHUYLFHV
)DXOWV &DXVH5HPHG\
:DWHU LV OHDNLQJ IURP
WKHDSSOLDQFH
■ $WWDFKWKHGUDLQKRVHFRUUHFWO\RUUHSODFHLW
■ 7LJKWHQWKHVFUHZILWWLQJRQWKHVXSSO\KRVH
7KHGRRUFDQQRWEH
RSHQHG
■ 7KHWHPSHUDWXUHLQGUXPLVWRRKLJKWRRSHQWKHGRRU
■ 7KHVDIHW\IXQFWLRQLVDFWLYDWHG6WRSWKHSURJUDPPH"
■ 7KHZDWHUOHYHOLQGUXPLVWRRKLJK
■ &DQWKHGRRURQO\EHRSHQHGE\WKHHPHUJHQF\UHOHDVH"
~ (PHUJHQF\UHOHDVHRQ SDJH
7KHDSSOLDQFHLVQRW
ILOOLQJZLWKZDWHU
■ 3URJUDPPHGRHVQRWVWDUW"
■ ,VWKHWDSWXUQHGRQ"
■ &RXOGWKHILOWHULQWKHZDWHUVXSSO\EHEORFNHG"
~ )LOWHULQWKHZDWHUVXSSO\LVEORFNHGRQ SDJH
1RWH ,IDQDGGLWLRQDOZDWHUILOWHUKDVEHHQLQVWDOOHG
GHSHQGLQJ RQ WKH PRGHO FKHFN IRU FRQWDPLQDQWV DQG FOHDQ
LIUHTXLUHG ~VHSDUDWHLQVWDOODWLRQDQGFOHDQLQJLQVWUXFWLRQ
IRUZDWHUILOWHU
■ ,VWKHVXSSO\KRVHNLQNHGRUWUDSSHG"
'LVSOD\ &DXVH5HPHG\

)DXOWVDQGZKDWWRGRDERXWWKHP HQ
'HWHUJHQWIDEULFVRI
WHQHULVQRWEHLQJ
GLVSHQVHG
■ ,VWKHDSSOLDQFHILOOHGZLWKZDWHU"
■ ,VGHWHUJHQWIDEULFVRIWHQHUFRQJHDOHGLQWKHGLVSHQVHUV"
■ ,VWKHL'26SXPSXQLWEORFNHG"(PSW\LQJWKHGLV
SHQVHUVSRXUDERXW&ZDWHULQWRWKHGLVSHQVHUV'R
QRW ILOO WKH GLVSHQVHUV DERYH WKH PD[ PDUN DQG VRDNLQJ IRU
DERXWKRXUWKHQHPSW\WKHGLVSHQVHUVDQGSRXUGHWHU
JHQWIDEULFVRIWHQHUDJDLQ
,I \RX FDQQRW UHFWLI\ WKH IDXOW \RXUVHOI SOHDVH FDOO FXVWRPHU VHU
YLFHV
7KHSURJUDPPHZLOO
QRWVWDUW
■ +DYH\RXWRXFKHGWKH AEXWWRQRUVHOHFWHG )LQLVKLQ
WLPH"
■ ,VWKHGRRUFORVHG"
■ &KLOGSURRIORFNDFWLYDWHG"'HDFWLYDWHFKLOGSURRIORFN
■ 6KRSPRGHDFWLYDWHG",IWKHGLVSOD\VKRZV àœ©˜IRU V
DIWHU\RXKDYHVZLWFKHGRQRURIIWKHDSSOLDQFHWKHDSSOL
DQFHLVLQVKRSPRGH7XUQRIIWKHVKRSPRGHDVIROORZV
1. 6ZLWFKWKHDSSOLDQFHRIIDQGRQDJDLQ
2. :DLWIRUWKHGLVSOD\PHVVDJH àœ©˜WRGLVDSSHDU
3. 7RXFKDQGKROG AIRUDWOHDVW V
7KH GLVSOD\ VKRZV ©”” DQG WKH DSSOLDQFH ZLOO DXWRPDWLFDOO\
VZLWFKRII<RXFDQXVHWKHDSSOLDQFHQRZDVXVXDO
7KHSURJUDPPHKDV
VWDUWHG DQG WKH GUXP
LVURWDWLQJEXWWKH
GUXPLVQRWILOOLQJ
ZLWKZDWHU
1RW D IDXOW ² 6RPH SURJUDPPH VSHFLILFDOO\ GHWHFW DQG ZHLJK WKH
ORDGDIWHUWKHSURJUDPPHKDVVWDUWHGLQRUGHUWRFDOFXODWHWKH
RSWLPXPDPRXQWRIZDWHUIRUZDVKLQJ7KHGUXPZLOOWKHQVWDUW
ILOOLQJZLWKZDWHU
A EXWWRQ FDQQRW EH
RSHUDWHG
ùLVFRQWLQXRXVO\OLW7KHGHWHUJHQWGUDZHUKDVQRWEHHQ
SXVKHGLQIXOO\3XVKWKHGHWHUJHQWGUDZHULQIXOO\
7KHZDWHULVQRW
GUDLQLQJ
■ 'UDLQSLSHRUZDWHUGUDLQKRVHLVEORFNHG&OHDQWKHGUDLQ
SLSHDQGWKHZDWHUGUDLQKRVH
■ 'UDLQ SLSH RU ZDWHU GUDLQ KRVH LV FDXJKW RU MDPPHG (QVXUH
WKDWWKHGUDLQSLSHDQGWKHZDWHUGUDLQKRVHDUHQRWNLQNHG
RUWUDSSHG
■ &RXOGWKHGUDLQSXPSEHEORFNHG"
~ 'UDLQSXPSLVEORFNHGRQ SDJH
■ &RXOGWKHGUDLQKRVHDWWKHVLSKRQEHEORFNHG"
~ 7KHGUDLQKRVHDWWKHVLSKRQLVEORFNHGRQ SDJH
■ 5LQVHKROG QRILQDOGUDLQLVDFWLYDWHGGHSHQGLQJRQ
WKH PRGXOH &RQWLQXH WKH SURJUDPPH E\ VHOHFWLQJ 6SLQ DQG
SUHVVLQJ A
■ 7KH ZDWHU GUDLQ KRVH LV FRQQHFWHG WRR KLJK ,QVWDOO WKH ZDWHU
GUDLQKRVHDWDPD[LPXPKHLJKWRIPHWHU
)DXOWV &DXVH5HPHG\

HQ )DXOWVDQGZKDWWRGRDERXWWKHP
:DWHU LV QRW YLVLEOH LQ
WKHGUXP
1RWDIDXOW²WKHZDWHULVEHORZWKHYLVLEOHDUHD
ý L'RV åRU þ L
'RV MåFDQQRWEH
RSHUDWHG
■ ,VDXWRPDWLFGRVLQJDQRSWLRQIRUWKHSURJUDPPH"
■ ,VWKHSXPSXQLWEORFNHG"3UHVVWKH #EXWWRQWLOOWKHLQGLFD
WRUODPSWXUQVRIIDQGFOHDQWKHSXPSXQLW
7KHZURQJGHWHU
JHQWIDEULFVRIWHQHU
KDV EHHQ SRXUHG LQWR
WKHGLVSHQVHUV
(PSW\WKHGLVSHQVHUVFOHDQLWWKHPDQGSRXULQWKHFRUUHFW
SURGXFW
'HWHUJHQWIDEULFVRI
WHQHU KDV FRQJHDOHG
LQWKHGLVSHQVHUV
(PSW\WKHGLVSHQVHUVFOHDQLWWKHPDQGSRXULQWKHFRUUHFW
SURGXFW
)RDP LV OHDNLQJ IURP
WKHGHWHUJHQW
GUDZHU
■ $XWRPDWLFGRVLQJL'26FKHFNWKHGRVDJHVHWWLQJVDQGLI
UHTXLUHGUHGXFHWKHEDVLFGRVDJH
,IUHTXLUHGXVHDGLIIHUHQWOLTXLGGHWHUJHQWIDEULFVRIWHQHU
■ 0DQXDOGRVLQJ+DYH\RXXVHGWRRPXFKGHWHUJHQW"8VH
OHVVGHWHUJHQWLQWKHQH[WZDVKF\FOH
■ ,PPHGLDWH DFWLRQ 0L[ RQH WDEOHVSRRQ RI IDEULF VRIWHQHU ZLWK
OLWUH RI ZDWHU DQG SRXU LW LQWR WKH PDQXDO GRVLQJ FRPSDUW
PHQWQRWVXLWDEOHIRURXWGRRUFORWKLQJVSRUWVZHDURULWHPV
VWXIIHGZLWKGRZQ
5HSHDWHGLQWHQVLYH
IRDPLQJ
■ $XWRPDWLFGRVLQJL'26FKHFNWKHGRVDJHVHWWLQJVDQGLI
UHTXLUHGUHGXFHWKHEDVLFGRVDJH ~ 3DJH
,IUHTXLUHGXVHDGLIIHUHQWOLTXLGGHWHUJHQWIDEULFVRIWHQHU
■ 0DQXDOGRVLQJ+DYH\RXXVHGWRRPXFKGHWHUJHQW"$GG
OHVV GHWHUJHQW LQ WKH QH[W WLPH \RX UXQ D ZDVK F\FOH ZLWK WKH
VDPHORDG
'HWHUJHQWIDEULFVRI
WHQHUGULSVRIIWKH
VHDODQGFROOHFWVRQ
WKHGRRURULQWKH
VHDOIROG
7KHUHLVWRRPXFKGHWHUJHQWIDEULFVRIWHQHULQWKHGLVSHQVHUV
'RQRWILOOWKHGLVSHQVHUVDERYHWKH PD[PDUN
7KH ZDVKLQJ UHVXOW LV
QRWVDWLVIDFWRU\
■ L'26FKHFNWKHGRVDJHVHWWLQJVDQGLIUHTXLUHGLQFUHDVH
WKHEDVLFGRVDJH ~ 3DJH
■ 8VHDGLIIHUHQWOLTXLGGHWHUJHQW
%ULHIZKLUULQJVRXQG
WZLFHDIWHUWKHDSSOL
DQFHLVVZLWFKHGRQ
1RWDIDXOW²ZKHQWKHDSSOLDQFHLVVZLWFKHGRQWKLVZKLUULQJ
VRXQG RFFXUV EULHIO\ GXH WR LQWHUQDO WHVWLQJ RI WKH DXWRPDWLF GRV
LQJV\VWHP
:KLUULQJVRXQGDIWHU
WKHSURJUDPPH
VWDUWV DQG GXULQJ WKH
ODVWULQVHF\FOH
1RWDIDXOW²ZKHQDXWRPDWLFGRVLQJLVDFWLYDWHGDZKLUULQJ
VRXQGRFFXUVDIWHUZDWHUHQWHUVWKHGUXPGXULQJGHWHUJHQWGRV
LQJ DQG LQ WKH ODVW ULQVH F\FOH GXULQJ IDEULF VRIWHQHU GRVLQJ 7KH
VRXQG LV FDXVHG E\ WKH L'26 SXPS XQLW DQG LV D QRUPDO RSHUDW
LQJQRLVH
)DXOWV &DXVH5HPHG\

)DXOWVDQGZKDWWRGRDERXWWKHP HQ
7KH VSLQ UHVXOW LV QRW
VDWLVIDFWRU\
/DXQGU\ZHWWRR
GDPS
■ 1RW D IDXOW ² WKH XQEDODQFHG ORDG GHWHFWLRQ V\VWHP KDV LQWHU
UXSWHGWKHVSLQF\FOHEHFDXVHWKHODXQGU\LVXQHYHQO\GLV
WULEXWHG 'LVWULEXWH VPDOO DQG ODUJH LWHPV RI ODXQGU\ HYHQO\ LQ
WKHGUXP
■ ,V 熍䦐厺(DV\LURQDGGLWLRQDOSURJUDPPHVHWWLQJ
VHOHFWHGGHSHQGLQJRQWKHPRGHO"
■ ,V 1LJKW ZDVK DGGLWLRQDO SURJUDPPH VHWWLQJ RU 1LJKW ZDVK
SURJUDPPHVHOHFWHGGHSHQGLQJRQWKHPRGHO"
■ ,VWKHVHOHFWHGVSHHGWRRORZ"
7KHVSLQF\FOHUXQV
VHYHUDOWLPHV
1RWDIDXOW²WKHXQEDODQFHGORDGGHWHFWLRQV\VWHPLVDGMXVWLQJ
DQLPEDODQFH
7KHSURJUDPPHLV
WDNLQJORQJHUWKDQ
XVXDO
■ 1RW D IDXOW ² WKH XQEDODQFHG ORDG GHWHFWLRQ V\VWHP LV DGMXVW
LQJDQLPEDODQFHE\UHSHDWHGO\GLVWULEXWLQJWKHODXQGU\
■ 1RW D IDXOW ² WKH IRDP GHWHFWLRQ V\VWHP LV DFWLYDWHG ² D ULQVH
F\FOHKDVEHHQVZLWFKHGRQ
7KHOHQJWKRIWKH
SURJUDPPH FKDQJHV
GXULQJWKHZDVK
F\FOH
1RWDIDXOW²WKHSURJUDPPHVHTXHQFHLVRSWLPLVHGIRUWKHVSH
FLILFZDVKLQJSURFHVV7KLVPD\FKDQJHWKHOHQJWKRIWKHSUR
JUDPPHVKRZQRQWKHGLVSOD\SDQHO
2GRXUVVWDLQIRUPD
WLRQLQWKHDSSOLDQFH
5XQWKH 'UXP&OHDQ&SURJUDPPHZLWKRXWODXQGU\
$GGZDVKLQJSRZGHURUDGHWHUJHQWFRQWDLQLQJEOHDFK
1RWH 7RSUHYHQWIRDPLQJRQO\XVHKDOIWKHDPRXQWRIGHWHU
JHQWUHFRPPHQGHGE\WKHGHWHUJHQWPDQXIDFWXUHU'RQRWXVH
GHWHUJHQWVGHVLJQHGIRUZRROOHQVRUGHOLFDWHV
/RXGQRLVHVYLEUD
WLRQVDQGDSSOLDQFH
PRYHPHQWGXULQJ
WKHVSLQF\FOH
■ ,VWKHDSSOLDQFHDOLJQHG" ~ $OLJQPHQWRQ SDJH
■ $UHWKHDSSOLDQFHVIHHWIL[HG"6HFXUHWKHDSSOLDQFHVIHHW
■ +DYH WKH WUDQVSRUW ORFNV EHHQ UHPRYHG" ~ 5HPRYLQJ WKH
WUDQVSRUWORFNVRQ SDJH
7KHGLVSOD\SDQHO
LQGLFDWRUOLJKWVGR
QRWZRUNZKLOHWKH
DSSOLDQFHLVUXQQLQJ
■ +DVWKHUHEHHQDSRZHUIDLOXUH"
■ +DYHWKHIXVHVEORZQ"5HVHWUHSODFHWKHIXVHV
■ ,IWKHIDXOWRFFXUVUHSHDWHGO\FDOOFXVWRPHUVHUYLFHV
7KHUHLVGHWHUJHQW
UHVLGXHRQWKHODXQ
GU\
■ 6RPHSKRVSKDWHIUHHGHWHUJHQWVFRQWDLQZDWHULQVROXEOH
UHVLGXH
■ 6HOHFW 5LQVHRUEUXVKWKHODXQGU\DIWHUZDVKLQJ
,I \RX FDQQRW UHFWLI\ D IDXOW \RXUVHOI DIWHU SUHVVLQJ WKH # EXWWRQ WLOO WKH LQGLFDWRU ODPS
WXUQVRIIDQGVZLWFKRQDJDLQRUDUHSDLULVUHTXLUHG
■ 3UHVVWKH #EXWWRQDQGSXOORXWWKHPDLQVSOXJ
■ 7XUQRIIWKHWDSDQGFDOOFXVWRPHUVHUYLFHV
)DXOWV &DXVH5HPHG\

HQ $IWHUVDOHVVHUYLFH
4 $IWHUVDOHVVHUYLFH
$IWHUVDOHVVHUYLFH
,I\RXFDQQRWUHFWLI\DIDXOW\RXUVHOI
~ )DXOWVDQGZKDWWRGRDERXWWKHP
RQ SDJH SOHDVHFRQWDFWRXUDIWHU
VDOHVVHUYLFH
:HZLOODOZD\VILQGDQDSSURSULDWH
VROXWLRQWRDYRLGXQQHFHVVDU\YLVLWVE\
HQJLQHHUV
3OHDVHSURYLGHWKHDIWHUVDOHVVHUYLFH
ZLWKWKHSURGXFWQXPEHU(1UDQGWKH
SURGXFWLRQQXPEHU)'RIWKHDSSOLDQFH
<RXFDQILQGWKLVLQIRUPDWLRQGHSHQGLQJ
RQWKHPRGHO
■ 2QWKHLQVLGHRIWKHORDGLQJGRRU
■ 2QWKHEDFNRIWKHDSSOLDQFH
7UXVWWKHH[SHUWLVHRIWKH
PDQXIDFWXUHU&RQWDFWXV%\GRLQJVR
\RXFDQEHVXUHWKDWWKHUHSDLUVDUH
FDUULHGRXWE\WUDLQHGVHUYLFHSHUVRQQHO
XVLQJJHQXLQHVSDUHSDUWV
$GYLFH DQG UHSDLU RUGHU LQ WKH HYHQW RI
IDXOWV
(1U 3URGXFWQXPEHU
)' 3URGXFWLRQQXPEHU
&1
(1U )'

&RQVXPSWLRQYDOXHV HQ
[ &RQVXPSWLRQYDOXHV
&RQVXPSWLRQYDOXHV
0RGHO ;4*:%80:
/HYHO
(QHUJ\FRQVXPSWLRQN:KSHUF\FOH
:DWHUFRQVXPSWLRQOLWUHVSHUF\FOH
(QHUJ\HIILFLHQF\RIZDVKLQJ
1RLVHOHYHOYDOXHV
0D[YDOXHIRUVSLQQLQJG%$
0D[YDOXHIRUZDVKLQJG%$
9DOXHV GHWHUPLQHG DFFRUGLQJ WR WKH WHVW ZLWK GHDFWLYDWHG DXWRPDWLF GRVLQJ V\VWHP
L'26
(QHUJ\FRQVXPSWLRQWHVWHGZLWK &RWWRQV &SURJUDPPHDQGGHDFWLYDWH
䗢爱 6SHHG3HUIHFWVHWWLQJLQDFFRUGDQFHZLWK*%
1RLVHOHYHOVWHVWHGLQDFFRUGDQFHZLWK*%
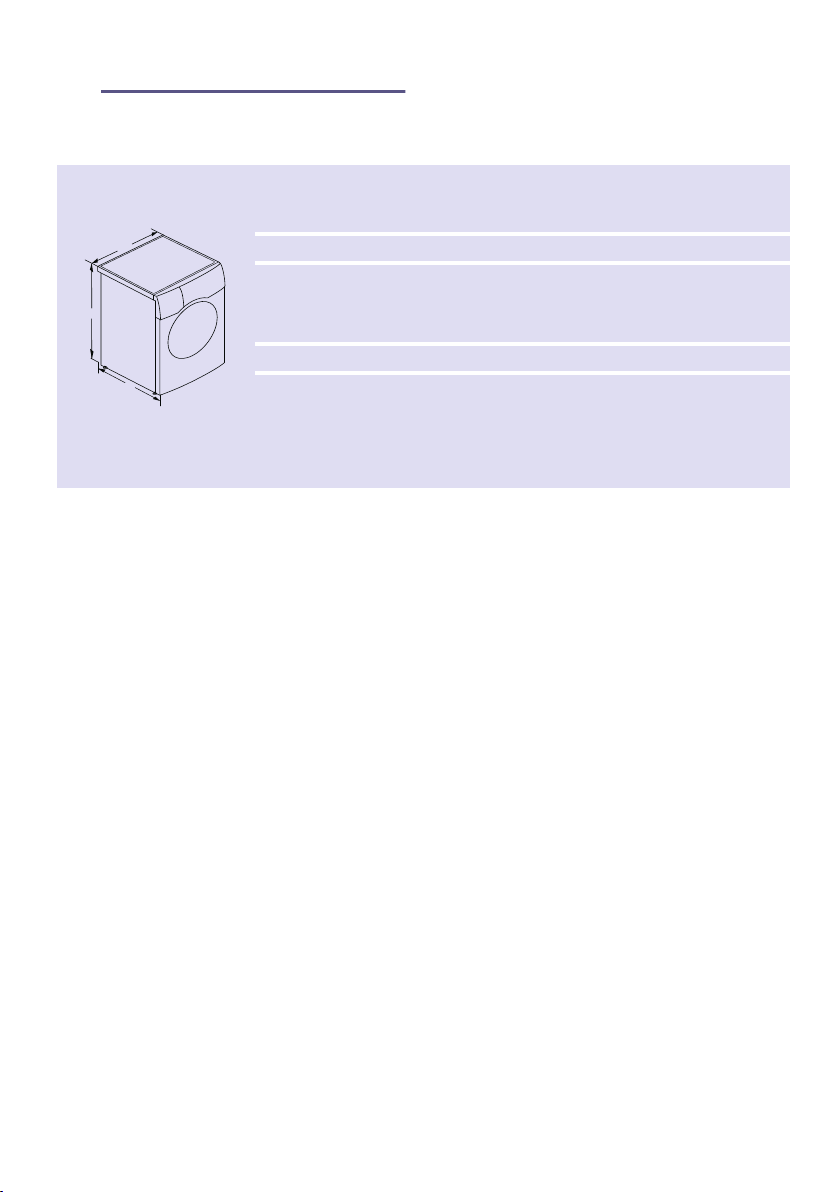
HQ 7HFKQLFDOGDWD
J 7HFKQLFDOGDWD
7HFKQLFDOGDWD
'LPHQVLRQV D PP
E PP
F PP
:HLJKW NJ
0DLQVFRQQHFWLRQ 1RPLQDOYROWDJH9+]
1RPLQDOFXUUHQW$
1RPLQDOSRZHU:
:DWHUSUHVVXUH 03D EDU
(QYLURQPHQWDO FRQGLWLRQV IRU
XVH
DFFRUGLQJWR*%7
$PELHQW7HPSHUDWXUH
ઊ ઊ QRQIUHH]LQJ
5HODWLYH+XPLGLW\
OHVVWKDQDWઊ
QRQFRQGHQVLQJ
D
F
E
F
E
D
F
D
E

6

%RVFK+RPH$SSOLDQFHV2IILFLDO:HFKDW
5REHUW%RVFK+DXVJHUlWH*PE+
&DUO:HU\6WUDH
0QFKHQ*(50$1<
ZZZERVFKKRPHFRP
*9001431980*
HQ
7KDQN \RX IRU EX\LQJ D %RVFK +RPH
$SSOLDQFH
5HJLVWHU\RXUQHZGHYLFHRQ0\%RVFKQRZDQGSURILWGLUHFWO\IURP
([SHUWWLSVWULFNVIRU\RXUDSSOLDQFH
:DUUDQW\H[WHQVLRQRSWLRQV
'LVFRXQWVIRUDFFHVVRULHVVSDUHSDUWV
'LJLWDOPDQXDODQGDOODSSOLDQFHGDWDDWKDQG
(DV\DFFHVVWR%RVFK+RPH$SSOLDQFHV6HUYLFH
)UHHDQGHDV\UHJLVWUDWLRQ²DOVRRQPRELOHSKRQHV
ZZZERVFKKRPHFRPZHOFRPH
/RRNLQJIRUKHOS"
<RXOOILQGLWKHUH
([SHUWDGYLFHIRU\RXU%RVFKKRPHDSSOLDQFHVQHHGKHOSZLWKSUREOHPVRUDUHSDLUIURP
%RVFKH[SHUWV
)LQGRXWHYHU\WKLQJDERXWWKHPDQ\ZD\V%RVFKFDQVXSSRUW\RX
ZZZERVFKKRPHFRPVHUYLFH
&RQWDFWGDWDRIDOOFRXQWULHVDUHOLVWHGLQWKHDWWDFKHGVHUYLFHGLUHFWRU\