
DWMT70784
Cut-Off Tool
Outil à tronçonner
Herramienta de corte
INSTRUCTION MANUAL
GUIDE D’UTILISATION
MANUAL DE INSTRUCCIONES
INSTRUCTIVO DE OPERACIÓN, CENTROS DE SERVICIO Y PÓLIZA
DE GARANTÍA. ADVERTENCIA: LÉASE ESTE INSTRUCTIVO ANTES
DE USAR EL PRODUCTO.
If you have questions or comments, contact us.
Pour toute question ou tout commentaire, nous contacter.
Si tiene dudas o comentarios, contáctenos.
1-800-4-DeWALT • www.dewalt.com
2
English
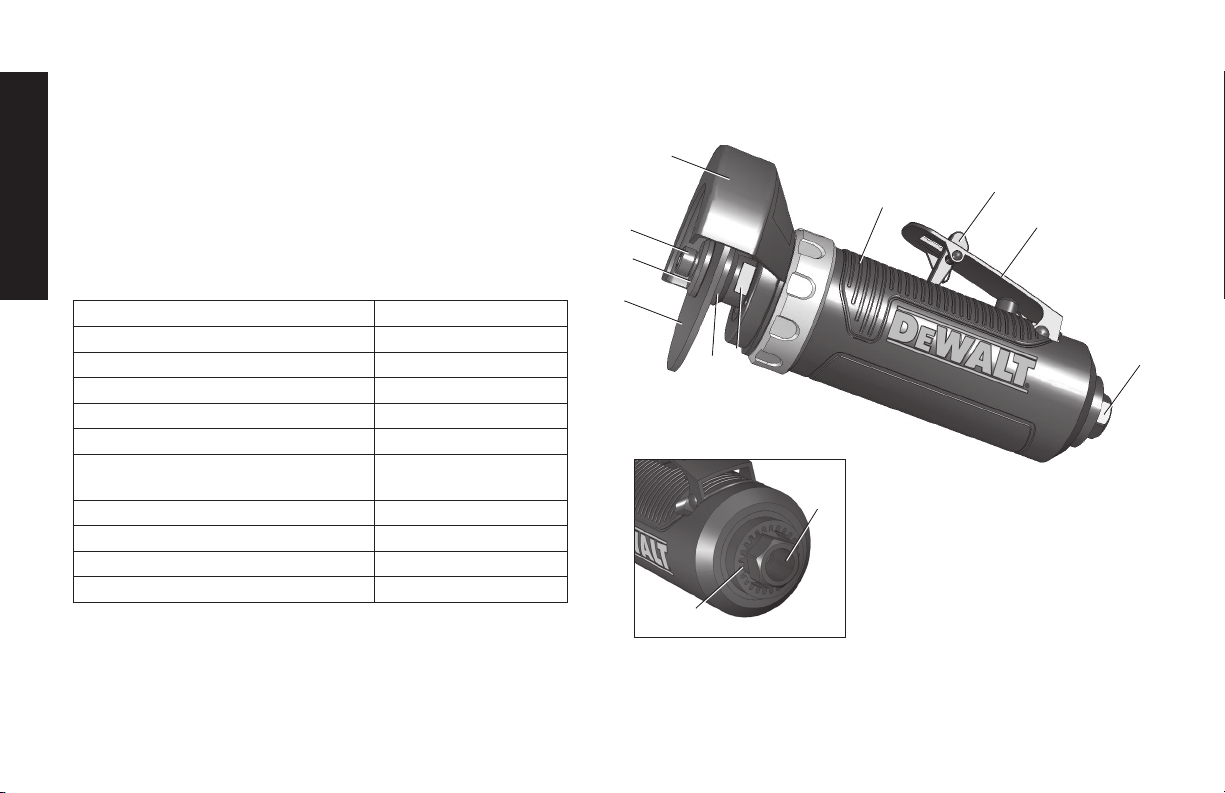
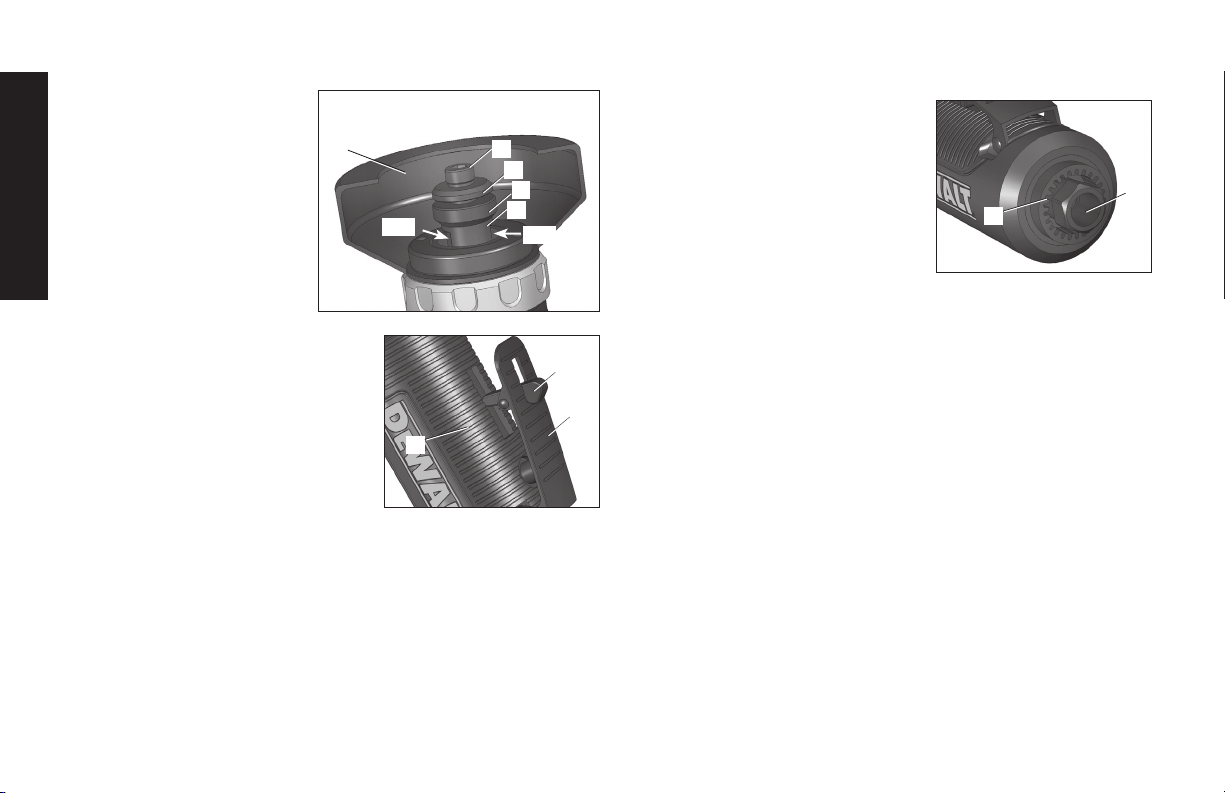
A. Wheel Guard
B. Hex Head Screw
C. Washer
D. Cutting Wheel
E. Collet
SPECIFICATIONS
MODEL
DWMT70784
FREE SPEED (@90PSI)
19000 RPM
EXHAUST TYPE
Rear
WHEEL DIAMETER
3" (76.2MM)
WHEEL ARBOR HOLE
3/8" (10MM)
SPINDLE SCREW
M6 x 12MM Hex
AVERAGE AIR CONSUMPTION
(@90PSI)
31 SCFM (14.6 L/s)
4.4 CFM (2.1 L/s)
NET WEIGHT
1.8 LBS (0.82Kg.)
AIR INLET SIZE
1/4" NPT(F)
RECOMMENDED HOSE SIZE
3/8" (10MM)
MAX. AIR PRESSURE
90 PSI
DWMT70784 CUT-OFF TOOL
F. Spindle
G. ¼" Air Inlet
H. Exhaust
I. Trigger
J. Safety Throttle Lever
K. Ergonomic Body
FIG.1
A
B
C
D
E
F
K
J
I
G
H
G

3
English
Denitions: Safety Guidelines
The definitions below describe the level of severity
for each signal word. Please read the manual and pay
attention to these symbols.
DANGER: Indicates an imminently hazardous
situation which, if not avoided, will result in death
or serious injury.
WARNING: Indicates a potentially hazardous
situation which, if not avoided, could result in death
or serious injury.
CAUTION: Indicates a potentially hazardous
situation which, if not avoided, may result in minor
or moderate injury.
CAUTION: Used without the safety alert symbol
indicates a potentially hazardous situation which,
if not avoided, may result in property damage.
IF YOU HAVE ANY QUESTIONS OR COMMENTS ABOUT
THIS OR ANY D
e
WALT TOOL, CALL US TOLL FREE AT:
1-800-4-D
e
WALT (1-800-433-9258)
IMPORTANT SAFETY INSTRUCTIONS
WARNING: Some dust created by power sanding, sawing,
grinding, drilling, and other construction activities contains chemicals
known to the State of California to cause cancer, birth defects or
other reproductive harm. Some example of these chemicals are:
• Leadfromlead-basedpaints
• Crystallinesilicafrombricksandcement
and other masonry products
• Arsenicandchromiumfromchemically-treatedlumber
Your risk from these exposures varies, depending on how often
you do this type of work. To reduce your exposure to these
chemicals: work in a well ventilated area, and work with
approved safety equipment, al ways wear OSHA/MSHA/NIOSH
approved, properly fit ting face mask or res pi ra tor when us ing
such tools. When using air tools, basic safety precautions should
always be followed to reduce the risk of personal injury.
WARNING: This product contains chemicals, known to the
State of California to cause cancer, and birth defects or other
reproductive harm. Wash hands after handling.
SAVE THESE INSTRUCTIONS
WARNING:
Improper operation or maintenance of this product
could result in serious injury and property damage.
Read and understand all warnings and operating
instructions before using this equipment. When using
air tools, basic safety precautions should always be
followed to reduce the risk of personal injury.
WARNING:
Read and understand this instruction manual and tool labels
before installing, operating or servicing this tool. Keep these
instructions in a safe accessible place.
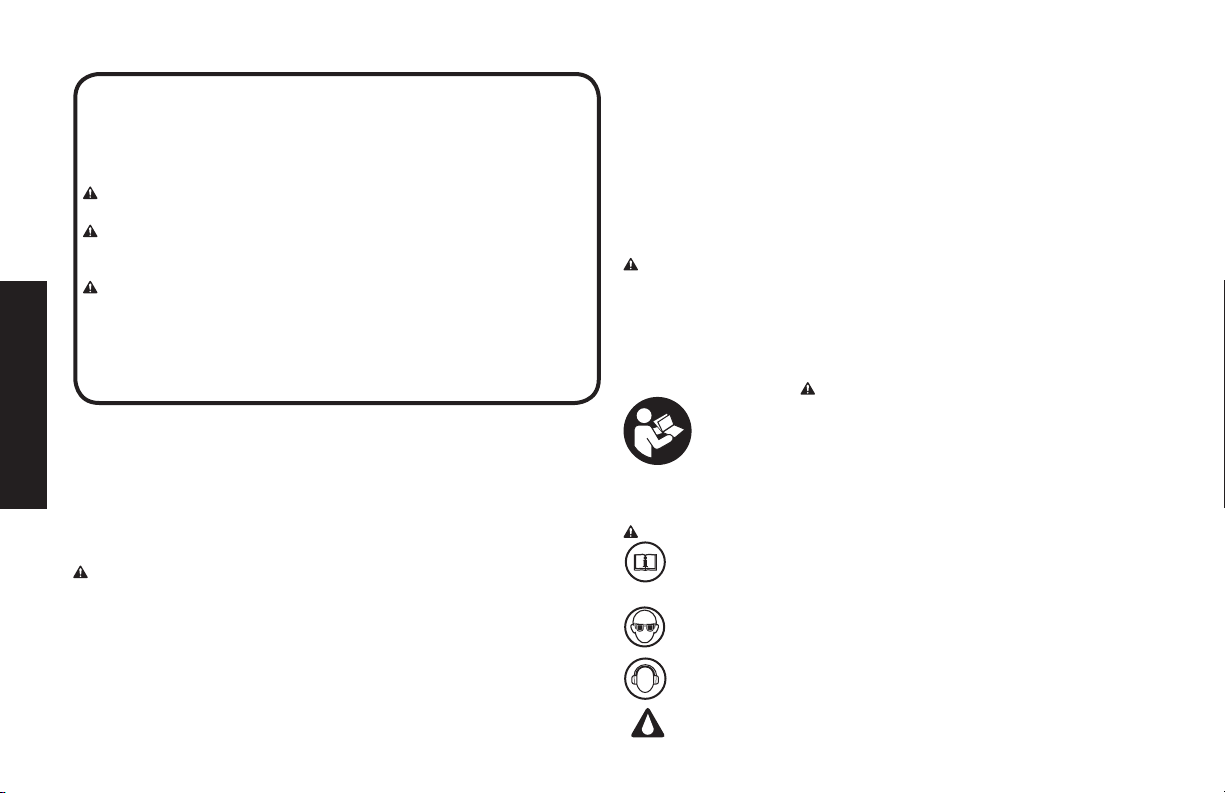
Operators and others in work area must wear ANSI Z87.1 CAN/
CSA Z94.3 approved safety glasses with side shields.
Operators and others in work area must wear ear protection.
Oil daily for optimal performance.

4
English
WARNING:
• Nevertriggerthetoolwhennotappliedtoaworkobject
Attachmentsmustbesecurelyattached.
Looseattachmentscancauseseriousinjury.
• Protectairlinesfromdamageorpuncture.
• Neverpointanairtoolatoneselforanyotherperson.
Serious injury could occur.
• Checkairhosesforweakorwornconditionbeforeeachuse.
Make sure all connections are secure.
• Keepallnuts,boltsandscrewstightandensureequipmentisin
safe working condition.
• Donotputhandsnearorundermovingparts.
WARNING:
• Avoidprolongeduse:repetitivemotionorexposuretovibration
may be harmful to your hands or arms. Use gloves to provide
extra cushion, take frequent rest periods, and limit daily
time of use.
• DoNotUseoxygenorreactivegases;explosionmayoccur.
• DoNotExceedairpressureof90PSI.
• Readallmanualsincludedwiththisproductcarefully.
Be thoroughly familiar with the controls and the proper use
of the equipment.
• Onlypersonswellacquaintedwiththeserulesofsafeoperation
should be allowed to use the air tool.
• Donotexceedanypressureratingofanycomponent
in the system.
• Disconnecttheairtoolfromairsupplybeforechangingtoolsor
attachmentsandduringnon-operation.
• Alwayswearsafetyglassesandearprotectionduringoperation.
Alwayswearapprovedsafetyglasseswithshields.Alwayswear
approved hearing protection.
• Donotwearloosefittingclothingorapparelwhichcontains
loose straps or ties, etc. Which could become entangled in
moving parts of the tool and results in serious personal injury.
• Donotwearjewelry,watches,identifications,bracelets,
necklace, etc. When operating any tool, they may become
caught in moving parts and result in serious injury.
• Donotdepresstriggerwhenconnectingtheairsupplyhose.
• Alwaysuseattachmentsdesignedforusewithair
powered tools.
• Donotusedamagedorwornattachments.
5
English
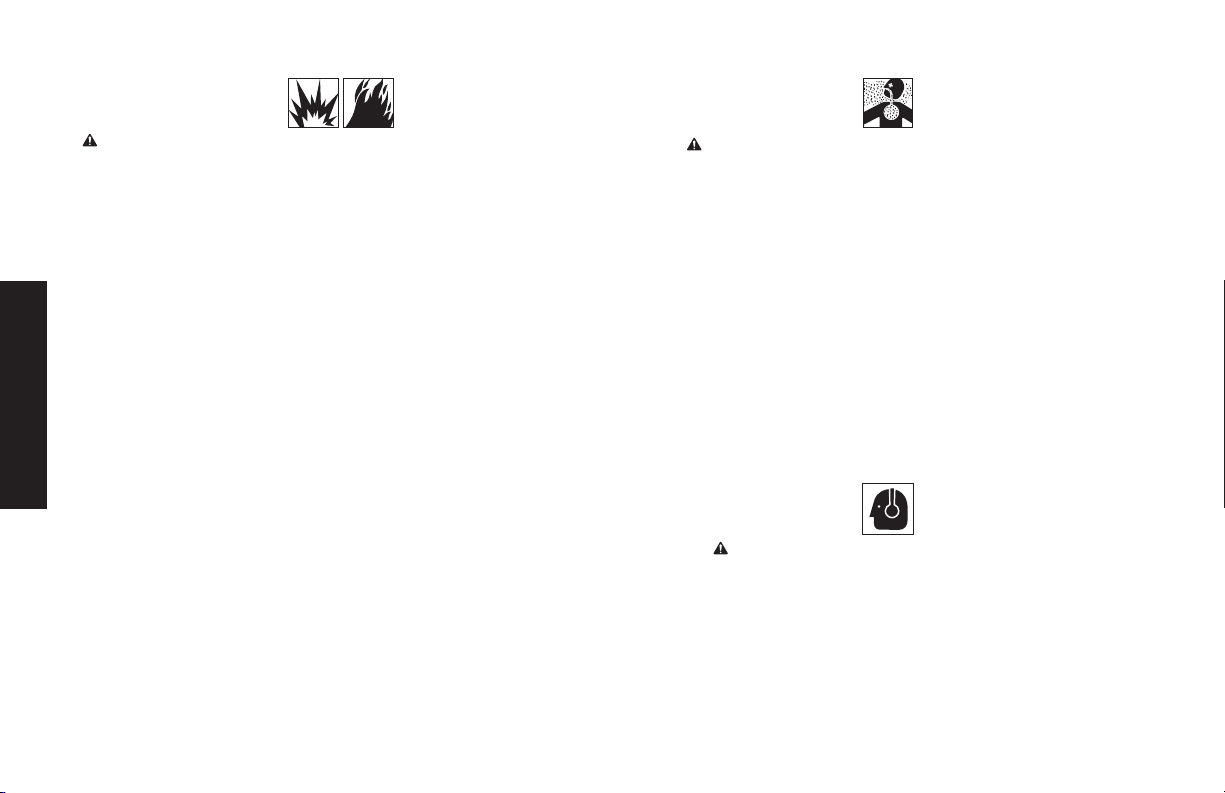
WARNING: RISK OF EXPLOSION OR FIRE
WHAT CAN HAPPEN HOW TO PREVENT IT
• Abrasivetoolssuchas
sanders and grinders,
rotating tools such as drills,
and impact tools such as
wrenches, hammers,
and reciprocating saws
are capable of generating
sparks which could
result in ignition of
flammable materials.
• Neveroperatetoolsnear
flammable substances such
as gasoline, naptha,
cleaning solvents, etc.
• Workinaclean,well
ventilated area free of
combustible materials.
• Neveruseoxygen,
carbon dioxide or other
bottled gases as a power
source for air tools.
• Exceedingthemaximum
pressure rating of tools
accessories could cause
an explosion resulting
in serious injury.
• Usecompressedairregulated
to a maximum pressure at or
below the rated pressure
of any attachments.
WARNING: RISK TO BREATHING (ASPHYXIATION)
WHAT CAN HAPPEN HOW TO PREVENT IT
• Abrasivetools,suchas
grinders, sanders, and
cut-off tools generate dust
and abrasive materials which
can be harmful to human
lungs and respiratory system.
• AlwayswearMSHA/NIOSH
approved, properly fitting face
mask or respirator when
using such tools.
• Somematerialssuchas
adhesives and tar contain
chemicals whose vapors
could cause serious injury
with prolonged exposure.
• Alwaysworkinaclean,dry,
well ventilated area.
CAUTION: RISK FROM NOISE
WHAT CAN HAPPEN HOW TO PREVENT IT
• Longtermexposuretonoise
produced from the operation
of air tools can lead to
permanent hearing loss.
• AlwayswearANSI (S3.19)
hearing protection.

6
English
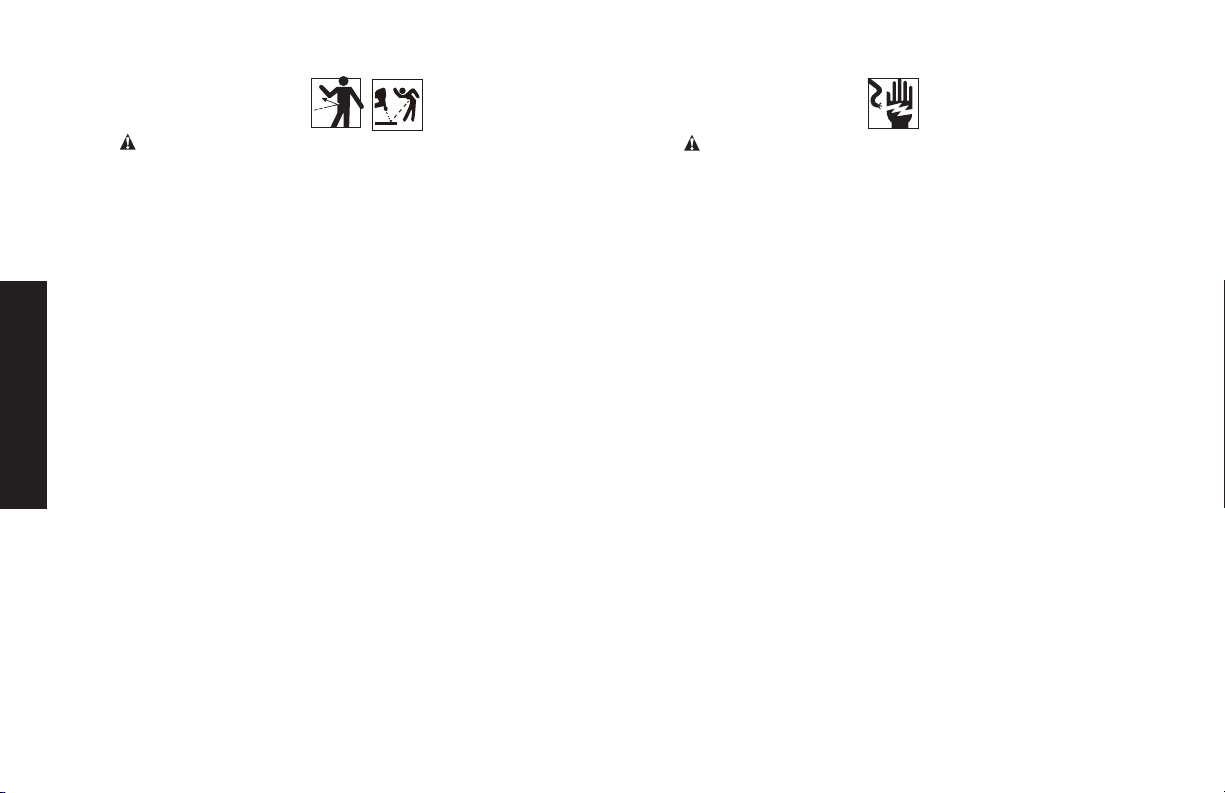
WARNING:
RISK OF INJURY
WHAT CAN HAPPEN HOW TO PREVENT IT
• Toolsleftunattended,orwith
the air hose attached can be
activated by unauthorized
persons leading to their injury
or injury to others.
•Removeairhosewhentool
is not in use and store tool
in a secure location away
from reach of children and/or
untrained users.
• Airtoolscanpropelloose
objects or other materials
throughout the work area.
• Useonlyparts,and
accessories recommended by
the manufacturer.
• Keepworkareacleanandfree
of clutter. Keep children and
others away from work area
during operation of the tool.
• Keepworkareawelllit.
• Airtoolscanbecome
activated by accident during
maintenance or tool changes.
• Removeairhosetolubricate,
add, or replace cutoff wheel,
accessories, etc., to the tool.
• Nevercarrythetool
by the hose.
• Avoidunintentionalstarting.
Don’t carry hooked-up tool with
finger on trigger.
• Repairserviceshouldbedone
only by an authorized service
representative.
• Awrenchorakeythatisleft
attached to a rotating part of
the tool increases the risk of
personal injury.
• Removeadjustingkeysand
wrench before turning
the tool on.
WHAT CAN HAPPEN HOW TO PREVENT IT
• Using inflator nozzles for
duster applications can cause
serious injury.
• DO NOT use inflator nozzles
for duster applications.
• Air tools can cause the work
piece to move upon contact
leading to injury.
• Use clamps or other devices
to prevent movement.
• Lossofcontrolofthetoolcan
lead to injury to self or others
• Never operate tool while
under the influence of
drugs or alcohol.
• Don’t overreach. Keep proper
footing and balance at all times.
• Keep handles dry, clean, and
free from oil and grease.
• Stay alert. Watch what you are
doing. Use common sense.
Do not operate tool when
you are tired.
• Poor quality, improper, or
damaged tools such as
grinding wheels, chisels,
sockets, drill, etc., can fly
apart during operation,
propelling particles
throughout the work area
causing serious injury.
• Always use tool attachments
rated for the speed of
the power tool.
• Never use tools which have
been dropped, impacted or
damaged by use.
• Do not apply excessive force
to the tool – let the tool
perform the work.
7
English
WARNING:
RISK OF INJURY (CONTINUED)
WHAT CAN HAPPEN HOW TO PREVENT IT
• Improperlymaintainedtool
and accessories can
cause serious injury.
• Maintainthetoolwithcare.
• Keepacuttingtoolsharpand
clean. Aproperly maintained
tool, with sharp cutting edged
reduces the risk of binding
and is easier to control.
• Thereisariskofburstingif
the tool is damaged.
• Checkformisalignmentor
binding of moving parts,
breakage of parts, and any
other condition that affects the
tool’s operation. If damaged,
have the tool serviced
before using.
WARNING:
RISK OF ELETRIC SHOCK
WHAT CAN HAPPEN HOW TO PREVENT IT
• Thistoolisnotprovidedwith
an insulated gripping surface.
Contact with a “live” wire will
also make exposed metal
parts of the tool “live”
and can result in
electrocution or death.
• Avoidbodycontactwith
grounded surfaces such as
pipes, radiators, ranges, and
refrigerators. There is an
increased risk of electric shock
if your body is grounded.
•Thoroughlyinvestigatethe
workpiece for possible hidden
wring before performing work.
8
English
WARNING:
RISK FROM FLYING OBJECTS
WHAT CAN HAPPEN HOW TO PREVENT IT
• Airpoweredequipmentand
power tools are capable of
propelling materials such as
metal chips, saw dust, and
other debris at high speed,
which could result in
serious eye injury.
• AlwayswearANSI Z87.1 CAN/
CSA Z94.3 approved safety
glasses with side shields.
• Neverleaveoperatingtool
unattended. Disconnect air
hose when tool is not in use.
• Compressedaircanbe
hazardous. The air stream
can cause injury to soft tissue
areas such as eyes, ears, etc.
Particles or objects
propelled by the stream
can cause injury.
• Foradditionalprotectionuse
an approved face shield in
addition to safety glasses.
• Toolattachmentscanbe
come loose or break and fly
apart propelling particles at
the operator and others
in the work area.
• Makesurethatany
attachments are
securely assembled.
WARNING:
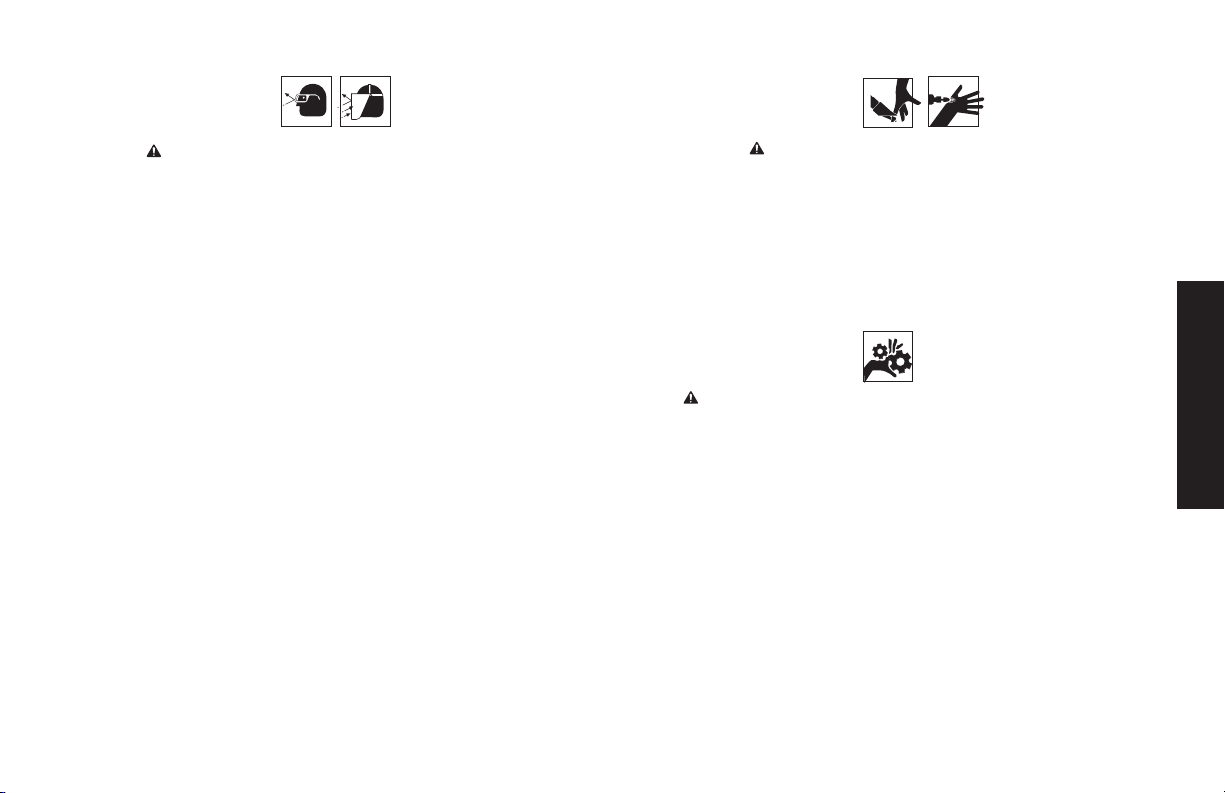
RISK OF CUT OR BURNS
WHAT CAN HAPPEN HOW TO PREVENT IT
• Toolswhichcut,shear,
drill, punch, chisel, etc.,
are capable of causing
serious injury.
• Keeptheworkingpart
of the tool away from
hands and body.
WARNING:
RISK OF ENTANGLEMENT
WHAT CAN HAPPEN HOW TO PREVENT IT
• Toolswhichcontainmoving
elements, or drive other
moving tools such as grinding
wheels, sockets, sanding
discs,etc., can become
entangled in hair, clothing,
jewelry and other loose
objects, resulting
in severe injury.
• Neverwearloosefitting
clothes, or apparel which
contains loose straps or ties,
etc., which could become
entangled in moving parts
of the tool.
• Removeanyjewelry,watches,
identifications, bracelets,
necklaces, etc., which might
become caught by the tool.
• Keephandsawayfrommoving
parts. Tie up or cover long hair.
• Alwayswearproperfitting
clothing and other safety
equipment when
using this tool.

9
English
WARNING:
AIR SUPPLY AND CONNECTIONS
• Donotuseoxygen,combustiblegases,orbottledgases
as a power source for this tool as the tool may explode,
possibly causing injury.
• Donotusesupplysourceswhichcanpotentiallyexceed
200PSI(13.8bar)astoolmayburst,possiblycausinginjury.
• Theconnectoronthetoolmustnotholdpressure
when air supply is disconnected. If a wrong fitting is used,
the tool can remain charged with air after disconnecting
and thus will be able to after the air line is disconnected
possibly causing injury.
• Alwaysdisconnectairsupply:
1)Beforemakingadjustments;
2)Whenservicingthetool;
3)Whentoolisnotinuse;
4)Whenmovingtoadifferentworkarea,asaccidental
actuation may occur, possibly causing injury.
WARNING:
ADDITIONAL SAFETY INSTRUCTIONS FOR
GRINDERS
• Accessoriesmustberatedforatleastthespeed
recommended on the tool. Wheels and other accessories
running over rated speed can fly apart and cause Injury.
Accessoryratingsmustbeabovelistedminimumwheel
speed for tool.
• Donotusesawbladesorothertoothedbladeswiththistool.
Serious injury may result.
• Whenstartingtoolwithneworreplacementwheelor
otheraccessory,holdtoolinwell-protectedareaand
run for one minute.
• Neverstartthetoolwithanoperatororothersinlinewith
the wheel or accessory. If the wheel or accessory has
an undetected flaw, it can burst in less than a minute.
• Avoidbouncingthewheelorsubjectingittoroughhandling
• Directsparksawayfromoperator,bystandardsor
flammable materials.
• Disconnecttoolfromairsupplywhenchangingaccessories
or when not in use.
• Donotcarrytoolwiththrottledepressed.DonotdisableThrottle
SafetyLever.Donottapeorlockthrottleinrunposition.
• Useonlyrecommendedairtoolgrinderaccessories.
SAVE THESE INSTRUCTIONS
FOR FUTURE USE
10
English
FEATURES
WHEEL GUARD
The
wheel guard (A)
allows
for quick, easy guard adjust-
ments and positioning to
protect against when the tool
is in use.
COLLET
The collet (E) is where cut-
ting wheels may be placed,
and is connected to the
spindle (F). The hex head
screw (B) and washer (C)
hold the cutting wheel in place.
TRIGGER
The trigger
(I)
allows the operator
to control the start and stop of
the air tool.
SAFETY THROTTLE LEVER
The safety throttle lever (J)
prevents the tool from accidentally
being actuated.
ERGONOMIC BODY
The body of the air tool is an ergonomically designed
cushion grip
body (K)
for reduced weight and superior power-to-weight ratio.
The grip is made of molded thermoplastic elastomer (TPE) design
for improved comfort, slippage reduction, and better tool control.
AIR INLET
The tool’s air inlet (G) located at
the bottom of the handle is used for
connecting an air supply with
a standard 1/4" NPT
American thread.
EXHAUST
The exhaust (H) is located at the base
of the handle and allows the exhaust to
be directed away from the operator and
working area.
A
B
C
E
F
FLAT
FLAT
J
I
H
G
K
11
English
INSTALLATION
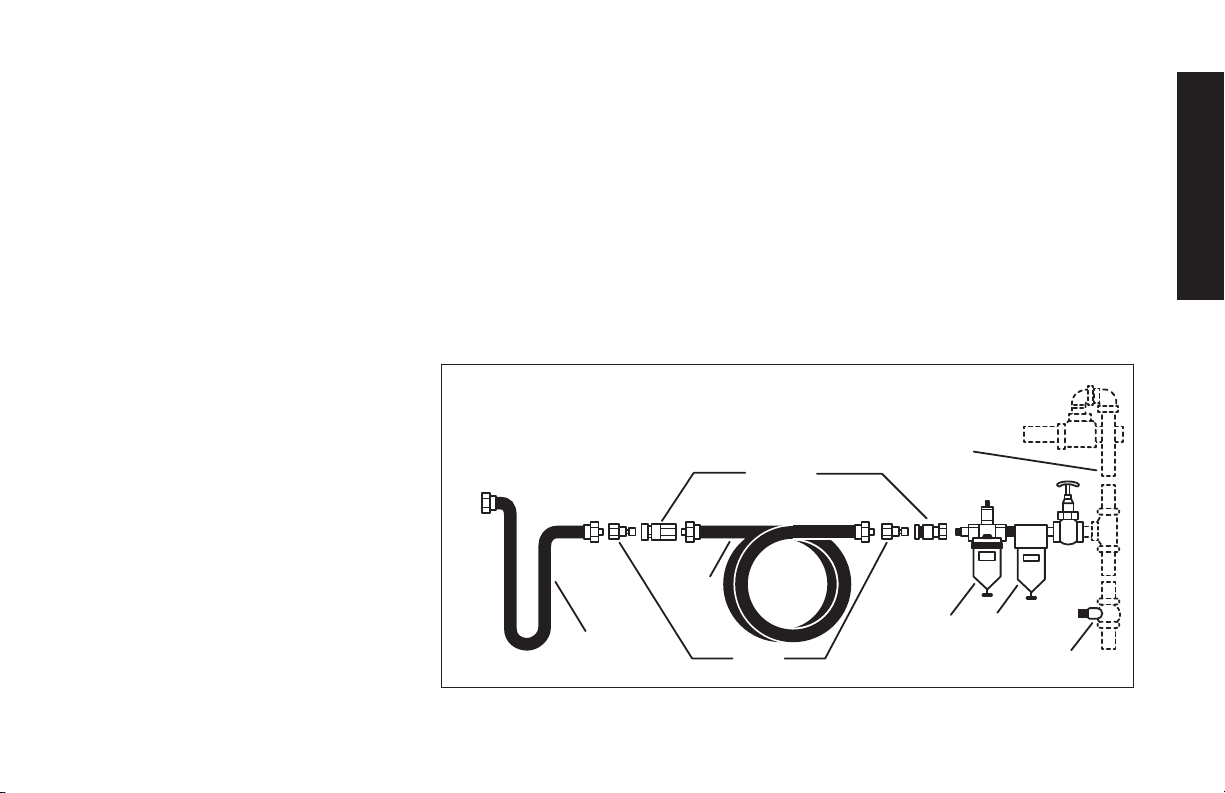
Air Supply
The recommended hook-up is shown in Figure A. Pneumatic tools
operate on a wide range of air pressures. For maximum efficiency
and longer tool life, the pressure of the air supplied to these
tools MUST not exceed the rated PSI at the tool when the tool is
running. Using a higher than rated pressure will cause faster wear
and drastically shorten the tool’s life. A higher air pressure can also
cause an unsafe condition and explosion.
The inside diameter of the hose should be increased to
compensate for unusually long air hoses (over 25 feet).
Minimum hose diameter should be 3/8" I.D. and fittings should
have 1/4" NPT thread.
The use of air line lubricators and air line
filters is recommended to prevent water
in the line that can damage the tool. Drain
the air tank daily. Clean the air inlet filter
screen on at least a weekly schedule to
remove accumulated dirt or other matter
that can restrict air flow.
The tool’s air inlet used for connecting
an air supply has standard 1/4" NPT
American thread.
Safety Rules For Pneumatic Tools
1) Inspect the air hose for cracks or other problems.
Replace the hose if worn.
2) Never point an air hose at another person.
3) Disconnect the tool when not in use, or before performing
service or changing accessories.
4) Use proper hoses and fittings. Never use quick change
couplings attached to the tool. Instead, add a hose and
coupling between the tool and the air supply.
1/2”(or larger)
Pipe and Fittings
Coupler
Air Hose
Leader Hose
Tool
Nipple
Oiler
Filter
Drain Daily
Figure A

12
English
PREPARATION FOR USE
Proper Use Of The Tool
Your new Cut-Off tool is designed for cutting and grinding
applications. This tool features a rear exhaust to direct airflow
away from the work area, a built-in regulator for convenient
speed control and safety lever to prevent accidental starts.
Work Stations
Your Cut-Off tool should only be used as a hand operated tool. It is
always recommended that the tool is used when standing with solid
footing. It can be used in other positions but before any such use,
the operator must be in a secure position having a firm grip
and footing.
Putting Into Service
Air Supply
CAUTION:
This air tool requires lubrication BEFORE initial use,
also before and after each additional use.
WARNING:
Use a clean lubricated air supply that will give a
mesuredairpressureatthetoolof90psi/6.2barwhenthetoolis
running with the trigger fully depressed.
Use recommended hose size. It is recommended that the tool is
connected to the air supply as shown in figure A on page 11.
Do not connect the tool to the air line system without incorporat-
ing an easy to reach and operate air shut off valve. The air supply
should be lubricated. It is strongly recommended that an air filter,
regulator, lubricator (FRL) is used as shown in figure A on page
11 as this will supply clean, lubricated air at the correct pressure to
the tool. Details of such equipment can be obtained from your
supplier. If such equipment is not used then the tool should be
lubricated by shutting off the air supply to the tool and then
depressurizing the line by pressing the trigger on the tool.
Disconnect the air line and pour into the air inlet 1 teaspoon (5cc.)
of a suitable pneumatic motor lubricating oil, preferably
incorporating a rust inhibitor. Reconnect tool to air supply and run
tool slowly for a few seconds to allow air to circulate the oil.
Lubricate tool daily if used frequently, or when it starts to slow or
lose power.
Using A Cut-Off Tool
WARNING:
1) Read all instructions before using this tool. All operators must
be fully trained in its use and aware of these safety rules.
2) Do not exceed the maximum working air pressure of
90 psi/6.2 bar.
3) Use personal safety equipment.
4) Use only compressed air at the recommended conditions.
5) If the tool appears to malfunction, remove from use
immediately and arrange for service and repair.
6) If the tool is used with a balancer or other support device,
ensure that it is fixed securely.
7) Always keep hands away from the working attachment fitted to
the tool.
8) The tool is not electrically insulated. Never use the tool if there
is any chance of it coming into contact with live electricity.
9) When using the tool, always adopt a firm footing and/or position
and grip the tool firmly to counteract any forces or reaction forces
that may be generated while using the tool.
10) Use only genuine Dewalt spare parts or parts which perform
equivalently. Do not make temporary or permanent repairs with
unauthorized parts.
11) Do not lock, tape, wire, etc., the on/off trigger in the run
position. The trigger must always be free to return to
the “off” position when it is released.
12) Always shut off the air supply to the tool and depress the
trigger to release air from the feed hose before fitting,
adjusting or removing the working attachment.
13
English
Using A Cut-Off Tool Continued
13) Check hoses and fittings regularly for wear. Replace if
necessary. Do not carry the tool by its hose. Ensure the
hand is removed from the on/off trigger when carrying
the tool with the air supply connected.
14) Take care against entanglement of moving tool parts
with clothing, ties, hair, cleaning rags, etc. This will
cause the body to be drawn towards the tool and can
be very dangerous.
15) Safe working practices and observe all relevant legal
requirements when installing, using or maintaining the tool.
16) Only install the tool when an easily accessible and easily
operable on/off switch is incorporated in the air supply.
17) Take care that the tool exhaust air does notcause problems or
blow onto another person.
18) Never lay a tool down unless the working attachment has
stopped moving.
PRE-START CHECKLIST (FIG. 1, PG. 2)
•Drainwaterfromaircompressortankandcondensationfrom
air lines. (Please refer to air compressor’s operation manual.)
•Lubricatethetool.(Pleaserefertothe“Maintenance”section
in the manual.)
WARNING: Risk of unsafe operation. Firmly grasp air hose
with hand when installing or disconnenting to prevent hose whip.
WARNING: Risk of bursting. Too much air pressure causes
a hazardous risk of bursting. Check the manufacturer’s maximum
pressure rating for air tools and accessories. The regulator output
pressure must never exceed the maximum pressure rating.
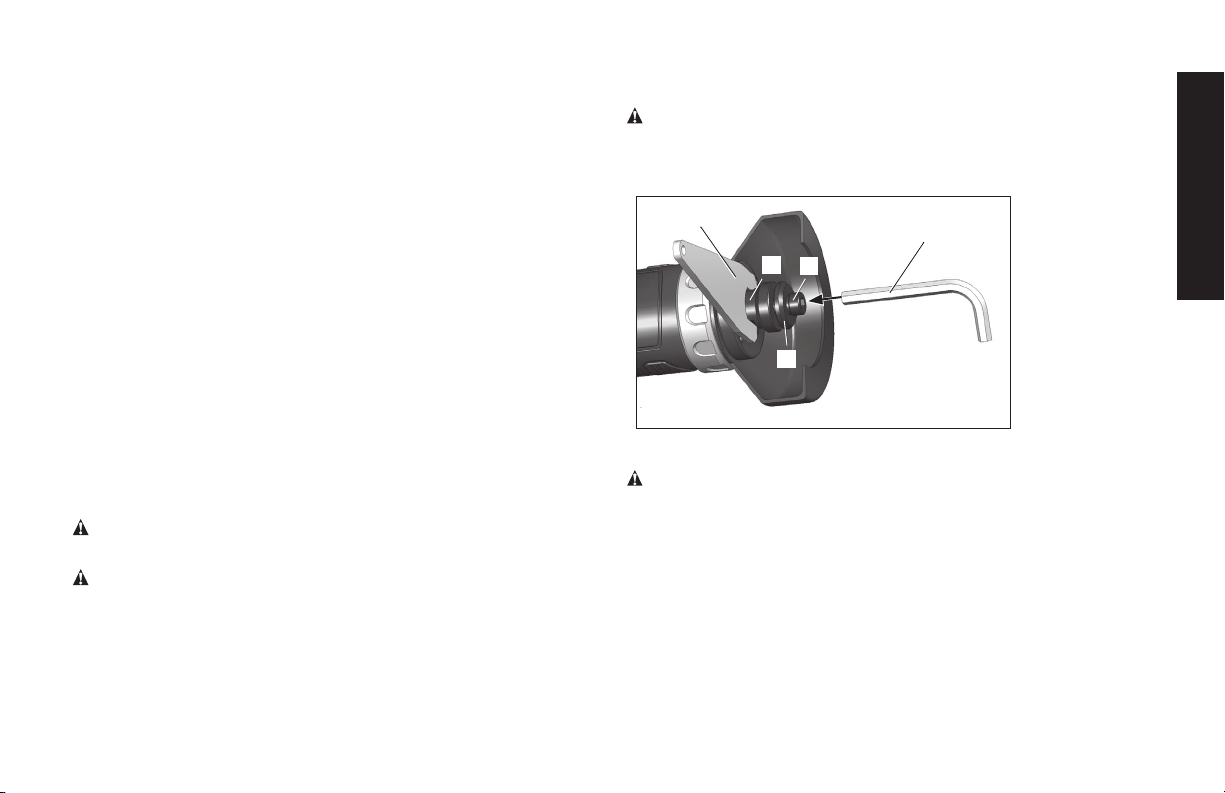
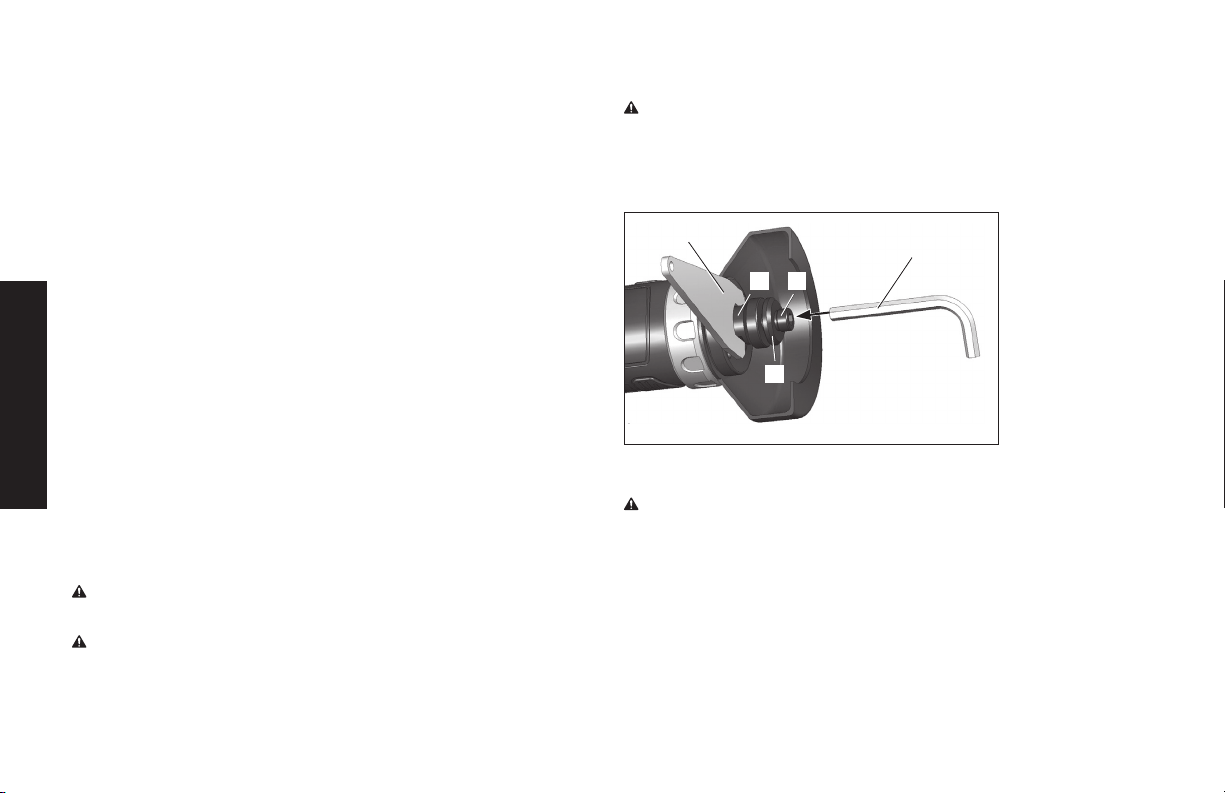
CUTTING WHEEL ASSEMBLY
CAUTION: Disconnectthecut-offtoolfromtheairsupplybefore
lubricating or changing cutting wheels.
•Holdingthespindle (F) with the supplied wrench (L), remove
the hex head screw (B) with the supplied allen key (M).
•Slidethewasher (C) off the tool.
CAUTION: Inspect and clean spindle before mounting cutting
wheels.
M
B
C
F
L
14
English
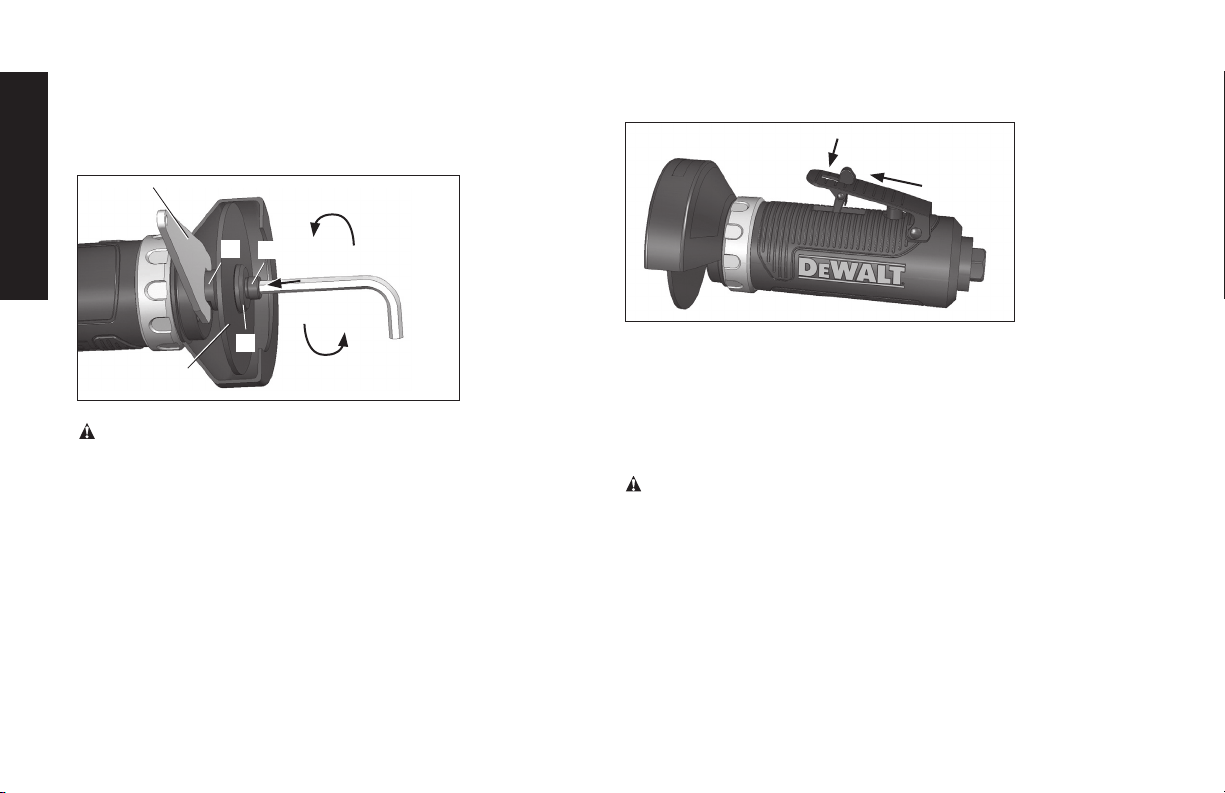
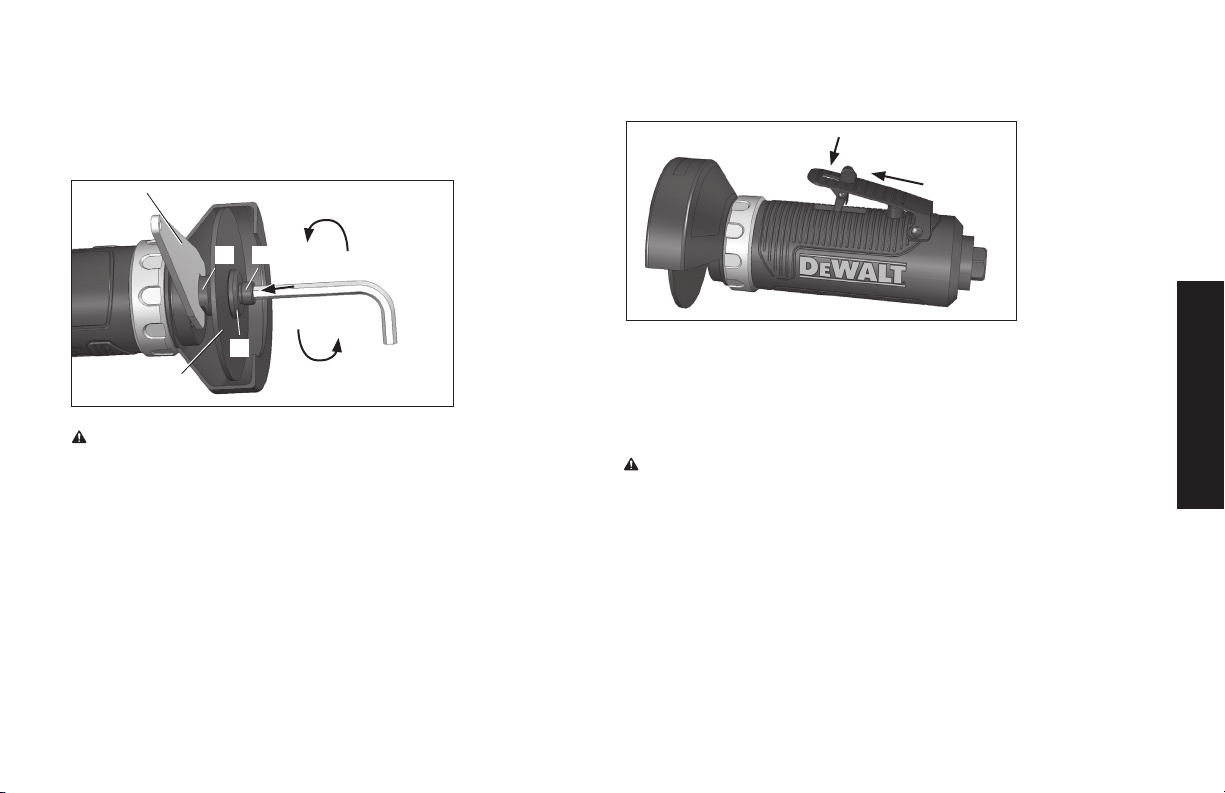
Cutting Wheel Assembly Continued
•Positionacutting wheel (D) onto the tool.
•Holdingthespindle (F) with the supplied wrench (L), replace
the washer (C) and hex head screw (B) until tightened.
WARNING: Make sure cutting wheels are securely fastened.
Loosecuttingwheelscouldcomeoffthetoolwhenoperatingand
cause serious injury.
OPERATING PROCEDURES
START-UP (FIG. 1, PG. 2)
•Connectthetooltoairsourcewiththehoseofrecommendedsize.
•Turnontheaircompressorandallowtheairtanktobefilled.
•Settheaircompressorregulatorto90PSI.Thisairtooloperates
at a maximum of 90 PSI air pressure.
•Whilepushingthesafety lever forward (1), depress
the trigger(2) to start operating the tool.
NOTE: The spindle revolves at full speed when the trigger is
fully depressed. As thumb is raised the self releasing
trigger closes, slowing down the spindle and allowing the
operator to choose the best speed and power for the job.
When the trigger is completely released it cannot be
depressed again until the safety release is disengaged.
CAUTION: DO NOT place any portion of the body in line with
the cutting wheel while it is rotating.
SHUT-DOWN (FIG. 1, PG. 2)
•Releasethetriggerinordertostopthetool.
•Whenjobiscompleted,turnofftheaircompressorandstore
the air tool after lubrication. For safety, put the tool
on a hanger or on a soft flat pad when not in use.
•Whenchangingcuttingattachments,alwaysdisconnectthe
air supply to avoid injury.
LOOSEN
FASTEN
1
2
B
C
F
L
D

15
English
MAINTENANCE
Lubrication
Air tools require lubrication throughout the lifetime of the tools.
The air motor and bearing uses compressed air to power the tool.
The compressed air contains moisture that will rust the air motor
and other parts in side of the tools, therefore lubrication is required
daily. Failure to lubricate the air tool properly will dramatically
shorten the life of the tool and will void the warranty
CAUTION: This air tool requires lubrication BEFORE initial use,
also before and after each additional use.
To Lubricate The Air Tool Manually:
1. Remove any attachment on the air tool.
2. Disconnect the tool from the air supply source, place
the air inlet face up.
3. Depress the trigger and place about 1 teaspoon
(5cc.) of air tool oil into the air inlet. (Depressing the trigger
will help circulate oil in the motor.)
NOTE: Use SAE #10 weight oil if air tool oil is not available.
4. Connect the tool to an air source, cover the exhaust end
with a towel and run for about 20 to 30 seconds.
WARNING: Keep out of the reach of children. If taken internally,
do not induce vomiting, call a doctor immediately.
WARNING: Anyexcessoilinthemotorisimmediatelyexpelled
fromtheexhaustport.Alwaysdirectexhaustportawayfrompeople
or objects.
Storage:
The air tool must be lubricated before storing.
Follow the “Lubrication” instruction with exception of step 4.
SERVICE INFORMATION
Please have the following information available for all service calls:
Model Number _________________________________________
Date and Place of Purchase ______________________________
FULL THREE YEARS WARRANTY
DeWALT heavy duty industrial tools are warranted for 3 years from
date of purchase. We will repair, without charge, any defects due
to faulty materials or workmanship. For warranty repair information,
call 1-800-4-D
e
WALT. This warranty does not apply to accessories
or damage caused where repairs have been made or attempted by
others. This warranty gives you specific legal rights and you may
have other rights which vary in certain states or provinces.
Latin America: This warranty does not apply to products sold in
Latin America. For products sold in Latin America, see country
specific warranty information contained either in the packaging, call
the local company or see website for warranty information.
FREE WARNING LABEL REPLACEMENT: If your warning labels
become illegible or are missing, call 1-800-4-D
e
WALT
for a free replacement.
16
English
LAS CAÍDAS PUEDEN CAUSAR
LESIONES GRAVES. NO PISAR NI
PARARSE EN ESTA ÁREA.
ADVERTENCIA
LES CHUTES PEUVENT CAUSER DE GRAVES
BLESSURES. NE MARCHEZ PAS ET NE VOUS
TENEZ PAS SUR CET EMPLACEMENT.
AVERTISSEMENT
FALLS CAN CAUSE SERIOUS
INJURIES. DO NOT STEP OR STAND
ON THIS AREA.
WARNING
SEE OWNER’S MANUAL FOR
BREAK-IN PROCEDURES.
CAUTION
PARA EL PROCEDIMIENTO DE
ASENTADO DE LA MAQUINA, VER
MANUAL DEL OPERARIO.
ATENCIÓN
CONSULTEZ LE MANUEL DE
L’UTILISATEUR POUR LES
PROCEDURES DE RODAGE.
ATTENTION
ADVERTENCIA
EL USO INDEBIDO PUEDE GENERAR RIESGOS. SEGUIR ESTAS INSTRUCCIONES: RIESGO DE ESTALLIDO. ASEGÚRESE QUE LA VÁLVULA DE SALIDA DEL
COMPRESOR ESTE REGULADA POR DEBAJO DEL MÁXIMO DE LA PRESIÓN DE OPERACIÓN DE LA PISTOLA ROCIADORA O HERRAMIENTA. ANTES DE ARRANCAR
EL COMPRESOR, TIRAR DEL ANILLO EN LA VÁLBULA DE SEGURIDAD PARA ASEGURARSE QUE LA VÁLVULA SE MUEVE LIBREMENTE. DRENAR EL AGUA DEL TANQUE DESPUÉS DE CADA USO.
RIESGO DE FUEGO O EXPLOSIÓN. NO ROCIAR LÍQUIDO NI PINTURAS INFLAMABLES O COMBUSTIBLES CERCA DE CHISPAS, LLAMAS, LLAMAS DE PILOTO O EN ÁREAS CERRADAS. EL ÂREA DE
TRABAJO DEBE ESTAR BIEN VENTILADA. MANTENER EL COMPRESOR ALEJADO POR LO MENOS 20 PIES DEL AREA DE PINTURA. NO LLEVAR NI OPERAR EL COMPRESOR NI DISPOSITIVO ELÉCTRICO
ALGUNO CERCA DEL AREA DEL ROCIADO. NUNCA FUME EN EL ÁREA DEL ROCIADO. USAR UNA MANGUERE DE UN MÍNIMO DE 25 PIES PARA CONECTAR LA PISTOLA AL COMPRESOR. RIESGO DE
DAÑOS PERSONALES. USAR GAFAS DE SEGURIDAD ANSI Z87. NUNCA APUNTAR EL CHORRO DE AIRE COMPRIMIDO O DE MATERIAL QUE SE ESTÉ ROCIANDO A SÍ MISMO NI A OTRAS PERSONAS.
NE RESPIRAR EL AIRE COMPRIMIDO. REDUCIR LA PRESIÓN A CERO ANTES DE DESMONTAR LA MANGUERA. RIESGO DE CHOQUE ELÉCTRICO. ALTO VOLTAJE. DESCONECTAR LA UNIDAD ANTES DE
QUITAR LA CUBIERTA. NO EXPONER A LLUVIA. ALMACENAR EN INTERIORES. PARA SEGURIDAD COMPLETA, OPERACIÓN E INSTRUCCIONES PARA REPARAR, LEER EL MANUAL DEL OPERADOR.
AVERTISSEMENT
UNE UTILISATION INCORRECTE PEUT ÊTRE DANGEREUSE. SUIVEZ LES INSTRUCTIONS CI-DESSOUS: RISQUE D'ECLATEMENT. ASSUREZ-VOUS QUE LA
PRESSION DE SORTIE DU COMPRESSEUR EST RÉGLÉE À UN NIVEAU INFÉRIEUR À LA PRESSION D'UTILISATION MAXIMUM DU PISTOLET VAPORISATEUR OU DE
L'ACCESSOIRE. AVANT DE DÉMARRER LE COMPRESSEUR, TIREZ SUR L'ANNEAU DE LA SOUPAPE DE SÛRETÉ POUR VOUS ASSURER QU'ELLE FONCTIONNE LIBREMENT. VIDANGEZ L'EAU DU RÉSERVOIR
À AIR APRÈS CHAQUE UTILISATION. RISQUE D'INCENDIE OU D'EXPLOSION. NE PAS VAPORISER UN LIQUIDE OU UN PEINTURE INFLAMMABLE OU COMBUSTIBLE PRÈS D'ÉTINCELLES, DE FLAMMES, DE
VEILLEUSES NI DANS UN ENDROIT RESTREINT OU RENFERMÉ. L'AIRE DE VAPORISATION DOIT ÊTRE BIEN AÉRÉE. GARDEZ LE COMPRESSEUR À UNE DISTANCE D'AU MOINS 20 PIEDS DE LA SURFACE À
VAPORISER. NE PORTEZ PAS LE COMPRESSEUR ET NE L'UTILISEZ PAS NI AUCUN AUTRE APPAREIL ÉLECTRIQUE À PROXIMITÉ DE L'AIRE DE VAPORISATION. NE FUMEZ JAMAIS QUAND VOUS
VAPORISEZ. UTILISEZ UN FLEXIBLE D'AIR D'UNE LONGUEUR MINIMUM DE 25 PIEDS POUR RELIER LE PISTOLET VAPORISATEUR AU COMPRESSEUR. RISQUE DE BLESSURES CORPORELLES. PORTEZ DES
LUNETTES DE PROTECTION ANSI Z87. NE DIRIGEZ JAMAIS L'AIR COMPRIME OU DES MATÉRIAUX VERS SOI OU VERS AUTRUI. NE JAMAIS UTILISER DE L'AIR COMPRIMÉ POUR LA RESPIRATION. RÉGLEZ
LA PRESSION À ZÉRO AVANT DE RETIRER LE BOYAU. RISQUE DE CHOC ÉLECTRIQUE. VOLTAGE DANGEREUX. DEBRANCHEZ LA MACHINE AVANT D'ENLEVER BOITIER. N'EXPOSEZ PAS LE COMPRESSEUR
À LA PLUIE. REMISEZ-LE À L'INTÉRIEUR. LISEZ LE MANUEL DE L'UTILISATEUR POUR DES INSTRUCTIONS COMPLÈTES CONCERNANT LA SÉCURITÉ, L'UTILISATION ET LES RÉPARATIONS.
INCORRECT USE CAN CAUSE HAZARDS. FOLLOW THESE INSTRUCTIONS: RISK OF BURSTING. MAKE SURE THE COMPRESSOR OUTLET PRESSURE IS SET
LOWER THAN THE MAXIMUM OPERATING PRESSURE OF THE SPRAY GUN OR TOOL. BEFORE STARTING THE COMPRESSOR, PULL THE RING ON THE SAFETY
VALVE TO MAKE SURE THE VALVE MOVES FREELY. DRAIN WATER FROM TANK AFTER EACH USE. RISK OF FIRE OR EXPLOSION. DO NOT SPRAY A FLAMMABLE OR COMBUSTIBLE
LIQUID OR PAINT NEAR SPARKS, FLAMES, PILOT LIGHTS, OR IN A CONFINED AREA. THE SPRAY AREA MUST BE WELL VENTILATED. KEEP COMPRESSOR AT LEAST 20 FEET AWAY FROM
SPRAY AREA. DO NOT CARRY AND OPERATE THE COMPRESSOR, OR ANY OTHER ELECTRICAL DEVICE NEAR THE SPRAY AREA. NEVER SMOKE WHEN SPRAYING. USE A MINIMUM OF
25 FEET OF HOSE TO CONNECT A SPRAY GUN TO THE COMPRESSOR. RISK OF PERSONAL INJURY. WEAR ANSI Z87 SAFETY GLASSES. NEVER SPRAY COMPRESSED AIR OR MATERIAL
AT SELF OR OTHERS. DO NOT USE COMPRESSED AIR FOR BREATHING. REGULATE PRESSURE TO ZERO BEFORE REMOVING HOSE. RISK OF ELECTRICAL SHOCK. HAZARDOUS VOLTAGE.
UNPLUG UNIT BEFORE REMOVING COVER. DO NOT EXPOSE TO RAIN, STORE INDOORS. READ OWNER'S MANUAL FOR COMPLETE SAFETY, OPERATION, AND REPAIR INSTRUCTIONS.
WARNING
HOLD HOSE FIRMLY TO
PREVENT HOSE WHIP.
CAUTION
SOSTENGA LA MANGUERA
CON FIRMEZA PARA EVITAR EL.
ATENCIÓN
BIEN TENIR LE TUYAU POUR
ÉVITER UN À-COUP.
ATTENTION
DRAIN TANK DAILY OR AFTER EACH USE. CONDENSATION BUILD-UP MAY CAUSE CORROSION
INSIDE TANK RESULTING IN TANK FAILURE. SEE MANUAL FOR INSPECTION PROCEDURES. TO DRAIN
TANK OPEN VALVE SLOWLY AND TILT COMPRESSOR TO EMPTY ACCUMULATED WATER.
WARNING
DRENE EL TANQUE A DIARIO O DESPUÉS DE CADA USO. LA ACUMULACIÓN DE CONDENSACIÓN
PUEDE OCASIONAR CORROSIÓN DENTRO DEL TANQUE Y PROVOCAR FALLA DEL TANQUE.
CONSULTE EL MANUAL PARA CONOCER LOS PROCEDIMIENTOS DE INSPECCIÓN. PARA DRENAR EL TANQUE, ABRA LA
VÁLVULA LENTAMENTE E INCLINE EL COMPRESOR PARAELIMINAR EL AGUA ACUMULADA.
ADVERTENCIA
RÉSERVOIR DE VIDANGE QUOTIDIEN
OU APRÈS CHAQUE UTILISATION. L'HABILLAGE
DE
CONDENSATION PEUT CAUSER LA CORROSION À L'INTÉRIEUR DU RÉSERVOIR AYANT POUR
RÉSULTAT L'ÉCHEC DE RÉSERVOIR. VOIR LE MANUEL POUR DES PROCÉDURES D'INSPECTION. À LA VALVE
OUVERTE
DE RÉSERVOIR DE VIDANGE LENTEMENT ET AU COMPRESSEUR D'INCLINAISON À L'EAU ACCUMULÉE VIDE.
AVERTISSEMENT
GLOSSARY
CFM: Cubic feet per minute.
SCFM: Standard cubic feet per minute;
a unit of measure of air delivery.
PSI: Pounds per square inch; a unit of measure of pressure.
Code Certification: Products that bear one or more of the
following marks: UL, CUL, ETL, CETL, have been evaluated by
OSHA certified independent safety laboratories and meet the
applicable Underwriters Laboratories Standards for Safety.
RPM: Revolutions per minute; is a measure of the frequency
of a rotation
BPM: Beats per minute.
NPT: National pipe thread (tapered thread); is a U.S. standard
for tapered threads used on threaded pipes and fittings.
ID: Inner diameter
17
Français
DWMT70784 OUTIL À TRONÇONNER
A. Protège-meule
B. Vis à tête hexagonale
C. Rondelle
D. Meule à tronçonner
E. Pince de serrage
F. Broche
G. Entrée d’air 6,4 mm (¼ po)
H. Échappement
I. Gâchette
J. Manette d’accélérateur de
sécurité
K. Corps ergonomique
FICHE TECHNIQUE
MODÈLE
DWMT70783
VITESSE À VIDE (À 620 KPA (90 PSI}
19 000 tr/min
TYPE D'ÉCHAPPEMENT
Arrière
DIAMÈTRE DU DISQUE
76,2 mm (3 po)
ALÉSAGE CENTRAL DU DISQUE
10 mm (3/8 po)
VIS DE RÉGLAGE
M6 x 12 mm hexagonale
CONSOMMATION D'AIR MOYENNE
(À 620 KPA (90 PSI}
19,6 l/s (41,5 pieds cubes
standard par minute)
2,8 l/s (5,9 pieds cubes
standard par minute)
POIDS NET
0,82 kg (1,8 lb)
DIMENSION DE L'ENTRÉE D'AIR
Filetage conique (F) 6,35
mm (1/4 po)
DIMENSION RECOMMANDÉE DU
TUYAU
10 mm (3/8 po)
PRESSION D'AIR MAXIMALE
90 psi
FIG.1
A
B
C
D
E
F
K
J
I
G
H
G
18
Français
Dénitions : lignes directrices en
matière de sécurité
Les définitions ci-dessous décrivent le niveau de gravité pour
chaque symbole. Veuillez lire le mode d’emploi et porter une
attention particulière à ces symboles.
DANGER : Indique une situation dangereuse imminente qui, si
elle n’est pas évitée, causera la mort ou des blessures graves.
AVERTISSEMENT :
Indique une situation potentiellement
dangereuse qui, si elle n’est pas évitée, pourrait se solder par un
décès ou des blessures graves.
ATTENTION : Indique une situation potentiellement dangereuse
qui, si elle n’est pas évitée pourrait se solder par des blessures
mineures ou modérées.
ATTENTION : Utilisé sans le symbole d’alerte à la sécurité,
indique une situation potentiellement dangereuse qui, si elle n'est
pas évitée pourrait se solder par des dommages à la propriété.
POUR TOUTES QUESTIONS OU COMMENTAIRES
RELATIFS(VES) À L’OUTIL OU À PROPOS DE TOUT AUTRE
OUTIL D
e
WALT, COMPOSER SANS FRAIS LE :
1-800-4-D
eWALT
(1-800-433-9258)
DIRECTIVES DE SÉCURITÉ
IMPORTANTES
AVERTISSEMENT : Nertainespoussièresproduitesparlestravaux
de ponçage, sciage, meulage, perçage et autres peuvent contenir des
produits chimiques pouvant selon l’état de Californie causer le cancer,
desanomaliescongénitalesoud’autresproblèmesliésauxfonctions
reproductrices. Voici quelques exemples de ces produits chimiques :
• leplombcontenudanslespeinturesàbasedeplomb;
• lasilice cristalline provenantdela brique,du cimentet d’autres
produitsdemaçonnerie;
• l’arsenicetchromeprovenantdeboistraitéchimiquement.
Les risques reliés à l’exposition à ces poussières varient selon la
fréquence à laquelle l’utilisateur travaille avec ce type de matériaux.
Pourréduirevotreexpositionàcesproduitschimiques:travaillerdans
un endroit bien ventilé et porter un équipement de sécurité approuvé
par l’OSHA/MSHA/NIOSH comme un masque anti-poussières
spécialement adapté ou un respirateur lors de l’utilisation de ces outils.
Lors de l’utilisation d’outils pneumatiques, des précautions de base
enmatièredesécuritédoiventêtresuiviesafinderéduirelerisquede
blessure personnelle.
AVERTISSEMENT : ce produit contient des produits
chimiques, notamment le plomb, reconnus par l’État de
Californie comme étant cancérigènes et pouvant entraîner
des anomalies congénitales et d’autres dangers relatifs à la
reproduction. Se laver les mains après toute manipulation.
CONSERVER CES INSTRUCTIONS
AVERTISSEMENT :
la mauvaise utilisation ou maintenance de ce produit peut
causerdesblessuresgravesEtdesdommagessérieuxaux
biens. Il faut lire et comprendre tous les avertissements et la
Notice d’emploi avant d’utiliser cet équipement. Lorsque
vous utilisez des outils pneumatiques, il faut respecter les
mesures de sécurité fondamentales pour réduire leRisque
de blessures.
AVERTISSEMENT :
l faut lire et comprendre ce guide d’instructions et les
étiquettes de l’outil avant d’installer, d’utiliser cet outil ou d’en
faire l’entretien. Gardez ces instructions dans un lieu sûr à
portée de la main.
Lesopérateursetautrespersonnesdanslazonedetravail
doivent porter des lunettes de sécurité avec écrans latéraux
approuvées ANSI Z87.1 CAN/CSA Z94.3.
Lesutilisateursetlesgensdanslazonedetravaildoivent
porter une protection auditive.
Graissez tous les jours pour un rendement optimal.

19
Français
AVERTISSEMENT :
•Évitezl’utilisationprolongée:lemouvementrépétitifoul’exposition
auxvibrationspeuventêtrenocifspourvosmainsouvosbras.
Utiliser des gants pour offrir un maximum de protection, prendre
des pauses fréquentes et limiter le temps d’utilisation quotidien.
•N’utilisezpasdegazoxygèneouréactif;uneexplosion
peut survenir.
•Nepasexcéderunepressiond’airde90psi.
•Ilfautlireattentivementtousleslivretsinclusavecceproduit.
Il faut bien se familiariser avec les commandes et l’emploi correct
de l’équipement.
•Seuleslespersonnesquiconnaissentbiencesrèglesde
sécurité devraient utiliser l’outil pneumatique.
•Ilnefautpasexcéderlapressionlimitedescomposantes
dusystème.
•Débrancherl’outilpneumatiquedel’arrivéed’airavantdechanger
les outils ou les accessoires et lorsqu’il n’est pas utilisé.
•Ilfauttoujoursporterdeslunettesdeprotectionetune
protection auditive durant l’emploi.Il faut toujours porter des
lunettes de protection avec écrans latéraux.Il faut toujours porter
une protection auditive.
•Ilnefautjamaisporterdesvêtementsamplesouunhabillement
comportant des attaches ou bretelles lâches, etc. qui pourraient
êtrehappéesparlespiècesmobilesdel’outiletcauserdes
blessures graves.
•Ilnefautpasporterdebijou,montre,identification,bracelet,
collier,etc.lorsquevousutilisezl’outil,carilspourraientêtre
happésparlespiècesmobilesdel’outiletcauserdes
blessures graves.
•Ilnefautpasabaisserlagâchettelorsquevousraccordezl’outil
au boyau d’air d’arrivée.
•Toujoursutiliserunaccessoireconçupourlesoutilspercuteurs
pneumatique.
•Ilnefautjamaisutiliserdesaccessoiresendommagésouusés.
AVERTISSEMENT :
•Ilnefautjamaisdéclencherl’outillorsqu’iln’estpasappliqué
contreunobjet.Lesaccessoiresdoiventêtrebienancrés.
Lesaccessoireslâchespeuventcauserdesblessuresgraves.
•Protégezlesconduitsd’airdesdommagesetdesperforations.
•Ilnefautjamaispointerl’outilpneumatiqueverssoiou
autrui.Desblessuresgravespeuventsurvenir.
•Vérifiezlesboyauxd’airencasd’usureoudedétérioration
avant chaque emploi. S’assurer que tous les raccords sont
bien branchés.
•S’assurerquelesboulons,écrousetvissontbienserréset
que l’équipement est en bon état.
•Nejamaisplacersesmainsprèsd’unepiècemobileouendessous.
20
Français
AVERTISSEMENT :
RISQUE D’EXPLOSION OU D’INCENDIE
Ce qui peut se produire Comment l’Éviter
• Lesoutilsabrasifscomme
les sableuses et les meules,
les outils rotatifs comme
les perceuses et les outils à
choc comme les clés, les
marteaux et les scies à
action réciproque peuvent
produire des étincelles
qui pourraient allumer des
produits inflammables.
• Nejamaisutiliserlesoutils
près des substances
inflammables, comme
l’essence, le naphte, les
solvants de dégraissage, etc.
• Travaillerdansunezone
de travail bien ventilée et
propre, exempte de matériaux
combustibles.
• Nejamaisutiliserdegaz
oxygène, de dioxyde de
carbone ou autres gaz
en bouteille comme source
d’énergie pour les outils
pneumatiques.
• Dépasserlapression
maximale nominale des
accessoires de l’outil peut
causer une explosion
causant des blessures
graves.
• Utiliserdel’aircompriméréglé
à une pression maximale près
ou au-dessous de la pression
nominale des accessoires.
DANGER :
RISQUE REPIRATOIRE (ASPHYXIE)
CE QUI PEUT SE PRODUIRE COMMENT L’ÉVITER
• Lesoutilsabrasifscomme
les sableuses et les meules
et les outils à tronçonner
produisent de la poussière
et de matériaux abrasifs qui
peuvent être nocifs pour
les poumons et le
système respiratoire.
• Toujoursporterunmasque
facial bien ajusté ou un
respirateur homologué
MSHA/NIOSH lorsque
vous utilisez ces outils.
• Certainsmatériaux,comme
les adhésifs et le goudron,
contiennent des produits
chimiques qui peuvent causer
des blessures graves à
l’exposition prolongée.
• Toujourstravaillerdans
une zone de travail bien
ventilée et propre.
ATTENTION :
RISQUE DE PERTED’OUÏE
QUE FAIRE COMMENT PRÉVENIR
• L’expositionàlongtermeaux
bruits produits par les outils
pneumatiques peut causer
une perte permanente de
l’ouïe.
• Toujoursporteruneprotection
auditive
ANSI S3.19.

21
Français
AVERTISSEMENT : RISQUE DE PERTED’OUÏE
QUE FAIRE COMMENT PRÉVENIR
• Lesoutilslaisséssans
surveillance ou dont le boyau
d’air est branché peuvent être
activés par des personnes
non autorisées qui peuvent se
blesser ou blesser autrui.
• Retirerletuyaud’airlorsque
l’outil n’est pas utilisé et ranger
l’outil dans un endroit sûr hors
de portée des enfants et des
utilisateurs n’ayant pas reçu la
formation requise.
• Lesoutilspneumatiques
peuvent projeter les objets
non fixés et autres matériaux
dans toutes les directions de
la zone de travail.
• Utiliseruniquementlespièces,
les fixations et les accessoires
recommandés par le fabricant.
• Conserverlazonedetravail
propre et en bon ordre. Éloigner
les enfants et autrui de la zone
de travail durant l’utilisation de
l’outil.
• Conserverleslieuxbien
illuminés.
• Lesoutilspneumatiques
peuvent être actionnés
accidentellement lors d’un
entretien ou d’un changement
d’outil.
• Retirerletuyaud’airpour
lubrifier, ajouter ou remplacer
des douilles.
• Nejamaistransporterl’outilpar
le boyau.
• Évitezlesdémarragesnon
intentionnels. Ne transportez pas
l’outil branché avec le doigt sur
la gâchette.
• Lesréparationsdoiventêtre
effectuées seulement par un
représentant de service autorisé.
• Lefaitdelaisserunecléde
réglage ou une clé fixée sur
une pièce tournante augmente
le risque de blessures.
• Retirertouteslesclésde
réglage et les clés avant de
mettre l’outil en marche.
QUE FAIRE COMMENT PRÉVENIR
• Utiliserdesbusesgonflantes
pour l’époussetage peut
causer des blessures graves.
• NE PAS utiliser de buses
gonflantes pour l’époussetage.
• Lesoutilsélectriquespeuvent
provoquer le déplacement de
la pièce de travail au contact
et causer des blessures.
• Utiliserdespincesouautres
dispositifs pour empêcher le
mouvement.
•Lapertedecontrôledel’outil
peut causer des blessures à
soi-même et à autrui.
• Nejamaisutiliserl’outilsous
l’influence d’alcool ou de
drogues.
• Ilnefautpastendrel’outiltrop
loin. Gardez l’équilibre en tout
temps.
• Gardezlesmainspropres,
sèches et exemptes de graisse
et d’huile.
• Restezalerte.Portezattentionà
ce que vous faites. Servez-vous
de votre bon sens. Il ne faut pas
utiliser l’outil lorsque vous êtes
fatigué.
• Desoutilsdemauvaisequa-
lité, inappropriés ou endom-
magés tels que les meules,
les ciseaux, les douilles, les
perceuses, etc., peuvent
voler en morceaux lors du
fonctionnement, projetant des
particules dans toutes les
directions de la zone de travail
et causer des
blessures graves.
• Toujoursutiliserlesaccessoires
cotés pour la vitesse de l’outil
électrique.
• Nejamaisutiliserdesoutilsque
vous avez échappés, impactés
ou endommagés par l’usage.
• Nepasexercerdeforce
excessive sur l’outil – laisser
l’outil effectuer le travail.
22
Français
AVERTISSEMENT:
RISQUE DE BLESSURE (SUITE)
QUE FAIRE COMMENT PRÉVENIR
• Lesoutilsetlesaccessoires
qui ne sont pas entretenus
correctement peuvent causer
des blessures graves.
• Entretenirlesoutilsdefaçon
minutieuse.
• Keepacuttingtoolsharpand
clean. A properly maintained
tool, with sharp cutting edges
reduces the risk of binding and
is easier to control.
• L’outilrisquedevoler
en morceaux s’il est
endommagé.
• Vérifierl’alignementetla
torsion des pièces mobiles,
la présence de pièces
brisées ou de toute autre
condition pouvant nuire au
fonctionnement de l’outil.
Faire réparer l’outil s’il est
endommagé avant de l’utiliser.
AVERTISSEMENT:
RISQUE D’ÉLECTROCUTION
QUE FAIRE COMMENT PRÉVENIR
• Cetoutilnecomportepas
de surface de prise isolée.
Le contact avec un fil « sous
tension » mettra les surfaces
métalliques de l’outil aussi
« sous tension », ce qui peut
causer une électrocution ou
la mort.
• Évitertoutcontactcorporel
avec les surfaces mises à la
terre telles que les tuyaux,
radiateurs, cuisinières et
réfrigérateurs. Le risque
d’électrocution est plus grand
si votre corps est mis à la terre.
• Inspecterminutieusementla
pièce de travail afin de détecter
tout câblage dissimulé avant
d’exécuter le travail.
23
Français
AVERTISSEMENT : RISQUE DE
COUPURES OU DE BRÛLURES
QUE FAIRE COMMENT PRÉVENIR
• Lesoutilsquicoupent,
cisaillent, percent,
poinçonnent, cisèlent, etc.
peuvent causer des
blessures graves.
• Éloignerlapiècemobilede
l’outil des mains et du corps.
AVERTISSEMENT : ARISQUE D’EMMÊLEMENT
QUE FAIRE COMMENT PRÉVENIR
• Lesoutilsquicontiennent
des éléments mobiles ou
entraînent d’autres outils
mobiles, comme les disques
de meulage, les douilles,
les meules, etc. peuvent
s’emmêler avec les cheveux,
les vêtements, les bijoux et les
objets lâches, et causer des
blessures graves.
• Nejamaisporterdevêtements
amples ou d’habillement
comprenant des attaches ou
des bretelles lâches, etc. qui
pourraient s’emmêler dans
les pièces mobiles de l’outil.
• Enleverlesbijoux,montres,
identifications, bracelets,
colliers, etc. pouvant être
happés par l’outil.
• Garderlesmainséloignées
des pièces mobiles. Attacher
ou couvrir les cheveux longs.
• Porteztoujoursdesvêtements
bien ajustés et les appareils de
protection appropriés lorsque
vous utilisez l’outil.
AVERTISSEMENT : RISQUE DE BLESSURE
À LA TÊTE OU AUX YEUX
QUE FAIRE COMMENT PRÉVENIR
• L’équipementpneumatique
et les outils électriques
peuvent propulser des
matériaux, comme les
copeaux de métal, le bran
de scie et autres débris, à
haute vitesse, ce qui pourrait
causer des blessures graves.
• Toujoursporterdeslunettes
de sécurité avec écrans
latéraux approuvées ANSI
Z87.1 CAN/CSA Z94.3.
• Nejamaislaisserl’outilsans
surveillance. Débrancher le
boyau d’air lorsque l’outil n’est
pas utilisé.
• L’aircomprimépeutêtre
dangereux. Le courant d’air
peut causer des lésions
aux tissus mous, comme
les yeux, les oreilles, etc.
Les particules ou objets
propulsés par le courant
d’air peuvent causer
des blessures.
• Pourplusdeprotection,utiliser
un masque facial approuvé en
plus des lunettes de protection.
• Lesaccessoiresdesoutils
peuvent devenir lâches ou
briser et se dégager en
propulsant des particules en
direction de l’utilisateur ou
des autres personnes dans
la zone de travail.
• S’assurerquetousles
accessoires sont fixés
solidement.

24
Français
AVERTISSEMENT :
ARRIVÉE D’AIR ET RACCORDS
• N’utilisez jamais de gaz oxygène, de gaz combustible ou
autres gaz en bouteille comme source d’énergie pour cet outil,
car l’outil peut exploser et possiblement causer des blessures.
• Ne pas utiliser de sources d’alimentation qui peuvent excéder
200 psig, car l’outil peut éclater et peut causer de blessures.
• Le raccord ne doit pas maintenir une pression lorsque l’arrivée
d’air est débranchée. Si le mauvais raccord est utilisé, l’outil
peut rester chargé d’air après l’avoir débranché; l’outil pourra
fonctionner après que le conduit d’air est débranché et pourra
causer des blessures.
• Toujours débrancher l’arrivée d’air :
1) avant d’effectuer des ajustements;
2) pour faire l’entretien de l’outil;
3) lorsque l’outil n’est pas utilisé;
4) pour le déplacer à une autre zone de travail,
car l’outil peut être activé par accident et peut
causer des blessures.
AVERTISSEMENT :
CONSIGNES DE SÉCURITÉ
ADDITIONNELLES POUR LES MEULEUSES
• La vitesse des accessoires doit être au moins de la vitesse
minimale recommandée Pour l’outil. Les meules et autres
accessoires fonctionnant à une vitesse Supérieure peuvent
se détacher de l’outil et causer des blessures. La vitesse des
accessoires doit être supérieure à la vitesse minimale de la
Meule de l’outil.
• Ne pas utiliser de lames de scies ou autres lames dentelées
avec cet outil. Cela risque de causer de graves blessures.
• Lors de la mise en marche de l’outil équipé d’une nouvelle
meule, d’une meule De remplacement ou d’un autre
accessoire, placer l’outil dans un endroit bien Protégé et
faire fonctionner l’outil pendant une minute. Ne jamais mettre
L’outil en marche lorsque l’utilisateur ou d’autres personnes
se trouvent à Proximité de la meule ou de l’accessoire. Si la
meule ou l’accessoire présente Une défaillance qui n’a pas été
détectée, il y aura risque d’éclatement dans la Minute qui suit.
• Éviter d’utiliser des meules qui tressautent ou les soumettre à
une Manipulation plus robuste.
• Diriger les étincelles loin de l’utilisateur, des observateurs ou
Des matières inflammables.
• Déconnecter l’outil de la source d’air comprimé avant de
remplacer Les accessoires ou lorsque l’outil n’est pas utilisé.
• Ne pas transporter l’outil lorsque l’accélérateur est enclenché.
Ne pas désactiver le levier de sécurité de l’accélérateur.
Ne pas appuyer. Sur l’accélérateur lors de la connexion à
la source d’air comprimé. Ne pas attacher ou verrouiller
l’accélérateur et position marche.
• N’utiliser que les accessoires de meuleuse conçus pour l’air
Comprimé.
CONSERVER CES DIRECTIVES
POUR UN USAGE ULTÉRIEUR

25
Français
CARACTÉRISTIQUES
PROTÈGE-MEULE
Le protégé-meule (A) peut
être réglé et positionné
rapidement et facilement
afin de protéger l’outil
lorsqu’il est utilisé.
PINCE DE SERRAGE
La pince de serrage (E)
est l’endroit où les meules
à tronçonner peuvent être
placées et elle est reliée
à la broche (F). La vis à
tête hexagonale (B) et la
rondelle (C) maintiennent la meule
à tronçonner en place.
GÂCHETTE
La gâchette (I) permet à l’opérateur
decontrôlerlamiseenmarcheet
l’arrêt de l’outil pneumatique.
MANETTE D’ACCÉLÉRATEUR DE
SÉCURITÉ
La manette d’accélérateur de
sécurité (J) prévient la mise en marche accidentelle de l’outil.
CORPS ERGONOMIQUE
Le corps de l’outil pneumatique est un corps à prise coussinée
conçu de manière ergonomique (K) afin d’en réduire le poids
et d’obtenir un rapport puissance-poids supérieur. La poignée est
faite d’élastomère thermoplastique (ETP) moulé conçue pour plus
deconfort,moinsdeglissementetunmeilleurcontrôledel’outil.
ENTRÉE D’AIR
L’entrée d’air de l’outil (D), située tout
en bas de la poignée, est utilisée pour
raccorder l’alimentation en air ayant
un filetage conique NPT classique de
6,4 mm (1/4 po).
ÉCHAPPEMENT
L’échappement (H) est situé dans la
base de la poignée et permet de diriger
l’échappement loin de l’opérateur et de
la zone de travail.
A
B
C
E
F
PLAT
PLAT
J
I
H
G

26
Français
INSTALLATION
Alimentation d’air
AVERTISSEMENT :
Le branchement recommandé est illustré dans la
figure A
.
Les outils pneumatiques fonctionnent selon une grande plage de
pression d’air. Pour une efficacité maximale et une longue vie de
l’outil, la pression de l’air fourni à ces outils NE DOIT PAS dépasser
la pression nominale de l’outil lorsque l’outil fonctionne. L’utilisation
d’une pression plus élevée que la pression nominale peut provoquer
l’usure plus rapide de l’outil et en écourter la durée. Une pression
d’air plus élevée peut aussi provoquer des conditions dangereuses
et une explosion. Il faut augmenter le diamètre intérieur du boyau
comme compensation lorsqu’il est
très long (plus de 25 pieds).
Le diamètre intérieur minimum
du boyau est être de 3/8 po et
les raccords doivent avoir les
mêmes dimensions intérieures.
Il est recommandé d’utiliser des
lubrificateurs et des filtres à air dans
les conduits d’air pour empêcher
l’eau de pénétrer dans le conduit et
endommager l’outil. Vider le réservoir
d’air tous les jours. Nettoyer le grillage
du filtre du conduit d’air au moins une
fois par semaine pour supprimer la
saleté accumulée ou autre débris qui
peutrestreindre le débit d’air.
L’entrée d’air de l’outil utilisée
pour raccorder l’alimentation d’air
comporte un fil standard américain
de 1/4 po NPT.
FIGURE A
Règles de sécurité pour les Outils
pneumatiques
1) Inspecter le boyau d’air pour noter les fêlures ou
autres problèmes. Remplacer le boyau s’il est usé.
2) Ne jamais pointer le boyau d’air en direction d’une personne.
3) Débrancher l’outil lorsqu’il n’est pas utilisé ou avant
d’en effectuer l’entretien ou de changer les accessoires.
4) Utiliser les boyaux et raccords appropriés. Ne jamais utiliser de
manchons de conversion rapide fixés directement sur l’outil.
Ajoutezplutôtunboyauetunraccordentrel’outilet
l’alimentation d’air.
Outil
Boyau récepteur
Huiler ici tous les jours
Connecteur
Boyau
d'air
Lubrificateur
Mamelon
Filtre
Vidanger tous les jours

27
Français
EMPLOI CORRECT DE L’OUTIL
Postes de travail
Votre nouvel outil à tronçonner est conçu pour les applications de
coupage et de meulage. L’échappement arrière de l’outil permet de
diriger le flux d’air loin de la zone de travail, un régulateur intégré
pouruncontrôledelavitessepratiqueetunemanettedesécurité
pour prévenir les mises en marche accidentelles.
Votre outil à tronçonner ne doit être utilisé que comme outil à main.
It is always recommended that the tool is used when standing with
solid footing. It can be used in other positions but before any such
use, the operator must be in a secure position having a firm grip
and footing.
Mise en service
ALIMENTATION D’AIR
MISE EN GARDE :
Cetoutilpneumatiquedoitêtrelubrifié
AVANTsapremièreutilisation,ainsiqu’avantetaprèschaque
utilisation ultérieure.
AVERTISSEMENT :
Utilisez une alimentation d’air propre et graissée qui fournit une
pression d’air mesurée à l’outil de 90 psi/6.2 bar lorsque l’outil
fonctionne avec la gâchette pleinement abaissée. Utilisez un
boyau de taille et de longueur recommandées. Il est recommandé
de raccorder l’outil à l’alimentation d’air tel qu’illustré dans la
figure A. Ne pas brancher l’outil au système de conduits d’air
sans avoir incorporé une vanne d’arrêt facile à atteindre et à
utiliser. L’alimentation d’air devrait être lubrifiée. Il est fortement
recommandé d’utiliser un filtre à air avec régulateur et lubrificateur
(FRL) tel qu’illustré dans la figure A pour fournir à l’outil un
air propre lubrifié à la pression appropriée. Les détails de cet
équipement s’obtiennent auprès de votre fournisseur. Si cet
équipement n’est pas utilisé, il faut graisser l’outil en fermant
l’alimentation d’air et dépressuriser le conduit en abaissant la
gâchette de l’outil. Débranchez l’alimentation d’air et versez dans
la bague d’admission une cuillère à thé (5 cc) d’huile de graissage
pour moteur pneumatique, incorporant de préférence un additif
antirouille. Rebranchez l’outil à l’alimentation d’air et faites tourner
l’outil lentement pendant quelques secondes pour permettre à l’air
de circuler l’huile.
Graissez l’outil tous les jours si vous l’utilisez fréquemment ou
lorsqu’il commence à ralentir ou à perdre de la puissance.
Utilisation d’un outil à tronçonner
AVERTISSEMENT :
1) Lire toutes les instructions avant d’utiliser cet outil. Tous les
utilisateurs doivent recevoir une formation complète sur son
utilisation et connaître les règles de sécurité.
2) Ne pas excéder la pression maximum d’utilisation d’air de
90 psi/6.2 bar.
3) Utiliser l’équipement de protection personnelle.
4) Utiliser seulement l’air comprimé dans les conditions
recommandées.
5) Si l’outil semble mal fonctionner, cesser de l’utiliser et prendre
les dispositions pour son entretien et sa réparation.
6) Si l’outil s’utilise avec un compensateur ou tout autre dispositif
de support, s’assurer qu’il est bien assujetti.
7) Toujours garder les mains éloignées de l’accessoire de travail
fixé à l’outil.
8) L’outil n’est pas isolé électriquement. Ne jamais utiliser l’outil
s’il existe un risque qu’il entre en contact avec une ligne sous
tension.
9) Lorsque vous utilisez l’outil, vous devez vous assurer d’avoir un
bon équilibre et de tenir l’outil fermement pour contrer les forces
ou réactions qui peuvent se produire en utilisant l’outil.
10)
Utiliser uniquement des pièces de rechange d’origine Dewalt ou
des pièces de qualité équivalente. Ne pas effectuer de réparations
temporaires ou permanentes à l’aide de pièces inadéquates.
11) Ne pas verrouiller, utiliser du ruban ou du fil métallique, etc.
pour immobiliser la gâchette réversible dans la position de
marche. La gâchette doit toujours être en mesure de retourner
à la position « arrêt » lorsqu’elle est libérée.
28
Français
Utilisation d’un outil à tronçonner (suite)
12) Toujours fermer l’alimentation d’air en direction de l’outil et
abaisser la gâchette pour libérer l’air du boyau d’alimentation
avant d’installer, d’ajuster ou de retirer l’accessoire de travail.
13) Vérifiez régulièrement les boyaux et les raccords pour en
noter l’usure. Remplacer au besoin. Ne pas transporter l’outil
par le boyau. S’assurer de retirer la main de la gâchette révers-
ible pour transporter l’outil branché à l’alimentation d’air.
14) Assurez-vous d’éviter l’emmêlement des pièces mobiles de
l’outil par les vêtements, les attaches, les cheveux, les chiffons,
etc, car cela aurait pour effet de pousser le corps vers l’outil et
peut être très dangereux.
15) Il est attendu que les utilisateurs adopteront des habitudes de
prudence au travail et respecteront toutes les prescriptions
légales pertinentes pour installer, utiliser et entretenir l’outil.
16) Installer seulement l’outil lorsqu’un interrupteur facilement
accessible et utilisable est incorporé dans l’alimentation d’air.
17) S’assurer que l’échappement d’air de l’outil ne cause pas de
problème ou n’est pas dirigé sur une personne.
18) Ne jamais poser l’outil sur le sol si l’accessoire de travail est
encore en marche.
LISTE DE VÉRIFICATIONS AVANT LA
MISE EN MARCHE (FIG. 1, PAGE 2)
•Évacuerl’eauduréservoirducompresseuràairainsiquel’humiditédes
conduites d’air. (Consulter le manuel d’instructions du compresseur à
air).
•Lubrificationdel’outil.(Voirlasection«Entretien»decemanuel.)
•Sélectionnerl’accessoirerequis.Lemandrindel’accessoiredoitcorre-
spondre exactement au diamètre de la pince de serrage pour la meule-
use pneumatique.
AVERTISSEMENT :Risque d’utilisation dangereuse. Saisir fermement
letuyauenmainlorsduraccordementoudeladéconnexionpourempê-
cherunà-coupdutuyau.
AVERTISSEMENT :Risque d’éclatement. Trop de pression d’air cause
un risque sérieux d’éclatement. Vérifiez la pression maximum suggérée
par le fabricant pour les outils pneumatiques et les accessoires.
Lapressiondesortiedurégulateurnedoitjamaisdépasserune
pression nominale maximale.
MEULE À TRONÇONNER
MISE EN GARDE : Séparer l’outil à tronçonner de l’alimentation
en air avant d’en effectuer la lubrification ou de changer les meules
à tronçonner.
• Tenir la broche (F) à l’aide de la clé fournie (L) et retirer la vis à
tête hexagonale (B) à l’aide de la clé à six pans (Allen) fournie (M).
M
B
C
F
L
•Faireglisserlarondelle (C) de l’outil.
MISE EN GARDE
: Inspecter et nettoyer la broche avant de fixer
les meules à tronçonner.
29
Français
MEULE À TRONÇONNER (SUITE)
•Positionnerunemeule à tronçonner (D) sur l’outil.
•
Tenir la broche (F) à l’aide de la clé fournie (L) et réinstaller la
rondelle (C) et la vis à tête hexagonale (B) jusqu’à ce qu’elles
soient serrées
AVERTISSEMENT : S’assurer que les meules à tronçonner sont
solidementfixées.Lesmeulesàtronçonnerlâchespourraientse
détacher de l’outil en cours de fonctionnement et causer de graves
blessures.
PROCÉDURES DE FONCTIONNEMENT
DÉMARRAGE (FIG. 1)
•Raccorderl’outilsurl’alimentationenairàl’aideduboyaude
diamètre recommandé.
•Mettrelecompresseurpneumatiqueenmarcheetlaisserle
réservoir se remplir d’air.
•Réglerlerégulateurducompresseurd’airà90psi.Cettecléà
rochet pneumatique fonctionne à une pression d’air maximum de
90 psi.
•Pousserl’outildesécurité vers l’avant (1) et maintenir la
gâchette (2) enfoncée afin de commencer à utiliser l’outil.
REMARQUE : La broche tourne à pleine vitesse lorsque la gâchette
est enfoncée complètement. La gâchette se ferme automatiquement
lorsqu’elle est relâchée, ce qui ralentit la broche et permet à
l’opérateur de sélectionner la vitesse et la puissance optimales pour
le travail. Une fois la gâchette complètement relâchée, elle ne peut
pas être enfoncée de nouveau avant de désenclencher la sécurité.
MISE EN GARDE : NEPLACERAUCUNEpartieducorpsdans
la trajectoire de l’outil à tronçonner alors qu’il est en rotation.
ARRÊT (FIG. 1, PAGE 2)
•Relâcherlagâchetteafind’arrêterl’outil.
•Unefoisletravailterminé,arrêterlecompresseuràairetranger
l’outil pneumatique après l’avoir lubrifié. Pour des raisons de
sécurité, placer l’outil sur un support ou sur un coussin souple et
plat lorsqu’il n’est pas utilisé.
•Avantdechangerlesaccessoiresdecoupe,toujoursséparer
l’alimentation en air afin d’éviter les blessures.
1
2
DESSERRER
FIXER
B
C
F
L
D

30
Français
ENTRETIEN
Graissage
Les outils pneumatiques doivent être graissés pendant toute la vie
des outils. Le moteur pneumatique et les coussinets utilisent l’air
comprimé pour actionner l’outil et comme l’humidité de l’air
comprimé entraîne la formation de rouille sur le moteur et les pièces
intérieures de l’outil, il faut graisser l’outil tous les jours.
Tout manquement à graisser les outils correctement réduira
fortement la vie de l’outil et annulera la garantie.
ATTENTION :
Il faut graisser l’outil AVANT l’emploi initial, avant et
après chaque usage additionnel.
Pour graisser l’outil pneumatique à la main :
1. Débrancher l’outil de la source d’alimentation d’air, placer
les entrées d’air vers le haut.
2. Retirer l’accessoire de la prise de l’outil pneumatique, comme
les douilles, les ciseaux, etc.
3. Abaisser la gâchette ou la commande et placer environ une
cuillère à thé (5 cc) d’huile à outil pneumatique dans l’entrée
d’air. (En abaissant la gâchette ou la commande, l’huile peut
circuler dans le moteur).
Remarque : Utiliser l’huile SAE n˚10 si l’huile à outil pneuma-
tique n’est pas disponible.
4. Raccorder l’outil sur une source d’air, couvrir l’extrémité de
l’échappement d’une serviette et faire fonctionner de 20 à 30
secondes.
AVERTISSEMENT :Gardezhorsdelaportéedesenfants.Encas
d’ingestion, ne pas provoquer de vomissement, appelez un médecin
immédiatement.
AVERTISSEMENT :L’excédentd’huiledanslemoteurest
immédiatement expulsé par l’orifice d’échappement. Toujours
éloigner l’orifice d’échappement des gens ou objets.
Emmagasinage
Il faut graisser l’outil pneumatique avant de le ranger. Se reporter
aux instructions sur le « Graissage » en omettant l’étape 4.
INFORMATION SUR LES RÉPARATIONS
Veuillez recueillir les informations suivantes pour tous les appels au
Service à la clientèle :
Numéro du modèle ____________________________________
Date et lieu de l’achat _____________________________________
GARANTIE COMPLÈTE D’UN (3) AN
Les outils industriels de service intensif de DeWALT sont garantis
pour une période de un (3) an à partir de la date d’achat.
DeWALT
réparera gratuitement toutes défectuosités provoquées par un défaut
de matériel ou de fabrication. Pour des renseignements relatifs aux
réparations sous garantie, composer le 1-800-4-D
e
WALT. Cette
garantie ne s’applique pas aux accessoires ni aux dommages
causés par des réparations réalisées ou tentées par des tiers. Cette
garantie vous accorde des droits légaux spécifiques et il est possible
que vous ayez d’autres droits qui varient d’un État ou d’une province
à l’autre.
AMÉRIQUE LATINE : cette garantie ne s’applique pas aux produits
vendus en Amérique latine. Pour ceux-ci, veuillez consulter les
informations relatives à la garantie spécifique présente dans
l’emballage, appeler l’entreprise locale ou consulter le site Web pour
les informations relatives à cette garantie.
REMPLACEMENT GRATUIT DES ÉTIQUETTES
D’AVERTISSEMENT : si les étiquettes d’avertissement deviennent
illisibles ou sont manquantes, composer le 1-800-4-D
e
WALT pour en
obtenir le remplacement gratuit.
31
Français
LAS CAÍDAS PUEDEN CAUSAR
LESIONES GRAVES. NO PISAR NI
PARARSE EN ESTA ÁREA.
ADVERTENCIA
LES CHUTES PEUVENT CAUSER DE GRAVES
BLESSURES. NE MARCHEZ PAS ET NE VOUS
TENEZ PAS SUR CET EMPLACEMENT.
AVERTISSEMENT
FALLS CAN CAUSE SERIOUS
INJURIES. DO NOT STEP OR STAND
ON THIS AREA.
WARNING
SEE OWNER’S MANUAL FOR
BREAK-IN PROCEDURES.
CAUTION
PARA EL PROCEDIMIENTO DE
ASENTADO DE LA MAQUINA, VER
MANUAL DEL OPERARIO.
ATENCIÓN
CONSULTEZ LE MANUEL DE
L’UTILISATEUR POUR LES
PROCEDURES DE RODAGE.
ATTENTION
ADVERTENCIA
EL USO INDEBIDO PUEDE GENERAR RIESGOS. SEGUIR ESTAS INSTRUCCIONES: RIESGO DE ESTALLIDO. ASEGÚRESE QUE LA VÁLVULA DE SALIDA DEL
COMPRESOR ESTE REGULADA POR DEBAJO DEL MÁXIMO DE LA PRESIÓN DE OPERACIÓN DE LA PISTOLA ROCIADORA O HERRAMIENTA. ANTES DE ARRANCAR
EL COMPRESOR, TIRAR DEL ANILLO EN LA VÁLBULA DE SEGURIDAD PARA ASEGURARSE QUE LA VÁLVULA SE MUEVE LIBREMENTE. DRENAR EL AGUA DEL TANQUE DESPUÉS DE CADA USO.
RIESGO DE FUEGO O EXPLOSIÓN. NO ROCIAR LÍQUIDO NI PINTURAS INFLAMABLES O COMBUSTIBLES CERCA DE CHISPAS, LLAMAS, LLAMAS DE PILOTO O EN ÁREAS CERRADAS. EL ÂREA DE
TRABAJO DEBE ESTAR BIEN VENTILADA. MANTENER EL COMPRESOR ALEJADO POR LO MENOS 20 PIES DEL AREA DE PINTURA. NO LLEVAR NI OPERAR EL COMPRESOR NI DISPOSITIVO ELÉCTRICO
ALGUNO CERCA DEL AREA DEL ROCIADO. NUNCA FUME EN EL ÁREA DEL ROCIADO. USAR UNA MANGUERE DE UN MÍNIMO DE 25 PIES PARA CONECTAR LA PISTOLA AL COMPRESOR. RIESGO DE
DAÑOS PERSONALES. USAR GAFAS DE SEGURIDAD ANSI Z87. NUNCA APUNTAR EL CHORRO DE AIRE COMPRIMIDO O DE MATERIAL QUE SE ESTÉ ROCIANDO A SÍ MISMO NI A OTRAS PERSONAS.
NE RESPIRAR EL AIRE COMPRIMIDO. REDUCIR LA PRESIÓN A CERO ANTES DE DESMONTAR LA MANGUERA. RIESGO DE CHOQUE ELÉCTRICO. ALTO VOLTAJE. DESCONECTAR LA UNIDAD ANTES DE
QUITAR LA CUBIERTA. NO EXPONER A LLUVIA. ALMACENAR EN INTERIORES. PARA SEGURIDAD COMPLETA, OPERACIÓN E INSTRUCCIONES PARA REPARAR, LEER EL MANUAL DEL OPERADOR.
AVERTISSEMENT
UNE UTILISATION INCORRECTE PEUT ÊTRE DANGEREUSE. SUIVEZ LES INSTRUCTIONS CI-DESSOUS: RISQUE D'ECLATEMENT. ASSUREZ-VOUS QUE LA
PRESSION DE SORTIE DU COMPRESSEUR EST RÉGLÉE À UN NIVEAU INFÉRIEUR À LA PRESSION D'UTILISATION MAXIMUM DU PISTOLET VAPORISATEUR OU DE
L'ACCESSOIRE. AVANT DE DÉMARRER LE COMPRESSEUR, TIREZ SUR L'ANNEAU DE LA SOUPAPE DE SÛRETÉ POUR VOUS ASSURER QU'ELLE FONCTIONNE LIBREMENT. VIDANGEZ L'EAU DU RÉSERVOIR
À AIR APRÈS CHAQUE UTILISATION. RISQUE D'INCENDIE OU D'EXPLOSION. NE PAS VAPORISER UN LIQUIDE OU UN PEINTURE INFLAMMABLE OU COMBUSTIBLE PRÈS D'ÉTINCELLES, DE FLAMMES, DE
VEILLEUSES NI DANS UN ENDROIT RESTREINT OU RENFERMÉ. L'AIRE DE VAPORISATION DOIT ÊTRE BIEN AÉRÉE. GARDEZ LE COMPRESSEUR À UNE DISTANCE D'AU MOINS 20 PIEDS DE LA SURFACE À
VAPORISER. NE PORTEZ PAS LE COMPRESSEUR ET NE L'UTILISEZ PAS NI AUCUN AUTRE APPAREIL ÉLECTRIQUE À PROXIMITÉ DE L'AIRE DE VAPORISATION. NE FUMEZ JAMAIS QUAND VOUS
VAPORISEZ. UTILISEZ UN FLEXIBLE D'AIR D'UNE LONGUEUR MINIMUM DE 25 PIEDS POUR RELIER LE PISTOLET VAPORISATEUR AU COMPRESSEUR. RISQUE DE BLESSURES CORPORELLES. PORTEZ DES
LUNETTES DE PROTECTION ANSI Z87. NE DIRIGEZ JAMAIS L'AIR COMPRIME OU DES MATÉRIAUX VERS SOI OU VERS AUTRUI. NE JAMAIS UTILISER DE L'AIR COMPRIMÉ POUR LA RESPIRATION. RÉGLEZ
LA PRESSION À ZÉRO AVANT DE RETIRER LE BOYAU. RISQUE DE CHOC ÉLECTRIQUE. VOLTAGE DANGEREUX. DEBRANCHEZ LA MACHINE AVANT D'ENLEVER BOITIER. N'EXPOSEZ PAS LE COMPRESSEUR
À LA PLUIE. REMISEZ-LE À L'INTÉRIEUR. LISEZ LE MANUEL DE L'UTILISATEUR POUR DES INSTRUCTIONS COMPLÈTES CONCERNANT LA SÉCURITÉ, L'UTILISATION ET LES RÉPARATIONS.
INCORRECT USE CAN CAUSE HAZARDS. FOLLOW THESE INSTRUCTIONS: RISK OF BURSTING. MAKE SURE THE COMPRESSOR OUTLET PRESSURE IS SET
LOWER THAN THE MAXIMUM OPERATING PRESSURE OF THE SPRAY GUN OR TOOL. BEFORE STARTING THE COMPRESSOR, PULL THE RING ON THE SAFETY
VALVE TO MAKE SURE THE VALVE MOVES FREELY. DRAIN WATER FROM TANK AFTER EACH USE. RISK OF FIRE OR EXPLOSION. DO NOT SPRAY A FLAMMABLE OR COMBUSTIBLE
LIQUID OR PAINT NEAR SPARKS, FLAMES, PILOT LIGHTS, OR IN A CONFINED AREA. THE SPRAY AREA MUST BE WELL VENTILATED. KEEP COMPRESSOR AT LEAST 20 FEET AWAY FROM
SPRAY AREA. DO NOT CARRY AND OPERATE THE COMPRESSOR, OR ANY OTHER ELECTRICAL DEVICE NEAR THE SPRAY AREA. NEVER SMOKE WHEN SPRAYING. USE A MINIMUM OF
25 FEET OF HOSE TO CONNECT A SPRAY GUN TO THE COMPRESSOR. RISK OF PERSONAL INJURY. WEAR ANSI Z87 SAFETY GLASSES. NEVER SPRAY COMPRESSED AIR OR MATERIAL
AT SELF OR OTHERS. DO NOT USE COMPRESSED AIR FOR BREATHING. REGULATE PRESSURE TO ZERO BEFORE REMOVING HOSE. RISK OF ELECTRICAL SHOCK. HAZARDOUS VOLTAGE.
UNPLUG UNIT BEFORE REMOVING COVER. DO NOT EXPOSE TO RAIN, STORE INDOORS. READ OWNER'S MANUAL FOR COMPLETE SAFETY, OPERATION, AND REPAIR INSTRUCTIONS.
WARNING
HOLD HOSE FIRMLY TO
PREVENT HOSE WHIP.
CAUTION
SOSTENGA LA MANGUERA
CON FIRMEZA PARA EVITAR EL.
ATENCIÓN
BIEN TENIR LE TUYAU POUR
ÉVITER UN À-COUP.
ATTENTION
DRAIN TANK DAILY OR AFTER EACH USE. CONDENSATION BUILD-UP MAY CAUSE CORROSION
INSIDE TANK RESULTING IN TANK FAILURE. SEE MANUAL FOR INSPECTION PROCEDURES. TO DRAIN
TANK OPEN VALVE SLOWLY AND TILT COMPRESSOR TO EMPTY ACCUMULATED WATER.
WARNING
DRENE EL TANQUE A DIARIO O DESPUÉS DE CADA USO. LA ACUMULACIÓN DE CONDENSACIÓN
PUEDE OCASIONAR CORROSIÓN DENTRO DEL TANQUE Y PROVOCAR FALLA DEL TANQUE.
CONSULTE EL MANUAL PARA CONOCER LOS PROCEDIMIENTOS DE INSPECCIÓN. PARA DRENAR EL TANQUE, ABRA LA
VÁLVULA LENTAMENTE E INCLINE EL COMPRESOR PARAELIMINAR EL AGUA ACUMULADA.
ADVERTENCIA
RÉSERVOIR DE VIDANGE QUOTIDIEN
OU APRÈS CHAQUE UTILISATION. L'HABILLAGE
DE
CONDENSATION PEUT CAUSER LA CORROSION À L'INTÉRIEUR DU RÉSERVOIR AYANT POUR
RÉSULTAT L'ÉCHEC DE RÉSERVOIR. VOIR LE MANUEL POUR DES PROCÉDURES D'INSPECTION. À LA VALVE
OUVERTE
DE RÉSERVOIR DE VIDANGE LENTEMENT ET AU COMPRESSEUR D'INCLINAISON À L'EAU ACCUMULÉE VIDE.
AVERTISSEMENT
GLOSSAIRE
CFM : pied cube par minute.
SCFM : pied cube par minute (standard), une unité de mesure du
soufflage.
PSI : livres par pouce carré, une unité de mesure de pression.
Code de certifications : les produits qui affichent un ou
plusieurs des étampes suivantes : UL, CUL, ETL, CETL
ont été évalués pas un laboratoire de sécurité indépendant
sanctionné par l’OSHA et qui répond aux normes en vigueur
des Underwriters Laboratories en ce qui a trait à la sécurité.
TR/MIN : Tours par minute; est une unité de mesure indiquant
la fréquence d’un tour
B/MIN : Battements par minute.
NPT : « National pipe thread » (filetage conique); est une
norme américaine pour les filets coniques utilisés dans les
tuyaux et les raccords filetés.
ID : Diamètre intérieur
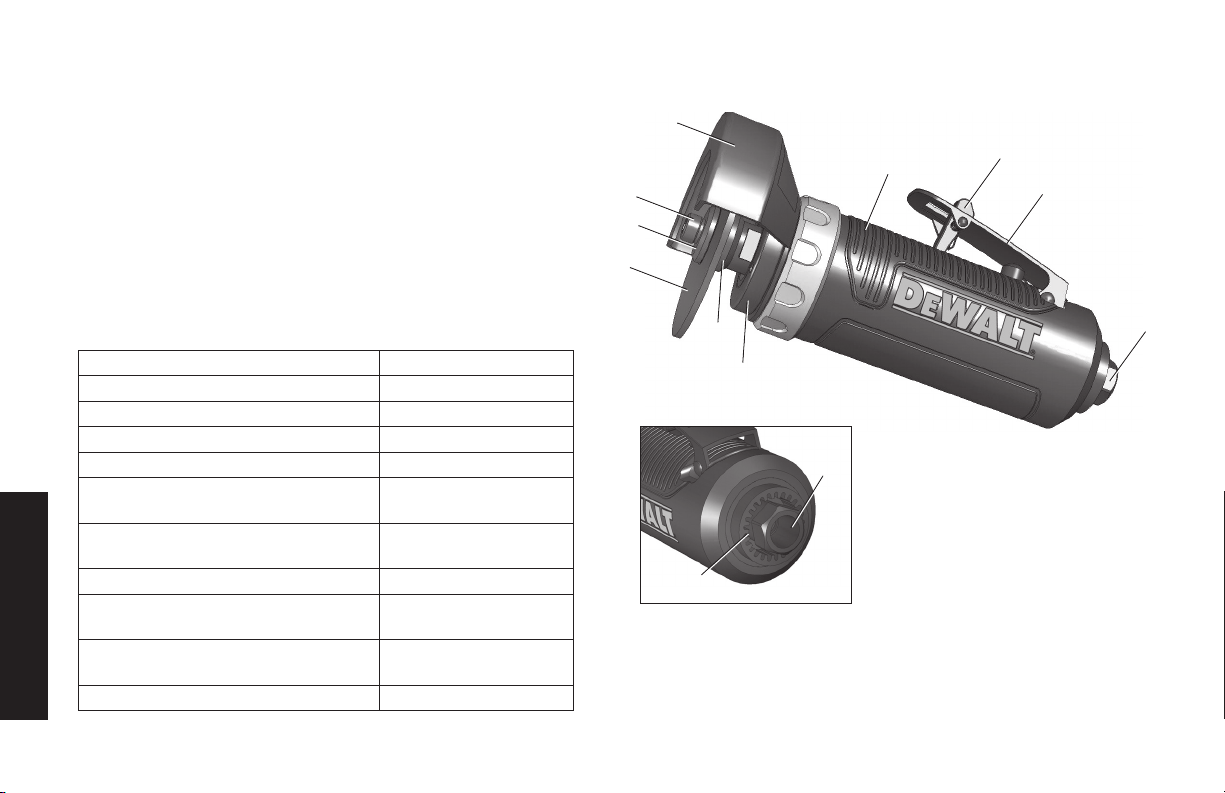
32
Español
DWMT70783 COMPRESOR DE AIRE
A. Protector de la sierra
B. Tornillo de cabeza
hexagonal
C. Arandela
D. Sierra de corte
E. Virola
F. Husillo
G. Entrada de aire de 1/4"
H. Escape
I. Gatillo
J. Palanca de seguridad del
acelerador
K. Cuerpo ergonómico
ESPECIFICACIONES
MODELO
DWMT70784
VELOCIDAD LIBRE (A 90 PSI)
19000 RPM
TIPO DE ESCAPE
Trasero
DIÁMETRO DE LA RUEDA
76,2 mm (3")
ORIFICIO DEL EJE DE LA RUEDA
10 mm (3/8")
TORNILLO DEL HUSO
M6 X 12 MM
HEXAGONAL
CONSUMO DE AIRE PROMEDIO
(A 90 PSI)
14,6 l/s (31 SCFM)
2,1 l/s (4,4 CFM)
PESO NETO
0,82 kg (1,8 lb)
TAMAÑO DE LA ENTRADA DE
AIRE
6.4 MM (1/4 PULG.)
NPT(F)
TAMAÑO RECOMENDADO DE LA
MANGUERA
10 MM (3/8")
PRESIÓN MÁXIMA DE AIRE
90 psi
FIG.1
A
B
C
D
E
F
K
J
I
G
H
G
33
Español
Dénitions : Deniciones: Normas
de seguridad
Lassiguientesdefinicionesdescribenelniveldegravedaddecada
advertencia.Leaelmanualypresteatenciónaestossímbolos.
PELIGRO:
indicaunasituacióndepeligroinminenteque,
si no se evita,
provocará
la
muerte o lesiones graves.
ADVERTENCIA:
Indicaunasituacióndepeligropotencialque,
si no se evita,
podría
provocar la
muerte o lesiones graves
ATENCIÓN:
Indicaunasituacióndepeligropotencialque,
si no se evita,
puede
provocar
lesiones leves o moderadas.
ATENCIÓN:
Utilizadosinelsímbolodealertadeseguridadindica
unasituacióndepeligropotencialque,sinoseevita,
puede
provocar
daños en la
propiedad
.
SI TIENE ALGUNA DUDA O COMENTARIO ACERCA DE ÉSTA
U OTRA HERRAMIENTA DEWALT, LLÁMENOS AL NÚMERO
GRATUITO: 1-800-4-DEWALT (1-800-433-9258)
INSTRUCCIONES DE SEGURIDAD
IMPORTANTES
ADVERTENCIA: Algunaspartículasoriginadasallijar,aserrar,
amolar,taladraryrealizarotrasactividadesdeconstrucción
contienenproductosquímicosreconocidosporelEstadode
California como causantes de cáncer, defectos de nacimiento u
otrosproblemasreproductivos.Algunosejemplosdeestosproductos
químicosson:
• elplomodelaspinturasdebaseplomo
• lasílicecristalinadeladrillos,cementoyotrosproductosde
mampostería,
• elarsénicoycromodemaderacontratamientoquímico.
Elriesgoderivadodeestasexposicionesvaríasegúnla
frecuenciaconlaqueserealiceestetipodetrabajo.Parareducir
laexposiciónaestosproductosquímicos:trabajeenáreasbien
ventiladas y con equipos de seguridad aprobados, use siempre
mascarillafacialoderespiraciónadecuadayaprobadapor
OSHA/MSHA/NIOSH cuando use este tipo de herramientas.
Cuando se utilizan herramientas neumáticas, siempre se deben
respetar las precauciones de seguridad para reducir el riesgo de
lesiones personales.
ADVERTENCIA: Este producto contiene sustancias químicas,
incluido el plomo, reconocidas por el Estado de California como
causantes de cáncer, defectos de nacimiento u otros problemas
reproductivos. Lávese las manos después de utilizarlo.
GUARDE ESTAS INSTRUCCIONES
ADVERTENCIA:
Laoperación o el mantenimiento inapropiados de
este producto podrán resultar en Lesiones graves
y daños a la propiedad. Lea y comprenda todas las
advertencias e Instrucciones de operación antes
de usar este equipo. Cuando use herramientas
neumáticas,Se deberán seguir las precauciones
de seguridad básicas para reducir el riesgo de
heridas Personales.
ADVERTENCIA:
Leaycomprendaestemanualdeinstruccionesylosrótulos
en la herramienta antes de instalarla, operarla o darle
servicio a esta herramienta. Mantenga estas instrucciones en
un lugar seguro y accesible.
Tanto el operador como las demás personas deben llevar
puestas gafas de seguridad con protectores laterales que
cumplan con la norma ANSI Z87.1 CAN/CSA Z94.3.
Losoperadoresyotroseneláreadeberánusarprotección
paralosoídos.
Graissez tous les jours pour un rendement optimal.

34
Español
ADVERTENCIA:
•Eviteelusoprolongado:elmovimientorepetitivoolaexposición
alavibraciónpodránserdañinosparasusmanosobrazos.Utilice
guantesparaproporcionarprotecciónadicional,tomedescansos
frecuentes y limite el el tiempo de uso diario.
•Nouseoxígenoogasesreactivos;podráocurrirunaexplosión.
•Noexcedaunapresióndeairede90lbs./pul.²(PSI).
•Leacuidadosamentetodoslosmanualesincluidoscon
esteproducto.Familiarícesecompletamenteconloscontroles
y con el uso apropiado del equipo.
•Sólopersonasbienfamiliarizadasconestasreglasde
operaciónsegurasselesdeberápermitirelusodela
herramienta neumática.
•Noexcedaningunacapacidaddepresióndeningún
componente en el sistema.
•Desconectelaherramientaneumáticadelafuentedeaire
antes de cambiar de herramienta o aditamento y mientras
no está operando.
•Siempreusegafasdeseguridadyprotecciónparalos
oídosdurantelaoperación.Siempreusegafasde
seguridad aprobadas con protector de cara. Siempre use
protecciónparalosoídosaprobada.
•Nouseropassueltasoatavíoquecontengascintaso
corbatas sueltas, etc. los cuales se podrán enredar con las
piezas en movimiento de la herramienta y resultar en heridas
corporales serias.
•Nousejoyas,relojes,identificaciones,brazaletes,collares,
etc. cuando opere esta herramienta, ellos se podrán enredar
con las piezas en movimiento de la herramienta y resultar
en lesiones graves.
•Nooprimaelgatillocuandoestéconectandolamanguera
dealimentacióndeaire.
•Utilicesiempreaccesoriosdiseñadosparaserutilizadoscon
herramientas de impacto neumáticas.
•Nouseaccesoriosdañadosodesgastados.
ADVERTENCIA:
•Nuncadispareelgatillocuandolaherramientanoestéaplicada
enunobjetodetrabajo.Losaccesoriostienenquese
sujetadosseguramente.Losaccesoriosflojospueden
causar heridas serias.
•Protejalamangueradeairededañosyperforaciones.
•Nuncaapuntelaherramientaneumáticahaciausteduotra
persona.Podránocurrirlesionesgraves.
•Reviselasmanguerasdeaireparaversiestándesgastadas
odébilesantesdecadauso.Asegúresedequetodas
las conexiones estén seguras.
•Mantengatodaslastuercas,pernosytornillosapretados
yasegúresedequeelequipoestéencondicionesseguras
de trabajo.
•Nocoloquelasmanoscercaodebajodepiezasenmovimiento.
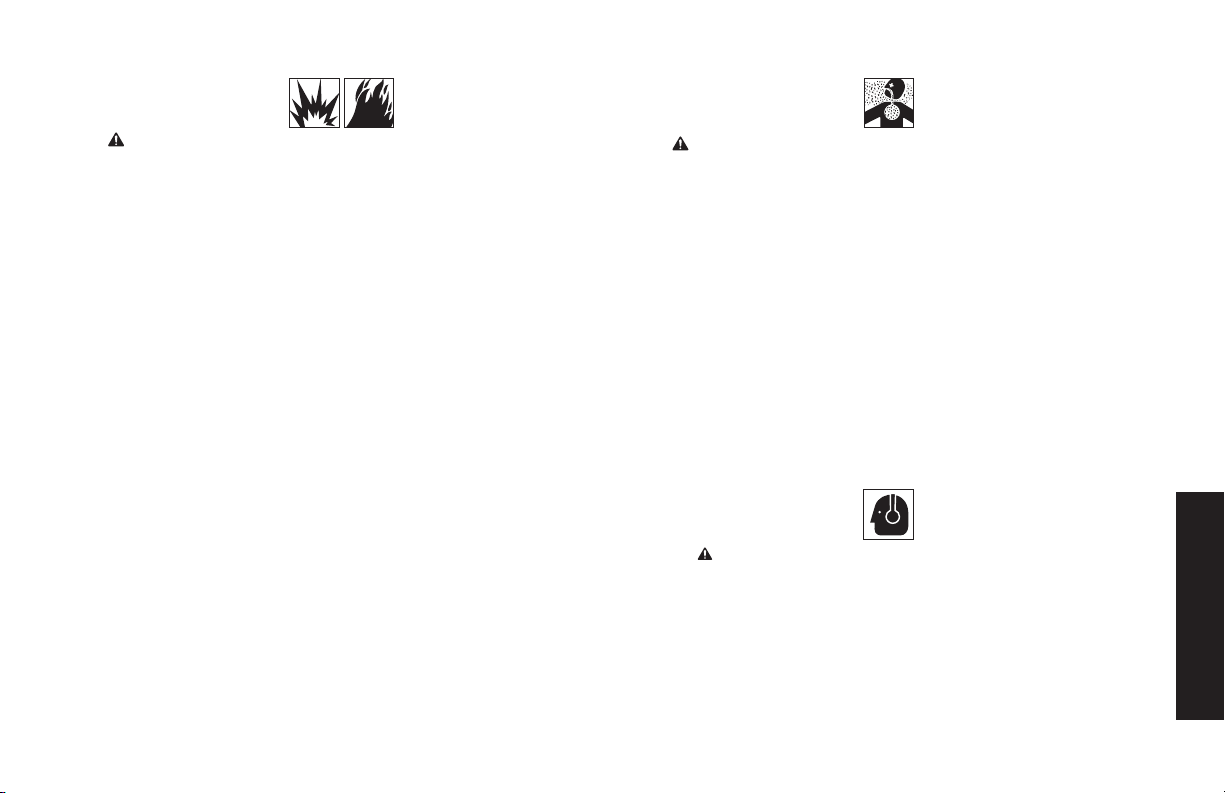
35
Español
ADVERTENCIA:
RIESGO DE INCENDIO O EXPLOSIÓN
¿QUÉ PUEDE SUCEDER? CÓMO EVITARLO
• Herramientasabrasivastales
como lijadoras y esmeriles,
herramientas rotativas como
taladros, y herramientas
de impacto como llaves,
martillos y sierras recíprocas
son capaces de generar
chispas las cuales pueden
resultar en la ignición de
materiales inflamables.
• Nuncaoperesherramientas
cerca de sustancias
inflamables como gasolina,
nafta, disolventes de
limpieza, etc.
• Trabajeenunaárealimpia
y bien ventilada libre de
materiales combustibles.
• Nuncauseoxígeno,
dióxido de carbono u otro
gas embotellado como
fuente deenergía para las
herramientasneumáticas.
• Elexcederlaclasificación
máximapresióndela
herramienta o de los
accesoriospodrácausar
una explosión resultando en
lesiones graves.
• Useairecomprimidoregulado
alapresiónmáximaopor
debajo de la clasificación de
presión de cualquier accesorio.
ADVERTENCIA:
RIESGO RESPIRATORIO (ASFIXIA)
¿QUÉ PUEDE SUCEDER? CÓMO EVITARLO
• Herramientasabrasivas,tales
como esmeriles, lijadoras
y herramientas de corte,
generan polvo y materiales
abrasivos los cuales
pueden ser dañinos para
los pulmones humanos y el
sistema respiratorio.
• Cuandousetalesherramientas,
siempreuseunamáscarao
respirador que le quede justo
y que sea aprobado por la
MSHA/NIOSH.
• Algunosmaterialestales
como adhesivos y brea,
contienen químicos cuyos
vapores pueden causar
lesiones graves bajo
exposición prolongada.
• Siempretrabajeenunaárea
limpia, seca y bien ventilada.
ATTENTION :
RIESGO DE PERDIDA AUDITIVA
¿QUÉ PUEDE SUCEDER? CÓMO EVITARLO
• Laexposiciónalruidoalargo
plazo producida por la
operación de herramientas
neumáticaspodráconducir
a la perdida auditiva
permanente.
• Siempreuseprotección
auditiva
ANSI S3.19

36
Español
ADVERTENCIA:
RIESGO DE LESIONES
¿QUÉ PUEDE SUCEDER? CÓMO EVITARLO
• Lasherramientas
desatendidas, o con la
manguera conectada pueden
ser activadas por personas no
autorizadas conduciendo a
lesiones o a lesionar a otros.
• Extraigalamanguerade
aire cuando no se utilice
la herramienta y guarde la
herramienta en un lugar seguro
lejos del alcance de los niños o
usuarios no capacitados para
utilizarla.
• Lasherramientasneumáticas
pueden despedir objetos
flojos u otros materiales en el
áreadetrabajo.
• Usesólolaspiezas,los
sujetadores y los accesorios
recomendados por el fabricante.
• Mantengaeláreadetrabajo
limpia y sin.
• obstrucciones.Mantengaalos
niñosyotrosalejadosdelárea
de trabajo mientras opera la
herramienta.
• Mantengaeláreabien
alumbrada.
• Lasherramientas
neumáticaspueden
activarse accidentalmente
durante operaciones de
mantenimiento o cambios en
la herramienta.
• Extraigalamanguerade
aire para lubricar, añadir o
reemplazar los casquillos.
• Nuncatransportela
herramienta por la manguera.
• Eviteunaarrancadaaccidental.
No transporte una herramienta
conectada con el dedo en el
gatillo.
• Elserviciodereparación
deberáserefectuadosólopor
un representante de servicio
autorizado.
• Unallaveollavedeajuste
abandonada en una pieza
giratoria de la herramienta
incrementa el riesgo de
lesiones personales.
• Extraigalallaveylasllavesde
ajuste antes de encender la
herramienta.
¿QUÉ PUEDE SUCEDER? CÓMO EVITARLO
• Usarlasboquillasdeinflado
para eliminar el polvo puede
causar serias lesiones.
• NO utilice las boquillas de
inflado para eliminar el polvo.
• Lasherramientas
mecanizadas pueden causar
que la pieza de trabajo se
mueva al hacer contacto
causando lesiones.
• Useabrazaderasuotros
dispositivos para evitar el
movimiento.
• Lapérdidadelcontroldela
herramientapodráconducira
lesiones personales
o de otros.
• Nooperelaherramienta
mientras esté bajo la influencia
de drogas o alcohol.
• Noseestiredemasiado.
Mantenga los pies sobre el piso
y el balance en todo momento.
• Mantengalosmangos
secos, limpios y libres
de aceite y grasa.
• Manténgasealerta.Vigilelo
queestáhaciendo.Useel
sentido común. No opere la
herramienta cuando
esté cansado.
• Eviteutilizarherramientas
inadecuadas, dañadas o de
calidad deteriorada, tales
como discos de desbaste,
cinceles, casquillos,
brocas, etc., ya que estos o
partículas de estos pueden
salir expulsados durante el
funcionamientoyporelárea
de trabajo, y causar serias
lesiones.
• Siempreuseaccesoriosde
herramienta clasificados
para la velocidad de la
herramientaneumática.
• Nuncauseherramientasquese
hayan caído, hayan recibido
un impacto o estén dañadas
por el uso.
• Noleapliquefuerzaexcesiva
a la herramienta – deje que ella
haga su trabajo.
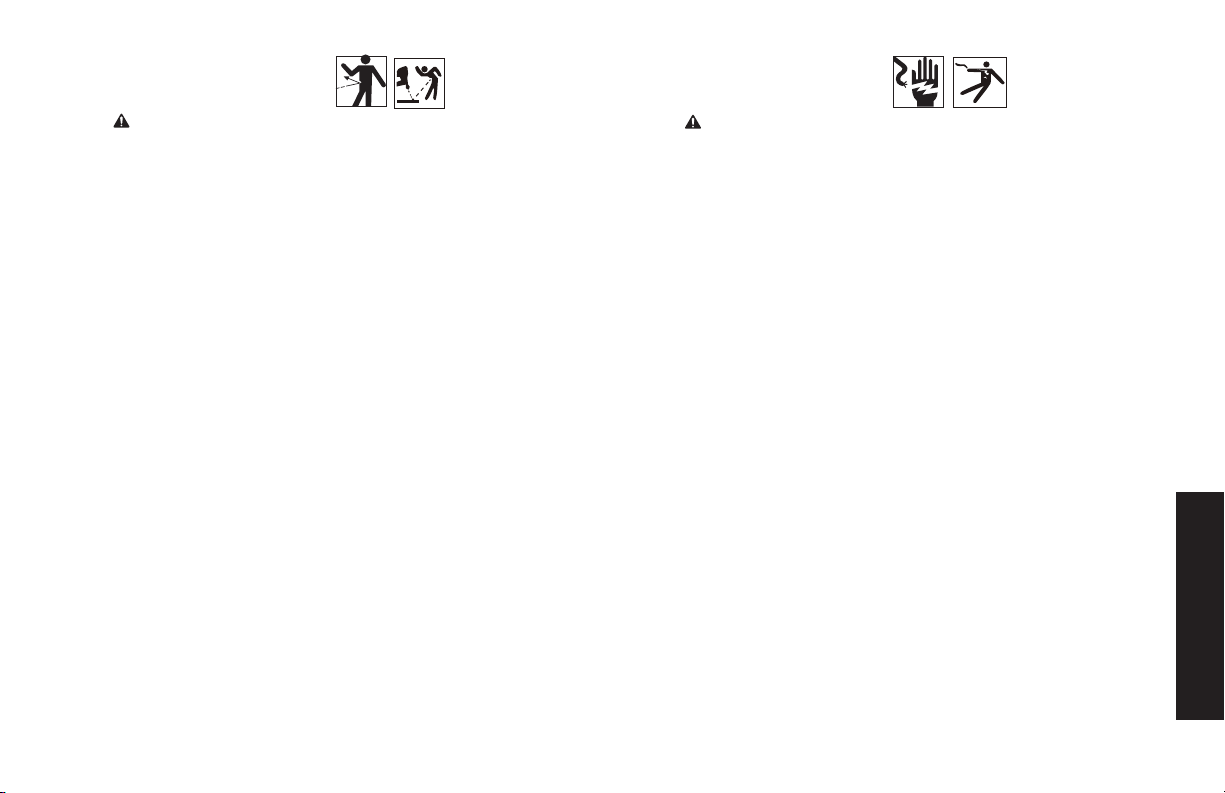
37
Español
ADVERTENCIA: RIESGO DE LESIONES (CONTINUACIÓN)
¿QUÉ PUEDE SUCEDER? CÓMO EVITARLO
• Unaherramientaolos
accesorios que no reciban
un mantenimiento adecuado
pueden causar serias
lesiones.
• Mantengalaherramientabien
cuidada.
• Keepacuttingtoolsharpand
clean. A properly maintained
tool, with sharp cutting edges
reduces the risk of binding and
is easier to control.
• Existenriesgosdequela
herramientaestallesiestá
dañada.
• Reviseladesalineacióno
el atoramiento de piezas
en movimiento, ruptura
de piezas y cualquier otra
condición que pueda afectar
el funcionamiento de la
herramienta. Si la herramienta
estádañada,envíelaa
reparación antes de utilizarla.
ADVERTENCIA:
RIESGO DE DESCARGA ELÉCTRICA
¿QUÉ PUEDE SUCEDER? CÓMO EVITARLO
• Estaherramientanoincluye
una superficie de agarre
aislada. El contacto con
un cable cargado también
cargarálaspiezasmetálicas
expuestas de la herramienta,
lo que puede ocasionar una
electrocución o la muerte.
• Eviteelcontactodelcuerpo
con superficies conectadas
a tierra, tales como caños,
radiadores y refrigeradores.
Existe un riesgo de descarga
eléctrica mayor si su cuerpo
estáencontactocontierra.
• nvestigueexhaustivamentela
pieza de trabajo en busca de
cableados ocultos antes de
realizar el trabajo.
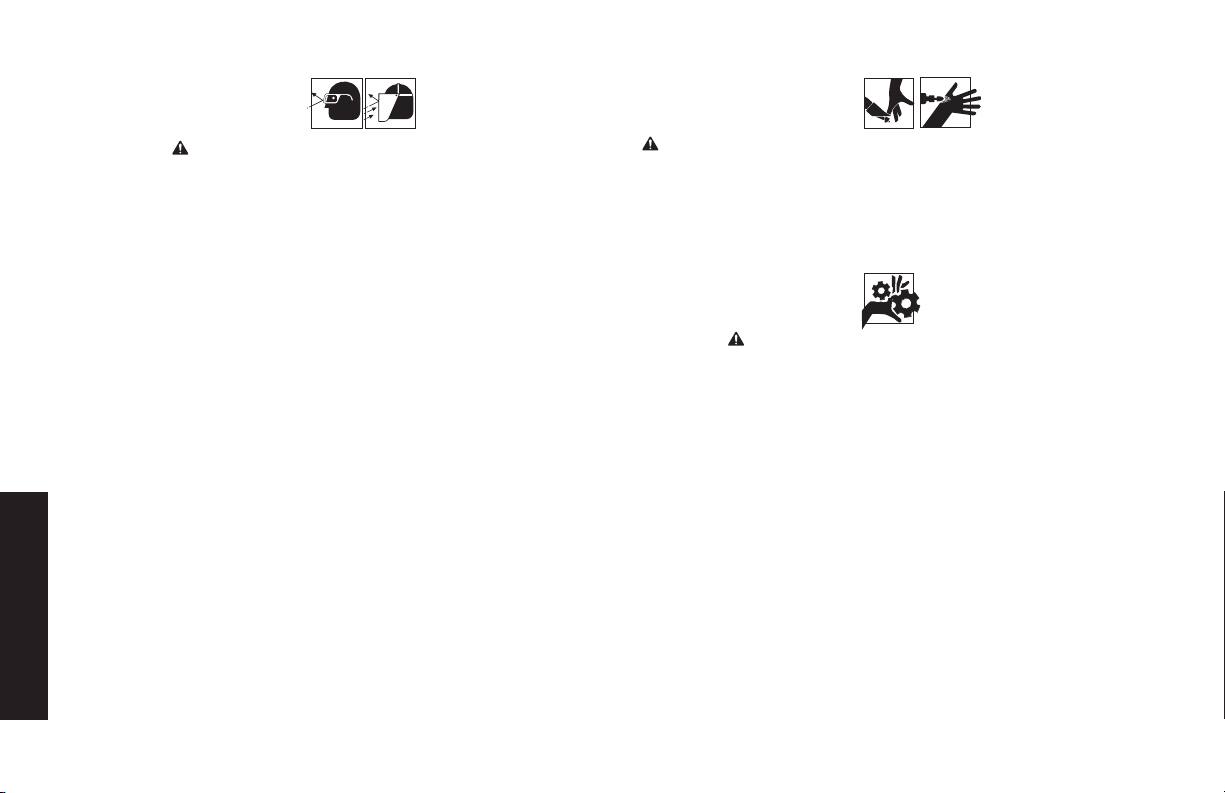
38
Español
ADVERTENCIA:
RIESGO DE HERIDAS
EN LOS OJOS O CABEZA
¿QUÉ PUEDE SUCEDER? CÓMO EVITARLO
• Losequiposmotorizados
neumáticosylas
herramientas motorizadas
son capaces de propulsar
materiales como astillas,
viruta de sierra, y otros
desperdicios a alta velocidad,
lo que puede resultar en
heridas serias en los ojos.
• Utilicesiempregafasde
seguridad con protectores
laterales que cumplan con
la norma ANSI Z87.1 CAN/
CSA Z94.3.
• Nuncadejedesatendidauna
herramienta en operación.
Desconecte la manguera de
aire cuando la herramienta no
esté siendo usada.
• Elairecomprimidopuede
ser peligroso. El chorro de
aire puede causar heridas
a los tejidos blandos tales
como los ojos, oídos, etc.
Las partículas u objetos
propulsados por un chorro
de aire pueden causar
heridas.
• Paraprotecciónadicionaluse
unprotectordecaraademás
de las gafas de seguridad.
• Losaccesoriosdela
herramienta se pueden
aflojar o romper y volar
en pedazos impulsando
partículas al operador u otros
eneláreadetrabajo.
• Compruebequelos
accesorios estén firmemente
ensamblados.
ADVERTENCIA:
RIESGO DE CORTADAS O QUEMADURAS
¿QUÉ PUEDE SUCEDER? CÓMO EVITARLO
• Lasherramientasquecorta,
cizallan, perforan, cincelan,
etc., son capaces de causar
lesiones graves.
• Mantengalapiezadetrabajo
de la herramienta alejada de
las manos y del cuerpo.
ADVERTENCIA:
RIESGO DE ENREDO
¿QUÉ PUEDE SUCEDER? CÓMO EVITARLO
• Lasherramientasque
contienen elementos
móviles, o propulsan otras
herramientas móviles, tales
como discos de esmeril,
discos de lijado, etc., se
pueden enredar en el pelo,
la ropa, las joyas y otros
objetos sueltos, resultando en
lesiones severas.
• Nuncauseropassueltas,o
atavíos que contengas cintas
o corbatas sueltas, etc. los
cualessepodránenredarcon
las piezas en movimiento de la
herramienta.
• Quítesecualquierjoya,reloj,
identificación, brazalete, collar,
etc., que se pueda enredar con
la herramienta.
• Mantengalasmanosalejadas
de las piezas en movimiento.
Amárreseocúbraseelpelo
suelto.
• Siempreuseropaqueajuste
apropiadamente y otros
equipos de seguridad cuando
use esta herramienta.

39
Español
ADVERTENCIA:
ALIMENTACIÓN DE AIRE Y CONEXIONES
•Nouseoxígeno,gasescombustiblesogasesembotellados
como fuente de potencia para esta herramienta ya que la
herramienta puede explotar, posiblemente causando lesiones.
•Noutilicefuentesdesuministroquepuedanexceder
potencialmente 200 PSI (13,8 bar) ya que esto puede ocasionar
que la herramienta estalle y cause lesiones.
•Elconectordelaherramientanodeberámantenerla
presión cuando el suministro de aire es desconectado. Si se usa
unacopleequivocado,laherramientapodráquedarsecargada
conairedespuésdedesconectaryasíserácapazde
operar después de que la manguera de aire ha sido
desconectada causando posiblemente lesiones.
•Siempredesconecteelsuministrodeaire:
1) Antes de efectuar ajustes,
2) Cuando le preste servicio a la herramienta,
3) Cuando la herramienta no esté siendo usada,
4)Cuandosemuevahaciaotraáreadetrabajo,yaquepuede
ocurrir activación accidental, posiblemente causando heridas.
ADVERTENCIA:
INSTRUCCIONES ADICIONALES DE SEGURIDAD PARA
AMOLADORAS
•Losaccesoriosdebenestarclasificadosparaalmenosla
velocidadrecomendadaenlaherramienta.Losdiscosyotros
accesorios que funcionen a una velocidad superior a la declarada
por la herramienta pueden salir expulsados y ocasionar lesiones.
Laclasificacióndelosaccesoriosdebeestarporencimadela
velocidadmínimadeldiscodelaherramienta.
•Noutilicehojasdecierrauotrashojasdentadasconesta
herramienta.Puedeocasionarheridasgraves.
•Cuandoenciendalaherramientaconundisconuevouotro
accesorio, sostenga la herramienta en un área bien protegida y
hágala funcionar durante un minuto.
•Nuncahagaarrancarlaherramientaconunoperadoruotras
personasenlíneaconeldiscooelaccesorio.Sieldiscooel
accesorio presentan una falla no detectada, este puede estallar
en menos de un minuto.
•Evitehacerrebotareldiscoomanipularloconbrusquedad.
•Orientelaschispaslejosdeloperador,materialescomuneso
inflamables.
•Desconectelaherramientadelsuministrodeairecuandocambie
los accesorios o cuando no esté en uso.
•Nosostengalaherramientaconelaceleradorpresionado.No
desactiveelacelerador.Palancadeseguridad.Nocoloqueuna
cintanibloqueeelaceleradorenlaposicióndefuncionamiento.
•Utilicesoloaccesoriosrecomendadosparaunarectificadora
neumática.
CONSERVE ESTAS INSTRUCCIONES
PARA FUTURAS CONSULTAS
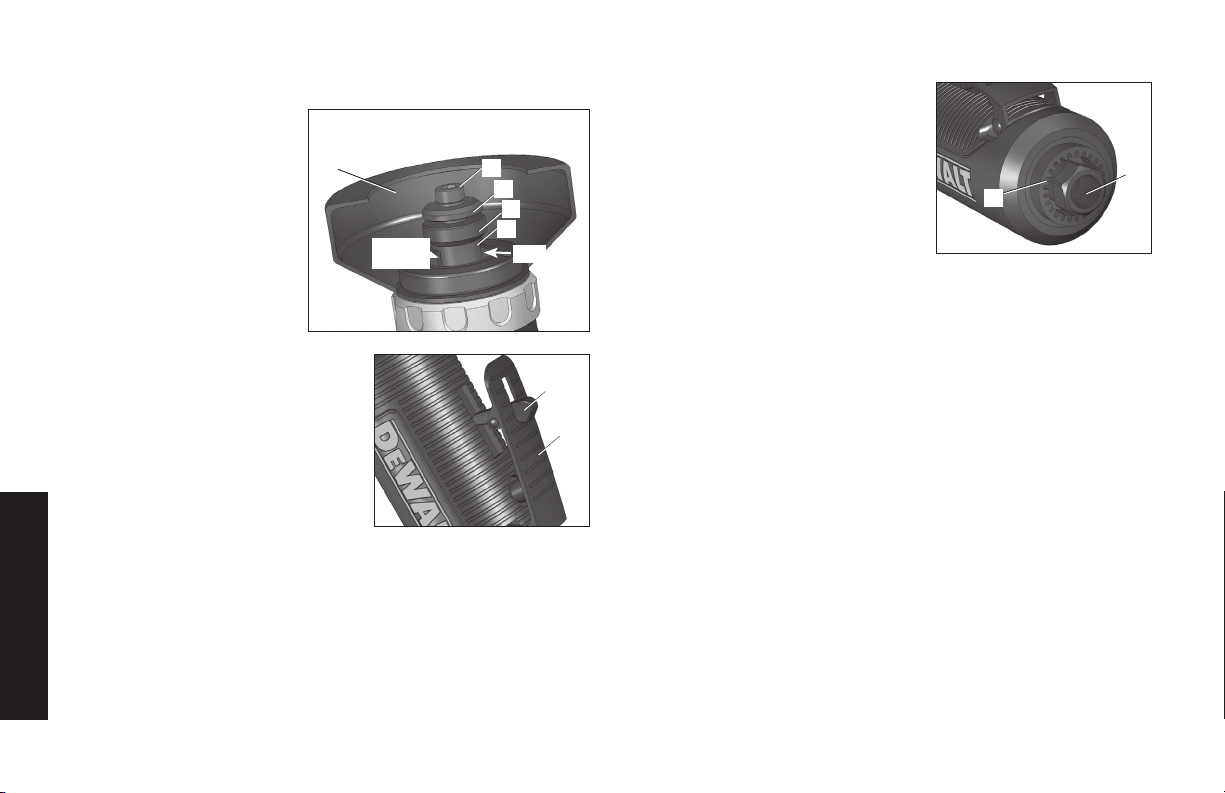
40
Español
CARACTERÍSTICAS
PROTECTOR DE LA
SIERRA
El protector de la
sierra (A) permite
realizarajustesrápidosy
seguros del protector, y
colocarlo para protección
del operador cuando la
herramientaestáenuso.
VIROLA
La virola (E) es el lugar de
colocación de las sierras
decorte,yestáconectada
al husillo (F). El tornillo de cabeza
hexagonal (B) y la arandela (C)
mantienen la sierra de corte en su
lugar.
GATILLO
El gatillo (I) permite al operador
controlar el arranque y la parada de
laherramientaneumática.
PALANCA DE SEGURIDAD DEL
ACELERADOR
La palanca de seguridad
del acelerador (J) impide que la herramienta se accione
accidentalmente.
CUERPO ERGONÓMICO
Elcuerpodelaherramientaneumáticaesuncuerpodiseñado
ergonómicamente con empuñadura almohadillada (K) para
proporcionar un peso reducido y una relación peso-potencia
superior.Laempuñaduraestáhechadeundiseñodeelastómero
termoplásticomoldeado(TPE)paraproporcionarunacomodidad
mejorada, una reducción del resbalamiento y un mejor control de
la herramienta.
ENTRADA DE AIRE
La entrada de aire (G) de la
herramienta que se encuentra en la
parte inferior de la empuñadura se
utiliza para conectar una fuente de
suministro de aire con una
roscaamericanaNPTde1/4"estándar.
ESCAPE
El escape (H) se encuentra en la base
de la empuñadura y permite orientar
elescapefueradeláreadetrabajodel
operador.
A
B
C
E
F
CUERPO
CUERPO
J
I
H
G

41
Español
INSTALACIÓN
Suministro de aire
La conexión recomendada se muestra en la figura A. Las
herramientasneumáticasoperansobreunampliomargen
depresionesdeaire.Paraobtenerlamáximaeficienciaymayor
vida útil de la herramienta, la presión del aire suministrado a estas
herramientas NO debe exceder la PSI de servicio especificada en la
herramientadurantesufuncionamiento.Elusodeunapresiónmás
altadelacapacidadnominaldelaherramientacausaráundesgaste
másrápidoreduciendodrásticamentelavidadelaherramienta.Una
presióndeairemásaltatambiéncausaráunacondicióninseguray
una explosión.
Eldiámetrointeriordelamangueradeberáseraumentadopara
compensarporunamanguerainusualmentelarga(másde7,62m
osea25pies).Eldiámetromínimo
delamangueradeberáserde3/8”de
D. I. y los conectores deben tener el
mismodiámetrointerno.
El uso de lubricadores de manguera
de aire y de filtros de aire en línea es
recomendado para evitar que agua
en la manguera dañe la herramienta.
Drene diariamente el tanque de aire.
Limpie el cedazo del filtro de entrada
de aire por lo menos una vez por
semana para remover la mugre
acumulada u otras cosas que puedan
restringir el flujo de aire.
La entrada de aire de la herramienta
usada para conectar una fuente de aire
tieneunaroscaestándaramericanade
1/4" NPT.
Reglas de seguridad para herramientas
neumáticas
1)Inspeccionelasmanguerasdeaireparaversiestánrajadaso
tienenotrosproblemas.Reemplacelamanguerasiestá
desgastada.
2) Nunca apunte una manguera de aire hacia otra persona.
3) Desconecte la herramienta cuando no esté siendo usada,
antes de prestarle servicio o cambiar de accesorio.
4) Use las mangueras y conectores apropiados. Nunca use
acopladoresdecambiorápidoenlaherramienta.Encambio,
adicione una manguera y un acoplador entre la herramienta y la
fuente de aire.
Herramienta
Manguera líder
Lubrique Aquí
A Diario
Acoples
1/2 pul. (o mayor)
Tubos y
conectores
Manguera
de aire
Aceitera
Conector
Filtro
Drene a diario
FIGURE A

42
Español
PREPARACIÓN PARA EL USO
Uso apropiado de la herramienta
Sunuevaherramientadetrabajoestádiseñadaparacortey
cepillado. Esta herramienta proporciona un escape trasero para
orientarelflujodeairefueradeláreadetrabajo,unregulador
integrado para un control de velocidad conveniente y una palanca
de seguridad para evitar arranques accidentales.
Estaciones de trabajo
Su herramienta de corte debe ser utilizada solo como una
herramienta manual. It is always recommended that the tool is
used when standing with solid footing. It can be used in other
positions but before any such use, the operator must be in a secure
position having a firm grip and footing and be aware that when
loosening fasteners the tool can move quite quickly away from the
fastener being undone. An allowance must always be made for this
rearward movement so as to avoid the possibility of hand/arm/body
entrapment.
Puesta en servicio
Suministro de aire
PRECAUCIÓN:
EstaherramientarequierelubricaciónANTES de su uso inicial pero
también antes y después de cada uso adicional.
ADVERTENCIA: Use una fuente de aire limpio y lubricado que
proporcione una presión de aire medida en la herramienta de
90 lbs./pul.² (6,2 bar) cuando la herramienta esté funcionando con
el gatillo completamente oprimido.
Use la manguera del tamaño y longitud recomendados. Se
recomienda que la herramienta sea conectada a la fuente de
aire como se muestra en la figura A. No conecte la herramienta
alsistemadeairesiantesincorporarunaválvuladecortede
airefácildealcanzarydeoperar.Lafuentedeairedeberáser
lubricada. Se recomienda enérgicamente que se use un filtro
de aire, regulador, lubricador (FRL) tal como se muestra en la
Figura A,yaqueestolesuministraráalaherramientaairelimpio
y lubricado a la presión correcta. Los detalles de este equipo
pueden ser obtenidos donde su proveedor. Si no se usa tal equipo,
entonceslaherramientadeberáserlubricadadesconectandola
fuente de aire de la herramienta y despresurizando el conducto
oprimiendo el gatillo de la herramienta. Desconecte el conducto
de aire y vierta dentro del buje de entrada 1 cucharada (5 cc)
deaceiteparamotorneumático,preferiblementeunoquetenga
preventivo de óxido. Conecte la fuente de aire en la herramienta y
opérela lentamente por unos segundospara que el aceite circule.
Lubrique la herramienta diariamente si es usada frecuentemente, o
cuando comience a perder velocidad o potencia.
Uso de una herramienta de corte
ADVERTENCIA:
1) Lea todas las instrucciones antes de usar esta herramienta.
Todoslosoperadoresdeberánserentrenadoscompletamente
en su uso y estar informados sobre estas reglas de seguridad.
2)Noexcedalamáximapresióndeairedetrabajode90lbs./pul.²
(6,2 bar).
3) Use equipos de seguridad personales.
4) Use únicamente aire comprimido en las condiciones
recomendadas.
5) Si parece que la herramienta funciona mal, retírela de servicio y
haga los arreglos necesarios para repararla.
6) Si la herramienta es usada con un balanceador u otro
dispositivo de soporte, asegúrese de que esté seguramente
sujetado.
7) Mantenga siempre sus manos alejadas del accesorio de trabajo
instalado en la herramienta.
8)Estaherramientanoestáaisladaeléctricamente.Nuncausela
herramienta si hay alguna probabilidad de que entre en contacto
con la electricidad.
9) Cuando use la herramienta, siempre adopte una posición
de pies firmes y agarre firmemente la herramienta para
contrarrestar cualquier fuerza o fuerzas de reacción que puedan
ser generadas al usar la herramienta.
10) Use sólo las piezas de repuesto correctas. No improvise o
efectúe reparaciones temporales.
11) No trabe, pegue con cinta adhesiva, amarre con alambre el
gatilloenlaposicióndemarcha.Elgatillosiempredeberáestar
libre para regresar a la posición de “apagado” al ser soltado.
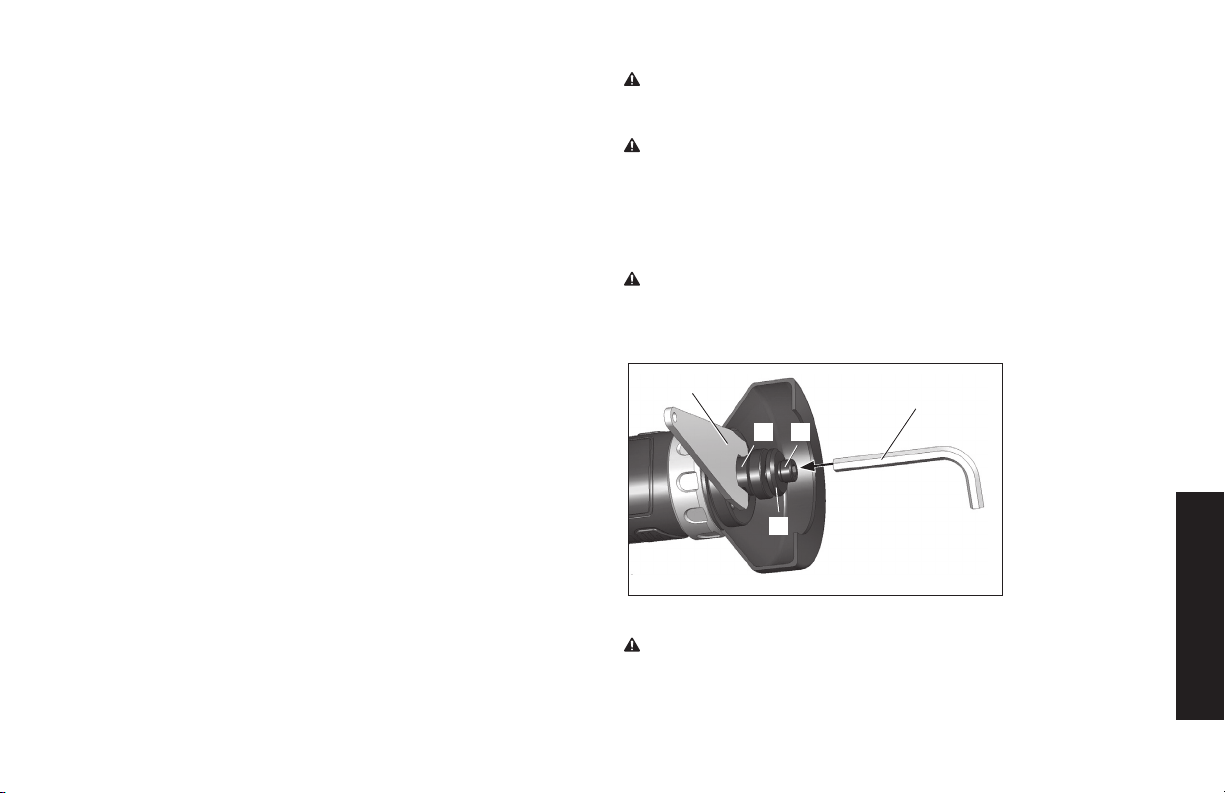
43
Español
Uso de una herramienta de corte (continuación)
12) Siempre cierre la fuente de aire de la herramienta y oprima el
gatillo para aliviar el aire de la manguera de alimentación antes
de ajustar o remover el accesorio de trabajo.
13) Revise regularmente las mangueras y conectores para ver
siestándesgastados.Reemplácelossiesnecesario.No
transportelaherramientaagarrándolaporlamanguera.
Asegúrese de retirar su mano del gatillo cuando transporte la
herramienta con la fuente de aire conectada.
14) Tenga cuidado de no enredar ninguna pieza de la herramienta
en la ropa, corbata, cabello, trapos de limpieza, etc. Esto
causaráqueelcuerposeaatraídohacialaherramientalocual
puede ser muy peligroso.
15)Seesperaquelosusuariosadoptenprácticasdetrabajo
seguras y observen todos los requisitos egales relevantes al
instalar, usar o darle mantenimiento a la herramienta.
16) Sólo instale la herramienta cuando tenga un interruptor de
encendido/apagadofácilmenteaccesibleyoperableenla
fuente de aire.
17) Tenga cuidado para que el escape de aire de la herramienta
no cause problemas o sople en dirección a otra persona.
18) Nunca recueste la herramienta a menos que el accesorios de
trabajo haya dejado de moverse. con el sujetador.
LISTA DE CONTROL PREVIA A LA
PUESTA EN MARCHA (FIG. 1)
•Dreneelaguadeltanquedelcompresordeaireylacondensación
de las mangueras de aire.(Por favor consulte el manual de
operación del compresor).
•Lubriquelaherramienta
•Seleccionelostubosdeimpactonecesarios.Lostubosdeben
coincidirconeltamañodelimpulsorenlallaveneumáticade
impacto.
ADVERTENCIA: Riesgodeoperacióninsegura.Sostengala
manguera firmemente con las manos al instalarla o desconectarla
paraevitarladesconexiónrepentinadelamanguera.
ADVERTENCIA: Riesgodeexplosión.Demasiadapresiónde
aire produce peligro de estallido. Controle el valor nominal máximo
depresióndelfabricanteparalasherramientasylosaccesorios
neumáticos.Lapresióndesalidadelreguladornuncadebeexcederel
valormáximodepresión.
ENSAMBLE DE LA SIERRA DE CORTE
PRECAUCIÓN: Desconectelaherramientadecortedel
suministro de aire antes delubricar o cambiar las sierras de corte.
•Sostengaelhusillo (F) con la llave suministrada (L) para extraer el
tornillo de cabeza hexagonal (B) con la llave allen (M) suministrada.”
•Deslicelaarandela (C) fuera de la herramienta.
PRECAUCIÓN: Inspeccione y limpie el husillo antes de colocar
las sierras.
M
B
C
F
L
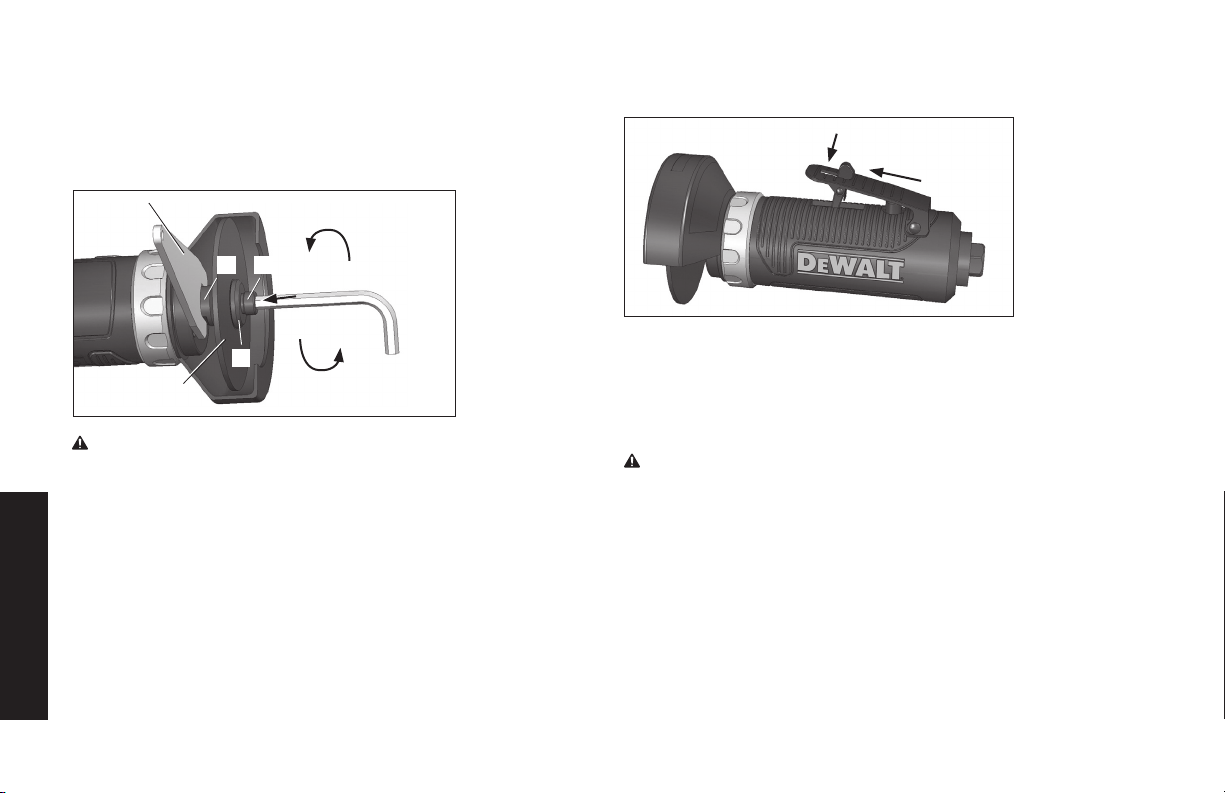
44
Español
Ensamble de la sierra de corte (continuación)
• Coloque la sierra de corte (D) en la herramienta.
•Sostengaelhusillo (F) con la llave suministrada (L) vuelva a
colocar la arandela (C) y el tornillo de cabeza hexagonal (B) hasta
ajustarlos.
ADVERTENCIA: Compruebe que las sierras de corte estén
sujetadasfirmemente.Lassierrasdecortepuedensalirexpulsadas
de la herramienta durante el funcionamiento y ocasionar serias
lesiones.
PROCEDIMIENTOS OPERATIVOS
PUESTA EN MARCHA (FIG. 1, PG.2)
•Conectelaherramientaalafuentedeaireconlamangueradel
tamaño recomendado.
•Enciendaelcompresordeaireydéjeloquelleneeltanque.
•Ajusteelreguladordeairea90lbs./pul.²(PSI).Estallave
neumáticaoperaaunapresiónmáximade90lbs./pul.²(PSI).
•Ajusteelreguladordetorsión(siseencuentradisponible)enla
torsión deseada.
•Mientraspresionala palanca de seguridad (1) hacia adelante,
presione el gatillo (2) para comenzar a utilizar la herramienta.
NOTA:Elhusillogiraamáximavelocidadcuandoelgatilloestá
completamente apretado. A medida que levanta el pulgar, el gatillo de
liberaciónautomáticasecierra,loqueaminoralavelocidaddelhusillo
y permite que el operador seleccione la mejor velocidad y potencia
para el trabajo. Cuando el gatillo esté completamente liberado, no se
puede presionar nuevamente hasta que el mecanismo de seguridad
se desacople.
PRECAUCIÓN: NOcoloqueningunapartedelcuerpoenlínea
con la sierra de corte mientras gira.
PARADA (FIG. 1, PÁG. 2)
•Libereelgatilloparadejardeutilizarlaherramienta.
•Unavezquehayacompletadoeltrabajo,apagueelcompresory
almacenelaherramientaneumáticadespuésdehaberlalubricado.
Por seguridad, coloque la herramienta en un soporte colgante o
sobre una placa plana y suave cuando no esté en uso.
•Cuandocambielosaccesoriosdecorte,desconectesiempreel
suministro de aire para evitar lesiones.
AFLOJE
AJUSTE
1
2
B
C
F
L
D

45
Español
MANTENIMIENTO
Graissage
Les outils pneumatiques doivent être graissés pendant toute la vie
des outils. Le moteur pneumatique et les coussinets utilisent l’air
comprimé pour actionner l’outil et comme l’humidité de l’air comprimé
entraîne la formation de rouille sur le moteur et les pièces intérieures
de l’outil, il faut graisser l’outil tous les jours. Tout manquement à
graisser les outils correctement réduira fortement la vie de l’outil et
annulera la garantie.
ATENCIÓN: Il faut graisser l’outil AVANT l’emploi initial, avant et
aprèschaqueusageadditionnel.
Pour graisser l’outil pneumatique à la main :
1. Débrancher l’outil de la source d’alimentation d’air, placer les
entrées d’air vers le haut.
2. Retirer l’accessoire de la prise de l’outil pneumatique, comme les
douilles, les ciseaux, etc.
3. Abaisser la gâchette ou la commande et placer environ une
cuillère à thé (5 cc) d’huile à outil pneumatique dans l’entrée d’air.
(En abaissant la gâchette ou la commande, l’huile peut circuler
dans le moteur).
Remarque : Utiliser l’huile SAE n˚10 si l’huile à outil pneumatique
n’est pas disponible.
4. Conecte la herramienta en una fuente de aire, cubra el extremo de
escapeconunatoallayhágalofuncionarentre20y30segundos.
ADVERTENCIA:
Gardezhorsdelaportéedesenfants.Encasd’ingestion,nepas
provoquer de vomissement, appelez un médecin immédiatement.
ADVERTENCIA:
L’excédent d’huile dans le moteur est immédiatement expulsé par
l’orifice d’échappement. Toujours éloigner l’orifice d’échappement des
gens ou objets.
Rangement
Il faut graisser l’outil pneumatique avant de le ranger. Se reporter aux
instructions sur le « Graissage » en omettant l’étape 4.
INFORMACIÓN DEL SERVICIO TÉCNICO
Tenga a mano la siguiente información cuando llame al
mantenimiento:
Número del modelo _____________________________________
Fecha y lugar de compra _________________________________
GARANTÍA COMPLETA DE UN TRES
Las herramientas industriales DeWALT para trabajo pesado tienen
garantía de un Tres a partir de la fecha de compra. Repararemos,
sin cargo, cualquier defecto debido a fallas en los materiales o la
mano de obra. Para obtener información sobre las reparaciones
cubiertas por la garantía, llame al 1-800-4-D
e
WALT. Esta garantía
no se extiende a los accesorios o a los daños causados por
terceros al intentar realizar reparaciones. Esta garantía le concede
derechos legales específicos; usted goza también de otros
derechos que varían según el estado o provincia.
AMÉRICA LATINA: Esta garantía no se aplica a los productos que
se venden en América Latina. Para los productos que se venden
en América Latina, debe consultar la información de la garantía
específica del país que viene en el empaque, llamar a la compañía
local o visitar el sitio Web a fin de obtener esa información.
REEMPLAZO GRATUITO DE LAS ETIQUETAS DE
ADVERTENCIA: Si sus etiquetas de advertencia se tornan
ilegibles o faltan, llame al 1-800-4-D
e
WALT para que se le
reemplacen gratuitamente.
46
Español
LAS CAÍDAS PUEDEN CAUSAR
LESIONES GRAVES. NO PISAR NI
PARARSE EN ESTA ÁREA.
ADVERTENCIA
LES CHUTES PEUVENT CAUSER DE GRAVES
BLESSURES. NE MARCHEZ PAS ET NE VOUS
TENEZ PAS SUR CET EMPLACEMENT.
AVERTISSEMENT
FALLS CAN CAUSE SERIOUS
INJURIES. DO NOT STEP OR STAND
ON THIS AREA.
WARNING
SEE OWNER’S MANUAL FOR
BREAK-IN PROCEDURES.
CAUTION
PARA EL PROCEDIMIENTO DE
ASENTADO DE LA MAQUINA, VER
MANUAL DEL OPERARIO.
ATENCIÓN
CONSULTEZ LE MANUEL DE
L’UTILISATEUR POUR LES
PROCEDURES DE RODAGE.
ATTENTION
ADVERTENCIA
EL USO INDEBIDO PUEDE GENERAR RIESGOS. SEGUIR ESTAS INSTRUCCIONES: RIESGO DE ESTALLIDO. ASEGÚRESE QUE LA VÁLVULA DE SALIDA DEL
COMPRESOR ESTE REGULADA POR DEBAJO DEL MÁXIMO DE LA PRESIÓN DE OPERACIÓN DE LA PISTOLA ROCIADORA O HERRAMIENTA. ANTES DE ARRANCAR
EL COMPRESOR, TIRAR DEL ANILLO EN LA VÁLBULA DE SEGURIDAD PARA ASEGURARSE QUE LA VÁLVULA SE MUEVE LIBREMENTE. DRENAR EL AGUA DEL TANQUE DESPUÉS DE CADA USO.
RIESGO DE FUEGO O EXPLOSIÓN. NO ROCIAR LÍQUIDO NI PINTURAS INFLAMABLES O COMBUSTIBLES CERCA DE CHISPAS, LLAMAS, LLAMAS DE PILOTO O EN ÁREAS CERRADAS. EL ÂREA DE
TRABAJO DEBE ESTAR BIEN VENTILADA. MANTENER EL COMPRESOR ALEJADO POR LO MENOS 20 PIES DEL AREA DE PINTURA. NO LLEVAR NI OPERAR EL COMPRESOR NI DISPOSITIVO ELÉCTRICO
ALGUNO CERCA DEL AREA DEL ROCIADO. NUNCA FUME EN EL ÁREA DEL ROCIADO. USAR UNA MANGUERE DE UN MÍNIMO DE 25 PIES PARA CONECTAR LA PISTOLA AL COMPRESOR. RIESGO DE
DAÑOS PERSONALES. USAR GAFAS DE SEGURIDAD ANSI Z87. NUNCA APUNTAR EL CHORRO DE AIRE COMPRIMIDO O DE MATERIAL QUE SE ESTÉ ROCIANDO A SÍ MISMO NI A OTRAS PERSONAS.
NE RESPIRAR EL AIRE COMPRIMIDO. REDUCIR LA PRESIÓN A CERO ANTES DE DESMONTAR LA MANGUERA. RIESGO DE CHOQUE ELÉCTRICO. ALTO VOLTAJE. DESCONECTAR LA UNIDAD ANTES DE
QUITAR LA CUBIERTA. NO EXPONER A LLUVIA. ALMACENAR EN INTERIORES. PARA SEGURIDAD COMPLETA, OPERACIÓN E INSTRUCCIONES PARA REPARAR, LEER EL MANUAL DEL OPERADOR.
AVERTISSEMENT
UNE UTILISATION INCORRECTE PEUT ÊTRE DANGEREUSE. SUIVEZ LES INSTRUCTIONS CI-DESSOUS: RISQUE D'ECLATEMENT. ASSUREZ-VOUS QUE LA
PRESSION DE SORTIE DU COMPRESSEUR EST RÉGLÉE À UN NIVEAU INFÉRIEUR À LA PRESSION D'UTILISATION MAXIMUM DU PISTOLET VAPORISATEUR OU DE
L'ACCESSOIRE. AVANT DE DÉMARRER LE COMPRESSEUR, TIREZ SUR L'ANNEAU DE LA SOUPAPE DE SÛRETÉ POUR VOUS ASSURER QU'ELLE FONCTIONNE LIBREMENT. VIDANGEZ L'EAU DU RÉSERVOIR
À AIR APRÈS CHAQUE UTILISATION. RISQUE D'INCENDIE OU D'EXPLOSION. NE PAS VAPORISER UN LIQUIDE OU UN PEINTURE INFLAMMABLE OU COMBUSTIBLE PRÈS D'ÉTINCELLES, DE FLAMMES, DE
VEILLEUSES NI DANS UN ENDROIT RESTREINT OU RENFERMÉ. L'AIRE DE VAPORISATION DOIT ÊTRE BIEN AÉRÉE. GARDEZ LE COMPRESSEUR À UNE DISTANCE D'AU MOINS 20 PIEDS DE LA SURFACE À
VAPORISER. NE PORTEZ PAS LE COMPRESSEUR ET NE L'UTILISEZ PAS NI AUCUN AUTRE APPAREIL ÉLECTRIQUE À PROXIMITÉ DE L'AIRE DE VAPORISATION. NE FUMEZ JAMAIS QUAND VOUS
VAPORISEZ. UTILISEZ UN FLEXIBLE D'AIR D'UNE LONGUEUR MINIMUM DE 25 PIEDS POUR RELIER LE PISTOLET VAPORISATEUR AU COMPRESSEUR. RISQUE DE BLESSURES CORPORELLES. PORTEZ DES
LUNETTES DE PROTECTION ANSI Z87. NE DIRIGEZ JAMAIS L'AIR COMPRIME OU DES MATÉRIAUX VERS SOI OU VERS AUTRUI. NE JAMAIS UTILISER DE L'AIR COMPRIMÉ POUR LA RESPIRATION. RÉGLEZ
LA PRESSION À ZÉRO AVANT DE RETIRER LE BOYAU. RISQUE DE CHOC ÉLECTRIQUE. VOLTAGE DANGEREUX. DEBRANCHEZ LA MACHINE AVANT D'ENLEVER BOITIER. N'EXPOSEZ PAS LE COMPRESSEUR
À LA PLUIE. REMISEZ-LE À L'INTÉRIEUR. LISEZ LE MANUEL DE L'UTILISATEUR POUR DES INSTRUCTIONS COMPLÈTES CONCERNANT LA SÉCURITÉ, L'UTILISATION ET LES RÉPARATIONS.
INCORRECT USE CAN CAUSE HAZARDS. FOLLOW THESE INSTRUCTIONS: RISK OF BURSTING. MAKE SURE THE COMPRESSOR OUTLET PRESSURE IS SET
LOWER THAN THE MAXIMUM OPERATING PRESSURE OF THE SPRAY GUN OR TOOL. BEFORE STARTING THE COMPRESSOR, PULL THE RING ON THE SAFETY
VALVE TO MAKE SURE THE VALVE MOVES FREELY. DRAIN WATER FROM TANK AFTER EACH USE. RISK OF FIRE OR EXPLOSION. DO NOT SPRAY A FLAMMABLE OR COMBUSTIBLE
LIQUID OR PAINT NEAR SPARKS, FLAMES, PILOT LIGHTS, OR IN A CONFINED AREA. THE SPRAY AREA MUST BE WELL VENTILATED. KEEP COMPRESSOR AT LEAST 20 FEET AWAY FROM
SPRAY AREA. DO NOT CARRY AND OPERATE THE COMPRESSOR, OR ANY OTHER ELECTRICAL DEVICE NEAR THE SPRAY AREA. NEVER SMOKE WHEN SPRAYING. USE A MINIMUM OF
25 FEET OF HOSE TO CONNECT A SPRAY GUN TO THE COMPRESSOR. RISK OF PERSONAL INJURY. WEAR ANSI Z87 SAFETY GLASSES. NEVER SPRAY COMPRESSED AIR OR MATERIAL
AT SELF OR OTHERS. DO NOT USE COMPRESSED AIR FOR BREATHING. REGULATE PRESSURE TO ZERO BEFORE REMOVING HOSE. RISK OF ELECTRICAL SHOCK. HAZARDOUS VOLTAGE.
UNPLUG UNIT BEFORE REMOVING COVER. DO NOT EXPOSE TO RAIN, STORE INDOORS. READ OWNER'S MANUAL FOR COMPLETE SAFETY, OPERATION, AND REPAIR INSTRUCTIONS.
WARNING
HOLD HOSE FIRMLY TO
PREVENT HOSE WHIP.
CAUTION
SOSTENGA LA MANGUERA
CON FIRMEZA PARA EVITAR EL.
ATENCIÓN
BIEN TENIR LE TUYAU POUR
ÉVITER UN À-COUP.
ATTENTION
DRAIN TANK DAILY OR AFTER EACH USE. CONDENSATION BUILD-UP MAY CAUSE CORROSION
INSIDE TANK RESULTING IN TANK FAILURE. SEE MANUAL FOR INSPECTION PROCEDURES. TO DRAIN
TANK OPEN VALVE SLOWLY AND TILT COMPRESSOR TO EMPTY ACCUMULATED WATER.
WARNING
DRENE EL TANQUE A DIARIO O DESPUÉS DE CADA USO. LA ACUMULACIÓN DE CONDENSACIÓN
PUEDE OCASIONAR CORROSIÓN DENTRO DEL TANQUE Y PROVOCAR FALLA DEL TANQUE.
CONSULTE EL MANUAL PARA CONOCER LOS PROCEDIMIENTOS DE INSPECCIÓN. PARA DRENAR EL TANQUE, ABRA LA
VÁLVULA LENTAMENTE E INCLINE EL COMPRESOR PARAELIMINAR EL AGUA ACUMULADA.
ADVERTENCIA
RÉSERVOIR DE VIDANGE QUOTIDIEN
OU APRÈS CHAQUE UTILISATION. L'HABILLAGE
DE
CONDENSATION PEUT CAUSER LA CORROSION À L'INTÉRIEUR DU RÉSERVOIR AYANT POUR
RÉSULTAT L'ÉCHEC DE RÉSERVOIR. VOIR LE MANUEL POUR DES PROCÉDURES D'INSPECTION. À LA VALVE
OUVERTE
DE RÉSERVOIR DE VIDANGE LENTEMENT ET AU COMPRESSEUR D'INCLINAISON À L'EAU ACCUMULÉE VIDE.
AVERTISSEMENT
GLOSARIO
CFM: Pies cúbicos por minuto.
PSI: Libras por pulgada cuadrada; una unidad de medida de presión.
SCFM:piescúbicosestándarporminuto;unidaddemedidade
suministro de aire.
Certificación de código: Losproductosquetienenunaomásde
las indicaciones siguientes: UL, CUL, ETL, CETL, han sido
evaluados por los laboratorios de seguridad independientes
certificados de OSHAycumplenlosestándaresdeseguridadde
Underwriters Laboratories cuya aplicación corresponda.
RPM: Revoluciones por minuto; es una medida de la frecuencia de
rotación.
BPM: Golpes por minuto (del inglés, Beats Per Minute).
NPT: Rosca de tubería nacional (del inglés, National Pipe Thread)
(roscacónica);esunestándardeEE.UU.pararoscascónicas
utilizadas en caños y accesorios roscados.
ID:Diámetrointerno

D
e
WALT Industrial Tool Co., 701 Joppa Road, Baltimore, MD 21286
Part No.DWMT70784 70100730 Copyright © 2014 D
e
WALT
The following are trademarks for one or more D
e
WALT power tools: the yellow and black color scheme; the “D” shaped air intake grill; the
array of pyramids on the handgrip; the kit box configuration; and the array of lozenge-shaped humps on the surface of the tool.