ID5G00KMW/UK /LID5G00KMW/UK /LID5G00KMW/UK /L

EN
ENGLISH
3
Safety Instructions
2
19
Daily Reference Guide
Instalation Guide
7
3
EN
SAFETYINSTRUCTIONS
IMPORTANTTOBEREADANDOBSERVED
Theseinstructionsarevalidifthecountry
symbolappearsontheappliance.Ifthesymbol
doesnotappearontheappliance,pleasereferto
thetechnicalinstructionswhichwillprovidethe
necessary instructions concerning modification of
theappliancetotheconditionsofuseofthe
country.
CAUTION:Useofthegascookingappliance
resultsintheproductionofheat,moistureand
productsofcombustionintheroominwhich
itisinstalled.Ensurethatthekitcheniswell
ventilated,especiallywhentheapplianceisin
use:keepnaturalventilationholesopenor
installamechanicalventilationdevice(mechanical
extractorhood).Prolongedintensiveuseofthe
appliance maycallforadditionalventilation,such
asopeningawindow,ormoreeffectiveventilation,
forexampleincreasingthelevelofmechanical
ventilation (if possible).
Failure to follow the information in this manual exactly maycause a
fire or explosion, resulting in property damage or personal injury.
Beforeusingtheappliance,readthesesafety
instructions.Keepthemnearbyforfuture
reference.
Theseinstructionsandtheapplianceitself provide
importantsafetywarnings,tobeobservedatall
times.Themanufacturerdeclinesanyliabilityfor
failuretoobservethesesafetyinstructions,for
inappropriateuseoftheapplianceorincorrect
setting of controls.
WARNING:If thehobsurfaceiscracked,donot
use the appliance – risk of electric shock.
WARNING:Danger offire:Donotstoreitems
on the cooking surfaces.
CAUTION:Thecookingprocesshastobe
supervised.Ashortcookingprocesshastobe
supervised continuously.
WARNING: Leavingthe hobunattendedwhen
cookingwithfatoroilcanbedangerous– riskof
fire.NEVERtrytoextinguishafirewithwater,but
switchoffthe applianceand thencoverthe flames
e.g. with a lid or a fire blanket.
Donotusethehobasaworksurfaceorsupport.
Keepclothesorotherflammablematerialsaway
from the appliance, until all the components have
cooled down completely – risk of fire.
Very young children (0-3years) shouldbe kept
awayfromtheappliance.Youngchildren(3-8
years)shouldbekeptawayfromtheappliance
unlesscontinuouslysupervised.Childrenfrom8
yearsoldandaboveandpersonswithreduced
physical,sensoryormentalcapabilitiesorlackof
experience and knowledge can usethis appliance
onlyiftheyaresupervisedorhavebeengiven
instructionsonsafeuseandunderstandthe
hazards involved.Children must notplay with the
appliance.Cleaningandusermaintenancemust
notbecarriedoutbychildrenwithoutsupervision.
CAUTION :In case ofhotplate glass breakage:-
shut immediately off all burners and any electrical
heatingelementandisolatetheappliancefrom
thepowersupply;-donottouchtheappliance
surface; -do not use the appliance
The glass lid can break in if it is heated up.
Turn off all the burners and the electric
plates before closing the lid. Do not shout
down lid when burner alight
WARNING:Theapplianceanditsaccessible
partsbecomehotduringuse. Careshouldbetaken
to avoidtouching heating elements.Children less
than8yearsofagemustbekeptawayunless
continuously supervised
Neverleavetheapplianceunattendedduring
use.Iftheapplianceissuitableforprobeusage,
onlyuseatemperatureproberecommendedfor
this oven - risk of fire.
Keepclothesorotherflammablematerials
awayfrom theappliance, untilall thecomponents
have cooled down completely - risk of fire.Always
bevigilantwhencookingfoodsrichinfat,oilor
when adding alcoholic beverages - risk of fire. Use
ovenglovestoremovepansandaccessories.At
theendofcooking,openthedoorwithcaution,
allowinghotairorsteamtoescapegradually
beforeaccessingthecavity-riskofburns.Donot
obstructhot airvents at thefront of theoven - risk
of fire.
Exercisecautionwhentheovendoorisinthe
open or down position, to avoid hitting the door.
Whenyouplacetherackinside,makesurethat
thestopis directedupwardsandinthebackofthe
cavity.
Thedeviceshallnotbeoperatedformore15s.If
after 15s the burner has not lit,stop operating the
deviceandopenthecompartmentdoorand/or
waitatleast1minbeforeattemptingafurther
ignition of the burner.
PERMITTEDUSE
CAUTION:Theapplianceisnotintendedto
beoperatedbymeansofanexternalswitching
device,suchasatimer,orseparateremote
controlled system.
Thisapplianceisintendedtobeusedin
householdandsimilarapplicationssuchas:staff
kitchenareasinshops,officesandotherworking
environments;farmhouses;byclientsinhotels,
motels,bed&breakfastandotherresidential
environments.
Nootheruseispermitted(e.g. heatingrooms).
Thisapplianceisnotforprofessionaluse.Do
not use the appliance outdoors.
4
Donotstoreexplosiveorflammable
substances(e.g. gasoline oraerosol cans) inside or
near the appliance - risk of fire.
Usepotsandpanswithbottomsthesame
widthasthatoftheburnersorslightlylarger(see
specifictable).Makesurepotsonthegratesdo
not protrude beyond the edge of the hob.
Improperuse ofthe gridscan resultin damage
to the hob: do not position the grids upside down
or slide them across the hob.
Do not let the burner flame extend beyond the edge of the pan.
Donotuse:Castirongriddles,ollarstones,terracottapotsandpans.
Heatdiffuserssuchasmetalmesh,oranyothertypes.Twoburners
simultaneously for one receptacle (e.g. Fish kettle).
Should particular local conditions of the delivered gas make the ignition
ofburnerdifficult,itisadvisabletorepeattheoperationwiththeknob
turned to small flame setting.
Incaseofinstallationofahoodabovethecooktop,pleaserefertothe
hood instructions for the correct distance.
Theprotectiverubberfeetonthegridsrepresentachockinghazardfor
young children.After removingthegrids,please ensurethatallthe feet
are correctly fitted.
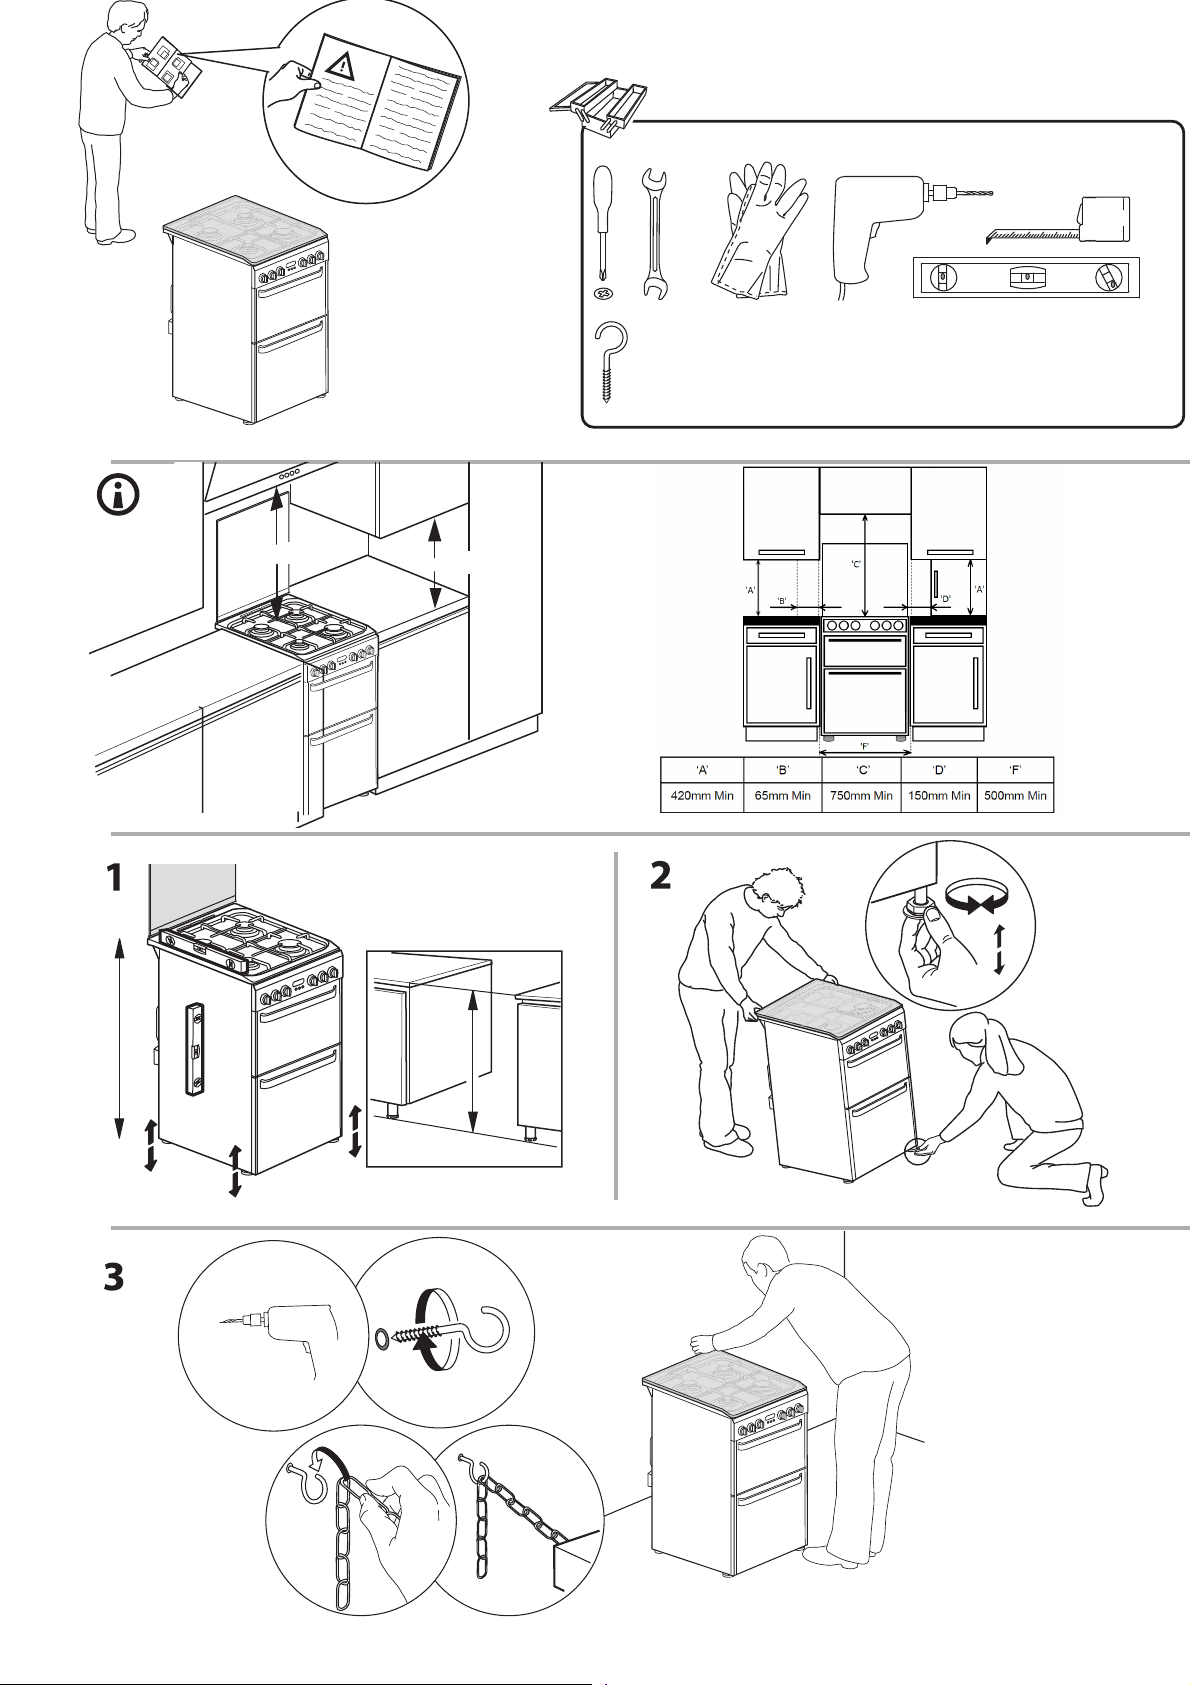
INSTALLATION
Theappliancemustbehandledandinstalled
bytwoormorepersons-riskofinjury.Use
protectiveglovestounpackandinstall-riskof
cuts.
Theelectricalandgasconnectionsmust
comply with local regulations.
Installation,includingwatersupply(ifany),
electrical connections andrepairs must becarried
outbyaqualifiedtechnician.Donotrepairor
replaceanypartoftheapplianceunlessspecifically
statedintheusermanual.Keepchildrenawayfrom
theinstallationsite.Afterunpackingtheappliance,
makesurethatithasnotbeendamagedduring
transport.Intheeventofproblems,contactthe
dealeroryournearestAftersalesService.Once
installed,packagingwaste(plastic,styrofoam
partsetc.)mustbestoredoutofreachof
children-riskofsuffocation.Theappliancemust
bedisconnectedfromthepowersupplybefore
anyinstallationoperation-riskofelectricshock.
Duringinstallation,makesuretheappliancedoes
notdamagethepowercable-riskoffireor electric
shock.Onlyactivatetheappliancewhenthe
installation has been completed.
WARNING:Modificationoftheapplianceand
itsmethodofinstallationareessentialinorderto
usetheappliancesafelyandcorrectlyinallthe
additional countries.
Usepressureregulatorssuitableforthegas
pressure indicated in the instructions.
Theroommustbeequippedwithanair
extractionsystemthatexpelsanycombustion
fumes.
Theroommustalsoallowproperaircirculation,
as air is needed for combustion to occur normally.
Theflowofairmustnotbelessthan2m³/hper
kW of installed power.
The aircirculation system maytake air directly
from the outside by means of a pipe with an inner
crosssectionof atleast100cm²; theopeningmust
not be susceptible to blockages.
The system canalso providethe airneeded for
combustionindirectly,i.e.fromadjacentrooms
fittedwithaircirculationtubesasdescribedabove.
However,theseroomsmustnotbecommunal
rooms,bedroomsor roomsthat maypresent afire
hazard.
Liquidpetroleumgassinkstothefloorasit
isheavierthanair.Therefore,roomscontaining
LPGcylindersmustalsobeequippedwithvents
toallowgastoescapeintheeventofaleak.
ThismeansLPGcylinders,whetherpartiallyor
completelyfull,mustnotbeinstalledorstored
inroomsorstorageareasthatarebelowground
level(cellars,etc.).Itisadvisabletokeeponlythe
cylinderbeingusedintheroom,positionedso
thatit isnotsubject toheatproducedby external
sources(ovens,fireplaces,stoves,etc.)which
couldraise thetemperature ofthecylinder above
50°C.
Shouldyoufinditdifficulttoturntheknobsfortheburner,please
contacttheAfter-salesService,whocanreplaceoftheburnertapif
found to be faulty.
Theopeningsusefortheventilationanddispersionofheatmustnever
be covered.
Donotremovetheappliancefromits
polystyrenefoambaseuntilthetimeof
installation.
Connection with rigid pipe (copper or steel).
Ifthegaspressureisdifferentfromthe
recommendedpressure,asuitablepressure
regulatormustbefittedtotheinletpipein
accordancewiththecurrentNationalRegulations.
Donotinstalltheappliancebehindadecorative
door - risk of fire.
if the range is placed on a base, it must
be leveled and fixed to the wall by the
retention chain provided, to prevent the
appliance slipping from the base.
WARNING: In order to prevent the
appliance from tipping, the retention chain
must be installed. Refer to the instructions
for installation.
GASCONNECTION
WARNING:Priortoinstallation, ensurethatthe
localdistributionconditions(typeofgasandgas
pressure)andtheconfigurationoftheappliance
are compatible.
Checkthatthepressureofthegassupplyis
consistentwiththevaluesindicatedinTable1
(“Burner and nozzle specifications”).
WARNING:Theconfigurationconditionsof
thisappliancearestatedonthelabel(ordata
plate).
WARNING:Thisapplianceisnotconnected
toacombustionproductsevacuationdevice.It
5
mustbeinstalledandconnectedinaccordance
withcurrentinstallationregulations.Particular
attentionmustbepaidtotherelevant
requirements regarding ventilation.
Iftheapplianceisconnectedtoliquidgas,
the regulationscrew mustbe fastned astightly as
possible.
IMPORTANT:Whenthegascylinderorgas
containerisinstalled,itmustbeproperlysettled
(vertical orientation).
WARNING:Thisoperationmustbeperfomed
by a qualified technician
Useonlyflexibleorrigidmetalhoseforgas
connection.
Connection with a rigid pipe (copper or steel)
Connectiontothegassystemmustbecarried
outinsuchawayasnottoplaceanystrainof
anykindontheappliance.Thereisanadjustable
L-shapedpipefittingontheappliancesupply
rampandthisisfittedwithasealinorderto
preventleaks.Thesealmustalwaysbereplaced
afterrotating thepipefitting(thesealisprovided
withtheappliance).Thegassupplypipefittingis
a threaded 1/2 gas cylindrical male attachment.
Connectingaflexiblejointlessstainlesssteel
pipe to a threaded attachment
Thegassupplypipefittingisathreaded1/2gas
cylindricalmaleattachment.Thesepipesmust
beinstalledsothattheyareneverlongerthan
2000mmwhenfullyextended.Onceconnection
hasbeenmade,makesurethattheflexiblemetal
pipedoesnottouchanymovingpartsandisnot
compressed.Onlyuse pipesand sealsthat comply
with current national regulations.
IMPORTANT:Ifastainelesssteelhoseisused,
itmustbeinstalledsoasnottouchanymoving
partofthefurniture(e.g.drawer).Itmustpass
thorughanareawheretherearenoobstructions
andwhereitispossibletoinspectitacrossits
entire length.
Theapplianceshouldbeconnectedtothemain
gas supply orto a gascylinder incompliance with
thecurrentnationalregulations.Beforemaking
theconnection,makesurethattheapplianceis
compatiblewiththegassupplyyouwishtouse.
Ifitisnot,followtheinstructionsindicatedinthe
paragraph "Adapting to different types of gas".
Afterconnectiontothegassupply,checkfor
leakswithsoapywater.Lightuptheburnersand
turntheknobsfrommaxposition1*tominimum
position 2* to check flame stability.
Connectiontothegasnetworkorthegas
cylindermaybecarryoutusingaflexiblerubber
orsteelhose,inaccordancewithcurrentnational
legislation.
ADAPTINGTODIFFERENTTYPESOFGAS
(Thisoperationneedstobecarriedoutbya
qualified technician.)
Inorderto adaptthe applianceto atype of gas
otherthan thetypefor whichit wasmanufactured
(indicatedontheratinglabel),followthededicated
steps provided after installation drawings.
ELECTRICALWARNINGS
IMPORTANT:Informationaboutcurrentand
voltageconsumptionisprovidedontherating
plate.
Theratingplateisonthefrontedgeofthe
oven (visible when the door is open).
Itmustbepossibletodisconnecttheappliance
fromthepowersupplybyunpluggingitif
plugisaccessible,orbyamulti-poleswitch
installedupstreamofthesocketinaccordance
withthewiringrulesandtheappliancemust
beearthedinconformitywithnationalelectrical
safety standards.
Thepowercablemustbelongenoughtoconnecttheappliance,
oncefittedinitshousing,tothemainpowersupply.Donotpullthe
power supply cable.
Donotuseextensionleads,multiplesockets
oradapters.Theelectricalcomponentsmustnot
beaccessible totheuserafterinstallation.Donot
usetheappliancewhenyouarewetorbarefoot.
Donotoperatethisapplianceifithasadamaged
powercableorplug,ifitisnotworkingproperly,
or if it has been damaged or dropped.
Ifthesupplycordisdamaged,itmust
bereplacedwithanidenticalonebythe
manufacturer,itsserviceagentorsimilarly
qualifiedpersonsinordertoavoidahazard-
risk of electric shock.
Ifthepowercableneedstobereplaced,
contact an authorised service centre.
WARNING:Ensurethattheapplianceis
switchedoffbeforereplacingthelamptoavoid
the possibility of electric shock.
CLEANINGANDMAINTENANCE
WARNING:Ensurethattheapplianceis
switchedoffanddisconnectedfromthepower
supplybeforeperforminganymaintenance
operation;neverusesteamcleaningequipment-
risk of electric shock.
Donotuseharshabrasivecleanersormetal
scraperstocleanthedoorglasssincetheycan
scratch thesurface, whichmay result in shattering
of the glass.
Donotuseabrasiveorcorrosiveproducts,
chlorine-based cleaners or pan scourers.
Makesuretheappliancehascooleddown
before cleaning orperforming maintenance.-risk
of burns.
WARNING:Switchofftheappliancebefore
replacing the lamp - risk of electric shock.
Toavoid damagingtheelectricignition device,donotuseitwhen
the burners are not in their housing.
Wearprotectiveglovesforcleaningand
maintenance.
Your new appliance is guaranteed* and will give
lasting service. This guarantee is only applicable if the
appliance has been installed in accordance with the
installation instructions detailed in this booklet.
To help make best use of your cooking equipment,
please read this booklet carefully.
The cooker is designed specifically for domestic use
and responsibility will not be accepted for use in any
other installation.
When the cooker is first used an odour may be
emitted, this will cease after a period of use.
When first using the cooker ensure that the room is
well ventilated (e.g. open a window or use an extractor
fan) and that persons who may be sensitive to the
odour avoid any fumes. It is suggested that any pets
be removed from the room until the smell has ceased.
This odour is due to temporary finish on oven liners
and elements and also any moisture absorbed by the
insulation.
* The guarantee is subject to the provisions that the
appliance:
a. Has been used solely in accordance with the Users
Instruction Book.
b. Has been properly connected to a suitable supply
voltage as stated on the rating plate attached to this
equipment.
c. Has not been subjected to misuse or accident or
been modified or repaired by any person other than
the authorised employee or agent.
d. Has been correctly installed.
1. This appliance is intended for nonprofessional use
within the home.
2. These instructions are only for those countries
whose symbols appear in the booklet and on the
serial no. plate of the appliance.
3. This owner’s manual is for a class 1 appliance
(insulated) or class 2, subclass 1 appliances
(installed between two cabinets).
Keep the appliance clean, as a build up
of grease or fat from cooking can cause
a fire.
6
Your new appliance is guaranteed* and will give
lasting service. This guarantee is only applicable if the
appliance has been installed in accordance with the
installation instructions detailed in this booklet.
To help make best use of your cooking equipment,
please read this booklet carefully.
The cooker is designed specifically for domestic use
and responsibility will not be accepted for use in any
other installation.
emitted, this will cease after a period of use.
When first using the cooker ensure that the room is
well ventilated (e.g. open a window or use an extractor
fan) and that persons who may be sensitive to the
odour avoid any fumes. It is suggested that any pets
be removed from the room until the smell has ceased.
This odour is due to temporary finish on oven liners
and elements and also any moisture absorbed by the
insulation.
* The guarantee is subject to the provisions that the
appliance:
a. Has been used solely in accordance with the Users
Instruction Book.
b. Has been properly connected to a suitable supply
voltage as stated on the rating plate attached to this
equipment.
c. Has not been subjected to misuse or accident or
been modified or repaired by any person other than
the authorised employee or agent.
d. Has been correctly installed.
1. This appliance is intended for nonprofessional use
within the home.
2. These instructions are only for those countries
whose symbols appear in the booklet and on the
serial no. plate of the appliance.
3. This owner’s manual is for a class 1 appliance
(insulated) or class 2, subclass 1 appliances
(installed between two cabinets).
Keep the appliance clean, as a build up
of grease or fat from cooking can cause
a fire.
DISPOSALOFPACKAGINGMATERIALS
ENERGYSAVINGTIPS
Onlypreheattheovenifspecifiedinthecookingtable
darklacqueredorenamelledbakingtraysasthey
tosaveevenmoreenergyandtime.
DISPOSALOFHOUSEHOLDAPPLIANCES
This appliance meets: Ecodesign requirements of European
Regulation 66/2014; Energy Labelling Regulation 65/2014;
Products and Energy Information (Amendment) (EU Exit)
Regulations (2019), in compliance with the European standard:
EN 15181. This appliance meets Ecodesign requirements
Energy-Related Products and Energy Information
(Amendment) (EU Exit) Regulations 2019 in compliance
with the European standard EN 30-2-1.
DECLARATIONOFCONFORMITY
Ecodesign for Energy-Related
of European Regulation 66/2014 and the Ecodesign for
The packaging material is 100 % recyclable
and is marked with the recycle symbol .
The various parts of the packaging must therefore
be disposed of responsibly and in full compliance
with local authority regulations governing
waste disposal .
This appliance is manufactured with recyclable or
reusable materials. Dispose of it in accordance
with local waste disposal regulations . For further information
contact your local authority, the collection service for household
waste or the store where you purchased the appliance.
This appliance is marked in compliance with
The European Directive 2012/19/EU, Waste Electrical and
Electronic Equipment ( WEEE ) and with the
Waste Electrical and Electronic Equipment regulations 2013
( as amended ) . By ensuring this product is disposed
of correctly , you will help prevent negative consequences
for the environment and human health . The ed , symbol
on the product or on the accompanying documentation
indicates that it should not be treated as domestic
waste but must be taken to an appropriate
collection centre for the recycling of electrical and
electronic equipment.
on the treatment, recovery and recycling of household
household electrical appliances,
or your recipe. Use dark lacquered or enamelled
absorb heat better. Use a pressure cooker
DAILY REFERENCE
GUIDE
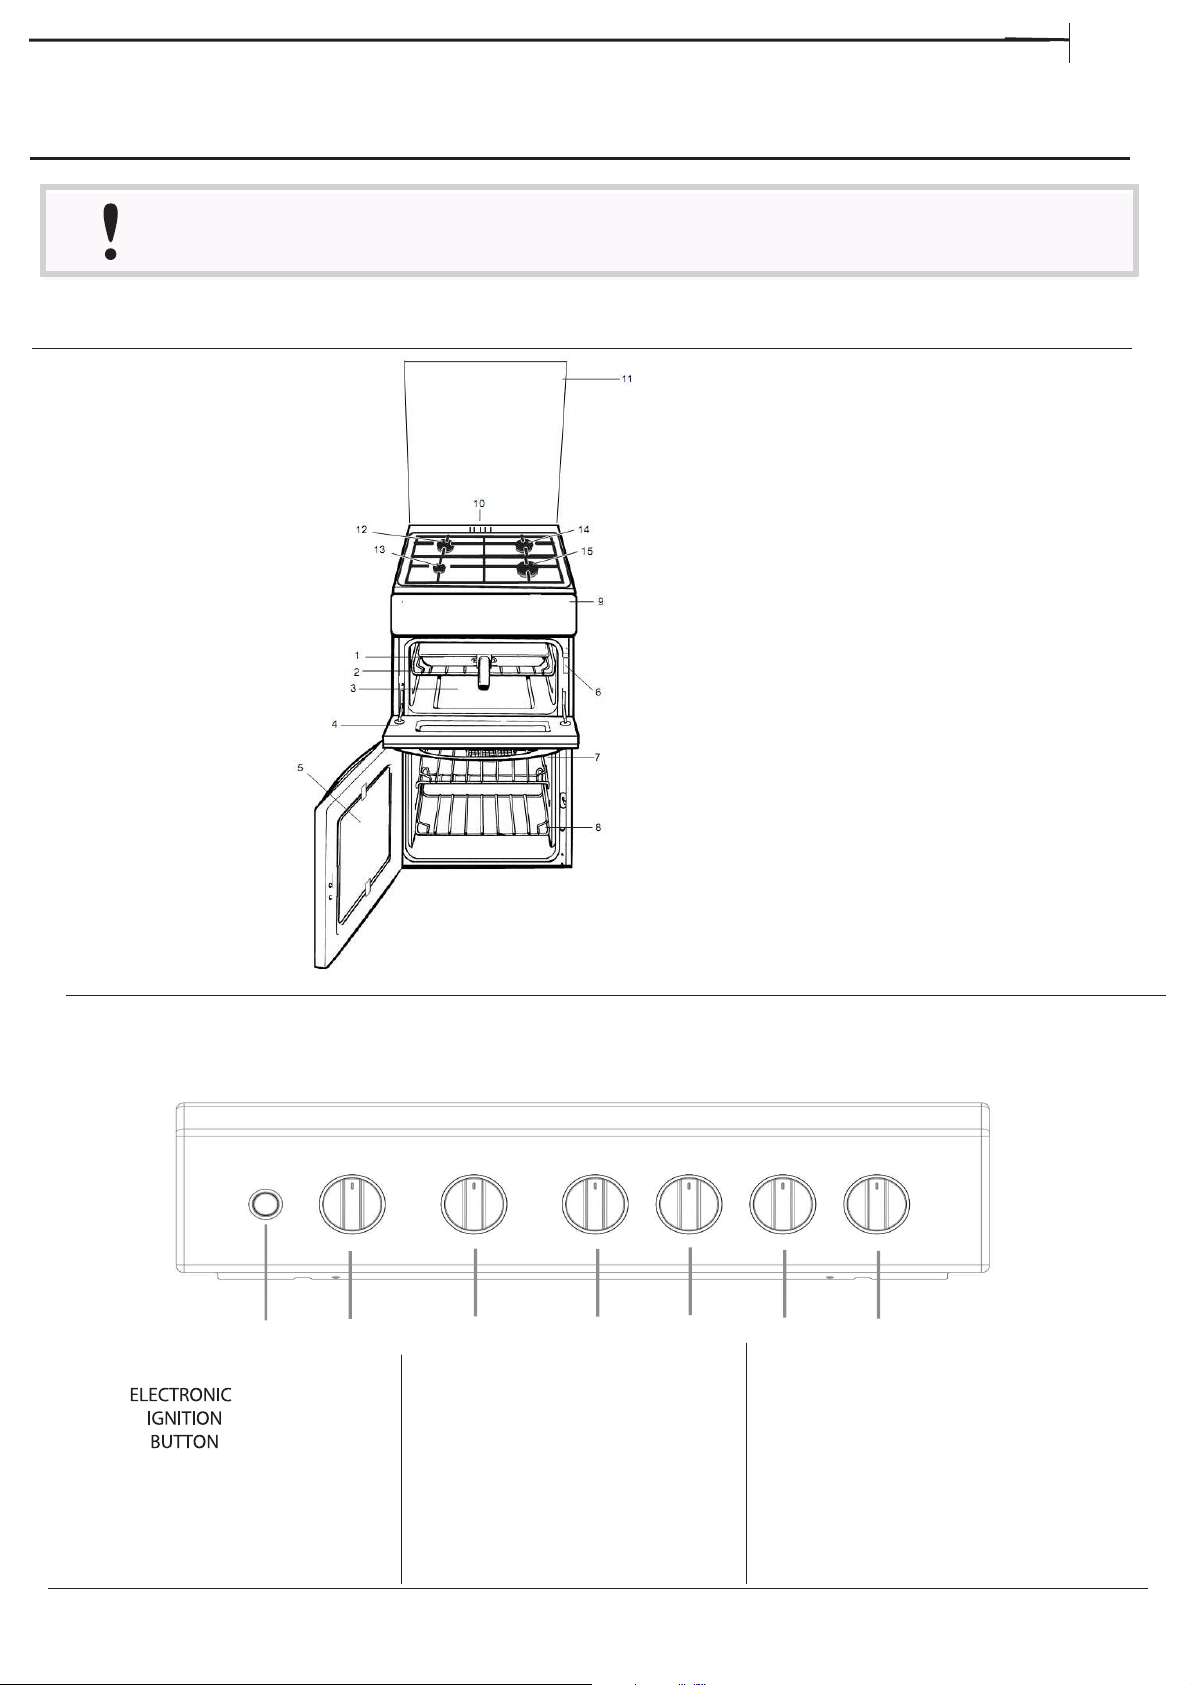
PRODUCT DESCRIPTION
Read the safety instructions carefully before using the product
GRILL DOOR
GLASS
DOOR
CONTROL
PANEL
MAIN OVEN
SHELF
SUPPORTS
OVEN ROD
SHELVES
GRILL
1900W
1900W
1000W
3000W
GRILL/MEAT PAN
WITH REMOVABLE
HANDLE AND WIRE
FOOD SUPPORT
MODEL & SERIAL
NUMBER
HOB VENTILATION SLOTS
SHELF
SUPPORT
*
GLASS COVER*
*
1
2
3
4
5
6
7
8
9
10
11
12
13
14
15
7
EN
RIGHT
FRONT
BURNER
GRILL
LEFT
FRONT
BURNER
RIGHT
REAR
BURNER
LEFT
REAR
BURNER
MAIN
OVEN
CONTROL PANEL
1
2
3
4
5
6
7
1
2
3
4
5
6
7
Control Knobs for the gas burners
The position of the gas burner controlled by each one of the knobs is shown by a solid ring
•
. To light one of
the burners, hold a lighted match or lighter near the burner and, at the same time, press down and turn the
corresponding knob counter clockwise to the maximum
setting. Each burner can be operated at its maximum,
minimum or intermediate power. Shown on the knob are the different symbols for off • (the knob is on this setting
when the symbol corresponds with the reference mark on the control panel), for maximum
and minimum
. To
obtain these settings, turn the knob counter clockwise with respect to the off position. To turn off the burner, turn the
knob clockwise until it stops (corresponding again with the • symbol).
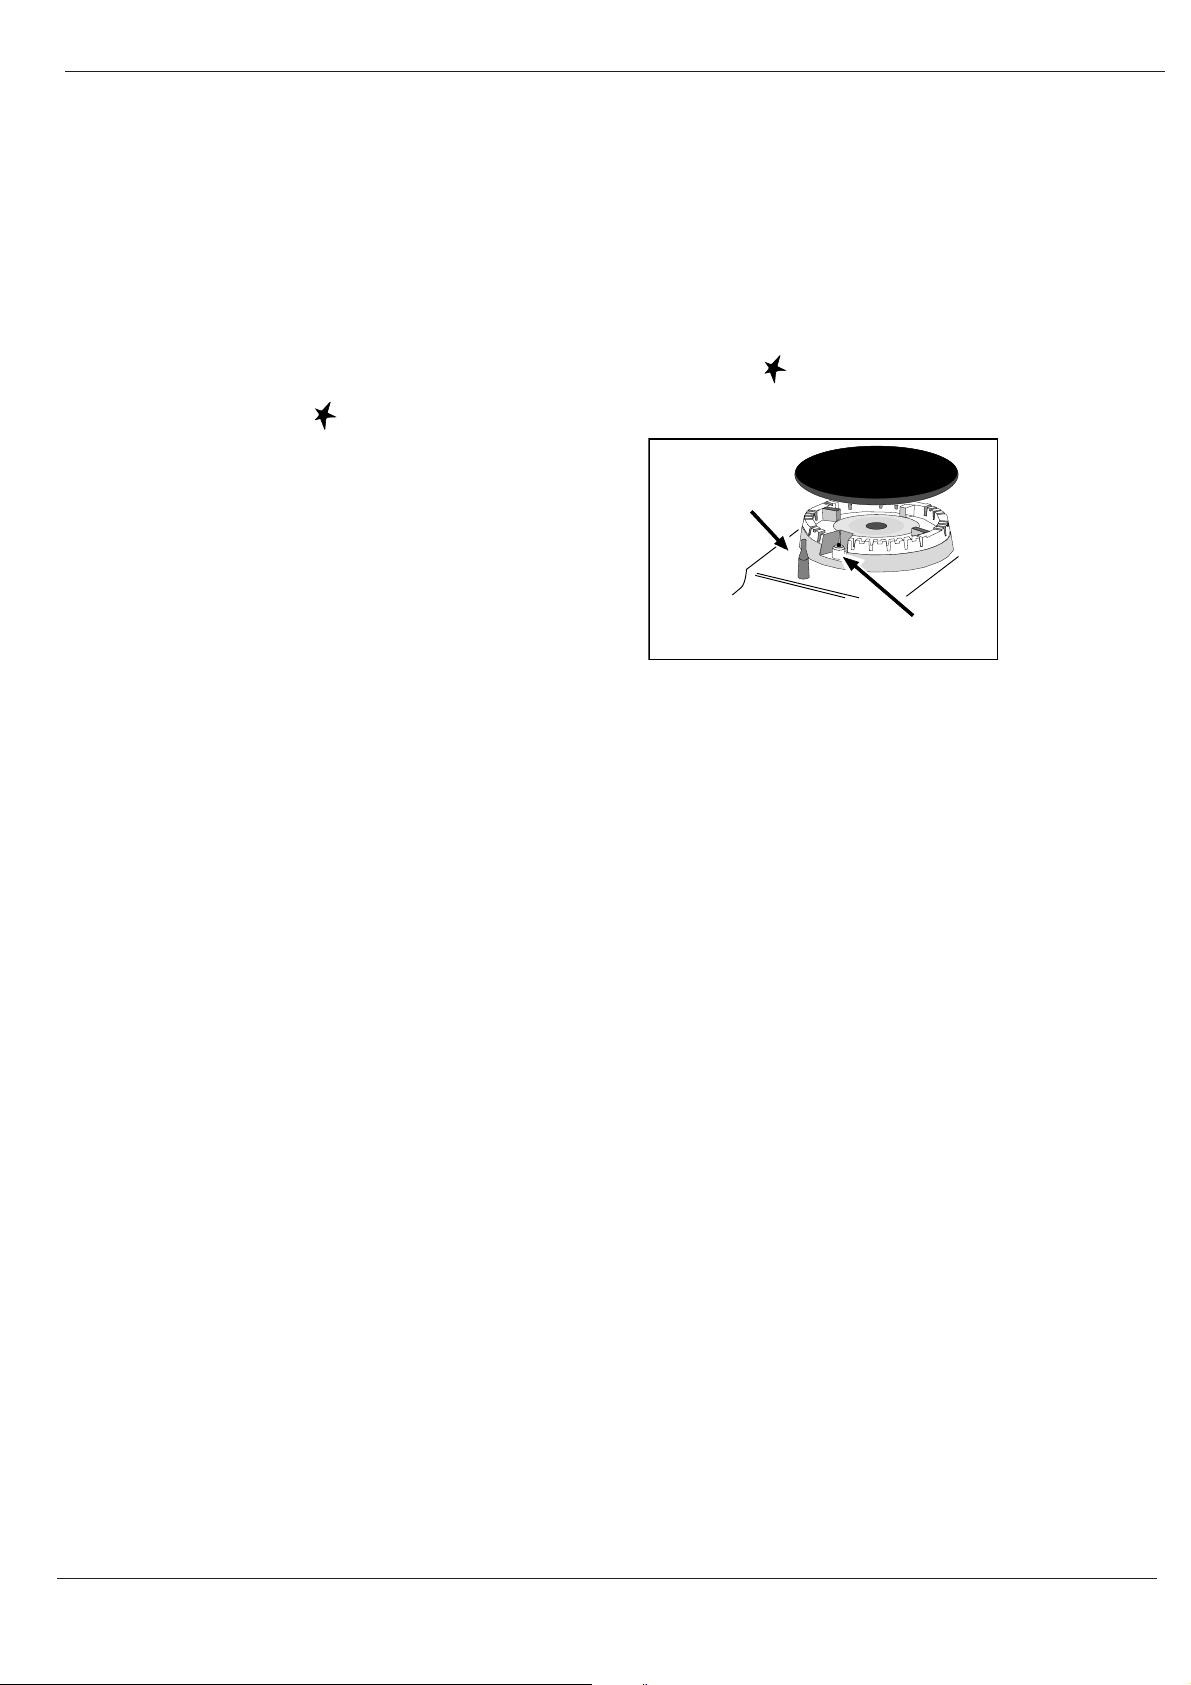
Electronic Ignition for the Gas Hob*
This device operates when a slight pressure is applied to the button marked with
symbol. To light a specific
burner just press the button while pushing the
corresponding knob all the way in and turning it
counter-clockwise until it lights. For immediate lighting,
first press the button and then turn the knob.
Should the burner flames accidentally go out,
turn off the control knob and wait at least 1 minute
before trying to relight.
Since the hob burners are equipped with a safety
device, you must hold the control knob in for about 3-7
seconds after the burner has been lighted to allow the
gas to pass until the safety thermocouple has heated.
HOB GAS BURNER
SAFETY DEVICE
ELECTRONIC
LIGHTING DEVICE
8

Technical dataTechnical dataTechnical dataTechnical dataTechnical data
Burner and Nozzle Specifications
* At 15°C and 1013 mbar- dry gas
** Propane P.C.S. = 50,37 MJ/Kg
*** Butane P.C.S. = 49,47 MJ/Kg
Natural P.C.S. = 37,78 MJ/m
3
Liquid Gas Natural Gas
Burner Diameter Thermal Power
kW (p.c.s.*)
By-Pass
1/100
Nozzle
1/100
Flow*
g/h
Nozzle
1/100
Flow*
l/h
(mm) Nominal Reduced (mm) (mm) *** ** (mm)
Fast
(Large)(R)
100 94 3,00 0,7 41 87 218 214 128 286
Semi Fast
(Medium)(S)
75 69 1,90 0,4 30 70 138 136 104 181
Auxiliary
(Small)(A)
51 46 1,00 0,4 30 52 73 71 76 95
Oven - 2,50 0,6 36 71 182 179 115 238
Grill - 2,50 1,3 63 80 182 179 122 238
Supply
Pressures
Nominal (mbar)
Minimum (mbar)
Maximum (mbar)
28-30
20
35
37
25
45
20
17
25
The European Directive 2002/96/EC on Waste Electrical and Electronic Equipment (WEEE), requires that old
household electrical appliances must not be disposed of in the normal unsorted municipal waste stream. Old
appliances must be collected separately in order to optimise the recovery and recycling of the materials they contain
and reduce the impact on human health and the environment. The crossed out “wheeled bin” symbol on the product
reminds you of your obligation, that when you dispose of the appliance it must be separately collected.
Consumers should contact their local authority or retailer for information concerning the correct disposal of their old
appliance.
Mains frequency and voltage of the electric section and characteristics of the gas section
Model Gas section Electric section
Class
Rated power
kW (1)
Voltage
II2H3+
12,80 (931 g/h - G30)
(914 g/h - G31)
220-240V~ 50-60Hz
(1) The values in g/h refer to the capacities with liquid gas (Butane, Propane).
ID5G00KMW/UK /LID5G00KMW/UK /LID5G00KMW/UK /L
TABLE OF CHARACTERISTSICS
Main oven
dimensions
Main oven
Volume
Burners
Adaptable for use with all the types
of gas indicated on the data plate.
Voltage and
frequency
see data plate
66 l
370x391x455 mm
9
EN
S
S
R
A
EN
Installation tips
Positioning
This unit may be installed and used only in
permanently ventilated rooms according to the British
Standards Codes Of Practice: B.S. 6172/B.S. 5440,
Par. 2 and B.S. 6891 Current Editions. The following
requirements must be observed:
a. The cooker should not be installed in a bed sitting
room with a volume of less than 20m
3
. If it is installed
in a room of volume less than 5m
3
an air vent of
effective area of 100cm
2
is required, if it is installed
in a room of volume between 5m
3
and 10m
3
a
supplementary airvent area of 50cm2 is required,
if the volume exceeds 10m
3
no airvent is required.
However, if the room has a door or a window which
opens directly to the outside no air vent is required
even when the volume is between 5m
3
and 10m
3
.
b. During prolonged use of the appliance you may
consider it necessary to open a window to the
outside to improve ventilation.
c. If there are other fuel burning appliances in the
same room, B.S.5440 Part 2 Current Edition, should,
be consulted to determine the requisite air vent.
This appliance must not be fitted on a platform.
The cooker is designed to fit between kitchen cabinets
spaced 500mm apart. The space either side need
only be sufficient to allow withdrawal of the cooker for
servicing. It can be used with cabinets one side or
both as well as in a corner setting. It can also be used
free-standing.
Adjacent side walls which project above hob level,
must not be nearer to the cooker than 150mm or 65mm
and should be protected by heat resistant
material. Any overhanging surface or cooker hood
should not be nearer than 750mm.
a. The cooker may be located in a kitchen, a kitchen/
diner or bed sitting room, but not in a bathroom or
shower room.
b. The hoods must be installed according to the
requirements in the hood handbook.
d.
The appliance must not be installed behind
a decorative door in order to avoid overheating
Gas connection
The cooker should be connected to the gas-supply
by a gas safe registered installer. During installation
of this product it is essential to fit an approved gas
tap to isolate the supply from the appliance for the
convenience of any subsequent removal or servicing.
Connection of the appliance to the gas mains or liquid
gas must be carried out according to the prescribed
is adaptable to the type of gas to be used. If not, follow
the instructions indicated in the paragraph headed
“Adaptation to different gas types”. On some models
the gas supply can be connected on the left or on the
right, as necessary; to change the connection, reverse
the position of the hose holder with that of the cap
and replace the gasket (supplied with the appliance).
In the case of connection to liquid gas, by tank, use
pressure regulators that conform to the regulation in
force. The gas supply must be connected to the left
of the appliance. Be sure that the hose does not pass
through the rear of the cooker touching hot parts.
Make sure the supply pressure conforms
with the values shown in the table entitled
“Caracteristics of the burners and nozzles”.
When the cooker is installed between cabinets
(recessed), the gas connection must be effected
by an approved flexible hose with bayonet fitting
(BS 669 Current Edition). The gas inlet for the
cookers is a threaded G 1/2 gas female fitting.
10
WARNING:Thisoperationmustbeperfomed
by a qualified technician
The height of the cooker can be adjusted by means
of adjustable feet in the plinth (900mm - 915mm).
Adjust the feet by tilting the cooker from the side.
Then install the product into position.
The cooker should be secured to the wall behind via
a safety chain and hook.
c.
above, and the width of the cooker, must be a non-
The wall behind the cooker, 50mm below and 450mm
combustible material such as ceramic wall tiles.
Removing the plug:
If your appliance has a non-rewireable moulded plug
and you should wish to remove it to add a cable
extension or to re-route the mains cable through
partitions, units etc., please ensure that either:
• the plug is replaced by a fused 13 amp re-wireable
plug bearing the BSI mark of approval.
or:
• the mains cable is wired directly into a 13 amp cable
outlet, controlled by a switch, (in compliance with
BS 5733) which is accessible without moving the
appliance.
Please note: for appliances with a rating greater
than 13 amp (eg: electric hob, double ovens and
freestanding electric cookers etc.) the mains cable
must be wired into a cooker output point with a rating
of 45 amp. In this case the cable is not supplied.
Disposing of the plug:
Ensure that before disposing of the plug itself,
you make the pins unusable so that it cannot be
accidentally inserted into a socket. Instructions for
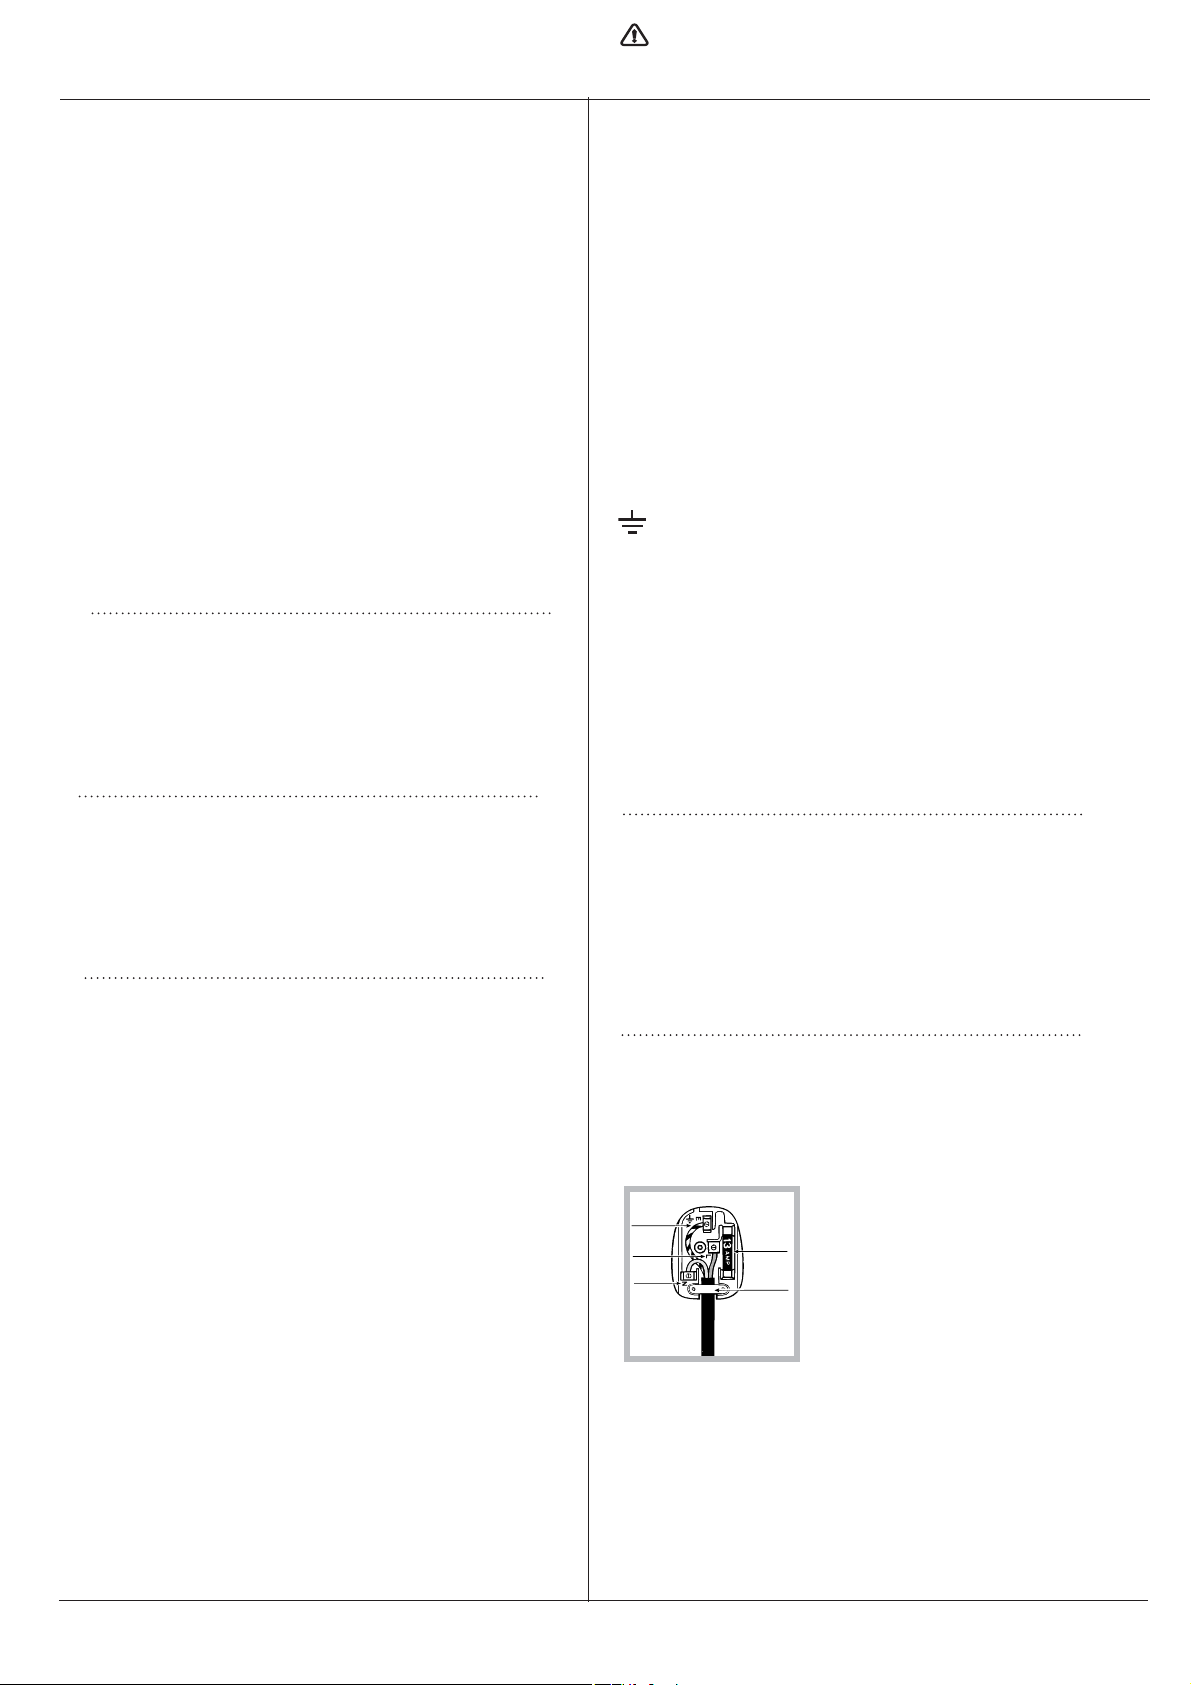
connecting cable to an alternative plug:
the wires in the mains lead are coloured in
accordance with the following code:
Green & Yellow - Earth
Blue - Neutral
Electrical connection
Power supply voltage and frequency: 230-240V a.c.
50Hz.
cable supplied with the appliance is replaced by one
of the same specifications in accordance with current
standards and legislation.
Your appliance is supplied with a 13 amp fused
plug that can be plugged into a 13 amp socket for
immediate use. Before using the appliance please read
the instructions below.
THIS APPLIANCE MUST BE EARTHED.
THE FOLLOWING OPERATIONS SHOULD BE
CARRIED OUT BY A QUALIFIED ELECTRICIAN.
Replacing the fuse
When replacing a faulty fuse, a 13 amp ASTA
approved fuse to BS 1362 should always be used, and
the fuse cover re-fitted. If the fuse cover is lost, the
plug must not be used until a replacement is obtained.
Replacement fuse covers:
If a replacement fuse cover is fitted, it must be of the
correct colour as indicated by the coloured marking
or the colour that is embossed in words on the base of
the plug. Replacements can be obtained directly from
your nearest Service Depot.
the supply cable must be positioned so that it never
reaches at any point a temperature 50°C higher than
the room temperature. The cable must be routed away
from the rear vents. Should you require it, you may
use a longer cable, however, you must ensure that the
Brown - Live
If the colours of the wires in the mains lead do not
correspond with the coloured markings identifying the
terminals in your plug, proceed as follows:
Connect Green & Yellow wire to terminal marked “E” or
or coloured Green or Green & Yellow.
Connect Brown wire to terminal marked “L” or coloured
Red.
Connect Blue wire to terminal marked “N” or coloured
Black.
If a 13 amp plug (BS 1363) is used it must be fitted
with a 13 amp fuse. A 15 amp plug must be protected
by a 15 amp fuse, either in the plug or adaptor or at
the distribution board. If you are in any doubt about the
electrical supply to your machine, consult a qualified
electrician before use.
How to connect an alternative plug:
The wires in this mains lead are coloured in
accordance with the following code:
BLUE “NEUTRAL” (“N”)
BROWN “LIVE” (“L”)
GREEN AND YELLOW “EARTH” (“E”)
Disposing of the appliance
When disposing of the appliance please remove the
plug by cutting the mains cable as close as possible to
the plug body and dispose of it as described above.
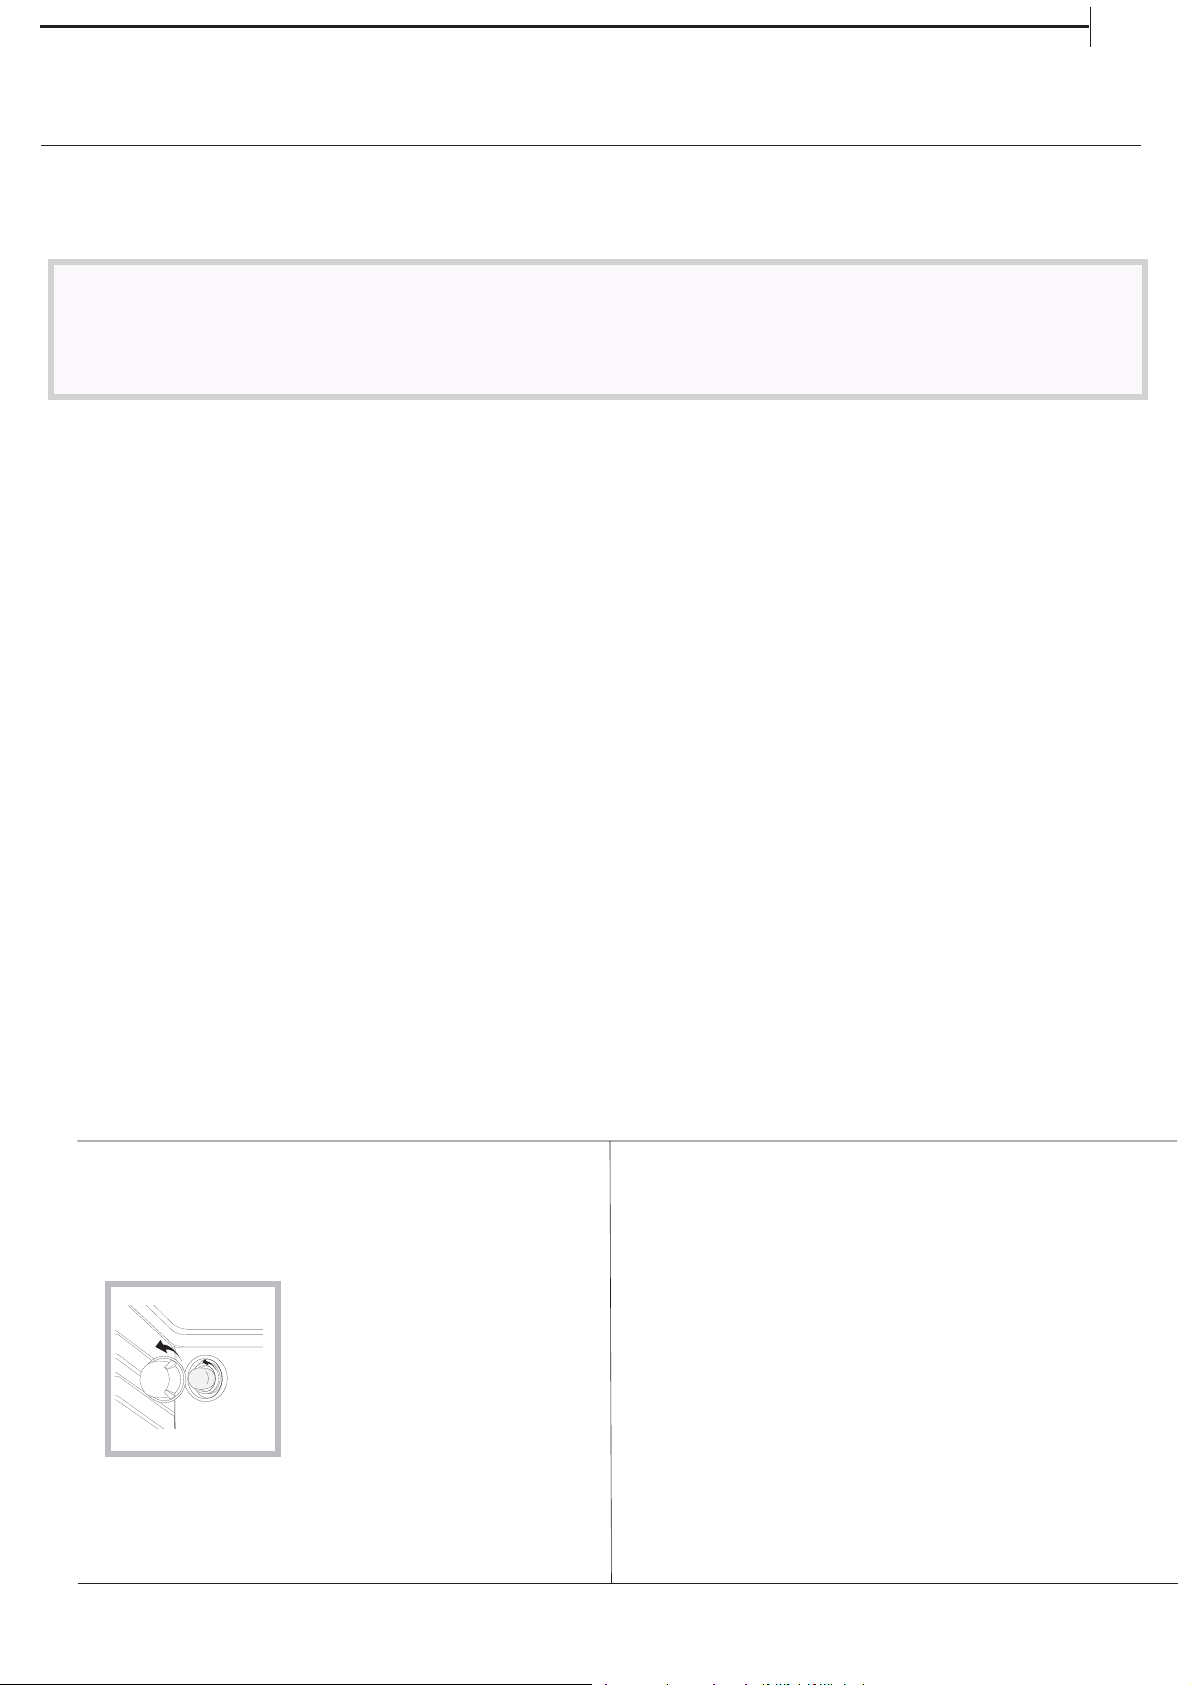
Adapting the cooker to
different types of gas
In order to adapt the cooker
to a different type of gas with
respect to the gas for which it
was produced (indicated on the
label attached to the lid), follow
these steps:
GREEN &
YELLOW
BROWN
BLUE
13 amp fuse
CROSS-BAR
CORD GRIP
11
WARNING:Thisoperationmustbeperfomed
by a qualified technician
a) replace the hose holder mounted on the
appliance with that supplied in the bag of “cooker
accessories”.
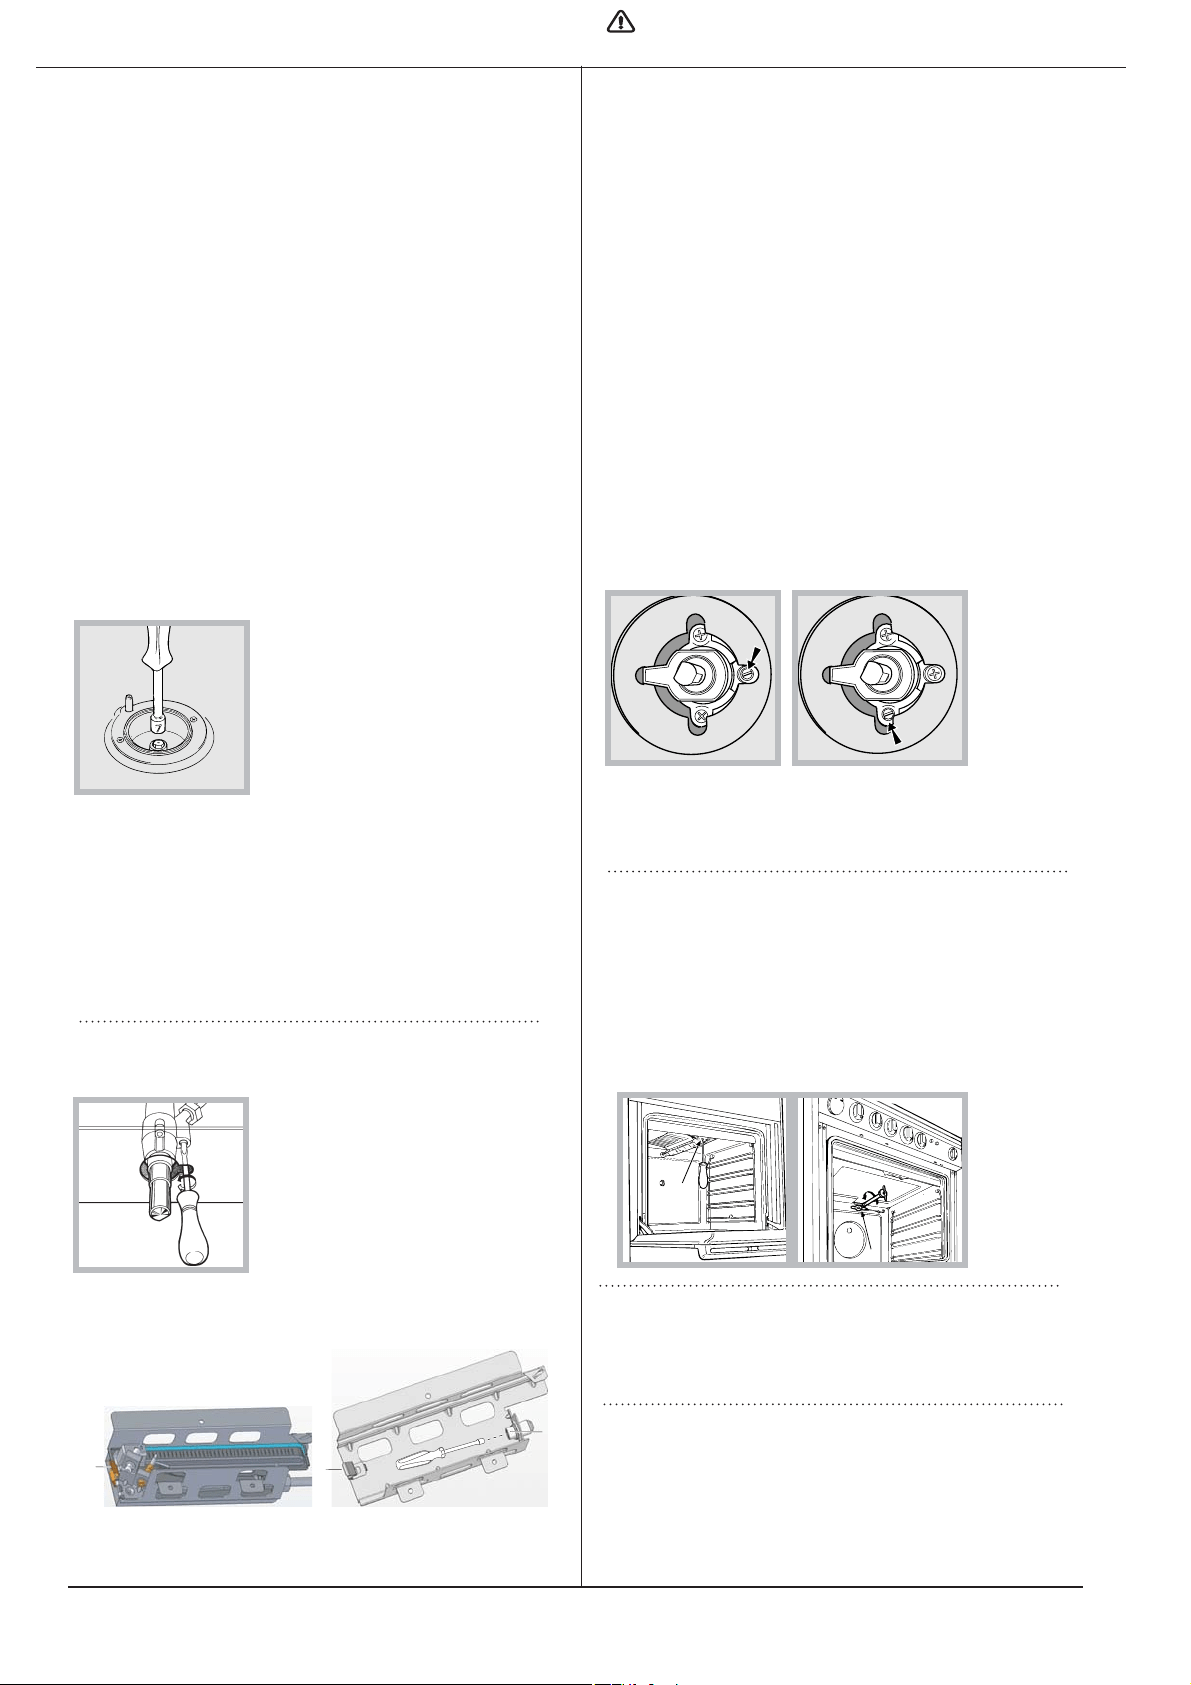
b) Replacing the burner nozzles on the hob:
• remove the grids and slide the burners from their
housings;
• unscrew the nozzles using a 7 mm socket
spanner, and replace them with nozzles for the
new type of gas (see table 1 “Burner and nozzle
characteristics”).
• replace all the components by repeating the steps in
reverse order.
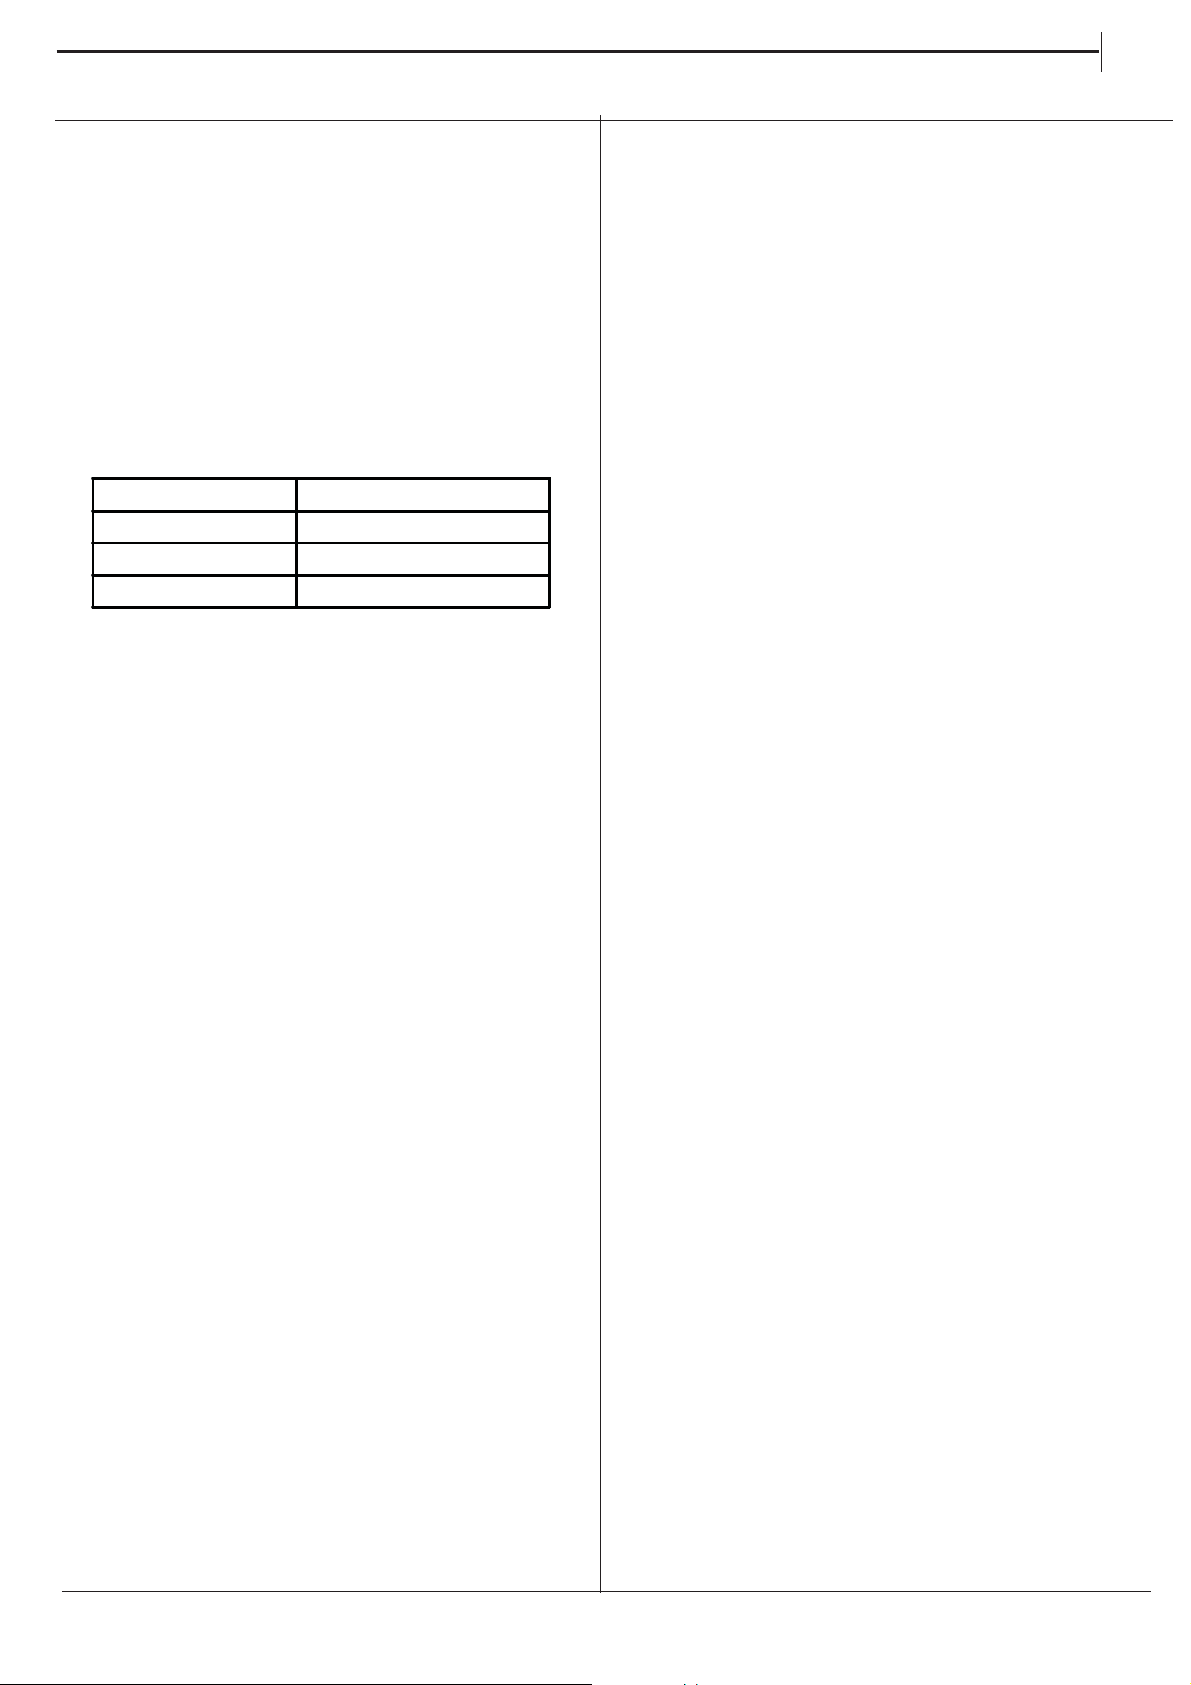
c) Minimum regulation of the hob burners:
• turn the tap to minimum;
• remove the knob and adjust the regulation screw,
which is positioned in or next to the tap pin, until the
flame is small but steady.
in the case of liquid gas, the regulation screw must
be screwed in to the bottom.
• check that the flame does not
turn off when you turn the tap
quickly from high to low.
d) Regulating the
primary air of the burners:
The primary air of the burners
requires no regulation.
Adapting to different types of gas
In order to adapt the oven to
a different type of gas with
respect to the gas for which it
was manufactured (indicated
on the label), follow these
simple steps:
a) Replacing the oven burner
nozzle
• open the oven door fully
• pull out the sliding oven bottom
V
V
Z
• Unscrew the oven burner nozzle using the socket
spanner for the nozzles “Z”, or a 7 mm socket
spanner, and replace it with a nozzle suited to the
new type of gas (see Table 1).
Take particular care handling the spark plug wires
and the thermocouple pipes.
• Replace all the parts, following the steps described
above in the reverse order.
b) Minimum regulation of the gas oven burner with
thermostat:
• light the burner as described in the paragraph “the
oven knob” of the instruction booklet.
unscrew the two screws and take off the shield
protecting the burner (in main oven burner only).
C
• turn the knob to Max for about 10 minutes and then
turn the knob to the Min setting;
• remove the knob;
• regulate the screw positioned outside the thermostat
pin until the flame is small but steady.
In the case of liquid gas, the regulation screw must
be screwed in to the bottom.
•
check that the burner does not turn off when you
turn the knob from Max to Min and and when you
open and close the oven door quickly.
Adapting the gas grill to different types of gas
Replacing the nozzle of the grill burner:
• remove the screw and then slide out the grill burner
“V” (see Figure);
• unscrew the grill burner nozzle using the special
socket spanner for the nozzles (see Figure) or better
still a 7mm socket spanner; replace the nozzle with
a nozzle
for the
new type
of gas
(see table
1).
Important
On completion of the operation, replace the old rating
sticker with one indicating the new type of gas used.
This sticker is available from our Service Centres.
Note
Should the pressure of the gas used be different (or
vary) from the recommended pressure, it is necessary
to fit a suitable pressure regulator onto the inlet pipe in
compliance with current National Regulations relative
to “regulators for channelled gas”.
V
I
If the appliance is connected to a liquid gas supply, the
bypass screw must be set to a minimum.
3. While the burner is alight, quickly change the position of the
knob from minimum to maximum and vice versa several times,
checking that the flame is not extinguished.
Upon completion of adjustment, reseal using sealing
wax or an equivalent material.
12
WARNING:Thisoperationmustbeperfomed
by a qualified technician
Use of Hotplates
Practical Advice on Using the Burners
To use the burners as efficiently as possible, some
basic guidelines should be followed:
• Use cookware that is the right size for each burner
(see table) in order to prevent the flame from
spreading beyond the bottom of the cookware.
• Only use cookware with flat bottoms.
• As soon as the boiling point is reached, turn the
knob to the lowest setting.
• Always use lids with pots and pans.
On models equipped with a reduction grid, the grid
should only be used with the auxiliary burner when
cookware with a diameter of less than 12 cm is used.
1. Press the ignition button and then push in and turn
the control knob of the chosen burner anti-clockwise
to the large flame symbol. Continue to press the
ignition button until the sparks light the gas.
2. Turn the control knob anti-clockwise to the desired
setting. Only turn the control knob between the
large flame symbol and the small flame symbol for
adjusting the setting.
3. To turn off, turn the control knob fully clockwise to
the symbol O.
Each burner is fitted with a spark ignitor for lighting
the gas. To ensure rapid lighting of the burners every
time they are used, the ignitors must be kept clean and
dry. Remove any food spillage or cleaning materials
from the electrode using a small nylon brush such as a
tooth brush. Access to the electrode can be achieved
by lifting off the loose burner parts carefully when the
burners are cool.
When the hotplate burner bodies and caps are
removed for cleaning, be careful not to drop any food
particles or cleaning materials into the burner bases, to
avoid the possibility of blocking the gas jets.
If aluminium based pans are used, a silvery deposit
may appear on the top edge of the pan support
fingers. See ‚Care and Cleaning’ section for cleaning
information.
Burner Cookware diameter (cm)
Fast (R) 24 - 26
Semi Fast (S) 16 - 20
Auxiliary (A) 10 - 14
EN
13
GRILLING MUST BE DONE WITH THE GRILL DOOR
OPEN.
CONTROL KNOBS MAY BECOME HOT DURING
GRILLING.
CAUTION: ACCESSIBLE PARTS WILL BECOME
HOT WHEN THE GRILL
IS USED - CHILDREN SHOULD BE KEPT AWAY.
To operate the grill proceed as follows:
• Open the grill door and remove the grill pan.
• Press the ignition button and then push in and turn
the grill control knob anti-clockwise to the large
flame symbol. Continue to press the ignition button
until the spark lights the gas.
• Turn the control knob anti-clockwise to the desired
setting. There is a delay of about six seconds whilst
the safety device operates before the burner comes
on full. Only turn the control knob between the large
flame symbol and the small flame symbol when
adjusting the setting.
• To turn off, turn the control knob fully clockwise to
the symbol O
(only on a few models): when using the grill, the oven
door must be left open by positioning the deflector
“B” between control panel and
deflector “A” to prevent the
cooker knobs from overheating.
Slide the grill pan along the
runner towards the rear of the
grill compartment until it stops.
An odour may be noticed when
first using the grill - this schould
cease after a short period of use.
Grill can be started from cold but for the best result
preheat for approximately five minutes. Most cooking is
done with the heat on full, but it may be necessary after
sealing the food to reduce the heat as required.
For au gratin dishes eg. Macaroni Cheese and
meringue toppings eg. Baked Alaska place the dish
on the floor of the grill compartment. The base of the
grill pan can be used for warming fruit garnishes on the
reduced setting.
Do not cover the grill pan or grid with aluminium
foil as this can hold fat, intensify the heat and create
a fire hazard.
Grilling
B
A
Relighting‘ the burner
In the event of the burner flames being accidentally
extinguished, turn off the burner control and do not
attempt to re-ignite the burner for at least one minute.
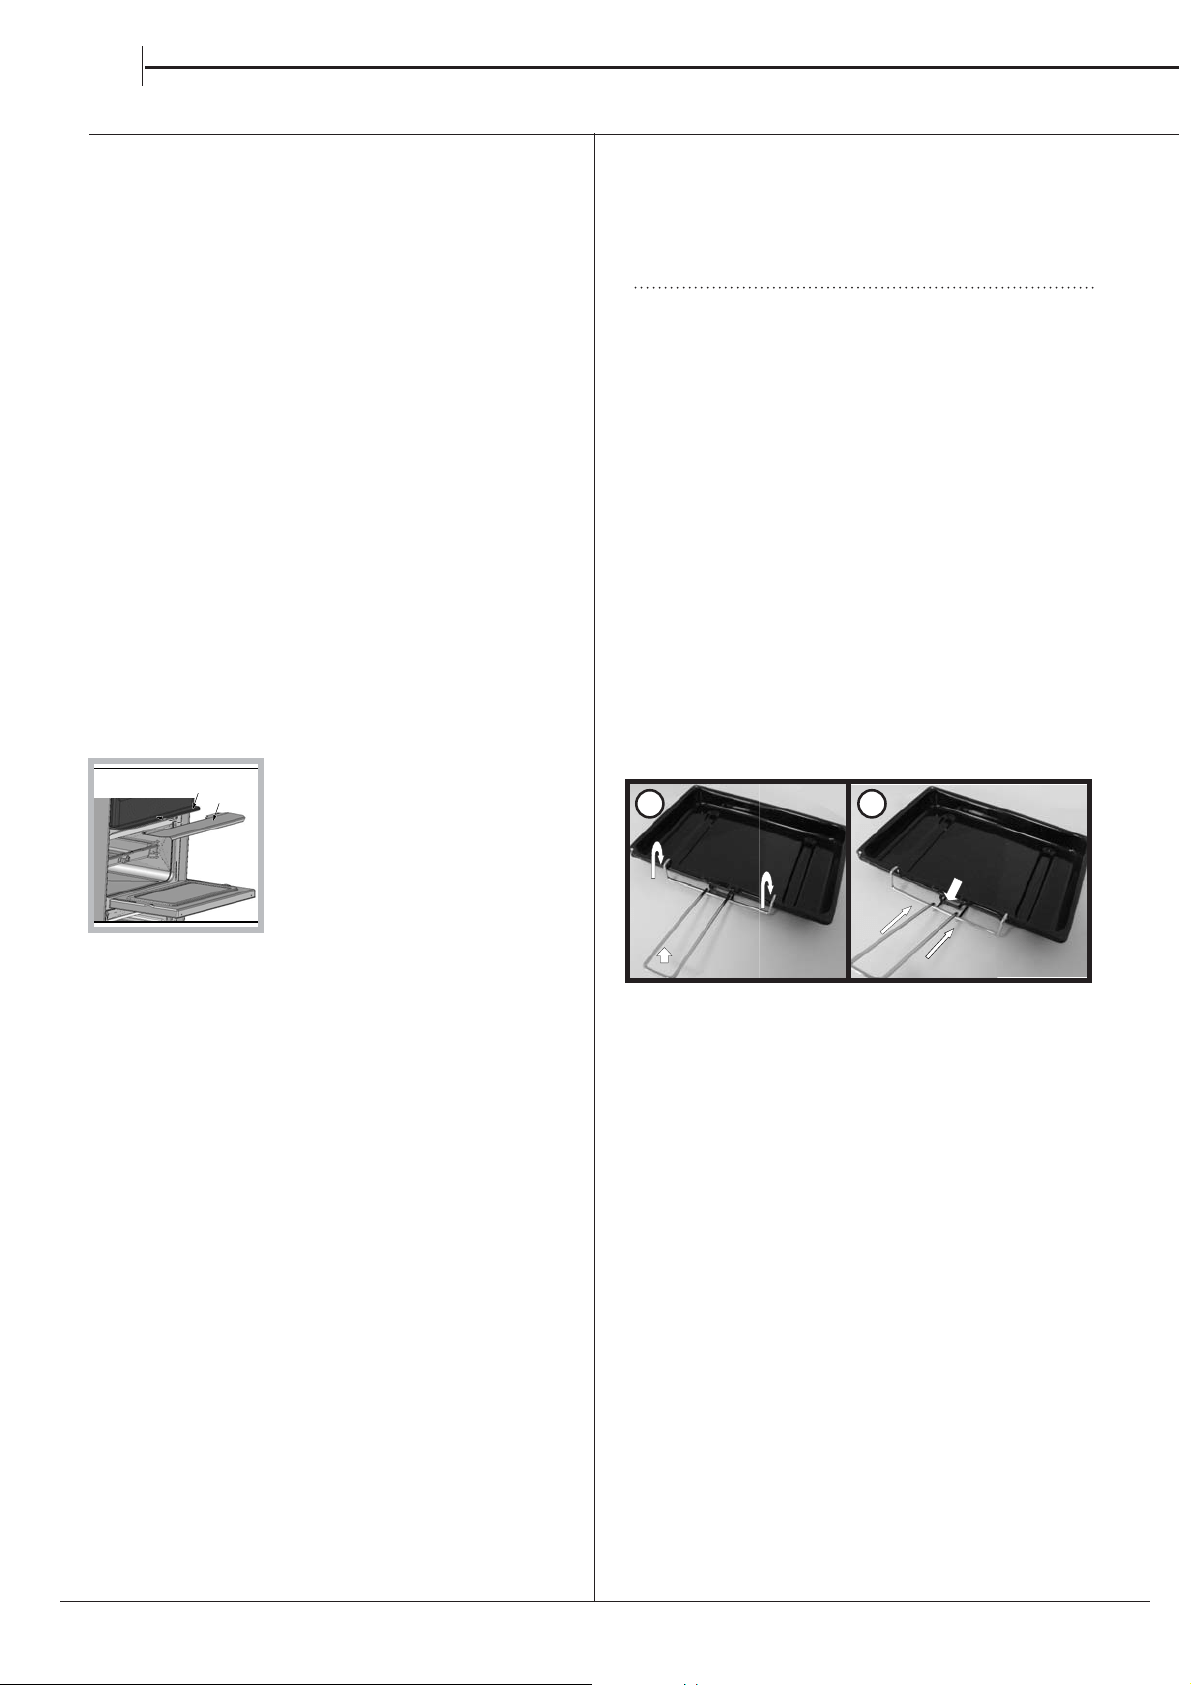
Using the grill pan kit
The grill pan handle is detachable from the pan to
facilitate cleaning and storage. Fix the pan handle
securely before use:
1. Fit the handle to the grill pan so that the external
‘hooks’ embrace the edge of the pan (fig. 1)
2. Make sure that the middle part of the handle fits
exactly the protruding support of the pan (fig .2) and
holds the pan from the bottom.
The food must be placed on the rack in the grill pan.
Position the grill pan on top of the oven rack. The best
results are achieved by placing the oven rack on the
uppermost shelves. Pouring a little water into the grill
pan will make the collection of grease particles more
efficient and prevent the formation of smoke.
1
2
14
EN
Oven
The oven has different heat zones - the thermostat
settings refer to the temperature on the middle shelf;
above this shelf it is hotter and below it is cooler. Two
shelves enable full use of the temperatures inside the
oven.
The grill pan without the handle can be used in the
oven. The maximum size of baking tray that should be
used is 300mm x 330mm (12” x 13”).
TO USE THE OVEN
1. Place oven shelves in the chosen positions (refer to
cooking charts).
2. Press the ignition button and then push in and turn
the oven control knob fully anti-clockwise. Continue
to press the ignition button until the spark lights the
gas.
3. Turn the control knob clockwise to the required
setting (refer to cooking chart). There is a delay of
about six seconds whilst the safety device operates
before the burner comes on full.
4. To turn off, turn the control knob fully clockwise the
the symbol 0.
Never place dishes on the oven base over the
burner.
An odour may be noticed when first using the oven -
this should cease after a short period of use.
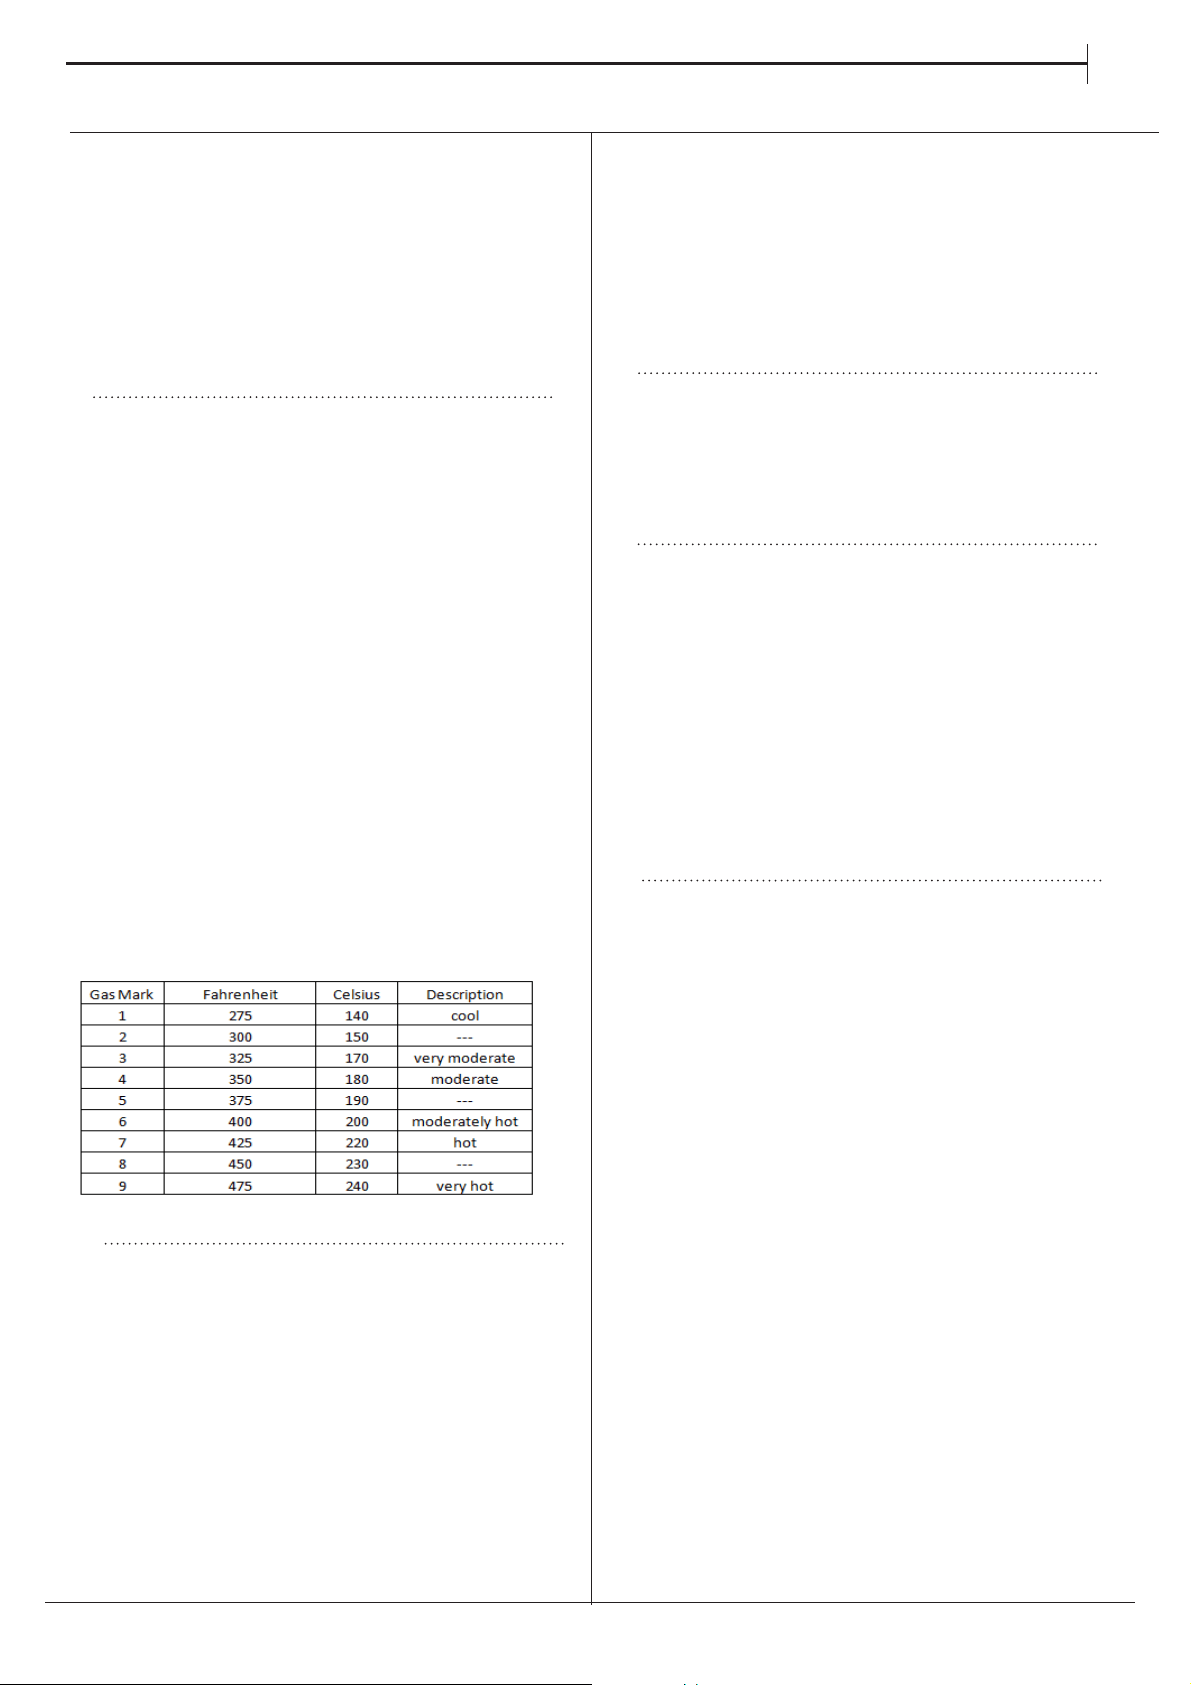
5. The oven temperature control marking are gas
marked 0 to 9.
The equivalent degrees Celsius (sometimes called Centigra-
de) and degrees Fahrenheit are shown below as a guide.
RELIGHTING THE BURNER
In the event of the burner flames being accidentally
extinguished, turn off the burner control and do not
attempt to re-ignite the burner for at least one minute
COLD START COOKING
Anything requiring long slow cooking such as
casseroles and rich fruit cakes can be put into a cold
oven. Satisfactory results can also be obtained with
creamed mixture, rich pastries or yeast mixtures, but
for perfection we recommend preheating the oven for
about 15 minutes.
ROASTING OF LARGE POULTRY
The maximum weight of poultry that can be
accommodated is 8kg (18 Ibs) of suitable shape. It is
important to check that the bird DOES NOT overhang
the burner at the back of the oven.
STORAGE AND RE-HEATING OF FOOD
It is vitally important to strictly adhere to the basic
principles of food handling and hygiene to prevent the
possibility of bacterial growth.
1. If food is to be frozen or not served immediately,
cool it in a clean container as quickly as possible.
2. Completely thaw frozen food in the refrigerator
before reheating.
3. Re-heat food thoroughly and quickly either on the
hotplate or in a hot oven, Gas Mark 6, and then serve
immediately.
4. Only re-heat food once.
‘COOK CHILL’ DISHES
These should always be placed in a pre-heated oven
ideally on the first or second shelf position. Follow the
packet instructions for cooking time.
EN
15
The following times and setting are for guidance
only. You may wish to alter the setting to give a result
more to your satisfaction. When a different setting
to that shown below is given in a recipe, the recipe
instructions should be followed. Allow 15 minutes
When baking with two trays or tins on two levels, the
top tray is removed first and the lower tray moved up to
the top position for a few minutes longer.
preheat for best results. Always turn the thermostat
knob to Mark 9 before selecting the appropriate gas
Mark. Shelf position 1 is the highest.
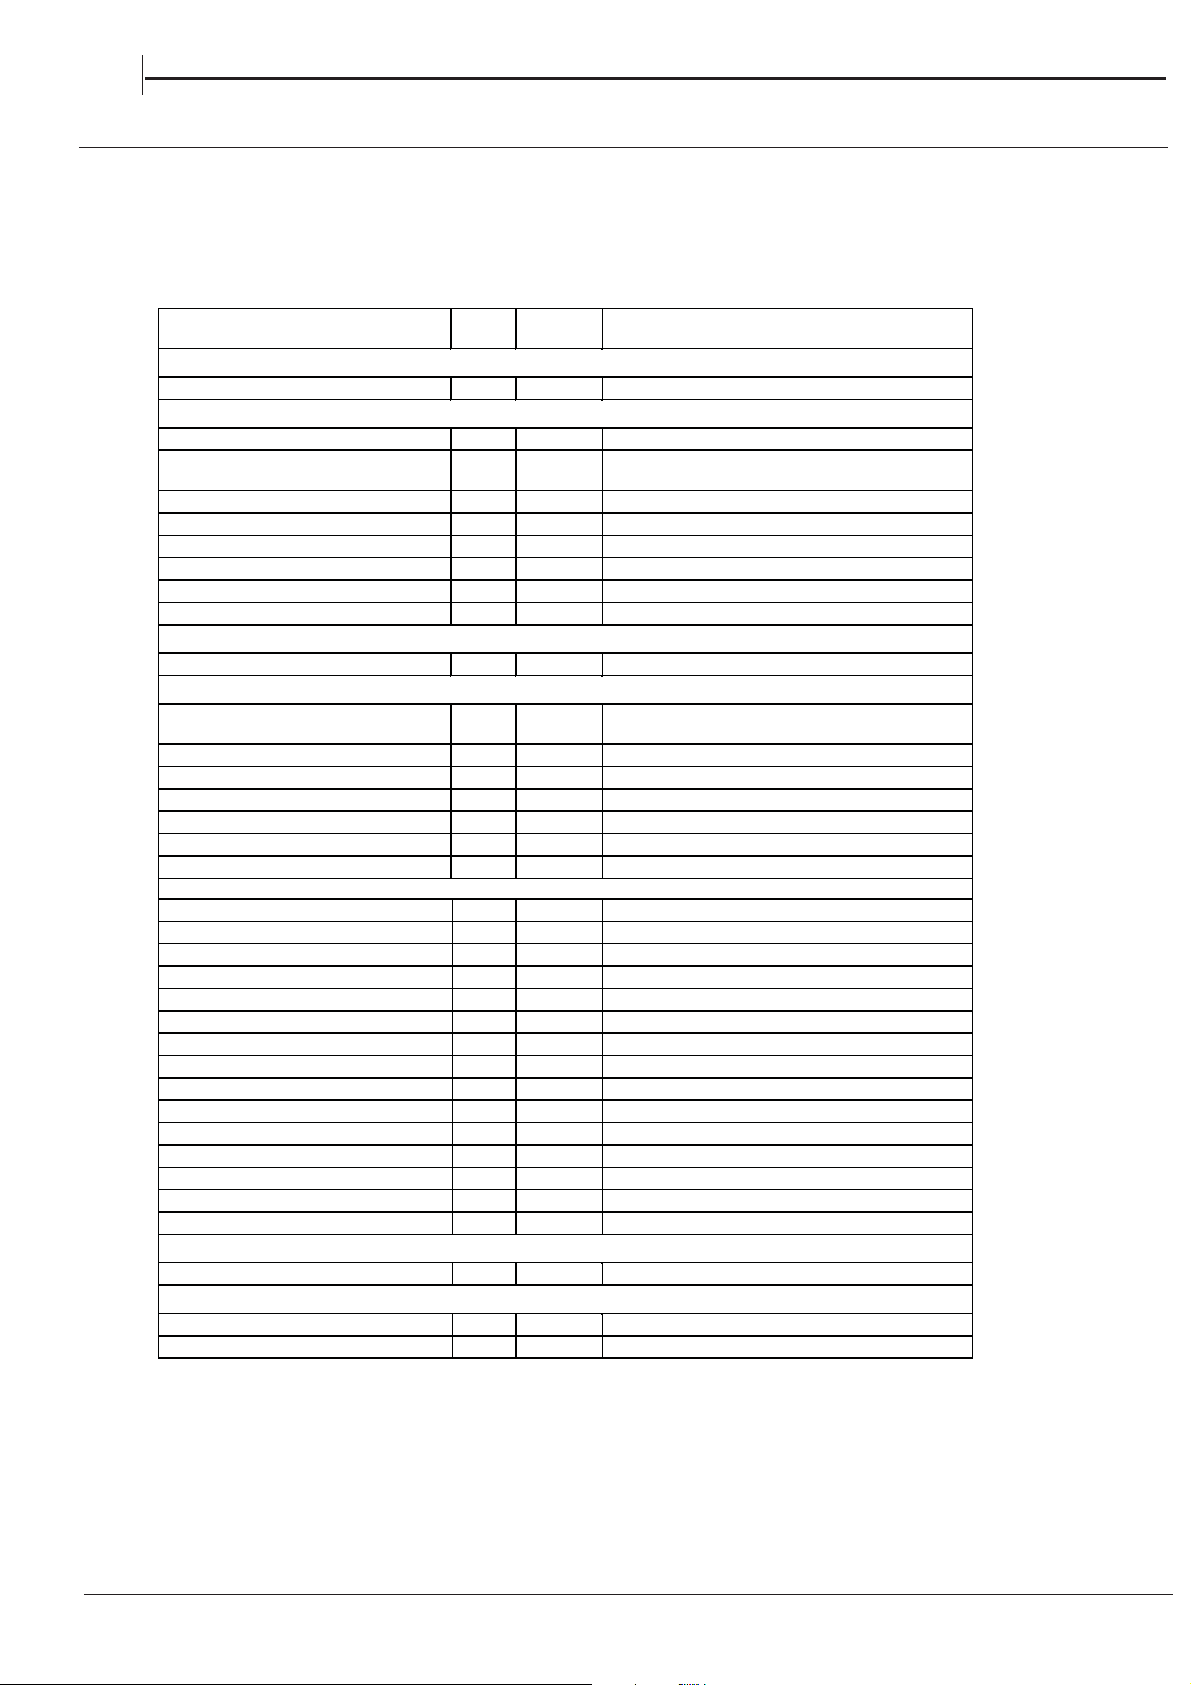
Food Gas
Mark
Shelf
Position
Approx. Cooking Time and Comments
Fish
Oily and white fish 3 or 4 4 25-60 mins. depending on recipe
Meat and Poultry
Beef 4 or 5 4 25-30 mins per 450g (1 Ib) + 25 mins. extra
Ham 5 4
40 mins per 450g (1 Ib) covered in foil plus 40 mins.
extra
Lamb 5 4 30 mins per 450g (1 Ib) + 30 mins extra
Pork 5 4 40 mins per 450g (1 Ib) + 40 mins extra
Chicken 5 4 25 mins per 450g (1 Ib) + 25 mins extra
Duckling & Goose 5 4 25 mins per 450g (1 Ib) + 25 mins extra
Turkey 4 or 5 4 or 5 15-20 mins per 450g (1 Ib) + 20 mins
Casseroles 3 3or4 2-6 hrs. depending on cut of meat
Vegetables
Baked jacket potatoes 4 or 5 3 1½ - 3 hrs. until soft, depending on size
Puddings
Milk Puddings (500ml/1 pt) 3 4
1¾-2½ stand dish on baking tray and started with
warm milk
Baked Custard (500ml/1 pt) 3 4 45-60 mins. bain-marie
Baked Sponge Puddings 4 3 40-50 mins
Baked Apples 3 3 30-45 mins depending on type and size of apples
Meringue Topped Puddings 1 3or4 15 mins or until "tinged" with brown
Apple Tart (1 x205mm/8
//
) 6 2 45-60 mins
Fruit Crumble 5 2 35 -45 mins
Cakes, Pastries & Biscuits
Small Cakes 2 trays 5 2 and 4 15-25 mins.
1 tray 5 2 15-22mins.
Victoria sandwich (2 x 7")
4 2 and 4 20-30 mins
Swiss Roll (3 egg quantity) 5 2 15-20 mins.
Meringues 1 3 2-3 hrs
Christmas cake (1 x 205mm / 8") 2 3 Time depending on recipe
Madeira cake (1 x 180mm / 7")
4 4 1¼-1½ hrs.
Rich Fruit cake (1 x 180mm / 7")
2 4 Time depending on recipe
Scones 7 1 and 3 10-20 mins.
Shortbread (1 x 180mm / 7")
2 3 55 -65 mins.
Biscuits 4 1 and 3 10-20 mins.
Shortcrust Pastry 6 2 15 - 60 mins depending on use.
Rich Short Crust 5 1 and 3 20-30 mins.
Flaky/Puff Pastry 7 2 10-30 mins.
Choux Pastry 6 2 20-30mins.
Yeast Mixtures
Bread - rolls 7 2 and 4 20-30 mins.
Miscellaneous
Yorkshire Pudding:- large 7 1 30-40 mins
individual 7 2 20-30mins
COOKING TABLE
16
EN
TURN OFF THE MAIN SWITCH AND ENSURE
THE COOKER IS COLD BEFORE CLEANING.
BEFORE SWITCHING ON AGAIN, ENSURE THAT
ALL CONTROLS ARE IN THE OFF POSITION.
Do not use steam cleaning
equipment.
Use protective gloves during all
operations.
Carry out the required
operations when the oven is cold.
Disconnect the appliance from
the power supply.
Do not use wire wool, abrasive
scourers or abrasive/corrosive
cleaning agents, as these could
damage the surfaces of the
appliance.
EXTERIOR SURFACES
• Clean the surfaces with a damp microfibre cloth.
If they are very dirty, add a few drops of pH-neutral
detergent. Dry them with a dry cloth.
• Do not use corrosive or abrasive detergents. If any of
these products inadvertently comes into contact with
the surfaces of the appliance, clean immediately with
a damp microfibre cloth.
INTERIOR SURFACES
• After every use, leave the oven to cool and then
clean it, preferably while it is still warm, to remove any
deposits or stains caused by food residues To dry any
condensation that has formed as a result of cooking
foods with a high water content, let the oven to cool
completely and then wipe it with a cloth or sponge.
• Clean the glass in the door with a suitable liquid
detergent.
CATALYTIC PANELS (SOME MODELS ONLY)
Special catalytic panels facilitate the cleaning of the
cooking compartment thanks to their special self-
cleaning coating, which is highly porous and able to
absorb grease and grime.
Please note: Using corrosive or abrasive cleaning agents,
sti brushes, pan scourers or oven sprays could damage the
catalytic surface and compromise its self-cleaning properties.
Please contact our After-sales Service if you require
replacement panels.
ACCESSORIES
Soak the accessories in a washing-up liquid solution
after use, handling them with oven gloves if they
are still hot. Food residues can be removed using a
washing-up brush or a sponge.
REPLACING THE LIGHT
1.
Disconnect the oven from the power supply.
2. Unscrew the cover from the light, replace the bulb
and screw the cover back on the light.
3. Reconnect the oven to the power supply.
Note: Use 25 W/230 V type E14
The bulb used in the product is specically designed for
domestic appliances and is not suitable for general room
lighting within the home (EC Regulation 244/2009).
Light bulbs are available from our After-sales Service.
- Do not handle bulbs with your bare hands as your
ngerprints could damage them. Do not use the oven until
the light cover has been retted.
Check the door seals around the oven periodically. If
the seals are damaged, please contact your nearest
Authorised After-sales Service Centre. We recommend
that the oven is not used until the seals have been
replaced.
INSPECTING THE OVEN SEALS
EN
MAINTENANCE AND
CLEANING
EN
17
This product contains a light source of energy
eciency class E.
18
• Cook your food in closed pots or pans with well-fitting
lids and use as little water as possible. Cooking with
the lid off will greatly increase energy consumption
• Use purely flat pots and pans
• If you are cooking something that takes a long time,
it's worth using a pressure cooker, which is twice as
fast and saves a third of the energy.
Respecting and conserving the environment
• Whenever possible, avoid pre-heating the oven
and always try to fill it. Open the oven door as little
as possible because heat is lost every time it is
opened. To save a substantial amount of energy,
simply switch off the oven 5 to 10 minutes before the
end of your planned cooking time and use the heat
the oven continues to generate.
• Keep gaskets clean and tidy to prevent any door
energy losses
• If you have a timed tariff electricity contract, the “delay
cooking” option will make it easier to save money by
moving operation to cheaper time periods.
• The base of your pot or pan should cover the hot plate.
If it is smaller, precious energy will be wasted and
pots that boil over leave encrusted remains that can
be difficult to remove.
•
a brief description of the problem;
•
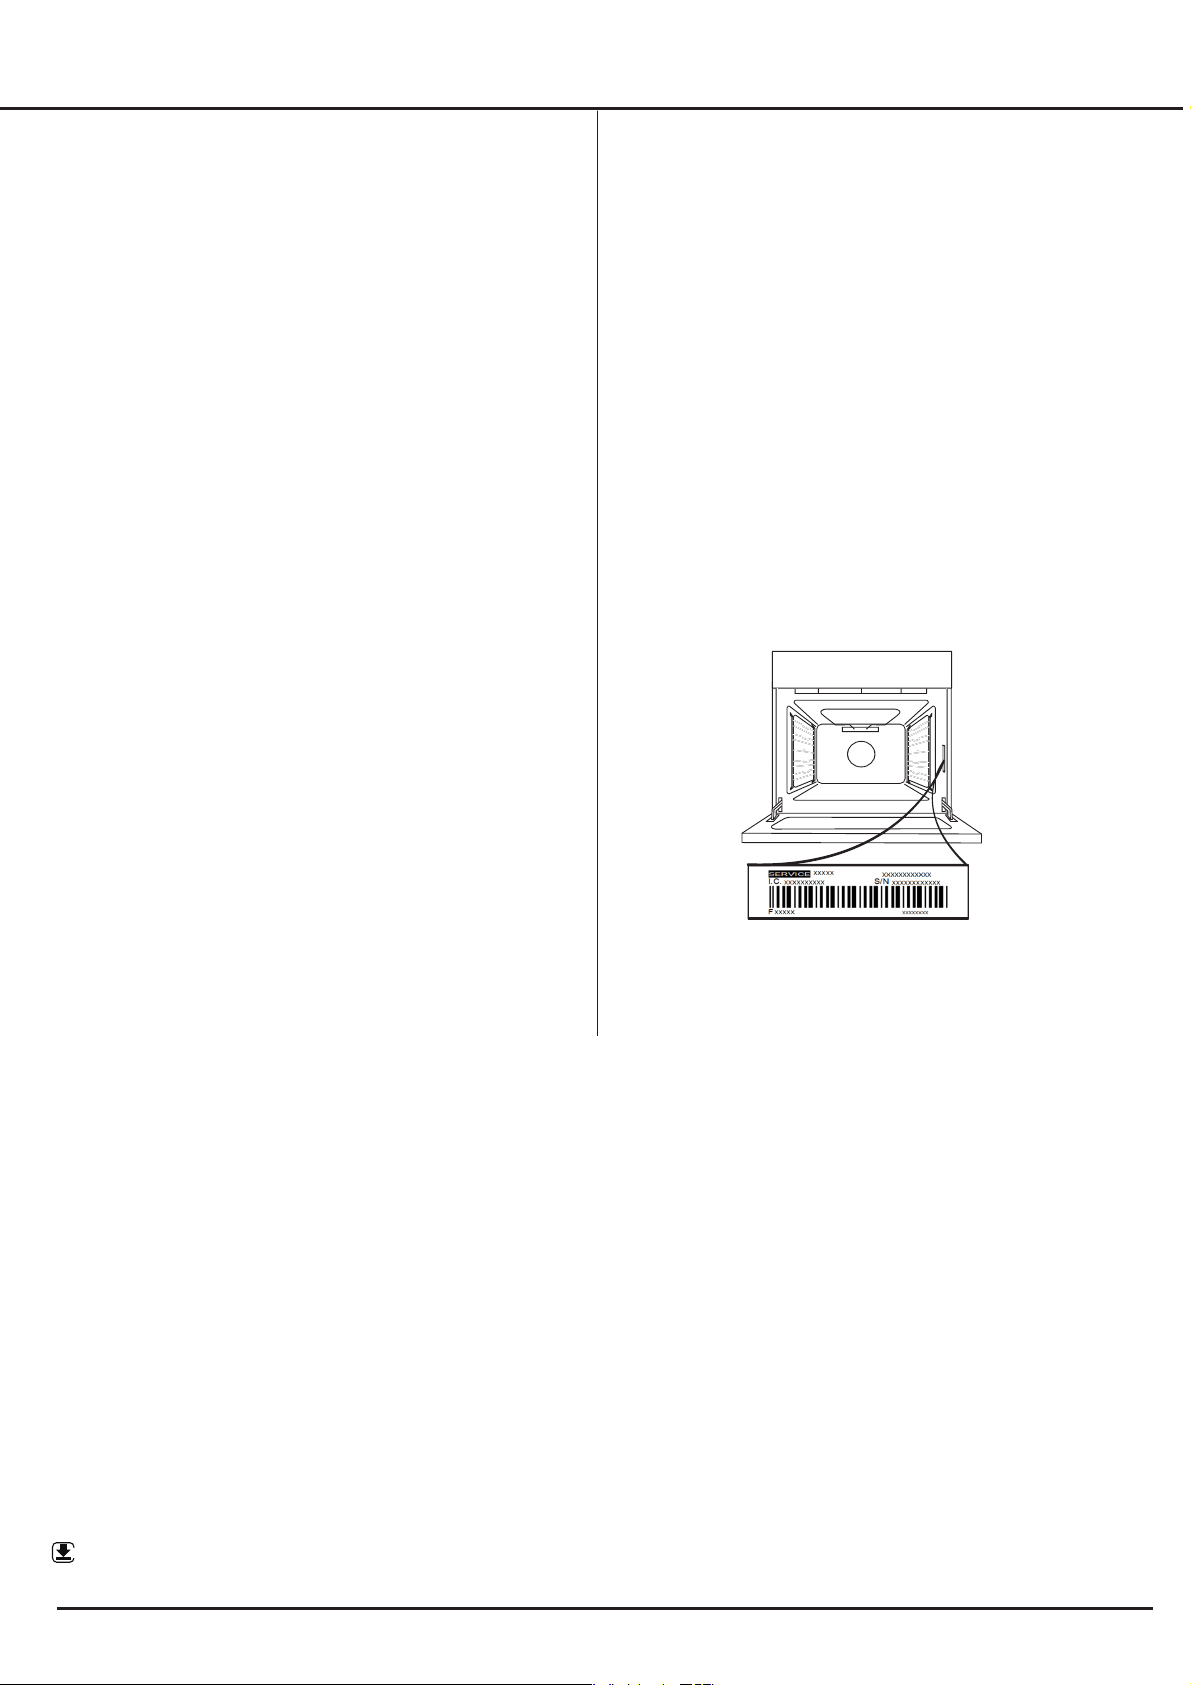
the exact model type of your product;
•
the assistance code (the number following the word
SERVICE on the identification plate attached to the
product, which can be seen on the inside edge when
the oven door is open);
•
your full address;
•
a contact telephone number.
Please note: If repairs are required, contact an
authorised service centre that is guaranteed to use
original spare parts and perform repairs correctly.
Please refer to the enclosed warranty leaflet for more
information on the warranty.
WWW
A complete product specification, including the energy efficiency ratings for this oven, can be read and
downloaded from our website
www.indesit.comwww.indesit.comwww.indesit.com
Assistance
Please have the following information handy:
• The appliance model (Mod.).
• The serial number (S/N).
This information can be found on the data plate located
on the appliance and/or on the packaging.
AFTER-SALES SERVICE
To receive assistance, call the number given on the
warranty leaflet enclosed with the product or follow
the instructions on our website. Be prepared to
provide:
x1
17mm - 0,67inch
max. 15 mm
Min. 420 mm
Min. 750 mm
19
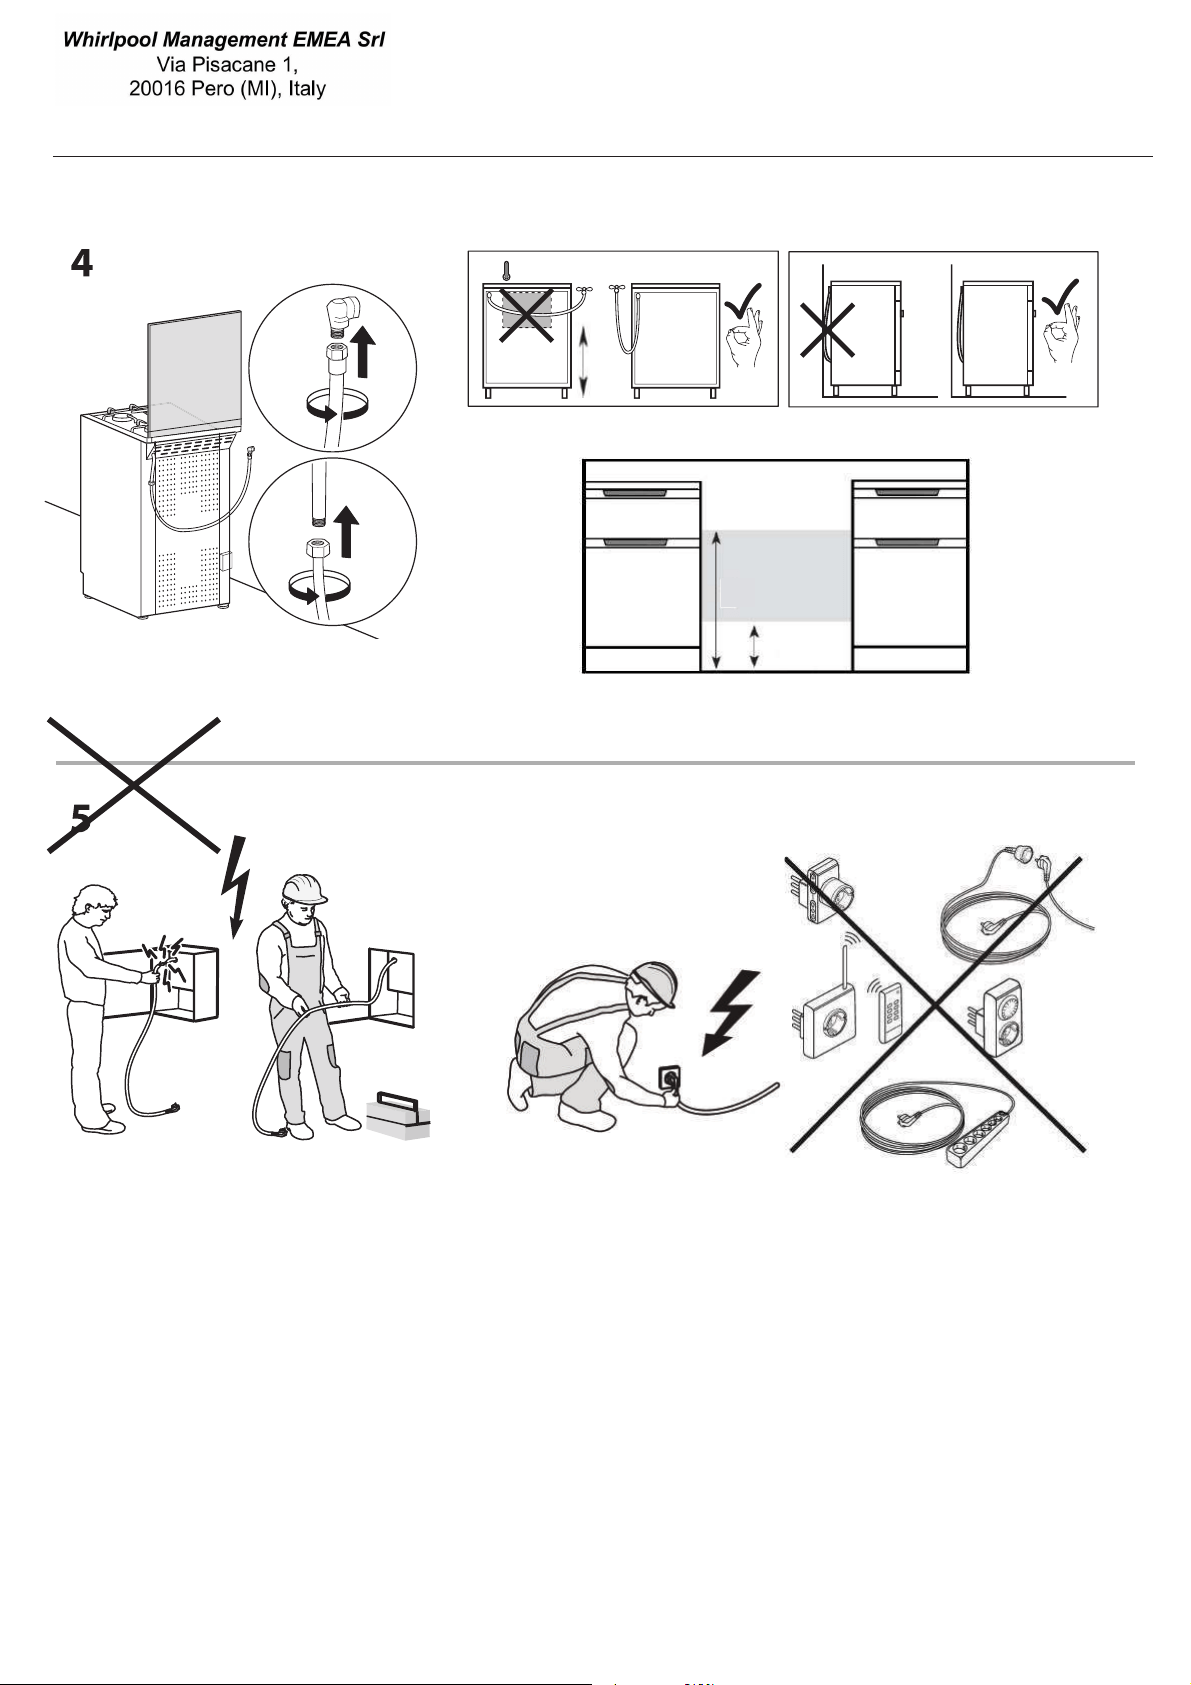
>50°C
Gas hose connection point must be installed within the shaded area
Connecting to gas supply
300
600
20
03/2023 -
XEROX FABRIANO
www.indesit.com
W11420421
600
W11420421W11420421