Loading ...
Loading ...
Loading ...
NEW 2/22 2 CW100_CW105_CW210ES
SAVE THESE INSTRUCTIONS
Read all instructions before using this Heater.
IMPORTANT SAFETY INSTRUCTIONS
When using electrical appliances, these instructions and warnings should always be
followed to reduce the risk of fire, electrical shock and injury to persons:
CAUTION
• Always place the Heater on a stable, flat, level surface when operating, to avoid the chance of the Heater overturning. Locate the Power Cord so the Heater or
other objects are not resting on it. DO NOT run Power Cord under carpeting. DO NOT cover Power Cord with throw rugs, runners, or similar coverings as this
may cause cord to overheat. Arrange Power Cord away from room traffic and where it will not be tripped over.
• This Heater is HOT when in use. To avoid burns, do not let bare skin touch hot surfaces. Always use handle when moving this Heater. Keep combustible materials, such as
furniture, pillows, bedding, papers, clothes and curtains at least 3 feet (0.9 m) from the front of the Heater and keep them at least 1 foot (0.3 m) from the sides and rear.
• This Heater is not intended for use in wet or damp locations. This Heater is not intended for use in bathrooms, laundry areas and similar indoor locations. NEVER
locate a Heater where it may fall into a bathtub or other water container.
• DO NOT use Heater outdoors.
• This Heater is not suitable for use in agricultural facilities including areas where livestock, poultry or other animals are confined. Please refer to National Electric
Code (NEC) Article 547-7 (2008), or applicable state or local codes or standards relating to electrical requirements for Agricultural Buildings. THIS Heater DOES
NOT MEET THE REQUIREMENTS OF NEC ARTICLE 547-7 (2008).
• This Heater is not suitable for use in hazardous locations. Please refer to National Electric Code (NEC) Article 500 or applicable state or local codes or
standards relating to electrical requirements for Hazardous locations. THIS Heater DOES NOT MEET THE REQUIREMENTS OF NEC ARTICLE 500 (2008).
• Remote controls for other appliances or electronic equipment can sometimes interfere with the operation of this Heater. If this occurs, move the Heater to
another location.
• Keep Heater remote control unit away from chairs and your bed where it may be sat or laid upon and inadvertently turn on the Heater.
WARNING
WARNING
• PLUG HEATERS DIRECTLY INTO A 120V WALL OUTLET/RECEPTACLE ONLY. NEVER USE WITH AN EXTENSION CORD. DO NOT PLUG HEATER
INTO ANY OTHER CORD CONNECTED DEVICE, SUCH AS A POWER STRIP, SURGE PROTECTOR, MULTIPLE OUTLET ADAPTER, CORD REEL
OR OUTLET-TYPE AIR FRESHENER. THE USE OF SUCH DEVICES MAY CREATE A FIRE HAZARD. DO NOT PLUG MULTIPLE DEVICES IN THE
SAME OUTLET OR ON SAME CIRCUIT AS HEATER.
• FAULTY WALL OUTLET CONNECTIONS MAY CAUSE THE WALL OUTLET TO OVERHEAT. BE SURE THAT HEATER PLUG FITS TIGHTLY INTO
OUTLET BEFORE EACH USE. DURING USE, CHECK TO MAKE CERTAIN THE HEATER PLUG IS NOT OVERHEATING. IF NECESSARY HAVE A
QUALIFIED ELECTRICIAN CHECK AND/OR REPLACE THE WALL OUTLET. DO NOT USE THIS HEATER WITH ANY SOLID STATE SPEED CON-
TROL DEVICES.
• Make certain that the power source conforms to the electrical requirements of the Heater.
• Extreme caution is necessary when any Heater is used by or near children or invalids. The Heater should not be left operating unattended. Never
leave children unattended when the Heater is on or plugged in.
• This appliance has a polarized plug (one blade is wider than the other). To reduce the risk of electric shock, this plug is intended to fit in a polarized
outlet only one way. If the plug does not fit fully in the outlet, reverse the plug. If it still does not fit, contact a qualified electrician. Do not attempt to
defeat this safety feature.
• DO NOT use the Heater in areas where gasoline, paint, or flammable liquids are used or stored. DO NOT use Heater in locations where flammable
or explosive chemicals are stored, or in wet atmospheres.
• Do not operate any Heater with a damaged cord or plug or after the Heater malfunctions, or has been dropped or damaged in any manner. To dis-
connect Heater, turn the Heater OFF then remove the plug from the outlet.
• Always unplug Heater when not in use. Unplug power cord before servicing or moving the Heater.
• Do not insert or allow fingers or foreign objects to enter any ventilation or exhaust opening as it may cause an electric shock, fire, or damage the
Heater. Do not block or tamper with the Heater in any manner while it is in operation.
• Do not block air intakes or exhaust in any manner. Do not place on soft surfaces, like a bed, where openings may become blocked. Do not depend
on the on/off switch as the sole means of disconnecting power when servicing or moving the Heater. Always unplug the power cord.
NEW 2/22 7 CW100_CW105_CW210ES
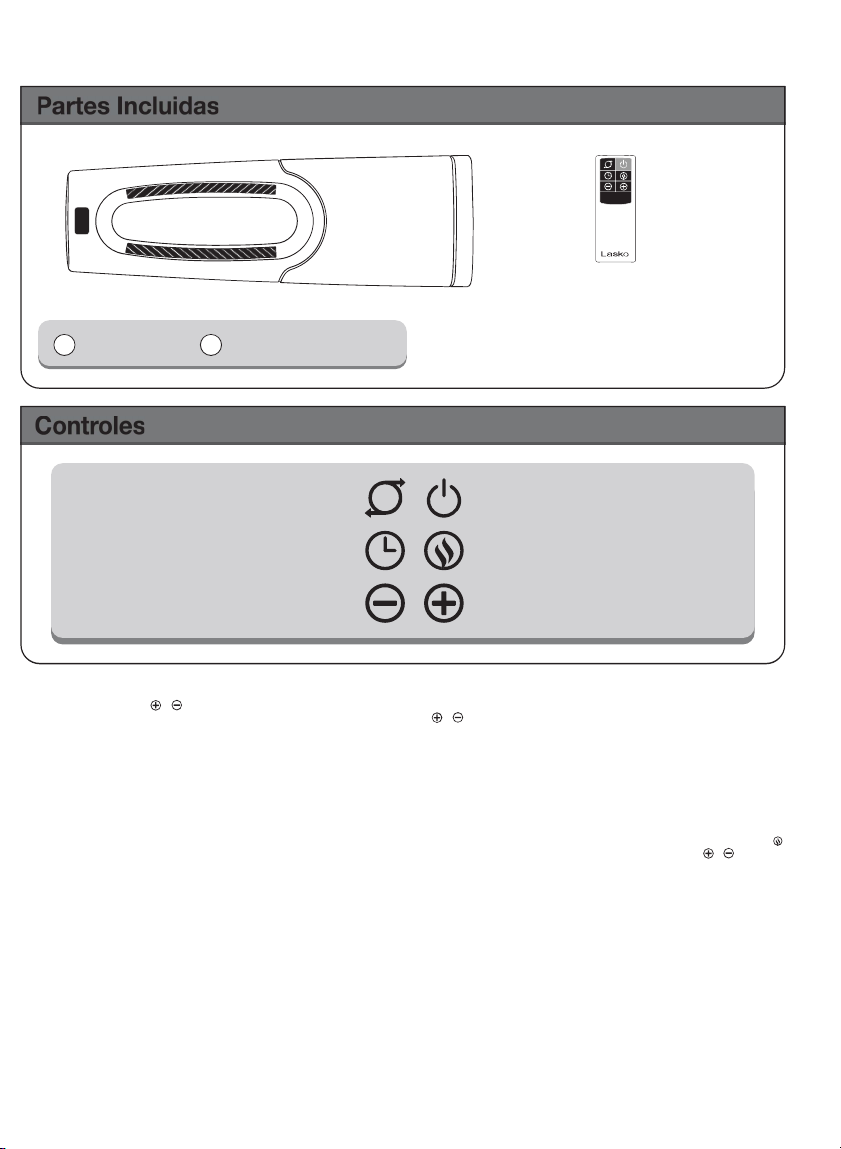
Partes Incluidas
1 Cuerpo 2 Control Remoto
AUTO ECO
™
THERMOSTAT
Al presionar los botones o mientras se encuentra en las configuraciones de energía ALTA o BAJA, se encenderá la función Auto Eco
™
.
1. Para fijar una temperatura específica en la habitación, presione los botones o hasta la temperatura deseada. La temperatura parpadeará en
la pantalla. El Unidad está ahora en modo Auto Eco
™
.
2. Cuando se alcance la temperatura en la cual desea establecer la unidad, la temperatura fijada destellará varias veces y luego la pantalla volverá
a indicar la temperatura ambiente actual y cambiará gradualmente a medida que cambie la temperatura ambiente. NOTA: La pantalla de la tem-
peratura no indica la temperatura del aire caliente que emite el Unidad.
3. El calentador funcionará a ALTO calor cuando la temperatura ambiente sea menor que la temperatura establecida.
4. El calefactor funcionará con BAJA temperatura cuando la temperatura ambiente alcance la temperatura establecida y seguirá funcionando con
BAJA temperatura hasta que la temperatura ambiente alcance 2 grados Fahrenheit por encima de la temperatura establecida.
5. El calentador se apagará una vez que la temperatura ambiente sea superior a 2 grados Fahrenheit por encima de la temperatura establecida. El
ventilador seguirá funcionando durante 15 segundos después de que se apague el elemento calefactor.
Todo esto ocurre automáticamente con la tecnología Auto Eco
™
de Lasko. Para desactivar la función Auto Eco
™
, apague el Unidad o presione el botón .
NOTA: En el modo Auto Eco
™
, el Calentador mostrará la temperatura ambiente actual en grados Fahrenheit. Presione los botones y al mismo
tiempo para mostrar los grados Celsius. Presione los mismos dos botones juntos nuevamente para volver a mostrar los grados Fahrenheit.
CONTROL REMOTO
Todas las funciones realizadas con el Control Remoto operan del mismo modo que los controles manuales.
1. El control requiere 2 baterías AAA de 1.5 Vcc (no incluídas).
2. No mezcle baterías viejas y nuevas. No mezcle baterías alcalinas, estándar (carbono-cinc) o recargables (níquel-cadmio).
3. NO ARROJE LAS BATERÍAS AL FUEGO. LAS BATERÍAS PUEDEN EXPLOTAR O SUFRIR PÉRDIDAS.
4. Siempre compre el tamaño y grado correctos de pilas más adecuados para el uso previsto.
5. Reemplace todas las pilas de un conjunto al mismo tiempo.
6. Limpie los contactos de las pilas y también los del dispositivo antes de la instalación de las mismas.
7. Asegúrese de que las pilas estén instaladas correctamente con respecto a la polaridad (+ y -).
8. Retire las pilas del equipo que no se va a utilizar durante un período prolongado.
9. Retire las pilas usadas con prontitud.
Si usted pierde su mando a distancia, por favor Cliente de llamada Serive para ordenar un reaplacement en (800) 233-0268, de lunes a viernes, entre
las 8 a.m. y las 5 p.m. (Horario Estándar del Este de los Estados Unidos).
Controles
Control Automático de la Temperatura
Presione para Disminuir la temperatura ambiente deseada.
Control Automático de la Temperatura
Presione para Aumentar la temperatura ambiente deseada.
Botón de Oscilación de Base
Presione para Iniciar/Detener la función de oscilación de la base.
Botón de Temporizador
El temporizador se puede configurar para 8 horas. Continúe pul-
sando el Botón del Temporizador para llegar a la configuración
de tiempo deseada. La luz se vuelve roja cuando se activa.
Botón de Encendido
ENCENDIDO/APAGADO el Calefactor presionando
el Botón de Encendido.
Botón de Modo de Calor
Presione para alternar entre Calor Alto y Bajo
1 2
Loading ...