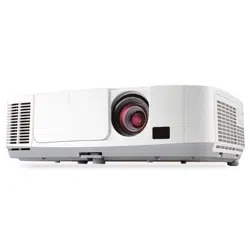

Portable Projector
P420X/P350X/P350W
User’s Manual
Model No.
NP-P420X, NP-P350X, NP-P350W

2nd edition, January 2011
•Macintosh,MacOSXandPowerBookaretrademarksofAppleInc.registeredintheU.S.andothercountries.
•Microsoft,Windows,WindowsVista,InternetExplorer,.NETFrameworkandPowerPointareeitheraregistered
trademarkortrademarkofMicrosoftCorporationintheUnitedStatesand/orothercountries.
•MicroSaverisaregisteredtrademarkofKensingtonComputerProductsGroup,adivisionofACCOBrands.
•VirtualRemoteToolusesWinI2C/DDClibrary,©NicomsoftLtd.
•HDMI,theHDMILogoandHigh-DenitionMultimediaInterfacearetrademarksorregisteredtrademarksofHDMI
LicensingLLC.
•TrademarkPJLinkisatrademarkappliedfortrademarkrightsinJapan,theUnitedStatesofAmericaandother
countriesandareas.
•Wi-Fi
®
,Wi-FiAlliance
®
,andWi-FiProtectedAccess(WPA,WPA2)
®
areregisteredtrademarksoftheWi-FiAlli-
ance.
•Blu-rayisatrademarkofBlu-rayDiscAssociation
•Crestron,CrestronControl,andCrestronRoomViewaretrademarksorregisteredtrademarksofCrestronElectron-
ics,Inc.
•Otherproductandcompanynamesmentionedinthisuser’smanualmaybethetrademarksorregisteredtrademarks
oftheirrespectiveholders.
•GPL/LGPLSoftwareLicenses
TheproductincludessoftwarelicensedunderGNUGeneralPublicLicense(GPL),GNULesserGeneralPublic
License(LGPL),andothers.
Formoreinformationoneachsoftware,see“readme.pdf”insidethe“aboutGPL&LGPL”folderonthesuppliedCD-
ROM.
NOTES
(1)Thecontentsofthisuser’smanualmaynotbereprintedinpartorwholewithoutpermission.
(2)Thecontentsofthisuser’smanualaresubjecttochangewithoutnotice.
(3)Greatcarehasbeentakeninthepreparationofthisuser’smanual;however,shouldyounoticeanyquestionable
points,errorsoromissions,pleasecontactus.
(4)Notwithstandingarticle(3),NECwillnotberesponsibleforanyclaimsonlossofprotorothermattersdeemed
toresultfromusingtheProjector.
i
Important Information
Safety Cautions
Precautions
PleasereadthismanualcarefullybeforeusingyourNECprojectorandkeepthemanualhandyforfuturereference.
CAUTION
Toturnoffmainpower,besuretoremovetheplugfrompoweroutlet.
Thepoweroutletsocketshouldbeinstalledasneartotheequipmentaspossible,andshouldbeeasily
accessible.
CAUTION
TOPREVENTSHOCK,DONOTOPENTHECABINET.
THEREAREHIGH-VOLTAGECOMPONENTSINSIDE.
REFERSERVICINGTOQUALIFIEDSERVICEPERSONNEL.
Thissymbolwarnstheuserthatuninsulatedvoltagewithintheunitmaybesufcienttocauseelectrical
shock.Therefore,itisdangeroustomakeanykindofcontactwithanypartinsideoftheunit.
Thissymbolalertstheuserthatimportantinformationconcerningtheoperationandmaintenanceofthis
unithasbeenprovided.
Theinformationshouldbereadcarefullytoavoidproblems.
WARNING: TOPREVENTFIREORSHOCK,DONOTEXPOSETHISUNITTORAINORMOISTURE.
DONOTUSETHISUNIT’SPLUGWITHANEXTENSIONCORDORINANOUTLETUNLESSALLTHEPRONGS
CANBEFULLYINSERTED.
DOC Compliance Notice (for Canada only)
ThisClassBdigitalapparatusmeetsallrequirementsoftheCanadianInterference-CausingEquipmentRegula-
tions.
Machine Noise Information Regulation - 3. GPSGV,
Thehighestsoundpressurelevelislessthan70dB(A)inaccordancewithENISO7779.
CAUTION
Avoiddisplayingstationaryimagesforaprolongedperiodoftime.
DoingsocanresultintheseimagesbeingtemporarilysustainedonthesurfaceoftheLCDpanel.
Ifthisshouldhappen,continuetouseyourprojector.Thestaticbackgroundfrompreviousimageswill
disappear.
Disposing of your used product
EU-widelegislationasimplementedineachMemberStaterequiresthatusedelectricalandelectronic
productscarryingthemark(left)mustbedisposedofseparatelyfromnormalhouseholdwaste.Thisin-
cludesprojectorsandtheirelectricalaccessoriesorlamps.Whenyoudisposeofsuchproducts,please
followtheguidanceofyourlocalauthorityand/orasktheshopwhereyoupurchasedtheproduct.
Aftercollectingtheusedproducts,theyarereusedandrecycledinaproperway.Thiseffortwillhelpus
reducethewastesaswellasthenegativeimpactsuchasmercurycontainedinalamptothehuman
healthandtheenvironmentattheminimumlevel.
ThemarkontheelectricalandelectronicproductsonlyappliestothecurrentEuropeanUnionMember
States.

ii
Important Information
WARNING TO CALIFORNIA RESIDENTS:
Handlingthecablessuppliedwiththisproductwillexposeyoutolead,achemicalknowntotheStateofCalifornia
tocausebirthdefectsorotherreproductiveharm.
WASH HANDS AFTER HANDLING.
RF Interference (for USA only)
WARNING
TheFederalCommunicationsCommissiondoesnotallowanymodicationsorchangestotheunitEXCEPTthose
speciedbyNECDisplaySolutionsofAmerica,Inc.inthismanual.Failuretocomplywiththisgovernmentregu-
lationcouldvoidyourrighttooperatethisequipment.Thisequipmenthasbeentestedandfoundtocomplywith
thelimitsforaClassBdigitaldevice,pursuanttoPart15oftheFCCRules.Theselimitsaredesignedtoprovide
reasonableprotectionagainstharmfulinterferenceinaresidentialinstallation.Thisequipmentgenerates,uses,and
canradiateradiofrequencyenergyand,ifnotinstalledandusedinaccordancewiththeinstructions,maycause
harmfulinterferencetoradiocommunications.However,thereisnoguaranteethatinterferencewillnotoccurina
particularinstallation.
Ifthisequipmentdoescauseharmfulinterferencetoradioortelevisionreception,whichcanbedeterminedby
turningtheequipmentoffandon,theuserisencouragedtotrytocorrecttheinterferencebyoneormoreofthe
followingmeasures:
•Reorientorrelocatethereceivingantenna.
•Increasetheseparationbetweentheequipmentandreceiver.
•Connecttheequipmentintoanoutletonacircuitdifferentfromthattowhichthereceiverisconnected.
•Consultthedealeroranexperiencedradio/TVtechnicianforhelp.
ForUKonly:InUK,aBSapprovedpowercordwithmouldedplughasaBlack(veAmps)fuseinstalledforusewith
thisequipment.Ifapowercordisnotsuppliedwiththisequipmentpleasecontactyoursupplier.
Important Safeguards
Thesesafetyinstructionsaretoensurethelonglifeofyourprojectorandtopreventreandshock.Pleasereadthem
carefullyandheedallwarnings.
Installation
•Donotplacetheprojectorinthefollowingconditions:
-onanunstablecart,stand,ortable.
-nearwater,baths,ordamprooms.
-indirectsunlight,nearheaters,orheatradiatingappliances.
-inadusty,smokyorsteamyenvironment.
-onasheetofpaperorcloth,rugsorcarpets.
•Ifyouwishtohavetheprojectorinstalledontheceiling:
-Donotattempttoinstalltheprojectoryourself.
-Theprojectormustbeinstalledbyqualiedtechniciansinordertoensureproperoperationandreducetherisk
ofbodilyinjury.
-Inaddition,theceilingmustbestrongenoughtosupporttheprojectorandtheinstallationmustbeinaccordance
withanylocalbuildingcodes.
-Pleaseconsultyourdealerformoreinformation.
iii
Important Information
Fire and Shock Precautions
•Ensurethatthereissufcientventilationandthatventsareunobstructedtopreventthebuild-upofheatinsideyour
projector.Allowatleast4inches(10cm)ofspacebetweenyourprojectorandawall.
•Donottrytotouchtheventilationoutletontheleftfront(whenseenfromthefront)asitcanbecomeheatedwhile
theprojectoristurnedonandimmediatelyaftertheprojectoristurnedoff.Partsoftheprojectormaybecometem-
porarilyheatediftheprojectoristurnedoffwiththePOWERbuttonoriftheACpowersupplyisdisconnectedduring
normalprojectoroperation.
Usecautionwhenpickinguptheprojector.
•Preventforeignobjectssuchaspaperclipsandbitsofpaperfromfallingintoyourprojector.Donotattempttoretrieve
anyobjectsthatmightfallintoyourprojector.Donotinsertanymetalobjectssuchasawireorscrewdriverintoyour
projector.Ifsomethingshouldfallintoyourprojector,disconnectitimmediatelyandhavetheobjectremovedbya
qualiedservicepersonnel.
•Donotplaceanyobjectsontopoftheprojector.
•Donottouchthepowerplugduringathunderstorm.Doingsocancauseelectricalshockorre.
•Theprojectorisdesignedtooperateonapowersupplyof100-240VAC50/60Hz.Ensurethatyourpowersupply
tsthisrequirementbeforeattemptingtouseyourprojector.
•Donotlookintothelenswhiletheprojectorison.Seriousdamagetoyoureyescouldresult.
•Keepanyitems(magnifyingglassetc.)outofthelightpathoftheprojector.Thelightpathbeingprojectedfromthe
lensisextensive,thereforeanykindofabnormalobjectsthatcanredirectlightcomingoutofthelens,cancause
anunpredictableoutcomesuchasareorinjurytotheeyes.
WARNING
•Donotuseanyotherobjectthantheprojector’sslidinglenscovertocoverthelenswhiletheprojectorison.
Doingsocancausetheobjecttogetextremelyhot,andpossiblyresultinginareordamageduetotheheat
emittedfromthelightoutput.
Place the projector in a horizontal position
Thetiltangleoftheprojectorshouldnotexceed10degrees,norshouldtheprojectorbeinstalledinanywayother
thanthedesktopandceilingmount,otherwiselamplifecoulddecreasedramatically.
10°

iv
Important Information
•Donotplaceanyobjects,whichareeasilyaffectedbyheat,infrontofaprojectorexhaustvent.
Doingsocouldleadtotheobjectmeltingorgettingyourhandsburnedfromtheheatthatisemittedfromtheex-
haust.
•Handlethepowercordcarefully.Adamagedorfrayedpowercordcancauseelectricshockorre.
-Donotuseanypowercordotherthantheonesuppliedwiththeprojector.
-Donotbendortugthepowercordexcessively.
-Donotplacethepowercordundertheprojector,oranyheavyobject.
-Donotcoverthepowercordwithothersoftmaterialssuchasrugs.
-Donotheatthepowercord.
-Donothandlethepowerplugwithwethands.
•Turnofftheprojector,unplugthepowercordandhavetheprojectorservicedbyaqualiedservicepersonnelunder
thefollowingconditions:
-Whenthepowercordorplugisdamagedorfrayed.
-Ifliquidhasbeenspilledintotheprojector,orifithasbeenexposedtorainorwater.
-Iftheprojectordoesnotoperatenormallywhenyoufollowtheinstructionsdescribedinthisuser’smanual.
-Iftheprojectorhasbeendroppedorthecabinethasbeendamaged.
-Iftheprojectorexhibitsadistinctchangeinperformance,indicatinganeedforservice.
•Disconnectthepowercordandanyothercablesbeforecarryingtheprojector.
•Turnofftheprojectorandunplugthepowercordbeforecleaningthecabinetorreplacingthelamp.
•Turnofftheprojectorandunplugthepowercordiftheprojectorisnottobeusedforanextendedperiodoftime.
•WhenusingaLANcable(onlymodelswiththeRJ-45LANport):
Forsafety,donotconnecttotheconnectorforperipheraldevicewiringthatmighthaveexcessivevoltage.
CAUTION
•Donotusethetilt-footforpurposesotherthanoriginallyintended.Misusessuchasgrippingthetilt-footorhang-
ingonthewallcancausedamagetotheprojector.
•Donotsendtheprojectorinthesoftcasebyparceldeliveryserviceorcargoshipment.Theprojectorinsidethe
softcasecouldbedamaged.
•Select[HIGH]inFanmodeifyoucontinuetousetheprojectorforconsecutivedays.(Fromthemenu,select
[SETUP][OPTIONS(1)][FANMODE][HIGH].)
•Donottrytotouchtheventilationoutletontheleftfront(whenseenfromthefront)asitcanbecomeheatedwhile
theprojectoristurnedonandimmediatelyaftertheprojectoristurnedoff.
•DonotturnofftheACpowerfor60secondsafterthelampisturnedonandwhilethePOWERindicatorisblink-
ingblue.Doingsocouldcauseprematurelampfailure.
Remote Control Precautions
•Handletheremotecontrolcarefully.
•Iftheremotecontrolgetswet,wipeitdryimmediately.
•Avoidexcessiveheatandhumidity.
•Donotshort,heat,ortakeapartbatteries.
•Donotthrowbatteriesintore.
•Ifyouwillnotbeusingtheremotecontrolforalongtime,removethebatteries.
•Ensurethatyouhavethebatteries’polarity(+/−)alignedcorrectly.
•Donotusenewandoldbatteriestogether,orusedifferenttypesofbatteriestogether.
•Disposeofusedbatteriesaccordingtoyourlocalregulations.

v
Important Information
Note for US Residents
Thelampinthisproductcontainsmercury.PleasedisposeaccordingtoLocal,StateorFederalLaws.
Lamp Replacement
•Usethespeciedlampforsafetyandperformance.
•Toreplacethelamp,followallinstructionsprovidedonpage
147.
•Besuretoreplacethelampandlterwhenthemessage[THE LAMP HAS REACHED THE END OF ITS USABLE
LIFE. PLEASE REPLACE THE LAMP AND FILTER.]appears.Ifyoucontinuetousethelampafterthelamphas
reachedtheendofitsusablelife,thelampbulbmayshatter,andpiecesofglassmaybescatteredinthelamp
case.Donottouchthemasthepiecesofglassmaycauseinjury.
Ifthishappens,contactyourdealerforlampreplacement.
A Lamp Characteristic
Theprojectorhasahigh-pressuremercurylampasalightsource.
Alamphasacharacteristicthatitsbrightnessgraduallydecreaseswithage.Alsorepeatedlyturningthelampon
andoffwillincreasethepossibilityofitslowerbrightness.
CAUTION:
•DONOTTOUCHTHELAMPimmediatelyafterithasbeenused.Itwillbeextremelyhot.Turntheprojectoroff
andthendisconnectthepowercord.Allowatleastonehourforthelamptocoolbeforehandling.
•Whenremovingthelampfromaceiling-mountedprojector,makesurethatnooneisundertheprojector.Glass
fragmentscouldfallifthelamphasbeenburnedout.
About High Altitude mode
•
Set[FANMODE]to[HIGHALTITUDE]whenusingtheprojectorataltitudesapproximately5500feet/1600metersor
higher.
Usingtheprojectorataltitudesapproximately5500feet/1600metersorhigherwithoutsettingto[HIGHALTITUDE]
cancausetheprojectortooverheatandtheprotectorcouldshutdown.Ifthishappens,waitacoupleminutesand
turnontheprojector.
•Usingtheprojectorataltitudeslessthanapproximately5500feet/1600metersandsettingto[HIGHALTITUDE]
cancausethelamptoovercool,causingtheimagetoicker.Switch[FANMODE]to[AUTO].
•Usingtheprojectorataltitudesapproximately5500feet/1600metersorhighercanshortenthelifeofopticalcom-
ponentssuchasthelamp.
About Copyright of original projected pictures:
Pleasenotethatusingthisprojectorforthepurposeofcommercialgainortheattractionofpublicattentioninavenue
suchasacoffeeshoporhotelandemployingcompressionorexpansionofthescreenimagewiththefollowingfunc-
tionsmayraiseconcernabouttheinfringementofcopyrightswhichareprotectedbycopyrightlaw.
[ASPECTRATIO],[KEYSTONE],Magnifyingfeatureandothersimilarfeatures.
Turkish RoHS information relevant for Turkish market
EEE Yönetmeliğine Uygundur.
Thisdeviceisnotintendedforuseinthedirecteldofviewatvisualdisplayworkplaces.Toavoidincommodingreec-
tionsatvisualdisplayworkplacesthisdevicemustnotbeplacedinthedirecteldofview.
vi
Important Information
Information on Wireless LAN:
Insomeareasandcountries,theP420X,P350X,andP350WseriesprojectorscomestandardwiththeUSBWireless
LANUnit.IfyoupurchasetheprojectormodelwithouttheWirelessLANUnit,theoptionalWirelessLANUnitmustbe
installedtousetheprojectorviaawirelessconnection.
Notethatuseinotherthansupportedcountriesandareasmayviolateradiowavelawsofthecountrywhereawire-
lessLANunitisused.UsethewirelessLANUnitaccordingtothecombinationsoftheproductnamesandsupported
countrieslistedonpage
viii.
Certificate marks and codes of the NP02LM Series (English)
NP02LM1MexicoCFTID:RCPNENP10-0740
Brazil
NP02LM2ArgentinaCNCID:C-8400
Australia
NewZealand
N56
HongKong
HK0011000150
Vietnam
A0557240610AE01A2
FPT Distribution Co, Ltd.
A0557
-
240610
Indonesia
15809/POSTEL/2010
SouthAfrica
India730/2010/WRLO
Singapore
Complies with
IDA Standards
DB00901
UAE
TRA
REGISTERED No:
ER0042849/10
DEALER No:
DA0038690/10
Pakistan
SouthKorea
인증번호:NDS-NP02LM

vii
Important Information
EnglishHereby,NECDisplaySolutions,Ltd.declaresthatthisWirelessLANUnit(Model:NP02LM)
isincompliancewiththeessentialrequirementsandotherrelevantprovisionsofDirective
1999/5/EC.
Finnish
NECDisplaySolutions,Ltd.vakuuttaatätenettäWirelessLANUnit(Model:NP02LM)tyyp-
pinenlaiteondirektiivin1999/5/EYoleellistenvaatimustenjasitäkoskeviendirektiivinmuiden
ehtojenmukainen.
GermanHiermiterklärtNECDisplaySolutions,Ltd.,dasssichdieser/diese/diesesWirelessLANUnit
(Model:NP02LM)inÜbereinstimmungmitdengrundlegendenAnforderungenunddenanderen
relevantenVorschriftenderRichtlinie1999/5/EGbendet”.(BMWi)
HiermiterklärtNECDisplaySolutions,Ltd.dieÜbereinstimmungdesGerätesWirelessLAN
Unit(Model:NP02LM)mitdengrundlegendenAnforderungenunddenanderenrelevanten
FestlegungenderRichtlinie1999/5/EG.(Wien)
FrenchParlapresenteNECDisplaySolutions,Ltd.declarequel’appareilWirelessLANUnit(Model:
NP02LM)estconformeauxexigencesessentiellesetauxautresdispositionspertinentesde
ladirective1999/5/CE.
Parlapresente,NECDisplaySolutions,Ltd.declarequeceWirelessLANUnit(Model:
NP02LM)estconformeauxexigencesessentiellesetauxautresdispositionsdeladirective
1999/5/CEquiluisontapplicables.
ItalianConlapresenteNECDisplaySolutions,Ltd.dichiarachequestoWirelessLANUnit(Model:
NP02LM)èconformeairequisitiessenzialiedallealtredisposizionipertinentistabilitedalla
direttiva1999/5/CE.
SpanishPormediodelapresenteNECDisplaySolutions,Ltd.declaraqueelWirelessLANUnit(Model:
NP02LM)cumpleconlosrequisitosesencialesycualesquieraotrasdisposicionesaplicables
oexigiblesdelaDirectiva1999/5/CE.
PortugueseNECDisplaySolutions,Ltd.declaraqueesteWirelessLANUnit(Model:NP02LM)estácon-
formecomosrequisitosessenciaiseoutrasdisposiçõesdaDirectiva1999/5/CE.
SwedishHärmedintygarNECDisplaySolutions,Ltd.attdennaWirelessLANUnit(Model:NP02LM)
stårIöverensstämmelsemeddeväsentligaegenskapskravochövrigarelevantabestämmelser
somframgåravdirektiv1999/5/EG.
DutchHierbijverklaartNECDisplaySolutions,Ltd.dathettoestelWirelessLANUnit(Model:
NP02LM)inovereenstemmingismetdeessentiëleeisenendeandererelevantebepalingen
vanrichtlijn1999/5/EG.
BijdezeverklaartNECDisplaySolutions,Ltd.datdezeWirelessLANUnit(Model:NP02LM)
voldoetaandeessentiëleeisenenaandeoverigerelevantebepalingenvanRichtlijn1999/5/
EC.
Danish
UndertegnedeNECDisplaySolutions,Ltd.erklærerherved,atfølgendeudstyrWireless
LANUnit(Model:NP02LM)overholderdevæsentligekravogøvrigerelevantekravidirektiv
1999/5/EF.
Greek
ΜΕ ΤΗΝ ΠΑΡOΥΣΑ NEC Display Solutions, Ltd. ΔΗΛΩΝΕΙ OΤΙ Wireless LAN Unit (Model:
NP02LM) ΣΥΜΜOΡΦΩΝΕΤΑΙ ΠΡOΣ ΤΙΣ OΥΣΙΩΔΕΙΣ ΑΠΑΙΤΗΣΕΙΣ ΚΑΙ ΤΙΣ ΛOΙΠΕΣ ΣXΕΤΙΚΕΣ
ΔΙΑΤΑΞΕΙΣ ΤΗΣ OΔΗΓΙΑΣ 1999/5/ΕΚ.

viii
Important Information
Table of Supported Areas and Countries
Notethatusewithotherthanthecombinationsoftheproductnamesandsupportedcountriesandareaslistedbelow
mayviolateradiowavelawsofthecountrywherethedeviceisused.
ProductNameSupportedcountriesandareas
NP02LM1Brazil/Canada/Colombia/Mexico/Taiwan/UnitedStates
NP02LM2Argentina/Australia/Austria/Belgium/Bulgaria/Chile/China/Cyprus/Czech/Denmark
/Ecuador/Egypt/Estonia/Finland/France/Germany/Greece/HongKong/Hungary/
Iceland/India/Indonesia/Ireland/Israel/Italy/Japan/Latvia/Liechtenstein/Lithuania/
Luxembourg/Malaysia/Malta/NewZealand/Norway/Oman/Pakistan/Peru/Philippines
/Poland/Portugal/Romania/SaudiArabia/Singapore/Slovak/Slovenia/SouthAfrica/
SouthKorea/Spain/SriLanka/Sweden/Switzerland/Thailand/TheNetherlands/Turkey
/Ukraine/UnitedArabEmirates/UnitedKingdom/Vietnam
NP02LM3Russia
Cautions
•CautionsonUsage
Warning
•TheWirelessLANUnitisnotmeantforusewithfacilitiesorequipmentinvolvingthesafeguardofhumanlife,
suchasmedicalequipment,nuclearfacilitiesorequipment,aeronauticalorspaceequipment,transportation
facilitiesorequipment,etc.,orwithfacilitiesorequipmentrequiringhighlevelsofreliability.DonotusetheWire-
lessLANUnitinsuchcases.
•DonotusetheWirelessLANUnitnearcardiacpacemakers.
•DonotusetheWirelessLANUnitnearmedicalequipment.Doingsomaycauseelectromagneticinterference
withthemedicalequipment,possibleleadingtodeath.
•DonotdisassembleormodifytheWirelessLANUnitinanyway.Doingsocouldleadtoreorelectricshock.
•DonotusetheWirelessLANUnitinwetormoistplaces,suchasinbathroomsornearhumidiers.Doingso
couldleadtore,electricshockormalfunction.
Caution
Topreventdamageduetostaticelectricity,eliminateanystaticelectricityfromyourbodybeforetouchingtheWire-
lessLANUnit.
•StaticelectricityfromthehumanbodymaydamagetheWirelessLANUnit.BeforetouchingtheWirelessLAN
Unit,touchanaluminumsash,adoorknob,orsomeothermetalobjectaroundyoutoeliminatethestaticelec-
tricity.
Caution
TheradiowavesusedbytheWirelessLANUnitpassthroughthewoodorglassusedinnormalhomes(butnot
throughwindowpaneswithbuilt-inmetallicmesh).
Theradiowavesdonotpassthroughironreinforcingbars,metalorconcrete,however,sotheWirelessLANUnit
cannotbeusedforcommunicatingthroughwallsoroorsmadewiththesematerials.

ix
Important Information
•FCCCompliance
ThisdevicecomplieswithPart15oftheFCCRules.Operationissubjecttothefollowingtwoconditions:(1)this
devicemaynotcauseharmfulinterferenceand(2)thisdevicemustacceptanyinterferencereceived,including
interferencethatmaycauseundesiredoperation.
ThisequipmenthasbeentestedandfoundtocomplywiththelimitsforaClassBPersonalComputerandPeripheral,
pursuanttoPart15oftheFCCRules.Theselimitsaredesignedtoprovidereasonableprotectionagainstharmful
interferenceinaresidentialinstallation.
Thisequipmentgenerates,usesandcanradiateradiofrequencyenergyand,ifnotinstalledandusedinaccordance
withtheinstructions,maycauseharmfulinterferencetoradiocommunications.
However,thereisnoguaranteethatinterferencewillnotoccurinaparticularinstallation.Ifthisequipmentdoescause
harmfulinterferencetoradioortelevisionreception,whichcanbedeterminedbyturningtheequipmentoffandon,
theuserisencouragedtotrytocorrecttheinterferencebyoneormoreofthefollowingmeasures:
•Reorientorrelocatethereceivingantenna.
•Increasetheseparationbetweentheequipmentandreceiver.
•Connecttheequipmentintoanoutletonacircuitdifferentfromthattowhichthereceiverisconnected.
•Consultthedealeroranexperiencedradio/TVtechnicianforhelp.
ThisequipmenthasbeentestedtocomplywiththelimitsforaClassBpersonalcomputerandperiph-eral,pursuantto
SubpartBofPart15ofFCCRules.Onlyperipherals(computerinput/outputdevices,terminals,printers,etc.)certied
(DoC)orveriedtocomplywithClassBlimitsmaybeattachedtothisequipment.Operationwithnon-certied(DoC)
ornon-veriedpersonalcomputerand/orperipheralsislikelytoresultinInterferencetoradioandTVreception.
TheconnectionofaunshieldedequipmentinterfacecabletothisequipmentwillinvalidatetheFCCCerticationof
thisdeviceandmaycauseinterferencelevelswhichExceedthelimitsestablishedbyFCCforequipment.
Youarecautionedthatchangesormodicationsnotexpresslyapprovedbythepartyresponsibleforcompliancecould
voidyourauthoritytooperatetheequipment.
Regulatory Information/Disclaimers
InstallationanduseofthisWirelessLANdevicemustbeinstrictaccordancewiththeinstructionsincludedinthe
userdocumentationprovidedwiththeproduct.Anychangesormodications(includingtheantennas)madetothis
devicethatarenotexpresslyapprovedbythemanufacturermayvoidtheuser’sauthoritytooperatetheequipment.
Themanufacturerisnotresponsibleforanyradioortelevisioninterferencecausedbyunauthorizedmodicationof
thisdevice,orthesubstitutionoftheconnectingcablesandequipmentotherthanmanufacturerspecied.Itisthe
responsibilityoftheusertocorrectanyinterferencecausedbysuchunauthorizedmodication,substitutionorattach-
ment.Manufactureranditsauthorizedresellersordistributorswillassumenoliabilityforanydamageorviolationof
governmentregulationsarisingfromfailingtocomplywiththeseguidelines.
IEEE802.11bor802.11goperationofthisproductintheU.S.A.isrmware-limitedtochannels1through11.
CAUTION
ThisequipmentcomplieswithFCCRFradiationexposurelimitssetforthforanuncontrolledenvironment.Thisdevice
anditsantennamustnotbeco-locatedoroperatinginconjunctionwithanyotherantennaortransmitter.
TocomplywithFCCRFexposurecompliancerequirements,theantennausedforthistransmittermustbeinstalled
toprovideaseparationdistanceofatleast7.87"/20cmfromallpersonsandmustnotbeco-locatedoroperatingin
conjunctionwithanyotherantennaortransmitter.
ThisClassBdigitalapparatuscomplieswithCanadianRSS-210.
CetappareilnumeriquedelaClasseBestconformealanormeCNR-210duCanada.
Industry Canada Statement
ThisdevicecomplieswithRSS-210oftheIndustryCanadaRules.Operationissubjecttothefollowingtwocondi-
tions:
1)thisdevicemaynotcauseinterferenceand
2)thisdevicemustacceptanyinterference,includinginterferencethatmaycauseundesiredoperationofthedevice

x
Important Information
Regulatory Statement:
OperationofthisdeviceissubjectedtothefollowingNationalregulationsandmaybeprohibitedtouseifcertain
restrictionshouldbeapplied.
France:
Outdooruselimitedto10mWe.i.r.p.withintheband2454–2483.5MHz.DerogationinFrenchoverseasdepartments
ofGuyaneandLaReunion:outdoorusenotallowedinband2400-2420MHz.
•CautionsonsecuritywhenusingwirelessLANproducts
WithawirelessLAN,radiowavesareusedinsteadofLANcablesfortheexchangeofdatabetweenthewireless
accesspoints(computers,etc.),offeringtheadvantagethatLANconnectionscanbemadefreelywithintherange
oftheradiowaves.
Ontheotherhand,theradiowavesreachallpointswithinthisrange,regardlessofwallsorotherobstacles,possibly
resultingintheproblemsdescribedbelowifthepropersecuritymeasuresarenottaken.
•Contentsoftransmissionsmaybeintercepted
Maliciousthirdpartiesmaypurposelyintercepttheradiowavesandstealinformationcontainedinthetransmissions,
includingsuchpersonalinformationasIDnumbers,passwords,creditcardnumbers,e-mailmessages,etc.
•Improperintrusions
Maliciousthirdpartiesmaywithoutpermissionaccessthepersonalorcompanynetworkandstealpersonalor
condentialinformation,pretendtobesomeoneelseandleakincorrectinformation,rewriteinformationthathas
beenintercepted,introducecomputervirusesorotherwisedamagedataorthesystem,etc.
WirelessLANcardsandwirelessaccesspointsgenerallyincludesecuritymeasuresfordealingwiththeseproblems.
Makingthepropersecuritysettingsbeforeusingtheproductscanreducetheriskofsuchproblemsarising.
Werecommendthatyoufullyunderstandtheproblemsthatcanarisewhenusingtheproductswithoutmakingthe
securitysettings,thenthatyoumakethesecuritysettingsbasedonyourowndecisionandatyourowndiscretion.

xi
Important Information
Specifications
(1) Specifications common to the NP02LM series
OperatingVoltage5V(powersuppliedfromtheprojector)
MAXAmps460mA
WirelessStandardIEEE802.11b/IEEE802.11g/IEEE802.11n
ModulationMethodCCK/DQPSK/DBPSK/OFDM/DS-SS
LEDDisplay
(Green)
Duringcommunication:blinking
Standby:slowblinking
Nooperation:lightoff
InterfaceUSB2.0(connectedtoUSBwirelessLANportontheprojector)
DimensionsWidth:1.1"/28mm
Height:0.43"/11mm
Length:
3.03"/81mm(includingthecap)
Weight0.049lbs/22g(includingthecap)
Environmental
Considerations
OperationalTemperatures:
41°to104°F/5°to40°C,20%to80%humidity
(non-condensing)
StorageTemperatures:
14°to122°F(-10°to50°C),20%to80%humidity
(non-condensing)
(2) Compliant standards according to model
NP02LM1
IEEE802.11bCenterFrequencyRange/
Operatingchannels
2412to2462MHz
1to11channels
TransmissionmethodDS-SSmethod(directdispersionspectrumdispersion
method)
DataRates11/5.5/2/1Mbps
IEEE802.11gCenterFrequencyRange/
Operatingchannels
2412to2462MHz
1to11channels
TransmissionmethodOFDMmethod(OrthogonalFrequencyDivisionMultiplex-
ingmethod)
DataRates54/48/36/24/18/12/9/6Mbps
IEEE802.11nCenterFrequencyRange/
Operatingchannels
2412to2462MHz
1to11channels
TransmissionmethodOFDMmethod(OrthogonalFrequencyDivisionMultiplex-
ingmethod)/
MIMOmethod(Multiple-Input
Multiple-Outputmethod)
DataRates*Whendualchannelcommunicationisdisabled
130/117/104/78/52/39/26/19.5/13Mbps
Whendualchannelcommunicationisenabled
300/270/243/216/162/108/81/54/40.5/27/13.5Mbps

xii
Important Information
NP02LM2
IEEE802.11bCenterFrequencyRange/
Operatingchannels
2412to2472MHz
1to13channels
TransmissionmethodDS-SSmethod(directdispersionspectrumdispersion
method)
DataRates11/5.5/2/1Mbps
IEEE802.11gCenterFrequencyRange/
Operatingchannels
2412to2472MHz
1to13channels
TransmissionmethodOFDMmethod(OrthogonalFrequencyDivisionMultiplex-
ingmethod)
DataRates54/48/36/24/18/12/9/6Mbps
IEEE802.11nCenterFrequencyRange/
Operatingchannels
2412to2472MHz
1to13channels
TransmissionmethodOFDMmethod(OrthogonalFrequencyDivisionMultiplex-
ingmethod)/
MIMOmethod(Multiple-Input
Multiple-Outputmethod)
DataRates*Whendualchannelcommunicationisdisabled
130/117/104/78/52/39/26/19.5/13Mbps
Whendualchannelcommunicationisenabled
300/270/243/216/162/108/81/54/40.5/27/13.5Mbps
NP02LM3
IEEE802.11bCenterFrequencyRange/
Operatingchannels
2412to2472MHz
1to13channels
TransmissionmethodDS-SSmethod(directdispersionspectrumdispersion
method)
DataRates11/5.5/2/1Mbps
IEEE802.11gCenterFrequencyRange/
Operatingchannels
2412to2472MHz
1to13channels
TransmissionmethodOFDMmethod(OrthogonalFrequencyDivisionMultiplex-
ingmethod)
DataRates54/48/36/24/18/12/9/6Mbps
IEEE802.11nCenterFrequencyRange/
Operatingchannels
Notavailable
TransmissionmethodNotavailable
DataRatesNotavailable
*Dualchannelcommunicationwillbeautomaticallyswitchedbetween"enabled"and"disabled"accordingtothe
usageenvironment.
注意
依據 低功率電波輻射性電機管理辦法
第十二條 經型式認證合格之低功率射頻電機,非經許可,公司、商號或使用者均不得擅自變更頻率、加大功率或
變更原設計之特性及功能。
第十四條 低功率射頻電機之使用不得影響飛航安全及干擾合法通信;經發現有干擾現象時,應立即停用,並改善
至無干擾時方得繼續使用。前項合法通信,指依電信規定作業之無線電信。低功率射頻電機須忍受合法通信或工
業、科學及醫療用電波輻射性電機設備之干擾。

xiii
Table of Contents
Important Information ............................................................................................i
1. Introduction .......................................................................................................... 1
1What’sintheBox? ......................................................................................................... 1
IntroductiontotheProjector .......................................................................................... 2
CongratulationsonYourPurchaseoftheProjector ................................................. 2
Featuresyou’llenjoy: ............................................................................................... 2
Aboutthisuser’smanual .......................................................................................... 3
PartNamesoftheProjector .......................................................................................... 4
Front/Top .................................................................................................................. 4
Rear ......................................................................................................................... 5
TopFeatures ............................................................................................................ 6
TerminalPanelFeatures .......................................................................................... 7
PartNamesoftheRemoteControl ............................................................................... 8
BatteryInstallation ................................................................................................... 9
RemoteControlPrecautions .................................................................................... 9
OperatingRangeforWirelessRemoteControl ........................................................ 9
OperatingEnvironmentforSoftwareIncludedonCD-ROM ........................................ 10
OperatingEnvironment .......................................................................................... 11
2. Projecting an Image (Basic Operation) .............................................. 12
1FlowofProjectinganImage ........................................................................................ 12
ConnectingYourComputer/ConnectingthePowerCord ............................................. 13
TurningontheProjector .............................................................................................. 14
NoteonStartupscreen(MenuLanguageSelectscreen) ...................................... 15
SelectingaSource ...................................................................................................... 16
Selectingthecomputerorvideosource................................................................. 16
AdjustingthePictureSizeandPosition ....................................................................... 17
Adjustingtheverticalpositionofaprojectedimage(Lensshift) ............................ 18
Focus ..................................................................................................................... 19
Zoom ...................................................................................................................... 20
AdjusttheTiltFoot ................................................................................................. 21
CorrectingKeystoneDistortionManually .................................................................... 22
Adjustingwithbuttonsonthecabinet .................................................................... 22
Adjustingwiththeremotecontrol ........................................................................... 23
OptimizingComputerSignalAutomatically ................................................................. 24
AdjustingtheImageUsingAutoAdjust .................................................................. 24
TurningUporDownVolume ........................................................................................ 24
TurningofftheProjector .............................................................................................. 25
AfterUse...................................................................................................................... 26
3. Convenient Features ..................................................................................... 27
1TurningofftheImageandSound ................................................................................ 27
FreezingaPicture ....................................................................................................... 27
EnlargingaPicture ...................................................................................................... 27
ChangingEcoMode/CheckingEnergy-SavingEffectUsingEcoMode[ECO
MODE] ................................................................................................................... 28

xiv
Table of Contents
CheckingEnergy-SavingEffect[CARBONMETER] ............................................. 29
PreventingtheUnauthorizedUseoftheProjector[SECURITY] ................................. 30
OperatingYourComputer’sMouseFunctionsfromtheProjector’sRemoteControl
viatheUSBCable(RemoteMouseFunction) ....................................................... 33
ProjectingYourComputer’sScreenImagefromtheProjectorviatheUSBCable
(USBDisplay) ........................................................................................................ 34
ControllingtheProjectorbyUsinganHTTPBrowser ................................................. 36
ProjectingYourComputer’sScreenImagefromtheProjectorviaaNetwork
[NETWORKPROJECTOR] .................................................................................... 43
UsingtheProjectortoOperateYourComputerviaaNetwork[REMOTE
DESKTOP] ............................................................................................................. 47
4. Using the Viewer ............................................................................................. 52
❶WhatyoucandowiththeViewer ................................................................................. 52
❷Preparingpresentationmaterials ................................................................................ 55
❸ProjectingimagesstoredinaUSBmemorydevice .................................................... 56
StartingtheViewer ................................................................................................. 56
ExitingtheViewer .................................................................................................. 59
NamesandfunctionsofViewerscreen .................................................................. 60
Vieweroptionsettings ............................................................................................ 65
❹Projectingdatafromsharedfolder .............................................................................. 68
Connectingtheprojectortothesharedfolder ....................................................... 68
Disconnectingthesharedfolderfromtheprojector ............................................... 71
❺Projectingdatafrommediaserver............................................................................... 72
Settingup“MediaSharing”inWindowsMediaPlayer 11 ...................................... 72
Settingup“MediaSharing”inWindowsMediaPlayer12 ...................................... 74
Connectingtheprojectortothemediaserver ........................................................ 75
Disconnectingtheprojectorfromthemediaserver ............................................... 76
❻Restrictionsondisplayingles .................................................................................... 77
SomerestrictionsonPowerPointles .................................................................... 77
SomerestrictionsonPDFles .............................................................................. 77
5. Using On-Screen Menu ................................................................................ 78
1UsingtheMenus .......................................................................................................... 78
MenuElements ............................................................................................................ 79
ListofMenuItems ....................................................................................................... 80
MenuDescriptions&Functions[SOURCE] ................................................................ 82
COMPUTER1and2 ............................................................................................. 82
HDMI ...................................................................................................................... 82
VIDEO .................................................................................................................... 82
S-VIDEO ................................................................................................................ 82
VIEWER ................................................................................................................. 82
NETWORK ............................................................................................................. 82
USBDISPLAY ........................................................................................................ 82
MenuDescriptions&Functions[ADJUST] .................................................................. 83
[PICTURE] ............................................................................................................. 83
[IMAGEOPTIONS] ................................................................................................ 86
[AUDIO] .................................................................................................................. 90

xv
Table of Contents
MenuDescriptions&Functions[SETUP] .................................................................... 91
[GENERAL] ............................................................................................................ 91
[MENU] .................................................................................................................. 93
[INSTALLATION] .................................................................................................... 95
[OPTIONS(1)] ........................................................................................................ 97
[OPTIONS(2)] ........................................................................................................ 99
MenuDescriptions&Functions[INFO.] .................................................................... 101
[USAGETIME] ..................................................................................................... 101
[SOURCE]............................................................................................................ 102
[WIREDLAN] ....................................................................................................... 102
[WIRELESSLAN] ................................................................................................ 102
[VERSION(1)] ...................................................................................................... 103
[VERSION(2)] ...................................................................................................... 103
[OTHERS] ............................................................................................................ 103
MenuDescriptions&Functions[RESET] .................................................................. 104
ReturningtoFactoryDefault[RESET] ................................................................. 104
❾ApplicationMenu ....................................................................................................... 105
IMAGEEXPRESSUTILITY ................................................................................. 105
DESKTOPCONTROLUTILITY ........................................................................... 105
NETWORKPROJECTOR .................................................................................... 106
REMOTEDESKTOPCONNECTION .................................................................. 106
NETWORKSETTINGS ........................................................................................ 107
TOOLS ................................................................................................................. 123
6. Installation and Connections ................................................................. 128
1SettingUptheScreenandtheProjector ................................................................... 128
SelectingaLocation............................................................................................. 128
ThrowDistanceandScreenSize ......................................................................... 130
MakingConnections .................................................................................................. 132
ConnectingYourComputer .................................................................................. 132
ConnectinganExternalMonitor .......................................................................... 134
ConnectingYourDVDPlayerorOtherAVEquipment .......................................... 135
ConnectingComponentInput .............................................................................. 136
ConnectingHDMIInput........................................................................................ 137
ConnectingtoaWiredLAN ................................................................................. 138
ConnectingtoaWirelessLAN(NP02LMseries) ................................................. 139
AttachingtheOptionalCableCover(NP01CV) ................................................... 142
7. Maintenance .................................................................................................... 143
1CleaningtheFilters.................................................................................................... 143
CleaningtheLens...................................................................................................... 146
CleaningtheCabinet ................................................................................................. 146
ReplacingtheLampandtheFilters ........................................................................... 147
8. User Supportware ......................................................................................... 152
InstallingSoftwareProgram ...................................................................................... 152
InstallationforWindowssoftware ......................................................................... 152
InstallationforMacintoshsoftware ....................................................................... 154
UsingtheComputerCable(VGA)toOperatetheProjector(VirtualRemoteTool) ... 155

xvi
Table of Contents
ProjectingYourComputer’sScreenImagefromtheProjectoroveraLAN(Image
ExpressUtilityLite) .............................................................................................. 160
ProjectinganImagefromanAngle(GeometricCorrectionToolinImageExpress
UtilityLite) ............................................................................................................ 163
WhatyoucandowithGCT .................................................................................. 163
ProjectinganImagefromanAngle(GCT) ........................................................... 163
ProjectingImagesorVideosfromtheProjectoroveraLAN(ImageExpressUtility
2.0) ....................................................................................................................... 165
WhatyoucandowithImageExpressUtility2.0 .................................................. 165
ConnectingtheprojectortoaLAN ....................................................................... 166
BasicOperationofImageExpressUtility2.0 ....................................................... 167
UsingtheProjectortoOperateYourComputeroveraLAN(DesktopControlUtility
1.0) ....................................................................................................................... 176
WhatyoucandowithDesktopControlUtility1.0 ................................................ 176
ConnectingtheprojectortoaLAN ....................................................................... 176
Usingtheprojectortooperateyourcomputer’sdesktopscreen .......................... 177
ControllingtheProjectoroveraLAN(PCControlUtilityPro4) ................................. 185
ConvertingPowerPointlestoSlides(ViewerPPTConverter3.0) ........................... 186
ProjectingYourMac’sScreenImagefromtheProjectoroveraLAN(Image
ExpressUtility2forMac) ..................................................................................... 188
WhatyoucandowithImageExpressUtility2 ..................................................... 188
Operatingenvironment ........................................................................................ 188
ConnectingtheprojectortoaLAN ....................................................................... 188
UsingImageExpressUtility2 .............................................................................. 189
9. Appendix ............................................................................................................. 192
1Troubleshooting ......................................................................................................... 192
IndicatorMessages .............................................................................................. 192
CommonProblems&Solutions ........................................................................... 193
Ifthereisnopicture,orthepictureisnotdisplayedcorrectly. .............................. 194
Specications ............................................................................................................ 195
CabinetDimensions .................................................................................................. 197
PinAssignmentsofD-SubCOMPUTERInputConnector ........................................ 198
CompatibleInputSignalList ...................................................................................... 199
PCControlCodesandCableConnection ................................................................. 200
TroubleshootingCheckList ........................................................................................ 201
TravelCareGuide ....................................................................................................... 203
1
Projector
1. Introduction
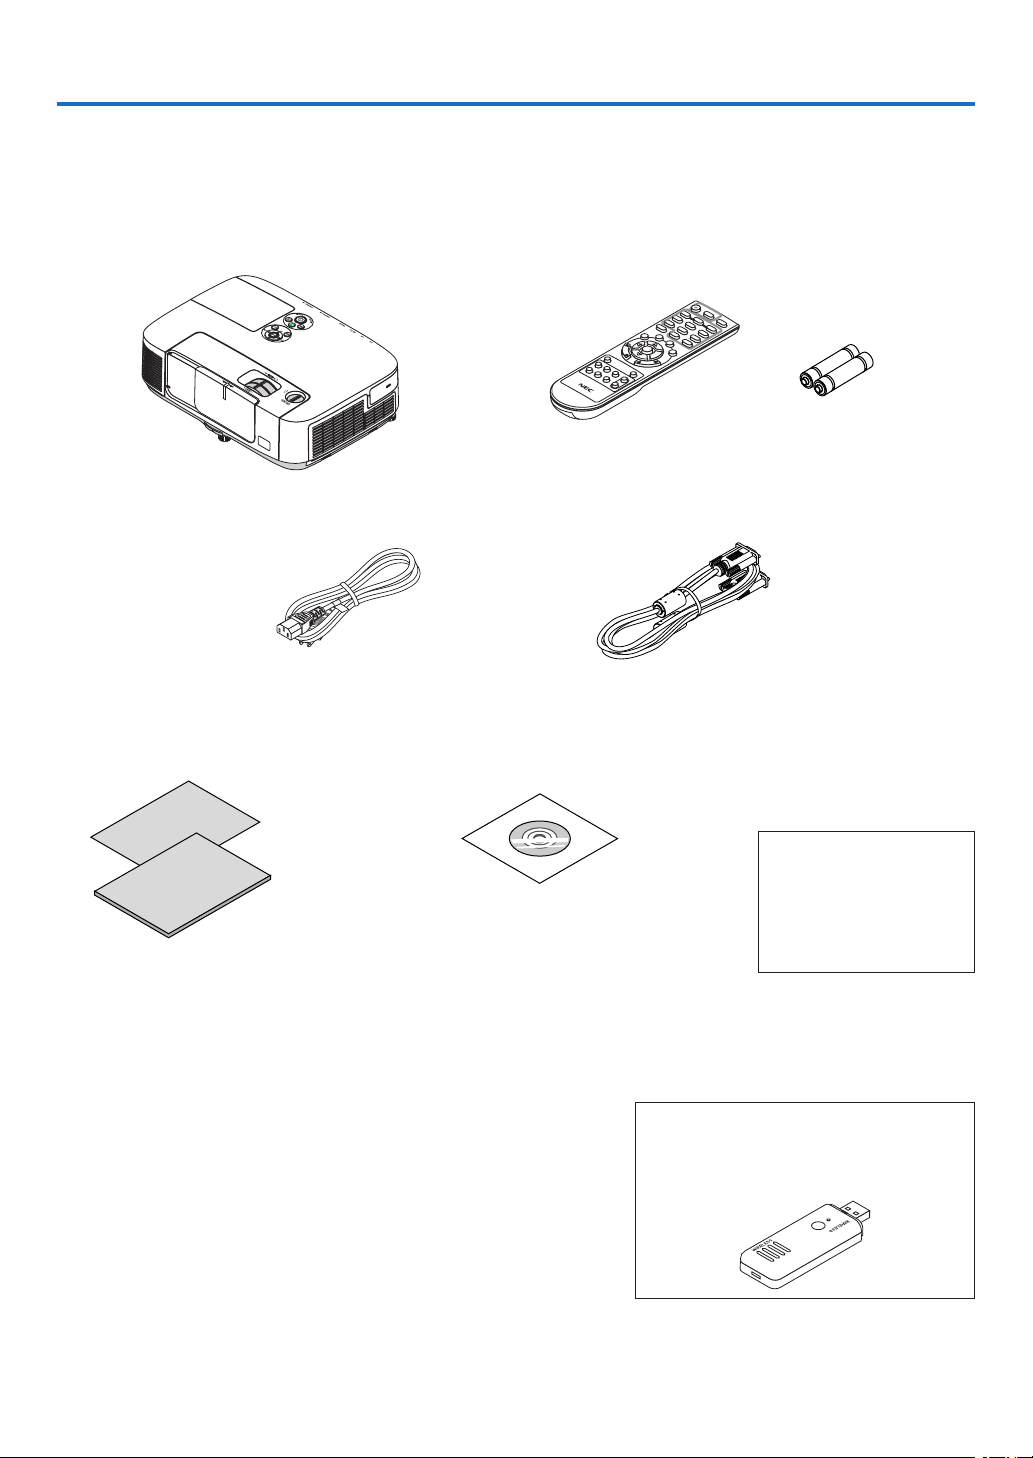
1 What’s in the Box?
Makesureyourboxcontainseverythinglisted.Ifanypiecesaremissing,contactyourdealer.
Pleasesavetheoriginalboxandpackingmaterialsifyoueverneedtoshipyourprojector.
Power cord
(US: 7N080236)
(EU: 7N080022)
Computer cable (VGA)
(7N520073)
NEC Projector CD-ROM
User’s manual (PDF) and the utility
software
(7N951551)
For North America only
Registrationcard
Limitedwarranty
For customers in Europe:
YouwillndourcurrentvalidGuar-
anteePolicyonourWebSite:
www.nec-display-solutions.com
Insomeareasandcountries,theprojectorcomes
standardwiththeUSBWirelessLANUnit.Ifyoupur-
chasetheprojectormodelwithouttheWirelessLAN
Unit,theoptionalWirelessLANUnitmustbeinstalled
tousetheprojectorviaawirelessconnection.
•ImportantInfomation(ForNorthAmerica:
7N8N1261) (For Other countries than North
America: 7N8N1261 and 7N8N1271)
•QuickSetupGuide(ForNorthAmerica:
7N8N1281) (For Other countries than North
America: 7N8N1281 and 7N8N1291)
Remote control
(7N900922)
Batteries (AAA × 2)
Unlessotherwisedescribedintheuser’smanual,thedrawingsfortheprojectorcabinetshowexamplesoftheP420X.

2
1. Introduction
Introduction to the Projector
Thissectionintroducesyoutoyournewprojectoranddescribesthefeaturesandcontrols.
Congratulations on Your Purchase of the Projector
Thisprojectorisoneoftheverybestprojectorsavailabletoday.Theprojectorenablesyoutoprojectpreciseimages
upto300inchesacross(measureddiagonally)fromyourPCorMacintoshcomputer(desktopornotebook),VCR,
DVDplayer,ordocumentcamera.
Youcanusetheprojectoronatabletoporcart,youcanusetheprojectortoprojectimagesfrombehindthescreen,
andtheprojectorcanbepermanentlymountedonaceiling*
1
.Theremotecontrolcanbeusedwirelessly.
*
1
Donotattempttomounttheprojectoronaceilingyourself.
Theprojectormustbeinstalledbyqualiedtechniciansinordertoensureproperoperationandreducetherisk
ofbodilyinjury.
Inaddition,theceilingmustbestrongenoughtosupporttheprojectorandtheinstallationmustbeinaccordance
withanylocalbuildingcodes.Pleaseconsultyourdealerformoreinformation.
Features you’ll enjoy:
•Quickstart(3seconds*
1
),QuickPowerOff(0seconds),DirectPowerOff
3seconds*
1
afterturningonthepower,theprojectorisreadytodisplayPCorvideoimages.
Theprojectorcanbeputawayimmediatelyaftertheprojectorispowereddown.Nocooldownperiodisrequired
aftertheprojectoristurnedofffromtheremotecontrolorcabinetcontrolpanel.
Theprojectorhasafeaturecalled“DirectPowerOff”.Thisfeatureallowstheprojectortobeturnedoff(evenwhen
projectinganimage)byusingtheMainPowerSwitchordisconnectingtheACpowersupply.
ToturnofftheACpowersupplywhentheprojectorispoweredon,useapowerstripequippedwithaswitchand
abreaker.
*1Thequickstarttimeisonlywhen[STANDBYMODE]issetto[NORMAL]intheon-screenmessage.
•0.2W(100-130VAC)/0.4W(200-240VAC)instandbyconditionwithenergysavingtechnology
Selecting[POWER-SAVING]for[STANDBYMODE]fromthemenucanputtheprojectorinpower-savingmode
thatconsumesonly0.2W(100-130VAC)/0.4W(200-240VAC).
•CarbonMeter
Thisfeaturewillshowenergy-savingeffectintermsofCO
2
emissionreduction(kg)whentheprojector’s[ECO
MODE]issetto[AUTOECO],[ECO1],or[ECO2]*
2
.
TheamountofCO
2
emissionreductionwillbedisplayedintheconrmationmessageatthetimeofpower-offand
intheINFOoftheon-screenmenu.
*2[ECO2]isavailableonP350Xonly.
•Lamplifeupto5000hours(P350X)/3500hours(P420X/P350W)withoutcleaningtheltersregularly
UsinginEcoModeallowsyoutoprolongtheprojector’slamplifeupto5000hours(upto4000hoursinNORMAL
Mode(ECOModeOFF)).
ForP420XandP350W:
UsinginEcoModeallowsyoutoprolongtheprojector’slamplifeupto3500hours(upto3000hoursinNORMAL
Mode(ECOModeOFF))
Thetwo-layer,largeltersrequirenoregularcleaning.Filterreplacementisrequredonlywhenlampreplacement
isdone.
•Verticallensshiftmechanismoffersinstallationexibility
Manuallensshiftthatcanbeadjustedbyturningdialsonthetopoftheprojector.
•HDMIinputportprovidesdigitalsignal
TheHDMIinputprovidesHDCPcompatibledigitalsignals.TheHDMIinputalsosupportsaudiosignal.

3
1. Introduction
•10Wbuilt-inspeakerforanintegratedaudiosolution
Powerful10wattmonauralspeakerprovidesvolumeneedforlargerooms.
•ThesuppliedremotecontrolallowsyoutoassignaCONTROLIDtotheprojector
Multipleprojectorscanbeoperatedseparatelyandindependentlywiththesamesingleremotecontrolbyassigning
anIDnumbertoeachprojector.
•Verticalkeystonecorrection
Keystonefeatureallowstheprojectortocorrectverticaldistortion.
•USBDisplay
UsingacommerciallyavailableUSBcable(compatiblewithUSB2.0specications)toconnectthecomputerwith
theprojectorallowsyoutosendyourcomputerscreenimagetotheprojectorwithouttheneedofatraditional
computercable(VGA).
•IntegratedRJ-45connectorforwirednetworkingcapabilityalongwithwirelessnetworkingcapabilities
AnRJ-45connectorisstandard.AwirelessLANunitisequippedwiththeprojectorformodelsdistributedinNorth
Americamodels.AnoptionalwirelessLANunitisavailableformodelsforEurope,Australia,Asiaandothercoun-
triesthanNorthAmerica.
•Softwareprograms(UserSupportware)containedinthesuppliedCD-ROM
ThesuppliedNECProjectorincludessevenprograms:VirtualRemoteTool,ImageExpressUtilityLite,Image
ExpressUtility2.0,DesktopControlUtility1.0,PCControlUtilityPro4,ViewerPPTConverter3.0,andImage
ExpressUtility2forMac.
•LAN-compatibleViewer
Theprojector’sbuilt-inViewerallowsyoutoviewimagesormovielesinthesharedfolderofyourPCconnected
toawiredorwirelessLAN.
*TheViewersupportstheMediaSharingfunctionofWindowsMediaPlayer11.
•AUTOPOWERONandAUTOPOWEROFFfeatures
TheAUTOPOWERON(AC),AUTOPOWERON(COMP1),AUTOPOWEROFF,andOFFTIMERfeatureseliminate
theneedtoalwaysusethePOWERbuttonontheremotecontrolorprojectorcabinet.
•Preventingunauthorizeduseoftheprojector
Enhancedsmartsecuritysettingsforkeywordprotection,cabinetcontrolpanellock,securityslot,andsecurity
chainopeningtohelppreventunauthorizedaccess,adjustmentsandtheftdeterrence.
•HighresolutionuptoUXGA
Highresolutiondisplay-uptoUXGAcompatible,XGA(P420X/P350X)/WXGA(P350W)nativeresolution.
•CrestronRoomView
®
supported
TheprojectorsupporsCrestronRoomViewwhichallowsyoutocontrolandmanageequipmentconnectedtoyour
networkfromyourcomputer.
About this user’s manual
Thefastestwaytogetstartedistotakeyourtimeanddoeverythingrightthersttime.Takeafewminutesnowto
reviewtheuser’smanual.Thismaysaveyoutimelateron.Atthebeginningofeachsectionofthemanualyou’llnd
anoverview.Ifthesectiondoesn’tapply,youcanskipit.
4
1. Introduction
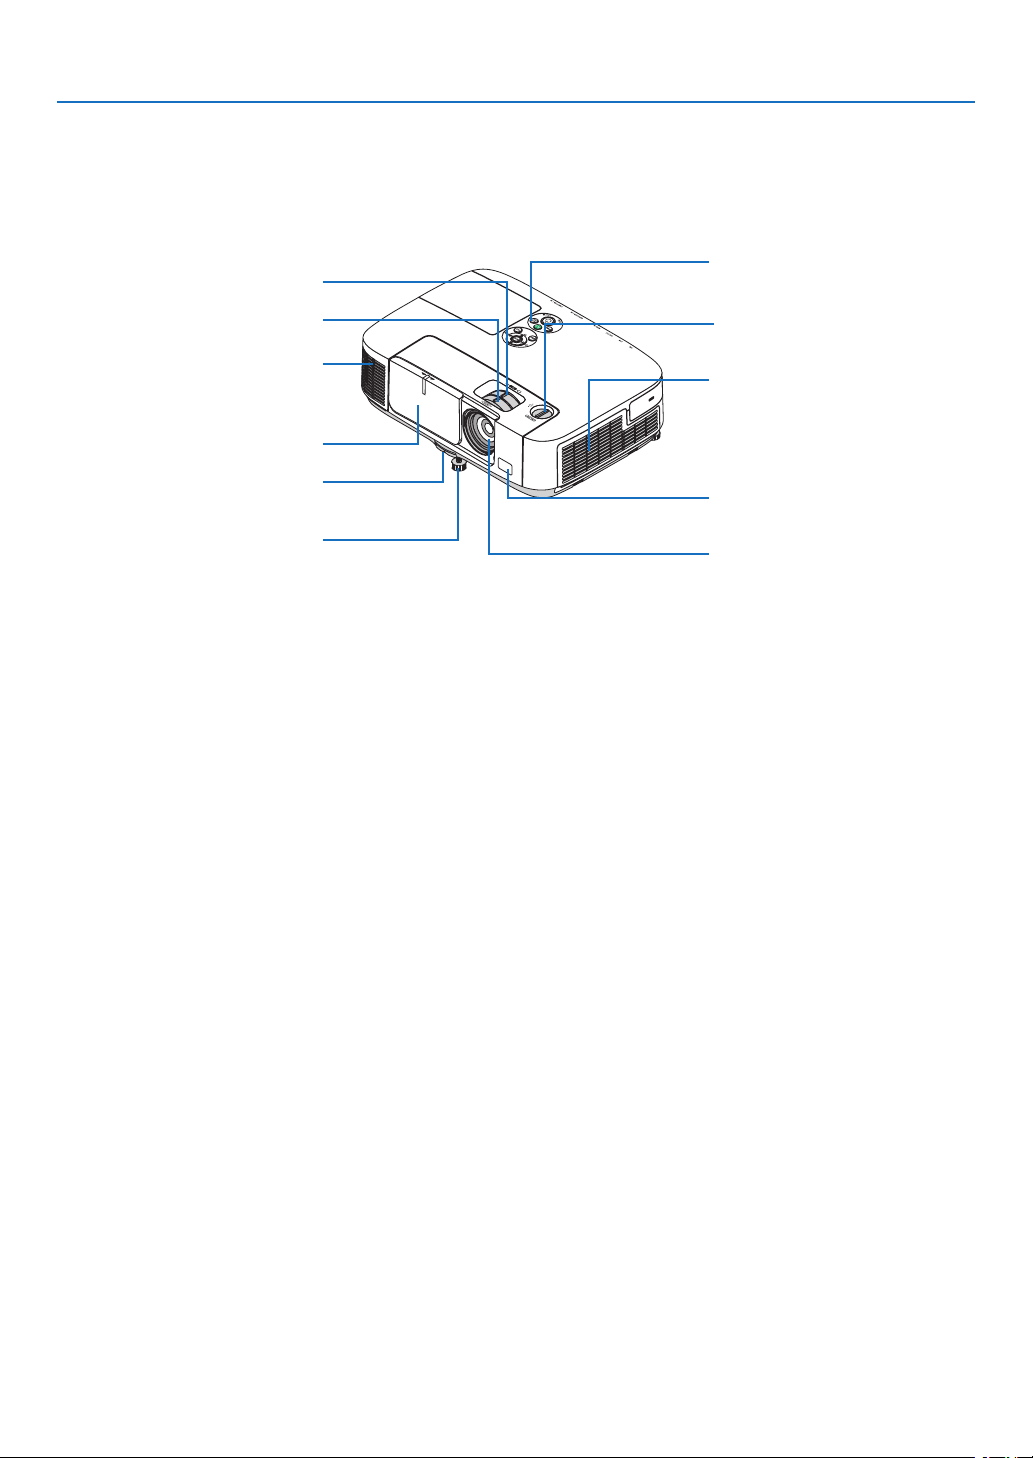
Part Names of the Projector
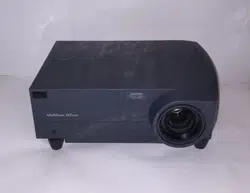
Front/Top
Controls
( page 6)
Lens Shift Dial (Vertical)
(
page 18)
Lens
Remote Sensor
( page 9)
Ventilation (inlet) / Filter Cover
(
page 143, 150)
Zoom Lever
( page 20)
Lens Cover
Focus Lever
(
page 19)
Adjustable Tilt Foot
(
page 21)
Adjustable Tilt Foot Lever
(
page 21)
Ventilation (outlet)
Heated air is exhausted from here.
5
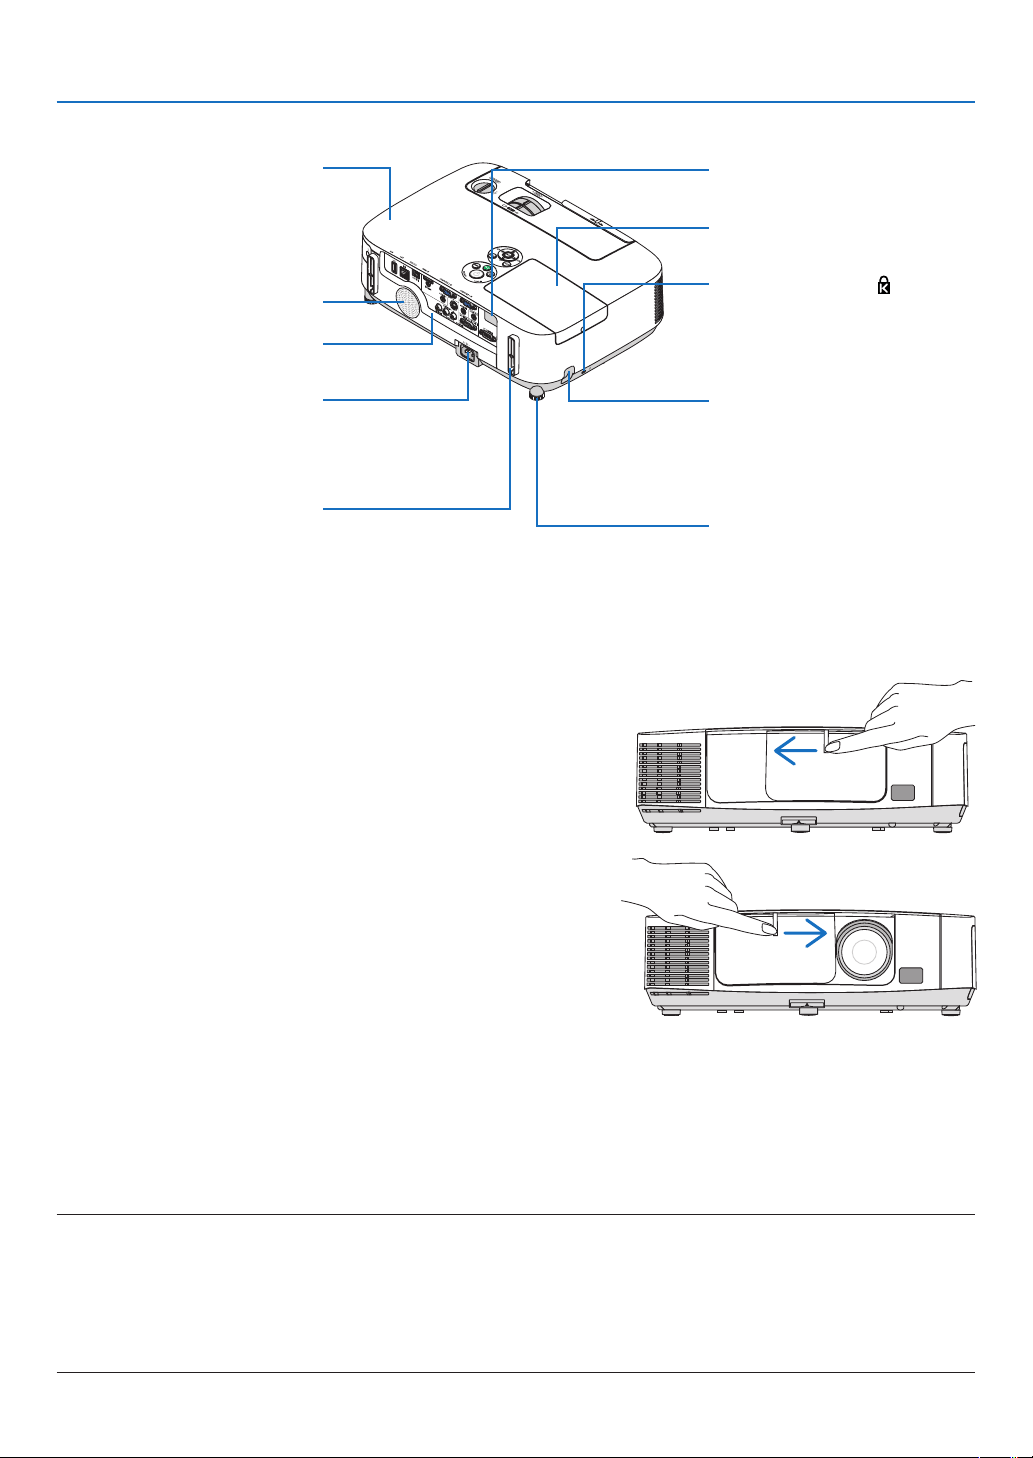
1. Introduction
Opening and closing the lens cover
Slidethelenscovertothelefttouncoverthelens.
Tocoverthelens,slidethelenscovertotheright.
NOTE:
•ThelenscoverworksinconjunctionwiththeAVmutefunction.Closingthelenscoverwillturnofftheimageandsoundduring
normalprojectoroperation;openingitwillrestoretheimageandsound.
Withthelenscoverclosedtheimageandsoundisturnedoff,howeverthelampisstilllit.Iftheprojectorstaysthiswayforabout
2hours,itwillturnoffautomatically.
•Donotpullthelenscoverwithexcessiveforceorapplystrongpressureineithertheupordowndirection.Doingsocancause
damagetothelenscoverslidingmechanism!
Port Cover for
USB Wireless LAN Unit
When using the USB Wireless LAN
Unit, first remove the cover. (
page
141)
Terminal Panel (
page 7)
MonauralSpeaker(10W)
Lamp Cover ( page 148)
Rear
Remote Sensor
( page 9)
AC Input
Connect the supplied power cord’s
three-pin plug here, and plug the
other end into an active wall outlet.
(
page 13)
*ThissecurityslotsupportstheMicroSaver
®
SecuritySystem.
Rear Foot ( page 21)
Security chain opening
Attach an anti-theft device.
The security chain opening accepts
security wires or chains up to 0.18
inch/4.6 mm in diameter.
Built-in Security Slot (
)*
Cable cover connection (right and
left)
Screw holes and grooves for the
optional cable cover

6
1. Introduction
Top Features
1/2
5
6
4
7
811
9
3
10
1. (POWER) Button (page14, 25)
2. POWER Indicator (page
13, 14, 25, 192)
3. STATUS Indicator (page
192)
4.LAMPIndicator(page
147, 192)
5.ECOButton(page
28)
6. SOURCE Button (page
16)
7.AUTOADJ.Button(page
24)
8. MENU Button (page
78)
9. /VolumeButtons/ Keystone Buttons
(
page
22, 24)
10. ENTER Button (page
78)
11.EXITButton(page
78)
7
1. Introduction
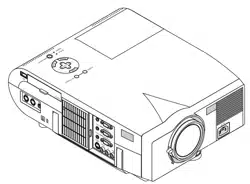
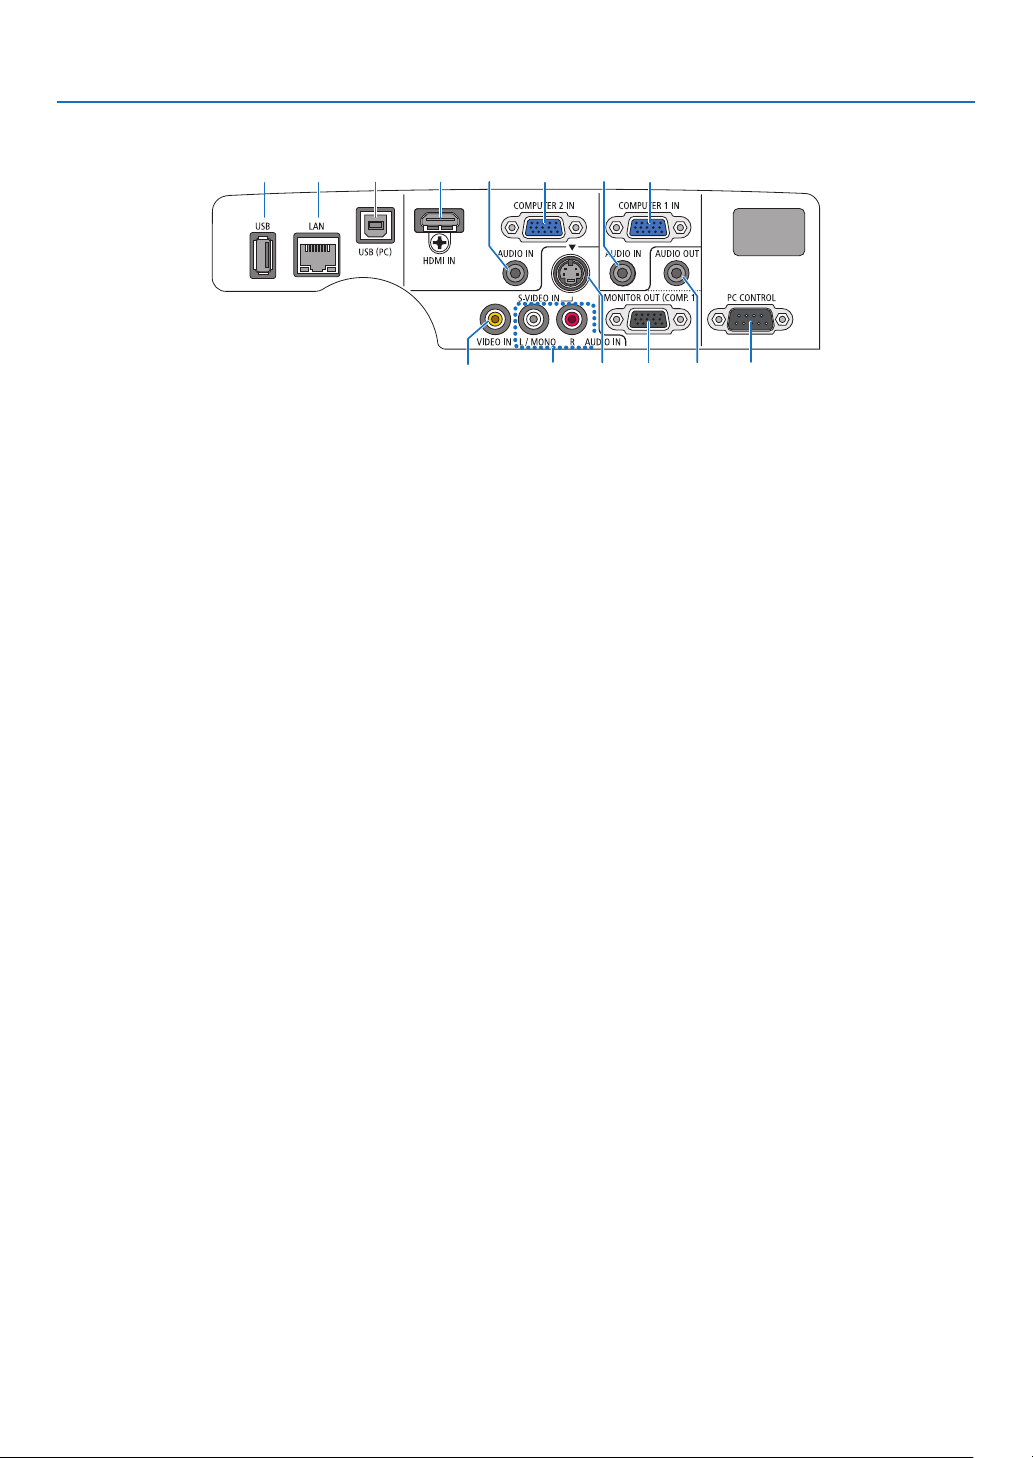
Terminal Panel Features
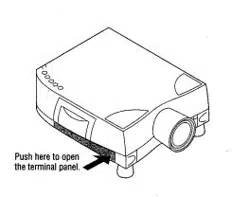
1235613 12
87
11 14910
4
1. COMPUTER 1 IN/ Component Input Connector
(MiniD-Sub15Pin)(page132, 136, 157)
2.COMPUTER1AUDIOINMiniJack(StereoMini)
(
page
132, 134, 136)
3. COMPUTER 2 IN / Component Input Connector
(MiniD-Sub15Pin)(page
132, 136)
4.COMPUTER2AUDIOINMiniJack(StereoMini)
(
page
132, 134, 136)
5.HDMIINConnector(TypeA)
(
page
132, 137)
6. USB (PC) Port (Type B)
(
page
33, 34, 132)
7.MONITOROUT(COMP.1)Connector(MiniD-Sub
15Pin)(page
134)
8.AUDIOOUTMiniJack(StereoMini)(page
134)
9.S-VIDEOINConnector(MiniDIN4Pin)
(page
135)
10.VIDEOINConnector(RCA)(page
135)
11.VIDEO/S-VIDEOAUDIOINL/MONO,R(RCA)
(
page
135)
12.LANPort(RJ-45)(page
141)
13. USB Port (Type A)(page
59, 180)
14.PCCONTROL[PCCONTROL]Port(D-Sub9Pin)
(
page
200)
UsethisporttoconnectaPCorcontrolsystem.This
enablesyoutocontroltheprojectorusingserialcommu-
nicationprotocol.Ifyouarewritingyourownprogram,
typicalPCcontrolcodesareonpage200.
8
1. Introduction
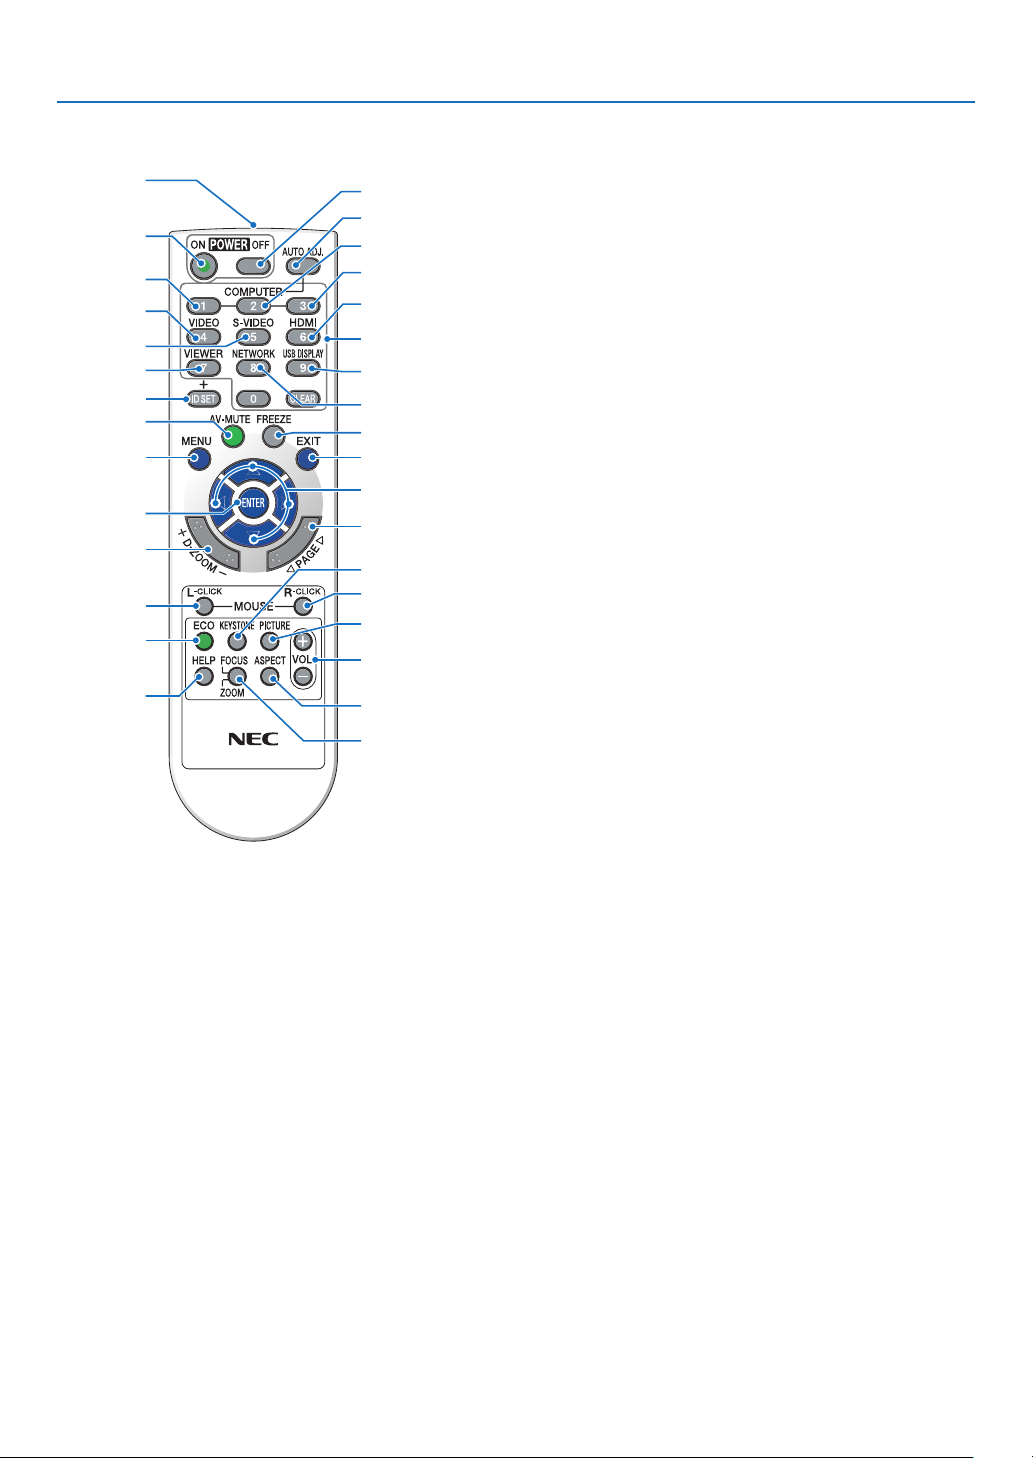
Part Names of the Remote Control
3
7
5
6
1
2
10
15
16
14
17
9
4
8
13
29
30
31
19
20
25
27
28
24
18
23
22
21
26
32
12
11
1. Infrared Transmitter
(page9)
2. POWER ON Button
(page
14)
3. POWER OFF Button
(page
25)
4,5,6.COMPUTER1/2/3Button
(
page
16)
(COMPUTER3buttonisnotavailable.)
7.AUTOADJ.Button
(page
24)
8.VIDEOButton
(page
16)
9.S-VIDEOButton
(page
16)
10. HDMI Button (page
16)
11.VIEWERButton(page
16, 56)
12. NETWORK Button (page
16)
13. USB DISPLAY Button (page
16)
14.IDSETButton
(page
96)
15.NumericKeypadButton/CLEARButton
(page
96)
16. FREEZE Button
(page
27)
17.AV-MUTEButton
(page
27)
18. MENU Button
(page
78)
19.EXITButton(page
78)
20. Button (page
78)
21. ENTER Button (page
78)
22.D-ZOOM(+)(–)Button
(page
27)
23.MOUSEL-CLICKButton*
(page
33)
24.MOUSER-CLICKButton*
(page
33)
25.PAGE/Button*
(
page
33)
26. ECO Button (page
28)
27. KEYSTONE Button
(page
23)
28. PICTURE Button
(page
83, 85)
29.VOL.(+)(–)Button
(page
24)
30. ASPECT Button
(page
88)
31. FOCUS/ZOOM Button
(notavailableonthisseriesofprojectors)
32. HELP Button
(page
101)
*ThePAGE/, ,MOUSEL-CLICKandMOUSER-CLICKbuttonsworkonlywhenaUSBcableisconnected
withyourcomputer..

9
1. Introduction
Remote Control Precautions
•Handletheremotecontrolcarefully.
•Iftheremotecontrolgetswet,wipeitdryimmediately.
•Avoidexcessiveheatandhumidity.
•Donotshort,heat,ortakeapartbatteries.
•Donotthrowbatteriesintore.
•Ifyouwillnotbeusingtheremotecontrolforalongtime,removethebatteries.
•Ensurethatyouhavethebatteries’polarity(+/−)alignedcorrectly.
•Donotusenewandoldbatteriestogether,orusedifferenttypesofbatteriestogether.
•Disposeofusedbatteriesaccordingtoyourlocalregulations.
Operating Range for Wireless Remote Control
1
Pressrmlyandslidethebattery
coveroff.
2
Installnewbatteries(AAA).Ensure
thatyouhavethebatteries’polarity
(+/−)alignedcorrectly.
•Theinfraredsignaloperatesbyline-of-sightuptoadistanceofabout22feet/7mandwithina60-degreeangleof
theremotesensorontheprojectorcabinet.
•Theprojectorwillnotrespondifthereareobjectsbetweentheremotecontrolandthesensor,orifstronglightfalls
onthesensor.Weakbatterieswillalsopreventtheremotecontrolfromproperlyoperatingtheprojector.
Battery Installation
3
Slipthecoverbackoverthebat-
teriesuntilitsnapsintoplace.Do
notmixdifferenttypesofbatteries
ornewandoldbatteries.
30°
30°
30°
30°
30°
30°
30°
30°
OPEN
7 m/22 feet
7 m/22 feet
7 m/22 feet
7 m/22 feet
Remote control
Remote sensor on projector cabinet
OPEN
Remote control

10
1. Introduction
Operating Environment for Software Included on CD-ROM
NamesandFeaturesofBundledSoftwarePrograms
NameofsoftwareprogramFeatures
VirtualRemoteToolThisisasoftwareprogramusedtocontrolthepowerON/OFFandsourceselec-
tionoftheprojectorfromyourcomputerbyusingthesuppliedcomputercable
(VGA)anditisalsousedtosendanimagetotheprojectorandregisteritasthe
logodataoftheprojector.Afterregisteringit,youcanlockthelogotopreventit
fromchanging.(page
155)
ImageExpressUtilityLite•Thisisasoftwareprogramusedtoprojectyourcomputer’sscreenoverthe
USBcableorthewired/wirelessnetwork.Thecomputercable(VGA)isnot
required.(page
34,page160)
•ThissoftwareprogramcanbeusedtocontrolthepowerON/OFFandsource
selectionoftheprojectorfromyourcomputer.
•TheGeometricCorrectionTool(GCT)functionallowsyoutocorrectdistortion
ofimagesprojectedonacurvedwall.(page163)
ImageExpressUtility2.0•Thisisasoftwareprogramusedtosendthescreensofyourpersonalcomput-
erstotheprojectorviawired/wirelessLAN(Meetingmode).
Projectedimagescanbetransferredandsavedtopersonalcomputers.
When“MeetingMode”isused,projectedimagescanbesentandsavedto
thepersonalcomputers.Imagescanbesentfromapersonalcomputerto
notonlyoneprojectorbutalsototwoormoreprojectorsatthesametime.
(page
165)
DesktopControlUtility1.0•Thisisasoftwareprogramusedtooperatethedesktopscreenofapersonal
computerataremotelocationbyusingaprojectorviawired/wirelessLAN.
(page
176)
PCControlUtilityPro4Thisisasoftwareprogramusedtooperatetheprojectorfromthecomputerwhen
thecomputerandtheprojectorareconnectedwithLAN(wiredorwireless)or
aserialcable.(page
185)
ViewerPPTConverter3.0ThisisasoftwareprogramusedtoconvertlescreatedwithPowerPointinto
JPEGlesthatcanbedisplayedwiththeviewerfunctionoftheprojectorwhen
aUSBmemorydeviceisinsertedintotheprojector.(page
186)
ImageExpressUtilityforMac•ThisisasoftwareprogramusedtosendtheMac’sscreenimagetotheprojec-
toroveranetwork(wiredorwirelessLAN).(page
188)ForMac’soperating
environment,seepage188.
NOTE:
•ImageExpressUtilityLitedoesnotsupport“MeetingMode”inImageExpressUtility2.0andImageExpressUtility2forMac
includedwithourothermodels.
Downloadservice
Fortheupdateinformationaboutthesesoftwareprograms,visitourwebsite:
URL:
http://www.nec-display.com/dl/en/index.html

11
1. Introduction
Operating Environment
ThefollowingistheoperatingenvironmentforImageExpressUtilityLite.Fortheoperatingenvironmentofothersoft-
wareprogram,refertothehelpfunctionofeachsoftwareprogram.
SupportedOSWindows7HomeBasic
Windows7HomePremium
Windows7Professional
Windows7Ultimate
Windows7Enterprise
WindowsVistaHomeBasic
WindowsVistaHomePremium
WindowsVistaBusiness
WindowsVistaUltimate
WindowsVistaEnterprise
WindowsXPHomeEditionServicePack3orlater
WindowsXPProfessionalServicePack3orlater
•Only32-bitversion
•Windowspower-savingfunctionisnotsupported.
Processor•Windows7/WindowsVista
PentiumM1.2GHzequivalentorhigherrequired
Dualcore1.5GHzorhigherrecommended
•WindowsXP
PentiumM1.0GHzequivalentorhigherrequired
Dualcore1.0GHzorhigherrecommended
Memory•Windows7/WindowsVista
512MBormorerequired
1GBormorerecommended
•WindowsXP
256MBormorerequired
512MBormorerecommended
*Morememorymayberequiredtorunadditionalapplicationssimultaneously.
Graphicprocessor•Windows7/WindowsVista
The“Graphics”score3.0ormoreof“WindowsExperienceIndex”recommended.
NetworkenvironmentTCP/IP-compatiblewiredLANorwirelessLAN
(*UseawirelessLANunitcomplyingwiththeWi-Fistandard.)
Resolution•Windows7/WindowsVista
SVGA(800×600)orhigherrequired
XGA(1024×768)recommended
•WindowsXP
VGA(640×480)orhigherrequired
XGA(1024×768)recommended
1024dots×768lines-1280dots×800linesrecommended(P350W)
ScreenColorsHighColor(15bits,16bits)
TrueColor(24bits,32bits)(recommended)
•256orfewercolorsarenotsupported.

12
Thissectiondescribeshowtoturnontheprojectorandtoprojectapictureontothescreen.
1 Flow of Projecting an Image
Step 1
•Connectingyourcomputer/Connectingthepowercord(page13)
Step 2
•Turningontheprojector(page14)
Step 3
•Selectingasource(page16)
Step 4
•Adjustingthepicturesizeandposition(page17)
•Correctingkeystonedistortion[KEYSTONE](page22)
Step 5
•Adjustingapictureandsound
- Optimizing a computer signal automatically ( page 24)
- Turning up or down volume (
page 24)
Step 6
•Makingapresentation
Step 7
•Turningofftheprojector(page25)
Step 8
•Afteruse(page26)
2. Projecting an Image (Basic Operation)
13
2. Projecting an Image (Basic Operation)
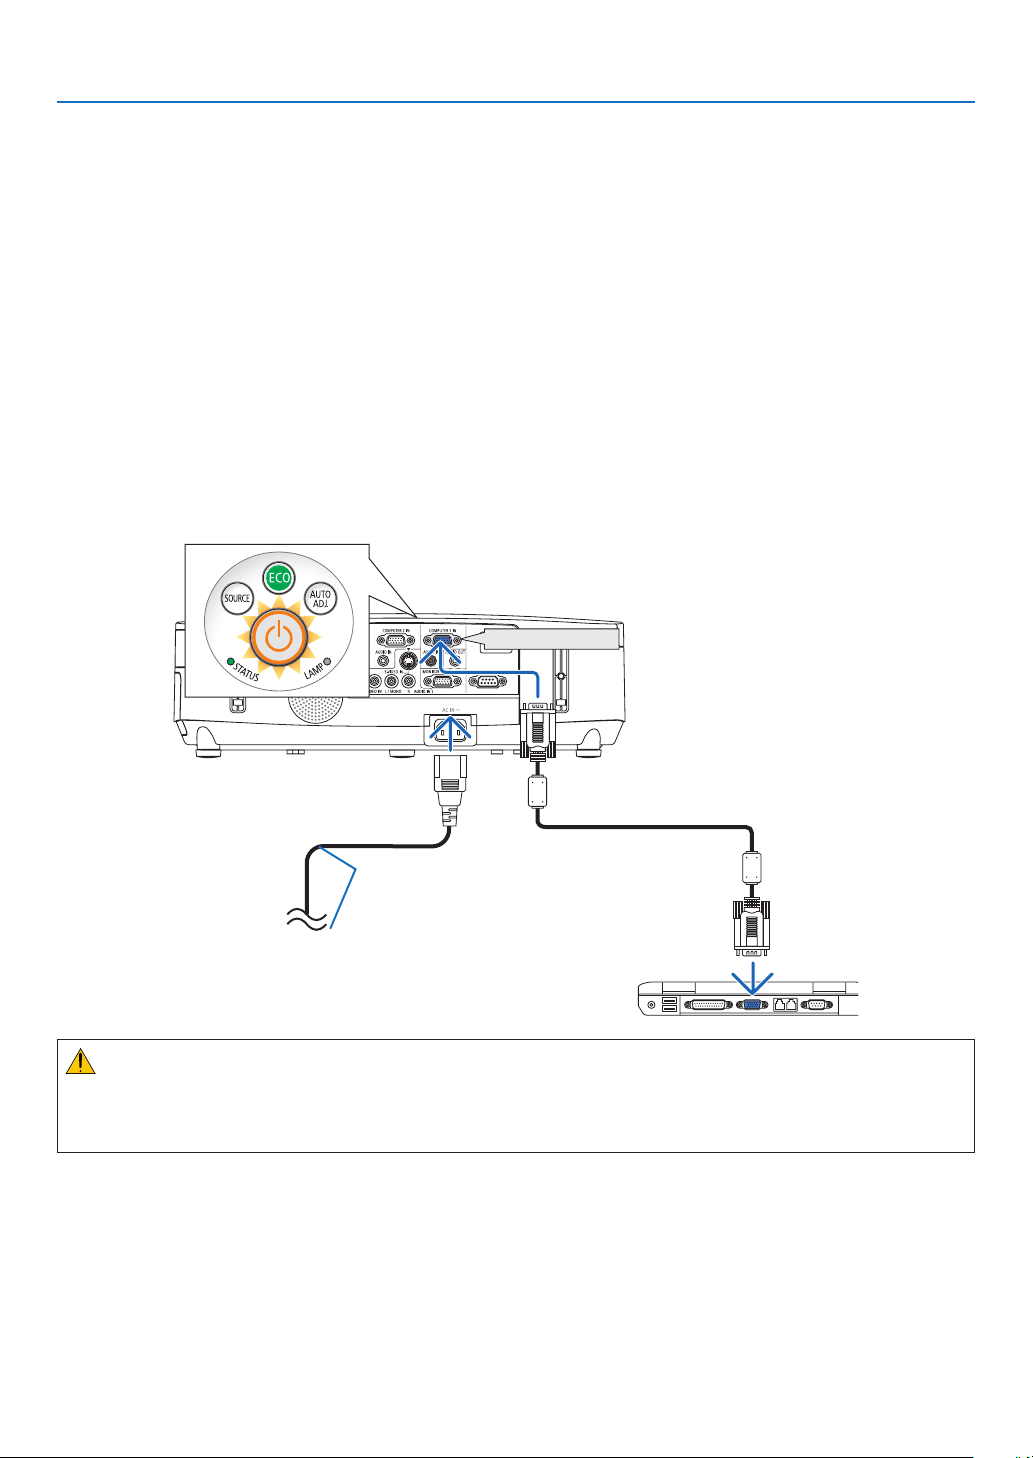
Connecting Your Computer/Connecting the Power Cord
1.Connectyourcomputertotheprojector.
This section will show you a basic connection to a computer. For information about other connections, see “6.
Installation and Connections” on page 132.
Connect the computer cable (VGA) between the projector’s COMPUTER 1 IN connector and the computer’s port
(mini D-Sub 15 Pin). Turn two thumb screws of both connectors to fix the computer cable (VGA).
2.Connectthesuppliedpowercordtotheprojector.
First connect the supplied power cord’s three-pin plug to the AC IN of the projector, and then connect the other
plug of the supplied power cord in the wall outlet.
The projector’s power indicator will flash for a few seconds and then will light orange* (standby mode).
The STATUS indicator will also light green*.
* This will apply for both indicators when [NORMAL] is selected for [STANDBY MODE]. See the Power Indicator
section.( page 192)
COMPUTER 1 IN
Makesurethattheprongsarefullyinsertedinto
both the AC IN and the wall outlet.
To wall outlet
CAUTION:
PartsoftheprojectormaybecometemporarilyheatediftheprojectoristurnedoffwiththePOWERbuttonorifthe
ACpowersupplyisdisconnectedduringnormalprojectoroperation.
Usecautionwhenpickinguptheprojector.
14
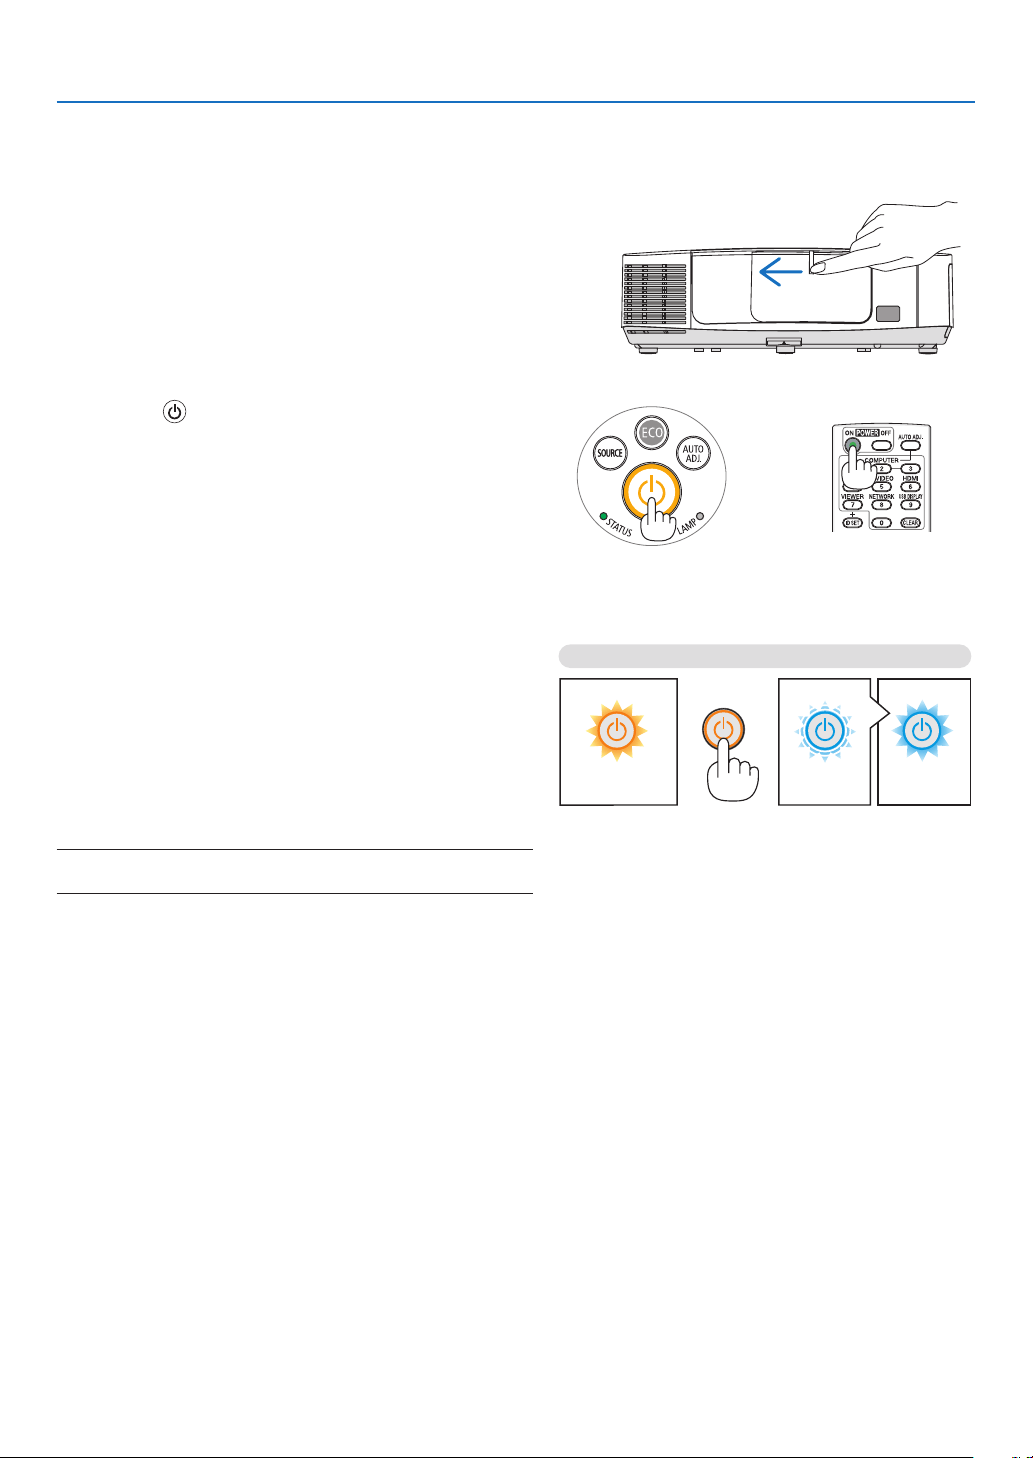
2. Projecting an Image (Basic Operation)
StandbyBlinkingPowerOn
Steady orange light Blinking blue light Steady blue light
Turning on the Projector
1.Slidethelenscovertothelefttouncoverthelens.
2.Pressthe
(POWER)buttonontheprojectorcabinet
orthePOWERONbuttonontheremotecontrol.
The POWER indicator will turn to blue and the projector
will become ready to use.
TIP:
•Whenthemessage“PROJECTORISLOCKED!ENTERYOUR
PASSWORD.”isdisplayed,itmeansthatthe[SECURITY]
featureisturnedon.(page30)
•WhentheECOmessageisdisplayed,itmeansthat[ON]is
selectedfor[ECOMESSAGE].(page94)
•PressingbuttonssuchaspowerbuttonandMENUbuttonwill
makesound.Toturnoffthebeepsound,select[OFF]for[BEEP]
fromthemenu.(page98)
After you turn on your projector, ensure that the computer
or video source is turned on and that the lens cover is
open.
NOTE:Whennoinputsignalispresent,theno-signalguidanceis
displayed(factorymenusetting).
(page192)
15
2. Projecting an Image (Basic Operation)
Note on Startup screen (Menu Language Select screen)
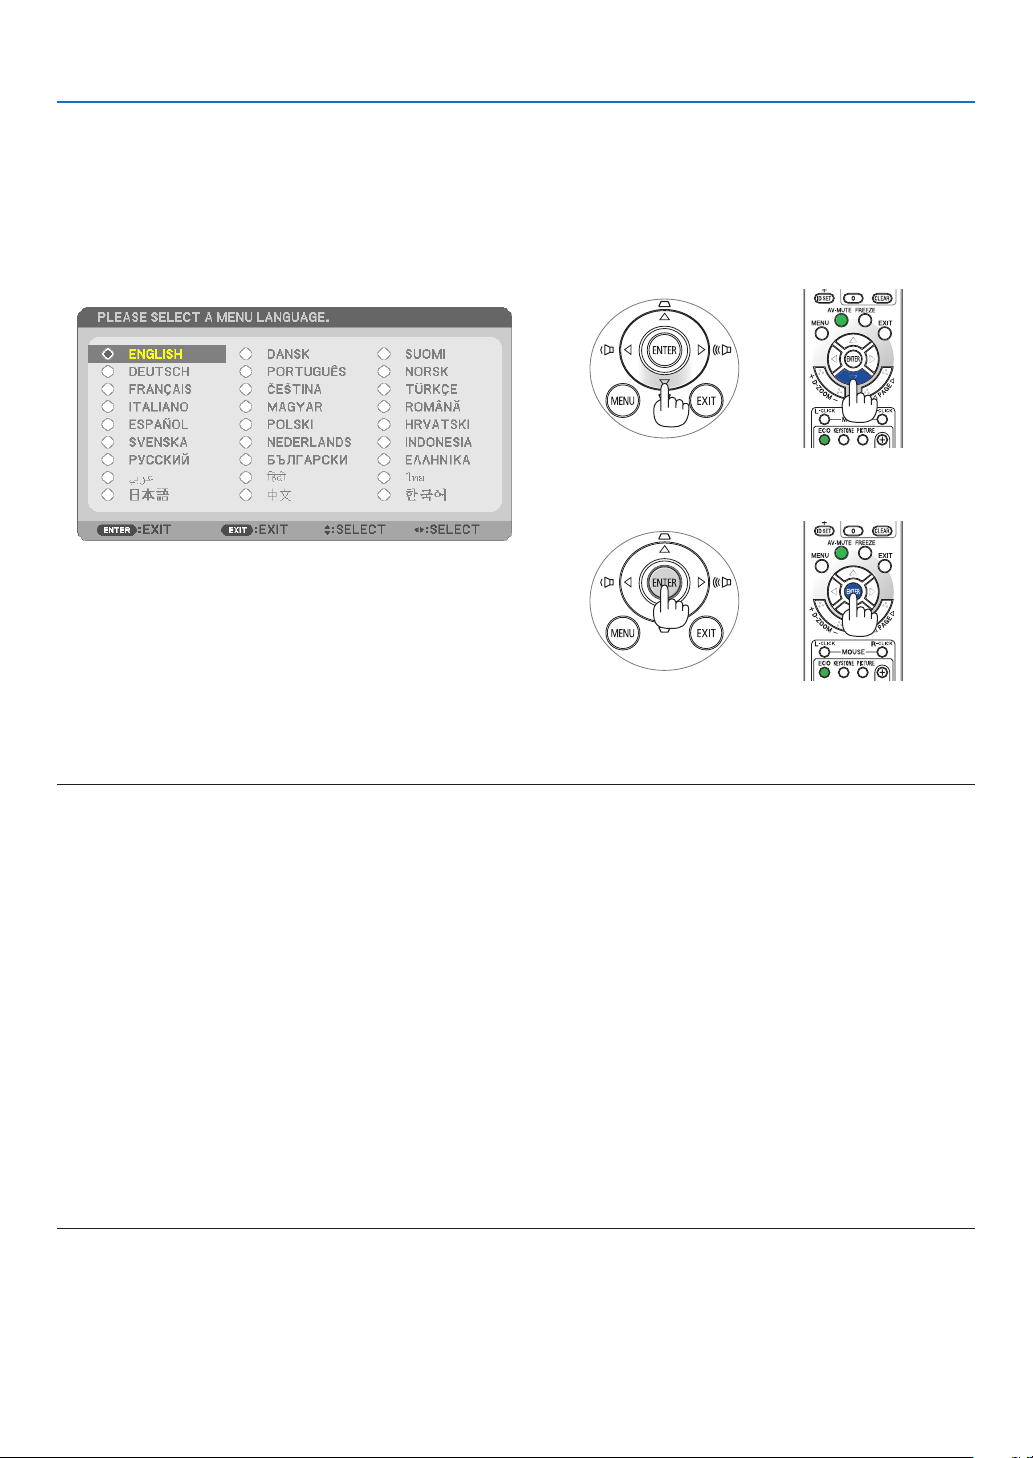
Whenyourstturnontheprojector,youwillgettheStartupmenu.Thismenugivesyoutheopportunitytoselectone
ofthe27menulanguages.
Toselectamenulanguage,followthesesteps:
1.Usethe
, , or buttontoselectoneofthe27
languagesfromthemenu.
2.PresstheENTERbuttontoexecutetheselection.
Afterthishasbeendone,youcanproceedtothemenu
operation.
Ifyouwant,youcanselectthemenulanguagelater.
([LANGUAGE]onpage
80 and 93)
NOTE:
•Whenturningoffthepowersupplyandthenbackonbyusingapowerstriporbreaker.
Allowaminimumof1secondbetweenturningoffthemainpowersupplyandturningitbackonagain.
Failingtodosocouldresultinnopowertotheprojector.(Therewillbenostand-byLED)
Shouldthishappen,unplugthepowercordandplugitinagain.Turnonthemainpower.
•Ifoneofthefollowingthingshappens,theprojectorwillnotturnon.
•Iftheinternaltemperatureoftheprojectoristoohigh,theprojectordetectsabnormalhightemperature.Inthisconditionthe
projectorwillnotturnontoprotecttheinternalsystem.Ifthishappens,waitfortheprojector’sinternalcomponentstocool
down.
•Whenthelampreachesitsendofusablelife,theprojectorwillnotturnon.Ifthishappens,replacethelamp.
•IftheSTATUSindicatorlightsorangewiththepowerbuttonpressed,itmeansthatthe[CONTROLPANELLOCK]isturnedon.
Cancelthelockbyturningitoff.(page95)
•Ifthelampfailstolight,andiftheSTATUSindicatorashesonandoffinacycleofsixtimes,waitafullminuteandthenturnon
thepower.
•WhilethePOWERindicatorisblinkingblueinshortcycles,thepowercannotbeturnedoffbyusingthepowerbutton.
•Immediatelyafterturningontheprojector,screenickermayoccur.Thisisnormal.Wait3to5minutesuntilthelamplightingis
stabilized.
•Whentheprojectoristurnedon,itmaytakesometimebeforethelamplightbecomesbright.
•Ifyouturnontheprojectorimmediatelyafterthelampisturnedofforwhenthetemperatureishigh,thefansrunwithoutdisplay-
inganimageforsometimeandthentheprojectorwilldisplaytheimage.
16
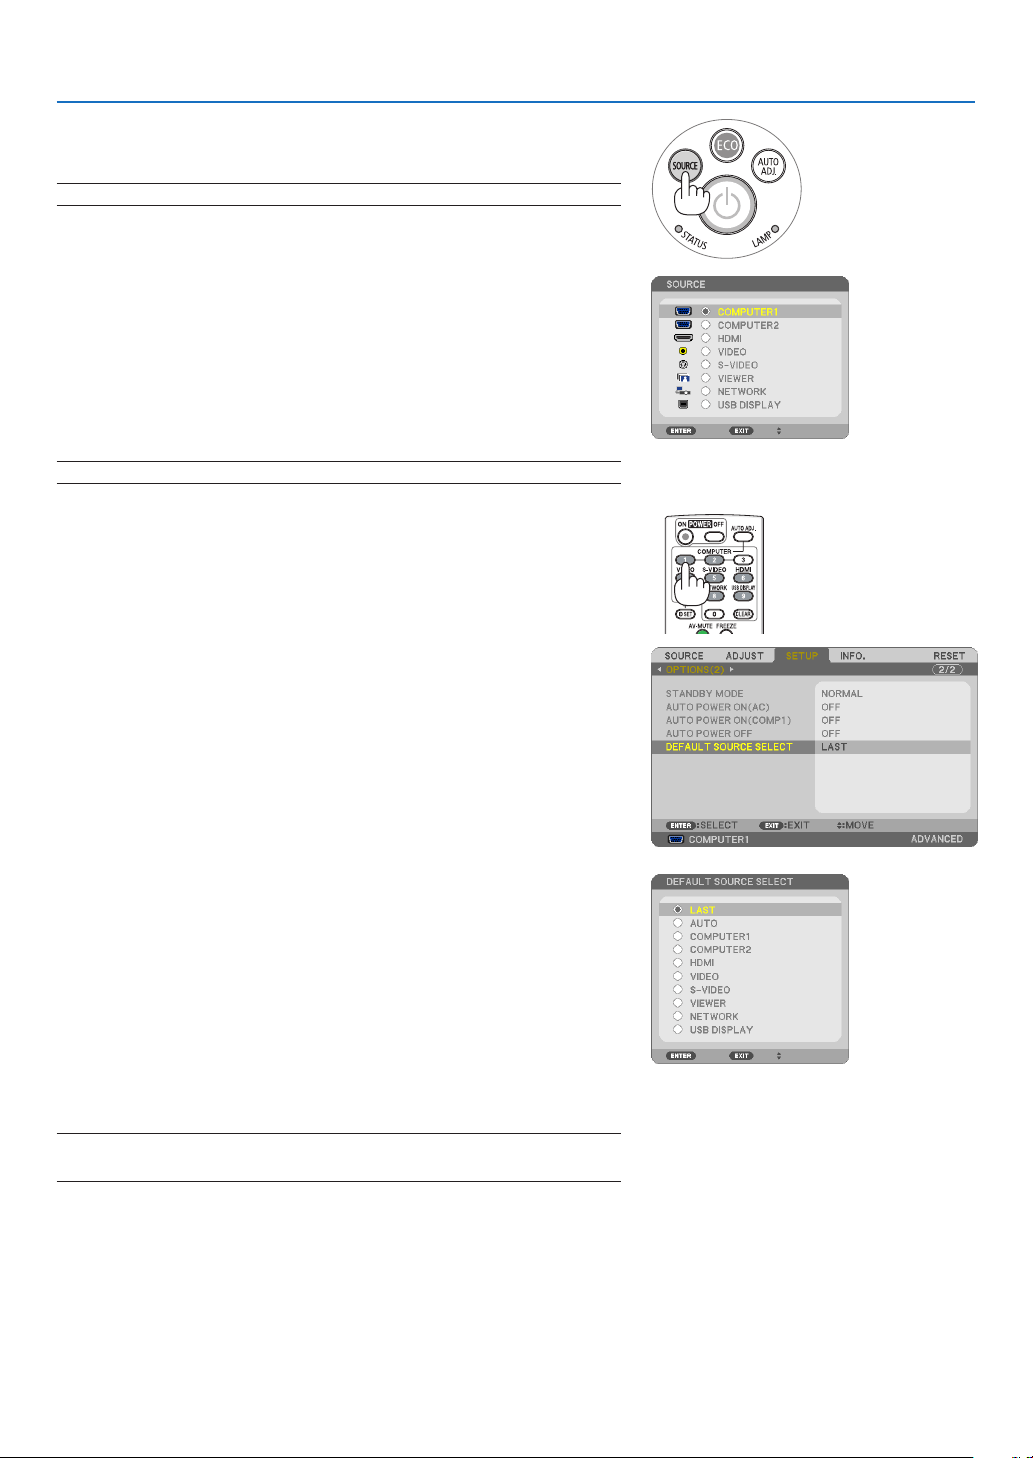
2. Projecting an Image (Basic Operation)
Selecting a Source
Selecting the computer or video source
NOTE:Turnonthecomputerorvideosourceequipmentconnectedtotheprojector.
Detecting the Signal Automatically
PresstheSOURCEbuttononce.Theprojectorwillsearchfortheavailable
inputsourceanddisplayit.Theinputsourcewillchangeasfollows:
COMPUTER1COMPUTER2HDMIVIDEOS-VIDEO
VIEWERUSBDISPLAYCOMPUTER1 ...
•WiththeSOURCEscreendisplayed,youcanpresstheSOURCE
buttonafewtimestoselecttheinputsource.
TIP:Ifnoinputsignalispresent,theinputwillbeskipped.
Using the Remote Control
PressanyoneoftheCOMPUTER1,COMPUTER2,HDMI,VIDEO,S-
VIDEO,VIEWER,NETWORK,orUSBDISPLAYbuttons.
Selecting Default Source
Youcansetasourceasthedefaultsourcesothatitwillbedisplayed
eachtimetheprojectoristurnedon.
1.PresstheMENUbutton.
The menu will be displayed.
2.Pressthebuttontwicetoselect[SETUP]andpressthe but-
tonortheENTERbuttontoselect[GENERAL].
3.
Pressthe
buttonthreetimestoselect[OPTIONS(2)].
4.Pressthebuttonsixtimestoselect[DEFAULTSOURCESE-
LECT]andpresstheENTERbutton.
The [DEFAULT SOURCE SELECT] screen will be displayed.
(
page 100)
5.Selectasourceasthedefaultsource,andpresstheENTERbut-
ton.
6.PresstheEXITbuttonafewtimestoclosethemenu.
7.Restarttheprojector.
The source you selected in step 5 will be projected.
NOTE:Evenwhen[AUTO]isturnedon,the[NETWORK]willnotbeautomatically
selected.Tosetyournetworkasthedefaultsource,select[NETWORK].
TIP:
•WhentheprojectorisinStandbymode,applyingacomputersignalfroma
computerconnectedtotheCOMPUTER1INinputwillpowerontheprojector
andsimultaneouslyprojectthecomputer’simage.
([AUTOPOWERON(COMP1)]page100)
•OntheWindows7keyboard,acombinationoftheWindowsandPkeysallows
youtosetupexternaldisplayeasilyandquickly.
17
2. Projecting an Image (Basic Operation)
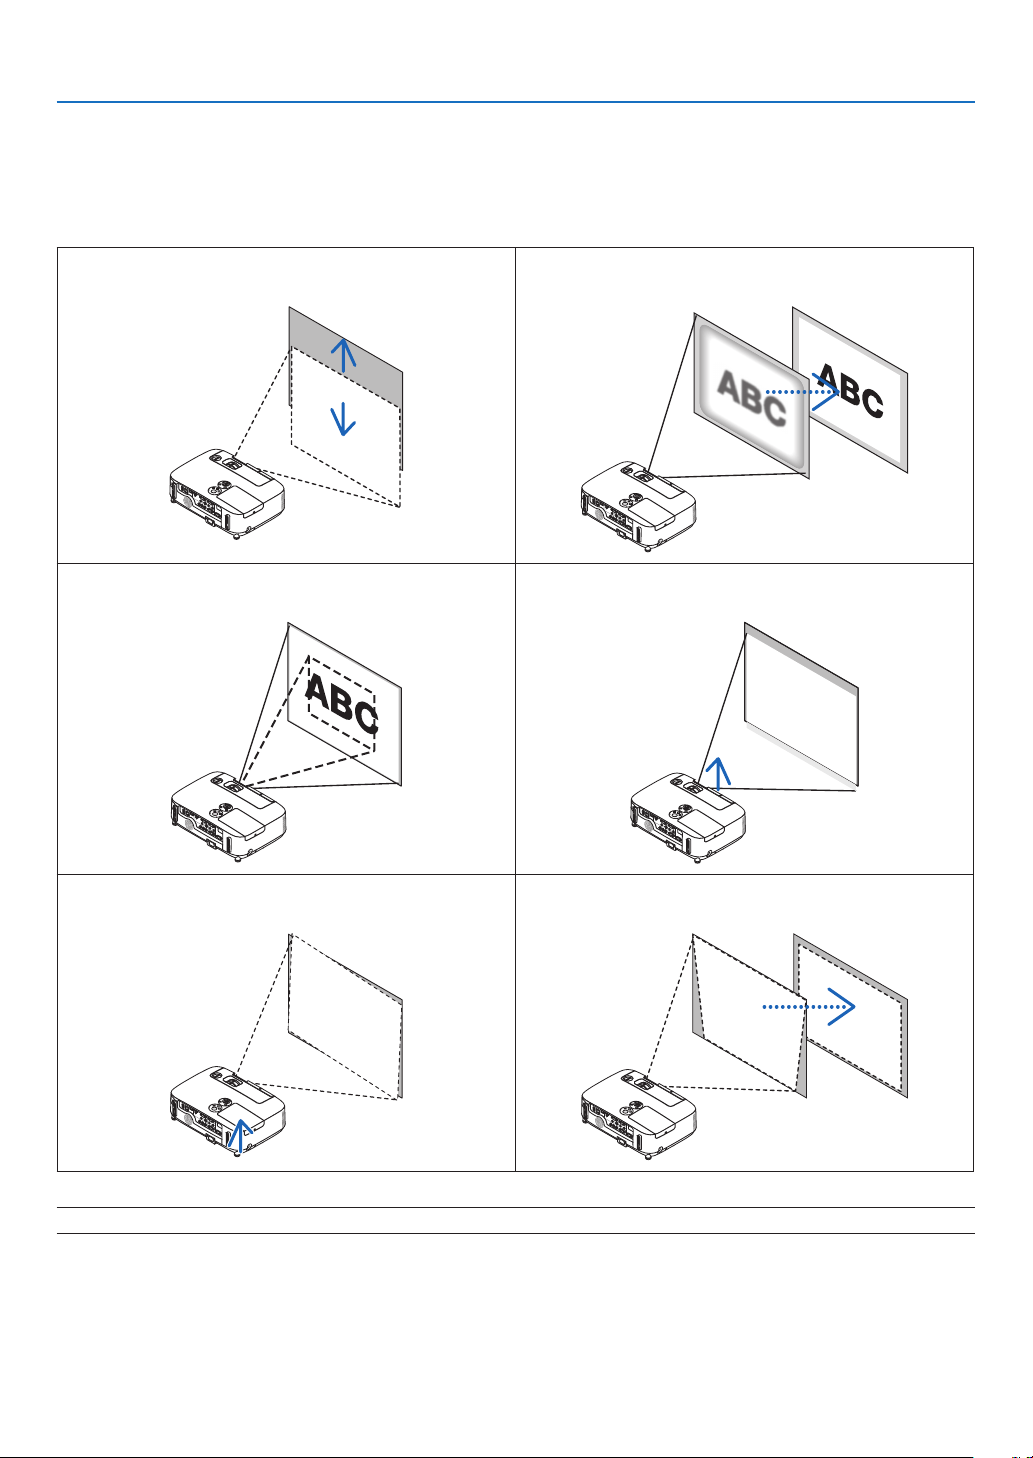
Adjusting the Picture Size and Position
Usethelensshiftdial,theadjustabletiltfootlever,thezoomleverandthefocuslevertoadjustthepicturesizeand
position.
In this chapter drawings and cables are omitted for clarity.
Adjustingtheverticalpositionofaprojectedimage
[Lensshift]
Adjustingthefocus
[Focuslever]
Finelyadjustingthesizeofanimage
[Zoomlever]
Adjustingthethrowangle(theheightofanimage)
[Tiltfoot]*¹
Adjustingtheleftandrighttiltofanimage
[Rearfoot]
Adjustingthekeystonecorrection
[Keystone]
NOTE*1:Adjustthethrowangle(theheightofanimage)whentheimagepositionishigherthanthelensshiftadjustablerange.
( page 18)
( page 20)
( page 21)
( page 19)
( page 21)
( page 22)
18
2. Projecting an Image (Basic Operation)
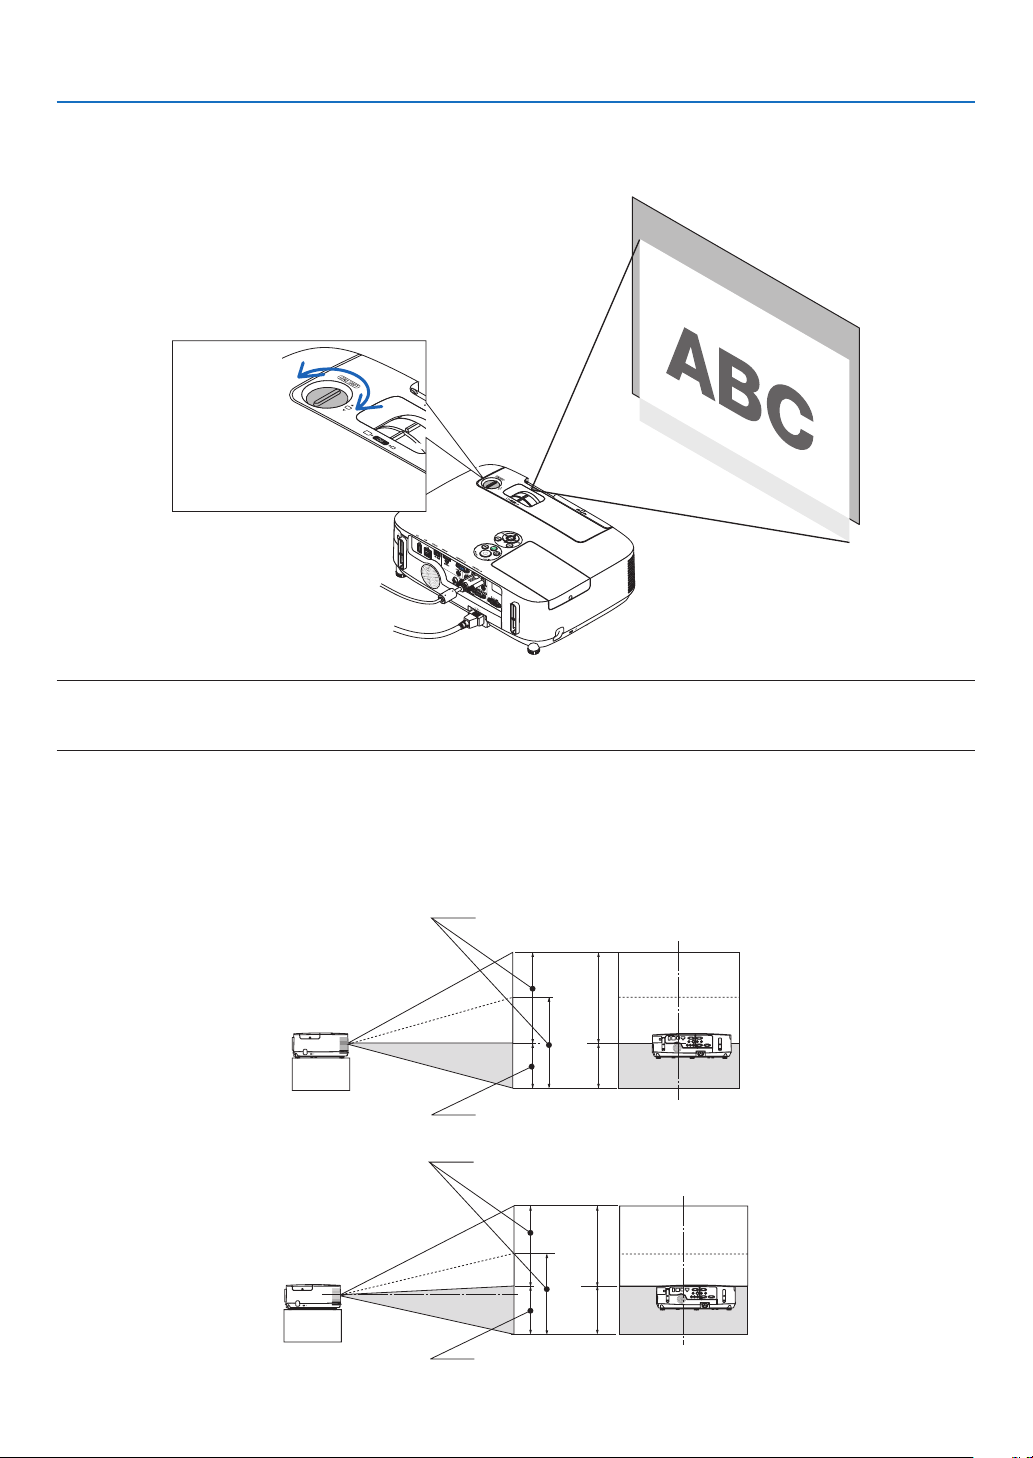
Adjusting the vertical position of a projected image (Lens shift)
Rotatethelensshiftdial.
Inthisuser’smanual,theupwardmaximumshiftisreferredtoas“normalposition”.
NOTE:
Thelensshiftdialcannotberotatedbeyondthemaximumupwardordownwardshift.Forciblyrotatingmaycausedamagetothe
projector.
TIP:
Lensshiftcanbeadjustedwiththerangebelow.Ifyouwishtomoveuptheimagehigherthanthislimit,usethetiltfootofthe
projector.
Desktopfrontprojection
[P420X/P350X]
[P350W]
Downward
Upward
Lens shift dial
Height of projected
image
Height of projected
image
Vertical shift range (0 to 0.5V)
Vertical shift range (0 to 0.6V)
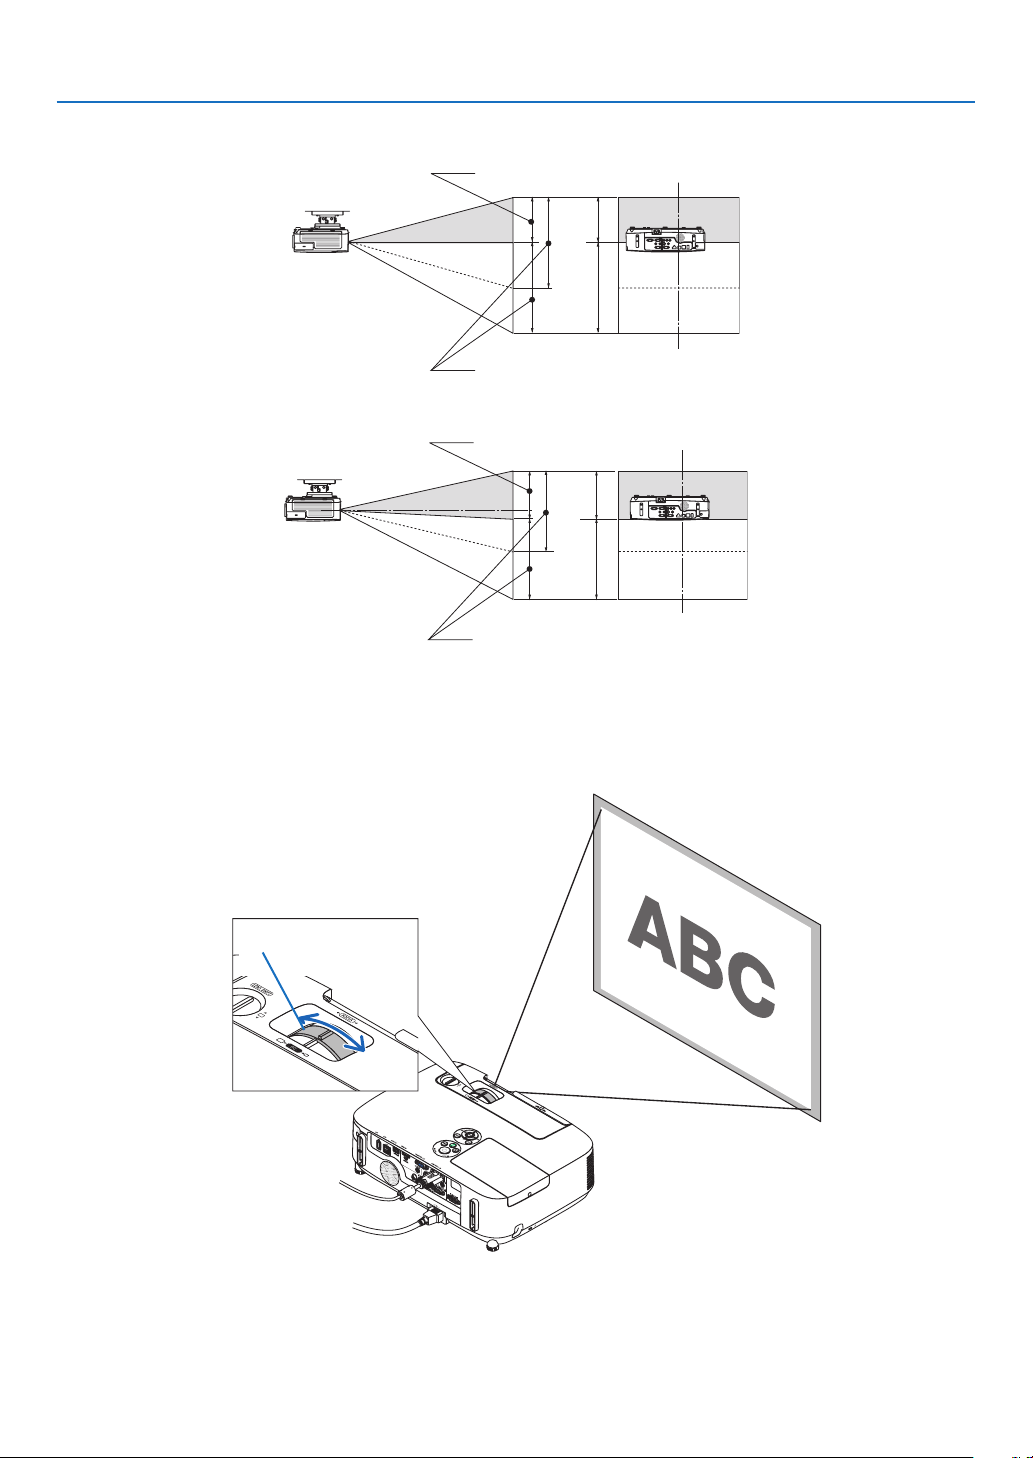
19
2. Projecting an Image (Basic Operation)
Ceilingfrontprojection
[P420X/P350X]
[P350W]
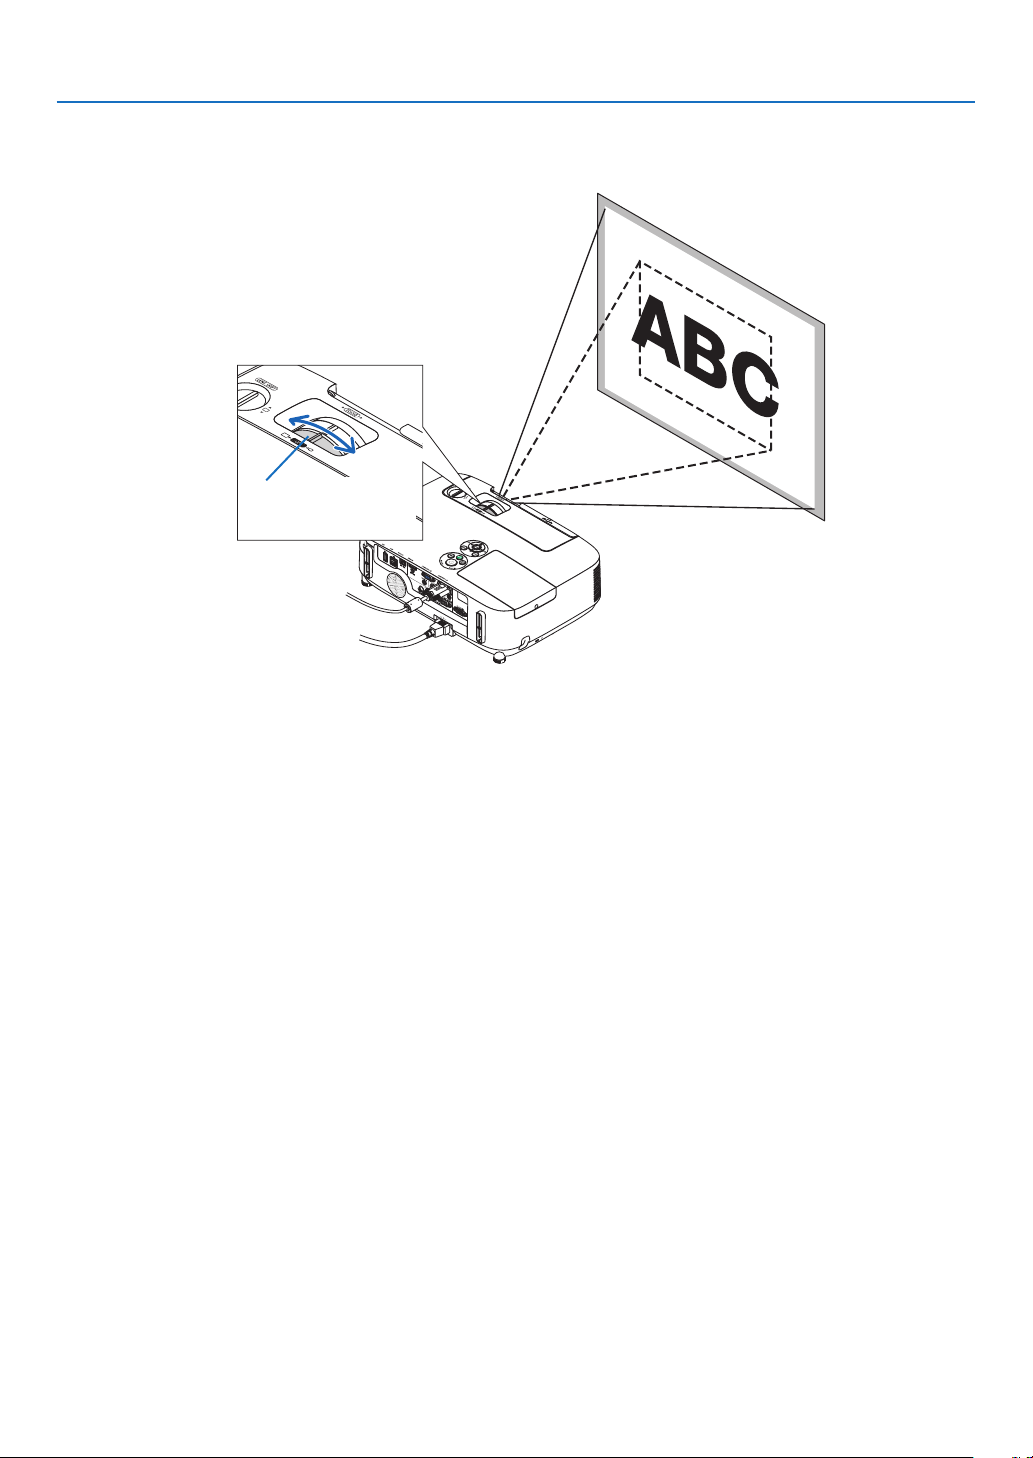
Focus
UsetheFOCUSlevertoobtainthebestfocus.
Height of projected
image
Height of projected
image
Vertical shift range (0 to 0.5V)
Vertical shift range (0 to 0.6V)
Focus Lever
20
2. Projecting an Image (Basic Operation)
Zoom
UsetheZOOMlevertoadjusttheimagesizeonthescreen.
Zoom Lever
21
2. Projecting an Image (Basic Operation)
2
1
3
Adjustable Tilt Foot
Adjustable Tilt
Foot Lever
Adjust the Tilt Foot
1.Liftthefrontedgeoftheprojector.
CAUTION:
DonottrytotouchtheventilationoutletduringTiltFootadjustment
asitcanbecomeheatedwhiletheprojectoristurnedonandafterit
isturnedoff.
2.PushupandholdtheAdjustableTiltFootLeveronthefrontof
theprojectortoextendtheadjustabletiltfoot.
3.Lowerthefrontoftheprojectortothedesiredheight.
4.ReleasetheAdjustableTiltFootLevertolocktheAdjustabletilt
foot.
The tilt foot can be extended up to 1.6 inch/40 mm.
There is approximately 10 degrees (up) of adjustment for the front of
the projector.
Rotate the rear foot to the desired height in order to square the image
on the projection surface.
CAUTION:
•Donotusethetilt-footforpurposesotherthanoriginallyintended.
Misusessuchasusingthetiltfoottocarryorhang(fromthewallor
ceiling)theprojectorcancausedamagetotheprojector.
Adjustingtheleftandrighttiltofanimage[Rearfoot]
•Rotatetherearfoot.
The rear foot can be extended up to 0.5 inch/12 mm. Rotating the rear
foot allows the projector to be placed horizontally.
NOTE:
•Donotextendtherearfootbeyonditsheightlimit(0.5inch/12mm).Doingso
maycausetherearfoottocomeoutoftheprojector.
Rear foot
Up Down
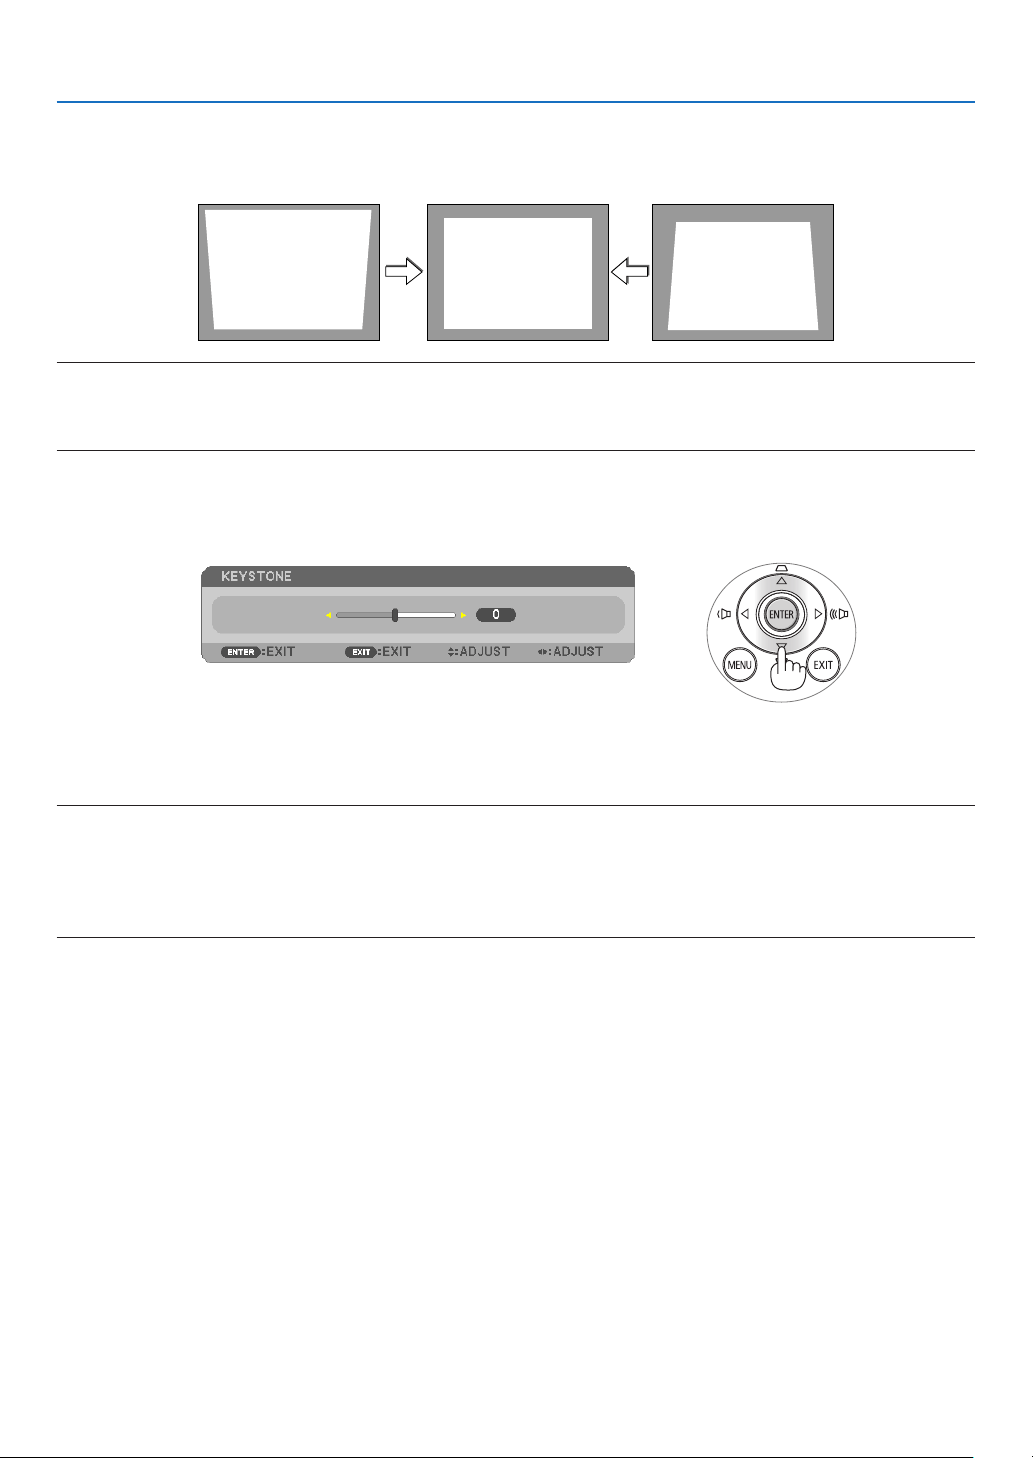
22
2. Projecting an Image (Basic Operation)
Correcting Keystone Distortion Manually
Ifthescreenistiltedvertically,keystonedistortionbecomeslarge.Tocorrectkeystonedistortionmanually,proceed
withthefollowingstepstocorrectkeystonedistortion.
NOTE:
•Themaximumrangeofverticalkeystonecorrectionis+/−30degrees.
•TheKeystonecorrectioncancauseanimagetobeslightlyblurredbecausethecorrectionismadeelectronically.
•TheKeystonecorrectionrangecanbemadenarrower,dependingonasignaloritsaspectratioselection.
Adjusting with buttons on the cabinet
1.Pressthe
or buttonwithnomenusdisplayed.
Thekeystonebarwillbedisplayed.
2.Usethe or tocorrectthekeystonedistortion.
3.PresstheENTERbutton.
Thekeystonebarwillbeclosed.
NOTE:
•Whenthemenuisdisplayed,theaboveoperationisnotavailable.Whenthemenuisdisplayed,presstheMENUbuttontoclose
themenuandstarttheKeystonecorrection.
Fromthemenu,select[SETUP][GENERAL][KEYSTONE].Thechangescanbesavedwith[KEYSTONESAVE].(page
91)
•KeystonecontrolisnotavailablewiththeorbuttonwhenVIEWERorNETWORKisused.
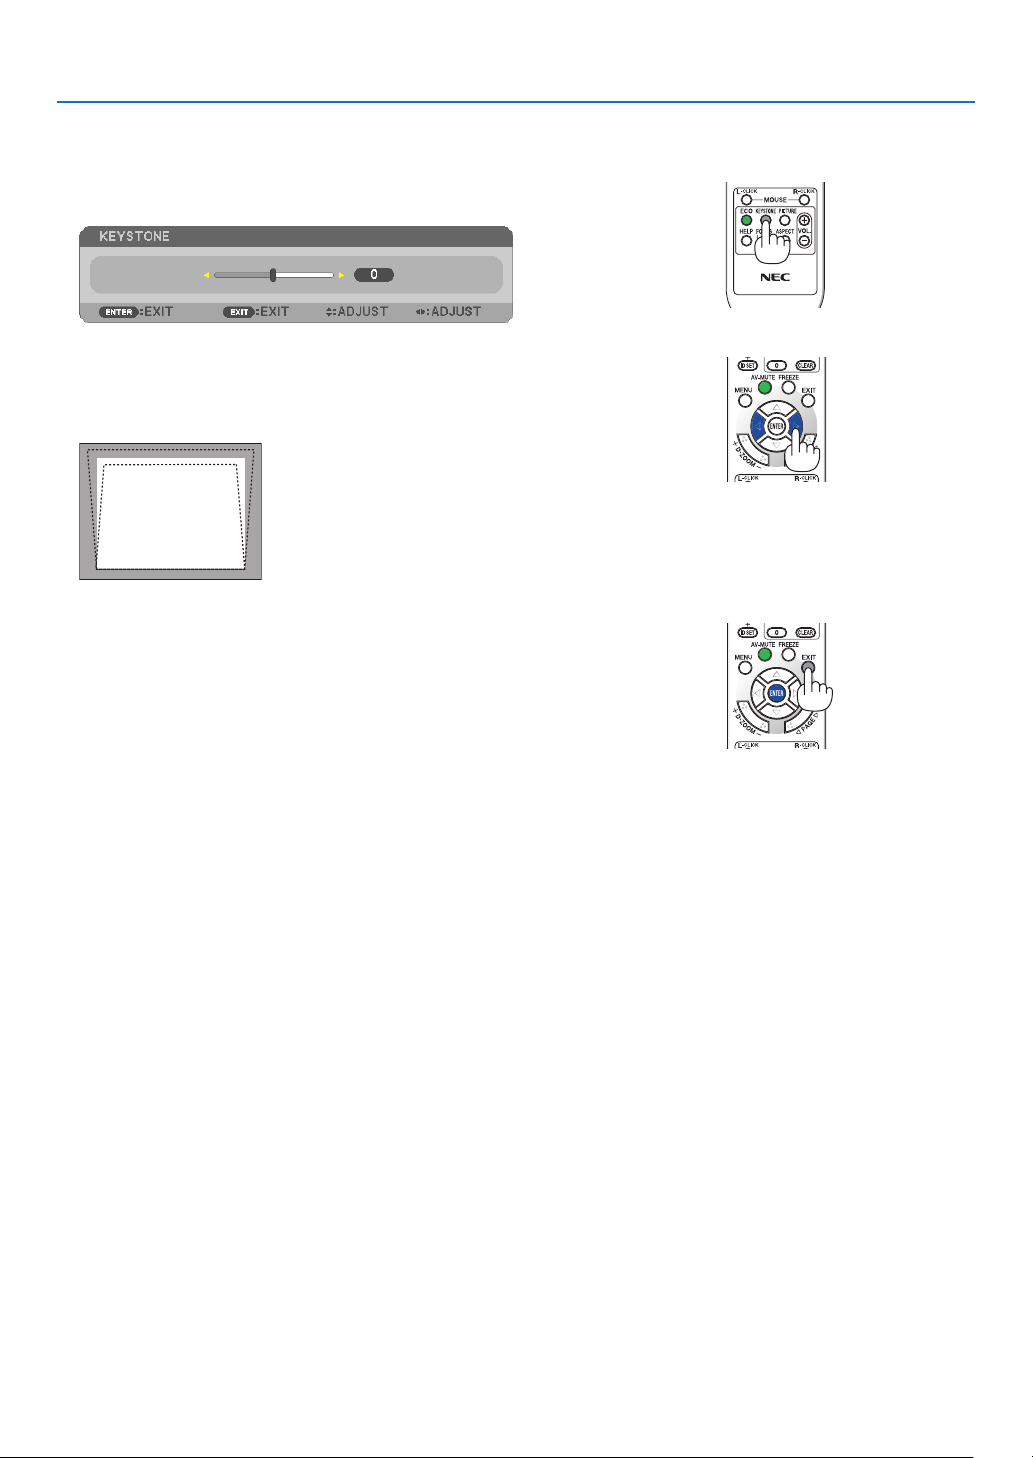
23
2. Projecting an Image (Basic Operation)
Adjusting with the remote control
1.PresstheKEYSTONEbutton.
The Keystone bar will be displayed.
2.Usethe or buttontocorrectthekeystonedistortion.
Adjust so that the right and left sides are parallel.
3.PresstheEXITbutton.
The Keystone bar will be closed.

24
2. Projecting an Image (Basic Operation)
Optimizing Computer Signal Automatically
Adjusting the Image Using Auto Adjust
Optimizingacomputerimageautomatically.(COMPUTER1/COMPUTER2)
PresstheAUTOADJ.buttontooptimizeacomputerimageautomatically.
Thisadjustmentmaybenecessarywhenyouconnectyourcomputerforthersttime.
[Poor picture]
[Normal picture]
NOTE:
Somesignalsmaytaketimetodisplayormaynotbedisplayedcorrectly.
•IftheAutoAdjustoperationcannotoptimizethecomputersignal,trytoadjust[HORIZONTAL],[VERTICAL],[CLOCK],and[PHASE]
manually.(page86,87)
Turning Up or Down Volume
Soundlevelfromthespeakercanbeadjusted.
TIP:Whennomenusappear,theandbuttonsontheprojectorcabinetwork
asavolumecontrol.
NOTE:
•Volumecontrolisnotavailablewiththeorbuttonwhenanimageisenlarged
byusingtheD-ZOOM(+)buttonorwhenthemenuisdisplayed.
•VolumecontrolisnotavailablewiththeorbuttonwhenVIEWERorNET-
WORKisused.
TIP:
•The[BEEP]soundvolumecannotbeadjusted.Toturnoffthe[BEEP]sound,
fromthemenu,select[SETUP][OPTIONS(1)][BEEP][OFF].
•Volumecanbecontrolledfromthemenu([ADJUST][AUDIO])
Increase volume
Decrease volume
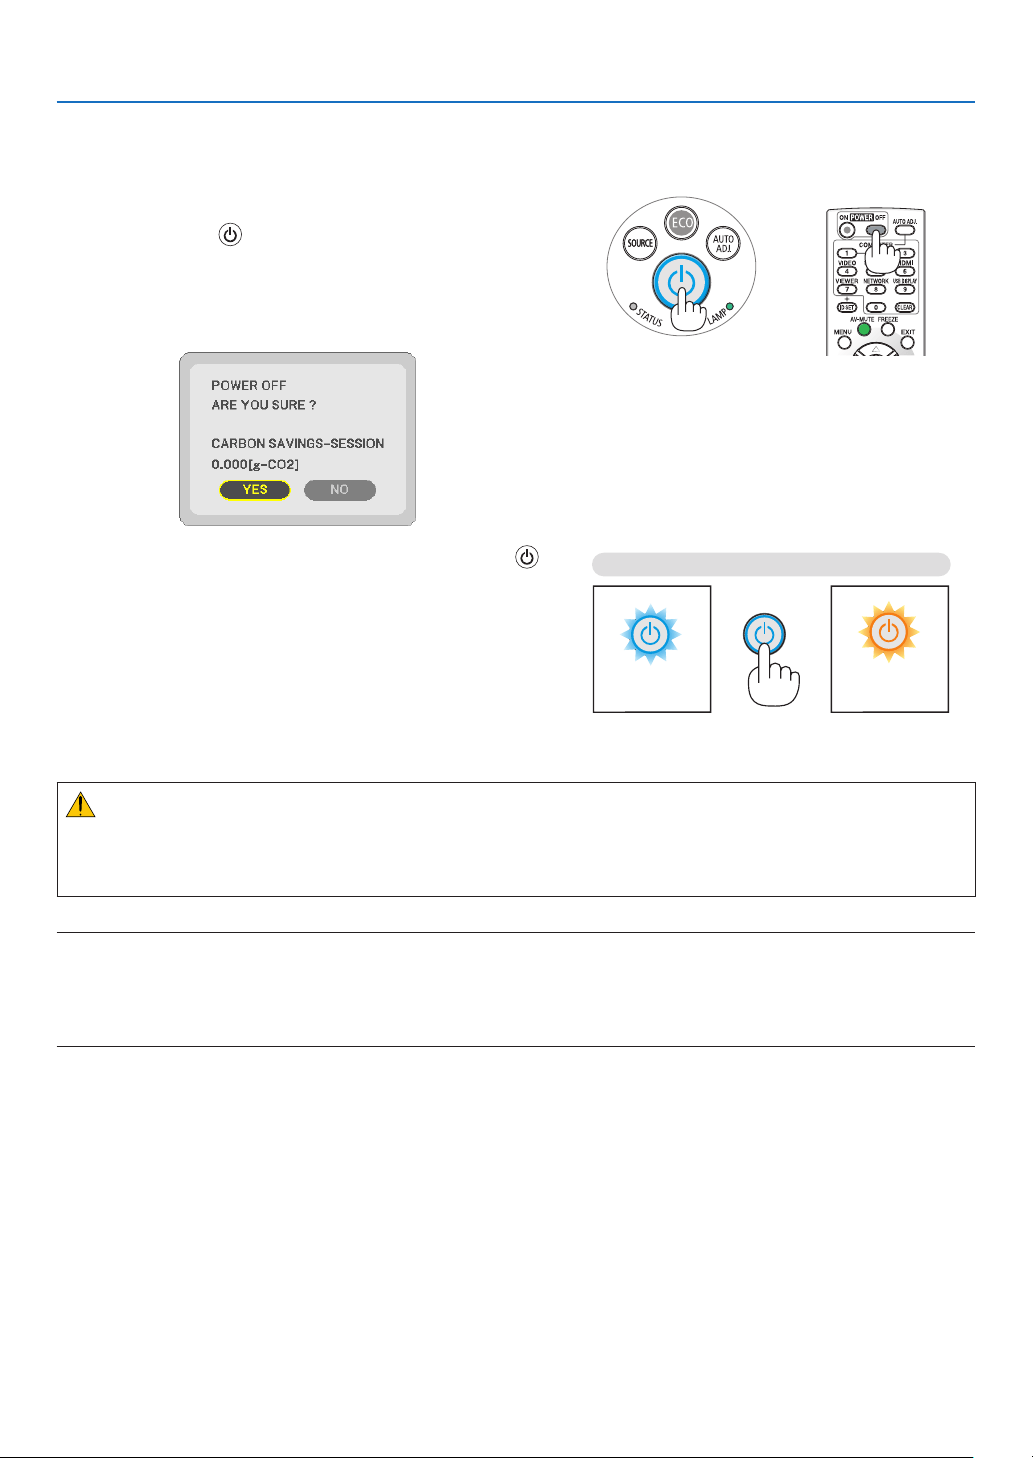
25
2. Projecting an Image (Basic Operation)
Turning off the Projector
Toturnofftheprojector:
1.First,pressthe
(POWER)buttonontheprojector
cabinetorthePOWEROFFbuttonontheremotecon-
trol.
The [POWER OFF / ARE YOU SURE ? / CARBON SAV-
INGS- SESSION 0.000[g-CO2]] message will appear.
2.Secondly,presstheENTERbuttonorpressthe
(POWER)orthePOWEROFFbuttonagain.
The lamp will turn off and the projector will go into standby
mode. When in standby mode, the POWER indicator will
light orange and the STATUS indicator will light green when
[NORMAL] is selected for [STANDBY MODE].
PowerOn
Steady blue light
Standby
Steady
orange light
Press twice
CAUTION:
PartsoftheprojectormaybecometemporarilyheatediftheprojectoristurnedoffwiththePOWERbuttonorifthe
ACpowersupplyisdisconnectedduringnormalprojectoroperation.
Usecautionwhenpickinguptheprojector.
NOTE:
•WhilethePOWERindicatorisblinkingblueinshortcycles,thepowercannotbeturnedoff.
•Youcannotturnoffthepowerfor60secondsimmediatelyafterturningitonanddisplayinganimage.
•DonotdisconnecttheACpowersupplytotheprojectorwithin10secondsofmakingadjustmentorsettingchangesandclosing
themenu.Doingsocancauselossofadjustmentsandsettings.

26
2. Projecting an Image (Basic Operation)
After Use
Preparation:Makesurethattheprojectoristurnedoff.
1.Unplugthepowercord.
2.Disconnectanyothercables.
•RemovetheUSBmemoryifitisinsertedintotheprojector.
3.Retractadjustabletiltfootifextended.
4.Slidethelenscovertotherighttocoverthelens.

27
1 Turning off the Image and Sound
PresstheAV-MUTEbuttontoturnofftheimageandsoundforashort
periodoftime.Pressagaintorestoretheimageandsound.
Theprojector’spower-savingfunctionwillwork10secondsaftertheimage
isturnedoff.Asaresult,thelamppowerwillbereduced.
NOTE:
•
Eventhoughtheimageisturnedoff,themenustillremainsonthescreen.
•SoundfromtheAUDIOOUTjack(Stereomini)canbeturnedoff.
•Torestoretheimage,evenifyoupresstheAV-MUTEbuttonimmediatelyafter
thestartofthepower-savingfunction,thelampbrightnessmaynotberestored
toitsoriginallevel.
Freezing a Picture
PresstheFREEZEbuttontofreezeapicture.Pressagaintoresume
motion.
NOTE:Theimageisfrozenbuttheoriginalvideoisstillplayingback.
Enlarging a Picture
Youcanenlargethepictureuptofourtimes.
NOTE:Themaximummagnicationmaybelessthanfourtimesdependingon
thesignal.
Todoso:
1.PresstheD-ZOOM(+)buttontomagnifythepicture.
To move the magnified image, use the ,,or button.
3. Convenient Features
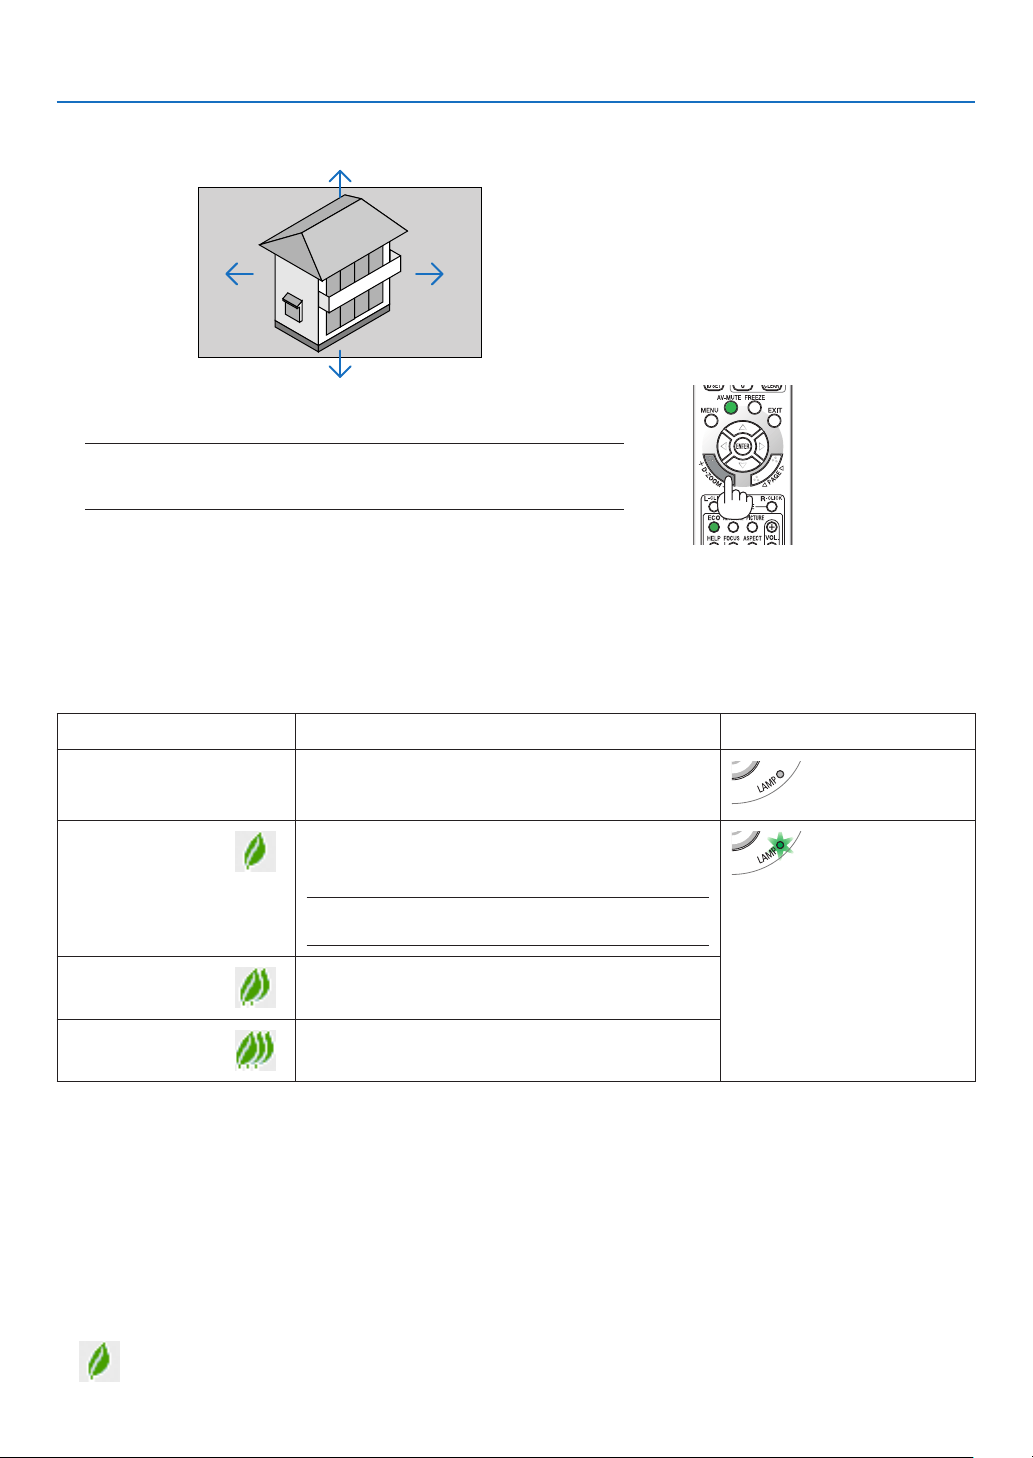
28
3. Convenient Features
Changing Eco Mode/Checking Energy-Saving Effect Using Eco
Mode [ECO MODE]
TheECOMODE(ECO1andECO2)increaseslamplife,whileloweringpowerconsumptionandcuttingdownonCO
2
emissions.
Fourbrightnessmodesofthelampcanbeselected:[OFF],[AUTOECO],[ECO1]and[ECO2]modes.
[ECOMODE]DescriptionStatusofLAMPindicator
[OFF]Thisisthedefaultsetting(100%Brightness).
Off
[AUTOECO]
Lamppowerconsumptionwillbechangedbetween
[OFF]and[ECO1]automaticallyaccordingtopicture
level
NOTE:Abrightgradationmaybelessvisibledepending
ontheimage.
SteadyGreen
light
[ECO1]
Lowlamppowerconsumption(approx.75%Bright-
ness).
[ECO2](P350X
only)
Lowerlamppowerconsumptionthan[ECO1]mode
(approx.60%Brightness)
Toturnonthe[ECOMODE],dothefollowing:
1.PresstheECOButtonontheremotecontroltodisplay[ECOMODE]screen.
2.PresstheECObuttonagaintoselectamodeyouwish.
•EachtimetheECObuttonispressed,thechoiceswillbechanged:
OFF AUTO ECO ECO1 ( ECO2) OFF
•WhentheprojectorisinECOmode,theLAMPindicatorwilllightgreen.
TIP:
•TheleafsymbolatthebottomofthemenushowsthecurrentselectionofECOmode.
2. Pressthe button.
The area of the magnified image will be moved
3.PresstheD-ZOOM(−)button.
Each time the D-ZOOM (−) button is pressed, the image is reduced.
NOTE:
•Theimagewillbeenlargedorreducedatthecenterofthescreen.
•Displayingthemenuwillcancelthecurrentmagnication.
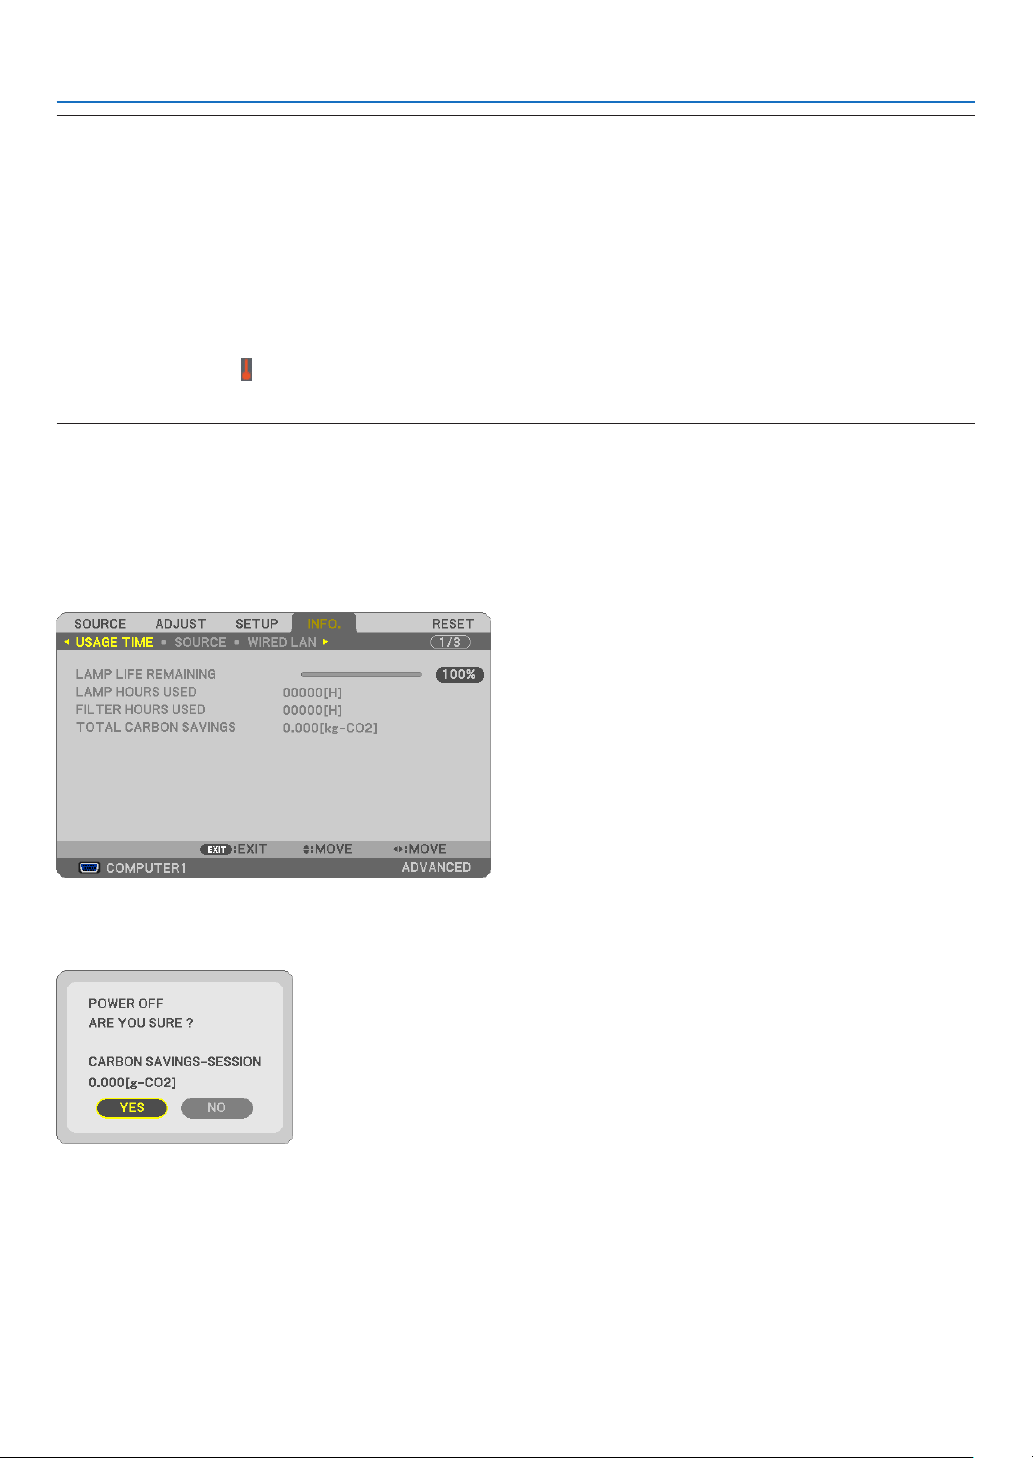
29
3. Convenient Features
NOTE:
•The[ECOMODE]canbechangedbyusingthemenu.
Select[SETUP][GENERAL][ECOMODE].
•Thelampliferemainingandlamphoursusedcanbecheckedin[USAGETIME].Select[INFO.][USAGETIME].
•Theprojectorisalwaysin[ECO1]([ECO2])*for90secondsafterthelampisturnedonandwhilethePOWERindicatorisblinking
blue.Thelampconditionwillnotbeaffectedevenwhen[ECOMODE]ischanged.
•Afteralapseof1minutefromwhentheprojectordisplaysno-signalguidance,ablue,blackorlogoscreen,[ECOMODE]will
automaticallyswitchto[ECO1]([ECO2])*.Theprojectorwillreturntothe[OFF]onceasignalisaccepted.
•Iftheprojectorisoverheatedin[OFF]mode,theremaybeacasewherethe[ECOMODE]automaticallychangesto[ECO1]
([ECO2])*modetoprotecttheprojector.Whentheprojectorisin[ECO1]([ECO2])*mode,thepicturebrightnessdecreases.
Whentheprojectorcomesbacktonormaltemperature,the[ECOMODE]returnsto[OFF]mode.
Thermometersymbol[]indicatesthe[ECOMODE]isautomaticallysetto[ECO1]([ECO2])*modebecausetheinternaltem-
peratureistoohigh.
*[ECO2]onP350Xonly
Checking Energy-Saving Effect [CARBON METER]
Thisfeaturewillshowenergy-savingeffectintermsofCO
2
emissionreduction(kg)whentheprojector’s[ECOMODE]
issetto[AUTOECO],[ECO1],or[ECO2].Thisfeatureiscalledas[CARBONMETER].
Therearetwomessages:[TOTALCARBONSAVINGS]and[CARBONSAVINGS-SESSION].The[TOTALCARBON
SAVINGS]messageshowsthetotalamountofCO
2
emissionreductionfromthetimeofshipmentuptonow.Youcan
checktheinformationon[USAGETIME]from[INFO.]ofthemenu.(page
101)
The[CARBONSAVINGS-SESSION]messageshowstheamountofCO
2
emissionreductionbetweenthetimeof
changingtoECOMODEimmediatelyafterthetimeofpower-onandthetimeofpower-off.The[CARBONSAVINGS-
SESSION]messagewillbedisplayedinthe[POWEROFF/AREYOUSURE?]messageatthetimeofpower-off.
TIP:
•TheformulaasshownbelowisusedtocalculatetheamountofCO
2
emissionreduction.
AmountofCO
2
emissionreduction=(PowerconsumptioninOFFforECOMODE−PowerconsumptioninAUTOECO/ECO1/ECO2
forECOMODE)×CO
2
conversionfactor.*WhentheimageisturnedoffwiththeAV-MUTEbuttonorwiththelenscoverclosed,
theamountofCO
2
emmissionreductionwillalsoincrease.
*CalculationforamountofCO
2
emissionreductionisbasedonanOECDpublication“CO
2
EmissionsfromFuelCombustion,2008
Edition”.
•The[TOTALCARBONSAVINGS]iscalculatedbasedonsavingsrecordedin15minutesintervals.
•Thisformulawillnotapplytothepowerconsumptionwhichisnotaffectedbywhether[ECOMODE]isturnedonoroff.
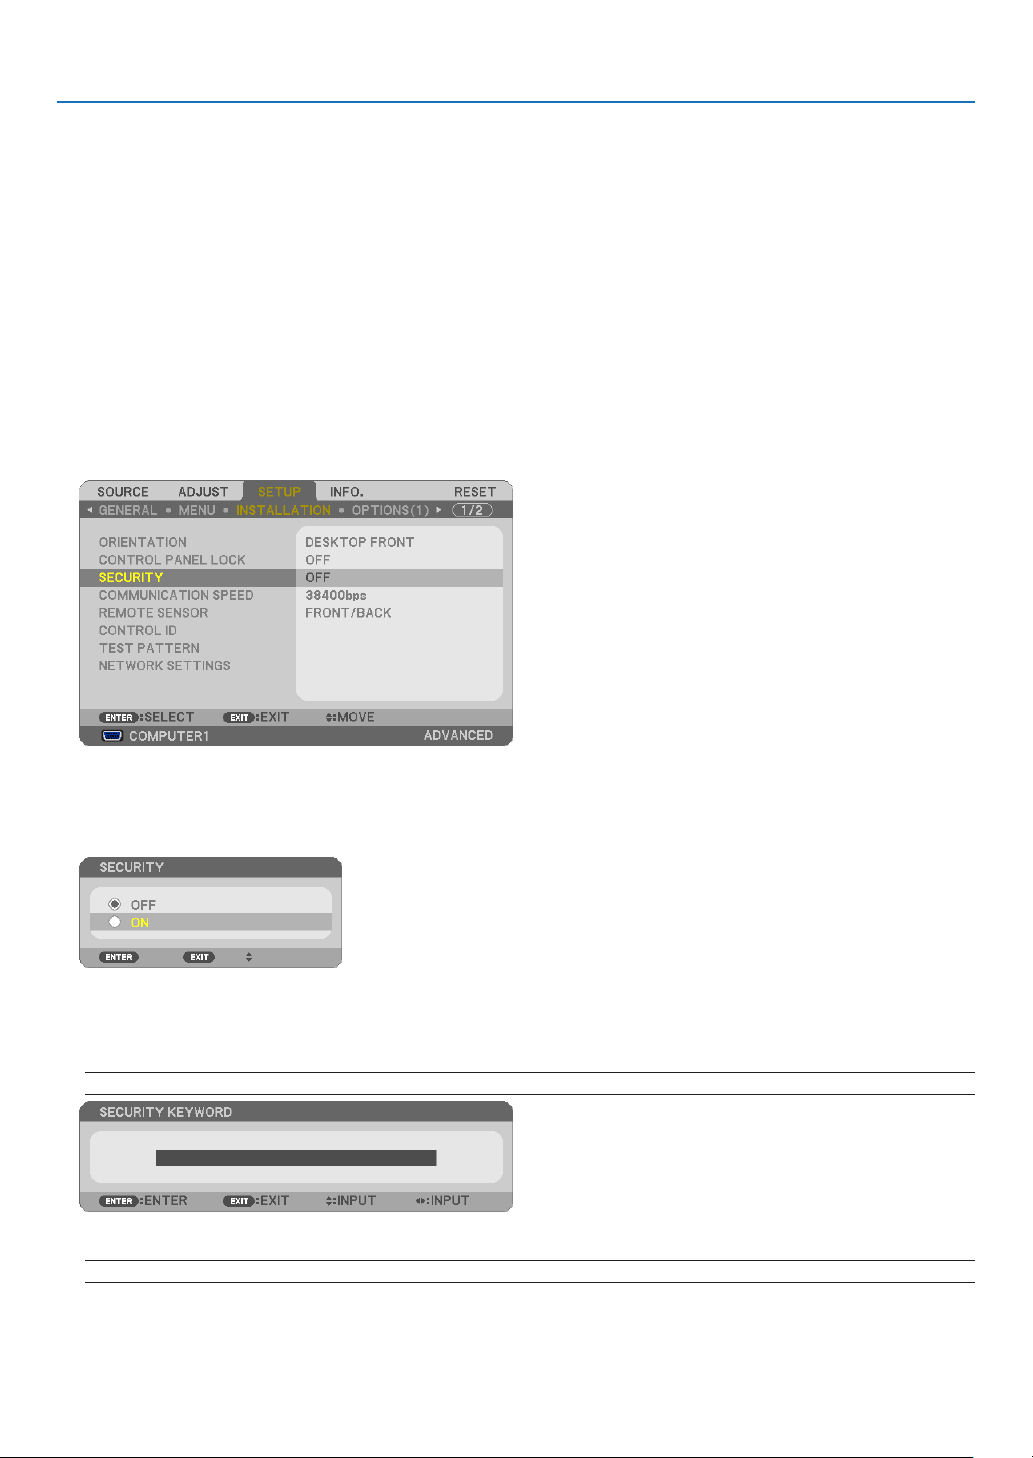
30
3. Convenient Features
Preventing the Unauthorized Use of the Projector [SECURITY]
AkeywordcanbesetforyourprojectorusingtheMenutoavoidoperationbyanunauthorizeduser.Whenakeyword
isset,turningontheprojectorwilldisplaytheKeywordinputscreen.Unlessthecorrectkeywordisentered,thepro-
jectorcannotprojectanimage.
•The[SECURITY]settingcannotbecancelledbyusingthe[RESET]ofthemenu.
To enable the Security function:
1.PresstheMENUbutton.
The menu will be displayed.
2.Pressthebuttontwicetoselect[SETUP]andpressthebuttonortheENTERbuttontoselect[GEN-
ERAL].
3.Pressthebuttontoselect[INSTALLATION].
4.Pressthebuttonthreetimestoselect[SECURITY]andpresstheENTERbutton.
The OFF/ON menu will be displayed.
5.Pressthebuttontoselect[ON]andpresstheENTERbutton.
The [SECURITY KEYWORD] screen will be displayed.
6.TypeinacombinationofthefourbuttonsandpresstheENTERbutton.
NOTE:Akeywordmustbe4to10digitsinlength.
The [CONFIRM KEYWORD] screen will be displayed.
NOTE:Makeanoteofyourpasswordandstoreitinasafeplace.
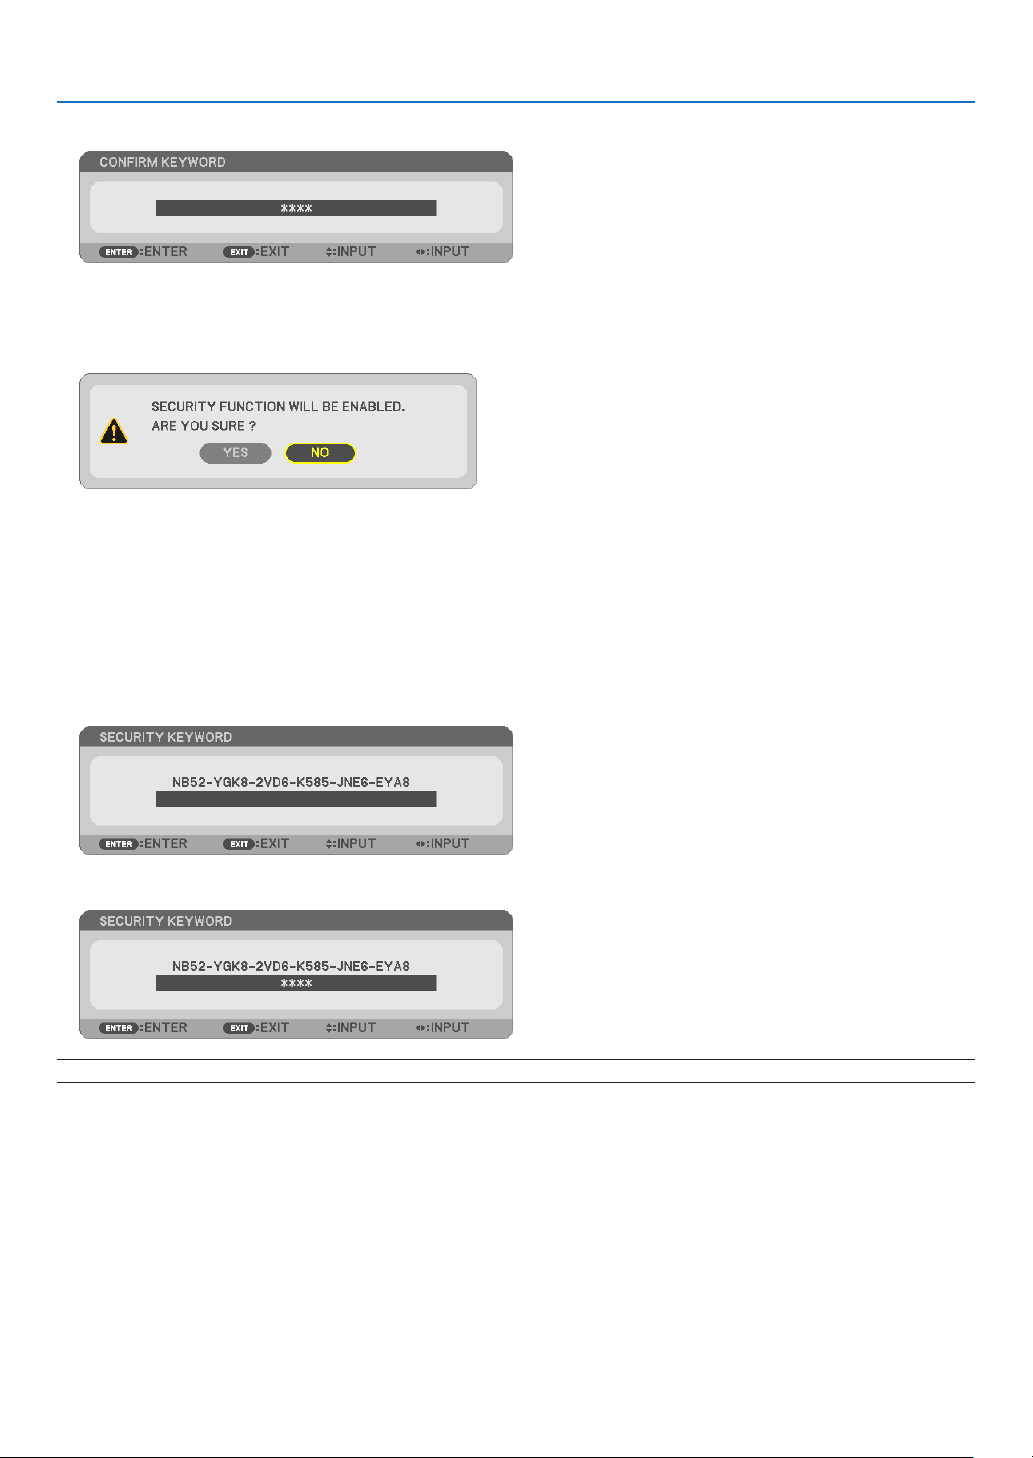
31
3. Convenient Features
7.TypeinthesamecombinationofbuttonsandpresstheENTERbutton.
The confirmation screen will be displayed.
8.Select[YES]andpresstheENTERbutton.
The SECURITY function has been enabled.
Toturnontheprojectorwhen[SECURITY]isenabled:
1.PressthePOWERbutton.
Theprojectorwillbeturnedonanddisplayamessagetotheeffectthattheprojectorislocked.
2.PresstheMENUbutton.
3.TypeinthecorrectkeywordandpresstheENTERbutton.Theprojectorwilldisplayanimage.
NOTE:Thesecuritydisablemodeismaintaineduntilthemainpoweristurnedofforunpluggingthepowercord.
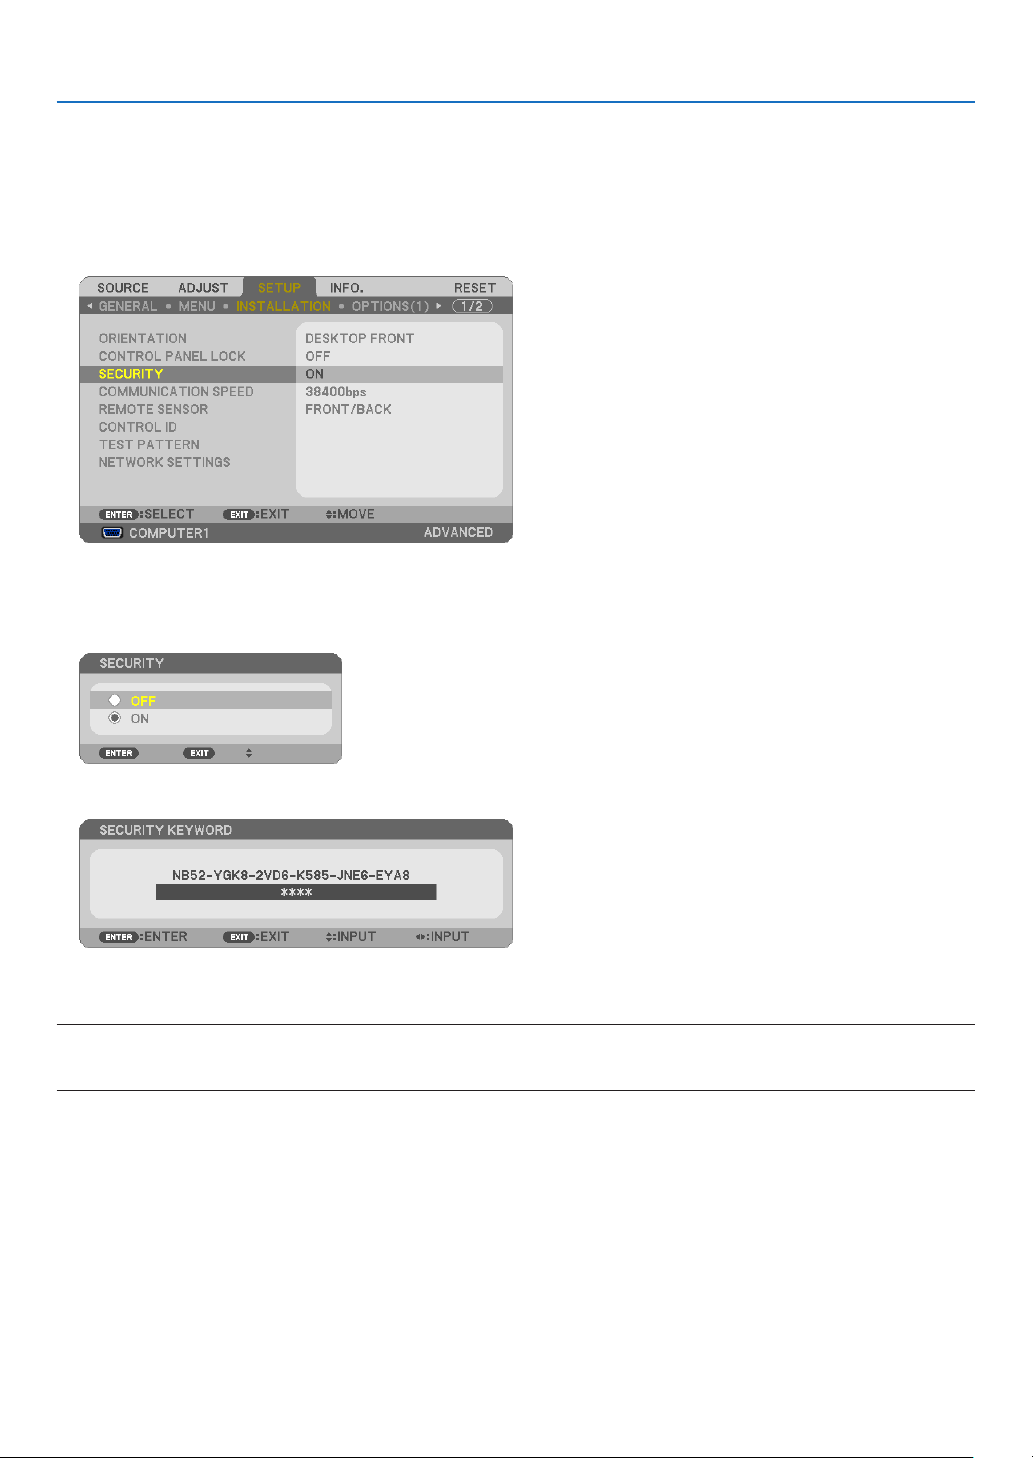
32
3. Convenient Features
To disable the SECURITY function:
1.PresstheMENUbutton.
The menu will be displayed.
2.Select[SETUP][INSTALLATION][SECURITY]andpresstheENTERbutton.
The OFF/ON menu will be displayed.
3.Select[OFF]andpresstheENTERbutton.
The SECURITY KEYWORD screen will be displayed.
4.TypeinyourkeywordandpresstheENTERbutton.
Whenthecorrectkeywordisentered,theSECURITYfunctionwillbedisabled.
NOTE:Ifyouforgetyourkeyword,contactyourdealer.Yourdealerwillprovideyouwithyourkeywordinexchangeforyourrequest
code.YourrequestcodeisdisplayedintheKeywordConrmationscreen.Inthisexample[NB52-YGK8-2VD6-K585-JNE6-EYA8]
isarequestcode.
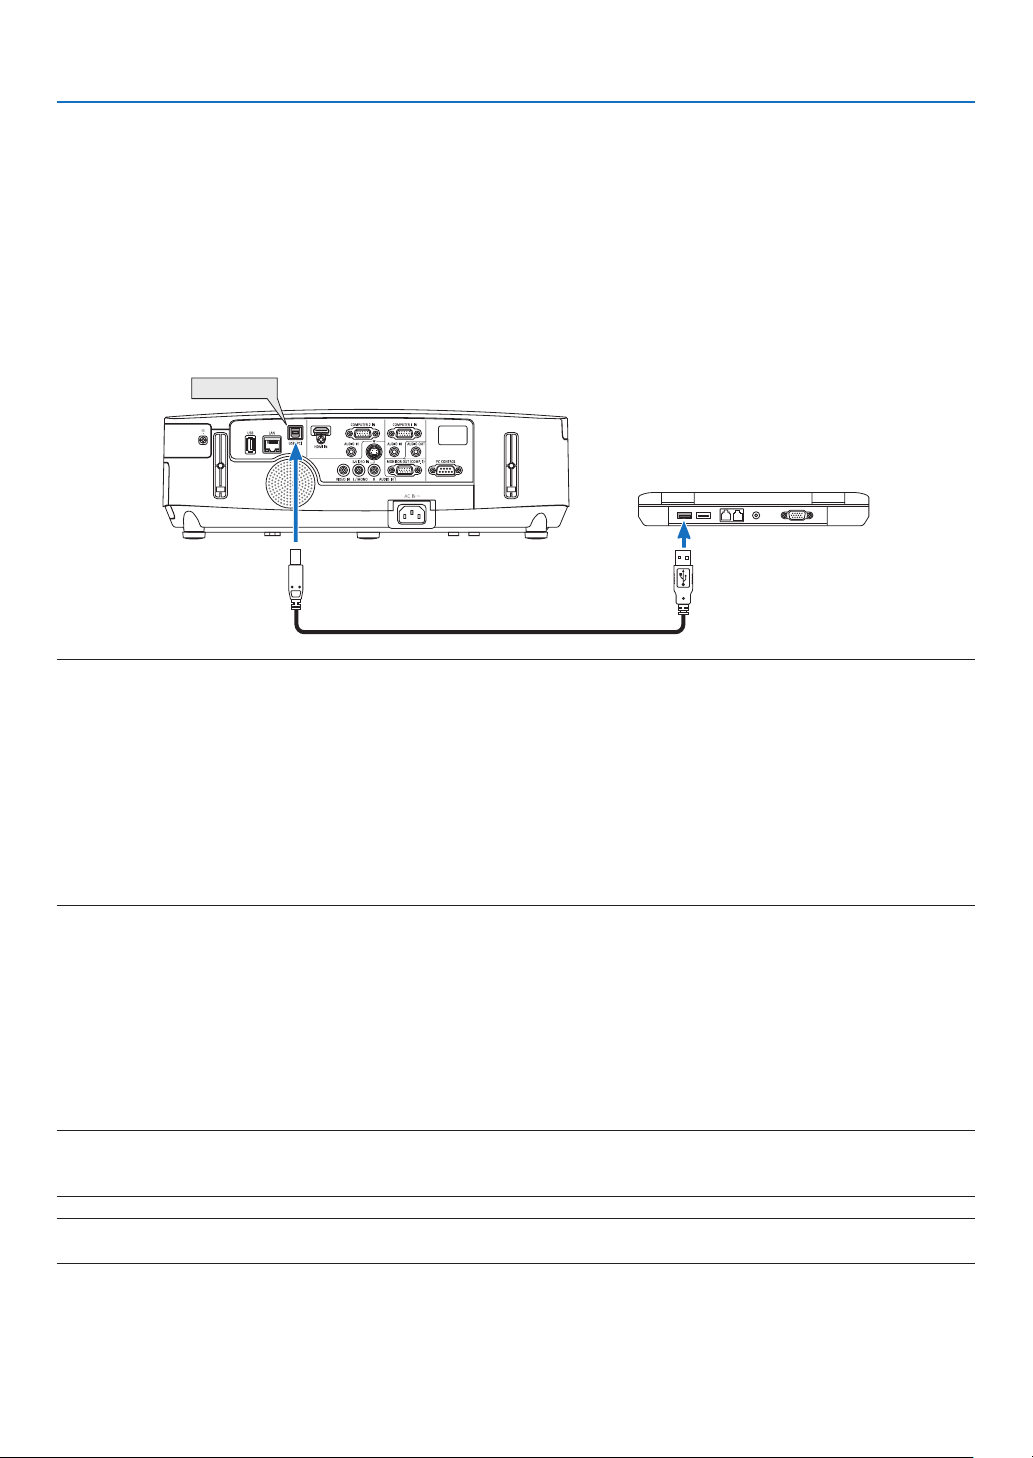
33
3. Convenient Features
Operating Your Computer’s Mouse Functions from the Projector’s
Remote Control via the USB Cable (Remote Mouse Function)
Thebuilt-inremotemousefunctionenablesyoutooperateyourcomputer’smousefunctionsfromthesuppliedremote
controlwhentheprojectorisconnectedtoacomputerviaacommerciallyavailableUSBcable(compatiblewithUSB
2.0specications).
TheRemoteMousefunctionworksfortheCOMPUTER1orCOMPUTER2inputwhilethecomputerscreenisdis-
played.
TheRemoteMousefunctionwillnotworkwhileyoufreezeormagnifyanimage.
-UsingtheUSBcabletoconnecttheprojectorandthecomputerwillalsostartUSBDisplayfunction.(page
34)
USB (PC)
NOTE:
•AUSBcablemustsupporttheUSB2.0Specications.
•Themousefunctioncanbeusedwiththefollowingoperatingsystems:
Windows7,WindowsXP,orWindowsVista
•InolderversionthanSP2ofWindowsXP,ifthemousecursorwillnotmovecorrectly,dothefollowing:
CleartheEnhancepointerprecisioncheckboxunderneaththemousespeedsliderintheMousePropertiesdialogbox[Pointer
Optionstab].
•Waitatleast5secondsafterdisconnectingtheUSBcablebeforereconnectingitandviceversa.Thecomputermaynotidentify
theUSBcableifitisrepeatedlyconnectedanddisconnectedinrapidintervals.
NOTE:
•ConnecttheprojectortothecomputerwithaUSBcableafterstartingthecomputer.Failuretosomayfailtostartthecomputer.
Operating your computer’s mouse from the remote control
Youcanoperateyourcomputer’smousefromtheremotecontrol.
PAGE / Button ...........................scrolls the viewing area of the window or to move to the previous or next slide in PowerPoint
on your computer.
Buttons ..............................moves the mouse cursor on your computer.
MOUSE L-CLICK/ENTER Button ......works as the mouse left button.
MOUSE R-CLICK Button ..................works as the mouse right button.
NOTE:
•Whenyouoperatethecomputerusingtheorbuttonwiththemenudisplayed,boththemenuandthemousepointer
willbeaffected.Closethemenuandperformthemouseoperation.
TIP:YoucanchangethePointerspeedontheMousePropertiesdialogboxontheWindows.Formoreinformation,seetheuser
documentationoronlinehelpsuppliedwithyourcomputer.
USB cable (not supplied)
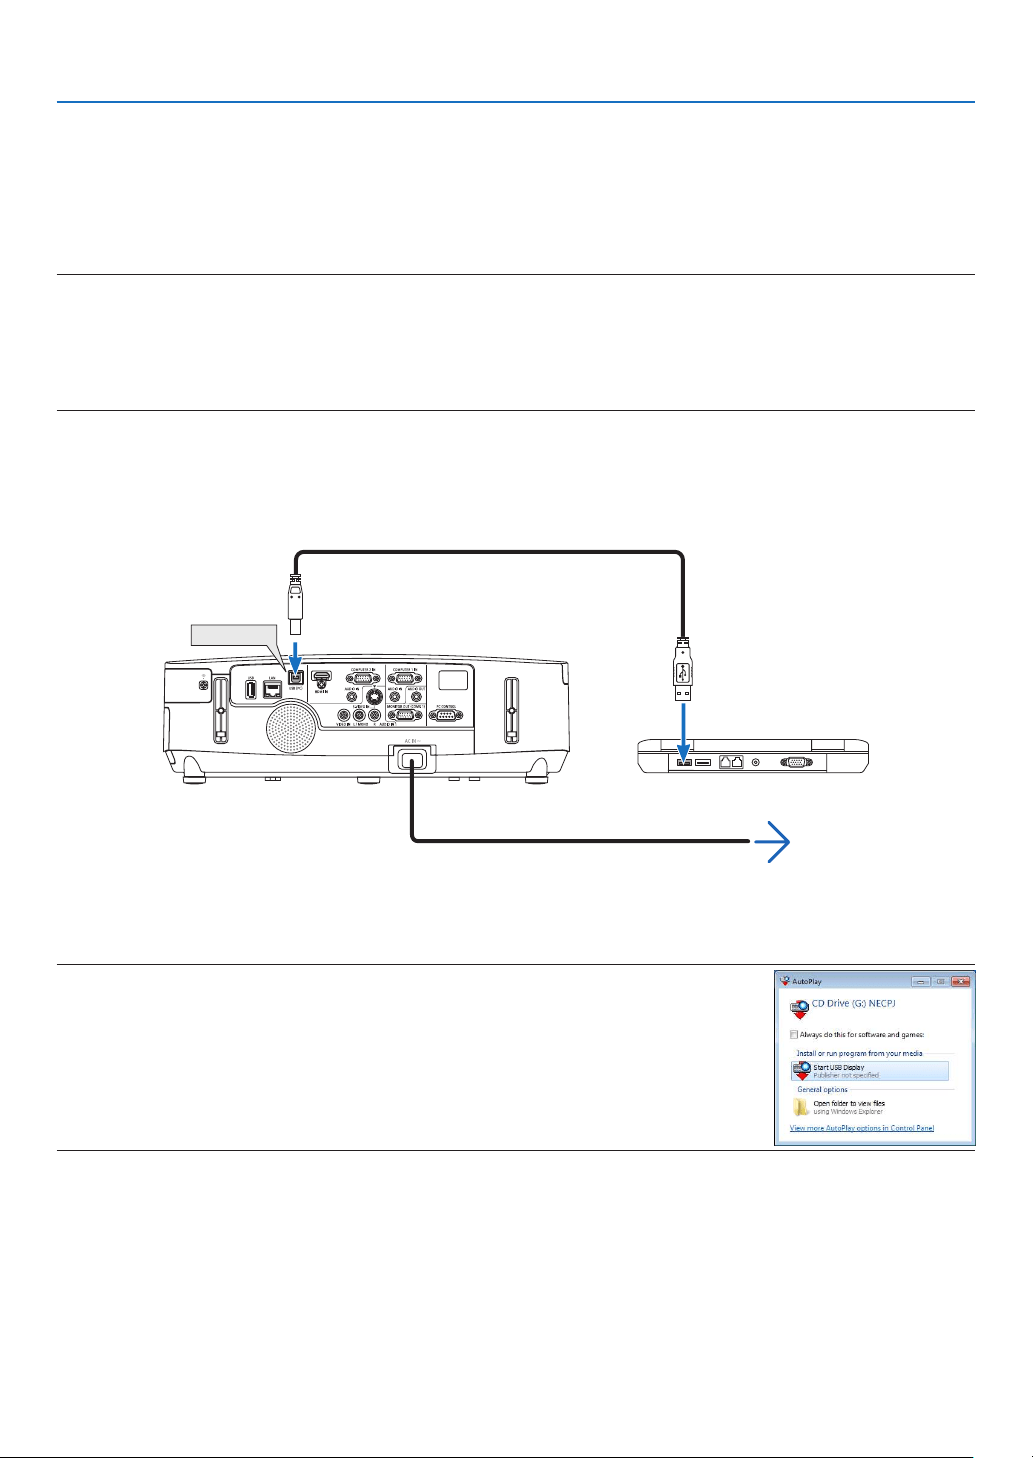
34
3. Convenient Features
Projecting Your Computer’s Screen Image from the Projector
via the USB Cable (USB Display)
UsingacommerciallyavailableUSBcable(compatiblewithUSB2.0specications)toconnectthecomputerwiththe
projectorallowsyoutosendyourcomputerscreenimagetotheprojectorfordisplaying.PowerOn/Offandsource
selectionoftheprojectorcanbedonefromyourcomputerwithoutconnectingacomputercable(VGA).
NOTE:
•TomakeUSBDISPLAYavailableonWindowsXP,theWindowsuseraccountmusthave“Administrator”privilege.
•USBDisplayusesfunctionsofImageExpressUtilityLitecontainedonNECProjectorCD-ROM(page160).
StartingUSBDisplay,however,willnotinstallImageExpressUtilityLiteonyourcomputer.ThisisbecauseUSBDisplayexecutes
theprojector’sprogramonly.
•USBDisplaywillnotworkin[POWER-SAVING]of[STANDBYMODE].(page99)
1.Startthecomputer.
2.Connecttheprojector’spowercordtothewalloutletandputtheprojectorintostandbycondition.
•Opentheprojector’slenscover.
3.UsetheUSBcabletoconnectthecomputerwiththeprojector.
USB (PC)
The message “The projector is in standby mode. Connect it?” will be displayed on the computer screen.
•ThecontrolwindowofImageExpressUtilityLitewillbedisplayedonthetopofthescreen.
NOTE:Dependingonthecomputersetting,the“AutoPlay”windowmaybedisplayedwhenthe
computerdetectstheconnectiontotheprojector.Ifthishappens,clickthe“StartUSBDisplay”
window.
4.Click“Yes”.
The projector will turn on and the message “The projector is getting ready. Please wait.” will be displayed on the
computer screen. This message will disappear in a few seconds.
USB cable (not supplied)
To wall outlet
Power cord (supplied)
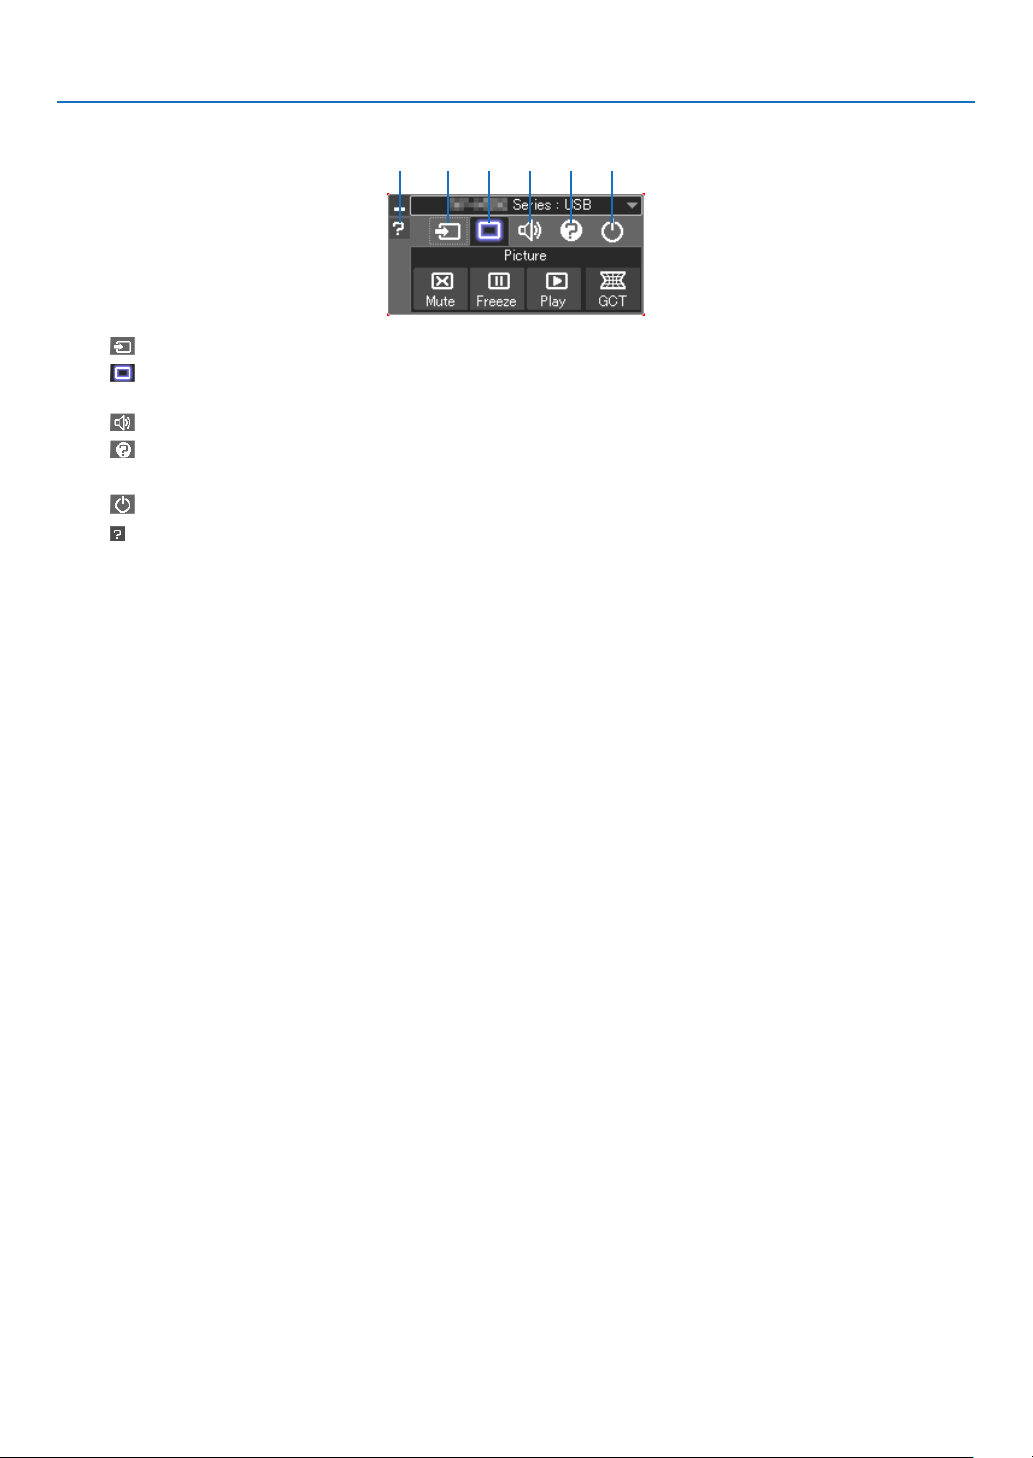
35
3. Convenient Features
5.Operatethecontrolwindow.
(1) (Source) ..... Selects an input source of the projector.
(2)
(Picture) .... Turns on or off the AV-MUTE (Picture mute), FREEZE (Freeze a picture), and Geometric Correction Tool
(GCT) functions.
(3)
(Sound) ..... Turns on or off AV-MUTE (Sound mute), play the sound and turns up or down the volume.
(4)
(Etc) ........... Uses “Update”, “HTTP Server”*, “Settings” and “Information”.
* The HTTP Server cannot be selected when a USB cable is connected.
(5)
(Exit) .......... Exit Image Express Utility Lite. You can also turn off the projector at the same time.
(6)
(Help) ........... Displays the help of Image Express Utility Lite.
(1) (2) (3) (4) (5)(6)

36
3. Convenient Features
Controlling the Projector by Using an HTTP Browser
Overview
TheHTTPServerfunctionprovidessettingsandoperationsfor:
1.Settingforwired/wirelessnetwork(NETWORKSETTINGS)
To use wireless LAN connection, the optional USB Wireless LAN Unit is required. ( page 139)
(The North American models are distributed with the USB Wireless LAN Unit as standard.)
To use wired/wireless LAN connection, connect the projector to the computer with a commercially available LAN
cable. (
page 138)
2.SettingAlertMail(ALERTMAIL)
Whentheprojectorisconnectedtoawired/wirelessnetwork,lampreplacetimeorerrormessageswillbesentvia
e-mail.
3.Operatingtheprojector
Power on/off, selecting input, volume control and picture adjustments are possible.
4.SettingPJLinkPASSWORDandAMXBEACON
TwowaysofaccesstotheHTTPserverfunctionareavailable:
•StarttheWebbrowseronthecomputerviathenetworkconnectedtotheprojectorandenterthefollowing
URL:
http://<theprojector’sIPaddress>/index.html
•UseImageExpressUtilityLitecontainedonthesuppliedNECProjectorCD-ROM.
TIP:ThefactorysettingIPaddressis[DHCPON].
NOTE:
•Tousetheprojectorinanetwork,consultwithyournetworkadministratoraboutnetworksettings.
•Thedisplay’sorbutton’sresponsecanbesloweddownoroperationmaynotbeaccepteddependingthesettingsofyournet-
work.
Shouldthishappen,consultyournetworkadministrator.Theprojectormaynotrespondifitsbuttonsarerepeatedlypressedin
rapidintervals.Shouldthishappen,waitamomentandrepeat.Ifyoustillcan’tgetanyresponse,turnoffandbackontheprojec-
tor.
•IfthePROJECTORNETWORKSETTINGSscreendoesnotappearinthewebbrowser,presstheCtrl+F5keystorefreshyourweb
browser(orclearthecache).
•Thisdeviceuses“JavaScript”and“Cookies”andthebrowsershouldbesettoacceptthesefunctions.Thesettingmethodwill
varydependingontheversionofbrowser.Pleaserefertothehelplesandtheotherinformationprovidedinyoursoftware.
Preparation before Use
ConnecttheprojectortoacommerciallyavailableLANcablebeforeengaginginbrowseroperations.(page
138)
Operationwithabrowserthatusesaproxyservermaynotbepossibledependingonthetypeofproxyserverandthe
settingmethod.Althoughthetypeofproxyserverwillbeafactor,itispossiblethatitemsthathaveactuallybeenset
willnotbedisplayeddependingontheeffectivenessofthecache,andthecontentssetfromthebrowsermaynotbe
reectedinoperation.Itisrecommendedthataproxyservernotbeusedunlessitisunavoidable.
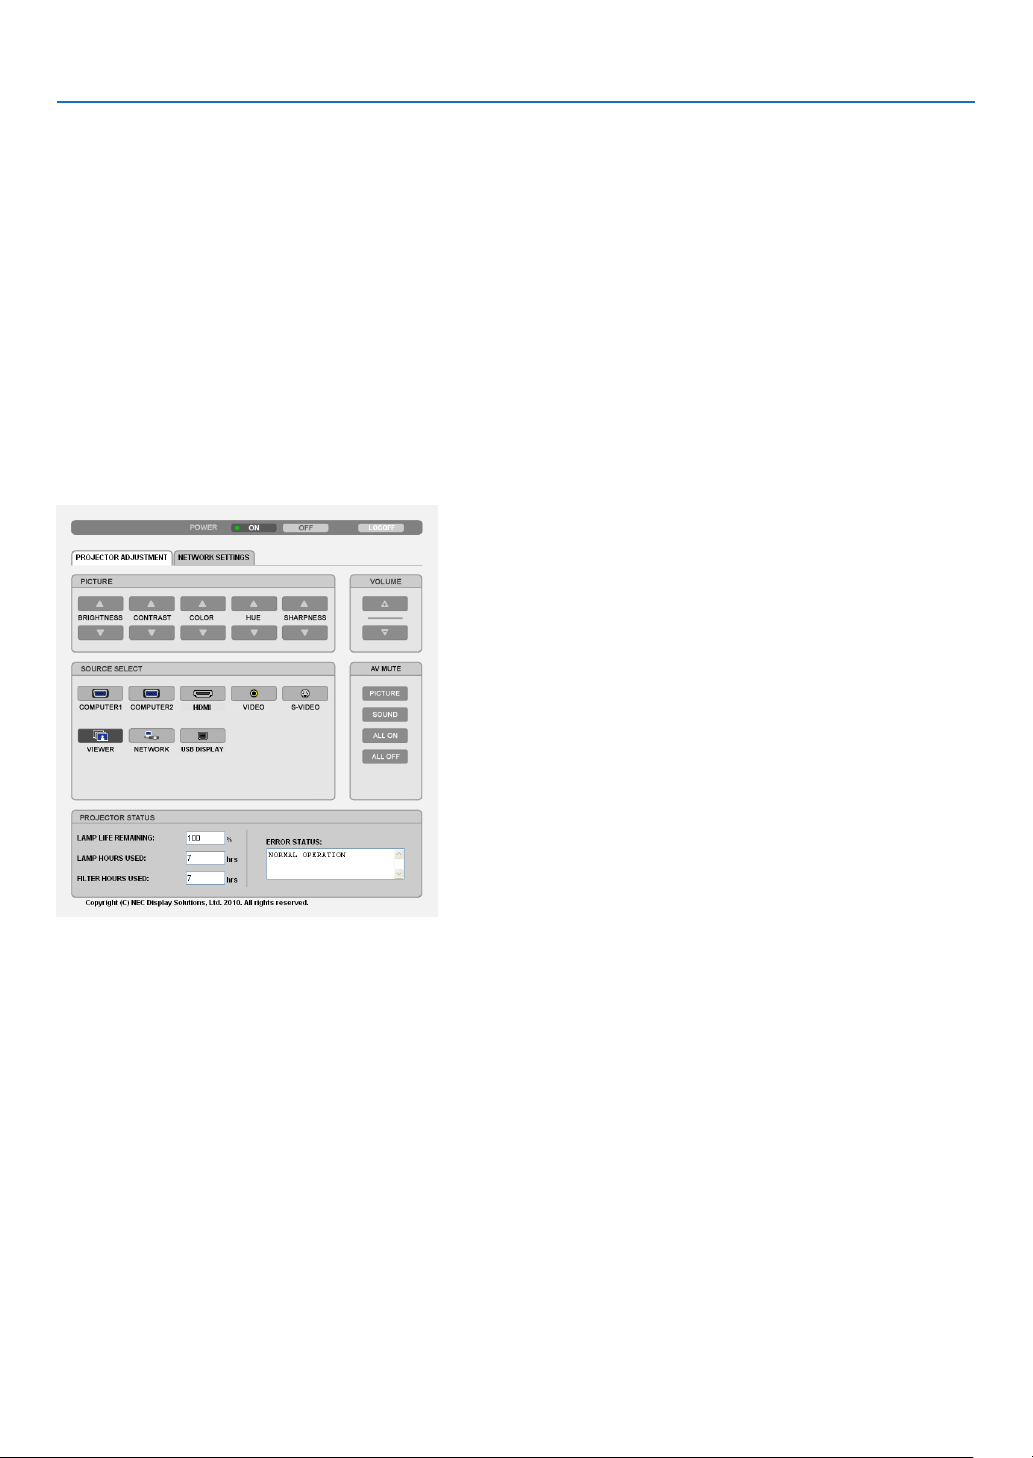
37
3. Convenient Features
Handling of the Address for Operation via a Browser
RegardingtheactualaddressthatisenteredfortheaddressorenteredtotheURLcolumnwhenoperationofthepro-
jectorisviaabrowser,thehostnamecanbeusedasitiswhenthehostnamecorrespondingtotheIPaddressofthe
projectorhasbeenregisteredtothedomainnameserverbyanetworkadministrator,orthehostnamecorresponding
totheIPaddressoftheprojectorhasbeensetinthe“HOSTS”leofthecomputerbeingused.
Example1:Whenthehostnameoftheprojectorhasbeensetto“pj.nec.co.jp”,accessisgainedtothenetwork
settingbyspecifying
http://pj.nec.co.jp/index.html
fortheaddressortheentrycolumnoftheURL.
Example2:WhentheIPaddressoftheprojectoris“192.168.73.1”,accessisgainedtothenetworksettingby
specifying
http://192.168.73.1/index.html
fortheaddressortheentrycolumnoftheURL.
PROJECTOR ADJUSTMENT
POWER:Thiscontrolsthepoweroftheprojector.
ON ......................... Power is switched on.
OFF ........................ Power is switched off.
VOLUME:Thiscontrolsthevolumeoftheprojector.
........................... Increases the volume adjustment value.
........................... Decreases the volume adjustment value.
AV-MUTE:Thiscontrolsthemutefunctionoftheprojector.
PICTURE ON .......... Mutes the video.
PICTURE OFF ......... Cancels the video muting.
SOUND ON ............ Mutes the audio.
SOUND OFF ........... Cancels the audio muting.
ALL ON .................. Mutes each of the video, and audio functions.
ALL OFF ................. Cancels the muting of each of the video, and audio functions.

38
3. Convenient Features
PICTURE:Controlsthevideoadjustmentoftheprojector.
BRIGHTNESS .... Increases the brightness adjustment value.
BRIGHTNESS .... Decreases the brightness adjustment value.
CONTRAST ........ Increases the contrast adjustment value.
CONTRAST ........ Decreases the contrast adjustment value.
COLOR .............. Increases the color adjustment value.
COLOR .............. Decreases the color adjustment value.
HUE ................... Increases the hue adjustment value.
HUE ................... Decreases the hue adjustment value.
SHARPNESS ..... Increases the sharpness adjustment value.
SHARPNESS ..... Decreases the sharpness adjustment value.
•Thefunctionsthatcanbecontrolledwillvarydependingonthesignalbeinginputtotheprojector.(page
85)
SOURCESELECT:Thisswitchestheinputconnectoroftheprojector.
COMPUTER 1 ........ Switches to the COMPUTER 1 IN connector.
COMPUTER 2 ........ Switches to the COMPUTER 2 IN connector.
HDMI ..................... Switches to the HDMI IN connector.
VIDEO .................... Switches to the VIDEO IN connector.
S-VIDEO ................ Switches to the S-VIDEO IN connector.
VIEWER ................. Switches to the data on the USB memory device.
NETWORK ............. Switches to a LAN signal.
USB DISPLAY ........ Switches to the USB Port (PC).
PROJECTORSTATUS:Thisdisplaystheconditionoftheprojector.
LAMP LIFE REMAINING .....Displays the remaining life of the lamp as a percentage.
LAMP HOURS USED ...........Displays how many hours the lamp has been used.
FILTER HOURS USED .........Displays how many hours the filter has been used.
ERROR STATUS .................. Displays the status of errors occurring within the projector.
LOGOFF:Loggingoffyourprojectorandreturningtotheauthenticationscreen(LOGONscreen).

39
3. Convenient Features
NETWORK SETTINGS
•SETTINGS
WIRED or WIRELESS
SETTINGSetforwiredLANorforwirelessLAN.
APPLYApplyyoursettingstowiredLANorwirelessLAN.
DHCPONAutomaticallyassignIPaddress,subnetmask,andgatewaytotheprojectorfromyour
DHCPserver.
DHCPOFFSetIPaddress,subnetmask,andgatewaytotheprojectorassignedbyyournetwork
administrator.
IPADDRESSSetyourIPaddressofthenetworkconnectedtotheprojector.
SUBNETMASKSetyoursubnetmasknumberofthenetworkconnectedtotheprojector.
GATEWAYSetthedefaultgatewayofthenetworkconnectedtotheprojector.
WINSSettheIPaddressofyourWINSserverofthenetworkconnectedtotheprojectorwhen
[DHCP]isturnedon,thisoptionisnotavailable.
AUTODNSONDHCPserverwillautomaticallyassignIPaddressofDNSserverconnectedtothe
projector.
AUTODNSOFFSetyourIPaddressofDNSserverconnectedtotheprojector.
Setting for WIRED LAN
PROFILE1/PROFILE2TwosettingscanbesetforwiredLANconnection.SelectPROFILE1orPROFILE2.
DISABLETurnoffwiredLANconnection
Setting for WIRELESS LAN (the optional Wireless LAN Unit required for Europe, Australia, and Asian coun-
tries)
EASYCONNECTIONExecuteawirelessLANusingEASYCONNECTION.
SIMPLEACCESPOINTSettheprojectorforsimpleaccesspoint.
WPSUseWPS(Wi-FiProtectedSetup™)tosetupthewirelessLANfortheprojector.
CHANNELSelectachannel.Availablechannelsvarydependingonthecountryandregion.When
youselect[INFRASTRUCTURE],makesurethattheprojectorandyouraccesspoint
areonthesamechannel;whenyouselect[ADHOC],makesurethattheprojectorand
yourcomputerareonthesamechannel.
PROFILE1/PROFILE2TwosettingscanbesetforwirelessLANconnection.SelectPROFILE1orPROFILE
2.

40
3. Convenient Features
SSIDEnteranidentier(SSID)forwirelessLAN.Communicationcanbedoneonlywith
equipmentwhoseSSIDmatchesSSIDforyourwirelessLAN.
SITESURVEYDisplaysalistofavailableSSIDsforwirelessLANonsite.SelectanSSIDwhichyou
canaccess.
NETWORKTYPESelectcommunicationmethodwhenusingwirelessLAN.
INFRASTRUCTURE:Selectthisoptionwhencommunicatingwithoneormoreequip-
mentconnectedtothewirelessLANnetworkviaawirelessaccesspoint.
ADHOC:SelectthisoptionwhenusingthewirelessLANtodirectlycommunicatewith
acomputerinpeer-to-peermode.
SECURITYTYPE
Turnonorofftheencryptionmodeforsecuretransmission.Whenturnontheencryp-
tionmode,setWEPkeyorencryptedkey.
DISABLEWillnotturnontheencryptionfeature.Yourcommunicationsmay
bemonitoredbysomeone.
WEP64bitUses64-bitdatalengthforsecuretransmission.
WEP128bitUses128-bitdatalengthforsecuretransmission.Thisoptionwill
increaseprivacyandsecuritywhencomparedtouseof64-bit
datalengthencryption.
WPA-PSKTKIP/
WPA-PSKAES/
WPA2-PSKTKIP/
WPA2-PSKAES/
WPA-EAPTKIPEAP-TLS/
WPA-EAPAESEAP-TLS/
WPA-EAPTKIPPEAP-MSCHAPv2/
WPA-EAPAESPEAP-MSCHAPv2/
WPA2-EAPTKIPEAP-TLS/
WPA2-EAPAESEAP-TLS/
WPA2-EAPTKIPPEAP-MSCHAPv2/
WPA2-EAPAESPEAP-MSCHAPv2
Theseoptionsparovidestrongersecurity
thanWEP.
NOTE:
•TheWEPsettingsmustbethesameascommunicationdevicessuchasPCoraccesspointin
yourwirelessnetwork.
•WhenyouuseWEP,yourimagetransmissionspeedwillslowdown.
•OtherencryptionkeysthanWEP64bitandWEP128bitarenotavailablewhen[ADHOC]is
selectedfrom[NETWORKTYPE].
•Toinstalladigitalcerticate,usetheprojector’smenu.(page112)
INDEX
Selectencryptionkeywhenselecting[WEP64bit]or[WEP128bit]in[SECURITY
TYPE].
KEY
Whenselecting[WEP64bit]or[WEP128bit]in[SECURITYTYPE]:
EnterWEPkey.
SelectCharacters(ASCII)Hexadecimaldigit(HEX)
WEP64bitUpto5charactersUpto10characters
WEP128bitUpto13charactersUpto26characters
Whenselecting[WPAPSK-TKIP],[WPAPSK-AES],[WPA2PSK-TKIP]or[WPA2
PSK-AES]:
Enterencryptionkey.Keylengthmustbe8orgreaterand63orless.
USERNAMESetausernameforWPA-EAP/WPA2-EAP.
PASSWORDSetapasswordforWPA-EAPTKIPPEAP-MSCHAPv2/WPA-EAPAESPEAP-MSCHAP
v2/WPA2-EAPTKIPPEAP-MSCHAPv2/WPA2-EAPAESPEAP-MSCHAPv2.

41
3. Convenient Features
USEDIGITALCERTIFI-
CATE
SelectthisifyouuseadigitalcerticateforWPA-EAPTKIPPEAP-MSCHAPv2/WPA-
EAPAESPEAP-MSCHAPv2/WPA2-EAPTKIPPEAP-MSCHAPv2/WPA2-EAPAES
PEAP-MSCHAPv2.
•NAME
PROJECTORNAMEEnteranameforyourprojectorsothatyourcomputercanidentifytheprojector.A
projectornamemustbe16charactersorless.
TIP:Projectornamewillnotbeaffectedevenwhen[RESET]isdonefromthemenu.
HOSTNAMEEnterthehostnameofthenetworkconnectedtotheprojector.Ahostnamemustbe
15orless.
DOMAINNAMEEnterthedomainnameofthenetworkconnectedtotheprojector.Adomainname
mustbe60charactersorless.
•ALERTMAIL
ALERTMAILThisoptionwillnotifyyourcomputeroflampreplacetimeorerrormessagesviae-mail
whenusingwirelessorwiredLAN.
PlacingacheckmarkwillturnontheAlertMailfeature.
ClearingacheckmarkwillturnofftheAlertMailfeature.
Sampleofamessagetobesentfromtheprojector:
Thelampandltersareattheendofitsusablelife.Pleasereplacethelampand
lters.
ProjectorName:NECProjector
LampHoursUsed:100[H]
SENDER’SADDRESSEntersender’saddress.
SMTPSERVERNAMEEntertheSMTPservernametobeconnectedtotheprojector.
RECIPIENT’SADDRESS
1,2,3
Enteryourrecipient’saddress.Uptothreeaddressescanbeentered.
TESTMAIL
Sendatestmailtocheckwhetheryoursettingsarecorrectornot
NOTE:
•Ifyouexecuteatest,youmaynotreceiveanAlertmail.Shouldthishappen,checkifnetwork
settingsarecorrect.
•Ifyouenteredanincorrectaddressinatest,youmaynotreceiveanAlertmail.Shouldthis
happen,checkiftheRecipient’sAddressiscorrect.
SAVEClickthisbuttontosaveyoursettingstotheprojector’smemory.

42
3. Convenient Features
•NETWORKSERVICE
PJLinkPASSWORDSetapasswordforPJLink*.Apasswordmustbe32charactersorless.Donotforget
yourpassword.However,ifyouforgetyourpassword,consultwithyourdealer.
HTTPPASSWORDSetapasswordforHTTPserver.Apasswordmustbe10charactersorless.
AMXBEACONTurnonorofffordetectionfromAMXDeviceDiscoverywhenconnectingtothenetwork
supportedbyAMX’sNetLinxcontrolsystem.
TIP:
WhenusingadevicethatsupportsAMXDeviceDiscovery,allAMXNetLinxcontrolsystemwillrec-
ognizethedeviceanddownloadtheappropriateDeviceDiscoveryModulefromanAMXserver.
PlacingacheckmarkwillenabledetectingtheprojectorfromAMXDeviceDiscovery.
ClearingacheckmarkwilldisabledetectingtheprojectorfromAMXDeviceDiscovery.
NOTE:Ifyouforgetyourpassword,contactyourdealer.
*WhatisPJLink?
PJLinkisastandardizationofprotocolusedforcontrollingprojectorsofdifferentmanufacturers.Thisstandardproto-
colisestablishedbyJapanBusinessMachineandInformationSystemIndustriesAssociation(JBMIA)in2005.
TheprojectorsupportsallthecommandsofPJLinkClass1.
SettingofPJLinkwillnotbeaffectedevenwhen[RESET]isdonefromthemenu.
•CRESTRON
DISABLEDisablesCrestronControl™.
ENABLEEnablesCrestronControl.
IPADDRESSSetyourIPaddressofCrestronserver.
IPIDSetyourIPIDofCrestronserver.
•INFORMATION
WIREDLANDisplayalistofsettingsofwiredLANconnection.
WIRELESSLANDisplayalistofsettingsofwirelessLANconnection.
UPDATEReectsettingswhentheyarechanged.
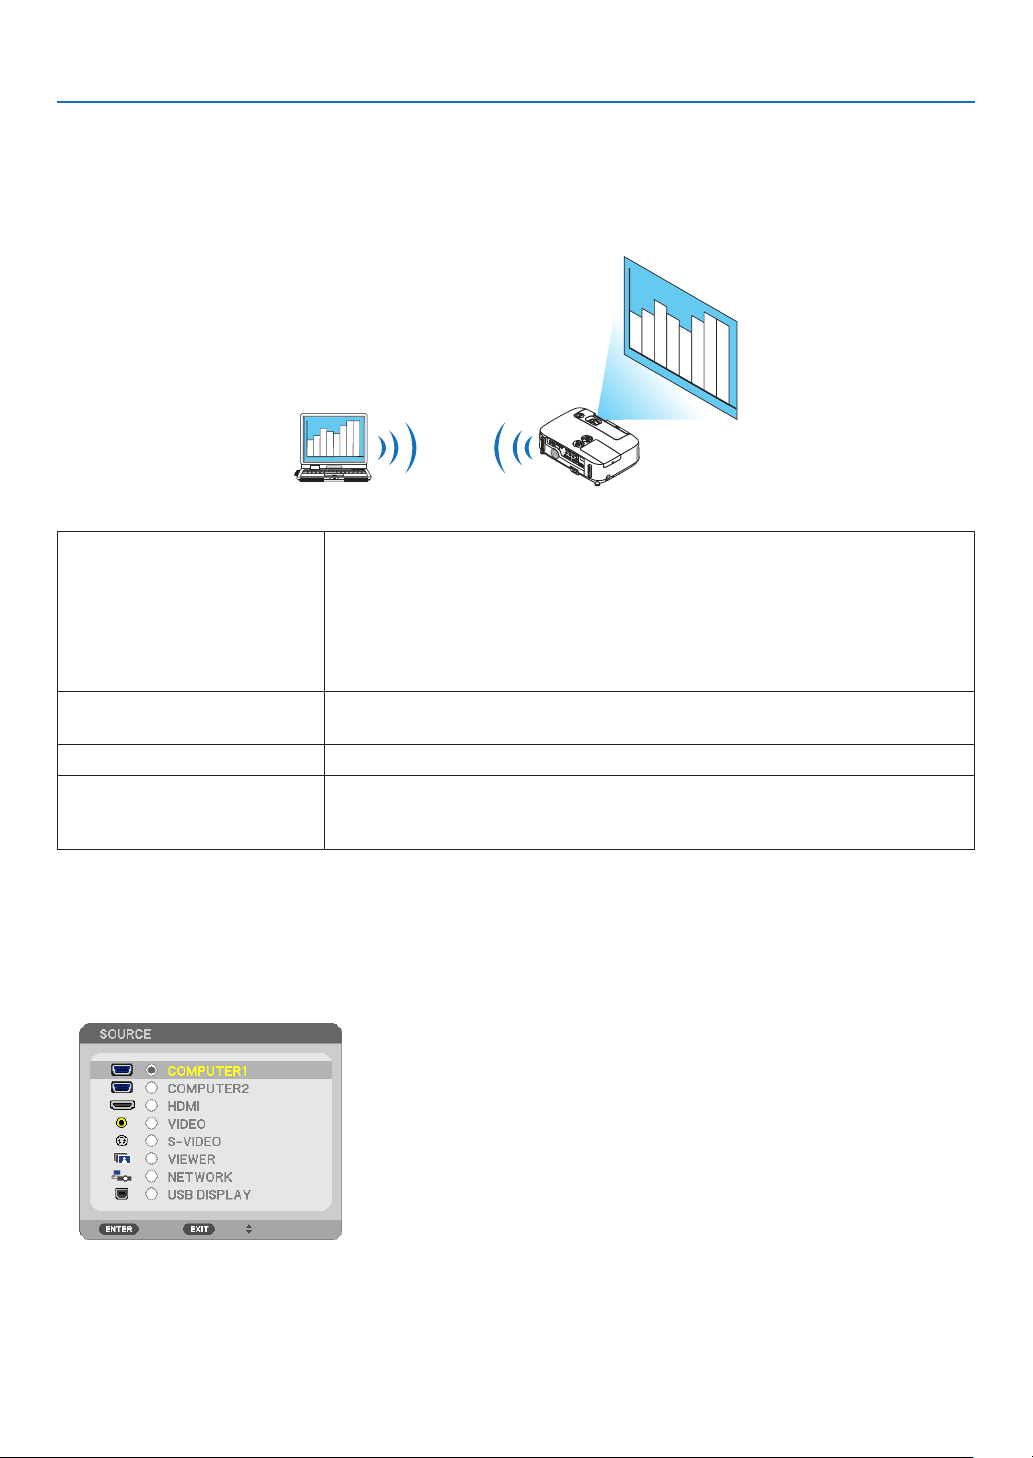
43
3. Convenient Features
Projecting Your Computer’s Screen Image from the Projector
via a Network [NETWORK PROJECTOR]
ByselectingtheprojectorconnectedtothesamenetworkasthatofyourPC,thePCscreenimagecanbeprojected
tothescreenvianetwork.Thereisnoneedofconnectionusingthecomputercable(VGA).
Operation Environment
ApplicableOSWindows7Professional
Windows7Ultimate
Windows7Enterprise
WindowsVistaHomePremium
WindowsVistaBusiness
WindowsVistaUltimate
WindowsVistaEnterprise
HardwarespecicationsThespecicationsrecommendedbyMicrosoftastheoperationenvironmentfor
Windows7/WindowsVistashouldbesatised.
NetworkEnvironmentWiredLANorwirelessLANenvironmentthatsupportsTCP/IPisrequired.
ScreencolorHighColor(16bits)
TrueColor(24bitsand32bits)
*Settingwith256colorsorlessisnotavailable.
SettingtheProjectortoNetworkProjectorInputMode
1.Withtheprojectorturnedon,presstheSOURCEbutton.
The input selection window appears.
Another way to display the input selection window is to press the NETWORK button on the remote control. The
APPLICATION MENU screen will be displayed. Go to step 3.
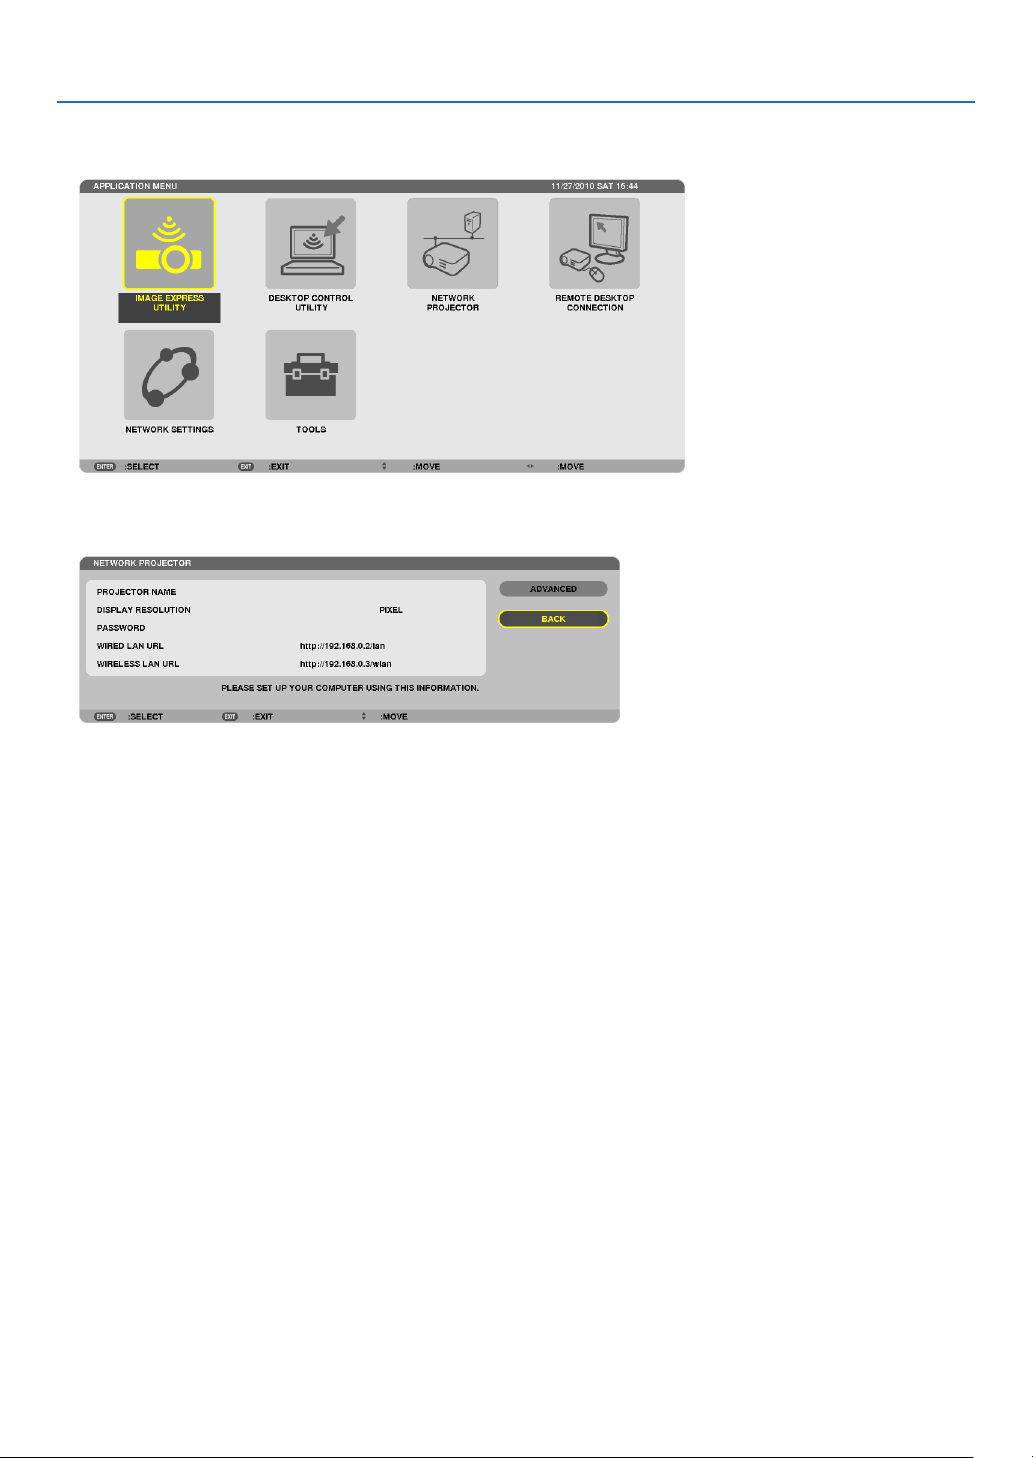
44
3. Convenient Features
2.PresstheSELECT
or buttontoselect[NETWORK]andpresstheENTERbutton.
In the screen, the [APPLICATION MENU] menu is displayed.
3.Fromthe[APPLICATIONMENU]menu,select[NETWORKPROJECTOR].
The [PROJECTOR NAME/DISPLAY RESOLUTION/PASSWORD/URL] will be displayed.
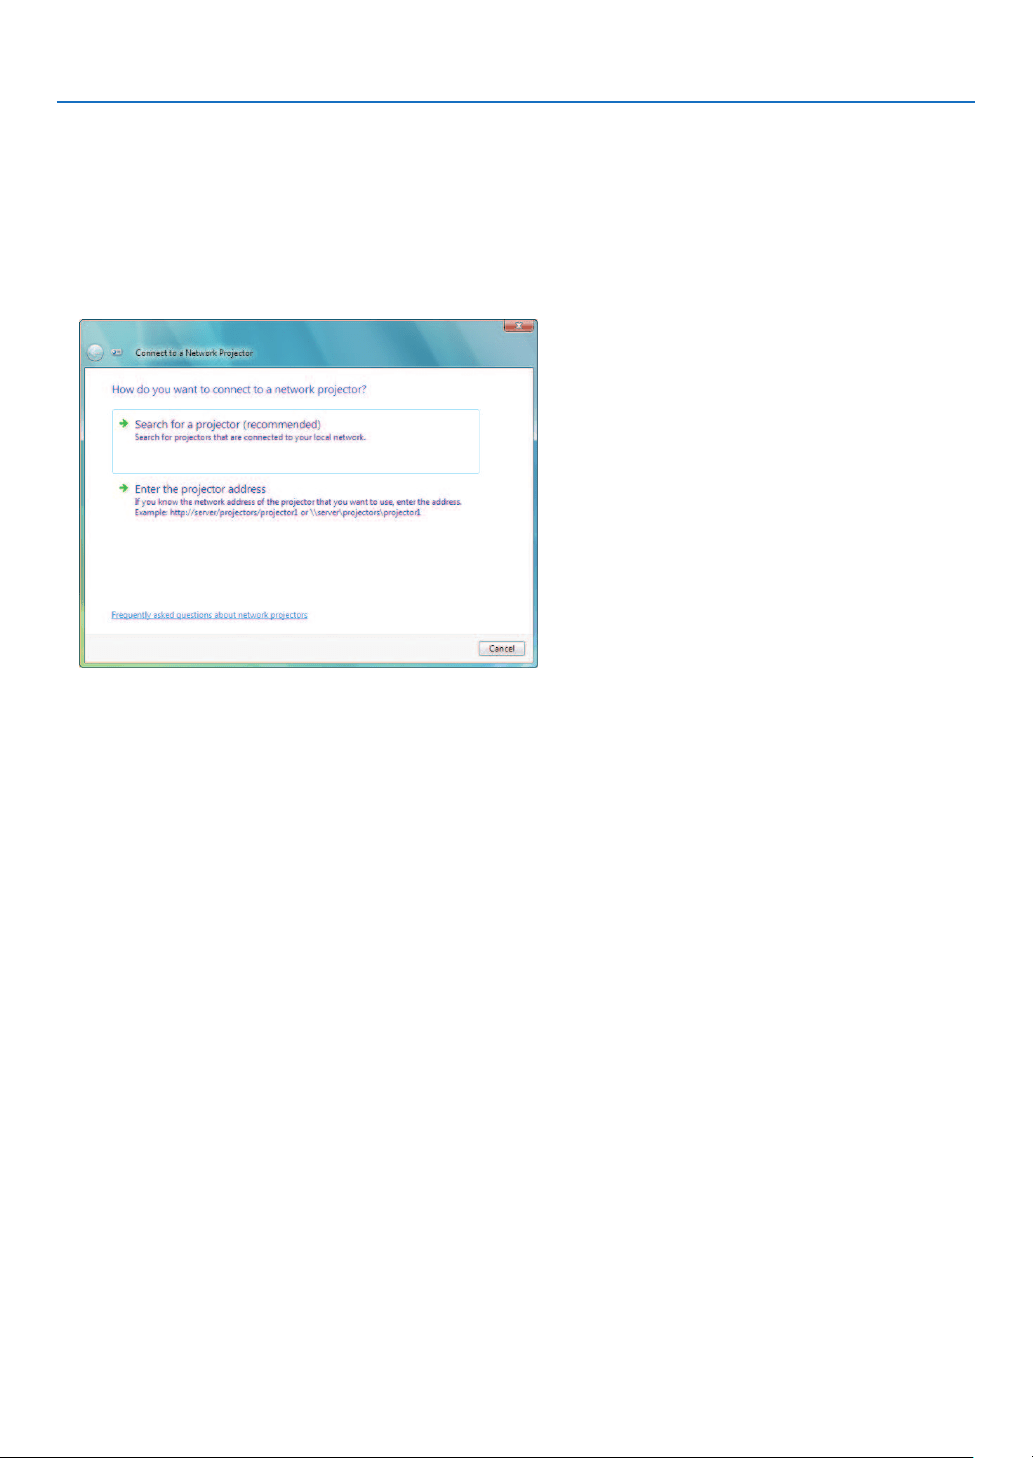
45
3. Convenient Features
ProjectingtheImagewithNetworkProjector
1.Click[Start]fromthedesktopofWindows7.
2.Click[AllPrograms].
3.Click[Accessories].
4.Click[ConnecttoaNetworkProjector].
Whenthe[PermissionConnecttoaNetworkProjector]windowappears,click[Yes.].
The“ConnecttoaNetworkProjector”windowappears.
5.Click[Searchforaprojector(recommended)].
In the “Available projectors” box, “P420 Series” is displayed.
6.Click[P420Series].
The message “Enter the password for the projector that you selected.” is displayed at the bottom of the window.
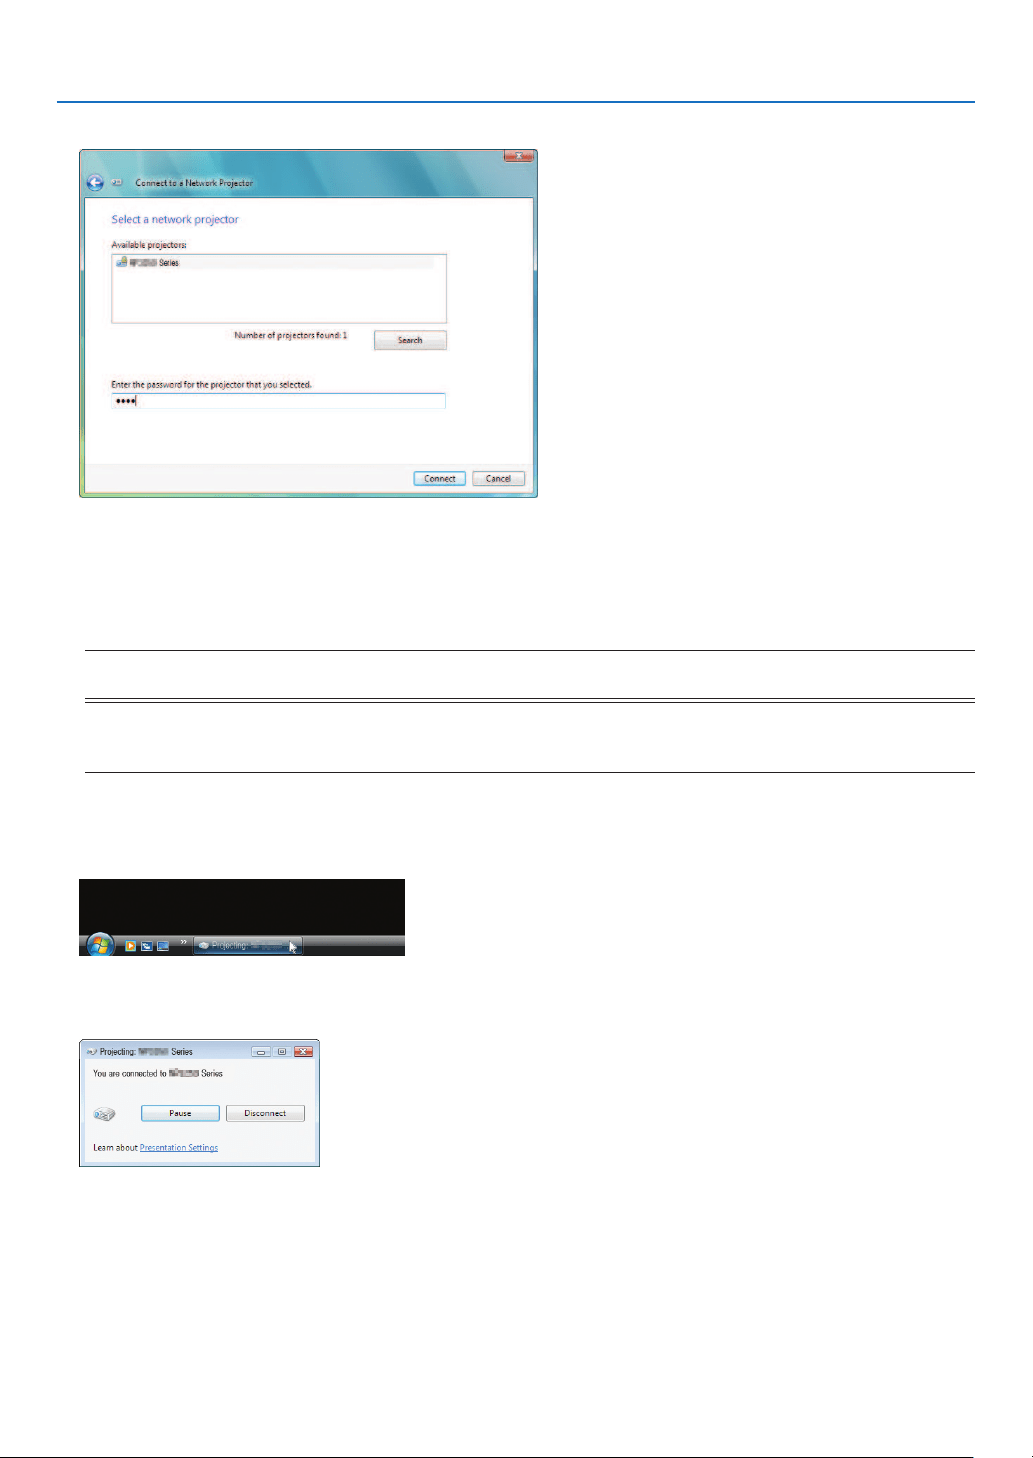
46
3. Convenient Features
7.Inputthepasswordtothepasswordinputboxdisplayedbytheoperationatstep3onpage44.
8.Click[Connect].
ThenetworkprojectorfunctionworksandthescreenofWindows7isprojectedfromtheprojector.
•Iftheresolutionofyourcomputer’sscreenisdifferentfromtheprojector’sscreenresolution,theNETWORK
PROJECTORfunctionmaynotwork.Ifthishappens,changetheresolutionofthecomputer’sscreentolower
resolution than the one displayed at Step 3 on page 44.
NOTE:Whenthenetworkprojectorfunctionworks,thebackgroundcolorofthedesktopchangestoblack.Whenthenetwork
projectorfunctionisstopped,theoriginalbackgroundcolorisrestored.
Reference:IftheprojectorcannotbefoundatStep5,click[Entertheprojectoraddress].Then,inputthe“Networkaddress”
(Inputexample:http://10.32.97.61/lan)and“Projectorpassword”(Inputexample:82291627)displayedinthescreenprojected
fromtheprojector.
ExitingtheNetworkProjectorOperation
1.Click[Projecting:P420Series]intheWindowsVistataskbar.
2.Click[Disconnect].
TheNetworkProjectorfunctionisstopped.
3.PresstheSOURCEbuttonoftheprojectortoselectaninputterminalotherthan[NETWORK].
When using the remote control, press a button other than the NETWORK button.
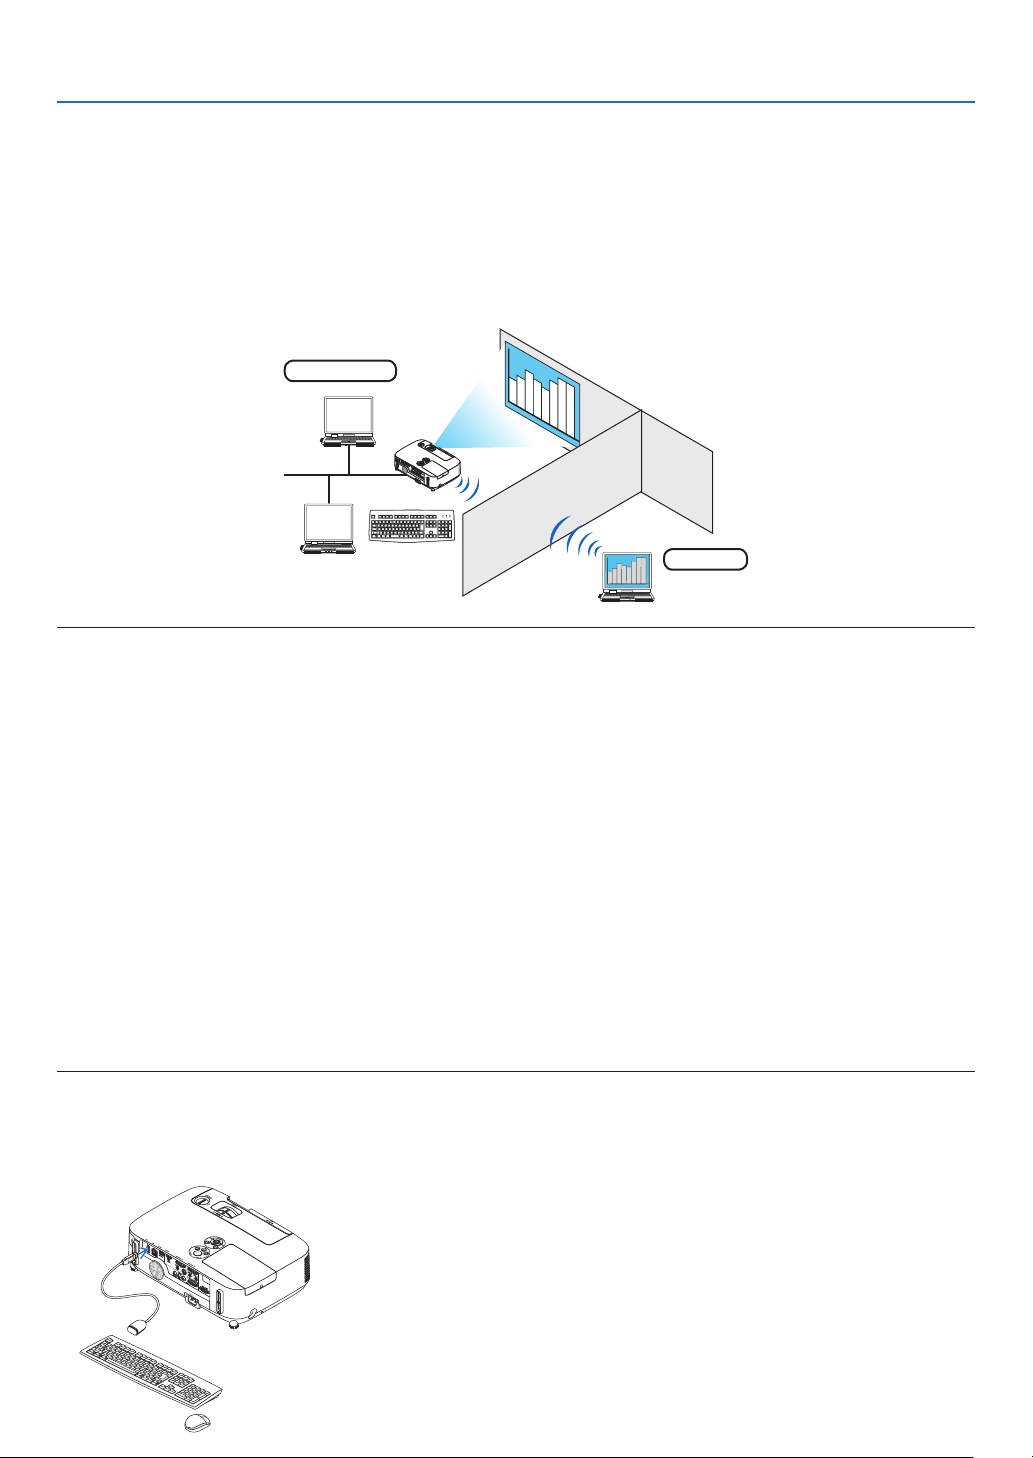
47
3. Convenient Features
Using the Projector to Operate Your Computer via a Network
[REMOTE DESKTOP]
•ByselectingthePCconnectedtothesamenetworkasthatoftheprojector,thePCscreenimagecanbeprojected
tothescreenvianetwork.
Then,byoperatingthekeyboard,youcanoperateWindows7,WindowsVistaorWindowsXPonthePCconnected
withthenetwork.
•WiththeRemoteDesktopfunction,youcanremotelyoperatethePCplacedatadistancefromtheprojector.
Meetingroom
Ofce
NOTE:
•The[REMOTEDESKTOP]functionwillworkonthefollowingWindowseditions.
Windows7Professional
Windows7Ultimate
Windows7Enterprise
WindowsVistaBusiness
WindowsVistaUltimate
WindowsVistaEnterprise
WindowsXPProfessionalwithServicePack3
(Note)
•Inthisuser’smanualthisfeatureisdescribedusingWindows7asanexample,butWindowsVistaandWindowsXPProfessional
ServicePack2orlaterwillalsoworkwiththisfeature.
•AkeyboardisrequiredtousetheRemoteDesktopfunction.
•TheRemoteDesktopfunctioncanbeoperatedwithakeyboard.Usingawirelessmousewithawirelesskeyboardismoreuseful
foroperating.
Useacommerciallyavailablewirelesskeyboard,awirelessmouse,andaUSBwirelessreceiver.
UseacommerciallyavailableUSBkeyboardandUSBmouse.
•AUSBkeyboardwithabuilt-inUSBhubcannotbeusedwiththeprojector.
•AwirelesskeyboardormousethatsupportsBluetoothcannotbeusedwiththeprojector.
•WedonotwarrantthattheUSBportoftheprojectorwillsupportallUSBdevicesinthemarket.
Prepareacommerciallyavailablewirelesskeyboard(USlayoutversion).
ConnecttheUSBwirelessreceivertotheUSBport(TypeA)oftheprojector.Makeallnecessarysettingsforyour
wirelesskeyboardandmouse.
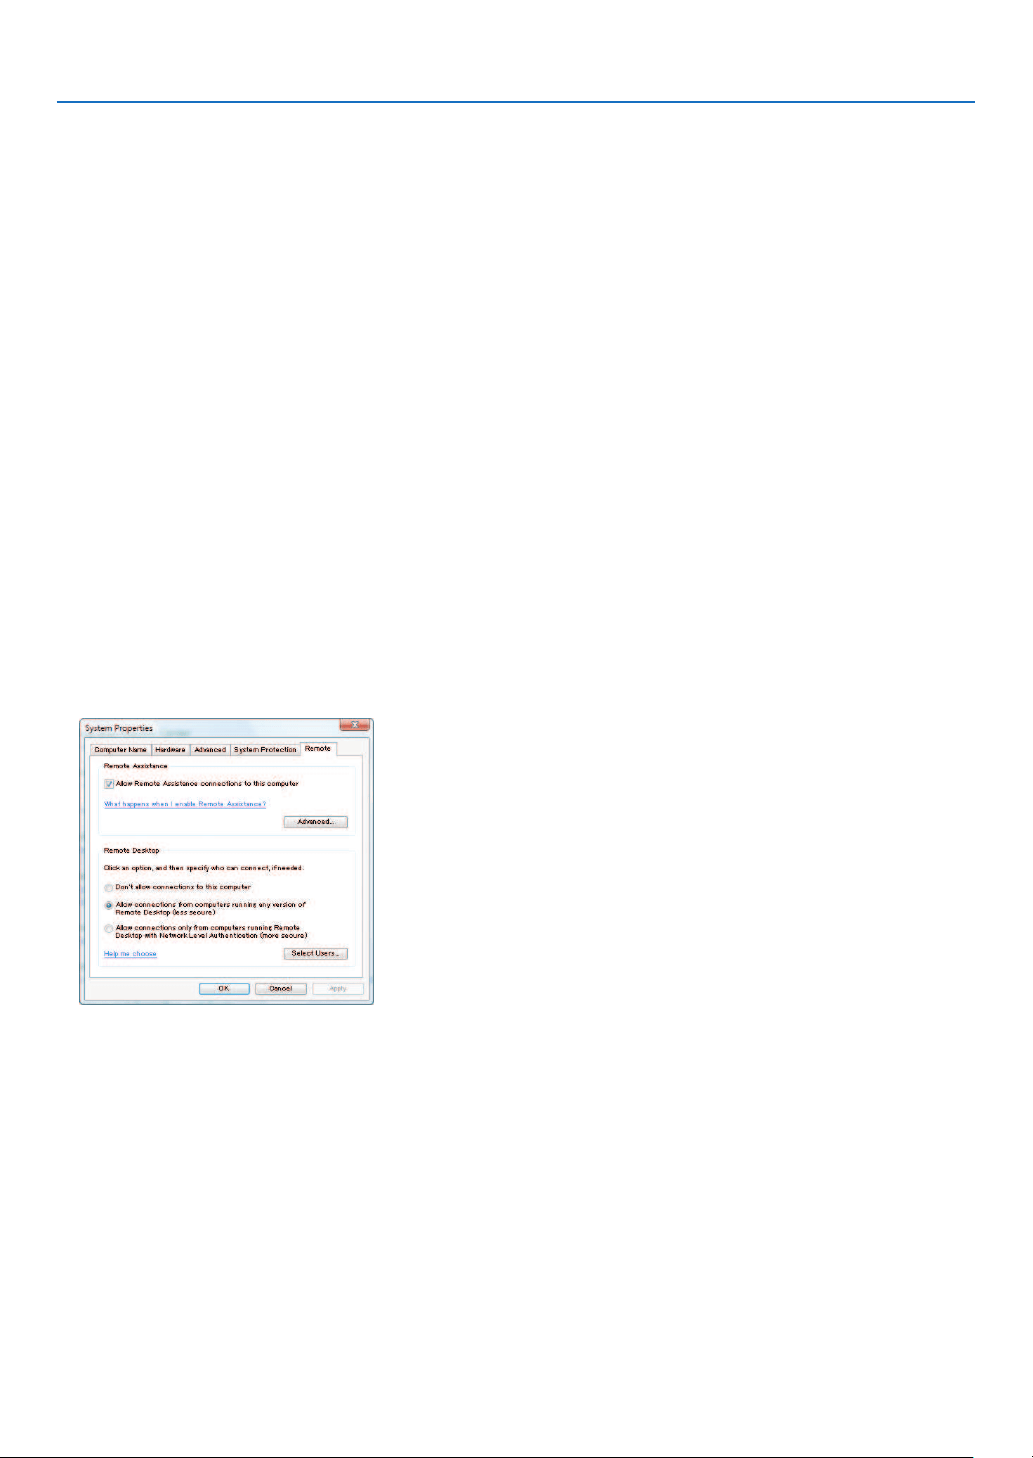
48
3. Convenient Features
SettingthepasswordtotheuseraccountofWindows7
TIP:Ifapasswordhasbeensetforanaccount,thesteps1to9canbeskipped.
1.Click[Start]fromthedesktopofWindows7.
2.Click[ControlPanel].
3.Click[Addorremoveuseraccounts]displayedunder[UserAccounts].
4.Whenthe[UserAccountControl]conrmationwindowappears,click[Continue].
5.Click[Administrator].
6.Click[Createapassword].
7.Inputthepasswordtothe[Newpassword]box.
8.InputthesamepasswordasthatatStep7tothe[Conrmnewpassword]box.
9.Click[Createapassword].
The Administrator is changed to [Password Protection].
Setting the Remote Access
1.Click[Start]fromthedesktopofWindows7.
2.Click[ControlPanel].
3.Click[SystemandSecurity].
4.Click[Allowremoteaccess]displayedunder[System].
5.Whenthe[UserAccountControl]conrmationwindowappears,click[Continue].
The [System Properties] window appears.
6.Click[AllowconnectionsfromcomputersrunninganyversionofRemoteDesktop(lesssecure)]inthe
RemoteDesktopboxandclick[OK].
CheckingtheIPaddressonWindows7
1.Click[Start]fromthedesktopofWindows7.
2.Click[ControlPanel].
3.Click[Viewnetworkstatusandtasks]displayedunder[NetworkandInternet].
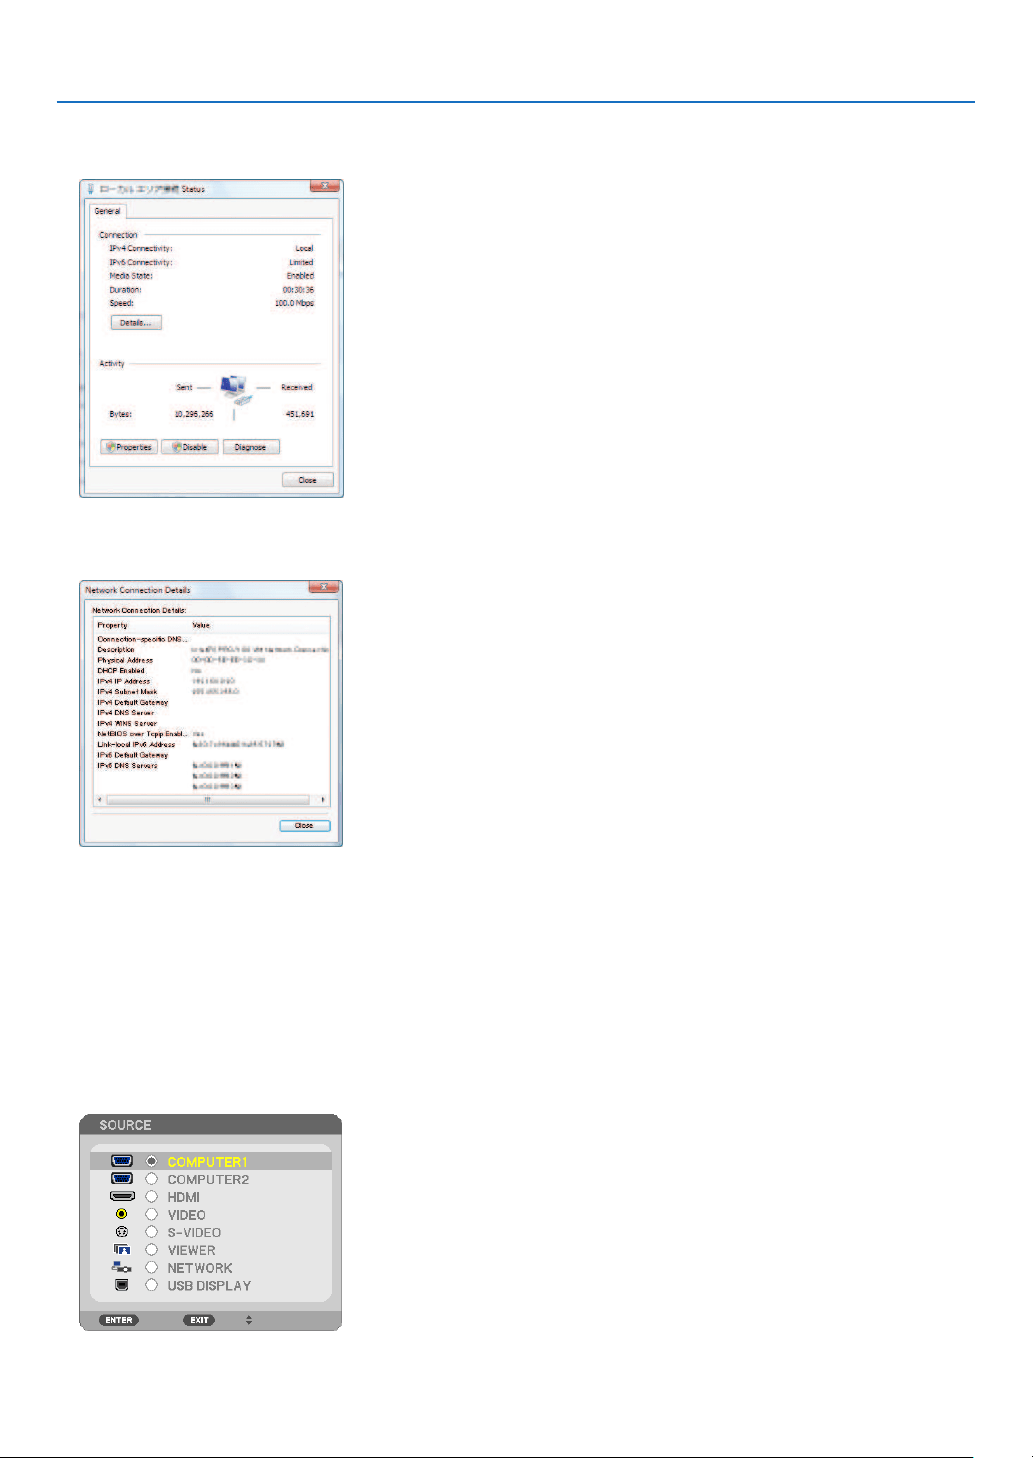
49
3. Convenient Features
4.Click[Viewstatus]displayedinblueontherightof[LocalAreaConnection]inthewindow.
The [Local Area Connection Status] window appears.
5.Click[Details...].
Write down the value for “IPv4 IP Address” (xxx.xxx.xxx.xxx) displayed.
6.Click[Close].
7.Click[X]attheupperrightofthewindow.
Thesystemgoesbacktothedesktop.
Starting the Remote Desktop
1.Withtheprojectorturnedon,presstheSOURCEbutton.
The input selection window appears.
Another way to display the input selection window is to press the NETWORK button on the remote control. The
NETWORK screen will be displayed. Go to step 3.

50
3. Convenient Features
2.PresstheSELECT or buttontoselect[NETWORK]andpresstheENTERbutton.
The [NETWORK] menu will be displayed.
3.Fromthe[NETWORK]menu,usethewirelesskeyboardtoselect[REMOTEDESKTOPCONNECTION].
The [REMOTE DESKTOP CONNECTION] window appears.
4.OperatethewirelesskeyboardtoinputtheIPaddressofWindows7andclick“Connect”.
The log-on screen of Windows 7 is displayed in the screen projected by the projector.
5.Operatethewirelesskeyboardtoinputtheuser’spasswordandpress“Enter”.
Theremotedesktopfunctionisstarted.
Windows7desktopisdisplayedinthescreenprojectedbytheprojector.
Log out the computer.
UsethewirelesskeyboardconnectedtotheprojectortooperateWindows7.
NOTE:Whentheprojectionismadewiththeremotedesktopfunction,thebackgroundcolorofthedesktopischangedto
black.

51
3. Convenient Features
Exiting the Remote Desktop
1.Operatethewirelesskeyboardtoclick[Start]fromthedesktopscreenprojectedbytheprojector.
2.Click[X]ontherightofthestartmenu.
Theremotedesktopfunctionisstopped.
3.PresstheSOURCEbuttonoftheprojectortoselectaninputterminalotherthan[NETWORK].
When using the remote control, press a button other than the NETWORK button.
TIP:
Setting[OPTIONS]inREMOTEDESKTOP
Clicking[OPTIONS]displaysthe[PERFORMANCE]screen.
Makingsettingsto[OPTIONS]willallowyoutodisplaythedesktopbackground,ortoenablethewindowanimationfunctionduring
theRemoteDesktopoperation.However,doingthiswillcausethedisplay’sormouse’sresponsetoslowdown.
Ifthedisplay’sormouse’sresponseissloweddown,tryoneormoreofthefollowing:
DESKTOPBACKGROUND:Clearthecheckmarktodisplaythedesktopbackgroundinmonochrome.
MENUANDWINDOWANIMATION:Clearthecheckmarktodisablemenuandwindowanimation.
THEMES:ClearthecheckmarknottouseThemes.
SHOWCONTENTSOFWINDOWWHILEDRAGGING:Clearthecheckmarktoshowonlythewindowpanewhile
dragging.

52
4. Using the Viewer
❶ What you can do with the Viewer
TheViewerfeatureallowsyoutoviewslidesormovielesstoredonaUSBmemoryontheprojector,orashared
folderinacomputerconnectedtothenetwork.
TheViewerhasthefollowingfeatures.
•WhenacommerciallyavailableUSBmemorythatstoresimagelesisinsertedintotheUSBport(TypeA)ofthe
projector,theViewerallowsyoutoviewtheimagelesontheUSBmemory.
Evenifnocomputerisavailable,presentationscanbeconductedsimplywiththeprojector.
•Movielewithaudiocanbeplayedback.
•AMicrosoftPowerPointleorAdobePDFlecanbesimplyprojectedonthescreenwithoutconnectingacom-
puter.
•Imageandmovielesstoredinasharedfolderinacomputerconnectedtoanetworkcanbeprojected.
Thecomputerwith“MediaSharing”ofWindowsMediaPlayer11turnedoncanbeusedasamediaserver.
Supported graphic formats
FormatFilenameextension
JPEG.jpg,.jpe,.jpeg(CMYKisnotsupported.)
BMP.bmp(biteldnotsupported)
PNG
.png(InterlacedPNGandchannelPNGarenotsupported.)
GIF.gif(InterlacedGIF,transparationGIF,andanimationGIFarenotsupported.)
*ByusingPPTConverter3.0,PowerPointleisconvertedintoindexle(withextension“.idx”)
*Ifanunsupportedimageisselected,theicon
willbedisplayed.
NOTE:
Maximumnumberofpixelsofimagewhichcanbedisplayedare:
•ProgressiveJPEG:1280×1280
•GIF:1280×1280
•Others:4000×4000
Supported movie files
FilenameextensionVideocompression/expansionmethodAudiocompression/expansionmethod
.mpg,.mpeg.MPEG2MPEGAudioLayer2
MPEGAudioLayer3
.wmvVC-1/WMV9WMA9Standard
.mp4H.264/AVCAAC-LC
Playback requirements:
Resolution:320×240to1280×720
Videoframerate:upto30fps
Bitrate:upto15Mbps
Audiosamplingrate:upto48kHz
Channel:upto2chstereo
Audiobitrate:upto256Kbps
Max.lesize:upto2GB

53
4. Using the Viewer
NOTE:
•Movielesconvertedbyusingthevideo/audioformatwhichisnotsupportedbythisprojectorcannotbeplayedback.
Inthiscase,therewillbenoicontoshowthatplaybackisnotpossible.
•FileswithDigitalRightsManagement(DRM)protectioncannotbeplayedback.
•Someofthemovielesthatmeettheaboverequirementsmaynotbeplayedback.
•WMVformatvideolewillbedisplayedinanaspectratioof1to1independentlyofitsoriginalaspectratio.
•Filesthatcanbeplayedbackonthemediaserveraregraphicsandmovieles.InWindowsMediaPlayer11(WindowsXP/
WindowsVista)mp4lescannotbeplayedback.
Supported PDF files
FilenameextensionSupportedleformat
.pdfAdobeAcrobatPDF
NOTE:
•FontsnotembeddedinPDFmaynotbedisplayed
•FunctionsaddedtoPDFleaftercreatedwillnotworkordisplay.Functionsaddedarebookmarks,boxesinformtool,andnotes
willnotbedisplayed.
AutoiporAutotransitionwillnotwork.
•SomePDFlesmaynotbedisplayed.
SupportedPowerPointles
FilenameextensionSupportedleformat
.pptMicrosoftPowerPoint97–2003
NOTE:
•Playablefonts,colors,fontornament,placement,objectinsertionoranimationarerestricted.
•SomeMicrosoftPowerPoint97–2003lesmaynotbedisplayed.
Supported USB memory devices
-BesuretouseaUSBmemorydeviceformattedwiththeFAT,exFAT,FAT32orFAT16lesystem.
TheprojectordoesnotsupportNTFSformattedUSBmemory.
IftheprojectordoesnotrecognizeyourUSBmemory,checkiftheformatissupported.
ToformatyourUSBmemoryinyourcomputer,refertothedocumentorhelplethatcomeswithyourWin-
dows.
-WedonotwarrantthattheUSBportoftheprojectorwillsupportallUSBmemoriesinthemarket.

54
4. Using the Viewer
Notices on shared folder and media server
•Filesfromasharedfolderormediaservermaynotbeprojectedifsecurityorantivirussoftwareisinstalledonyour
computer.
•Openthefollowingrewallports:
-Mediaserver
PortnumberProtocol
1900UDP
2869TCP
10243 TCP
10280-10284UDP
-Sharedfolder
PortnumberProtocol
137UDP/TCP
138UDP/TCP
139UDP/TCP
445 UDP/TCP
•Setyourcomputerforsharingandsecuritytograntaccesstolesinthesharedfolderandsetyoursecurityor
antivirussoftwaretograntaccesstolesinthesharedfolder.Consultyournetworkadministratorformoreinforma-
tion.
•Movielesinthesharedfolderorthemediaservermaynotbeplayedbackcorrectlydependingonyournetwork
environmentorthebitrateofyourle.
NOTE:
DonotdisconnectbetweentheprojectorandyourcomputerbyremovingtheLANcableorturningofftheprojectorwhenaPow-
erPointleorPDFleisdisplayedfromasharedfolder.
DoingsowillmakeViewerinoperable.
NOTE
•ThefollowingoperationsbyusingthebuttonsontheprojectorarenotpossiblewhentheVIEWERscreensuchastheslidescreen
andthethumbnailscreenisdisplayed.
-Keystonecorrectionbyusingthe▲or▼button
-AutoAdjustmentbyusingtheAUTOADJ.button
-Volumecontrolwiththe◀or▶button
•FreezingpicturebyusingtheFREEZE,ASPECT,orAUTOADJ.buttonontheremotecontrolisnotpossiblewhentheVIEWER
screensuchastheslidescreenandthethumbnailscreenisdisplayed.
•Executing[RESET][ALLDATA]fromthemenuwillreturnthesettingsfortheViewertoolbartothefactorydefault.
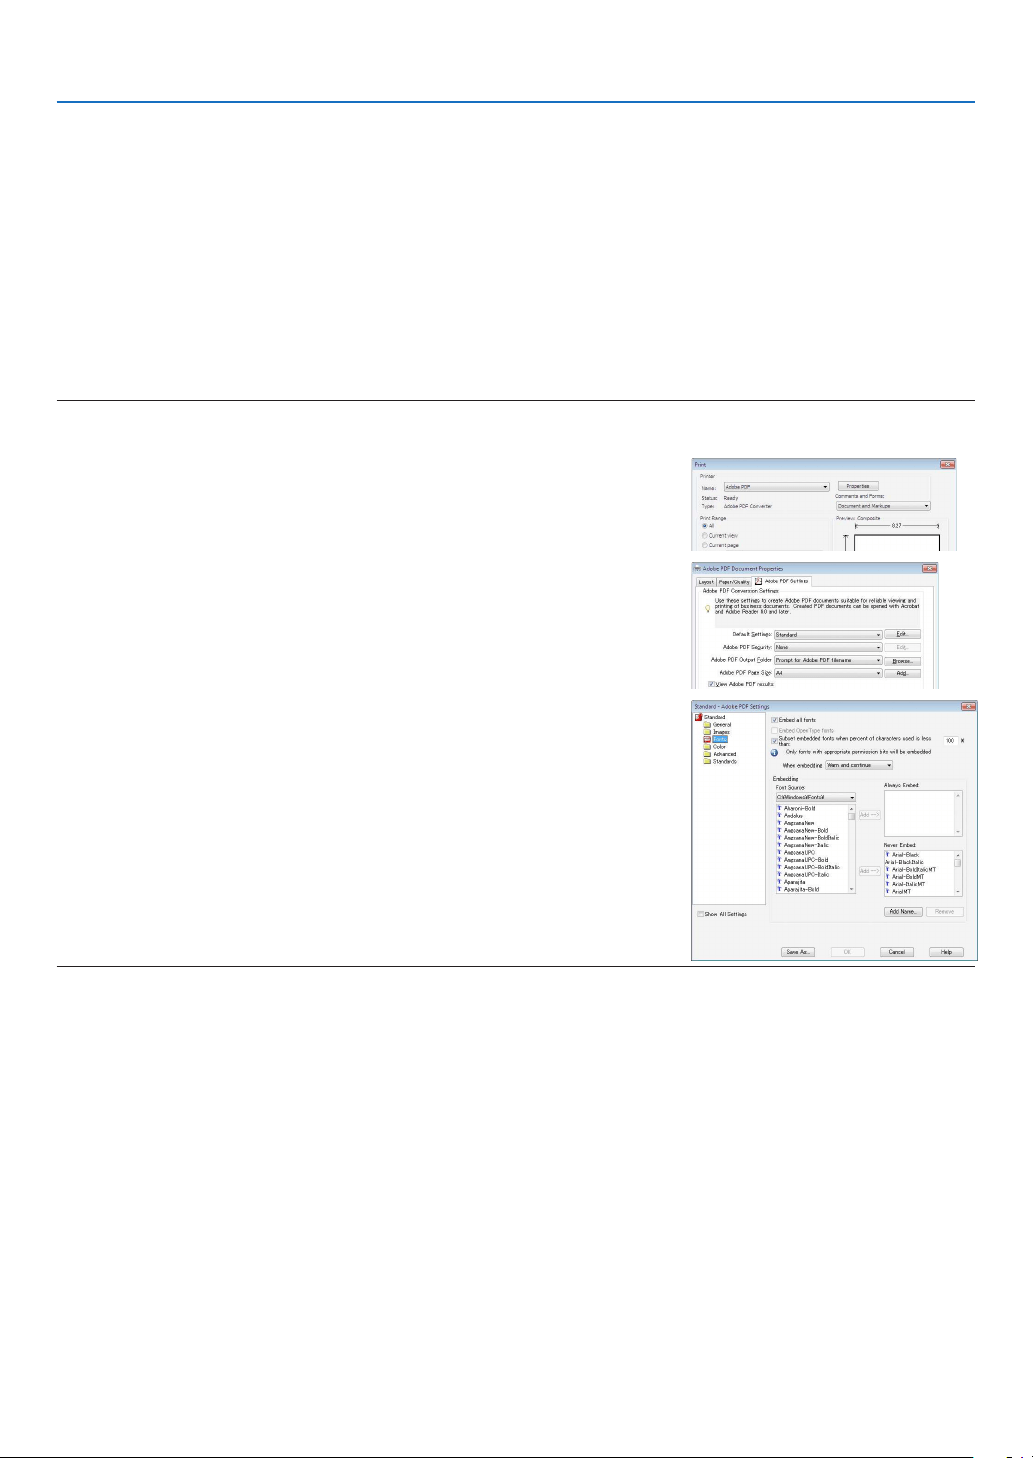
55
4. Using the Viewer
❷ Preparing presentation materials
1.Createyourpresentationmaterialsandsavetheminasupportedleformattoyourcomputer.
•Seepage
77 for supported file formats.
•MakesurethatPowerPointleisdisplayedontheViewerbeforegivingyourrealpresentation.
With Viewer PPT Converter 3.0 contained the supplied CD-ROM, you can convert your PowerPoint files to index
files that can be displayed on the Viewer.
•WhencreatingaPDFle,embedyourfontsinyourPDFle.EmbeddingfontsrequiresAdobeAcrobat.This
cannot be done in Adobe Reader.
TIP:
•UsingPrintCommand
ExampleforfontembeddingusingPrintCommand.SeethehelpofAdobeAcrobatformoreinformation.
1.Select“Print”fromthe“File”menu.
2.Select“AdobePDF”from“Printername”andclickthe“Properties”but
-
ton.
3.Clickthe“Edit”buttoninthe“AdobePDFSettings”tab.
4.ClickthefonttabintheEditwindowtoselectthefontembedwindow.
5.Placeacheckmarkfor“Embedallfonts”.
Click“OK”toreturntothePrintwindow,andclick“OK”tostartcreatinga
PDF file.
2.Savealetoyourdrive.
To save a file to your USB memory:
Use the Windows Explore to copy the file to your USB memory.
To place a file in a shared folder you create in your computer, see page
68.
To use “Media Sharing” in Windows Media Player 11, see page
72.
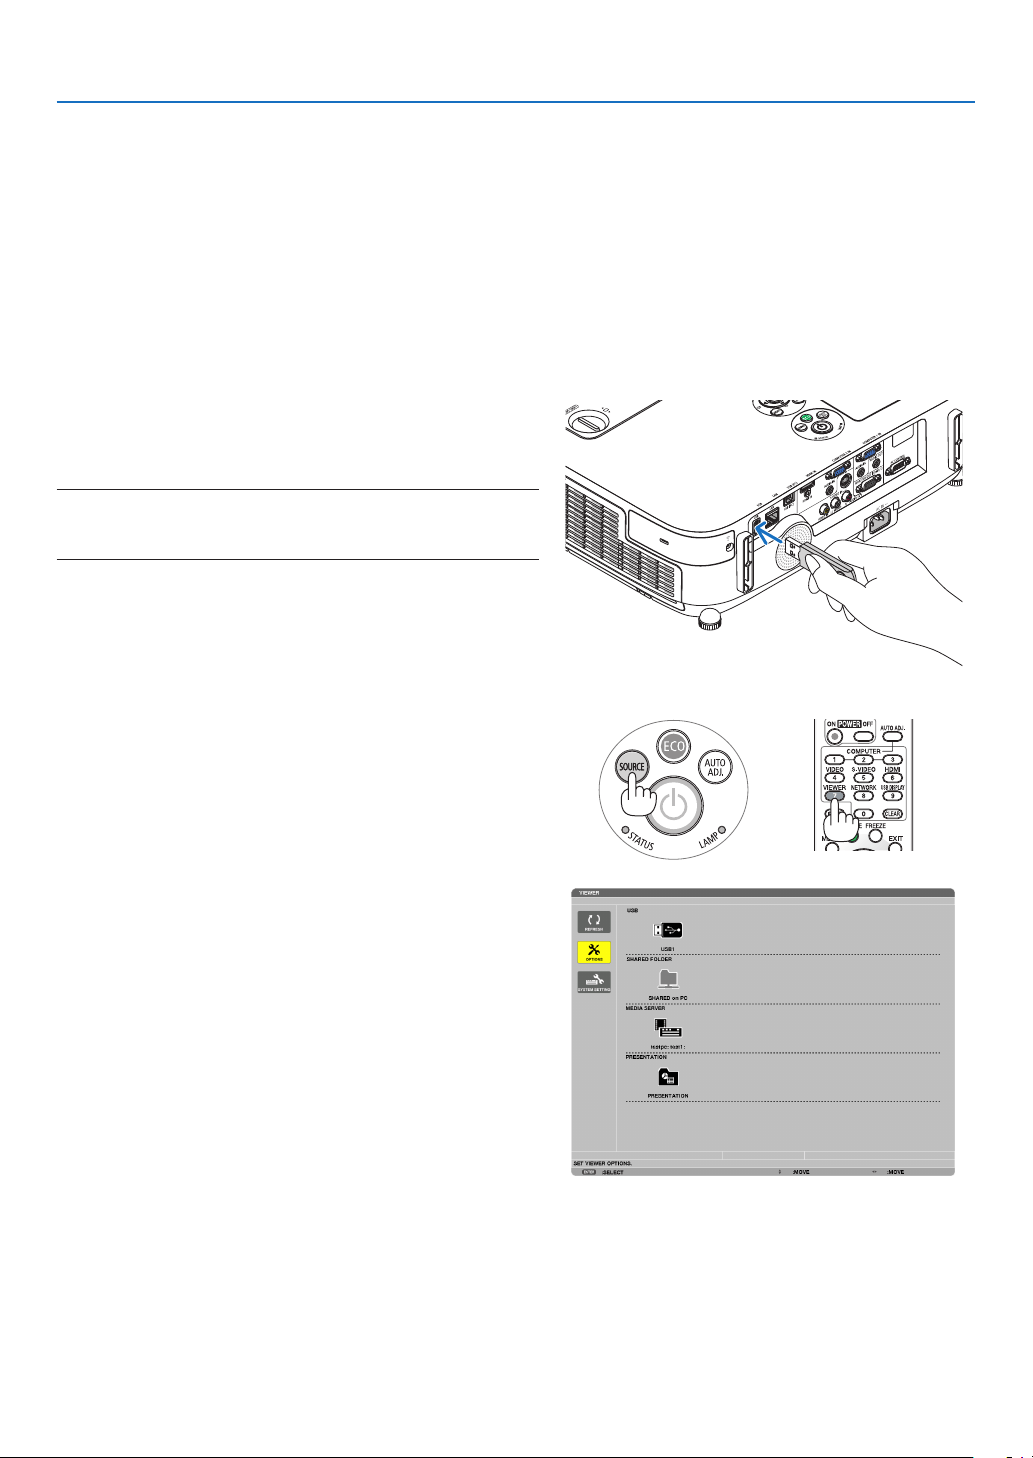
56
4. Using the Viewer
❸ Projecting images stored in a USB memory device
ThissectionexplainsthebasicoperationoftheViewer.
TheexplanationprovidestheoperationalprocedurewhentheViewertoolbarissettothefactorydefault.
Preparation:BeforestartingtheViewer,storeimagestotheUSBmemoryusingyourcomputer.
Starting the Viewer
1.Turnontheprojector.(page
14)
2.InserttheUSBmemoryintotheUSBportoftheprojec-
tor.
NOTE:
•DonotremovetheUSBmemoryfromtheprojectorwhileit’sLED
ashes.Doingsomaycorruptthedata.
TIP:
YoucanaUSBmemoryinserttheprojectorwhenthedrivelistscreen
isdisplayed.
3.PresstheSOURCEbuttontoselect[VIEWER].
A press of the SOURCE button will display the source select
screen.
A few more presses of the SOURCE button will display the
drive list screen.
Another way to select [VIEWER] is to press the VIEWER
button on the remote control.
TIP:
•Formoreinformationaboutthedrivelistscreen,seepage
60.
•Todisplaygraphicsinasharedfolder,seepage68;todisplaystill
imagesormovielesinamediaserver,seepage72.
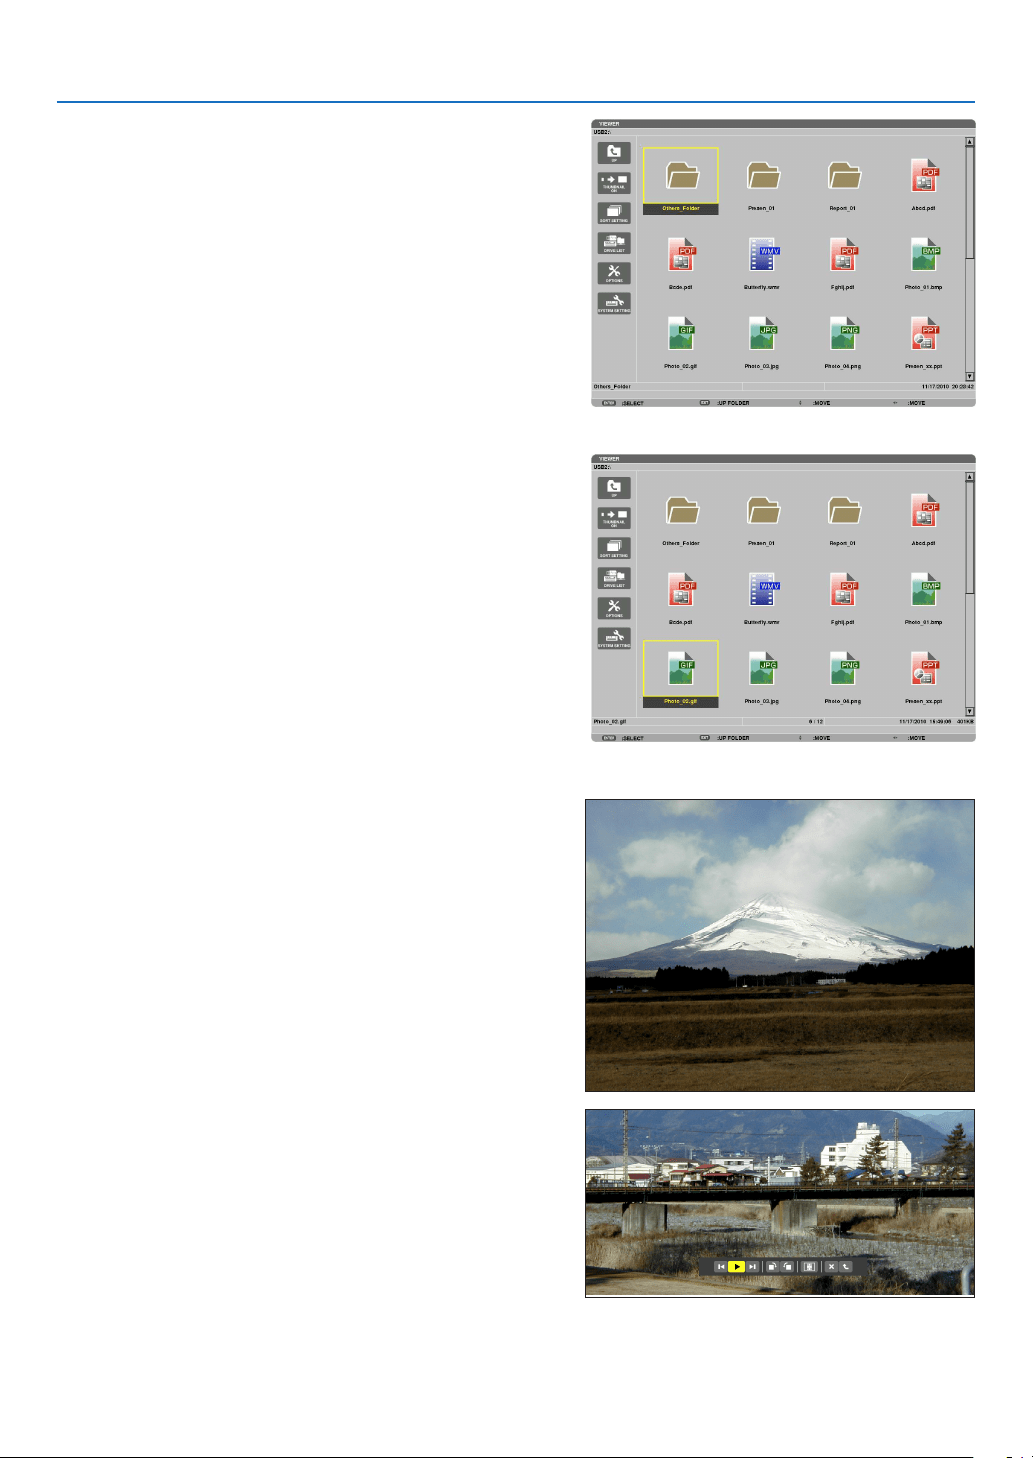
57
4. Using the Viewer
4.Pressthe▶buttontoselect“USB1”andpressthe
ENTERbutton.
The “USB1” thumbnail screen will be displayed.
TIP:
•Formoreinformationaboutthumbnailscreen,seepage62.
5.Usethe▲▼◀ or ▶buttontoselectanicon.
•The
(arrow) symbol on the right indicates there are
more pages. pressing the PAGE
▽ (page down) button
will show the next page: pressing the PAGE
△ (page up)
will show the previous page.
6.PresstheENTERbutton.
Operation varies depending on the selected file.
•Stillimage
The selected slide will be displayed.
The
◀ or ▶ button can be used to select the next (right)
slide or the previous (left) slide in the thumbnail screen.
•PressingtheENTERbuttonwilldisplaythecontrolbar
with which is used to select or rotate an slide.( page
63)
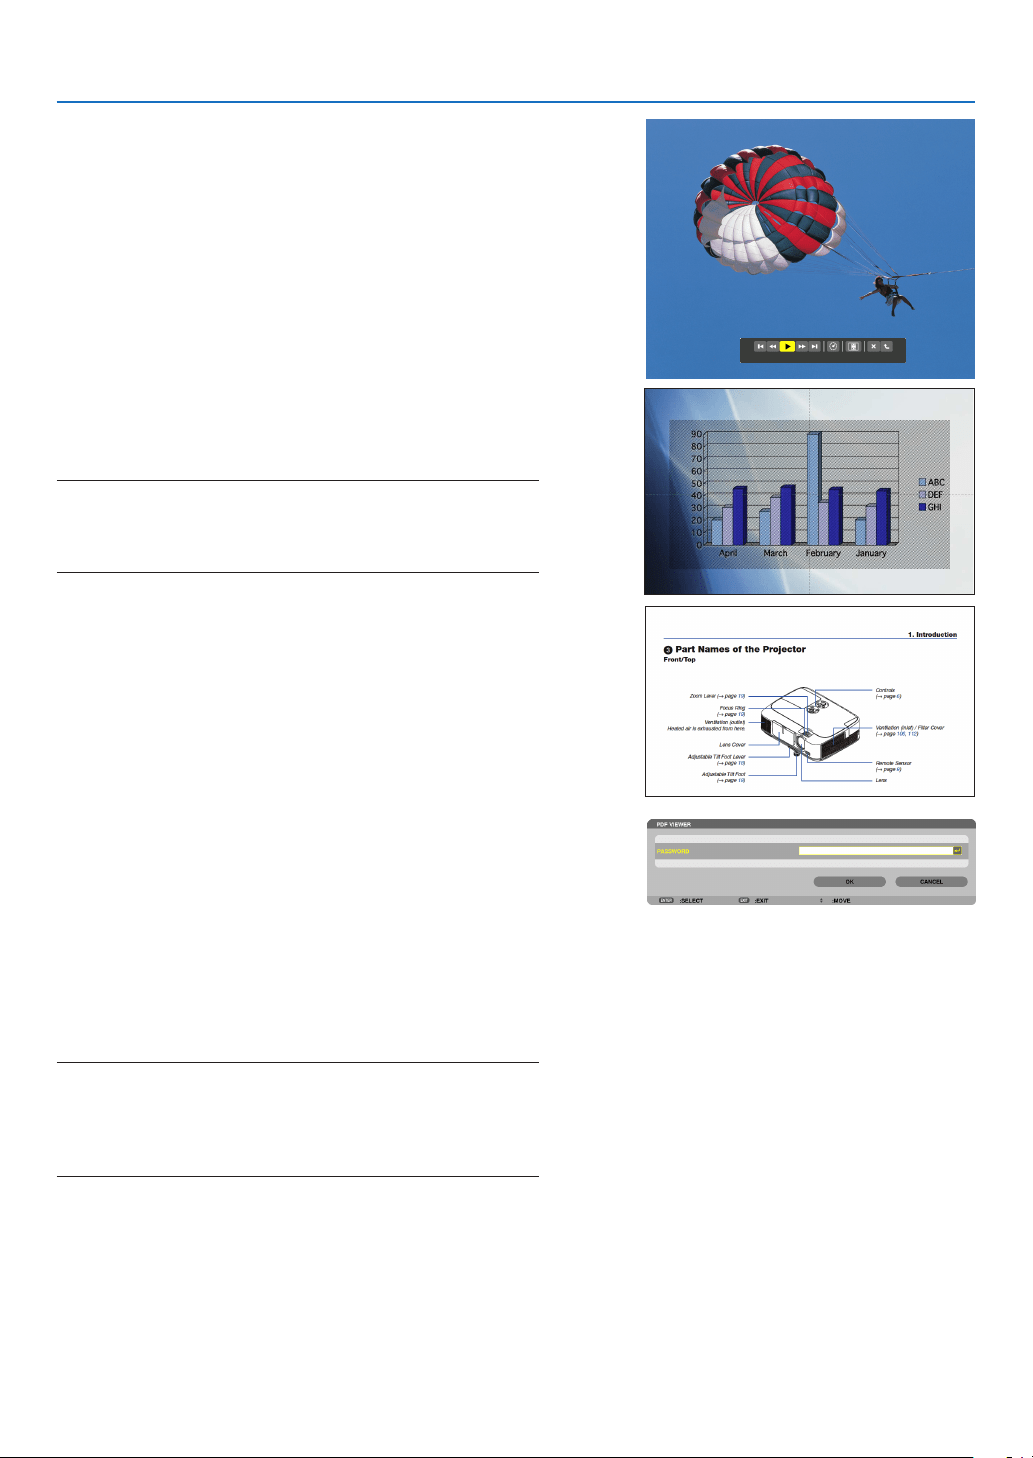
58
4. Using the Viewer
•Moviele
The movie file will start playing.
Afternishingtheplayback,thescreenwillturntoblack.
Press the EXIT button to return to the thumbnail screen.
•PressingtheENTERbuttonwilldisplaythemovie’s
control bar with which you can pause or fastforward and
some other operations.
•MicrosoftPowerPointle
The slide on the first page will be displayed.
Press
▶ to select the next slide; press ◀ to select the previ-
ous slide.
•Youcanalsousethe▼ or ▲ button to select a page. To
return to the thumbnail screen, press the EXIT button.
NOTE:
•Fileswithslideshoworanimationeffectsmaynotbecorrectly
displayedontheViewer.
See“SupportedPowerPointles”onpage53,77.
•AdobePDFle
The first page will be displayed.
•ThePDFlewillllthewidthofthescreen.
Pressing the ▼ or ▲ button will scroll the screen down or
up.
The PAGE
▼ or PAGE ▲ button will move the screen one
page down or up.
To return to the thumbnail screen, press the EXIT button.
•Whenapassowordinputwindowisdisplayed,itmeans
that the PDF file is password-protected.
Pressing the ENTER button will show the software
keyboard.Usethesoftwarekeyboardtoenteryour
password.
Select [OK] and press the ENTER button. The PDF file
will be displayed.
•Formoreinformationonthesoftwarekeyboard,seepage
118.
NOTE:
BookmarksandnotesthatwereaddedafterPDFconversionwillnot
bedisplayed.
IffontswerenotembeddedatthetimeofPDFconversion,thosefonts
willnotbedisplayed.
TIP:
Ittakessometime(about30secondstotwominutes)todisplaya
largesizeleortoturnpagesofaPDFlethathasmanypages.
59
4. Using the Viewer
•Indexle(extension:.idx)
•Indexles,whichisconvertedbyusingViewerPPT
Converter 3.0, will appear in the Thumbnail screen.
Only folders and JPEG files converted by using
Viewer PPT Converter 3.0 will appear in the Thumbnail
screen.
•Toselectslideshowofindexles,openthe[PRESENTA-
TION] folder in the DRIVE LIST screen.
However, index files will not appear. Only folders and
JPEG files will appear.
•UptofourindexfoldersinyourUSBandsharedfolder
are displayed. The four folders will be displayed in reverse
chronological order
•WhenyouinserttheUSBmemorydevicestoringindex
with the Viewer in operation, the content of the index files
will be displayed.
NOTE:
•Theplaymode(MANUAL/AUTO)forslidesofindexleworksin
thefollowingway:
Incaseof[MANUAL]for[PLAYMODE]
Whenyouselect[OPTIONS][SLIDESETTING][PLAYMODE]
[MANUAL],indexleswillbesetformanualplaybackinregard-
lessofwhether[INTERVAL]isset.
Incaseof[AUTO]selectedfor[PLAYMODE]
Whenyouselect[OPTIONS][SLIDESETTING][PLAYMODE]
[AUTO],indexleswillbesetforautoplaybackatintervals
speciedbyusing[INTERVAL].
When,however,[-1]isselectedfor[INTERVAL],theplaymodewill
besetforautoplaybackaccordingtothesettingfor[OPTIONS]
[SLIDESETTING][INTERVAL].
7.RemovetheUSBmemoryfromtheprojector.
Returntothedrivelistscreen.MakesurethattheLEDon
the USB memory is not flashing before removing the USB
memory.
NOTE:IfyouremovetheUSBmemoryfromtheprojectorwithaslide
displayed,theprojectormaynotoperatecorrectly.Ifthishappens,
turnofftheprojectorandunplugthepowercord.Wait3minutes,then
connectthepowercord,andturnontheprojector.
Exiting the Viewer
1.PresstheSOURCEbuttontoselectasourceotherthan
[VIEWER].
A press of the SOURCE button will display the source select
screen.
A few more presses of the SOURCE button will display
another source.
•ToexittheViewerusingtheremotecontrol,selecta
source other than [VIEWER].
XXXX Motors
60
4. Using the Viewer
Names and functions of Viewer screen
TheViewerhasthreescreens:Drivelistscreen,Thumbnailscreen,andSlidescreen.
•Drivelistscreen
Displaysalistofdrivesconnectedtotheprojector.
Menu operation
•Usethe▼
or ▲buttontomovethecursorupordown.SelectthemenuitemandpresstheENTERbutton
todisplaythesubmenu.
Operation for Drive list screen
1.Pressthe▶buttontomovethecursortothedrivelist.
(Use the ◀ or ▶ button to switch between the menu and the drive list.)
Press the
▼ or ▲ button to select a type of drive; press the ◀ or ▶ button to select the drive connected to the
projector.
2.SelectthedriveandpresstheENTERbuttontoswitchtothethumbnailscreenoftheselecteddrive.
Cursor (yellow) Cursor (yellow)
Menu Menu
Scroll bar
[Drive list screen] [Thumbnail screen]
Folder icon
Path information
Drive information/File information
Menu guide
Operation button guide
Control bar
* The operation for still image differs from that for movie.
[Slide screen]
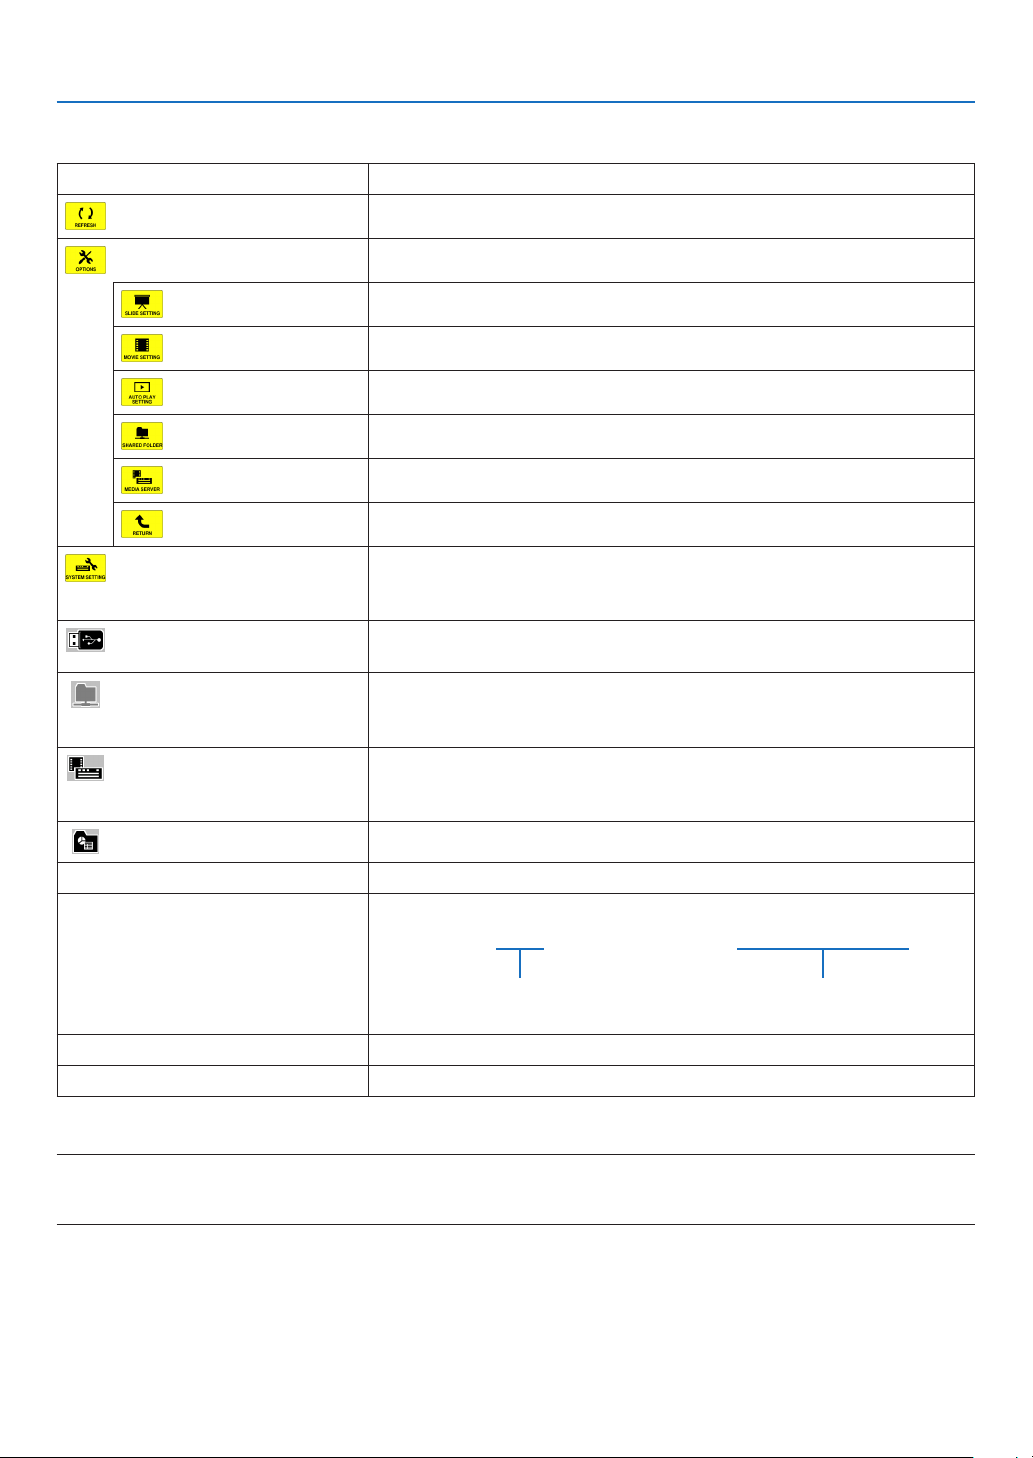
61
4. Using the Viewer
Functions
NameDescription
REFRESHDisplaysadditionalmediaserversinthedrivelistscreen.
OPTIONSOpenstheOPTIONSmenu.
SLIDESETTING
Setsupslides.(page
65)
MOVIESETTING
Setsupmovieles.(page
66)
AUTOPLAYSETTING
Setsupautoplay.(page
66)
SHAREEDFOLDER
Setsupasharedfolder.(page
68)
MEDIASERVER
Setsupamediaserver.(page
72)
RETURNClosestheOPTIONSmenu.
SYSTEMSETTINGSwitchestothesystemsettingmenu.SeewiredLAN,wirelessLAN,WPS,
networkinformation,mouse,andkeyboardin“9.ApplicationMenu”.(
page105)
USBDisplaystheiconforaUSBmemoryinsertedintotheUSBportofthe
projector.
SHAREDFOLDERDisplaysuptofourdrivesofacomputerconnectedtoaLAN(setforcon-
nectingasharedfolder).
*Seepage68forsettingupforconnectingasharedfoleroftheprojector.
MEDIASERVERDisplaysuptofourdrivesofacomputerconnectedtoaLAN(setforcon-
nectingamediaserver).
*Seepage72forsettingupforconnectingamediaserveroftheprojector
PRESENTATIONDisplaystheiconwhenaUSBmemoryorsharedfolerstoresindexles.
PathinformationDisplaysthelocationofafolderorle.
Driveinformation[Example]
USB1314MBFREE/492MB
Displaysthedrive.Displaysfreespaceandcapcityof
adrive.(USBonly)
MenuguideDisplaysthedescriptionofaselectedmenu.
OperationbuttonguideDisplaysinformationaboutoperationbuttons.
*Itisdisplayedinthree-digitnumber(roundingup)
NOTE:
WhentheOPTIONSmenuisdisplayed,thedrivelistscreenorthumbnailscreenisnotdisplayed.Todisplayit,selectthe[RETURN]
iconandpresstheENTERbutton.
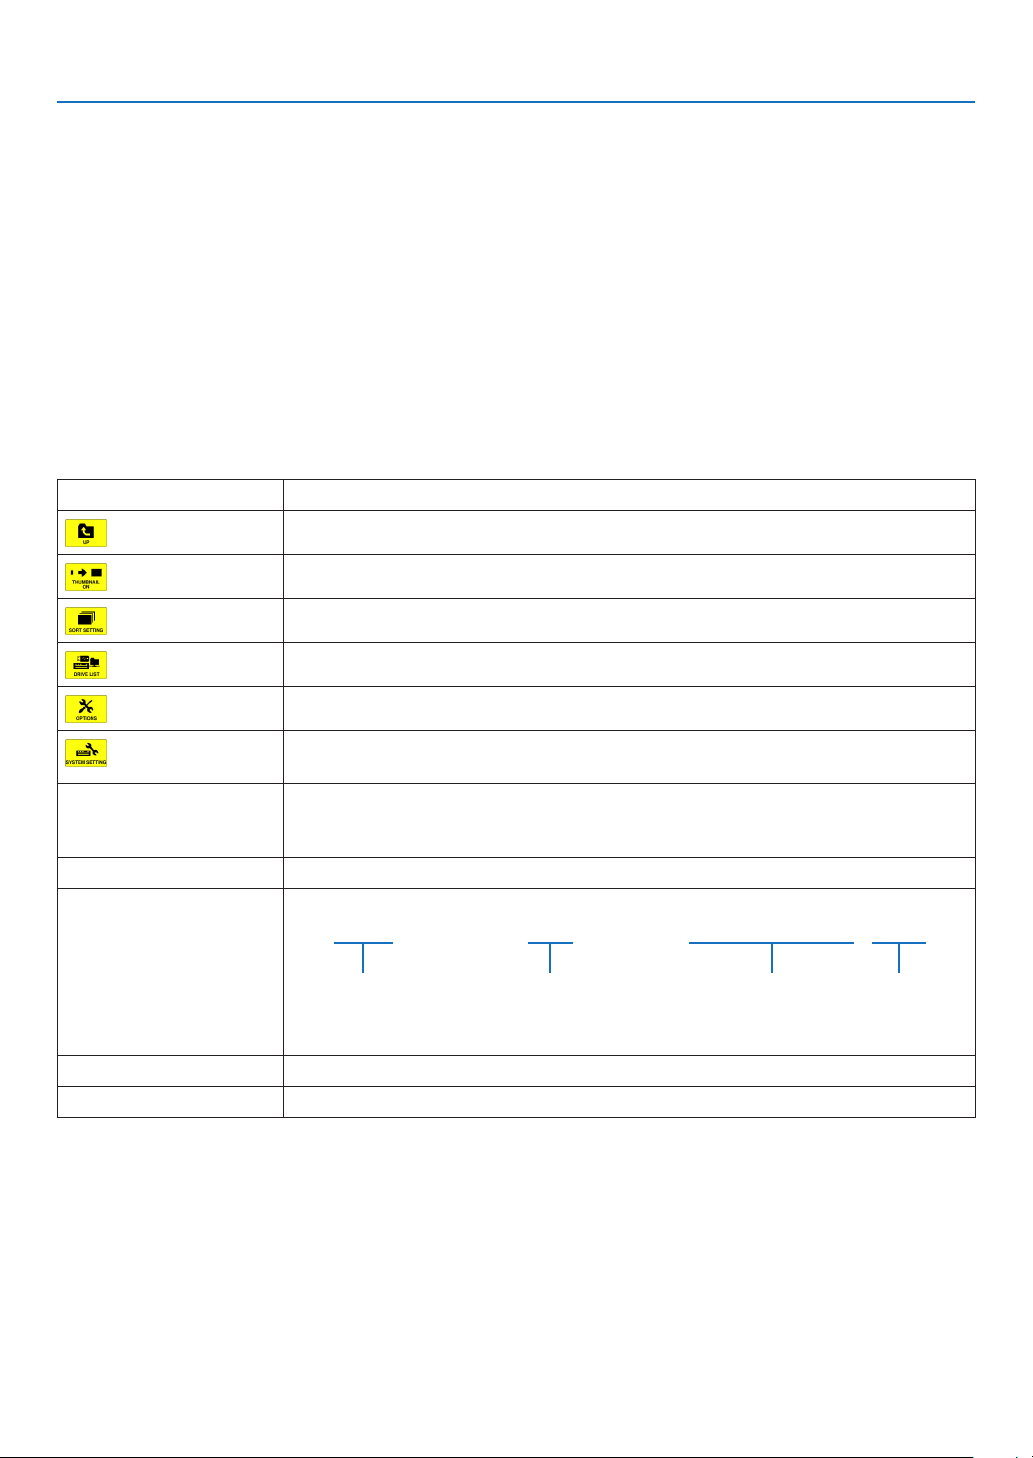
62
4. Using the Viewer
•Thumbnailscreen
Displaysalistoffolders,thumbnails,andiconsinthedriveselectedonthedrivelistscreen.
Menu operation
•Usethe▼
or ▲buttontomovethecursorupordown.SelectthemenuitemandpresstheENTERbutton
todisplaythemenuorsettingscreen.
Operation for Thumbnail screen
1.Pressthe▶buttontomovethecursortothethumbnailscreenwhentheOPTIONSmenuisnotdis
-
played.
2.Pressthe▼
, ▲, ◀, or ▶buttontoselectaleorfolder.
3.PresstheENTERbuttontostartslideshoworplaybackoftheselectedle.Selectingafolderwilldisplay
itsthumbnailscreen.
Functions
NameDescription
UPGoestooneupperlevelmenu.
THUMBNAILSwitchestwodisplaysbetweenthumbnailandicon.
SORTSETTINGRearrangesfoldersorles.
DRIVELISTReturnstothedrivelistscreen.
OPTIONSChangestotheOPTIONSmenu.
SYSTEMSET-
TING
Opensthesystemsettingmenu.
ScrollbarThumbnailscreenwilldisplay12leswith4by3.Ifthethumbnailscreenhastwelveor
morelesorfolders,thescrollbarwillbedisplayedattherightside.UsingthePAGE
▼orPAGE▲buttonwillscrollthewholescreendownorup.
PathinformationDisplaysthelocationofafolderorle.
Thumbnailinformation[Example]
005.jpg5/20011/03/201013:25:12502KB
Selectedfolder
nameorle
name
Numbersandorderof
lesinafolder(only
whenfolderselected)
Create/Changedate:
M/D/Y/H/M/B
Displaysle
capacity
MenuguideDisplaysthedescriptionofaselectedmenu.
OperationbuttonguideDisplaysinformationaboutoperationbuttons.
TIP:
•Ifanunsupportedimageisselected,theicon[?]willbedisplayed,
•Themaximumdisplayablenumberofimagesis300inthethumbnailscreenincludingthenumberoffolders.
•Ifalenameorpathofafolderislongerthanspecied,itwillbedisplayedwithcentercharactersorpathskipped.
Example:“123456789.jpg”willbedisplayedin“123..789.jpg”.
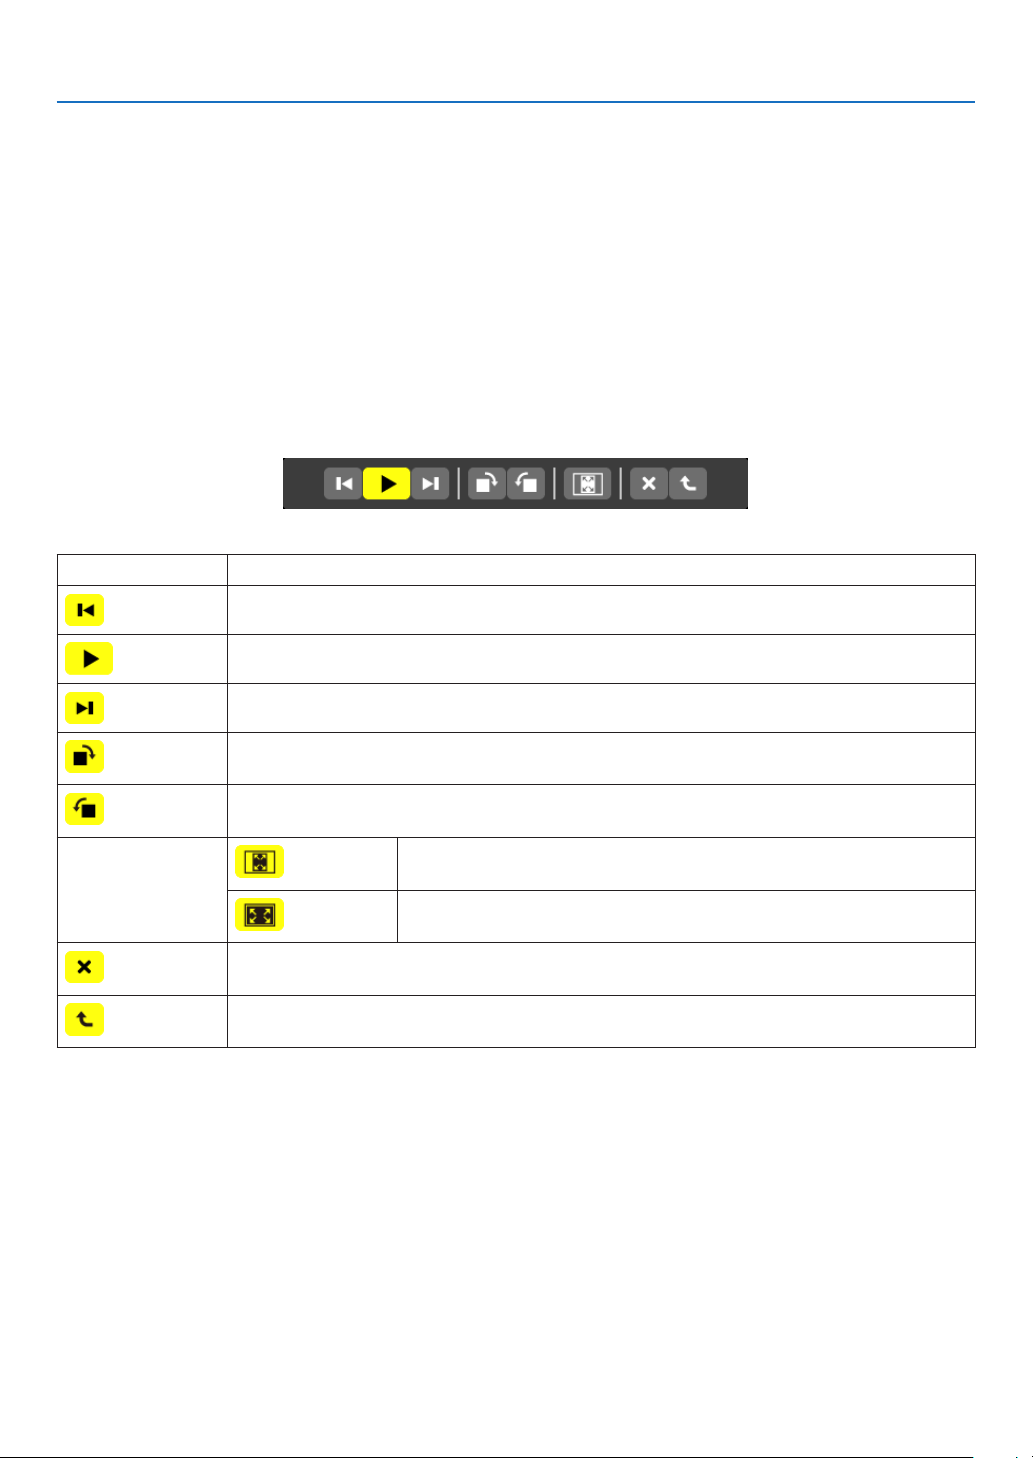
63
4. Using the Viewer
•Slidescreen(stillimage/movie)
Playsaleselectedfromalistofthumbnailsoricons.
•ForoperatingaMicrosoftPowerPointleandAdobePDFle,seepage
58.
Control bar operation
•Thecontrolbarwillbedisplayedonlywhenastillimage(orindexle)andamovieleisselected.
•Thecontrolbarforstillimagesdiffersfromthatformovieles.
1.PressingtheENTERbuttoninSlidescreenwilldisplaythecontrolbaratthebottomofthescreen.
2.Usethe◀
or ▶buttontoselectaleandpresstheENTERbutton.
•Theselectedfunctionwillbeexecuted.
Functions of still image control bar
NameDescription
PREVGoesbacktothepreviousimage
PLAYPlaystheimage.Thisbuttonalsoisusedtostoporstartplayinganimage.
NEXTGoestothenextimage.
RIGHTRotatestheimage90°clockwise.
•Tocancel,selectanotherfolder.
LEFTRotatestheimage90°counterclockwise.
•Tocancel,selectanotherfolder.
SIZE
BESTFITDisplaystheimagewithitsaspectratiointheprojector’sdisplayable
maximumresolution.
ACTUAL
SIZE
Displaystheimageinitsactualsize.
CLOSEClosesthecontrolbar.
•YoucanalsopresstheEXITbuttontoclosethecontrolbar.
ENDStopsplayingslidesorslideshow,andclosesthecontrolbartoreturntothethumbnail
screen.
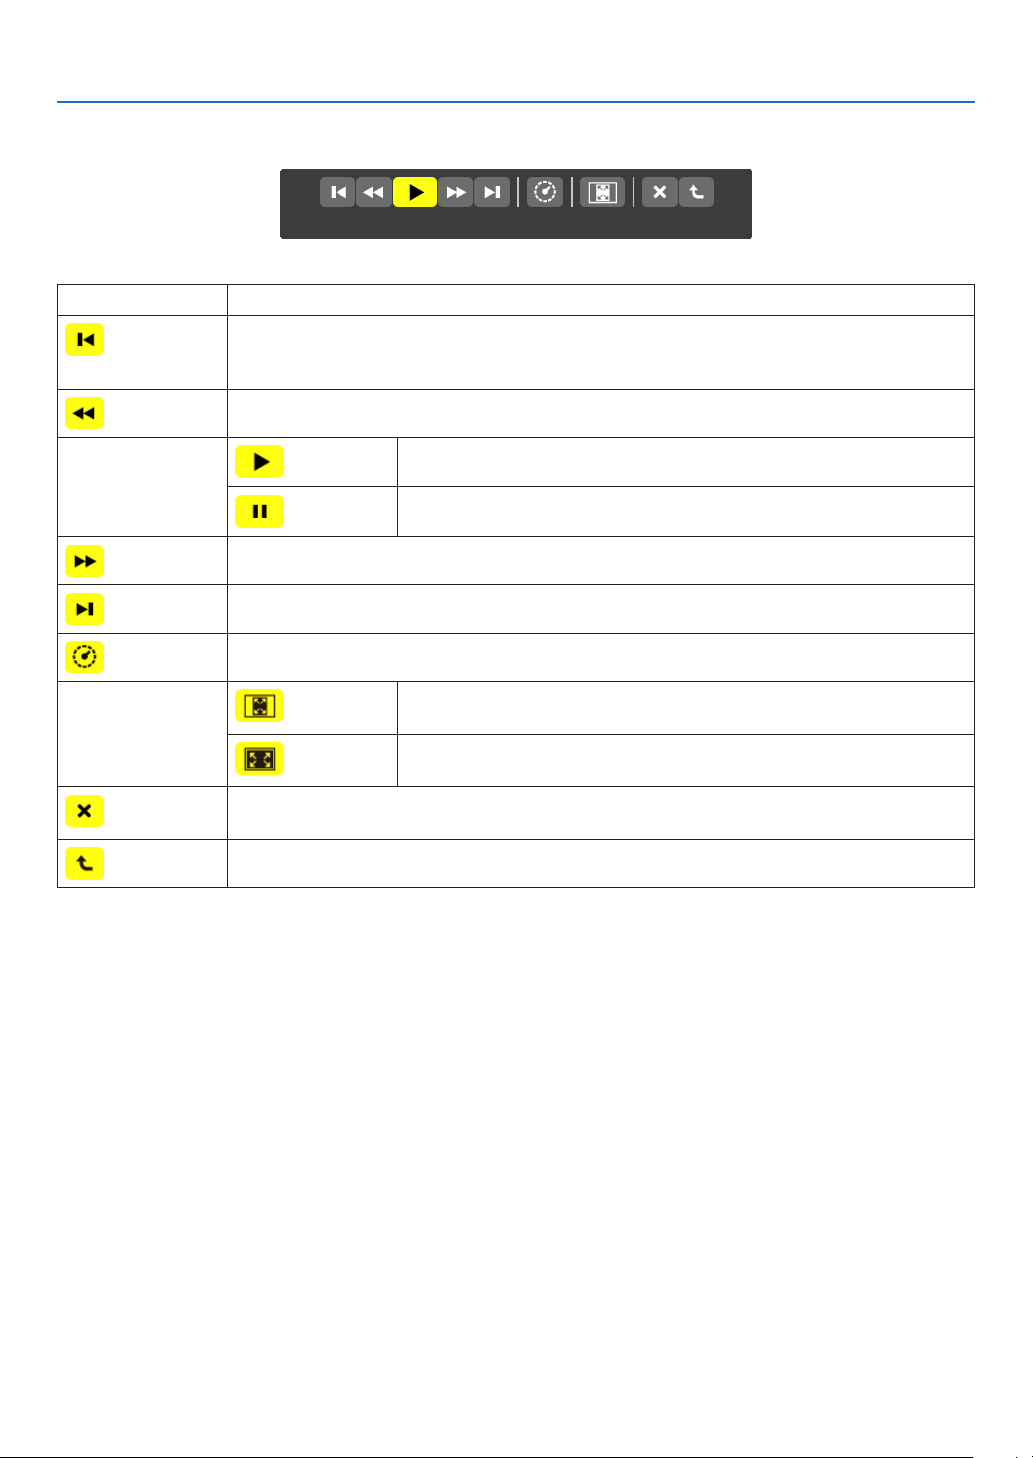
64
4. Using the Viewer
Functions of movie control bar
NameDescription
PREVGoesbacktothebeginningofamoviele.
•Goesbacktothebeginningofthepreviousmovieleifexecutedimmediatelyafterbeing
startedplaying.
FRFast-rewindsamovieleforabout7seconds.
PLAY/PAUSE
PLAYPlaysamoviele.
PAUSEStopsplayingamoviele.
FFFast-forwardsamovieleforabout7seconds.
NEXTGoestothebeginningofanextmoviele.
TIMEDisplaysanelapsedtimeforplaybackorpause.
SIZE
BESTFITDisplaystheimagewithitsaspectratiointheprojector’sdisplayable
maximumresolution.
ACTUAL
SIZE
Displaystheimageinitsactualsize.
CLOSEClosesthecontrolbar.
•YoucanalsopresstheEXITbuttontoclosethecontrolbar.
ENDStopsplayingamovie,andclosesthecontrolbartoreturntothethumbnailscreen.

65
4. Using the Viewer
Viewer option settings
•SLIDESETTING
Setsstillimagesorslides.
NameOptionsDescription
SCREENSIZEBESTFITDisplaystheimagewithitsaspectratiointheprojector’sdisplay-
ablemaximumresolution.
ACTUALSIZEDisplaystheimageinitsactualsize.
PLAYMODEMANUALSelectsmanualplay.
AUTOSelectsautoplay.
INTERVAL5-300secondsSpecifiesintervaltimewhen[AUTO]isselectedforPLAY
MODE.
REPEAT
CheckmarkTurnsonorofftherepeatfunction.
TIP
•Toplayoneormoreslides,placethoselesintoafolder.
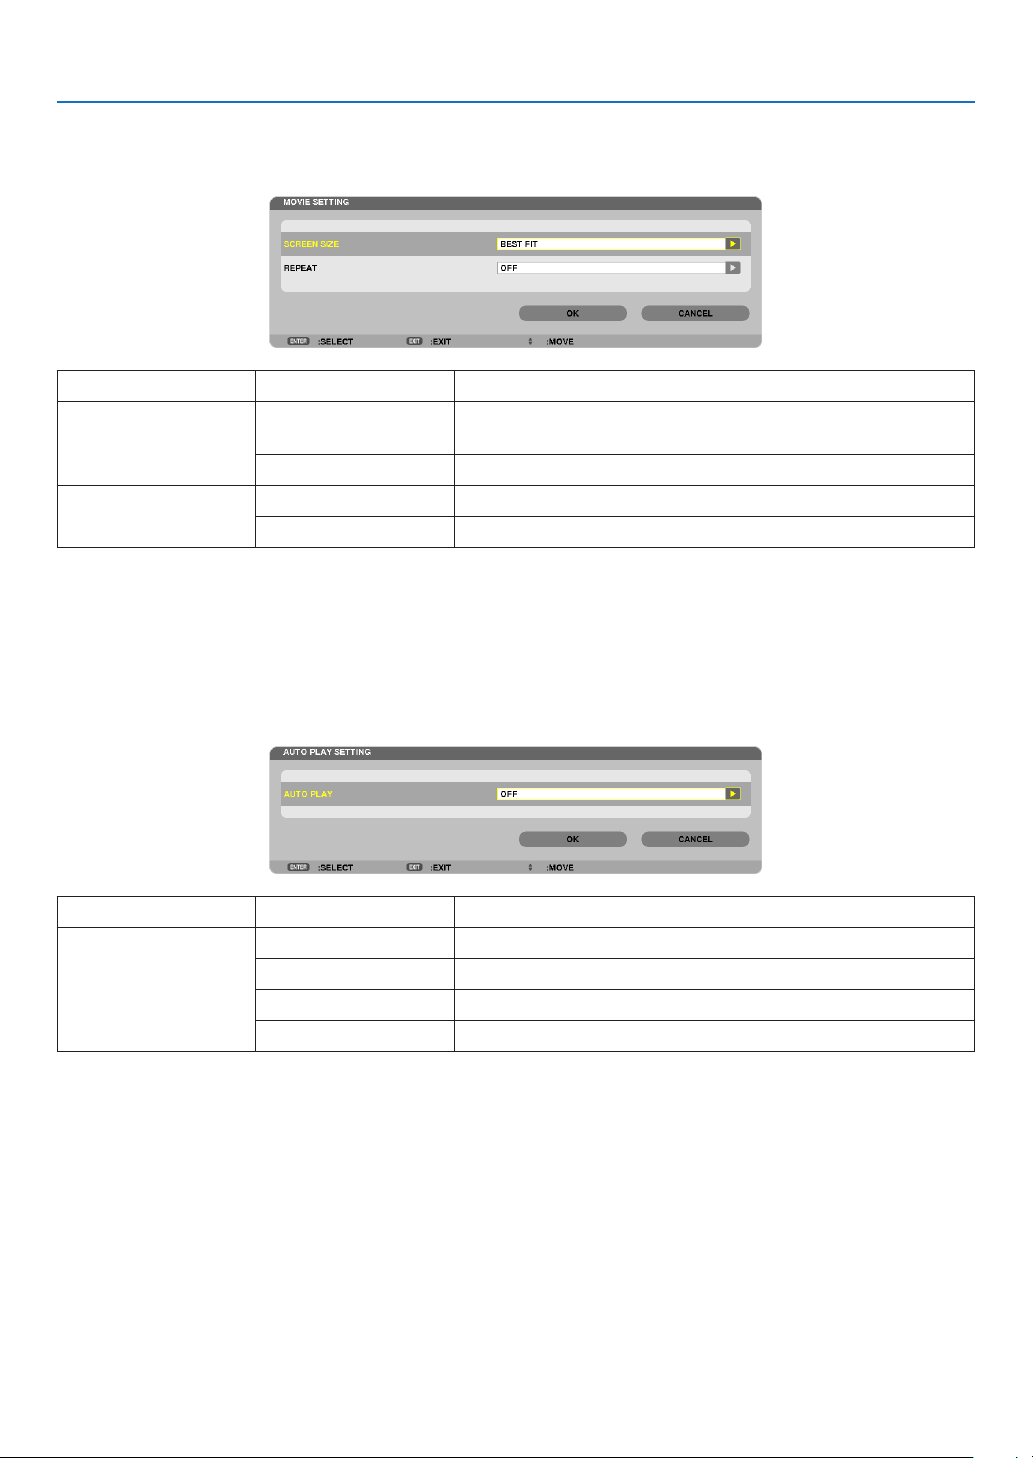
66
4. Using the Viewer
•MOVIESETTING
Setsthefunctionsforamoviele.
NameOptionsDescription
SCREENSIZEBESTFITDisplaystheimagewithitsaspectratiointheprojector’sdisplay-
ablemaximumresolution.
ACTUALSIZEDisplaystheimageinitsactualsize.
REPEATOFFTurnsonorofftherepeatfunction.
ONEREPEATRepeatsoneleonly.
TIP
•Turningon[REPEAT]willdisplayblackscreenduringintermissionbetweenmovies.
•AUTOPLAYSETTING
SetsautoplayforslideshowwhenaUSBmemorydeviceisinsertedintotheUSBportoftheprojector,orwhen
[VIEWER]isselectedfor[SOURCE].
NameOptionsDescription
AUTOPLAYOFF—
PICTURE
Playsarstfoundstillimageinadrive.
MOVIEPlaysarstfoundmovieleinadrive.
PowerPointPlaysarstfoundPowerPointleinadrive.
TIP
•AutoplaybehaviorisdifferentbetweenwhenaUSBmemorydeviceisinsertedintotheUSBportoftheprojectorandwhen
[VIEWER]isselectedfor[SOURCE].
•AutoplaystartsfortherstfoundlesupportingtheletypesetupforAutoPlay.Thelewillbesearchedinthedriverootor
lowerlevel.
•When[VIEWER]isselectedfor[SOURCE],thelastselectedlewillbeautomaticallyplayedifitisfound,orthelastselectedfolder
willbesearchedandtherstfoundlewillbeautomaticallyplayed.
ToautomaticallyplayamovieleinaUSBmemory,storeonemovieleorchangeitslenamesothatitcanbesearchedrst.

67
4. Using the Viewer
•SORTSETTING
Setstheorderofdisplayingthumbnailsorslides.
NameOptionsDescription
SORT
NAME(ABC..)Displaysthelesalphabeticallybynameinascendingorder.
NAME(ZYX..)Displaysthelesalphabeticallybynameindescendingorder.
EXT.(ABC..)Displaysthelesalphabeticallybyextensioninascendingor-
der.
EXT.(ZYX..)Displaysthelesalphabeticallybyextensionindescending
order.
DATE(NEW)Displaysthelesinreversechronologicalorder.
DATE(OLD)Displaysthelesinchronologicalorder.
SIZE(BIG)Displaysthelesindescendingorderofitslesize.
SIZE(SMALL)Displaysthelesinascendingorderofitslesize.
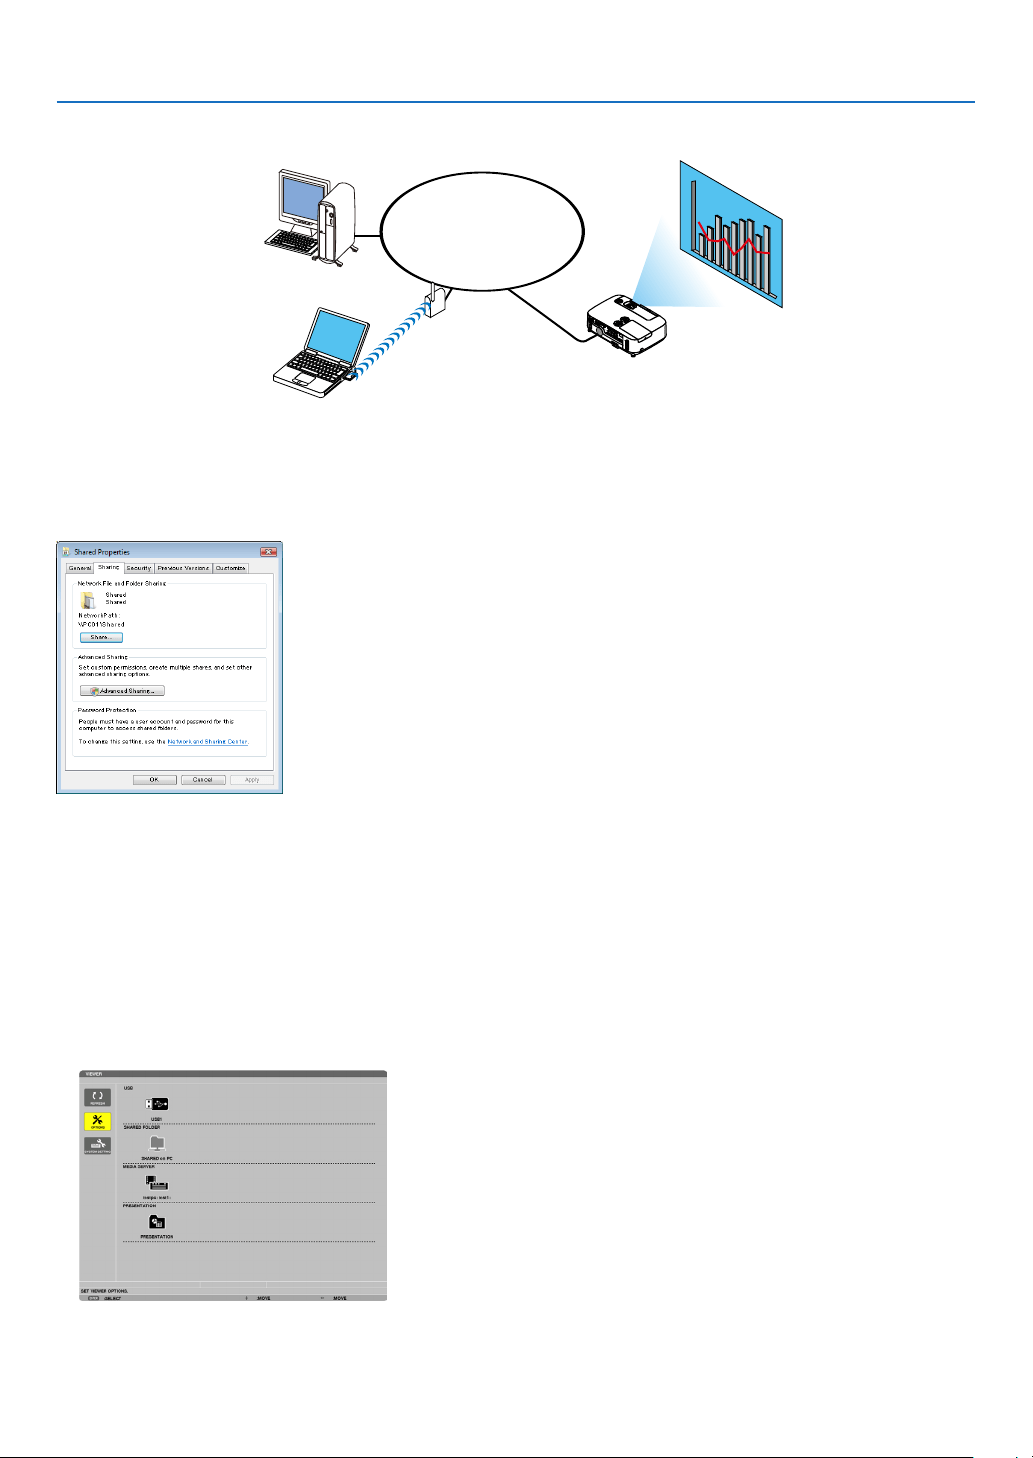
68
4. Using the Viewer
❹ Projecting data from shared folder
LAN
Shared folder
Wireless LAN
Projector
Shared folder
Preparation
Forprojector:Connecttheprojectortothenetwork.
Forcomputer:Placelestobeprojectedinasharedfolderandnotethefolder’spath.Memorizeorwritedownthe
pathforlateruse.
•Forsharingafolder,refertoyouruserguideorhelpleaccompaniedwithyourWindowscomputer.
•Useakeyboardtogiveanametothesharedfolderinalphanumericcharacters.
•Toconnectthesharedfolderbeyondthesubnet,set[WINSCONFIGURATION]in[NETWORKSETTINGS]from
themenu.
•Digitalsignature(SMBsignature)isnotsupported.
Connecting the projector to the shared folder
1.PresstheVIEWERbuttonontheremotecontrol.
The drive list window will be displayed.
•AnotherwaytostarttheVIEWERistopresstheSOURCEbuttonafewtimesontheprojectorcabinet.( page
16)
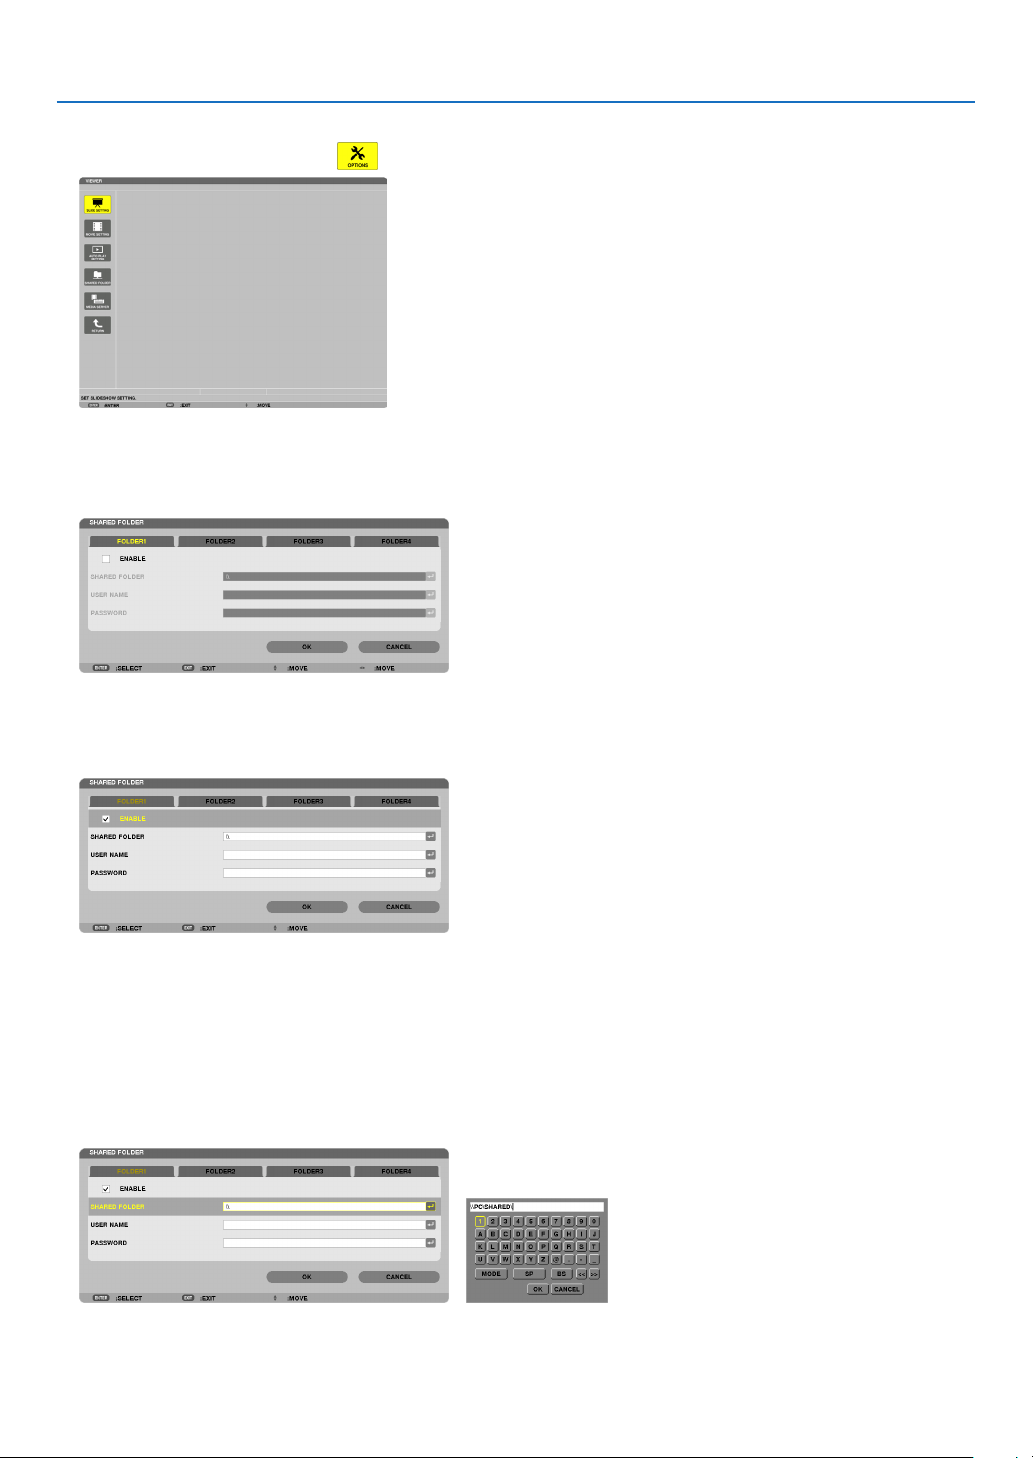
69
4. Using the Viewer
2.Displaysthe[OPTIONS]menu.
Press the ▼ button to select the (OPTIONS) icon and press the ENTER button.
•WhentheOPTIONSmenuisdisplayed,thedrivelistwillnotbedisplayed.
3.Displaythe[SHAREDFOLDERSETTING]screen.
Press the ▼ button to select the (SHARED FOLDER SETTING) icon and press the ENETR button.
4.Selectafoldernumberandplacetoenableit.
Press the ◀ or ▶ button to a shared folder number and press the ▼ button to select [ENABLE] , and then press
the ENTER button.
5.Enterthepath,username,andpasswordforthesharedfolder.
Press the ▼buttontoselectthe[SHAREDFOLDER]eld.Thesoftwarekeyboardwillbedisplayed.
Forusingthesoftwarekeyboard,seepage
118.
•Ifyourcomputerisnotpasswordprotected,enteringapasswordisnotrequired.
•Uptofoursharedfolderscanbeadded.
•Themaximumlengthofapathofthesharedfoldermustbe15alphanumericcharactersforcomputernameand
23 alphanumeric characters for folder name.

70
4. Using the Viewer
6.Exitthesetting.
Press the ▼ button to select [OK] and press the ENTER button.
This will close the [SHARED FOLDER] screen.
•Ifanerrormessageappear,yoursettingsarenotcorrect.Tryagain.

71
4. Using the Viewer
Disconnecting the shared folder from the projector
•Disablethenumberofasharedfolderyouwishtodisconnect
Press the ▼ button to select [ENABLE] and press the ENTER button to clear it.
NOTE:
•WhenaPowerPointleorPDFleisdisplayed,donotdisconnectyourLANcable.Ifdoingso,theViewerwillnotwork.
TIP:
•ConnectingsettingsforSharedfolder
Settingsofuptofourfolderscanbesaved.
Restartingtheprojectorwilldisplaysetting-savedsharedfoldersingreyfoldericononthedrivelistscreen.
Selectingthegreyiconfolderwillskipentryforafolderpath.
•Failingtoconnectwithasharedfolderwilldisplaythefoldericonwith“x”mark.Ifthishappen,checkyourfoldersetting.

72
4. Using the Viewer
❺ Projecting data from media server
LAN
Media server
Media server
Wireless LAN
Media server
Projector
Preparation
Forprojector:Connecttheprojectortothenetwork.
Forcomputer:Prepareimagelesormovielestobeprojected,andsetup“MediaSharing”inWindowsMediaPlayer
11orWindowsMediaPlayer12.
NOTE:
•Boththeprojectorandthemediaservermustbeonthesamesubnet.Connectingtothemediaserverbeyondthesubnetisnot
possible.
•TypesofimagesandmovieswhichcanbesharedmayvarydependingonWindowsversion.
Setting up “Media Sharing” in Windows Media Player 11
1.StartWindowsMediaPlayer11.
2.Select“MediaSharing”from“Library”.
The “Media Sharing” dialog box will be displayed.
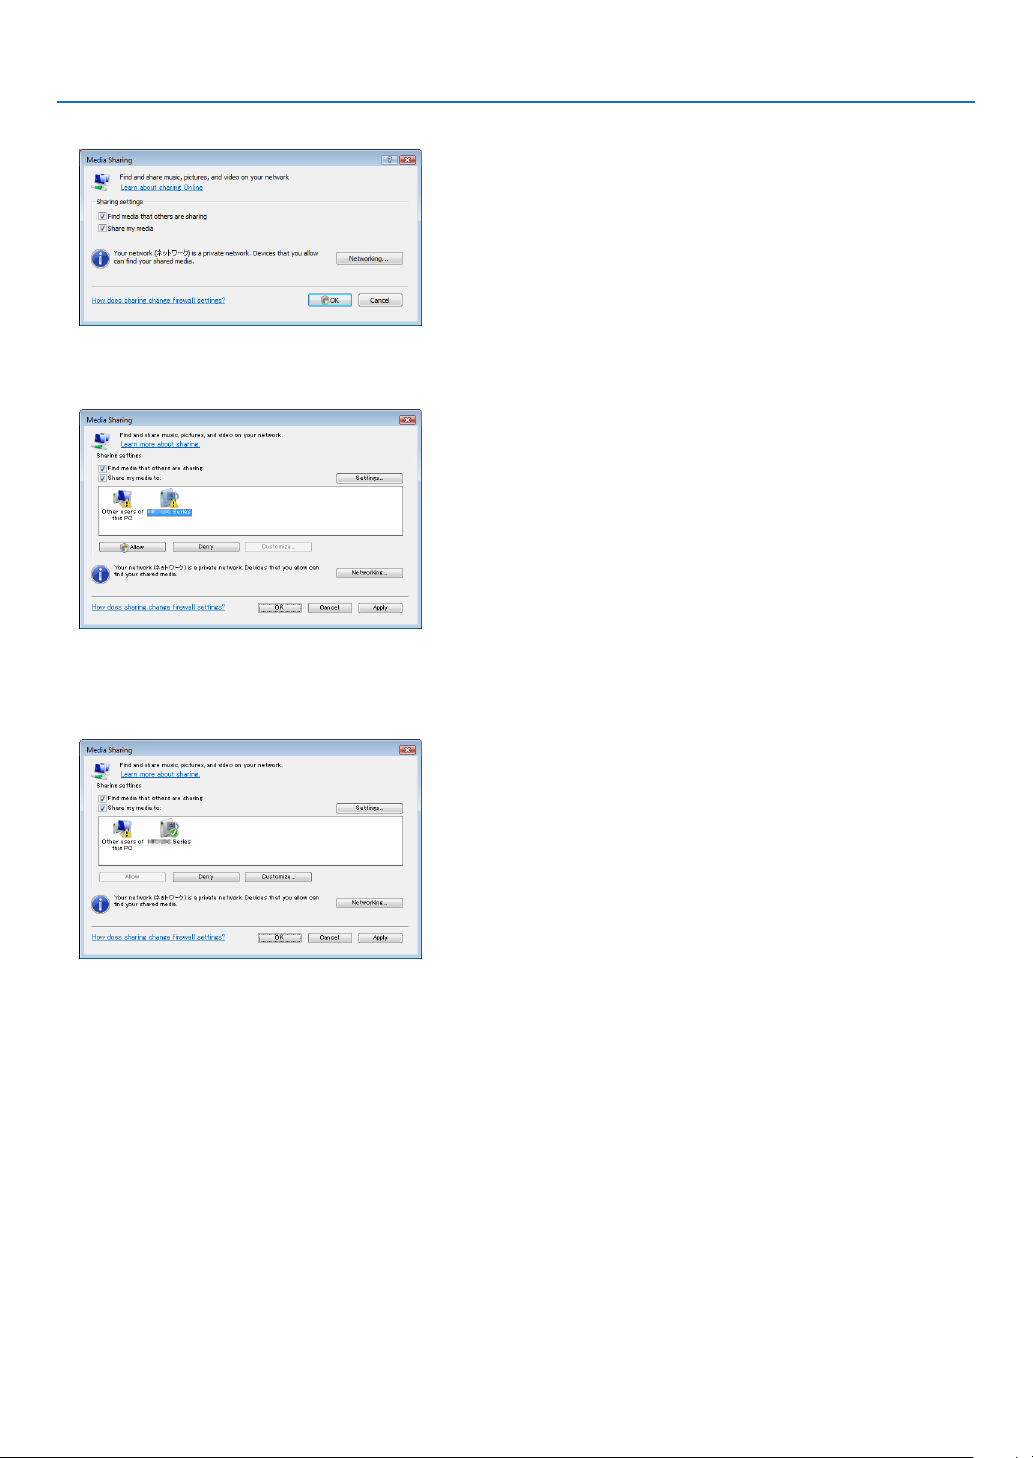
73
4. Using the Viewer
3.Select“Sharemymedia”checkbox,andthenselectOK.
A list of accessible devices will be displayed.
4.Select“P420Series”andthen“Allow”.
Acheckmarkwillbeaddedtothe“P420Series”icon.
•The“P420Series”isaprojectornamespeciedin[NETWORKSETTINGS].
5.Select“OK”.
Thiswillmakepicturesandvideoin“Library”availablefromtheprojector.
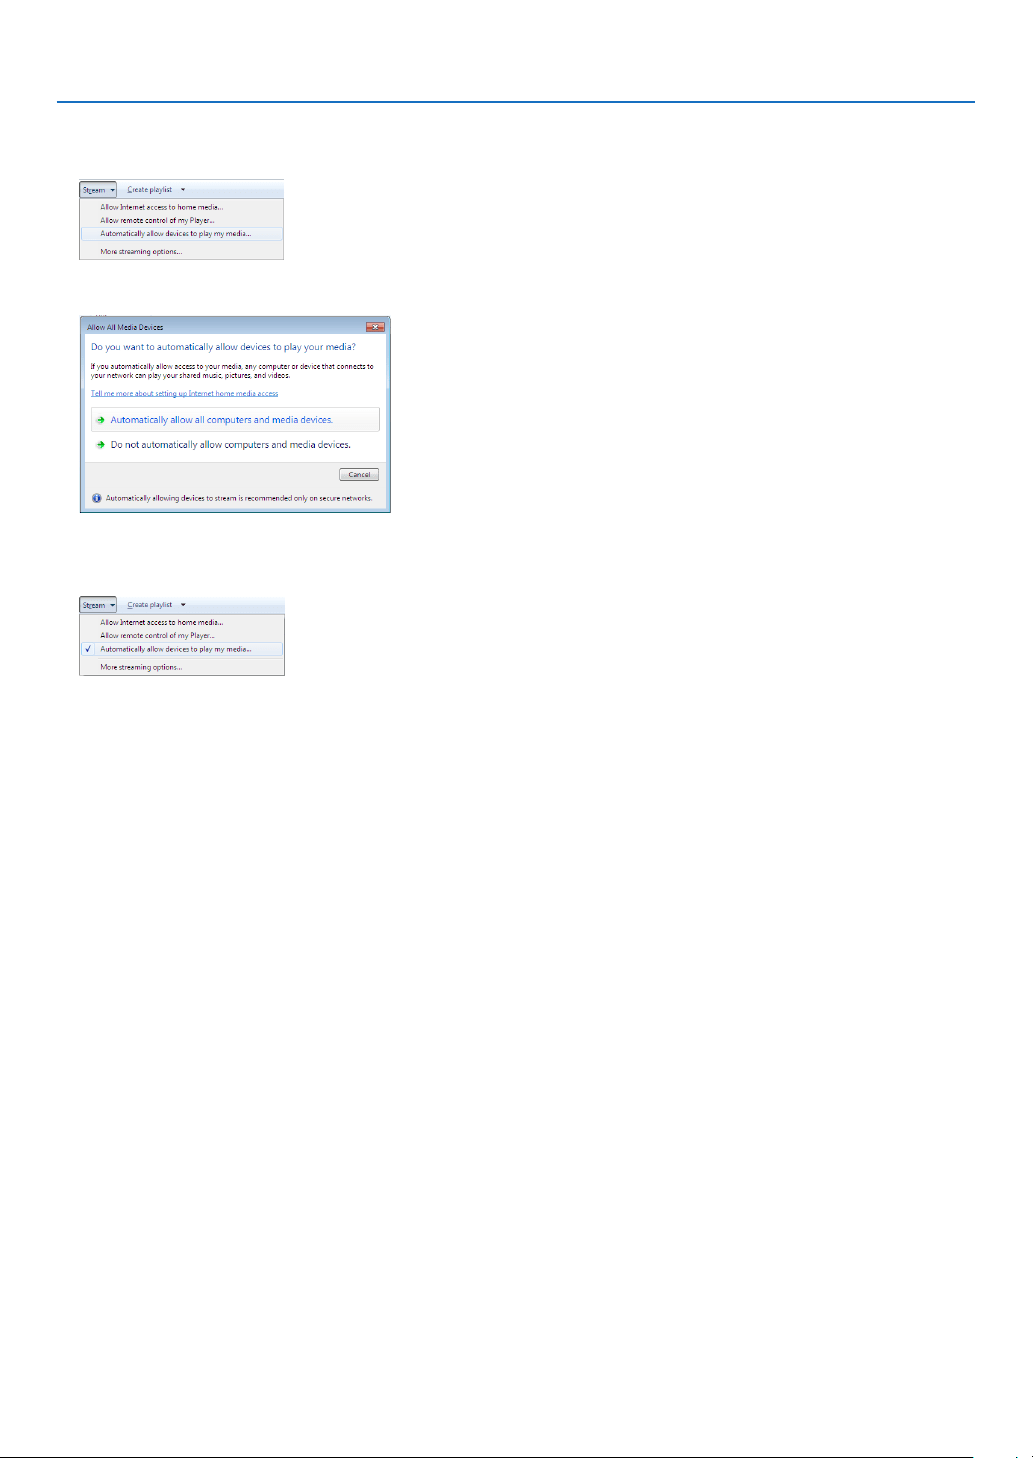
74
4. Using the Viewer
Setting up “Media Sharing” in Windows Media Player 12
1.StartWindowsMediaPlayer12.
2.Select“Stream”,andthenselect“Automaticallyallowdevicestoplaymymedia”.
The “Allow All Media Devices” windows will be displayed.
3.Select“Automaticallyallowallcomputersandmediadevices”.
Graphics and movie files in “Library” can be used from the projector.
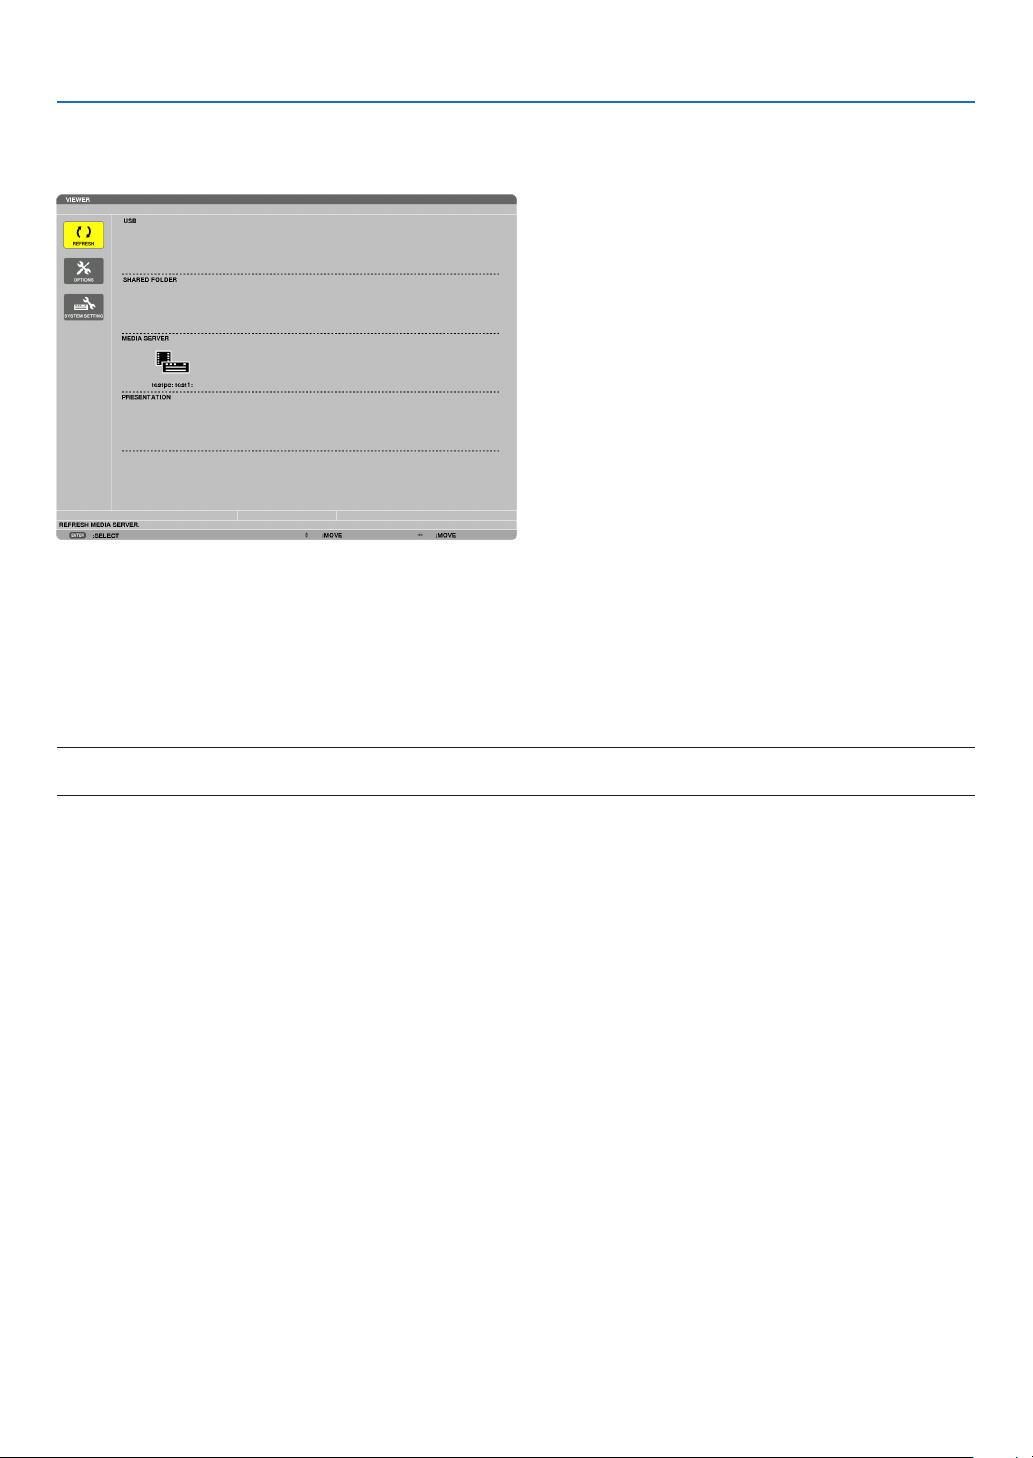
75
4. Using the Viewer
Connecting the projector to the media server
PresstheVIEWERbuttonontheremotecontrol.
TheVIEWERwillstart.
•AnotherwaytostarttheVIEWERistopresstheSOURCEbuttonafewtimesontheprojectorcabinet.(page
16)
•Thiswillstartsearchingforacomputerwith“mediasharing”enabledinthenetworkandaddittothe“Mediaserver”
ofthethumbnailscreen.
Anotherwaytodothisistopointthecursorto“Mediaserver”andselect[REFRESH]fromthethumbnailmenu
andpresstheENTERbutton.
NOTE:
•Uptofouraccessiblemediaserverscanbeautomaticallysearchedanddisplayed.Thefthdeviceorlatercannotbedisplayed.
(page56)
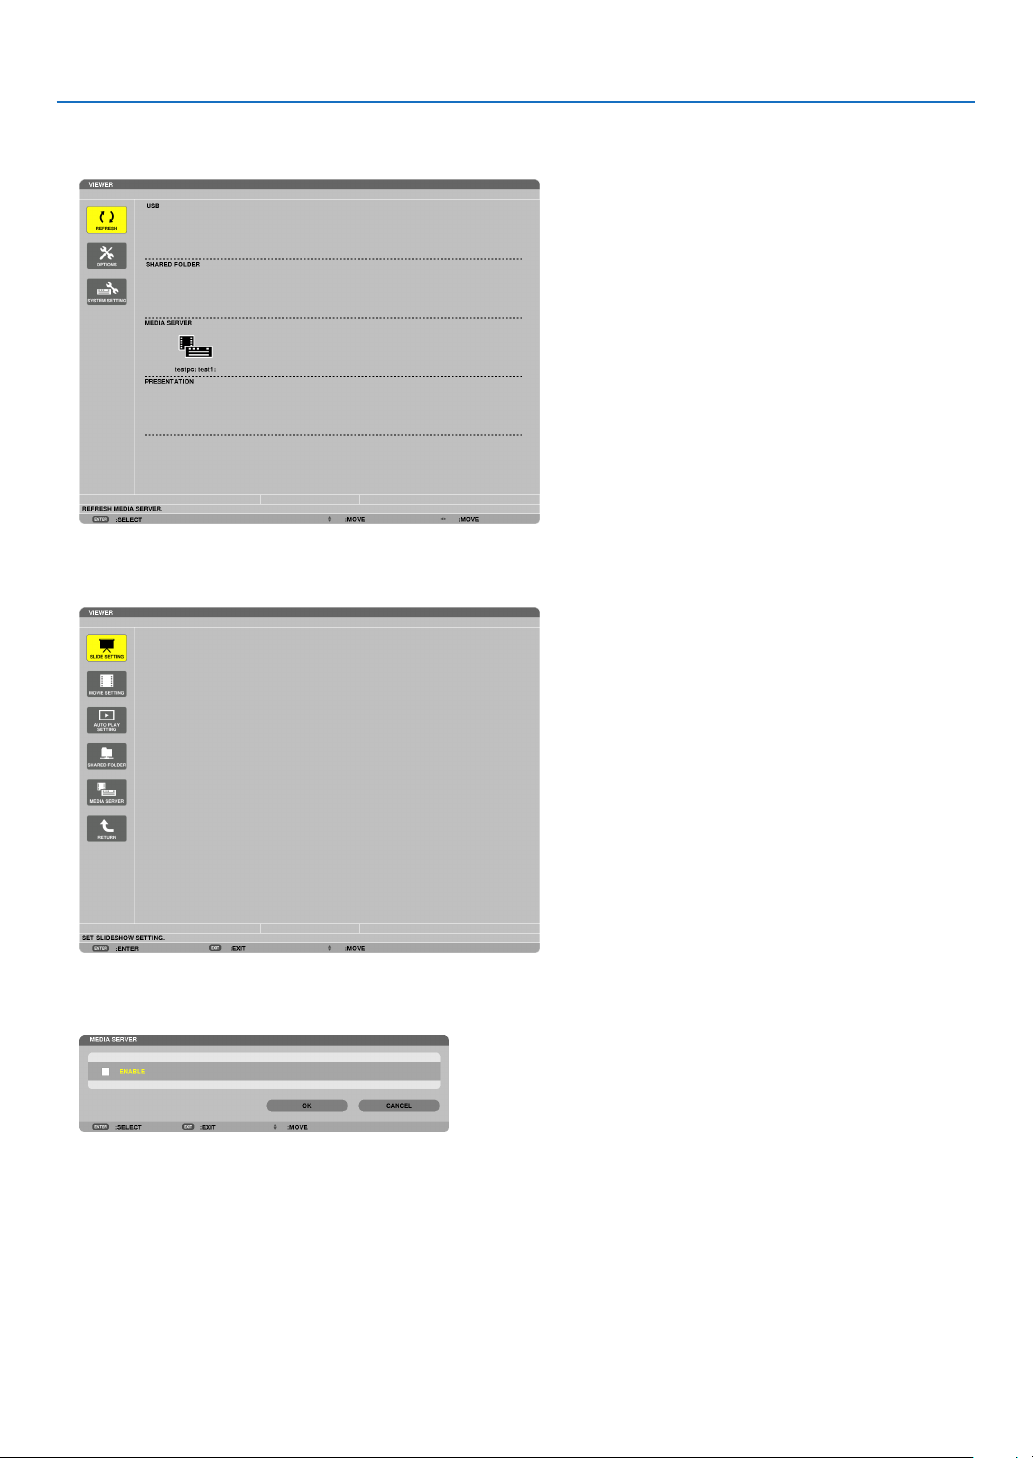
76
4. Using the Viewer
Disconnecting the projector from the media server
1.DisplaytheOPTIONSmenu.
Press the ▼ button to select the [OPTIONS] icon and select the ENTER button.
2.DisplaytheMEDIASERVERsettingscreen.
Press the ▼ button to select the MEDIA SERVER icon and press the ENTER button.
3.Disabletheconnection.
PresstheENTERbuttontoclearthecheckmarktodisabletheconnection.
Press the ▼ button to select [OK] and press the ENTER button to close the MEDIA SERVER setting screen.

77
4. Using the Viewer
❻ Restrictions on displaying files
TheViewerallowsyoutogiveasimplieddisplayofaPowerPointleorPDFle.
Duetosimplieddisplay,however,actualdisplaymaybedifferentfromtheoneonyourcomputerapplicationpro-
gram.
Some restrictions on PowerPoint files
•Fontswillbeautomaticallyconvertedtothefontsinstalledintheprojector.Fontscanvaryinsizeorwidth,causing
layoutcorruption
Somecharactersorfontsmaynotbedisplayed.
•Somefunctionsincludedinfontarenotsupported.
Example:Therearesomerestrictionsonanimation,selection,orhyperlink.
•Itmaytakelongertimetofeedpagescomparedwithacomputer
•InsomecasesMicrosoftPowerPoint97-2003formatlesmaynotbedisplayed.
Some restrictions on PDF files
•FontsnotembeddedatthetimeofPDFcreationmaynotbedisplayed.
•Somefunctionsincludedinfontarenotsupported.
Example:Therearesomerestrictionsonannotations,selection,form,orcolorspace.
•Itmaytakelongertimetofeedpagescomparedwithacomputer
•InsomecasesAdobeAcrobatformatlesmaynotbedisplayed.
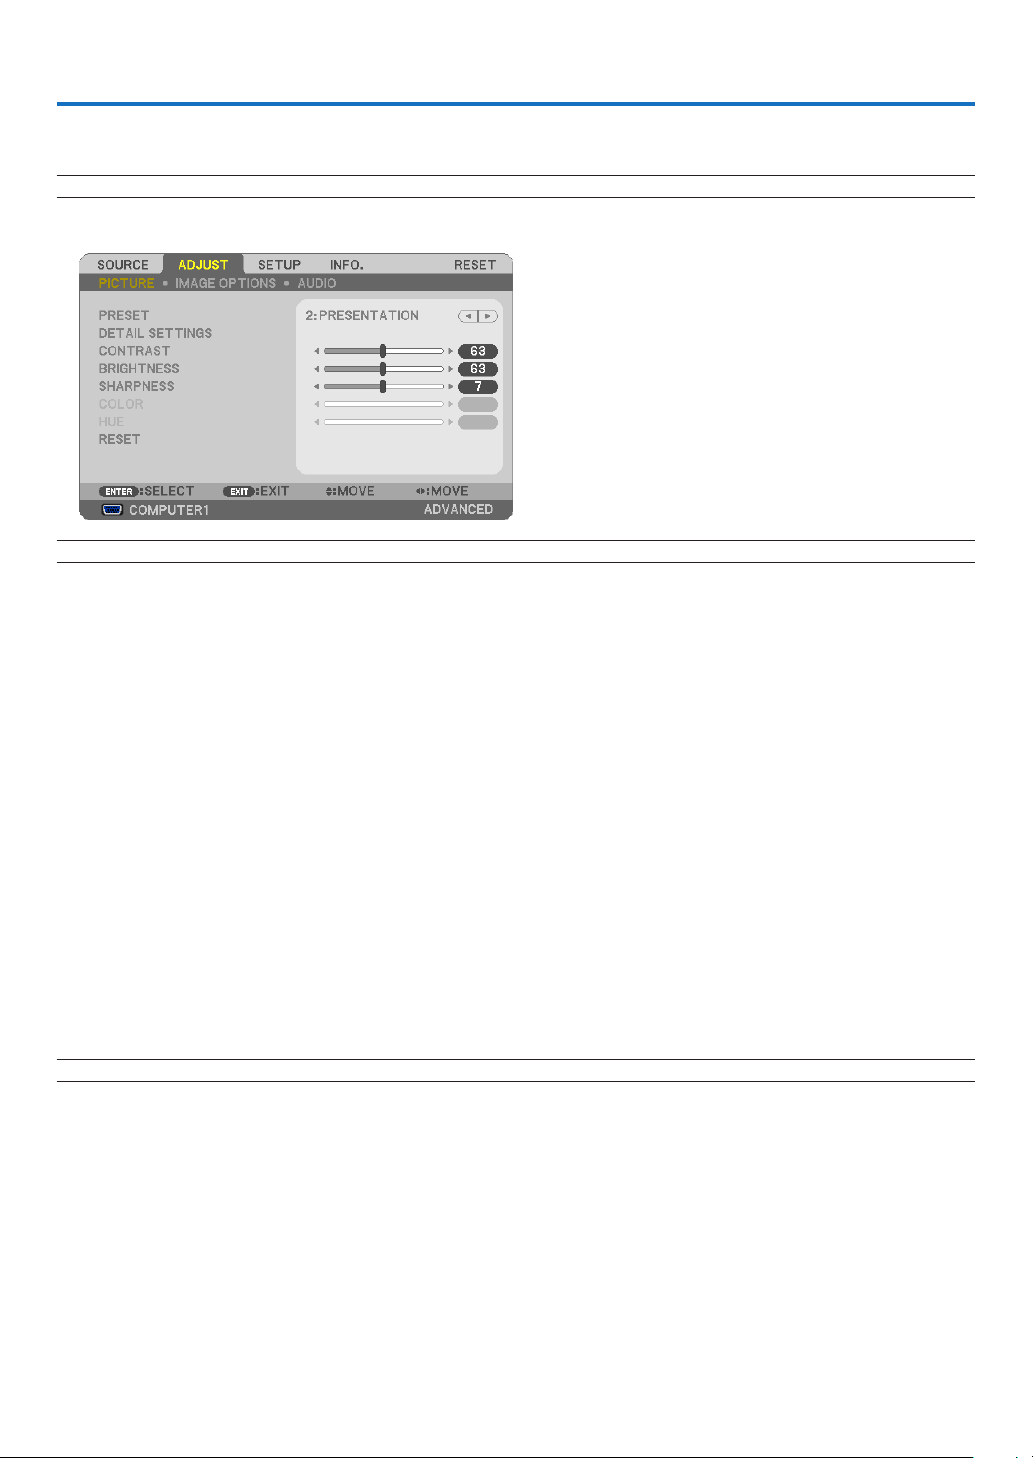
78
5. Using On-Screen Menu
1 Using the Menus
NOTE:Theon-screenmenumaynotbedisplayedcorrectlywhileinterlacedmotionvideoimageisprojected.
1.PresstheMENUbuttonontheremotecontrolortheprojectorcabinettodisplaythemenu.
NOTE:ThecommandssuchasENTER,EXIT,,inthebottomshowavailablebuttonsforyouroperation.
2.Pressthebuttonsontheremotecontrolortheprojectorcabinettodisplaythesubmenu.
3.PresstheENTERbuttonontheremotecontrolortheprojectorcabinettohighlightthetopitemortherst
tab.
4.Usethebuttonsontheremotecontrolortheprojectorcabinettoselecttheitemyouwanttoadjustor
set.
Youcanusethebuttonsontheremotecontrolortheprojectorcabinettoselectthetabyouwant.
5.PresstheENTERbuttonontheremotecontrolortheprojectorcabinettodisplaythesubmenuwindow.
6.Adjustthelevelorturntheselecteditemonoroffbyusingthebuttonsontheremotecontrolor
theprojectorcabinet.
Changesarestoreduntiladjustedagain.
7.Repeatsteps2-6toadjustanadditionalitem,orpresstheEXITbuttonontheremotecontrolortheprojec
-
torcabinettoquitthemenudisplay.
NOTE:Whenamenuormessageisdisplayed,severallinesofinformationmaybelost,dependingonthesignalorsettings.
8.PresstheMENUbuttontoclosethemenu.
Toreturntothepreviousmenu,presstheEXITbutton.
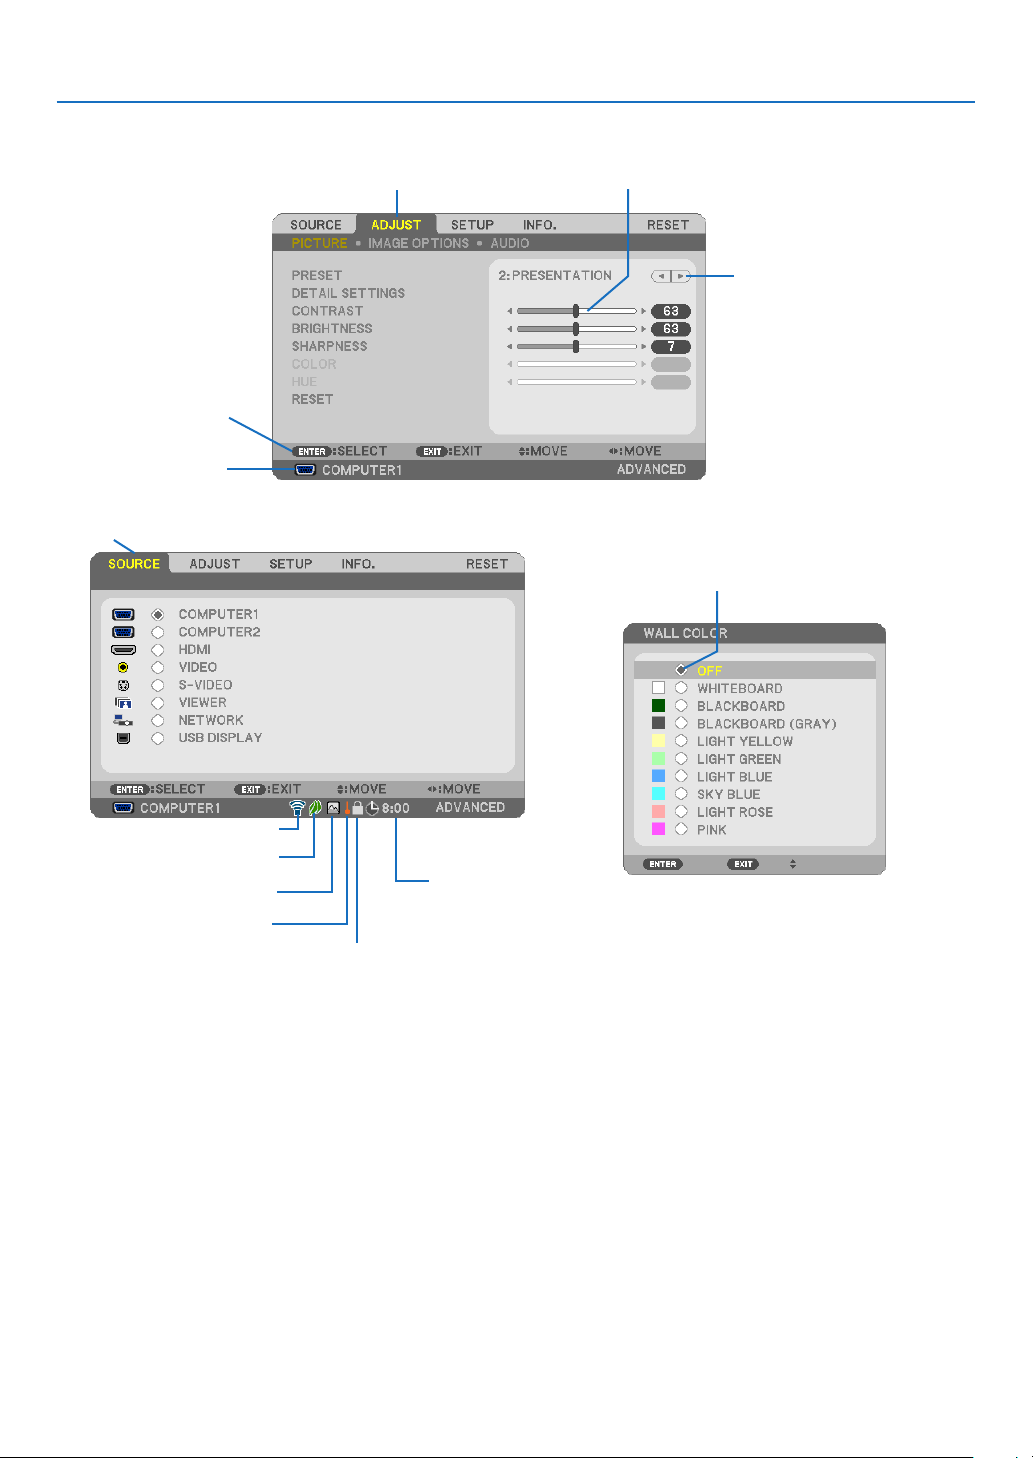
79
5. Using On-Screen Menu
Menu Elements
Slide bar
Solid triangle
Tab
Radio button
High Altitude symbol
ECO mode symbol
Wireless symbol
Menuwindowsordialogboxestypicallyhavethefollowingelements:
Highlight .............................Indicates the selected menu or item.
Solid triangle ......................Indicates further choices are available. A highlighted triangle indicates the item is active.
Tab ......................................Indicates a group of features in a dialog box. Selecting on any tab brings its page to the front.
Radio button .......................Use this round button to select an option in a dialog box.
Source ................................ Indicates the currently selected source.
Off Timer remaining time ....Indicates the remaining countdown time when the [OFF TIMER] is preset.
Slide bar ............................. Indicates settings or the direction of adjustment.
ECO mode symbol .............. Indicates ECO MODE is set.
Key Lock symbol ................ Indicates the [CONTROL PANEL LOCK] is enabled.
Thermometer symbol ......... Indicates the [ECO MODE] is forcibly set to [ON] mode because the internal temperature is too
high.
High Altitude symbol .......... Indicates the [FAN MODE] is set to [HIGH ALTITUDE] mode.
Wireless symbol .................Indicate the wireless LAN connection is enabled.
Source
Available buttons
Thermometer symbol
KeyLocksymbol
Off Timer remaining
time
Highlight
80
5. Using On-Screen Menu
List of Menu Items
Somemenuitemsarenotavailabledependingontheinputsource.
MenuItemDefaultOptions
SOURCE
COMPUTER1*
COMPUTER2*
HDMI*
VIDEO*
S-VIDEO*
VIEWER*
NETWORK*
USBDISPLAY*
ADJUST
PICTURE
PRESET*1–7
DETAIL
SETTINGS
GENERAL
REFERENCE*
HIGH-BRIGHT,PRESENTATION,VIDEO,MOVIE,GRAPHIC,
sRGB,DICOMSIM.
GAMMA
CORRECTION*
1
DYNAMIC,NATURAL,BLACKDETAIL
SCREENSIZE*
2
*LARGE,MEDIUM,SMALL
COLOR
TEMPERATURE
*5000,6500,7800,8500,9300,10500
DYNAMIC
CONTRAST
*OFF,ON
IMAGEMODE*STILL,MOVIE
WHITEBALANCE
CONTRASTR0
CONTRASTG0
CONTRASTB0
BRIGHTNESSR0
BRIGHTNESSG0
BRIGHTNESSB0
CONTRAST
BRIGHTNESS
SHARPNESS
COLOR*
1
HUE
RESET
IMAGE
OPTIONS
CLOCK*
PHASE*
HORIZONTAL*
VERTICAL*
OVERSCAN*
0[%],5[%],10[%]
ASPECTRATIO
*
P420X/P350X:AUTO,4:3,16:9,15:9,16:10,WIDEZOOM,
NATIVE
*P350W:AUTO,4:3,16:9,15:9,16:10,LETTERBOX,NATIVE
POSITION0 (NotavailableonP350W)
AUDIOVOLUME11 0 - 31
SETUP
GENERAL
KEYSTONE0
KEYSTONESAVEOFFOFF,ON
WALLCOLOROFF
OFF,WHITEBOARD,BLACKBOARD,BLACKBOARD
(GRAY),LIGHTYELLOW,LIGHTGREEN,LIGHTBLUE,
SKYBLUE,LIGHTROSE,PINK
ECOMODEAUTOECOOFF,AUTOECO,ECO1,ECO2*
3
CLOSEDCAPTIONOFF
OFF,CAPTION1,CAPTION2,CAPTION3,CAPTION4,
TEXT1,TEXT2,TEXT3,TEXT4
OFFTIMEROFFOFF,0:30,1:00,2:00,4:00,8:00,12:00,16:00
LANGUAGEENGLISH
ENGLISH,DEUTSCH,FRANÇAIS,ITALIANO,ESPAÑOL,
SVENSKA,日本語
DANSK,PORTUGUÊS,ČEŠTINA,MAGYAR,POLSKI,
NEDERLANDS,SUOMI
NORSK,TÜRKÇE,РУССКИЙ,
, Ελληνικά, 中文, 한국어
ROMÂNĂ, HRVATSKA, БЪЛГАРСКИ, INDONESIA, ,
ไทย
MENU
COLORSELECTCOLORCOLOR,MONOCHROME
SOURCEDISPLAYONOFF,ON
IDDISPLAYONOFF,ON
ECOMESSAGEOFFOFF,ON
DISPLAYTIMEAUTO45SECMANUAL,AUTO5SEC,AUTO15SEC,AUTO45SEC
BACKGROUNDBLUEBLUE,BLACK,LOGO
FILTERMESSAGEOFFOFF,100[H],500[H],1000[H],2000[H]
*Theasterisk(*)indicatesthatthedefaultsettingvariesdependingonthesignal.
*1The[GAMMACORRECTION]itemisavailablewhenanitemotherthan[DICOMSIM.]isselectedfor[REFERENCE].
*2The[SCREENSIZE]itemisavailablewhen[DICOMSIM.]isselectedfor[REFERENCE].
*3[ECO2]isavailableonP350Xonly.
•Basicmenuitemsareindicatedbyshadedarea.

81
5. Using On-Screen Menu
SETUP
INSTALLATION
ORIENTATION
DESKTOP
FRONT
DESKTOPFRONT,CEILINGREAR,DESKTOPREAR,
CEILINGFRONT
CONTROLPANELLOCKOFFOFF,ON
SECURITYOFFOFF,ON
COMMUNICATIONSPEED38400bps4800bps,9600bps,19200bps,38400bps
REMOTESENSORFRONT/BACKFRONT/BACK,FRONT,BACK
CONTROLID
CONTROLID
NUMBER
1 1–254
CONTROLIDOFFOFF,ON
TESTPATTERN
NETWORKSETTINGS
WIREDLAN,WIRELESSLAN,WPS,NETWORK
INFORMATION,PROJECTORNAME,DOMAIN,ALERT
MAIL,NETWORKSERVICE
OPTIONS(1)
AUTOADJUSTNORMALOFF,NORMAL,FINE
FANMODEAUTOAUTO,HIGH,HIGHALTITUDE
SIGNALSELECT
COMPUTER1
RGB/
COMPONENT
RGB/COMPONENT,RGB,COMPONENT
COMPUTER2
RGB/
COMPONENT
RGB/COMPONENT,RGB,COMPONENT
VIDEOAUTO
AUTO,NTSC3.58,NTSC4.43,PAL,PAL-M,PAL-N,PAL60,
SECAM
S-VIDEOAUTO
AUTO,NTSC3.58,NTSC4.43,PAL,PAL-M,PAL-N,PAL60,
SECAM
WXGAMODE
P420X/P350X:
OFF
P350W:ON
OFF,ON
DEINTERLACEONOFF,ON
HDMISETTINGS
VIDEOLEVELAUTOAUTO,NORMAL,ENHANCED
AUDIOSELECTHDMIHDMI,COMPUTER2
BEEPONOFF,ON
TOOLS
ADMINISTRATORMODE,PROGRAMTIMER,TIME,
MOUSE
OPTIONS(2)
STANDBYMODENORMALNORMAL,POWER-SAVING
AUTOPOWERON(AC)OFFOFF,ON
AUTOPOWERON(COMP1)OFFOFF,ON
AUTOPOWEROFFOFFOFF,0:05,0:10,0:20,0:30
DEFAULTSOURCESELECTLAST
LAST,AUTO,COMPUTER1,COMPUTER2,HDMI,VIDEO,
S-VIDEO,VIEWER,NETWORK,USBDISPLAY
INFO.
USAGETIME
LAMPLIFEREMAINING
LAMPHOURSUSED
FILTERHOURSUSED
TOTALCARBONSAVINGS
SOURCE
SOURCENAME
SOURCEINDEX
HORIZONTALFREQUENCY
VERTICALFREQUENCY
SIGNALTYPE
VIDEOTYPE
SYNCTYPE
SYNCPOLARITY
SCANTYPE
WIREDLAN
IPADDRESS
SUBNETMASK
GATEWAY
MACADDRESS
WIRELESSLAN
IPADDRESS
SUBNETMASK
GATEWAY
MACADDRESS
SSID
NETWORKTYPE
WEP/WPA
CHANNEL
SIGNALLEVEL
VERSION(1)
FIRMWARE
DATA
VERSION(2)FIRMWARE2
OTHERS
PROJECTORNAME
MODELNO.
SERIALNUMBER
LANUNITTYPE
CONTROLID(when[CONTROLID]
isset)
RESET
CURRENTSIGNAL
ALLDATA
CLEARLAMPHOURS
CLEARFILTERHOURS
*Theasterisk(*)indicatesthatthedefaultsettingvariesdependingonthesignal.

82
5. Using On-Screen Menu
Menu Descriptions & Functions [SOURCE]
COMPUTER 1 and 2
SelectsthecomputerconnectedtoyourCOMPUTER1orCOMPUTER2inputconnectorsignal.
NOTE:WhenthecomponentinputsignalisconnectedtotheCOMPUTER1INorCOMPUTER2INconnector,select[COMPUTER1]
or[COMPUTER2]respectively.TheprojectorautomaticallydetermineswhethertheCOMPUTER1or2inputsignalisanRGBor
componentsignal.
HDMI
SelectstheHDMIcompatibleequipmentconnectedtoyourHDMIINconnector.
VIDEO
SelectswhatisconnectedtoyourVIDEOinput-VCR,DVDplayerordocumentcamera.
S-VIDEO
SelectswhatisconnectedtoyourS-VIDEOinput-VCRorDVDplayer.
NOTE:Aframemayfreezeforabriefperiodoftimewhenavideoisplayedbackinfast-forwardorfast-rewindwithaVideoorS-
Videosource.
VIEWER
ThisfeatureenablesyoutomakepresentationsusingaUSBmemorythatcontainsslides.
(page
52“4.UsingtheViewer”)
NETWORK
SelectsasignalfromtheLANport(RJ-45)ortheinstalledUSBwirelessLANunit(optionalformodelsforEurope,
Australia,AsiaandothercountriesthanNorthAmerica).
USB DISPLAY
SelectsthecomputerconnectedtotheUSB(PC)port(typeB)byusingacommerciallyavailableUSBcable.
(page
34)
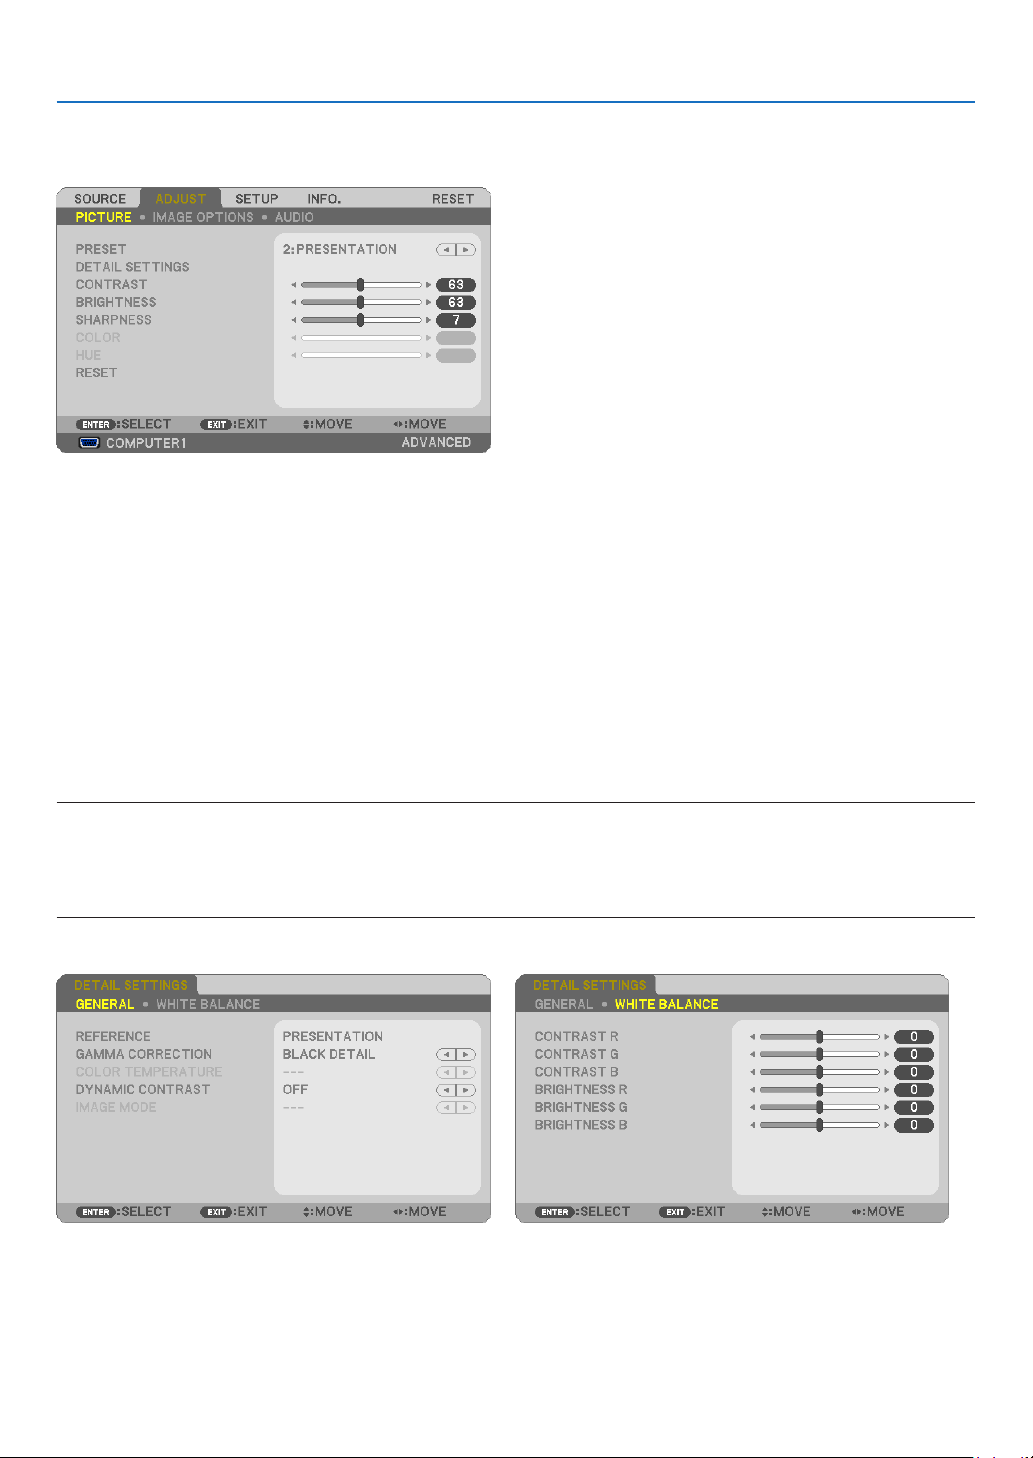
83
5. Using On-Screen Menu
Menu Descriptions & Functions [ADJUST]
[PICTURE]
[PRESET]
Thisfunctionallowsyoutoselectoptimizedsettingsforyourprojectedimage.
Youcanadjustneutraltintforyellow,cyanormagenta.
Therearesevenfactorypresetsoptimizedforvarioustypesofimages.Youcanalsouse[DETAILSETTINGS]toset
useradjustablesettingstocustomizeeachgammaorcolor.
Yoursettingscanbestoredin[PRESET1]to[PRESET7].
HIGH-BRIGHT ........ Recommended for use in a brightly lit room.
PRESENTATION ..... Recommended for making a presentation using a PowerPoint file.
VIDEO .................... Recommended for typical TV program viewing.
MOVIE ................... Recommended for movies.
GRAPHIC ............... Recommended for graphics.
sRGB ..................... Standard color values
DICOM SIM. .......... Recommended for DICOM simulation format.
NOTE:
•The[DICOMSIM.]optionisfortraining/referenceonlyandshouldnotbeusedforactualdiagnosis.
•DICOMstandsforDigitalImagingandCommunicationsinMedicine.ItisastandarddevelopedbytheAmericanCollegeofRadiol-
ogy(ACR)andtheNationalElectricalManufacturersAssociation(NEMA).
Thestandardspecieshowdigitalimagedatacanbemovedfromsystemtosystem.
[DETAIL SETTINGS]

84
5. Using On-Screen Menu
[GENERAL]
StoringYourCustomizedSettings[REFERENCE]
Thisfunctionallowsyoutostoreyourcustomizedsettingsin[PRESET1]to[PRESET7].
First,selectabasepresetmodefrom[REFERENCE],thenset[GAMMACORRECTION]and[COLORTEMPERA-
TURE].
HIGH-BRIGHT ........ Recommended for use in a brightly lit room.
PRESENTATION ..... Recommended for making a presentation using a PowerPoint file.
VIDEO .................... Recommended for typical TV program viewing.
MOVIE ................... Recommended for movies.
GRAPHIC ............... Recommended for graphics.
sRGB ..................... Standard color values.
DICOM SIM. .......... Recommended for DICOM simulation format.
Selecting Gamma Correction Mode [GAMMA CORRECTION]
Eachmodeisrecommendedfor:
DYNAMIC .............. Creates a high-contrast picture.
NATURAL ............... Natural reproduction of the picture.
BLACK DETAIL ....... Emphasizes detail in dark areas of the picture.
NOTE:Thisfunctionisnotavailablewhen[DICOMSIM.]isselectedfor[DETAILSETTINGS].
SelectingScreenSizeforDICOMSIM[SCREENSIZE]
Thisfunctionwillperformgammacorrectionappropriateforthescreensize.
LARGE ................... For screen size of 150"
MEDIUM ................ For screen size of 100"
SMALL ................... For screen size of 50"
NOTE:Thisfunctionisavailableonlywhen[DICOMSIM.]isselectedfor[DETAILSETTINGS].
AdjustingColorTemperature[COLORTEMPERATURE]
Thisoptionallowsyoutoselectthecolortemperatureofyourchoice.
NOTE:When[PRESENTATION]or[HIGH-BRIGHT]isselectedin[REFERENCE],thisfunctionisnotavailable.
AdjustingBrightnessandContrast[DYNAMICCONTRAST]
Thisfunctionallowsyoutoadjustthecontrastratioopticallyusingthebuilt-iniris.
Toincreasethecontrastratio,select[ON].
Selecting Still Image Mode or Movie Mode [IMAGE MODE]
Thisfunctionallowsyoutoselectthestillimagemodeorthemoviemode.
STILL ..................... This mode is for a still image.
MOVIE ................... This mode is for a movie.
NOTE:Thisfunctionisavailableonlywhen[HIGH-BRIGHT]isselectedfor[REFERENCE].
AdjustingWhiteBalance[WHITEBALANCE]
Thisallowsyoutoadjustthewhitebalance.Contrastforeachcolor(RGB)toadjustthewhitelevelofthescreen;
Brightnessforeachcolor(RGB)isusedtoadjusttheblacklevelofthescreen.

85
5. Using On-Screen Menu
[CONTRAST]
Adjuststheintensityoftheimageaccordingtotheincomingsignal.
[BRIGHTNESS]
Adjuststhebrightnesslevelorthebackrasterintensity.
[SHARPNESS]
Controlsthedetailoftheimage.
[COLOR]
Increasesordecreasesthecolorsaturationlevel.
[HUE]
Variesthecolorlevelfrom+/−greento+/−blue.Theredlevelisusedasreference.
InputsignalCONTRASTBRIGHTNESSSHARPNESSCOLORHUE
COMPUTER/HDMI(RGB)YesYesYesNo No
COMPUTER/HDMI(COMPONENT)YesYesYesYesYes
VIDEO/S-VIDEO/COMPONENTYesYesYesYesYes
VIEWER/NETWORK/USBDISPLAYYesYesYesNo No
Yes=Adjustable,No=Notadjustable
[RESET]
Thesettingsandadjustmentsfor[PICTURE]willbereturnedtothefactorysettingswiththeexceptionofthefollowing;
Presetnumbersand[REFERENCE]withinthe[PRESET]screen.
Thesettingsandadjustmentsunder[DETAILSETTINGS]withinthe[PRESET]screenthatarenotcurrentlyselected
willnotbereset.
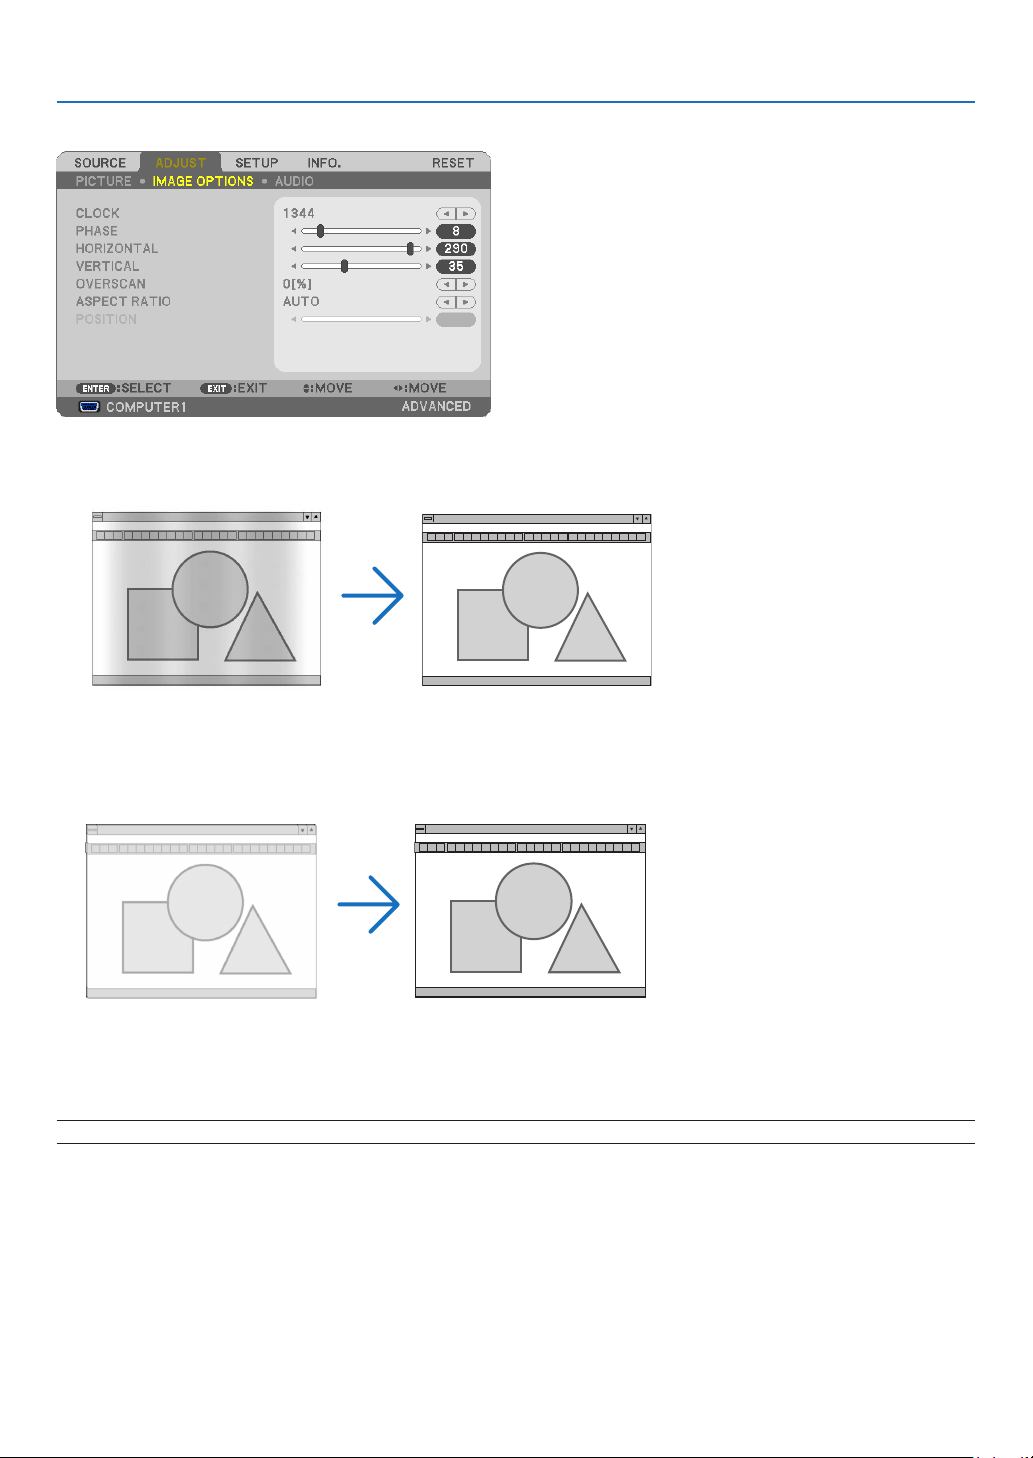
86
5. Using On-Screen Menu
[IMAGE OPTIONS]
AdjustingClockandPhase[CLOCK/PHASE]
ThisallowsyoutomanuallyadjustCLOCKandPHASE.
CLOCK ................... Use this item to fine tune the computer image or to remove any vertical banding that might appear. This
function adjusts the clock frequencies that eliminate the horizontal banding in the image.
This adjustment may be necessary when you connect your computer for the first time.
PHASE ................... Use this item to adjust the clock phase or to reduce video noise, dot interference or cross talk. (This is
evident when part of your image appears to be shimmering.)
Use [PHASE] only after the [CLOCK] is complete.
NOTE:The[CLOCK]and[PHASE]itemsareavailableforRGBsignalsonly.
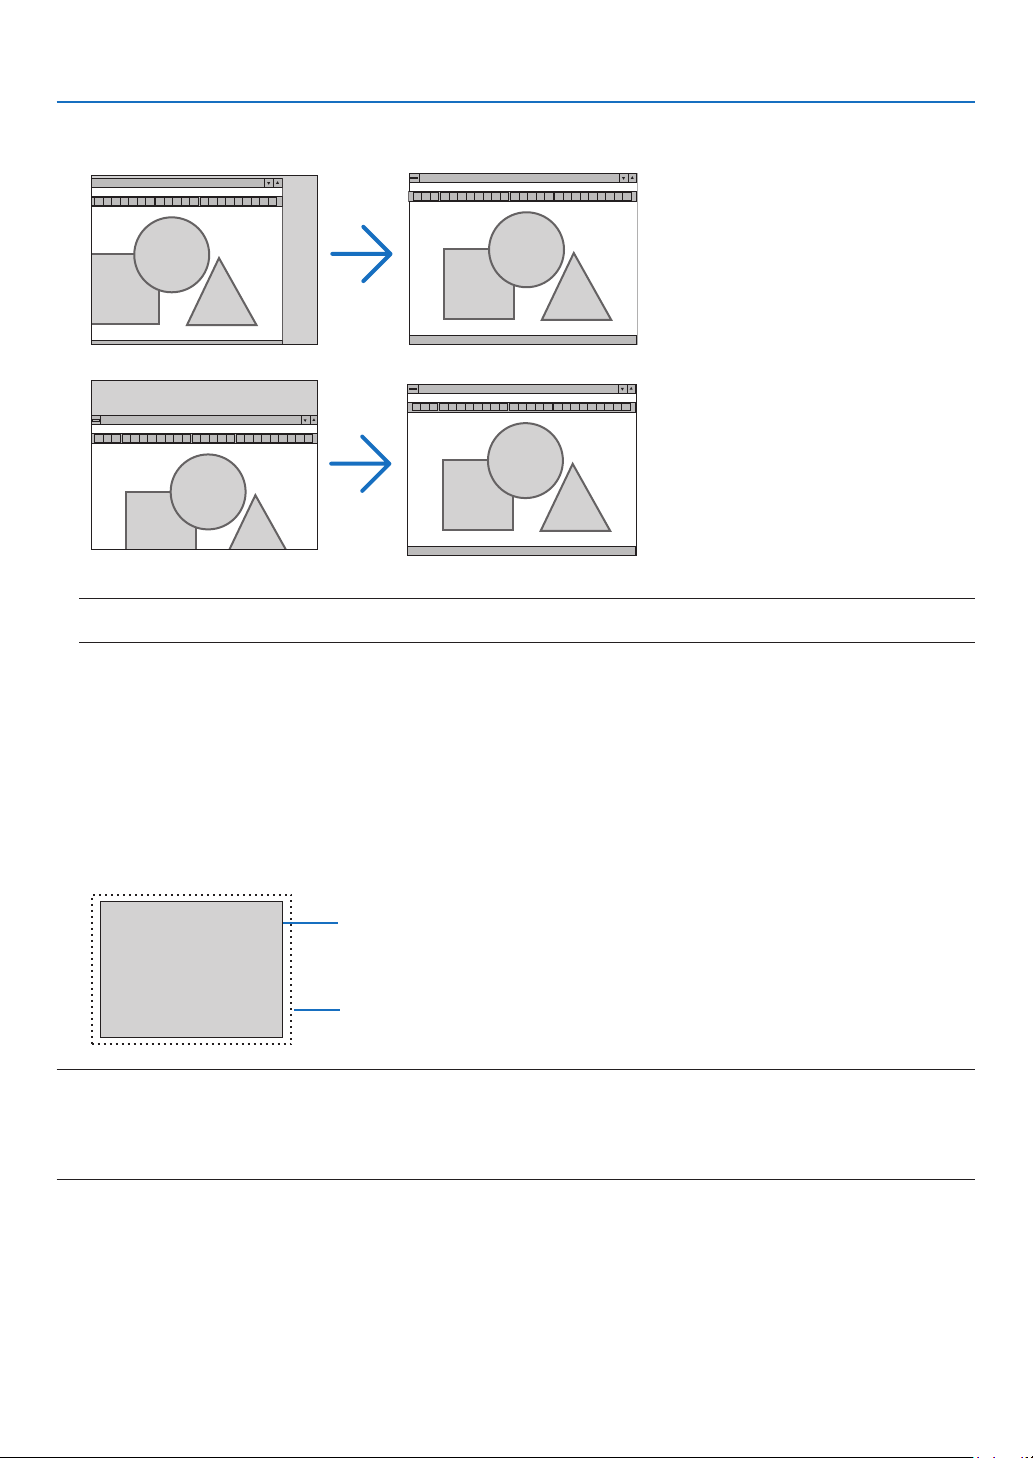
87
5. Using On-Screen Menu
AdjustingHorizontal/VerticalPosition[HORIZONTAL/VERTICAL]
Adjuststheimagelocationhorizontallyandvertically.
NOTE:The[HORIZONTAL]and[VERTICAL]itemsarenotavailableforVIDEO,S-VIDEO,HDMI,VIEWER,NETWORK,andUSB
DISPLAY.
-Animagecanbedistortedduringtheadjustmentof[CLOCK]and[PHASE].Thisisnotmalfunction.
-Theadjustmentsfor[CLOCK],[PHASE],[HORIZONTAL],and[VERTICAL]willbestoredinmemoryforthe
currentsignal.Thenexttimeyouprojectthesignalwiththesameresolution,horizontalandverticalfrequency,
itsadjustmentswillbecalledupandapplied.
Todeleteadjustmentsstoredinmemory,fromthemenu,youselect[RESET][CURRENTSIGNAL]or[ALL
DATA]andresettheadjustments.
SelectingOverscanPercentage[OVERSCAN]
Selectoverscanpercentage(0%,5%and10%)forsignal.
Projected image
Overscaned by 10%
NOTE:
•The[0[%]]cannotbeselectedwhenVIDEOandS-VIDEOsignalsareused.
•The[OVERSCAN]itemisnotavailable:
•when[NATIVE]isselectedfor[ASPECTRATIO].
•when[VIEWER],[NETWORK],or[USBDISPLAY]isselectedfor[SOURCE]
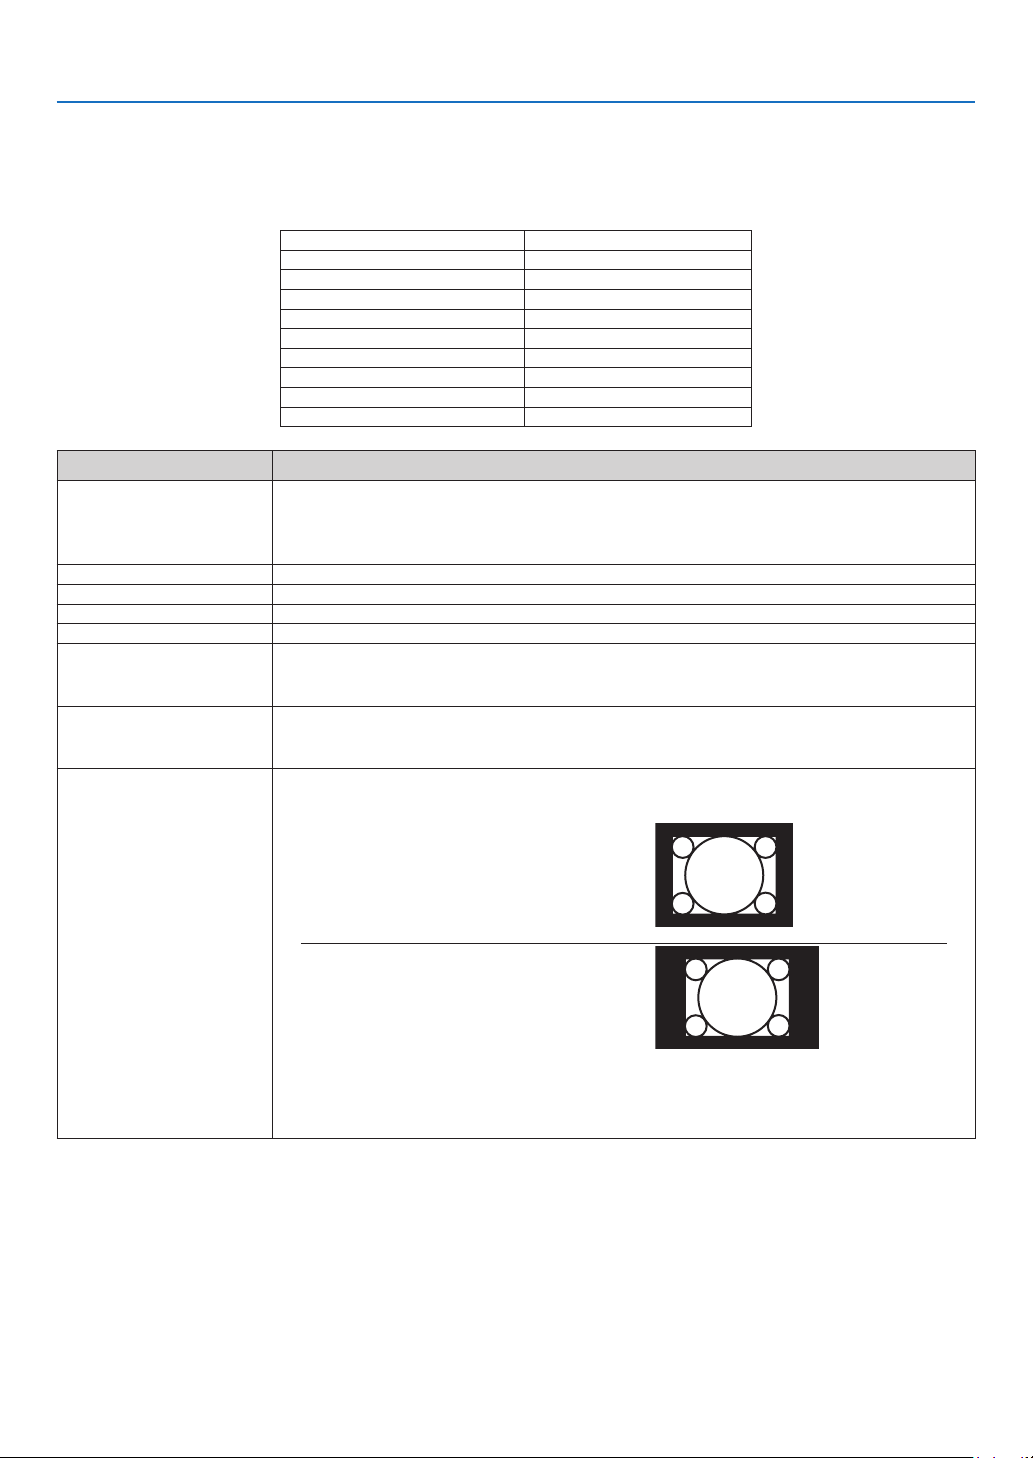
88
5. Using On-Screen Menu
Selecting Aspect Ratio [ASPECT RATIO]
Theterm“aspectratio”referstotheratioofwidthtoheightofaprojectedimage.
Theprojectorautomaticallydeterminestheincomingsignalanddisplaysitinitsappropriateaspectratio.
•Thistableshowstypicalresolutionsandaspectratiosthatmostcomputerssupport.
ResolutionAspectRatio
VGA640×4804:3
SVGA
800×6004:3
XGA1024×7684:3
WXGA1280×76815:9
WXGA1280×80016:10
WXGA+1440×90016:10
SXGA1280×10245:4
SXGA+
1400×10504:3
UXGA1600×12004:3
OptionsFunction
AUTO
Theprojectorwillautomaticallydeterminetheincomingsignalanddisplayitinitsaspect
ratio.(
nextpage)
Theprojectormayerroneouslydeterminetheaspectratiodependingonitssignal.Ifthis
occurs,selecttheappropriateaspectratiofromthefollowing.
4:3Theimageisdisplayedin4:3aspectratio.
16:9Theimageisdisplayedin16:9aspectratio.
15:9Theimageisdisplayedin15:9aspectratio.
16:10Theimageisdisplayedin16:10aspectratio.
WIDEZOOM
(P420X/P350X)
Theimageisstretchedleftandright.
Partsofthedisplayedimagearecroppedattheleftandrightedgesandthereforenot
visible.
LETTERBOX
(P350W)
Theimageofaletterboxsignalisstretchedequallyinthehorizontalandverticaldirections
totthescreen.Partsofthedisplayedimagearecroppedatthetopandbottomedges
andthereforenotvisible.
NATIVETheprojectordisplaysthecurrentimageinitstrueresolutionwhentheincomingcomputer
signalhasalowerresolutionthantheprojector’snativeresolution.
[Example 1]Whentheincomingsig-
nalwiththeresolutionof800×600is
displayedontheP420X/P350X:
[Example 2]Whentheincomingsig-
nalwiththeresolutionof800×600is
displayedontheP350W:
NOTE:
•Whenanon-computersignalisdisplayed,the[NATIVE]isnotavailable.
•Whenasignalwithahigherresolutionthantheprojector’snativeresolutionisdisplayed,[NATIVE]
isnotavailable.
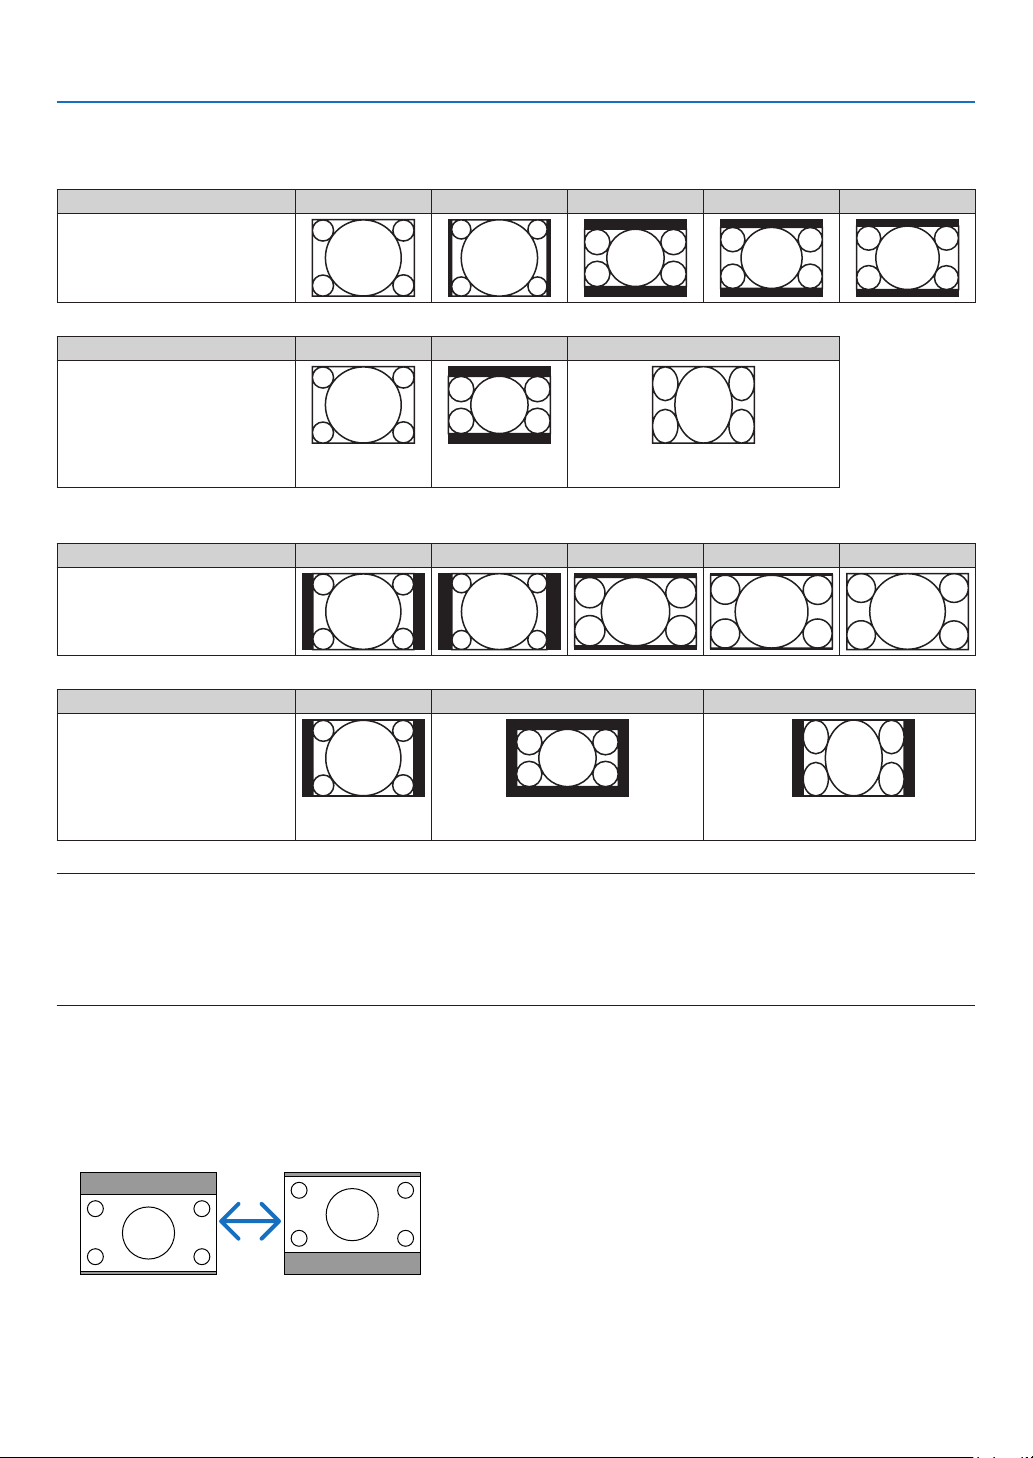
89
5. Using On-Screen Menu
Sampleimagewhentheappropriateaspectratioisautomaticallydetermined
P420X/P350X
[Computersignal]
Aspectratioofincomingsignal4:35:416:915:916:10
Sampleimagewhentheappro-
priateaspectratioisautomati-
callydetermined
[Videosignal]
Aspectratioofincomingsignal4:3LetterboxSqueeze
Sampleimagewhentheas-
pectratioisautomaticallyde-
termined
NOTE:Todisplayasqueezedsignalprop-
erly,select[16:9]or[WIDEZOOM].
P350W
[Computersignal]
Aspectratioofincomingsignal4:35:416:915:916:10
Sampleimagewhentheappro-
priateaspectratioisautomati-
callydetermined
[Videosignal]
Aspectratioofincomingsignal4:3LetterboxSqueeze
Sampleimagewhentheas-
pectratioisautomaticallyde-
termined
NOTE:Todisplayaletterboxsignalprop-
erly,select[LETTERBOX].
NOTE:Todisplayasqueezedsignalprop-
erly,select[16:9].
TIP:
•Imagepositioncanbeadjustedverticallyusing[POSITION]whenthe[16:9],[15:9],or[16:10]aspectratiosareselected.
•Theterm“letterbox”referstoamorelandscape-orientedimagewhencomparedtoa4:3image,whichisthestandardaspect
ratioforavidesource.
Theletterboxsignalhasaspectratioswiththevistasize“1.85:1”orcinemascopesize“2.35:1”formovielm.
•Theterm“squeeze”referstothecompressedimageofwhichaspectratioisconvertedfrom16:9to4:3.
AdjustingtheVerticalPositionofImage[POSITION](notavailableonP350W)
(onlywhen[16:9],[15:9],or[16:10]isselectedfor[ASPECTRATIO])
When[16:9],[15:9],or[16:10]isselectedin[ASPECTRATIO],theimageisdisplayedwithblackbordersonthetop
andbottom.
Youcanadjusttheverticalpositionfromthetoptothebottomoftheblackarea.

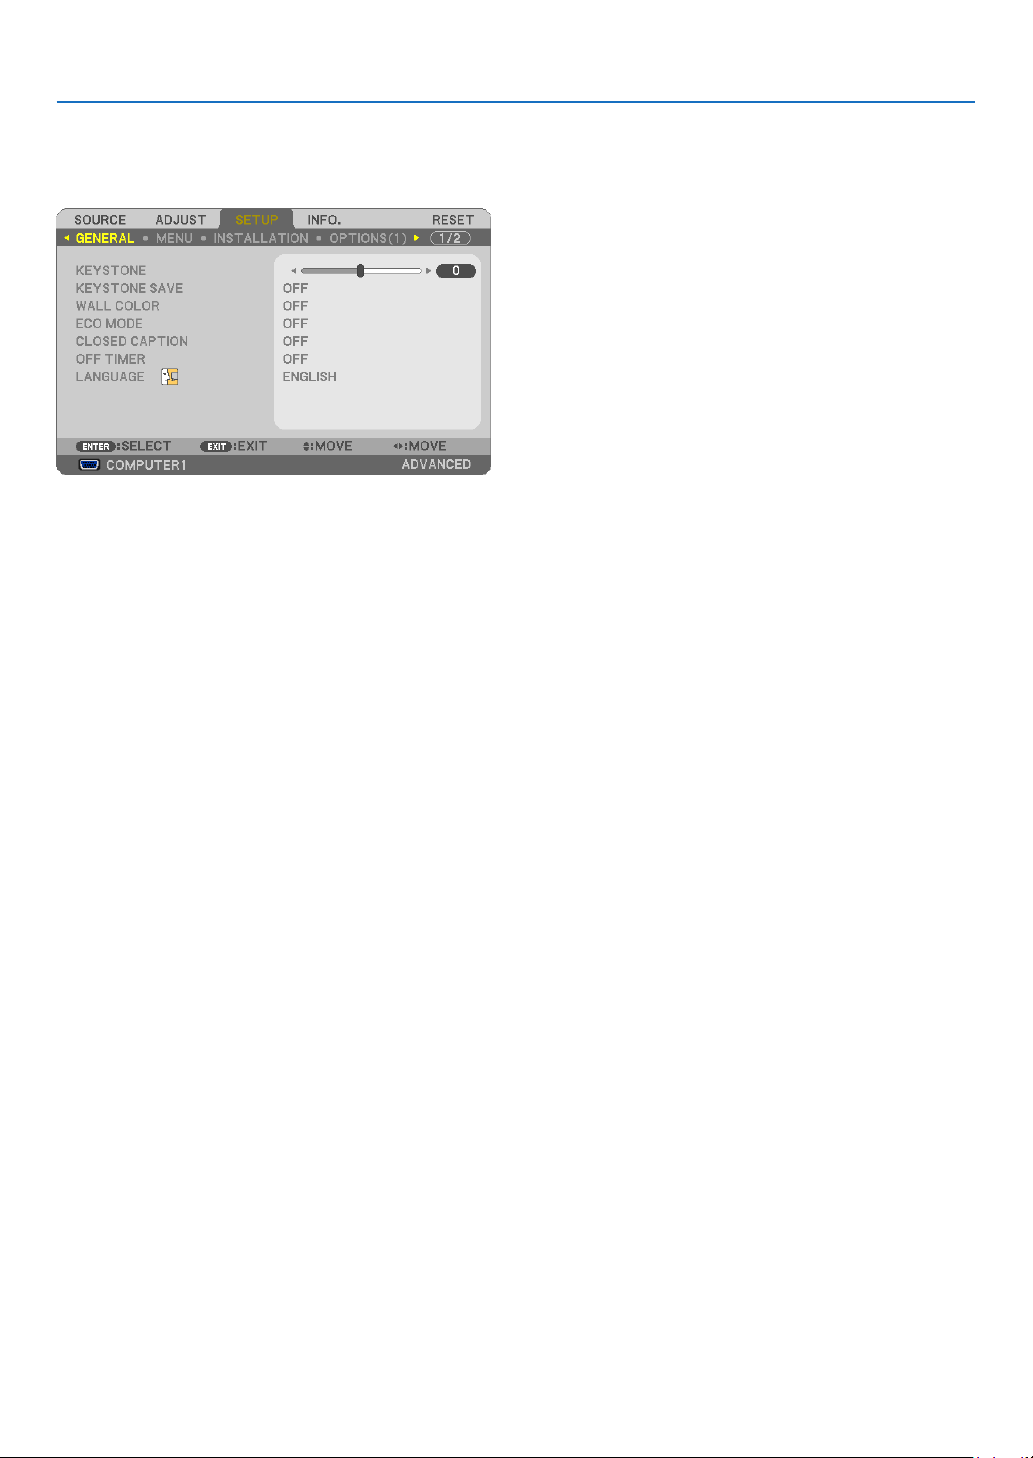
91
5. Using On-Screen Menu
Menu Descriptions & Functions [SETUP]
[GENERAL]
CorrectingVerticalKeystoneDistortionManually[KEYSTONE]
Youcancorrectverticaldistortionmanually.(page
22)
TIP:Whenthisoptionishighlighted,pressingtheENTERbuttonwilldisplayitsslidebarforadjustment.
SavingVerticalKeystoneCorrection[KEYSTONESAVE]
Thisoptionenablesyoutosaveyourcurrentkeystonesettings.
OFF ........................ Does not save current keystone correction settings. It will return your keystone correction settings to
“zero”.
ON ......................... Saves current keystone correction settings
Savingyourchangeonceaffectsallsources.Thechangesaresavedwhentheprojectoristurnedoff.

92
5. Using On-Screen Menu
Using the Wall Color Correction [WALL COLOR]
Thisfunctionallowsforquickadaptivecolorcorrectioninapplicationswherethescreenmaterialisnotwhite.
NOTE:Selecting[WHITEBOARD]reduceslampbrightness.
Setting Eco Mode [ECO MODE]
TheECOMODEincreaseslamplife,whileloweringpowerconsumptionandcuttingdownonCO
2
emissions.
Fourbrightnessmodesofthelampcanbeselected:[OFF],[AUTOECO],[ECO1]and[ECO2]modes.
(page
28)
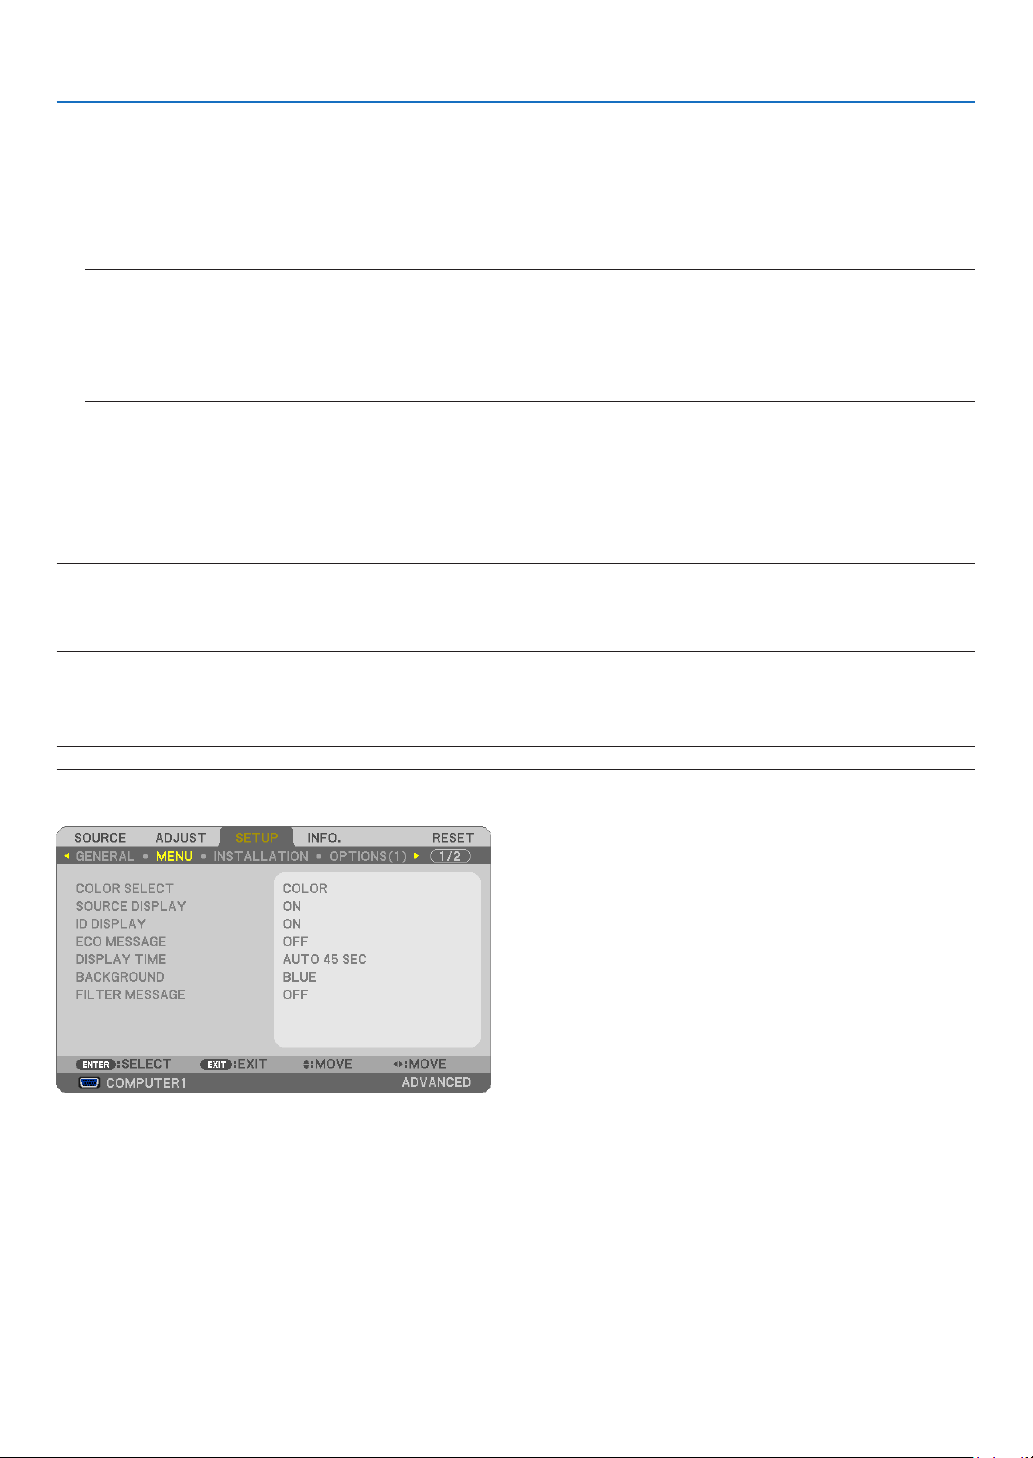
93
5. Using On-Screen Menu
Setting Closed Caption [CLOSED CAPTION]
ThisoptionsetsseveralclosedcaptionmodesthatallowtexttobesuperimposedontheprojectedimageofVideo
orS-Video.
OFF ........................ This exits the closed caption mode.
CAPTION 1-4 ......... Text is superimposed.
TEXT 1-4 ................ Text is displayed.
NOTE:
•Theclosedcaptionisnotavailableunderthefollowingconditions:
-whenmessagesormenusaredisplayed.
-whenanimageismagnied,frozen,ormuted.
•Portionsofsuperimposedtextorclosedcaptionmaybetruncated.Ifthathappens,trytoplacethesuperimposedtextor
closedcaptionwithinthescreen.
Using Off Timer [OFF TIMER]
1.Selectyourdesiredtimebetween30minutesand16hours:OFF,0:30,1:00,2:00,4:00,8:00,12:00,16:00.
2.PresstheENTERbuttonontheremotecontrol.
3.Theremainingtimestartscountingdown.
4.Theprojectorwillturnoffafterthecountdowniscomplete.
NOTE:
•Tocancelthepresettime,set[OFF]forthepresettimeorturnoffthepower.
•Whentheremainingtimereaches3minutesbeforetheprojectoristurnedoff,the[THEPROJECTORWILLTURNOFFWITHIN3
MINUTES]messagewillbedisplayedonthebottomofthescreen.
Selecting Menu Language [LANGUAGE]
Youcanchooseoneof27languagesforon-screeninstructions.
NOTE:Yoursettingwillnotbeaffectedevenwhen[RESET]isdonefromthemenu.
[MENU]
Selecting Menu Color [COLOR SELECT]
Youcanchoosebetweentwooptionsformenucolor:COLORandMONOCHROME.
Turning On / Off Source Display [SOURCE DISPLAY]
ThisoptionturnsonoroffinputnamedisplaysuchasCOMPUTER1,COMPUTER2,HDMI,VIDEO,S-VIDEO,
VIEWER,NETWORK,USBDISPLAY,tobedisplayedonthetoprightofthescreen.
Whennoinputsignalispresent,theno-signalguidancepromptingyoutocheckforanavailableinputwillbedisplayed
atthecenterofthescreen.Whenthe[VIEWER]or[NETWORK]itemisselectedfor[SOURCE],theno-signalguid-
ancewillnotbedisplayed.
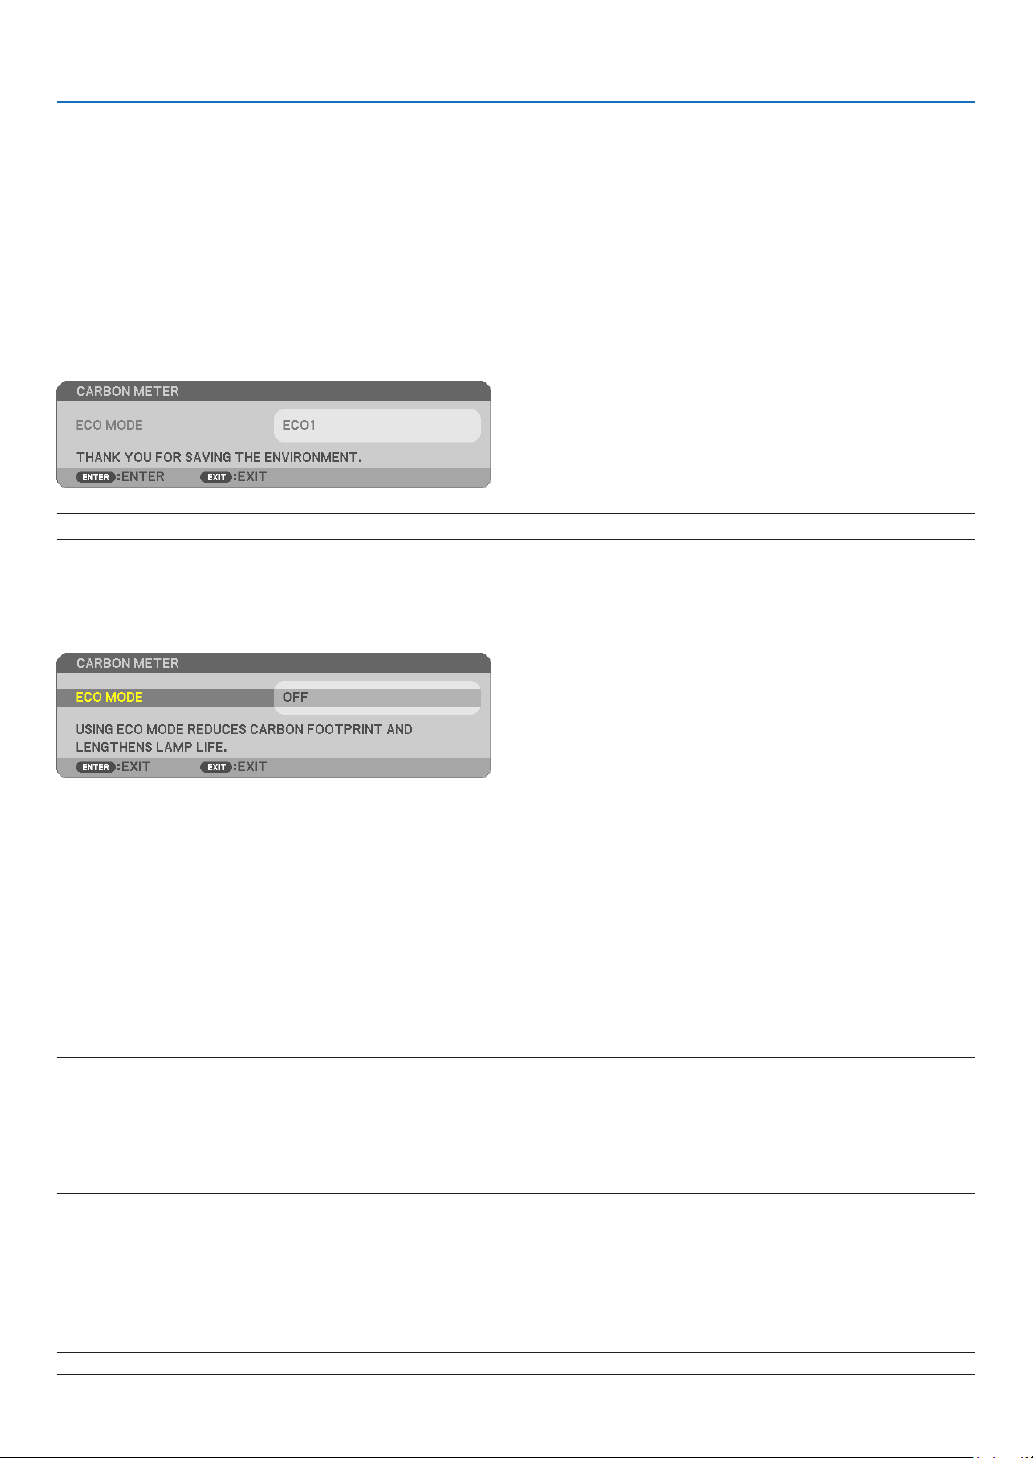
94
5. Using On-Screen Menu
Turning ON/OFF Control ID [ID DISPLAY]
ID DISPLAY ........... This option turns on or off the ID number which is displayed when the ID SET button on the remote control
is pressed.
Turning On / Off Eco Message [ECO MESSAGE]
Thisoptionturnsonoroffthefollowingmessageswhentheprojectoristurnedon.
TheEcoMessagepromptstheusertosaveenergy.When[OFF]isselectedfor[ECOMODE],youwillgetamessage
topromptyoutoselect[AUTOECO],[ECO1],or[ECO2]*for[ECOMODE].
When[AUTOECO],[ECO1],or[ECO2]*isselectedfor[ECOMODE]
NOTE:*[ECO2]isavailableonP350Xonly.
Toclosethemessage,pressanyoneofthebuttons.Themessagewilldisappearifnobuttonoperationisdonefor
30seconds.
When[OFF]isselectedfor[ECOMODE]
PressingtheENTERbuttonwilldisplaythe[ECOMODE]screen.(page28)
Toclosethemessage,presstheEXITbutton.
Selecting Menu Display Time [DISPLAY TIME]
Thisoptionallowsyoutoselecthowlongtheprojectorwaitsafterthelasttouchofabuttontoturnoffthemenu.The
presetchoicesare[MANUAL],[AUTO5SEC],[AUTO15SEC],and[AUTO45SEC].The[AUTO45SEC]isthefac-
torypreset.
Selecting a Color or Logo for Background [BACKGROUND]
Usethisfeaturetodisplayablue/blackscreenorlogowhennosignalisavailable.Thedefaultbackgroundis
[BLUE].
NOTE:
•Ifthe[LOGO]itemisselectedfor[BACKGROUND]withthe[NETWORK]or[USBDISPLAY]sourceselected,the[BLUE]itemwill
beselectedregardlessofitsselection.
•When[SOURCEDISPLAY]isturnedon,theno-signalguidancepromptingyoutocheckforanavailableinputwillbedisplayed
atthecenterofthescreenregardlessofitsselection.
•Yoursettingwillnotbeaffectedevenwhen[RESET]isdonefromthemenu.
Selecting Interval Time for Filter Message [FILTER MESSAGE]
Thisoptionallowsyoutoselectthetimepreferencebetweendisplayingthemessageforcleaningthelters.Clean
thelterwhenyougetthemessage“PLEASECLEANFILTER.”(page
143)
Fiveoptionsareavailable:OFF,100[H],500[H],1000[H],2000[H]
Thedefaultsettingis[OFF].
NOTE:Yoursettingwillnotbeaffectedevenwhen[RESET]isdonefromthemenu.
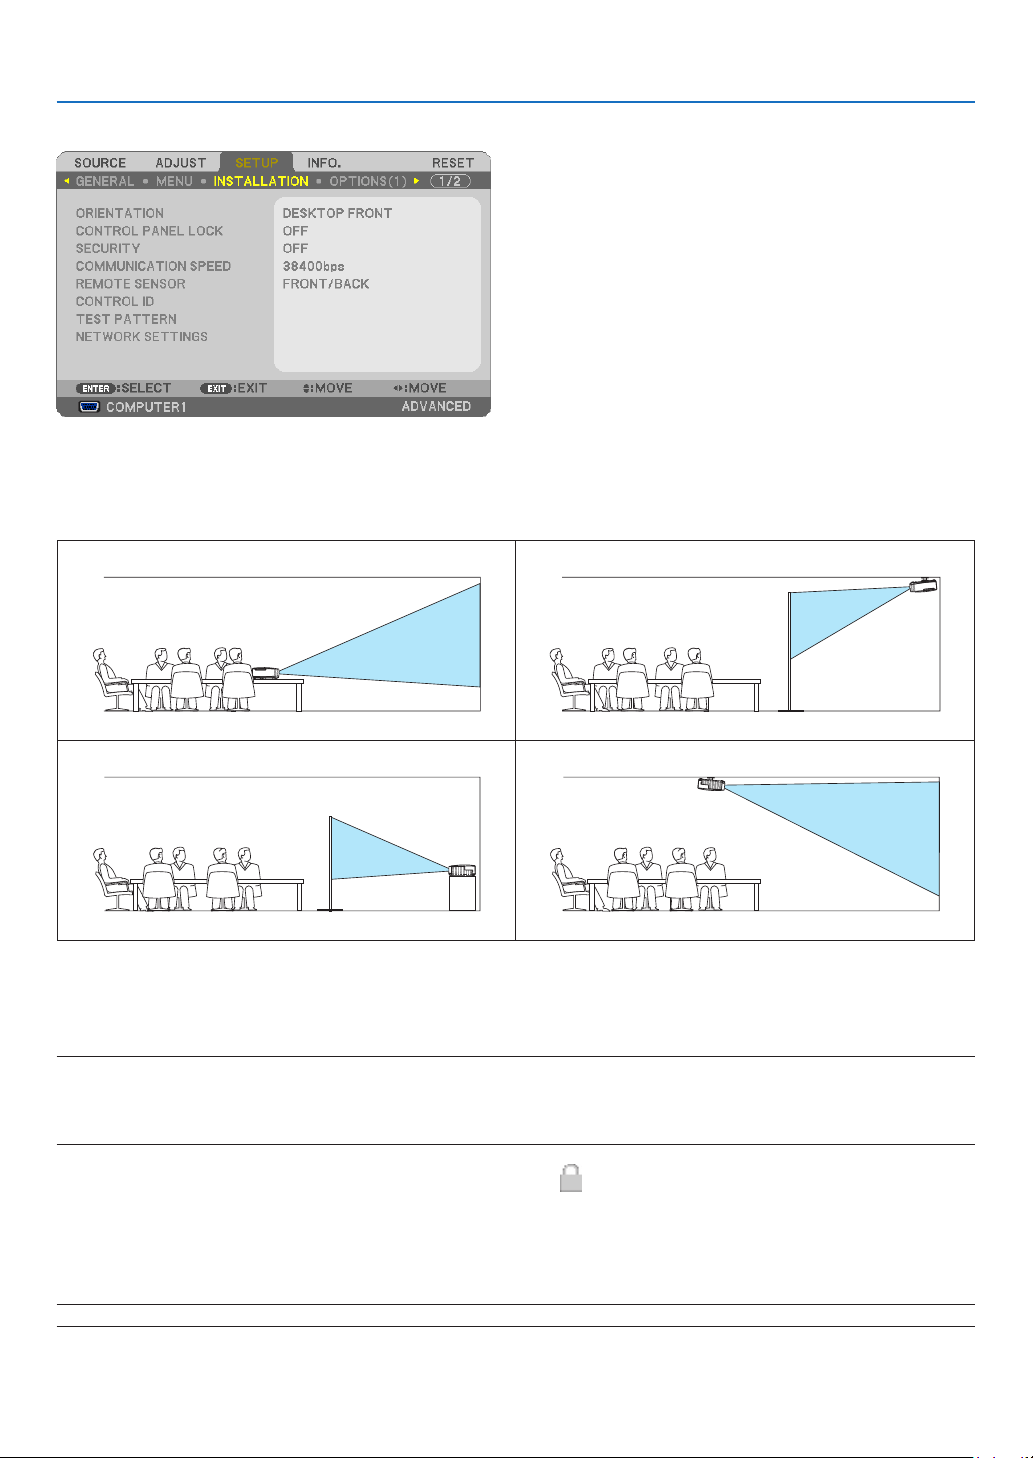
95
5. Using On-Screen Menu
[INSTALLATION]
SelectingProjectorOrientation[ORIENTATION]
Thisreorientsyourimageforyourtypeofprojection.Theoptionsare:desktopfrontprojection,ceilingrearprojection,
desktoprearprojection,andceilingfrontprojection.
DESKTOPFRONTCEILINGREAR
DESKTOPREARCEILINGFRONT
Disabling the Cabinet Buttons [CONTROL PANEL LOCK]
ThisoptionturnsonorofftheCONTROLPANELLOCKfunction.
NOTE:
•ThisCONTROLPANELLOCKdoesnotaffecttheremotecontrolfunctions.
•Whenthecontrolpanelislocked,pressingandholdingtheEXITbuttonontheprojectorcabinetforabout10secondswillchange
thesettingto[OFF].
TIP:Whenthe[CONTROLPANELLOCK]isturnedon,akeylockicon[]willbedisplayedatthebottomrightofthemenu.
Enabling Security [SECURITY]
ThisfeatureturnsonorofftheSECURITYfunction.
Unlessthecorrectkeywordisentered,theprojectorcannotprojectanimage.(page
30)
NOTE:Yoursettingwillnotbeaffectedevenwhen[RESET]isdonefromthemenu.
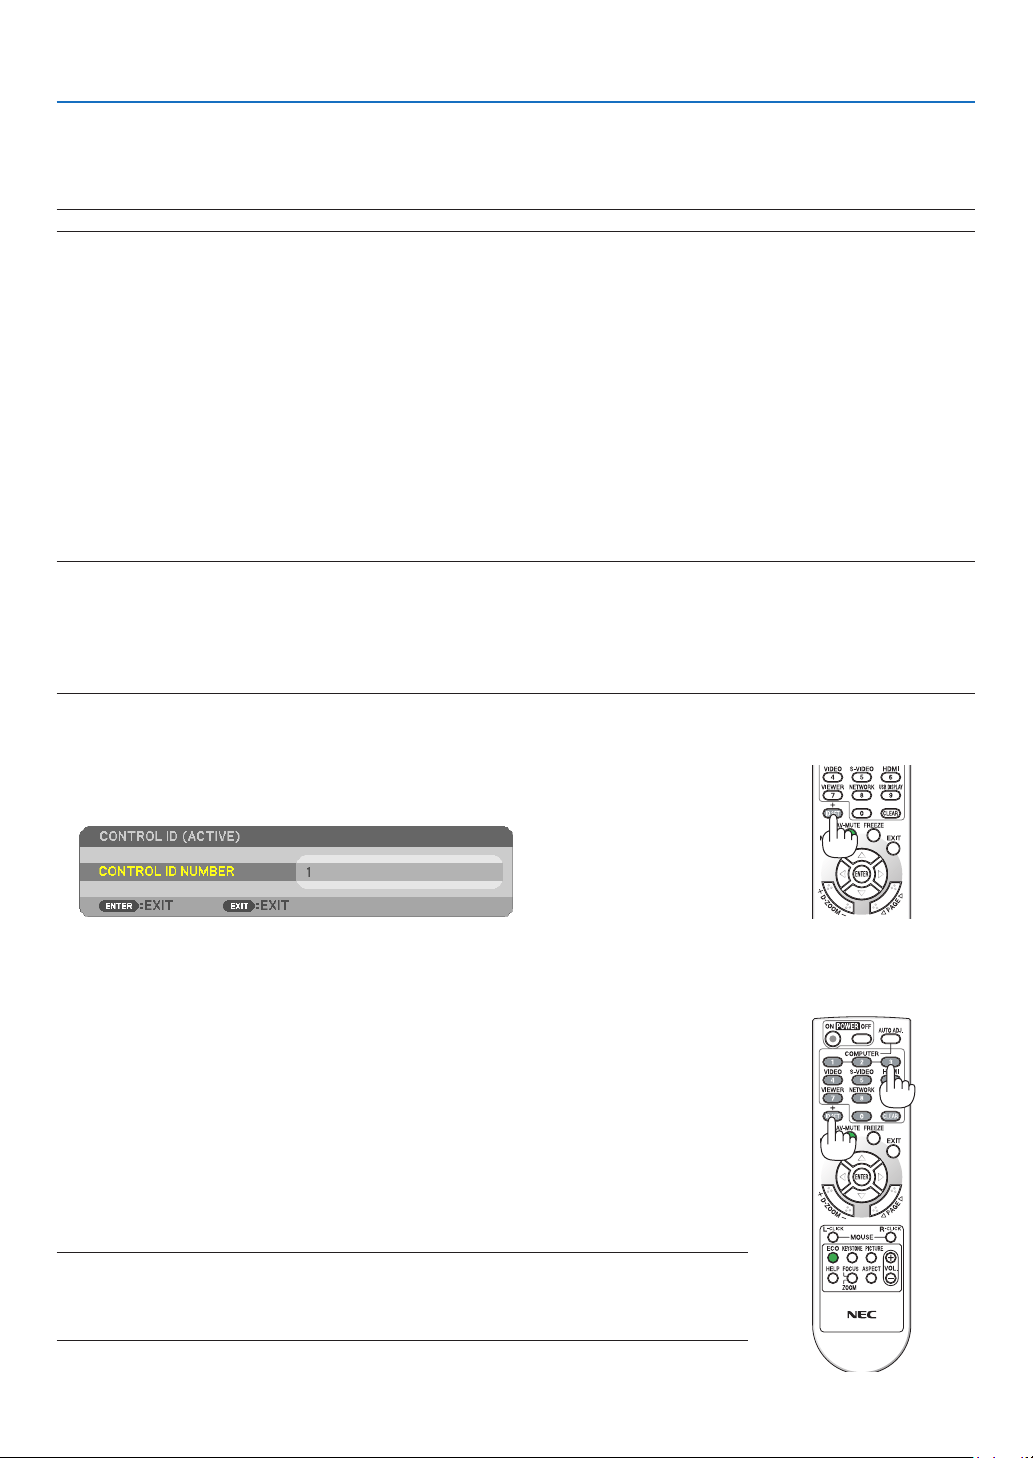
96
5. Using On-Screen Menu
Selecting Communication Speed [COMMUNICATION SPEED]
ThisfeaturesetsthebaudrateofthePCControlport(D-Sub9P).Itsupportsdataratesfrom4800to38400bps.The
defaultis38400bps.Selecttheappropriatebaudrateforyourequipmenttobeconnected(dependingontheequip-
ment,alowerbaudratemayberecommendedforlongcableruns).
NOTE:Yourselectedcommunicationspeedwillnotbeaffectedevenwhen[RESET]isdonefromthemenu.
Turning On or Off Remote Sensor [REMOTE SENSOR]
Thisoptiondetermineswhichremotesensorontheprojectorisenabledinwirelessmode.
Theoptionsare:FRONT/BACK,FRONT,andBACK.
Iftheremotecontrolsystemdoesnotfunctionwhendirectsunlightor
strongilluminationstrikestheremotecontrolsensoroftheprojector,changeanotheroption.
SettingIDtotheProjector[CONTROLID]
YoucanoperatemultipleprojectorsseparatelyandindependentlywiththesingleremotecontrolthathastheCONTROL
IDfunction.IfyouassignthesameIDtoalltheprojectors,youcanconvenientlyoperatealltheprojectorstogether
usingthesingleremotecontrol.Todoso,youhavetoassignanIDnumbertoeachprojector.
CONTROL ID NUMBER .......Select a number from 1 to 254 you wish to assign to your projector.
CONTROL ID .......................Select [OFF] to turn off the CONTROL ID setting and select [ON] to turn on the CONTROL ID set-
ting.
NOTE:
•When[ON]isselectedfor[CONTROLID],theprojectorcannotbeoperatedbyusingtheremotecontrolthatdoesnotsupport
theCONTROLIDfunction.(Inthiscasethebuttonsontheprojectorcabinetcanbeused.)
•Yoursettingwillnotbeaffectedevenwhen[RESET]isdonefromthemenu.
•PressingandholdingtheENTERbuttonontheprojectorcabinetfor10secondswilldisplaythemenuforcancelingtheControl
ID.
Assigning or Changing the Control ID
1.Turnontheprojector.
2.PresstheIDSETbuttonontheremotecontrol.
The CONTROL ID screen will be displayed.
If the projector can be operated with the current remote control ID, the [ACTIVE] will be displayed. If the projector
cannot be operated with the current remote control ID, the [INACTIVE] will be displayed. To operate the inactive
projector, assign the control ID used for the projector by using the following procedure (Step 3).
3.PressoneofnumerickeypadbuttonswhilepressingandholdingtheIDSET
buttonontheremotecontrol.
Example:
To assign “3”, press the “3” button on the remote control.
No ID means that all the projectors can be operated together with a single remote
control. To set “No ID”, enter “000” or press the CLEAR button.
TIP:TherangeofIDsisfrom1to254.
4.ReleasetheIDSETbutton.
The updated CONTROL ID screen will be displayed.
NOTE:
•TheIDscanbeclearedinafewdaysafterthebatteriesarerundownorremoved.
•Accidentallypressinganyoneofthebuttonsoftheremotecontrolwillclearcurrentlyspecied
IDwithbatteriesremoved.
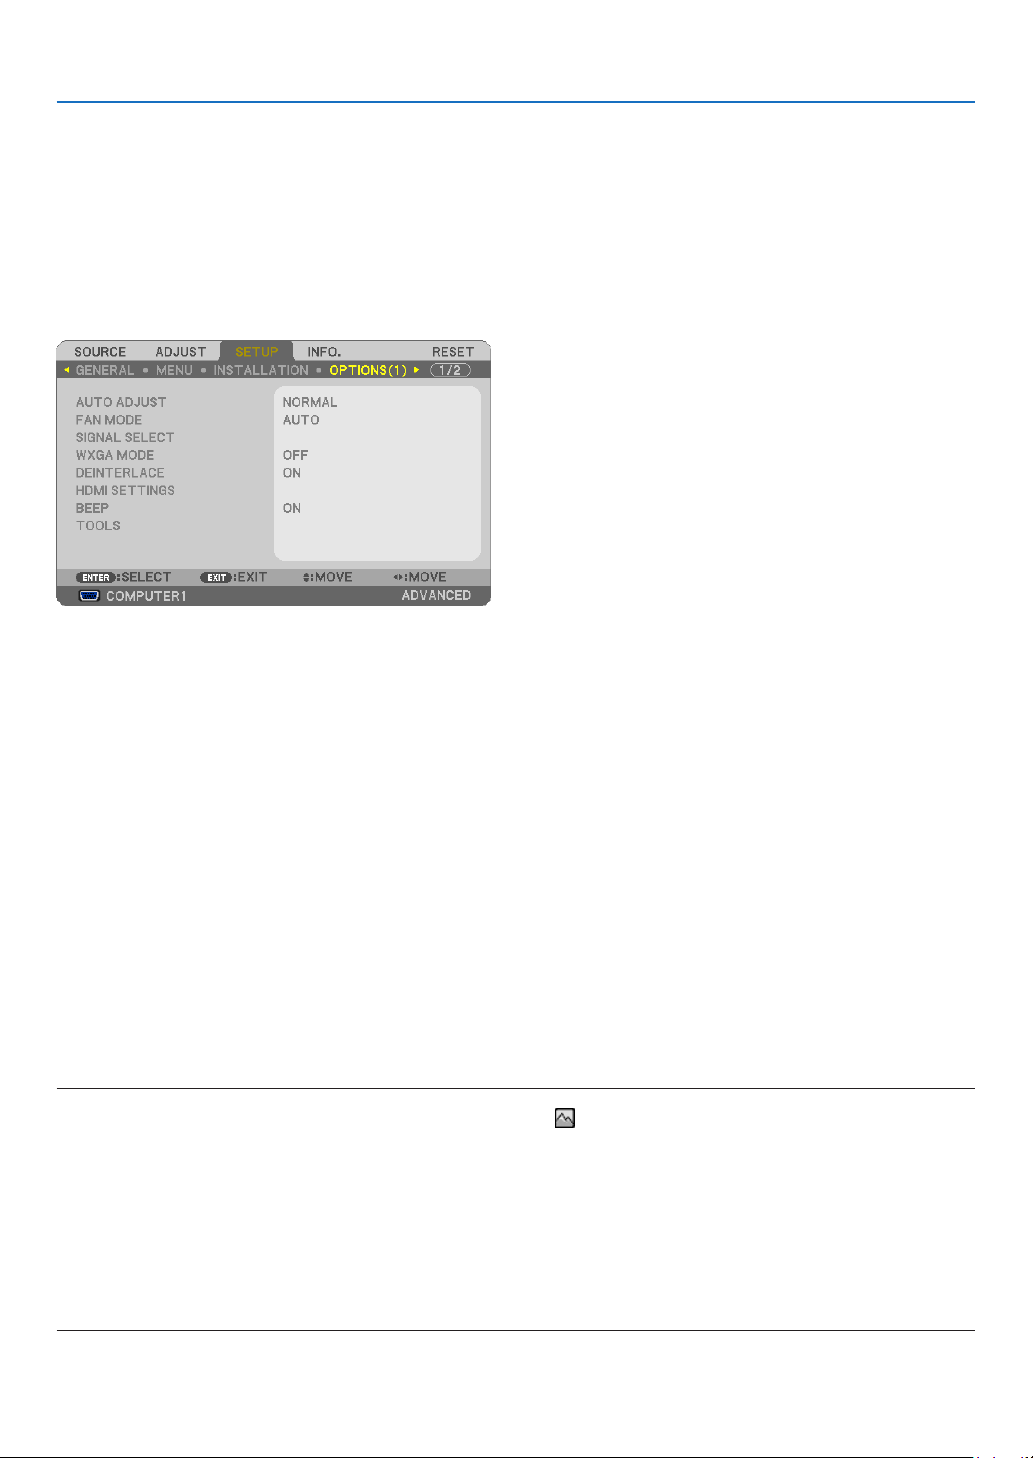
97
5. Using On-Screen Menu
Using Test Pattern [TEST PATTERN]
Displaysthetestpatterntocheckforimagedistortionatthetimeoftheprojectorsetup.PresstheENTERbuttonto
displaythetestpattern;presstheEXITbuttontoclosethetestpatternandreturntothemenu.Menuoperationand
keystonecorrectionarenotpossiblewhenthetestpatternisdisplayed.
[NETWORKING SETTINGS]
See“APPLICATIONMENU”onpage
107.
[OPTIONS(1)]
SettingAutoAdjust[AUTOADJUST]
ThisfeaturesetstheAutoAdjustmodesothatthecomputersignalcanbeautomaticallyormanuallyadjustedfor
noiseandstability.Youcanautomaticallymakeadjustmentintwoways:[NORMAL]and[FINE].
OFF ........................ The computer signal will not be automatically adjusted. You can manually optimize the computer signal.
NORMAL ................ Default setting. The computer signal will be automatically adjusted. Normally select this option.
FINE ....................... Select this option if fine adjustment is needed. It takes more time to switch to the source than when [NOR-
MAL]is selected.
Selecting Fan Mode [FAN MODE]
Thisoptionallowsyoutoselectthreemodesforfanspeed:Automode,Highspeedmode,andHighAltitudemode.
AUTO ..................... The built-in fans automatically run at a variable speed according to the internal temperature.
HIGH ...................... The built-in fans run at high speed.
HIGH ALTITUDE ..... The built-in fans run at a high speed. Select this option when using the projector at altitudes approximately
5500 feet/1600 meters or higher.
Whenyouwishtocooldownthetemperatureinsidetheprojectorquickly,select[HIGH].
NOTE:
•When[HIGHALTITUDE]isselectedfor[FANMODE],asymbolicon
willbedisplayedatthebottomofthemenu.
•ItisrecommendedthatyouselectHighspeedmodeifyouusetheprojectornon-stopforconsecutivedays.
•Set[FANMODE]to[HIGHALTITUDE]whenusingtheprojectorataltitudesapproximately5500feet/1600metersorhigher.
•Usingtheprojectorataltitudesapproximately5500feet/1600metersorhigherwithoutsettingto[HIGHALTITUDE]cancause
theprojectortooverheatandtheprotectorcouldshutdown.Ifthishappens,waitacoupleminutesandturnontheprojector.
•Usingtheprojectorataltitudeslessthanapproximately5500feet/1600metersandsettingto[HIGHALTITUDE]cancausethe
lamptoovercool,causingtheimagetoicker.Switch[FANMODE]to[AUTO].
•Usingtheprojectorataltitudesapproximately5500feet/1600metersorhighercanshortenthelifeofopticalcomponentssuch
asthelamp.
•Yoursettingwillnotbeaffectedevenwhen[RESET]isdonefromthemenu.

98
5. Using On-Screen Menu
Selecting Signal Format [SIGNAL SELECT]
[COMPUTER1],[COMPUTER2]
Allowsyoutochoose[COMPUTER1],or[COMPUTER2]foranRGBsourcesuchasacomputer,or[COMPONENT]
foracomponentvideosourcesuchasaDVDplayer.Normallyselect[RGB/COMPONENT]andtheprojectorauto-
maticallydetectsacomponentsignal.Howevertheremaybesomecomponentsignalsthattheprojectorisunableto
detect.Ifthisisthecase,select[COMPONENT].
[VIDEO&S-VIDEOSystemSelect]
Thisfeatureenablesyoutoselectcompositevideostandardsautomaticallyormanually.
Normallyselect[AUTO]andtheprojectorwillautomaticallydetectthevideostandard.
Inthecasewheretheprojectorhasdifcultydetectingthevideostandard,selecttheappropriatevideostandardfrom
themenu.
ThismustbedoneforVIDEOandS-VIDEOrespectively.
EnablingorDisablingWXGAMode[WXGAMODE]
Selecting[ON]willgiveprioritytoaWXGA(1280×768)signalinrecognizinganinputsignal.
When[WXGAMODE]issetto[ON],anXGA(1024×768)signalmaynotberecognizedonP420X/P350X.Inthis
case,select[OFF].
NOTE:
•The[OFF]isselectedatthetimeofshipmentofP420X/P350X.
•The[ON]isselectedatthetimeofshipmentofP350W.
Enabling the deinterlace [DEINTERLACE]
Turnsonoroffthedeinterlacefunctionforatelecinesignal.
OFF ........................ Select this option if there is any jitter or artifacts in video.
ON ......................... Default standard setting.
NOTE:ThisfeatureisnotavailableforHDTV(progressive)andcomputersignals.
Setting HDMI [HDMI SETTINGS]
MakethesettingsforvideolevelandaudiolevelwhenconnectingHDMIequipmentsuchasaDVDplayer.
VIDEO LEVEL ......... Select [AUTO] to automatically detect video level. If automatic detection may not work well, select [NOR-
MAL] to disable the [ENHANCED] feature of your HDMI equipment or select [ENHANCED] to improve image
contrast and increase detail in the dark areas.
AUDIO SELECT ...... Select [HDMI] to switch the HDMI IN digital audio signal and select [COMPUTER 2] to switch the COMPUTER
2 input audio signal.
Enabling Key Sound and Error Sound [BEEP]
Thisfeatureturnsonoroffthebuttonsoundoralarmwhenanerroroccursorthefollowingoperationsareper-
formed.
-Displayingthemainmenu
-Switchingsources
-Resettingdatabyusing[RESET]
-PressingPOWERONorPOWEROFFbutton
[TOOLS]
See“APPLICATIONMENU”onpage
123.

99
5. Using On-Screen Menu
[OPTIONS(2)]
SelectingPower-savingin[STANDBYMODE]
Theprojectorhastwostandbymodes:[NORMAL]and[POWER-SAVING].
ThePOWER-SAVINGmodeisthemodethatallowsyoutoputtheprojectorinthepower-savingconditionwhich
consumeslesspowerthantheNORMALmode.TheprojectorispresetforNORMALmodeatthefactory.
NORMAL ................ Power indicator: Orange light/STATUS indicator: Green light
POWER-SAVING .... Power indicator: Red light/STATUS indicator: Off
The following connectors, buttons or functions will not work during this mode.
- MONITOR OUT (COMP. 1) connector, and AUDIO OUT connector
- LAN and Mail Alert functions
- Buttons other than POWER button on the cabinet
- Buttons other than POWER ON button on the remote control
- Virtual Remote Tool, USB Display fucntion
NOTE:
•When[CONTROLPANELLOCK],[CONTROLID],or[AUTOPOWERON(COMP1)]isturnedon,the[STANDBYMODE]settingis
notavailable.
•Evenwhen[POWER-SAVING]isselectedfor[STANDBYMODE],poweronoroffcanbedonebyusingthePCCONTROLport.
•ThepowerconsumptioninthestandbymodewillnotbeincludedincalculatingCO
2
emissionreduction.
•Yoursettingwillnotbeaffectedevenwhen[RESET]isdonefromthemenu.
EnablingAutoPowerOn[AUTOPOWERON(AC)]
Turnstheprojectoronautomaticallywhenthepowercordisinsertedintoanactivepoweroutlet.Thiseliminatesthe
needtoalwaysusethePOWERbuttonontheremotecontrolorprojectorcabinet.

100
5. Using On-Screen Menu
TurningOntheProjectorByApplyingComputerSignal[AUTOPOWERON(COMP1)]
WhentheprojectorisinStandbymode,applyingacomputersignalfromacomputerconnectedtotheCOMPUTER1
INinputwillpowerontheprojectorandsimultaneouslyprojectthecomputer’simage.
ThisfunctionalityeliminatestheneedtoalwaysusethePOWERbuttonontheremotecontrolortheprojectorcabinet
topowerontheprojector.
Tousethisfunction,rstconnectacomputertotheprojectorandtheprojectortoanactiveACinput.
NOTE:
•Disconnectingacomputersignalfromthecomputerwillnotpowerofftheprojector.Werecommendusingthisfunctionincom-
binationoftheAUTOPOWEROFFfunction.
•Thisfunctionwillnotbeavailableunderthefollowingconditions:
-whenacomponentsignalisappliedtotheCOMPUTER1INconnector
-whenaSynconGreenRGBsignalorcompositesyncsignalisapplied
•ToenabletheAUTOPOWERON(COMP1)afterturningofftheprojector,wait3secondsandinputacomputersignal.
Ifacomputersignalisstillpresentwhentheprojectoristurnedoff,theAUTOPOWERON(COMP1)willnotworkandtheprojector
remainsinstandbymode.
EnablingPowerManagement[AUTOPOWEROFF]
Whenthisoptionisselectedyoucanenabletheprojectortoautomaticallyturnoff(attheselectedtime:5min.,10min.,
20min.,30min.)ifthereisnosignalreceivedbyanyinputorifnooperationisperformed.
Selecting Default Source [DEFAULT SOURCE SELECT]
Youcansettheprojectortodefaulttoanyoneofitsinputseachtimetheprojectoristurnedon.
LAST ...................... Sets the projector to default to the previous or last active input each time the projector is turned on.
AUTO ..................... Searches for an active source in order of COMPUTER1 COMPUTER2 HDMI VIDEO S-VIDEO
VIEWER USB DISPLAY COMPUTER1 and displays the first found source.
COMPUTER1 ......... Displays the computer signal from the COMPUTER 1 IN connector every time the projector is turned on.
COMPUTER2 ......... Displays the computer signal from the COMPUTER 2 IN connector every time the projector is turned on.
HDMI ..................... Displays the digital source from the HDMI IN connector every time the projector is turned on.
VIDEO .................... Displays the Video source from the VIDEO IN connector every time the projector is turned on.
S-VIDEO ................ Displays the Video source from the S-VIDEO IN connector every time the projector is turned on.
VIEWER ................. Displays slides or plays back movie files from the USB memory device every time the projector is turned
on.
NETWORK ............. Displays a signal from LAN port (RJ-45) or the USB Wireless LAN Unit.
USB DISPLAY ........ Displays the computer signal from the USB (PC) port every time the projector is turned on.
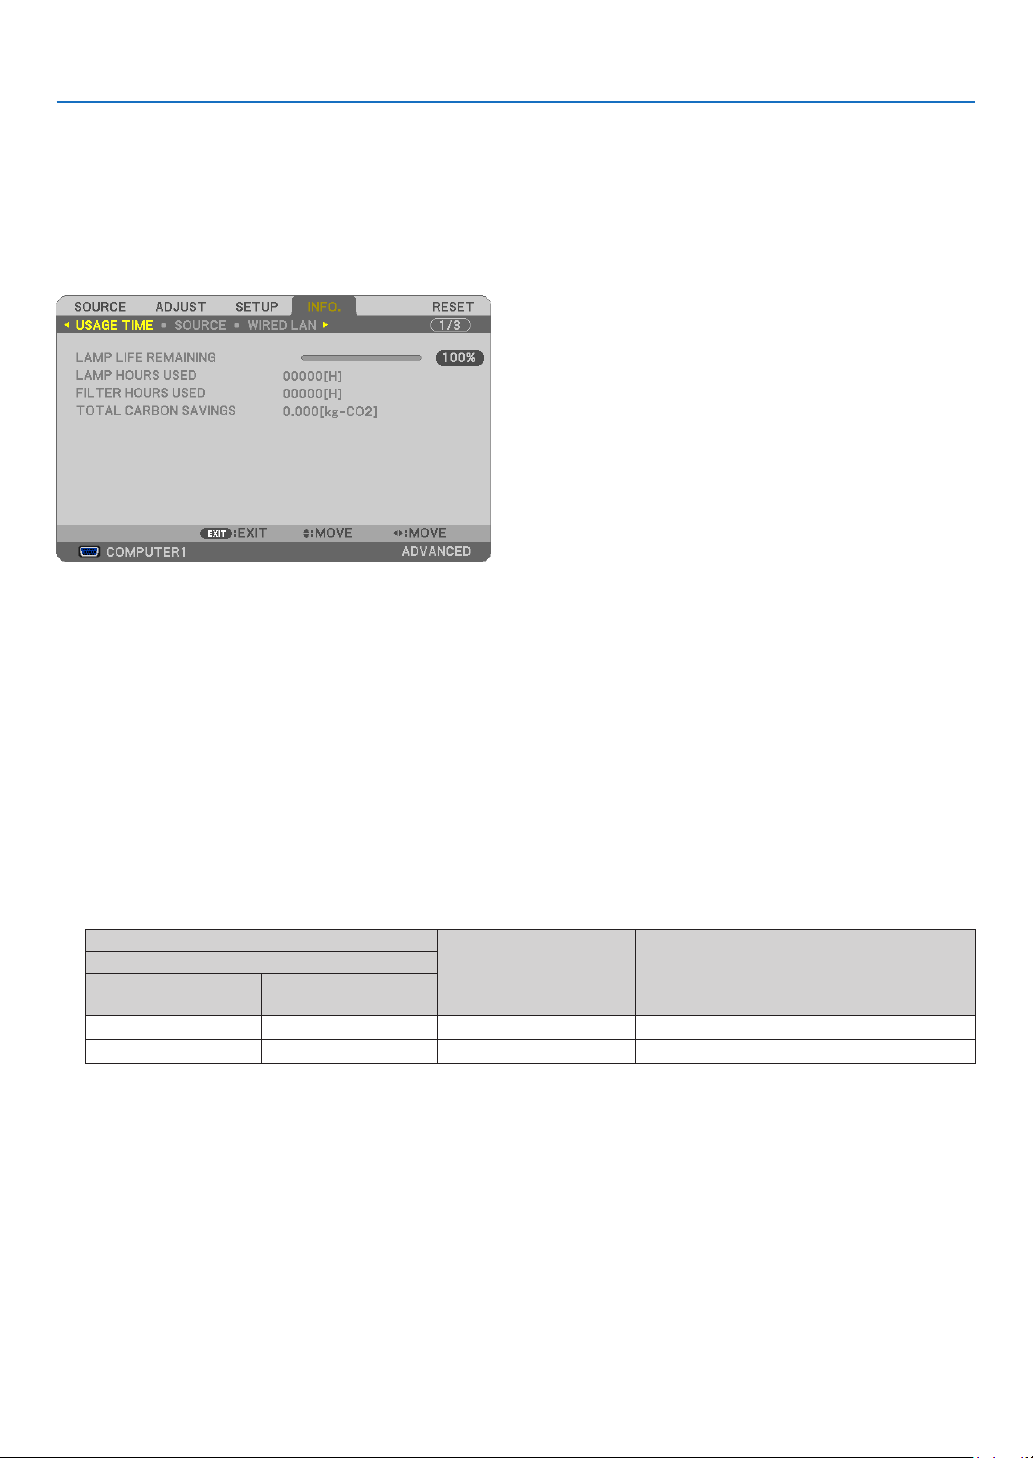
101
5. Using On-Screen Menu
Menu Descriptions & Functions [INFO.]
Displaysthestatusofthecurrentsignalandlampusage.Thisitemhassixpages.Theinformationincludedisas
follows:
TIP:PressingtheHELPbuttonontheremotecontrolwillshowthe[INFO.]menuitems.
[USAGE TIME]
[LAMPLIFEREMAINING](%)*
[LAMPHOURSUSED](H)
[FILTERHOURSUSED](H)
[TOTALCARBONSAVINGS](kg-CO2)
*Theprogressindicatorshowsthepercentageofremainingbulblife.
Thevalueinformsyouoftheamountoflampusage.Whentheremaininglamptimereaches0,theLAMPLIFE
REMAININGbarindicatorchangesfrom0%to100Hoursandstartscountingdown.
Iftheremaininglamptimereaches0hours,theprojectorwillnotturnon.
•Themessagetotheeffectthatthelamportheltersshouldbereplacedwillbedisplayedforoneminutewhen
theprojectoristurnedonandwhenthePOWERbuttonontheprojectorortheremotecontrolispressed.
Todismissthismessage,pressanybuttonontheprojectorortheremotecontrol.
Lamp life(H)
Replacement lamp Model
ECO MODE
NORMAL
(OFF or AUTO ECO)
ECO
(ECO1orECO2*)
4000 5000
NP16LPP350X
3000 3500
NP17LPP420X/P350W
*[ECO2]isavailableonP350Xonly.
•[TOTALCARBONSAVINGS]
Thisdisplaystheestimatedcarbonsavinginformationinkg.Thecarbonfootprintfactorinthecarbonsavingcal-
culationisbasedontheOECD(2008Edition).(page
29)
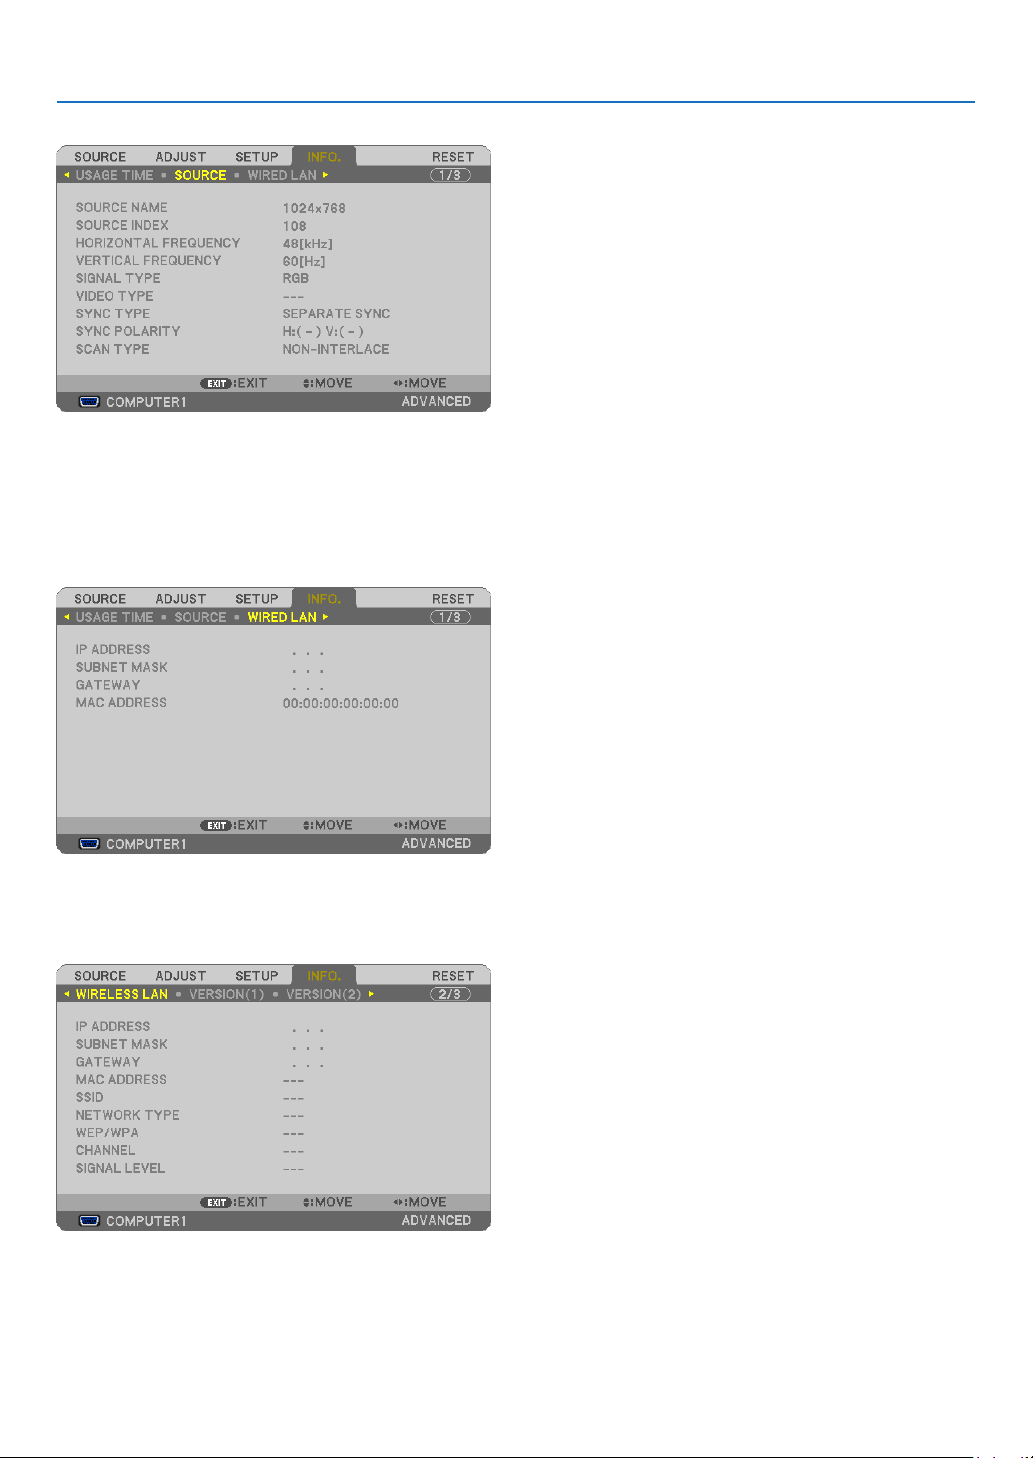
102
5. Using On-Screen Menu
[SOURCE]
[SOURCENAME][SOURCEINDEX]
[HORIZONTALFREQUENCY][VERTICALFREQUENCY]
[SIGNALTYPE][VIDEOTYPE]
[SYNCTYPE][SYNCPOLARITY]
[SCANTYPE]
[WIRED LAN]
[IPADDRESS][SUBNETMASK]
[GATEWAY][MACADDRESS]
[WIRELESS LAN]
[IPADDRESS][SUBNETMASK]
[GATEWAY][MACADDRESS]
[SSID][NETWORKTYPE]
[WEP/WPA][CHANNEL]
[SIGNALLEVEL]
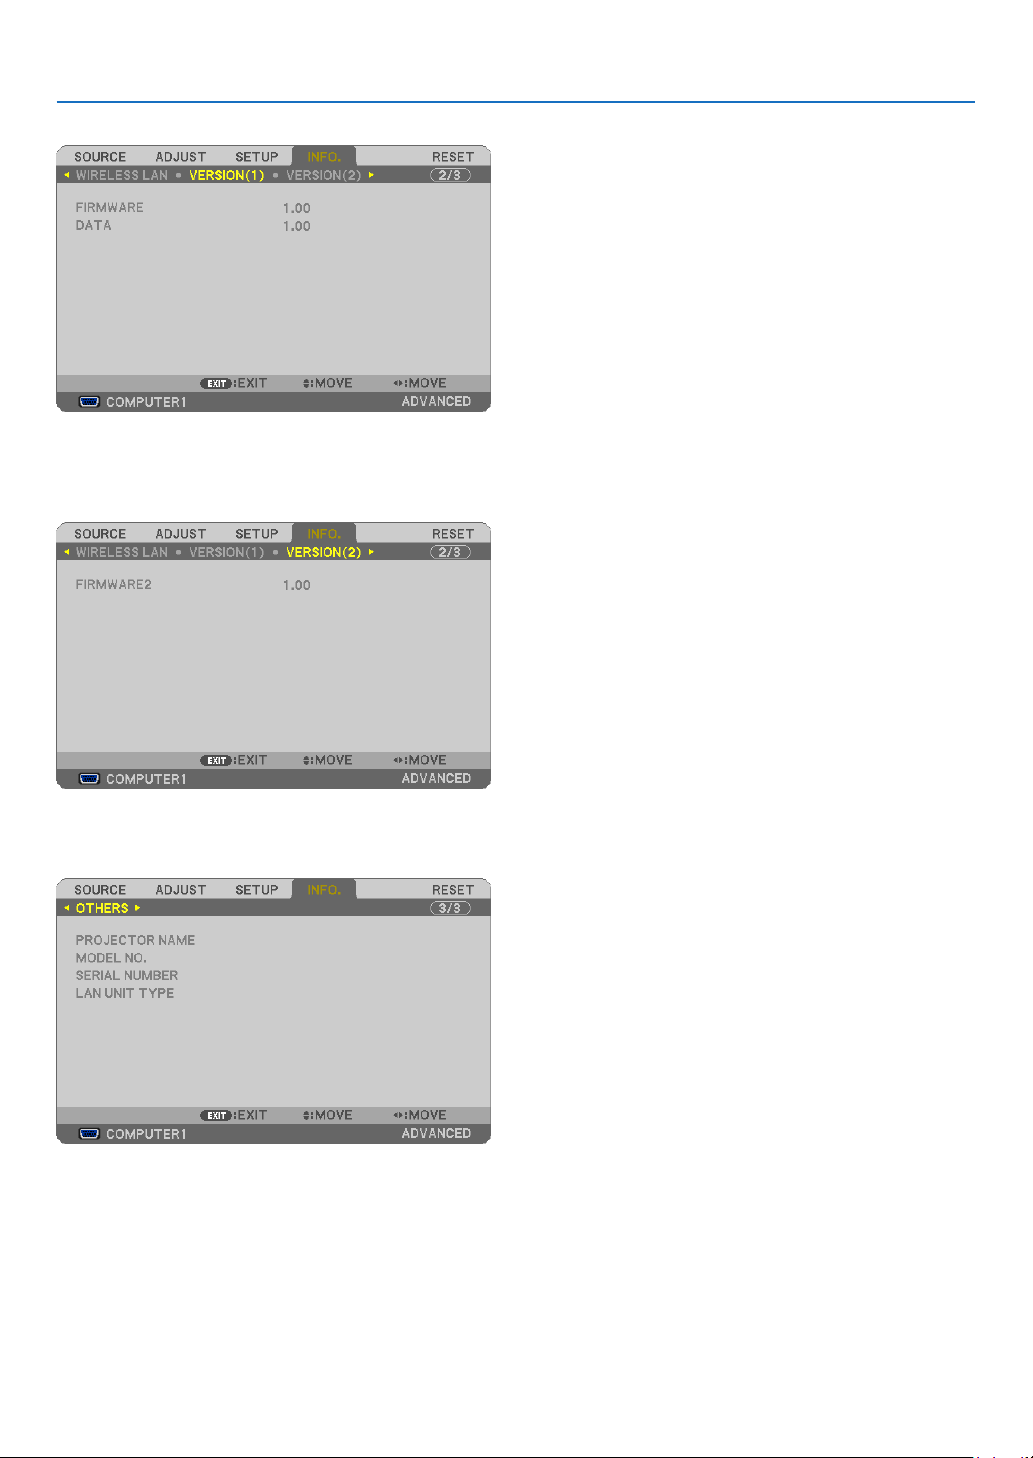
103
5. Using On-Screen Menu
[VERSION(1)]
[FIRMWARE]Version
[DATA]Version
[VERSION(2)]
[FIRMWARE2]Version
[OTHERS]
[PROJECTORNAME]
[MODELNO.]
[SERIALNUMBER]
[LANUNITTYPE]
[CONTROLID](when[CONTROLID]isset)

104
5. Using On-Screen Menu
Menu Descriptions & Functions [RESET]
Returning to Factory Default [RESET]
TheRESETfeatureallowsyoutochangeadjustmentsandsettingstothefactorypresetfora(all)source(s)except
thefollowing:
[CURRENTSIGNAL]
Resetstheadjustmentsforthecurrentsignaltothefactorypresetlevels.
Theitemsthatcanberesetare:[PRESET],[CONTRAST],[BRIGHTNESS],[COLOR],[HUE],[SHARPNESS],
[ASPECTRATIO],[HORIZONTAL],[VERTICAL],[CLOCK],[PHASE],and[OVERSCAN].
[ALLDATA]
Resetalltheadjustmentsandsettingsforallthesignalstothefactorypreset.
AllitemscanberesetEXCEPT[LANGUAGE],[BACKGROUND],[FILTERMESSAGE],[SECURITY],[COMMUNI-
CATIONSPEED],[CONTROLID],[STANDBYMODE],[FANMODE],[LAMPLIFEREMAINING],[LAMPHOURS
USED],[FILTERHOURSUSED],[TOTALCARBONSAVINGS],[WIREDLAN],and[WIRELESSLAN].
Toresetthelampusagetime,see“ClearingLampHourMeter[CLEARLAMPHOURS]”below.
Clearing Lamp Hour Meter [CLEAR LAMP HOURS]
Resetsthelampclockbacktozero.Selectingthisoptiondisplayssubmenuforaconrmation.Select[YES]andpress
theENTERbutton.
NOTE:Elapsedtimeofthelampusewillnotbeaffectedevenwhen[RESET]isdonefromthemenu.
NOTE:Theprojectorwillturnoffandgointostandbymodewhenyoucontinuetousetheprojectorforanother100hoursafterthe
lamphasreachedtheendofitslife.Inthisconditionyoucannotclearthelamphourmeteronthemenu.Ifthishappens,pressthe
HELPbuttonontheremotecontrolfor10secondstoresetthelampclockbacktozero.Dothisonlyafterreplacingthelamp.
Clearing the Filter Usage Hours [CLEAR FILTER HOURS]
Resetsthelterusagebacktozero.Selectingthisoptiondisplayssubmenuforaconrmation.Select[YES]andpress
theENTERbutton.
The[OFF]itemisselectedfor[FILTERMESSAGE]atthetimeofshipment.When[OFF]isselected,youdonotneed
toclearthelterusagehour.
NOTE:Elapsedtimeofthelterusewillnotbeaffectedevenwhen[RESET]isdonefromthemenu.
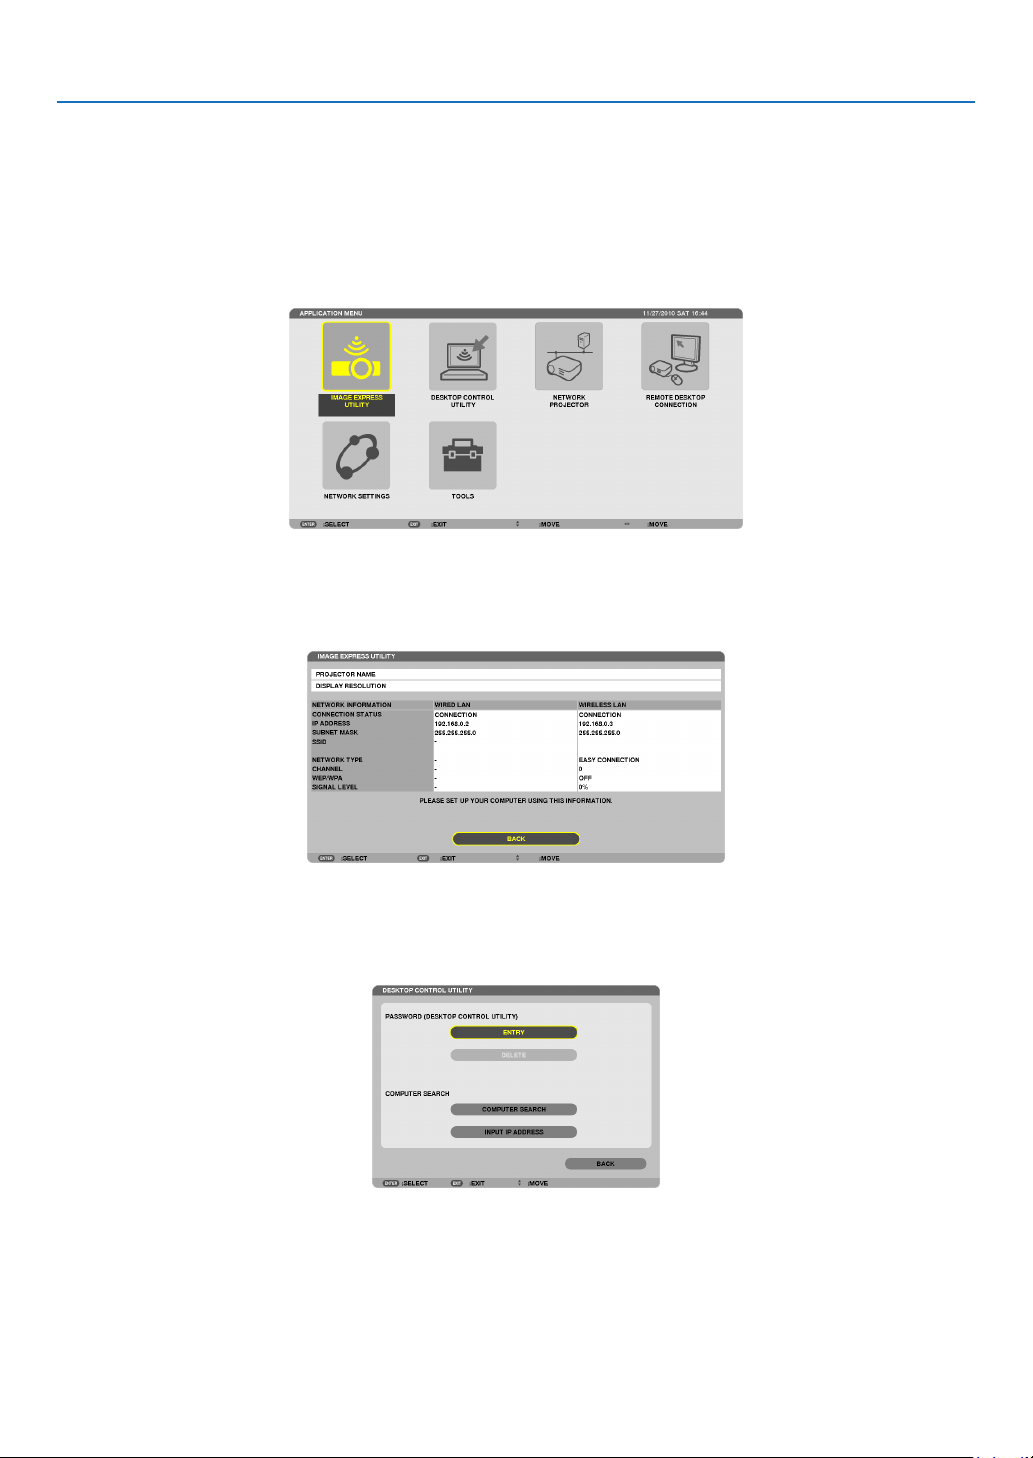
105
5. Using On-Screen Menu
❾ Application Menu
When[NETWORK]isselectedfromthe[SOURCE]menu,theapplicationmenu[APPLICATIONMENU]willbedis-
played.
TheapplicationmenuallowsyoutosetuptheUserSupportware,NetworkSettings(NETWORKSETTINGS)and
Tools(TOOLS).
TheUserSupportwareiscontainedonthesuppliedNECProjectorCD-ROM.
In[ADMINISTRATORMODE],either[ADVANCED]menuor[BASIC]menucanbeselected.(page
123)
The[BASIC]menucontainsminimumessentialsofmenusandcommands.
IMAGE EXPRESS UTILITY
Thisshowsinformationforprojectorname,resolution,andnetwork(wired/wireless)whicharerequiredtouseImage
ExpressUtility.
Usethisinformationtosetupforyourcomputer.
DESKTOP CONTROL UTILITY
Thisallowsyoutosetupforpasswordentry/deletion,computersearchingandIPaddressonnetwork(wired/wireless)
whicharerequiredtouseDesktopControlUtility.
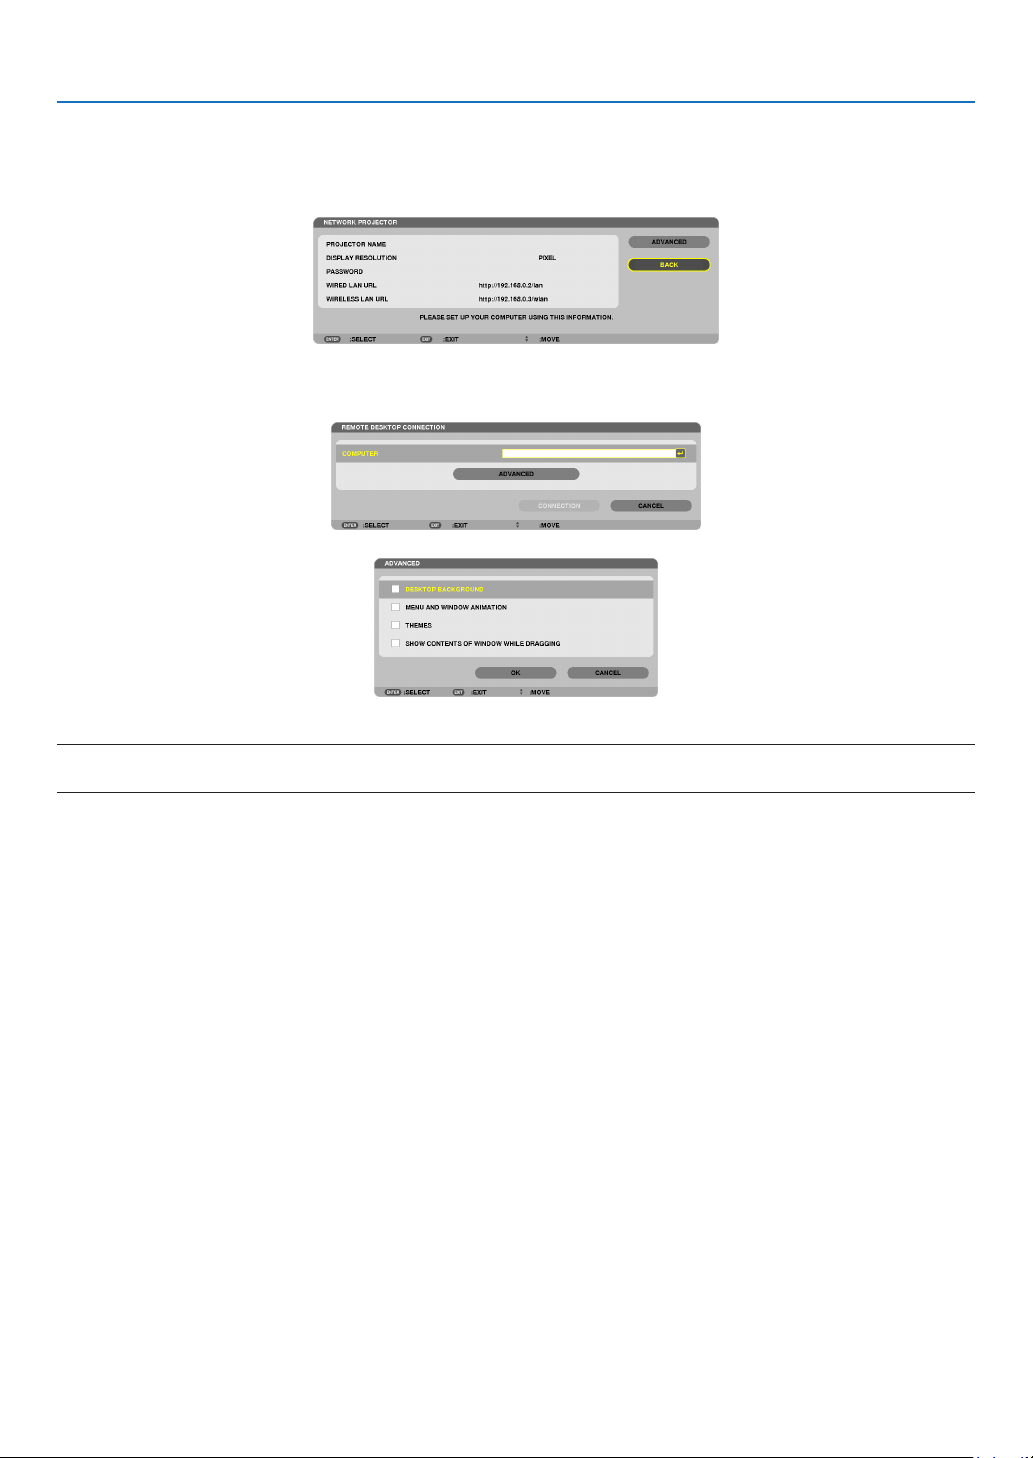
106
5. Using On-Screen Menu
NETWORK PROJECTOR
Thisshowsinformationforprojectorname,resolution,andnetwork(wired/wireless)whicharerequiredtouseNetwork
Projector.
Usethisinformationtosetupforyourcomputer.
REMOTE DESKTOP CONNECTION
ThisallowsyoutosetupforcomputernameentryandeffectsforRemoteDesktop.
NOTE:
•AUSBkeyboardisrequiredtosetuptheRemoteDesktopConnection.
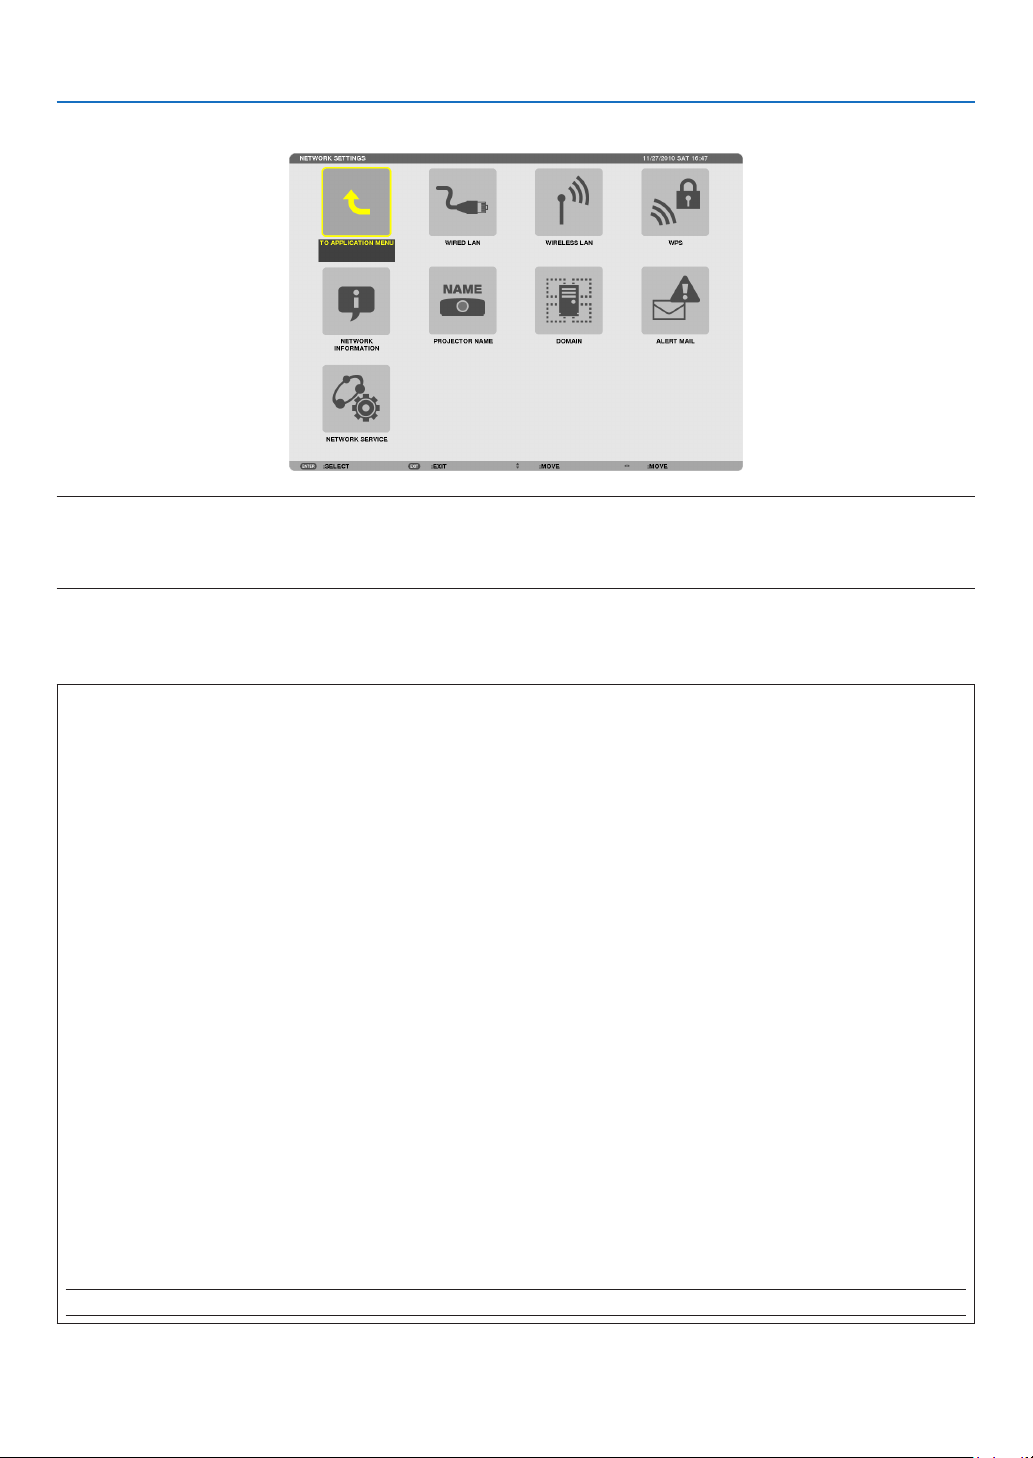
107
5. Using On-Screen Menu
NETWORK SETTINGS
Important:
•Consultwithyournetworkadministratoraboutthesesettings.
•WhenusingawiredLANconnection,connectaLANcable(Ethernetcable)totheLANport(RJ-45)oftheprojector.(page
138)
TIP:Thenetworksettingsyoumakewillnotbeaffectedevenwhen[RESET]isdonefromthemenu.
HintsonHowtoSetUpLANConnection
TosetuptheprojectorforaLANconnection:
Select[WIREDLAN]or[WIRELESSLAN][PROFILES][PROFILE1]or[PROFILE2].
TwosettingscanbesetforwiredorwirelessLAN.
Nextturnonorofffor[DHCP],[IPADDRESS],[SUBNETMASK],and[GATEWAY]andselect[OK]andpressthe
ENTERbutton.(page108)
To recall LAN settings stored in the profile number:
Select[PROFILE1]or[PROFILE2]forwiredorwirelessLAN,andthenselect[OK]andpresstheENTERbutton.
(page108)
To connect a DHCP server:
Turnon[DHCP]forwiredorwirelessLAN.Select[ON]andpresstheENTERbutton.TospecifyIPaddresswithout
usingtheDHCPserver,turnoff[DHCP].(page109)
TosetonlyforwirelessLAN(NETWORKTYPEandWEP/WPA):
Select[PROFILE1]or[PROFILE2]forwirelessLAN,andthenselect[ADVANCED]and[OK]andpresstheENTER
button.TheAdvancedmenuwillbedisplayed.(page110)
To select an SSID:
Select[ADVANCED][SITESURVEY]andpresstheENTERbutton.
SelectanSSIDandpressthe>buttontoselect[OK]andpresstheENTERbutton.
Ifyoudonotuse[SITESURVEY],typetheSSIDandselect[INFRASTRUCTURE]or[ADHOC].(page110)
Toreceivelampreplacementtimeorerrormessagesviae-mail:
Select[ALERTMAIL],andset[SENDER'SADDRESS],[SMTPSERVERNAME],and[RECIPIENT'SADDRESS].
Last,select[OK]andpresstheENTERbutton.(page121)
To execute [EASY CONNECTION] using Image Express Utility 2.0 or Image Express Utility 2 for Mac:
The[EASYCONNECTION]isamodethatcanabbreviatethetroublesomeLANsettingswhenusingtheImage
ExpressUtilityandconnectingthePCandprojectorviaawirelessLAN.
TheImageExpressUtilityLite,ImageExpressUtility2.0,andImageExpressUtility2forMacarecontainedonthe
suppliedNECProjectorCD-ROM.
Touse[EASYCONNECTION],select[WIRELESSLAN][PROFILES][EASYCONNECTION].
NOTE:The[EASYCONNECTION]functionisavailableonWindows7,WindowsVistaorWindowsXPSP3.

108
5. Using On-Screen Menu
WIREDLANorWIRELESSLAN(ADVANCEDmenuonly)
PROFILES•UptotwosettingsfortheLANportorUSBwirelessLANunit
canbestoredinmemoryoftheprojector.Totaloffoursettings
canbestored.
Fivesettingscanbestored:twoforthebuilt-inLANport,two
forwirelessLANandoneforWPS.
•Select[PROFILE1]or[PROFILE2]andthendosettingsfor
[DHCP]andtheotheroptions.
Afterdoingthis,select[OK]andpresstheENTERbutton.This
willstoreyoursettingsinmemory.
•Torecallthesettingsfrommemory:
Afterselecting[PROFILE1]or[PROFILE2]fromthe[PRO-
FILES]list.
Select[OK]andpresstheENTERbutton.
•Toexecute[EASYCONNECTION]usingImageExpressUtility
2.0orImageExpressUtility2forMac,select[WIRELESSLAN]
[PROFILES][EASYCONNECTION].
•TostopemittingradiowavesfromtheUSBWirelessLANUnit,
select[DISABLE]fromthe[PROFILES]list.
•Selecting[SIMPLEACCESSPOINT]willallowtheprojectorto
createaninfrastructurenetwork.
AnSSIDwillbeautomaticallycreated.
WhentheIPaddressoftheprojectorischanged,itwillauto-
maticallytakeeffectinoneortwominutes.
Select“ObtainanIPAddressAutomatically”tosettheIPad-
dressofaconnectedcomputer.
Ittakesafewsecondsforachangeofyourcomputer’sIPad-
dresstocomeintoeffectinWindows7/WindowsVistawhileit
takesoneortwominutesinWindowXP.
Whenyouconnectwithyourcomputertosaveyourprole
andselect“Automaticallyconnectwhenwithinrange”fromthe
PropertiestabofWirelessNetworkinWindowsforyourselected
prole,yourwirelessLANwillbeaccessedunderthefollowing
conditions:
•atthetimeofturningonthecomputerortheprojector
•whenthenotebooktypeiswithintherangeoftheprojector’s
wirelessLANcanbeachieved.
DatatransmissionbetweenwirelessLANandwiredLANisnot
possible.
Whenthe[SIMPLEACCESSPOINT]modeisusedtosend
images,itisrecommendedtoconnecttoonlyonecomputer.
—

109
5. Using On-Screen Menu
•Whenselecting[WPS],thenetworkwillbeconnectedbyusing
settingsstoredautomaticallywiththeWPSfunction.
Selecting[WPS]willallowtheprojectortoaccessthenetwork
byusingthesettingstheWPSfunctionautomaticallystored.
DHCPPlaceacheckmarktoautomaticallyassignanIPaddresstothe
projectorfromyourDHCPserver.
ClearthischeckboxtoregistertheIPaddressorsubnetmask
numberobtainedfromyournetworkadministrator.
—
IPADDRESSSetyourIPaddressofthenetworkconnectedtotheprojector
when[DHCP]isturnedoff.
Upto12numeric
characters
SUBNETMASKSetyoursubnetmasknumberofthenetworkconnectedtothe
projectorwhen[DHCP]isturnedoff.
Upto12numeric
characters
GATEWAY
Setthedefaultgatewayofthenetworkconnectedtotheprojector
when[DHCP]isturnedoff.
Upto12numeric
characters
WNSCONFIGURA-
TION
SettheIPaddressofyourWINSserverofthenetworkconnected
totheprojectorwhen[DHCP]isturnedoff.
Upto12numeric
characters
AUTODNSPlaceacheckmarktoautomaticallyassigntheIPaddressofyour
DNSserverconnectedtotheprojectorfromyourDHCPserver.
ClearthischeckboxtosettheIPaddressofyourDNSserver
connectedtotheprojector.
Upto12numeric
characters
DNSCONFIGURA-
TION
SettheIPaddressofyourDNSserveronthenetworkconnected
totheprojectorwhen[AUTODNS]iscleared.
Upto12numeric
characters
ADVANCED*
ThismenuallowsyoutosetvariousitemsforyourwirelessLAN
connection(networktype,security).
—
RECONNECT
Retrytoconnecttheprojectortoanetwork.Trythisifyouhave
changed[PROFILES].
—
*The[ADVANCED]settingscreenisavailablefor[WIRELESSLAN]only.
NOTE:
•Ifyouselect[EASYCONNECTION]from[PROFILES],youcannotmakesettingstoDHCPanditsfollowingitemsexcept[CHAN-
NEL]in[ADVANCED].
ADVANCEDSetting(requiredforwirelessLANonly)(ADVANCEDmenuonly)

110
5. Using On-Screen Menu
SITESURVEYDisplaysalistofavailableSSIDsforwirelessLANonsite.Select
anSSIDwhichyoucanaccess.
ToselectanSSID,highlight[SSID]andusetheSELECT to
select[OK]andpresstheENTERbutton.
....................... Wireless access point
....................... Ad Hoc PC
....................... WEP or WPA enabled
—
SECURITY
Thiswillturnonorofftheencryptionmodeforsecuretransmis-
sion.
Touseencryption,specifyaWEPkeyorencryptionkey.Select
yoursecuritytypeappropriateforyourcomputerandthewire-
lessLANunit.
DISABLE ................ Will not turn on the encryption feature. Your com-
munications may be monitored by someone.
WEP(64bit) ............ Uses 64-bit datalength for secure transmis-
sion.
WEP(128bit) .......... Uses 128-bit datalength for secure transmission.
This option will increase privacy and security
when compared to use of 64-bit datalength en-
cryption.
WPA-PSK/WPA2-PSK/WPA-EAP/WPA2-EAP
.............................. These options provide stronger security than
WEP.
NOTE:
•Thesecuritytype,WEPkey,andencryptionkeysettingsmustbethe
sameascommunicationdevicessuchasPCoraccesspointinyour
wirelessnetwork.
•Whenyouuse[SECURITY],yourimagetransmissionspeedwillslow
down.
•[WPA-PSK],[WPA-EAP],[WPA2-PSK]and[WPA2-EAP]arenotavail-
ablewhen[ADHOC]isselectedfrom[NETWORKTYPE].
—
SSID
Enteranidentier(SSID)forwirelessLAN.Communicationcan
bedoneonlywithequipmentwhoseSSIDmatchesSSIDforyour
wirelessLAN.
Upto32alphanumeric
characters(case
sensitive).
NETWORKTYPESelectcommunicationmethodwhenusingwirelessLAN.
INFRASTRUCTURE ...Select this option when communicating with
one or more equipment connected to the wire-
less or wired LAN network via a wireless access
point.
AD HOC ....................Select this option when using the wireless LAN
to directly communicate with a computer in
peer-to-peer mode.
—
CHANNEL
Selectachannel.Availablechannelsvarydependingonthe
countryandregion.Whenyouselect[INFRASTRUCTURE],make
surethattheprojectorandyouraccesspointareonthesame
channel;whenyouselect[ADHOC],makesurethattheprojector
andyourcomputerareonthesamechannel.
—

111
5. Using On-Screen Menu
When[WEP(64bit)]or[WEP(128bit)]isselectedfor[SECURITYTYPE]
KEYSELECTSelectsoneWEPkeyfromthefourkeysbelow.
KEY1,KEY2,KEY3,
KEY4
EnteraWEPkey.
•Maximumnumberofcharacters
OptionAlphanumeric(ASCII)Hexadecimal(HEX)
WEP64bit5 10
WEP128bit13 26
When[WPA-PSK],[WPA-EAP],[WPA2-PSK],or[WPA2-EAP]isselectedfor[SECURITYTYPE]
ENCRYPTIONTYPESelect[TKIP]or[AES].
KEYEnterencryptionkey.Keylengthmustbe8orgreaterand63orless.
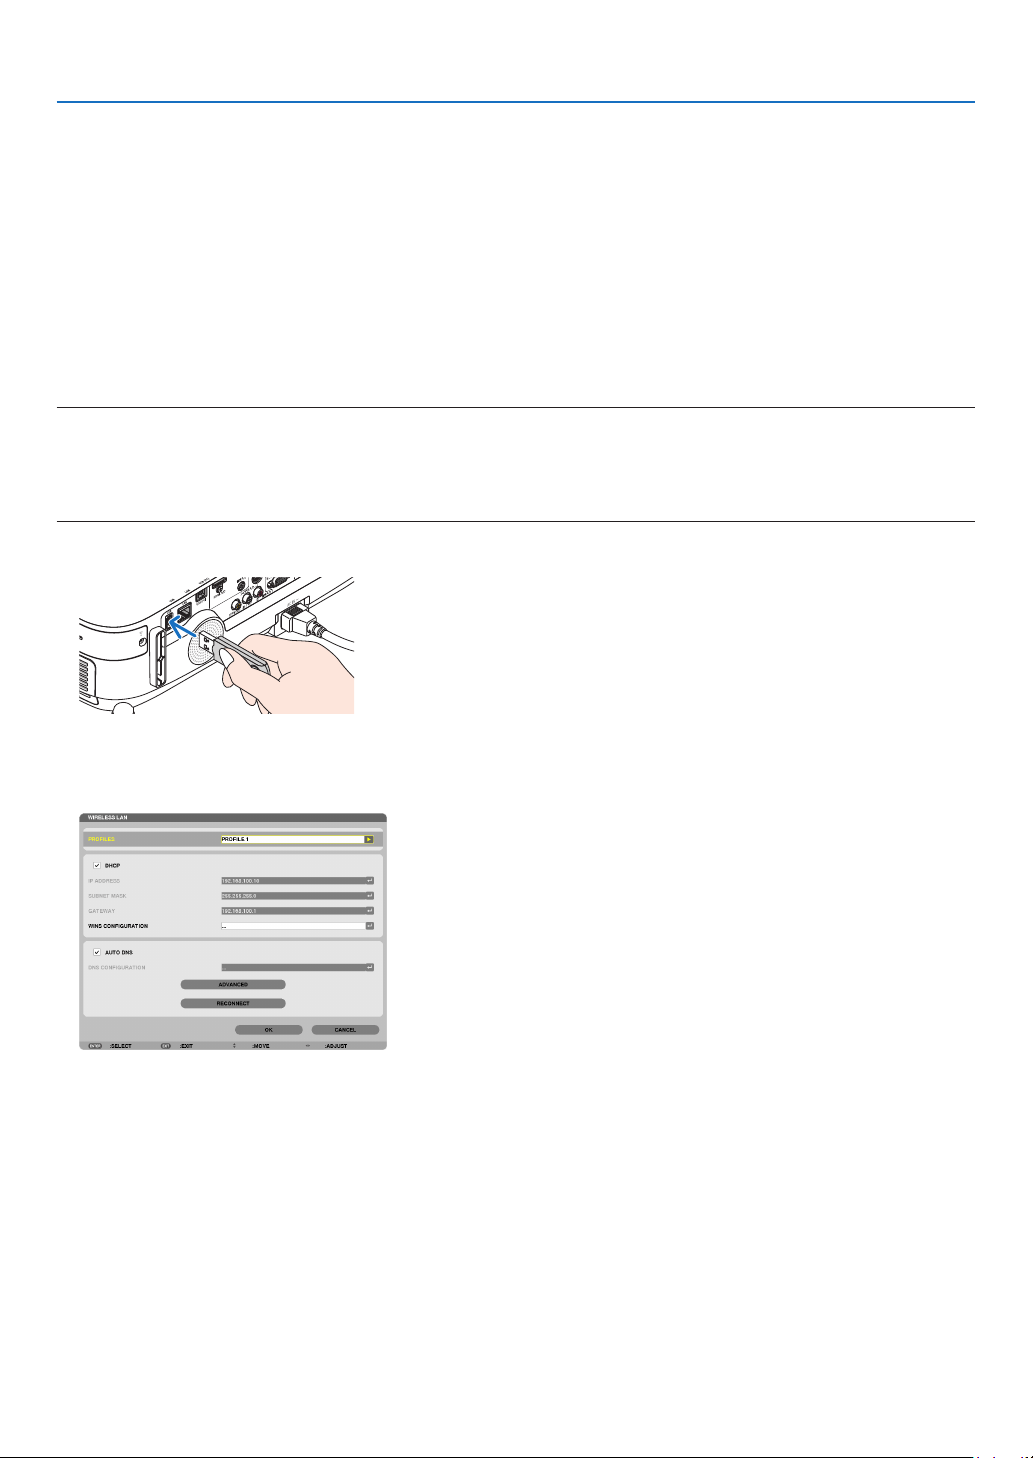
112
5. Using On-Screen Menu
[AUTHENTICATION](requiredforwirelessonly)
SettingisrequiredforusingWPA-EAPorWPA2-EAP.
Preparation before setting
SelectawirelessLANcompliantWPA-EAPorWPA2-EAPauthenticationandinstalladigitalcerticateontheprojec-
tor.
1.Set[DATEANDTIME]ontheprojector.(page
127)
2.Useacomputertosavedigitalcerticates(les)forWPA-EAPorWPA2-EAPsettingtoyourUSBmemory
device.
After completing saving the file, remove the USB memory device from the computer.
Important:
•TheleformatsofdigitalcerticatethataresupportedbytheprojectorareDERandPKCS#12only.
•Theprojectorcannothandleanydigitalcerticatewhoselesizeexceeds8KB.
•CRL(CerticateRelocationList)isnotsupported.
•Clientcerticatechainisnotsupported.
3.PlugtheUSBmemorydeviceintotheUSBportoftheprojector.
Setting Procedures
1.Select[NETWORKSETTINGS][WIRELESSSLAN].
2.SetitemssuchasPROFILES,DHCP,IPADDRESS,SUBNETMASKandothersasrequired.
•Select[PROFILE1]or[PROFILE2]for[PROFILES].If[EASYCONNECTION]isselected,WPA-PSK,WPA2-
PSK, WPA-EAP, or WPA2-EAP is not available.
3.Select[ADVANCED]andpresstheENTERbutton.
The [ADVANCED] setting screen will be displayed.
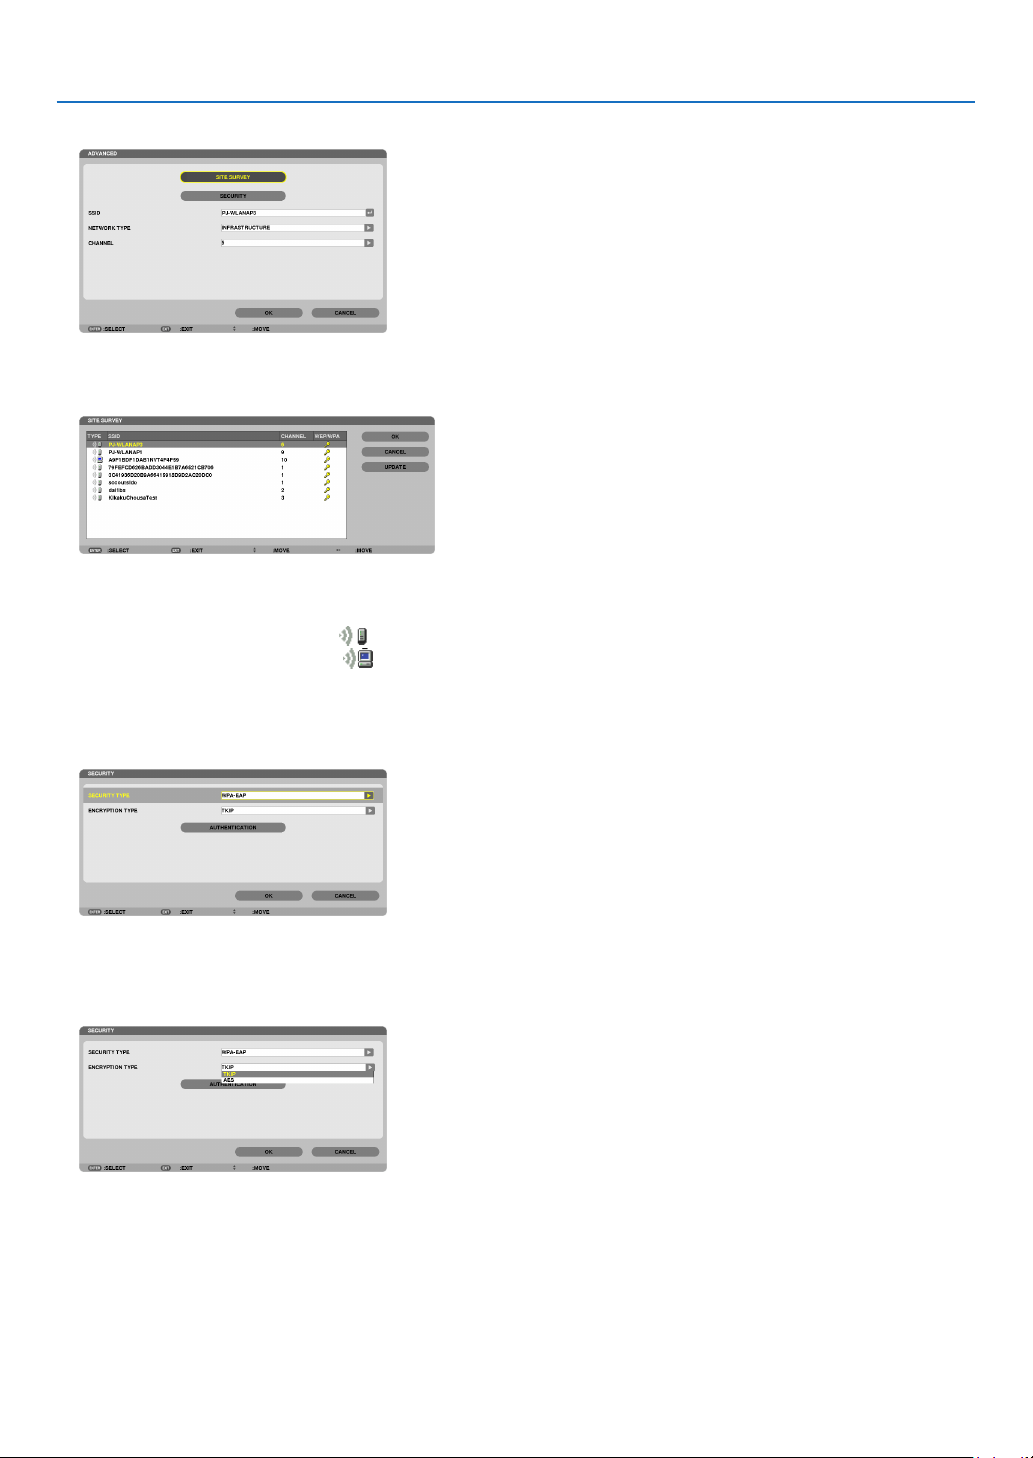
113
5. Using On-Screen Menu
4.Select[SITESURVEY]andpresstheENTERbutton.
The “SSID” list will be displayed.
5.SelectaconnectingSSID,andthenselect[OK].
Finally press the ENTER button.
•SelecttheSSIDforwhichWPA-PSKorWPA2-PSKisset.
•Select[INFRASTRUCTURE(
)] for [NETWORK TYPE]. WPA-PSK, WPA2-PSK, WPA-EAP, or WPA2-EAP is
not available when [AD HOC ( )] is selected.
6.Selectthe[SECURITY]tab.
The [SECURITY] page will be displayed.
7.Selectthe[SECURITYTYPE]eldandpresstheENTERbutton.
The pull-down list will be displayed.
8.Select[WPA-EAP]or[WPA2-EAP]andpresstheENTERbutton.
9.Selectthe[TKIP/AES]eldandpresstheENTERbutton.
The pull-down list will be displayed.
10
.Select[TKIP]or[AES]andpresstheENTERbutton.
Select [TKIP] or [AES] according to the setting for your access point.
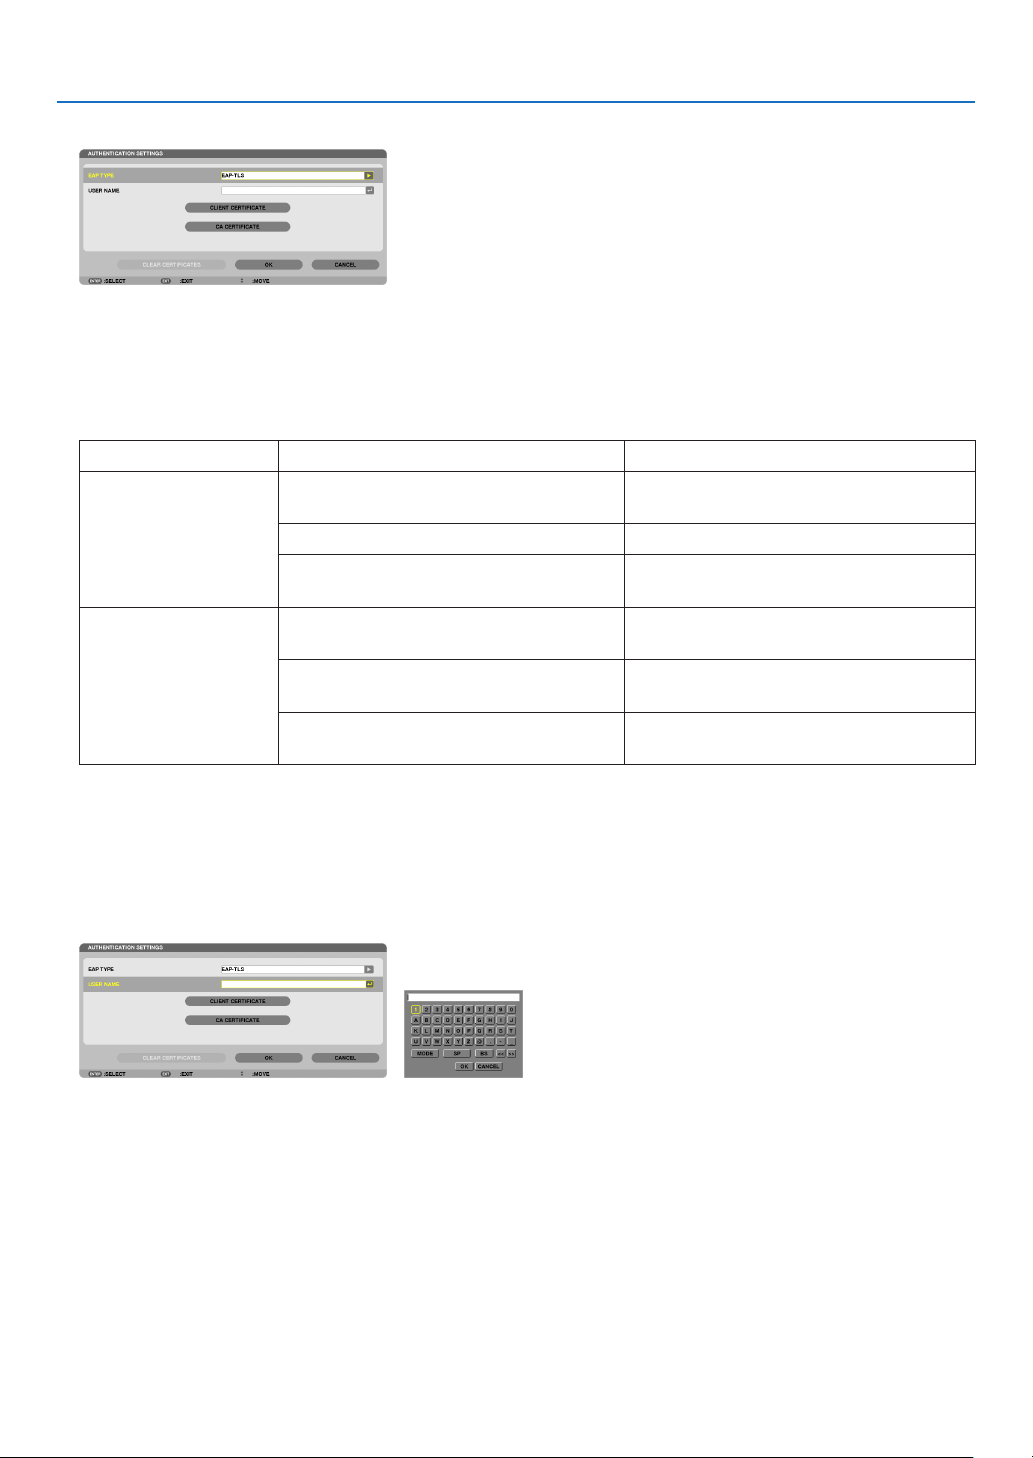
114
5. Using On-Screen Menu
11
.Selectthe[AUTHENTICATION]tab.
The [AUTHENTICATION] page will be displayed.
Select either [EAP-TLS] or [PEAP-MSCHAPv2] for [EAP TYPE]. The setting items vary depending on the EAP
type.
See the table below.
EAPTypeSettingItemNote
EAP-TLS
UserName1characterormoreand32charactersor
less
ClientCerticatePKCS#12formatle
CACerticate
(Certicateauthority’scerticate)
DERformatle
PEAP-MSCHAPv2UserName1characterormoreand32charactersor
less
Password
1characterormoreand32charactersor
less
CACerticate
(Certicateauthority’scerticate)
DERformatle
①Selecting[EAP-TLS]for[EAPTYPE]:
The following section explains the operation for selecting [EAP-TLS].
For selecting [PEAP-MSCHAPv2], go on to Step 12 on page
116.
12.
Selectthe[USERNAME]eldandpresstheENTERbutton.
Thecharacterentryscreen(softwarekeyboard)willbedisplayed.Setausername.
•Ausernamemustbe1characterormoreand32charactersorless.
•Seepage26of“WiredandWirelessNetworkSetupGuide”forusingthesoftwarekeyboardtoentercharac
-
ters.
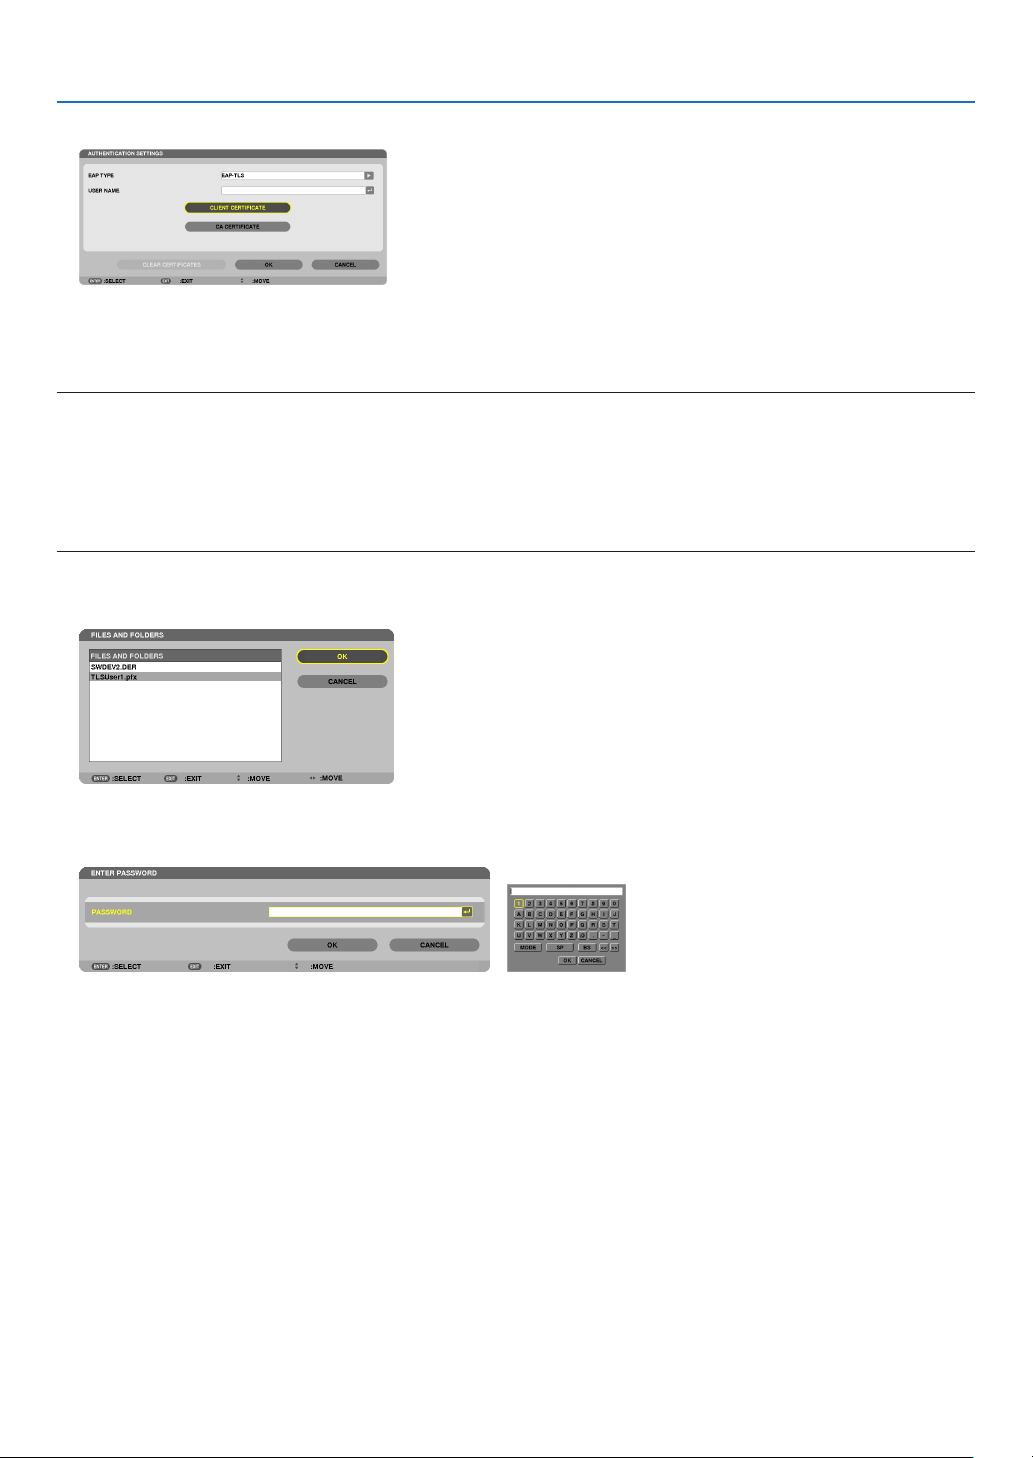
115
5. Using On-Screen Menu
13.
Select[CLIENTCERTIFICATE]andpresstheENTERbutton.
A list of files (thumbnail screen) will be displayed.
•Foroperatingthethumbnailscreen,see“4.UsingtheViewer”inthe“User’sManual”(PDF).
•Toreturntothe[AUTHENTICATION]page,presstheEXITbutton.
NOTE:
Installing a digital certificate
Youcaninstalleachdigitalcerticate(clientcerticateandCAcerticate)for[PROFILE1(or2)]onale-by-lebasis.
•InstallarootCAcerticateforaCAcerticate.
•Ifyouinstalladigitalcerticateoveryourexistingdigitalcerticate,theexistingdigitalcerticatewillbeoverwrittenwiththenew
digitalcerticate.
•Onceadigitalcerticatehasbeeninstalled,itsinformationcannotbedeletedevenifyoustopsettingWPA-EAPorWPA2-EAP.
14.
Onthethumbnailscreen,selectadigitalcerticate(PKCS#12formatle)savedinyourUSBmemorydevice
andpresstheENTERbutton.
The password screen will be displayed.
15.
Select[PASSWORD]eldandpresstheENTERbutton.
Thecharacterentryscreen(softwarekeyboard)willbedisplayed.Setthepasswordoftheprivatekey.Apassword
must be 1 character or more and 32 characters or less.
The selected digital certificate file will be installed on the projector.
•WhentherootCAcerticateisnotincludedinthelethatwasselectedinStep14,proceedtoStep16.When
the root certification authority certificate is included, proceed to Step 18.
16.Select[CACERTIFICATE]andpresstheENTERbutton.
The drive list screen will be displayed.
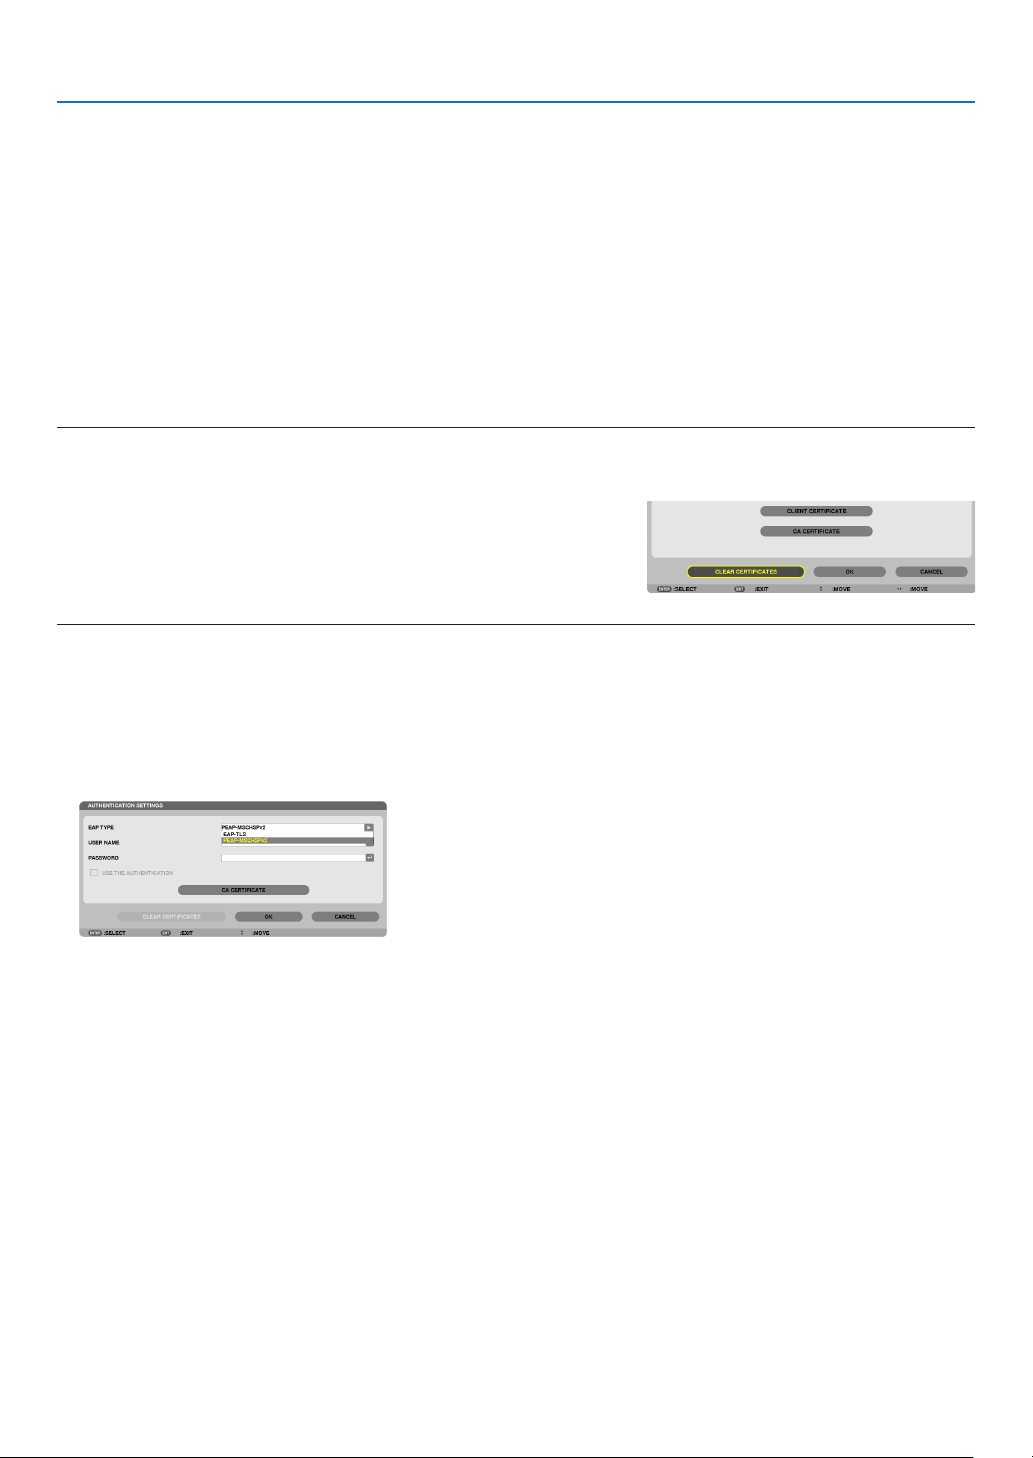
116
5. Using On-Screen Menu
17.
Onthethumbnailscreen,selectadigitalcerticate(DERformatle)savedinyourUSBmemorydevice
andpresstheENTERbutton.
•SelectyourrootCAcerticatehere.
The selected digital certificate will be installed on the projector.
18.
Aftercompletingrequiredsettings,select[OK]andpresstheENTERbutton.
The [WIRELESS] page will be returned.
19.
Select[RECONNECT]andpresstheENTERbutton.
20.
Select[OK]andpresstheENTERbutton.
Thiswillcompletesetting[EAP-TLS]for[EAPTYPE]in[WPA-EAP]or[WPA2-EAP].
TIP:
Clearingthedigitalcerticatethatisinstalledontheprojector
Toclearthedigitalcerticateinstalledontheprojector,followthestepsbelow.
Bydoingthefollowingprocedure,allthedigitalcerticatesforthecurrentlydisplayedprolewillbecleared.
1.Select[CLEARCERTIFICATES]inthebottomleftofthe[AD
-
VANCED]settingscreenandpresstheENTERbutton.
A message for confirmation will be displayed.
2.Select[YES]andpresstheENTERbutton.
The digital certificates will be cleared.
TIP:
•ThePKCS#12formatdigitalcerticateincludingaCAcerticatewillbeinstalledasarootCAcerticate.
②Selecting[PEAP-MSCHAPv2]for[EAPTYPE]:
12.
Fromthe[AUTHENTICATION]page,select[EAPTYPE]eldandpresstheENTERbutton.
The pull-down list will be displayed.
13.
Select[PEAP-MSCHAPv2]andpresstheENTERbutton.
14.
Select[USERNAME]eldandpresstheENTERbutton.
Thecharacterentryscreen(softwarekeyboard)willbedisplayed.Setausername.
•Ausernamemustbe32charactersorless.
( page 118)
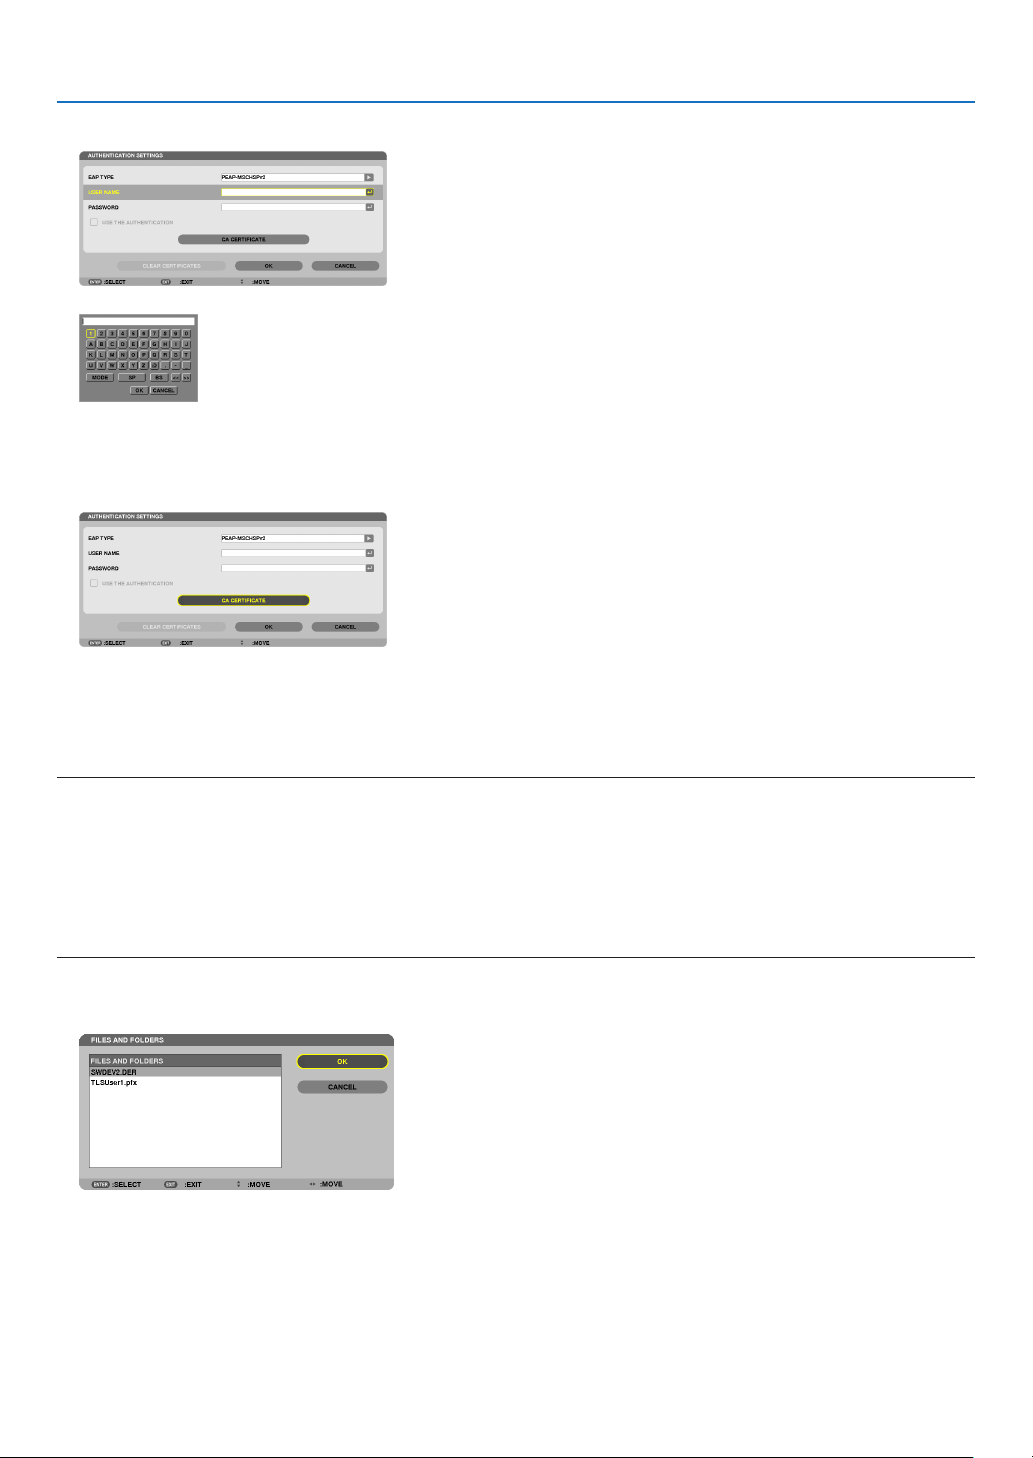
117
5. Using On-Screen Menu
15.
Aftercompletingsettingausername,selectthe[PASSWORD]eldandpresstheENTERbutton.
Thecharacterentryscreen(softwarekeyboard)willbedisplayed.Setapassword.
•Apasswordmustbe32charactersorless.
16.
Aftercompletingsettingthepassword,select[CACERTIFICATE]eldandpresstheENTERbutton.
The drive list screen will be displayed.
•Foroperatingthethumbnailscreen,see“4.UsingtheViewer”inthe“User’sManual”(PDF).
•Toreturntothe[AUTHENTICATION]page,presstheEXITbutton.
NOTE:
Installing a digital certificate
Youcaninstalleachdigitalcerticate(clientcerticateandCAcerticate)for[PROFILE1(or2)]onale-by-le
basis.
•InstallarootCAcerticateforaCAcerticate.
•Ifyouinstalladigitalcerticateoveryourexistingdigitalcerticate,theexistingdigitalcerticatewillbeoverwrittenwiththenew
digitalcerticate.
•Onceadigitalcerticatehasbeeninstalled,itsinformationcannotbedeletedevenifyoustopsettingWPA-EAPorWPA2-EAP.
17.
Onthethumbnailscreen,selectadigitalcerticate(DERformatle)savedinyourUSBmemorydevice
andpresstheENTERbutton.
•SelectyourrootCAcerticatehere.
The selected digital certificate will be installed on the projector.
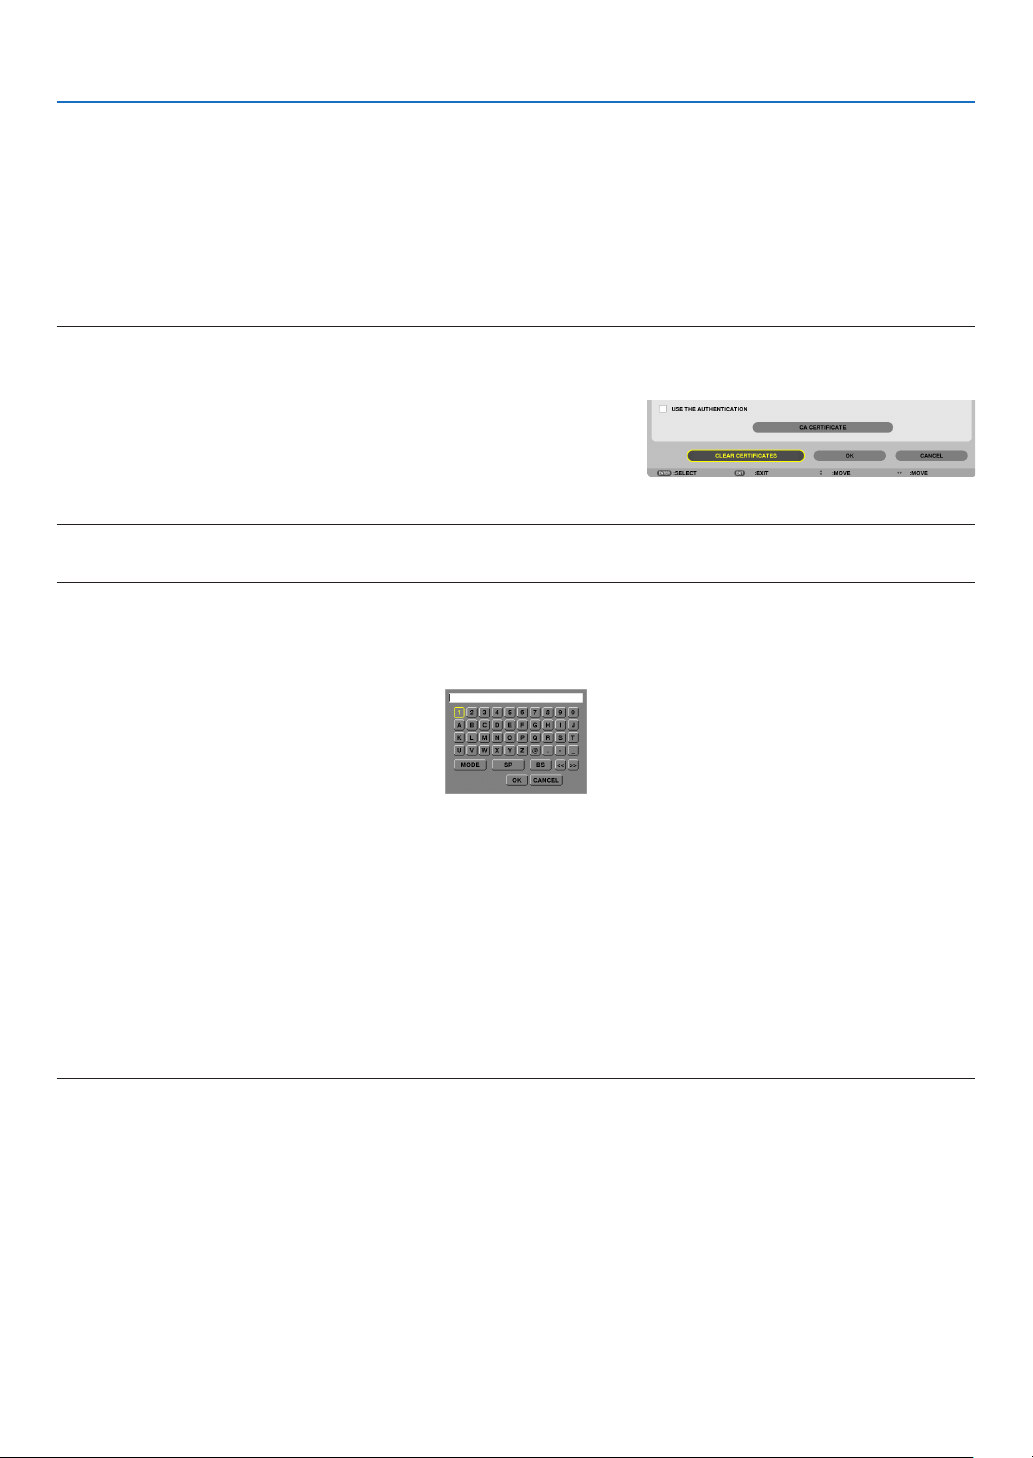
118
5. Using On-Screen Menu
18.
Aftercompletingrequiredsettings,select[OK]andpresstheENTERbutton.
The [WIRELESS] page will be returned.
19.
Select[RECONNECT]andpresstheENTERbutton.
20.
Select[OK]andpresstheENTERbutton.
Thiswillcompletesetting[PEAP-MSCHAPv2]for[EAPTYPE]in[WPA-EAP]or[WPA2-EAP].
TIP:
Clearingthedigitalcerticatethatisinstalledontheprojector
Toclearthedigitalcerticateinstalledontheprojector,followthestepsbelow.
Bydoingthefollowingprocedure,allthedigitalcerticatesforthecurrentlydisplayedprolewillbecleared.
1.Select[CLEARCERTIFICATES]inthebottomleftofthe[AD
-
VANCED]settingscreenandpresstheENTERbutton.
A message for confirmation will be displayed.
2.Select[YES]andpresstheENTERbutton.
The digital certificates will be cleared.
TIP:
EnteringWEPkeys(SwitchingbetweenAlphanumericcharactersandhexadecimal)
Toenterfrom[KEY1]to[KEY4],dothefollowing:
1.Selectoneof[KEY1],[KEY2],[KEY3]and[KEY4]andpresstheENTERbutton.
Thecharacterentryscreen(softwarekeyboard)willbedisplayed.
2.Usethe▼, ▲, ◀, or ▶buttontoselectacharacterandpresstheENTERbutton.
•ToenteraWEPkeyorpassphrase,usealphanumericcharacters(ASCII)orhexadecimal(HEX).ToenteraPSK
key,usealphanumericcharacters(ASCII).
•Pressthe[HEX]buttontochangeto[ASCII]tosetthekeyinASCIIdigit.Youcantogglethisbuttonbetween
[ASCII] and [HEX].
•Enter0x(numeralandalphabetrespectively)rightinfrontofyourkeycode.
•Hexadecimaluses0to9andAtoF.
3.AfterenteringyourWEPkeyorpassphrase,usethe▼
, ▲, ◀, or ▶buttontoselect[OK]andpresstheENTER
button.
Thecharacterentryscreen(softwarekeyboard)willbeclosed.
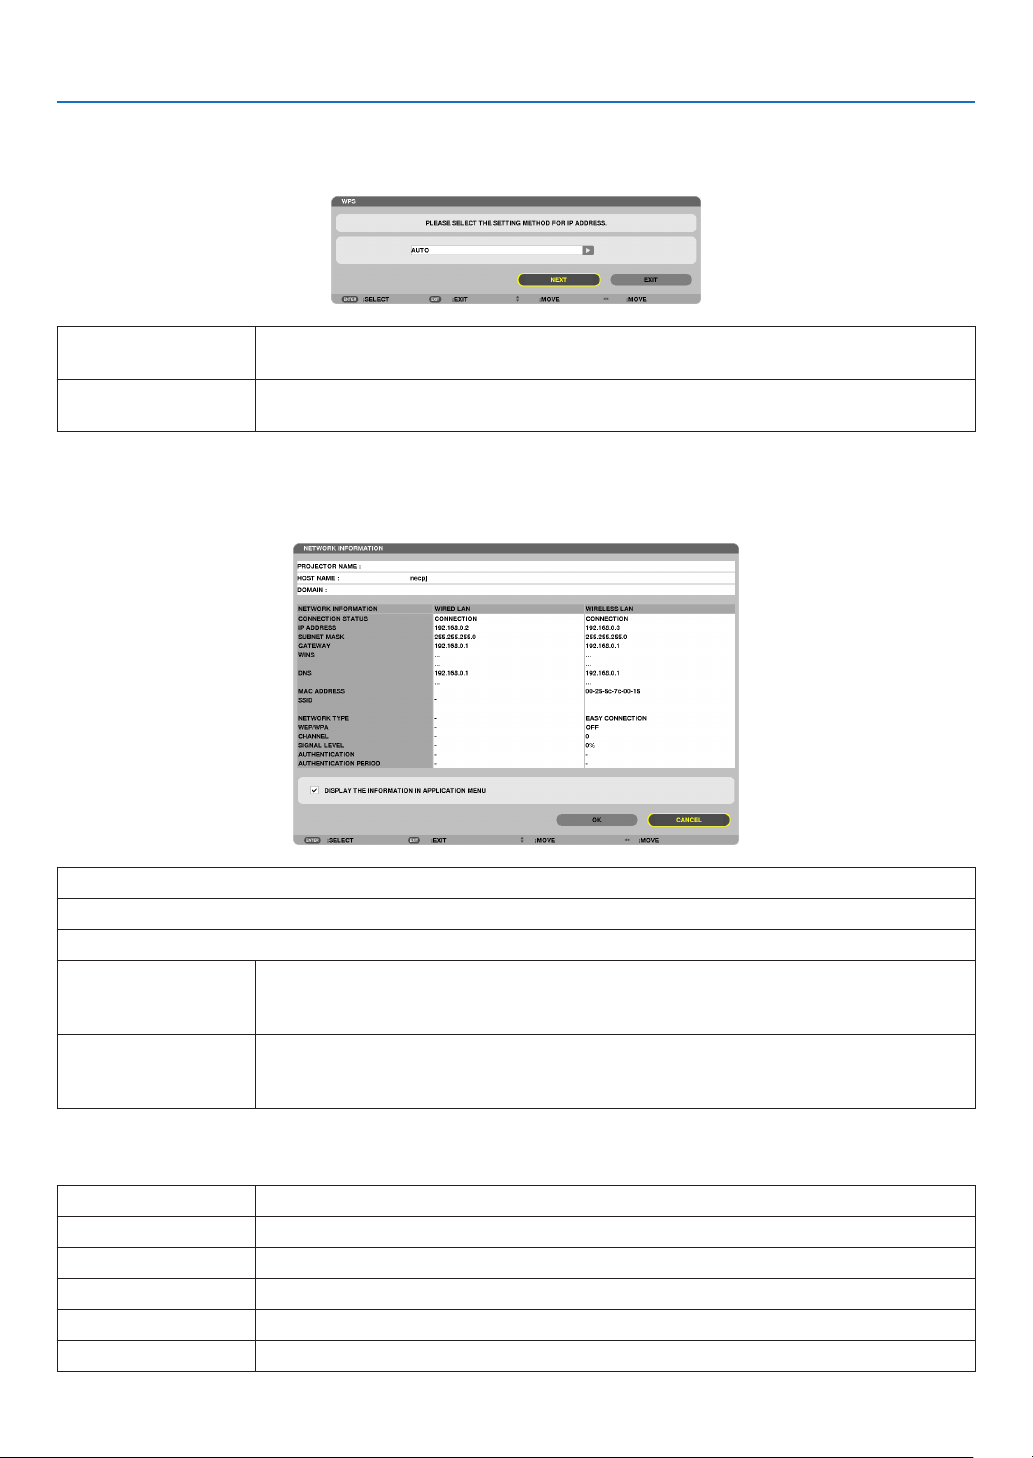
119
5. Using On-Screen Menu
WPS
WhenthewirelessLANaccesspointconnectedtotheprojectorsupportsWPS(Wi-FiProtectedSetupTM),youcan
usePINmethodorpushbuttonmethodtosetupthewirelessLANfortheprojector.
PINTYPESeta4-digitor8digit-PINcodeofWPSforyouraccesspointtocompletesettingforthe
SSIDsecurity.
PUSHBUTTONTYPEPressthededicatedbuttonoftheaccesspointandtheprojector’swirelessLANunitto
completesettingfortheSSIDsecurity.
NETWORK INFORMATION
Thefollowinginformationwillbedisplayedwhentheprojectorisconnectedtoanetwork(wiredLANorwireless
LAN).
PROJECTORNAME
HOSTNAME
DOMAIN
NETWORKINFOR-
MATION(WIRED
LAN/WIRELESSLAN)
CONNECTIONSTATUS,IPADDRESS,SUBNETMASK,GATEWAY,WINS,DNS,MAC
ADDRESS,SSID,NETWORKTYPE,WEP/WPA,CHANNEL,SIGNALLEVEL,AU-
THENTICATION,AUTHENTICATIONPERIOD
DISPLAYTHEINFOR-
MATIONINAPPLICA-
TIONMENU
Turnonoroffthedisplayofthenetworkinformation.
Themeaningsofthesestatusstatementsaredescribedbelow.
StatementAuthenticationstatus
AuthenticatedAuthenticationisdonecorrectly.
FailureAuthenticationfailed.
Authenticating…Authenticationisinprocess.
ExpiredThedigitalcerticateisexpired.Or[DATE,TIMEPRESET]isnotsetcorrectly.
TimeErrorThe[DATE,TIMEPRESET]hasbeencleared.Setthecorrectdateandtime.
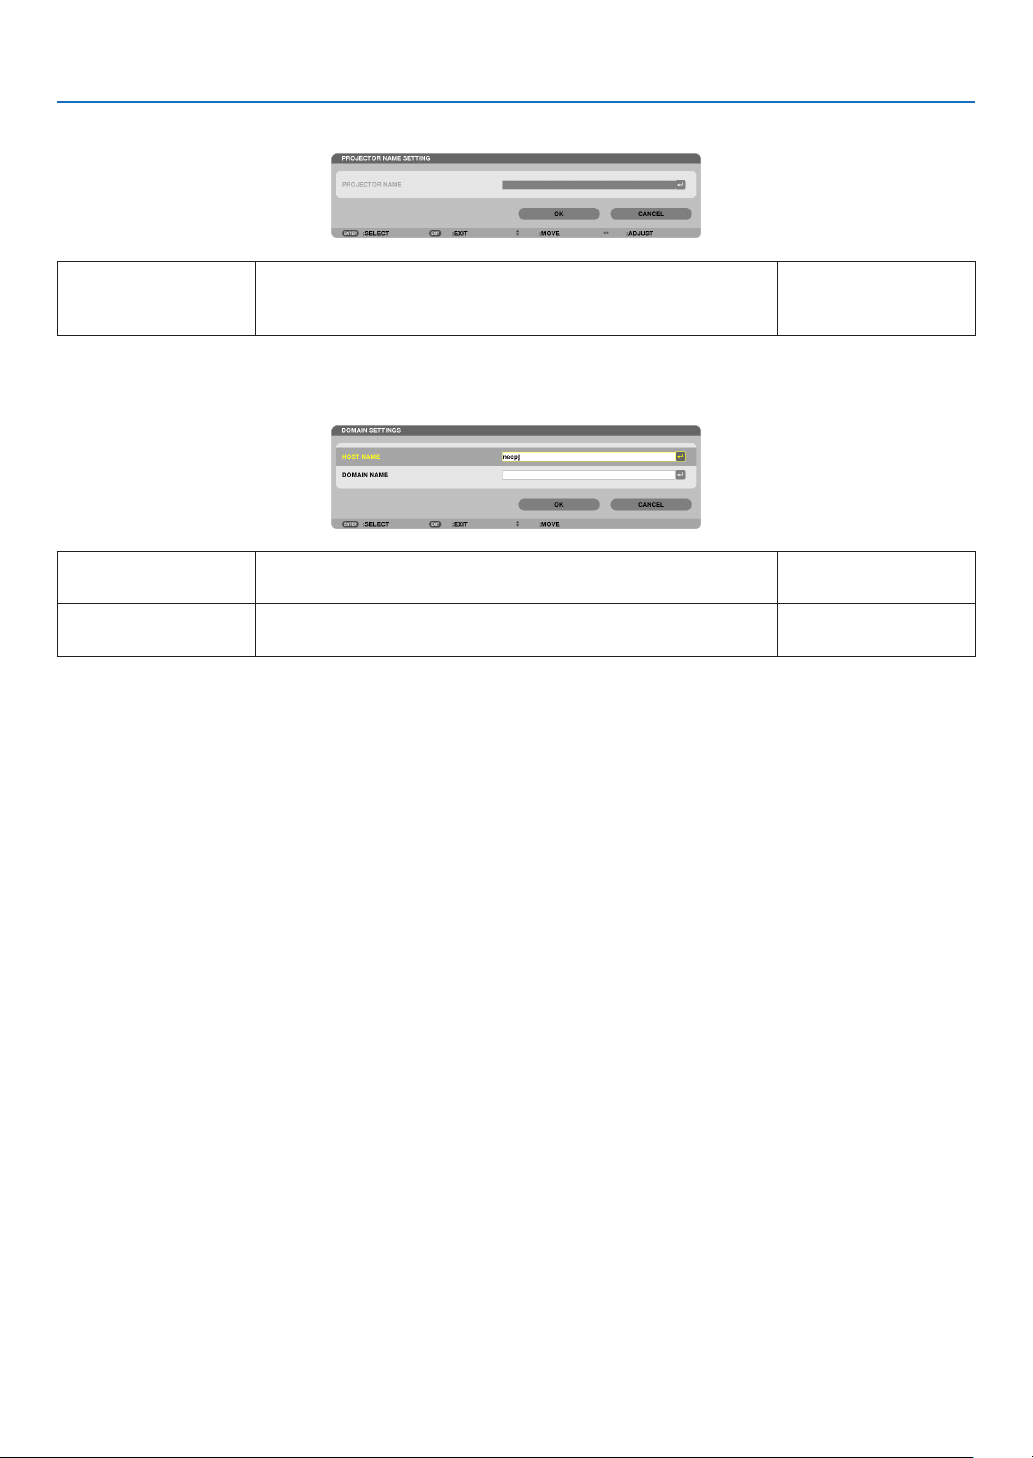
120
5. Using On-Screen Menu
PROJECTORNAME(ADVANCEDmenuonly)
PROJECTORNAMESetauniqueprojectorname.Upto16alphanu-
mericcharactersand
symbols
DOMAIN(ADVANCEDmenuonly)
Setahostnameanddomainnameoftheprojector.
HOSTNAMESetahostnameoftheprojector.Upto15alphanumeric
characters
DOMAINNAMESetadomainnameoftheprojector.Upto60alphanumeric
characters

121
5. Using On-Screen Menu
ALERTMAIL(ADVANCEDmenuonly)
ALERTMAILThisoptionwillnotifyyourcomputeroflampreplacetimeorerror
messagesviae-mailwhenusingwirelessorwiredLAN.
Placing a checkmark will turn on the Alert Mail feature.
Clearing a checkmark will turn off the Alert Mail feature.
Sampleofamessagetobesentfromtheprojector:
Thelampandltersareattheendofitsusablelife.Please
replacethelampandlters.
ProjectorName:NECProjector
LampHoursUsed:100[H]
—
HOSTNAMETypeinahostname.Upto15alphanumeric
characters
DOMAINNAMETypeinadomainnameofthenetworkconnectedtotheprojec-
tor.
Upto60alphanumeric
characters
SENDER'SAD-
DRESS
Specifythesender’saddress.Upto60alphanu-
mericcharactersand
symbols
SMTPSERVER
NAME
TypeintheSMTPservernametobeconnectedtotheprojec-
tor.
Upto60alphanumeric
characters
RECIPIENT'SAD-
DRESS1,2,3
Typeinyourrecipient’saddress.Upto60alphanu-
mericcharactersand
symbols
TESTMAIL
Sendatestmailtocheckifyoursettingsarecorrect.
NOTE:
•Ifyouenteredanincorrectaddressinatest,youmaynotreceivean
Alertmail.Shouldthishappen,checkiftheRecipient’sAddressis
correctlyset.
•Unlessanyoneofthe[SENDER'SADDRESS],[SMTPSERVER'S
NAME]or[RECIPIENT'SADDRESS1-3]isselected,[TESTMAIL]is
notavailable.
•Besuretohighlight[OK]andpresstheENTERbuttonbeforeexecuting
[TESTMAIL].
—
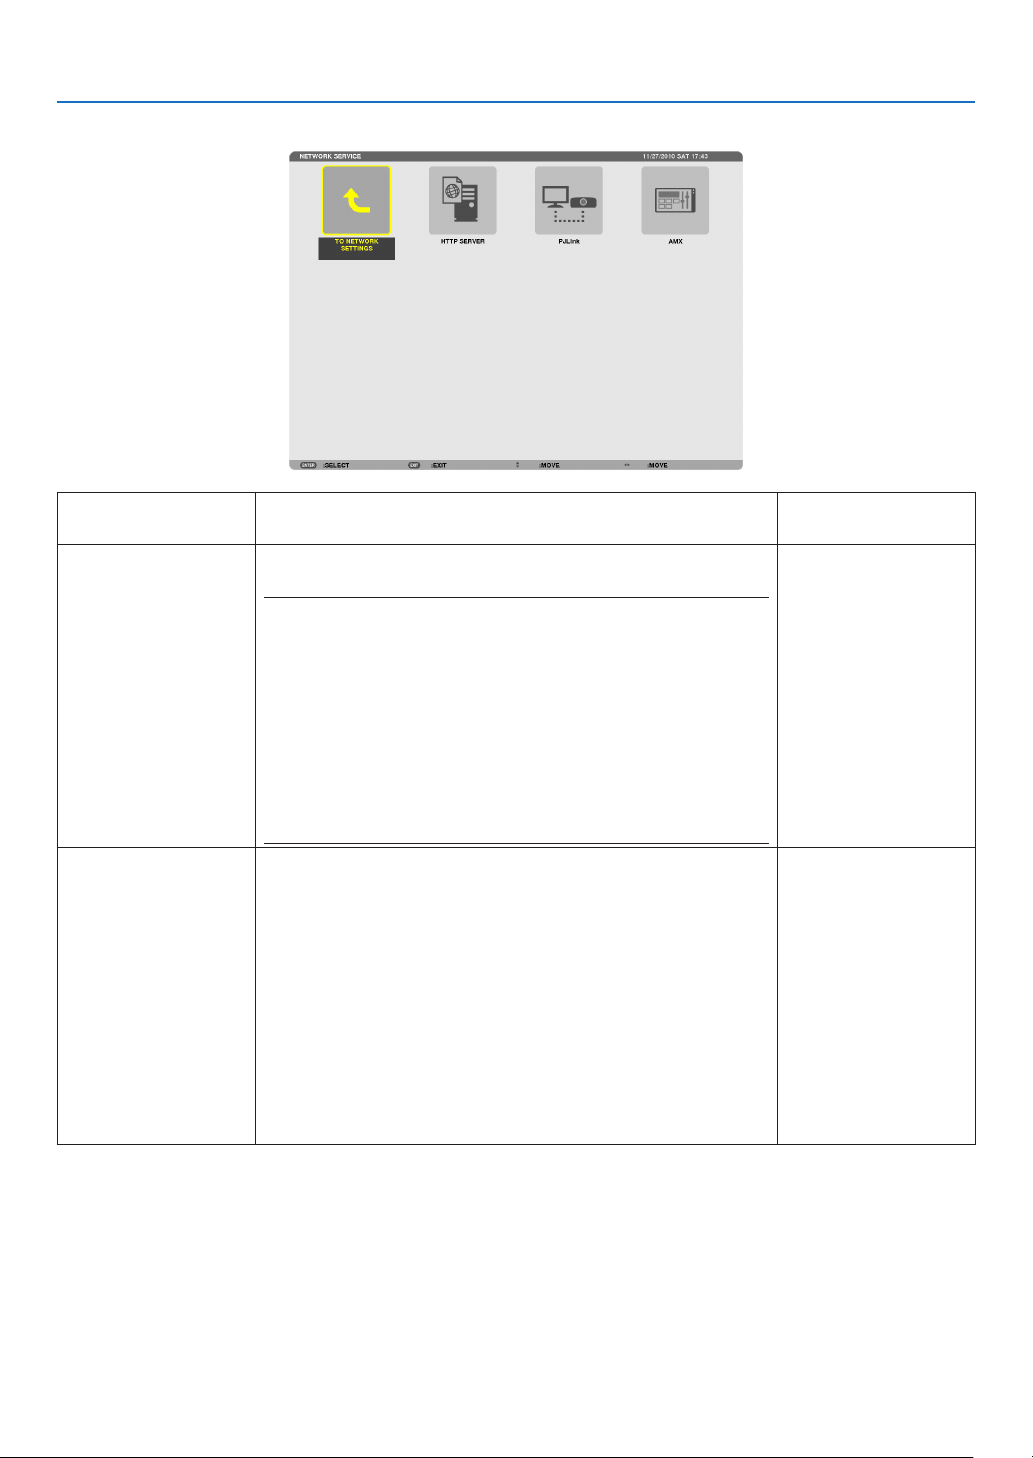
122
5. Using On-Screen Menu
NETWORKSERVICE(ADVANCEDmenuonly)
HTTPSERVERSetapasswordforyourHTTPserver.Upto10alphanumeric
characters
PJLink
Thisoptionallowsyoutosetapasswordwhenyouusethe
PJLinkfeature.
NOTE:
•Donotforgetyourpassword.However,ifyouforgetyourpassword,
consultwithyourdealer.
•WhatisPJLink?
PJLinkisastandardizationofprotocolusedforcontrollingprojectors
ofdifferentmanufacturers.Thisstandardprotocolisestablishedby
JapanBusinessMachineandInformationSystemIndustriesAssocia-
tion(JBMIA)in2005.
TheprojectorsupportsallthecommandsofPJLinkClass1.
•SettingofPJLinkwillnotbeaffectedevenwhen[RESET]isdonefrom
themenu.
Upto32alphanumeric
characters
AMX
TurnonorofffordetectionfromAMXDeviceDiscoverywhen
connectingtothenetworksupportedbyAMX’sNetLinxcontrol
system.
TIP:
WhenusingadevicethatsupportsAMXDeviceDiscovery,allAMXNetLinx
controlsystemwillrecognizethedeviceanddownloadtheappropriate
DeviceDiscoveryModulefromanAMXserver.
Placing a checkmark will enable detecting the projector from AMX Device
Discovery.
Clearing a checkmark will disable detecting the projector from AMX
Device Discovery.
—
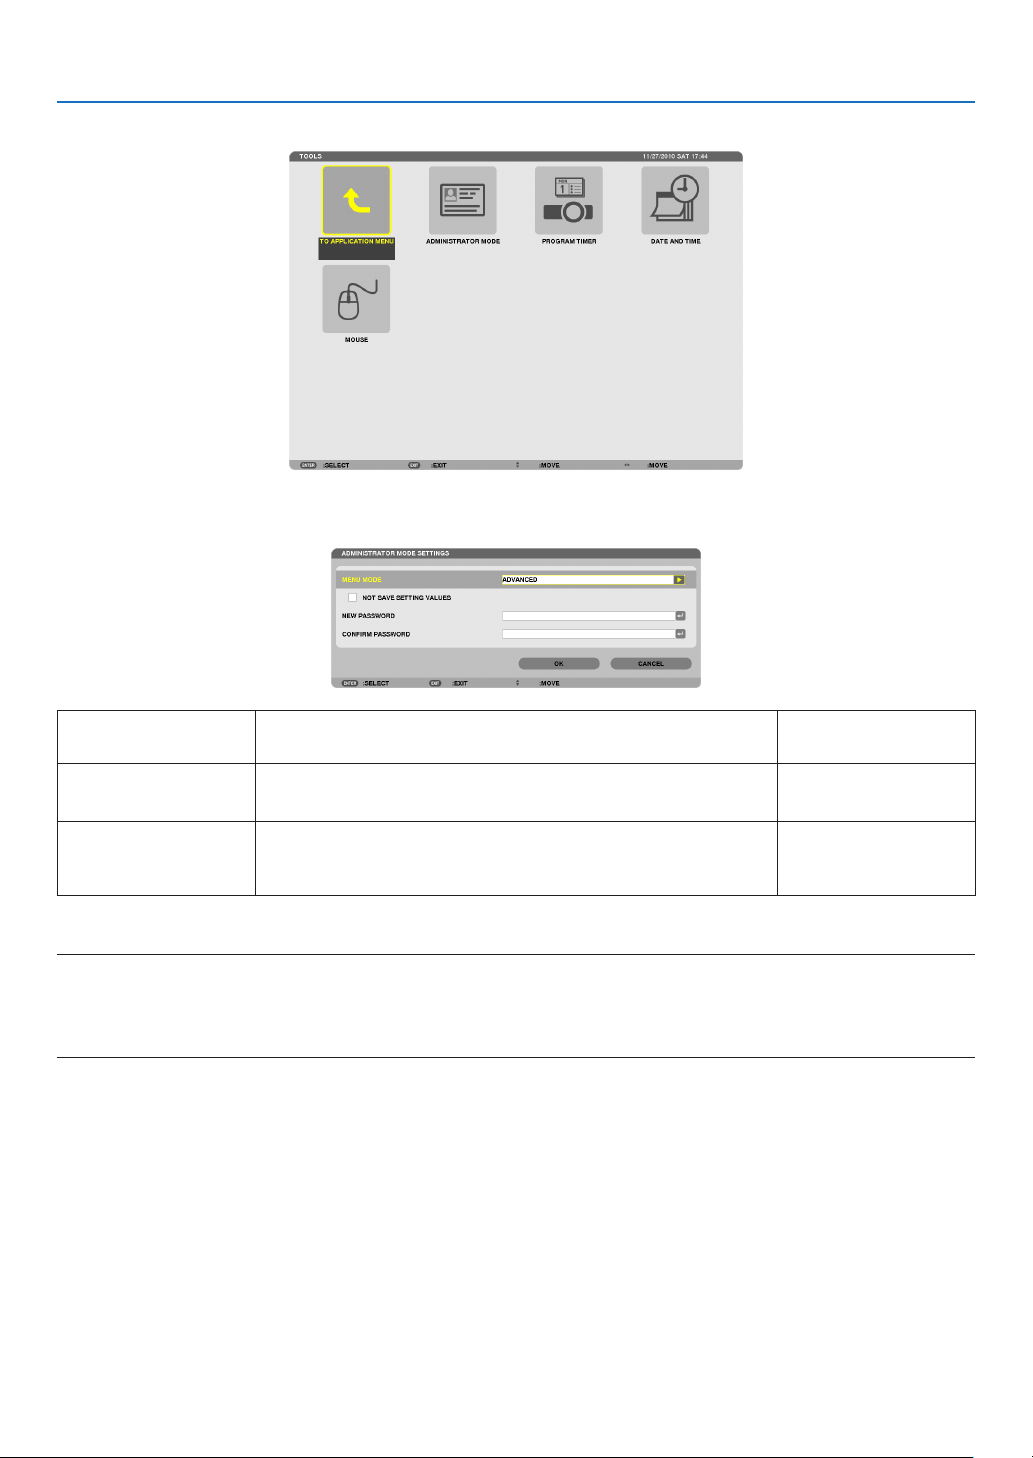
123
5. Using On-Screen Menu
TOOLS
ADMINISTRATOR MODE
ThisallowsyoutoselectMENUMODE,savesettings,andsetapasswordfortheadministratormode.
MENUMODESelecteither[BASIC]or[ADVANCED]menu.
(page80)
—
NOTSAVESETTING
VALUES
Placing a check mark will not save your projector settings.
Clear this check box to save your projector settings.
—
NEWPASSWORD/
CONFIRMPASS-
WORD
Assignapasswordfortheadministratormode.Upto10alphanumeric
characters
TIP:
ToreturntotheADVANCEDmenufromtheBASICmenu,dothefollowing:
1.UsetheSOURCEbuttononthecabinetorpresstheNETWORKbuttonontheremotecontroltoselect
[NETWORK]todisplaytheAPPLICATIONMENU.
2.Select[TOOLS][ADMINISTRATORMODE][MENUMODE][ADVANCEDMODE].
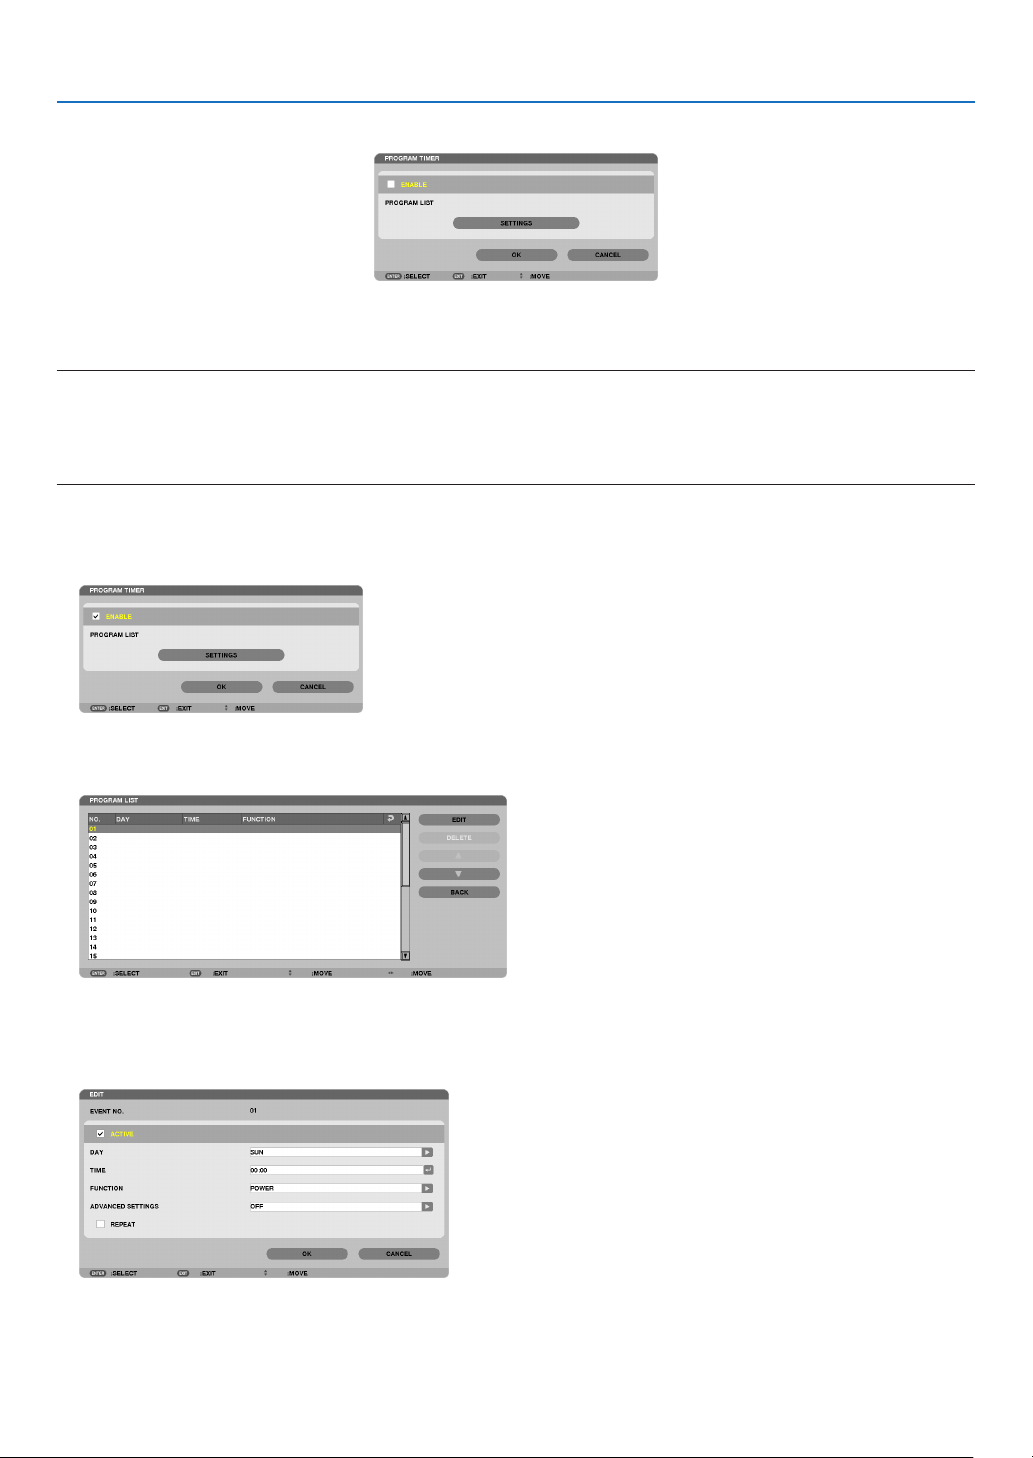
124
5. Using On-Screen Menu
PROGRAM TIMER
Thisoptionturnson/offtheprojectorandchangesvideosignals,andselectsECOmodeautomaticallyataspecied
time.
NOTE:
•Beforeusing[PROGRAMTIMER],makesurethatthe[DATEANDTIME]featureisset.(page127)
•MakesurethattheprojectorisinthestandbyconditionwiththePOWERcordconnected.
•Theprojectorhasabuilt-inclock.Theclockwillkeepworkingforabouttwoweeksafterthemainpoweristurnedoff.Ifthemain
powerisnotsuppliedtotheprojectorfortwoweeksormore,thebuilt-inclockstopsworking.
Settinganewprogramtimer
1.OnthePROGRAMTIMERscreen,usetheSELECT▲ or ▼buttontoselect[SETTINGS]andpresstheENTER
button.
The [PROGRAM LIST] screen will be displayed.
2.SelectablankprogramnumberandpresstheENTERbutton.
The [EDIT] screen will be displayed.
3.Makesettingsforeachitemasrequired.
ACTIVE .................. Place a check mark to enable the program.
DAY ........................ Select days of the week for the program timer. To execute the program from Monday to Friday, select [MON-
FRI].To execute the program in everyday basis, select [EVERYDAY].

125
5. Using On-Screen Menu
TIME ...................... Set the time to execute the program. Enter time in 24-hour format.
FUNCTION ............. Select a function to be executed. Selecting [POWER] will allow you to turn on or off the projector by
setting [ADVANCED SETTINGS]. Selecting [SOURCE] will allow you to select a video source by setting
[ADVANCED SETTINGS]. Selecting [ECO MODE] will allow you to select [EC MODE] by setting [ADVANCED
SETTINGS].
ADVANCED SETTINGS
.............................. Select power on/off, a type of video source, or ECO MODE for the selected item in [FUNCTION].
REPEAT .................. Place a check mark to repeat the program continuing basis. To use the program this week only, clear the
check mark.
4.Select[OK]andpresstheENTERbutton.
This will complete the settings.
You will be returned to the [PROGRAM LIST] screen.
5.Select[BACK]andpresstheENTERbutton.
You will be returned to the [PROGRAM TIMER] screen.
6.Select[OK]andpresstheENTERbutton.
You will be returned to the [TOOLS] screen.
NOTE:
•Upto30differenttimersettingscanbeprogrammed.
•When[PROGRAMTIMER]isturnedon,the[STANDBYMODE]settingisignored.
•TheProgramTimerisexecutedonasettimebasis,notinaprogrambasis.
•Oncetheprogramnotmarkedwithacheckin[REPEAT]hasbeenexecuted,thecheckmarkinthe[ACTIVE]checkboxwillbe
clearedautomaticallyandtheprogramwillbedisabled.
•Whentheon-timeandtheoff-timesetforthesametime,theoff-timesettingwilltakepreference.
•Twodifferentsourcesaresetforthesametime,thelargerprogramnumberwilltakepreference.
•Theon-timesettingwillnotbeexecutedwhilethecoolingfansarerunningoranerrorisoccurring.
•Iftheoff-timesettingisexpiredundertheconditioninwhichthepoweroffisnotpossible,theoff-timersettingwillnotbeexecuted
untilthepoweroffbecomespossible.
•Programsnotmarkedwithacheckmarkin[ACTIVE]ofthe[EDIT]screenwillnotbeexecutedeveniftheProgramTimeris
enabled.
•Whentheprojectoristurnedonbyusingtheprogramtimerandifyouwanttoturnofftheprojector,settheoff-timeordoit
manuallysoasnottoleavetheprojectoronforalongperiodoftime.

126
5. Using On-Screen Menu
Activating the program timer
1.Select[ENABLE]onthe[PROGRAMTIMER]screenandpresstheENTERbutton.
The [ENABLE] will be activated.
2.Select[OK]andpresstheENTERbutton.
The [PROGRAM TIMER] screen will be changed to the [TOOL] screen.
NOTE:
•Clearing[ENABLE]willdisabletheProgramTimerevenwhenaprogramismarkedwithacheckmarkon[PROGRAMLIST]
screen.
•When[ENABLE]isselected,the[PROGRAMLIST]cannotbeedited.Toedittheprograms,select[ENABLE]toturnofftheProgram
Timer.
Changing the programmed settings
1.Onthe[PROGRAMLIST]screen,selectaprogramyouwanttoeditandpresstheENTERbutton.
2.Changethesettingsonthe[EDIT]screen.
3.Select[OK]andpresstheENTERbutton.
The programmed settings will be changed.
You will be returned to the [PROGRAM LIST] screen.
Changing the order of programs
1.Onthe[PROGRAMLIST]screen,selectaprogramwhoseorderyouwanttochangeandpresstheSELECT
▶ button.
2.PresstheSELECT▼ button to select ▲ or ▼.
3.PresstheENTERbuttonafewtimestoselectarowtowhichyouwishtomovetheprogram.
The order of the programs will be changed.
Deleting the programs
1.Onthe[PROGRAMLIST]screen,selectaprogramnumberyouwanttodeleteandpresstheSELECT▶
button.
2.PresstheSELECT▼buttontoselect[DELETE].
3.PresstheENTERbutton.
The confirmation screen will be displayed.
4.Select[YES]andpresstheENTERbutton.
The program will be deleted.
This will complete deleting the program.

127
5. Using On-Screen Menu
DATE ANDTIME
Youcansetthecurrenttime,month,date,andyear.
NOTE:Theprojectorhasabuilt-inclock.Theclockwillkeepworkingforabout2weeksafterthemainpoweristurnedoff.Ifthe
mainpowerisofffor2weeksormore,thebuilt-inclockwillcease.Ifthebuilt-inclockceases,setthedateandtimeagain.The
built-inclockwillnotceasewhileinthestandbymode.
TIME ZONE SETTINGS .............. Select your time zone.
DATE AND TIME SETTINGS ...... Set your current date (MM/DD/YYYY) and time (HH:MM).
INTERNET TIME SERVER ......... If you place a check mark, the projector’s built-in clock will be synchronized with an Internet
time server in every 24 hours and at the time of projector’s startup.
UPDATE .................................... Synchronizes the projector’s built-in clock immediately. The UPDATE button is not available
unless the INTERNET TIME SERVER check box is turned on.
SUMMER TIME SETTINGS ....... If you place a check mark, the clock for daylight saving will be enabled.
MOUSE
ThisoptionletsyoutochangeyourUSBmousesettings.ThemousesettingsfeatureisavailableforUSBmouseonly.
Choosethesettingsyouwant:
MOUSE BUTTON ...................... [RIGHT HAND] or [LEFT HAND]
MOUSE SENSITIVITY ............... [FAST], [MEDIUM] or [SLOW]
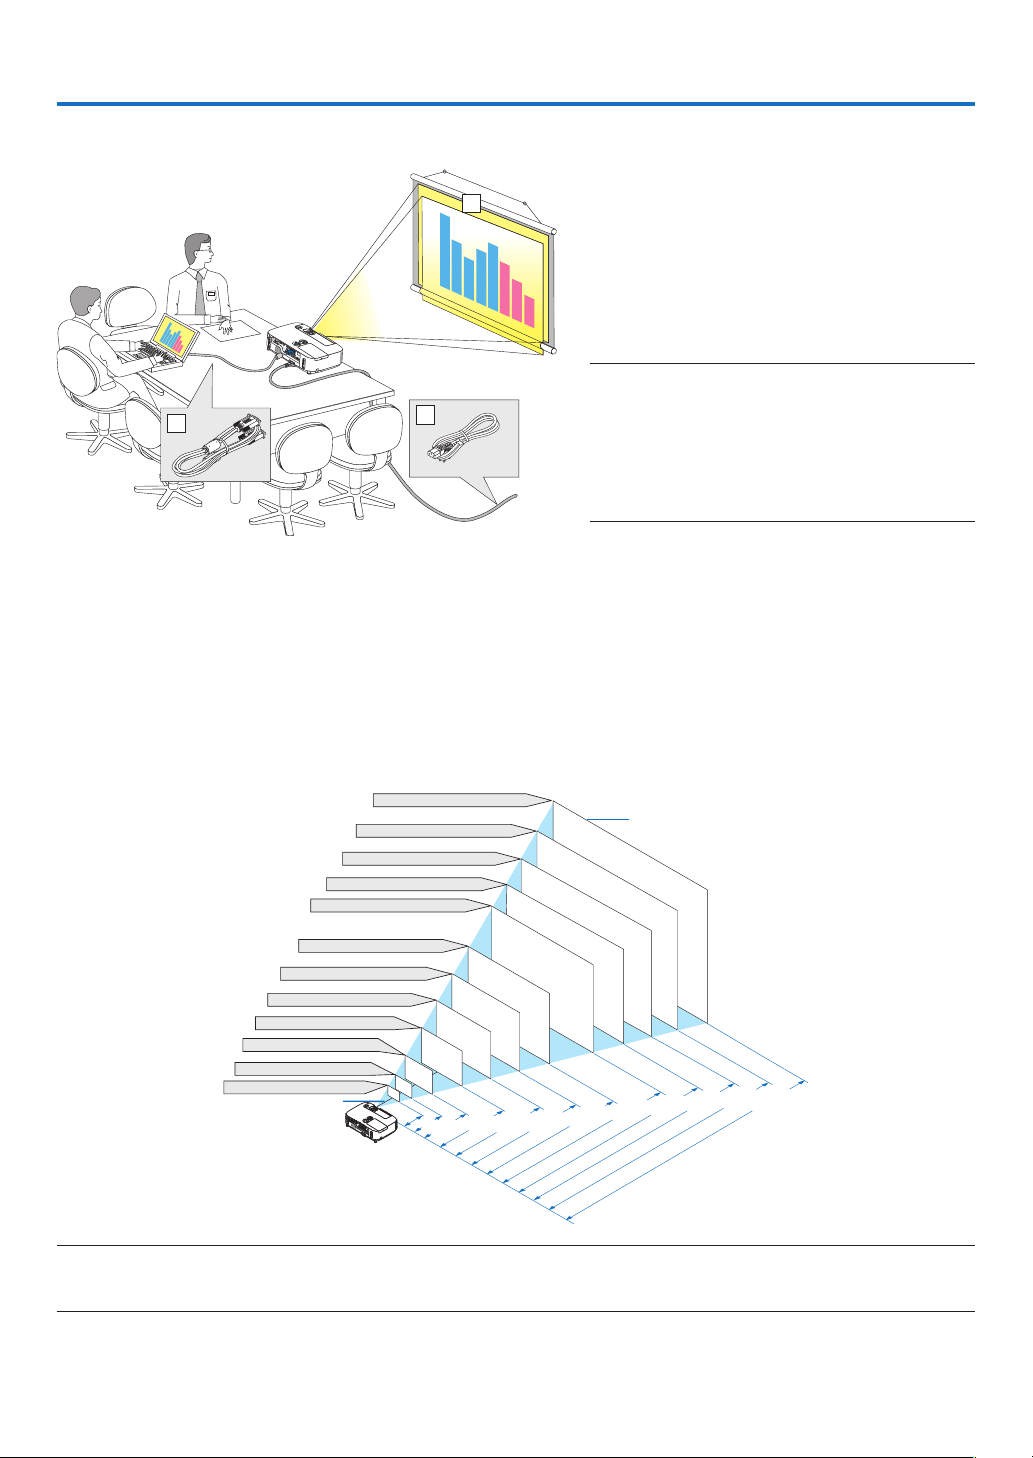
128
6. Installation and Connections
3
2
1
Thissectiondescribeshowtosetupyourprojectorandhowtoconnectvideoandaudiosources.
Yourprojectorissimpletosetupanduse.Butbeforeyougetstarted,youmustrst:
zSetupascreenandtheprojector.
xConnectyourcomputerorvideoequipment
totheprojector.
(page132, 134, 135, 136, 137, 138)
c
Connectthesuppliedpowercord.
(page
13)
NOTE:
•Ensurethatthepowercordandanyothercablesare
disconnectedbeforemovingtheprojector.When
movingtheprojectororwhenitisnotinuse,cover
thelenswiththeslidinglenscover.
•Anoptionalcablecover(NP01CV)isavailable.Refer
topage142forattachingthecablecover.
1 Setting Up the Screen and the Projector
Selecting a Location
[P420X/P350X]
Thefurtheryourprojectorisfromthescreenorwall,thelargertheimage.Theminimumsizetheimagecanbeis
approximately25"(0.64m)measureddiagonallywhentheprojectorisroughly35inches(0.9m)fromthewallor
screen.Thelargesttheimagecanbeis300"(7.6m)whentheprojectorisabout435inches(11.0m)fromthewall
orscreen.
300"
240"
Distance
(Unit: m/inch)
Lens center
Screen Size
Screen Size (Unit: cm/inch)
200"
180"
150"
120"
100"
80"
11.0/435
"
8.8/348
"
6.6/260
"
5.5/216
"
4.4/173
"
3.6/144
"
2.9/115
"
2.2/86
"
1.4/57
"
40"
7.3/289
"
60"
30"
25"
1.1/
42
"
0.9/
35
"
609.6(W)�457.2(H) / 240(W)�180(H)
487.7(W)�365.8(H) / 192(W)�144(H)
406.4(W)�304.8(H) / 160(W)�120(H)
304.8(W)�228.6(H) / 120(W)�90(H)
365.8(W)�274.3(H) / 144(W)�108(H)
243.8(W)�182.9(H) / 96(W)�72(H)
203.2(W)�152.4(H) / 80(W)�60(H)
162.6(W)�121.9(H) / 64(W)�48(H)
121.9(W)�91.4(H) / 48(W)�36(H)
81.3(W)�61.0(H) / 32(W)�24(H)
61.0(W)�45.7(H) / 24(W)�18(H)
50.8(W)�38.1(H) / 20(W)�15(H)
TIP:
•Thedistancesareindicatedbyintermediatevaluesbetweenteleandwide.Useasaruleofthumb.
•Formoredetailsonthrowdistance,seepage130.
To the wall outlet.
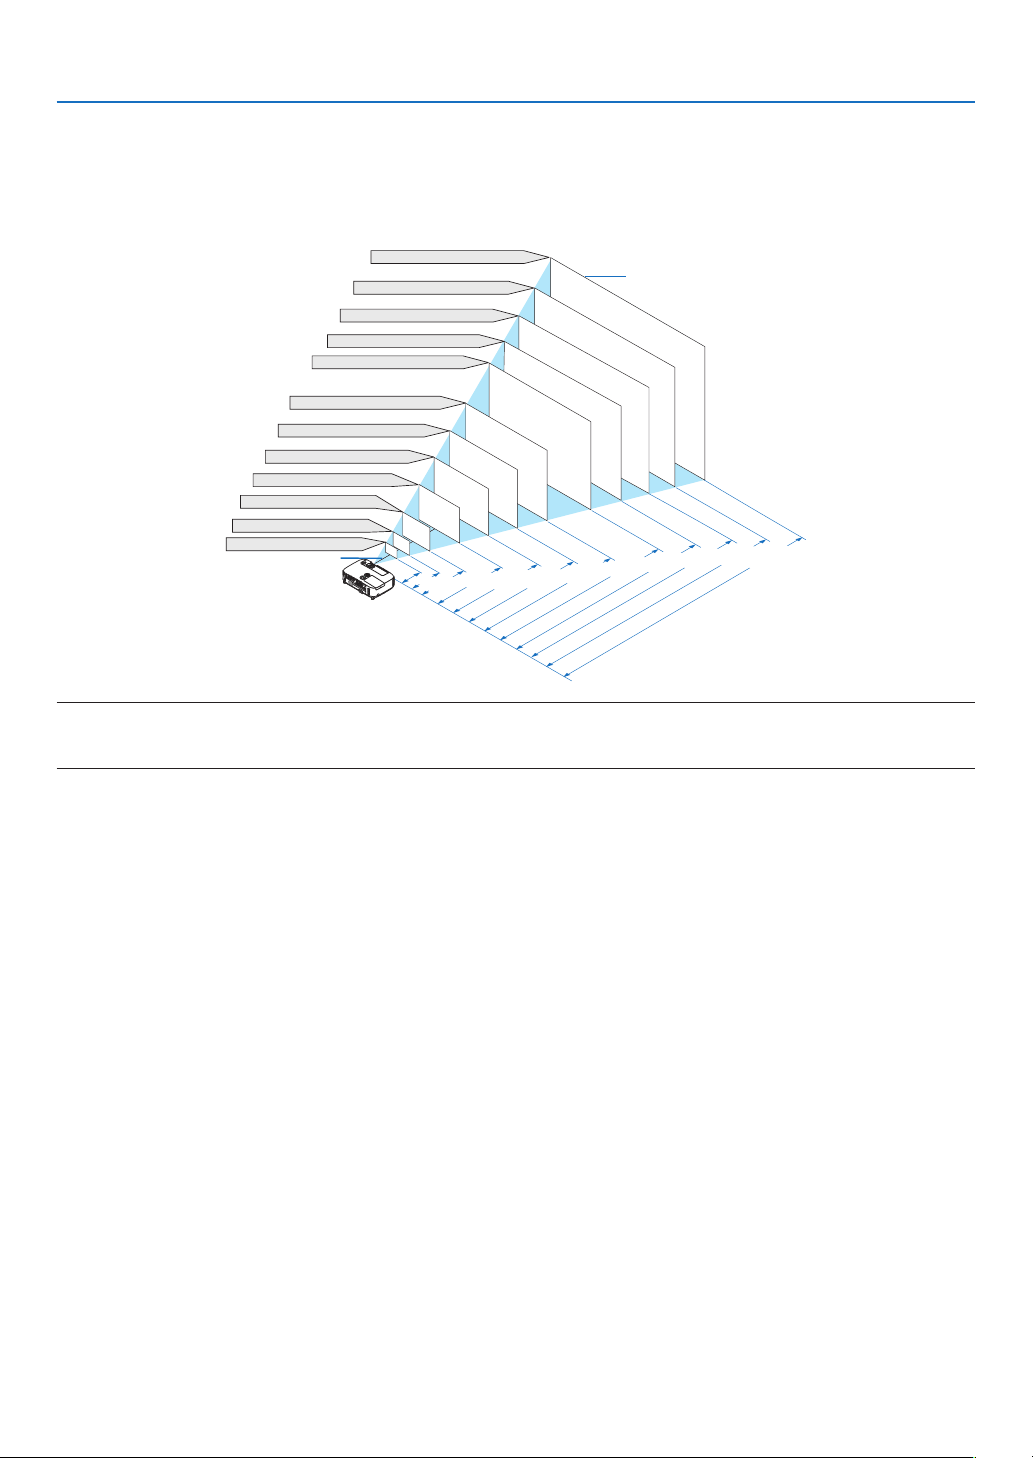
129
6. Installation and Connections
[P350W]
Thefurtheryourprojectorisfromthescreenorwall,thelargertheimage.Theminimumsizetheimagecanbeis
approximately25"(0.64m)measureddiagonallywhentheprojectorisroughly37inches(0.9m)fromthewallor
screen.Thelargesttheimagecanbeis300"(7.6m)whentheprojectorisabout459inches(11.7m)fromthewall
orscreen.
300"
240"
Distance
(Unit: m/inch)
Lens center
Screen Size
Screen Size (Unit: cm/inch)
200"
180"
150"
120"
100"
80"
11.7/459
"
9.3/367
"
7.0/275
"
5.8/229
"
4.6/183
"
3.9/152
"
3.1/121
"
2.3/90
"
1.5/60
"
40"
7.8/306
"
60"
30"
25"
1.1/
45
"
0.9/
37
"
646.2(W)�403.9(H) / 254(W)�159(H)
516.9(W)�323.1(H) / 204(W)�127(H)
430.8(W)�269.2(H) / 170(W)�106(H)
323.1(W)�201.9(H) / 127(W)�79(H)
387.7(W)�242.3(H) / 153(W)�95(H)
258.5(W)�161.5(H) / 102(W)�64(H)
215.4(W)�134.6(H) / 85(W)�53(H)
172.3(W)�107.7(H) / 68(W)�42(H)
129.2(W)�80.8(H) / 51(W)�32(H)
86.2(W)�53.8(H) / 34(W)�21(H)
64.6(W)�40.4(H) / 25(W)�16(H)
53.8(W)�33.7(H) / 21(W)�13(H)
TIP:
•Thedistancesareindicatedbyintermediatevaluesbetweenteleandwide.Useasaruleofthumb.
•Formoredetailsonthrowdistance,seepage130.
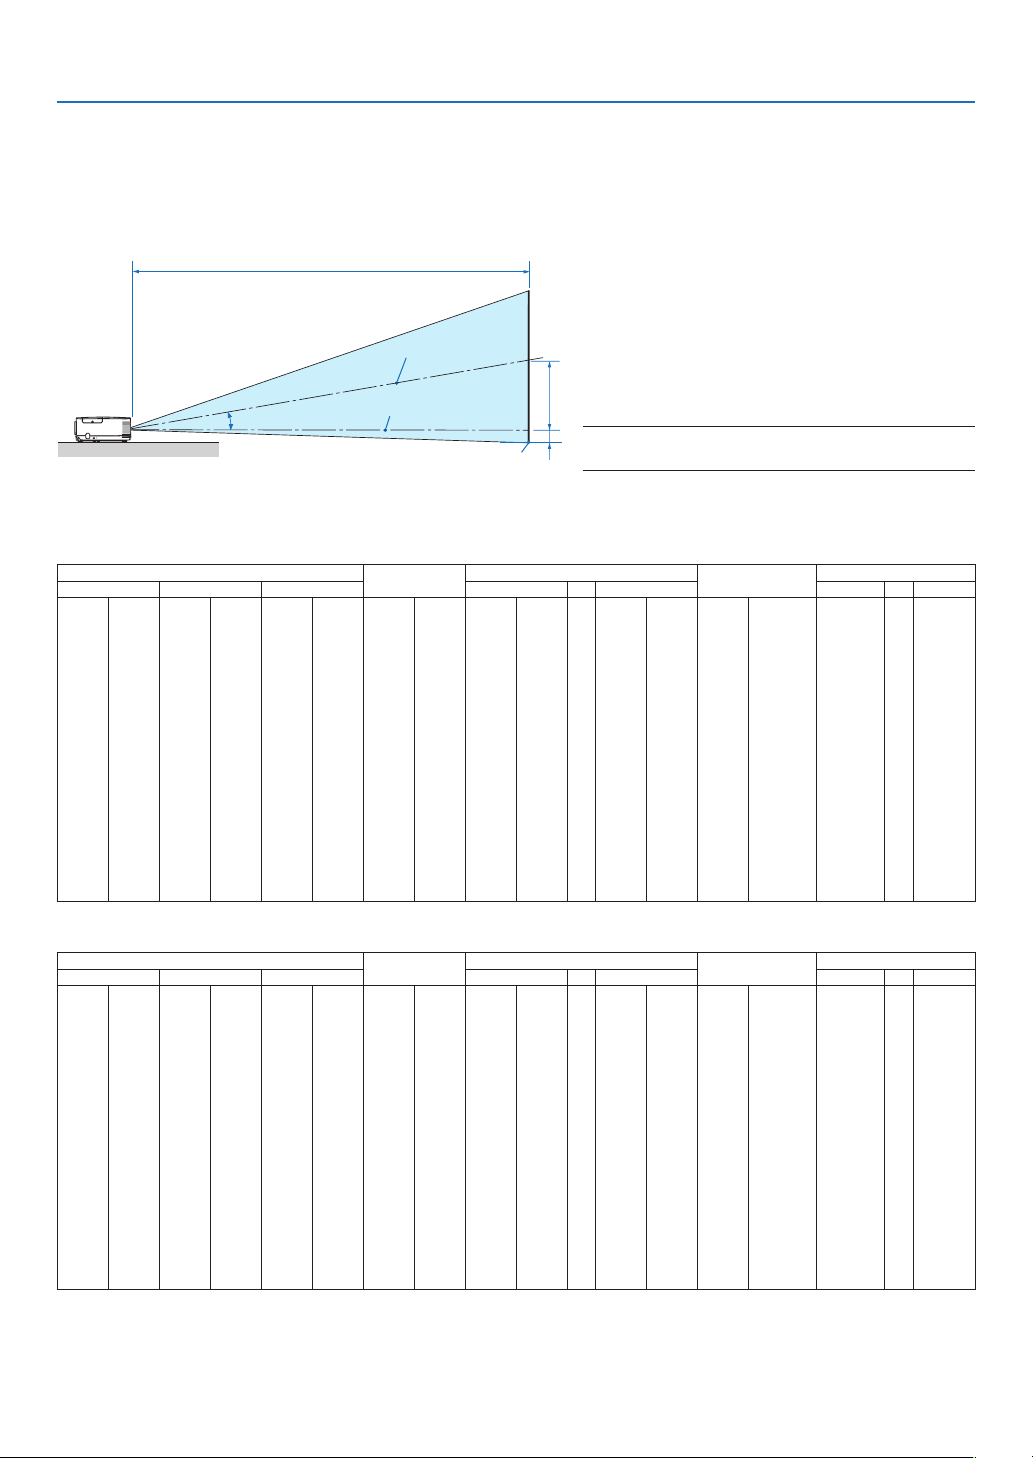
130
6. Installation and Connections
C
B
D
Throw Distance and Screen Size
Thefollowingshowstheproperrelativepositionsoftheprojectorandscreen.Refertothetabletodeterminethe
positionofinstallation.
Distance Chart
B=Verticaldistancebetweenlenscenterand
screencenter
C=Throwdistance
D=Verticaldistancebetweenlenscenterand
screenbottom(topofscreenforceilingap-
plication)
=Throwangle
NOTE:Thevaluesinthetablesaredesignvaluesand
mayvary.
[P420X/P350X]
Screen Size
B
C
D
Diagonal Width Height wide tele wide tele
inch mm inch mm inch mm inch mm inch mm - inch mm inch mm degree - degree
25 635 20 508 15 381 0–8 0–191 25 643 - 43 1102 -8–0 -191–0
0.0–16.5 - 0.0–9.8
30 762 24 610 18 457 0–9 0–229 31 782 - 52 1333 -9–0 -229–0 0.0–16.3 - 0.0–9.7
40 1016 32 813 24 610 0–12 0–305 42 1060 - 71 1794 -12–0 -305–0 0.0–16.0 - 0.0–9.6
60 1524 48 1219 36 914 0–18 0–457 64 1616 - 107 2717 -18–0 -457–0 0.0–15.8 - 0.0–9.6
72 1829 58 1463 43 1097 0–22 0–549 77 1950 - 129 3271 -22–0 -549–0 0.0–15.7 - 0.0–9.5
80 2032 64 1626 48 1219 0–24 0–610 86 2172 - 143 3641 -24–0 -610–0 0.0–15.7 - 0.0–9.5
84 2134 67 1707 50 1280 0–25 0–640 90 2284 - 151 3825 -25–0 -640–0 0.0–15.7 - 0.0–9.5
90 2286 72 1829 54 1372 0–27 0–686 96 2450 - 161 4102 -27–0 -686–0 0.0–15.6 - 0.0–9.5
100 2540 80 2032 60 1524 0–30 0–762 107 2728 - 180 4564 -30–0 -762–0 0.0–15.6 - 0.0–9.5
120 3048 96 2438 72 1829 0–36 0–914 129 3285 - 216 5487 -36–0 -914–0 0.0–15.6 - 0.0–9.5
150 3810 120 3048 90 2286 0–45 0–1143 162 4119 - 271 6872 -45–0 -1143–0 0.0–15.5 - 0.0–9.4
180 4572 144 3658 108 2743 0–54 0–1372 195 4953 - 325 8256 -54–0 -1372–0 0.0–15.5 - 0.0–9.4
200 5080 160 4064 120 3048 0–60 0–1524 217 5509 - 361 9180 -60–0 -1524–0 0.0–15.5 - 0.0–9.4
210 5334 168 4267 126 3200 0–63 0–1600 228 5787 - 380 9641 -63–0 -1600–0 0.0–15.5 - 0.0–9.4
240 6096 192 4877 144 3658 0–72 0–1829 261 6621 - 434 11026 -72–0 -1829–0 0.0–15.4 - 0.0–9.4
270 6858 216 5486 162 4115 0–81 0–2057 294 7456 - 489 12411 -81–0 -2057–0 0.0–15.4 - 0.0–9.4
300 7620 240 6096 180 4572 0–90 0–2286 326 8290 - 543 13795 -90–0 -2286–0 0.0–15.4 - 0.0–9.4
[P350W]
Screen Size
B
C
D
Diagonal Width Height wide tele wide tele
inch mm inch mm inch mm inch mm inch mm - inch mm inch mm degree - degree
25 635 21 538 13 337 0–8 0–202 27 682 - 46 1167 -7–1 -168–34
0.0–16.5 - 0.0–9.8
30 762 25 646 16 404 0–10 0–242 33 829 - 56 1411 -8–2 -202–40 0.0–16.3 - 0.0–9.7
40 1016 34 862 21 538 0–13 0–323 44 1123 - 75 1898 -11–2 -269–54 0.0–16.1 - 0.0–9.7
60 1524 51 1292 32 808 0–19 0–485 67 1710 - 113 2873 -16–3 -404–81 0.0–15.8 - 0.0–9.6
72 1829 61 1551 38 969 0–23 0–582 81 2063 - 136 3458 -19–4 -485–97 0.0–15.7 - 0.0–9.5
80 2032 68 1723 42 1077 0–25 0–646 90 2298 - 151 3848 -21–4 -538–108 0.0–15.7 - 0.0–9.5
84 2134 71 1809 45 1131 0–27 0–678 95 2415 - 159 4043 -22–4 -565–113 0.0–15.7 - 0.0–9.5
90 2286 76 1939 48 1212 0–29 0–727 102 2591 - 171 4336 -24–5 -606–121 0.0–15.7 - 0.0–9.5
100 2540 85 2154 53 1346 0–32 0–808 114 2885 - 190 4823 -26–5 -673–135 0.0–15.6 - 0.0–9.5
120 3048 102 2585 64 1615 0–38 0–969 137 3472 - 228 5799 -32–6 -808–162 0.0–15.6 - 0.0–9.5
150 3810 127 3231 79 2019 0–48 0–1212 171 4354 - 286 7261 -40–8 -1010–202 0.0–15.6 - 0.0–9.5
180 4572 153 3877 95 2423 0–57 0–1454 206 5235 - 343 8724 -48–10 -1212–242 0.0–15.5 - 0.0–9.5
200 5080 170 4308 106 2692 0–64 0–1615 229 5822 - 382 9699 -53–11 -1346–269 0.0–15.5 - 0.0–9.5
210 5334 178 4523 111 2827 0–67 0–1696 241 6116 - 401 10187 -56–11 -1414–283 0.0–15.5 - 0.0–9.5
240 6096 204 5169 127 3231 0–76 0–1939 275 6997 - 459 11649 -64–13 -1615–323 0.0–15.5 - 0.0–9.4
270 6858 229 5816 143 3635 0–86 0–2181 310 7878 - 516 13112 -72–14 -1817–363 0.0–15.5 - 0.0–9.4
300 7620 254 6462 159 4039 0–95 0–2423 345 8759 - 574 14575 -79–16 -2019–404 0.0–15.5 - 0.0–9.4
Screencenter
Lenscenter
Screenbottom

131
6. Installation and Connections
WARNING
*Installingyourprojectorontheceilingmustbedone
byaqualiedtechnician.ContactyourNECdealerfor
moreinformation.
*Donotattempttoinstalltheprojectoryourself.
•Onlyuseyourprojectoronasolid,levelsurface.Ifthe
projectorfallstotheground,youcanbeinjuredand
theprojectorseverelydamaged.
•Donotusetheprojectorwheretemperaturesvary
greatly.Theprojectormustbeusedattemperatures
between41°F(5°C)and104°F(40°C)(Ecomodese-
lectedautomaticallyat95°Fto104°F/35°Cto40°C).
•Donotexposetheprojectortomoisture,dust,or
smoke.Thiswillharmthescreenimage.
•Ensurethatyouhaveadequateventilationaroundyour
projectorsoheatcandissipate.Donotcoverthevents
onthesideorthefrontoftheprojector.
ReectingtheImage
Usingamirrortoreectyourprojector’simageenables
youtoenjoyamuchlargerimagewhenasmallerspace
isrequired.ContactyourNECdealerifyouneedamirror
system.Ifyou’reusingamirrorsystemandyourimage
isinverted,usetheMENUandbuttonsonyour
projectorcabinetoryourremotecontroltocorrectthe
orientation.(page
95)
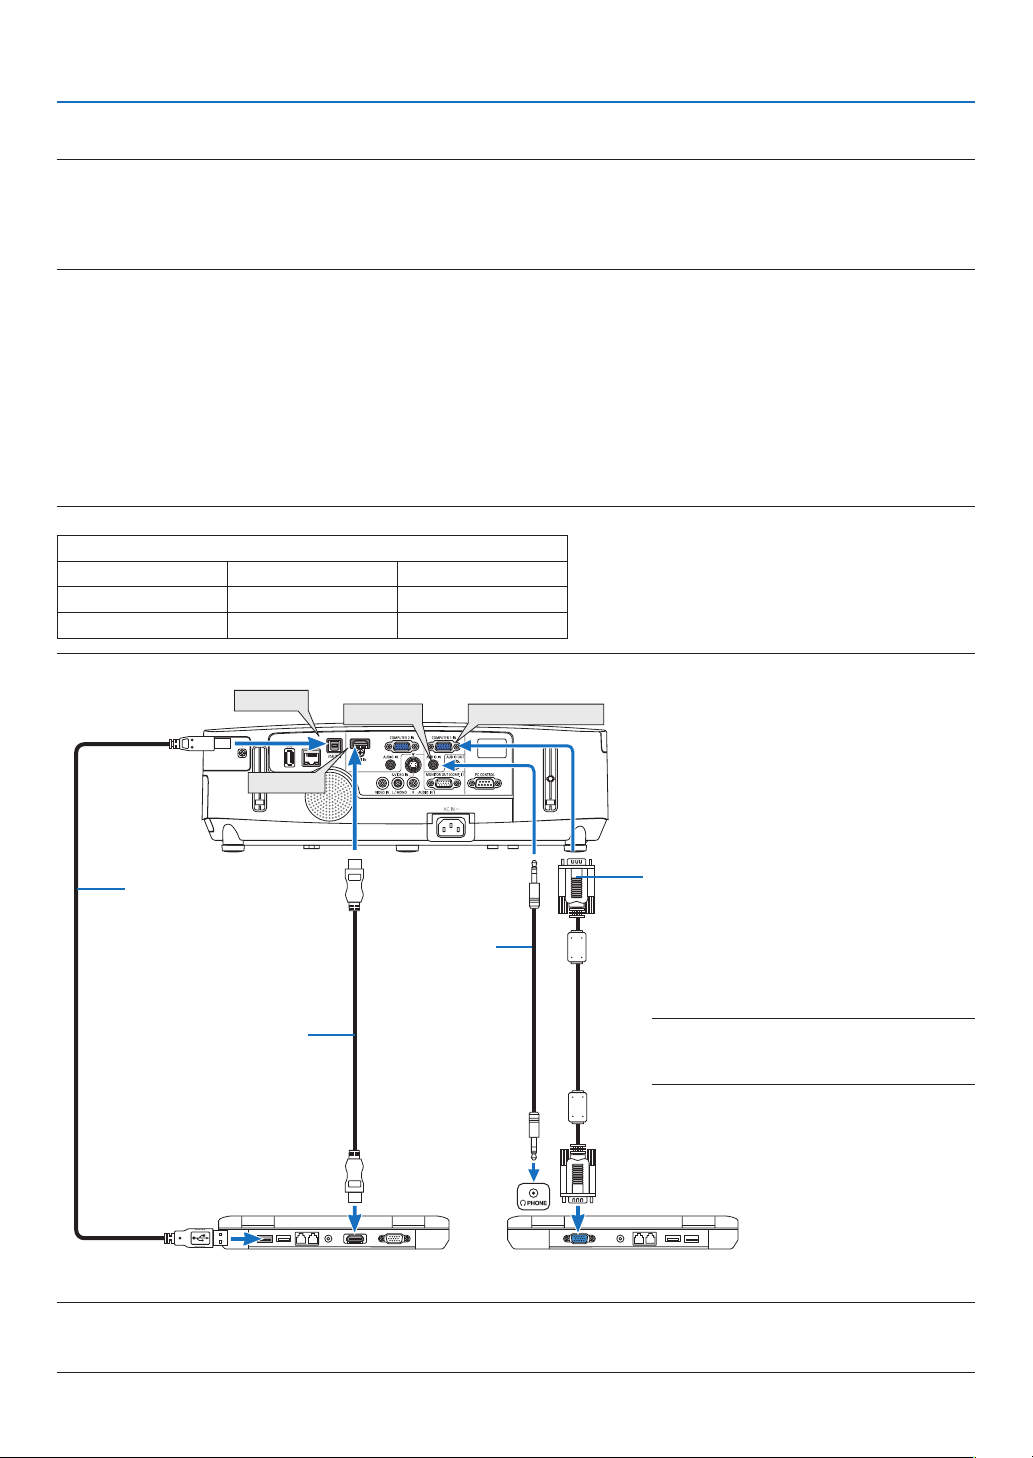
132
6. Installation and Connections
COMPUTER 1 IN
AUDIO IN
HDMI IN
USB(PC)
Computer cable (VGA) (supplied)
To mini D-Sub 15-pin connector on the
projector. It is recommended that you use a
commercially available distribution amplifier
if connecting a signal cable longer than the
cable supplied.
A commercially available
USB cable
(compatible with USB 2.0
specifications)
NOTE:ForMacintosh,useacommerciallyavail-
ablepinadapter(notsupplied)toconnectto
yourMac’svideoport.
Stereo mini-plug
audio cable (not
supplied)
Making Connections
NOTE:WhenusingwithanotebookPC,besuretoconnecttheprojectorandnotebookPCwhiletheprojectorisinstandbymode
andbeforeturningonthepowertothenotebookPC.
InmostcasestheoutputsignalfromthenotebookPCisnotturnedonunlessconnectedtotheprojectorbeforebeingpoweredup.
*Ifthescreengoesblankwhileusingyourremotecontrol,itmaybetheresultofthecomputer’sscreen-saverorpowermanage-
mentsoftware.
Enabling the computer’s external display
DisplayinganimageonthenotebookPC’sscreendoesnotnecessarilymeanitoutputsasignaltotheprojector.
WhenusingaPCcompatiblelaptop,acombinationoffunctionkeyswillenable/disabletheexternaldisplay.
Usually,thecombinationofthe“Fn”keyalongwithoneofthe12functionkeysgetstheexternaldisplaytocomeon
oroff.Forexample,NEClaptopsuseFn+F3,whileDelllaptopsuseFn+F8keycombinationstotogglethrough
externaldisplayselections.
Connecting Your Computer
NOTE:SignalssupportedbyPlug&Play(DDC2)
INPUT
COMPUTER 1 IN COMPUTER 2 IN HDMI
analog analog digital
Yes Yes Yes
HDMI cable (not supplied)
Use High Speed HDMI
®
Cable.
NOTE:
•When[VIEWER],[NETWORK],or[USBDISPLAY]isselectedfor[SOURCE],soundfromtheCOMPUTER2AUDIOINminijack
willbeoutputthroughthespeaker.

133
6. Installation and Connections
•Selectthesourcenameforitsappropriateinputconnectorafterturningontheprojector.
Inputconnector
SOURCEbuttonontheprojector
cabinet
Buttonontheremotecontrol
COMPUTER1IN
COMPUTER1(COMPUTER1)
COMPUTER2IN
COMPUTER2(COMPUTER2)
HDMIIN
HDMIHDMI
USB(PC)
USBDISPLAY(USBDISPLAY)
NOTE:TheprojectorisnotcompatiblewithvideodecodedoutputsoftheNECISS-6020switcher.
NOTE:AnimagemaynotbedisplayedcorrectlywhenaVideoorS-Videosourceisplayedbackviaacommerciallyavailablescan
converter.
Thisisbecausetheprojectorwillprocessavideosignalasacomputersignalatthedefaultsetting.Inthatcase,dothefollowing.
*Whenanimageisdisplayedwiththelowerandupperblackportionofthescreenoradarkimageisnotdisplayedcorrectly:
ProjectanimagetollthescreenandthenpresstheAUTOADJ.buttonontheremotecontrolortheprojectorcabinet.
NOTE:WhenViewingaDVIDigitalSignal
•UseaDVI-to-HDMIcablecompliantwithDDWG(DigitalDisplayWorkingGroup)DVI(DigitalVisualInterface)revision1.0stan-
dard.Thecableshouldbewithin197"/5mlong.
•TurnofftheprojectorandthePCbeforeconnectingtheDVI-to-HDMIcable.
•ToprojectaDVIdigitalsignal:Connectthecables,turntheprojectoron,thenselecttheHDMIinput.Finally,turnonyourPC.
Failuretodosomaynotactivatethedigitaloutputofthegraphicscardresultinginnopicturebeingdisplayed.Shouldthishappen,
restartyourPC.
•SomegraphicscardshavebothanalogRGB(15-pinD-Sub)andDVI(orDFP)outputs.Useofthe15-pinD-Subconnectormay
resultinnopicturebeingdisplayedfromthedigitaloutputofthegraphicscard.
•DonotdisconnecttheDVI-to-HDMIcablewhiletheprojectorisrunning.Ifthesignalcablehasbeendisconnectedandthen
reconnected,animagemaynotbecorrectlydisplayed.Shouldthishappen,restartyourPC.
NOTE:When[VIEWER],[NETWORK],or[USBDISPLAY]isselectedfor[SOURCE],soundfromtheCOMPUTER2AUDIOINmini
jackwillbeoutputthroughthespeaker.
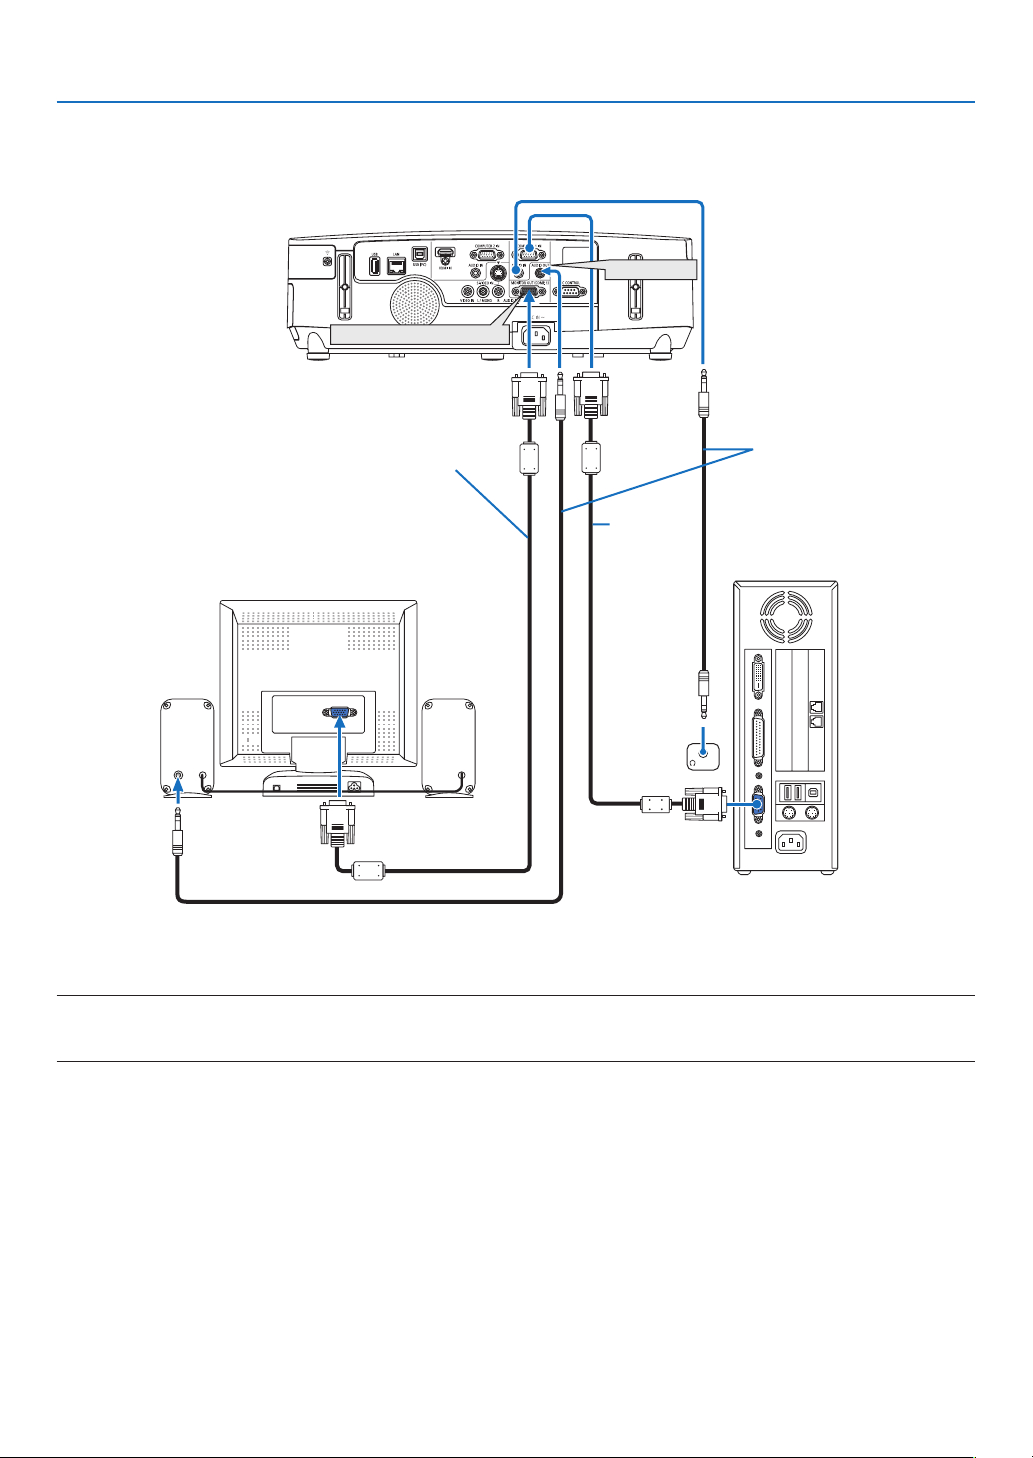
134
6. Installation and Connections
Connecting an External Monitor
Youcanconnectaseparate,externalmonitortoyourprojectortosimultaneouslyviewonamonitorthecomputer
analogimageyou’reprojecting.
NOTE:
•Daisychainconnectionisnotpossible.
•Whenaudioequipmentisconnected,theprojectorspeakerisdisabled.
AUDIO
IN
PHONE
MONITOR OUT (COMP. 1)
AUDIO OUT
Com-
puter cable
(VGA)
(supplied)
Stereo mini-plug audio cable
(not supplied)
Computer cable (VGA)
(not supplied)
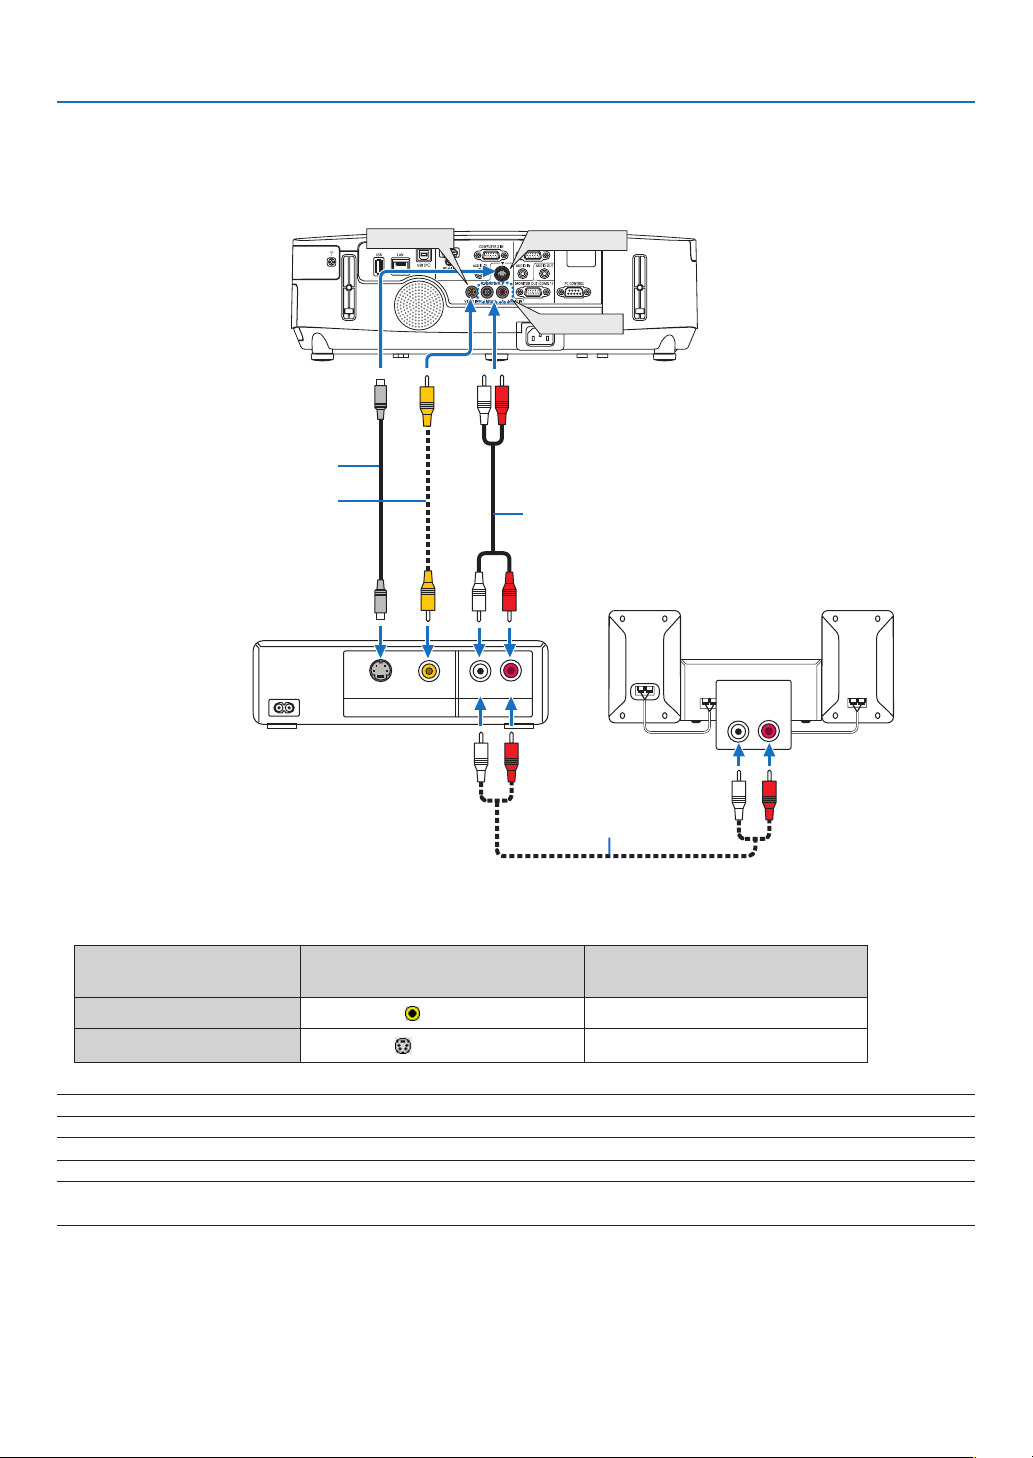
135
6. Installation and Connections
Connecting Your DVD Player or Other AV Equipment
ConnectingVideo/S-VideoInput
•Selectthesourcenameforitsappropriateinputconnectorafterturningontheprojector.
Inputconnector
SOURCEbuttonontheprojector
cabinet
Buttonontheremotecontrol
VIDEOIN
VIDEO
(VIDEO)
S-VIDEOIN
S-VIDEO
(S-VIDEO)
NOTE:TheAUDIOINLandRjacks(RCA)aresharedbetweentheVideoandS-Videoinputs.
NOTE:RefertoyourVCRowner’smanualformoreinformationaboutyourequipment’svideooutputrequirements.
NOTE:AnimagemaynotbedisplayedcorrectlywhenaVideoorS-Videosourceisplayedbackinfast-forwardorfast-rewindvia
ascanconverter.
AUDIO OUTVIDEO OUT
S-VIDEO VIDEO LR
AUDIO IN
LR
S-VIDEO IN
VIDEO IN
AUDIO IN
Audio cable (not supplied)
S-Video cable (not supplied)
Video cable (not supplied)
Audio equipment
Audio cable (not supplied)
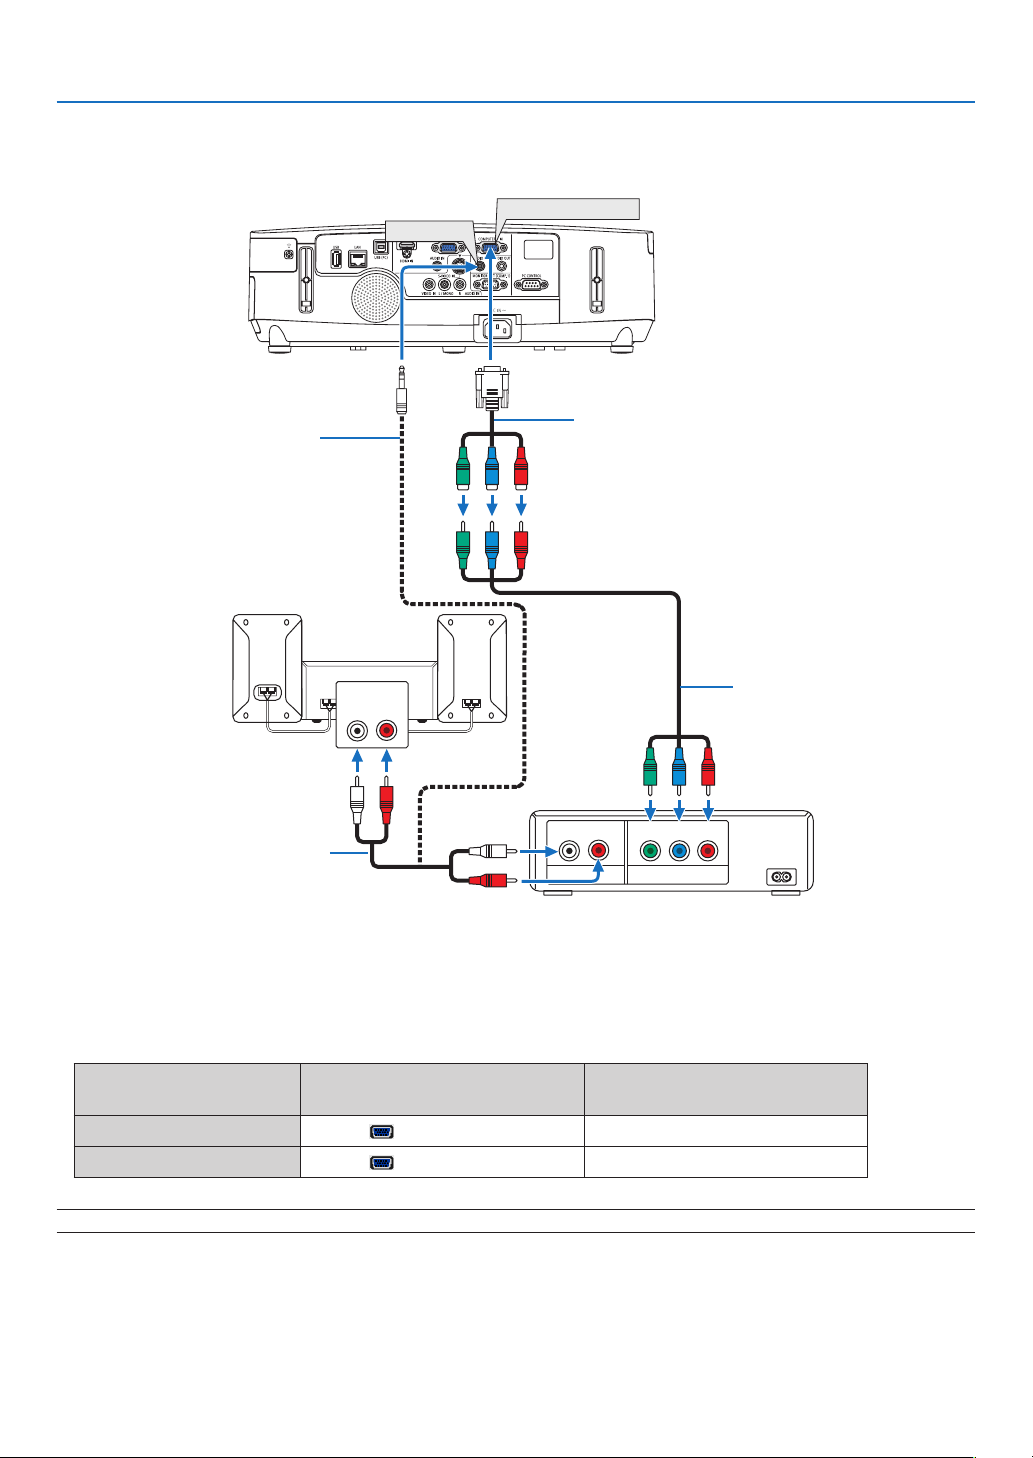
136
6. Installation and Connections
Connecting Component Input
Acomponentsignalwillbeautomaticallydisplayed.Ifnot,fromthemenu,select[SETUP][OPTIONS(1)]
[SIGNALSELECT][COMPUTER1]or[COMPUTER2],andthenplaceacheckmarkintheComponentradio
button.
•Selectthesourcenameforitsappropriateinputconnectorafterturningontheprojector.
Inputconnector
SOURCEbuttonontheprojector
cabinet
Buttonontheremotecontrol
COMPUTER1IN
COMPUTER1(COMPUTER1)
COMPUTER2IN
COMPUTER2(COMPUTER2)
NOTE:RefertoyourDVDplayer’sowner’smanualformoreinformationaboutyourDVDplayer’svideooutputrequirements.
AUDIOIN
LR
AUDIOOUT
LR
Component
YCbCr
AUDIOIN
COMPUTER1IN
Audio cable (not supplied)
15-pin - to - RCA (fe-
male) × 3 cable adapter
(ADP-CV1E)
Stereo mini plug - to - RCA audio
cable (not supplied)
Component video RCA × 3
cable (not supplied)
DVD player
Audio Equipment
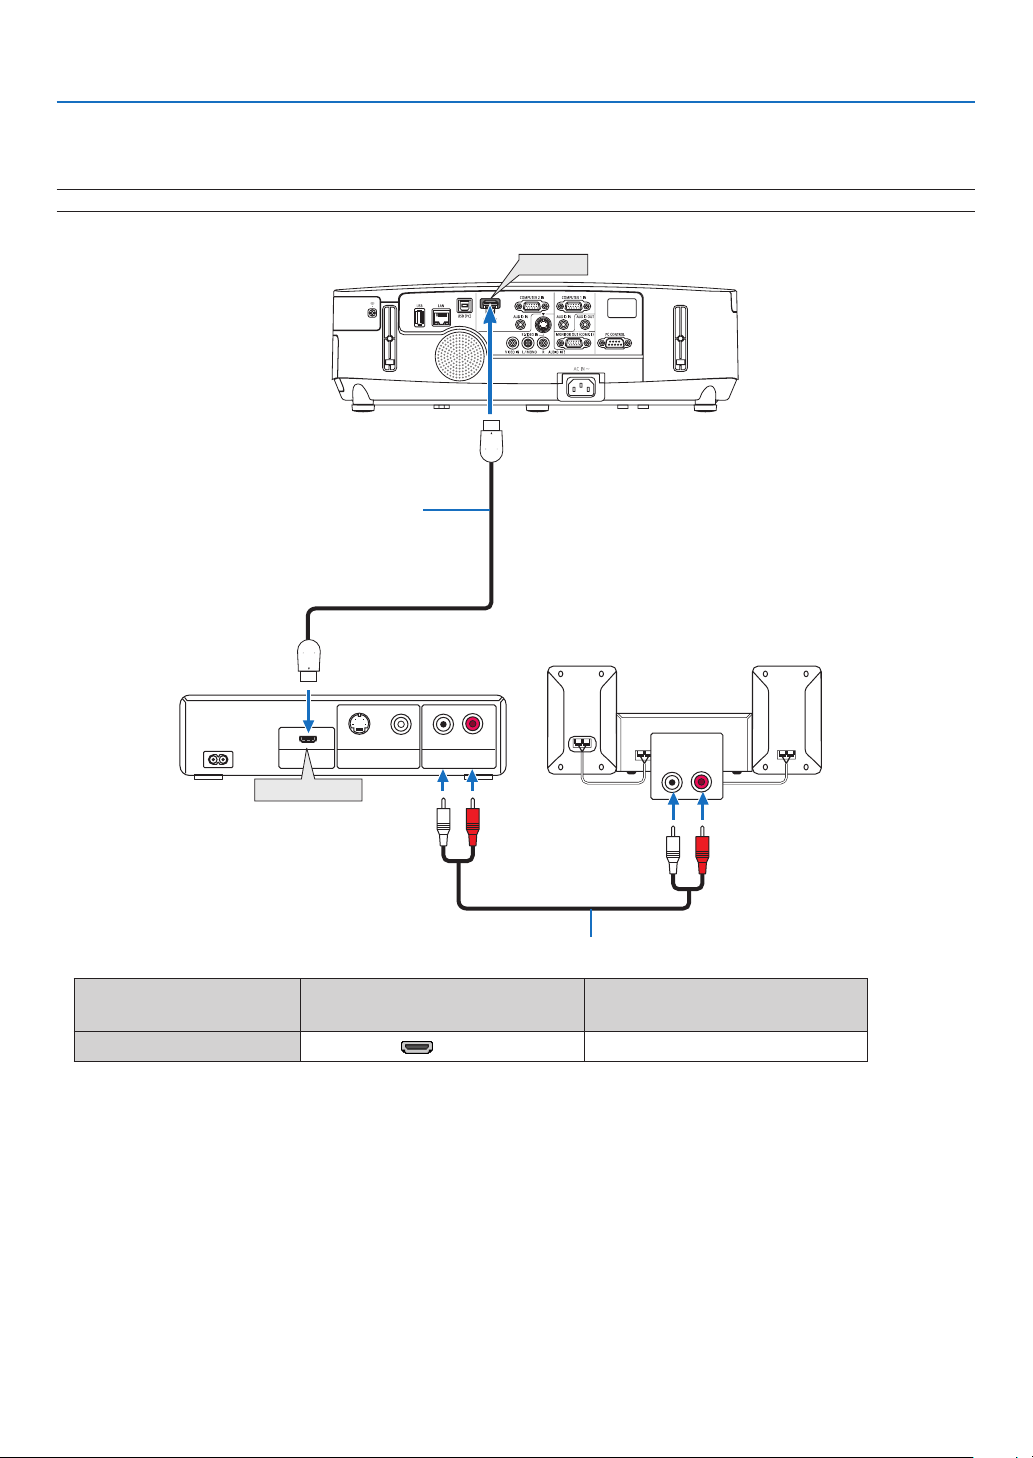
137
6. Installation and Connections
AUDIO IN
LR
AUDIO OUT
LR
VIDEO OUT
HDMI OUT
S-VIDEO VIDEO
HDMI Output
HDMI
HD MI
HDMI IN
Connecting HDMI Input
YoucanconnecttheHDMIoutputofyourDVDplayer,harddiskplayer,Blu-rayplayer,ornotebooktypePCtothe
HDMIINconnectorofyourprojector.
NOTE:TheHDMIINconnectorsupportsPlug&Play(DDC2B).
Audio cable (not supplied)
HDMI cable (not supplied)
Use High Speed HDMI
®
Cable.
Inputconnector
SOURCEbuttonontheprojector
cabinet
Buttonontheremotecontrol
HDMIIN
HDMIHDMI
TIP:ForusersofaudiovideoequipmentwithanHDMIconnector:
Select“Enhanced”ratherthan“Normal”ifHDMIoutputisswitchablebetween“Enhanced”and“Normal”.
Thiswillprovideimprovedimagecontrastandmoredetaileddarkareas.
Formoreinformationonsettings,refertotheinstructionmanualoftheaudiovideoequipmenttobeconnected.
•WhenconnectingtheHDMIINconnectoroftheprojectortotheDVDplayer,theprojector’svideolevelcanbe
madesettingsinaccordancewiththeDVDplayer’svideolevel.Inthemenuselect[HDMISETTINGS][VIDEO
LEVEL]andmakenecessarysettings.
•IftheHDMIinputsoundcannotbeheard,inthemenuselect[HDMISETTINGS][AUDIOSELECT]
[HDMI].
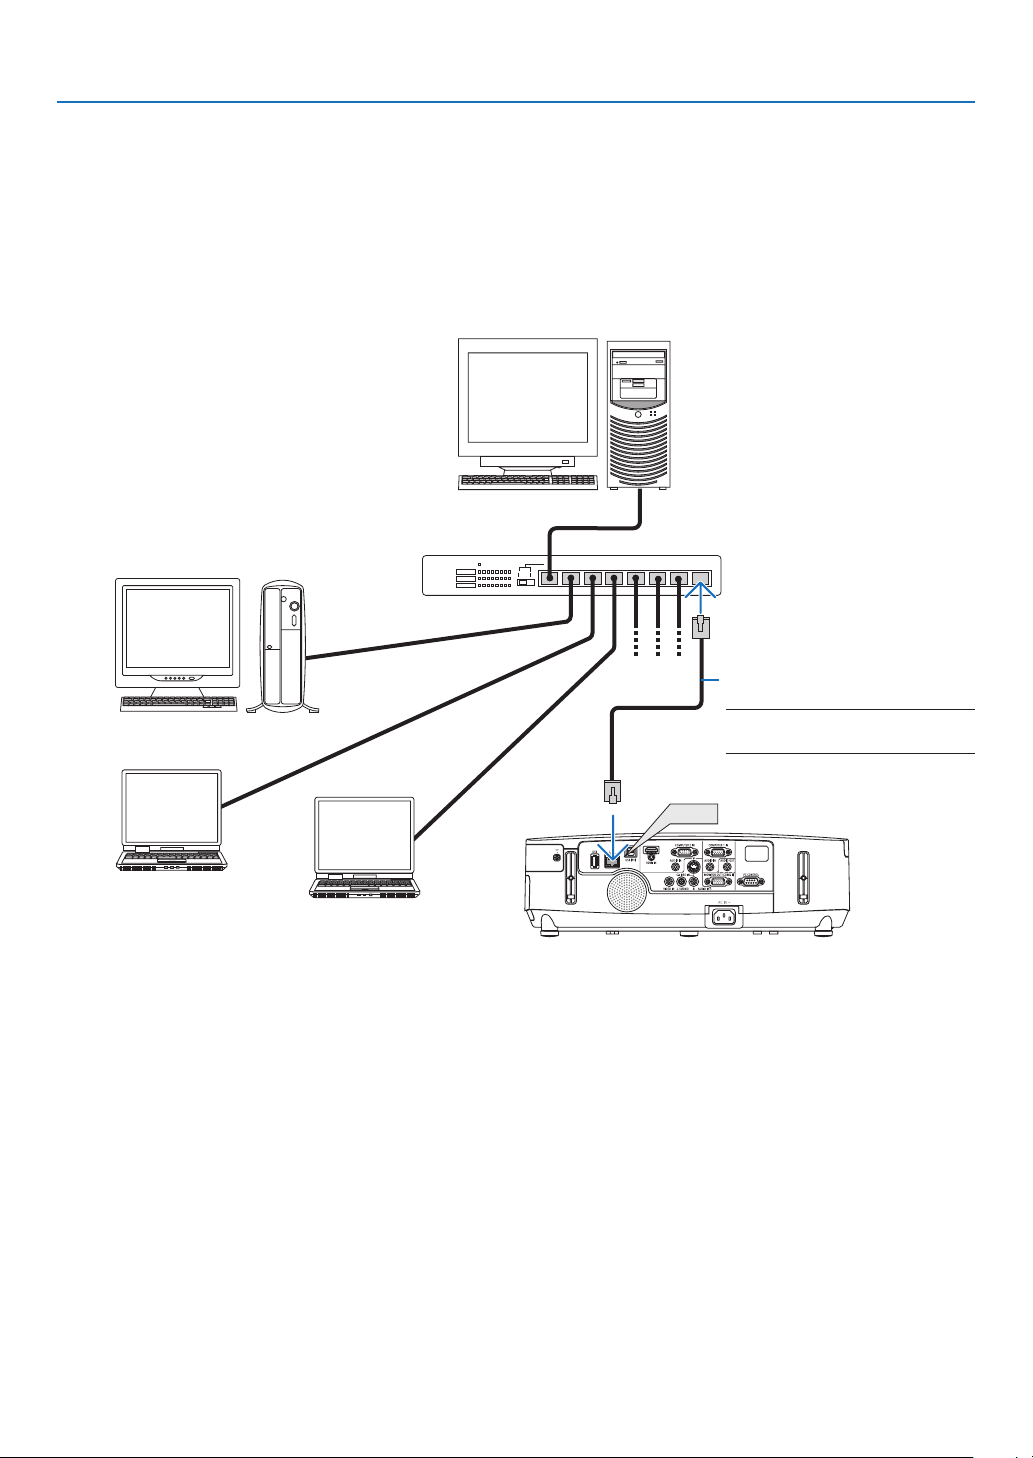
138
6. Installation and Connections
Connecting to a Wired LAN
TheprojectorcomesstandardwithaLANport(RJ-45)whichprovidesaLANconnectionusingaLANcable.
TouseaLANconnection,youarerequiredtosettheLANontheprojectormenu.Select[APPLICATIONMENU]
[NETWORKSETTINGS][WIREDLAN].(page
108).
Example of LAN connection
ExampleofwiredLANconnection
LAN
Server
Hub
LAN cable (not supplied)
NOTE:UseaCategory5orhigherLAN
cable.

139
6. Installation and Connections
Connecting to a Wireless LAN (NP02LM series)
TheUSBWirelessLANUnitalsoprovidesawirelessLANconnection.TouseawirelessLANconnection,youare
requiredtoassignanIPaddresstotheprojector.
NOTE:
AwirelessLANunitisequippedwiththeprojectorformodelsdistributedinNorthAmericamodels.AnoptionalwirelessLANunit
isavailableformodelsforEurope,Australia,AsiaandothercountriesthanNorthAmerica.
Important:
•IfyouusetheprojectorwiththeUSBWirelessLANUnitintheareawheretheuseofwirelessLANequipmentis
prohibited,removetheUSBWirelessLANUnitfromtheprojector.
•BuytheappropriateUSBWirelessLANUnitforyourcountryorarea.
NOTE:
•ThegreenLEDontheUSBWirelessLANUnitashestoshowthattheUSBWirelessLANUnitisworking.
•Yourcomputer’swirelessLANadapter(orunit)mustbecompliedwithWi-Fi(IEEE802.11b/g/n)standard.
FlowofSettingWirelessLAN
Step1:AttachtheUSBWirelessLANUnittotheprojectorifrequired.
Step2:Display[NETWORKSETTINGS]from[APPLICATIONMENU].(page
107)
Step3:Select[NETWORKSETTINGS][WIRELESSLAN][PROFILES]andset[EASYCONNECTION],
[PROFILE1],or[PROFILE2].(page108)
TIP:
AccesstheHTTPserverfunctiontoset[NETWORKSETTINGS][SETTINGS][WIRELESS][EASYCONNECTION],[PRO-
FILE1],[PROFILE2].
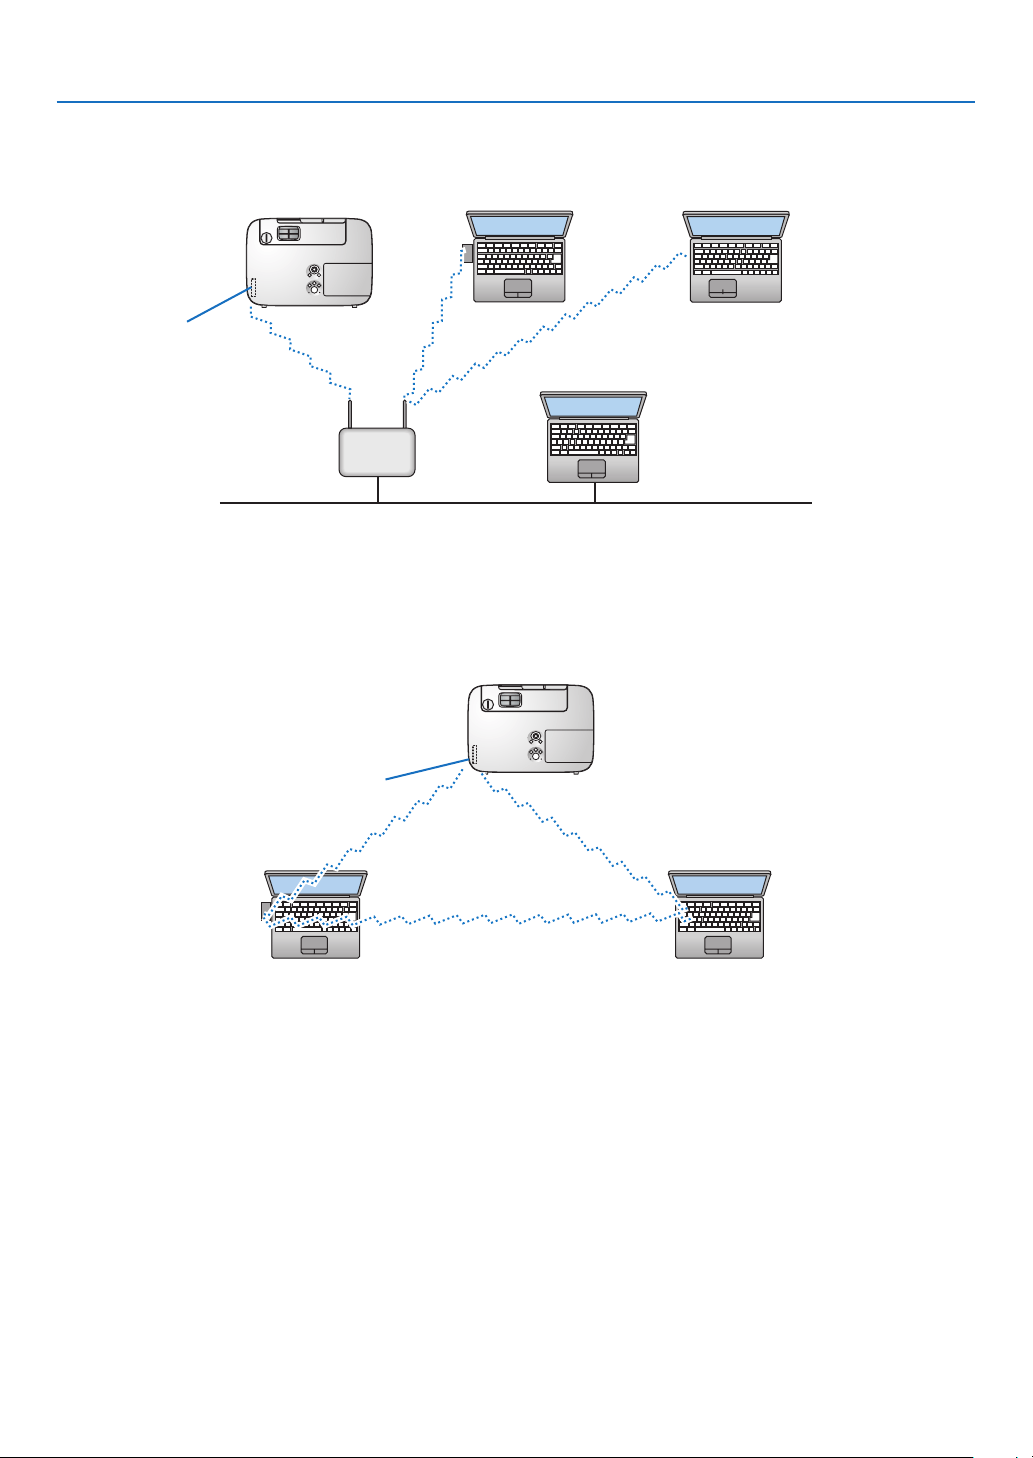
140
6. Installation and Connections
ExampleofwirelessLANconnection
(NetworkTypeInfrastructure)
PC with wireless
LAN card inserted
PC with built-in wireless
LAN function
Wired LAN
Wireless access point
USB Wireless LAN Unit
Toenabledirectcommunication(i.e.,peer-to-peer)betweencomputersandprojectors,youneedtoselecttheAd
Hocmode.
UsetheHTTPserverfunctiontomakethesettings.(page36)
PC with wireless
LAN card inserted
PC with built-in wireless
LAN function
UsetheHTTPserverfunctiontomakethesettings.(page36)
ExampleofwirelessLANconnection(NetworkTypeAdHoc)
USB Wireless LAN Unit
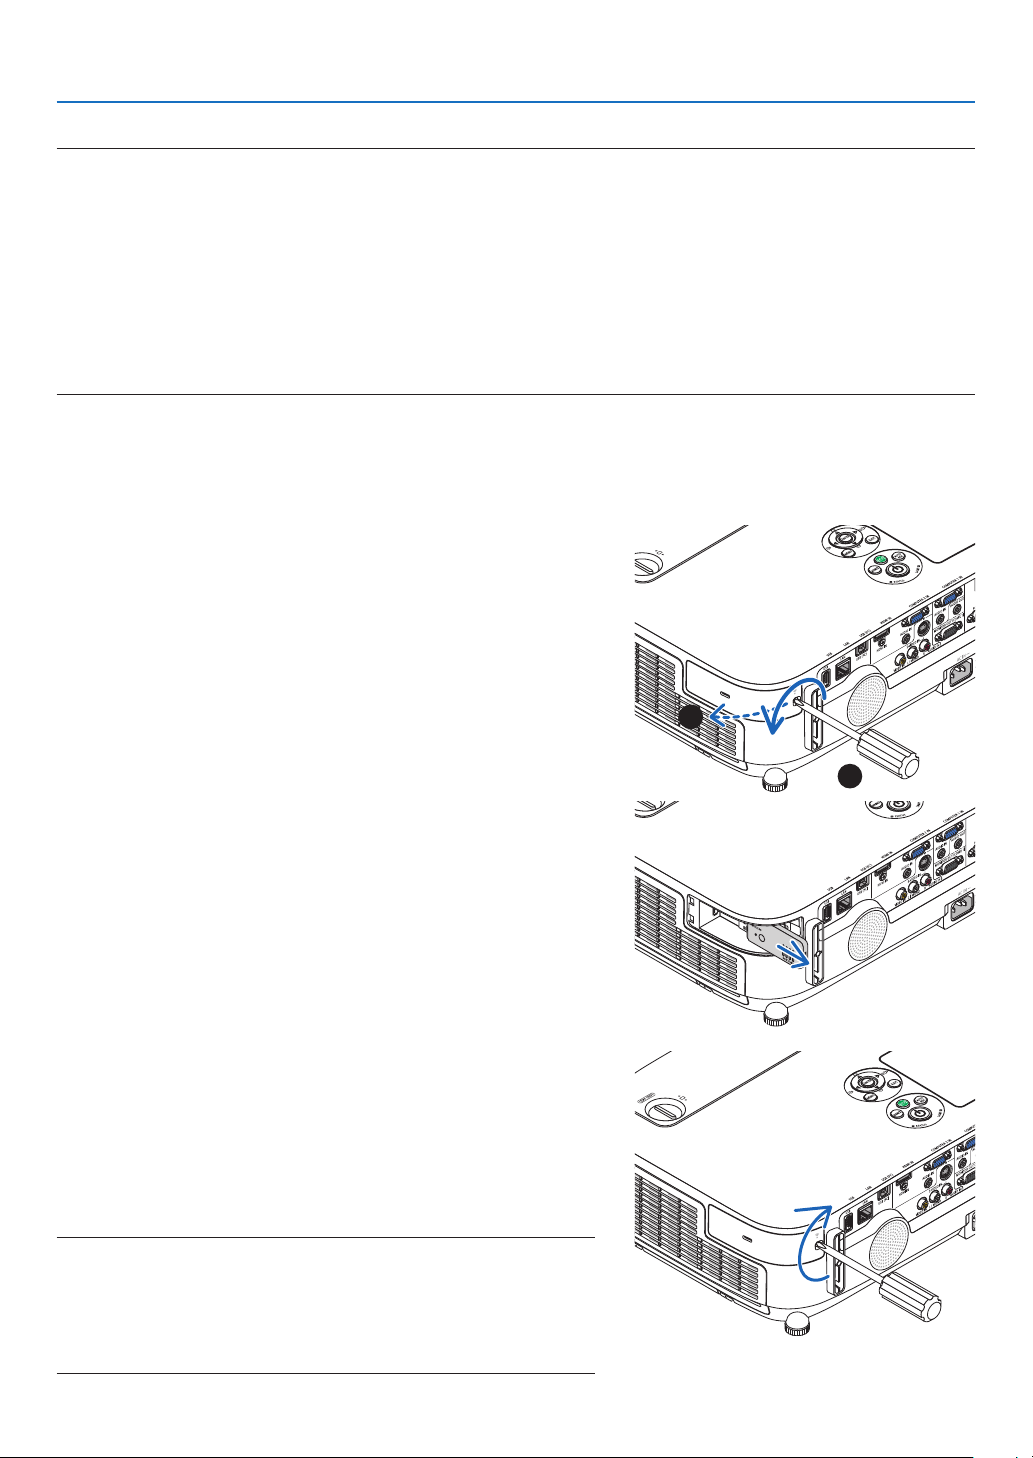
141
6. Installation and Connections
PrepareaPhillipsscrewdriverbeforehand.
1.PressthePOWERbuttontoturnofftheprojectorandsetit
intostandbycondition,anddisconnectthepowercord.
2.RemovetheUSB(LAN)portcover.
Loosen the screw securing the port cover.
•Thescrewisnotremovable.
3.SlowlypullouttheUSBWirelessLANUnitintotheUSB(LAN)
port.
Keep the cap for later use.
4.PuttheUSB(LAN)portcoverbackintoplace.
Insert the catch of the USB (LAN) port cover into the groove of the
projector cabinet, and then tighten the screw to secure the port
cover.
ToinstalltheUSBWirelessLANUnit,disconnectthepowercordand
usetheaboveprocedure.
NOTE:
•ThegreenLEDontheUSBWirelessLANUnitashestoshowthatWireless
LANUnitisworking.IftheUSBWirelessLANUnitisincorrectlyattached,
theblueLEDwillnotash.
•DonotpressthebuttonontheUSBWirelessLANUnit.Thebuttonwillnot
workwiththismodel.
1
2
Removing and attaching the USB Wireless LAN Unit
NOTE:
•TheUSBWirelessLANUnitmustbeinsertedintotheUSBWirelessLANUnitportinthecorrectdirection.Itcannotbeinserted
inthereversedirection.IftheUSBWirelessLANUnitisinsertedinthereversedirectionwithexcessiveforceapplied,theUSB
portmaybreak.
•BeforetouchingtheUSBWirelessLANUnit,touchametallicobject(suchasadoorknoboraluminumwindowframe)todischarge
thestaticelectricityfromyourbody.
•AlwaysinsertorremovetheUSBWirelessLANunitwhenthemainpoweristurnedoff.Failuretodosomaycauseprojector
malfunctionordamagetotheUSBwirelessLANunit.Iftheprojectorwillnotworkcorrectly,turnofftheprojector,disconnect
thepowercord,andthenconnectitagain.
•DonotinsertotherUSBdevicesintotheUSBWirelessLANunitport.DonotinserttheUSBWirelessLANunitintotheUSB(PC)
port(TypeB).
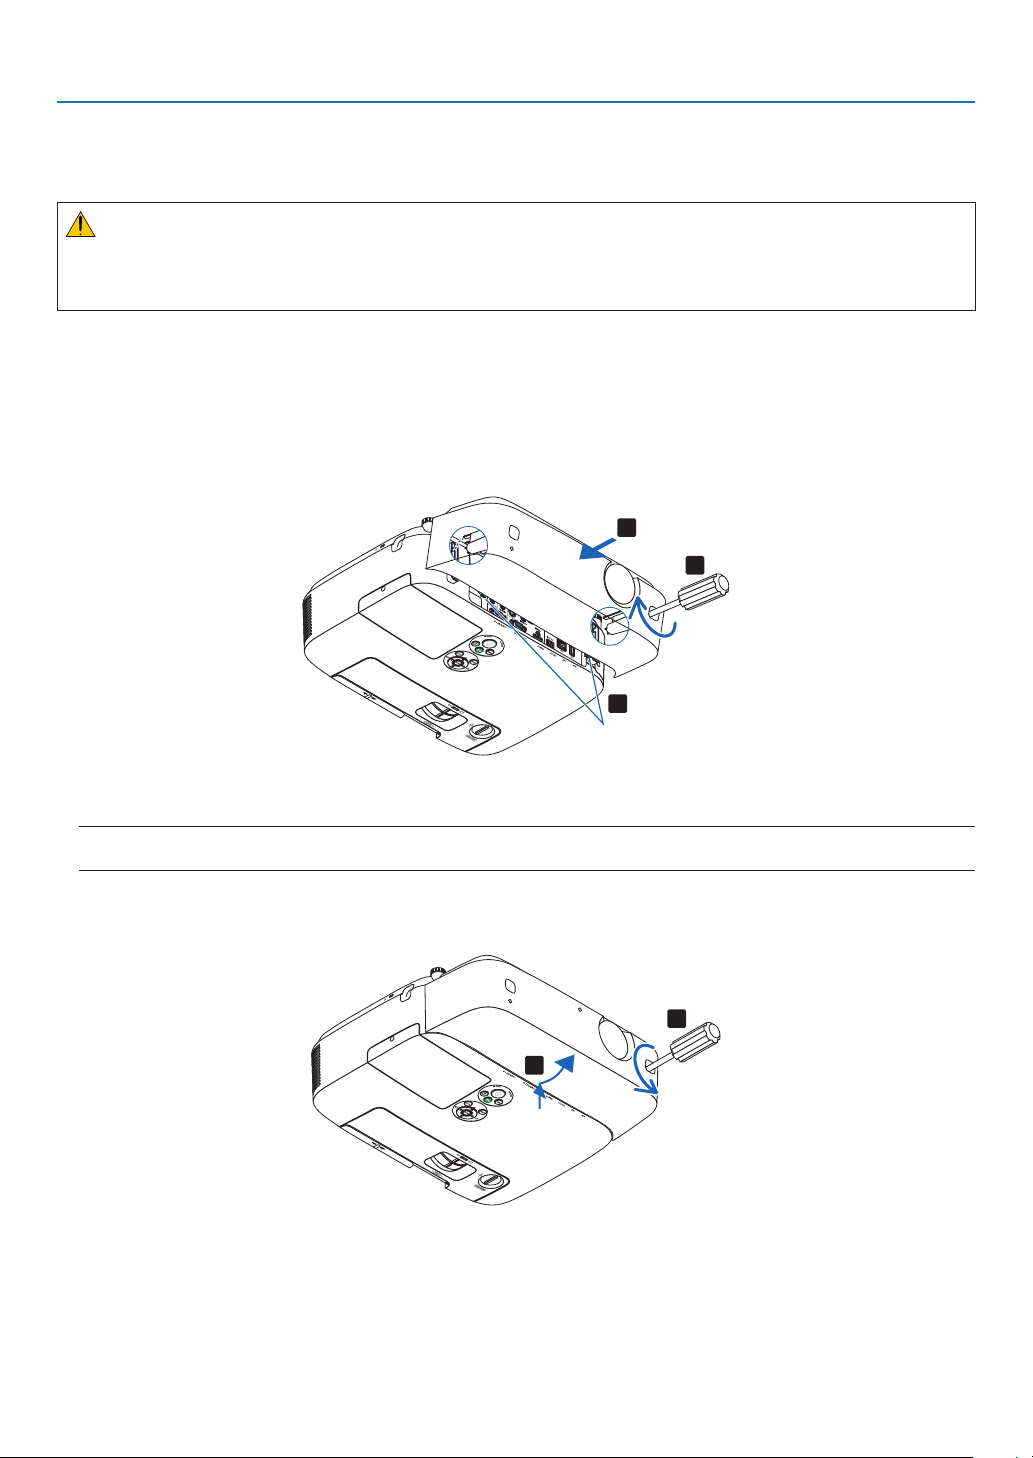
142
6. Installation and Connections
Attaching the Optional Cable Cover (NP01CV)
Anoptionalcablecover(NP01CV)isavailableforhidingcables.
TheNP01CVcablecoverisdesignedforusewiththeP420X,P350X,andP350W.
CAUTION:
•Besuretotightenthescrewsafterattachingthecablecover.Failuretodosomaycausethecablecovertocome
offandfall,resultingininjuryordamagetothecablecover.
•Donotputbundledcablesinthecablecover.Failuretodosomaydamagethepowercord,resultingare.
Attaching the cable cover
Attachthecablecoverafterinstallingtheprojectorontheceilingandconnectingcables.
Toolneededforattaching:
•Phillipsscrewdriver(plus-head)
1.Aligntwotabsontheoutsideofthecablecoverwithgroovesoftheprojectorandpushthetopend.
1
1
2
Tabs
•Atthesametimetwotabsontheinsideofthecablecoverwillbeengagedintherespondinggroovesofthe
projector.
NOTE:
•Becarefulnottogetcablescaughtinbetweenthecablecoverandtheprojector.
2.Tightenthecablecoverscrews.
•Besuretotightenthescrews.
1
2
Removing the cable cover
1.LoosenthecablecoverscrewsuntilthePhillipsscrewdrivergoesintoafreewheelingcondition

143
7. Maintenance
Thissectiondescribesthesimplemaintenanceproceduresyoushouldfollowtocleanthelters,thelens,thecabinet,
andtoreplacethelampandthelters.
1 Cleaning the Filters
Theair-lterspongekeepsdustanddirtfromgettinginsidetheprojectorandshouldbefrequentlycleaned.Ifthelter
isdirtyorclogged,yourprojectormayoverheat.
NOTE:Themessageforltercleaningwillbedisplayedforoneminuteaftertheprojectoristurnedonoroff.Whenthemessageis
displayed,cleanthelters.Thetimetocleantheltersissetto[OFF]attimeofshipment.
Tocancelthemessage,pressanybuttonontheprojectorcabinetortheremotecontrol.
Thetwo-layerlterontheprojectorimprovescoolinganddust-proofcapabilitiescomparedwiththeconventional
models.
Theoutsides(intakeside)oftherstandsecondlayerltersremovedust.
Tocleanthelter,detachthelterunitandtheltercover.
CAUTION
•Beforecleaningthelters,turnofftheprojector,disconnectthepowercordandthenallowthecabinettocool.
Failuretodosocanresultinelectricshockorburninjuries.
1.Pushupthebuttonsontheleftandrighttoreleasethe
lterunitandpullitout.
2.Removethelterunitbypullingoutthetab.
3.Removethefourlters.
(1) Turn the filter unit over and pull out the two soft accordion
filters (large and small).
Filter cover
Filter unit

144
7. Maintenance
(2) Push the left end of each filter and remove the hard two
honeycomb filters (large and small).
•Thelargeltercannotberemovedbypushingonitsright
end.
4.Useavacuumcleanertovacuumallthedustinside.
Get rid of dust in the accordion filter
NOTE:
•Wheneveryouvacuumthelter,usethesoftbrushattachmentto
vacuum.Thisistoavoiddamagetothelter.
•Donotwashthelterwithwater.Doingsocanresultinlterclog-
ging.
5.Removedustfromthelterunitandtheltercover.
Clean both outside and inside.
6.Attachthefourlterstothelterunit.
(1) Insert the left end of each hard honeycomb filter (large and
small) first and then the right end of each hard honeycomb
filter to the filter unit.
•Thelargeltercannotbettedifitsrightendisinserted.
(2) Turn the filter unit over.
•Attachthetwosoftaccordionlters(largeandsmall).Each
accordion filter has a slit on it. Align the slit with each pro-
trusion of the filter unit.
Slit

145
7. Maintenance
7.Putthelterunitbacktotheprojectorcabinet.
Makesurethatthelterunitisplacedinthecorrectorienta
-
tion.
8.Puttheltercoverbacktotheprojectorcabinet.
Insert two catches of the top side of the filter cover into the
groove of the cabinet, and push the buttons on the left and right
to close the filter cover.
•Pushtheltercoveruntilitclicksintoplace.
9.Clearthelterusagehours.
Plug the power cord into the wall outlet, and then turn on the
projector.
From the menu, select [RESET]
[CLEAR FILTER HOURS].
( page 104)
The interval time to clean the filters is set to [OFF] at time of
shipment. When using the projector as it is, you do not clear
the filter usage
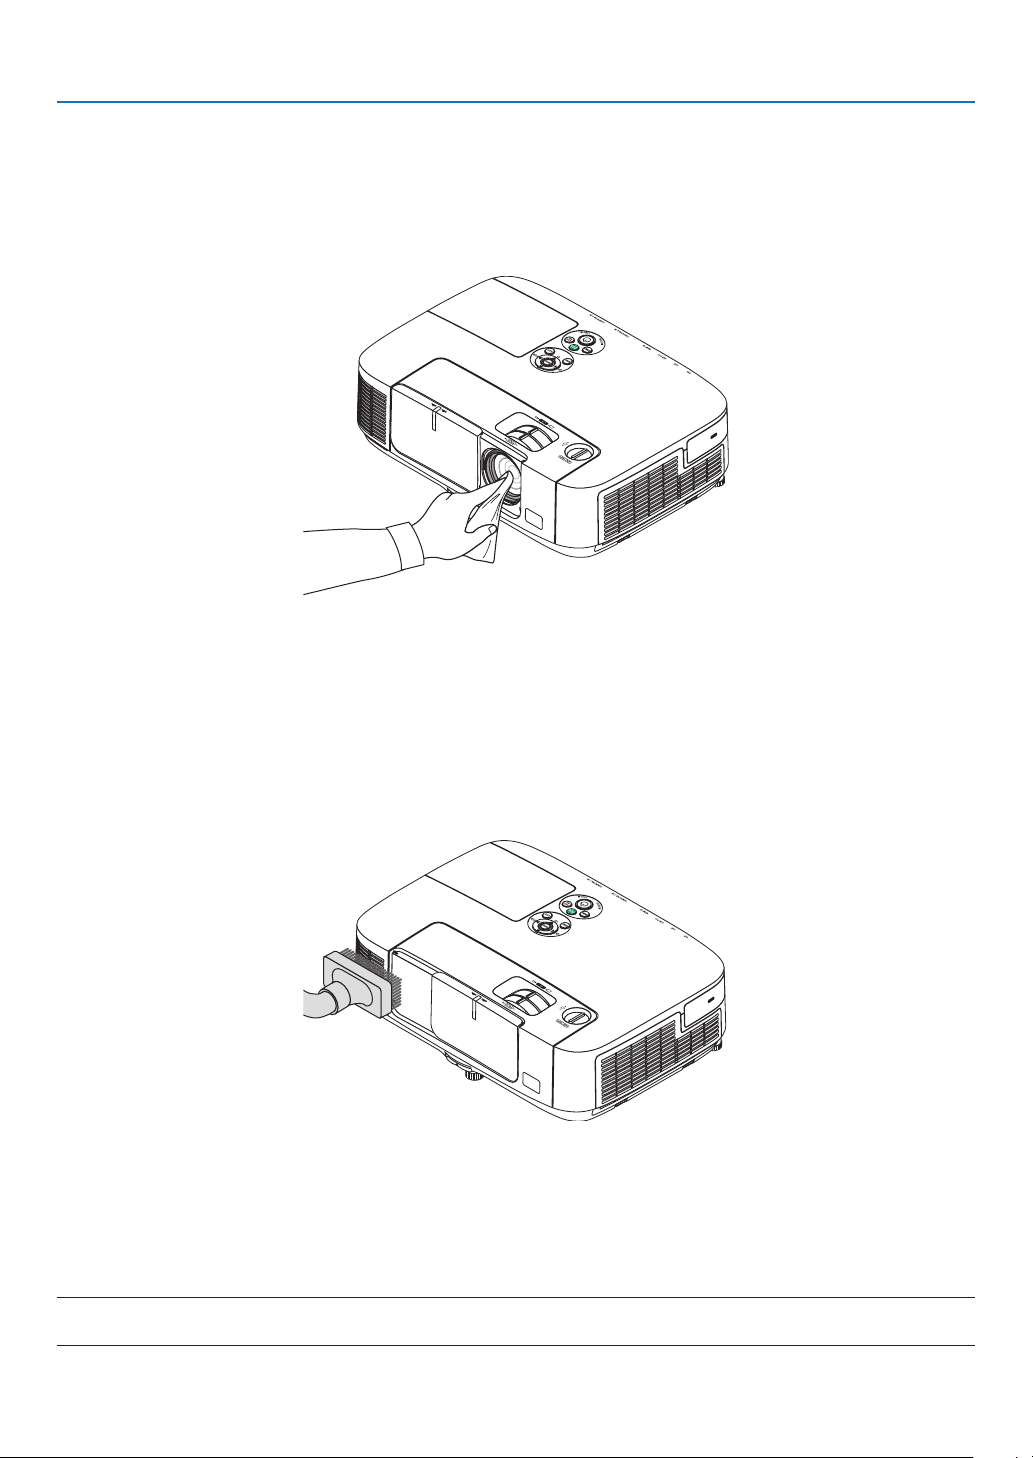
146
7. Maintenance
Cleaning the Lens
•Turnofftheprojectorbeforecleaning.
•Theprojectorhasaplasticlens.Useacommerciallyavailableplasticlenscleaner.
•Donotscratchormarthelenssurfaceasaplasticlensiseasilyscratched.
•Neverusealcoholorglasslenscleanerasdoingsowillcausedamagetotheplasticlenssurface.
Cleaning the Cabinet
Turnofftheprojector,andunplugtheprojectorbeforecleaning.
•Useadrysoftclothtowipedustoffthecabinet.
Ifheavilysoiled,useamilddetergent.
•Neverusestrongdetergentsorsolventssuchasalcoholorthinner.
•Whencleaningtheventilationslitsorthespeakerusingavacuumcleaner,donotforcethebrushofthevacuum
cleanerintotheslitsofthecabinet.
Vacuum the dust off the ventilation slits.
•Cloggedventilationslitsmaycauseariseintheinternaltemperatureoftheprojector,resultinginmalfunction.
•Donotscratchorhitthecabinetwithyourngersoranyhardobjects
•Contactyourdealerforcleaningtheinsideoftheprojector.
NOTE:Donotapplyvolatileagentsuchasinsecticideonthecabinet,thelens,orthescreen.Donotleavearubberorvinylproduct
inprolongedcontactwithit.Otherwisethesurfacenishwillbedeterioratedorthecoatingmaybestrippedoff.

147
7. Maintenance
Replacing the Lamp and the Filters
Whenthelampreachestheendofitslife,theLAMPindicatorinthecabinetwillblinkredandthemessage“THE
LAMPHASREACHEDTHEENDOFITSUSABLELIFE.PLEASEREPLACETHELAMPANDFILTER.”willappear
(*).Eventhoughthelampmaystillbeworking,replacethelamptomaintaintheoptimalprojectorperformance.After
replacingthelamp,besuretoclearthelamphourmeter.(page
104)
CAUTION
•DONOTTOUCHTHELAMPimmediatelyafterithasbeenused.Itwillbeextremelyhot.Turntheprojector
offandthendisconnectthepowercord.Allowatleastonehourforthelamptocoolbeforehandling.
•Usethespeciedlampforsafetyandperformance.
•DONOTREMOVEANYSCREWSexceptonelampcoverscrewandtwolamphousingscrews.Youcouldreceive
anelectricshock.
•Donotbreaktheglassonthelamphousing.
Keepngerprintsofftheglasssurfaceonthelamphousing.Leavingngerprintsontheglasssurfacemightcause
anunwantedshadowandpoorpicturequality.
•Theprojectorwillturnoffandgointostandbymodewhenyoucontinuetousetheprojectorforanother100hours
afterthelamphasreachedtheendofitslife.Ifthishappens,besuretoreplacethelamp.Ifyoucontinuetouse
thelampafterthelampreachestheendofitslife,thelampbulbmayshatter,andpiecesofglassmaybescattered
inthelampcase.Donottouchthemasthepiecesofglassmaycauseinjury.Ifthishappens,contactyourNEC
dealerforlampreplacement.
*NOTE:Thismessagewillbedisplayedunderthefollowingconditions:
•foroneminuteaftertheprojectorhasbeenpoweredon
•whenthe
(POWER)buttonontheprojectorcabinetorthePOWEROFFbuttonontheremotecontrolispressed
Toturnoffthemessage,pressanybuttonontheprojectorcabinetortheremotecontrol.
Optionallampandtoolsneededforreplacement:
•Phillipsscrewdriver(plus-head)
•Replacementlamp:
NP16LP(P350X)
NP17LP(P420X/P350W)
Flow of Replacing the Lamp and the Filters
Step 1.Replacethelamp
Step 2.Replacethelters(page150)
Step 3.
Clearthelampusagehoursandthelterusagehours(page104)
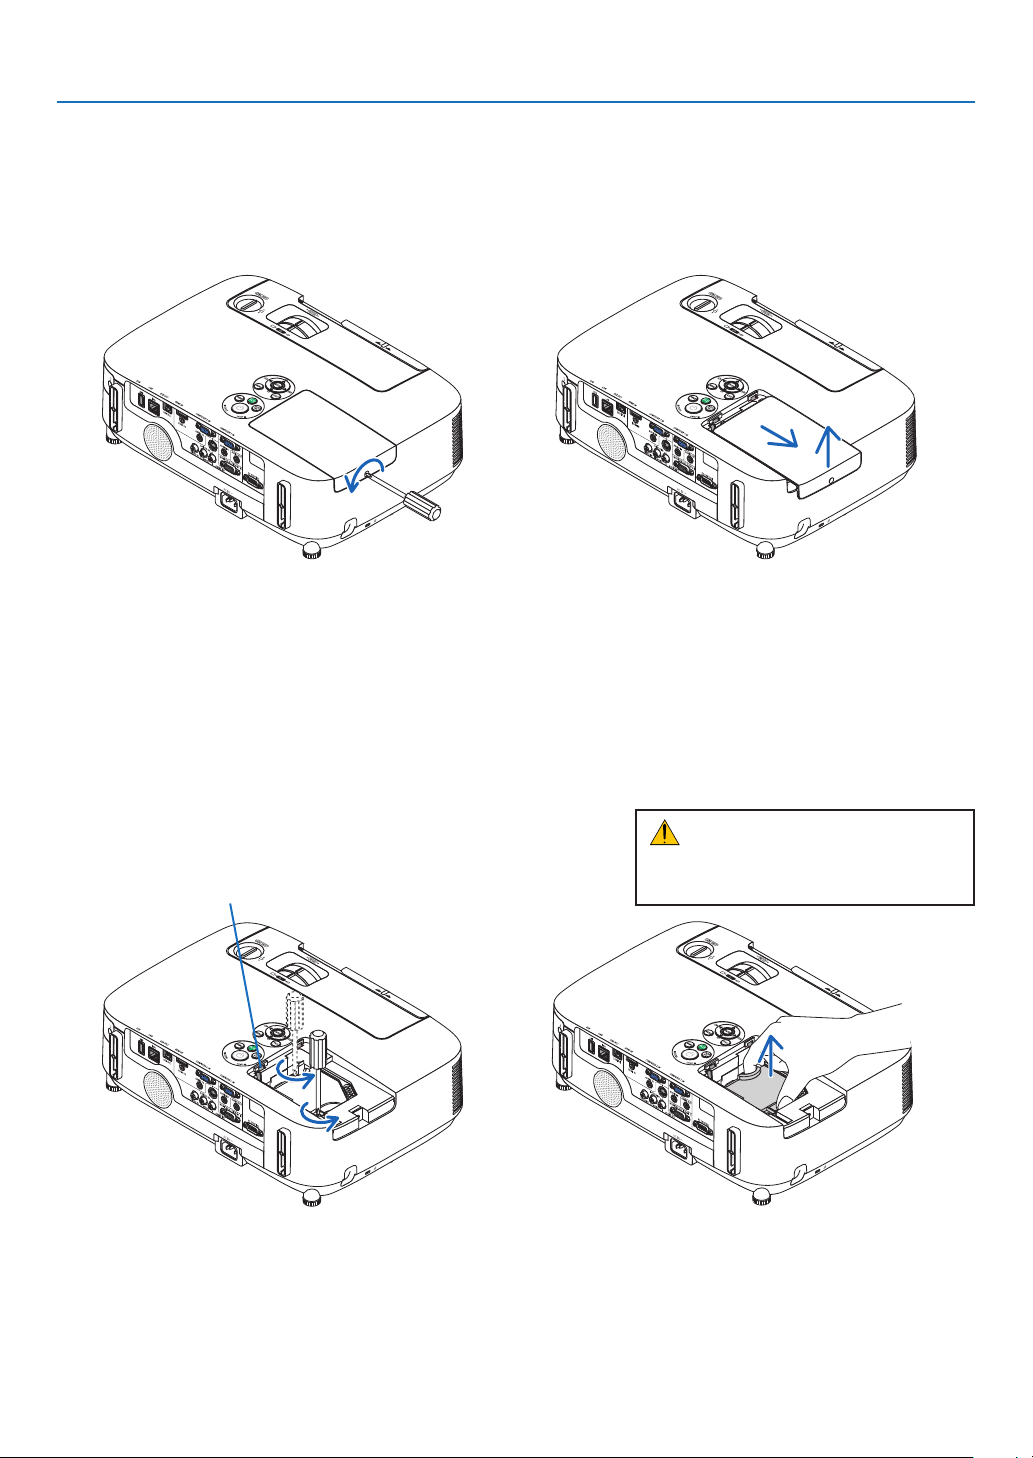
148
7. Maintenance
2.Removethelamphousing.
(1)Loosenthetwoscrewssecuringthelamphousinguntilthephillipsscrewdrivergoesintoafreewheelingcondi-
tion.
•Thetwoscrewsarenotremovable.
•Thereisaninterlockonthiscasetopreventtheriskofelectricalshock.Donotattempttocircumventthis
interlock.
(2)Removethelamphousingbyholdingit.
Interlock
To replace the lamp:
1.Removethelampcover.
(1)Loosenthelampcoverscrew
•Thelampcoverscrewisnotremovable.
(2)Pushandslidethelampcoveroff.
CAUTION:
Makesurethatthelamphousingiscool
enoughtobeforeremovingit.
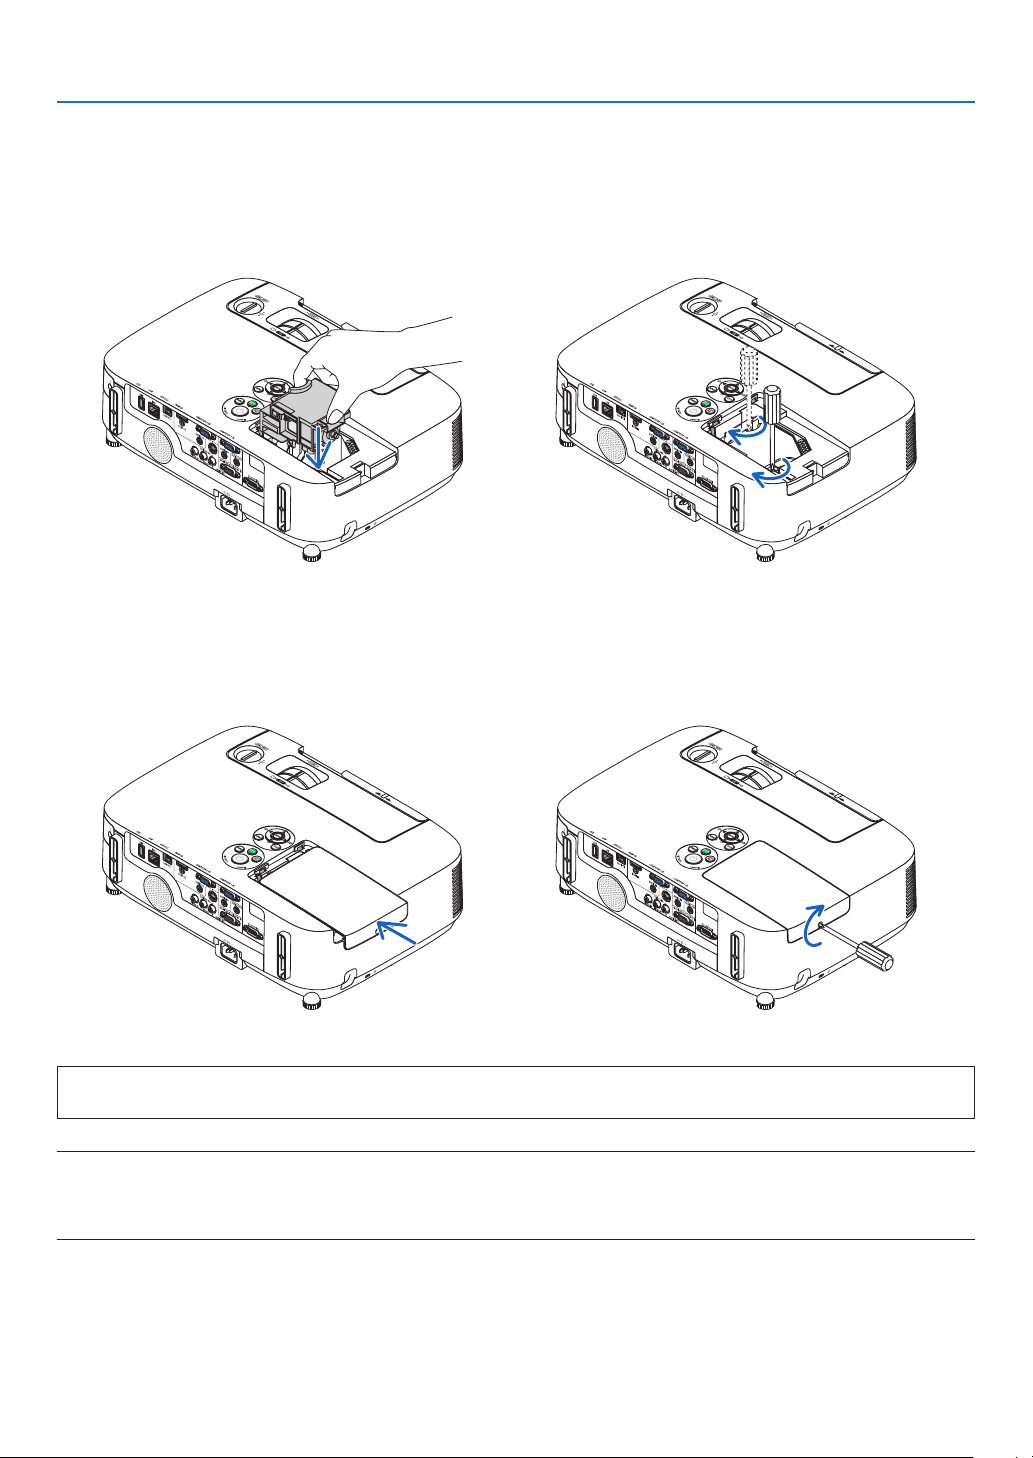
149
7. Maintenance
This completes the lamp replacement.
Go on to the filter replacement.
NOTE:Whenyoucontinuetousetheprojectorforanother100hoursafterthelamphasreachedtheendofitslife,theprojector
cannotturnonandthemenuisnotdisplayed.
Ifthishappens,presstheHELPbuttonontheremotecontrolfor10secondstoresetthelampclockbacktozero.
Whenthelamptimeclockisresettozero,theLAMPindicatorgoesout.
4.Reattachthelampcover.
(1)Slidethelampcoverbackuntilitsnapsintoplace.
(2)Tightenthescrewtosecurethelampcover.
•Besuretotightenthescrew.
3.Installanewlamphousing.
(1)Insertanewlamphousinguntilthelamphousingispluggedintothesocket.
(2)Pushthetopcenterofthelamphousingtosecureit.
(3)Secureitinplacewiththetwoscrews.
•Besuretotightenthescrews.
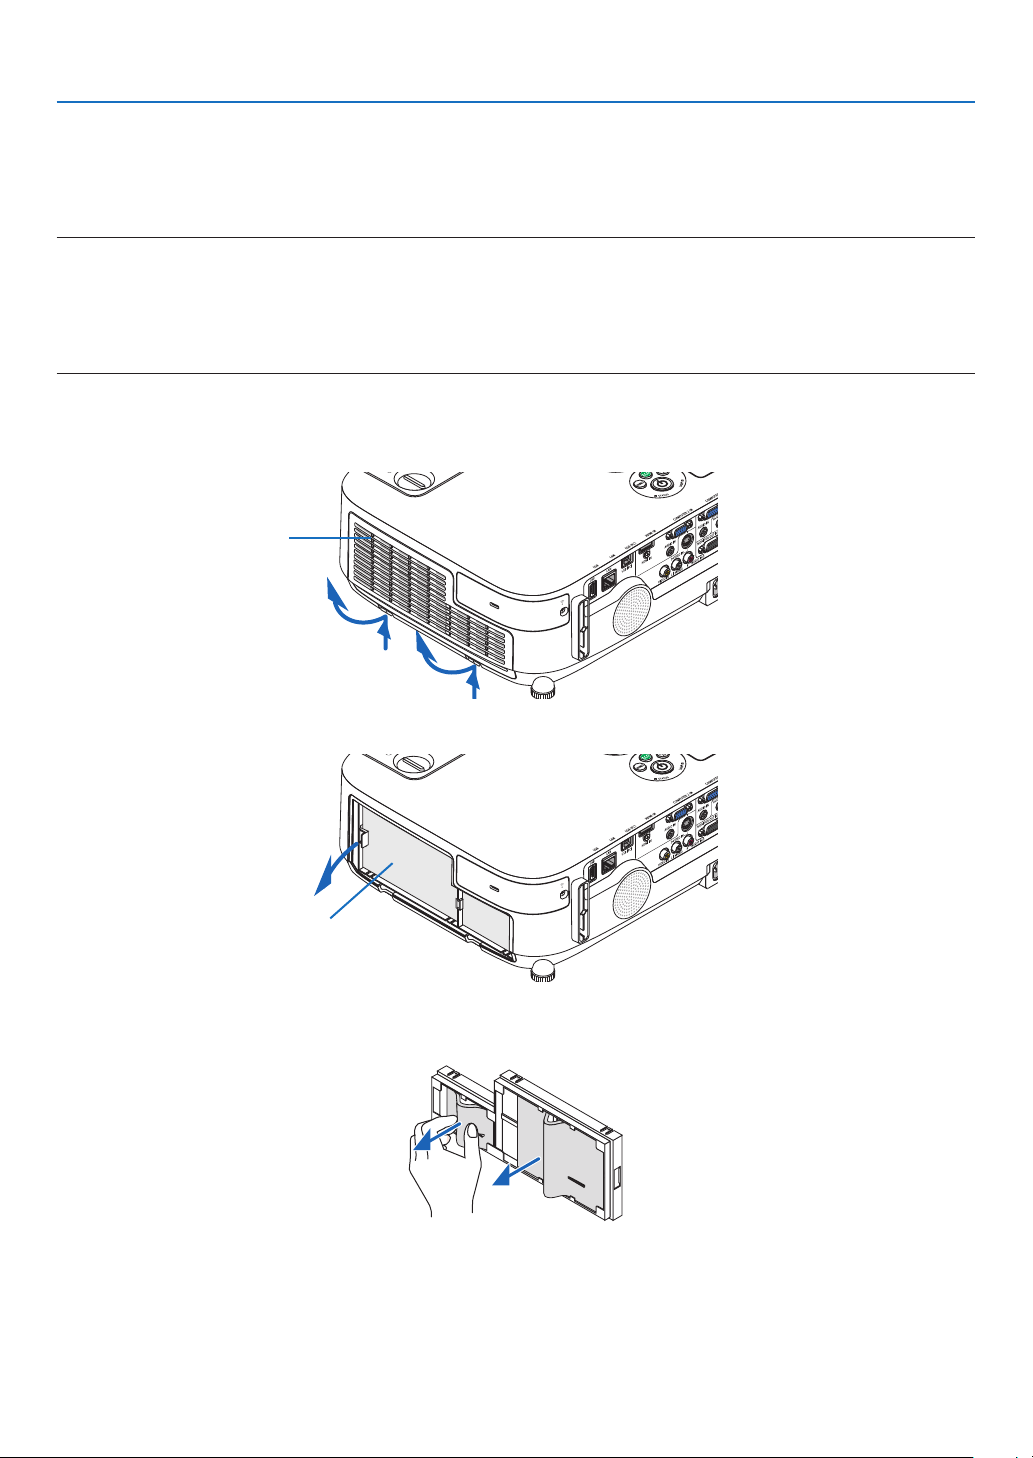
150
7. Maintenance
To replace the filters:
Fourltersarepackagedwiththereplacementlamp.
Honeycomblter(coarsemesh):Largeandsmallsizes(attachedtotheoutsideofthelterunit)
Accordionlter(nemesh):Largeandsmallsizes(attachedtotheinsideofthelterunit)
NOTE:
•Replaceallfourltersatthesametime.
•Beforereplacingthelters,wipeoffdustanddirtfromtheprojectorcabinet.
•Theprojectorisprecisionequipment.Keepoutdustanddirtduringlterreplacement.
•Donotwashthelterswithsoapandwater.Soapandwaterwilldamagetheltermembrane.
•Putltersintoplace.Incorrectattachmentofaltermaycausedustanddirttogetintotheinsideoftheprojector.
Beforereplacingthelters,replacethelamp.(page
148)
1.Pushupthebuttonsontheleftandrighttoreleasethelterunitandpullitout.
2.Removethelterunitbypullingoutthetab.
3.Removethefourlters.
(1) Turn the filter unit over and pull out the two soft accordion filters (large and small).
Filter cover
Filter unit
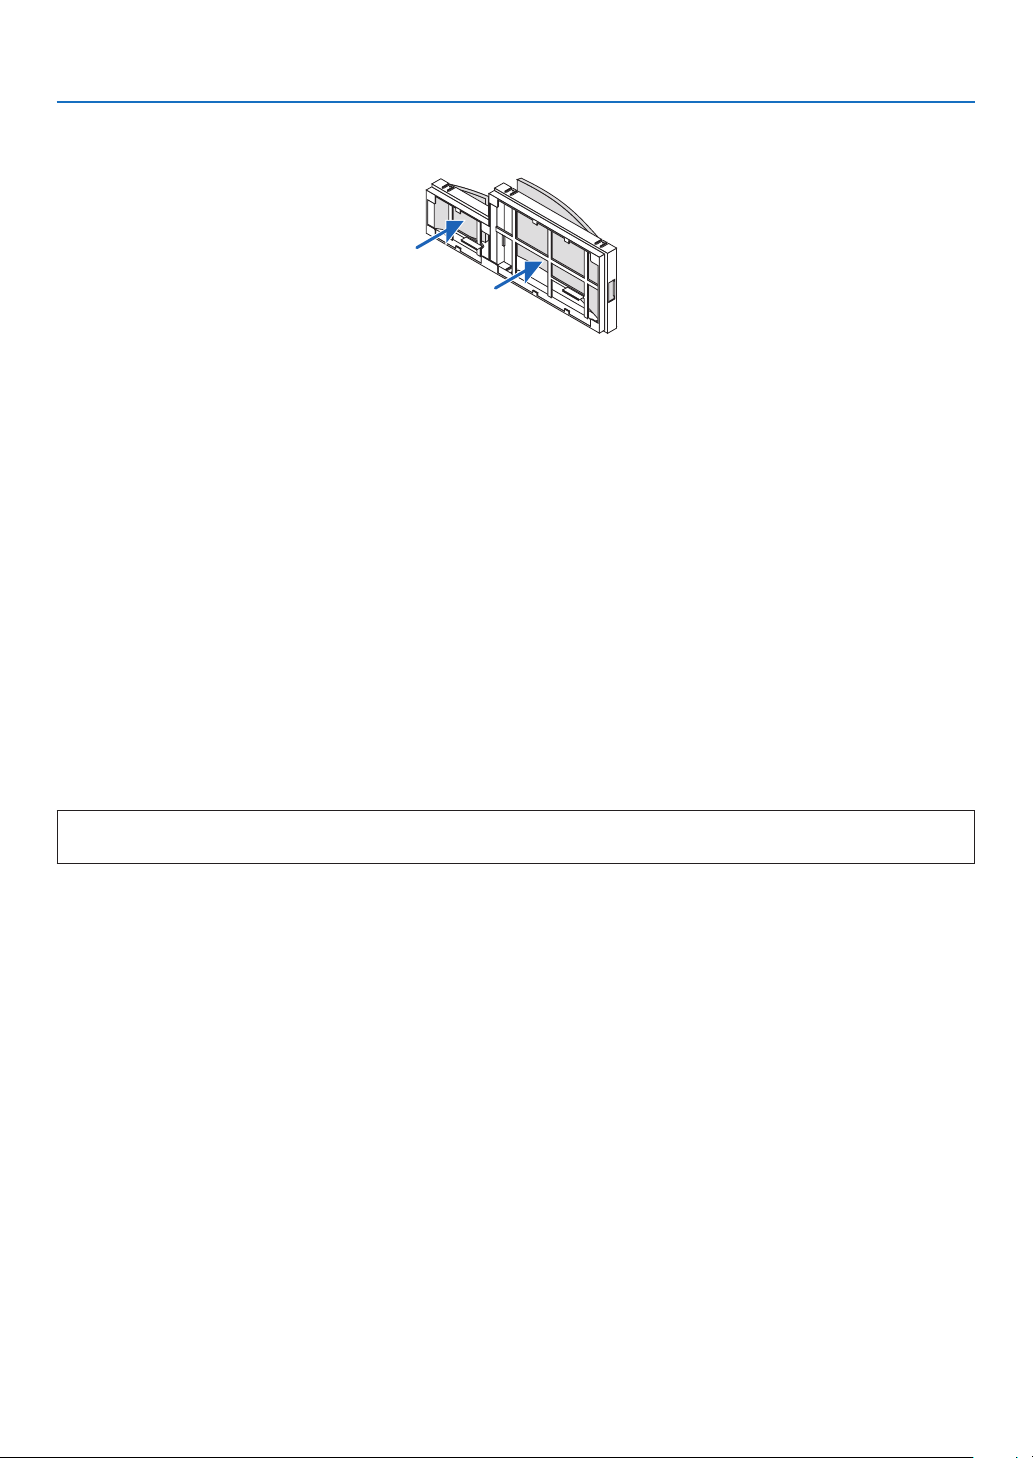
151
7. Maintenance
(2) Push the left end of each filter and remove the hard two honeycomb filters (large and small).
•Thelargeltercannotberemovedbypushingonitsrightend.
4.Removedustfromthelterunitandtheltercover.
Clean both outside and inside.
5.Attachfournewlterstothelterunit.
(1) Insert the left end of each hard honeycomb filter (large and small) first and then the right end of each hard
honeycomb filter to the filter unit.
•Thelargeltercannotbettedifitsrightendisinserted.
(2) Turn the filter unit over.
•Attachthetwosoftaccordionlters(largeandsmall).Eachaccordionlterhasaslitonit.Aligntheslitwith
each protrusion of the filter unit.
6.Putthelterunitbacktotheprojectorcabinet.
Makesurethatthelterunitisplacedinthecorrectorientation.
7.Puttheltercoverbacktotheprojectorcabinet.
Insert two catches of the top side of the filter cover into the groove of the cabinet, and push the buttons on the left
and right to close the filter cover.
Pushtheltercoveruntilitclicksintoplace.
This completes the filter replacement.
Go on to the clearing lamp and filter hour meters.
To clear the lamp usage hours and the filter usage hours:
1.Placetheprojectorwhereyouuseit.
2.Plugthepowercordintothewalloutlet,andthenturnontheprojector.
3.Clearthelampusagehoursandthelterusagehours.
1. From the menu, select [RESET] [CLEAR LAMP HOURS] and reset the lamp usage hours.
2. Select [CLEAR FILTER HOURS].and reset the filter usage hours. (
page 104)
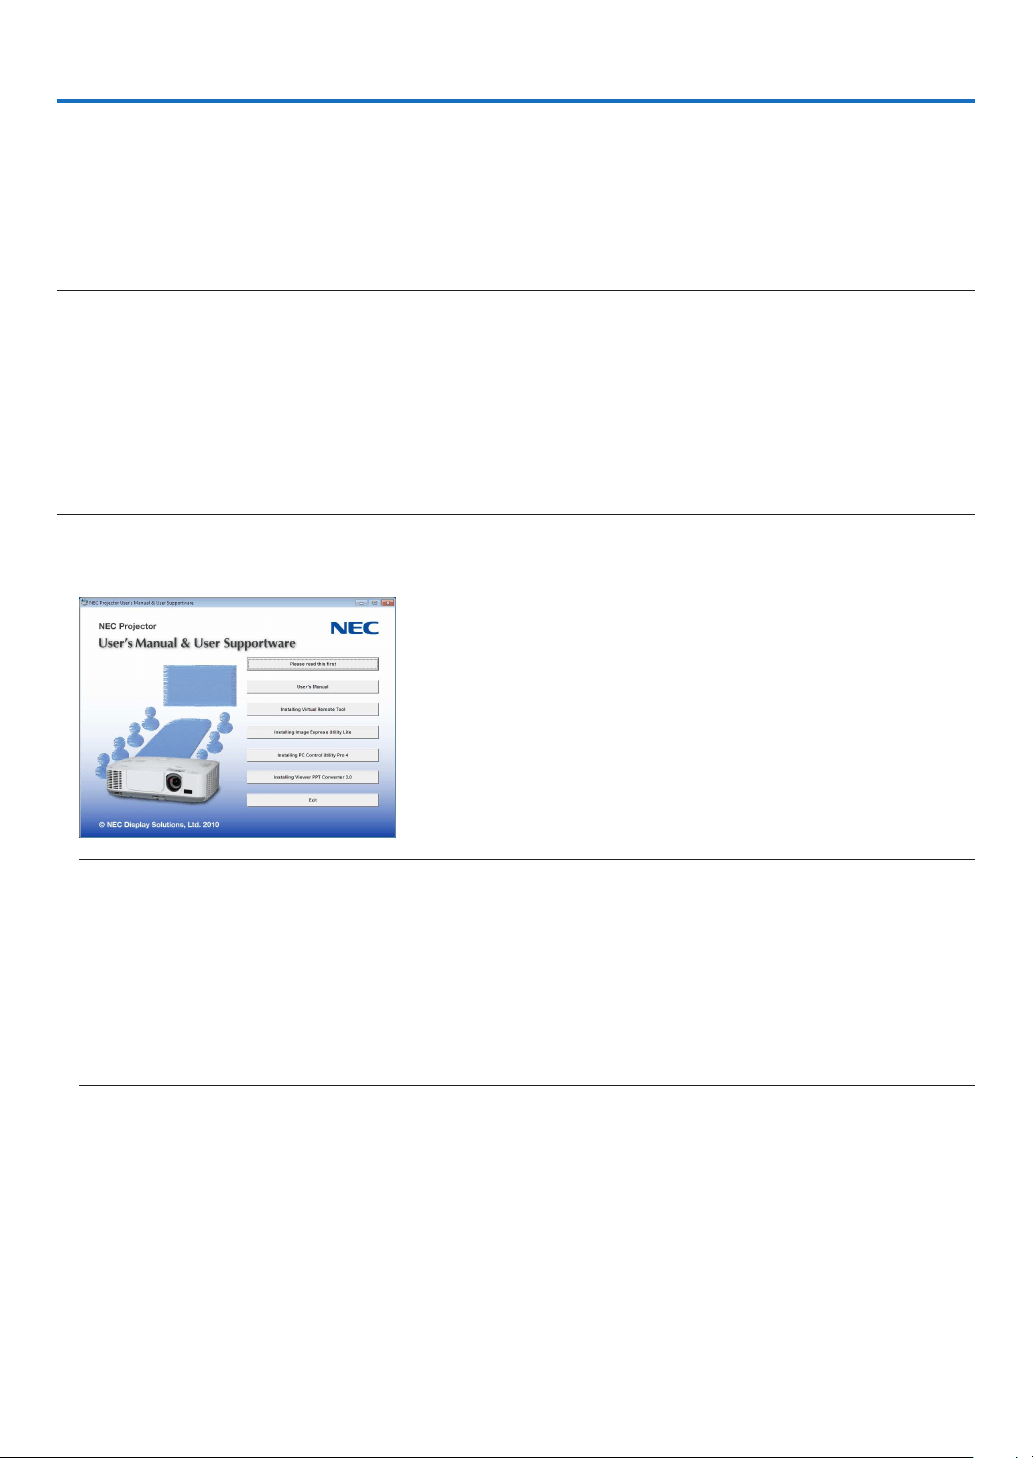
152
8. User Supportware
Installing Software Program
Installation for Windows software
ThesoftwareprogramsexceptImageExpressUtility2forMacsupportWindows7,WindowsVista,andWindows
XP.
NOTE:
•Toinstalloruninstalleachsoftwareprogram,theWindowsuseraccountmusthave“Administrator”privilege(Windows7,Win-
dowsVista)or“ComputerAdministrator”privilege(WindowsXP).
•Exitallrunningprogramsbeforeinstallation.Ifanotherprogramisrunning,theinstallationmaynotbecompleted.
•TorunVirtualRemoteToolorPCControlUtilityPro4onWindowsXPHomeEditionandWindowsXPProfessional,“Microsoft
.NETFrameworkVersion2.0orlater”isrequired.TheMicrosoft.NETFrameworkVersion2.0orlaterisavailablefromMicrosoft’s
webpage.Downloadandinstallitonyourcomputer
•ImageExpressUtilityLitewillbeinstalledtothesystemdriveofyourcomputer.
Ifthemessage“Thereisnotenoughfreespaceondestination”isdisplayed,freeupenoughspace(about100MB)toinstallthe
program.
1InserttheaccompanyingNECProjectorCD-ROMintoyourCD-ROMdrive.
The menu window will be displayed.
TIP:
Ifthemenuwindowwillnotbedisplayed,trythefollowingprocedure.
ForWindows7
1.Click“start”onWindows.
2.Click“AllPrograms”“Accessories”“Run”.
3.TypeyourCD-ROMdrivename(example:“Q:\”)and“LAUNCHER.EXE”in“Name”.(example:Q:\
LAUNCHER.EXE)
4.Click“OK”.
the menu window will be displayed.

153
8. User Supportware
2Clickasoftwareprogramyouwishtoinstallonthemenuwindow.
The installation will start.
•Followtheinstructionsontheinstallerscreenstocompletetheinstallation.
TIP:
UninstallingaSoftwareProgram
Preparation:
Exitthesoftwareprogrambeforeuninstalling.Touninstallthesoftwareprogram,theWindowsuseraccountmusthave
“Administrator”privilege(Windows7andWindowsVista)or“ComputerAdministrator”privilege(WindowsXP).
•ForWindows7/WindowsVista
1Click“Start”andthen“ControlPanel”.
The Control Panel window will be displayed.
2Click“Uninstallaprogram”under“Programs”
The “Programs and Features” window will be displayed.
3Selectthesoftwareprogramandclickit.
4Click“Uninstall/Change”or“Uninstall”.
•Whenthe“UserAccountControl”windowsisdisplayed,click“Continue”.
Follow the instructions on the screens to complete the uninstallation.
•ForWindowsXP
1Click“Start”andthen“ControlPanel”.
The Control Panel window will be displayed.
2Double-click“Add/RemovePrograms”.
The Add / Remove Programs window will be displayed.
3Clickthesoftwareprogramfromthelistandthenclick“Remove”.
Follow the instructions on the screens to complete the uninstallation.
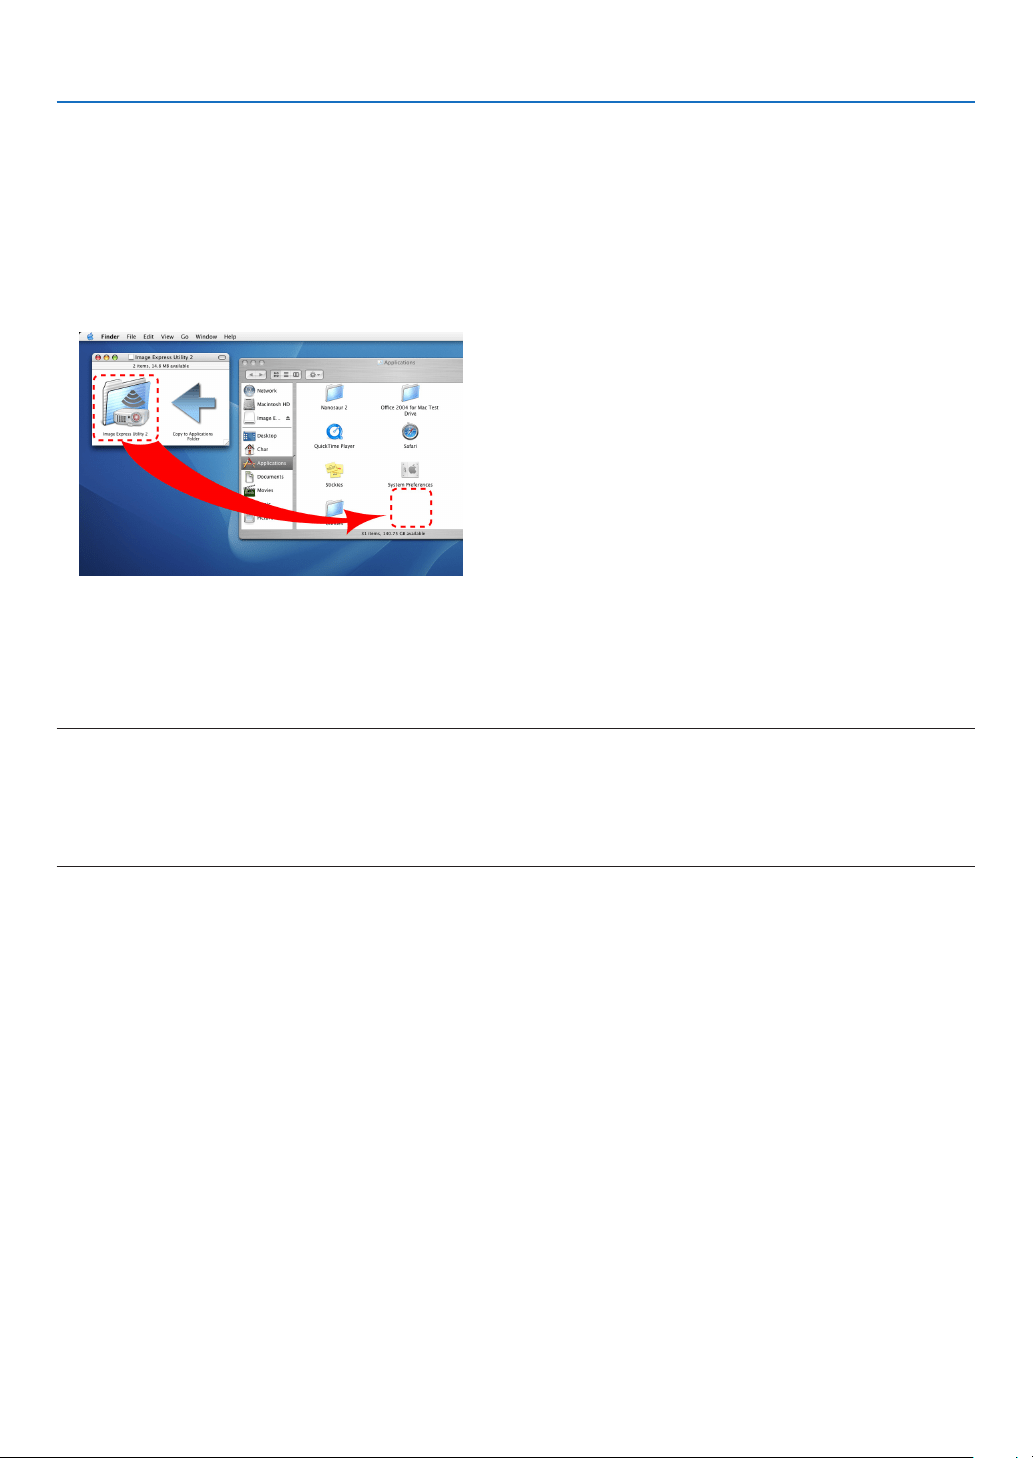
154
8. User Supportware
Installation for Macintosh software
ImageExpressUtility2forMacsupportsMacOSX.
1InserttheaccompanyingNECProjectorCD-ROMintoyourCD-ROMdrive.
The menu window will be displayed.
2Double-clicktheCD-ROMicon.
3Double-clickthe“MacOSX”folder.
4Double-click“ImageExpressUtility2(Intel).dmg”.
The “Image Express Utility 2” folder will be displayed.
•IfyourMacisPowerPC-based,double-click“ImageExpressUtility2.dmg”.
5Movethe“ImageExpressUtility2”folderto“Applications”folderusingadrag-and-dropoperation.
TIP:
•Uninstallingasoftwareprogram
1.Putthe“ImageExpressUtility2”foldertotheTrashicon.
2.PutthecongurationleofImageExpressUtility2totheTrashicon.
•ThecongurationleofImageExpressUtility2islocatedin“/user/yourusername/library/Preferences/jp.co.
nec.nevt. ImageExpressUtility.plist”.
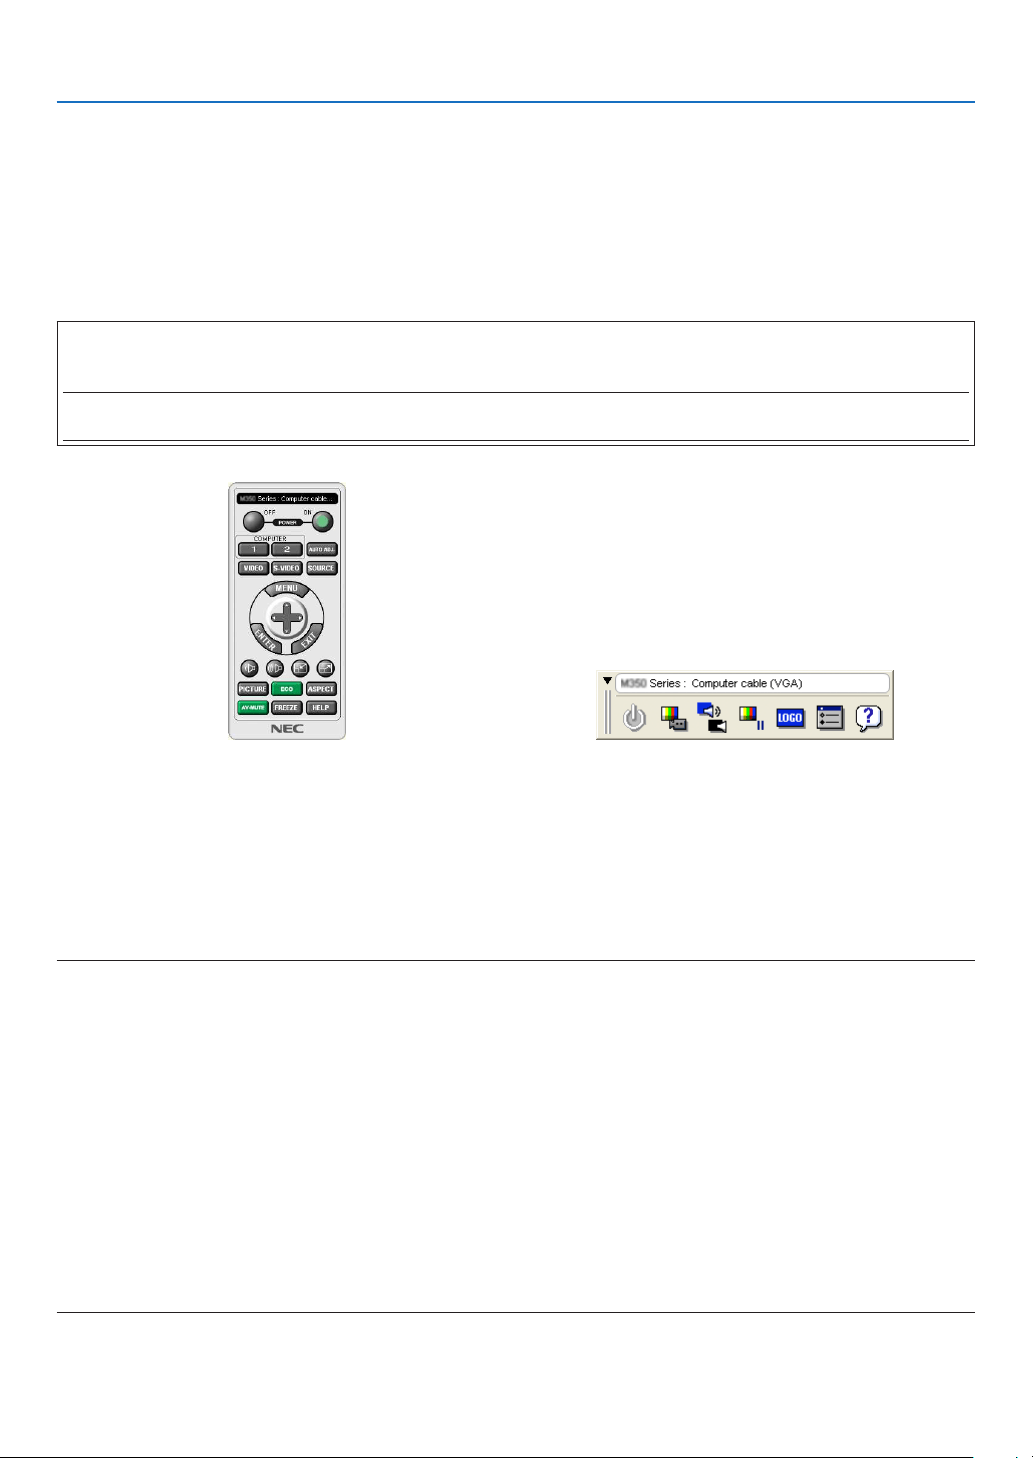
155
8. User Supportware
Using the Computer Cable (VGA) to Operate the Projector
(Virtual Remote Tool)
Usingtheutilitysoftware“VirtualRemoteTool”,VirtualRemotescreen(ortoolbar)canbedisplayedonyourcomputer
screen.
Thiswillhelpyouperformoperationssuchasprojector’spoweronoroffandsignalselectionviathecomputercable
(VGA),serialcable,orLANconnection.OnlyviaserialorLANconnectionitisalsousedtosendanimagetothe
projectorandregisteritasthelogodataoftheprojector.Afterregisteringit,youcanlockthelogotopreventitfrom
changing.
Control Functions
PowerOn/Off,signalselection,picturefreeze,picturemute,audiomute*,Logotransfertotheprojector,andremote
controloperationonyourPC.
NOTE:
*AudiomutefunctionisnotavailableonM420XV.
VirtualRemotescreen
RemoteControlWindowToolbar
ThissectionprovidesanoutlineofpreparationforuseofVirtualRemoteTool.
ForinformationonhowtouseVirtualRemoteTool,seeHelpofVirtualRemoteTool.(page
159)
TIP:
•VirtualRemoteToolcanbeusedwithaLANandaserialconnection.
•ForupdateinformationonVirtualRemoteTool,visitourwebsite:
http://www.nec-display.com/dl/en/index.html
NOTE:
•When[COMPUTER1]isselectedfromyoursourceselection,theVirtualRemotescreenorthetoolbarwillbedisplayedaswell
asyourcomputerscreen.
•Usethesuppliedcomputercable(VGA)toconnecttheCOMPUTER1INconnectordirectlywiththemonitoroutputconnectorof
thecomputertouseVirtualRemoteTool.
Usingaswitcherorothercablesthanthesuppliedcomputercable(VGA)maycausefailureinsignalcommunication.
VGAcableconnector:
PinNos.12and15arerequiredforDDC/CI.
•VirtualRemoteToolmaynotworkdependingonyourcomputer’sspecicationsandversionofgraphicadaptersordrivers.
•Logodata(graphics)thatcanbesenttotheprojectorwithVirtualRemoteToolhasthefollowingrestrictions:
(OnlyviaserialorLANconnection)
-Filesize:64KBorless
-Imagesize(resolution):Horizontal699dots×vertical499dotsorless
-Numberofcolors:256colorsorless
•ThelogodatathatissentwithVirtualRemoteToolwillbedisplayedatthecenterofthescreen.Itssurroundingwillbepainted
outinthesamecolorasonefor1dotattopleft
TIP:
•Theprojector’sCOMPUTER1INconnectorsupportsDDC/CI(DisplayDataChannelCommandInterface).DDC/CIisastandard
interfaceforbidirectionalcommunicationbetweendisplay/projectorandcomputer.
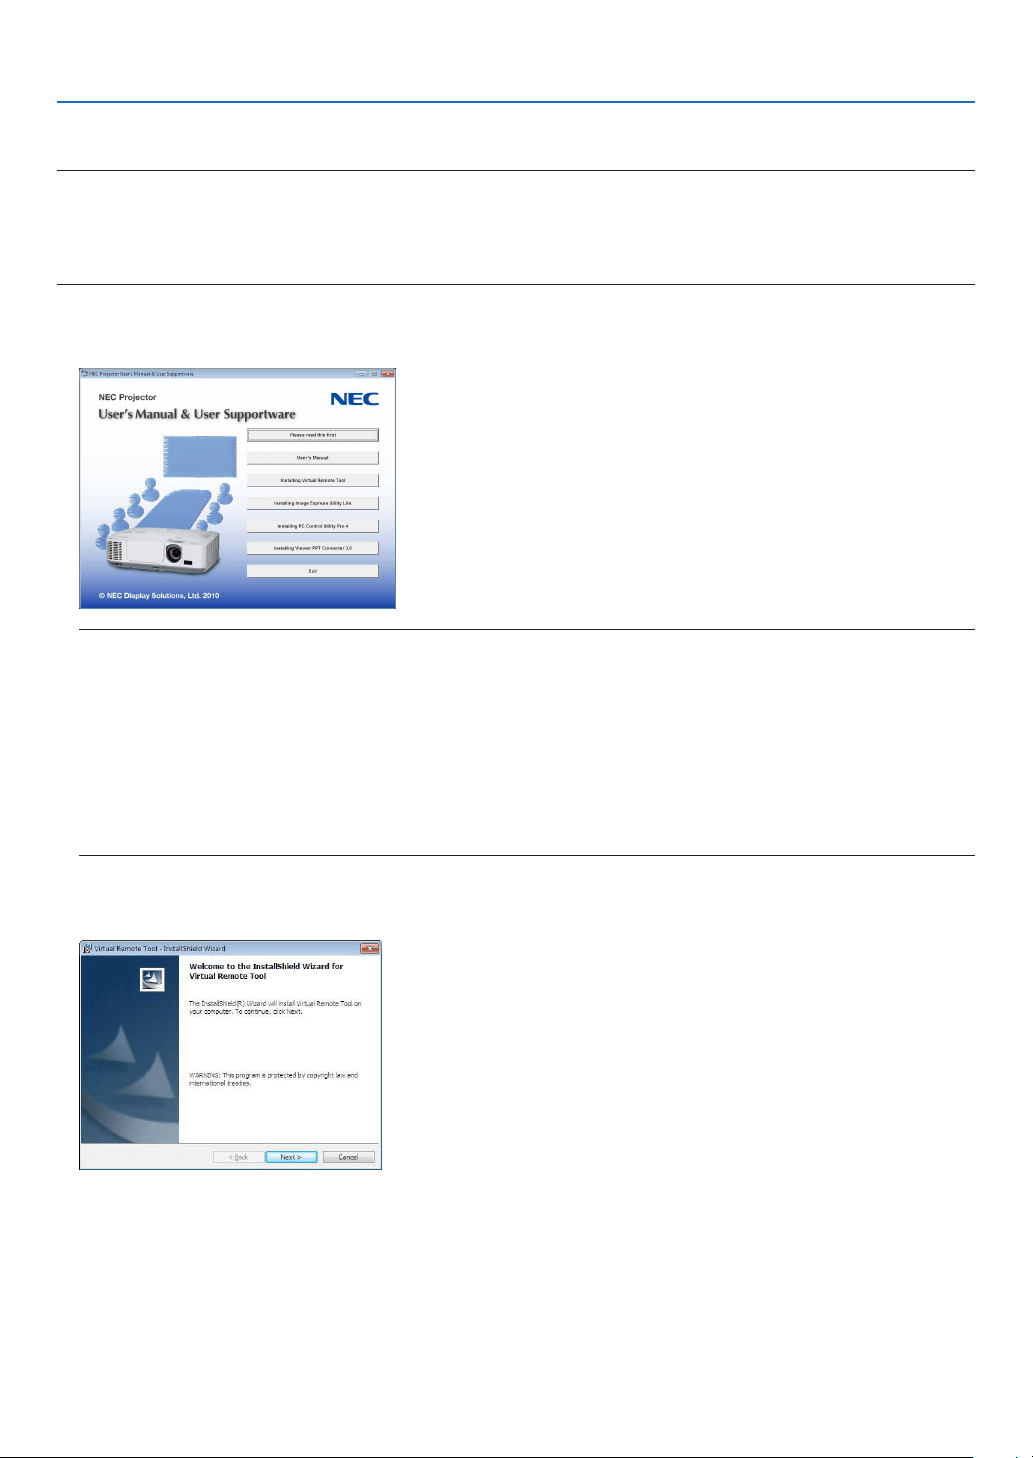
156
8. User Supportware
Step 1: Install Virtual Remote Tool on the computer
NOTE:
•ToinstallVirtualRemoteTool,theWindowsuseraccountmusthave“Administrator”privilege(Windows7,WindowsVistaand
WindowsXP).
•ExitallrunningprogramsbeforeinstallingVirtualRemoteTool.Ifanotherprogramisrunning,theinstallationmaynotbecom-
pleted.
1InserttheaccompanyingNECProjectorCD-ROMintoyourCD-ROMdrive.
The menu window will be displayed.
TIP:
Ifthemenuwindowwillnotbedisplayed,trythefollowingprocedure.
ForWindows7
1.Click“start”onWindows.
2.Click“AllPrograms”“Accessories”“Run”.
3.TypeyourCD-ROMdrivename(example:“Q:\”)and“LAUNCHER.EXE”in“Name”.(example:Q:\
LAUNCHER.EXE)
4.Click“OK”.
the menu window will be displayed.
2Clickasoftwareprogramyouwishtoinstallonthemenuwindow.
The installation will start.
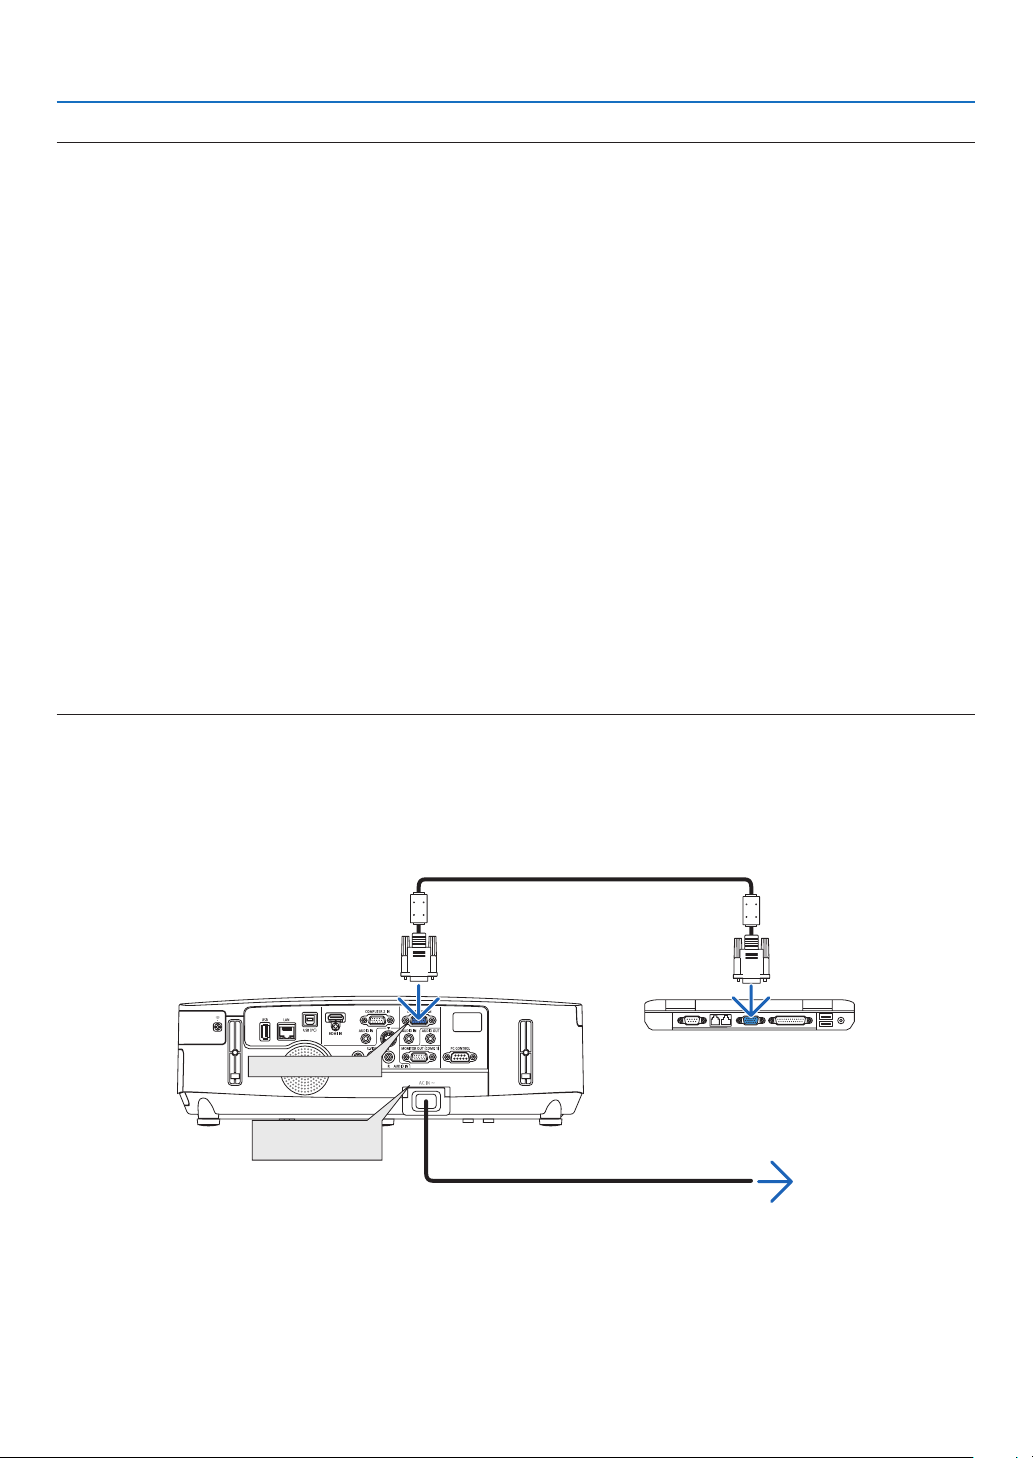
157
8. User Supportware
TIP:
UninstallingSoftwareProgram
Preparation:
Exitthesoftwareprogrambeforeuninstalling.Touninstallthesoftwareprogram,theWindowsuseraccountmusthave
“Administrator”privilege(Windows7andWindowsVista)or“ComputerAdministrator”privilege(WindowsXP).
•ForWindows7/WindowsVista
1Click“Start”andthen“ControlPanel”.
The Control Panel window will be displayed.
2Click“Uninstallaprogram”under“Programs”
The “Programs and Features” window will be displayed.
3Selectthesoftwareprogramandclickit.
4Click“Uninstall/Change”or“Uninstall”.
•Whenthe“UserAccountControl”windowsisdisplayed,click“Continue”.
Follow the instructions on the screens to complete the uninstallation.
•ForWindowsXP
1Click“Start”andthen“ControlPanel”.
The Control Panel window will be displayed.
2Double-click“Add/RemovePrograms”.
The Add / Remove Programs window will be displayed.
3Clickthesoftwareprogramfromthelistandthenclick“Remove”.
Follow the instructions on the screens to complete the uninstallation.
Connect the projector to the computer
1Usethesuppliedcomputercable(VGA)toconnecttheCOMPUTER1INconnectoroftheprojectordirectly
withthemonitoroutputconnectorofthecomputer.
2ConnectthesuppliedpowercordtotheACINoftheprojectorandthewalloutlet.
The projector is in the standby condition.
COMPUTER 1 IN
TIP:
•WhenVirtualRemoteToolstartsforthersttime,“EasySetup”windowwillbedisplayedtonavigateyourconnections.
ACInput
Supplied computer cable (VGA)
To wall outlet
Power cord (supplied)
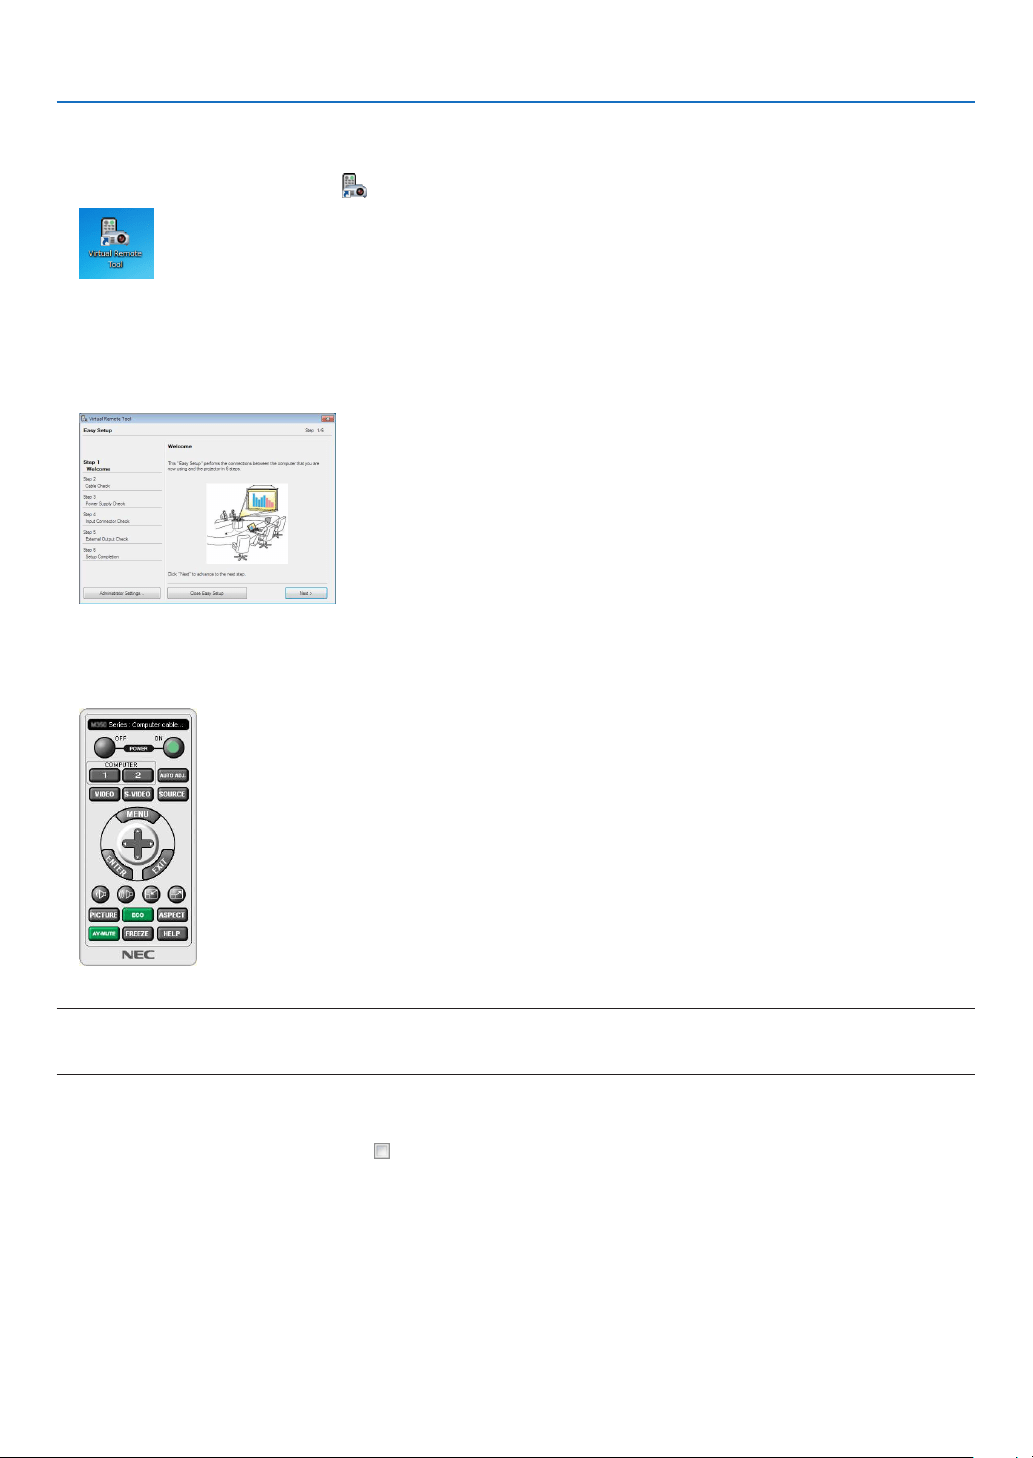
158
8. User Supportware
Start Virtual Remote Tool
Start using the shortcut icon
•Double-clicktheshortcuticon
ontheWindowsDesktop.
Start from the Start menu
•Click[Start][AllPrograms]or[Programs][NECProjectorUserSupportware][VirtualRemoteTool]
[VirtualRemoteTool].
When Virtual Remote Tool starts for the first time, “Easy Setup” window will be displayed.
Follow the instructions on the screens
When “Easy Setup” is completed, the Virtual Remote Tool screen will be displayed.
NOTE:
•When[POWER-SAVING]isselectedfor[STANDBYMODE]fromthemenu,theprojectorcannotbeturnedonviathecomputer
cable(VGA)ornetwork(wiredLAN/wirelessLAN)connection.
TIP:
•TheVirtualRemoteToolscreen(orToolbar)canbedisplayedwithoutdisplaying“EasySetup”window.
Todoso,clicktoplaceacheckmarkfor“DonotuseEasySetupnexttime”onthescreenatStep6in“EasySetup”.
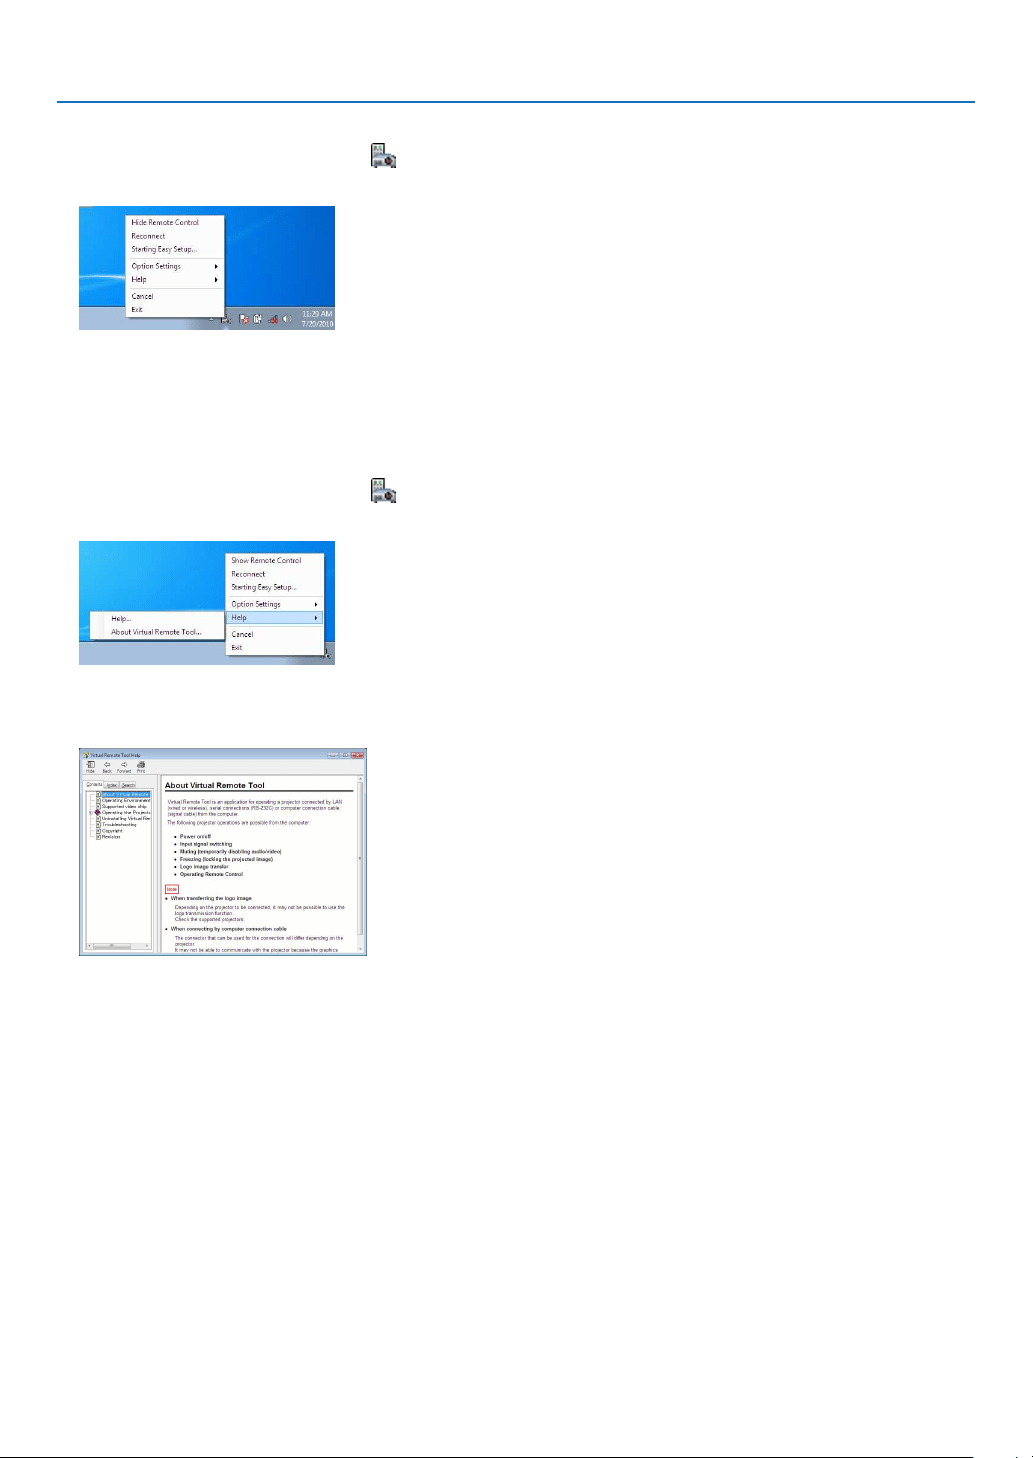
159
8. User Supportware
ExitingVirtualRemoteTool
1ClicktheVirtualRemoteToolicon
ontheTaskbar.
The pop-up menu will be displayed.
2Click“Exit”.
The Virtual Remote Tool will be closed.
ViewingthehelpleofVirtualRemoteTool
•Displayingthehelpleusingthetaskbar
1ClicktheVirtualRemoteToolicon
onthetaskbarwhenVirtualRemoteToolisrunning.
The pop-up menu will be displayed.
2.Click“Help”.
The Help screen will be displayed.
•DisplayingthehelpleusingtheStartMenu.
1.Click“Start”.“Allprograms”or“Programs”.“NECProjectorUserSupportware”.“VirtualRemoteTool”.and
then“VirtualRemoteToolHelp”inthisorder.
The Help screen will be displayed.

160
8. User Supportware
Projecting Your Computer’s Screen Image from the Projector
over a LAN (Image Express Utility Lite)
UsingImageExpressUtilityLiteallowsyoutosendthecomputer’sscreenimagetotheprojectoroveraUSBcable
orawiredorwirelessLAN.
ThissectionwillshowyouanoutlineabouthowtoconnecttheprojectortoaLANandtouseImageExpressUtility
Lite.FortheoperationofImageExpressUtilityLite,seethehelpofImageExpressUtilityLite.
What you can do with Image Express Utility Lite
•USBDisplay
•Computer’sscreenimagecanbeprojectedviaaUSBcable,withoutconnectingacomputercable(VGA).
•JustconnectingthecomputerandtheprojectoroveraUSBcablewillmaketheUSBDisplayfunctionavailable
(Plug&Play)evenwithoutinstallingImageExpressUtilityLiteonthecomputer.(page
34)
•Imagetransmission
•Thescreenofyourcomputercanbesenttotheprojectorviaawiredorwirelessnetworkwithoutacomputercable
(VGA).
•Byusing“EASYCONNECTION”function,thecomplicatednetworksettingscanbesimpliedandthecomputer
willautomaticallyconnecttotheprojector.
•Thescreenofyourcomputercanbesenttouptofourprojectorsatthesametime.
•GeometricCorrectionTool(GCT)
See“❹ProjectinganImagefromanAngle(GeometricCorrectionToolinImageExpressUtilityLite)”.
Step 1: Install Image Express Utility Lite on the computer.
NOTE:
•Toinstalloruninstalltheprogram,theWindowsuseraccountmusthave“Administrator”privilege(Windows7,WindowsVista
andWindowsXP).
•Exitallrunningprogramsbeforeinstallation.Ifanotherprogramisrunning,theinstallationmaynotbecompleted.
•ImageExpressUtilityLitewillbeinstalledtothesystemdriveofyourcomputer.
Ifthemessage“Thereisnotenoughfreespaceondestination”isdisplayed,freeupenoughspace(about100MB)toinstallthe
program.
1.InserttheaccompanyingNECProjectorCD-ROMintoyourCD-ROMdrive.
The menu window will be displayed.
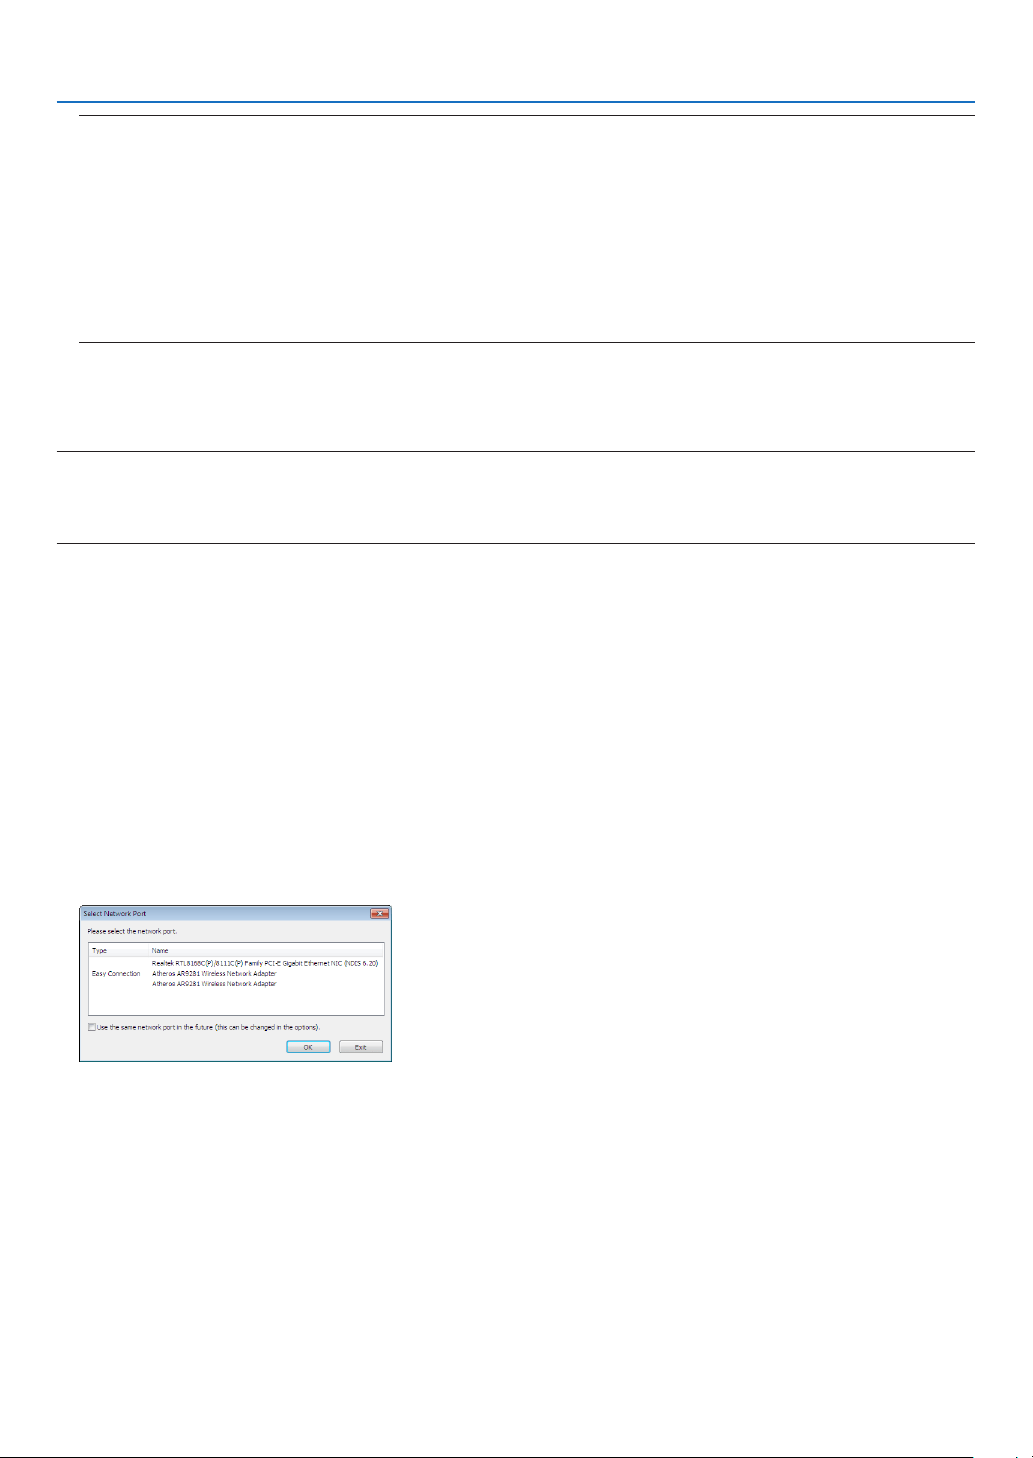
161
8. User Supportware
TIP:
Ifthemenuwindowwillnotbedisplayed,trythefollowingprocedure.
ForWindows7:
1.Click“start”onWindows.
2.Click“AllPrograms”“Accessories”“Run”.
3.TypeyourCD-ROMdrivename(example:“Q:\”)and“LAUNCHER.EXE”in“Name”.(example:Q:\LAUNCH
-
ER.EXE)
4.Click“OK”.
The menu window will be displayed.
2.Clickasoftwareprogramonthemenuwindow.
The installation will start.
•Followtheinstructionsontheinstallerscreenstocompletetheinstallation.
TIP:
•UninstallingImageExpressUtilityLite
TouninstallImageExpressUtilityLite,dothesameproceduresstatedasin“UninstallingVirtualRemoteTool”.Read“VirtualRemote
Tool”as“ImageExpressUtilityLite”(page
157)
Connect the projector to a LAN.
ConnecttheprojectortotheLANbyfollowingtheinstructionsin“ConnectingtoaWiredLAN”(page
138),“Con-
nectingtoaWirelessLAN(standardsforNorthAmerica,optional:NP02LMseries)”(page139)and“9Application
Menus”(page105)
Start Image Express Utility Lite.
1.OnWindows,click“Start”“Allprograms”“NECProjectorUserSupportware”“ImageExpressUtility
Lite”“ImageExpressUtilityLite”.
Image Express Utility Lite will start.
Theselectwindowfornetworkconnectionwillbedisplayed
2.SelectNetworkandclick“OK”.
The select window for destination will show a list of connectable projectors.
•Whenconnectingthecomputerdirectlytotheprojectorbyone-to-one,“EasyConnection”isrecommended.
•Whenoneormorenetworksfor“EASYCONNECTION”arefound,the“EasyConnectionSelectionScreen”
windowwillbedisplayed.
•Tocheckforthenetworkavailableforconnectedprojectors,fromthemenu,select[INFO.][WIRELESS
LAN][SSID].

162
8. User Supportware
3.Selecttheprojectoryouwishtoconnect,andclick“Connect”.
The target selection window will be displayed.
4.Placeacheckmarkforprojectorstobeconnected,andthenclick“Connect”.
•Whenoneormoreprojectorsaredisplayed,fromthemenuontheprojector,select[INFO.]
[WIRELESS LAN]
[IP ADDRESS].
When connecting with the projector is establised, you can operate the control window to control the projector. (
page 35)
NOTE:
•When[POWER-SAVING]isselectedfor[STANDBYMODE]fromthemenu,theprojectorthatisturnedoffwillnotbedisplayed
intheselectwindowfordestination
TIP:
ViewingtheHelpofImageExpressUtilityLite
•DisplayingtheHelpleofImageExpressUtilityLitewhileitisrunning.
Clickthe[?](help)icononthecontrolwindow.
The Help screen will be displayed.
•DisplayingtheHelpleofGCTwhileitisrunning.
Click“Help(C)”
“Help” on the Cornerstone Edit screen.
The Help screen will be displayed.
•DisplayingthehelpleusingtheStartMenu.
Click“Start”
“All programs” or “Programs” “NEC Projector User Supportware” “Image Express Utility Lite”
“Image Express Utility Lite Help”.
The Help screen will be displayed.
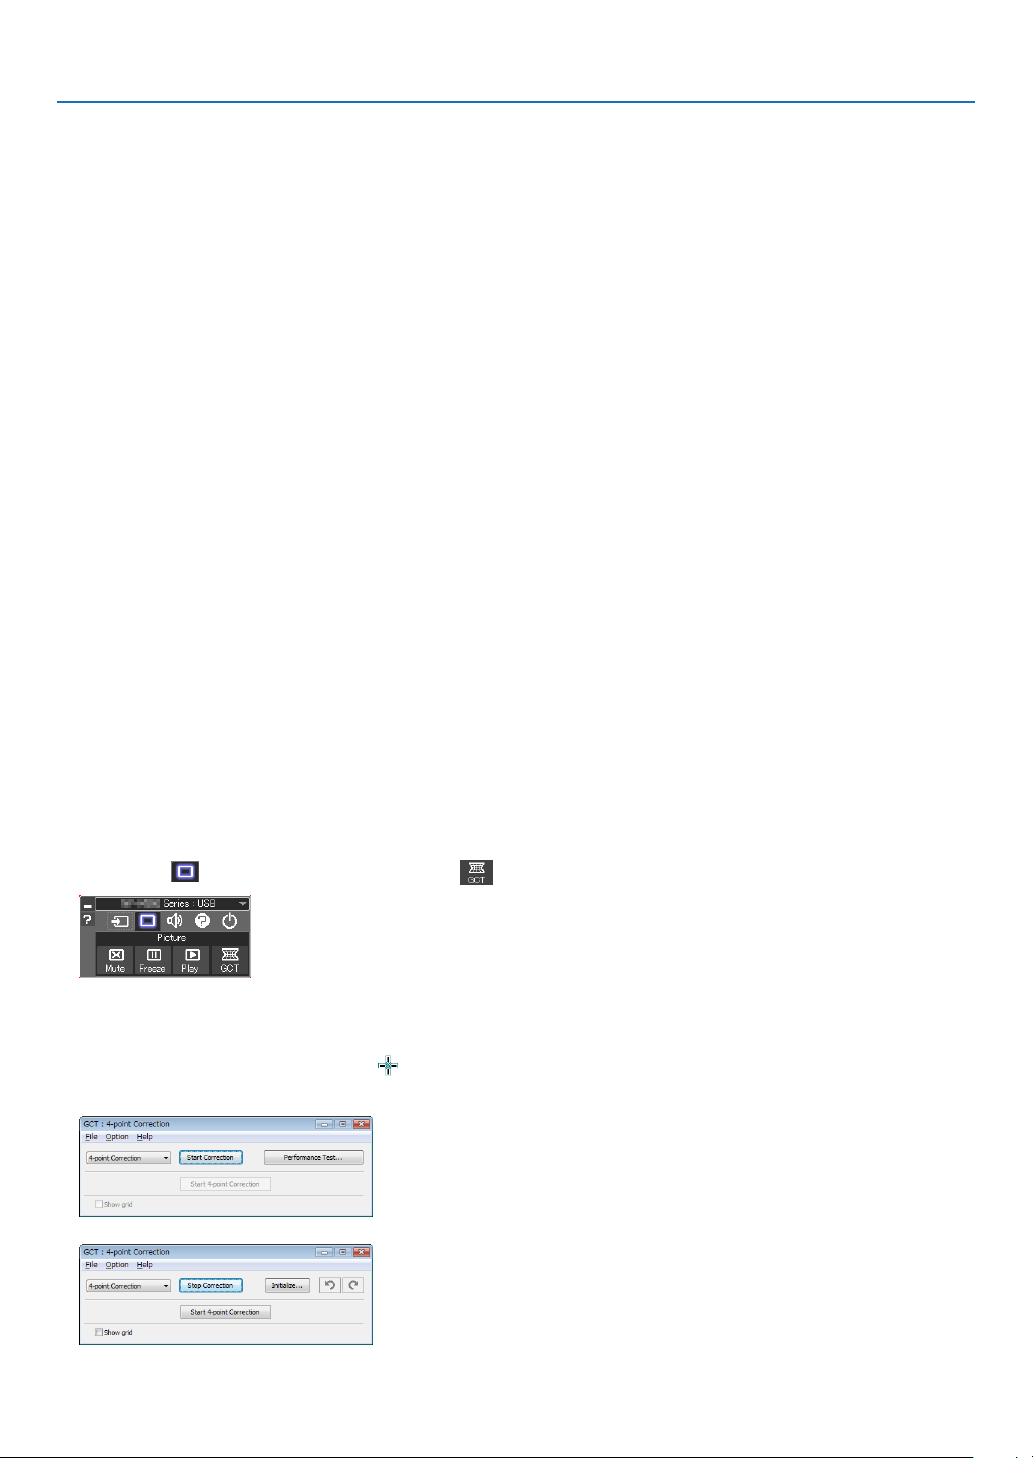
163
8. User Supportware
Projecting an Image from an Angle (Geometric Correction Tool
in Image Express Utility Lite)
TheGeometricCorrectionTool(GCT)functionallowsyoutocorrectdistortionofimagesprojectedevenfroman
angle.
What you can do with GCT
•TheGCTfeatureincludesthefollowingthreefunctions
•4-pointCorrection:Youcantaprojectedimagewithintheborderofthescreeneasilybyalignthefourcorners
ofanimagetotheonesofthescreen.
•Multi-pointCorrection:Youcancorrectadistortedimageonthecornerofawallorirregularshapedscreen
byusingmanyseparatedscreenstocorrecttheimageaswellas4-pointCorrection.
•Parameters Correction:Youcancorrectadistortedimagebyusingacombinationoftransformationalrules
preparedinadvance.
Thissectionwillshowanexampleforusewith4-pointCorrection.
Forinformationabout“Multi-pointCorrection”and“ParametersCorrection”,seethehelpleofImageExpress
UtilityLite.(page
162)
•Yourcorrectiondatacanbestoredintheprojectororyourcomputerwhichcanberestoredwhennecessary.
•TheGCTfunctionisavailablewithaUSBcable,wiredorwirelessLANconnection,andvideocable.
Projecting an Image from an Angle (GCT)
ThissectionwillshowanexampleforusewithUSBDisplay(usingaUSBcabletoconnectacomputerandthepro-
jector).
•
TheUSBDisplayfunctionwillautomaticallydisplaythecontrolwindow
•ForavideocableorLANconnection,installandstartImageExpressUtilityLiteinyourcomputerbeforehand.(
page
34)
Preparation:Adjusttheprojectorpositionorthezoomsothattheprojectedimagecancoverthewholescreenarea.
1.Clickthe“
”(Picture)iconandthenthe“”button.
The “4-point Correction” window will be displayed.
2.Clickthe“StartCorrection”buttonandthen“Start4-pointCorrection”button.
A green frame and a mouse pointer ( ) will be displayed.
•Four[•]markswillbeappearedatfourcornersofthegreenframe
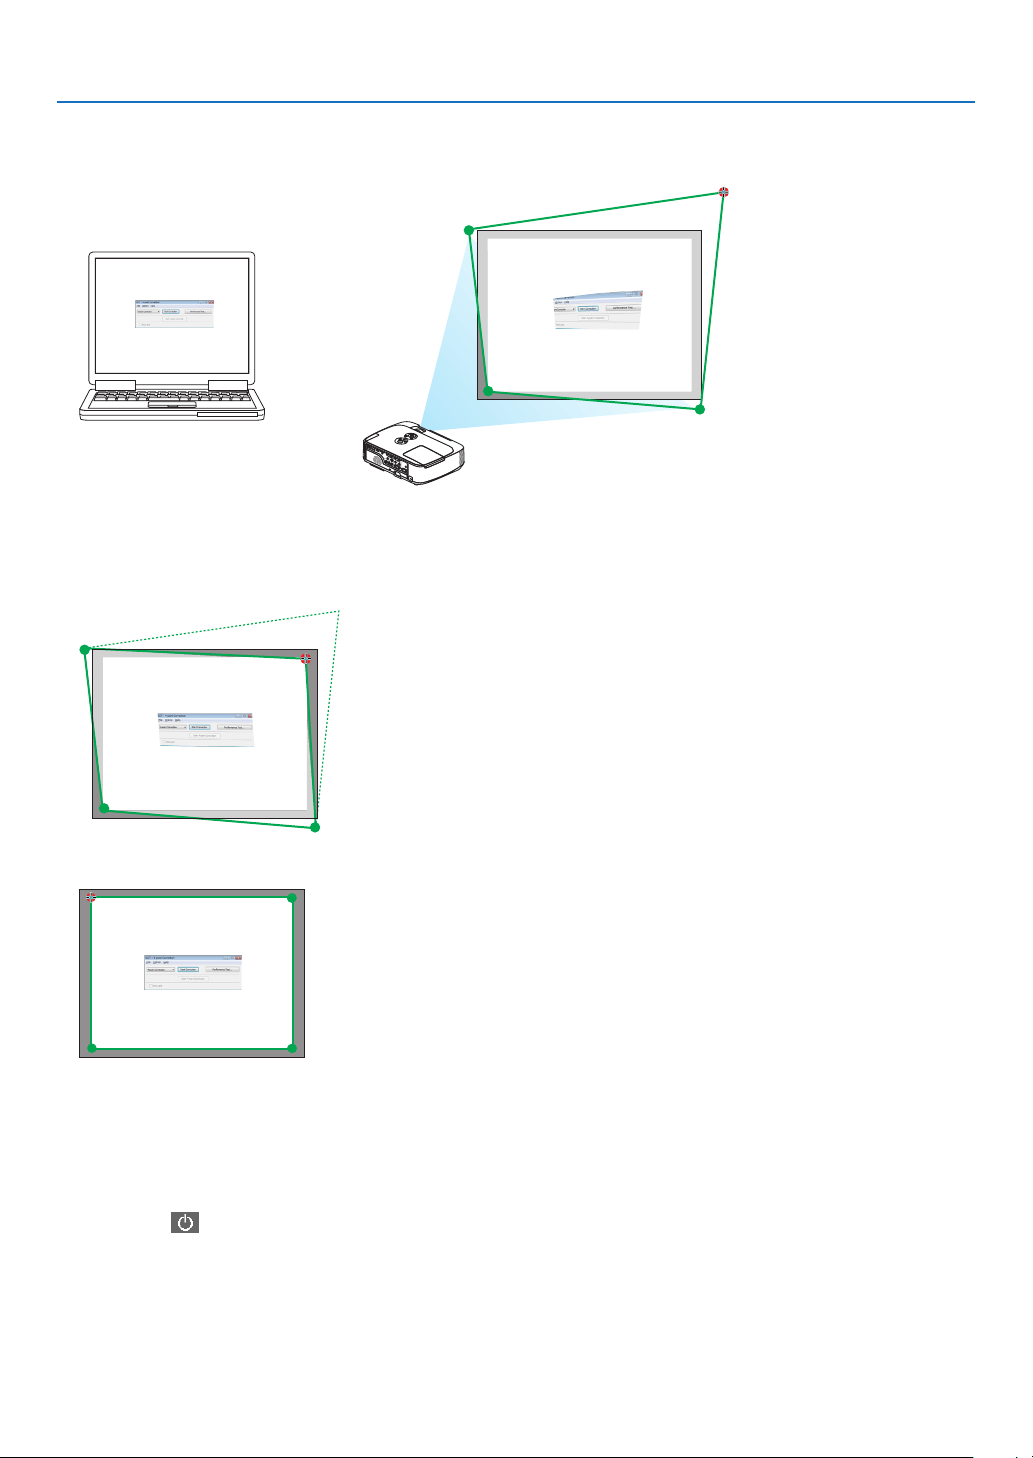
164
8. User Supportware
3.Usethemousetoclickthe[
• ]markofwhichcorneryouwishtomove.
The currently selected [ •]markwillturnred.
(In the above example, Windows screens are omitted for clarification.)
4.Dragtheselected[ • ]marktothepointyouwishtocorrectanddropit.
•Whenyouclicksomewherewithintheprojectimagearea,thenearest[•]markwillgotothepositionwhere
the mouse cursor is.
5.RepeatStep3and4tocorrectthedistortionoftheprojectedimage.
6.Aftercompleting,right-clickthemouse.
The green frame and the mouse pointer will disappear from the projected image area. This will complete the cor-
rection.
7.Clickthe“X”(close)buttononthe“4-pointCorrection”window.
The“4-pointCorrection”windowwilldisappearandthe4-pointcorrectionwilltakeeffect.
8.Clickthe“
”buttononthecontrolwindowtoexittheGCT.
TIP:
•Afterperformingthe4-pointcorrection,youcansavethe4-pointcorrectiondatatotheprojectorbyclicking“File”“Writingto
theprojector…”onthe“4-pointCorrection”window.
•SeetheHelpofImageExpressUtilityLiteforoperating“4-pointCorrection”windowandotherfunctionsthanGCT.(page
162)
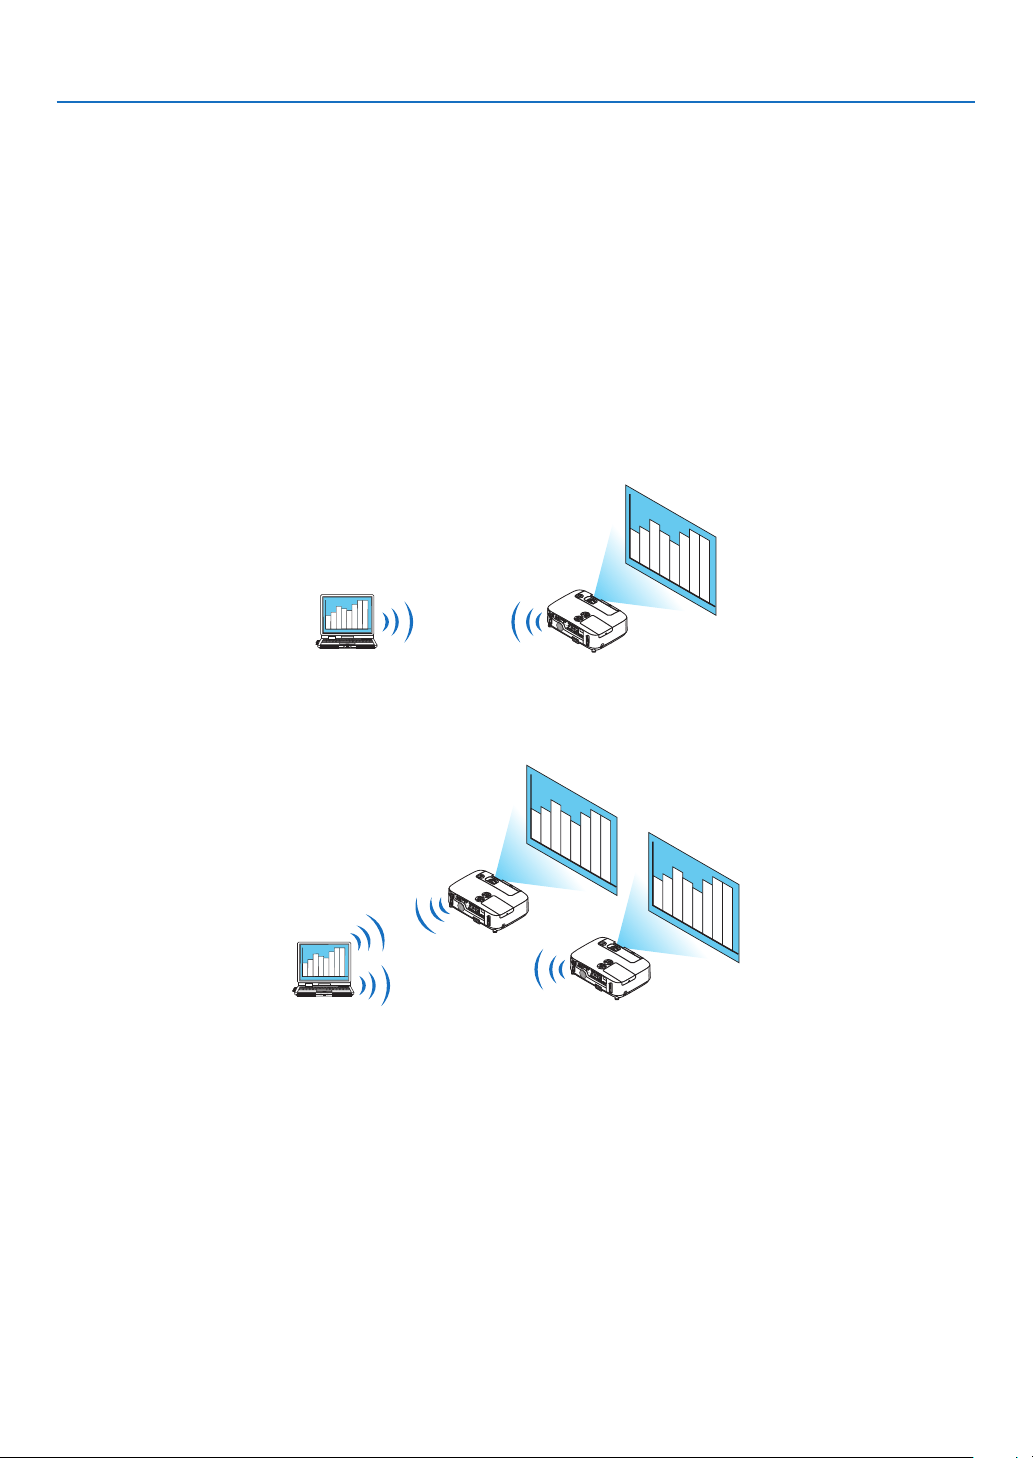
165
8. User Supportware
Projecting Images or Videos from the Projector over a LAN
(Image Express Utility 2.0)
What you can do with Image Express Utility 2.0
•UsingImageExpressUtility2.0allowsyoutosendthescreensofyourcomputerstotheprojectorviawired/wire-
lessLAN.
ThedifferencefromImageExpressUtilityLiteisthatprojectedimagescanbesentfromacomputertonotonly
oneprojectorbutalsototwoormoreprojectorsatthesametime.
When“MeetingMode”isused,projectedimagescanbesentandreceivedbetweentwoormorecomputers.
•High-speed,high-qualityimagetransmissionsbasedonNEC’soriginalcompressionalgorithm
NEC’soriginalcompressionalgorithmallowshigh-qualityimagestobesentoverthenetworkathighspeed,from
yourcomputertotheprojector.
•Simultaneousprojectionbymultipleprojectors
Imagescanbesentfromacomputertonotonlyoneprojectorbutalsototwoormoreprojectorsatthesame
time.
•“EasyConnection”functionforconnectingwirelessLAN
Byusing“EasyConnection”function*
1
,thecomplicatedsettingofwirelessLANcanbesimplied.
*
1
ThisfunctioncanbeusedwhenWindowsXPisusedastheOSandwhenyouhavea“ComputerAdminis-
trator”privilege.IftheOSisWindows7/WindowsVista,inputoflogonpasswordas“Administrator”maybe
prompted.
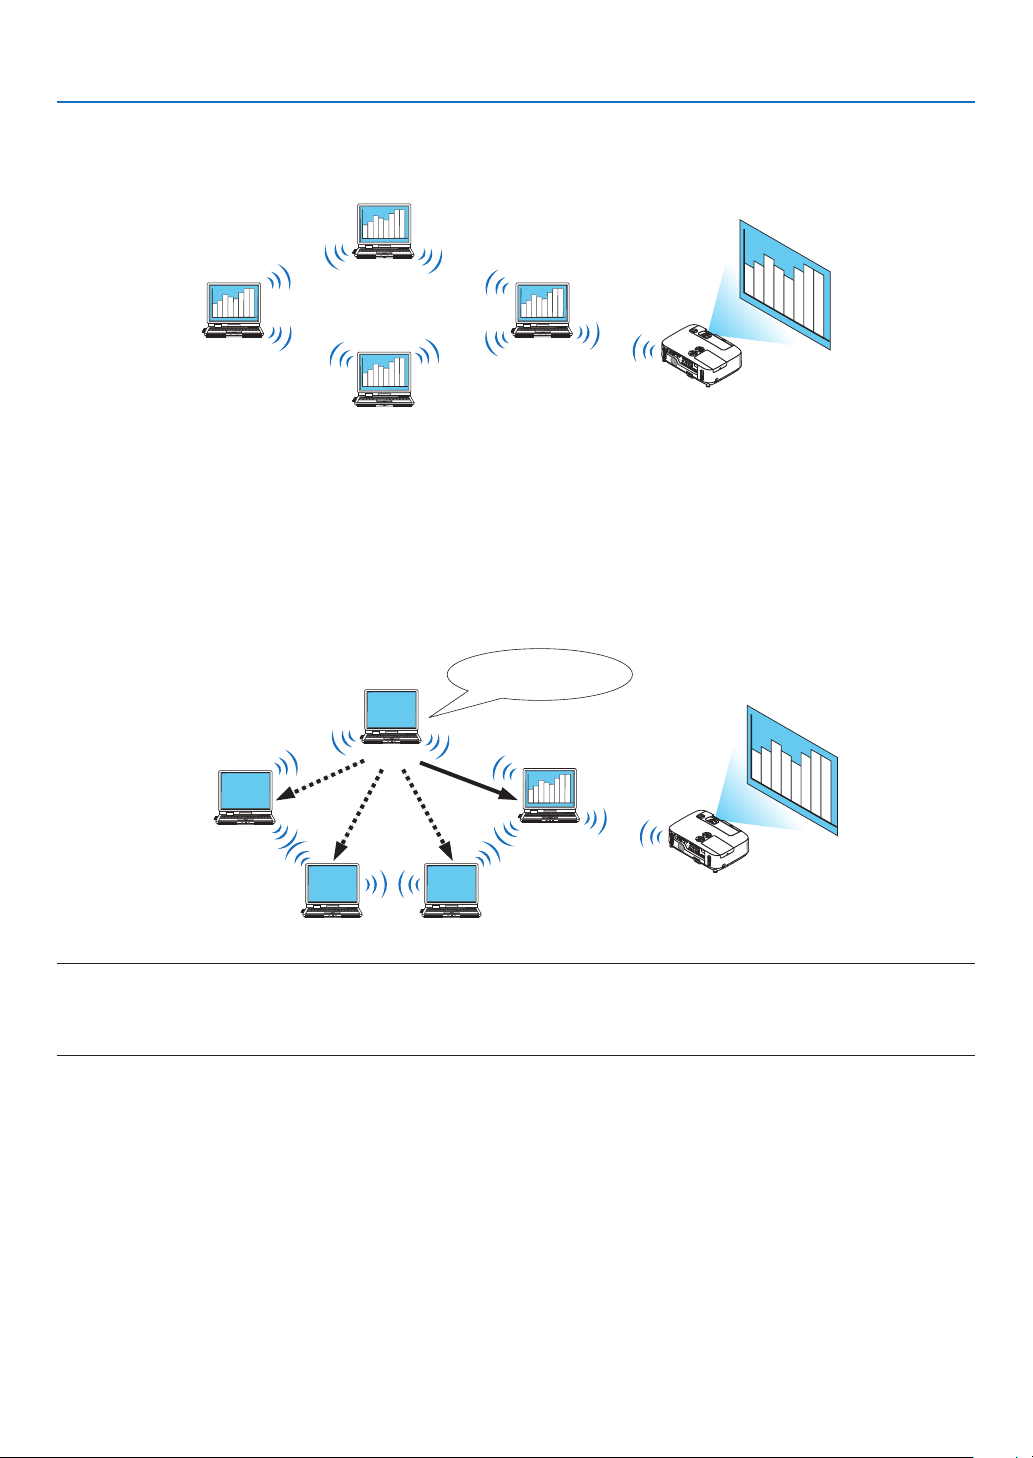
166
8. User Supportware
•Projectedimagescanbetransferredandsavedtocomputers.
When“MeetingMode”isused,projectedimagescanbesenttothecomputersofalltheparticipants(attendants)
ofa“Meeting”.Thereceivedimagescanbesavedtoyourcomputerwithamemo(textdata)attached.
Attendant
Attendant
Presenter
Attendant
•1-clickswitchingofpresenter
Whenswitchingtoanotherpresenterduringtheconference,theparticipants(attendants)cansimplyclickabutton
toswitchovertothenewpresenter.
•Centralmanagementoftheprojectingcomputer
UsingtheTrainingModeallowsyoutouseasinglecomputer(Manager)tomanagewhichcomputer(Attendant)
projects.Possibleoperationincludesswitchingprojectingcomputerstoprojectfrom,aswellastemporarilytermi-
natingcommunicationwiththeprojector.
AttendantA
AttendantD
(presenter)
AttendantBAttendantC
Manager
Mr. D,pleasestart
yourpresentation.
NOTE::
TheTrainingModeisnotinstalledviathe“Typical”installationoptionwhenImageExpressUtility2.0isinstalled.
TouseTrainingMode,select“Extension”installationoptionontheinstallselectionscreenthatisdisplayedwhileImageExpress
Utility2.0installationisinprogress,andselect“TrainingMode(Attendant)”or“TrainingMode(Manager)”.
Connecting the projector to a LAN
ConnecttheprojectortotheLANbyfollowingtheinstructionsin“ConnectingtoaWiredLAN”(page
138),“Con-
nectingtoaWirelessLAN”(page139)and“9ApplicationMenus”(page105)
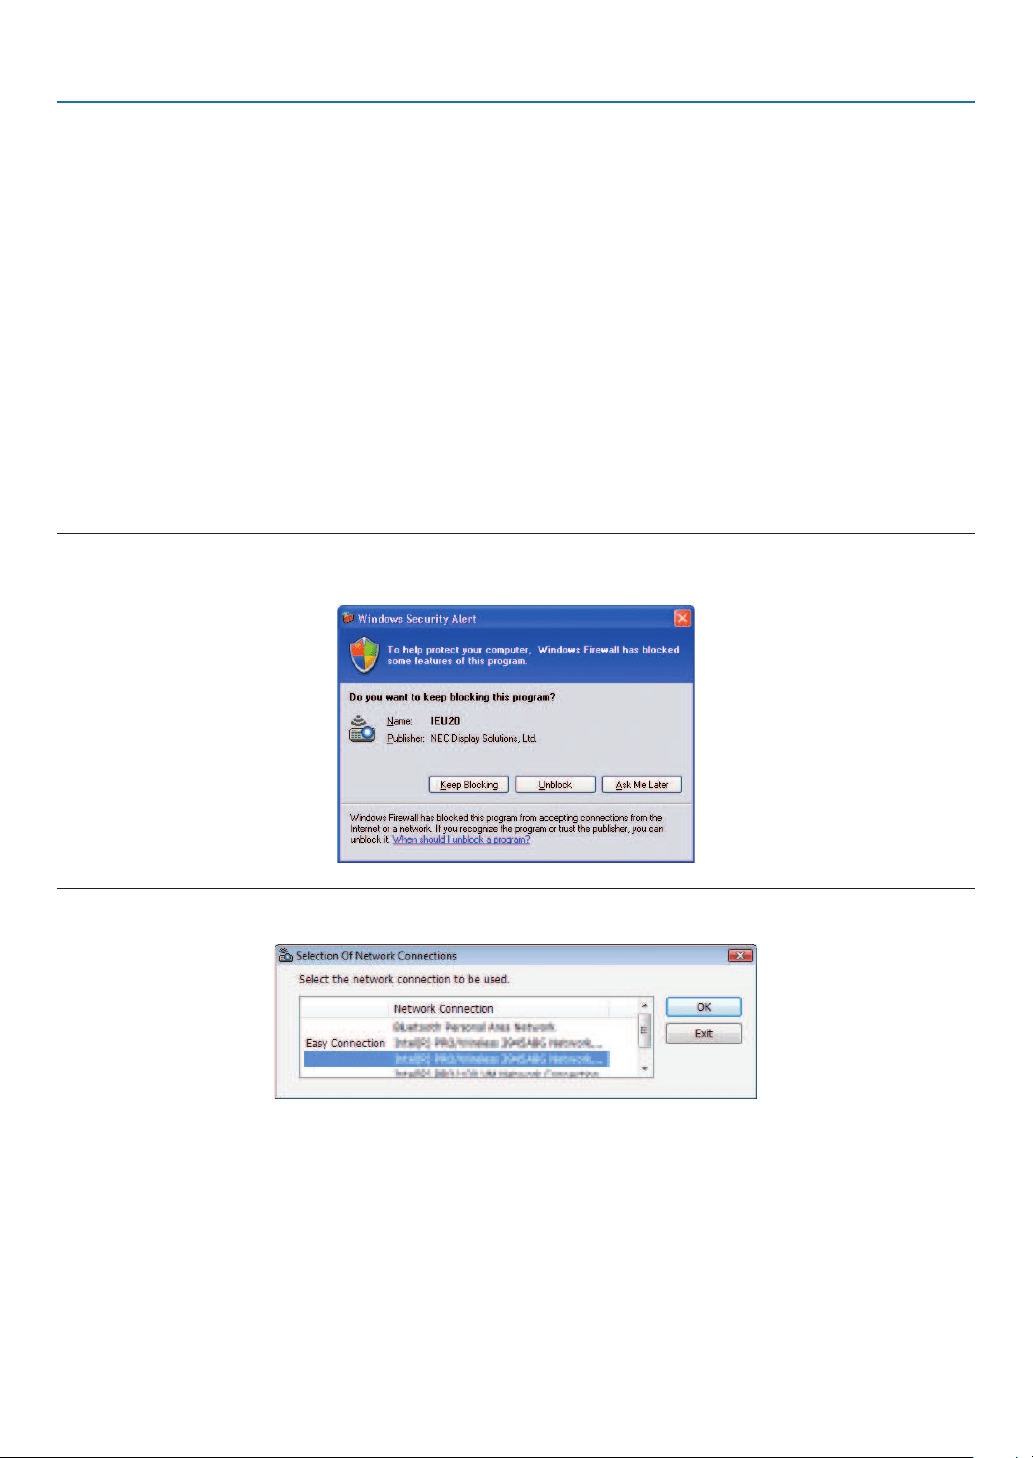
167
8. User Supportware
Basic Operation of Image Express Utility 2.0
ThissectionexplainsthefollowingthreecasesasexamplesofoperatingImageExpressUtility2.0.
(1)Transferringimagestotheprojector
(2)Holdingaconference
(3)Participatinginaconference
SendingImagestoProjector
•Connectingprojector
1TurnonthepowertotheprojectorforwhichLANhasbeenset.
2ClickWindows[Start][AllPrograms][NECProjectorUserSupportware][ImageExpressUtility2.0]
[ImageExpressUtility2.0],inthatorder.
The“SelectionOfNetworkConnections”windowwillbedisplayed.
Alistofthenetworkequipmentconnectedtoyourcomputerwillbedisplayed.
IMPORTANT:
AscreenliketheonebelowisdisplayedwhenthesoftwareisstartedonaPCinstalledwithWindowsXPServicePack2(SP2)(or
later).
Click“Unblock”ifthisisdisplayed.
3Selectthenetworkequipmentthatistobeusedandclick[OK].
Selectthenetworkdevicedisplaying“EasyConnection”iftheproductLANsettingisfor“EasyConnection.”This
will call up the “Projector List” window.
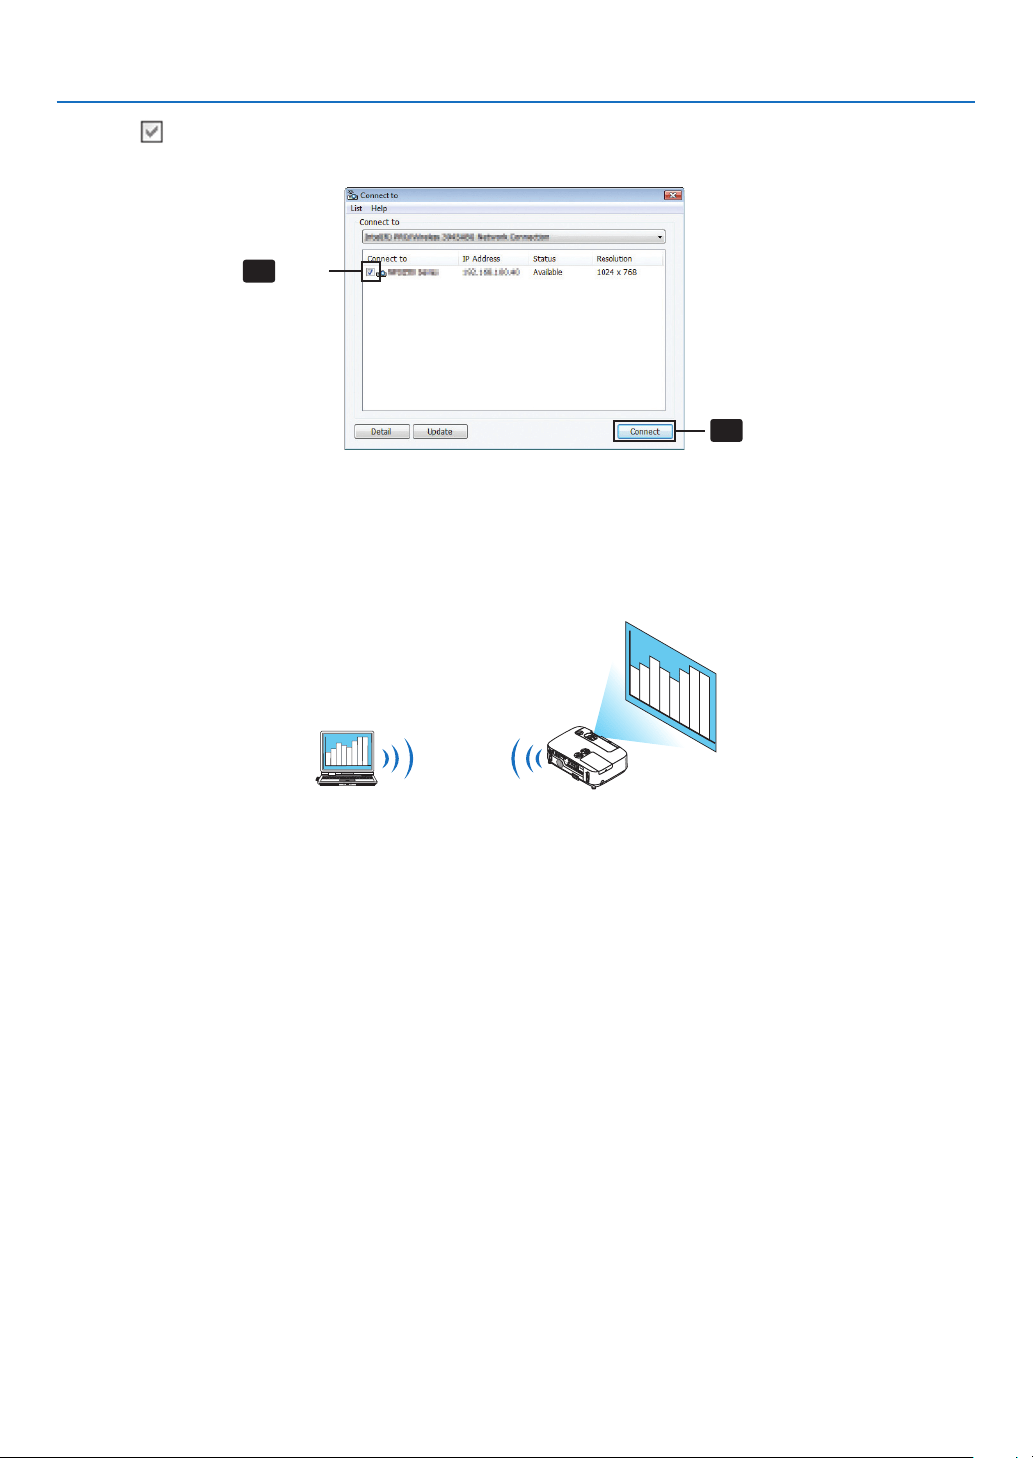
168
8. User Supportware
4Check(
)theprojectortoconnectandclick[Connect].
Ifthenameoftheprojectortoconnectisnotonthelistorifitishidden,click[Update].
Click
4
-1
Clic
k
4
-2
The screen of your computer will be projected from the projector.
At this time, the input signal of the projector will automatically change to “NETWORK”.
•Transferringimages
Whenyourcomputerisconnectedtotheprojector,thescreenofthecomputerisprojectedfromtheprojectorasis.To
makeyourpresentationbyusingaPowerPointle,openthePowerPointleandstartyourpresentation.

169
8. User Supportware
•Stoppingorresumingthetransmissionofimages
Thetransmissionofthescreenofthecomputertotheprojectorcanbetemporarilystoppedandthenresumed.
1Clicktheprojectoricon(
)ontheWindowstaskbar.
A pop-up menu will be displayed.
2Click[StopSending].
Theprojectoricononthetaskbarwillchange(
).
NOTE:
Evenifthescreenofthecomputerischangedinthisstatus,theimageprojectedfromtheprojectordoesnotchange.
Tomanipulatethescreenthatshouldnotbedisclosed(projectedfromtheprojector),stoptransmission.
3Clicktheprojectoricon()ontheWindowstaskbar.
A pop-up menu will be displayed.
4Click[StartSending].
Theprojectoricononthetaskbarwillchange(
).
The transmission of the screen for the computer will be resumed, and the current screen of the computer will be
projected from the projector.
•Endthetransmissionofimages
ExitImageExpressUtility2.0.
1Clicktheprojectoricon()ontheWindowstaskbar.
A pop-up menu will be displayed.
2Click[Exit].
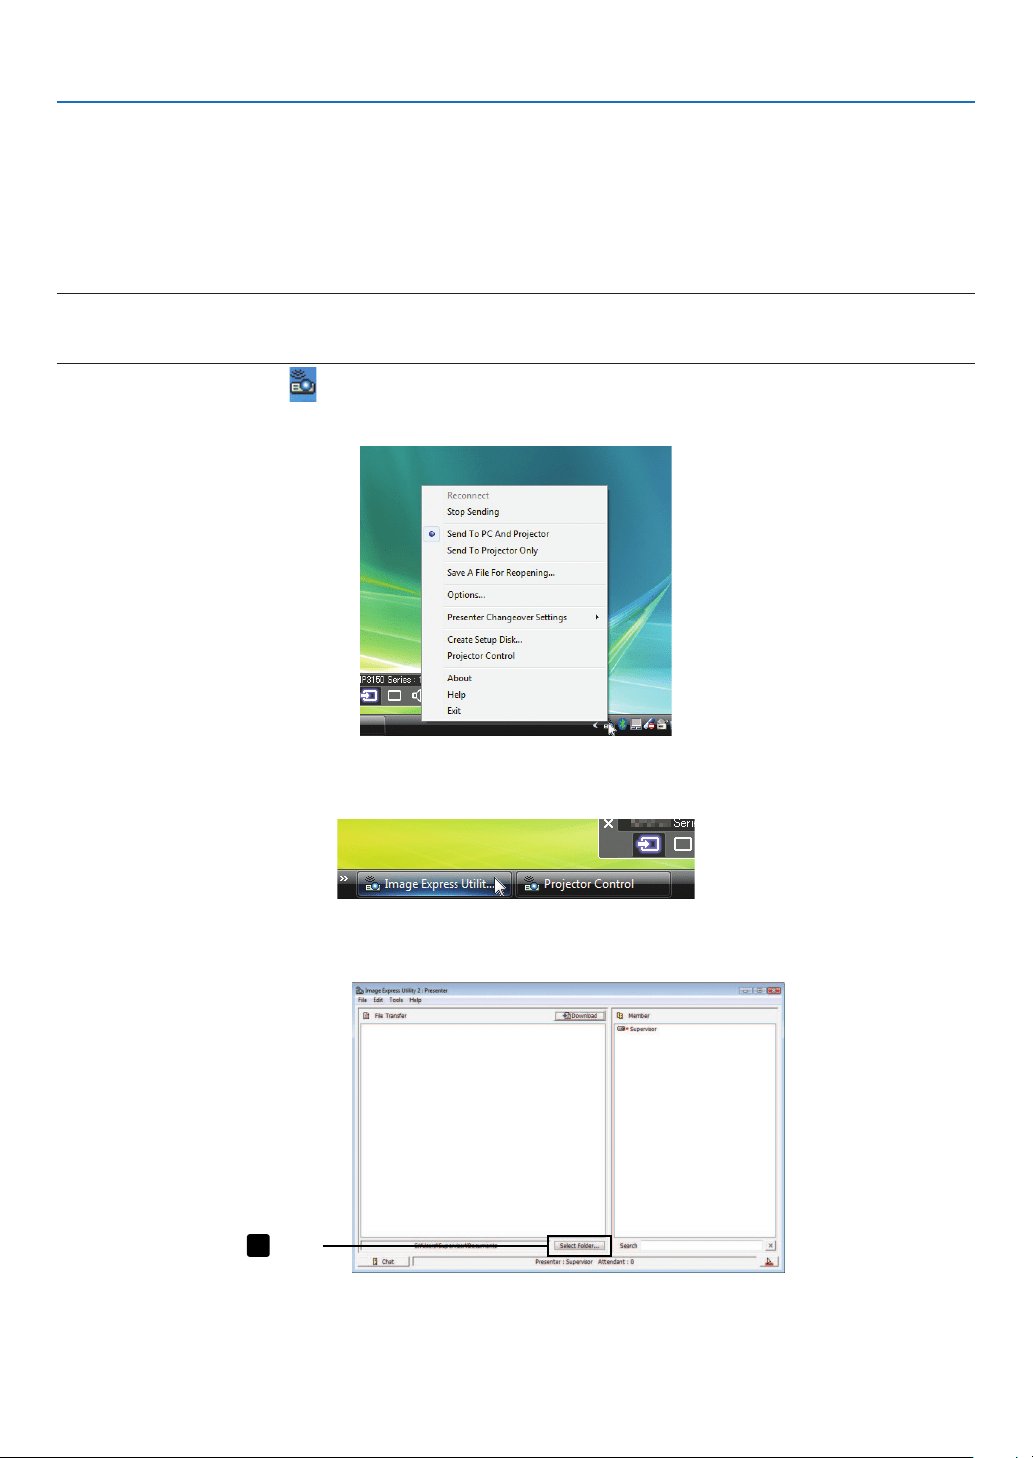
170
8. User Supportware
Holding Conferences
•Holdingconferences
1Followsteps1through4in“Connectingprojector”of“SendingImagestoProjector”(page
167).
The screen of your computer will be projected from the projector.
•Disclosealetotheparticipantsoftheconference.
NOTE:
Todisclosealetotheparticipants,selectioncanbemadeonlyinfolderunits.
Therefore,afolderonlyhavinglesthatcanbedisclosedtotheparticipantsmustbecreatedinadvance.
1Clicktheprojectoricon()ontheWindowstaskbar.
A pop-up menu will be displayed.
2Beforeclicking[SendtoPCandProjector],checkthatthereisa“•”markapplied.
3Clickthe[ImageExpressUtility2.0]buttononthetaskbar.
The presenter window will be opened.
4Click[SelectFolder].
Click
4
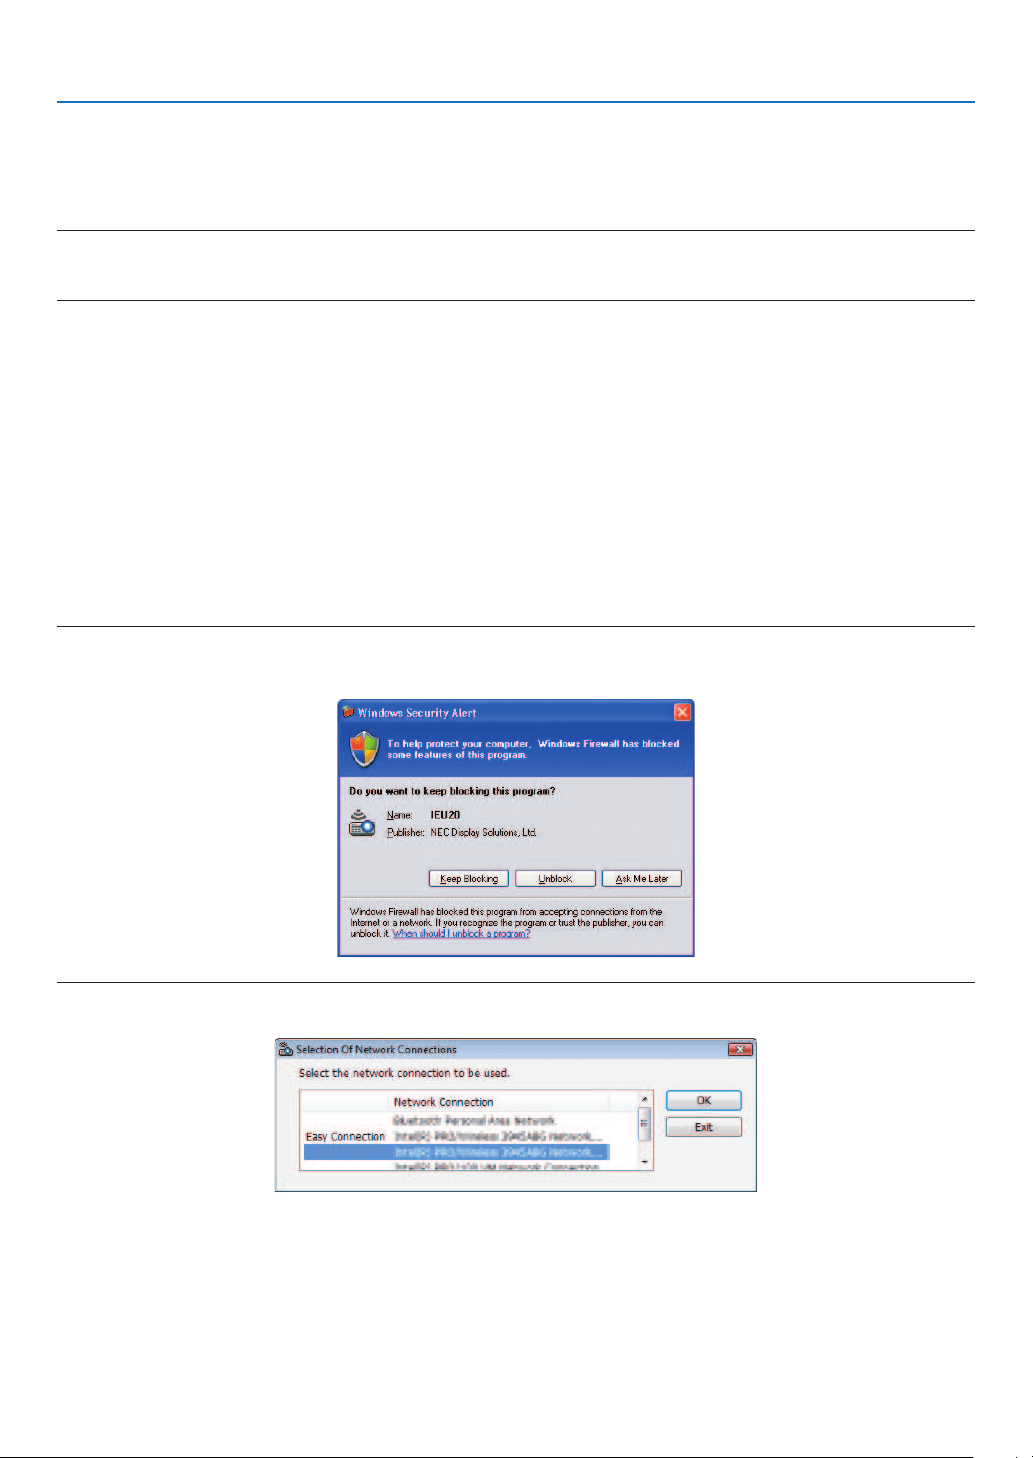
171
8. User Supportware
5Selectafoldersavingtheletobedisclosedtotheparticipants,andclick[OK].
The file in the selected folder will be displayed in the list of files to transfer.
6Click[Download].
The file will be shown to the participants.
NOTE:
Whenthecomputerisconnectedtotheprojector,thecomputerscreenthatisinofbeingprogressisalsoprojectedfromtheprojec-
tor.Tomanipulateascreenthatshouldnotbeshown(notprojected),temporarilystopthetransmission(page169).
•Endingconference
1Click[File]inthepresenterwindow,andclick[Exit].
Youcanalsoendtheconferencebyclicking[×]attheupperrightofthepresenterwindow.
Participating in Conference
•Participatinginconferences
1ClickWindows[Start][AllPrograms][NECProjectorUserSupportware][ImageExpressUtility2.0]
[ImageExpressUtility2.0],inthatorder.
The“SelectionOfNetworkConnections”windowwillbedisplayed.
Alistofthenetworkequipmentconnectedtoyourcomputerwillbedisplayed.
IMPORTANT:
AscreenliketheonebelowisdisplayedwhenthesoftwareisstartedonaPCinstalledwithWindowsXPServicePack2(SP2)(or
later).
Click“Unblock”ifthisisdisplayed.
2Selectthenetworkequipmentthatistobeusedandclick[OK].
Selectthenetworkdevicedisplaying“EasyConnection”iftheproductLANsettingisfor“EasyConnection.”This
will call up the “ Meeting List” window.
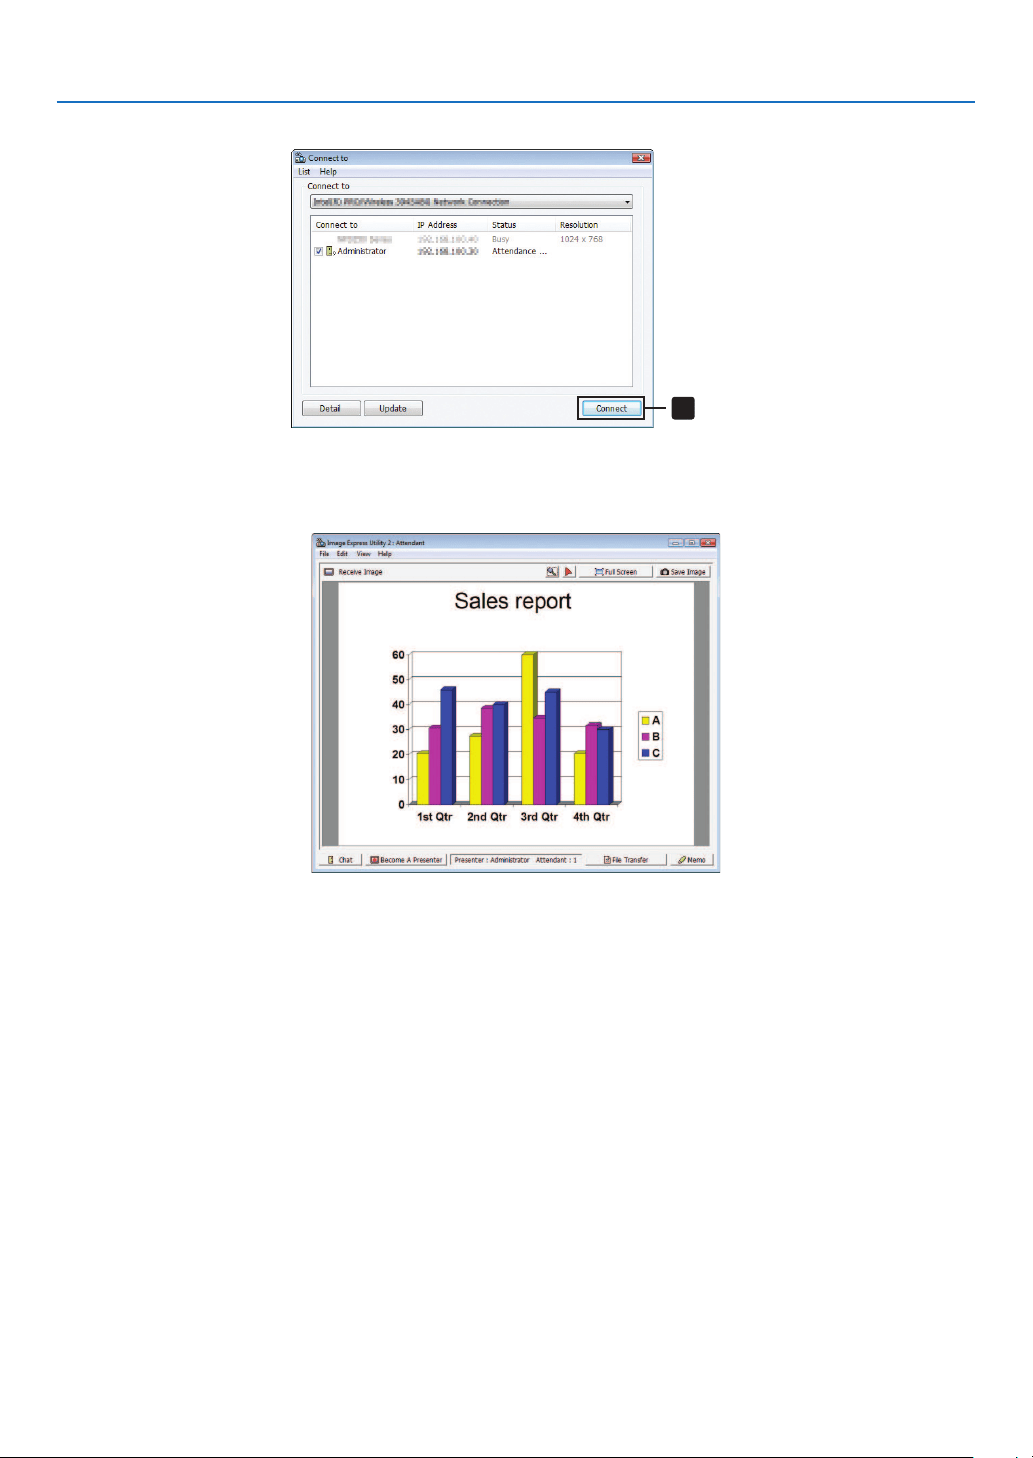
172
8. User Supportware
3ClicktheMeetingNametoparticipate,andclick[Connect].
Click
3
The computer will be connected to the selected conference and the attendant window will be displayed.
If the presenter selects “Send to PC And Projector”, the image projected from the projector is displayed in the at-
tendant window.
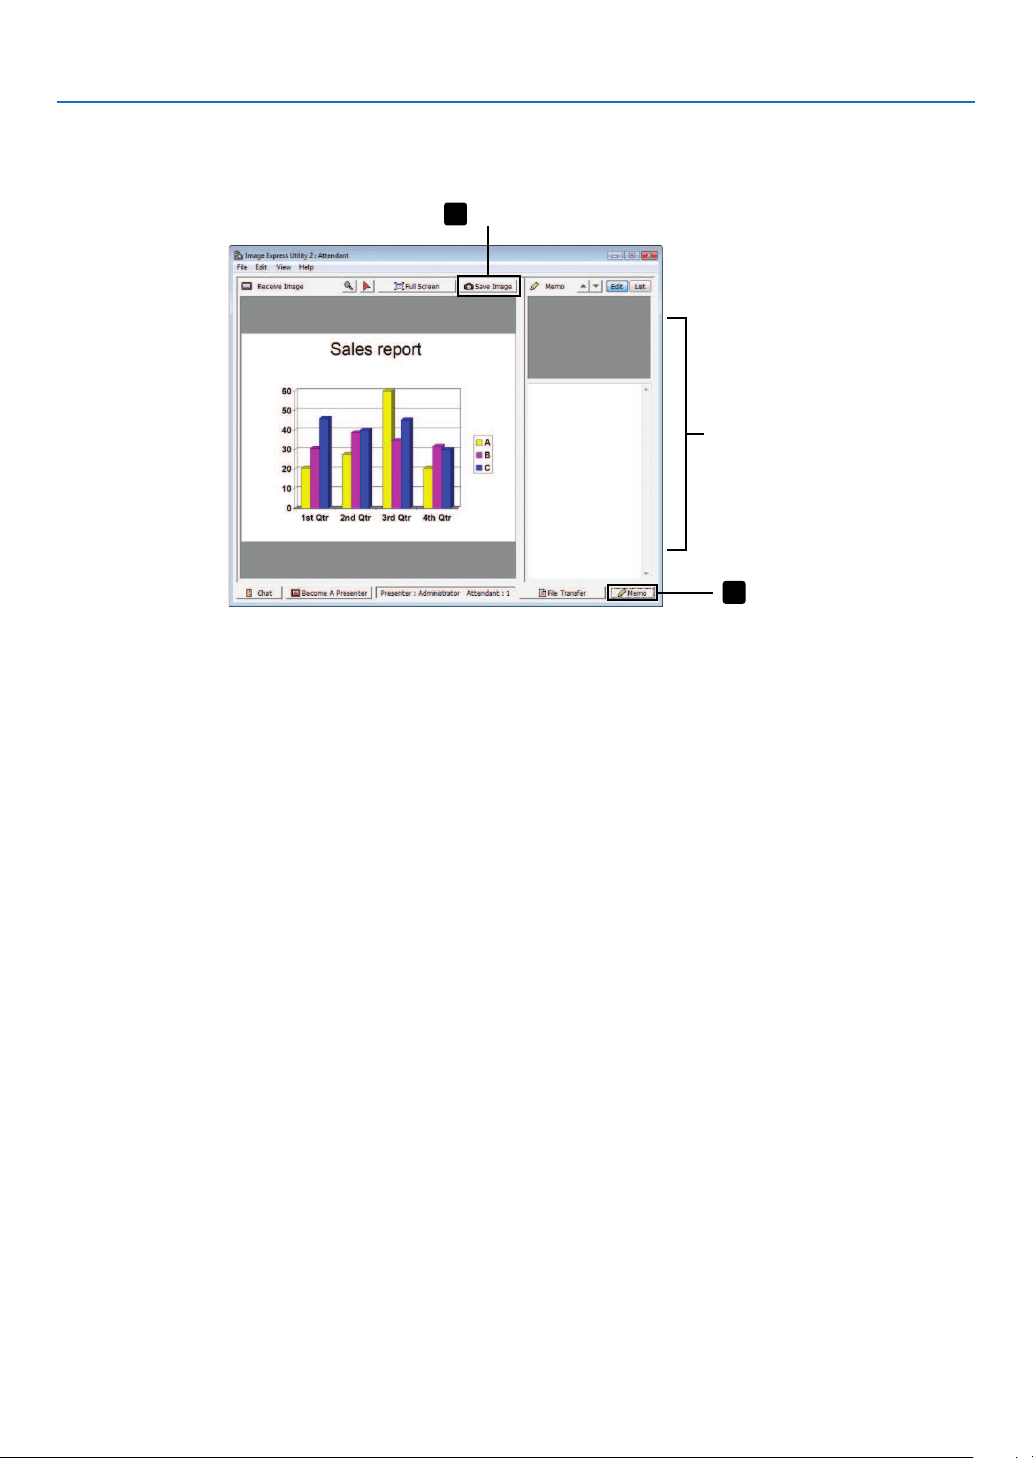
173
8. User Supportware
•Savingreceivedimages
1Click[Memo]intheattendantwindow.
A memo pane will be displayed.
Memopane
Click
2
Click
1
2Click[SaveImage]intheattendantwindow.
The image displayed in the attendant window will be saved.
•Thesavedimageisaddedtothememolistandathumbnailisdisplayed.
•Amemocanbeattachedtothesavedimage.
REFERENCE:
•IncaseofWindowsXP,acreatedleissavedto“MyDocuments\ImageExpress\”underthedefaultsettings.IncaseofWindows
7/WindowsVista,“Document\ImageExpress\”isthedefaultfoldertosaveacreatedle.
•Afolderiscreatedbelowthedefaultfolderbasedonthetimeanddateoftheconference,andtheimageissavedtoaleinthe
createdfolder.
Forexample,ifaconferenceisheldat11:20onMay14,2009,thedefaultfoldernameonWindowsXPwillbe“MyDocuments\
ImageExpress\2009-05-14_11-20_MeetingRecords”.
Inthisfolder,anHTMLlenamed“MeetingRecords”iscreated.
Thesavedimageissavedin“Images”folder.
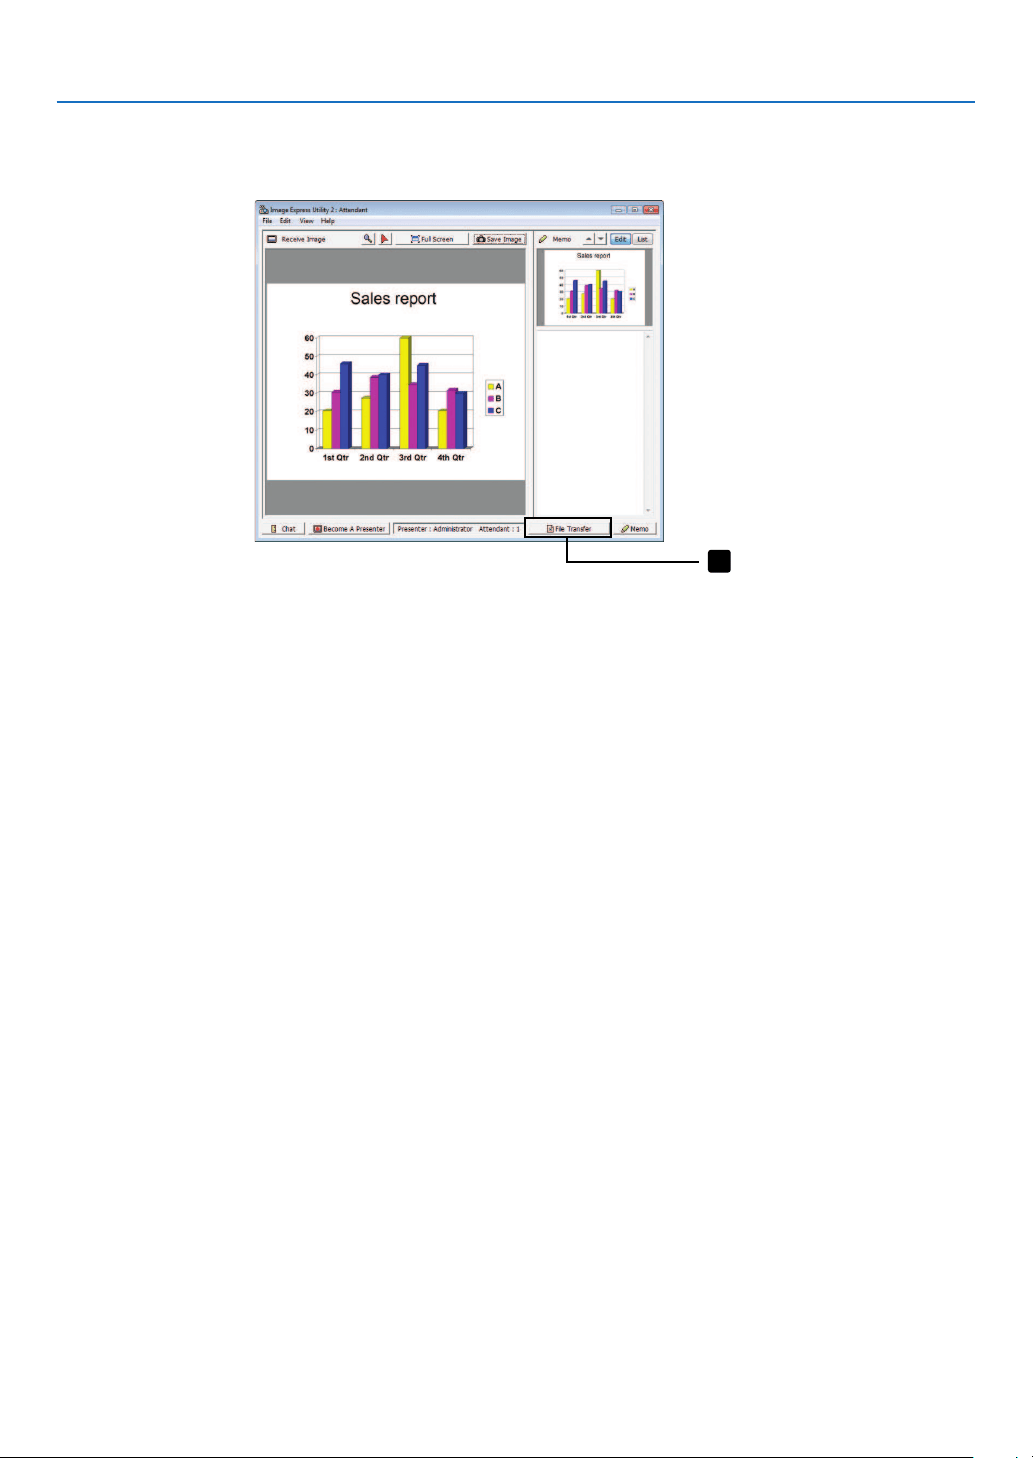
174
8. User Supportware
•Downloadingdisclosedle
1Click[FileTransfer]intheattendantwindow.
The “File Transfer” window will be opened.
Click
1
2Selectaletodownload,andclick[Download].
Downloading will begin.
The progress of the downloading is displayed at the lower left of the window.
3Whendownloadingiscomplete,click[File]inthe“FileTransfer”window,andclick[Exit].
The “File Transfer” window will be closed.
REFERENCE:
•If“OpenAfterDownloading”ischecked,theleisopenedbyspeciedWindowsapplicationsoftwareafterdownloadingiscom-
plete.
•IncaseofWindowsXP,acreatedleissavedto“MyDocuments\ImageExpress\”underthedefaultsettings.IncaseofWindows
7/WindowsVista,“Document\ImageExpress\”isthedefaultfoldertosaveacreatedle.
•Afolderiscreatedbelowthedefaultfolderbasedonthetimeanddateoftheconference,andtheimageissavedtoaleinthe
createdfolder.
Forexample,ifaconferenceisheldat11:20onMay14,2009,thedefaultfoldernameonWindowsXPwillbe“MyDocuments\
ImageExpress\2009-05-14_11-20_MeetingRecords”.
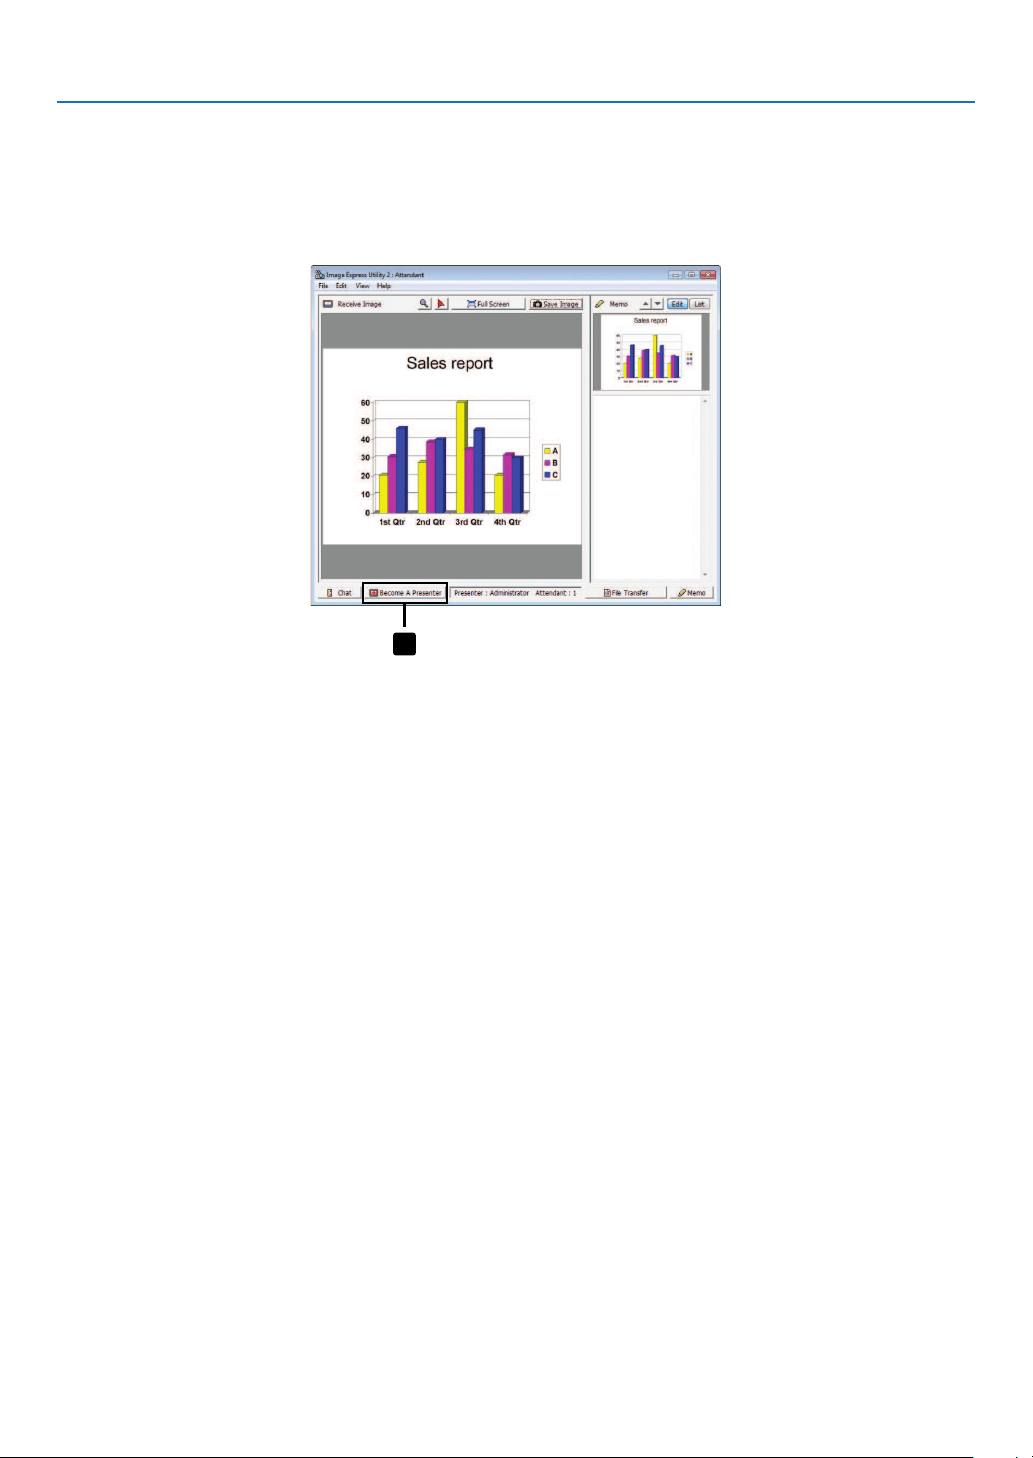
175
8. User Supportware
•Changingpresenter
Threetypesofsettingsmaybemadetochangethepresenter:“NotApproved”,“Approved”,and“ChangingProhibited”
(thesecanbeselectedonlybythepresenter).
Inthefollowingexample,“NotApproved”isselected.
•Click[BecomeAPresenter]intheattendantwindow.
You will change from a participant to a presenter.
Click
1
•Leavingconference
LeavetheconferenceandexitImageExpressUtility2.0.
•Click[File]intheattendantwindow,andclick[Exit].
Youcanalsoleavetheconferencebyclicking[×]attheupperrightoftheattendantwindow.
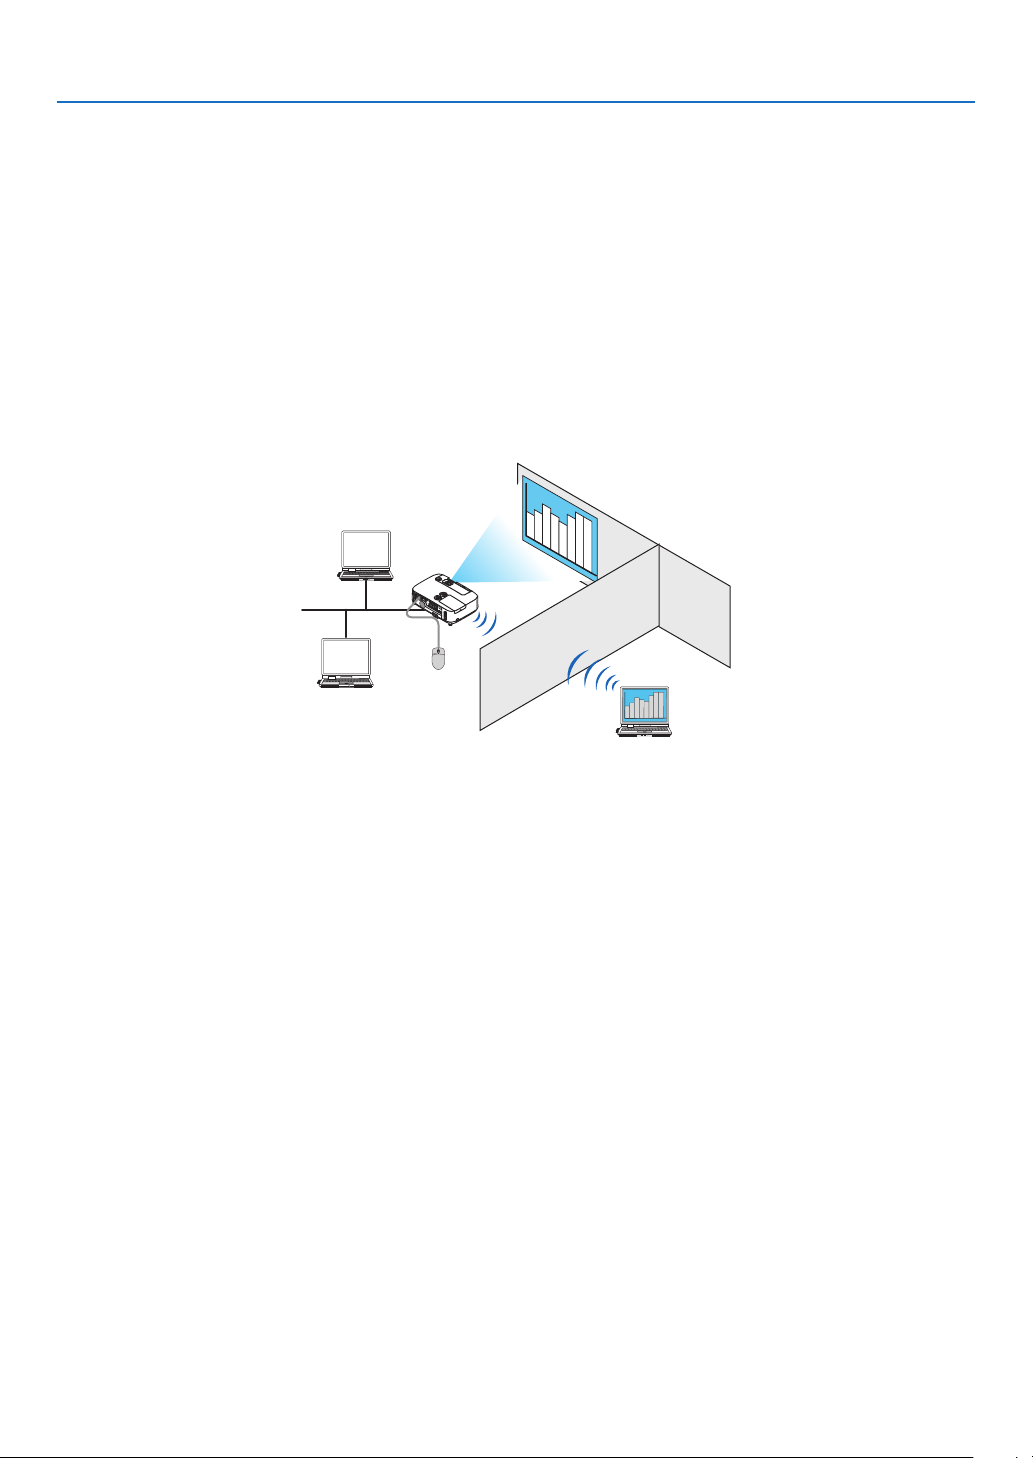
176
8. User Supportware
Using the Projector to Operate Your Computer over a LAN
(Desktop Control Utility 1.0)
UsingDesktopControlUtility1.0allowsyoutoremotelyoperateyourcomputerplacedatadistancefromtheprojector
overanetwork(wiredLANorwirelessLAN).
What you can do with Desktop Control Utility 1.0
•AcommerciallyavailableUSBmouseisconnectedtotheprojectortooperatethecomputer.
•Suppose,forexample,aPowerPointletobepresentedinaconferenceissavedtoacomputerinyourofce.
IfthiscomputerisconnectedtotheprojectorintheconferenceroomwithLANwhentheconferenceisheld,the
desktopscreenofthecomputerinyourofce(Windows7/WindowsVista/WindowsXP)canbeprojectedandthe
Power-Pointlecanbepresentedbyoperatingtheprojector.Inotherwordsthecomputerdoesnotneedtobe
broughtintotheconferenceroom.
IMPORTANT:
•YoucanusetheDesktopControlUtility1.0tooperateacomputerlocatedinaseparateroomfromtheprojectoroveranetwork.
Therefore,caremustbeexercisedtopreventanythirdpartyfromviewingthescreenofyourcomputer(importantdocuments),
copyingles,orturningoffthepower.
NECassumesnoliabilityforanylossordamagesarisingfrominformationleakorsystemfailurewhileyouareusingDesktop
ControlUtility1.0.
•ThiswilldisconnectLANconnectionwhenthecomputergoesinthestandbymodewhiletheDesktopControlUtility1.0isbeing
used.
IntheWindows7/WindowsVista,select[ControlPanel][HardwareandSound][PowerOptions].Set[Changewhenthe
computersleeps]to[Never].
IntheWindowsXP,click[ControlPanel][PerformanceandMaintenance][PowerOptions][SystemStandby]
[Never].
•ThescreensaverfunctionisoffwhileDesktopControlUtility1.0isrunning.
Connecting the projector to a LAN
ConnecttheprojectortotheLANbyfollowingtheinstructionsin“ConnectingtoaWiredLAN”(page
138),“Con-
nectingtoaWirelessLAN”(page139)and“9ApplicationMenus”(page105)

177
8. User Supportware
Using the projector to operate your computer’s desktop screen
IMPORTANT:
•IncaseofWindows7/WindowsVista,disabletheuseraccountcontrolbeforeusingDesktopControlUtility1.0.
WindowsVistahas“UserAccountControl”functiontoprotectthecomputer.Theuseraccountconrmationwindowmaybe
displayed.
SinceDesktopControlUtility1.0cannottransfertheuseraccountconrmationwindow,thiswindowmakestheoperationunavail-
able.BeforeusingDesktopControlUtility1.0,itisnecessarytodisabletheuseraccountcontrolofWindows7/WindowsVista.
Afterloggingonwiththeadministratoraccount,followtheprocedurebelowtochangethesetting:
[Change Procedure]
<ForWindows7>
1Click[ControlPanel]fromtheStartManu.
2Click[UserAccountsandFamilySafety].
3Click[UserAccounts].
4Click[ChangeUserAccountControlsettings].
5Change[Choosewhentobenotiedaboutchangestoyourcomputer]to[Nevernotify]andclick[OK].
•Ifrestartingisrequested,click[Restartnow].
<ForWindowsVista>
1Click[ControlPanel]fromtheStartMenu.
2Click[UserAccountsandFamilySafety].
3Click[UserAccount].
4Click[Enable/DisableUserAccountControl].
5Removethecheckmarkfor[UseUserAccountControl(UAC)toHelpComputerProtection]andclick
[OK].
•Ifrebootingisrequested,click[RebootNow].
UponcompletionofDesktopControlUtility,itisrecommendedtoenabletheuseraccountcontrol.
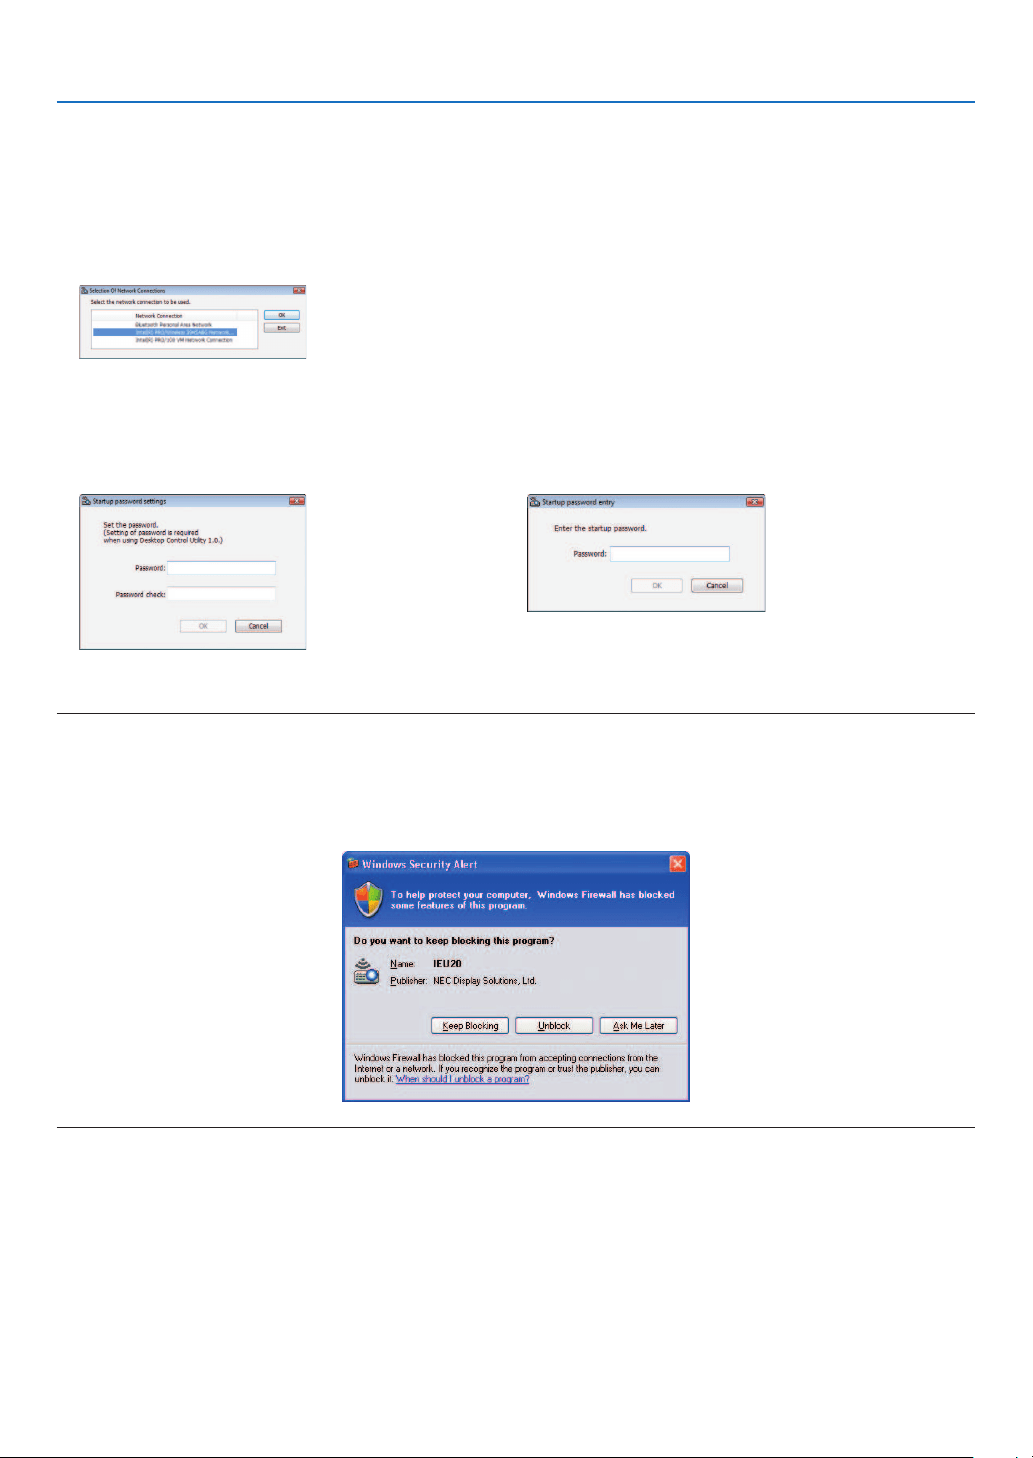
178
8. User Supportware
•Operationoncomputer
1ClickWindows[Start][AllPrograms][NECProjectorUserSupportware][DesktopControlUtility
1.0][DesktopControl],inthatorder.
The“SelectionOfNetworkConnections”windowisdisplayed.
Thisdisplaysalistofthenetworkdevicesconnectedtothecomputeryouareusing.
2Selectthenetworkdevicetouseandclick[OK].
The “Startup password settings” window will be displayed.
•IncaseofWindows7/WindowsVista,theUserAccountControlWindowisdisplayed.Click[OK]orinputthe
administrator password.
ScreenwhenDesktopControlUtility1.0isstartedrsttime
already
Screen if starting password has been set
IMPORTANT:
•Besuretowritedownthestartingpasswordincaseyouforgetit.
•ThestartingpasswordmustbeinputeachtimeDesktopControlUtility1.0isstarted.
•Shouldyouforgetthestartingpassword,reinstalltheDesktopControlUtility1.0.
AscreenliketheonebelowisdisplayedwhenthesoftwareisstartedonaPCinstalledwithWindowsXPServicePack2(SP2)(or
later).
Click“Unblock”ifthisisdisplayed.

179
8. User Supportware
3InputthestartingpasswordofDesktopControlUtility1.0,andclick[OK].
The “Current password” window will be displayed.
NOTE:
ThecharacterstringdisplayedinthepasswordeldvarieseachtimeDesktopControlUtility1.0isstarted.
4Writedownthecharacterstringdisplayedinthepasswordeld.
Write down “PMHN” in the screen example of step 3.
5Click[OK].
DesktopControlUtility1.0willbestarted.
Move to the room where the projector is installed, with the paper on which you have written down the password in
step 4.
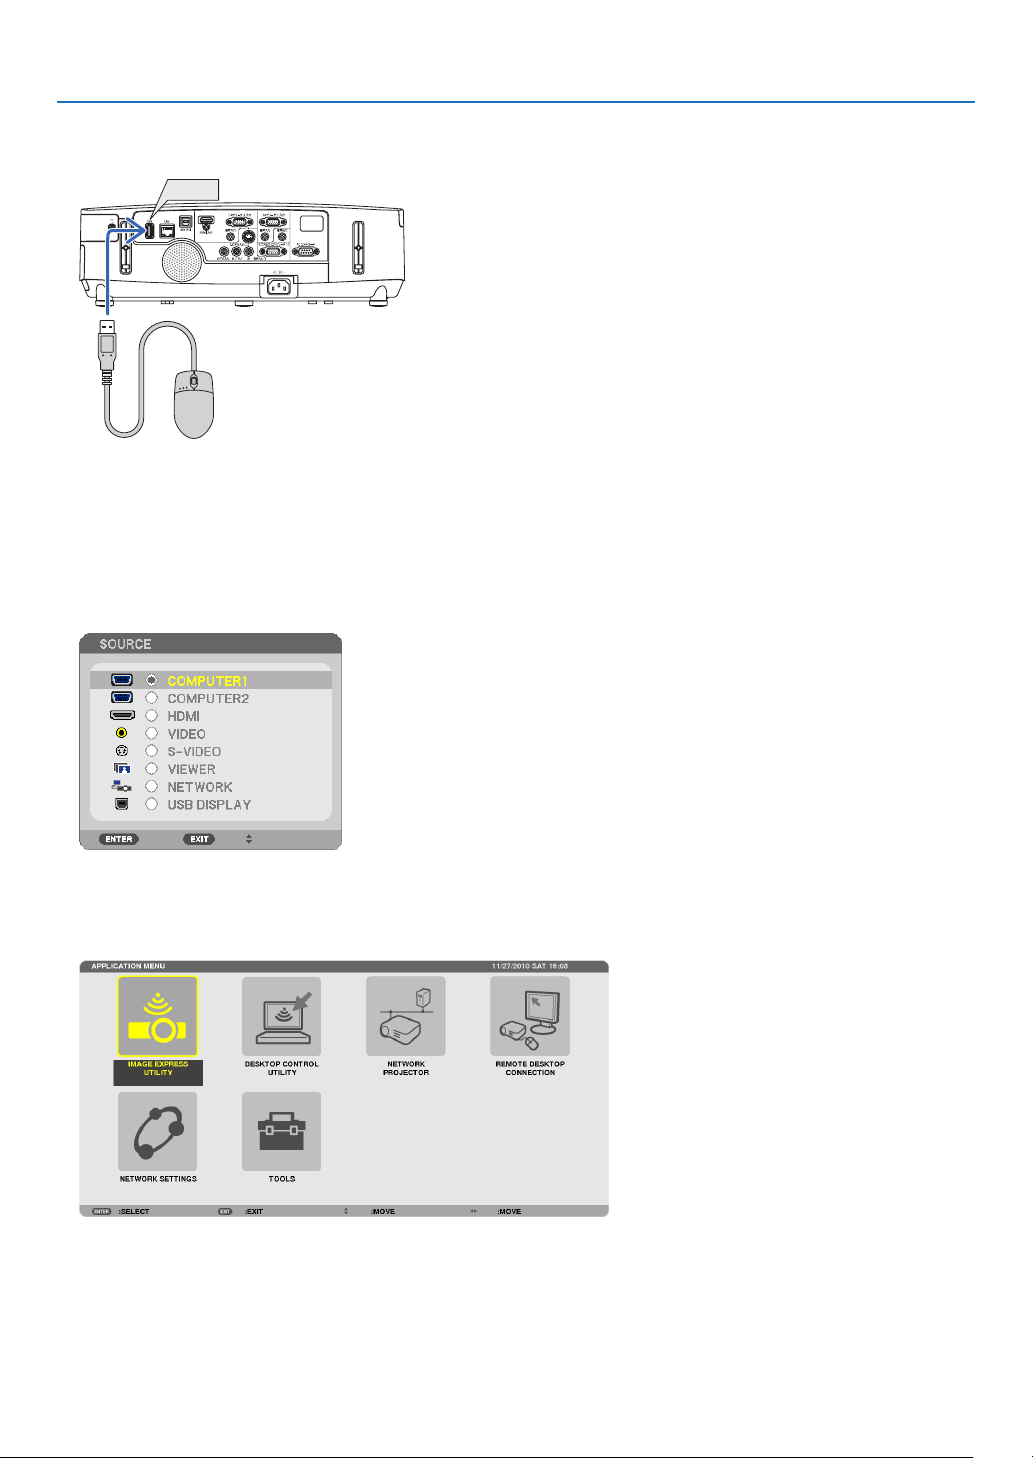
180
8. User Supportware
•Operatingtheprojector(connectingcomputer)
1ConnectaUSBmousethatiscommerciallyavailabletotheprojector.
USB
2Turnonthepowertotheprojector.
Set the LAN setting of the projector in advance.
3PresstheSOURCEbuttonontheprojectorunit.
The Source list will be displayed.
In case of the remote control, press the NETWORK button.
The“networkmenu”screenwillbedisplayed,proceedtostep5.
4PresstheSELECT/buttonstoselect[NETWORK],andthenpresstheENTERbutton.
The“networkmenu”screenwillbedisplayed.
•TheremainingoperationscanbeperformedusingaUSBmouseconnectedtotheprojector.
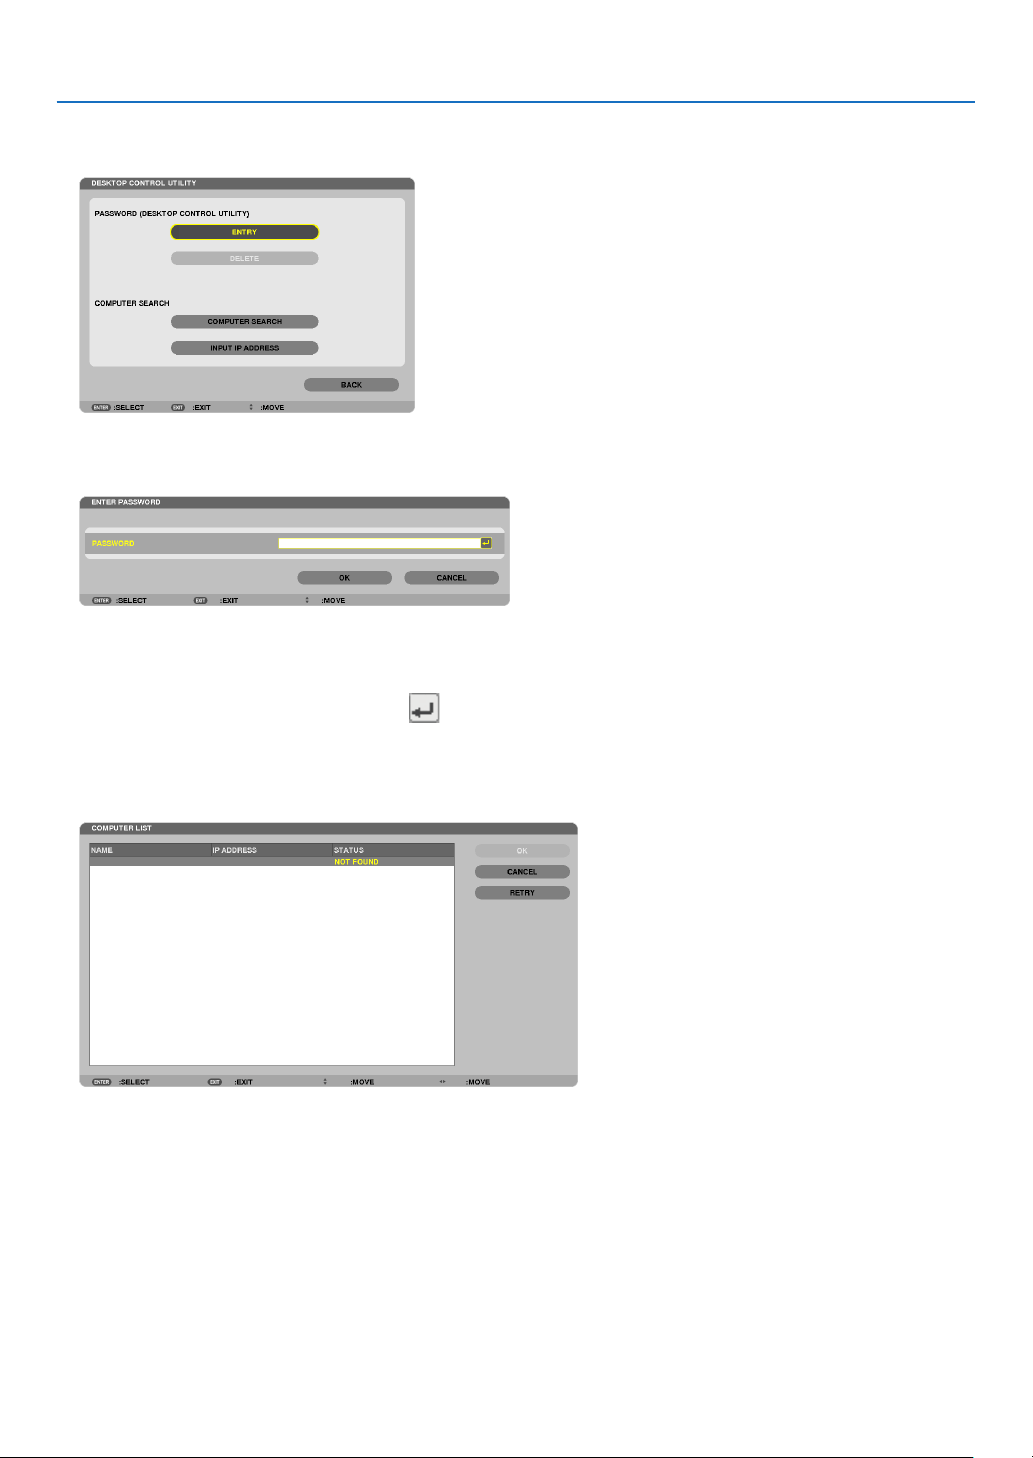
181
8. User Supportware
5Click[DESKTOPCONTROLUTILITY].
The “DESKTOP CONTROL UTILITY menu” screen will be displayed.
6Click“ENTRY”.
A password input screen will be displayed.
7Inputthepasswordyouhavewrittendowninstep4of“Operationoncomputer”.
•Clickthe[BS]buttonontherightsideofthe[PASSWORD]eldtodeletethecharactertotheleftofthecharacter
insertion point.
8Afterinputtingthepassword,clickthebuttonontherightsideofthe[PASSWORD]eld.
You are returned to the “DESKTOP CONTROL UTILITY” menu screen.
9Click[COMPUTERSEARCH].
The “COMPUTER LIST” screen will be displayed.
If the connection destination has not been found as a result of a COMPUTER SEARCH, search for the connection
destinationbyinputtingtheIPaddressofthecomputerattheconnectiondestination,click“InputIPAddress”.

182
8. User Supportware
10Clickthecomputerattheconnectiondestinationandthen[OK].
Thedesktopscreenofthecomputerattheconnectiondestinationwillbedisplayed.
•Operatingtheprojector(manipulatingdesktopscreen)
ThedisplayeddesktopscreencanbemanipulatedbyusingtheUSBmouseconnectedtotheprojector.IftheEXIT
buttonoftheprojectororremotecontrolispressedwhilethedesktopscreenisdisplayed,anauxiliaryoperationbar
isdisplayedatthelowerleftofthescreen.
Manipulatetheauxiliaryoperationbarbyusingthebuttonsoftheprojectororremotecontrol.
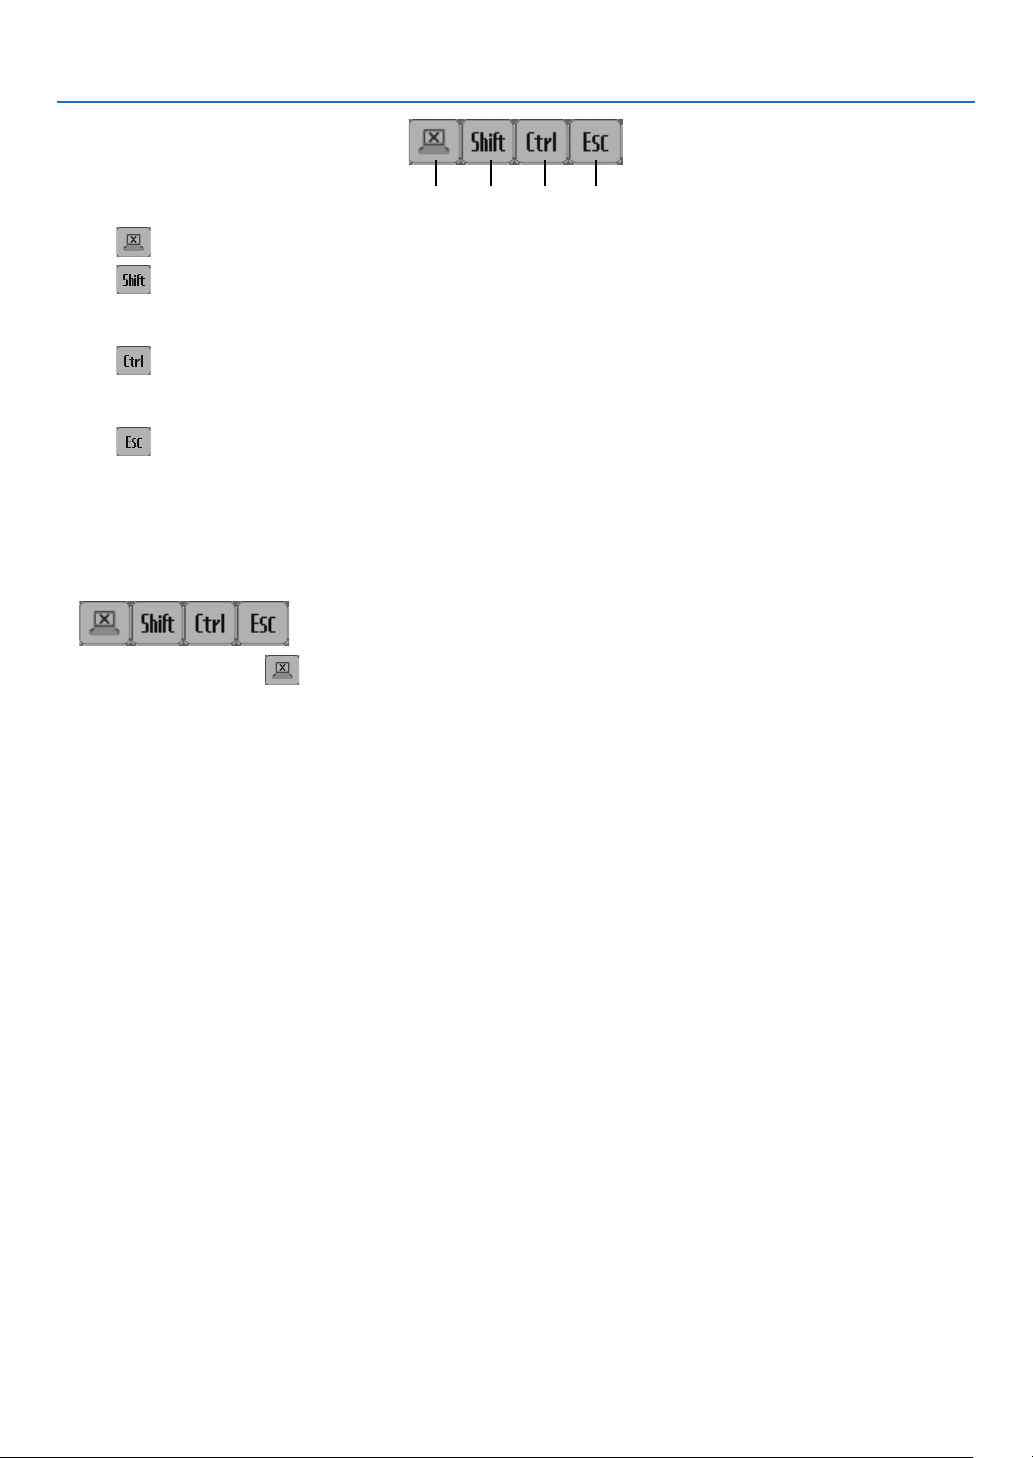
183
8. User Supportware
<1><2><3><4>
<1> (cut-off icon) .......Disconnects communication with the computer.
<2>
(Shift icon) ..........When the highlight is moved to this icon and the ENTER button is pressed, shift lock status is set.
The shift lock is canceled if the highlight is moved to this icon and the ENTER button is pressed
again.
<3>
(Ctrl icon) ............When the highlight is moved to this icon and the ENTER button is pressed, control lock status is set.
The control lock is canceled if the highlight is moved to this icon and the ENTER button is pressed
again.
<4>
(ESC icon) ...........The same operation as when the [ESC] key of the computer is pressed is performed. This icon is
used, for example, to stop a slideshow of PowerPoint.
•Operatingtheprojector(disconnectingcommunications)
1PresstheEXITbuttonwhilethedesktopscreenisdisplayed.
An auxiliary operation bar will be displayed at the lower left of the screen.
2Movethehighlightto(cut-officon)andpresstheENTERbutton.
Communication will be disconnected and you are returned to the “DESKTOP CONTROL UTILITY” menu screen.
Toresumecommunication,click[COMPUTERSEARCH].
After that, follow step 10 on the preceding page.
REFERENCE:
Communicationcanalsobedisconnectedbyclickingtheprojectoricononthetaskbarandthenclicking“Disconnect”whilethe
desktopscreenisdisplayed.
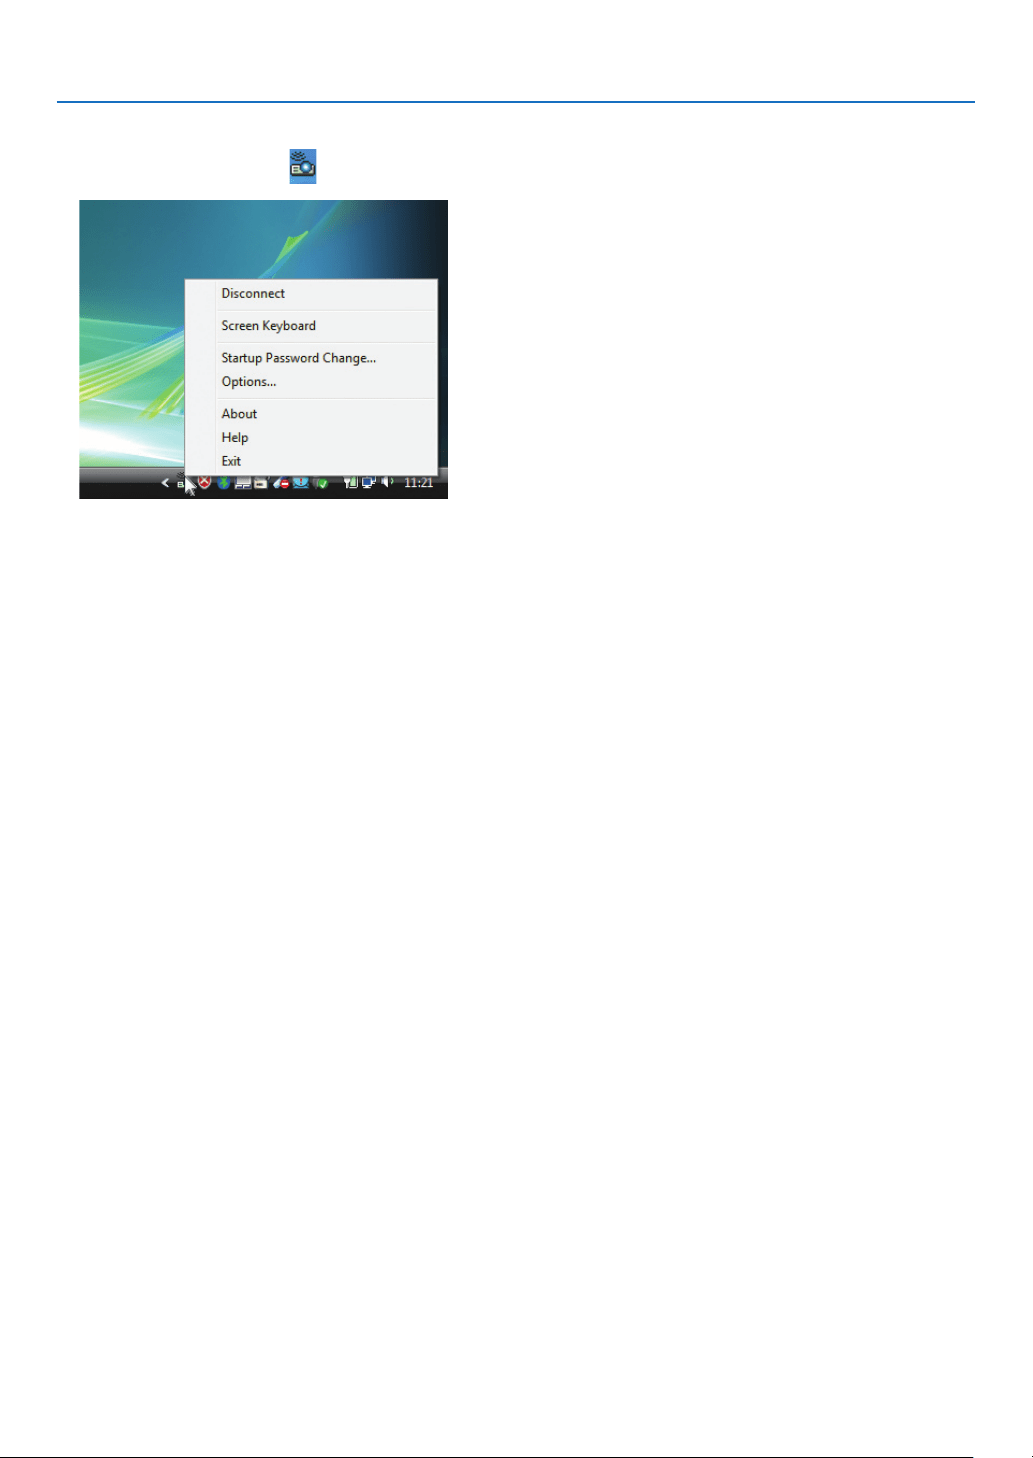
184
8. User Supportware
•Operatingtheprojector(exitingDesktopControlUtility1.0)
1Clicktheprojectoricon[
]onthetaskbarwhilethedesktopscreenisdisplayed.
2Click[Exit].
DesktopControlUtility1.0willbeterminated.
3PresstheEXITbuttonontheprojectorunitorontheremotecontrol.
The“networkmenu”screenwillbedisplayed.
4PresstheMENUbuttonontheprojectorunitorontheremotecontrol.
The on-screen menu will be displayed.
5Selectaninputsourceotherthan[NETWORK].

185
8. User Supportware
Controlling the Projector over a LAN (PC Control Utility Pro 4)
Usingtheutilitysoftware“PCControlUtilityPro4”,theprojectorcanbecontrolledfromacomputeroveraLAN.
Control Functions
PowerOn/Off,signalselection,picturefreeze,picturemute,audiomute,adjusting,errormessagenotication,event
schedule.
ScreenofPCControlUtilityPro4
ThissectionprovidesanoutlineofpreparationforuseofPCControlUtilityPro4.ForinformationonhowtousePC
ControlUtilityPro4,seeHelpofPCControlUtilityPro4.
TIP:
•PCControlUtilityPro4canbeusedwithaserialconnection.
Connect the projector to a LAN.
ConnecttheprojectortotheLANbyfollowingtheinstructionsin“ConnectingtoaWiredLAN”(page
138),“Con-
nectingtoaWirelessLAN(Optional:NP02LMseries)”(page139)and“9ApplicationMenus”(page105)
Start PC Control Utility Pro 4
Click“Start”“Allprograms”or“Programs”“NECProjectorUserSupportware”“PCControlUtilityPro4”
“PCControlUtilityPro4”.
NOTE:
•FortheSchedulefunctionofthePCControlutilityPro4towork,youmusthaveyourcomputerrunningandnotinstandby/
sleepmode.Select“PowerOptions”fromthe“ControlPanel”inWindowsanddisableitsstandby/sleepmodebeforerunningthe
scheduler.
[Example]ForWindows7:
Select“ControlPanel”“SystemandSecurity”“PowerOptions”“Changewhenthecomputersleeps”“Putthecomputer
tosleep”“Never”.
NOTE:
•When[POWER-SAVING]isselectedfor[STANDBYMODE]fromthemenu,theprojectorcannotbeturnedonviathenetwork
(wiredLAN/wirelessLAN)connection.
TIP:
ViewingtheHelpofPCControlUtilityPro4
•DisplayingtheHelpleofPCControlUtilityPro4whileitisrunning.
Click“Help(H)” “Help (H) …” of window of PC Control Utility Pro 4 in this order.
The pop-up menu will be displayed.
•DisplayingthehelpleusingtheStartMenu.
Click“Start”
“All programs” or “Programs” “NEC Projector User Supportware” “PC Control Utility Pro 4”
“PC Control Utility Pro 4 Help”.
The Help screen will be displayed.
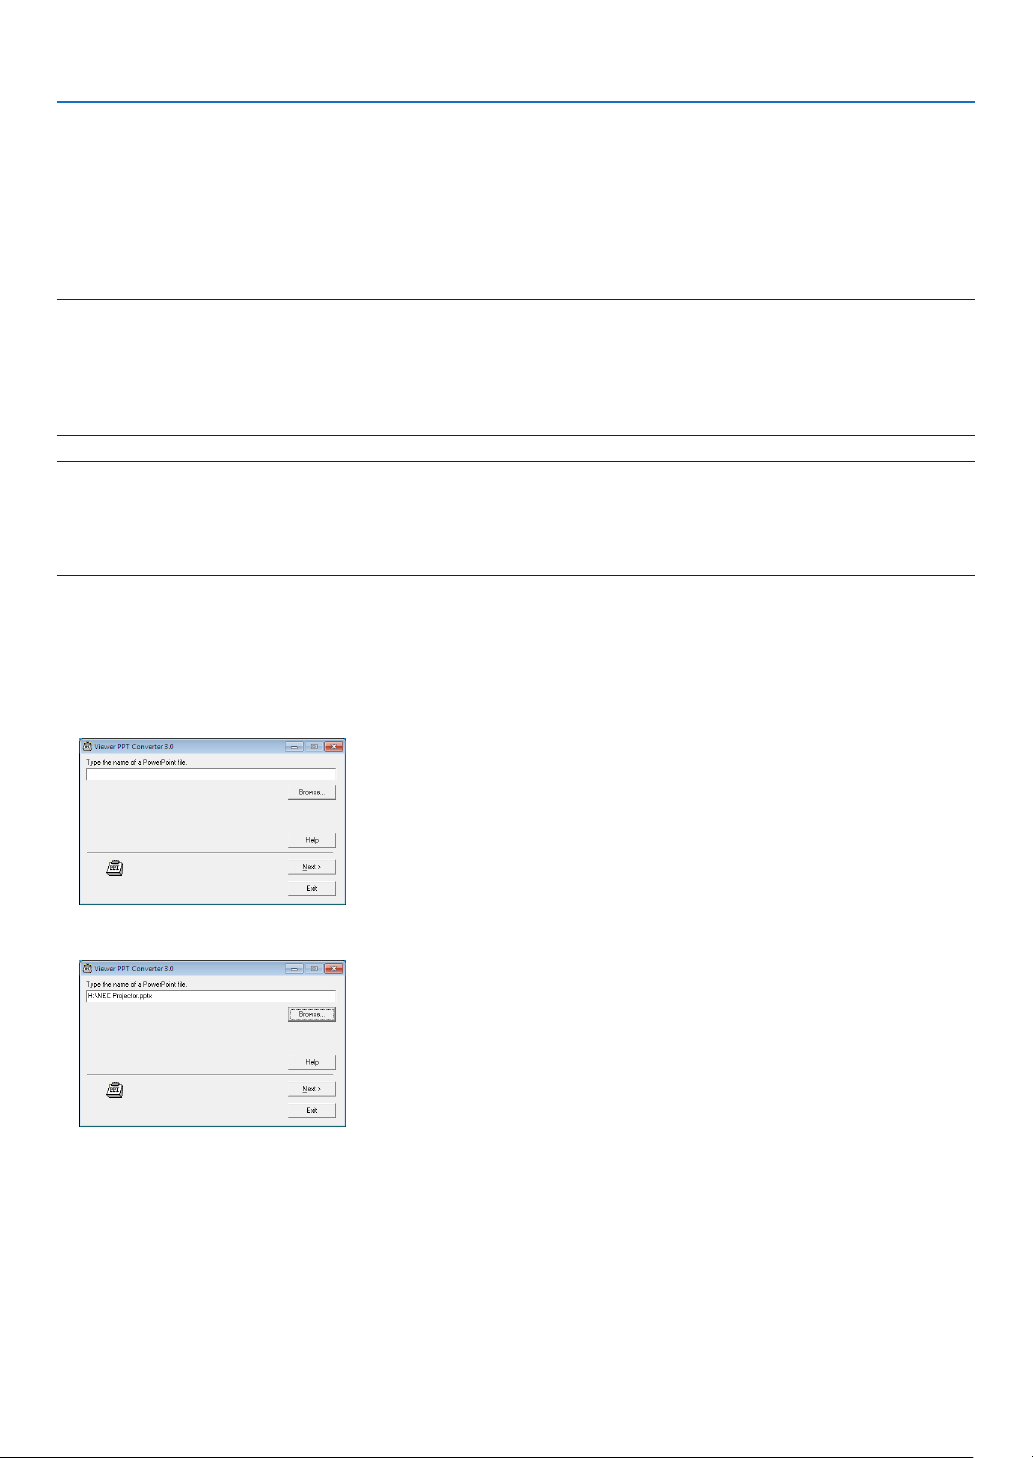
186
8. User Supportware
Converting PowerPoint files to Slides (Viewer PPT Converter
3.0)
UsingViewerPPTConverter3.0allowsyoutoconvertPowerPointlesintoJPEGles.ConvertedJPEGlesand
Indexles(.idx)canbesavedtoaUSBmemory.WhentheUSBmemoryinsertedintotheprojector,theseJPEGles
andIndexles(.idx)canbedisplayedwiththeviewerfunctionoftheprojectorwithoutconnectingacomputer.
NOTE:
WhenViewerPPTConverter3.0hasbeeninstalled,oncestartViewerPPTConverter3.0oncewiththeprivilegeusedforinstallation.
ThenexitfromViewerPPTConverter3.0withoutdoinganything.
•Starting
ClickWindow’s[Start][AllPrograms][NECProjectorUserSupportware][ViewerPPTConverter3.0][ViewerPPT
Converter3.0],inthatorder.
NOTE:
WheninstallingViewerPPTConverter3.0ontoacomputerthathasPowerPointinstalled,ViewerPPTConverter3.0isautomatically
registeredasaPower-Pointadd-in.
ItisnecessarytocancelViewerPPTConverter3.0add-inbeforeuninstallingViewerPPTConverter3.0.
RefertoViewerPPTConverter3.0Helptounregistertheadd-in.
Converting PowerPoint files and saving them to a USB memory
1.InserttheUSBmemoryintotheUSBportofthecomputer.
2.OnWindows,click“Start”“Allprograms”“NECProjectorUserSupportware”“ViewerPPTConverter
3.0”“ViewerPPTConverter3.0”.
Viewer PPT Converter 3.0 will start.
3.Click“Brows...”andselectaPowerPointleyouwishtoconvert,andthenclick“Open”.
4.Click“Next”.

187
8. User Supportware
5.SelecttheUSBmemorydrivefor“CardDrive”andtypein“Indexname”.
Index name must be eight alphanumeric characters or less. 2-byte character and file with a long filename cannot
be used.
6.Click“Export”.
A confirmation message will be displayed.
7.Click“OK”.
Exporting a file will start.
8.Click“OK”.
9.Click“Exit”.
Viewer PPT Converter 3.0 will exit.
10.RemovetheUSBmemoryfromthecomputer.
NOTE:
•BeforeremovingtheUSBmemoryfromtheUSBportofthecomputer,clickthe“SafetoRemoveHardware”icononthetask-
bar.

188
8. User Supportware
Projecting Your Mac’s Screen Image from the Projector over
a LAN (Image Express Utility 2 for Mac)
UsingImageExpressUtility2forMaccontainedallowsyoutosendtheMac’sscreenimagetotheprojectorovera
network(wiredorwirelessLAN).
ImageExpressUtility2forMacrunsonMacOSX10.2.8orlater.
ItrunsonbothMacOSX(PowerPC)andMacOSX(Intel).
Hereafter,“ImageExpressUtility2forMac”isabbreviatedas“ImageExpressUtility2”.
What you can do with Image Express Utility 2
•ViathenetworkimagesonthescreenofyourMaccanbesenttotheprojectorandprojectedonthescreen.
•Onecomputercansendimagestomorethanoneprojector.
Operating environment
Supported OS
MacOSX10.2.8orlaterrequired
MacOSX10.3.0orlaterrecommended
Processor (CPU)
PowerPCG3600MHzprocessorrequired
PowerPCG4800MHzorhigherrecommended
or
IntelCoreSolo1.5GHzorhigherrequired
Memory
256MBorhigherrequired
Networkenvironment
WiredorwirelessLANrequiredthatsupportsTCP/IP
OnlytheAirPortandAirPortExtremewirelessLANcardsareguaranteedtoworkwithImageExpressUtility2.
“EasyConnection”supportsonlyAirPortandAirPortExtreme.
Supported resolution
VGA(640×480)orhigherrequired
XGA(1024×768)recommended
(1024×768-1280×800recommendedforP350W)
Supported screen colors
32thousandsofcolors,16.7millioncolorsrequired
*256orfewercolorsarenotsupported.
Connecting the projector to a LAN
ConnecttheprojectortotheLANbyfollowingtheinstructionsin“ConnectingtoaWiredLAN”(page
138),“Con-
nectingtoaWirelessLAN”(page139)and“9ApplicationMenus”(page105)
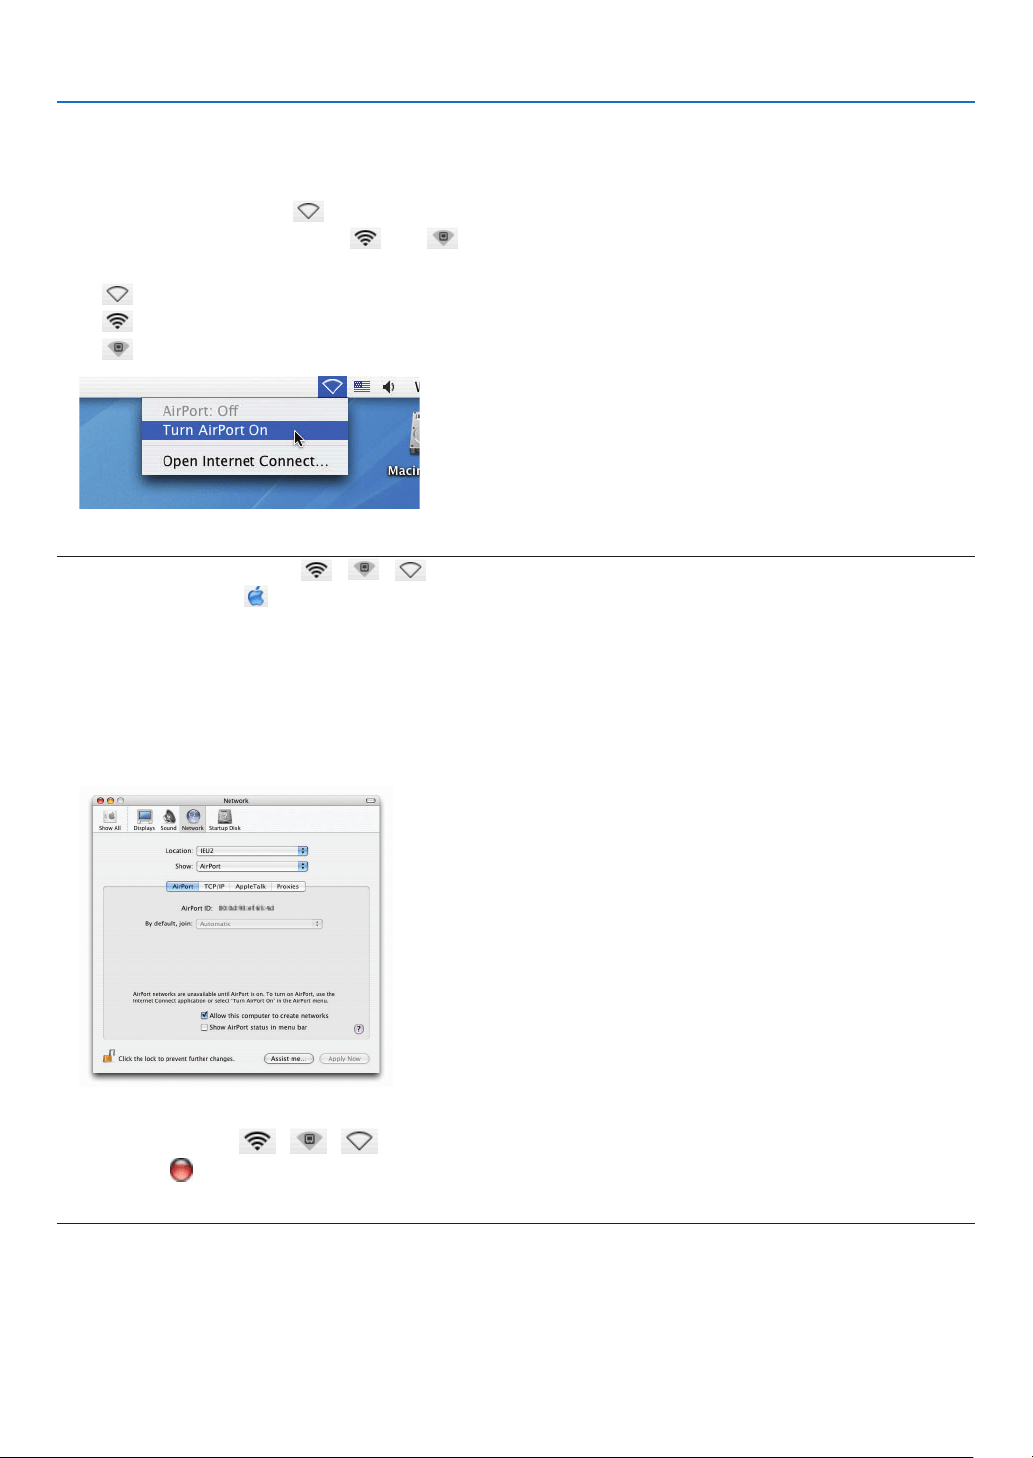
189
8. User Supportware
Using Image Express Utility 2
Connectingtoaprojector
1Conrmthattheprojectorhasbeenturnedon.
2ClicktheAirPortstatus(
)ontheMacintoshmenubar,andclick“TurnAirPortOn”.
The AirPort status is changed to “ ” or “ ”.
•AirPortstatustypesandmeanings
...AirPort : Off
...AirPort : On ( in infrastructure connection )
...AirPort : On ( in adhoc connection )
REFERENCE:
When the AirPort status ( / / ) is not displayed on the menu bar:
1ClickAppleMenu(
)and[SystemPreferences...].
The “System Preferences” window will be displayed.
2Click[Network].
TheNetworkcongurationwindowwillbedisplayed.
3Select[AirPort]in[Show].
4Click[AirPort]tab.
The AirPort configuration item will be displayed.
5Checkthe“ShowAirPortstatusinmenubar”checkboxatthebottomcongurationitem.
The AirPort status ( / / ) will be displayed on the menu bar.
6Clickthe[]buttonattheupperleftontheNetworkcongurationwindow.
TheNetworkcongurationwindowwillbeclosed.

190
8. User Supportware
3Double-clickthe“ImageExpressUtility2”iconinthe“ImageExpressUtility2”folder.
•Attheinitialstart,the“LicenseAgreement”windowisdisplayed.
Thoroughlyreadtheagreementshownonthescreen,andclick“Iacceptthetermsinthelicenseagreement”
and the [OK] button.
Next, the “Authenticate” window will be displayed.
4EntertheadministratornameandpasswordofyourMacintoshcomputer,andclickthe[OK]button.
The [Projector Selection] window will be displayed.
5Checkthe()checkboxtotheleftoftheprojectornametoconnectandclick[Connect].
The Macintosh computer and the projector are connected via wireless LAN, and images on the Macintosh screen
are projected from the projector.

191
8. User Supportware
Stopping/Restarting Image Transmission
•Stoppingimagetransmission
1Click[Tools]onthemenubar,andclick[StopSending].
Image transmission is temporarily stopped.
•Restartingimagetransmission
1Click[Tools]onthemenubar,andclick[StartSending].
Image transmission is started again.
Exiting Image Express Utility 2
1Click[ImageExpressUtility2]onthemenubar,andclick[QuitImageExpressUtility2].
Image Express Utility 2 is exited.

192
9. Appendix
1 Troubleshooting
Thissectionhelpsyouresolveproblemsyoumayencounterwhilesettinguporusingtheprojector.
Indicator Messages
Power Indicator
Indicator Condition ProjectorConditionNote
Off The main power is off
–
Blinking light Blue
0.5 sec On,
0.5 sec Off
The projector is getting ready to turn on. Wait for a moment.
2.5 sec On,
0.5 sec Off
Off Timer is enabled.
–
Steady light Blue The projector is turned on.
–
Orange [NORMAL] is selected for [STANDBY MODE]
–
Red [POWER-SAVING] is selected for [STANDBY
MODE]
–
Status Indicator
Indicator Condition ProjectorConditionNote
Off
Normal or Standby ([POWER-SAVING] for
[STANDBY MODE])
–
Blinking light Red
1 cycle (0.5 sec
On, 2.5 sec Off)
Lamp cover error or lamp housing error Replace the lamp cover or lamp housing correctly.
2 cycle (0.5 sec
On, 0.5 sec Off)
Temperature error The projector is overheated. Move the projector to
a cooler location.
3 cycle (0.5 sec
On, 0.5 sec Off)
Power error Power unit is not working properly. Contact your
dealer.
4 cycle (0.5 sec
On, 0.5 sec Off)
Fan error Fans will not work correctly.
6 cycle (0.5 sec
On, 0.5 sec Off)
Lamp error Lamp fails to light. Wait a full minute and then turn
on again.
9 cycle (0.5 sec
On, 0.5 sec Off)
[DYNAMIC CONTRAST] error Dynamic Contrast function is not working properly.
Contact your dealer.
Orange
1 cycle (0.5 sec
On, 2.5 sec Off)
Network conflict
Both the built-in wired LAN and the wireless LAN can-
not be connected to the same network at the same
time.
To use both built-in wired LAN and wireless LAN at
the same time, connect them to different networks.
Green Re-firing the lamp (The projector is cooling
down.)
The projector is re-firing.
Wait for a moment.
Steadylight
Green
Standby ([NORMAL] for [STANDBY MODE])
–
Orange
CONTROL PANEL LOCK is on. You have pressed cabinet button when Control
Panel Lock is on.
CONTROL ID error Remote control ID and projector ID are not
matched.
Lamp Indicator
Indicator Condition ProjectorConditionNote
Off Normal
–
Blinking light Red Lamp has reached its end of life. Lamp replace-
ment message will be displayed.
Replace the lamp.
Steady light Red Lamp has been used beyond its limit. The projector
will not turn on until the lamp is replaced.
Replace the lamp.
Green [ECO MODE] is set to [AUTO ECO], [ECO1], or
[ECO2]
–
Over-TemperatureProtection
Ifthetemperatureinsidetheprojectorrisestoohigh,theover-temperatureprotectorwillautomaticallyturnoffthelamp
withtheSTATUSindicatorblinking(2-cycleOnandOff.)
Shouldthishappen,dothefollowing:
•Unplugthepowercordafterthecoolingfansstop.
•Movetheprojectortoacoolerlocationiftheroomwhereyouarepresentingisparticularlytoowarm.
•Cleantheventilationholesiftheyarecloggedwithdust.
•Waitabout60minutesuntiltheinsideoftheprojectorbecomescoolenough.

193
9. Appendix
Common Problems & Solutions
(“Power/Status/LampIndicator”onpage
192.)
Problem Check These Items
Does not turn on
or shut down
• Checkthatthepowercordispluggedinandthatthepowerbuttonontheprojectorcabinetortheremotecontrol
is on. ( pages
13, 14)
• Ensurethatthelampcoverisinstalledcorrectly.( page 149)
• Checktoseeiftheprojectorhasoverheated.Ifthereisinsufcientventilationaroundtheprojectororiftheroom
where you are presenting is particularly warm, move the projector to a cooler location.
• Checktoseeifyoucontinuetousetheprojectorforanother100hoursafterthelamphasreachedtheendofits
life. If so, replace the lamp. After replacing the lamp, reset the lamp hours used. ( page 104)
• Thelampmayfailtolight.Waitafullminuteandthenturnonthepoweragain.
• Set[FANMODE]to[HIGHALTITUDE]whenusingtheprojectorataltitudesapproximately5500feet/1600meters
or higher. Using the projector at altitudes approximately 5500 feet/1600 meters or higher without setting to [HIGH
ALTITUDE] can cause the projector to overheat and the projector could shut down. If this happens, wait a couple
minutes and turn on the projector. ( page 97)
If you turn on the projector immediately after the lamp is turned off, the fans run without displaying an image for
some time and then the projector will display the image. Wait for a moment.
Will turn off • Ensurethatthe[OFFTIMER]or[AUTOPOWEROFF]isoff.( page 93, 100)
No picture
• UsetheCOMPUTER1,theCOMPUTER2,theVIDEOortheS-VIDEObuttonontheremotecontroltoselectyour
source (Computer, Video or S-Video). ( page
16) If there is still no picture, press the button again.
• Ensureyourcablesareconnectedproperly.
• Usemenustoadjustthebrightnessandcontrast.( page 85)
• Ensurethatthelenscoverisopen.( page 5)
• Resetthesettingsoradjustmentstofactorypresetlevelsusingthe[RESET]intheMenu.( page 104)
• EnteryourregisteredkeywordiftheSecurityfunctionisenabled.( page 30)
• BesuretoconnecttheprojectorandnotebookPCwhiletheprojectorisinstandbymodeandbeforeturningon
the power to the notebook PC.
In most cases the output signal from the notebook PC is not turned on unless connected to the projector before
being powered up.
* If the screen goes blank while using your remote control, it may be the result of the computer’s screen-saver
or power management software.
• Seealsothenext page.
Picture suddenly
becomes dark
• CheckiftheprojectorisintheForcedECOmodebecauseoftoohighambienttemperature.Ifthisisthecase,
lower the internal temperature of the projector by selecting [HIGH] for [FAN MODE]. ( page 97)
Color tone or hue is
unusual
• Checkifanappropriatecolorisselectedin[WALLCOLOR].Ifso,selectanappropriateoption.( page
92)
• Adjust[HUE]in[PICTURE].( page 85)
Image isn’t square to
the screen
• Repositiontheprojectortoimproveitsangletothescreen.( page
17)
• UsetheKeystonecorrectionfunctiontocorrectthetrapezoiddistortion.( page 22)
Picture is blurred
• Adjustthefocus.( page
19)
• Repositiontheprojectortoimproveitsangletothescreen.( page 17)
• Ensurethatthedistancebetweentheprojectorandscreeniswithintheadjustmentrangeofthelens.
( page
130)
• Condensationmayformonthelensiftheprojectoriscold,broughtintoawarmplaceandisthenturnedon.
Should this happen, let the projector stand until there is no condensation on the lens.
Flicker appears on
screen
•
Set [FAN MODE] to other than [HIGH ALTITUDE] mode when using the projector at altitudes approximately 5500 feet/1600
meters or lower. Using the projector at altitudes less than approximately 5500 feet/1600 meters and setting to [HIGH ALTI-
TUDE] can cause the lamp to overcool, causing the image to flicker. Switch [FAN MODE] to [AUTO]. ( page 97)
Image is scrolling
vertically, horizontally
or both
• Checkthecomputer’sresolutionandfrequency.Makesurethattheresolutionyouaretryingtodisplayissupported
by the projector. ( page
199)
• AdjustthecomputerimagemanuallywiththeHorizontal/Verticalinthe[IMAGEOPTIONS].( page 87)
Remote control does
not work
• Installnewbatteries.( page
9)
• Makesuretherearenoobstaclesbetweenyouandtheprojector.
• Standwithin22feet(7m)oftheprojector.( page 9)
Indicator is lit or
blinking
• SeethePOWER/STATUS/LAMPIndicator.( page
192)
Cross color in RGB
mode
• PresstheAUTOADJ.buttonontheprojectorcabinetortheremotecontrol.( page
24)
• Adjustthecomputerimagemanuallywith[CLOCK]/[PHASE]in[IMAGEOPTIONS]inthemenu.( page 86)
Formoreinformationcontactyourdealer.

194
9. Appendix
If there is no picture, or the picture is not displayed correctly.
•PoweronprocessfortheprojectorandthePC.
BesuretoconnecttheprojectorandnotebookPCwhiletheprojectorisinstandbymodeandbeforeturningon
thepowertothenotebookPC.
InmostcasestheoutputsignalfromthenotebookPCisnotturnedonunlessconnectedtotheprojectorbefore
beingpoweredup.
NOTE:Youcancheckthehorizontalfrequencyofthecurrentsignalintheprojector’smenuunderInformation.Ifitreads“0kHz”,
thismeansthereisnosignalbeingoutputfromthecomputer.(page
102orgotonextstep)
•Enablingthecomputer’sexternaldisplay.
DisplayinganimageonthenotebookPC’sscreendoesnotnecessarilymeanitoutputsasignaltotheprojector.
WhenusingaPCcompatiblelaptop,acombinationoffunctionkeyswillenable/disabletheexternaldisplay.Usu-
ally,thecombinationofthe“Fn”keyalongwithoneofthe12functionkeysgetstheexternaldisplaytocomeon
oroff.Forexample,NEClaptopsuseFn+F3,whileDelllaptopsuseFn+F8keycombinationstotogglethrough
externaldisplayselections.
•Non-standardsignaloutputfromthecomputer
IftheoutputsignalfromanotebookPCisnotanindustrystandard,theprojectedimagemaynotbedisplayed
correctly.Shouldthishappen,deactivatethenotebookPC’sLCDscreenwhentheprojectordisplayisinuse.Each
notebookPChasadifferentwayofdeactivate/reactivatethelocalLCDscreensasdescribedinthepreviousstep.
Refertoyourcomputer’sdocumentationfordetailedinformation.
•ImagedisplayedisincorrectwhenusingaMacintosh
WhenusingaMacintoshwiththeprojector,settheDIPswitchoftheMacadapter(notsuppliedwiththeprojector)
accordingtoyourresolution.Aftersetting,restartyourMacintoshforthechangestotakeaffect.
ForsettingdisplaymodesotherthanthosesupportedbyyourMacintoshandtheprojector,changingtheDIPswitch
onaMacadaptermaybounceanimageslightlyormaydisplaynothing.Shouldthishappen,settheDIPswitch
tothe13"xedmodeandthenrestartyourMacintosh.Afterthat,restoretheDIPswitchestoadisplayablemode
andthenrestarttheMacintoshagain.
NOTE:AVideoAdaptercablemanufacturedbyAppleComputerisneededforaPowerBookwhichdoesnothaveaminiD-Sub
15-pinconnector.
•MirroringonaPowerBook
*WhenusingtheprojectorwithaMacintoshPowerBook,outputmaynotbesetto1024×768unless“mirroring”
isoffonyourPowerBook.Refertoowner’smanualsuppliedwithyourMacintoshcomputerformirroring.
•FoldersoriconsarehiddenontheMacintoshscreen
Foldersoriconsmaynotbeseenonthescreen.Shouldthishappen,select[View][Arrange]fromtheApple
menuandarrangeicons.

195
9. Appendix
Specifications
Thissectionprovidestechnicalinformationaboutprojector’sperformance.
ModelNumberP420X/P350X/P350W
Optical
P420XP350XP350W
LCDPanel0.63inchLCDwithMicroLensArray(AspectRatio4:3)0.59inchLCDwithMicroLens
Array(AspectRatio16:10)
Resolution*
1
1024×768pixels(XGA)1280×800pixels(WXGA)
LensManualzoomandfocus
ZoomRatio=1.7
F1.7–2.0f=17.4–29.0mm
LensShift(Vertical)0-0.5V0-0.6V
Lamp
265WAC
(195WinECO1)
230WAC
(170WinECO1)
(140WinECO2)
265WAC
(195WinECO1)
LightOutput*
2
*
3
4200lumens3500lumens3500lumens
ECO1:75%ECO1:75%ECO1:75%
ECO2:60%
ContrastRatio*
3
(fullwhite:fullblack)
2000:1
ImageSize(Diagonal)25–300inches/0.64m–7.6m
ProjectionDistance
(Min.–Max.)
26–543inches/0.65–13.8m27–573inches/0.69–14.6m
ProjectionAngle0°–16.5°(wide)/0°–9.8°(tele)
*1 Effectivepixelsaremorethan99.99%.
*2 Thisisthelightoutputvalue(lumens)whenthe[PRESET]modeissetto[HIGH-BRIGHT].Ifanyothermodeisselectedasthe
[PRESET]mode,thelightoutputvaluemaydropslightly.
*3 CompliancewithISO21118-2005
Electrical
P420XP350XP350W
Inputs
2×RGB/Component(D-Sub15P),1×HDMITypeA(HDMI
®
Connector)HDCPsupported*
4
,
1×S-Video(DIN4P),1×Video(RCA),1×(L/R)RCAAudio,2×StereoMiniAudio
Outputs1×RGB(D-Sub15P),1×StereoMiniAudio
PCControl1×PCControlPort(D-Sub9P)
WiredLANPort1×RJ-45(10BASE-T/100BASE-TX)
WirelessLANPort
(Optional)
IEE802.11b/g/n(optionalWirelessLANUnit[NP02LMSeries]required)
USBPort1×TypeA,1×TypeB
ColorReproduction10-bitsignalprocessing(1.07billioncolors)(HDMI,VIEWER,NETWORK:Colors,16.7millioncolors)
CompatibleSignals*
5
Analog:VGA/SVGA/XGA/XGA+/WXGA/WXGA+/SXGA/SXGA+/UXGA
480i/480p/576i/576p/720p/1080i/1080p
HDMI:VGA/SVGA/XGA/WXGA/SXGA/480p/576p/720p/1080i/1080p
VideoBandwidthRGB:80MHz(Max.)
HorizontalResolution540TVlines:NTSC/NTSC4.43/PAL/PAL-M/PAL-N/PAL60
300TVlines:SECAM
ScanRateHorizontal:15kHzto100kHz(RGB:24kHzorover)
Vertical:50Hzto120Hz(HDMI:50Hzto85Hz)
SyncCompatibilitySeparateSync
Built-inSpeaker10W(monaural)
PowerRequirement100–240VAC,50/60Hz
InputCurrent3.9-1.7A3.5-1.5A3.9-1.7A

196
9. Appendix
Power
Consump-
tion
ECO
MODE
OFF
(NOR-
MAL)
358W
(100-130V)/
343 W
(200-240V)
311 W
(100-130V)/
302 W
(200-240V)
358W
(100-130V)/
343 W
(200-240V)
ECO1
MODE
271W
(100-130V)/
264W
(200-240V)
239W
(100-130V)/
236W
(200-240V)
271W
(100-130V)/
264W
(200-240V)
ECO2
MODE
— 197W(100-130V)
195W(200-240V)
—
STANDBY
(NOR-
MAL)
9W(100-130V/200-240V)
STANDBY
(POWER-
SAVING)
0.2W(100-130V)/0.4W(200-240V)
*4 HDMI
®
(DeepColor,LipSync)withHDCP
WhatisHDCP/HDCPtechnology?
HDCPisanacronymforHigh-bandwidthDigitalContentProtection.HighbandwidthDigitalContentProtection(HDCP)isa
systemforpreventingillegalcopyingofvideodatasentoveraDigitalVisualInterface(DVI).
IfyouareunabletoviewmaterialviatheHDMIinput,thisdoesnotnecessarilymeantheprojectorisnotfunctioningproperly.
WiththeimplementationofHDCP,theremaybecasesinwhichcertaincontentisprotectedwithHDCPandmightnotbedis-
playedduetothedecision/intentionoftheHDCPcommunity(DigitalContentProtection,LLC).
*5 Animagewithhigherorlowerresolutionthantheprojector’snativeresolution(P420X/P350X:1024×768/P350W:1280×
800)willbedisplayedwithAdvancedAccuBlend.
Mechanical
P420XP350XP350W
Installation
Orientation
Desktop/Front,Desktop/Rear,Ceiling/Front,Ceiling/Rear
Dimensions15.7"(W)×4.5"(H)×11.1"(D)/398mm(W)×115mm(H)×282mm(D)
(notincludingprotrusions)
Weight8.6lbs/3.9kg
Environmental
Considerations
OperationalTemperatures:41°to104°F(5°to40°C),
(ECOmodeselectedautomaticallyat95°Fto104°F/35°Cto40°C)
20%to80%humidity(non-condensing)
StorageTemperatures:14°to122°F(-10°to50°C),
20%to80%humidity(non-condensing)
RegulationsUL/C-ULApproved(UL60950-1,CSA60950-1)
MeetsDOCCanadaClassBrequirements
MeetsFCCClassBrequirements
MeetsAS/NZSCISPR.22ClassB
MeetsEMCDirective(EN55022,EN55024,EN61000-3-2,EN61000-3-3)
MeetsLowVoltageDirective(EN60950-1,TÜVGSApproved)
Foradditionalinformationvisit:
US:http://www.necdisplay.com/
Europe:http://www.nec-display-solutions.com/
Global:http://www.nec-display.com/global/index.html
Forinformationonouroptionalaccessories,visitourwebsiteorseeourbrochure.
Thespecicationsaresubjecttochangewithoutnotice.
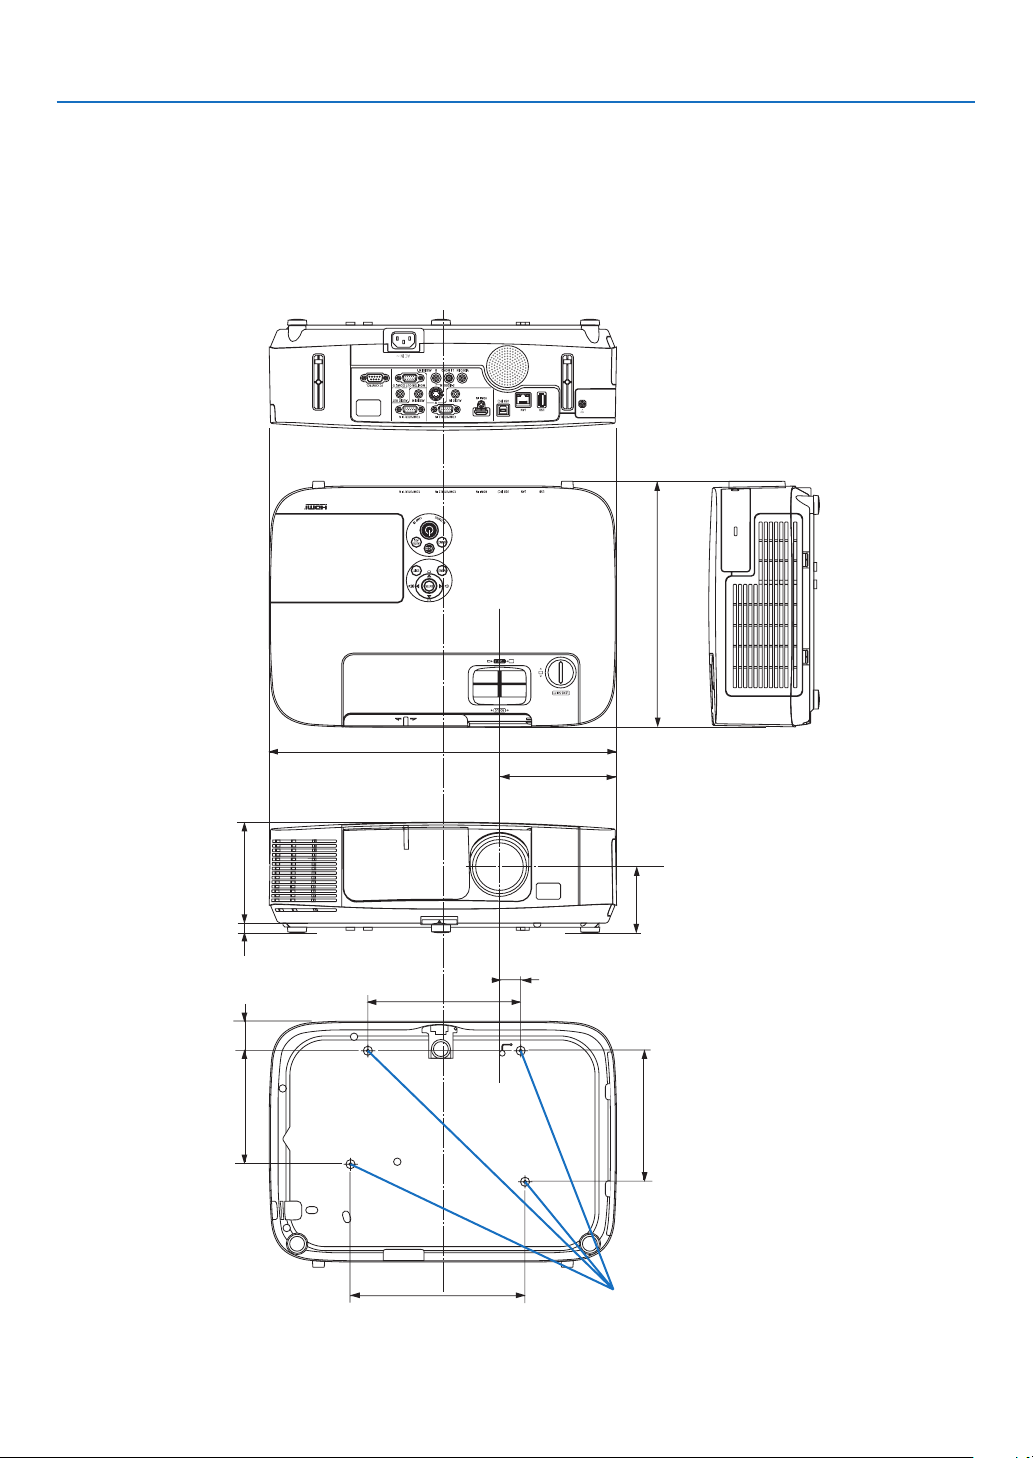
197
9. Appendix
71.8–76.5
(2.8–3)
398 (15.7)
115 (4.5)
282 (11.1)
11.5 (0.5)
175 (6.9)
24 (0.9)
33.8 (1.3)
130 (5.1)
150 (5.9)
200 (7.9)
134 (5.3)
Cabinet Dimensions
Lens center
Lens center
Holes for ceiling mount
Unit:mm(inch)

198
9. Appendix
Mini D-Sub 15 Pin Connector
Pin Assignments of D-Sub COMPUTER Input Connector
SignalLevel
Videosignal:0.7Vp-p(Analog)
Syncsignal:TTLlevel
51423
10
11 12 13 14 15
6978
COMPUTER 1 IN
NOTE:PinNos.12and15arerequiredforDDC/CI.
Pin No. RGB Signal (Analog) YCbCr Signal
1RedCr
2GreenorSynconGreenY
3BlueCb
4Ground
5Ground
6RedGroundCrGround
7GreenGroundYGround
8BlueGroundCbGround
9NoConnection
10SyncSignalGround
11NoConnection
12Bi-directionalDATA(SDA)
13
HorizontalSyncorCompositeSync
14VerticalSync
15DataClock

199
9. Appendix
Compatible Input Signal List
Analog RGB
Signal
Resolution
(dots)
AspectRatio
RefreshRate
(Hz)
VGA640 ×4804:360/72/75/85/
iMac
SVGA800×6004:356/60/72/75/85/
iMac
XGA1024 ×768*
1
4:360/70/75/85/
iMac
XGA+1152 ×8644:360/70/75/85
WXGA1280 ×768*
2
15:960
1280×800*
2
16:1060
1360×768*
3
16:960
1366×768*
3
16:960
Quad-VGA1280 ×9604:360/75
SXGA1280 ×1024 5:460/75
SXGA+1400 × 1050 4:360
WXGA+1440 ×90016:1060
WXGA++1600×900*
3
16:960
UXGA1600× 1200 4:360
WSXGA+1680 ×1050 16:1060
HD1280 ×72016:960
FullHD1920 ×108016:960
MAC13"640 ×4804:367
MAC16"832 ×6244:375
MAC19"1024 ×7684:375
MAC21"1152 ×8704:375
MAC23"1280×1024 5:465
Component
SignalFormatAspectRatio
RefreshRate
(Hz)
HDTV(1080p)1920×108016:960
HDTV(1080i)1920×108016:950/60
HDTV(720p)1280×72016:950/60
SDTV(480p)720×4804:3/16:960
SDTV(576p)720×5764:3/16:950
SDTV(480i)720×4804:3/16:960
SDTV(576i)720×5764:3/16:950
CompositeVideo/S-Video
SignalAspectRatio
RefreshRate
(Hz)
NTSC4:360
PAL4:350
PAL604:360
SECAM4:350
*1NativeresolutiononXGAmodel(P420X/P350X)
*2NativeresolutiononWXGAmodel(P350W)
*3Theprojectormayfailtodisplaythesesignalscorrectlywhen[AUTO]
isselectedfor[ASPECTRATIO]intheon-screenmenu.
Thefactorydefaultis[AUTO]for[ASPECTRATIO].Todisplaythese
signals,select[16:9]for[ASPECTRATIO].
NOTE:
•Animagewithhigherorlowerresolutionthantheprojector’snativeresolution(P420X/P350X:1024×768/P350W:1280×800)
willbedisplayedwithAdvancedAccuBlend.
•SynconGreenandCompositesyncsignalsarenotsupported.
•Signalsotherthanthosespeciedinthetableabovemaynotbedisplayedcorrectly.Ifthisshouldhappen,changetherefresh
rateorresolutiononyourPC.RefertoDisplayPropertieshelpsectionofyourPCforprocedures.
HDMI
Signal
Resolution
(dots)
AspectRatio
RefreshRate
(Hz)
VGA640 ×4804:360
SVGA800×6004:360
XGA1024 ×768*
1
4:360
WXGA1280 ×768*
2
15:960
1280×800*
2
16:1060
1366×76816:960
Quad-VGA1280 ×9604:360
SXGA1280 ×1024 5:460
SXGA+1400 × 1050 4:360
WXGA+1440 ×90016:1060
WXGA++1600×90016:960
WSXGA+1680 ×1050 16:1060
HDTV(1080p)1920 ×108016:950/60
HDTV(1080i)1920× 108016:950/60
HDTV(720p)1280 ×72016:950/60
SDTV(480p)720×4804:3/16:960
SDTV(576p)720×5764:3/16:950
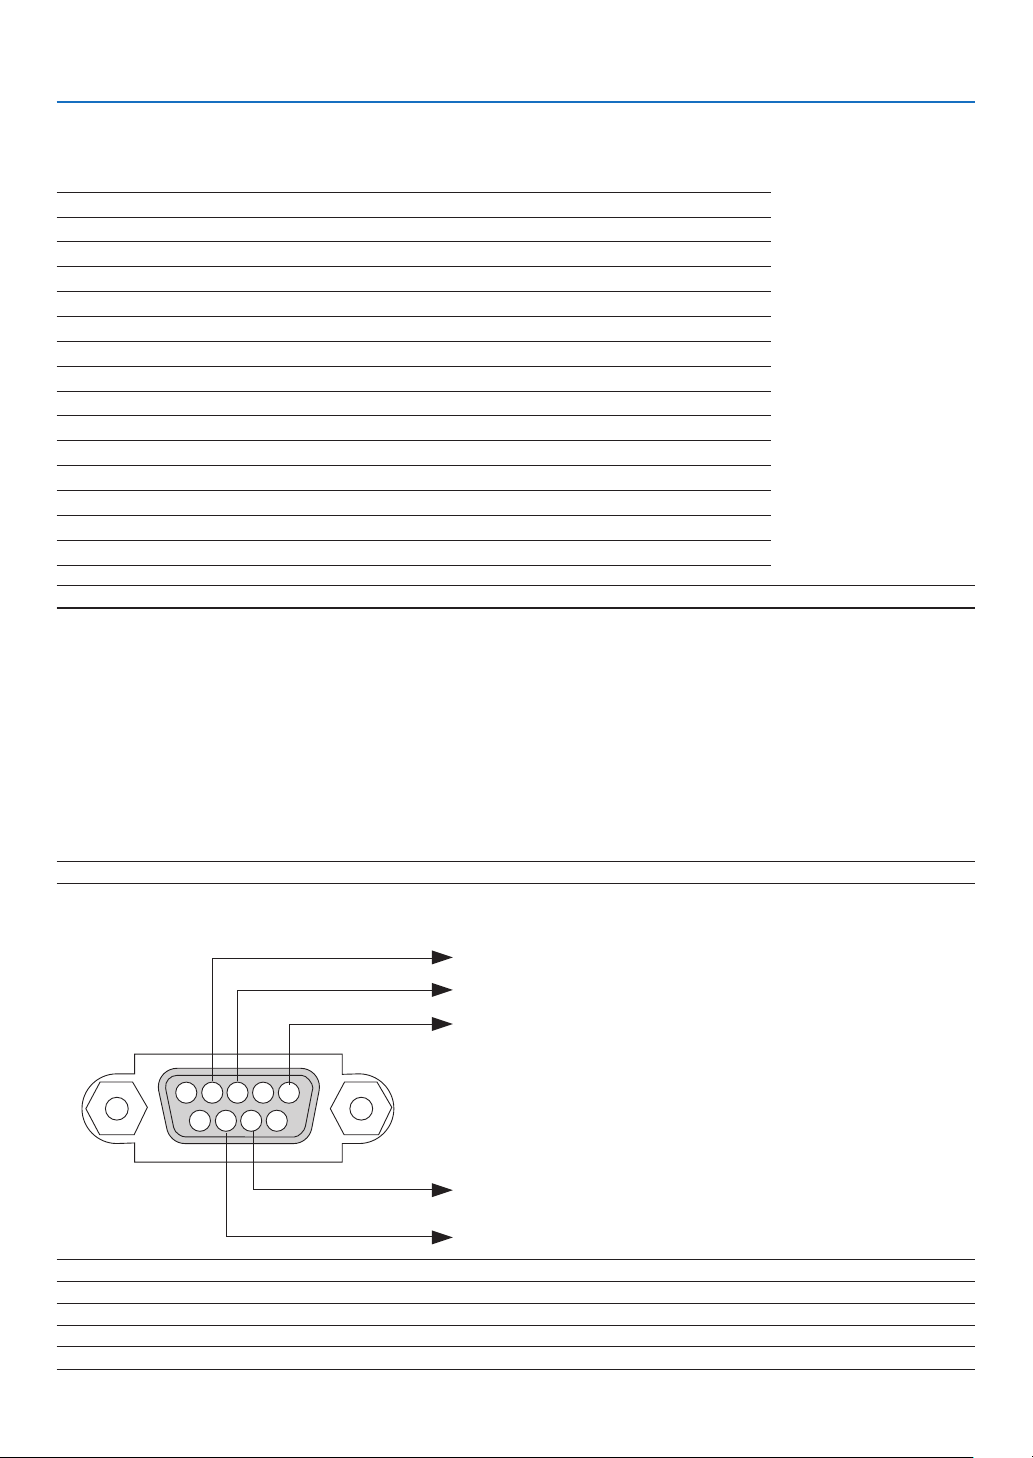
200
9. Appendix
NOTE:ContactyourlocaldealerforafulllistofthePCControlCodesifneeded.
Cable Connection
CommunicationProtocol
Baud rate .........................................38400 bps
Data length
......................................8 bits
Parity ...............................................No parity
Stop bit ............................................One bit
X on/off ............................................None
Communications procedure .............Full duplex
NOTE:Dependingontheequipment,alowerbaudratemayberecommendedforlongcableruns.
PC Control Connector (D-SUB 9P)
PC Control Codes and Cable Connection
PC Control Codes
Function Code Data
POWER ON 02H 00H 00H 00H 00H 02H
POWER OFF 02H 01H 00H 00H 00H 03H
INPUT SELECT COMPUTER 1 02H 03H 00H 00H 02H 01H 01H 09H
INPUT SELECT COMPUTER 2 02H 03H 00H 00H 02H 01H 02H 0AH
INPUT SELECT HDMI 02H 03H 00H 00H 02H 01H 1AH 22H
INPUT SELECT VIDEO 02H 03H 00H 00H 02H 01H 06H 0EH
INPUT SELECT S-VIDEO 02H 03H 00H 00H 02H 01H 0BH 13H
INPUT SELECT VIEWER 02H 03H 00H 00H 02H 01H 1FH 27H
INPUT SELECT NETWORK 02H 03H 00H 00H 02H 01H 20H 28H
INPUT SELECT USB DISPLAY 02H 03H 00H 00H 02H 01H 22H 2AH
PICTURE MUTE ON 02H 10H 00H 00H 00H 12H
PICTURE MUTE OFF 02H 11H 00H 00H 00H 13H
SOUND MUTE ON 02H 12H 00H 00H 00H 14H
SOUND MUTE OFF 02H 13H 00H 00H 00H 15H
NOTE1:Pins1,4,6and9arenoused.
NOTE2:Jumper“RequesttoSend”and“CleartoSend”togetheronbothendsofthecabletosimplifycableconnection.
NOTE3:Forlongcablerunsitisrecommendedtosetcommunicationspeedwithinprojectormenusto9600bps.
15243
67 98
To GND of PC
To RxD of PC
To TxD of PC
To RTS of PC
To CTS of PC

201
9. Appendix
No image is displayed from your PC or video equipment to the
projector.
Still no image even though you connect the projector to the PC
first, then start the PC.
Enabling your notebook PC’s signal output to the projector.
• Acombinationoffunctionkeyswillenable/disabletheexter-
naldisplay.Usually,thecombinationofthe“Fn”keyalong
withoneofthe12functionkeysturnstheexternaldisplay
onoroff.
No image (blue or black background, no display).
Still no image even though you press the AUTO ADJUST
button.
Still no image even though you carry out [RESET] in the
projector’s menu.
Signal cable’s plug is fully inserted into the input connector
A message appears on the screen.
( _____________________________________________ )
The source connected to the projector is active and available.
Still no image even though you adjust the brightness and/or
the contrast.
Input source’s resolution and frequency are supported by the
projector.
Troubleshooting Check List
Beforecontactingyourdealerorservicepersonnel,checkthefollowinglisttobesurerepairsareneededalsoby
referringtothe“Troubleshooting”sectioninyouruser’smanual.Thischecklistbelowwillhelpussolveyourproblem
moreefciently.
*Printthispageandthenextpageforyourcheck.
Frequency of occurrence always sometimes (How often?_____________________) other (__________________)
Power
No power (POWER indicator does not light blue) See also “Status
Indicator (STATUS)”.
Power cord’s plug is fully inserted into the wall outlet.
Main power switch is pressed to the ON position.
Lamp cover is installed correctly.
Lamp Hours Used (lamp operation hours) was cleared after
lamp replacement.
No power even though you press and hold the POWER button
for 1 second.
Shut down during operation.
Power cord’s plug is fully inserted into the wall outlet.
Lamp cover is installed correctly.
[AUTO POWER OFF] is turned off (only models with the [AUTO
POWER OFF] function).
[OFF TIMER] is turned off (only models with the [OFF TIMER]
function).
Video and Audio
Image is too dark.
Remains unchanged even though you adjust the brightness
and/or the contrast.
Image is distorted.
Image appears to be trapezoidal (unchanged even though you
carry out the [KEYSTONE] adjustment).
Parts of the image are lost.
Still unchanged even though you press the AUTO ADJUST
button.
Still unchanged even though you carry out [RESET] in the
projector’s menu.
Image is shifted in the vertical or horizontal direction.
Horizontal and vertical positions are correctly adjusted on a
computer signal.
Input source’s resolution and frequency are supported by the
projector.
Some pixels are lost.
Image is flickering.
Still unchanged even though you press the AUTO ADJUST
button.
Still unchanged even though you carry out [RESET] in the
projector’s menu.
Image shows flickering or color drift on a computer signal.
Still unchanged even though you change [FAN MODE] from
[HIGH ALTITUDE] to [AUTO].
Image appears blurry or out of focus.
Still unchanged even though you checked the signal’s resolution
on PC and changed it to projector’s native resolution.
Still unchanged even though you adjusted the focus.
No sound.
Audio cable is correctly connected to the audio input of the
projector.
Still unchanged even though you adjusted the volume level.
AUDIO OUT is connected to your audio equipment (only models
with the AUDIO OUT connector).
Other
Remote control does not work.
No obstacles between the sensor of the projector and the
remote control.
Projector is placed near a fluorescent light that can disturb the
infrared remote controls.
Batteries are new and are not reversed in installation.
Buttons on the projector cabinet do not work (only models with the
[CONTROL PANEL LOCK] function)
[CONTROL PANEL LOCK] is not turned on or is disabled in
the menu.
Still unchanged even though you press and hold the EXIT button
for a minimum of 10 seconds.
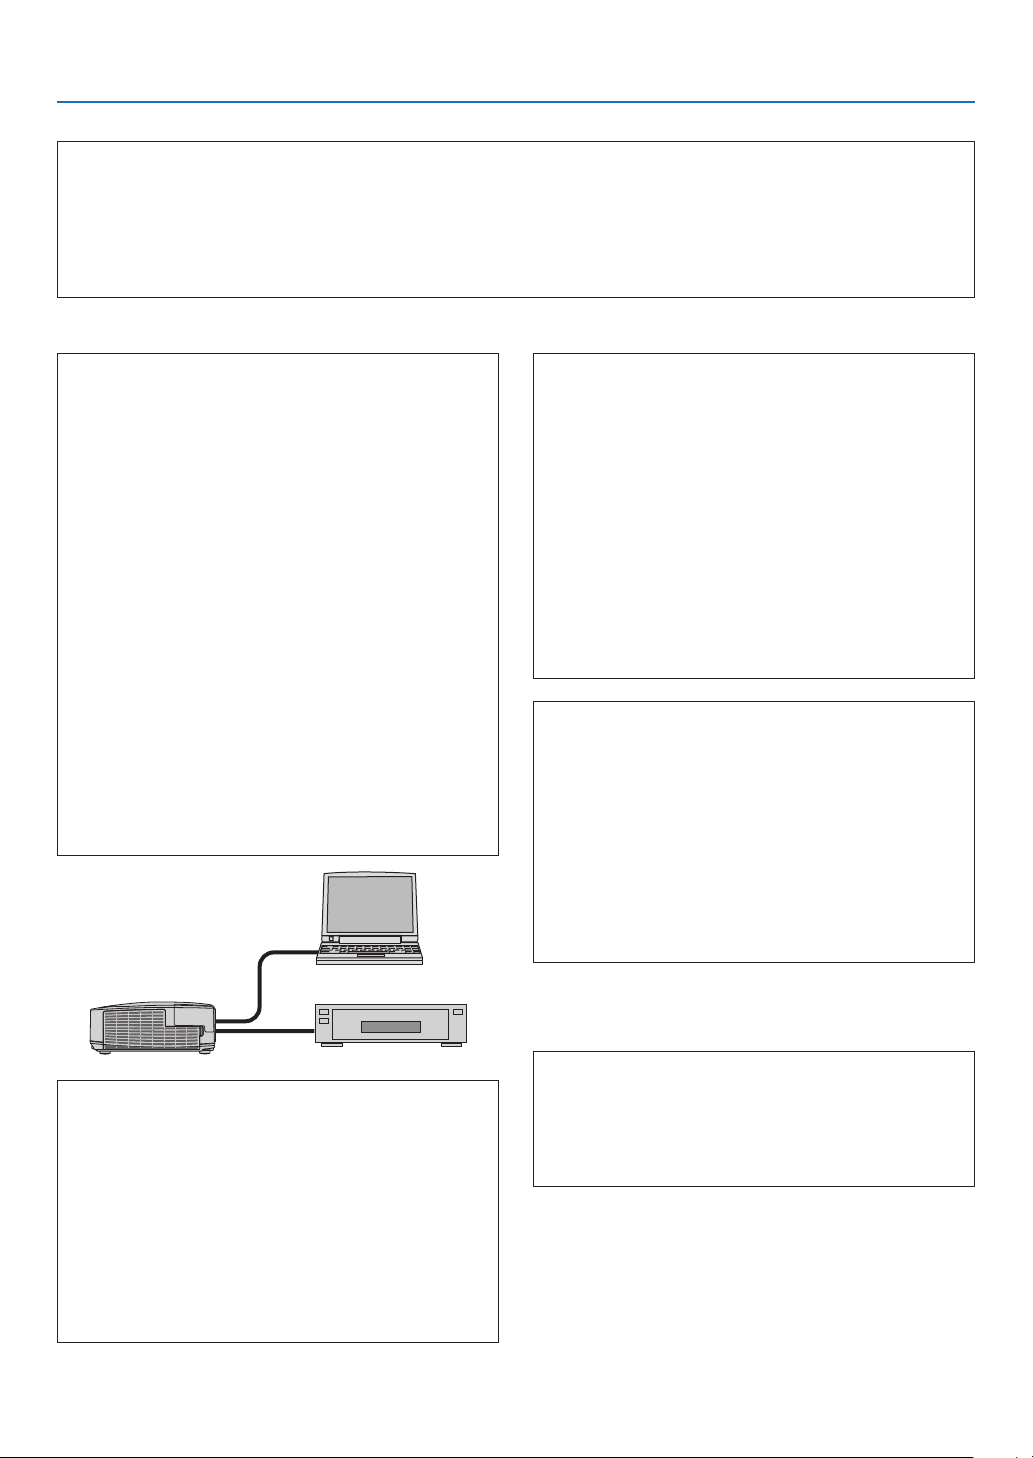
202
9. Appendix
In the space below please describe your problem in detail.
Information on application and environment where your projector is used
Projector
Model number:
Serial No.:
Date of purchase:
Lamp operating time (hours):
Eco Mode: OFF AUTO ECO
ECO1 ECO2
Information on input signal:
Horizontal synch frequency [ ] kHz
Vertical synch frequency [ ] Hz
Synch polarity H (+) (−)
V (+) (−)
Synch type Separate Composite
Sync on Green
STATUS Indicator:
Steady light Orange Green
Flashing light [ ] cycles
Remote control model number:
Signal cable
NEC standard or other manufacturer’s cable?
Model number: Length: inch/m
Distribution amplifier
Model number:
Switcher
Model number:
Adapter
Model number:
Projector
PC
DVD player
Installation environment
Screen size: inch
Screen type: White matte Beads Polarization
Wide angle High contrast
Throw distance: feet/inch/m
Orientation: Ceiling mount Desktop
Power outlet connection:
Connected directly to wall outlet
Connected to power cord extender or other (the
number of connected equipment______________)
Connected to a power cord reel or other (the number
of connected equipment______________)
Computer
Manufacturer:
Model number:
Notebook PC / Desktop
Native resolution:
Refresh rate:
Video adapter:
Other:
Videoequipment
VCR, DVD player, Video camera, Video game or other
Manufacturer:
Model number:

203
9. Appendix
TravelCare Guide
TravelCare - a service for international travelers
Thisproductiseligiblefor“TravelCare”,NEC’suniqueinternationalwarrantyandrepairservice.
FormoreinformationonTravelCareservice,visitourwebsite(inEnglishonly).
http://www.nec-display.com/dl/en/pj_support/travel_care.html

©NECDisplaySolutions,Ltd.20107N951552