Loading ...
Loading ...
Loading ...

Need Help? Toll Free 866.252.38113
Parts Listing
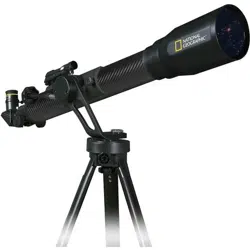
Please check while unpacking, if all parts are complete:
1. Objective lens
2. Tripod with accessory tray
3. Telescope mounting arm with clamp
4. Telescope tube with dew shield
5. Red Dot Viewfinder
6. Plössl Eyepiece 26mm
7. Plössl Eyepiece 9.7mm
8. Diagonal mirror
9. Slow motion control cable
10. Tension knob azimuth (left and right)
11. Tension knob altitude (up and down)
12. Focuser
13. Azimuth Wheel
14. 2x Barlow
Setting Up
It is recommended to do the first set-up during the daytime to
familiarize yourself with steps and components of setting up your
telescope. Now you may easily set up the telescope even in low
light.
1. Spread the tripod legs until the tripod spreaders are level.
Afterwards, put the accessory tray in place and lock it by turning by
60�Fig 2. Now you can set the tripod height by adjusting the single
legs with their locking clamps Fig 1.
2. Insert the mounting arm from above into the mount hole at the
tripod head and lock it with the black screw Fig 3.
3. Set the telescope tube with the threaded bolts from the left into
the clamp so that the bolts fit into the clamp's holes. Then screw the
black locking nuts and tighten them to a firm feel Fig 4.
4. Finally, put the Red Dot Viewfinder from the back in its holder
Fig 5.
5. Slide diagonal into Focuser (turn silver screws until snug) and
insert the 26mm Pössl eyepiece in to the diagonal (turn silver screws
until snug).
Aligning the Red Dot Viewfinder
Your telescope is designed for terrestrial and astronomical
observations. Please keep in mind that heat turbulences in the air
are also magnified. In warm conditions, it can be useful to limit
observations to medium magnifications.
First, remove the dust cover from the object lens.
*Please make sure to remove plastic insulator from battery Fig 6.*
Insert the 26mm Plössl Eyepiece into the diagonal, you may
now adjust the focus with the draw tube's wheel. The Redo Dot
Viewfinder is activated by sliding the switch on its right side; there
are two intensities available. Before the first observation, the
viewfinder has to be aligned to the telescope. For this, point at a
striking target (e.g. telephone pole) with the telescope's eyepiece.
Now, without moving the telescope, switch on the viewfinder and
adjust the red dot with the 2 adjustment screws (left and right - up
and down) until it fits in the eyepiece's view. Now the viewfinder is
aligned and ready to point for the telescope.
Hint: Don't forget to switch off the viewfinder after use!
Using the Telescope
Once you setup your telescope and aligned your viewfinder, you
will now be ready to use your telescope. On the side and on top of
the telescope mount head you will find tension knobs (#10) for the
azimuth and (#11) for altitude. Loosen both knobs while holding
the telescope near the focuser (#12). Slowly move the telescope
close to the desired object to b e observed and tighten the altitude
and azimuth tension knobs. While viewing through your red dot, use
both the slow motion altitude control and the side azimuth wheel
(#13) for centering the desired object. Once centered you will be
able to view through the eyepiece and make minor adjustments to
the location using the altitude control and azimuth wheel.
Hint: The object will appear as if it is moving in an elliptical path
across the sky. You can make adjustments using the slow motion
controls on the mount head.
Cleaning / Maintenance
Your telescope should, like every optical instrument, be treated with
care and stored dry. Doing so will maintain its optical performance
for many years. After using, the dust cover should be closed after
dew has dried off. The lenses can be cleaned with a soft brush
available from photo stores. Don’t ever use sharp detergents like
gasoline or thinner to clean the optics!
The Red Dot Viewfinder is
powered by a battery type CR-2032 (3V);
if a replacement is necessary, remove
cap (Fig. 1) by unscrewing set screw
(Fig. 2) and sliding battery towards the
front. Slide new battery in place with the
positive (+) side showing.
Replace cap and tighten with
set screw (Fig. 2).
Technical Data
Objective Diameter: 70mm
Focal Length: 700mm
Focal Ratio: f/10
Design: Achromatic
Magnifications
w/ Plössl eyepiece 26mm: 26.9x and with 2x Barlow: 52x
w/ Plössl eyepiece 9.7mm: 72x and with 2x Barlow: 144x
To make things simpler, please review the table with some
magnifications:
Red Dot Viewfinder
(bottom view)
WARNING:
Never use a telescope to look at the sun! Looking at or
near the sun will cause instant and irreversible damage
to your eye. Eye damage is often painless, so there is no
warning to the observer that damage has occurred until
it is too late. Do not point the telescope or its viewfinder
at or near the sun. Do not look through the telescope or
its viewfinder as it is moving. Children should always
have adult supervision while observing.
Available Downloads:
Instruction Manual, Planisphere, Software
Visit:
http://exploreone.com/pages/product-manuals
Fig 2
Fig 1
Front
Telescope Focal
Length
Focal Length of
Eyepiece
Magnification
without 2x Barlow with 2x Barlow
700mm 26mm 26.9x 52x
700mm 9.7mm 72x 144x
Loading ...
Loading ...
Loading ...
