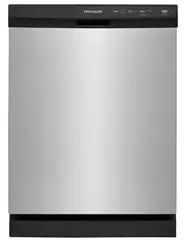

Frigidaire.com USA 1-800-374-4432 Frigidaire.ca Canada 1-800-265-8352
use
&
care
DISHWASHER
117859022 RevC (May 2021)
Important Safety Instructions .....................2
Product Registration ..................................3
Features at a Glance ..................................4
Operating Instructions ...............................5
Preparing and Loading Dishes ....................9
Dishwasher Dispenser & Detergents ......... 12
)DFWRUV$HFWLQJ3HUIRUPDQFH .................. 14
Care and Cleaning ................................... 15
Before You Call ....................................... 17
Major Appliance Warranty ........................ 19
T
his symbols will help alert you to such dan
g
ers
D
VSHUVRQDOLQMXU\EXUQV
¿
UHDQGHOHFWULFDO
s
h
o
ck.
7RUHGXFHWKHULVNRI¿UH
HOHFWULFDOVKRFNRU
i
n
j
ury when usin
g
your dishwasher, follow the
above basic
p
recautions .
S
AVE THESE INSTR
U
CTI
O
N
S
2
2
IMP
O
RTANT SAFETY INSTR
U
CTI
O
N
S
W
hen usin
g
your dishwasher, follow basic
precautions, includin
g
the followin
g
:
•
D
o not tam
p
er with controls.
•
U
se care unloadin
g
the dishware when the
S
ANITIZE o
p
tion has been selected. Contents
ma
y
be hot to the touch immediatel
y
after
the end of c
y
cle.
•
U
nder certain conditions, hydro
g
en
g
as may
be
p
roduced in a hot water s
y
stem that
h
a
s n
o
t
b
een
u
se
d
f
o
r 2 weeks
o
r m
o
re.
H
YDR
O
GEN GAS IS EXPL
O
SIVE. If h
o
t w
a
ter
sy
stem has not been used for such a
p
eriod,
before usin
g
dishwasher, turn on all hot
ZDWHU
I
DXFHWVDQGOHWZDWHU
À
RZ
I
URPHDFK
for several minutes. This will release an
y
accumulated hydro
g
en
g
as. HYDROGEN GAS
IS FLAMMABLE. D
o
n
o
t sm
o
ke
o
r
u
se
a
n
RSHQÀDPHGXULQ
J
WKLVWLPH
•
D
o not store or use combustible materials,
J
DVROLQHRURWKHUÀDPPDEOHYDSRUVDQG
l
i
q
uids in the vicinit
y
of this or an
y
other
a
pp
liance.
•
D
isconnect electrical
p
ower to dishwasher
before servicin
g
.
•
5H
S
DLUVVKRXOGEHGRQHE
\
D
T
XDOL
¿
HG
technici
a
n.
•
7RDYRLGHQWUD
S
PHQWDQGRUVX
RFDWLRQ
rem
o
ve
doo
r
o
r
doo
r l
a
tch mech
a
nism fr
o
m
an
y
dishwasher that is discarded or not in
u
s
e
.
•
W
hen loadin
g
items to be washed:
-
L
ocate shar
p
items and knives so that the
y
are not likely to dama
g
e the door seal or
t
ub
.
-
L
oad shar
p
items and knives with the
handles u
p
to reduce the risk of cut t
yp
e
i
n
j
uries.
For
y
our Safet
y
•
U
se
y
our dishwasher onl
y
as instructed in
this
U
se
a
n
d
C
a
re M
a
n
ua
l.
•
T
his Manual does not cover ever
y
p
ossible
condition and situation that ma
y
occur. Use
common sense and caution when installin
g
,
o
peratin
g
and maintainin
g
any appliance.
•
16)FHUWL¿H
G
UHVL
G
HQWL
D
O
G
LVKZ
D
VKHUV
D
UHQ
R
W
i
nten
d
e
d
f
o
r license
d
f
ood
est
ab
lishments.
•
D
I
S
HWA
S
HER M
US
T BE ELE
C
TRI
C
ALLY
GROUNDED. This a
pp
liance must be
connected to a
g
round metal, permanent
w
irin
g
system, or an equipment-
g
roundin
g
c
o
n
du
ct
o
r m
u
st
b
e r
u
n with the circ
u
it
conductors and connected to the e
q
ui
p
ment
-
g
roundin
g
terminal or lead on this appliance.
R
e
ad
the Inst
a
ll
a
ti
o
n Instr
u
cti
o
ns f
o
r
d
et
a
ils.
•
T
his dishwasher is desi
g
ned to operate on
re
g
ular house current (120V, 60Hz). Use
a circuit e
q
ui
pp
ed with a 15 am
p
ere fuse
o
r circuit breaker. Use a 20 am
p
ere fuse i
f
dishwasher is connected with a food dis
p
oser.
•
D
o not o
p
erate dishwasher unless all
enclosure
p
anels are in their
p
ro
p
er
p
lace.
•
K
eep youn
g
children and infants away from
dishwasher when it is operatin
g
.
•
D
o not let children abuse, sit, stand or
p
la
y
o
n
doo
r
o
r r
a
cks
o
f
a
d
ishw
a
sher.
•
T
o reduce the risk of in
j
ury, do not allow
children to
p
la
y
in or on the dishwasher.
•
U
se only deter
g
ents and rinse a
g
ents
rec
o
mmen
d
e
d
f
o
r
u
se in
a
d
ishw
a
sher.
•
S
tore dishwasher deter
g
ent and rinse a
g
ents
ou
t
o
f the re
a
ch
o
f chil
d
ren.
•
If the dishwasher drains into a food dis
p
oser,
make sure dis
p
oser is com
p
letel
y
em
p
t
y
before runnin
g
dishwasher.
•
D
o not wash
p
lastic items unless marked:
“
Dishwasher Safe” or e
q
uivalent. Check
w
ith manufacturer for recommendations,
i
f n
o
t m
a
rke
d
. Items th
a
t
a
re n
o
t m
a
rke
d
dishwasher safe ma
y
melt and create a
S
RWHQWLDO¿UHKD]DUG

3
3
PR
O
D
U
CT RE
G
ISTRATI
O
N
T
hank you for choosin
g
Fri
g
idaire
T
his Use & Care Guide is
p
art of our commitment
to customer satisfaction and
p
roduct
q
ualit
y
throu
g
hout the service life of your new appliance.
W
e view your purchase as the be
g
innin
g
of a
relationshi
p
. To ensure our abilit
y
to continue
s
ervin
g
you, please use this pa
g
e to record
i
m
p
ortant
p
roduct information.
_________________________________
Pu
rch
a
se D
a
t
e
_________________________________
Mod
el N
u
m
b
e
r
_________________________________
S
eri
a
l N
u
m
b
e
r
R
e
g
isterin
g
your product with Fri
g
idaire enhances
o
ur ability to serve you. You can re
g
ister online
at
www.fri
g
idaire.co
m
or by droppin
g
your
P
roduct Re
g
istration Card in the mail.
Í
N
O
TE
T
he dishwasher is pro
g
rammed to remember
y
our last c
y
cle so
y
ou do not have to reset each
time. To start the dishwasher usin
g
the same
c
y
cle and o
p
tions selected on the
p
revious
w
ash,
j
ust press the START/CANCEL pad.
Í
N
O
TE
N
ot all c
y
cles and o
p
tions available on all
m
od
els.
Í
N
O
TE
:K\(QHU
J
\(FLHQW8QLWVUXQORQ
J
F\FOHV6H
Y
-
eral factors are important to washin
g
dishware.
T
he ener
g
y use of the dishwasher was reduced
by applyin
g
more of the factors that don’t use
s
o much ener
g
y and less of the ones that use
more. As a result,
y
ou will see that the wash
cycles take lon
g
er.
Í
N
O
TE
Ver
y
Im
p
ortant Information - Read Before
O
peratin
g
Your Dishwasher
!
Normal Operatin
g
Sounds
T
his
d
ishw
a
sher
do
es n
o
t s
ou
n
d
like m
o
st
d
is
h
-
wa
shers
-
IT’S
Q
UIETE
R
.
Your Direct Feed Wash S
y
stem dishwasher uses
H
QHU
J
\HFLHQWPRWRUVIRUWKHZDVKDQGGUDLQ
p
ortions of the c
y
cle
y
ou select. Each c
y
cle has
D
VHULHVRIZDWHU¿OOVDQGGUDLQVIRUZDVKLQ
J
and rinsin
g
dishes. As each cycle be
g
ins, you
ma
y
-or ma
y
not- hear the drain motor. The next
s
ound you will hear is the splashin
g
water as it
enters the t
ub
.
P
LEASE BE ADVISED: If
y
ou com
p
are this
dishwasher to
p
revious models,
y
ou ma
y
be
s
ur
p
rised at what
y
ou DON’T hear.
G
ettin
g
Started
1.
L
oad Dishwasher (See Preparin
g
and Loadin
g
D
ishes
)
.
2
. Add deter
g
ent (See Dishwasher Dispenser &
D
eter
g
ents).
3
. Add Rinse Aid, if needed
(
See Rinse Aid
)
.
4
.
Ru
n h
o
t w
a
ter f
au
cet ne
a
rest
d
ishw
a
sher
u
ntil
Z
DWHULVKRW7XUQZDWHUR
5
.
S
elect desired CYCLE
(
See C
y
cle Chart
)
.
6
.
S
elect desired OPTION
(
See O
p
tion
S
elections
)
.
7
.
T
o start,
p
ress START/CANCEL
p
ad and close
door immediatel
y
.
4
4
FEAT
U
RES AT A
G
LANCE
Your dishwasher cleans by sprayin
g
a mixture of hot water and deter
g
ent throu
g
h the spray arms
a
g
ainst soiled surfaces. First, the dishwasher drains for a few seconds to remove soils dropped while
ORDGLQ
J
WKHQ¿OOVZLWKZDWHUFRYHULQ
J
WKH¿OWHUDUHD:DWHULVWKHQSXPSHGWKURX
J
KWKHVSUD\DUPV
6RLOSDUWLFOHV
J
RWKURX
J
KDQGDFURVVWKH¿OWHUDQGGRZQWKHGUDLQDVWKHZDWHULVSXPSHGRXW7KLV
VHULHVR
I
VWHSVDUHUHSHDWHGDVQHHGHG7KHQXPEHUR
I
ZDWHU
¿
OOVYDULHVZLWKWKHF\FOHEHLQ
J
XVHG
T
o Start a C
y
cle
W
hen c
y
cle and o
p
tions are selected, LEDs of selected c
y
cle and o
p
tions are illuminated. The status
w
indow dis
p
la
y
s the c
y
cle time and then dis
p
la
y
s ‘Press Start’.
T
o start the c
y
cle,
p
ress
S
TART
/
CANCE
L
p
ad and close the dishwasher door immediatel
y
.
T
he status window dis
p
la
y
s ‘Close’ after the
S
TART
/
CANCE
L
p
ad is
p
ressed.
A tone will sound indicatin
g
the cycle is successfully started after door is closed.
Features may vary accordin
g
to model.
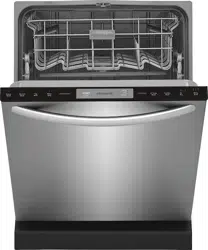
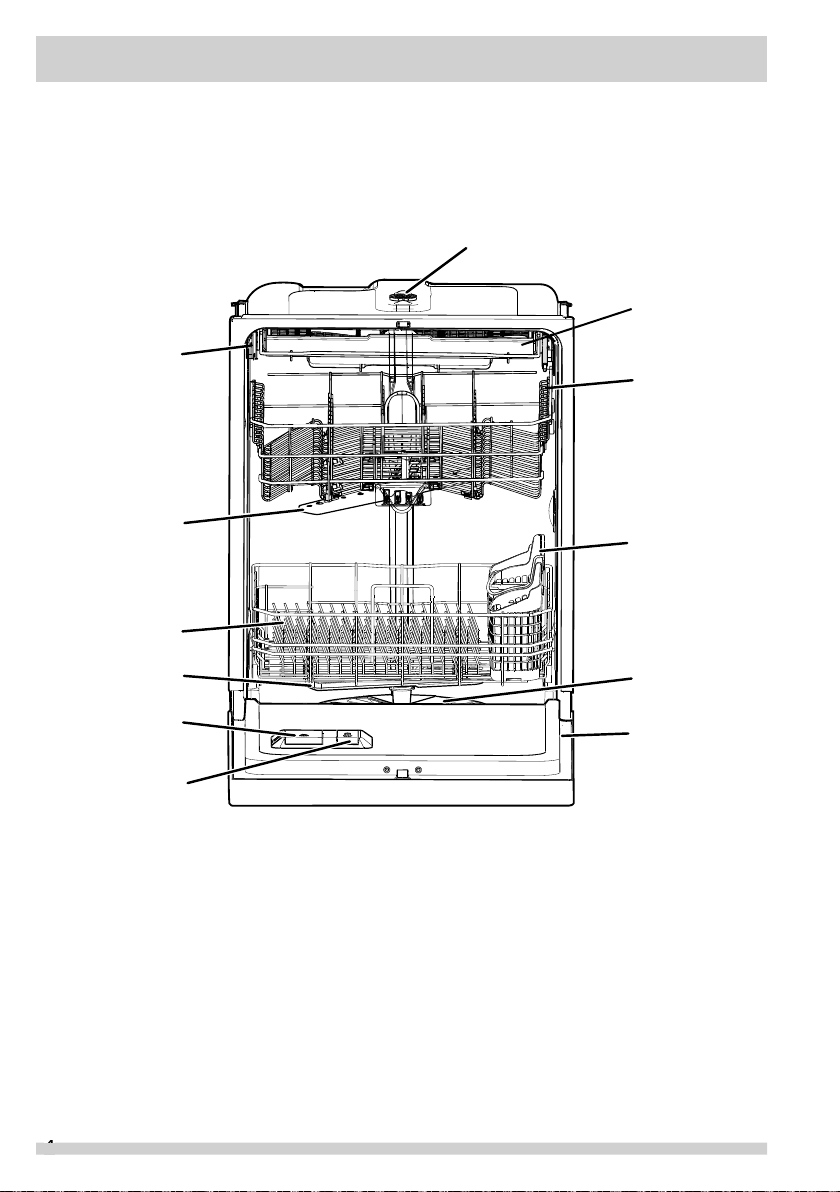
R
inse Ai
d
D
is
p
ense
r
Tub
G
a
ske
t
M
iddle S
p
ra
y
Arm
Lo
wer R
a
ck
L
ower
Sp
ra
y
A
rm
D
eter
g
ent
D
is
p
ense
r
Sp
ra
y
Arm
Upp
er Rack
S
ilverw
a
re
Ba
ske
t
F
ilt
er
S
eri
a
l L
ab
el
(
located on
ri
g
ht side o
f
door
)
T
hir
d
level r
a
ck
Property Dama
g
e Hazard
B
efore startin
g
dishwasher be sure that the
wa
ter is c
o
nnecte
d
a
n
d
t
u
rne
d
o
n. F
a
il
u
re t
o
do so may cause dama
g
e to the pump seal and
result in water leaka
g
e.
5
5
O
PERATIN
G
INSTR
U
CTI
O
N
S
W
ash C
y
cle Selections
C
y
cle times are a
pp
roximate and will var
y
with
op
tions selected. Hot water is necessar
y
to
activate dishwasher deter
g
ent and melt fatty food
s
oils. An automatic sensor will check the incomin
g
w
ater temperature and, if it is not hot enou
g
h,
the cycle will be len
g
thened for automatic water
KHDWLQ
J
LQWKHPDLQZDVKDQG¿QDOULQVHRIDOO
c
y
cles. This ha
pp
ens even when HI-TEMP WASH
op
tion has not be selected. When HI-TEMP WASH
i
s selected, an even hi
g
her temperature will be
re
a
che
d
t
o
h
a
n
d
le he
a
vier s
o
il l
oad
s.
Op
tion Selections
W
a
s
h Pre
ssu
re
T
he pro
g
rammed cycles default to the “sur
g
e
”
p
ressure o
p
tion which varies the
p
ressure o
p
timall
y
for the c
y
cle’s intended normal use. If a ver
y
low
“
s
p
ra
y
” is desired,
p
ress the WASH PRESSURE
p
ad.
D
ue to wash c
y
cle o
p
timization, some
p
ressure
op
tions are not selectable in all wash c
y
cle.
W
ash Tem
p
T
he pro
g
rammed cycles default to the “normal
”
tem
p
erature o
p
tion, to choose HI-TEMP or
S
ANITIZE press WASH TEMP pad a
g
ain.
Hi-Tem
p
Wash O
p
tio
n
H
I-TEMP WASH option is selected, by pressin
g
the WASH TEMP
p
ad. The dishwasher heats
w
ater in the main wash to a
pp
roximatel
y
140°F
(
60°C) and increases the temperature hi
g
her in
WKH¿QDOULQVHWRKHOSZLWKWKHGU\LQ
J
VWD
J
H
T
his helps dishwasher deter
g
ent remove food
J
UHDVHDQGVRLO
I
URPGLVKHVPRUHH
HFWLYHO\DQG
aids in dryin
g
performance by addin
g
additional
rinse aid and increasin
g
the water temperature.
Recommended C
y
cle for t
yp
ical use
:
T
he Normal c
y
cle with its factor
y
default o
p
tions
o
f normal temperature and heated dry to
g
ether
p
rovide the best all around
p
erformance. This c
y
cle
s
election is recommended for ever
y
da
y
use and is
s
uitable for a lar
g
e ran
g
e of both dish load sizes
and food quantities remainin
g
on those dishes.
S
an
i
t
i
ze O
p
t
i
o
n
T
o sanitize your dishes and
g
lassware, select
S
ANITIZE option, by pressin
g
WASH TEMP pad.
W
hen selected, the li
g
ht will come on and remain
o
n until end of c
y
cle. The water tem
p
erature in
WKH¿QDOULQVHZLOOEHUDLVHGWR)
&
DQG
w
ill maintain that tem
p
erature for 9 minutes. This
op
tion is available in Heav
y
and Normal C
y
cles.
Only these sanitization cycles have been desi
g
ned
to meet N
S
F re
q
uirements.
The cycle time will be extended until the proper
water temperature is reached.
Washing action will
continue durin
g
the water heatin
g
delay. For best
results, the incomin
g
water temperature should be
at least 120°F
(
49°C
)
.
7KHVDQLWL]HFULWHULDPD
\
QRWEHVDWLV¿HGLIWKHUH
i
s an interru
p
tion of the c
y
cle,
p
ower failure or i
f
the incomin
g
water temperature is below 120°F
(
49°C
)
.
7RWXUQR
WKH6$1,7,=(R
S
WLRQ
S
UHVVWKH:DVK
7HPSSDG7KH6$1,7,=(OLJKWZLOOWXUQR
Í
N
O
TE
Your dishwasher uses a DishSense
TM
e
Technolo
g
y to understand how much food is on the dishes and
then ad
j
usts the cycle accordin
g
ly.

6
6
O
PERATIN
G
INSTR
U
CTI
O
N
S
To Cancel a C
y
cle and Dela
y
Start
B
oth runnin
g
cycle and delay countdown can be
cancelled at an
y
time.
O
p
en the dishwasher door and
p
ress the START
/
CANCEL pad until you hear a tone. The runnin
g
c
y
cle or dela
y
countdown is cancelled.
If desired, a new c
y
cle can now be selected, b
y
pressin
g
START/CANCEL pad and closin
g
the door
i
mmediately, the new cycle will be
g
in.
Dela
y
Start
T
he DELAY START o
p
tion allows
y
ou to
automatically delay startin
g
your dishwasher from
1-24 h
ou
rs.
S
elect
y
our desired c
y
cle and o
p
tions, then
p
ress
the DELAY START
p
ad until the desired dela
y
time dis
p
la
y
s in the status window. The LEDs o
f
s
elected c
y
cle and o
p
tions are illuminated. The
s
tatus window dis
p
la
y
s the dela
y
time and then
dis
p
la
y
s ‘Press Start’.
T
o start the dela
y
countdown,
p
ress START
/
CANCEL
p
ad and close door immediatel
y
.
T
he status window dis
p
la
y
s ‘Close’ after the
S
TART/CANCEL
p
ad is
p
ressed.
A tone will sound indicatin
g
that the countdown
h
a
s st
a
rte
d
a
fter the
doo
r is cl
o
se
d
. The selecte
d
c
y
cle starts when the countdown is com
p
leted.
C
hild L
o
ck C
o
ntr
o
ls
T
o prevent children from accidentally chan
g
in
g
the
dishwasher cycle or startin
g
the dishwasher, lock
the dishwasher controls by pressin
g
the DELAY
S
TART
p
ad until the status window dis
p
la
y
s “loc”.
T
o unlock the controls,
p
ress the DELAY START
pad until “loc” is no lon
g
er displayed in the status
w
in
do
w.
H
eat
D
r
y
T
he HEAT DRY o
p
tion in combination with rinse
aid will enhance dryin
g
performance. HEAT DRY
op
tion is available on all c
y
cles.
A
i
r Dr
y
T
he AIR DRY o
p
tion will reduce tem
p
erature in the
hot rinse of the selected wash c
y
cle. This o
p
tion
w
ill sli
g
htly decrease ener
g
y usa
g
e but will increase
the likelihood that dishware will not be dr
y
.
O
penin
g
the door durin
g
cycle
If door is opened while a cycle is runnin
g
or delay
i
s countin
g
down, the dishwasher will stop runnin
g
.
T
he LEDs of selected c
y
cle and o
p
tions are
i
lluminated, the status window dis
p
la
y
s the
remainin
g
cycle time or delay time and displays
‘
Press St
a
rt’.
T
o resume,
p
ress START/CANCEL
p
ad and close
the dishwasher door immediatel
y
. The status
w
indow dis
p
la
y
s ‘Close’ after the START/CANCEL
p
ad is
p
ressed.
A tone will sound indicatin
g
that the dishwasher
w
ill be
g
in runnin
g
from the point of interruption
a
fter the
doo
r is cl
o
se
d
.
If the dishwasher door is ke
p
t o
p
en for too
l
on
g
, or the door is closed without pressin
g
S
TART/CANCEL pad, the runnin
g
cycle or delay
c
ou
nt
do
wn will
b
e c
a
ncelle
d
.
S
tatus Indicator Li
g
hts
T
he CLEAN li
g
ht will remain on after door is opened.
W
hen the SANITIZE o
p
tion is selected and the
criteria is met, the Sanitized indicator will dis
p
la
y
and remain on after the door is o
p
ened. If the
s
anitization criteria is not achieved, the indicator
w
ill not dis
p
la
y
. This can ha
pp
en if the c
y
cle is
i
nterru
p
ted or if the sanitization tem
p
erature
could not be reached due to incomin
g
water
WHPSHUDWXUHVLJQL
¿
FDQWO\EHORZ)
To Cancel a Settin
g
If
y
ou have selected
y
our c
y
cle and o
p
tions and
decide to cancel, by pressin
g
the START/CANCEL
pad, the unit will
g
o into a stand-by mode, which
all LEDs will
g
o out.

7
7
O
PERATIN
G
INSTR
U
CTI
O
N
S
,QDOO(UURU&RGHLQVWDQFHVLI3UHVVLQ
J
WKHFDQFHOEXWWRQRUWXUQLQ
J
SRZHURDWWKHEUHDNHUIRU
min. does not resolve the
p
roblem
,
contact the Fri
g
idaire Customer Care Center at 1-800-944-9044.
Err
o
r C
o
de
Dis
p
la
y
ed
Err
o
r C
o
de
*
Pr
o
ble
m
So
luti
on
i
1
0
$
ORZ
¿
OOKDVEHHQ
d
etecte
d
.
/RRN
I
RUD
S
LQFKHGZDWHUVX
SS
O
\
OLQHRUZDWHUVKXWR
i
s not com
p
letel
y
o
p
ened.
i2
0; i40; iF0 &OR
JJ
HG¿OWHUVRUD
restricte
d
d
r
a
in line h
a
s
b
een
d
etecte
d
.
&KHFNDQGFOHDQERWK¿OWHUVDQGVXP
S
DUHDDQGFKHFN
for a
p
inched or blocked drain hose. If the drain line is
attached to a disposer, check that the knockout plu
g
h
a
s
b
een rem
o
ve
d
.
i30
$
OHDNRURYHU
À
RZR
I
wa
ter h
a
s
b
een
d
etecte
d
i
n the bottom
p
an.
Loo
k f
o
r l
oo
se c
o
nnecti
o
ns
a
t the w
a
ter inlet v
a
lve
a
n
d
ensure the unit is
p
ro
p
erl
y
leveled.
i50
A
p
roblem has been
d
etecte
d
with the
d
r
a
in
o
r w
a
sh m
o
t
o
r.
3UHVVLQ
J
WKHFDQFHOEXWWRQRUWXUQLQ
J
SRZHUR
DWWKH
b
re
a
ker f
o
r
5
min. sh
ou
l
d
cle
a
r this err
o
r c
od
e
a
n
d
the
u
nit c
a
n
b
e rest
a
rte
d
.
If this does not resolve the
p
roblem, service will
need t
o
be called.
i60
A
p
roblem has been
d
etecte
d
with the w
a
ter
heatin
g
system.
i
C
0
A
p
roblem has been
d
etecte
d
with the
electronic control s
y
stem.
S
tatus Wind
o
w
T
he STATUS window, available on some models, indicates the followin
g
activity:
U
ser Instructi
o
n C
o
de
1
-
24h
N
umber of dela
y
start hours.
T
he l
a
st h
ou
r will c
ou
nt
do
wn
i
n min
u
tes.
CL
O
SE Cl
o
se will scr
o
ll
a
cr
o
ss the st
a
t
u
s
w
indow indicatin
g
the door needs to
b
e cl
o
se
d
.
M
IN
U
TE
S
N
umber of minutes left in c
y
cle
(
1-199
)
.
L0
–L
6
.
L
evel of Rinse Aid dosa
g
e.
Instruct
io
n
Co
de
Dis
p
la
y
ed
Problem
/
Conditio
n
So
luti
on
Cl
o
s
e
T
his in
d
ic
a
tes the
doo
r
has been left o
p
en or not
p
ro
p
erl
y
latched.
E
nsurin
g
the door is properly latched will clear the
dis
p
la
y
. This does not indicate a
p
roblem with
y
our
d
ishw
a
sher
a
n
d
service will n
o
t nee
d
t
o
b
e c
o
nt
a
cte
d
.
PF
S
oft Power Failure: PF is displayed if a power outa
g
e occurs durin
g
a wash cycle. The
w
ash c
y
cle will be
p
aused tem
p
oraril
y
and resume once
p
ower is restored if the door
has not been o
p
ened.
H
ard Power Failure: A hard
p
ower failure means the unit will not o
p
erate until
p
ower
i
s restored. Pressin
g
start within 18 hours of loss of power will resume power at the
p
oint of c
y
cle interru
p
tion.
8
8
O
PERATIN
G
INSTR
U
CTI
O
N
S
Cy
cle Chart
Cy
cle
S
ett
i
n
g
s
W
ater
(
a
pp
rox.
)
Time *
(
Hours
)
W
ashes
/
R
i
n
s
e
s
H
eav
y
F
or
p
ots,
p
ans ca
s
-
s
er
o
les
a
n
d
d
innerw
a
re
w
ith
d
rie
d
-
o
n
o
r
ba
ke
d-
o
n soils, and silverware
Defa
u
lt
S
ur
g
e, Hi-Temp, and Hea
t
Op
t
i
ons
S
anitize, and Ai
r
7.0 - 7.9
g
al.
2
6
.
6
- 29.9 liter
s
2
1
/
4
-
3
1
/
4
4
W
a
she
s
3
Rinse
s
N
o
rma
l
F
or re
g
ularly soiled
d
ishes
a
n
d
silverw
a
re.
Defa
u
lt
S
ur
g
e, Normal, and Hea
t
Op
t
i
ons
Sp
ra
y
, Hi-Tem
p
S
anitize, and Ai
r
2.9 - 7.3
g
al.
11.
0
- 27.7 liter
s
2
-
3
1
/
4
5
W
a
she
s
2
Rin
ses
C
hina Cr
y
sta
l
F
or li
g
htly soiled China
and Cr
y
stal
Defa
u
lt
Sp
ra
y
, Normal, and Hea
t
Op
t
i
ons
No
ne Av
a
il
ab
le
5
.7
g
al.
21.
5
liter
s
1
1
/
4
3
W
a
she
s
2
Rin
ses
Ener
g
y
S
aver
F
or li
g
htly soiled
p
re-rinsed dishes and
s
ilverw
a
re
Defa
u
lt
S
ur
g
e, Normal, and Ai
r
Op
t
i
ons
Sp
ra
y
4
.4 - 7.9
g
al.
1
6
.
5
- 29.7 liter
s
1
1
/
4
- 1
3
/
4
5
W
a
she
s
3
Rinse
s
Rinse Onl
y
F
or rinsin
g
dishes that
w
ill
b
e w
a
she
d
l
a
ter.
Defa
u
lt
S
ur
ge
Op
t
i
ons
No
ne Av
a
il
ab
le
2.0
g
al.
7.
6
liter
s
1
/
4
2
Rin
ses
Í
N
O
TE
*
T
he time remainin
g
may suddenly increase or drop several minutes. This means that the dishwasher
received input from the Smart Sensor concernin
g
the soil load and has automatically ad
j
usted the
cycle len
g
th.
9
9
PREPARIN
G
AND L
O
ADIN
G
DISHE
S
Dish Pre
p
aratio
n
S
crape away lar
g
e pieces of food, bones, pits,
WRRWK
S
LFNVHWF7KHFRQWLQXRXVO
\
¿
OWHUHGZDVK
À
XLGZLOOUHPRYHUHPDLQLQJ
I
RRGSDUWLFOHV
Bu
rne
d
-
o
n f
ood
s sh
ou
l
d
b
e l
oo
sene
d
b
ef
o
re
l
oadin
g
. Empty liquids from
g
lasses and cups.
F
oods such as mustard, mayonnaise, vine
g
ar,
l
emon
j
uice and tomato based products may
cause discoloration of stainless steel and
p
lastics
i
f allowed to sit for a lon
g
period of time. Unless
the dishwasher is to be o
p
erated at once, it is
best to
p
re-rinse or use the rinse onl
y
c
y
cle to
ULQVH
R
WKHVHI
RRG
V
R
LOV
•
L
oad racks so that lar
g
e items do not
prevent the deter
g
ent dispenser from
o
penin
g
.
•
Check m
a
n
u
f
a
ct
u
rer’s rec
o
mmen
da
ti
o
ns
before washin
g
items in question.
•
If the
d
ishw
a
sher
d
r
a
ins int
o
a
F
ood
D
is
p
oser, be sure dis
p
oser is
completely empty before startin
g
d
i
s
hwa
s
her.
Loadin
g
the Upper Rack
Features and appearance of racks and silverware
basket may vary from your model.
7KHXSSHUUDFNLVGHVLJQHG
I
RU
À
H[LELOLW\LQORDGLQJ
a wide variety of items includin
g
cups,
g
lasses,
s
temware, small
p
lates, bowls, etc.
L
oad
g
lasses and plastic items in upper rack only.
L
oad items with open end facin
g
down for better
cleanin
g
and drainin
g
.
D
ama
g
e may occur if delicate items touch each
o
ther durin
g
dishwasher operation.
L
on
g
-handled knives and utensils can be placed in
upp
er rack.
B
e sure nothin
g
protrudes throu
g
h the bottom o
f
the rack to block rotation of middle s
p
ra
y
arm.
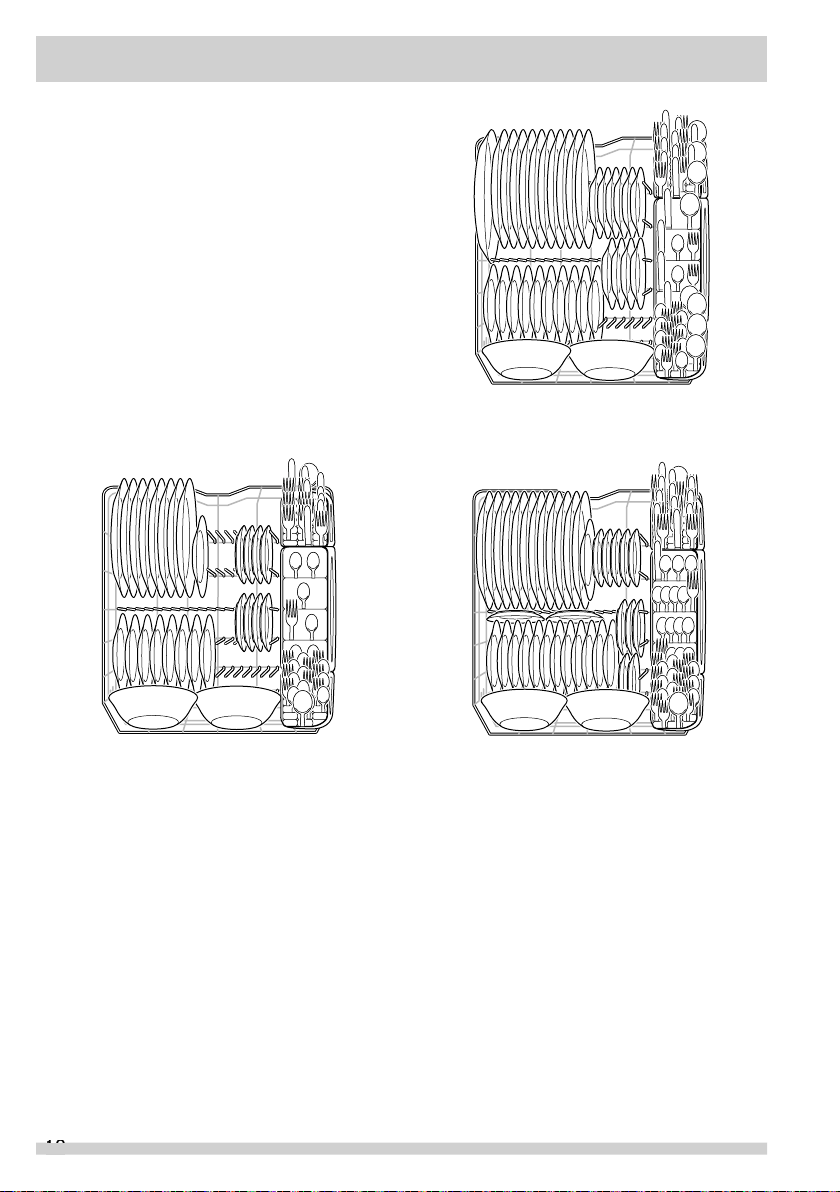
10 place settin
g
s standard loadin
g
pattern
12 place settin
g
s standard loadin
g
pattern
8 place settin
g
s standard loadin
g
pattern
10
10
PREPARIN
G
AND L
O
ADIN
G
DISHE
S
Loadin
g
the Bottom Rack
Features and a
pp
earance of racks and
s
ilverware basket ma
y
var
y
from
y
our
m
o
del.
T
he bottom rack is best for
p
lates, saucers, bowls,
and cookware. Lar
g
e items should be placed
alon
g
the ed
g
e so they do not block the spray arm
rotation. For best results,
p
lace bowls, casseroles,
and sauce pans with soiled surface facin
g
down or
toward the center. Tilt sli
g
htly for better draina
g
e.
M
ake sure tall items do not block s
p
ra
y
arm
r
o
t
a
ti
o
n.
B
e sure pan handles do not protrude throu
g
h
the bottom of the rack and block the s
p
ra
y
arm
r
o
t
a
ti
o
n.
12 place settin
g
s standard loadin
g
pattern
8 place settin
g
s standard loadin
g
pattern.
10 place settin
g
s standard loadin
g
pattern.
11
11
PREPARIN
G
AND L
O
ADIN
G
DISHE
S
M
ix items in e
a
ch secti
o
n
o
f the
ba
sket with s
o
me
pointin
g
up and some down to avoid nestin
g
.
W
ater s
p
ra
y
cannot reach nested items.
Addin
g
an article
T
o add or remove items after wash c
y
cle starts:
•
U
nl
a
tch
doo
r
a
n
d
w
a
it
a
few sec
o
n
d
s
u
ntil
w
ash action stops before openin
g
.
•
A
dd
the item
a
n
d
w
a
it
a
few sec
o
n
d
s t
o
a
ll
o
w
cold air to slowl
y
ex
p
and inside dishwasher.
•
T
o resume c
y
cle
p
ress the START/CANCEL
p
ad and close the door immediatel
y
.
L
oad shar
p
items
(
knives, skewers, etc.
)
pointin
g
down.
F
ailure to do so may result in in
j
ury.
Features and appearance of racks and silverware
basket may vary from your model.
Load
the silverw
a
re
ba
sket while it is in the
bottom rack or take the basket out for loadin
g
on
a
c
ou
nter
o
r t
ab
le.
In some models small items like bab
y
bottle ca
p
s,
j
ar lids, corn cob holders, etc., can be placed in
a
c
o
vere
d
secti
o
n. Cl
o
se the c
o
ver t
o
h
o
l
d
sm
a
ll
i
tems in
p
lace.
U
se su
gg
ested loadin
g
patterns, as shown, to
i
ncrease washabilit
y
of the silverware.
•
B
e sure nothin
g
protrudes throu
g
h bottom o
f
basket or rack to block the s
p
ra
y
arm.
•
Do
n
o
t mix silver
a
n
d
st
a
inless t
o
a
v
o
i
d
GDPD
J
LQ
J
WKHVLOYHU¿QLV
K
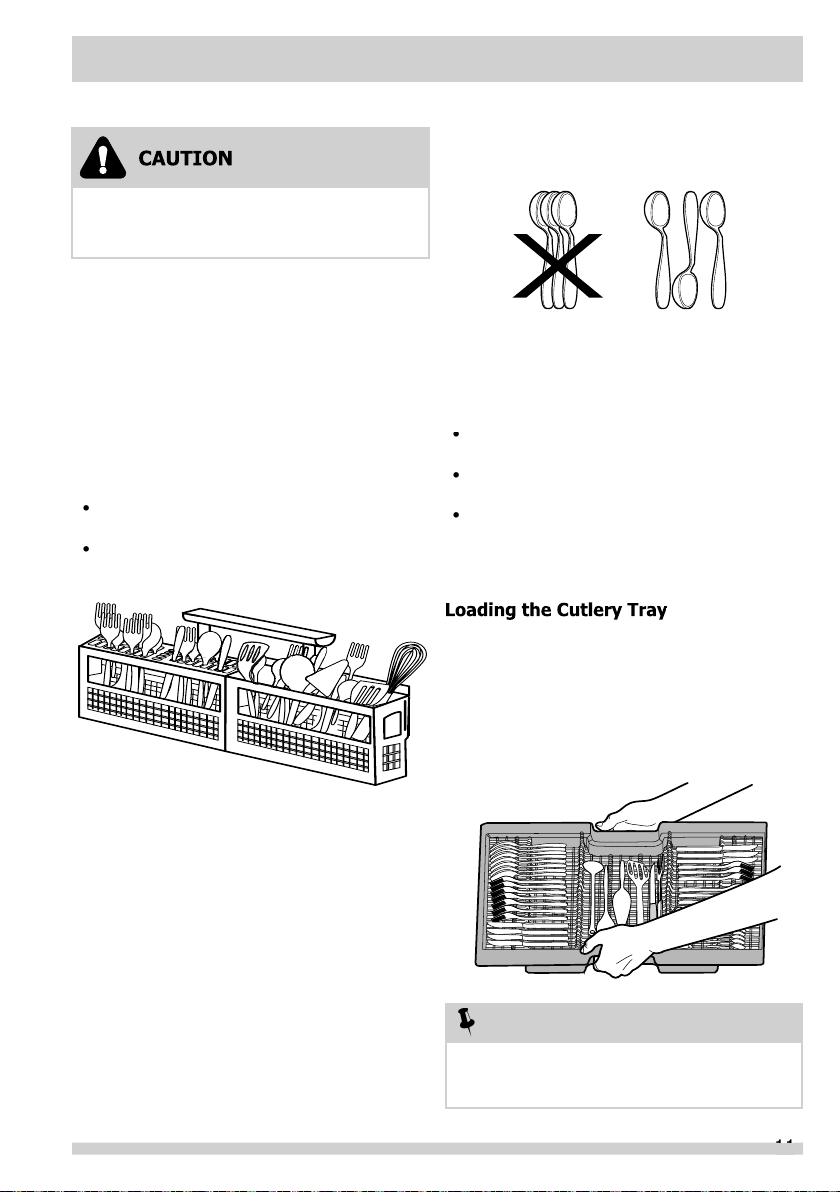
Loadin
g
the Silverware Basket
7KH&XWOHU\7UD\LVGHVL
J
QHGIRUÀDWZDUHDQG
most cookin
g
or servin
g
utensils. Heavily soiled
u
tensils
o
r items with
ba
ke
d
o
n f
ood
s sh
ou
l
d
b
e
p
laced in the u
pp
er rack or silverware basket for
best washin
g
performance. The separators on the
FXWOHU
\
WUD
\
KHO
S
NHH
S
ÀDWZDUHVH
S
DUDWHGWRDYRLG
dama
g
e and improve cleanin
g
.
Í
N
O
TE
L
oad cutlery as su
gg
ested with cutlery
handles placed inwards to optimize cleanin
g
p
erformance.
T
he use of industrial
g
rade deter
g
ent can
dama
g
e parts of the dishwasher leadin
g
to
dama
g
e to the unit and surroundin
g
property.
U
se only household
g
rade automatic dishwasher
deter
g
ents.
How much Deter
g
ent to use
T
he amount of deter
g
ent to use depends on the
wa
ter h
a
r
d
ness. W
a
ter h
a
r
d
ness is me
a
s
u
re
d
in
g
rains per
g
allon. Usin
g
too little deter
g
ent can
UHVXOWLQSRRUFOHDQLQ
J
DQGKDUGZDWHU¿OPLQ
J
RU
s
pottin
g
. Usin
g
too much deter
g
ent in soft water
can cause etchin
g
to some
g
lassware which is
VXUIDFHGDPD
J
HWKDWDSSHDUVOLNHD¿OPEXWFDQQRW
EHZL
S
HGR<RXUORFDOZDWHUFRP
S
DQ
\
ZDWHU
s
oftener company or county extension a
g
ent can
tell
y
ou the water hardness in
y
our area.
12
12
DISHWASHER DISPENSER
&
DETER
G
ENT
S
M
ain Wash Cu
p
Ma
in W
a
sh C
o
ve
r
Co
ver
La
tc
h
Í
N
O
TE
H
ard water ma
y
cause lime de
p
osit buildu
p
o
n the interi
o
r
o
f the
d
ishw
a
sher. F
o
r cle
an
-
LQJLQVWUXFWLRQVVHH³5HPRYLQJ6SRWVDQG
¿
OP
´
s
ecti
o
n.
Í
N
O
TE
D
eter
g
ent tablets and All-In-One packs may not
dissolve com
p
letel
y
if used with the QUICK WASH
c
y
cles. If one of these
p
roducts are used,
p
lace
the tab or
p
ack directl
y
on the bottom of the tub
i
n a corner before startin
g
the dishwasher, rather
than placin
g
these products in the dispenser.
Fillin
g
the Deter
g
ent Dispenser
T
he deter
g
ent dispenser has a main wash cup
w
here you will add your deter
g
ent or deter
g
ent
t
ab
.
•
U
se only fresh automatic dishwashin
g
deter
g
ent. Other deter
g
ents may cause
o
versudsin
g
.
•
W
hen usin
g
automatic dishwashin
g
deter
g
ent
tablet,
p
lace one tablet in main wash cu
p
and
cl
o
se.
•
Add deter
g
ent
j
ust before startin
g
cycle.
•
S
tore deter
g
ent in a cool, dry location.
Mo
ist
o
r caked deter
g
ent may not dissolve properly.
T
o add deter
g
ent
:
1.
P
ress the dis
p
enser cover latch to o
p
en the
main wash deter
g
ent cup.
2.
Add the recommended amount of deter
g
ent to
the main wash cu
p
.
3
.
S
li
d
e the m
a
in w
a
sh c
o
ver
ba
ck
o
ver the m
a
in
w
ash cu
p
to close.

Deter
g
ent Usa
g
e Chart
Dosa
g
e of Deter
g
ent
P
lace a sin
g
le deter
g
ent tablet or packet into the deter
g
ent dispenser compartment.
13
13
DISHWASHER DISPENSER
&
DETER
G
ENT
S
W
ater Har
d
ne
ss
So
ft Water
(
0-3
g
rains)
Me
d
i
u
m Har
d
Water
(
4-8
g
rains)
Har
d
Water
(
9-12
g
rains)
Amount of deter
g
ent
(
teas
p
oons
)
4
teas
p
oon
s
6
teas
p
oon
s
8 teas
p
oon
s
Dis
p
enser cu
p
leve
l
F
ir
s
t Lin
e
S
ec
o
n
d
Line
Fu
ll
Í
N
O
TE
F
or very hard water, deter
g
ent alone may not be enou
g
h. A water softener is recommended to
i
mprove water quality and dishwashin
g
performance. Try addin
g
more deter
g
ent at the be
g
innin
g
o
f the main wash portion of the cycle. As a rule, use 1 teaspoon for each
g
rain above 12. Unlatch
the door, open slowly and add deter
g
ent to the bottom of the tub. Close the door to latch and the
dishwasher will continue throu
g
h the cycle.
IMP
O
RTANT
B
efore startin
g
a cycle, run hot water to clear
cool water from
p
i
p
e.
14
14
FACT
O
RS AFFECTIN
G
PERF
O
RMANCE
W
ater
P
re
ssu
re
T
he hot water line to dishwasher must
p
rovide
w
ater
p
ressure between 20 and 120
p
si.
L
ow water
p
ressure ma
y
occur when laundr
y
o
r showers are in o
p
eration. If
y
ou ex
p
erience
p
oor wash
p
erformance
y
ou ma
y
need to wait
u
ntil water use is reduced before startin
g
the
d
ishw
a
sher.
How to ad
j
ust the rinse aid dosa
g
e
Press and hold the RINSE ONLY and DELAY START
Press and hold the RINSE ONLY and DELAY START
pad for 5 seconds until the status window showspad for 5 seconds until the status window shows
rinse aid level. Pressing the DELAY START padrinse aid level. Pressing the DELAY START pad
increases the increment level (L0-L6).increases the increment level (L0-L6).
Once the rinse-aid level reaches L6, the statusOnce the rinse-aid level reaches L6, the status
window will start back at level L0.window will start back at level L0.
P
ressin
g
the START button or
j
ust pausin
g
for a
IHZVHFRQGVFRQ¿UPVWKHULQVHDLGOHYHOVHWWLQ
J
the st
a
t
u
s win
do
w sh
o
ws the
du
r
a
ti
o
n
o
f the
c
y
cle.
W
ater
T
em
p
erature
H
ot water is needed for best dishwashin
g
and
dryin
g
results. Water enterin
g
dishwasher should
be at least 120°F (49°C) to
g
ive satisfactory
res
u
lts.
T
o check water temperature enterin
g
dishwasher:
•
Tu
rn
o
n h
o
t w
a
ter f
au
cet ne
a
rest
d
ishw
a
sher
f
o
r sever
a
l min
u
tes t
o
cle
a
r c
oo
l w
a
ter fr
o
m
p
i
p
es.
•
H
old a cand
y
or meat thermometer in the
w
ater stream to check the tem
p
erature.
•
If tem
p
erature is below 120°F
(
49°C
)
, have
D
T
XDOL
¿
HG
S
HUVRQUDLVHWKHKRWZDWHUKHDWHU
thermostat settin
g
.
In
d
ic
a
t
or
R
inse Ai
d
C
om
p
artmen
t
R
inse Ai
d
Co
ve
r
Rin
s
e Ai
d
Rinse aid
g
reatly improves dryin
g
, reduces
ZDWHUVSRWV¿OPLQ
J
:LWKLWZ
D
WHU³VKHHWV´
R
dishes rather than formin
g
water droplets that
clin
g
and leave spots.
A dispenser, located next to the deter
g
ent cup,
automaticall
y
releases a measured amount o
f
rinse aid durin
g
the last rinse. If spottin
g
and poor
dryin
g
are problems, increase the amount of rinse
aid dis
p
ensed.
T
he in
d
ic
a
t
o
r will
b
e
da
rk when f
u
ll
D
QGZLOOVKRZFOHDUZKHQLWLVWLPHWRUH¿OO
To add li
q
uid rinse aid
:
1.
L
ift u
p
the rinse aid cover to o
p
en.
2.
F
ill the rinse aid dis
p
enser with li
q
uid rinse aid
XQWLOWKHOL
T
XLGUHDFKHVWKHLQGLFDWHG
¿
OOOHYHO
'2127RYHU
¿
OO
3
. 3UHVVWKHULQVHDLGFRYHUGRZQ
¿
UPO
\
WRFORVH
4.
W
i
p
e u
p
an
y
s
p
ills with a dam
p
cloth.
T
he dispenser holds enou
g
h for 11 to 66 washes,
dependin
g
on settin
g
.
Í
N
O
TE
T
he HEAT DRY o
p
tion in combination with rinse
aid will enhance dryin
g
performance. The ener
g
y
re
q
uired to use the HEAT DRY o
p
tion costs
p
e
n
-
nies
p
er c
y
cle. You ma
y
choose not to select the
H
EAT DRY o
p
tion; however
y
ou will have items in
y
our dish load that will not be com
p
letel
y
dr
y
at
the end of the c
y
cle.
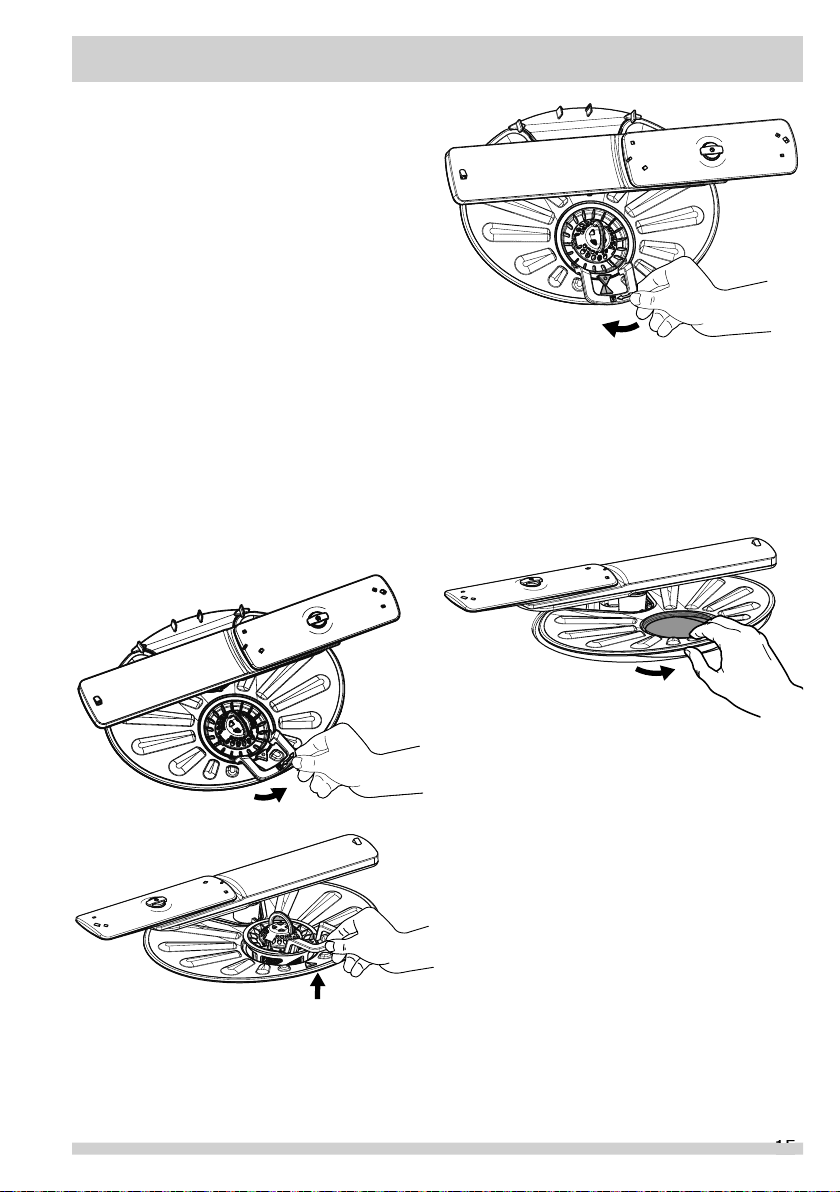
C
lean the C
o
arse Filter
T
ake out the C
y
linder Fine Filter and remove the
C
oa
rse Filter fr
o
m the
d
ishw
a
sher t
ub
bo
tt
o
m.
F
lush the Coarse Filter by holdin
g
it under runnin
g
w
ater and re
p
lace.
C
lean the C
y
linder Fine Filter
T
he Cylinder Fine Filter is desi
g
ned to collect
s
ome bi
g
items such as broken
g
lass, bones and
p
its. The C
y
linder Fine Filter needs to be cleaned
to maximize wash
p
erformance.
R
emove the C
y
linder Fine Filter as shown, rotate
i
t counterclockwise, lift it out, em
p
t
y
and clean it
by rinsin
g
under runnin
g
water and replace. Use
o
f a spon
g
e or bottle brush may be necessary to
rem
o
ve
a
ll f
ood
resi
du
e.
Ou
t
s
i
d
e
Occasionall
y
wi
p
e with a mild nonabrasive
deter
g
ent and water. Rinse and dry.
C
are of Drain Air Ga
p
If a drain air
g
ap was installed for your built-in
dishwasher, check to make sure it is clean so the
dishwasher will drain properly. A drain air
g
ap
i
s usuall
y
mounted on the counter to
p
and can
be inspected by removin
g
the cover. This is not
p
art of
y
our dishwasher and is not covered b
y
w
arran
ty
.
15
15
C
ARE AND CLEANIN
G
Wi
nter
i
z
i
n
g
A dishwasher left in an unheated
p
lace should be
S
URWHFWHGIURPIUHH]LQ
J
+DYHDTXDOL¿HGSHUVRQ
do the followin
g
:
To
D
i
sc
o
nnect Serv
i
ce
:
1.
7
XUQR
HOHFWULFDO
S
RZHUWRWKHGLVKZDVKHUDW
the supply source by removin
g
fuses or trippin
g
circ
u
it
b
re
a
ker.
2
. 6KXWRZDWHUVX
SS
O
\
3
.
P
lace a
p
an under the inlet valve. Disconnect
wa
ter line fr
o
m the inlet v
a
lve
a
n
d
d
r
a
in int
o
p
a
n
.
4
.
D
isconnect drain line from
p
um
p
and drain
w
ater into
p
an.
To
Rest
o
re Serv
i
ce
:
1.
R
econnect the water, drain, and electrical
p
ower su
pp
l
y
.
2
.
T
urn on water and electrical
p
ower su
pp
l
y
3
.
F
ill deter
g
ent cup and run the dishwasher
throu
g
h a HEAVY cycle.
4.
Check connections to make sure the
y
do not
l
e
a
k.
Property Dama
g
e Hazard
F
reezin
g
temperatures may cause water
l
ines to ru
p
ture. Be sure all su
pp
l
y
lines to
and circulatin
g
lines within dishwasher are
p
rotected.
F
ailure to do so could result in
p
ro
p
ert
y
dama
g
e.
16
16
C
ARE AND CLEANIN
G
Í
N
O
TE
S
ee Inst
a
ll
a
ti
o
n Instr
u
cti
o
ns f
o
r m
o
re
d
et
a
ils
o
n disconnectin
g
and restorin
g
service to your
d
ishw
a
sher.

17
17
Before callin
g
for service, review this list. It
ma
y
save
y
ou both time and ex
p
ense. This
list includes common ex
p
eriences that are
not the result of defective workmanshi
p
or
material in
y
our dishwasher.
F
oo
d S
o
ils Left
o
n Dishes
•
Choose another cycle for lon
g
er washin
g
time.
•
Choose the Hi-Tem
p
Wash o
p
tion.
•
Check rack loadin
g
section for proper loadin
g-
avoid nestin
g
items.
•
H
ome water
p
ressure ma
y
be too low - should
be 20 to 120
p
ounds
p
er s
q
uare inch
(p
si
)
.
•
Check incomin
g
water temperature. It should
be at least 120°F
(
49°C
)
.
(
See Factors
$
HFWLQ
J
3HU
I
RUPDQFH
•
Check water hardness. For extremel
y
hard
w
ater, it ma
y
be necessar
y
to install a water
s
oftener. (See Deter
g
ent Chart).
•
U
se Fresh Deter
g
ent.
•
M
ake sure items are not blockin
g
the spray
arms, preventin
g
them from rotatin
g
.
Dishes not Dr
y
•
S
elect heat dr
y
o
p
tion.
•
0DNHVXUHWKHULQVHDLGGLV
S
HQVHULV¿OOHG
•
Increase the dischar
g
e settin
g
of rinse aid.
(
See Rinse Aid
)
.
•
Check the incomin
g
water temperature. Be
s
ure it is at least 120°F
(
49°C
)
.
•
Check for proper loadin
g
-avoid nestin
g
items.
•
P
lastic items ma
y
need to be towel dried.
•
Cu
p
s with a concave bottom will collect water.
L
oad them at the far left of the u
pp
er rack so
the
y
will be held in a tilted
p
osition.
G
lassware/Flatware S
p
otted or Cloud
y
•
Check water hardness. For extremel
y
hard
w
ater, it ma
y
be necessar
y
to install a water
s
oftener. (See Deter
g
ent Chart).
•
W
ater tem
p
erature ma
y
be low. Avoid
extremely low or hi
g
h temperatures. (See
)DFWRUV$
HFWLQ
J
3HU
I
RUPDQFH
•
Avoid overloadin
g
and improper loadin
g
. (See
P
reparin
g
and Loadin
g
Dishes).
•
U
se fresh deter
g
ent. Old deter
g
ent is
LQH
HFWLYH
•
0DNHVXUHULQVHDLGGLV
S
HQVHULV
¿
OOHG
•
Check to see that proper amount of deter
g
ent
i
s bein
g
used for cycle selected. Also, check
phosphate level. (See Deter
g
ent Dispenser.
)
BEF
O
RE Y
OU
CAL
L
•
H
ome water
p
ressure ma
y
be too low - it
s
hould be 20 to 120
p
ounds
p
er s
q
uare inch
(p
si
)
.
Dishware Chi
pp
ed
•
L
oad with care and do not overload.
(
See
P
reparin
g
and Loadin
g
Dishes).
•
P
lace delicate items in to
p
rack.
•
P
lace
g
lasses securely a
g
ainst pins and not
o
ver
p
ins.
•
L
oad items so they are secure and don’t
j
ar
l
oose when movin
g
racks in and out. Move
racks in and out slowl
y
.
•
M
ake sure tall
g
lasses and stemware will clear
to
p
of tub when rack is
p
ushed in.
•
F
ine anti
q
ue china and cr
y
stal should be
h
a
n
d
-w
a
she
d
.
W
ater in B
o
tt
o
m
o
f Tu
b
•
W
ater left in the tub bottom after the c
y
cle is
com
p
lete is not normal. If water remains in
the bottom of the tub, the dishwasher ma
y
not be drainin
g
properly. (See Dishwasher
D
oes not Drain Pro
p
erl
y)
.
Dishware Stained
o
r Disc
o
l
o
red
•
7HDDQGFR
HHFDQVWDLQFX
S
V5HPRYHWKH
s
tains by hand washin
g
in a solution of 1/2
cu
p
(
120 ml
)
bleach and one
q
uart
(
1L
)
o
f
w
arm water. Rinse thorou
g
hly.
•
Iron de
p
osits in water can cause a
y
ellow
R
UEURZQ¿OP$V
S
HFLDO¿OWHULQVWDOOHGLQWKH
w
ater su
pp
l
y
line will correct this
p
roblem.
(
See Removin
g
Spots and Film).
•
Aluminum utensils can leave
g
ray/black marks
w
hen they rub a
g
ainst other items. Load
P
ro
p
erl
y
.
•
Certain hi
g
h acid foods can cause
discoloration of stainless steel and
p
lastics i
f
allowed to sit for a lon
g
period. Use the Rinse
Only cycle or rinse by hand if not operatin
g
d
ishw
a
sher
a
t
o
nce.
•
M
ixin
g
stainless steel and silver utensils in
s
ilverware basket can cause pittin
g
of the
s
tainless steel blades. Avoid mixin
g
stainless
s
teel
a
n
d
silver.
C
ycle Takes a Lon
g
Time
•
Is cycle in a water heatin
g
delay
?
•
H
as the dela
y
start o
p
tion been selected
?
•
H
as the sanitize o
p
tion been selected
?
N
o
rmal S
o
unds Y
o
u Will Hear
•
1RUPDOVRXQGVLQFOXGHZDWHU¿OO
ZDWHU
circ
u
l
a
ti
o
n
a
n
d
m
o
t
o
r s
ou
n
d
s.

18
18
BEF
O
RE Y
OU
CAL
L
Removin
g
Spots and Fil
m
H
ard water can cause lime de
p
osit buildu
p
on the
i
nterior of the dishwasher. Dishes and
g
lasses may
DOVR
J
HWVSRWVDQG¿OPIRUDQXPEHURIUHDVRQV
(
See Glassware/Flatware S
p
otted or Cloud
y
VHFWLRQ7RUHPRYHEXLOGXSDQG¿OPFOHDQXVLQ
J
the followin
g
instructions:
1.
L
oad clean dishes and
g
lasses in normal
manner. Do not load an
y
metal utensils or
s
ilverw
a
re.
2.
D
o not add deter
g
ent.
3
.
S
elect the NORMAL c
y
cle. Press START/CANCEL
p
ad. Close and latch the door.
4.
All
o
w
d
ishw
a
sher t
o
r
u
n
u
ntil it st
a
rts the
VHFRQGZDWHU¿OO
D
SS
UR[LPDWHO
\
PLQXWHV
5
.
U
nlatch an and o
p
en door and
p
our 2 cu
p
s o
f
w
hite vine
g
ar into the bottom of dishwasher.
6
.
&
ORVHDQGODWFKGRRUDQGDOORZF
\
FOHWR¿QLVK
Di
s
hwa
s
her Leak
s
•
U
se only fresh deter
g
ent desi
g
ned for
automatic dishwashers. Measure deter
g
ent
FDUHIXOO
\
7U
\
DGLHUHQWEUDQG
Etchin
g
•
U
sin
g
too much deter
g
ent especially in soft or
s
oftened water causes dama
g
e that looks like
D
¿OP
EX
WF
D
QQ
R
W
E
HUHP
R
YH
G
•
Ad
j
ust the amount of deter
g
ent based on the
w
ater hardness. (Check Deter
g
ent Chart).
•
L
ower the water tem
p
erature.
Deter
g
ent Left in Dispenser Cup
•
D
eter
g
ent may be old. Discard and use fresh
deter
g
ent.
•
B
e sure the dish load doesn’t block s
p
ra
y
from
enterin
g
the deter
g
ent cup.
•
Check to see if c
y
cle has been com
p
leted.
•
M
ake sure items do not prevent the deter
g
ent
dispenser from openin
g
.
V
a
p
or at
V
ent
•
Sp
illed rinse aid can cause foam and lead to
RYHUÀRZLQ
J
:LSHXSDQ\VSLOOVZLWKDGDPS
cl
o
th.
•
W
ater vapor escapes from the vent durin
g
the
dryin
g
part of the cycle. This is normal.
•
Check to see that dishwasher is level.
(
See
Installation Instructions
)
.
Dishwasher W
o
n’t Ru
n
•
Check to see if circuit breaker is tri
pp
ed or if a
f
u
se is
b
l
o
wn.
•
M
ake sure water su
pp
l
y
is turned on.
•
Check to see if c
y
cle is set correctl
y
.
(
See
Operatin
g
Instructions).
•
Is dishwasher set for Dela
y
Start O
p
tion
?
•
Ma
ke s
u
re
doo
r is cl
o
se
d
a
n
d
l
a
tche
d
.
Dishwasher W
o
n’t Fil
l
•
Is water su
pp
l
y
turned on
?
Dishwasher Does Not Drain Pro
p
erl
y
•
If unit is hooked u
p
to a food waste dis
p
oser,
make sure the dis
p
oser is em
p
t
y
.
•
Check to see if the knockout plu
g
has been
removed from inside the food waste dis
p
oser
i
nl
e
t.
•
Check t
o
see if
d
r
a
in h
o
se is kinke
d
.
•
M
ake sure c
y
cle is com
p
lete, not in a
p
ause.
Dishwasher has an Od
o
r
•
S
oiled dishes left in dishwasher too lon
g
can
create an odor. Use Rinse Onl
y
c
y
cle.
•
7KHUHZLOO
E
H
D
³QHZ´VPHOOZKHQ¿UVW
i
nst
a
lle
d
. This is n
o
rm
a
l.
•
Check to see if unit is drainin
g
properly. (See
D
ishwasher Does Not Drain Pro
p
erl
y)
.
S
tains
o
n Tub Interi
o
r
•
W
ashin
g
lar
g
e amounts of dishware with
tomato based soil can cause a pink/oran
g
e
D
SS
HDUDQFH7KLVZLOOQRWDHFW
S
HUIRUPDQFH
and will
g
radually fade over time. Pre-rinsin
g
o
r usin
g
the Rinse Only cycle will reduce the
chance of stainin
g
. Usin
g
air dry option will
l
essen stainin
g
.
O
penin
g
the door durin
g
cycle
•
If the dishwasher door is o
p
ened while the
u
nit is runnin
g
, the START/CANCEL pad must
be
p
ressed and the door shut immediatel
y
to return the unit to the selected c
y
cle and
op
tion.

19
19
N
O
TE
S

20
20
Y
MAJ
O
R APPLIANCE WARRANT
Y
Your appliance is covered by a one year limited warranty. For one year from your ori
g
inal date of purchase,
E
lectrolux will pay all costs for repairin
g
or replacin
g
any parts of this appliance that prove to be defective
i
n materials or workmanshi
p
when such a
pp
liance is installed, used and maintained in accordance with the
p
rovided instructions.
Exclusi
o
ns
If Y
o
u Need Service
This warranty does not cover the followin
g:
1.
P
roducts with ori
g
inal serial numbers that have been removed, altered or cannot be readily determined.
2.
P
roduct that has been transferred from its ori
g
inal owner to another party or removed outside the
U
SA
o
r C
a
n
ada
.
3
.
Ru
st
o
n the interi
o
r
o
r exteri
o
r
o
f the
u
nit.
4.
P
roducts
p
urchased “as-is” are not covered b
y
this warrant
y
.
5
.
F
ood loss due to any refri
g
erator or freezer failures.
6
.
P
roducts used in a commercial settin
g
.
7.
S
ervice calls which do not involve malfunction or defects in materials or workmanshi
p
, or for a
pp
liances not in
o
rdinar
y
household use or used other than in accordance with the
p
rovided instructions.
8.
S
ervice calls to correct the installation of
y
our a
pp
liance or to instruct
y
ou how to use
y
our a
pp
liance.
9
.
E
xpenses for makin
g
the appliance accessible for servicin
g
, such as removal of trim, cupboards, shelves,
etc., which are not a
p
art of the a
pp
liance when it is shi
pp
ed from the factor
y
.
6HUYLFHFDOOVWRUHSDLURUUHSODFHDSSOLDQFHOL
J
KWEXOEVDLU¿OWHUVZDWHU¿OWHUVRWKHUFRQVXPDEOHVRU
knobs, handles, or other cosmetic
p
arts.
11.
S
urchar
g
es includin
g
, but not limited to, any after hour, weekend, or holiday service calls, tolls, ferry trip
char
g
es, or milea
g
e expense for service calls to remote areas, includin
g
the state of Alaska.
'DPD
J
HVWRWKH¿QLVKRIDSSOLDQFHRUKRPHLQFXUUHGGXULQ
J
LQVWDOODWLRQLQFOXGLQ
J
EXWQRWOLPLWHGWR
ÀRRUVFDELQHWVZDOOVHWF
1
3
.
D
ama
g
es caused by: services performed by unauthorized service companies; use of parts other than
g
enuine Electrolux parts or parts obtained from persons other than authorized service companies; or
H
[WHUQDOFDXVHVVXFKDVDEXVHPLVXVHLQDGH
T
XDWH
S
RZHUVX
SS
O
\
DFFLGHQWV
¿
UHVRUDFWVR
I
*RG
DISCLAIMER
O
F IMPLIED WARRANTIES; LIMITATI
O
N
O
F REMEDIE
S
C
U
ST
O
MER’S S
O
LE AND EXCL
U
SIVE REMEDY
U
NDER THIS LIMITED WARRANTY SHALL BE PR
O
D
U
CT
R
EPAIR
O
R REPLACEMENT AS PR
O
VIDED HEREIN. CLAIMS BASED
O
N IMPLIED WARRANTIES, INCLUDING
W
ARRANTIES
O
F MERCHANTABILITY
O
R FITNESS F
O
R A PARTICULAR PURP
O
SE, ARE LIMITED T
O
O
NE
YEAR
O
R THE SH
O
RTEST PERI
O
D ALL
O
WED BY LAW, BUT N
O
T LESS THAN
O
NE YEAR. ELECTR
O
LUX
S
HALL N
O
T BE LIABLE F
O
R C
O
NSE
Q
UENTIAL
O
R INCIDENTAL DAMAGES SUCH AS PR
O
PERTY DAMAGE
AND INCIDENTAL EXPENSES RES
U
LTING FR
O
M ANY BREACH
O
F THIS WRITTEN LIMITED WARRANTY
O
R ANY IMPLIED WARRANTY. S
O
ME STATES AND PR
O
VINCES D
O
N
O
T ALL
O
W THE EXCL
U
SI
O
N
O
R
L
IMITATI
O
N
O
F INCIDENTAL
O
R C
O
NSE
Q
UENTIAL DAMAGES,
O
R LIMITATI
O
NS
O
N THE DURATI
O
N
O
F
IMPLIED WARRANTIES, S
O
THESE LIMITATI
O
NS
O
R EXCLUSI
O
NS MAY N
O
T APPLY T
O
Y
O
U. THIS WRITTEN
W
ARRANTY GIVES Y
OU
SPECIFIC LEGAL RIGHTS. Y
OU
MAY ALS
O
HAVE
O
THER RIGHTS THAT VARY FR
O
M
S
TATE T
O
STATE.
T
his warrant
y
onl
y
a
pp
lies in the USA and Canada. In the USA,
y
our a
pp
liance is warranted b
y
Electrolux
M
a
j
or Appliances North America, a division of Electrolux Home Products, Inc. In Canada, your appliance is
w
arranted by Electrolux Canada Corp. Electrolux authorizes no person to chan
g
e or add to any obli
g
ations
u
nder this warranty. Obli
g
ations for service and parts under this warranty must be performed by Electrolux
RUDQDXWKRUL]HGVHUYLFHFRPSDQ\3URGXFWIHDWXUHVRUVSHFL¿FDWLRQVDVGHVFULEHGRULOOXVWUDWHGDUHVXE
M
HFW
to chan
g
e without notice.
K
ee
p
y
our recei
p
t, deliver
y
sli
p
, or some other a
pp
ro
p
riate
p
a
y
ment record to establish the warrant
y
p
eriod should service be re
q
uired. If service is
p
erformed, it is in
y
our best interest to obtain and kee
p
all
receipts. Service under this warranty must be obtained by contactin
g
Electrolux at the addresses or phone
n
u
m
b
ers
b
el
o
w.
US
A
1
.800.374.4432
F
ri
g
idair
e
10200 David Ta
y
lor Driv
e
Charlotte, NC 2826
2
C
ana
d
a
1
.800.265.8352
E
lectrolux Canada Cor
p
.
5
855 Terr
y
Fox Wa
y
M
ississau
g
a, Ontario, Canad
a
L5
V
3
E
4