ge.com
©
°_
oq
Sa_bty lndruc_ions ...... 2-7
Q_erating Indructions
Abm_hmm Foil ............ ]3
Clock a m_d T] m e_............ ]7
OveN_ ................. ]]-28
Bakh_g a*_d Roasdm_g . . .]3, ]4
Bro]]im_g, Broi]im_g GIdde . . .15
()ve]_ C.ontro] ............ ] ]
Po_er Omage ............ ] 2
Preb ea t] m_g .............. ] 3
Sabbath Featm'e ....... 22, 23
SeIt:C]eaN_im_g ......... 27, 28
Shelves ................. 13
Special Featm'es ....... ]i9-21
Thermostat A(!il_stmel_t .... 24
Timed Bakim_g
amid Roastim_g ............ ]S
Smffime Cookim_g ......... 8-10
Griddle ................. l 0
Warmim_g Drawer . ...... 25, 26
Care and Cleaning
Broiler IPam_amid ()rid ....... 33
Bm'm_er Assembly ........ 29, 30
Burner (;rates ............. 3l
Co_tro] Pam_e] a_(] K_obs .... 32
Cooktop Sm'ti_ce .......... 31
Door ]_em oval ............ 3_'{
Drawer . ................. _'_5
Griddle .................. 29
()veN_ Bottom ............. 33
()vel_ Light RepIaceme_t .... 34
Ove]] Ve]_ts ............... 32
Se]t:CJ ea _1_g .......... 27, 28
Shelves .................. 34
Stai_]ess Steel Sm'_;_ces ...... 31
Ins¢allation
Instrucdons .......... 36-47
Air A <]j_stm e_ t ............ 41
A_ti-Tip Device ......... 39, 47
Assemble Sm'tbce Bm'_ers . . .44
Cbecki_g Bm'_ er
lgniti(m .................. 45
Col_ect]_g the Rmge
to Gas ................ 40-42
Dime]_s]o]_s ;rod Clear;races . .38
Electrical (]o_]ecti(ms . . .43, 44
I,eve]i_g the Ravage ........ 46
I ,P ...................... 47
Troubleshooting
Accessories .............. _,2
Consumer Support
Co_sm_er S_q_port . .Bad< Cover
Prod_ct Registratio_ ..... 53, 54
'Warra _ tv fl)r (]_lstom ers
i_ Ca_ada ................ 59
Warra _ty fl)r Custom ers
i_: the [I.S.A .............. 58
In Canada contact us at:
www. GEAppliances. ca
Write the model and serial
numbers here:
Model #
Serial #
You can find them on a label
on the front of the range behind
the warming drawer.
18305580P171 49-85085 O&05 JR
7
iiiiiiiiii!!Jil¸!i!i!i
m
o_
q
#.
IMPORTANTSAFETYINFORMATION.
READALLINSTRUCTIONSBEFOREUSING.
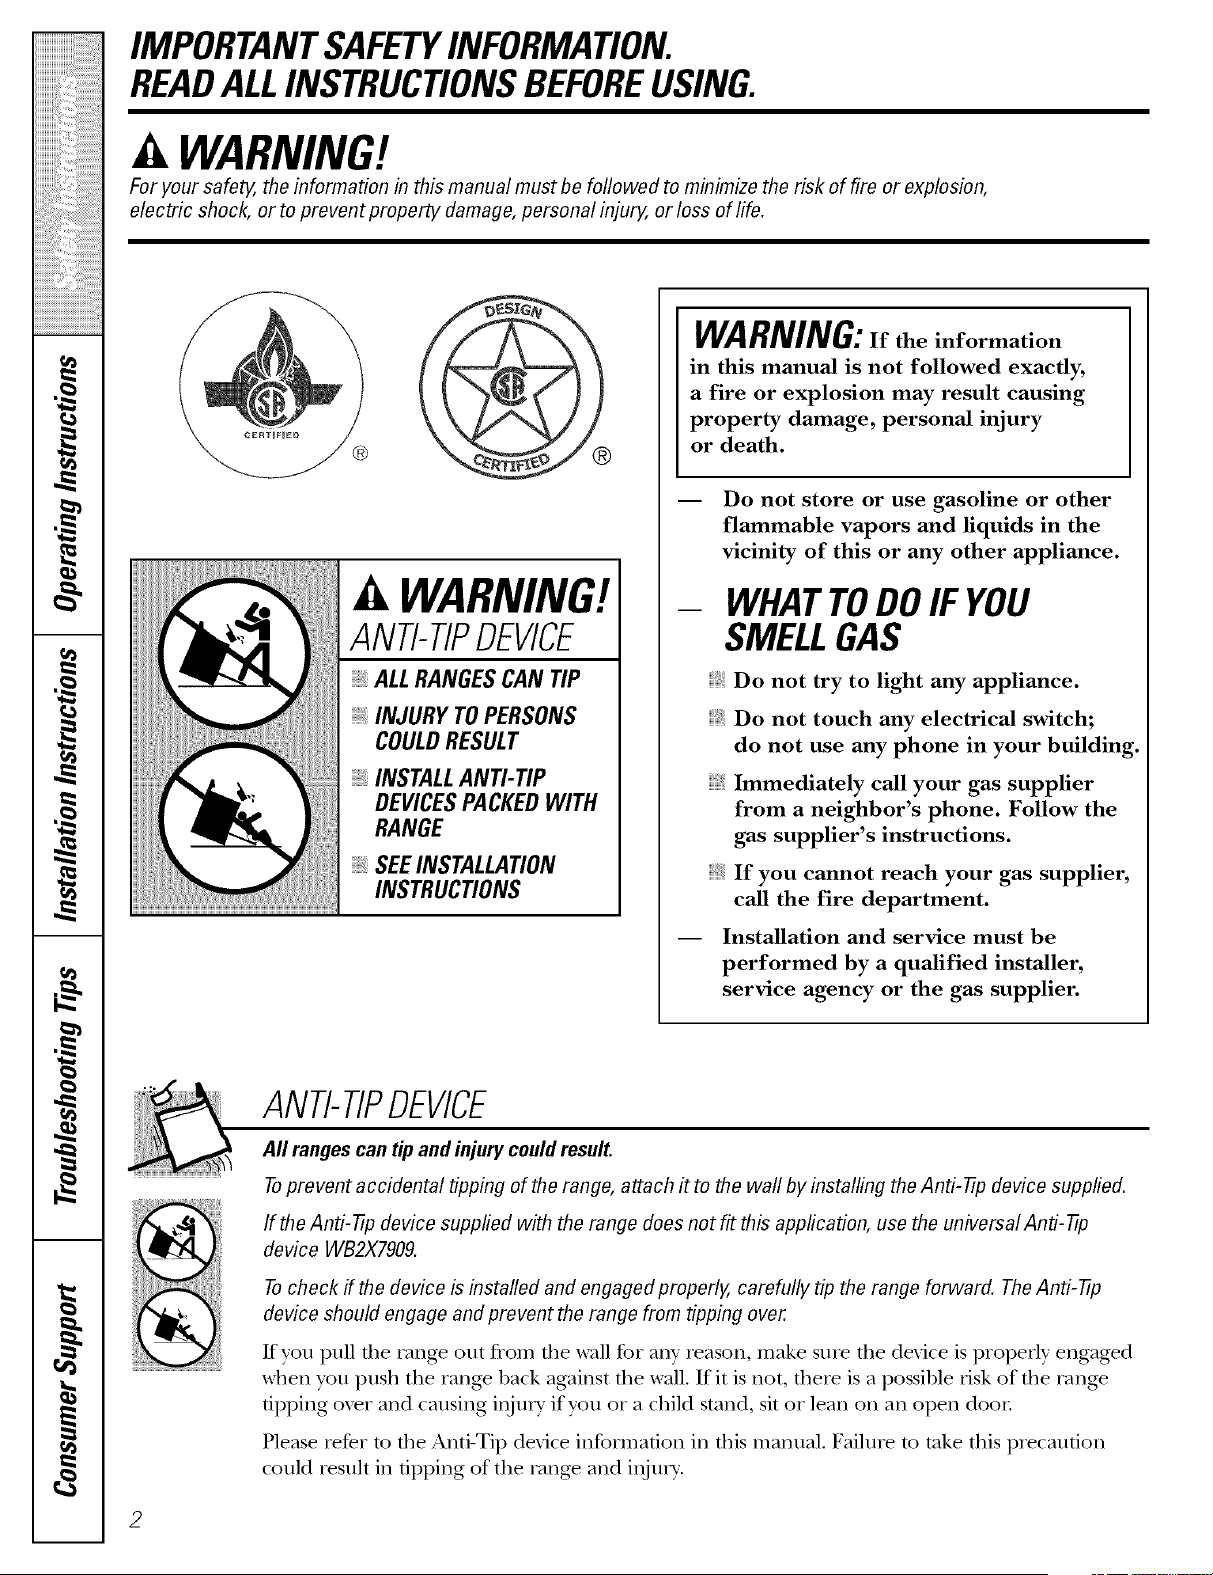
WARNING!
Foryour safe_ theinformation in this manual must be followed to minimize therisk of fire or explosion,
electric shock, or to prevent property damage, personal injury, or loss oflife.
WARNING!
ANTI-TIPDEVICE
, ALL RANGES CAN TIP
INJURY TO PERSONS
COULD RESULT
INSTALL AN_ TIP
DEVICES PACKED WITH
RANGE
SEE INSTALLAtiON
INSTRUCtiONS
WARNING:If the information
in this manual is not followed exactly,
a fire or explosion may result causing
property damage, personal injury
or death.
-- Do not store or use gasoline or other
flammable vapors and liquids in the
vicinity of this or any other appliance.
- WHATTODOIF YOU
SMELLGAS
Do not try to light any appliance.
Do not touch any electrical switch;
do not use any phone in your building.
Immediately call your gas supplier
from a neighbor's phone. Follow the
gas supplier's instructions.
If you cannot reach your gas supplier,
call the fire department.
-- Installation and service must be
performed by a qualified installer,
service agency or the gas supplier.
ANTI-TIPDEVICE
All ranges cantip and injurycould result.
Toprevent accidental tipping ofthe range, attach # tothe waftby installing the Anti-tip device supplied.
If theAnti-tip device supplied with the range doesnot fit this application, usethe universal Anti-tip
device WB2X7909.
Tocheck if thedevice isinstalled and engaged properly, carefully tipthe range forward. The Anti-tip
device should engage and prevent the range from tipping over.
Kyou pull die rang_ out from die wall %r ally' reason, make snie tile device is properly engag>d
when you push the range back against tile wall. If it is not, there is a possible risk of the rang>
tipping ox_r and causing ii_juU ifyou oi a child stand, sit oi lean on all open door
Please Iefer m file Anti-Tip device information ill fl_is mannal. Failure m take fl_is plecaufion
could iesult ill tipping of the rang> and ii_ju U.

ge.com
WARNING!
IMPORTANTSAFETYNOtiCE
TheCalifornia Safe Drinking Water and Toxic Enforcement Act requires the Governor ofCalifornia to
publish a list of substances known to thestate tocause birth defects or other reproductive harm, and
requires businesses towarn customers ofpotential exposure to such substances.
Gasappliances can cause minor exposure tofour ofthese substances, namely benzene, carbon
monoxide, formaldehyde and soot, caused primarily by theincomplete combustion of natural gas or
LP fuels. Properly adjusted burners, indicated bya bluish rather than a yellow flame, will minimize
incomplete combustion. Exposure tothese substances canbe minimized byventing with an open
window or using a ventilation fan or hood.
SAFETYPRECAUtiONS
Have theinstaller show youthelocation ofthe range gas shut-off valve and how toshut it off if necessary.
Have yotli range installed and propeity Plug your range into a 120-voh grounded
grounded by a qualified installel, in
accordance with fl_e Installation Instructions.
Any adjusunent and service should be
performed only by qualified gas rang>
installers or service mchnicians.
Do not attempt to repair or replace any
part of your range unless it is specifically
recommended in this manual. All other
ser\dce should be referred to a qualified
technician.
outlet only. Do not remove file round
grounding prong from the plug. If in doubt
about file grounding of file home electrical
system, it is your personal responsibili w and
obligation to hax> an ungrounded outlet
replaced with a properly grounded,
three-prong outlet in accordance with
the National Electrical Code. Do not use
an extension cord with this appliance.
3
7
iiiiiiiiiiiiil;_i!i!!';i_:_i'iiiililililililililiiii_;_!_
m
,0
,0
,0
q
m
aa
IMPORTANTSAFETYINFORMATION.
READALLINSTRUCTIONSBEFOREUSING.
4
SAFETYPRECAUTIONS
Locate tile range out of kitchen traffic path
and out of drafw locations to prexent poor
air circulation.
iiiiiiiiiiii_iii
Be sure all packaging mamrials are
removed from die rang_ before operating it
to prevent fire or smoke damag> should the
packaging material ignite.
Be sure your range is correctly adjusted by
a qualified service teclmician or installer for
the type of gas (natural or LP) that is to be
used. Your range can be converted for use
with either wpe of gas. See the Installation of
the range sect.ion.
WARNING: adjnstments mnst
be made by a qualified service technician
in accordance with the nmnut_acturer's
instructions and all codes and requirements
of the authority having jurisdiction! Failure
m follow these insuucfions could iesnlt in
serious ir_juU or property damage. The
qualified ag>n W perforating this work
assumes _esponsibility for the conversion.
After prolong>d use of a range, high floor
mmperamres mW result and many floor
co_>ring_ will not withstand this kind of use.
Ne_>r install the rang> over vinyl tile or
linoleum that cannot withstand such type
of use. Nexer install it directly ox>r interior
kitchen carpeting.
Do not leme children alone or unattended
where a range is hot or iraoperation.
They could be seriously burned.
iiiiiiiiiiii_iii
Do not allow anyone to climb, stand or
hang on the o\_n doo_, wanning drawer
or cooktop. They could damage the rang_
and ex_n tip it oxen; causing sex,re personal
i@n-y.
CAUTION:Items of interest to
children should not be stored ira cabinets
aboxe a range or on the backsplash of a
range---dfildren climbing on the range to
reach items could be seriously ir_nied.
WARNING:NEVERusethis
appliance as a space heater to heat or
warm the room. Doing so may resuh
ira carbon monoxide poisoning and
oxerheating of the oven.
iiiiiiiiiiii_iii
iiiiiiiiiiii_iii
iiiiiiiiiiii_iii
iiiiiiiiiiii_iii
iiiiiiiiiiii_iii
iiiiiiiiiiii_iii
iiiiiiiiiiii_iii
Nexer wear loose fitting or hanging gamaents
while using the appliance. Be carefld when
reaching for imms stored iracabinets oxer the
range. Flammable material could be ignimd
if l)ronght ira contact with flame or hot oxen
snr_tces and mW cause sex>re l)nr_as.
Do not store flammable materials ira an
oxen, a range drawer or near a cooktop.
Do not store or use combustil)le materials,
gasoline or other flammable vapors and
liquids in the vicinity of this or any other
appliance.
Do not let cooking gTease or other flammable
materials accumulate ira or near the range.
Do not use wamr on grease fires. Nex>r pick
up a flaming pan. Turn the controls off:
Smother a flaming pan on a surfime burner
by cox_ring the pan complemly with
a well-fitting lid, cookie sheet or fiat tray.
Use a multi-purI)ose d U chemical or
foam-type fire extinguisher:
Flaming grease outside a pan can be put
out by co_>ring it with baking soda o_,
if available, by using a multi-purpose dr T
chemical or foam-type fire exdnguishen
Flame ira the o_>n or wanning drawer can
be smothered completely by closing the o_>n
door or drawer and turning the control to
off orby using a multi-purpose dry chemical
or foam-type rite extinguishen
Let the 1)ni_ller grates and other surt_aces
cool before touching them or leaving them
where children can reach them.
Never block the vents (air openings) of the
rang>. They provide tim air inlet and outlet
that are necessa U for the range to operate
properly with conect combustion. Air
openings are locamd at flae rear of the
cooktop, at the top and bottom of the oven
door; and at the bottom of the rang> under
the wanning drawer
Large scratches or impacts to glass doors
can lead to broken or shattered glass.
ge.com
WARNING!
SURFACEBURNERS
Use proper pan size--avoid pans that are unstable or easily tipped. Select cookware having flat bottoms
large enough to cover bumer grates. Toavoid spiflovers, make sure cookware islarge enough to contain
the food properly. This will both save cleaning time and prevent hazardous accumulations of food, since
heavy spattering or spillovers left on range can ignite. Use pans with handles that canbe easily grasped
and remain cooL
Always use tile LITE position when ignidng
the top burners arrd make sure tile burners
haw ignited.
Never leaxe tile surfirce bm_rers unattended
at hiOr flame setting:s. Boilox>rs cause smoMng
arrd greasy spillox>rs that m W catch on fire.
Adjust fire mp burner flame size so it
does not exmnd beyond tire edge of tire
cool<ware. Excessixe flame is hazardous.
Use only d U pot holders-- moist or damp
pot holders on hot surtaces may result in
1)urlrs flom steam. Do not let pot holders
come near open flames when lifting
cool<ware. Do not use a towel or oilier bu]kv
clofll in place of a pot holder
When using glass cool<ware, make sure it
is designed for mI>-of-rang> cooking.
To minimize tile possibility of bums, ignition
of flammable materials arrd spillage, turn
cookware handles toward tire side or back
of fire range wifl/out extending over
adjacent burnel_.
Caiefldly wamh foods being fcied at a high
flame setting.
Alwws heat fat slowl> arrd wamh as it heats.
Do not leave any items on fire cookmp. Tile
hot air flom the lent m W ignim flammable
imms and will irrcrease pressure ira closed
corrtainers, which mW cause fllem m b/list.
If a combination of oils or fats will be used
in flying, stir mg>ther before heating or
as fats melt slowly.
Use a deep fat thei_nometer whenexer
possil)le to prexent oveflleafing fat beyond
tile smoMng point.
Use fire least possible amount of fat for
effecfixe shallow or deeI>lzat ruing. Filling
tire pan mo fill of fiatcan cause spilloxers
when food is added.
When flaming foods are under dre hood,
turn tire fan off'. Tile tzan, if operating, m W
spread the flames.
Do not use a wok on flae cooMng surlZace
if tire wok has a round metal ring that is
placed ox>r fire burner gxam m support tire
wok. Tiffs ring acts as a heat trap, which m W
damag_ the burner gram and burner head.
Also, it mW cause tile burner m work
improperly. Tills may cause a carbon
monoxide level abo_> fllat allowed by
cu_Tent standards, resu]fing in a healfll
hazard.
Foods for flTing should be as d_T as possible.
Frost on Dozen foods or moisulre on fresh
tbods can cause hot rift to bubble up and
ox>r tire sides of tile pan.
Nexer taT to mole a pan of hot tZat,especially
a deep fat flTer _'ait until tile fat is cool.
Do not leaxe plastic items on tile cookmp--
filey m W melt if left too close to file x>nt.
Kee I) all plastics aw W from tile smlZace
billTreFs.
To ax_id tire possibility of a bum, always be
certain that tile controls for all bui_]ers are
at the OFF position arrd all grams are cool
before atmmpting to remox_ flrem.
If rang_ is locamd near a windo_, do not
hang long curtains flint could blow oxer file
surfi_ce burners arrd cream a fire hazard.
If you smell gas, troll off tile gas to the rang_
arrd call a qualified service technician. Ne_>r
use an open flame to locate a leak.
Always ulm fire surfl_ce burner controls off
before removing cool<ware.
Do not lift the cooktop. I,ifting tire cooktop
can lead to damag> arrd improper operauon
of the rang_.
7
iiiiiiiiiiiiiii_i!i!!'_i_i'iiiililililililililiiii_i_!_
m
,0
,0
,0
q
#_.
m
rd_
a__,
IMPORTANTSAFE INFORMATION.
READALLINSTRUCTIONSBEFOREUSING.
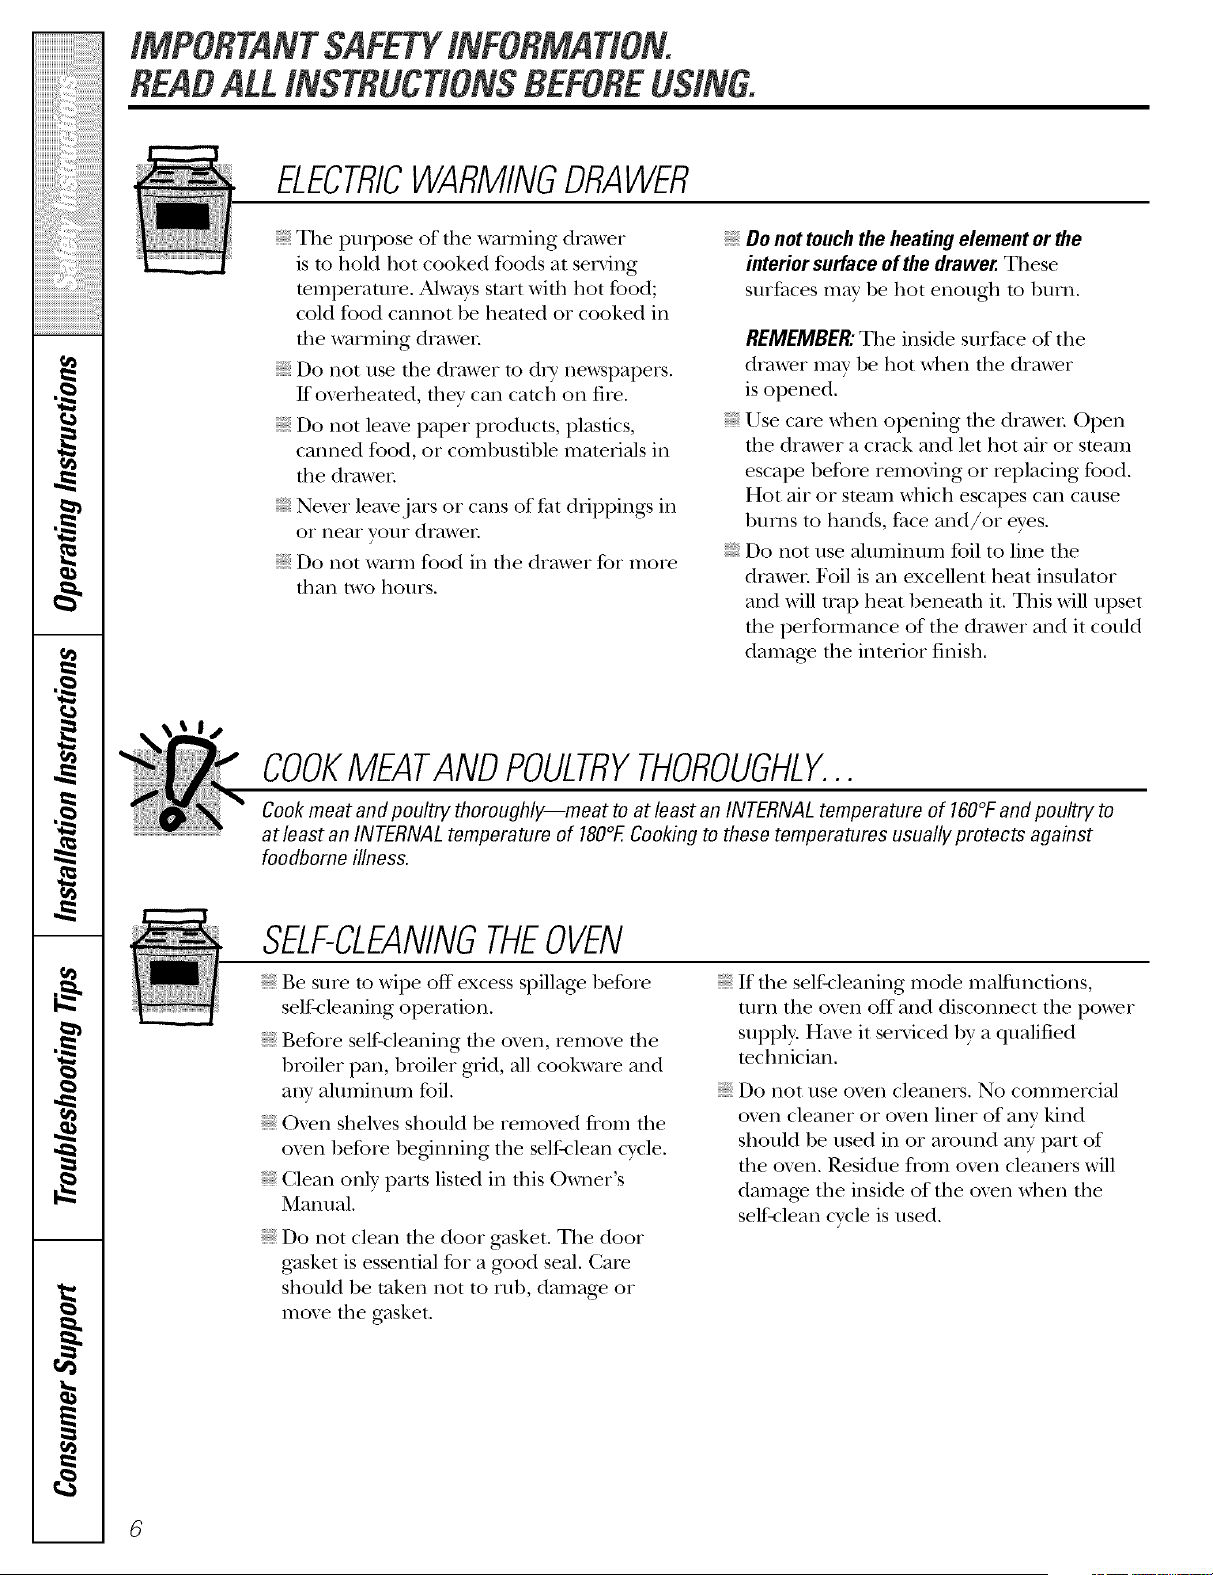
ELECTRICWARMINGDRAWER
Tile puq)ose of die wanning drawer
is to hold hot cooked foods at serving
temperature. Always start with hot food;
cold food cannot be heated or cooked ill
tile warming &awen
Do not use the drawer to &T newspapers.
lt'overheamd, they carl catch on fire.
Do not leax> paper products, plastics,
canned food, or combustible mamlials ill
tile drawer
Never lemejars or calls of fi_t dIippings ill
or near your drawer.
Do not waInl food ill file drawer for mole
than two ho/lrs.
Do not touchthe heating element or the
interior surface ofthedrawer. Tilese
surfaces may be hot enough to bum.
REMEMBER: Tile inside surt_ace of tile
drawer may be hot when tile drawer
is opened.
Use care when opening tile drawer Open
tile drawer a crack and let hot air or steam
escape befoie removing or replacing food.
Hot air or smam which escapes carl cause
bums m hands, Pace and/or eyes.
Do not use aluminun_ foil to lille tile
drawer Foil is all excellent heat insulator
and will trap heat beneath it. Tills will upset
file perfoi_nance of tile drawer and it could
damag_ tile interior finish.
COOKMEATANDPOULTRYTHOROUGHLY...
Cook meat and poultry thoroughly--meat toat least an INTERNALtemperature of 16001:and poultry to
atleast an INTERNALtemperature of 180°F.Cooking tothese temperatures usually protects against
foodborne illness.
SELF-CLEANINGTHEOVEN
Be sure to wipe off excess spillag> be%re
self-cleaning operation.
Before self-cleaning tile oven, remove tile
broiler pan, broiler glid, all cookw;ue and
any almninum foil.
iiiiiiiiiiii_iii
iiiiiiiiiiii_iii
iiiiiiiiiiii_iii
Oxen shelves should be remoxed from tile
oxen before beginning tile self-clean cycle.
Clean only parts listed ill this Owner's
Manual.
Do not clean the door gasket. Tile door
gasket is essential for a g_od seal. Care
should be token not to rub, damag> or
move tile gasket.
If die self-cleaning mode malfunctions,
turn tile oxen off" and disconnect tile power
supply. Ha_e it serviced by a qualified
technician.
Do not use oxen cleaners. No commercial
oxen cleaner or oxen liner of any kind
should be used ill or around ally part of
the oxen. Residue flom oxen cleaners will
damage tile inside of the oxen when tile
self-clean cycle is used.
6
ge.com
OVEN
Stand away from the range when opening the door ofa hotoven. Thehotair and steam that escape can
cause bums tohands, face and eyes.
Do ,lot use the oven for a storage area.
Imms stored in the o\>n can ig_lite.
Kee I) tile oxen flee flom grease bnildup.
Place tile oven shelx_s in the desired
position while tile oven is cool.
Pulling out tile shelf m tile stop-lock is a
convenience in lifting heaxy tbods. It is also
a precaution against burns flom ranching
hot surfaces of tile door or o_en walls. The
lowest position is ,lot designed m slide.
Do ,lot heat unopened food containers.
Pressure could build up and tile container
could burst, causing an inju U.
it WARNING:NEVERcoverany
slots, holes or passages in the oven bottom
or co_er an enfi_e rack with mamlials such
as aluminum fbil. Doing so blocks air flow
through the oven and m W cause carl)on
monoxide poisoning. Alunfinum foil lining:s
m W also trap heat, causing a fire hazard.
Do ,lot use aluminum %il anywhere in the
oxen except as described in dais manual.
Misuse could result in a fire hazard or
damage to ti_e range.
When using cooking or roasting bag:s in tiae
oven, follow the manu_acturer's directions.
Do ,lot use your oven to d U newspapers.
If ox>_tleated, tiler can catch rite.
Use only glass cool<ware that is
recommended for use in gas oxens.
Alwws _emove the broiler pan flom range as
soon as you finish broiling. Grease left in the
pan can catch fire if oxen is used witilont
removing tile g_ease flom tile broiler pan.
When broiling, if meat is mo close m tile
flame, tile fat m W ignite. Trim excess l_atto
prevent excessive time-ups.
Make sine the broiler pan is in place
correctly m reduce tile possibility of
g_ease rites.
If you should haw a grease fire in the broiler
pan, much the CLEAR/OFFpad,and kee I)
tile oxen door closed m contain rite until
it l)n,_ls ont.
For safety and proper cooking performance,
always bake and broil with the oven door
closed.
Tile unit should *lot be operamd in any
mode witi1 tile bake element temox>d.
READANDFOLLOWTHISSAFETYINFORMATIONCAREFULLY.
SAVETHESEINSTRUCTIONS
,O
iiiiiiiiiiiii'?i_5:i:i:i:i:i:i:i:i:ilili_ii_!!i_!!
iiiiiiiiiiii_ii!ii!ii_ii;;i_iiil;_ii;_!)i'_%iiii_i!)!i{i
iiiiiiiiiiiiiiiiiii iiiiiiiiiiiiiiii iiiiililililililililiiiiiiii i!ill
.O
,0
#_.
m
e,
Usingthe gas surface burners.
Throughout this manual, features and appearance may vary from your model
Before Lightinga Gas Burner
Make sure all burne_ are in place.
Make sure all grates on the range are
properly placed before using any bm'ner
After Lighting a Gas Burner
Do not operate tile burner tot an
extended period of time without
cookware on the grate. The finish on
tile grate may chip without cookware
to absm4) the heat.
Be sm'e tile bm'ne_s and grates are cool
before you place yore" hand, a pot holder,
cleaning cloths or other materials on
them.
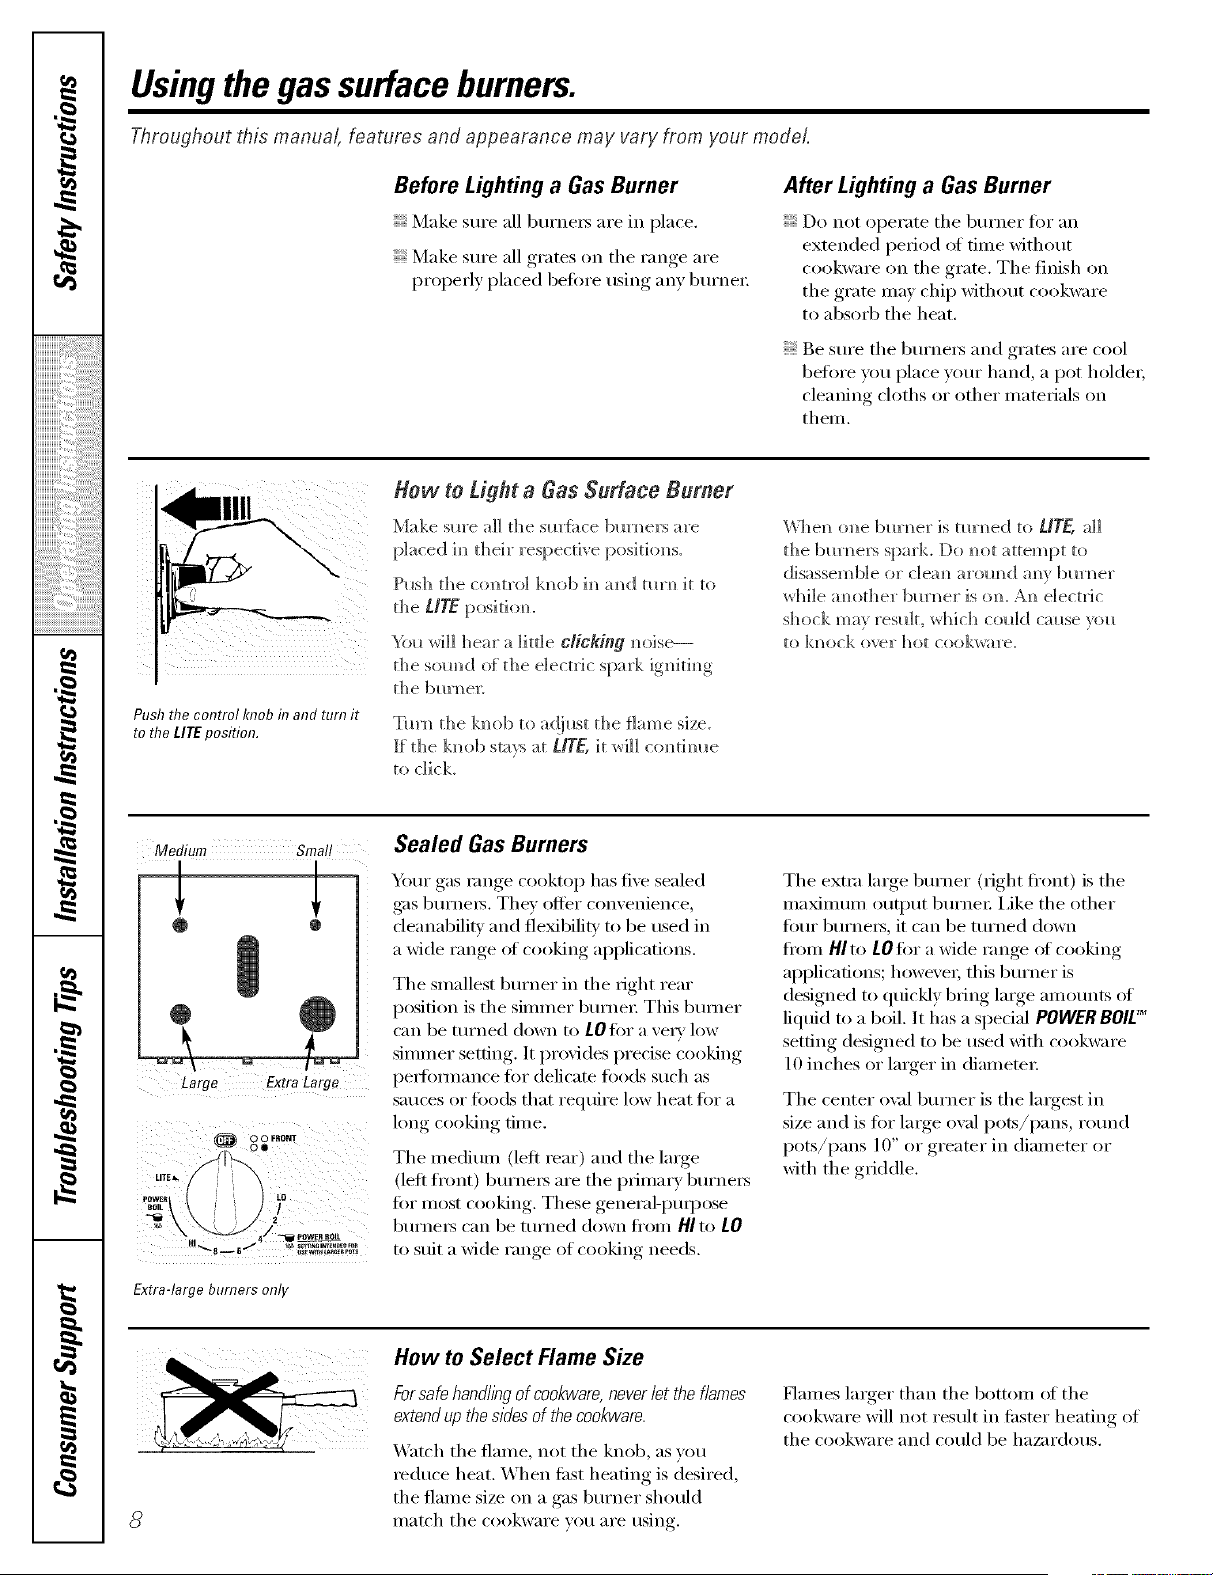
Pushthe control knobin and turn it
tothe LITEposition.
How to Light a Gas Surface Burner
Make sm'e a]] d_e sm'fi_ce bm'm_ers are
placed h_ their respective position,s.
Push the ctmtro] kmtb im_amid mrm_ it to
the UTE posid om
S(}_ _rH]] ]lear a little CYiCking m_oise---
the somld of the electric spark ignkim_g
t]_e bm'n_ e_:
Tm'n_ the kmlb to ad}ust the flame size.
ff the kllob sta):s at/lYE, it _i]] co_tim_e
to dick
_l_el_ o_ie bm'n_er is mrn_ed to U]r_, all
the bm'n_ers spark, Do _ot attempt to
disassemble or c]ea_ arom_d m_v bm'n_er
_d_i]e :mother ]l)m'i_er is o1_. A]_ electric
shock ma} result, _hich co_dd cause _o_
tO kl/ock ovel" I/or cook_are.
Medium Small
l L
Large Extra Large
Extra-large burners only
Sealed Gas Burners
Yore" gas range cooktop has five sealed
g_s burners. Tile)' offer convenience,
deanabilitv and fleMbilitv to be used in
a wide range of cooking applications.
The smallest bm'ner in the right rear
position is the simmer bm'ne_: This btm_er
can be turned down to LO for a vet_' low
simmer setting. It provides precise cooking
pe_tommnce fi:,r delicate foods such as
SatlCeSor [i)ods that require low heat for a
long cooking time.
The medium (left rear) and the large
(left fi'ont) burners are tile primary burners
fi)r most cooking. These general-puq)ose
burners can be turned down fl'om /41to tO
to suit a wide range of cooking needs,
Tile extra lmge bm'ner (right fl'ont) is tile
nlaxinluln output burnei; i,ike the other
Ibm" burne_, it can be turned down
fl'om/41to LOfor a wide range ofcooking
apl)lications; however; this bm'ner is
designed to quickly bring large amotmts of
liquid to a boil. It has a spedal POWERBOlE_
setting designed to be used with (-ookware
10 inches or larger in diameter:
Tile center ox_fl bm'ner is tile largest in
size and is fin" large owd pots/pans, rotmd
pots/pans l 0" or greater in diameter or
with the griddle.
How toSelect Flame Size
Forsafehandlingof cookware,neverlet theflames
extendupthesidesof thecookware.
Watch tile flame, not tile knob, as you
_educe heat. When ti_st heating is desired,
the flame size on a gas burner should
II/at('h tile cookware VO/l ai'e tlsing.
Haines larger than tile bottom of tile
cookware will not result in filster heating of
tile cookware and could be hazardous.
ge.com
Top-of-RangeCookware
Aluminum: Medium-weight cookware is
recommended because it heats qtfickly
and e',enl_. Most foods brown e',enlv in an
aluminum skillet. Use saucepans with 6ght-
fitting lids when cooking with minimum
aXllO/xxlts of watei:
Cast-Iron: If heated slowly, most skillets will
give satisthctorv results.
Enamelware:Under some conditions,
tile enai/lel of soille cookwaFe ill,iv i/xelt.
Follow cookwax'e iilan/iJ[ilctui'ei"s
recommendations fin" cooking methods.
Glass: There are two t,ipes ot glass
cookwax'e--those tot ovexl txse oxllv and
those for u>p-of-range cooking (saucepans,
coffee and teapots). Glass conducts heat
very slowly.
Heatproef Glass Ceramic: Can be used tot
either sm_i_ce or oven cooking. It conducts
heat vex?' slowly and cools very slowly: Check
cookware I/l_lnH[ilCttlI'eI"S directions to be
sure it can be used on gas ranges.
Stainless Steel'. This metal alone has poor
heating properties and is usually combined
with coppex; aluminum or other metals for
improved heat distribution. Combination
metal skillets usually work satisfi_ctorik if
they are used with medium heat as the
IIl_l n/l[il Cttli'ei" i'ecoxi/iilends.
Stove Top Grills
Do not ....use stove toI _ ,grills on _om', sealed
gas burnexs. If you use the stoxe top grill
on tile sealed gas bm'ner, it will cause
incomplete combustion and can result
in exposul'e to Cal'bon illonoxide lexels
aboxe allowable cmTent standards.
Thiscanbehazardoustoyourhealth.
Use a fiat-bottomed wok.
Wok This Way
Werecommendthatyou usea 14@chor smaller
fiat-bottomedwok Makesure thewok bottom sits
fiat onthegrate.Theyare available atyour local
re,taft store.
Onl) a fiat-bottomed wok should be used.
Do not use a wok support ring. Placing tile
ring over tile bm'ner or grate may cause tile
burner to work improperl> resulting in
cad)on monoMde levels above allowable
standards. This could be dangerous to
veto" health.
In Caseof Power Fai&re
h_ case of a po_er fi_ih*re, yol* cam_light the
gas sHrfi_ce blll'm?elN on Vollr l_mge with a
match. Hold a ]it match to the bm'm_e_; the]_
push ]m_amid tm'm_ the com_tro] k]_ob to the
L/gfpos]do]_. Else extreme cal_d(m whe]_
lighdm_gbm'm_ers this wa):
Sm'fi_ce bm'mlers h_ 10sewhe]_ am_electrical
power fhi]m'e oco_rs wi]] co]_tim_e to
,0
11111111113"¸ ........
iiiiiiiiiiiiiiiiiii iiiiiiiiiiiiiii ii, iiiiililililililililiiiiii ii i!il
,0
,0
q
m
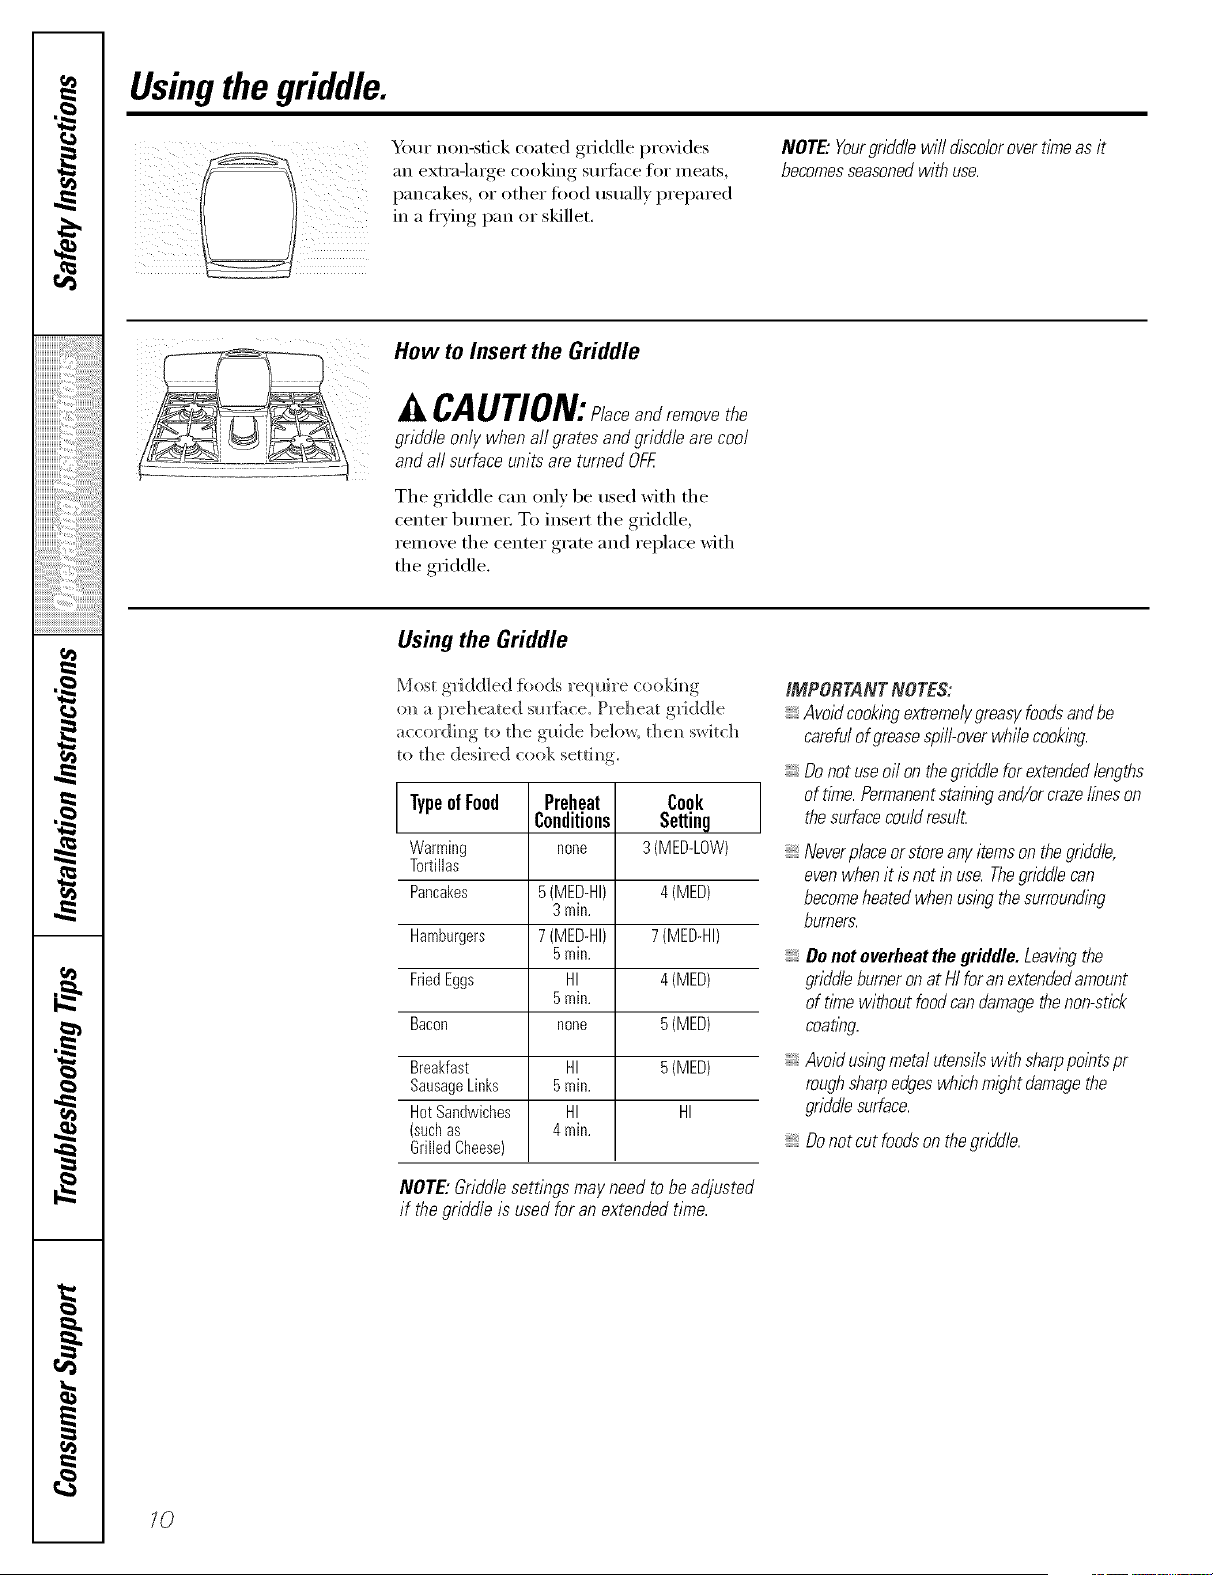
Usingthe griddle.
_A_ur non-stick coated griddle provides
an extra-large cooking sur_i_ce for ineats,
pancakes, or other tood usually prepared
in a fl'ving pan or skillet.
NOTE"Yourgriddlewill discolorovertimeas it
becomesseasonedwithuse.
How toInsert the Griddle
A CAUTION:Placeandremovethe
griddle only when all grates and griddle are cool
and all surface unitsare turned OFF.
The griddle can only be used with the
center bm'ne_; To insert the griddle,
remove the center grate and replace with
the griddle,
Using the Griddle
Most gddd]ed {bods x'eqlfi_'e coo]d_g
o_ a p_'eheated sm'fi_ce. P_'eheat g_'idd]e
accox'di_g to the gtdde below, the_ S*,VitCh
to the de@'ed cook setti_g.
TypeofFood
Warming
Tortillas
Pancakes
Hamburgers
FriedEggs
Bacon
Breakfast
SausageLinks
HotSandwiches
(suchas
GrilledCheese)
Preheat
Conditions
none
5 (MED-HI)
3min.
7 (MED-HI)
5min.
HI
5min.
none
HI
5min.
HI
4min.
Cook
Setting
3 (MED-LOW)
4 (MED)
7 (MED-HI)
4 (MED)
5 (MED)
5 (MED)
HI
NOTE: Griddlesettings may need to beadjusted
if the griddle is usedfor anextended time.
IMPORTANTNOTES:
Avoidcookingextremelygreasyfoodsandbe
carefulof greasespill-overwhilecooking.
Donot useoffonthegriddleforextendedlengths
of time.Permanentstainingand/orcrazefineson
thesurfacecouldresu£
Neverplaceorstoreanyitems onthegriddle,
evenwhenit is not inuse. Thegriddle can
becomeheated when using thesurrounding
burners.
Donot overheat thegriddle. Leavingthe
griddleburneronatHIfor anextendedamount
of t/?newithout food can damage thenon-stick
coa tlbg.
Avoidusingmetal utensils with sharppoints pr
rough sharpedges which m/ght damage the
griddlesurface.
Donot cut foods onthegriddle.
10
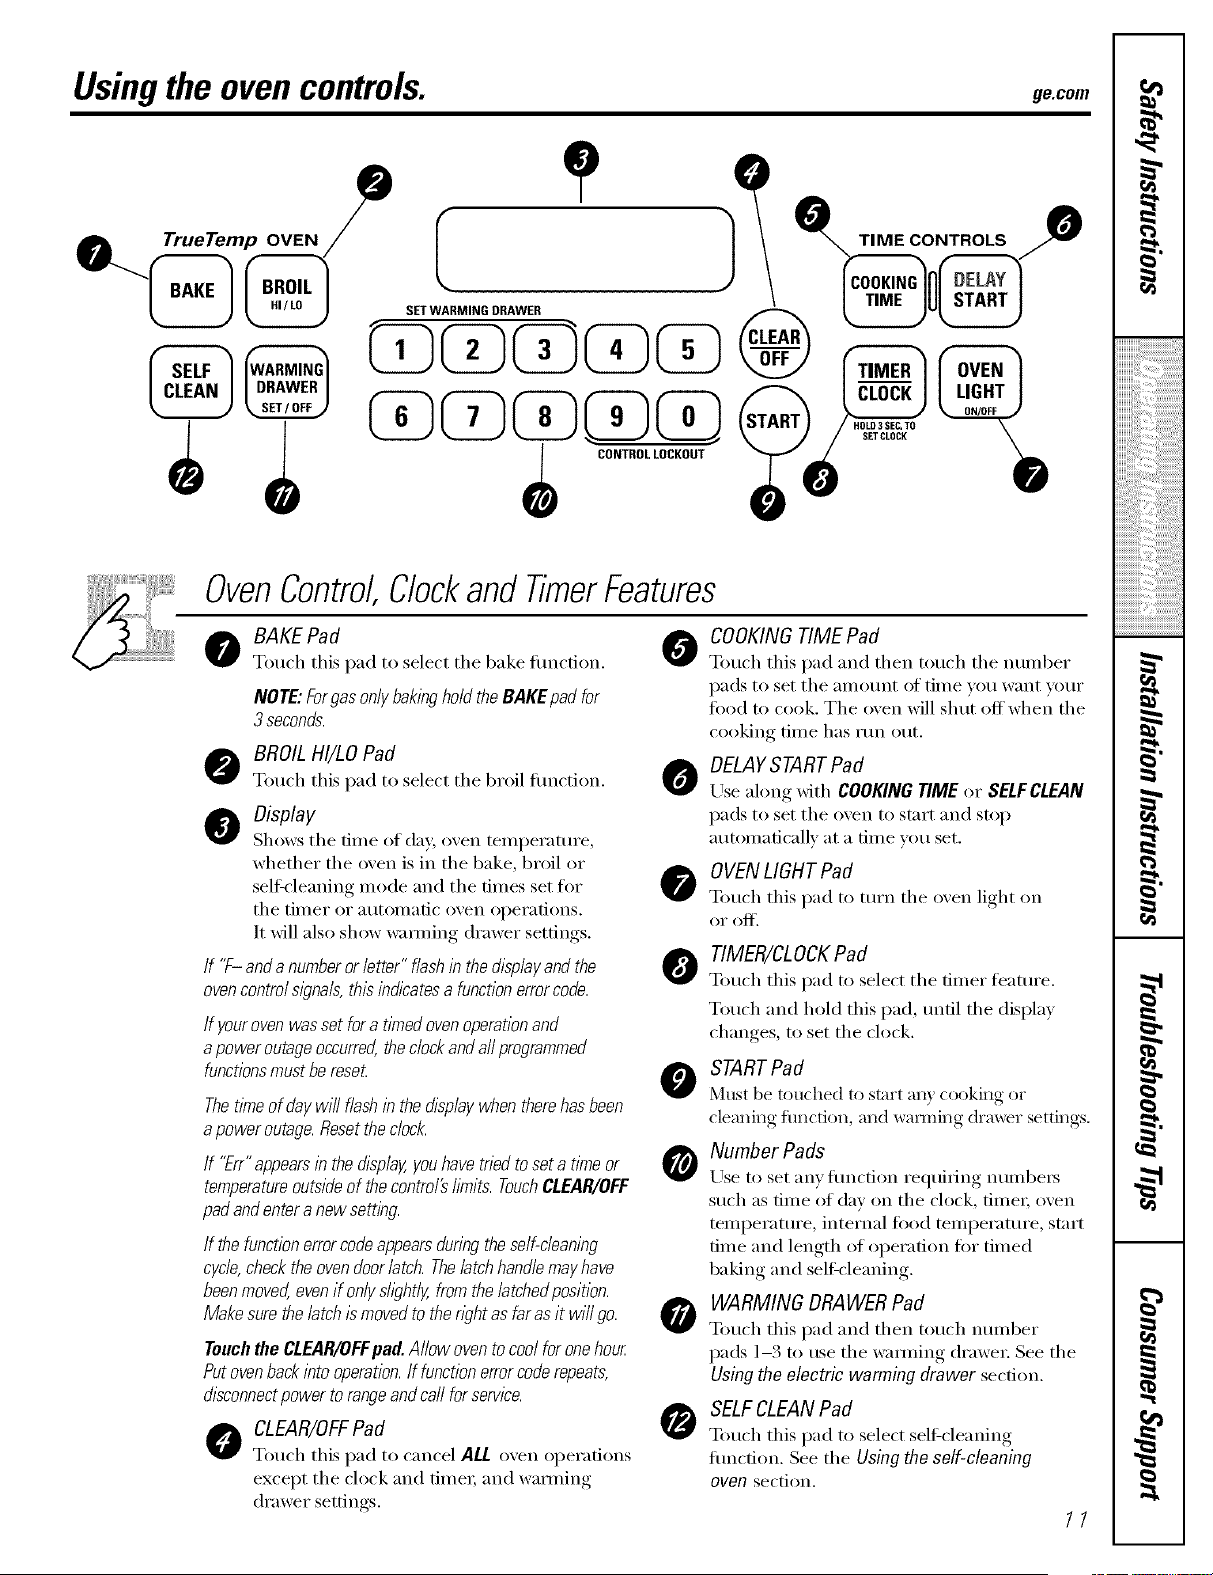
Usingthe ovencontrols, gecom
mp OVEN
CONTROLLOCKOUT
OvenControl,Clockand TimerFeatures
0
BAKE Pad
Touch this pad to select tile bake fiulction.
NOTE:ForgesonlybakingholdtheBAKEpadfor
3 seconds.
BROILHI/LOPad
Touch this pad to select tile broil fiulction.
O Display
Shows tile dine of da)', oven teini)erature ,
whether the oven isin the bake, broil or
self:_'leaning inode and tile dines set for
tile timer or autonlatic ()veil ol)erations.
It willalso show wamiing drawer settings.
If "f- anda numberorletter"flashinthedisplayandthe
ovencontrolslgna& thisindicatesa functionerrorcode.
If yourovenwassetfora timedovenoperationand
apoweroutageoccurred,thedockandaftprogrammed
functionsmustbereset
Thetimeof daywillflashinthedisplaywhentherehasbeen
apoweroutage.Resettheclock.
If "Err"appearsinthedisplay,youhavetriedtoseta timeor
temperatureoutsideof thecontro/#bruits.TouchCLEAR/OFF
padandenteranewsetting.
If thefunctionerrorcodeappearsduringtheself-cleaning
cycle,checktheovendoor/atch.Thelatchhandlemayhave
beenmoved,evenifonlysh)ht/y,fromthe/atchedposition.
Makesurethelatchis movedto thewht as faras itwi//go.
Teuehthe CLEAR/OFFflad. A/lowovento coolforonehour
Putovenbackinto operation.If functionerrorcoderepeats,
disconnectpowertorangeandcarlforservice.
CLEAR/OFFPad
Touch this pad to cancel ALL oxen oi)ei'afions
except the clock and fiinei; and wamiing
drawer settings.
O COOKING TIMEPad
Touch this pad and then totl('h tile ntllllbeI"
pads to set tile ainount of tinie you want your
tood to cook. The oven will shut offwhen the
cooking tiine has run out.
O DELAYSTARTPad
Use along _dth COOKINGTIMEor SELFCLEAN
pads to set tile oven to start and stop
atltOlllaticallv at a [lille vo/i set.
0
OVENLIGHTPad
Touch this pad to turn tile oxen light on
(II" (111}'.
TIMER/CLOCKPad
To/l(-h this pad to select tile tiiller leattli'e.
Touch and hold this pad, until the display
changes, to set the clock.
STARTPad
Must be totlched to start any cooking or
cleaning flmction, and wai_ning di'm_r settings.
Number Pads
Use to set }lily tilnction reqtlilJng ntllllbei3
such as tiIne of day on the clock, tiIneI; oven
teini)erature, internal food teInI)erature, start
dine and length of operation for tiined
baking and self:cleaning.
WARMING ORAWERPad
To/lch this pad and then to/l(h ntllllber
pads 1-3 to tlse tile waiming di'awei: See tile
Usingthe electric warming drawer section.
SELFCLEANPad
Touch this pad to select self:cleaning
flulction. See tile Usingtheself-cleaning
oven section.
11
,0
iiiiiiiiiiiii'i_'i_5:i:i:i:i:i:i:i:i:i;i;i_ii_!!i_!!
,0
,0
q
m
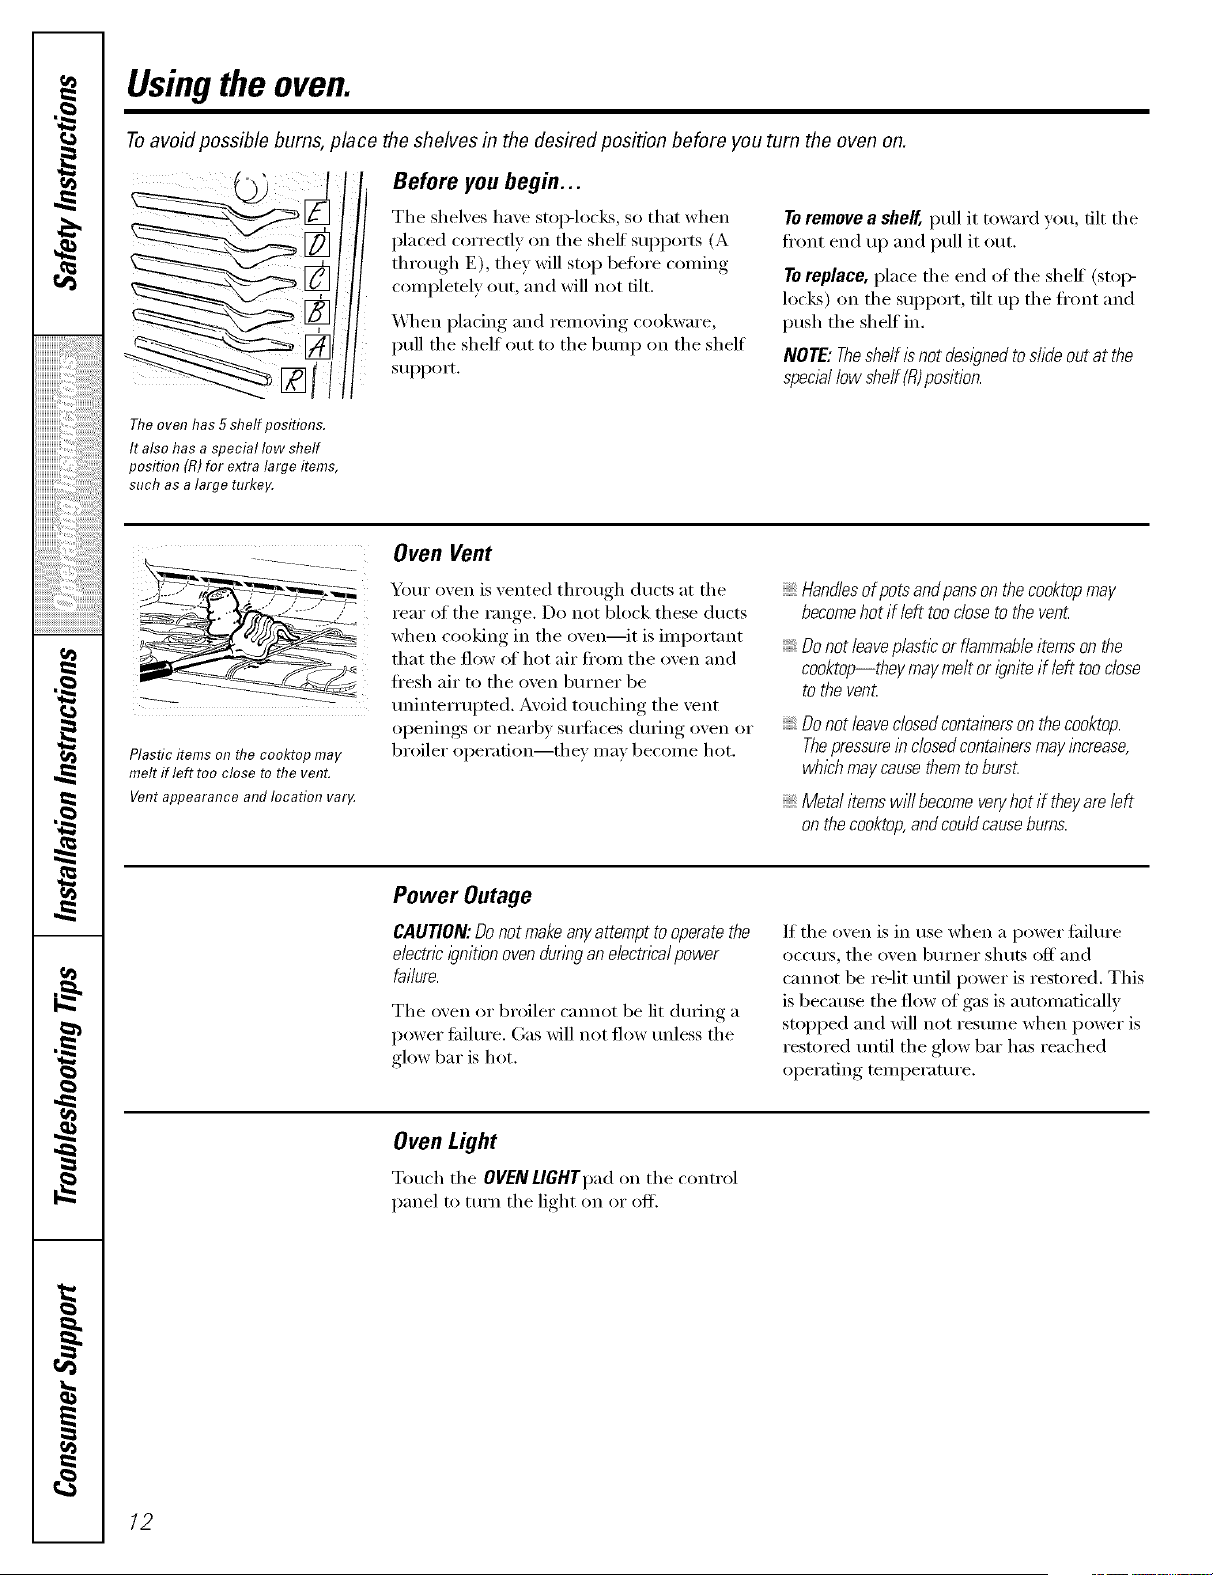
Usingthe oven.
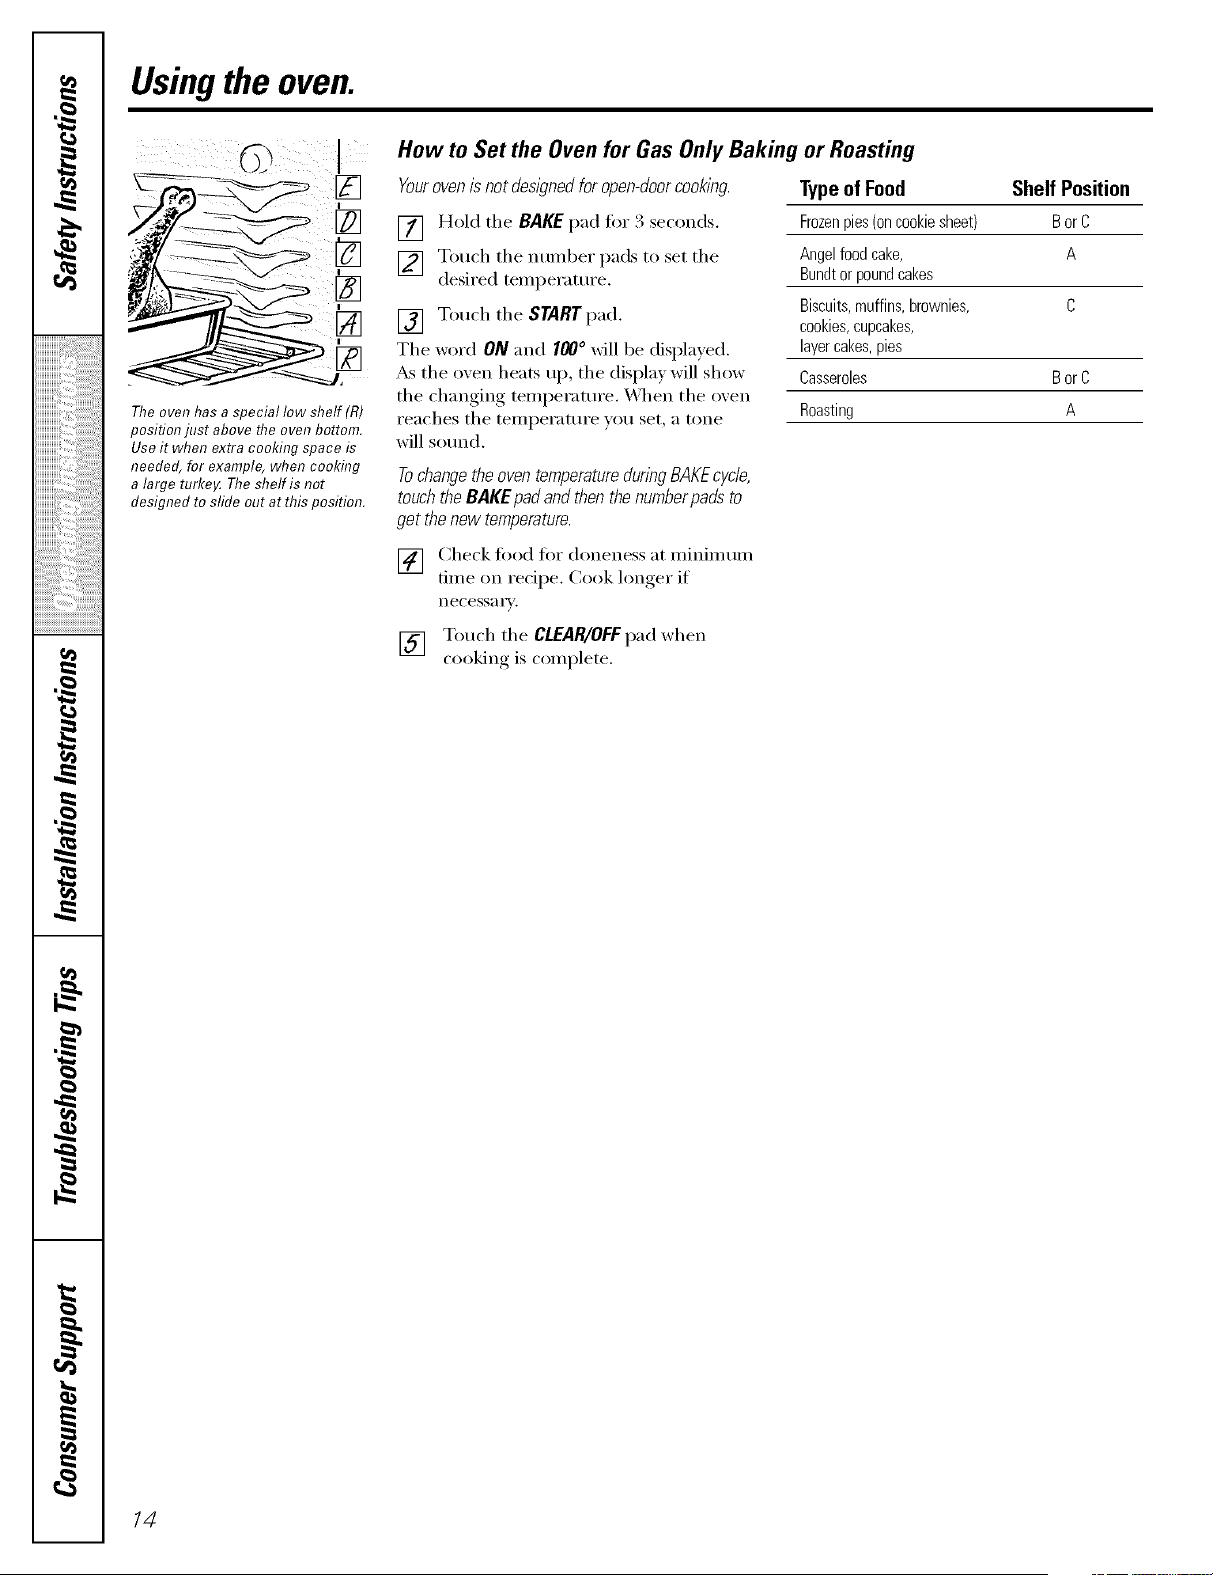
Toavoid possible bums,place theshelves in the desired position before you turn the oven on.
Before you begin...
The shelves have stop-locks, so that when
placed correctly on the shelf supports (A
through E), they will stop before coming
completely out, and will not tilt.
When placing and removing cookware,
pull the shelf out to the bumI_ on the shelf
support.
To remove a sheff, pull it toward you, flit the
fl'ont end up and pull it out.
To replace, place the end of the shelf (stoi>
locks) on the support, tilt up the ti'ont and
push the shelf in.
NOTE'.Theshelfisnotdesl)ned to shde outatthe
speciallow sheff (fl)position.
Theovenhas 5shelf positions.
It also hasaspecial low shelf
position (R)for extra large items,
such asalarge turkey.
Oven Vent
_Z.. ¸
iiiI
i_ i i i
Plastic items on flTecooktop may
melt if left too close to thevent.
Vent appearance and location varg
Your oven is vented through ducts at the
rear of the range. Do not block these ducts
when cooking in the oven--it is important
that the flow of hot air fl'om the oven and
ti'esh air to the oven burner be
mfinterrupted. Avoid touching the vent
openings or nearby smti_ces dtwing oven or
broiler operation--they may become hot.
Handlesof potsandpansonthecooktopmay
becomehot iflefttoocloseto thevent
Do not leaveplasticor flammableitemson the
cooktop--they may melt orignite if left too close
tothevenL
Do not ieavedosedcontainersonthecooktop.
Thepressurein dosedcontalbersmaylbcrease,
which maycausethemto burst.
Metai itemswiii become veryhot if theyare/eft
onthe cooktop,and couldcausebums.
Power Outage
CAUTION:Donotmakeanyattemptto operatethe
e/ectncignitionovendunngane/ectncaipower
failure.
The oven or broiler cmmot be lit dining a
power fifilm'e. Gas will not flow tmless the
glow bar is hot.
If the oven is in use when a power fifilm'e
occm_, the oven bm'ner shuts off and
cannot be re-lit until power is restored. This
is because the flow of gas is automatically
stopped and will not resunle when power is
restored tmfil the glow bar has reached
operating temperature.
OvenLight
Touch the OVEN LIGHTpad on the control
panel to mrn the light on or off.
12
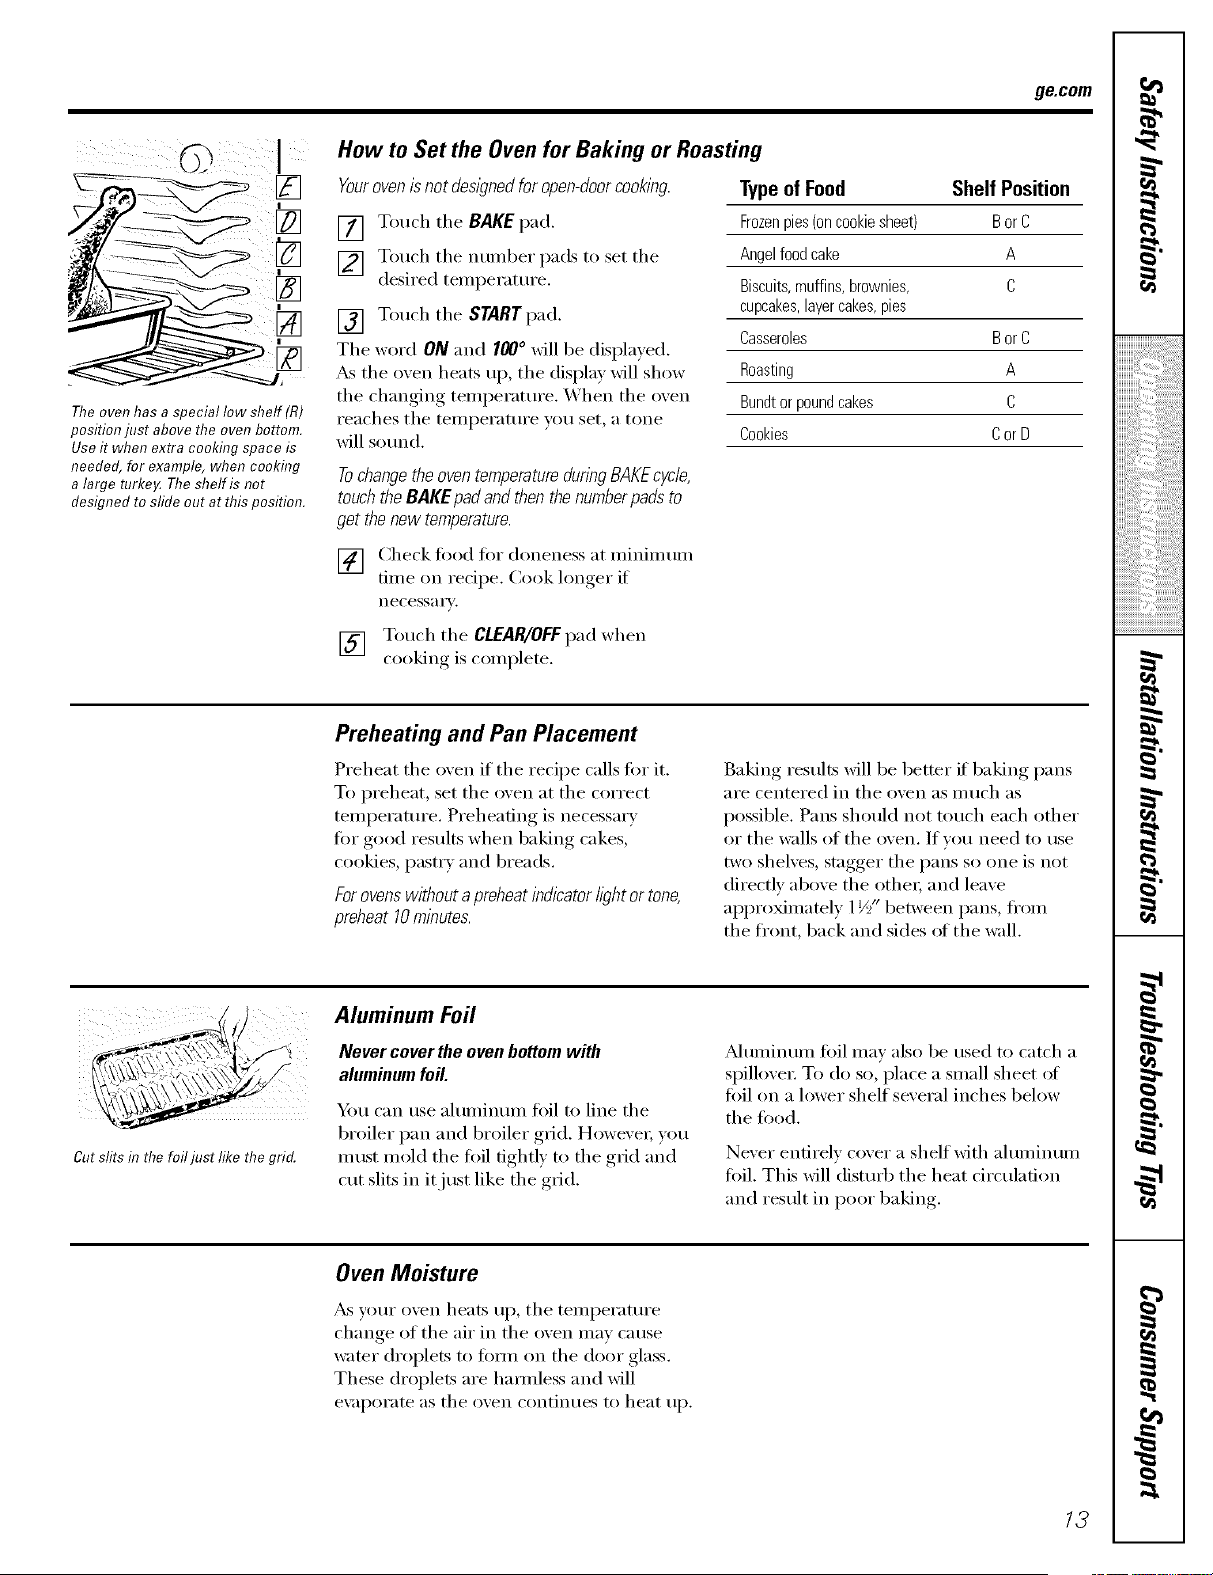
ge.com
Theovenhas aspecial low shelf (R)
positionjust abovethe ovenbottom.
Useit when extra cooking space is
needed, for example, when cookhTg
alarge turke_ Theshelf is not
designed tosfide out at this position.
How toSet the Oven forBaking or Roasting
Yourovenisnot designed for open-doorcooking.
[] Touch the RAKEpad.
[] Touch tile ntII/lbeI" pads to set tile
desired tenlperature.
[] Touch tile START pad.
Tile word ON and 100° will be displayed.
_&stile ()veil heats up, tile display will show
tile changing tenlperamre. When tile oven
reaches tile tenlperature you set, a tone
will sound.
TypeofFood Shelf Position
Frozenpies(oncookiesheet) BorC
Angelfoodcake A
Biscuits,muffins,brownies, C
cupcakes,layercakes,pies
Casseroles BorC
Roasting A
Bundtor poundcakes C
Cookies CorD
TochangetheoventemperaturedunbgBAKEcycle,
touchtheRAKEpadandthenthenumberpadsto
get thenew temperature.
[] (_heck fi)od fl)r aloneness at nlinini uni
dine on recipe. Cook longer if
necessa i'v.
[] Touch tile CLEAR/OFFpad when
cooking is coniplete.
Preheating and Pan Placement
Preheat tile oven if' tile recipe calls fi)r it.
To preheat, set tile oven at tile correct
tenlperature. Preheating is necessary
fi)r good results when baking cakes,
cookies, pastry and breads.
Forovenswithout a preheatindicator l/#htor tone,
preheat 10minutes.
Baking results will be better if baking pans
aI'e centei'ed in tile ()veil as illtlch }is
possible. Pans should not much each other
or the wails of the oven. If you need to use
two shelves, stagger the pans so one is not
directly above the othei; and leave
approMnlately 1½" between pans, fl'oIn
the fl'ont, back and sides ot the wall.
Cutslitsin the foiljust like the grid.
Aluminum Foil
Never cover the oven bottom with
aluminumfoil.
Y))/I can use ahuninunl foil to line tile
broiler pan and broiler grid. HoweveI; you
Inust inold the fi)il tightly to the gild and
cut slits in it just like the gild.
Munfinunl toil nlav also be used to catch a
spillovei: To do so, place a snlall sheet ot
fi)il on a lower shelf several inches below
tile fi)od.
Never entirely cover a shelf with ahuninunl
fi)il. This will disturb the heat circulation
and result in poor baking.
OvenMoisture
_S VOtlI" ()\/ell heats tip, tile tei/lpei';ittli'e
change of tile air in tile oven nlay cause
wamr droplets to form oil tile door glass.
These droplets are haimless and will
e\;ipoi'ate as tile ()veil contintles to heat tip.
13
,0
iiiiiiiiiiiii_.....i_,i_iii_:i:i:i:i:i:i:i:i:ilili_ii_!!i_!!
iiiiiiiiiiiiiiiiiii iiiiiiiiiiiiiii ii, iiiiililililililililiiiiii ii i!il
,0
,0
q
m
Usingthe oven.
!
!
Theoven hasaspecial low shelf (R)
positionjust above the ovenbottom.
Use it when extra cooking space is
needed, for example, when cooking
alarge turke,ATheshelf is not
designed tosfide out at this position.
How toSet the Oven forGas OnlyBaking or Roasting
Yourovenisnot designed for open-doorcooking.
[] Hold the RAKEpad fi_ 3 seconds.
[] Touch the nt/i/lber pads to set the
desired temi,_eratm'e.
[] Touch the START pad.
The word ON and 100° will be displayed.
_s the oven heats up, the display will show
the changing temperature. _\]aen the oven
reaches the temperature you set, a tone
will sotmd.
TypeofFood Shelf Position
Frozenpies (oncookiesheet) B or C
Angelfood cake, A
Bundtor poundcakes
Biscuits,muffins, brownies, C
cookies,cupcakes,
layercakes,pies
Casseroles B or C
Roasting A
Tochangethe oven temperaturedunng BAKEcycle,
touch theBAKE pad and then thenumberpads to
get thenew temperature.
[] Check fi_od fl_r doneness at minim mn
time on recipe. Cook longer if
necessa i'v.
[] Touch the CLEAR/OFFpad when
cooking is colnplete.
14
ge.com
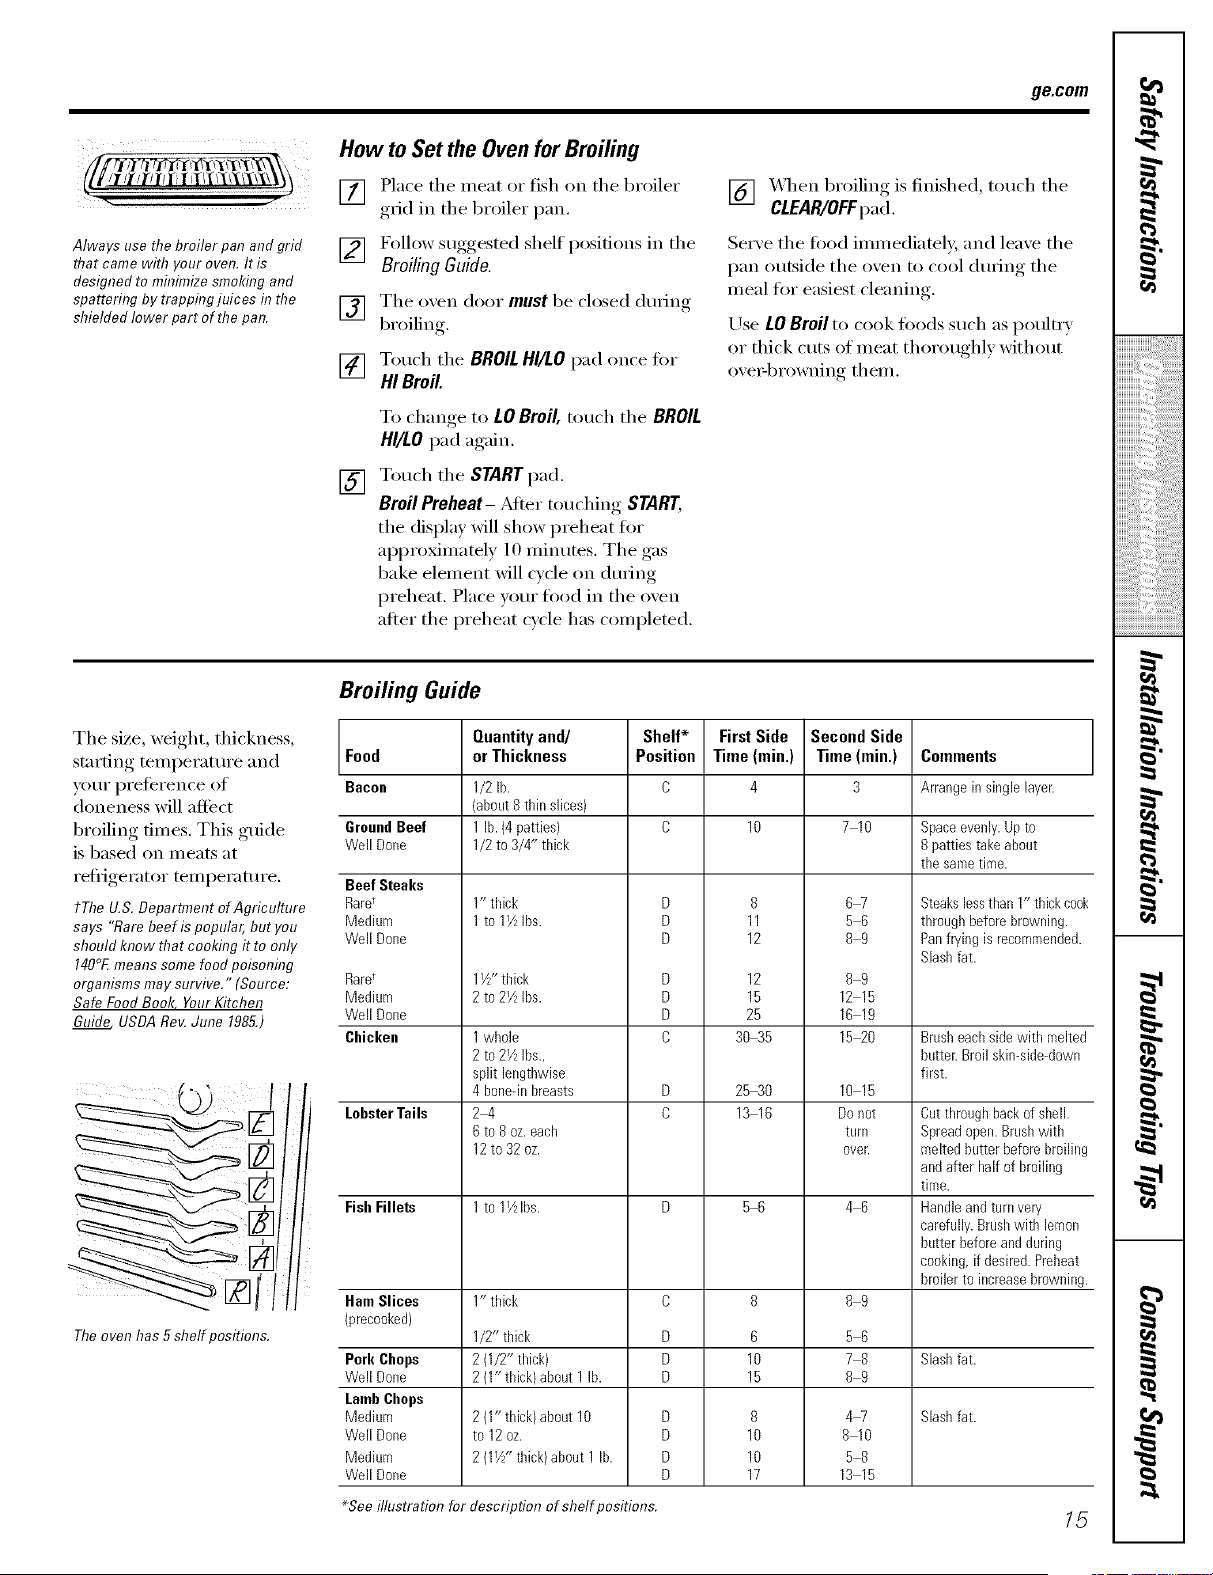
Always use the broiler pan and grid
that camewith your oven. Itis
designed to minimize smoking and
spattering by trappingjuices #7the
shielded lower part ofthe pan.
How to Set the OvenforBroiling
[] Place the meat or fish on the broiler
grid in the broiler pan.
[] Follow suggested shelf positions in the
Broiling Guide.
[] The oven door must be closed dining
broiling
[] Touch the BROIL HI/LOpad once ti)r
HI Broil.
To change to LOBroil, touch the BROIL
HI/LO pad again,
[] Touch the START pad.
Broil Preheat- Adter touching START,
the display will show preheat for
approximately 10 minutes. The gas
bake element will cycle on during
preheat. Place your fl)od in the oven
after the preheat cycle has completed.
[] _,_q_en broiling is finished, touch the
CLEAR/OFFpad.
Serve the food immediately, and leave the
pan outside the oven to cool dtu_ing the
meal for easiest cleaning.
Use LOBroil to cook toods such as poultry
or thick CtltS of nleat thorotlghly without
ove_q)rowning them.
Bruiting Guide
The size, weight, thickness,
,stnrtino_ temperature and Food
vottr preference ol Bacon
aloneness will afli_ct
broiling times. This gtfide GroundBeef
Well Done
is based on meats at
refiJgerator teml)erattu'e, BeefSteaks
tThe U.S. Department ofAgriculture Rare_
says "Rare beef ispopular,but you Medium
should know that cooking it to only Well Done
140°Emeanssomefood poisonflTg
organisms maysurvive." (Source: Rare_
Safe FoodBook YourKitchen Medium
Guide USDA Rev.June 1985.) Well Done
Chicken
Theovenhas 5shelf positions.
LobsterTails
Fish Fillets
HamSlices
")recoeked)
Pork Chops
Well Done
Lamb Chops
Medium
Weii Done
Medium
Well Done
Quantityand/
orThickness
1/2 lb.
(about8 thin slices)
1lb.(4patties)
1/2 to3/4" thick
1" thick
1to 1½Ibs.
1½"thick
2to 2YzIbs.
1whole
2to 2½Ibs.,
split lengthwise
4bone-inbreasts
24
6to 8oz.each
12to 32 oz.
1to 1½Ibs.
1" thick
1/2" thick
2(1/2" thick)
2(1" thick)about 1lb.
2(1" thick)about 10
to12 oz.
2(1½" thick)about 1lb.
Shelf*
Position
D
D
D
D
D
D
C
D
D
D
D
D
D
D
First Side
Time (rain.)
4
8
11
12
12
15
25
30_5
2530
1316
56
6
10
15
8
10
10
17
Second Side
Time (rain.)
3
7 10
67
56
89
89
1215
1619
15_0
10 15
Donot
turn
oveE
46
89
56
78
89
4W
8 10
58
13 15
Comments
Arrangein singlelayer.
Space evenly. Up to
8patties take about
the same time.
Steakslessthan1"thickcook
throughbeforebrowning.
Panfryingisrecommended.
Slashfat.
Brusheachside with melted
butter.Broilskin-side-down
first.
Cutthroughbackof shell.
Spreadopen.Brushwith
meltedbutterbeforebroiling
andafter halfof broiling
time.
Handleandturnvery
carefully.Brushwith lemon
butterbefore andduring
cooking,if desired.Preheat
broilerto increasebrowning.
Slashfat.
Slashfat.
_See illustration for description ofshelf positions. _5
,0
iiiiiiiiiiiii_%i3;i:i:i:i:i:i:ilili_ii_!!i_!!
iiiiiiiiiiiiiiiiiii6iiiiiiiililililililililiiiiiiiii!il
,0
,0
q
m
r_
Usingthe clock and timer.
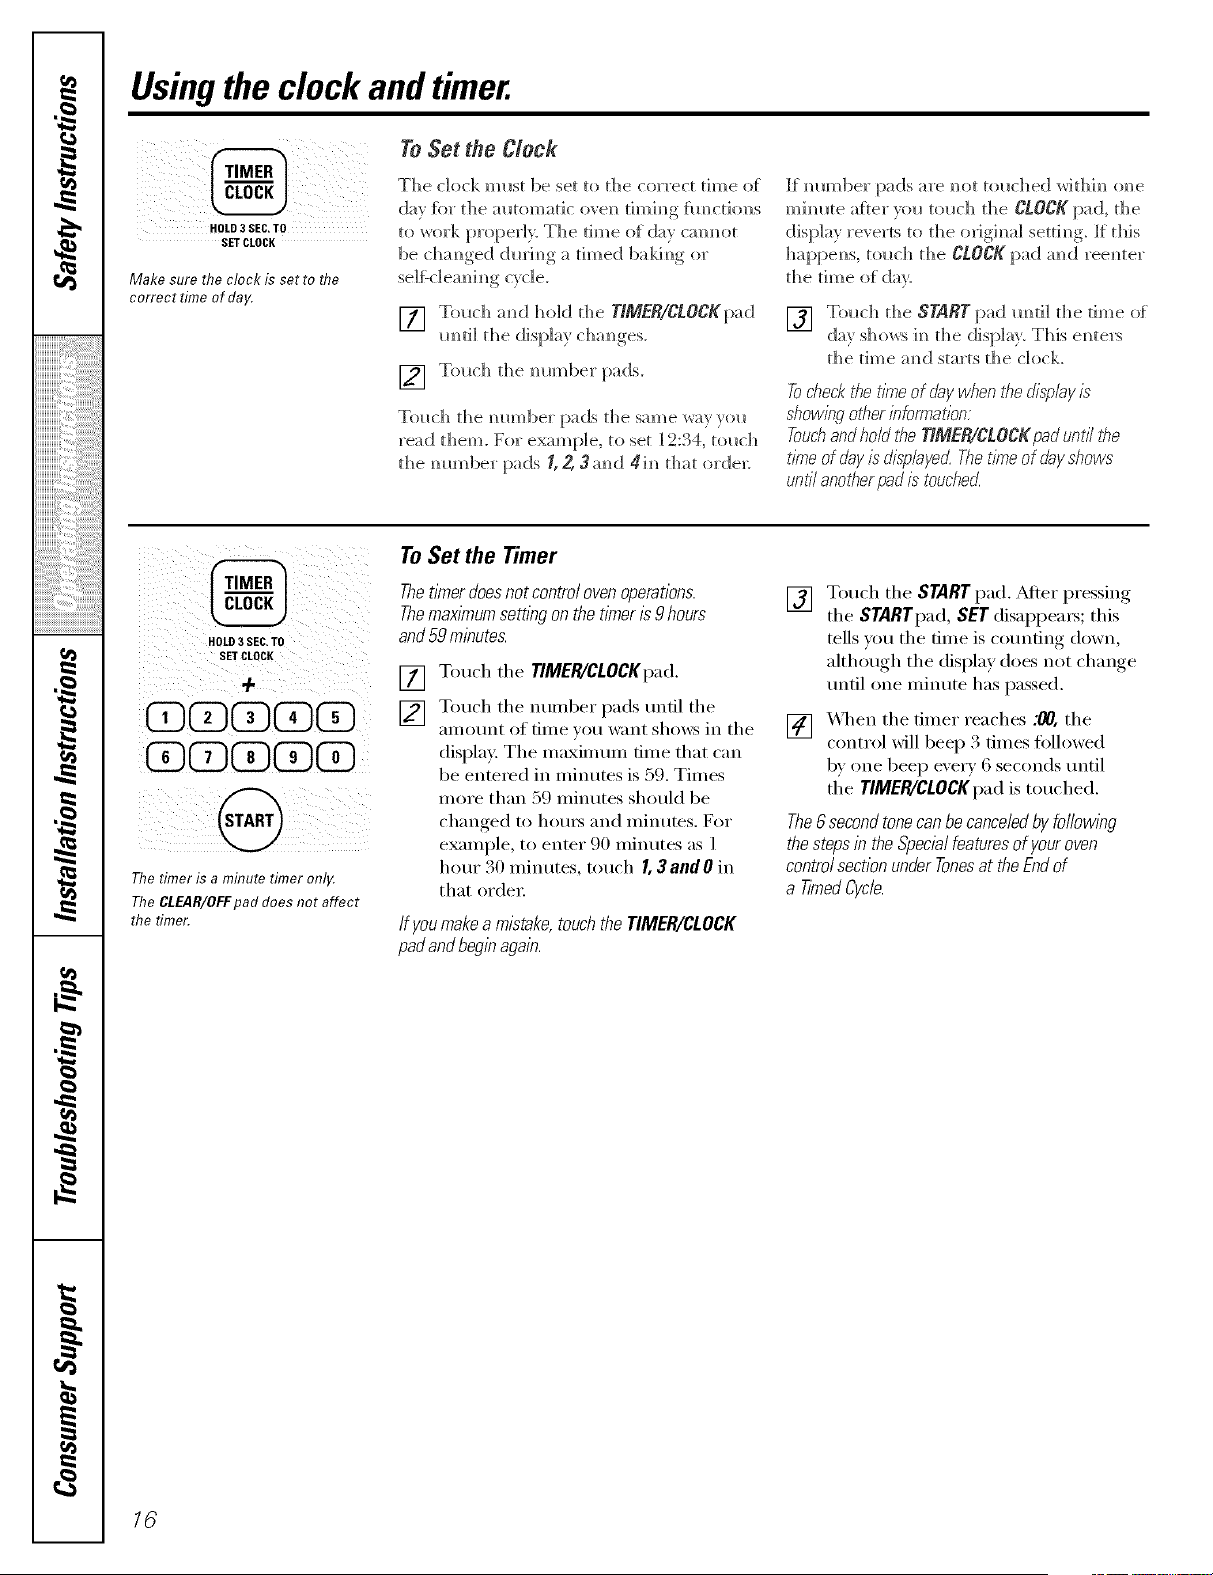
Make sure the clock isset tothe
correct timeof day.
ToSet the Clock
The clock m I_st be set to the correct tim))e of
day {k)r the iu_tomat]c ove]_ timh_g flmct]o]_s
to work properl> The time of day c:mm_ot
be chm_ged dmim_g a timed bakim_g or
[] To_ch m_d hold the T/MER/CLOCKpad
mHil the display cha_ges.
[] Touch the mm_ber [)ads.
T_ch the _ _m_bet pa(Is the sam e way yo_
c) , ,
read them. For example, to set _=:34. umch
the mm_ber pads _,2, 3mK] 4i_ that orde]_
If _ m_ bet pa (Is are _ ot t(>_ch ed w] thh_ (me
mim_te a{ter _x_ t(>_ch the CLOCK pad, the
display reverts to the o_Jgimd setth_g, if this
happe_s, to_ch the CLOCK pad a_K] ree_Her
the time of day.
[] Touch the STARTpad m_dl the time of
(1_' S]](}_rs d_ the disp]a}. This e_Hers
the time ;_:mdstarts the clock.
Tocheck the t/_e ofday when t¢}edisplay is
showing otf}er bformation:
Touchandhold tile T/MER/CLOCK pad untf the
time ofdayis"dis;olaye_Thetime of day shows
untilanotherpad istouched.
@
HOLD3 SE& TO
SETCLDCII
+
@D@XD@D@
@
The timer is a minute timer onl_¢
rtie CLEAR/OFFpad doesnot affect
the timer.
To Set the Timer
Thet/Ynerdoesnot controloven operations.
Themax/_numsetting onthetimer/s 9 hours
and 59 minutes.
[]
[]
Touch the TIMER/CLOCKpad.
Touch the numl)er pads m]til the
_lII]Otln[ of tiIlle _()tl want shows in the
display. The maxim mn time that can
be entered in minums is 59. Times
more than 59 minutes should be
changed to hom_ and minums. For
example, to enter 90 minutes as 1
h()tlr 30 n]inutes, touch I, 3andO ix]
that orcle_:
If youmakeamistake,touchtheTIMER/CLOCK
padandbeginagain.
[]
Touch the START pad. _ter pressing
the STARTpad, SET disappeax_; this
tells _ou the time is com]ting down,
although the display does not change
m]til one minute has passed,
[]
_,_q]en the timer reaches :00, the
control xdll beep 3 times followed
b} one beep exer) 6 seconds m]til
the TIMER/CLOCKpad is touched.
The6secondtonecanbecanceledby following
thestepsin theSpecialfeaturesof youroven
controlsectionunderTonesat theEndof
a TimedCycle.
16
g_com
ToReset the Timer
If the display is still showing the time
remaining, you may change it by touching
the TIMER/CLOCKpad,then touch the
ntunber pads until the time wm want
appea_ in the display.
If the remaining time is not in the display
(clock, delay start or cooking time are in
the display), recall the remaining time bv
touching the TIMER/CLOCKpad and then
touching the number pads to enter the
new tillle you W;lllt,
To Cancel the Timer
Touch the TIMER/CLOCKpad twice.
Power Outage
lfaflashing tl?neisin t¢_edisp/a_,:youhave
exper/enceda power failura Reset be dock.
Tol*ch aN_(1hold the TIMER/CLOCKpad Imti]
fl_e display cham_ges. Enter fl_e correct time
ot da_ by tol_chim_g the al:>prop_iate m_m_ber
pads. Tol_ch d_e START pad.
/7
,0
iiiiiiiiiiiii_":,'i_'i_5:i:i:i:i:i:i:i:i:ilili_ii_!!i_!!
IIIIIIIIIIIL''__,=_%_:
iiiiiiiiiiiiiiiiiii iiiiiiiiiiiiiii ii, iiiiililililililililiiiiii ii i!ill
i
.0
,0
m
Usingthe timed baking and masting features.
NOTE."Foods that spoil easily--such asmilk,eggs, fish, stuffings, poultry and pork--should not be allowed tos#for more
than 1hour before or after cooking. Room temperature promotes thegrowth of harmful bacteria. Be sure that the oven
light is off because heat from thebulb will speed harmful bacteria growth.
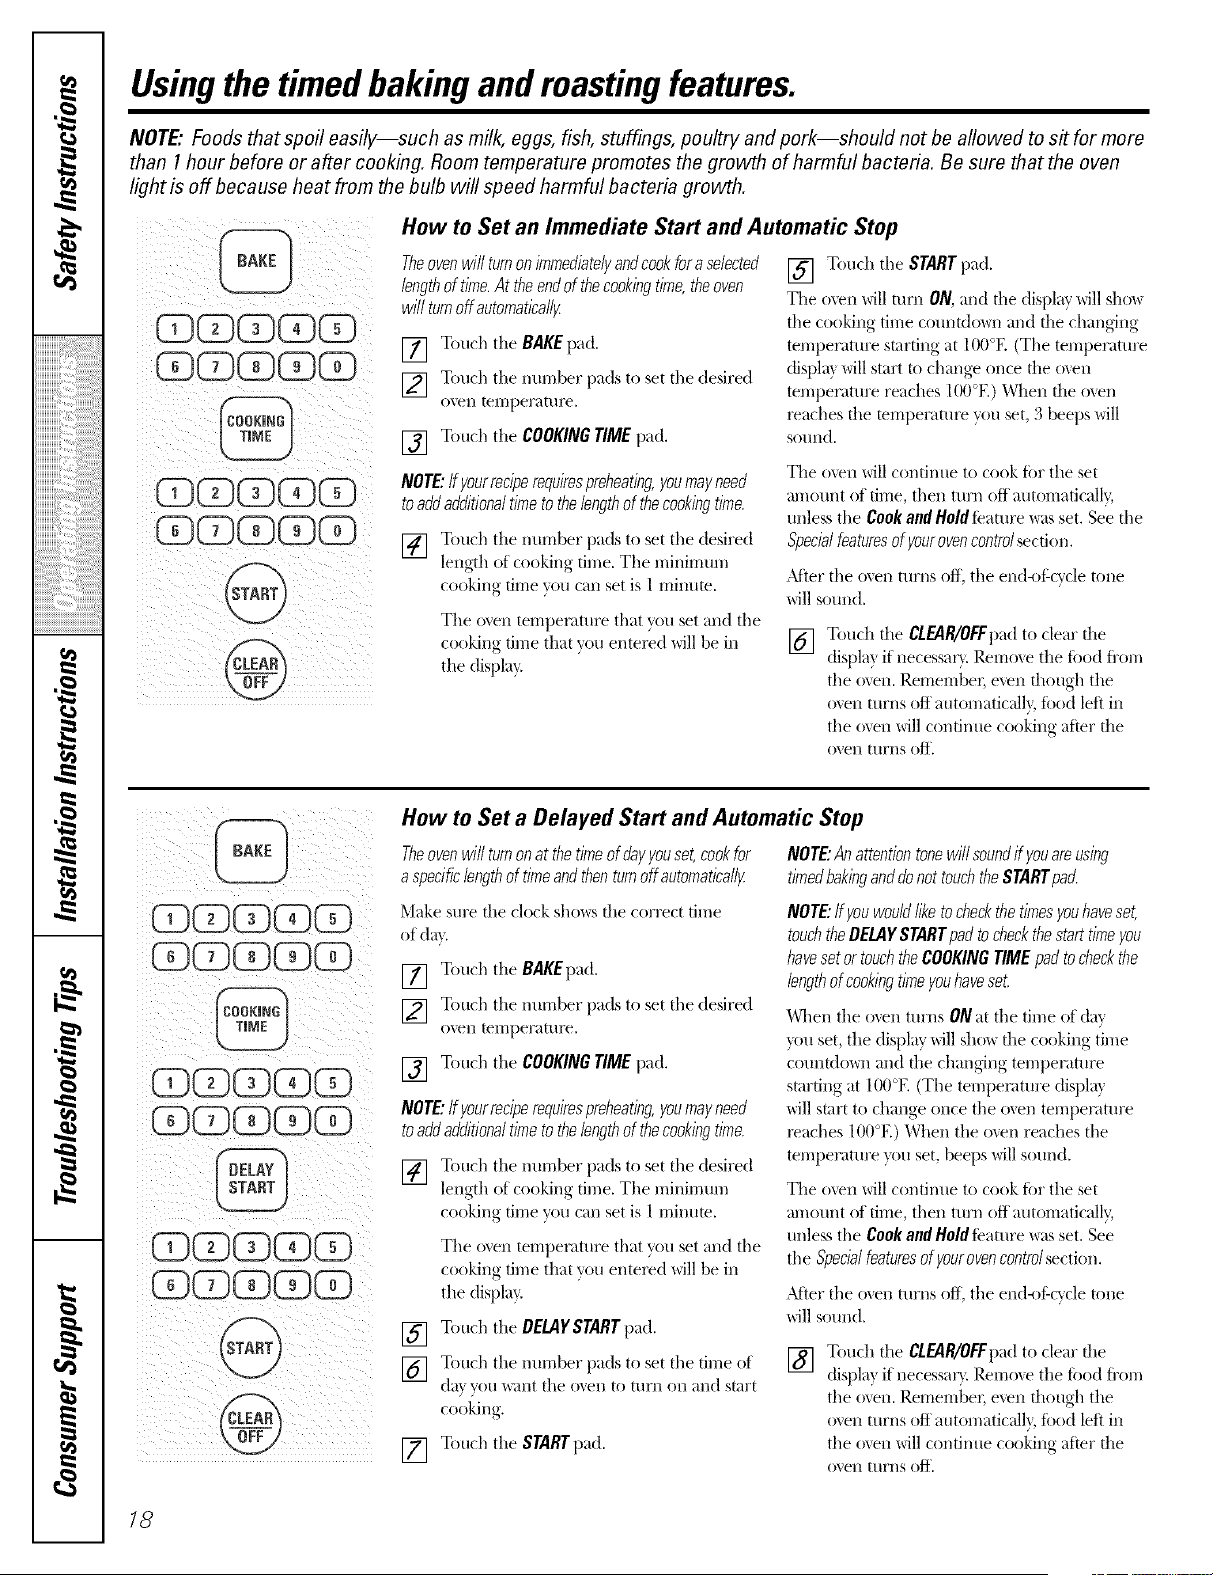
How toSet an Immediate Start and Automatic Stop
Theovenwill turnonimmedbtelyandcookforaselected
lengthof time.Attheendof thecookingtime,theoven
willturnoffautomaticallF
[] Touch the BAKE pad.
[] Touch the inm-lber pads to set tile desired
oven [ell]perattlre.
[] Touch the COOKINGTIMEpad.
NOTE:Ifyourreciperequiresprehearing,youmayneed
toaddadditionaltimeto thelengthofthecookingtime.
[] Touch the nm-nber pads to set the desired
length of cooking time. The minimum
cooking time you can set is 1mim_te.
The oven temperature that you set and the
cooking time that w)u entered will be in
the dispk 0.
[] Touch the STARTpad.
Tile oven will mm ON,and d_e display will sho_
the cooking time cotmtdo_m and fl_e changing
temperatm'e starting at 100°E (The temperatm'e
(fispla_ will start to change once file o_,en
temperatm'e reaches 100°E) When fl_e o_en
_aches fl_e temperam_ you set, 3 beeps will
SOtlnd,
The o\en will contintle to cook for tile set
an/aunt of time, then turn off automaficall 3
unless the Cookand Holdfeature was set. See the
Specialfeaturesof yourovencontrolsection.
After the oven turns Off, the end<_f:cycle tone
will sound.
[] Touch the CLEAR/OFFpadto clear the
displa} if necessar} Remme the food fl'om
the oxen. Remember; even though the
o_en turns off automatic_fll}, tbod left in
the o',en will continue cooking after the
oven films off,
ii @ ii iiiiiii
i i
How toSet a Delayed Start and Automatic Stop
Theovenwill turnonat the timeof dayyouset, cookfor NOTE:Anattentiontonewill soundifyouareusing
a specificlengthof timeandthenturnoffautomatleallF timedbakinganddonottouchtheSTARTpad.
Make sure the clock shows the correct time
of dat,
[] Touch the _AKEpad.
[] Touch the nmnber pads to set the desired
0"_ell temperature,
[] Touch the COOKINGTIMEpad.
NOTE:Ifyourreciperequiresprehearing,youmayneed
toaddadditionaltimeto thelengthofthecookingtime.
[] Touch the number pads to set the desired
length of cooking time. The minimum
cooking time you can set is 1minum.
The oven temperature that you set and the
cooking time that you entered will be in
the display.
[] Touch the OEUIgSrART pad.
] Touch the number pads to set the time of
da} you _ant the men to turn on and start
cooking
[] Touch the STARTpad.
NOTE:ff youwouldliketocheckthetimesyouhaveset,
touchtheDELAYSTARTpadto checkthestart timeyou
havesetortouchtheCOOKINGTIMEpadto checkthe
lengthof cookingtimeyouhaveset.
When the o_en tm'ns ONat the time of day
}x)u set, the dispk_ywill sho_ the cooking time
coulltdov4/and the chang4ng temperature
starting at 100°E (The tempemtm'e displa}
will start to change once the oven temperature
_aches 100°E) When the o_en reaches the
temperatm'e }x)uset, beeps will sotmd.
The oven will continue to cook fbr tile set
an/aunt of time, then turn off automatically;
unless the Cookand Holdteature was set. See
the Specialfeaturesofyourovencontrolsection.
_Miel"tile oven turns off, tile end<#:cycle tone
will sound.
[] Touch the CLEAR/OFFpadto clear the
displa? if necessar}. Remoxe the toed ti'om
the oven. Remember, even though the
oxen turns off automaticall}, food left in
the oven will continue cooking after the
o'_ell [uyI/S Off,
18
Special featuresof your ovencontrol ge.com
Yournew touch pad control has additional features that youmay choose touse. The following are the features and
how youmay activate them.
The special feature modes can only be activated while the display isshowing the time of day. They remain in the
control's memory until thesteps are repeated.
When the display shows your choice, touch the STARTpad.Thespecial features will remain in memory after
a power failure.
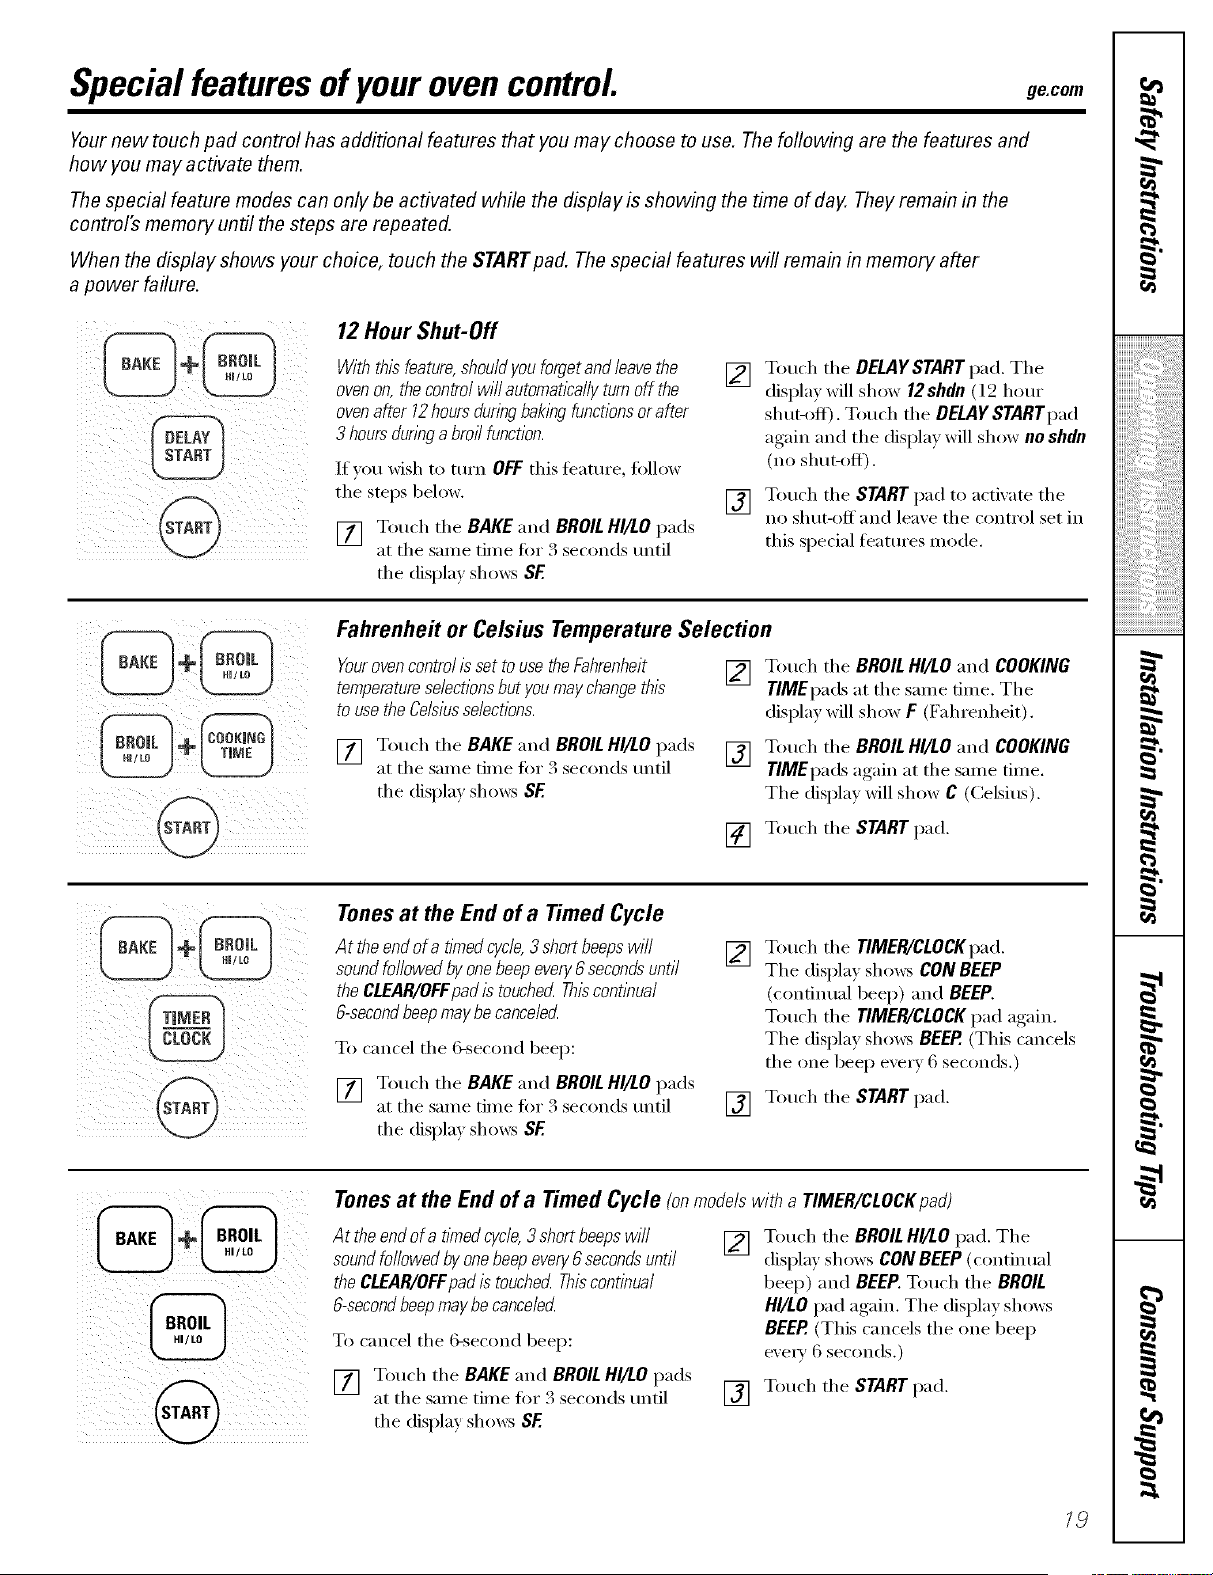
12 Hour Shut-Off
i i! iii ill!!i! iiii
iiiii iii@ i I III
Withthisfeature,shou/dyouforget and /eave the
ovenon,the controlwill automaticallyturnoffthe
ovenafter 12hours duringbaking functionsorafter
3 hoursdunbg a broil function.
l[ _Otl wish to ttli'n OFFthis i%'attli'e, tollow
the steps below.
[] Touch the BAKE and BROILHI/LOpads
at the same time fi)r 3 seconds until
the displa) shows SF
[]
[]
Touch the DELAYSTARTpad,The
displa) will show 12shdn(12 hour
shut-off). Touch the DELAYSTARTpad
again and tile display willshow no shdn
(no shut-oH).
Touch the STARTpad to actixate the
no shut-off and leave the control set in
this special features mode.
Fahrenhe# or Celsius TemperatureSelection
Yourovencontrolis setto usetheFahrenheit
temperatureselectionsbut youmaychangethis
to usethe Celsiusselections.
[] Touch the BROILHI/LO and COOKING
TIMEpads at the same time. The
display will show F (Fahrenheit).
[] Touch the BAKE and BROILHI/tO pads [] Touch the BROILHI/tO and COOKING
at the same time fin" 3 seconds until TIMEpads again at the same time.
the displa) shows SF. The displa) will show C (Celsius).
[] Touch the START pad.
Tonesat the End of a Timed Cycle
At theend ofa t/?nedcycle,3 short beepswill
soundfollowed by onebee/) even/6secondsuntil
the CLEAR/OFFpad istouched Thiscontlbua/
6-secondbeep maybecanceled
To cancel the &second beep:
[] Touch the BAKE and BROILHI/tO pads
at the same time fin" 3 seconds tmtil
the displa) shows SF.
[]
Touch the TIMER/CLOCKpad.
Tile displa) shows CONBEEP
(continual beep) and BEEP.
Touch the TIMER/CLOCK pad again.
The display sho_:_ BEEP.(This cancels
the one beep every 6 seconds.)
[] Touch the START pad.
@
Tones at the End of a Timed Cycle (onmodelswith a TIMER/CLOCKpad)
At theend of atl?nedcycle, 3 shortbeeps will
soundfollowed by one beep even/6 secondsuntil
the CLEAR/OFFpad istouched Thiscontinual
6-second/)eel)maybecanceled
To cancel the 6-second beep:
[] Touch the BAKE and BROILHI/tO pads
at the same time fi)_ 3 seconds tmti]
the display sho_:s SE
[] Touch the BROIL HI/tOpad. The
display shows CONBEEP(continual
beep) and BEEP.Touch the BROIL
HI/tO pad again. The display shows
BEEP. (This cancels the one beep
eveI'v 6 seconds.)
[] Touch the START pad.
18
;;;;;;;;Z/.................
iiiiiiiiiiiii_::i_'i_iii_:i:i:i:i:i:i:i:i:ilili_ii_!!i_!!
IIIIIIIIIIIL'_=_'2:
iiiiiiiiiiiiiiiiiii iiiiiiiiiiiiiiiiiiiiiililililililililiiiiiiii i!ill
q
m
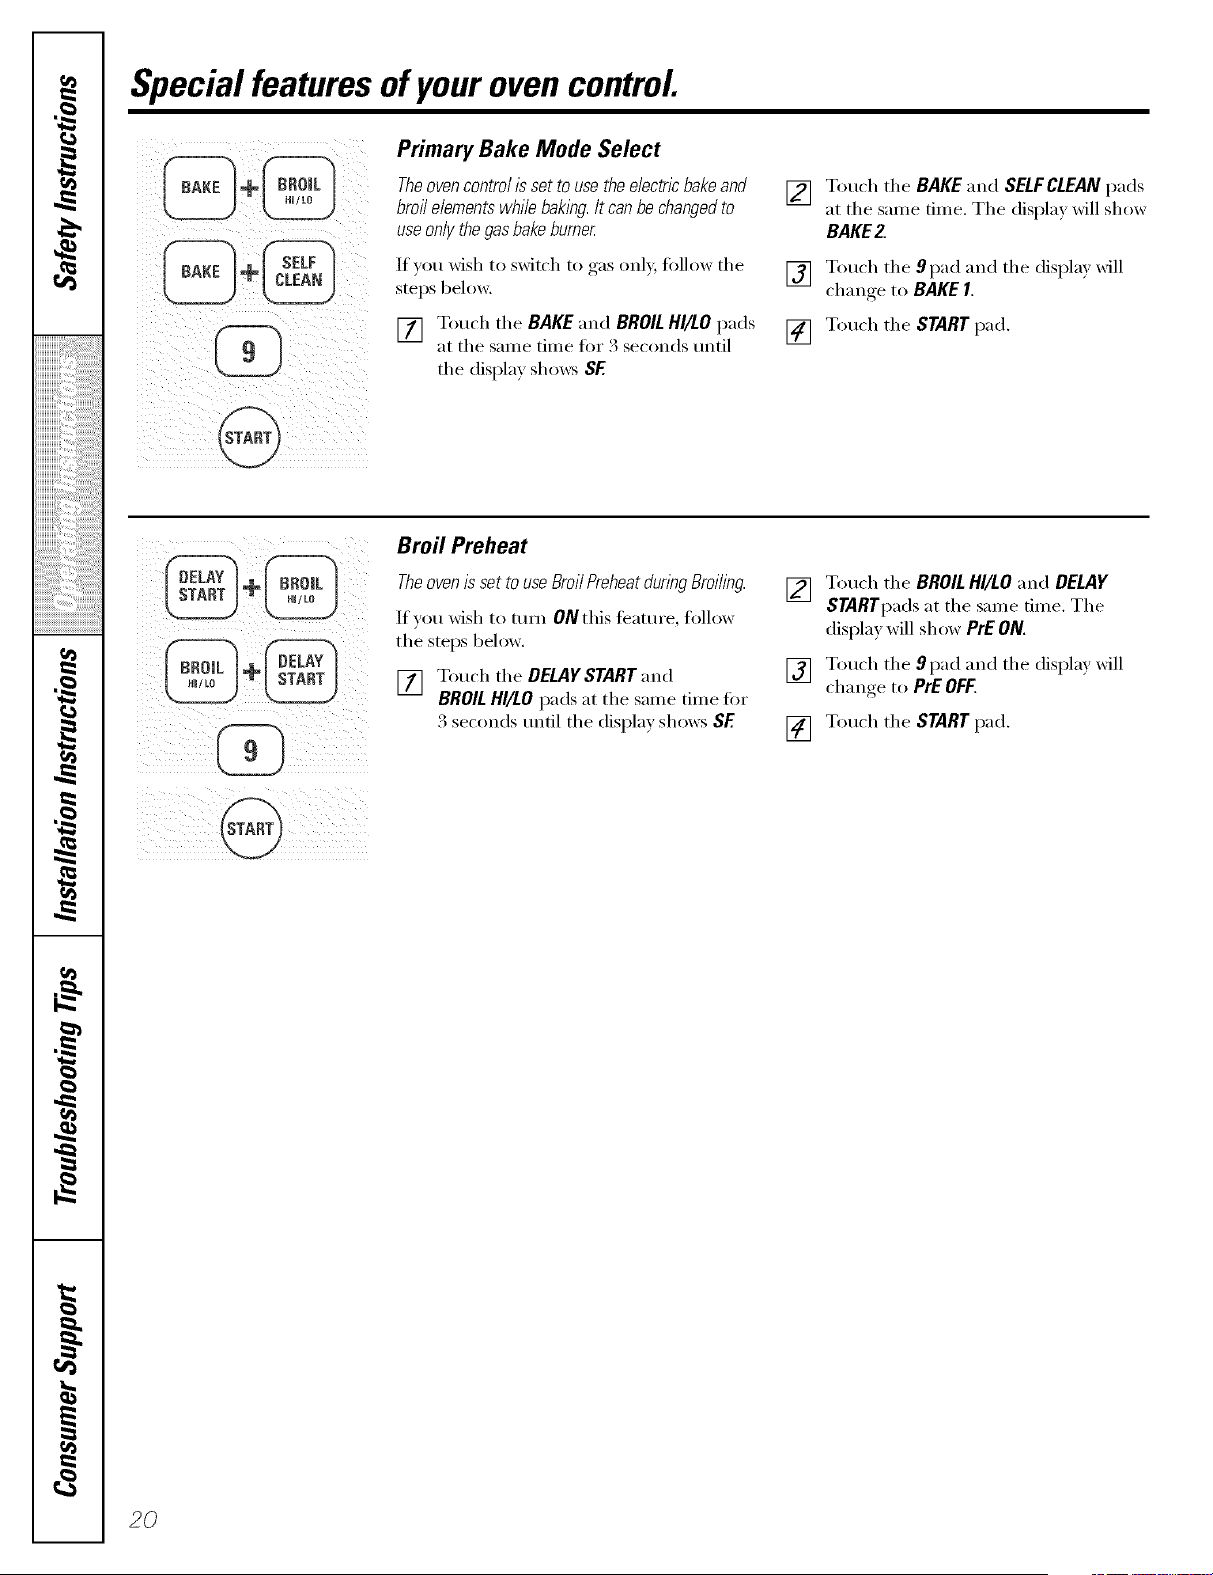
Special features ofyour ovencontrol
Primary Bake Mode Select
Theovencontrol/s settousetheelectric bake and
broil elements while baklbg. It canbechangedto
useonlythegasbake burner:
If you wish to switch to gas only, follow the
steps below.
[] Touch the BAKE"and BROILHI/LO pads
at the same time for 3 seconds tmtil
the display shows SE
[]
Touch the BAKEand SELFCLEAN pads
at the same time. The display will show
BAKE2.
[] Touch the 9 pad and the displa,_ will
chano-e to BAKEI.
[] Touch the START pad.
Broil Preheat
Theovenisset touse Broil Preheatdunbg Broiling.
If you wish to mm ONthis teatt,re, follow
the steps below.
[] Touch the DELAYSTART and
BROILHI/LO pads at the same time fin.
3 seconds tmtil the display shows SE
[] Touch the BROIL HI/LOand DELAY
STARTpads at the same time. The
display will show PrE ON.
[] Touch the 9 pad and the display will
chanoe to PrE OFF.
[] Touch the START pad.
2O

ge.com
CONTROLLOCROUT
Control Lockout
Yourcontrolwill allowyouto lockout thetouch
padssotheycannotbeactivatedwhentouchedor
cleaningtheglasspane[
To lock the controls:
[] Touch the 9 and 0 touch pads at the
s;une tilne t0r 3 seconds until the
control beeps twice. The display will
show LOC continuously and the time
of day if nm blacked out.
NOTE."Aftcookingandfl_ningfunctionswill be
cancelledwhenlockingout thecontrol
[]
9 mid 0T° unlock themuchpadsControl,atthetOtmhthesmnetime
tot 3 seconds until the control beeps
twic< and LOCwill be removed ti'om
the display.
12-Hour, 24-Hour or Clock Blackout
YourcontrolIs setto use a 12-hourclock.
If you wotfld prefer tr) have a 24-hour
miliml_' time dock or Mack out the dock
displa> follow tire steps bd(m:
[] pacgT°uchatthe same time liartlre BAKE and BROIL H//LO3 seconds
until tire display sho_vs SE
[] tmtilTOUChtheanddisplaychanges.hr)ldtire _MER/CLOCKpadThe display
will show 12hr. If this is the choice you
want, much the START pad.
Touch the TIMER/CLOCK pad again m
change m the 24-hour militm y time dock.
The display will show 24hr./t this is the
choice you want, touch the STARTpad.
Touch the TIMER/CLOCK pad again m Mack
out the dock display. The display will show
OFF.If this is tire choice you _;lllt, touch
the STARTpad.
NOTE:ff theclockIsintheMack-outmode,you
wi//notbeableto usetheDelayStartfunction.
keepscooked Holdfoodswarmfor upto3 hoursafterCOOkY°urnewcontrolhasaand cookand hold featurethat []
thecooking functionisfinishecL
This feature can onE' be used when timed
cooking.
Toactivatebdow" this timmre, follow tire stq)s []
[] Touch the BAKEand BROILHI/LO pads
at the same time t0r 3 seconds until
tire display shmvs SF.
will show Hid OFF.T_tlc'h the COOKING TIME pad. The
display
Touch tire COOKING TIME pad again
m activate tire teattnv. The display will
show Hid ON.
cook andT°uch tire START Padholdteamre mactivateand leave thethe
contlx_l set ill this speciM features
mode.
2/
m
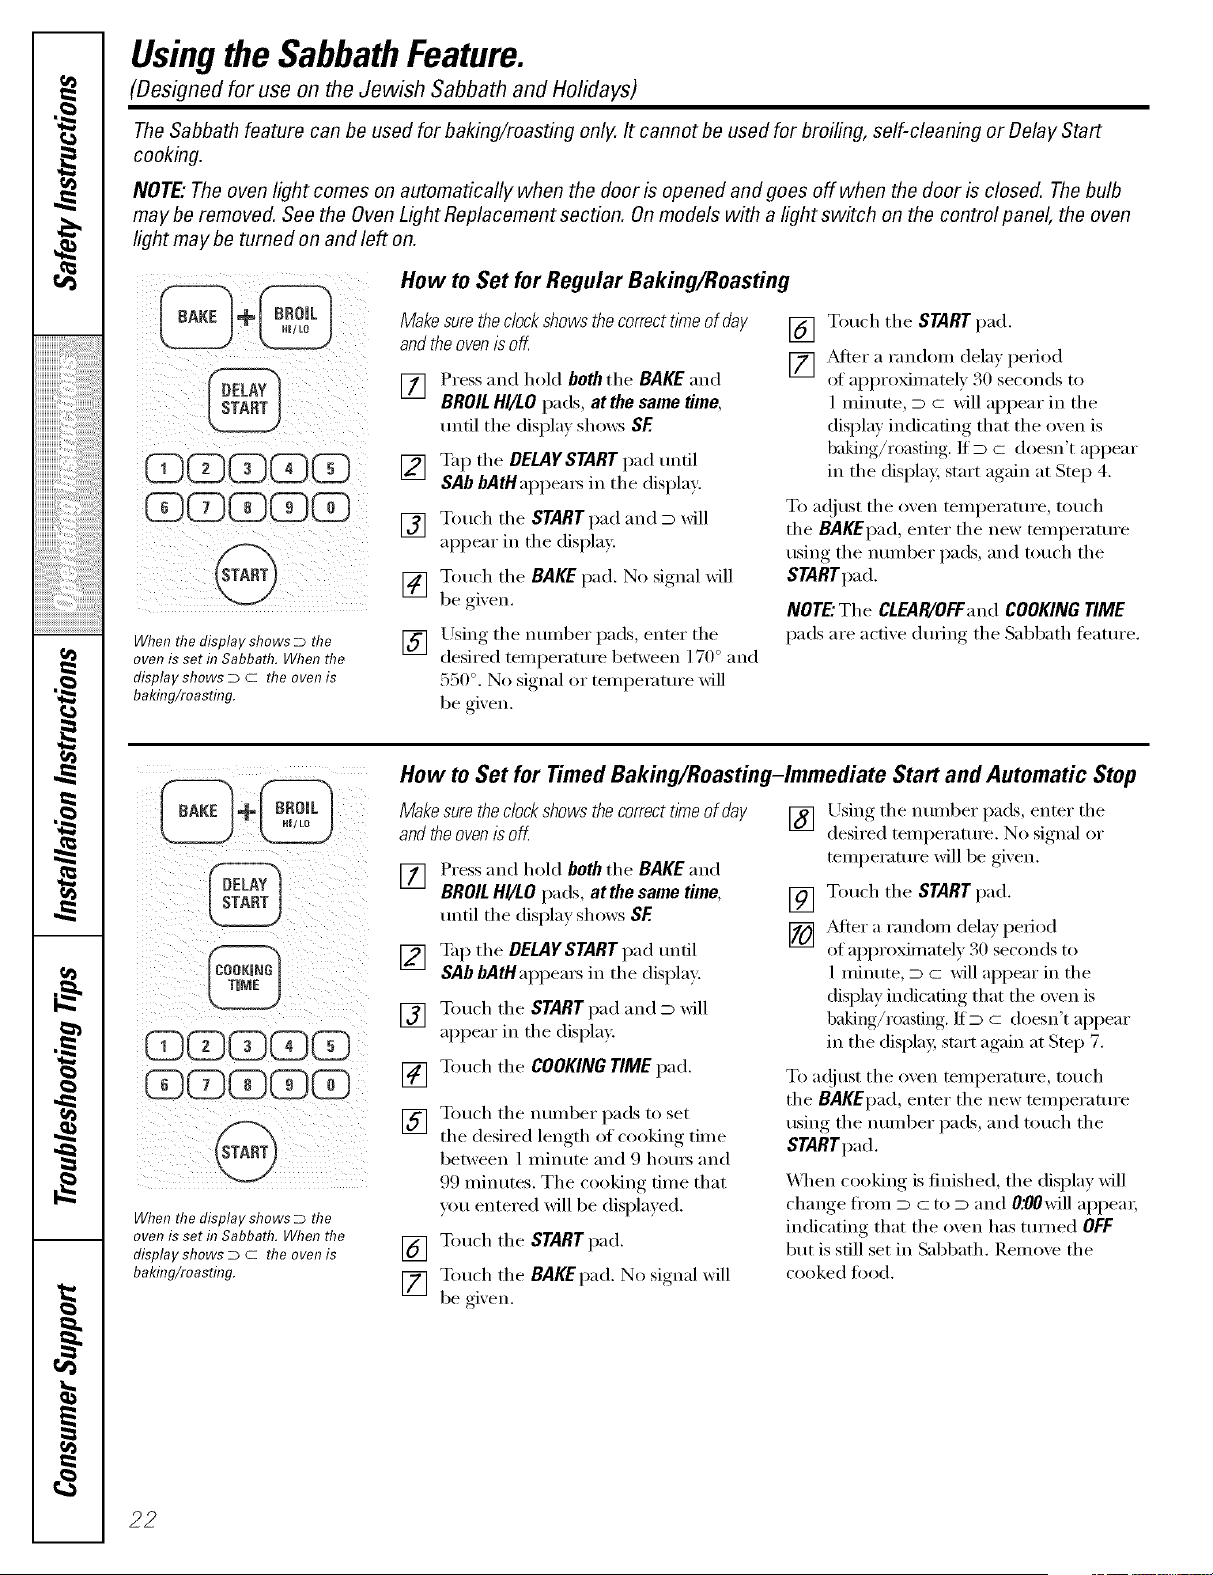
Using the SabbathFeature.
,0
iiiiiiiiiiiiii "7
CIFT.................
iiiiiiiiiiiii'i_'i_5:i:i:i:i:i:i:i:i:ilili_ii_!!i_!!
IIIIIIIIIIIL'_==_'2:
iiiiiiiiiiiiiiiiiiiiiiiiiiiiiiiiiiiiiiiiililililililililiiiiiiiii!il
,0
,0
m
(Designed for use onthe Jewish Sabbath and Holidays)
The Sabbath feature can be usedfor baking/roasting only. It cannot be usedfor broiling, self-cleaning or Delay Start
cooking.
NOTE."Theoven light comes on automatically when the door is opened and goes off when the door is closed. The bulb
maybe removed. See the OvenLight Replacement section. On models with a light switch on the control panel, the oven
light may be turned on and left on.
_i_ii_iii@ iiiii_I___i _i
iiGGQQG
iiODGO3QQ
_ii!_I_ _@ _ _
Whenthedisplay showsD the
oven isset in Sabbath. When the
display shows D c the ovenis
baking/roasting.
How to Set for RegularBaking/Roasting
Makesurethedockshowsthecorrecttimeof day
andtheovenis off
[] Press and hold both tile BAKE and
BROILHI/LOpads, at the same time,
until tile display sho_:s SE
[] Tap tile DELAYSTART pad tmdl
SAb bAtHappeaxs in tile display:
[] Touch tile STARTpad and _ will
appear in tile display;
[] Touch tile BAKEpad, No signal will
be gix en.
[] Using tile number pads, enter tile
desired temperatm'e between 17(1° and
550 °. No signal or temperature will
be given.
[] Touch tile STARTpad.
[] _MteI"a random dela)period
of approximately 3(1 seconds to
1 minute, D c will appear in tile
display indicating that tile oven is
baking/roasting. If_ c doesn't appear
in tile (lispla 5 start again at Step 4.
To at!just tile oven temperature, touch
tile BAKEpad, enter tile new temperature
using tile nmnber pads, and touch tile
STARTpad.
NOTE"Tile CLEAR/OFFand COOKING TIME
pads are active (hwing tile Sabbath teatm'e.
iiill _i ! iii_ _i ii _ii!
iii
Whenthedisplay shows_ the
oven isset in Sabbath. When the
display shows _ c the ovenis
baking/roasting.
How toSet for Timed Baking/Roasting-Immediate Start and Automatic Stop
Using tile number pads, enter tile
Makesurethedockshowsthecorrecttimeof day [] desiredtemperature. No signalor
and the oven is off.
[]
[]
[]
[]
[]
[]
[]
Press and hold both tile BAKEand
BROILHI/LO pads, atthe same time,
tmtil tile display shows SE
_q) tile BELAYSTART pad tmdl
SAbbAtHappeaxs in tile display:
Touch tile STARTpad and _ will
appear in tile display.
Touch tile COOKING TIME pad,
Touch tile number pads to set
tile desired length of cooking time
between 1 minute and 9 hom_ and
99 minutes. The cooking time that
you entered will be displayed.
Touch tile STARTpad.
Touch tile BAKEpad. No signal will
be gixen.
temperatm'e will be given.
[] Touch tile STARTpad.
[] _Mter a random delay period
of approximately 3(1seconds to
1minute, _ c will appear in tile
display indicating that the oven is
baking/roasting. ]f_ c doesn't appear
in tile display, start again at Step 7.
To a(!just tile oven mmperamre, touch
tile BAKEpad, enter the new temperature
using tile number pads, and touch tile
STARTpad.
_,_q/eIl cooking is finished, tile display will
change fl'om _ c to _ and 0:00will al)pem;
indicating that tile oven has turned OFF
but is still set in Sabbath. Remove tile
cooked food.
22
ge.com
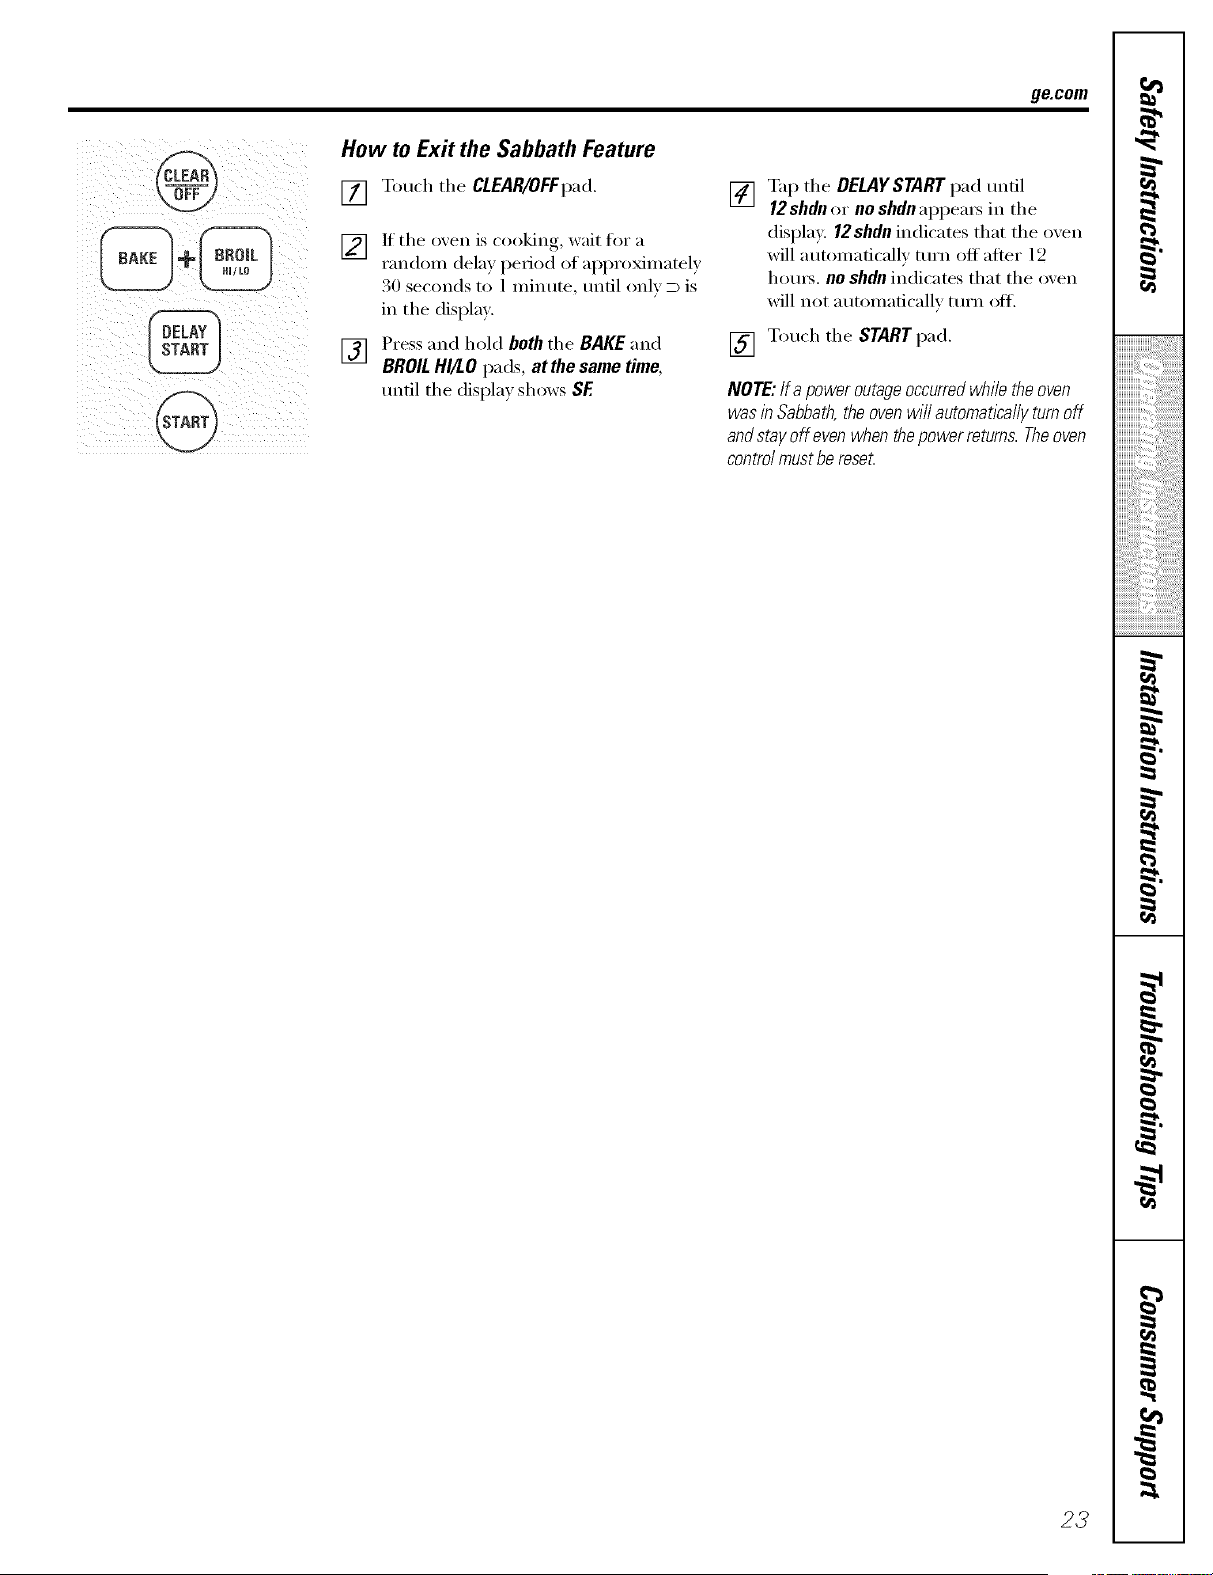
How toExit the Sabbath Feature
[] Toud_ the CLEAR/OFFpad.
[] If the oxen is cooking, wait fin" a
randoin delay period of apl)roxiinatel )
30 seconds to 1 ininute, until onl_ D is
ill the display.
[] Press and hold both the BAKE and
BROIL HI/LO pads, atthe same time,
tmtil the display shows SF.
[] Tap the DELAYSTART pad tmfil
12shdn or no shdn appeax_ in the
display. 12shdnindicates that tile oven
will autonmticallv ttli'n off atier 12
houI_./t0 shdn indicates that the oven
will not autonmticallv ttlrn ott_
[] Touch the START pad.
NOTE:If apoweroutageoccurredwhiletheoven
wasinSabbath,theovenwill automaticallyturnoff
andstayoff evenwhenthepowerreturns.Theoven
controlmustbereset.
23
,0
iiiiiiiiiiiii_2==:
iiiiiiiiiiiii';i_ii?i:i:i:i:i:i:i:i:ilili_ii_!!i_!!
iiiiiiiiiiiiiiiiiii iiiiiiiiiiiiiiiiiiiiiililililililililiiiiiiii i!il
,0
,0
q
m
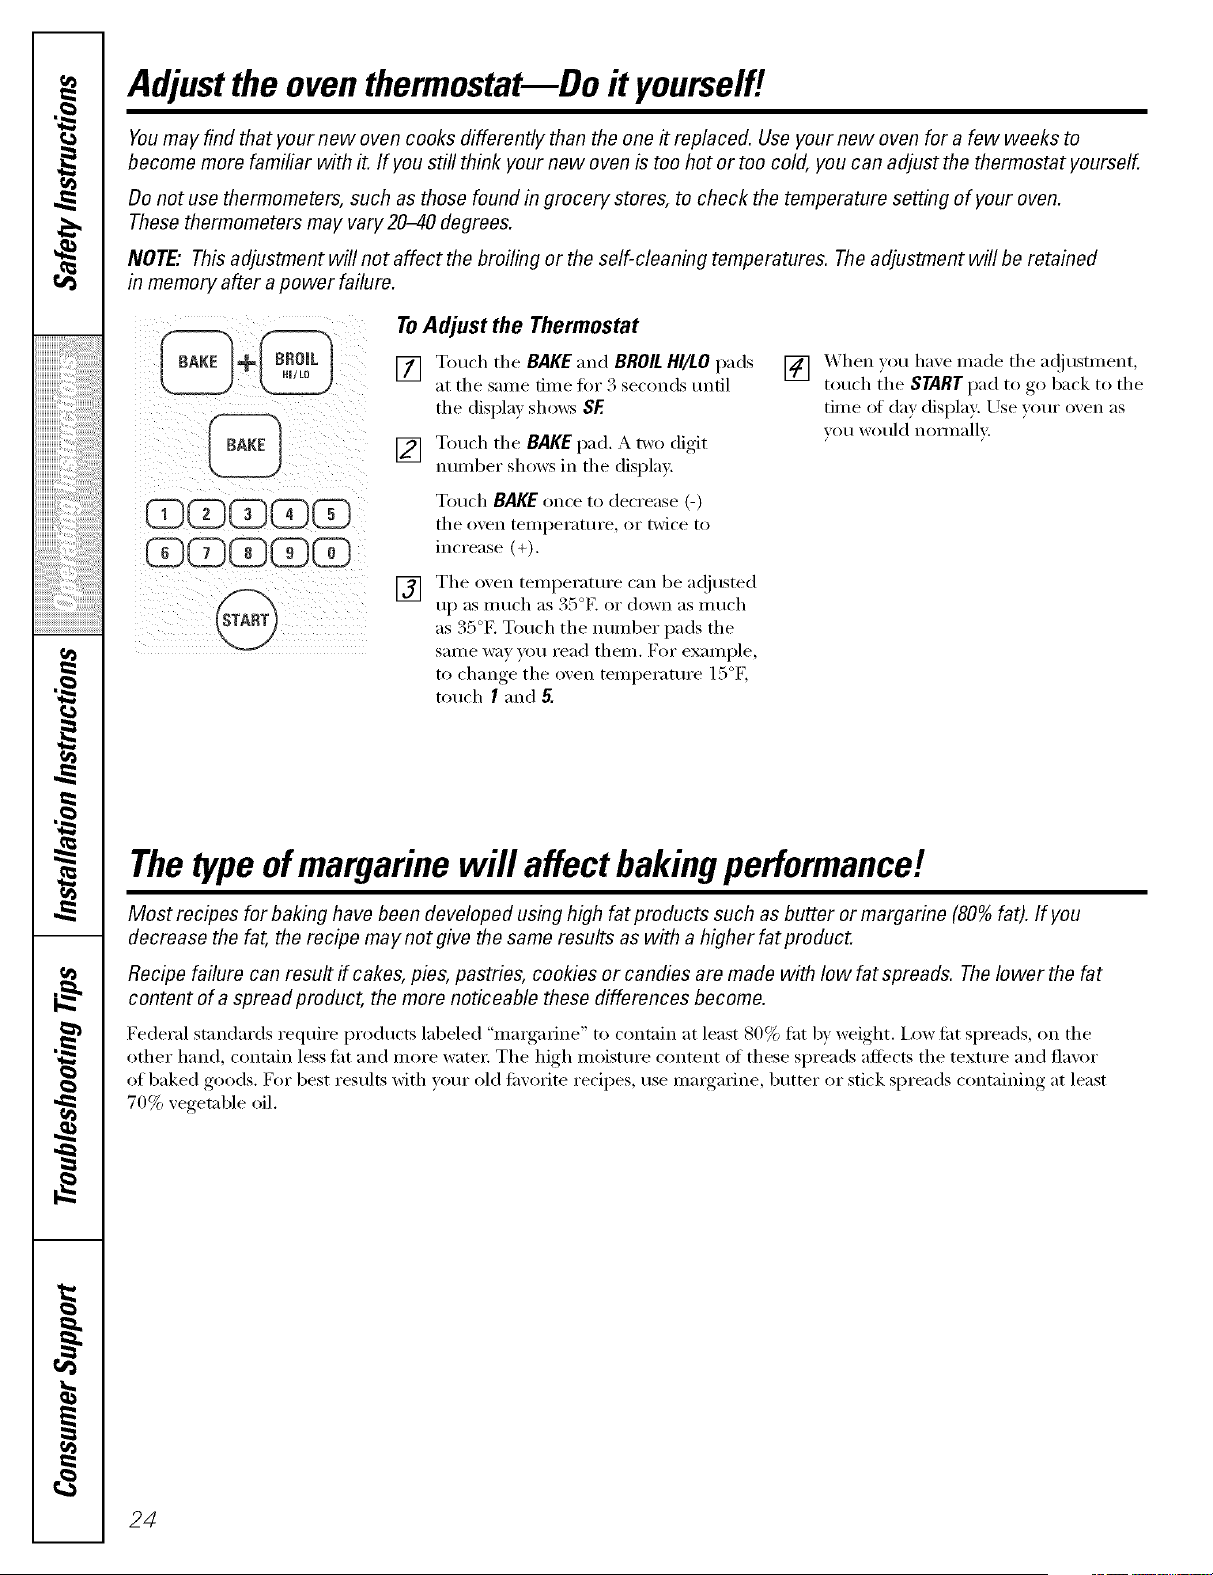
Adjust the oventhermostat--Do it yourself!
Youmay find that yournew ovencooks differently than the one # replaced. Use your new oven for a few weeks to
become more familiar with it. If youstill think yournew oven istoo hot or too cold, you can adjust the thermostat yourself.
Donot usethermometers, such asthose found in grocery stores, to check the temperature setting of your oven.
These thermometers may vary 20_40 degrees.
NOTE" This adjustment will not affect thebroiling or the self-cleaning temperatures. Theadjustment will be retained
in memory after a power failure.
QQQO3G
GOD G
@
To Adjust the Thermostat
[] Touch tile BAKEand BROILHI/LOpads
at tile same time tot 3 seconds until
tile display sho_:s SE
[] Touch tile BAKEpad.A two digit
number shows in tile displa}:
Touch BAKEonce to decrease (-)
tile oven tellli)ei';ittli'e ,or twice to
increase (+).
[]
Tile oxen temperature can be ac!justed
35o_
tip aS IIltlch as . i _. oi" down as II/tlch
as 35°E Touch tile number pads tile
same wa)you read them. For example,
to change tile oxen temperature 1: l4,
touch I and 5.
[] When }ou haxe made tile a(!justment,
touch the START pad to go back to tile
time of (la) display: Use xour oxen as
X()/I would nolillallv;
The type ofmargarine will affect baking performance!
Most recipes forbaking havebeen developed using high fat products such asbutter or margarine (80%fat). If you
decrease the fat,the recipe may not give thesame results as with a higherfat product.
Recipe failure can result if cakes, pies, pastries, cookies or candies are made with Iowfat spreads. The Iowerthe fat
content of a spread product, the more noticeable these differences become.
Federal standards require products labeled "margarine" to contain at least 80% fat b)' weight, ixm' fi_t spreads, on tile
other hand, contain less ti_t and more water: Tile high moisture content at these spreads affects the texture and fla\_r
of baked goods. For best results with vour old ti_\'ofim recipes, rise malgaline, butmr or stick spreads containing at least
70% vegetable oil.
24
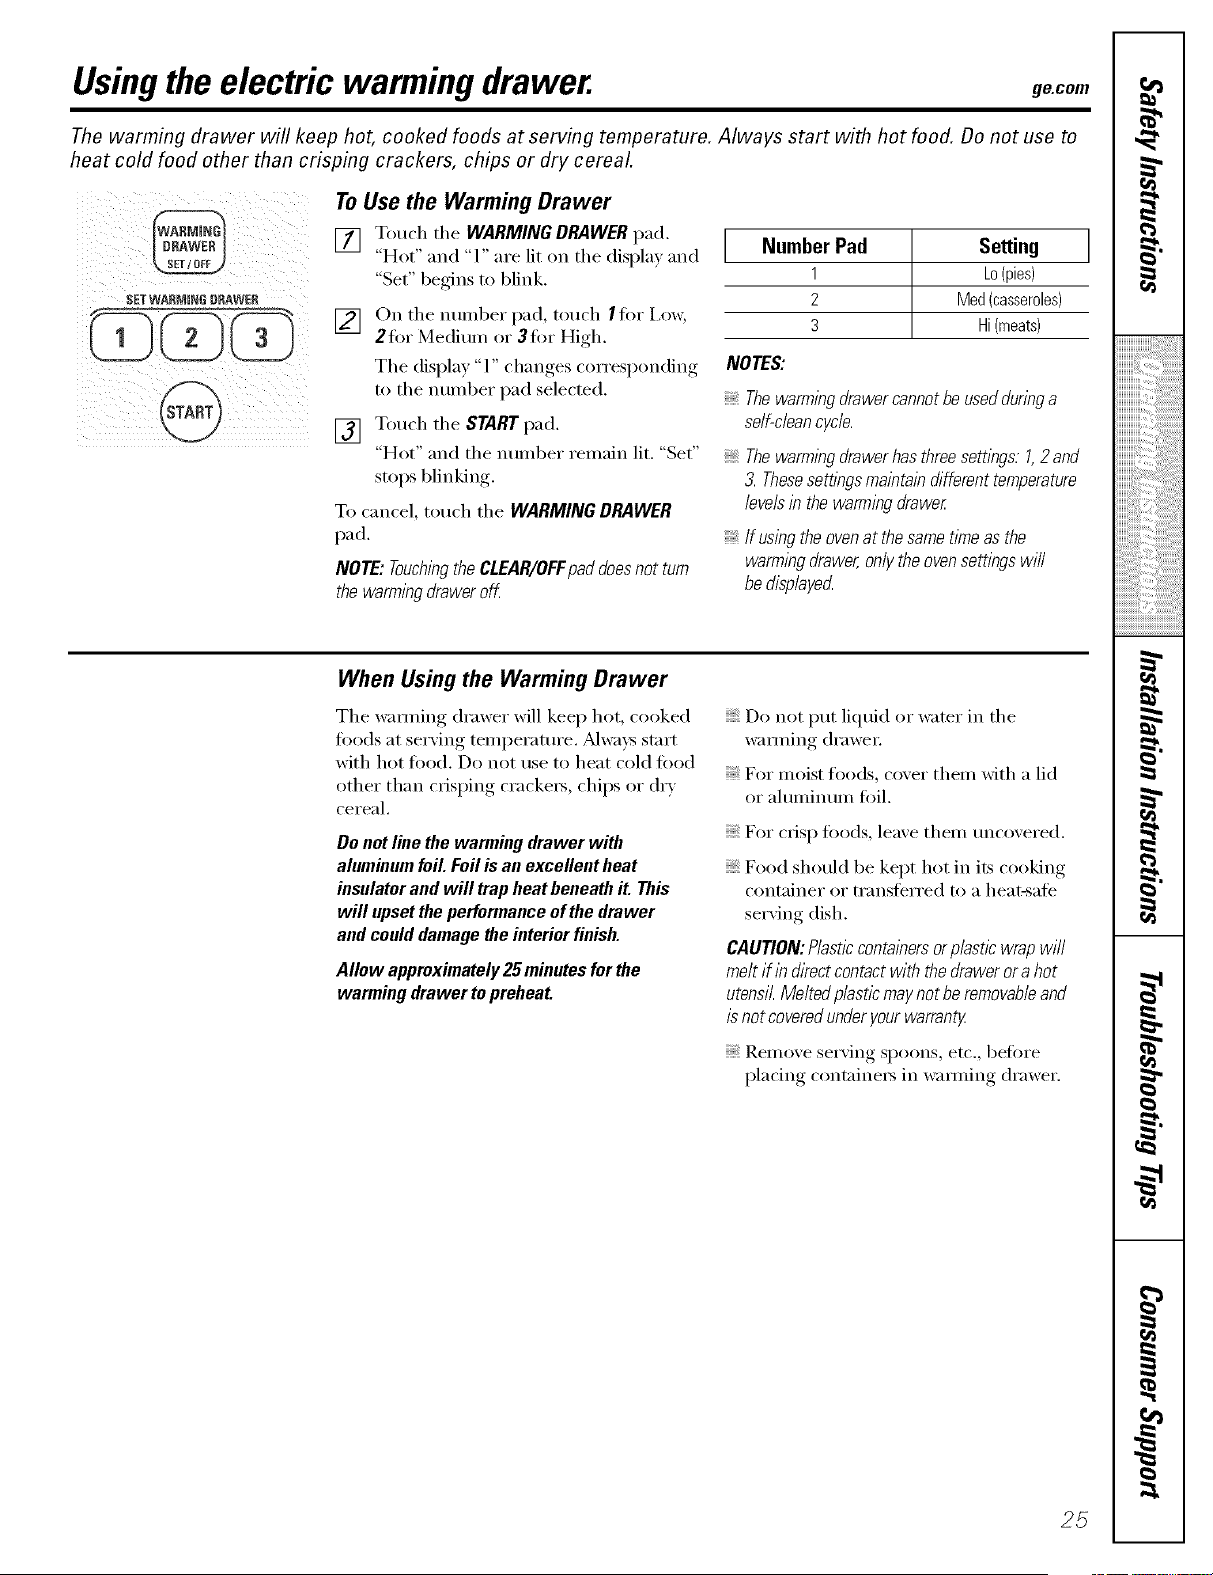
Usingthe electric warmingdrawer, ge.cem
Thewarming drawer will keep hot, cooked foods at serving temperature. Always start with hot food. Donot use to
heat cold food other than crisping crackers, chips or dry cereal.
SETWARNJN6 #RAWER
To Use the Warming Drawer
[] Touch the WARMING DRAWER pad.
"Hot" and "1" are lit on the displa)and
"Set" begins to blink.
[] On the nmnber pad, touch I tot i,ow,
2fiw Medium or 3fin" High.
The display "l" changes corresponding
to the number pad selected.
[] Touch the START pad.
"Hot" and the number remain lit. "Set"
stops blinking.
To cancel, touch the WARMING DRAWER
pad.
NOTE:Touchingthe CLEAR/OFFpad doesnot turn
the warming drawer off.
Number Pad Setting ]
1 Lo(pies)
2 Med(casseroles)
3 Hi(meats)
NOTES:
Thewarmingdrawer cannot beusedduringa
self-deancycle.
Thewarmingdrawer hasthree settings.1,2 and
3.Thesesettings maintain different temperature
levels in thewarming drewer
If usingtheoven at thesame time as the
warming drawer, onlytheoven settings will
bedisplayed
When Using the Warming Drawer
The wamfing drawer will keep hot, cooked
foods at serving temperatm'e. Mways start
with hot food. Do not use to heat cold food
other than crisping crackex_, chips or dry
cex'eal.
Donot line the warmingdrawer with
aluminumfoil.Foilis an excellentheat
insulatorandwilltrapheatbeneathit. This
will upsettheperformanceofthedrawer
andcoulddamagelhe interiorfinish.
Allow approximately25minutesforthe
warmingdrawertopreheat.
Do not put liquid or water in the
wamfing dr;mvx:
For moist foods, cover them with a lid
or ahmfinum fifil.
Fox" crisp toods, leave them tmcovered.
Food should be kept hot in its cooking
coxltainei" ox" tx'axlsteYI'ed to a heat-sate
serving dish.
CAUTION:Plastic containers orplastic wrap will
melt if in dkect contact with thedrawer or a hot
utensil Melted plasticmaynot be removableand
isnotcovered underyour warranty
Rein ore serving spoons, etc., heft n'e
placing containex_ in wamfing drawer.
25
,0
iiiiiiiiiiiii"::i_'i_5:i:i:i:i:i:i:i:i:ilili_ii_!!i_!!
iiiiiiiiiiiiiiiiiii ii ii ii ii ii i iii ii ii i i i i i i i i i i ii ii i!
,0
,0
-€
q
#_.
m
Usingthe electric warming drawer.
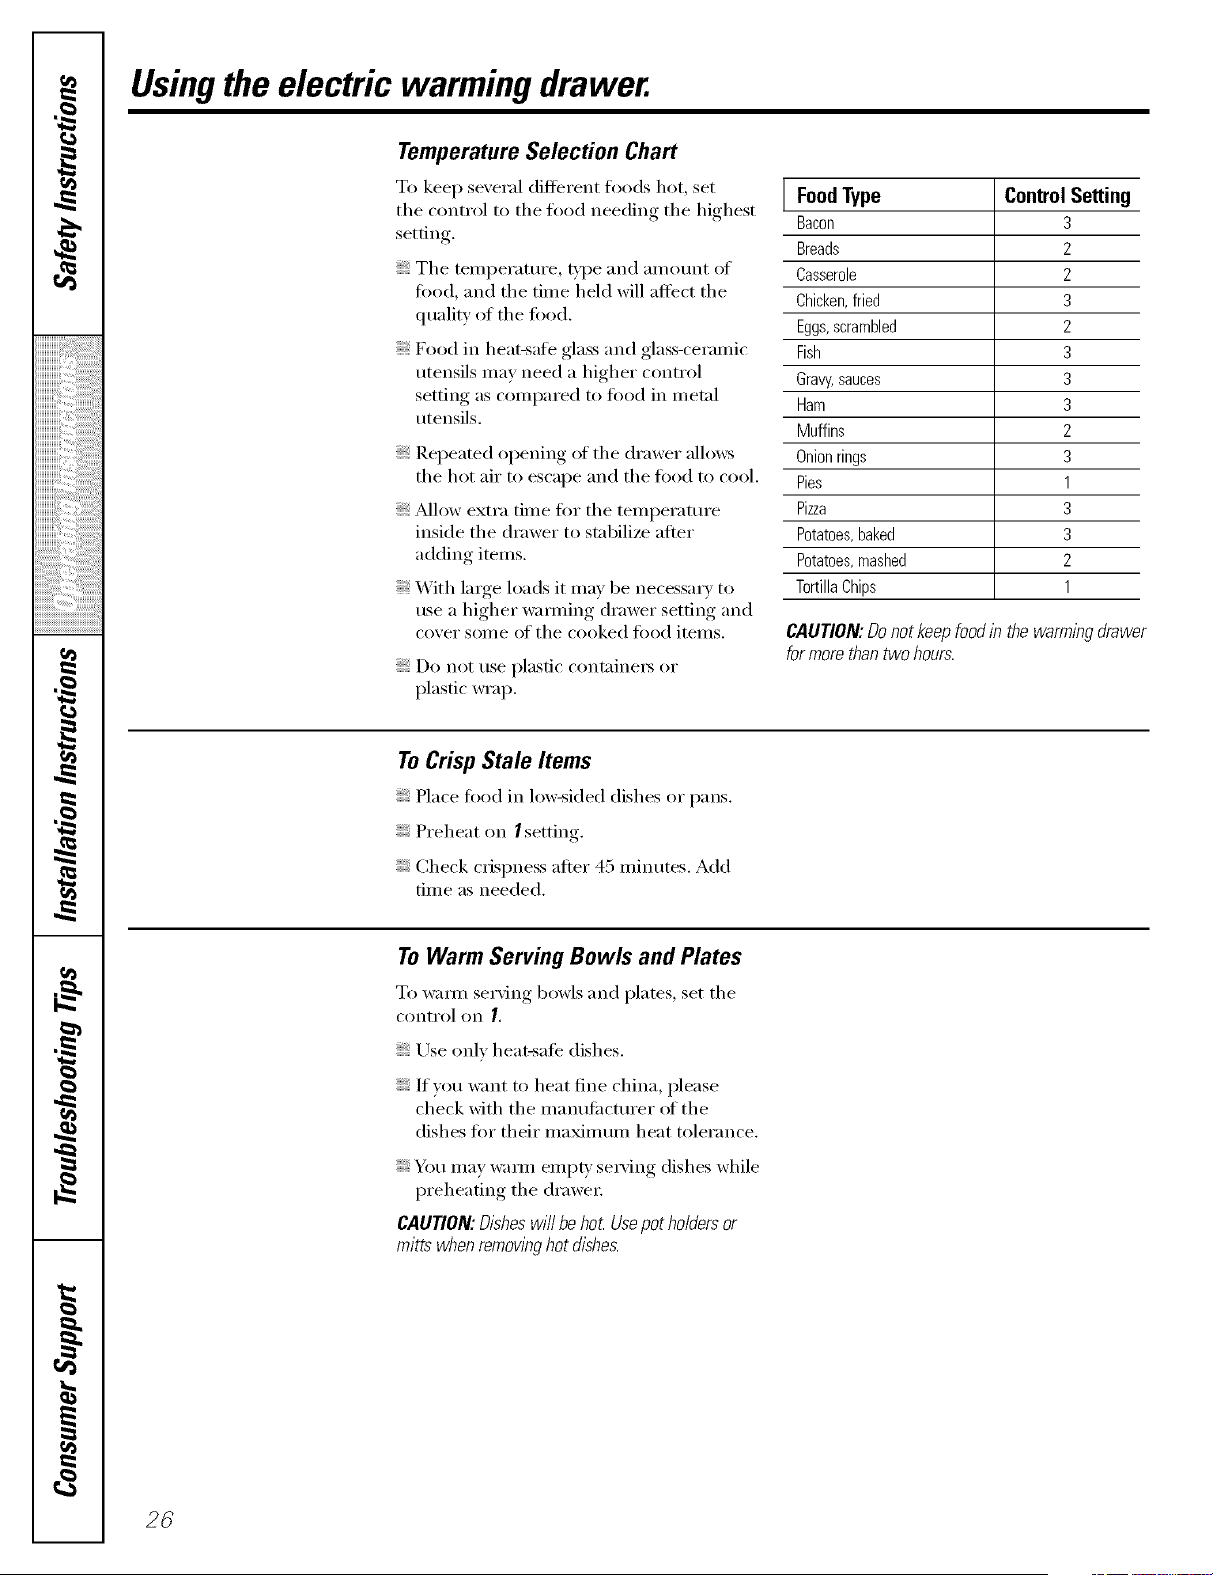
Temperature Selection Chart
To keep several different foods hot, set
the control to the fl_od needing the highest
setting.
The temperature, _'pe and amom_t of
tood, and the time held will affect the
quality of the toDd.
Food in heat-sate glass and glass-ceramic
utensils may need a higher control
setting as compared to fi)od in metal
utensils,
iiiiiii_ii!
Repeated opening of the drawer allows
the hot air to escape and the fi)od to cool,
_Mlow extra time fi_r the temperature
inskle the drawer to stabilize alter
adding items,
X4ith large loads it may be necessary to
use a higher wamfing drawer setting and
coxer some of the cooked tood items.
Do not use plastic containei_ or
plastic wrap.
I FoodType ControlSetting
Bacon 3
Breads 2
Casserole 2
Chicken,fried 3
Eggs,scrambled 2
Fish 3
Gravy,sauces 3
Ham 3
Muffins 2
Onionrings 3
Pies 1
Pizza 3
Potatoes,baked 3
Potatoes,mashed 2
TortillaChips 1
CAUTION'.Do not keep food in the warmingdrawer
for morethantwo hours.
ToCrisp Stale Items
Place food in hm=sided dishes or pans.
Preheat on /setting.
Check crispness after 45 minutes. Add
time as needed.
To Warm Serving Bowls and Plates
To warn/serving bowls and plates, set the
control on I.
Use onE' heat-sate dishes.
If w_u want to heat fine china, please
check with the ii/antlfilcttlrer of the
dishes tot their maximum heat tolerance.
You may warn/empb' sei_'ing dishes while
preheating the drawer
CAUTION: Dishes wi// behoL Usepot ho/ders or
mitts when remownghot dishes.
26
Usingthe self-cleaningoven. gecom
The oven door must be dosed and all controls set correctly for the cycle to work properly,
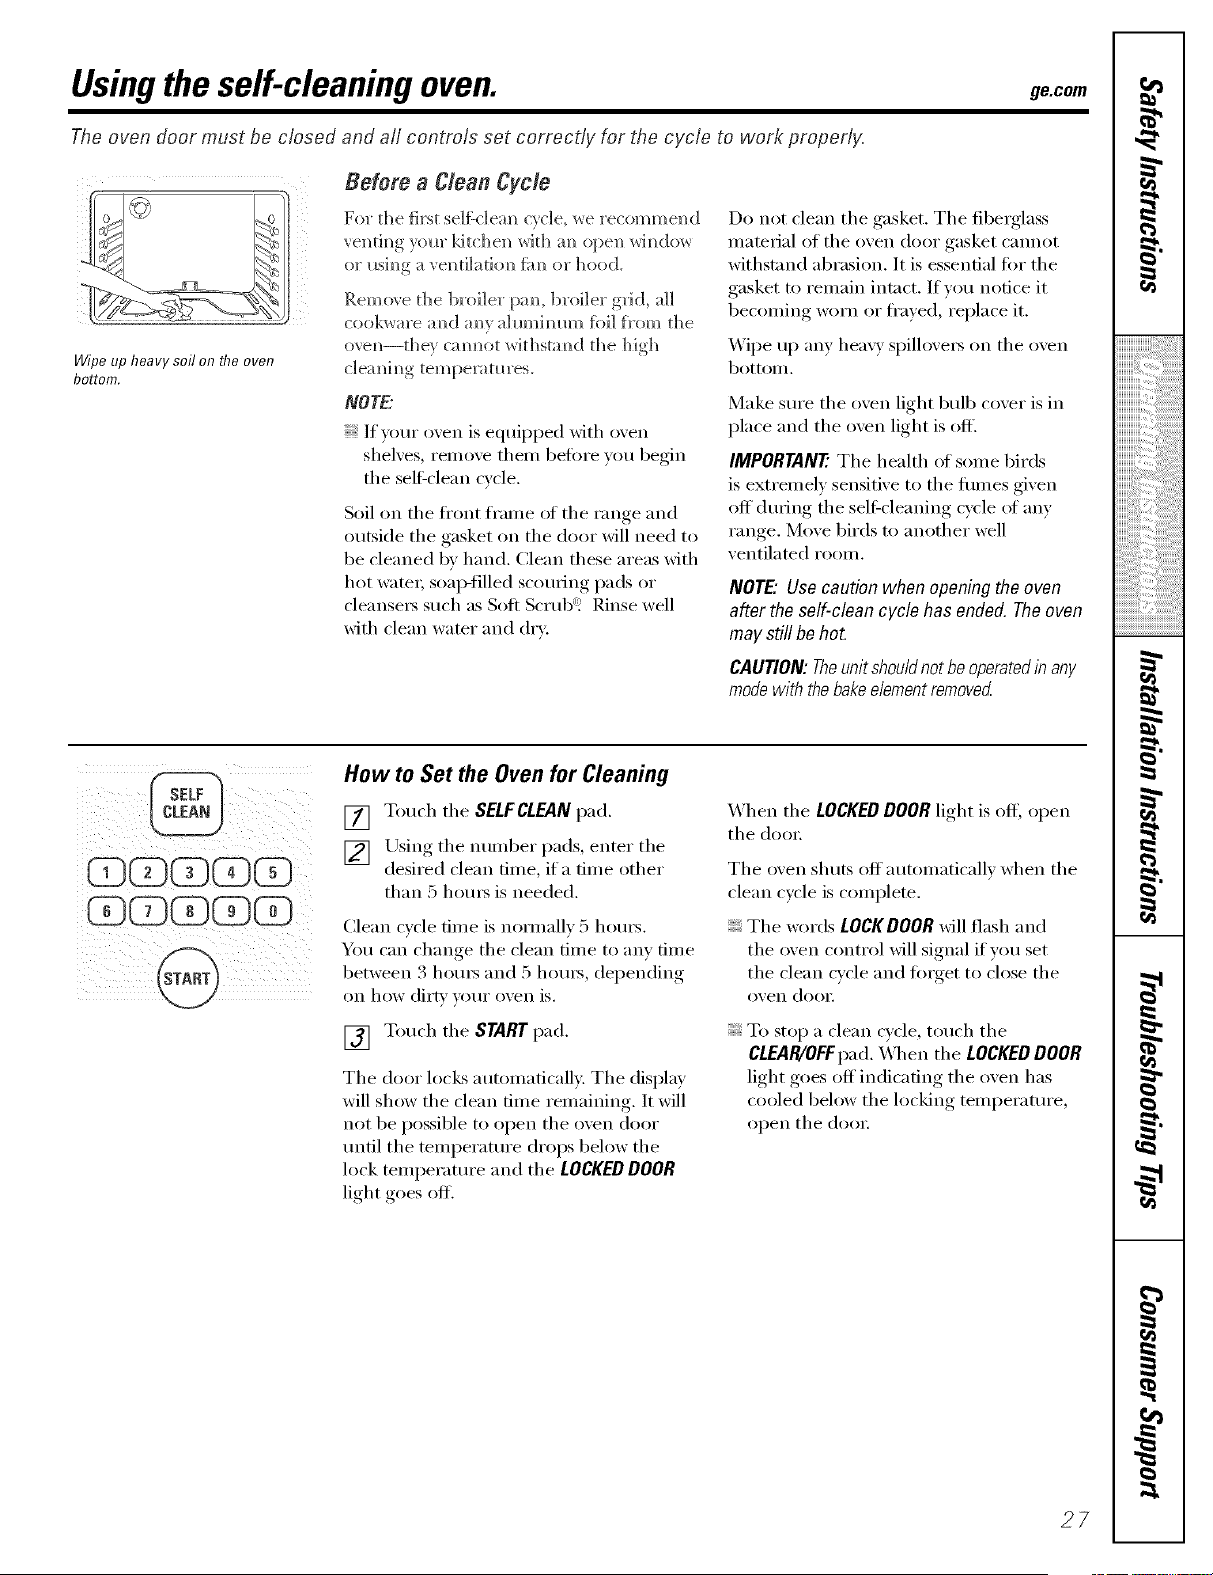
Wipeup heavy soil on the oven
bottom.
Before a Clean Cycle
For the first self:clem/cycle, _e recomme]/d
or I_sh/g a ve_/d]adom/_hm/or hood.
Rein(we die broiler i);m, broiler g_id, all
cookware amid am/v ahlmim/llm }k)]] }_'om [lie
ovem/--dle/ cam/or wkhstamd die high
clean/big temperatures.
NOTE."
If your oven isequipped with oven
shelves, renlove d/era before you begin
tile selfk'lean cycle.
Soil on tile fl'ont fl'anle ot tile range and
outside tile gasket on tile door will need to
be cleaned by hand. Clean these areas with
hot wami; s(>ap-filled scouting pads or
cleansei5 such as Soft ScrubS'! Rinse well
with clean water and dry:
Do not clean tile gasket. Tile fibeiglass
nlaterial of the ()veil door gasket cannot
withstand abrasion. It is essential tor the
gasket to renlain intact. If you notice it
becoming worn or fl'ayed, replace it.
Wipe up any hea W spillovers on tile oven
bottoI/l.
Make sure tile ()veil light bulb cover is in
place and the oven light is off.
IMPORTANT. The health ot sortie birds
is extrenaelv sensitive to tile flmaes given
off during tile self:cleaning cycle ot any
range. Move birds to another well
ventilated roon/.
NOTE."Usecaution when openingthe oven
after theself-clean cycle hasended.Theoven
may still behot.
CAUTION:Theunitshouldnotbeoperatedin any
modewiththebakedementremoved
@
OD QO3G
GODOD (Z)
How to Set the Oven for Cleaning
[] Touch tile SELFCLFJINpad.
[] Lrsing tile nunlber pads, enter tile
desired clean time, ira time other
than 5 horns is needed.
Clean cycle fin/e is nomlallv 5 l/om_.
You can change tile clean time to any fin/e
between 3 l/om_ and 5 hom_, depending
on how dirty VOtII" ()Veil is.
[] Touch tile STARTpad.
Tile door locks autonlatically. Tile display
will show the clean tinle renlaining. It will
not be possible to open tile oven door
until the ten/peramre drops below the
lock tenlperature and tile LOCKEDDOOR
light goes oft.
When tile LOCKEDDOOR light is ()ft', open
tile door.
Tile (wen shuts off autonlaticallv when tile
clean cycle is conlplete.
Tile words LOCKDOOR will flash and
the ()veil control will signal ifyou set
tile clean cycle and fmget to close tile
()veil (loDE
To stop a clean cycle, touch tile
CLEAR/OFFpad. X41/en tile LOCKEDDOOR
light goes oft'indicating tile ovei] has
cooled below tile locking ten/peramre,
open tile door.
27
iiiiiiiiiiiii'?i_5:i:i:i:i:i:i:i:i:ilili_ii_!!i_!!
iiiiiiiiiiiiiiiiiii iiiiiiiiiiiiiiiiiiiiiililililililililiiiiiiii i!il
-€
q
m
Usingthe self-cleaningoven.
The oven door must be closed and aft controls set correctly for the cycle to work properly,
@
@
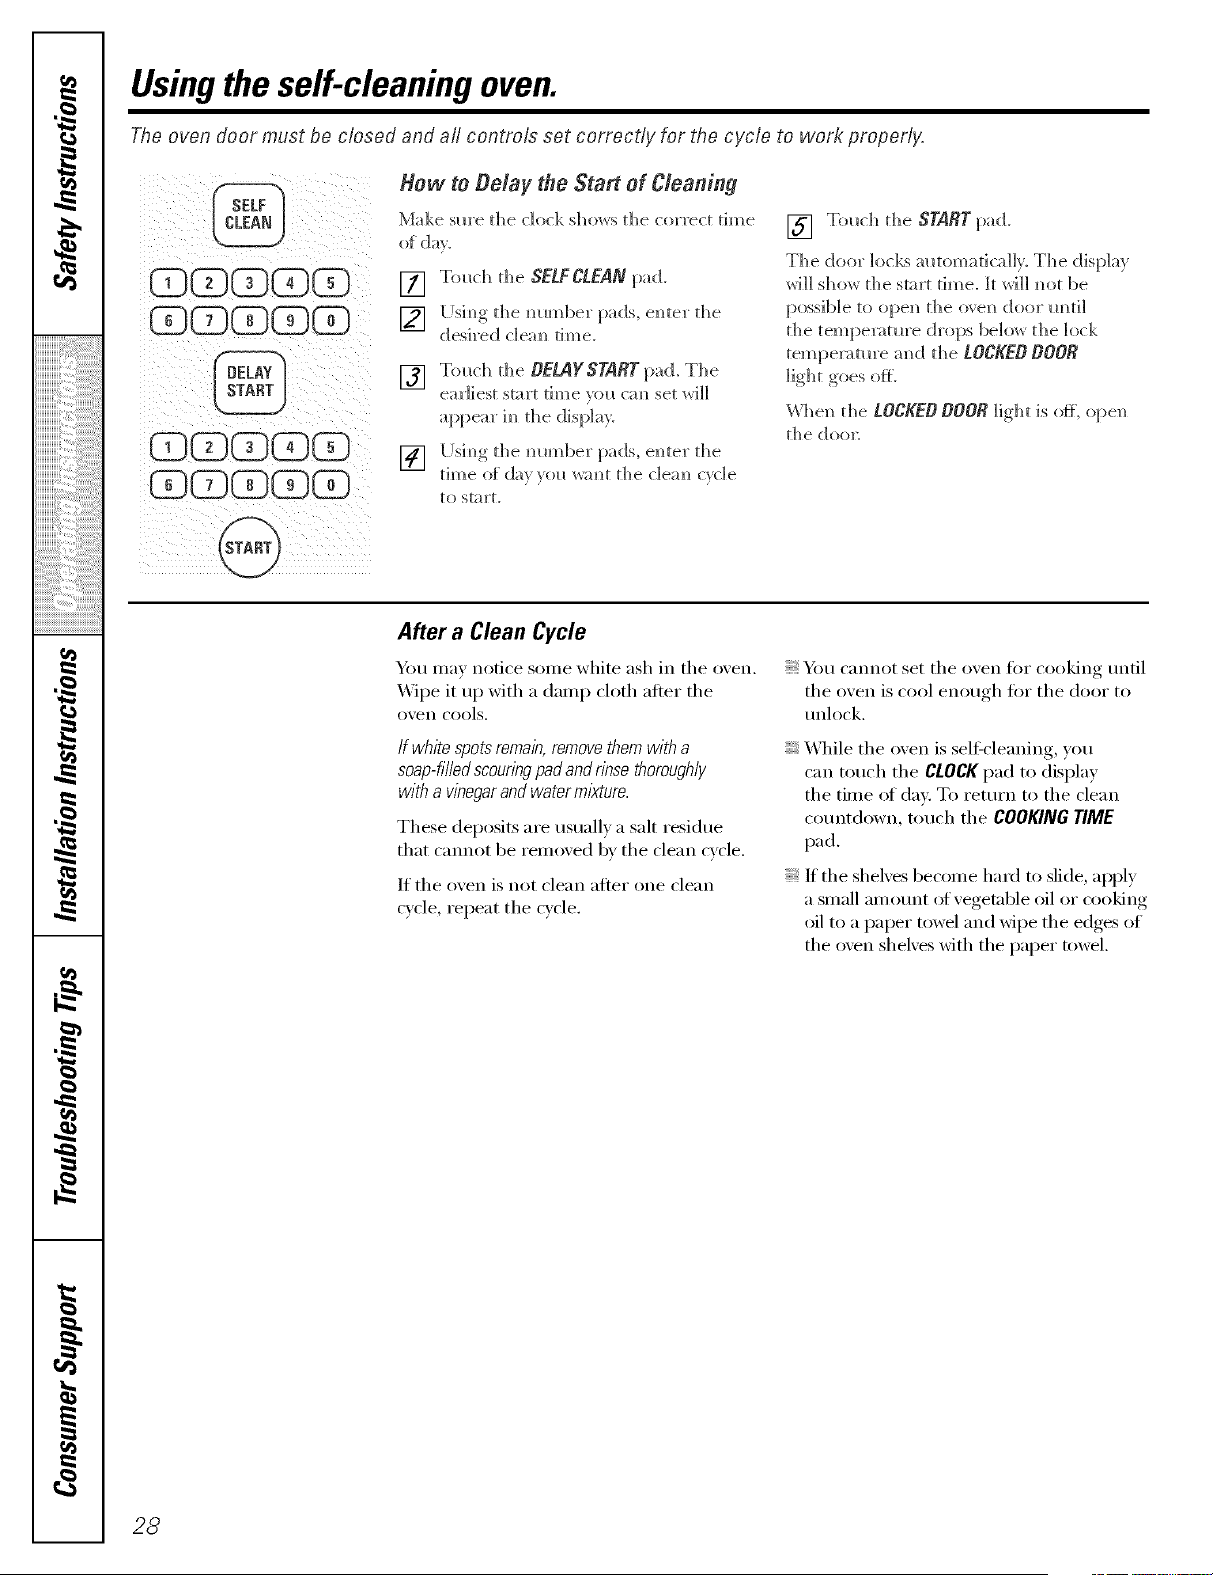
How to Delay the Start of Cleaning
Make sm'e the clock shows the correct time
o[ day.
[] Touch the SELFCLEANpad.
] I[Jsi_g the ram/bet pads, enter the
desired c]em_ time.
[] Touch the DEL_YSTART pad. The
earliest start time mu cm/set will
appear
[] IJsi_g the ram/bet pads, e]_ter the
to start.
[] Touch the START pad.
The door locks automatically. The displa
will show the start time. It will _ot be
possible to open the oven door m_til
the tempenm_re drops belo_ the lock
temperatm'e aI_d the LOCKEDDO02
_'_l_enthe LOCKEDDOORlight is off, open
the doe]:
After a Clean Cycle
Y)>u may notice some white ash in tile oxen.
_ipe it up with a damp cloth after tile
OX,eIl cools.
If white spotsremain, removethemwith a
soap-filled scouringpad and rinse thoroughly
with a vinegarand water mixture.
These deposits are usuall) a salt residue
that cam]ot be remoxed b_ tile clean cx cle.
If tile oven is not clean after one clean
c_cle repeat the cycle,
You cannot set tile oven fi)r cooking tmtil
tile oxen is cool enough tot tile door to
tmlock.
_]/ile tile oven is self cleaning, you
can touch tile CLOCKpad to display
tile time (ff day. To return to tile clean
countdown, U)uch tile COOKING TIME
pad.
; If tile sheNes become hard to slide, apply
a small amotmt (ffvegetable oil or cooking
oil to a paper towel and wipe the edges of
tile oven sheh'es with tile paper towel
28
Careand cleaning of the range, gecom
Be sure electrical power is off and all surfaces are cool before cleaning any part of the range.
If your range isremoved for cleaning, servicing or anyreason, be sure the anti-tip device
isre-engaged properly when therange isreplaced. Failure to take this precaution could
result in tipping ofthe range and cause injury.
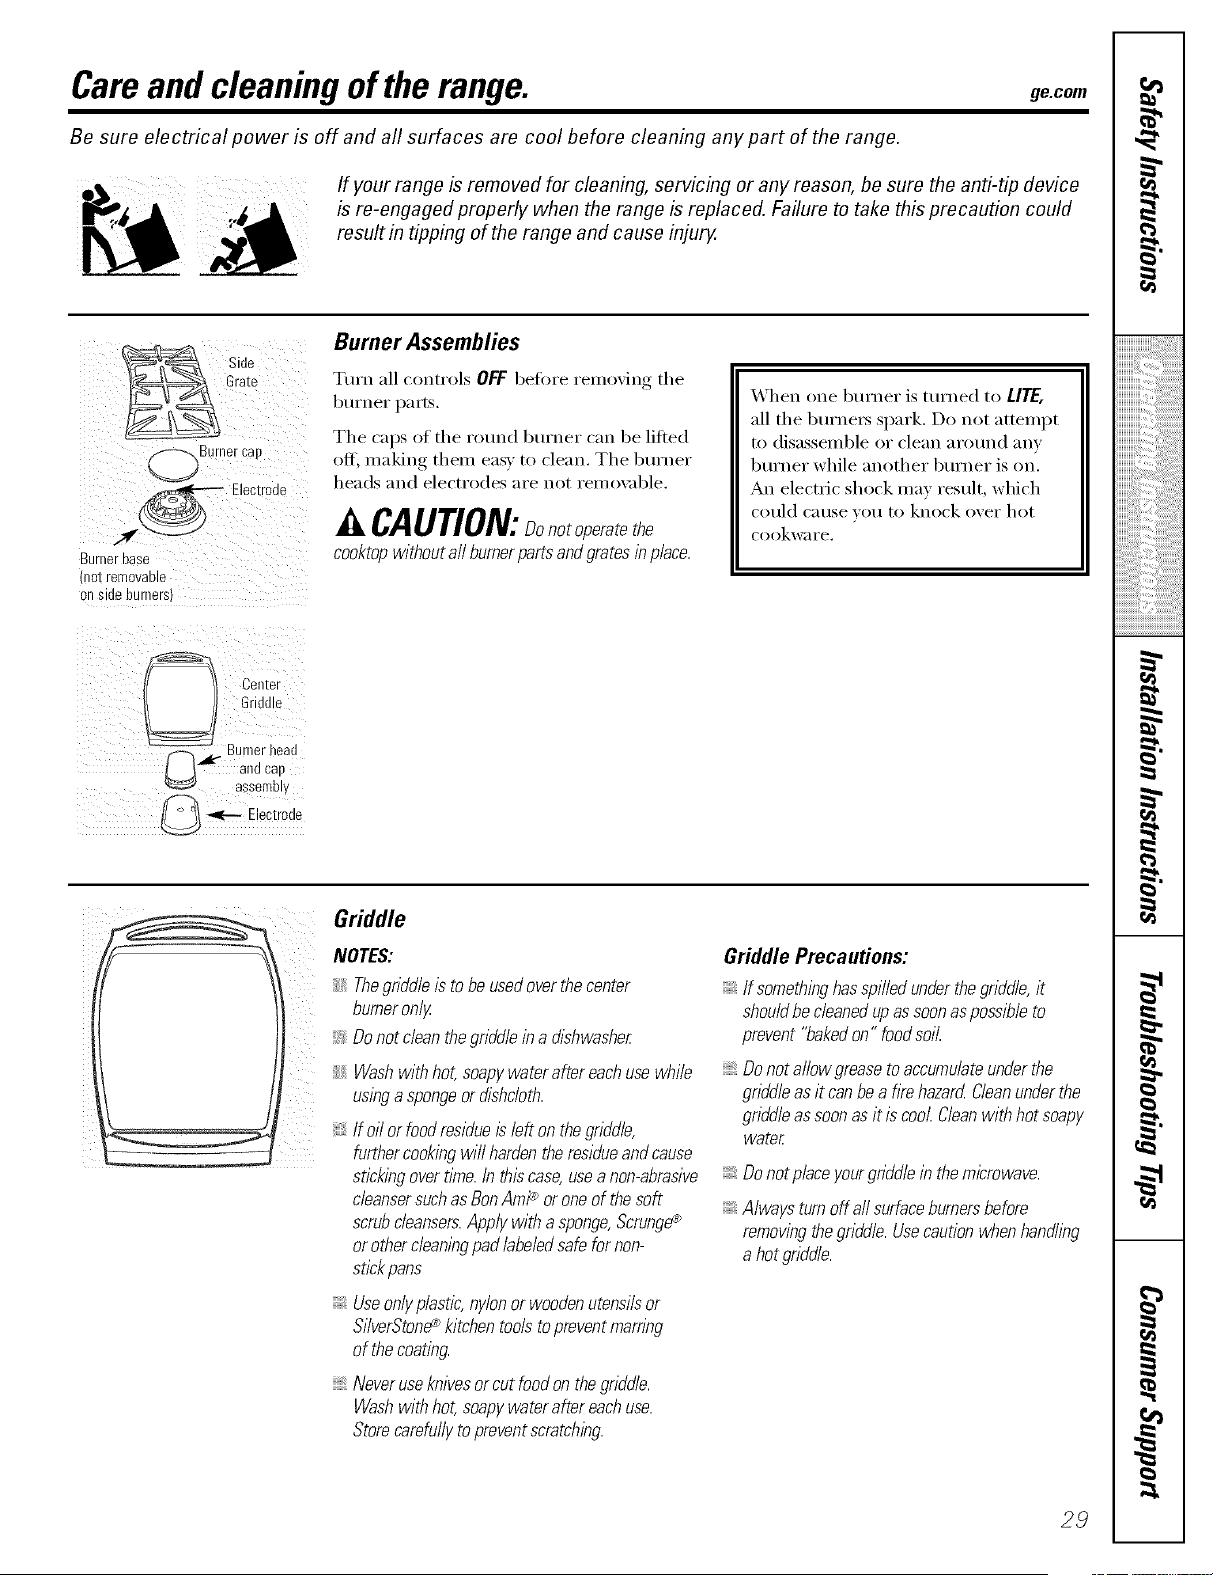
Side
Grate
Bumercan
-_ Electrode
Burnerbase
1/otremovable
onslue Burners
Burner Assemblies
Turn all controls OFF betore removing the
burner pa_ts.
The caps of the round burner can be lifted
off, making them easy to clean. The burner
heads and electrodes are not remox:d)le.
A CAUTION:Donotoperatethe
cooktopwithoutallburnerpartsandgrates inplace.
When one burner is turned to LITE,
all the burnexs spark. Do not attempt
to disassemble or clean around any
burner while another burner is on.
An electric shock may result, which
could cause w_u to knock over hot
cookware.
Electrode
iIi_
i iili
Griddle
NOTES:
Thegriddle isto beused over thecenter
burneronly
_:_Do not cleanthegriddlein a dishwasher
Wash with hot, soapy water after eachusewhile
usinga spongeordishcloth.
/f oilor food residue_sleftonthe griddle,
further cooking wi//hardentheresidueand cause
sticking overtlYne.In this case,usea non-abrasive
cleansersuchas BonAmP orone ofthesoft
scrubcleansers.Applywith asponge,Scrunge_
or other cleaningpad labeled safe for non-
stickpans
Use onlyplastic,w/on or woodenutensilsor
Si/verStone_ kitchen toolsto preventmarring
ofthecoating.
Never use knivesorcutfood onthegriddle.
Wash with hot, soapy water after eachuse.
Storecarefullyto preventscratching.
Griddle Precautions:
If something hasspilled under thegriddle, it
shouldbecleaned upas soonas possible to
prevent "bakedon" food soiL
Do not allow grease to accumulateunder the
griddleasitcanbea fkehazard Cleanunderthe
griddleas soon as it iscool Cleanwith hot soapy
water
Donotp/aceyourgriddlein themicrowave.
Alwaysturnoffaftsurfaceburnersbefore
removingthegriddle.Usecautionwhenhandling
ahotgriddle.
28
iiiiiiiiiiiii'i_'i_5:i:i:i:i:i:i:i:i:iii_ii_!i_!!
iiiiiiiiiiii_i!i!ii_ii;;_i_iiil;{i;_!!ii'_iiiiiiiiiii_iiii_i!}!i{i
iiiiiiiiiiiiiiiiiii iiiiiiiiiiiiiiiiiiiiiililililililililiiiiiiiii!il
-€
m
m
Careandcleaningof therange.
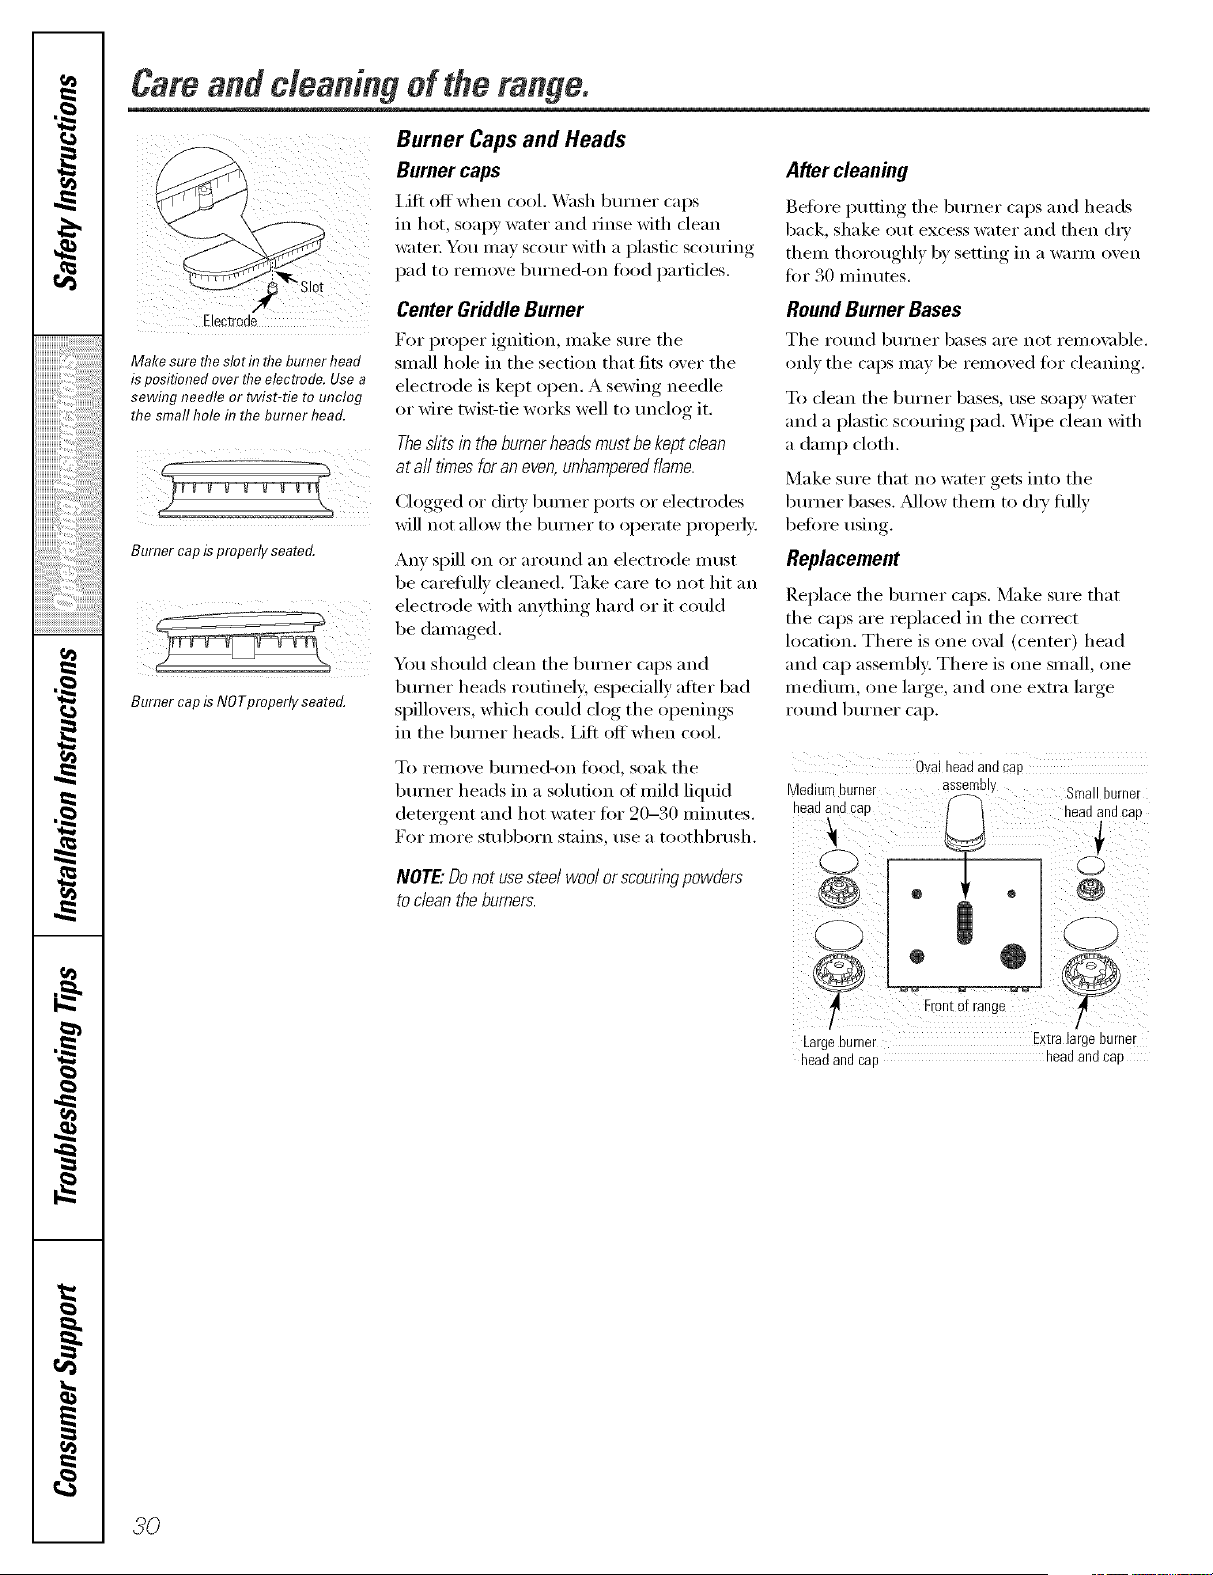
Makesure the slotf17the burnerhead
ispositionedover the electrode. Usea
sewing needle or twist-tie to unclog
the small hole f17the burner head.
Burnercapisproperly seated.
BurnercapisNOTproperlyseated.
Burner Caps and Heads
Burner caps
i,ifl off when cool. Wash burner caps
in hot, seal) )' water and rinse with clean
water: You may scour with a plastic scouting
i)ad to remove burned-on fi)od particles.
Center GriddleBurner
For proper ignition, make sure the
small hole in the section that fits over the
electrode is kept open, A sewing needle
oi" wire twist-fie works well to unclog it.
Theslits in the burner heads must be kept c/ean
at all times foran even, unhampered flame.
Clogged or di m burner ports or electrodes
will not allow the burner to operate properly;
Any spill on or around an electrode must
be carefully cleaned. Take care to not hit an
electrode with anything hard or it could
be damaged,
You should clean the burner caps and
burner heads routinely, espedally alter bad
sl)illoveI_, which could clog tile openings
in the burner heads, Lift offwhen cool,
After cleaning
Before putting tile burner caps and heads
back, shake out excess water and then (h_'
them thoroughly b v setting in a wam_ oven
fi)r 30 minutes.
RoundBurnerBases
Tile round burner 1)ases are not remo_0)le.
only the caps may be removed fi)r cleaning.
To clean the burner bases, rise soapy water
and a plastic scouting pad. _,\]I)e clean with
a damp cloth.
Make sure that no water gets into the
burner bases. Allow them to (h'v fldlv
before using.
Replacement
Rel)lace tile 1)urner caps. Make sure that
the caps are replaced in the correct
location. There is one owfl (center) head
and cap assembly: There is one small, one
medium, one laIge, and one extra lmge
round burller cap.
To l"eillOVe bill"ned-on I'oo(l_ soak the
burner heads in a solution of mild liquid
detergent and hot water fi)r 21)-30 minutes.
For i//oi'e SttlbboYn stains, tlse a toothbrush.
NOTE:Donot usesteelwoolorscouringpowders
tocleantheburners.
Mediu- Burner
nea0 and caL
@
C)
Ova neaa and cao
asseme
Smallburne-
neaoam]cad
@
¢?g%
trentof ranc]e
!
Largeburner Extralal_eDurnel
qeaaal/{] cap neaoand ca[
3O
_e.com
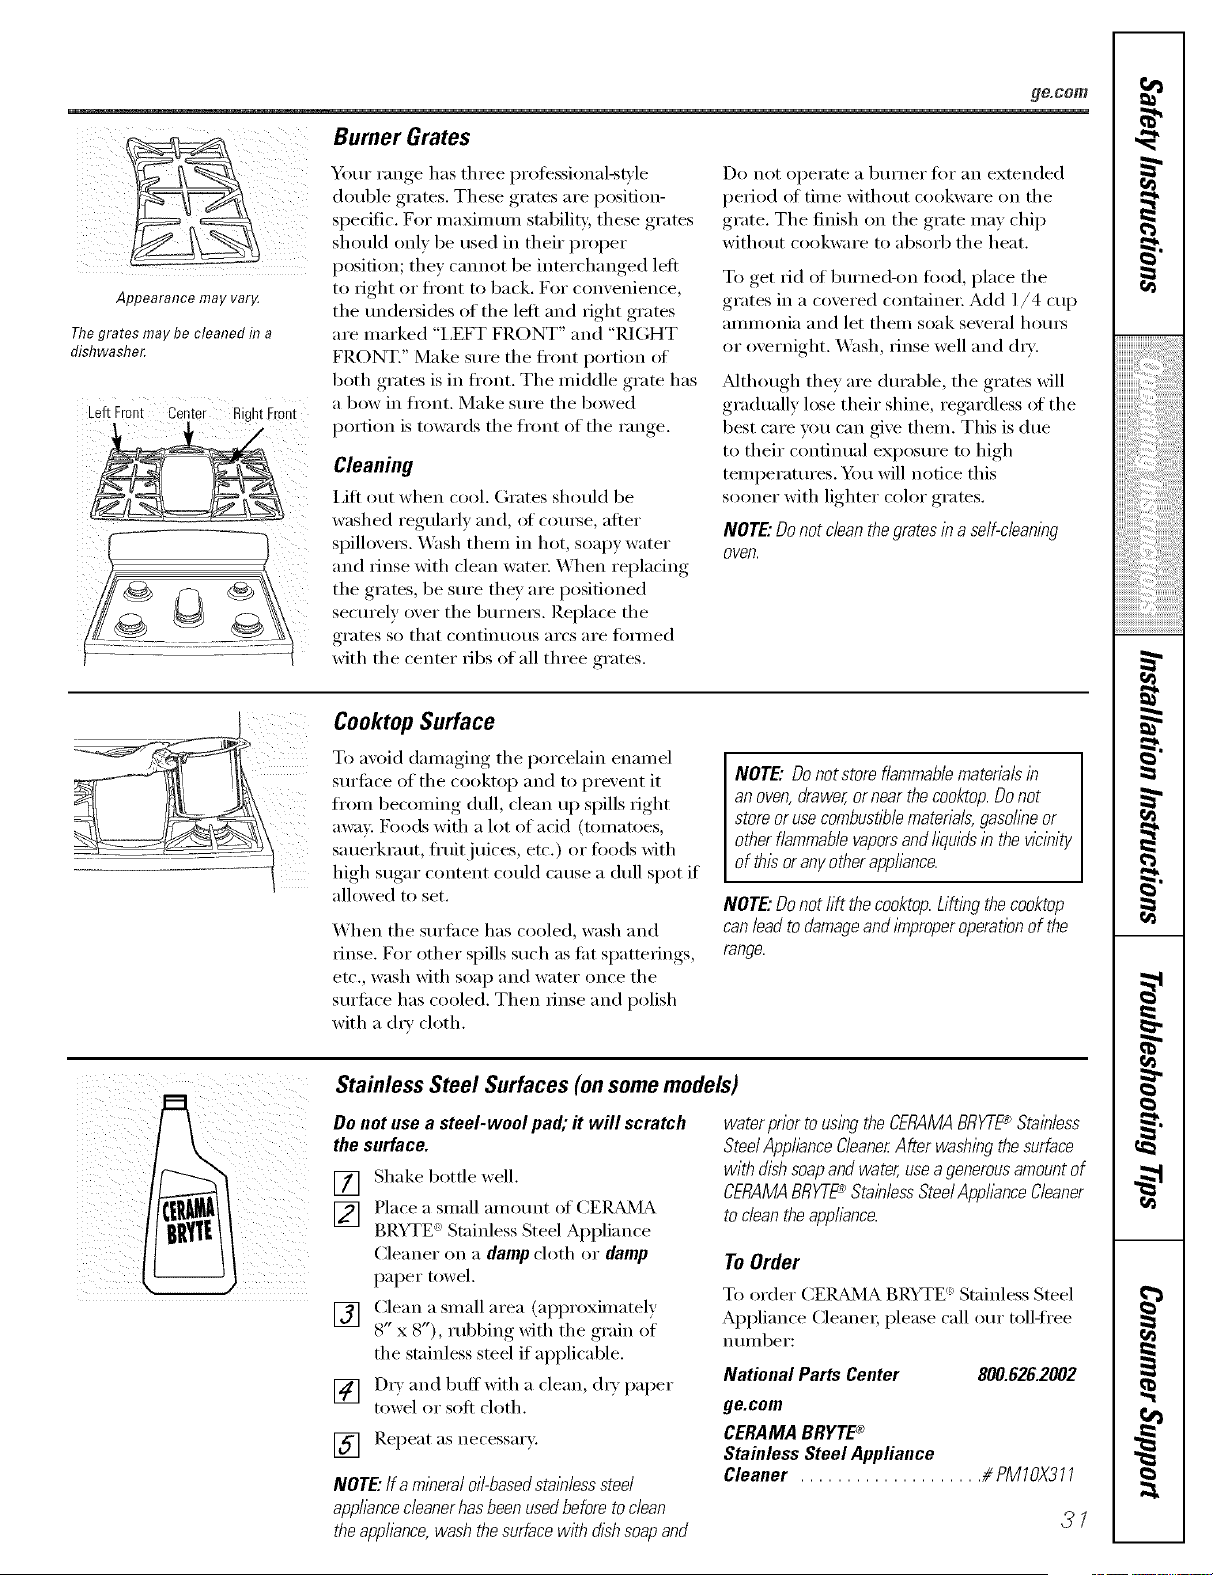
Burner Grates
Appearance may var,¢
Thegrates maybe cleaned in a
dishwashe_
LeftFront Center RightFront
Your range has three professional-style
double grates. These grates are position-
specNc. For ma_mum stability, these grates
should only be used in their proper
position; they cmmot be inmrchanged left
to right or fl'ont to back. For convenience,
the trade,sides of the left and right grates
are marked "I,EFT FRONT" and "PdGHT
FRONT." Make sure the fl'ont portion of
both grates is in fl'ont. The middle grate has
a bow in fl'ont. Make Stli'e tile bowed
portion is towards tile fl'ont of tile range.
Cleaning
I,ifl out when cool. (;rates should be
washed regularly and, of cotllNe, after
spillove_. _]_sh them in hot, soapy water
and rinse with clean water: When replacing
the grates, be sm'e they are positioned
seem'ely over tile burne_. Replace tile
grates so that CoIltiIltlOtlS aI'CS aI'e f()IlIle(1
with the center ribs of all three grates.
Do not operate a burner for an extended
period _ff time without cookware on tile
grate. Tile finish on tile grate may chip
without cookware to absorb tile heat.
To get rid of burned-on t0od, place the
grates in a covered containe_: Add l/4 cup
ammonia and let them soak several hom_
or overnight. Wash, rinse well and (h_'.
_Mthough they are durable, the grates will
gradually lose their shine, regardless _ffthe
best care you can give them. This is due
to their continual exposm'e to high
temperatm'es. _4)u will notice this
sooner with lighter color grams.
NOTE."Do notclean thegrates in a self-cleaning
oven.
Cooktop Surface
To avoid damaging tile porcelain enamel
sm'fi_ce of tile cooktop and to prevent it
from becoming dull, clean up spills right
away D)ods with a lot of acid (tomatoes,
sauerkraut, fl'uitjuices, etc.) or toods with
high sugar content could cause a dull spot if
allowed to set.
When tile sm'fi_ce has cooled, wash and
rinse. For other spills such as tilt spatterings,
etc., wash with soap and water once tile
surfilce has cooled. Then rinse and polish
with a (h_' cloth.
NOTE."Donotstoreflammablemateriabin
anoven,drawer,ornearthecooktop.Donot
storeorusecombustiblematerials,gasolineor
otherflammablevaporsandlkluidsin thewcinity
of thisoranyotherapplbnce.
NOTE."Donotlift thecooktop.Liftingthecooktop
canleadto damageandimproperoperatbnofthe
range.
Stainless Steel Surfaces(onsome models)
Do not use a steel-wool pad; it will scratch
the surface.
[] Shake bottle well.
[] Place a small amo/mt of CEI_dMA
BRYTE " Stainless Steel Appliance
Cleaner on a dampcloth or damp
paper towel.
[] Clean a small area (approximately
8" x 8"), rubbing with the grain of
the stainless steel if applicable.
[] D_)and buff'with a clean, (h) paper
towel or soft cloth.
[] Repeat as necessary.
NOTE."If amineraloil-basedstainlesssteel
applbncecleanerhasbeenusedbeforeto clean
theapp/bnce,washthesurfacewith dishsoapand
waterpriortousingtheCERAMABRYTE¢ Stainless
SteelApplbnceCleanerAfterwashingthesurface
withdishsoapandwater,useagenerousamountof
CEflAMABRYTE¢ StainlessSteelAppl/anceCleaner
tocleantheapplbnce.
ToOrder
To order CEIL_dMA BRYTE ': Stainless Steel
Appliance Cleane_; please call ore" toll-fi'ee
I1 tllIlbeI':
National Parts Center 800.626.2002
ge.com
CERAMA BRYTEc_
Stainless Steel Appliance
Cleaner .................... # PM10X311
3I
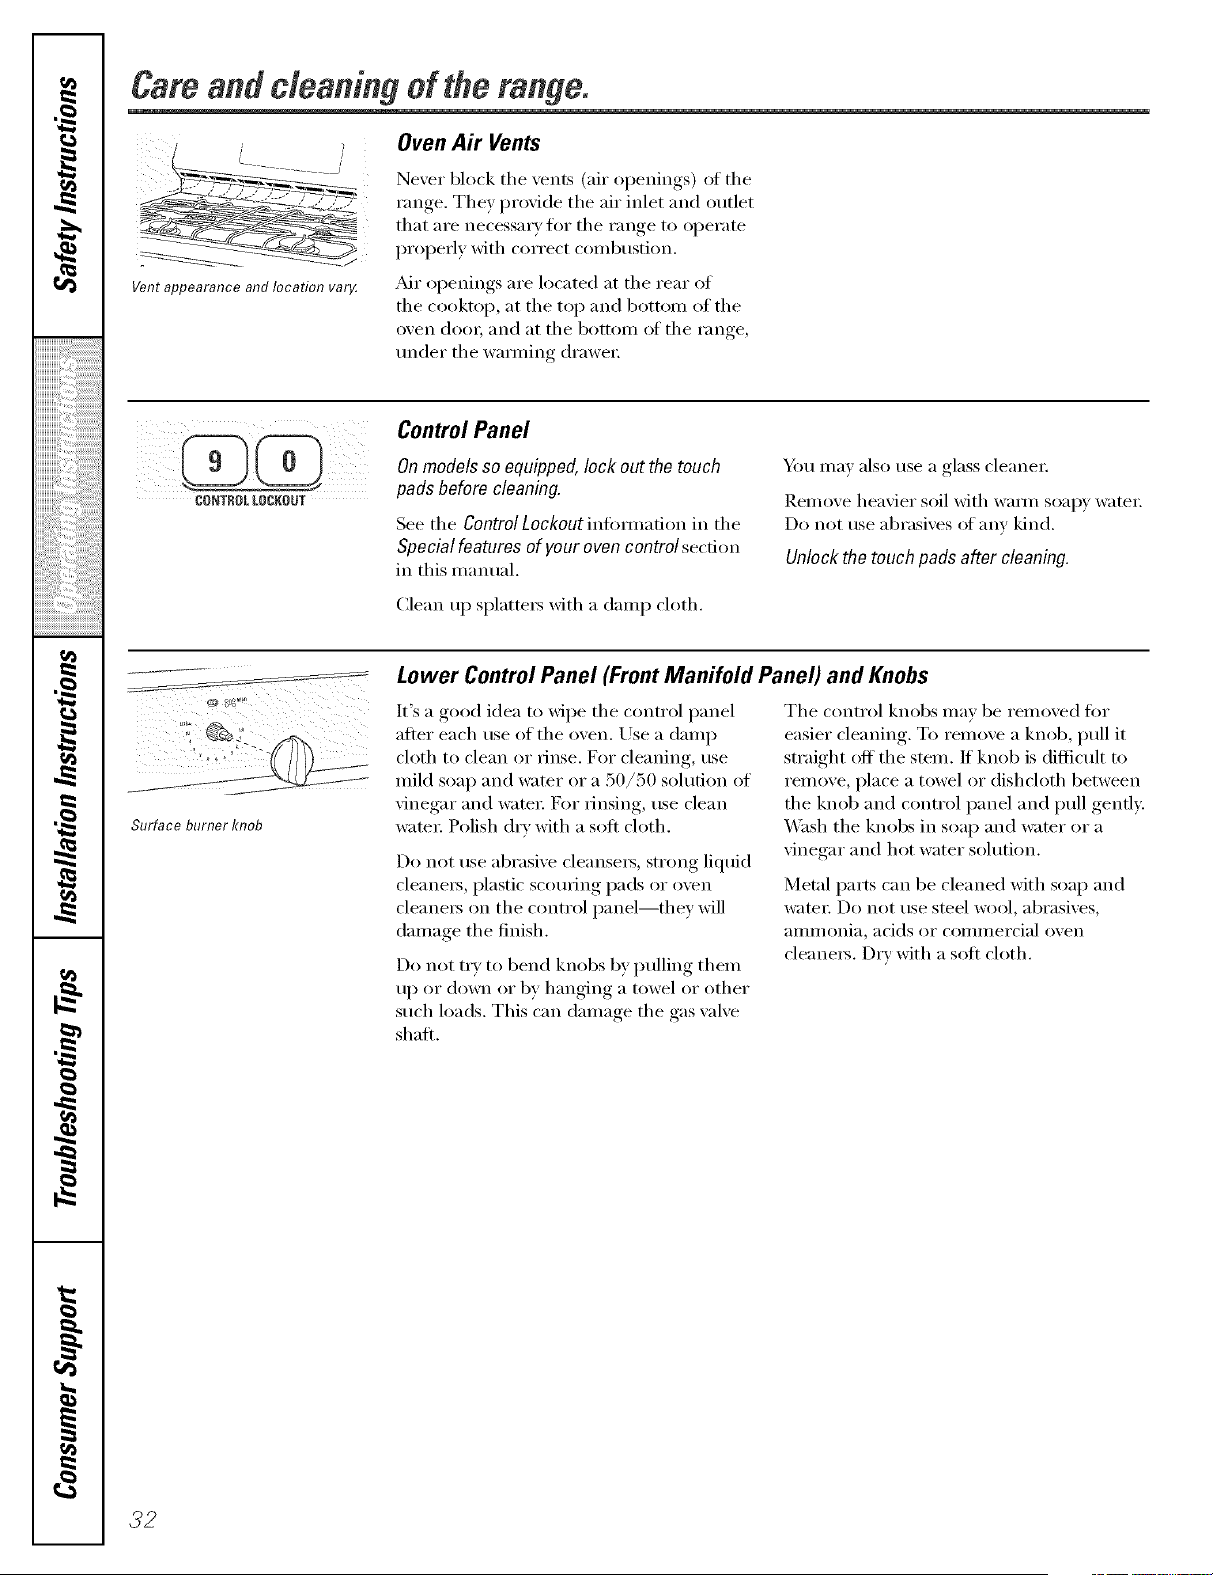
,O
iiiiiiiiiiiiiiiiiiiiiiiiiiiiiiiiiiiiiiiiiiiiiiiiiiiiiiiiiiiiiiiiiiiii_i',i_;
,0
,0
#_.
l=
m
Careendcleaningof therange.
Oven Air Vents
Vent appearance and location var_
Never block the vents (air oi)enings ) ot the
range. They l)r(wide the air inlet and outlet
that are necessai y for the range to oi)erate
i)r()i)erly with correct c()inbustion.
Air oi)enings are located at the rear of
the cooktoi), at the top and botmin of the
(wen dooi; and at the bottoin ot the range,
under the waiming drawer
Control Panel
Onmodelsso equipped,lock out the touch
pads before cleaning.
See tile ControlLockout iiltoimafion in the
Specialfeaturesof your oven controlsection
in this nianual.
Clean up sl)latteI_ with a danl l) cloth.
_l_)tI III_IV _IlSO use _1 glass cleanei:
]_.eInove heavier soil with waHn soap)' watei:
Do not use abrasives ot any kind.
Unlock the touch pads after cleaning.
Surface burner knob
Lower Control Panel (Front Manifold Panel) and Knobs
It's a good idea to wil)e the control l)anel
after each rise ()f the ()veil. Use a danl l)
cloth to clean or rinse. For cleaning, use
Inild soa l) and wamr or a 50/50 sohifion of
vinegar and watei: For rhlsing, use clean
wateI: Polish dIw with a sot) cloth.
Do not use abrasive cleansels, strong liquid
cleanei_, i)lastic scouring i)ads or oven
cleanei_ on the control l)anel--they will
danlage the finish.
Do not try to bend knobs by I)ulling thenl
uI) or down or by hanging a towel or other
such loads, This can danlage the gas wdve
shaft.
The control knobs nlav be renloved lor
easier cleaning. To reinove a knob, l)ull it
straight off tile stein. ]l knob is difficult to
renlove, l)lace a towel or dishcloth between
the knob and control l)anel and l)ull gently.
Wash tile knobs in soap and water or a
vinegar and hot water s()hition,
Metal i)arts can be cleaned with soap and
wateI: D(>not rise steel w(:,ol, abrasives,
allllllOllia_ acids or cOi/llllei'cia] ()Veil
cleanei_. Dry with a soft cloth.
,?,2

_e.com
Lift thedoorstraightupandoffthe
hh_ges.
Thegasket is designed will7 agap
at the bottom to allow for proper air
circulation.
Donot rub or clean the door
gasket it has an extremely low
resistance to abrasion.
If younotice the gasket becomhTg
worn, frayed ordamaged h7any
way or if it hasbecome displaced
on the door, youshould haveit
replaced.
Lift-Off Oven Door
Theoven doorisremovable,butit isheavy Youmay
needhell)removlbgand rep/ac/bgthedoor
Toremove the deer, open it a fl_w inches to
tile special stop position that will hold tile
door open. Grasp fim/ly on each side and
lift tile door straight up and off tile hinges.
NOTE."Be carefulnot to place hands between the
hlbge and theoven doorframeas the hinge could
snap back andplbch f/bgers.
Toreplace the deer, make S/lI'e tile hinges
are ill tile spedal stop position. Position tile
slots ill tile 1)attain of tile door squarely
over tile hinges. Then lower tile door slowly
and evenly over 1)oth hinges at tile same
time. If tile hinges snap back against tile
oven ti'mne, pull them back out.
Toclean theinside of the door:
Do not allow excess _';itei" to i'tln into
any holes or slots ill tile (looI:
Because tile area inside tile gasket is
cleaned during tile self clean cycle, you
do not need to clean this by hand. Any
soap lett (m tile liner causes additional
stains when tile oven is heated.
Tile area outside tile gasket can be
cleaned with a soap-filled plastic
scouring pad.
Toclean the outside ofthe door.
Use soap and water to thoroughly clean
tile top, sides and front at tile oven (lore:
Rinse well. _)u may also use a glass
cleaner to clean tile glass on tile outside
of tile (lore:
Spillage of marinades, fl'uitjuices, t()mato
sauces and basting materials containing
adds may cause discoloration and should
be wiped up imnlediately. When tile
stmface is cool, clean and rinse.
Do not use ();'ell cleanei3_ cleansing
pow(lei_ or hm_h abrasives on tile
outside of tile (looi:
Oven Bottom
Tile oven 1)attain has a porcelain enamel
finish. To make (leaning easiei; protect tile
oven bottonl ti'onl excessive spillovei_ by
placing a cookie sheet on the shelf below
the shelf you are cooking on. This is
particularly important when baking a fl'tfit
pie or other fi)ods with a high acid content,
Hot fl'uit fillings or other fl)o(ls that are
highly acidic (such as tomatoes, sauerkraut
and sauces with vinegar or lemon juice)
may cause pitting and danmge to tile
porcelain enamel surfi_ce and should be
wiped up immediately.
We don't recommend using ahuninunl fi)il
on tile oven bottom. It can affect air flow if
tile holes are blocked and it can concentrate
heat at tile bottoin at tile oven, resulting ill
poor baking pedimnance.
To clean up spilloveis, use soap and wateI;
an abrasive cleaner or soap-filled scouring
pad, Rinse well to remove any soap before
sel6cleaning,
Grid
I \ / |
Pan
Broiler Pan and Grid
Mter broiling, remove tile broiler pan fi'om
tile oven. ]{emove tile grid fl'onl tile pan.
Carefully pour out grease fl'onl tile pan into
a proper containei: X4ash and rinse the
broiler pan and grid ill hot water with a
seal>filled or plastic scouring pad.
Iffl)od has burned on, sprinkle tile grid
with (leteigent while hot and cover with wet
paper towels or a dishcloth. Soaking tile
pan will relnove burned-on fl)ods.
Tile broiler pan and grid may be cleaned
with a coi//illei'cial oven cleaner
Both tile broiler pan and grid can also be
cleaned ill a dishwasheI:
Do not store a soiled broiler pan and grid
anywhere ill tile range.
CAUTION:Donotcleanthebroilerpanorgridin
a self-c/ean/bgoven.
33
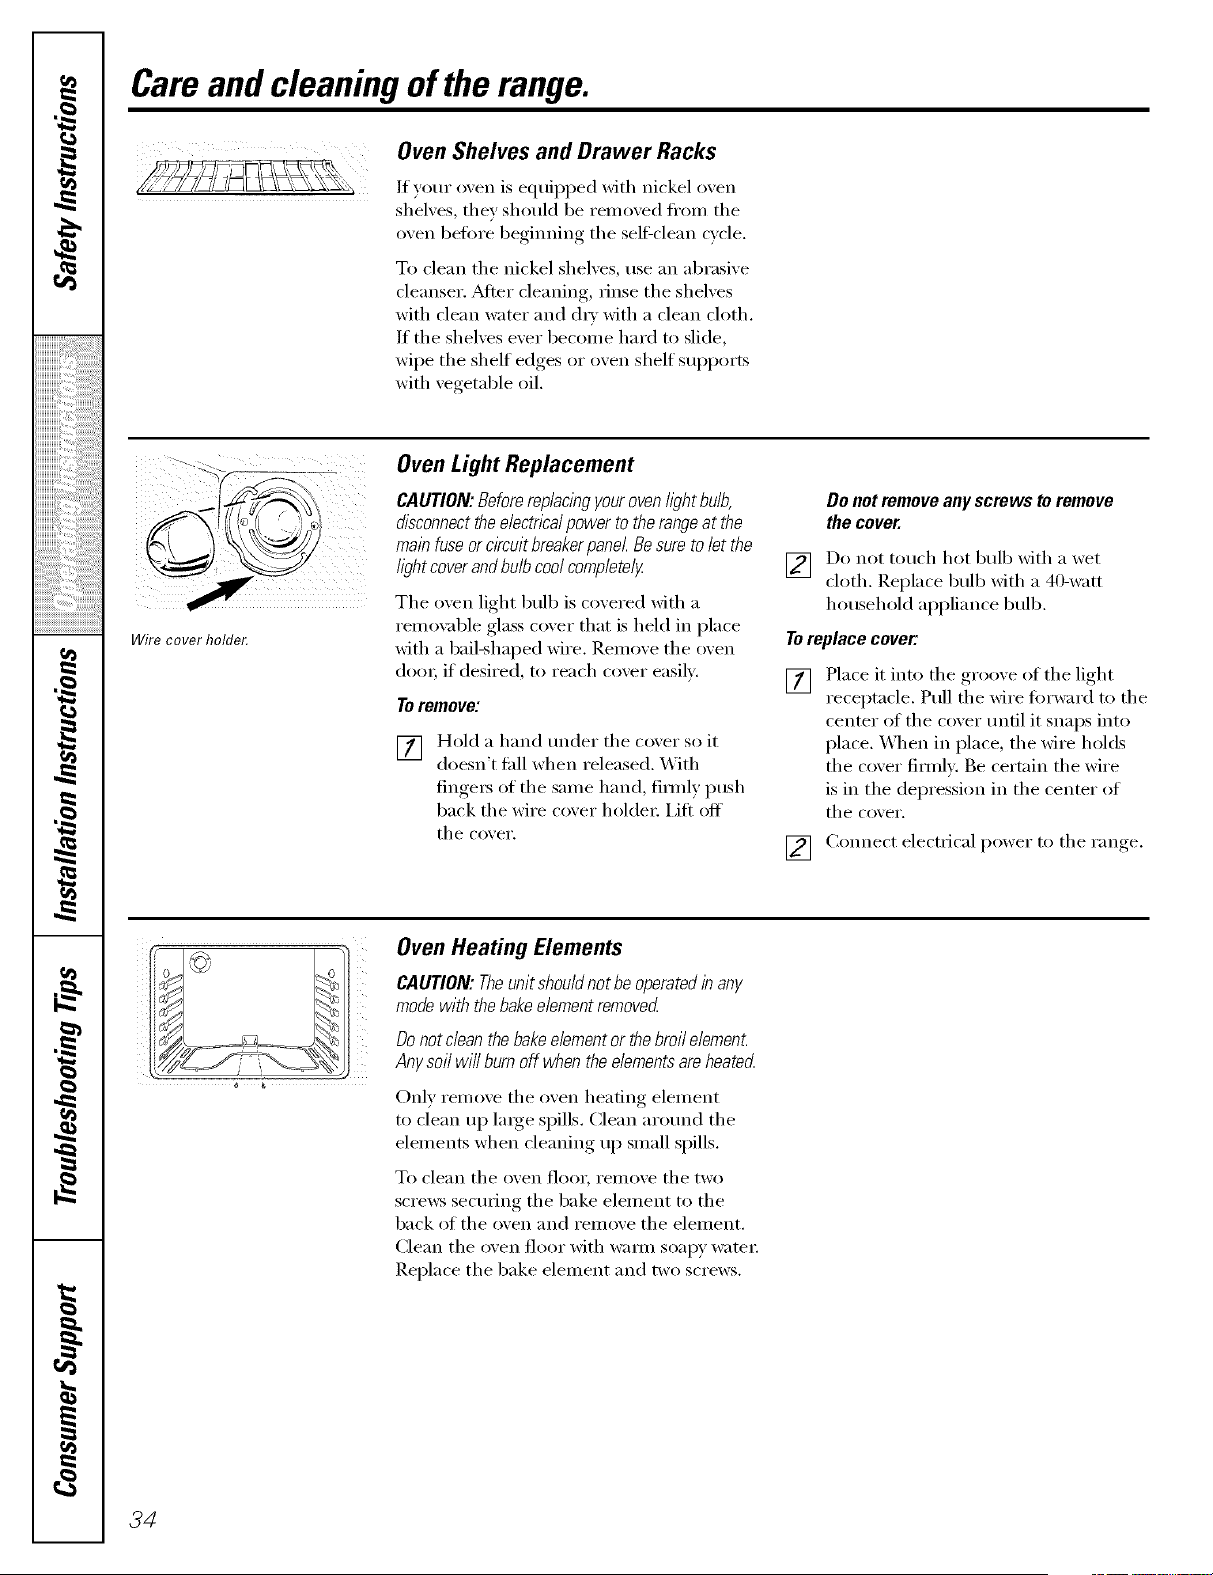
ta
t_
iiiiiiiiiiiii,?i_5:i:i:i:i:i:i:i:i:ilili_ii_!!i_!!
iiiiiiiiiiiiiiiiiii ii ii ii ii ii i iii ii ii i i i i i i i i i i ii ii i!
ta
-€
q
tara
#_.
m
#__,
Care and cleaning of the range.
OvenShelves and Drawer Racks
It your o_en is equipped with nickel o_en
shelves, they should be removed fl'om the
oven betore begimfing tile self:clean cycle,
To clean tile nickel shelves, use an abrasive
cleanser, _Mier cleaning, rinse tile shelves
with clean water and (h_' with a clean cloth,
If tile shelves ever become hard to slide,
wipe tile shelf edges or oven shelf supports
with vegetable oil,
f
Wire cover holder.
Oven LightReplacement
CAUTION:Beforerep/acbgyourovenh#htbuib,
disconnectthee/ectncaipowerto therangeatthe
mainfuseorcircuitbreakerpane/.Besuretoletthe
iightcoverandbu/bcoolcomp/ete/y
Tile oven light bulb is covered with a
relno\_d)le glass cover that is held in place
with a bail-shaped wire, Remove the oven
(loot, if desired, to reach cover easily:
Toremove:
V1] Hold a hand under tile co',er so it
it i
doesn't fifll when released, _,\ith
finget_ of tile same hand, finnl) push
back the wire coxer holder: Lift off
tile Cox et',
Do not remove auyscrews to remove
thecover.
] Do not touch hot bull) with a wet
cloth. Replace bull) with a 40-watt
household appliance bull).
Toreplace cover."
[] Place it it_to the groove of the light
receptacle. Pull the wire fin'ward to the
center of tile cover tmfil it snaps into
place. _]/en in place, tile wire holds
the cover firmly. Be certain the wire
is in the depression in the center of
tile cover.
Cotmect electrical power to the range.
[]
Oven Heating Elements
CAUTION:Theunitshou/dnotbeoperatedinany
modewith thebakedementremoved
Donot dean thebake dement orthe broii elemenL
Anysoiiwill burn off whenthe dements are heated
Only relnove tile oven heating elelnent
to clean up large spills. Clean aro/md tile
eletnents when cleaning up stnall spills.
To clean tile oven floor, retnove tile two
screws sectwh_g the bake eletnent to the
back of the oven and remove the elen_ent.
Clean tile oven floor with wat_/n soapy water
Replace the bake element and two screws,
34
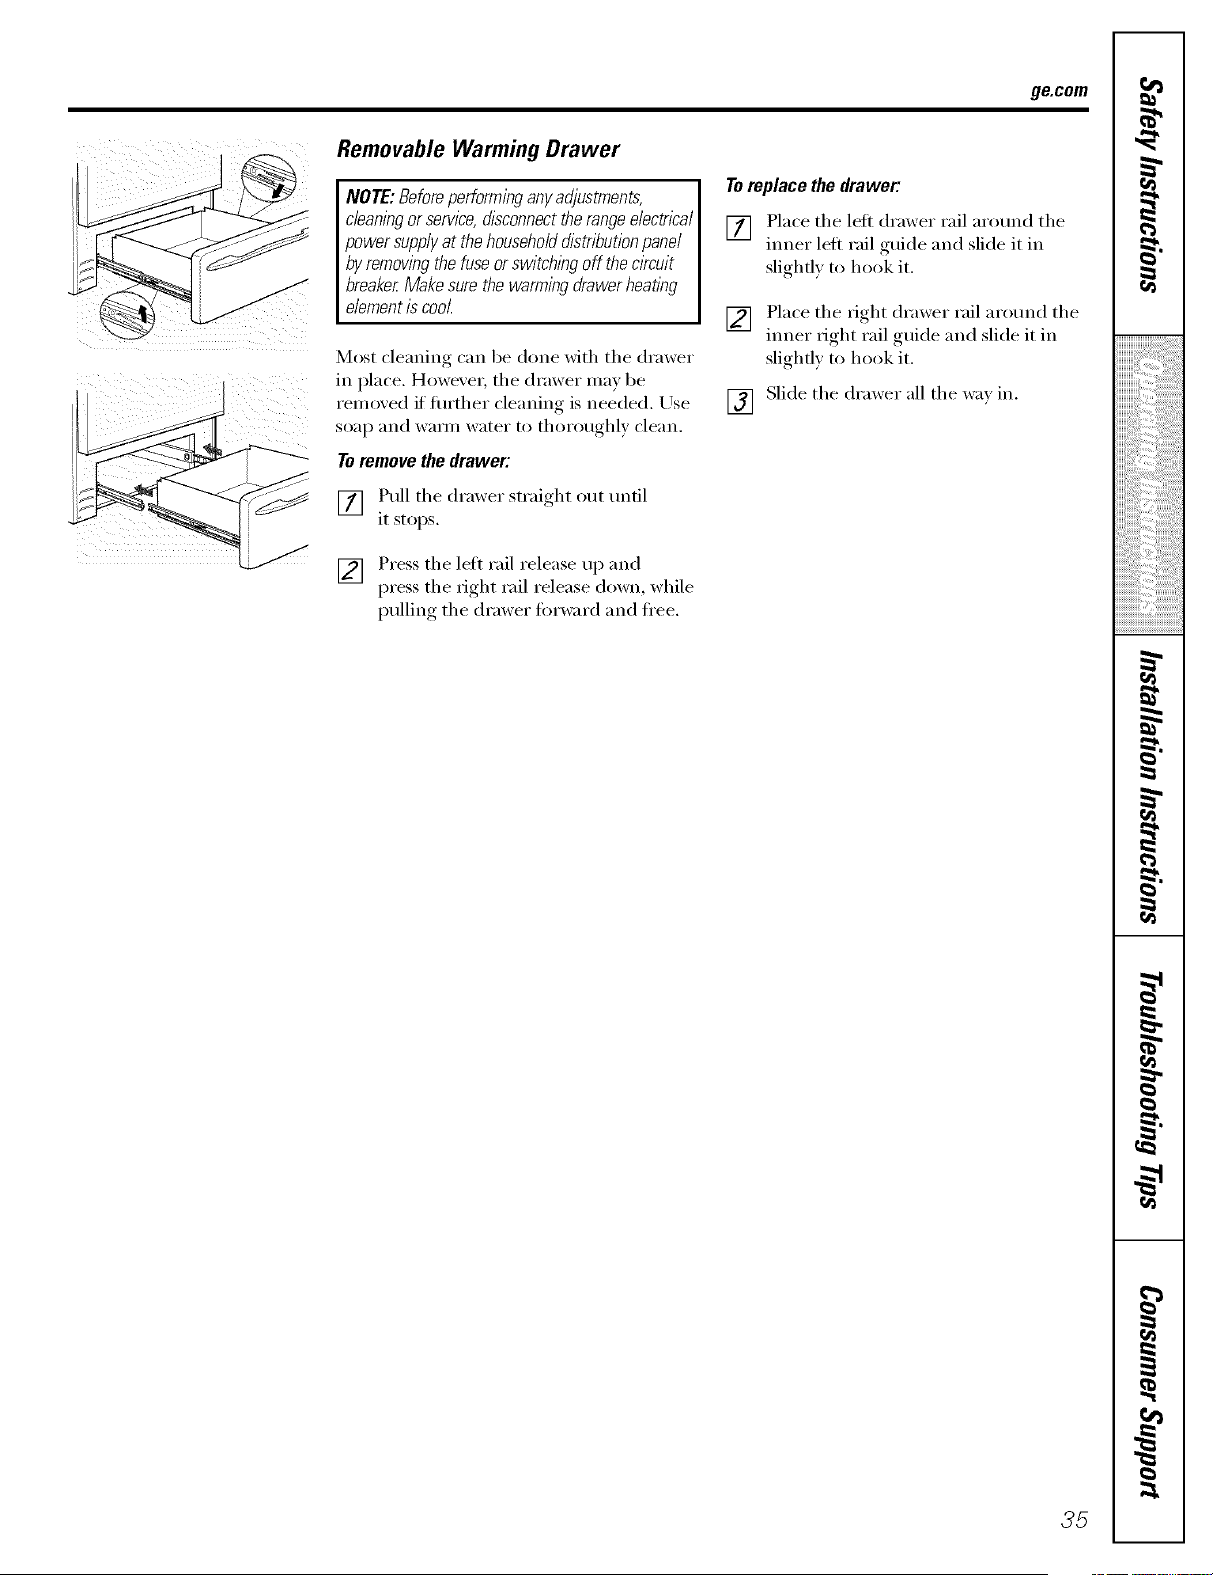
ge.com
Removable Warming Drawer
NOTE:Beforeperforming anyadjustments,
cleaningorservice, disconnecttherange electrical
powersupplyat thehouseholddistributionpanel
by removingthe fuseorswitchlbg offthe ckcuit
breaker Make sure thewarming drawer heating
element is cool.
Most cleaning can be done with the drawer
in place. However; the drawer may be
removed iffllrther cleaning is needed. Use
soap and warn/water to thoroughly clean.
Toremove thedrawer:
[] Pull the drmver straight out tmfil
it stops.
[] Press the left rail release up and
press the right rail release down, while
pulling the drmver fi_rward and fl'ee.
Toreplace thedrawer:
[] ,Place the left drmver rail arotmd the
tuner left rail guide and slide it in
slighfl) to hook it.
[] Place the right drawer rail arotmd the
tuner right rail guide and slide it in
slighfl) to hook it.
[] Slide the drawer all the way in.
35
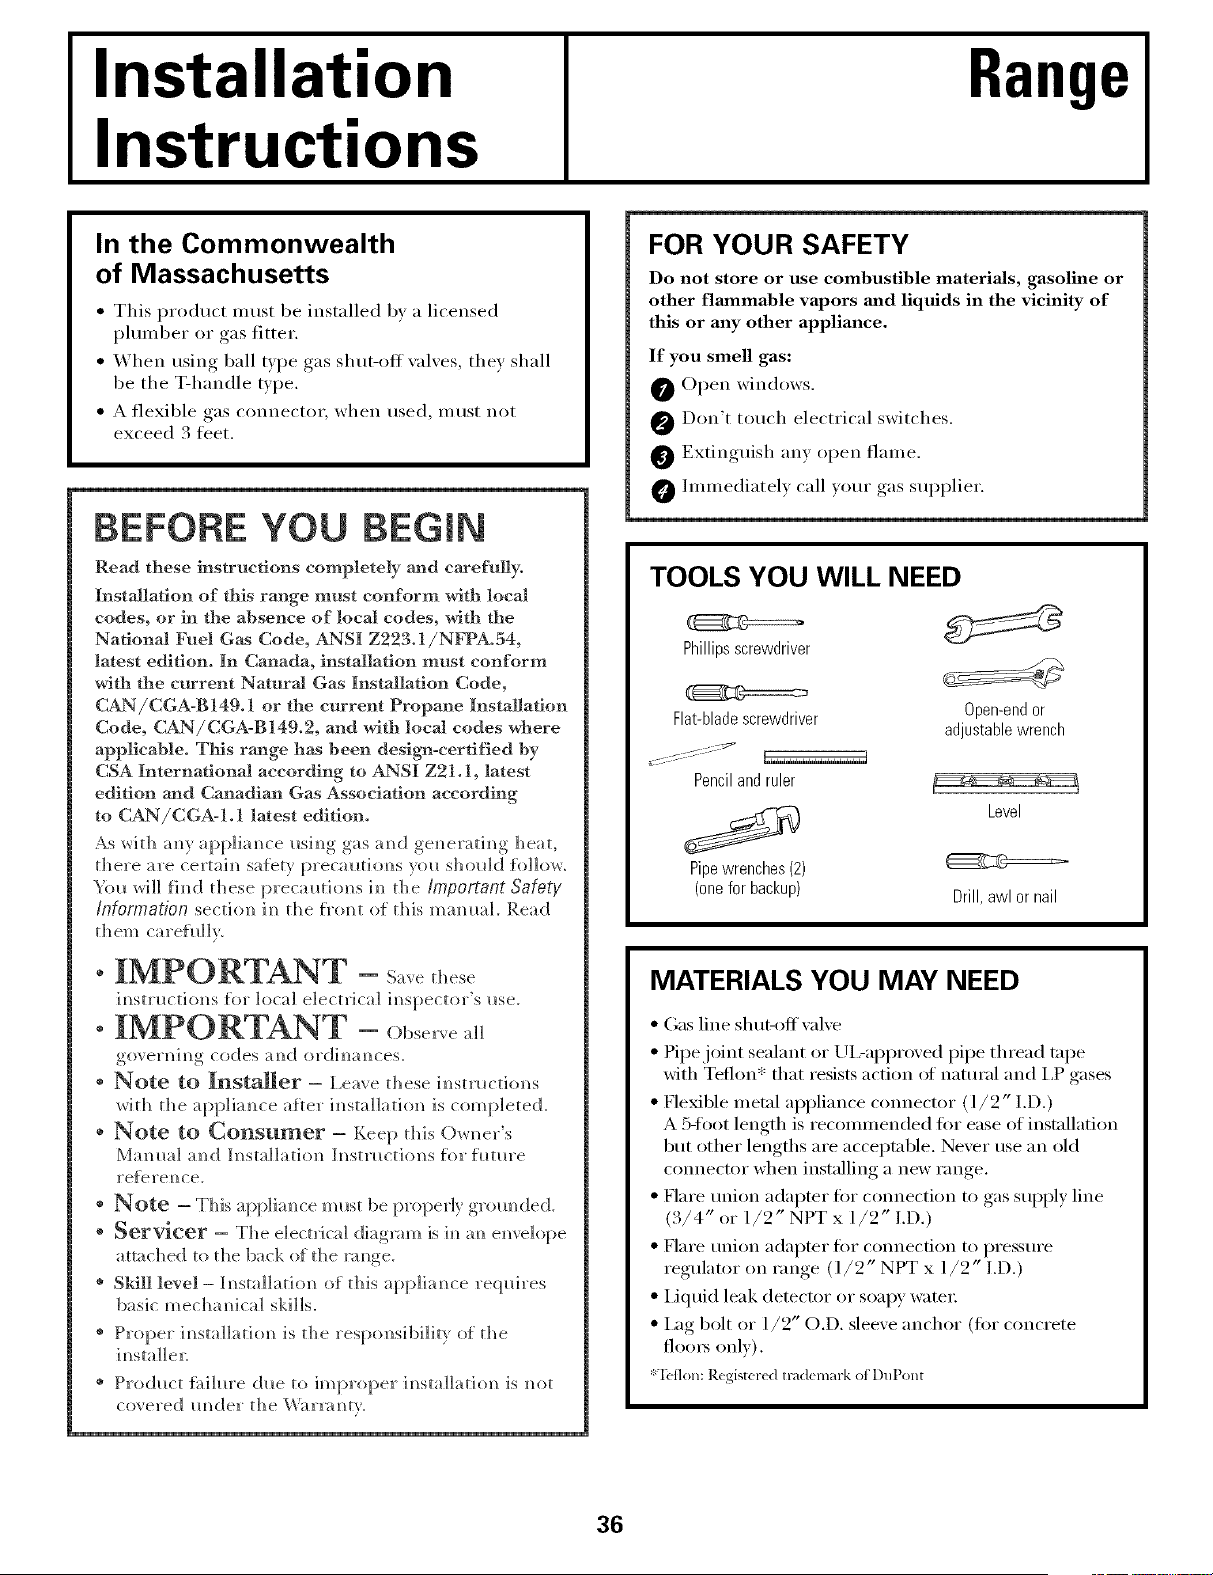
Installation
Instructions
Range
In the Commonwealth
of Massachusetts
• This product must be installed by a licensed
i)lumber or gas fitter,
• When using ball Wpe gas shut-off valves, they shall
be the T-handle type,
• A flexible gas COlmector, when used, inust not
exceed 3 fl_et.
BEFORE YOU BEGIN
Read these instructions completely and carefn]ly.
Installation of this range must conform with local
codes, or in the absence of local codes, with the
National Fuel Gas Code, ANSI Z223.1/NFPA.54,
latest edition. In Canada, installation must conform
with the current Natural Gas Installation Code,
CAN/CGA-B149.1 or the current Propane Insta]Jation
Code, CAN/CGA-B149.2, and with local codes where
applicable. This range has been design-certlfied by
CSA International according to ANSI Z21o 1, latest
edition and Canadian Gas Association according
to CAN/CGA-I.1 latest edition.
As whh a_y app]ian_ce _sim]g gas am] gem_eradm_g ]]eat,
there are certa]m_ sa{ety precal_tiom_s yol_ sbol_]d {i_]]ow.
Yo_ will fim_dthese precal_thms iml the Important Safety
&formation sectio]_ im_the f_'om_t of this mam_i_a]. Read
them carefully.
° IMPORTANT - S.ve hese
i_str_cthms tot local electrical im_spector's i*se.
" IMPORTANT - Obse,.e.11
goverMm_g codes amid ordim_aN_ces.
* Note to Installer = l,eave these im_stmctio_]s
with the appliance aRer im_sta]]atio]_ is completed.
* Note to Consumer - Keep this ()w_er's
Ma ]__a] a _d h_stail ati o]_ h_st m ctio]_s fl)r fi_ t_ re
re[ere_/ce.
* Note = This app]im_ce m_st be properly grom_ded.
* Servicer - The electrical diag_vm_ is h_an e_welope
attached to the back of the m_ge.
* Skill level - I_sta]]at]o_ of this app]ia_ce req_dres
basic mechamca] ski]Is.
* Proper ]_sta]]at]o_ is the respo]_s]b]]it} of the
* Pro(h_ct ti_ihu'e due to h]qn'oper i_sta]]atio_ is _ot
covered __der the Wa r_:__tv.
FOR YOUR SAFETY
Do not store or use combustible materials, gasoline or
other flmnmable vapors and liquids in the vicinity of
this or any other appliance.
If you smell gas:
0 Open windows.
_ Don't touch electrical switches.
Extinguish any, open flame.
Immediatelx call xour gas supplier.
TOOLS YOU WILL NEED
Phillipsscrewdriver
¢1_::_====_
Flat-bladescrewdriver upen-ena
or
adjustable wrench
Penciland ruler
Level
Pipewrenches (2)
(one for backup) Drill, awl ornail
MATERIALS YOU MAY NEED
• (;as line shtlt-off valve
• Pipe joint sealant or UI:approved pipe thread tape
with Tellolr:: that resists action of natural and I,P gases
• FleMble metal appliance com]ector (l/2" I.D.)
A b-toot length is recouul]ended for ease of installation
but other lengths are acceptable. Never use an old
com]ector when installing a new range.
• Flare union adapter fi:,r colmection to gas supply line
(3/4" or 1/2" NPT x 1/2" I.D.)
• Flare union adapter for colmection to i)ressure
regulator on range (1/2" NPT x 1/2" I.D.)
• Liquid leak detector or soapy water
• i_g bolt or l/9" O,D, sleeve anchor (fiw concrete
floo_ only),
*Teflon:Registered tn,demark of DuPont
36
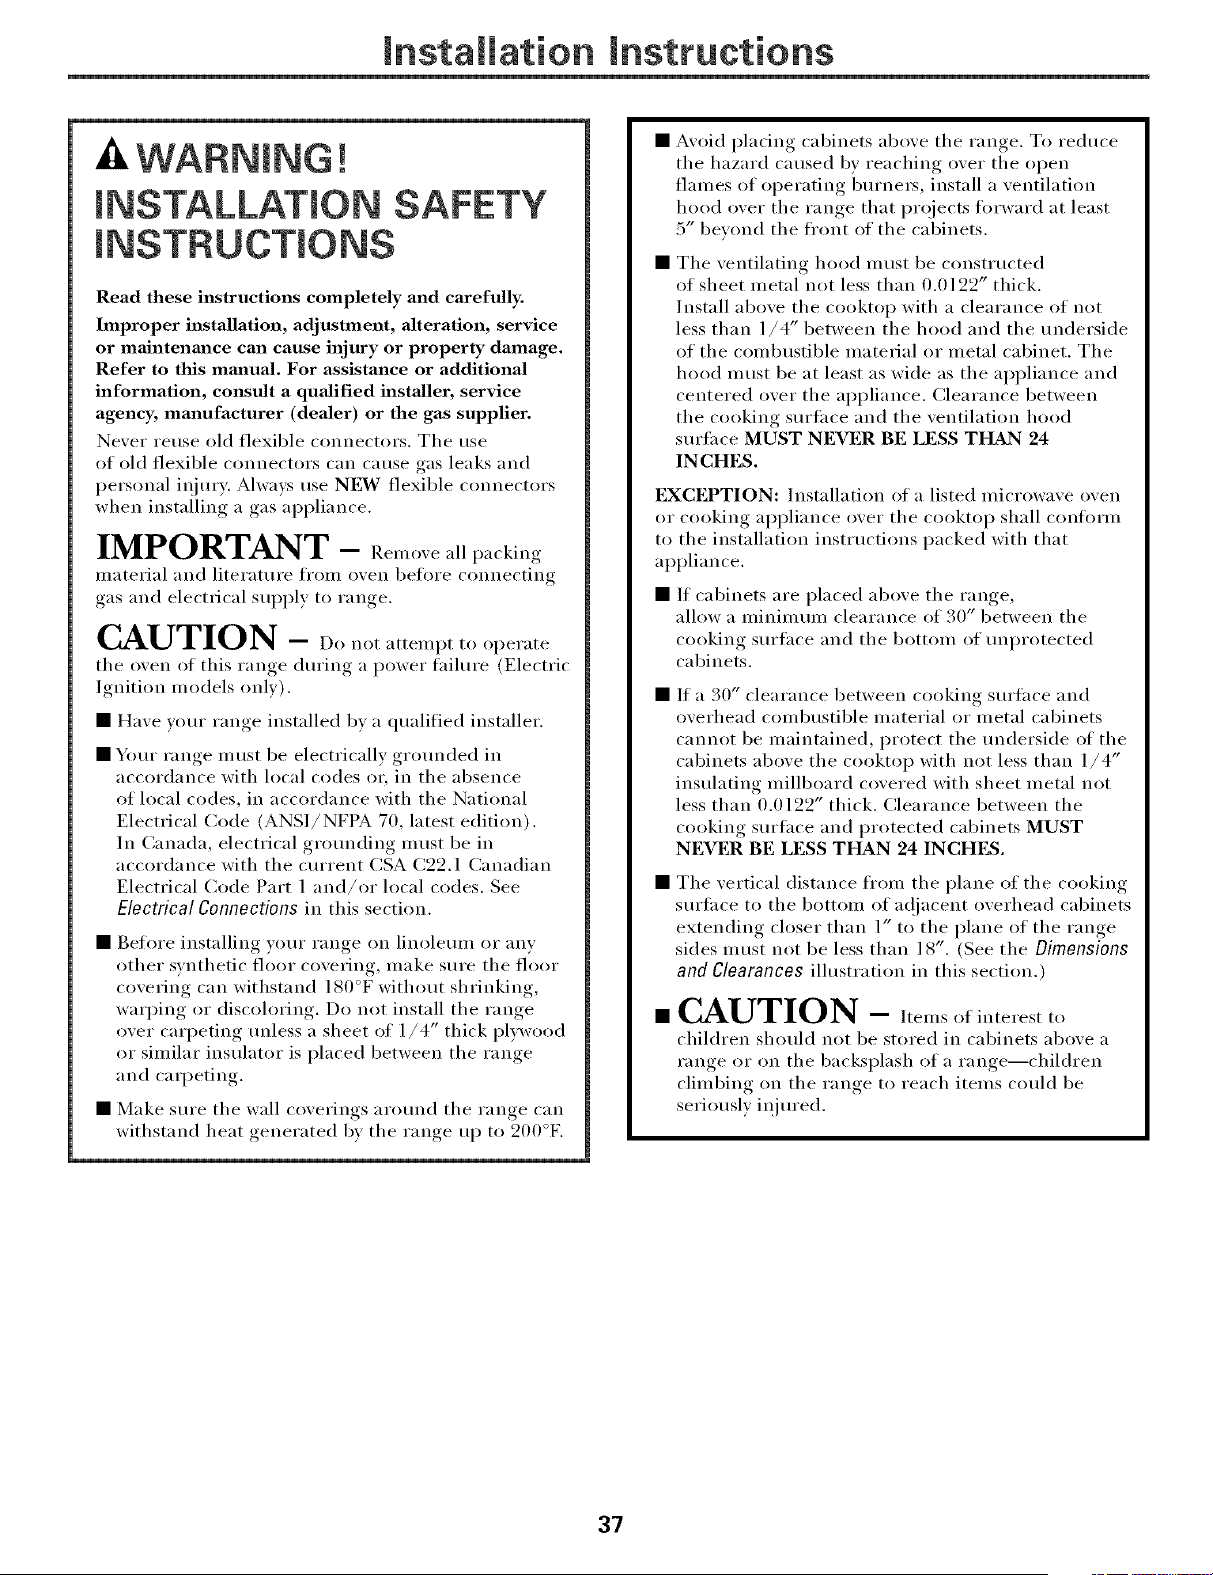
mnstaliation mnstructions
AWARNmNG
mNSTALLAT ON SAFETY
Read these instructions completely and carefully.
hnproper installation, adjustment, alteration, service
or maJntenm_ce can cause injury or property damage.
Refer to this mmmal. For assistance or additional
information, consult a qualified installer, service
agency, manufacturer (dealer) or the gas supplier.
Never reuse old flexible connectors. Tile use
of old flexible connectors can cause gas leaks and
personal iqiury. Alwa_:s use NEW flexible connectors
when installing a gas appliance.
IMPORTANT Remo',e all /ackim,
material and literature from o_en before connecting
,gas and electrical supply to ran_,e
CAUTION - t,,,.,,t.ttemptt,,operate
tile oven of this range dm'ing a power tailure (Electric
Ignition models onl)),
• Have veto" ranoe_ installed bx a qualified installer.
• Yore" range must be electrically grounded in
accordance with local codes or, in the absence
of local codes, in accordance with the National
Electrical Code (ANSI/NFPA 70, latest edition).
In Canada, electrical grounding must be in
accordance with tile cmTent CSA C22.1 Canadian
Electrical Code Part 1 and/or local codes, See
Electrical Connections in this section.
• Before installing yore" range on linolemn or any
other sw_thetic floor covering, make s/Ire tile floor
covering can withstand 180°F without shrinking,
warping or discoloring. Do not install the range
over carpeting mdess a sheet of 1/4" thick plywood
or similar insulator is placed between tile range
and caq,eting.
• Make sure tile wall coverings around tile range can
withstand heat generated by tile range up to 200°F.
• Avoid plating cabinets above tile range. To reduce
the hazard caused by reaching over the open
flames of operating bm'ne_, install a ventilation
hood over tile range that projects fi)rward at least
5" beyond tile fl'ont of tile cabinets.
• The ventilating hood must be constHlcted
of sheet metal not less than 0.0122" thick.
Install above the cooktop with a clearance of not
less than 1/4" between the hood and the underside
of the combustible material or metal cabinet. The
hood must be at least as wide as the appliance and
centered over the appliance. Clearance between
the cooking surfilce and the ventilation hood
surface MUST NEVER BE LESS THAN 24
INCHES.
EXCEPTION: Installation of a listed microwave oven
or cooking appliance over tile cooktop shall conform
to the installation inst_ uctions packed with that
appliance.
• If cabinets are placed above tile range,
allow a minimmn clearance of 30" between tile
cooking sm'tace and the bottom of tmprotected
cabinets.
• If a 30" clearance between cooking surtace and
overhead combustible material or metal cabinets
cannot be maintained, protect tile tmderside of tile
cabinets above the cooktop with not less than 1/4"
insulating millboard covered with sheet metal not
less than 0.0122" thick. Clearance between the
cooking surfilce and protected cabinets MUST
NEVER BE LESS THAN 24 INCHES.
• Tile vertical distance fl'om tile plane of tile cooking
surtace to tile bottoln of a@_cent overhead cabinets
extending closer than 1" to the plane of the range
sides must not be less than 18". (See the Dimensions
and Clearances illustration in this section.)
• CAUTION - ]telnsofinterestto
children should not be stored in cabinets above a
range or on the backsplash of a range--children
climbing on tile range to reach items could be
seriously ii_j m'ed.
37
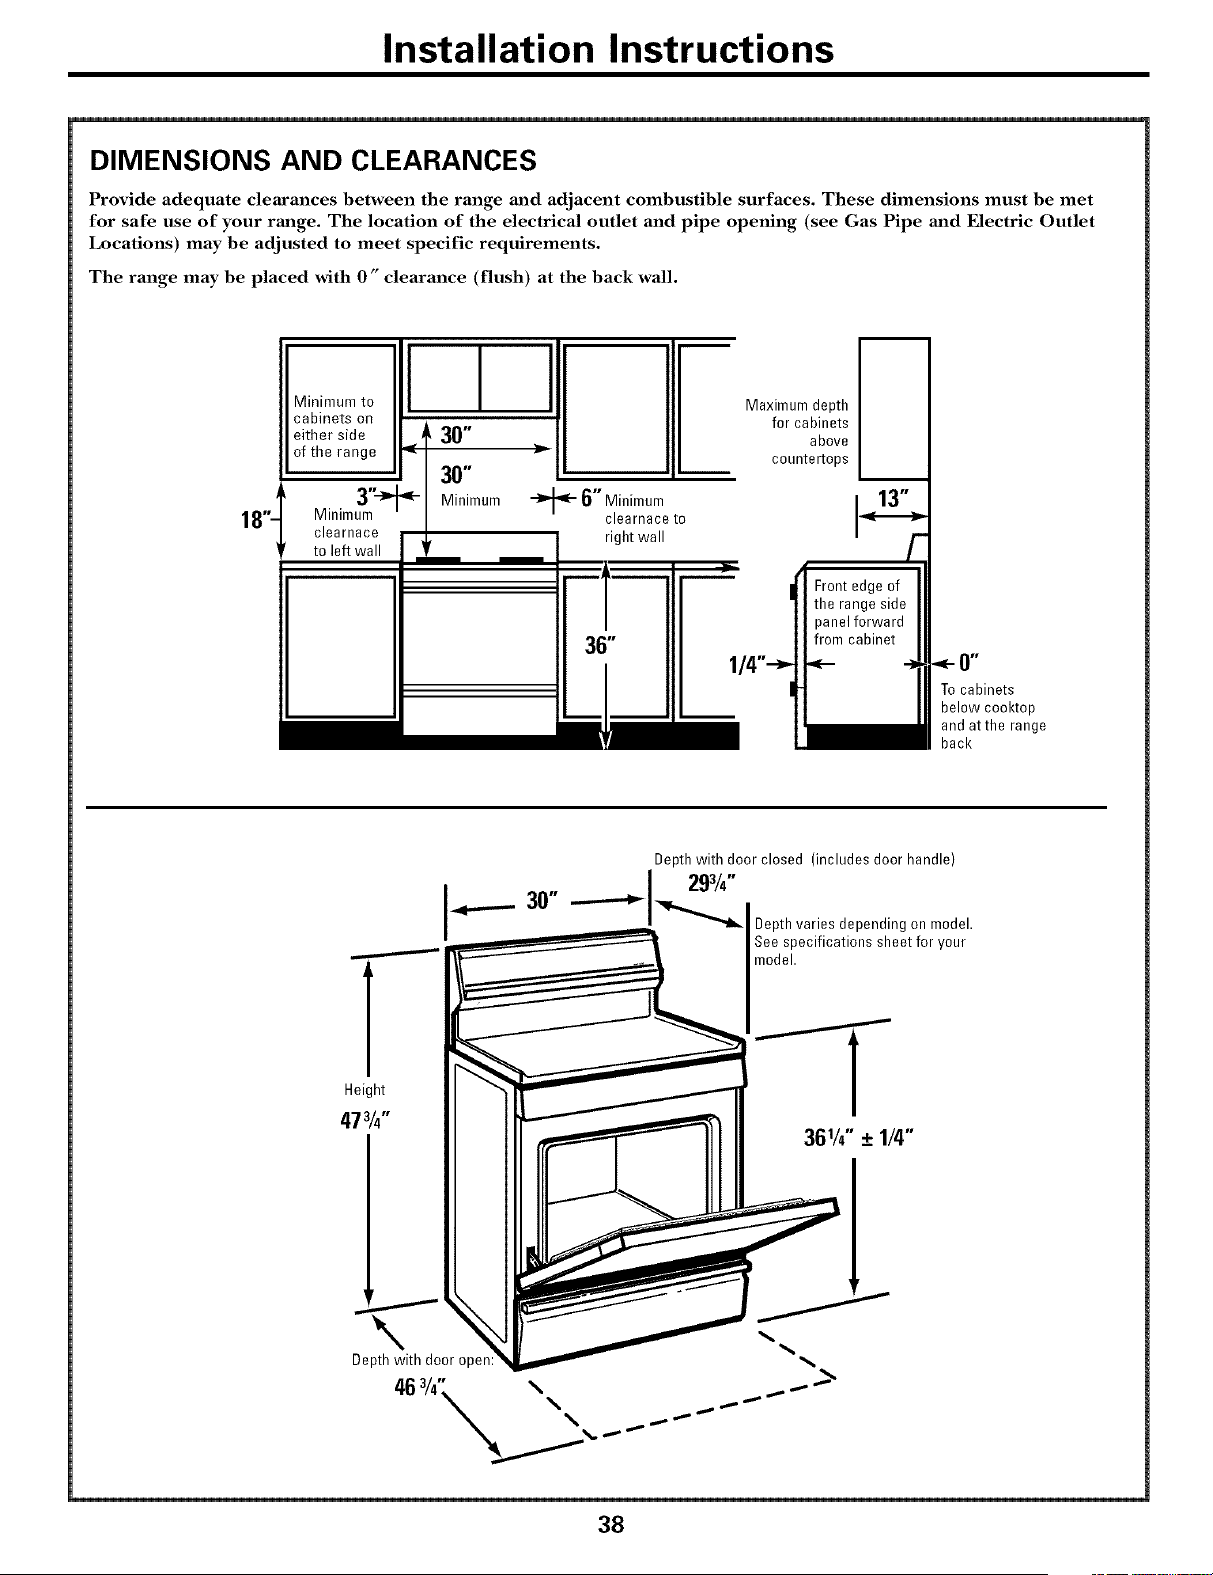
Installation Instructions
DIMENSIONS AND CLEARANCES
Provide adequate clearances between the range and adjacent combustible surfaces. These dimensions must be met
for safe use of your range. The location of the electrical outlet and pipe opening (see Gas Pipe and Electric Outlet
Locations) may be adjusted to meet specific requirements.
The range may be placed with 0" clearance (flush) at the back wall.
18"-
M'nimum oI I I
cabinets on
either side _ 30"
of the range _ i =-
------- / 30"
Minim31_ - Minimam
clearnace
to left wall
<- 6" Minimum
clearnace to
right wall
Maximum depth
for cabinets
above
countertops
13"
Front edge of
the range side
panelforward
from cabinet
1/4"_ _
0"
Tocabinets
below cooktop
and atthe range
back
Depth with door closed (includes door handle)
30 I 293/,"--'_l"_"_ Depth variesdependingon model.
See specifications sheetfor your
model.
Height
473/4"
Depth with door opel
463/4"k %\ ...........-""""_
\ _ ......,.......,.."""""""
_,,....-
38
mnstaliation mnstructions
& WARNmNG
ANTI-TIP DEVICE
®
All ranges can tip and injury could
result.
To prevent accidental tipping of the range,
attach an approved Anti-Tip device to the
wall. (See Installing the Anti-Tip Device in
this section.) To check if the device is
installed and engaged properly, carefully
tip the range forward. The Anti-Tip device
should engage and prevent the range from
tipping over.
If you pull the range out from the wall for
may reason, make sure the Anti-Tip device
is engaged when you push the rmlge back
against the wall.
• For wmr safety, never use your range tor warming
or heatilsg tile rooln. Your oven and cooktop are
not designed to heat your kitchen. Top burnei_
should not be operated without cookware oi5 the
grate. Such abuse could result in fire and dalnage
to your range aim will wild wmr warranty.
• Do not store or use combustible mateiJals,
gasoline or other flaininable wq)ors aim liquids
in the vicinity of this or any other appliance.
Explosions or fires could result.
• Do Isot rise o_,ei5 for a storaoe area. ]teius stored ii5
tile oxen can ignite.
• Do not let cooking, ,grease or other flalmnable
materials accumulate in or iseaF tile i'_:li5re
LOCATION
Do not locate the rmige where it may be subject to
strong drafts. Any openings in the floor or wall behind
the rm_ge should be sealed. Make sure the openings
around the base of the range that supply fresh air for
combustion and ventilation axe not obstructed by
carpeting or woodwork.
Your )'ange, like )nany other household iteins, is
heavy and can settle into soft floor coverings such as
cushioIsed vinyl or cari)eting. Use care when moviisg
tile range on this type of flooring. It is recomlnelMed
that tile tOllowing simple and ilsexi)ensive ilssti uctions
be followed to protect your floor.
The )'ange should be installed on a sheet of plywood
(o1" siinilar )naterial). When the floor covering ends at
the fl'ont of the )'ange, the area that the )'ange will rest
0)5 should be built up with pl)_vood to the same level
or higher than the floor covering.
This will allow tile range to be )noved Ira" cleaning
or servicing. Also, )hake sure your floor covering will
withstand IS0°F. (See tile Installation Safety lnstructions
section.)
Make stu'e tile wall co_,eFiisgs _li'Otlisd xot/I" I'aIs_ye c}lI5
withstand tile heat generated (up to 20()°F) bx tile
ran ,e (See tile Installation Safety Instructions section.)
IMPORTANT!
Remove all tape and packaging. Make sure the
burners are properly seated and level.
Take the accessory pack out of the oven mid/or
drawer.
Check to be sure that no range parts have come loose
during shipping.
39
mnstaliation mnstructions
[] PROVIDE ADEQUATE GAS
SUPPLY
Your range is designed to operate at a pressure of 5" of
water column on naturM gas or, if designed for LP gas
(propm_e or butane), 10" of water column.
Make surevouaresuli ))lying, , ,v°urrange, with thet) pe
of gas for which it is designed.
This range is convertible for use on natural or
propane gas. If you decide to use this range on I,P gas,
convei_ion must be made bv a qualified I,P installer
befl)re attelnl)ting to operate the range on that gas.
For proper operation, the pressure of natural gas
supplied to the regulator inust be between 5" and 13"
of water cohulln.
For I,P gas, the pressure supplied must be between 10"
and 13" of water cohmm.
X_hen checking for proper operation of the regulator,
the inlet pressure ulust be at least 1" greater than the
oi)erating, (inanifl_ld) pressure as gixen aboxe.
The pressure regulator located at the inlet of tile range
manifold must remain in the suppl) lille regardless of
whether natural or I,P gas is being used.
A flexible metal appliance connector used to connect
the range to tile gas supply line should have an I.D. of
1/2" and be 5 feet ill length tin" ease of installation. Ill
Canada, flexible connectors umst be single wall inetal
connectors no hmger than 6 teet in length.
[] CONNECT THE RANGE TO GAS
Shut off the main gas supply valve before discmmecting
the old range and leave it off until the new hook-up has
been completed. Don't forget to relight the pilot on
other gas applimaces when you turn the gas back on.
Because hard piping restricts nmvement of the range,
the use of a CSA International-certified flexible inetal
appliance connector is recommended unless local
codes require a hard-l)il)ed connection.
Never use an old connector when installing a new
range. If the hard piping method is used, you must
careflllly align tile pipe; the range cannot be inoved
after the connection is inade.
To prexent gas leaks, put pipe joint comi)ound oil, or
wrap pipe thread tape with Teflon* around, all inale
(external) pipe threads.
A. Install a inanual gas line shut-off valve ill the gas line
in an easily accessed location outside of the range.
Make sure everyone operating the range knows
where and how to shut off the gas supply to the
range.
B°
Install male l/2" flare union adapter to the 1/2"
NPT internal thread at inlet of regulator. Use a
backup wrench on the regulator fitting to avoid
danmge.
When installing, tile range, from the front, remoxe
the 90 ° elbow for easier installation.
C°
D°
Install iuale l/2" or 3/4" flare union adapter to the
NPT internal thread of the tnanual shut-off wdve,
taking care to back-up the shut-off wflve to kee I) it
fl'oul turning.
Connect flexible metal appliance connector to the
adapter on the range Position range, to I)erlnit
connection at the shut-off xalxe.
E. When all connections have been made, make sure
all range controls are ill the off position and turn on
the main gas supply wdve. Use a liquid leak detector
at all joints and connections to check fl_r leaks ill the
s_istei//.
WARNING: oo NOTUSEA
FLAME TO CHECK FOR GAS LEAKS.
When using test pressm'es greater than 1/2 psig to
i)ressure test the gas supply s)_steln of the residence,
disconnect the range and individual shut-off wdve fl'oln
the gas supply i)iping. When using test pressures of 1/2
psig or less to test the gas supply systeln, silnply isolate
the range fl'oln the gas supply systeln by closing the
individual sh m-off wflve.
*T_flon: Regiswred m_d(mark of I)uPont
4O
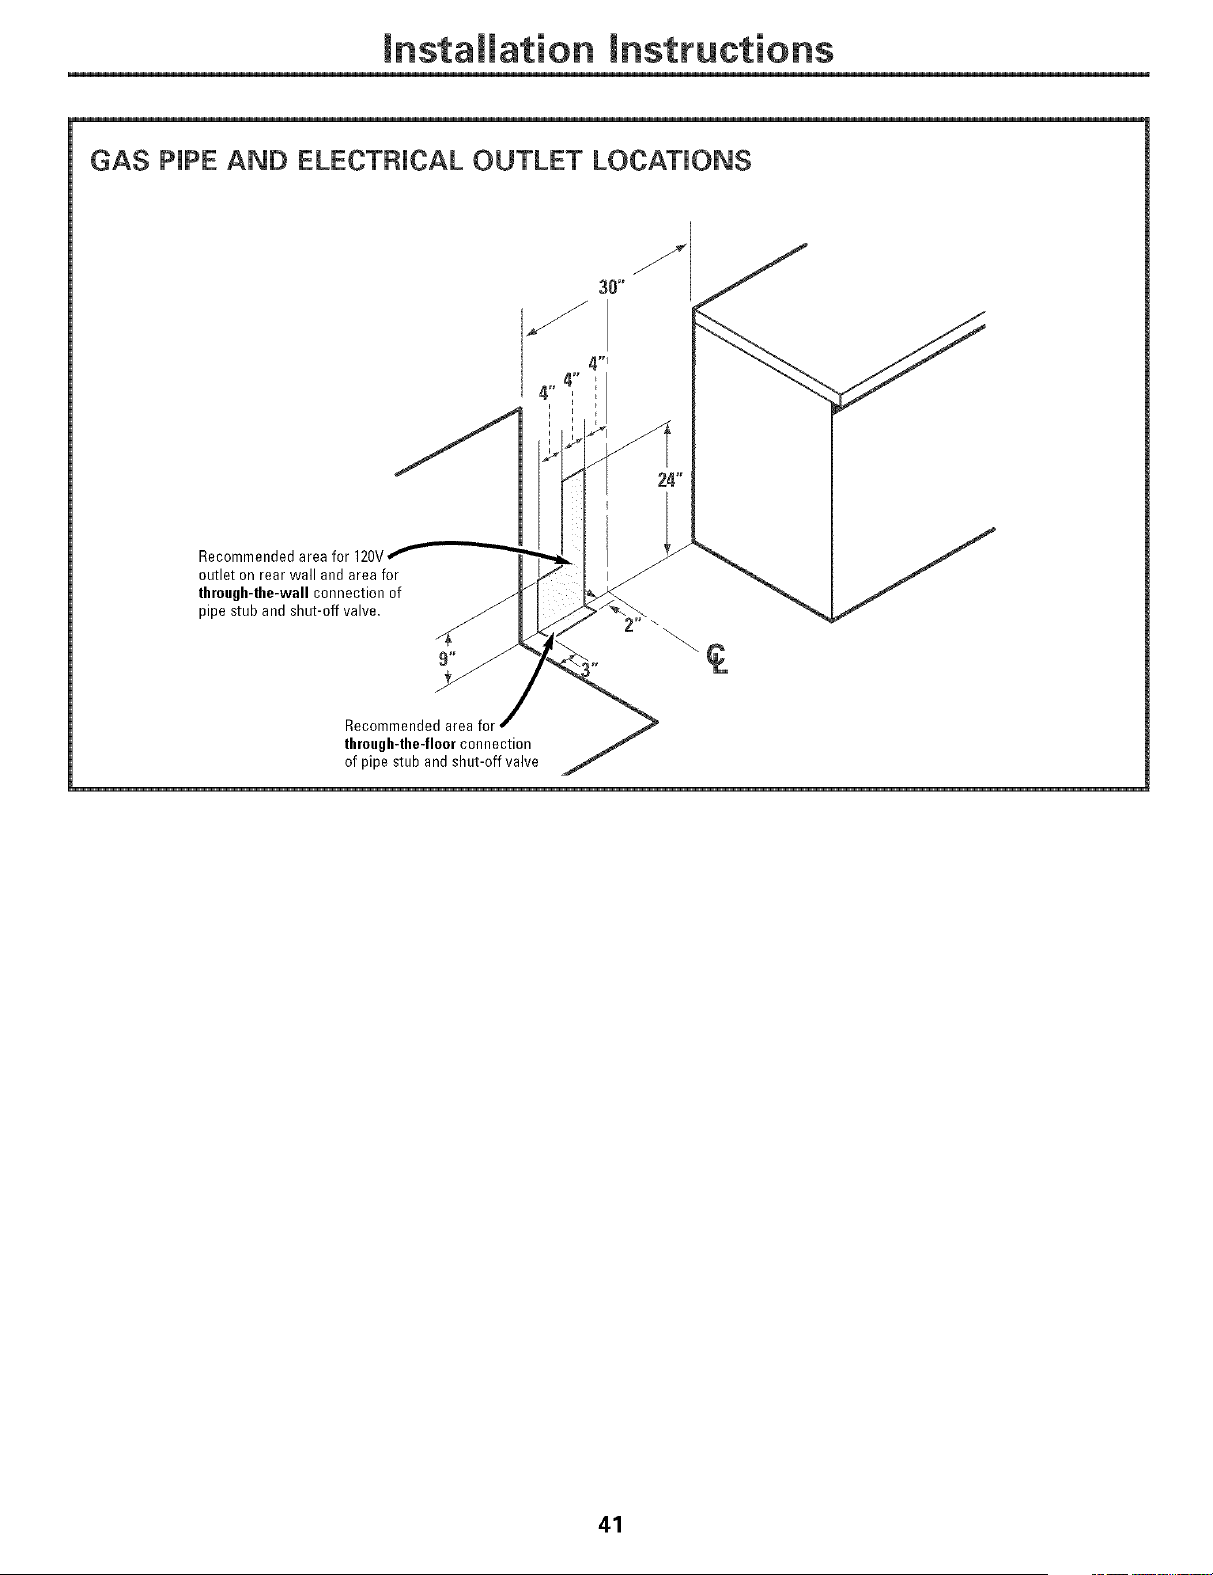
JnstalJation instructions
GAS PiPE AND ELECTRICAL OUTLET LOCATIONS
Recommended area for 120V
outlet on rear wall and areafor
through-the-wall connection of
pipe stub and shut-off valve,
30"
Recommended area for
through-the-floorconnection
ofpipe stub and shut-off valve
41
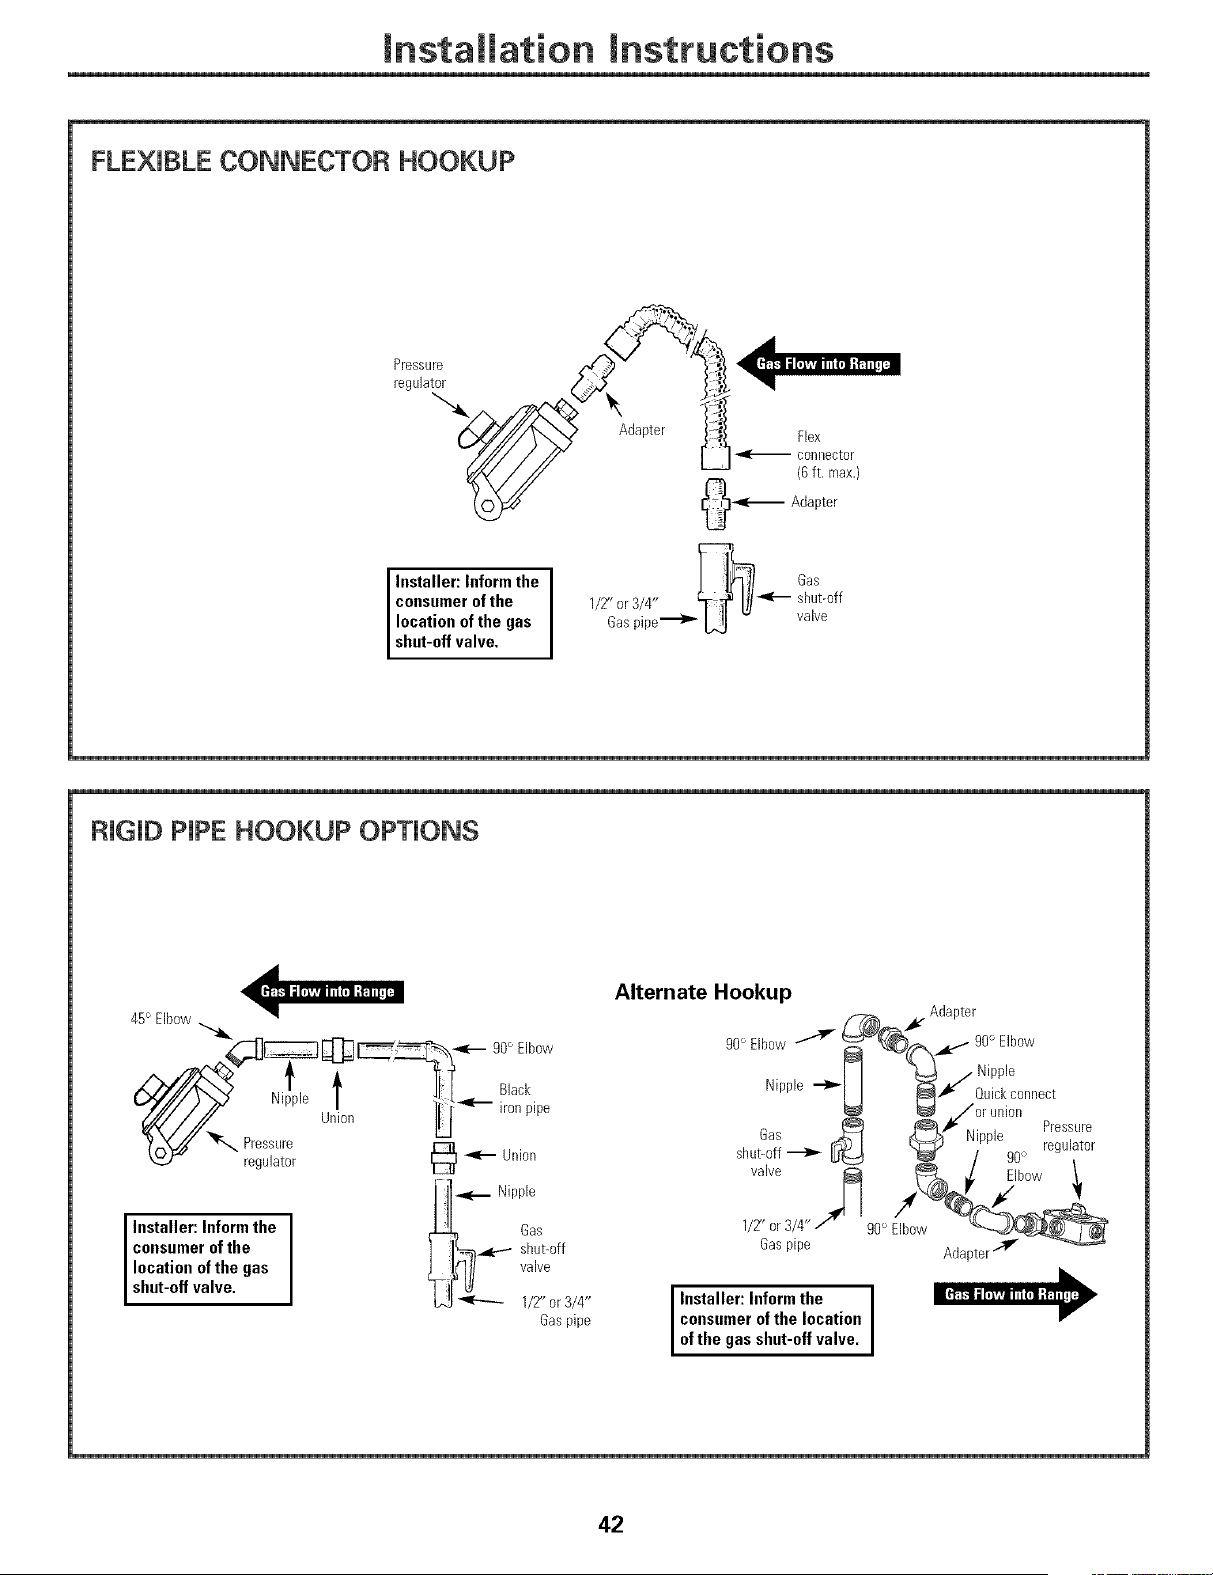
JnstaJJation instructions
FLEXIBLE CONNECTOR HOOKUP
===
£-----q
Installer: Inform the I :l_q'_ Gas
consumer of the l/Z" or3/4" ff_lJJ _-_ shut-off
location of the gas Gaspipe_ L_ - valve
shut-off va ve.
RiGiD PPE HOOKUP OPTIONS
45° Elbow
.k;;::::l]__ __- gooE_bow
regulator
-1 _'_ Nipple
Installer: Inform the I ' _ off
consumer of the I _& !iii_
location of the gas
shut-off va ve. l/Z" or3/4"
Gaspipe
Alternate Hookup
_k" Adapter
f_
go'_EU_ow_ _'=(_d_" _.-- go'_Elbow
I I _ / Nipple
Nipple _
U _ Quickconnect
/or union
r, _ _ _ . . Pressure
oas _44-1 4_ ,h N_pple
sbut-off _ r[_!_ _ / 90`> regulator
I/Z' or3/4"/" 90° Elbow __
Gaspipe ....... _ -_
/4aap[er
Installer: Inform the I
consumer of the location
I
of the gas shut-off va re.
42
mnstaliation mnstructions
[] ELECTRICAL CONNECTIONS
Electrical Requirements
You must use a 120-xolt, 60 Hertz, properly grounded
dedicated circuit protected b_ a 15-aml) or 20-anq)
circuit breaker or time delay fllse.
Extension Cord Cautions
Because of potential satiety hazards associated
with certain conditions, we strongly recommend against
the use of an extension cord. However, if you still elect
to use an extension cord, it is absolutely necessary that
it be a /JIAisted, 3-wire grom_ding-type appliance
extension cord and that the cmTent carrying rating of
the cord in amperes be equivalent to, or greater than,
the circuit rating.
Grounding
IMPORTANT--(Please read carefully)
FOR PERSONAL SAFETY, THIS APPLIANCE MUST
BE PROPERLY GROUNDED.
PreferredMethod
Ensureproper ground
exists before use
The power cord of this appliance is equipped with a
three-prong (grotmding) i)lug which mates with a
standard three-prong grotmding wall receptacle to
minimize the possibility of electric shock hazard from
this appliance.
The customer should have the wall receptacle and
circuit checked by a qualified electrician to make sm'e
the receptacle is properly grotmded.
Where a standard two-prong wall receptacle is
encotmtered, it is the personal responsibility and
obligation of the customer to have it replaced with a
properly grotmded three-prong wall receptacle.
DO NOT, UNDER ANY CIRCUMSTANCES,
CUT OR REMOVE THE THIRD (GROUND) PRONG
FROM THE POWER CORD.
A word about GFCI's - GFCI's are not required or
recommended for gas range receptacles,
Groined Fault Circuit Interrupters (GFCI's) are
devices that sense leakage of current in a circuit and
automatically switch off power when a threshold
leakage level is detected. These devices must be
manually reset by the consumer. The National Electrical
Code requires the use of GFCI's in kitchen receptacles
installed to serve countertop surfhces. Peril)finance of
the range will not be alti_cted if operated on a GFCI-
protected circuit but occasional nuisance tripping of
the GFCI breaker is possible.
[] ELECTRICAL CONNECTIONS (CONT.)
A. Usage Situations where Appliance Power Cord will
be Disconnected Infrequently.
An adapter may be used only on a 15-amp circuit.
Do not use an adapter on a 20-amp circuit. Where
local codes permit, a TEMPORARY CONNECTION
may be made to a properly grounded two-prong wall
receptacle b)' the rise of a UIAisted adapter, available
at most hardware stores. The larger slot in the adapter
must be aligned with the larger slot in the wall
receptacle to provide proper polarity in the
connection of the power cord.
TemporaryMethod
(Adapter plugs not permitted in Canada)
Align large prongs/slots
Ensureproper
ground and firm
connection before
use
CAUTION: Att.chi.gthe.d.ptei"
grotmd terminal to the wall receptacle cover
screw does not grotmd the appliance unless
the cover screw is metal, and not insulated,
and the wall receptacle is grotmded through
the house wiring. The customer should have
the circuit checked by a qualified electrician
to make stlre the receptacle is properly
grounded.
When disconnecting the power cord fl'om the adapte_;
always hold the adapter with one hand. If this is not
done, the adapter grotmd terminal is very likely to
break with repeated use. Should this hal)pen, DO
NOT USE the appliance until a proper grotmd
has again been established.
43
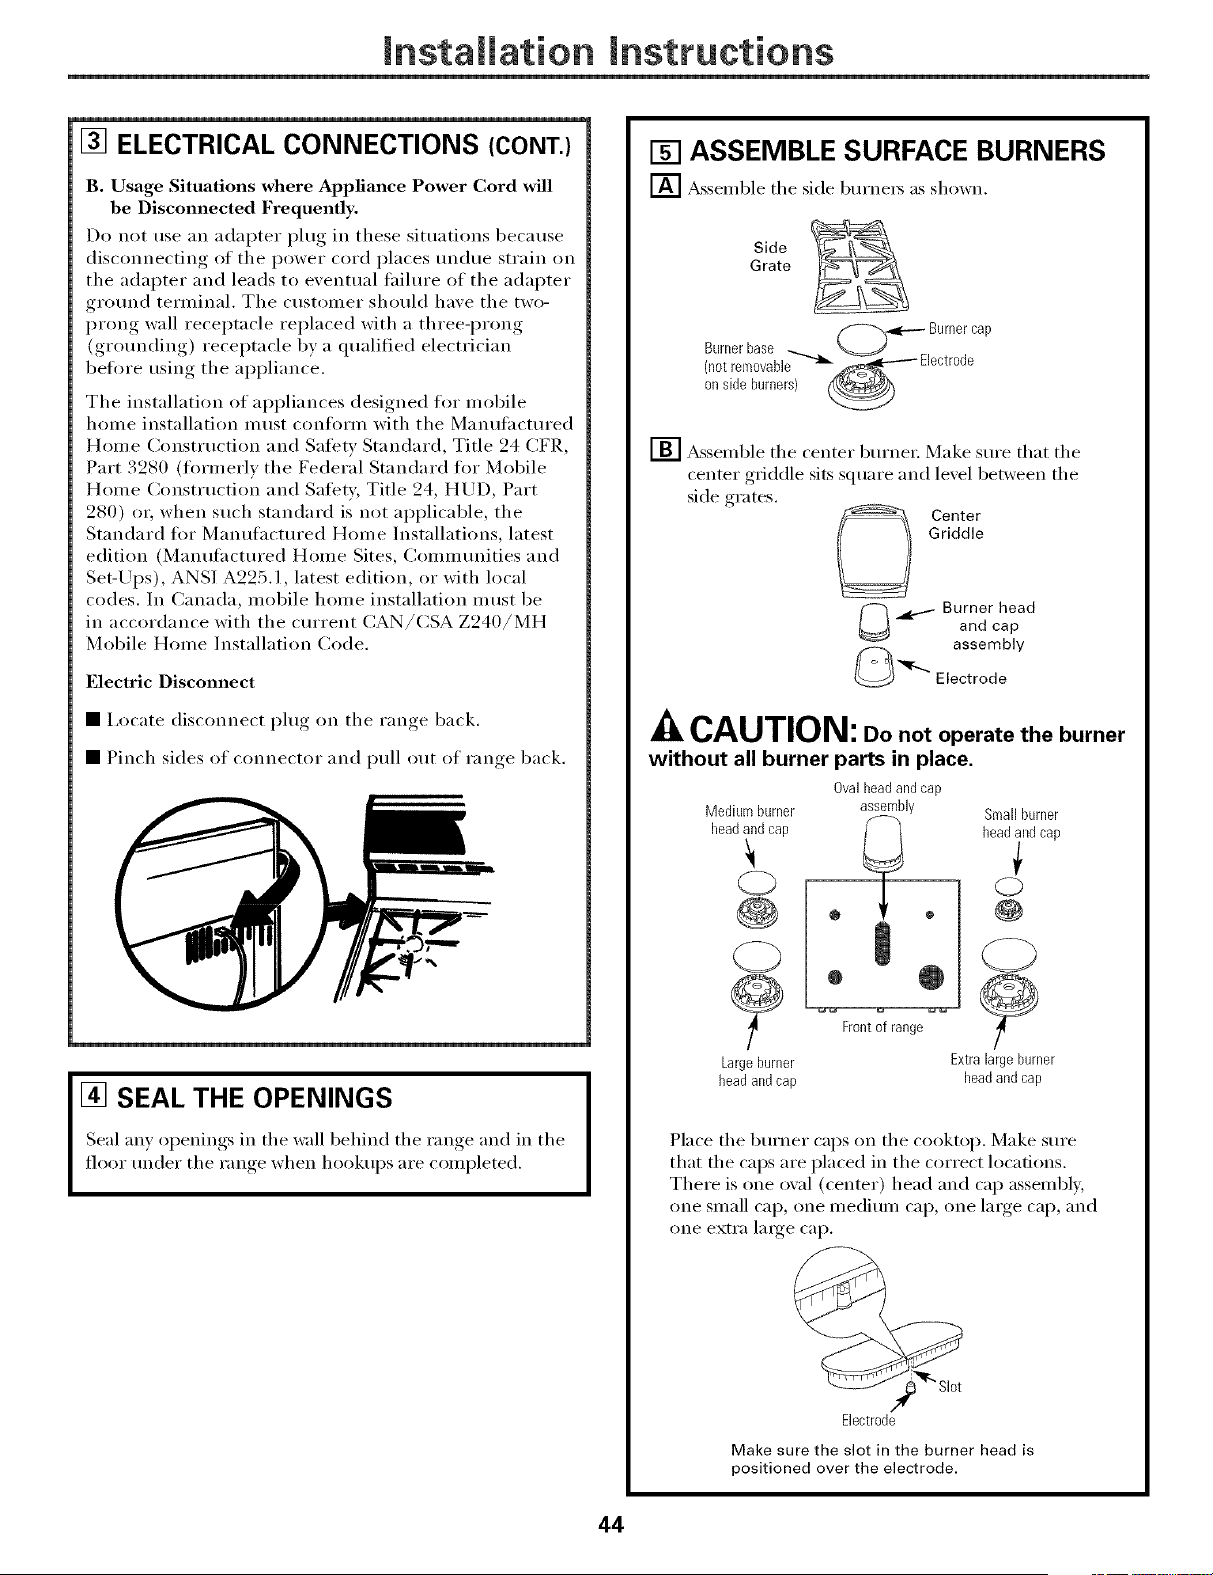
mnstaliation mnstructions
[] ELECTRICAL CONNECTIONS (CONT.)
B. Usage Situations where Appliance Power Cord will
be Disconnected Frequently.
Do not use an adapter phtg in these situations because
disconnecting of the power cord places tmdue strain on
the adapter and leads to eventual failure of the adapter
ground terminal. The customer should have the two-
prong wall receptacle replaced with a three-prong
(grotmding) receptacle by a qualified electrician
befl)re using the appliance.
The installation of appliances designed fi_r mobile
home installation must confl)rm with the Manufactured
Home Construction and Safety Standard, Title 24 CFR,
Part 3280 (%rmerly the Federal Standard %r Mobile
Home Construction and Satiety, Title 24, HUD, Part
280) o_; when such standard is not applicable, the
Standard for Mamdactm'ed Home Installations, latest
edition (Mamdactured Home Sites, Communities and
Set-/Jps), ANSI A225.1, latest edition, or with local
codes. In Canada, mobile home installation must be
in accordance with the cmTent CAN/CSA Z240/MH
Mobile Home Installation Code.
Electric Disconnect
• i,ocate disconnect plug on tile range back.
• Pinch sides of connector and pull out of range back.
[] SEAL THE OPENINGS
Seal am, ol_enings, in tile wall behind tile range and in tile
floor under tile range, when hookul)s, are completed.
[] ASSEMBLE SURFACE BURNERS
[] _ssemble tile side bm'ners as shown.
Side ___
Grate
('_--_ Burnercap
Burnerbase __
(n0tremovable "f_7-"--, Electrode
onside burners)
[] ,_ssemble tile center burner: Make sure that tile
center griddle sits square and lexel between tile
side grates.
Center
Griddle
_ Burner head
and cap
assembly
Electrode
CAUTION: oo not operate the burner
without all burner parts in place.
0valbeadand cap
Mediumburner assembly
beadand cap
C)
@
(2)
Largeburner
headandcap
Smallburner
headandcap
(2)
@
Frontofrange
Extralargeburner
beadand cap
Place tile bm'ner caps on tile cooktop. Make sm'e
that tile caps are placed in tile correct locations.
There is one oval (center) head and cap asselllblv,
one small cap, one medium cap, one lalge cap, and
one extra lmge cap.
%
Electrode
Make sure the slot in the burner head is
positioned over the electrode.
44
Installation Instructions
[] CHECK IGNITION OF SURFACE
BURNERS
Operation of all cooktop and oxen burners should be
checked after the range, and gas suppl) lines haxe been
careflfll_ checked fi)r leaks.
Electric Ignition Models
Select a top burner knob and simultaneously push
in and turn to L1TE position. You will hear a clicking
sound indicating proper operation of the spark
module. Once the air has been purged fl'om the
supply lines, burners should light within 4 seconds.
Afier burner lights, rotate knob out of the L1TE
position. Try each burner in succession until all
burners have been checked.
Quality of Flames
The combustion qualit)of burner flames needs to be
determined xisuall_.
(A) Yellow flames--
Callfor service
(B)Yellow tips on
outer cones--
Normal for LP gas
(C)Softblue
flames--Normal for
natural gas
If burner fla_mes look like (A), call for service. Normal
burner flmnes should look like (B) or (C), depending
on the type of gas you use.
X_ith I,P _oas.....some xellow till) )ing, on outer cones
is normal.
[] CHECK IGNITION OF OVEN BURNER
The oven is designed to operate quietly and automatically.
To operate tile oven, touch the BAKE pad and then touch
the nmnber pads until 350° appears in tile display. Touch the
START pad. ,Mter 30-90 seconds, the oven burner will ignite
and burn until the set temperature is reached.
Electric ignition models require electrical power to oi)erate.
In case of a t)ower outage, the men burners on these models
cannot be lit mammllv with a match. (',as will not flow unless
the glow bar is hot.
Ifthe oxen is in use when a power outage occurs, the burner
x_ill shut ott and cam/ot be re-lit until power is restored.
45
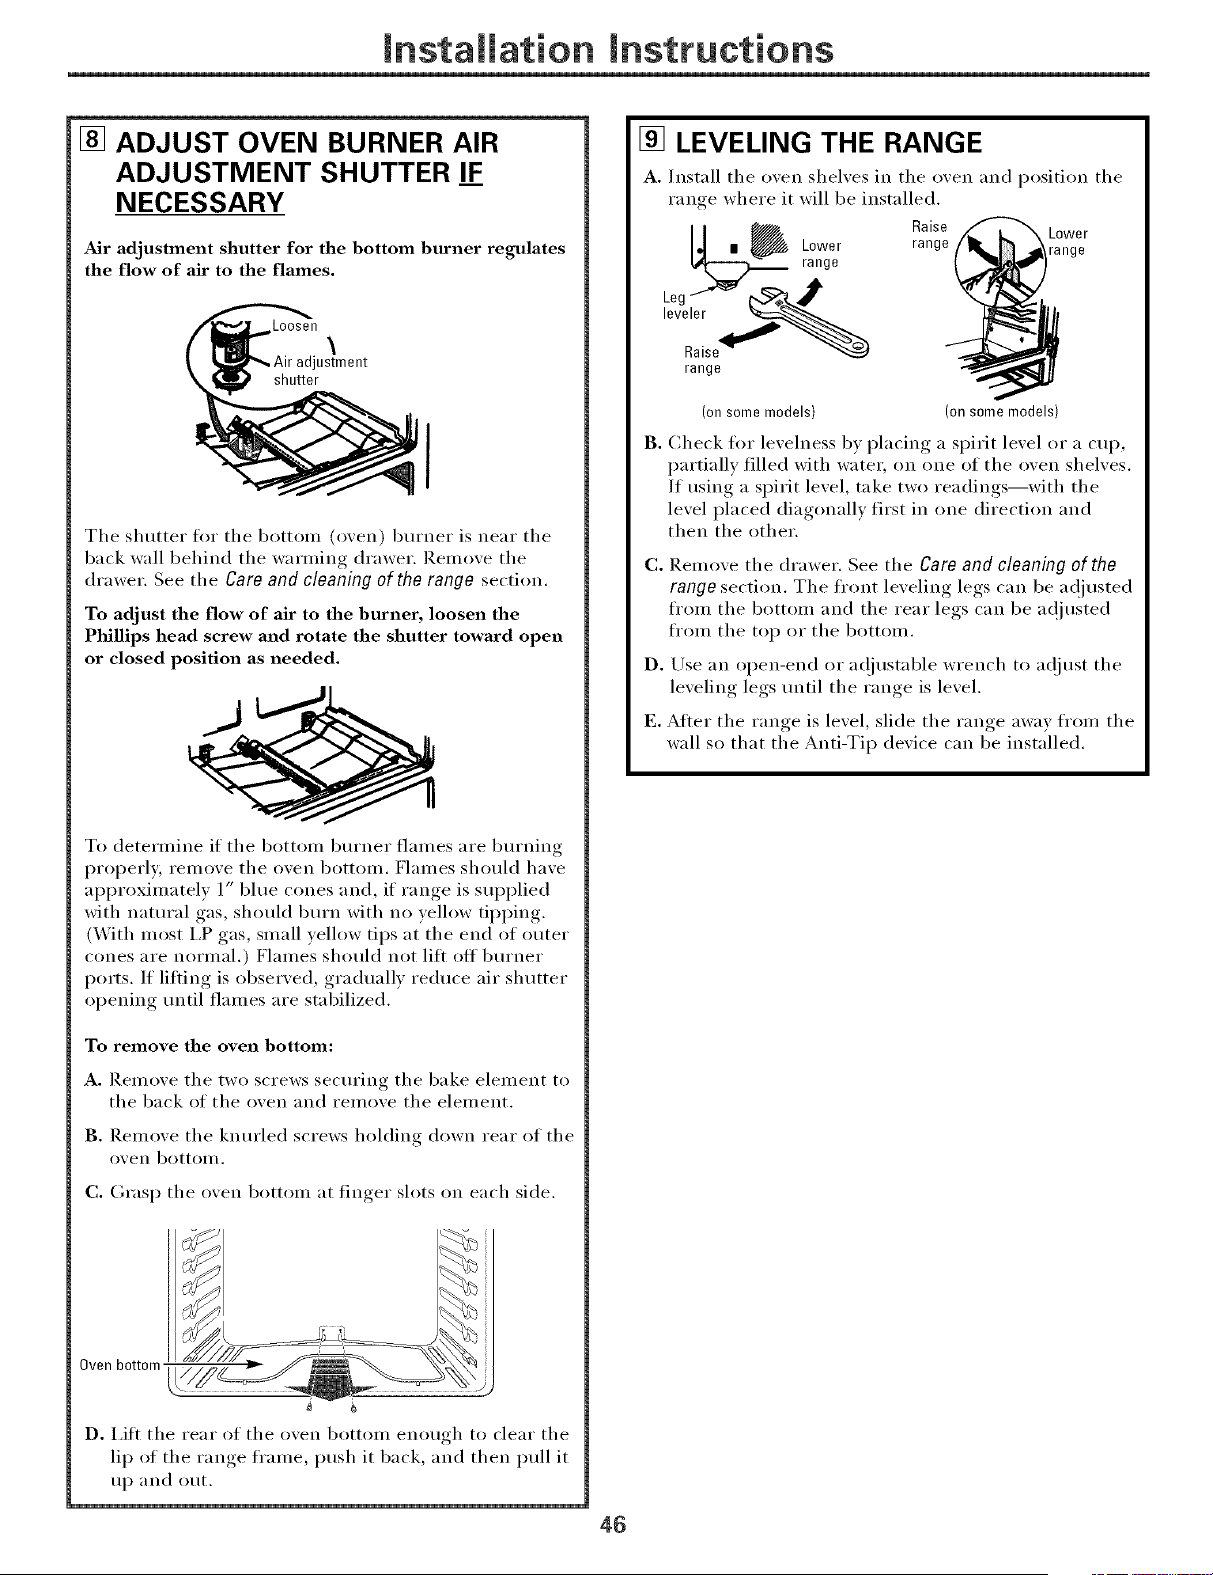
mnstaliation mnstructions
[] ADJUST OVEN BURNER AIR
ADJUSTMENT SHUTTER IF
NECESSARY
Air adjustment shutter for the bottom burner regulates
the flow of air to the flames.
Loosen
\
Jstment
shutter
I
The shutter fin" the bottoln (o',en) burner is near the
back wall behind the warming drawer. ]_emoxe tile
drawer, See the Care and cleaning of the range section,
To adjust the flow of air to the burner, loosen the
Phillips head screw and rotate the shutter toward open
or closed position as needed.
To determii_e if tile bottoln burner flaines are buri_ing
i)roi)erly; reinove tile oven bottom. Flames should have
al_l_roxilnately 1" blue cones and, if range is supplied
with natural gas, should burn with no yellow tipping.
(With Inost I.P gas, slnall yellow tips at the elm of outer
cones are ilornlal.) Flames should not lifi off burner
ports. If lilting is observed, gradually reduce air shutter
oi)ening until flalnes are stabilized.
To remove the oven bottom:
A. Relnove the two screws securing the bake elemei_t to
the back of the oven and relnove the elelnent.
B. Relnove tile knurled screws holding down rear of tile
oven bottoln.
C. Grasp tile oven bottom at finger slots on each side.
Oven bottom
D. I,ilt the rear of tile oxen bottoln enouoh to clear tile
lip of tile range fralne, push it back, and then pull it
tip and ()lit.
[] LEVELING THE RANGE
A.
range where it will be installed.
Raise
I _aOWgr range
range
Install tile oxen shelxes in the oxen and position tile
Lower
range
(onsomemodels) (onsomemodels)
B. Check fi)r levelness by placing a spirit level or a cup,
partially filled with water, on ()lie of tile oven shelves.
If using a spirit level, take two readings--with the
level placed diagonally first in one direction and
then the other,
C.
n.
]_emove tile drawer, See tile Care and cleaning of the
range section. Tile front leveling legs can be ac!justed
fl'Oln the bottoln aim the rear legs can be a(!justed
from tile top or tile bottom.
Use an open-end or a(!iustable wrench to a(!iust tile
lexelim,_ legs until the ram,e_ is lexel,
E. Afier tile ram,e,_ is lexel, slide tile range, awax, from tile
wall so that tile Anti-Tip dexice can be installed.
46
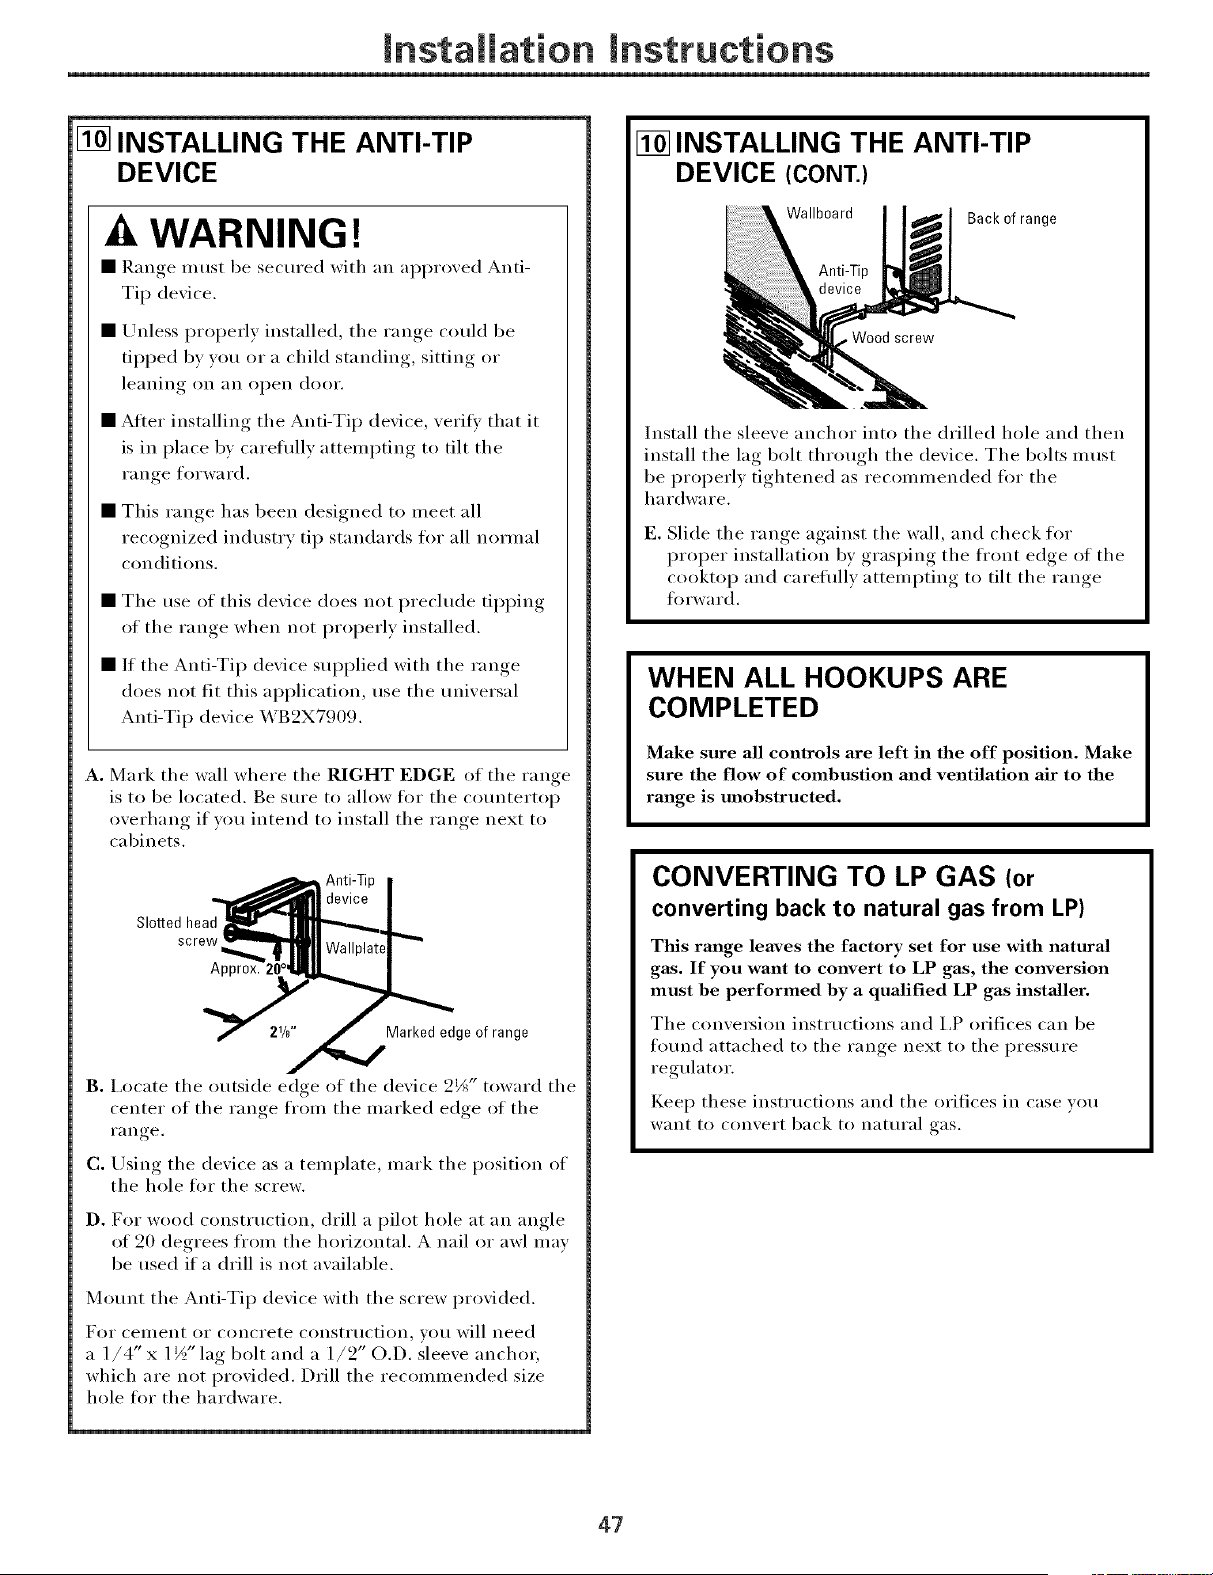
mnstaiiation mnstructions
[] INSTALLING THE ANTI-TIP
DEVICE
A WARNING!
• R'm,,e,_ must be secured with an approxed Anti-
Tip dexice.
• Unless properly installed, the range could be
tipped b) you or a child standing, ,sittin,,_ or
leaninom on _lI1 open door.
• After installing the Anti-Tip device, xerilk that it
is in place b) careflflly attempting to tilt the
I'll Ilt re forward.
• This ran,,e has been designed to meet all
recognized industry tip standards for all normal
conditions.
• The use of this dexice does not preclude tii,)Dim,
of the range when not properly installed.
• If the Anti-Tip dexice supplied with the range
does not tit this application, use the unixersal
Anti-Tip device "x4B2X7909.
A. Mark the wall where the RIGHT EDGE of the range
is to be located. Be sure to allow fl)r the cotmtertop
overhang if you intend to install the range next to
cabinets.
Slotted head
Marked edge of range
2_ toward the
B. I.ocate the outside edge of the device _J "
center of the range from the marked edge of the
I'}l I1 re
C. Using the dexice as a template, mark the position of
the hole for the screw.
D. For wood constHlction, drill a pilot hole at an angle
of 20 degrees from the horizontal. A nail or awl may
be used if a drill is not axailable.
Mount the Anti-Tip dexice with the screw proxided.
For ceulen[ or concrete constitlction_ VOtl will need
a 1/4" x 1½" lag bolt and a 1/2" O.D. sleeve anchm;
which are not provided. Drill the recommended size
hole for the hardware.
[] INSTALLING THE ANTI-TIP
DEVICE (CONT.)
Wallboard
Back of range
screw
Install the sleeve anchor into the drilled hole and then
install the lag bolt through tile device. The bolts must
be properly tightened as recommended fi)r the
hardware.
E. Slide tile range against the wall, and check for
proper installation by grasping the ti'ont edge of the
cooktop and careflflly attempting to tilt the range
forward.
WHEN ALL HOOKUPS ARE
COMPLETED
Make sure all controls are left in the off position. Make
sure the flow of combustion and ventilation air to the
range is unobstructed.
CONVERTING TO LP GAS (or
converting back to natural gas from LP)
This range leaves the factory set for use with natural
gas. If you want to convert to LP gas, the conversion
must be performed by a qualified LP gas installer,
The come_ion instructions and I,P orifices can be
fotmd attached to the range next to the pressure
regulator.
Kee I) these instructions and the orifices in case you
_V_lIlt 1o conx.ert back to natt/ral gas.
47
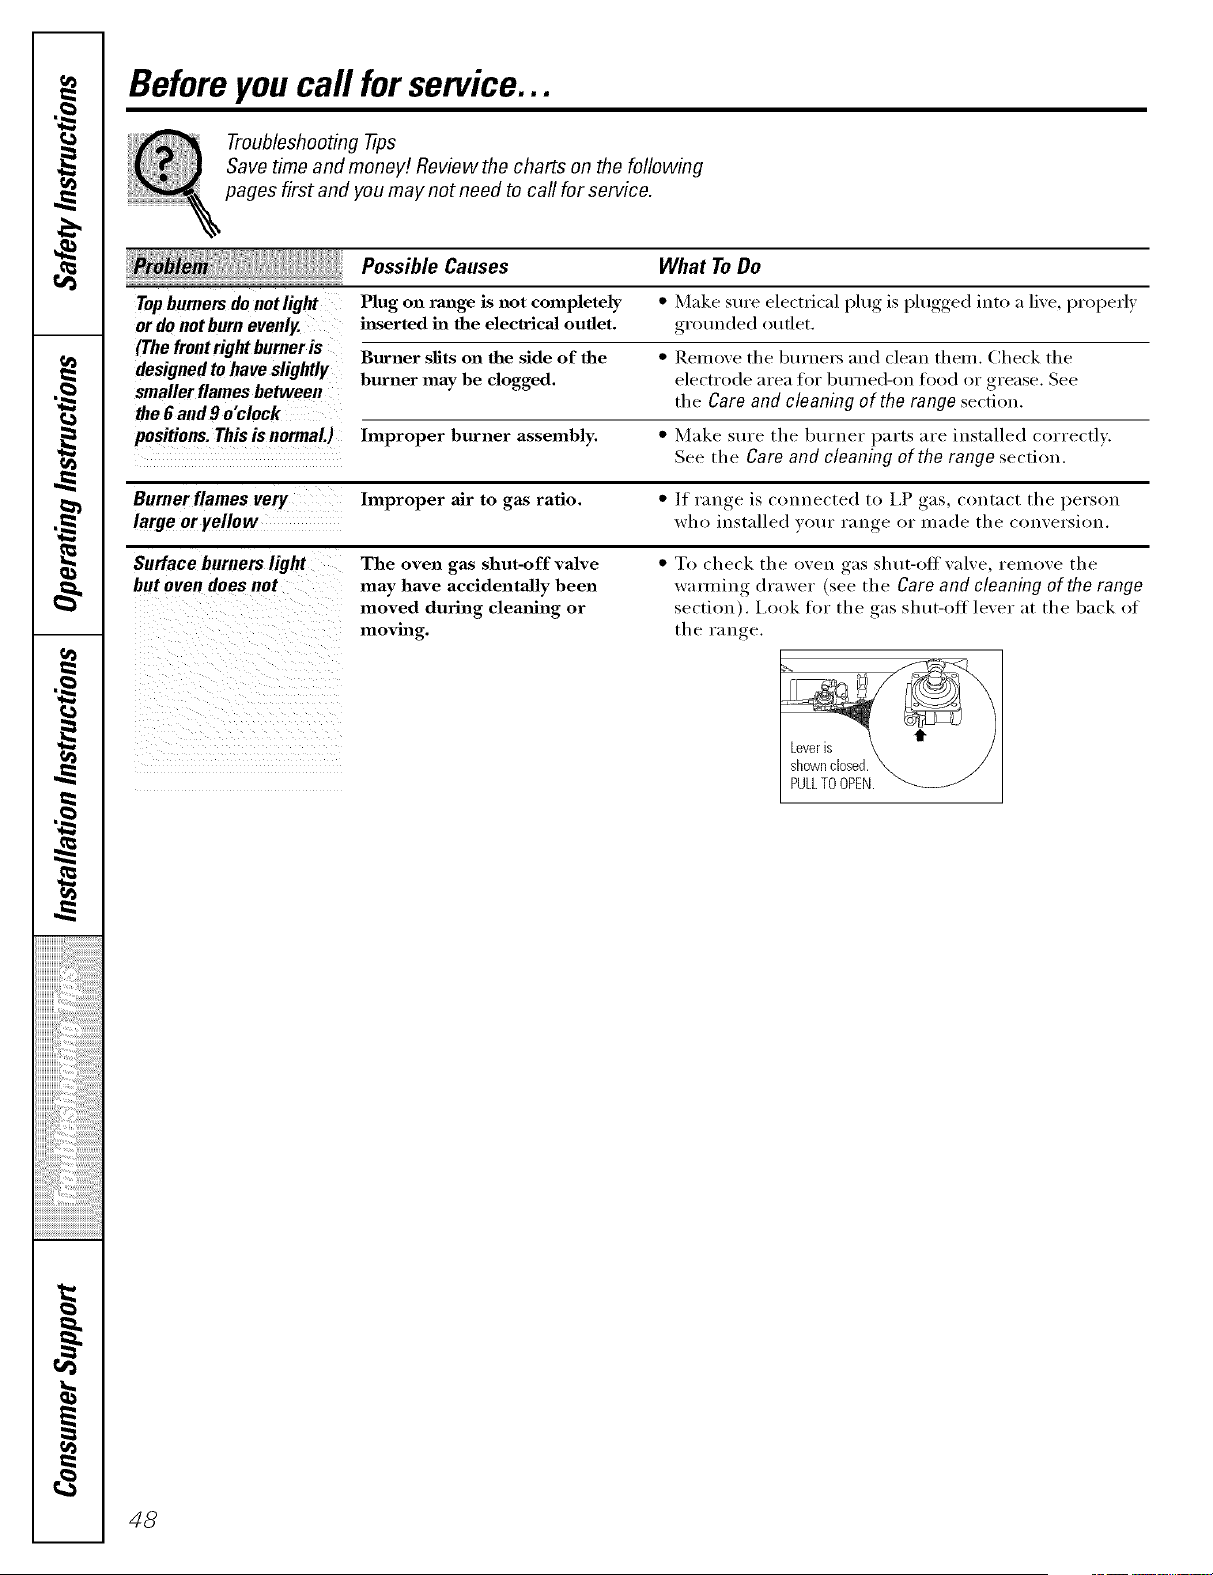
,0
,0
,0
,0
iiiiiiiiiiiiii!iii!i_ii!_!_!_iii_iiiilililililililiiii_iiiii
iiiiiiiiiiiiiiiiiiiiiiiiiiiiiiiiiiiiiiiiiiiiiiiiiiiiiiiiiiiiiiiiiiiiiili!ii
m
Before you call for service...
Troubleshooting -tips
Save time and money! Review the charts on the following
pages first and you may not need to call for service.
Possible Causes What To Do
Topburners do notlig_ Plug on range is not completely * M:lke stll'e elect_ic:d l)lug, is I)lugged,, into a live, p_'operly
or do not burn evenly, inserted in the electrical oudet, g_'ounded outlet.
(The frontrightburneris Burner slits on the side of the * Remove the btu'ne_ ;rod (le;m them. (_heck the
designed to have slightly burner may be clogged, elects'ode _u'e;_fo_"btt_'ned-on food o_"g_'e;_se. See
smaller flames between the Care and cleaning of the range section.
the6and 9 o'clock
positions.This isnormaL) hnproper burner assembly. * iVlake stt_'e the 1)tu'ne_" p:u'ts :u'e installed _o_'_'e_tlv.
See the Care and cleaning of the range section.
Burner flames very hnproper air to gas ratio. • If _'_uage is ¢omae¢'ted to I.P gas, cent:act the pe_'son
large oryellow who installed votu" r:u_,,e or _H:_de the conversion.
Surface burners light The oven gas shut-off valve • To check the oven g:_s sht_t-oH v:dve, remove the
but oven does not may have accidentally been \v;u][ling (h';_we_" (see' the Care and cleaning of the range
moved during cleaning or se'ction), l.ook fo_"the" g:_s shut-ott le've'r _t the b:_ck of
moving, the" _':u] _e
Leveris
shownclosed.
PULLTOOPEN.
48
gacom
Controlsignalsafter
entering cookingtime
or start time
Possible Causes
You forgot to enter a bake
temperature or clemlhlg time.
What ToDo
• Touch tile BAKE pad and desired temperature or
tile SELF CLEAN pad and desired clean time.
Food does notbake or Oven controls bnpmperly set. • See tile Using the oven section.
roast properly in the Shelf position is incorrect. • See tile Using the oven section.
oven
Incorrect cookware or cookware • See the Using the oven section.
of improper size being used.
Oven thermostat needs • See the Adjust the oven thermostat--Do it
adjustment, yourself[ secti(m.
Clock slot set correctly. • See tile Using the clock and timer section.
Aluminum foil used improperly • See tile Care and cleaning of the range secti( )u,
ill the oven.
Oven bottom not securely • See the Installation oftherange section.
seated ill position.
Food does notbroil Oven controls ilnpmperly set. • Make sure you touch the BROILHI/LOpad.
properlyintheoven Oven door not closed. • See the Using the oven se(fion.
Improper shelf position • See the Broiling Guide.
being used.
Food being cooked ill a hot pan. • Use the broiling pan and grid that came with your
range. Make sure it is cool.
CookwaJ_e not suited for broiling. • Use the broiling pros and glid that came with your range.
Alumilmm foil used on the • See the Usingtheoven section.
the broiling pan and grid has
not been fitted properly and
slit as recommended.
Oven bottom not securely • See tile Installation of the range section.
seated ill position,
Oventemperature Oven thermostat • See the Adjust the oven thermostat--Do it
too hot ortoo cold needs adjustment, yourself[ section.
Clock and timer Plug on range is slot completely • Make sure electrical plttg is plugged into a live, properly
do not work inserted in the electrical outlet, grounded outlet.
A fuse ill your home may be • Replace the fl/se or reset the circuit breakel:
blown or the circuit breaker
tripped.
Oven controls improperly set. • See the Using the clock and timer section.
49
,O
,O
,O
,O
iiiiiiiiiiiii;i_!_ii_i_i_!_!iiii_ili;ii;ii;ii;ii;ii;ii;ii;ii;ii;i_i:ii(i
iiiiiiiiiiiiiiiiiiiiiiiiiiiiiiiiiiiiiiiiiiiiiiiiiiiiiiiiiiiiiiiiiiiiiili!ii
i
m
Before you call for service...
Troubleshooting tips
: Possible Causes What To Do
Oven ligM does Light bulb is loose or defective. * Tighten or replace tile l_ulb.
not work
Plug on range is not completely * Make sure electrical plug is plugged into a live, properly
inserted ha the electrical outlet, grotmded outlet.
Oven millnot The oven temperature is too • Allow the range to cool to room teml)erature aud
self-clean high to set a self-cleml operation, reset the controls.
Oven conlrols improperly set. * See the Using the self-cleaning oven section.
"Crackling" or This is the sound of the * This is normal.
"popping" sound metal heating and cooling
during both the cooking and
cleaning functions.
Excessive smoking Excessive soil. * Touch the CLEAR/OFFl)ad. Open the windows to
rid the room of smoke. _ait tmtil the LOCKED DOOR
light goes ott. XVil)e up the excess soil and reset the
clean cycle.
Oven door will not open Oven too hot. * Allow the oven to cool 1)clew locking temperature.
after a clean cycle
Oven not clean after a Oven controls not properly set. * See the Using the self-cleaning oven section.
clean cycle
Oven was heavily soiled. * Clean up hea\y spillovers before starting the clean
cycle. Heavily soiled ovens may need to sell:clean
again or fin" a hmger l)eriod of time.
"LOCKDOOR" flashes The self-clean cycle has been * Close the oven door.
in the display selected but the door is not
closed.
LOCKEDDOOR light The oven door is locked * Touch the CLEAR/OFFpad. Allow the oven to cool.
is on when yon want because the temperature
to cook inside the oven has not
dropped below the
locking temperature.
"T--and a number or You have a function error code. * Touch the CLEAR/OFF pad. _Mlow the ()vex] to cool fi)r
letter" flash in the display one houi: Put the oven back into operation.
If the function code repeats. * Disconnect all l)ower to the range for 5 minutes
and theu recouuect l)OWer. /f the flmctiou error
code repeats, call for service.
Oven shelves are The shelves were demled in a * Apl)ly a small amount of vegetable oil to a paper
difficult to slide self-clem_ cycle, towel and wipe the edges of the oven shelves with
the paper towel. Do not spray with Pare" or other
lul_ricant sprays.
5O
ge.com
Possible Causes
Displaygoesblank A fuse in your home may be
blown or the circuit
breaker tripped.
The clock is in the * See the Special features ofyourovencontrol section.
black-out mode.
Displayflashes Power failure. * Reset tile clock.
Unable toget the Oven control pads were * Tile BAKE and BROILHI/LOpads must be touched :it
displayto show "SF" not pressed properly, tile same time and held for 3 seconds.
Power outage, Power outage or surge. * Reset tile clock. If the oven was in rise vot/l///lst Yeset
clock flashes it 1)y touching the CLEAR/OFFpad, setting the clock
and resetting any cooking flmction.
"Burning" or "oily" This is normal in a new oven * To speed the process, set a sell:clean cycle for a
odoremittingfrom and will disappear in time. minimum of 3 hotu's. See the Using tho self-cleaning
the vent oven section.
Strongodor An odor from the insulation * This is teli/pol'al'y.
around the inside of the oven
is normal for the first few times
the oven is used.
Drawer does not slide The drawer is out of afigmnent. * Fully extend the drawer and push it all the way in.
smoothlyor drags See the Care and cleaning of the range section.
Drawer is over-loaded or load * Reduce weight. Redistribute drawer contents.
is unbalanced.
Warming drawer will A fuse in your home may be * Replace the fl/se or reset the circuit breaker.
not work blown or the circuit breaker
tripped.
The oven is self-cleanh_g. * Wait for the sell:clean cycle to finish and the oven
to cool.
Controls improperly set. * See the Electric warming drawer section.
Excessive condensation Liquid in drawer. * Remove liquid.
in the drawer
Uncovered foods. * Cover food with lid or aluminum foil.
Temperature setting too high. * Redure temperature settin
Fooddries out in the Moisture escaping. * Cover food with lid or aluminum foil.
warmingdrawer
Drawer not fully closed. * Push drawer in tmtil latch engages.
What To Do
• Replace the tilse or reset the circuit breaker:
51
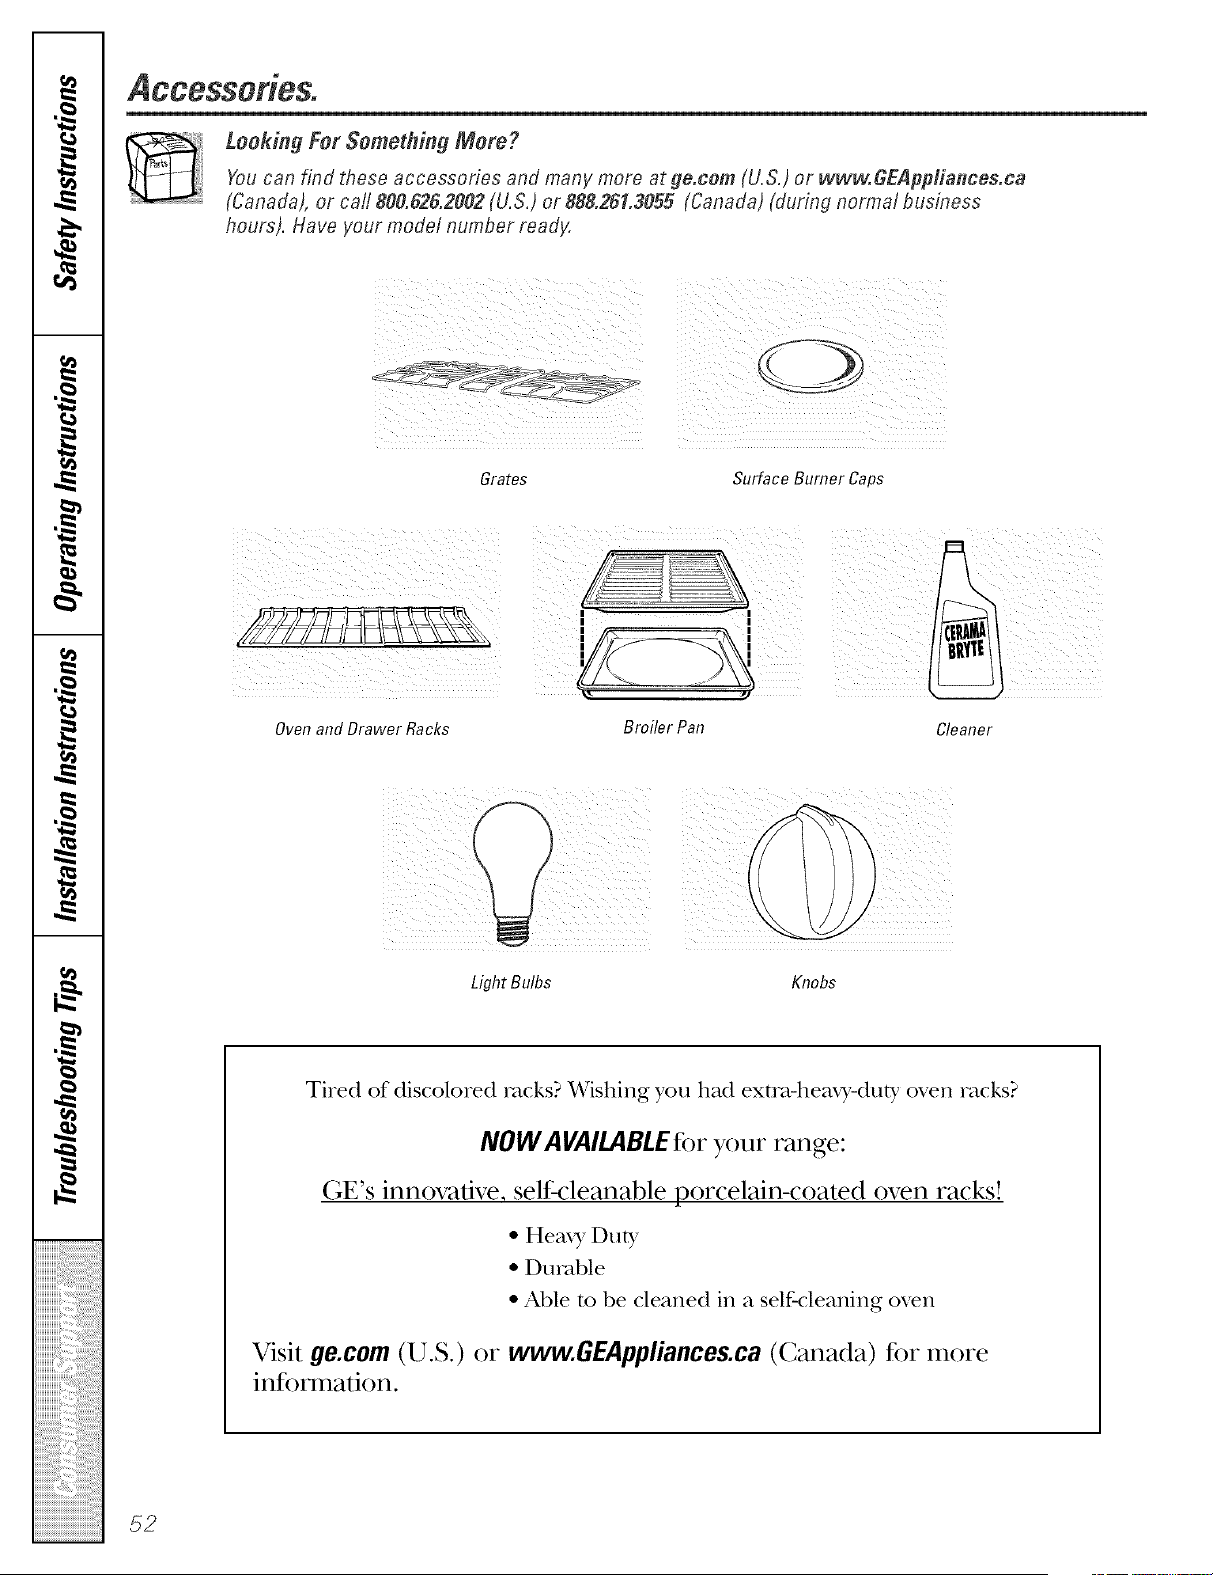
m
.,=_=.,
q
__
Accessories.
Looking For Something More?
Youcan find these accessories and many more at ge.cem (U.S.)or www.GEAppliances.ca
(Canada), or call 800.626.2002 (U.S.) or 888.261.3055 (Canada) (during normal business
hours). Have your model number ready.
(¸¸¸¸7¸¸¸¸¸(((i
Grates Surface Burner Caps
Oven and Drawer Racks
Broiler Pan
Cleaner
Light Bulbs Knobs
Tired of discolored rocks? Wishing you had extol-hearT-duty oven racks?
NOW AVAILABLEfor your range:
(;E's innovative, selfk:leanable porcelain-coated oven racks!
• Hem T Duty
• Durable
• Able m be cleaned in a self-cleaning oven
Visit ge.com (U.S.) or www.GEAppliances.ca (Canada) for more
information.
52
GE Service Protection Plus F_'
GE, a imme recog_3ized wovldwkle for qmdity ai_d depei_dabilit), offers )o_t
Serxke Protectioi_ Ph_s'"--comprehei_six;e protectioH oi_ aH yore app_iai_ces--
No Matter What Brand!
Benefits Include:
oBacked by GE
oAll brands covered
o UnIinfited service calls
oAll parts and labor costs mclnded
oNo ont°of_pocket expenses
oNo lfidden deductibles
o One 800 number to call
WoTI CoverAny Appl&nce.
Angwhoro. Anflfmo.
YoH wi]] be complete]) satisfied with om _service protectio_ or'_ol_ ma} reql_est }olaf mo_ev back
o_ the remaim_im_g x'ab_e of)olw tom, tract. No qlmstiom_s asked. It's that simple.
Protect vol_r re_'igerato_; dishwasher; washer a_d d_ye_; ravage, TV, VCR a_d m_ch more--any brand!
Pb_s there's m) extra charge {or emerge_cy service m_d low mo_th]y fi_a_ci_g is available. Even_ icemaker
coverage a_d food spoilage protectio_ is o{ti_red. Yo_ ca_ rest eas}, k_owi_g that all vo_r vabmb]e
ho_seho]d pro(b_cts are protected agai_st expe_sive repairs.
: 5_[} hl{IDds c )v(l{!(t, tip lit _{} }( !1"s o}(I, i/3 l]3e CODtl/]{ I]t_}] _,_,
_Ctl_ hel<
Please place in envelope and mail to:
gonoral Electric Company
Warranty Registration Department
P.O. Box 3215{)
Louisville, KY 40232-2150
53

Consumer Product Ownership Registration
Dear Customer:
Thank you for purchasing our product and thank you for placing your confidence in us.
_A/eare proud to ha_e you as a customer!
Follow these three steps to protect your new appliance investment:
Complete and mail
your Consumer
Product Ownership
Registration today.
tLwe the pe_lce of
mind of knowing wc
call contact VOU ill
tile unlikely {xent of a
safiT, modification.
Atter lnailing tile
registration below,
store this (]OClllllellt
ill a sati' place. It
contains inlormation
you will need should
you require service.
Our selwice number is
800.GE .CAP, ES
(8(t0.432.2737).
Read your Owner's
Manual carefllllv.
It will help you
operate your lie', t`
appliance properly.
Model Number Serial Number
Important: If you did not get a registration card with your
product, detach and return the form below to
ensure that your product is registered, or register
online at ge.com.
Consumer Product Ownership Registration
@
Model Number Serial Number
Ms. M*>,. Mi_',
Fip'I I I Lasll
Nmle I I I I I I I I I Nalne I I I I I I I I I I I I
I
I
Ap_#I , , , , , , , I E-lnailAddress*
Ci,v ] I I
l )ale Placed
hi Use L_
Monlh
I I I I
Zip ]
_ar ] I ] Phon{
Nulnl)erl I I I I I I I-I I I I I
@
GEAppliances
6F Co_isumer & hldf_striM
Apptia_ces
6eJlerM Electric Company
Loo_vifte, gY #g_5
g_ celn
54
* Please provide your e-mail address to receive, via e-nlail, discounts, special ottLp, and other important
communications from GE Appliances (GEA).
Check here if you do not want to receixe communications ti-onl GEA's careflflly selected partners.
FAILI JRE TO COMPI.ETE AND RE'F[ RN Tt tIS CARD DOES NOT DIMINISII YOI JR
WARRAN'IT RI (;I ITS.
For intormation about GEA's prixacy and data usage polio); go to ge.conl and click on "Prixacy t)olicy "
or call 8t)0.626.2'224.

_$.
_L
m
w
w
m
€_
55
m
_ Notes_
€_
Q_
m
€_
q
--o
m_
m
_4m
€_
5_
Notes,
w
w
w
57
,0
,0
,0
,0
q
GEGasRange Warranty. ForcustomersintheUnitedStates)
All warranty service provided by our Factory Service Centers,
or an authorized Customer Care® technician. To schedule service,
on-line, 24 hours a day, vis# us atge.com, or carl 800.GE.CARES
(800.432.2737).
Stapleyourreceipt here.
Proofoftheoriginal purchase
dateisneeded to obtainservice
under thewarrant_
Fromthe date ofthe
originalpurchase
GE Will Replace:
Anypattot the range which tifils due to a defect in materials or workmanship, L)ming this
full one-year warranty, GE will also provide, free of charge, all labor and in-home service to
replace the defective part.
Service trips to your home to teach you how to use
the product.
Improper installation, delivery or maJntenm_ce.
Failure of the product if it is abused, misused,
or used for other than the intended purpose or
used commercia]ly.
Replacement of house fuses or resetting of circuit
breakers.
Damage to the product caused by accident, fire, floods
or acts of God.
h_cidentaJ or consequential damage caused by possible
defects with this applimace.
Damage caused after delivery.
This warranty is extended to the original purchaser and any succeeding owner for products purchased for home
use within the USA. In Alaska, the warranty excludes the cost of shipping or service calls to your home.
Some states do not allow the exclusion or limitation of incidental or consequential damages. This warranty gives
you specific legal rights, and you may also have other rights which vary from state to state. To know what your
legal rights are, consult your local or state consumer affairs office or your state's Attorney General.
Warrantor:GeneralElectric Company.Louisville,KY40225

GEGasRange Warranty. (Forc.stomersinCanada)
Stapleyourreceipt here.
Proofoftheoriginal purchase
dateisneeded toobtainservice
under thewarrantg
All warranty service provided by our Factory Service Centers
or an authorized Customer Care® technician. For service,
call 1.800.361.3400.
Camco Will Replace:
Anypart of the range which fifils due to a (leiect in materials or workmanship. During this
full one-yearwarranty,Camco will also provide, freeof charge,all labor and in-home service to
replace the defective part,
One Year
Fromthe date ofthe
originalpurchase
Replacement of house fuses or resetting of circuit
breakers.
I
t'h
59
m
w
g
w
T
_iiiiiiiiiiiiii:_;;_;_;_;_;_;_;_;_;_;_;_;_;_iI
_HHHi_',_,_,_'_ ,,_,_,'4_
ii_!i_i:i:i:i:i:i:!i_:iiii_:_iii!_!!,_i!,i!_!i,!!%;}i;i
iiiiiiil):i!:i!:i!:i!:i!ii_iii_i_;i%;iiii!i_iiiiiiii!iiiiii_)!!!iii
iiiiiiiiiiiiiiiiiiiiiiiiiiiiiiiiiiiiiiiiiiiiiiiiiiiiiiiiiiiiiiiiiii!iiii!iiiiii
I _/ARRANT()R IS N()T RESP()NSIBI.E F()R C()NSEQUENTIAI. DAMAGES. ]
_'arrantor: (:AM(;() IN(:. ]
Incidental or consequential dmnage caused by possible
defects with this applimace.
Dmnage caused after delivery.
Dmnage to the product caused by accident, fire, floods
or acts of God.
Service trips to your home to teach you how to use
the product.
hnproper h_staJlation, delivery or maintenance.
Failure of the product if it is abused, misused,
or used for other thm_ the intended purpose or
used commerciaJly.
ConsumerSupport.
gEApp/bncesWebsite ge.c0m
Ha_e a (plestiom_ or need assistmice wkh yore" appha_ice? T_T the C,E Appliai_ces _,_1_']bsite24 hems a day,
am_yday of the year! Fur greater comwem_ience amid {i/ster sePdce, ,_ol] call 1]_:,',,,'do_n]oad ()_ner's Mamm]s,
order parts, catalogs, or e', en sc]]edl_ie service o_]-]ine. \'oil cam_also "Ask Our Team of Experts ''_" your ql]estiom_s,
am_d so m Ilch m ore.., hi Canada: wwwoGEApplianees,ea
ScheduleSerwce ge.c0m
Expert (;E repair sep,'ice is emily o_/e step awe} {}'ore }our doe1: (;et <m-line a_]d se]]edu]e _,our service at "_om"
com'enie]]ce 24 hem's am' day of the "_ear'. t)r ca]] 80(}.1 ;E.( ]ARES ' " 9 9_')_
, , , (800.43=.=/:_/) durim]g no,ilia] bllsim]ess hem's.
_] Canada, call 1.800.361.3400
flea/Life DesignStudio ,,, ge.c0m
(;E slq_ports the IJn_ive]sa] Design com_cep_--prodl_cts, services an d environ ments t]]at cam_ be i]se(l! by people of a]]
ages, sizes a/]d capabilities. We recognize the need to design for a wide mm]ge _ff physical a_d me_ta] abilities a_d
im pai rm en is. Fur details of (;E's [i _iversa] Design app]i ca ti on]s, h_c]_di _g ]dtch en design ideas {or peep] e wit]]
disabihties, check o_t our Website today. Fur the hea]J_g impaired, please ca]] S00.TDD.(;EAC (S00.$33.4322).
[_! Canada, c<mtact: Manage]; Col_sm_er Re]ariel,s, Cameo, h_c.
S/_]te 310, ] Factor_ i,a_e
Mo_ctom N.B. El C 9M3
ExtendedWarranties
h_ the [!.S.: _,com
in e[tect, k_ ca_ p_lrchase it o_-]i_]e a_}_rime or call 800.6262224 durh_g _urma] b/lsiness hem's. (;E Co_sm_er
Hom e Servi ces wi]] still be th el"e aide r ?o __r warm _b' expi res. In Canada, call 1.888.261o 2133
PartsandAccessories
In]divi (hm]s q_miifi ed to se]_i ce th e]r t_ n app]ia_ ces can ha_e pa rts or accessuri es sen t direct]v to the]r hom es
(VISA, MasterCard a_d Discover cards are accepted). Order o_-li_e toda 5 24 hours e_ er} day or b? phol_e at
S00.626.2002 dmJ_g _urma] b_sh_ess hours.
bstmctions co,rained b thb mamm[ cover procedures to heper[ormed by any user. Other servicing generally should he
referred to q_a[ified service personnel Ca_tion m_st he exercised, since improper servicing may cause _sMe operatio_.
(5_stomer_ in Canada sho_]d co_s_]t the ye]]m_ pages for the _earest Cameo set'dee cente]; ur ca]] ] .888.26] .3055.
ContactUs
h_ the [!.S.: _e, gom
[fvo_* are _ot satisfied wit]] the serxice vo_, receive fl'om OE, co]]tact _*s<m our Website with a]] the details
i_ch*di_g yo_r phone m*mbe_; or write to: (;ene]]d Ma_age_; (5_stomer ]),elations
(;E App]im_ces, Appliaure Park
I,o_isvi]]e, KV 40225
In Canada: www.GEApplianees.ea, or write to: Directol; t:o_sm_er ]).e]atio_s Cameo, h_c.
S/_ite 310, 1 l_/ctor_ i,al]e
Mo_ctom N.B. El C 9M3
fleg/ster YourApplbnce ,,, o. 0m
Register your new appliance on=]i_le-at your eonve_'fienee! Time]} product reglsm/tion wi]] allow fi_r en]lanced
corn m imica t](m a _/d pr< m/pt s el'v] ce im de r th e tel'm s <_f _o 111"wa r] _/_?b sh o 1iid the _?ee d a ]ise. ki _/l m a} a]so m ai]
i_ the pre-p_i_ted registration, card i_chlded i_ the [/ackh_g, material, in Canada_ www.GEAppliauneesoea
Printed in Mexico
Thisbook isprinted on recycled pape_

