®
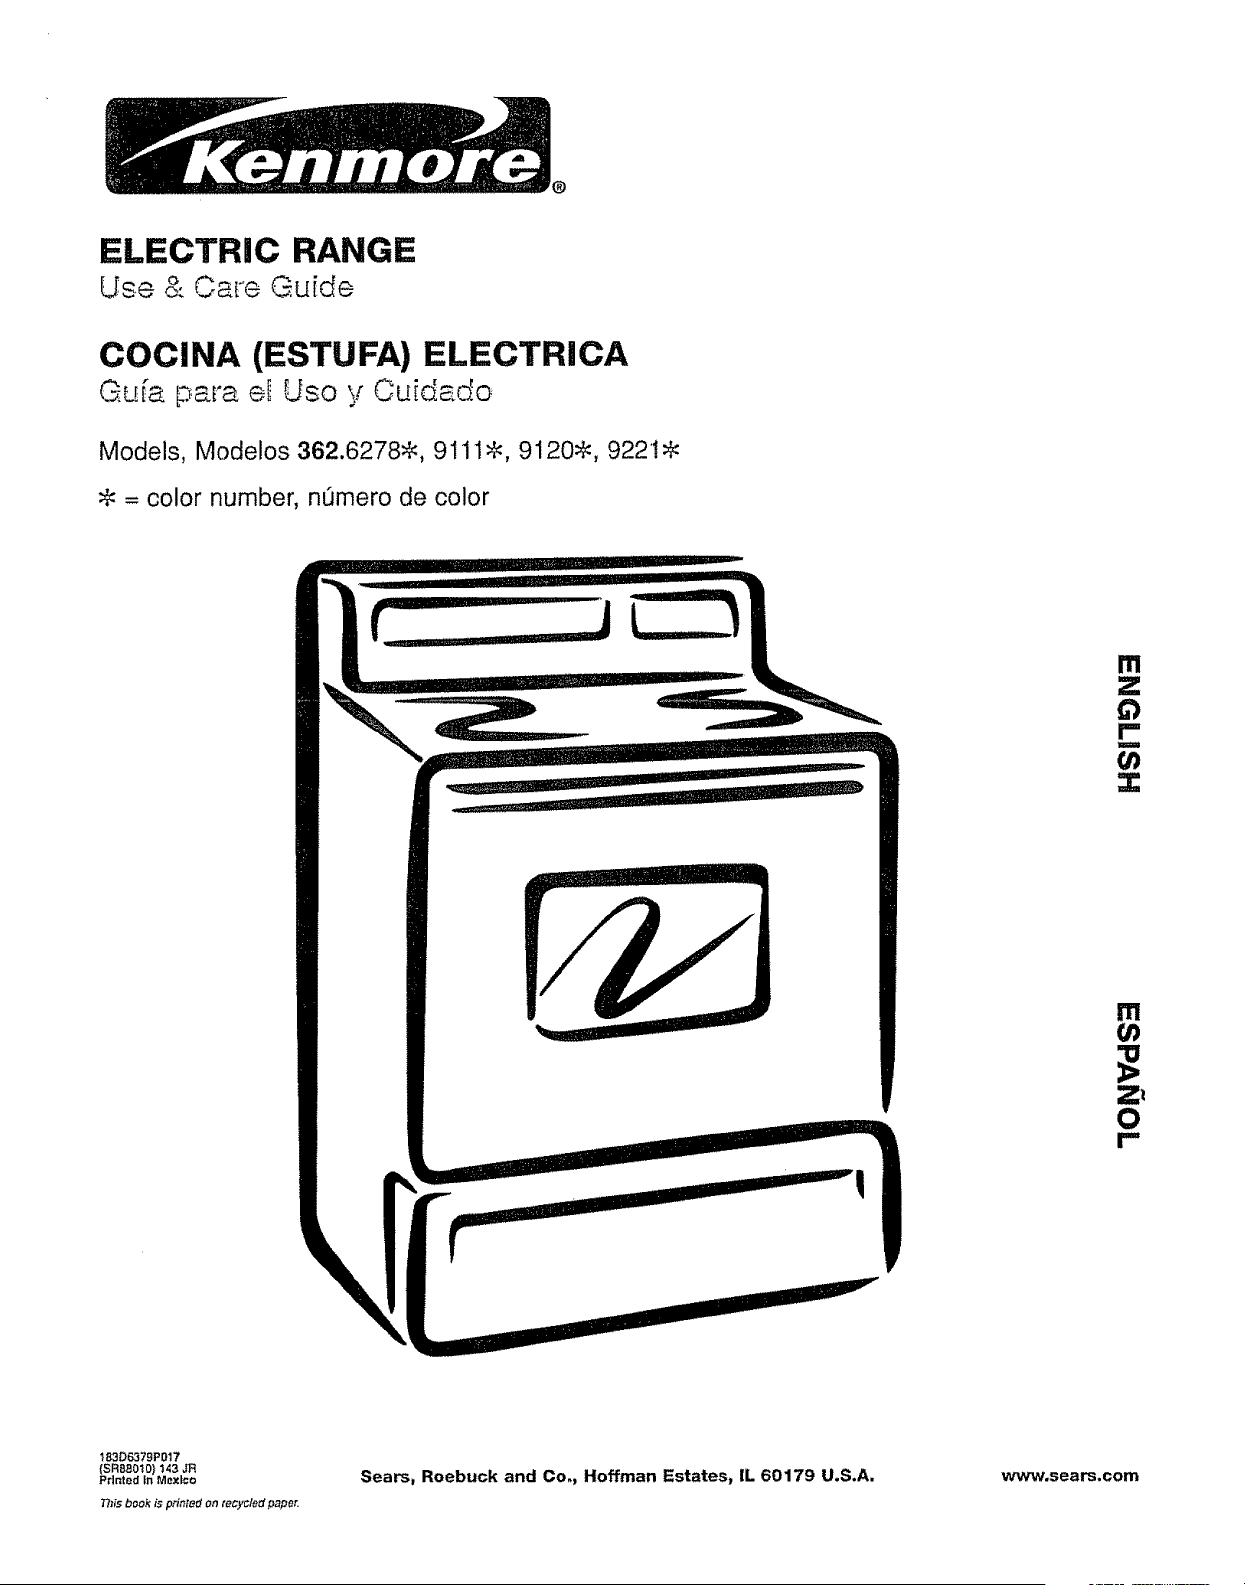
ELECTRIC RANGE
Use & Ca_°_eGuide
COCINA (ESTUFA) ELECTRICA
Gu_a para e_Uso y Cuidado
Models, Modelos 362.6278_, 9111_, 9120:% 9221 :_
= color number, nOmero de color
,
m
Z
i"
U)
X
m
u)
Z|
0
r-
183D6379P017
(SR880_0} 143 JR
Pdnted tn Mexico
Th[s bDok is printed on recycled paper.
Sears, Roebuck and Co., Hoffman Estates, IL 60179 U.S.A.
www.sears.com
Safety Instructions
Important Safety Instructions ....................... 2-4
Operation
Features of Your Range .......................... 5
Using the Oven .............................. 7-10
Using the Surface Units ................................. 6
Care & Maintenance
Before You Call for Service ................ 22-23
Care and Cleaning ............................. 11-14
Consumer Services ................................. 48
Master Protection Agreements ...................... 24
Repair Services ....................................... 48
Warranty ............................................ 24
Installation Instructions
Anti-Tip Bracket Installation ...................... 15, 2'1
Dimensions & Clearances ............................ 16
Electrical Connections ......................... 17-20
Electrical Requirements ............................ 17
Flooring Requirements ............................ 16
Level the Range ...................................... 21
Service ............................................ back cover
En Espanol
tnstrucciones en EspaSot ........................... 25
For your convenience and future reference, please
write down your model and serial numbers in the space ..
provided.. The model number and serial number of your
electric range can be found on a label behind the range
door or behind the storage drawer.
MODEL NUMBER:
SERIAL NUMBER:
A WARNING!
For your safety the information in this manual
must be followed to minimize the risk of fire or
explosion, electric shock, or to prevent property
damage, personal injury, or loss of life.
WARNING-ANTI-TIP DEVICE
All ranges can tip and injury could result.
To prevent accidental tipping of the range,
attach it to the wail by installing the Anti*Tip
device supplied.
if the Anti-Tip device supplied with the
range does not fit this application, use the
universal Anti-Tip device WB2X7909.
Call 1-800-4-MY-HOME_..
To check if the device is installed and engaged
properly, carefully tip the range forward. The
Anti-Tip device should engage and prevent the
range from tipping over.
If you pull the range out from the wall for any reason,
make sure the device is properly engaged when you
push the range back against the wall If it is not, there is
a possible risk of the range tipping over and causing
injury if you or a child stand, sit or lean on an open door..
Please refer to the Anti-Tip device information in this
manual. Failure to take this precaution could result in
tipping of the range and injury.
Read all instructions before using
this appliance.
When using electrical appliances, basic safety
precautions should be followed, including the
following:
- Use this appliance only for its intended purpose as
described in this Use and Care Guide.
• Be sure your appliance is properly installed and
grounded by a qualified technician in accordance with
the provided installation instructions.
• Do not attempt to repair or replace any
part of your range unless it is specifically
recommended in this manual, All other servicing
should be referred to a qualified technician
, Have the installer show you the location of the
circuit breaker or fuse. Mark it for easy reference..
• Before performing any service, UNPLUG OR
DISCONNECT THE POWER SUPPLY AT THE
HOUSEHOLD DISTRIBUTION PANEL BY REMOVING
THE FUSE OR SWITCHING OFF THE CIRCUIT
BREAKER
• Large scratches or impacts to glass doors can lead
to broken or shattered glass.
2
• Donotleavechildrenalone--childrenshouldnotbe
leftaloneorunattendedin anareawhereanappliance
isinuse Theyshouldneverbeallowedtositorstand
onanypartoftheappliance.
oDonotallowanyoneto climb,standor hangon
thedoor,storagedrawer,or cooktop.Theycould
damagetherangeandeventipit over,causingsevere
personalinjury
* Do not store flammable materials in an oven or near
a cooktop.
" CAUTION: ITEMS OF INTEREST TO CHILDREN
SHOULD NoT BE STORED IN CABINETS ABOVE
THE RANGE OR ON THE BACKSPLASH OF A
RANGEmCHILDREN CLIMBING ON THE RANGE
TO REACH ITEMS COULD BE SERIOUSLY INJURED.
* Never wear loose-fitting or hanging garments while
using the appliance. Be careful when reaching for
items stored over the range. Flammable material
could be ignited if brought in contact with hot surface
units or heating elements and may cause severe burns.
BASIC SAFETY
PRECAUTIONS
• Use only dry pot holders--moist or damp pot holders
on hot surfaces may result in burns from steam Do not
let pot holders hot touch surface units or heating
elements Do not use a towel or other bulky cloth.
. For your safety, never use your appliance for
warming or heating the room.
• Do not store or use combustible materials, gasoline
or other flammable vapors and liquids in the vicinity
of this or any other appliance.
, Keep the hood and grease filters clean to maintain
good venting and to avoid grease fires.
- Do not let cooking grease or other flammable
materials accumulate in or near the range.
• Do not use water on grease fires. Never pick up a
flaming pan Turn the controls off Smother a flaming
pan on a surface unit by covering the pan completely
with a well-fitting tid, cookie sheet or flat tray Use a
multi-purpose dry chemical or foam4ype fire
extinguisher
Flaming grease outside the pan can be put out
by covering it with baking soda or, if available, by
using a multi-purpose dry chemical or foam4ype fire
extinguisher
Flame in the oven can be smothered completely by
closing the oven door or by using a multFpurpose dr,.,,
chemical or foam-type fire extinguisher
• Do not touch the surface units, the heating
elements, or the interior surface of the oven.
These surfaces may be hot enough to burn even
thought they are dark in color During and after use,
do not touch, or let clothing or other flammable
materials contact, the surface units, areas nearby
the surface units or any interiorarea of the oven;
allow sufficient time for cooling first Potentially hot
surfaces include the cooktop, areas facing the cooktop,
oven vent opening, surfaces near the opening, crevices
around the oven door and metal trim parts above
the door.
REMEMBER: The inside surface of the oven may be
hot when the door is opened.
PROTECTING AGAINST
FOODBORNE ILLNESS
• Cook meat and poultry thoroughly--meat to at least
an INTERNAL temperature of 160°F and poultry to at
least an INTERNAL temperature of 180°F. Cooking
to these temperatures usually protects against
foodborne illness,
OVEN SAFETY
• Stand away from the range when opening the oven
door. Hot air or steam which escapes can cause
burns to hands, face and/or eyes,
• Do not heat unopened food containers, Pressure
could build up and the container could burst,
causing an injury,
- Keep the oven vent unobstructed. The vent is under
the right rear surface unit.
* Keep the oven free from grease buildup,
, Place the oven shelf in the desired position while
the oven is cool. If shelves must be handled when
hot, do not let pot holders or oven mitts contact the
heating elements.
• Pulling out the shelf to the stop-lock is a
convenience in lifting heavy foods. It is also a
precaution against burns from touching hot surfaces
of the door or oven walls.
• When using cooking or roasting bags in the oven,
follow the manufacturer's directions,
* Do not use the oven to dry newspapers.
If overheated, they can catch on fire.
* Do not use the oven for a storage area°
Items stored in an oven can ignite.
• Do not leave paper products, cooking utensils or
food in the oven when not in use.
SURFACE UNITS
Use proper pan size--select cookware having flat
bottoms large enough to cover the surface unit heating
element. The use of undersized cookware will expose
a portion of the surface unit to direct contact and may
result in the ignition of clothing. Proper relationship of
cookware to surface unit size will also improve efficiency.
o Never leave the surface units unattended at
high heat settings. Boilovers cause smoking
and greasy spiltovers that may catch on fire,
o Use little fat for effective shallow or deep fat frying.
Filling the pan too full of fat can cause spiltovers when
food is added
• If a combination of oils or fats will be used in frying,
stir together before heating, or as fats melt siowly.,
• Always heat fat slowly, and watch as it heats.
• Only certain types of glass, glass/ceramic,
earthenware or other glazed containers are suitable
for cooktop service; others may break because of the
sudden change in temperature°
. To minimize the possibility of burns, ignition of
flammable materials and spillage, the handle of a
container should be turned toward the center of the
range without extending over nearby surface units,
oAlways turn the surface units off before removing
cookware.
=When preparing flaming foods under the vent hood,
turn the fan on.
• Use a deep fat thermometer whenever possible to
prevent overheating fat beyond the smoking point.
° Keep an eye on foods being fried at high or medium
high heat settings.
° Foods for frying should be as dry as possible, Frost
on frozen foods or moisture on fresh foods can cause
hot fat to bubble up and over the sides of the pan_
° Clean the cooktop with caution, if a wet sponge is
used to wipe spills on a hot cooktop, be careful to avoid
steam burns
• To avoid the possibility of a burn or electric shock,
always be certain that the controBs for all surface units
are at the OFF position and all coils are cool before
attempting to lift or remove a unit,
Do not immerse or soak the removable surface
units. Do not put them in a dishwasher.
Be sure the drip pans and the vent duct are not
covered and are in place. Their absence during
cooking could damage range parts and wiring°
Do not use aluminum foil to line the drip pans or
anywhere in the oven except as described in this
manual, Misuse could result in a shock, fire hazard or
damage to the range
SAVE THESE INSTRUCTIONS
4
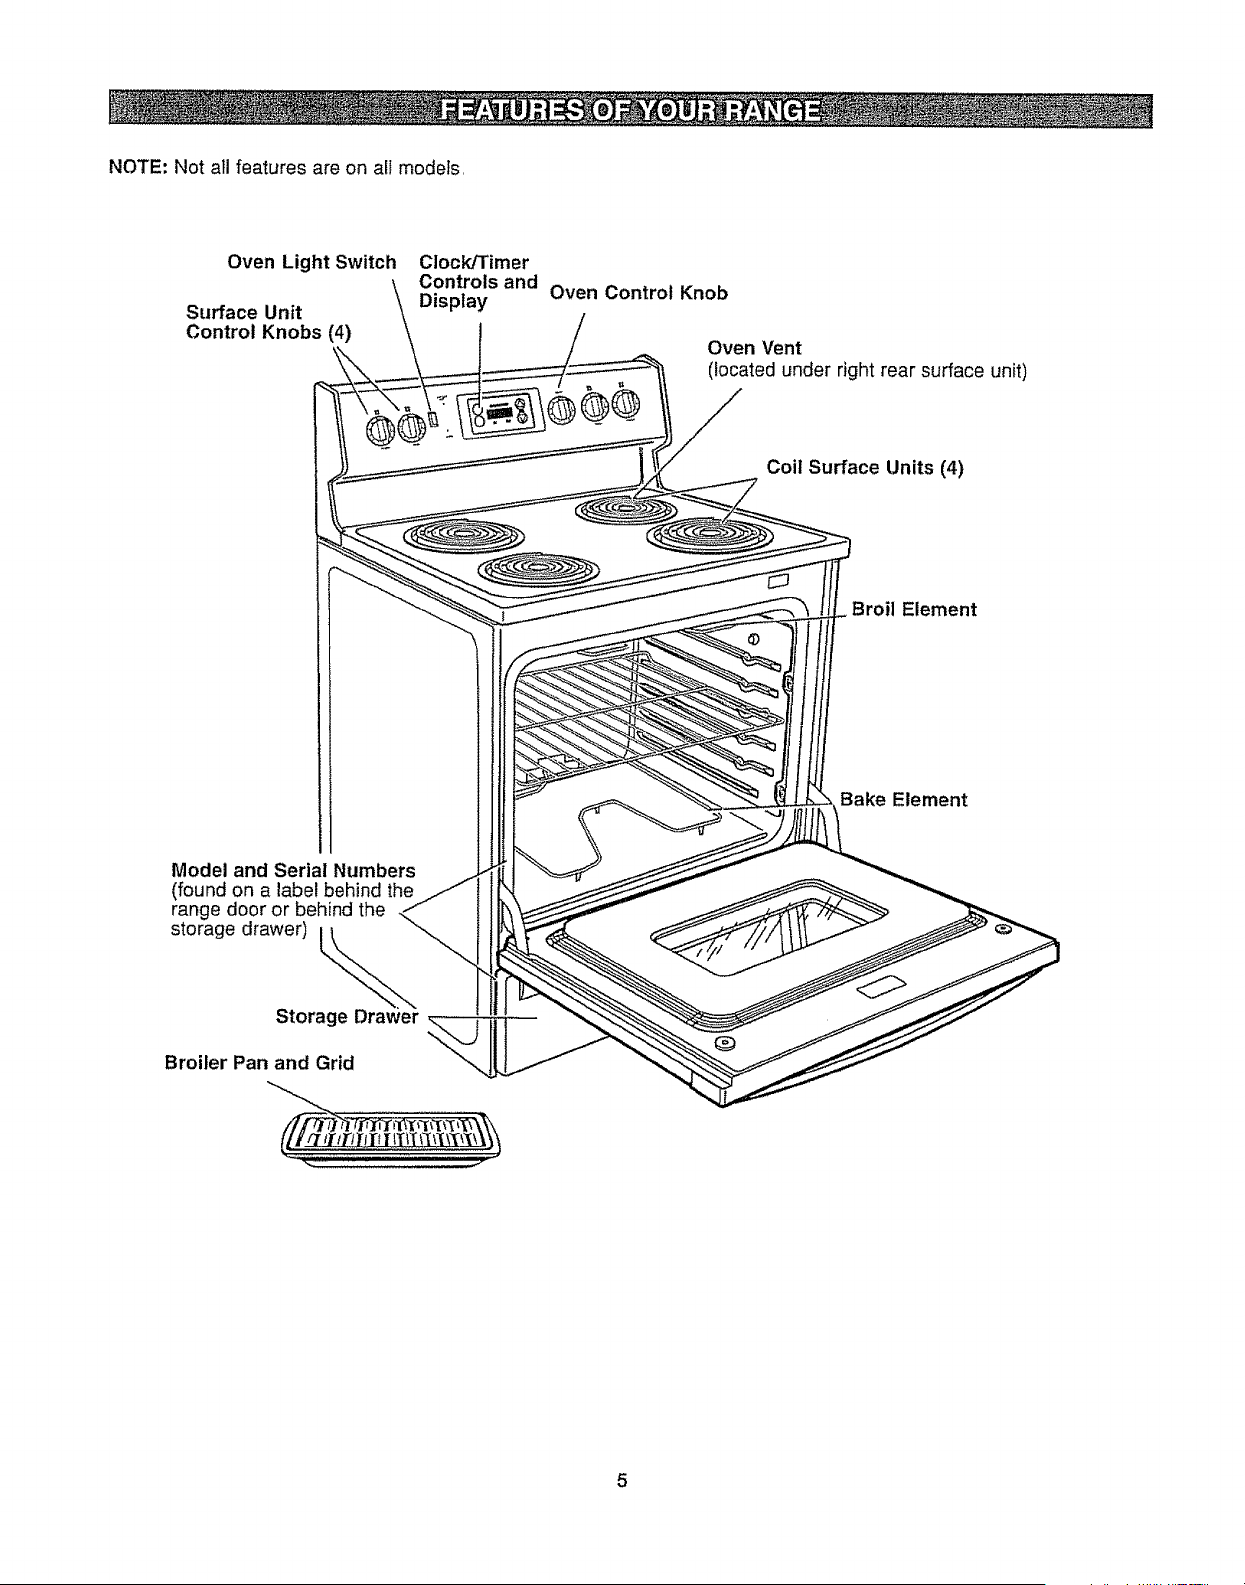
NOTE:Notallfeaturesareonallmodels,
OvenLight Switch
Surface Unit
Control Knobs (4)
Clock/Timer
Controls and
Display
Oven Control Knob
Oven Vent
(located under right rear surface unit)
Coil Surface Units (4)
Broil Element
Model and Serial Numbers
(found on a label behind the
range door or behind the
storage drawer) L_.._..
Storage Drawer
Broiler Pan and Grid
Bake Element
5
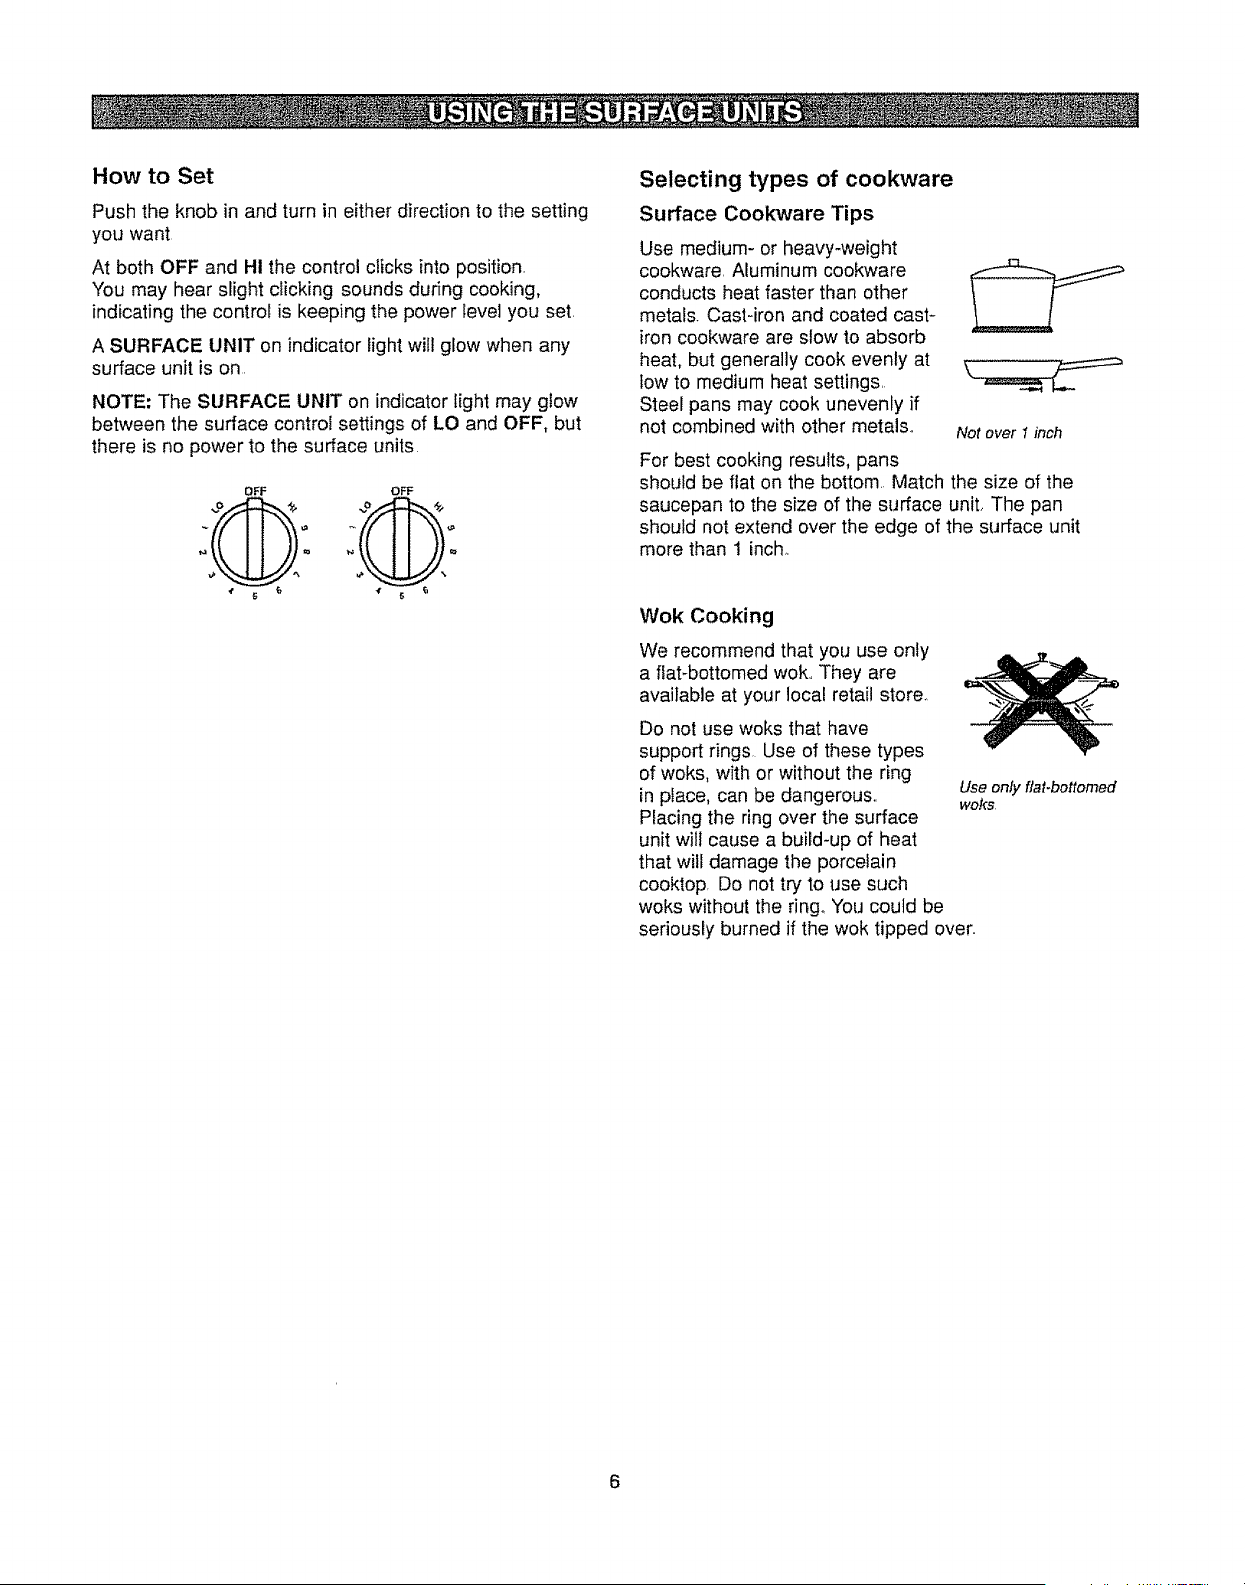
How to Set
Push the knob in and turn in either direction to the setting
you want
At both OFF and Hi the control clicks into position.
You may hear slight clicking sounds during cooking,
indicating the control is keeping the power level you set.
A SURFACE UNIT on indicator light will glow when any
surface unit is on.
NOTE; The SURFACE UNIT on indicator light may glow
between the surface control settings of LO and OFF, but
there is no power to the surface units.
OFF OFF
Selecting types of cookware
Surface Cookware Tips
Use medium- or heavy-weight
cookware. Aluminum cookware
conducts heat faster than other
metals. Cast-iron and coated cast-
iron cookware are slow to absorb
heat, but generally cook evenly at
tow to medium heat settings.
Steel pans may cook unevenly if
not combined with other metals,.
Not over I inch
For best cooking results, pans
should be flat on the bottom. Match the size of the
saucepan to the size of the surface unit, The pan
should not extend over the edge of the surface unit
more than 1 inch.
Wok Cooking
We recommend that you use only
a fiat-bottomed wok., They are
available at your local retail store..
Do not use woks that have
support rings Use of these types
of woks, with or without the ring
in place, can be dangerous,.
Placing the ring over the surface
unit wili cause a build-up of heat
that will damage the porcelain
cooktop. Do not try to use such
woks without the ring..You could be
seriously burned if the wok tipped over.
Use only flat-bottomed
woks
6
Oven Temperature Knob
Turn this knob to the setting
you wahl
The oven cycle light gfows until
the oven reaches your selected
temperature, then goes off and
on with the oven element(s)
during cooking
•L j
Clock and Timer Features (on some models)
1. TIMER ON/OFF Pad
Press this pad to select the timer feature,
2. CLOCK Pad
Press this pad before setting the clock.
3. Display
Shows the time of day and the time set for the timer.
4. SET TIME _. / V Pads
These pads aliow you to set the clock and timer
To Set the Clock:
1. Press the CLOCK pad twice.
2. Press the SET TIME A / _' pads,
3. Press the CLOCK pad to start
Make sure the clock is set to the correct time of day,
To Set the Timer:
!. Press the TIMER ON/OFF pad.,
2_
Press the SET TIME _ / V pads until 1he amount
of time you want shows in the display. The timer will
start automatically within a few seconds of releasing
the pad,
3, Press the CLOCK pad to return to the clock
display if desired. The timer function will retain
the programmed settings,
The timer is a minute timer only.
The timer does not control oven operations_
The maximum setting on the timer is 9 hours
and 50 minutes,,
To Reset the Timer:
If the display is still showing the time remaining, you may
change it by pressing the SET TIME A / _ pads until the
time you want appears in the display,
If the remaining time is not in the disp}ay, recalt the
remaining time by pressing the TIMER ON!OFF pad
and then pressing the SET TtME A / V pads until the
new time you want shows in the display.
To Cancel the Timer:
Press the TIMER ON/OFF pad t"wiceo
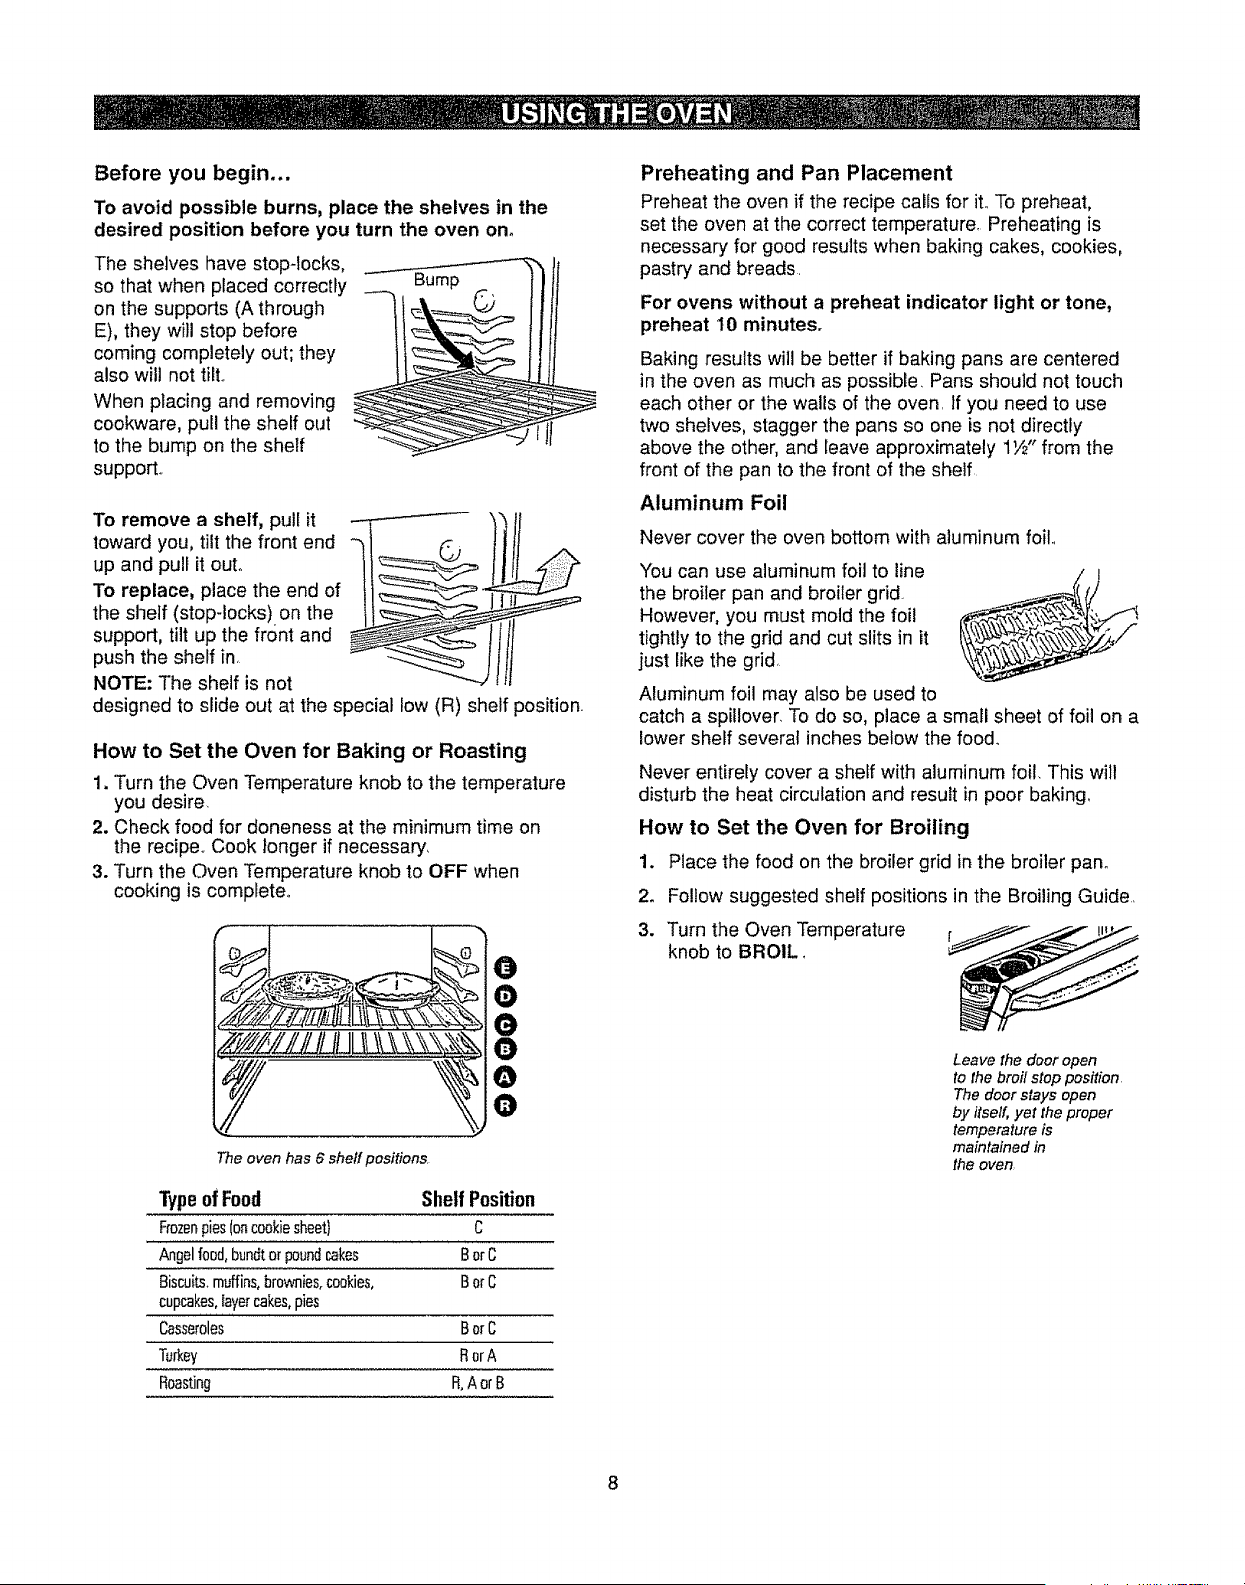
Before you begin...
To avoid possible burns, place the shelves in the
desired position before you turn the oven on.
The shelves have stop-locks,
so that when placed correctly
on the supports (A through
E), they will stop before
coming completely out; they
also will not tilL.
When placing and removing
cookware, pull the shelf out
to the bump on the shelf
support..
To remove a shelf, pull it
toward you, tilt the front end
up and pull it out.,
To replace, place the end of
the shelf (stop-locks) on the
support, tilt up the front and
push the shelf in,
NOTE: The shelf is not
designed to slide out at the special low (R) shelf position.
How to Set the Oven for Baking or Roasting
1, Turn the Oven Temperature knob to the temperature
you desire
2. Check food for doneness at the minimum time on
the recipe., Cook longer if necessary,
3. Turn the Oven Temperature knob to OFF when
cooking is complete,,
O
0
O
O
0
O
The oven has 6 sheff positions,
Typeof Food
Frozenpies(oncookiesheet}
Angelfood,bundtorpoundcakes
Biscuits.muffins,brownies,cookies,
cupcakes,iayercakes,pies
Casseroles
Turkey
Roasting
Shelf Position
c
Bore
BorC
BorC
RorA
R,AorB
Preheating and Pan Placement
Preheat the oven if the recipe calls for it.. To preheat,
set the oven at the correct temperature, Preheating is
necessary for good results when baking cakes, cookies,
pastry and breads.
For ovens without a preheat indicator light or tone,
preheat 10 minutes,
Baking results will be better if baking pans are centered
in the oven as much as possible, Pans should not touch
each other or the waUs of the oven. If you need to use
two shelves, stagger the pans so one is not directly
above the other, and leave approximately 1W' from the
front of the pan to the front of the shelf
Aluminum Foil
Never cover the oven bottom with aluminum foil..
You can use aluminum foil to line
the broiler pan and broiler grid,
However, you must mold the foil
tightly to the grid and cut slits in it
just like the grid,
Aluminum foil may also be used to
catch a spillover, To do so, place a small sheet of foil on a
lower shelf several inches below the food.
Never entirely cover a shelf with aluminum foil. This will
disturb the heat circulation and result in poor baking,
How to Set the Oven for Broiling
1. Place the food on the broiler grid in the broiler pan°
2. Follow suggested shelf positions in the Broiling Guide,
3. Turn the Oven Temperature
knob to BROIL _
Leave the door open
to the broil stop position
The door stays open
by itself, yet the proper
temperature is
maintained in
the oven,
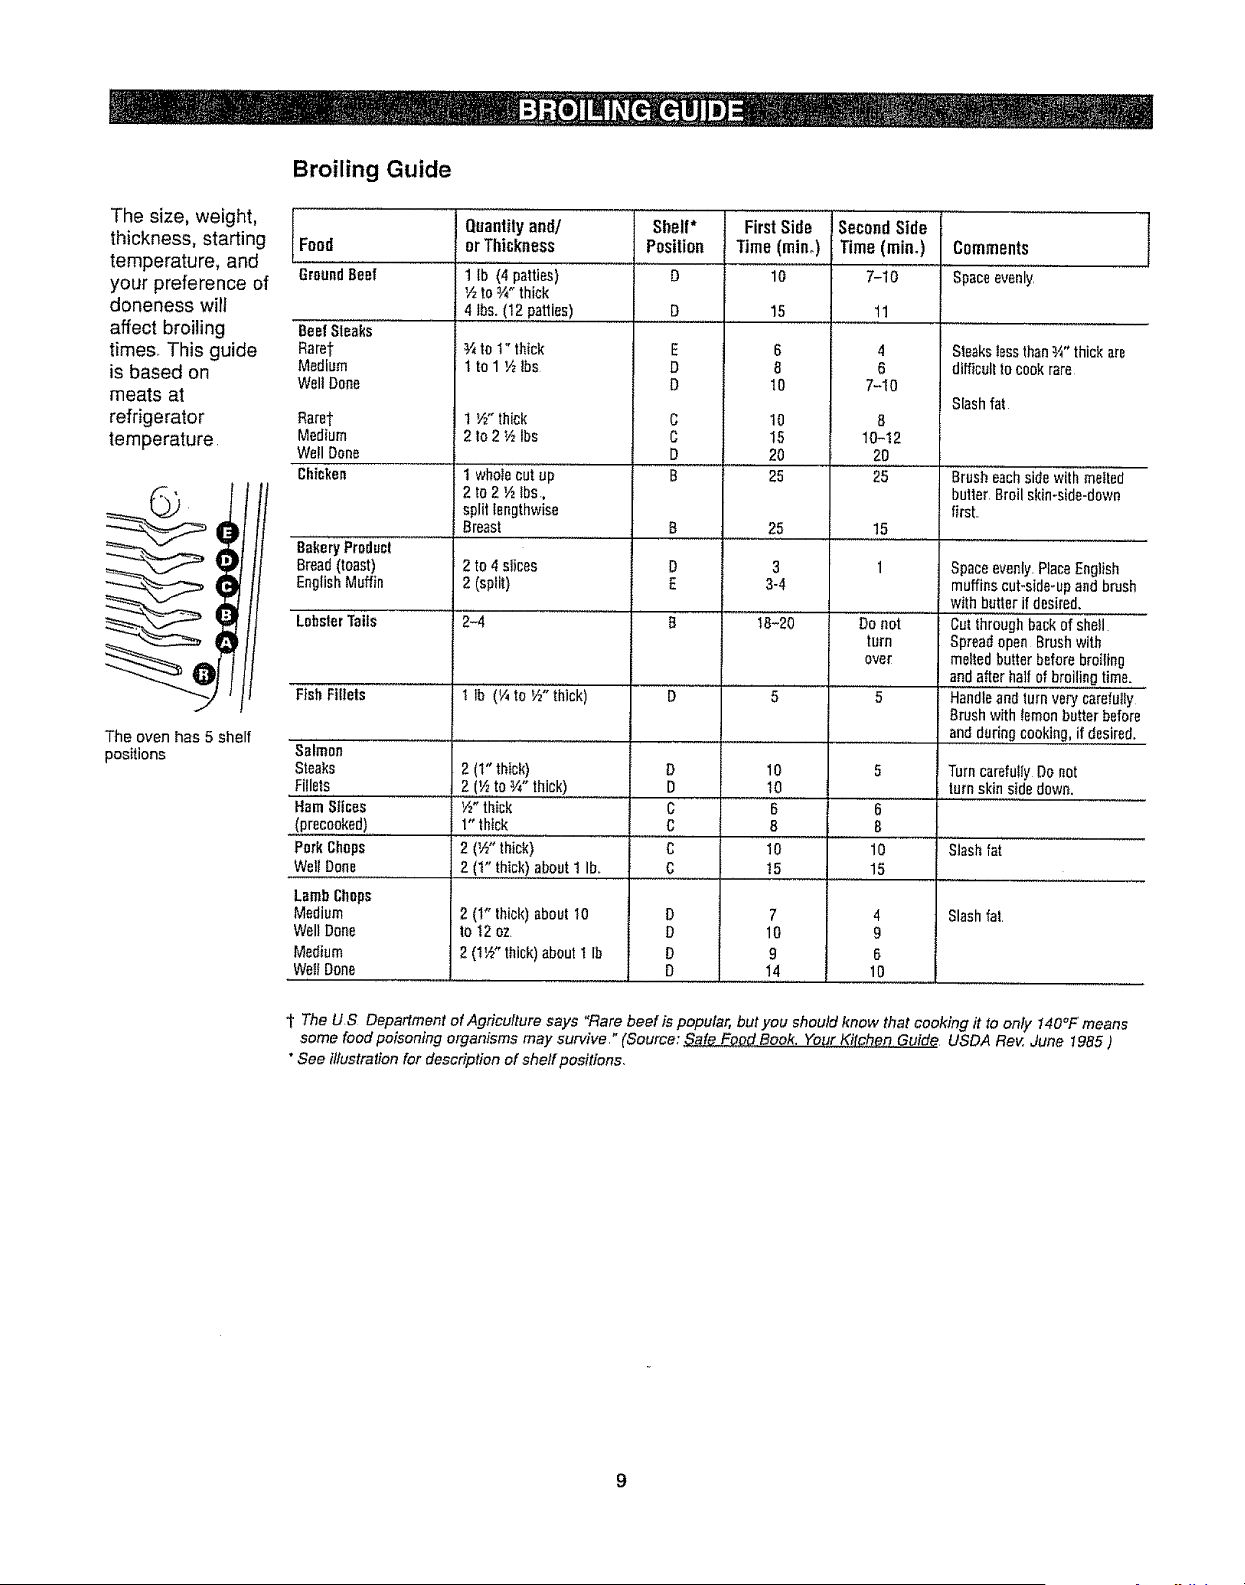
The size, weight,
thickness, starting
temperature, and
your preference of
doneness wilt
affect broiling
times_ This guide
is based on
meats at
refrigerator
temperature.
The oven has 5 shelf
positions
Broiling Guide
IFOOd
Ground Beef
Beef Sleaks
Rarer
Medium
Well Done
Rarer
Medium
Well Done
Chicken
eakery Product
Bread (toast)
EnglishMuffin
LobsterTails
Quantity and!
or Thickness
t lb (4 patties)
to t " thick
1 to 1 ½ lbs
1 ½" thick
2 to 2 _/_lbs
V2to _A"thick
4 lbs. (12 patties)
i wr;otecutuP..............
2 to 2 ½ lbs.,
split lengthwise
Breast
2 to 4 slices
2 (split)
2-4
Fish Fillets
1 lb (_,4to½" thick)
Salmon ..............................
Steaks 2 (1" thick)
Fillets 2 .................... (_..!o _" thick)
Ham Stices ½" thick
Shell*
Position
D
E
D
D
0
c
D
B
B
D
E
B
D
D
C
FirstSide
Time(mine)
10
15
6
8
10
10
15
20
25
25
3
3-4
18-20
SecondSide
Time (rain.)
' 7-'10
11
4
6
7-10
8
10-!2
20
25
15
Do not
turn
ove£
5 5
10 5
10
6
Comments
Spaceevenlyl......
Steakstess than¾" thick are
difficult to cook rare
Slash fat
Brush eachside with melted
butter. Broil skin-side-down
first..
Space evenly, PlaceEnglish
muffins cut-side-upand brush
with batter if desired,
Cut through back of shell '........
Spread open Brush with
melted butter before broiling
and after half of broiling time.
Handieand turn very'caiefuily '
Brush with lemon butter before
and daring cooking, if desired.
Turn carefully Do not
turnskin side down.
(precooked)
Pork Chops
Well Done
Lamb Chops
Medium
Well Done
Medium
Well Done
1" tNck
2 (½" thick)
2(t"thick!.a..boutl lb.
2 (1" thick) about 10
to I2 oz.
2 0½"thick) about t Ib
C
C
C
D
D
D
D
6
8 8
10 10 Slash fat
t5
7
lO
9
14
15
4
9
6
10
Slashfat
"t The US Department of Agriculture says "Rare beef is popular, but you should know that cooking # to only 140°F means
some food poisoning organisms may survive." (Source: Safe Feod Book. Your Kitchen Guide, USDA Rev, June I985 )
* See illustration for description of sheffpositions,
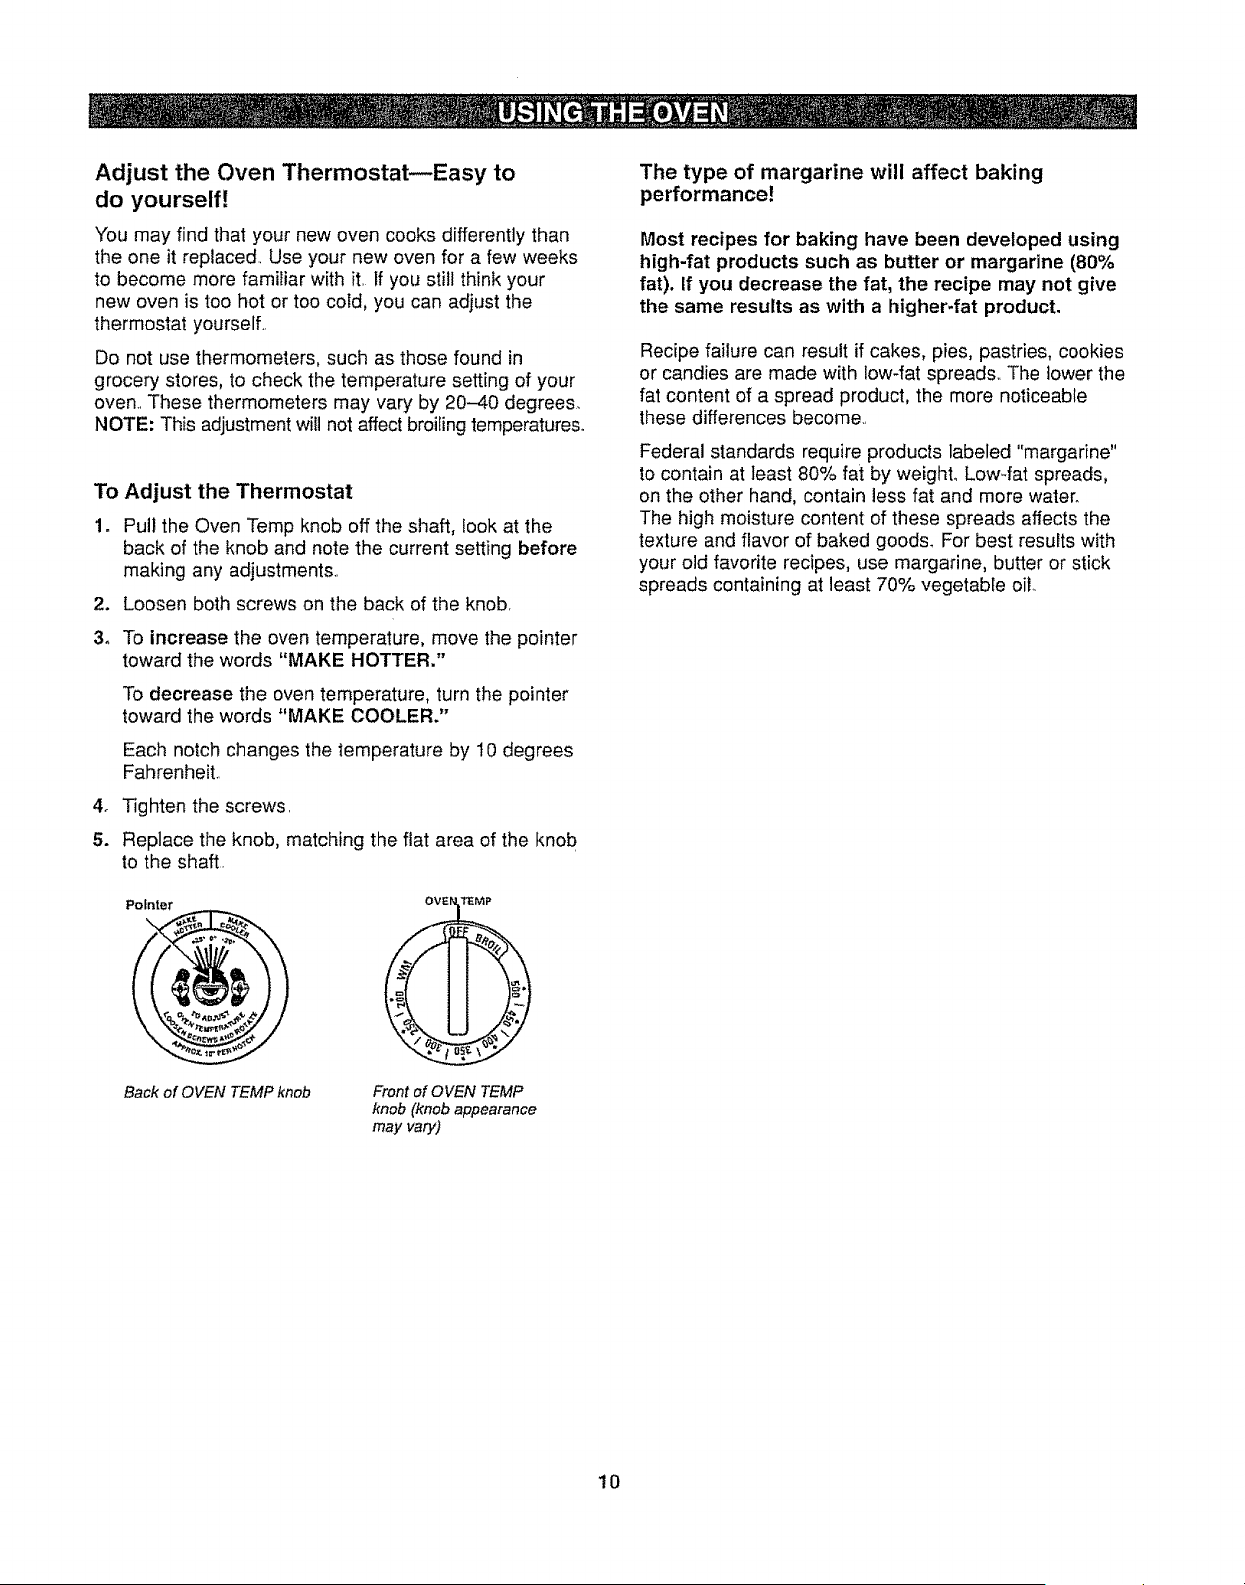
Adjust the Oven Thermostat--Easy to
do yourself!
You may find that your new oven cooks differently than
the one it replaced, Use your new oven for a few weeks
to become more familiar with it, If you still think your
new oven is too hot or too cold, you can adjust the
thermostat yourself,,
Do not use thermometers, such as those found in
grocery stores, to check the temperature setting of your
oven, These thermometers may vary by 20-40 degree&
NOTE: This adjustment will not affect broiling temperatures°
To Adjust the Thermostat
1. Pull the Oven Temp knob off the shaft, look at the
back of the knob and note the current setting before
making any adjustments.,
2. Loosen both screws on the back of the knob,
3. To increase the oven temperature, move the pointer
toward the words "MAKE HOTTER."
4.
5.
To decrease the oven temperature, turn the pointer
toward the words "MAKE COOLER."
Each notch changes the temperature by 10 degrees
Fahrenheit.,
Tighten the screws,
Replace the knob, matching the flat area of the knob
to the shaft.
Pointer .
\ "\.%2'_..,._7;o_"I
Back of OVEN TEMP knob
Front of OVEN TEMP
knob (knob appearance
mayvary)
The type of margarine will affect baking
performance!
Most recipes for baking have been developed using
high-fat products such as butter or margarine (80%
fat). If you decrease the fat, the recipe may not give
the same results as with a higher-fat product,
Recipe failure can result if cakes, pies, pastries, cookies
or candies are made with low-fat spreads,, The lower the
fat content of a spread product, the more noticeable
these differences become.,
Federal standards require products labeled "margarine"
to contain at least 80% fat by weight. Low4at spreads,
on the other hand, contain less fat and more water.
The high moisture content of these spreads affects the
texture and flavor of baked goods. For best results with
your old favorite recipes, use margarine, butter or stick
spreads containing at least 70% vegetable oil.
10
If your range is removed for cleaning,
servicing or any reason, be sure the anti-tip
device is re-engaged properly when the
range is replaced. Failure to take this
precaution could result in tipping of the
range and cause injury.
Oven Interior
With proper care, the porcelain enamel finish on the
inside of the oven--top, bottom, sides, back and inside
of the door--will stay new-looking for years.
Let the range cool before cleaning.. We recommend that
you wear rubber gloves when cleaning the range.
Soap and water will normally do the job. Heavy spattering
or spiltovers may require cleaning with a mild abrasive
cleaner., Soap-filled scouring pads may also be used.
Do not allow food spills with a high sugar or acid content
(such as milk, tomatoes, sauerkraut, fruit juices or pie
filling) to remain on the surface. They may cause a dull
spot even after cleaning.
Household ammonia may make the cleaning job easier.
Place 1/2 cup in a shallow glass or pottery container in
a cold oven overnight_ The ammonia fumes wilt help
loosen the burned-on grease and food.
If necessary, you may use an oven cleaner. Follow the
package directions.
Do not spray oven cleaner on the electrical controls
and switches because it could cause a short circuit
and result in sparking or fire.
Do not allow a film from the cleaner to build up on the
temperature sensor--it could cause the oven to heat
improperly (The sensor is located at the top of the oven )
Carefully wipe the sensor clean after each oven cleaning,
being careful not to move the sensor as a change in its
position could affect how the oven bakes.
Do not spray any oven cleaner on the outside of the
oven door, handles or any exterior surface of the oven,
cabinets or painted surfaces. Oven cleaner can damage
these surfaces.
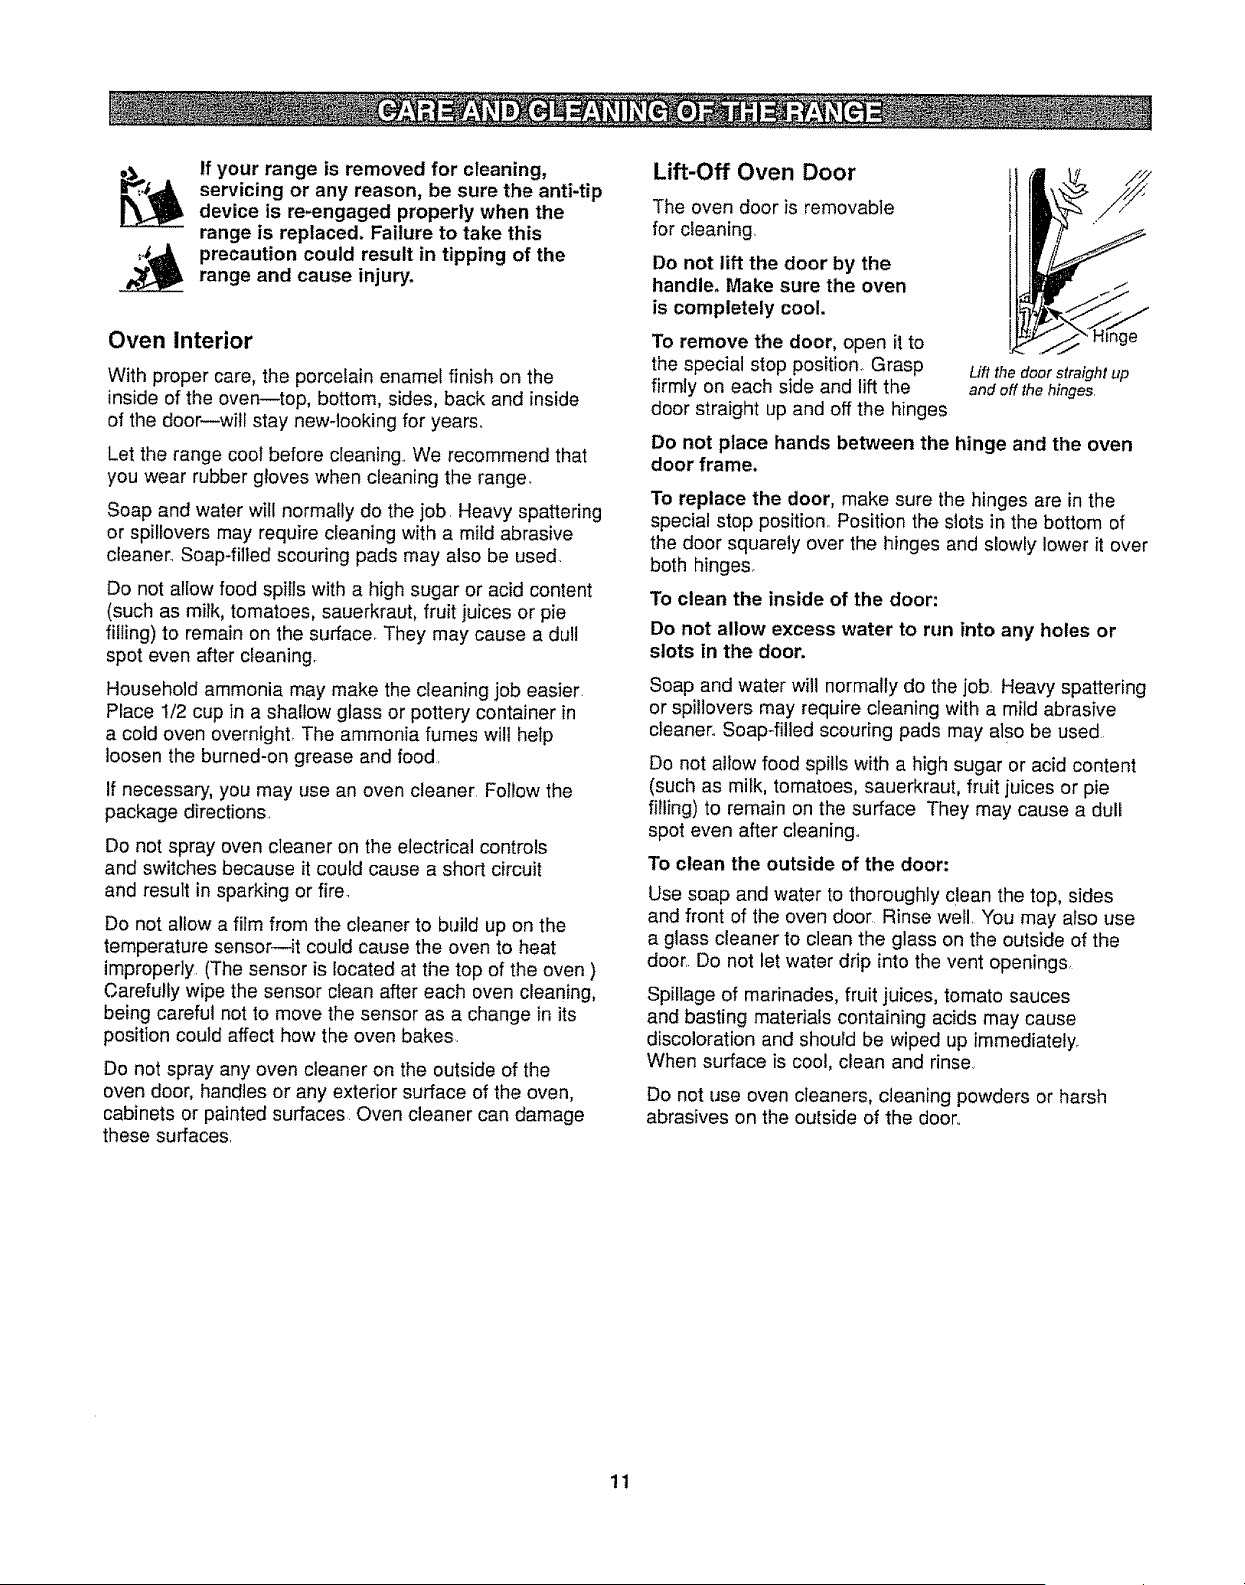
Lift-Off Oven Door
The oven door is removable
for cleaning.
Do not lift the door by the
handle. Make sure the oven
is completely cool.
To remove the door, open it to
the special stop position.. Grasp
firmly on each side and lift the
door straight up and off the hinges
=_nge
Lift the door straight up
and off the hinges,
Do not place hands between the hinge and the oven
door frame.
To replace the door, make sure the hinges are in the
special stop position., Position the slots in the bottom of
the door squarely over the hinges and slowly lower it over
both hinges.
To clean the inside of the door:
Do not allow excess water to run into any holes or
slots in the door.
Soap and water will normally do the job, Heavy spattering
or spillovers may require cleaning with a mild abrasive
cleaner° Soap-filled scouring pads may also be used
Do not allow food spills with a high sugar or acid content
(such as milk, tomatoes, sauerkraut, fruit juices or pie
filling) to remain on the surface They may cause a dull
spot even after cleaning.
To clean the outside of the door:
Use soap and water to thoroughly clean the top, sides
and front of the oven door Rinse well, You may also use
a glass cleaner to clean the glass on the outside of the
door,, Do not let water drip into the vent openings,
Spillage of marinades, fruit juices, tomato sauces
and basting materials containing acids may cause
discoloration and should be wiped up immediately.
When surface is cool, clean and rinse
Do not use oven cleaners, cleaning powders or harsh
abrasives on the outside of the door,,
11
Oven Heating Elements
Do not clean the bake element or
the broil element, Any soil will burn
off when the elements are heated,
To clean the oven floor, gently
lift the bake element° Clean with
warm soapy water,
Oven Shelves
Clean the shelves with an abrasive _,
cleanser or scouring pad.,
NOTE; Take the shelves out of the oven before you begin
the self-clean cycle or they may discolor.
To make the shelves slide more easily apply a small
amount of vegetable oi! or cooking oil to a paper towel
and wipe the edges of the oven shelves with the paper
towel,,
Oven Light Replacement
(on some models)
CAUTION: Before replacing your
oven light bulb, disconnect the
electrical power to the range at the
main fuse or circuit breaker panel,
Be sure to let the light cover and
bulb cool completely
To remove the cover:
Wire cover holder
1. Hold a hand under the cover so it doesn't fall when
released. With fingers of the same hand, firmly push
back the wire cover holder, Lift off the cover.
Do not remove any screws to remove the cover.,
2. Replace bulb with a 40-watt household appliance
bulb,,
To replace the cover:
1. Place it into groove of the light receptacle. Pull wire
forward to the center of the cover until it snaps into
place,
2. Connect electdca! power to the range,,
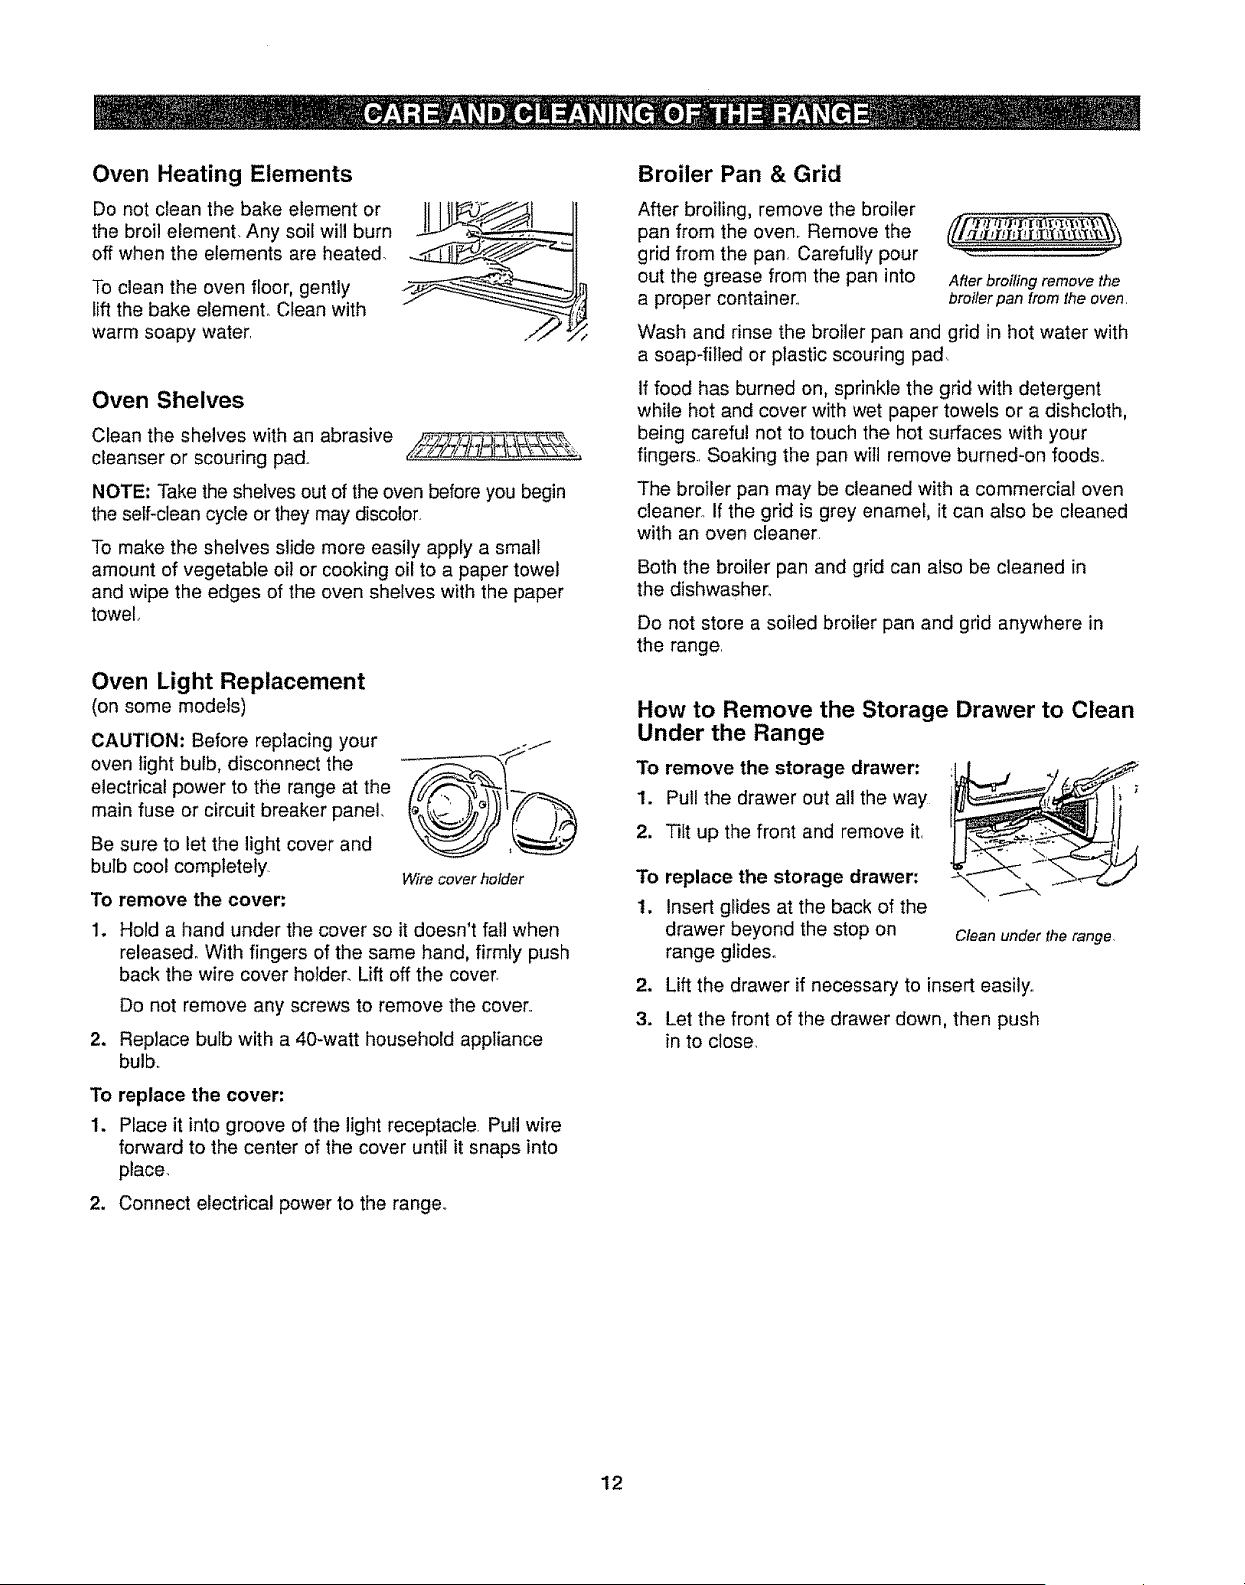
Broiler Pan & Grid
After broiling, remove the broiler
pan from the oven, Remove the
grid from the pan, Carefully pour
out the grease from the pan into
a proper container.,
After broiling remove the
broiler pan from the oven,
Wash and rinse the broiler pan and grid in hot water with
a soap-fitted or plastic scouring pad..
if food has burned on, sprinkle the grid with detergent
while hot and cover with wet paper towels or a dishcloth,
being careful not to touch the hot surfaces with your
fingers., Soaking the pan will remove burned-on foods,
The broiler pan may be cleaned with a commercial oven
cleaner,, If the grid is grey enamel, it can also be cleaned
with an oven cleaner.
Both the broiler pan and grid can also be cleaned in
the dishwasher,
Do not store a soiled broiler pan and grid anywhere in
the range,
How to Remove the Storage Drawer to Clean
Under the Range
To remove the storage drawer:
1. Pull the drawer out all the way
2. Tilt up the front and remove it,
To
t.
1
3.
replace the storage drawer:
Insert glides at the back of the
drawer beyond the stop on
range glides°
C/ean under the range,
Lift the drawer if necessary to insert easily.,
Let the front of the drawer down, then push
in to close,
12
Porcelain Enamel Cooktop
The porcelain enamel finish is sturdy but breakable if
misused This finish is acid-resistant. However, any acidic
foods spilled (such as fruit juices, tomato or vinegar)
should not be permitted to remain on the finish.
if acids spill on the cooktop while it is hot, use a dry
paper towel or cloth to wipe it up right away_,When
the surface has cooled, wash with soap and water,
Rinse well.
For other spills such as fat spatterings, wash with soap
and water or cleansing powders after the surface has
cooled. Rinse well. Polish with a dry cloth.
Lift-Up Cooktop
Some models have a cooktop
that can be rifted up for easier
cleaning. The entire cooktop
may be lifted up and supported
in the up position.
The surface units do not need to Be sure all sufiaceunits
be removed; however, you may areturnedoffbefore
remove one to make raising the raisingthecooktop
cooktop easier. There are two side supports that lock
into position when the cooktop is lifted up.
After cleaning under the coektop with hot, mild soapy
water and a clean cloth, lower the coektop. Be careful
not to pinch your fingers,
To lower the cooktop, push the rods back and gently
lower the cooktop until it rests in place.
Be sure all the controls are turned to OFF and the
surface units are cool before attempting to remove them°
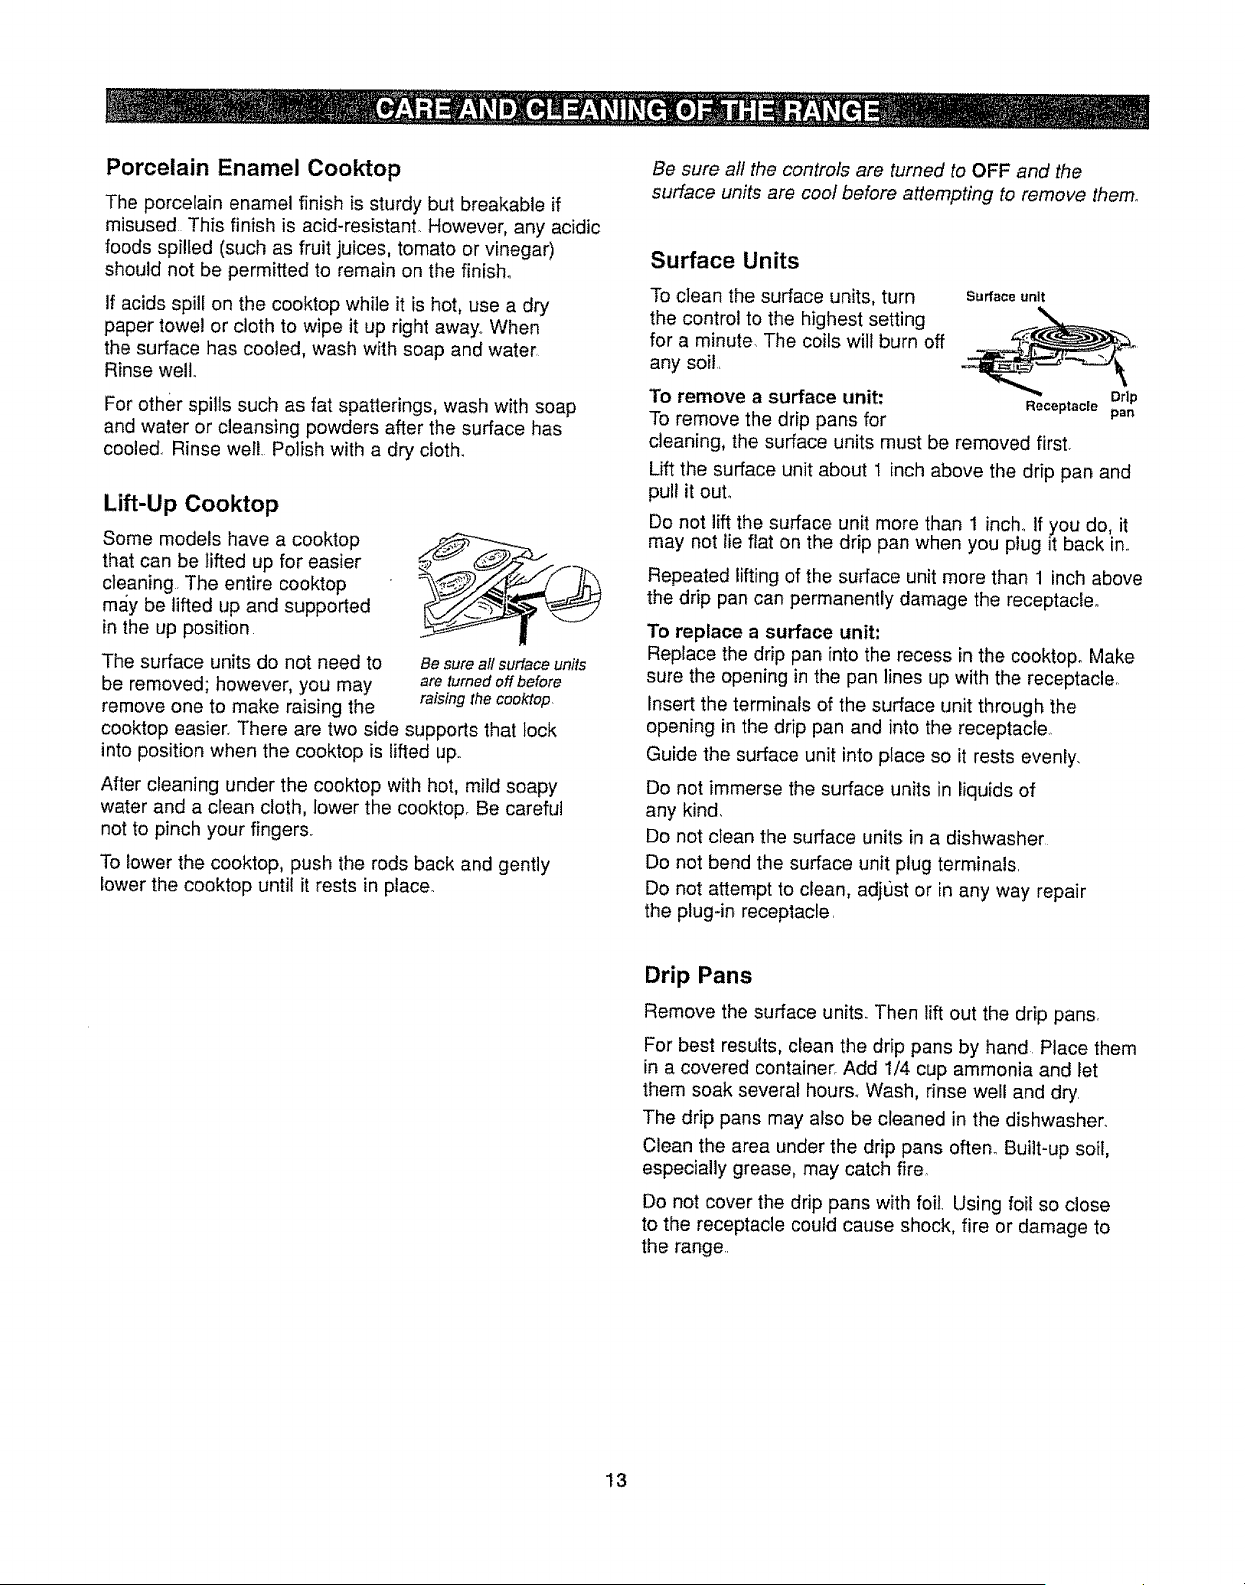
Surface Units
To clean the surface units, turn
the control to the highest setting
for a minute. The coils wilt burn off
any soil.
Surface unit
Drlp
To remove a surface unit: Receptacle pan
To remove the drip pans for
cleaning, the surface units must be removed first.
Lift the surface unit about 1 inch above the drip pan and
pull it ouL
Do not lift the surface unit more than 1 inch, If you do, it
may not lie flat on the drip pan when you plug it back in..
Repeated lifting of the surface unit more than 1 inch above
the drip pan can permanently damage the receptacle,,
To replace a surface unit:
Replace the drip pan into the recess in the cooktopo Make
sure the opening in the pan lines up with the receptacle,
Insert the terminals of the surface unit through the
opening in the drip pan and into the receptacle.,
Guide the surface unit into place so it rests evenly.
Do not immerse the surface units in liquids of
any kind,
Do not clean the surface units in a dishwasher
Do not bend the surface unit plug terminals.
Do not attempt to clean, adjust or in any way repair
the plug-in receptacle.
Drip Pans
Remove the surface units. Then lift out the drip pans,
For best resutts, clean the drip pans by hand Place them
in a covered container. Add 1/4 cup ammonia and let
them soak several hours. Wash, rinse well and dry.
The drip pans may also be cleaned in the dishwasher.
Clean the area under the drip pans often_ Built-up soil,
especially grease, may catch fire,.
Do not cover the drip pans with foil Using foil so close
to the receptacle could cause shock, fire or damage to
the range.,
13

Control Panel and Knobs
It's a good idea to wipe the control ___"'__ _
panel after each use of the oven.
Use a damp cloth to clean or rinse.
For cleaning, use mild soap and
water or a 50/50 solution of vinegar
and water, For rinsing, use clean
water. Polish dry with a soft cloth. Pull the knob straight
off the stem,.
Do not use abrasive cleansers,
strong liquid cleaners, plastic scouring pads or oven
cleaners on the control panel--they will damage the finish.
The control knobs may be removed for easier cleaning To
remove knob, pull it straight off the stem.. If knob is difficult
to remove, place a towel or dishcloth between the knob
and control panel and pull gently Wash the knobs in soap
and water, or in a vinegar and hot water solution,
Oven Vent
Never cover the opening
with aluminum foil or any
other material.
The oven is vented through
an opening under the right
rear surface unit..
Painted Surfaces
Painted surfaces include the sides of the range and the
sides of the door trim,.
Clean these with soap and water or a vinegar and water
solution,
Do not use commercial oven cleaners, cleaning powders,
steel wool or harsh abrasives on any painted surface.
Glass Window (on some models)
To clean the outside glass finish, use a glass cleanen
Rinse and polish with a dry cloth.
14
BEFORE YOU BEGIN
Read these instructions completely and carefully,
IMPORTANT--Save these instructions for the local
inspector's use.
IMPORTANTmObserve all governing codes and
ordinances,
NOTE TO INSTALLER:
Be sure to leave these instructions with the
Consumer.
NOTE TO CONSUMER:
Keep these instructions for future reference,
SKILL LEVEL:
Installation of this appliance requires basic
mechanical skills.
COMPLETION TIME:
t to 3 hours
Proper installation is the responsibility of the
installer,
Product failure due to improper installation is not
covered under the Warranty.
WARNING: This appliance must be
properly grounded,
beyond the front of the cabinets, Cabinets instarled
above a cooktop must be no deeper than 13"
Be sure your appliance is properly installed and grounded
by a quaEified technician.
Make sure the cabinets and wall coverings around the
range can withstand the temperatures (up to 200°F)
generated by the range_
ANTI-TIP DEVICE
WARNING: Toreducetherisk
of tipping, the appliance must be secured by properly
installedAnti-Tip bracket packed with this appliance..
If the Anti-Tip device supplied with the range does
not fit this application, use the universal Anti-Tip device
WB2X7909.. CaJJ1-800-4-MY-HOME_
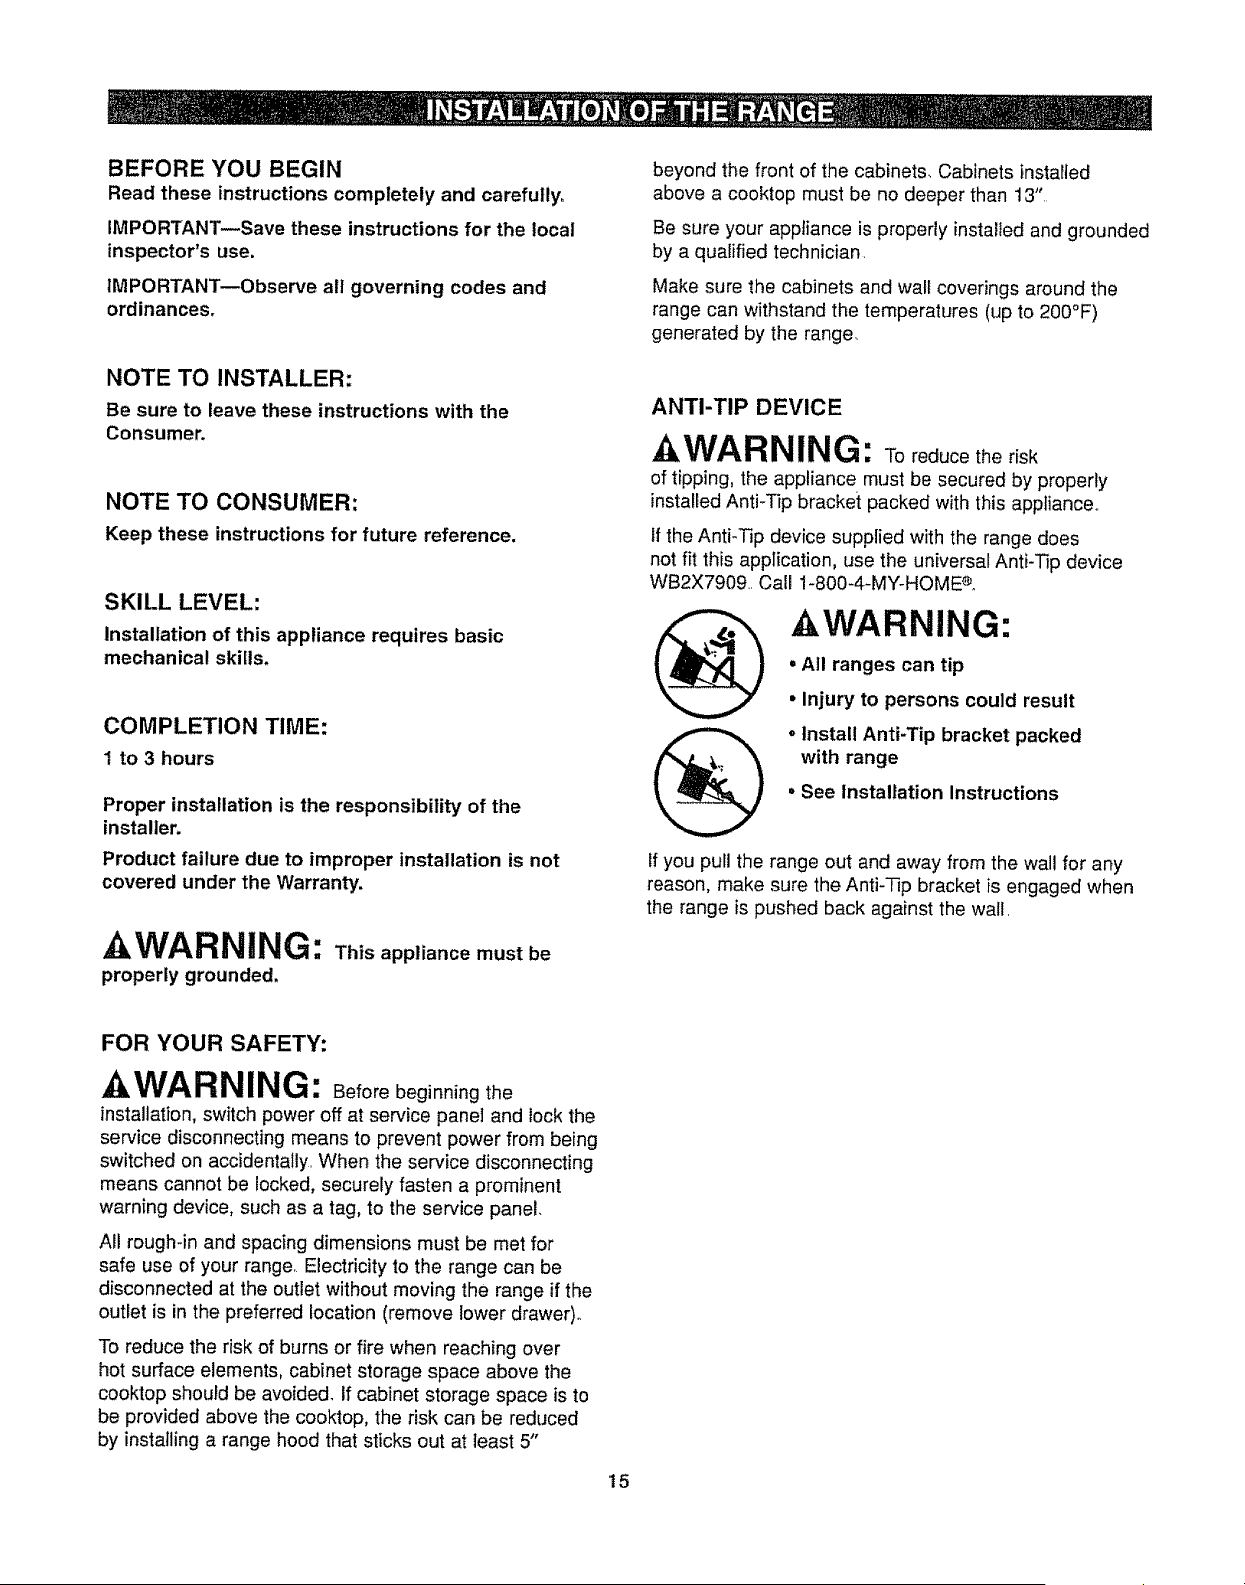
WARNING:
• All ranges can tip
• Injury to persons could result
oinstall Anti-Tip bracket packed
with range
• See Installation Instructions
If you pull the range out and away from the wall for any
reason, make sure the Anti-_p bracket is engaged when
the range is pushed back against the wall_
FOR YOUR SAFETY:
-&WARNING: Beforebegion ngthe
installation,switch power off at service panel and lock the
service disconnecting means to prevent power from being
switched on accidentally. When the service disconnecting
means cannot be locked, securely fasten a prominent
warning device, such as a tag, to the service panel,
All rough-in and spacing dimensions must be met for
safe use of your range, Electricity to the range can be
disconnected at the outlet without moving the range if the
outlet is in the preferred location (remove lower drawer)°
To reduce the risk of burns or fire when reaching over
hot surface elements, cabinet storage space above the
cooktop should be avoided, If cabinet storage space is to
be provided above the cooktop, the risk can be reduced
by installing a range hood that sticks out at least 5"
15
MATERIALS YOU MAY NEED
Lag Bolts Anchor Sleeves
(For Antl_Tlp Bracket Mounted
on Concrete Floors Only)
Tin Snips
(UL Approved 40 AMP)
4*Wtre Cord OR 3-W|re Cord
4' Long 4' Long
Squeeze Connector
(For Conduit installations Only)
TOOLS YOU WILL NEED
Drill with 118_ Bit
Safety Glasses
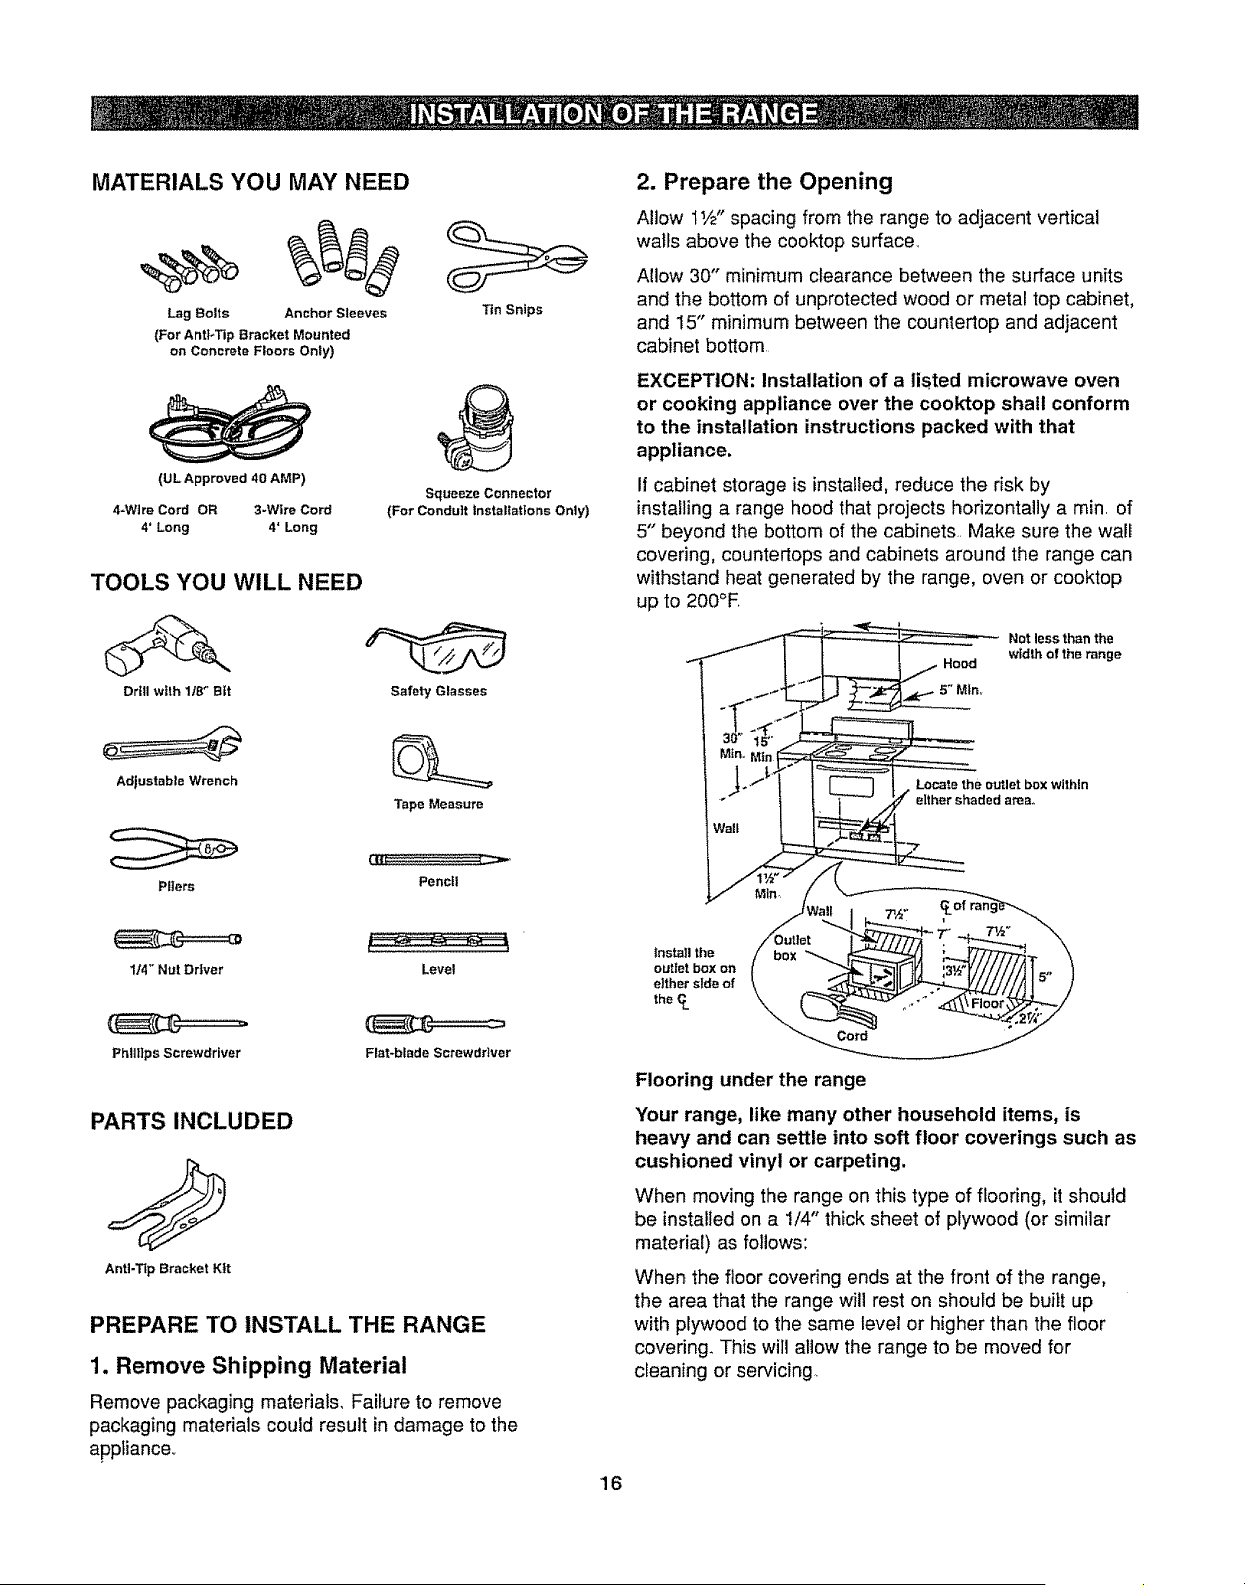
2. Prepare the Opening
Allow 11/4'spacing from the range to adjacent vertical
walls above the cooktop surface,
Allow 30" minimum clearance between the surface units
and the bottom of unprotected wood or metal top cabinet,
and 15" minimum between the countertop and adjacent
cabinet bottom
EXCEPTION: Installation of a listed microwave oven
or cooking appliance over the cooktop shall conform
to the insta!lation instructions packed with that
appliance.
If cabinet storage is installed, reduce the risk by
installing a range hood that projects horizontally a min, of
5" beyond the bottom of the cabinets,, Make sure the wall
covering, countertops and cabinets around the range can
withstand heat generated by the range, oven or cooktop
up to 200°E
Not less than the
Hood width o! the range
Adiustable Wrench
Tape Measure
Locate the outlet box wllhln
either shaded area.
Pliers
Pencil
1/4" Nut Dr|ver
PhllI]ps Screwdriver
Level
Flat-blade Screwdriver
PARTS INCLUDED
AntI-T_p Bracket Kit
PREPARE TO INSTALL THE RANGE
1. Remove Shipping Material
Remove packaging materials, Failure to remove
packaging materials could result in damage to the
appliance..
Install the
outlet box on
either side of
the _.
box
Flooring under the range
Your range, like many other household items, is
heavy and can settle into soft floor coverings such as
cushioned vinyl or carpeting.
When moving the range on this type of flooring, it should
be installed on a !/4" thick sheet of plywood (or similar
material) as follows:
When the floor covering ends at the front of the range,
the area that the range will rest on should be built up
with plywood to the same level or higher than the floor
covering. This will allow the range to be moved for
cleaning or servicing..
16
ELECTRICAL CONNECTIONS
Electrical Requirements
A CAUTION: For personal safety, do not
use an extension cord with this appliance° Remove
house fuse or open circuit breaker before beginning
installation°
This appliance must be supplied with the proper voltage
and frequency, and connected to an individual properly
grounded branch circuit, protected by a circuit breaker or
fuse having amperage as specified on the rating plate
The rating plate is located above the storage drawer on
the oven frame.
We recommend you have the electrical wiring and
hookup of your range connected by a qualified electrician.
After installation, have the electrician show you where
your main range disconnect is located
Check with your local utilities for electrical codes which
apply in your area. Failure to wire your oven according to
governing codes could result in a hazardous condition.. If
there are no local codes, your range must be wired and
fused to meet the requirements of the National Electrical
Code, ANSI!NFPA No. 70- Latest Edition, You can get a
copy by writing:
National Fire Protection Association
Batterymarch Park
Quincy, MA 02269
Effective January 1, 1996, the National Electrical Code
requires that new construction (not existing) utilize a
4-conductor connection to an electric range.
When installing an electric range in new
construction, follow Steps 3 and 5 for 4-wire
connection.
You must use a 3-wire, single-phase A C..208Y/120 Volt
or 240/i 20 Volt, 60 hertz electrical system.. If you connect
to aluminum wiring, properly installed connectors
approved for use with aluminum wiring must be used.
If the electrical service provided does not meet the
above specifications, have a licensed electrician install
an approved outlet..
ALL NEW CONSTRUCTIONS,
MOBILE HOMES AND
INSTALLATIONS WHERE
LOCAL CODES DO NOT ALLOW
GROUNDING THROUGH NEUTRAL
Use only a 3-conductor or a 4-conductor UL-ffsted range
cord. These cords may be provided with ring terminals on
wire and a strain relief device.
A range cord rated at 40 amps with !25/250 minimum
volt range is required A 50 amp range cord is not
recommended but if used, it should be marked for use
with nominal 1¾" diameter connection openings., Care
should be taken to center the cable and strain relief within
the knockout hole to keep the edge from damaging the
cable,
. Because range terminals are not accessible after range
is in position, flexible service conduit or cord must be
used.,
NOTE: If conduit is being used, go to Step 3D and then
to Step 6 or 7
• On some models, a filter capacitor may be connected
between the black and white leads on the junction
block,,
17
EI.ECTRICAL CONNECTIONS (cont.)
3. Power Cord and Strain Relief installation
a. Remove the wire cover (on the lower back of the
range) by removing two (2) screws using a 1/4" nut
driver_
Do not discard these screws,
\
Back of range
b. Remove the knockout ring (I3/8") located on bracket
directly below the terminal block. To remove the
knockout, use a pair of pliers to bend the knockout ring
away from the bracket and twist until ring is removed
Terminal block
c. For power cord installations only (see the next step
if using conduit), assemble the strain relief in the hole
Insert the power cord through the strain relief and
tighten Allow enough slack to easily attach the cord
terminals to the terminal block If tabs are present at
the end of the winged strain relief, they can be
removed for better fit
NOTE: Do not instal] the power cord without a
strain relief. The strain relief bracket should be
installed before reinstalling the rear range wiring
cover.
Strain retlef
e
/
Power cord
Terminal block
/
Bracket
Skip to Step 4 or 5
d. For conduit installations only, purchase a squeeze
connector matching the diameter of your conduit and
assemble it in the hole Insert the conduit through the
squeeze connector and tighten_Af]ow enough slack to
easily attach the wires to the terminal block
NOTE' Do not install the conduit without a squeeze
connector. The squeeze connector should be installed
before reinstalling the rear range wiring cover°
Knockout ring in
bracket
Knockout ring
removed
Squeeze
connector
Conduit Bracket
SkiptoStep6or7
18

4. 3-Wire Power Cord Installation
-& WARNING: Theneutralor ground
wire of the power cord must be connected to
the neutral terminal located in the center of
the terminal block. The power leads must be
connected to the lower left and the lower right
terminals of the terminal block.
a, Remove the 3 lower terminal screws from the terminal
block. Insert the 3 terminalscrews through each power
cord terminal ring and into the lower terminals of the
terminal block. Be certain that the center wire
(white/neutral) is connected to the center lower position
of the terminal block, Tighten screws securely into the
terminal block,,
DO NOT remove the ground strap connection.
(appearance may vary)
Ground plato,
I
terminal
strap
b. Skip to Step 8 and proceed with the installation.
5. 4-Wire Power Cord Installation
WARNING: Theneutralwireof
the supply circuit must be connected to the
neutral terminal located in the lower center
of the terminal block. The power leads must
be connected to the lower left and the lower
right terminals of the terminal block. The 4th
grounding lead must be connected to the
frame of the range with the ground plate
and the ground screw,
a, Remove the 3 lower terminal screws from the terminal
block, Remove the ground screw and the ground plate
and retain them,
b.Out and discard the ground strap. DO NOT DlSCARD
ANY SCREWS,
c. Insert the one ground screw into the power cord
ground wire terminal ring, through the ground plate and
into the frame of the range.
d. Insert the 3 terminal screws (removed earlier) through
each power cord terminal ring and into the lower
terminals of the terminal block,, Be certain that the
center wire (white/neutral) is connected to the center
lower position of the terminal block,, Tighten screws
securely into the terminal block,
Before //,_._
Terminal block
_i rap
Neutral
lermlnal
or
After
Termlna_
block /
Ground
screw
Neutral
terminal
Ground plate
(grounding to
range)
t
e. Skip to Step 8 and proceed with the installation
19
ELECTRICAL CONNECTIONS (cont.)
6. 3-Wire Conduit Installation
a. Loosen the 3 lower terminal screws from the terminal
block. Insert the center bare wire (white/neutral) tip
through the bottom center terminal biock opening. On
certain models, the wire wilt need to be inserted
through the ground strap opening and then into the
bottom center block opening., insert the two side bare
wire tips into the lower left and the lower right terminal
block openings.. Tighten the screws until the wire is
firmly secure (approximately 20 inch-lbs.).
DO NOT remove the ground strap connection,
NOTE: ALUMINUM WIRING:
Aluminum building wire may be used but it must be
rated for the correct amperage and voltage to make
connection. Connect wires according to this Step 6 or
Step 7 depending on number of wires°
Wire tips
Conduit
Wire used, location and enclosure of splices, etc.,
must conform to good wiring practices and local
codes.
b. Skip to Step 8 and proceed with the installation.
7. 4-Wire Conduit Installation
a_
b,
Loosen the three lower terminal screws from the
terminal block. Remove the ground screw and the
ground plate and retain them Cut and discard the
ground strap. DO NOT DISCARD ANY SCREWS..
Insert the ground bare wire tip between the range
frame and the ground plate (removed eartier) and
secure it in place with the ground screw (removed
earlier).. Insert the bare wire (white/neutral) tip through
the bottom center of the terminal block opening.. Insert
the center two side bare wire tips into the lower left and
the lower right terminal block openings.. Tighten the
screws until the wire is firmly secure (approximately 20
inch-lbs,),
block f !_
Ground strap f
After
_strap
X_ Neutral
termtnat
or
Wire
Ground
screw
Ground piale
(grounding to
range)
\N
Bracket
Wire used, location and enclosure of splices, etc.,
must conform to good wiring practices and local
codes,
c. Proceed to Step 8_
2O
INSTALL 'THE RANGE
8. Replace the Wire Cover
Replace the wire cover on the range back by sliding its
right edge under the retaining tab and replacing the two
screws removed eartier_ Make sure that no wires are
pinched between the cover and the range back,
2 sorews to
replace wire,
cover
\
cover
• • # u
9. Anti-Tip Device Installation
An Anti-Tip bracket is supplied with instructions for
installationin a variety of locations, The instructions
include all necessary information to complete the
installation,,Read the Safety Instructions and the
instructionsthat fit your situation before beginning
installation,
10. Level the Range
a. tnstaltthe oven shelves in the oven and position the range
where it wilt be installed
b.Check for levelness by placing a
spirit level or a cup, partially filled
with water, on one of the oven
shelves, If using a spirit level,
take two readings--with the level
placed diagonally first in one
direction and then the other,,
Spirit level
c. Remove the storage drawer, broiler drawer or kick
panel, The front leveling legs can be adjusted from the
bottom and the rear legs can be adjusted from the top or
the bottom,
Front leveling legs
(on some models)
Raise Lower
rang_ range
Bracket. / Wali plate
Screw "",,,d
tm"_tenter _IIl ,J,
woodor--........ Iil
Typical installation of antl-ttp bracket attachment to walt
WARNING:
• Range must be secured by Anti-Tip bracket supplied.
• If the Anti-Tip device supplied with the range does
not fit this application, use the universal Anti-Tip device
WB2X7909, Call 1-800-4-MY-HOME ®,
• See instructionsto install (suppliedwith bracket),
• Unless properly installed, the range could be tipped by
stepping or sitting on the door. Injury may result from
spilled hot liquids or from the range itself,.
Rear leveling legs
(on some models)
d. Use an open-end or adjustable wrench to adjust the
leveling legs until the range is level,,
e. Replace the drawer or panel,
21
'11. Final Installation Checklist
• Check to make sure the circuit breaker is closed
(RESET) or the circuit fuses are replaced.
• Be sure power is in service to the building..
, Check to be sure that all packing materials and tape
have been removed, This will include tape on metal
panel under control knobs (if applicable), adhesive tape,
wire ties, cardboard and protective plastic.. Failure to
remove these materials could result in damage to the
appliance once the appliance has been turned on and
surfaces have heated,
• Check to make sure that the rear leveling leg is fully
inserted into the Anti-Tip bracket and that the bracket is
securely installed.
12. Operation Checklist
Turn on one of the surface units to observe that the
element glows within 60 seconds. Turn the unit off when
glow is detected, tf the glow is not detected within the
time limit, recheck the range wiring connections. If
change is required, retest again.. If no change is
required, have building wiring checked for proper
connections and voltage_
Check to make sure the Clock (on models so equipped)
display is energized, If a series of horizontal red lines
appear in the display, disconnect power immediately..
Recheck the range wiring connections_ If change is
made to connections, retest again. If no change is
required, have building wiring checked for proper
connections and voltage. It is recommended that the
clock be changed if the red lines appear..
. Be sure all range controls are in the OFF position before
leaving the range..
Problem Possible Causes
Surface units The surface units are not plugged
not functioning in solidly.
properly
The surface unit controls
are improperly set,
The drip pans are not set securely
in the cook-top.
Oven light does Light bulb is loose or defective,
not work
Switch operating light is broken.
Oven will not work Plug on range is not completely
inserted in the electrical outlet.
A fuse in your home may be blown
or the circuit breaker tripped.
Oven controls improperly set.
Food does not bake Oven controls improperly set.
or roast properly
Shelf position is incorrect or the
shelf is not level.
Incorrect cookware or cookware of
improper size being used.
Oven thermostat needs adjustment.
What To Do
With the controls off, check to make sure the surface
unit is plugged completely into the receptacle.
Check to see the correct control is set for the surface
unit you are using.
With the controls off, check to make sure the drip .pan is
in the recess in the cooktop and that the opening _nthe
pan lines up with the receptacle.
Tighten or replace the bulb_
Cal! for service.
Make sure electrical plug is plugged into a live, properly
grounded outlet..
Replace fuse or reset circuit breaker.
See the Using the oven section_
See the Using the oven section,.
See the Using the oven section,.
See the Using the oven section.
See the Adjust the oven thermostatuEasy to do
yourself! section_,
22
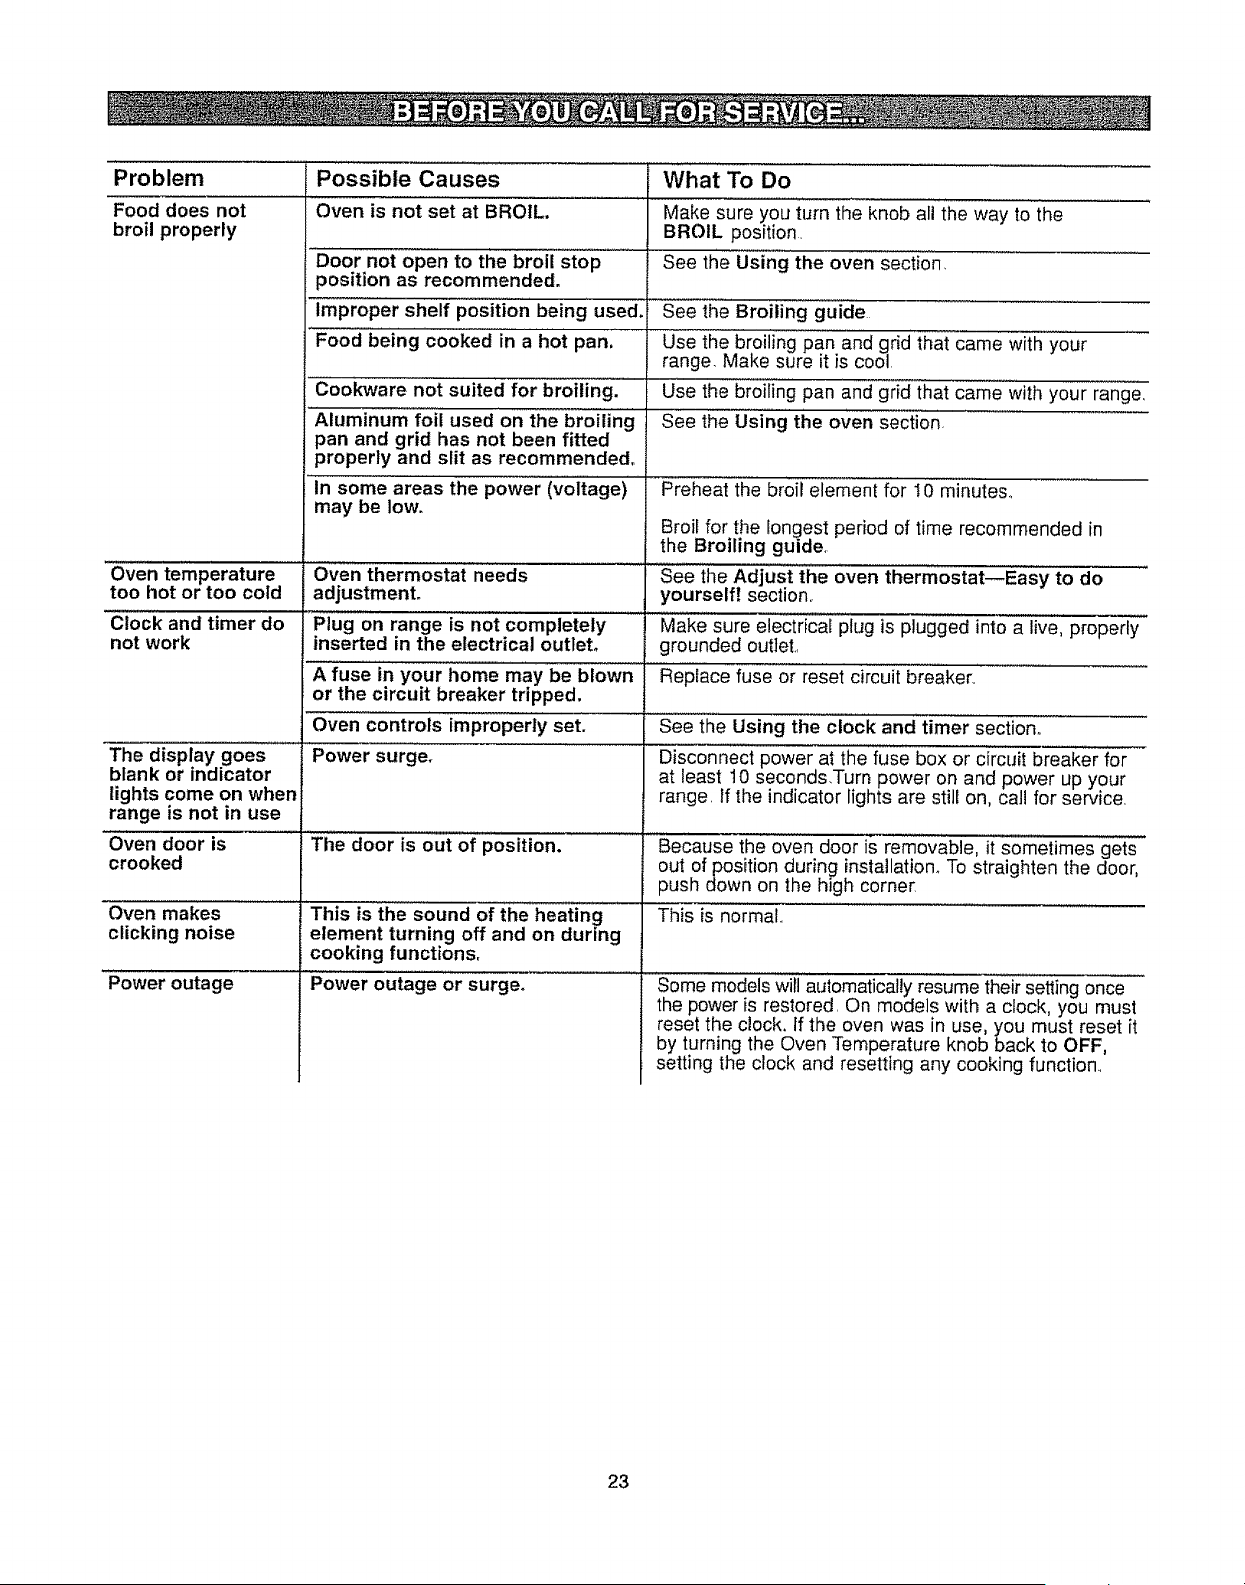
Problem Possible Causes What To Do
Food does not Oven is not set at BROIL. Make sure you turn the knob all the way to the
broil properly BROIL position,
Door not open to the broil stop See the Using the oven section.
position as recommended.
Improper shelf position being used. See the Broiling guide
Food being cooked in a hot pan. Use the broiling pan and grid that came with your
range. Make sure it is cool
Cookware not suited for broiling. Use the broiling pan and grid that came with your range_
Aluminum foil used on the broiling See the Using the oven section.
pan and grid has not been fitted
properly and slit as recommended°
In some areas the power (voltage) Preheat the broir element for I0 minutes°
may be low.
Broil for the Eongest period of time recommended in
the Broiling guide
Oven temperature Oven thermostat needs See the Adjust the oven thermostat--Easy to do
too hot or too cold adjustment, yourself! section,
Clock and timer do Plug on range is not completely Make sure electricaE plug is plugged into a live, properly
not work inserted in the electrical outlet, grounded outlet,
A fuse in your home may be blown Reptace fuse or reset circuit breaker_
or the circuit breaker tripped.
Oven controls improperly set. See the Using the clock and timer section,,
The display goes Power surge. Disconnect power at the fuse box or circuit breaker for
blank or indicator at least t0 seconds.Turn power on and power up your
lights come on when range_ If the indicator lights are still on, call for service,
range is not in use
Oven door is The door is out of position.
crooked
Oven makes
clicking noise
Power outage
This is the sound of the heating
element turning off and on during
cooking functions,
Power outage or surge.
Because the oven door is removable, it sometimes gets
out of position during installation_ To straighten the door,
push down on the high corner
This is normal.,
Some models will automatically resume their setling once
the power is restored On models with a clock, you must
reset the clock. If the oven was in use, you must reset it
by turning the Oven Temperature knob back to OFF,
setting the clock and resetting any cooking function.,
23
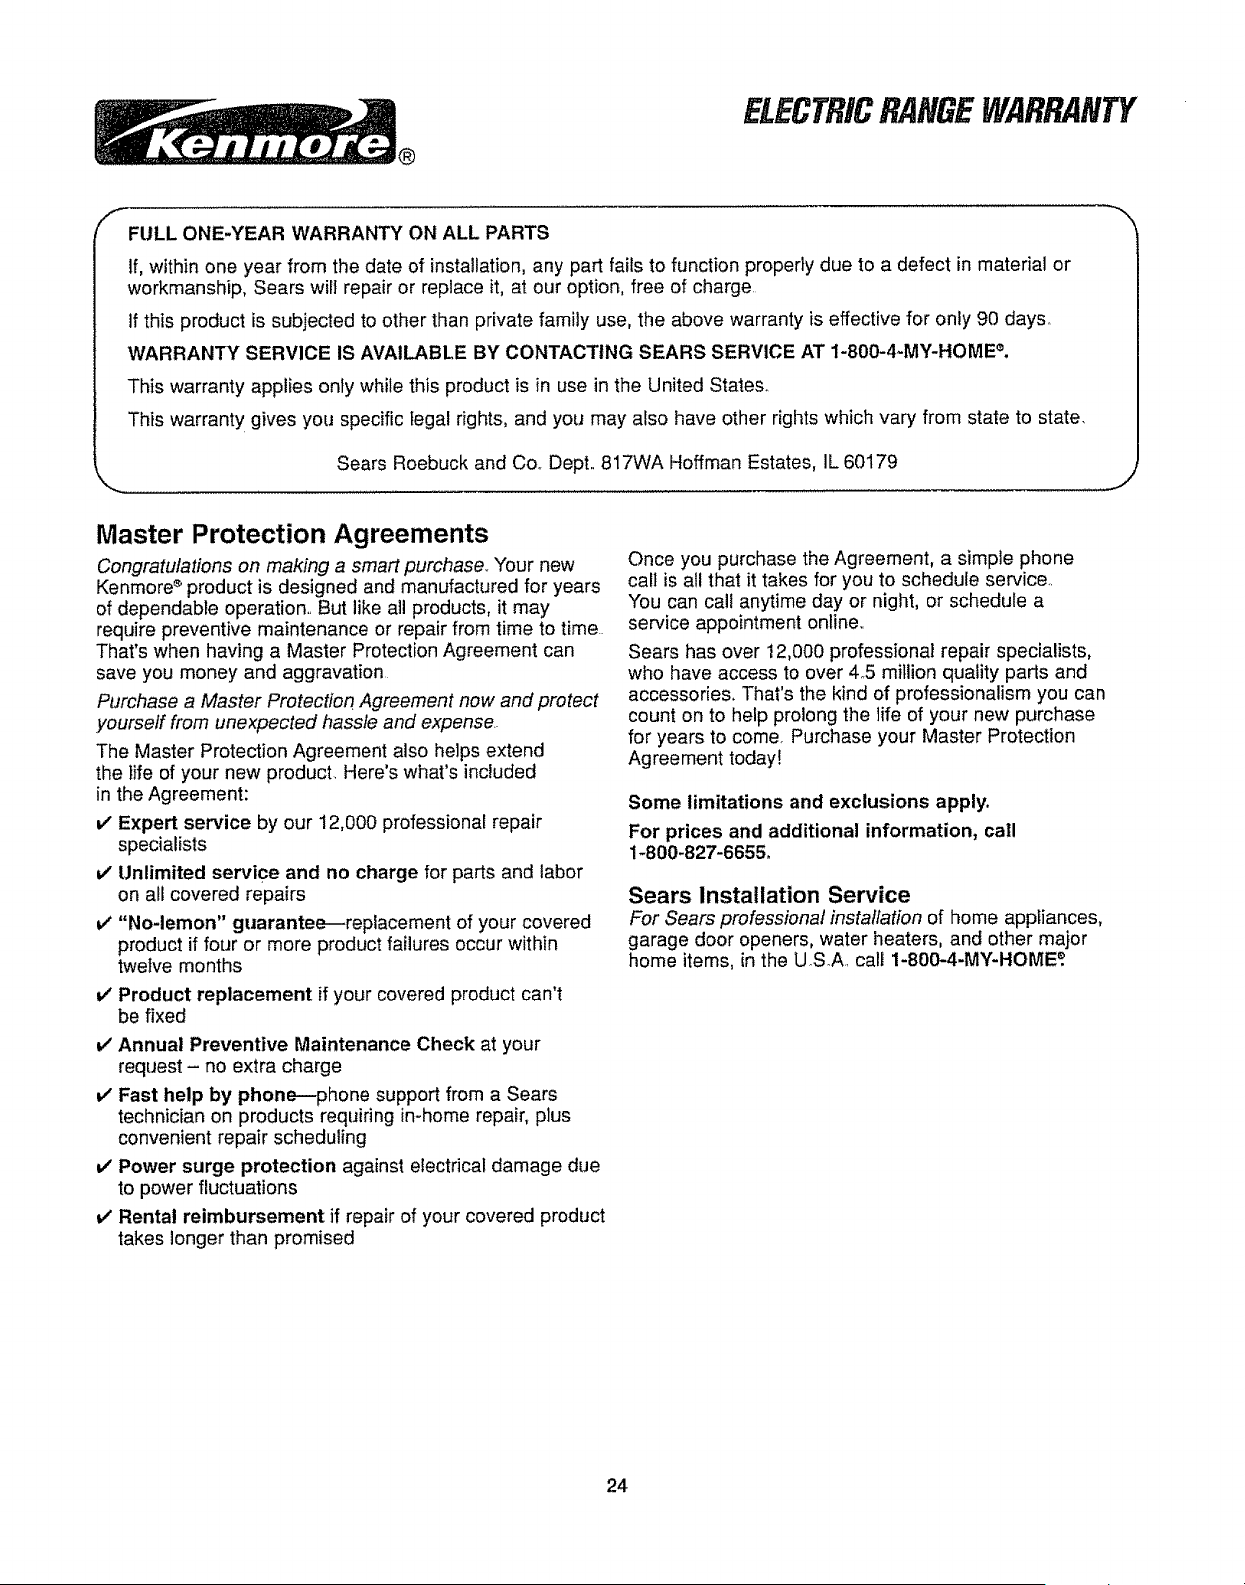
_®
ELECTRICRANGEWARRANTY
f
%....L
FULL ONE-YEAR WARRANTY ON ALL PARTS
if, within one year from the date of installation,any part fails to function properly due to a defect in material or
workmanship, Sears will repair or replace it, at our option, free of charge
If this product is subjected to other than private family use, the above warranty is effective for only 90 days.
WARRANTY SERVICE IS AVAILABLE BY CONTACTING SEARS SERVICE AT 1-800-4-MY-HOME%
This warranty applies only while this product is in use in the United State&
This warranty gives you specific legal rights, and you may also have other rights which vary from state to state.
Sears Roebuck and Co.. Dept.. 817WA Hoffman Estates, IL 60179
J
Master Protection Agreements
Congratulations on making a smart purchase_ Your new
Kenmore _ product is designed and manufactured for years
of dependable operation.. But like all products, it may
require preventive maintenance or repair from time to time..
That's when having a Master Protection Agreement can
save you money and aggravation
Purchase a Master Protection Agreement now and protect
yourself from unexpected hassle and expense..
The Master Protection Agreement also helps extend
the life of your new product. Here's what's included
in the Agreement:
v" Expert service by our 12,000 professional repair
specialists
v" Unlimited service and no charge for parts and labor
on all covered repairs
v" "No-lemon" guarantee---replacement of your covered
product if four or more product failures occur within
twelve months
v' Product replacement if your covered product can't
be fixed
v" Annual Preventive Maintenance Check at your
request - no extra charge
it" Fast help by phone--phone support from a Sears
technician on products requiring in-home repair, plus
convenient repair scheduling
v' Power surge protection against electrical damage due
to power fluctuations
v' Rental reimbursement if repair of your covered product
takes longer than promised
Once you purchase the Agreement, a simple phone
call is all that it takes for you to schedule service..
You can call anytime day or night, or schedule a
service appointment online,.
Sears has over 12,000 professional repair specialists,
who have access to over 4°5 million quality parts and
accessories. That's the kind of professionalism you can
count on to help prolong the life of your new purchase
for years to come Purchase your Master Protection
Agreement today!
Some limitations and exclusions apply°
For prices and additional information, call
1-800-827-665&
Sears Installation Service
For Sears professional installation of home appliances,
garage door openers, water heaters, and other major
home items, in the USA.. call 1-800-4-MY-HOME _.
24
Instrucciones de seguridad
Instrucciones de seguridad importantes _,., 25-27
Funcionamiento
Caracteristicas de su estufa ..................... 28
CSmo usar las unidades de superficie .......... 29
C6mo usar el homo ....................... 30-33
Cuidado y mantenimiento
Antes de llamar para un servicio .......... 45-46
Cuidado y limpieza ....................... 34-37
Servicios al consumidor ....................... 48
Contrato de protecci6n maestra ................. 47
Servicios de reparaci6n ......................... 48
Garantfa ...................................... 47
lnstrucciones de instalacion
Dimensiones & espacios ......................... 38
Requerimientos el_ctricos ..................... 38
Requerimientos de los pisos .................... 39
Conexiones eF6ctricas ..................... 40-43
lnstalaci6n de dispositivo contra volcaduras ..... 44
Nivelaci6n de ]a estufa ............................ 44
Servicio .............................. Cubierta trasera
Para su conveniencia y referencia futura, por favor
escriba los n_meros de modeto y serie en el espacio
que se provee_ El n6mero de modelo y el n_mero de
serie de su estufa electrica pueden ser encontrados
sobre una etiqueta detr&s de fa puerta de la estufa o
detr&s del cajSn de atmacenajeo
NUMERO DE MODELO:
NUMERO DE SERIE:
A iADVERTENCIA!
Para su seguridad la informaci6n en este manual debe
ser seguida para minimizar el riesgo de incendio o
explosi6n, golpe de corriente, o para prevenir dafio a la
propiedad, heridas personales, o p_rdida de vida.
ADVERTENCIA-
DISPOSITIVO CONTRA
VOLCADURAS
Todas las estufasse pueden volcar Io cual podfia resultar
en heridas.
Parapreveniruna volcadura accidentalde
la estufa,p_guelaa la paredinstalandoel
dispositivocontravolcadurasque se provee.
Si e! dispositivocontra volcadurasque se
suministracon la estufano se ajustaa esta
aplicaci6n,use el dispositivocontravolcadura
universalWB2X7909_,
Uameal 1-888-SU-HOGAR_.
Para revisarsi eldispositivoest_ instaladoy
enganchadoadecuadamente,haga ladear la estufa
cuidadosamentehacia adelante.El dispositivocontra
volcadurasdebefia estarenganchadopara prevenirque la
estufa se vuelque_
Si ustedsepara la estufade la paredpot cualquierraz6n,
aseg0reseque el dispositivoest&adecuadamente
enganchadocuando empujela estufacontrala pared. Si no,
hay un posibteriesgo de quela estufase vuelquey cause
heridassi usted o un niSose para,se sientao se afirmesobre
unapuerta abierta..
Pot favor haga referenciaa la informaci6ndel Dispositivo
contraVolcadurasen este manual.La falla de tomar esta
precauci6npodriaresultaren que la estufase vuelqueyen
heridaso
Lea todas las instrucciones antes de usar
este aparato.
Cuando se usan aparatos el_ctricos, se debe seguir
precaucionesde seguridad bdsicas, incluyendo Io
siguiente:
• Use este aparato solamente con el prop6sito para el
cual fue diseSado como se describe en esta Gufa de
Uso y Cuidado.
- Asegurese de que el aparato estd instalado
adecuadamentepor un electricista catificado y que haga
tierra de acuerdo alas instrucciones de instalaci6n que se
proveen.
. No trate de reparar o reemplazar ninguna parte
de su estufa a menos que sea recomendado
especificamente en este manual. Todos los otros
servicios deberian ser referidos a un t6cnico calif_cado.
° Haga que el instalador ]e muestre ta ubicaci6n de!
interruptor del circuito o del fusible. M_rquelo para una
referenciaf_cil,,
. Antes de haceralgdn servicio, DESENCHUFE O
DESCONECTE EL PASO DE LA ELECTRICIDAD
EN El. PANELDE DISTRIBUCION DE LA CASA
SACANDO ELFUSIBLE O APAGANDO EL
INTERRUPTORDEL CIRCUITO,_
. Rayones grandes o impactos alas puertas de vidrio
pueden causar que el vidrio se rompa o se agriete.
25
m
Zt
O
r"
. No deje solos a los nifios--los niSos no se deberian
dejar solos o sin ser vigilados en un Area donde un
aparato eleclrodom_stico estA en uso. Nunca se les
deberia permitir sentarse o pararse sobre cualquier
parte de ta estufa.
. No permita que alguien se suba, se pare o se cuelgue
de la puerta, del caj6n de almacenaje, o la cubierta
para cocinar. Podr(a daSar ia estufa y posiblemente
hacerla vofcar, causando severas heridas personales
° No guarde los materiates inflamables dentro del
homo o cerca la supefficie de cocci6n°
° PRECAUClON: LOS ARTiCULOS DE INTERES PARA
LOS NI_IOS NO SE DEBERIAN GUARDAR EN LOS
GABINETES QUE ESTAN SOBRE LA ESTUFA O EN
LA PARTE TRASERA DE UNA ESTUFA--LOS NII_OS
QUE SE SUBAN SOBRE LA ESTUFA PARA
ALCANZAR COSAS PODRIAN RESULTAR
SERIAMENTE HERIDOS+
• Nunca se ponga ropa suelta o ropa que le quede
colgando cuando use la estufa. Tenga cuidado
cuando tome cosas guardadas por sobre la estufa.
Los materiales inflamables se podrfan encender si se
ponen en contacto con las unidades calientes de la
superficie o los elementos calentadores y podrian
causar graves quemaduras.
PRECAUClONES BASUCAS
DE SEGURIDAD
° Use solamente agarraderas para ollas secas--
las agarraderas para ollas mojadas o h(Jmedas sobre
las superficies catientes podr[an producir quemaduras
por vapor. No permita que las agarraderas de las ollas
toquen las unidades de superficie o los elementos
calentadores. No use una toatla u otto paso abultado+
° Para su seguridad, nunca use su estufa para
entibiar o calentar la habitaci6n.
= No guarde o use materiales combustibles, gasolina
u otros vapores o Ifquidos inflamables cerca de
esta o de cualquier otto aparato electrodom6stico+
• Mantenga los filtros de la campana y para ia grasa
limpios para mantener una buena ventilaci6n y
evitar incendios de grasa.
• No permita que la grasa u otros materiales
inflamables se acumulen en o cerca de la estufa.
° No use agua sobre incendios de grasa. Nunca
tevante una olta en llamas, Apague los controles..
Sofoque una olla en tlamas sobre la unidad de
superficie cubriendo completamente la olla con una
tapa que quede bier} apretada, bandeja para galletas o
una bandeja plana. Use un extintor para propSsito
mr3Itiple de qurmico seco o a espuma,
La grasa en llamas afuera de ta olla se puede
apagar cubri6ndola con soda para hornear o,
siest& disponible, usando un extintor para propSsito
multiple de qulmico seco o a espuma.
Las llamas dentro del homo se pueden sofocar
completamente cerrando la puerta del horno o usando
un extintor para propSsito mOItiple de quimico seco o
a espuma.
No toque las unidades de ta superficte, los
elementos calentadores, o la superficie interior
del homo+ Estas superficies podr[an estar _o
suficientemente caliente para quemar aunque se vean
de color oscuro. Durante y despu_s del uso, no toque
o permita que la ropa u otros materiales inflamables
hagan contacto con las unidades de superficie, con ias
Areas cerca de las unidades de superficie o cualquier
Area interior del homo; permita suficiente tiempo para
que se enfrfe primero, Potencialmente tas superficies
calientes incluyen la superficie para cocinar, las Areas
que hacen frente a la superficie para cocinar, las
aberturas de la ventilaci6n det homo, _assuperficies
cerca de la abertura, aberturas alrededor de ia puerta
del homo y las partes de metal de la moldura arriba de
la puerta RECUERDE: La superficie interior del horno
podr[a estar cariente cuando se abre la puerta..
COMO PROTEGER CONTRA
ENFERMEDADES
CAUSADAS POR LAS
COMIDAS
° Cocine bien la came y las aves--la came a pot 1o
menos una temperatura INTERNA de 160°F y las
ayes a pot Io menos una temperatura INTERNA
de 180°i=. El cocinar a estas temperaturas
generalmente protege contra las enfermedades
causadas pot los alimentos.
SEGURIDAD EN EL USO
DEL HORNO
• PArese lejos del homo cuando abra la puerta del
homo° Et aire caliente o el vapor que escapa puede
causar quemaduras alas manos, rostro y/u ojos.
° No caliente los envases que est6n cerrados. La
presi6n podri'a aumentar y el envase podrfa
explotar, causando heridas.
• No obstruya ta ventilaci6n del homo. La ventilaciSn
estA debajo de la unidad de superficie trasera derecha.,
° Mantenga el homo libre de acumulaci6n de grasa.
° Coloque la parritla del homo en su posicibn
deseada mientras el homo est_ fr[o, Si tiene que
tomar las parrillas cuando est_n calientes, no
permita que las agarraderas para las ollas o los
guantes para homo hagan contacto con los
elementos para calentar+
26
• E!sacarlaparrilla hasta la posici6n de tope es
una conveniencia para levantar comidas pesadas.
Es tambi6n una precauci6n contra quemaduras
causadas al tocar las superficies calientes de la puerta
o las paredes del homo.
o Cuando use bolsas para cocinar o asar en el homo,
siga las direcciones del fabricante.
• No use e! horno para secar peri6dicoso Si se
sobrecalientan, se podrfan incendiar,
• No use el homo para almacenar cosas, Los artfculos
guardados en un homo se podr[an incendiar.
, No deje productos de papal, utensilios de cocina o
comida en el homo cuando no est_ en uso.
UNIDADES DE SUPERFIClE
Use el tamafio de ollas adecuaclo--seteccione las ollas
qua tengan fondo piano fo suficientemente grande para
cubrir el elemento calentador de la unidad de superficie.
El uso de oltas de tamafio demasiado pequefio expondr#
una porciSn de la unidad de superficie a un contacto
directo y podrfa resuttar en el incendio de la ropa.. La
relacidn correcta entre/as olfas y el tamafio de fa unidad
de superficie tambi#n mejorar_ ta eficiencia..
• Nunca deje las unida_es de superficie sin ser
vigiladas cuando est_n en posici6n alta de
temperatura.. Los derrames causan humo y los
derrames de grasa podr[an incendiarse.
- Use poca grasa para fre[r eficientemente en forma
baja o profunda. El lfenar demasiado la olla con
grasa podrfa causar derrames cuando sele agrega
ta comida..
- Si se usa una combinaci(_n de aceites o grasas
para freir, revu_Ivalas antes de calentar, o a medida
que la grasa se derrita lentamente
° Siempre caliente la grasa ientamente y obs_rvela
cuando se calienta
• $61o ciertos tipos de oltas de vidrio, vidrio
cer_mica, piedra u otros tipos de envidriados
se pueden usar para cocinar sobre la cubierta;
otros se podrian quebrar debido a los subitos cambios
de temperatura.
° Para minimizar la posibilidad de quemaduras,
incendio de materiales inflamables y derrames,
la manilta de una olla deberia estar dirigida hacia el
centro de la estufa sin qua se extienda por sobre las
unidades de superficie qua est6n cerca,.
Siempre apague las unidades de superficie antes
de sacar tas ollaso
Cuando prepare comidas alas llamas debajo de la
campana de ventilaci6n, encienda el ventilador.
Use un term6metro para grasa profundo cuando
sea posible para prevenir sobrecalentar ]a grasa
m_s all_ del punto de humo.
Vigile las comidas qua se est_n friendo en
posiciones altas o medianas altas.
Las comidas que se van a freir deberian estar Io
mrs secas posibleo El hielo sobre los alimentos
congelados o la humedad sobre las comidas frescas
pueden causar que la grasa haga burbujas hacia arriba
y que caigan hacia los lados de la olla.
Limpie la cubierta para cocinar con cuidado. Si se
usa una esponja mojada para limpiar derrarnes sobre
una cubierta caliente, tenga cuidado para evitar
quemaduras por vapor,.
Para prevenir la posibilidad de una quemadura o
un gotpe de corriente, siempre asegLirese que los
controles de todas las unidades de superficie est_n
en posici6n OFF (APAGADO) y que todos los
espirafes est6n frios antes de tratar de tevantar
o sacar una unidad.
No sumeda o remoje las unidades removibles de la
superficie. No las ponga en una lavadora de platos.
Aseg_rese que los bolos para los derrames y los
tubos de la ventitaci6n no est_n obstruidos y que
est_n en su lugar, Su ausencia durante el proceso
de cocinar podria daSar las partes y el aiambrado de
la estufa,
No use papel aluminio para forrar los bolos para
derrames o en ninguna parte dei homo excepto
como se describe en este manual. Et mal uso podria
resultar en un gotpe de corriente, un peligro de
incendio o un da_o a ta estufa.
GUARDE ESTAS INSTRUCClONES
27
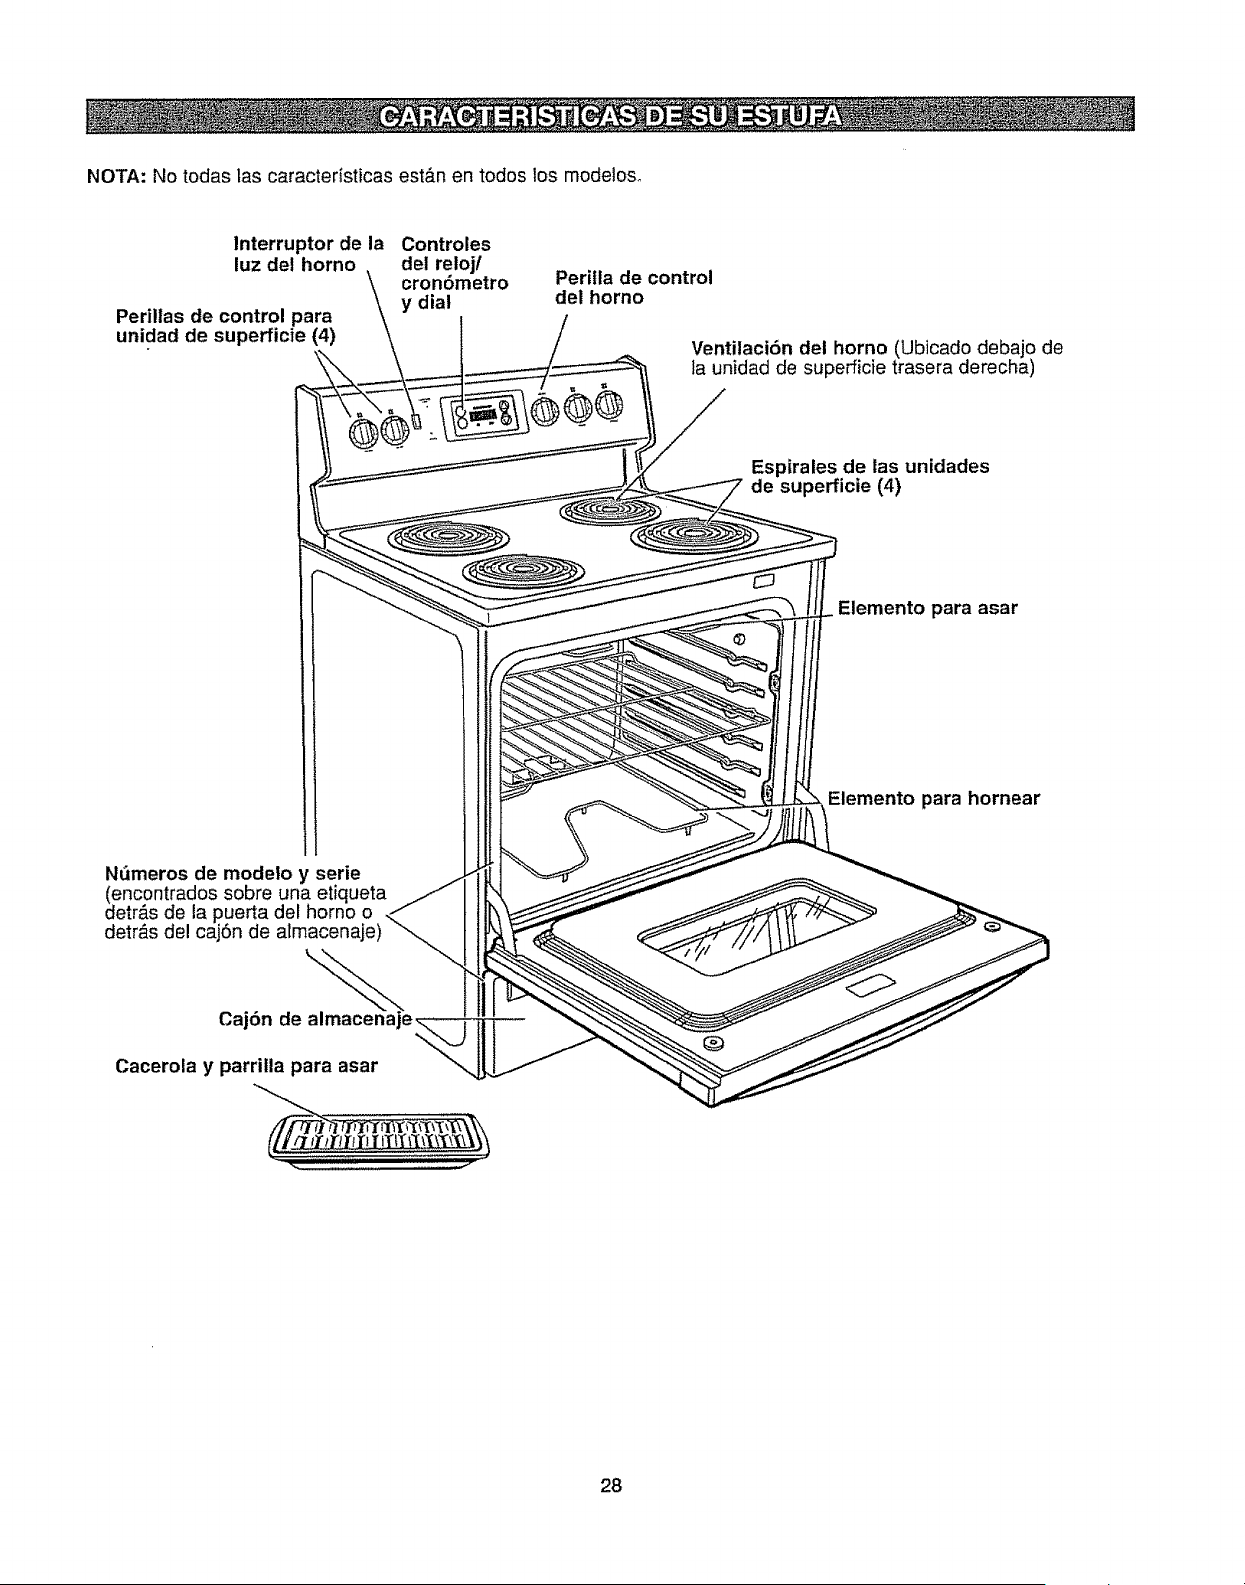
NOTA:Notodaslascaracteristicasest&nentodoslosmodetos,
Interruptor de la Controles
luz del horno del reloj/
cron6metro Perilla de control
y dial del homo
Perillas de control para
unidad de superficie (4)
Ventilaci6n dei homo (Ubicado debajo de
la unidad de superficie trasera derecha)
Esp[rales de las unidades
de superficie (4)
Elemento para asar
N_tmeros de modeto y serie
(encontrados sobre una etiqueta
detr&s de la puerta del homo o
detr&s de! caj6n de almacena
Caj6n de a_mac_ena"
Cacerola y parriila para asar
Elemento para hornear
28
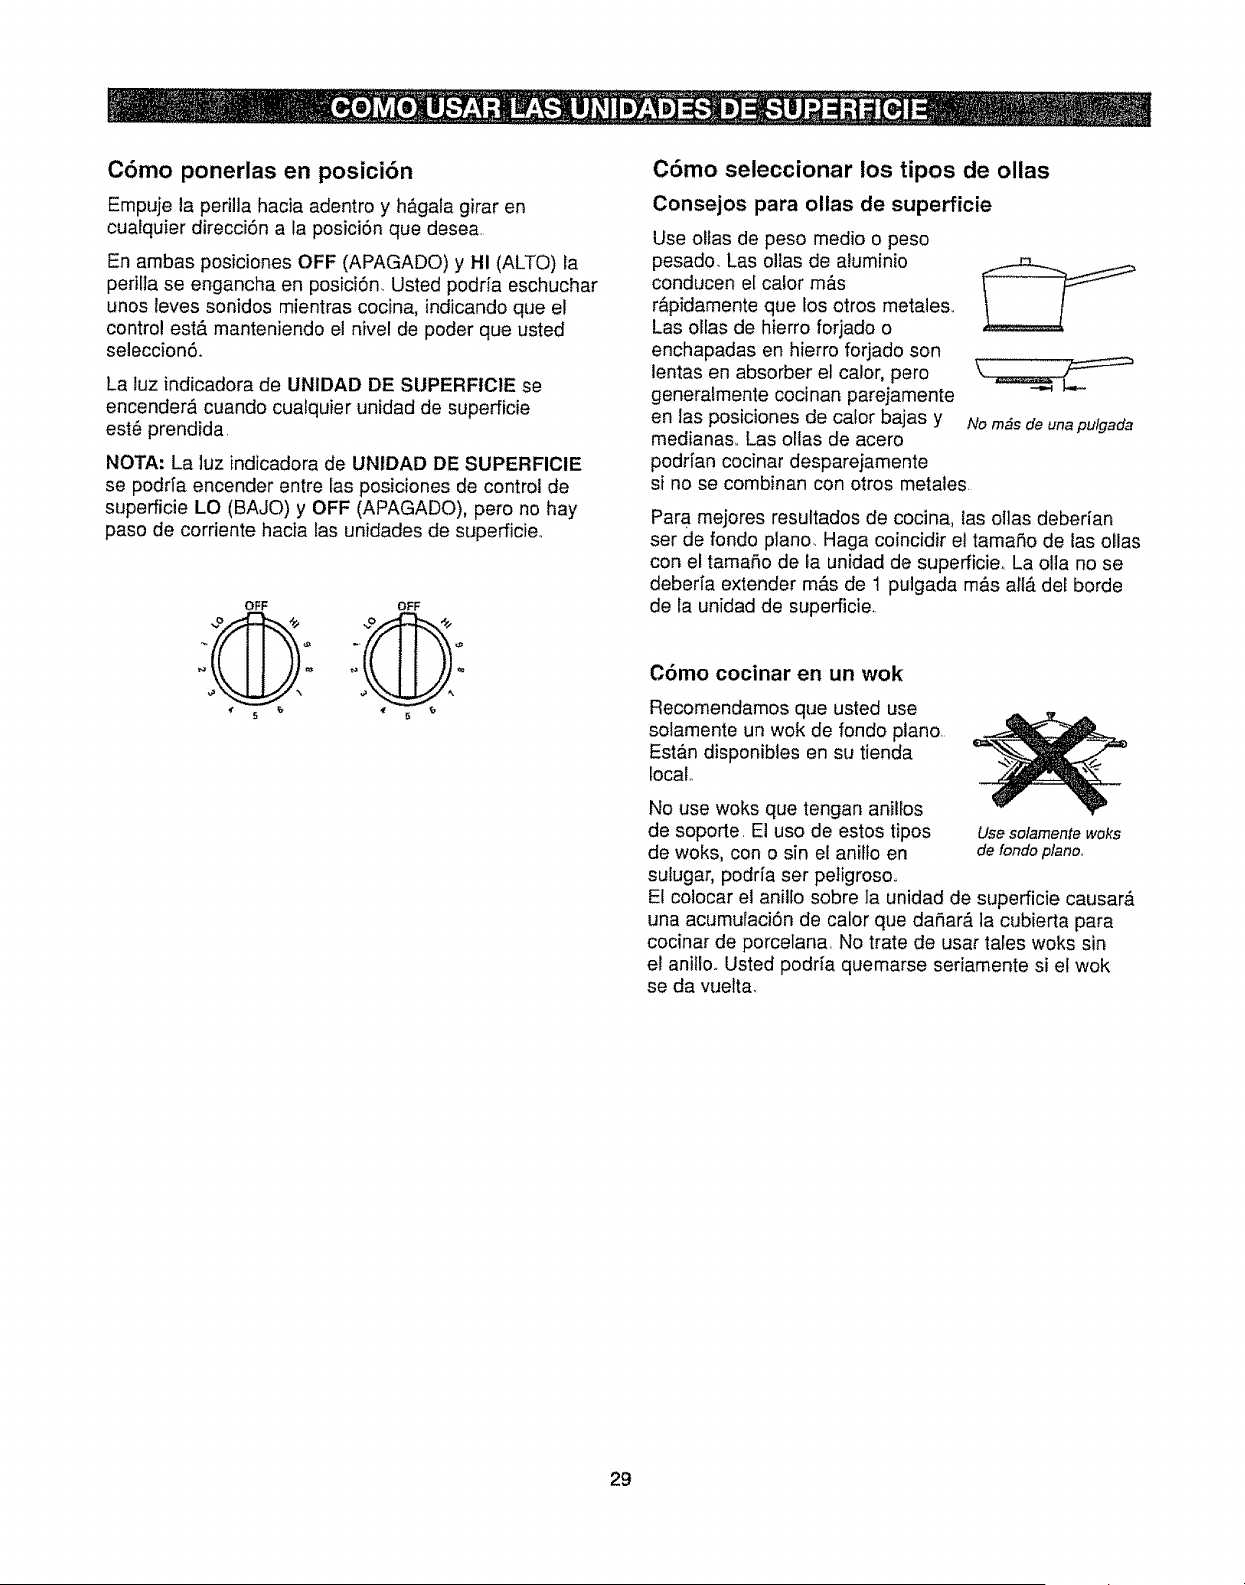
C6mo ponerlas en posici6n
Empuje la perilla hacia adentro y h&gala girar en
cualquier direcciSn a la posiciSn que desea.
En ambas posiciones OFF (APAGADO) y HI (ALTO) la
perilta se engancha en posiciSn. Usted podria eschuchar
unos leves sonidos mientras cocina, indicando que el
control estA manteniendo el nivel de poder que usted
seleccionS.
La luz indicadora de UNIDAD DE SUPERFIClE se
encender#, cuando cualquier unidad de superficie
est_ prendida
NOTA: La luz indicadora de UNIDAD DE SUPERFIClE
se podr[a encender entre las posiciones de control de
superficie LO (BAJO) y OFF (APAGADO), pero no hay
paso de corriente hacia las unidades de superficie.
OFF OFF
C6mo seleccionar los tipos de ollas
Consejos para ollas de superficie
Use olfas de peso medio o peso
pesado, Las ollas de aluminio
conducen el calor m&s
r_pidamente que los otros metales,,
Las ollas de hierro forjado o
enchapadas en hierro forjado son
lentas en absorber el calor, pero
generafmente cocinan parejamente
en las posiciones de ca!or bajas y
medianas,, Las ollas de acero
podrian cocinar desparejamente
si no se combinan con otros metales
Para mejores resultados de cocina, las ollas deberian
ser de fondo piano, Haga coincidir el tamaSo de ias oilas
con el tamaSo de ia unidad de superficie,, La olla no se
deberia extender m&s de 1 pulgada m&s all_ del borde
de la unidad de superficie.
C6mo cocinar en un wok
Recomendamos que usted use
solamente un wok de fondo piano.
Est&n disponibles en su tienda
local°
No use woks que tengan anillos
de soporte, El uso de estos tipos
de woks, con o sin el aniffo en
sulugar, podrfa ser petigroso,,
Use solamente woks
de rondo piano,,
El colocar el anillo sobre ]a unidad de superficie causarb,
una acumulaciSn de calor que daSar_, la cubierta para
cocinar de porcelana, No trate de usar tales woks sin
el anitlo_ Usted podria quemarse seriamente si el wok
se da vuelta,
29
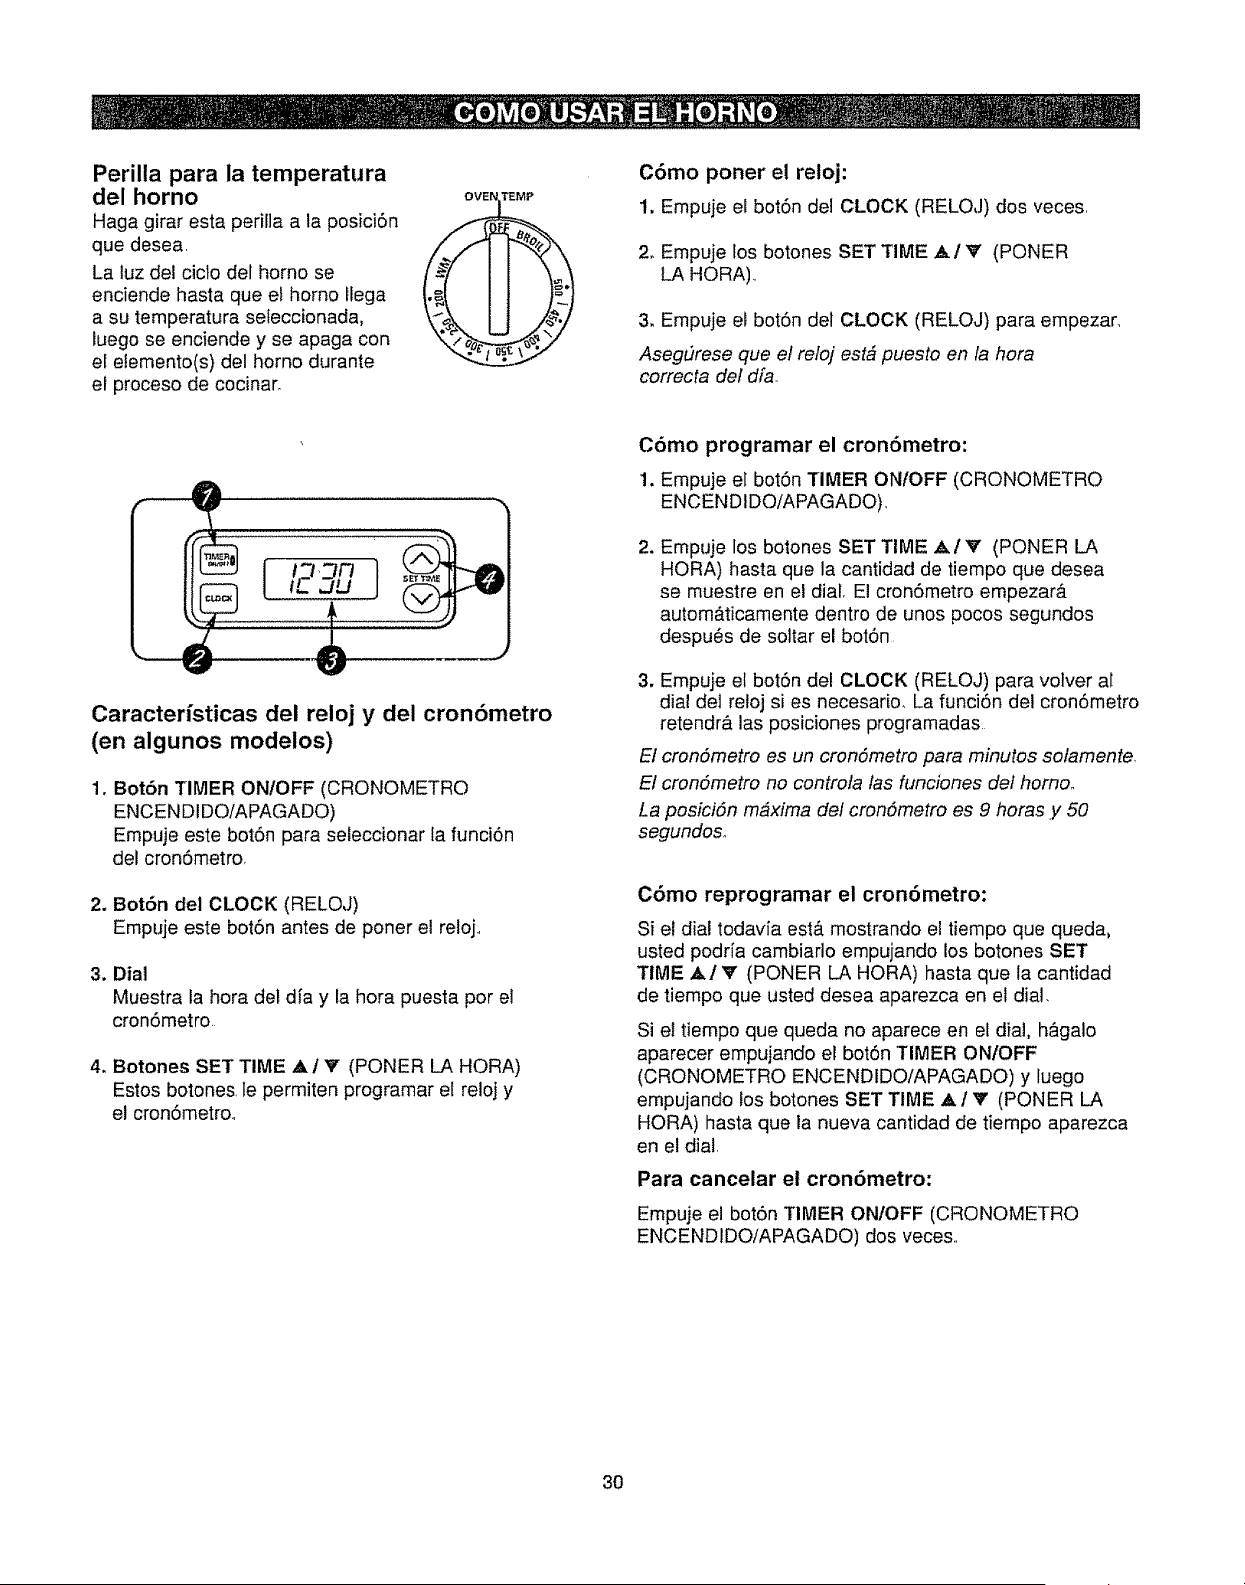
Perilla para la temperatura
del horno
Haga girar esta perilla a la posici6n
que desea.
La luz del ciclo del homo se
enciende basra que el homo llega
a su temperatura sefeccionada,
luego se enciende y se apaga con
el elemento(s) del homo durante
el proceso de cocinar.
C6mo poner el reloj:
1. Empuje el botSn del CLOCK (RELOJ) dos veces,
2, Empuje los botones SET TIME _k/V (PONER
LA HORA).
3. Empuje el bot6n del CLOCK (RELOJ) para empezar_
Aseg_trese que el refoj est# puesto en la hora
correcta de/dfa
1
Caracterfsticas del reloj y del cron6metro
(en algunos modelos)
1. Bot6n TIMER ON/OFF (CRONOMETRO
ENCENDIDO/APAGADO)
Empuje este botSn para seleccionar la funci6n
del cronSmetro.
2. Bot6n del CLOCK (RELOJ)
Empuje este botSn antes de poner el reloj..
3. Dial
Muestra la hora det dfa y la hora puesta por et
cronSmetro
4, Botones SET TIME AI V (PONER LA HORA)
Estos botones te permiten programar el reloj y
el cronSmetroo
C6mo programar el cron6metro:
1. Empuje e[ bot6n TIMER ON/OFF (CRONOMETRO
ENCENDIDO/APAGADO)_
2. Empuje los bolones SET TIME ,_/V (PONER LA
HORA) hasta que la cant!dad de tiempo que desea
se muestre en el dial, El cronSmetro empezar&
autom#,ticamente dentro de unos pocos segundos
despu_s de soltar el botSn
3, Empuje el botSn del CLOCK (RELOJ) para vo]ver al
dial del reloj si es necesario_ La funciSn del cronSmetro
retendr#, las posiciones programadas
El cronSmetro es un cronSmetro para minutos sotamente
El cronSmetro no controla las funciones de/homo_
La posiciSn maxima det cronSmetro es 9 horas y 50
segundos.
C6mo reprogramar el cron6metro:
Si el dia! todav[a estermostrando el tiempo que queda,
usted podrfa cambiarlo empujando los botones SET
TIME ,_1V (PONER LA HORA) hasta que la cantidad
de tiempo que usted desea aparezca en el dial,
Si e7tiempo que queda no aparece en el dia!, h&galo
aparecer empujando e_botSn TIMER ON/OFF
(CRONOMETRO ENCENDIDO/APAGADO) y luego
empujando los botones SET TIME ,& / v (PONER LA
HORA) hasta que la nueva cant!dad de tiempo aparezca
en el dial.
Para cancelar el cron6metro:
Empuje el botSn TIMER ON/OFF (CRONOMETRO
ENCENDIDO/APAGADO) dos veces..
3O

Antes de empezar...
Para evitar posibles quemaduras, coloque las
parriltas en la posici6n deseada antes de encender
el homo.
Las parrillas tienen frenos,
de manera que al colocarse
correctamente en los soportes
(de la A a la E) frenarAn antes
de salirse por completo, at
mismo tiempo que se evita
que se inclinen.
Cuando ponga y saque las
ollas, tire la parrilla hacia el tope
sobre el soporte de la parritla.
Para sacar la parrilla, tirela
hacia usted, levante el frente
y tirefa hacia afuera..
Para reemplazar, coloque la
parte de atr#,s de la bandeja
(los topes) sobre el soporte,
levante el frente y empuje la
parrilla hacia adentro.
i
NOTA: La parriila no est& disefiada para
deslizarse hacia fuera en la posici6n especial m&s baia (R).
C6mo programar el horno para Hornear y Asar.
1, Haga girar la perilla de temperatura del homo a la
temperatura que desea..
2o Cocine la comida en el tiempo necesario minimo de la
receta.. Cocine por m&s tiempo si es necesario.
3. Haga girar la perilla de la temperatura del homo a OFF
(APAGADO) cuando termine de cocinar..
El homo tiene 6 posiciones de parrilla
fipo de comida Posicibnde parrilla
Pastelescongo[adDs C
(sobrebandejasparagaIletas)
"Angelfood",queques BoC
Pancitos,pastelillos0"brownies",gaIletas, BoC
quequitos,tortaselcapas,pasteles
Cacerolas BoC
Pavo R0 A
Asado R,AoB
Precatentamiento y colocaci6n de los utensilios
Precaliente el homo si la receta fo requiereo Para
precalentar, ponga et homo a Ia temperatura correcta
El precalentamiento es necesario para obtener buenos
resultados cuando hornee queques, galFetas, pasteles
y panes.
Para hornos sin indicadores de precalentamiento de
luz o tono, precatiente por 10 minutos°
Los resultados del homeado ser,_n mejores si los
utensilios para hornear estAn centrados lo m_ts posible
en el homo. Los utensilios no se deber[an tocar uno a
otro o tas paredes del homo° Si usted necesita usar dos
parrillas, coloque los utensilios de manera que ninguno
quede directarnente encima de otro, y deje
aproximadamente 1Y2"desde el frente det utensilio
hasta el frente de la parrilla.
Papel aluminio
Nunca cubra et fondo del horno con pape! de
aluminio.
Usted puede usar papeFaluminio _-_'}
para forrar la caceroia y la parrilta .0
para asar. Sin embargo, usted
debe moldear el papel aluminio
apretadamente a la parrilla y hacer
cortes sobre _1que coincidan con
las ranuras de la parrilla
Tambi6n puede usar pape! de aluminio para recoger
los derramamientos,, Para hacerlo, coloque una hoja
pequefia de papel aluminio en una parrilla m&s baia,
varias pulgadas por debaio del alimento
Nunca cubra completamente una parrilla con papel
aluminioo Esto disturbar& la circulaci6n del calory
resultar& en un horneado de mala calidad.
C6mo programar el horno para asar
1. Coloque la comida sobre la parrilla para asar de la
cacerola para asar.
2. Siga las posiciones de las parrillas sugeridas en Ja
Guia para Asar.
3. Haga girar la perilla de la
temperatura de] homo a
BROIL (ASAR)..
De]e abierta la puerta de/
homo en ta posiciSn de
pare para asar, La puerta
permanece abierta pot si
sota, pero la temperatura
adecuada se mantiene
en el homo,
31
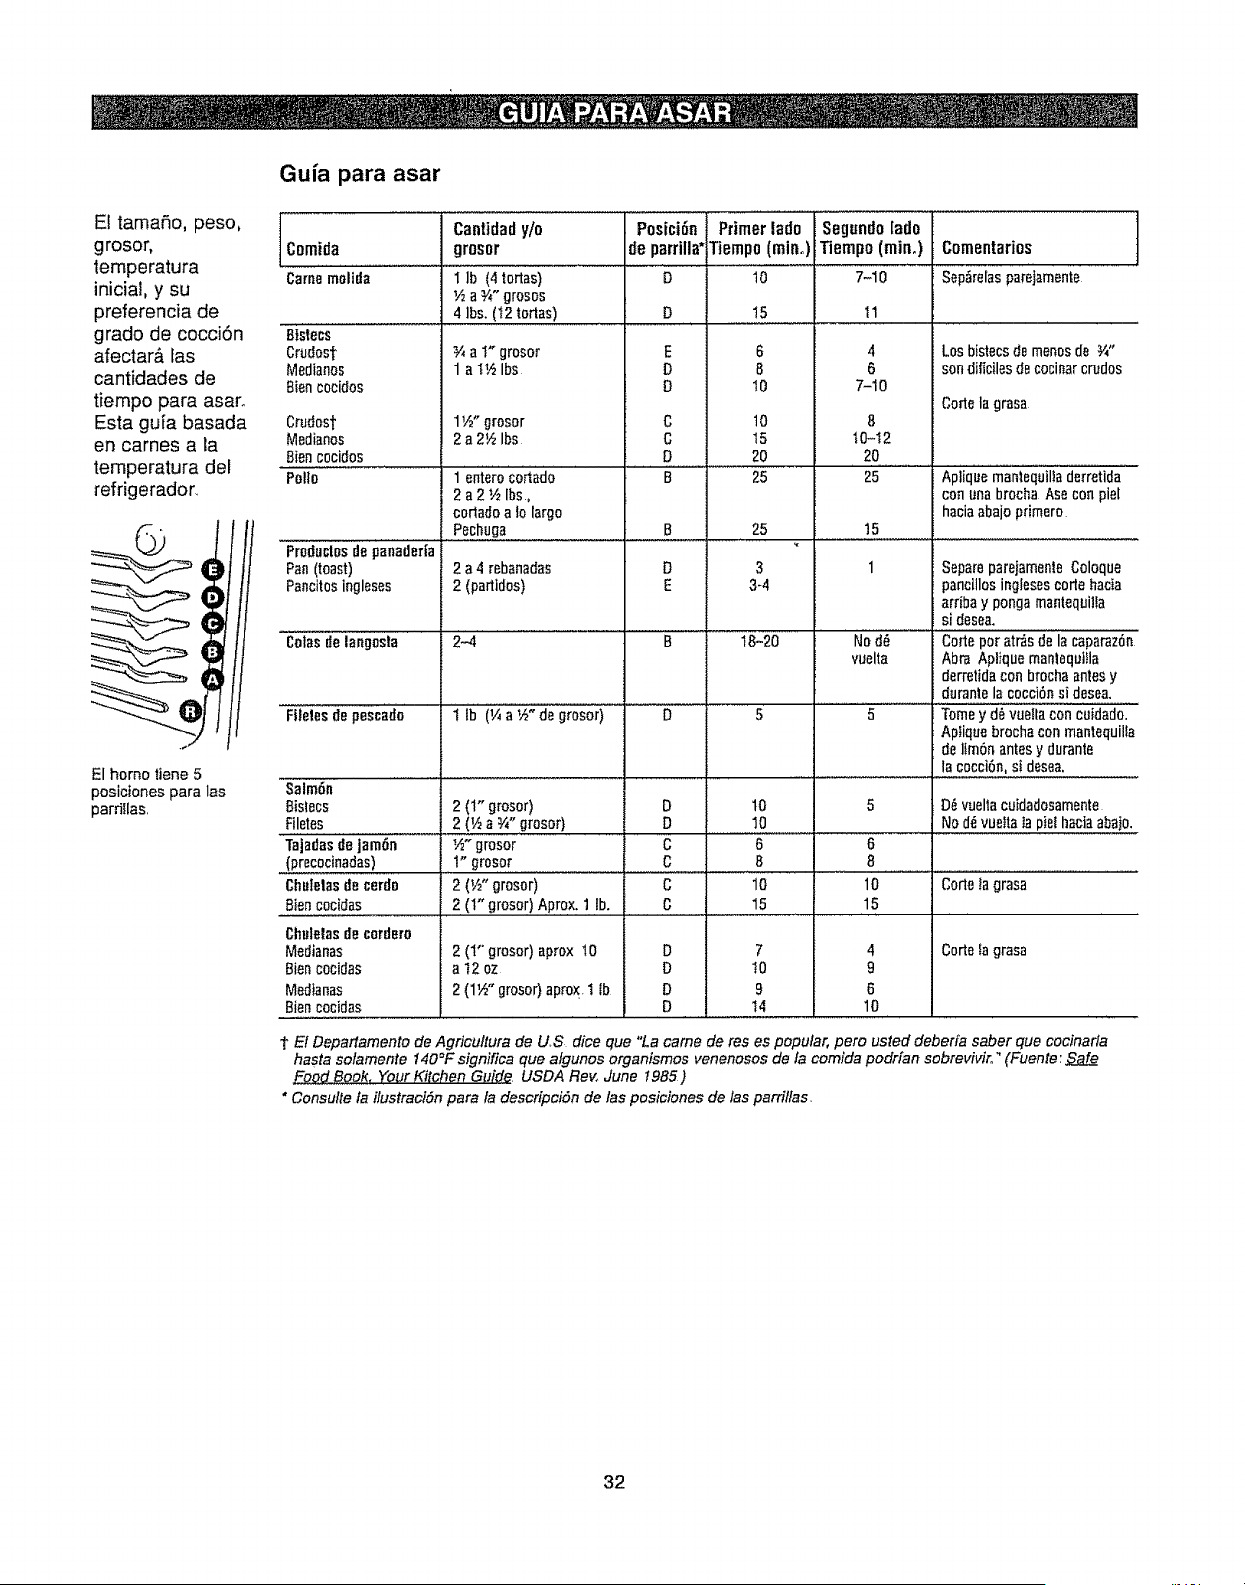
Eltamaho,peso,
grosor,
temperatura
inicial,ysu
preferenciade
gradodecocciSn
afectar_,las
cantidadesde
tiempoparaasaro
Estaguiabasada
encarnesala
temperaturadel
refdgerador.
El homo tiene 5
posiciones para las
parfillas.
Gufa para asar
Comiaa
Camemolida
Bisiess
Cro'Josf
Medianos
giencocidos
Crudost
Medianos
Biencocidos
Cantidady/o
grosor
I lb (4 tortas)
_,5a W' grosos
4 Ibs. (t2 tortas)
a V" grosor
1 a I½ Ibs
1½" grosor
2 a 2½ Ibs
Polio 1 entero cortado
2 a 2 ½ Ibs.,
cortado a to largo
...... Pechuga
Prodactes de panadet[a
Pan(toast) 2 a 4 rebanadas
Pancitosingleses 2 (partidos)
Colasde langosla 2-4
FJletesde pescado
Salm6n
Bislecs 2 (1" grosor)
Fi!etes.......................... 2 (½ a _" grosor)
Taja[fasde jam6n
(precocinadas)
Chulelasde cerdo
Bien cocidas
Chololasdecordero
Medianas
Biencocidas
Medtanas
Biencocidas
Posici6n Primerlado
deparrilla"[Tiempo(rain.)
D
D
E
D
D
C
c
D
10
15
6
8
10
10
15
2O
B 25
B
D
E
25
3
3-4
B 18-20
t ib (¼ a _,4"de grosori .............. D
D t0
D 10
½" grosor C 6
1" grosor C B
2 (½" grosor) C 10
2 (1" grosor) Aprox. 1 lb. C 15
2 (1" grosor) aprox 10 D 7
a t2 oz D !0
2 (1_" grosor)aprox, t ib D 9
D t4
SegundoIado
_Tiempo(mira)
7-10
4
6
7-10
8
t0-t2
20
25
15
Comentarios
Sep_relasparejamente
Los bistecs de menos de ,W'
son dificilesde cocinarcrudos
Code la grasa
Aplique manlequilta derretida
con una brocba Asecon piel
haciaabajo pfimero
Nod6
vuelta
5
5
6
8
10
15
4
9
G
10
Separe parejamente Coloque
pancillos inglesescortehacia
arnba y ponga mantequilla
si desea.
Corte pot atr_s de la caparaz_n
Abra Apliquemantequitla
derretida con brocha antes y
durante la cocci6n si desea.
Tomey d_ vuetla concuidado.
Apiique brocha con mantequilla
de IIm6n antesy durante
la cocci6n, s_ desea.
D_ vuella cuidadosamente
No d_ vuelta ta pieI haciaaba]o.
Cortalagrasa
Corte lagrasa
! _ El Departamento de Agricu!lura de US dice que "La came de reses popular, pero usteddeberfa saber que cocinarla
hasta solamente 140°F significa que algunos organismos venenosos de la comida podrfan sobreviviro" (Fuente :._Ze
Food Book. Your Kitchen Guide. USDA Roy. June t985)
* Consulte fa ilustracl6n para fa descripciSn de las posiciones de las parfillas.
32
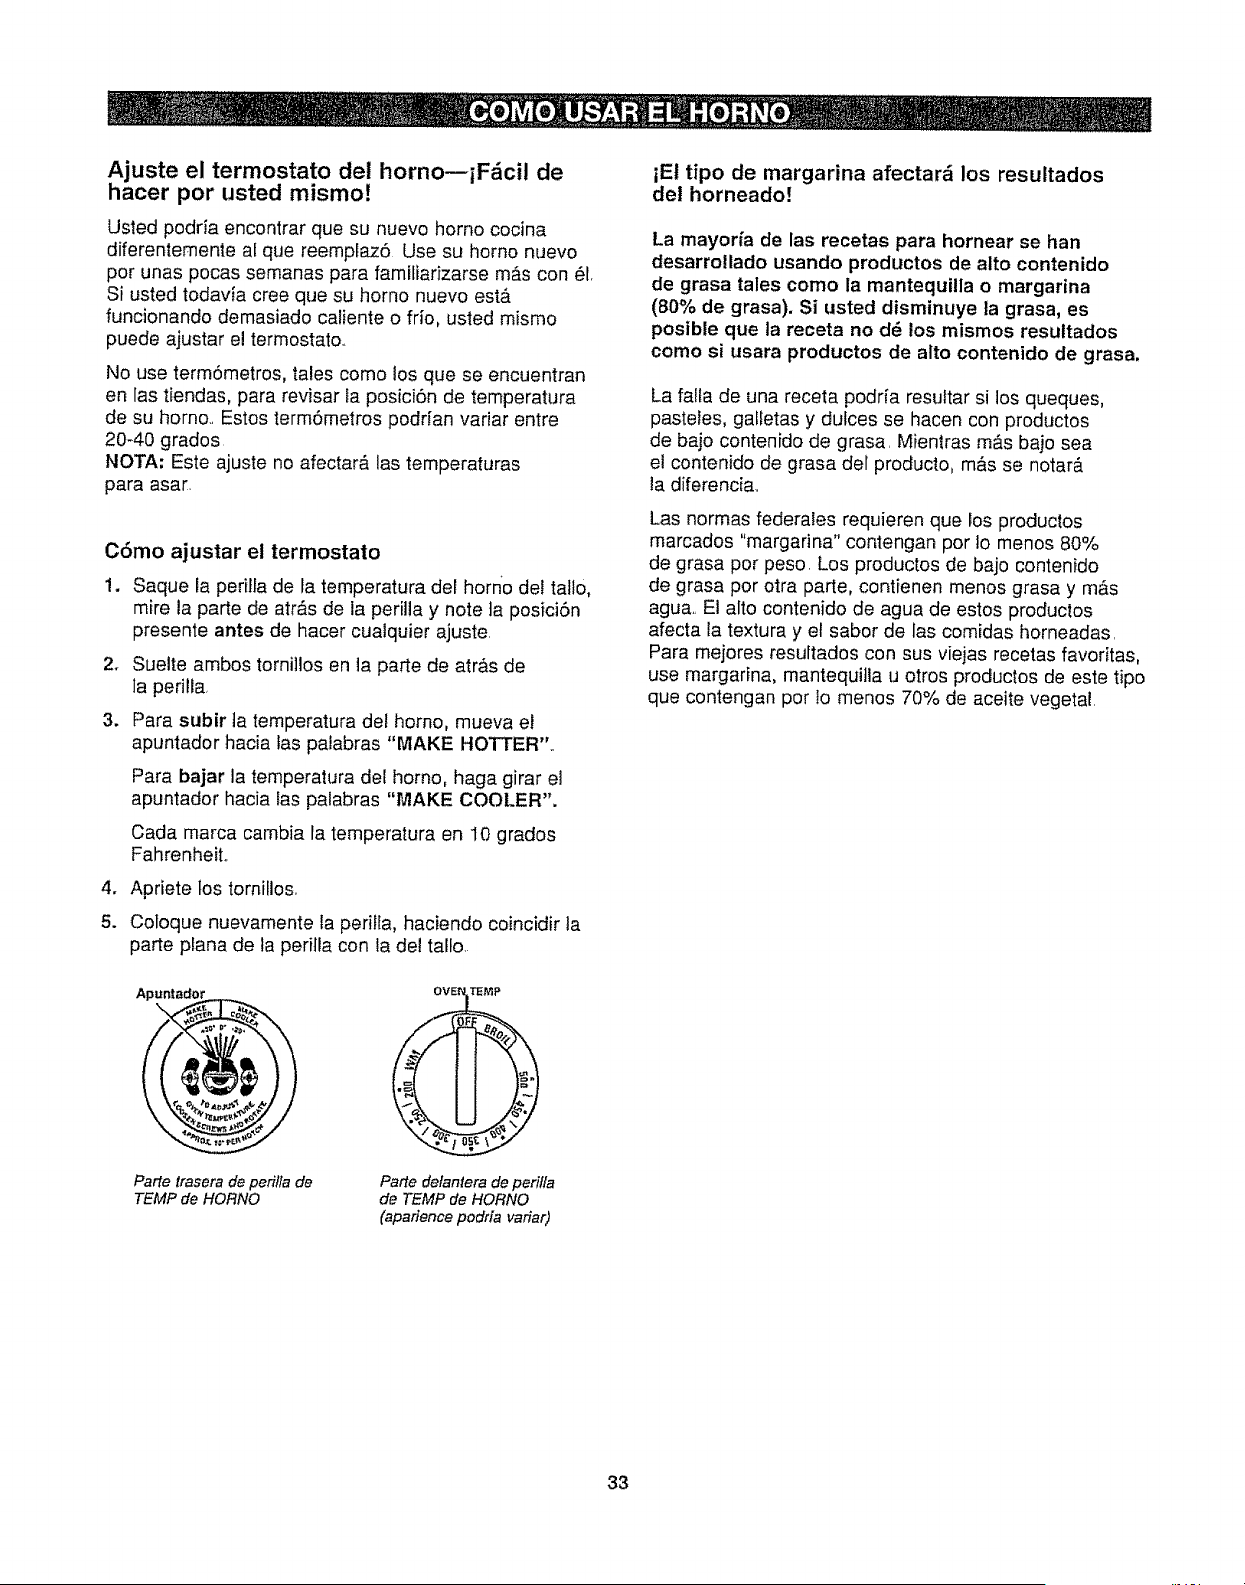
Ajuste el termostato del hornomiF_cil de
hacer por usted mismo!
Usted podria encontrar que su nuevo homo cocina
diferentemenle al que reemplaz6 Use su homo nuevo
por unas pocas semanas para familiarizarse m&s con #1,
Si usted todavia cree que su homo nuevo est&
funcionando demasiado caliente o frio, usted mismo
puede ajustar el termostato..
No use term6metros, tales como los que se encuentran
en las tiendas, para revisar la posici6n de temperatura
de su homo.. Estos term6metros podr[an variar entre
20-40 grados
NOTA; Este ajuste no afectar#, las temperaturas
para asar.
C6mo ajustar el termostato
1. Saque la perilla de ta temperatura del homo de! tallo,
mire la parte de arras de la perilla y note ta posiciSn
presente antes de hacer cualquier ajuste.
2_
3_
Suelte ambos tornillos en la parte de atr&s de
Ia perilla,
Para subir ta temperatura del homo, mueva el
apuntador hacia tas palabras "MAKE HOTTER"..
Para bajar la temperatura del homo, haga girar el
apuntador hacia las palabras "MAKE COOLER".
Cada marca cambia la temperatura en I0 grados
Fahrenheit..
4, Apriete los tornillos,
5. Coloque nuevamente la perilfa, haciendo coincidir la
parte ptana de la peritla con la del tallo.
Parle trasera de perilla de
TEMP de HORNO
Parle defantera de perilla
de TEMP de HORNO
(aparience podrfa variar)
iE! tipo de margarina afectar_ los resultados
del horneado!
La mayorfa de las recetas para hornear se hart
desarrollado usando productos de alto contenido
de grasa tales como la mantequilla o margarina
(80% de grasa). Si usted disminuye la grasa, es
posible que la receta no d_ los mismos resultados
como si usara productos de alto contenido de grasa.
La fa!fa de una receta podria resuttar si los queques,
pastetes, galletas y dufces se hacen con productos
de bajo contenido de grasa. Mientras m&s bajo sea
el contenido de grasa del producto, m&s se notar&
la diferencia,.
Las normas federales requieren que los productos
marcados "margarina" contengan por 1omenos 80%
de grasa por peso. Los productos de bajo contenido
de grasa por otra parle, contienen menos grasa y m&s
agua,, El alto contenido de agua de estos productos
afecta la textura y el sabor de las comidas horneadas,
Para mejores resultados con sus viejas recetas favoritas,
use margarina, mantequitla u otros productos de este tipo
que contengan por Io menos 70% de aceite vegetal,
33

Sisacasu estufapara limpiarla, hacerle
servicio o por cualquier raz6n, aseg_rese
que el dispositivo contra volcaduras se
reengancha adecuadamente cuando
ponga la estufa nuevamente en su lugaro
La falla de no tomar esta precauci6n
podria resuttar en que ta estufa se
vuetque y cause heridas.
Interior del horno
Con un buen cuidado, el terminado de esmalte
porcelanizado del interiordel horno--techo, fondo, lados,
espalda y parte interior de la puerta--se ver&n nuevos
por aSos.,
Permita que la estufa se enfrie antes de limpiarla,
Recomendamos que se ponga guantes cuando limpie
la estufao
El jab6n y agua normalmente har&n un buen trabajo,
Las salpicaduras o derrames pesados podrfan requerir
una limpieza con un limpiador abrasivo suave, Las
almohadillas para fregar de pl&stico tambi_n podrian
ser usadas.
No permita que los derrames de comida con un alto
contenido de azucar y &cido (tales como la leche,
tomates, chucrut, jugos de fruta o reltenos de pastetes)
permanezcan sobre la superficie Podrian causar
una mancha opaca incluso despu6s de que hayan
sido limpiados
La amonia para uso de casa podria facilitar el trabajo
de limpieza, Coloque 1/2 taza en un envase bajo de
vidrio o greda dentro de un homo frio durante ]a noche,,
Los vapores de fa amonia ayudar_n a soltar la grasa
y la comida quemada_
Si es necesario, usted podr[a usar un limpiador de
hornos., Siga las direcciones det envase.
No rocie el Iimpiador de hornos sobre los controles y
los interruptores el_ctricos porque podria causar un
corto circuito y resultar en chispas o incendio,
No permita que se acumule una capa del limpiador sobre
el sensor de temperatura--podr[a causar que el homo
se caliente incorrectamente,. (El sensor estA ubicado
en ta parte de arriba del homo). Cuidadosamente
limpie el sensor despu6s de cada limpieza del homo,
teniendo cuidado de no mover el sensor ya que un
cambio en su posici6n podria afectar la manera en
que el homo hornea,
No rode limpiadores de homo en e! exterior de la puerta
del homo, las manijas o cuatquier superficie exterior del
homo, gabinetes o superficies pintadas, El limpiador
puede daSar estas superficies.
Puerta del horno levantable
La puerta del homo es sacable para
ta limpieza
No ievante la puerta tom_ndola
de la manilla. Asegt_rese de que
el homo est_ completamente frio.
Para sacar la puerta, #.brala
hasta la posici6n especial de paro,
T6meta firmemente de cada lado
y levante la puerta derecho hacia
arriba y s&quela de las bisagras
Bisagra
Levante la puerta derecho
hacia arriba y s_quela de
las bisagras
No ponga las manos entre la bisagra y el marco de la
puerta del homo.
Para colocar nuevamente la puerta, asegurese de
que las bisagras est6n en ta posici6n especial de tope
Cotoque las ranuras del fondo de fa puerta
cuadradamente sobre las bisagras y b&jela
lentamente sobre ambas bisagras,,
Para limpiar el interior del homo:
No permita que agua en exceso circule hacia atg_n
orificio o ranura de la puerta.
El jab6n y agua har&n normalmente un buen trabajo..
Las salpicaduras y los derrames grandes podrian
requerir una limpieza con un limpiador abrasivo suave.
Las almohadillas para fregar de pl_.stico tambi_n podrian
ser usadas
No permita que los derrames de comida con un
alto contenido de azt_car o &cido (tales como la
teche, tomates, chucrut, jugos de fruta, o rellenos de
pasteles) permanezcan sobre la superficie. Podrian
causar una mancha opaca incluso despu_s de que
hayan sido limpiados
Para limpiar el exterior de la puerta:
Use jab6n y agua y limpie completamente la parte
superior, los lados y el frente de la puerta del homo
Enjuague bien Usted tambi_n podria usar un limpiador
de vidrios para limpiar et vidrio exterior de ia puerta.
No permita que el agua gotee hacia adentro de las
aberturas de la ventitaci6n.
Los derrames de salsas para sazonar, jugos de fruta,
salsas de tomate y materiales para sazonar que
contengan &cidos podrian causar una descoloraci6n
y deberian ser limpiados inmediatamente_ Cuando la
superficie est_ if[a, limpie y enjuague
No use limpadores para homos, polvos para limpiar o
abrasivos fuertes en el exterior del homo,
34
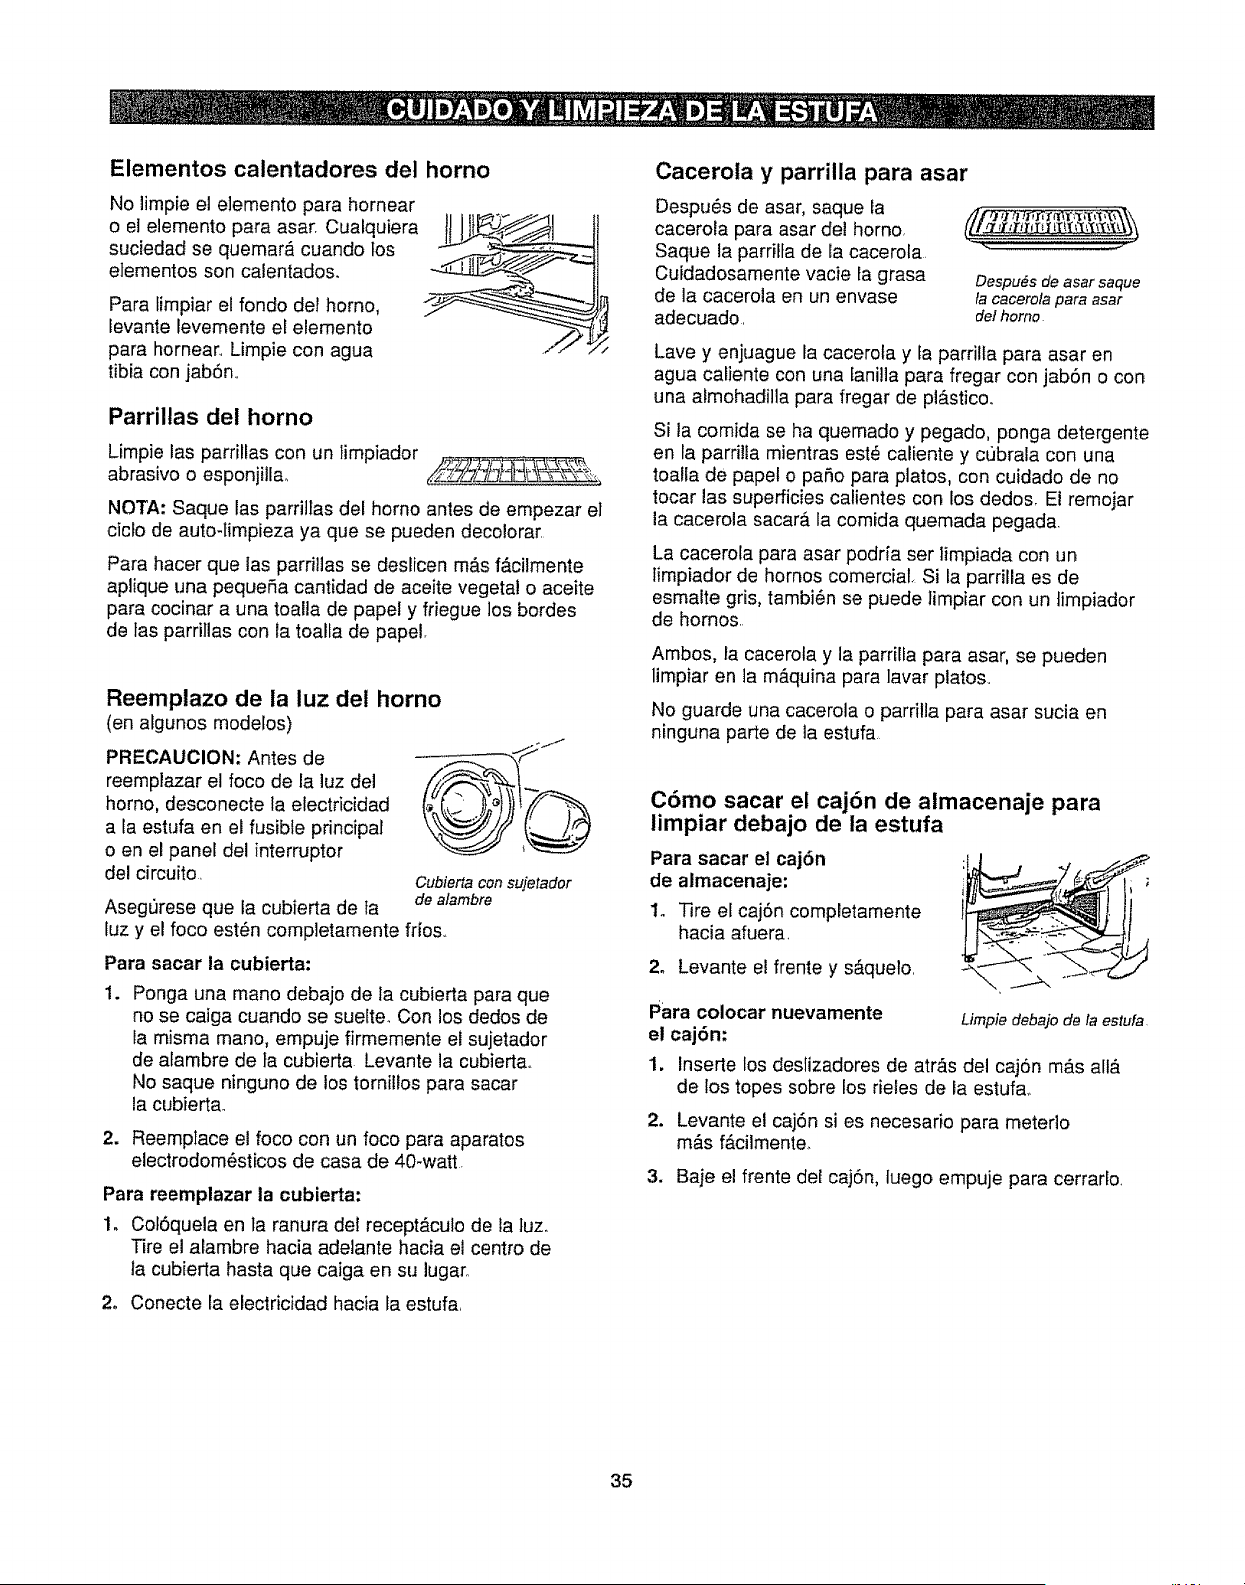
Elementos calentadores del horno
No limpie el elemento para hornear
o el elemento para asar, Cualquiera
suciedad se quemar9` cuando los
elementos son calentados.
Para fimpiar el fondo del homo,
levante levemente el elemento
para hornean Limpie con agua
tibia con jab6n,,
Parrillas del horno
Limpie las parrillas con un limpiador /_
abrasive o esponjillao __
NOTA: Saque las parritlas del homo antes de empezar el
ciclo de auto-timpieza ya que se pueden decolorar.
Para hacer que las parrilias se deslicen m_.sfg`cilmente
aplique una pequefia cantidad de aceite vegetal o aceite
para cocinar a una toalla de papel y friegue los bordes
de tas parrillas con la toalla de papel.
Reemplazo de la luz del horno
(en atgunos modelos)
PRECAUCION: Antes de
reemplazar el foco de la luz del
homo, desconecte la electricidad
a la estufa en el fusible principal
o en el panel del interruptor
del circuito,
Asegt]rese que la cubierta de la
Cubierta con sujetador
de alambre
luz y el foco est#n completamente frios.,
Para sacar ia cubierta:
Ponga una mano debajo de la cubierta para que
no se caiga cuando se suelte_ Con los dedos de
la misma mano, empuje firmemente el sujetador
de alambre de ta cubierta Levante la cubierta,,
No saque ninguno de los tornillos para sacar
la cubiert&
2. Reemplace el foco con un foco para aparatos
electrodom6sticos de casa de 40-watt.
Para reemplazar la cubierta:
1. Col6quela en la ranura det recept&cuto de la luz,
Tire el alambre hacia adelante hacia et centro de
la cubierta hasta que caiga en su lugan
2. Conecte la electricidad hacia la estufa,
Cacerola y parrilla para asar
Despu_s de asar, saque la
cacerola para asar dei homo,
Saque la parrilfa de la cacerola
Cuidadosamente vacie la grasa
de la cacerola en un envase
adecuado,
Despu_s de asar saque
ta cacerola para asar
det homo
Lave y enjuague la cacerola y fa parrilla para asar en
agua cafiente con una fani!la para fregar con jab6n o con
una almohadilla para fregar de plg`stico.
Si la comida se ha quemado y pegado, penga detergente
en la parrilla mientras est_ caliente y cubrala con una
toa!la de papel o patio para platos, con cuidado de no
tocar las superficies calientes con los dedos. El remojar
la cacerola sacarg` la comida quemada pegada.
La cacerola para asar podr[a ser limpiada con un
limpiador de hornos comercial. Si la parrilla es de
esmalte gris, tambi6n se puede limpiar con un timpiador
de hornos
Ambos, la cacerota y la parrilfa para asar, se pueden
limpiar en la mg`quina para lavar plato&
No guarde una cacerola o parrilla para asar sucia en
ninguna parte de la estufa
C6mo sacar el caj6n de almacenaje para
limpiar debajo de la estufa
Para sacar el caj6n
de almacenaje:
1. Tire el caj6n completamente
hacia afuera,
2o Levante el frente y sg`quelo,
Para colocar nuevamente
el caj6n:
Limpie debajo de la estufa,
1. Inserte los deslizadores de atrg`s del caj6n m_ts altg.
de los topes sobre los deles de la estuf&
2_
Levante el caj6n si es necesario para meterlo
m&s fg`cilmente,
3. Baje el frente del caj6n, luego empuje para cerrarlo
35
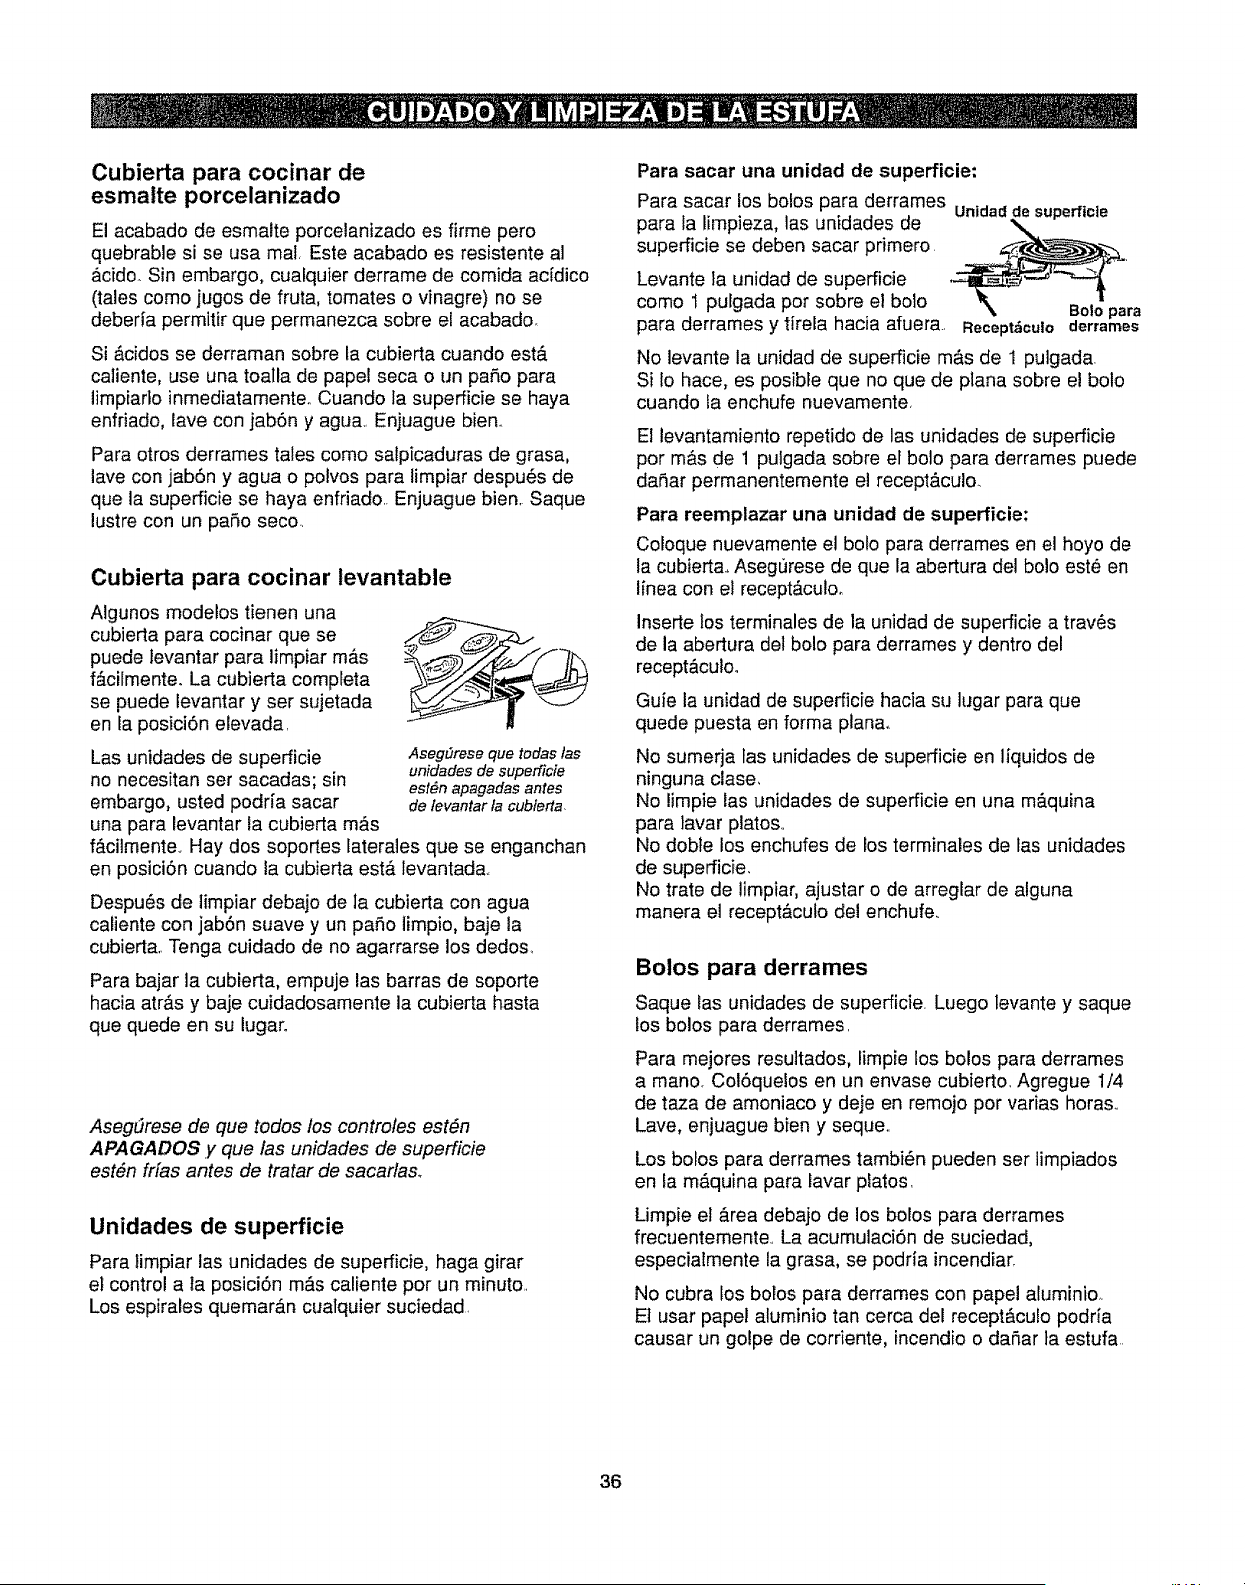
Cubierta para cocinar de
esmalte porcelanizado
El acabado de esmalte porcelanizado es firme pero
quebrable si se usa mal. Este acabado es resistente al
&cido. Sin embargo, cualquier derrame de comida acfdico
(tales como jugos de fruta, tomates o vinagre) no se
deberfa permitir que permanezca sobre el acabado
Si &cidos se derraman sobre la cubierta cuando estb.
caliente, use una toalla de papel seca o un patio para
limpiarlo inmediatamenteo Cuando la superficie se haya
enfriado, lave con jab6n y agua.. Enjuague bieno
Para otros derrames tales como salpicaduras de grasa,
lave con jab6n y agua o polvos para limpiar despu_s de
que la superficie se haya enfriado.. Enjuague bien. Saque
lustre con un paso seco..
Cubierta para cocinar levantable
Algunos modelos tienen una
cubierta para cocinar que se
puede levantar para limpiar m_.s
f&cilmente. La cubierta completa
se puede levantar y ser sujetada
en la posici6n elevada.
Las unidades de superficie AsegOresequetodaslas
unidades de superficie
no necesitan ser sacadas; sin est#napagadasantes
embargo, usted podria sacar de tevantar fa cubierta
una para levantar la cubierta m&s
f&cilmente. Hay dos soportes laterales que se enganchan
en posici6n cuando la cubierta est#, levantada.
Despu_s de limpiar debajo de la cubierta con agua
caliente con jab6n suave y un paso limpio, baje la
cubierta.. Tenga cuidado de no agarrarse los dedos_
Para bajar la cubierta, empuje las barras de soporte
hacia atr&s y baje cuidadosamente la cubierta hasta
que quede en su lugaro
AsegSrese de que todos los controles est#n
APAGADOS y que las unidades de superficie
est#n frfas antes de tratar de sacarlas.
Unidades de superficie
Para limpiar las unidades de superficie, haga girar
el control a la posiciSn m,_s caliente por un minuto..
Los espirales quemarAn cualquier suciedad.
Para sacar una unidad de superficie:
Para sacar los bolos para derrames
Unidad de superficie
para la limpieza, las unidades de
superficie se deben sacar primero
Levante ta unidad de superficie
como 1 pulgada pot sobre el bolo
para derrames y tirela hacia afuera., Recept_culo derrames
No levante la unidad de superficie m&s de 1 putgada.
Si Io hace, es posible que no que de plana sobre el bolo
cuando la enchufe nuevamente
El levantamiento repetido de las unidades de superficie
por m&s de 1 pulgada sobre el bolo para derrames puede
dafiar permanentemente el receptb.culo.
Para reemplazar una unidad de superficie:
Coloque nuevamente el bolo para derrames en el hoyo de
la cubierta.. AsegL_rese de que la abertura del bolo est_ en
linea con el receptb,culo.
Insede los terminales de la unidad de superficie a trav6s
de la abertura del bolo para derrames y dentro del
recept&oulo.
Guie la unidad de superficie hacia su lugar para que
quede puesta en forma planao
No sumerja fas unidades de superficie en liquidos de
ninguna clase,
No limpie las unidades de superficie en una m&quina
para lavar platos_.
No dobte los enchufes de los terminales de tas unidades
de superficie.
No trate de limpiar, ajustar o de arreglar de alguna
manera el recept&cuto del enchufe..
Bolos para derrames
Saque tas unidades de superficie. Luego levante y saque
los bolos para derrames,
Para mejores resultados, limpie los bolos para derrames
a mano. Colbquelos en un envase cubierto. Agregue 1/4
de taza de amoniaco y deje en remojo pot varias horas.
Lave, enjuague bien y seque..
Los bolos para derrames tambi_n pueden ser limpiados
en fa m&quina para lavar platos,
Limpie el Area debajo de los bolos para derrames
frecuentemente., La acumulaciSn de suciedad,
especiatmente la grasa, se podria incendiar,
No cubra los bolos para derrames con papel aluminio,.
Et usar papel aluminio tan cerca del recept&culo podria
causar un golpe de corriente, incendio o dafiar ta estufa.
36
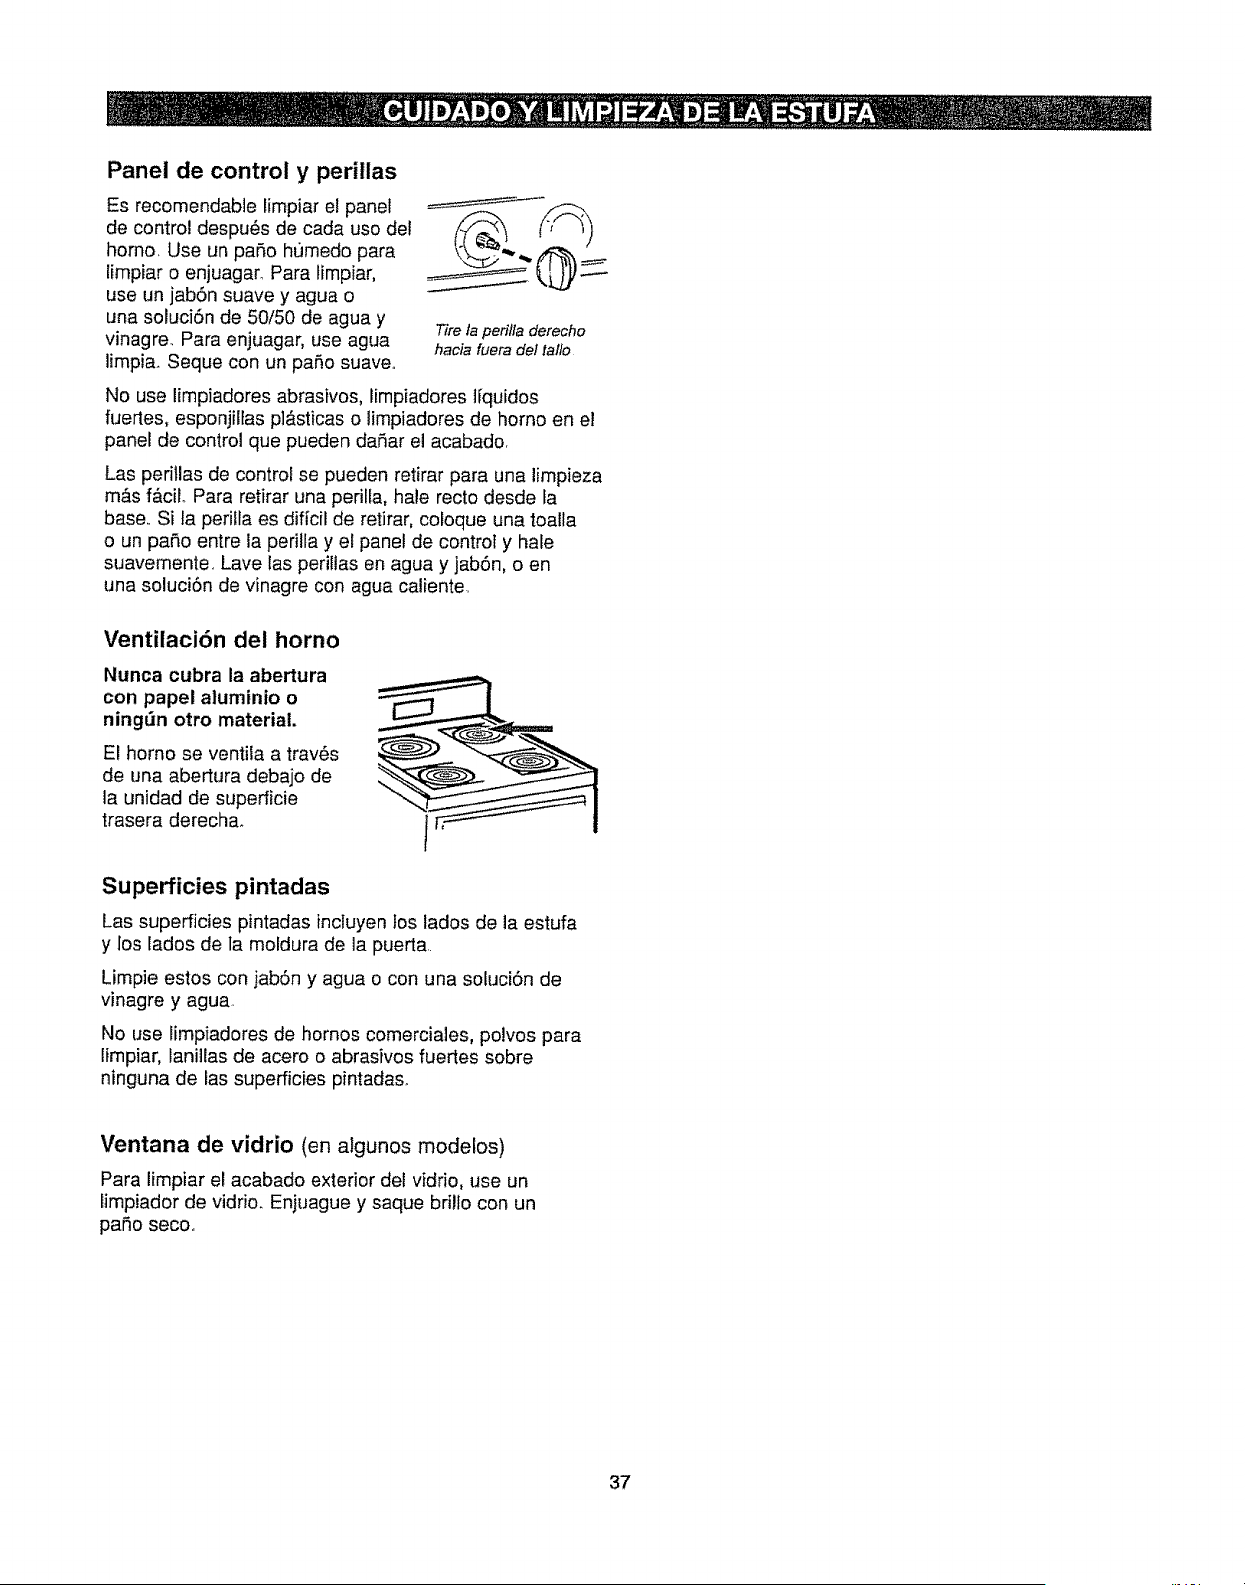
Panel de control y perillas
Es recomendable limpiar el panel
de control despu6s de cada uso del
homo+ Use un paso ht)medo para
limpiar o enjuagar. Para limpiar,
use un jabSn suave y agua o
una soluciSn de 50/50 de agua y
vinagre.. Para enjuagar, use agua
limpia. Seque con un paso suave..
Tire fa perifla derecho
hacia fuera de/tallo
No use limpiadores abrasivos, limpiadores IFquidos
fuertes, esponjiltas p]&sticas o limpiadoresde homo en el
panel de control que pueden da_ar el acabador
Las perillas de control se pueden retirar para una limpieza
m_s f&ciL Para retirar una perilla, hale recto desde la
base.. Si la perilfa es dif{cil de retirar, coloque una toatla
o un paso entre la perilla y el panel de controt y hale
suavemente. Lave tas periUas en agua y jabSn, o en
una soluciSn de vinagre con agua caliente+
Ventilaci6n del horno
Nunca cubra la abertura
con papel aluminio o
ningt]n otro material.
El homo so ventila a trav6s
de una abertura debajo do
la unidad de superficie
trasera derecha+
Superficies pintadas
Las superficies pintadas incluyen los lados de la estufa
y los lados de la moldura de la puerta..
Limpie estos con jab6n y agua o con una soluci6n de
vinagre y agua.
No use limpiadores de hornos comerciales, polvos para
[impiar, laniltas de acero o abrasivos fuertes sobre
ninguna de las superficies pintadas+
Ventana de vidrio (en algunos modelos)
Para limpiar el acabado exterior det vidrio, use un
limpiador de vidrio. Enjuague y saque brillo con un
par_o seco..
37
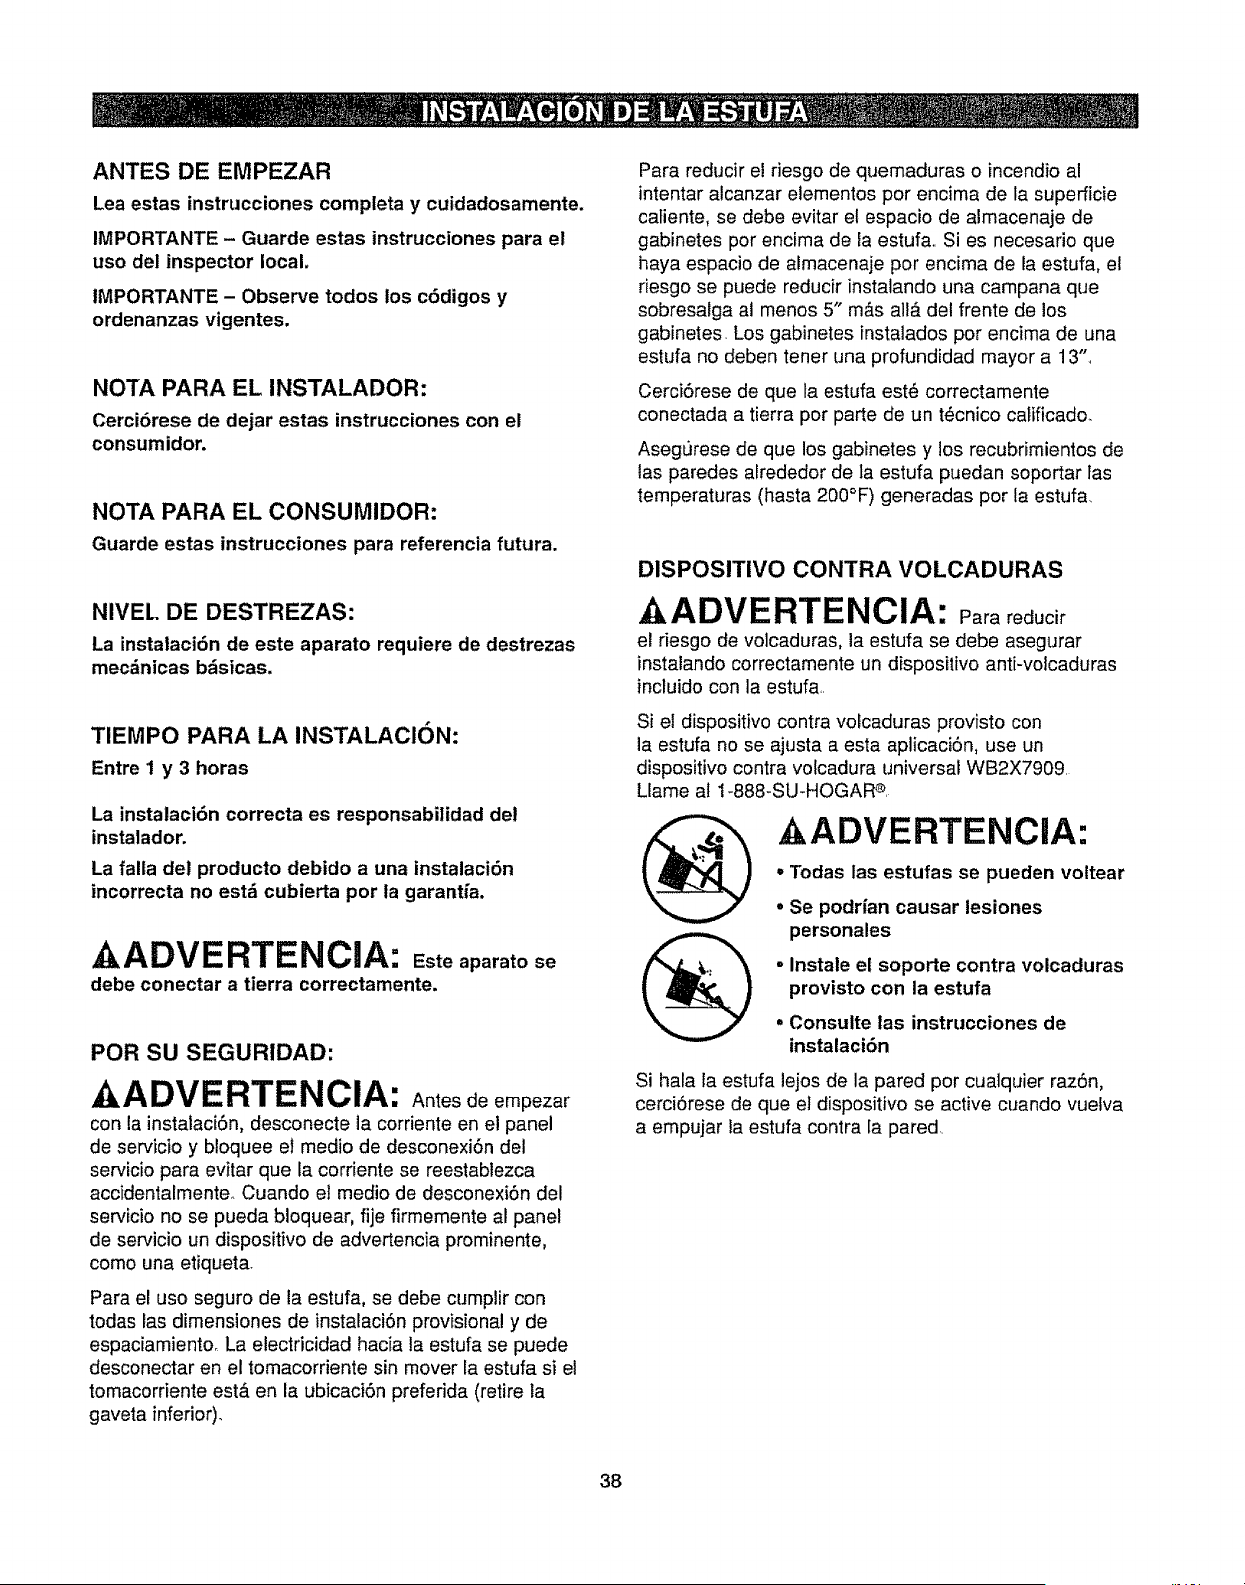
ANTES DE EMPEZAR
Lea estas instrucciones completa y cuidadosamente.
IMPORTANTE - Guarde estas instrucciones para el
use del inspector local,
IMPORTANTE - Observe todos los c6digos y
ordenanzas vigentes.
NOTA PARA EL INSTALADOR:
Cerci6rese de dejar estas instrucciones con el
consumidor.
NOTA PARA EL CONSUMIDOR:
Guarde estas instrucciones para referencia futura.
NIVEL DE DESTREZAS:
La instalaci6n de este aparato requiere de destrezas
mec_nicas b_sicas,
TIEMPO PARA LA INSTALACION:
Entre 1 y 3 horas
La instalaci6n correcta es responsabilidad del
instatador,
La falla del producto debido a una instalaci6n
incorrecta no est_ cubierta per la garantfa.
AADVERTENCIA: Esteaparato se
debe conectar a tierra correctamente.
PeR SU SEGURIDAD"
AADVERTENCIA: Antes de empezar
con la instalaci6n, desconecte la corriente en el panel
de servicio y bloquee et medio de desconexi6n del
servicio para evitar que la corriente se reestablezca
accidentalmente_ Cuando el medio de desconexi6n del
servicio no se pueda bloquear, fije firmemente al panel
de servicio un dispositivo de advertencia prominente,
come una etiqueta.
Para el use seguro de la estufa, se debe cumplir con
todas las dimensiones de instalaci6n provisional y de
espaciamiento_ La electricidad hacia la estufa se puede
desconectar en el tomacorriente sin mover la estufa si el
tomacordente estA en la ubicaci6n preferida (retire la
gaveta inferior).
Para reducir e! riesgo de quemaduras o incendio al
intentar alcanzar elementos per encima de la superficie
catiente, se debe evitar et espacio de almacenaje de
gabinetes per encima de Faestufa,. Si es necesario que
haya espacio de aimacenaje per encima de ia estufa, el
desgo se puede reducir instalando una campana que
sobresalga al menos 5" m&s all#. del frente de los
gabinetes. Los gabinetes fnstalados per encima de una
estufa no deben tener una profundidad mayor a 13".
Cerci6rese de que ta estufa est{_ correctamente
conectada a tierra per parte de un t_cnico calificado.
Asegurese de que los gabinetes y los recubrimientos de
tas paredes alrededor de la estufa puedan soportar fas
temperaturas (hasta 200°F) generadas per la estufa.
DISPOSITIVO CONTRA VOLCADURAS
AADVERTENCIA: Para reducir
el desgo de volcaduras, la estufa se debe asegurar
instalando correctamente un dispositivo anti-volcaduras
incluido con la estufa,.
Si el dispositivo contra volcaduras provisto con
la estufa no se ajusta a esta aplicaci6n, use un
dispositivo contra volcadura universa_ WB2X7909.
Llame aI 1-888-SU-HOGAR ®,
AADVERTENCIA:
- Todas las estufas se pueden voltear
• Se podr[an causar lesiones
personales
=Instale el soporte contra volcaduras
provisto con la estufa
. Consulte las instrucciones de
instataci6n
Si hala la estufa lejos de la pared per cuatquier raz6n,
cerci6rese de que et dispositivo se active cuando vuelva
a empujar la estufa contra [a pared.
38
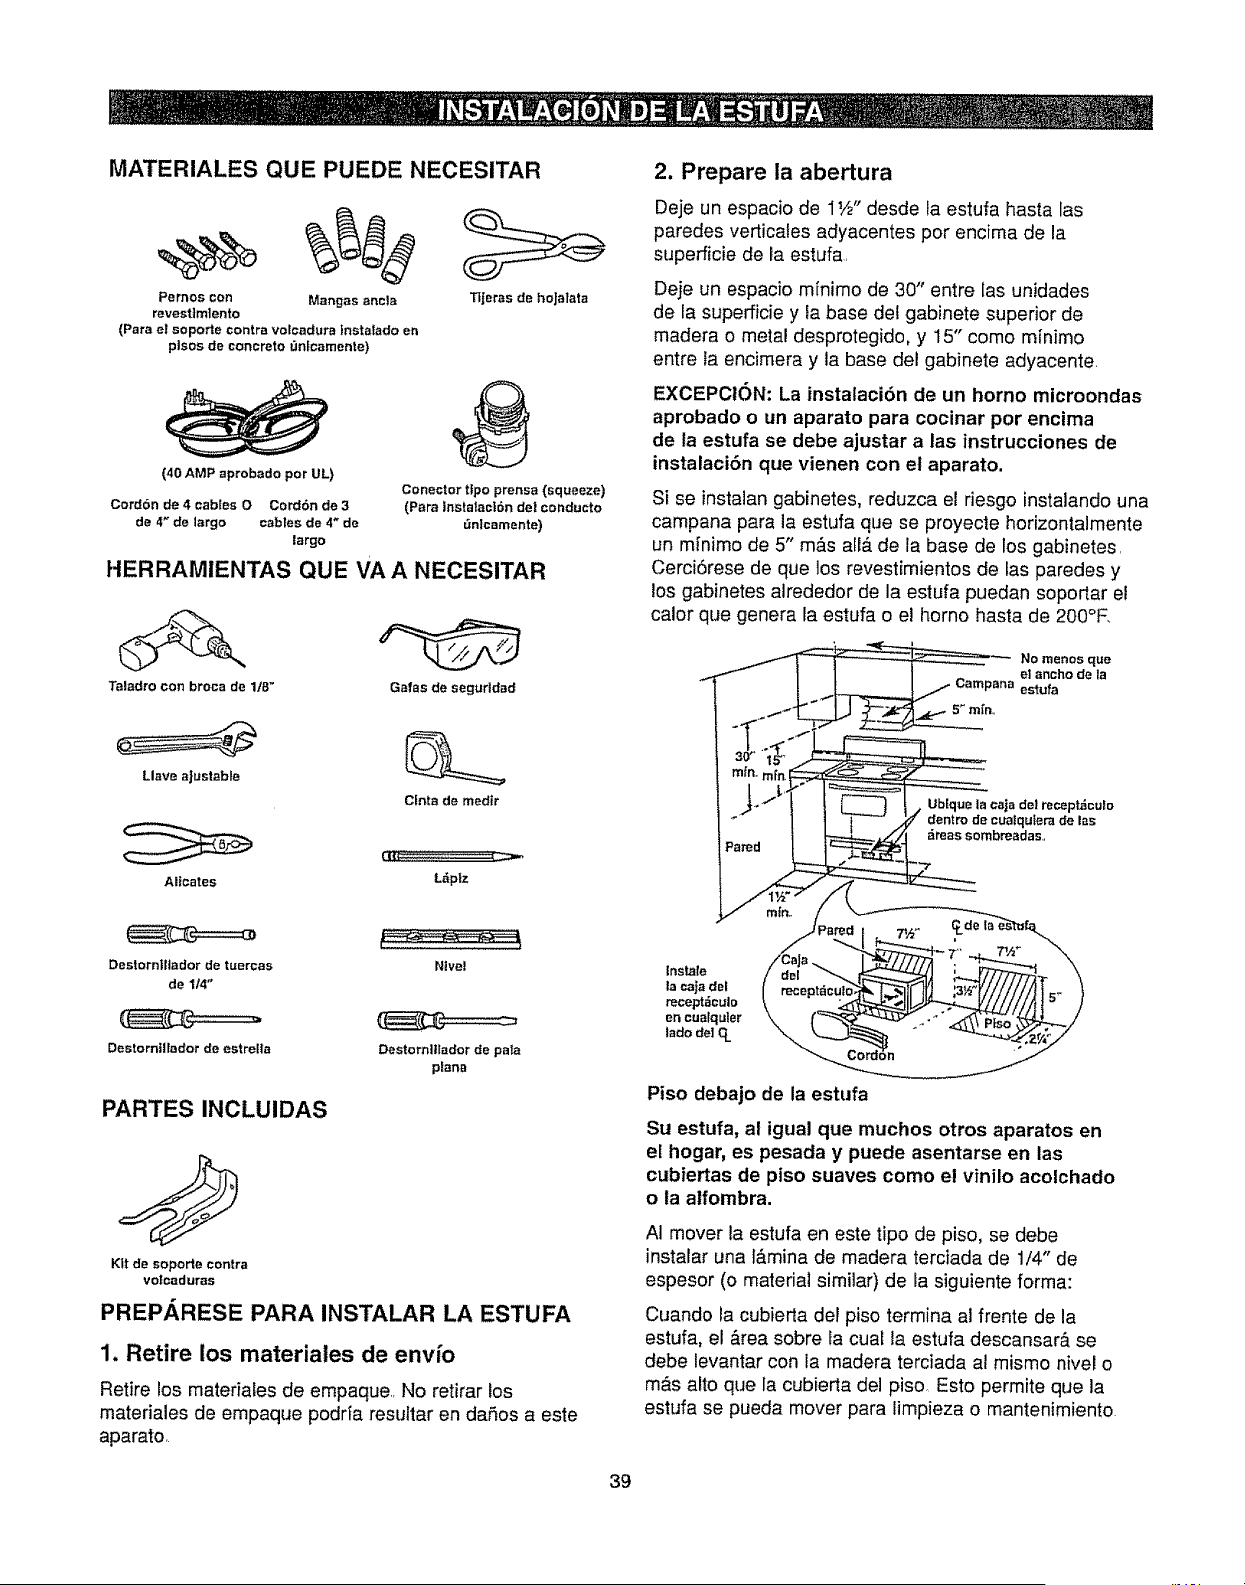
MATERIALES QUE PUEDE NECESITAR
Pernos con Mangas ancla
revest!mlento
(Para e! soporte contra volcadura |nstalado en
plsos de concrete _nfcarnente)
Tljeras de ho]alata
,8
(40 AMP aprobado per UL)
Conector tips prensa (squeeze)
CordSn de 4 cables O Cord6n de 3 (Para instalaci6n de! conducts
de 4_ de largo cables de 4_ de r3nlcamente)
largo
HERRAMIENTAS QUE VA A NECESITAR
Taladro con broca de ltB _
Galas de segurldad
2. Prepare la abertura
Deje un espacio de 1W" desde la estufa hasta las
paredes verticates adyacentes per encima de la
superficie de la estufa,
Deje un espacio minims de 30" entre las unidades
de la superficie y la base de! gabinete superior de
madera o metal desprotegido, y 15" come m[nimo
entre la encimera y la base del gabinete adyacente.
EXCEPCION: La instalaci6n de un horns microondas
aprobado oun aparato para cocinar per encima
de la estufa se debe ajustar a las instrucciones de
instalaci6n qua vienen con et aparato.
Si se instalan gabinetes, reduzca el riesgo instalando una
campana para la estufa que se proyecte horizontalmente
un minims de 5" m&s all_.de la base de los gabinetes,
Cerci6rese de qua los revestimientos de las paredes y
los gabinetes alrededor de la estufa puedan soportar el
calor que genera la estufa o el homo hasta de 200°R
No m_nos qua
e! ancho de la
estufa
Llave aJustable
Cfnta de medtr
(3'[f
Altcates L_,piz
Ublque la caja de! recept_culo
den!re de cUafqulera de las
_reas sembreadas,
Destotnil]ador de tuercas
de 114"
Ntvel
Destomillador de estrel|a
PARTES INCLUIDAS
Oestornlilador de pair
plana
Kit de soporte contra
volcaduras
PREPARESE PARA INSTALAR LA ESTUFA
1, Retire los mater!ales de envfo
Retire los materiales de empaque., No retirar los
mater!ales de empaque podria resultar en daSos a este
aparato,
Inslale
la caja del
recept_culo
en cualquler
Jade de| q_
Piss debajo de ia estufa
Su estufa, al igual qua muchos otros aparatos en
el hogar, es pesada y puede asentarse en las
cubiertas de piss suaves come el vinilo acolchado
o ia alfombra.
AI mover la estufa en este tips de piss, se debe
instalar una l&mina de madera terciada de 1/4" de
espesor (o matedal similar) de la siguiente forma:
Cuando la cubierta deFpiss termina al frente de la
estufa, el &rea sabre la cual la estufa descansar& se
debe levantar con la madera terciada al mismo nivel o
m_.s alto que la cubierta del piss. Esto permite que la
estufa se pueda mover para limpieza o mantenimiento
39
CONEXIONES ELISCTRICAS
Requisitos el_ctricos
1"
A PRECAUCION: Porsego. ad
personal, no use un cable de extensl6n para este
aparato. Baje et fusible de la casa o abra el
interruptor de circuitos antes de empezar la
instalaci6n,
Este aparato debe recibir e! voltaje y la frecuencia
correctos y conectarse a un circuito ramal individual
correctamente conectado a tierra, protegido pot un
interruptor de circuitos o fusible que tenga el amperaje
que se especifica en fa placa de indicaci6n de potencia,
la cual se encuentra por encima de la gaveta de
almacenaje en el marco del horno.
Recomendamos que el cableado y la conexi6n el6ctrica
de la estufa la realice un electricista calificado. Despu6s
de la instalaciSn, pida af electricista que le muestre
d6nde se encuentra la desconexi6n principal de fa estufa.
Consulte con la compaSfa Focal el_ctrica los c6digos
el_ctricos que corresponden a su _,rea, No conectar el
homo segt3n los c6digos vigentes podria resultar en una
condici6n peligrosa, Si no hay cSdigos locales, la estufa
se debe conectar de acuerdo con los requisitos del
c6digo el6ctrico nacional, ANSI/NFPA No, 70 - Ultima
edici6n, Puede obtener una copia si escribe a:
National Fire Protection Association
Batterymarch Park
Quincy, MA 02269
A partir del lro de enero de 1996, el c6digo el_ctrico
nacional exige que ias construcciones nuevas (no
existentes) utilicen una conexi6n de 4 conductores
hacia una estufa eldctrica.
AI instalar una estufa eldctrica en una construcci6n
nueva, siga los pasos 3 y 5 para ia conexi6n de 4
cables.
Debe usar un sistema el_ctrico de 60 hertz, de 3
alambres, monof&sico, A.C, 208Y/120 voltios o 240/120
voltios. Si conecta a un cableado de aluminio, se deben
usar conectores correctamente instatados aprobados
para uso con el cableado de aluminio.
Si el servicio ef_ctrico provisto no cumple con las
especificaciones anteriores, solicite a un electricista con
licencia que le instale un tomacorriente aprobado.
TODAS LAS CONSTRUCClONES
NUEVAS, CASAS RODANTES E
INSTALACIONES DONDE LOS
C(DDIGOS LOCALES NO PERMITAN
LA CONEX1ON A TIERRA A TRAVES
DEL NEUTRO
Use unicamente un cord6n para estufa de 3 conductores
o 4 conductores, aprobado por UL, Estos cables pueden
tener terminales en arc en el alambre y un dispositivo
aliviador de presi6n.
Se requiere un cord6n para estufa de 40 amperios con
un rango de voftaje de 125/250 como minimo, No se
recomienda un cord6n para estufa de 50 amperios, pero
si se usa, se debe marcar par a uso con aberturas
nominales de conexi6n de 13/8"de dib_metro, Se debe
tener cuidado de centrar el cable y el aliviador de presi6n
dentro del orificio removible para evitar que el borde
daSe el cable,,
• Dado que no se puede tener acceso a los terminales de
la estufa una vez que est_ en posici6n, se debe usar un
conducto o cordSn de servicio flexibles.
NOTA: Si se usa un conducto, vaya al paso 3D y iuego
al paso 6 6 7.
• En algunos modelos, se puede conectar un
condensador de filtro entre los alambres negro y blanco
en el bloque de empa[me..
40
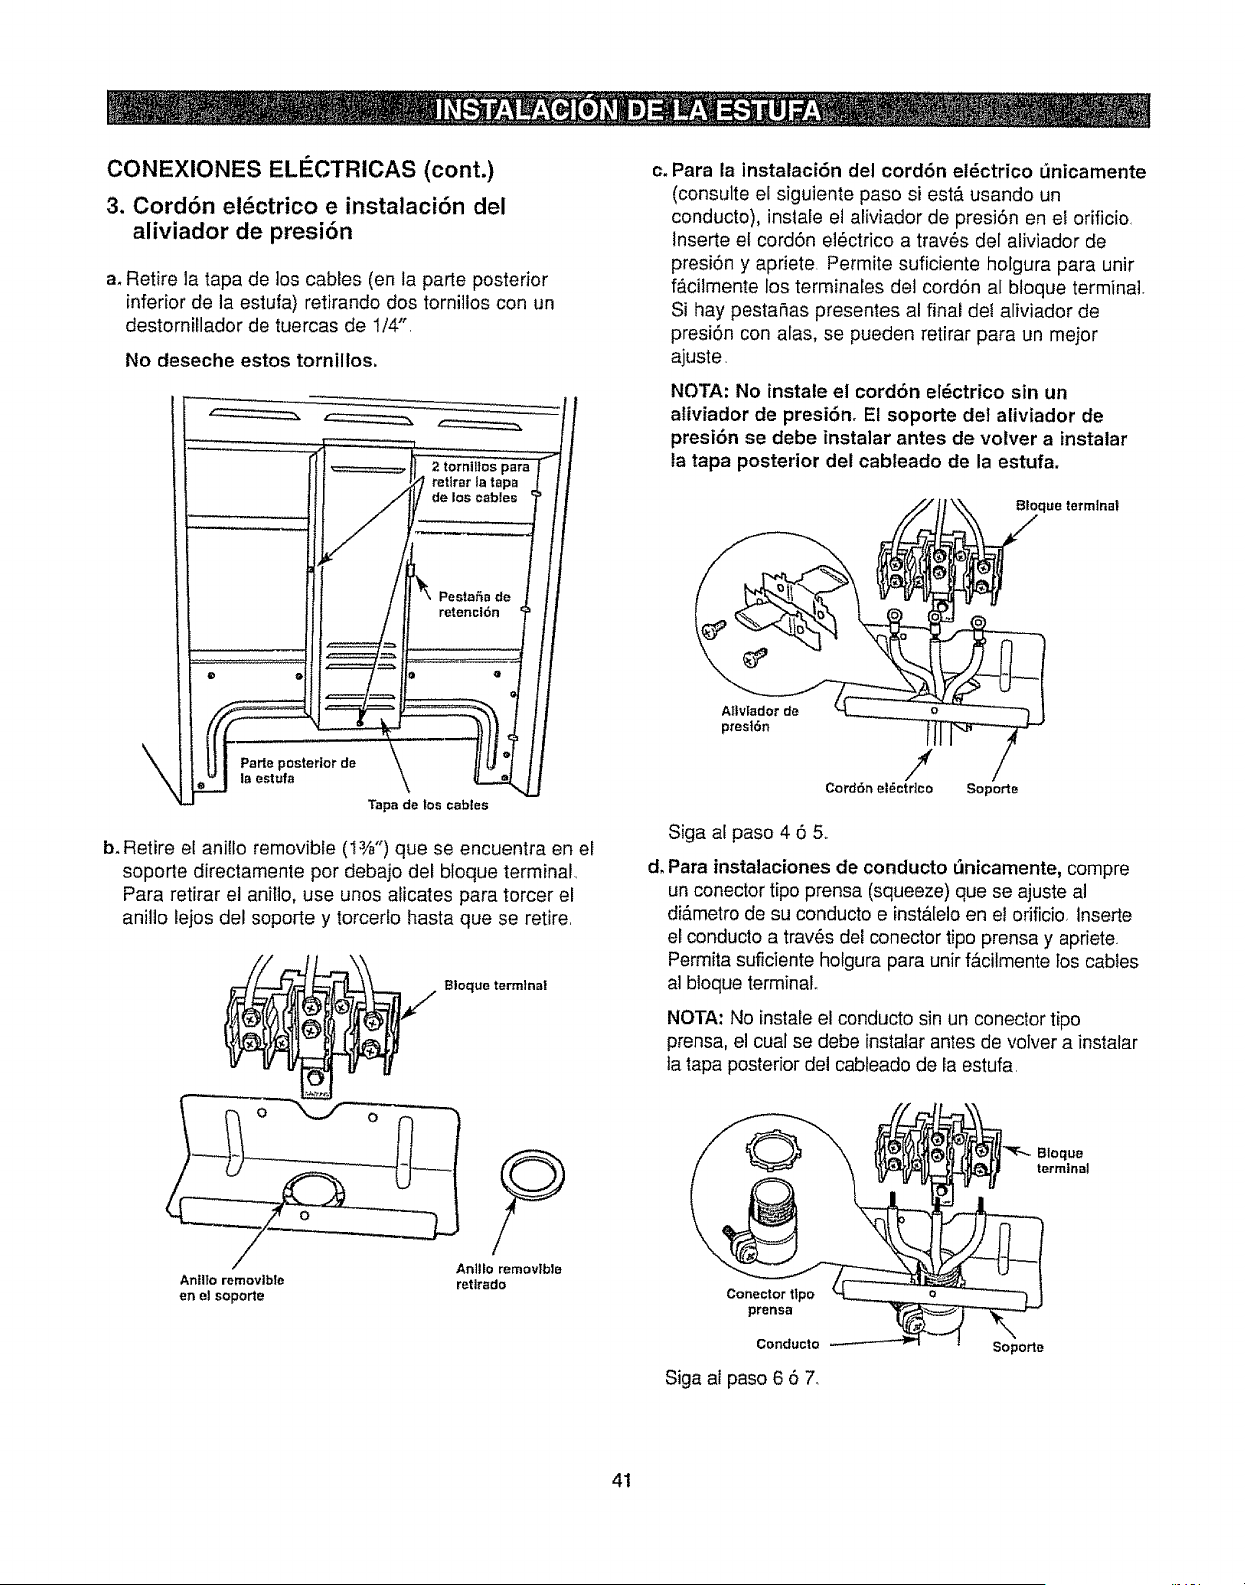
CONEXIONES ELIECTRICAS (cont.)
3. Cord6n el6ctrico e instalaci6n del
aliviador de presi6n
a, Retire la tapa de los cables (en la parle posterior
inferior de la estufa) retirando dos tornillos con un
destomillador de tuercas de I/4".
No deseche estos tornillos.
\
Parle posterior de
la estufa
_" retirar la tapa __
I
_'_ Pesta_a de
retencl6n
_ Q
Tapa de los cables
b. Retire el ani!lo removible (I3/_") que se encuentra en el
soporte directamente por debajo del bloque terminal
Para retirar el anillo, use unos alicates para torcer el
anillo lejos del sopode y torcerlo hasta que se retire
B!oque termlna|
c_Para la instalaci6n del cord6n ei_ctrico unicamente
(consulte el siguiente paso si est& usando un
conducto), instale el aliviador de presi6n en el orificio,
lnserte el cord6n el_ctrico a trav6s del aliviador de
presi6n y apriete Permite suficiente holgura para unir
f&cilmente los terminales del cord6n al bloque terminal,
Si hay pestaSas presentes al final det aliviador de
presi6n con alas, se pueden retirar para un mejor
ajuste_
d_
NOTA: No instale el cordSn el_ctrico sin un
aliviador de presi6n. El soporte del aliviador de
presibn se debe instalar antes de volver a instalar
la tapa posterior del cableado de la estufa.
_\\ _que teTmtnal
presldnAIM'a'd°tde
CordOn el_ctrtco Soporte
Siga al paso 4 6 5
Para instalaciones de conducto 5nicamente, compre
un conector tipo prensa (squeeze) que se ajuste al
di_.metro de su conducto e inst&[elo en el orificie lnserte
el conducto a tray,s del conector tipo prensa y apriete
Permita suficiente holgura para unir fAcilmente los cables
al btoque terminal
NOTA: No instale el conducto sin un conector tipo
prensa, el cual se debe instatar antes de volver a instalar
ta lapa posterior del cableado de la estufa
Anlllo removlble
en el soporte
Anlllo removtble
retlrado
Conector t|po
prensa
Conducto
Siga al paso 6 6 7,
Bloque
terminal
Soporle
41
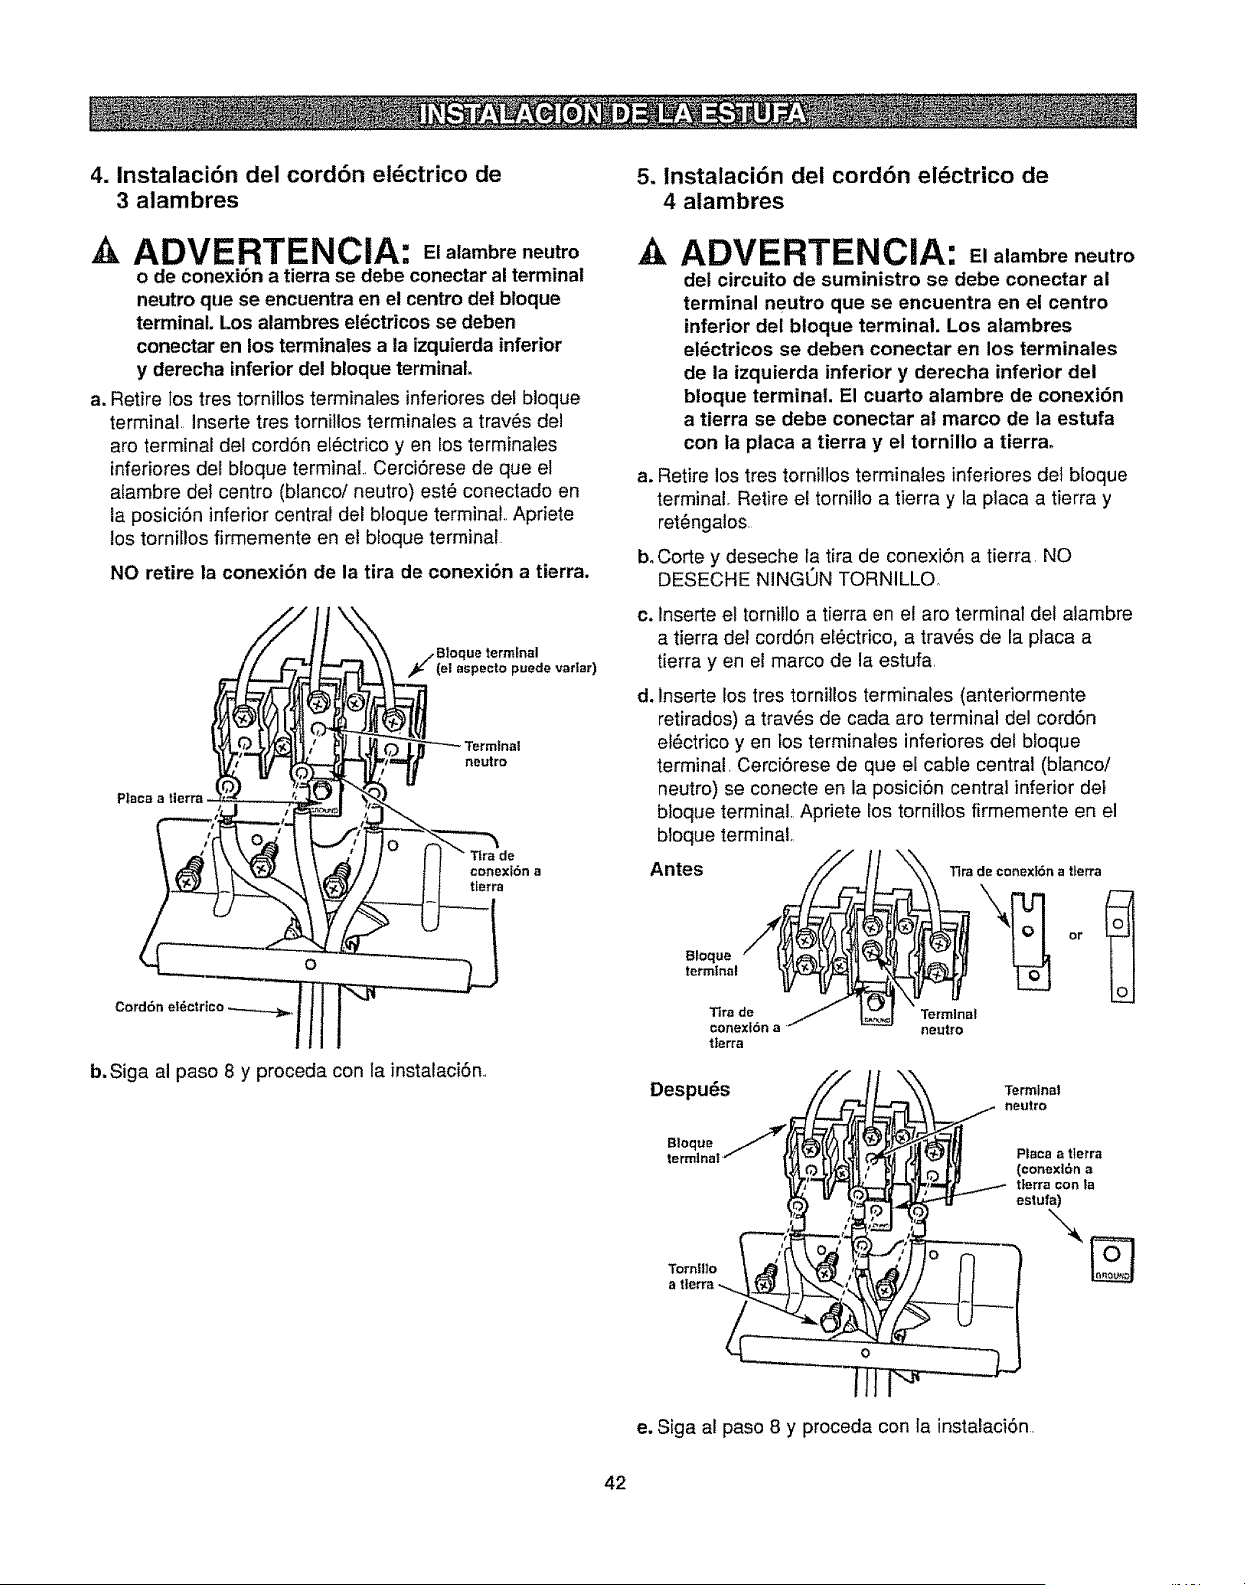
4. Instalaci6n del cord6n eldctrico de
3 alambres
A ADVERTENCIA: E,atambreneutro
o de conexi6n a tierra se debe conectar al terminal
neutro que se encuentra en el centro del bloque
terminal. Los alambres eldctricos se deben
conectar en los terminales a ia izquierda inferior
y derecha inferior del bloque terminal,
a, Retire los tres tornillos terminales inferiores del bloque
terminal.. Inserte tres tornillosterminales a trav_s del
aro terminal del cordSn el_ctrico y en los terminales
inferiores del bloque terminal., Cerci6rese de que el
alambre dei centro (blanco/neutro) est_ conectado en
ia posici6n inferior central del bloque terminal., Apriete
!os tornillos firmemente en el bloque terminal
NO retire la conexi6n de la tira de conexi6n a tierra.
ue terminal
(el aspecto puede varlar)
Ttra de
conext6n a
tterra
b. Siga al paso 8 y proceda con la instalaci6n.,
5. Instalaci6n del cord6n eldctrico de
4 alambres
.& ADVERTENCIA: Elalambreneutro
del circuito de suministro se debe conectar al
terminal neutro que se encuentra en el centro
inferior del bioque terminal, Los alambres
el6ctricos se deben conectar en los terminales
de la izquierda inferior y derecha inferior del
bloque terminal. El cuarto alambre de conexibn
a tierra se debe conectar al marco de la estufa
con ta placa a tierra y el tornillo a tierra,
a. Retire los tres tornillosterminales inferiores del bloque
terminal. Retire el tornillo a tierra y la placa a tierra y
ret_ngalos
b.Corte y deseche la tira de conexi6n a tierra, NO
DESECHE NINGUN TORNILLQ
c. inserte el torniilo a tierra en el aro terminal del alambre
a tierra del cord6n el_ctrico, a trav_s de la placa a
tierra yen el marco de la estufa,
d, Inserte los tres tornitlos terminales (anteriormente
retirados) a tray,s de cada aro terminal del cord6n
el6ctrico y en los terminales inferiores del bloque
terminal, Cerci6rese de que el cable central (btanco/
neutro) se conecte en la posici6n central inferior def
bloque terminal Apriete los tornillos firmemente en el
bloque terminal,,
Antes //,#_
Btoque
terminal
Ttra de
e.ortexJ6n a "
tlarra
_ d_next6n a tterra
Terminal
neutro
Despu_s
Termlnat
neutt'o
Bloque
Tornfl]o
a
Ptaca a tlerra
(cor_exl6na
t_erra con ta
estufa)
e. Siga al paso 8 y proceda con la instalaciSn.
42
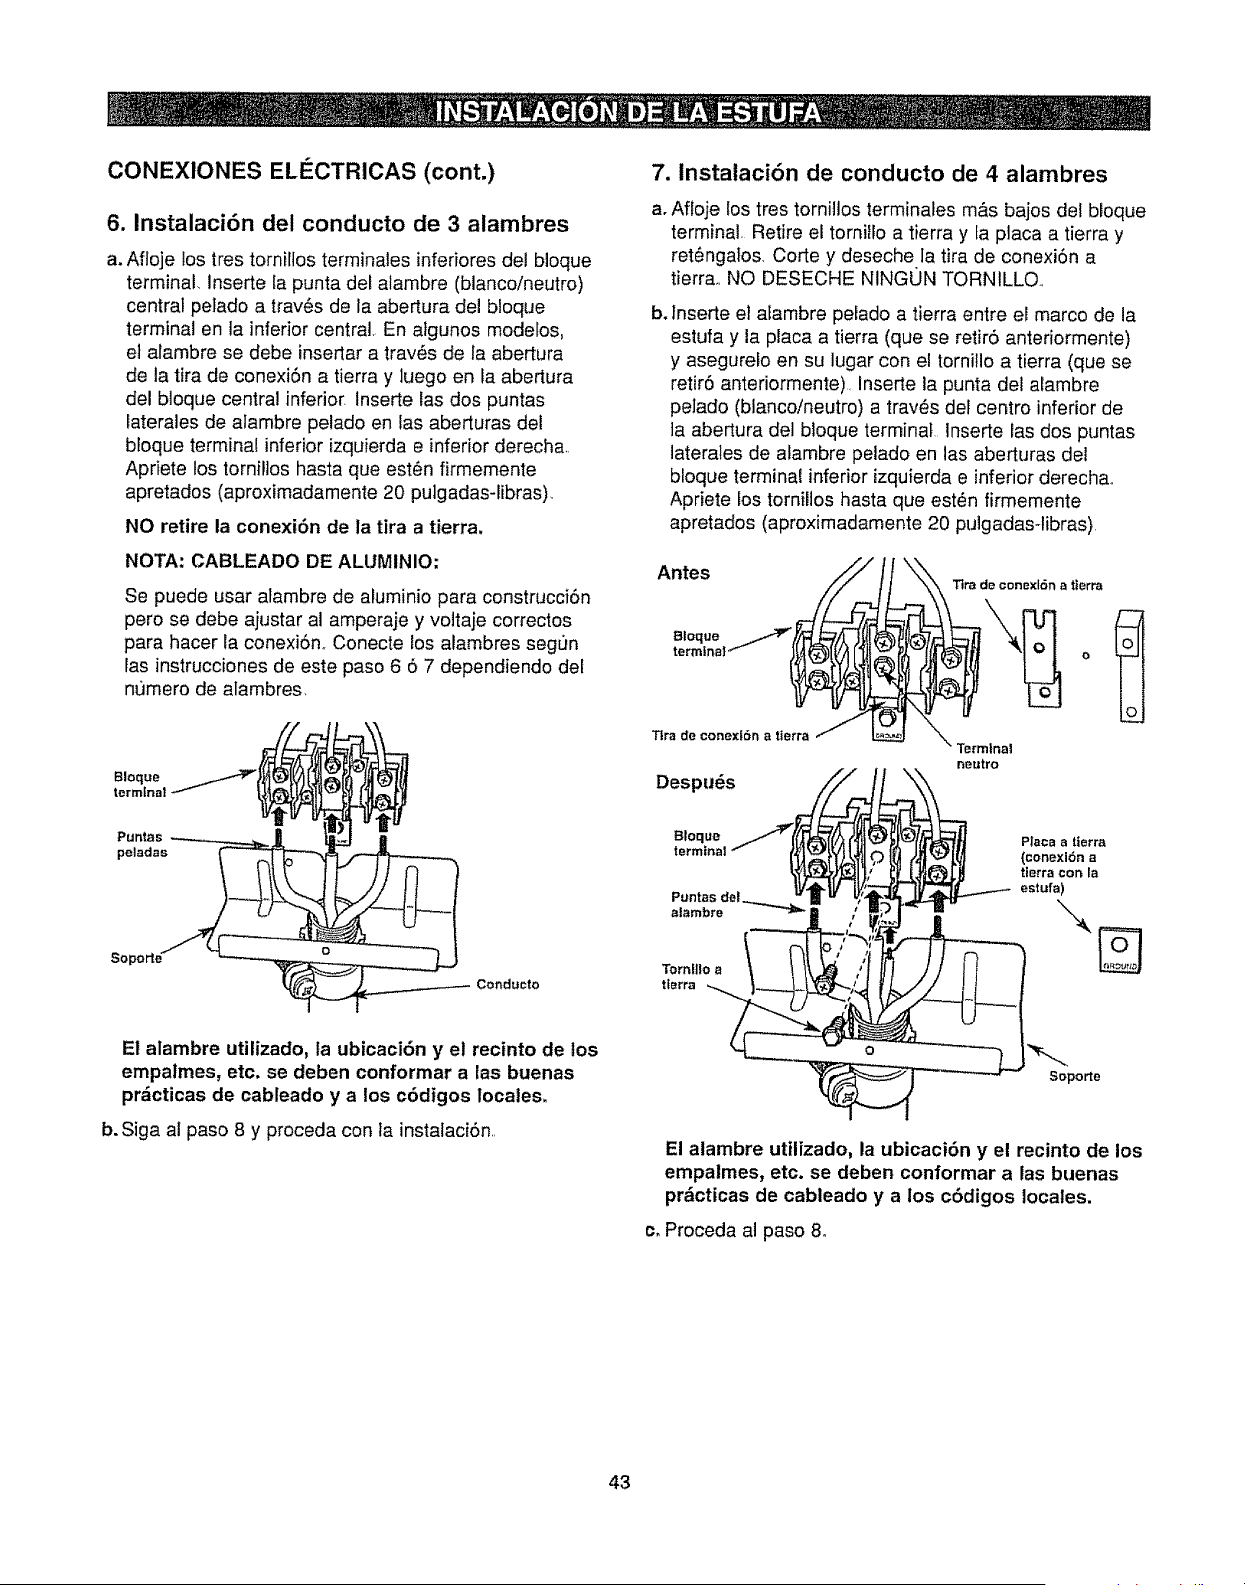
CONEXIONES ELECTRICAS (cont.)
6. Instalaci6n del conducto de 3 alambres
a. Afloje los tres tornillos terminales inferiores del bloque
terminal, Inserte la punta del alambre (blanco/neutro)
central pelado a trav6s de la abertura del bloque
terminal en la inferior central. En atgunos modelos,
et alambre se debe insertar a tray,s de la abertura
de la tira de conexi6n a tierra y luego en la abertura
del bleque central inferior. Inserte las dos puntas
laterales de atambre pelado en las aberturas del
bloque terminal inferior izquierda e inferior derecha,.
Apriete los tornillos hasta que est_n firmemente
apretados (aproximadamente 20 pulgadas-libras),
NO retire la conexi6n de la tira a tierra.
NOTA" CABLEADO DE ALUMINIO:
Se puede usar alambre de aluminio para construcci6n
pero se debe ajustar al amperaje y vottaje correctos
para hacer la conexiSn, Conecte los alambres segun
las instrucciones de este paso 6 6 7 dependiendo del
numero de alambres.
Puntas
peladas
sopoHe
Conducto
E! alambre utilizado, la ubicaci6n y el recinto de los
empalmes, etc. se deben conformar a las buenas
pr_cticas de cableado y a los c6digos locales.
b.Siga al paso 8 y proceda con la instalaci6n,,
7. Instalaci6n de conducto de 4 alambres
a. Afioje los tres tornitlos terminales m&s bajos de! bloque
terminal. Retire el torniilo a tierra y la placa a tierra y
retengalos, Corte y deseche la tira de conexi6n a
tierra,, NO DESECHE NINGUN TORNILLQ
b. Inserte et atambre pelado a tierra entre el marco de la
estufa y la placa a tierra (que se retir6 anteriormente)
y asegurelo en su lugar con el tornillo a tierra (que se
retir6 anteriormente), Inserte la punta del alambre
pelado (blanco/neutro) a trav_s del centro inferior de
]a abertura del bloque terminal tnserte las dos puntas
laterales de alambre pelado en las aberturas del
bfoque terminal inferior izquierda e inferior derecha,,
Apriete los tornillos hasta que est#n firmemente
apretados (aproximadamente 20 pulgadas-libras)
Antes
termfnaI'f I_
Ttra de conexfSn a tierra / I.
Despu6s
de conext6n a tterra
Terminal
neutro
Bloque
terminal
Puntas del
alambre
Tornltlo a
tferra
L
Placa a tierra
(conexi6n a
tlerra con la
estufa)
Soporte
El alambre utilizado, la ubicaci6n y el recinto de los
empalmes, etc. se deben conformar a las buenas
pr&cticas de cableado y a los c6digos locales.
c, Proceda al paso 8.
43
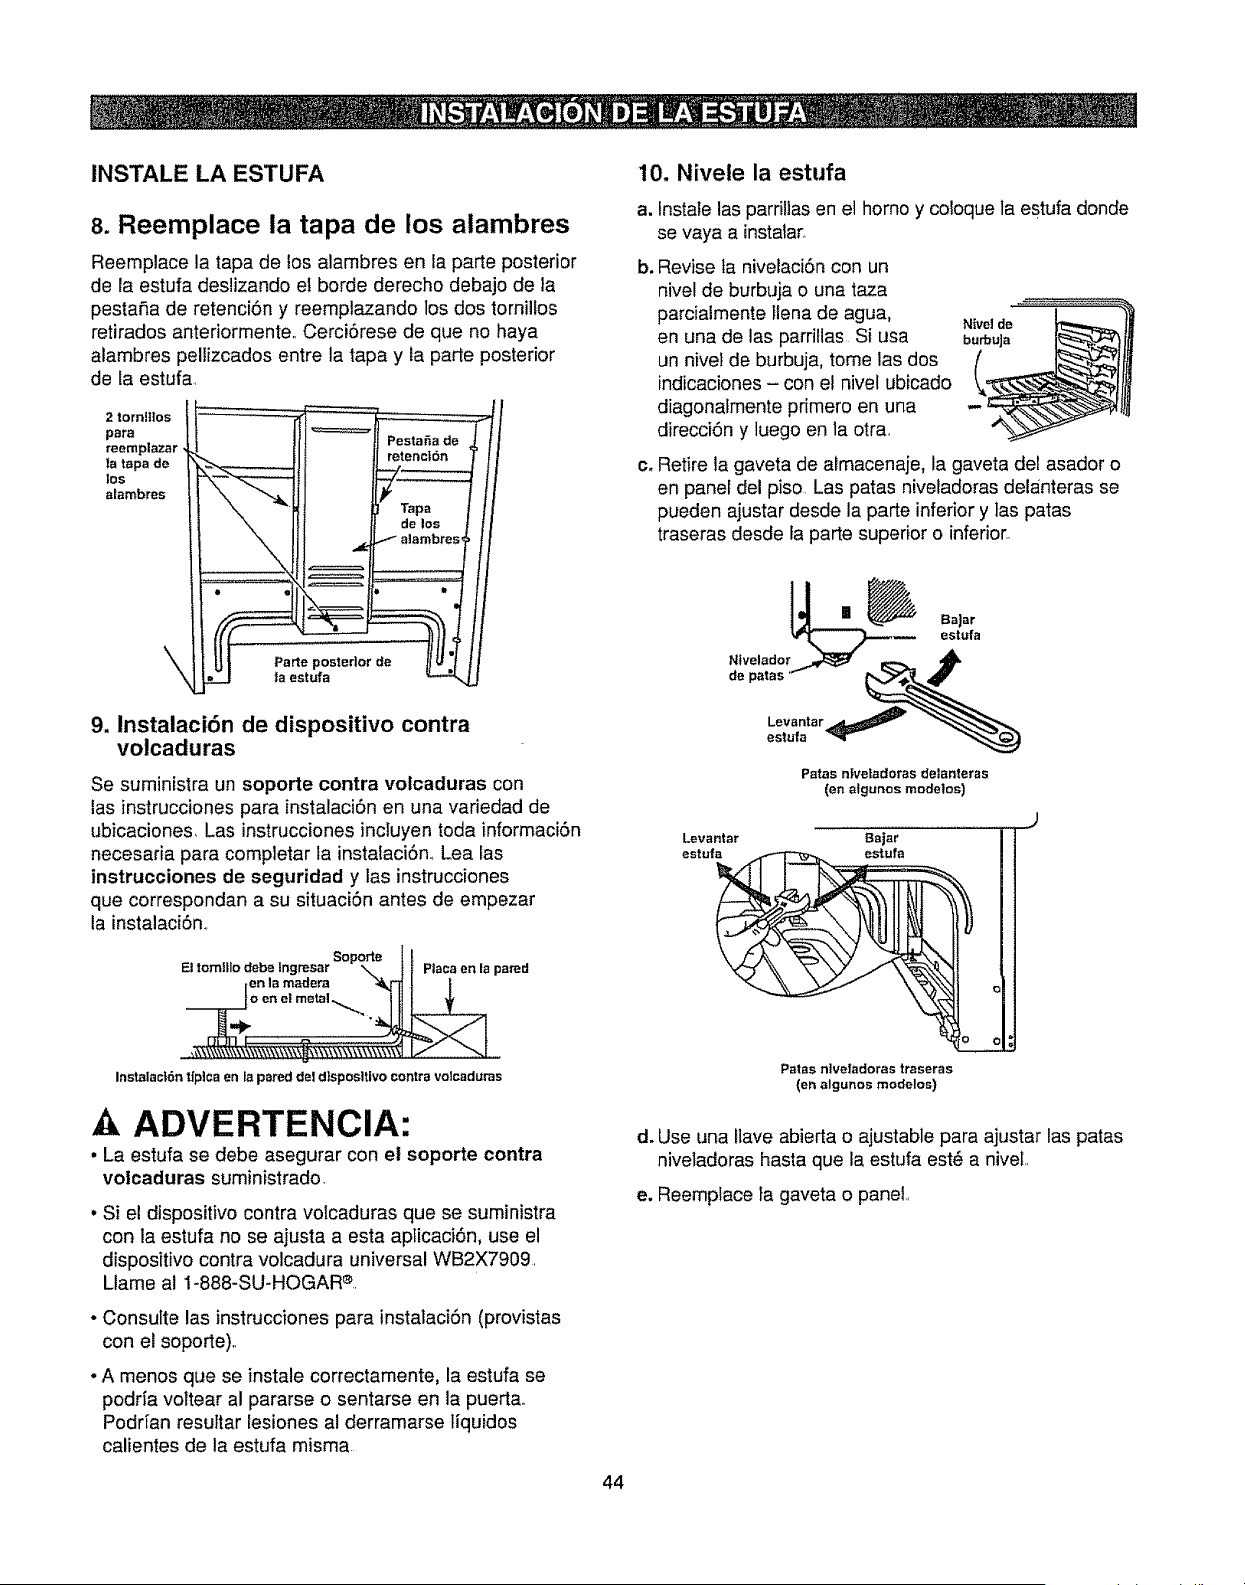
INSTALE LA ESTUFA
8. Reemplace la tapa de los alambres
Reemplace la tapa de los alambres en la parte posterior
de la estufa deslizando el borde derecho debajo de la
pesta5a de retenciSn y reemptazando los dos tornillos
retirados anteriormente,, CerciSrese de que no haya
alambres pellizcados entre la tapa y la parte posterior
de la estufa,
2 tornltlos
para
reernplazar.
Ia tapa de
los
alambres
\
Parte posterior de
ta estufa
9. lnstalaci6n de dispositivo contra
volcaduras
Se suministra un soporte contra volcaduras con
las instrucciones para instalaci6n en una variedad de
ubicaciones, Las instrucciones incluyen toda informaciSn
necesaria para completar la instalaciSn_ Lea las
instrucciones de seguridad y las instrucciones
que correspondan a su situaci6n antes de empezar
la instalaciSn,,
l
Soporte
El tomtiIo debe tngresar \| Placa en la pared
len la madera _ f
Instalacl6n tfplca en la pared dal d}sposltlvo contra volcaduras
ADVERTENCIA:
• La estufa se debe asegurar con el soporte contra
volcaduras suministrado,
. Si el dispositivo contra volcaduras que se suministra
con la estufa no se ajusta a esta aplicaci6n, use el
dispositivo contra volcadura universal WB2X7909,
Llame al 1-888-SU-HOGAR_..
• Consutte las instruccionespara instalaci6n (provistas
con el soporte).,
• A menos que se instale correctamente, la estufa se
podria voltear al pararse o sentarse en la puertao
Poddan resultar lesiones al derramarse tiquidos
calientes de la estufa misma..
10. Nivele la estufa
a. Instate las parrillas en el homo y coloque la estufa donde
se vaya a instalar_
b_
Revise ta nivelaciSn con un
nivel de burbuja o una taza
parcialmente flena de agua,
en una de las parrillas Si usa
un nivel de burbuja, tome las dos
indicaciones - con el nivel ubicado
diagonafmente primero en una
direcciSn y luego en la otra,
Retire la gaveta de almacenaje, la gaveta del asador o
en panel del piso, Las patas niveladoras delanteras se
pueden ajustar desde la parte inferior y las paras
traseras desde la parte supedor o inferior,,
Ntvelador _ _ _1_
de patas '_'- __.._.._
estufa _
Pataa ntveladoras delanteras
(en algurtes modelos)
Levantar Bajar
estufa estufa
Paras niveladoras traseras
(an algunos modelos)
J
e
doUse una llave abierta o ajustable para ajustar las patas
nivetadoras basra que la estufa est_ a niveL
e. Reemplace la gaveta o panel,,
44
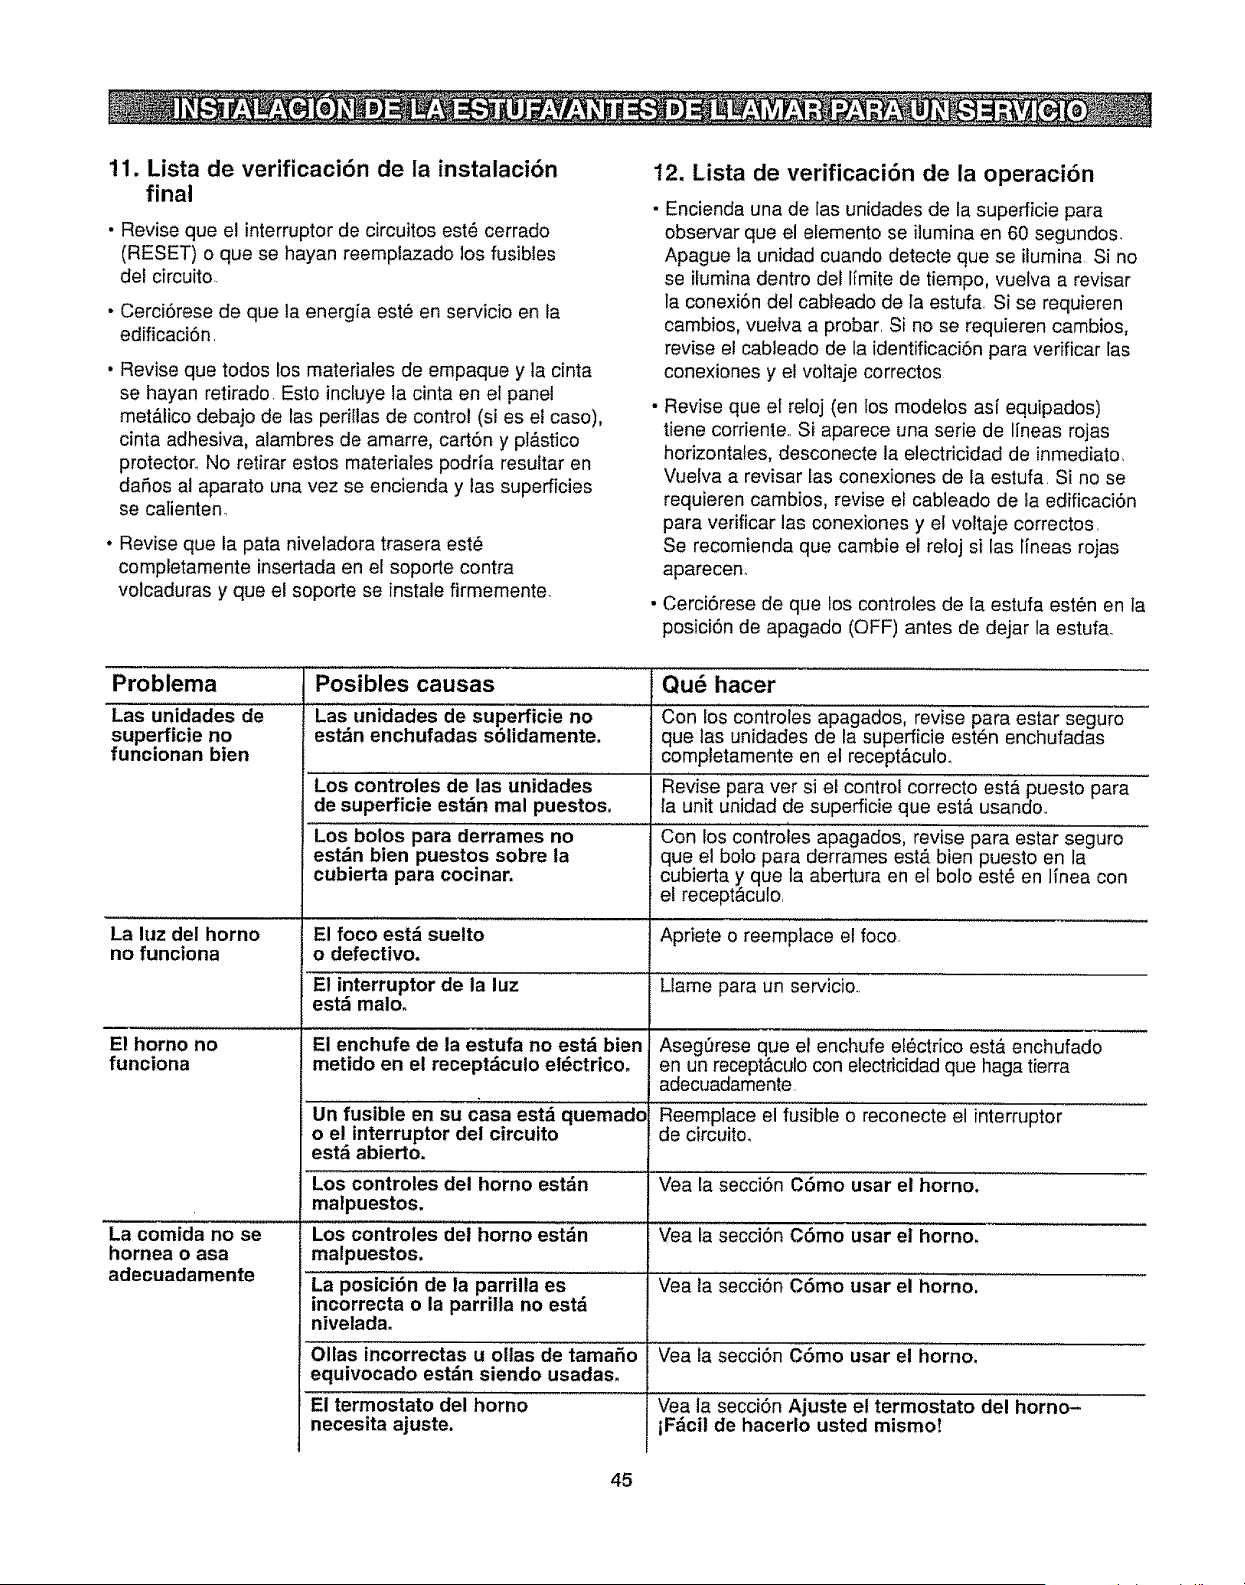
11. Lista de verificaci6n de ia instalaci6n
final
• Revise que e! interruptor de circuitos est_ cerrado
(RESET) o que se hayan reemplazado los fusibles
del circuito..
- Cerci6rese de que la energia est6 en servicio en la
edificaci6n.
• Revise que todos los materiales de empaque y la cinta
se hayan retirado. Esto incluye ta cinta en el panel
met&lico debajo de las perillas de control (si es el caso),
cinta adhesiva, alambres de amarre, cart6n y pl#,stico
protector_ No retirar estos materiates podria resuttar en
daSos al aparato una vez se encienda y ias superficies
se calienten.
* Revise que la pata niveladora trasera est_
completamente insertada en el soporte contra
volcaduras y que el soporte se instale firrnemente.
12. Lista de verificaci6n de la operaci6n
• Encienda una de las unidades de la superficie para
observar que el elemento se ilumina en 60 segundos.
Apague la unidad cuando detecte que se ilumina Si no
se ilumina dentro del limite de tiernpo, vuelva a revisar
la conexi6n det cableado de la estufa. Si se requieren
cambios, vuelva a probar. Si no se requieren cambios,
revise el cableado de la identificaci6n para verificar [as
conexiones y el voltaje correctos
Revise que el reloj (en los modetos asi equipados)
tiene corriente,. Si aparece una serie de I[neas rojas
horizontates, desconecte la electricidad de inmediato.
Vuetva a revisar las conexiones de la estufa. Si no se
requieren cambios, revise el cableado de la edificaci6n
para verificar las conexiones y el voltaje correctos.
Se recomienda que cambie el reloj si las lineas rojas
aparecen.
• Cerci6rese de que los controles de la estufa est6n en la
posici6n de apagado (OFF) antes de dejar la estufa.
Problema Posibles causas Qu6 hacer
Las unidades de Las unidades de superficie no Con los controles apagados, revise para estar seguro
superficie no est&n enchufadas s61idamente, que las unidades de la superficie est_n enchufadas
funcionan bien completamente en el recept&culo,
Los controles de las unidades Revise para ver si el control correcto est& puesto para
de superficie est_n real puestos, la unit unidad de superficie que est& usando_.
Los bolos para derrames no Con los controles apagados, revise para estar seguro
est_n bien puestos sobre la que el bolo para derrames est& bien puesto en la
cubierta para cocinar, cubierta y que la abertura en el boto est_ en Ifnea con
el recept&culo,
La luz del homo El foco est,1 suelto Apriete o reempiace el foco,
no funciona o defectivo.
El interruptor de la luz Llame para un servicio..
est_ maloo
E! homo no El enchufe de la estufa no est_ bien AsegL_reseque el enchufe el_ctrico esta enchufado
funciona metido en el recept_culo el_ctrico, en un recept&culo con electricidad que haga tierra
adecuadamente
Un fusible en su casa est_ quemado Reemplace el fusible o reconecte el interruptor
o el interruptor del circuito de circuito,
est_ abierto.
Los controles del horno est_in Vea la secci6n C6mo usar el homo,
malpuestos.
La comida no se Los controles del horno est_n Vea la secci6n C6mo usar el homo.
hornea o asa malpuestos,
adecuadamente La posici6n de la parrilla es Yea la secci6n C6mo usar el homo.
incorrecta o la parrilla no est_
nivelada.
Ollas incorrectas u oltas de tamaSo Vea la secci6n C6mo usar et homo°
equivocado est_n siendo usadas.
El termostato del horno Vea la secci6n Ajuste el termostato del homo-
necesita ajuste, iF_cil de hacerlo usted mismo!
45
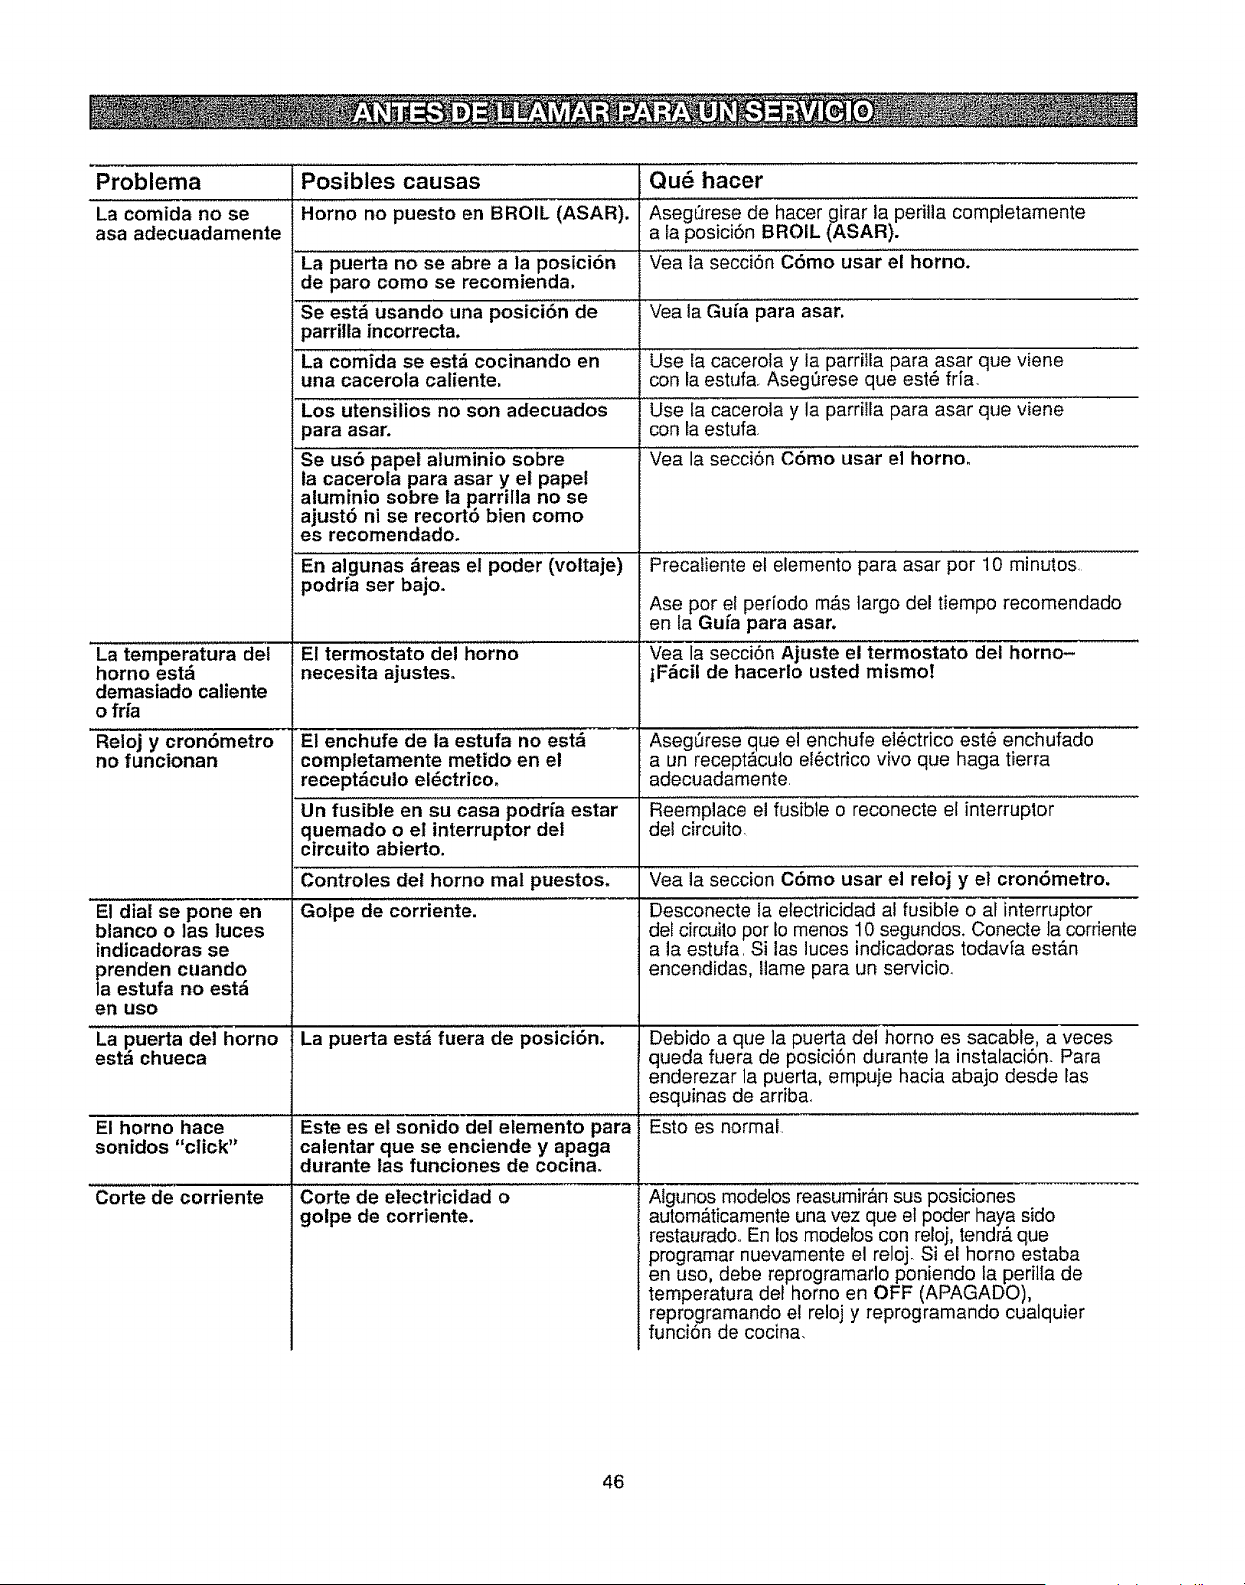
Problema Posibles causas Qu_ hacer
La comida no se Horno no puesto en BROIL (ASAR). Aseg_rese de hacer girar la perilla completamente
asa adecuadamente a Ia posiciSnBROIL (ASAR).
La puerta no se abre a la posici6n Vea la secci6n C6mo usar el horno.
de paro como se recomienda.
Se estd usando una posici6n de Vea la Gufa para asar.
parrilla incorrecta.
La comida se est_ cocinando en Use la cacerota y la parrilEa para asar que viene
una cacerola caliente, con la estufa. AsegQrese que est_ fda.
Los utensilios no son adecuados Use la cacerola y la parrilla para asar que viene
para asar. con la estufa
Se us6 papel atuminio sobre Vea la secci6n C6mo usar el homo.
la cacerola para asar y el papel
aluminio sobre la parrilla no se
ajust6 ni se recort6 bien como
es recomendado.
En algunas _ireas el poder (voltaje) Precatiente el elemento para asar por 10 minutos,
podr{a ser bajo.
Ase por el ped0do m&s largo del tiempo recomendado
en la Guia para asar.
La temperatura del E! termostato del horno Vea la secci6n Ajuste el termostato del horno-
homo est_ necesita ajusteso iF_cil de hacerio usted mismo!
demasiado catiente
o frfa
Reloj y cron6metro Et enchufe de la estufa no est& Aseg_rese que el enchufe eI6ctrico est6 enchufado
no funcionan completamente metido en el a un recept&culo el6ctrico vivo que haga tierra
recept_iculo el_ctrico, adecuadamente,
Un fusible en su casa podr_a estar Reemplace el fusible o reconecte el interruplor
quemado o el interruptor del del circuito.
ctrcuito abierto,
Controles del homo real puestos.
Golpe de corriente.El dial se pone en
blanco o las luces
indicadoras se
prenden cuando
la estufa no est_
en uso
La puerta del horno
est_ chueca
El horno hace
sonidos "click"
Corte de corriente
La puerta est_ fuera de posici6n.
Este es el sonido del elemento para
calentar que se enciende y apaga
durante las funciones de cocma.
Corte de electricidad o
golpe de corriente.
Vea la seccion C6mo usar el reloj y el cron6metro.
Desconecte la electricidad al fusible o al interruptor
det circuilo por Io menos 10 segundos. Conecte la corriente
a la estufa, Si las luces indicadoras todavfa est&n
encendidas, !lame para un servicio.,
Debido a que la puerta del homo es sacable, a veces
queda fuera de posici6n durante la instalaci6n. Para
enderezar la puerta, empuje hacia abajo desde las
esquinas de arriba.
Esto es normal
Algunos modelos reasumir&n sus posiciones
autom&ticamente una vez que el poder haya sido
restaurado,.En los modelos con reloj, tendr_, que
programar nuevamente el reloj. Si el homo estaba
en uso, debe reprogramarlo poniendo la perilia de
temperatura del homo en OFF (APAGADO),
reprogramando el reloj y reprogramando cualquier
funci6n de cocina.
46
®
QARANTIADELA ESTUFA
ELECTRICA
f
UN At_O COMPLETO DE GARANT[A PARA TODAS LAS PIEZAS
Si, dentro de un afio a partir de la fecha de instalaci6n, cualquier parte funciona indebidamente a causa de un
defecto en materiales o fabricaci6n, Sears ]a reparar& o la reemplazar_., a nuestra discreci6n, sin costo alguno
para el comprador.
Si este producto se utiliza para otros fines que no sean el uso familiar privado, las garanfias indicadas arriba
s61otendr&n vigencia durante 90 dias.
LA GARANT[A DE SERVICIO EST/_.DISPONIBLE AL CONTACTAR AL SERVICIO DE SEARS
AL 1-888-SU=HOGARSM.
Esta garant[a aplica unicamente mientras este producto se use en los Estados Unidos,
Esta garantfa le otorga derechos legales especificos y es posible que usted tenga tambi6n otros derechos que
varian de un estado a otto..
Sears Roebuck and Co. Dept..817WA Hoffman Estates, ]L 6()179
Contrato de proteccibn maestra
Felicitaciones por su compra inteligente_ Su nuevo
producto Kenmore e estb. disefiado y fabricado para
muchos afios de operaciSn confiab]e. Sin embargo, al
igual que todos los productos, puede requerir de
mantenimiento o reparaci6n preventivas en cualquier
momento,. Es ahf cuando el contrato de protecciSn
maestra le puede ahorrar dinero y molestias,
Adquiera un Contrato de proteccidn maestra ahora mismo
y prot_jase contra inconvenientes y gastos inesperados_
El Contrato de protecci6n maestra tambi_n le ayuda a
ampliar la vida de su nuevo producto. Lo siguiente es
Io que se inc]uye en el contrato:
V Servicio experto por parle de nuestros I2,000
especialistas profesionales de reparaci6n
is' Servicio ilimitado sin costo pot partes y mano de
obra en todas las reparaciones cubiertas
v' Garantfa total--reposiciSn de su producto cubierto
si ocurren cuatro o mb,s de cuatro fallas del producto
dentro de doce meses
v' Reposici6n del producto si el producto cubierto no se
puede reparar
v" Revisi6n anual de mantenirniento preventivo a su
solicitud - sin cargo adicional
v' Ayuda telef6nica r,_pida--asistencia telef6nica de
parte de un t_cnico de Sears sobre los productos que
requieren reparaci6n en casa, adem&s de una
conveniente programaci6n de reparaciones
v' Protecci6n contra descargas el_ctricas para dafios
debido a fluctuaciones el_ctricas
v" Reembolso pot alquiler si la reparaci6n del producto
cubierto toma m_s tiempo del prometido
Una vez adquiera el contrato, solo necesita una Ilamada
telefSnica para programar el servicio Puede Ilamar a
cuatquier hora del dra o de la noche o programar la cita
del servicio pot Internet,.
Sears cuenta con m,_s de 12,000 especialistas
profesionales de reparaci6n, quienes tienen acceso a m_.s
de 4,5 millones de partes y accesorios de calidad Este es
el tipo de profesionalismo en el que puede contar para
ayudar a prolongar la vida de su nueva compra para los
afios venideros, iAdquiera el Contrato de protecci6n
maestra hoy mismo!
Aplican ciertas limitaciones y exclusiones.
Para precios e informaci6n adicional, Itame
al 1-800-827-6655.
Servicio de instalaci6n de Sears
Para la instafaciSn profesional de Sears de
electrodom_sticos, dispositivos para abrir puertas de
garaje, calentadores de agua y otros aparatos importantes
para el hogar, en los EE.UU flame al 1-800-4-MY.HOME e,
47
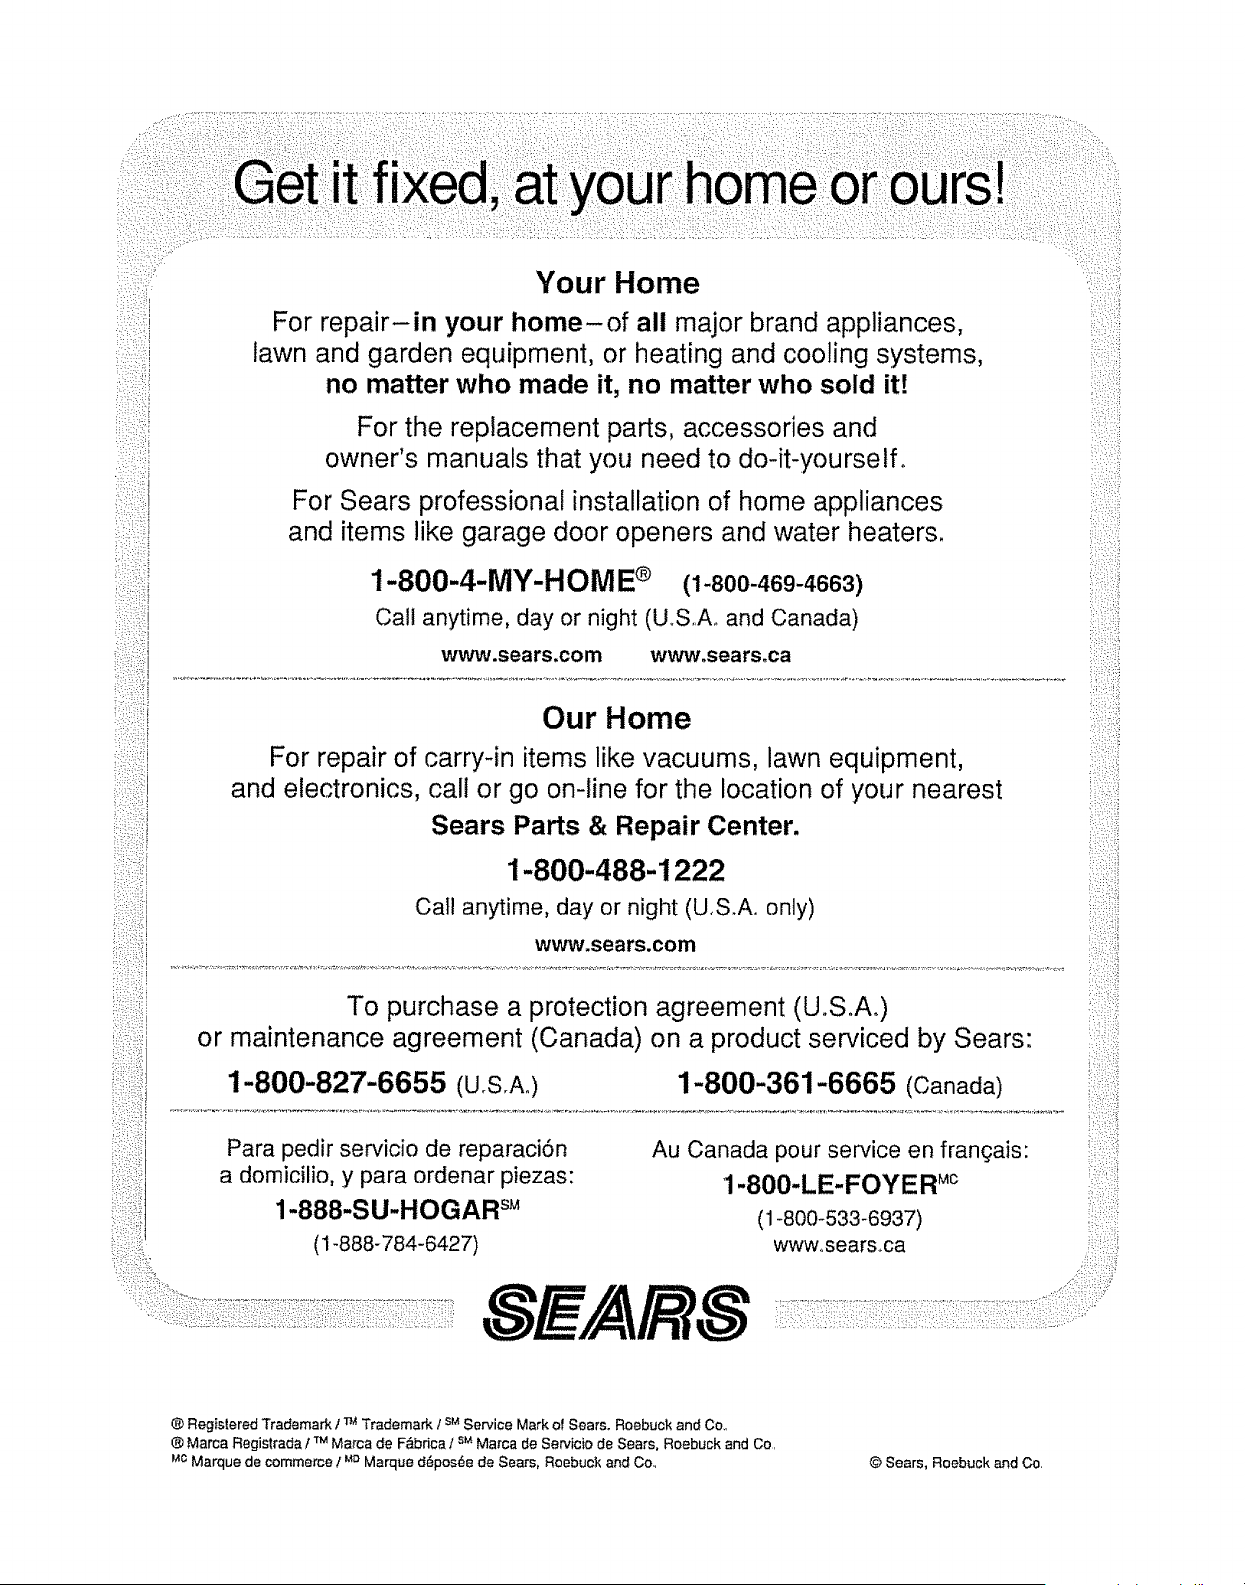
•!•!_•!i:•ili:;iii
:•i!/[:}_! i
z_i__ i
Your Home
For repair-in your home-of all major brand appliances,
lawn and garden equipment, or heating and cooling systems,
no matter who made it, no matter who sold it[
For the replacement parts, accessories and :_::,:::_
owner's manuals that you need to do-it-yourself.
For Sears professional installation of home appliances
and items like garage door openers and water heaters.
1-800-4-MY-HOM E® (1-800-469-4663)
Call anytime, day or night (U..S.A_ and Canada) _:,
iii_i¸iill
www.sears.com www.sears.ca
i!:i_:_•iiii!i;
I
Our Home
For repair of carry-in items like vacuums, lawn equipment,
and electronics, call or go on-line for the location of your nearest
Sears Parts & Repair Center.
1-800-488-1222 .....
Call anytime, day or night (U,&Ao only)
=
L: !:!i
To purchase a protection agreement (U.S.A°) ,::;::::=:__:::
I
ii_iil........ or mainte_nance agreement (Canada) on a product serviced by Sears:
: ; [:::::
1 800 827 6655 (U.S,A,) 1-800-361-6665 (Canada)
Para pedir servicio de reparacidn
a domicilio, y para ordenar piezas:
1-888-SU-HOGAR su
(1-888-784-6427)
Au Canada pour service en frangais: _,_::::_:::_;
1-800-LE-FOYER Mc _i'::::;_::::'_:i,
(1-800-533-6937) !:i:!:i:!i=i!!:;!::i!:!i
wwwosears, ca ,'!i:::i::::!!ii:i
,%:_!_:!ii
® Registered Trademark t TM Trademark I sMService Mark o! Sears, Roebuck and Co,,
TM
® Marca Registrada I Marca de F_bdca / s_ Marca de Servicio de Sears, Roebuck and Co,
_c Marque de commerce/ _a Marque ddposde de Sears, Roebuck and Co,, © Sears, Roebuck and Co,


