Loading ...
Loading ...
Loading ...
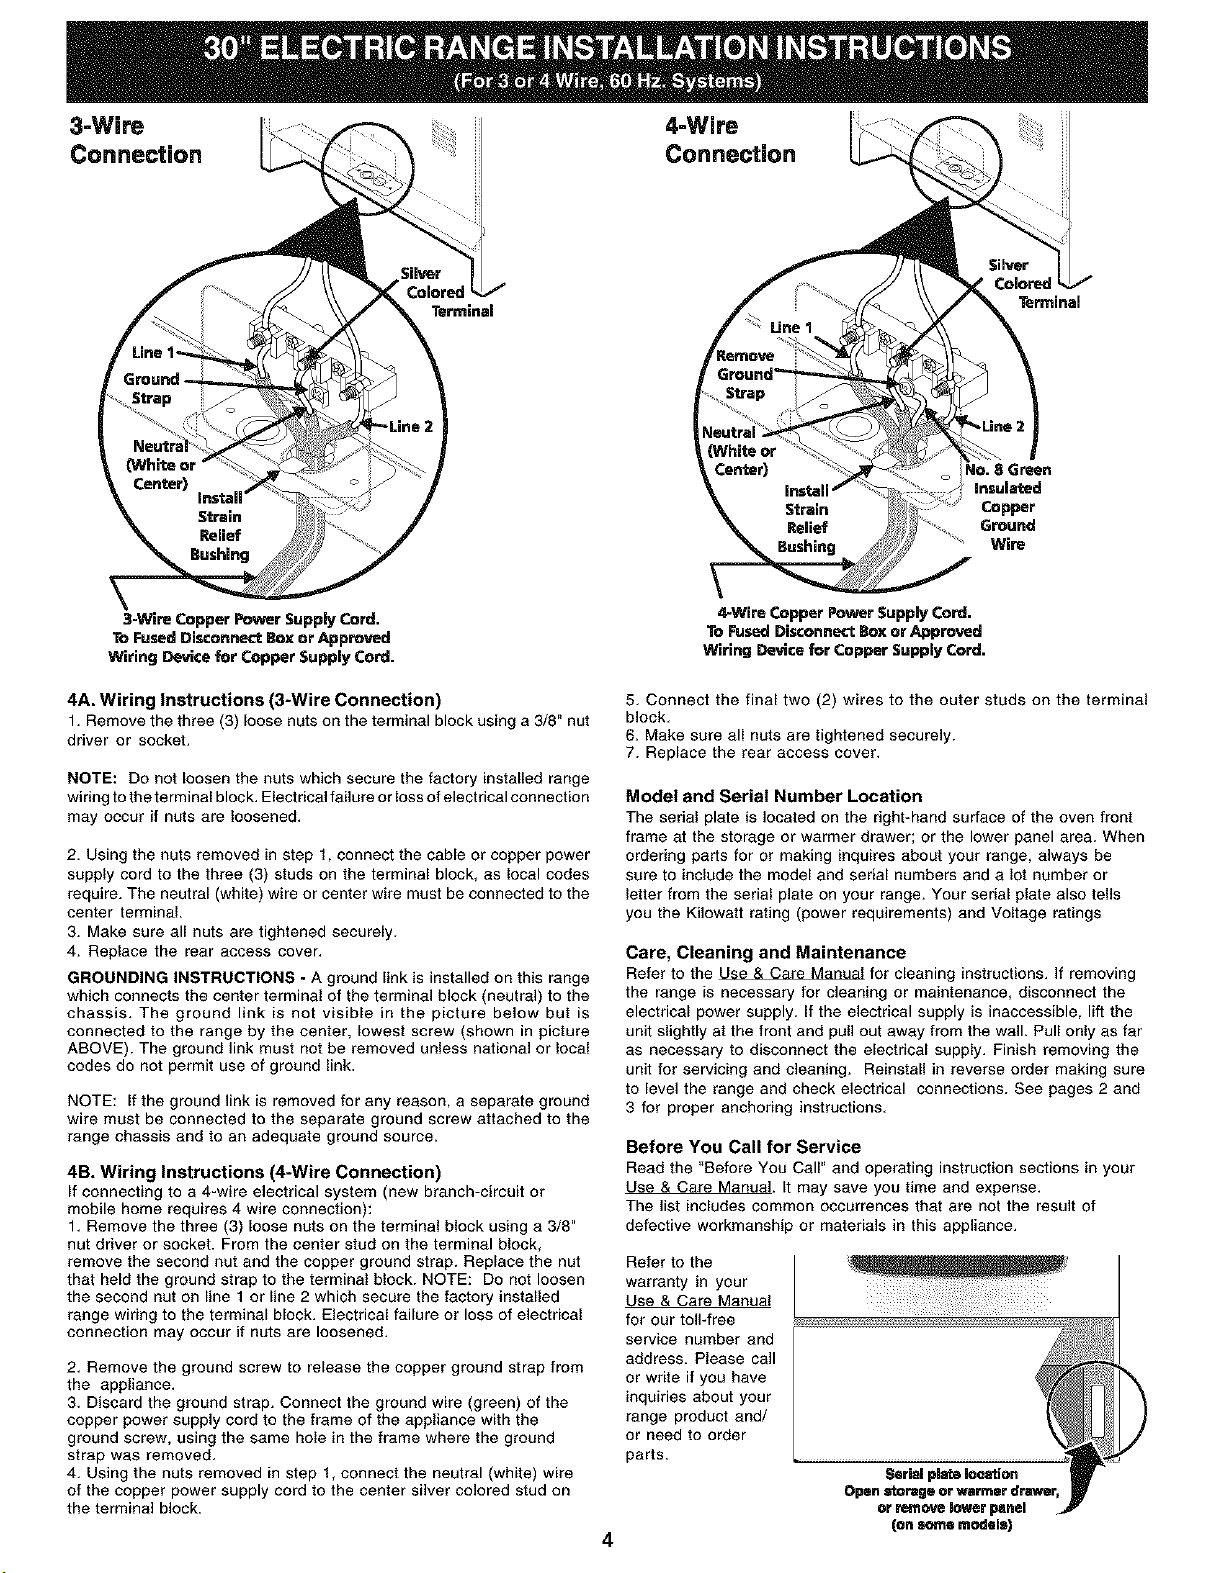
3-Wire 4-Wire
Connection Connection
Terrninel
Terminal
Insulated
Copper
Ground
"_ Wire
3-Wire Copper Power Supply Cord.
To Fused Disconnect Box or Approved
Wiring Device for Copper Supply Cord.
4A. Wiring Instructions (3-Wire Connection)
1. Remove the three (3) loose nuts on the terminal block using a 3/8" nut
driver or socket.
NOTE: Do not loosen the nuts which secure the factory installed range
wiring to the terminal block. Electrical failure or loss of electrical connection
may occur if nuts are loosened.
2. Using the nuts removed in step 1, connect the cable or copper power
supply cord to the three (3) studs on the terminal block, as local codes
require. The neutral (white) wire or center wire must be connected to the
center terminal.
3. Make sure all nuts are tightened securely.
4. Replace the rear access cover.
GROUNDING INSTRUCTIONS - A ground link is installed on this range
which connects the center terminal of the terminal block (neutral) to the
chassis. The ground link is not visible in the picture below but is
connected to the range by the center, lowest screw (shown in picture
ABOVE). The ground link must not be removed unless national or local
codes do not permit use of ground link.
NOTE: If the ground link is removed for any reason, a separate ground
wire must be connected to the separate ground screw attached to the
range chassis and to an adequate ground source.
4B. Wiring Instructions (4-Wire Connection)
if connecting to a 4-wire electrical system (new branch-circuit or
mobile home requires 4 wire connection):
1. Remove the three (3) loose nuts on the terminal block using a 3/8"
nut driver or socket. From the center stud on the terminal block,
remove the second nut and the copper ground strap. Replace the nut
that held the ground strop to the terminal block. NOTE: Do not loosen
the second nut on line 1 or line 2 which secure the factory installed
range wiring to the terminal block. Electrical failure or loss of electrical
connection may occur if nuts are loosened.
2. Remove the ground screw to release the copper ground strap from
the appliance.
3. Discard the ground strap. Connect the ground wire (green) of the
copper power supply cord to the frame of the appliance with the
ground screw, using the same hole in the frame where the ground
strap was removed.
4. Using the nuts removed in step 1, connect the neutral (white) wire
of the copper power supply cord to the center silver colored stud on
the terminal block.
a-Wire Copper Power Supply Cord.
To Fused Disconnect Box or Approved
Wiring Device for Copper Supply Cord.
4
5. Connect the final two (2) wires to the outer studs on the terminal
block.
6. Make sure all nuts are tightened securely.
7. Replace the rear access cover.
Model and Serial Number Location
The serial plate is located on the right-hand surface of the oven front
frame at the storage or warmer drawer; or the lower panel area. When
ordering parts for or making inquires about your range, always be
sure to include the model and serial numbers and a lot number or
letter from the serial plate on your range. Your serial plate also tells
you the Kilowatt rating (power requirements) and Voltage ratings
Care, Cleaning and Maintenance
Refer to the Use & Care Manual for cleaning instructions. If removing
the range is necessary for cleaning or maintenance, disconnect the
electrical power supply. If the electrical supply is inaccessible, lift the
unit slightly at the front and pull out away from the wall. Pull only as far
as necessary to disconnect the electrical supply. Finish removing the
unit for servicing and cleaning. Reinstall in reverse order making sure
to level the range and check electrical connections. See pages 2 and
3 for proper anchoring instructions.
Before You Call for Service
Read the "Before You Call" and operating instruction sections in your
Use & Care Manual. It may save you time and expense.
The list includes common occurrences that are not the result of
defective workmanship or materials in this appliance.
Refer to the
warranty in your
Use & Care Manual
for our toll-free
service number and
address. Please call
or write if you have
inquiries about your
range product and/
or need to order
parts.