
INSTRUCTION MANUAL
MANUAL DE INSTRUCCIONES
Cordless Hedge Trimmer
Cortasetos Inalámbrico
XHU06
XHU07
XHU08
IMPORTANT: Read Before Using.
IMPORTANTE: Lea antes de usar.

2 ENGLISH
ENGLISH (Original instructions)
SPECIFICATIONS
Model: XHU06 XHU07 XHU08
Blade length 500 mm (19-3/4") 600 mm (23-5/8") 750 mm (29-1/2")
Strokes per minute 0 - 2,000 / 0 - 3,600 / 0 - 4,400/min
Overall length 1,009 mm (39-3/4") 1,113 mm (43-3/4") 1,269 mm (50")
Rated voltage D.C. 18 V
Net weight 3.7 - 4.4 kg (8.2 - 9.7 lbs)
• Duetoourcontinuingprogramofresearchanddevelopment,thespecicationshereinaresubjecttochange
without notice.
• Specicationsmaydifferfromcountrytocountry.
• Theweightmaydifferdependingontheattachment(s),includingthebatterycartridge.Thelightestandheavi-
est combination, according to EPTA-Procedure 01/2014, are shown in the table.
Applicable battery cartridge and charger
Batterycartridge
BL1815N / BL1820B / BL1830 / BL1830B / BL1840B / BL1850B / BL1860B
Charger DC18RC / DC18RD / DC18RE / DC18SD / DC18SE / DC18SF
•
Someofthebatterycartridgesandchargerslistedabovemaynotbeavailabledependingonyourregionofresidence.
WARNING: Only use the battery cartridges and chargers listed above.Useofanyotherbatterycartridges
andchargersmaycauseinjuryand/orre.
SAFETY WARNINGS
General power tool safety warnings
WARNING:
Read all safety warnings, instruc-
tions, illustrations and specications provided with this
power tool. Failure to follow all instructions listed below
mayresultinelectricshock,reand/orseriousinjury.
Save all warnings and instruc-
tions for future reference.
Theterm"powertool"inthewarningsreferstoyour
mains-operated(corded)powertoolorbattery-operated
(cordless) power tool.
Work area safety
1. Keep work area clean and well lit. Cluttered or
dark areas invite accidents.
2. Do not operate power tools in explosive atmo-
spheres, such as in the presence of ammable
liquids, gases or dust. Power tools create sparks
whichmayignitethedustorfumes.
3. Keep children and bystanders away while
operating a power tool. Distractions can cause
youtolosecontrol.
Electrical Safety
1. Power tool plugs must match the outlet. Never
modify the plug in any way. Do not use any
adapter plugs with earthed (grounded) power
tools. Unmodiedplugsandmatchingoutletswill
reduce risk of electric shock.
2. Avoid body contact with earthed or grounded
surfaces, such as pipes, radiators, ranges and
refrigerators. There is an increased risk of elec-
tricshockifyourbodyisearthedorgrounded.
3. Do not expose power tools to rain or wet con-
ditions. Water entering a power tool will increase
the risk of electric shock.
4. Do not abuse the cord. Never use the cord for
carrying, pulling or unplugging the power tool.
Keep cord away from heat, oil, sharp edges
or moving parts. Damaged or entangled cords
increase the risk of electric shock.
5. When operating a power tool outdoors, use an
extension cord suitable for outdoor use. Use of
a cord suitable for outdoor use reduces the risk of
electric shock.
6. If operating a power tool in a damp location is
unavoidable, use a ground fault circuit inter-
rupter (GFCI) protected supply. Use of a GFCI
reduces the risk of electric shock.
7. Power tools can produce electromagnetic
elds (EMF) that are not harmful to the user.
However, users of pacemakers and other similar
medical devices should contact the maker of their
device and/or doctor for advice before operating
this power tool.
Personal Safety
1. Stay alert, watch what you are doing and use
common sense when operating a power tool.
Do not use a power tool while you are tired or
under the inuence of drugs, alcohol or med-
ication. A moment of inattention while operating
powertoolsmayresultinseriouspersonalinjury.

3 ENGLISH
2. Use personal protective equipment. Always
wear eye protection. Protective equipment such
asdustmask,non-skidsafetyshoes,hardhat,or
hearing protection used for appropriate conditions
willreducepersonalinjuries.
3. Prevent unintentional starting. Ensure the
switch is in the off-position before connecting
to power source and/or battery pack, picking
up or carrying the tool.Carryingpowertoolswith
yourngerontheswitchorenergisingpowertools
that have the switch on invites accidents.
4.
Remove any adjusting key or wrench before turning
the power tool on.Awrenchorakeyleftattachedtoa
rotatingpartofthepowertoolmayresultinpersonalinjury.
5. Do not overreach. Keep proper footing and
balance at all times. This enables better control
of the power tool in unexpected situations.
6. Dress properly. Do not wear loose clothing or
jewellery. Keep your hair, clothing and gloves
away from moving parts.Looseclothes,jewel-
leryorlonghaircanbecaughtinmovingparts.
7. If devices are provided for the connection of
dust extraction and collection facilities, ensure
these are connected and properly used. Use of
dust collection can reduce dust-related hazards.
8.
Do not let familiarity gained from frequent use
of tools allow you to become complacent and
ignore tool safety principles. A careless action can
causesevereinjurywithinafractionofasecond.
9.
Always wear protective goggles to protect your
eyes from injury when using power tools.The
goggles must comply with ANSI Z87.1 in the USA.
It is an employer's responsibility to enforce
the use of appropriate safety protective equip-
ments by the tool operators and by other per-
sons in the immediate working area.
Power tool use and care
1. Do not force the power tool. Use the correct
power tool for your application. The correct
powertoolwilldothejobbetterandsaferatthe
rate for which it was designed.
2. Do not use the power tool if the switch does
not turn it on and off.Anypowertoolthatcannot
be controlled with the switch is dangerous and
must be repaired.
3. Disconnect the plug from the power source
and/or remove the battery pack, if detachable,
from the power tool before making any adjust-
ments, changing accessories, or storing power
tools.Suchpreventivesafetymeasuresreduce
theriskofstartingthepowertoolaccidentally.
4. Store idle power tools out of the reach of chil-
dren and do not allow persons unfamiliar with
the power tool or these instructions to operate
the power tool. Power tools are dangerous in the
hands of untrained users.
5.
Maintain power tools and accessories. Check for
misalignment or binding of moving parts, break-
age of parts and any other condition that may
affect the power tool’s operation. If damaged, have
the power tool repaired before use.Manyaccidents
arecausedbypoorlymaintainedpowertools.
6. Keep cutting tools sharp and clean.Properly
maintained cutting tools with sharp cutting edges
arelesslikelytobindandareeasiertocontrol.
7. Use the power tool, accessories and tool bits
etc. in accordance with these instructions, tak-
ing into account the working conditions and
the work to be performed. Use of the power tool
for operations different from those intended could
result in a hazardous situation.
8. Keep handles and grasping surfaces dry,
clean and free from oil and grease.Slippery
handles and grasping surfaces do not allow for
safe handling and control of the tool in unexpected
situations.
9. When using the tool, do not wear cloth work
gloves which may be entangled. The entangle-
mentofclothworkglovesinthemovingpartsmay
resultinpersonalinjury.
Battery tool use and care
1. Recharge only with the charger specied by
the manufacturer. A charger that is suitable for
onetypeofbatterypackmaycreateariskofre
whenusedwithanotherbatterypack.
2. Use power tools only with specically desig-
nated battery packs.Useofanyotherbattery
packsmaycreateariskofinjuryandre.
3. When battery pack is not in use, keep it away
from other metal objects, like paper clips,
coins, keys, nails, screws or other small metal
objects, that can make a connection from one
terminal to another.Shortingthebatterytermi-
nalstogethermaycauseburnsorare.
4. Under abusive conditions, liquid may be
ejected from the battery; avoid contact. If con-
tact accidentally occurs, ush with water. If
liquid contacts eyes, additionally seek medical
help.Liquidejectedfromthebatterymaycause
irritation or burns.
5. Do not use a battery pack or tool that is dam-
aged or modied.Damagedormodiedbatteries
mayexhibitunpredictablebehaviourresultingin
re,explosionorriskofinjury.
6. Do not expose a battery pack or tool to re or
excessive temperature.Exposuretoreortem-
peratureabove130°Cmaycauseexplosion.
7. Follow all charging instructions and do not
charge the battery pack or tool outside the
temperature range specied in the instruc-
tions.Chargingimproperlyorattemperatures
outsidethespeciedrangemaydamagethe
batteryandincreasetheriskofre.
Service
1. Have your power tool serviced by a qualied
repair person using only identical replacement
parts.Thiswillensurethatthesafetyofthepower
tool is maintained.
2. Never service damaged battery packs. Service
ofbatterypacksshouldonlybeperformedbythe
manufacturer or authorized service providers.
3. Follow instruction for lubricating and chang-
ing accessories.
4. Do not modify or attempt to repair the appli-
ance or the battery pack except as indicated in
the instructions for use and care.

4 ENGLISH
Cordless Hedge Trimmer Safety
Warnings
1. Keep all parts of the body away from the cut-
ter blade. Do not remove cut material or hold
material to be cut when blades are moving.
Make sure the switch is off when clearing
jammed material. Blades coast after turn off. A
moment of inattention while operating the hedge
trimmermayresultinseriouspersonalinjury.
2. Carry the hedge trimmer by the handle with
the cutter blade stopped. Proper handling of the
hedgetrimmerwillreducepossiblepersonalinjury
from the cutter blades.
3.
Hold the power tool by insulated gripping sur-
faces only, because the cutter blade may contact
hidden wiring. Cutter blades contacting a "live" wire
maymakeexposedmetalpartsofthepowertool
"live" and could give the operator an electric shock.
4.
DANGER - Keep hands away from blade. Contact
withbladewillresultinseriouspersonalinjury.
5. Do not use the hedge trimmer in the rain or in
wet or very damp conditions. The electric motor
is not waterproof.
6.
First-time users should have an experienced hedge
trimmer user show them how to use the trimmer.
7. The hedge trimmer must not be used by
children or young persons under 18 years of
age.Youngpersonsover16yearsofagemaybe
exemptedfromthisrestrictioniftheyareundergo-
ing training under the supervision of an expert.
8. Use the hedge trimmer only if you are in good
physical condition.Ifyouaretired,yourattention
willbereduced.Beespeciallycarefulattheendof
aworkingday.Performallworkcalmlyandcare-
fully.Theuserisresponsibleforalldamagesto
third parties.
9. Never use the trimmer when under the inu-
ence of alcohol, drugs or medication.
10. Work gloves of stout leather are part of the
basic equipment of the hedge trimmer and
must always be worn when working with it.
Also wear sturdy shoes with anti-skid soles.
11. Before starting work check to make sure
that the trimmer is in good and safe working
order. Ensure guards are tted properly. The
hedge trimmer must not be used unless fully
assembled.
12. Make sure you have a secure footing before
starting operation.
13. Hold the tool rmly when using the tool.
14. Do not operate the tool at no-load
unnecessarily.
15. Immediately switch off the motor and remove
the battery cartridge if the cutter should come
into contact with a fence or other hard object.
Check the cutter for damage, and if damaged
repair immediately.
16. Before checking the cutter, taking care of
faults, or removing material caught in the cut-
ter, always switch off the trimmer and remove
the battery cartridge.
17. Switch off the trimmer and remove the battery
cartridge before doing any maintenance work.
18. When moving the hedge trimmer to another
location, including during work, always
remove the battery cartridge and put the blade
cover on the cutter blades. Never carry or
transport the trimmer with the cutter running.
Never grasp the cutter with your hands.
19. Clean the hedge trimmer and especially the
cutter after use, and before putting the trimmer
into storage for extended periods. Lightly oil
the cutter and put on the cover. The cover sup-
plied with the unit can be hung on the wall, pro-
vidingasafeandpracticalwaytostorethehedge
trimmer.
20. Store the hedge trimmer with the cover on, in
a dry room. Keep it out of reach of children.
Never store the trimmer outdoors.
21. Never point the shear blades to yourself or
others.
22. If the blades stop moving due to the stuck of
foreign objects between the blades during
operation, switch off the tool and remove the
battery cartridge, and then remove the foreign
objects using tools such as pliers. Removing
theforeignobjectsbyhandmaycauseaninjury
forthereasonthatthebladesmaymoveinreac-
tiontoremovingtheforeignobjects.
23. Avoid dangerous environment. Don't use the
tool in damp or wet locations or expose it to
rain. Water entering the tool will increase the
risk of electric shock.
24. Do not dispose of the battery(ies) in a re. The
cell may explode. Check with local codes for
possible special disposal instructions.
25. Do not open or mutilate the battery(ies).
Released electrolyte is corrosive and may
cause damage to the eyes or skin. It may be
toxic if swallowed.
26. Do not charge battery in rain, or in wet
locations.
27. Check the hedges and bushes for foreign
objects, such as wire fences or hidden wiring
before operating the tool.
SAVE THESE INSTRUCTIONS.
WARNING: DO NOT let comfort or familiarity
with product (gained from repeated use) replace
strict adherence to safety rules for the subject
product. MISUSE or failure to follow the safety
rules stated in this instruction manual may cause
serious personal injury.
WARNING: Use of this product can create
dust containing chemicals which may cause
respiratory or other illnesses. Some examples of
these chemicals are compounds found in pesti-
cides, insecticides, fertilizers and herbicides.
Your risk from these exposures varies, depend-
ing on how often you do this type of work. To
reduce your exposure to these chemicals: work
in a well ventilated area, and work with approved
safety equipment, such as those dust masks that
are specially designed to lter out microscopic
particles.

5 ENGLISH
Symbols
Thefollowingsshowthesymbolsusedfortool.
volts
direct current
no load speed
revolutions or reciprocation per minute
Important safety instructions for
battery cartridge
1.
Before using battery cartridge, read all instruc-
tions and cautionary markings on (1) battery
charger, (2) battery, and (3) product using battery.
2. Do not disassemble battery cartridge.
3.
If operating time has become excessively shorter,
stop operating immediately. It may result in a risk of
overheating, possible burns and even an explosion.
4.
If electrolyte gets into your eyes, rinse them out
with clear water and seek medical attention right
away. It may result in loss of your eyesight.
5. Do not short the battery cartridge:
(1) Do not touch the terminals with any con-
ductive material.
(2)
Avoid storing battery cartridge in a container
with other metal objects such as nails, coins, etc.
(3) Do not expose battery cartridge to water
or rain.
A battery short can cause a large current
ow, overheating, possible burns and even a
breakdown.
6. Do not store the tool and battery cartridge in
locations where the temperature may reach or
exceed 50 °C (122 °F).
7. Do not incinerate the battery cartridge even if
it is severely damaged or is completely worn
out. The battery cartridge can explode in a re.
8. Be careful not to drop or strike battery.
9. Do not use a damaged battery.
10.
The contained lithium-ion batteries are subject to
the Dangerous Goods Legislation requirements.
Forcommercialtransportse.g.bythirdparties,
forwarding agents, special requirement on pack-
aging and labeling must be observed.
For preparation of the item being shipped, consulting an
expert for hazardous material is required. Please also
observepossiblymoredetailednationalregulations.
Tapeormaskoffopencontactsandpackupthebatteryin
such a manner that it cannot move around in the packaging.
11. Follow your local regulations relating to dis-
posal of battery.
12. Use the batteries only with the products
specied by Makita. Installing the batteries to
non-compliantproductsmayresultinare,exces-
siveheat,explosion,orleakofelectrolyte.
SAVE THESE INSTRUCTIONS.
CAUTION:
Only use genuine Makita batteries.
Use of non-genuine Makita batteries, or batteries that
havebeenaltered,mayresultinthebatterybursting
causingres,personalinjuryanddamage.Itwillalso
voidtheMakitawarrantyfortheMakitatoolandcharger.
Tips for maintaining maximum
battery life
1.
Charge the battery cartridge before completely dis-
charged. Always stop tool operation and charge the
battery cartridge when you notice less tool power.
2.
Never recharge a fully charged battery cartridge.
Overcharging shortens the battery service life.
3.
Charge the battery cartridge with room tempera-
ture at 10 °C - 40 °C (50 °F - 104 °F). Let a hot
battery cartridge cool down before charging it.
4. Charge the battery cartridge if you do not use
it for a long period (more than six months).
FUNCTIONAL DESCRIPTION
CAUTION: Always be sure that the tool is
switched off and the battery cartridge is removed
before adjusting or checking function on the tool.
Installing or removing battery cartridge
CAUTION: Always switch off the tool before
installing or removing of the battery cartridge.
CAUTION: Hold the tool and the battery car-
tridge rmly when installing or removing battery
cartridge.Failuretoholdthetoolandthebattery
cartridgermlymaycausethemtoslipoffyourhands
andresultindamagetothetoolandbatterycartridge
andapersonalinjury.
1
2
3
►1. Red indicator 2. Button 3.Batterycartridge
Toremovethebatterycartridge,slideitfromthetool
while sliding the button on the front of the cartridge.
Toinstallthebatterycartridge,alignthetongueonthe
batterycartridgewiththegrooveinthehousingandslip
itintoplace.Insertitallthewayuntilitlocksinplace
withalittleclick.Ifyoucanseetheredindicatoronthe
uppersideofthebutton,itisnotlockedcompletely.

6 ENGLISH
CAUTION: Always install the battery cartridge
fully until the red indicator cannot be seen. If not,
itmayaccidentallyfalloutofthetool,causinginjuryto
youorsomeonearoundyou.
CAUTION: Do not install the battery cartridge
forcibly.Ifthecartridgedoesnotslideineasily,itis
notbeinginsertedcorrectly.
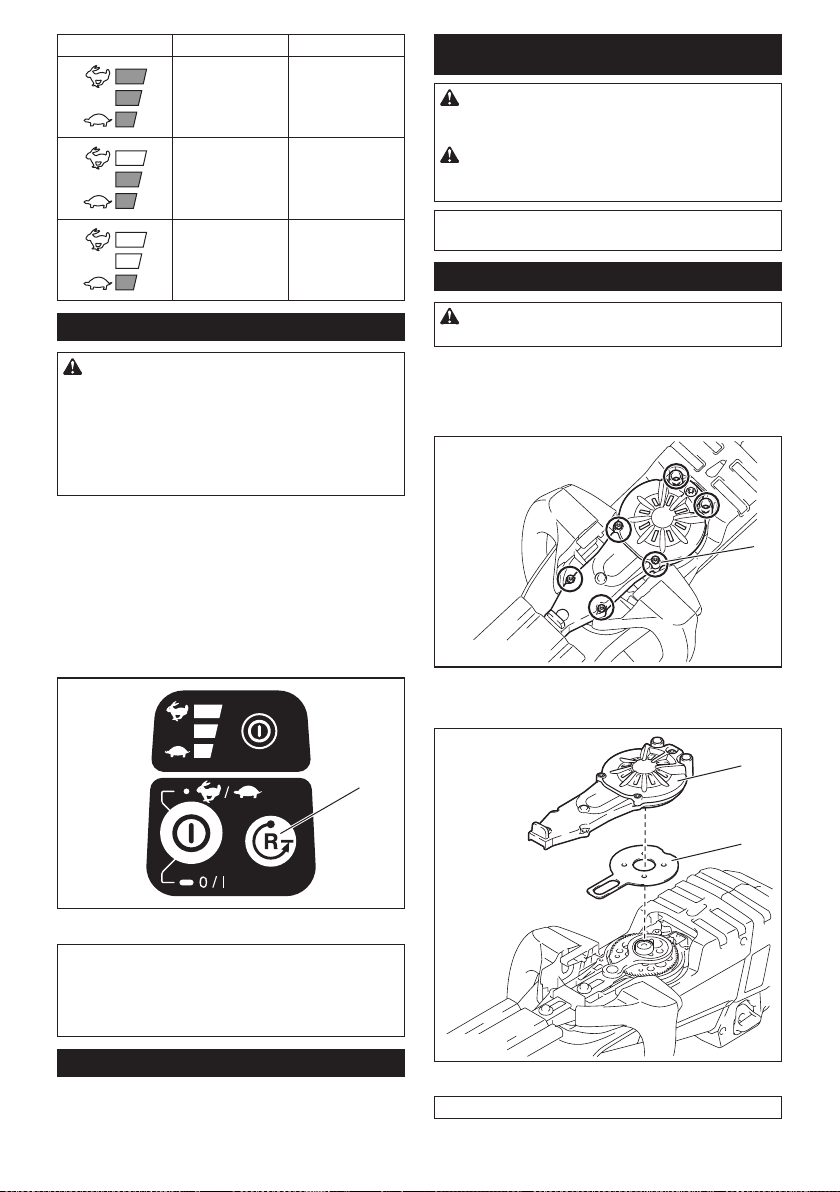
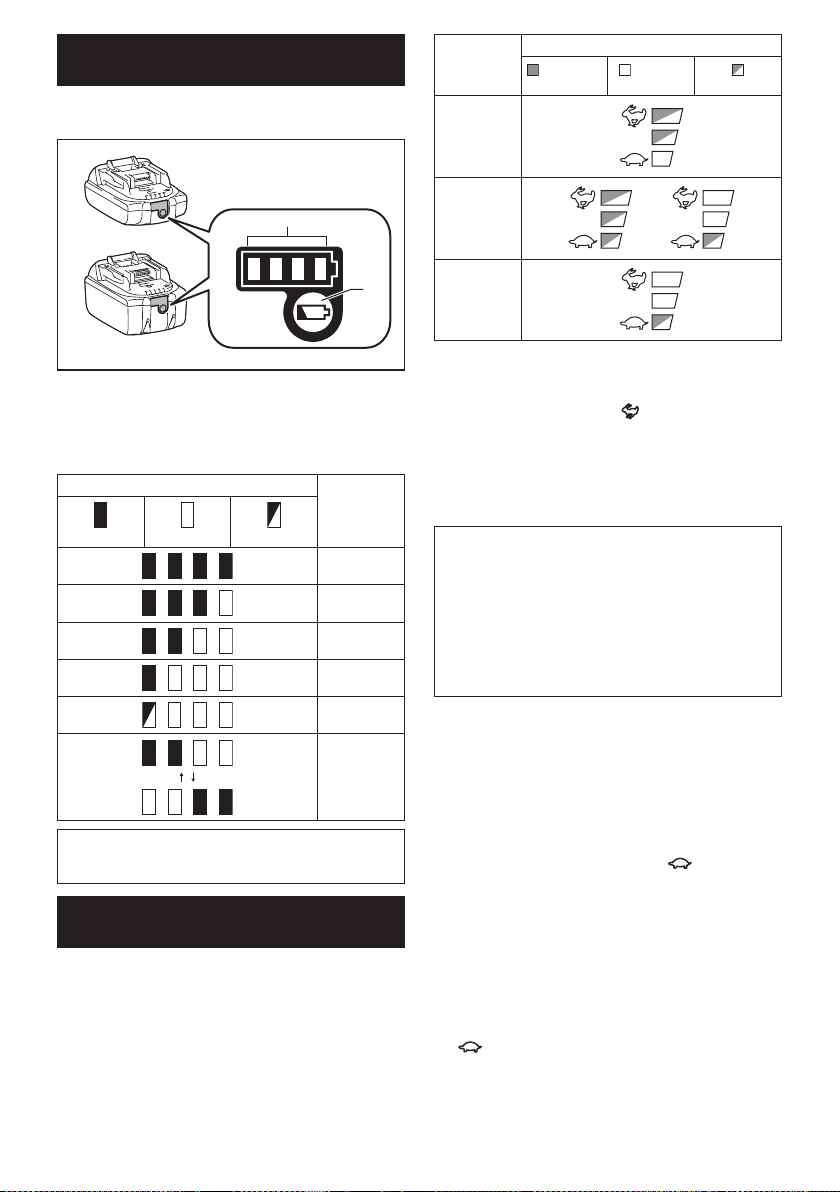
Indicating the remaining battery
capacity
Only for battery cartridges with the indicator
1
2
►1. Indicator lamps 2. Check button
Pressthecheckbuttononthebatterycartridgetoindi-
catetheremainingbatterycapacity.Theindicatorlamps
light up for a few seconds.
Indicator lamps Remaining
capacity
Lighted Off Blinking
75% to 100%
50% to 75%
25% to 50%
0% to 25%
Charge the
battery.
Thebattery
mayhave
malfunctioned.
NOTE: Depending on the conditions of use and the
ambienttemperature,theindicationmaydifferslightly
fromtheactualcapacity.
Tool / battery protection system
Thetoolisequippedwithatool/batteryprotectionsys-
tem.Thissystemautomaticallycutsoffpowertothe
motortoextendtoolandbatterylife.Thetoolwillauto-
maticallystopduringoperationifthetoolorbatteryis
placed under one of the following conditions:
Status Indicator lamps
On Off Blinking
Overload
Overheat
Over
discharge
Overload protection
Ifthetoolisoverloadedbyentangledbranchesorother
debris,
and the middle indicators start blinking and
thetoolautomaticallystops.
In this situation, turn the tool off and stop the application
that caused the tool to become overloaded. Then turn
the tool on to restart.
NOTICE: Depending on the usage conditions,
the tool is automatically turned off without any
indication if the tool is overloaded by entangled
branches or debris. In this case, switch off the
tool and remove the battery cartridge, and then
remove entangled branches or debris using tools
such as pliers. After removing the branches or
debris, install the battery cartridge and turn on
the tool again.
Overheat protection for tool or
battery
Therearetwotypesofoverheating;tooloverheating
andbatteryoverheating.Whenthetooloverheating
occurs,allspeedindicatorsblink.Whenthebatteryover
heating occurs,
indicator blinks.
Iftheoverheatingoccurs,thetoolstopsautomatically.
Letthetooland/orbatterycooldownbeforeturningthe
tool on again.
Overdischarge protection
Whenthebatterycapacitybecomeslow,thetoolstops
automaticallyand
indicator blinks.
If the tool does not operate even when the switches are
operated,removethebatteryfromthetoolandcharge
thebattery.

7 ENGLISH
Angle setting of the handle
CAUTION: Always make sure that the handle
is locked in the desired position before operation.
CAUTION: Do not pull down the lever to
unlock the handle while pulling the switch trigger.
Do not pull the switch trigger while pulling down
the lever and turning the handle. Failure to do so
maycauseamalfunctionofthetool.
You can set the angle of the handle to 0°, 45°, or 90° to the
left or right. To change the angle of the handle, turn the han-
dle while pulling down the lever, and then release the lever.
1
►1. Lever
Power switch action
WARNING: For your safety, this tool is
equipped with lock-off lever which prevents the
tool from unintended starting. NEVER use the tool
if it runs when you simply press the switch lever
and pull the switch trigger without pressing the
lock-off lever. Return the tool to our authorized
service center for proper repairs BEFORE further
usage.
WARNING: NEVER tape down or defeat pur-
pose and function of lock-off lever.
WARNING: Before installing the battery car-
tridge on the tool, always check to see that the
switch trigger and switch lever actuate properly
and return to the "OFF" position when released.
Operating a tool with a switch that does not actuate
properlycanleadtolossofcontrolandseriousper-
sonalinjury.
CAUTION: Never put your nger on the
switch when carrying.Thetoolmaystartuninten-
tionallyandcauseinjury.
NOTICE: Do not pull the switch trigger hard with-
out pressing the lock-off lever. This can cause
switch breakage.
Press and hold the main power button to turn on the tool.
The power lamp lights up when the tool is turned on. To
turn off the tool, press and hold the main power button
again. The power lamp goes off when the tool is turned off.
2
1
►1. Power lamp 2. Main power button
NOTE:Thetoolisautomaticallyturnedoffifthetoolis
not operated for a certain period.
Topreventtheswitchtriggerfrombeingaccidentallypulled,
a lock-off lever is provided. To start the tool, depress the
lock-off lever, and then press the switch lever and pull the
switchtrigger.Thetoolspeedincreasesbyincreasingpres-
sure on the switch trigger. Release the switch trigger to stop.
12
3
►1. Switch lever 2. Lock-off lever 3. Switch trigger
Speed adjusting
Youcanadjustthetoolspeedbytappingthemainpowerbutton.
Eachtimeyoutapthemainpowerbutton,thelevelof
speed will change.
2
1
►1. Power lamp 2. Main power button
8 ENGLISH
Indicator Mode Stroke speed
High 4,400/min
Medium 3,600/min
Low 2,000/min
Reverse button for debris removal
WARNING:
If the entangled branches or debris can-
not be removed by the reverse function, switch off the tool
and remove the battery cartridge, and then remove the entan-
gled branches or debris using tools such as pliers. Failure to
switchoffthetoolandremovethebatterycartridgemayresultin
seriouspersonalinjuryfromaccidentalstart-up.Removingthe
entangledbranchesordebrisbyhandmaycauseaninjury,since
theshearbladesmaymoveinreactiontoremovingthem.
This tool has a reverse button to change the direction
ofshearbladesmovement.Itisonlyforremoving
branches and debris entangled in the tool.
To reverse the shear blades movement, tap the reverse button when
the shear blades have stopped, then press the switch lever and pull
the switch trigger while pressing the lock-off lever. The power lamp
starts blinking, and the shear blades move in reverse direction.
When entangled branches and debris are removed,
the tool returns to the regular movement and the power
lamp stops blinking and lights up.
1
►1. Reverse button
NOTE:
If the entangled branches or debris cannot be removed,
releaseandpulltheswitchtriggeruntiltheyareremoved.
NOTE:Ifyoutapthereversebuttonwhiletheshear
blades are still moving, the tool comes to stop and to
bereadyforreversemovement.
Electric brake
This tool is equipped with an electric brake. If the tool
consistentlyfailstoquicklystopaftertheswitchtriggeris
released, have the tool serviced at a Makita service center.
ASSEMBLY
CAUTION: Always be sure that the tool is
switched off and the battery cartridge is removed
before carrying out any work on the tool.
CAUTION: When replacing the shear blades,
always wear gloves so that your hands do not
directly contact the blades.
NOTICE: When replacing the shear blades, do
not wipe off grease from the gear and crank.
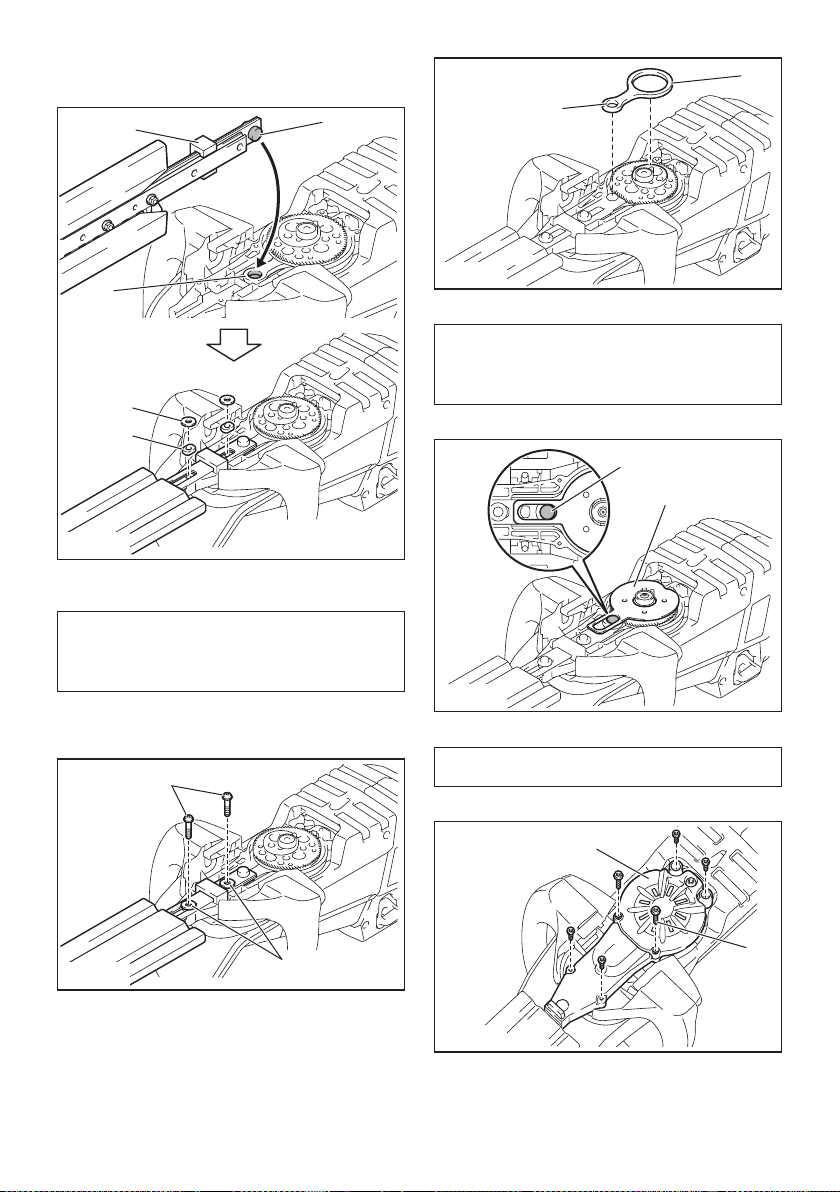
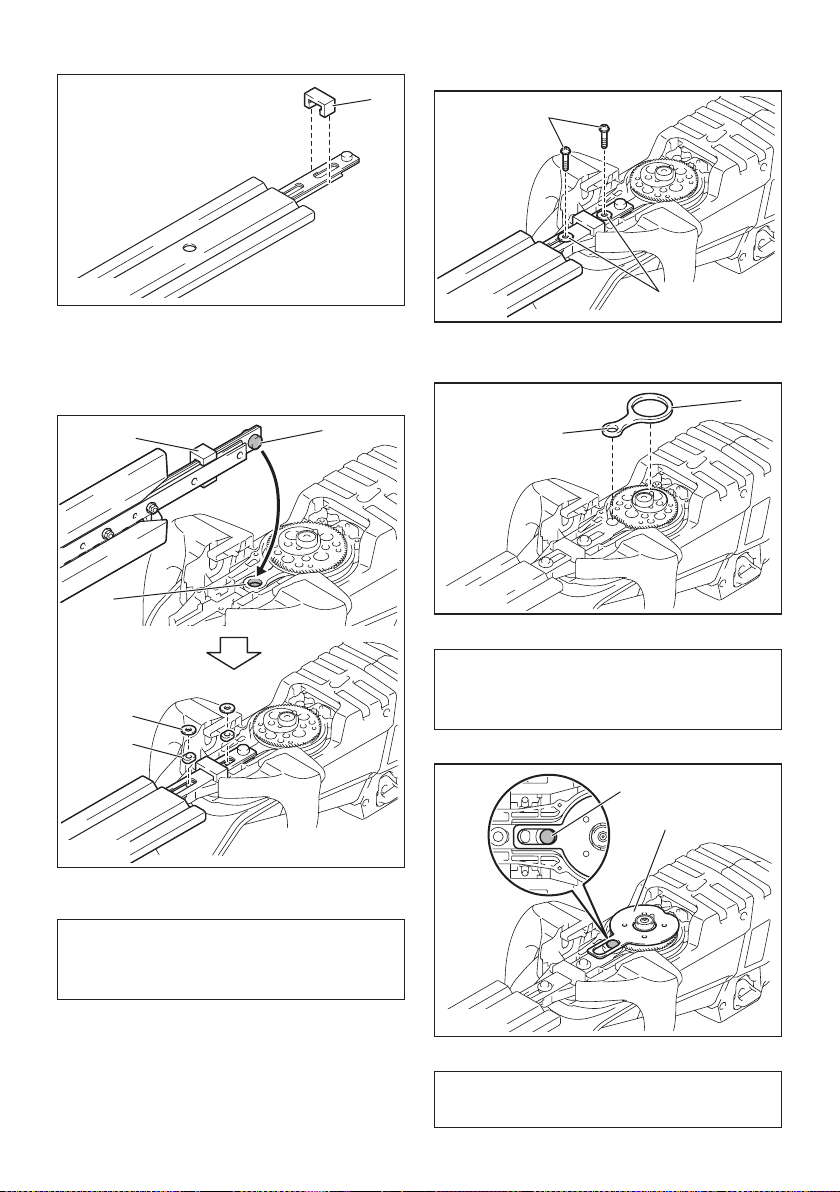
Installing or removing the shear blades
CAUTION: Attach the blade cover before
removing or installing the shear blades.
You can install 500 mm (19-3/4"), 600 mm (23-5/8"), or
750mm(29-1/2")shearbladestoyourtool.
1. Place the tool upside down, and then remove 6
screws.
1
►1. Screw
2. Remove the cover and the plate.
1
2
►1. Cover 2. Plate
NOTE:Theplatemayremainonthecover.

9 ENGLISH
3. Remove the rod.
1
►1. Rod
NOTE:Therodmayremainonthecover.
4. Remove 2 screws, the felt pad, the washers, and
the sleeves, and then remove the shear blades.
1
5
2
3
4
►1. Felt pad 2. Screw 3. Washer 4. Sleeve 5. Shear
blades
5. Remove the blade cover, and then attach it to the
new shear blades.
6. Adjustthecranksothat2holesarelinedupon
the alignment line.
1
2
►1. Hole 2. Alignment line
7. Aligntheprotrusionsontheshearbladesvertically
at the same position.
1
1
►1. Protrusion
8. Attach the felt pad to the shear blades.
1
►1. Felt pad
10 ENGLISH
9. Insert the protrusion on the shear blades to the
hole on the rod, then align the position of the felt pad
with the holes on the tool, and then attach new sleeves
and washers.
1
2
3
4
5
►1. Protrusion 2. Hole 3. Felt pad 4. Washer
5. Sleeve
NOTICE: Apply a small amount of grease to the
inner periphery of the hole of the rod.
NOTICE: Be careful not to lose the washers and
the sleeves.
10. Align the holes on the shear blades with the holes
onthetool,andthentighten2screwstoxtheshear
blades.
1
2
►1. Screw 2. Hole
11. Attach the rod.
1
2
►1. Rod 2. Small hole
NOTICE: Apply a small amount of grease to the
inner periphery of the small hole of the rod.
NOTICE: Make sure that the protrusion on the
shear blades ts in the small hole on the rod.
12. Attach the plate.
1
2
►1. Protrusion 2. Plate
NOTICE: Make sure that the protrusion on the
shear blades ts in the hole on the plate.
13. Attach the cover, and then tighten 6 screws.
2
1
►1. Cover 2. Screw

11 ENGLISH
NOTICE: Be sure to attach 2 long screws to the
center holes.
NOTICE: If the shear blades do not move
smoothly, the shear blades are not engaged with
the rods properly. Install the shear blades again.
NOTICE: If the parts other than the shear
blades such as the rods are worn out, ask Makita
Authorized Service Centers for parts replacement
or repairs.
Installing or removing the chip receiver
Optional accessory
CAUTION: When installing or removing the
chip receiver, always wear gloves so that your
hands do not directly contact the shear blades.
NOTICE: The blade cover cannot be installed if
the chip receiver is installed on the tool. Before
carrying or storing the tool, uninstall the chip
receiver, and then install the blade cover to avoid
blade exposure.
NOTICE: Be sure to remove the blade cover
before installing the chip receiver.
The chip receiver gathers discarded leaves and makes
clean-up afterward much easier. It can be installed on
either side of the tool.
To install the chip receiver, align the tip of the shear
blades with the tip of the chip receiver, and then press
the chip receiver against the shear blades so that the
hookstintothegroovesontheshearblades.
1
1
►1. Hook
1
►1. Hook
NOTICE: Make sure that the chip receiver does
not overlap the branch catcher.
1
►1. Branch catcher
To remove the chip receiver, press the levers on both
sides to release the hooks.
1
►1. Lever
NOTICE: Never try to remove the chip receiver
by an excessive force with its hooks locked in the
grooves of the shear blades.
OPERATION
WARNING: Keep hands away from shear
blades.

12 ENGLISH
CAUTION: Avoid operating the tool in very
hot weather as much as practicable. When operat-
ing the tool, be careful of your physical condition.
CAUTION: Be careful not to accidentally
contact a metal fence or other hard objects while
trimming.Theshearbladesmaybreakandcause
aninjury.
CAUTION: Be careful not to allow the shear
blades to contact the ground.Thetoolmayrecoil
andcauseaninjury.
CAUTION: Overreaching with a hedge trim-
mer, particularly from a ladder, is extremely
dangerous.Donotworkwhilestandingonanything
wobblyorinrm.
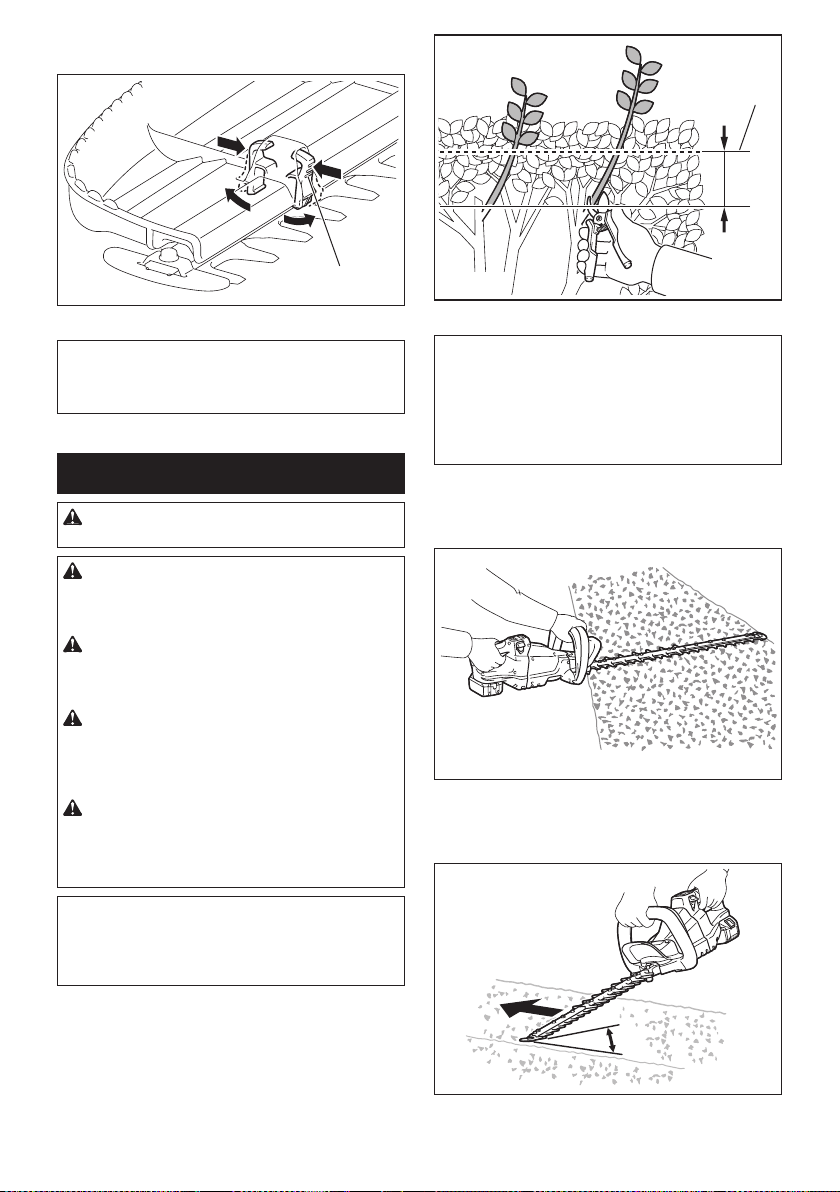
NOTICE: Do not attempt to cut branches thicker
than 10 mm (3/8") in diameter with the tool. Cut
branches to 10 cm (4") lower than the cutting height
using branch cutters before using the tool.
(1)
(2)
►(1) Cutting height (2) 10 cm (4")
NOTICE: Do not cut down dead trees or similar
hard objects.Doingsomaydamagethetool.
NOTICE: Do not trim the grass or weeds while
using the shear blades.Theshearbladesmay
become tangled in the grass or weeds.
Hold the tool with both hands, press the switch lever
and pull the switch trigger while pressing the lock-off
lever, and then move it forward.
For basic operation, tilt the shear blades toward the
trimmingdirectionandmoveitcalmlyandslowlyatthe
speed rate of 3 to 4 seconds per meter.
Tocutahedgetopevenly,tieastringatthedesired
height and trim along it.
If the chip receiver is attached to the shear blades, it
gathers discarded leaves and makes clean-up after-
ward much easier.

13 ENGLISH
Tocutahedgesideevenly,cutfromthebottomtotop.
When trimming to make a round shape (trimming box-
wood or rhododendron, etc.), trim from the root to the
topforabeautifulnish.
MAINTENANCE
CAUTION: Always be sure that the tool is
switched off and the battery cartridge is removed
before attempting to perform inspection or
maintenance.
To maintain product SAFETY and RELIABILITY,
repairs,anyothermaintenanceoradjustmentshould
beperformedbyMakitaAuthorizedorFactoryService
Centers,alwaysusingMakitareplacementparts.
Cleaning the tool
Cleanthetoolbywipingoffdustwithadryclothorone
dippedinsoapywaterandwrungout.
NOTICE: Never use gasoline, benzine, thinner,
alcohol or the like. Discoloration, deformation or
cracks may result.
Shear blade maintenance
Before the operation or once per hour during operation,
applylow-viscosityoil(machineoil,orspray-typelubri-
cating oil) to the shear blades.
After operation, remove dust from both sides of the
shear blades with a wired brush, wipe it off with a cloth
andthenapplylow-viscosityoil(machineoil,orspray-
typelubricatingoil)totheshearblades.
NOTICE: Do not wash the shear blades in water.
Doingsomaycauserustordamagetothetool.
NOTICE: Dirt and corrosion cause excessive
blade friction and shorten the operating time per
battery charge.

14 ENGLISH
Storage
The hook hole in the tool bottom is convenient for hang-
ing the tool from a nail or screw on the wall.
Attach the blade cover to the shear blades so that the blades
are not exposed. Store the tool out of the reach of children.
Store the tool in a place not exposed to moisture or rain.
1
►1. Hole
Grinding the shear blades
NOTICE:
If the shear blades have considerably deformed
by grinding, replace the shear blades with new ones.
1. Installthebatterycartridgetothetool.
2. Turn on and start the tool so that the upper blade
andlowerbladearepositionedalternately.
3.
Turnoffthetoolandremovethebatterycartridgefromthetool.
4.
Remove the screw, and then remove the branch catcher.
1
2
►1. Screw 2. Branch catcher
5. Settheangleofaleto45°,andgrindtheupper
bladefrom3directionswiththele.
1
2
►(1) File (2) 45°
CAUTION: Before grinding the shear blades,
make sure that the tool is switched off and the
battery cartridge is removed from the tool.
6. Place the tool upside down, and then remove the
burrsfromtheshearbladeswiththele.
1
►1. File
7. Settheangleoftheleto45°,andgrindthelower
bladefrom3directionswiththele.
8. Return the tool to normal position, and then
removetheburrsfromtheshearbladeswiththele.
9. Attachthebranchcatcherbytighteningthescrew.

15 ENGLISH
Grease lubrication
Interval of lubrication:Every100operatinghours
1.
Remove 3 screws, and then remove the bottom cover.
1
2
►1. Screw 2. Bottom cover
2. Remove the cap from the grease vessel, and then
attachthegreasevesseltotheholeonthecoverby
turning the grease vessel.
2
1
►1. Cover 2. Grease vessel
3. Applythegreasetothetool(Approximately5g
(0.2 oz) as a guide).
4. Remove the grease vessel.
5.
Attach the bottom cover, and then tighten 3 screws.
OPTIONAL ACCESSORIES
CAUTION: These accessories or attachments
are recommended for use with your Makita tool
specied in this manual.Theuseofanyother
accessories or attachments might present a risk of
injurytopersons.Onlyuseaccessoryorattachment
for its stated purpose.
Ifyouneedanyassistanceformoredetailsregard-
ingtheseaccessories,askyourlocalMakitaService
Center.
• Shearbladeassembly
• Shear blade cover
• Chip receiver
• Grease vessel
• Makitagenuinebatteryandcharger
NOTE:Someitemsinthelistmaybeincludedinthe
toolpackageasstandardaccessories.Theymay
differfromcountrytocountry.
MAKITA LIMITED WARRANTY
Pleaserefertotheannexedwarrantysheetforthe
mostcurrentwarrantytermsapplicabletothisproduct.
Ifannexedwarrantysheetisnotavailable,refertothe
warrantydetailssetforthatbelowwebsiteforyour
respectivecountry.
United States of America: www.makitatools.com
Canada: www.makita.ca
Other countries: www.makita.com
16 ESPAÑOL
ESPAÑOL (Instrucciones originales)
ESPECIFICACIONES
Modelo: XHU06 XHU07 XHU08
Longitud de la cuchilla 500mm(19-3/4″) 600mm(23-5/8″) 750mm(29-1/2″)
Carreras por minuto 0 cpm - 2 000 cpm / 0 cpm - 3 600 cpm / 0 cpm - 4 400 cpm
Longitud total 1009mm(39-3/4″) 1113mm(43-3/4″) 1269mm(50″)
Tensión nominal 18 V c.c.
Peso neto 3,7 kg - 4,4 kg (8,2 lbs - 9,7 lbs)
• Debidoanuestrocontinuoprogramadeinvestigaciónydesarrollo,lasespecicacionesaquíincluidasestán
sujetasacambiosinprevioaviso.
• Lasespecicacionespuedenvariardepaísapaís.
• Elpesopuedevariarenfuncióndelosaccesorios,incluidoelcartuchodebatería.Enlatablasemuestrala
combinacióndepesomásligeroymáspesadoconformealprocedimiento01/2014deEPTA.
Cartucho de batería y cargador aplicables
Cartuchodebatería
BL1815N / BL1820B / BL1830 / BL1830B / BL1840B / BL1850B / BL1860B
Cargador DC18RC / DC18RD / DC18RE / DC18SD / DC18SE / DC18SF
• Algunosdeloscartuchosdebateríaycargadoresenumeradosarribapodríannoestardisponiblesdepen-
diendodesuáreaderesidencia.
ADVERTENCIA: Use únicamente los cartuchos de batería y los cargadores indicados arriba. El uso de
cualquierotrocartuchodebateríaycargadorpodríaocasionarunalesióny/ounincendio.
ADVERTENCIAS DE
SEGURIDAD
Advertencias generales de seguridad
para herramientas eléctricas
ADVERTENCIA: Lea todas las advertencias
de seguridad, instrucciones, ilustraciones y espe-
cicaciones suministradas con esta herramienta
eléctrica. El no seguir todas las instrucciones indi-
cadasacontinuaciónpodríaocasionarunadescarga
eléctrica,incendioy/olesionesgraves.
Conserve todas las advertencias e ins-
trucciones como referencia en el futuro.
En las advertencias, el término “herramienta eléctrica” se
reereasuherramientaeléctricadefuncionamientocon
conexión a la red eléctrica (con cableado eléctrico) o herra-
mientaeléctricadefuncionamientoabatería(inalámbrica).
Seguridad en el área de trabajo
1. Mantenga el área de trabajo limpia y bien ilu-
minada.Lasáreasoscurasodesordenadasson
propensas a accidentes.
2. No utilice las herramientas eléctricas en
atmósferas explosivas, tal como en la presen-
cia de líquidos, gases o polvo inamables. Las
herramientas eléctricas crean chispas que pueden
prender fuego al polvo o los humos.
3. Mantenga a los niños y curiosos alejados
mientras utiliza una herramienta eléctrica. Las
distracciones le pueden hacer perder el control.
Seguridad eléctrica
1.
Las clavijas de conexión de las herramientas
eléctricas deberán encajar perfectamente en la
toma de corriente. No modique nunca la clavija
de conexión de ninguna forma. No utilice ninguna
clavija adaptadora con herramientas eléctricas
que tengan conexión a tierra (puesta a tierra). La
utilizacióndeclavijasnomodicadasyqueencajen
perfectamenteenlatomadecorrientereduciráel
riesgo de que se produzca una descarga eléctrica.
2.
Evite tocar con el cuerpo supercies conecta-
das a tierra o puestas a tierra tales como tubos,
radiadores, cocinas y refrigeradores. Si su cuerpo
espuestoatierraoconectadoatierraexistiráun
mayorriesgodequesufraunadescargaeléctrica.
3. No exponga las herramientas eléctricas a la
lluvia ni a condiciones húmedas. La entrada de
aguaenunaherramientaeléctricaaumentaráel
riesgo de que se produzca una descarga eléctrica.
4.
No maltrate el cable. Nunca utilice el cable para trans-
portar, jalar o desconectar la herramienta eléctrica.
Mantenga el cable alejado del calor, aceite, objetos
cortantes o piezas móviles. Los cables dañados o enre-
dados aumentan el riesgo de sufrir una descarga eléctrica.
5.
Cuando utilice una herramienta eléctrica en
exteriores, utilice un cable de extensión apro-
piado para uso en exteriores. La utilización de un
cableapropiadoparausoenexterioresreduciráel
riesgo de que se produzca una descarga eléctrica.

17 ESPAÑOL
6. Si no es posible evitar usar una herramienta
eléctrica en condiciones húmedas, utilice un
alimentador protegido con interruptor de cir-
cuito de falla a tierra (ICFT). El uso de un ICFT
reduce el riesgo de descarga eléctrica.
7. Las herramientas eléctricas pueden producir
campos electromagnéticos (CEM) que no son
dañinos para el usuario. Sin embargo, si los
usuariostienenmarcapasosyotrosdispositivos
médicossimilares,deberánconsultaralfabricante
desudispositivoy/oasumédicoantesdeoperar
esta herramienta eléctrica.
Seguridad personal
1. Manténgase alerta, preste atención a lo que
está haciendo y utilice su sentido común
cuando opere una herramienta eléctrica. No
utilice una herramienta eléctrica cuando esté
cansado o bajo la inuencia de drogas, alco-
hol o medicamentos. Un momento de distracción
mientras opera las herramientas eléctricas puede
terminar en una lesión grave.
2. Use equipo de protección personal. Póngase
siempre protección para los ojos. El equipo
protectortalcomomáscaracontraelpolvo,zapa-
tosdeseguridadantiderrapantes,cascorígidoy
protecciónparaoídosutilizadoenlascondiciones
apropiadasreduciráelriesgodelesiones.
3. Impida el encendido accidental. Asegúrese
de que el interruptor esté en la posición de
apagado antes de conectar a la alimentación
eléctrica y/o de colocar el cartucho de batería,
así como al levantar o cargar la herramienta.
Cargar las herramientas eléctricas con su dedo
en el interruptor o enchufarlas con el interrup-
tor encendido hace que los accidentes sean
comunes.
4. Retire cualquier llave de ajuste o llave de
apriete antes de encender la herramienta. Una
llavedeajusteollavedeaprietequehayasido
dejadapuestaenunapartegiratoriadelaherra-
mienta eléctrica puede ocasionar alguna lesión.
5. No utilice la herramienta donde no alcance.
Mantenga los pies sobre suelo rme y el equi-
librio en todo momento.Estopermiteunmejor
control de la herramienta eléctrica en situaciones
inesperadas.
6. Use una vestimenta apropiada. No use ropa
suelta ni alhajas. Mantenga el cabello, la ropa
y los guantes alejados de las piezas móviles.
Lasprendasdevestirholgadas,lasalhajasy
elcabellolargosueltopodríanengancharseen
estas piezas móviles.
7. Si dispone de dispositivos para la conexión
de equipos de extracción y recolección de
polvo, asegúrese de conectarlos y utilizarlos
debidamente. Hacer uso de la recolección de
polvo puede reducir los riesgos relacionados con
el polvo.
8. No permita que la familiaridad adquirida
debido al uso frecuente de las herramientas
haga que se sienta conado e ignore los prin-
cipios de seguridad de las herramientas. Un
descuidopodríaocasionarunalesióngraveen
una fracción de segundo.
9. Utilice siempre gafas protectoras para prote-
ger sus ojos de lesiones al usar herramientas
eléctricas. Las gafas deben cumplir con la
Norma ANSI Z87.1 en EUA.
Es responsabilidad del empleador imponer
el uso de equipos protectores de seguridad
apropiados a los operadores de la herramienta
y demás personas cerca del área de trabajo.
Mantenimiento y uso de la herramienta eléctrica
1. No fuerce la herramienta eléctrica. Utilice la
herramienta eléctrica correcta para su aplica-
ción.Laherramientaeléctricaadecuadaharáun
mejortrabajoydeformamásseguraalaveloci-
dad para la que ha sido fabricada.
2. No utilice la herramienta eléctrica si el inte-
rruptor no la enciende y apaga. Cualquier
herramienta eléctrica que no pueda ser contro-
ladaconelinterruptorespeligrosaydebeser
reemplazada.
3. Desconecte la clavija de la fuente de alimen-
tación y/o retire la batería de la herramienta
eléctrica, en caso de ser removible, antes de
realizar ajustes, cambiar accesorios o almace-
nar las herramientas eléctricas. Tales medidas
deseguridadpreventivasreduciránelriesgo
de poner en marcha la herramienta eléctrica de
forma accidental.
4. Guarde la herramienta eléctrica que no use
fuera del alcance de los niños y no permita
que las personas que no están familiarizadas
con ella o con las instrucciones la operen. Las
herramientas eléctricas son peligrosas en manos
de personas que no saben operarlas.
5. Dé mantenimiento a las herramientas eléctri-
cas y los accesorios. Compruebe que no haya
piezas móviles desalineadas o estancadas,
piezas rotas y cualquier otra condición que
pueda afectar al funcionamiento de la herra-
mienta eléctrica. Si la herramienta eléctrica
está dañada, haga que la reparen antes de
utilizarla. Muchos de los accidentes son ocasio-
nados por no dar un mantenimiento adecuado a
las herramientas eléctricas.
6.
Mantenga las herramientas de corte limpias y
losas.Sirecibeunmantenimientoadecuadoytiene
losbordesalados,esprobablequelaherramienta
seatasquemenosyseamásfácilcontrolarla.
7. Utilice la herramienta eléctrica, los accesorios
y las brocas de acuerdo con estas instruccio-
nes, considerando las condiciones laborales
y el trabajo a realizar. Si utiliza la herramienta
eléctrica para realizar operaciones distintas de
lasindicadas,podrápresentarseunasituación
peligrosa.
8. Mantenga los mangos y supercies de asi-
miento secos, limpios y libres de aceite o
grasa.Losmangosysuperciesdeasimiento
resbalosos no permiten una manipulación segura
ni el control de la herramienta en situaciones
inesperadas.
9. Cuando vaya a utilizar esta herramienta, evite
usar guantes de trabajo de tela ya que éstos
podrían atorarse.Silosguantesdetrabajode
tela llegaran a atorarse en las piezas móviles,
estopodríaocasionarlesionespersonales.

18 ESPAÑOL
Uso y cuidado de la herramienta a batería
1. Recargue sólo con el cargador especicado
por el fabricante. Un cargador que es adecuado
paraunsolotipodebateríapuedegenerarriesgo
deincendioalserutilizadoconotrabatería.
2. Utilice las herramientas eléctricas solamente
con las baterías designadas especícamente
para ellas.Lautilizacióndecualquierotrabatería
puede crear un riesgo de lesiones o incendio.
3.
Cuando no se esté usando la batería, manténgala
alejada de otros objetos metálicos, como sujeta-
papeles (clips), monedas, llaves, clavos, tornillos
u otros objetos pequeños de metal los cuales
pueden actuar creando una conexión entre las
terminales de la batería. Originar un cortocircuito en
las terminales puede causar quemaduras o incendios.
4. En condiciones abusivas, podrá escapar
líquido de la batería; evite tocarlo. Si lo toca
accidentalmente, enjuague con agua. Si hay
contacto del líquido con los ojos, busque asis-
tencia médica.Puedequeellíquidoexpulsado
delabateríacauseirritaciónoquemaduras.
5. No utilice una herramienta ni una batería que
estén dañadas o hayan sido modicadas. Las
bateríasdañadasomodicadaspodríanoca-
sionar una situación inesperada provocando un
incendio, explosión o riesgo de lesiones.
6. No exponga la herramienta ni la batería al
fuego ni a una temperatura excesiva. La expo-
sición al fuego o a una temperatura superior a los
130°Cpodríacausarunaexplosión.
7.
Siga todas las instrucciones para la carga y
evite cargar la herramienta o la batería fuera del
rango de temperatura especicado en las ins-
trucciones. Una carga inadecuada o a una tempe-
raturafueradelrangoespecicadopodríadañarla
bateríaeincrementarelriesgodeincendio.
Servicio
1. Haga que una persona calicada repare la
herramienta eléctrica utilizando sólo piezas de
repuesto idénticas. Esto asegura que se man-
tenga la seguridad de la herramienta eléctrica.
2. Nunca dé servicio a baterías que estén daña-
das.Elservicioalasbateríassolamentedeberá
ser efectuado por el fabricante o un agente de
servicio autorizado.
3. Siga las instrucciones para la lubricación y
cambio de accesorios.
4. No modique ni intente reparar el aparato ni el
paquete de baterías salvo como se indique en
las instrucciones para el uso y cuidado.
Advertencias de seguridad para el
cortasetos inalámbrico
1. Mantenga todas las partes del cuerpo alejadas
de la cuchilla de corte. No retire ni sostenga el
material que va a cortar cuando las cuchillas
estén en movimiento. Las cuchillas siguen
girando por inercia aún después de apagadas.
Asegúrese de que el interruptor se encuentre
apagado antes de despejar el material atas-
cado. Un momento de distracción mientras opera
elcortasetospodríaocasionarlesionespersona-
les graves.
2. Sostenga el cortasetos por el mango cuando
la cuchilla de corte se encuentre detenida. La
manipulaciónadecuadadelcortasetosreducirála
posibilidad de lesiones personales ocasionadas
por las cuchillas de corte.
3. Sujete la herramienta solamente por las
supercies de asimiento aisladas, ya que la
cuchilla de corte podría entrar en contacto
con cableado oculto. Las cuchillas de corte que
entren en contacto con un cable con corriente
podránhacerquelacorrientecirculeporlaspie-
zasmetálicasexpuestasdelaherramientaeléc-
trica pudiendo ocasionar una descarga eléctrica al
operador.
4. PELIGRO - Mantenga las manos alejadas de la
cuchilla.Elcontactoconlacuchillapodríaoca-
sionar lesiones personales graves.
5. No utilice el cortasetos bajo la lluvia o en
lugares mojados ni en condiciones de mucha
humedad. El motor eléctrico no es a prueba de
agua.
6. Un usuario con experiencia deberá enseñar
a los usuarios primerizos cómo manejar el
cortasetos.
7. El cortasetos no deberá ser utilizado por niños
ni por personas menores de 18 años. Esta
restricciónpodrápasarseporaltoparapersonas
mayoresde16añossiemprequerecibanlacapa-
citacióncorrespondientebajolasupervisióndeun
experto.
8. Utilice el cortasetos sólo si se encuentra en
buena condición física.Siestácansado,su
atenciónseverádisminuida.Seaespecialmente
cuidadosoaltérminodeunajornadalaboral.
Realicetodoeltrabajotranquilaycuidadosa-
mente.Elusuarioseráresponsabledetodoslos
daños a terceras personas.
9. Nunca utilice el cortasetos si está bajo
la inuencia de alcohol, drogas o algún
medicamento.
10. Los guantes de trabajo hechos de piel gruesa
forman parte del equipo básico del cortasetos
y deberán usarse siempre que se trabaje con
éste. Utilice también zapatos resistentes con
suelas antiderrapantes.
11. Antes de comenzar el trabajo, revise el cor-
tasetos para asegurarse de que esté en buen
estado y en condiciones seguras de funcio-
namiento. Asegúrese de que los protectores
estén colocados correctamente. El cortasetos
no deberá ser utilizado hasta que se encuentre
totalmente ensamblado.
12. Asegúrese de pisar rmemente antes de
comenzar la operación.
13. Siempre que utilice la herramienta sosténgala
rmemente.
14. No opere la herramienta sin carga
innecesariamente.
15. Si la pieza de corte entra en contacto con
alguna cerca u otro objeto duro, apague
inmediatamente el motor y retire el cartucho
de batería. Verique si la cortadora presenta
algún daño, de ser así deberá ser reparada de
inmediato.

19 ESPAÑOL
16. Siempre apague el cortasetos y retire el car-
tucho de batería antes de revisar la cortadora,
enmendar fallas o retirar algún material ato-
rado en la cortadora.
17. Apague el cortasetos y retire el cartucho de
batería antes de realizar cualquier trabajo de
mantenimiento.
18. Siempre que traslade el cortasetos a otro
lugar, aun durante el trabajo, retire el cartu-
cho de batería y coloque la cubierta de las
cuchillas para cubrir las cuchillas de corte.
Nunca cargue ni transporte el cortasetos con
la cortadora funcionando. Nunca sostenga la
cortadora con sus manos.
19.
Limpie el cortasetos y en especial la cortadora
después de usarlos y antes de almacenar el corta-
setos por períodos prolongados. Aplique una capa
ligera de aceite a la cortadora y coloque la cubierta.
La cubierta suministrada con la unidad puede colgarse
enlapared,proporcionandounamaneraprácticay
segura para almacenar el cortasetos.
20. Almacene el cortasetos con la cubierta
puesta en una habitación libre de humedad.
Manténgalo fuera del alcance de los niños.
Nunca almacene el cortasetos en exteriores.
21. Nunca apunte las cuchillas de cizalla hacia
usted ni hacia otras personas.
22. Si las cuchillas se dejan de mover a causa de
objetos extraños atorados entre ellas durante
la operación, apague la herramienta, extraiga
el cartucho de batería y luego retire los obje-
tos extraños usando herramientas tales como
pinzas.Elretirarlosobjetosextrañosconlamano
podríaocasionarunalesión,debidoaquelas
cuchillas pueden moverse al intentar retirarlos.
23. Evite los entornos peligrosos. No utilice la
herramienta en lugares húmedos o mojados
ni la exponga a la lluvia. El agua que ingrese a
la herramienta incrementará el riesgo de des-
carga eléctrica.
24. No arroje la(s) batería(s) al fuego. La celda
podría explotar. Consulte los códigos locales
para ver si hay instrucciones especiales rela-
cionadas con la disposición.
25. No abra ni dañe la(s) batería(s). Los electroli-
tos liberados son corrosivos y pueden ocasio-
nar daños en los ojos o la piel. Estos pueden
ser tóxicos si se llegan a tragar.
26. No cargue la batería bajo la lluvia ni en lugares
mojados.
27. Antes de operar la herramienta, revise los
setos y arbustos para ver que no haya objetos
extraños, tales como cercas de alambre o
cableado oculto.
GUARDE ESTAS
INSTRUCCIONES.
ADVERTENCIA: NO DEJE que la comodidad
o familiaridad con el producto (a base de utilizarlo
repetidamente) evite que siga estrictamente las
normas de seguridad para dicho producto. El
USO INCORRECTO o el no seguir las normas de
seguridad indicadas en este manual de instruc-
ciones puede ocasionar lesiones graves.
ADVERTENCIA: El uso de este producto
puede producir polvo que contenga sustancias
químicas que podrían causar enfermedades
respiratorias o de otro tipo. Algunos ejemplos de
estas sustancias químicas son los compuestos
encontrados en pesticidas, insecticidas, fertili-
zantes y herbicidas.
El riesgo al que se expone varía, dependiendo
de la frecuencia con la que realice este tipo de
trabajo. Para reducir la exposición a estas sus-
tancias químicas: trabaje en un área bien ven-
tilada y use un equipo de seguridad aprobado,
tal como las máscaras contra polvo que están
especialmente diseñadas para ltrar partículas
microscópicas.
Símbolos
Acontinuaciónsemuestranlossímbolosutilizados
para la herramienta.
volts o voltios
corriente directa o continua
velocidad sin carga
revoluciones o alternaciones por minuto,
frecuencia de rotación
Instrucciones importantes de
seguridad para el cartucho de
batería
1. Antes de utilizar el cartucho de batería, lea
todas las instrucciones e indicaciones de
precaución en el (1) el cargador de batería, (2)
la batería, y (3) el producto con el que se utiliza
la batería.
2. No desarme el cartucho de batería.
3. Si el tiempo de operación se ha acortado en
exceso, deje de operar de inmediato. Podría
correrse el riesgo de sobrecalentamiento,
posibles quemaduras e incluso explosión.
4. En caso de que ingresen electrolitos en sus
ojos, enjuáguelos bien con agua limpia y con-
sulte de inmediato a un médico. Esto podría
ocasionar pérdida de visión.
5. Evite cortocircuitar el cartucho de batería:
(1) No toque las terminales con ningún mate-
rial conductor.
(2) Evite guardar el cartucho de batería en un
cajón junto con otros objetos metálicos,
tales como clavos, monedas, etc.
(3) No exponga el cartucho de batería al
agua o la lluvia.
Un cortocircuito en la batería puede causar
un ujo grande de corriente, sobrecalenta-
miento, posibles quemaduras e incluso una
descompostura.

20 ESPAÑOL
6. No guarde la herramienta ni el cartucho de
batería en lugares donde la temperatura pueda
alcanzar o exceder los 50°C (122°F).
7. Nunca incinere el cartucho de batería incluso
en el caso de que esté dañado seriamente o
ya no sirva en absoluto. El cartucho de batería
puede explotar si se tira al fuego.
8. Tenga cuidado de no dejar caer ni golpear la
batería.
9. No use una batería dañada.
10. Las baterías de ión de litio están sujetas a los
requisitos reglamentarios en materia de bie-
nes peligrosos.
Paraeltrasportecomercial,porej.,mediante
terceros o agentes de transporte, se deben tomar
en cuenta los requisitos especiales relativos al
empaqueyeletiquetado.
Paraefectuarlospreparativosdelartículoquese
va a enviar, se requiere consultar a un experto
en materiales peligrosos. Si es posible, consulte
ademásotrasregulacionesnacionalesmásdeta-
lladas.
Pegue o cubra con cinta adhesiva los contactos
abiertosyempaquelabateríademaneraqueésta
no pueda moverse dentro del paquete.
11. Siga las regulaciones locales relacionadas al
desecho de las baterías.
12. Utilice las baterías únicamente con los pro-
ductos especicados por Makita. Instalar las
bateríasenproductosquenocumplanconlos
requisitospodríaocasionarunincendio,uncalen-
tamiento excesivo, una explosión o una fuga de
electrolito.
GUARDE ESTAS
INSTRUCCIONES.
PRECAUCIÓN: Utilice únicamente baterías
originales de Makita.Elusodebateríasnoorigina-
lesdeMakita,odebateríasalteradas,puedeocasio-
narquelasbateríasexplotencausandounincendio,
lesionespersonalesydaños.Asimismo,estoinva-
lidarálagarantíadeMakitaparalaherramientayel
cargador Makita.
Consejos para alargar al máximo
la vida útil de la batería
1. Cargue el cartucho de batería antes de que
se descargue completamente. Pare siem-
pre la operación y cargue el cartucho de
batería cuando note menos potencia en la
herramienta.
2. No cargue nunca un cartucho de batería que
esté completamente cargado. La sobrecarga
acortará la vida de servicio de la batería.
3. Cargue el cartucho de batería a una tempera-
tura ambiente de 10 °C - 40 °C (50 °F - 104 °F).
Si un cartucho de batería está caliente, déjelo
enfriar antes de cargarlo.
4. Cargue el cartucho de batería si no va a utili-
zarlo durante un período prolongado (más de
seis meses).
DESCRIPCIÓN DEL
FUNCIONAMIENTO
PRECAUCIÓN: Asegúrese siempre de que la
herramienta esté apagada y el cartucho de batería
haya sido extraído antes de realizar cualquier
ajuste o comprobación en la herramienta.
Instalación o extracción del
cartucho de batería
PRECAUCIÓN: Apague siempre la herra-
mienta antes de colocar o quitar el cartucho de
batería.
PRECAUCIÓN: Sujete la herramienta y el car-
tucho de la batería con rmeza al colocar o quitar
el cartucho de batería.Sinosesujetaconrmezala
herramientayelcartuchodebatería,puedeocasio-
nar que se resbalen de sus manos causando daños
alaherramientayalcartuchodebatería,asícomo
lesiones a la persona.
1
2
3
►1.Indicadorrojo2. Botón 3.Cartuchodebatería
Paraquitarelcartuchodebatería,deslícelodelaherra-
mienta mientras desliza el botón sobre la parte delan-
tera del cartucho.
Paracolocarelcartuchodebatería,alineelalengüeta
sobreelcartuchodebateríaconlaranuraenlacarcasa
ydesliceensulugar.Inserteporcompletohastaque
sejeensulugarconunpequeñoclic.Sipuedeverel
indicadorrojodelladosuperiordelbotón,estoindica
quenohaquedadojoporcompleto.
PRECAUCIÓN: Introduzca siempre com-
pletamente el cartucho de batería hasta que
el indicador rojo no pueda verse.Sino,podría
accidentalmentesalirsedelaherramientaycaeral
suelo causando una lesión a usted o alguien a su
alrededor.
PRECAUCIÓN: No instale el cartucho de
batería a la fuerza. Si el cartucho no se desliza al
interiorfácilmente,sedebeaquenoestásiendo
insertado correctamente.
21 ESPAÑOL
Indicación de la capacidad restante
de la batería
Únicamente para cartuchos de batería con el
indicador
1
2
►1. Luces indicadoras 2.Botóndevericación
Oprimaelbotóndevericaciónenelcartuchodela
bateríaparaqueindiquelacapacidadrestantedela
batería.Laslucesindicadorasseiluminaránporalgu-
nos segundos.
Luces indicadoras Capacidad
restante
Iluminadas Apagadas Parpadeando
75% a 100%
50% a 75%
25% a 50%
0% a 25%
Cargar la
batería.
Labatería
pudo haber
funcionado
mal.
NOTA:Dependiendodelascondicionesdeusoy
latemperaturaambiente,laindicaciónpodrádiferir
ligeramente de la capacidad real.
Sistema de protección para la
herramienta/batería
Laherramientaestáequipadaconunsistemadepro-
teccióndelaherramienta/batería.Estesistemacorta
enformaautomáticaelsuministrodeenergíaalmotor
paraprolongarlavidaútildelaherramientaylabatería.
Laherramientasedetendráautomáticamentedurante
laoperaciónsilaherramientaolabateríasesometena
una de las siguientes condiciones:
Estado Luces indicadoras
Encendido Apagado
Parpadeando
Sobrecarga
Sobrecalenta-
miento
Sobredescarga
Protección contra sobrecarga
Si la herramienta se sobrecarga al enredarse ramas
u otros residuos, el indicador
yeldeenmedio
comenzaránaparpadearylaherramientasedetendrá
automáticamente.
Enestecaso,apaguelaherramientaydetengalaapli-
cación que causó que la herramienta se sobrecargara.
Luego encienda la herramienta para volver a ponerla
en marcha.
AVISO: Dependiendo de las condiciones de uso,
la herramienta se apagará automáticamente sin
indicación alguna en caso de sobrecargarse si
alguna rama o residuo llegara a enredarse. En
este caso, apague la herramienta, extraiga el
cartucho de batería y luego retire las ramas o
residuos usando herramientas tales como pinzas.
Después de retirar las ramas o residuos, instale
el cartucho de batería y vuelva a encender la
herramienta.
Protección contra el
sobrecalentamiento de la
herramienta o la batería
Existen dos tipos de sobrecalentamiento: sobrecalen-
tamientodelaherramientaysobrecalentamientodela
batería.Cuandolaherramientasesobrecaliente,todos
losindicadoresdevelocidadparpadearán.Cuandola
bateríasesobrecaliente,elindicador
parpadeará.
Cuando ocurra el sobrecalentamiento, la herramienta
sedetendráautomáticamente.Permitaquelaherra-
mientay/olabateríaseenfríenantesdevolvera
encender la herramienta.
Protección en caso de
sobredescarga
Cuandolacapacidaddelabateríaseabaja,laherra-
mientasedetendráautomáticamenteyelindica-
dor
parpadeará.
Si la herramienta no funciona aun con los interruptores
activados,retirelabateríadelaherramientaycárguela.

22 ESPAÑOL
Ajuste del ángulo del mango
PRECAUCIÓN: Asegúrese siempre de que
el mango esté bloqueado en la posición deseada
antes de la operación.
PRECAUCIÓN: No jale hacia abajo la palanca
para desbloquear el mango mientras jala el gatillo
interruptor. No jale el gatillo interruptor mientras
jala hacia abajo la palanca y gira el mango. El
hacerlopodríaocasionarunaaveríaalaherramienta.
Ustedpuedeajustarelángulodelmangoa0°,45°,
o 90° a la izquierda o a la derecha. Para cambiar el
ángulodelmango,gireelmangomientrasjalahacia
abajolapalancayluegosueltelapalanca.
1
►1. Palanca
Accionamiento del interruptor de
encendido
ADVERTENCIA: Por su seguridad, esta
herramienta está equipada con una palanca de
desbloqueo para evitar que la herramienta se
ponga en marcha accidentalmente. NUNCA use la
herramienta si se pone en marcha simplemente
al presionar la palanca del interruptor y jalar el
gatillo interruptor sin haber presionado la palanca
de desbloqueo. Lleve la herramienta a nuestro
centro de servicio autorizado para una reparación
adecuada ANTES de seguir usándola.
ADVERTENCIA: NUNCA je con cinta adhe-
siva ni impida el funcionamiento ni la nalidad de
la palanca de desbloqueo.
ADVERTENCIA: Antes de instalar el cartu-
cho de batería en la herramienta, verique siem-
pre que el gatillo interruptor y la palanca del inte-
rruptor se accionen debidamente y que regresen
a la posición de apagado una vez que se suelten.
Usar una herramienta con un interruptor que no fun-
cione adecuadamente puede provocar la pérdida del
controlyocasionarlesionespersonalesgraves.
PRECAUCIÓN: Nunca coloque su dedo en el
interruptor cuando transporte la herramienta. La
herramientapodríaponerseenmarchaaccidental-
menteyocasionarunalesión.
AVISO: No jale fuerte el gatillo interruptor sin
presionar la palanca de desbloqueo. Esto podría
dañar el interruptor.
Mantenga oprimido el botón de encendido principal
para encender la herramienta. La luz de alimentación
seencenderáunavezquelaherramientasehaya
encendido. Para apagar la herramienta, mantenga
oprimido el botón de encendido principal nuevamente.
Laluzdealimentaciónseapagaráunavezquela
herramientasehayaapagado.
2
1
►1. Luz de alimentación 2. Botón de encendido
principal
NOTA:Laherramientaseapagaráautomáticamente
si no es operada durante cierto periodo de tiempo.
Paraevitarqueelgatillointerruptorseajaladoacciden-
talmente, se proporciona una palanca de desbloqueo.
Para arrancar la herramienta, presione la palanca de
desbloqueo,yluegopresionelapalancadelinterruptor
yjaleelgatillointerruptor.Lavelocidaddelaherra-
mientaaumentaráalincrementarlapresiónenelgatillo
interruptor. Suelte el gatillo interruptor para parar la
herramienta.
12
3
►1. Palanca del interruptor 2. Palanca de desbloqueo
3. Gatillo interruptor

23 ESPAÑOL
Ajuste de velocidad
Puedeajustarlavelocidaddelaherramientapulsando
el botón de encendido principal.
Cada vez que toque el botón de encendido principal, el
niveldevelocidadcambiará.
2
1
►1. Luz de alimentación 2. Botón de encendido
principal
Indicador Modo Velocidad de
carrera
Alto 4 400 cpm
Medio 3 600 cpm
Bajo 2 000 cpm
Botón de inversión para la
eliminación de residuos
ADVERTENCIA:
Si las ramas o residuos
enredados no pueden ser retirados con la función
inversa, apague la herramienta, extraiga el cartucho
de batería y luego retire las ramas o residuos usando
herramientas tales como pinzas. El no apagar la herra-
mientayextraerelcartuchodebateríapodríaocasionar
lesiones personales graves a causa de una puesta en
marcha accidental. El retirar las ramas o residuos con
lamanopodríaocasionarunalesión,debidoaquelas
cuchillas de cizalla pueden moverse al intentar retirarlas.
Esta herramienta cuenta con un botón de inversión
para cambiar la dirección del movimiento de las cuchi-
llas de cizalla. Su única función es la de eliminar las
ramasyresiduosenredadosenlaherramienta.
Para invertir el movimiento de las cuchillas de cizalla, pulse
el botón de inversión una vez que las cuchillas de cizalla se
hayandetenido,yluegopresionelapalancadelinterruptor
yjaleelgatillointerruptormientraspresionalapalancade
desbloqueo.Laluzdealimentacióncomenzaráaparpadeary
lascuchillasdecizallasemoveránenladirecciónopuesta.
Unavezquelasramasyresiduosenredadossehayan
retirado,laherramientaregresaráasumovimiento
normalylaluzdealimentacióndejarádeparpadeary
seencenderá.
1
►1. Botón de inversión
NOTA: Si las ramas o residuos enredados no pueden
serretirados,suelteyjaleelgatillointerruptorhasta
que sean retirados.
NOTA: Si pulsa el botón de inversión mientras las
cuchillasdecizallaestánmoviéndose,laherramienta
sedetendráyseprepararáparaelmovimiento
inverso.
Freno eléctrico
Laherramientaestáequipadaconunfrenoeléctrico.Si
la herramienta falla constantemente en detenerse tras
soltar el gatillo interruptor, lleve la herramienta a mante-
nimiento a un centro de servicio Makita.
MONTAJE
PRECAUCIÓN: Asegúrese siempre de que la
herramienta esté apagada y el cartucho de batería
haya sido extraído antes de realizar cualquier
trabajo en la misma.
PRECAUCIÓN: Siempre utilice guantes al
reemplazar las cuchillas de cizalla de manera que
sus manos no hagan contacto directo con las
cuchillas.
AVISO: Cuando reemplace las cuchillas de
cizalla no elimine la grasa del engranaje y de la
manivela.
Instalación o extracción de las
cuchillas de cizalla
PRECAUCIÓN: Coloque la cubierta de las
cuchillas antes de extraer o instalar las cuchillas
de cizalla.
Usted puede instalar en su herramienta cuchillas de
cizallade500mm(19-3/4″),600mm(23-5/8″),o750
mm(29-1/2″).

24 ESPAÑOL
1. Coloquelaherramientadecabezayluegoretire
los 6 tornillos.
1
►1. Tornillo
2. Extraigalacubiertaylaplaca.
1
2
►1. Cubierta 2. Placa
NOTA: La placa puede permanecer en la cubierta.
3. Retire la barra.
1
►1. Barra
NOTA: La barra puede permanecer en la cubierta.
4. Retirelos2tornillos,laalmohadilladeeltro,las
arandelasylosmanguitos,yluegoextraigalascuchi-
llas de cizalla.
1
5
2
3
4
►1.Almohadilladeeltro2. Tornillo 3. Arandela
4. Manguito 5. Cuchillas de cizalla
5. Retirelacubiertadelascuchillasyluegocoló-
quela en las nuevas cuchillas de cizalla.
6. Ajustelamanivelademaneraquelos2oricios
quedenalineadosenlalíneadealineación.
1
2
►1.Oricio2.Líneadealineación
7. Alinee las protuberancias en las cuchillas de
cizalla verticalmente en la misma posición.
1
1
►1. Protuberancia
25 ESPAÑOL
8. Coloquelaalmohadilladeeltroenlascuchillas
de cizalla.
1
►1.Almohadilladeeltro
9. Inserte la protuberancia en las cuchillas de cizalla
eneloriciodelabarra,luegoalineelaposicióndela
almohadilladeeltroconlosoriciosenlaherramienta,
ydespuéscoloquelosmanguitosyarandelasnuevos.
1
2
3
4
5
►1. Protuberancia 2.Oricio3.Almohadilladeeltro
4. Arandela 5. Manguito
AVISO: Aplique una pequeña cantidad de grasa a
la periferia interior del oricio de la barra.
AVISO: Tenga cuidado de no perder las arande-
las ni los manguitos.
10. Alineelosoriciosenlascuchillasdecizallacon
losoriciosenlaherramienta,yluegoaprietelos2
tornillosparajarlascuchillasdecizalla.
1
2
►1. Tornillo 2.Oricio
11. Coloque la barra.
1
2
►1. Barra 2.Oriciopequeño
AVISO
: Aplique una pequeña cantidad de grasa a
la periferia interior del oricio pequeño de la barra.
AVISO:
Asegúrese de que la protuberancia en las cuchi-
llas de cizalla encaje en el oricio pequeño de la barra.
12. Coloque la placa.
1
2
►1. Protuberancia 2. Placa
AVISO: Asegúrese de que la protuberancia en
las cuchillas de cizalla encaje en el oricio de la
placa.
26 ESPAÑOL
13. Coloquelacubiertayluegoaprietelos6tornillos.
2
1
►1. Cubierta 2. Tornillo
AVISO: Asegúrese de instalar 2 tornillos largos
en los oricios centrales.
AVISO: Si las cuchillas de cizalla no se mueven
con suavidad, es porque estas no están correcta-
mente embonadas en las barras. Vuelva a instalar
las cuchillas de cizalla.
AVISO: Si aparte de las cuchillas de cizalla otras
piezas, tales como las barras, muestran signos de
desgaste, solicite su reparación o reemplazo a los
centros de servicio autorizados Makita.
Instalación o extracción del colector
de residuos
Accesorio opcional
PRECAUCIÓN: Siempre utilice guantes
al instalar o extraer el colector de residuos de
manera que sus manos no hagan contacto directo
con las cuchillas de cizalla.
AVISO: La cubierta de las cuchillas no puede ser
instalada si el colector de residuos está instalado
en la herramienta. Antes de transportar o almace-
nar la herramienta, desinstale el colector de resi-
duos y luego instale la cubierta de las cuchillas
para evitar la exposición de las cuchillas.
AVISO: Asegúrese de retirar la cubierta de las
cuchillas antes de instalar el colector de residuos.
Elcolectorderesiduosrecolectalosrestosdehojasy
facilitalalimpiezamásadelante.Éstepuedeinstalarse
en ambos lados de la herramienta.
Para instalar el colector de residuos, alinee la punta
de las cuchillas de cizalla con la punta del colector de
residuosyluegopresioneelcolectorderesiduoscontra
las cuchillas de cizalla, de manera que los ganchos
encajenenlasranurasdelascuchillasdecizalla.
1
1
►1. Gancho
1
►1. Gancho
AVISO: Asegúrese de que el colector de residuos
no se encime en el receptáculo de ramas.
1
►1.Receptáculoderamas
27 ESPAÑOL
Para extraer el colector de residuos, presione las palan-
cas en ambos lados para liberar los ganchos.
1
►1. Palanca
AVISO: Nunca intente extraer el colector de
residuos aplicando una fuerza excesiva con sus
ganchos asegurados en las ranuras de las cuchi-
llas de cizalla.
OPERACIÓN
ADVERTENCIA: Mantenga las manos aleja-
das de las cuchillas de cizalla.
PRECAUCIÓN: Si es posible, evite utilizar
la herramienta cuando haga demasiado calor.
Durante la operación de la herramienta, vigile su
condición física.
PRECAUCIÓN: Tenga cuidado de no tocar
accidentalmente una cerca de metal u otros
objetos duros durante el podado. Las cuchillas de
cizallapodríanromperseyocasionarunalesión.
PRECAUCIÓN: Tenga cuidado de no permitir
que las cuchillas de cizalla hagan contacto con el
suelo.Laherramientapodríaretrocederyocasionar
una lesión.
PRECAUCIÓN: Trabajar con el cortasetos
en un lugar donde no alcance, particularmente
desde una escalera, es extremadamente peli-
groso.Notrabajemientrasestéparadosobreuna
supercietambaleanteopocorme.
AVISO: No intente usar la herramienta para cor-
tar ramas con un diámetro mayor a 10 mm (3/8″).
Cortelasramasa10cm(4″)menosquelaalturade
corte usando algún cortador de ramas antes de usar
la herramienta.
(1)
(2)
►(1) Altura de corte (2)10cm(4″)
AVISO: No corte árboles muertos ni otros obje-
tos duros similares.Elhacerlopodríadañarla
herramienta.
AVISO: No pode hierba ni maleza mientras esté
usando las cuchillas de cizalla. Las cuchillas de
cizallapodríanquedaratrapadasenlahierbao
maleza.
Sostenga la herramienta con ambas manos, presione
lapalancadelinterruptoryjaleelgatillointerruptor
mientraspresionalapalancadedesbloqueo,yluego
desplácelahaciaadelante.
Paralaoperaciónbásica,inclinelascuchillasdecizalla
hacialadireccióndelpodadoydesplácelaslentamente
yconcalmaaunritmodevelocidadde3a4segundos
por metro.

28 ESPAÑOL
Paracortarlasuperciedeunsetodemanerauni-
forme,ateuncordónalaalturadeseadaypodealo
largo de este.
Tener colocado el colector de residuos en las cuchillas
decizallapermitequeésterecolectelosrestosdehojas
yfacilitalalimpiezamásadelante.
Para cortar la parte lateral de un seto de manera uni-
forme,cortedeabajohaciaarriba.
Cuando desee hacer formas redondas al podar (podar
setosdebojorododendro,etc.),cortedelaraízala
parte superior para lograr un resultado excelente.
MANTENIMIENTO
PRECAUCIÓN: Asegúrese siempre de que la
herramienta esté apagada y el cartucho de batería
extraído antes de intentar realizar una inspección
o mantenimiento.
ParamantenerlaSEGURIDADyFIABILIDADdelpro-
ducto,lasreparaciones,ycualquierotratareademan-
tenimientooajustedeberánserrealizadasencentros
deservicioautorizadosodefábricaMakita,empleando
siempre repuestos Makita.
Limpieza de la herramienta
Quite el polvo de la herramienta con un paño seco o
humedezcaunpañoenaguayjabónyexprímalopara
limpiarla.
AVISO: Nunca use gasolina, bencina, diluyente
(tíner), alcohol o sustancias similares. Puede que
esto ocasione grietas o descoloramiento.
Mantenimiento de las cuchillas de
cizalla
Antes de la operación o una vez por hora durante la
operación,apliqueaceitedebajaviscosidad(aceite
paramáquinasoaceitelubricanteenaerosol)alas
cuchillas de cizalla.

29 ESPAÑOL
Después de la operación, elimine el polvo en ambos
lados de las cuchillas de cizalla con un cepillo de alam-
bre,limpieconunpañoyluegoapliqueaceitedebaja
viscosidad(aceiteparamáquinasoaceitelubricanteen
aerosol) a las cuchillas de cizalla.
AVISO: No lave las cuchillas de cizalla con
agua.Estopodríaocasionaroxidaciónodañosala
herramienta.
AVISO: La suciedad y la corrosión causan una
fricción excesiva de las cuchillas y acorta el
tiempo de operación en cada carga de batería.
Almacenamiento
Eloricioparaelganchoenlaparteinferiordela
herramienta resulta útil para colgar la herramienta en la
pared usando un clavo o tornillo.
Coloque la cubierta de las cuchillas de cizalla de
manera que las cuchillas no queden expuestas.
Almacene la herramienta fuera del alcance de los
niños. Almacene la herramienta en un lugar que no esté
expuesto a la humedad o la lluvia.
1
►1.Oricio
Alado de las cuchillas de cizalla
AVISO: Si las cuchillas de cizalla se encuentran
considerablemente desgastadas a causa del
alado, reemplácelas con unas nuevas.
1. Instaleelcartuchodebateríaenlaherramienta.
2. Enciendaypongaenmarchalaherramientade
manera que las cuchillas superior e inferior estén posi-
cionadas alternativamente.
3. Apaguelaherramientayretireelcartuchode
batería.
4. Retireeltornilloyluegoextraigaelreceptáculode
ramas.
1
2
►1. Tornillo 2.Receptáculoderamas
5. Ajusteelángulodelalimaa45°,yalelacuchilla
superior desde 3 direcciones con la lima.
1
2
►(1) Lima (2) 45°
PRECAUCIÓN: Antes de alar las cuchillas
de cizalla, asegúrese de que la herramienta esté
apagada y que el cartucho de batería haya sido
extraído de la herramienta.
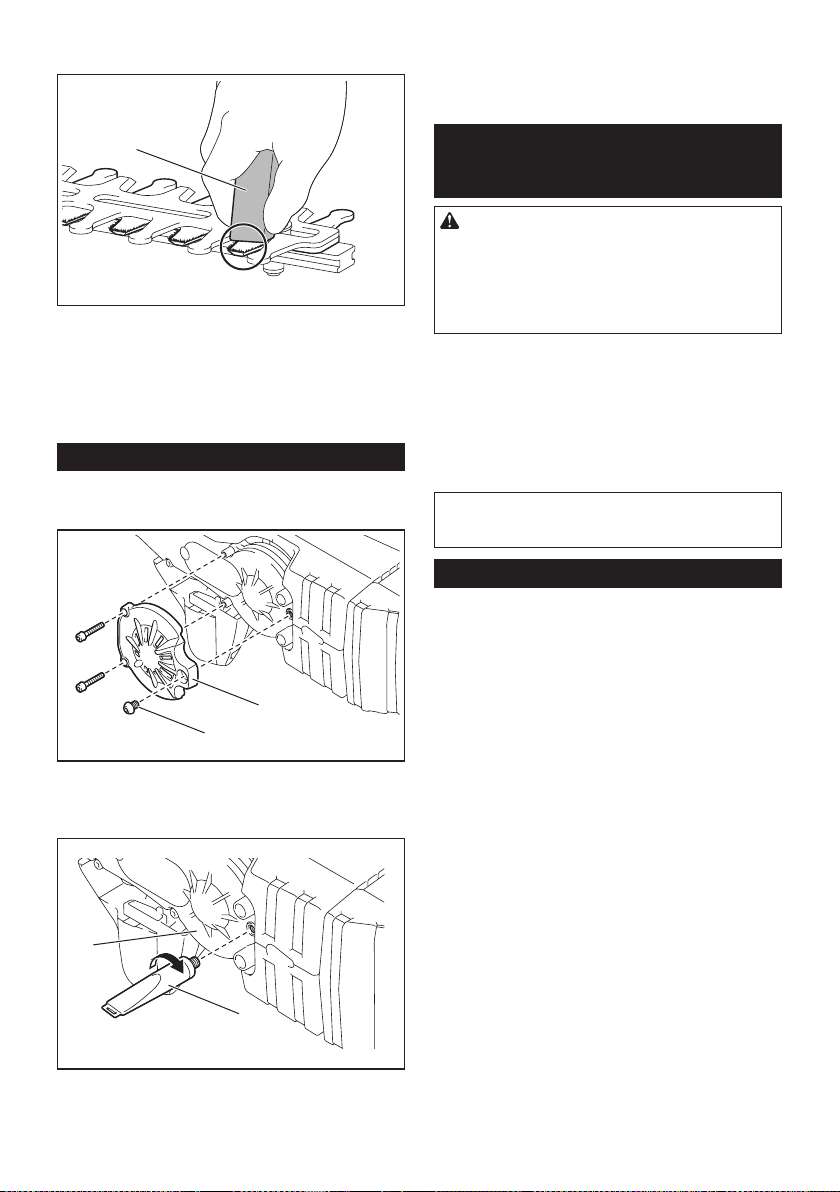
30 ESPAÑOL
6. Coloquelaherramientadecabezayluegoretire
las rebabas de las cuchillas de cizalla con la lima.
1
►1. Lima
7. Ajusteelángulodelalimaa45°,yalelacuchilla
inferior desde 3 direcciones con la lima.
8.
Regreselaherramientaalaposiciónnormalyluego
retire las rebabas de las cuchillas de cizalla con la lima.
9. Fijeelreceptáculoderamasapretandoeltornillo.
Lubricación con grasa
Intervalo de lubricación: Cada 100 horas de operación
1.
Quitelos3tornillosyluegoretirelacubiertainferior.
1
2
►1. Tornillo 2. Cubierta inferior
2.
Retirelatapadelrecipienteparagrasayluegocoloque
elrecipienteparagrasaeneloriciodelacubiertagirándolo.
2
1
►1. Cubierta 2. Recipiente para grasa
3. Aplique la grasa a la herramienta (aproximada-
mente 5 g (0,2 oz) como referencia).
4. Retire el recipiente para grasa.
5. Coloquelacubiertainferioryluegoaprietelos3
tornillos.
ACCESORIOS
OPCIONALES
PRECAUCIÓN: Estos accesorios o aditamen-
tos están recomendados para utilizarse con su
herramienta Makita especicada en este manual.
El empleo de cualquier otro accesorio o aditamento
puede conllevar el riesgo de lesiones personales.
Utilice los accesorios o aditamentos solamente para
sunestablecido.
Sinecesitacualquierayudaparamásdetallesen
relación con estos accesorios, pregunte a su centro de
servicio local Makita.
• Conjuntodecuchillasdecizalla
• Cubierta de las cuchillas de cizalla
• Colector de residuos
• Recipiente para grasa
• BateríaycargadororiginalesdeMakita
NOTA:Algunosdelosartículosenlalistapueden
incluirse en el paquete de la herramienta como acce-
soriosestándar.Éstospuedenvariardepaísapaís.
GARANTÍA LIMITADA DE MAKITA
Ésta Garantía no aplica para México
Consultelahojadelagarantíaanexaparaverlos
términosmásvigentesdelagarantíaaplicableaeste
producto.Encasodenodisponerdeestahojade
garantíaanexa,consultelosdetallessobrelagarantía
descritosenelsitiowebdesupaísrespectivoindicado
a continuación.
Estados Unidos de América: www.makitatools.com
Canadá:www.makita.ca
Otrospaíses:www.makita.com

31

Makita Corporation
3-11-8, Sumiyoshi-cho,
Anjo, Aichi 446-8502 Japan
www.makita.com
885633A947
XHU06-1
EN, ESMX
20181023

