
FOR USER
THIS RANGE IS FOR RESIDENTIAL USE ONLY
INSTALLATION AND SERVICE MUST BE PERFORMED BY A
QUALIFIED INSTALLER.
Dear Customer,
Thank you for choosing Lofra appliances. We are pleased to welcome you as a new
customer.
The safety precautions and recommendations reported below are for yours and other
People’s safety, and they will also help you to make full use your appliance.
Please keep this booklet safe, it will be useful in the future for reference.
This appliance must be used only for the function for which it was designed, i.e. to cook
food. Any other use shall be considered inappropriate or dangerous.
The manufacturer will not be responsible in case of improper use of the appliance.
WARNING:
This appliance has to be installed by a qualified installer.
Improper installation, adjustment, alteration, services, or maintenance can
cause injury or property damage. Consult a qualified installer, service agent,
or the gas supplier.
Never Operate the Top Surface Cooking Section of this Appliance Unattended
•Failure to follow this warning statement could result in fire, explosion, or
burn hazard that could cause property damage, personal injury, or death.
•If a fire should occur, keep away from the appliance and immediately call
your fire department.
DO NOT ATTEMPT TO EXTINGUISH AN OIL/GREASE FIRE WITH WATER.
WARNING: If the information in this manual is not followed exactly, a fire or
explosion may result causing property damage, personal injury or death.
Do not store or use gasoline or other flammable vapors and liquids in the vicinity of
this or any other appliance.
WHAT TO DO IF YOU SMELL GAS
- Do not light any appliance.
- Do not touch any electrical switch.
- Do not use any phone in your building.
- Immediately call your gas supplier from a neighbour’s phone. Follow the gas
supplier’s instructions.
- If you cannot reach your gas suppliers , call the fire department.
Installation and service must be performed by a qualified installer service agency or
the gas supplier.
2
Nuova Lofra S.r.l. reserves the right to modify data and characteristics at any time for technical production needs.
WARNING:
- This range can tip. Injury to person could result.
- Install anti-tip device shipped with range.
- See installation Instructions.
IMPORTANT: SAVE FOR LOCAL ELECTRICAL INSPECTOR’S USE.
READ AND SAVE THERE INSTRUCTIONS FOR FUTURE REFERENCE.
OBSERVE ALL GOVERNING CODES AND ORDINANCES.
WARNING:
A child or adult can tip the range and be killed.
Verify the anti-tip device has been properly installed and engaged
Ensure the anti-tip device is re-engaged when the range is moved.
Do not operate the range without the anti-tip device in place and
engaged.
Failure to do so can result in death or serious burns to children or
adults.
3
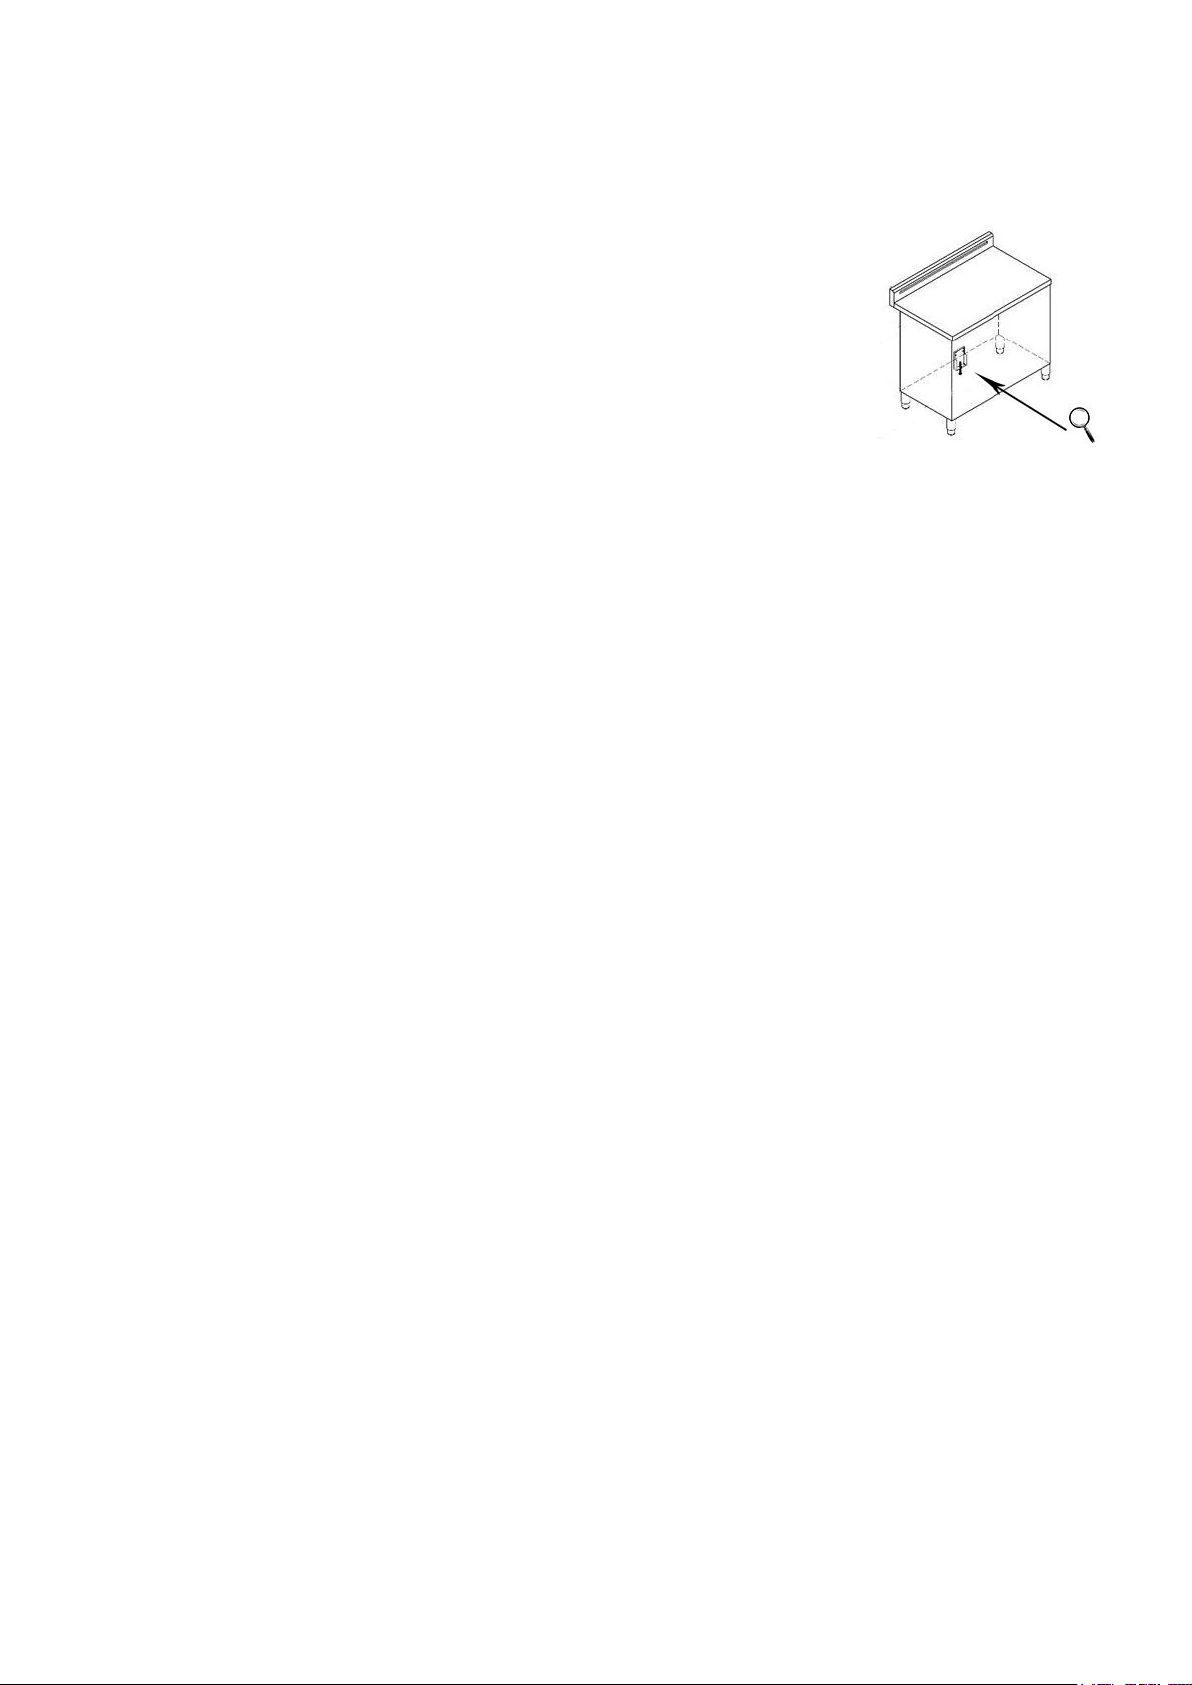
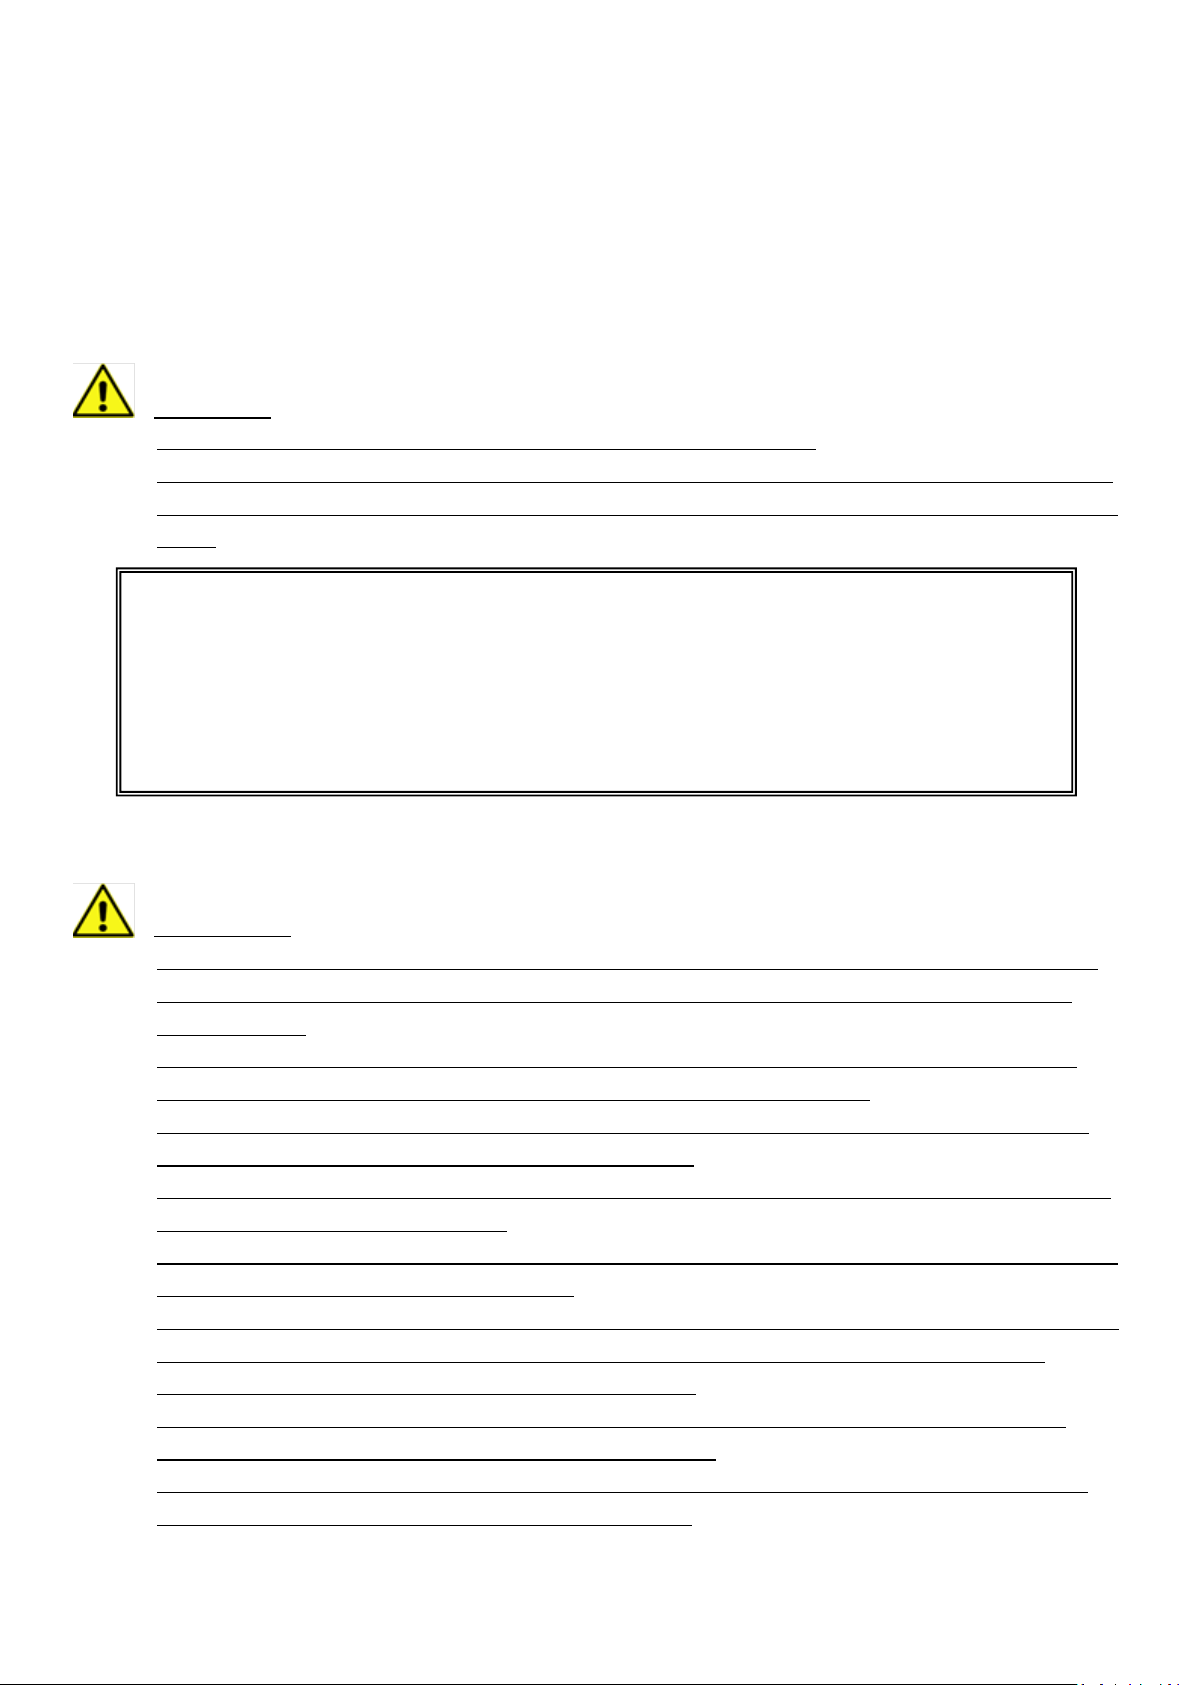
CHECKING THE ANTI TIP DEVICE
To check the installation of the anti-tipping safety system, we
recommend that you view the installation of the bracket under the
kitchen (in the visible part between the feet, see illustration).
IMPORTANT - PLEASE READ AND FOLLOW
Before beginning, please read these instructions completely and carefully.
Do not remove permanently affixed labels, warnings, or plates from the product. This
may void the warranty
Please observe all local and national codes and ordinances.
Please ensure that this product is properly grounded.
The installer should leave these instructions with the consumer who should retain for
local inspector’s use and for future reference.
For an installation at altitudes above 2000 ft (610 mt) contact the Service Centre.
IMPORTANT INSTRUCTION
• Proper installation – Be sure your appliance is properly installed and grounded by a
qualifier technician.
• Never Use Your Appliance for Warming or Heating the Room.
• Do Not Leave Children Alone – Children should not be left alone or unattended in area
where appliance is in use. They should never be allowed to sit or stand on any part of
the appliance.
• Wear Proper Apparel – Loose-fitting or hanging garments should never be worn while
using the appliance.
• User Servicing – Do not repair or replace any part of the appliance unless specifically
recommended in the manual. All other servicing should be referred to a qualified
technician.
• Storage in or on Appliance – Flammable materials should not be stored in an oven or
near surface units.

4
• Do Not Use Water on Grease Fires – Smother fire or flame or use dry chemical or foam-
type extinguisher.
• Use Only Dry Potholders – Moist or damp potholders on hot surfaces may result in burns
from steam. Do not let potholder touch hot heating elements. Do not use a towel or
other bulky cloth.
• Use Care When Opening Door – Let hot air or steam escape before removing or replacing
food.
• Do Not Heat Unopened Food Containers – Build-up of pressure may cause container to
burst and result in injury.
• Keep Oven Vent Ducts Unobstructed.
• Placement of Oven Racks – Always place oven racks in desired location while oven is
cool. If rack must be moved while oven is hot, do not let potholder contact hot heating
element in oven.
• To check the installation of the anti-tipping safety system, we recommend that you view
the installation of the bracket under the kitchen (in the visible part between the feet,
see illustration).
• Installation must conform with local codes or in the absence of codes, the National Fuel
Gas Code ANSIZ223.1/NFPA 54- Iatest edition. Electrical installation must be in
accordance with the National Electrical Code, ANSI/NFPA70 - latest edition and/or local
codes.
The instructions have been examined by the testing agency for comprehensibility,
accuracy and compatibility with the results of tests.
IN CANADA:
The installation must conform with local codes or, in the absence of local codes, with
the Natural Gas Propane Installation Code, CSA B149.1.
GENERAL INFORMATION
WARNING!!
1. This appliance shall not be used for space heating. This information is based on safety
considerations.
2. All openings in the wall behind the appliance and in the floor under the appliance shall be
sealed.

5
3. Keep appliance area clear and free from combustible materials, gasoline, and other
flammable vapors.
4. Do not obstruct the flow of combustion and ventilation air.
5. Disconnect the electrical supply to the appliance before servicing.
6. When removing appliance for cleaning and/or service:
Shut off gas at main supply.
Disconnect AC power supply.
Disconnect gas line to the inlet pipe.
Carefully remove the range by pulling outward.
CAUTION: Range is heavy; use care in handling.
7. Electrical Requirement: electrical installation should comply with national and local
codes.
8. Air Supply and Ventilation: the installer must refers to local/national codes.
The appliance should not be installed with a ventilation system that blows air downward
toward the appliance. This type of ventilation system may cause ignition and combustion
problems with the gas cooking appliance resulting in personal injury or unintended
operation.
An air curtain or other overhead range hood, which operates by blowing a downward
airflow onto a range, shall not be used in conjunction with a range.
9. Gas Manifold Pressure:
• natural gas - 5.0” W.C.P.
• Propane - 10.0” W.C.P.
10. The misuse of oven door (e.g. stepping, sitting, or leaning on them) can result in potential
hazards and/or injuries.
11. When installing or removing the range for service, a rolling lift jack should be used. Do not
push against any of the edges of the range in an attempt to slide it into or out of the
installation. Pushing or pulling a range (rather than using a lift jack) also increases the
possibility of bending the leg spindles or the internal coupling connectors.
6
REPLACEMENT PARTS
Only authorized replacement parts may be used in performing service on the range.
Replacement parts are available from factory authorized parts distributors. Contact the
nearest parts distributor in your area.
PRODUCT SPECIFICATION
IMPORTANT NOTE TO THE CONSUMER
Keep these instructions manual for future reference.
• As when using any appliance generating heat, there are certain safety precautions you
should follow.
• Be sure your cooktop is installed and grounded properly by a qualified installer or
service technician.
• Make sure the wall covering around the cooktop can withstand the heat generated by
the cooktop.
Write the appliance’s model/serial numbers in this manual for service/maintenance
reference.
The user have to keep this manual for personal reference and for that of inspectors, service
personnel, etc.
WARNING:
ELECTRICAL GROUNDING INSTRUCTIONS
The range must be electrically grounded in accordance with
local codes or, in the absence of local codes, with the
National Electrical Code, NFPA 70 or the Canadian Electric
Code, CSA C22.1-02. Installation should be made by a licensed
electrician.
FOR PERSONAL SAFETY, THIS APPLIANCE MUST BE PROPERLY
GROUNDED.
7
CAUTION:
Cold temperature can damage the electronic control. When
using the appliance for the first time, or when the appliance
has not been used for an extended period, be certain the
unit has been in temperatures above 32°F (0°C) for at least 3
hours before turning on the power to the appliance.
CUSTOMER SERVICE INFORMATION
The serial number can be found on the inner side of door trim.
IMPORTANT SAFETY INSTRUCTIONS
The manufacturer declines all liability for injury to persons or damage to property caused
by incorrect or improper use of the appliance.
After having unpacked the appliance, check to ensure that it is not damaged.
This range is supplied with a protective film on steel and aluminium parts. This film must
be removed before installing/using the appliance.
This appliance is intended for use in your household. Never use the appliance for any other
purpose!
In case of doubt, do not use the appliance and consult your supplier or a professionally
qualified technician.
Do not attempt to modify the technical characteristics of the appliance as this may become
dangerous to use.
Do not carry out cleaning or maintenance operations on the appliance without having
previously disconnected it from the electric power supply.
After use, ensure that the knobs are in OFF position.
Do not allow children or other incapable people to use the appliance without supervision.
Keep children away from the range when it is in use.
Do not cook on broken cook-top: if cook-top should break, cleaning solutions and spillovers
may penetrate the broken cook – top and create a risk of electric shock. Contact a qualified
technician immediately.

8
Clean cook – top with caution: if a wet sponge o cloth is used to wipe spills on a hot cooking
area, be careful to avoid steam burn. Some cleaners can produce noxious fumes if applied
to a hot surface.
Induction cooktop surface units: do not place metallic objects such as knives, forks, spoons
and lids on the cooktop surface since they can get hot.
Do not touch heating elements or interior surfaces of oven: heating elements may be hot
even though they are dark in colour. Interior surfaces of an oven become hot enough to
cause burns. During and after use of the range, do not touch, or let clothing or other
flammable materials contact heating elements or interior surfaces of oven until they have
had sufficient time to cool.
Placement of oven racks: always place oven racks in desired location while oven in cool. If
rack must be moved while oven is hot, do not let potholder contact hot heating element in
oven.
Fire risk! Do not store flammable material in the oven, and in the storage compartment.
All the non-combustible material is to be installed on the underside of a cabinet located
above the broiler section or unit in accordance with local codes, or in absence of local
codes, with the National Fuel Gas Code, ANSI Z223.1/NFPA 54 or, in Canada, the Natural
Gas and Propane Installation Codes, CSA B149.1.
Make sure that electrical cables connecting other appliances in the proximity of the range
cannot come into contact with the hob or become entrapped in the oven door.
Do not line the oven walls with aluminium foil. Do not place shelves, broiler pan, pans or
other cooking utensils on the base of the oven chamber.
Never cover any slots, holes or passages in the oven bottom or cover an entire rack with
materials such as aluminium foil. Doing so blocks air flow through the oven and may cause
carbon monoxide poisoning. Aluminium foil linings may also trap heat, causing a fire
hazard.
To avoid any possible hazard, the appliance must be installed by qualified personnel only.
Any repairs by unqualified persons may result in electric shock or short circuit. In order to
avoid possible injuries to your body or to the appliance, do not attempt any repairs by
yourself. Such work should be carried out by qualified service personnel only.
Danger of burns! The oven and cooking accessories may become very hot during operation.
Make sure children are kept out of reach and warn them accordingly. To avoid burns use
kitchen clothes and gloves when handling hot parts or utensils.
Stand away from the range when opening oven door. Hot air or steam which escapes can
cause burns to hands, face, and/or eyes.
9
Remove the door and the storage compartment pivoting panel before disposal to prevent
entrapment.
Never clean the range, oven and storage compartment with a high-pressure steam cleaning
device, as it may provoke a short circuit.
Wear Proper Apparel: loose – fitting or hanging garments should never be worn while using
the appliance.
Packing elements (i.e. plastic bags, polystyrene foam, nails, packing straps, etc.) should not
be left around within easy reach of children, as these may cause serious injuries.
The packaging material is recyclable and is marked with the recycling symbol .
If you should decide not to use this appliance any longer (or decide to substitute an older
model), before disposing of it, it is recommended that it be made inoperative in an
appropriate manner in accordance to health and environmental protection regulations,
ensuring in particular that all potentially hazardous parts be made harmless, especially in
relation to children who could play with old appliances.
The appliance should not be installed with a ventilation system that blows air downward
toward the appliance. This type of ventilation system may cause ignition and combustion
problems with the gas cooking appliance resulting in personal injury or unintended
operation.
An air curtain or other overhead rage hood, which operates by blowing a downward airflow
onto a range, shall not be used in conjunction with a range.
IMPORTANT PRECAUTIONS AND RECOMMENDATIONS FOR USE OF
ELECTRICAL APPLIANCES
Use of any electrical appliance implies the necessity to follow a series of fundamental rules. In
particular:
Never touch the appliance with wet hands or feet;
Do not operate the appliance barefooted;
Do not allow children or disabled people to use the appliance without your supervision.
WARNING:
NEVER use this appliance as a space heater to heat or warm
the room. Doing so may result in carbon monoxide poisoning
and overheating of the oven.

10
FIRE SAFETY
• Do not store/place/use combustible materials (e.g., paper, plastic, pot holders, linens,
gasoline, alcohol) near the product.
• Do not douse a grease fire with water. Instead, turn off the heat source, and smother
the fire with a tight-fitting lid, or use a multi-purpose, dry-chemical or foam
extinguisher.
• If a grease fire should occur in the oven, turn off the oven by putting the handle in the
OFF position.
• Do not wear loose fitting or hanging garments while using the product.
• Use only dry potholders: moist or damp potholders on hot surfaces may result in
burns from steam. Do not let potholder touch hot heating elements. Do not use a
towel or other bulky cloth.
• Do not let potholders or other flammable material touch a heating element. Do not use
a towel or other bulky cloth item as a pot holder.
• Use proper pan size: this appliance is equipped with one or more surface units of
different size. Select pans having flat bottoms large enough to cover the surface unit-
heating element. The use of undersized utensils will expose a portion of the heating
element to direct contact and may result in ignition of clothing. Proper relationship of
utensil to burner will also improve efficiency.
• Glazed cooking utensils: only certain types of glass, glass/ceramic, ceramic,
earthenware, or other glazed utensils are suitable for range-top service without
breaking due to the sudden change in temperature.
• Never leave surface units unattended at high heat settings: broilover causes smoking
and greasy spillovers that my ignite.
• Do not soak removable heating elements: heating elements should never be immersed
in water.
• Keep oven vent ducts unobstructed, to avoid grease build up, regularly clean the vents.
• Use care when opening door: let hot air or steam escape before removing or replacing
food.
• Keep the oven door closed until the fire goes out. If necessary, use a multipurpose dry
chemical or foam-type fire extinguisher.
• Do not heat unopened food containers: build – up of pressure may cause container to
burst and result in injury.

11
GAS SAFETY
If you smell gas:
• Close the valve and do not use the product.
• Do not light a match, candle, or cigarette.
• Do not turn on any gas or electric appliances.
• Do not touch any electrical switch or plug in a power cord.
• Do not use any phone in your building.
• Evacuate everyone from the building.
• Immediately call your gas supplier from a neighbor’s phone. Follow the gas supplier’s
instructions.
• If you cannot reach your gas supplier, call the fire department.
• Checking for gas leaks.
• Leak-testing the appliance must be done according to the manufacturer’s
instructions. Do not use a flame to check for gas leaks. Use a brush to spread a soap-
and-water solution around the area you are checking. If there is a gas leak, small
bubbles will appear in the solution. When not sure, call for professional help.
ELECTRICAL AND GROUNDING SAFETY
• Do not use an adapter or an extension cord.
• Do not use a damaged power plug, power cord, or loose power outlet.
• Do not modify the power plug, cord, or outlet.
• Do not put a fuse in a neutral or ground circuit.
• Do not connect the ground wire to plastic plumbing lines, gas lines, or hot water pipes.
• This product must be grounded. If the range malfunctions or breaks down, grounding
reduces the risk of electric shock by providing a safe path for the current. This range's
power cord has a grounding plug, which must be firmly plugged into an outlet that is
properly installed and grounded according to local regulations. If you are not sure your
electrical outlet is properly grounded, have it checked by a licensed electrician.
• The range is supplied with a 4-pronged grounded plug. This cord must be plugged into
a mating, grounded 4-prong outlet that meets all local codes and ordinances.

12
• The product owner shall ensure that the proper electrical service is provided for the
product.
COOKTOP SAFETY
• Before igniting, make sure all burner caps are properly in place and all burners are
level.
• Make sure all burners are OFF when not in use.
• Do not leave burners unattended on medium or high heat settings.
• When you set a burner to simmer, do not turn the knob quickly. Make sure the flame
stays on.
• If ignition fails, turn the knob to OFF, and wait 5 minutes for the gas to dissipate.
• Do not place any objects other than cookware on the cooktop.
• Before removing or changing cookware, turn off the burners.
• Remove food and cookware immediately after cooking.
• Make sure all cooktop burners are off and all surfaces have completely cooled before
removing the grates and disassembling the burners.
• Before self-cleaning the oven: remove broiler pan and other utensils.
• After cleaning the burner head, make sure it is completely dry before re-assembling.
• To avoid carbon monoxide poisoning, do not pour water or other liquids into the
cooktop during cleaning.
• Do not clean door gasket: the door gasket is essential for a good seal. Care should be
taken not to rub, damage, or move the gasket.
• Do not use oven cleaners: no commercial oven cleaner or oven liner protective coating
of any kind should be used in or around any part of the oven.
• Clean only parts listed in manual.
• Select cookware that is designed for cooktops and that is large enough to cover the
grates. Burner flames should not extend beyond the bottom of the cookware.
• To avoid cookware discoloration, deformity, and/or carbon monoxide poisoning, do
not use cookware that is exceedingly larger than the grate.
• Do not use aluminium foil to line the grates or any part of the cooktop.

13
• Always use a minimum amount of oil for any type of frying. Always thaw food before
frying, and do not frying food that is overly cold or that has clumps of ice attached to it.
• When frying, always heat the oil slowly, and monitor the oil as it heats. When frying
foods at high heat, monitor the oil throughout the cooking process. If combining fats or
oils for frying, mix them together before heating. Stand at a safe distance while frying
to avoid hot spatter.
• Use a deep-fry thermometer when possible to avoid heating the oil beyond its smoke
point. (Know the smoke point of the oil you are using.)
• Always let the oil/fat in the cookware to cool to room temperature before moving the
cookware.
• To avoid delayed-eruptive boiling, let hot oil/fat stand at least 20 seconds after turning
off the burner so the temperature can stabilize. In the event of scalding, follow these
first-aid instructions:
1. Immerse the scaled area in cool or lukewarm water for at least 10 minutes.
2. Do not apply any creams, oils, or lotions.
3. Cover with a clean, dry cloth.
OVEN SAFETY
• Do not use the oven for non-cooking purposes such as drying clothes or storage. Use
the oven for cooking purposes only.
• Do not leave plastic items inside the oven.
• Do not use aluminium foil or foil liners anywhere in the oven. Do not use aluminium
foil or like material to cover any holes or passages in the oven bottom or to cover an
oven rack.
• When repositioning the oven racks, make sure the oven is completely cool.
• Make sure the oven racks are placed on the same level on each side.
• Do not damage, move, or clean the door gasket.
• Stand away from the oven when opening the oven door.
• To avoid damaging the burner control knobs or oven control, always bake and/or broil
with the oven door closed.
• Do not broil meat too close to the broil element. Trim excess fat from meat before
cooking.
• When using cooking or roasting bags in the oven, follow the manufacturer’s
directions.
14
• Keep the oven free from grease build up.
• Do not spray water on the oven glass while the oven is on or just after you have turned
it off.
• Do not use harsh abrasive cleaners or sharp metal scrapers to clean the oven door
glass. They can scratch the surface which may result in the glass shattering.
CAUTION:
• Do not attempt to operate the oven during a power failure.
• If the power fails, always turn the oven off. If the oven is not turned off and the power
returns, the oven may begin to operate again. Food left unattended could catch fire or
spoil.
CAUTION:
• Stepping, leaning or sitting on the door or drawers of this range can result in serious
injuries and can also cause damage to the range. A child or adult can tip the range
and be killed.
• Do not store items of interest to children in the cabinets above the range. Children
could be seriously burned climbing on the range to reach items.
• Do not store or use gasoline or other flammable vapors and liquids near this or any
other appliance. Explosions or fires could result.
• To eliminate the need to reach over the surface burners, cabinet storage space above
the burners should be avoided.
• Adjust surface burner flame size so it does not extend beyond the edge of the cooking
utensil. Excessive flame is hazardous.
• Do not use the oven as a storage space. This creates a potentially hazardous situation.
• Install the anti – tip device to the structure and/or the range. Verify the anti – tip
device has been properly installed and engaged.
• Re – engaged the anti – tip device if the range is moved. Do not operate the range
without the anti – tip device in place and engaged.
• Never use your range for warming or heating the room. Prolonged use of the range
without adequate ventilation can be dangerous.
WARNING:
Never leave children alone or unattended in the area where
an appliance is in use. As children grow, teach them the
proper, safe use of all appliances. Never leave the oven door
open when the range is unattended.
15
• In the event of an electrical power outage, the surface burners can be lit manually.to
light a surface burner, hold a lit match to the burner head and slowly turn the Surface
Control knob to LITE. Use caution when lighting surface burners manually.
• Reset all control to the “off“ position after using a programmable timing operation.
To avoid breakage: Do NOT handle or manipulate the unit by the cooktop.
Electrical and gas equipment with moving parts can be dangerous. The important safety
instructions in this manual are intended to minimize the risk of property damage, personal
injury, and death. Be sure to read them.
Keep this manual in a handy place so you can refer to it as needed.
REPLACEMENT PARTS
Only authorized replacement parts may be used in performing service on the range.
Replacement parts are available from factory authorized parts distributors. Contact the
nearest parts distributor in your area.
PRODUCT SPECIFICATION
NOTE: do not pinch the power supply cord or the flexible gas conduit
between the range and the wall.
Do not seal the range to the side cabinets.
For all other information about the appliance, see the labels on the back of the appliance.
16
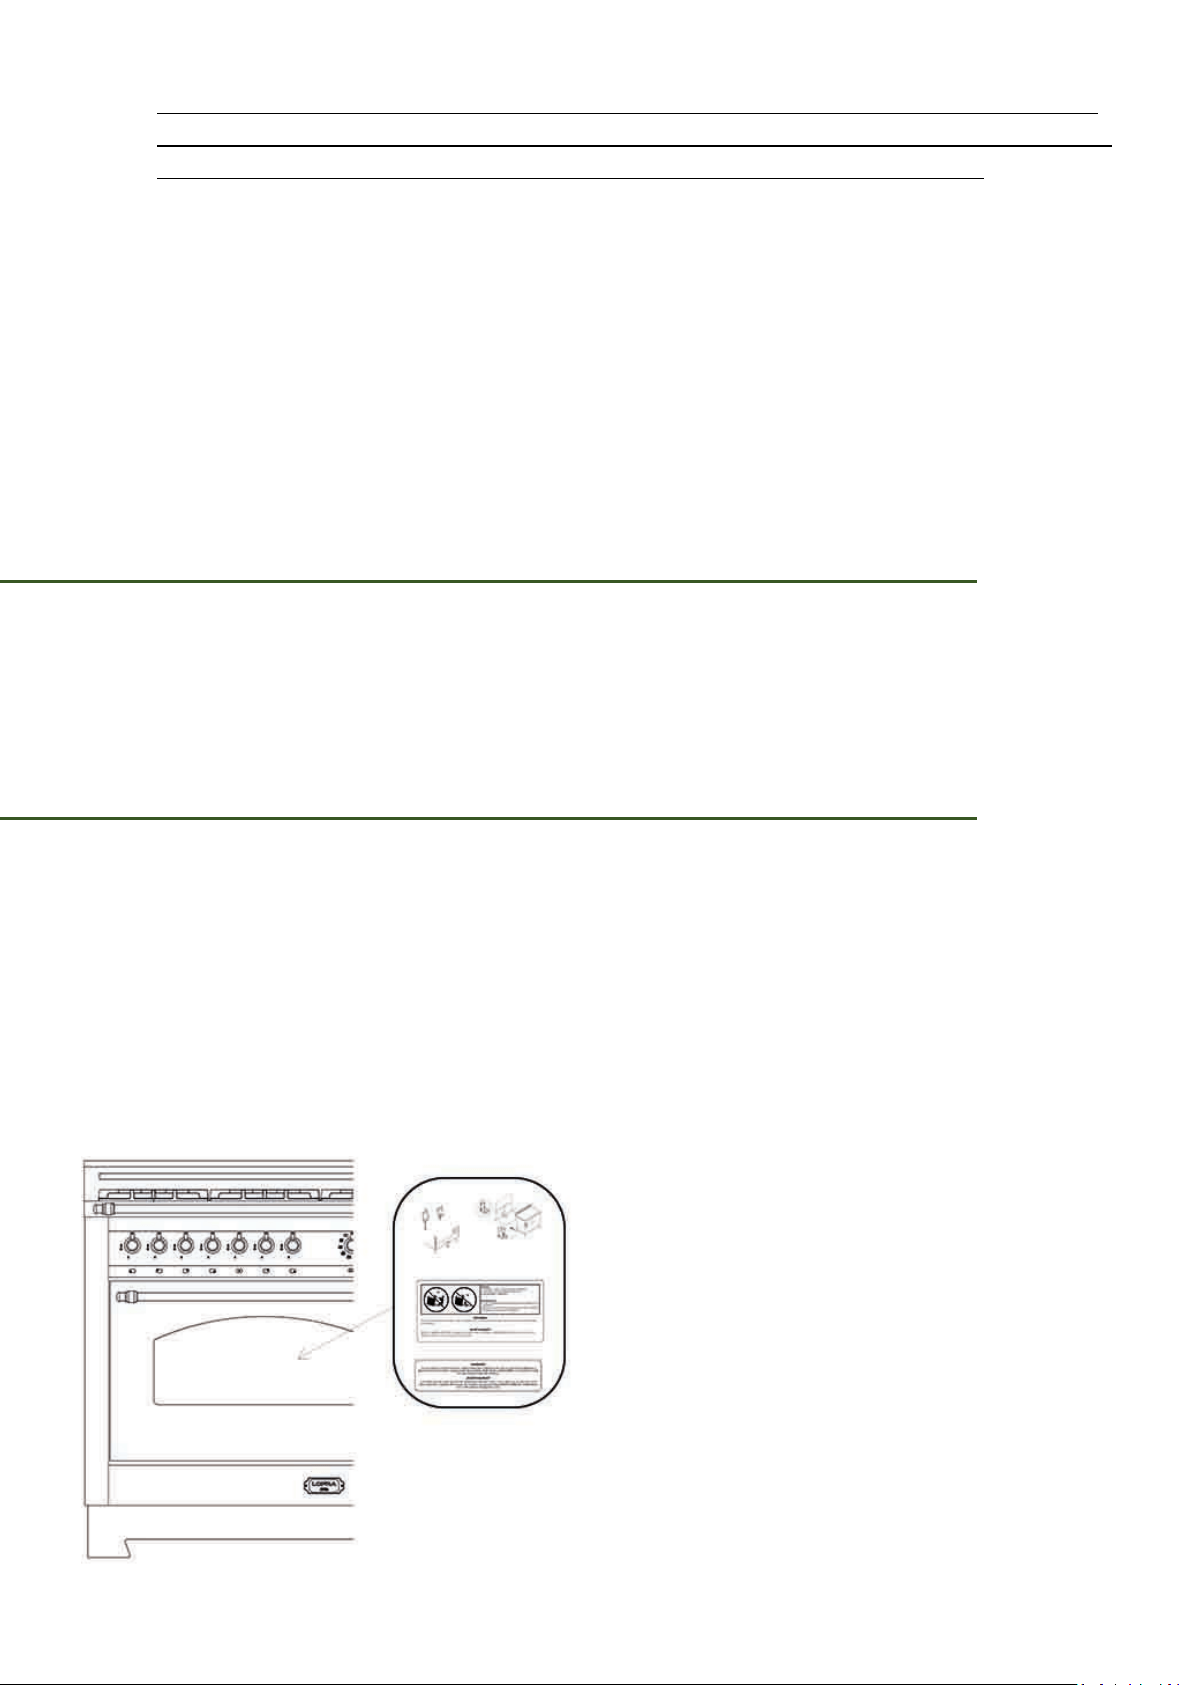
The cooking surface:
1. Front Left – Rapid (R)
2. Rear Left - Auxiliary (A)
3. Center - Double Crown (DC)
4. Rear Right – Rapid (R)
5. Front Right - Semi-Rapid (SR)
Note:
The electric gas-lighting device is incorporated into the knobs.
The appliance has a safety valve system fitted, the flow of gas will be stopped if and when the
flame should accidentally go out.
CAUTION:
If the burner is accidentally extinguished, turn the gas off at the control knob and wait
at least 1 minute before attempting to relight.
CAUTION:
Gas appliances produce heat and humidity in the environment in which they are
installed.
Ensure that the cooking area is well ventilated following national/local codes.
17
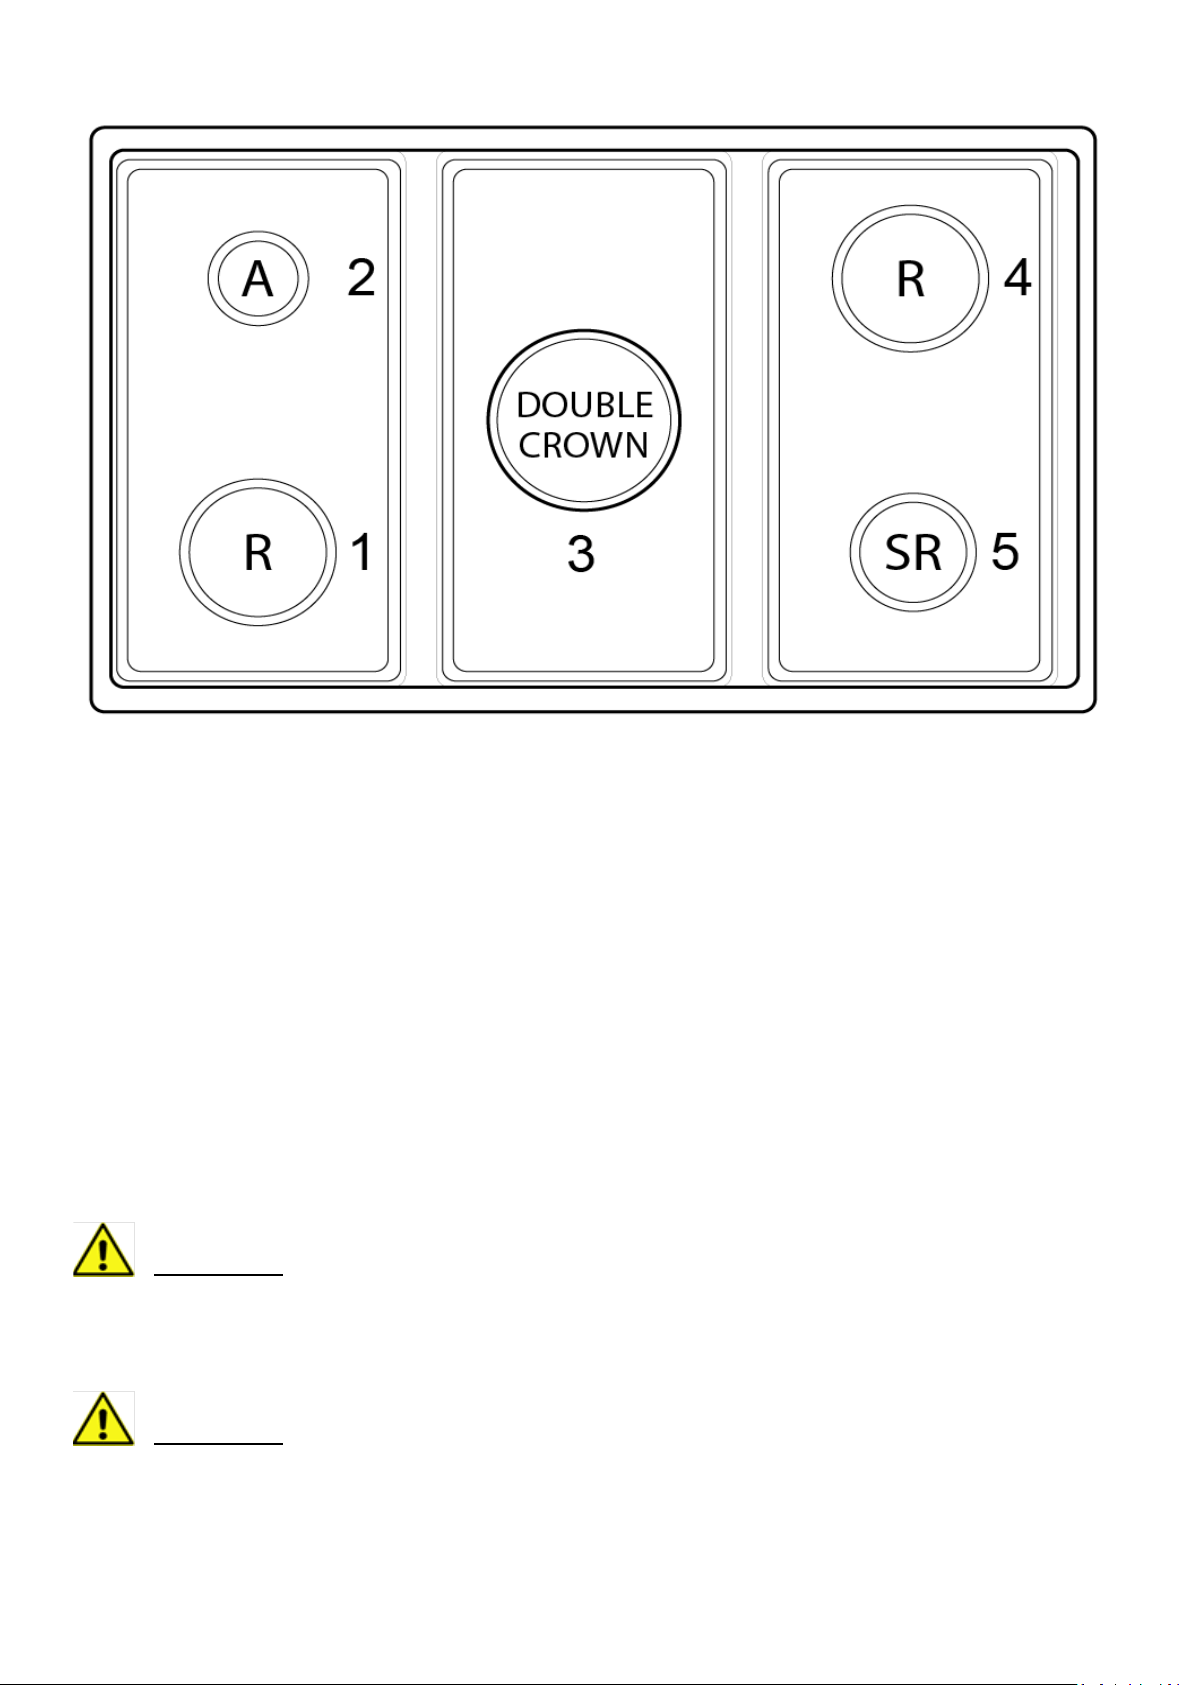
Controls description:
1. Front left burner control knob
2. Rear left burner control knob
3. Front left burner control knob
4. Rear left burner control knob
5. Central dual burner control knob
6. Electronic programmer
7. Multifunction oven switch knob
8. Multifunction oven thermostat knob
9. Oven thermostat indicator light
USING THE TOP BURNERS
GAS BURNERS
Electronic ignition integrated in the knob: turn the knob to the maximum position and press it
fully and the burner ignites automatically.
WARNING:
If overhead cabinets are provided, a range hood should also
be provided that projects horizontally a minimum of 5 in
(12.7 cm) beyond the front of the cabinets.
This will dissipate any heat build-up in the overhead cabinets
to prevent death, personal injury, and/or fire hazard.
The ventilating hood must be constructed of sheet metal not
less then 0.0122" thick. Install above the range with a
clearance of not less than 1/4" between the hood and the
underside of the combustible material or metal cabinet. The
hood must be at least as wide as the appliance and centred
over the appliance. Clearance between the cooking surface
and the ventilation hood surface must never be less than 24
inches.
18
No gas supply (tap closed)
Maximum gas supply Minimum gas supply
To obtain the minimum flow rate, turn the knob counterclockwise and position the index
finger of the knob at the small flame.
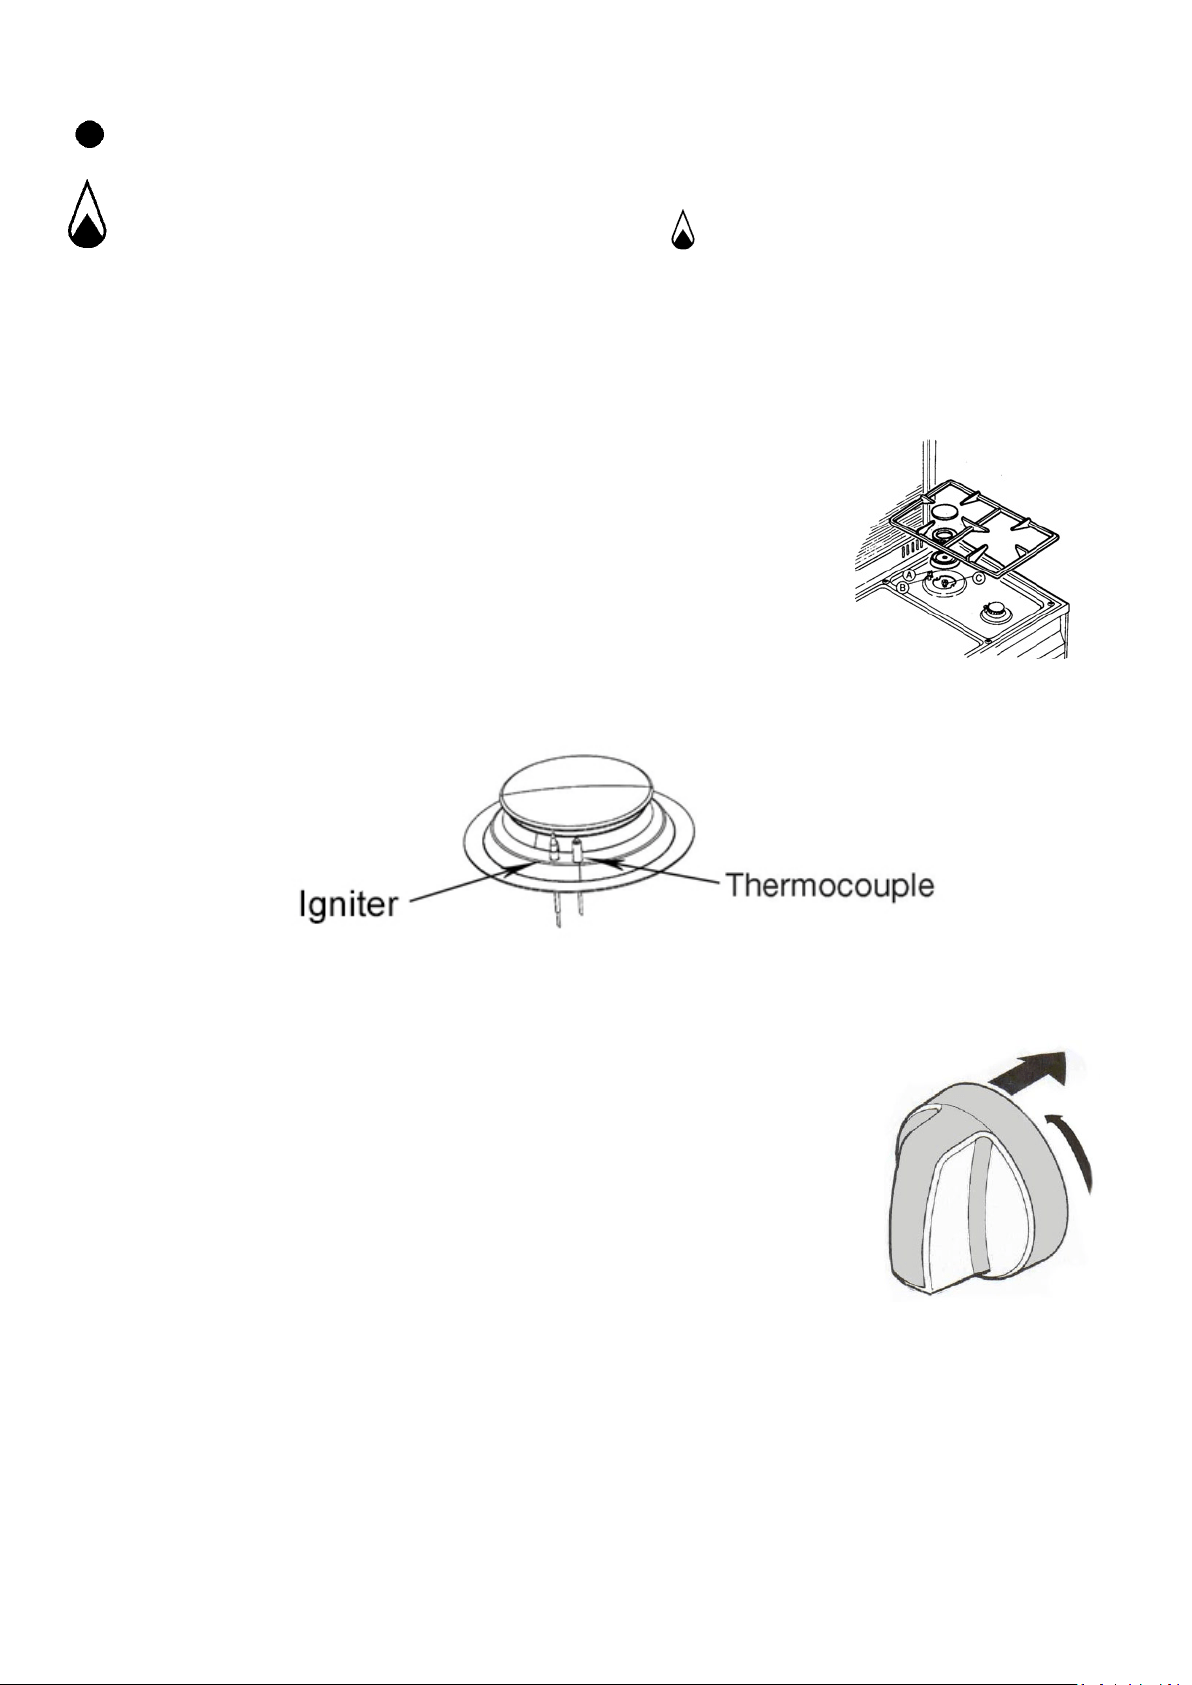
Safety device: once the burner is ignited, keep the knob pressed for
at least 5 / 10 seconds and then release, the burner remains ignited
by the thermocouple (A), which keeps the gas passage open through
a safety valve, which in case of accidental burner shutdown
interrupts the gas passage.
In the event of a momentary power failure, the hob burner can be
ignited manually using an igniter.
Push and turn the knob to the maximum gas position to induce a
flame into the desired burner.
In the event of accidental extinction of the flame, it is advisable to turn
the knob to the off position.
19
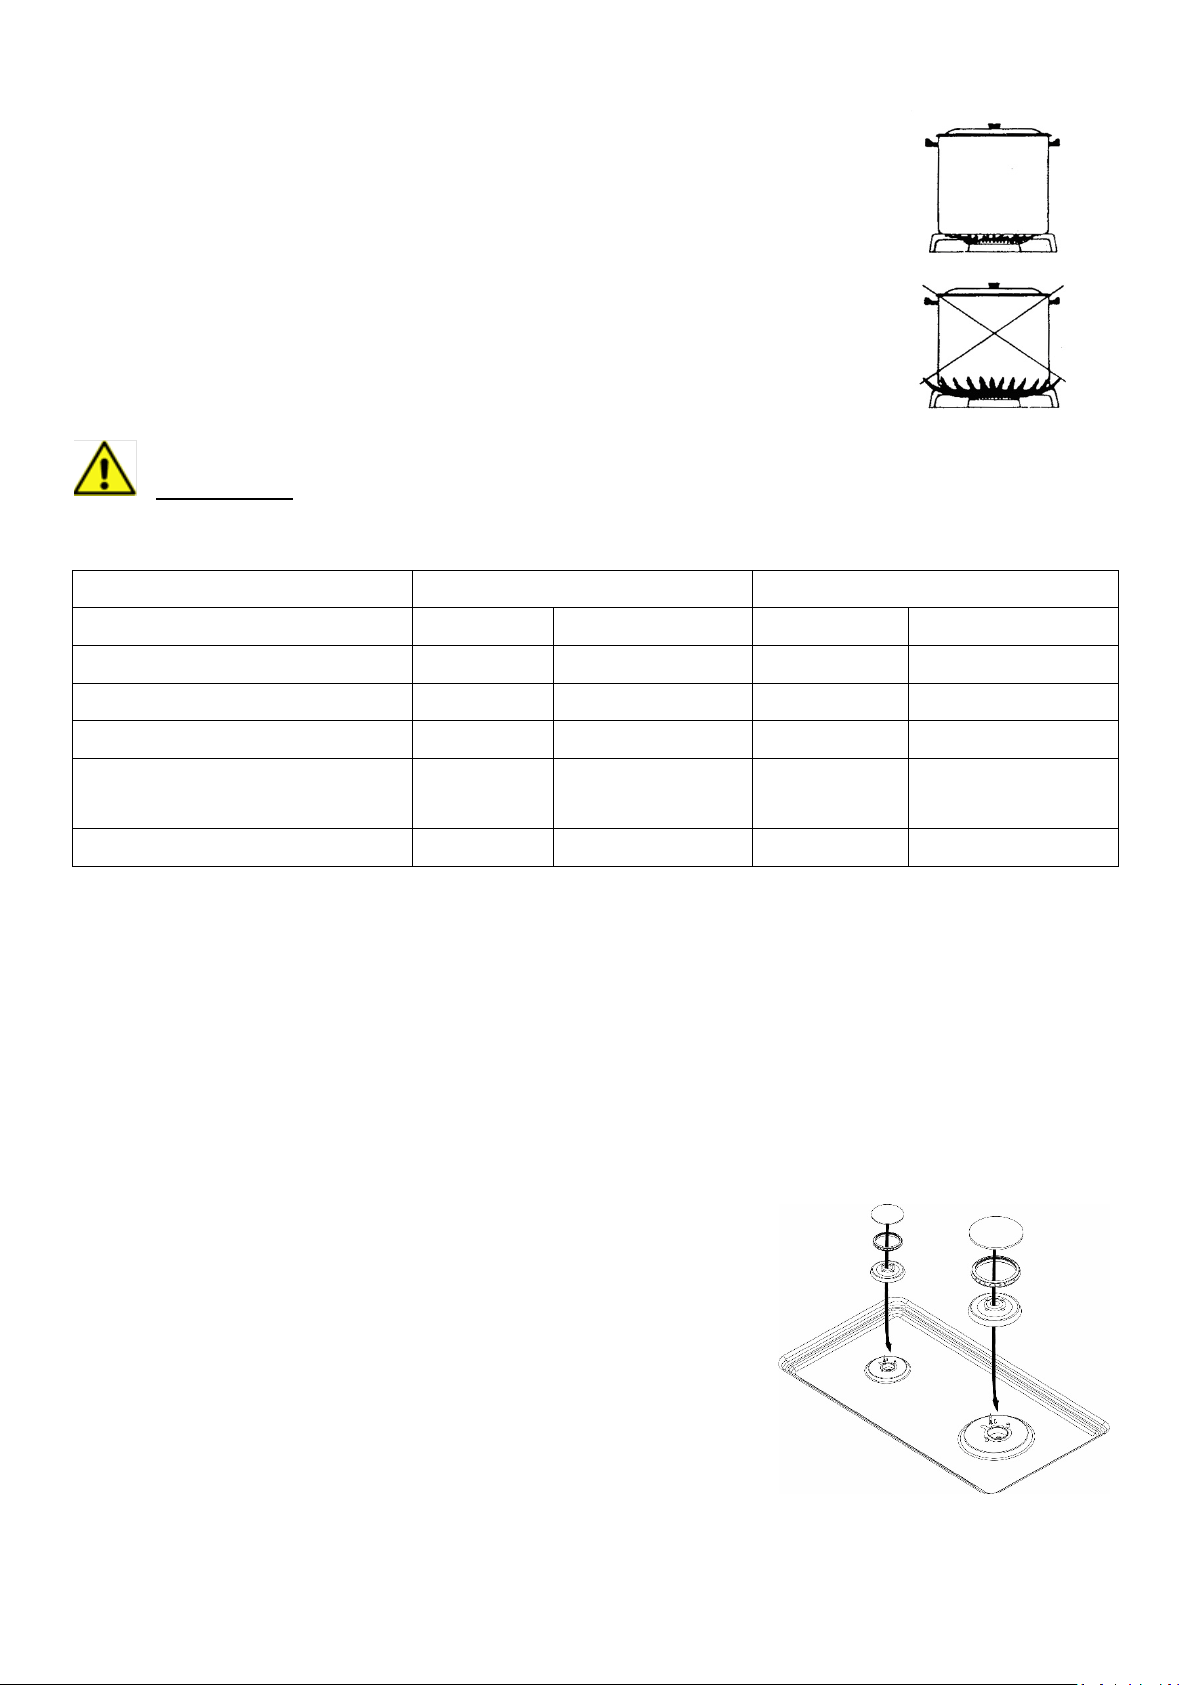
BURNER PERFORMANCE
A variety of pans with a minimum diameter of 5 inches (12 cm) can be used
on the “medium and small” burners. The pans must not have concave or
convex bottoms, but be perfectly flat as shows in figure. For optimum
performance, use the saucepans shown in figure, i.e. the flames must not
stay beyond the bottom of the pan. When a liquid starts boiling, lower the
flame as much as possible, but keep it on the boil. For safety reasons, we
recommend using pans with the following diameters on the various
burners (see tables).
CAUTION:
For emergency reasons we advise I use it of the following pots with diameters to overlap
to the burners: auxiliary, semi-rapid, rapid, triple ring, fish burner.
Burner
Diameter min.
Diameter max
Inches
cm
Inches
cm
Small (auxiliary)
4
10
6
14
Medium (semi –rapid) 6 15 8 20
Large (rapid) 8 21 10 26
Triple ring (ultra-rapid) dual
Ø125mm AEO
9 24 10 26
Dual Ø145mm AEO four-leaf 10 26 12 30
NOTE:
A minimum 4 inches (10 cm) distance is recommended between the edges of two
different pans.
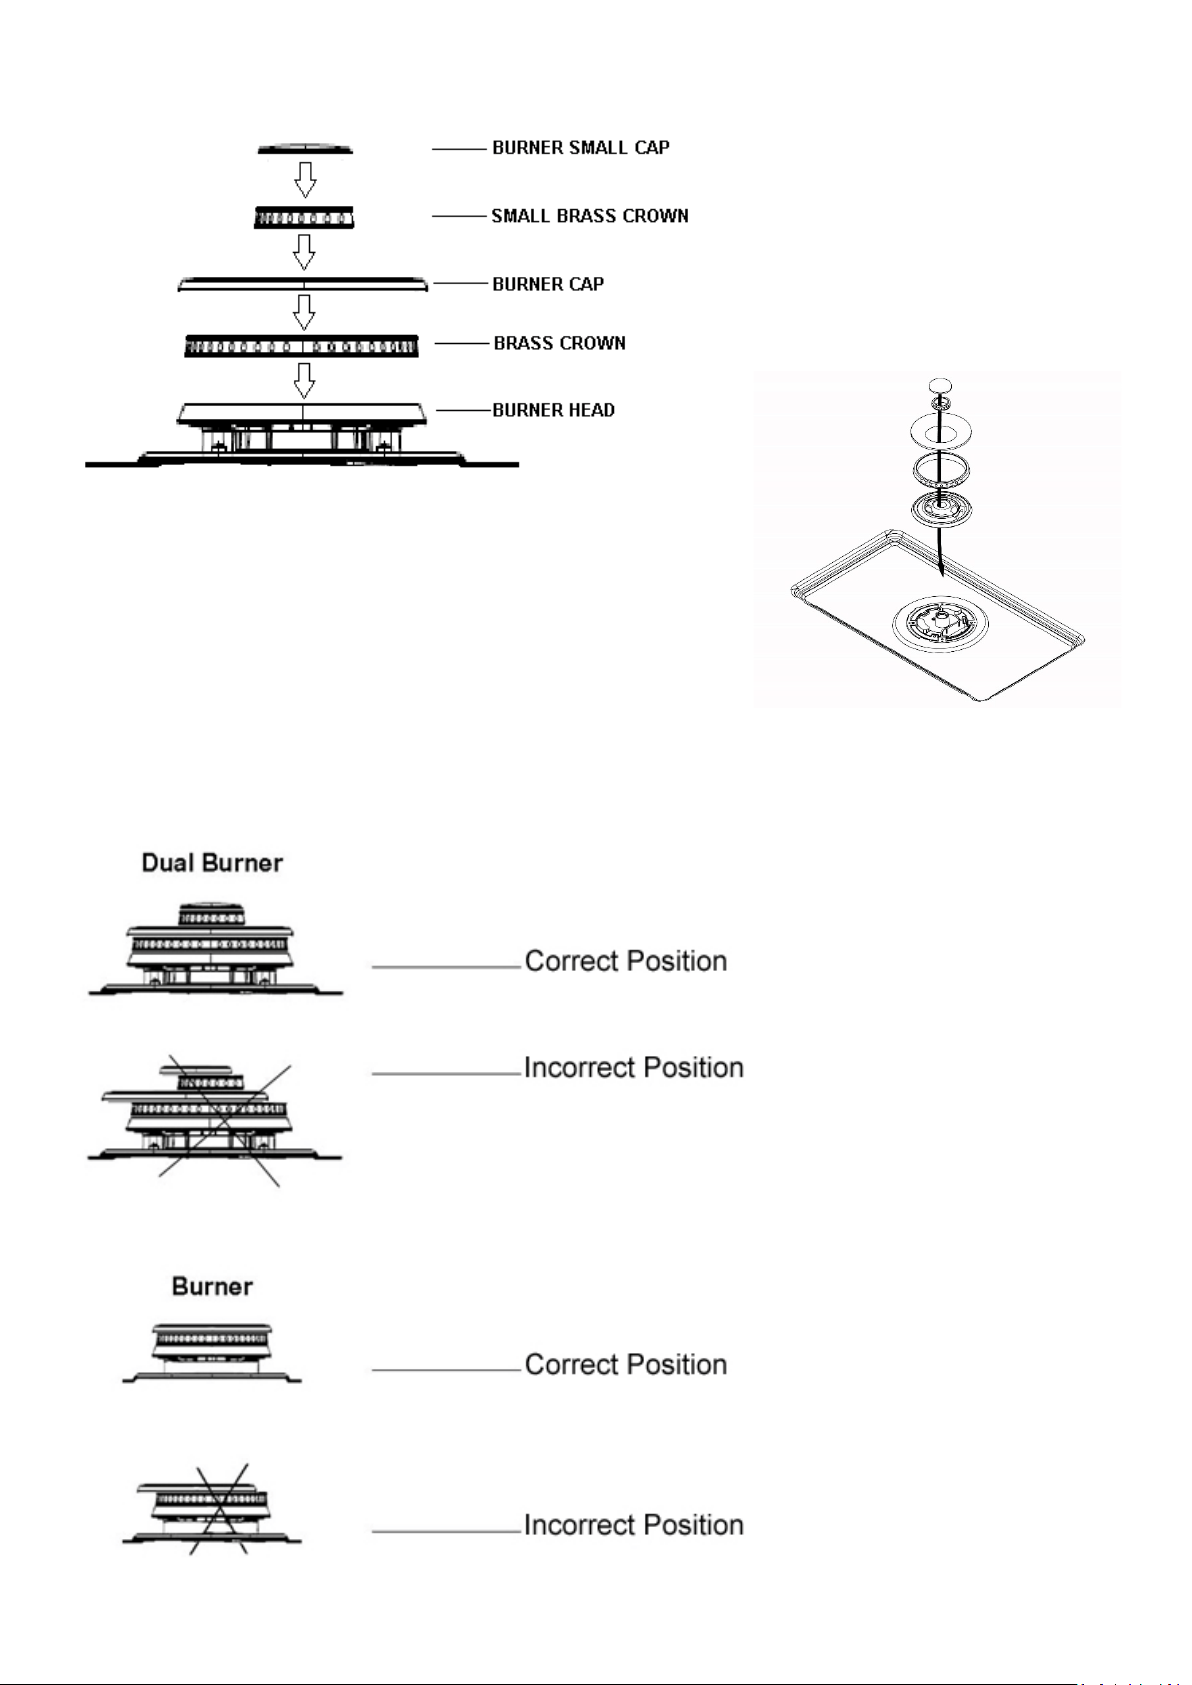
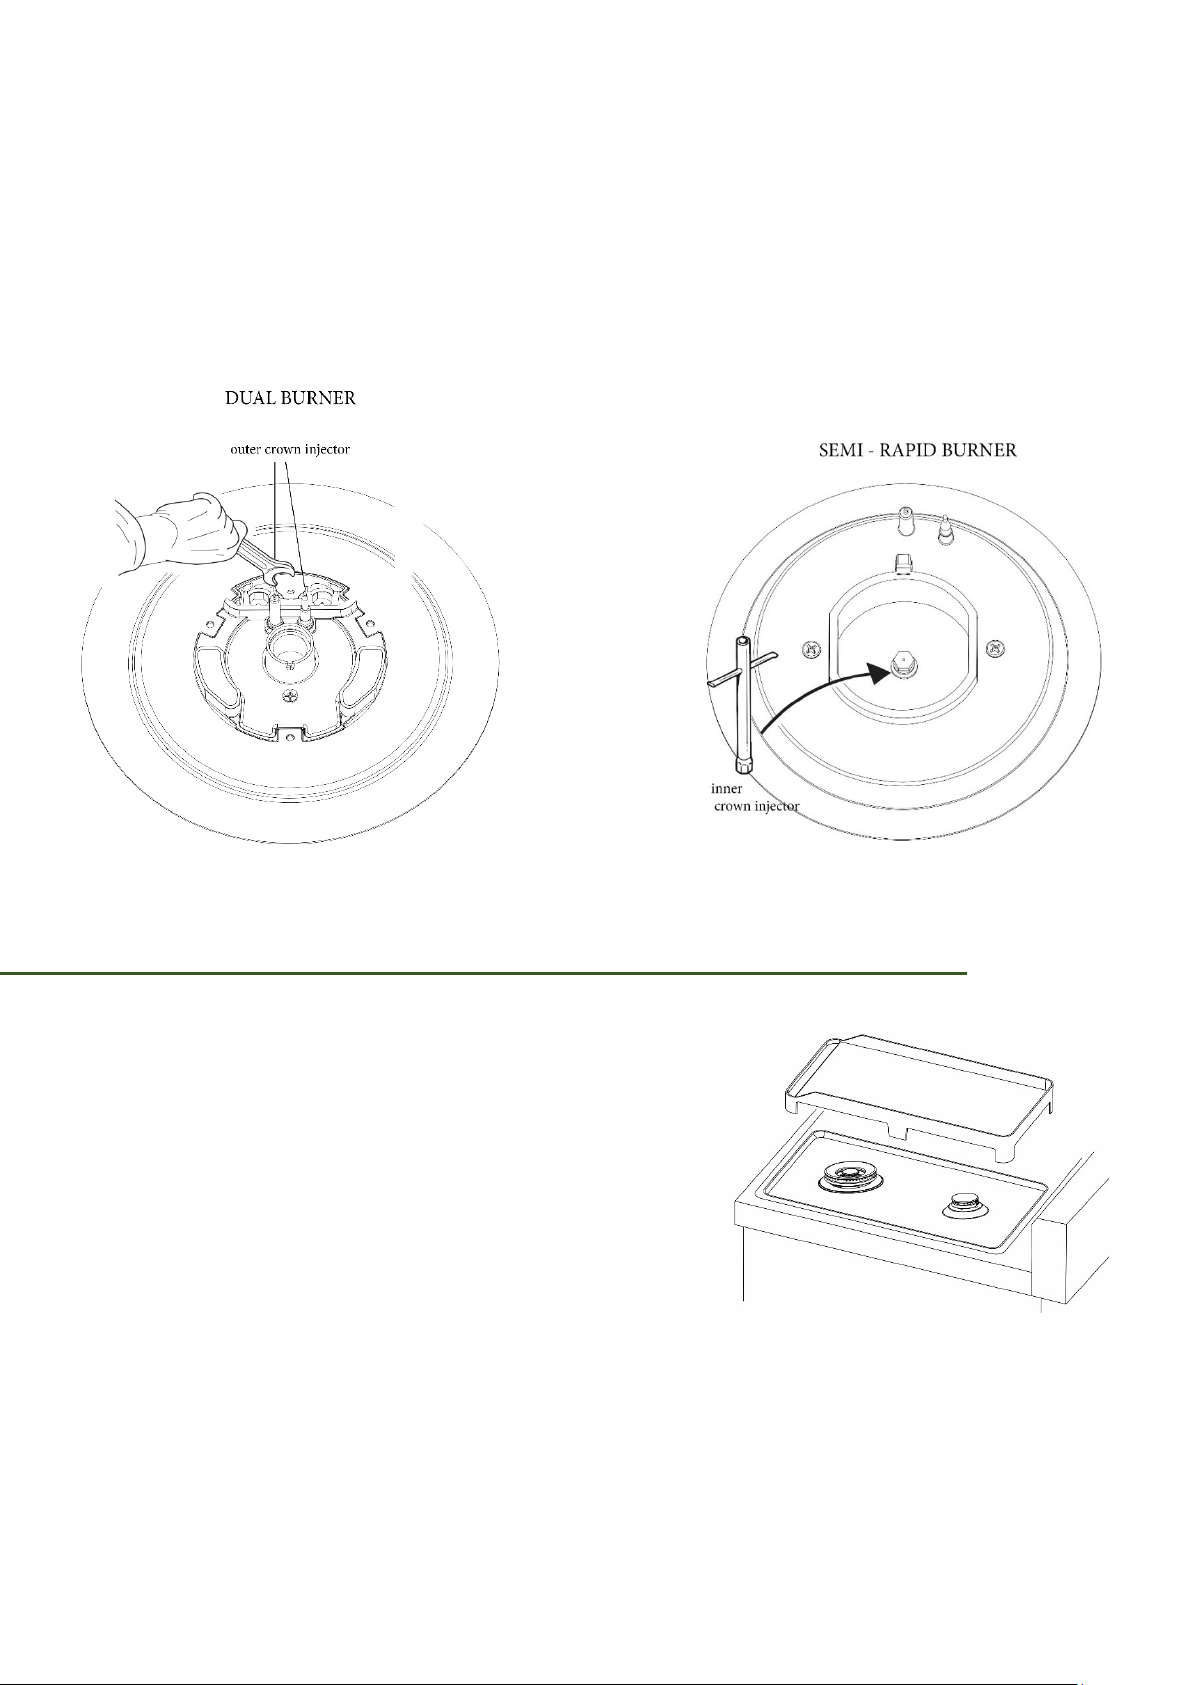
DISASSEMBLED AND REASSEMBLED GAS BURNERS
The burners can be disassembled and reassembled following the sequence in the picture for
cleaning and maintenance.
20
Assembly of the burner caps and burner grates
It is very important to make sure that all of the surface
burner caps and surface burner grates are installed
correctly and at the correct locations.
Once in place, you may check the fit by gently sliding the
burner cap from side to side to be sure it is centered and firmly seated. When the burner cap
lip makes contact inside the center of the burner head you will be able to hear the burner cap
click.
21
INJECTORS TABLE – MAXIMUM INLET PRESSURE TO THE REGULATOR
BURNERS
NOMINAL POWER
BTU/hr
NATURAL GAS (A)
5" (12.7cm) (12.5mbar)
PROPANE (E)
10" (25.4cm) (25mbar)
min line pressure (i.w.c.)
min pression de ligne (i.w.c.)
6" (15.2cm) (15mbar)
min line pressure (i.w.c.)
min pression de ligne (i.w.c.)
11" (27.9cm) (27.4mbar)
max line pressure (i.w.c.)
max pression de ligne (i.w.c.)
14" (35.6cm) ) (34.9mbar)
max line pressure (i.w.c.)
max pression de ligne (i.w.c.)
14" (35.6cm) (34.96mbar)
Ø injector
(1/100 mm)
Ø injector
(1/100 mm)
Auxiliary (A)
4000
90
60
Semi-rapid (SR)
7000
120
78
Rapid (R)
11000
150
96
Double Crown (DC)
16000
80/165
50/105
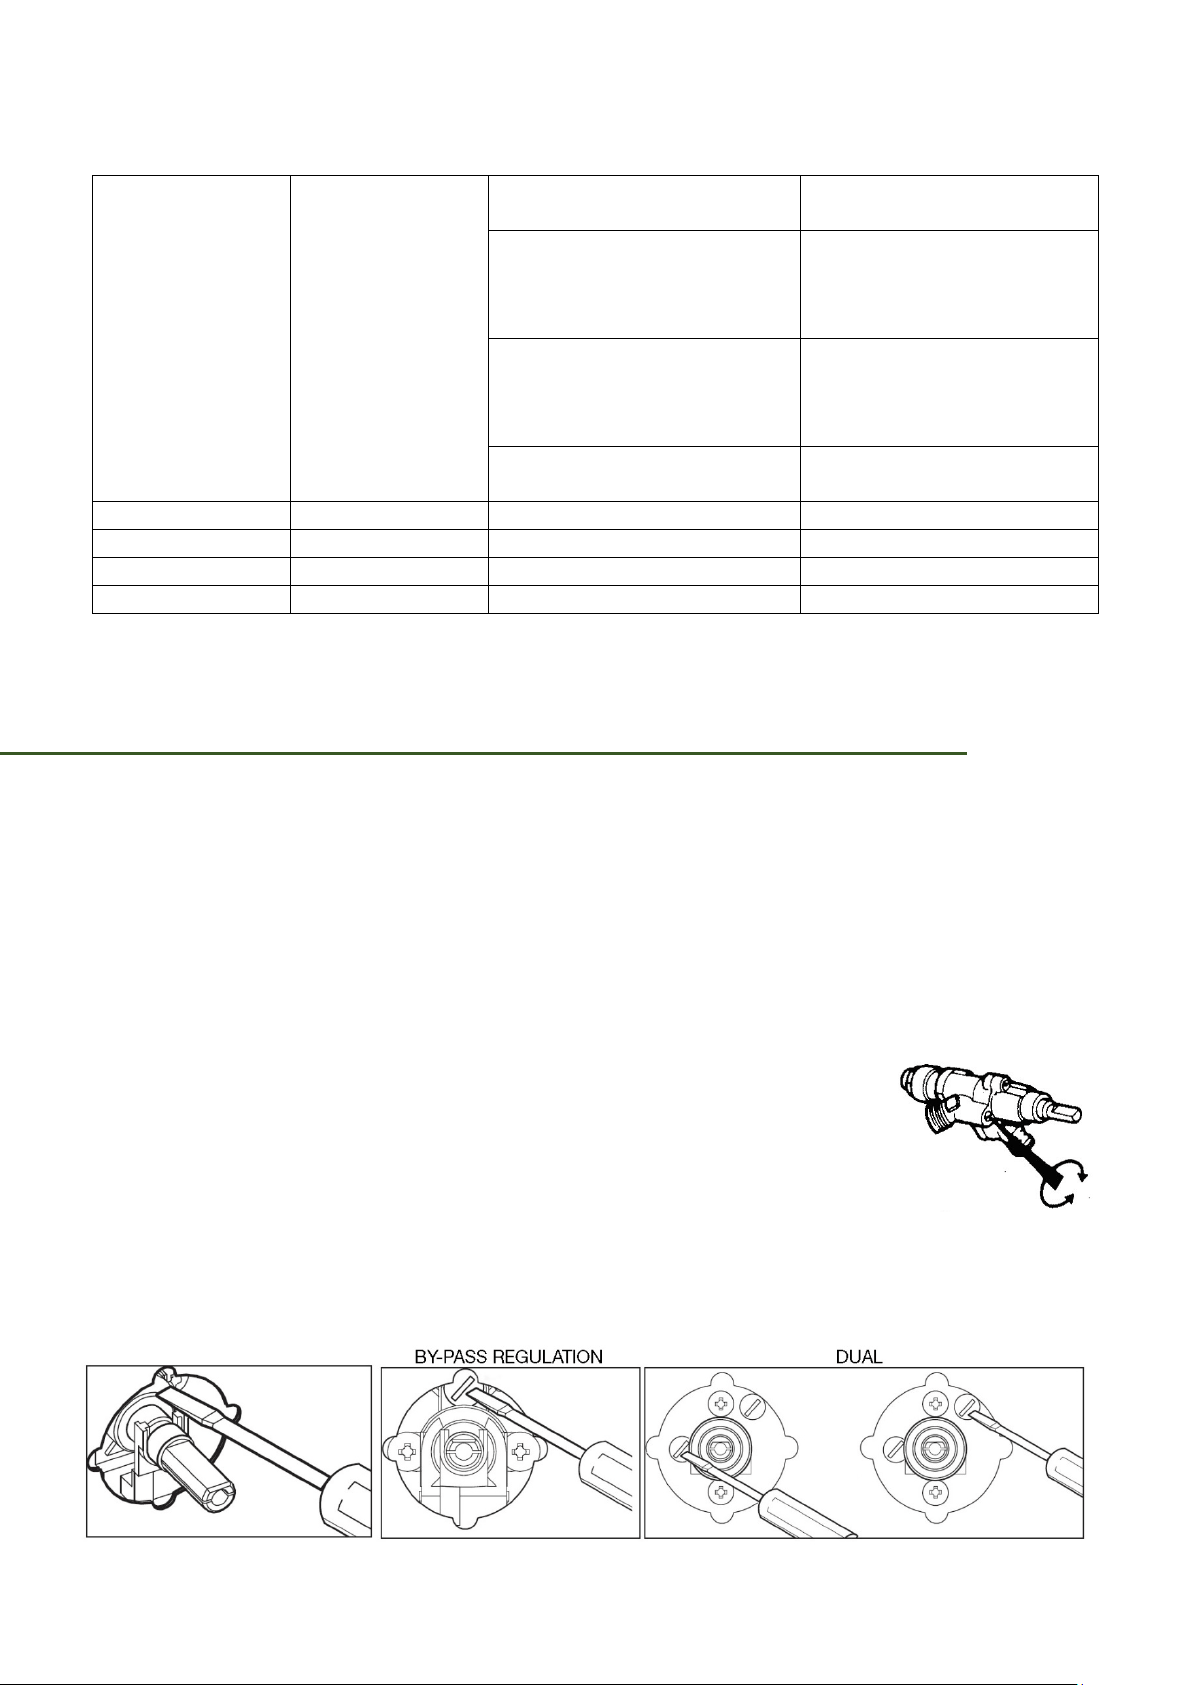
REGULATING THE MINIMUM OUTPUT OF THE COOKTOP BURNERS
Normal/valve taps
Ignite the burners and turn the knob to the maximum position. Remove the knob and insert a
small flat-head screwdriver into the holes on the side of the control panel, in accordance with
the type.
Loosen the by-pass screw by two turns in an anti-clockwise direction and rotate the rod to the
minimum position.
Adjust the previously loosened screws until the flame is lowered but
stable, even when rapid changes are made from the maximum to the
minimum position with the burner cold. If safety taps are fitted, let the
burner run on minimum for a few minutes to ensure that the device
does not cut in. If does, increase the minimum.
N.B.: for propane gas settings, the burner minimum must be set
by fully tightening the tap by-passes.
22
OPERATIONS TO BE PERFORMED WHEN SUBSTITUTING THE INJECTORS
Remove the gratings and the burner covers:
Using a wrench substitute the nozzle injector with those most suitable for the kind of
gas for which it is to be used.
The burners are conceived in such a way so as not to require the regulation of the primary
air.
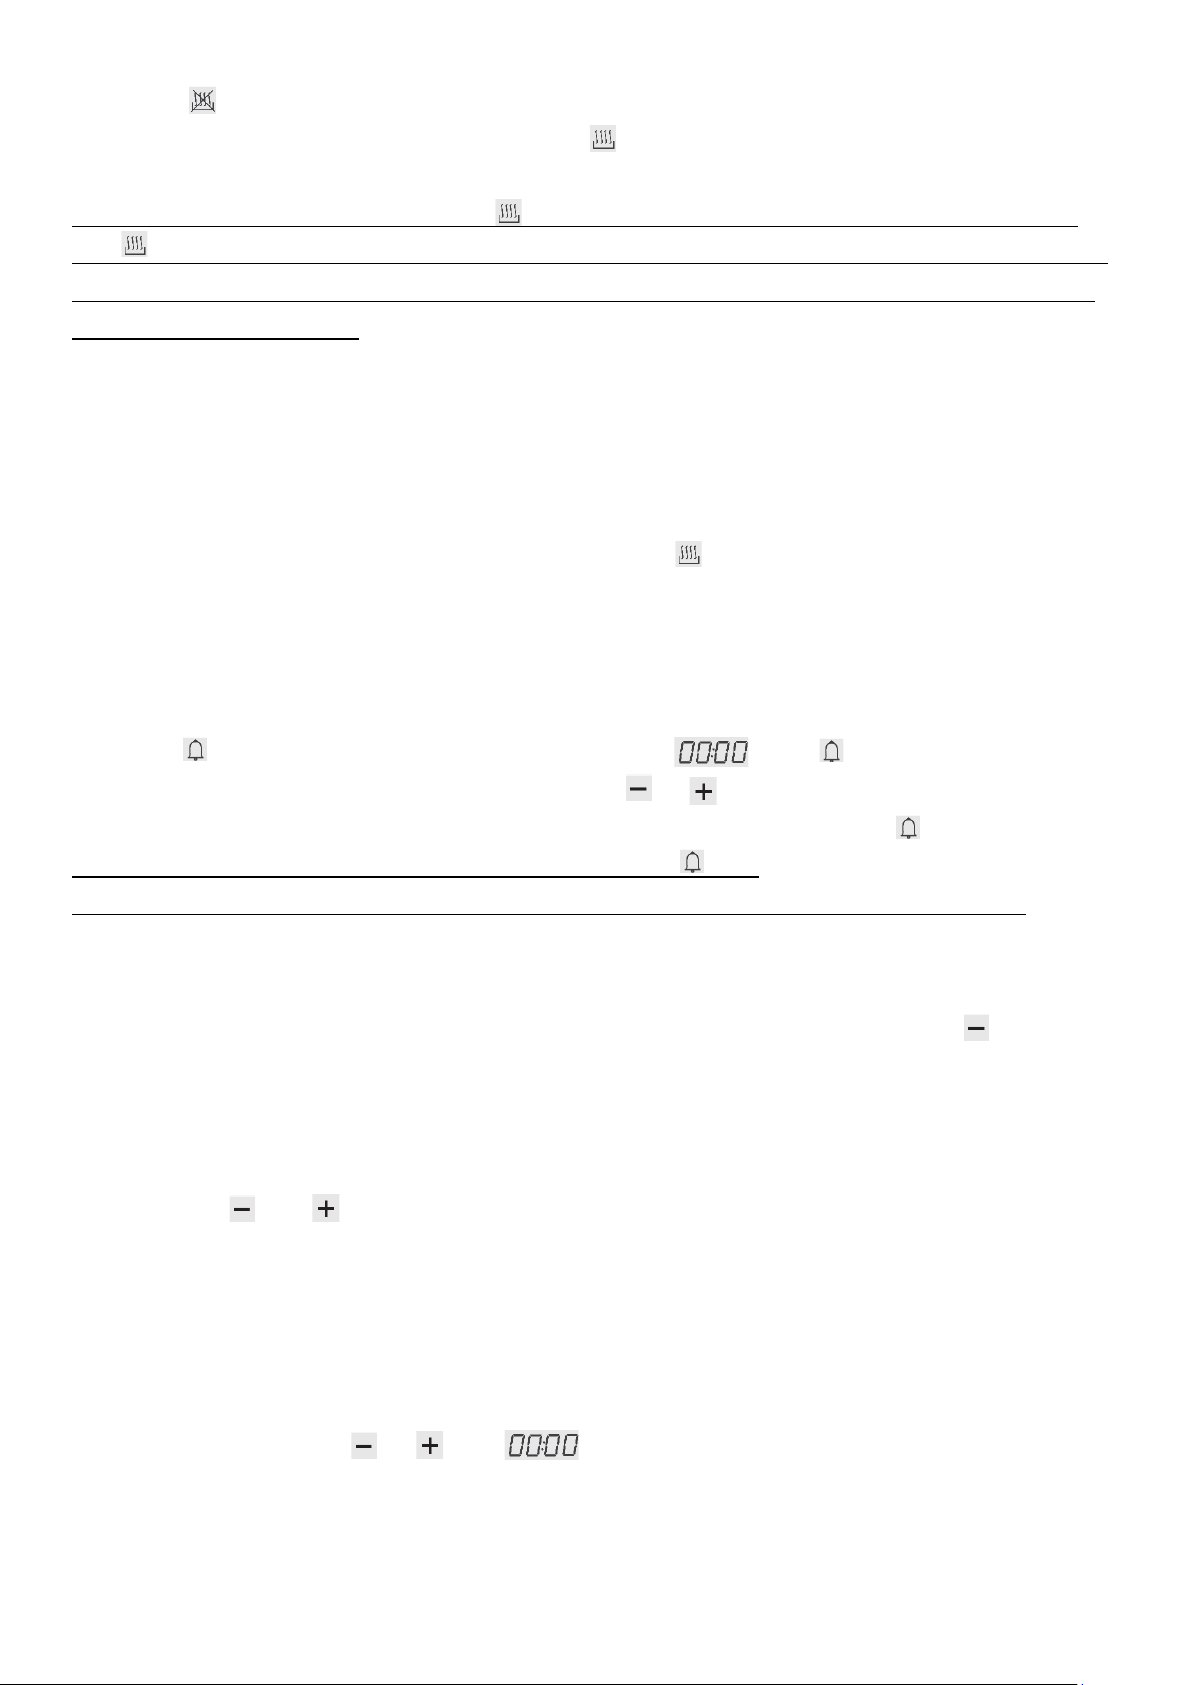
TEPPANYAKI
The "Teppanyaki" accessory (if available) must be placed
over two burners on the cooktop as shown in the photo.
WARNING: it must not be placed on the cooktop with
only one burner.
AUXILIARY RAPID
23
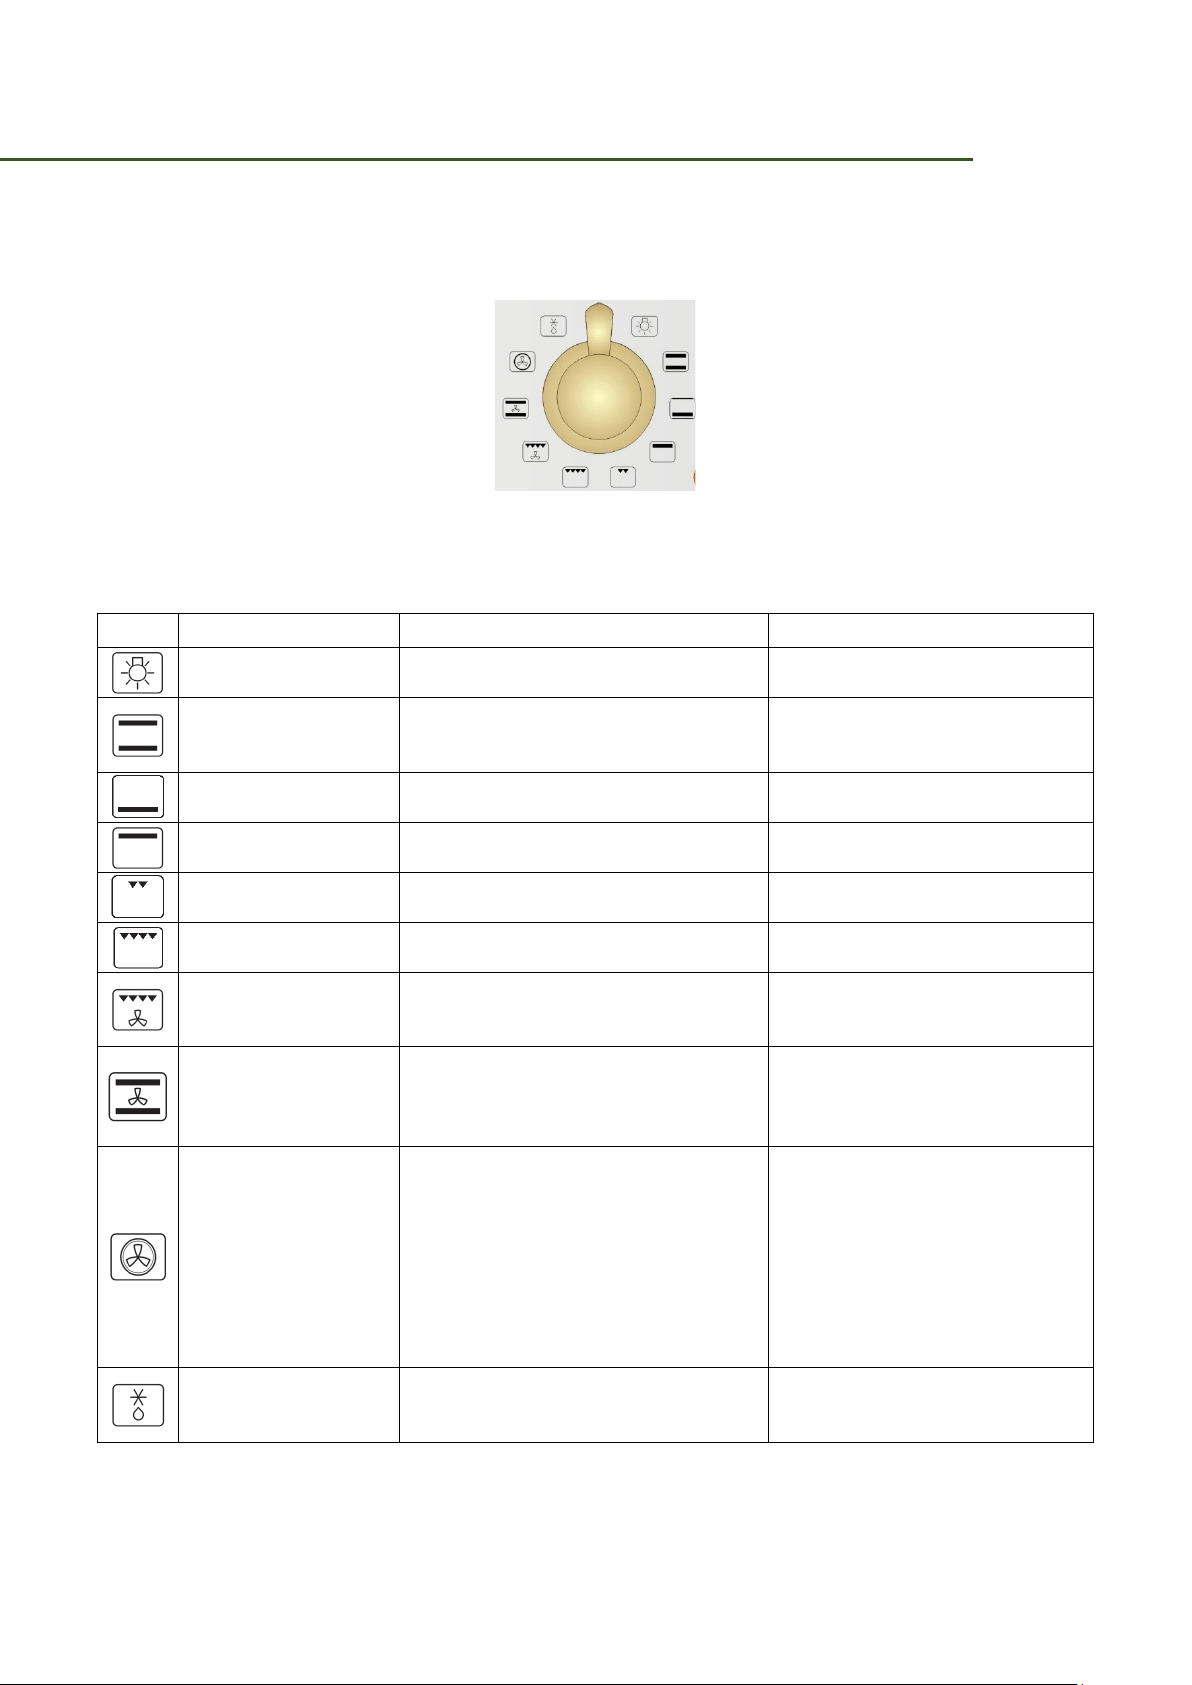
OVEN FUNCTIONS
FUNCTION SELECTOR KNOB
Icon
Function Name
Description
Notes
Oven Light The oven lamp light up.
The lamp is always on in all the
cooking functions.
Conventional Oven
The heat distributes evenly from the top
and the bottom. Ideal for baking pastries,
cakes & biscuits and roasts.
Recommended for cooking
individual items.
Cooking From Below
The heat distributes from the bottom to
give cooked food a finishing touch.
Cooking From Above
The heat comes from the top (sky)
heating element.
Ideal for cooking the top of dishes
without grilling.
Grilling The heat is radiated in the oven.
Ideal for cooking on the grill,
toasting, browning, gratinating.
Grilling With Maxi Grill
The heat expands with higher power and
greater irradiation surface.
Ideal for cooking on the grill,
toasting, browning, gratinating.
Grilling With Fan-
Assisted Oven
The heat is radiated in the oven and
evenly distributed by the fan.
Ideal for grilling, toasting, browning,
gratin dishes, etc. without the inside
of the food drying out.
Even Cooking
The heat emitted by the top and bottom
heating elements is distributed by the
fan for quick, even cooking, inside and
out.
Recommended for cooking
individual items.
Fan-Assisted Cooking
The heat is distributed by forced
ventilation.
This cooking system enables you to cook
three different dishes at the same time.
Ideal for food that has to be well-
cooked in the middle and not well-
done on the outside.
Super fast defrosting:
Set the switch to “fan-assisted
cooking” and the thermostat to
120° F in order to defrost food in no
time at all.
Defrosting
Set the oven thermostat to “0” position.
Food can be defrosted by using the fan
without any heat.
24
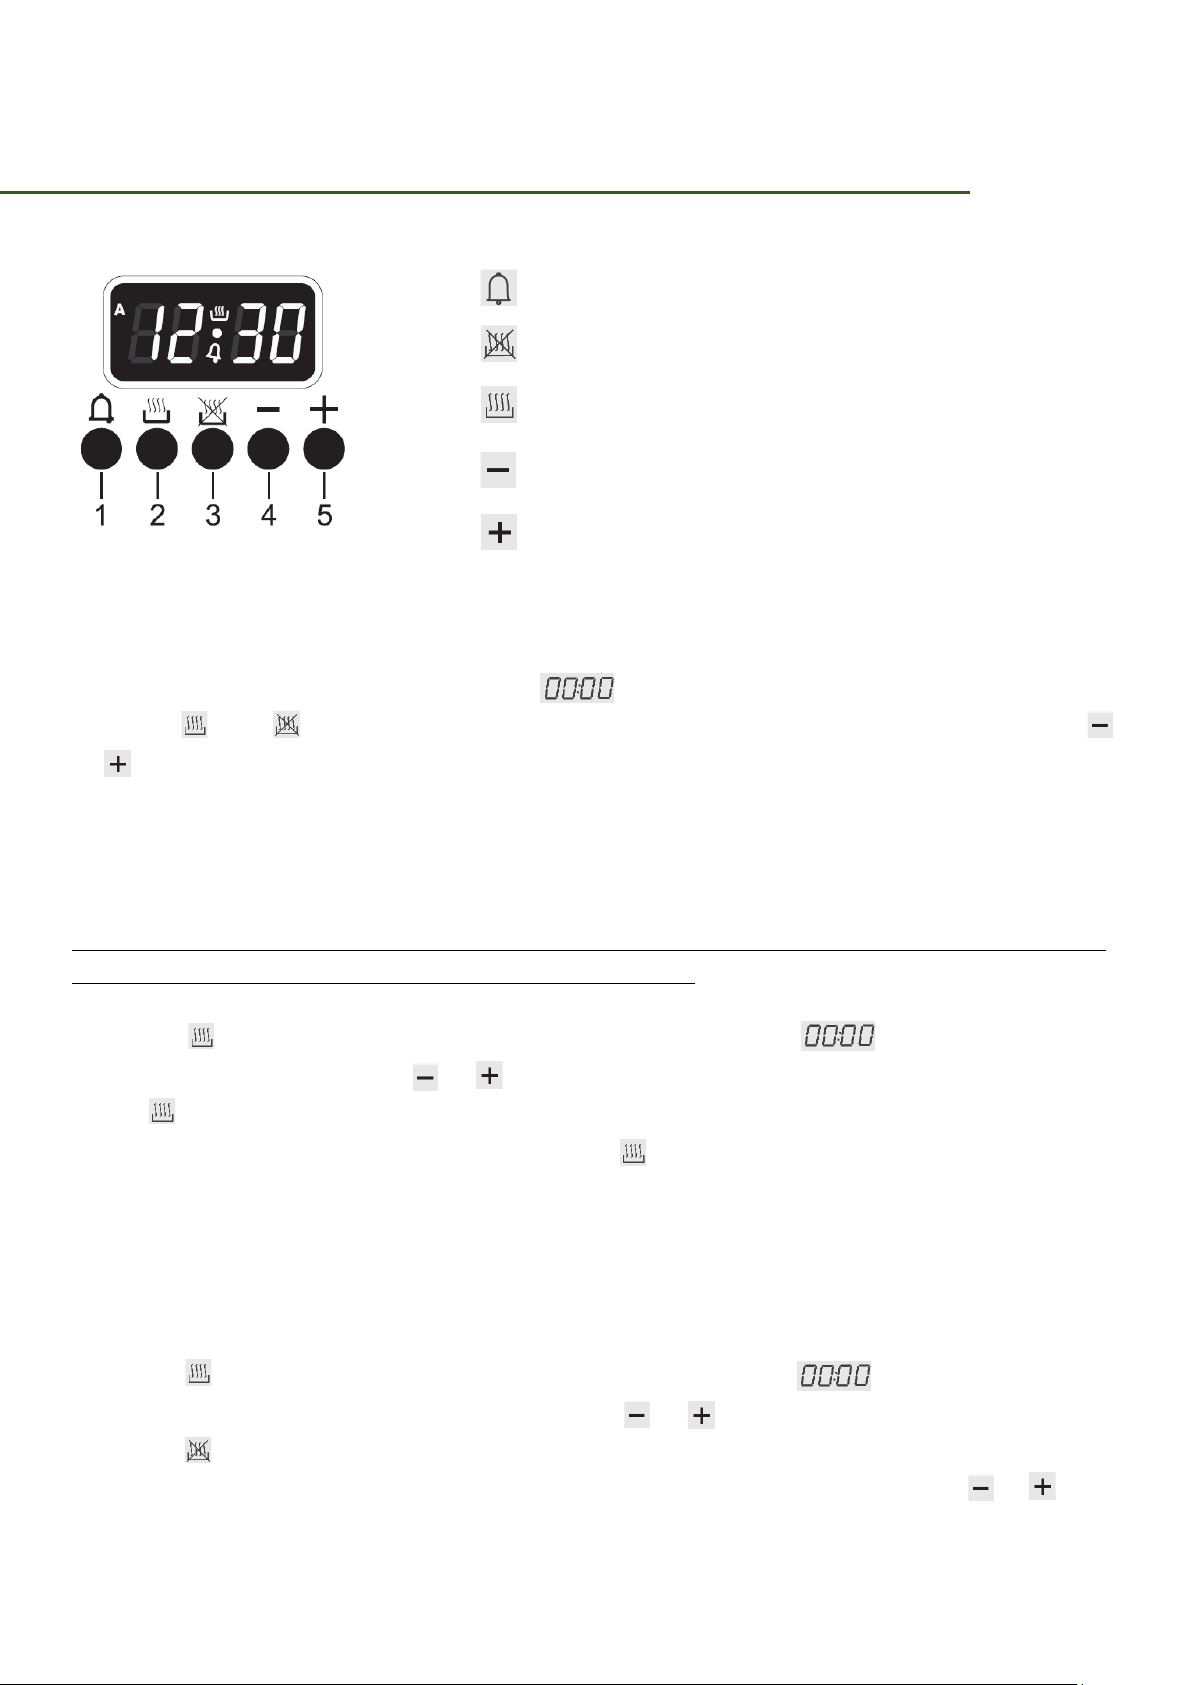
ELECTRONIC PROGRAMMER
LIST OF FUNCTIONS
Timer key
End of cooking key
Cooking duration key
Value decrease key
Value increase key
Setting the time
On the first use, or after a power failure, will be flashing on the oven's display.
Press the and keys together, and at the same time press the value adjustment keys
or : this will increase or decrease the setting by one minute for each press.
Press either of the value modification keys to display the current time.
Before each programmer setting, activate the required function and temperature.
Timed cooking
Timed cooking is the function which allows a cooking operation to be started and then
ended after a specific length of time set by the user.
Press the key and the display will light up showing the figures ; keep it pressed, and
at the same time use the keys or to set the cooking duration.
When is released, the count of the programmed cooking duration will start and the
display will show the current time together with and A (to indicate that a programmed
cooking operation has been set).
Programmed cooking
This function switches the oven on and off in fully automatic mode.
Press the key and the display will light up showing the figures ; keep it pressed, and
at the same time use the value modification keys or to set the cooking duration.
Press the key and the display will show the sum of the current time plus the cooking
duration: keep it pressed, and at the same time use the value modification keys or to
adjust the end of cooking time.
25
When the key is released, the programmed count will start and the display will show the
current time together with the symbols A and .
After making the setting, press the key to view the remaining cooking time; press
the key to view the cooking end time. The logic prevents the setting of incompatible
values (e.g. the programmer will not accept a cooking end time with a duration which
is too long for its value).
End of cooking
At the end of the cooking time the oven will switch off automatically and simultaneously a
buzzer will start to sound intermittently. After the buzzer has been deactivated, the display
will return to show the current time together with the symbol to indicate that the oven has
returned to manual use mode.
Timer
The programmer can also be used as an ordinary timer.
Press the key and the display will show the figures ; keep pressed and
simultaneously press the value modification keys or . When the key is released the
count will start and the display will show the current time and the symbol .
After the setting, to display the time left press the key.
In timer mode, the oven operation will not be cut out at the end of the set time.
Adjusting the buzzer volume
The buzzer volume can be varied (3 settings) while it is in operation by pressing .
Stopping the buzzer
The buzzer stops automatically after about seven minutes. It can be deactivated manually by
pressing keys and together.
To switch off the appliance, return all the knobs to the 0 setting.
Deleting the set data
Having programmed a timed or programmed cooking operation, this programming can be
cancelled by holding down the key for the function which has just been programmed and
simultaneously pressing or until appears on the display.
The programmer will interpret the cancellation of the program as terminating the cooking
operation.

26
Modifying the set data
The set cooking data can be modified at any time by holding down the function key and at the
same time pressing the keys or to change the value.
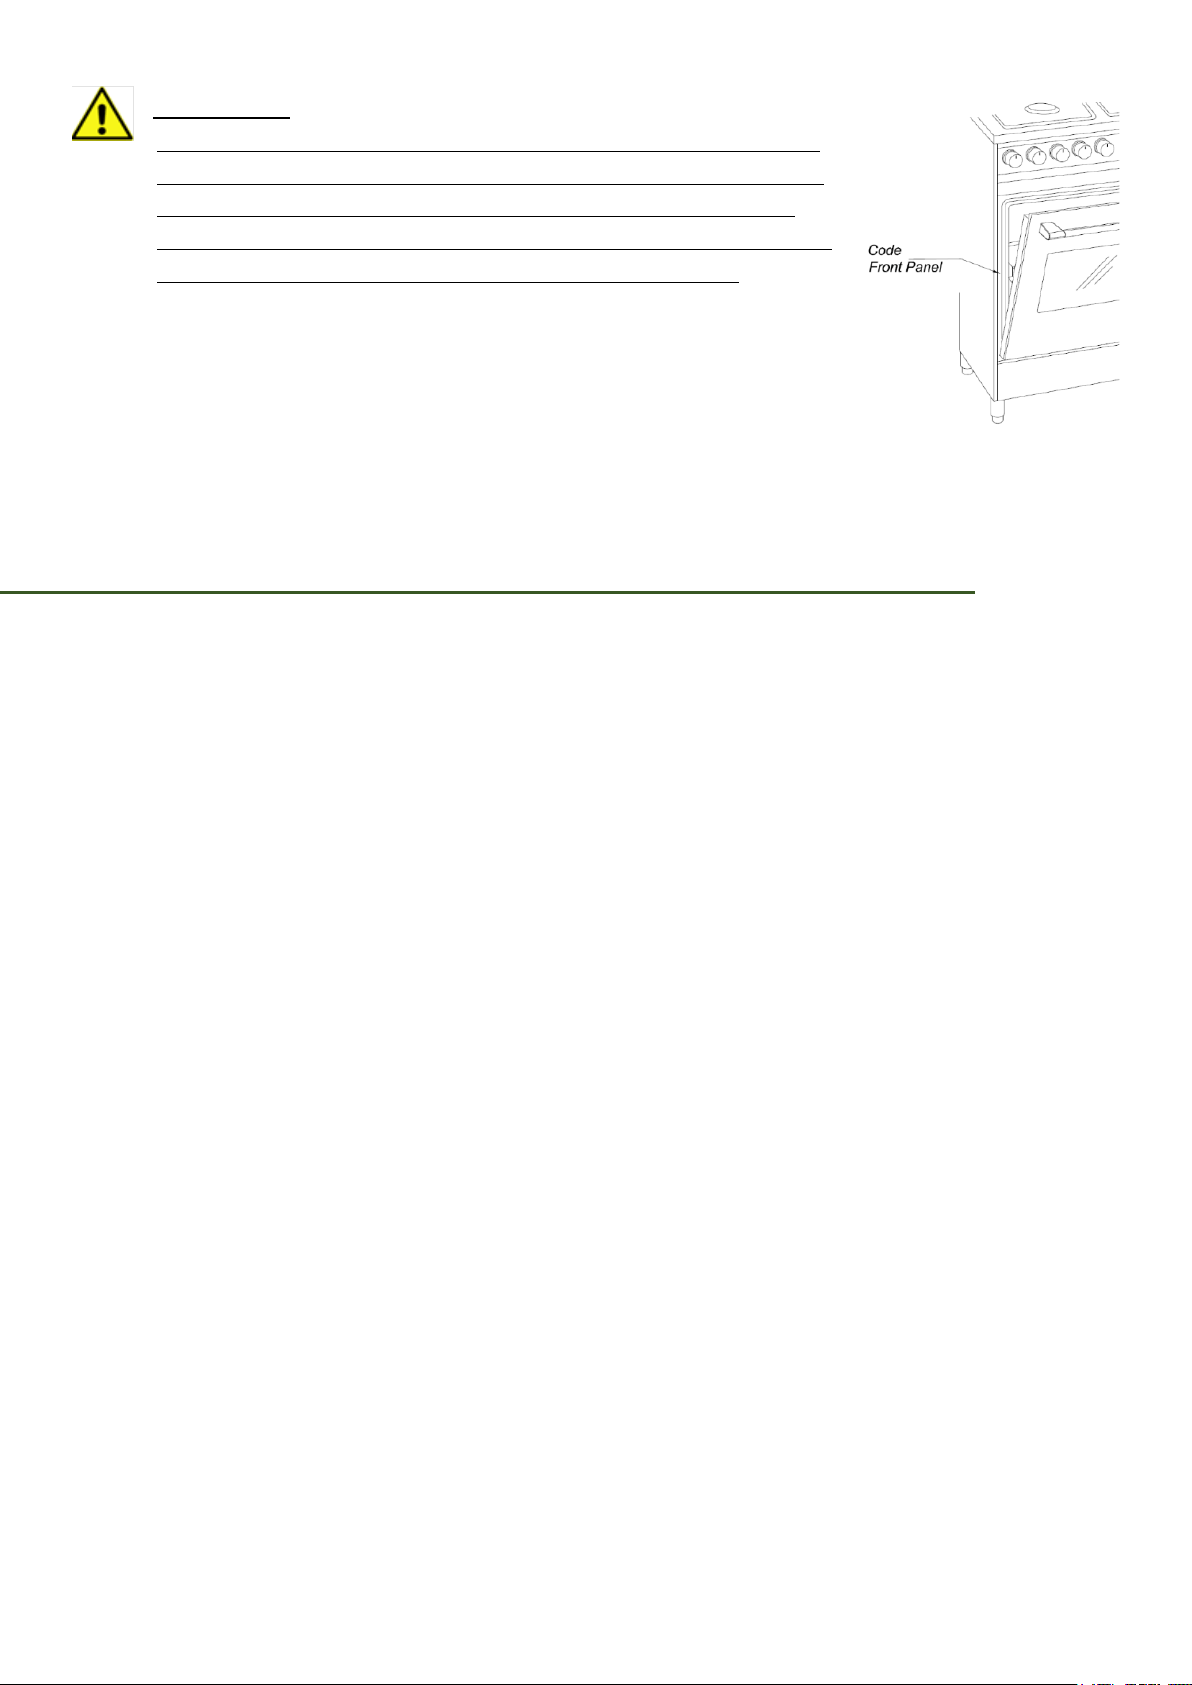
MODEL AND SERIAL NUMBER LOCATION
The serial plate is located on the oven front frame behind the oven door or on the drawer
side frame.
When ordering parts for or making inquiries about your range, always be sure to include the
model and serial numbers and a lot number or letter from the serial plate on your range.
Your serial plate also tells you the rating of the burners, the type of fuel and the pressure the
range was adjusted for when it left the factory.
Marking shall comply with CAN/CSA – C22.2 No. 0.
Adhesive nameplates shall comply with the applicable requirements of CSA C22.2 No.
0.15.
These adhesive nameplates must have:
• Manufacturer’s name and trademark
• Model number
• Rated input voltage
• Frequency in hertz
• Rated input in amperes or watts
• Number of phases
• Date code, serial number, moths and year of manufacture.
BEFORE YOU CALL FOR SERVICE
Read the manual and the Troubleshooting chapter carefully. It
may save you time and expense. The list includes common occurrences that are not the
result of defective workmanship or materials in this appliance.
Please contact our US partner in case of need of technical assistance or spare parts:
EuroChef USA
41 Mercedes Way Ste 25
Edgewood, NY 11717
631-254-3434
27
SEAL THE OPENINGS
Seal any openings in the wall behind the range and in the floor under the range after gas
supply line is installed.
CONNECT THE RANGE TO THE GAS SUPPLY
Important: remove all packing material and literature from range before connecting gas and
electrical supply.
To prevent leaks, put pipe joint sealant on all external pipe threads.
The supply line should be equipped with an approved shutoff valve. This valve should be
located in the same room as the range and should be in a location that allows ease of
opening and closing.
Do not block access to the shutoff valve. The valve is for turning on or shutting off gas to the
appliance.
Open the gas shutoff valve in the gas supply line. Wait 5 minutes for gas to move through the
gas line.
The gas supply between the shutoff valve and the regulator may be connected by rigid piping
or by A.G.A./C.G.A.-approved flexible metallic union- connected piping where local codes
permit use.
CAUTION:
Do not allow regulator to rotate on pipe when tightening fittings.
CONNECTION TO PRESSURE REGULATOR
The regulator is already installed on the appliance.
CAUTION:
Do not make the connection too tight. The regulator is die cast. Overtightening may
crack the regulator resulting in a gas leak and possible fire or explosion.
The user must know the location of the main shutoff valve and have easy access to it.
When using flexible gas conduit on the range, allow sufficient slack to pull the range outside
the cut-out for the cleaning or servicing.
28
NOTE:
Do not allow the flexible conduit to get pinched between the wall and the range. To visually
check, remove the range drawer.
It flexible connectors are used, be certain connectors are not kinked.
MOVING THE APPLIANCE FOR SERVICING AND CLEANING
WARNING:
Before cleaning the appliance, remove broiler trays and other utensils and
wiping off all excessive spillage before initiating the cleaning cycle.
Do not clean door gasket: the door gasket is essential for a good seal. Care
should be taken not to rub, damage, or move the gasket.
Do not use oven cleaners: no commercial oven cleaner or oven liner
protective coating of any kind should be used in or around any part of the
oven.
Clean only parts listed in manual.
Before self-cleaning the oven: remove broiler pan and other utensils.
Turn off the range line fuse or circuit breakers at the main power source, and turn off the
manual gas shut-off valve.
Make sure the range is cold. Remove the service drawer (warming drawer on some models)
and open the oven door.
Lift the range at the front and slide it out of the cut-out opening without creating undue strain
on the flexible gas conduit. Make sure not to pinch the flexible gas conduit at the back of the
range when replacing the unit into the cut-out opening. Replace the drawer, close the door
and switch on the electrical power and gas to the range.
WARNING:
When raising cooker to upright position always ensure two
people carry out this manoeuvre to prevent damage to the
adjustable feet.
Be careful: do not lift the cooker by the door handle when
raising to the upright position.
When moving cooker to its final position, DO NOT DRAG. Lift
feet clear of floor.
29
Trouble shooting
• Carefully read the chapter in this manual: "IMPORTANT PRECAUTIONS AND
RECOMMENDATIONS FOR THE USE OF DOMESTIC APPLIANCES”
• "Repairs should be performed by a licensed technician only. Improper repair may
result in considerable danger to you and others.
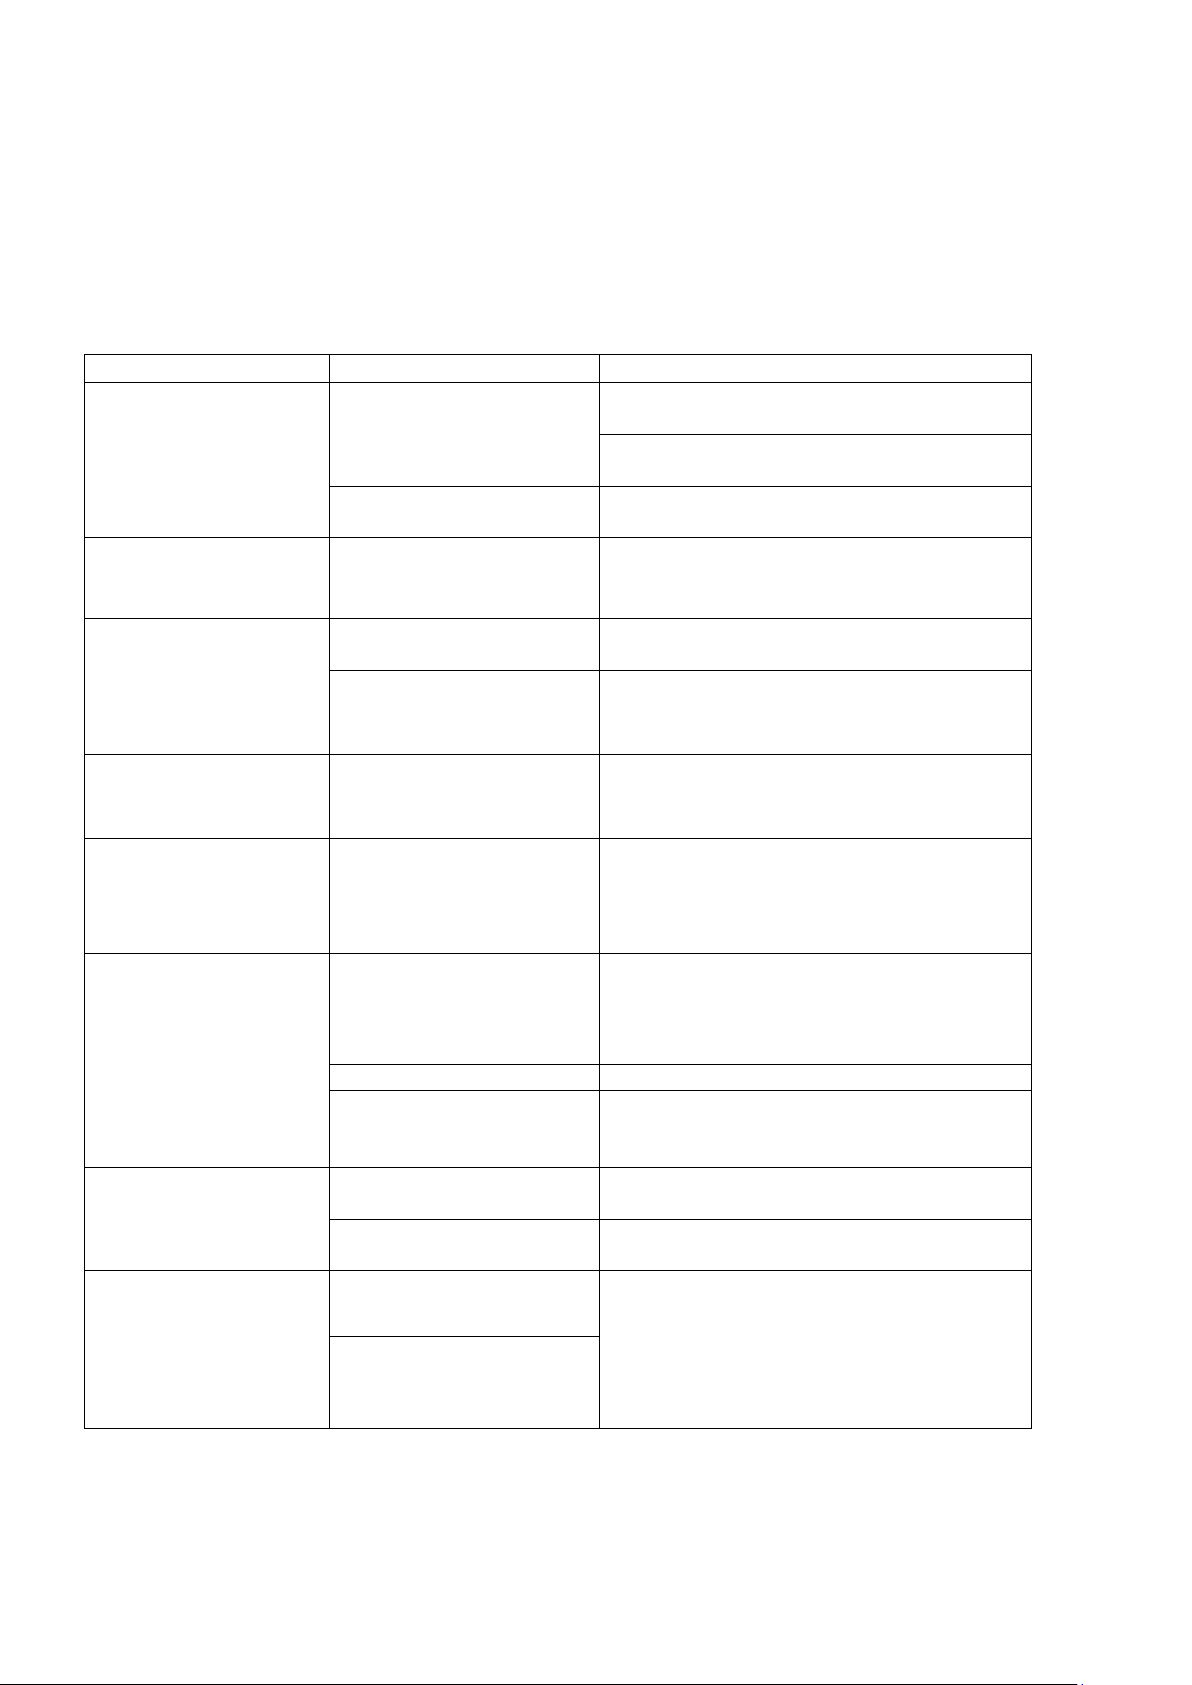
• Some minor problem can be resolved as follows:
Problem
Probable cause
Advice/remedy
The appliance does
not work
Power grid blackout
Check if the lights in the house or other
appliances are working.
Check the main switch of the house /
kitchen.
The power cord is
unplugged
Plug the power cord into the electrical
outlet
Oven light does not
make light
The oven lamp is faulty
Unplug the appliance's power cord from
the electrical outlet. Replace the bulb.
See notes in the manual.
The oven does not
heat
Cooking function and
temperature are not set
Select with the knobs cooking and
temperature function.
Appliance with timer
The timer only controls the largest oven.
The timer is not adjusted or set.
See timer notes, present in the manual.
With the door closed,
steam comes out of
the oven gasket
Check gasket mounting
Damaged gasket.
Contact a qualified technician
The appliance makes
metallic noises
The noise is caused by
the metal expanding
during heating and/or
cooling.
It's not a fault.
The burner does not
ignite
There is no ignition
spark.
See problem: The appliance does not
work.
Or the appliance is not grounded.
Contact the electrical installer.
The gas tap is closed.
Open the gas tap completely.
If the gas comes from a
cylinder, check that it
is not empty
Change the gas cylinder
The burner is not
working properly
The burners are dirty
or wet
Remove dirt from the burner cover. Dry
the burner covers well.
The burner cover is not
correctly positioned.
Position the
cover.
Smell of gas in the
kitchen
A tap is open.
Turn off the general gas tap. Open the
windows and ventilate the room.
Contact the service or an authorized
technician for the revision and
certification of the gas system.
Possible leakage of gas
from a connecting fitting
or pipe.
If the problem does not resolve, DO NOT TRY TO REPAIR THE DEFECTIVE APPLIANCE
YOURSELF.
Contact the Technical Service or the dealer where you purchased the appliance.

30
NOTE

31
NOTE

Nuova Lofra S.r.l.
Via Montegrotto, 125 – 35038 TORREGLIA (PADOVA) – ITALY
Tel.: +39 049 9904811
Telefax: +39 049 9904800
Website: www.lofra.us
03202769 - Rev. 1.4 – 05/10/2022