
Loading ...
Loading ...
Loading ...
ENGLISH
4
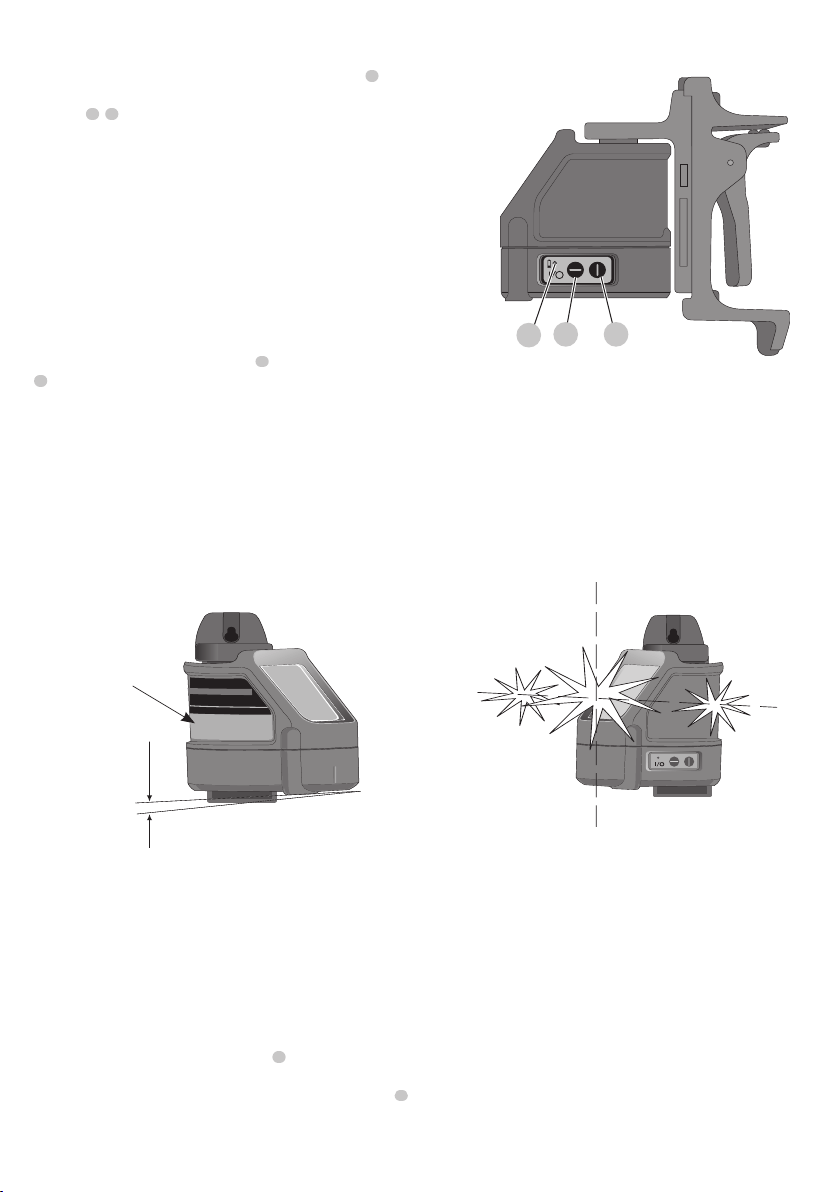
Low Battery Indication
The DW088 lasers are equipped with a red indicator light
2
, as shown in
Fig. B
DW088
2
3 4
FigureB. The red indicator lights are located to the left of the on/off
buttons
3
,
4
.
A flashing red indicator light indicates that the batteries are low and need
to be replaced. The laser may continue to operate for a short time while
the batteries continue to drain, but the beam(s) will quickly dim. After fresh
batteries are installed and the laser is turned on again, the laser beam(s)
will return to full brightness and the red indicator light will stay off. (A
flashing laser beam is not caused by low batteries; see Out of Tilt Range
Indicator.)
OPERATION
To Turn the Lasers On and Off (Fig.B)
With the laser off, place it on a flat surface. This model has two ON/OFF
buttons, one for a horizontal laser line
3
and one for a vertical laser line
4
. Each laser line is powered on by pressing its ON/OFF button. The laser lines can be powered one at a time or at the same time.
Pressing the ON/OFF buttons again turns the laser lines off.
Using the Lasers
The beams are level or plumb as long as the calibration has been checked (see Field Calibration Check) and the laser beam is not
flashing (see Out of Tilt Range Indicator).
Out of Tilt Range Indicator (Fig.C,D)
The lasers are designed to self-level. If the laser has been tilted so much that it cannot level itself (average > 4° tilt), it will flash the
laser beam (Fig.D). The flashing beam indicates the tilt range has been exceeded and IS NOT LEVEL (OR PLUMB) AND SHOULD NOT
BE USED FOR DETERMINING OR MARKING LEVEL (OR PLUMB). Try repositioning the laser on a more level surface.
Fig. D
>4° {
AVERAGE
FLASHING
Fig. C
FLASHING
LABEL
PLACEMENT
Using the Lasers with Accessories
The lasers are equipped with a 1/4” x 20 female thread on the bottom of the unit. This thread is to accommodate current or future
DeWALT accessories. Only use DeWALT accessories specified for use with this product. Follow the directions included with the
accessory.
CAUTION: The use of any other accessory not recommended for use with this tool could be hazardous.
If you need any assistance in locating any accessory, please contact DeWALT Industrial Tool Co., 701 East Joppa Road, Towson, MD
21286 or call 1–800–4-DeWALT (1–800–433–9258). See our catalog on the World Wide Web at www.DeWALT.com.
Using the Pivot Bracket (Fig.E)
The lasers have a magnetic pivot bracket
5
permanently attached to the units. This bracket allows the unit to be mounted to
any upright surface made of steel or iron. Common examples of suitable surfaces include steel framing studs, steel door frames
and structural steel beams. The bracket also has a keyhole slot
6
allowing the unit to be hung from a nail or screw on any kind of
surface. Position the laser and/or wall mount on a stable surface. Serious personal injury or damage to the laser may result if the
laser falls.
Loading ...
Loading ...
Loading ...