
USER’S MANUAL ELECTRIC
SNOW THROWER
ARNING: Read carefully and understand all INSTRUCTIONS before operating. Failure to follow the safety
es and other basic safety precautions may result in serious personal injury. Save this instructions in a safe
ce and on hand so that they can be read when required.
Model:ELG
10
ELG10
2022-8-18
157g铜版纸
* 已出血

USER’S MANUAL
CORDED ELECTRIC SNOW THROWER
WARNING: Read carefully and understand all INSTRUCTIONS before operating. Failure to follow the safety
rules and other basic safety precautions may result in serious personal injury. Save this instructions in a safe
place and on hand so that they can be read when required.
Model:ELG10
ALTON INDUSTRY LTD. GROUP
643 Innovation Drive West Chicago, IL 60185
info @ altonindustries.com
https://www.altonindustries.com
MADE IN CHINA

CONTENTS
Description
Introduction
Purpose
Overview
Intended use
Improper use
General power tool safety warnings
Symbols on the product
Risk levels
Recycle
Installation
Operation
Maintenance
Troubleshooting
Technical data
WARRANTY
Training
Unpack the machine
Install the middle handle
Install the upper handle
Install the chute control rod
Use the cord retainer
Start the machine
Stop the machine
Adjust the discharge chute
Adjust the chute deflector
Operation tips
General maintenance
Replace the scraper
Replace the impeller
Store the machine
Preparation
Operation
Maintenance
01
01
01
01
01
01
01
02
02
04
03
01
04
04
05
05
05
05
06
06
06
07
07
07
06
08
08
08
10
09
08
10
10
11
01
https://www.altonindustries.com
02
info@altonindustries.com
DESCRIPTION
INTRODUCTION
PURPOSE
INTENDED USE
IMPROPER USE
GENERAL POWER TOOL
SAFETY WARNINGS
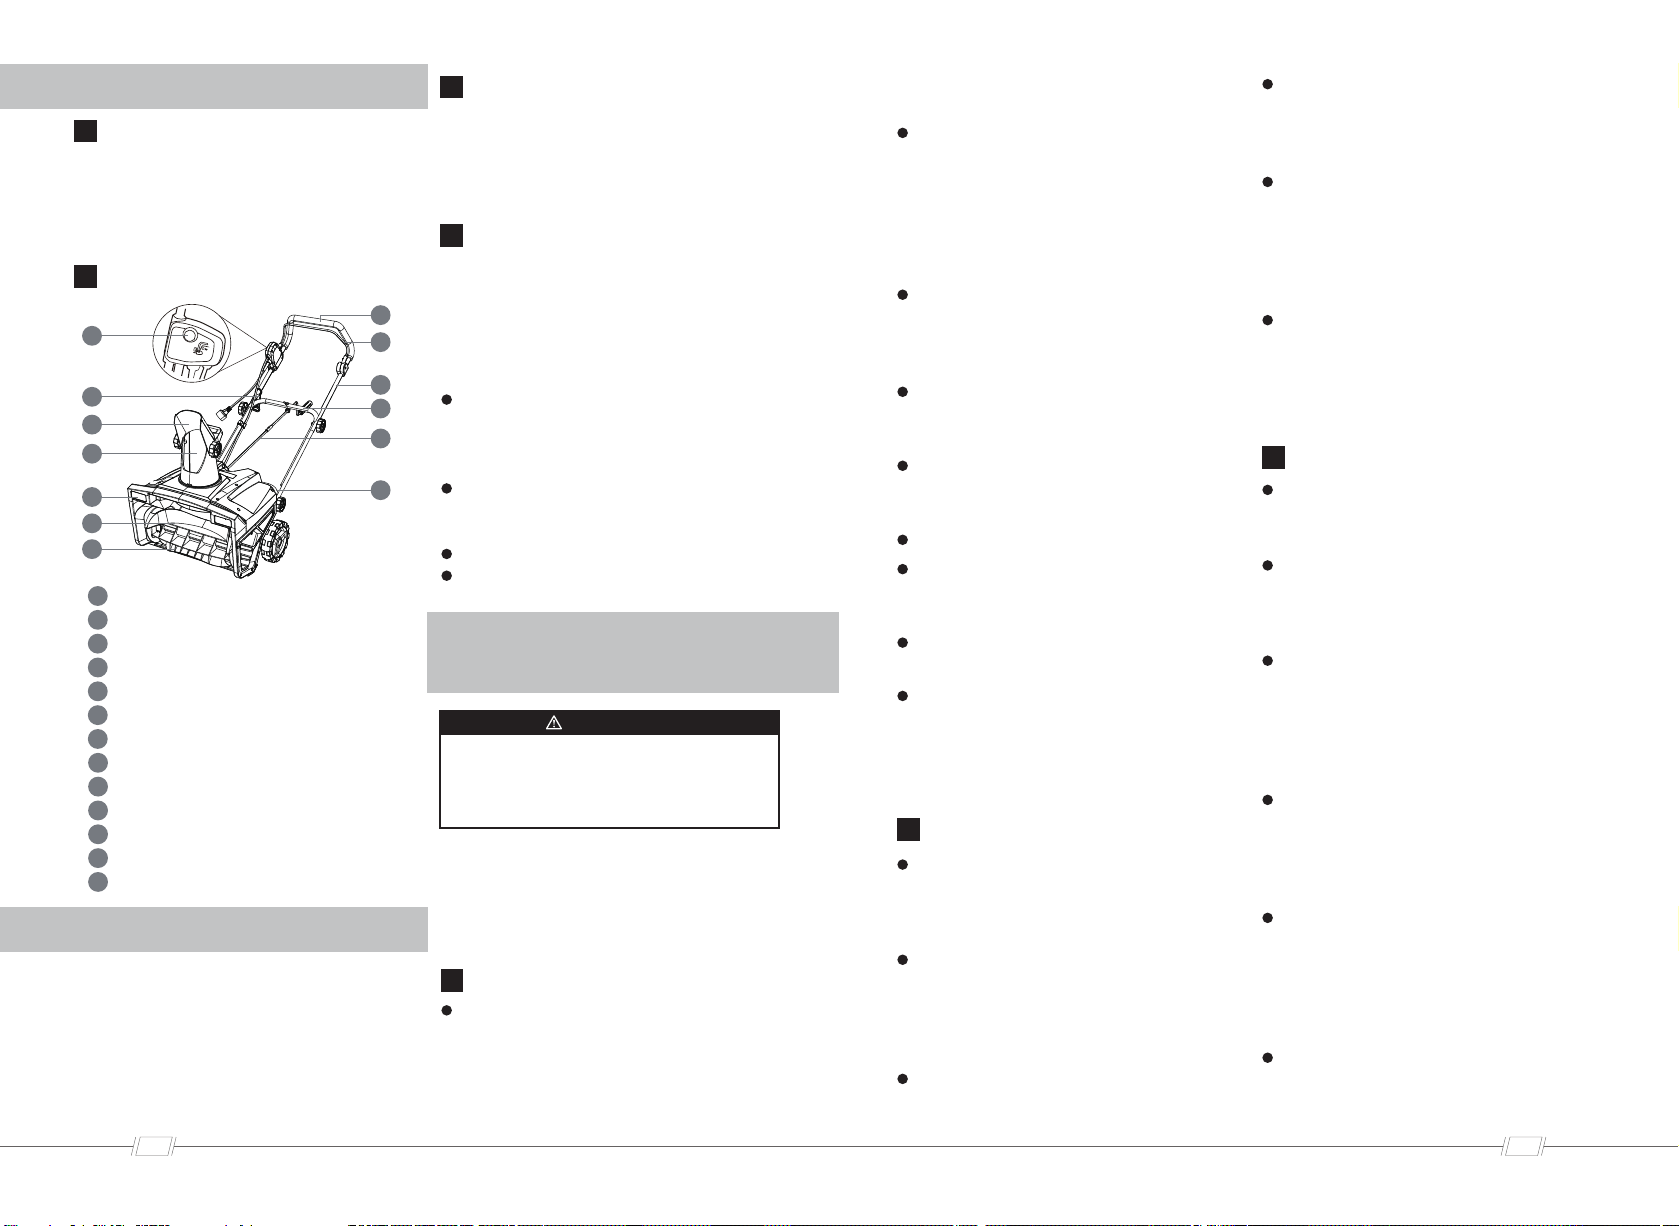
OVERVIEW
TRAINING
PREPARATION
PREPARATION
This machine is used to remove and
clear away snow from pavements,
gardens, driveways and other ground
level surfaces.
This product has been designed and
built to remove and clear away snow
from pavements, gardens, driveways
and other ground-level surfaces.
Read all safety warnings and all instruc-
tions. Failure to follow the warnings and
instructions may result in electric shock,
fire and/or serious injury.
Any other usage not in keeping with
the above mentioned ones may be
hazardous and harm persons and/or
damage things. Examples of improper
use may include, but are not limited
to:
Save all warnings and instructions for
future reference.
The term “power tool” in the warnings
refers to your mains-operated (cord-
ed) power tool.
Your product has been engineered
and manufactured to high standards
for dependability, ease of operation,
and operator safety. When properly
cared for, it will give you years of
rugged, trouble-free performance.
1
1
2
3
4
5
6
8
9
10
11
12
13
7
2
3
4
5
6
7
8
9
10
11
13
12
Handle bar
Start lever
Upper handle
Middle handle
Chute control rod
Lower handle
Scraper
Impeller
LED light
Discharge chute
Chute deflector
Safety switch button
Cord retainer
WARNING
Use of the product on surfaces above
ground level, such as roofs on houses,
garages, porticoes or other structures or
buildings,
Activate the auger in the presence of
materials other than snow (e.g. soil,
grass, pebbles, etc.),
Pulling or pushing loads,
Do not carry passengers.
Do not allow children under the age
of 14 to operate this tool. Children
who are 14 years of age or older
must read and understand the
operating instructions and safety
rules in this manual and must be
trained and supervised by a parent.
Thoroughly inspect the area where
the appliance is to be used and
remove all doormats, sleds, boards,
wires, and other foreign objects.
Do not operate the appliance
without wearing adequate winter
garments. Wear footwear, which will
improve footing on slippery surfac-
es.
Adjust the housing height to clear
gravel or crushed rock surface.
Read the operating and service
instruction manual carefully. Be
thoroughly familiar with the
controls and the proper use of the
appliance. Know how to stop the
unit and disengage the controls
quickly.
Never allow children to operate the
appliance. Never allow adults to
operate the appliance without
proper instruction.
Keep the area of operation clear of
all persons, particularly small
children, and pets.
Exercise caution to avoid slipping or
falling, especially when operating in
reverse.
Do not use on graveled surfaces.
Dress Properly – Do not wear loose
clothing or jewelry. They can be
caught in moving parts.
Wear rubber boots when operating
the appliance.
Operation of the appliance in the
hand-held position is unsafe, except
in accordance with the special
instructions for such use provided in
the operator’s manual.
Never attempt to make any adjust-
ments while the appliance is
running (except where specifically
recommended by manufacturer).
Always wear safety glasses or eye
shields during operation or while
performing an adjustment or repair
to protect eyes from foreign objects
that may be thrown from the
appliance.
Prevent unintentional starting.
Carrying the appliance with your
finger on the switch or energizing
appliance that have the switch on
invites accidents.
Do not put hands or feet near or
under rotating parts. Keep clear of
the discharge opening at all times.
Exercise extreme caution when
operating on or crossing gravel
drives, walks, or roads. Stay alert for
hidden hazards or traffic.
After striking a foreign object, stop
the engine, remove the wire from
the spark-plug, thoroughly inspect
the power tool for any damage, and
repair the damage before restarting
and operating the power tool.
If the power tool should start to
vibrate abnormally, stop the engine
and check immediately for the
cause. Vibration is generally a
warning of trouble.
Stop the engine whenever you leave
the operating position, before
unclogging the collector/impeller
housing or discharge guide, and
when making any repairs, adjust-
ments, or inspections.
When cleaning, repairing, or
inspecting, make certain the collec-
tor/impeller and all moving parts
have stopped.
SYMBOLS ON THE PRODUCT
RISK LEVELS
RECYCLE
MAINTENANCE
03
https://www.altonindustries.com
04
info@altonindustries.com
Take all possible precautions when
leaving the power tool unattended.
Disengage the power takeoff, lower
the attachments, shift into neutral,
set the parking brake, stop the
engine and remove the key.
Check shear bolts; engine-mounted
bolt, etc., at frequent intervals for
proper tightness to be sure the
appliance is in safe working condi-
tion.
Always refer to owner’s guide
instructions for important details if
the appliance is to be stored for an
extended period.
Store Idle appliances Indoors –
When not in use, the appliances
should be stored indoors in a dry,
locked-up place – out of reach of
children.
Check shear bolts and other bolts at
frequent intervals for proper
tightness to be sure the equipment
is in safe working condition.
Run the appliance a few minutes
after throwing snow to prevent
freeze-up of the collector/impeller.
Do not expose appliance to fire or
excessive temperature space.
Exposure to fire or temperature
above 265°F (130°C) may cause
explosion.
Have servicing performed by a
qualified repair person using only
identical replacement parts. This will
ensure that the safety of the prod-
uct is maintained.
Do not modify or attempt to repair
the appliance except as indicated in
the instructions for use and care.
Maintain appliance with care -follow
instructions for changing accesso-
ries.
Maintain or replace safety and
instructions labels, as necessary.
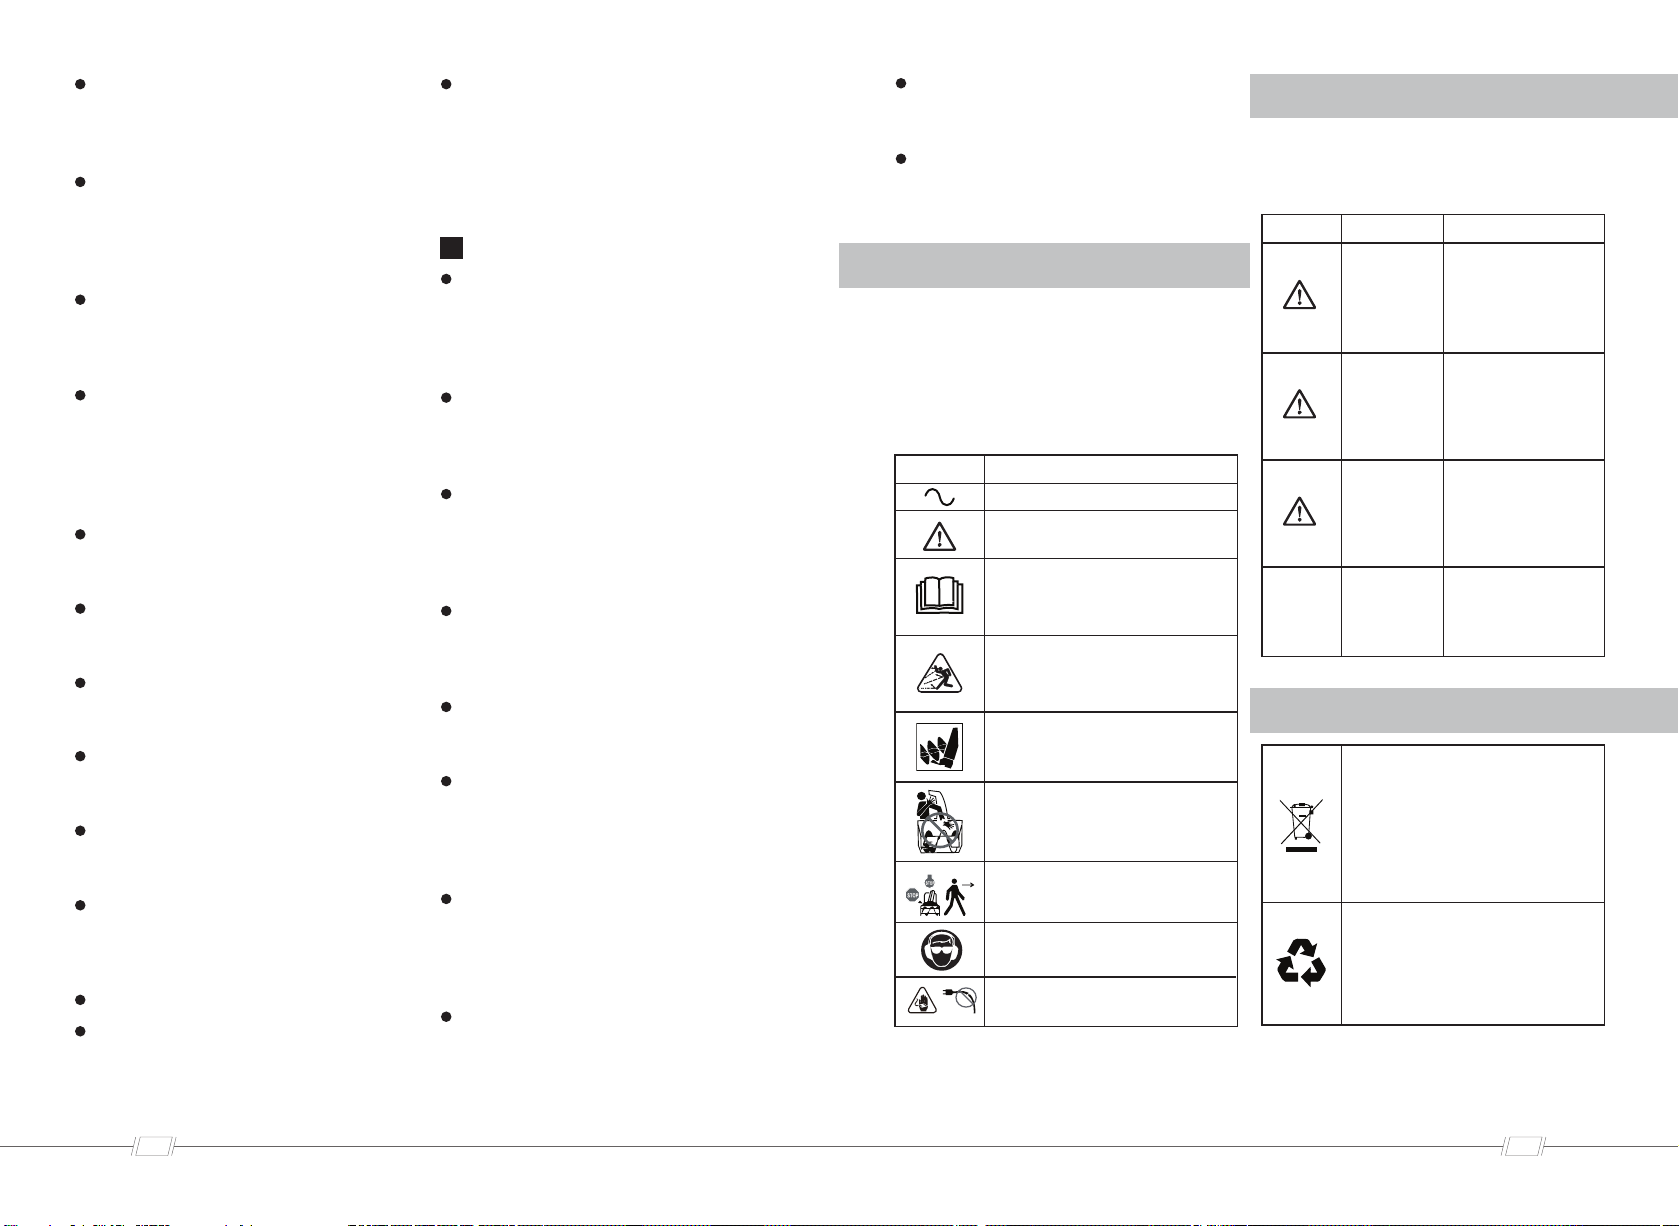
Some of the following symbols may
be used on this tool. Please study
them and learn their meaning. Proper
interpretation of these symbols will
allow you to operate the tool better
and safer.
The signal words and meanings show
the levels of risk related with this
machine.
Symbol
Symbol Signal word Explanation
Explanation
Alternating current
DANGER:
WARNING:
Precautions that involve your
safety.
shows an imminently
dangerous situation,
which, if you do not
prevent, can cause
death or dangerous
injury.
shows a possibly
dangerous situation,
which, if you do not
prevent, can cause
death or dangerous
injury.
Keep feet away from openings
while the product is running.
Keep hands away from the
discharge area.
Stop the motor and unplug the
product before leaving the
product.
Separate collection. This product
must not be disposed of with
normal household waste. Should
you find one day that your product
needs replacement, or if it is no
further use to you, do not dispose
of it with household waste. Make
this product available for separate
collection.
Separate collection of used
products and packaging allows
materials to be recycled and used
again. Re-use of recycled materials
helps prevent environmental
pollution and reduces the demand
for raw materials.
Do not use a damaged power
cord.
Wear eye and ear protection.
Read and understand all
instructions before operating the
product, and follow all warnings
and safety instructions.
Thrown objects can ricochet and
result in personal injury or
property damage. Wear
protective clothing and boots.
Disconnect the spark-plug wire, and
keep the wire away from the plug to
prevent accidental starting. Discon-
nect the cable on electric motors.
Do not clear snow across the face of
slopes. Exercise extreme caution
when changing direction on slopes.
Do not attempt to clear steep
slopes.
Never operate the power tool
without proper guards, plates or
other safety protective devices in
place.
Never operate the power tool near
glass enclosures, automobiles,
window wells, drop-offs, etc.,
without proper adjustment of the
snow discharge angle. Keep children
and pets away.
Do not overload the power tool
capacity by attempting to clear
snow at too fast a rate.
Never operate the power tool at
high transport speeds on slippery
surfaces. Use care when reversing.
Never direct discharge at bystanders
or allow anyone in front of the
power tool.
Disengage power to the colletor/im-
peller when the power tool is
transported or not in use.
Use only attachments and accesso-
ries approved by the manufacturer
of the power tool.
Never operate the power tool
without good visibility or light.
Always be sure of your footing, and
keep a firm hold on the handles.
Walk, never run.
Use the power tool only in daylight
or good artificial light.
CAUTION:
shows a possibly
dangerous situation,
which, if you do not
prevent, can cause
mitigated or
moderate injury.
CAUTION:
(Without Safety Alert
Symbol) shows a
situation that can
cause property
damage.
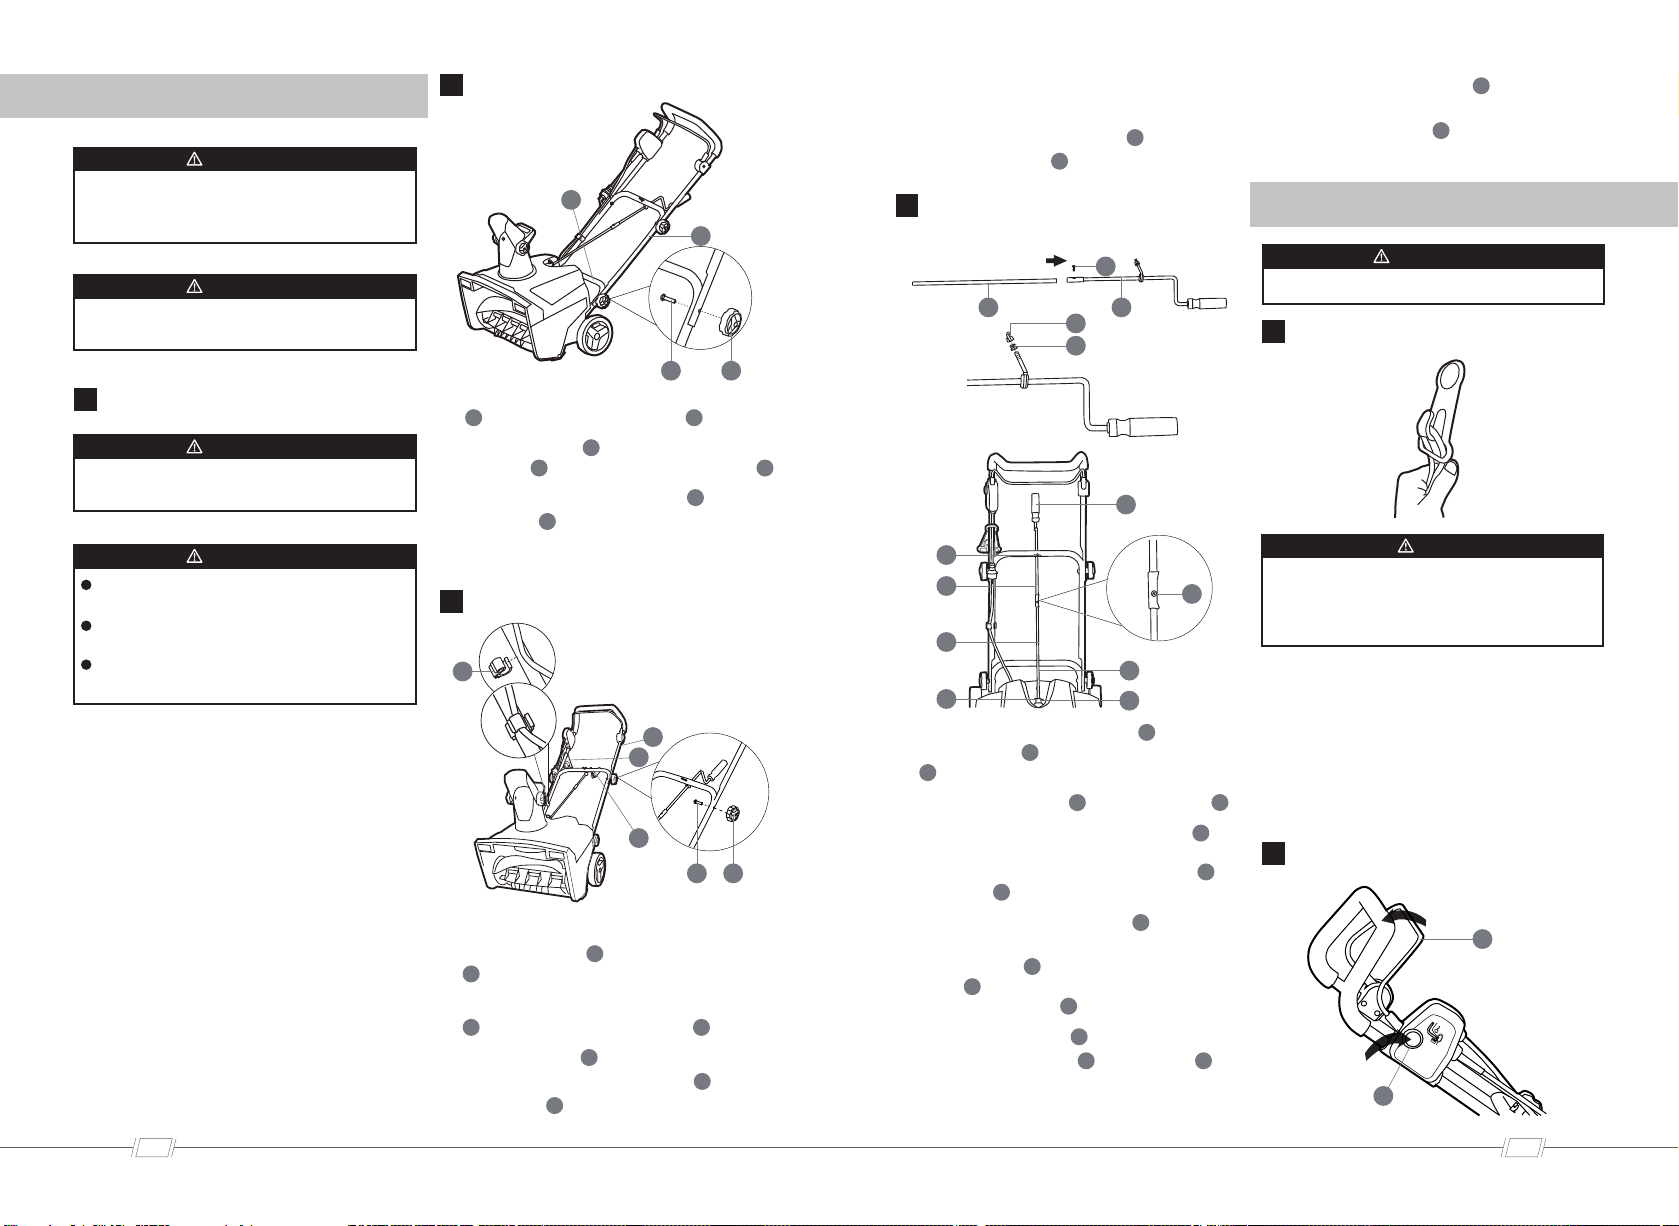
UNPACK THE MACHINE
INSTALL THE MIDDLE HANDLE
INSTALL THE CHUTE CONTROL
ROD
USE THE CORD RETAINER
START THE MACHINE
INSTALL THE UPPER HANDLE
Do not change or make accessories that
are not recommended by the manufac-
turer.
WARNING
Do not connect to power supply until
you assemble all the parts.
WARNING
Make sure that you correctly assemble
the machine before use.
WARNING
Wear eye protection during operation.
WARNING
Do not plug the extension cable into the
outlet until it has been connected to the
cord retainer and plugged into the
machine.
NOTE
If the parts are damaged, do not use
the machine.
If you do not have all the parts, do not
operate the machine.
If the parts are damaged or missing,
speak to the service center.
Open the package.
Read the documentation in the box.
Remove all the unassembled parts
from the box.
Remove the machine from the box.
Discard the box and package in
compliance with local regulations.
1.
2.
3.
4.
5.
Align the holes in the middle handle
( )and the lower handle ( ).
Put the bolts ( ) through the middle
handle ( ) and the lower handle ( ).
Tighten the handle knob ( ) onto
the bolt ( ).
Repeat for left/right side.
1.
2.
3.
4.
Put the cord retainer between the
upper handle ( ) and middle handle
( ).
Align the holes in the middle handle
( ) and the upper handle ( ).
Put the bolts ( ) through the holes.
Tighten the handle knobs ( ) onto
the bolts ( ).
1.
2.
3.
Do the same operation on the other
side.
Attach the cable clamp ( ) to the
middle handle ( ).
4.
5.
Connect the upper lever ( ) and
lower lever ( ) with 1 screw supplied
( ).
Unscrew the nut ( ) and washers( ).
Put the bolt of the upper lever ( )
through the hole in the middle
handle. And install the washers ( )
and nut ( ).
Pull out of the hitch pin ( ). And
then put the end of the chute
control rod ( ) straight through the
hole ( ) in the bracket. And Keep
the grip handle ( ) down.
Put the hitch pin ( ) through the
chute control rod ( ) and hole ( ).
1.
2.
3.
4.
5.
Turn the grip handle ( ) left and
right to make sure that the
discharge chute ( ) moves in the
same direction.
6.
Fold the extension cable to form a
tight loop near the retainer.
Push the loop through the bottom
hole in the retainer.
Move the loop over the retaining
clip, and pull until the cable is
secured.
1.
2.
3.
WARNING
INSTALLATION
OPERATION
05
https://www.altonindustries.com
06
info@altonindustries.com
4
6
21 14
3
22
4
13
21 14
15 16
18
22
17
23
5
17
19
20
16
15
18
2
12
4
4
3
3
4
4
6
6
14
14
21
21
21
21
4
22
16
17
18
18
19
19
22
22
20
20
23
10
23
5
5
15
15

STOP THE MACHINE
ADJUST THE DISCHARGE CHUTE
OPERATION TIPS
GENERAL MAINTENANCE
REPLACE THE SCRAPER
ADJUST THE CHUTE DEFLECTOR
Keep bystanders a safe distance from
the machine.
WARNING
Examine the work area. Remove all
stones, sticks, wire, bones, and other
debris that can ricochet because of the
rotating impeller.
WARNING
Wait until the impeller fully stops before
you start the machine again. Do not
quickly turn the machine off and on.
WARNING
Pull the plug after you complete the
work.
WARNING
Release the bail lever before you adjust
the chute deflector.
WARNING
Do not push the deflector so far forward
that a gap shows between the deflector
and the chute.
WARNING
Disconnect the extension cord before
maintenance.
WARNING
Use only approved replacement scrapers.
WARNING
Wear heavy gloves or wind cloth around
the impeller when you touch the impeller.
WARNING
Use only approved replacement parts.
CAUTION
Do not use strong solvents or detergents
on the plastic housing or components.
CAUTION
Lower the scraper to the ground to
remove the snow.
NOTE
You can adjust the discharge chute
180° to change the snow direction.
You can adjust the chute deflector up
and down to change the throwing
distance of the snow.
While holding the safety switch
button ( ), pull the start lever ( ) to
start the machine.
Once the machine powers on,
release the safety switch button ( )
and begin operation.
The machine can only be started by
pressing the safety switch button ( )
first, followed by squeezing the start
lever ( ), reverse operation will not
start the machine.
1.
2.
3.
Release the start lever ( ) to stop the
machine.
1.
1.
2.
3.
Turn the grip handle ( ) left to
move the discharge chute ( ) to the
left.
Turn the grip handle ( ) right to
move the discharge chute ( ) to the
right.
1.
2.
Loosen the locking knobs ( ) and
adjust the chute deflector ( ) to a
suitable height.
Move the chute deflector ( ) up or
down to selected comfortable angle.
Tighten the locking knob ( ).
1.
2.
3.
If it is possible, clear the snow with
the direction of the wind.
In strong winds, lower the chute
deflector to direct the snow to the
ground.
When you complete the work, let
the machine operate for a while to
prevent ice formation in the
discharge chute.
If the snow is deeper than 8",
decrease the speed and let the
machine work at its own rhythm.
Do not use the scraper to remove
compact snow and ice.
Before each use, examine the
machine for damaged, missing, or
loose parts such as screws, nuts,
bolts and caps.
Tighten correctly all the fasteners
and caps.
Clean the remaining snow on the
machine with a brush.
Remove the 6 screws ( ) .
Remove and discard the old scraper.
Install the new scraper.
MAINTENANCE
07
https://www.altonindustries.com
08
info@altonindustries.com
2
2
90° 90°
23
10
10
11
14
21
12
12
12
23
23
10
14
14
11
11
21
10
2
2
2
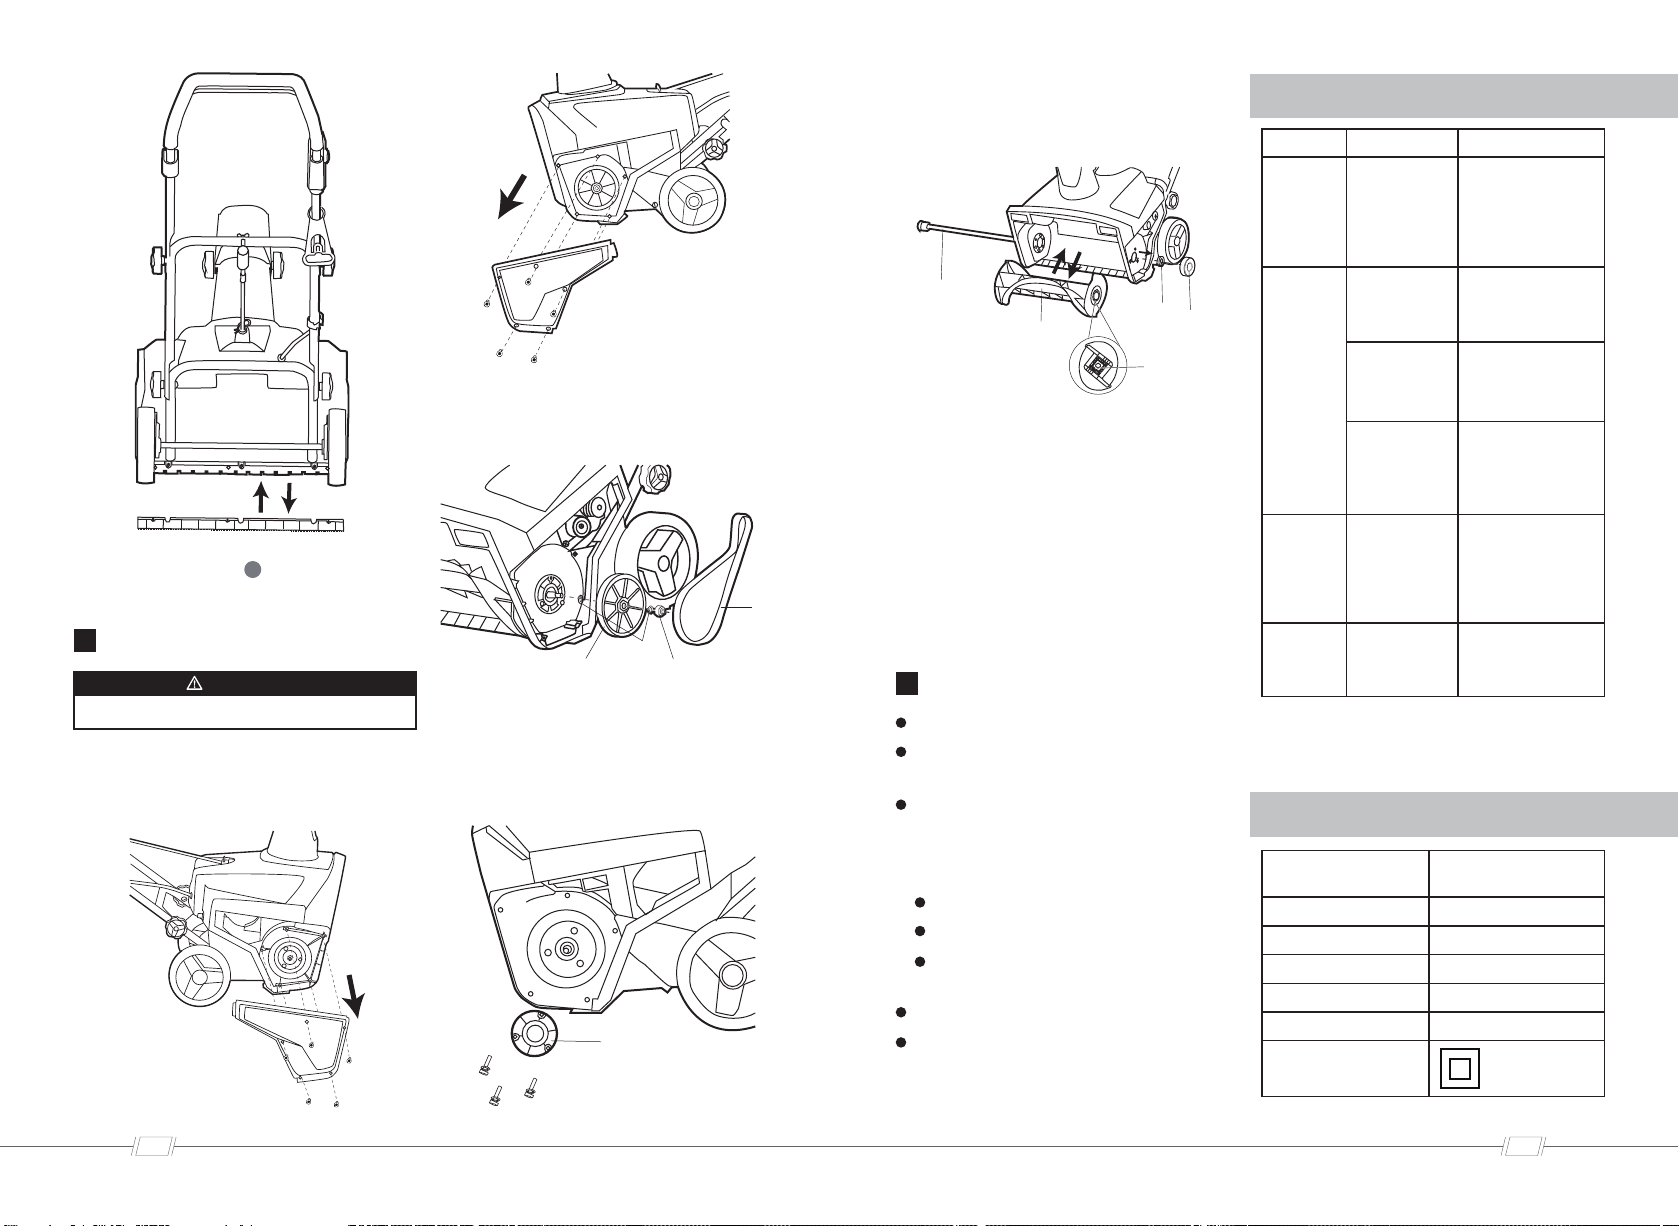
REPLACE THE IMPELLER
STORE THE MACHINE
Use only approved replacement scrapers.
WARNING
Clean the machine before storage.
Make sure the motor is not hot
when you store the machine.
Make sure that the machine does
not have loose or damaged parts. If
it is necessary, do these steps/
instructions:
Replace the damaged parts.
Tighten the bolts.
Speak to a person at an approved
service center.
Store the machine in a dry area.
Make sure that children cannot
come near the machine.
4. Put in the screw ( ) and scraper and
tighten them.
1. Remove the 10 screws and side wear
pads that secure the right and left
side covers.
2. Remove the belt, unscrew the nut
and then remove the washer, large
pulley and washer.
4. Remove the bearing, impeller axle,
washer and old impeller. And then
remove the insert blocks from the
old impeller to the new impeller.
5.
6.
7.
8.
Reinstall the new impeller, impeller
axle, washer and bearing in order.
Reinstall the splint, nut with flat
washer and spring washer.
Reinstall the washer, large pulley and
washer. And screw the nut, reinstall
the belt.
Reinstall the 10 screws and side wear
pads that secure right and left side
covers.
* If you cannot find the solution to
these problems, please go to the
service center.
3. Unscrew the nut with flat washer and
spring washer, remove the splint. Do
the same operation on the other
side.
TROUBLESHOOTING
TECHNICAL DATA
09
https://www.altonindustries.com
10
info@altonindustries.com
Problem
Rated Voltage
/Current
Working Width
Working Depth
Throwing Distance
Roller Diameter
No Load Speed
19.5inch (495mm)
120V/15A
Double-insulated
construction
10inch (25mm)
6.8inch (173mm)
9m
3000RPM
Possible cause Solution
Adjust the height
of the handle and
make sure that
the knobs and
bolts are aligned
correctly.
The bolts are
not engaged
correctly.
The switch is
defective. Have the switch
replaced by an
authorized service
center.
The extension
cord is not
connected to
the plug.
Connect the plug
on the machine to
the extension cord.
The extension
cord is not
connected to
the power
source.
Plug the extension
cord into a live 120
V AC, 60 Hz outlet.
The handle
is not in
position.
The
machine
does not
start.
The belt is
damaged. Replace the belt.The engine
is on, but
the
impeller
does not
turn.
The scraper is
damaged. Replace the
scraper.
A thin layer
of snow
stays
behind.
belt
nut
washer
large pulley
Splint
Bearing
Washer
Insert blocks
Impeller
Impeller axle
21

WARRANTY
11
https://www.altonindustries.com