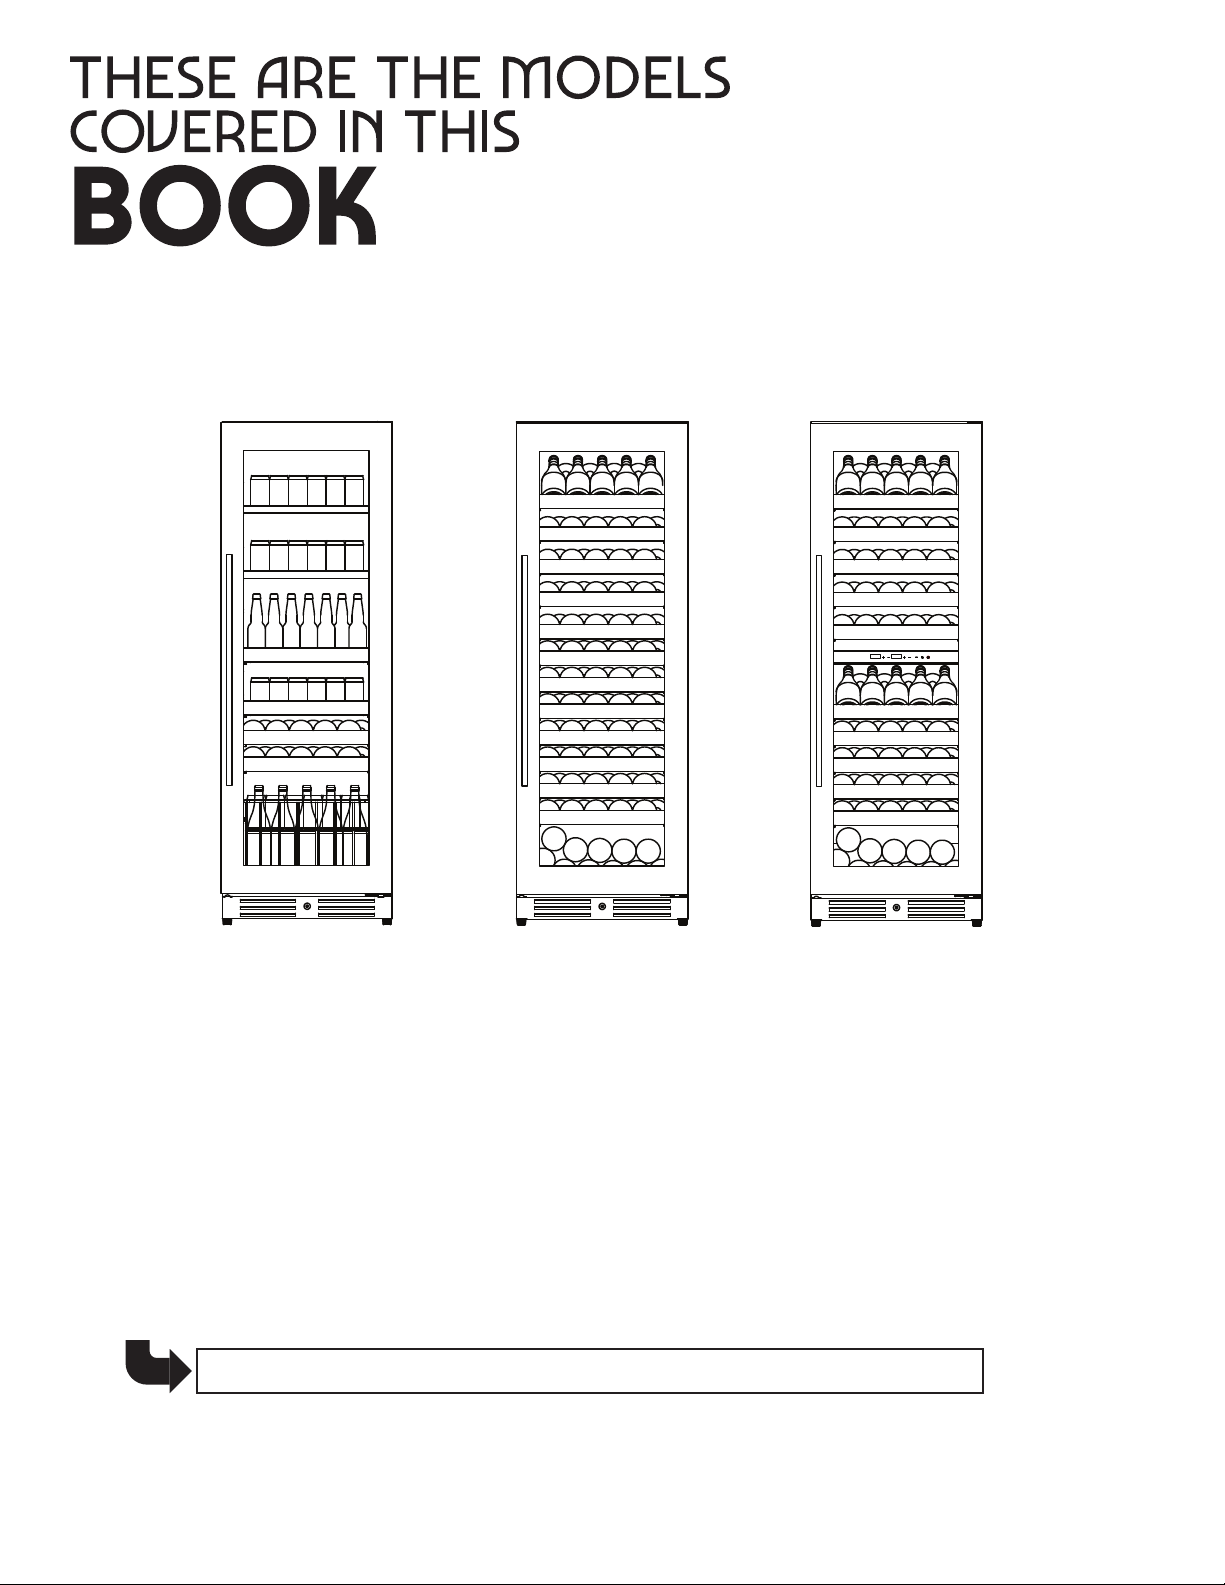
LIFESTYLE REFRIGERATION
MODELS: XOU2470BCG_
XOU2470WDZG_
XOU2470WG_
3
APPLIANCE
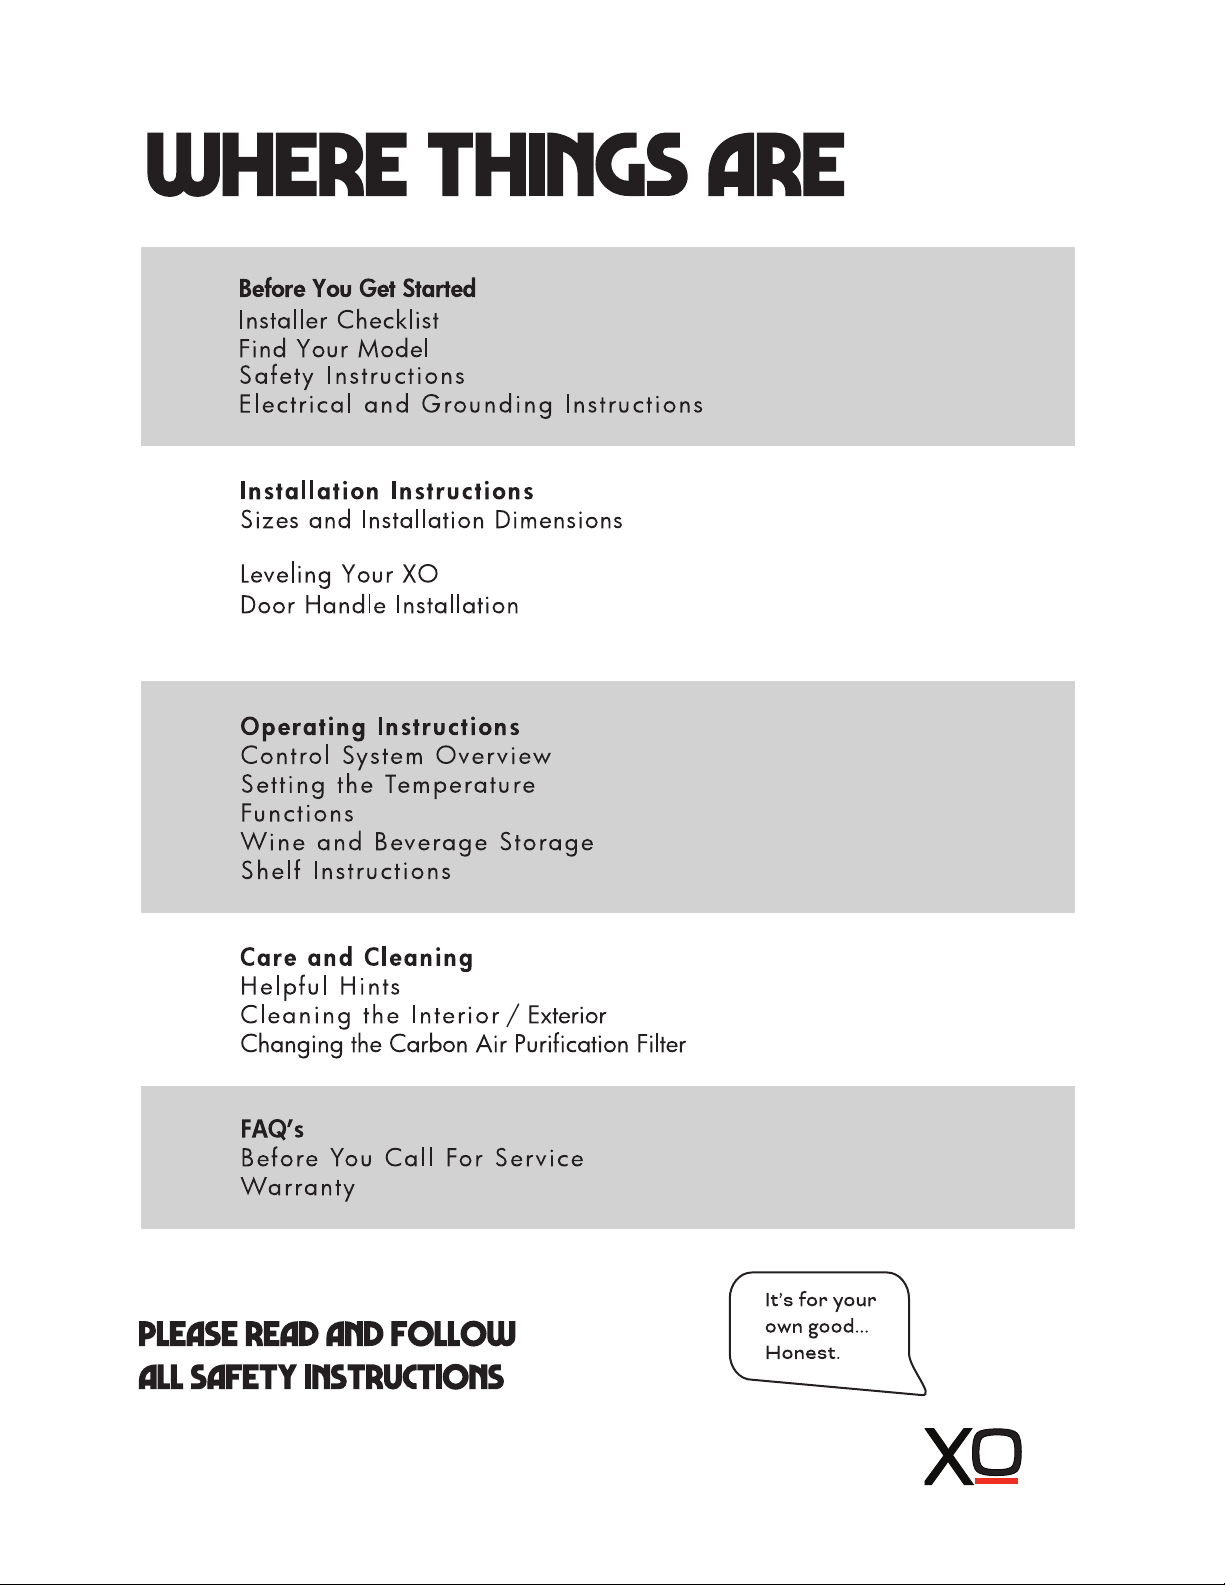
4
5 - 8
9 - 15
16 - 23
24 - 25
26 - 28
Reversing the Door
Anti-Tip Bracket
5
2
take a minute to circle your model above
and record your serial number
here in case you need it later
XOU2470BCGS
XOU2470BCGB
XOU2470WGS
XOU2470WGB
XOU2470WDZGS
XOU2470WDZGB
6
7
8
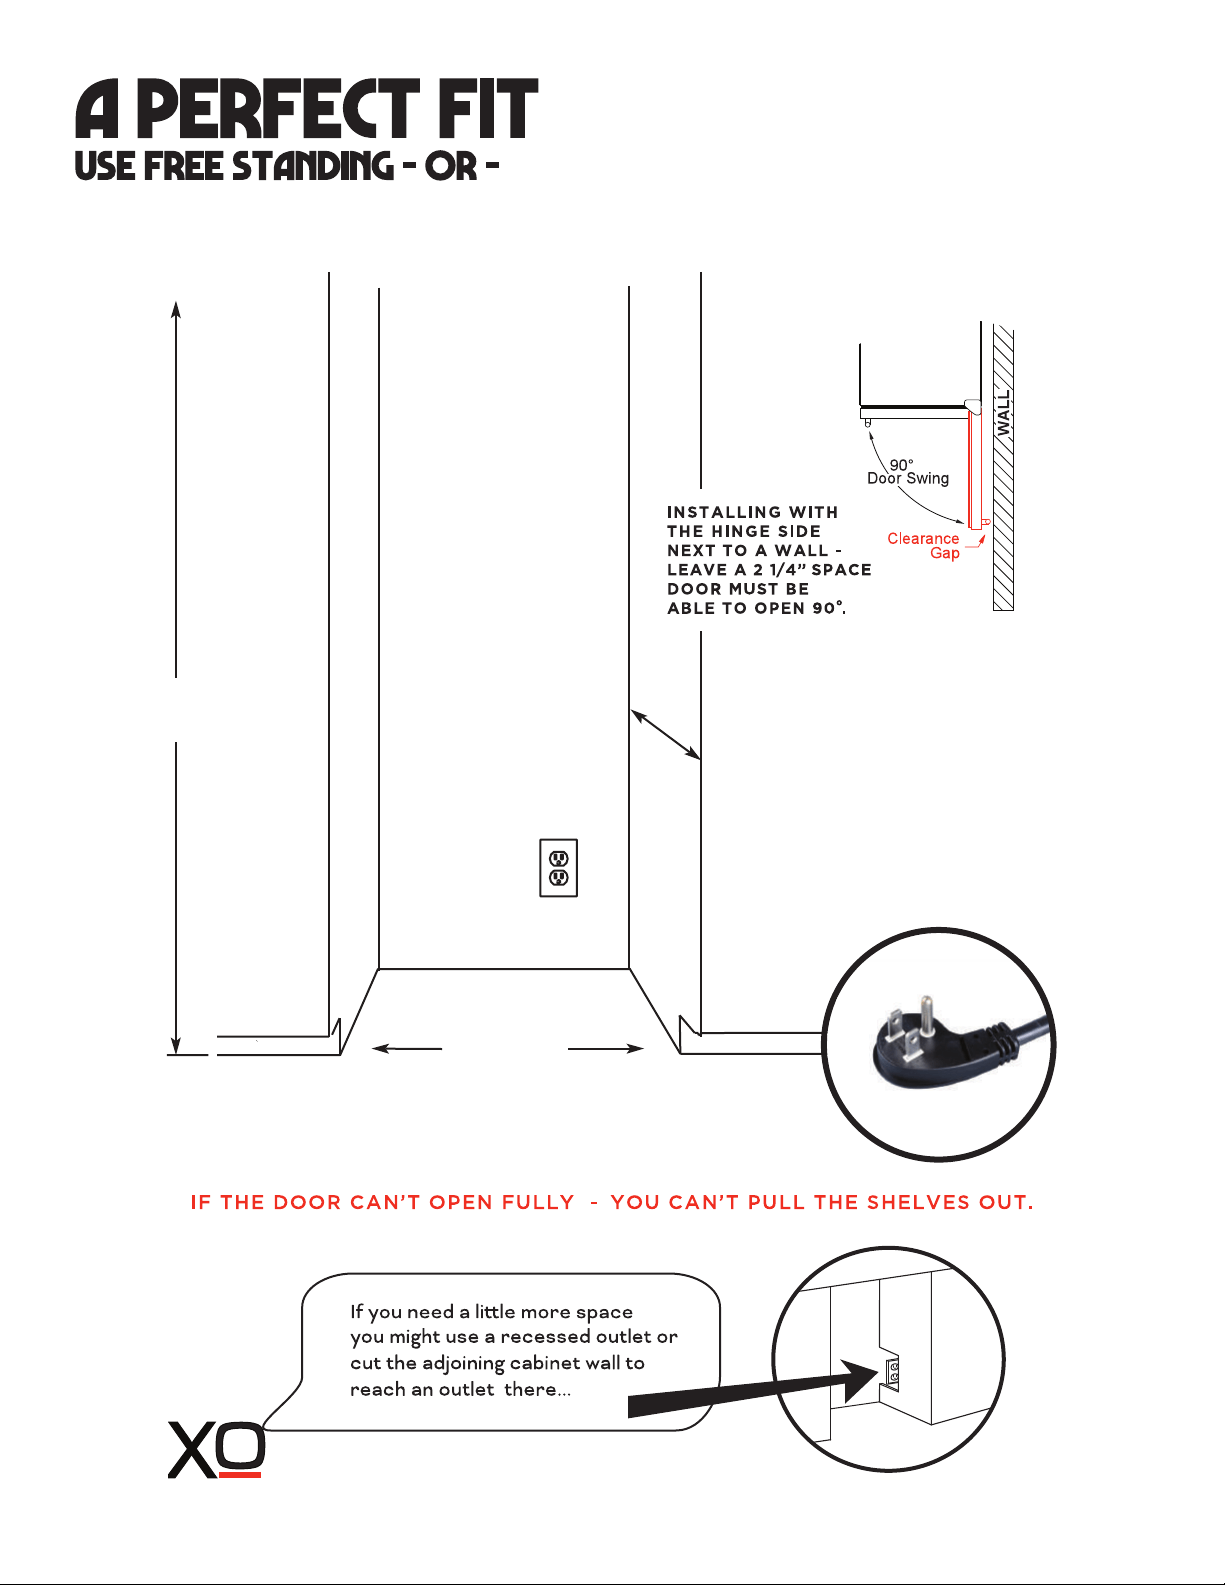
24”
70”
built-in
27 3/4”
(This will allow a 1” gap behind the
unit while the door face sits flush)
9

ALL
MODELS
ARE
69 1/2”
(1764mm)
HIGH
H
W
THE DEPTH IS SHOWN
WITHOUT HANDLES
HANDLE WILL ADD 1 3/4”
TO THE DEPTH
26 11/16”
D
(678mm)
23 7/16”
(595mm)
10

WARNING: Do not attempt to reverse the door alone. This operation requires at least two
people to be performed safely. The door is large, heavy and fragile.
READ THESE INSTRUCTIONS COMPLETELY BEFORE BEGINNING - IF YOU ARE UNSURE
ABOUT PROCEEDING, STOP AND CALL FOR SERVICE.
.
Step 1: Remove the screws attaching the lower hinge to the
bottom of the door from below.
Step 2: Swing the bottom hinge out of the way and carefully
slide the door free from the top hinge pin.
CAUTION: DO NOT USE THE DOOR HANDLE TO LIFT
OR HOLD THE DOOR. GRIP BY THE EDGES ONLY.
Step 3:
USE CARE NOT TO DAMAGE THE FINISH OR DOOR GASKET
Lay the door on a secure, flat, padded, working surface.
Remove and save the plugs, stickers and hardware from the
top of the door.
Step 4: Remove the hardware
from the bottom of the door
and replace it with the parts
removed in Step 3.
Step 5: Reinstall the hardware from the bottom of the door
removed in Step 4 in the holes provided in what had previously
been the top of the door.
THE DOOR IS NOW REVERSED 180 DEGREES.
PROCEED TO STEP 6.
BEFORE BEGINNING - REMOVE ALL INTERIOR SHELVES,
RACKS AND BINS - THEN LAY THE UNIT FLAT ON ITS BACK.
TEAM LIFT - TWO OR MORE PEOPLE ARE REQUIRED!
11
reversing the door
12
WARNING: Do not attempt to reverse the door alone. This operation requires at least two
people to be performed safely. The unit is large, heavy and fragile.
.
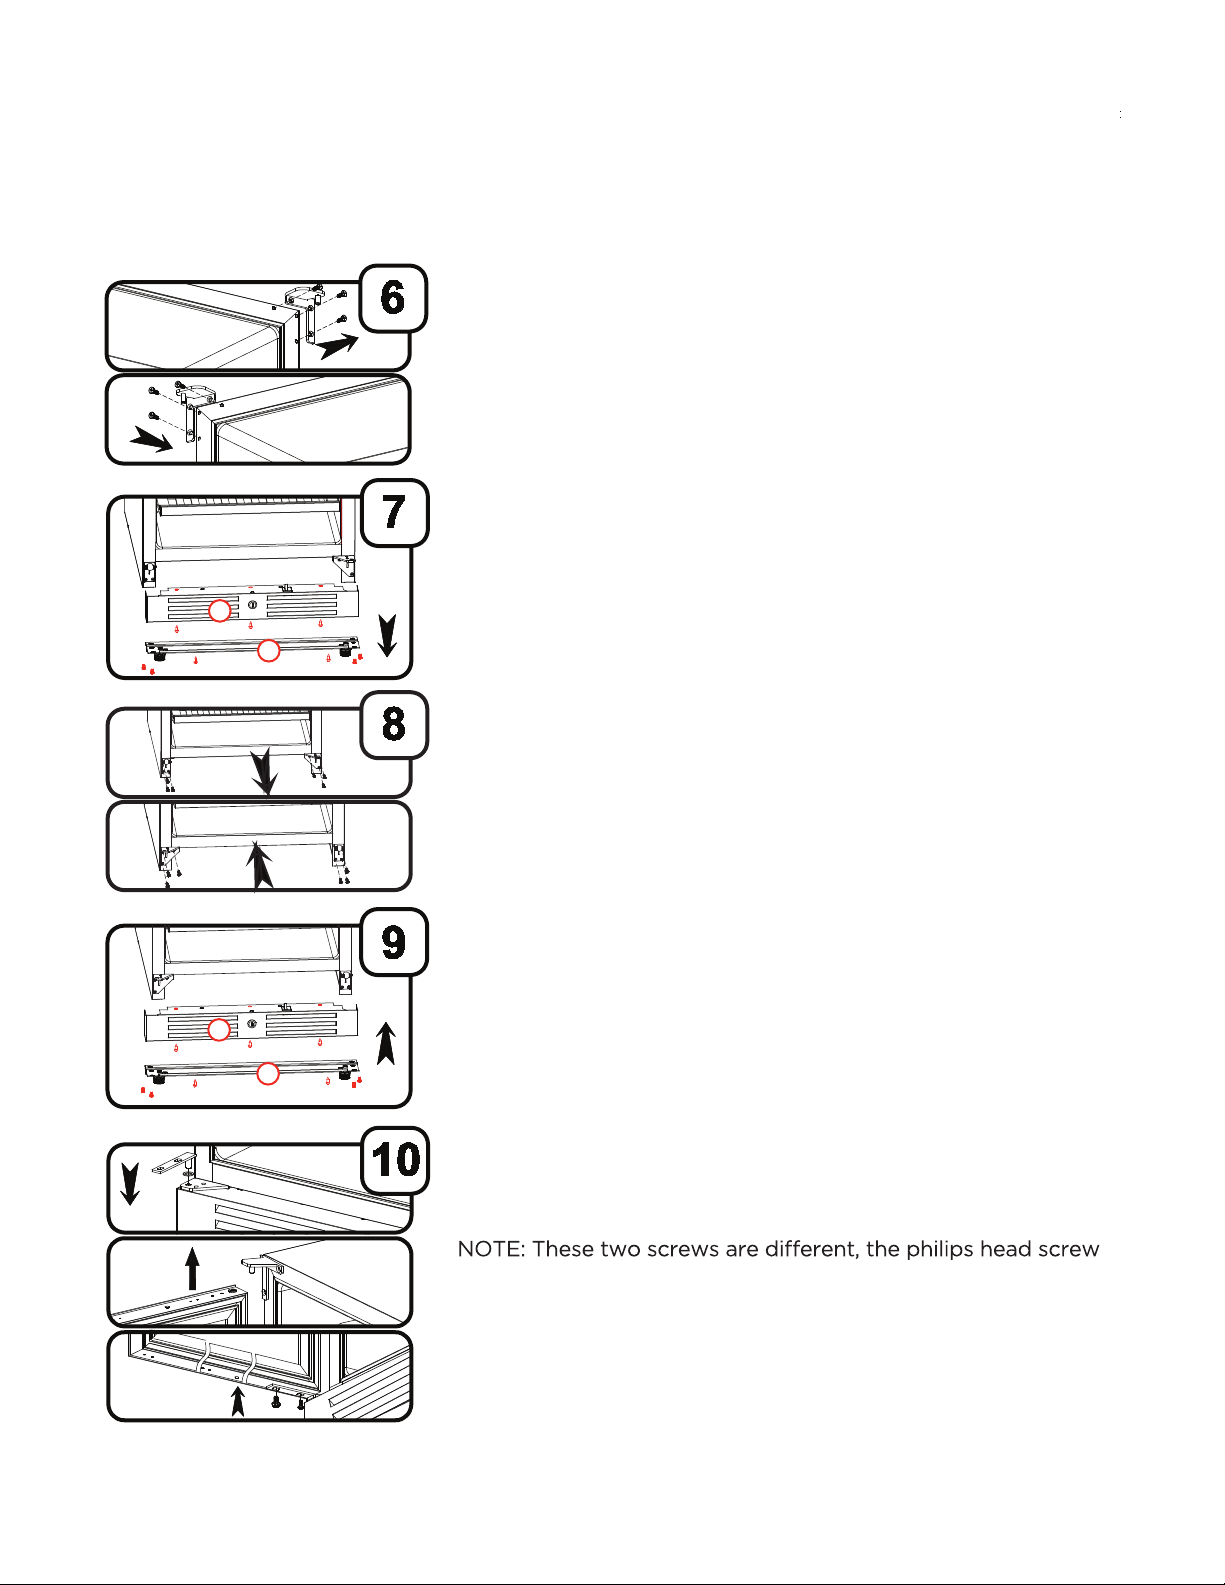
Step 6: Remove the upper hinge on the cabinet and replace it
with the opposite facing upper hinge, supplied.
Step 7:
expose the screws (below and behind) holding the toe kick in
place. Remove the toe kick (B).
Remove the front leveling leg support (A) - this will
Step 8:
shown. Reinstall the door bracket on the opposite side and
install the new opposite facing lower hinge support in its place.
Remove the lower hinge support and door bracket as
Step 9:
replace the front leveling leg support (A) removed in Step 7.
First, replace the toe kick (B) removed in Step 7, then
Step 10: Install the lower hinge pin and washer.
TEAM LIFT: Slide the door onto the upper hinge pin, rotate the
lower hinge plate into position and secure in place.
installs closest to the cabinet.
AFTER THE DOOR IS SECURE, STAND THE UNIT UPRIGHT
AND ALLOW TO STAND AT LEAST 12 HOURS BEFORE
PLUGGING IT IN.
cont.
A
B
A
B
reversing the door
13
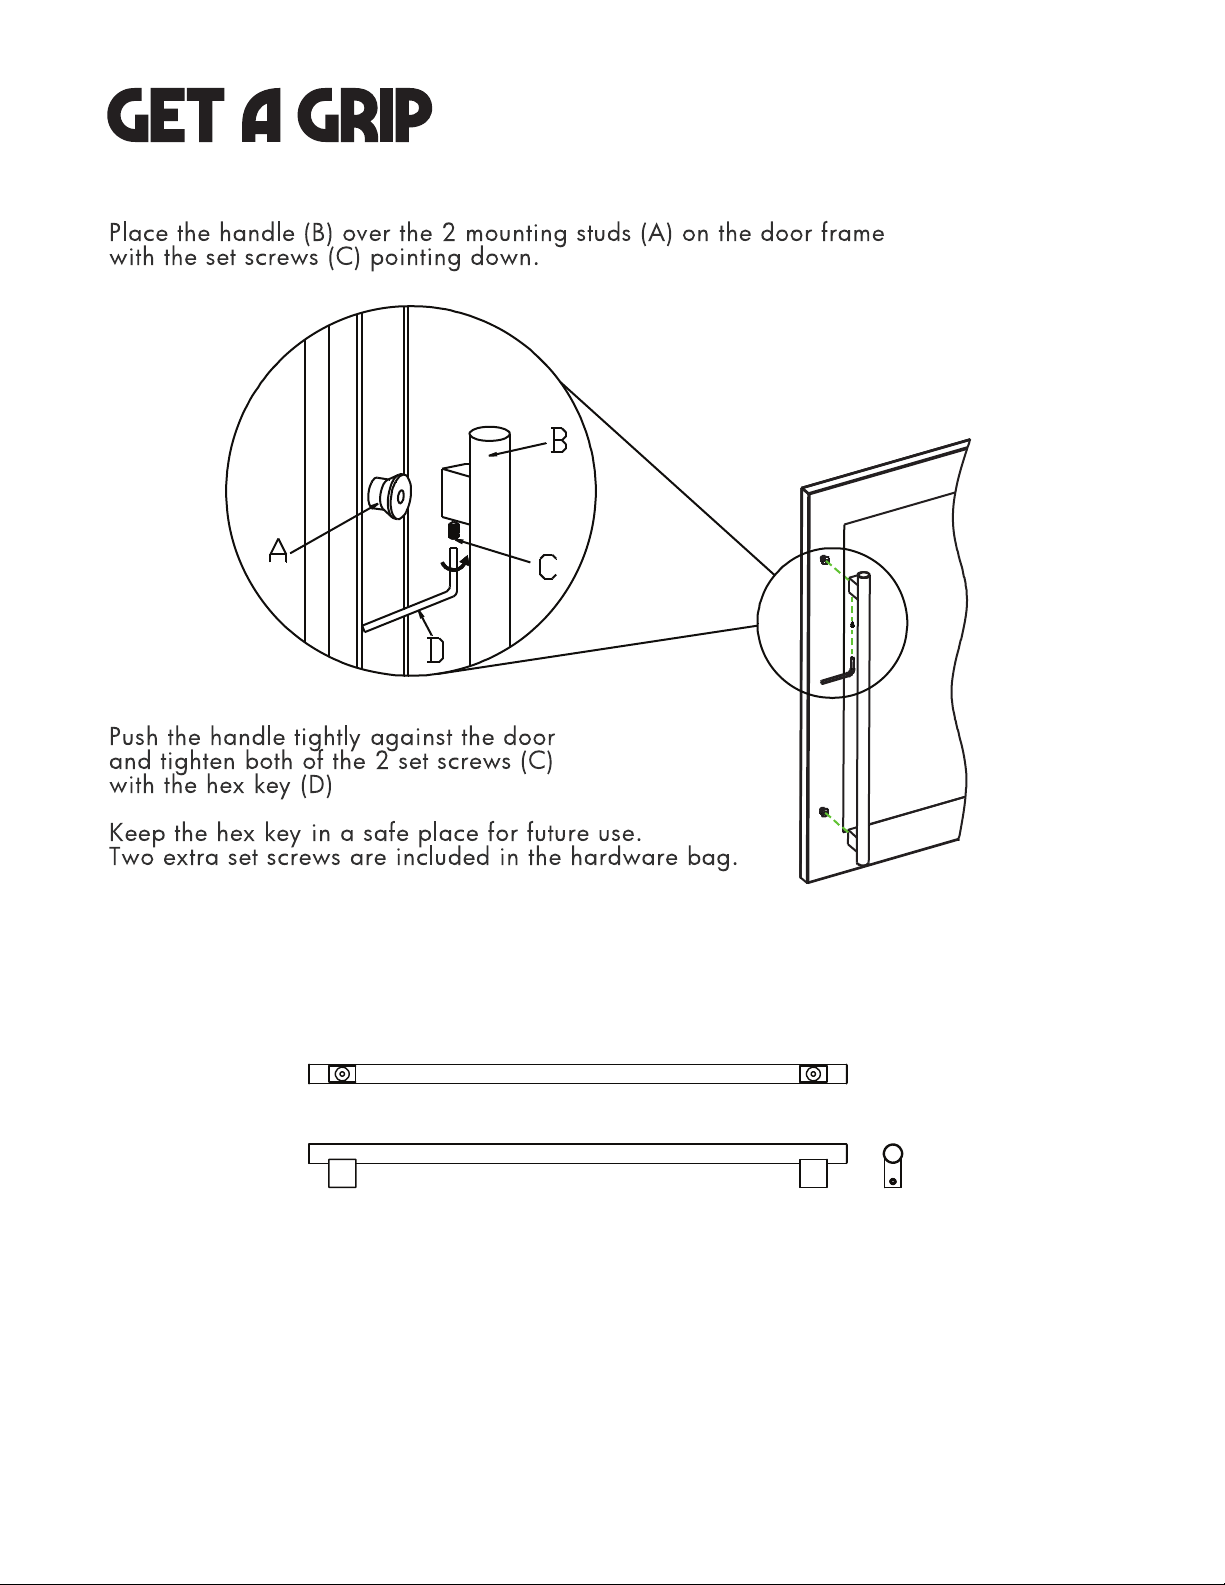
Stainless Steel / Glass door models come with a matching stainless steel designer handle.
Black glass models come with a black designer handle.
time to get a handle on this

14

anti-tip bracket
an essential step
When drawers, racks and shelves are extended while loaded, there is a danger of tipping the unit.
In these cases an Anti-Tip Bracket must be installed on the rear right or left side.
The Anti-Tip Bracket kit comes with a bolt and washers to mount to the rear of the refrigerator and
three different sets of fasteners to mount it to any of the following: Dry Wall Construction, Wooden
Flooring or Concrete Flooring.
DRYWALL CONSTRUCTION: (2 Screws) The bracket is screwed
to the wall and at least one of the screws must be into a stud
within the wall.
WOODEN FLOORING: (2 Screws) The bracket must be screwed
down into the flooring.
CONCRETE FLOORING: (Expansion Bolt) A 3/8” hole is bored
into the flooring 1 3/4” to 2” deep. The expansion sleeve is set
with a mallet into the hole and the bracket is bolted to the floor.
Make certain that the unit will not tip when finished.
FAILURE TO SECURE THE UNIT PROPERLY CAN CREATE A
DANGEROUS CONDITION.
ANTI-TIP BRACKET
15
LOCK
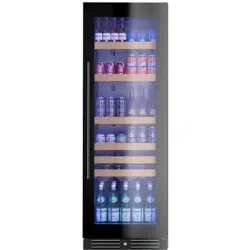
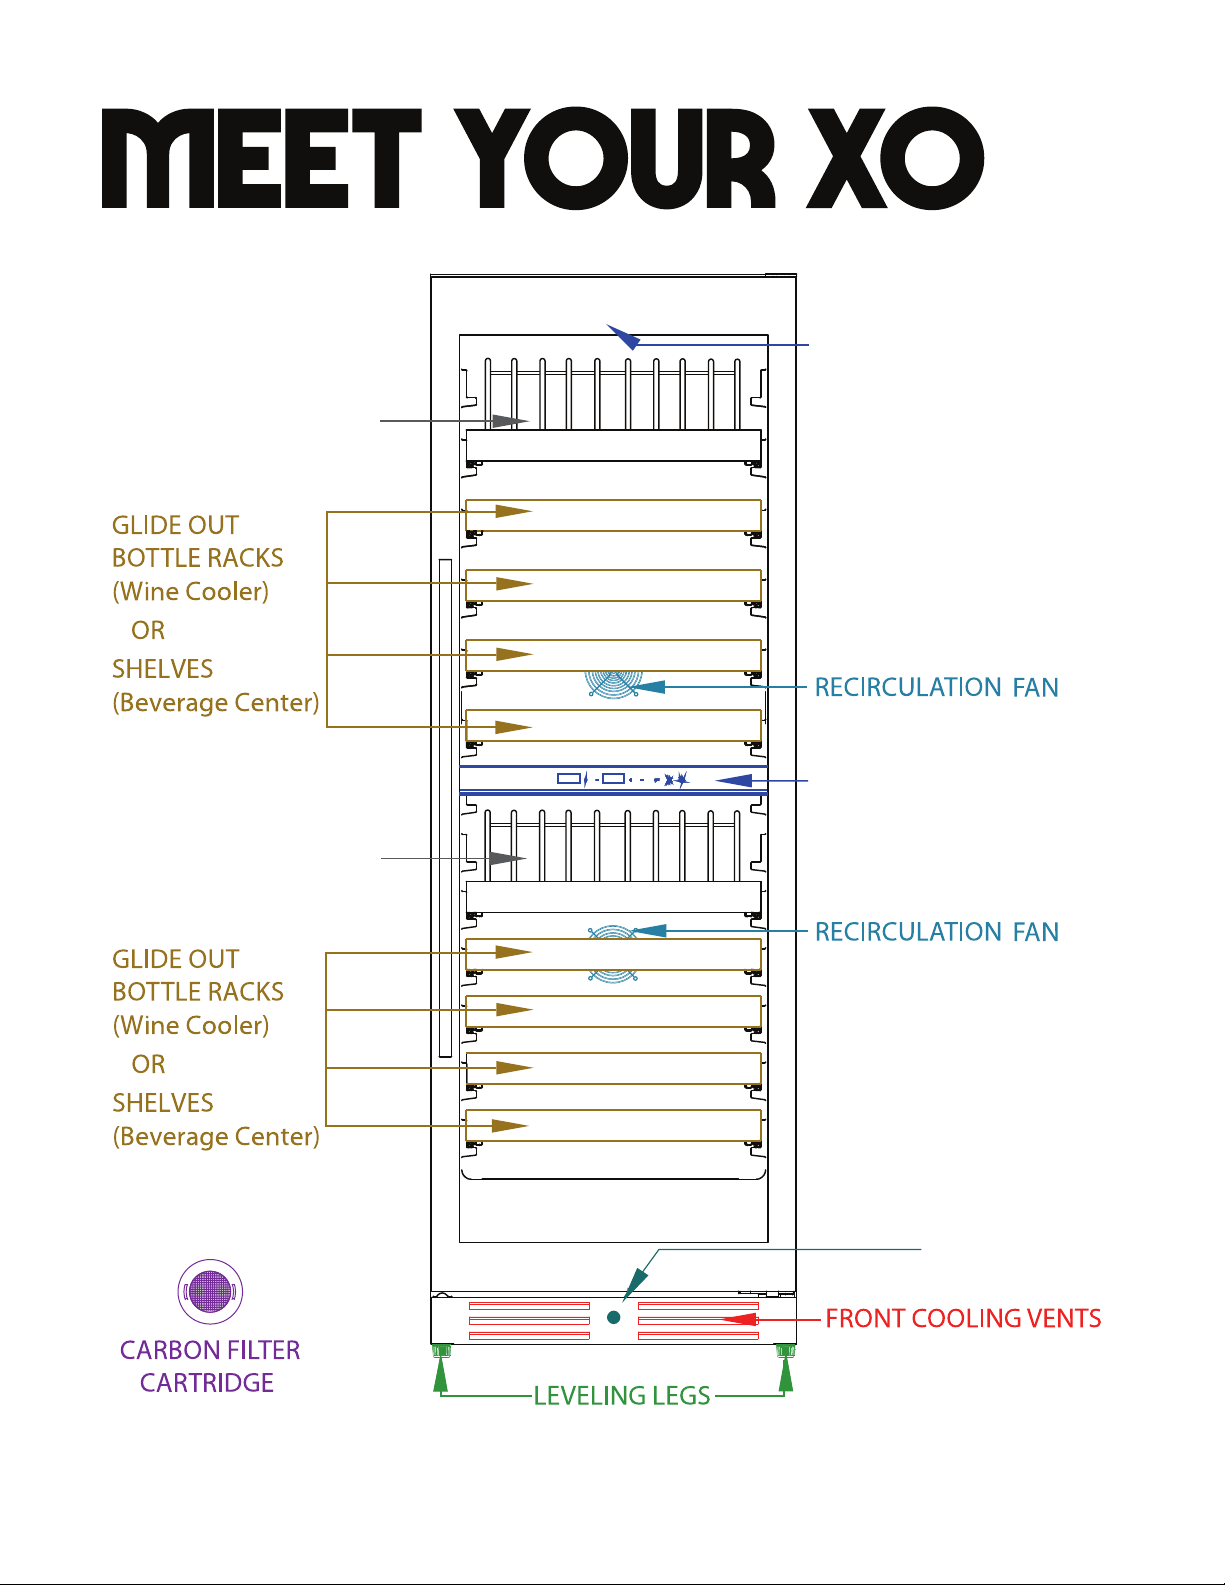
BOTTLE DISPLAY RACK
BOTTLE DISPLAY RACK
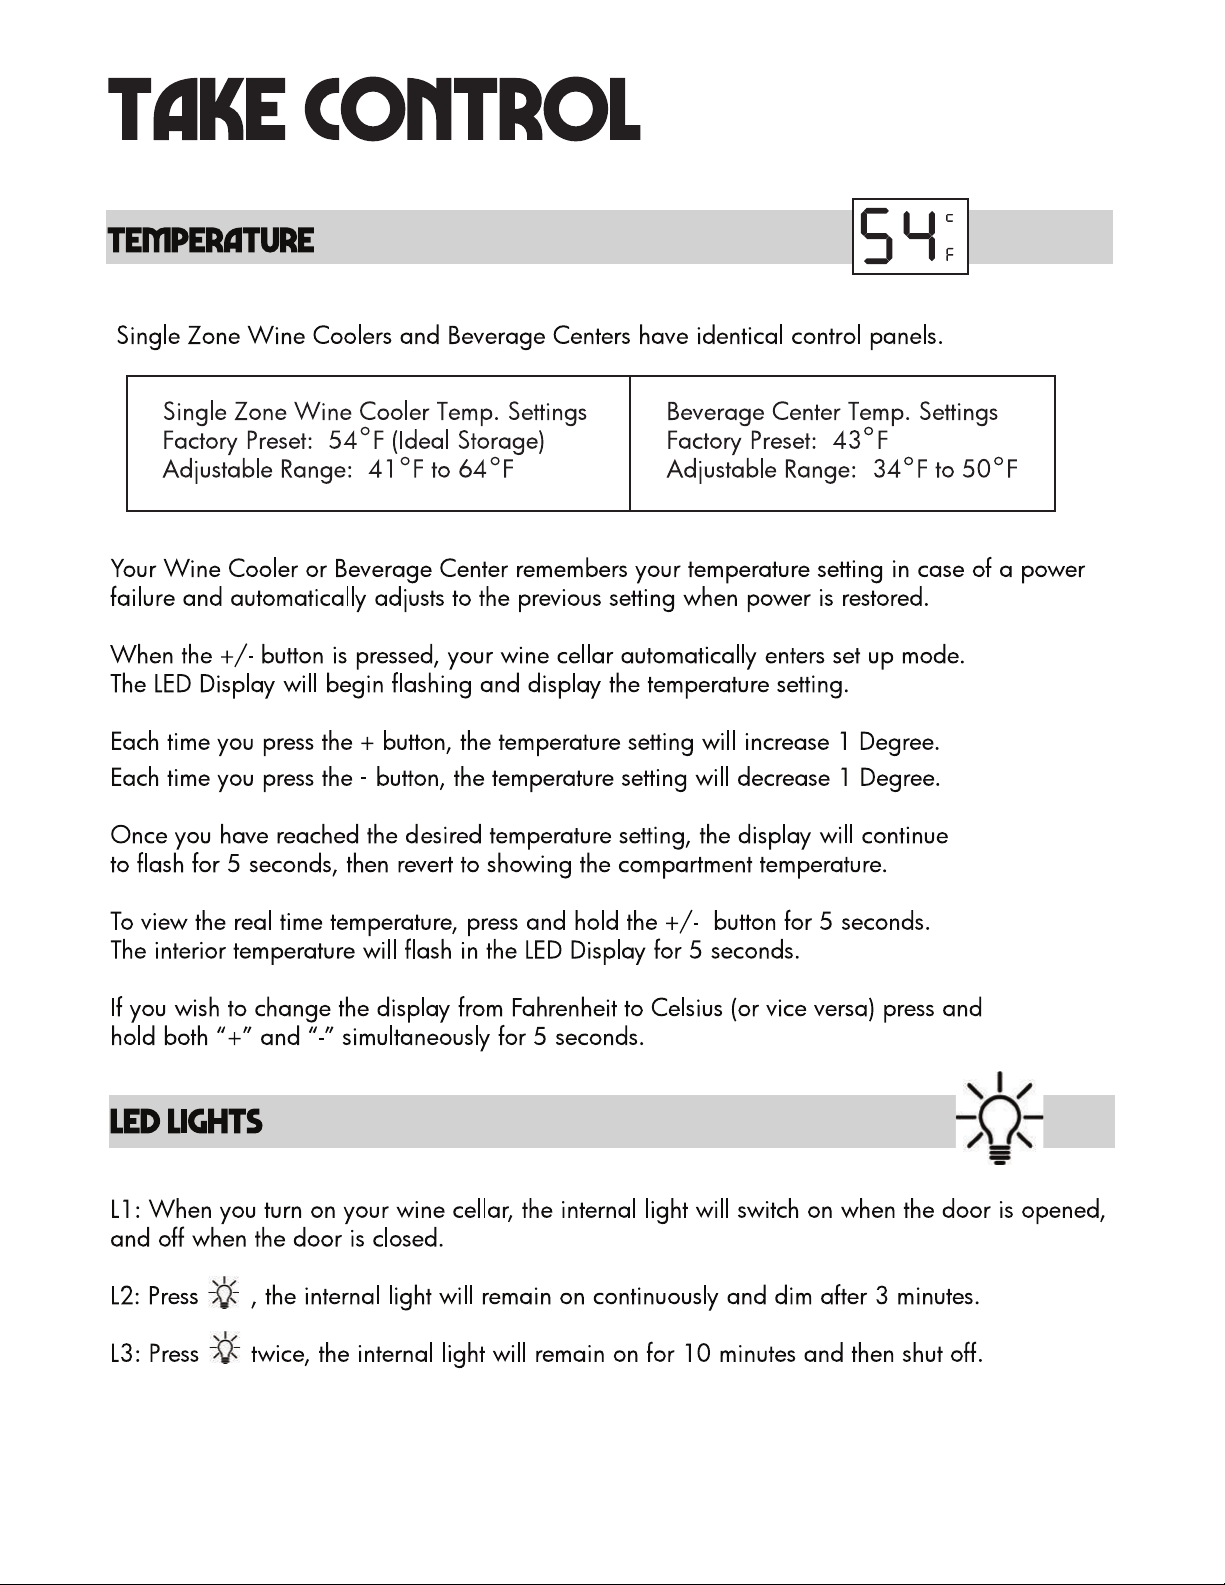
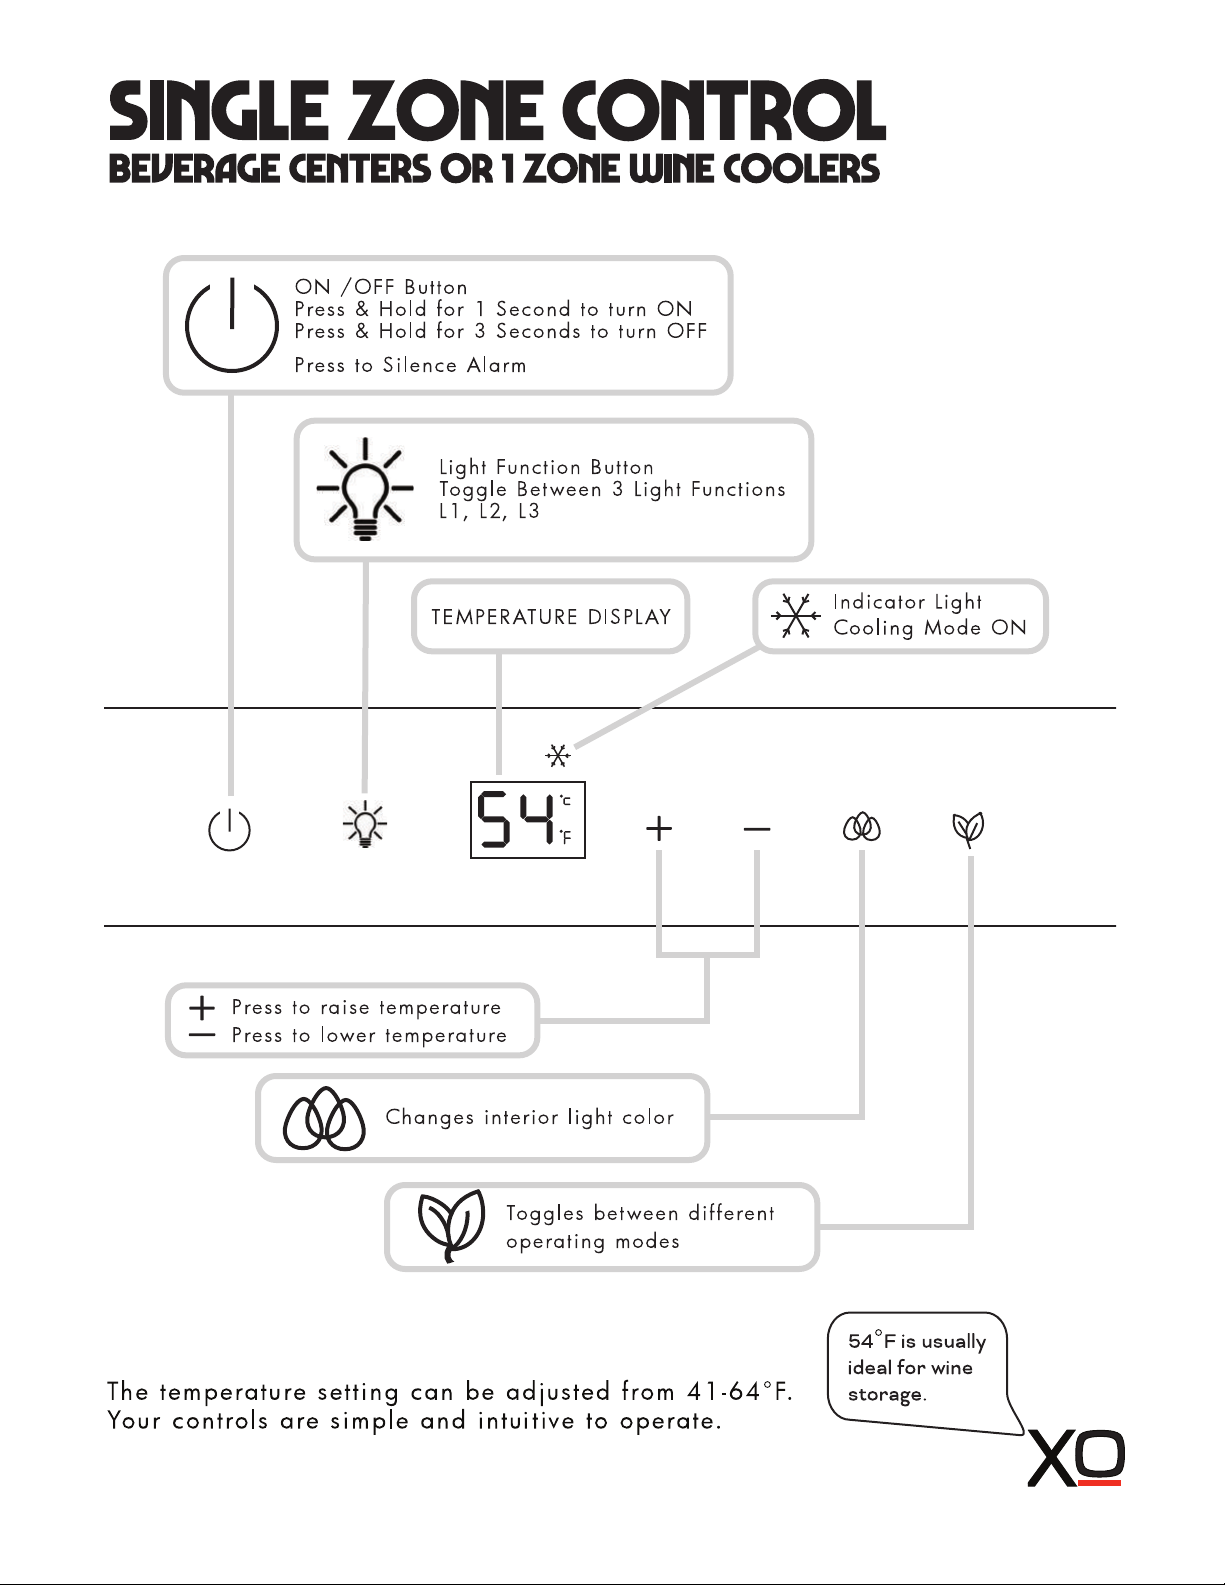
SINGLE ZONE
CONTROL PANEL
(hides up here)
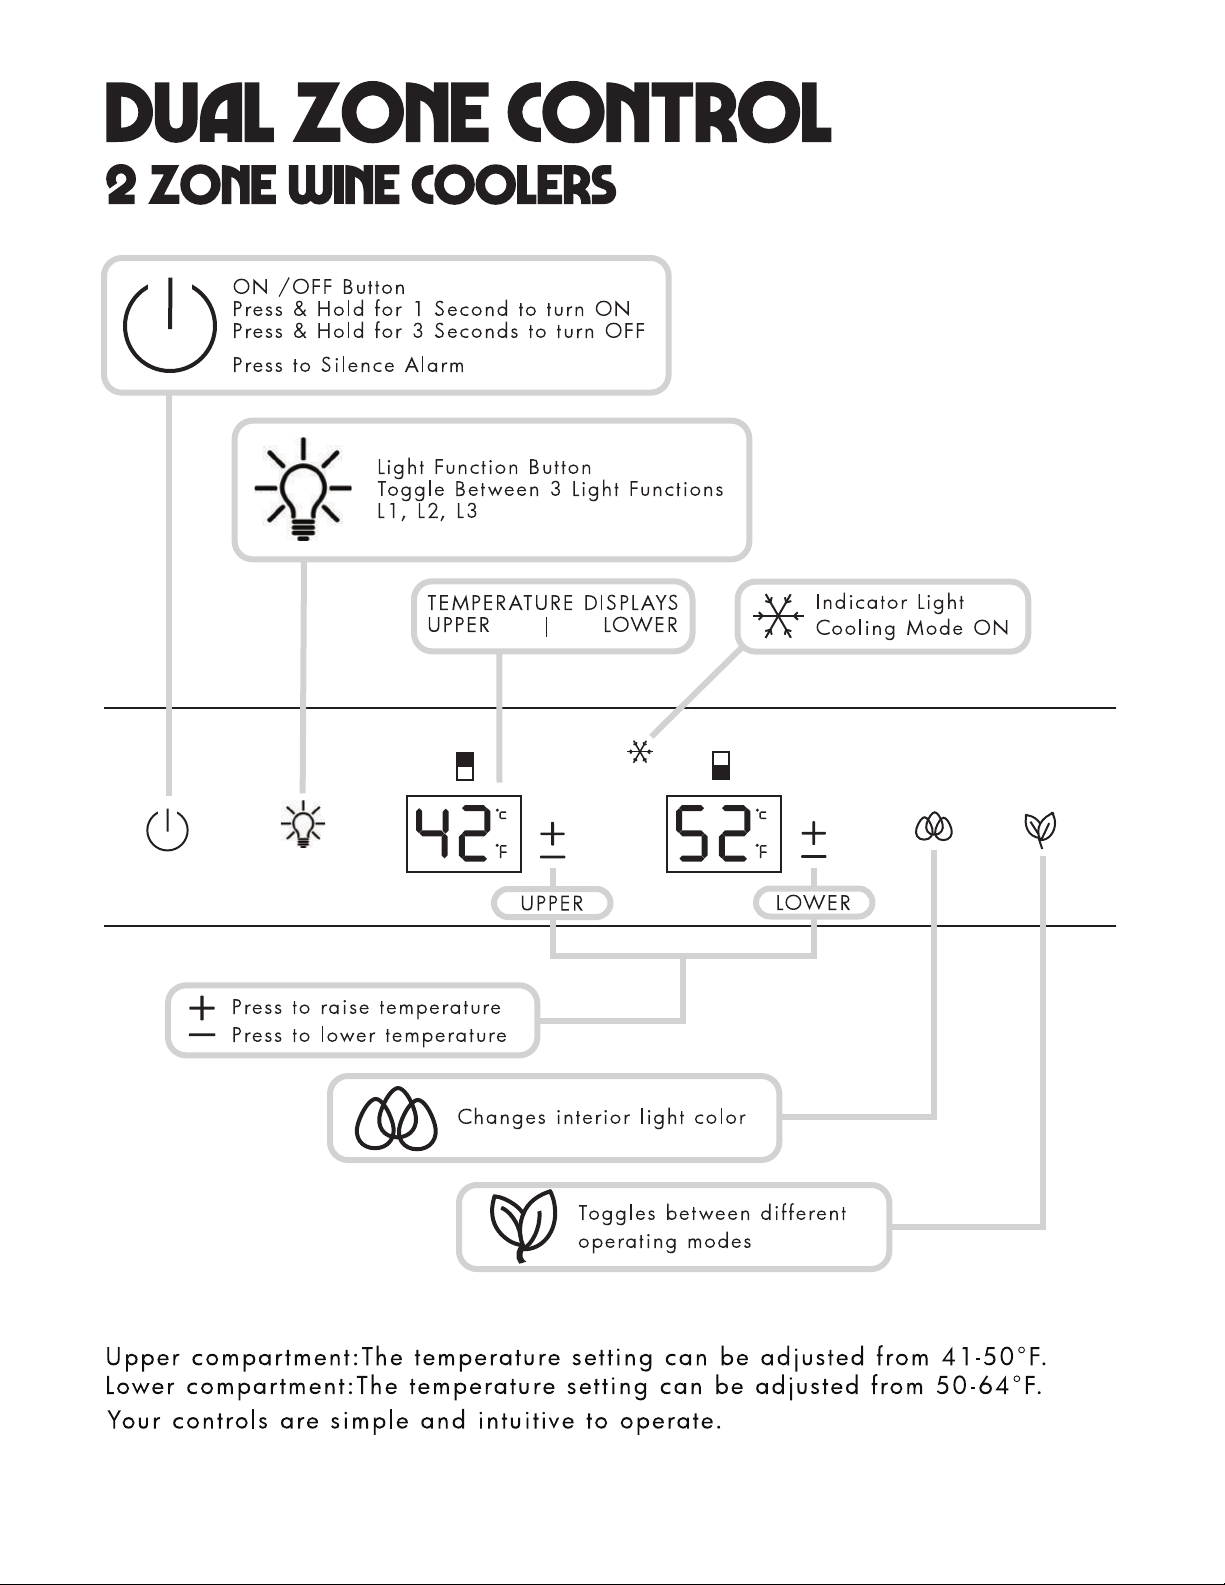
2 ZONE CONTROL PANEL
(location varIes by model)
16
(The number and location
of recirculation fans vary
according to model)
17
19
20

1
2
21
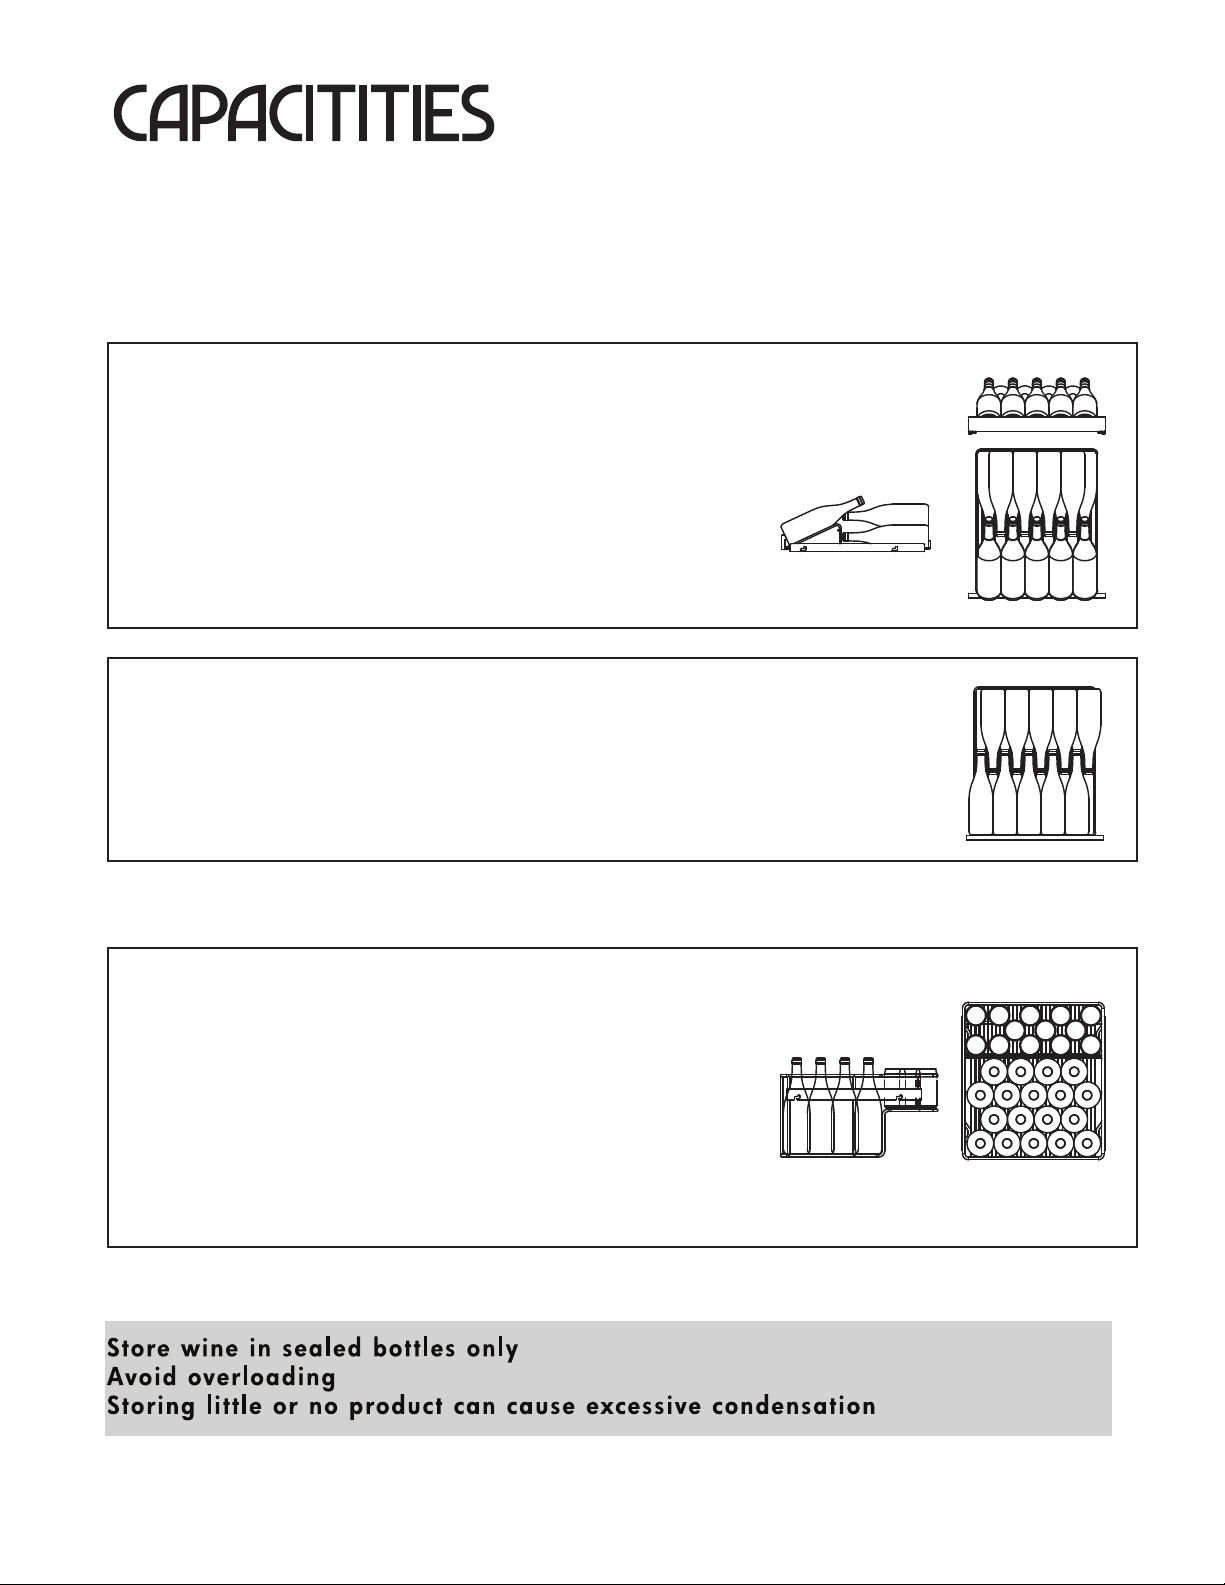
how much can my unit hold
Wine bottles and other types of beverage containers come in a host of different sizes and shapes.
The following is provided as a general guideline, wine bottles are assumed to 750ml / Bourdeaux style
unless otherwise noted.
WINE DISPLAY RACKS
The display racks present in both the single zone and two zone
wine storage cabinets are designed to showcase up to 5 bottles.
These racks also have the ability to rack up to 9 bottles behind
the bottles on display - see diagram, right.
XOU2470WGS and XOU2470BG have 1display racks.
XOU2470WDZGS and XOU2470WDZBG have 2 display racks, 1 per zone.
WINE STORAGE RACKS
These racks have the ability to rack up to 10 bottles side by side - see diagram, right.
XOU2470WGS and XOU2470BG have 11 storage racks.
XOU2470WDZGS and XOU2470WDZBG have 8 storage racks, 4 per zone.
In addition, up to 11 bottles may also be stored lying flat on the floor of the unit.
BEVERAGE CENTER SHELVES AND BINS
The clear glass shelving of the beverage centers have the ability
to store a variety of different size and shape beverage containers.
In addition to shelving, these units incorporate a slide out bin
which has two levels to fit both 12oz cans and tall bottles,
standing up - see diagram, right.
This inccludes XOU2470BCGS and XOU2470BG.
22
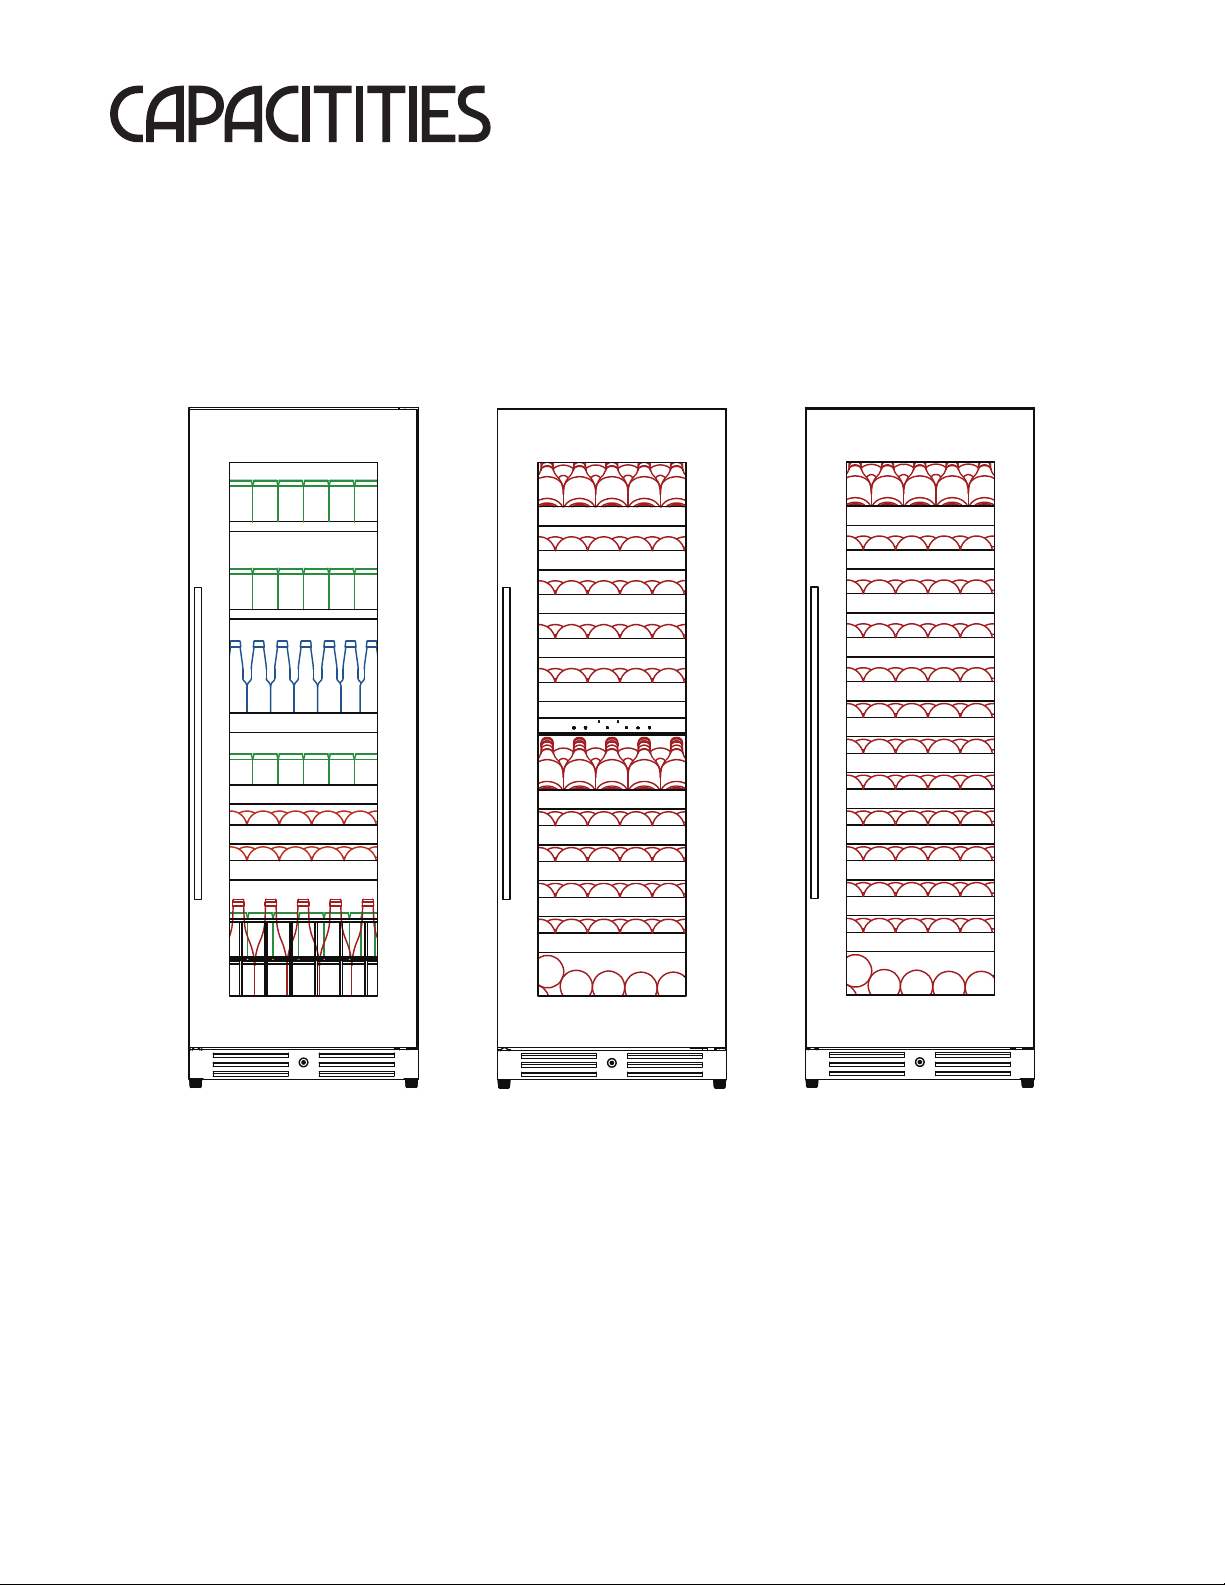
XOU2470BCGS
XOU2470BCBG
BEVERAGE
CENTER
144 (12oz) CANS
+40 BOTTLES
XOU2470WDZGS
XOU2470WDZBG
2 ZONE
WINE
119 (750ml)
BOTTLES
XOU2470WGS
XOU2470WBG
1 ZONE
WINE
135 (750ml)
BOTTLES
Assumptions are taken regarding bottle / can size and shape.
Values are max loading estimates.
how much can my unit hold
23

24
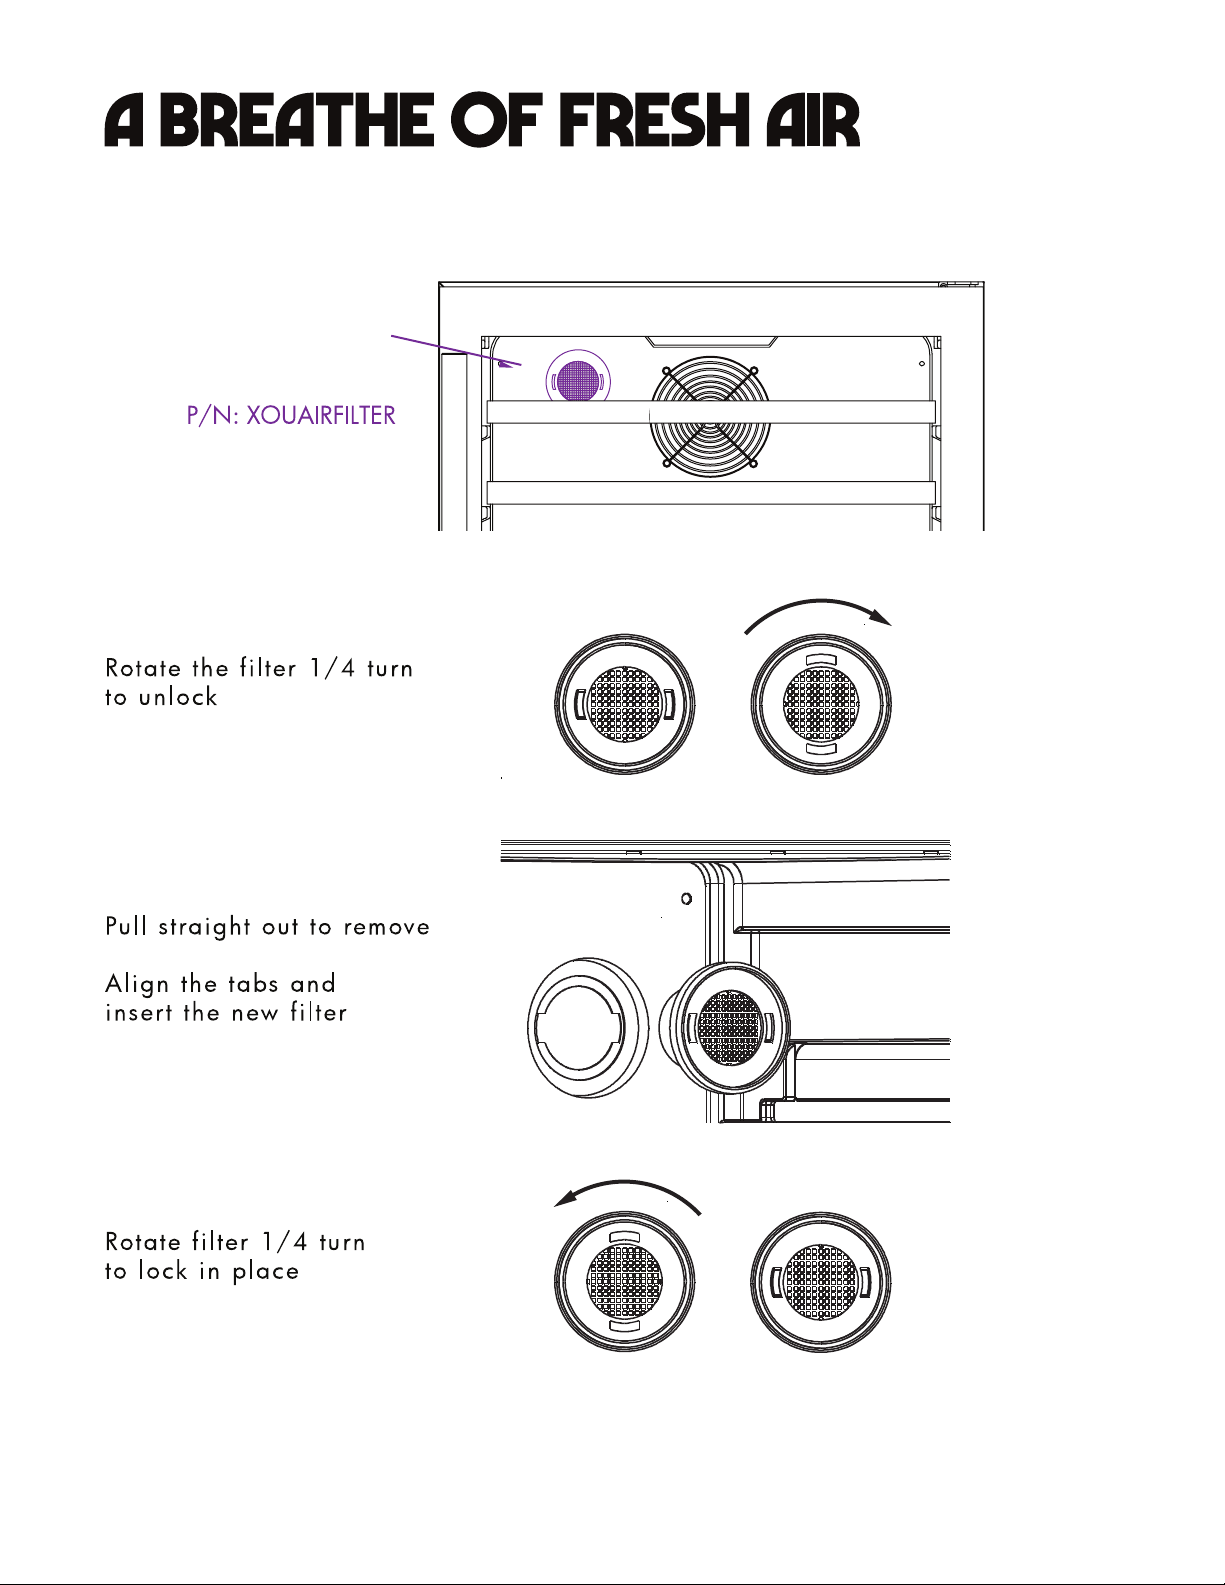
The location of the
Air Filter will vary
according to model
NOTE: Not all models are equipped with XOUAIRFILTER
25
26
27
NOTES:

2023.04.10
XOU2470BCWCMAN2023
28