vvvvvv.GEAppliances.com
Safety h_orrnation
Anti-Tip Device ............ 2
Oven ..................... 4
Safety Precautions ....... 3, 4
Self Cleaning Oven ........ 5
Surface Units ........... 5, 6
Operating Instructions
A(!just the Oven
Thermostat .............. 19
CircuWave TM .............. 15
Clock and Timer .......... 16
Oven ................. 12-14
Oven Controls ......... 10, 11
Sabbath Feature ............. 18
Selecting Types of Cookware . .9
Self'Cleaning ............. 20
Surface Units ........... 7, 8
Timed Baking & Roasting .. 17
Care and Cleaning... 20-27
Glass Cooktop ......... 26, 27
Self'Cleaning Oven ........ 20
Installation Instructions
Anti-Tip Device ........... 34
Before You Begin ......... 28
Electrical Connection . .30-33
Leveling ................. 34
Prepare the Opening ...29, 30
TJvubleshootil N Tips.. 35-39
Consumer Support
Consumer
Support .......... Back Cover
Product Registration ... 41,42
Warrant}, ................ 43
Coil 7"@ and
Radiant Top
Modds
Writethemodelandserial numbershere:
Model #
Serial #
You can find them on a label, behind
the open oven door, on the flont th(e.
183D6379P010 49-88003 04-01JR
iMPORTANTSAFETYiNFORMATiON.
READALLiNSTRUCTIONSBEFOREUSING.
m
For your safety, the information in this manual must be followed to minimize the risk of fire or explosion,
electric shock, or to prevent property damage, personal injury, or loss of life.
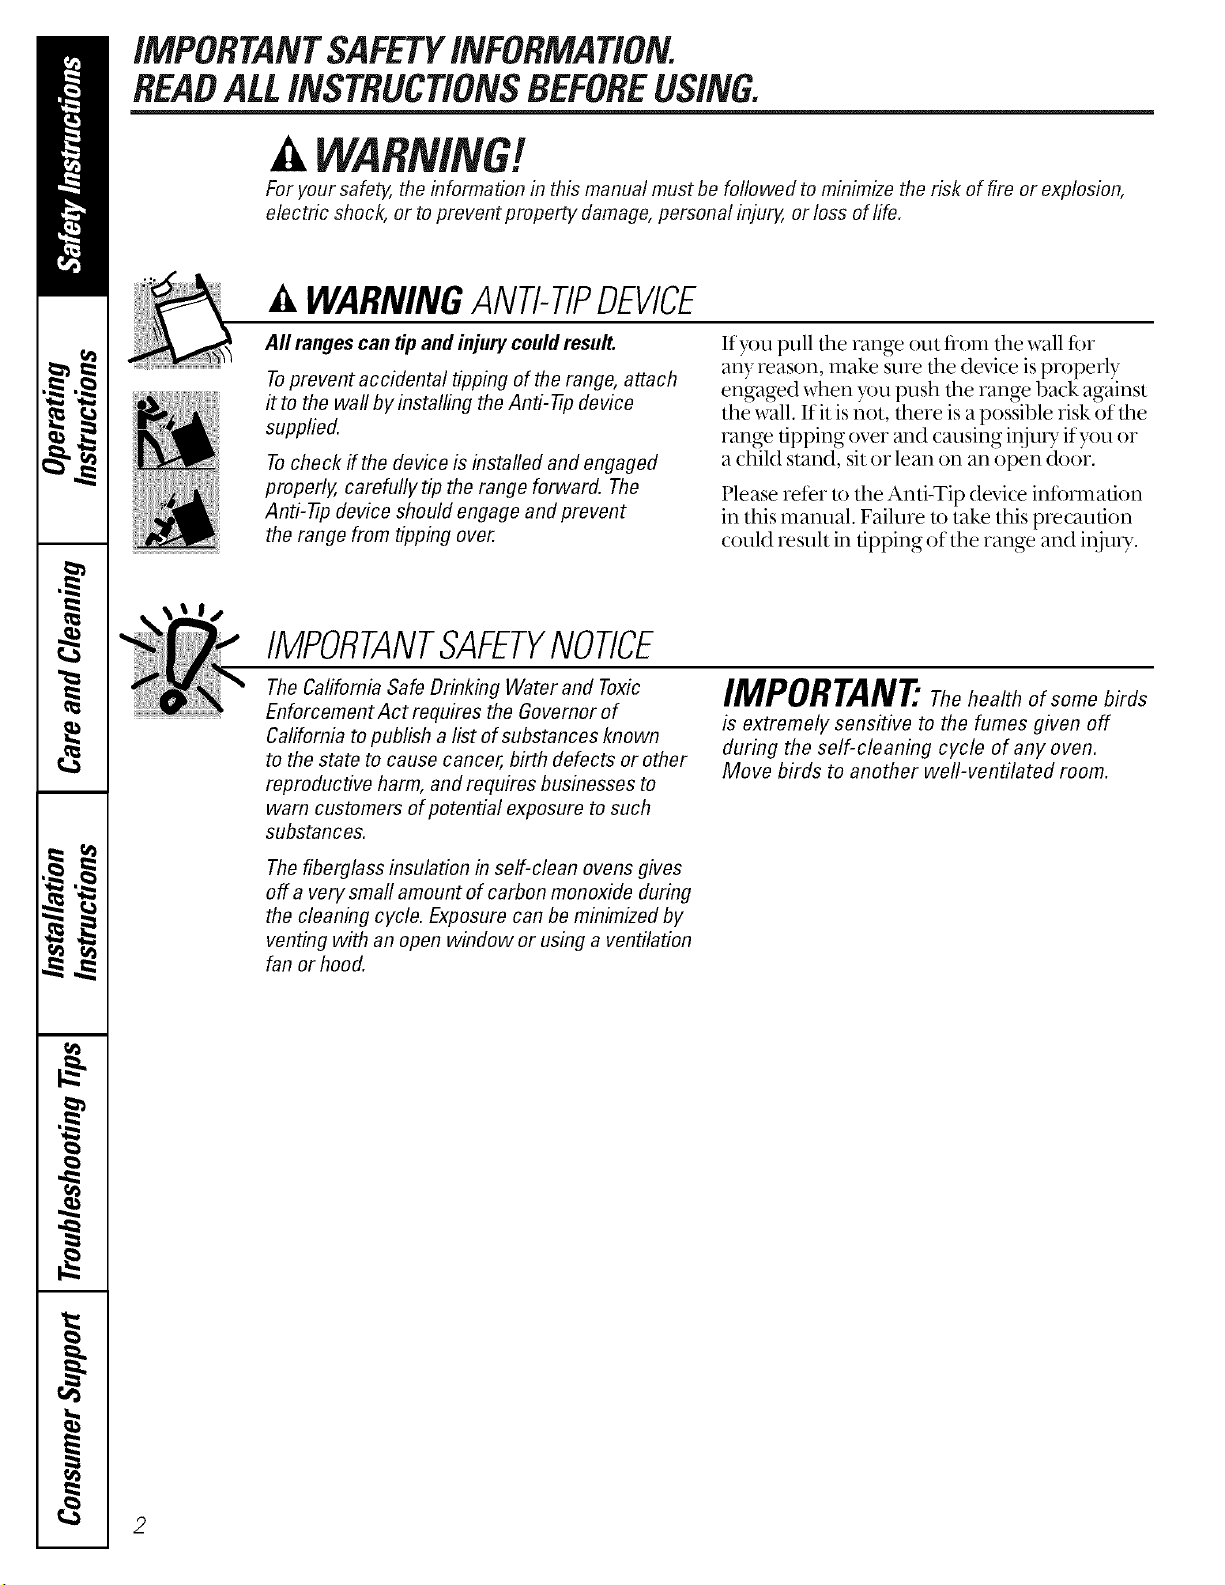
,P,WARNINGANTI-TIPDEVICE
All rangescan tip and injury couldresult.
Toprevent accidental tipping of the range, attach
it to the wa# by installing the Anti--tip device
supplied.
Tocheck if the device is installed and engaged
properly, carefully tip the range forward. The
Anti--tip device should engage and prevent
the range from tipping over.
If you pull dm range out from tile wall for
any reason, make sine dm device is properly
engaged when you push file range back against
the wall. Ifit is not, there is a possible risk of the
range tipping over ml(1 causing inju U if you or
a child stand, sit or lean on an open door.
Please refer to the Anti-Tip device infb,mation
in this manual. Failure to take this precaution
could result in tipping of the range and injuU.
IMPORTANTSAFETYNOTICE
The California Safe Drinking Water and Toxic
Enforcement Act requires the Governor of
California to publish a list of substances known
to the state to cause cancer, birth defects or other
reproductive harm, and requires businesses to
warn customers of potential exposure to such
substances.
IMPORTANT"Thehealthofsomebirds
is extremely sensitive to the fumes given off
during the self-cleaning cycle of any oven.
Move birds to another well-ventilated room.
The fiberglass insulation in self-clean ovens gives
off a very smafl amount of carbon monoxide during
the cleaning cycle. Exposure can be minimized by
venting with an open window or using a ventilation
fan or hood.
2
vvww.GEAppliances.com
SAFETYPRECAUTIONS
When using electrical appliances, basic safety precautions should be foflowed, including the following:
iJ_i:_Use this appliance only fi)r its inmnded
purpose as described in this Oxmer's
Manual.
Y_;Be sure your appliance is properly installed
and g¢_mnded by a qualified technidan in
acco_,lance with the provided installation
instructions.
_ Do not attempt to repair or replace any
part of your range unless it is specifically
recommended in this manual. All other
se,_'icing should be ,eter,ed m a qualified
technician.
iJ_i:;Do not allow anyone to climb, stand or hang
on the door, storage (kawer, or cooku)p.
They could damage the range and even tip
it over, causing severe personal in,juU.
_; Do not sto[> flamrnable materials in an oven
or near the cooktop.
!;_CAUTION:Itemsof interest to children
should not 1)esto*ed in cabinets above a
range or on the backsplash of a range-
children climbing on the range to reach
items could be seriously injured.
iJ_i:;Befbre pe_fbmfing any sets'ice, disconnect
the range power supply at the household
distribution panel by removing the fllse or
switching off the cirodt breaker.
iJ_i:;Do not leave children alone-children should
not be left alone or unattended in an area
where an appliance is in use. They should
never be allowed to sit or stand on any part
of the appliance.
COOKMEATANDPOULTRYTHOROUGHLY...
Cookmeat andpoultrythoroughly--meat to atleast an iNTERNALtemperatureof 160°Eandpou/tryto at least an
iNTERNALtemperatureof 180°ECookingto thesetemperaturesusuallypmtects againstfoodbomeillness.
iMPORTANTSAFETYiNFORMATiON.
READALLiNSTRUCTiONSBEFOREUSING.
WARNING!
SAFETYPRECAUTIONS
iJ_i:_Never wear loose-fitting or hanging g_uments iJ_i:_
while using the appliance. Be careful when
reaching for items stored over the range.
Flammable material could be ignited if
brought in contact with hot stnihce units
or heating elemenLs and may cause severe
bums.
Use only (h-v pot holders-moist or damp pot
holders on hot smiaces may result in burns
from steam. Do not let pot holders touch hot
smlace uniLs or heating elements. Do not use
a towel or other bulky doff1.
_; For your safety, never use your appliance
for wamdng or heating the morn.
_; Do not let cooldng g_ease or other flammable
materials accumulate in or near the range.
_; Do not use water on g_ease fires. Never pick
up a flaming pan. Turn the controls off.
Smother a flaming pan on a stntace unit by
covering the pan completely with a well-
fitting lid, cookie sheet or flat u W. Use a
multi-purpose d U chemical or foam-type
fire exting_|isher.
Flaming g_xmseoutside a pan can be put
out by covering it with baking soda or,
if available, by using a multi-purpose d U
chemical or fimm-t}_)e fire exfingldsher.
Flame in the oven can be smothered
completely by closing the oven door and
ulrning the ox>n off or by using a nmlti-
purpose d U chemical or fbam-t)l)e fire
exting_|isher.
@
@
Do not touch dm smihce units, dm heating
elements or the interior smiace ofthe oven.
These smiaces may be hot enough m btlrn
even though they are dad< in color. During
and after use, do not touch, or let dothing
or other flammable materials contact, the
smiace units, areas neaH)y the su_iace unil_s
or any interior arx_aof the oven; allow
sufficient time for cooling first.
Potentially hot smihces include the cooktop,
areas facing the cooktop, oven vent opening,
smiaces near the opening, crevices around
the oven door and metal trim parts above
the door.
REMEMBER:The inside smihce of the oven
may be hot when dm door is opened.
Do not store or use combustible materials,
gasoline or other flammable vapors and
liquids in the vicinity of this or any other
appliance.
Keep die hood and g_ease filters clean
to maintain good venting and to avoid
grease fires.
OVEN
_; Stand away from the range when opening the
oven door. Hot air or steam which escapes
can cause burns u) hands, face and/or eyes.
_; Do not lmat unopened food containers.
Pressure could build up mid dm container
could burst, causing an it!juU.
_i_Keep the oven vent unobstructed.
!i;:_Keep the oven flee from g_ase buildup.
@ Place the oven shelf in the desired position
while the oven is cool. If shelves must be
handled when hot, do not let pot holder
contact the heating elements.
Pulling.out the shelf to the stop-lock isa
convemence in lifting heaxT foods. It is also
a precaution against burns tiom touching
hot surfaces of the (Mot or oven walls.
i_i:;gqaen using cooking or masdng bags in the
oven, follow the manuthcu|rer's directions.
i_hi:;Do not use tim oven to dU newspapers.
If overheated, flmy can catch on fire.
_; Do not use dm oven fi)r a storage area.
Items sto,ed in an oven can ignite.
i_i:;Do not leave paper products, cooking
utensils or %od in lhe oxen when not in use.
4
www.GEAppliances.com
t
SELF-CLEANINGOVEN(onsomemodelsJ
_; Do not dean fire door gasket. The door
gasket is essential f()r a good seal. Car,e
should be taken not to rob, damage or
move the gasket.
iJ_i:_Clean only parts listed in this Owner's
Manual.
iJ_i:_Do not use oven cleaners on sell:clean
nrodels. No conmrercial (wen cleaner or
oven liner protective coating of any kind
should be used in or around any part of
the oven. Residue fionr oven cleaners will
danrage the inside of the oven when the
sell:clean cycle is used.
_;lk_f()r,esell:cleaning the oven, remove the
broiler pml, gTid and other cookwar,e.
iJ_i:_l',e sure to wipe up excess spillage befi)r,e
starting file selt:demling operation.
_ Iffile self:cleaning mode malflmctions,
turn tim oven off and disconnect tim power
supply. Have it serviced by a qualified
technician.
SURFACEUNITS-ALLMODELS
Use proper pan size--select cookware having flat bottoms large enough to cover the surface unit
heating element. The use of undersized cookware will expose a portion of the surface unit to direct
contact and may result in ignition of clothing. Proper relationship of cookware to surface unit will also
improve efficiency.
iiii:Never leave tim sudace units unattended at
high heat settings, l_filovers cause smoking
and g_,easyspillovers that may catcll on fire.
_; Only certain types of glass, glass/ceramic,
earthenware or other glazed containers are
suitable f()r cooktop sets'ice; others m W
break because of the sudden clmnge in
temperamr,e.
iJ_i:;To minimize the possibility of burns,
ignition of flammable materials and spillage,
the handle ofa container should be turned
towar_l tim (:enter of tim rang,e without
extending over neafl)y sudhce units.
iJ_i:;Always turn the snrla(:e units oft bef()re
removing (:ookware.
_; When preparing flaming foods under tim
vent hood, mm tim fan on,
iiii:Keep an eye on foods being flied at high or
medium high heat settings.
_; Foods f()r fiTing should be as dU as possible.
Frost on fi_)zen toods or moismr,e on fresh
foods can cause hot fat to bubble up and over
tim sides of the pan.
iJ_i:;Use little fat fi)r effective shallow or deep fat
flying. Filling the pan too fifll of fat can cause
spillovers when food is added.
_; Ira combination of oils or fats will be used in
flying, stir together befbr,e heating, or as fats
melt slowly.
_; Always heat fat slowly, and watch as it heats.
iJ_i:;Use adeep fat tlmrmometer whenever
possible to prevent overheating fat beyond
the smoking point.
iMPORTANTSAFETYiNFORMATiON.
READALLiNSTRUCTiONSBEFOREUSING.
WARNING!
RADIANTSURFACEUNITS_onsomemodefsI
Use care when touching the cooktop. Theglass surface of the cooktop will retain heat afterthe controls
have been turned off.
_ Avoid scratching die glass cooktop. The
cooktop can be scratched with items such as
sharp instruments, rings or other jewelU and
riveLson clothing.
iJhi:;Do not operate tile radiant smiace units if
the glass isbroken. Spillovers or cleaning
solution may penetrate a broken cooku)p
and create a risk of electrical shock. Contact
a qualified teclmician immediamly should
tour glass cookmp become broken.
Never use tile glass cooktop stniace as a
cutting board.
Do not place or store items that can melt or
catch fire on tile glass cooktop, even when it
is not being used.
_; l',e careful when placing spoons or odmr
stining utensils on glass cooktop smihce
when it is in use. They may become hot and
could cause burns.
_; (]lean tile cooktop with caution. Ira wet
sponge or cloth is used m wipe spills on a hot
smtace unit, be careful to avoid steam burns.
Some cleaners can produce noxious fumes if
applied u) a hot smiace.
NOTE:We recommend that you avoid wiping
any surface unit areas until they have cooled
and the indicator light has gone off. Sugar
spills are tile exception to this. Please see
Cleaning the glass cooktop section.
V_mn dm cooktop is cool, use only dm
recommended cleaning cream to clean the
cooktop.
To avoid possible damage to tile cooking
smihce, do not apply cleaning cream u) tile
glass smiace when it is hot.
!;_After cleaning, use a (hT clodl or paper towel
U_remove all cleaning cream residue.
_:_Read and follow all instructions and warnings
on the cleaning cream labels.
A WARNING?
COILSURFACEUNITS_o__om_mod_/_I
iJhi:;(;lean tile cooktop wifll caution. Ira
wet sponge is used to wipe spills on a hot
cooktop, be careful to avoid steam burns.
To avoid die possibility of a burn or electric
shock, always be certain that tile controls ff)r
all smtace units are at tile OFFposition and
all coils are cool before attempting m lift or
remove a unit.
Do not immerse or soak tile removable
stniace units. Do not put them in a
dishwasher.
Be sure tile drip pans and tile vent duct me
not cover>d and are in place. Their absence
(luring cooking could damage range parts
and wiring.
Do not use aluminum foil to line dm drip
pmls or an_-ber_ in tile oven except as
described in this manual. Misuse could
result in a shock, fire hazard or damage
to tile range.
READANDFOLLOWTHISSAFETYINFORMATIONCAREFULLY.
SAVETHESEINSTRUCTIONS
USing the surface units. .CEAppliancos.co,n
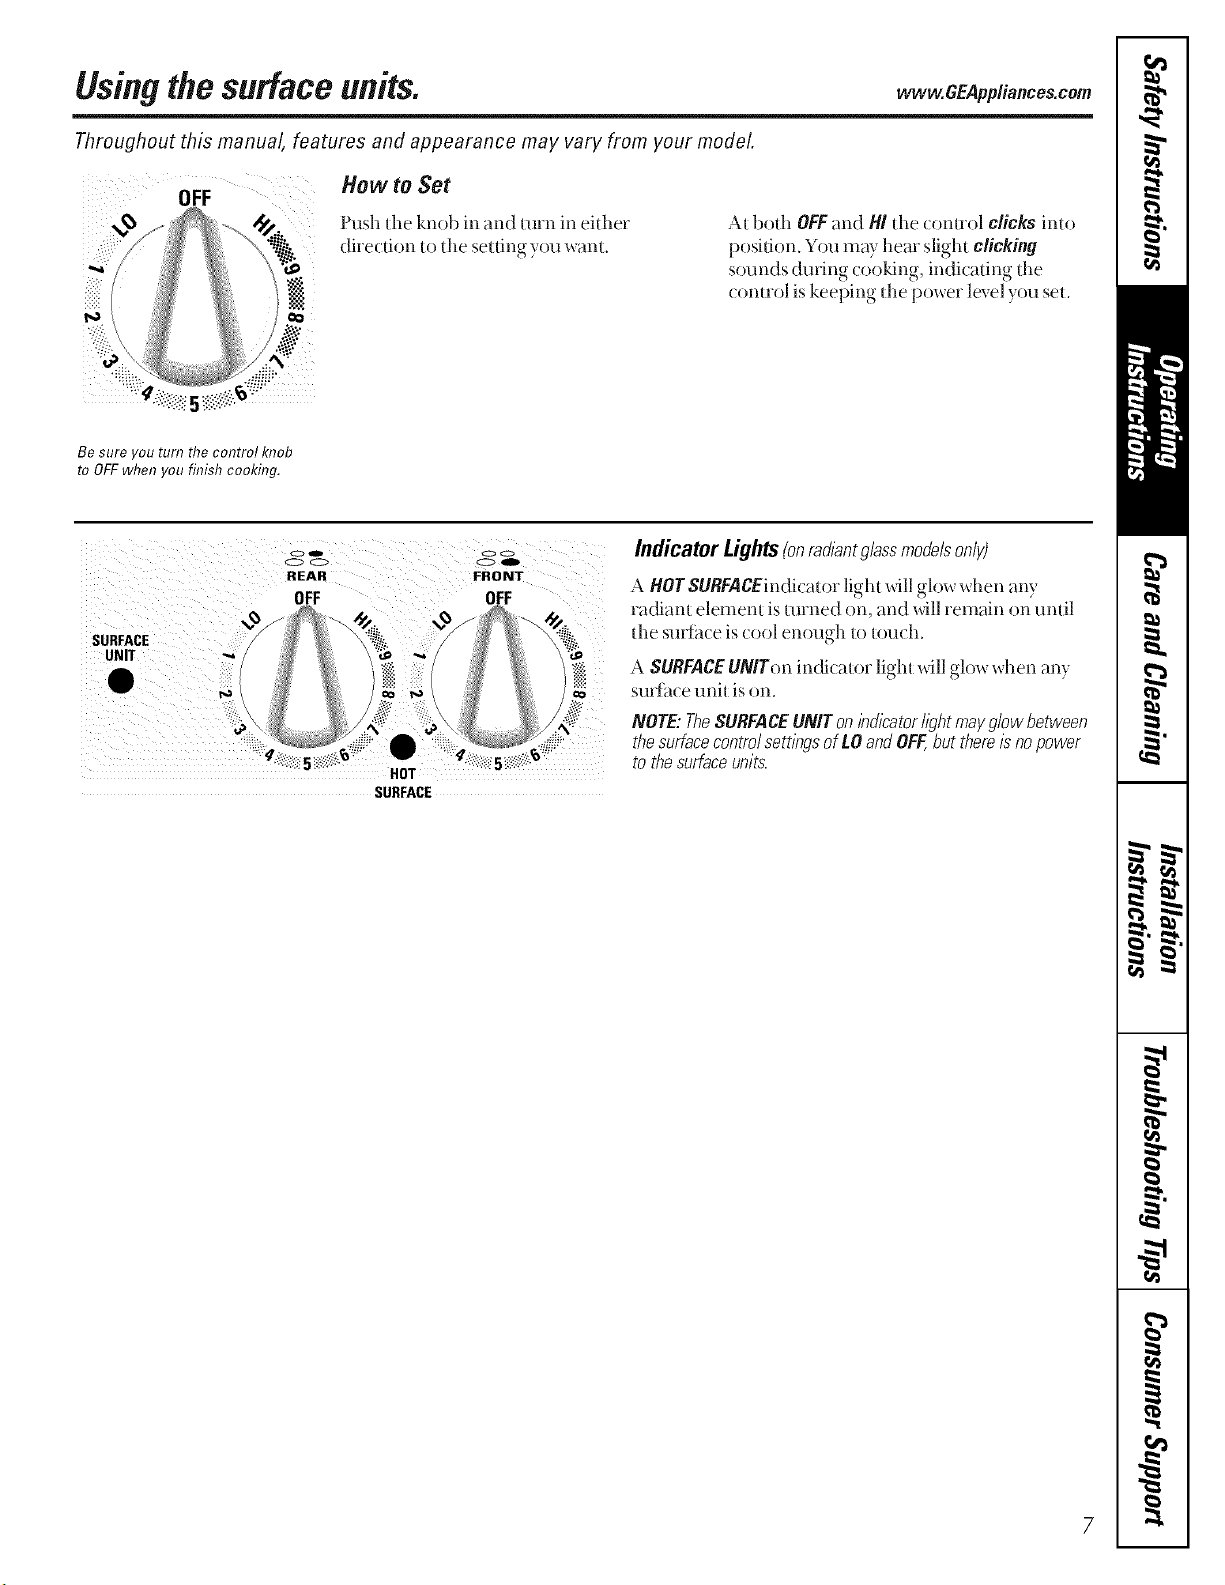
Throughout this manual, features and appearance may vary from your model.
How to Set
Push tile knob in _md mrn in either
direction to the setting you wnnt.
At bod_ OFF_md H/tile conuol clicks into
position. You m_y he_ slight clicking
sounds during (ooking, indi(ating the
(OlltrO1 is keeping tile power le-_el you set.
Be sure you turn the control knob
to OFFwhen you finish cooking.
SURFACE
UNIT
O
O0
REAR
OFF
HOT
SURFACE
o0
FRONT
OFF
IndicatorLights(onrad&nt g/ass modelson/y)
A HOT SURFACEindicator light x_411glow when _my
r_(li_mt element is turned on, _md will remnin on until
tile sin%ice is (ool enough to tout h.
A SURFACEUNITon indic_mw light-,,,ill glow when _my
sl]_3_it(e unit is otl.
NOTE:TheSURFACEUNITonindicator//_?htmayg/owbetween
thesurfacecontro/sett/bgsoftO andOFF,butthereisnopower
tothesurfaceunits.
7
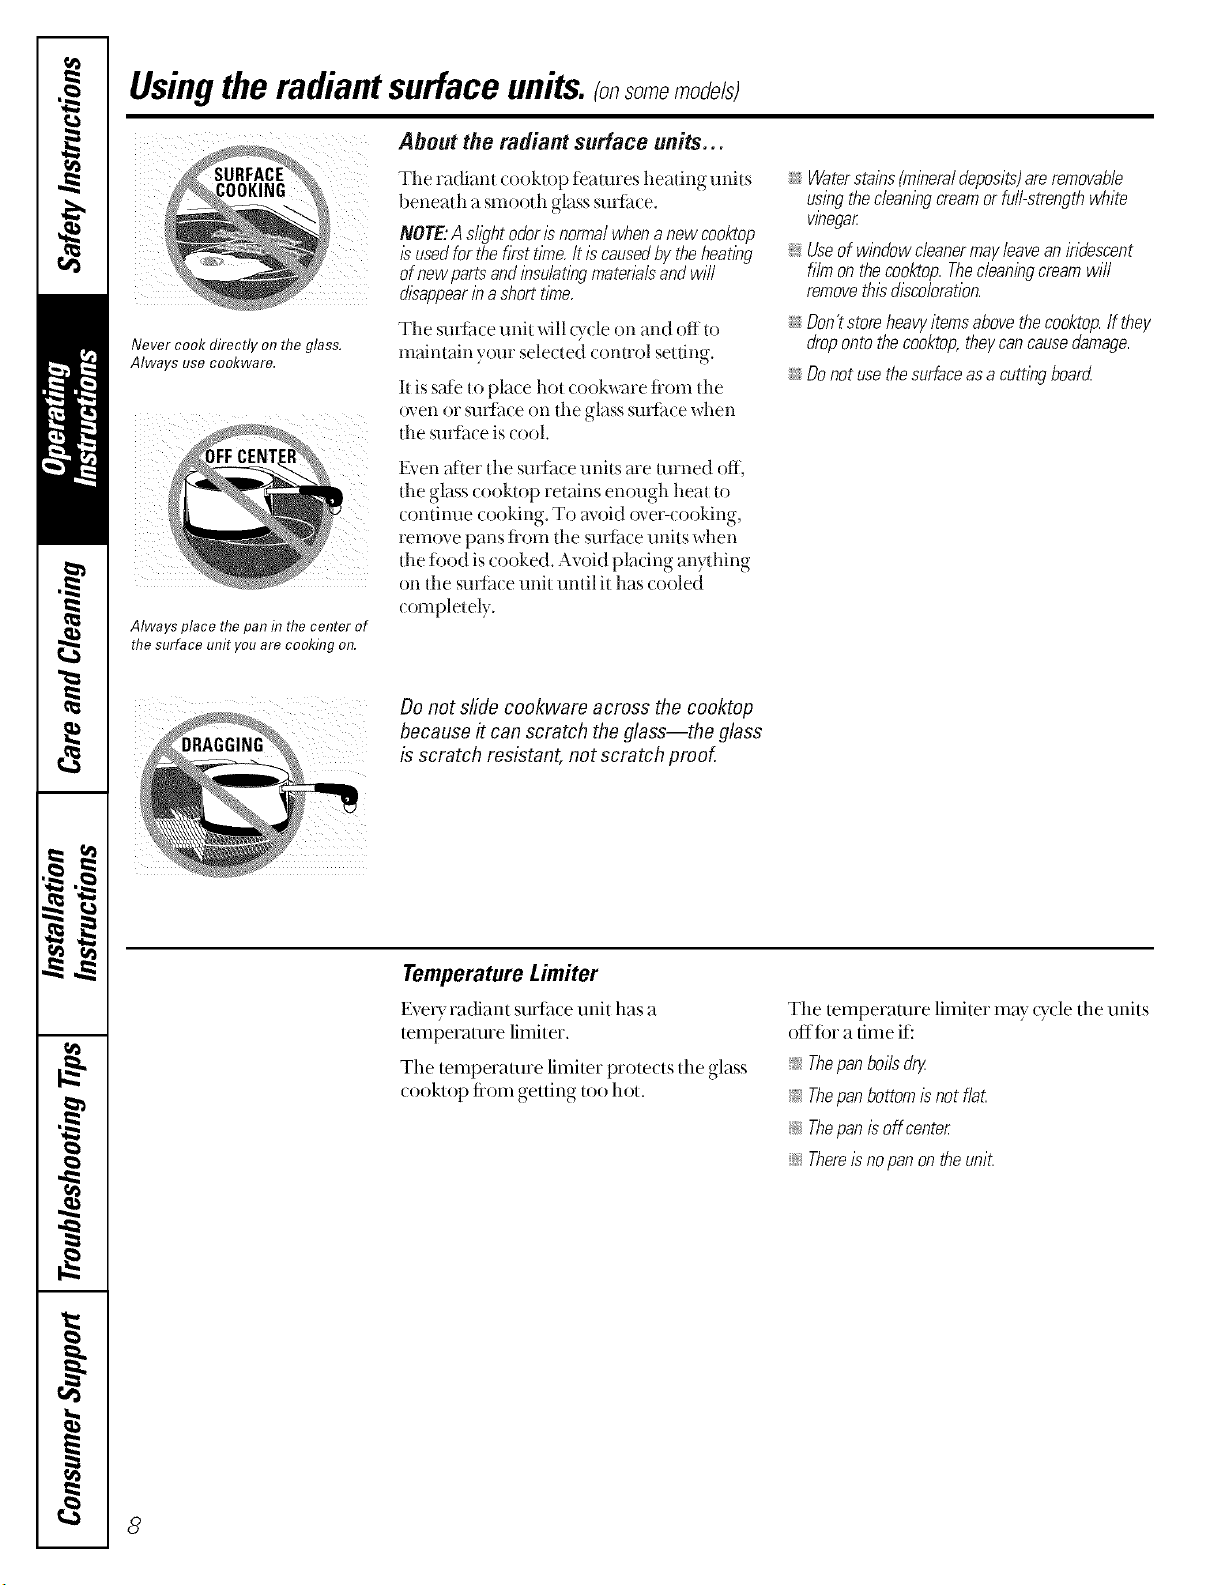
Usingtheradiant surfaceunits.(onsomemodefsl
Never cook directly on the glass.
Always use cookware.
Always place thepan in thecenter of
the surface unit youare cooking on.
About the radiant surface units...
The radiant cooktop features heating units
beneath a smooth glass smthce.
NOTE:Asfl)ht odorIsnormalwhenanewcoo/d:op
/susedforthefksttinTe./t /scausedbytheheating
ofnewpartsandinsulatingmaterialsandwill
disappearinashorttinTe.
The surtitce unit _dll O_cleon and off to
maintain your selected (onuol setdng.
It is saR_t()place hot cookware fiom tl_e
o_en or sm_hce on tl_e glass smlh( e when
the smtit(::eis(ool.
Even after the smthce units _ue turned off,
the glass cooktop retains enough heat to
continue cooking. To avoid over-(ooking,
remove pans fiom d_e smthce units when
the tbod is cooked. Avoid plating anydfing
on tile smth( e unit until it has cooled
(ompletely.
i2 Waterstains(mineral deposits)areremovable
usingthe cleaningcream orfull-strength white
wnegar
:i_Useof window cleanermay &ave an iridescent
film on the cooktop. Thecleaningcream will
removethis discoloration.
i2 Don't storeheavyitemsabove thecooktop. If they
droponto the cooktop,theycan causedamage.
i2 Donot usethe surfaceas a cutting board
Do not sfide cookware across the cooktop
because # can scratch the glass--the glass
is scratch resistant, not scratch proof.
Temperature Limiter
EveD_radiant sudilce unit has a
temperature limiter.
The temperature limiter protects the glass
cooklop fiom getting too hot.
Tile temperature limiter may {Tcle the units
offli)r a time if:
>: Thepan boilsdry
:i_ Thepan bottomis not f/a£
>: Thepan is off center
i2 Thereisno panon the unit.
8
Selecting types of cookware.
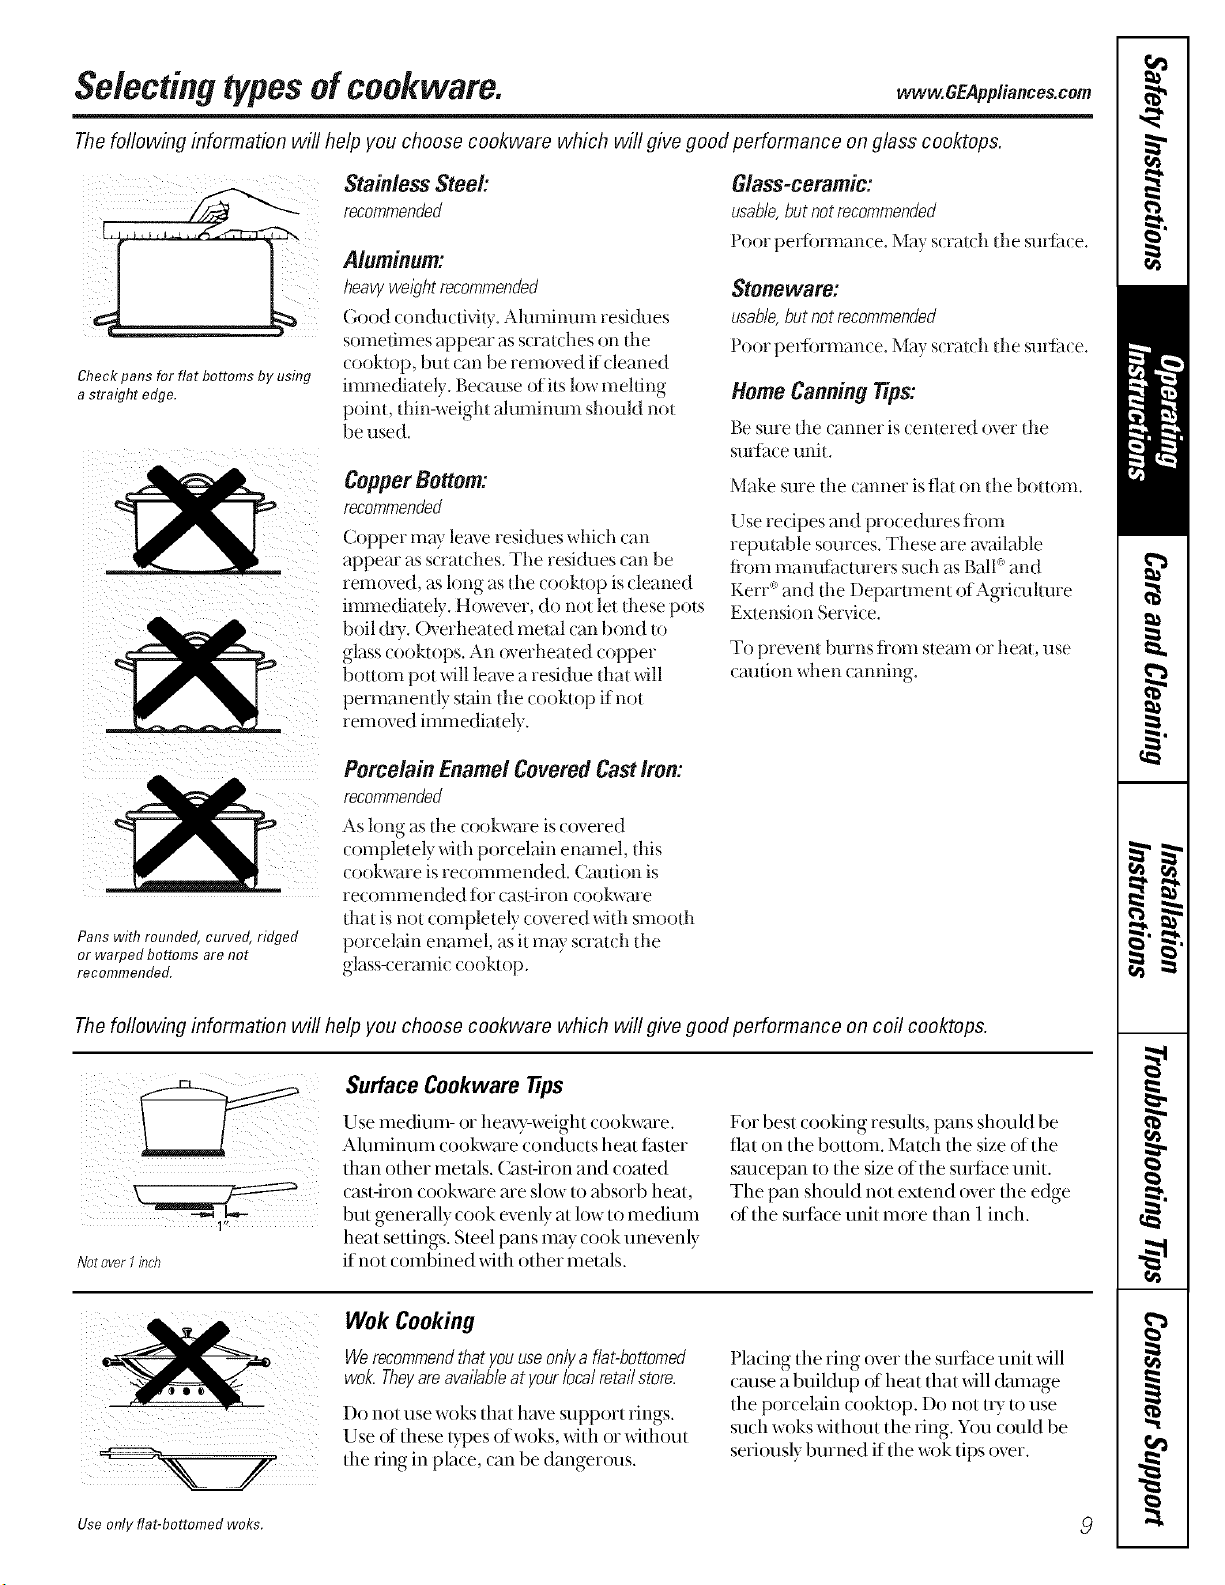
The following information will help you choose cool<ware which will give good performance on glass cooktops.
Check pans for flat bottoms by using
a straight edge.
Stainless Steel:
recommended
Aluminum:
heavywe/_?htrecommended
Good conductMty. Aluminum residues
sometimes appear as scratches on tl_e
cooktop, but (an be rem_wed ifcleaned
immediately. Because of its low mehing
poinL thin-weigh! aluminum should not
be used.
Copper Bottom:
recommended
Copper may leave resi&ms whith can
appear as st ratches. The resi&les can be
rein(wed, as long as die tooktop is cleaned
immediately. However, do not let these pols
boil &T. Overheated metal tan bond to
glass cooktops. An overheated copper
bottom pot _dll leave a resi&m that _4ll
permanendy slain the ( ooktop ifnol
rem_wed immediat ely.
Glass-ceramic:
usable,butnotrecommended
Poor performance. May scratch the stab:ace.
Stoneware:
usable,but not recommended
Poor pefforman( e. May s(rat( h die smi:a( e.
Home Canning Tips:
Be st]re the (anner is (emered over dm
sl]F{_tce unik
Make sure [lie (anner is fla[ on [lie boHom.
Use recipes and proce&lres fiom
reputable sour( es. These me available
tiom mam_immrers such as Ball: and
Kerr: and the Depamnent of Ag_it:ulmre
Extension Service.
To prevent burns flom sleam or heal use
( alllion when tanning.
Pans with rounded, curved, ridged
or warped bottoms are not
recommended.
Porcelain EnamelCovered Cast Iron:
recommended
As long as lhe cookwme is c(}vered
completely xdth porcelain enmnel, this
(ookware is recommended. Creation is
re( ommended ior (astriron (ookware
that is not completely (:_wered _dth smooth
port elain enamel, as it mW scrat( h the
glass-ceramit t ooktop.
The foflowing information will help you choose cookware which will give good performance on coil cooktops.
Notever I inch
Surface Cookware tips
Use me(fium- or heax_weight cookwme.
Aluminum cookwme conducts heat t_}ster
than other metals. Cast-iron and coated
cast-iron cookwzue are slow to absorb heat,
but generally cook evenly at h)w to medium
heat settings. Smel pans m W cook unevenly
if not combined xdth other metals.
For best (:{}{}kingresults, pans shouM be
fiat on tile bottoln. Match tile size of tim
sau( epan to tile size oftile surf_tce unit.
The pan should not extend over tlle edge
of the sudilce unit more than 1inch.
Wok Cooking
Werecommendthatyouuseonlya fiat-bottomed
wok.Theyareavailableat yourlocalretailstore.
Do not use woks that have support rings.
Use of tllese types ofwoks, _dth or _dthout
the ring in place, can be dangerous.
Pladng the ring over the sudilce unit will
cause a buiMup of heat that xdll damage
the porcelain cooktop. Do not tU to use
such woks _dtllout the ring. You could be
seriously burned if the w{)ktips over.
Use only flat-bottomed woks.
Usingtheovencontrols.
Throughout this manual, features and appearance may vary from your model
)
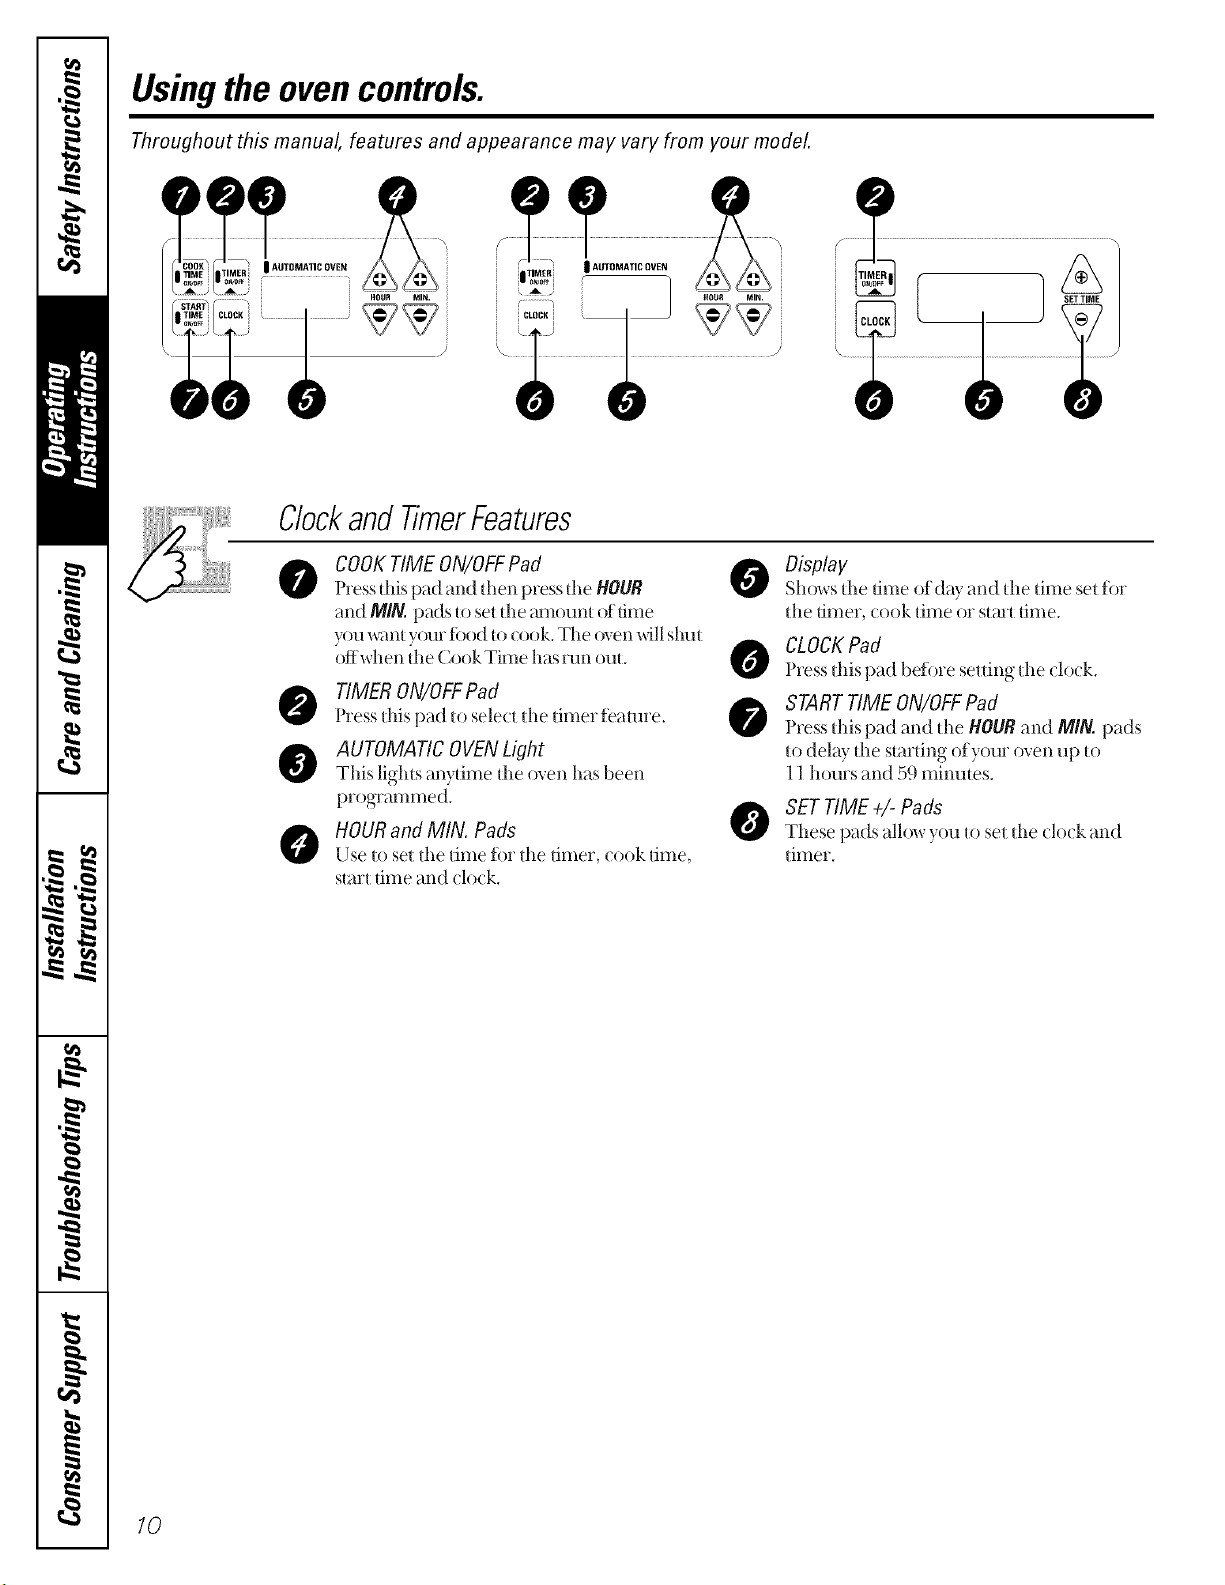
Clockand TimerFeatures
0
COOKTIME ON/OFFPad
Press this pad and then press the HOUR
and M/N. pads to set the mnount of dine
you want your fix)d to (ook. The ()yenxdll shut
offwhen the Cook Time has nm out.
TIMER ON/OFFPad
Press this pad to sele(t the timer feature.
AUTOMATIC OVENLight
This lights anytime the oven has been
programmed.
HOURand MIN. Pads
Use to set the time ibr the timer, (ook time,
start dine and ( lo(k.
Display
Shows the time of(lay and the time set for
the timer, cook time or start time.
CLOCKPad
Press this pad befi)re setting the (lo( k.
STARTTIME ON/OFFPad
Press this pad and the HOURand M/N. pads
to delay the starting of your oven up to
11 hours and 59 minutes.
SET TIME ÷/- Pads
These pads allow you to set the (lo(k and
timer.
10
Usingthe ovencontrols,ronsomemodels; www.GEAppliances.com
Throughout this manual, features and appearance may vary from your model.
OFF
0
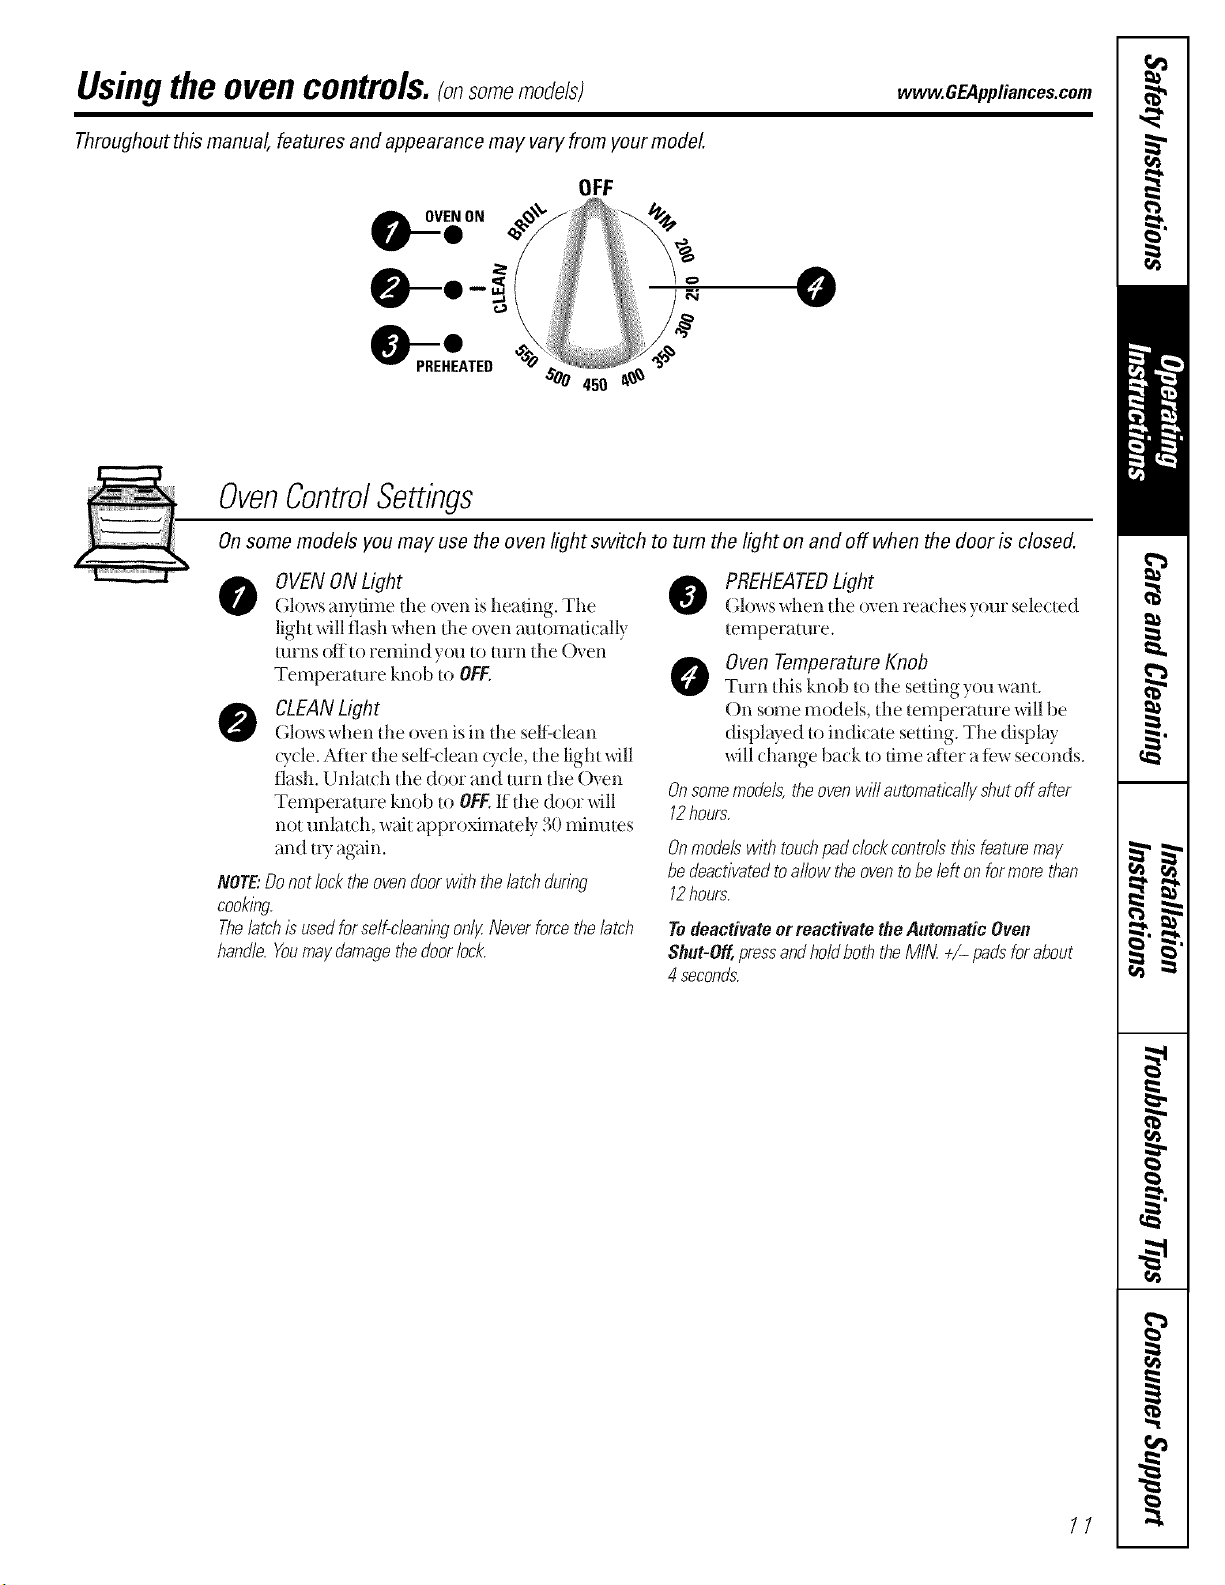
OvenControlSettings
Onsome models you may use the oven light switch to turn the lighten and off when the door is closed.
0
OVEN ONLight
Glows anydme tile oven is headng. The
lighl will flash when dm oven amomad( ally
turns off to remind you to turn dm Oven
Temperature knob Io OFF.
O
CLEAN Light
Glows when tl_e oven is in tlle sell:clean
Q't:le. After dm sell:clean ()'tie, dm light will
flash. Unlat( h die door and turn die Oven
Temperature knob to OFF.If the door will
not unlatch, wait approximately 30 minmes
and IU again.
NOTE:Donotlocktheovendoorwith thelatchdunbg
cooklbg
Thelatch/susedforse/f-c/ean/bgon/gNeverforcethelatch
hand/e.Youmaydamagethecloor/ock.
PREHEATEDLight
(;lows when the oven rea(hes your sele(ted
temperature.
Oven Temperature Knob
Turn this knob to the setting you want.
On some models, the temperature _dll be
displwed 1oindi( ate selfing. The display
_dll change back to dine atier a tow seconds.
& somenTo&ls, the ovenwill automaticallyshut off after
12hours.
Onmodelswith touchpadclock controls thisfeature may
be deactivatedto allow theoven to beleft on formore than
12hours.
TodeactivateorreactivatetheAutomaticOven
Shut-Oil,pressandho/clboththeMIN +/- paclsforabout
4 seconds.
11
Usingthe oven.
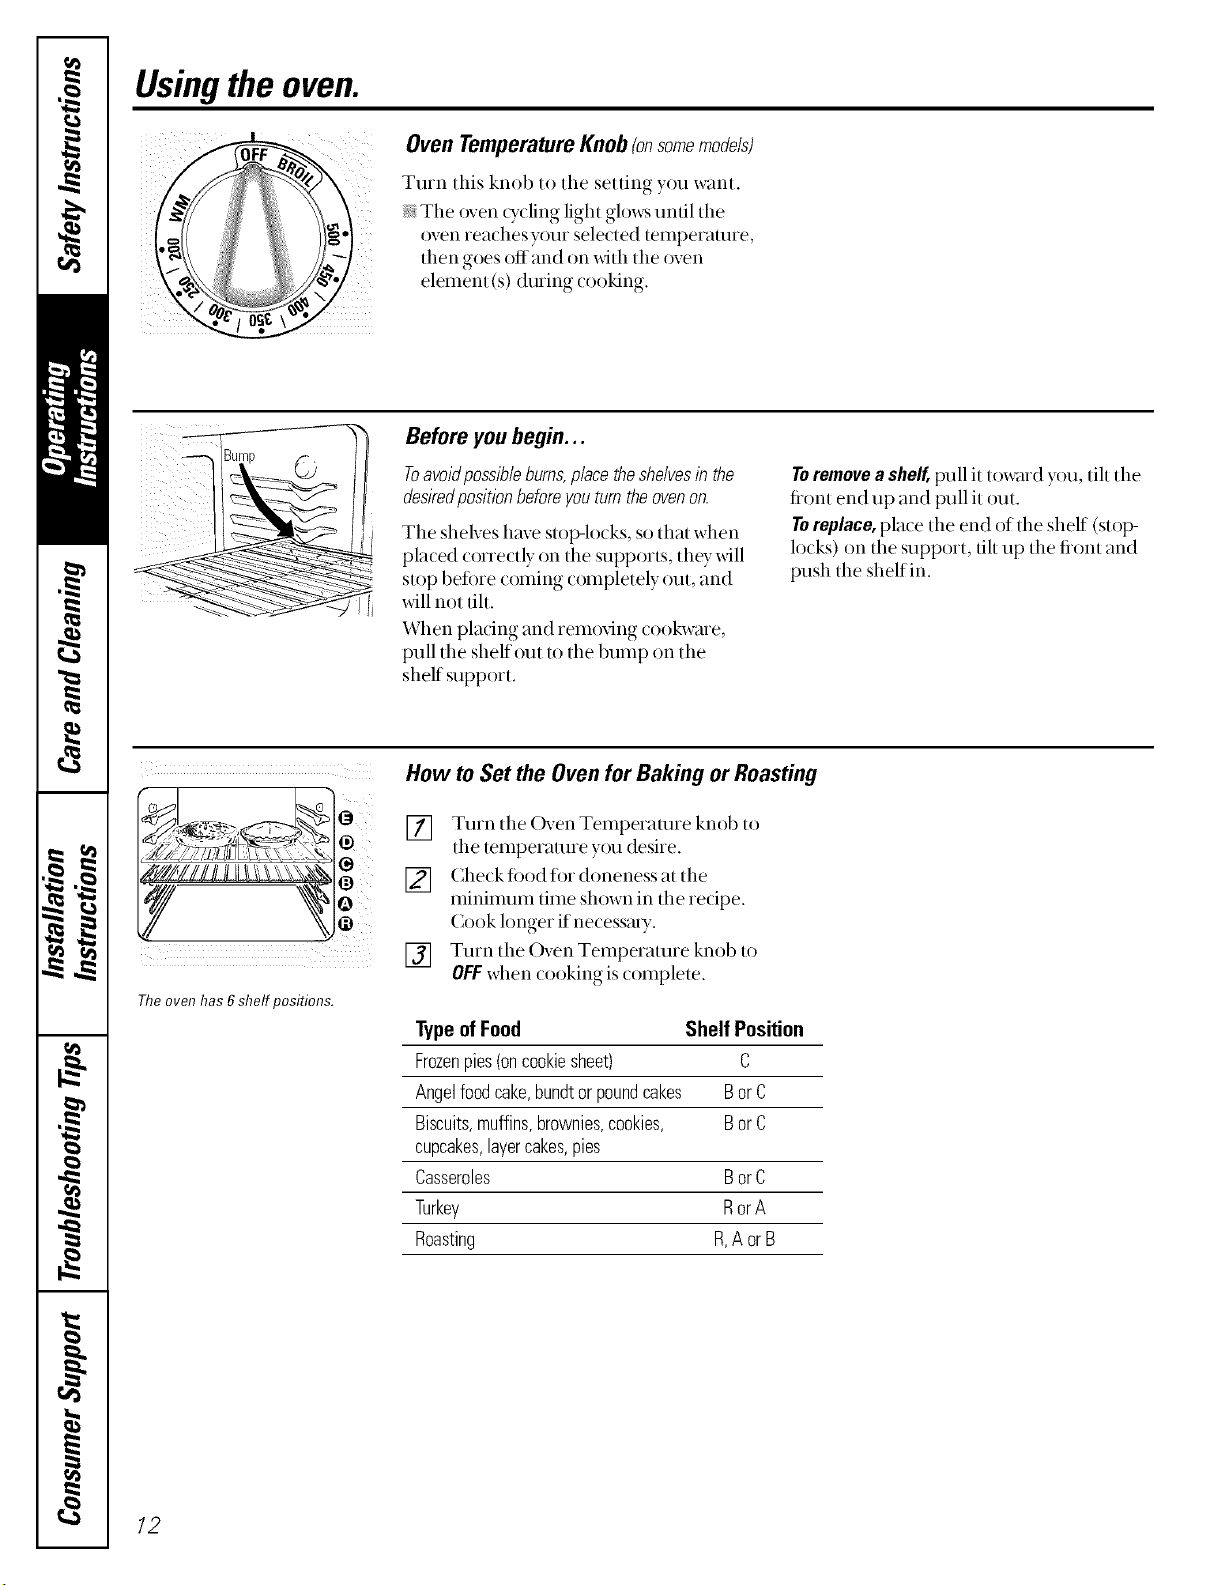
OvenTemperatureKnob (onsomemodels)
Turn this knob to the setting you want.
The oven _ycling light glows until tile
)yen reaches y_nn selected temperature,
then goes off and on with tile oven
element (s) during cooking.
Before youbegin...
Toavoldposslbleburns,place the shelvesIb the
desiredposifion beforeyou turn the ovenon.
The shelves have stop-locks, so that when
placed correctly on the supports, they will
stop betore coming completely out, and
will not flit.
When plating and rem(Mng cookwme,
pull the shelf out m the bump on the
shelf support.
Toremovea shelf,pull it toward you, tilt tile
fiont end up and pull it out.
Toreplace, place the end of the shelf (stop-
locks) on the support, flit up the fiont and
push the shelf in.
C_ ®"
Y
Theoven has 6shelf positions.
How to Set the Oven for Baking or Roasting
[] Turn tile Oven Temperature knob to
the temperature y{)u desire.
[] Checkloodli)r doneness at the
mininmm time shown in the recipe.
Cook longer if necessmy.
[] Turn the Oven Temperature knob to
OFFwhen cooking is complete.
Typeof Food Shelf Position
Frozenpies(oncookiesheet) C
Angelfoodcake,bundtor poundcakes Bor C
Biscuits,muffins,brownies,cookies, Bor C
cupcakes,layercakes,pies
Casseroles BorC
Turkey RorA
Roasting R,A orB
12
vvww.GEAppliances.com
Preheating and PanPlacement
Preheat tile oven if the recipe calls fi)r it.
To preheat, set dm oven at the correct
temperature. Preheating is necessmy tbr
good results when baking cakes, cookies,
past*)' and breads.
Forovenswithoutapreheat/h&cator//_Thtortone,
preheat10minutes.
Baldng results will be better if baking pans
are (entered ii1the ovei1as ITtlllcbas
possible. Pans should not u)uch each other
or tile walls of the oven. If you need to use
mo shelves, stagger die pans so one is not
direcdy above tile other, and leave
approximately 1V,_,"tiom tile flom of tile
pan to tile flont of tile shel£
ii i i !
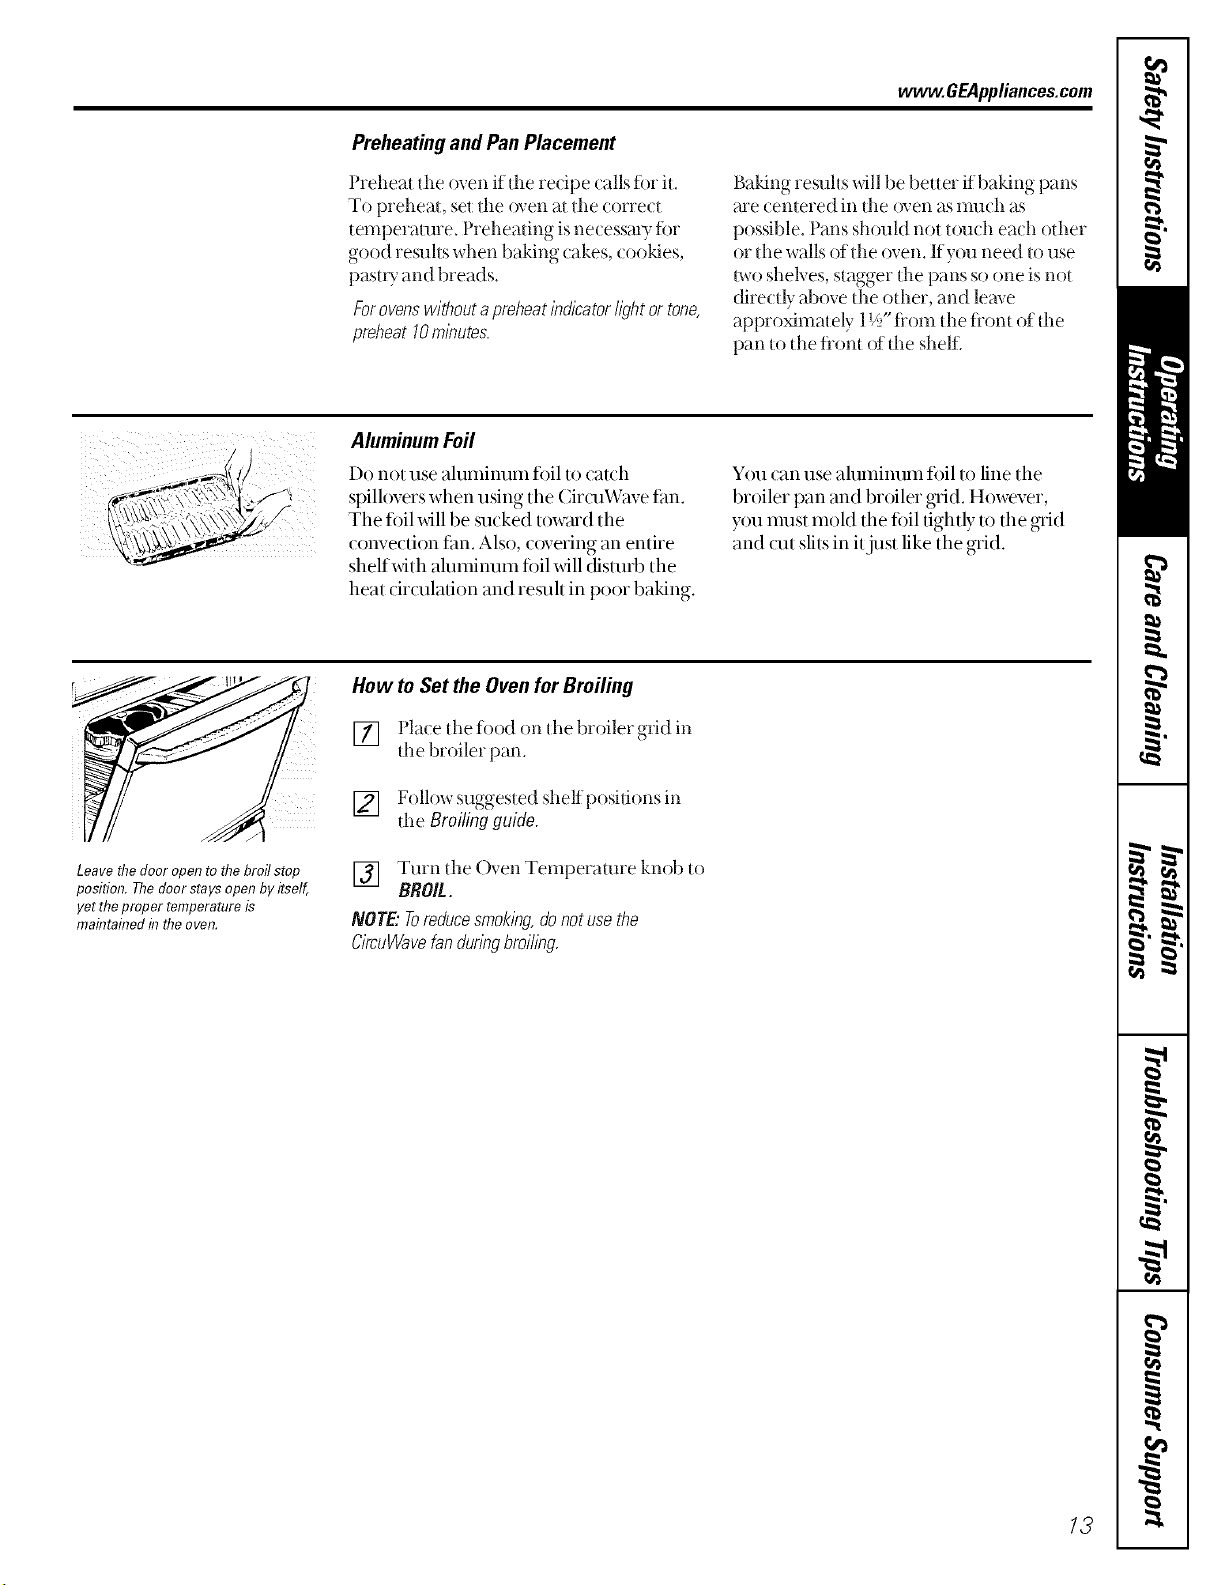
Aluminum Foil
Do not use ahmfinuIn fi)il to catch
spillovers when using tile ( ircuWave tim.
Tile fi)il _dll be sucked towmd tile
convection filn. Also, covering an entire
shelfxxdth alulninuln fi)il xdll distufl) tile
heat (:irculation and resuh in poor baking.
You can use ah]minum fi)il to line tile
broiler pan and broiler grid. However,
you inust inold tile fi)il tightly to tile grid
and cut slits in itjust like the grid.
Leavethedoor opento thebroil stop
position. Thedoorstays open by itself,
yet theproper temperatureis
maintaflTedin theoven.
How to Set the Ovenfor Broiling
[] Pla(e tile fi)od on tim broiler grid in
tile broiler pan.
[] Follox_ suggest ed shelf posidons in
tile Broilingguide.
[] Turn tile Oven Temperature knob t()
BROIL.
NOTE."Toreducesmokingdonotusethe
C/rcuWavefandunngbroiling.
13
Usingtheoven.
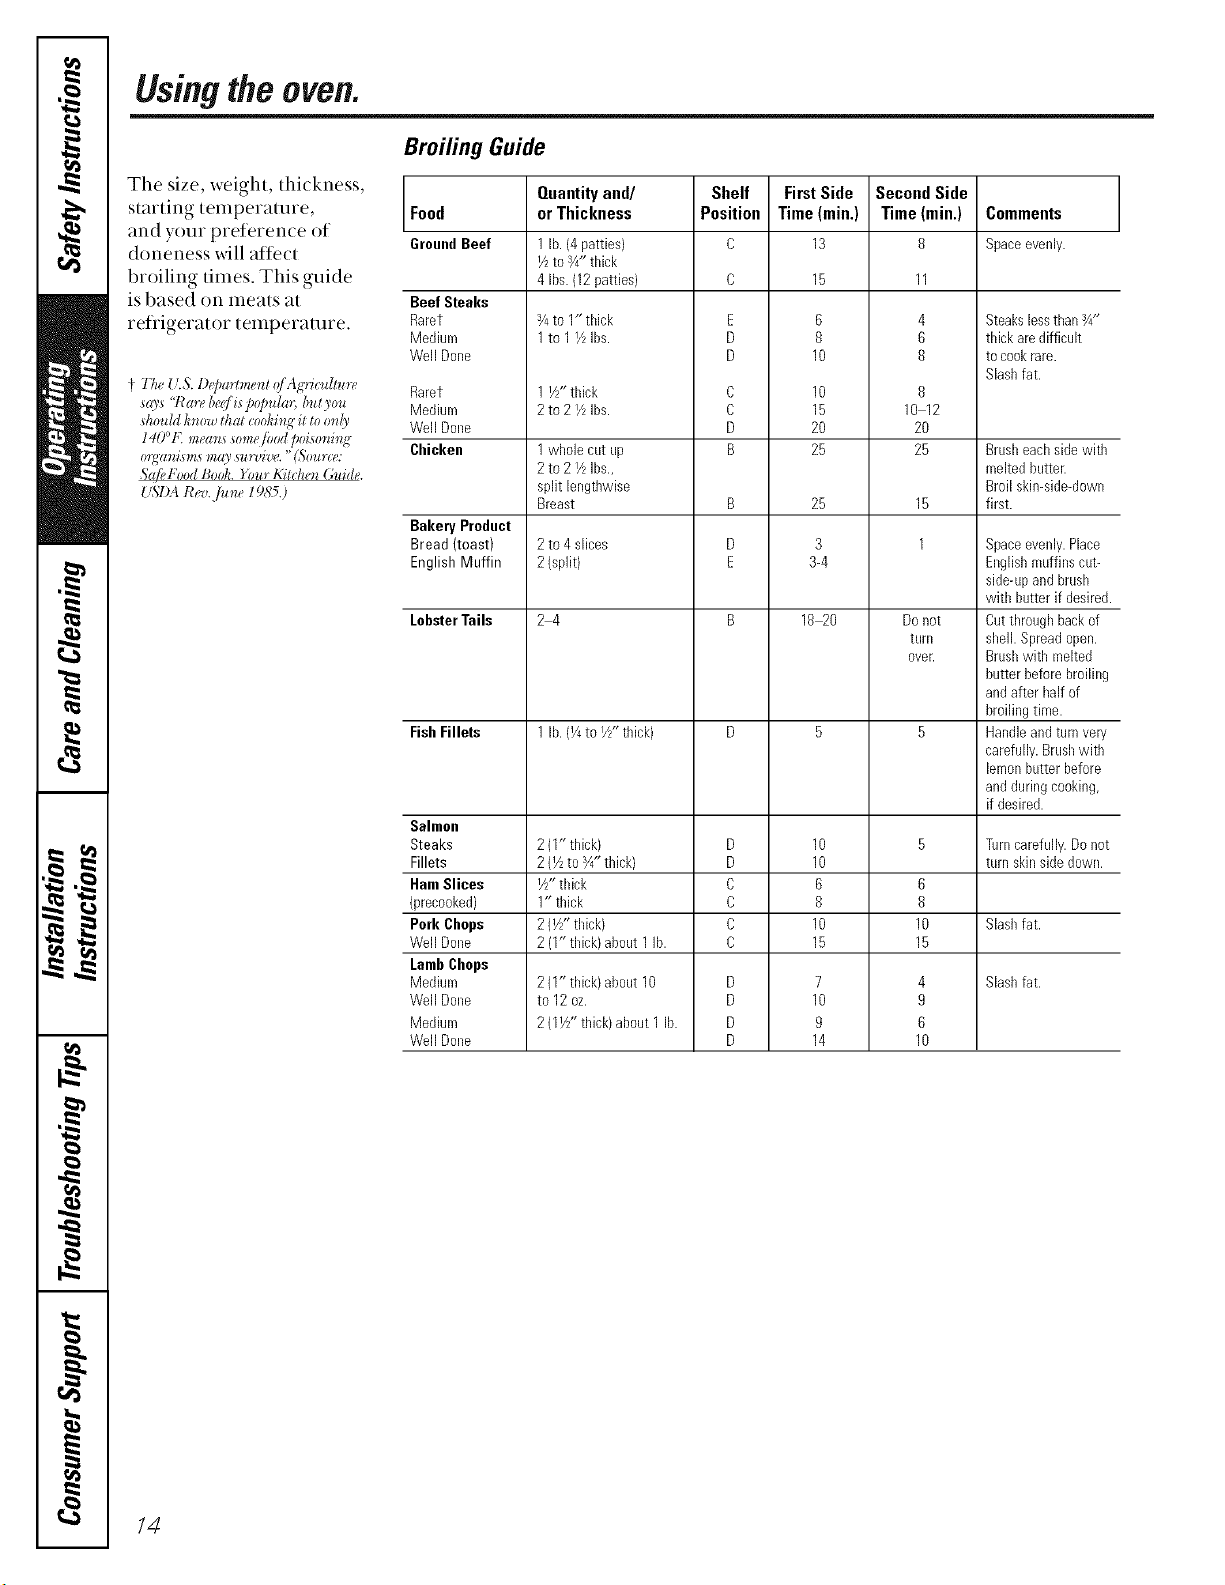
The size, weight, thickness,
starting temperature,
and your preferen(e of
doneness _dll affect
broiling times. This guide
is based on meats at
refligerat or temperamre.
q Th( U.S. Depadmenl o/'Agricultun,
says '!Rare be_fis po]mlm, bulyo_
sho_dd h,ow that cooking it to o_dy
140°I( meam some/bed poi,_mmL<
m;ganisms may sun@e. "L%urc_:
Sa!H"ood Boeli. }'bur AYtchenGuide.
Broiling Guide
Food
GroundBeef
Beef Steaks
Raret
Medium
WellDone
Raret
Medium
WellDone
Chicken
Bakery Product
Bread (toast)
English Muffin
LobsterTails
FishFillets
Salmon
Steaks
Fillets
HamSlices
")recooked)
Pork Chops
WellDone
LambChops
Medium
WellDone
Medium
WellDone
Quantityand/
or Thickness
1 lb. (4patties)
I/ztos/4"thick
4 Ibs.(12patties)
3/4to 1" thick
1to 1I/LIbs.
1 I//' thick
2to 2 I/LIbs.
1 whole cut up
2 to 2 Y_Ibs.,
split lengthwise
Breast
2to 4 slices
2{split)
24
1 lb. (¼to i//, thick)
2(1" thick)
2(½ to _4"thick}
i/j thick
1" thick
2(1//,thick)
2 (1"thick}about 1lb.
2(1" thick)about10
to 12oz.
2(1½" thick)about1 lb.
Shelf First Side
Position Time(rain.)
C 13
E
D
D
C
C
D
B
B
D
E
D
D
C
C
C
C
D
D
D
D
6
8
10
10
15
20
25
25
3
3-4
18_0
10
10
6
8
10
15
7
10
9
14
Second Side
Time (rain.)
8
4
6
8
8
10 12
20
25
15
1
Donot
tunl
oveE
6
8
10
15
4
9
6
10
Comments
Spaceevenly.
Steakslessthan¾"
thick aredifficult
tocookrare.
Slashfat.
Brusheachsidewith
meltedbutter.
Broil skin-side-down
first.
Spaceevenly.Place
Englishmuffins cut-
side-upandbrush
with butter if desired.
Cutthroughbackof
sheik Spreadopen.
Brushwith melted
butter beforebroiling
andafter half of
broilingtime.
Handleandturnvery
carefully.Brushwith
lemonbutterbefore
andduringcooking,
if desired.
Turncarefully.Donot
turn skinsidedown.
Slashfat.
Slash fat.
14
UsingCircuWave7ronsomemodels) .CEAppliances.com
Benefitsof CircuWave
i__Saves time when roasting meats and whole
meals. Time savings will depend on size,
type and amount offi)od.
i__Seals in moisture while the outside of
meats and poulu T gets (risp and brown.
i;__Byreducing cooking time, you xdll save
enerD; and reduce heat in the kitchen.
i;__Muhi-rack baking may increase cook time
slightly for some tbods, but the overall
time savings is greater than when baking
each rack indMdually.
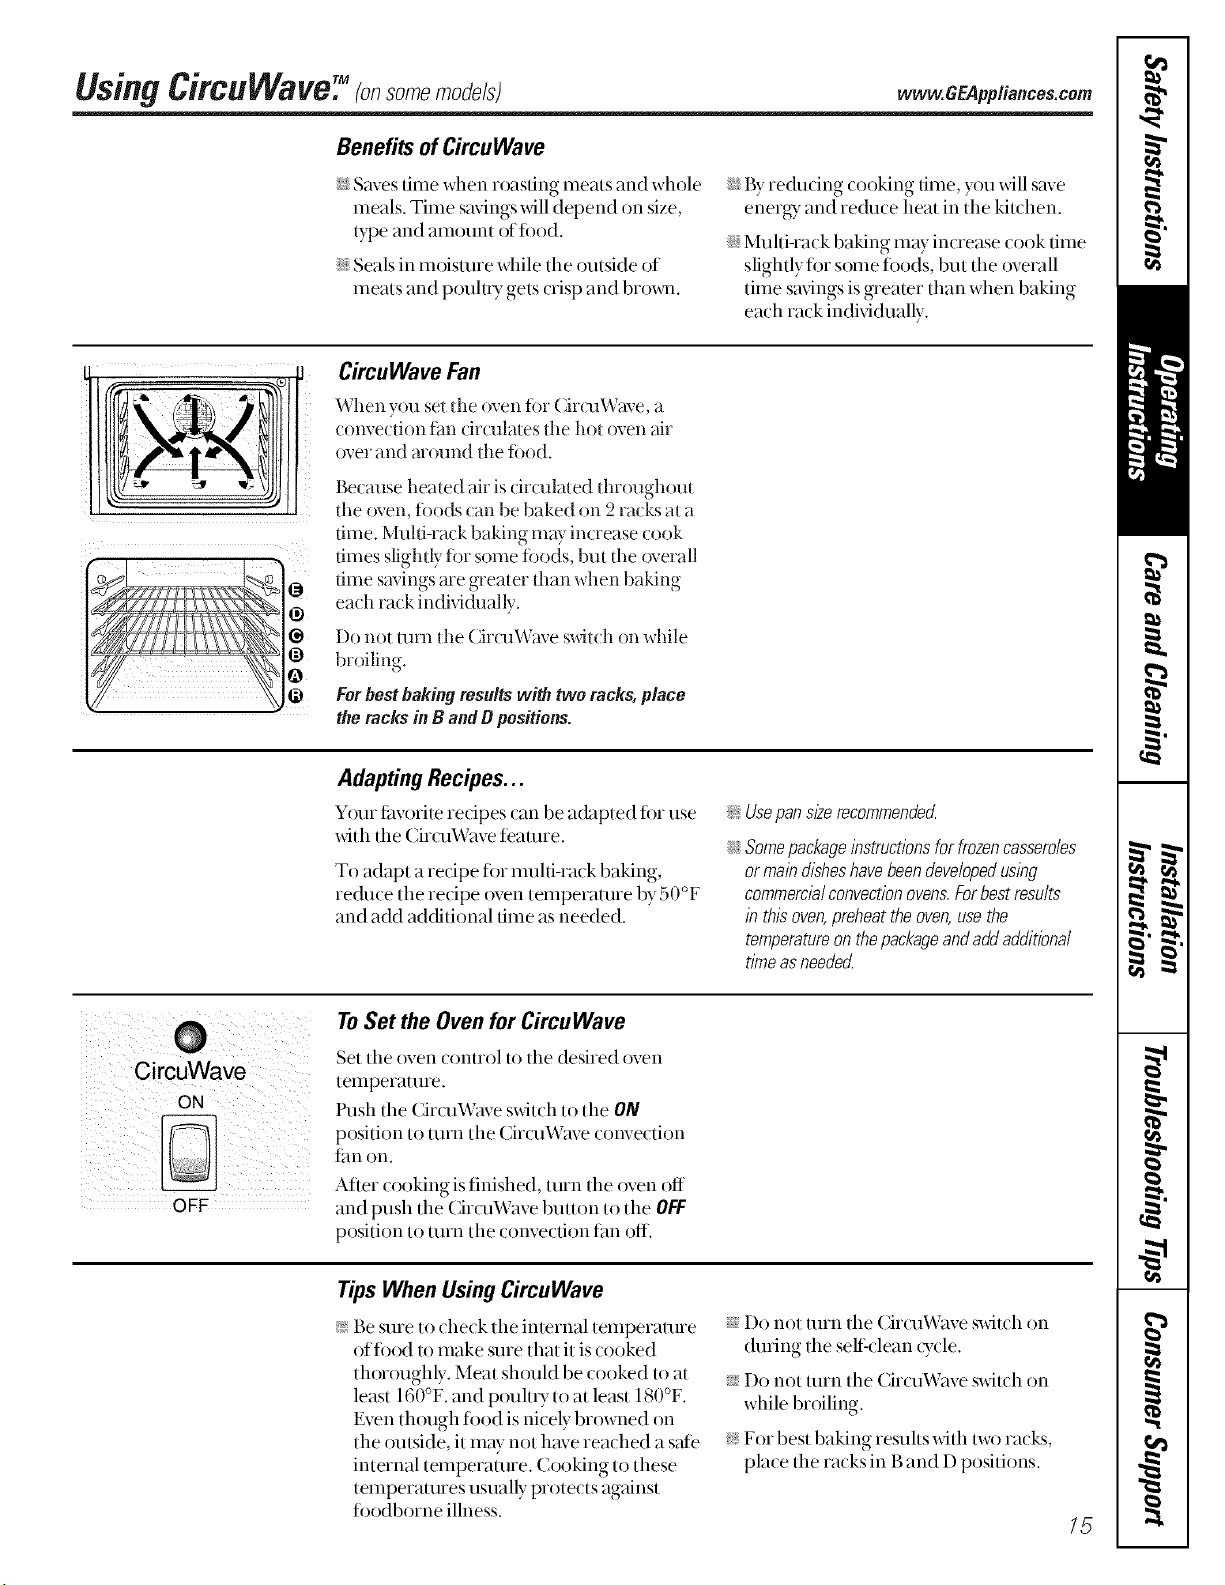
CircuWave Fan
When you set the oven ior Cir(u\,Vave, a
convection tim circulates tl_e hot oven air
over and mound dm tood.
Because heated air is (ir(ulated dnoughout
the o_en, tbods can be baked on 2 racks at a
time. Muhi-rack baking may increase cook
_ i limes slighdy for some fi,ods, b'm tl_eoxerall
@ dine savingsare greater d_an when baking
each rack individually.
Do not mrn the CircuWave svdtch on vdfile
broiling.
Forbestbakingresultswith tworacks,place
theracksinBandDpositions.
AdaptingRecipes...
Your tilvorite re(ipes (an be adapted for use
with the (_ii(uWave feature.
To adapt a recipe for multi-rack baking,
redu(e the redpe oven temperature by 50°F
and add additional time as needed.
i_:Usepansl2erecommended
i:__Somepackage instructionsforfrozencasseroles
or main disheshavebeendevelopedusing
commerc&iconvection ovens.Forbest resuits
in thisoven,preheat theoven,use the
temperatureon thepackageandadd additional
time asneeded
CircuWave
ON
(3FF
ToSet the Oven for CircuWave
Set the oven control to the desired oven
telnpera/ure.
l'ush the ( ircuWave switch to the ON
position to turn the CircuWave convection
tim oi1.
After cooking is finished, turn the oven off
and push the CircuWave button to the OFF
position to turn the convection fan off.
Tips When Us&g CircuWave
i_ Be sure to check the internal telnperamre
offi)od to inake sure that it is cooked
thor{)ughly, Meat should be cooked to at
least 160°F, and poult U to at least 180°F,
Even though food is nicely browned oi1
the outside, it inay not have reached a s>de
internal telnperamre. (_ooking to these
temperatures usually protects against
fi)odborne illness.
_ Do not/11ii1 the CircuWave switch on
during the sell-clean _Tcle.
_ Do not turn the CiicuWave switch on
while broiling.
i_ For best baking resuhs with Ix,a)racks,
place the racks in Band D positions.
75
Usingthe clock and timer, somemo e/sl
=
Make sure the clock is set to flTe
correct time of day.
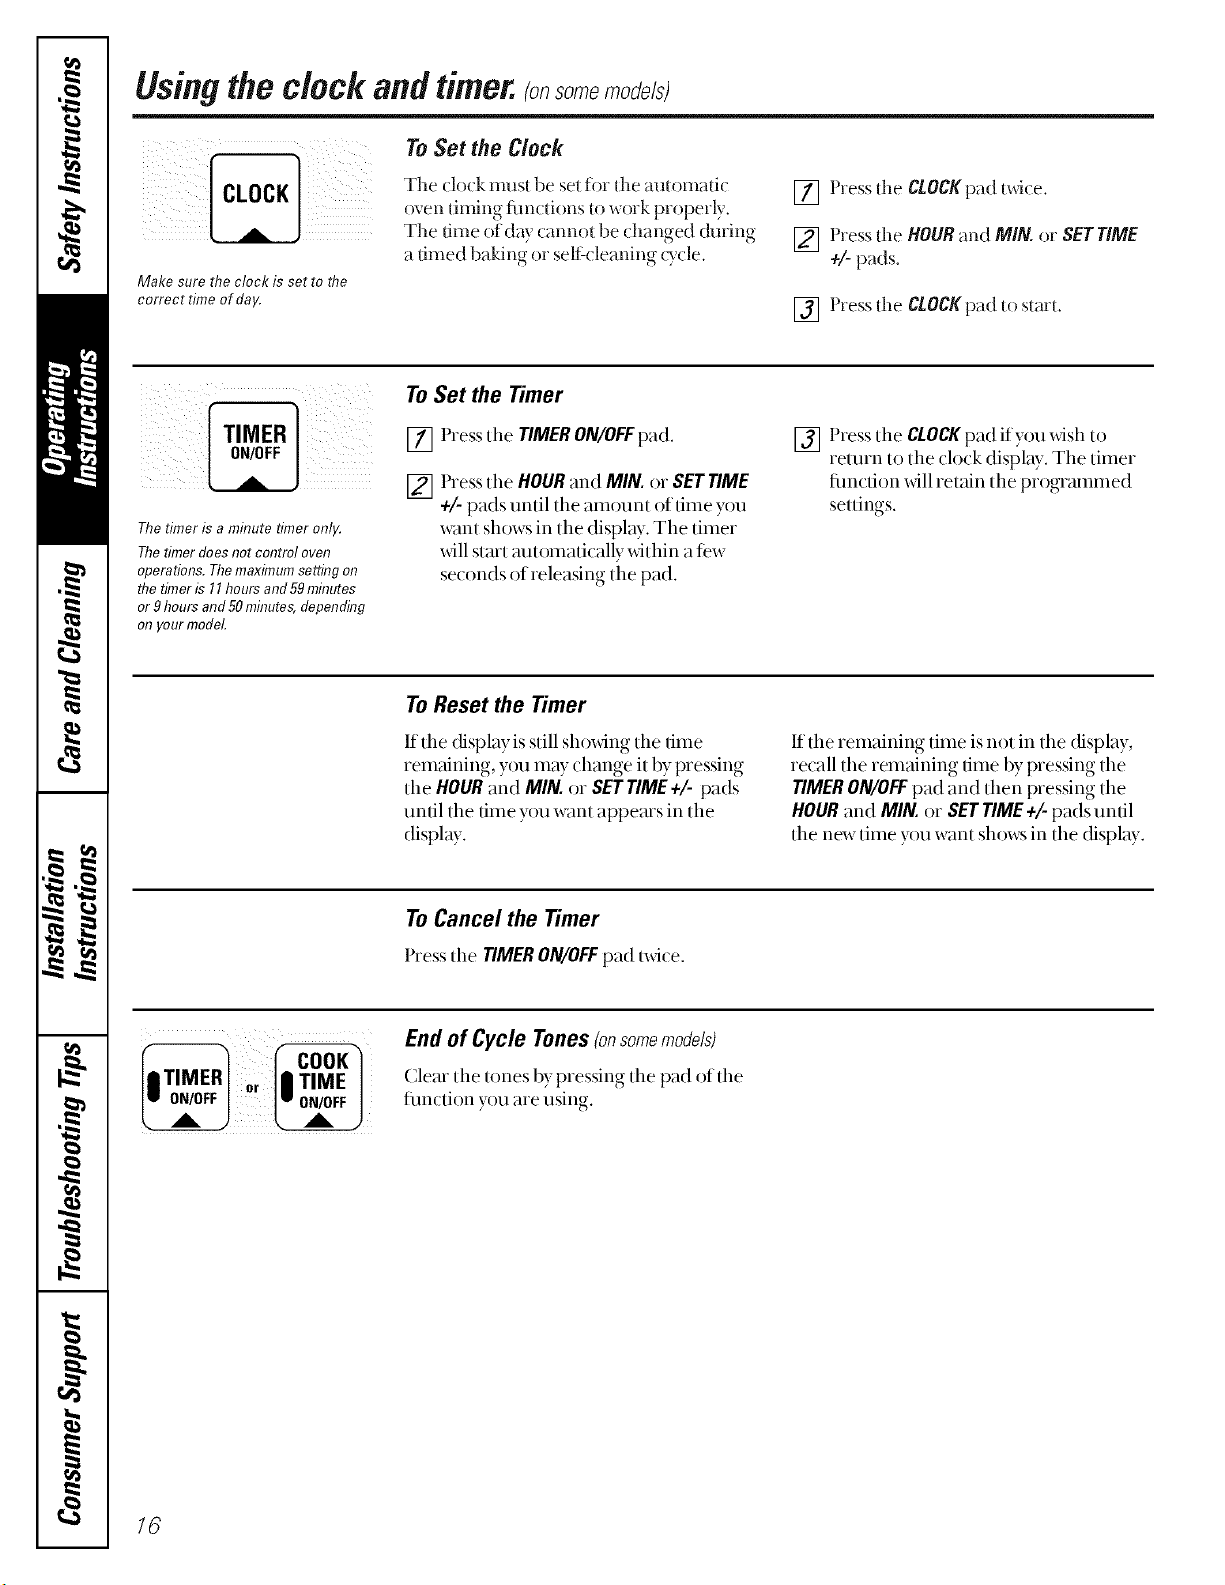
To Set the Clock
The clock must be sel for dm automadc
oven timing fimctions to work properly.
The dine of day (_tlln()[ be (hanged during
a timed baking or seli:( leaning Q,/le.
[] Pressflm CtOCKpadlwite.
[] Presstlle HOURand MIN. or SETTIME
÷/-pads.
[] Press II_eCLOCKpad I11sialI,
Thetimer is a mhTutetimer only.
Thet#nerdoesnot control oven
operations.Themaximumsetting on
the timer is II hours and59minutes
or 9hours and 50mhnltes,depending
on yourmodel
To Set the Timer
TIMER] [] Press file TIMERON/OFFpad.
[] Pressthe HOURand MIN. or SETTIME
+,/'-pads until the amount of time you
XV}lll[sholvs in the display. Tile timer
will start automatically _dthin a few
seconds of releasing tlle pad.
[] Press the CLOCKpad if you xdsh to
return to the clock display. Tile timer
fimction _dll retain the programmed
settings.
ToReset the Timer
If the display is still sh{)wing the time
remaining, you may change it by pressing
the HOUR and MIN. or SETrIME+/-pads
until the time you want appears in tile
display.
If the remaining time is not in the display,
recall the remaining time by pressing the
TIMERON/OFFpad and then pressing the
HOURand MIN. or SETTIME+/- pads until
the new time you want shows in the display.
ToCancel the Timer
Pressthe TIMERON/OFFpad mile.
"_ (COOK')
End of Cycle Tones(onsomemodels)
Clear the tones bypressing the pad of the
fun( tion you are using.
/8
Usingthe timedbakingand mastingfeatures.
(on some models)
vvvvw.GEAppliances.com
Donot latch the oven door during timed cooking. Thelatch is used for self-cleaning only.
NOTE:Foods that spoil easily, such as milk, eggs, fish, stuffings, poultry and pork, should not be allowed to sit for more
than 1hour before or after cooking. Room temperature promotes the growth of harmful bacteria. Be sure that the oven
light is off because heat from the bulb will speed harmful bacteria growth.
HOUR MIN.
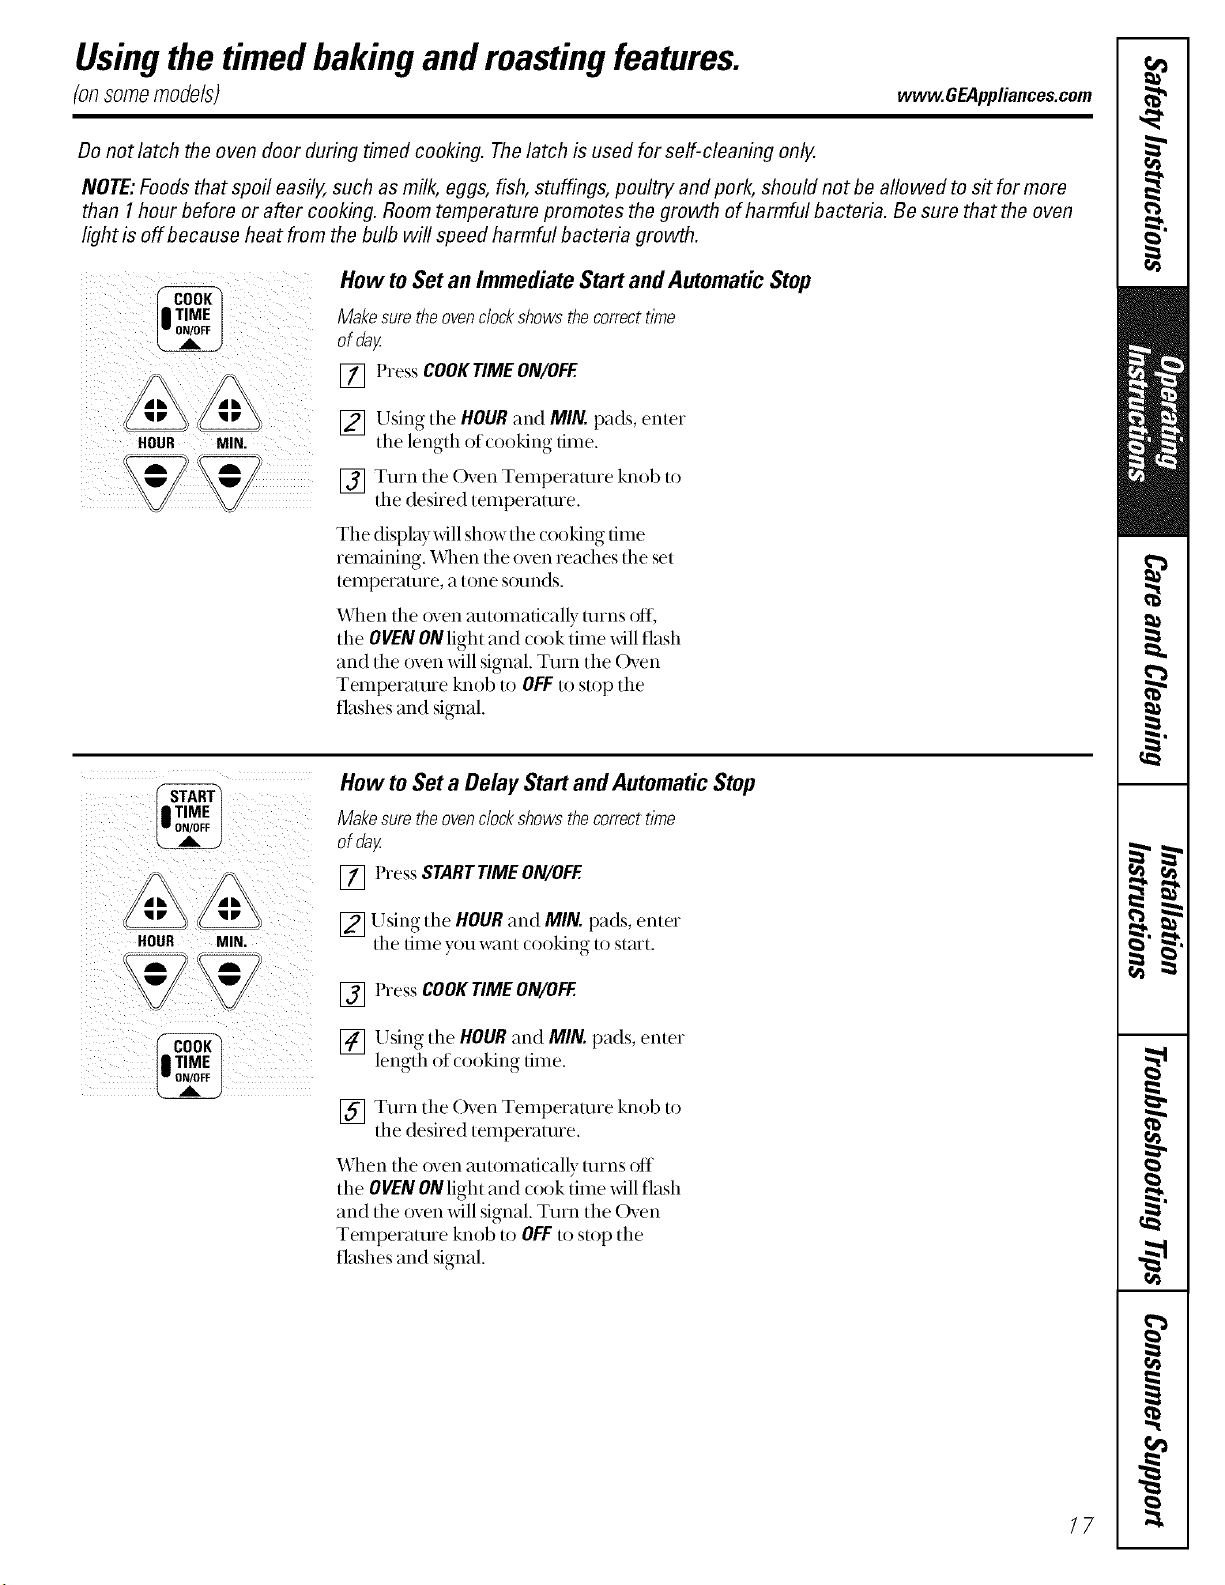
How toSet an Immediate Start andAutomatic Stop
Makesuretheovenclockshowsthecorrecttime
ofday
[] PressCOOKTIMEON/OFE
[] Using tlle HOURand MIN. pads, enter
the length of cooking time.
[] Turn the Oven Temperature knob to
the desired temperature.
The display xfillshow tile cooking time
remaining. "v\_mnthe oven reaches the set
temperature, a tone sounds.
When tile ovenmm)mafically Unns oil
the OVENONlight and cook time will flash
and the oven will signal. Turn the Oven
Temperature knob to OFFto stop the
flashes and signal.
sC_a_
| TIME
ON/OFF
HOUR MIN,
How toSet a Delay Start andAutomatic Stop
Makesuretheovenclockshowsthecorrecttime
ofday
[] Press STARTTIMEON/OFE
[] Using tlle HOURand MIN. pads, enter
tile time you want (:()()king to start.
[] Press COOKTIMEON/OFE
[] Using tlle HOURand MIN. pads, enter
length of (()()king time.
[] Turn tile Oven Temperature knob to
the desired temperature.
When the oven mm)mafically unns off
the OVENONlight and cook time will flash
and the oven will signal. Turn the Oven
Temperature knob to OFFto stop the
flashes and signal.
17
Usingthe SabbathFeature.(onso e o e/s;
(DesignedforuseontheJewishSabbathandHolidays.)
The Sabbath feature can be used for baking/roasting only. It cannot be used for broiling, self-cleaning, or Delay
Start cooking.
NOTE: The oven light comes on automaficafly (on some models) when the door is opened and goes off when the
door is closed. The bulb maybe removed. See the Oven Light Replacement secfion. On models with a light switch
on the control panel, the oven light may be turned on and left on.
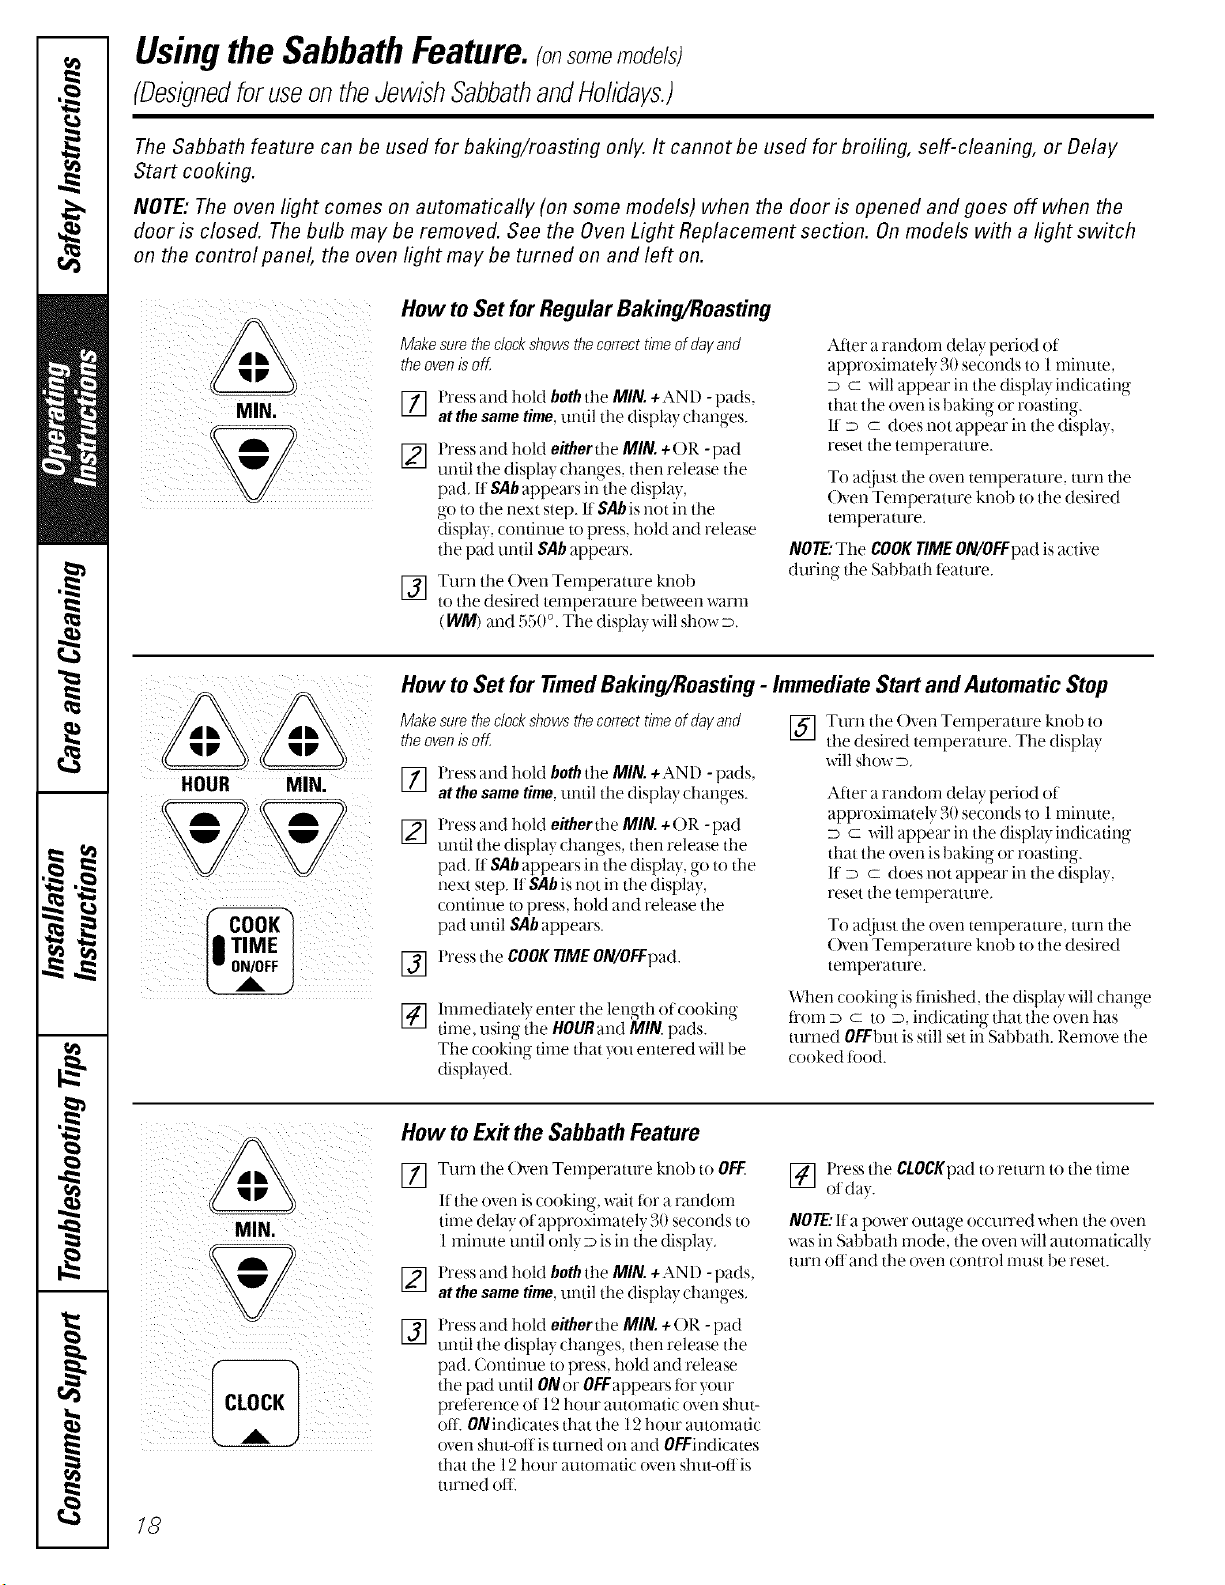
How to Set forRegularBaking/Roasting
Makesuretheclockshowsthecorrecttimeof dayand
theovenisoff
[]
[]
[]
Press and hold bothtile MIN, +AND -pads,
at the same time, until tile display changes.
l'ress and hold either tile MIN.+ OR -pad
until the display changes, then release tile
pad. It SAb appears in the display,
go to the next step. ILlSAb is not in tile
display, continue to press, hold and release
the pad until SAb appears.
Turn tile ()ven Tenlperature knob
to tile desired temperature between warn]
(WM) and 550 °, Tile displa) will show D.
After a random delay period of
approximately 30 seconds to 1minute,
D C will appear in tile displayindicating
that tile oven is baking or roasting.
II D C does clot appear in the display,
reset the temperature.
To a(!iust file oven temi)erature, mrn the
(h'en Temperature knob to the desired
temperature.
NOTE:Tile COOKTIMEON/OFFpad is active
during tile Sabbath fi_ature.
HOUR MIN.
i
How to Set for timed Baking/Roasting- Immediate Start andAutomatic Stop
Makesuretheclockshowsthecorrecttimeof dayand [] Turn tile ()yen Temperature knob to
theoven is off tile desired temperature. Tile d splay
[]
[]
[]
l'ress and hold both tile MIN.+AND -pads,
at the sametime, until tile display (hanges.
Press and hold either the MIN.+()R -pad
until tile displa} changes, then release the
pad. It SAbappears in the displa}, go to the
next step. It SAb is not in the display,
continue u) press, hold and release tile
pad until SAbappears.
Press tile COOKTIMEON/OFFpad.
will show D,
After a random delay period of
approximately 30 seconds to 1minute,
D C will appear in tile displayindicating
that tile oven is baking or roasting.
It D C does clot appear in the display,
reset tile temperature.
To a(!iust file oven temperature, turn the
(h'en Temperature knob to the desired
temperature.
[]
hnmediatel_, enter tile lenmh_ of cooking,"
time. using tile HOURand MIN. pads.
The cooking time that )ou entered will be
displa}ed.
When cook no-_,sthlished,, the dis.t)lax,will. chanoe
fl'om D C tO D, indicating that tile oven has
turned OEEbut is still set in Sal)bath. Remove the
cooked tood.
How to Exitthe SabbathFeature
[]
[]
[]
Turn tile ()yen Temperature knol) to OFF.
If the oven is cooking, wait tot a randona
time dela} of approximatel) 30 seconds to
1minute until onl) D is in the displa}.
Press and hold bothtile MIN.+AND -pads,
at the same time, until tile display changes.
Press and hold either tile MIN.+()R - pad
until tile displa) changes, then release tile
pad. Continue to press, hold and release
the pad until O/Vor OFFappears ti)r your
preterence of 12 hour automatic oven shul-
off: O/Tindicates that the 12 hour autonlatic
oven shut-ott'is turned on and OFFindicates
that tile 12 hour automatic oven sllut-ofl is
turned otE
] Press tile CLOCKpad to return to tile time
()Ida}.
NOTE: If a power outage oco.uTed when tile oven
was in Sabbath mode, tile oven will automaticall)
tHrll ()It and tile oven control lnHSt be reset.
/8
Adjusttheoventhermostat--Easy todoyourself! .CEA,p,ances.ce,n
Youmay find that your new oven cooks differently than the one it replaced. Use your new oven for a few weeks to
become more familiar with it. If you still think your new oven is too hot or too cold, you can adjust the thermostat yourself.
Donot use thermometers, such as those found in grocery stores, to check the temperature setting of your oven. These
thermometers may vary 20-40°F.
NOTE: This adjustment will not affect the broiling or the self-cleaning temperatures (on some models). The adjustment
will be retained in memory after a power failure.
I
i ii
\
OFF_o_
Front ofOVENTEMPknob
(knob appearancemay vary)
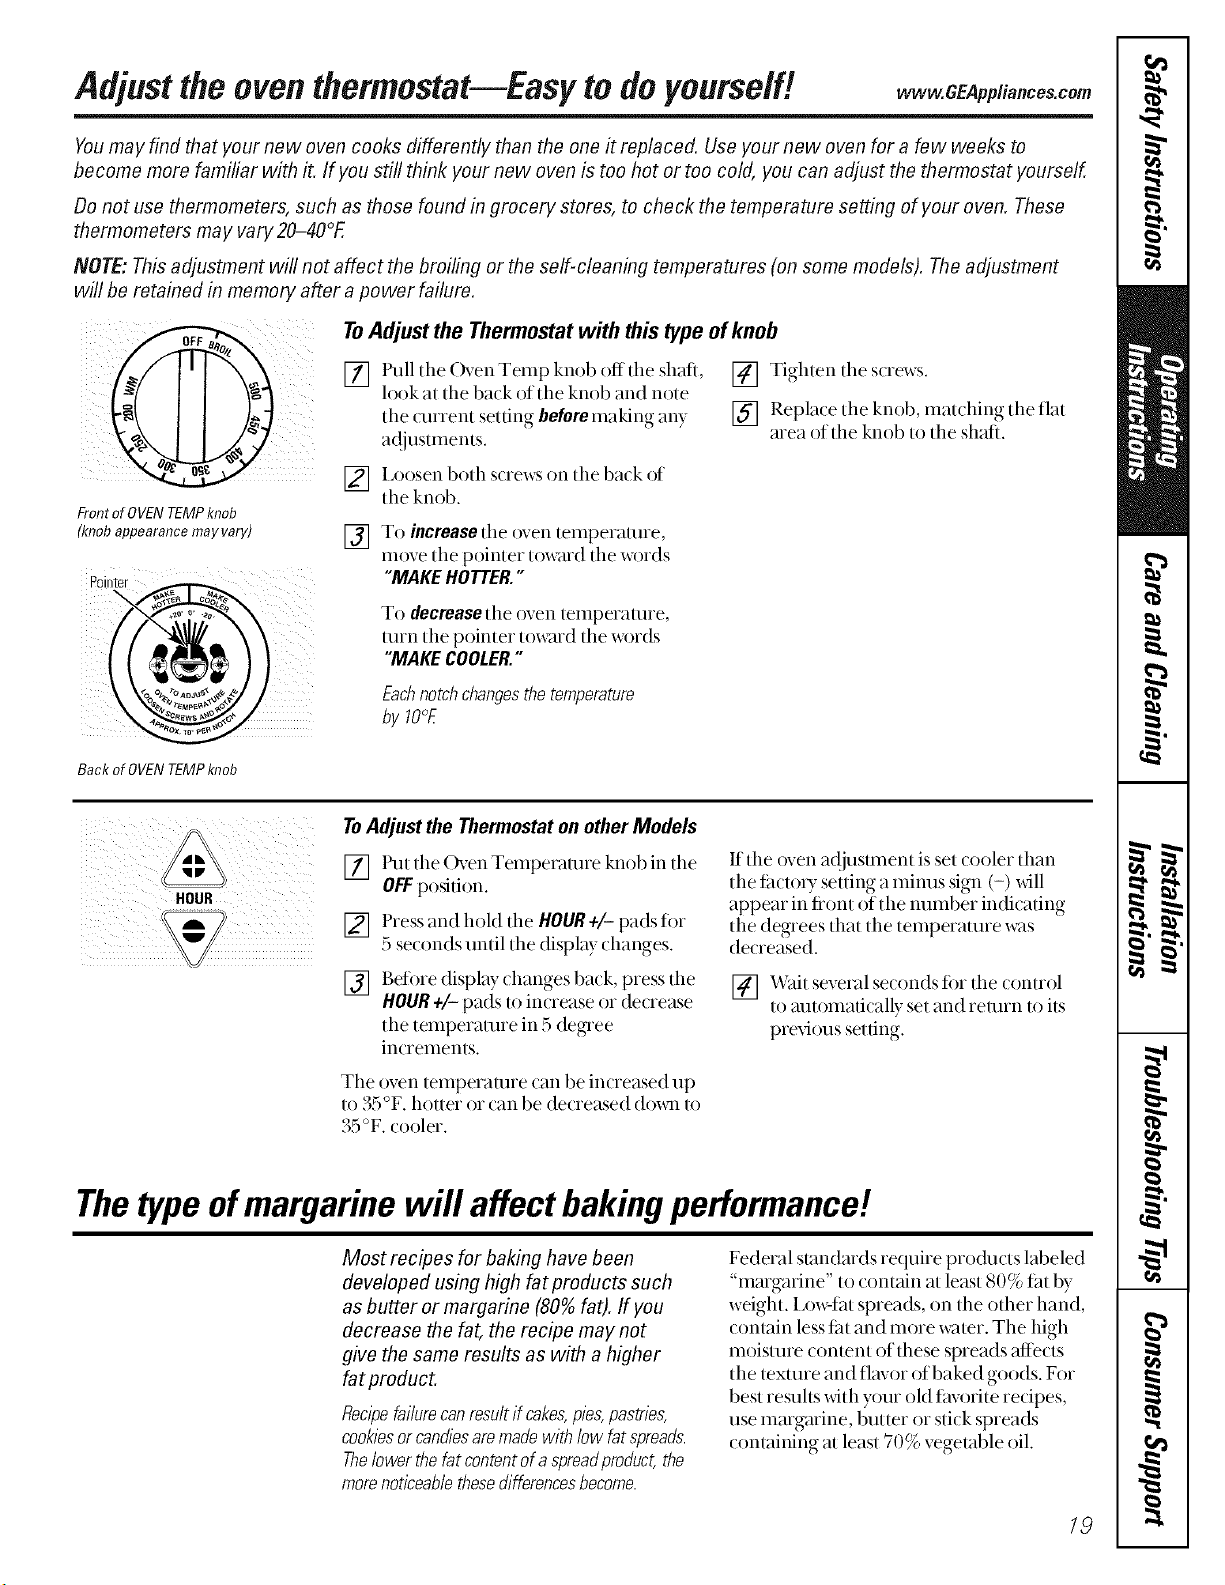
ToAdjustthe Thermostatwith thistypeof knob
[]
Pull the Oven Temp knob off tile shaft,
look at the back of the knob and note
the current setting beforeinaking any
adjusmmnts.
[] Tighten tile screws.
[] Repla(e the knob, matdfing the fiat
area of the knob to the shaft.
V_ I,oosen both screws on tile back of
the knob.
] To increasetile oven temperature,
move the pointer toward the words
"MAKEHOTTER."
To decreasetile oven telnperamre,
turn the pointer toward tile words
"MAKECOOLER."
Eachnotchchangesthetemperature
by lO°E
Back of OVENTEMPknob
HOUR
((...............,.
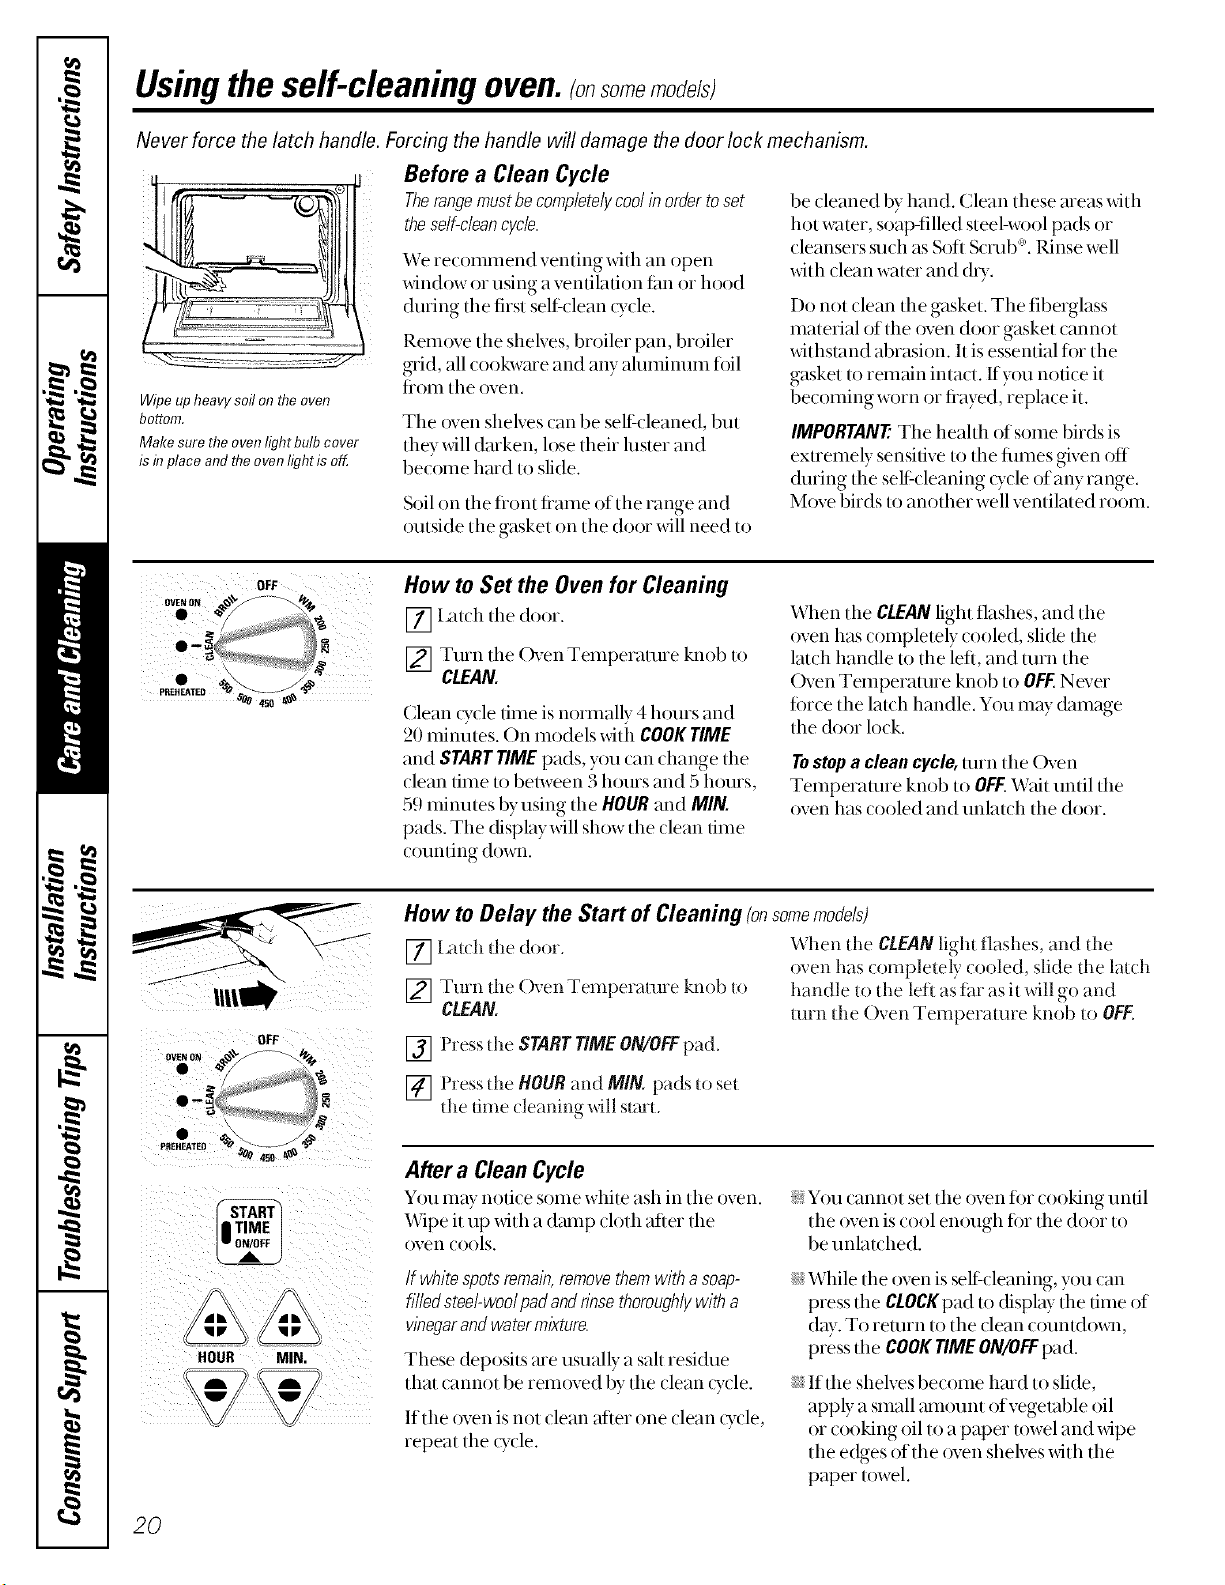
ToAdjust the Thermostaton other Models
[] Put tile Oven Tempe_vmue knob in the
OFFposition.
[]
[]
Press and hold the HOUR+/- pads for
5 se(onds until the display dlanges.
Befi)re display changes back, press tile
HOUR+/- pads to in(rease or de(rease
the temperature in 5 degree
in(rements.
The oven telnperamre (an be increased up
to 35°F. hotter or can be decreased ch)_l to
35 °F. cooler.
If tile {)yen a(!jusUnent is set cooler than
the titcto U setting a minus sign (-) will
appear in fiont of the nulnber indicating
the degTees that the telnperamre was
decreased,
[] \,\hit seveI_d seconds fi)r the control
to aUtOlnatically set and return to its
prexfous setting.
Thetypeofmargarine will affect bakingperformance!
Most recipes for baking have been
developed using high fat products such
as butter or margarine (80% fat). If you
decrease the fat, the recipe may not
give the same results as with a higher
fat product.
Recipefailurecanresultifcakes,pies,pastries,
cookiesorcandiesaremadewithlowfatspreads.
Thelowerthefat contentofa spreadproduct,the
morenoticeablethesedifferencesbecome.
Federal standmds require pro&acts labeled
"mmgarine" to contain at least 80% tat by
wright. I,ox_qht spreads, on the other hand,
contain lesstht and more water. The high
moisture content of these spreads affects
the texture and flavor of baked goods. For
best resuhs with your old tm-orite recipes,
use inargarine, butter or stick spreads
containing at least 70% vegetable oil.
79
Usingtheself-cleaning oven.(onsomemodels)
Never force the latch handle. Forcing the handle will damage the door lock mechanism.
Wipeupheavysoil onthe oven
bottom.
Make sure theoven lightbulb cover
is in place andthe ovenlight is ofL
Before a Clean Cycle
Therangemustbecompletelycoolinordertoset
theself-cleancycle.
_vVerecoininend venting _dth an open
x_4ndow or using a ventilation fan or hood
during tlie first self-clean o, cle.
Remove tlie shelves, broiler pan, broiler
grid, all cookware and any alunfinuni fi)il
fiom the oven.
Tile oven shelves can be self-cleaned, but
flmy will darken, lose their luster and
become hard to slide.
Soil on tile front fiame of tim range and
outside file gasket on file door will need to
be cleaned by hand. Clean these meas with
hot water, soap-filled steel-wool pads or
cleansers such as Soft Scrub (P. Rinse well
with clean water and dU.
Do not clean the g_Lsket.The fiberglass
material of the {)ven door gasket cannot
withstand abrasion. It is essential fitr the
gasket to remain intact. Ifyou notice it
becoming worn or flayed, replace it.
IMPORTANT'.The heahh of some birds is
exUemely sensitive to the finnes given off
during tlie self-cleaning o,(le of any range.
Move birds to another well ventilated room.
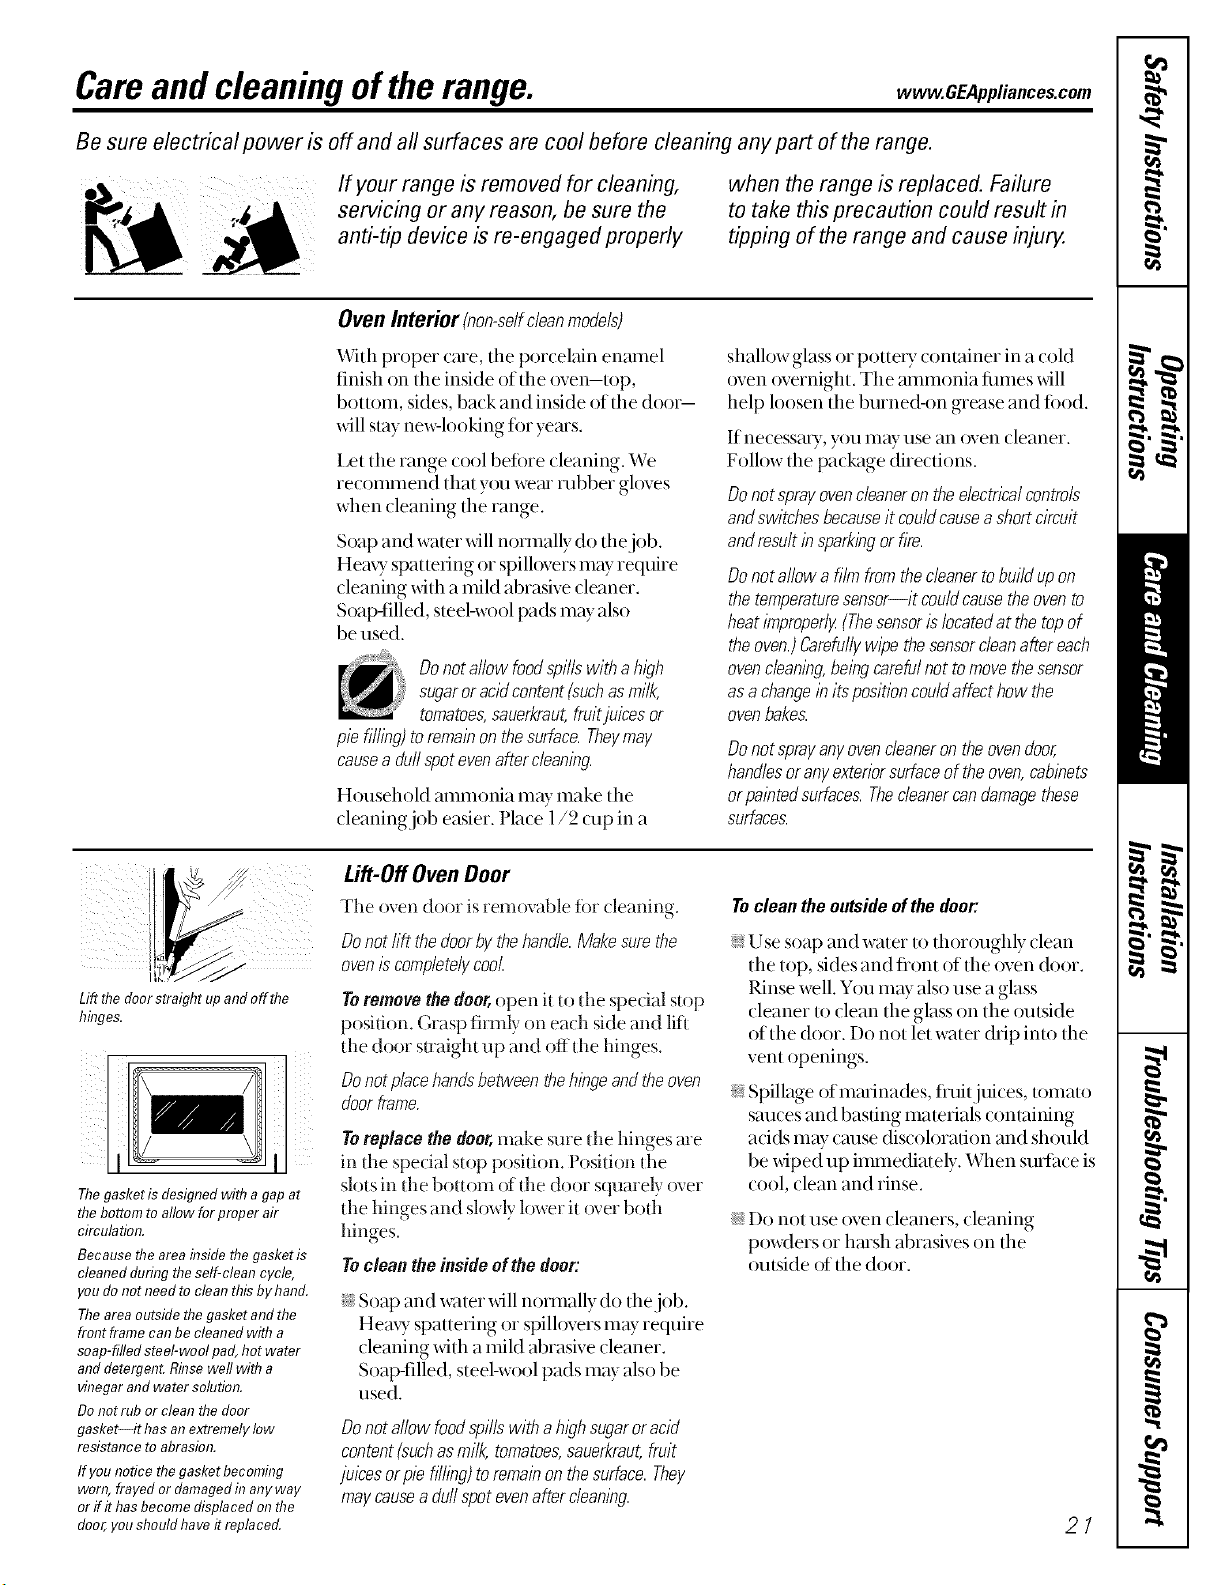
How to Set the Oven for Cleaning
[] Hu(h tile door.
[] Turn tlie Oven Temperature knob to
CLEAN.
Clean _ycle time is normally 4 hours and
20 minutes. On models with COOKTIME
and STARTTIMEpads, you can change the
clean time to between 3 hours and 5 hours,
59 minutes byusing tile HOURand MIN.
pads. Tile display will sh_twtile dean time
counting (h)wn.
When the CLEANlight flashes, and the
oven has completely cooled, slide the
latch handle to the left, and turn the
Oven TemperaUne knob to OFF.Never
fi)rce the latch handle. Y()u may damage
the door lock.
Tostopa cleancycle,turn tile Oven
Temperature knob to OFF.Wait until tile
oven has tooled and unlat(h tlie door.
llll_
OFF
PREHfiATED _00 ";_n_'J_4_
| TIME
,m ON/OFF
702FFJ
HOUR MIN,
,\g
How to Delay the Start of Cleaning (onsomemodels)
[] I_uch tlle door.
[] Turn the ()yen Temperature knob U)
CLEAN.
[] Pressdie STARTT/MEON/OFFpad.
When the CLEANlight flashes, and dm
oven has completely cooled, slide the latch
handle to the left as thr as it will go and
turn dm Oven Temperature knob to OFF.
[] Press tlie HOURand MIN. pads u) set
tile time cleaning xdll start.
After a CleanCycle
You illay noti(e some white ash in [lie oven.
Wipe it up with a damp (loth after tile
oven tools.
If white spots remalk removethem with asoap-
filledsteel-wool pad and nnse thoroughlywith a
wnegarand watermixture.
These deposi/s me usually a salt residue
that cannot be removed by tile clean o:cle.
Iftim oven is not clean after ()tie clean cycle,
repeat the _yde.
>;You cannot set tile oven for cooking until
tile oven is cool enough for tile door to
be unlatched.
i_?While the oven is sellcleaning, y{tucan
press the CLOCKpad m _fisplaythe time of
day. To return to the clean c(mntd()_l,
press the COOKTIMEON/OFFpad.
i;_?If tile shelves become hmd to slide,
apply a small mnount ofvegelable oil
or cooking oil to a paper towel and wipe
the edges of the oven shelves with the
paper towel.
2O
Careand cleaning ofthe range, www.GEAppliances.com
Be sure electrical power is off and all surfaces are cool before cleaning any part of the range.
If your range is removed for cleaning,
servicing or any reason, be sure the
anti-tip device is re-engaged properly
when the range is replaced. Failure
to take this precaution could result in
tipping of the range and cause inju_
Oven Interior (non-selfcleanmodels)
With proper care, the porcelain enmnel
finish on the inside of the oven-top,
bottom, sides, back and inside of the door-
_dll stay ne_qooking tin yems.
I,et tile range cool before cleaning. We
recolnlnend thatyou wear rubber gloves
when cleaning the range.
Soap and water will normally do the job.
Hemy spattering or spilh)vers mW require
cleaning with a mild abrasive cleaner.
Soap-filled, steel-wool pads m Walso
be used.
Donotallowfoodspillswithahigh
sugaroracidcontent(suchasmilk,
tomatoes,sauerkraut,fruitjuieesor
piefilling)toremainonthesurface.Theymay
causea duffspotevenaftercleaning.
Household ammonia may make the
cleaning job easier. Place 1/2 cup in a
shallow glass or potte U container in a cold
oven overnight. The mnmonia fim_es will
help loosen the burned-on grease and tood.
If necessm7, }_)umay use an ()yencleaner.
Follow the package directions.
Donotsprayovencleanerontheelectricalcontrols
andswitchesbecauseitcouldcauseashortcircuit
andresultinsparkingorfire.
Donotallowa filmfromthecleanertobum upon
thetemperaturesensor--itcouldcausetheovento
heatimproperly(Thesensorislocatedat thetopof
theoven.)Carefullywipethesensordeanaftereach
ovencleaningbeingcarefulnottomovethesensor
asa changeinitspositioncouldaffecthowthe
ovenbakes.
Do not sprayanyoven cleaneron the ovendoor,
handlesor any exteriorsurfaceof the oven,cabinets
or painted surfaces.Thecieanercandamagethese
surfaces.
Lift flTedoorstraight upand off flTe
hflTges.
Thegasketla designed with agap at
the bottom toallow forproper air
circulation.
Because the areaflTsidethe gasket la
cleaned during theself-clean cycle,
you donot needto cleanthis by hand.
Theareaoutsidethe gasket andthe
front frame can be cleaned witha
soap-filled steel-wool pad, hot water
and detergent.Rinsewell witha
vinegar andwater soletlan.
Donot rub or clean thedoor
gasket--it has anextremely low
reslatance to abrasion.
If you notice thegasMt becoming
worn, frayed or damagedin any way
or ff it has become displaced onthe
door,youshodd haveit replaced.
Lift-OffOven Door
Tile oven door is rem_wable tbr (leaning.
Donothft thedoorbythehandle.Makesurethe
oven/scompletelycool
Toremovethedeer,open it to tile special sto1)
position. Grasp firmly on each side and lift
the door suaight up and offtl_e hinges.
Donotplacehan& betweenthehingeandtheoven
doorframe.
Toreplacethe doer,make sure tile hinges are
in the special stop position. Position tl_e
slots in tile bottom of tile door squarely over
die hinges and sl()wlyl()wer il over bodl
binges.
Toclean theinsideofthedoor:
i;ySoap and water will normally do the job.
Hemy spattering or spilh)vers may require
cleaning with a mild abrasive cleaner.
Soap-filled, steel-wool pads mW also be
used.
Donotallowfoodspillswithahighsugaroracid
content(suchasmilk,tomatoes,sauerkraut,fruit
juicesorpiefilling)toremainonthesurface.They
maycauseadullspotevenaftercleaning
Toclean the outside of the door:
>:Use soap and water to thoroughly clean
the top, sides and flont of the oven door.
Rinse well. You m W also use a glass
cleaner to clean the glass on the ou/side
of the door. Do not let water drip into the
vent openings.
>:Spillage ofmm'inades, fl_uitjuices, tomato
sauces and basting materials containing
acids may cruise discoloration and should
be wiped up immediately. When sudace is
cool, clean and rinse.
i;_}:Do not use oven (leaners, (leaning
powders or hmsh abrasives on tile
outside of tlle door.
21
Careand cleaning ofthe range.
OvenHeatingElements
Donotcleanthebakeelementorthebroilelement
Anysoilwillbumoff whentheelementsareheater_
To dean the oven floor, gently lift tile bake
element. (lean _dth warm soapywater.
Oven Shelves
Clean the shelves xdth an abrasive cleanser
or steel wool.
On self cleaning models the oven shelves
may be cleaned in the selt_leaning oven.
However, the shelves will darken in color,
lose their luster and become hmd to slide
if cleaned during the self cleaning _ycle.
To make the shelves slide more easily apply
a small mnount ofvegelable oil or cooking
oil to a paper towel and wipe the edges of
the oven shelves with the paper towel.
\
Wire cover holder
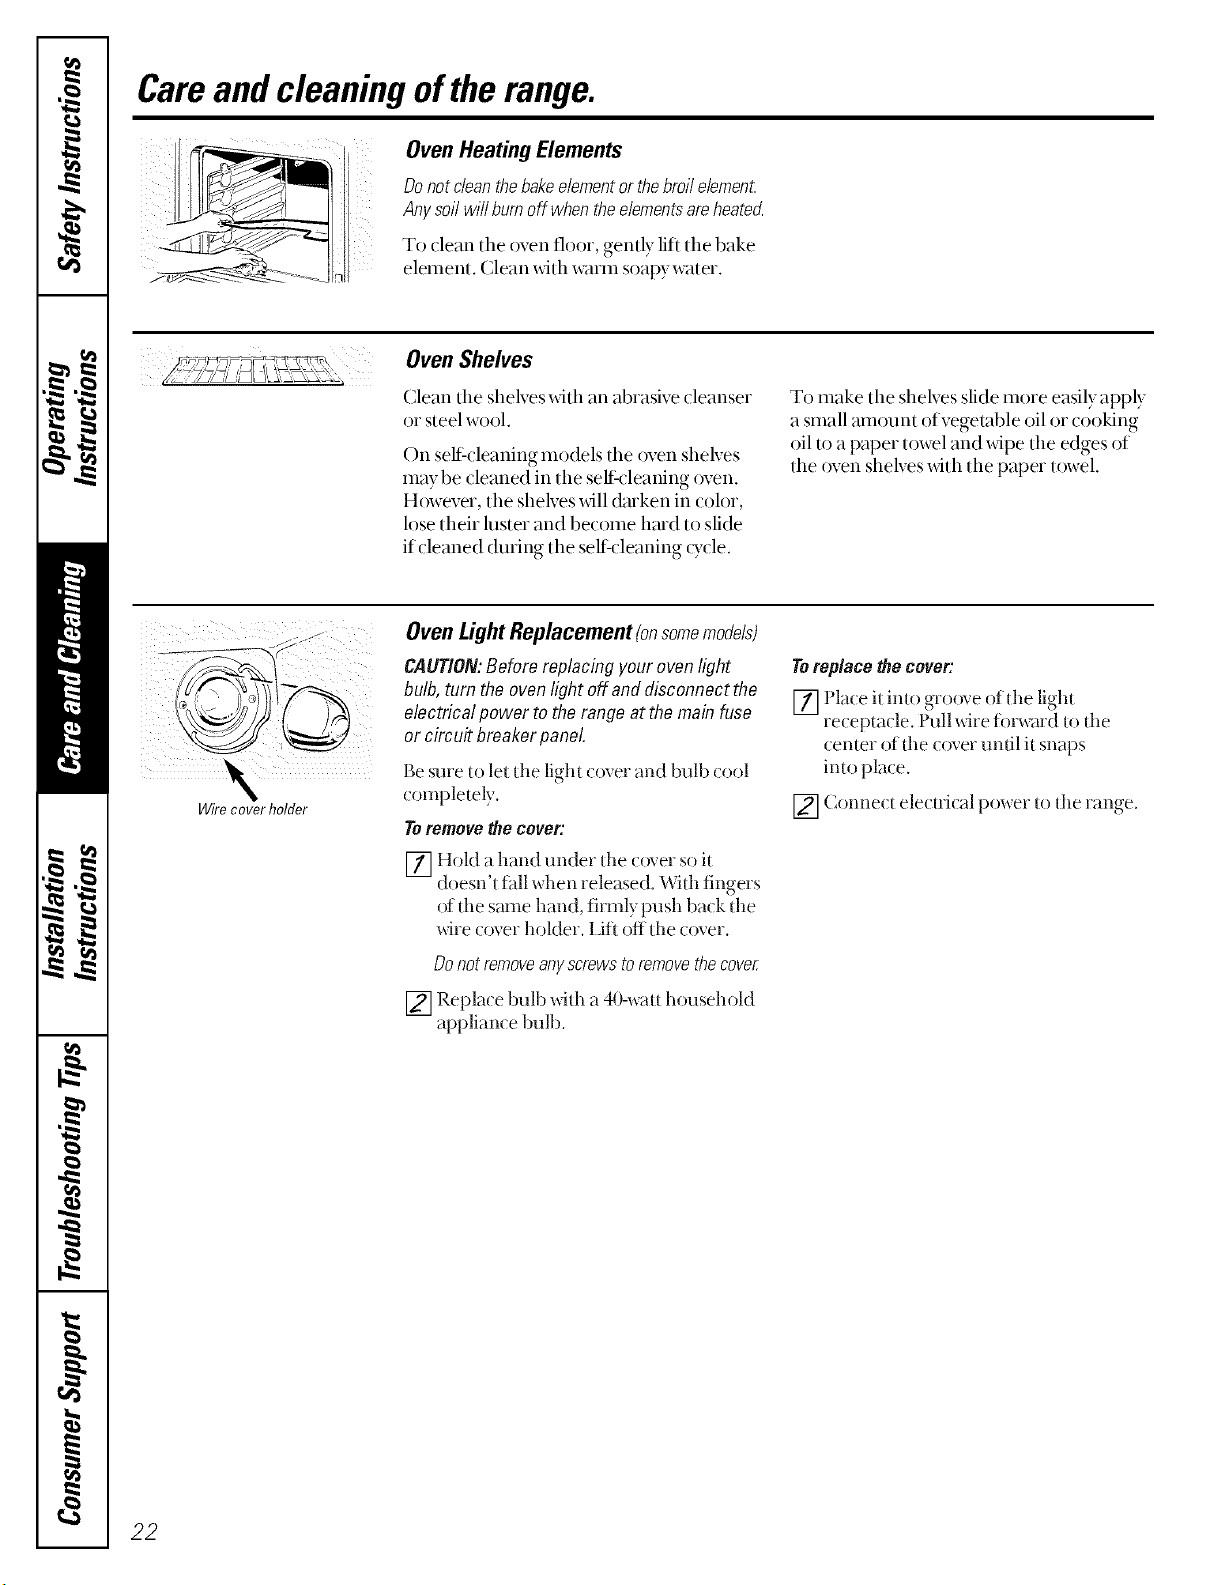
OvenLightReplacement(onsomemodels)
CAUTION:Before replacingyourovenlight
bulb,turn theovenlightoff and disconnectthe
electricalpower tothe rangeat themainfuse
or circuit breakerpaneL
Be sure to let tim light cover and bulb cool
completely.
Toremovethecover:
[7_ Hold a hand under the (over soil
doesn't tidl xdmn released. \.Vflhlingers
of d*e same hand, tim@ push back d*e
wire c()ver bolder. IJfl off dm c()ver.
Donotremoveanyscrewstoremovethecover
[] Repla( e bulb with a 40-wail household
applian( e bulb.
Toreplacethecover:
[] I'la(e ii into groove of the lighi
re(epta(:le. Pull wire forward to the
center of the (()vet undl ii snaps
imo place.
[] Conne( I elecui( al power io il,e range.
22
wvvw.GEAppliances.com
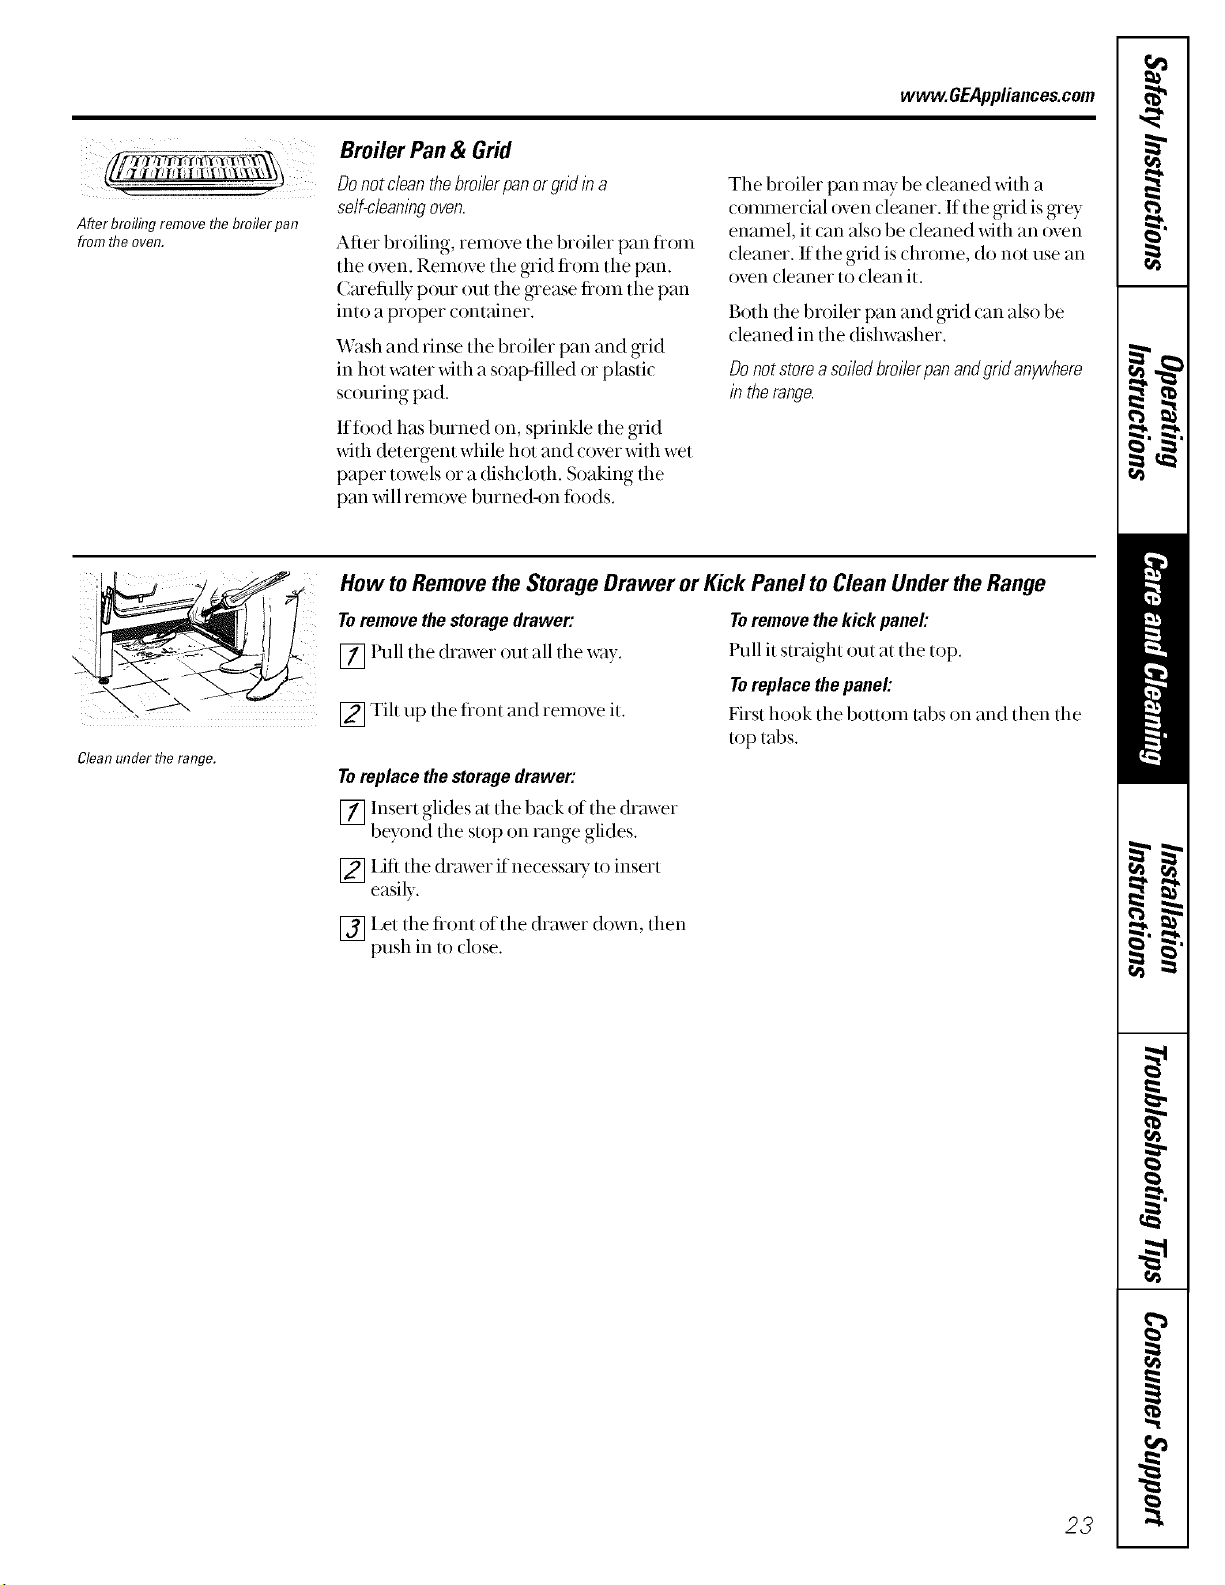
After broilingremove flTebroiler pan
from flTeoven.
Broiler Pan& Grid
Do not clean thebroiler pan or grid/# a
self-clean/#goven.
After broiling, rem{)ve the broiler pan flom
the oven. Remove tile grid fiom tile pan.
Cmefiflly pc)ur out the grease fiom the pan
into a proper container.
Wash and rinse the broiler pan and grid
in hot water with a soap-filled or plastic
scouring pad.
lffi)od has burned on, sprinkle the grid
with detergent while hot and o)ver with wet
paper towels or a dishcloth. Soaking the
pan will rem()ve burned-on fi)ods.
The broiler pan may be cleaned with a
commercial oven cleaner. If the grid is grey
enamel, it can also be cleaned with an oven
cleaner. If the grid is chrome, do not use an
oven cleaner to clean it.
Both the broiler pan and grid can also be
(leaned in the dishwasher.
Donotstorea soiledbroilerpanandgndanywhere
in therange.
Clean under flTerange.
How to Remove the Storage Drawer or Kick Panel to Clean Under the Range
Toremove the storage drawer:
[] Pull the drawer out all the way.
[] Tilt up the flont and remove it.
Toreplacethestoragedrawer:
[]Insert glides at the back of the drawer
beyon'd the stop on range glides.
[] I,ifi the drawer if necessat Tto insert
easily.
[] Let the fiont of the drawer down, then
push in to close.
Toremove the kick panek
l'ull it straight out at the top.
Toreplace the panel:
First hook the bottom tabs on and then the
top tabs.
23
Careand cleaning ofthe range.
PorcelainEnamelCooktop(onsomemodels)
The porcelain enmnel finish issturdy
but brealctble ifmisused. This finish is
add-resistant. H_)wever, any addic ti)ods
spilled (such as fi_uitjuices, tomato or
xinegm) shouM not be permitted to remain
on the finish.
If adds spill on the cooklop while it is hot,
use a &T paper towel or cloth to wipe it up
right away. When the surlace has cooled,
wash with soap and water. Rinse well.
For other spills sudl as fat spaUerings, wash
xdfll soap and water or cleansing powders
after the suffa(e has (ooled. Rinse well.
Polish _dth a dIT ch)th.
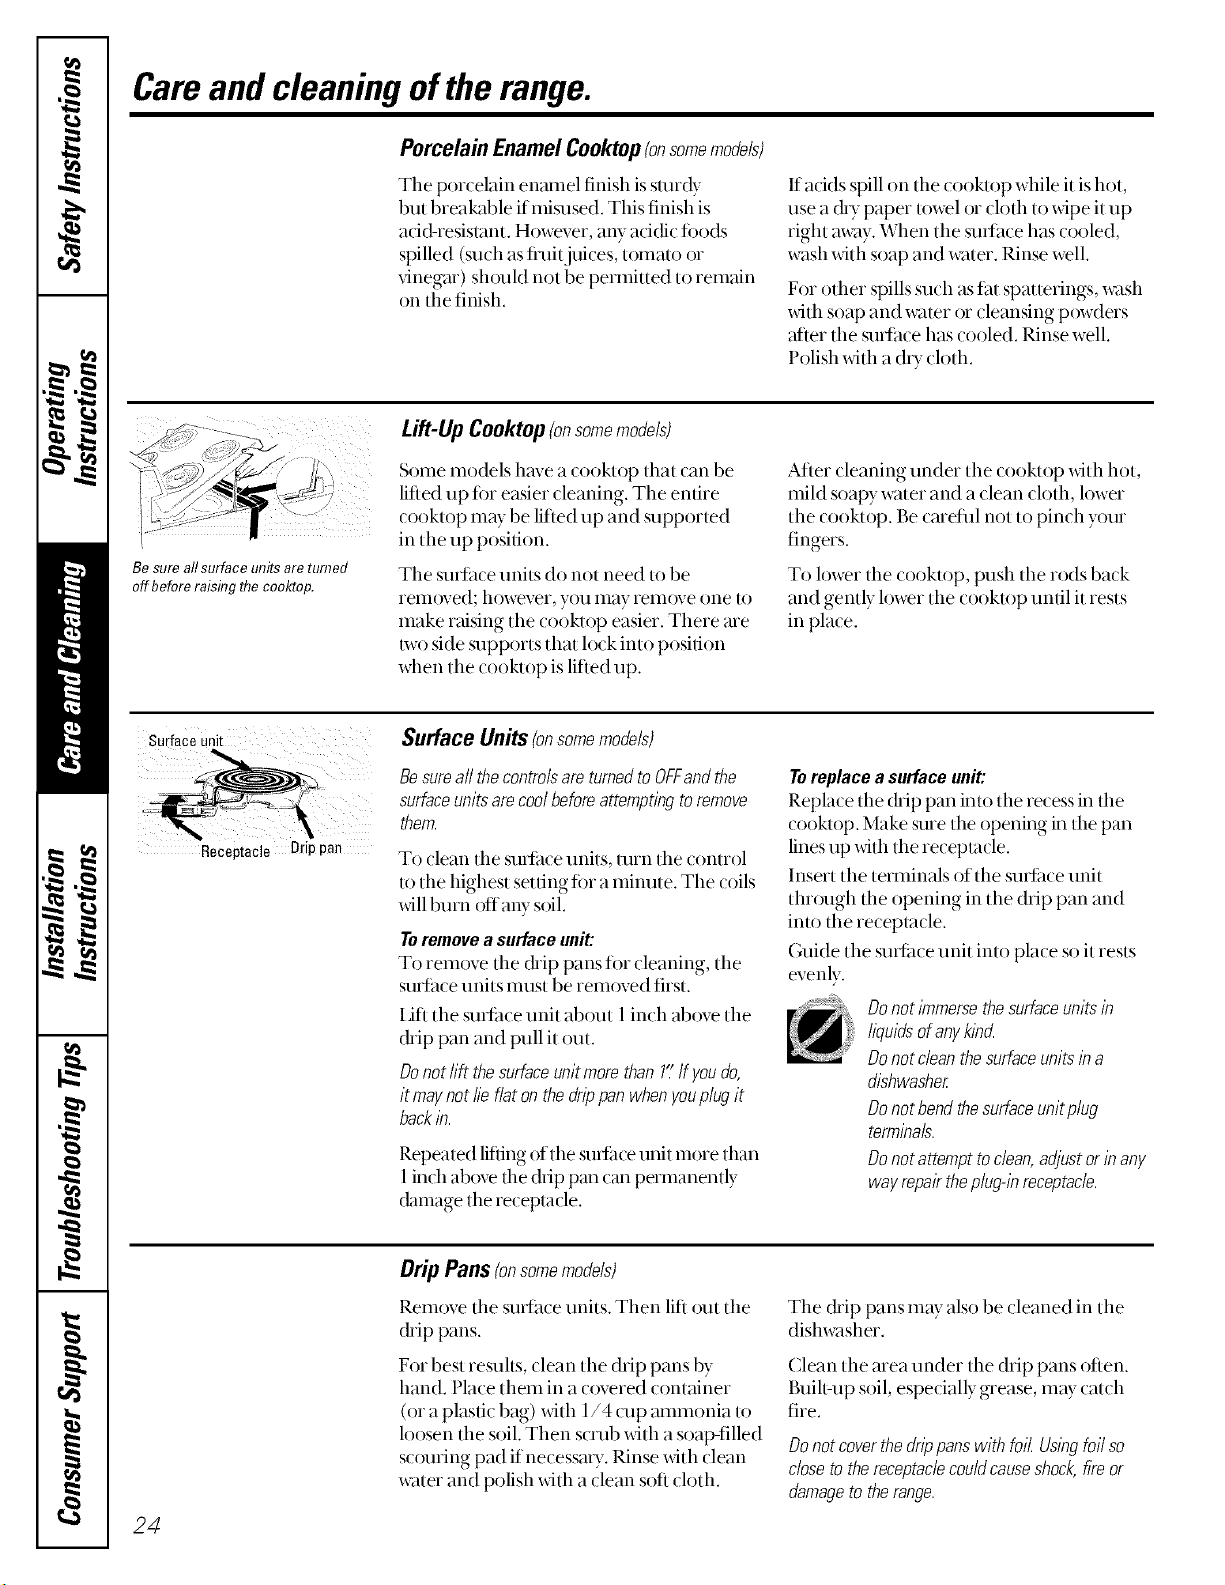
/
Be sure all surface units are turned
off before raising flTe eoold:op.
Lift-UpCooktop(onsomemodels)
Some models have a cooktop that can be
lifted up ti)r easier cleaning. The entire
cooktop may be lifted up and supported
in the up position.
The surlhce units do not need m be
ieln{)ved; however, y{)u Inay ieln{)ve one to
inake raising the cooktop easier. There are
two side supports that lock into position
when the cooktop is lifted up.
After cleaning under the cooktop with hot,
mild soap) water and a clean cloth, lower
the cooktop. Be cmetifl not to pinch your
fingers.
To lower the cooktop, push the rods back
and gently lower the cooktop until it rests
in pla_e.
Surface unit
Receptacle Drippan
Surface Units(onsomemodels)
Besureall the controlsare turnedto OFFandthe
surfaceunits arecool beforeattempt/np to remove
them.
To clean the surlitce ui]its, tuin the control
to the highest setting fi)r a minute. The coils
xdllburn offany soil.
Toremovea surfaceunit:
To remove the &ip pansfi)r deaning, the
surLtce units inust be ieln{)ved first.
lift the surlilce unit about 1 inch above the
chip pan and pull it out.
Donothfi thesurfaceunitmorethan17If youdo,
it maynot/ieflatonthedrippanwhenyoup/upit
backlb.
Repeated lifting of the SUli_lceunit more than
I inch above the (hip pan (an permanently
(btmage the receptacle.
D replacea surface unit:
Replace the chip pan into the recess in the
cooktop. Make sure the opening in the pan
lines up with the receptacle.
Insext the texininals of the sufiilce unit
tlm)ugh the opening in the drip pan and
into the receptacle.
Guide the surtitce unit into place so it rests
evenly.
Donotimmersethesurfaceunitsin
liquidsofanykind
Donotc/eanthesurfaceunitsina
dishwasher
Donotbendthesurfaceunitplug
terminals.
Donotattempttodean,adjustorinany
wayrepairthep/up-inreceptacle.
24
Drip Pans (onsomemodels)
Remove the surface units. Then lift out the
&ip pans.
For best results, clean the drip pans by
hand. Place theln in a o)vered container
(or a plasdc bag) with 1/4 cup mnmonia to
lo_)sen the soil. Then scrub with a soap-filled
sc{nning pad if necessmy. Rinse with clean
water and polish with a clean soft cloth.
The (hip pans may also be cleaned in the
dishwasher.
Clean the area under the drip pans often.
Built,up soil, especially grease, may catch
fire.
Donot coverthe drippans with foit Us/bgfall so
close to the receptaclecouldcauseshock, fire or
damageto the range.
www.GEAppliances.com
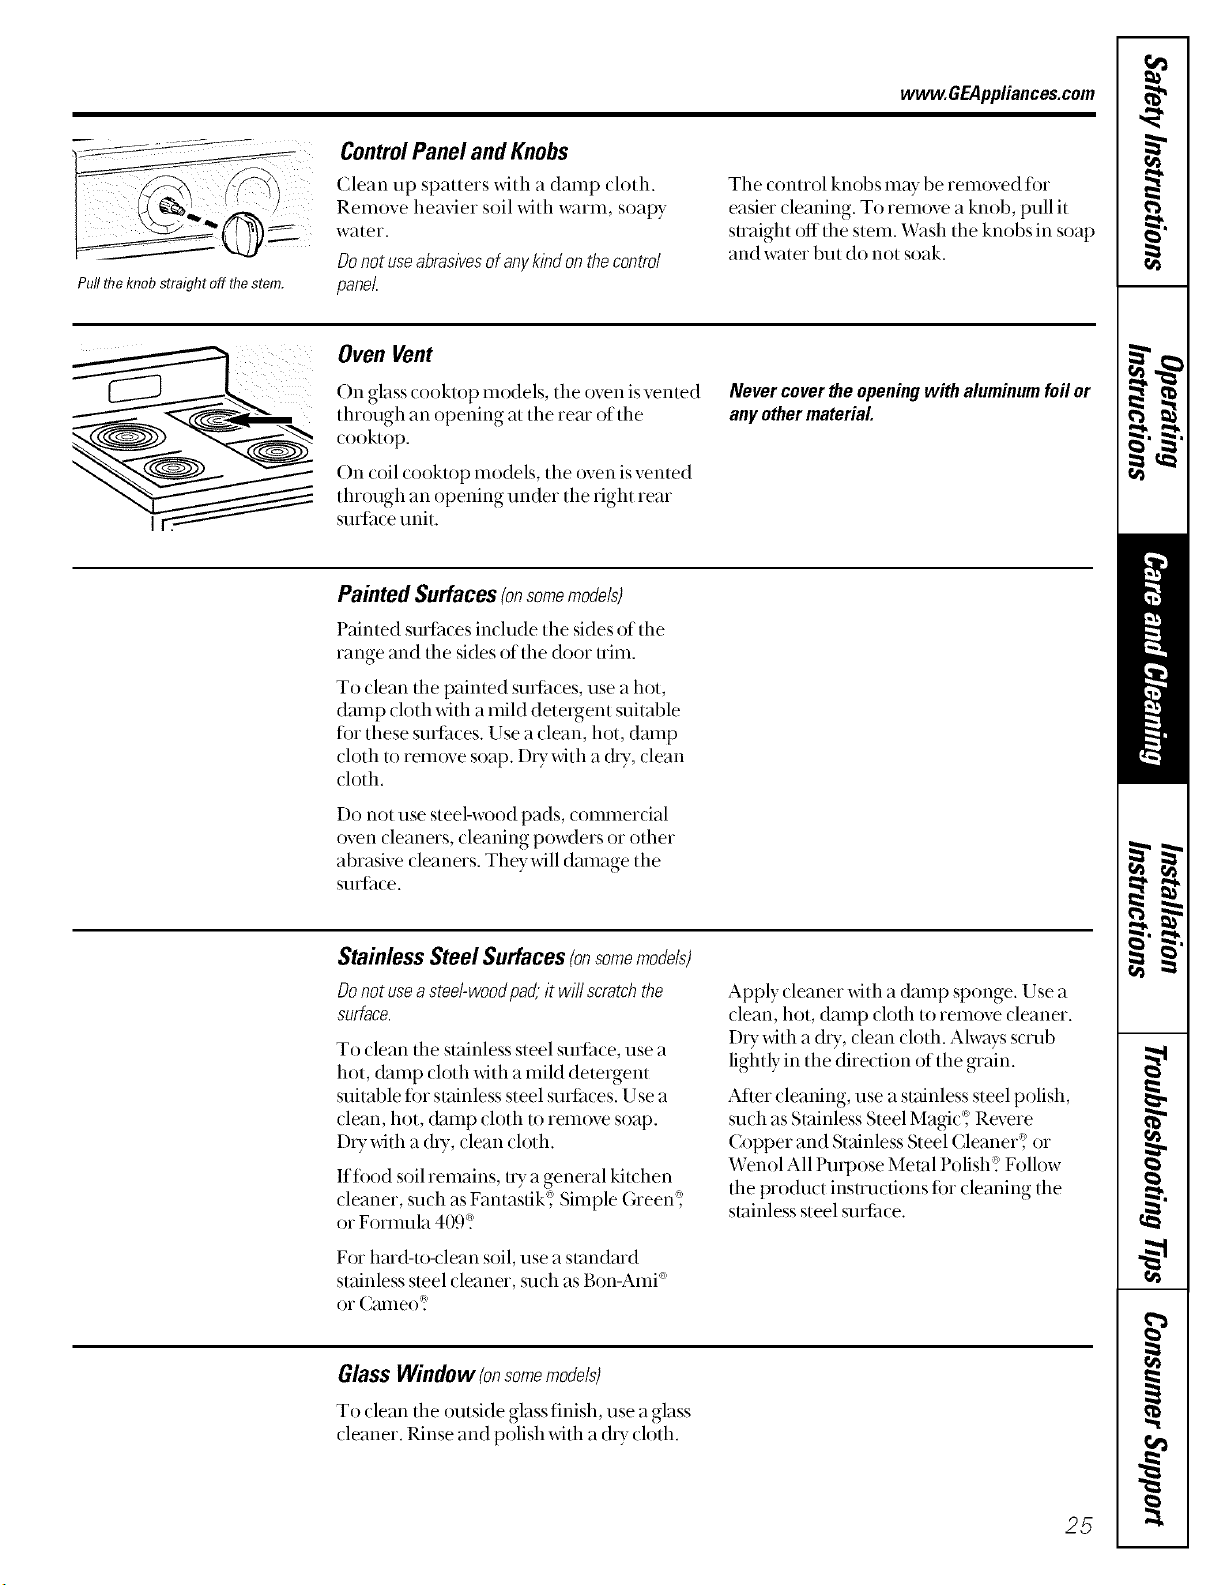
Pulltheknobstraightoffthestem.
ControlPanel and Knobs
Clean up spatters _dth a damp (loth.
Remove heavier soil with warm, soapy
water.
Donotuseabrasivesofanykindonthecentre/
panel.
Tile control knobs may be rem{)ved ti)r
easier cleaning. To remove a knob, pull it
suaight off the stem. Wash the knobs in soap
and water but do not soak.
Oven Vent
On glass cooklop models, tile oven is vented
through an opening at the rear of the
cookmp.
On coil cooktop models, the oven is vented
through an opening under the fight rear
sudime unit.
Nevercovertheopeningwith aluminumfoilor
anyothermaterial
Painted Surfaces(onsomemodels)
Painted sudhces include tile sides of the
range and the sides of the door uim.
To clean the painted suditces, use a hot,
dmnp cloth with a mild detergent suitable
fi)r these sudilces. Use a clean, hot, dmnp
cloth to rem_)ve soap. DU with a city,clean
cloth.
Do not use steel-wood pads, commercial
oven cleaners, cleaning powders or other
abrasive cleaners. They will dmnage the
sudhce.
Stainless Steel Surfaces(onsomemodels)
Donotusea stee/-woodpad,it wii/scratchthe
surface.
To clean the stainless steel sudilce, use a
hot, damp cloth with a mild detergent
suitable fi)r s/ainless steel surlaces. Use a
clean, hot, damp cloth to remove soap.
DU with a d U, clean cloth.
lftbod soil remains, uy a general kiwhen
cleaner, such as FantasfiU; Simple Green';
or Fommla 4()9<';
For hmd-to-clean soil, use a standmd
stainless steel cleaner, such as Bon-Ami'
or Cmneo:_
Apply cleaner with a dmnp sponge. Use a
clean, hot, damp cloth to rem_)ve cleaner.
DU with a (ity, clean cloth. Always scrub
lightly in the direction of the grain.
Atier cleaning, use a s/ainless steel polish,
such as S/ainless Steel Magid_ Revere
Copper and Stainless Steel Cleaner';' or
Wenol All Propose Melal Polish:? Follow
the product inswucfions ti_r cleaning the
stainless steel suvlitce.
GlassWindow (onsomemodels)
To clean the outside glass tinish, use a glass
cleaner. Rinse and polish with a d U cloth.
25
Cleaningthe glasscooktop.
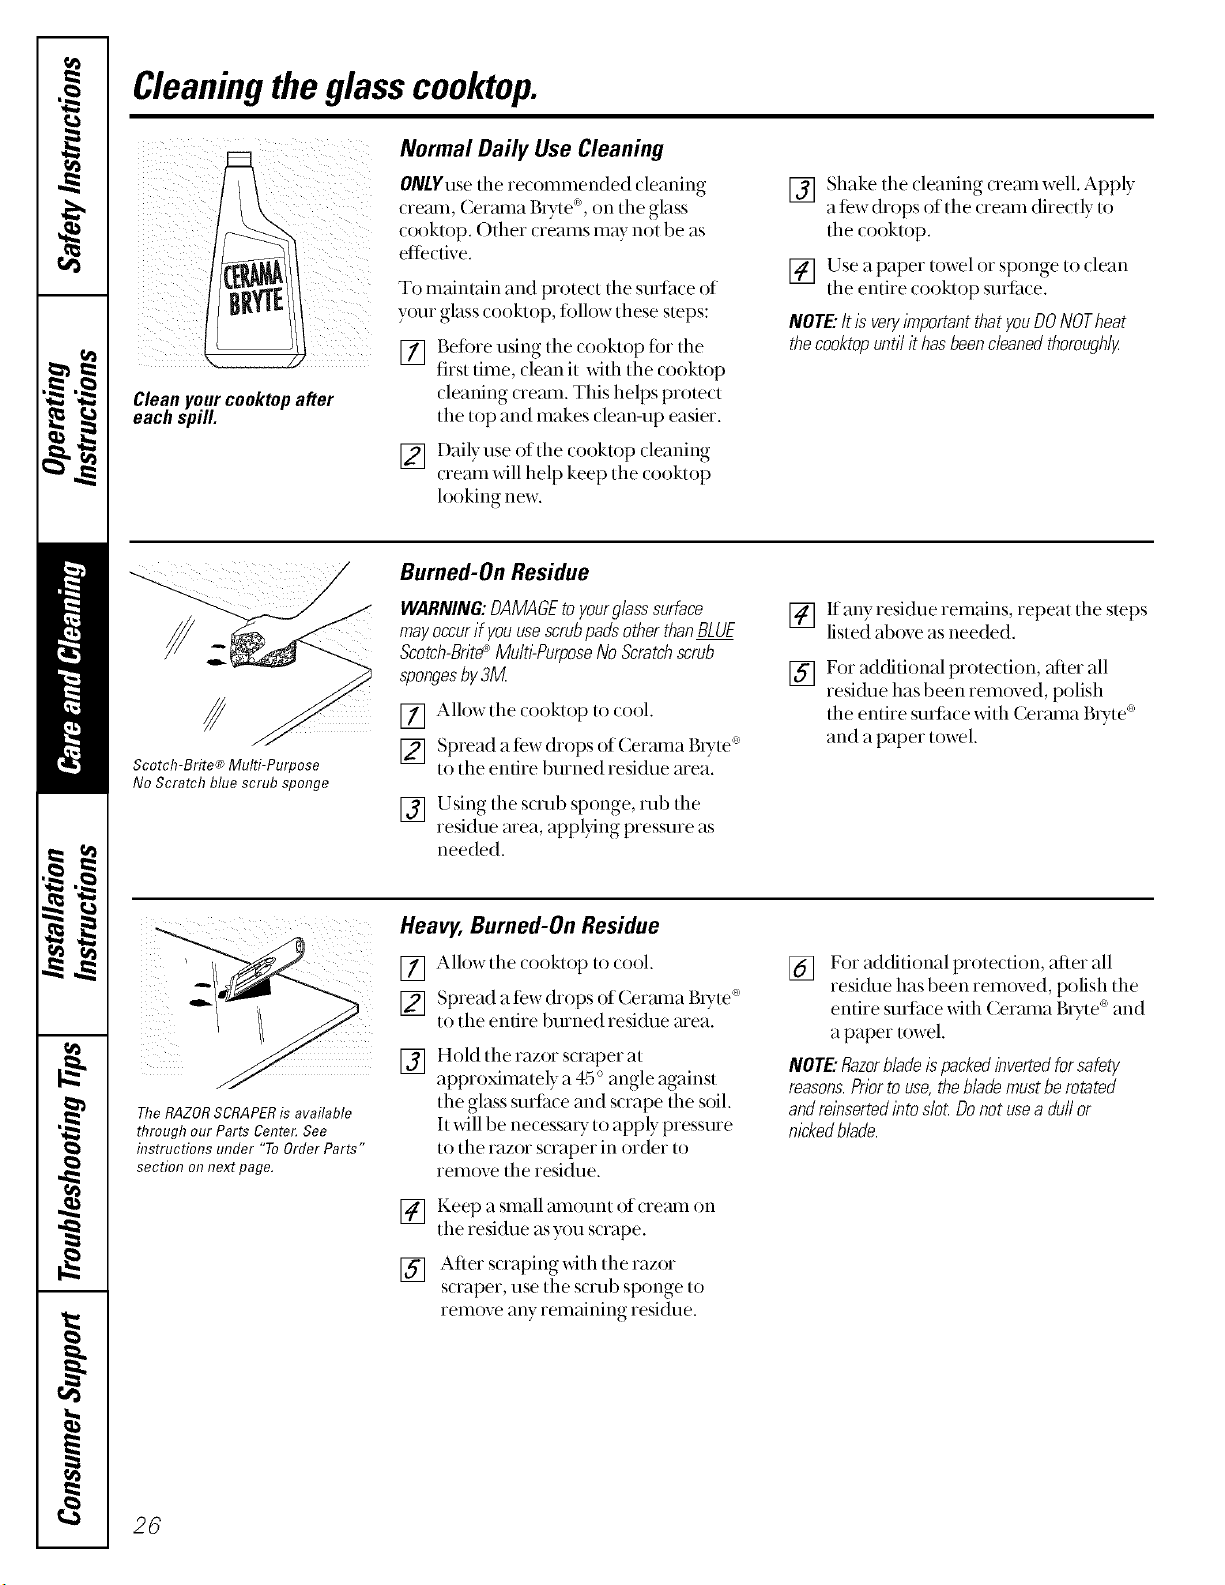
Cleanyourcooktepafter
eachspill.
Normal Daily Use Cleaning
ONLYusethe recommended cleaning
cream, Cerama Butd P, on tile glass
cooktop. Other creams may not be as
efl_'(tive.
To maintain and protect tile surface of
your glass cooktop, tollow tllese steps:
[] Before using tile cooktop for tile
first time, clean it xdth tile cooktop
cleaning creatn. This helps protect
tile top and makes clean-up easier.
[] Daily use of tile cooktop cleaning
cream xdll help keep the (ooktop
looking new.
[] Shake tile cleaning cream well. Apply
a few drops of tile (ream diredly to
tile cooktop.
[] Use a paper towel or sponge to clean
the entire cooktop surfhce.
NOTE:It isverylYnportantthatyouDONOTheat
thecooktopuntilit hasbeencleanedthoroughly
Scotch-Brite® Multi-Purpose
No Scratch blue scrub sponge
Burned-On Residue
WARNIN&DAMAGEtoyourglasssurface
mayoccurif youusescrubpadsotherthanBLUE
Scotch-Brite_Muitl:PurposeNoScratchscrub
spongesby3M
[] Allowtlle cooktop to cool.
[] Spread a few dr°ps °f (_erama BUtC:
to tile entire burned residue area.
[] Using tile scrub sponge, rub tile
residue area, appl)dng pressure as
needed.
[] If any residue remains, repeat the steps
listed above as needed.
[] For adcfitional protection, after all
residue has been removed, polish
tile entire surfh0e _dth Cerama Bute <P'
and a paper towel.
The RAZORSCRAPERis available
through our Parts Center.See
instructions under "ToOrder Parts"
section onnext page.
Heavy, Burned-On Residue
[] Allow tile (ooktop to (ool.
[] St-nead a few dr°ps °f Cerama BUte'P
to tile entire burned residue area.
[]
Hold tile razor scraper at
approximately a 45 ° angle against
the glass surface and scrape the soil.
It will be necessa U to apply pressure
to the razor scraper in order to
rem_)ve tile residue.
[]
[]
Keep a small amount of cream on
tile residue asyou s(rape.
After scraping xdth tile razor
scraper, use tile scrub sponge to
remove any remaining residue.
[]
For additional protection, after all
residue has been removed, polish the
entire smtace with Cerama Bute <"and
a paper towel.
NOTE."Razorbladeispackedinvertedforsafety
reasons.Priortouse,theblademustberotated
andreinsertedintoslot.Donotusea duffor
rockedblade.
26
Metal Marks and Scratches
[]
Be caretnl not to slide pots and pails
aooss y()m cooklop. It _dll leave metal
markings oil tile cooklop surlilce.
These tamks me removable using
the cleaning cretan xfith a scrub
sponge and/or razor scraper.
[]
If pots with a thin overlay ofahmfinum
or copper are allowed u) boil (hy, the
overlay may leave black discoloration
on the cooktop.
This should be rem()ved immecfiately
befi)re heating again or the
discoloration may be permanent,
WARNING'.Carefullycheckthebottomofpansfor
roughnessthatwouldscratchthecooktop.
CooktopSeal
To clean tile cooktop seal around tile edges
of tile glass, lay a wet cloth on it fi)r a tew
minutes, then wipe clean with nonabrasive
cleaners.
Glasssurface - potential forpermanent damage.
Our testing shows that if
you are cooking high sugar
mixtures such as jelly or
fudge and have a spillover,
it can cause permanent
damage to the glass surface
unless the spillover is
immediately removed.
Damage from Sugary Spills and Melted Plastic
] Ttn.n offall stn_lh( e traits. Remove
hot pans.
[] Wearing an oven mitt:
a. Use tile r_.or scraper to move tile
spill to a cool area on the cooktop.
b. Remove tile spill with paper towels.
[] Any rem_fining spillover should be left
until tile surface of tile cooktop has
cooled.
[] Don't use tile surface units again until
all of the residue has been completely
reliloved.
NOTE."If pitting or indentationin theg/ass surface
hasalready occurred,thecooktopglass will haveto
be replaced Inthis case,servicewill be necessan/
To Order Parts
To order Ceratlla thTte _''creatll and the
razor scraper, please call our toll-flee
nllillber:
NationalParts Center 800-626-2002.
CeramaBryte®Cream ....... # WXIOX300
RazorScraper ............. # WX5X1614
Kit ...................... # WB64XS027
(Kitincludescreamandrazorscraper)
27
InstallationInstructions.
Read theseinstructionscompletely and carefully.
BEFOREYOUBEGIN
IMPORTANT Save these instructions for the local
electrical inspector's use.
IMPORTANT OBSERVEALL GOVERNINGCODES
AND ORDINANCES.
NOTE TOINSTALLER:Leave these instructions with
the appliance after installation is completed.
NOTE TOCONSUMER:Keep this Owner's Manual
and Installation Instructions for future use.
NOTE."This appliance must be properly grounded.
TOOLSYOUWILLNEED
i:yPhillips s_rewdriver
i_:l/4" hex head nutdriver
>_(_hannel lo(k pliers
_i 3/16" open-end or socket x_¢ench
i_yOpen-end or ac!justable _ench
>_Tape measure
ELECTRICALREOUIREMENTS
CAUTION,FORPERSONALSAFE_."DO NOT USE
AN EXTENSION CORDWITH THISAPPLIANCE.
REMOVE HOUSEFUSEOROPENCIRCUIT
BREAKERBEFOREBEGINNING INSTALLATION.
This appliance must be supplied with the proper
voltage and flequen( T, and connected to an
indivi(hml, properly grounded b_tnch drcuit,
protected by a circuit breaker or time del Wfi]se,
as noted on the rating plate.
W/kingmust conform toNational ElectricCodes.
If the elecuic service provided does not meet the
above specifications, have a licensed electrician
install an approved outlet.
Because range terminals are not accessible after
range is in position, flexible sep&e (on(hilt or (ord
must be used.
28
Read theseinstructionscompletely and carefully.
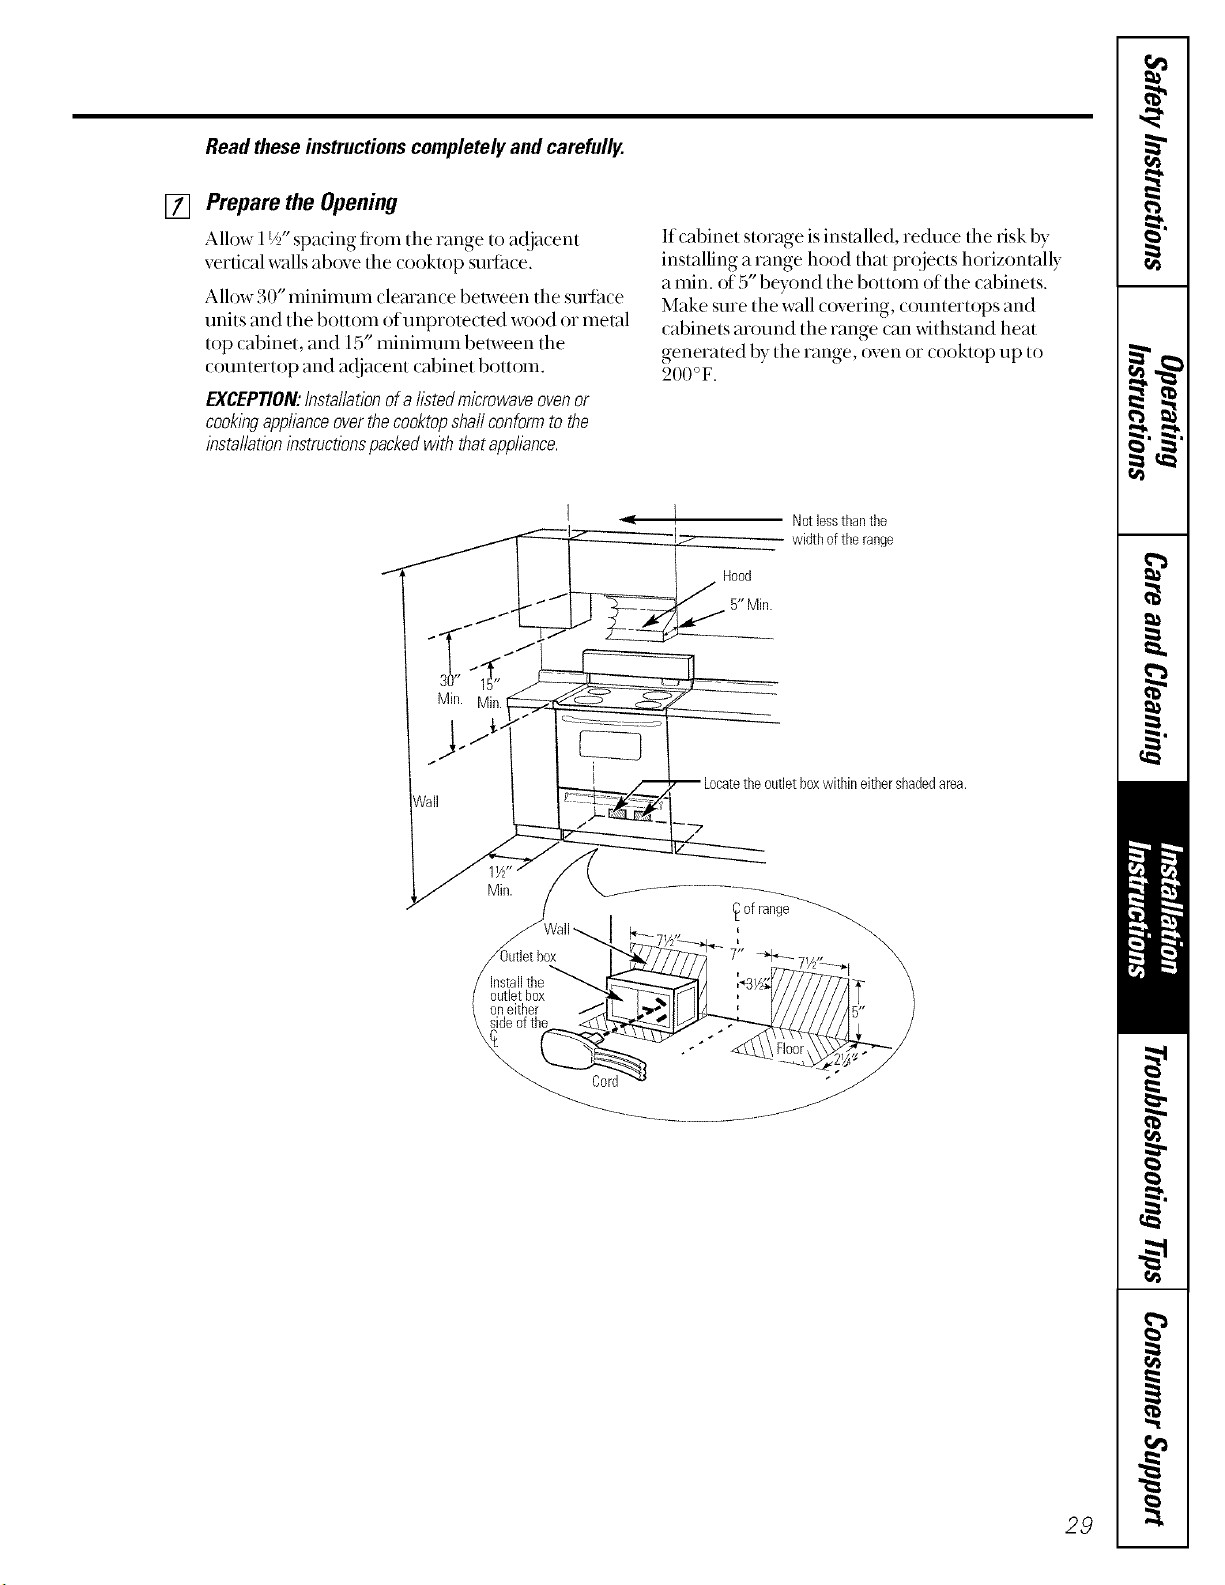
[] Preparethe Opening
Allow ' ....
1/-, spa(u_g hom the range to a_%cent
vertical walls above the cooktop surface.
Allow 30" minimum cle_uance between the surlace
units and the bottom of unprotected wood or metal
top cabinet, and 15" mininmm between the
countertop and ac!jacent cabinet bottom.
EXCEPTION:Installation of a //stedm/crowaveovenor
cookbg applianceoverthe cooktopshallconform to the
installation/nstrucflonspackedwith that appliance.
If cabinet storage is installed, reduce the risk by
installing a range hood that projects horizontally
a inin. of 5" beyt md the bottom of the cabinets.
Make sure the wall covering, ct)untertops and
cabinets art)und the range can withstand heat
generamd by the range, oven or cooktop up to
200°F.
Hood
5" Min.
Notlessthanthe
width oftile range
29
InstallationInstructions.
[]
Read theseinstructionscompletelyand carefully.
FlooringUnder theRange
Yourrange,likemanyother householditems, isheavyand
cansettle into soft floorcoveringssuchascushionedvinyl
or carpeting
When m{Mng tile range on this bpe of flooring,
it should be installed on a 1/4" thick sheet of
pl}wood (or similar material) as tollows:
When the floor covering ends at the flont of the
range, the area that the range will rest on should be
buih up _dth pl}wood to the stone level or higher
than the floor c_)vering. This vdll allow the range to
be m_)ved tot cleaning or servicing.
Prepare for Electrical Connection
Effective January 1,1996 the National Electric
Code requires that new construction (not
existing) utilize a 4-conductor connection to
an electric range.
When installing an electric range in new
construction follow Steps 3 and 5 for 4-wire
connection.
Use only a 3-con&_ctor or a 4-conductor UI,-listed
range cord. These cords may be pr{Mded with ring
temfinals on wire and a suain relief device.
A range cord rated at 40 amps xdth 125/250
minimum volt range is required. A 50 amp range
cord is not recommended but if used, it should be
mmked tot use _dth nominal l_!/s"dimneter
connection openings. Care should be token m
center the cable and strain relief within the
knockout hole to keep the edge fiom dmnaging the
cable.
NOTE."A 4-conductorcordistobeusedwhentheapplianceis
installedina mobilehomeor whenlocalcodesdonotpermit
groundingthroughtheneutralIfconduitisbeingused,go to
Step6orZ
30
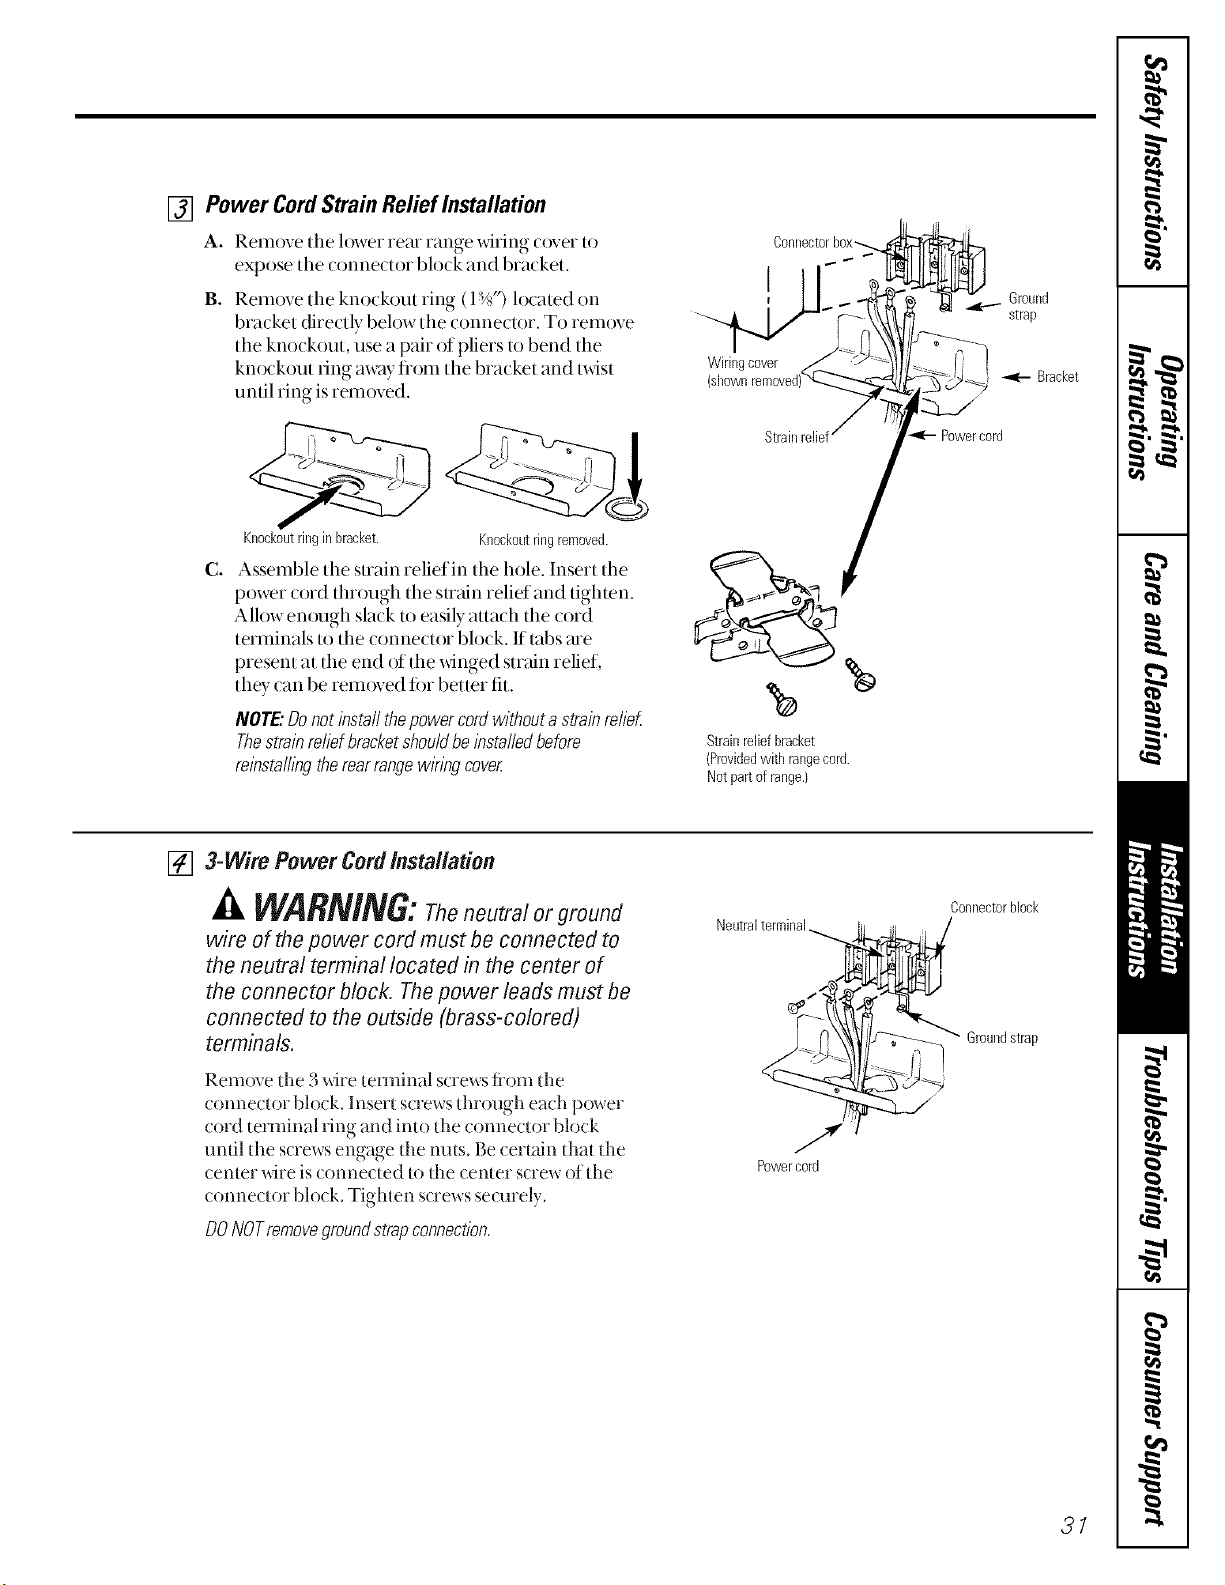
[] Power Cord Strain Relief Installation
A. Rei_love the lower rear range _iring (over to
expose the (onne(tor blo(k and bra(ket.
B°
Rem()ve the knockout ring (l _!/s")located on
bracket directly beh)w the connector. To remove
the knockout, use a pair of pliers/o bend the
knockout ring away flom the bracket and twist
until ring is rem{)ved.
Wiringcover
(sllown
Ground
strap
_e- Bracket
Powercord
C°
Knockoutringinbracket. Knockoutringremoved.
Assemble the suain relief in the hole. Insert the
power cord through the suain relief and tigh/en.
Allow era)ugh slack to easily attach the cord
terminals m the connector block. If robs me
present at the end of the winged strain relief,
they can be removed fi)r bettor fit.
NOTE:Donotinstallthepowercordwithouta strainrelief
Thestrainreliefbracketshouldbeinstalledbefore
rebsta//bgtherearrangewiringcover
Strainreliefbracket
(Providedwith rangecord.
Notpartof range.}
[] 3-Wire Power Cord installation
WARNING:theneutralorground
wire of the power cord must be connected to
the neutral terminal located in the center of
the connector block. Thepower leads must be
connected to the outside (brass-colored)
terminals.
Remt we ll_e 3 x_{retemfinal screws fiom the
connector blo( k. Insert screws through each power
cord terminal ring and into the connector block
until the screws engage the nms. Be certain tl_at dm
(enter wire is (onnected to [he center screw of [he
connedor blot k. Tiglnen s(rews securely.
DONOTremovegroundstrapconnection,
Neutral terminal
J
Powercord
Connectorblock
31
InstallationInstructions.
[]
Read theseinstructionscompletelyand carefully.
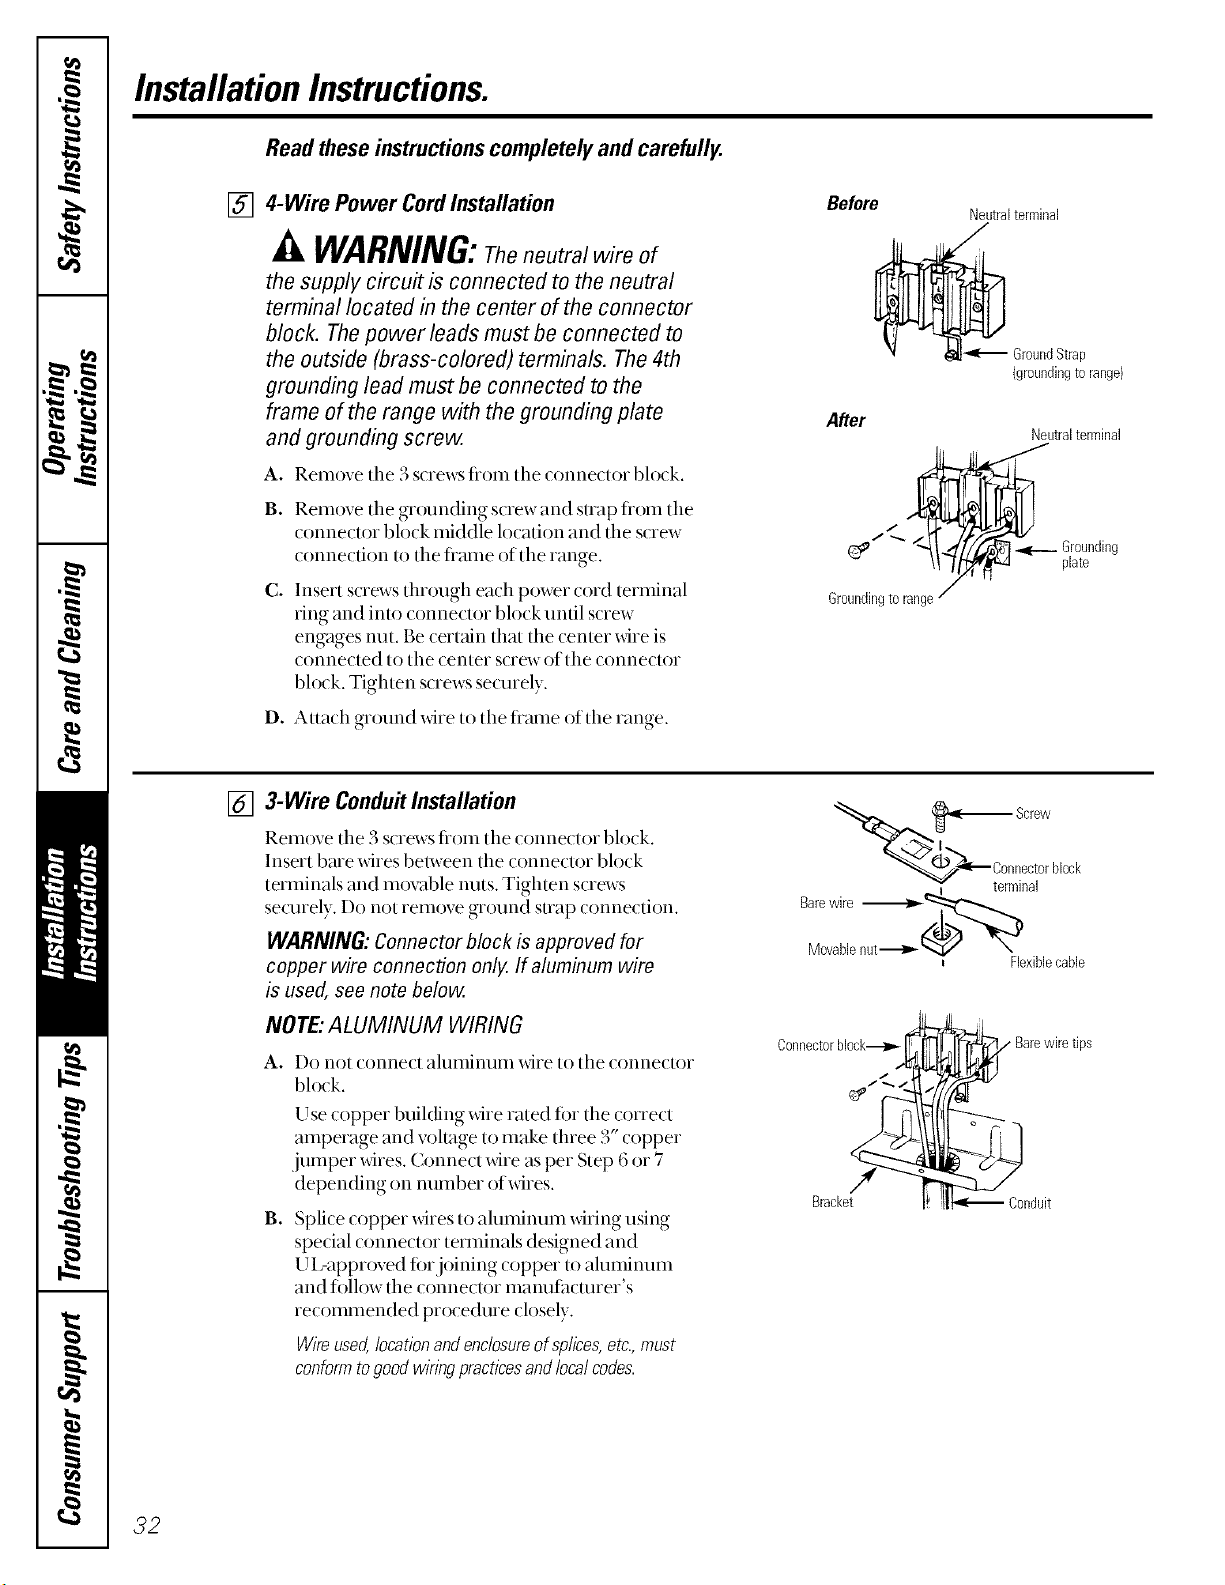
4-Wire Power Cord Installation
WARNING:Theneutralwireof
the supply circuit is connected to the neutral
terminal located in the center of the connector
block. Thepower leads must be connected to
the outside (brass-colored) terminals. The4th
grounding lead must be connected to the
frame of the range with the grounding plate
and grounding screw.
A. Renlove tile 3 screws tiom tile connector block.
B°
C°
Remove tile grounding screw and strap fiom tile
connector block iniddle location and tile screw
connection to tile fiame of the range.
Insert soews through each power cord teHninal
ring and into connector block until screw
engages nut. Be certain that the center wire is
connected to the center scI'ew ofthe connectoi
block. Tighten screws securely.
D. AttaOl ground xdre to tile fiame of the range.
Before
Neutralterminal
i
GroundStrap
(groundingto range)
After
Neutralterminal
'ra°'Uen '°O
Groundingto range"
[]
3-Wire Condu# Installation
Renl(we tile 3 so'ews fi'om tile connector block.
hlsert bare wires belween the connector block
terminals and movable ntlts. Tighten so'ews
securely. Do not remove ground suap connection.
WARNING: Connector block is approved for
copper wire connection only. If aluminum wire
is used, see note below.
NOTE:ALUMINUM WIRING
A°
B°
1)O not connect altllilinuiil wiie to tile conne(TU)i
block.
Use copper buikfing wire rated for tile correct
amperage and voltage to make three 3" copper
jumper wires. ( onnect wire as per Step 6or 7
depending on number ofxdres.
Splice copper wires to ahmlinum wMng using
special connector terminals designed and
UL-approved fi,rjoining copper to aluminum
and tbllow tile connector mamltimuner's
recommended procedure closely.
Wireused,locationandenclosureofsplices,etc.,must
conformtogoodwiringpracticesandlocalcodes.
"__ Screw
_°n'm'i_ctiorbl°ck
I
Barewire -_,-_,'*_
Movablenut'------_ _ _'_
Flexiblecable
/
Bracket
32
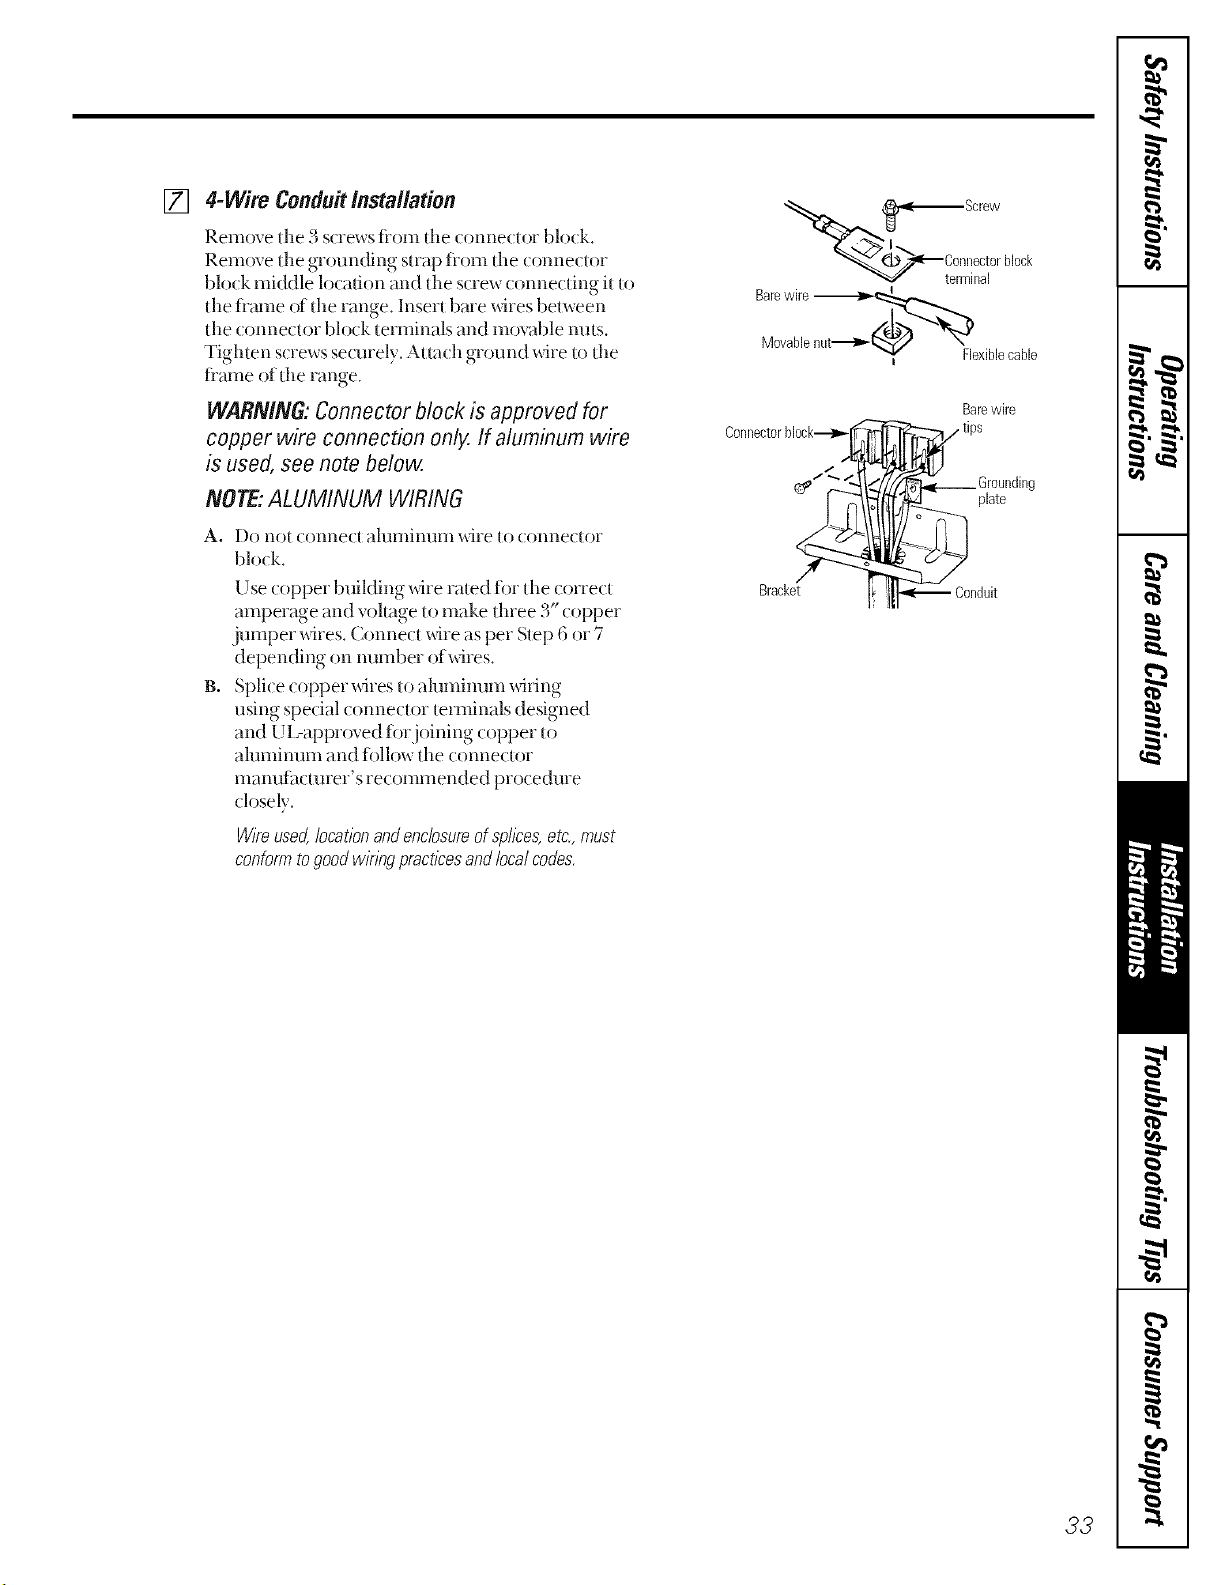
[]
4-Wire Conduitinstallation
Rem()ve the 3 s(rews fiom tile conne(tor blo(k.
Rein(we die grounding strap tiom the connector
block middle location and the screw connecting it to
tile timne of tile range. Insert bare whes between
tile connector block terminals and movable nuts.
Tighten screws securely. Attach ground wire to the
flame of tile range.
WARNIN& Connector block is approved for
copper wire connection only. If aluminum wire
is used, see note below.
NOTE:ALUMINUM WIRING
a.
B,
[)0 not (Olllle( [ allllIlinlllll wire to ( ollneclor
blot k.
Use copper building whe rated %i the correct
amperage and voltage 1omake three 3" copper
jumper _dres. Connect whe as per Step 6 or 7
depending on number of wires.
Splice copper _dres to ahmdnum _dring
using special ( onnector terminals designed
and UI 7appr_wed tbrjoining copper to
ahmdnum and tollow tile connector
mam_imturer's recommended pro( edure
closely.
VV/_eused,locationandenclosureofsplices,etc.,must
conformtogoodw/nngpracticesandlocalcodes.
t'_ _Screw
Barewire
MovablenLIt'_'_ \
Flexiblecable
I
Connectorblock----_,_I
Bracket
Barewire
tips
lrat°e" inO
I_ lip<'_ Conduit
33
InstallationInstructions.
Read theseinstructionscompletelyand carefully.
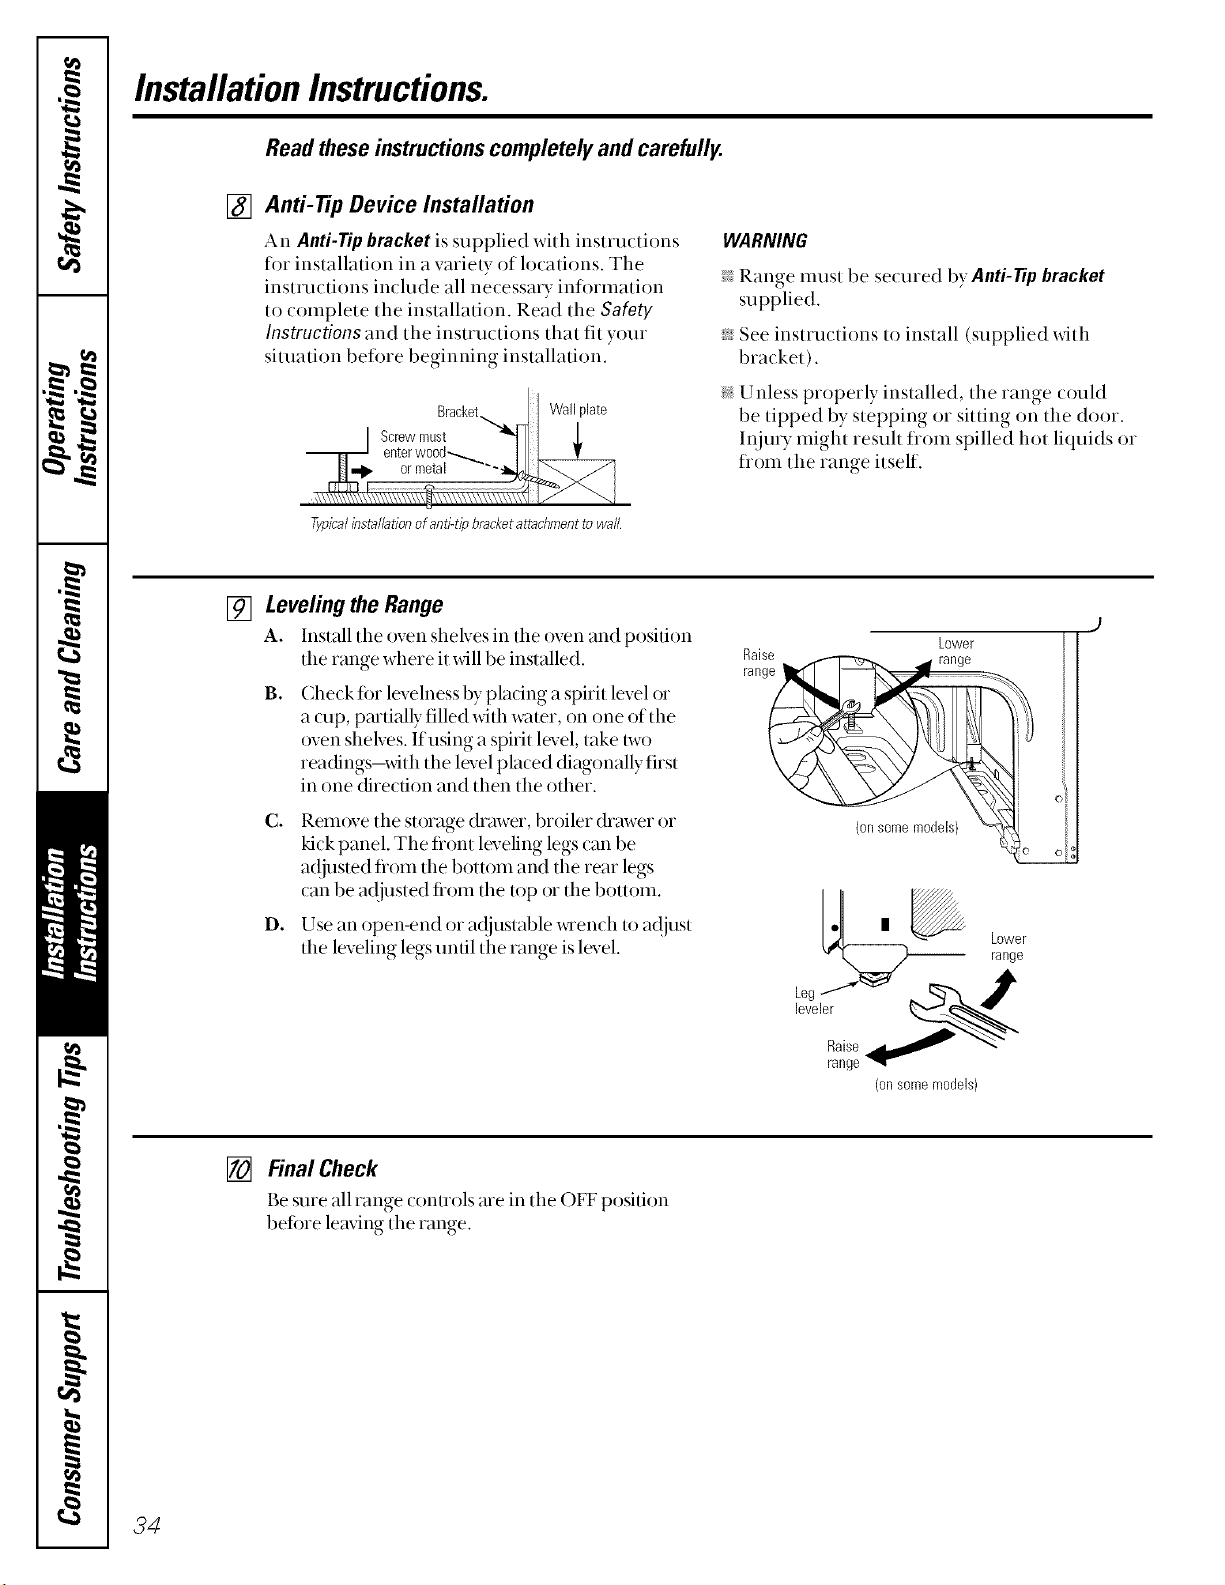
[] Anti-tip Device Installation
An Anti-Tipbracket is supplied with instructions
for installation in a varie b of locations. The
instructions include all necessa_ y inii)rmation
to complete the installation. Read the SafoW
Instructions and the instructions that fit your
situation befi)re beginning installation.
WARNING
Range must be secured by Anti-Tipbracket
supplied.
s_,See instructions to install (supplied xdth
brat ket ).
i_ Unless properly installed, the range could
be tipped by stepping or sitting on the door,
In jut y might resuh fiom spilled hot liquids or
flom the range itself,
Typicalinstallationofanti-tipbracketattachmentto wall
[] Leveling the Range
A. Install the oven shelves in the oven and position
the range where it xdll be installed.
B°
(heck ti)r levelness by pladng a spirit level or
a cup, pmtially filled with wztter, on one of the
oven shelves. Ifusing a spirit level, take/wo
readings-with the level placed diagonally first
in one (firedion and then the other.
C°
D°
Rem()ve the storage drawer, broiler drawer or
kick panel. The flont leveling legs can be
a(!justed flom the bottom and the rear legs
can be a(!justed fiom the top or the bottom.
Use an open-end or a(!iustable x_ench to at{lust
the leveling legs until the range is level,
Lower
Raise
(onsomemodels)
[] Final Check
Be sure all range (onuols are in the OFF position
belore leaving the range.
34
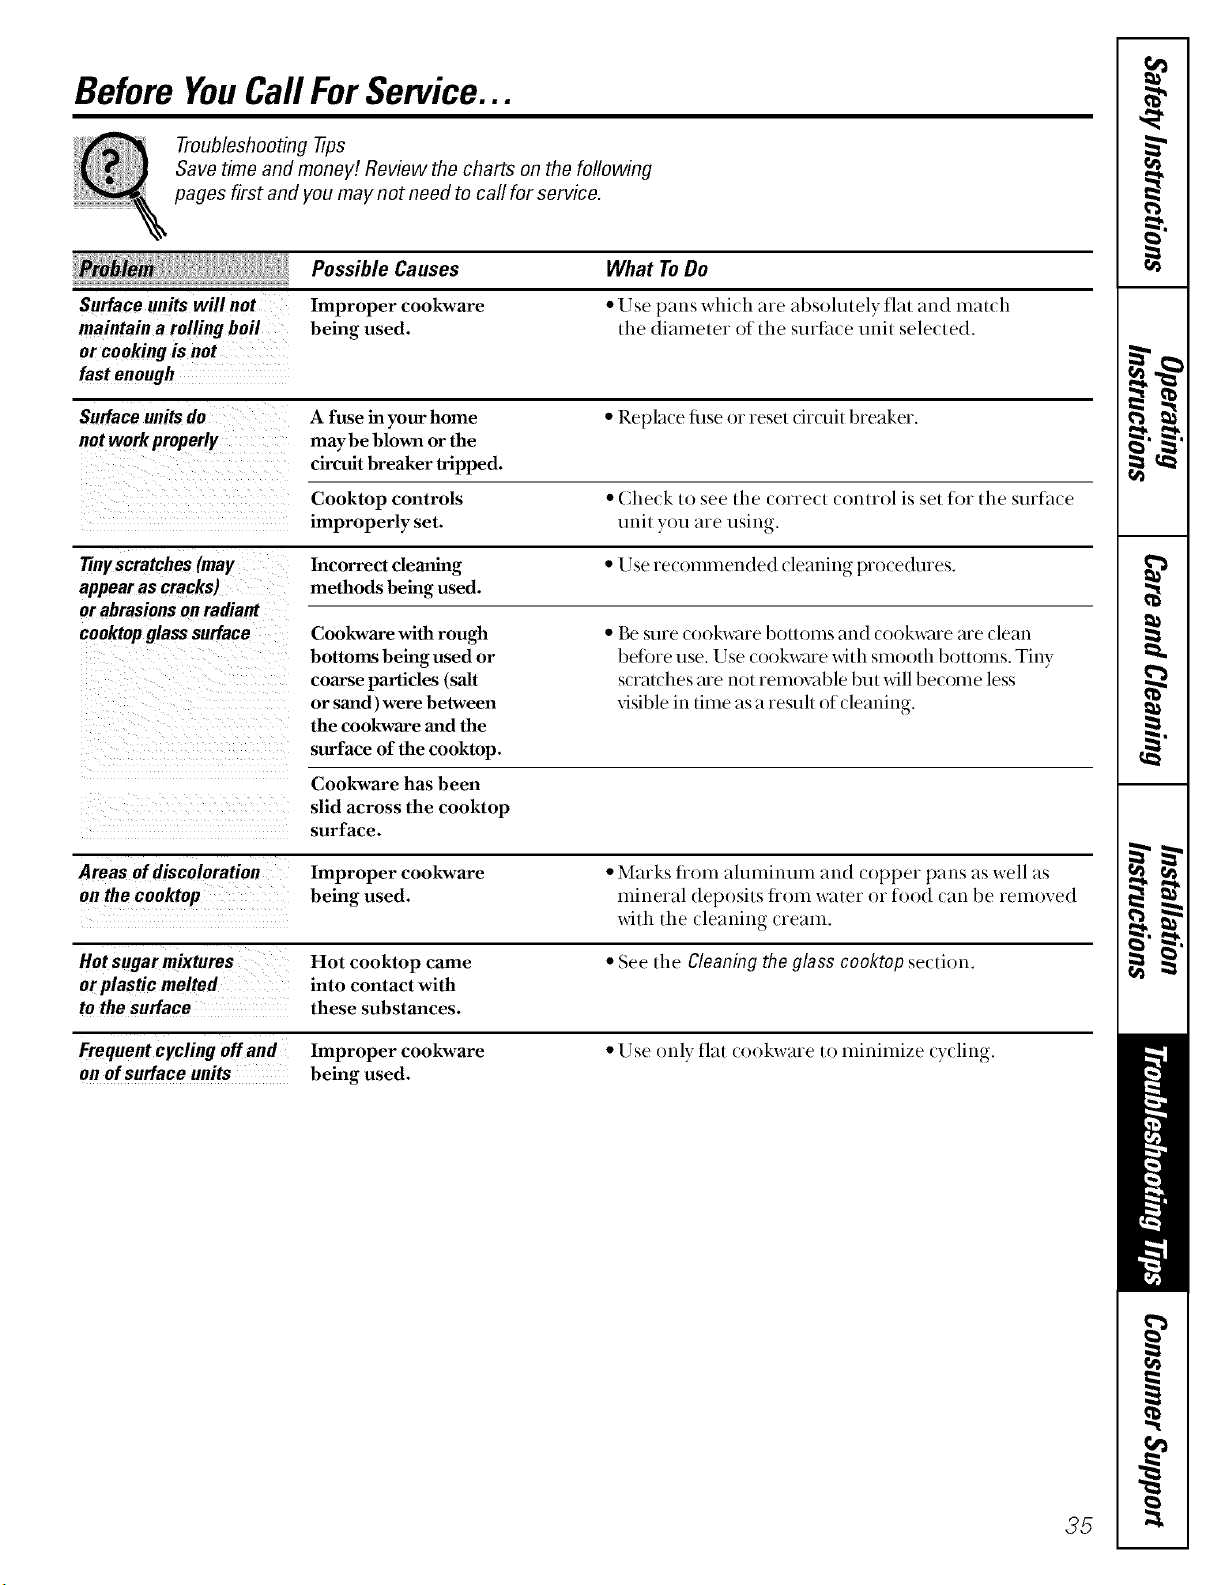
Before YouCallForService...
Troubleshooting tips
Save time and money! Review the charts on the following
pages first and you may not need to carl for service.
Surfaceunitswill not
maintaina rolling boil
or cookingis not
fast enough
Possible Causes
Improper cookware
being used.
What ToDo
• Use pans which are absolutely fiat and mat(h
tile diameter of tile surlitce unit selected.
Surface units do A fuse in your home • Replace filse o1 reset drcui/breaker.
notworkproperly may be blown or the
circuit breaker tripped.
Cooktop controls • Check to see tile correct comrol is set for tile smlhce
improperly set. trait you are using.
Tinyscratches (may Incorrect cleaning • Use recommended cleaning procedures.
appearas cracks; methods being used.
or abrasions onradiant
cooktop glass surface Cookware with rough
bottoms being used or
coarse particles (salt
or sand) were between
the cookware and the
surface of the cooktop.
• Be sure cookware bottoiils and cookware are clean
betore use. Use cookware _Jth smooth bottoms. Tiny
scratches are not rem()vable but will become less
visible in time as a remh of cleaning.
Cookware has been
slid across the cooktop
surface.
Areas of discoloration Improper cookware • Marks ti'om alumiuuln and copper pans its well its
on the cooktop being used. miueral deposits fl'om water o1 food can be removed
with the cleaning cream.
Hot sugar mixtures Hot cooktop came • See tile Cleaning the glass cooktop section.
or plastic melted into contact with
to the surface these substances.
Frequent cycling offand Improper cookware • Use only fiat cookware to milfimize (ycling.
on of surface units being used.
35
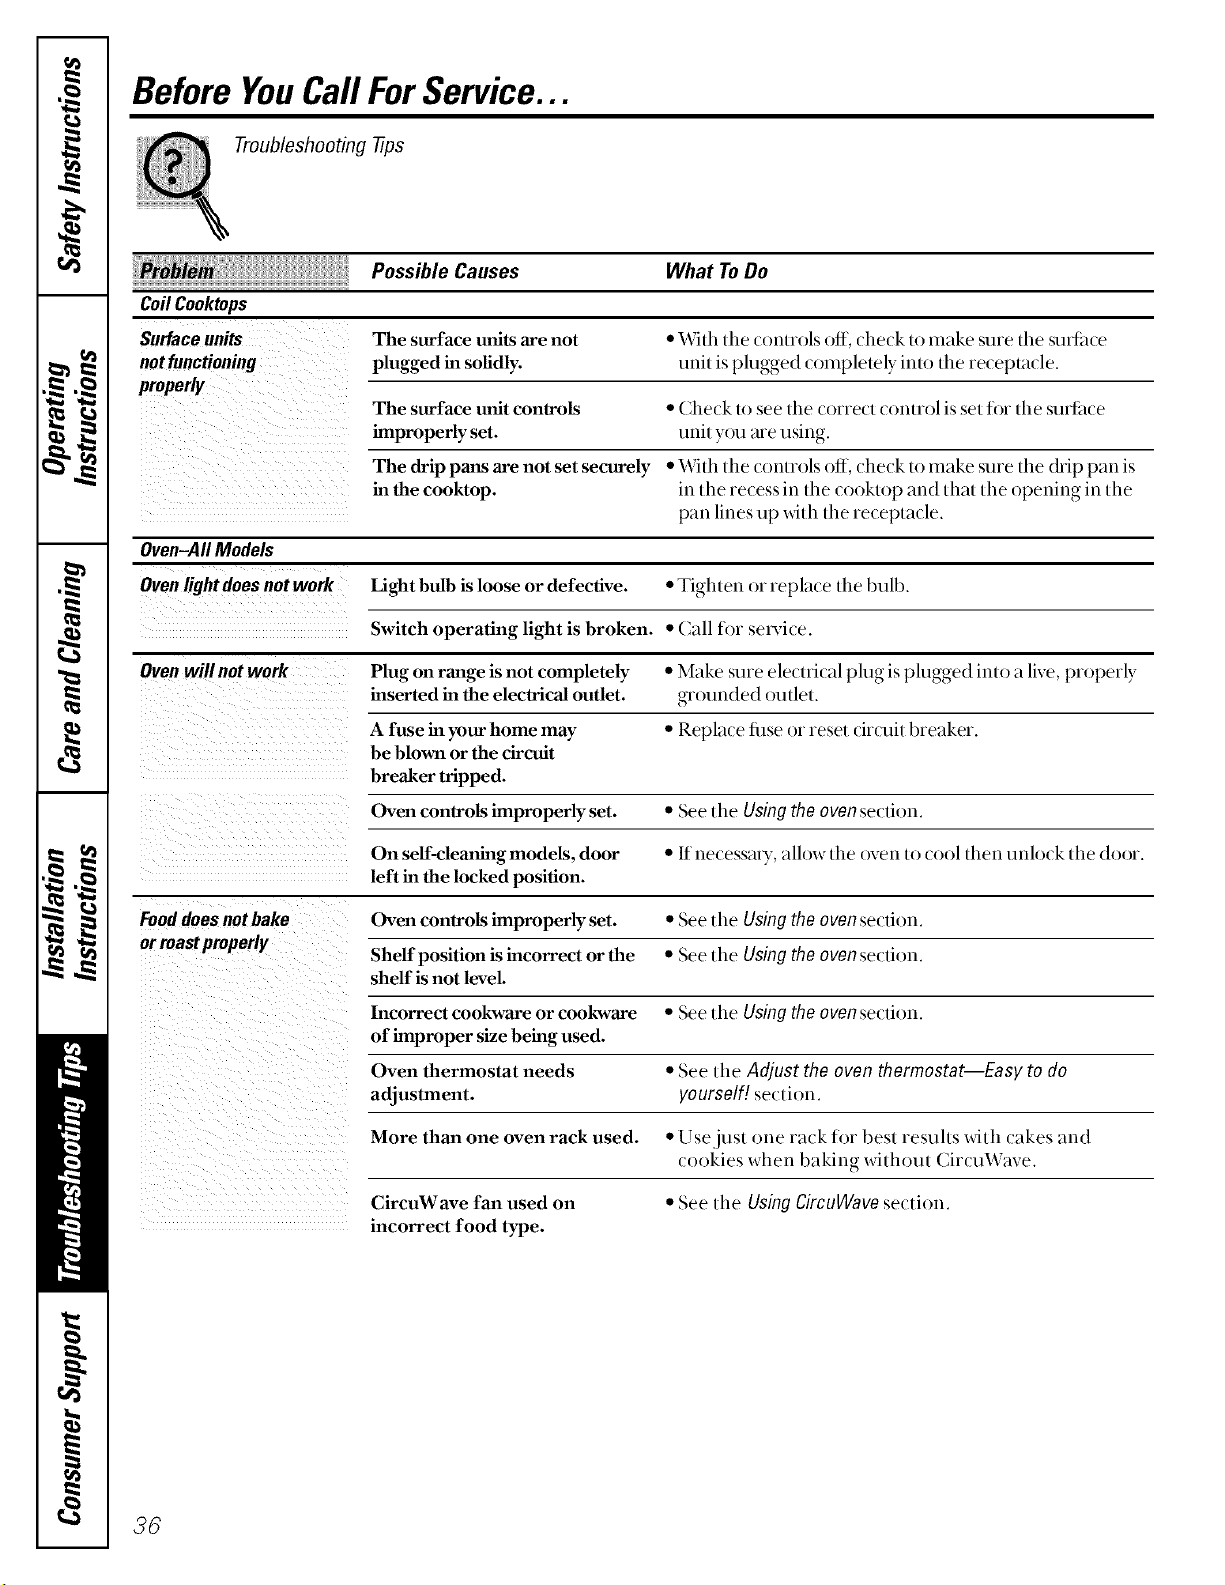
Before YouCallForService...
Troubleshooting tips
Possible Causes What ToDo
Coil Cooktops
The surface units are not * With tide cou/rols off, che/'k lo m_/ke sure tile Sln_hce
notfunctioning plugged in sofidly, unit is plugged completely into tile recept_Me.
properly
The surface unit controls * Check lo see the torte(1 couuol is sel ii)r tile suvliwe
improperly set. unit you are using.
The drip pans are not set securely • With tile _'ouu'ols off, check to m_/ke sure tile &ip pan is
in the cooktop, in tile recess in tile cooktop ;rod th:tt tile opening in tile
p,m lines up xdth the re{ept,wle.
Oven-All Models
Oven light does not work Light bulb is loose or defective. * Tighten or repl_lce tile bulb.
Switch operating light is broken. * C,dl for sevvice.
Oven will not work Plug on range is not completely "Make sure electrical plug is plugged into a live, properly
inserted in the electrical outlet, grounded outlet.
A fuse in your home may * Replace filse or reset circuit bre;lker.
be blown or the circuit
breaker tripped.
Oven controls improperly set. * See tile Using the oven section.
On serf-cleaning models, door * If necessary, allow tile oven to cool then uuhwk tile door.
left in the locked position.
Food does not bake Oven controls improperly set. * See tile Using the oven section.
or roastproperly Sheff position is incorrect or the " See tile Using the oven section.
shelf is not level.
Incorrect cookware or cookware * See tile Using the oven section.
of improper size being used.
Oven thermostat needs * See tile Adjust the oven thermostat--Easy to do
adjustment, yourself[ section.
More than one oven rack used. * Use just due rack fin" best results with cakes mM
cookies when baking without Circu'vVave.
CircuWave fan used on * See tile Using CircuWave se_'tiou.
incorrect food type.
36
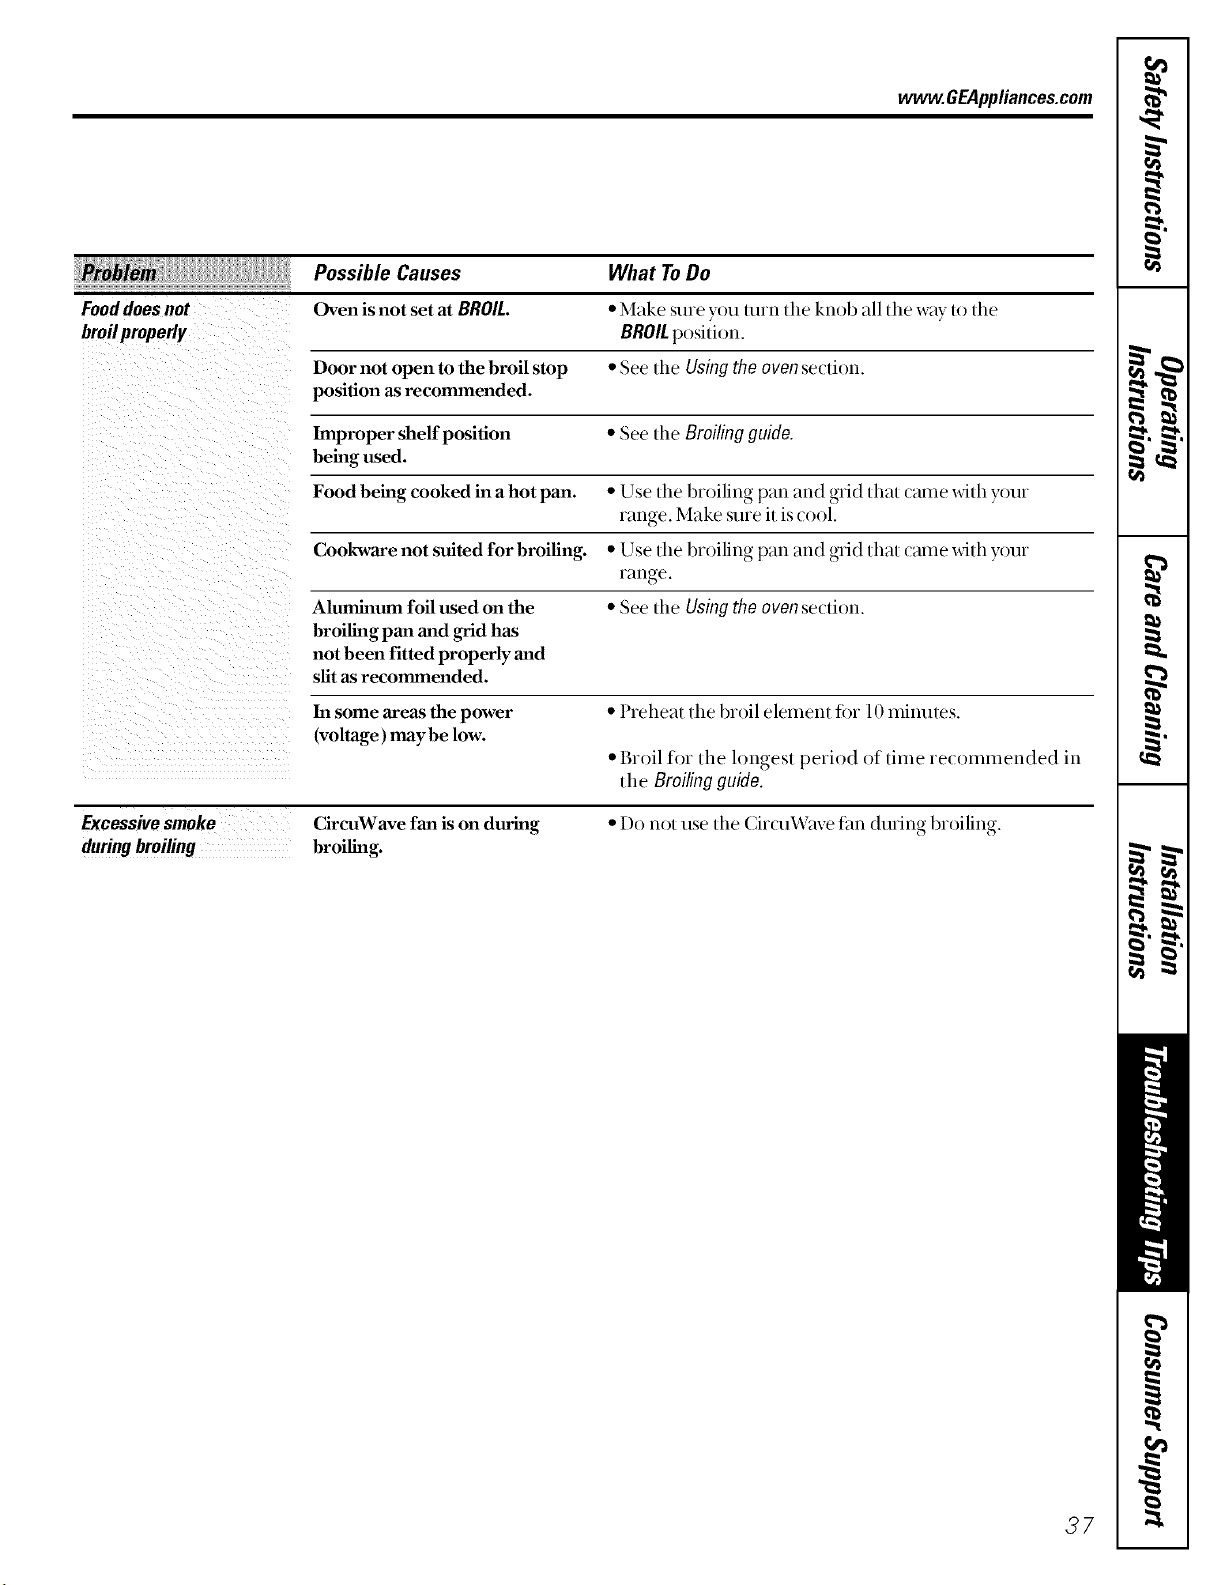
www.GEAppliances.com
Possible Causes What To Do
Fooddoes not Oven is not set at BROIL. • Make sure you turn tile knob all die way to die
broil properly BROILposition.
Door not open to the broil stop .SeeilieUsingtheovense(lion.
position as recormnended.
Improper shelf position • See the Broiling guide.
being used.
Food being cooked in a hot pan. • Use the broiling pm_ and grid that came xdth your
range. Make sure it is cool.
Cookware not suited for broifing. • Use the broiling pan and grid that came with your
l'aIlge.
Aluminum foil used on the • See the Using the oven section.
broiling pan and grid has
not been fitted properly and
slit as recommended.
In some areas the power * Preheat tile broil element fin l 0 minutes.
(voltage) may be low.
• Broil for the longest period of time recommended in
tile Broiling guide.
Excessive smoke CircuWave fan is on during • Do not use the CircuWave, £m during_ broiling.
during broiling broiling.
,37
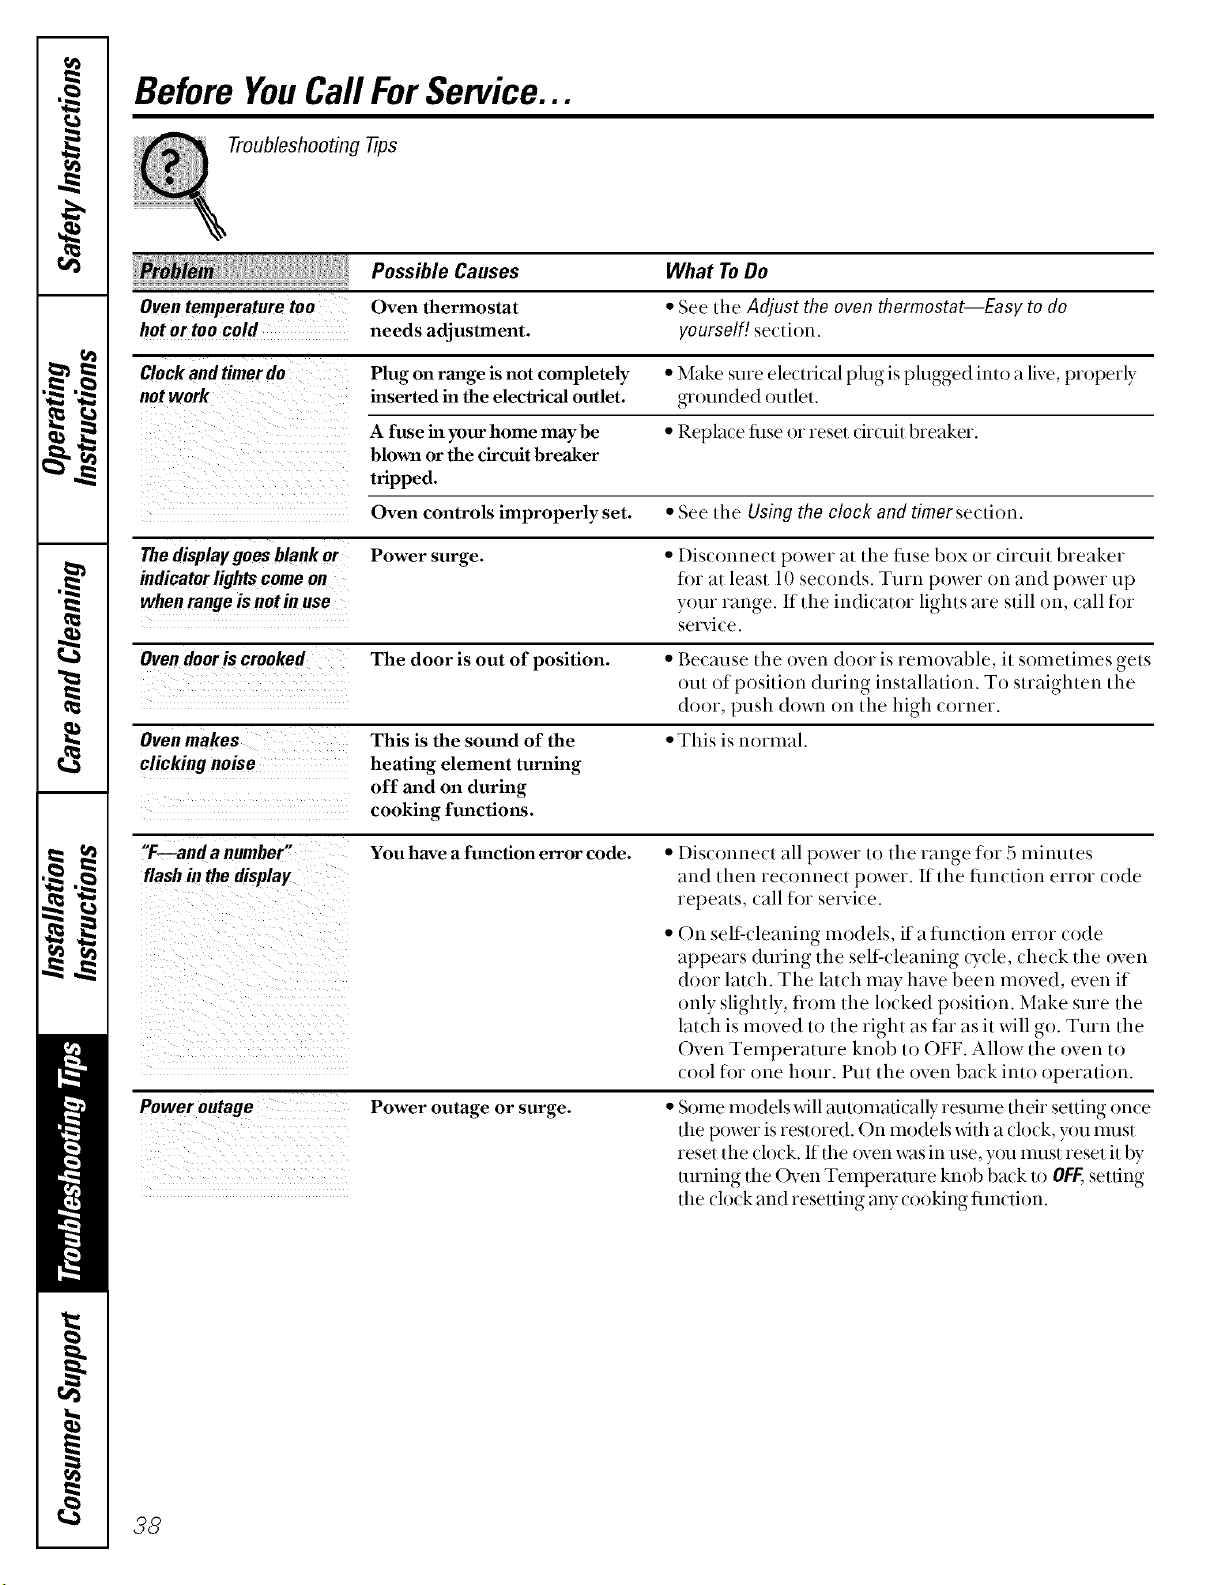
Before YouCall ForService...
Troubleshooting -tips
Possible Causes
Oven temperamte too Oven thermostat
hot or too cold needs adjustment.
What ToDo
• See tile Adjust the oven thermostat--Easy to do
yourself! section.
Clock and timer do Plug on range is not completely • Make sure electrical plug is plugged into a live, properly
not work inserted in the electrical outlet, grounded outleL
A fuse in your home may be • Replace fi_se or reset dr_afit breaker.
blown or the circuit breaker
tripped.
Oven controls improperly set. • See file Usin9 the clock and timer section.
The display goes blank or Power surge. • Disconnect power at the fl_se box or circuit breaker
indicator lights come on fi)r at leant 10 seconds. Turn power on and power up
when range is notin use your range. If the indicator lights are still on, call fin.
service.
Oven door is crooked The door is out of position. • Because the oven door is removable, it sometimes gets
out of position during installation. To straighten the
door, push down on the high corner.
Oven makes This is the sound of the • This is normal.
clicking noise heating element turning
off and on during
cooking functions.
"F--and a number"
flashinthedisplay
Power outage
You have a function error code. • Disconnect all power to the range for5 minutes
and then reconnect power. If the flm(fion error (ode
repeats, (all for secvi(e.
• On self cleaning models, if a traction error code
appears during the self cleaning cycle, check the oven
door latch. The latch may have been moved, even if
only slightly, fiom the locked position. Make sure the
latch is moved to the right as flu as it will go. Turn the
Oven Temperature knob to OFF. Allow the oven to
cool for one hour. Put the oven back into operation.
Power outage or surge. • Some models will mnomafically resume thdr setting once
the power is restored. On models with a clock, you nmst
reset the clock. If the oven was in use, y()u must reset it 1)y
turning the Oven Temperature knob back to OFF,setting
the clock and resetting aW cooking fimction.
38
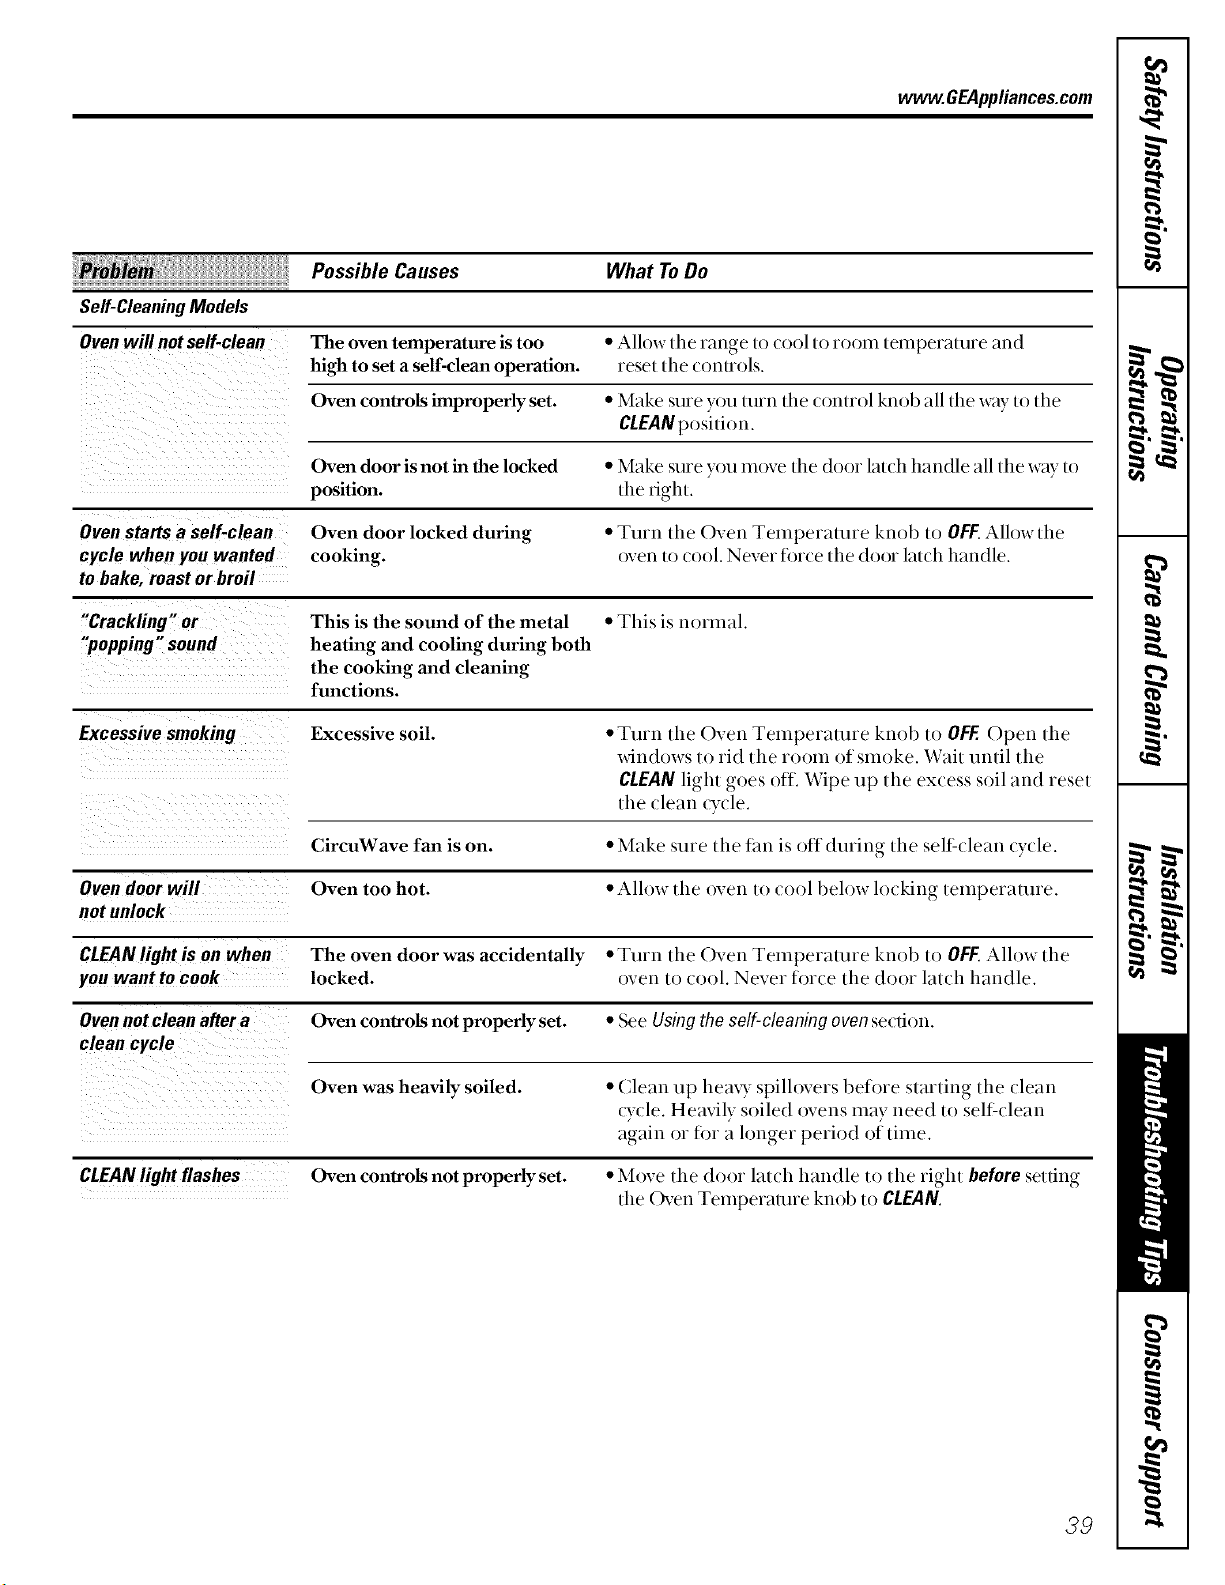
www.GEAppliances.com
Possible Causes What ToDo
Self-Cleaning Models
Oven will not self-clean The oven temperature is too "Alh)w the range to (eel to room temperature and
high to set a self-clean operation, reset the controls.
Oven controls improperly set. "Make sure you turu the (oi_trol ki_ob all the w,ly to the
CLEAN position.
Oven door is not in the locked "Make sure you inove the door latch handle all the way to
position, the fight.
Oven starts a self-clean Oven door locked during "Turn the Oven Temperature knob to OFF.Allow the
cycle when you wanted cooking, oven to (ool. Never fi)r(e the door lat(ll handle.
to bake, roast or broil
"CracklingS'or This is the sound of the metal * This is imrlnal.
heating and cooling during both
the cooking and cleaning
functions.
Excessiv e smoking Excessive soil. "Turn the Oven Temperature knob to OFF. Open the
windows to rid the rooln of slnoke. Wait until the
CLEAN light goes off. Wipe up the ex(ess soil and reset
the clean cycle.
CircuWave fan is on. "Make sure the f_m is off during the self-clean cycle.
Oven door will Oven too hot. • Allow the oven to (ool below lo(king temperattlre.
not unlock
CLEAN light is on when The oven door was accidentally • Turn the Oven Telnperature knob to OFF.Alh)w the
Yon want to COOk locked, oven to (ool. Never for(e the door lat(h handle.
Oven not clean after a Oven controls not properly set. "See Usingtheself-cleaningovense(uou.
clean cycle
Oven was heavily soiled. "(lean up hea W spilh)vers before starting the (lean
(y(le. Heavily soiled ovens may need to self-(lean
again or ti)r a hmger period of time.
CLEAN light flashes Oven controls not properly set. *Move the door lat(h handle to the right before setting
the Oven Temperature knob to CLEAN.
39
m
_ FL
--°
€_
_ h
m
Q_
I
_muw
NOteS,
40
GE Service Protection Plus '_'
GE, a name recognized worldwide %r quality and dependability, oKbrs you
SaMce Protection Plus'"-comprehensive protection on all your appliances-
No Matter What Brand!
Benefits Include:
• Backed by GE
• All brands covered
• Unlimited service calls
• All parts and labor costs included
• No out-of-pocket expenses
• No hidden deductibles
• One 800 number to call
We TI Cover Any Appliance.
Anywhere. Anytime.
You will be completely satisfied with our service protection or you may request your money back
on the remaining value of your ( ontra(t. No questions asked. It's that simple.
Protect your refligerator, dishwasher, washer and dryer, range, TV, VCR and nmch more-anybrand!
Plus there's no extra charge fi)r emergenq, service and low monthly financing is available. Even icemaker
(:overage and food spoilage protedion is offered. You can rest easy, knotting tl_at all your valuable
household produds are protected against expensive repairs.
Place your (onfiden(e in GE and tall us in d_e U.S. toll-flee at 800.626.2224
for more infi)rmafion.
_AII I)13nds (overed, up Io 20 yeals old, ill I]le (olqlh]elll31 U.S.
._ Cut here
Please place in envelope and mail to:
General Electric Company
Warranty Registration Department
P.O. Box 32150
Louisville, KY 40232-2150
4/
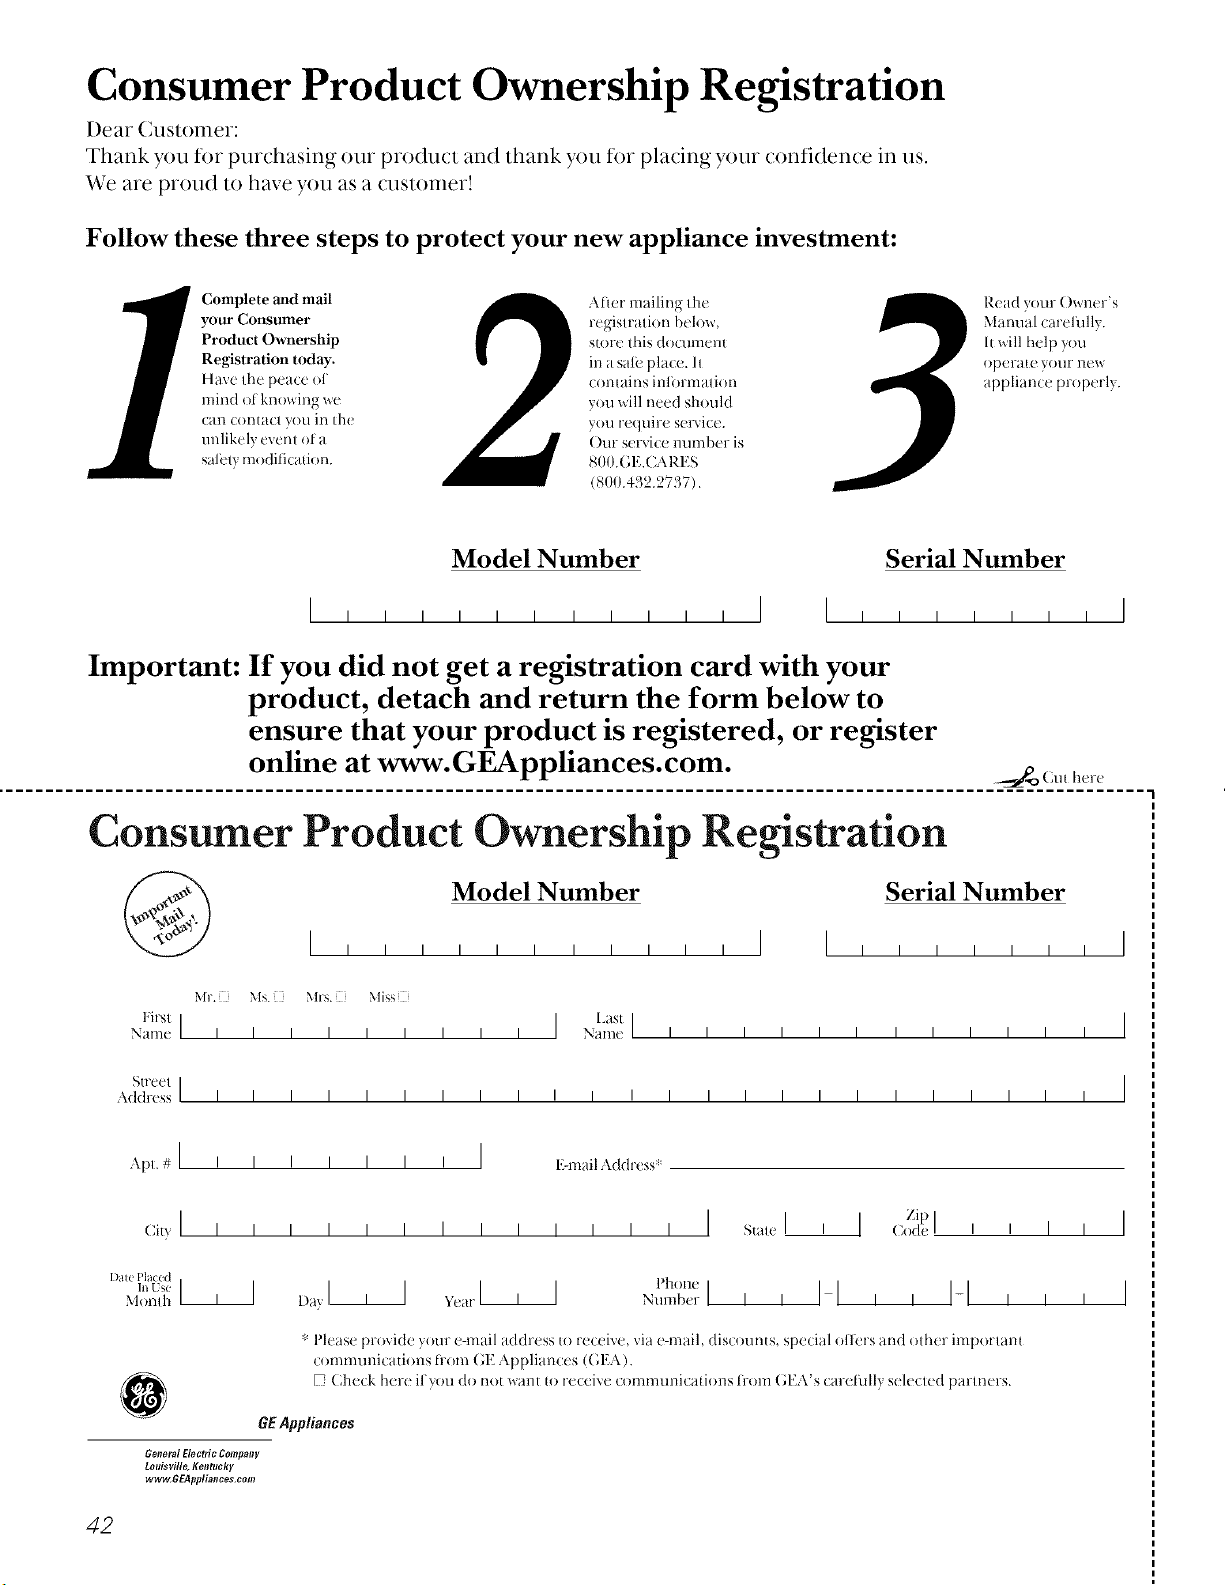
Consumer Product Ownership Registration
[)ear (_ustomer:
Thank you fbr purchasing our product and thank you fl)r placing your confidence in us.
We are proud to have you as a customer!
Follow these three steps to protect your new appliance investment:
Complete and mail
your Consumer
Product Ownership
Registration today.
Have Ihe pea(c (fl"
mind ol knowing we
(all con(acl }()u ill tilt
unlikely exenl of a
saRqy modifica/ion.
Afier mailing Ihe
regislralion below,
store Ibis document
in a saR' place, h
contains inlbnnalion
you will need should
you require set-rice.
Our service number is
800.(;E.(ARES
(800.432.2737).
Read your Owner's
Manual carelully.
It will help you
operate VOUFnew
appliance properly.
Model Number Serial Number
I I I I I I
Important: If you did not get a registration card with your
product, detach and return the form below to
ensure that your product is registered, or register
online at www.GEAppliances.com.
._ (_ttt herr
Consumer Product Ownership Registration
Model Number Serial Number
I I I
Mr. Ms. Mrs. Miss
First I I Last]
Name I I I I I I I I I Nana( I I I I I I I I I I I I
, I
S t'ee'l I
Addr(ss I I I I I I I I I I I I I I I I I I I I I I I I
Zi )
Daft:Placed
Monlh I)av
0
* PIt ase provide your e-mail address to receixe, xia t -mail, discounts, special ol]_'rs and olhtr imporlanl
communications Ii-om (,E Applianct s ((;ILk).
Cl-leck herr if you (h) not want 1()receixe cotnmunicafions Ii-om (;l:A's carel_tll} st lecled l)_lYlnt YS.
GEAppliances
General E/ectric Company
Looisville, Kentocky
w_GEAppliances•com
42
GEElectricRange Warranty.
Aft warranty service provided by our Factory Service Centers,
or an authorized Customer Care®technician. Toschedule service,
on-line, 24 hours a day, vis# us at www.GEAppliances.co_
or call 800.GE.CARES(800.432.2737).
Staple your receipt here.
Proofof the original purchase
date is needed to obtain service
under the warrant_
GE Will Provide:
Fromthe dateof the
originalpurchase
Anypartof the range which fails due to a detect in materials or workmanship.
During this fullone-yearwarranty,GE_fill also proxdde, freeofcharge,all labor
and in-home seniti(e to repla(e the defe( rivepart.
FORGLASSCOOKTOPMODELSONLY'.
FiveYears
Fromthedateof the
originalpurchase
(onglass cooktop
modelsonly)
A replacementglasscooMopif it should: crack (h_eto thermal shock; discolor;
crack at the rubber seal between the glass cooktop and the porcelain edge; or
if the pattern wears oil
A replacement radiant surface unit if it should burn out.
During this limited additional four-year warranty, you will be responsible fin any
labor or in-home sevvice.
i__Service trips to your home to teach you how to use
the product.
i_:Improper installation.
i__Failure of the product if it is almsed, misused, or used for
other than the intended purpose or used commercially.
>: Damage to the glass cooktop caused by use of cleaners
other than the recommended cleaning creams.
i_yDamage to the glass cooktop caused by hardened spills
of sugary materials or melted plastic that are not cleaned
according to the directions in the Owner's Manual.
i;_):Replacement of house fuses or resetting of circuit
breakers.
;i::Damage to the product caused by accident, fire, floods
or acts of God.
ii: Incidental or consequential damage caused by possible
defects with this appliance.
This warranty is extended to the original purchaser and any succeeding owner for products purchased for home
use within the USA. In Alaska, the warranty excludes the cost of shipping or service calls to your home.
Some states do not aflow the exclusion or limitation of incidental or consequential damages. This warranty gives
you specific legal rights, and you may also have other rights which vary from state to state. Toknow what your
legal rights are, consult your local or state consumer affairs office or your state's Attorney General.
Warrantor."General Electric Company.Louisville, KY40225
43

ConsumerSupport.
GEAppliancesWebsite vvvvvv.GEAppliances.com
Have a question or need assistance xdth your appliance? TU tile GE Appliances Website 24 hours a day,
any day of the yem! For greater comvnience and taster service, y()u can n()w download Owner's Manuals,
order pmts, catalogs, or even sche&de sevvice on-line. Y_)ucan also "Ask Our Temn of Experts ......
your questions, and so much more...
ScheduleService
vvvvvv.GEAppliances.com
Expert GE repair se_x4ceis only one step away fiom your door. Get on-line and schedule your se_x4ceat
your(onvenience24hou_sanydayoftheyea_:Ot (all800.(,E.CARES 800.432.2737) during normal
business hours.
RealLifeDesignStudio
vvvvvv.GEAppliances.com
GE supports the Universal Design concept-products, se_x_icesand environments that can be used by
people of all ages, sizes and capabilities. We recognize the need to design tina wide range of physical and
mental abilities and impairments. For details of GE's U niversal Design applications, including kitchen
design ideas tin people with disabilities, check out our Website tod W. For the heming impaired, please call
80/!.TDD.GEA((800.833.4322).
ExtendedWarranties
vvvvvv.GEAppliances.com
Purchase a GE extended warranty and learn about special discounts that are available while your warranty
is still in efl>ct. You can purchase it on-line anytime, or call 8110.626.2224 during normal business hours.
GE ( onsumer Home Sev_4cesxdll still be there after your warranty expires.
PartsandAccessories
vvvvvv.GEAppliances.com
Individuals qualified to service their ox_alappliances can have parts or accessories sent directly to their homes
(VISA, MasterCard and Discover cards are accepted). Order on-line today, 24 hours m_eU day or by phone at
800.626.2002 during normal business hours.
Instructions contained in this manual coverprocedures tobe performed by any user. Otherservicing generally
should be referred to qualified service personnel Cautionmust be exercised, since improper servicing may cause
unsafe operation.
ContactUs
www. GEAppliances.com
lf}_u me not satistied with the service y()u receive flom GE,contact us on our Website with all tile details
includingyour phone number, orx_Tite to: General Manager, Customer Relations
GE Appliances, Appliance Park
I,ouisville, KY 40225
q
RegisterYourAppliance vvvvvv.GEAppliances.com
Register your new appliance on-line--at your convenience! Timely produ(t registration will allow for
enhan(ed (ommuni(ation and prompt sev_d(eunder the terms of your warranty, should tile need arise.
You may also mail in the pre-printed registration card included in the packing material, or detach and
use the form in this Owner's Manual.
Thisbook is printed on recycled pape_
Printed in Mexico