ACMT 6332/WHACMT 6332/WH
English
EN
Operating Instructions
COOKER AND OVEN
Contents
Installation,13
Start-up and use,17
Cooking modes,18
Care and maintenance,22
,3
SAFETY INSTRUCTIONS
Using the hob,17
Clock/Minute Minder Operation,20
Românã
Instrucюiuni de folosire
ARAGAZ ЄI CUPTOR
Sumar
ATENЮIE,8
Instalare,26
Pornire єi utilizare, 30
Utilizarea cuptorului,30
RO
RomânãRomânã
Instrucюiuni de folosire
ARAGAZ ЄI CUPTOR
Sumar
Instrucюiuni de folosire
ARAGAZ ЄI CUPTOR
Sumar
Moduri de gătire,
Între"inere #i cură"ire,
31
Funcţionarea ceasului/
temporizatorului
,33
35
2
12
25
DAILY REFERENCE
GUIDE
DAILY REFERENCE
GUIDE
DAILY REFERENCE
GUIDE
DAILY REFERENCE
GUIDE
DAILY REFERENCE
GUIDE
DAILY REFERENCE
GUIDE
GHID DE
REFERINŢĂ
PENTRU UTILIZARE ZILNICĂ
Instalare,26
Pornire єi utilizare, 30
Utilizarea cuptorului,30
Moduri de gătire,
31
Instalare,26
Pornire єi utilizare, 30
Utilizarea cuptorului,30
Moduri de gătire,
31
Instalare,26
Pornire єi utilizare, 30
Utilizarea cuptorului,30
Moduri de gătire,
31
GHID DE GHID DE
Installation,13
Start-up and use,17
Cooking modes,18
Care and maintenance,22
Using the hob,17
Clock/Minute Minder Operation,20
Installation,13
Start-up and use,17
Cooking modes,18
Care and maintenance,22
Using the hob,17
Clock/Minute Minder Operation,20
Installation,13
Start-up and use,17
Cooking modes,18
Care and maintenance,22
Using the hob,17
Clock/Minute Minder Operation,20
Installation,13
Start-up and use,17
Cooking modes,18
Care and maintenance,22
Using the hob,17
Clock/Minute Minder Operation,20
RomânãRomânã
EnglishEnglishEnglish
,3,3
SAFETY INSTRUCTIONS
These instructions shall also be available on website: www.whirlpool.eu
YOUR SAFETY AND
This manual and the appliance itself provide important safety warnings, to be read and observed at all times.
Indicates a hazardous situation which, if not avoided, will cause serious injury.
Indicates a hazardous situation which, if not avoided, could cause serious injury.
DANGER
WARNING
Before using the appliance carefully read Health and Safety and Use and Care guides.
Keep these instructions close at hand for future reference.
This is the safety alert symbol.
This symbol alerts you to potential hazards that can kill or hurt you and others.
All safety messages will follow the safety alert symbol or the word “DANGER” or “WARNING.” These words
mean:
All safety warnings give specific details of the potential risk present and
indicate how to reduce risk of injury,
damage and electric shock
resulting from improper use of the appliance. Carefully observe the following
instructions.
- Very young (0-3 years) and young children (3-8 years) shall be kept away unless continuously supervised.
- Children from 8 years old and above and persons with reduced physical, sensory or mental capabilities or
lack of experience and knowledge can use this appliance only if they are supervised or have been given
instructions on safe appliance use and if they understand the hazards involved. Children shall not play with
the appliance. Cleaning and user maintenance shall not be made by children without supervision.
IMPORTANT TO BE RED AND OBSERVED
SAFETY OF OTHERS IS VERY IMPORTANT
Failure to observe these instructions may lead to risks. The Manufacturer declines any liability for injury to
persons or animals or damage to property if these advices and precautions are not respected.
-
The appliance and its accessible parts become hot during use, young children should be kept away.
Do not
allow the appliance to come into contact with cloths or other flammable materials until all the
components
have cooled down completely.
-
During and after use, do not touch the heating elements or interior surface of the appliance - risk of
burns.
-
Overheated
oils
and
fats
catch
fire
easily. Always remain vigilant when cooking foods rich in fat, oil or
alcohol
(e.g.
rum, cognac, wine).
-
Never leave the appliance unattended during food drying.
-
WARNING : Do not heat or cook with sealed jars or containers in the appliance.
The pressure that builds up inside might cause them to explode, damaging the appliance.
-
If alcoholic beverages are used when cooking foods (e.g. rum, cognac, wine), remember that alcohol
evaporates at high temperatures. As a result, there is a risk that vapours released by the alcohol catch fire
if
coming
in contact
with the electrical heating element.
-
If the appliance is suitable for probe usage, Only use the temperature probe recommended for this
oven.
-
DANGER OF FIRE : Do not store items on the cooking surfaces since they can catch fire.
-
CAUTION : In case of hotplate glass breakage:-shut immediately off all burners and any electrical
heating element and isolate the appliance from the power supply; - do not touch the appliance surface;
-
do not use the appliance
-
These instructions are valid if the country symbol appears on the appliance. If the symbol doesn't
appear on the appliance, it is necessary to refer to the technical instructions which will provide the
necessary instructions concerning modification of the appliance to the conditions of use of the country
-
CAUTION : The use of the gas cooking appliance results in the production of heat, moisture and
products of combustion in the room in which it is installed. Ensure that the kitchen is well ventilated
especially when the appliance is in use: keep natural ventilation holes open or install a mechanical
(mechanical extractor hood). Prolonged intensive use of the appliance may call for
for example opening of the window, or more effective ventilation, increasing the
ventilation where present
"
-
The glass lid can break in if it is heated up. Turn off all the burners and the electric plates before
Do not shout down lid when burner alight.
-
If the information in this manual is not followed exactly, a fire or explosion , may result causing
property damage or injury.
level of mechanical
closing the lid.
ventilation device
additional ventilation,
EN
3

INTENDED USE OF THE PRODUCT
-
This appliance is designed solely for domestic usage. No other use is permitted (e.g. heating rooms). To
professional use is forbidden. The manufacturer declines all responsibility for
innapropriate use or incorrect setting of the con
trols.
.
-
This appliance is intended to be used in household and similar applications such as :
-
Staff kitchen areas in shops, offices and other working environments;
-
Farm houses;
-
By clients in hotels, motels and other residential environments;
-
Bed and breakfast type environments.
aim the appliance as
INSTALLATION
-
CAUTION : The appliance is not intended to be operated by means of an external timer or separate
remote
controlled supply system.
-
Do not use the appliance outdoors.
-
Do not store explosive or flammable substances such as aerosol cans and do not place or use gasoline or
other flammable materials in or near the appliance: a fire may break out if the appliance is inadvertently
switched on.
-
Do not store explosive or flammable substances such as aerosol cans and do not place or use
gasoline or
other flammable materials in or near the appliance: a fire may break out if the appliance
is inadvertently
switched
on.
-
Installation and repairs must be carried out by a qualified technician, in compliance with the
manufacturer's
instructions
and
local
safety
regulations.
Do
not
repair
or
replace
any
part
of
the
appliance unless specifically stated in the user manual.
-
The electrical and gas connections must comply with local regulation.
-
Children should not perform installation operations. Keep children away during installation of the
appliance.
Keep the packaging materials (plastic bags, polystyrene parts, etc.) out of reach of
children,
during and after the installation of the appliance.
-
WARNING : Modification of the appliance and its method of installation are essential in order to use the
appliance safely and correctly in all the additional countries
-
Use protective gloves to perform all unpacking and installation operations.
-
After unpacking the appliance, make sure that the appliance door closes properly.In the event of
problems,
contact
the
dealer
or your nearest After-sales Service.
To
prevent
any
damage,
only
remove
the oven from its polystyrene foam base at the time of installation.
-
The appliance must be handled and installed by two or more persons.
-
The appliance must be disconnected from the power supply before carrying out any installation
operation.
-
During installation, make sure the appliance does not damage the power cable.
-
Only activate the appliance when the installation procedure has been completed.
-
Kitchen units in contact with the appliance must be heat resistant (min 90°C).
GAS CONNECTION
-
WARNING : Prior to installation, ensure that the local gas delivery conditions (nature or pressure) are
the setting of the hob (see the rating plate and injector table).
-
Use pressure regulators suitable for the gas pressure indicated in the instruction.
-
WARNING : The adjustment condictions for this appliance are stated on the lable (or data plate).
-
WARNING : This appliance is not connected to a combustion products evacuation device. It shall be installed
accordance with current installation regulations. Particulat attention
shall be given to the
relevant requirements regarding ventilation.
-
WARNING : These operations must be perfomed by a qualified technician.
-
If the appliances is connected to liquid gas, the regulation screw must be fastned as tightly as possible.
-
When gas cylinder is adopted, the gas cylinder or gas container must be properly settled (vertical orientation).
-
Use only flexible or rigid metal hose for gas connection.
-
IMPORTANT : If a staineless steel hose is used, it must be installed so as not touch any mobile part of the
It must pass thorugh an area where there are no obstructions and where it is possible to
inspect it on all its length.
-
After connection to the gas supply, check for leaks with soapy water. Light up the burners and turn the knobs
from max position 1* to minimum position 2* to check flame stability.
compatible with
furniture (e.g.drawer).
and connected in
ELECTRICAL WARNINGS
-
Make sure the voltage specified on the rating plate corresponds to that of your home.
-
For installation to comply with current safety regulations, an omnipolar switch with minimum contact
gap of
3mm is required.
-
Regulation require that the appliance is earthed.
-
For appliances with fitted plug, if the plug is not suitable for you socket outlet, contact a qualified
technician.
-
Do not use extension leads, multiple sockets or adapters. Do not connect the appliance to a socket
which
can be operated by remote control.
GB
EN
4
-
The power cable must be long enough for connecting the appliance, once fitted in its housing, to the
main
power supply.
-
Do not pull the power supply cable.
-
If the power cable is damaged it must be replaced with an identical one. The power cable must only be
replaced by a qualified technician in compliance with the manufacturer instruction and current safety
Contact an authorized service center.
-
Do not operate this appliance if it has a damaged mains cord or plug, if it is not working properly, or if it has
been damaged or dropped. Do not immerse the mains cord or plug in water. Keep the cord away from hot
surfaces.
-
The electrical components must not be accessible to the user after installation.
-
Do not touch the appliance with any wet part of the body and do not operate it when barefoot.
-
It must be possible to disconnect the appliance from the power supply by unplugging it if plug is accessible, or
by means of an accessible multi-pole switch installed upstream of the socket in conformity with national
electrical safety standards.
-
The rating plate is on the front edge of the oven (visible when the door is open).
regulations.
CAUTION : The cooking process has to be supervised. A short cooking process has to be
supervised
continuously.
-
Do not use the hob as a work surface or support.
WARNING : Unattended cooking on a hob with fat or oil can be dangerous and may result in fire.
Never try
to extinguish a fire with water, but switch off the appliance and then cover flame e.g. with a
lid or a fire
blanket.
IMPORTANT : Should you experience difficulty in turning the burners knobs, please contact After Sales
Service for replacement of the burner tap if found to be faulty.
-
The openings use for the ventilation and dispersion of heat must never be covered.
-
Use pots and pans with bottoms the same width as that of the burners or slightly larger (see specific table).
Make sure pots on the grates do not protrude beyond the edge of the hob.
-
WARNING : Do not let the burner flame extend beyond the edge of the pan.
-
IMPORTANT : Improper use of the grids can result in damage to the hob: do not position the grids upside
down or slide them across the hob.
-
Do not use : Cast iron griddles, ollar stones, terracotta pots and pans.
Heat diffusers such as metal mesh, or any other types.
Two burners simultaneously for one receptacle (e.g. Fish kettle).
-
Note : should particular local conditions of the delivered gas make the ignition of burner difficult, it is advisable
to repeat the operation with the knob turned to small flame setting.
-
Note : In case of installation of a hood above the cooktop, please refer to the hood instructions for the correct
distance
.
-
WARNING : The protective rubber feet on the grids represent a chocking hazard for young children. After
removing the grids, please ensure that all the feet are correctly fitted.
-
Remove any liquid from the lid before opening it
CORRECT USE
CLEANING AND MAINTANCE
-
The appliance must be disconnected from the power supply before carrying out any cleaning or
maintenance operation.
-
Never use steam cleaning equipment.
-
Ensure that the appliance is switched off before replacing the lamp to avoid the possibility of electric shock.
-
Do not use harsh abrasive cleaners or sharp metal scrapers to clean the appliance door glass since they can
scratch the surface, which may result in shattering of the glass.
-
Do not use abrasive or corrosive products, chlorine-based cleaners or pan scourers.
-
To avoid damaging the electric ignition device, do not use it when the burners are not in their housing.
DISPOSAL OF PACKAGING MATERIALS
SAFEGUARDING THE ENVIRONMENT
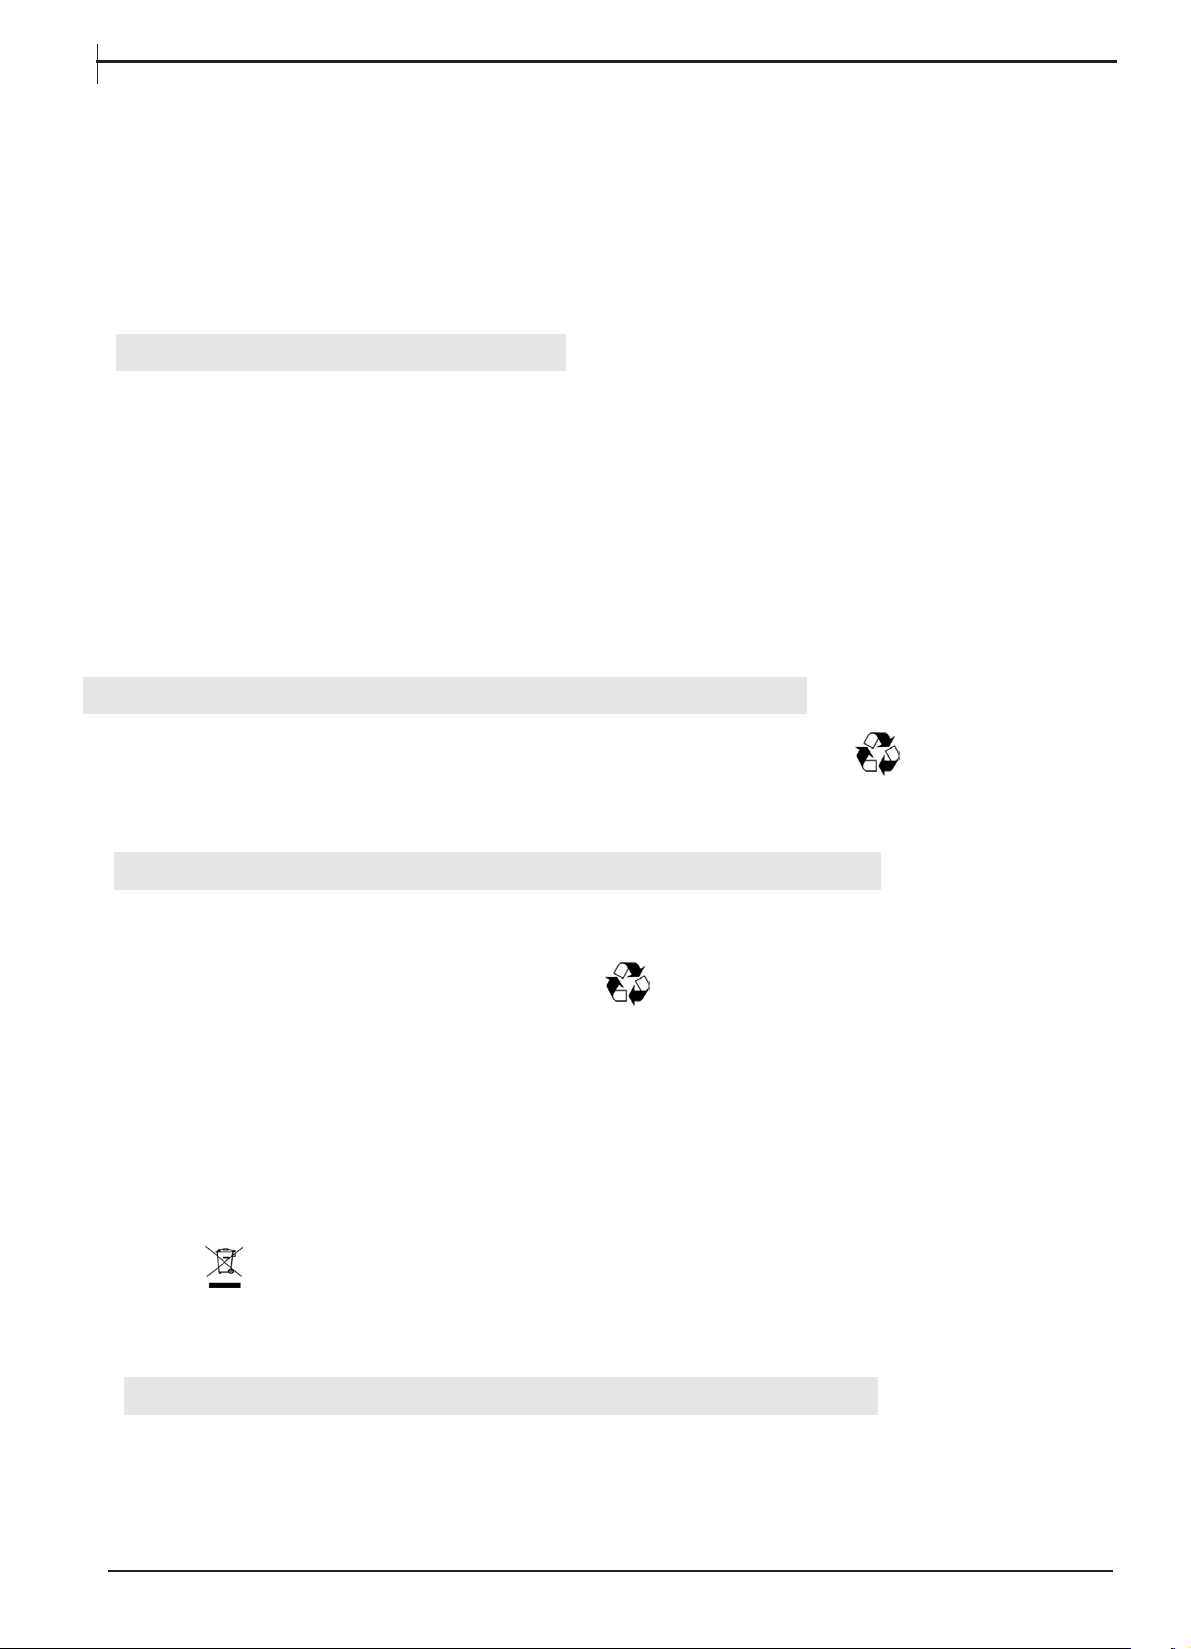
- The packaging material is 100% recyclable and is marked with the recycle symbol . The various parts of
the packaging must therefore be disposed of responsibility and in full compliance with local authority
regulations governing waste disposal.
SCRAPPING OF HOUSEHOLD APPLIANCES
- When scrapping the appliance, make it unusable by cutting off the power cable and removing the doors and
shelves (if present) so that children cannot easily climb inside and become trapped.
- This appliance is manufactured with recyclable or reusable materials. Dispose of it in accordance with
local waste disposal regulations.
EN
5
- For further information on the treatment, recovery and recycling of household electrical appliances,
contact your competent local authority, the collection service for household waste or the store where you
purchase the appliance.
- This appliance is marked in compliance with European Directive 2012/19/EU, Waste Electrical and Electronic
Equipment (WEEE).
- By ensuring this product is disposed of correctly, you will help prevent potential negative consequences for
the environment and human health, which could otherwise be caused by inappropriate waste handling of this
product.
- The symbol on the product or on the accompanying documentation indicates that it should not be treated
as domestic waste but must be taken to an appropriate collection center for the recycling of electrical and
electronic equipment.
ENERGY SAVING TIPS
- Only preheat the oven if specified in the cooking table or your recipe.
- Use dark lacquered or enamelled baking moduls as they absorb heat far better.
- Switch the oven off 10/15 minutes before the set cooking time. Food requiring prolonged cooking will
continue to cook even once the oven is switched off."
DECLARATION OF CONFORMITY
- This appliance has been designed, constructed and distributed in compliance with the safety requirements of
European Directives :
° 2006/95/EC Low Voltage Directive
° 2004/108/EC Electromagnetic Compatibility Directive
- This appliance, which is intended to come into contact with foodstuffs, complies with European Regulation
(LOGO CE) n. 1935/2004.
- This appliance meets the Eco Design requirements of European Regulations n. 65/2014, and n. 66/2014 in
conformity to the European standard EN 60350-1.
• “Service”
•
•
AFTER-SALES SERVICE
Before calling the After-Sales Service
1. See if you can eliminate the problem on your own (see “Troubleshooting Guide”).
2. Switch the appliance off and on again to see if the problem persists.
If the fault persists after the above checks, contact your nearest After-Sales Service.
Specify: the type of fault;
• exact type and model of oven;
• the After-Sales Service number (the number given after the word “Service” on the dataplate) located inside
the storage compartment flap. The service number is also given in the warranty booklet;
• your full address;
• your telephone number.
For repairs, contact an Authorised After-Sales Service, indicated in the warranty.
If any work is carried out by technicians not belonging to the Manufacturer's authorised After-Sales Service
centres, request a receipt specifying the work performed and make sure the replacement parts are original.
Failure to comply with these instructions can compromise the safety and quality of the product.
TABLE OF CHARACTERISTICS
Oven dimensions
(HxWxD)
32,4x45.5x40,3 cm
Volume 61 l
Useful
measurements
relating to the
oven
compartment
width 42 cm
depth 44 cm
height 8.5 cm
Burners
may be adapted for use with any
type of gas shown on the data
plate
Voltage and
frequency
see data plate
ENERGY LABEL
Energy consumption for Natural
convection – heating mode:
Convection mode
Declared energy consumption for
Forced convection Class – heating
mode: Baking
and ECODESIGN
EN
6
INSTRUCŢIUNI DE SIGURANŢĂ
IMPORTANT DE CITIT ŞI RESPECTAT
Înainte de a folosi echipamentul, citiţi cu atenţie ghidurile de Sănătate şi Siguranţă şi
Folosire şi Îngrijire. Ţineţi aceste instrucţiuni la îndemână pentru referinţă viitoare.
Aceste instrucţiuni vor fi disponibile pe pagina web: www.whirlpool.eu
SIGURANŢA DVS. ŞI A CELORLALŢI ESTE FOARTE IMPORTANTĂ
Acest manual şi echipamentul însuşi oferă avertismente de siguranţă importante, care trebuie citite şi respectate în
permanenţă.
Acesta este un simbol de alertă de siguranţă.
Acest simbol vă alertează asupra posibilelor pericole care pot duce la rănire
sau deces în cazul dvs. sau al altora.
Toate mesajele de siguranţă vor urma simbolul de alertă de siguranţă sau cuvântul “PERICOL” sau “AVERTISMENT.”
Aceste cuvinte înseamnă:
Indică o situaţie periculoasă, care, dacă nu este evitată, va provoca răniri grave.
Indică o situaţie periculoasă care, dacă nu e evitată, va provoca răniri serioase.
Toate avertismentele de siguranţă oferă detalii specifice despre posibilul risc prezentat şi indică modul în
care se reduce riscul de rănire, avariere şi electrocutare care rezultă în urma folosirii inadecvate a
echipamentului. Respectaţi cu stricteţe următoarele instrucţiuni.
Neresperctarea acestor instrucţiuni poate duce la riscuri. Producătorul declină orice răspundere pentru
rănirea persoanelor sau animalelor sau pentru pagubele aduse proprietăţii dacă aceste sfaturi şi măsuri
de precauţie nu sunt respectate.
-
Copiii foarte mici (0-3 ani) şi mici (3-8 ani) trebuie ţinuţi departe sau supravegheaţi în
permanenţă.
-
Copiii de la 8 ani în sus şi persoanele cu capacităţi fizice, senzoriale sa mentale reduse sau fără
experienţă sau cunoştinţe pot folosi acest echipamentul sub supraveghere sau dacă au primit
instrucţiuni asupra utilizării echipamentului în condiţii de siguranţă şi dacă înţeleg pericolele
implicate. Copiii nu trebuie să se joace cu echipamentul. Curăţarea şi operaţiunile de întreţinere
realizate de utilizator nu vor fi realizate de copii nesupravegheaţi.
-
Echipamentul şi piesele sale accesibile se încing în timpul folosirii, copiii mici trebuie ţinuţi
departe. Nu permiteţi echipamentului să intre în contact cu cârpe sau alte materiale
inflamabile decât după ce toate componentele s-au răcit complet.
-
În timp şi după utilizare, nu atingeţi elementele de încălzire sau suprafaţa interioară a
echipamentului - risc de arsuri.
-
Uleiurile şi grăsimile supraîncălzite iau foc cu uşurinţă. Rămâneţi mereu vigilenţi atunci când gătiţi
mâncăruri bogate în grăsimi, ulei sau alcool (ex. rom, coniac, vin).
-
Nu lăsaţi niciodată echipamentul nesupravegheat în timpul uscării mâncării.
-
AVERTISMENT:
Nu încălziţi şi nu gătiţi cu borcane sau containere sigilate în echipament.
-
Presiunea acumulată înăuntru pe poate face să explodeze, avariind echipamentul.
-
Dacă se folosesc băuturi alcoolice atunci când gătiţi mâncare (ex. rom, coniac, vin), nu uitaţi că
alcoolul se evaporă la temperaturi înalte. Ca urmare, există riscul ca vaporii emanaţi de alcool
să ia foc dacă intră în contact cu elementul de încălzire electric.
-
Dacă echipamentul este adecvat folosirii sondelor, folosiţi numai o sondă de temperatură adecvată acestui cuptor.
-
PERICOL DE INCENDIU:
Nu stocaţi articole pe suprafeţe de gătit, deoarece pot lua foc.
-
ATENŢIE: În cazul în care se sparge sticla plitei:-opriţi imediat toate arzătoarele şi orice element e
încălzire electric şi izolaţi echipamentul de sursa de alimentare; - nu atingeţi suprafaţa
echipamentul; -nu folosiţi echipamentul
-
Aceste instrucţiuni sunt valide dacă simbolul ţării apare pe echipament. Dacă simbolul nu apare pe
echipament, este necesar să consultaţi instrucţiunile tehnice care vor oferi suficiente informaţii
referitoare la modificarea echipamentului pentru condiţiile de folosire ale ţării
-
Capacul de sticlă se poate sparge dacă este încălzit. Opriţi toate arzătoarele şi plăcile electrice
înainte de a închide capacul. Nu închideţi capacul atunci când un arzător arde
-
Dacă informaţiile din acest manual nu sunt respectate exact, o flacără sau o explozie poate
rezulta, provocând pagube materiale sau răniri.
PERICOL
AVERTISMENT
EN
7
DOMENIUL DE UTILIZARE A PRODUSULUI
-
Acest echipament este conceput doar pentru uz domestic. Nicio altă utilizare nu este
permisă (ex. încălzirea încăperilor). Folosirea echipamentului în scopuri comerciale este
interzisă. Producătorul îşi declină răspunderea pentru utilizarea inadecvată sau pentru
setarea incorectă a comenzilor.
-
Acest echipament este făcut pentru a fi folosit pentru aplicaţii domestice sau similare, precum:
-
Chicinete pentru angajaţi în magazine, birouri sau alte medii de lucru;
-
Ferme;
-
De către clienţi în hoteluri, moteluri şi alte medii rezidenţiale;
-
Medii de tip pensiune.
-
ATENŢIE: Echipamentul nu este destinat utilizării cu ajutorul unui temporizator extern sau al unui
sistem separat de comandă la distanţă.
-
Nu folosiţi echipamentul în aer liber.
-
Nu stocaţi substanţe explozive sau inflamabile precum sprayurile cu aerosoli şi nu plasaţi sau
folosiţi benzina sau alte materiale inflamabile în sau pe echipament: e posibil să izbucnească
un incendiu dacă echipamentul este pornit în mod neglijent.
INSTALARE
-
Instalarea şi reparaţiile trebuie efectuate de către un tehnician calificat, în conformitate cu
instrucţiunile producătorului şi cu reglementările locale de siguranţă. Nu reparaţi şi nu înlocuiţi
nicio parte a echipamentului decât dacă acest lucru este stipulat în mod special în manualul
de utilizare.
-
Conexiunile de la alimentarea cu curent electric şi cu gaz trebuie să respecte reglementările
locale.
-
Copiii nu trebuie să efectueze operaţiuni de instalare. Ţineţi copiii departe în timpul instalării
echipamentului. Nu lăsaţi materialele de ambalare (pungi de plastic, bucăţi din polistiren etc.)
la îndemâna copiilor, în timpul şi după instalarea echipamentului.
AVERTISMENT
: Modificarea echipamentului şi metoda sa de instalare sunt esenţiale pentru folosirea
echipamentului în condiţii de siguranţă şi corect în toate celelalte ţări
-
Folosiţi mănuşi de protecţie pentru a efectua toate operaţiunile de despachetare şi instalare.
-
După despachetarea echipamentului, asiguraţi-vă că uşa echipamentului se închide bine. În
cazul în care apar probleme, contactaţi dealerul sau cel mai apropiat service post-vânzare.
Pentru a preîntîmpina orice avarii, îndepărtaţi cuptorul din baza din polistiren doar la momentul
instalării.
-
Acest echipament trebuie manevrat şi instalat de cel puţin două persoane.
-
Echipamentul trebuie deconectat de la sursa de alimentare înaintea instalării.
-
În timpul instalării, asiguraţi-vă că echipamentul nu avariază cablul de alimentare.
-
Activaţi echipamentul doar când procedura de instalare a fost încheiată.
-
Unităţile de bucătărie care intră în contact cu echipamentul trebuie să fie rezistente la căldură
(min 90°C).
CONEXIUNEA LA REŢEAUA DE GAZE
AVERTISMENT
: Înaintea instalării, asiguraţi-vă că condiţiile locale de furnizare a gazului (natural sau
presiune) sunt compatibile cu setarea plitei (consultaţi plăcuţa indicatoare şi tabelul cu injectoare).
-
Folosiţi regulatoarele adecvate pentru presiunea gazului indicat în instrucţiuni.
-
AVERTISMENT: Condiţiile de ajustare pentru acest echipament sunt stipulate pe etichetă (sau plăcuţa
indicatoare).
-
AVERTISMENT:
Acest echipament nu este conectat la un dispozitiv de evacuare a produselor de
combustie. Va fi instalat şi conectat în conformitate cu reglementările curente de instalare. Trebuie
să acordaţi atenţie specială cerinţelor relevante referitoare la ventilaţie.
RO
8

-
AVERTISMENT: Aceste operaţiuni trebuie efectuate de către un tehnician calificat.
-
Dacă echipamentul este conectat la o alimentare cu gaz lichefiat, şurubul de reglare trebuie
strâns cât mai bine posibil.
-
Atunci când cilindrul de gaz este adoptat, cilindrul sau containerul de gaz trebuie să fie aşezat
corect (orientare verticală).
-
Folosiţi doar racorduri metalice flexibile sau rigide pentru conexiunea la gaze.
-
IMPORTANT : Dacă este folosit un racord din oţel inoxidabil, trebuie instalat astfel încât să nu atingă
nicio piesă mobilă de mobilier (ex. sertarul). Trebuie să treacă printr-o zonă unde nu există obstrucţii
şi unde e posibilă inspectarea acestuia pe toată lungimea.
-
După conectarea la alimentarea cu gaze, verificaţi dacă există scurgeri cu apă cu săpun. Aprindeţi
arzătoarele şi rotiţi butoanele de la poziţia max 1* la poziţia minimă 2* pentru verificarea stabilităţii
flăcării.
AVERTISMENTE ELECTRICE
-
Asiguraţi-vă că voltajul specificat pe plăcuţa identificatoare corespunde cu cea de acasă de la
dvs.
-
Pentru ca instalarea să corespundă cu reglementările actuale referitoare la siguranţă, este
necesar un comutator omnipolar cu un interval minim de contact de 3 mm.
-
Reglementările necesită ca echipamentul să fie împământat.
-
Pentru echipamentele dotate cu ştecăr, dacă ştecărul nu se potriveşte cu priza din perete,
contactaţi un tehnician calificat.
-
Nu folosiţi prelungitoare, prize multiple sau adaptoare. Nu conectaţi echipamentul la o priză care
poate fi acţionată prin telecomandă.
-
Cablul de alimentare trebuie să fie suficient de lung pentru conectarea echipamentului, odată
aşezat la locul său, la reţeaua de curent electric.
-
Nu trageţi de cablul de alimentare furnizat.
-
Dacă cablul de alimentare este avariat, trebuie înlocuit cu unul identic. Cablul de alimentare
trebuie înlocuit de către un tehnician calificat, în conformitate cu instrucţiunile producătorului şi cu
reglementările locale de siguranţă. Contactaţi un centru de service autorizat.
-
Nu puneţi echipamentul în funcţiune dacă are cablul de alimentare sau ştecărul avariat, dacă nu
funcţionează normal sau dacă a fost avariat sau scăpat. Nu scufundaţi cablul de alimentare sau
ştecărul în apă. Ţineţi cablul de alimentare departe de suprafeţe fierbinţi.
-
Keep the cord away from hot surfaces.
-
Nu atingeţi echipamentul cu nicio parte udă a corpului şi nu-l operaţi desculţ.
-
Trebuie să fie posibilă deconectarea echipamentului de la sursa de alimentare prin scoaterea
din priză dacă ştecărul este accesibil sau prin intermediul unui comutator multipolar accesibil
instalat înaintea prizei în conformitate cu standardele naţionale de siguranţă electrică.
FOLOSIREA CORECTĂ
ATENŢIE: Procesul de gătire trebuie supravegheat. Procesul de gătire trebuie supravegheat
în permanenţă.
-
Nu utilizaţi plita ca blat de lucru sau suport.
AVERTISMENT: Gătitul nesupravegheat cu grăsimi sau ulei pe o plită poate fi periculos şi poate
conduce la incendiu. Nu încercaţi niciodată să stingeţi focul cu apă, însă opriţi echipamentul şi
acoperiţi flacăra, de exemplu, cu un capac sau o pătură pentru foc.
-
Folosiţi mănuşi de bucătărie pentru a îndepărta tăvile şi accesoriile, având grijă să nu atingeţi
elementele de încălzire.
-
IMPORTANT : În cazul în care întâmpinaţi dificultăţi în rotirea butoanelor arzătoarelor, vă rugăm
să contactaţi serviciul post-vânzare pentru înlocuirea robinetului arzătorului dacă se dovedeşte a
fi defect.
-
Fantele folosite pentru aerisire şi dispersia căldurii nu trebuie acoperite niciodată.
-
Folosiţi oale şi tăvi cu funduri de aceeaşi lăţime ca cea a arzătoarelor sau puţin mai mari (vezi
tabelul specific). Asiguraţi-vă că oalele de pe grile trec dincolo de marginea plitei.
-
AVERTISMENT: Nu lăsaţi flacăra arzătorului să se extindă dincolo de marginea tăvii
-
IMPORTANT : Folosirea inadecvată a grilelor poate duce la avarierea plitei: nu poziţionaţi grilele
cu susul în jos şi nu le frecaţi de plită.
-
Nu folosiţi: Site din fontă, ceaune, oale sau tigăi din teracotă.
-
Difuzoarele de căldură, precum plasa metalică sau orice alt tip.
RO
9
.
-
Notă: în cazul în care anumite condiţii locale ale gazului furnizat fac dificilă aprinderea arzătorului, este
recomandabil să repetaţi operaţiunea cu butonul rotit spre setarea mică a flăcării.RO
-
Notă: În cazul instalării unei hote deasupra suprafeţei de gătit, consultaţi instrucţiunile hotei pentru
distanţa corectă.
-
AVERTISMENT: Picioarele protectoare din cauciuc ale grilei reprezintă un pericol de înecare pentru
copiii mici.
După îndepărtarea grilelor, asiguraţi-vă că toate picioarele sunt corect montate.
-
Îndepărtaţi orice lichid de pe capac înainte să-l deschideţi
-
Echipamentul trebuie deconectat de la sursa de alimentare înaintea operaţiunilor de curăţare sau întreţinere.
-
Nu folosiţi niciodată echipamente de curăţare cu aburi.
-
Asiguraţi-vă că echipamentul este oprit înainte de a înlocui becul, pentru a evita electrocutarea
-
Nu folosiţi agenţi de curăţare abrazivi sau raclete ascuţite din metal pentru a curăţa uşile de sticlă, deoarece
pot zgâria suprafaţa, ceea ce poate duce la spargerea sticlei.
-
Nu folosiţi produse abrazive sau corozive, agenţi pe bază de clor sau bureţi de sârmă.
-
Pentru a evita avarierea dispozitivului de aprindere electrică, nu-l folosiţi atunci când arzătoarele nu sunt în
carcasă.
PROTEJAREA MEDIULUI
ARUNCAREA MATERIALELOR DE AMBALARE
- Materialul de ambalare este 100% reciclabil şi este marcat cu simbolul de reciclare Diverse părţi ale
ambalajului trebuie astfel aruncate într-un mod responsabil şi în conformitate cu reglementările autorităţilor
locale privind aruncarea deşeurilor.
CASAREA ECHIPAMENTELOR GOSPODĂREŞTI
-
Atunci când casaţi un echipament gospodăresc, faceţi-l neutilizabil tăind cablul de alimentare şi îndepărtând
uşile şi rafturile (dacă există) astfel încât copiii să nu aibă acces facil în interior, rămânând blocaţi.
-
Acest echipament este produs cu materiale reciclabile sau reutilizabile. Aruncaţi-le în
conformitate cu reglementările locale de tratare a deşeurilor.
-
Pentru mai multe informaţii asupra tratării, recuperării şi reciclării echipamentelor electrice
gospodăreşti, contactaţi autoritatea locală competentă, serviciul de colectare pentru deşeuri
gospodăreşti sau magazinul de unde aţi achiziţionat echipamentul.
-
Acest echipament este marcat în conformitate cu Directiva Europeană 2012/19/EU, DEEE
(Deşeurile de echipamente electrice şi electronice).
-
Asigurându-vă că acest produs este aruncat corect, veţi putea evita posibilele consecinţe
negative pentru sănătatea mediului şi cea umană, care ar putea fi provocate de tratarea
incorectă a deşeurilor rezultate în urma casării acestui produs.
-
Simbolul
de pe produs sau de pe documentaţia însoţitoare indică faptul că nu trebuie să
fie tratat ca deşeu gospodăresc, ci trebuie dus într-un centru de colectare adecvat pentru
recilclarea echipamentelor electrice şi electronice.
SFATURI PENTRU DE ECONOMISIREA ENERGIEI
-
Preîncălziţi cuptorul doar dacă acest lucru este specificat în tabelul de gătit sau în reţeta dvs.
-
Folosiţi module de copt smălţuite sau emailate negre, deoarece acestea absorb căldura mult mai bine.
-
Opriţi cuptorul 10-15 minute înainte de seta timpul de gătit. Mâncarea care necesită gătire
prelungită va continua să fie gătită chiar după oprirea cuptorului."
-
-
CURĂȚARE ȘI ÎNTREȚINERE
RO
10
DECLARAŢIE DE CONFORMITATE
-
Acest echipament îndeplineşte cerinţele Eco Design ale Reglementărilor Europene nr. 65/2014, şi nr.
66/2014 în conformitate cu Standardul European EN 60350-1.
TABEL CARACTERISTICI
Dimensiuni
lăţime 40,3 cm
înălţime 32,4 cm
adâncime 45,5 cm
Volum
61l
Dimensiunile
compartimentului
inferior
lăţime 42 cm
înălţime 8,5 cm
adâncime 44 cm
Arzătoare
poate fi adaptat pentru a fi folosit cu
orice tip de gaz indicat pe plăcuţa cu
date tehnice, care se află înăuntru
sau, după ce compartimentul
cuptorului a fost deschis, pe peretele
di tâ di it i l t li
Tensiune şi
frecvenţă
vezi plăcuţa cu date tehnice
ETICHETĂ
PENTRU
ALIMENTARE
CU ENERGIE şi
ECODESIGN
Consum energie pentru
convecţie naturală - mod
încălzire:
Convecţie;
Consum de energie declarat pentru
clasa de convecţie forţată
-
mod
încălzire: Coacere
Plăcuţa identificatoare se află în interiorul clapetei
sau, după ce compartimentul cuptorului a fost
deschis, pe peretele din stânga din interiorul
cuptorului.
SERVICE POST-VÂNZARE
Înaintea apelării serviciului post-vânzare
1. Vedeţi dacă puteţi elimina problema de unul singur (vedeţi “Ghidul de depanare”).
2. Opriţi echipamentul şi reporniţi-l pentru a vedea dacă problema persistă.
Dacă problema persistă după verificările de mai sus, contactaţi cel mai apropiat service
post-vânzare
.
Specificaţi: tipul defecţiunii;
•
tipul exact şi modelul cuptorului;
•
numărul servicului post-vânzare (numărul de după cuvântul “Service” de pe plăcuţa identificatoare) aflat
înăuntrul clapetei compartimentului de stocare. Numărul de service este de asemenea furnizat în ghidul de
garanţie;
•
adresa dvs. completă;
•
telefonul dvs.
Pentru reparaţii, contactaţi un Serviciu Post-Vânzare Autorizat, indicat în garanţie.
Dacă orice lucrări efectuate de tehnicieni neafiliaţi centrelor de service post-vânzare ale Producătorului, solicitaţi
o chitanţă care specifică lucrări efectuate şi asiguraţi-vă că piesele de rezervă sunt originale.
Nerespectarea
acestor instrucţiuni poate compromite siguranţa şi calitatea produsului.
RO
11
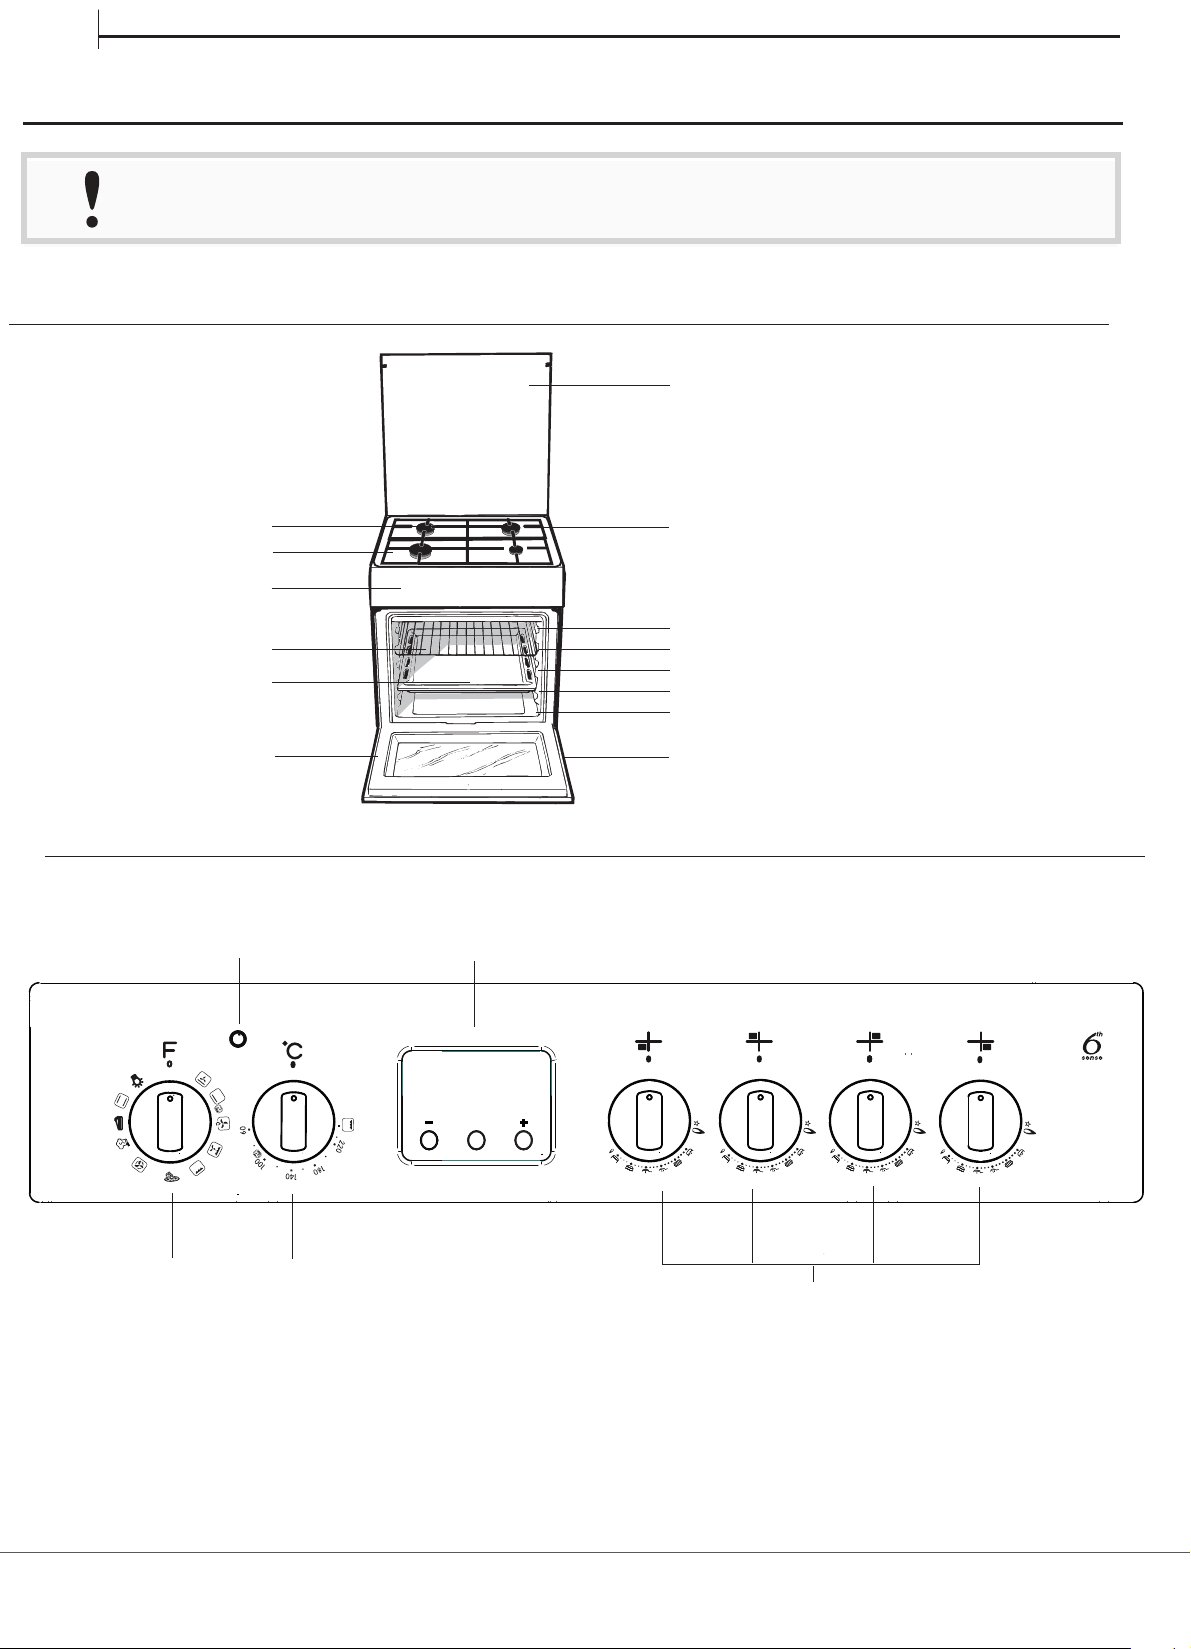
Hob grid
Glass cover*
Control panel
RACK shelf
DRIPPING PAN shelf
GUIDE RAILS
for the sliding racks
position 3
position 2
position 1
Gas burner
Containment surface
spillsfor
Adjustable foot
position 5
position 4
4.Electronic cooking programmer
2.THERMOSTAT knob
1.SELECTOR knob
3.THERMOSTAT indicator light
5.Hob BURNER control knob
4
5
1
3
2
MMM
EN
EN
PRODUCT DESCRIPTION
ENEN
Read the safety instructions carefully before using the product
DAILY REFERENCE
GUIDE
DAILY REFERENCE
GUIDE
DAILY REFERENCE
GUIDE
DAILY REFERENCE
GUIDE
DAILY REFERENCE
GUIDE
DAILY REFERENCE
GUIDE
CONTROL PANEL
1
2
1.
2.
3.
4.
5.
6.
7.
3
4
5
6
7
8
8.
9.
9
10
10.
11.
11.
12.
12
13
13
13.
12
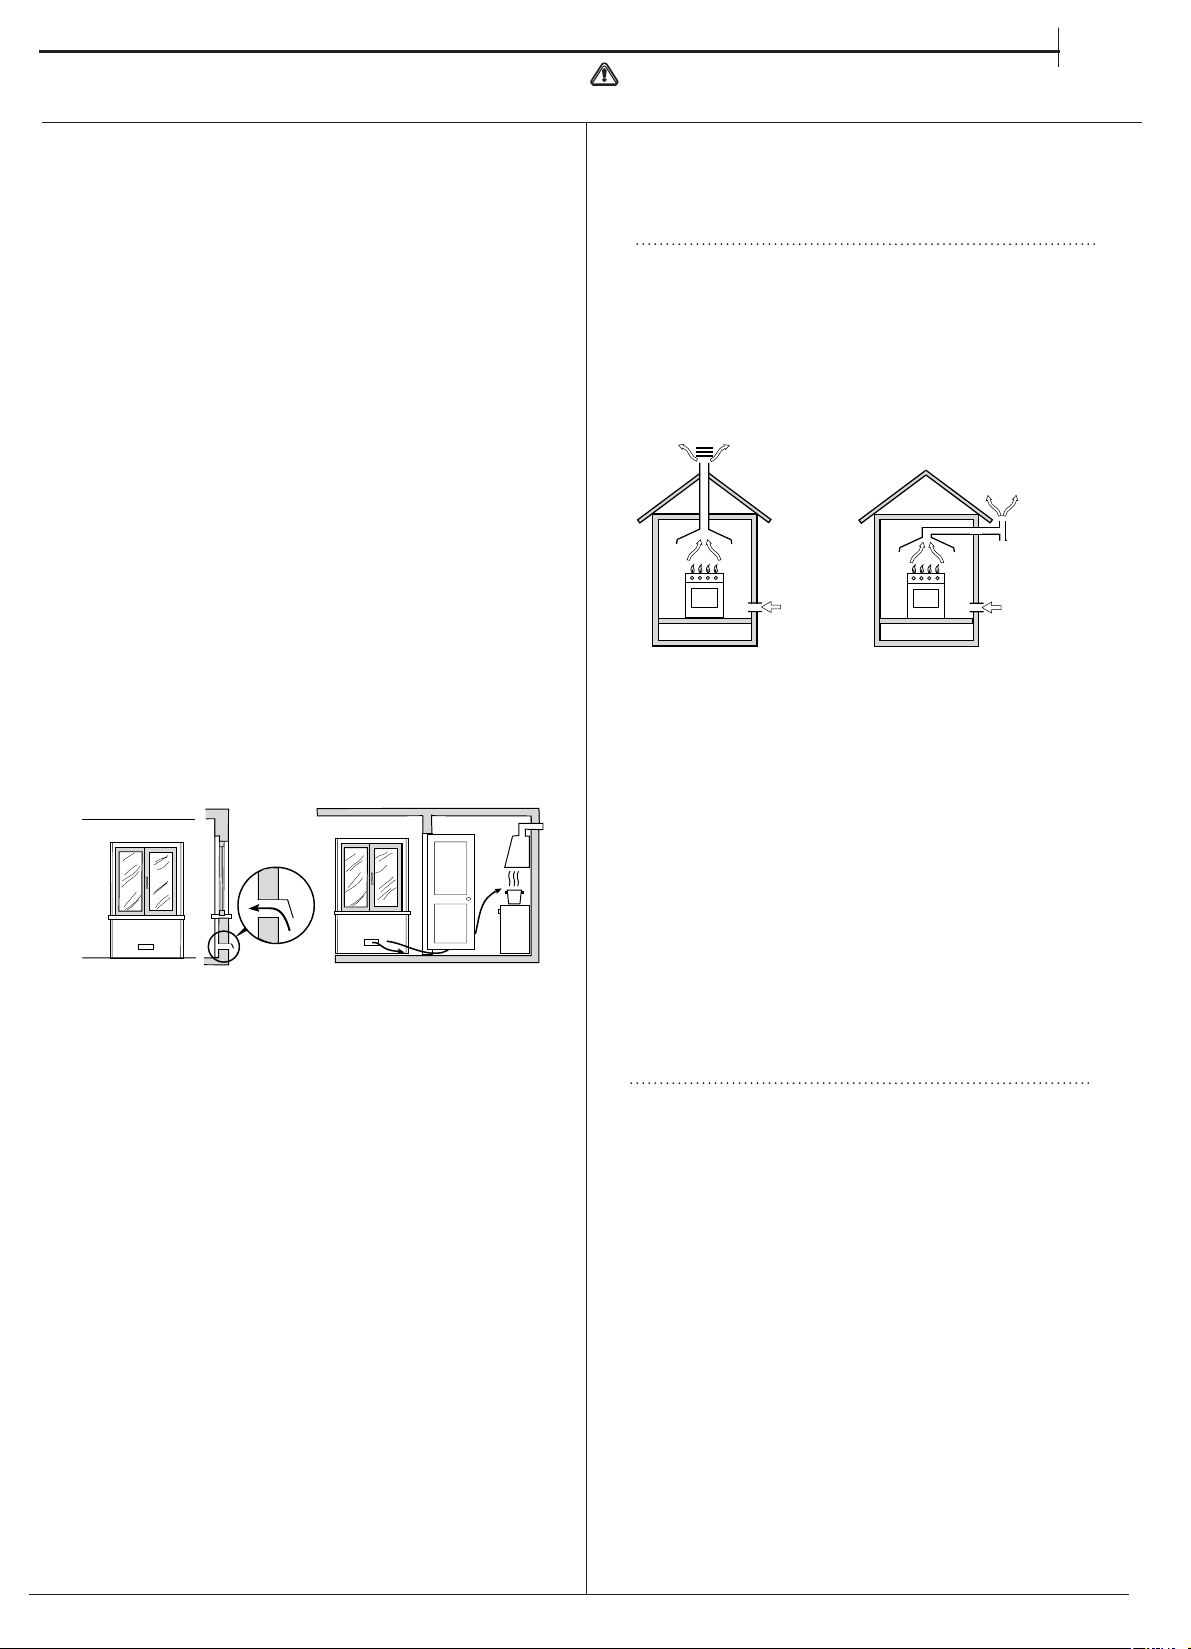
Room ventilation
The appliance may only be installed in permanently-
ventilated rooms, according to current national
legislation and any subsequent amendments in force.
The room in which the appliance is installed must be
ventilated adequately in order to provide as much air
as is needed by the normal gas combustion process
(the flow of air must not be lower than 2 m
3
/h per kW
of installed power).
The air inlets, protected by grilles, should have a
duct with an inner cross section of at least 100 cm
2
and should be positioned so that they are not liable
to even partial obstruction (
see figure A
).
These inlets should be enlarged by 100% - with a
minimum of 200 cm
2
- whenever the surface of the
hob is not equipped with a flame failure safety
device. When the flow of air is provided in an
indirect manner from adjacent rooms (
see figure B
),
provided that these are not communal parts of a
building, areas with increased fire hazards or
bedrooms, the inlets should be fitted with a
ventilation duct leading outside as described above.
Adjacent room Room requiring ventilation
AB
A
After prolonged use of the appliance, it is
advisable to open a window or increase the speed of
any fans used.
Disposing of combustion fumes
The efficient removal of combustion fumes should
be guaranteed using a hood which is connected to a
safe and efficient natural suction chimney, or using
an electric fan which begins to operate automatically
every time the appliance is switched on (
see figure
).
The liquefied petroleum gases are heavier than air
and collect by the floor, therefore all rooms
containing LPG cylinders must have openings
leading outside so that any leaked gas can escape
easily.
LPG cylinders, therefore, whether partially or
completely full, must not be installed or stored in
rooms or storage areas which are below ground level
(cellars, etc.). Only the cylinder currently in use
should be stored in the room; this should also be
kept well away from sources of heat (ovens,
chimneys, stoves) which may cause the temperature
of the cylinder to rise above 50°C.
Positioning and levelling
The appliance may be installed alongside any
cupboards whose height does not exceed that of the
hob surface.
Make sure that the wall which is in contact with the
back of the appliance is made from a non-
flammable, heat-resistant material (T 90°C).
To install the appliance correctly:
• Place it in the kitchen, the dining room or the
studio flat (not in the bathroom).
• If the top of the hob is higher than the cupboards,
the appliance must be installed at least 600 mm
away from them.
Installation
Ventilation
opening for
comburent air
Increase in the gap
between the door and
the flooring
Fumes channelled
straight outside
Fumes channelled through
a chimney or a branched
flue system (reserved for
cooking appliances)
EN
13
byaqualifiedtechnician
WARNING:Thisoperationmustbeperfomed
• If the cooker is
installed underneath a
wall cabinet, there must
be a minimum distance
of 420 mm between
this cabinet and the top
of the hob.
This distance should
be increased to 700
mm if the wall cabinets
are flammable (
see
figure
).
• Do not position blinds behind the cooker or less
than 200 mm away from its sides.
• Any hoods must be installed in accordance with
the instructions listed in the relevant operating
manual.
Levelling
If it is necessary to level the
appliance, screw the
adjustable feet into the
positions provided on each
corner of the base of the
cooker (
see figure
).
The legs* fit into the slots on
the underside of the base of
the cooker.
Electrical connection
Install a standardised plug corresponding to the
load indicated on the appliance data plate (
see
Technical data table
).
The appliance must be directly connected to the
mains using an omnipolar switch with a minimum
contact opening of 3 mm installed between the
appliance and the mains. The switch must be
suitable for the charge indicated and must comply
with current electrical regulations (the earthing wire
must not be interrupted by the switch). The supply
cable must be positioned so that it does not come
into contact with temperatures higher than 50°C at
any point.
HOOD
420
Min.
min.
650
mm. with hood
min.
700 mm. without hood
mm.
600
Min. mm.
420
Min. mm.
Before connecting the appliance to the power
supply, make sure that:
• The appliance is earthed and the plug is compliant
with the law.
• The socket can withstand the maximum power of
the appliance, which is indicated by the data
plate.
• The voltage falls between the values indicated on
the data plate.
• The socket is compatible with the plug of the
appliance. If the socket is incompatible with the
plug, ask an authorised technician to replace it.
Do not use extension cords or multiple sockets.
Once the appliance has been installed, the power
supply cable and the electrical socket must be
easily accessible.
The cable must not be bent or compressed.
The cable must be checked regularly and replaced
by authorised technicians only.
The manufacturer declines any liability should
these safety measures not be observed.
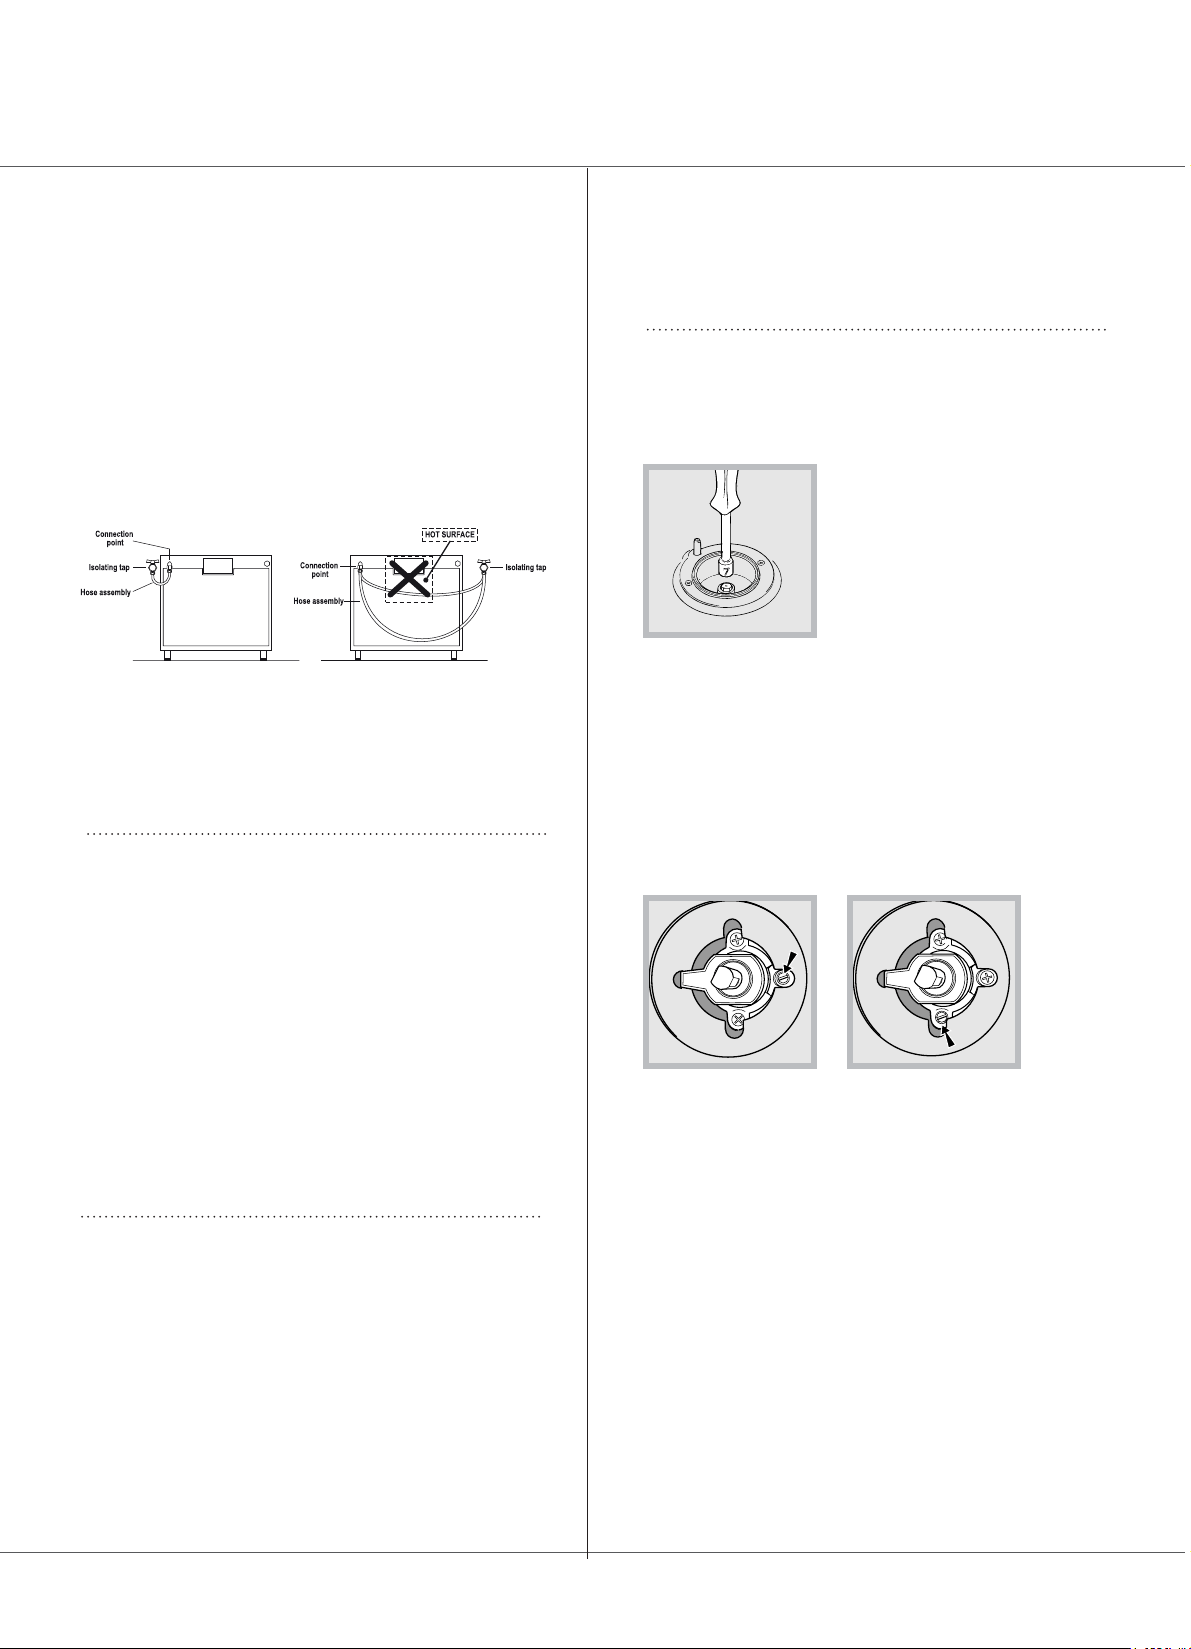
Gas connection
Connection to the gas network or to the gas cylinder
may be carried out using a flexible rubber or steel
hose, in accordance with current national legislation
and any subsequent amendments in force, after
making sure that the appliance is suited to the type
of gas with which it will be supplied (see the rating
sticker on the cover: if this is not the case
see
below
). When using liquid gas from a cylinder,
install a pressure regulator which complies with
current national regulations and any subsequent
amendments in force. To make connection easier, the
gas supply may be turned sideways*: reverse the
position of the hose holder with that of the cap and
replace the gasket supplied with the appliance.
Make sure that the gas supply pressure is
consistent with the values indicated in the Table of
burner and nozzle specifications (
see below
). This
will ensure the safe operation and durability of your
appliance while maintaining efficient energy
consumption.
Gas connection using a flexible rubber hose
Make sure that the hose complies with current
national legislation. The internal diameter of the hose
must measure: 8 mm for a liquid gas supply; 13
mm for a methane gas supply.
*
Only available in certain models.
The appliance must not be installed behind
a decorative door in order to avoid overheating
14
Once the connection has been performed, make
sure that the hose:
• Does not come into contact with any parts which
reach temperatures of over 50°C.
• Is not subject to any pulling or twisting forces and
that it is not kinked or bent.
• Does not come into contact with blades, sharp
corners or moving parts and is not compressed.
• Is easy to inspect along its whole length so that
its condition may be checked.
• Is shorter than 1500 mm.
• Fits firmly into place at both ends, where it will be
fixed using clamps which comply with current
national regulations.
If one or more of these conditions is not fulfilled or
if the cooker must be installed in accordance with
the conditions listed for class 2 - subclass 1
appliances (installed between two cupboards), the
flexible steel hose must be used instead (
see
below
).
Connecting a flexible jointless stainless steel
pipe to a threaded attachment
Make sure that the hose complies with current
national regulations and that the aluminium gaskets
comply with UNI 9001-2, or the rubber gaskets
comply with current national regulations.
To begin using the hose, remove the hose holder on
the appliance (the gas supply inlet on the appliance
is a cylindrical threaded 1/2 gas male attachment).
Perform the connection in such a way that the hose
length does not exceed a maximum of 2 metres,
making sure that the hose is not compressed and
does not come into contact with moving parts.
Checking the connection for leaks
When the installation process is complete, check the
hose fittings for leaks using a soapy solution. Never
use a flame.
Adapting to different types of gas
It is possible to adapt the appliance to a type of gas
other than the default type (this is indicated on the
rating label on the cover).
Adapting the hob
Replacing the nozzles for the hob burners:
1. Remove the hob grids and slide the burners off
their seats.
2. Unscrew the nozzles using
a 7 mm socket spanner (
see
figure
), and replace them with
nozzles suited to the new type
of gas (
see Table of burner
and nozzle specifications
).
3. Replace all the components
by following the above
instructions in reverse.
Adjusting the hob burners’ minimum setting:
1. Turn the tap to the minimum position.
2. Remove the knob and adjust the regulatory
screw, which is positioned inside or next to the tap
pin, until the flame is small but steady.
If the appliance is connected to a liquid gas
supply, the regulatory screw must be fastened as
tightly as possible.
3. While the burner is lit, quickly change the position of
the knob from minimum to maximum and vice versa
several times, checking that the flame is not
extinguished.
The hob burners do not require primary air adjustment.
After adjusting the appliance so it may be used with a
different type of gas, replace the old rating label with a
new one which corresponds to the new type of gas (these
labels are available from Authorised Technical Assistance
Centres).
Should the gas pressure used be different (or vary
slightly) from the recommended pressure, a suitable
pressure regulator must be fitted to the inlet hose in
accordance with current standards EN 88-1 and EN
88-2 relating to “regulators for channelled gas”.
15
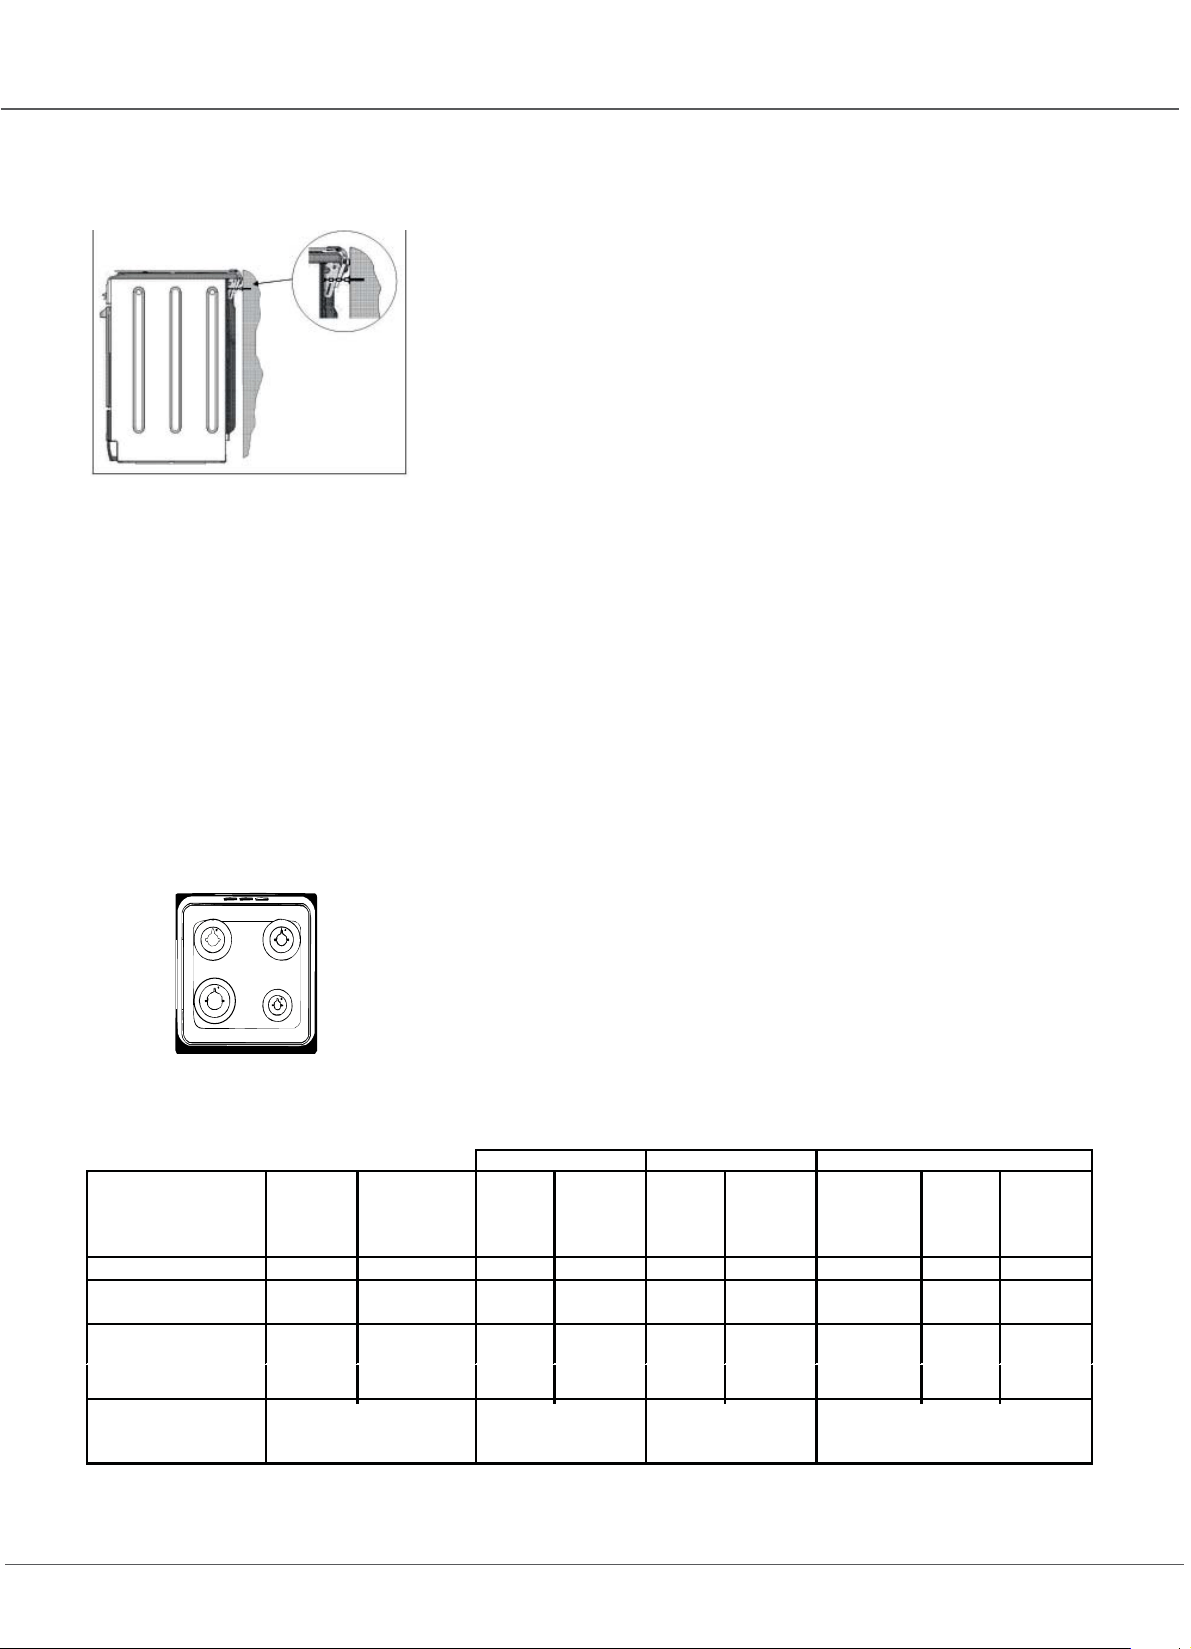
Safety Chain
In order
to prevent
accidental
tipping of the
appliance, for
example by
a child clim-
bing onto the
oven door, the
supplied safety
chain MUST be
installed!
The cooker is fitted with a safety chain to be fixed by
means of a screw (not supplied with the cooker) to
the wall behind the appliance, at the same height as
the chain is attached to the appliance.
Choose the screw and the screw anchor according
to the type of material of the wall behind the applian-
ce. If the head of the screw has a diameter smaller
than 9mm, a washer should be used. Concrete wall
requires the screw of at least 8mm of diameter, and
60mm of length.
Ensure that the chain is fixed to the rear wall of the
cooker and to the wall, as shown in figure, so that
after installation it is tensioned and parallel to the
ground level.
Table of burner and nozzle specifications
Table1 (for Poland) G20 (GZ50) G2.350 (GZ35) G30 (GPB)
Burner Diameter
(mm)
Thermal
Power
kW (p.c.s.*)
Nozzle
1/100
(mm)
Flow*
l/h
Nozzle
1/100
(mm)
Flow*
l/h
Thermal
power
(p.c.i.*)
kW
Dysza
1/100
(mm)
Flow*
g/h
Fast (Large)(R)
100 3,00 128 286 170 397 3,40 87 247
Semi Fast
(Medium)(S)
75 1,90 104 181 140 251 2,20 69 160
Auxiliary (Small)(A)
51
1,00
78 95 102 132 1,10 50 80
Supply Pressures
Nominal (mbar)
Minimum (mbar)
Maximum (mbar)
16
20
25
10
13
16
29
37
44
* A 15°C 1013 mbar dry gas
G20 (GZ50) p.c.i. = 37,78 MJ/m³
G2.350 (GZ35) p.c.i. = 27,20 MJ/m³
G30
(
GPB
)
p.c.i. = 125,81 MJ/m³
S
S
A
R
16
Start-up and use
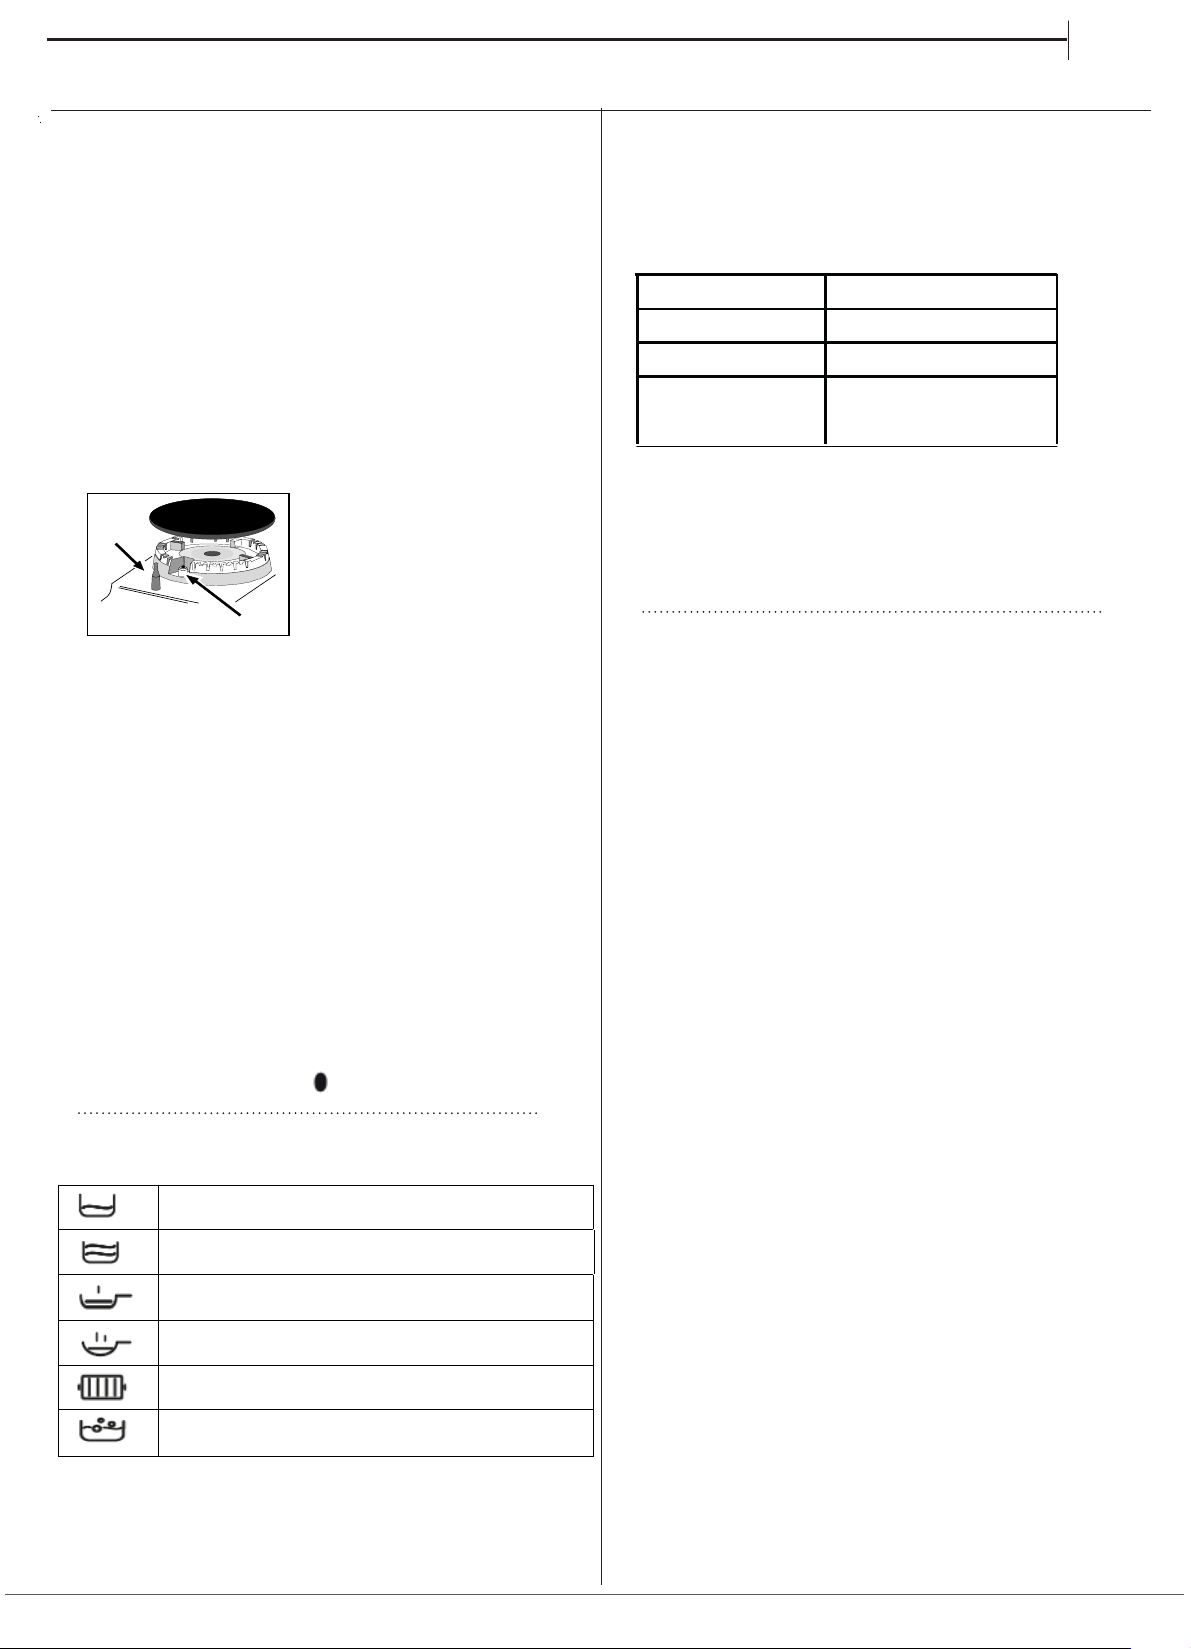
Using the hob
Lighting the burners
For each BURNER knob there is a complete ring
showing the strength of the flame for the relevant
burner.
To light one of the burners on the hob:
1. Bring a flame or gas lighter close to the burner.
2. Press the BURNER knob and turn it in an
anticlockwise direction so that it is pointing to the
maximum flame setting E.
3. Adjust the intensity of the flame to the desired
level by turning the BURNER knob in an
anticlockwise direction. This may be the minimum
setting C, the maximum setting E or any position in
between the two.
If the appliance is fitted with
an electronic lighting
device*(C) (
see figure
),
press the BURNER knob
and turn it in an
anticlockwise direction,
towards the minimum flame
setting, until the burner is lit. The burner might be
extinguished when the knob is released. If this
occurs, repeat the process, holding the knob down
for a longer period of time.
If the appliance is equipped with a flame failure
safety device (X), press and hold the BURNER knob
for approximately 3-7 seconds to keep the flame
alight and to activate the device.
If the flame is accidentally extinguished, switch off
the burner and wait for at least 1 minute before
attempting to relight it.
If the appliance is equipped with a flame failure
safety device*, press and hold the BURNER knob
for approximately 2-3 seconds to keep the flame
alight and to activate the device.
To switch the burner off, turn the knob until it
reaches the stop position .
Advice when using burners
For the burners to work in the most efficient way
possible and to save on the amount of gas
consumed, it is recommended that only pans which
have a lid and a flat base are used. They should
also be suited to the size of the burner.
To identify the type of burner, please refer to the
diagrams contained in the paragraph “Burner and
nozzle specifications.”
For models equipped with a reducer grid, the latter
must be used only for the auxiliary burner, when
pans with a diameter of less than 12 cm are used.
X
C
Burner Ĝ Cookware Diameter (cm)
Fast (R) 24 - 26
Semi Fast (S) 16 - 20
Auxiliary (A) 10 - 14
Flame adjustment according to levels
*
Only available in certain models.
GB
Ideal for gentle cooking (e.g: rice, sauces, roasts, fish) with
liquids (water, wine, broth, milk)
Ideal for stewing ( for a long period of time) and thickening.
Creaming pasta,
Ideal for sautéing.
Cooking on a high flame and browning (roast, steaks,
escalopes, fish fillets, fried eggs.)
Ideal for grilling and browning, starting to cook, frying deep
frozen products.
Ideal for rapidly increasing the temperature of food to fast
boiling in the case of water or rapidly heating cooking liquids.
Using the oven
The first time you use your appliance, heat the empty
oven with its door closed at its maximum temperature
for at least half an hour. Ensure that the room is well
ventilated before switching the oven off and opening
the oven door. The appliance may emit a slightly
unpleasant odour caused by protective substances
used during the manufacturing process burning away.
Before operating the product, remove all plastic film
from the sides of the appliance.
Never put objects directly on the bottom of the oven;
this will avoid the enamel coating being damaged.
1. Select the desired cooking mode by turning the
SELECTOR knob.
2. Select the recommended temperature for the
cooking mode or the desired temperature by turning
the THERMOSTAT knob.
A list detailing cooking modes and suggested cooking
temperatures can be found in the relevant table (see
Oven cooking advice table).
During cooking it is always possible to:
• Change the cooking mode by turning the
SELECTOR knob.
• Change the temperature by turning the
THERMOSTAT knob.
• Stop cooking by turning the SELECTOR knob to the
“0” position.
Always place cookware on the rack(s) provided.
All cooking modes have a default cooking
EN
17
THERMOSTAT indicator light
When this is illuminated, the oven is generating heat.
It switches off when the inside of the oven reaches
temperature. At this point the light
illuminates and switches off alternately, indicating
and is maintaining the
temperature at a constant level.
Oven light
This is switched on by turning the SELECTOR knob to
any position other than “0”. It remains lit as long as the
oven is operating. By selecting
with the knob, the
light is switched on without any of the heating elements
being activated.
Cooking modes
All cooking modes have a default cooking
temperature which may be adjusted manually to a
40°C and 250°C as desired.
value between
the selected
that the thermostat is working
Function Function Function
TRADITIONAL
OVEN
Both the top and bottom heating elements will come on. When using this traditional
cooking mode, it is best to use one cooking rack only. If more than one rack is used, the
heat will be distributed in an uneven manner.
BAKING
The rear heating element and the fan are switched on, thus guaranteeing the
distribution of heat in a delicate and uniform manner throughout the entire oven. This
mode is ideal for baking and cooking temperature sensitive foods (such as cakes that
need to rise) and for the preparation of pastries on 3 shelves simultaneously.
FAST COOKING
The heating elements and the fan come on, guaranteeing the distribution of heat
consistently and uniformly throughout the oven.
Preheating is not necessary for this cooking mode. This
mode is particularly suitable
for cooking pre-packed
food quickly (frozen or pre-cooked). The best results are
achieved using one cooking rack only.
MULTI-
COOKING
All the heating elements (top, bottom and circular) switch on and the fan begins to
operate. Since the heat remains constant throughout the oven, the air cooks and
browns food in a uniform manner. A maximum of two racks may be used at the same
time.
PIZZA
The circular heating elements and the elements at the bottom of the oven are
switched on and the fan is activated. This combination heats the oven rapidly by
producing a considerable amount of heat, particularly from the element at the
bottom. If you use more than one rack at a time, switch the position of the dishes
halfway through the cooking process.
GRILL
The central part of the top heating element is switched on. The high and direct
temperature of the grill is recommended for food that requires a high surface
temperature (veal and beef steaks, fillet steak and entrecôte). This cooking
mode uses a limited amount of energy and is ideal for grilling small dishes. Place the food
in the centre of the rack, as it will not be cooked properly if it is placed in the corners.
GRATIN
The top heating element and the rotisserie (where present) are activated and
the fan begins to operate. This combination of features increases the effectiveness of
the unidirectional thermal radiation provided by the heating elements through
forced circulation of the air throughout the oven. This helps prevent food from burning
on the surface and allows the heat to penetrate right into the food.
DEFROSTING
The fan located on the bottom of the oven makes the air circulate at room temperature
around the food. This is recommended for the defrosting of all types of food, but in
particular for delicate types of food which do not require heat, such as for example: ice
cream cakes, cream or custard desserts, fruit cakes. By using the fan, the defrosting
time is approximately halved. In the case of meat, fish and bread, it is possible to
accelerate the process using the “multi-cooking” mode and setting the temperature to
80° - 100°C
BOTTOM
The lower heating element is activated. This position is recommended for
perfecting the cooking of dishes (in baking trays) which are already cooked on the
surface but require further cooking in the centre, or for desserts with a covering of
fruit or jam, which only require moderate colouring on the surface. It should
be noted that this function does not allow the maximum temperature to be reached
inside the oven (250°C) and it is therefore not recommended that foods are cooked
using only this setting, unless you are baking cakes (which should be baked at a
temperature of 180°C or lower).
BOTTOM
VENTILATED
The bottom heating element and the fan is activated, which allows for the heat
distribution within the whole cavity of the oven. This combination is useful for light
cooking of vegetables and fish
.
18
Cooking on several shelves simultaneously
If it is necessary to use two racks, use the FAN
ASSITED mode , as this is the only cooking mode
suited to this type of cooking. We also recommend
that:
• Positions 1 and 5 are not used. This is because
excessive direct heat can burn temperature
sensitive foods.
• Positions 2 and 4 are used and that food that
requires more heat is placed on the rack in position
2.
• When cooking foods that require different cooking
times and temperatures, set a temperature
that is halfway between the two recommended
temperatures (see Oven cooking advice table) and
place the more delicate food on the rack in position
4. Remove the food that requires a shorter cooking
time first.
• When cooking pizzas on several racks with the
temperature set to 220°C, the oven is preheated for
15 minutes. Generally speaking, cooking on the rack
in position 4 takes longer: we recommend that the
pizza cooked on the lowest rack position is removed
first, followed by the pizza cooked in position 4 a few
minutes later.
• Place the dripping pan on the bottom and the rack
on top.
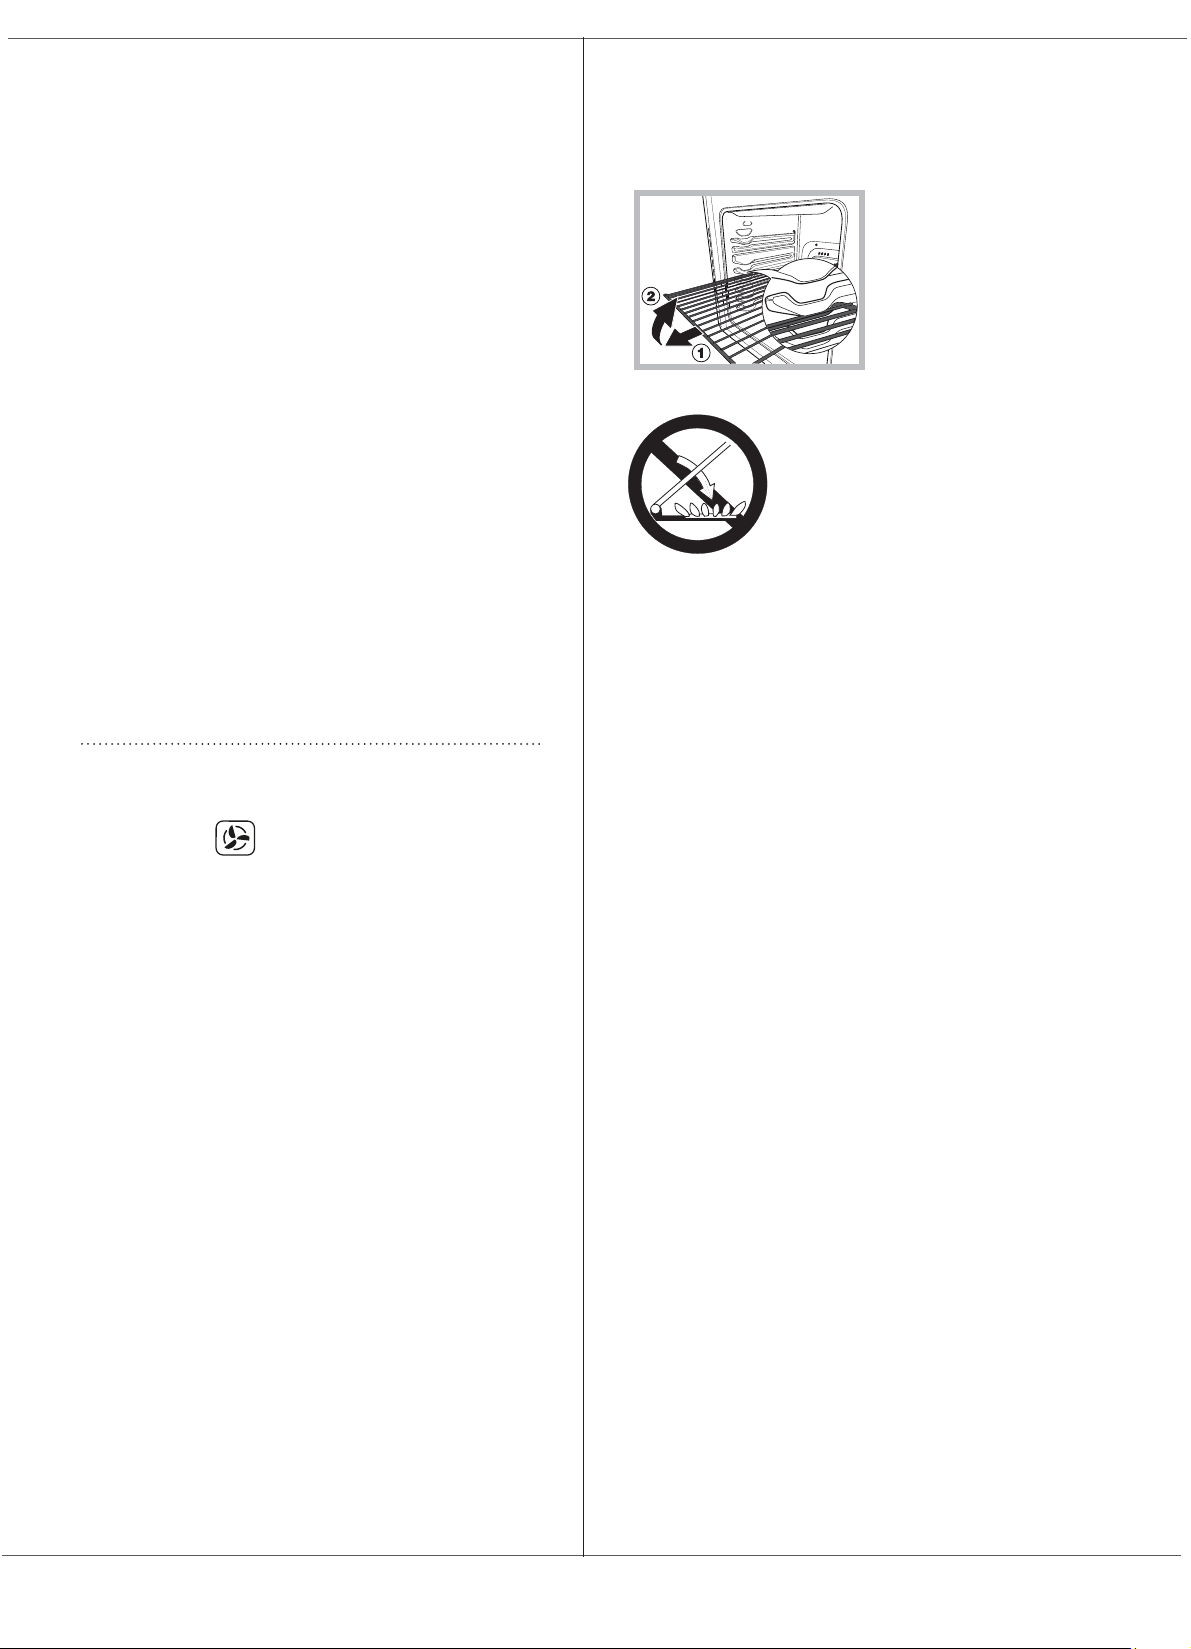
The oven is
provided with a stop sys-
tem to extract the racks
and prevent them from
coming out of the oven.(1)
As shown in the drawing,
to extract them comple-
tely, simply lift the racks,
holding them on the front
part, and pull (2).
WARNING! The glass lid can break
in if it is heated up. Turn off all the
burners and the electric plates before
closing the lid. *Applies to the models
with glass cover only.
Practical cooking advice
In the GRILL cooking mode, place the dripping pan in
position 1 to collect cooking residues (fat and/or grease).
GRILL
• Insert the rack in position 3 or 4. Place the food in the
centre of the rack.
• We recommend that the power level is set to maximum.
The top heating element is regulated by a thermostat
and may not always operate constantly.
PIZZA
• Use a light aluminium pizza pan. Place it on the rack
provided.
For a crispy crust, do not use the dripping pan as it
prevents the crust from forming by extending the total
cooking time.
• If the pizza has a lot of toppings, we recommend
adding the mozzarella cheese on top of the pizza
halfway through the cooking process.
19
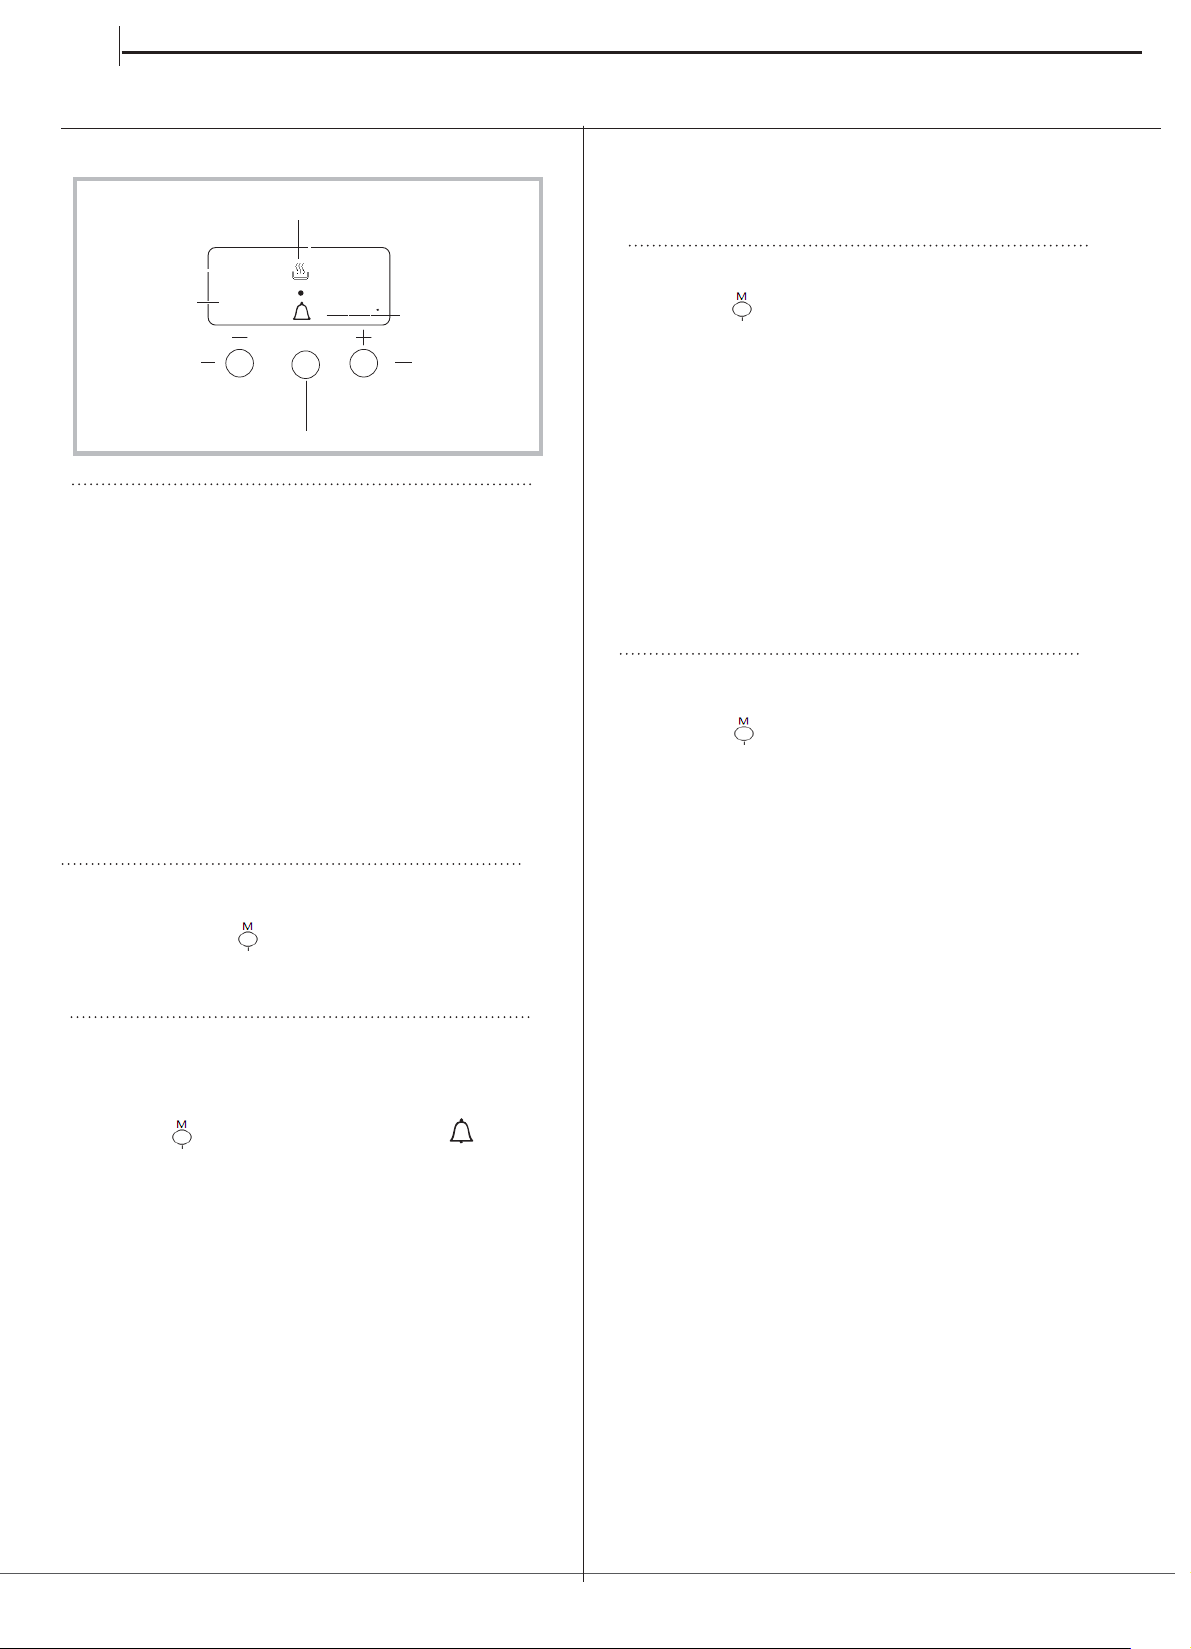
DISPLAY
MODE
button
AUTO
icon
TIMER icon
DECREASE TIME
button
INCREASE TIME
button
•• ••
Setting the clock
The clock may be set when the oven is switched off
or when it is switched on, provided that the end time of
a cooking cycle has not been programmed previously.
After the appliance has been connected to the mains,
or after a blackout, the 00:00
digits on the DISPLAY will begin to flash.
1. Press the
"+" and "-" button simultaneously
2. Use the “+” and “-” buttons to adjust the time; if you
press and hold either button, the display will scroll
through the values more quickly, making it quicker and
easier to set the desired value.
Setting the minute minder
This function does not interrupt cooking and does not
affect the oven; it is simply used to activate the buzzer
when the set amount of time has elapsed.
1. Press the
button several times until the
icon
and the three digits on the display begin to flash.
2. Use the “+” and “-” buttons to set the desired time; if
you press and hold either button, the display will scroll
through the values more quickly, making it quicker and
easier to set the value.
3. Wait for 5 seconds, If you press the buttom one more time
the display will then show the time as it counts down.
When this period of time has elapsed the buzzer will be
activated.
Programming cooking
A cooking mode must be selected before
programming can take place.
Programming the cooking duration
1. Press the button several times until
icon
and the DUR digits on the DISPLAY begin to flash.
2. Use the “+” and “-” buttons to set the desired
duration; if you press and hold either button, the
display will scroll through the values more quickly,
making it quicker and easier to set the value.
3. Wait for 5 seconds, after that the icon will be visible
4. When the set time has elapsed
and the oven will stop cooking
you will hear a buzzer sounds. Press any button to stop the
buzzer.
• For example: it is 9:00 a.m. and a time of 1 hour and
15 minutes is programmed. The programme will
stop automatically at 10:15 a.m.
Cancelling a programme
To cancel a programme:
• press the button until the icon corresponding to
the setting you wish to cancel and the digits on the
display are flashing. Press the “-” button until the
digits 00:00 appear on the display.
• Press and hold the “+” and “-” buttons; this will
cancel all the settings selected previously, including
timer settings.
M
on the display.
A
U
T
O
A
U
T
O
A
U
T
O
Changing the buzzer frequency
1. First press "+" and "-" button simultaneously
and than press the
button for selecting the menu
for changing the buzzer frequency. While the text tonX is
visible the buzzer signal frequency can be changed by
touching the "- " repeatedly.
Than the colon between hours and minutes is flashing.
COOKING PROCESS
icon
Clock/Minute
Minder Operation
EN
20
Oven cooking advice table
cooking times are approximate and may vary according to personal taste. When cooking using the grill or fan
assisted grill, the dripping pan must always be placed on the 1st oven rack from the bottom.
Cooking
modes
Foods Weight
(in kg)
Rack Position Pre-heating
time
(minutes)
Recommended
temperature
Cooking
time
(minutes)
Traditional
Oven
Duck
Roast veal or beef
Pork roast
Biscuits (short pastry)
Tarts
1
1
1
-
1
3
3
3
3
3
15
15
15
15
15
200
200
200
180
180
65-75
70-75
70-80
15-20
30-35
Baking
Mode
Tarts
Fruit cakes
Plum cake
Sponge cake
Stuffed pancakes (on 2 racks)
Small cakes (on 2 racks)
Cheese puffs (on 2 racks)
Cream puffs (on 3 racks)
Biscuits (on 3 racks)
Meringues (on 3 racks)
0.5
1
0.7
0.5
1.2
0.6
0.4
0.7
0.7
0.5
3
2 or 3
3
3
2 and 4
2 and 4
2 and 4
1 and 3 and 5
1 and 3 and 5
1 and 3 and 5
15
15
15
15
15
15
15
15
15
15
180
180
180
160
200
190
210
180
180
90
20-30
40-45
40-50
25-30
30-35
20-25
15-20
20-25
20-25
180
Frozen food
Pizza
Courgette and prawn pie
Country style spinach pie
Turnovers
Lasagne
Golden Rolls
Chicken morsels
0.3
0.4
0.5
0.3
0.5
0.4
0.4
2
2
2
2
2
2
2
-
-
-
-
-
-
-
250
200
220
200
200
180
220
12
20
30-35
25
35
25-30
15-20
Pre-cooked food
Golden chicken wings
0.4
2
-
200
20-25
Fast
cooking
Fresh Food
Biscuits (short pastry)
Plum cake
Cheese puffs
0.3
0.6
0.2
2
2
2
-
-
-
200
180
210
15-18
45
10-12
Multi-
cooking
Pizza (on 2 racks)
Lasagne
Lamb
Roast chicken + potatoes
Mackerel
Plum cake
Cream puffs (on 2 racks)
Biscuits (on 2 racks)
Sponge cake (on 1 rack)
Sponge cake (on 2 racks)
Savoury pies
1
1
1
1+1
1
1
0.5
0.5
0.5
1
1.5
2 and 4
3
2
2 and 4
2
2
2 and 4
2 and 4
2
2 and 4
3
15
10
10
15
10
10
10
10
10
10
15
230
180
180
200
180
170
190
180
170
170
200
15-20
30-35
40-45
60-70
30-35
40-50
20-25
10-15
15-20
20-25
25-30
Pizza Mode
Pizza
Roast veal or beef
Chicken
0.5
1
1
3
2
2 or 3
15
10
10
220
220
180
15-20
25-30
60-70
Soles and cuttlefish
Squid and prawn kebabs
Cuttlefish
Cod filet
Grilled vegetables
Veal steak
Sausages
Hamburgers
Mackerels
Toasted sandwiches (or toast)
0.7
0.6
0.6
0.8
0.4
0.8
0.6
0.6
1
4 and 6
4
4
4
4
3 or 4
4
4
4
4
4
-
-
-
-
-
-
-
-
-
-
Max
Max
Max
Max
Max
Max
Max
Max
Max
Max
10-12
8-10
10-15
10-15
15-20
15-20
15-20
10-12
15-20
3-5
Gratin
Grilled chicken
Cuttlefish
1.5
1.5
2
2
10
10
200
200
55-60
30-35
Bottom
Ventilated
Bottom
For perfecting cooking
Bottom
Ventilated
Bottom
Grill
*
21
Switching the appliance off
Disconnect your appliance from the electricity
supply before carrying out any work on it.
Cleaning the appliance
Never use steam cleaners or pressure cleaners on
the appliance.
• The stainless steel or enamel-coated external
parts and the rubber seals may be cleaned using
a sponge which has been soaked in lukewarm
water and neutral soap. Use specialised products
for the removal of stubborn stains. After cleaning,
rinse well and dry thoroughly. Do not use abrasive
powders or corrosive substances.
• The hob grids, burner caps, flame spreader rings
and burners may be removed to make cleaning
easier; wash them in hot water and non-abrasive
detergent, making sure all burnt-on residue is
removed before drying them thoroughly.
• Clean the terminal part of the flame failure safety
devices* frequently.
• The inside of the oven should ideally be cleaned
after each use, while it is still lukewarm. Use hot
water and detergent, then rinse well and dry with
a soft cloth. Do not use abrasive products.
• Clean the glass part of the oven door using a
sponge and a non-abrasive cleaning product,
then dry thoroughly with a soft cloth. Do not use
rough abrasive material or sharp metal scrapers
as these could scratch the surface and cause the
glass to crack.
• The accessories can be washed like everyday
crockery, and are even dishwasher safe.
• Do not close the cover when the burners are alight
or when they are still hot.
Gas tap maintenance
Over time, the valves may become jammed or
difficult to turn. If this occurs, the valve must be
replaced.
This procedure must be performed by aThis procedure must be performed by a
This procedure must be performed by aThis procedure must be performed by a
This procedure must be performed by a
qualified technician who has been authorised byqualified technician who has been authorised by
qualified technician who has been authorised byqualified technician who has been authorised by
qualified technician who has been authorised by
the manufacturer.the manufacturer.
the manufacturer.the manufacturer.
the manufacturer.
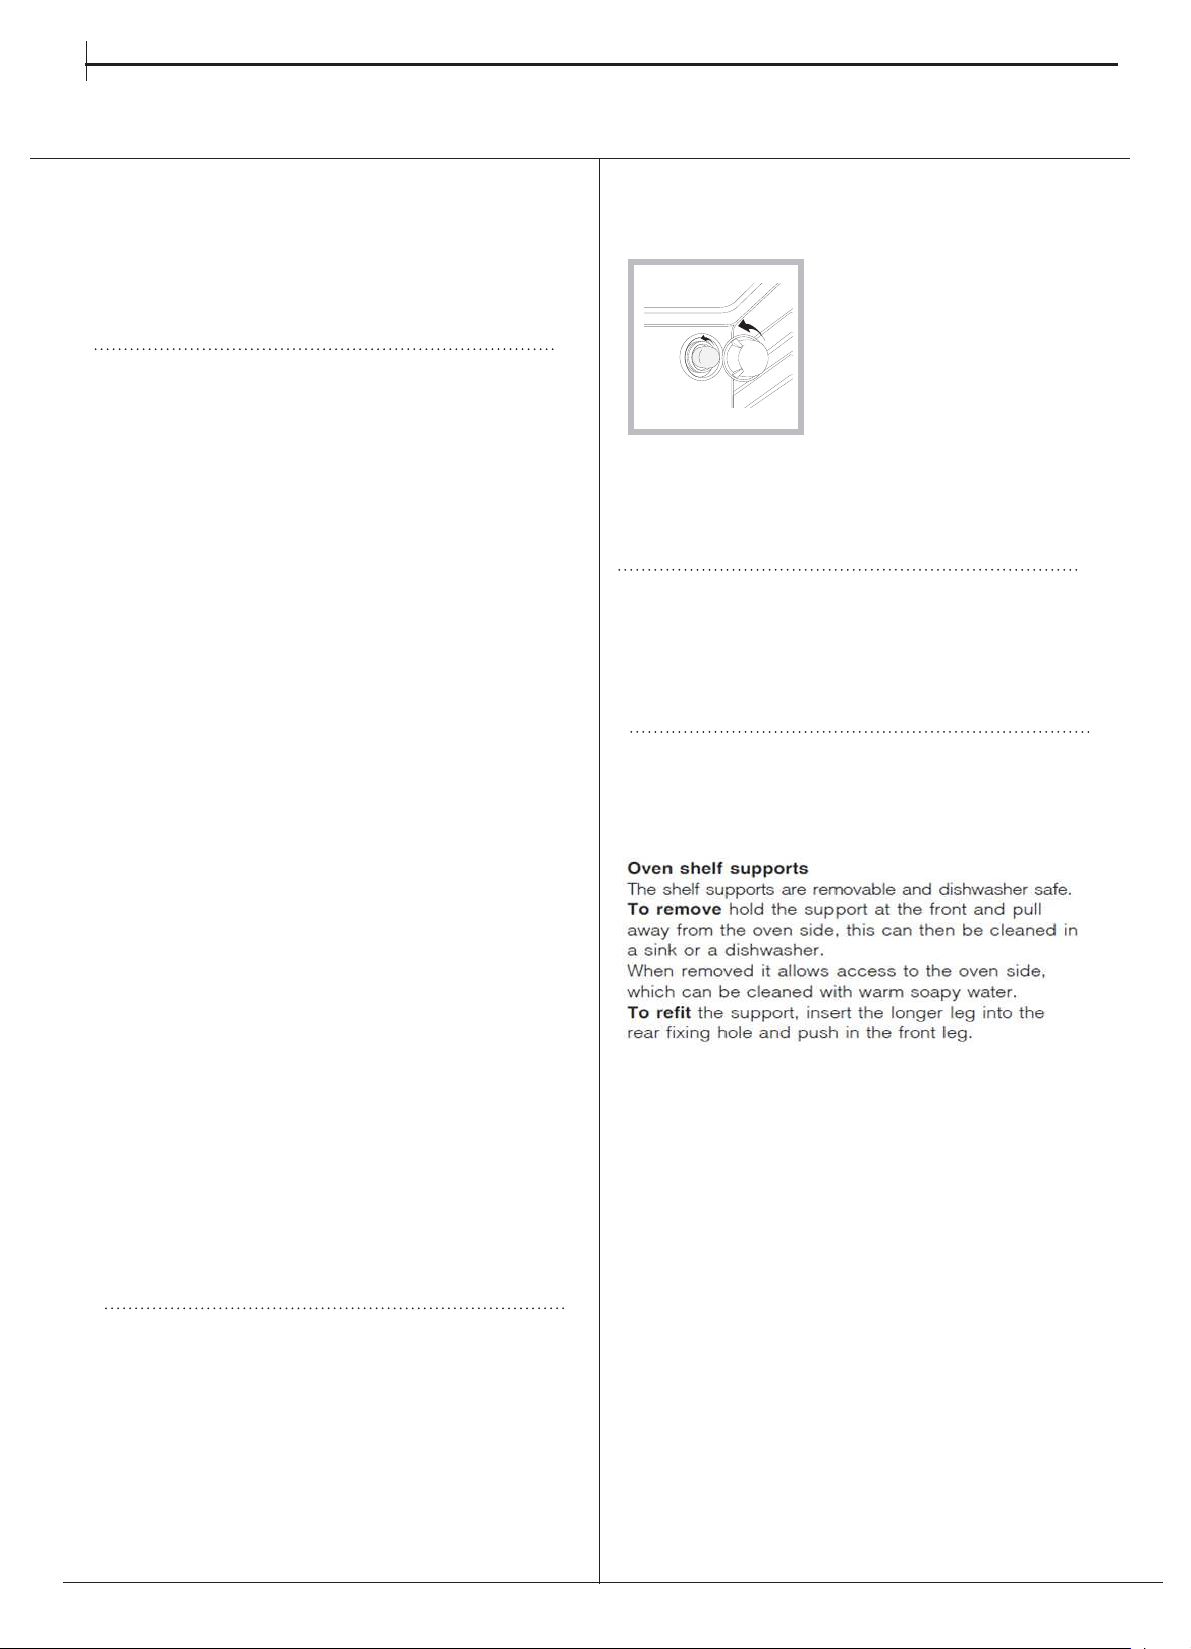
Care and maintenance
*
Only available in certain models.
Replacing the oven light bulb
1. After disconnecting the oven
from the electricity mains, remove
the glass lid covering the lamp
socket (see gure).
2. Remove the light bulb and
replace it with a similar one:
voltage 230 V, wattage 25 W,
cap E 14.
3. Replace the lid and reconnect the oven to the electricity
supply.
Inspecting the oven seals
Check the door seals around the oven regularly. If
the seals are damaged, please contact your nearest
Authorised After-sales Service Centre. We
recommend that the oven is not used until the seals
have been replaced.
EN
22
This product contains a light source of
energy eciency class E.
40°
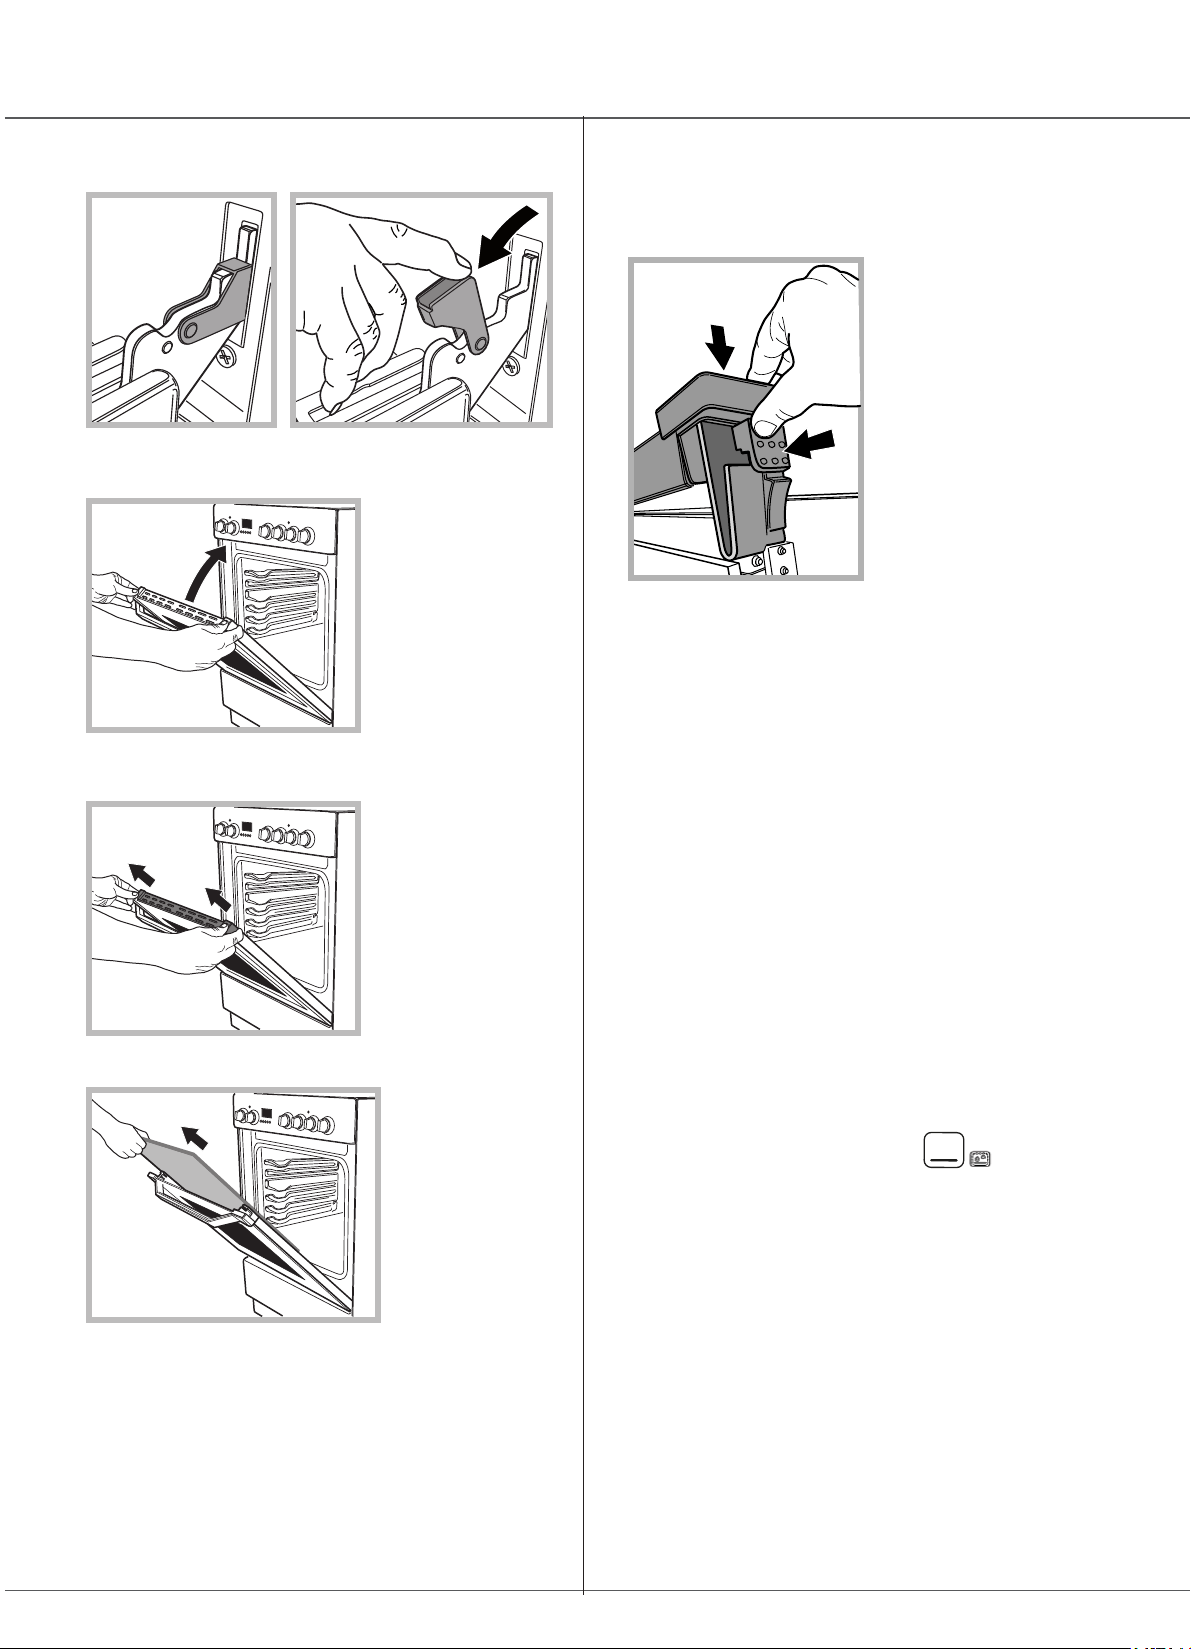
Removing and fitting the oven door:
1.Open the door
2.Make the hinge clamps of the oven door rotate
backwards completely (see photo)
3.Close the door until the clamps stop (the door will
remain open for 40° approx.) (see photo)
4.Press the two buttons on the upper profile and
extract the profile (see photo)
5.Remove the glass sheet and do the cleaning as
indicated in chapter: “Care and maintenance”.
6.Replace the glass.
WARNING! Oven must not be operated
with inner door glass removed!
WARNING! When reassembling the inner
door glass insert the glass panel correctly
so that the text written on the panel is
not reversed and
can be easily legible.
7.Replace the profile, a click will indicate that the
part is positioned correctly.
8.Open the door completely.
9.Close the supports (see photo).
10.Now the door can be completely closed and the
oven can be started for normal use.
This method of cleaning is recommended especially after
cooking very fatty (roasted)meats.
This cleaning process allows to facilitate the removal of
dirt of the walls of the oven by the generation of steam
that is created inside the oven cavity for easier cleaning.
! Important! Before you start steam -cleaning:
-Remove any food residue and grease from the bottom
of the oven.
- Remove any oven accessories (grids and drip pans).
Perform the above operations according to the following
procedure:
1. pour 300ml of water into the baking tray in the oven,
placing it in the bottom shelf. In the models where the
drip pan is not present, use a baking sheet and place it
on the grill at the bottom shelf;
2. select the function of the oven
and set the temperature to 100 ° C;
3. keep it in the oven for 15min;
4. turn off the oven;
5. Once cooled the oven, you can open the door to
complete the cleaning with water and a damp cloth;
6. eliminate any residual water from the cavity after
finishing cleaning
When the steam –cleaning is done, after cooking
especially fatty foods, or when grease is difficult to
remove, you may need to complete the cleaning with the
traditional method, described in the previous paragraph.
Perform cleaning only in the cold oven!
23
ONLY FOR SOUTH AFRICA
Additional notes
Important: Read these instructions for use carefully so as to familiarize yourself with the appliance
before connecting it to its gas container. Keep these instructions for future reference.
IF YOU SMELL GAS:
• Turn off gas supply at bottle
• Extinguish all naked flames
• Do not operate any electrical appliances
• Ventilate the area
• Check for leaks as detailed in this manual
If odour persists, contact your dealer or gas supplier immediately.
Do not tamper or modify the appliance.
BURN-BACK (FIRE IN BURNER TUBE OR CHAMBER)
In the event of a burn-back, where the flame burns back to the jet, immediately turn the gas supply
off at the control valve on the panel. After ensuring the flame is extinguished, wait for I minute and
re-light the appliance in the normal manner. Should the appliance again burn back, close the control
valve and call a service technician. Do not use the appliance again until the service technician has
declared that it is safe to do so.
GAS-PRESSURE REGULATOR
This appliance requires an operating pressure of 2,8 kPa at the appliance. This appliance is set as
NG, a suitable LPG regulator, that complies with the requirements of SANS 1237, must be
installed.
IMPORTANT INFORMATION FOR THE USER
This appliance may only be installed by a registered SAQCC Gas installer. All registered installers
are issued with a card carrying their registration number. Ask to be shown the card before allowing
the installation work to commence and make a note of the Installer registration number. Upon
completion of the installation, the installer is required to explain the operational details of the
appliance together with the safety instructions. You will be asked to sign acceptance of the
installation and be provided with a completion certificate. You should only sign for acceptance of
the installation when the installation is completed to your satisfaction.
Note that your invoice is required in the event that you wish make a guarantee claim.
IMPORTANT INFORMATION FOR THE INSTALLER
This appliance may only be installed by a gas installer registered with the South African qualification
and certification committee (SAQCC). The appliance must be installed in accordance with the
requirements of SANS 10087-1for use with LPG, SANS 827 for use with NG and any fire
department regulations and/or local bylaws applicable to the area. If in doubt, check with the
relevant authority before undertaking the installation. Upon completion of the installation you are
required to fully explain and demonstrate to the user the operational details and safety practices
applicable to the appliance and the installation.
Table of burner and nozzle specifications
Table1 (for Poland) NATURAL GAS
Burner Diameter
(mm)
Thermal
Power
kPa
Nozzle
1/100
(mm)
Flow*
l/h
Thermal
power
kPa
Dysza
1/100
(mm)
Flow*
g/h
Fast (Large)(R)
100 3,00 128 286 3,40 87 247
Semi Fast
(Medium)(S)
75 1,90 104 181 2,20 69 160
Auxiliary (Small)(A)
51
1,00
78 95 1,10 50 80
Supply Pressures
(Methane) NG LIQUEFIED GASLIQUEFIED GAS
(Butane) LPG
2,0 kPa 2,8 kPa
24
1. Arzător pe gaz
2. Fund dublu în caz de transvazare
4. Raft GRĂTAR
5. Raft DECO
6. Piciare pentru reglare
7. Suprafață pentru colectarea lichidului scurs
8. Şine pentru rafturi
9. Poziția 5
10. Poziția 4
11. Poziția 3
12. Poziția 2
13. Poziția 1
14.Capac de sticlă (Există doar la
3.Tablou de comandă
anumite modele.)
1
2
3
4
5
6
7
8
9
10
11
12
13
6
14
4
5
1
3
2
MMM
4.Programator electronic
2.Buton TERMOSTAT
1.Buton PROGRAME
3.Indicator TERMOSTAT
5.
Butoane comandi ochiuri aragaz
RO
GHID DE REFERINŢĂ
PENTRU UTILIZARE ZILNICĂ
DESCRIEREA PRODUSULUI
Înainte de a utiliza aparatul, citiţi cu atenţie Ghidul privind sănătatea şi siguranţa.
PANOUL DE COMANDĂ
25

Aerisirea încăperilor
Acest aparat poate fi instalat #i poate func"iona doar
în încăperi aerisite în permanen"ă, conform Normelor
Na"ionale în vigoare. Încăperea în care va fi montat
aragazul trebuie să fi e alimentată cu o cantitate de aer
sufi cientă pentru a asigura arderea gazelor (debitul
de aer nu poate fi mai mic de 2 m
3
/h pe kW de putere
instalată).
Prizele de aer, protejate de grătare, trebuie să aibă o
sec"iune a conductei de cel pu"in 100 cm
2
#i trebuie să
fi e amplasate astfel încât să nu fi e acoperite, nici măcar
par"ial (vezi fi gura A).
Acestea trebuie să fi e mărite 100% - minim cu 200
cm
2
– dacă aragazul nu este dotat cu dispozitivul de
siguran"ă împotriva scăpărilor de gaz sau dacă aerul
necesar arderii este tras dintr-o încăpere alăturată
(vezi fi gura B), care oricum nu poate fi o parte comună
a imobilului, o încăpere cu pericol de incendiu sau un
dormitor. Prizele de aer trebuie să aibă o conductă de
comunicare cu exteriorul, după descrierea de mai sus.
A B
! După folosirea îndelungată a aparatului, se
recomandă să deschide"i fereastra sau să mări"i viteza
de rota"ie a ventilatoarelor.
Evacuarea gazelor de ardere
Evacuarea gazelor de ardere trebuie să fi e asigurată de
o hotă legată la un co# cu tiraj natural, efi cient, sau de un
ventilator electric care să intre în func"iune automat, la
fi ecare aprindere a aragazului (vezi fi gurile).
Gazele de petrol lichefi ate, mai grele ca aerul,
stagnează în partea de jos a încăperii ; de aceea,
încăperea unde este amplasat aragazul - dacă folosi"i
butelii cu GPL – trebuie să aibă fante de aerisire spre
exterior, împotriva eventualelor scăpări de gaz.
Buteliile GPL, atât goale cât #i umplute par"ial, nu
trebuie instalate sau depozitate în încăperi sau camere
situate sub nivelul solului (pivni"e, etc.). Păstra"i în
încăperea cu aragazul numai butelia pe care o utiliza"i,
amplasată departe de sursele de căldură (cuptoare,
sobe), care ar putea încălzi butelia la peste 50°C.
Pozi"ionarea #i punerea la nivel
Este posibil să instala"i aparatul între alte piese
de mobilier, dacă înăl"imea acestora nu depă#e#te
înăl"imea aragazului.
Asigura"i-vă că peretele din spatele aragazului este
făcut dintr-un material neinfl amabil, rezistent la căldură
(t 90°C).
Pentru o instalare corectă:
• amplasa"i aparatul în bucătărie, în sala de masă
sau într-o garsonieră fără pere"i despăr"itori, dar
niciodată în baie.
• dacă aragazul este mai înalt decât celelalte piese de
mobilier, acestea trebuie să fi e distan"ate cu 200 mm
de aparat ;
• dacă aragazul se instalează sub un raft, acesta din
urmă va trebui să fi e montat la o distan"ă de minim
420 mm de blatul de lucru.
Dacă rafturile sunt infl amabile, distan"a trebuie să fi e
de 700 mm (vezi fi gura);
A
Evacuarea gazelor prin
#emineu sau
co# de fum ramifi cat
(numai pentru aparatele
de coacere)
Încăpere
adiacentă
Încăperea de
aerisit
Canale de aerisire pentru
aerul necesar arderii
Major area spa"iului dintre
u#ă #i podea
Evacuarea la exterior
Instalare
Această opera"ie trebuie să fi e executată numai de
un instalator autorizat de fabricant.
RO
26
• perdelele nu trebuie
să fi e montate în spatele
aragazului #i nici la mai
pu"in de 200 mm de
fl ancurile acestuia;
• eventualele hote
trebuie să fi e instalate
conform indica"iilor
con"inute în manualul de
instruc"iuni ale acestora.
Punerea la nivel
Dacă este necesar să pune"i
la nivel aparatul, în#uruba"i
#uruburile de reglare - din
dotare – în loca#urile speciale
de sub aragaz (vezi fi gura).
Picioarele* vor fi introduse în
orifi ciile de sub aragaz.
Conectarea electrică
Monta"i pe cablu un #tecăr normalizat, capabil să suporte
sarcina indicată pe plăcu"a cu caracteristici a aparatului
(vezi tabelul cu Date tehnice).
În cazul efectuării legăturii directe la re"ea, este necesar
să se monteze între aparat #i re"ea un întrerupător
omnipolar cu deschiderea minimă a contactelor de 3
mm, dimensionat la sarcină, conform normelor NFC
15-100 (fi rul de împământare nu trebuie să fi e întrerupt
de întrerupător). Cablul de alimentare trebuie să fi e
pozi"ionat astfel încât să nu atingă în nici un punct
o temperatură cu 50°C peste temperatura mediului
ambiant.
Înainte de a efectua legătura, asigura"ivă că:
• priza să fi e cu împământare #i conform prevederilor de
lege;
• priza să poată suporta sarcina maximă de putere a
ma#inii, indicată pe plăcu"a de caracteristici;
• tensiunea de alimentare să fi e cuprinsă în valorile
indicate pe plăcu"a cu caracteristici;
• priza să fi e compatibilă cu #tecărul aparatului. În
caz contrar înlocui"i priza sau #tecărul; nu folosi"i
prelungitoare sau prize multiple.
HOOD
420
Min.
min. 650 mm. with hood
min. 700 mm. without hood
mm.
600
Min. mm.
420
Min. mm.
*doar pe anumite modele.
După instalarea aparatului, cablul de alimentare #i
priza de curent trebuie să fi e u#or accesibile.
Cablul nu trebuie să fi e îndoit sau comprimat.
Cablul trebuie să fi e controlat periodic #i înlocuit de
electricieni autoriza"i.
Firma î#i declină orice responsabilitate în cazul în
care aceste norme nu se respectă.
Racordarea la gaze
Racordarea la gaze sau la butelie poate fi efectuată cu
un furtun fl exibil din cauciuc sau o"el, conform normelor
na"ionale în vigoare, numai după ce a"i verifi cat că
aparatul este reglat pentru tipul de gaz pe care îl ve"i
folosi (vezi eticheta de pe capac: în caz contrar vezi mai
jos). În caz de alimentare cu gaz lichefi at, de la butelie,
folosi"i regulatoare de presiune care să fi e conforme
cu normele na"ionale în vigoare. Pentru a facilita
racordarea, alimentarea aragazului se poate orienta
lateral*: închide"i racordul pe care se fi xează furtunul cu
capacul respectiv #i înlocui"i garnitura de etan#are (din
dotarea aparatului).
Pentru o func"ionare sigură, pentru o folosire adecvată
a energiei #i o durabilitate sporită a aparaturii, asigura"ivă
că presiunea de alimentare respectă valorile indicate în
tabelul cu „Caracteristicile arzătoarelor #i duzelor” (vezi
mai jos).
Racordarea la gaze cu furtun din cauciuc
Verifi ca"i ca furtunul să corespundă normelor na"ionale
în vigoare. Diametrul intern al tubului de utilizat trebuie
să fi e de: 8 mm pentru alimentarea cu gaz lichefi at #i 13
mm pentru alimentarea cu gaz metan.
După racordare, asigura"i-vă că furtunul:
• nu atinge nici o componentă susceptibilă de a depă#i
50°C;
• nu este supus nici unui fel de for"e, de trac"iune #i de
torsiune, #i nu este curbat excesiv sau îngustat;
• nu intră în contact cu obiecte sau col"uri ascu"ite,
păr"i mobile #i că nu este presat;
• este u#or accesibil, pe tot traseul său, cu scopul de
al putea controla;
• are o lungime sub 1500 mm;
• este bine introdus la capete #i fi xat cu coliere de
strângere, conform normelor na"ionale în vigoare.
! Dacă una sau mai multe din aceste condi"ii nu sunt
respectate sau dacă aragazul este încastrat între două
Aparatul nu trebuie instalat în spatele unei
uşi decorative, pentru a evita supraîncălzirea
Aparatul nu trebuie instalat în spatele unei
uşi decorative, pentru a evita supraîncălzirea
Aparatul nu trebuie instalat în spatele unei
uşi decorative, pentru a evita supraîncălzirea
27
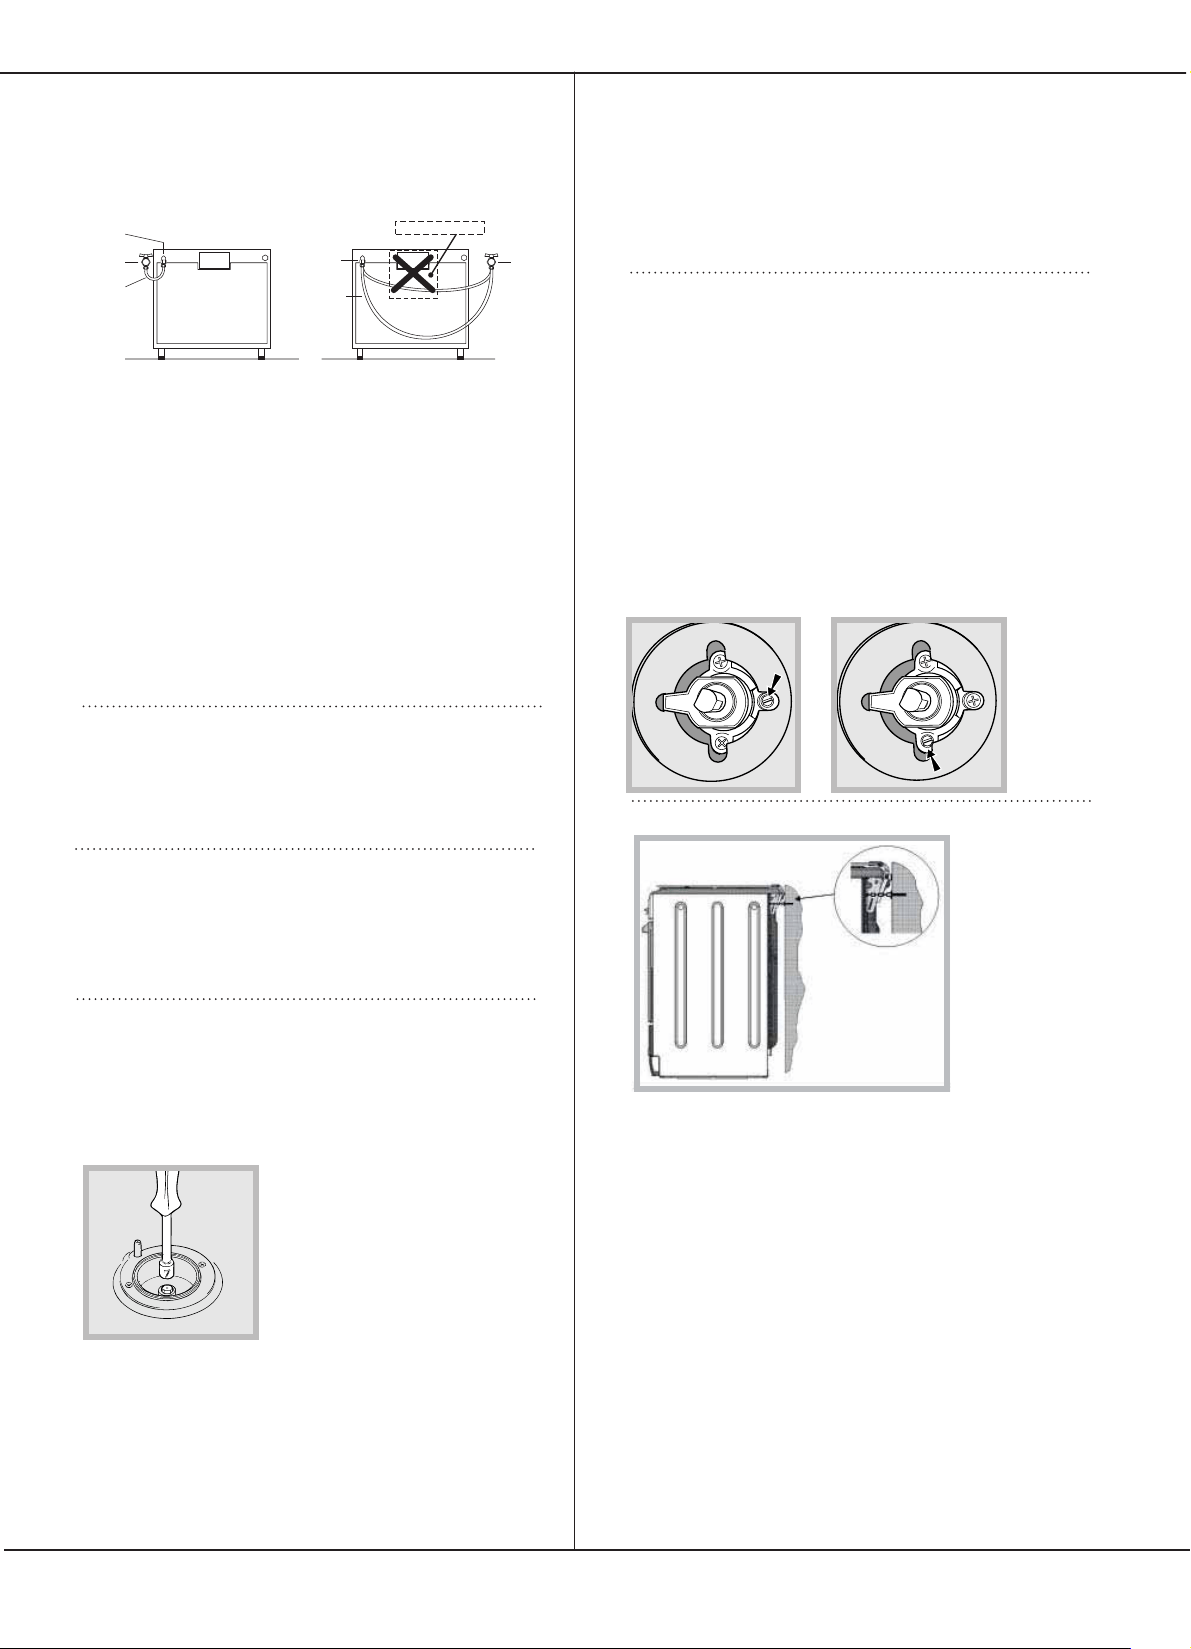
piese de mobilier – condi"ii clasa a 2a, subcategoria 1 –
va trebui să utiliza"i pentru racordare un tub fl exibil din
o"el (vezi mai jos).
Racordarea la gaze cu tub fl exibil din o"el
inoxidabil, pe perete, cu cuplări fi letate
Verifi ca"i ca tubul #i garniturile să corespundă normelor
na"ionale în vigoare.
Pentru a monta tubul, este necesar să îndepărta"i mufa
furtunului de pe aragaz (robinetul de alimentare cu gaz este
„tată”, de 1/2, fi letat, cilindric).
!Efectua"i legătura astfel încât lungimea tubului să nu
depă#ească 2 m (la întinderea maximă); asigura"i-vă că
acesta nu atinge nici o componentă mobilă #i nu este
strivit.
Controlul etan#eită"ii
După terminarea instalării, controla"i perfecta
etan#eitate a tuturor racordurilor folosind o solu"ie de
săpun, însă niciodată o fl acără.
Adaptarea la diferite tipuri de gaz
Aragazul poate fi adaptat #i la alte tipuri de gaz, în afara
celui pentru care a fost predispus (indicat pe eticheta
de pe capac).
Adaptarea blatului de lucru
Înlocuirea duzelor arzătoarelor:
1. înlătura"i grătarul #i extrage"i arzătoarele din sediul lor;
2. de#uruba"i duzele, folosind o cheie tubulară de 7 mm
(vezi fi gura), #i înlocui"ile cu cele adecvate pentru noul
tip de gaz (vezi tabelul cu “Caracteristicile arzătoarelor
#i duzelor”); .
3. monta"i la loc toate
componentele efectuând
acelea#i opera"ii ca la
demontare, dar în sens invers.
Reglarea arzătoarelor
aragazului la minim:
1. roti"i bu#onul la minim;
2. scoate"i bu#onul #i roti"i #urubul de reglare (din
interiorul sau de lângă tija centrală) până când ob"ine"i
o fl acără mică, constantă;
! În cazul unui gaz lichefi at, #urubul de reglare trebuie
să fi e în#urubat complet.
3. verifi ca"i apoi ca, rotind rapid bu#onul aragazului, de
la maxim la minim, să nu se stingă ochiul.
! Arzătoarele blatului nu au nevoie de reglarea aerului
primar.
Reglarea arzătoarelor cuptorului la minim:
1. aprinde"i arzătorul (vezi
Pornire #i utilizare);
2. roti"i bu#onul la minim (MIN) după ce a"i lăsat arzătorul
să func"ioneze cam 10 minute la maxim (MAX);
3. scoate"i bu#onul;
4. roti"i #urubul de reglare de lângă tija termostatului
(vezi fi gurile) până când ob"ine"i o fl acără mică,
constantă;
! În cazul unui gaz lichefi at, #urubul de reglare trebuie
să fi e în#urubat complet;
5. verifi ca"i dacă, rotind repede bu#onul de la MAX
la MIN sau dacă închide"i #i deschide"i repede u#a
u
nct de
o
nectare
n
samblu
f
urtun
Ansamblu
furtun
SUPRAFAŢĂ FIERBINTE
Punct de
conectare
R
obinet
e
blocare
Robinet
de blocare
cuptorului, fl acăra rămâne aprinsă.
SiguranĠă furnizat
! Pentru a pre-
veni răsturna-
rea accidentală
a aparatului,
de exemplu de
către un copil
care se caĠără
pe uúa cupto-
rului, TREBUIE
să ¿ e montat
lanĠul de sigu-
ranĠă furnizat!
Aragazul este echipat cu un lanĠ de siguranĠă care
trebuie să ¿ e ¿ xat cu un úurub (care nu este furnizat
cu
aragazul) de peretele din spatele aparatului, la ace-
eaúi înălĠime ca úi lanĠul care este ataúat la aparat.
AlegeĠi úurubul úi ancora úurubului în funcĠie de tipul
de material al peretelui din spatele aparatului. În
cazul în care capul úurubului are un diametru mai
mic de 9mm, trebuie să se utilizeze o úaibă. Perete-
le de
beton necesită un úurub cu diametrul de cel puĠin 8
mm, úi lungimea de cel puĠin 60mm.
AsiguraĠi-vă că lanĠul este ¿ xat de peretele din spate
al aragazului úi de perete, aúa cum se arată în
imagine, astfel încât, după instalare, să ¿ e întins úi
paralel cu nivelul solului.
28
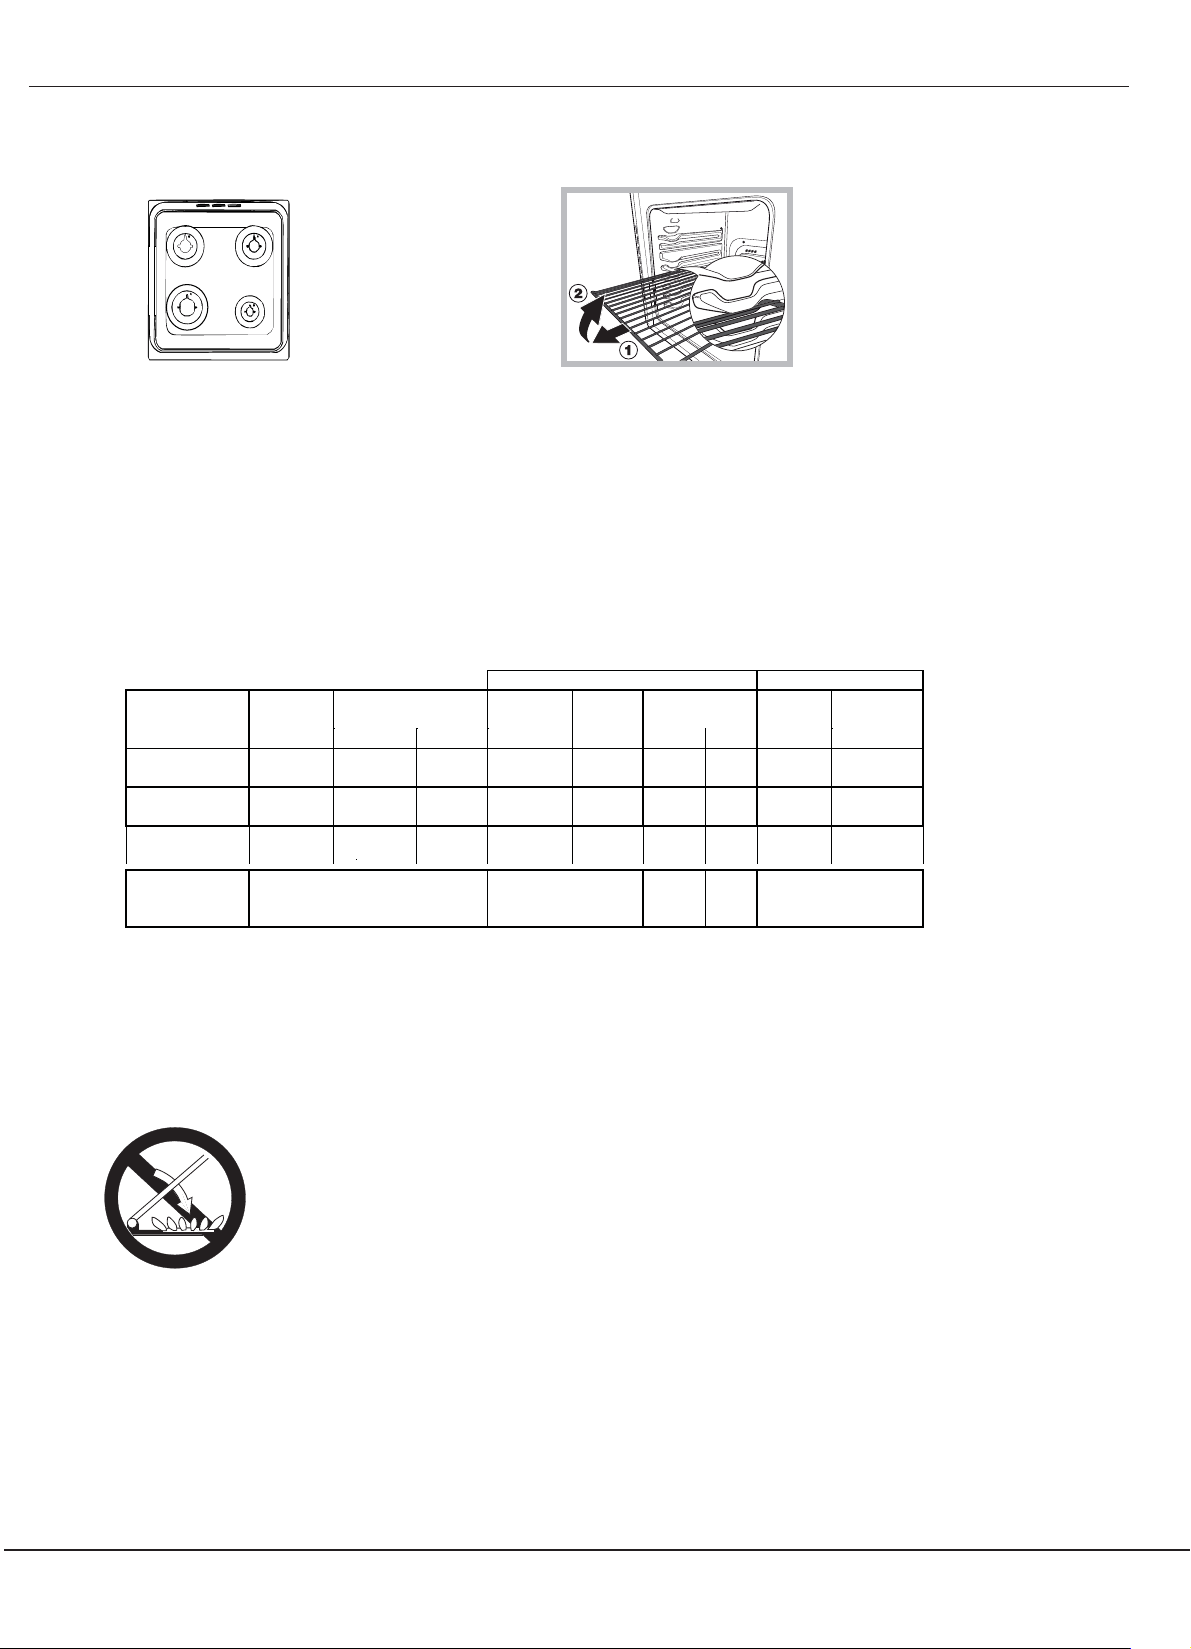
S
S
A
R
ATENğIE!Cuptorul este
prevăzut cu un sistem de
oprire a grătarelor care
permite extragerea ace-
stora fără ca ele să iasă
din cuptor(1).
Pentru a extrage complet
grătarele este su¿ cient,
astfel cum se arată în
desen, să le ridicaĠi, prinzându-le din partea din faĠă
ú
i să le trageĠi (2).
ATEN&IE! Capacul din sticlă se
poate sparge dacă este încălzit.
Stinge"i toate arzătoarele sau
eventualele plite electrice înainte
de a-l închide.*Se referă numai la
modelele cu capac de sticlă
Tabelul cu caracteristicile arzătoarelor şi duzelor
Tabelul Gaz lichefiat Gaz natural
Diametru
(mm)
Putere termică
kW (p.c.s.*)
By Pass
1/100
duză
1/100
debit*
g/h
duză
1/100
debit*
l/h
Arzător
Nominală Redusă (mm) (mm) *** ** (mm)
Rapid (mare)
(R)
100 3.00 0.7 41 87 218 214 128 286
Semirapid
(mediu) (S)
75 1.90 0.4 30 69 138 136 104 181
Auxiliar (mic)
(A)
51 1.00 0.4 30 50 73 71 78 95
Presiuni de
alimentare
20
30
35
20
30
35
17
20
25
* La 15°C 1013 mbar-gaz uscat *** Butan P.C.S. = 49,47 MJ/Kg
** Propan P.C.S. = 50,37 MJ/Kg Gaze naturale P.C.S. = 37,78 MJ/Kg
Minimum (mbar)
Nominal (mbar)
Maximum (mbar)
29
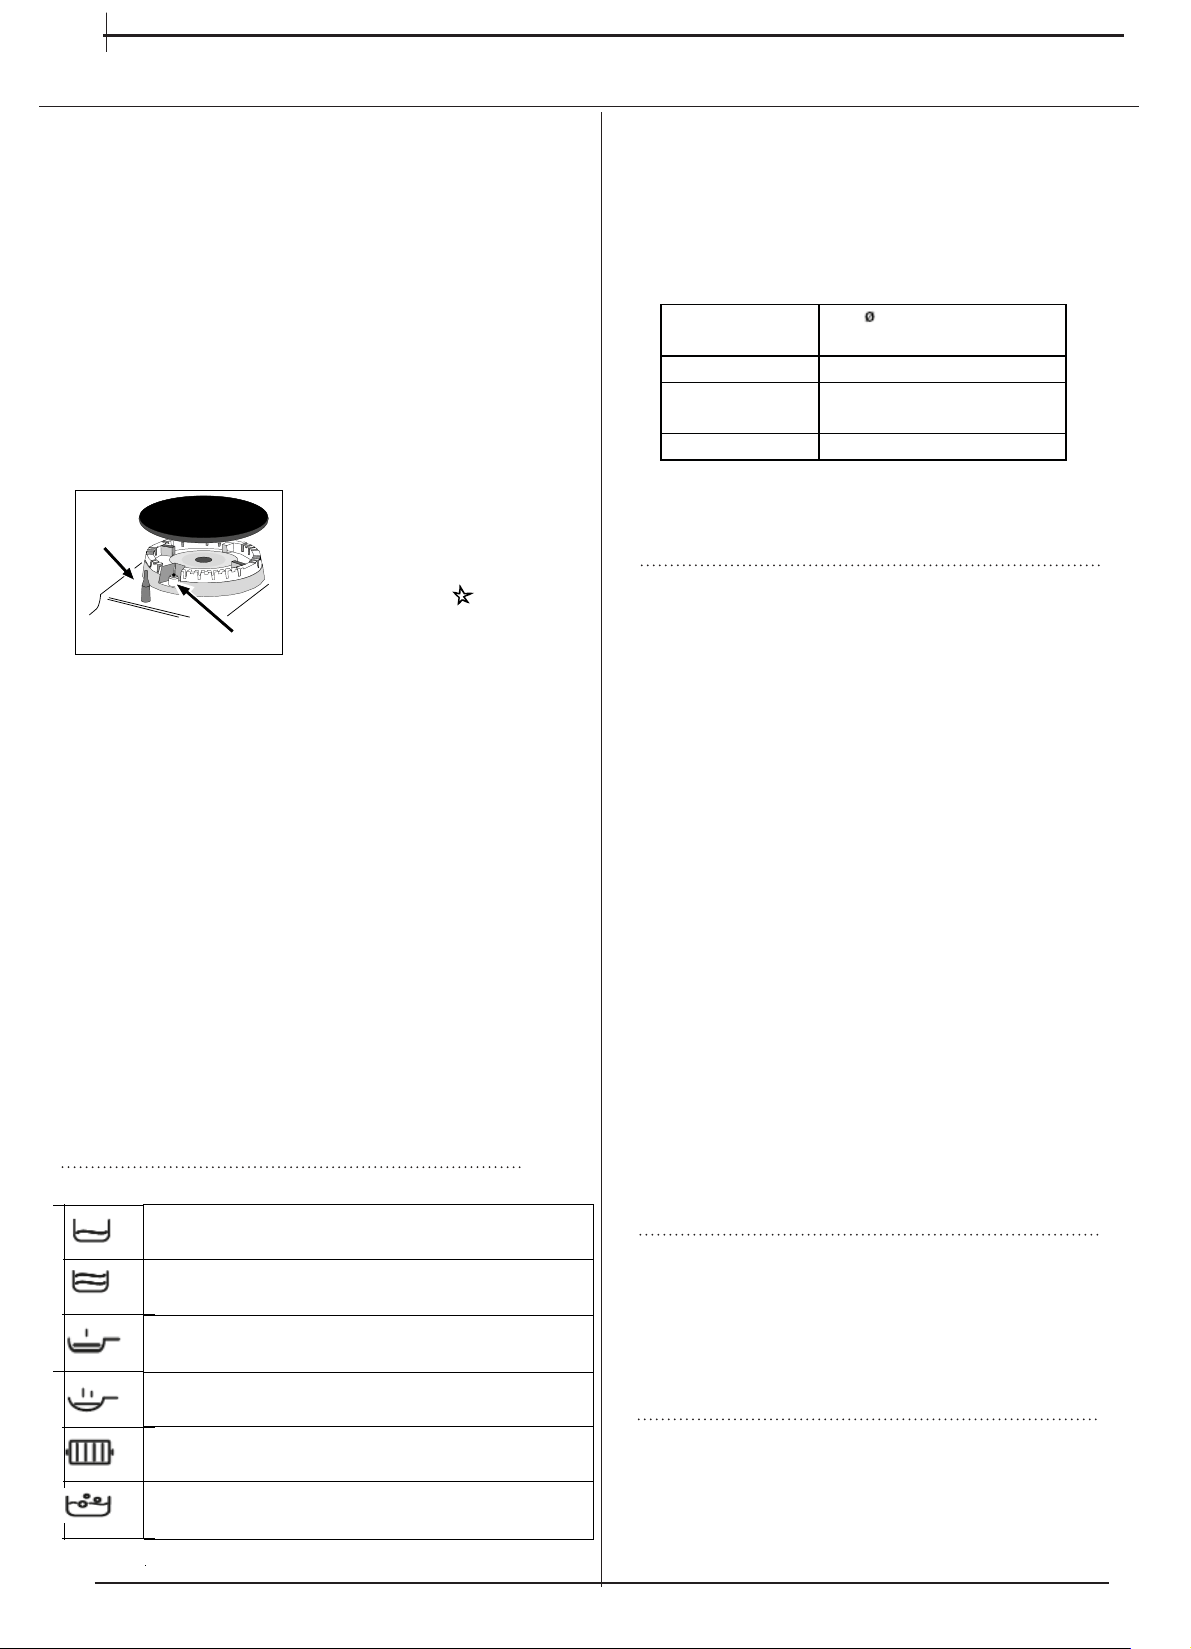
Utilizarea cuptorului
Înainte de a începe utilizarea dispozitivului, asigurați-vă
că ați eliminat foliile de plastic de pe părțile laterale ale
aparatului.
Prima dată când porniți cuptorul lăsați să funcţioneze în
gol timp de cel puțin o oră cu termostatul la maxim și
cu ușile închise. Apoi opriți cuptorul, deschideți ușa și
aerisiți încăperea. Mirosul care apare este rezultatul
evaporării substanțelor necesare pentru a proteja
cuptorul! Pentru a preveni deteriorarea smalțului se
interzice punerea oricărui lucru în partea de jos a
cuptorului.
1. Selectați programul de gătit dorit rotind butonul
PROGRAME.
2. Selectați un program aprobat sau temperatura dorită
prin rotirea butonului TERMOSTAT Lista modurilor de
gătit și temperaturilor recomandate corespunzătoare
este inclusă într-un tabel special (vezi Tabelul gătirilor
în cuptor).
În timpul de pregătire a mâncării, există posibilitatea:
• să schimbați programul de preparare, utilizând butonul
PROGRAME;
• schimbați temperatura cu ajutorul butonuui TERMOSTAT;
• întrerupeți gătitul prin întoarcerea butonului PROGRAM
în poziția «0».
Instalați toate ustensilele de bucătărie pe grătarele
complet furnizate.
Utilizarea aragazului
Aprinderea arzătoarelor
Fiecare buşon al aragazului are, în dreptul său, schiţa
arzătoarelor; ARZĂTORUL comandat de buşon este
reprezentat cu un cerc evidenţiat.
Pentru a aprinde un arzător al aragazului:
1. apropiaţi de arzător o fl acără sau o brichetă de aragaz;
2. apăsaţi şi, în acelaşi timp, rotiţi buşonul arzătorului
în sens contrar acelor de ceasornic, până în poziţia
maxim .
3. reglaţi intensitatea fl ăcării, după dorinţă, rotind
în sens contrar acelor de ceasornic buşonul
ARZĂTORULUI: la minim , la maxim sau într-o
poziţie intermediară.
Dacă aparatul este dotat cu
un dispozitiv electronic de
aprindere* (C), apăsaţi mai
întâi butonul de aprindere,
indicat cu simbolul
,
apoi apăsaţi şi rotiţi buşonul
ARZĂTORULUI în sens
contrar acelor de ceasornic,
până când reperul ajunge în dreptul poziţiei maxim;
aşteptaţi aprinderea fl ăcării.
Anumite modele sunt dotate cu un dispozitiv de
aprindere integrat în buşon; în acest caz, veţi observa
numai dispozitivul de aprindere electronic* (vezi fi gura)
dar nu şi butonul de aprindere. Este sufi cient să apăsaţi
şi, în acelaşi timp, să rotiţi buşonul ARZĂTORULUI
în sens contrar acelor de ceasornic, până în poziţia
maxim şi să aşteptaţi aprinderea fl ăcării. În momentul în
care lăsaţi buşonul, se poate întâmpla ca fl acăra să se
stingă. În acest caz, repeta
ţi operaţiile, ţinând buşonul
apăsat mai mult timp.
! Dacă fl acăra se stinge accidental, opriţi arzătorul şi
aşteptaţi minim 1 minut înainte să încercaţi din nou.
Dacă aparatul este dotat cu un dispozitiv de
siguranţă*(X) împotriva scăpării d e gaz, ţineţi apăsat
buşonul ARZĂTORULUI timp de 2-3- secunde, pentru a
menţine fl acăra aprinsă şi a activa dispozitivul.
Pentru a stinge arzătorul, rotiţi buşonul până la •.
X
C
Sfaturi practice pentru utilizarea arzătoarelor
Pentru a obţine un randament maxim al arzătoarelor,
precum şi a economisi gazul, utilizaţi numai recipiente
cu fundul plat, acoperite cu capac, de dimensiuni
proporţionale cu ale arzătoarelor:
Pentru a identifi ca tipul arzătorului faceţi referire la
desenele din paragraful „Caracteristicile arzătoarelor şi
duzelor”.
Arzător Diametru
recipienţi (cm)
Rapid (R) 24-26
Semi-rapid
(S)
16-20
Auxiliar (A) 10-14
Ajustarea ăcării în funcţie de niveluri
* Disponibil numai pentru anumite modele.
Indicator TERMOSTAT
Aprinderea acestuia arată că în cuptor se produce
căldură. Se stinge atunci când în interior se atinge
temperatura selectată. În această fază indicatorul
se aprinde şi se stinge alternativ, indicând faptul că
termostatul funcţionează şi menţine temperatura
constantă.
Lumina din cuptor
Se aprinde rotind butonul PROGRAME în orice poziţie
diferită de “0” şi rămâne aprinsă atât timp cât cuptorul
este în funcţiune. Selecţionând
cu butonul, lumina se
aprinde fără activarea niciunui element de încălzire.
Ideal pentru gătire lentă (ex.: orez, sosuri, fripturi, peşte) cu
lichide (apă, vin, bulion, lapte)
Ideal pentru gătit înăbuşit ( pentru perioade lungi) şi
îngroşare. Paste cremoase,
Ideal pentru soteuri.
Gătitul la flacără mare şi rumenire (grătar, fripturi,
escalop, file de peşte, ouă prăjite.)
Ideal pentru grătare şi rumenire, începerea gătitului, frigerea
în ulei a produselor congelate.
Ideal pentru mărirea rapidă a temperaturii alimentelor pentru
a fierbe rapid în cazul apei sau încălzirii rapide în gătirea de
lichide
.
Pornire şi utilizare
RO
30
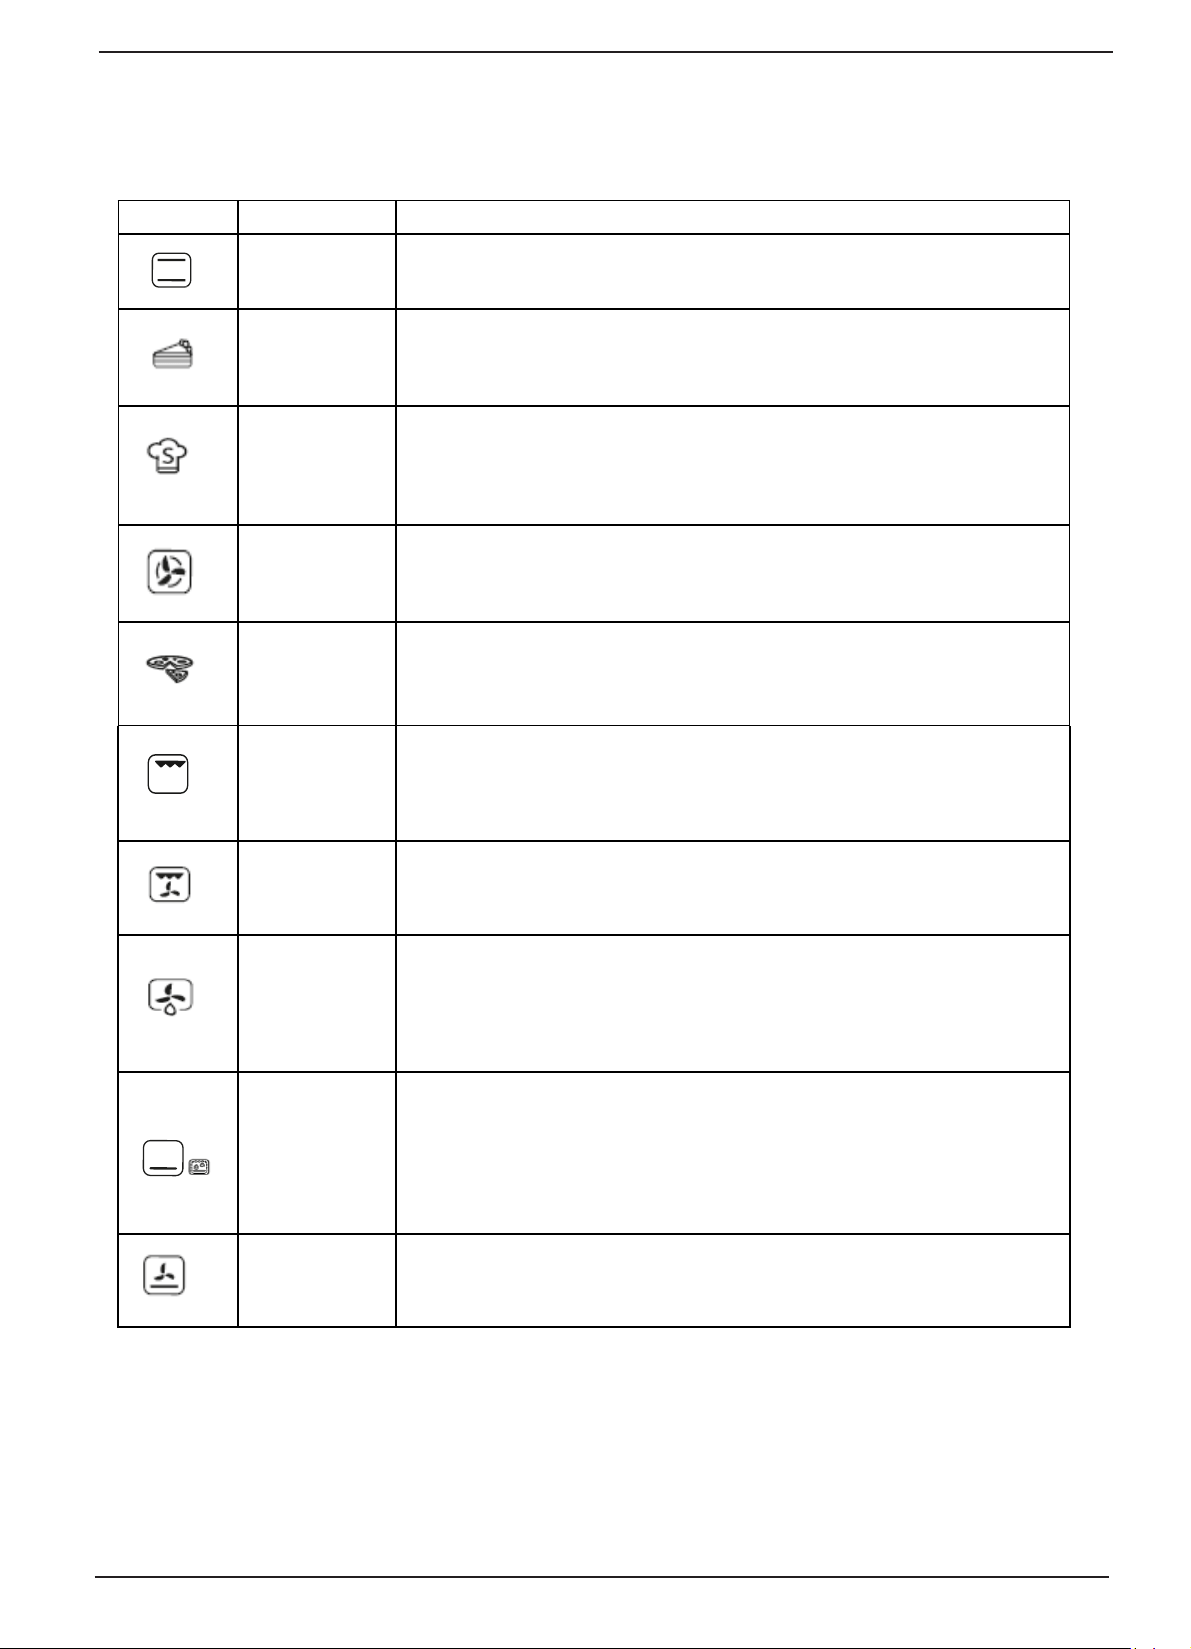
Moduri de gătire
Toate modurile de gătire au o temperatură implicită de gătit care poate fi ajustată manual la o
valoare între 40°C şi 250°C după dorinţă.
Moduri de gătireModuri de gătire
Funcţie
Funcţie Funcţie
CUPTOR
TRADIŢIONAL
Ambele elemente de încălzire de sus şi de jos vor activate. Atunci când folosiţi modul d egătire
tradiţional, este mai bine să folosiţi o singură poliţă. Dacă folosiţi mai mult de o poliţă, căldura va
distribuită în mod neuniform.
COACEREA Elementul de încălzire din spate şi ventilatorul sunt activate, garantând astfel distribuţia căldurii
într-o manieră delicată şi uniformă în întregul cuptor. Acest mod este ideal pentru coacere şi gătire
de mâncăruri delicate (mai ales prăjituri care trebuie să crească) şi pentru pregătirea anumitor tarte
pe 3 poliţe simultan.
GĂTIRE RAPIDĂ
Elementele de încălzire şi ventilator pornesc, garantând o căldură delicată distribuită uniform în tot
cuptorul.
Preîncălzirea nu este necesară pentru acest mod de gătire. Acest mod este adecvat mai ales pentru
gătirea de mâncare preambalată rapid (congelată sau pregătită). Cele mai bune rezultate se real-
izează folosind o singură poliţă.
GĂTIRE MULTIPLĂ
Toate elementele de încălzire (superioare, inferioare şi circulare) pornesc şi ventilatorul începe să
funcţioneze. Din moment ce căldura rămâne constantă în tot cuptorul, aerul găteşte şi colorează în
cafeniu mâncarea în mod uniform. Maximum două poliţe pot folosite acelaşi timp.
PIZZA
Elementele de încălzire circulare şi elementele din partea de jos a cuptorului sunt aprinse şi ventila-
torul este activat. Această combinaţie încălzeşte cuptorul rapid producând o cantitate considerabilă
de căldură, mai ales din elementul de jos. Dacă vedeţi mai mult de un raft odată, schimbaţi poziţia
vaselor la jumătatea procesului de gătit.
GRILL (GRĂTAR)
Partea centrală a elementului de încălzire de sus porneşte. Temperatura înaltă şi directă a grătarului
este recomandată pentru mâncarea care necesită o temperatură de suprafaţă mai mare (fripturi de
vită şi mânzat, leuri şi antricoate). Acest mod de gătire foloseşte o cantitate limitată de energie şi
este ideal pentru a face mici feluri de mâncare la grătar. Puneţi mâncarea în centrul poliţei, deoarece
nu va gătită în mod adecvat dacă stă în colţ.
GRATINARE
Elementul de încălzire de deasupra şi elementul pentru rotisare (atunci când e prezent) sunt acti-
vate şi ventilatorul începe să funcţioneze. Această combinaţie de funcţii sporeşte ecienţa radiaţiilor
termice unidirecţionale ale elementelor de încălzire prin circulaţia forţată a aerului prin cuptor. Acest
lucru previne arderea mâncării de la suprafaţă şi permite căldurii să pătrundă direct în mâncare.
DECONGELAREA
Ventilatorul din partea inferioară a cuptorului antrenează aerul de la temperatura camerei în jurul
alimentelor. Acesta este recomandat pentru decongelarea tuturor tipurilor de alimente, însă în spe-
cial pentru tipurile delicate de alimente care nu necesită încălzire, de exemplu: torturi de îngheţată,
deserturi cu frişcă, şarlote, torturi cu fructe. Utilizând ventilatorul, intervalul de dezgheţare este redus
aproximativ la jumătate. În cazul cărnii, peştelui şi pâinii, este posibilă accelerarea procesului prin
utilizarea modului „multi-cooking” (gătire multiplă) şi setarea temperaturii la 80° - 100°C
PARTEA INFERIO-
ARĂ
Elementul de încălzire inferior este activat. Această poziţie este recomandată pentru perfecţionarea
gătirii de feluri de mâncare (în tăvi de copt) care sunt deja gătite pe suprafaţă, dar necesită şi gătire
în centru sau pentru deserturi cu un strat de fructe sau gem, care necesită doar o colorare moderată
la suprafaţă. A se nota că aceatsă funcţie nu permite atingerea temperaturii maxime în interiorul cup-
torului (250°C) şi nu este recomandat ca felurile de mâncare să e gătite folosind această setare, cu
excepţia cazului în care coaceţi torturi (care trebuie coapte la o temperatură de 180°C sau mai mică).
MODUL INFERIOR
VENTILAT
Elementul de încălzire a părţii inferioare şi ventilatorul sunt activate, lucru ce permite distribuţia
căldurii în întregul interior al cuptorului. Această combinaţie este utilă pentru gătirea uşoară a legu-
melor şi peştelui
.
31
Gătirea pe mai multe poliţie simultan
Dacă este necesar să folosiţi două poliţe, folosiţi modul de
gătire CUPTOR VENTILATOR
, deoarece acesta este
singurul mod de gătire adecvat acestui tip de gătire. Vă mai
recomandăm:
● să nu folosiţi poziţiile 1 şi 5. Asta deoarece căldura directă
excesivă poate arde alimentele sensibile la temperatură.
● să folosiţi poziţiile 2 şi 4 sunt folosite şi ca mâncarea care
are nevoie de mai multă căldură să e plasată pe poliţă în
poziţia 2.
● Atunci când gătiţi mâncăruri care necesită timpi de
gătit diferiţi şi temperaturi diferite, setaţi o temperatură
la jumătate intervalului dintre cele două temperaturi
recomandate (vezi tabelul de sfaturi pentru gătirea la
cuptor) şi plasaţi mâncărurile mai delicate pe poliţă în
poziţia 4. Scoateţi mai întâi mâncarea care necesită un
timp mai scurt de gătire.
● Atunci când gătiţi pizza pe mai multe poliţe cu temperatura
setată la 220°C, cuptorul este preîncălzit timp de 15
minute. În general, gătirea pe poliţă în poziţia 4 durează
mai mult: recomandăm ca pizza gătită pe poliţa cea mai de
jos să e scoasă prima, urmată de pizza gătită pe poziţia 4,
după câteva minute.
● Plasaţi tava de colectare în partea de jos şi poliţa sus.
32
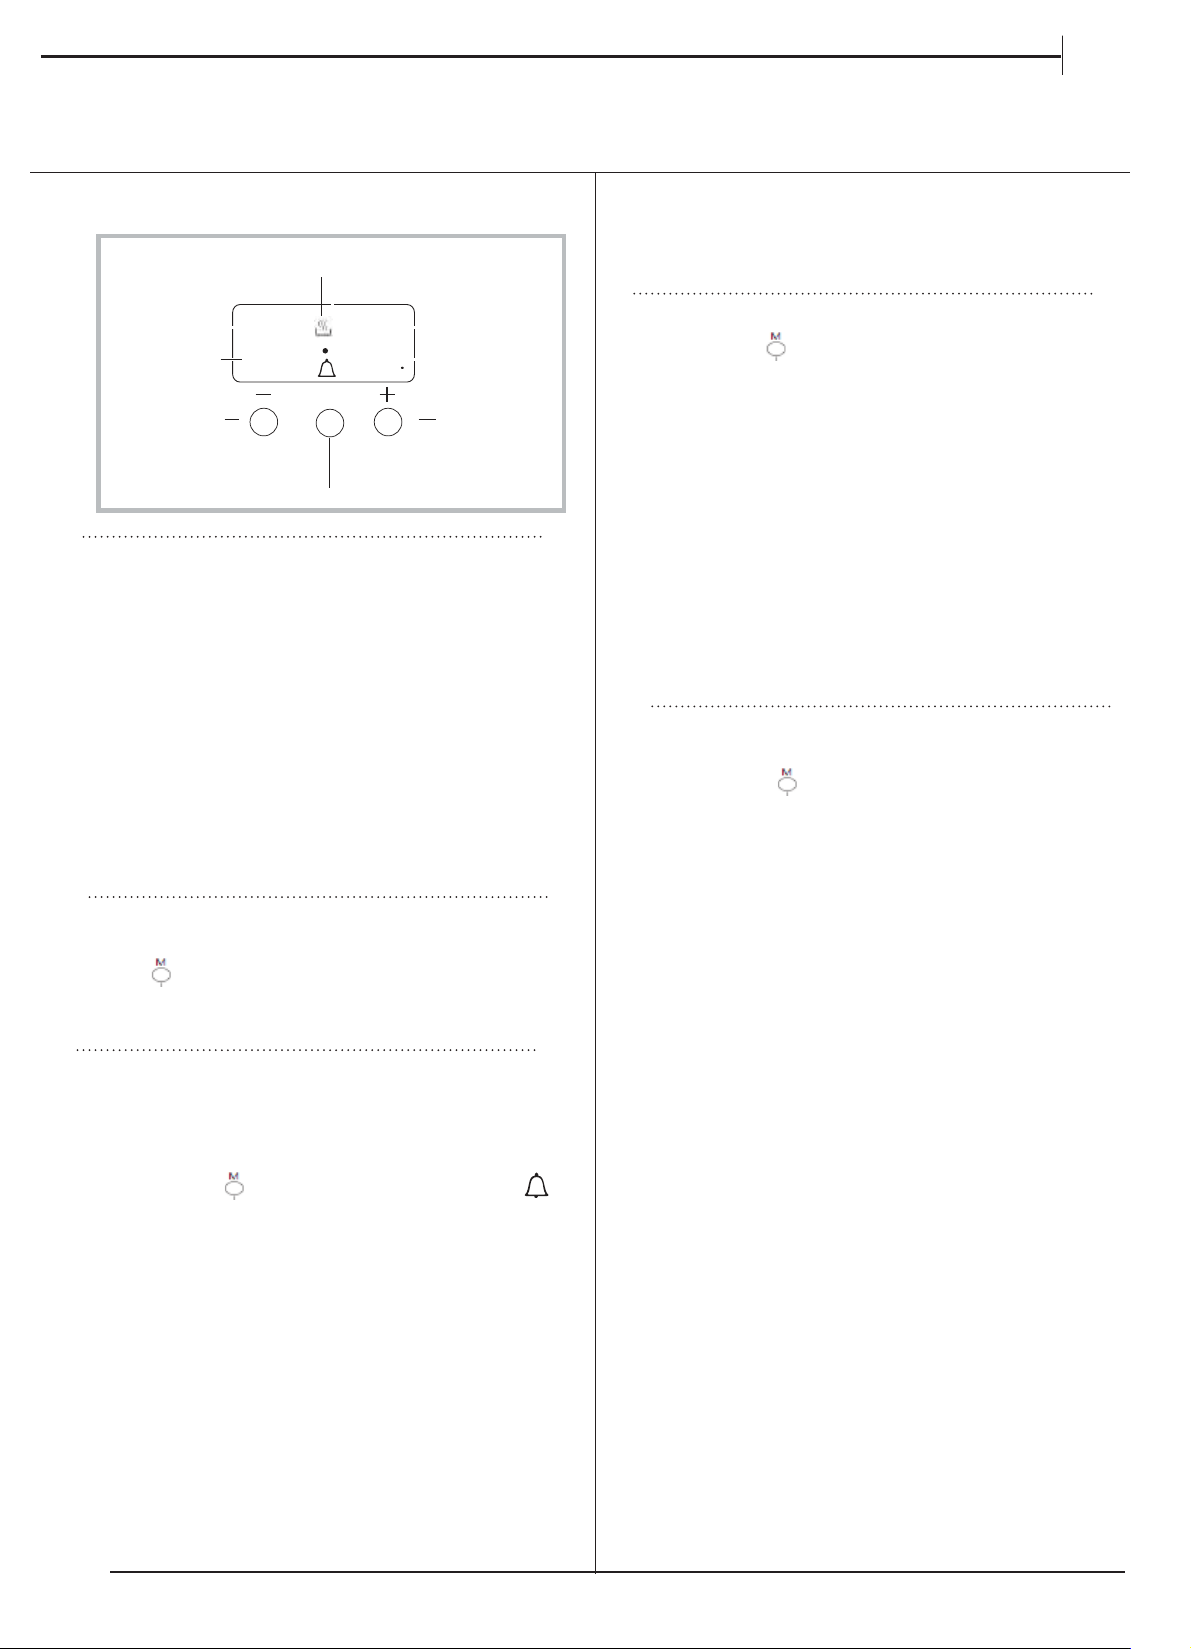
AFIŞAJ
Buton
MOD
Pictograma
AUTO
Pictograma
TEMPORIZATOR
Buton
REDUCERE TIMP
Buton
MĂRIRE TIMP
•• ••
M
A
U
T
O
Pictograma
PROCES GĂTIRE
Funcţionarea ceasului/
temporizatorului
Setarea ceasului !
Ceasul poate setat atunci când cuptorul este oprit sau pornit, cu
condiţia ca ora de nal a ciclului de gătit să nu fost programat anterior.
După ce aparatul a fost conectat la reţeaua de alimentare,
sau după o pană de curent, cifrele 00:00
de pe AFIŞAJ vor începe să clipească.
1. Apăsaţi şi ţineţi apăsat butoanele “+” şi “-” simultan
Apoi, cele două puncte dintre ore şi minute vor începe să clipească.
2. Folosiţi butoanele “+” şi “-” pentru a ajusta ora; dacă apăsaţi şi ţineţi
apăsat oricare dintre butoane, aşajul va dela printre valori mai
rapid, stabilirea valorii dorite făcându-se mai rapid şi mai simplu.
Schimbarea frecvenţei alarmei
1. Mai întâi apăsaţi butoanele “+” şi “-” simultan şi apoi apăsați bu-
tonul
pentru selectarea meniului pentru schimbarea frecvenţei
alarmei. În timp ce textul tonX este vizibil, frecvenţa semnalului
alarmei poate schimbată apăsând în mod repetat “- “.
Setarea temporizatorului !
Această funcţie nu întrerupe gătitul şi nu afectează cuptorul; este
folosită doar pentru a activa alarma atunci când perioada de timp
stabilită s-a scurs.
1. Apăsaţi butonul
de mai multe ori până când pictograma
şi
cele trei cifre de pe ecran încep să clipească.
2. Folosiţi butoanele “+” şi “-” pentru a ajusta ora; dacă apăsaţi şi ţineţi
apăsat oricare dintre butoane, aşajul va dela printre valori mai
rapid, stabilirea valorii dorite făcându-se mai rapid şi mai simplu.
3. Aşteptaţi vreme de 5 secunde, Dacă apăsaţi butonul încă o
dată, aşajul va arăta timpul scurgându-se. Atunci când această
perioadă de timp s-a scurs, va activată alarma.
Programarea gătitului !
Un mod de gătire trebuie selectat înainte de programare.
Programarea duratei de gătit
1. Apăsaţi butonul
de mai multe ori până când pictograma AUTO
şi cifrele DUR de pe AFIŞAJ încep să clipească.
2. Folosiţi butoanele “+” şi “-” pentru a ajusta durata dorită; dacă
apăsaţi şi ţineţi apăsat oricare dintre butoane, aşajul va dela
printre valori mai rapid, stabilirea valorii dorite făcându-se mai rapid
şi mai simplu.
3. Aşteptaţi 5 secunde, după care pictograma AUTO va vizibilă
pe ecran.
4. Atunci când timpul setat a trecut şi cuptorul a oprit procesul de
gătire, veţi auzi o alarmă sunând. Apăsaţi orice buton pentru a opri
alarma.
• De exemplu: este ora 9:00 A.M. şi este programată o perioadă de
1 oră şi 15 minute. Programul se va opri automat la ora 10:15 A.M.
Anularea unui program
Pentru a anula un program:
• apăsaţi butonul
până când pictograma care corespunde setării
pe care doriţi să o anulaţi şi cifrele de pe aşaj clipesc. Apăsaţi
butonul “-” până când cifrele 00:00 apar pe aşaj.
• Apăsaţi şi ţineţi apăsate butoanele “+” şi “-”; acest lucru va anula
toate setările selectate anterior, inclusiv setările de temporizare.
RO
33
timpii de gătit sunt aproximativi şi pot varia în funcţie de gustul personal. Atunci când gătiţi, folosiţi grătarul asistat de
ventilator, tigaia trebuie plasată întotdeauna pe primul raft al cuptorului de jos.
M o d u r i d e g ă t i r e
Preparate Greutate
(în kg)
Greutate
(în kg)
Timp preîncălzire
(minute)
Temperatură
recomandată
Timp gătire (min-
ute)
Tradiţional
Cuptor
Raţă
Mânzat sau vită friptă
Friptură de porc
Biscuiţi (pateuri mici)
1
1
1
-
1
3
3
3
3
3
15
15
15
15
15
200
200
200
180
180
65-75
70-75
70-80
15-20
30-35
Coacere
Mod
Tarte
Prăjituri cu
fructe Plumchec
Pandişpan
Clătite umplute (pe 2 poliţe)
Prăjitur mici (pe 2 poliţe)
pufuleţi (pe 2 poliţe)
choux a la creme (pe 3 poliţe)
biscuiţi (pe 3 poliţe)
bezele (pe 3
0,5
1
0,7
0,5
1,2
0,6
0,4
0,7
0,7
0,5
3
2 sau 3
3
3
2 şi 4
2 şi 4
2 şi 4
1 şi 3 şi 5
1 şi 3 şi 5
1 şi 3 şi 5
15
15
15
15
15
15
15
15
15
15
180
180
180
160
200
190
210
180
180
90
20-30
40-45
40-50
25-30
30-35
20-25
15-20
20-25
20-25
180
Gătire rapidă Alimente congelate
Pizza
Plăcintă cu dovlecei şi crevete Plăcintă
ţărănască cu spanac Trigoane
Lazane
0,3
0,4
0,5
0,3
0,5
0,4
0,4
2
2
2
2
2
2
2
-
-
-
-
-
-
-
250
200
220
200
200
180
220
12
20
30-35
25
35
25-30
15-20
Mâncare semipreparată
Aripioare de pui aurii
0,4 2 - 200 20-25
Mâncare proaspătă
Biscuiţi (pateuri mici)
Plumchec
Pufuleţi cu brânză
0,3
0,6
0,2
2
2
2
-
-
-
200
180
210
15-18
45
10-12
Gătire multiplă Pizza (pe 2 poliţe)
Lazane
Miel
Pui fript + carto
Macrou
Plumchec
Choux a la creme (pe 2 poliţe)
Biscuiţi (pe 2 poliţe)
Pandişpan (pe 1 poliţă)
Pandişpan (pe 2 poliţe)
1
1
1
1+1
1
1
0,5
0,5
0,5
1
1,5
2 şi 4
3
2
2 şi 4
2
2
2 şi 4
2 şi 4
2
2 şi 4
3
15
10
10
15
10
10
10
10
10
10
15
230
180
180
200
180
170
190
180
170
170
200
15-20
30-35
40-45
60-70
30-35
40-50
20-25
10-15
15-20
20-25
25-30
Modul Pizza
Pizza
Mânzat sau vită friptă
Pui
0,5
1
1
3
2
2 sau 3
15
10
10
220
220
180
15-20
25-30
60-70
Grăitoare
Calcan şi sepie Kebap
cu calmar şi crevete
Sepie
File de cod
Legume la grătar
Friptură de viţel
Cârnaţi
Hamburgeri
Macrou
Sandvişuri prăjite (sau pâine prăjită)
0,7
0,6
0,6
0,8
0,4
0,8
0,6
0,6
1
4 en 6
4
4
4
4
3 sau 4
4
4
4
4
4
-
-
-
-
-
-
-
-
-
-
Max
Max
Max
Max
Max
Max
Max
Max
Max
Max
10-12
8-10
10-15
10-15
15-20
15-20
15-20
10-12
15-20
3-5
Gratinare Pui la grătar
Sepie
1,5
1,5
2
2
10
10
200
200
55-60
30-35
Ventilat inferior
Plătică
File de cod
Baban de mare în folie
Amestec Legume
(Tip Ratatouillle)
Legume bine făcute
0.5
0.5
0.5
0.8-1,0
1,5-2,0
3
3
3
3
18
16
24
21
170-180
160-170
200-210
190-200
180-190
25-35
15-20
35-45
50-60
55-60
Partea inferioară
Pentru gătirea perfectă
Tabelul cu recomand
ări pt coacerea în cuptor
RO
34
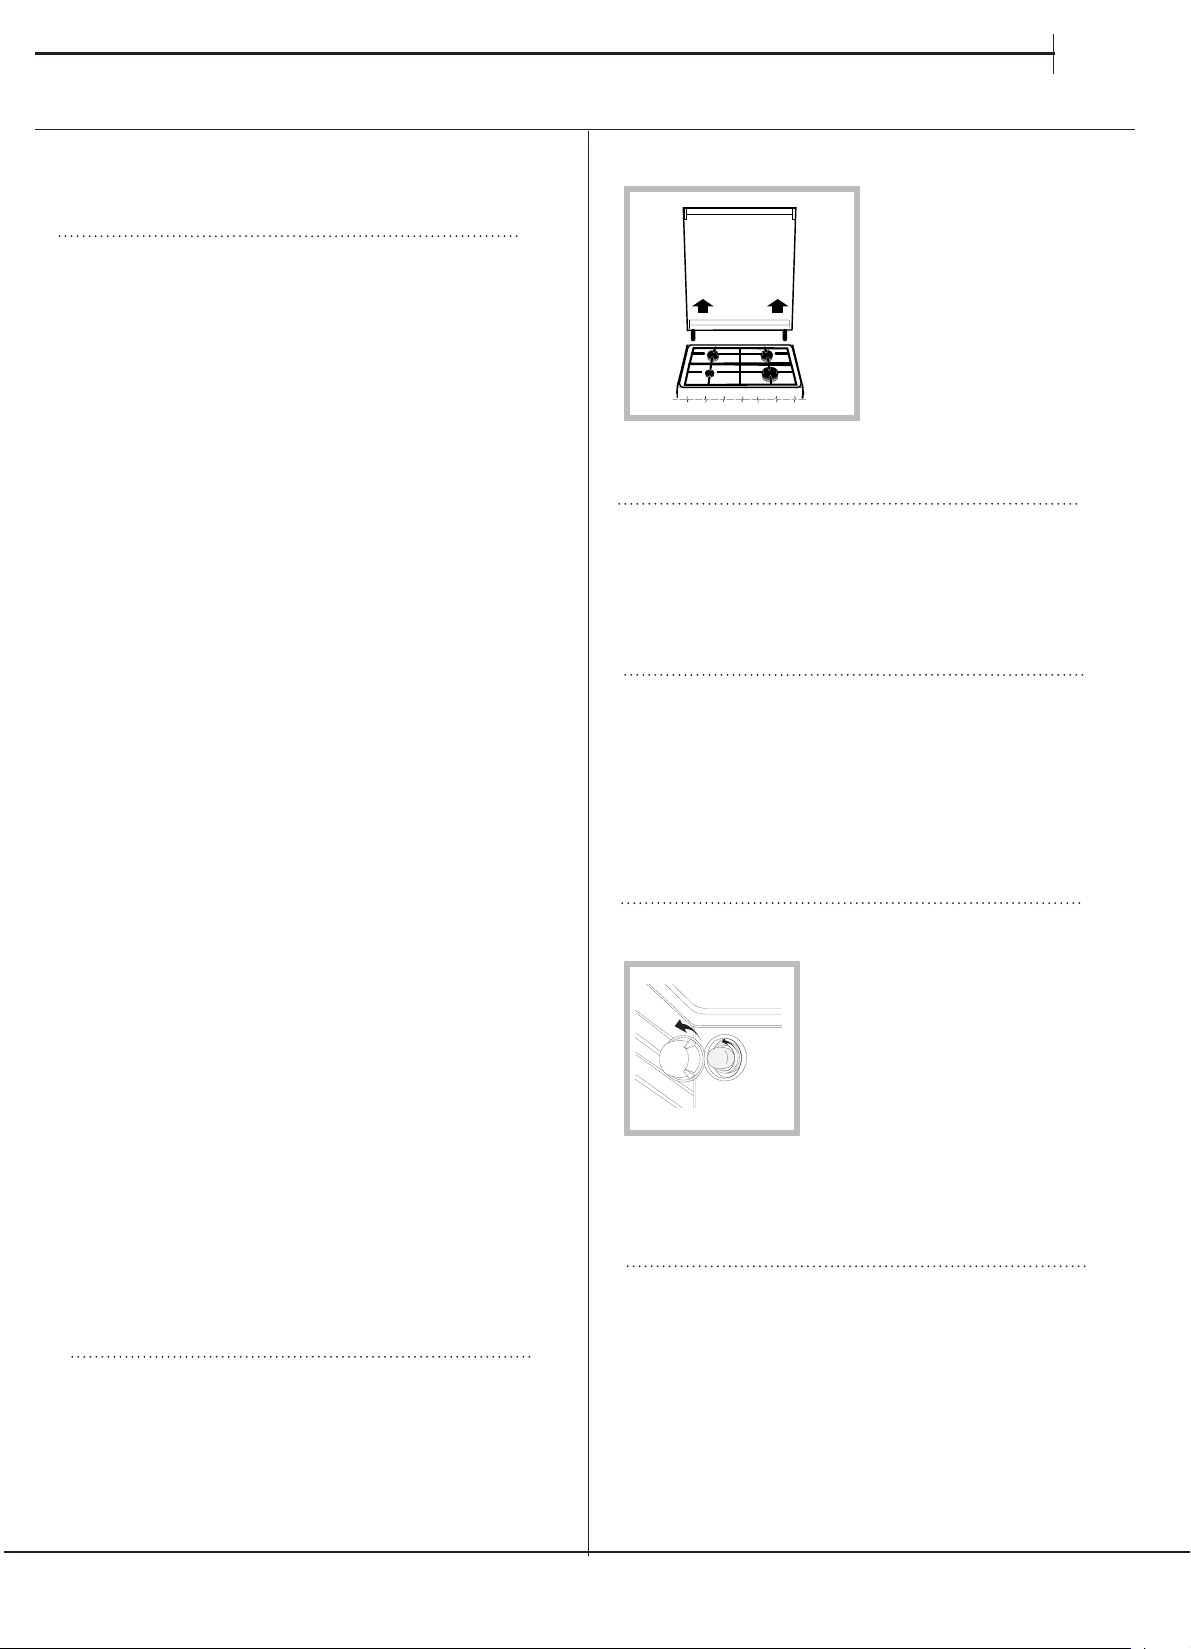
Decuplarea electrică
Înainte de orice opera"ie, debran#a"i aparatul de la
re"eaua de alimentare cu curent electric.
Cură"area aparatului
Evita"i utilizarea de detergen"i abrazivi sau corosivi,
ca de ex. solu"iile de scos pete sau produsele împotriva
ruginii, detergen"ii praf sau bure"ii care au o suprafa"ă
rugoasă: ele pot zgâria iremediabil suprafa"a aparatului.
! Nu utiliza"i niciodată produse pe bază de vapori sau
cu presiune ridicată în vederea cură"ării aparatelor.
• Pentru opera"iile de între"inere curente, este sufi cient
să spăla"i aragazul cu un burete umed, după care
să-l #terge"i cu hârtie absorbantă de bucătărie.
• Păr"ile externe, smăl"uite sau din inox, precum #i
garniturile din cauciuc pot fi cură"ate cu un burete
îmbibat în apă căldu"ă #i săpun neutru. Dacă petele
sunt persistente, folosi"i produse speciale. Clăti"i cu
multă apă #i #terge"i, după cură"ire. Nu folosi"i prafuri
abrazive sau substan"e corosive.
• Grătarele, plitele de deasupra ochiurilor, coroanele
de separat fl acăra
#i arzătoarele aragazului sunt deta#abile,
pentru a facilita cură"area lor: spăla"i-le cu apă caldă
#i detergent delicat, având grijă să scoate"i orice
depunere. Apoi a#tepta"i până când sunt perfect
uscate.
• Dacă aparatul dvs are aprindere electronică, este
necesar să îl cură"a"i cât mai des - în special capătul
dispozitivelor de aprindere instantanee – #i să
verifi ca"i dacă orifi ciile prin care iese gazul nu sunt
înfundate.
• Interiorul cuptorului se va spăla, de preferin"ă, după
fi ecare utilizare, când este cald. Utiliza"i apă caldă #i
detergent; clăti"i bine #i #terge"i cu o lavetă moale.
Evita"i substan"ele abrazive.
• Cură"a"i geamul u#ii cu un burete; nu utiliza"i produse
abrazive; #terge"i cu o lavetă moale; nu folosi"i
articole abrazive sau răzuitoare din metal, ascu"ite,
deoarece acestea pot deteriora suprafa"a geamului
sau îl pot sparge.
• Accesoriile pot fi spălate ca orice alt vas, chiar #i în
ma#ina de spălat vase.
• O"elul inox poate rămâne pătat dacă intră des în
contact cu apa, mai ales dacă are un con"inut mare de
calcar, sau cu detergen"ii agresivi (care con"in fosfor).
După fi ecare spălare, se recomandă să îl clăti"i bine #i
să îl #terge"i. Este oportun în acela#i timp să #terge"i
#i eventualele urme de apă.
Capacul
Modelele dotate cu capac
din sticlă se vor spăla
cu apă căldu"ă. Evita"i
substan"ele abrazive.
Pute"i demonta capacul
pentru a facilita opera"iile
de cură"are, mai ales în
spatele aragazului: pentru
aceasta, deschide"i
capacul #i ridica"i-l (vezi
fi gura).
! Evita"i să închide"i capacul aragazului când
arzătoarele sunt calde sau aprinse.
Controla"i garniturile cuptorului.
Controla"i periodic garnitura din jurul u#ii cuptorului.
Dacă este deteriorată, apela"i la cel mai apropiat
Centru de Asisten"ă Autorizat. Se recomandă să nu
folosi"i cuptorul până la înlocuirea garniturii.
Între"inerea robinetelor de gaz
Cu timpul, se poate întâmpla ca bu#oanele să se
blocheze sau să se rotească mai greu; în acest caz,
este necesar să le înlocui"i.
! Această opera"ie trebuie să fi e executată numai de
un instalator autorizat de fabricant.
Înlocuirea becului cuptorului
1. După ce a"i debran#at
aparatul de la alimentarea
electrică, scoate"i capacul din
sticlă care acoperă becul (vezi
fi gura).
2. De#uruba"i becul #i înlocui"i-l
cu unul similar: tensiune 230 V,
putere 25 W, cuplare E 14.
3. Monta"i la loc capacul de sticlă #i racorda"i din nou
aragazul la instala"ia electrică.
Între"inere #i cură"ire
RO
35
Suporţi poliţă cuptor
Suporţii poliţei sunt detaşabili şi sigure pentru maşina de
spălat vase. Pentru a elimina, ţineţi suportul în faţă şi
trageţi în partea opusă cuptorului, acesta poate fi apoi
curăţat într-o chiuvetă sau într-o maşină de spălat vase.
Atunci când este scos, permite accesul la partea
cuptorului, care poate fi curăţată cu apă călduţă, cu
săpun. Pentru a remonta suportul, introduceţi piciorul mai
lung în gaura de fixare din spate şi împingeţi piciorul din
faţă.
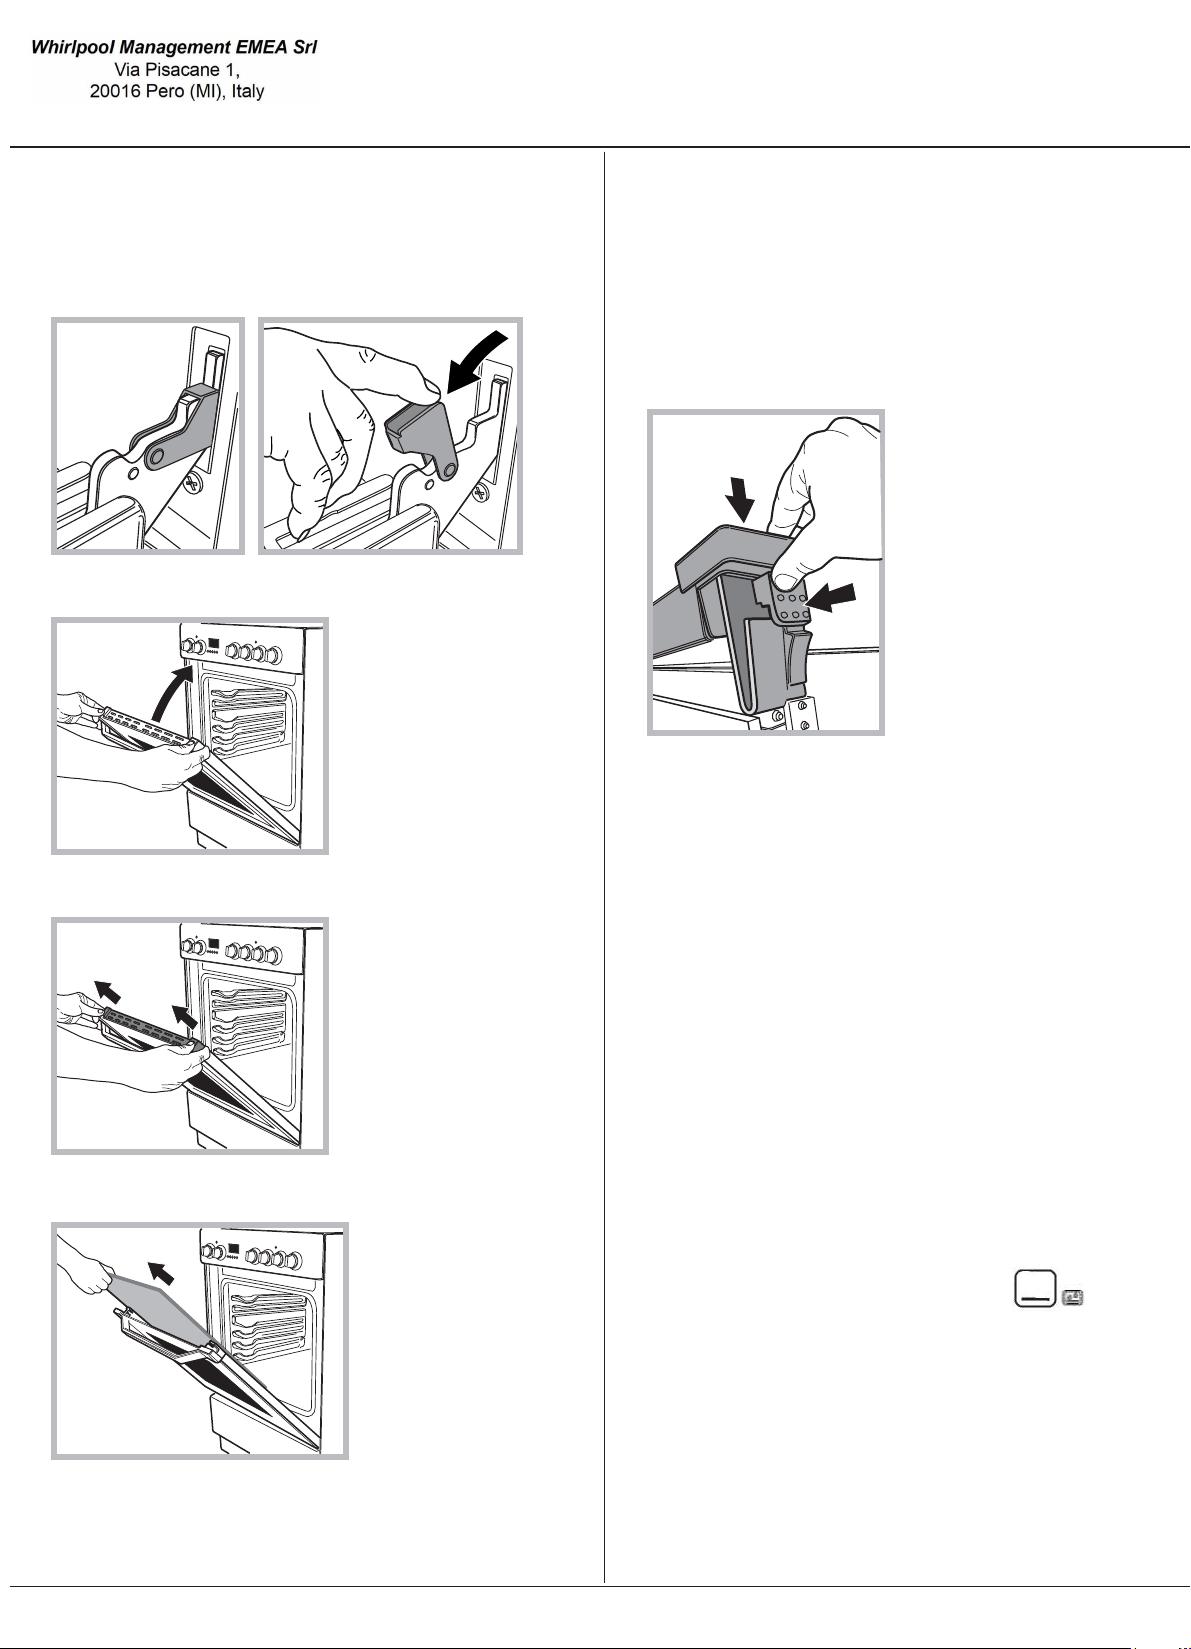
Scoaterea și montarea ușii cuptorului:
1. Deschideți ușa
2. Face clemele balamalelor din ușa cuptorului roti
înapoi complet (vezi foto)
3. Închideți ușa până când clemele opri (ușa se va
rămâne deschis pentru 40 ° aprox.) (vezi foto)
40°
4. Apăsați cele două butoane de pe pro lul superior și
extrage pro lului (vezi foto)
5. Scoateți foaia de sticlă și de a face curățenie în calitate
de
indicate în capitolul: "Îngrijire și întreținere".
6. Înlocuiți de sticlă.
ATENȚIE! Cuptorul nu trebuie să e operat
cu interior
ușă de sticlă eliminat!
ATENȚIE! La reasamblare ușa interioară
sticlă se introduce geamul corect, astfel încât
text scris pe panoul nu este inversat și
poate ușor lizibile
7. Înlocuiți pro l, un clic va indica faptul că
parte este poziționat corect.
8. Deschideți complet ușa.
9. Închideți suporturi (vezi foto).
10. Acum ușa poate închisă complet și
cuptorul poate pornit pentru o utilizare
normală.
36
Această metodă de curăţare este recomandată mai ales
după ce aţi gătit cărnuri (prăjite) foarte grase.
Acest proces de curăţare permite facilitarea îndepărtării
murdăriei de pe pereţii cuptorului prin generarea de aburi,
care este creată înăuntrul cavităţii cuptorului, pentru o
curăţare mai uşoară.
Important ! Înainte de a începe curăţarea prin aburi
- Îndepărtaţi orice rest de mâncare şi grăsime de pe
fundul cuptorului
- Îndepărtaţi orice accesorii ale cuptorului (grătare şi tăvi de
scurgere)
Efectuaţi operaţiunile de mai sus, ţinând seama de
procedura următoare:
1. turnaţi 300 ml de apă în tava de coacere din cuptor,
plasând-o pe raftul de jos. La modelele fără tavă de
scurgere, folosiţi o hârtie de copt şi plasaţi-o pe grătar, în
raftul de jos;
2. selectaţi funcţia cuptorului şi setaţi temperatura
la 100 ° C;
3. ţineţi-l în cuptor preţ de 15 min;
4. opriţi cuptorul
5. Odată ce s-a răcit cuptorul, puteţi deschide uşa pentru a
finaliza curăţarea cu apă şi o cârpă moale
6. îndepărtaţi orice apă reziduală din cavitate după
terminarea curăţării
Când aţi terminat curăţarea prin aburi, mai ales după ce
aţi gătit mâncăruri grase, sau când grăsimea este dificil de
îndepărtat, s-ar putea să fie necesară finalizarea curăţării
prin metoda tradiţională, descrisă în paragraful anterior
Efectuaţi curăţarea doar când cuptorul este rece!
XEROX FABRIANO
05/2022-
www.whirlpool.com
W11614392