
INSTRUCTION MANUAL
MANUAL DE INSTRUCCIONES
Cordless Chain Saw
Electrosierra Inalámbrica
XCU11
IMPORTANT: Read Before Using.
IMPORTANTE: Lea antes de usar.

2 ENGLISH
ENGLISH (Original instructions)
SPECIFICATIONS
Model: XCU11
Overall length
(without guide bar)
PPƎ
Rated voltage D.C. 18 V
Net weight *1 2.9 kg (6.4 lbs)
*2 4.2 - 4.3 kg (9.3 - 9.5 lbs)
Standard guide bar length PPƎ
Recommended guide bar length PPƎ
Applicable saw chain type
(refer to the table below)
90PX
Sprocket Number of teeth 6
Pitch Ǝ
Chain speed 0 - 7.7 m/s
(0 - 460 m/min)
(0 - 1,520 ft/min)
Chain oil tank volume 150 cm
3
ÀR]
•
'XHWRRXUFRQWLQXLQJSURJUDPRIUHVHDUFKDQGGHYHORSPHQWWKHVSHFL¿FDWLRQVKHUHLQDUHVXEMHFWWRFKDQJHZLWKRXWQRWLFH
6SHFL¿FDWLRQVPD\GLႇHUIURPFRXQWU\WRFRXQWU\
*1: Weight, without the saw chain, guide bar, guide bar cover, oil and battery cartridge(s).
7KHOLJKWHVWDQGKHDYLHVWFRPELQDWLRQRIZHLJKWDFFRUGLQJWR(37$3URFHGXUH7KHZHLJKWPD\GLႇHU
depending on the attachment(s), including the battery cartridge(s).
Saw chain, guide bar, and sprocket combination
Saw chain type 90PX
Number of drive links 52
Guide bar Guide bar length PPƎ
Cutting length PPƎ
Part No. 165246-6
Pitch Ǝ
Gauge PPƎ
Type Sprocket nose bar
Sprocket Number of teeth 6
Pitch Ǝ
WARNING:8VHDSSURSULDWHFRPELQDWLRQRIWKHJXLGHEDUDQGVDZFKDLQ2WKHUZLVHSHUVRQDOLQMXU\PD\
result.
Applicable battery cartridge and charger
Battery cartridge BL1830 / BL1830B / BL1840B / BL1850B / BL1860B
Charger
DC18RC / DC18RD / DC18RE / DC18SD / DC18SE / DC18SF / DC18SH
•
Some of the battery cartridges and chargers listed above may not be available depending on your region of residence.
WARNING: Only use the battery cartridges and chargers listed above. Use of any other battery cartridges
DQGFKDUJHUVPD\FDXVHLQMXU\DQGRU¿UH
Recommended cord connected power source
Portable power pack PDC01
• The cord connected power source(s) listed above may not be available depending on your region of residence.
• Before using the cord connected power source, read instruction and cautionary markings on them.

3 ENGLISH
SAFETY WARNINGS
General power tool safety warnings
WARNING: Read all safety warnings, instruc-
WLRQVLOOXVWUDWLRQVDQGVSHFL¿FDWLRQVSURYLGHG
with this power tool. Failure to follow all instructions
OLVWHGEHORZPD\UHVXOWLQHOHFWULFVKRFN¿UHDQGRU
VHULRXVLQMXU\
Save all warnings and instruc-
tions for future reference.
The term "power tool" in the warnings refers to your
mains-operated (corded) power tool or battery-operated
(cordless) power tool.
Work area safety
1. Keep work area clean and well lit. Cluttered or
dark areas invite accidents.
2. Do not operate power tools in explosive atmo-
VSKHUHVVXFKDVLQWKHSUHVHQFHRIÀDPPDEOH
liquids, gases or dust. Power tools create sparks
which may ignite the dust or fumes.
3.
Keep children and bystanders away while operating
a power tool. Distractions can cause you to lose control.
Electrical Safety
1. Power tool plugs must match the outlet. Never
modify the plug in any way. Do not use any
adapter plugs with earthed (grounded) power
tools. 8QPRGL¿HGSOXJVDQGPDWFKLQJRXWOHWVZLOO
reduce risk of electric shock.
2. Avoid body contact with earthed or grounded
surfaces, such as pipes, radiators, ranges and
refrigerators. There is an increased risk of elec-
tric shock if your body is earthed or grounded.
3. Do not expose power tools to rain or wet con-
ditions. Water entering a power tool will increase
the risk of electric shock.
4. Do not abuse the cord. Never use the cord for
carrying, pulling or unplugging the power tool.
Keep cord away from heat, oil, sharp edges
or moving parts. Damaged or entangled cords
increase the risk of electric shock.
5.
When operating a power tool outdoors, use an
extension cord suitable for outdoor use. Use of a cord
suitable for outdoor use reduces the risk of electric shock.
6. If operating a power tool in a damp location is
unavoidable, use a ground fault circuit inter-
rupter (GFCI) protected supply. Use of a GFCI
reduces the risk of electric shock.
7.
3RZHUWRROVFDQSURGXFHHOHFWURPDJQHWLF¿HOGV
(EMF) that are not harmful to the user. However,
users of pacemakers and other similar medical
devices should contact the maker of their device and/
or doctor for advice before operating this power tool.
Personal Safety
1. Stay alert, watch what you are doing and use
common sense when operating a power tool.
Do not use a power tool while you are tired or
XQGHUWKHLQÀXHQFHRIGUXJVDOFRKRORUPHG-
ication. A moment of inattention while operating
SRZHUWRROVPD\UHVXOWLQVHULRXVSHUVRQDOLQMXU\
2. Use personal protective equipment. Always
wear eye protection. Protective equipment such
as dust mask, non-skid safety shoes, hard hat, or
hearing protection used for appropriate conditions
ZLOOUHGXFHSHUVRQDOLQMXULHV
3. Prevent unintentional starting. Ensure the
VZLWFKLVLQWKHRႇSRVLWLRQEHIRUHFRQQHFWLQJ
to power source and/or battery pack, picking
up or carrying the tool. Carrying power tools with
\RXU¿QJHURQWKHVZLWFKRUHQHUJLVLQJSRZHUWRROV
that have the switch on invites accidents.
4. Remove any adjusting key or wrench before
turning the power tool on. A wrench or a key left
attached to a rotating part of the power tool may
UHVXOWLQSHUVRQDOLQMXU\
5. Do not overreach. Keep proper footing and
balance at all times. This enables better control
of the power tool in unexpected situations.
6. Dress properly. Do not wear loose clothing or
jewellery. Keep your hair, clothing and gloves
away from moving parts./RRVHFORWKHVMHZHO-
lery or long hair can be caught in moving parts.
7. If devices are provided for the connection of
dust extraction and collection facilities, ensure
these are connected and properly used. Use of
GXVWFROOHFWLRQFDQUHGXFHGXVWUHODWHGKD]DUGV
8.
Do not let familiarity gained from frequent use
of tools allow you to become complacent and
ignore tool safety principles. A careless action can
FDXVHVHYHUHLQMXU\ZLWKLQDIUDFWLRQRIDVHFRQG
9. Always wear protective goggles to protect
your eyes from injury when using power tools.
The goggles must comply with ANSI Z87.1 in
the USA.
It is an employer's responsibility to enforce the
use of appropriate safety protective equipment
by the tool operators and by other persons in
the immediate working area.
Power tool use and care
1. Do not force the power tool. Use the correct
power tool for your application. The correct
SRZHUWRROZLOOGRWKHMREEHWWHUDQGVDIHUDWWKH
rate for which it was designed.
2. Do not use the power tool if the switch does
QRWWXUQLWRQDQGRႇ Any power tool that cannot
be controlled with the switch is dangerous and
must be repaired.
3. Disconnect the plug from the power source
and/or remove the battery pack, if detachable,
from the power tool before making any adjust-
ments, changing accessories, or storing power
tools. Such preventive safety measures reduce
the risk of starting the power tool accidentally.
4. Store idle power tools out of the reach of chil-
dren and do not allow persons unfamiliar with
the power tool or these instructions to operate
the power tool. Power tools are dangerous in the
hands of untrained users.
5. Maintain power tools and accessories. Check
for misalignment or binding of moving parts,
breakage of parts and any other condition that
PD\DႇHFWWKHSRZHUWRRO¶VRSHUDWLRQ,IGDP-
aged, have the power tool repaired before use.
Many accidents are caused by poorly maintained
power tools.

4 ENGLISH
6. Keep cutting tools sharp and clean. Properly
maintained cutting tools with sharp cutting edges
are less likely to bind and are easier to control.
7. Use the power tool, accessories and tool bits
etc. in accordance with these instructions, tak-
ing into account the working conditions and
the work to be performed. Use of the power tool
IRURSHUDWLRQVGLႇHUHQWIURPWKRVHLQWHQGHGFRXOG
UHVXOWLQDKD]DUGRXVVLWXDWLRQ
8. Keep handles and grasping surfaces dry,
clean and free from oil and grease. Slippery
handles and grasping surfaces do not allow for
safe handling and control of the tool in unexpected
situations.
9. When using the tool, do not wear cloth work
gloves which may be entangled. The entangle-
ment of cloth work gloves in the moving parts may
UHVXOWLQSHUVRQDOLQMXU\
Battery tool use and care
1. 5HFKDUJHRQO\ZLWKWKHFKDUJHUVSHFL¿HGE\
the manufacturer. A charger that is suitable for
RQHW\SHRIEDWWHU\SDFNPD\FUHDWHDULVNRI¿UH
when used with another battery pack.
2. 8VHSRZHUWRROVRQO\ZLWKVSHFL¿FDOO\GHVLJ-
nated battery packs. Use of any other battery
SDFNVPD\FUHDWHDULVNRILQMXU\DQG¿UH
3. When battery pack is not in use, keep it away
from other metal objects, like paper clips,
coins, keys, nails, screws or other small metal
objects, that can make a connection from one
terminal to another. Shorting the battery termi-
QDOVWRJHWKHUPD\FDXVHEXUQVRUD¿UH
4. Under abusive conditions, liquid may be
ejected from the battery; avoid contact. If con-
WDFWDFFLGHQWDOO\RFFXUVÀXVKZLWKZDWHU,I
liquid contacts eyes, additionally seek medical
help./LTXLGHMHFWHGIURPWKHEDWWHU\PD\FDXVH
irritation or burns.
5. Do not use a battery pack or tool that is dam-
DJHGRUPRGL¿HG'DPDJHGRUPRGL¿HGEDWWHULHV
may exhibit unpredictable behaviour resulting in
¿UHH[SORVLRQRUULVNRILQMXU\
6. 'RQRWH[SRVHDEDWWHU\SDFNRUWRROWR¿UHRU
excessive temperature.([SRVXUHWR¿UHRUWHP-
perature above 130 °C may cause explosion.
7. Follow all charging instructions and do not
charge the battery pack or tool outside the
WHPSHUDWXUHUDQJHVSHFL¿HGLQWKHLQVWUXF-
tions. Charging improperly or at temperatures
RXWVLGHWKHVSHFL¿HGUDQJHPD\GDPDJHWKH
EDWWHU\DQGLQFUHDVHWKHULVNRI¿UH
Service
1. +DYH\RXUSRZHUWRROVHUYLFHGE\DTXDOL¿HG
repair person using only identical replacement
parts. This will ensure that the safety of the power
tool is maintained.
2. Never service damaged battery packs. Service
of battery packs should only be performed by the
PDQXIDFWXUHURUDXWKRUL]HGVHUYLFHSURYLGHUV
3. Follow instruction for lubricating and chang-
ing accessories.
4. Do not modify or attempt to repair the appli-
ance or the battery pack except as indicated in
the instructions for use and care.
General chain saw safety warnings
1. Keep all parts of the body away from the saw
chain when the chain saw is operating. Before
you start the chain saw, make sure the saw
chain is not contacting anything. A moment of
inattention while operating chain saws may cause
entanglement of your clothing or body with the
saw chain.
2. Always hold the chain saw with your right
hand on the rear handle and your left hand on
the front handle. Holding the chain saw with a
UHYHUVHGKDQGFRQ¿JXUDWLRQLQFUHDVHVWKHULVNRI
SHUVRQDOLQMXU\DQGVKRXOGQHYHUEHGRQH
3. Hold the chain saw by insulated gripping sur-
faces only, because the saw chain may contact
hidden wiring. Saw chains contacting a "live"
wire may make exposed metal parts of the chain
saw "live" and could give the operator an electric
shock.
4. Wear eye protection. Further protective equip-
ment for hearing, head, hands, legs and feet is
recommended. Adequate protective equipment
ZLOOUHGXFHSHUVRQDOLQMXU\IURPÀ\LQJGHEULVRU
accidental contact with the saw chain.
5. Do not operate a chain saw, on a ladder, from a
rooftop, or any unstable support. Operation of
a chain saw in this manner could result in serious
SHUVRQDOLQMXU\
6.
Do not operate a chain saw in a tree unless you
KDYHEHHQVSHFL¿FDOO\WUDLQHGWRGRVR Operation
of a chain saw in a tree without proper training could
LQFUHDVHWKHULVNRIVHULRXVSHUVRQDOLQMXU\
7.
Always keep proper footing and operate the chain
VDZRQO\ZKHQVWDQGLQJRQ¿[HGVHFXUHDQG
level surface. Slippery or unstable surfaces may
cause a loss of balance or control of the chain saw.
8. When cutting a limb that is under tension, be
alert for spring back. When the tension in the
ZRRG¿EUHVLVUHOHDVHGWKHVSULQJORDGHGOLPE
may strike the operator and/or throw the chain
saw out of control.
9.
Use extreme caution when cutting brush and sap-
lings. The slender material may catch the saw chain
DQGEHZKLSSHGWRZDUG\RXRUSXOO\RXRႇEDODQFH
10. Carry the chain saw by the front handle with
WKHFKDLQVDZVZLWFKHGRႇDQGDZD\IURP\RXU
body. When transporting or storing the chain
VDZDOZD\V¿WWKHJXLGHEDUFRYHU Proper
handling of the chain saw will reduce the likelihood
of accidental contact with the moving saw chain.
11. Follow instructions for lubricating, chain
tensioning and changing the bar and chain.
Improperly tensioned or lubricated chain may
either break or increase the chance for kickback.
12. Cut wood only. Do not use chain saw for pur-
poses not intended. For example: do not use
chain saw for cutting metal, plastic, masonry
or non-wood building materials. Use of the
FKDLQVDZIRURSHUDWLRQVGLႇHUHQWWKDQLQWHQGHG
FRXOGUHVXOWLQDKD]DUGRXVVLWXDWLRQ
13. Do not attempt to fell a tree until you have an
understanding of the risks and how to avoid
them.6HULRXVLQMXU\FRXOGRFFXUWRWKHRSHUDWRURU
bystanders while felling a tree.

5 ENGLISH
14. Causes and operator prevention of kickback:
Kickback may occur when the nose or tip of the
JXLGHEDUWRXFKHVDQREMHFWRUZKHQWKHZRRG
closes in and pinches the saw chain in the cut.
Tip contact in some cases may cause a sudden
reverse reaction, kicking the guide bar up and
back towards the operator.
Pinching the saw chain along the top of the guide
bar may push the guide bar rapidly back towards
the operator.
Either of these reactions may cause you to lose
control of the saw which could result in serious
SHUVRQDOLQMXU\'RQRWUHO\H[FOXVLYHO\XSRQWKH
safety devices built into your saw. As a chain saw
user, you should take several steps to keep your
FXWWLQJMREVIUHHIURPDFFLGHQWRULQMXU\
Kickback is the result of chain saw misuse and/or
incorrect operating procedures or conditions and
can be avoided by taking proper precautions as
given below:
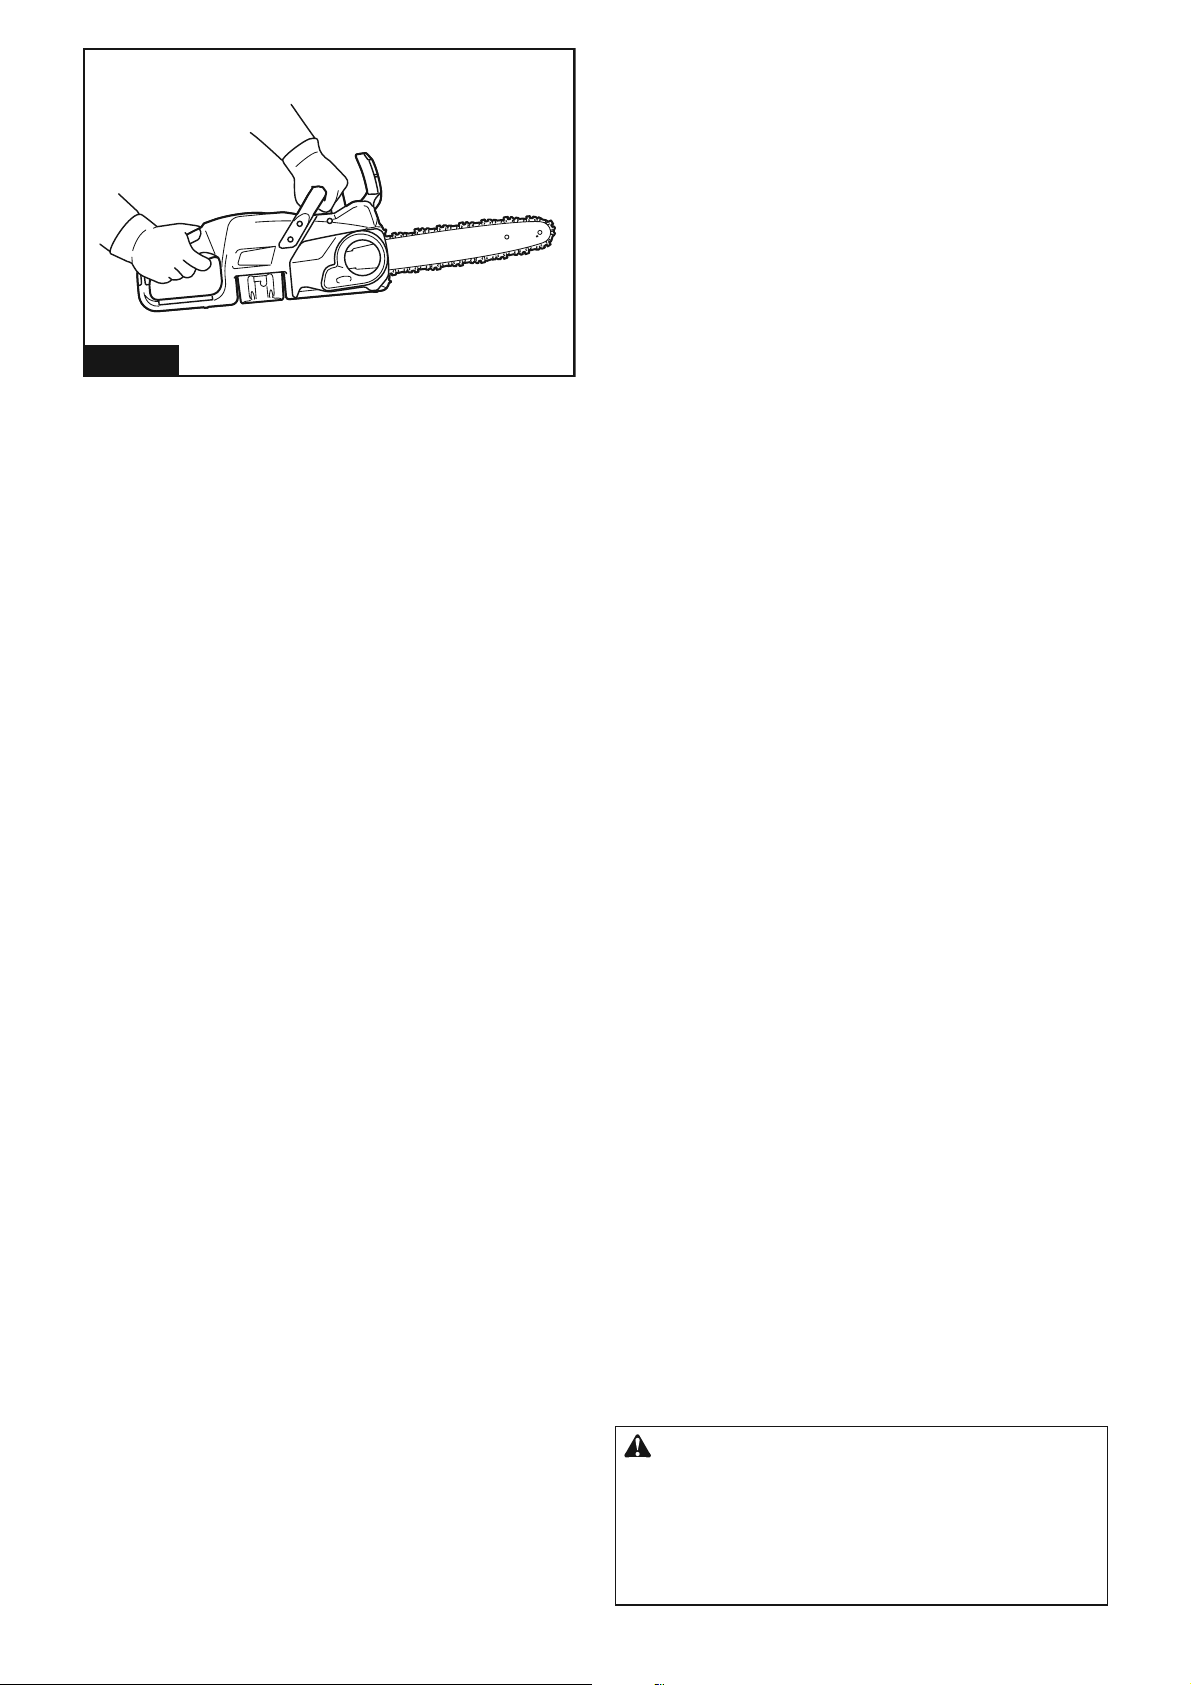
• 0DLQWDLQD¿UPJULSZLWKWKXPEVDQG
¿QJHUVHQFLUFOLQJWKHFKDLQVDZKDQGOHV
with both hands on the saw and position
your body and arm to allow you to resist
kickback forces. Kickback forces can be
controlled by the operator, if proper precau-
tions are taken. Do not let go of the chain
saw.
Fig.1
• Do not overreach and do not cut above
shoulder height. This helps prevent unin-
tended tip contact and enables better control
of the chain saw in unexpected situations.
• Only use replacement guide bars and saw
FKDLQVVSHFL¿HGE\WKHPDQXIDFWXUHU
Incorrect replacement guide bars and saw
chains may cause chain breakage and/or
kickback.
• )ROORZWKHPDQXIDFWXUHU¶VVKDUSHQLQJ
and maintenance instructions for the saw
chain. Decreasing the depth gauge height
can lead to increased kickback.
15. Follow all instructions when clearing jammed
material, storing or servicing the chain saw.
0DNHVXUHWKHVZLWFKLVRႇDQGWKHEDWWHU\
pack is removed. Unexpected actuation of the
FKDLQVDZZKLOHFOHDULQJMDPPHGPDWHULDORU
VHUYLFLQJPD\UHVXOWLQVHULRXVSHUVRQDOLQMXU\
Additional Safety Instructions
Operation
1. Before starting work, check that the chain
saw is in proper working order and that its
condition complies with the safety regulations.
Check in particular that:
• The chain brake is working properly;
• The run-down brake is working properly;
7KHEDUDQGWKHVSURFNHWFRYHUDUH¿WWHG
correctly;
• The chain has been sharpened and ten-
sioned in accordance with the regulations.
2. Do not start the chain saw with the chain cover
being installed on it. Starting the chain saw with
the chain cover being installed on it may cause
the chain cover to thrown out forward resulting in
SHUVRQDOLQMXU\DQGGDPDJHWRREMHFWVDURXQGWKH
operator.
3. Keep handles dry, clean, and free from oil and
grease. Greasy, oily handles are slippery causing
loss of control.
4. When you use the tool on muddy ground, wet
slope, or slippery place, pay attention to your
footing.
5. Do not submerge the tool into a puddle.
6. Do not leave the tool unattended outdoors in
the rain.
Electrical and battery safety
1. Avoid dangerous environment. Don't use the
tool in dump or wet locations or expose it to
rain. Water entering the tool will increase the risk
of electric shock.
2. 'RQRWGLVSRVHRIWKHEDWWHU\LHVLQD¿UH
The cell may explode. Check with local codes for
possible special disposal instructions.
3. Do not open or mutilate the battery(ies).
Released electrolyte is corrosive and may cause
damage to the eyes or skin. It may be toxic if
swallowed.
4. Do not charge battery in rain, or in wet
locations.
5. Do not charge the battery outdoors.
6. Do not handle charger, including charger plug,
and charger terminals with wet hands.
7. Do not replace the battery in the rain.
8. Do not replace the battery with wet hands.
9. Do not leave the battery in the rain, nor charge,
use, or store the battery in a damp or wet
place.
10. Do not wet the terminal of battery with liquid
such as water, or submerge the battery. If the
terminal gets wet or liquid enters inside of battery,
the battery may be short circuited and there is a
ULVNRIRYHUKHDW¿UHRUH[SORVLRQ
11. After removing the battery from the machine or
charger, be sure to attach the battery cover to
the battery and store it in a dry place.
12. If the battery cartridge gets wet, drain the
water inside and then wipe it with a dry cloth.
Dry the battery cartridge completely in a dry
place before use.

6 ENGLISH
Maintenance and storage
1. When storing the tool, avoid direct sunlight
and rain, and store it in a place where it does
not get hot or humid.
SAVE THESE INSTRUCTIONS.
WARNING: DO NOT let comfort or familiarity
with product (gained from repeated use) replace
strict adherence to safety rules for the subject
product. MISUSE or failure to follow the safety
rules stated in this instruction manual may cause
serious personal injury.
Symbols
The followings show the symbols used for tool.
volts
direct current
feet per minute
parts number of applicable saw chain and
guide bar
Important safety instructions for
battery cartridge
1.
Before using battery cartridge, read all instruc-
tions and cautionary markings on (1) battery
charger, (2) battery, and (3) product using battery.
2.
Do not disassemble or tamper with the battery car-
tridge.,WPD\UHVXOWLQD¿UHH[FHVVLYHKHDWRUH[SORVLRQ
3. If operating time has become excessively
shorter, stop operating immediately. It may
result in a risk of overheating, possible burns
and even an explosion.
4.
If electrolyte gets into your eyes, rinse them out
with clear water and seek medical attention right
away. It may result in loss of your eyesight.
5. Do not short the battery cartridge:
(1) Do not touch the terminals with any con-
ductive material.
(2) Avoid storing battery cartridge in a con-
tainer with other metal objects such as
nails, coins, etc.
(3) Do not expose battery cartridge to water
or rain.
$EDWWHU\VKRUWFDQFDXVHDODUJHFXUUHQWÀRZ
overheating, possible burns and even a breakdown.
6. Do not store and use the tool and battery car-
tridge in locations where the temperature may
reach or exceed 50 °C (122 °F).
7. Do not incinerate the battery cartridge even if
it is severely damaged or is completely worn
RXW7KHEDWWHU\FDUWULGJHFDQH[SORGHLQD¿UH
8. Do not nail, cut, crush, throw, drop the battery
cartridge, or hit against a hard object to the
battery cartridge. Such conduct may result in a
¿UHH[FHVVLYHKHDWRUH[SORVLRQ
9. Do not use a damaged battery.
10.
The contained lithium-ion batteries are subject to
the Dangerous Goods Legislation requirements.
For commercial transports e.g. by third parties,
forwarding agents, special requirement on pack-
aging and labeling must be observed.
For preparation of the item being shipped, consult-
LQJDQH[SHUWIRUKD]DUGRXVPDWHULDOLVUHTXLUHG
Please also observe possibly more detailed
national regulations.
7DSHRUPDVNRႇRSHQFRQWDFWVDQGSDFNXSWKH
battery in such a manner that it cannot move
around in the packaging.
11. When disposing the battery cartridge, remove
it from the tool and dispose of it in a safe
place. Follow your local regulations relating to
disposal of battery.
12. Use the batteries only with the products
VSHFL¿HGE\0DNLWD Installing the batteries to
QRQFRPSOLDQWSURGXFWVPD\UHVXOWLQD¿UHH[FHV-
sive heat, explosion, or leak of electrolyte.
13. If the tool is not used for a long period of time,
the battery must be removed from the tool.
14. During and after use, the battery cartridge may
take on heat which can cause burns or low
temperature burns. Pay attention to the han-
dling of hot battery cartridges.
15. Do not touch the terminal of the tool imme-
diately after use as it may get hot enough to
cause burns.
16. Do not allow chips, dust, or soil stuck into the
terminals, holes, and grooves of the battery
cartridge.,WPD\FDXVHKHDWLQJFDWFKLQJ¿UH
burst and malfunction of the tool or battery car-
WULGJHUHVXOWLQJLQEXUQVRUSHUVRQDOLQMXU\
17. Unless the tool supports the use near
high-voltage electrical power lines, do not use
the battery cartridge near high-voltage electri-
cal power lines. It may result in a malfunction or
breakdown of the tool or battery cartridge.
18. Keep the battery away from children.
SAVE THESE INSTRUCTIONS.
CAUTION:
Only use genuine Makita batteries.
Use of non-genuine Makita batteries, or batteries that
have been altered, may result in the battery bursting
FDXVLQJ¿UHVSHUVRQDOLQMXU\DQGGDPDJH,WZLOODOVR
void the Makita warranty for the Makita tool and charger.
Tips for maintaining maximum
battery life
1.
Charge the battery cartridge before completely dis-
charged. Always stop tool operation and charge the
battery cartridge when you notice less tool power.
2.
Never recharge a fully charged battery cartridge.
Overcharging shortens the battery service life.
3.
Charge the battery cartridge with room tempera-
ture at 10 °C - 40 °C (50 °F - 104 °F). Let a hot
battery cartridge cool down before charging it.
4. When not using the battery cartridge, remove
it from the tool or the charger.
5. Charge the battery cartridge if you do not use
it for a long period (more than six months).

7 ENGLISH
PARTS DESCRIPTION
1
3
4
5
6
7
8
9
10
11
13
14
2
12
Fig.2
1 Front hand guard 2 Lever 3 Guide bar
4 Saw chain 5 Guide bar cover 6 /RFNRႇEXWWRQ
7 Rear handle 8 Switch trigger 9 Battery cartridge
10 Front handle 11 Oil tank cap 12 Spike bumper
13 Chain catcher 14 $GMXVWLQJGLDO - -

8 ENGLISH
FUNCTIONAL
DESCRIPTION
CAUTION: Always be sure that the tool is
VZLWFKHGRႇDQGWKHEDWWHU\FDUWULGJHLVUHPRYHG
before adjusting or checking function on the tool.
Installing or removing battery
cartridge
CAUTION: $OZD\VVZLWFKRႇWKHWRROEHIRUH
installing or removing of the battery cartridge.
CAUTION: Hold the tool and the battery car-
WULGJH¿UPO\ZKHQLQVWDOOLQJRUUHPRYLQJEDWWHU\
cartridge. Failure to hold the tool and the battery
FDUWULGJH¿UPO\PD\FDXVHWKHPWRVOLSRႇ\RXUKDQGV
and result in damage to the tool and battery cartridge
DQGDSHUVRQDOLQMXU\
1
2
3
Fig.3
Ź1. Red indicator 2. Button 3. Battery cartridge
To remove the battery cartridge, slide it from the tool
while sliding the button on the front of the cartridge.
To install the battery cartridge, align the tongue on the
battery cartridge with the groove in the housing and slip
it into place. Insert it all the way until it locks in place
with a little click. If you can see the red indicator as
VKRZQLQWKH¿JXUHLWLVQRWORFNHGFRPSOHWHO\
CAUTION: Always install the battery cartridge
fully until the red indicator cannot be seen. If not,
LWPD\DFFLGHQWDOO\IDOORXWRIWKHWRROFDXVLQJLQMXU\WR
you or someone around you.
CAUTION: Do not install the battery cartridge
forcibly. If the cartridge does not slide in easily, it is
not being inserted correctly.
Indicating the remaining battery capacity
Only for battery cartridges with the indicator
1
2
Fig.4
Ź1. Indicator lamps 2. Check button
Press the check button on the battery cartridge to indi-
cate the remaining battery capacity. The indicator lamps
light up for a few seconds.
Indicator lamps Remaining
capacity
Lighted 2ႇ Blinking
75% to 100%
50% to 75%
25% to 50%
0% to 25%
Charge the
battery.
The battery
may have
malfunctioned.
NOTE: Depending on the conditions of use and the
DPELHQWWHPSHUDWXUHWKHLQGLFDWLRQPD\GLႇHUVOLJKWO\
from the actual capacity.
NOTE:7KH¿UVWIDUOHIWLQGLFDWRUODPSZLOOEOLQNZKHQ
the battery protection system works.
Tool / battery protection system
The tool is equipped with a tool/battery protection sys-
WHP7KLVV\VWHPDXWRPDWLFDOO\FXWVRႇSRZHUWRWKH
motor to extend tool and battery life. The tool will auto-
matically stop during operation if the tool or battery is
placed under one of the following conditions:
Overload protection
When the tool or battery is operated in a manner that
causes it to draw an abnormally high current, the tool
DXWRPDWLFDOO\VWRSV,QWKLVVLWXDWLRQWXUQWKHWRRORႇ
and stop the application that caused the tool to become
overloaded. Then turn the tool on to restart.

9 ENGLISH
Overheat protection
When the tool or battery is overheated, the tool stops
automatically. In this case, let the tool and battery cool
before turning the tool on again.
NOTE:
In high temperature environment, the overheat
protection likely to work and the tool stops automatically.
Overdischarge protection
When the battery capacity is not enough, the tool stops
automatically. In this case, remove the battery from the
tool and charge the battery.
Protections against other causes
Protection system is also designed for other causes that could
damage the tool and allows the tool to stop automatically.
Take all the following steps to clear the causes, when the tool
has been brought to a temporary halt or stop in operation.
1.
7XUQWKHWRRORႇDQGWKHQWXUQLWRQDJDLQWRUHVWDUW
2. Charge the battery(ies) or replace it/them with
recharged battery(ies).
3. Let the machine and battery(ies) cool down.
If no improvement can be found by restoring protection
system, then contact your local Makita Service Center.
NOTICE: If the tool stops due to a cause
not described above, refer to the section for
troubleshooting.
Switch action
WARNING: For your safety, this tool is
HTXLSSHGZLWKWKHORFNRႇEXWWRQZKLFKSUHYHQWV
the tool from unintended starting. Never use the
tool if it starts when you pull the switch trigger
ZLWKRXWSUHVVLQJWKHORFNRႇEXWWRQ Ask your local
Makita Service Center for repairs.
WARNING: Never disable the lock function or
WDSHGRZQWKHORFNRႇEXWWRQ
CAUTION: Before installing the battery car-
tridge into the tool, always check to see that the
switch trigger actuates properly and returns to
the "OFF" position when released.
NOTICE:
Do not pull the switch trigger forcibly with-
RXWSUHVVLQJWKHORFNRႇEXWWRQ The switch may break.
1
2
Fig.5
Ź1./RFNRႇEXWWRQ2. Switch trigger
To prevent the switch trigger from being accidentally
SXOOHGDORFNRႇEXWWRQLVSURYLGHG7RVWDUWWKHWRRO
SUHVVWKHORFNRႇEXWWRQDQGSXOOWKHVZLWFKWULJJHU
Release the switch trigger to stop.
Checking the chain brake
CAUTION: Hold the chain saw with both
hands when switching it on. Hold the rear handle
with your right hand, the front handle with your
left. The bar and the chain must not be in contact
with any object.
CAUTION: Should the saw chain not stop
immediately when this test is performed, the
saw may not be used under any circumstances.
Consult our authorized service center.
1. 3UHVVWKHORFNRႇEXWWRQWKHQSXOOWKHVZLWFK
trigger. The saw chain starts immediately.
2. Push the front hand guard forwards with the back
of your hand. Make sure that the chain saw comes to an
immediate standstill.
2
1
3
2 3
1
Fig.6
Ź1. Front hand guard 2. Unlocked position 3. Locked
position
Checking the run-down brake
CAUTION: If the saw chain does not stop
within one second in this test, stop using the
chain saw and consult our authorized service
center.
Run the chain saw then release the switch trigger com-
pletely. The saw chain must come to a standstill within
one second.
10 ENGLISH
ASSEMBLY
CAUTION: Always be sure that the tool is
VZLWFKHGRႇDQGWKHEDWWHU\FDUWULGJHLVUHPRYHG
before carrying out any work on the tool.
CAUTION: Do not touch the saw chain with
bare hands. Always wear gloves when handling
the saw chain.
Installing or removing saw chain
CAUTION: The saw chain and the guide bar
are still hot just after the operation. Let them cool
down enough before carrying out any work on
the tool.
CAUTION: Carry out the procedure of install-
ing or removing saw chain in a clean place free
from sawdust and the like.
Installing the saw chain
To install the saw chain, perform the following steps:
1. Release the chain brake by pulling the front hand
guard.
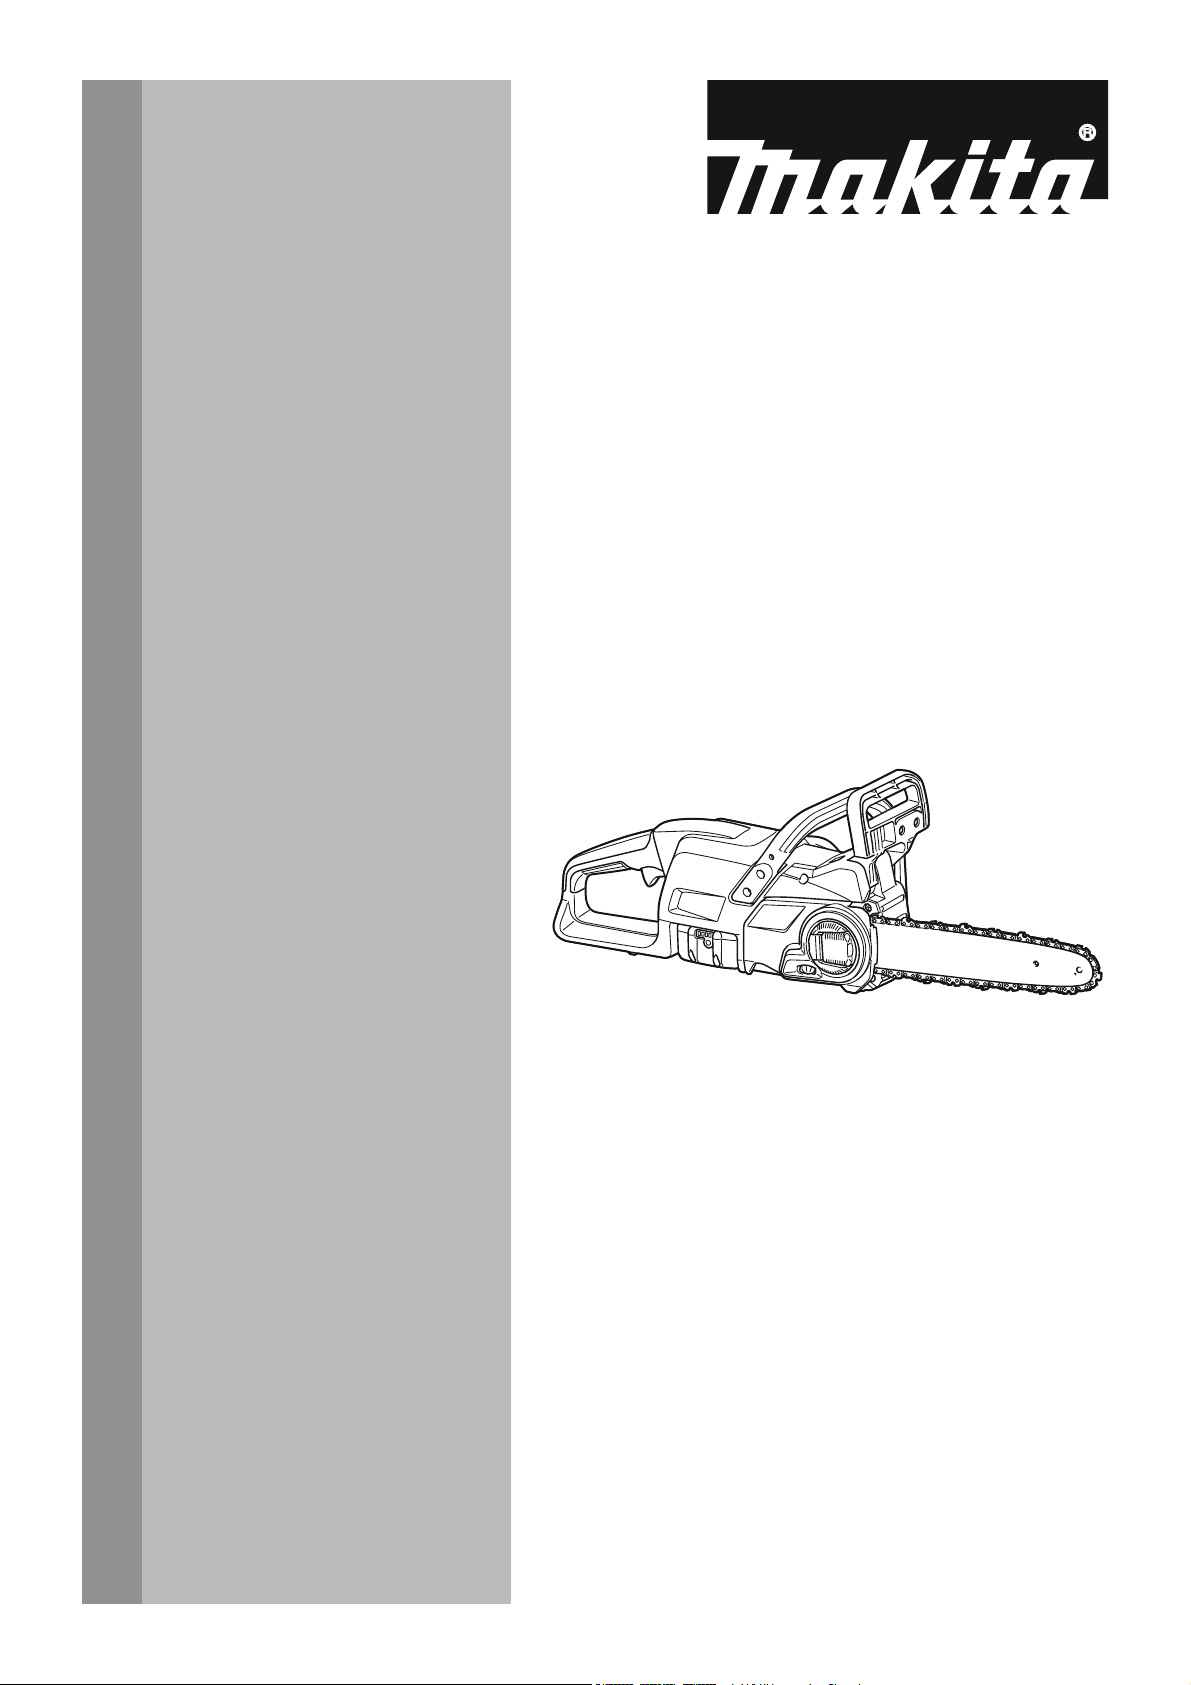
2. Pull the lever up while pressing its edge.
1
Fig.7
Ź1. Lever
3. Turn the lever counterclockwise until the sprocket
FRYHUFRPHVRႇ
1
2
Fig.8
Ź1. Lever 2. Sprocket cover
4. Remove the sprocket cover.
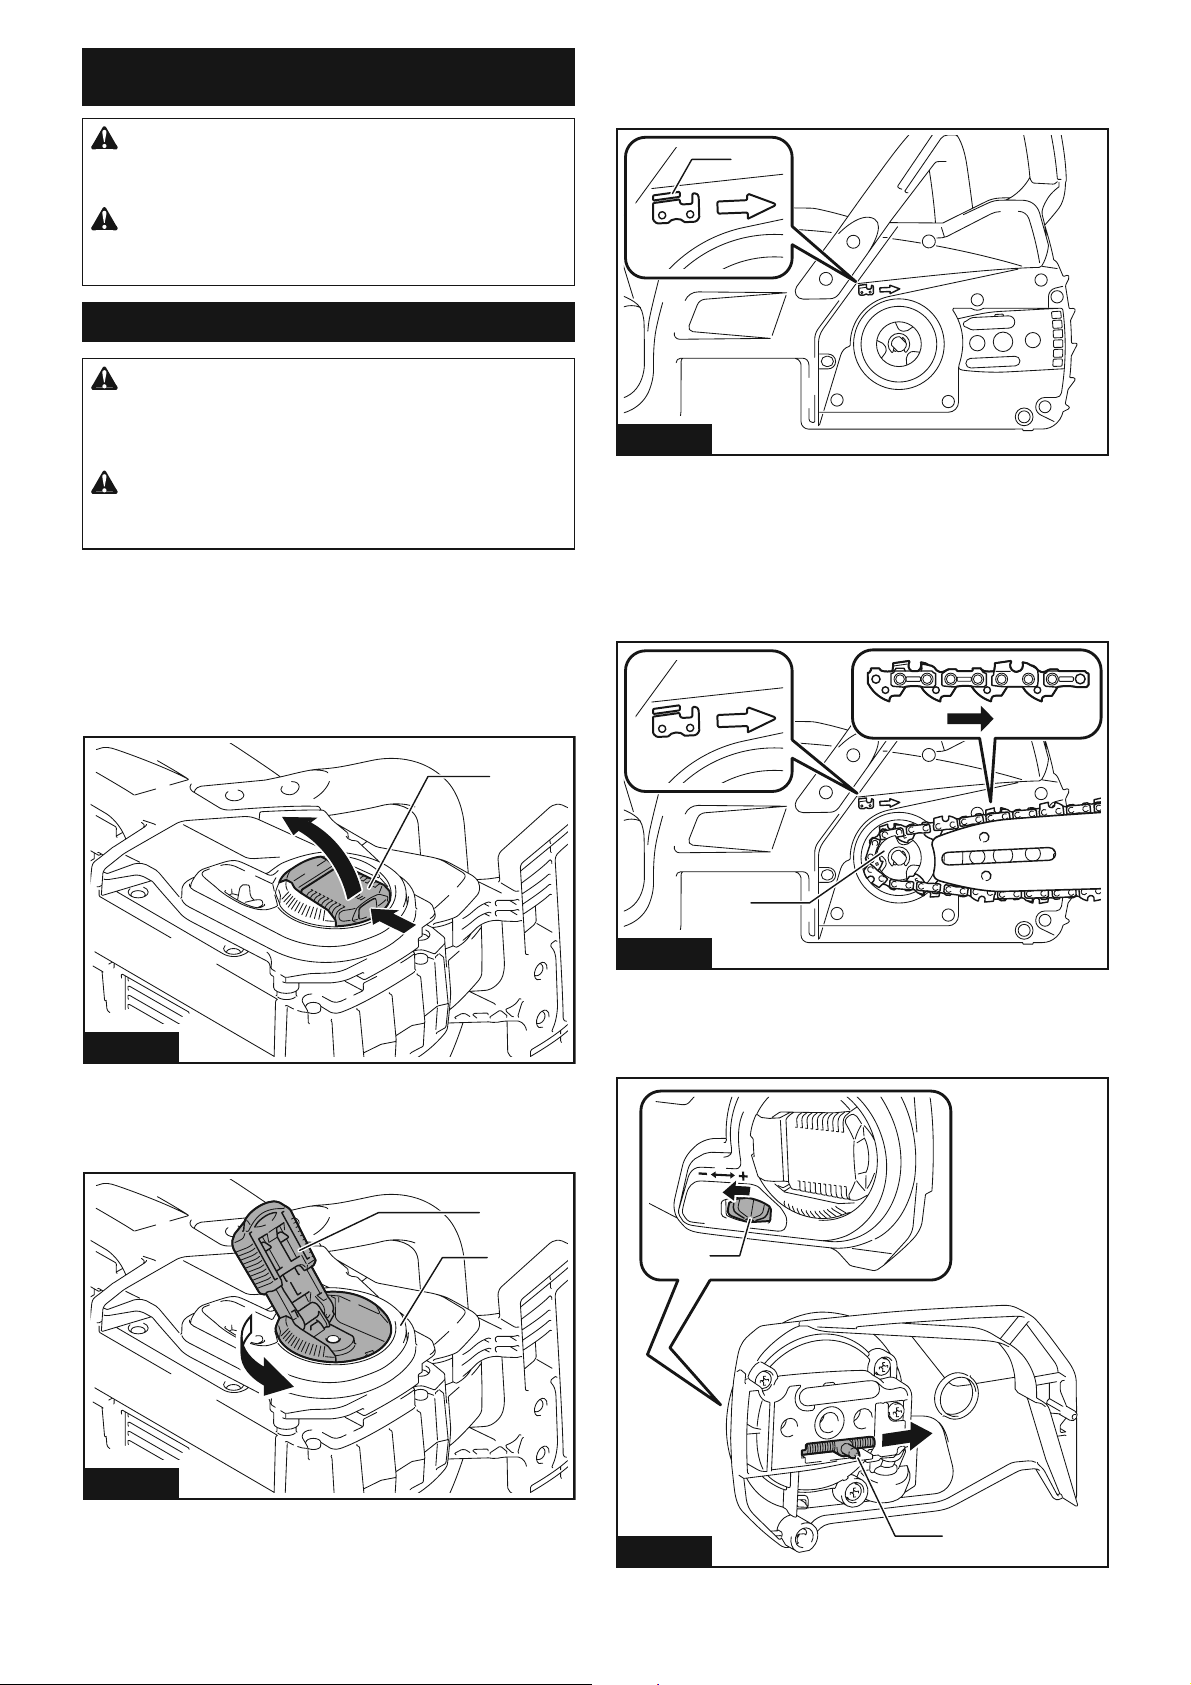
5. Check the direction of the saw chain. Match the
direction of the saw chain with that of the mark on the
chain saw body.
1
Fig.9
Ź1. Mark on chain saw body
6. Fit one end of the saw chain on the top of the
guide bar.
7. Fit the other end of the saw chain around the
sprocket, then attach the guide bar to the chain saw
body.
1
Fig.10
Ź1. Sprocket
8. 7XUQWKHDGMXVWLQJGLDOWRGLUHFWLRQWRVOLGHWKH
DGMXVWLQJSLQLQWKHGLUHFWLRQRIDUURZ
1
2
Fig.11
Ź1.$GMXVWLQJGLDO2.$GMXVWLQJSLQ

11 ENGLISH
9. Place the sprocket cover on the chain saw so that
WKHDGMXVWLQJSLQLVSRVLWLRQHGLQDVPDOOKROHRQWKH
guide bar.
3
1
2
Fig.12
Ź1. Sprocket cover 2. Guide bar 3. Hole
10. Turn the lever clockwise fully and turn back the
OHYHUDOLWWOHWRNHHSORRVHQHVVIRUDGMXVWLQJWKHFKDLQ
tension.
11. $GMXVWWKHFKDLQWHQVLRQ5HIHUWRWKHVHFWLRQIRU
DGMXVWLQJVDZFKDLQWHQVLRQIRUSURFHGXUH
12. Turn the lever clockwise until the sprocket cover is
secured then return it to the original position.
1
2
Fig.13
Ź1. Lever 2. Sprocket cover
Removing the saw chain
To remove the saw chain, perform the following steps:
1. Release the chain brake by pulling the front hand
guard.
2. 7XUQWKHDGMXVWLQJGLDOWRGLUHFWLRQWRUHOHDVH
the saw chain tension.
1
Fig.14
Ź1.$GMXVWLQJGLDO
3. Pull the lever up while pressing its edge.
1
Fig.15
Ź1. Lever
4. Turn the lever counterclockwise until the sprocket
FRYHUFRPHVRႇ
2
1
Fig.16
Ź1. Lever 2. Sprocket cover
5. Remove the sprocket cover then remove the saw
chain and guide bar from the chain saw body.

12 ENGLISH
Adjusting saw chain tension
CAUTION: Carry out the procedure of install-
ing or removing saw chain in a clean place free
from sawdust and the like.
CAUTION: Do not tighten the saw chain too
much. Excessively high tension of saw chain may
cause breakage of saw chain, wear of the guide bar
DQGEUHDNDJHRIWKHDGMXVWLQJGLDO
CAUTION: A chain which is too loose can
MXPSRႇWKHEDUDQGLWPD\FDXVHDQLQMXU\
accident.
The saw chain may become loose after many hours
of use. From time to time check the saw chain tension
before use.
1. Pull the lever up while pressing its edge.
1
Fig.17
Ź1. Lever
2. Turn the lever counterclockwise a little to loosen
the sprocket cover lightly.
2
1
Fig.18
Ź1. Lever 2. Sprocket cover
3.
/LIWXSWKHJXLGHEDUWLSVOLJKWO\DQGDGMXVWWKHFKDLQWHQ-
VLRQ7XUQWKHDGMXVWLQJGLDOWRWKHGLUHFWLRQWRORRVHQWXUQWR
the "+" direction to tighten. Tighten the saw chain until the lower
VLGHRIWKHVDZFKDLQ¿WVLQWKHJXLGHEDUUDLODVLOOXVWUDWHG
2
3
1
Fig.19
Ź1.$GMXVWLQJGLDO2. Guide bar 3. Saw chain
4. Keep holding the guide bar lightly and tighten the
sprocket cover. Make sure that the saw chain does not
loose at the lower side.
5. Return the lever to the original position.
0DNHVXUHWKHVDZFKDLQ¿WVVQXJO\DJDLQVWWKHORZHU
side of the bar.
OPERATION
Lubrication
CAUTION: Do not operate the chain saw when
the tank is empty. Replenish the oil in due time
before the tank is empty.
CAUTION:
Prevent the oil from coming into con-
tact with the skin and eyes. Contact with the eyes causes
LUULWDWLRQ,QWKHHYHQWRIH\HFRQWDFWÀXVKWKHDႇHFWHGH\H
immediately with clear water, then consult a doctor at once.
CAUTION:
Never use waste oil. Waste oil contains
carcinogenic substances. The contaminants in waste
oil cause accelerated wear of the oil pump, the bar and
the chain. Waste oil is harmful to the environment.
NOTICE:
:KHQWKHFKDLQVDZLVXVHGIRUWKH¿UVW
time, it may take up to two minutes for the saw chain
RLOWREHJLQLWVOXEULFDWLQJHႇHFWXSRQWKHVDZPHFK-
anism. Run the saw without load until it does so.
NOTICE:
:KHQ¿OOLQJWKHFKDLQRLOIRUWKH¿UVWWLPH
RUUH¿OOLQJWKHWDQNDIWHULWKDVEHHQFRPSOHWHO\HPS-
WLHGDGGRLOXSWRWKHERWWRPHGJHRIWKH¿OOHUQHFN
The oil delivery may otherwise be impaired.
NOTICE:
Use the saw chain oil exclusively for Makita
chain saws or equivalent oil available in the market.
NOTICE: Never use oil including dust and parti-
cles or volatile oil.
NOTICE: When pruning trees, use botanical oil.
Mineral oil may harm trees.
NOTICE: Before the cutting operation, make sure
that the provided oil tank cap is screwed in place.

13 ENGLISH
Saw chain is automatically lubricated when the tool is in
operation. Check the amount of remaining oil in the oil
tank periodically through the oil inspection window.
1
2
Fig.20
Ź1. Oil tank cap 2. Oil inspection window
7R¿OOWKHRLOSHUIRUPWKHIROORZLQJVWHSV
1. Clean the area around the oil tank cap thoroughly
to prevent any dirt from entering the oil tank.
2.
Lay the chain saw on its side and remove the oil tank cap.
3. Fill the oil tank with the oil. The proper amount of
RLOLVPOÀR]
4. 6FUHZWKHRLOWDQNFDS¿UPO\EDFNLQSODFH
5. Wipe away any spilt chain oil carefully.
NOTE:
,ILWLVGLႈFXOWWRUHPRYHWKHRLOWDQNFDSLQVHUWWKH
slotted screwdriver into the slot of the oil tank cap, and then
remove the oil tank cap by turning it counterclockwise.
1
2
Fig.21
Ź1. Slot 2. Slotted screwdriver
$IWHUUH¿OOLQJKROGWKHFKDLQVDZDZD\IURPWKHWUHH6WDUW
it and wait until lubrication on saw chain is adequate.
Fig.22
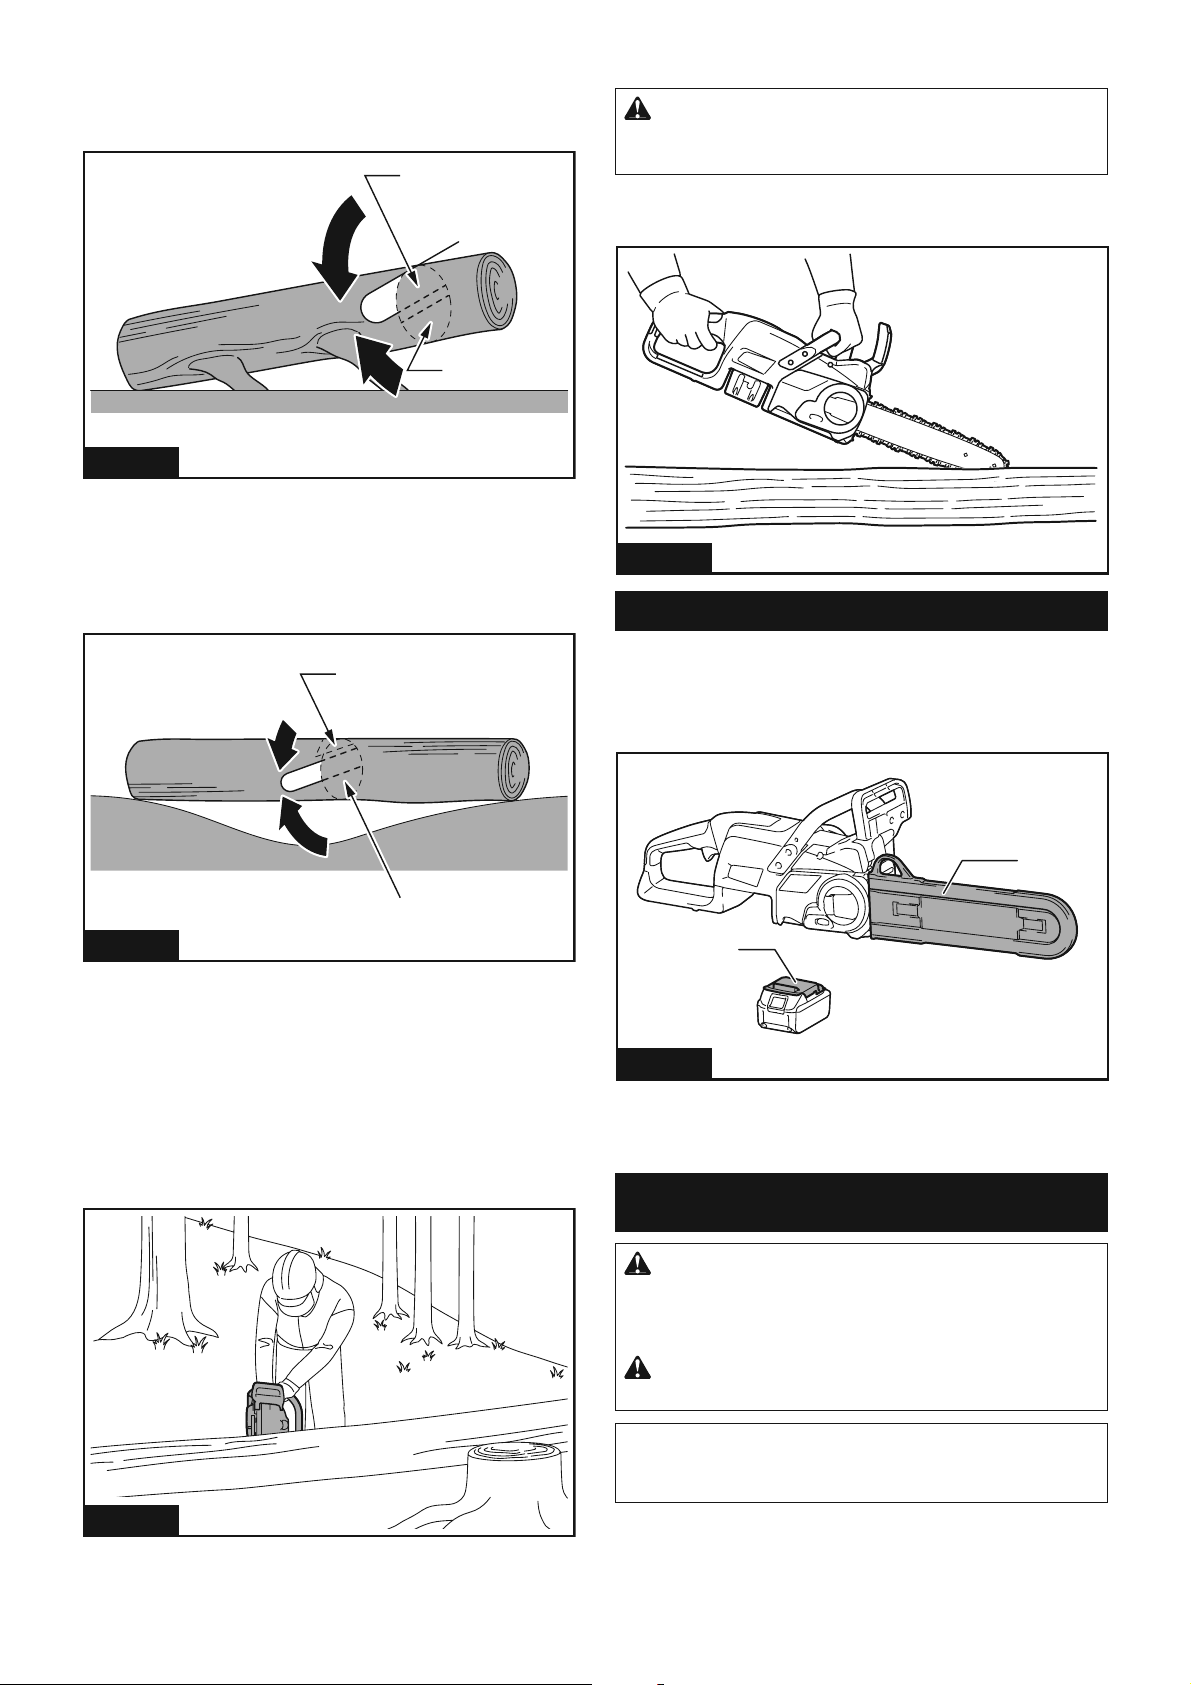
Working with the chain saw
CAUTION:
7KH¿UVWWLPHXVHUVKRXOGDVDPLQL-
mum practice, do cutting logs on a saw-horse or cradle.
CAUTION: When sawing precut timber, use a
safe support (saw horse or cradle). Do not steady
the workpiece with your foot, and do not allow
anyone else to hold or steady it.
CAUTION:
Secure round pieces against rotation.
CAUTION: Keep all parts of the body away
from the saw chain when the motor is operating.
CAUTION: +ROGWKHFKDLQVDZ¿UPO\ZLWK
both hands when the motor is running.
CAUTION: Do not overreach. Keep proper
footing and balance at all times.
CAUTION:
When you use the upper side of the
guide bar for cutting, be careful since the chain saw may
be pushed in your direction if the saw chain is trapped.
NOTICE: Never toss or drop the tool.
NOTICE: Do not cover the vents of the tool.
NOTICE: When making several cuts, switch the
FKDLQVDZRႇEHWZHHQFXWV
Felling a tree
CAUTION: Felling work may only be per-
formed by trained persons.7KHZRUNLVKD]DUGRXV
When cross-cutting/bucking and felling operations are
being performed by two or more persons at the same
time, the felling operations should be separated from
the crosscutting/bucking operation by a distance of at
least twice the height of the tree being felled. Trees
should not be felled in a manner that would endanger
any person, strike any utility line or cause any property
damage. If the tree does make contact with any utility
OLQHWKHFRPSDQ\VKRXOGEHQRWL¿HGLPPHGLDWHO\
The chain saw operator should keep on the uphill side
of the terrain as the tree is likely to roll or slide downhill
after it is felled.
An escape path should be planned and cleared as nec-
essary before cuts are started. The escape path should
extend back and diagonally to the rear of the expected
line of fall as illustrated.
1
2
2
3 3
Fig.23
Ź1. Felling direction 2.'DQJHU]RQH3. Escape route

14 ENGLISH
Before felling is started, consider the natural lean of the
tree, the location of larger branches and the wind direc-
WLRQWRMXGJHZKLFKZD\WKHWUHHZLOOIDOO
Remove dirt, stones, loose bark, nails, staples and wire
from the tree.
Notching undercut and felling back cut
CAUTION: Do not cut the hinge under any
circumstances. The tree may fall unexpectedly.
NOTICE: Use plastic or aluminum wedges to
keep the back cut open. Do not use iron wedges.
1
1
2
3
4
5
Fig.24
Ź1.PPƎ2. Felling back cut 3. Hinge 4. Notch
5. Direction of fall
Make the notch 1/3 the diameter of the tree, perpen-
dicular to the direction of falls as illustrated. Make the
ORZHUKRUL]RQWDOQRWFKLQJFXW¿UVW7KLVZLOOKHOSWRDYRLG
pinching either the saw chain or the guide bar when the
second notch is being made.
0DNHWKHIHOOLQJEDFNFXWDWOHDVWPPƎKLJKHU
WKDQWKHKRUL]RQWDOQRWFKLQJFXWDVLOOXVWUDWHG.HHSWKH
IHOOLQJEDFNFXWSDUDOOHOWRWKHKRUL]RQWDOQRWFKLQJFXW
Make the felling back cut so enough wood is left to act
as a hinge. The hinge wood keeps the tree from twisting
and falling in the wrong direction. Do not cut through
the hinge.
As the felling gets close to the hinge, the tree should
begin to fall. If there is any chance that the tree may
not fall in desired direction or it may rock back and bind
the saw chain, stop cutting before the felling back cut is
complete and use wedges of wood, plastic or aluminium
to open the cut and drop the tree along the desired line
of fall.
When the tree begins to fall, remove the chain saw
from the cut, stop the motor, put the chain saw down,
then use the retreat path planned. Be alert for overhead
limbs falling and watch your footing.
Limbing a tree
CAUTION: Limbing may only be performed by
trained persons.$KD]DUGLVSUHVHQWHGE\WKHULVN
of kickback.
Limbing is removing the branches from a fallen tree.
When limbing leave larger lower limbs to support the
ORJRႇWKHJURXQG5HPRYHWKHVPDOOOLPEVLQRQHFXWDV
illustrated. Branches under tension should be cut from
the bottom up to avoid binding the chain saw.
1
Fig.25
Ź1. Limb cut
Cross-cutting/bucking a log
Cross-cutting/bucking is cutting a log into lengths. It
LVLPSRUWDQWWRPDNHVXUH\RXUIRRWLQJLV¿UPDQG\RXU
weight is evenly distributed on both feet. When possi-
ble, the log should be raised and supported by the use
of limbs, logs or chocks. Follow the simple directions for
easy cutting.
When the log is supported along its entire length as
illustrated, it is cut from the top (overbuck).
Fig.26
15 ENGLISH
When the log is supported on one end, as illustrated,
cut 1/3 the diameter from the underside (underbuck).
7KHQPDNHWKH¿QLVKHGFXWE\RYHUEXFNLQJWRPHHWWKH
¿UVWFXW
1
2
Fig.27
Ź1. Second cut 2. First cut
When the log is supported on both ends, as illustrated,
cut 1/3 the diameter from the top (overbuck). Then
PDNHWKH¿QLVKHGFXWE\XQGHUEXFNLQJWKHORZHUWR
PHHWWKH¿UVWFXW
1
2
Fig.28
Ź1. First cut 2. Second cut
When cross-cutting/bucking on a slope always stand on
the uphill side of the log, as illustrated. When “cutting
through”, to maintain complete control, release the
cutting pressure near the end of the cut without relaxing
your grip on the chain saw handles. Don’t let the chain
contact the ground. After completing the cut, wait for
the saw chain to stop before you move the chain saw.
Always stop the motor before moving from tree to tree.
Fig.29
Parallel-to-grain cut
CAUTION: Parallel-to-grain cut may only be
performed by trained persons. The possibility of
NLFNEDFNSUHVHQWVDULVNRILQMXU\
Perform the parallel-to-grain cut at as shallow an angle
as possible.
Fig.30
Carrying tool
Before carrying the tool, always apply the chain brake
and remove the battery cartridge from the tool. Then
attach the guide bar cover. Also cover the battery car-
tridge with the battery cover.
1
2
Fig.31
Ź1. Guide bar cover 2. Battery cover
MAINTENANCE
CAUTION: Always be sure that the tool is
VZLWFKHGRႇDQGWKHEDWWHU\FDUWULGJHLVUHPRYHG
before attempting to perform inspection or
maintenance.
CAUTION: Always wear gloves when perform-
ing any inspection or maintenance.
NOTICE: Never use gasoline, benzine, thinner,
alcohol or the like. Discoloration, deformation or
cracks may result.
To maintain product SAFETY and RELIABILITY,
UHSDLUVDQ\RWKHUPDLQWHQDQFHRUDGMXVWPHQWVKRXOG
EHSHUIRUPHGE\0DNLWD$XWKRUL]HGRU)DFWRU\6HUYLFH
Centers, always using Makita replacement parts.

16 ENGLISH
Sharpening the saw chain
Sharpen the saw chain when:
•
Mealy sawdust is produced when damp wood is cut;
7KHFKDLQSHQHWUDWHVWKHZRRGZLWKGLႈFXOW\HYHQ
when heavy pressure is applied;
• The cutting edge is obviously damaged;
• The saw pulls to the left or right in the wood.
(caused by uneven sharpening of the saw chain or
damage to one side only)
Sharpen the saw chain frequently but a little each time.
7ZRRUWKUHHVWURNHVZLWKD¿OHDUHXVXDOO\VXႈFLHQWIRU
routine resharpening. When the saw chain has been
resharpened several times, have it sharpened in our
DXWKRUL]HGVHUYLFHFHQWHU
Sharpening criteria:
WARNING: An excessive distance between
the cutting edge and depth gauge increases the
risk of kickback.
22
1
1
3
1
Fig.32
Ź1. Cutter length 2. Distance between cutting edge
and depth gauge 3. Minimum cutter length (3 mm)
² $OOFXWWHUOHQJWKPXVWEHHTXDO'LႇHUHQWFXWWHU
lengths prevent the saw chain from running
smoothly and may cause the saw chain to break.
— Do not sharpen the chain when the cutter length
has reached 3 mm or shorter. The chain must be
replaced with new one.
— The chip thickness is determined by the distance
between the depth gauge (round nose) and the
cutting edge.
— The best cutting results are obtained with following
distance between cutting edge and depth gauge.
&KDLQEODGH3;PPƎ
30
30
55
55
Fig.33
— The sharpening angle of 30° must be the same on
DOOFXWWHUV'LႇHUHQWFXWWHUDQJOHVFDXVHWKHFKDLQ
to run roughly and unevenly, accelerate wear, and
lead to chain breaks.
² 8VHDVXLWDEOHURXQG¿OHVRWKDWWKHSURSHUVKDUS-
ening angle is kept against the teeth.
• Chain blade 90PX : 55°
)LOHDQG¿OHJXLGLQJ
² 8VHDVSHFLDOURXQG¿OHRSWLRQDODFFHVVRU\IRU
saw chains to sharpen the chain. Normal round
¿OHVDUHQRWVXLWDEOH
² 'LDPHWHURIWKHURXQG¿OHIRUHDFKVDZFKDLQLVDV
follows:
&KDLQEODGH3;PPƎ
² 7KH¿OHVKRXOGRQO\HQJDJHWKHFXWWHURQWKHIRU-
ZDUGVWURNH/LIWWKH¿OHRႇWKHFXWWHURQWKHUHWXUQ
stroke.
² 6KDUSHQWKHVKRUWHVWFXWWHU¿UVW7KHQWKHOHQJWK
of this shortest cutter becomes the standard for all
other cutters on the saw chain.
² *XLGHWKH¿OHDVVKRZQLQWKH¿JXUH
1
2
Fig.34
Ź1. File 2. Saw chain
² 7KH¿OHFDQEHJXLGHGPRUHHDVLO\LID¿OHKROGHU
RSWLRQDODFFHVVRU\LVHPSOR\HG7KH¿OHKROGHU
has markings for the correct sharpening angle of
30° (align the markings parallel to the saw chain)
and limits the depth of penetration (to 4/5 of the
¿OHGLDPHWHU
30
1/5
1
Fig.35
Ź1. File holder
17 ENGLISH
— After sharpening the chain, check the height of the
depth gauge using the chain gauge tool (optional
accessory).
Fig.36
² 5HPRYHDQ\SURMHFWLQJPDWHULDOKRZHYHUVPDOO
ZLWKDVSHFLDOÀDW¿OHRSWLRQDODFFHVVRU\
² 5RXQGRႇWKHIURQWRIWKHGHSWKJDXJHDJDLQ
Cleaning the guide bar
Chips and sawdust will build up in the guide bar groove.
7KH\PD\FORJWKHEDUJURRYHDQGLPSDLUWKHRLOÀRZ
Clean out the chips and sawdust every time when you
sharpen or replace the saw chain.
Fig.37
Cleaning the sprocket cover
Chips and saw dust will accumulate inside of the
sprocket cover. Remove the sprocket cover and saw
chain from the tool then clean the chips and saw dust.
Fig.38
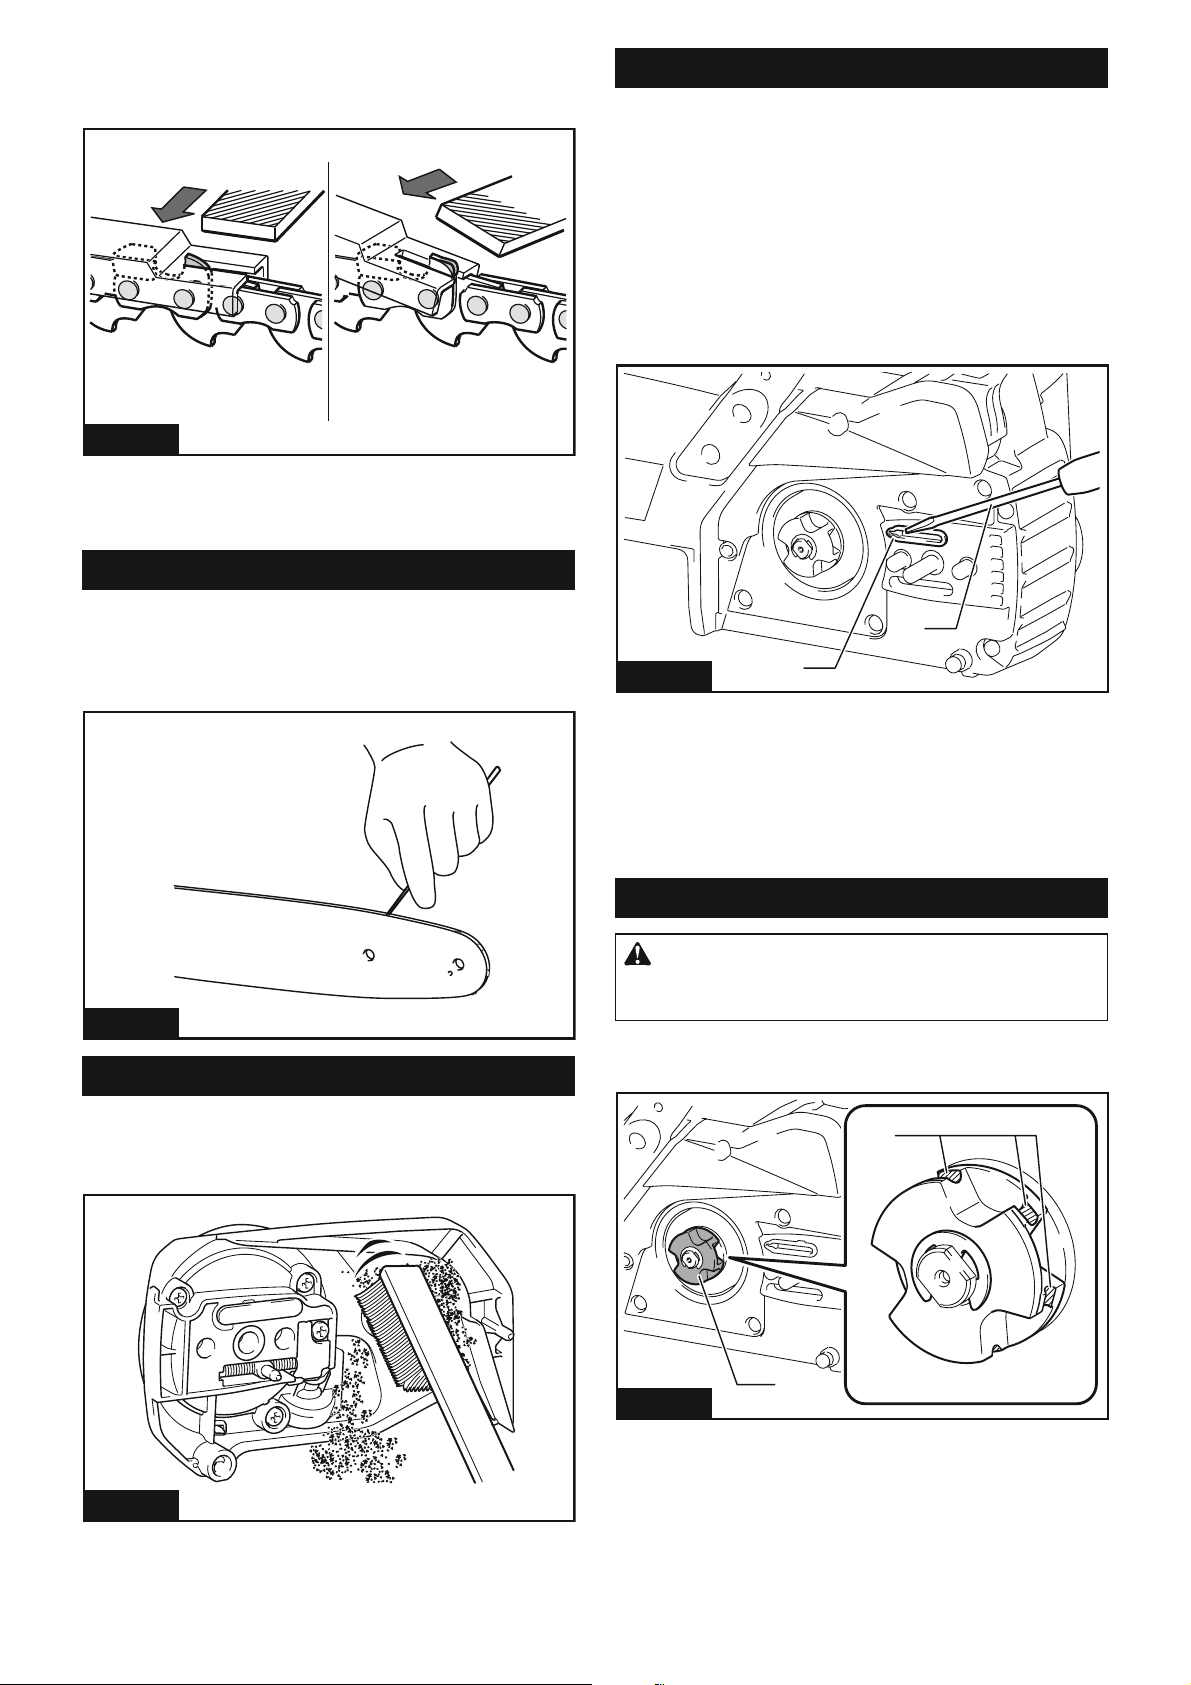
Cleaning the oil discharge hole
Small dust or particles may be built up in the oil dis-
charge hole during operation. These dust or particles
PD\LPSDLUWKHRLOWRÀRZDQGFDXVHDQLQVXႈFLHQW
lubrication on the whole saw chain. When a poor chain
oil delivery occurs at the top of guide bar, clean the oil
discharge hole as follows.
1. Remove the sprocket cover and saw chain from
the tool.
2. Remove the small dust or particles using a slotted
screwdriver or the like.
2
1
Fig.39
Ź1. Slotted screwdriver 2. Oil discharge hole
3. Insert the battery cartridge into the tool. Pull the
VZLWFKWULJJHUWRÀRZEXLOWXSGXVWRUSDUWLFOHVRႇWKHRLO
discharge hole by discharging chain oil.
4. Remove the battery cartridge from the tool.
Reinstall the sprocket cover and saw chain on the tool.
Replacing the sprocket
CAUTION: A worn sprocket will damage a
new saw chain. Have the sprocket replaced in this
case.
%HIRUH¿WWLQJDQHZVDZFKDLQFKHFNWKHFRQGLWLRQRI
the sprocket.
1
2
Fig.40
Ź1. Sprocket 2. Areas to be worn out
18 ENGLISH
$OZD\V¿WDQHZORFNLQJULQJZKHQUHSODFLQJWKH
sprocket.
1
2
Fig.41
Ź1. Locking ring 2. Sprocket
NOTICE: Make sure that the sprocket is installed
DVVKRZQLQWKH¿JXUH
Storing the tool
1. Clean the tool before storing. Remove any chips
and sawdust from the tool after removing the sprocket
cover.
2. After cleaning the tool, run it under no load to lubri-
cate the saw chain and guide bar.
3. Cover the guide bar with the guide bar cover.
4. Empty the oil tank.
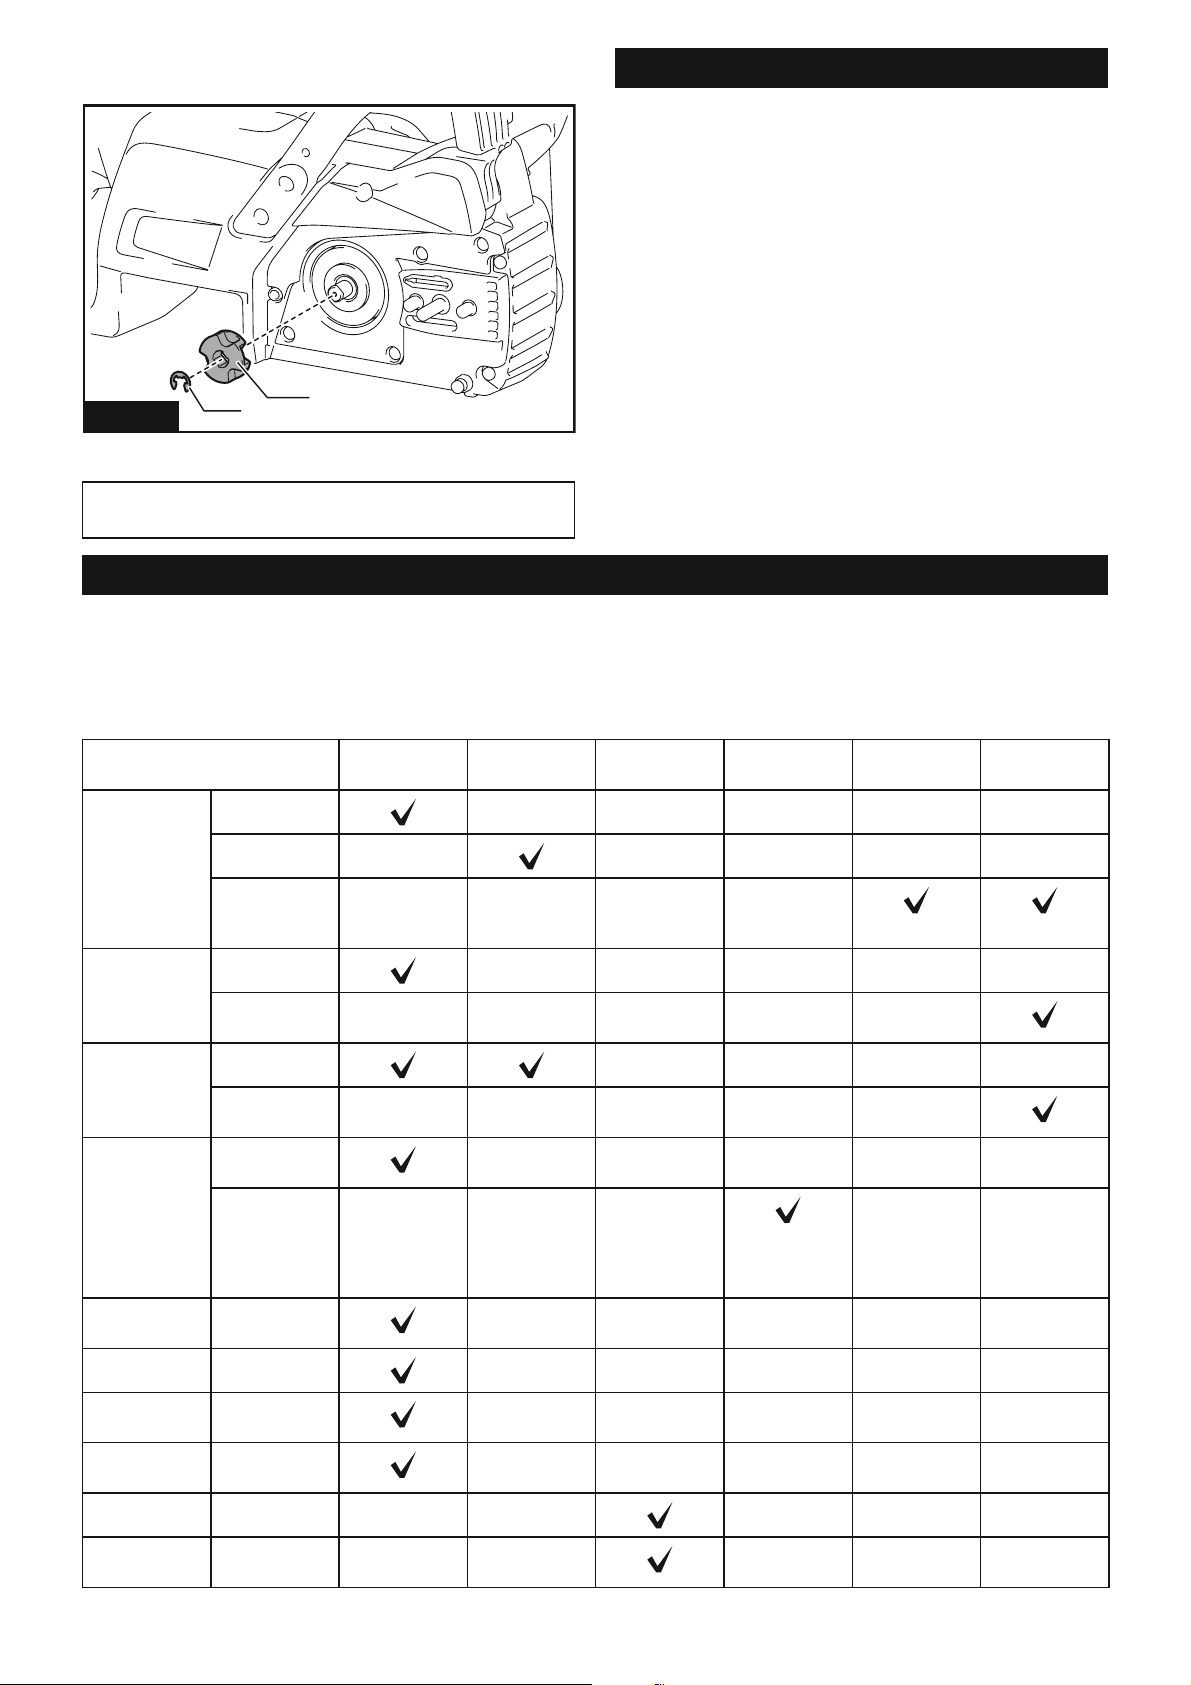
Instructions for periodic maintenance
To ensure long life, prevent damage and ensure the full functioning of the safety features, the following maintenance
PXVWEHSHUIRUPHGUHJXODUO\:DUUDQW\FODLPVFDQEHUHFRJQL]HGRQO\LIWKLVZRUNLVSHUIRUPHGUHJXODUO\DQGSURS-
erly. Failure to perform the prescribed maintenance work can lead to accidents! The user of the chain saw must not
perform maintenance work which is not described in the instruction manual. All such work must be carried out by our
DXWKRUL]HGVHUYLFHFHQWHU
Check item / Operating time Before
operation
Everyday Every week Every 3
month
Annually Before
storage
Chain saw Inspection.
- - - - -
Cleaning. -
- - - -
Check at
DXWKRUL]HG
service center.
- - - -
Saw chain Inspection. - - - - -
Sharpening if
necessary.
- - - - -
Guide bar Inspection. - - - -
Remove from
the chain saw.
- - - - -
Chain brake Check the
function.
- - - - -
Have it
inspected
regularly at
DXWKRUL]HG
service center.
- - -
- -
Chain
lubrication
Check the oil
feed rate.
- - - - -
Switch trigger Inspection.
- - - - -
/RFNRႇ
button
Inspection.
- - - - -
Oil tank cap Check
tightness.
- - - - -
Chain catcher Inspection. - -
- - -
Screws and
nuts
Inspection. - - - - -

19 ENGLISH
TROUBLESHOOTING
%HIRUHDVNLQJIRUUHSDLUVFRQGXFW\RXURZQLQVSHFWLRQ¿UVW,I\RX¿QGDSUREOHPWKDWLVQRWH[SODLQHGLQWKHPDQXDO
GRQRWDWWHPSWWRGLVPDQWOHWKHWRRO,QVWHDGDVN0DNLWD$XWKRUL]HG6HUYLFH&HQWHUVDOZD\VXVLQJ0DNLWDUHSODFH-
ment parts for repairs.
Malfunction status Cause Action
The chain saw does not start. Battery cartridge is not installed. Install a charged battery cartridge.
Battery problem (low voltage).
Recharge the battery cartridge. If recharging
LVQRWHႇHFWLYHUHSODFHWKHEDWWHU\FDUWULGJH
The saw chain does not run. Chain brake activated. Release chain brake.
The motor stops running after a little use. Battery's charge level is low.
Recharge the battery cartridge. If recharging
LVQRWHႇHFWLYHUHSODFHWKHEDWWHU\FDUWULGJH
No oil on the chain. Oil tank is empty. Fill the oil tank.
Oil guide groove is dirty. Clean the groove.
The chain saw does not reach maximum
RPM.
Battery cartridge is installed improperly. Install the battery cartridge as described in
this manual.
Battery power is dropping. Recharge the battery cartridge. If recharg-
LQJLVQRWHႇHFWLYHUHSODFHWKHEDWWHU\
cartridge.
The drive system does not work correctly. $VNWKHDXWKRUL]HGVHUYLFHFHQWHULQ\RXU
region for repair.
Chain does not stop even the chain brake
is activated:
Stop the tool immediately!
The brake band is worn down. $VNWKHDXWKRUL]HGVHUYLFHFHQWHULQ\RXU
region for repair.
Abnormal vibration:
Stop the tool immediately!
Loose guide bar or saw chain.
$GMXVWWKHJXLGHEDUDQGVDZFKDLQWHQVLRQ
Tool malfunction. $VNWKHDXWKRUL]HGVHUYLFHFHQWHULQ\RXU
region for repair.
The saw chain cannot be installed. The combination of saw chain and
sprocket is not correct.
Use the correct combination of saw chain
and sprocket by referring to the section for
VSHFL¿FDWLRQV
OPTIONAL ACCESSORIES
CAUTION: These accessories or attachments
are recommended for use with your Makita tool
VSHFL¿HGLQWKLVPDQXDO The use of any other
accessories or attachments might present a risk of
LQMXU\WRSHUVRQV2QO\XVHDFFHVVRU\RUDWWDFKPHQW
for its stated purpose.
If you need any assistance for more details regard-
ing these accessories, ask your local Makita Service
Center.
• Saw chain
• Guide bar
• Guide bar cover
• File
• Tool bag
• Makita genuine battery and charger
WARNING: If you purchase a guide bar of
GLႇHUHQWOHQJWKIURPWKHVWDQGDUGJXLGHEDUDOVR
purchase a suitable guide bar cover together. It
PXVW¿WDQGIXOO\FRYHUWKHJXLGHEDURQWKHFKDLQ
saw.
NOTE: Some items in the list may be included in the
tool package as standard accessories. They may
GLႇHUIURPFRXQWU\WRFRXQWU\
MAKITA LIMITED WARRANTY
Please refer to the annexed warranty sheet for the
most current warranty terms applicable to this product.
If annexed warranty sheet is not available, refer to the
warranty details set forth at below website for your
respective country.
United States of America: www.makitatools.com
Canada: www.makita.ca
Other countries: www.makita.com

20 ESPAÑOL
ESPAÑOL (Instrucciones originales)
ESPECIFICACIONES
Modelo: XCU11
Longitud total
(sin la barra de guía)
PPƎ
Tensión nominal 18 V c.c.
Peso neto *1 2,9 kg (6,4 lbs)
*2 4,2 kg - 4,3 kg (9,3 lbs - 9,5 lbs)
Longitud de la barra de guía estándar PPƎ
Longitud recomendada de la barra de guía PPƎ
Tipo de cadena de sierra aplicable
(consulte la tabla a continuación)
90PX
3LH]DGHQWDGD Número de dientes 6
Paso Ǝ
Velocidad de la cadena 0 m/s - 7,7 m/s
(0 m/min - 460 m/min)
(0 ft/min - 1 520 ft/min)
Volumen del tanque de aceite para cadena 150 cm
3
ÀR]
'HELGRDQXHVWURFRQWLQXRSURJUDPDGHLQYHVWLJDFLyQ\GHVDUUROORODVHVSHFL¿FDFLRQHVDTXtLQFOXLGDVHVWiQ
VXMHWDVDFDPELRVLQSUHYLRDYLVR
/DVHVSHFL¿FDFLRQHVSXHGHQYDULDUGHSDtVDSDtV
*1: Peso sin la cadena de la sierra, barra de guía, cubierta de la barra de guía, aceite y cartucho(s) de batería.
*2: La combinación de peso más ligero y más pesado, conforme al procedimiento 01/2014 de EPTA. El peso puede
variar en función de los accesorios, incluido el o los cartuchos de batería.
Combinación de cadena de la sierra, barra de guía y pieza dentada
Tipo de cadena de sierra 90PX
Número de eslabones motorices 52
Barra de guía Longitud de la barra de guía PPƎ
Longitud de corte PPƎ
1RGHSLH]D 165246-6
Paso Ǝ
Calibre PPƎ
Tipo Barra dentada
3LH]DGHQWDGD Número de dientes 6
Paso Ǝ
ADVERTENCIA: Utilice una combinación apropiada de la barra de guía y cadena de la sierra. De lo contra-
rio, esto podría ocasionar una lesión personal.
Cartucho de batería y cargador aplicables
Cartucho de batería BL1830 / BL1830B / BL1840B / BL1850B / BL1860B
Cargador
DC18RC / DC18RD / DC18RE / DC18SD / DC18SE / DC18SF / DC18SH
• Algunos de los cartuchos de batería y cargadores enumerados arriba podrían no estar disponibles depen-
diendo de su área de residencia.
ADVERTENCIA: Use únicamente los cartuchos de batería y los cargadores indicados arriba. El uso de
cualquier otro cartucho de batería y cargador podría ocasionar una lesión y/o un incendio.

21 ESPAÑOL
Fuente de alimentación conectada por cable recomendada
Unidad portátil de alimentación eléctrica PDC01
• La o las fuentes de alimentación conectadas por cable enumeradas arriba podrían no estar disponibles depen-
diendo de su área de residencia.
$QWHVGHXWLOL]DUODIXHQWHGHDOLPHQWDFLyQFRQHFWDGDSRUFDEOHOHDODVLQVWUXFFLRQHVHLQGLFDFLRQHVGHSUHFDX-
ción sobre ellas.
ADVERTENCIAS DE
SEGURIDAD
Advertencias generales de seguridad
para herramientas eléctricas
ADVERTENCIA: Lea todas las advertencias
de seguridad, instrucciones, ilustraciones y espe-
FL¿FDFLRQHVVXPLQLVWUDGDVFRQHVWDKHUUDPLHQWD
eléctrica. El no seguir todas las instrucciones indi-
cadas a continuación podría ocasionar una descarga
eléctrica, incendio y/o lesiones graves.
Conserve todas las advertencias
e instrucciones como referencia
en el futuro.
En las advertencias, el término “herramienta eléctrica”
VHUH¿HUHDVXKHUUDPLHQWDHOpFWULFDGHIXQFLRQDPLHQWR
con conexión a la red eléctrica (con cableado eléctrico)
o herramienta eléctrica de funcionamiento a batería
(inalámbrica).
Seguridad en el área de trabajo
1. Mantenga el área de trabajo limpia y bien ilu-
minada. Las áreas oscuras o desordenadas son
propensas a accidentes.
2. No utilice las herramientas eléctricas en
atmósferas explosivas, tal como en la presen-
FLDGHOtTXLGRVJDVHVRSROYRLQÀDPDEOHV Las
herramientas eléctricas crean chispas que pueden
prender fuego al polvo o los humos.
3. Mantenga a los niños y curiosos alejados
mientras utiliza una herramienta eléctrica. Las
distracciones le pueden hacer perder el control.
Seguridad eléctrica
1. Las clavijas de conexión de las herramientas
eléctricas deberán encajar perfectamente en la
WRPDGHFRUULHQWH1RPRGL¿TXHQXQFDODFOD-
vija de conexión de ninguna forma. No utilice
ninguna clavija adaptadora con herramientas
eléctricas que tengan conexión a tierra (puesta
a tierra). /DXWLOL]DFLyQGHFODYLMDVQRPRGL¿FD-
GDV\TXHHQFDMHQSHUIHFWDPHQWHHQODWRPDGH
FRUULHQWHUHGXFLUiHOULHVJRGHTXHVHSURGX]FD
una descarga eléctrica.
2. (YLWHWRFDUFRQHOFXHUSRVXSHU¿FLHVFRQHF-
tadas a tierra o puestas a tierra tales como
tubos, radiadores, cocinas y refrigeradores. Si
su cuerpo es puesto a tierra o conectado a tierra
existirá un mayor riesgo de que sufra una des-
carga eléctrica.
3. No exponga las herramientas eléctricas a la
lluvia ni a condiciones húmedas. La entrada de
agua en una herramienta eléctrica aumentará el
ULHVJRGHTXHVHSURGX]FDXQDGHVFDUJDHOpFWULFD
4. No maltrate el cable. Nunca utilice el cable
para transportar, jalar o desconectar la herra-
mienta eléctrica. Mantenga el cable alejado del
calor, aceite, objetos cortantes o piezas móvi-
les. Los cables dañados o enredados aumentan
el riesgo de sufrir una descarga eléctrica.
5.
Cuando utilice una herramienta eléctrica en
exteriores, utilice un cable de extensión apro-
piado para uso en exteriores./DXWLOL]DFLyQGHXQ
cable apropiado para uso en exteriores reducirá el
ULHVJRGHTXHVHSURGX]FDXQDGHVFDUJDHOpFWULFD
6. Si no es posible evitar usar una herramienta
eléctrica en condiciones húmedas, utilice un
alimentador protegido con interruptor de cir-
cuito de falla a tierra (ICFT). El uso de un ICFT
reduce el riesgo de descarga eléctrica.
7. Las herramientas eléctricas pueden producir
campos electromagnéticos (CEM) que no son
dañinos para el usuario. Sin embargo, si los
usuarios tienen marcapasos y otros dispositivos
médicos similares, deberán consultar al fabricante
de su dispositivo y/o a su médico antes de operar
esta herramienta eléctrica.
Seguridad personal
1. Manténgase alerta, preste atención a lo que
está haciendo y utilice su sentido común
cuando opere una herramienta eléctrica. No
utilice una herramienta eléctrica cuando esté
FDQVDGRREDMRODLQÀXHQFLDGHGURJDVDOFR-
hol o medicamentos. Un momento de distracción
mientras opera las herramientas eléctricas puede
terminar en una lesión grave.
2. Use equipo de protección personal. Póngase
siempre protección para los ojos. El equipo
SURWHFWRUWDOFRPRPiVFDUDFRQWUDHOSROYR]DSD-
tos de seguridad antiderrapantes, casco rígido y
SURWHFFLyQSDUDRtGRVXWLOL]DGRHQODVFRQGLFLRQHV
apropiadas reducirá el riesgo de lesiones.
3.
Impida el encendido accidental. Asegúrese
de que el interruptor esté en la posición de
apagado antes de conectar a la alimentación
eléctrica y/o de colocar el cartucho de batería,
así como al levantar o cargar la herramienta.
Cargar las herramientas eléctricas con su dedo
en el interruptor o enchufarlas con el interruptor
encendido hace que los accidentes sean comunes.
4. Retire cualquier llave de ajuste o llave de
apriete antes de encender la herramienta. Una
OODYHGHDMXVWHROODYHGHDSULHWHTXHKD\DVLGR
GHMDGDSXHVWDHQXQDSDUWHJLUDWRULDGHODKHUUD-
mienta eléctrica puede ocasionar alguna lesión.

22 ESPAÑOL
5. No utilice la herramienta donde no alcance.
0DQWHQJDORVSLHVVREUHVXHOR¿UPH\HOHTXL-
librio en todo momento.(VWRSHUPLWHXQPHMRU
control de la herramienta eléctrica en situaciones
inesperadas.
6. Use una vestimenta apropiada. No use ropa
suelta ni alhajas. Mantenga el cabello, la ropa
y los guantes alejados de las piezas móviles.
/DVSUHQGDVGHYHVWLUKROJDGDVODVDOKDMDV\
el cabello largo suelto podrían engancharse en
HVWDVSLH]DVPyYLOHV
7.
Si dispone de dispositivos para la conexión de
equipos de extracción y recolección de polvo,
asegúrese de conectarlos y utilizarlos debida-
mente. Hacer uso de la recolección de polvo puede
reducir los riesgos relacionados con el polvo.
8. No permita que la familiaridad adquirida
debido al uso frecuente de las herramientas
KDJDTXHVHVLHQWDFRQ¿DGRHLJQRUHORVSULQ-
cipios de seguridad de las herramientas. Un
descuido podría ocasionar una lesión grave en
una fracción de segundo.
9. Utilice siempre gafas protectoras para prote-
ger sus ojos de lesiones al usar herramientas
eléctricas. Las gafas deben cumplir con la
Norma ANSI Z87.1 en EUA.
Es responsabilidad del empleador imponer
el uso de equipos protectores de seguridad
apropiados a los operadores de la herramienta
y demás personas cerca del área de trabajo.
Mantenimiento y uso de la herramienta eléctrica
1. No fuerce la herramienta eléctrica. Utilice la
herramienta eléctrica correcta para su aplica-
ción. La herramienta eléctrica adecuada hará un
PHMRUWUDEDMR\GHIRUPDPiVVHJXUDDODYHORFL-
dad para la que ha sido fabricada.
2. No utilice la herramienta eléctrica si el inte-
rruptor no la enciende y apaga. Cualquier
herramienta eléctrica que no pueda ser contro-
lada con el interruptor es peligrosa y debe ser
UHHPSOD]DGD
3. Desconecte la clavija de la fuente de alimen-
tación y/o retire la batería de la herramienta
eléctrica, en caso de ser removible, antes de
realizar ajustes, cambiar accesorios o almace-
nar las herramientas eléctricas. Tales medidas
de seguridad preventivas reducirán el riesgo
de poner en marcha la herramienta eléctrica de
forma accidental.
4. Guarde la herramienta eléctrica que no use
fuera del alcance de los niños y no permita
que las personas que no están familiarizadas
con ella o con las instrucciones la operen. Las
herramientas eléctricas son peligrosas en manos
de personas que no saben operarlas.
5. Dé mantenimiento a las herramientas eléctri-
cas y los accesorios. Compruebe que no haya
piezas móviles desalineadas o estancadas,
piezas rotas y cualquier otra condición que
pueda afectar al funcionamiento de la herra-
mienta eléctrica. Si la herramienta eléctrica
está dañada, haga que la reparen antes de
utilizarla. Muchos de los accidentes son ocasio-
nados por no dar un mantenimiento adecuado a
las herramientas eléctricas.
6. Mantenga las herramientas de corte limpias
\¿ORVDV Si recibe un mantenimiento adecuado
\WLHQHORVERUGHVD¿ODGRVHVSUREDEOHTXHOD
herramienta se atasque menos y sea más fácil
controlarla.
7. Utilice la herramienta eléctrica, los accesorios
y las brocas de acuerdo con estas instruccio-
nes, considerando las condiciones laborales
y el trabajo a realizar.6LXWLOL]DODKHUUDPLHQWD
HOpFWULFDSDUDUHDOL]DURSHUDFLRQHVGLVWLQWDVGH
las indicadas, podrá presentarse una situación
peligrosa.
8. 0DQWHQJDORVPDQJRV\VXSHU¿FLHVGHDVL-
miento secos, limpios y libres de aceite o
grasa./RVPDQJRV\VXSHU¿FLHVGHDVLPLHQWR
resbalosos no permiten una manipulación segura
ni el control de la herramienta en situaciones
inesperadas.
9. Cuando vaya a utilizar esta herramienta, evite
usar guantes de trabajo de tela ya que éstos
podrían atorarse.6LORVJXDQWHVGHWUDEDMRGH
WHODOOHJDUDQDDWRUDUVHHQODVSLH]DVPyYLOHV
esto podría ocasionar lesiones personales.
Uso y cuidado de la herramienta a batería
1. 5HFDUJXHVyORFRQHOFDUJDGRUHVSHFL¿FDGR
por el fabricante. Un cargador que es adecuado
para un solo tipo de batería puede generar riesgo
GHLQFHQGLRDOVHUXWLOL]DGRFRQRWUDEDWHUtD
2. Utilice las herramientas eléctricas solamente
FRQODVEDWHUtDVGHVLJQDGDVHVSHFt¿FDPHQWH
para ellas./DXWLOL]DFLyQGHFXDOTXLHURWUDEDWHUtD
puede crear un riesgo de lesiones o incendio.
3. Cuando no se esté usando la batería, mantén-
gala alejada de otros objetos metálicos, como
sujetapapeles (clips), monedas, llaves, clavos,
tornillos u otros objetos pequeños de metal
los cuales pueden actuar creando una cone-
xión entre las terminales de la batería. Originar
un cortocircuito en las terminales puede causar
quemaduras o incendios.
4. En condiciones abusivas, podrá escapar
líquido de la batería; evite tocarlo. Si lo toca
accidentalmente, enjuague con agua. Si hay
contacto del líquido con los ojos, busque asis-
tencia médica. Puede que el líquido expulsado
de la batería cause irritación o quemaduras.
5. No utilice una herramienta ni una batería que
HVWpQGDxDGDVRKD\DQVLGRPRGL¿FDGDV Las
EDWHUtDVGDxDGDVRPRGL¿FDGDVSRGUtDQRFD-
sionar una situación inesperada provocando un
incendio, explosión o riesgo de lesiones.
6. No exponga la herramienta ni la batería al
fuego ni a una temperatura excesiva. La expo-
sición al fuego o a una temperatura superior a los
130 °C podría causar una explosión.
7. Siga todas las instrucciones para la carga y
evite cargar la herramienta o la batería fuera
GHOUDQJRGHWHPSHUDWXUDHVSHFL¿FDGRHQ
las instrucciones. Una carga inadecuada o a
XQDWHPSHUDWXUDIXHUDGHOUDQJRHVSHFL¿FDGR
podría dañar la batería e incrementar el riesgo de
incendio.

23 ESPAÑOL
Servicio
1. +DJDTXHXQDSHUVRQDFDOL¿FDGDUHSDUHOD
herramienta eléctrica utilizando sólo piezas de
repuesto idénticas. Esto asegura que se man-
tenga la seguridad de la herramienta eléctrica.
2. Nunca dé servicio a baterías que estén daña-
das. El servicio a las baterías solamente deberá
ser efectuado por el fabricante o un agente de
VHUYLFLRDXWRUL]DGR
3. Siga las instrucciones para la lubricación y
cambio de accesorios.
4. 1RPRGL¿TXHQLLQWHQWHUHSDUDUHODSDUDWRQLHO
paquete de baterías salvo como se indique en
las instrucciones para el uso y cuidado.
Advertencias de seguridad
generales para la sierra eléctrica
1.
Mantenga todas las partes del cuerpo alejadas de
la cadena de la sierra cuando la sierra eléctrica
esté en marcha. Antes de arrancar la sierra eléc-
trica, asegúrese de que la cadena de la sierra no
esté haciendo contacto con nada. Un momento de
falta de atención al estar operando sierras eléctricas
podría causar que su ropa o alguna parte de su
cuerpo se enganchara con la cadena de la sierra.
2. Siempre sujete la sierra eléctrica con su
mano derecha en el mango trasero y su mano
izquierda en el mango delantero.6XMHWDUOD
VLHUUDHOpFWULFDFRQXQDFRQ¿JXUDFLyQGHPDQRV
invertida aumenta el riesgo de lesiones persona-
les, por lo que nunca debe hacer esto.
3. Sujete la sierra eléctrica solamente por las
VXSHU¿FLHVGHDVLPLHQWRDLVODGDV\DTXHOD
cadena de la sierra podría entrar en contacto
con cableado oculto. Si las cadenas de la sierra
entran en contacto con un cable con corriente, las
SLH]DVPHWiOLFDVH[SXHVWDVGHODVLHUUDHOpFWULFD
también se cargarán de corriente y el operador
podría recibir una descarga eléctrica.
4.
Utilice protección para los ojos. Se recomienda uti-
lizar equipo de protección adicional para los oídos,
la cabeza, manos, piernas y pies. El uso de equipo
de protección adecuado reducirá las lesiones persona-
les a causa de los residuos que salgan proyectados o
el contacto accidental con la cadena de la sierra.
5. No use una sierra eléctrica sobre una escalera,
desde un tejado o cualquier soporte inestable.
Usar la sierra eléctrica de esta manera podría
resultar en lesiones personales graves.
6. No use la sierra eléctrica sobre un árbol a
menos que haya sido especialmente entre-
nado para hacerlo. Usar una sierra eléctrica
sobre un árbol sin entrenamiento adecuado podría
aumentar el riesgo de lesiones personales graves.
7.
6LHPSUHSLVH¿UPHPHQWH\VRODPHQWHRSHUHOD
sierra eléctrica cuando esté parado sobre una
VXSHU¿FLH¿MDVHJXUD\QLYHODGD/DVVXSHU¿FLHV
resbalosas o inestables pueden causar la pérdida
del equilibrio o del control de la sierra eléctrica.
8.
Cuando corte una rama que se encuentre ten-
sionada, esté alerta a su liberación brusca. Al
OLEHUDUVHODWHQVLyQHQODV¿EUDVGHODPDGHUDOD
rama tensionada puede golpear al operador y/o
provocar la pérdida de control de la sierra eléctrica.
9. Tenga extrema precaución al cortar matorra-
les y árboles jóvenes. El material tierno puede
quedar atascado en la cadena de la sierra y ser
ODQ]DGRKDFLDXVWHGRKDFHUOHSHUGHUHOHTXLOLEULR
10. Cargue la sierra eléctrica del mango delan-
tero estando apagada y lejos de su cuerpo.
Cuando vaya a transportar o almacenar la
sierra eléctrica, coloque siempre la cubierta de
la barra de guía. La manipulación adecuada de
la sierra eléctrica reducirá la probabilidad de un
contacto accidental con la cadena de la sierra en
movimiento.
11.
Siga las instrucciones para la lubricación,
tensión de la cadena y cambio de la barra y la
cadena. Una tensión o lubricación inadecuadas de
la cadena podría ocasionar ya sea un rompimiento
o aumentar la probabilidad de un retroceso brusco.
12. Corte madera únicamente. No utilice la sierra
HOpFWULFDSDUDRWURV¿QHVTXHQRVHDQSDUD
los que fue diseñada. Por ejemplo: no utilice
la sierra eléctrica para cortar metal, plástico,
mampostería o materiales de construcción que
no sean de madera. El uso de la sierra eléctrica
para operaciones distintas para las que fue dise-
ñada podría provocar una situación peligrosa.
13. Antes de intentar talar un árbol, entienda pri-
mero los riesgos y como evitarlos. El operador
o las personas alrededor podrían sufrir graves
heridas mientras se corta un árbol.
14. Causas de retrocesos bruscos y prevención
por parte del operador:
(OUHWURFHVREUXVFRSXHGHRFXUULUFXDQGRODQDUL]
RSXQWDGHODEDUUDGHJXtDWRFDDOJ~QREMHWRR
FXDQGRODPDGHUDDOFDQ]DODFDGHQDGHODVLHUUD\
la atora en el corte.
En algunos casos, el contacto de la punta puede
causar una reacción en reversa, ocasionando que
la barra de guía se mueva bruscamente hacia
arriba y hacia atrás en dirección del operador.
(ODWRUDPLHQWRGHODFDGHQDGHODVLHUUDMXQWRFRQ
la parte superior de la barra de guía puede empu-
MDUUiSLGDPHQWHODEDUUDGHJXtDKDFLDDWUiVHQOD
dirección del operador.
Cualquiera de estas reacciones puede causar la
SpUGLGDGHFRQWUROGHODVLHUUDORTXHDVXYH]
podría ocasionar lesiones personales graves. No
dependa exclusivamente de los dispositivos de
seguridad incorporados en su sierra. Como usua-
rio de una sierra eléctrica, usted deberá tomar
GLYHUVDVPHGLGDVSDUDPDQWHQHUVXVWUDEDMRVGH
corte libres de accidentes o lesiones.
El retroceso brusco es el resultado de un mal uso
de la sierra eléctrica o de condiciones o proce-
dimientos de uso incorrectos y se puede evitar
tomando las precauciones debidas, como se
indica a continuación:
• 0DQWHQJDXQDVXMHFLyQ¿UPHURGHDQGR
con los pulgares y los dedos los mangos
de la sierra eléctrica, con ambas manos
en la sierra y posicionando su cuerpo y
su brazo de manera que le permita resis-
tir las fuerzas de los retrocesos bruscos.
/DVIXHU]DVGHORVUHWURFHVRVEUXVFRVSXH-
den ser controladas por el operador, siempre
que se tomen las precauciones adecuadas.
No suelte la sierra eléctrica.
24 ESPAÑOL
Fig.1
• No exceda su alcance ni corte por encima
de la altura de su hombro. Esto le ayudará
a prevenir que la punta haga contacto de
PDQHUDQRLQWHQFLRQDO\OHSHUPLWDXQPHMRU
control de la sierra eléctrica durante situacio-
nes inesperadas.
• Use solamente barras de guía y cadenas
GHODVLHUUDGHUHSXHVWRHVSHFL¿FDGDV
por el fabricante.(OUHHPSOD]RLQFRUUHFWR
de las barras de guía y cadenas de la sierra
podría causar la rotura de la cadena y/o un
retroceso brusco.
• 6LJDODVLQVWUXFFLRQHVGHD¿ODGR\PDQ-
tenimiento del fabricante para la cadena
de la sierra. Reducir la altura del calibrador
de profundidad podría ocasionar un mayor
número de retrocesos bruscos.
15. Siga las instrucciones para quitar material
atascado, guardar o hacerle manutención a
la sierra eléctrica. Asegúrese de que el inte-
rruptor está apagado y el grupo de baterías se
ha sacado. La activación inesperada de la sierra
eléctrica mientras se quita el material atascado o
se le da servicio podría resultar en lesiones perso-
nales graves.
Instrucciones adicionales de
seguridad
Operación
1. $QWHVGHFRPHQ]DUHOWUDEDMRYHUL¿TXHTXHOD
sierra eléctrica se encuentre en buen estado
y que su condición cumpla con las normas de
VHJXULGDG9HUL¿TXHHQSDUWLFXODUTXH
• El freno de la cadena funcione debidamente;
• El freno de retención funcione debidamente;
/DEDUUD\ODFXELHUWDGHODSLH]DGHQWDGD
estén colocadas correctamente;
/DFDGHQDKD\DVLGRD¿ODGD\WHQVLRQDGDGH
acuerdo con los reglamentos.
2. No arranque la sierra eléctrica con la cubierta
de la cadena instalada en ésta. El arrancar la
sierra eléctrica con la cubierta de la cadena ins-
talada en ésta podría causar que la cubierta de la
FDGHQDVDOLHUDDUURMDGDKDFLDDGHODQWHRFDVLR-
QDQGROHVLRQHVSHUVRQDOHV\GDxRVDORVREMHWRV
alrededor del operador.
3. Mantenga los mangos secos, limpios, y libres
de aceite y grasa. Los mangos grasosos y
aceitosos son resbalosos y causan la pérdida de
control.
4. Cuando utilice la herramienta sobre suelo
HPEDUUDGRLQFOLQDFLRQHVPRMDGDVRVXSHU¿-
cies resbalosas, tenga cuidado al pisar.
5. No sumerja la herramienta en los charcos.
6. No deje la herramienta desatendida a la intem-
perie bajo la lluvia.
Seguridad eléctrica y de la batería
1. Evite los entornos peligrosos. No utilice la
herramienta en lugares húmedos o mojados ni
la exponga a la lluvia. El agua que ingrese a la
herramienta incrementará el riesgo de descarga
eléctrica.
2. No deseche la(s) batería(s) donde haya fuego.
La celda podría explotar. Consulte los códigos
locales para ver si hay instrucciones especiales
relativas al desecho.
3. No abra ni dañe la(s) batería(s). Los electrolitos
liberados son corrosivos y pueden ocasionar
GDxRVHQORVRMRVRODSLHOeVWRVSXHGHQVHU
tóxicos si se llegan a tragar.
4. No cargue la batería bajo la lluvia ni en lugares
mojados.
5. No cargue la batería en exteriores.
6. No manipule el cargador, incluida la clavija
del cargador, ni los terminales con las manos
mojadas.
7. No reemplace la batería bajo la lluvia.
8. No reemplace la batería con las manos
mojadas.
9. No deje la batería bajo la lluvia, ni cargue,
utilice, o guarde la batería en un lugar húmedo
o mojado.
10. No moje el terminal de la batería con líquidos,
como el agua, ni sumerja la batería en ellos.
6LHOWHUPLQDOVHPRMDRHQWUDOtTXLGRGHQWURGHOD
batería, la batería puede sufrir un cortocircuito,
con el consiguiente riesgo de sobrecalentamiento,
incendio o explosión.
11. Después de retirar la batería de la máquina o
el cargador, asegúrese de acoplar la cubierta
de la batería a la batería y de guardarla en un
lugar seco.
12. Si el cartucho de batería se moja, drene el
agua que se haya acumulado en el interior
y luego límpielo con un paño seco. Seque el
cartucho de batería por completo en un lugar
seco antes de usarlo.
Mantenimiento y almacenamiento
1. Almacene la herramienta lejos de la lluvia y la
luz directa del sol y en un sitio donde no haga
calor ni haya humedad.
CONSERVE ESTAS
INSTRUCCIONES.
ADVERTENCIA: NO DEJE que la comodidad
o familiaridad con el producto (a base de utilizarlo
repetidamente) evite que siga estrictamente las
normas de seguridad para dicho producto. El
USO INCORRECTO o el no seguir las normas de
seguridad indicadas en este manual de instruc-
ciones puede ocasionar lesiones graves.

25 ESPAÑOL
Símbolos
$FRQWLQXDFLyQVHPXHVWUDQORVVtPERORVXWLOL]DGRV
para la herramienta.
volts o voltios
corriente directa o continua
pies por minuto
Q~PHURGHSLH]DVGHODFDGHQDGHODVLHUUD
y la barra de guía aplicables
Instrucciones importantes de
seguridad para el cartucho de
batería
1. Antes de utilizar el cartucho de batería, lea
todas las instrucciones e indicaciones de
precaución en el (1) el cargador de batería, (2)
la batería, y (3) el producto con el que se utiliza
la batería.
2. 1RGHVDUPHQLPRGL¿TXHHOFDUWXFKRGHEDWH-
ría. Podría ocurrir un incendio, calor excesivo o
una explosión.
3. Si el tiempo de operación se ha acortado en
exceso, deje de operar de inmediato. Podría
correrse el riesgo de sobrecalentamiento,
posibles quemaduras e incluso explosión.
4. En caso de que ingresen electrolitos en sus
ojos, enjuáguelos bien con agua limpia y con-
sulte de inmediato a un médico. Esto podría
ocasionar pérdida de visión.
5. Evite cortocircuitar el cartucho de batería:
(1) No toque las terminales con ningún mate-
rial conductor.
(2) Evite guardar el cartucho de batería en un
cajón junto con otros objetos metálicos,
tales como clavos, monedas, etc.
(3) No exponga el cartucho de batería al
agua o la lluvia.
Un cortocircuito en la batería puede causar
XQÀXMRJUDQGHGHFRUULHQWHVREUHFDOHQWD-
miento, posibles quemaduras e incluso una
descompostura.
6. No guarde ni utilice la herramienta y el cartu-
cho de batería en lugares donde la tempera-
tura pueda alcanzar o exceder los 50 °C (122
°F).
7. Nunca incinere el cartucho de batería incluso
en el caso de que esté dañado seriamente o
ya no sirva en absoluto. El cartucho de batería
puede explotar si se tira al fuego.
8. No clave, corte, aplaste, lance o deje caer el
cartucho de batería, ni golpee un objeto sólido
contra el cartucho de batería. Dicha acción
podría resultar en un incendio, calor excesivo o en
una explosión.
9. No use una batería dañada.
10. Las baterías de ión de litio están sujetas a los
requisitos reglamentarios en materia de bie-
nes peligrosos.
3DUDHOWUDVSRUWHFRPHUFLDOSRUHMPHGLDQWH
terceros o agentes de transporte, se deben tomar
en cuenta los requisitos especiales relativos al
empaque y el etiquetado.
Para efectuar los preparativos del artículo que se
va a enviar, se requiere consultar a un experto
en materiales peligrosos. Si es posible, consulte
además otras regulaciones nacionales más deta-
lladas.
Pegue o cubra con cinta adhesiva los contactos
abiertos y empaque la batería de manera que ésta
no pueda moverse dentro del paquete.
11. Para deshacerse del cartucho de batería,
sáquelo de la herramienta y deséchelo en un
lugar seguro. Siga las regulaciones locales
relacionadas al desecho de las baterías.
12. Utilice las baterías únicamente con los pro-
GXFWRVHVSHFL¿FDGRVSRU0DNLWD Instalar las
baterías en productos que no cumplan con los
requisitos podría ocasionar un incendio, un calen-
tamiento excesivo, una explosión o una fuga de
electrolito.
13. Si no se utiliza la herramienta por un
período largo, debe extraerse la batería de la
herramienta.
14. El cartucho de batería podría absorber calor
durante y después de su uso, lo que ocasiona-
ría quemaduras o quemaduras a baja tempe-
ratura. Tenga cuidado con la manipulación de
los cartuchos de batería que estén calientes.
15. No toque el terminal de la herramienta inme-
diatamente después de su uso, ya que el
PLVPRSRGUtDHVWDUORVX¿FLHQWHPHQWHFDOLHQWH
como para provocarle quemaduras.
16. No permita que las rebabas, el polvo o la tierra
TXHGHQDWUDSDGRVHQORVWHUPLQDOHVRUL¿FLRV
y ranuras del cartucho de batería. Podría pro-
vocar calentamiento, incendio, explosión y mal
funcionamiento de la herramienta o del cartucho
de batería, lo que resultaría en quemaduras o
lesiones personales.
17. No utilice el cartucho de batería cerca de
cables eléctricos de alto voltaje, a menos que
la herramienta sea compatible con el uso cer-
cano a estos cables eléctricos de alto voltaje.
Esto podría ocasionar una avería o descompos-
tura de la herramienta o del cartucho de batería.
18. Mantenga la batería alejada de los niños.
GUARDE ESTAS
INSTRUCCIONES.
PRECAUCIÓN: Utilice únicamente baterías
originales de Makita. El uso de baterías no origina-
les de Makita, o de baterías alteradas, puede ocasio-
nar que las baterías exploten causando un incendio,
lesiones personales y daños. Asimismo, esto inva-
lidará la garantía de Makita para la herramienta y el
cargador Makita.

26 ESPAÑOL
Consejos para alargar al máximo
la vida útil de la batería
1. Cargue el cartucho de batería antes de que
se descargue completamente. Pare siem-
pre la operación y cargue el cartucho de
batería cuando note menos potencia en la
herramienta.
2. No cargue nunca un cartucho de batería que
esté completamente cargado. La sobrecarga
acortará la vida de servicio de la batería.
3. Cargue el cartucho de batería a una tempera-
tura ambiente de 10 °C - 40 °C (50 °F - 104 °F).
Si un cartucho de batería está caliente, déjelo
enfriar antes de cargarlo.
4. Cuando no utilice el cartucho de batería,
sáquelo de la herramienta o del cargador.
5. Cargue el cartucho de batería si no va a utili-
zarlo durante un período prolongado (más de
seis meses).
DESCRIPCIÓN DE LAS PIEZAS
1
3
4
5
6
7
8
9
10
11
13
14
2
12
Fig.2
1 Protector de mano delantero 2 Palanca 3 Barra de guía
4 Cadena de la sierra 5 Cubierta de la barra de guía 6 Botón de desbloqueo
7 Mango trasero 8 Gatillo interruptor 9 Cartucho de batería
10 Mango delantero 11 Tapa del tanque de aceite 12 Tope de picos
13 Receptor de la cadena 14 'LDOGHDMXVWH - -

27 ESPAÑOL
DESCRIPCIÓN DEL
FUNCIONAMIENTO
PRECAUCIÓN: Asegúrese siempre de que la
herramienta esté apagada y el cartucho de batería
haya sido extraído antes de realizar cualquier
ajuste o comprobación en la herramienta.
Instalación o extracción del
cartucho de batería
PRECAUCIÓN: Apague siempre la herra-
mienta antes de colocar o quitar el cartucho de
batería.
PRECAUCIÓN: Sujete la herramienta y el car-
WXFKRGHODEDWHUtDFRQ¿UPH]DDOFRORFDURTXLWDU
el cartucho de batería.6LQRVHVXMHWDFRQ¿UPH]DOD
herramienta y el cartucho de batería, puede ocasio-
nar que se resbalen de sus manos causando daños
a la herramienta y al cartucho de batería, así como
lesiones a la persona.
1
2
3
Fig.3
Ź1.,QGLFDGRUURMR2. Botón 3. Cartucho de batería
Para quitar el cartucho de batería, deslícelo de la herra-
PLHQWDPLHQWUDVGHVOL]DHOERWyQVREUHODSDUWHGHODQ-
tera del cartucho.
Para instalar el cartucho de batería, alinee la lengüeta
sobre el cartucho de batería con la ranura en la carcasa
y deslícela hasta su lugar. Insértelo por completo hasta
TXHVH¿MHHQVXOXJDUFRQXQSHTXHxRFOLF6LSXHGH
YHUHOLQGLFDGRUURMRFRPRVHPXHVWUDHQODLOXVWUDFLyQ
este no ha quedado asegurado por completo.
PRECAUCIÓN: Introduzca siempre com-
pletamente el cartucho de batería hasta que
el indicador rojo no pueda verse. Si no, podría
accidentalmente salirse de la herramienta y caer al
suelo causando una lesión a usted o alguien a su
alrededor.
PRECAUCIÓN: No instale el cartucho de
batería a la fuerza.6LHOFDUWXFKRQRVHGHVOL]DDO
interior fácilmente, se debe a que no está siendo
insertado correctamente.
Indicación de la capacidad restante
de la batería
Únicamente para cartuchos de batería con el
indicador
1
2
Fig.4
Ź1. Luces indicadoras 2.%RWyQGHYHUL¿FDFLyQ
2SULPDHOERWyQGHYHUL¿FDFLyQHQHOFDUWXFKRGHOD
batería para que indique la capacidad restante de la
batería. Las luces indicadoras se iluminarán por algu-
nos segundos.
Luces indicadoras Capacidad
restante
Iluminadas Apagadas Parpadeando
75% a 100%
50% a 75%
25% a 50%
0% a 25%
Cargar la
batería.
La batería
pudo haber
funcionado
mal.
NOTA: Dependiendo de las condiciones de uso y
la temperatura ambiente, la indicación podrá diferir
ligeramente de la capacidad real.
NOTA:/DSULPHUDOX]LQGLFDGRUDH[WUHPDL]TXLHUGD
parpadeará cuando el sistema de protección de
batería esté en funcionamiento.

28 ESPAÑOL
Sistema de protección para la
herramienta/batería
La herramienta está equipada con un sistema de pro-
tección de la herramienta/batería. Este sistema corta
en forma automática el suministro de energía al motor
para prolongar la vida útil de la herramienta y la batería.
La herramienta se detendrá automáticamente durante
la operación si la herramienta o la batería se someten a
una de las siguientes condiciones:
Protección contra sobrecarga
&XDQGRODKHUUDPLHQWDREDWHUtDVHDQXWLOL]DGDVGH
una manera que cause que consuman una cantidad
inusualmente alta de corriente, la herramienta se
detendrá automáticamente. En este caso, apague la
herramienta y detenga la aplicación que causó que la
herramienta se sobrecargara. Luego, encienda la herra-
mienta para volver a arrancarla.
Protección contra
sobrecalentamiento
Cuando la herramienta o la batería se sobrecalienten,
la herramienta se detendrá automáticamente. En este
caso, permita que la herramienta y la batería se enfríen
antes de volver a encender la herramienta.
NOTA: En un entorno donde la temperatura sea
alta, es probable que la protección contra sobreca-
lentamiento se active y la herramienta se detenga
automáticamente.
Protección en caso de
sobredescarga
&XDQGRODFDSDFLGDGGHODEDWHUtDQRHVVX¿FLHQWHOD
herramienta se detiene automáticamente. En este caso,
retire la batería de la herramienta y cárguela.
Protección contra otras causas
El sistema de protección también está diseñado para
otras causas que podrían dañar la herramienta, y per-
mite que la herramienta se detenga automáticamente.
Siga todos los pasos a continuación para eliminar las
causas cuando la herramienta se haya detenido tempo-
ralmente o se haya detenido durante el funcionamiento.
1. Apague la herramienta, y luego enciéndala nueva-
mente para reiniciarla.
2. Cargue la(s) batería(s) o reemplácela(s) con
batería(s) recargada(s).
'HMHTXHODPiTXLQD\ODVEDWHUtDVVHHQIUtHQ
6LQRKD\QLQJXQDPHMRUDDOUHVWDXUDUHOVLVWHPDGH
protección, comuníquese con su centro local de servi-
cio Makita.
AVISO: Si la herramienta se detiene debido a
una causa no descrita anteriormente, consulte la
sección de detección y solución de problemas.
Accionamiento del interruptor
ADVERTENCIA: Por su seguridad, esta
herramienta está equipada con un botón de
desbloqueo para prevenir que la herramienta se
active accidentalmente. Nunca use la herramienta
si se pone en marcha al jalar el gatillo interrup-
tor sin haber oprimido el botón de desbloqueo.
Solicite la reparación en el centro de servicio Makita
de su localidad.
ADVERTENCIA: Nunca deshabilite la fun-
ción de bloqueo ni cubra con cinta el botón de
desbloqueo.
PRECAUCIÓN: Antes de insertar el cartucho
de batería en la herramienta, compruebe siem-
pre y cerciórese de que el gatillo interruptor se
acciona debidamente y que vuelve a la posición
“OFF” (apagado) cuando lo suelta.
AVISO: No jale con fuerza el gatillo interruptor
sin oprimir el botón de desbloqueo. El interruptor
podría averiarse.
1
2
Fig.5
Ź1. Botón de desbloqueo 2. Gatillo interruptor
3DUDHYLWDUTXHHOJDWLOORLQWHUUXSWRUVHDMDODGRDFFL-
dentalmente, se proporciona un botón de desbloqueo.
Para encender la herramienta, presione el botón de
GHVEORTXHR\MDOHHOJDWLOORLQWHUUXSWRU3DUDGHWHQHUOD
herramienta, suelte el gatillo interruptor.
9HUL¿FDFLyQGHOIUHQRGHODFDGHQD
PRECAUCIÓN: Sujete la sierra eléctrica con
ambas manos cuando vaya a encenderla. Sujete
el mango trasero con su mano derecha, y el
mango delantero con su mano izquierda. La barra
y la cadena no deberán estar haciendo contacto
con ningún objeto.
PRECAUCIÓN: En caso de que la cadena de
la sierra no se detenga de inmediato al realizar
esta prueba, la sierra no deberá usarse bajo nin-
guna circunstancia. Consulte a nuestro centro de
servicio autorizado.
1. 3UHVLRQHHOERWyQGHGHVEORTXHR\OXHJRMDOHHO
gatillo interruptor. La cadena de la sierra arrancará de
inmediato.
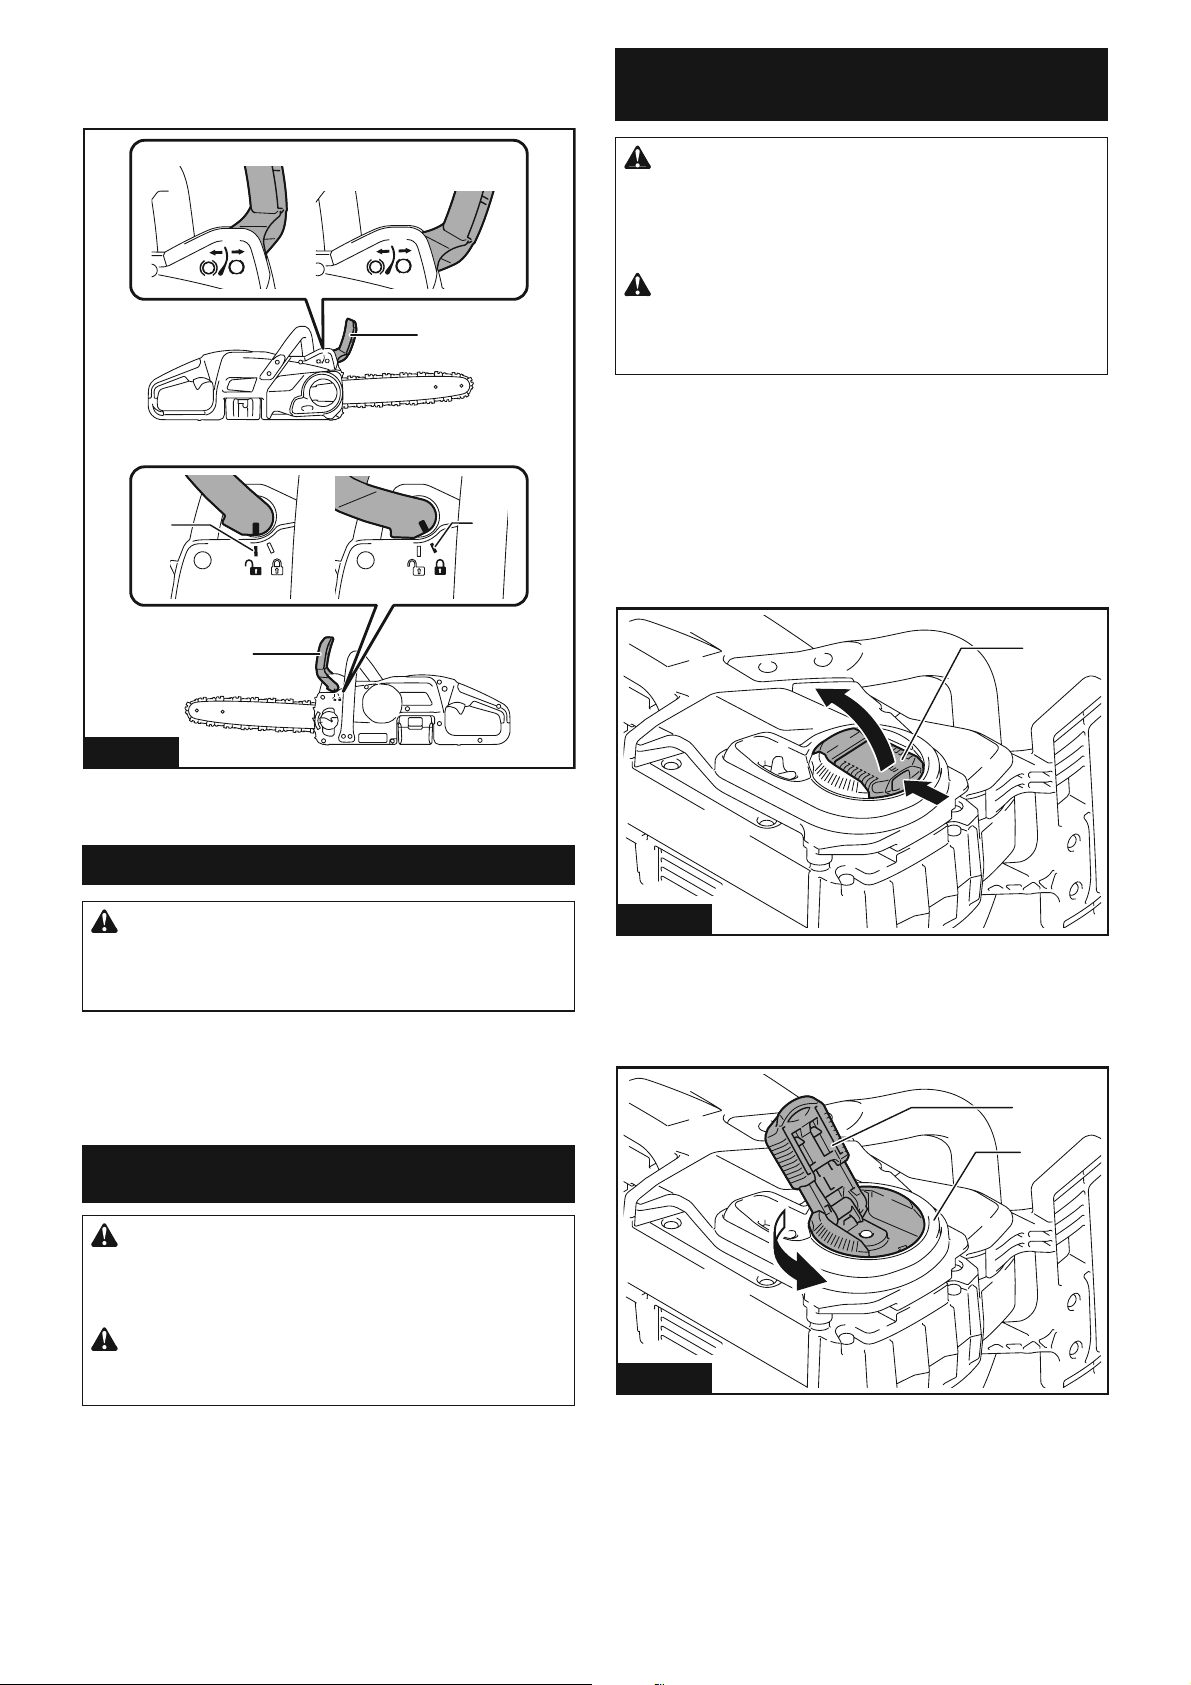
29 ESPAÑOL
2. (PSXMHHOSURWHFWRUGHPDQRGHODQWHURKDFLD
adelante con el dorso de su mano. Asegúrese de que la
sierra eléctrica se detenga de inmediato.
2
1
3
2 3
1
Fig.6
Ź1. Protector de mano delantero 2. Posición desblo-
queada 3. Posición bloqueada
9HUL¿FDFLyQGHOIUHQRGHUHWHQFLyQ
PRECAUCIÓN: Si la cadena de la sierra no se
detiene en el lapso de un segundo durante esta
prueba, deje de usar la sierra eléctrica y consulte
a nuestro centro de servicio autorizado.
Haga funcionar la sierra eléctrica y luego suelte el gati-
llo interruptor por completo. La sierra eléctrica deberá
detenerse en el lapso de un segundo.
MONTAJE
PRECAUCIÓN: Asegúrese siempre de que la
herramienta esté apagada y el cartucho de batería
haya sido extraído antes de realizar cualquier
trabajo en la misma.
PRECAUCIÓN: No toque la cadena de la
sierra con las manos descubiertas. Siempre use
guantes al manipular la cadena de la sierra.
Instalación o extracción de la
cadena de la sierra
PRECAUCIÓN: La cadena de la sierra y la
barra de guía siguen estando calientes justo
después de la operación. Permita que se enfríen
ORVX¿FLHQWHDQWHVGHUHDOL]DUFXDOTXLHUWUDEDMRHQ
la herramienta.
PRECAUCIÓN: Realice el procedimiento de
instalación o extracción de la cadena de la sierra
en un lugar limpio, libre de aserrín y residuos
similares.
Instalación de la cadena de la sierra
Para instalar la cadena de la sierra, realice los siguien-
tes pasos:
1. /LEHUHHOIUHQRGHODFDGHQDMDODQGRHOSURWHFWRU
de mano delantero.
2. Jale la palanca hacia arriba mientras presiona su
borde.
1
Fig.7
Ź1. Palanca
3. Gire la palanca en sentido inverso al de las mane-
FLOODVGHOUHORMKDVWDTXHODFXELHUWDGHODSLH]DGHQWDGD
se desprenda.
1
2
Fig.8
Ź1. Palanca 2.&XELHUWDGHODSLH]DGHQWDGD
4. 5HWLUHODFXELHUWDGHODSLH]DGHQWDGD

30 ESPAÑOL
5. 9HUL¿TXHODGLUHFFLyQGHODFDGHQDGHODVLHUUD
Iguale la dirección de la cadena de la sierra con la de la
marca en el cuerpo de la sierra eléctrica.
1
Fig.9
Ź1. Marca del cuerpo de la sierra eléctrica
6. Coloque un extremo de la cadena de la sierra en
la punta de la barra de guía.
7. (QFDMHODRWUDSXQWDGHODFDGHQDGHODVLHUUD
DOUHGHGRUGHODSLH]DGHQWDGDOXHJRLQVHUWHODEDUUDGH
guía en el cuerpo de la sierra eléctrica.
1
Fig.10
Ź1.3LH]DGHQWDGD
8. *LUHHOGLDOGHDMXVWHDODGLUHFFLyQ³´SDUDGHVOL-
]DUHOSDVDGRUGHDMXVWHHQODGLUHFFLyQGHODÀHFKD
1
2
Fig.11
Ź1.'LDOGHDMXVWH2.3DVDGRUGHDMXVWH
9. &RORTXHODFXELHUWDGHODSLH]DGHQWDGDHQOD
VLHUUDHOpFWULFDGHWDOIRUPDTXHHOSDVDGRUGHDMXVWH
TXHGHSRVLFLRQDGRHQHORUL¿FLRSHTXHxRHQODEDUUDGH
guía.
3
1
2
Fig.12
Ź1.&XELHUWDGHODSLH]DGHQWDGD2. Barra de guía
3.2UL¿FLR
10. Dé un giro completo a la palanca en el sentido
GHODVPDQHFLOODVGHOUHORM\OXHJRJtUHODXQSRFRHQOD
GLUHFFLyQRSXHVWDSDUDPDQWHQHUDÀRMDGDODWHQVLyQ
SDUDDMXVWDUODWHQVLyQGHODFDGHQD
11. $MXVWHODWHQVLyQGHODFDGHQD&RQVXOWHODVHF-
FLyQGHDMXVWHGHODWHQVLyQGHODFDGHQDGHODVLHUUD
para información sobre el procedimiento.
12. Gire la palanca en el sentido de las manecillas del
UHORMKDVWDTXHODFXELHUWDGHODSLH]DGHQWDGDTXHGH
asegurada, y luego regrésela a la posición original.
1
2
Fig.13
Ź1. Palanca 2.&XELHUWDGHODSLH]DGHQWDGD
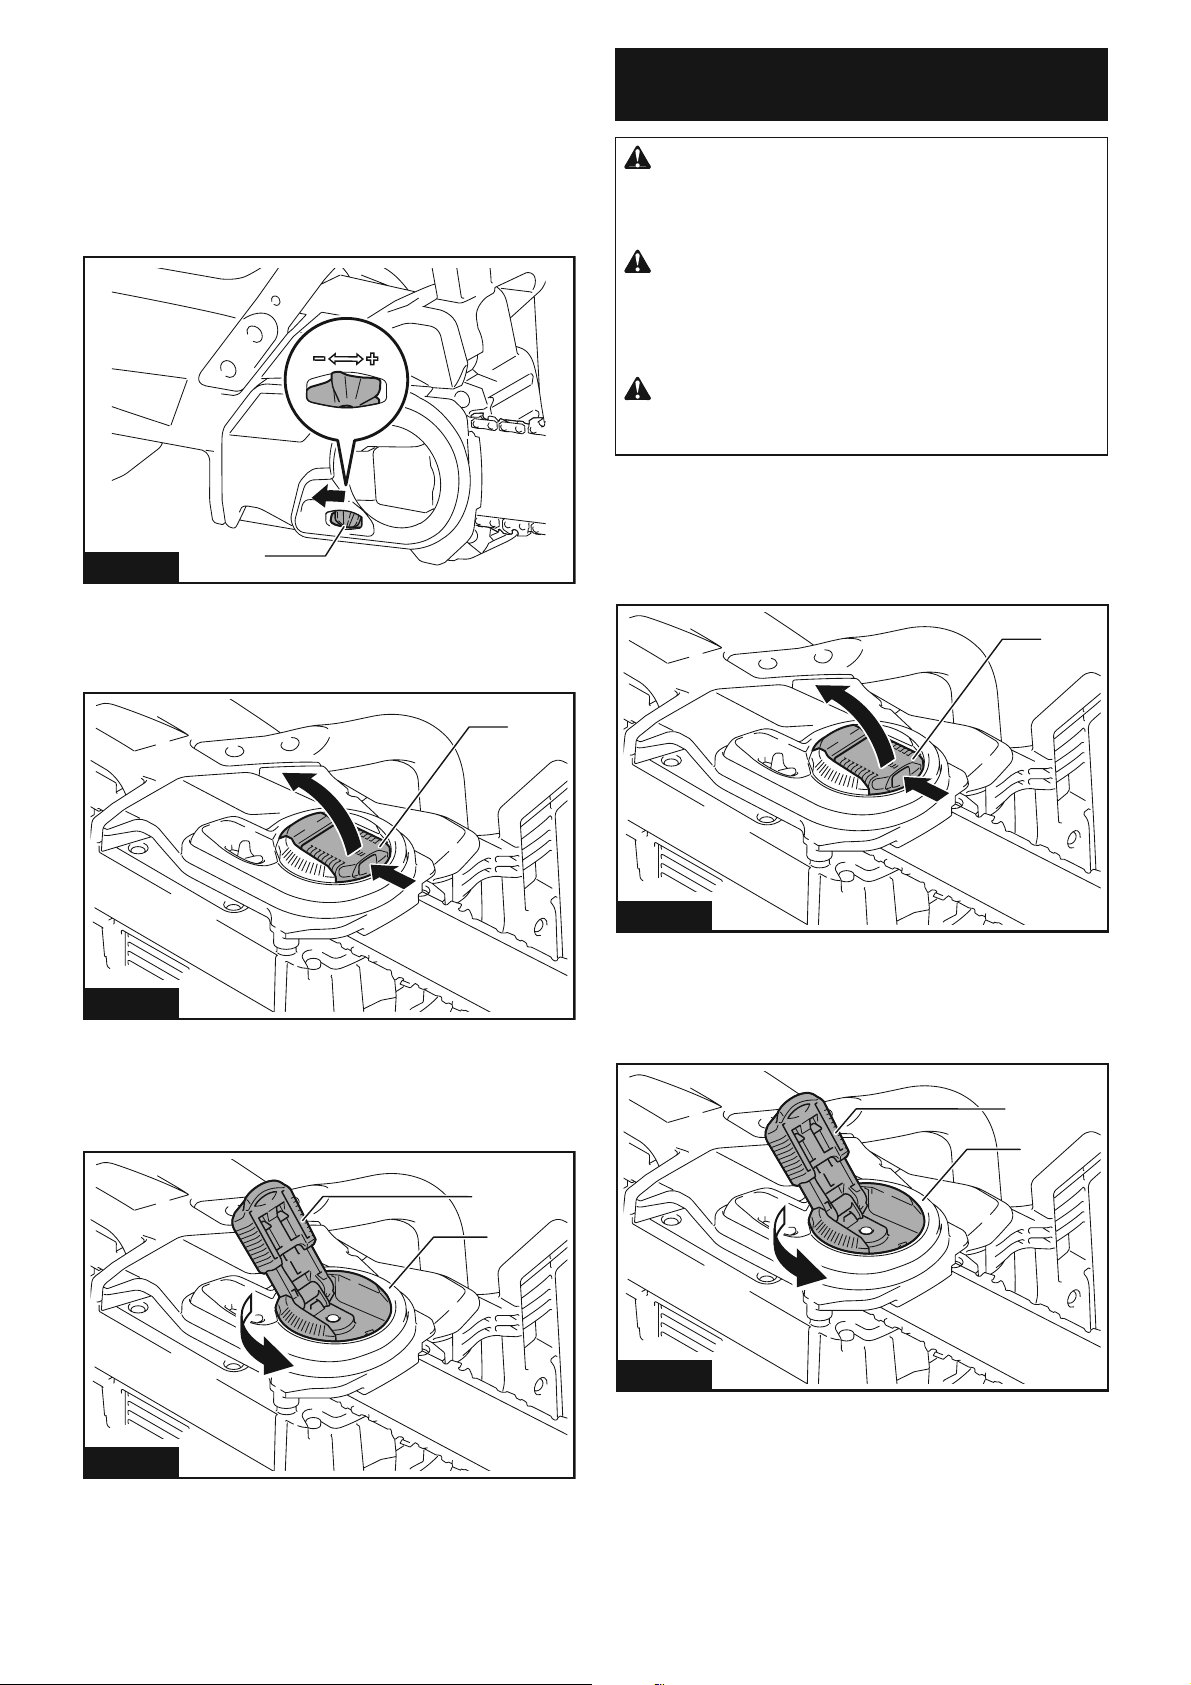
31 ESPAÑOL
Extracción de la cadena de la sierra
Para extraer la cadena de la sierra, siga los pasos a
continuación:
1. /LEHUHHOIUHQRGHODFDGHQDMDODQGRHOSURWHFWRU
de mano delantero.
2. *LUHHOGLDOGHDMXVWHKDFLDODGLUHFFLyQ³´SDUD
liberar la tensión de la cadena de la sierra.
1
Fig.14
Ź1.'LDOGHDMXVWH
3. Jale la palanca hacia arriba mientras presiona su
borde.
1
Fig.15
Ź1. Palanca
4. Gire la palanca en sentido inverso al de las mane-
FLOODVGHOUHORMKDVWDTXHODFXELHUWDGHODSLH]DGHQWDGD
se desprenda.
2
1
Fig.16
Ź1. Palanca 2.&XELHUWDGHODSLH]DGHQWDGD
5. 5HWLUHODFXELHUWDGHODSLH]DGHQWDGD\OXHJR
extraiga la cadena de la sierra y la barra de guía del
cuerpo de la sierra eléctrica.
Ajuste de la tensión de la cadena de
la sierra
PRECAUCIÓN: Realice el procedimiento de
instalación o extracción de la cadena de la sierra
en un lugar limpio, libre de aserrín y residuos
similares.
PRECAUCIÓN: No apriete demasiado la
cadena de la sierra. Una tensión excesiva de la
cadena de la sierra puede causar que ésta se rompa,
que la barra de guía se desgaste y que el dial de
DMXVWHVHGDxH
PRECAUCIÓN: Una cadena demasiado
suelta puede salirse de la barra y ocasionar lesio-
nes por accidentes.
/DFDGHQDGHODVLHUUDSXHGHDÀRMDUVHWUDVYDULDV
KRUDVGHXVR'HYH]HQFXDQGRUHYLVHODWHQVLyQGHOD
cadena de la sierra antes de usarla.
1. Jale la palanca hacia arriba mientras presiona su
borde.
1
Fig.17
Ź1. Palanca
2. Gire la palanca ligeramente en sentido inverso
DOGHODVPDQHFLOODVGHOUHORMSDUDDÀRMDUXQSRFROD
FXELHUWDGHODSLH]DGHQWDGD
2
1
Fig.18
Ź1. Palanca 2.&XELHUWDGHODSLH]DGHQWDGD

32 ESPAÑOL
3. Levante ligeramente la punta de la barra de guía
\DMXVWHODWHQVLyQGHODFDGHQD*LUHHOGLDOGHDMXVWH
KDFLDODGLUHFFLyQ³´SDUDDÀRMDU\KDFLDODGLUHFFLyQ
“+” para apretar. Apriete la cadena de la sierra hasta
que el lado inferior de la cadena de la sierra embone
en el riel de la barra de guía, tal como se muestra en la
ilustración.
2
3
1
Fig.19
Ź1.'LDOGHDMXVWH2. Barra de guía 3. Cadena de la
sierra
4. Continúe sosteniendo ligeramente la barra
GHJXtD\DSULHWHODFXELHUWDGHODSLH]DGHQWDGD
$VHJ~UHVHGHTXHODFDGHQDGHODVLHUUDQRTXHGHÀRMD
del lado inferior.
5. Regrese la palanca a la posición original.
$VHJ~UHVHGHTXHODFDGHQDGHODVLHUUDTXHGHDMXV-
tada contra el lado inferior de la barra.
OPERACIÓN
Lubricación
PRECAUCIÓN: No use la sierra eléctrica
cuando el tanque esté vacío. Llénelo con aceite
en el momento debido antes de que el tanque
quede vacío.
PRECAUCIÓN: Evite que el aceite entre en
contacto directo con su piel y ojos. El contacto
directo con los ojos causa irritación. Si hay con-
tacto directo con los ojos, lave inmediatamente
el ojo afectado con agua limpia y consulte a un
doctor lo antes posible.
PRECAUCIÓN: Nunca utilice residuos de
aceite usado. Los residuos de aceite usado con-
tienen substancias cancerígenas. Los contami-
nantes en los residuos de aceite usado aceleran
el desgaste de la bomba de aceite, la barra y la
cadena. Los residuos de aceite usado son dañi-
nos para el medio ambiente.
AVISO: Cuando se usa la sierra eléctrica por
primera vez, puede tomar hasta dos minutos para
que el aceite de la cadena de la sierra comience a
lubricar el mecanismo de la sierra. Haga girar la
sierra sin carga hasta que se lubrique.
AVISO: Cuando llene el aceite para la cadena por
primera vez, o al reabastecer el tanque después
de haberse vaciado por completo, añada el aceite
hasta el borde inferior del cuello de la abertura
de suministro. De lo contrario, el suministro de
DFHLWHSRGUtDVHUGH¿FLHQWH
AVISO: Utilice el aceite para la cadena de la sie-
rra exclusivamente para sierras eléctricas Makita
o un aceite equivalente disponible en el mercado.
AVISO: Nunca use aceite que tenga polvo y partí-
culas, ni aceite volátil.
AVISO: Cuando pode árboles, use aceite vegetal.
El aceite mineral puede dañar los árboles.
AVISO: Antes de la operación de corte, asegú-
rese de que la tapa del tanque de aceite provista
se encuentre atornillada en su lugar.
La cadena de la sierra se lubrica automáticamente
cuando la herramienta está en funcionamiento.
9HUL¿TXHSHULyGLFDPHQWHODFDQWLGDGGHDFHLWHUHVWDQWH
en el tanque de aceite a través de la ventanilla de ins-
pección de aceite.
1
2
Fig.20
Ź1. Tapa del tanque de aceite 2. Ventanilla de ins-
pección de aceite
Para llenar con el aceite, siga los siguientes pasos:
1. Limpie completamente el área alrededor de la
tapa del tanque de aceite para evitar que entre sucie-
dad en el tanque.
2. Coloque la sierra eléctrica sobre su costado y
retire la tapa del tanque de aceite.
3. Llene el tanque de aceite con el aceite. La canti-
GDGFRUUHFWDGHDFHLWHVRQPOÀR]
4. Enrosque de nuevo la tapa del tanque de aceite
FRQ¿UPH]D

33 ESPAÑOL
5. Limpie cuidadosamente con un paño cualquier
aceite de la cadena que se haya derramado.
NOTA:6LVHGL¿FXOWDTXLWDUODWDSDGHOWDQTXHGH
aceite, inserte el destornillador plano en la hendidura
de la tapa del tanque de aceite, y luego quite la tapa
del tanque de aceite girándola en sentido inverso al
GHODVPDQHFLOODVGHOUHORM
1
2
Fig.21
Ź1. Hendidura 2. Destornillador plano
Después del reabastecimiento, sostenga la sierra
HOpFWULFDOHMRVGHOiUERO3yQJDODHQPDUFKD\HVSHUH
hasta que la lubricación en la cadena de la sierra sea
adecuada.
Fig.22
Operación de la sierra eléctrica
PRECAUCIÓN: El usuario sin experiencia
deberá, como práctica mínima, cortar leña sobre
un caballete o base.
PRECAUCIÓN: Al aserrar madera precor-
tada, utilice un apoyo seguro (como un caballete
o base). No utilice su pie para mantener la pieza
GHWUDEDMR¿MDQLSHUPLWDTXHDOJXLHQPiVODVRV-
WHQJDRPDQWHQJD¿UPH
PRECAUCIÓN: Fije las piezas redondas para
que no giren.
PRECAUCIÓN: Mantenga todas las partes
del cuerpo alejadas de la cadena de la sierra
cuando el motor esté funcionando.
PRECAUCIÓN: Sostenga la sierra eléctrica
¿UPHPHQWHFRQDPEDVPDQRVFXDQGRHOPRWRU
esté en marcha.
PRECAUCIÓN: No utilice la herramienta
GRQGHQRDOFDQFH3LVH¿UPHPHQWH\PDQWHQJDHO
equilibrio en todo momento.
PRECAUCIÓN: Cuando use el lado superior
de la barra de guía para cortar, tenga cuidado ya
que la sierra eléctrica podría ser empujada en su
dirección si la cadena de la sierra queda atrapada.
AVISO: Nunca tire ni deje caer la herramienta.
AVISO: No cubra las rejillas de ventilación de la
herramienta.
AVISO: Cuando realice varios cortes, apague la
sierra eléctrica entre corte y corte.
Talado de un árbol
PRECAUCIÓN: El talado solo deberá ser
realizado por personas capacitadas.(VWHWUDEDMR
es peligroso.
&XDQGRGRVRPiVSHUVRQDVUHDOL]DQRSHUDFLRQHVGH
corte transversal/leñado y tala al mismo tiempo, las
operaciones de tala deberían estar separadas de la
operación de corte transversal/leñado por una distancia
de al menos el doble de la altura del árbol que se está
talando. Los árboles no se deben talar de manera que
pueda poner en peligro a cualquier persona, golpear
cualquier línea de servicios públicos o causar daños
a la propiedad. Si el árbol entra en contacto con cual-
TXLHUOtQHDGHVHUYLFLRVS~EOLFRVVHGHEHQRWL¿FDUDOD
empresa de inmediato.
El operador de la sierra eléctrica debe mantenerse en
el lado cuesta arriba del terreno, ya que es probable
TXHHOiUEROUXHGHRVHGHVOLFHFXHVWDDEDMRGHVSXpV
de ser talado.

34 ESPAÑOL
6HGHEHSODQL¿FDUXQDUXWDGHHVFDSHTXHHVWpGHV-
SHMDGDVHJ~QVHUHTXLHUDDQWHVGHLQLFLDUORVFRUWHV
La ruta de escape deberá extenderse hacia atrás y en
forma diagonal a la parte trasera de la línea de caída
esperada, tal como se muestra.
1
2
2
3 3
Fig.23
Ź1. Dirección de talado 2. Zona de peligro 3. Ruta
de escape
$QWHVGHFRPHQ]DUDWDODUFRQVLGHUHODLQFOLQDFLyQ
natural del árbol, la ubicación de las ramas más gran-
des y la dirección del viento para determinar en qué
dirección caerá el árbol.
4XLWHODWLHUUDSLHGUDVFRUWH]DVXHOWDFODYRVJUDSDV\
alambre del árbol.
Incisión con muesca y corte trasera para talado
PRECAUCIÓN: No corte en la parte articu-
lante bajo ninguna circunstancia. El árbol podría
caer inesperadamente.
AVISO: Use cuñas de plástico o aluminio para
mantener el corte trasero abierto. No utilice cuñas
de hierro.
1
1
2
3
4
5
Fig.24
Ź1.PPƎ2. Corte trasero para talado 3. Parte
articulante 4. Muesca 5. Dirección de la caída
Haga la muesca de 1/3 del diámetro del árbol, perpen-
dicular a la dirección de las caídas como se ilustra.
5HDOLFHSULPHURHOFRUWHGHPXHVFDKRUL]RQWDOLQIHULRU
Esto ayudará a evitar que quede atrapada la cadena de
la sierra o la barra de guía cuando se haga la segunda
muesca.
+DJDHOFRUWHWUDVHURSDUDWDODGRDOPHQRVPPƎ
PiVDOWRTXHHOFRUWHGHPXHVFDKRUL]RQWDOFRPRVH
muestra en la ilustración. Mantenga el corte trasero
SDUDWDODGRSDUDOHORDOFRUWHGHPXHVFDKRUL]RQWDO
+DJDHOFRUWHWUDVHURSDUDWDODGRSDUDTXHTXHGHVX¿-
ciente madera para actuar como parte articulante. La
madera que funciona como parte articulante evita que
HOiUEROVHWXHU]D\FDLJDHQODGLUHFFLyQHTXLYRFDGD
No corte a través de la parte articulante.
A medida que la acción de tala se acerca a la parte
DUWLFXODQWHHOiUEROGHEHUtDHPSH]DUDFDHU6LH[LVWH
la posibilidad de que el árbol no caiga en la dirección
deseada o se balancee hacia atrás y se trabe la cadena
GHODVLHUUDGHMHGHFRUWDUDQWHVGHTXHVHFRPSOHWHHO
corte trasero para talado y use cuñas de madera, plás-
WLFRRDOXPLQLRSDUDDEULUHOFRUWH\GHMDUFDHUHOiUEROD
lo largo de la línea de caída deseada.
Cuando el árbol comience a caer, retire la sierra eléc-
WULFDGHOFRUWHGHWHQJDHOPRWRUEDMHODVLHUUDHOpFWULFD
\OXHJRXVHHOFDPLQRGHUHWLUDGDSODQL¿FDGR(VWpDO
pendiente de ramas que caigan desde arriba, y pise
¿UPHPHQWH
Desmembrado de ramas de un árbol
PRECAUCIÓN: El desmembrado solo deberá
ser realizado por personas capacitadas. Puede
presentarse algún peligro debido al riesgo de un
retroceso brusco.
El desmembrado es quitar las ramas de un árbol caído.
&XDQGRUHDOLFHHOGHVPHPEUDGRGHMHODVUDPDVLQIH-
riores más grandes para dar soporte al tronco en el
suelo. Retire las ramas más pequeñas en un solo corte,
FRPRVHLOXVWUD/DVUDPDVEDMRWHQVLyQGHEHQFRUWDUVH
GHDEDMRKDFLDDUULEDSDUDHYLWDUTXHODVLHUUDHOpFWULFD
se trabe.
1
Fig.25
Ź1. Corte de la rama

35 ESPAÑOL
Corte transversal/leñado de un tronco
El corte transversal/leñado es cortar un tronco en tramos. Es
LPSRUWDQWHDVHJXUDUVHGHTXHVXSLHHVWp¿UPH\TXHVXSHVRHVWp
distribuido uniformemente en ambos pies. Cuando sea posible,
el tronco debe elevarse y apoyarse mediante el uso de ramas,
troncos o cuñas. Siga las instrucciones sencillas para un corte fácil.
Cuando el tronco está apoyado en toda su longitud,
como se muestra en la ilustración, se corta desde la
parte superior (leñado superior).
Fig.26
Cuando el tronco esté apoyado sobre un extremo, como
se muestra en la ilustración, corte 1/3 del diámetro desde
ODSDUWHLQIHULRUOHxDGRLQIHULRU/XHJRKDJDHOFRUWH¿QDO
mediante corte superior para llegar al primer corte.
1
2
Fig.27
Ź1. Segundo corte 2. Primer corte
Cuando el tronco esté apoyado sobre ambos extremos,
como se muestra en la ilustración, corte 1/3 del diáme-
tro desde la parte superior (leñado superior). Luego,
KDJDHOFRUWH¿QDOPHGLDQWHXQFRUWHLQIHULRUHQHO
segundo tercio inferior para llegar al primer corte.
1
2
Fig.28
Ź1. Primer corte 2. Segundo corte
Cuando haga un corte transversal/leñado en una pen-
diente, párese siempre sobre el lado hacia arriba del
tronco, tal y como se ilustra. Al “atravesar con el corte”,
para mantener un control total, libere la presión de
FRUWHFHUFDGHO¿QDOGHOFRUWHVLQUHODMDUHODJDUUHGHORV
PDQJRVGHODVLHUUDHOpFWULFD1RGHMHTXHODFDGHQD
haga contacto con el suelo. Después de completar el
corte, espere a que la cadena de la sierra se detenga
antes de mover la sierra eléctrica. Detenga siempre el
motor antes de cambiarse entre árboles.
Fig.29
Corte paralelo a la veta
PRECAUCIÓN: El corte paralelo a la veta
solo podrán realizarlo personas capacitadas. La
posibilidad de un retroceso brusco representa un
riesgo de lesión.
Realice los cortes en paralelo a la veta a un ángulo tan
VXSHU¿FLDOFRPRVHDSRVLEOH
Fig.30
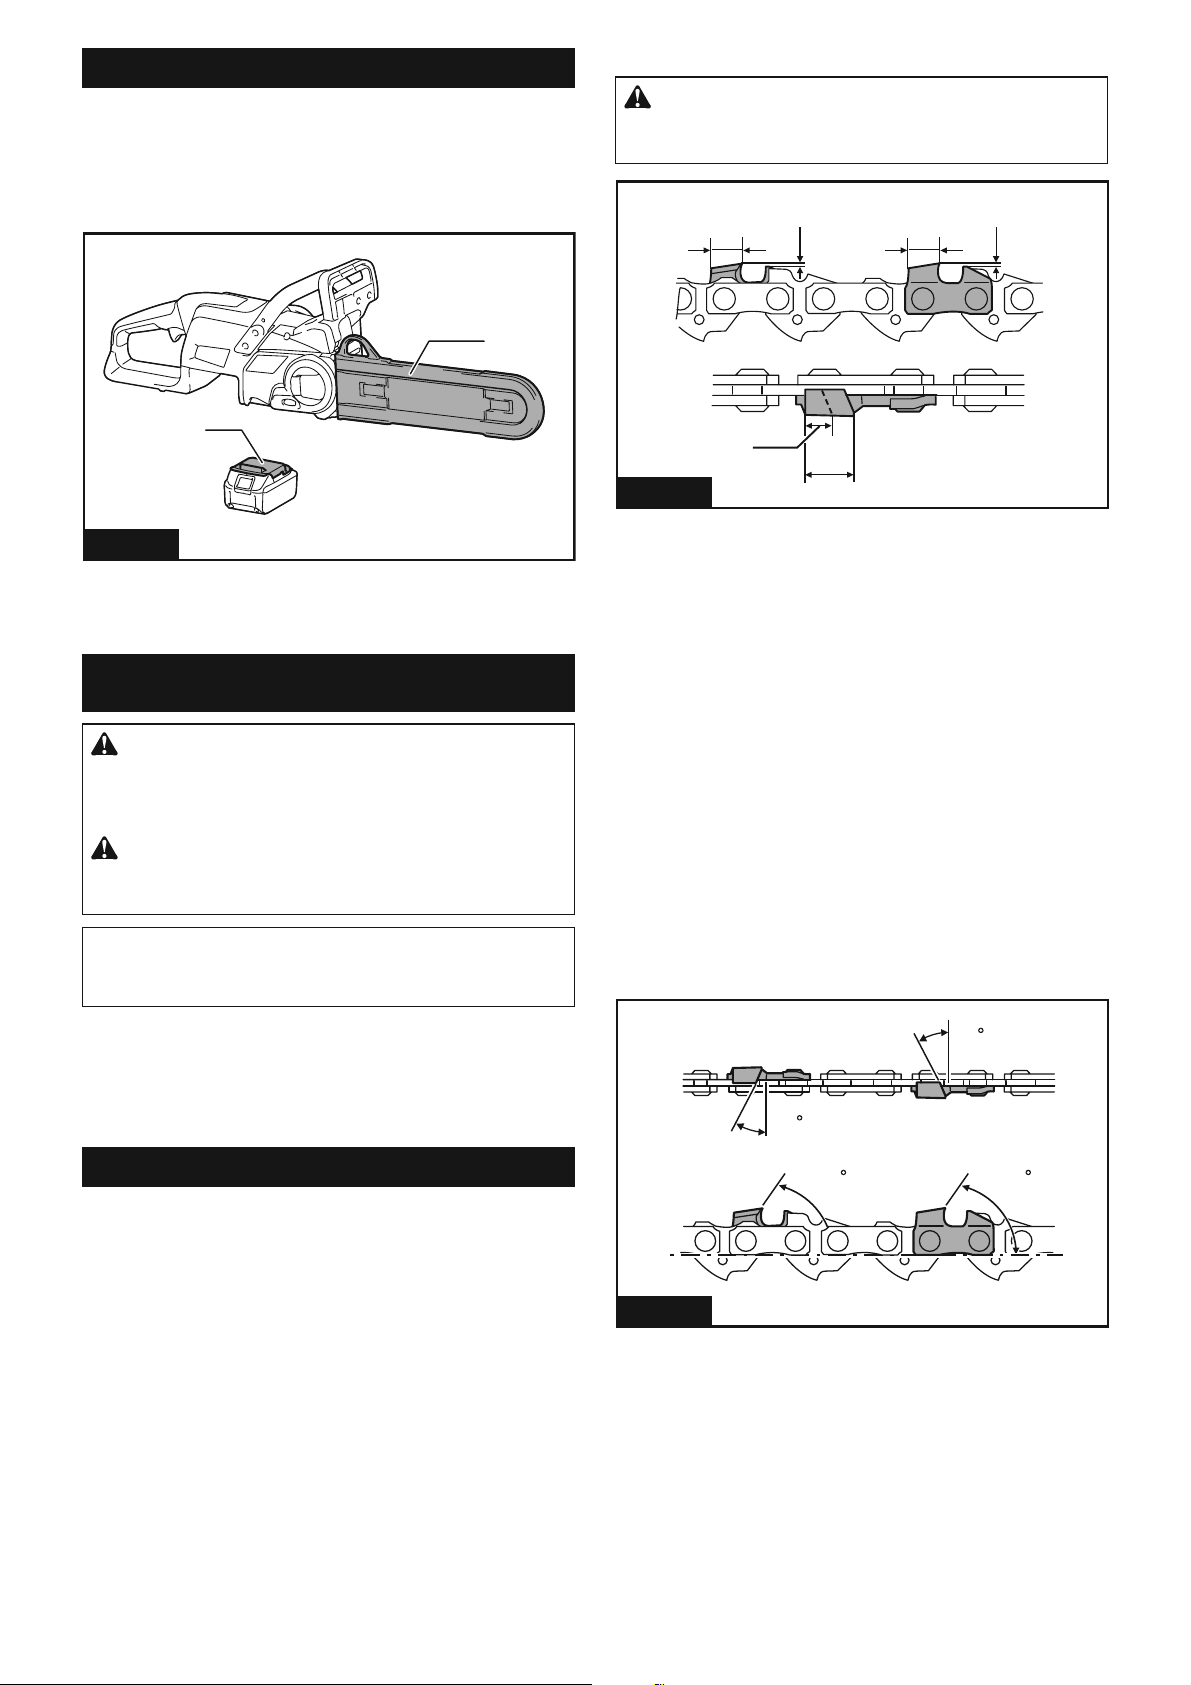
36 ESPAÑOL
Transporte de la herramienta
Antes de transportar la herramienta, accione siempre
el freno de la cadena y retire el cartucho de batería de
la herramienta. Luego instale la cubierta de la barra
de guía. Asimismo, cubra el cartucho de batería con la
cubierta de la batería.
1
2
Fig.31
Ź
1. Cubierta de la barra de guía 2. Cubierta de la batería
MANTENIMIENTO
PRECAUCIÓN: Asegúrese siempre de que la
herramienta esté apagada y el cartucho de batería
extraído antes de intentar realizar una inspección
o mantenimiento.
PRECAUCIÓN: Siempre use guantes
cuando realice cualquier trabajo de inspección o
mantenimiento.
AVISO: Nunca use gasolina, bencina, diluyente
(tíner), alcohol o sustancias similares. Puede que
esto ocasione grietas o descoloramiento.
Para mantener la SEGURIDAD y FIABILIDAD del pro-
ducto, las reparaciones, y cualquier otra tarea de man-
WHQLPLHQWRRDMXVWHGHEHUiQVHUUHDOL]DGDVHQFHQWURV
GHVHUYLFLRDXWRUL]DGRVRGHIiEULFD0DNLWDHPSOHDQGR
siempre repuestos Makita.
$¿ODGRGHODFDGHQDGHODVLHUUD
$¿OHODFDGHQDGHODVLHUUDFXDQGR
6HSURGX]FDDVHUUtQFRQFRQVLVWHQFLDKDULQRVDDO
cortar madera húmeda;
/DVLHUUDSHQHWUHODPDGHUDFRQGL¿FXOWDGLQFOXVR
al aplicar una gran presión;
• El borde de corte esté evidentemente dañado;
/DVLHUUDVHGHVYtHKDFLDODL]TXLHUGDRODGHUHFKD
HQODPDGHUDDFDXVDGHXQD¿ODGRQRXQLIRUPH
de la cadena de la sierra o daño en sólo uno de
los lados)
$¿OHODFDGHQDGHODVLHUUDFRQIUHFXHQFLDSHURVyORXQ
SRFRFDGDYH]3RUORJHQHUDOVyORGRVRWUHVSDVDGDV
FRQXQDOLPDVRQVX¿FLHQWHVSDUDXQUHD¿ODGRGHUXWLQD
&XDQGRODFDGHQDGHODVLHUUDKD\DVLGRUHD¿ODGD
YDULDVYHFHVOOpYHODDD¿ODUDQXHVWURFHQWURGHVHUYLFLR
DXWRUL]DGR
&ULWHULRVGHD¿ODGR
ADVERTENCIA: Una distancia excesiva
entre el borde de corte y el calibrador de profun-
didad aumenta el riesgo de un retroceso brusco.
22
1
1
3
1
Fig.32
Ź1. Longitud de la parte cortadora 2. Distancia entre
el borde de corte y el calibrador de profundidad
3. Longitud mínima de la parte cortadora (3 mm)
— Todas las partes cortadoras deberán tener la
misma longitud. El que las partes cortadoras ten-
gan diferentes longitudes impide que la cadena de
la sierra se accione fácilmente y puede ocasionar
que ésta se rompa.
² 1RD¿OHODFDGHQDFXDQGRODORQJLWXGGHODSDUWH
FRUWDGRUDKD\DDOFDQ]DGRPPRPHQRV/D
FDGHQDGHEHUiVHUUHHPSOD]DGDFRQXQDQXHYD
— El grosor de las virutas es determinado por la
GLVWDQFLDHQWUHHOFDOLEUDGRUGHSURIXQGLGDGQDUL]
redonda) y el borde de corte.
² /RVPHMRUHVUHVXOWDGRVGHFRUWHVHREWLHQHQFRQ
la distancia siguiente entre el borde de corte y el
calibrador de profundidad.
• Cuchilla de la cadena 90PX: 0,65 mm
Ǝ
30
30
55
55
Fig.33
² (OiQJXORGHD¿ODGRGHGHEHUiVHUHOPLVPR
en todas las partes cortadoras. Las diferencias de
ángulos en las partes cortadoras causan que la
cadena corra de forma brusca e irregular, acelera
el desgaste y provocan la rotura de la cadena.
— Utilice una lima redonda adecuada de manera que
HOiQJXORGHD¿ODGRFRUUHFWRVHPDQWHQJDFRQWUD
el diente.
• Cuchilla de la cadena 90PX: 55°

37 ESPAÑOL
Lima y guiado del limado
— Use una lima redonda especial (accesorio
RSFLRQDOSDUDFDGHQDVGHODVLHUUDSDUDD¿ODU
la cadena. Las limas redondas comunes no son
apropiadas.
— El diámetro de la lima redonda para cada cadena
de la sierra es:
&XFKLOODGHODFDGHQD3;PPƎ
— La lima sólo deberá embonar en la parte corta-
dora en la pasada hacia adelante. Levante la lima
SDUDDOHMDUODGHODSDUWHFRUWDGRUDHQODSDVDGDGH
regreso.
² $¿OHODSDUWHFRUWDGRUDPiVSHTXHxDSULPHUR
Después la longitud de esta parte más pequeña
se volverá el estándar para todas las demás
partes cortadoras en la cadena de la sierra.
— Guíe la lima tal como se muestra en la ilustración.
1
2
Fig.34
Ź1. Lima 2. Cadena de la sierra
— La lima puede guiarse más fácilmente si se
HPSOHDXQVXMHWDGRUGHOLPDVDFFHVRULRRSFLR-
QDO(OVXMHWDGRUGHOLPDVFXHQWDFRQPDUFDV
SDUDHOiQJXORGHD¿ODGRFRUUHFWRGHDOLQHH
las marcas paralelas a la cadena de la sierra) y
limita la profundidad de penetración (a 4/5 del
diámetro de la lima).
30
1/5
1
Fig.35
Ź1.6XMHWDGRUGHOLPDV
² 7UDVHOD¿ODGRGHODFDGHQDYHUL¿TXHODDOWXUDGHO
calibrador de profundidad usando la herramienta
de calibración de la cadena (accesorio opcional).
Fig.36
— Elimine cualquier material protuberante, indepen-
diente de cuán pequeño sea, con una lima plana
especial (accesorio opcional).
— Redondee la parte delantera del calibrador de
profundidad de nuevo.
Limpieza de la barra de guía
En la ranura de la barra de guía se acumularán astillas
\DVHUUtQeVWDVSXHGHQREVWUXLUODUDQXUDGHODEDUUD\
DIHFWDUHOÀXMRGHDFHLWH/LPSLHODVDVWLOODV\HODVHUUtQ
FDGDYH]TXHD¿OHRUHHPSODFHODFDGHQDGHODVLHUUD
Fig.37
Limpieza de la cubierta de la pieza
dentada
(QHOLQWHULRUGHODFXELHUWDGHODSLH]DGHQWDGDVHDFX-
PXODUiQDVWLOODV\DVHUUtQ5HWLUHODFXELHUWDGHODSLH]D
dentada y la cadena de la sierra de la herramienta y
luego limpie las astillas y el aserrín.
Fig.38

38 ESPAÑOL
/LPSLH]DGHORUL¿FLRGHGHVFDUJDGH
aceite
(QHORUL¿FLRGHGHVFDUJDGHDFHLWHVHSXHGHQDFXPXODU
polvo y pequeñas partículas durante la operación. Este
SROYRRSDUWtFXODVSXHGHQDIHFWDUHOÀXMRGHDFHLWH\
FDXVDUXQDOXEULFDFLyQLQVX¿FLHQWHHQWRGDODFDGHQDGH
ODVLHUUD&XDQGRKD\DXQVXPLQLVWURGH¿FLHQWHGHDFHLWH
HQODSDUWHVXSHULRUGHODEDUUDGHJXtDOLPSLHHORUL¿FLR
de descarga de aceite como se indica a continuación.
1. 5HWLUHODFXELHUWDGHODSLH]DGHQWDGD\ODFDGHQD
de la sierra de la herramienta.
2. Elimine polvo y partículas de tamaño pequeño
usando un destornillador plano o similar.
2
1
Fig.39
Ź1. Destornillador plano 2.2UL¿FLRGHGHVFDUJDGH
aceite
3. Inserte el cartucho de batería en la herramienta.
Jale el gatillo interruptor para eliminar la acumulación
GHSROYRRSDUWtFXODVGHORUL¿FLRGHGHVFDUJDGHDFHLWH
descargando el aceite de la cadena.
4. Retire el cartucho de batería de la herramienta.
5HLQVWDOHODFXELHUWDGHODSLH]DGHQWDGD\ODFDGHQDGH
la sierra en la herramienta.
Reemplazo de la pieza dentada
PRECAUCIÓN: Una pieza dentada desgas-
tada dañará una cadena nueva de la sierra. En
este caso, reemplace la pieza dentada.
$QWHVGHLQVWDODUXQDQXHYDFDGHQDGHODVLHUUDYHUL¿-
TXHODFRQGLFLyQGHODSLH]DGHQWDGD
1
2
Fig.40
Ź1.3LH]DGHQWDGD2. Áreas a desgastarse
Instale siempre un anillo de bloqueo nuevo cuando
UHHPSODFHODSLH]DGHQWDGD
1
2
Fig.41
Ź1. Anillo de bloqueo 2.3LH]DGHQWDGD
AVISO: Asegúrese de que la pieza dentada sea
instalada tal como se muestra en la ilustración.
Almacenamiento de la herramienta
1. Limpie la herramienta antes de almacenarla.
Retire cualquier astilla y aserrín de la herramienta
GHVSXpVGHTXLWDUODFXELHUWDGHODSLH]DGHQWDGD
2. Después de limpiar la herramienta, hágala fun-
cionar sin carga para lubricar la cadena de la sierra y la
barra de guía.
3. Cubra la barra de guía con la cubierta de la barra
de guía.
4. Vacíe el tanque de aceite.

39 ESPAÑOL
Instrucciones para el mantenimiento periódico
Para asegurar una vida útil prolongada, prevenga el daño y asegure un funcionamiento total de las funciones de
seguridad, efectuando el siguiente programa de mantenimiento de forma periódica. Las reclamaciones de garantía
SRGUiQVHUUHFRQRFLGDVVRODPHQWHVLHVWHSURJUDPDGHPDQWHQLPLHQWRHVUHDOL]DGRSHULyGLFDPHQWH\FRPRFRUUHV-
ponde. ¡El no seguir el programa de mantenimiento indicado puede provocar accidentes! El usuario de la sierra
HOpFWULFDQRGHEHUiUHDOL]DUQLQJ~QWUDEDMRGHPDQWHQLPLHQWRTXHQRHVWpGHVFULWRHQHOPDQXDOGHLQVWUXFFLRQHV
7RGRHVWHWLSRGHWUDEDMRGHEHUiVHUUHDOL]DGRSRUQXHVWURFHQWURGHVHUYLFLRDXWRUL]DGR
Elemento a revisar / Tiempo
de operación
Antes de la
operación
Diariamente
Semanalmente
Cada 3 meses Anualmente Antes del
almacena-
miento
Sierra
eléctrica
Inspección.
- - - - -
/LPSLH]D -
- - - -
Inspección
en el centro
de servicio
DXWRUL]DGR
- - - -
Cadena de la
sierra
Inspección. - - - - -
$¿ODPLHQWR
en caso
necesario.
- - - - -
Barra de guía Inspección. - - - -
Retirar de
la sierra
eléctrica.
- - - - -
Freno de la
cadena
Revisar el fun-
cionamiento.
- - - - -
Hacer que lo
inspeccionen
regularmente
en el centro
de servicio
DXWRUL]DGR
- - -
- -
Lubricación de
la cadena
Revisar el
caudal de
alimentación
de aceite.
- - - - -
Gatillo
interruptor
Inspección.
- - - - -
Botón de
desbloqueo
Inspección.
- - - - -
Tapa del
tanque de
aceite
Revisar que
esté bien
apretado.
- - - - -
Receptor de la
cadena
Inspección. - -
- - -
Tornillos y
tuercas
Inspección. - -
- - -

40 ESPAÑOL
RESOLUCIÓN DE PROBLEMAS
Antes de solicitar alguna reparación, primero realice una inspección por su cuenta. Si detecta algún problema que
QRHVWpH[SOLFDGRHQHOPDQXDOQRLQWHQWHGHVHQVDPEODUODKHUUDPLHQWD(QYH]GHHVWRVROLFLWHODUHSDUDFLyQDXQ
FHQWURGHVHUYLFLRDXWRUL]DGRGH0DNLWDXVDQGRVLHPSUHSLH]DVGHUHSXHVWR0DNLWD
Estado de la avería Causa Solución
La sierra eléctrica no arranca. El cartucho de batería no está instalado. Instale un cartucho de batería cargado.
3UREOHPDFRQODEDWHUtDEDMRYROWDMH
Recargue el cartucho de batería. Si la recarga no
UHVXOWDH¿FD]UHHPSODFHHOFDUWXFKRGHEDWHUtD
La cadena de la sierra no funciona. El freno de la cadena está activado. Libere el freno de la cadena.
(OPRWRUGHMDGHIXQFLRQDUDOSRFRWLHPSR
de uso.
(OQLYHOGHFDUJDGHODEDWHUtDHVEDMR
Recargue el cartucho de batería. Si la recarga no
UHVXOWDH¿FD]UHHPSODFHHOFDUWXFKRGHEDWHUtD
La cadena no tiene aceite. El tanque de aceite está vacío. Llene el tanque de aceite.
La ranura de la guía de aceite está sucia. Limpie la ranura.
/DVLHUUDHOpFWULFDQRDOFDQ]DHOQLYHO
máximo de RPM.
El cartucho de batería está instalado
incorrectamente.
Instale el cartucho de batería como se
describe en este manual.
La potencia de la batería está
disminuyendo.
Recargue el cartucho de batería. Si la recarga no
UHVXOWDH¿FD]UHHPSODFHHOFDUWXFKRGHEDWHUtD
El sistema de accionamiento no funciona
correctamente.
Solicite la reparación en el centro de
VHUYLFLRDXWRUL]DGRGHVXUHJLyQ
La cadena no se detiene aun cuando el
freno de la cadena ha sido activado:
¡Detenga la herramienta inmediatamente!
La banda del freno está desgastada. Solicite la reparación en el centro de
VHUYLFLRDXWRUL]DGRGHVXUHJLyQ
Vibración anormal:
¡Detenga la herramienta
inmediatamente!
La barra de guía o la cadena de la sierra
están sueltas.
$MXVWHODEDUUDGHJXtDRODWHQVLyQGHOD
cadena de la sierra.
Avería de la herramienta. Solicite la reparación en el centro de
VHUYLFLRDXWRUL]DGRGHVXUHJLyQ
La cadena de la sierra no puede instalarse. La combinación de cadena de la sierra y la
SLH]DGHQWDGDQRHVFRUUHFWD
Utilice la combinación correcta de cadena
GHODVLHUUD\ODSLH]DGHQWDGDFRQVXOWHOD
VHFFLyQGHHVSHFL¿FDFLRQHV
ACCESORIOS OPCIONALES
PRECAUCIÓN:
Estos accesorios o aditamentos
están recomendados para utilizarse con su herra-
PLHQWD0DNLWDHVSHFL¿FDGDHQHVWHPDQXDO El empleo
de cualquier otro accesorio o aditamento puede conllevar
el riesgo de lesiones personales. Utilice los accesorios o
DGLWDPHQWRVVRODPHQWHSDUDVX¿QHVWDEOHFLGR
Si necesita cualquier ayuda para más detalles en
relación con estos accesorios, pregunte a su centro de
servicio local Makita.
• Cadena de la sierra
• Barra de guía
• Cubierta de la barra de guía
• Lima
• Bolsa de herramientas
• Batería y cargador originales de Makita
ADVERTENCIA:
Si usted adquiere una barra
de guía de una longitud distinta a la de la barra de guía
estándar, también adquiera junto con ésta una cubierta
de la barra de guía adecuada. Ésta debe quedarle y cubrir
completamente a la barra de guía en la sierra eléctrica.
NOTA: Algunos de los artículos en la lista pueden
incluirse en el paquete de la herramienta como acce-
VRULRVHVWiQGDUeVWRVSXHGHQYDULDUGHSDtVDSDtV
GARANTÍA LIMITADA DE MAKITA
Ésta Garantía no aplica para México
&RQVXOWHODKRMDGHODJDUDQWtDDQH[DSDUDYHUORV
términos más vigentes de la garantía aplicable a este
SURGXFWR(QFDVRGHQRGLVSRQHUGHHVWDKRMDGH
garantía anexa, consulte los detalles sobre la garantía
descritos en el sitio web de su país respectivo indicado
a continuación.
Estados Unidos de América: www.makitatools.com
Canadá: www.makita.ca
Otros países: www.makita.com

41

42

43

Some dust created by power sanding, sawing, grinding, drilling, and other
construction activities contains chemicals known to the State of California
to cause cancer, birth defects or other reproductive harm. Some examples
of these chemicals are:
• lead from lead-based paints,
• crystalline silica from bricks and cement and other masonry products, and
• arsenic and chromium from chemically-treated lumber.
Your risk from these exposures varies, depending on how often you do this
type of work. To reduce your exposure to these chemicals: work in a well
ventilated area, and work with approved safety equipment, such as those
dust masks that are specially designed to filter out microscopic particles.
WARNING
< USA only >
ADVERTENCIA
Algunos polvos creados por el lijado, aserrado, esmerilado, taladrado y
otras actividades de la construcción contienen sustancias químicas
reconocidas por el Estado de California como causantes de cáncer, defectos
de nacimiento y otros peligros de reproducción. Algunos ejemplos de estos
productos químicos son:
• plomo de pinturas a base de plomo,
• sílice cristalino de ladrillos y cemento y otros productos de albañilería, y
• arsénico y cromo de maderas tratadas químicamente.
El riesgo al que se expone varía, dependiendo de la frecuencia con la que
realice este tipo de trabajo. Para reducir la exposición a estos productos
químicos: trabaje en un área bien ventilada y póngase el equipo de seguridad
indicado, tal como las máscaras contra polvo que están especialmente
diseñadas para filtrar partículas microscópicas.
< Sólo en los Estados Unidos >
Makita Corporation
3-11-8, Sumiyoshi-cho,
Anjo, Aichi 446-8502 Japan
www.makita.com
885980B946
XCU11-1
EN, ESMX
20220511


