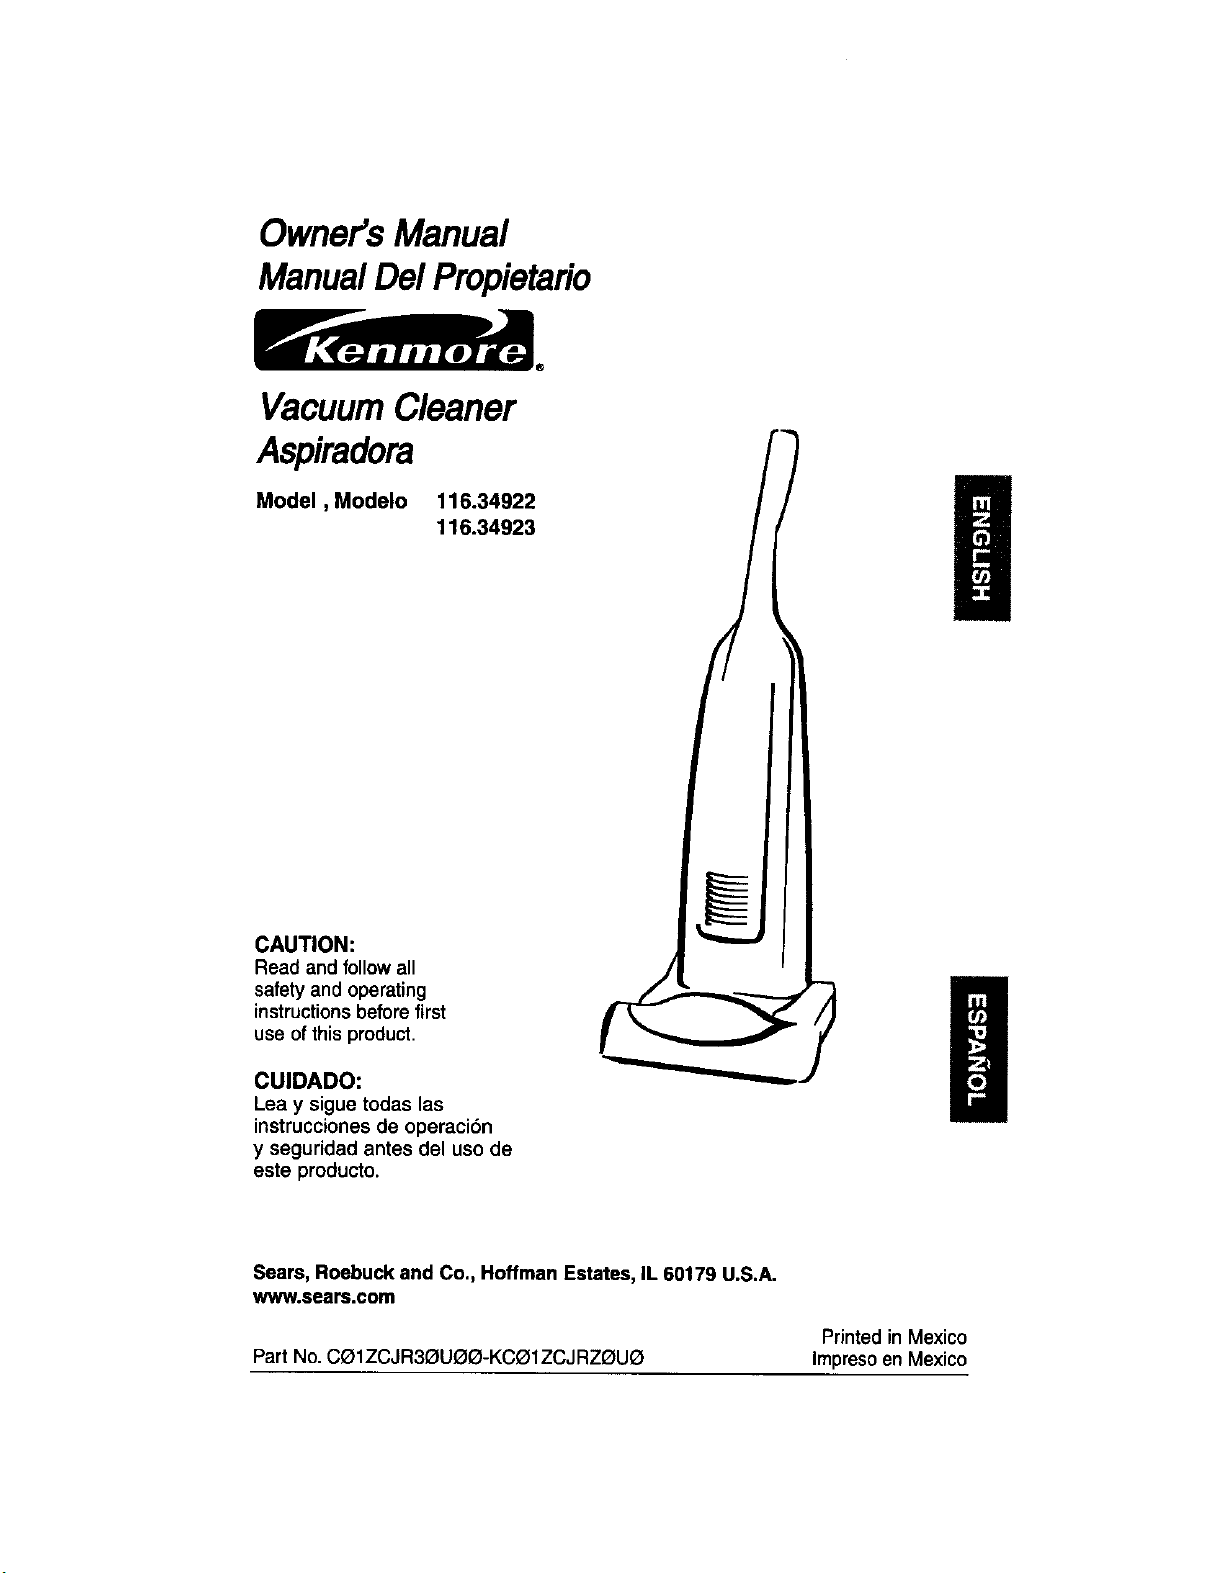
Owner'sManual
ManualDelPropietario
VacuumCleaner
Aspiradora
Model, Modelo 116.34922
116.34923
CAUTION:
Read and followall
safety and operating
instructionsbeforefirst
use ofthis product,
CUIDADO:
Lea y sigue todas las
instruceiones de operaci6n
y seguridad antes del uso de
este producto.
Sears, Roebuck and Co., Hoffman Estates, IL 60179 U.S.A.
www.sears.com
Printed in Mexico
Part No. CelZCJR3G_U(_Q-KCO1ZCJ RZI_UQ Impresoen Mexico
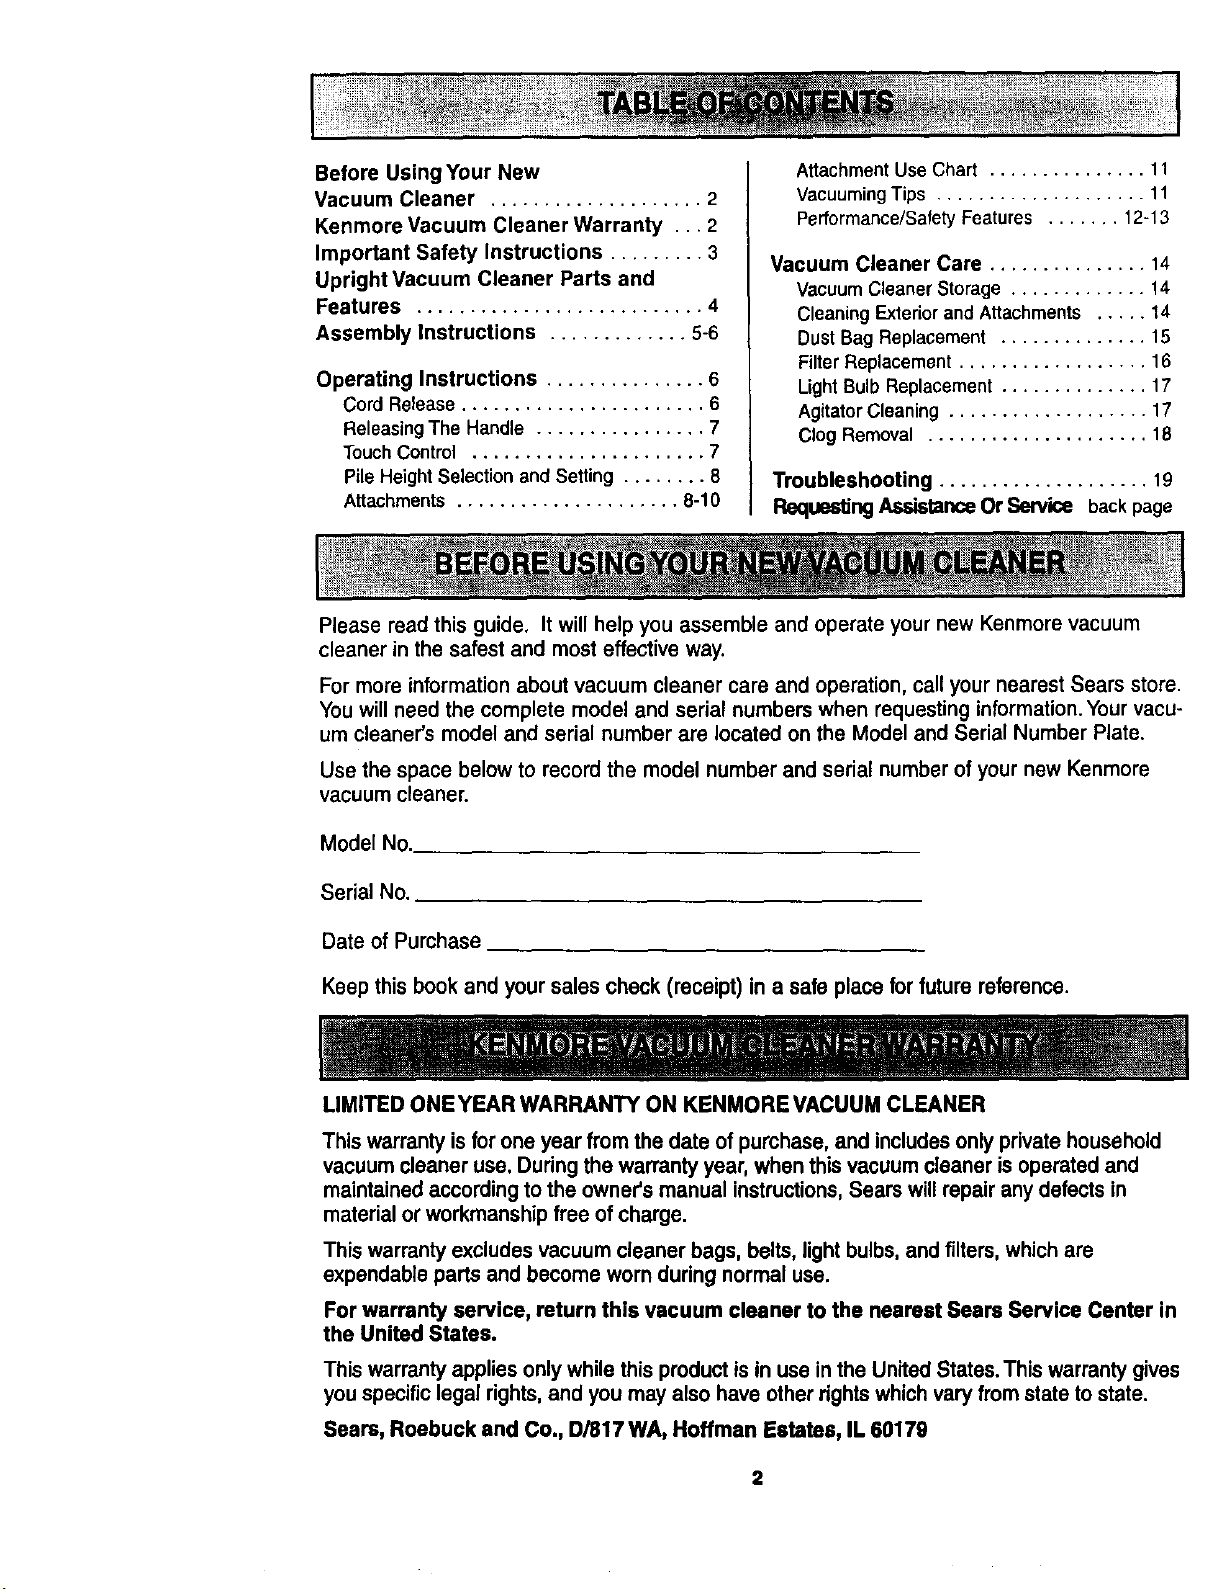
Before Using Your New
Vacuum Cleaner .................... 2
Kenmore Vacuum Cleaner Warranty ... 2
Important Safety Instructions ......... 3
Upright Vacuum Cleaner Parts and
Features ........................... 4
Assembly Instructions ............. 5-6
Operating Instructions ............... 6
Cord Release ....................... 6
ReleasingThe Handle ................ 7
TouchContml ...................... 7
Pile HeightSelectionand Setting ........ 8
Attachments..................... 8-10
AttachmentUse Chart ............... 11
Vacuuming Tips .................... 11
Performance/Safety Features ....... 12-13
Vacuum Cleaner Care ............... 14
Vacuum Cleaner Storage ............. 14
Cleaning Exteriorand Attachments ..... 14
DustBag Replacement .............. 15
FilterReplacement .................. 16
LightBulb Replacement .............. 17
AgitatorCleaning ................... 17
Clog Removal ..................... 18
Troubleshooting .................... 1g
Requesting Assistance Or Service back page
Please read this guide. It will help you assemble and operate your new Kenmore vacuum
cleaner in the safest and most effective way.
For more information about vacuum cleaner care and operation, call your nearest Sears store.
You will need the complete model and serial numbers when requesting information. Your vacu-
um cleaner's model and serial number are located on the Model and Serial Number Plate.
Use the space below to record the model number and serial number of your new Kenmore
vacuum cleaner.
Model No.
Serial No.
Date of Purchase
Keep this bookand yoursales check(receipt) ina safe place for future reference.
LIMITED ONE YEAR WARRANTY ON KENMORE VACUUM CLEANER
This warrantyisforone year from the date of purchase, and includesonlyprivate household
vacuumcleaneruse. Duringthe warrantyyear,whenthisvacuumcleaneris operatedand
maintainedaccordingtothe owner'smanual instructions,Searswill repairanydefectsin
materialor workmanshipfree of charge.
Thiswarrantyexcludesvacuumcleaner bags, belts,lightbulbs,and filters,whichare
expendablepartsand become worn duringnormaluse.
For warranty service, return this vacuum cleaner to the nearest Sears Service Center in
the United States.
This warrantyappliesonlywhile thisproductisin use inthe UnitedStates.This warrantygives
youspecificlegalrights,and you may alsohave otherrightswhichvaryfrom stateto state.
Sears, Roebuck and Co., D/817 WA, Hoffman Estates, IL 60179
2
rV.,L WARNING:
Your safety is important to us.To reduce the risk
of fire, electrical shock, injury to persons or
damage when using your vacuum cleaner, follow
basic safety precautions including the following:
Read all instructions in this manual before
assembling or using your vacuum cleaner.
Use your vacuum cleaner only as
described in this manual. Use only with
Sears recommended attachments.
Disconnect electrical supply before per-
rming maintenance to the brush area.
Failure to oo so couia result in electrical
shock or the brush suddenly starting.
Do not leave vacuum cleaner when
plugged in. Unplug from outlet when not in
use and before performing maintenance.
To reduce the risk of electrical shock - Do
not use outdoors or on wet surfaces.
Do not allow to be used as a toy. Close
attention is necessary when used by or
near children.
Do not use with a damaged cord or plug.
If vacuum cteaner is not working as =.t
should, has b,een dropped damageo, Jan
outdoors ororo.ppeo inwater returnitto a
_ears _erv ce _enter.
Do not pull or carry by cord, use cord as
a handle.close a oooroncord,orpullcoro
aroundsharpedgesor corners. Do notrun
vacuum cleaner over cord. Keep core
awayfrom heated surfaces.
Do not unplug by pulling on cord. To
unplug,graspthe plug, notthe cord.
Do not handlep_ugor vacuumcleanerwith
wethands.
Do not put any objects into openings.
Do not use with any opening blocked;
keep free of dust, lint, hair, and anything
that may reduce air flow.
Keep hair, loose clothing, fingers, and all
parts of body away from openings and
moving parts.
Turn off all controls before unplugging.
Do not rest vacuum cleaner on steps.
Do not put on chairs, tables, etc. Keep on
floor.
B
Do not use vacuum cleaner to pick up
flammable or combustible liquids (gaso-B
line, cleaning fluid, perfumes, etc.), or use
U
in areas where they may be present. The
fumes from these substances can create a
fire hazard or explosion.
Do not pick up anything that is burning or
smoking, such as cigarettes, matches, or
hot ashes.
Do not use vacuum cleaner without dust
bag and/or filters in place.
Always change the dust bag after vacu-
uming carpet cleaners or freshenar, pow-
ders, and fine dust. These products clog
the bag, reduce airflow and can cause the
bag to burst. Failure to change the bag
promptly could cause permanent damage
to the cleaner.
Do not usethe vacuumcleaner to pickup
sharphard objects,smalltoys,pins, paper
clips, etc. They maydamagethecleaneror
dustbag.
Do not operate vacuum cleaner without the
belt access door properly installed(if applica-
ble).
Always turn off and unplug the vacuum
cleaner before connectinq or oisconnect-
ing either hose Handi-ma'te,Jr.(if applica-
be) or Power-mateJr.nozzle.
You are responsible for making sure that
your vacuum cleaner is not used by any-
one unable to operate it properly.
SAVE THESE INSTRUCTIONS
Proper assembly and safe use of your vacuum cleaner are your responsibilities. Your
vacuum cleaner is intended for Household use. Read this Owne¢s Manual carefully for
important use and safety information. This guide contains safety statements under warn-
ing and caution symbols.
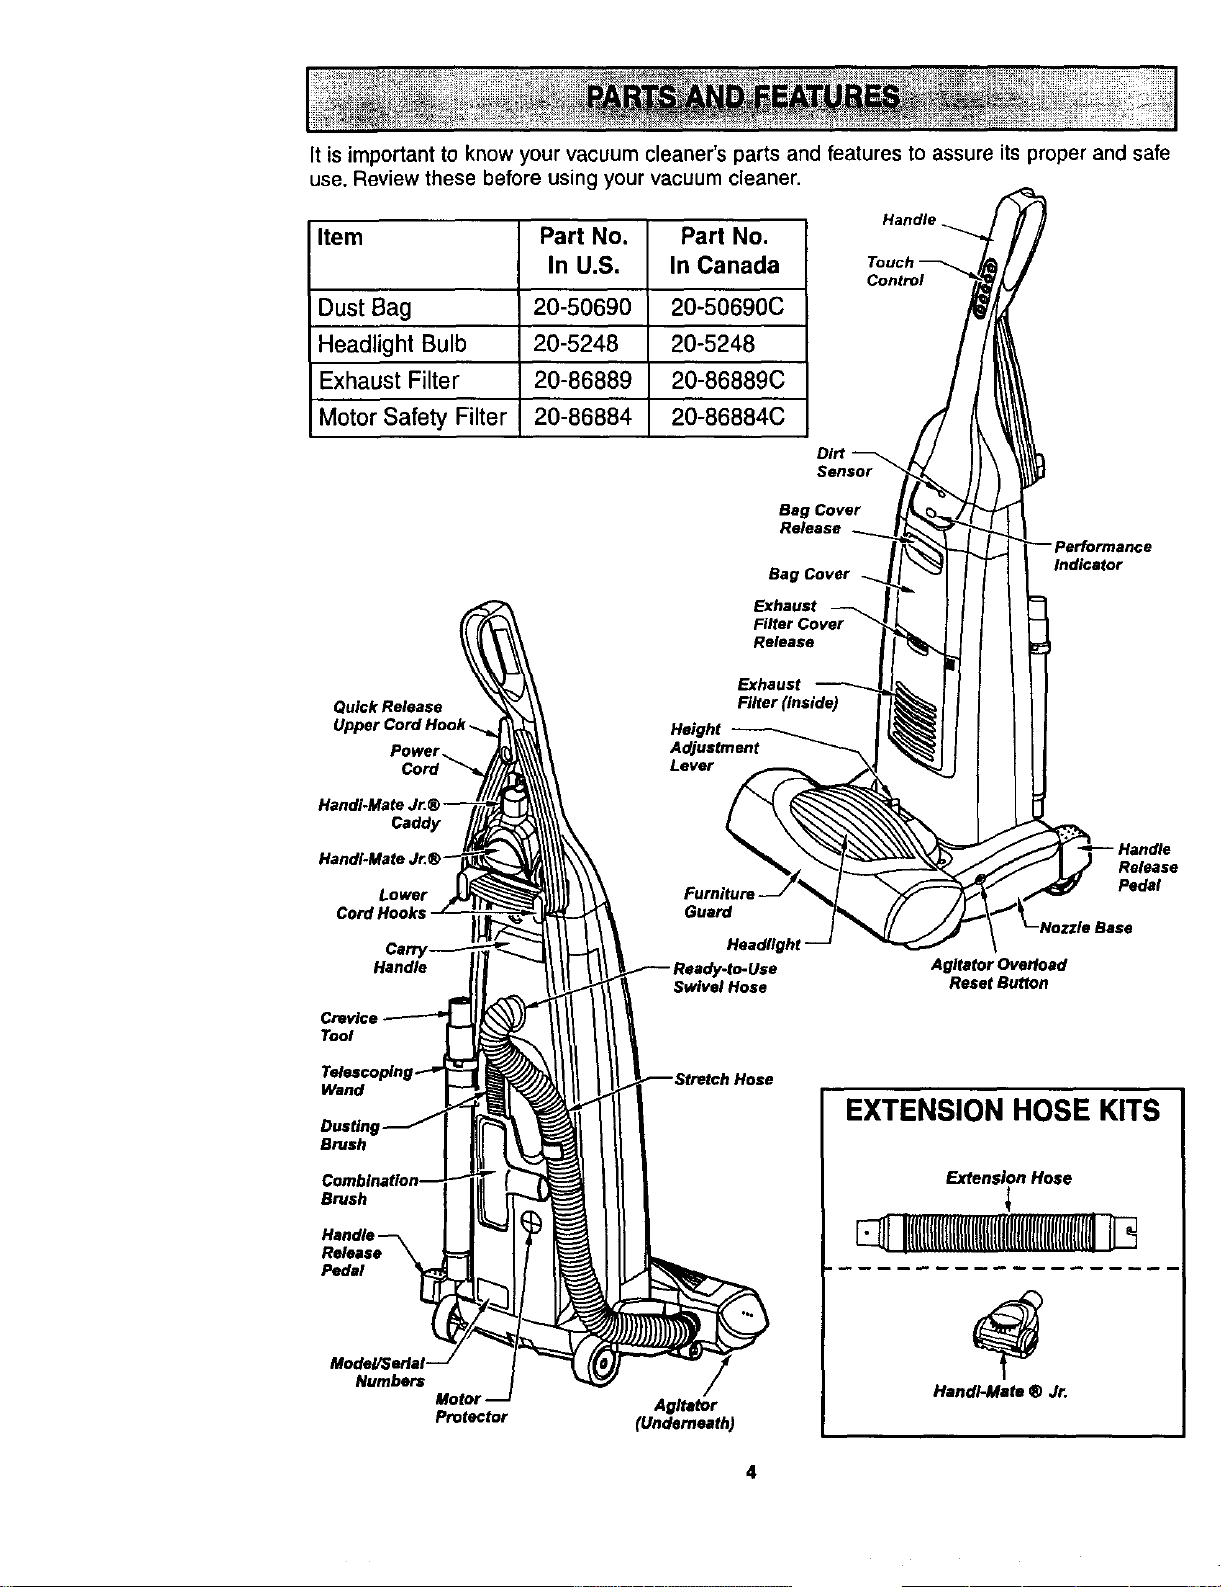
It is important to know your vacuum cleaner's parts and features to assure its proper and safe
use. Review these before using your vacuum cleaner.
Item Part No. Part No.
In U.S. In Canada
Dust Bag 20-50690 20-50690C
Headlight Bulb 20-5248 20-5248
Exhaust Filter 20-86889 20-86889C
Motor Safety Filter 20-86884 20-86884C
Handle.
Control
DIN
Sensor
Bag Cover
Release
Bag Cover
Exhaust
Filer Cover
Re_ase
Quick Release
Upper
Power,
Height
Lever
Exhaust
Indicator
Caddy
Lower
CordHooks
Release
Pedal
Handle
Swivel Hose
Agitator Overload
Reset Button
Tool
Wand
Brush
Brush
Release
Pedal
Model/$erlel
Numbers
Motol
Protector
Agitator
(Underneath)
EXTENSION HOSE KITS
Extension Hose
1
Handl-Mato ® Jr.
4
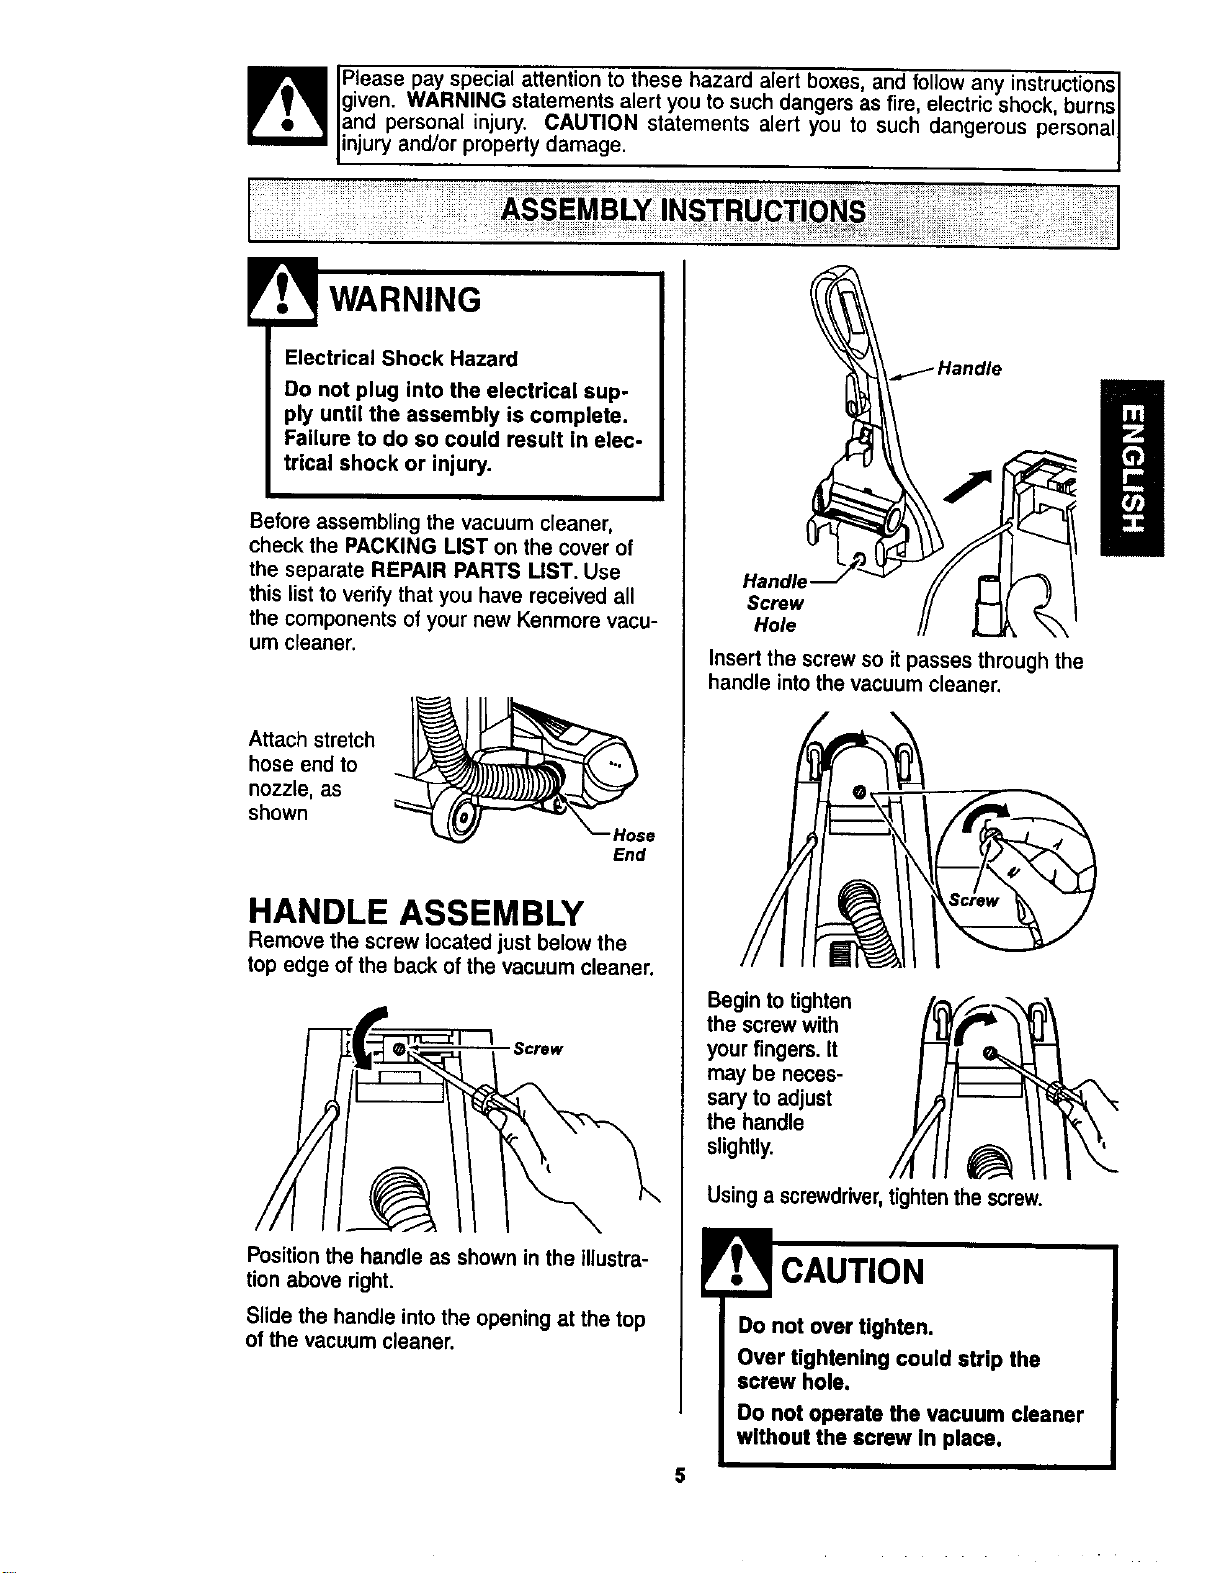
Please pay special attention to these hazard alert boxes, and follow any instruct onsl
'_ given. WARNING statements alert you to such dangers as fire electric shock, burns I
and personal injury. CAUTION statements alert you to such dangerous personal
injury and/or property damage.
WARNING
Electrical Shock Hazard
Do not plug into the electrical sup-
ply until the assembly is complete.
Failure to do so could result in elec-
trical shock or injury.
Before assembling the vacuum cleaner,
check the PACKING LIST on the cover of
the separate REPAIR PARTS UST. Use
this list to verify that you have received all
the components of your new Kenmore vacu-
um cleaner.
Attach stretch
hose end to
nozzle, as
shown
Hose
End
HANDLE ASSEMBLY
Remove the screw located just below the
top edge of the back of the vacuum cleaner.
Screw
Position the handle as shown in the illustra-
tion above right.
Slide the handle into the opening at the top
of the vacuum cleaner.
Handle
Screw
Hole
Insert the screw so it passes through the
handle into the vacuum cleaner.
Begin totighten
the screwwith
yourfingers. It
may be neces-
sary to adjust
the handle
slightly.
Usinga screwdriver,tightenthescrew.
Do not over tighten.
Over tightening could strip the
screw hole.
Do not operate the vacuum cleaner
without the screw In place.
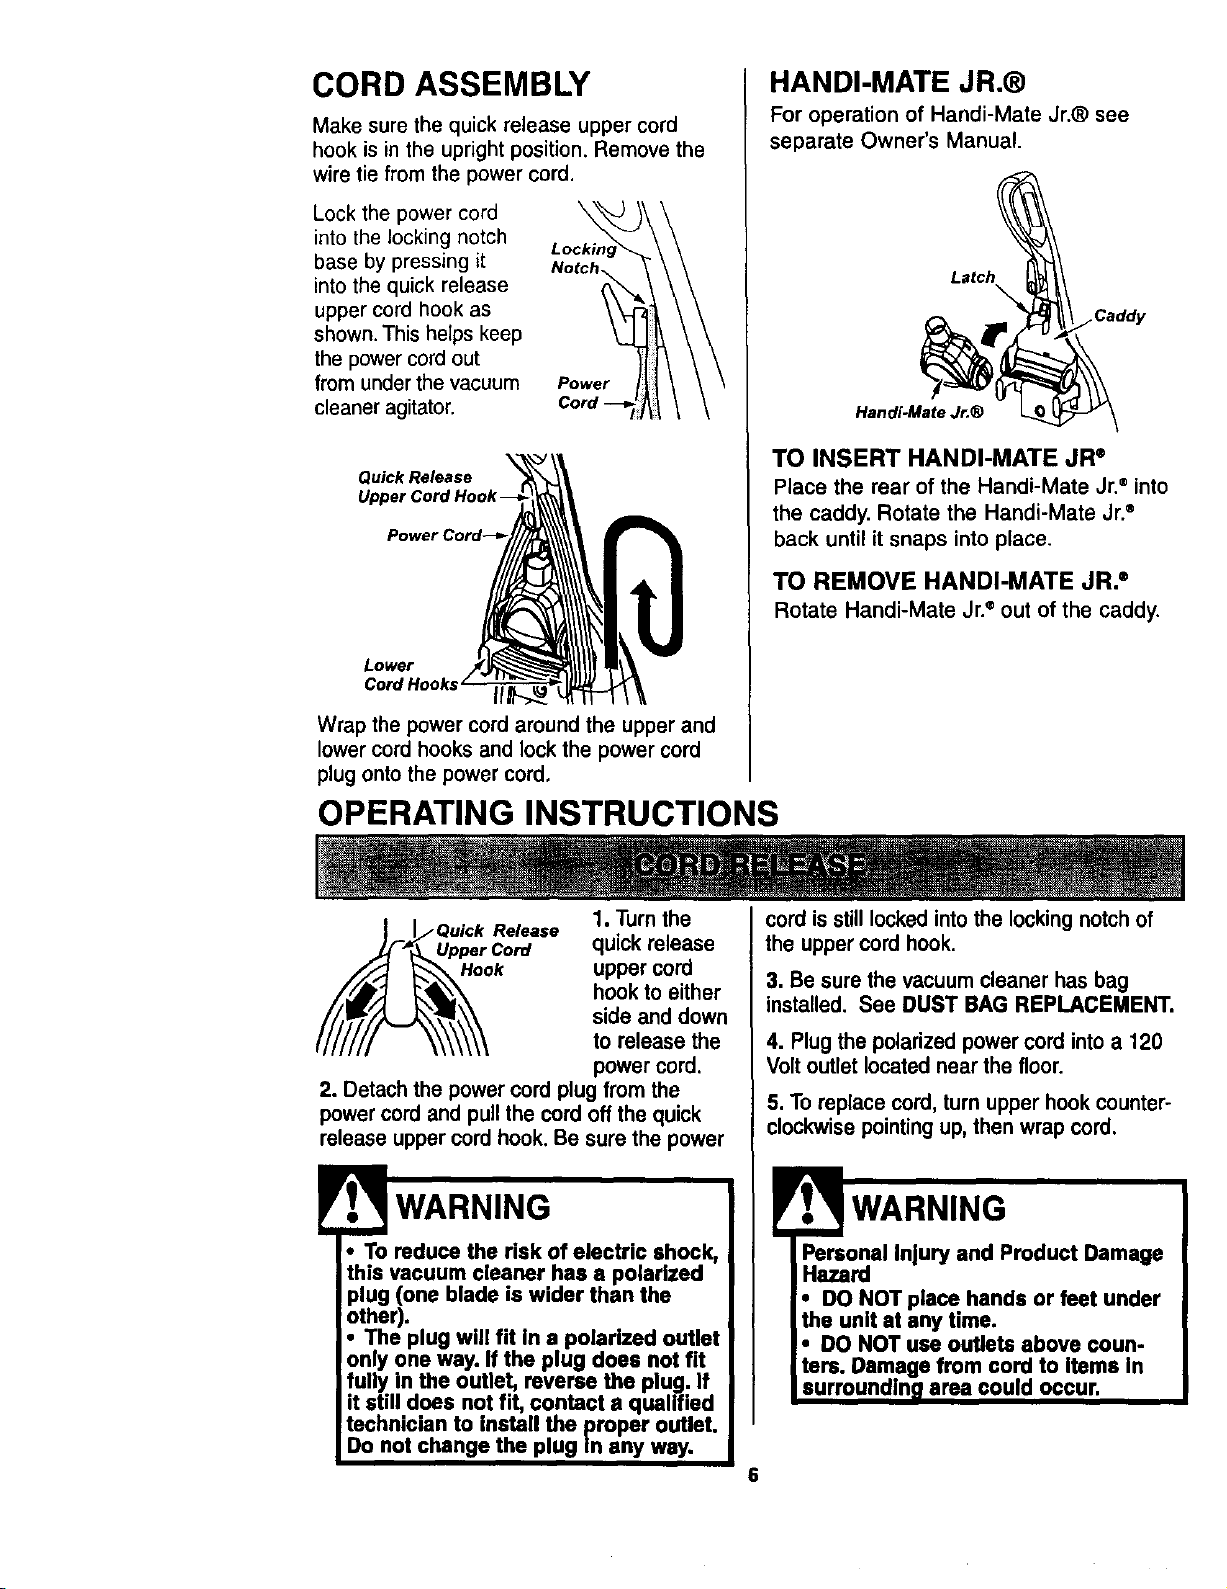
CORD ASSEMBLY
Make sure the quick release upper cord
hook is in the upright position. Remove the
wire tie from the power cord.
Lock the power cord
into the locking notch
base by pressing it
into the quick release
upper cord hook as
shown. This helps keep
the power cord out
from under the vacuum
cleaner agitator.
Power
Quick Release
Lower
Cord Hooks II
Wrap the power cord around the upper and
lower cord hooks and lock the power cord
plug onto the power cord,
OPERATING INSTRUCTIONS
HANDI-MATE JR.®
For operation of Handi-Mate Jr.® see
separate Owner's Manual.
Latch
•Caddy
Handi.Mate Jr,®
TO INSERT HANDI-MATE JR ®
Place the rear of the Handi-Mate Jr.®into
the caddy. Rotate the Handi-Mate Jr.®
back until it snaps into place.
TO REMOVE HANDI-MATE JR. ®
Rotate Handi-Mate Jr.e out of the caddy.
3. Be sure the vacuumcleaner has bag
installed. See DUST BAG REPLACEMENT.
4. Plug the polarizedpower cord intoa 120
Voltoutlet locatednear the floor.
5. To replace cord,turn upper hook counter°
clockwisepointing up,then wrapcord.
Personal Injury and Product Damage
Hazard
• DO NOT place hands or feet under
the unit at any time.
• DO NOT use outlets above coun-
tsrs. Damage from cord to Items In
surroundln_ area could occur.
6
• To reduce the risk of electric shock,
this vacuum cleaner has a polarized
plug (one blade is wider than the
other),
• The plug will fit in a polarized outlet
only one way. If the plug does not fit
fully in the outlet, reverse the plug. If
it still does not fit, contact a qualified
technician to install the proper outlet.
Do not change the plug In any way.
1. Turnthe
Release quickrelease
Hook uppercord
hookto either
side and down
to release the
powercord.
2. Detachthe powercord plugfrom the
powercordand pullthe cord offthe quick
releaseuppercord hook.Be surethe power
cordisstill lockedintothe locking notchof
the uppercord hook.
ii¸
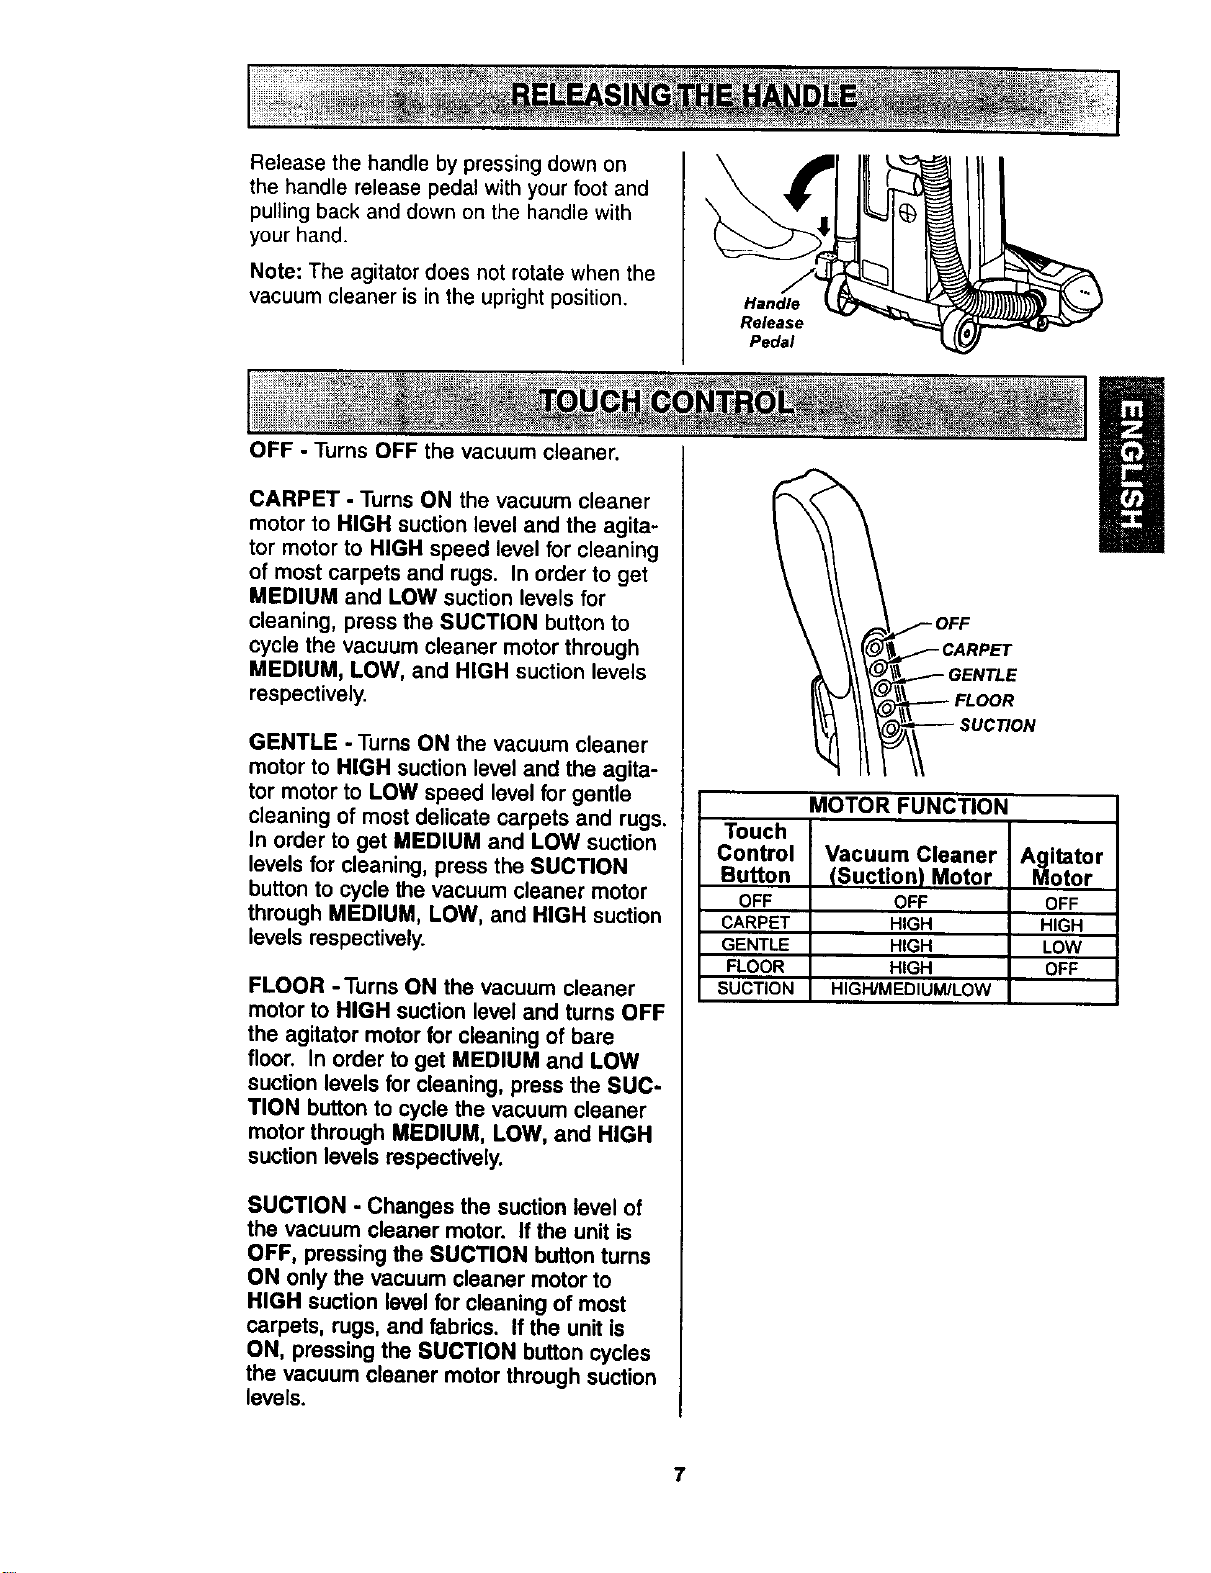
Release the handle by pressing down on
the handle release pedal with your foot and
pulling back and down on the handle with
your hand.
Note" The agitator does not rotate when the
vacuum cleaner is in the upright position.
OFF - Turns OFF the vacuum cleaner.
CARPET - Turns ON the vacuum cleaner
motor to HIGH suction level and the agita-
tor motor to HIGH speed level for cleaning
of most carpets and rugs. In order to get
MEDIUM and LOW suction levels for
cleaning, press the SUCTION button to
cycle the vacuum cleaner motor through
MEDIUM, LOW, and HIGH suction levels
respectively.
GENTLE - Turns ON the vacuum cleaner
motor to HIGH suction level and the agita-
tor motor to LOW speed level for gentle
cleaning of most delicate carpets and rugs,
In order to get MEDIUM and LOW suction
levels for cleaning, press the SUCTION
button to cycle the vacuum cleaner motor
through MEDIUM, LOW, and HIGH suction
levels respectively.
FLOOR -Turns ON the vacuum cleaner
motor to HIGH suction leveland turns OFF
the agitator motor for cleaning of bare
floor. In order to get MEDIUM and LOW
suction levels for cleaning, press the SUC-
TION button to cycle the vacuum cleaner
motor through MEDIUM, LOW, and HIGH
suction levels respectively.
SUCTION - Changes the suctionlevel of
the vacuum cleaner motor. If the unit is
OFF, pressing the SUCTION button turns
ON only the vacuum cleaner motor to
HIGH suction level for cleaning of most
carpets, rugs, and fabrics. If the unit is
ON, pressing the SUCTION button cycles
the vacuum cleaner motor through suction
levels.
Handle
Release
Pedal
__.___OFF
CARPET
I _\ \_.-_'_- GENTLE
II l LOOR
MOTOR FUNCTION
Touch
Control Vacuum Cleaner Agitator
Button (Suction) Motor Motor
OFF OFF OFF
CARPET HIGH HIGH
GENTLE HIGH LOW
FLOOR HIGH OFF
SUCTION HtGH/MEDtUM/LOW
7
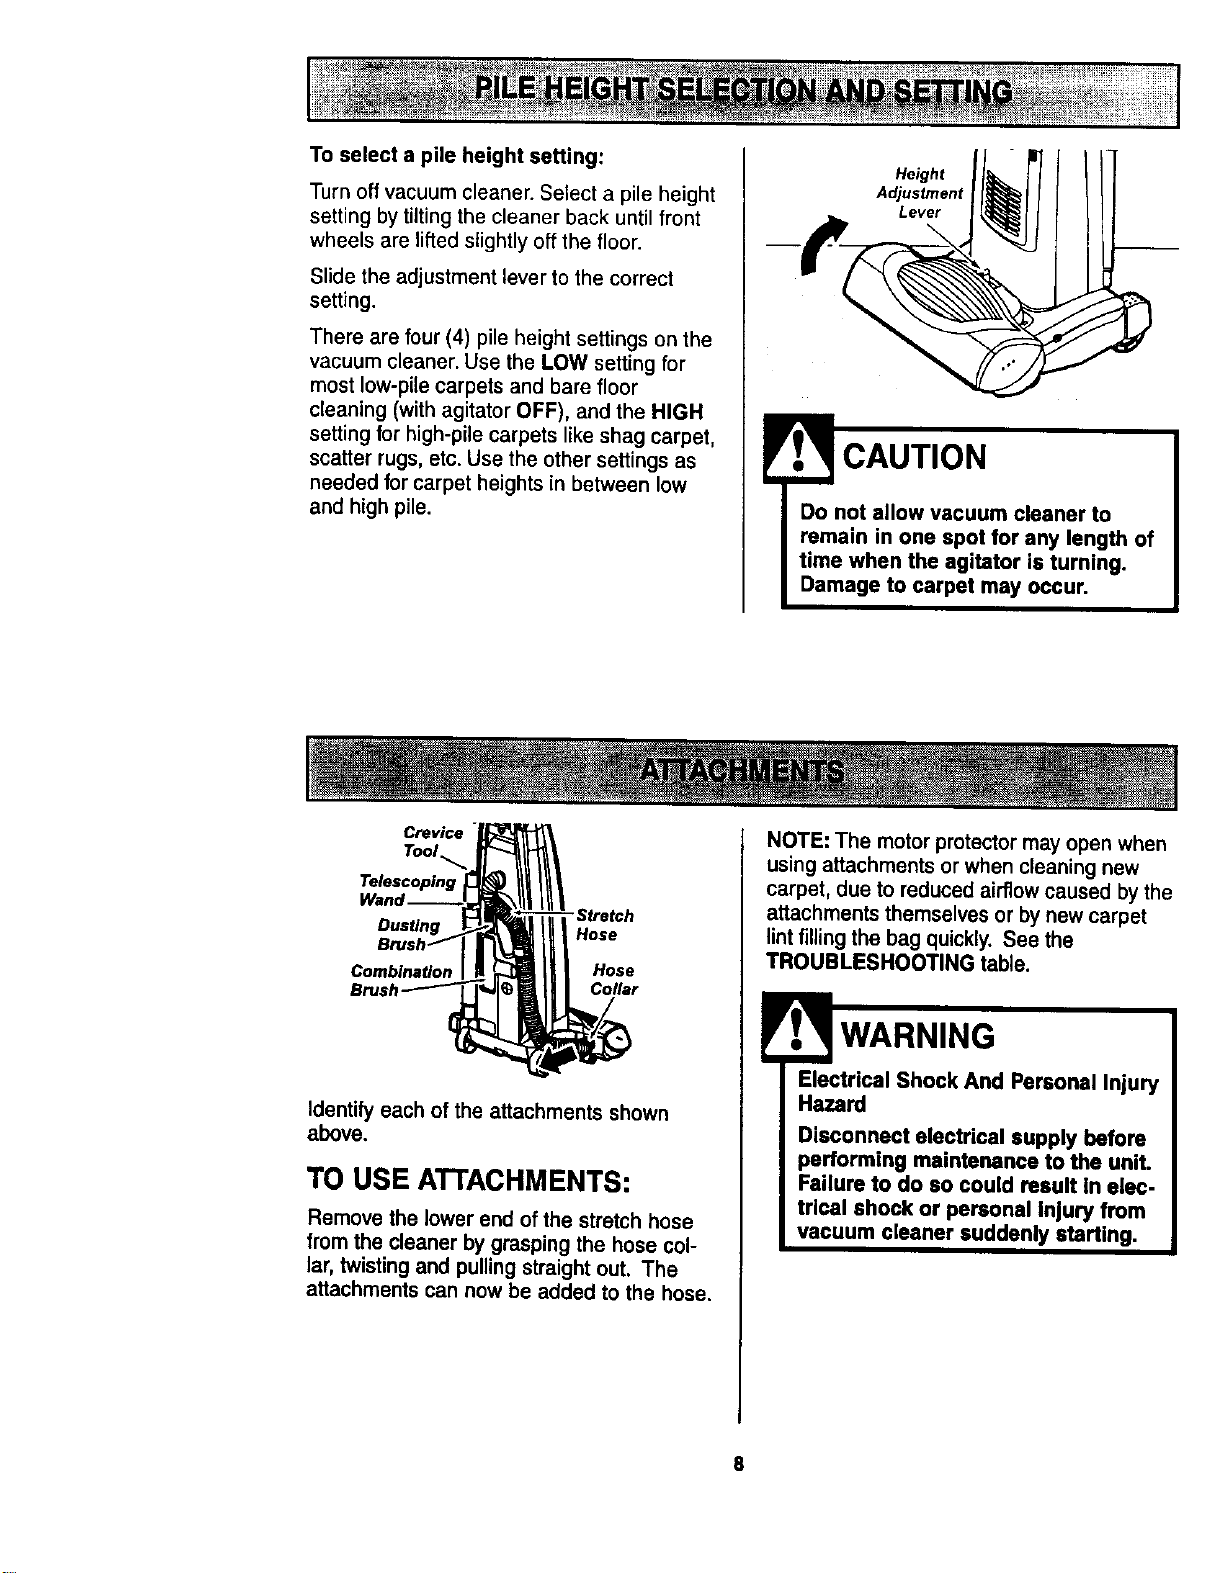
Toselectapile heightsetting:
Turn off vacuum cleaner. Select a pile height
setting by tilting the cleaner back until front
wheels are lifted slightly off the floor.
Slide the adjustment lever to the correct
setting.
There are four (4) pile height settings on the
vacuum cleaner. Use the LOW setting for
most low-pile carpets and bare floor
cleaning (with agitator OFF), and the HIGH
setting for high-pile carpets like shag carpet,
scatter rugs, etc. Use the other settings as
needed for carpet heights in between low
and high pile.
Height
Adjustment
Lever
CAUTION
Do not allow vacuum cleaner to
remain in one spot for any length of
time when the agitator is turning.
Damage to carpet may occur.
Crevice
Tool
Telescoping
Dusting
Combination
"Stretch
Hose
Hose
Collar
Identily each ofthe attachmentsshown
above.
TO USE ATTACHMENTS:
Remove the lower end of the stretch hose
from the cleaner by grasping the hose col-
lar, twisting and pulling straight out. The
attachments can now be added to the hose.
NOTE: The motor protector may open when
using attachments or when cleaning new
carpet, due to redLv;ed airflow caused by the
attachments themselves or by new carpet
lint filling the bag quickly, See the
TROUBLESHOOTING table.
Electrical Shock And Personal Injury
Hazard
Disconnect electrical supply before
performing maintenance to the unit.
Failure to do so could result in elec-
tric,al shock or personal Injury from
vacuum cleaner suddenly starting.
TELESCOPIC WAND WITH
SUCTION CONTROL SLIDE
Hose
Clip
1. Remove the
hose from the
hose clip by
pulling straight
out.
2. Remove the telescopic wand from its
storage position.
3. Remove
the crevice
tool from its
storage posi-
tion in the
wand. Turn
the locking
ring to the
UNLOCK
position.
--'Crevice
Tool
Telescopic
Wand
4. Extend the wand to its full length. Turn
the locking ring to the LOCK position.
Attach the extension wand onto the open
end of the hose.
Lower_ Suction
Wand _____ Slide
Align the tabs on the extension wand with
the "J" slots in the hose (as illustrated above
right). Push the wand into the hose and
twist to the right to lock.
To achieve maximum reach with
the attachments, add the
crevice tool to the end of
Hose
the wand by inserting and
twisting slightly.
Suction
Control
Wand_
Crevice
Tool
The dusting brush or the combination
brush may be attached directly to the
wand or placed on the end of the crevice
tool.
Dustlng Brush
(Some Models)
Combination
Brush (Some
Models)
Crevice Tool
Wand
TO OPERATE SUCTION
CONTROL SLIDE
Telescopic Wand
When using attachments for cleaning
draperies, small rugs with low pile and other
delicate items, twist the suction control slide
to the open position. This slide is located on
the telescopic wand, close to the hose.
This will reduce suction for ease of cleaning.
Note: Return
suction control
slide to the closed
position for
normal cleaning.
Sutton
Control
Sflde
9
CAUTION
When using attachments, be careful
not to overextend the stretch hose
when reaching.Trying to reach
beyond the hose stretch capability
could cause the vacuum cleaner to
tip over.
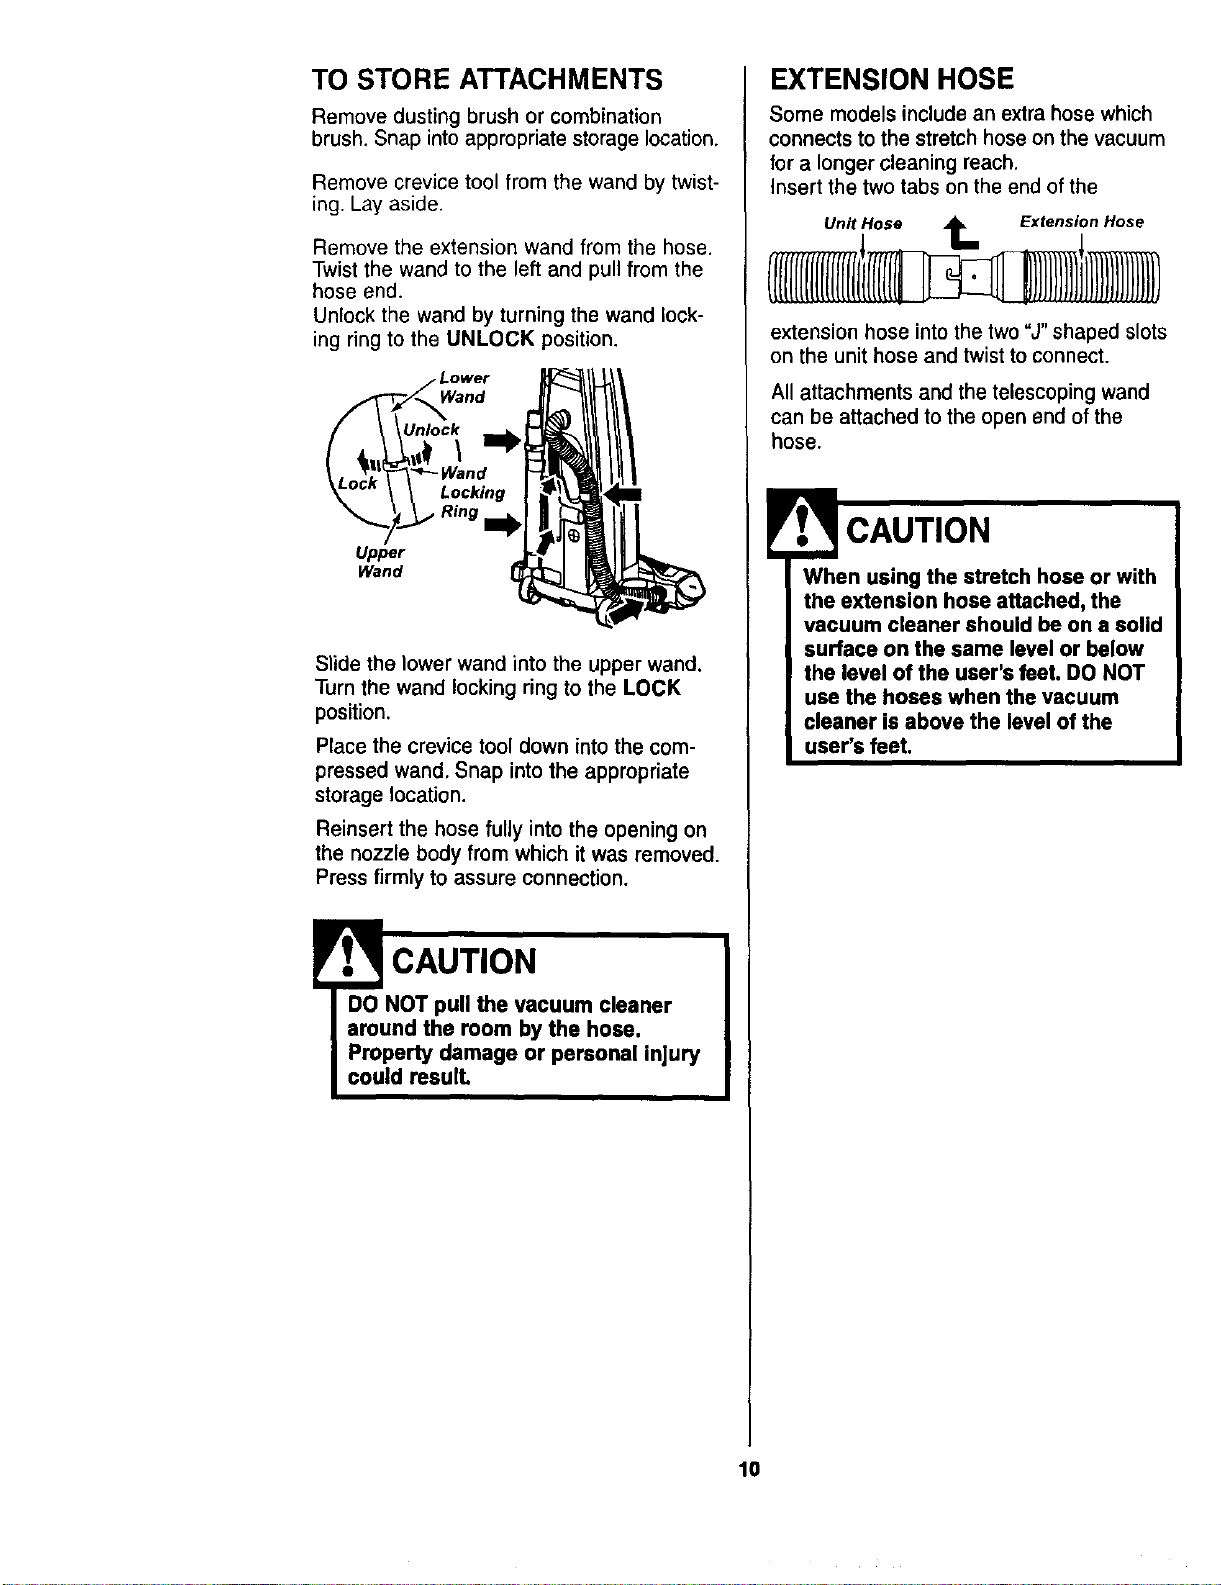
TO STORE ATTACHMENTS
Remove dusting brush or combination
brush. Snap into appropriate storage location.
Remove crevice tool from the wand by twist-
ing. Lay aside.
Remove the extension wand from the hose.
Twist the wand to the left and pull from the
hose end.
Unlock the wand by turning the wand lock-
ing ring to the UNLOCK position,
Unlock
Locking
Upper
Wand
Slide the lower wand into the upper wand.
Turn the wand locking ring to the LOCK
position.
Place the crevice tool down into the com-
pressed wand. Snap into the appropriate
storage location.
Reinsert the hose fully into the opening on
the nozzle body from which it was removed.
Press firmly to assure connection.
!
CAUTION
DO NOT pull the vacuum cleaner
around the room by the hose.
Property damage or personal injury
could reaulL
EXTENSION HOSE
Some models include an extra hose which
connects to the stretch hose on the vacuum
for a longer cleaning reach.
Insert the two tabs on the end of the
Unit Hose _ Extension Hose
extension hose into the two "J" shaped slots
on the unit hose and twist to connect.
All attachments and the telescoping wand
can be attached to the open end of the
hose.
When using the stretch hose or with
the extension hose attached, the
vacuum cleaner should be on a solid
surface on the same level or below
the level of the user's feet. DO NOT
use the hoses when the vacuum
cleaner is above the level of the
user's feet.
10
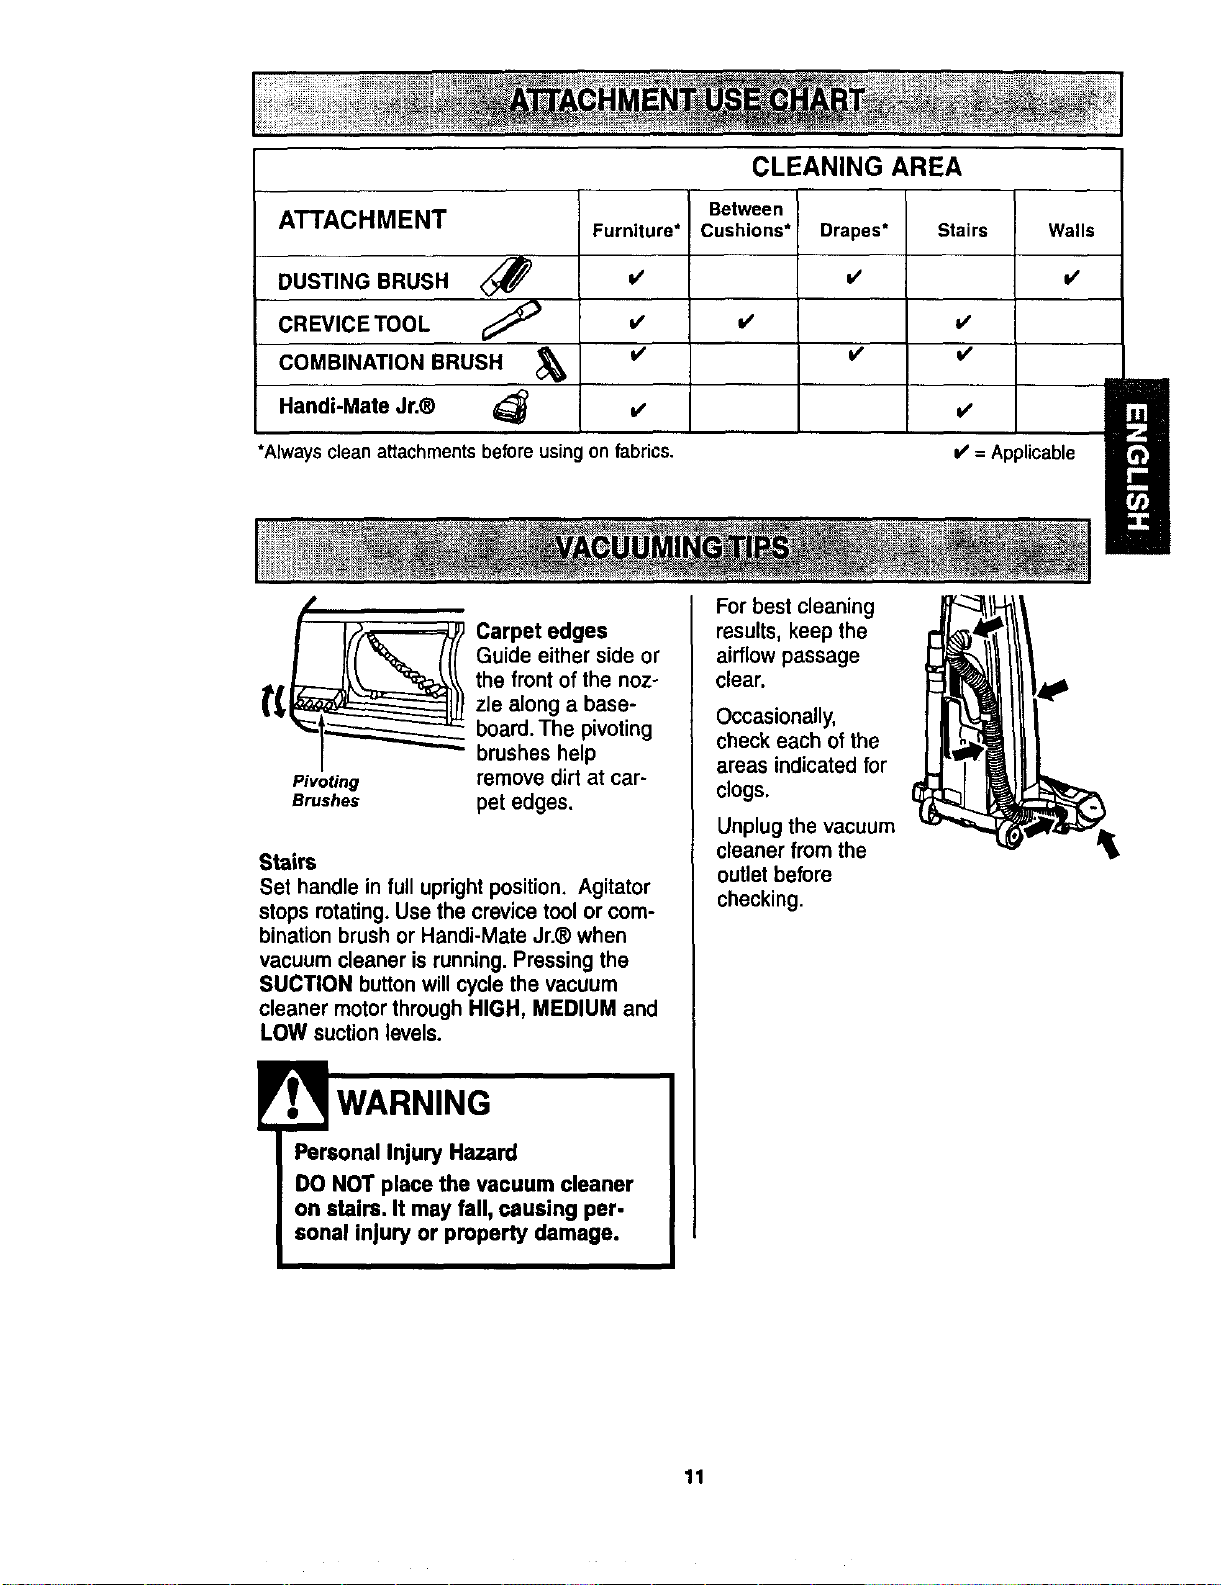
ATTACHMENT
DUSTING BRUSH _)
CREVICE TOOL
COMBINATION BRUSH
Handi-Mate Jr.®
Furniture*
=/
V'
I/
CLEANING AREA
Between
Cushions*
Drapes*
i/
v'
i/
*Always clean attachmentsbefore usingon fabrics.
Stairs Walls
l/
V'
I/
V'
= Applicable
Pivoting
Brushes
Carpet edges
Guide either side or
the front of the noz-
zle along a base-
board. The pivoting
brushes help
remove dirt at car-
pet edges.
Stairs
Set handle in full upright position. Agitator
stops rotating. Use the crevice tool or com-
bination brush or Handi-Mate Jr.® when
vacuum cleaner is running. Pressing the
SUCTION button will cycle the vacuum
cleaner motor through HIGH, MEDIUM and
LOW suction levels.
WARNING
Personal Injury Hazard
DO NOT place the vacuum cleaner
on stairs, It may fall, causing per-
sonal injury or property damage.
For best cleaning
results, keep the
airflow passage
clear.
Occasionally,
check each of the
areas indicated for
clogs.
Unplug the vacuum
cleaner from the
outlet before
checking.
11
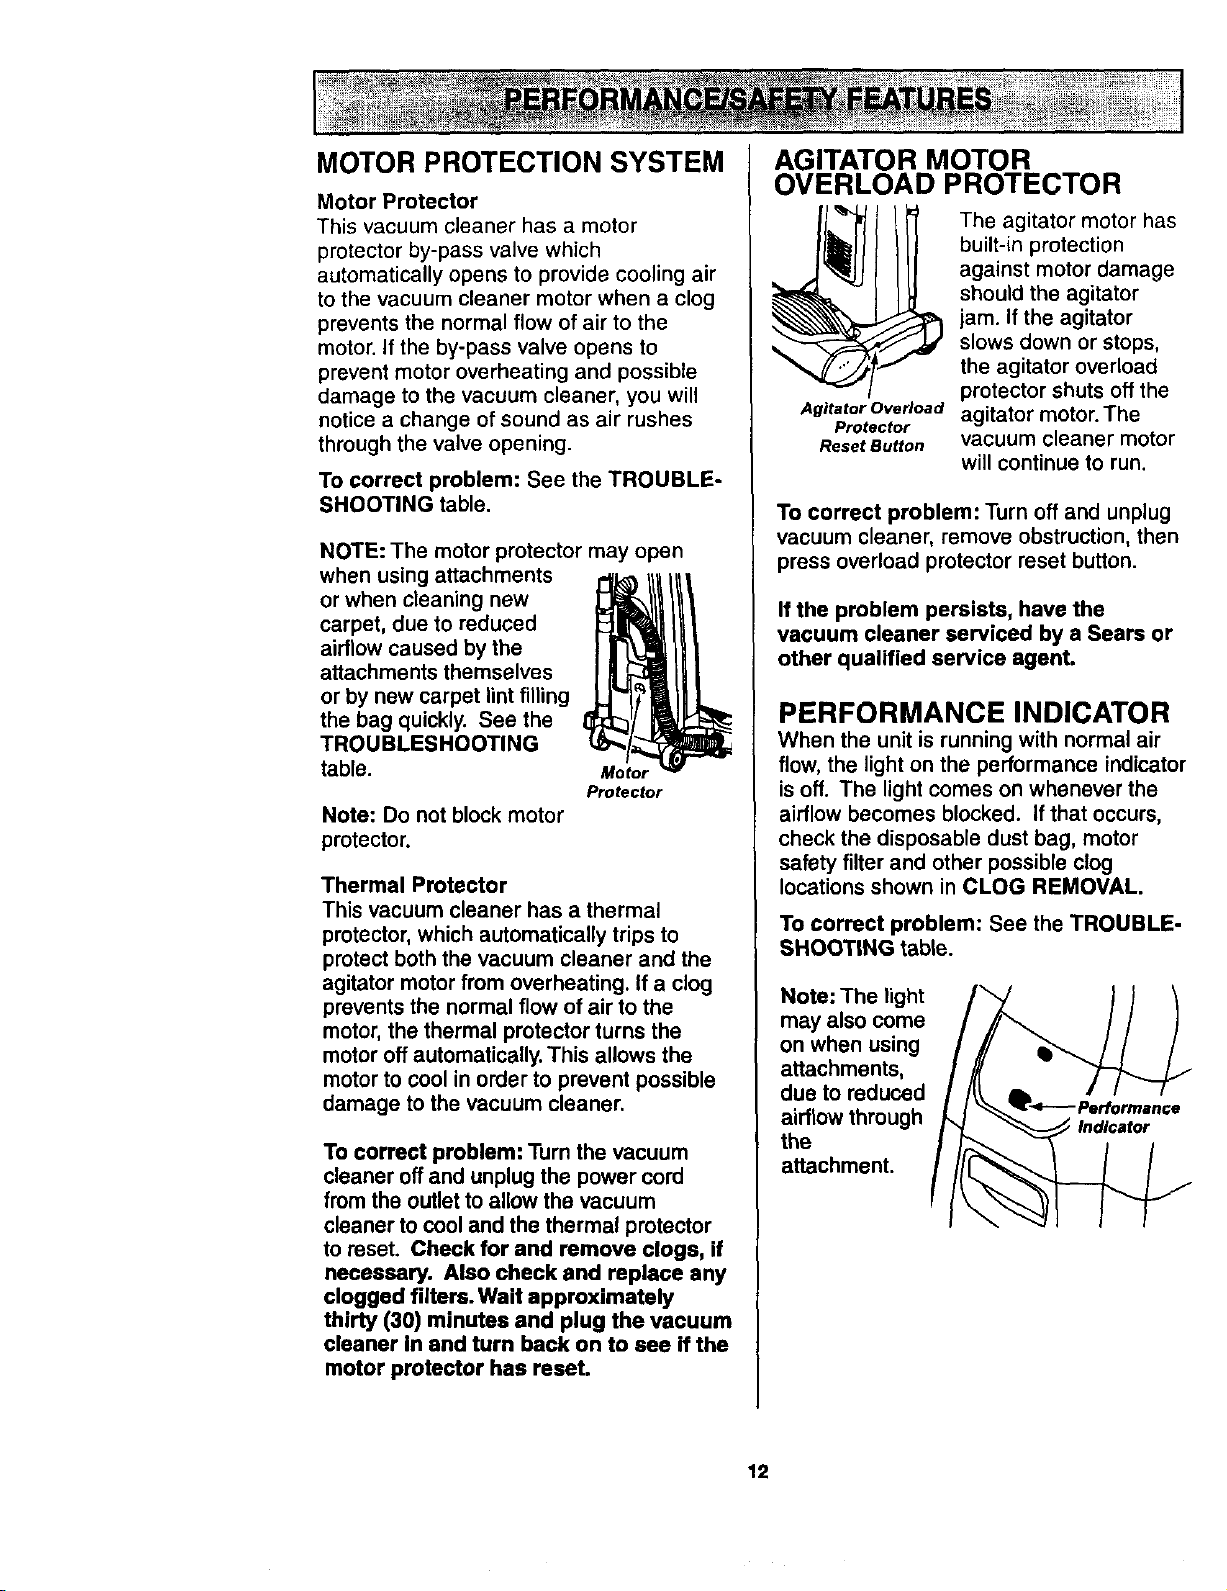
MOTOR PROTECTION SYSTEM
Motor Protector
This vacuum cleaner has a motor
protector by-pass valve which
automatically opens to provide cooling air
to the vacuum cleaner motor when a clog
prevents the normal flow of air to the
motor. If the by-pass valve opens to
prevent motor overheating and possible
damage to the vacuum cleaner, you will
notice a change of sound as air rushes
through the valve opening.
To correct problem: See the TROUBLE-
SHOOTING table.
NOTE: The motor protector may open
when using attachments
or when cleaning new
carpet, due to reduced
airflow caused by the
attachments themselves
or by new carpet lint filling
the bag quickly. See the
TROUBLESHOOTING
table. Motor
Protector
Note: Do not block motor
protector.
Thermal Protector
This vacuum cleaner has a thermal
protector, which automatically trips to
protect both the vacuum cleaner and the
agitator motor from overheating. If a clog
prevents the normal flow of air to the
motor, the thermal protector turns the
motor off automatically. This allows the
motor to cool in order to prevent possible
damage to the vacuum cleaner.
To correct problem: Turn the vacuum
cleaner off and unplug the power cord
from the outlet to allow the vacuum
cleaner to cool and the thermal protector
to reset. Check for and remove clogs, if
necessary. Also check and replace any
clogged filters. Wait approximately
thirty (30) minutes and plug the vacuum
cleaner in and turn back on to see if the
motor protector has reset.
AGITATOR MOTOR
OVERLOAD PROTECTOR
Agitator Overload
Protector
Reset Button
The agitator motor has
built-in protection
against motor damage
should the agitator
jam. If the agitator
slows down or stops,
the agitator overload
protector shuts off the
agitator motor. The
vacuum cleaner motor
will continue to run.
To correct problem: Turn off and unplug
vacuum cleaner, remove obstruction, then
press overload protector reset button.
If the problem persists, have the
vacuum cleaner serviced by a Sears or
other qualified service agent.
PERFORMANCE INDICATOR
When the unit is running with normal air
flow, the light on the performance indicator
is off. The light comes on whenever the
airflow becomes blocked. If that occurs,
check the disposable dust bag, motor
safety filter and other possible clog
locations shown in CLOG REMOVAL.
To correct problem: See the TROUBLE-
SHOOTING table.
Note: The light
may also come
on when using
attachments,
due to reduced
airflow through
the
attachment.
Indicator
12
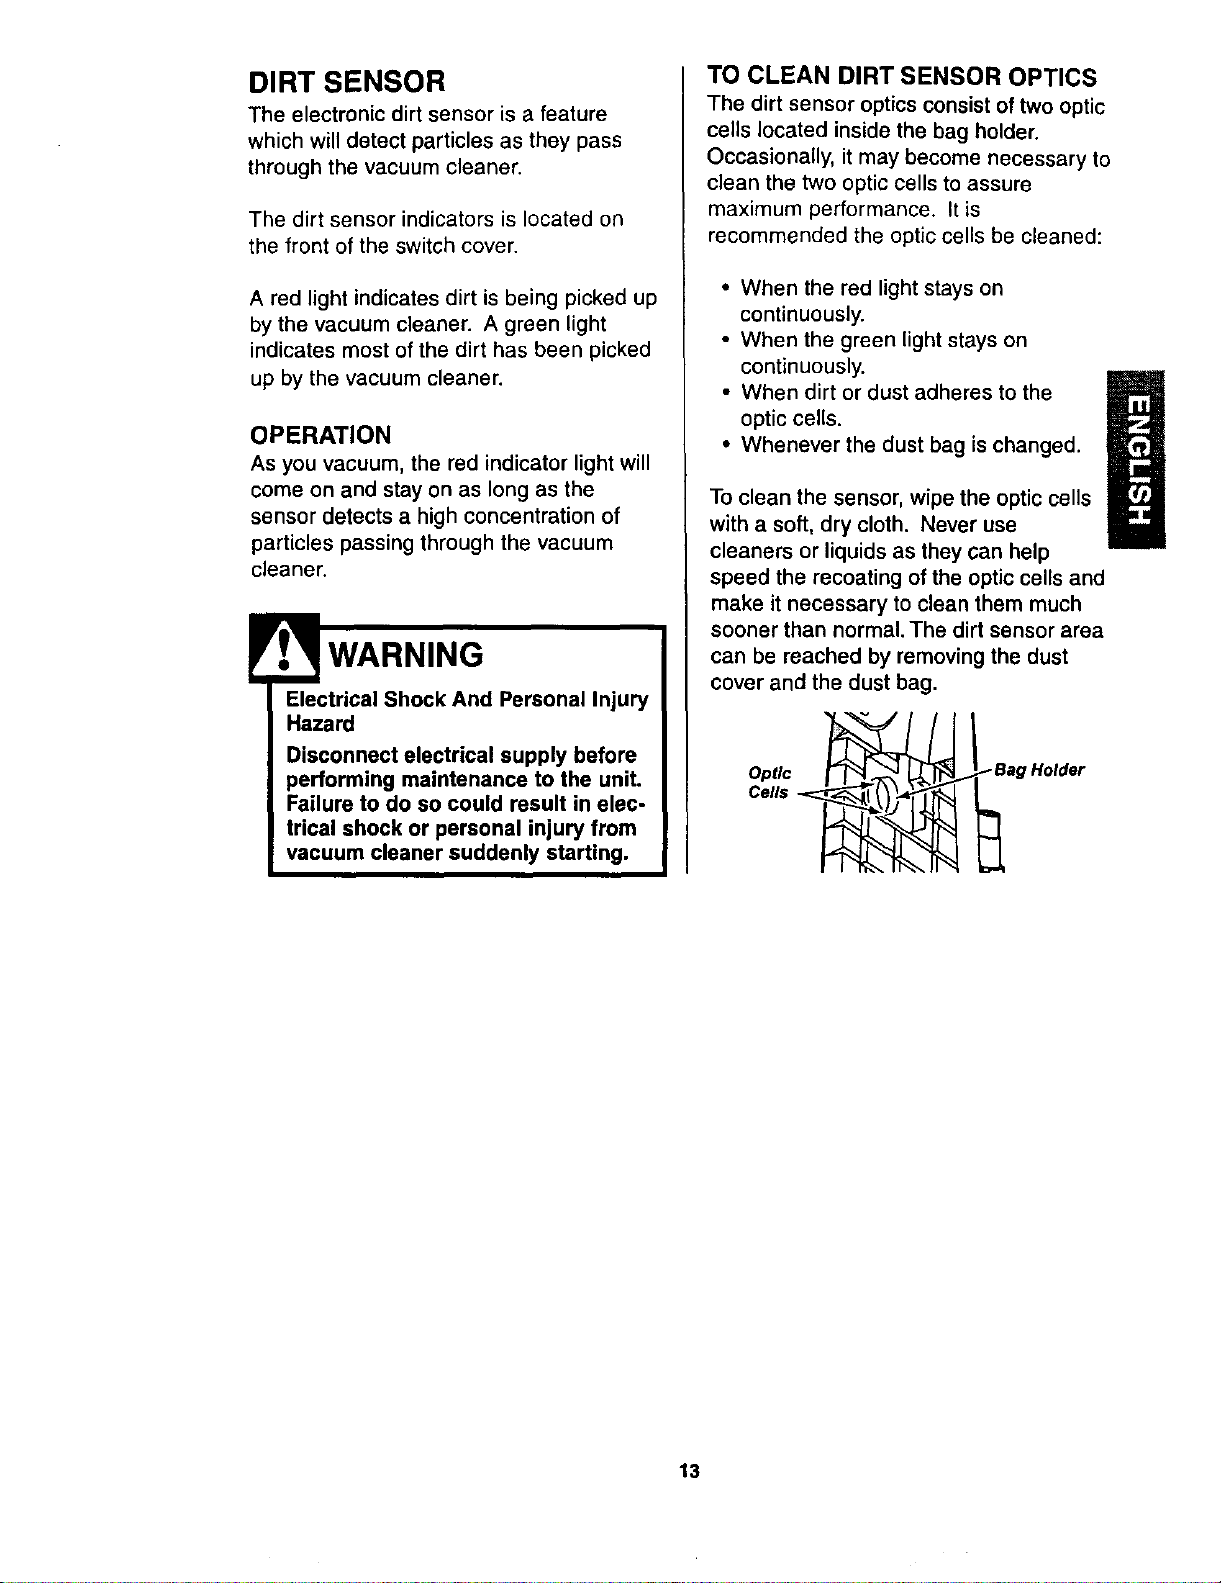
DIRT SENSOR
The electronic dirt sensor is a feature
which will detect particles as they pass
through the vacuum cleaner.
The dirt sensor indicators is located on
the front of the switch cover.
A red light indicates dirt is being picked up
by the vacuum cleaner. A green light
indicates most of the dirt has been picked
up by the vacuum cleaner.
OPERATION
As you vacuum, the red indicator light will
come on and stay on as long as the
sensor detects a high concentration of
particles passing through the vacuum
cleaner.
Electrical Shock And Personal Injury
Hazard
Disconnect electrical supply before
performing maintenance to the unit.
Failure to do so could result in elec-
trical shock or personal injury from
vacuum cleaner suddenly starting.
TO CLEAN DIRT SENSOR OPTICS
The dirt sensor optics consist of two optic
cells located inside the bag holder.
Occasionally, it may become necessary to
clean the two optic cells to assure
maximum performance. It is
recommended the optic cells be cleaned:
• When the red light stays on
continuously.
• When the green light stays on
continuously.
• When dirt or dust adheres to the
optic cells.
• Whenever the dust bag is changed.
To clean the sensor, wipe the optic cells
with a soft, dry cloth. Never use
cleaners or liquids as they can help
speed the recoating of the optic cells and
make it necessary to clean them much
sooner than normal. The dirt sensor area
can be reached by removing the dust
cover and the dust bag.
Optic
Cells
Bag Holder
13
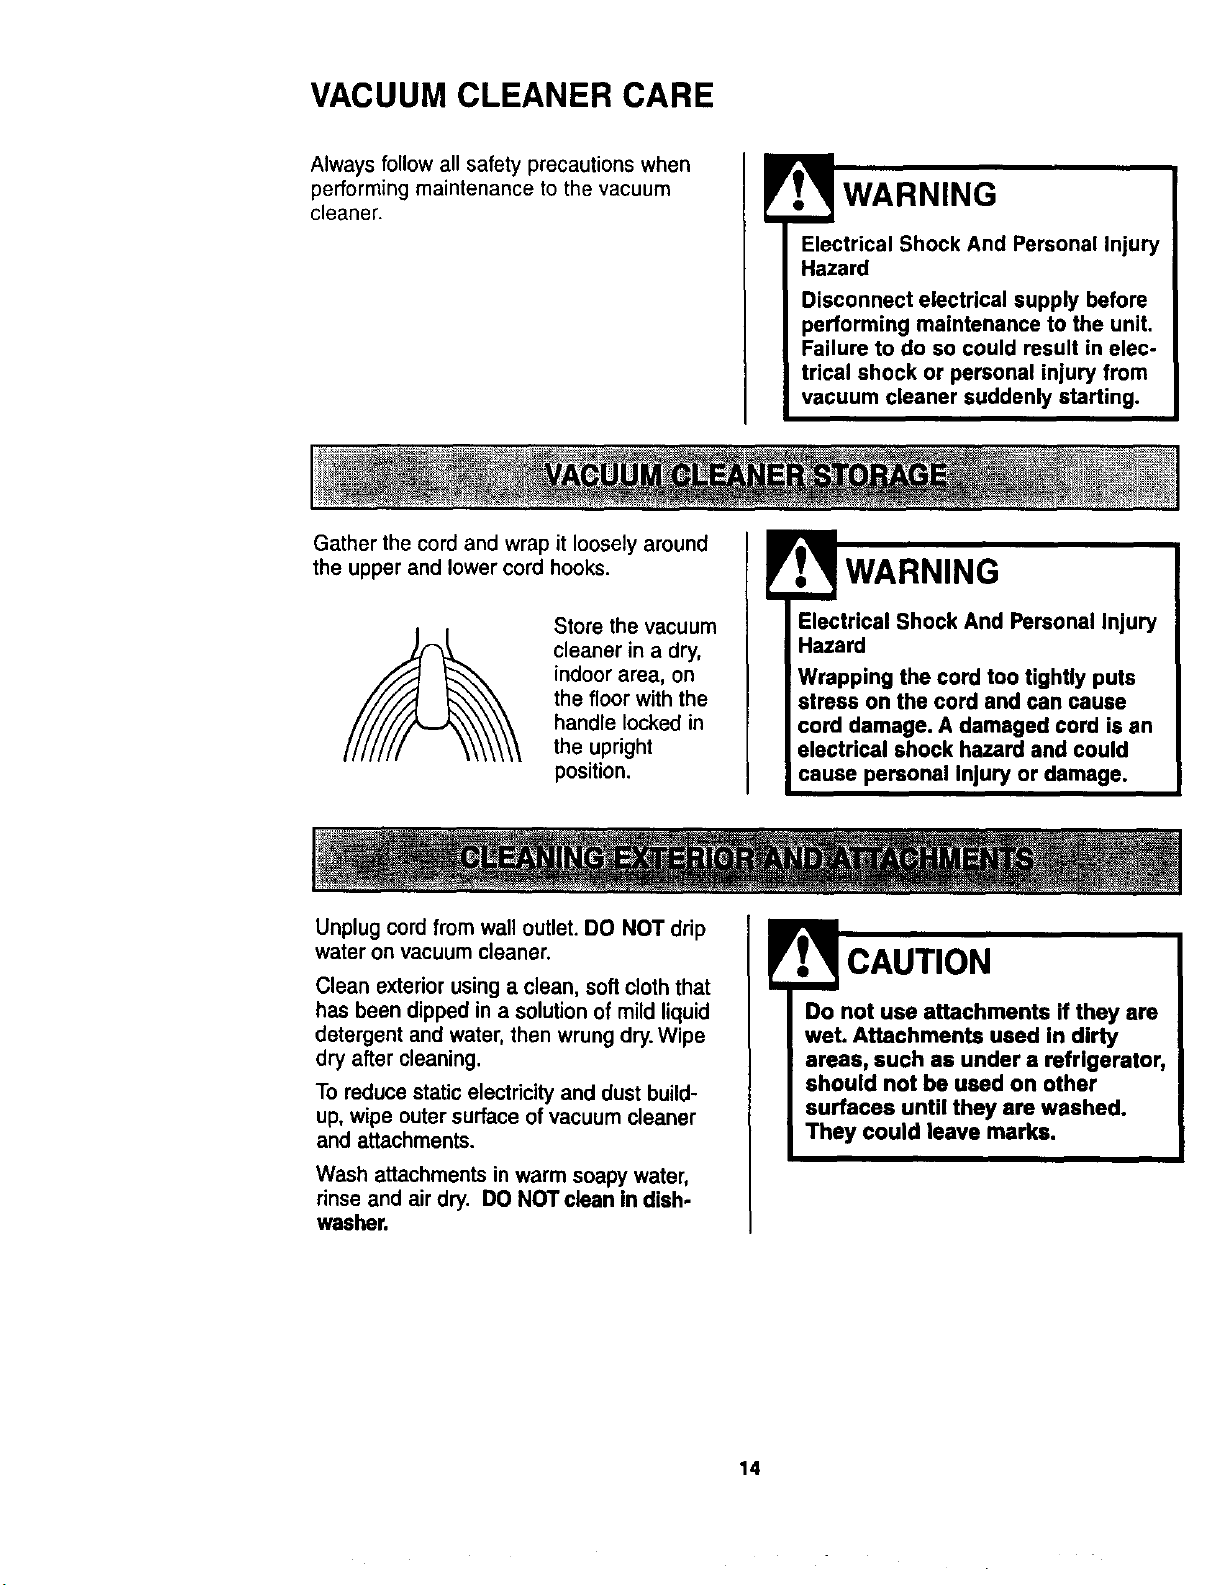
VACUUM CLEANER CARE
Always follow all safety precautions when
performing maintenance to the vacuum
cleaner.
WARNING
Electrical Shock And Personal Injury
Hazard
Disconnect electrical supply before
performing maintenance to the unit.
Failure to do so could result in elec-
trical shock or personal injury from
vacuum cleaner suddenly starting.
Gather the cord and wrap it loosely around
the upper and lower cord hooks.
Store the vacuum
cleaner in a dry,
indoor area, on
the floor with the
handle locked in
the upright
position.
Electrical Shock And Personal Injury
Hazard
Wrapping the cord too tightly puts
stress on the cord and can cause
cord damage. A damaged cord is an
electrical shock hazard and could
cause personal Injury or damage.
Unplug cord from wall outlet. DO NOT drip
water on vacuum cleaner.
Clean exterior using a clean, soft cloth that
has been dipped in a solution of mild liquid
detergent and water, then wrung dry. Wipe
dry after cleaning.
To reducestaticelectricityand dust build-
up,wipe outer surfaceofvacuumcleaner
and attachments.
Wash attachments in warm soapy water,
rinse and air dry. DO NOT clean in dish.
washer.
Do not use attachments if they are
wet. Attachments used in dirty
areas, such as under a refrigerator,
should not be used on other
surfaces until they are washed.
They could leave marks.
14
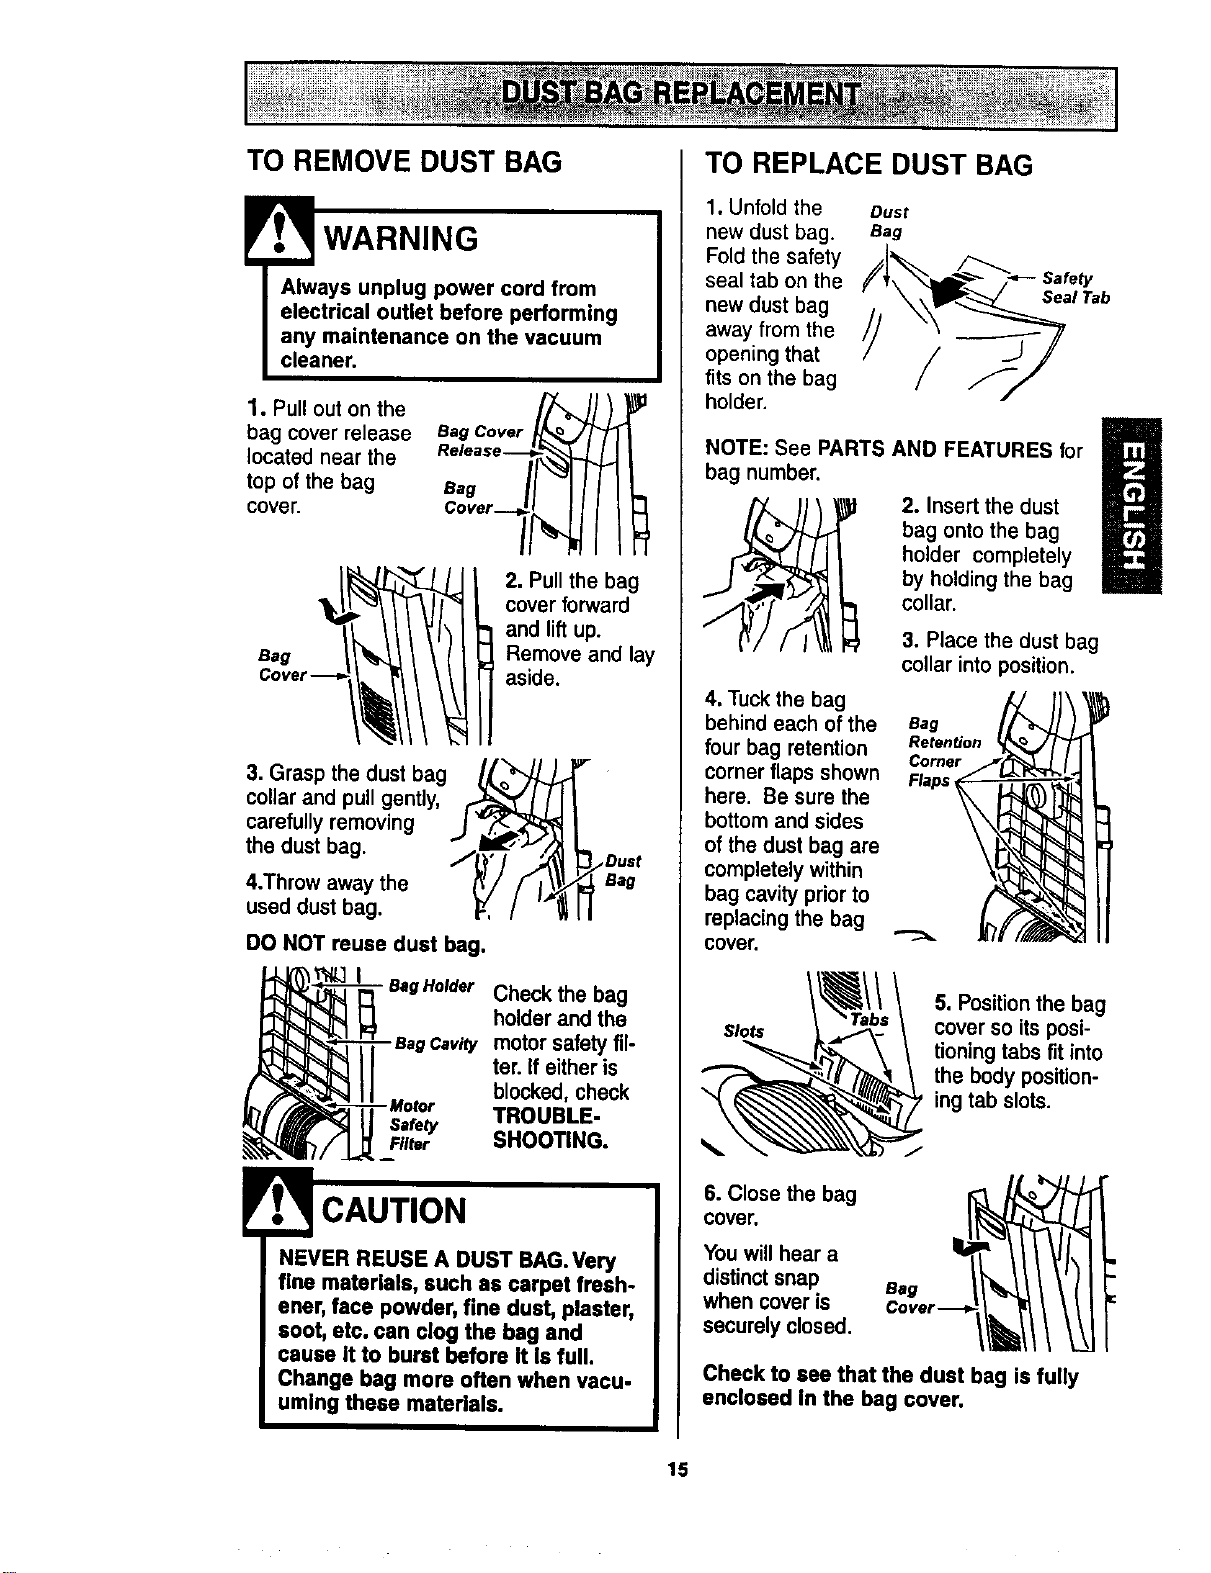
TO REMOVE DUST BAG
WARNING
1. Pull out on the
bag cover release
located near the
top of the bag
cover.
Bag
BagCover_ )_
2. Pull the bag
cover forward
and lift up.
Remove and lay
aside.
3. Grasp the dust bag _ _'-
collar and pull gently, _ / /
carefully removing J v_._
the dust bag. _,L_,I_ _,_
4.Throw away the _'/ f I_
used dust bag. _,, / '"!
/Duet
Bag
DO NOT reuse dust bag.
- Bag Holder Check the bag
holder and the
motor safety fil-
ter. If either is
blocked, check
Safety TROUBLE-
FIlM SHOOTING.
NEVER REUSE A DUST BAG.Very
fine materials, such as carpet fresh-
ener, face powder, fine dust, plaster,
soot, etc. can clog the bag and
cause it to burst before It Is full.
Change beg more often when vacu-
uming these materials.
TO REPLACE DUST BAG
1. Unfold the
new dust bag.
Fold the safety
seal tab on the
new dust bag
away from the
opening that
fits on the bag
holder.
NOTE: See PARTS AND FEATURES for
bag number.
2. Insert the dust
bag onto the bag
U
holder completely
by holding the bag
collar.
3. Place the dust bag
collar into position.
4. Tuck the bag
behind each of the Bag
four bag retention Retention
Corner
corner flaps shown Flaps,
here. Be sure the
bottom and sides
of the dust bag are
completely within
bag cavity prior to
replacing the bag
cover.
Slots
5. Position the bag
cover so its posi-
tioning tabs fit into
the body position-
ing tab slots.
6. Close the bag
cover,
Youwill hear a
distinctsnap
when coveris
securelyclosed.
Bag
c°"r--II II!
Check to see that the dust bag is fully
enclosed in the bag cover.
15
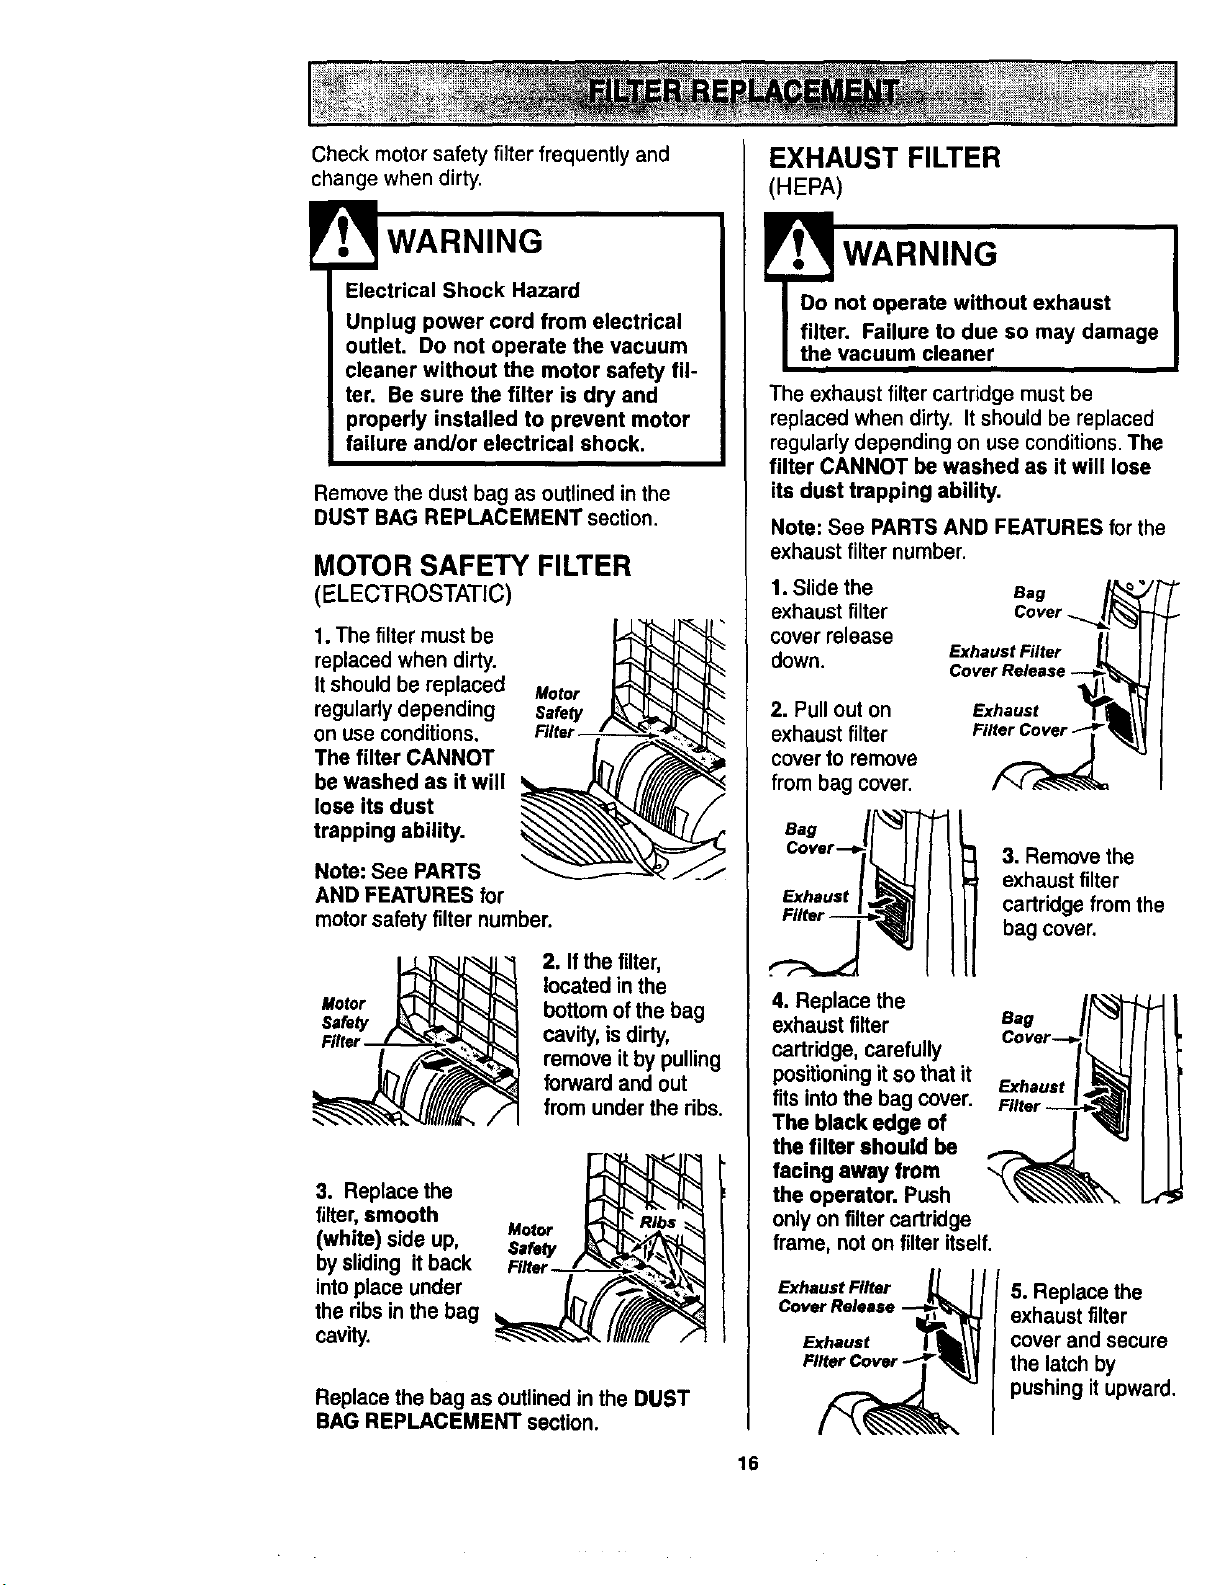
Check motor safety filter frequently and
change when dirty.
Electrical Shock Hazard
Unplug power cord from electrical
outlet. Do not operate the vacuum
cleaner without the motor safety fil-
ter. Be sure the filter is dry and
properly installed to prevent motor
failure and/or electrical shock.
Remove the dust bag as outlined in the
DUST BAG REPLACEMENT section.
MOTOR SAFETY FILTER
(ELECTROSTATIC)
1. The filter must be
replaced when dirty.
It should be replaced Motor
regularly depending
on use conditions,
The filter CANNOT
be washed as it will
lose its dust
trapping ability.
Note: See PARTS
AND FEATURES for
motor safety filter number.
2. Ifthe filter,
located in the
bottom of the bag
cavity, is dirty,
remove it by pulling
forward and out
from under the ribs.
3. Replace the
filter, smooth
Motor
(white) side up,
by sliding it back Fl_
into place under
the ribs in the bag
cavity.
Replace the bag as outlined in the DUST
BAG REPLACEMENT section.
16
EXHAUST FILTER
(HEPA)
Do not operate without exhaust
filter. Failure to due so may damage
the vacuum cleaner
The exhaust filter cartridge must be
replaced when dirty. It should be replaced
regularly depending on use conditions. The
filter CANNOT be washed as it will lose
its dust trapping ability.
Note: See PARTS AND FEATURES for the
exhaust filter number.
1. Slide the
exhaust filter
cover release
down.
2. Pull out on
exhaust filter
cover to remove
from bag cover.
e.g /_
Cover.. l/%
Exhaust Filter _ _
Cover Release
FE_ihaust
Bag
Exhaust
3. Remove the
exhaustfilter
ca_r_ge from the
bag coven
4. Replace the
exhaust filter
cartridge, carefully
positioning it so that it
fits into the bag cover.
The black edge of
the filter should be
facing away from
the operator. Push
only on filter cartridge
frame, not on filter itself.
Exhaust Filter _L I/
C°:h":':"
Eag
Cover-.-_,
Exhaust
5. Replace the
exhaust filter
cover and secure
the latch by
pushing itupward.
E
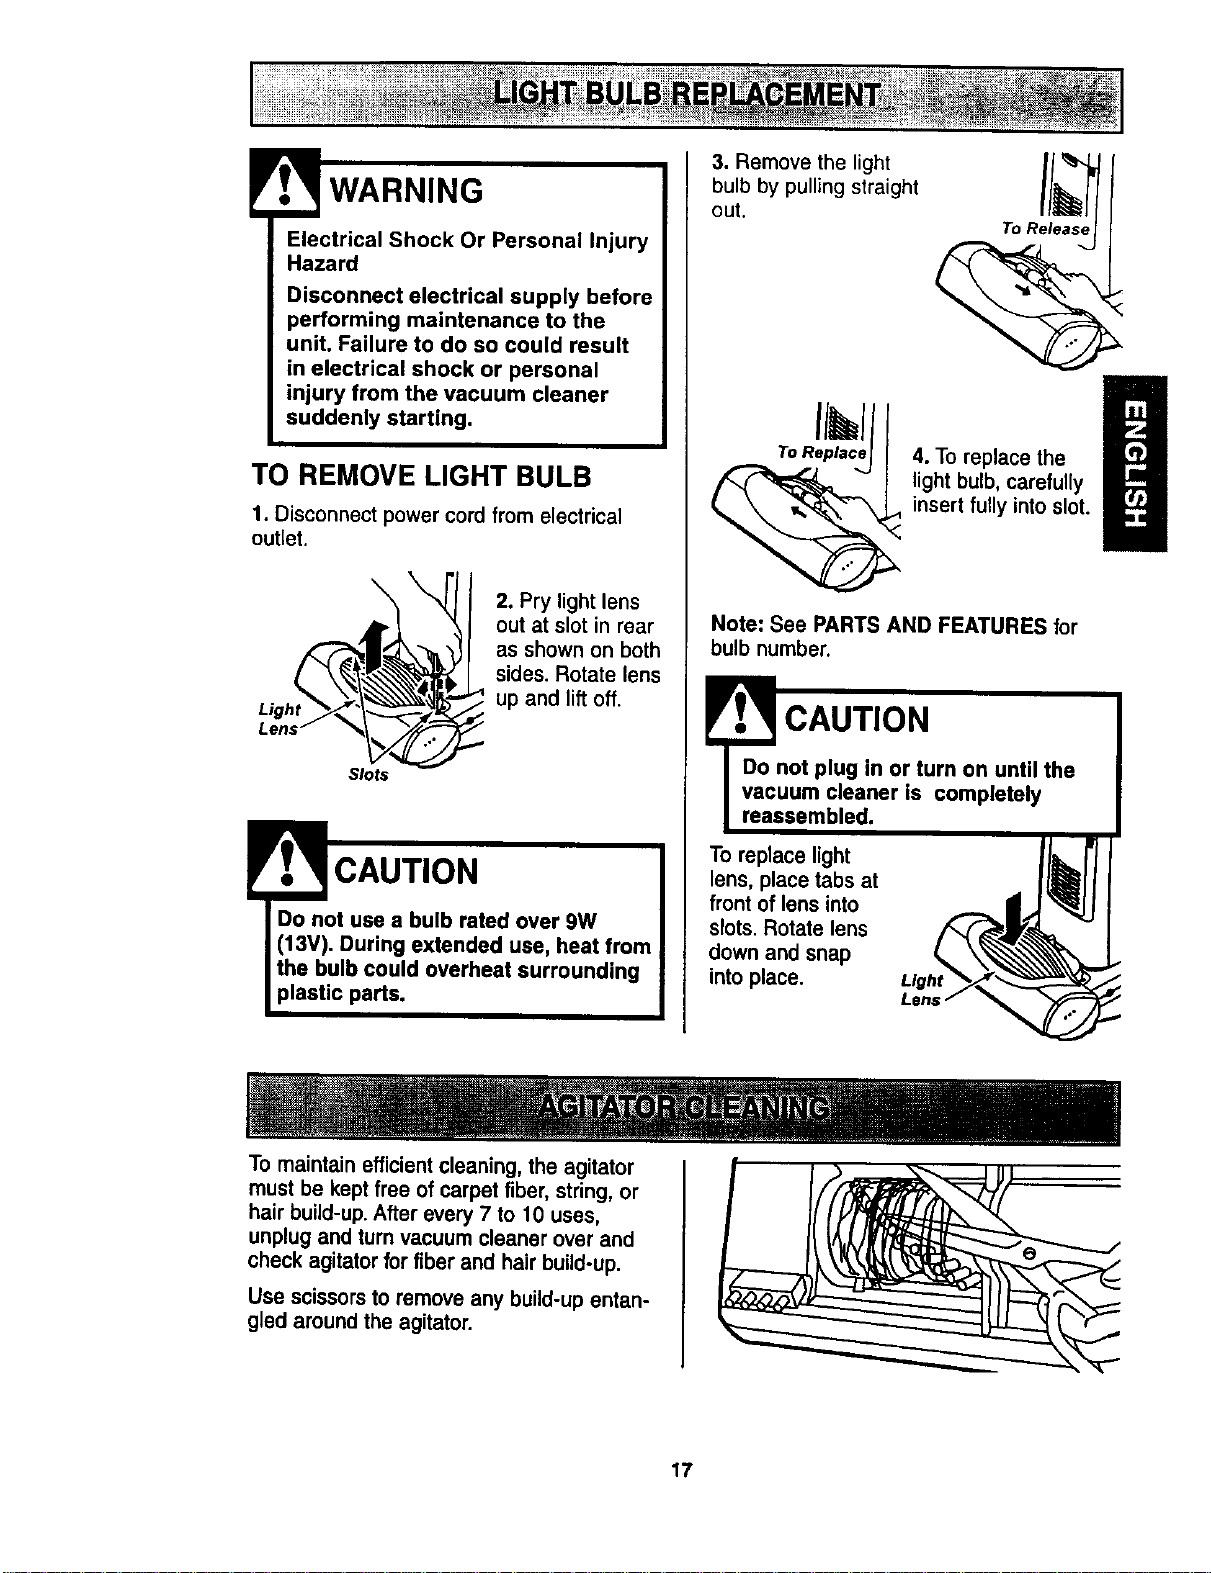
Electrical Shock Or Personal Injury
Hazard
Disconnect electrical supply before
performing maintenance to the
unit. Failure to do so could result
in electrical shock or personal
injury from the vacuum cleaner
suddenly starting.
TO REMOVE LIGHT BULB
1. Disconnect power cord from electrical
outlet.
Light
\
2. Pry light lens
out at slot in rear
as shown on both
sides. Rotate lens
up and lift off.
Slots
CAUTION
Do not use a bulb rated over 9W
(13V). During extended use, heat from
the bulb could overheat surrounding
plastic pads.
3. Remove the light
bulb by pulling straight
out.
To Release
To Replace
4. To replace the l
light bulb, carefully
insert fully into slot.
Note: See PARTS AND FEATURES for
bulb number.
l CAUTION
Do not plug in or turn on until the
vacuum cleaner is completely
reassembled.
To replace light
lens, place tabs at
front of lens into
slots. Rotate lens
down and snap
into place.
!
To maintain efficient cleaning, the agitator
must be kept free of carpet fiber, string, or
hair build-up. After every 7 to 10 uses,
unplug and turn vacuum cleaner over and
check agitator for fiber and hair build-up.
Use scissors to remove any build-up entan-
gled around the agitator.
17
Always follow all safety precautions when
performing maintenance to the vacuum
cleaner.
l
Electrical Shock Or Personal Injury
Hazard
Disconnect electrical supply before
performing maintenance to the unit.
Failure to do so could result in elec-
trical shock or personal injury from
vacuum cleaner suddenly starting.
If the vacuum cleaner does not seem to
have adequate suction, first check if the
dust bag is full or if a filter is clogged. See
DUST BAG REPLACEMENT and FILTER
REPLACEMENT.
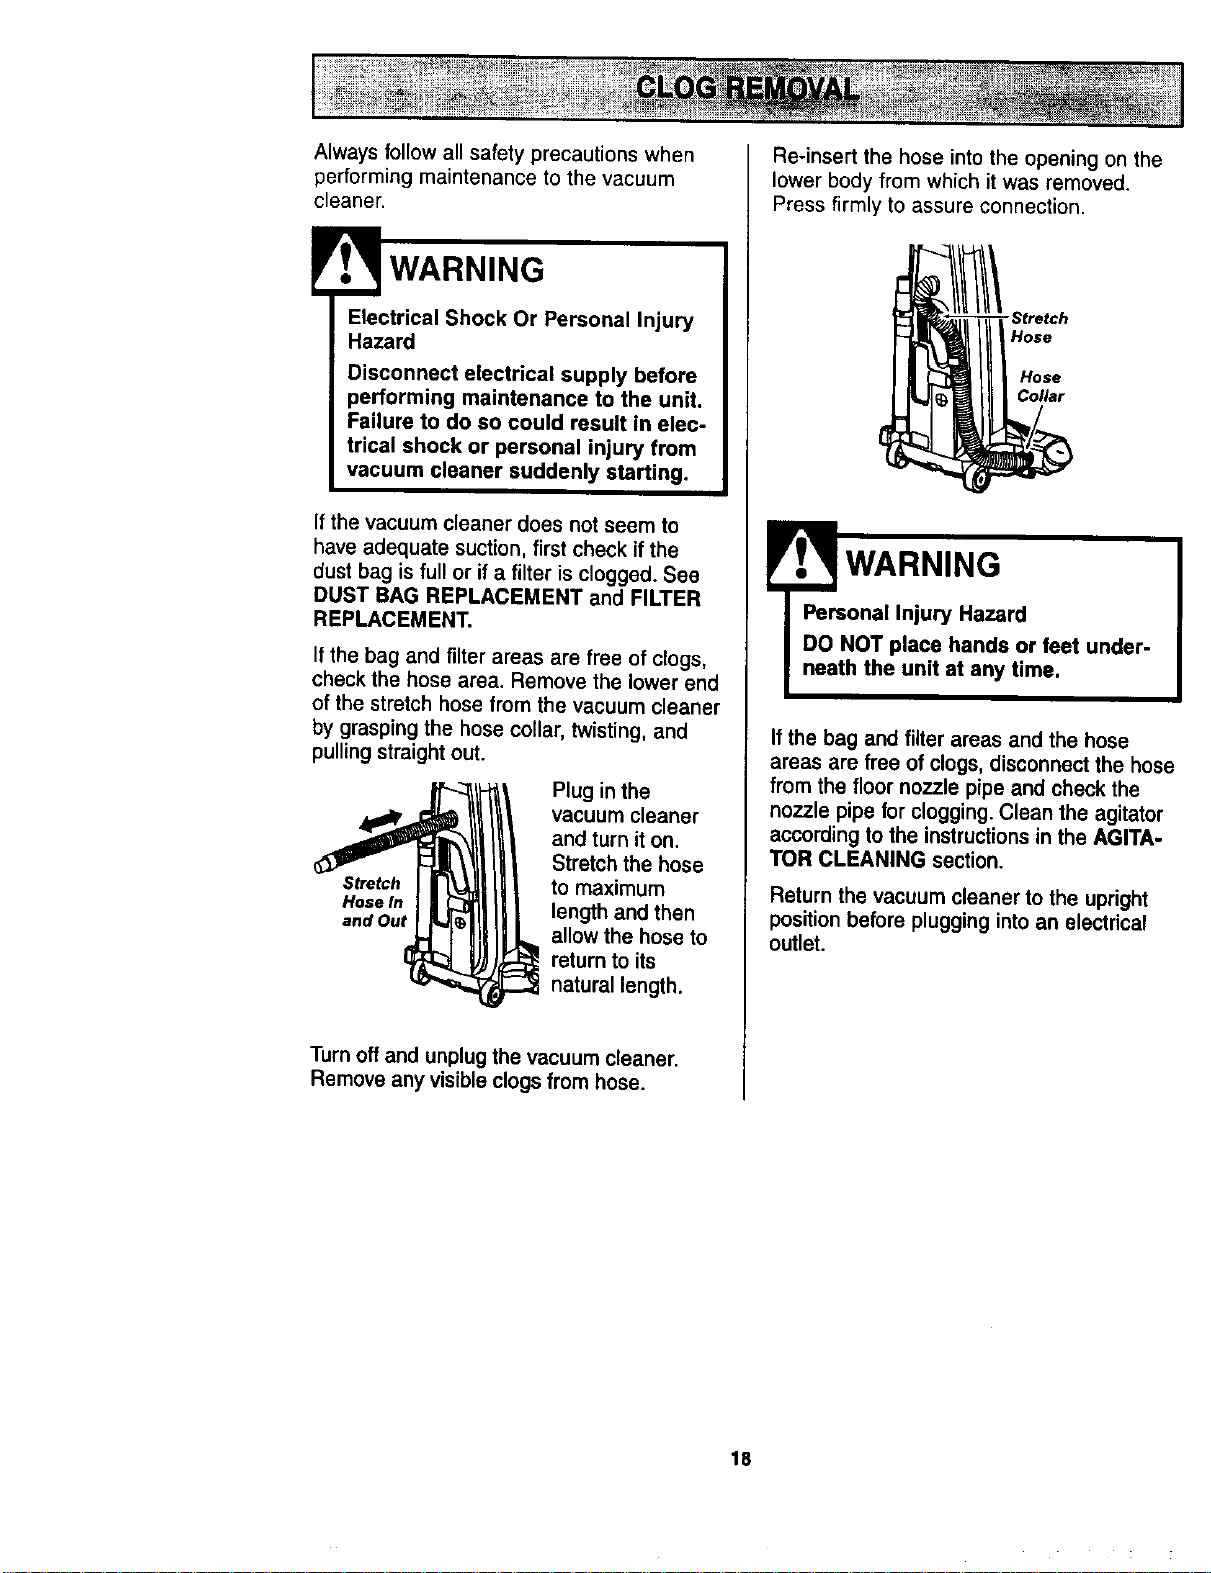
If the bag and filter areas are free of clogs,
check the hose area. Remove the lower end
of the stretch hose from the vacuum cleaner
by grasping the hose collar, twisting, and
pulling straight out.
Plug in the
vacuum cleaner
and turn it on.
Stretch the hose
Stretch to maximum
HoseIn length and then
and Out
allow the hose to
return to its
natural length.
Turn off and unplug the vacuum cleaner.
Remove any visible clogs from hose.
Re-insert the hose into the opening on the
lower body from which it was removed.
Press firmly to assure connection.
-Stretch
Hose
Hose
Collar
! WARNING
Personal Injury Hazard
DO NOT place hands or feet under-
neath the unit at any time.
If the bag and filter areas and the hose
areas are free of clogs, disconnect the hose
from the floor nozzle pipe and check the
nozzle pipe for clogging. Clean the agitator
according to the instructions in the AGITA-
TOR CLEANING section.
Return the vacuum cleaner to the upright
position before plugging into an electrical
outlet.
18
Review this table to find do-it-yourself solutions for minor performance problems. Any other
service needed, should be performed by a Sears or other qualified service agent.
WARNING:
D'_ming maintenance to the
_ical shock or personal
injury.
Vacuum cleaner
won't run.
Poor job of dirt
pick-up.
1. Unplugged at walloutlet.
2. Trippedcircuitbreaker/blown fuse
at household servicepanel.
3. Thermalprotectortdpped.
1. Full orcloggeddustbag.
2. Wrongpileheightsetting.
3. Worn agitator.
4. Cloggednozzleor bag holder.
5. Clogged hose.
6. Hole in hose.
7.
8.
9,
1. Plug infirmly,selectthedesiredset-
tingonthetouchcontrol.
2. Reset circuitbreakeror replacefuse.
Hosenot insededfully. 7.
Motorprotectionsystemactivated. 8.
Dirtyfilters, g.
Wrongpileheightsetting. 1.
Burnedout lightbulb. 1.
Handle infulluprightposition. 1.
AgitatorOverloadtripped. 2.
Thermal protector tripped. 3.
Fullor cloggeddustbag. 1.
Dirtyriflers. 2.
Cloggedairflowpassage. 3.
Certainattachmenttools. 4.
Attachmentuserestrictsair flow. 1.
Nowcarpetfuzzclogged air path. 2.
Dirtyopticcells.
Vacuumcleanercot In upright
position.
3. Unplugvacuumcleaner,allow tocool
and thermalprotectorwillresetitself.
1. Change bag.
2. Adjustsetting.
3. Take toyournearestSears
ServiceCenter.
4. CheckCLOG REMOVAL
5. Checkforclogs.
6. Taketo yournearestSears
ServiceCenter.
Inserthose fully.
Checkforclogs.
Changemotorsafetyfilter and
exhuastfilter.
Vacuum Cleaner picks up 1. Adjustsetting.
moveable rugs or
pushes too hard.
Light won't work. 1. Change lightbulb.
Agitator does notturn. 1. Move handlefromuprightposition.
2. ResetAgitatorOvadoad.
3. Unplugvacuumcleaner,allowto cool
andthermalprotectorwillresetitself.
Performance Indicator, 1. Changebag.
some models, Is red. 2 Change motorsafetyfilterand
exhuastfilter.
3. Clear clogfromairflowpassage.
4. Thisisnormal. Ught shouldgooff
whentoolis removed.
Air flow restricted 1. CheckATTACHMENTS.
with attachment use.
Sound changes. 2. CheckCLOG REMOVALand clean
hose.
Dirt Sensor, soma 1. 1. Clean opticcalls.
models, wig not work.
Difficulty adjusting pile 1. 1. Tiltvacuumcleanertoupright
height setting position.
19
i
_'0
Antes de user su aspiradora nueva ..... 1
Garantia de la aspiradora de Kenmore... 1
Instrucciones importantes de
seguridad ............................ 2
Piezas.y caracteristicas de aspiradora
vertical ............................... 3
Instrucciones de ensamblamiento ..... 4-5
Instrucciones de operaci6n ............ 5
I_iberaci6ndel cord6nel6ctrico .......... 5
Desprandimientodelmango .............. 6
PulcadordeControt.................... 6
Ajustey selecci6ndenivelde pelode la
alfombra ............................ 7
Accesorios......................... 7-9
Cuadrodeusode losaccesorios......... 10
Sugerenciaspara aspirar ............... 10
Carecterfisticasde
rendimiento/seguridad............... 11-12
Cuidado de la aspiradora .............. 13
Almacenamientode laaspiradora ........ 13
Limpiezadelexteriory delos accesorios... 13
Cambio de laboiseparapolvo........... 14
Cambiodefiltros ..................... 15
Cambiode labombilla................. 16
Limpiezadel agitador.................. 16
C6moeliminarlosresiduosde basura
enlosconductos..................... 17
Reconocimiento de problemas ......... 18
Informaci6n de assistancia
o servicio ...................... backpage
Porfavor leaesta guiaqueleayudaraa assemblary operarsuaspiradoranuevade Kenmoraenunamanera
rodsseguray efectiva.
Paremas informaci6nacerca del cuidadoy operaci6nde estaaspirador,Ilamea sutiendaSearsmascercana.
Cuandopreguntepotinformaci6nustednecisitardel n0merocompletodeseriey modelode laaspiradoraque
estanenlaplacade losnL_merasde modeloy serie.
Useel espaciodeabajopara registrarel n0merodemodeloy seriede sunuevaaspiradorade Kenmore.
N0merodeModelo
N0merodeSerie.
FechadeCompra
Matengaestelibray sureciboen unlugarseguraparareferenciasfuturas.
GARANTfAUMITADADE UNA_O DELA ASPIRADORAKENMORE
EstagarantfeesporunaSodesdelafecha decompra,e incluyesolamenteel usode laaspiradoraen
hogarasprivados.Duranteela_odegarsntfa,cuandolaaspiradoraes operaday mantenidade acuerdoal
manualdeinstruccionesdeldueSo,Searsreparar_,cualquierdefectoenmaterialeso fabricaci6nlibrede cargo.
Estagarantfaexclwe lasbolsasdecolecci6n,correas,lamparillas,y filtras,lascualessonpartesgastablesque
se deterioranconeluso normal.
Pareel servlclodegarantia,retorne eeta asplradorael CentredeServlclo Searsm,is cercanoen los
Estados Unidos.
Estagerantfaseaplicasolamentemientrasesteproducfoestdenusoen losEstadosUnidos.Estagarantiale
daa ustedderechoslegalesespec[ficos,y ustedpuedetenortambidnotrosderechosloscualesvarlande
estadoa estado.
Sears, Roebuckand Co.,I)/817 WA,Hoffmen Estates,IL 60179
ADVERTENCIA
Suseguridades muyimportanteparanosotros.Para
reducirelrlesgodeincendio,choqueel_ctrtco,lesibncor-
poraloda_osal utilizarsuaspiradora,astdedeacuerdo
conprecaucionesI_icas de seguddad,entreelias:
Leaestemanualantesdearrnaro utUizarsu
aspiradora.
Usesuaspiradoradnicamenteenlaforma
descritaenestemanual.Use_nicamentecon
accesoriosrecomendadosper Sears.
Parareducirelriesgodechoqueel_ctrico,nouse
suaspiradoraalairelibrenisobresuperficies
mojadas.
Desconectelapmvisi6ndeelectricidadantesde
efectuarel mantenimlentodel alma del cepillo.
DeIocontrariopodrfacausarunchoqueeldctfico
o lesi6ncorporal.
Siempredebeapagarsuaspiradoraantesde
desconectada.
Nodesconectelaaspiradoratirandodelcord6n
et_ctrico.Paradesconectarla,jaleel enchufe,no
elcord6n.
No uselaaspiradorasielcord6noel enchufe
est_dahado.Silaaspiradoranoestd
funcionandoadecuadamenteosise hadejado
caer,ast_ da_ada,se hadejadoexpuestaa la
intemperieose hade'_docaeren agua,devudl-
valaa unCentrodeserviciodeSears.
Nojale nitransportelaaspiraderaperelcorddn;
nouseelcorddncomomango;no clerrepuertas
sobreelcord6n;nojaleelcord6nsobrerebordas
agudosniesquinas.Nopaselaaspimdorasobre
elcord6n.Mantengaelcord6nalejadodesuperfi-
ciescalientes.
No abandonelaaspiradoracuandoestdconec-
tada.Descondctelacuandono laestdusandoy
antesdedarleservicio.
No permitaqueseautilizadacomojuguete.Se
mquieretenermayorcuidadocuandosea
utilizadaenlaproximidadde ni_osopornifios.
No toquelaaspiradoranielenchufeconlas
manosmojadas.
No coloqueobjetosenlasaberturas.
No utilicelaaspiradorasialgunaabertura est_
bloqueada;mant_ngalafibrede polvo,pelusa,
cabellosy cualquieracosaque podrfadisminuir
el fluiodeaire.
Mantengaelcabello,ropasuelta,dedosy todas
laspartesdelcuerpoalejadosde lasaberturasy
piezas mec_nicas.
No descanselaaspiradorasobreescalones,
La mangueracontlenecables el6ctricos.Nolos
usecuandoast_n dahadoso pinchados. Evite
tevantarobjetosafilados.
Siempreapag_la aspiradoraantesde conectar
ode desconectarla manguerao laboquillaelec-
trica.
No usela aspiradorasintenerinstaladala bolsa
para polvoy/olosfiltros.
Cambiesiemprela bolsaparapolvodespudsde
aspirarlimpiadoresde alfombrasodesodorantes,
talcosy polvosfinos.Estosproductosatascanla
bolsa,reducenelflujo deairey puedencausar
quedsta se rompa.Sinocambialabolsapodria
ocasionardafiopermanentea laaspiradora.
No usela aspiradoraparalevantarobjetosagu-
dos,juguetas pequeSos,alflleres,sujetapapeles,
etc.Podr[andafiarlaaspiradoraolabolsapara
polvo.
No levanteningunacosa quese est_quemando
oemitiendo humo,comecigarrillos,cerilloso
cenizascallentes.
No usela aspiradoraparaaspirarIiquidos
inflamableso combustibles(gasolina,I[quidos
paralimpleza,perfumes,etc.)ni lauseen
lugaresdondedstospodn'anestarpresentes.Los
vaperesdeestassustanciaspuedencrearun
peligrode incendiooexplosi6n.
Tengacuidadoespecialal utilizarlaaspiradora
enescalones.Nolacoloquesobresillas,mesas,
etc.Mant6ngalaenelpiso.
Ustedes responsabledeasegurarquesuaspira-
dorano sea utJlizadaper ningunapersonaque no
puedamanojarlacorrectamente.
GUARDE ESTAS INSTRUCCIONES
Elarmadoy usosegurodesuaspiradorasonsuresponsabilidad.EstaaspirademhasidediseSada
exclusivamenteparausodom6stico.La asplradoradeberdalmacenarseen unlugarsecoyen elinterior.
Leaaste Manualdelpmpletariodetenidamente,puesconlieneinformacidnimpertantesobreseguridady
uso.Estaguiacontieneinformaci6nsobreseguridaddebajo desimbolosdeadvertienciao cuidedo.
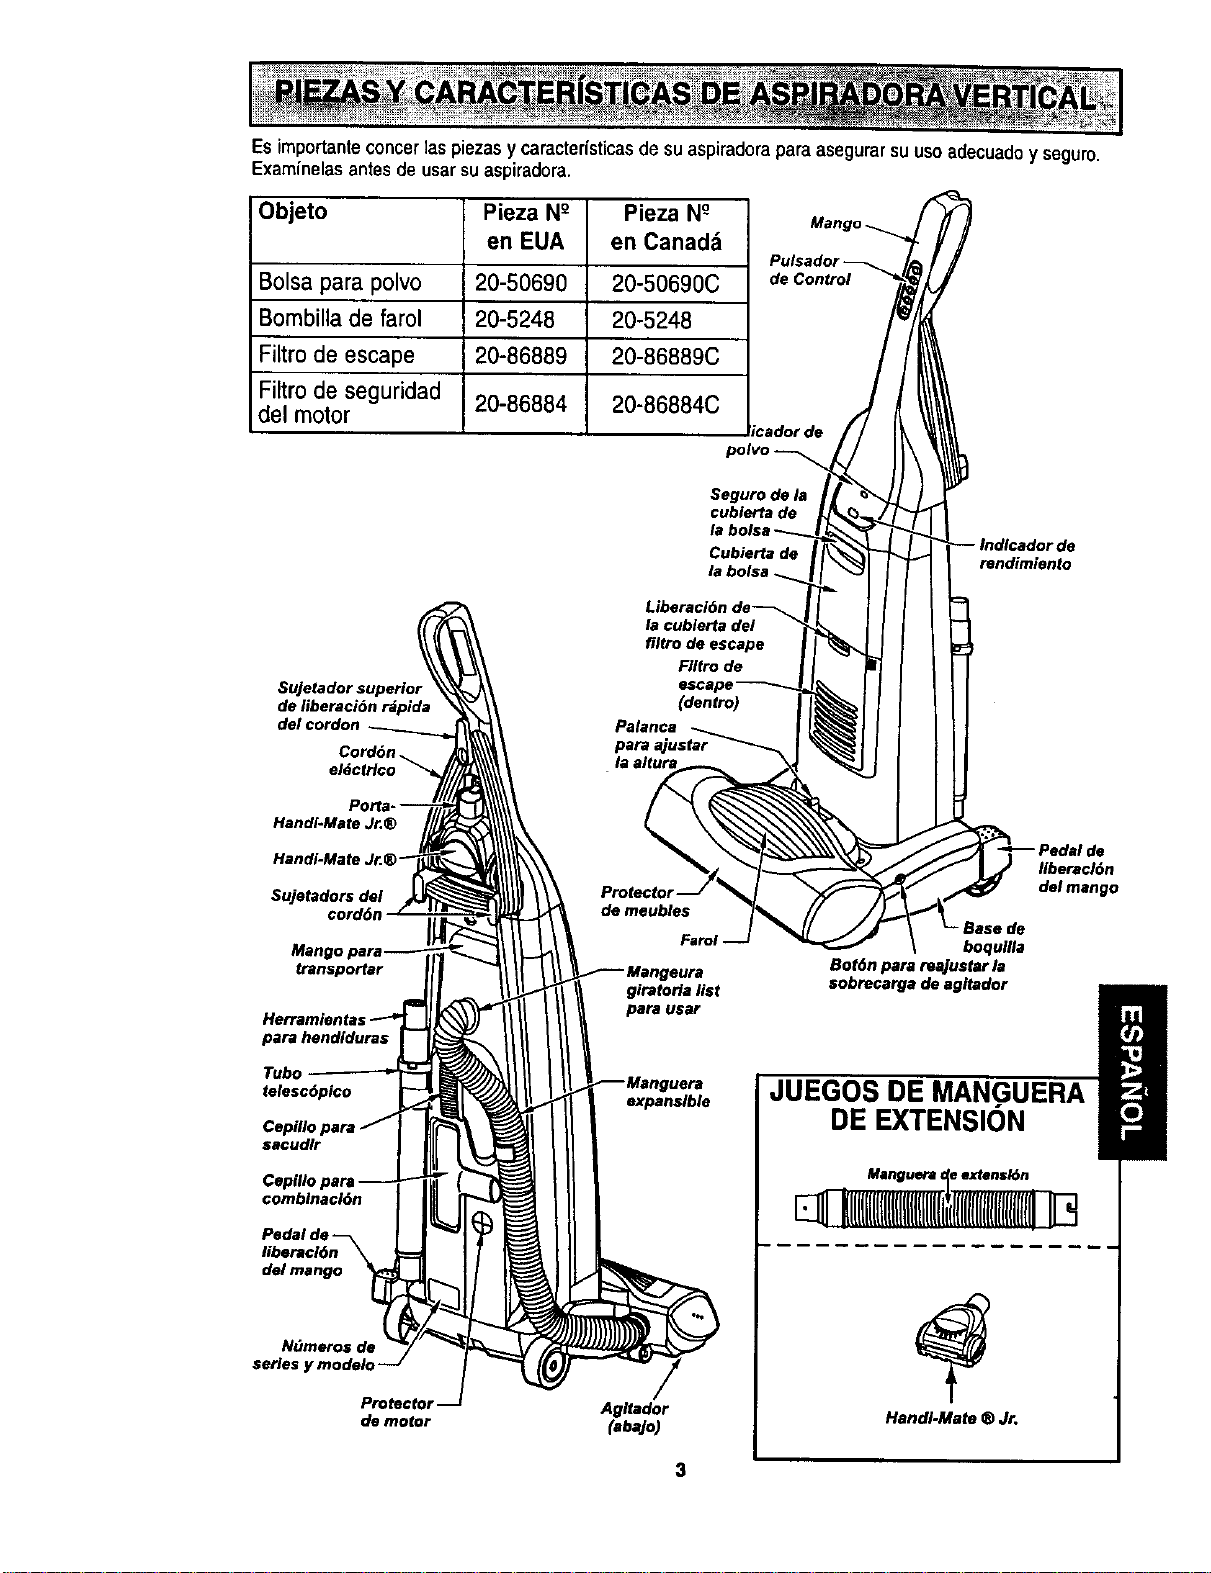
Esimportanteconcer 1aspiezas y caracter{sticasde su aspiradoraparaasegurarsu uso adecuadoy seguro.
Examinelasantes de usar suaspiradora.
Objeto Pieza N° Pieza N°
en EUA en Canadd
Bolsa para polvo 20-50690 20-50690C
Bombilla de farol 20-5248 20-5248
Filtro de escape 20-86889 20-86889C
Filtro de seguridad
del motor 20-86884 20-86884C
ricador de
polvo
de Control
Seguro de la
cublerta de
la bolsa
Cubierta de
de
rendimiente
Sujetador superior
de liberaci6n rdpida
Handi-Mate Jr.®
Handi-Mate J
Sujetadors del
cord6n
transpolar
para hendlduras
Tubo
telesc6pico
sacudlr
combinacl6n
Pedal d=
libsraci6n
del mango
N(_meros de
series y modelo
Protector
de motor
girateria list
pars usar
expansible
Agitedor
(abajo)
Ilberacl6n
del mango
•Base de
boqugla
Bot6n pars reajuster la
sobrocargs de agltador
G
JUEGOS DE MANGUERA
DE EXTENSION
Manguera _ extensk_n
HandI-Mate ® Jr.
Porfavorpongaespecialatenci6na dstosrecuadrosconalertsde riesgo.Adverlencia: Este
inlormacibnlealsrtard delpsligmdefusgo,choqueselectricos,quemadasy lesionss Cuidado:
Esteinformaci6nlealertaradepeligroscomolesionesy daSosde propiedad.
Peligrode choqueeldctrico
No conects la asplradora hastaque ter-
minede armada. DeIo contrario podria
causarun choque el_ctrico o lesl6n corpo-
ral.
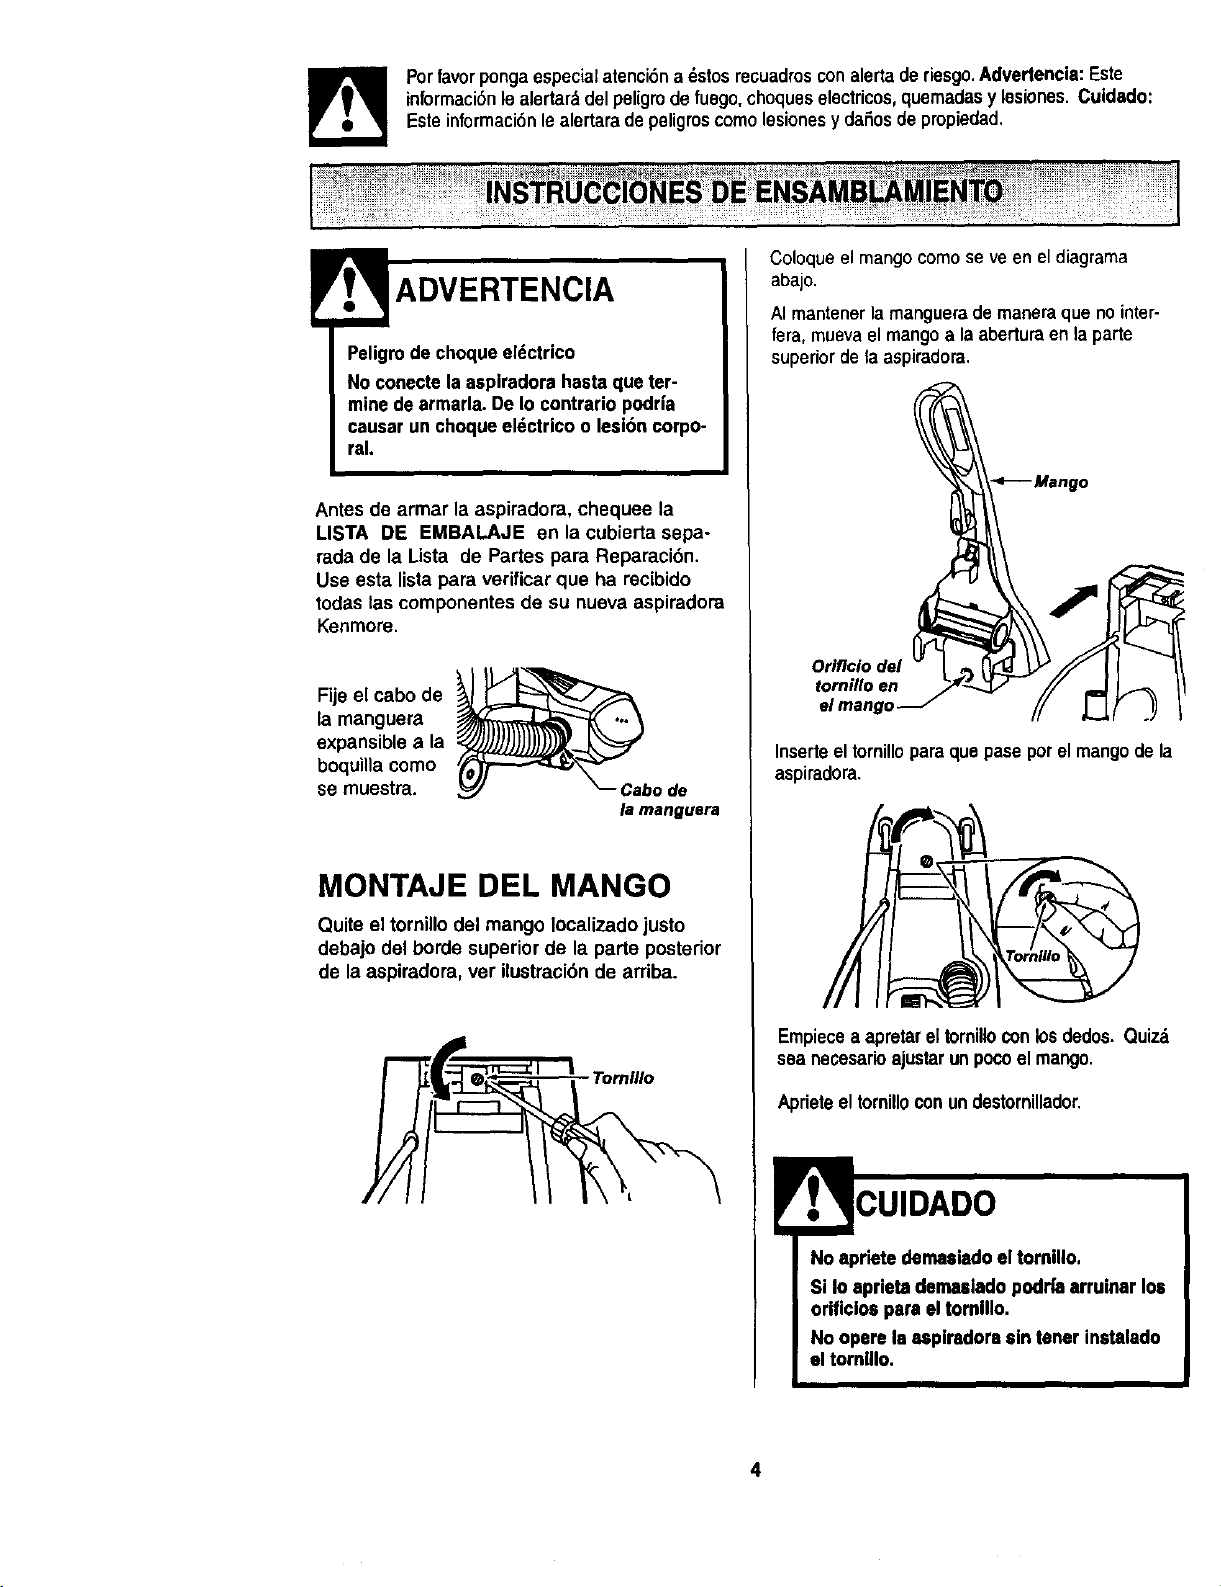
Antes de armar la aspiradora, chequee la
LISTA DE EMBALAJE en la cubierta sepa-
rada de la Lista de Partes pars Reparaci6n.
Use esta lista para verificar que ha recibido
todas las componentes de su nueva aspiradora
Kenmore.
Fijeel cabo de _ ._.._--------_X...'_L./_
la manguera
expansiblea la
boquina como
se muestra, o
de
la manguera
MONTAJE DEL MANGO
Quite el tornillodel mango localizado justo
debajo del borde superior de la parte posterior
de la aspiradora, vet ilustraci6n de arriba.
Tornlllo
Coloqueel mangocomose veen el diagrama
abajo.
AI mantenerla manguerade mansra que nointer-
fera, muevael mangoa la aberturaen la parte
superior de fa aspiradora.
Inserteeltornilloparsquepaseporelmangode la
aspiradora.
Empiecea apretar eltomillo conlosdedos. Quizd
sea necesarioajustarunpocoel mango.
Aprieteel tornilloconundestornillador.
No apriete dernasladoel tomillo.
Si Io aprietadentulado podrfaarruinar los
orificlos pars el tomlllo.
No opere la 8splradorssin tener instalado
el tornlllo.
4
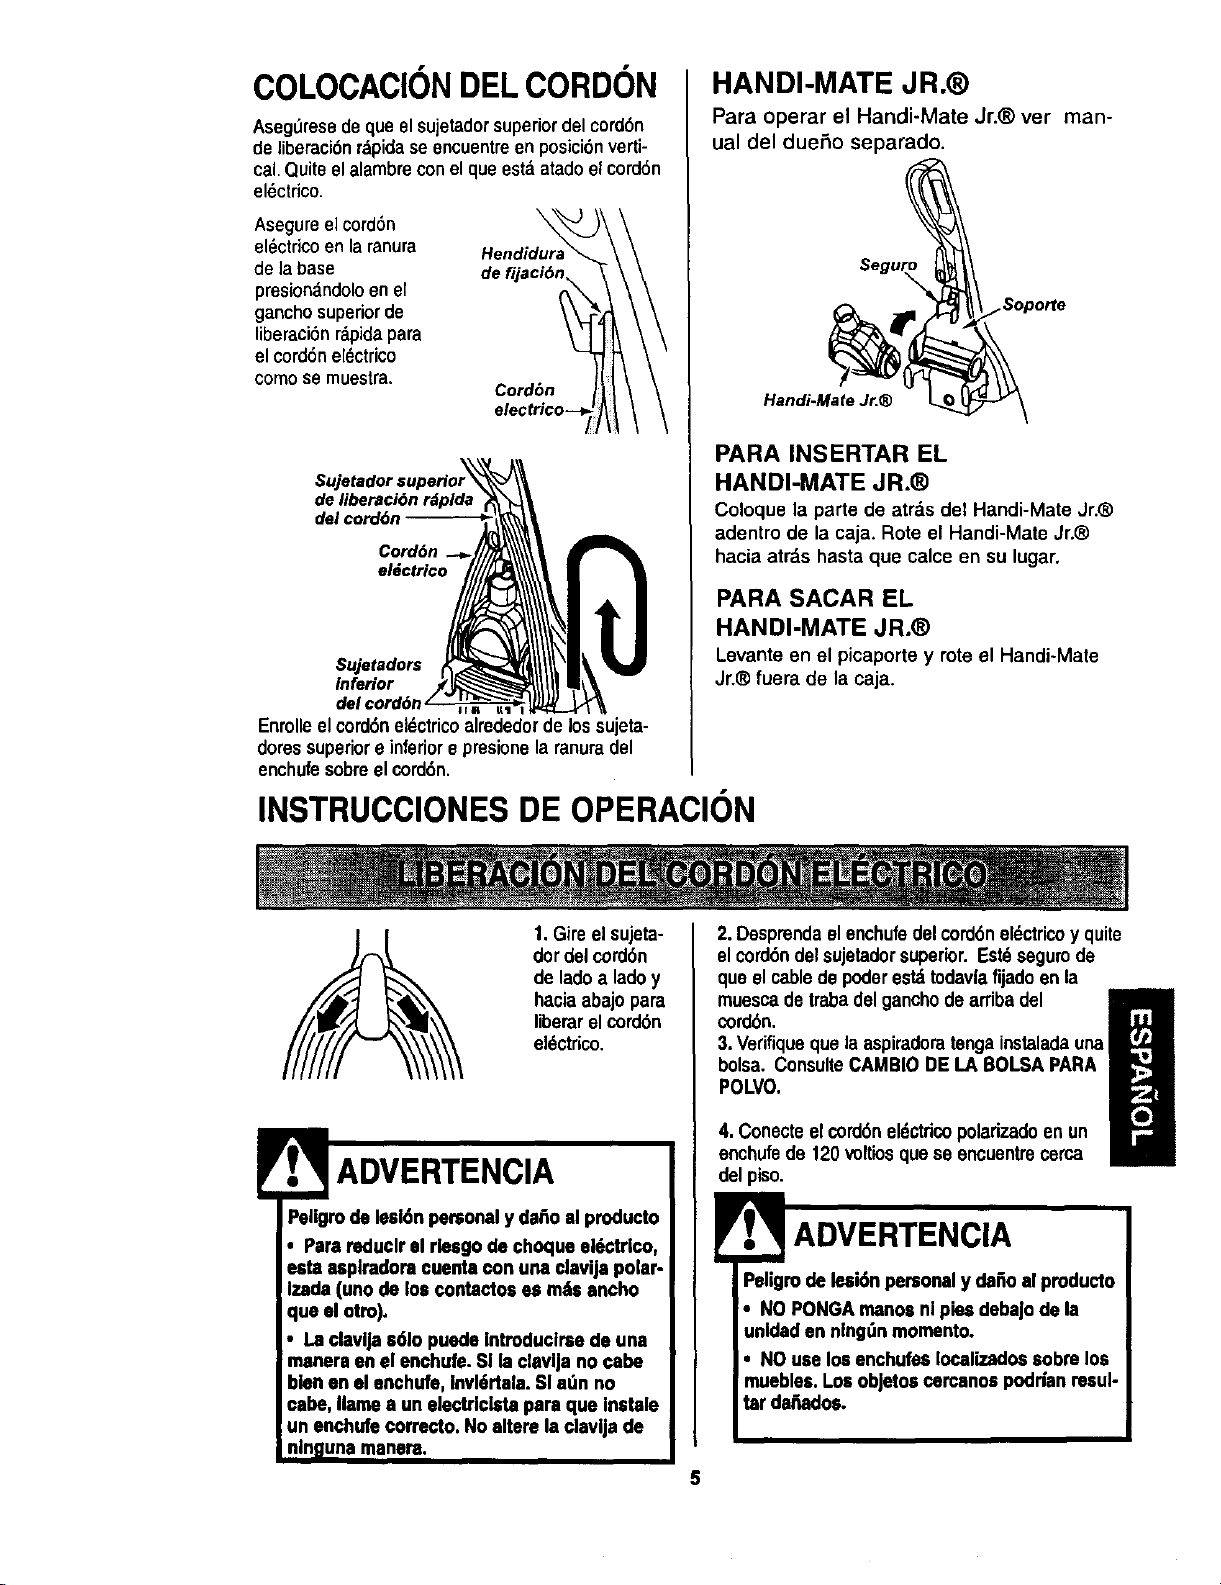
COLOCAClONDELCORDON
AsegL_resedequeelsujetadorsuperiordelcord6n
deliberaci6nrdpidase encuentreen posici6nverti-
cal,Quiteelalambreconelque estdatadoelcord6n
el_ctrico.
Asegureelcord6n
el_ctricoen la ranura
de labase
presionandoloen el
ganchosuperiorde
liberaci6nrdpida para
el cord6nelectrico
como se muestra,
de f,
Cord6n
de liberaci6n rdpida
del cord6n
Cord6n
eldctrico
$ujetadors
inferior
Enrolleel cord6neldctricoalrededorde los sujeta-
doressuperiore inferiore presionela ranuradel
enchufesobreel cord6n.
INSTRUCCIONES DE OPERACION
HANDI-MATE JR.®
Para operar el Handi-Mate Jr.® vet man-
ual del dueSo separado.
.Sopo_e
Handi-Mate Jr.®
PARA INSERTAR EL
HANDI-MATE JR.®
Coloque la parte de arras de1Handi-Mate Jr._
adentro de la caja. Rote el Handi-Mate Jr.®
hacia atrds hasta que calce en su lugar.
PARA SACAR EL
HANDI-MATE JR.®
Levante en el picaporte y rote el Handi-Mate
Jr.® fuera de la caja.
1.Gireel sujeta-
dordelcord6n
de lado a ladoy
haciaabajopara
liberar el cord6n
el_ctrioo.
Peligmde lesl6npersonaly dahoal producto
• Parereduclrel rleegode choque el_ctrlco,
esta asplradoraeuenta con una elavija polar-
Izade(unode los contactoses rodsancho
que el otro).
• La clavlJas61opuedeIntroduclrsede una
manereen el enchufe.Sl laclavlja no cabe
blenen elenchufe, Invl6rtala.Sl a_n no
cabe, Ilamea un electrlcista pare que inetale
un enchufecorrecto,No altare la clavljade
nlngunarnanera.
2. Desprendael enchufedelcord6nel_ctricoy quite
el cord6ndelsujetadorsuperior.Estdsegurode
que elcablede poderestdtodav|afijado enla
muescade trabadel ganchodearribadel
cord6n.
H
3. Verifiquequela aspiradoratengainstaladauna
bolsa. ConsulteCAMBIODE LA BOLSAPARA
POLVO.
4. Conecteelcord6neldctdcopolarizadoenun
enchufede 120voltiosquese encuentrecerca
del piso.
Peligmde lesi6npersonaly dafioalpmducto
• NO PONGAmanosnl piesdebaJode la
unldaden nlng_nmomento.
• NO uselos enchufesIocalizadoseobrslos
mueblee.Los objetoecercanoapodrfanresul-
tar dertadoe.
5
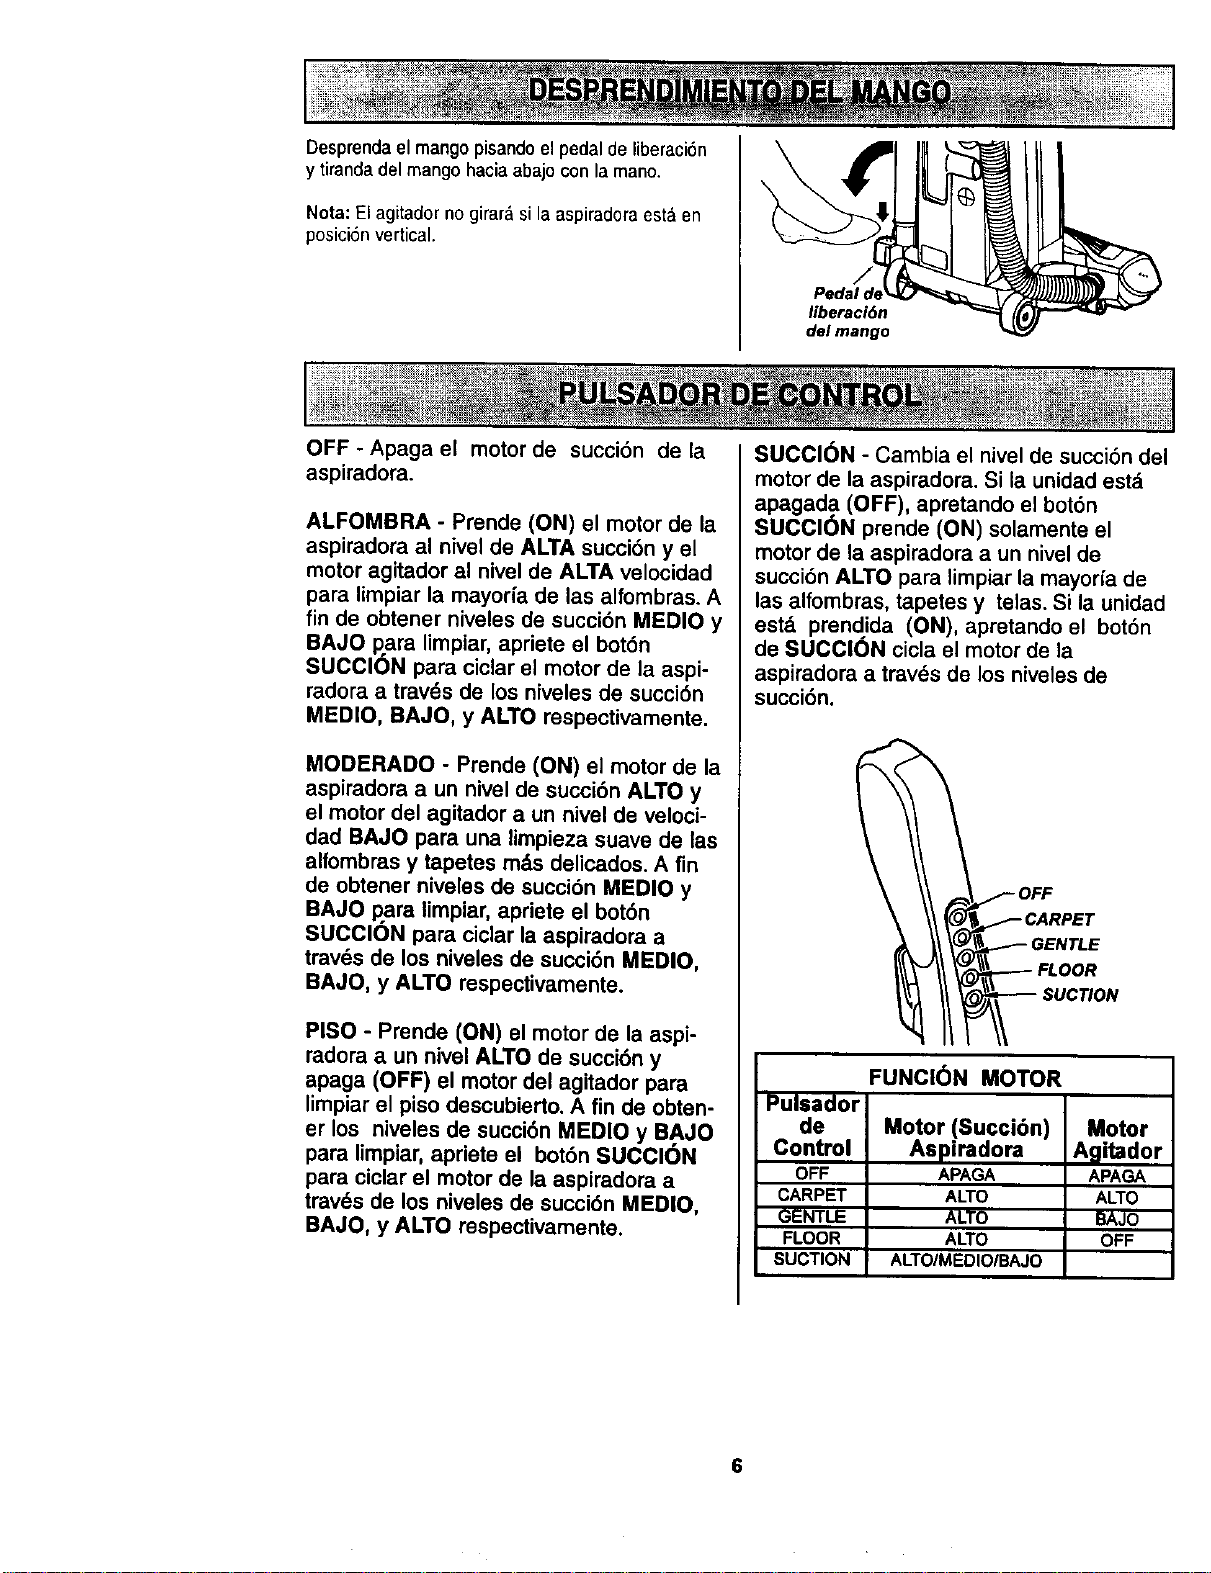
Desprendael mango pisandoel pedal de liberaci6n
y tiranda del mango haciaabajo con la mano.
Nota: El agitador no girard si la aspiradoraest,. en
posici6nvertical.
liberaciOn
del mango
OFF - Apaga el motor de succi6n de la
aspiradora.
ALFOMBRA - Prende (ON) el motor de la
aspiradora al nivel de ALTA succi6n y el
motor agitador al nivel de ALTA velocidad
para limpiar la mayor_a de las alfombras. A
fin de obtener niveles de succi6n MEDIO y
BAJO para limpiar, apriete el bot6n
SUCCION para ciclar el motor de la aspi-
radora a travds de los niveles de succi6n
MEDIO, BAJO, y ALTO respectivamente.
MODERADO - Prende (ON) el motor de la
aspiradora a un nivel de succi6n ALTO y
el motor del agitador a un nivel de veloci-
dad BAJO para una limpieza suave de las
alfombras y tapetes rods delicados. A fin
de obtener niveles de succi6n MEDIO y
BAJO para limpiar, apriete el bot6n
SUCClON para ciclar la aspiradora a
travds de los niveles de succi6n MEDIO,
BAJO, y ALTO respectivamente.
PISO - Pmnde (ON) el motor de la aspi-
radora a un nivel ALTO de succidn y
apaga (OFF) el motor del agitador para
limpiar el piso descubierto. A fin de obten-
er los niveles de succi6n MEDIO y BAJO
para limpiar, apriete el bot6n SUCCl6N
para ciclar el motor de la aspiradora a
trav6s de los niveles de succi6n MEDIO,
BAJO, y ALTO mspectivamente.
SUCCION - Cambia el nivel de succi6n del
motor de la aspiradora. Si la unidad est&
apagada (OFF), apretando el bot6n
SUCClON prende (ON) solamente el
motor de la aspiradora a un nivel de
succi6n ALTO para limpiar la mayorfa de
las alfombras, tapetes y telas. Si la unidad
estd prendida (ON), apretando el bot6n
de SUCClON cicla el motor de la
aspiradora a travds de los niveles de
succi6n.
LOOR
!_'_ SUCTION
FUNCI6N MOTOR
Pulsador
de Motor (Succi6n) Motor
Control Aspi_dora Agi_dor
OFF APAGA APAGA
CARPET ALTO ALTO
GENTLE ALTO BAJO
FLOOR ALTO OFF
SUCTION ALTO/MEDIO/BAJO
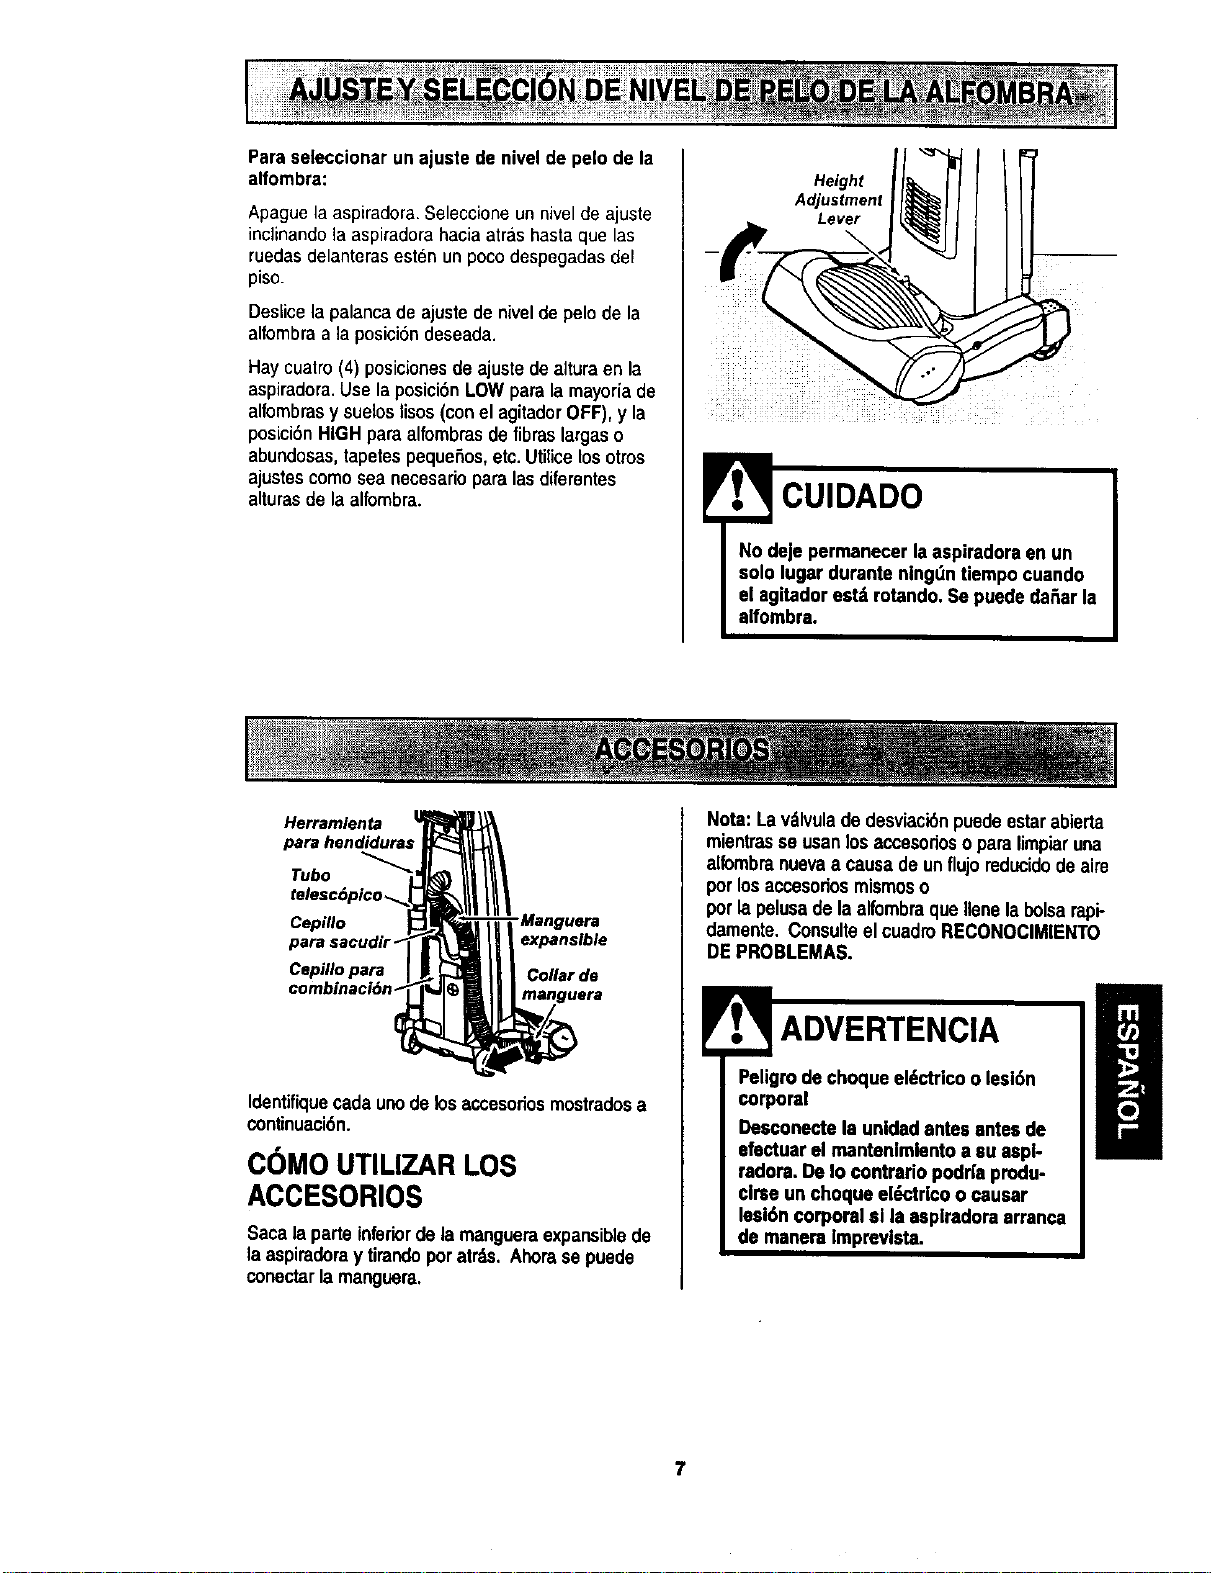
Paraseleccionarun ajuste de nivelde pelo de la
alfombra:
Apague la aspiradora. Seleccione un nivel de ajuste
inclinando la aspiradora hacia atras hasta que las
ruedas delanteras esten un poco despegadas del
piso.
Deslicela palanca de ajustede nivelde pelo de la
alfombraa la posici6n deseada.
Haycuatro (4) posicionesde ajuste de alturaen la
aspiradora.Use la posici6n LOWpara la mayoria de
alfombrasy suelos lisos (con el agitadorOFF),y la
posLciSnHIGHpara alfombrasde fibras largaso
abundosas,tapetes peque6ns,etc.Utilice losotros
ajustescomo sea necesarioparalasdiferentes
alturas de la alfombra.
Height
Adjustment
Lever
CUIDADO
Herramlenta
Tubo _
Cepillo
Cepillo para
combmaci6n
expansible
Collar de
Identifiquecadaunode losaccesorios mostradosa
continuaci6n.
COMO UTILIZAR LOS
ACCESORIOS
Saca laparteinferiorde lamangueraexpansiblede
laaspiraderay tirandopor atrds.Ahorase puede
conectarla manguera,
Nota: La vdlvuladedesviaci6npuede estarabierta
mientrasse usanlosaccesorioso paralimpiaruna
alfombranuevaa causade unflujoreducidode aire
porlosaccesoriosmismoso
porla pelusade la alfombraque Ilenelabolsarapi-
damente.ConsulteelcuadroRECONOClMIENTO
DEPROBLEMAS.
Pe_gomradechoqueel6ctricoo lesl6n
Desconectela unldadantes antesde
efactuarel mantenlmlentoa su aspl-
radora.DeIo contradopodr|a produ-
clrse un choqueel_trlco o causar
lesi6ncorporal sl la asplradoraarranca
de manera Imprevlsta.
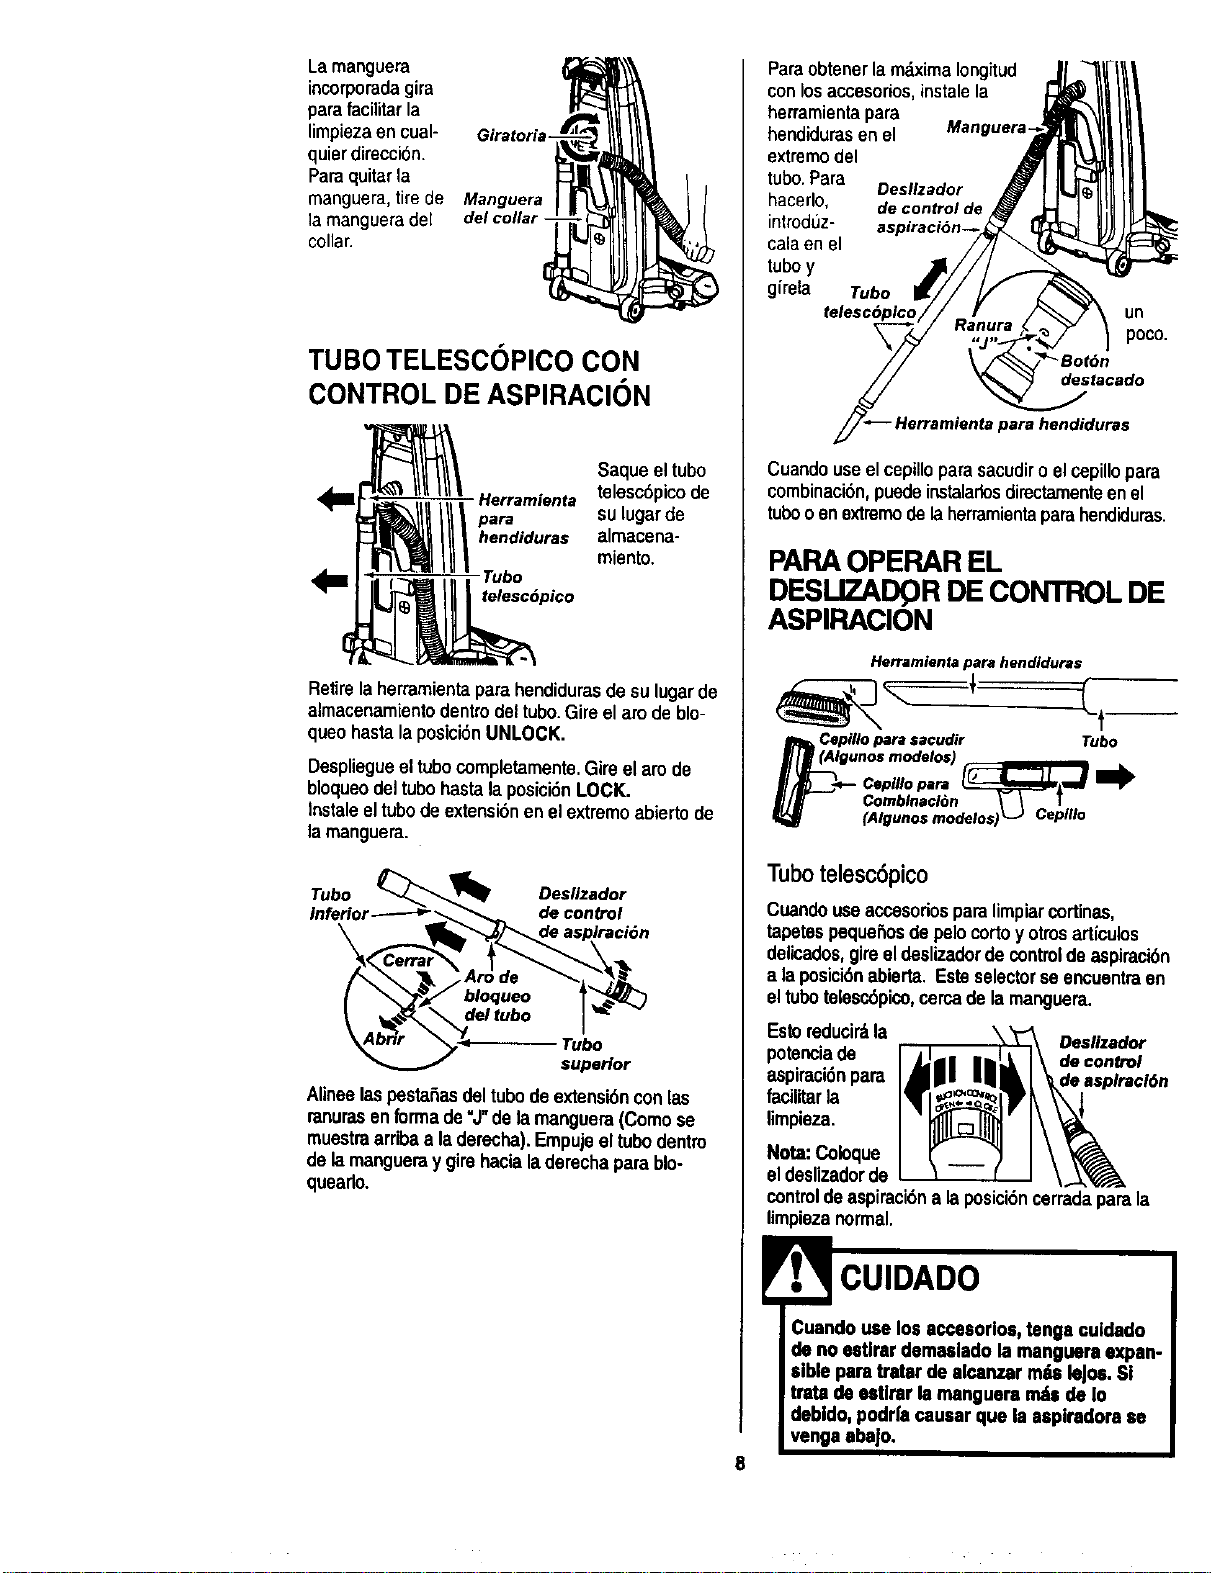
Larnanguera
incorporadagira
parafacilitarla
limpiezaen cual- Giratori
quierdireccion.
Paraquitarla
manguera,tirede Manguera
la mangueradel del collar-
collar.
TUBOTELESCOPICO CON
CONTROL DE ASPIRAClON
Saque el tubo
Herramienta telesc6pico de
para SUlugar de
hendiduras almacena-
miento.
Tubo
telesc6pico
Retirela herramientapara hendidurasde sulugarde
almacenamientodentrodeltubo.Gire el arode blo-
queohastalaposici6nUNLOCK.
Despliegueel tubocompletamente.Gireel am de
bloqueodeltubo hasta la posici6n LOCK.
Instaleeltubode extensi6nenel extremoabierto de
lamanguera.
jTufbe°or _ DdeSclioZadtr_
AlineelaspestaSasdeltubodeextensi6nconlas
ranurasenforrnade "J"de lamanguera(Comose
muestraarribaa laderecha).Empujeeltubodentin
delamangueraygirehacialaderechaparablo-
quearlo.
ParaobtenerlamdximaIongitud J1_7I_1/1
conlosaccesorios,instalela _ _i _
herramientapara -.-'_'_11 _1
he.did_,enel M*""u*r'TiP,l \_tll_
extremodel ._] | _1_
tubo.Para Oes.zador J !IL._I_II
hacerlo, decontrolde_ _H I-It!1111!..-
introdL_z- aspiraci6n--_ _I _))JI_
calaen el /7/ _(_;_=_ %
t,,boy -"
girela Tubo _// _/
telesc6plco// - ! _ .7 \ un
Cuandouseelcepilloparasacudiro elcepillopara
combinaci6n,puedeinstalarlosdirectamenteenel
tubooenextremodelaherramientaparahendiduras.
PARAOPERAR EL
DESUZADQR DE CONTROL DE
ASPIRACION
Herramienta para hendiduras
Cepillo para sacudir Tubo
gunos modelos) __
Comblnacl6n \ \ I
(Algunos modelos) _J Ceplllo
Tubotelesc6pico
Cuandouseacoesoriosparalimpiarcortinas,
tapetespeque5osdepelocortoy otrosarticulos
delicados,gireeldeslizadordecontrolde aspiracibn
a laposici6nabierta. Esteselectorse encuentraen
eltubotelesc6pico,cercade lamanguera.
Esto reducirdla
potenciade
aspiraci6npara
facilitarla
limpieza.
Oeslizador
de control
Nota:Coioque
el deslizadorde
controldeaspiracidna laposici6ncermdaparala
limpiezanormal.
8
CUIDADO
Cuandouse losaccesorlos,tenga culdado
de no estlrardemasladola mangueraexpan-
siblepara tratarde alcanzar rodsleJos.Sl
trata de estlrarla mangueramdsde Io
debldo, podri'acausarque laaspiradora se
venga aba|o.

ALMACENAJE DE LOS
ACCESORIOS
RetireelcepilioparasacudiroelcepiUopara
combinaci6n,Col6quelosfirmementeen sulugarde
almacenamientocorrespondiente.
Retire la herramientapara hendidurasdel tubo
girdndola.P6ngalaa unlado.
Retireel tubode extensi6nde la manguera.Gire el
tube haciataizquierday tire del extremode la
manguera.
Tubo
Abr_
Cerrar
bloqueo
del tubo
Tubo
superior
Desbloqueeel tubogirando el aro de bloqueo hasta
la posici6n UNLOCK.
Desticeeltubo inferiordentrodel tubosuperior.Gire
elarede bloqueodeltuboa laposici6nLOCK.
Introduzcala herramientaparahendidurasdentro
del tubocomprimido.Instalebien ensuposici6nde
almacenamiento,
Aseg_resedequela unidadest_apagada.Inserte
nuevamentelamangueracompletamentedentrode
la aberturaubicadaentaparteinferiordela
aspiradora,dedondelasac6inicialmente.
! CUIDADO
NO tire dela aspiradorapor la manguera
an la habltaci6n.Podrianocurrlr da_os a
I sus pertenencias.
MANGUERA DE EXTENSION
Algunosmodelosincluyenunamangueraauxiliar
queconectaconlamangueraexpansibleen la
aspiradoraparaunaextensi6nm_slarga,
Manguera de la unidad Manguera de extensi6n
[llll[llJ
Insertelasdosleng0etasenel extremede la
mangueradeextensi6nen lasdosranurasformadas
como la letraJ en la aspiradoray gire paraconectar.
Se puedeeonectartodaslasherramientasy el tubo
telesc6picoconelextremoabiertodela manguera,
E CUIDADO
Cuando usela mangueraen forma normal o
con la manguerade extensl6ntnstalada,la
aspiradora debe mantenersesobre una
superficiefirme al mismonivel o a un nlvel
inferiorque los pies del usuario. NOuse las
manguerascuando la asplradoraest_ a un
nlvel m._salto que los pies del usuario.
9
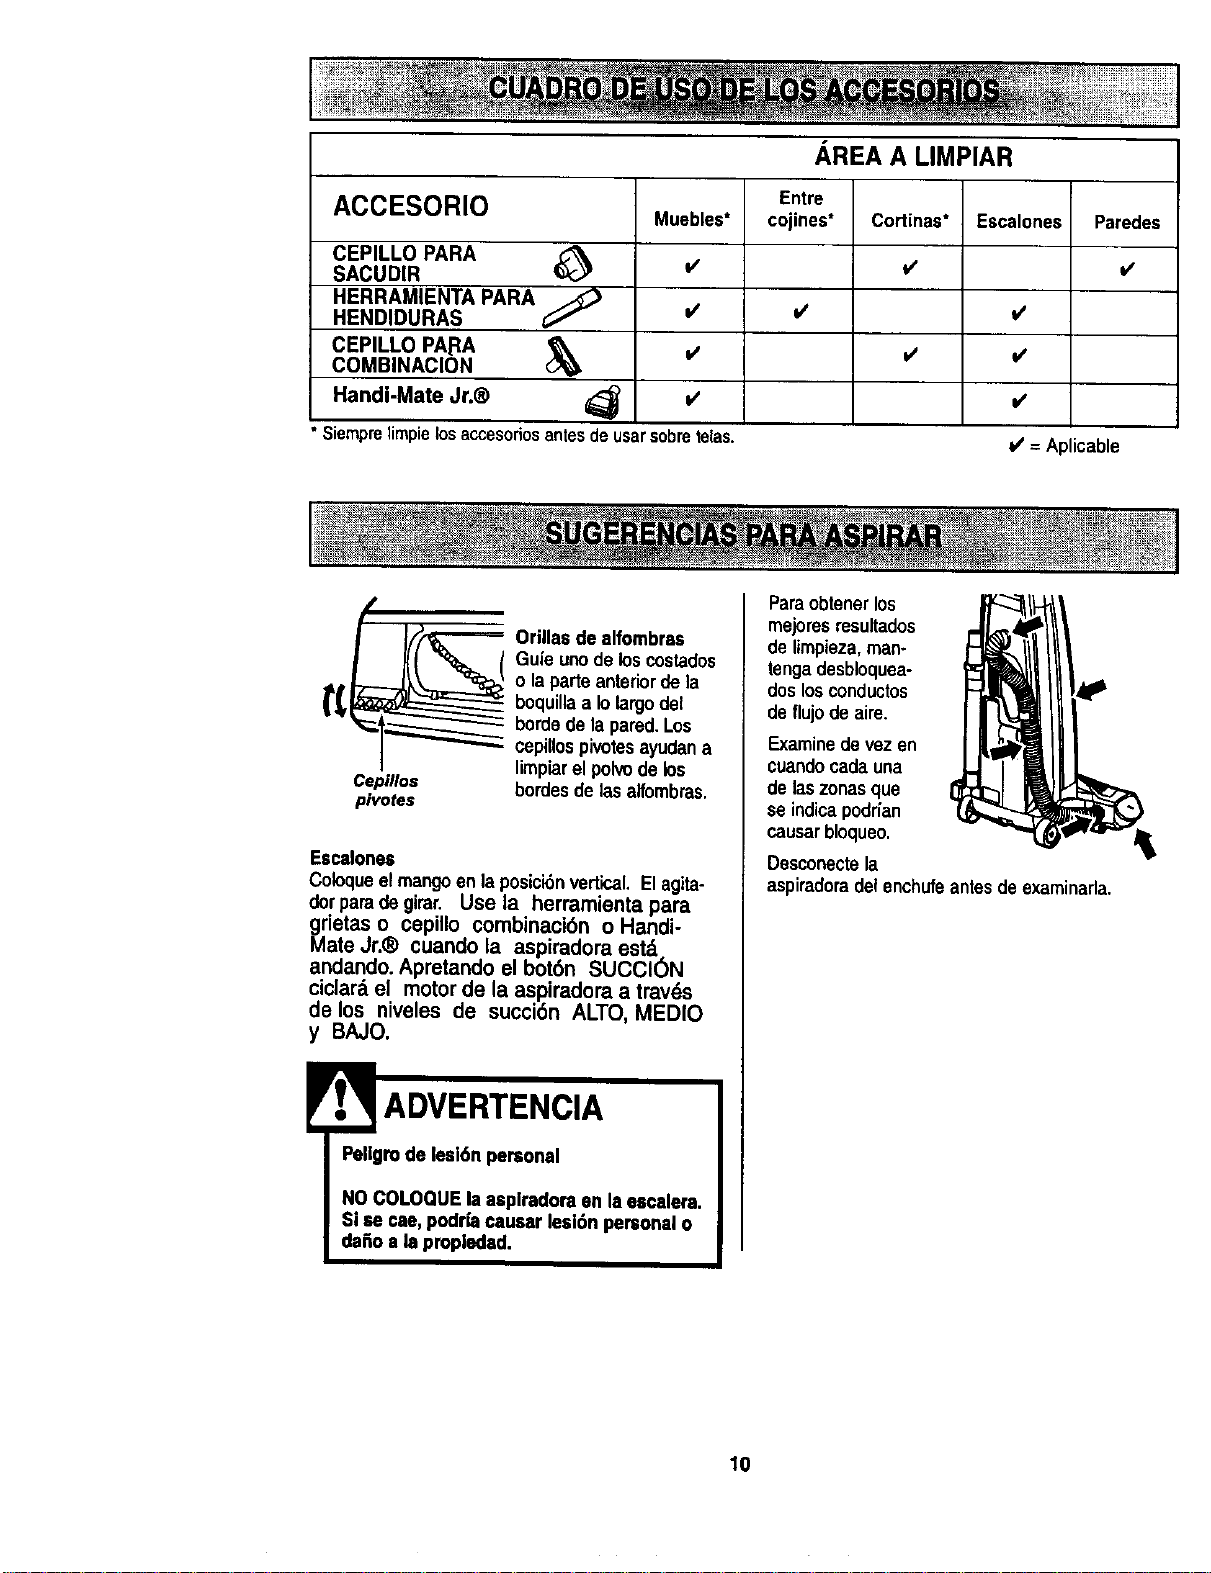
ACCESORIO
CEPILLO PARA
SACUDIR
HERRAMIENTA PARA
HENDIDURAS
CEPILLO PARA
COMBINACION
Muebles*
=/
Siemprelimpielosaccesoriosantesdeusarsobretelas.
Handi-Mate Jr.®
AREA A LIMPIAR
Entre
cojines*
Cortinas*
v'
Escalones
Paredes
v'
v'
v'
v'
v' = Aplicable
Cepfllos
pivotes
_ rillas de alfombras
Gufeunode loscostados
o la parte anteriordela
boquillaa Iolargodel
bordede lapared.Los
cepillospi_tes ayudana
limpiarel polvode los
hordesde lasalfombras.
Escalones
Coloqueelmangoen laposicibnvertical. Elagita-
dotparade girar. Use la herraroienta para
i_ietas o cepillo combinaci6n o Handi-
ate Jr.® cuando la aspiradora est,.
andando. Apretando el bot6n SUCCION
ciclard el motor de la aspiradora a travds
de los niveles de succi6n ALTO, MEDIO
y BAJO.
ADVERTENClA
Pellgrode lesi6n personal
NOCOLOQUEla aeplradoraen la eecalera.
Siae cae,podriacauser lesi6n personalo
dafio a la propledad.
Paraobtener los
mejoresresultados
de limpieza,man-
tenga desbloquea-
dos los conductos
de flujode aire.
Examinedevezen
cuandocadauna
de laszonasque
se indicapodrfan
causarbioqueo.
Desconectela
aspiradoradel enchufeantesdeexaminada.
lO
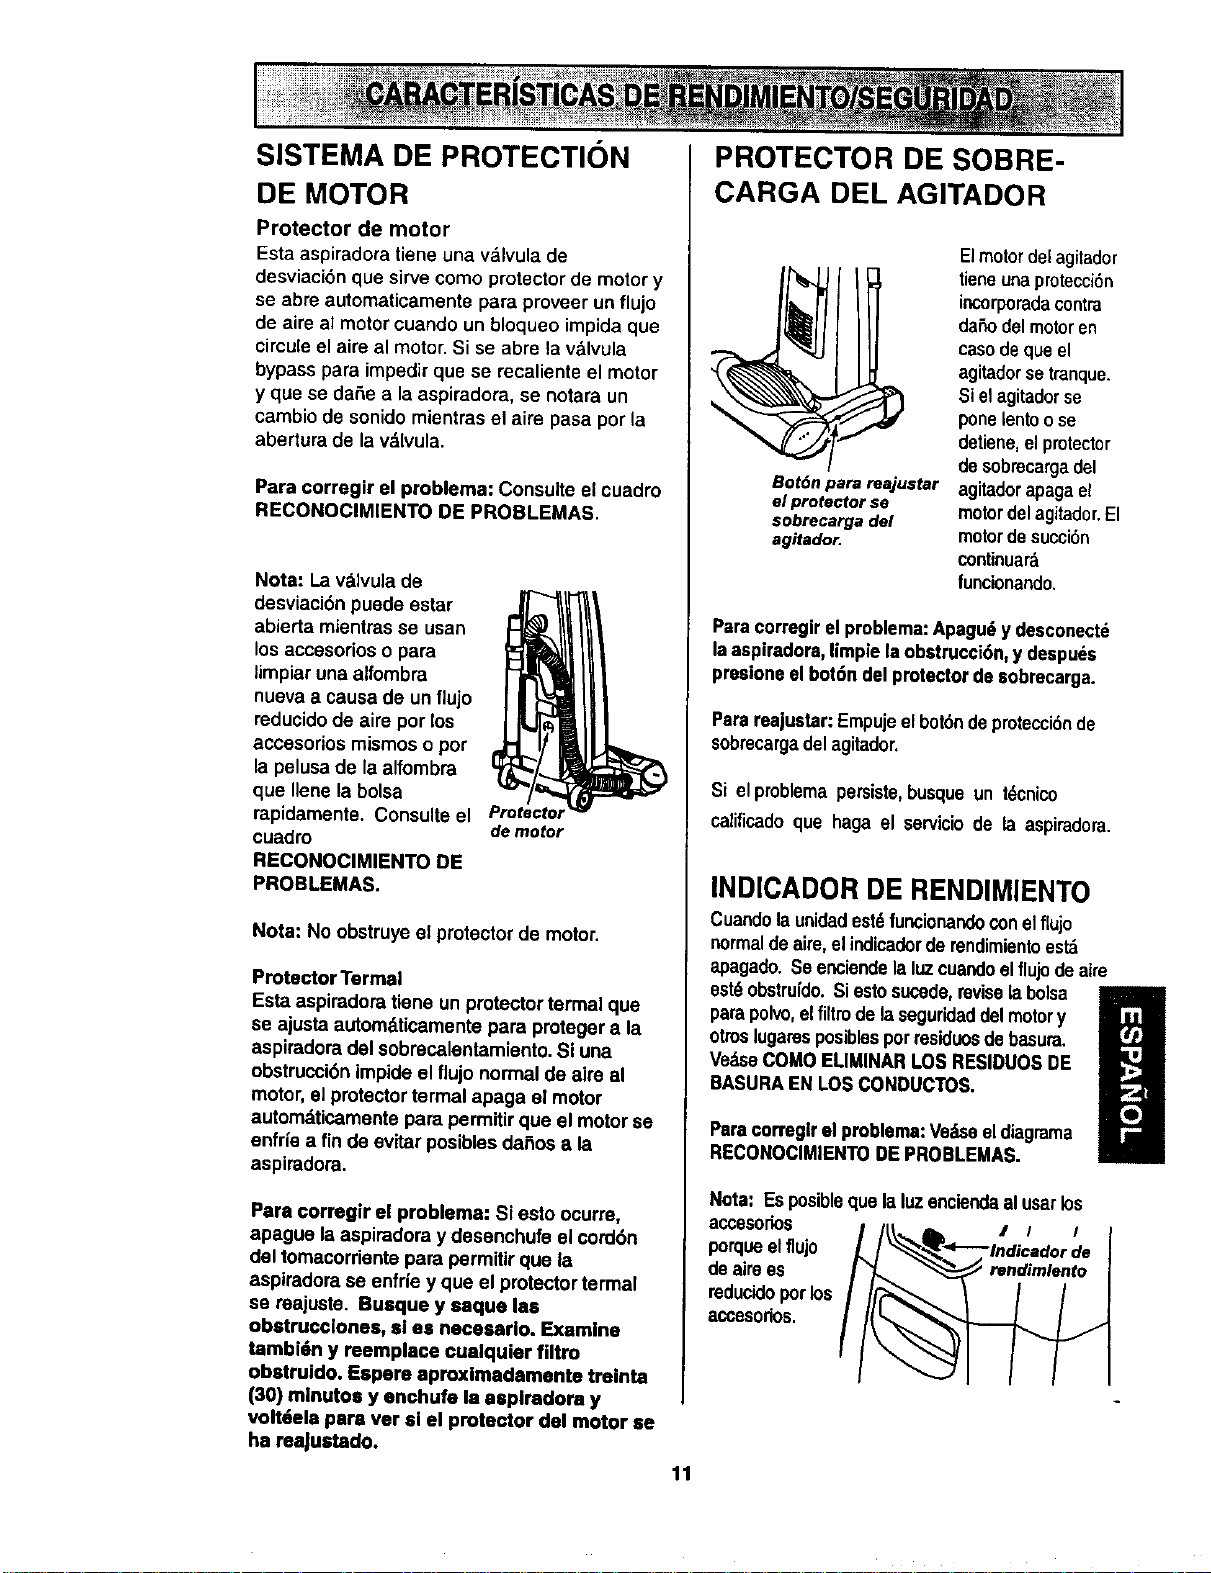
SISTEMA DE PROTECTION
DE MOTOR
Protector de motor
Esta aspiradora tiene una v&lvula de
desviacibn que sirve como protector de motor y
se abre automaticamente para proveer un flujo
de aire al motor cuando un bloqueo impida que
cireule el aire al motor. Si se abre la valvula
bypass para impedir que se recaliente el motor
y que so daSe a la aspiradora, se notara un
cambio de sonido mientras el aire pasa por la
abertura de la v,_lvula.
Para corregir el problema: Consulte el cuadro
RECONOCIMIENTO DE PROBLEMAS.
Nota: La v&lvulade
desviaci6n puede estar
abierta mlontrasse usan
los accesorioso para
limpiaruna alfombra
nueva a causa de un flujo
reducidode aire por los
accesorlos mismos o por
la pelusade la alfombra
que Ilene la bolsa
rapidamente. Consulteel
cuadro demotor
RECONOClMIENTO DE
PROBLEMAS.
Note: No obstruye el protector de motor.
Protector Tormal
Esta aspiradora tlone un protectortermal que
se ajusta automdticamentepara protegera la
aspiradora del sobmcalentamiento. Siuna
obstruccibnimpide el tlujo normal de aim al
motor, el protectortermal apaga el motor
automd.ticamentepara permitirque el motorse
enfrie a fin de evitar posiblosdai_osa la
aspiradora.
Para corregir el problema: Si esto ocurre,
apague toaspiradora y desonchufe el cord6n
del tomocorrientopara permitirque la
aspirodorase enfde y que el protectortermal
se reajuste. Busque y eaque los
obstrucclones, sl es necesarlo. Examine
tambi6n y reemplace cualquler filtro
obotruido. Espero aproximadamento treinta
(30) m|nutoo y enchufe ta aspiradora y
volt6ela poro ver si el protector dcl motor se
ha reaJustado.
PROTECTOR DE SOBRE-
CARGA DEL AGITADOR
Bot6n para reajustar
el protector se
sobrecarga del
agitador.
Elmotor detagitador
tieneenaprotecciSn
incorporadacontra
daSodelmotoren
casodeque el
agitadorse tranque.
Siel agitadorse
pone_entoose
detiene,elprotector
desobmcargadel
agitadorapagael
motordelagitador.El
motordesucci6n
continuar&
lunclonando.
Paracorregirel problema:Apagu_y desconectd
laaspiradora,limpie laobstrucci6n,y despuds
presioneelbot6n del protectorde sobrecarga.
Parareajustar:Empujeel bot6ndepmteccidnde
sobrecargadel agitador,
Si el problema persiste, busque un tdcnico
calificadoque haga el servicisde ta aspiradora.
INDICADOR DE RENDIMIENTO
Cuandola unidadest6funcionandoconelflujo
normaldeaire,el indicadorderendimientoest_
apagado.Se enciendela luzcuandoelflujodeaire
est_ obstrufdo.Si esto sucede,revisetaboisa
parapolvo,elfiltro delaseguridaddelmotory
otroslegatosposiblespormsiduosdebasura.
VedseCOMOELIMINARLOSRESIDUOSDE
BASURAEN LOSCONDUCTOS.
Paracorreglr el problema:Vedseeldiagrama
RECONOClMIENTODEPROBLEMAS.
Nota: Esposibleque la luzenciendaalusarlos
ac,cesorios • i i
porqueelflujo
de aimes
reducidoporlos
acoesodos.
11
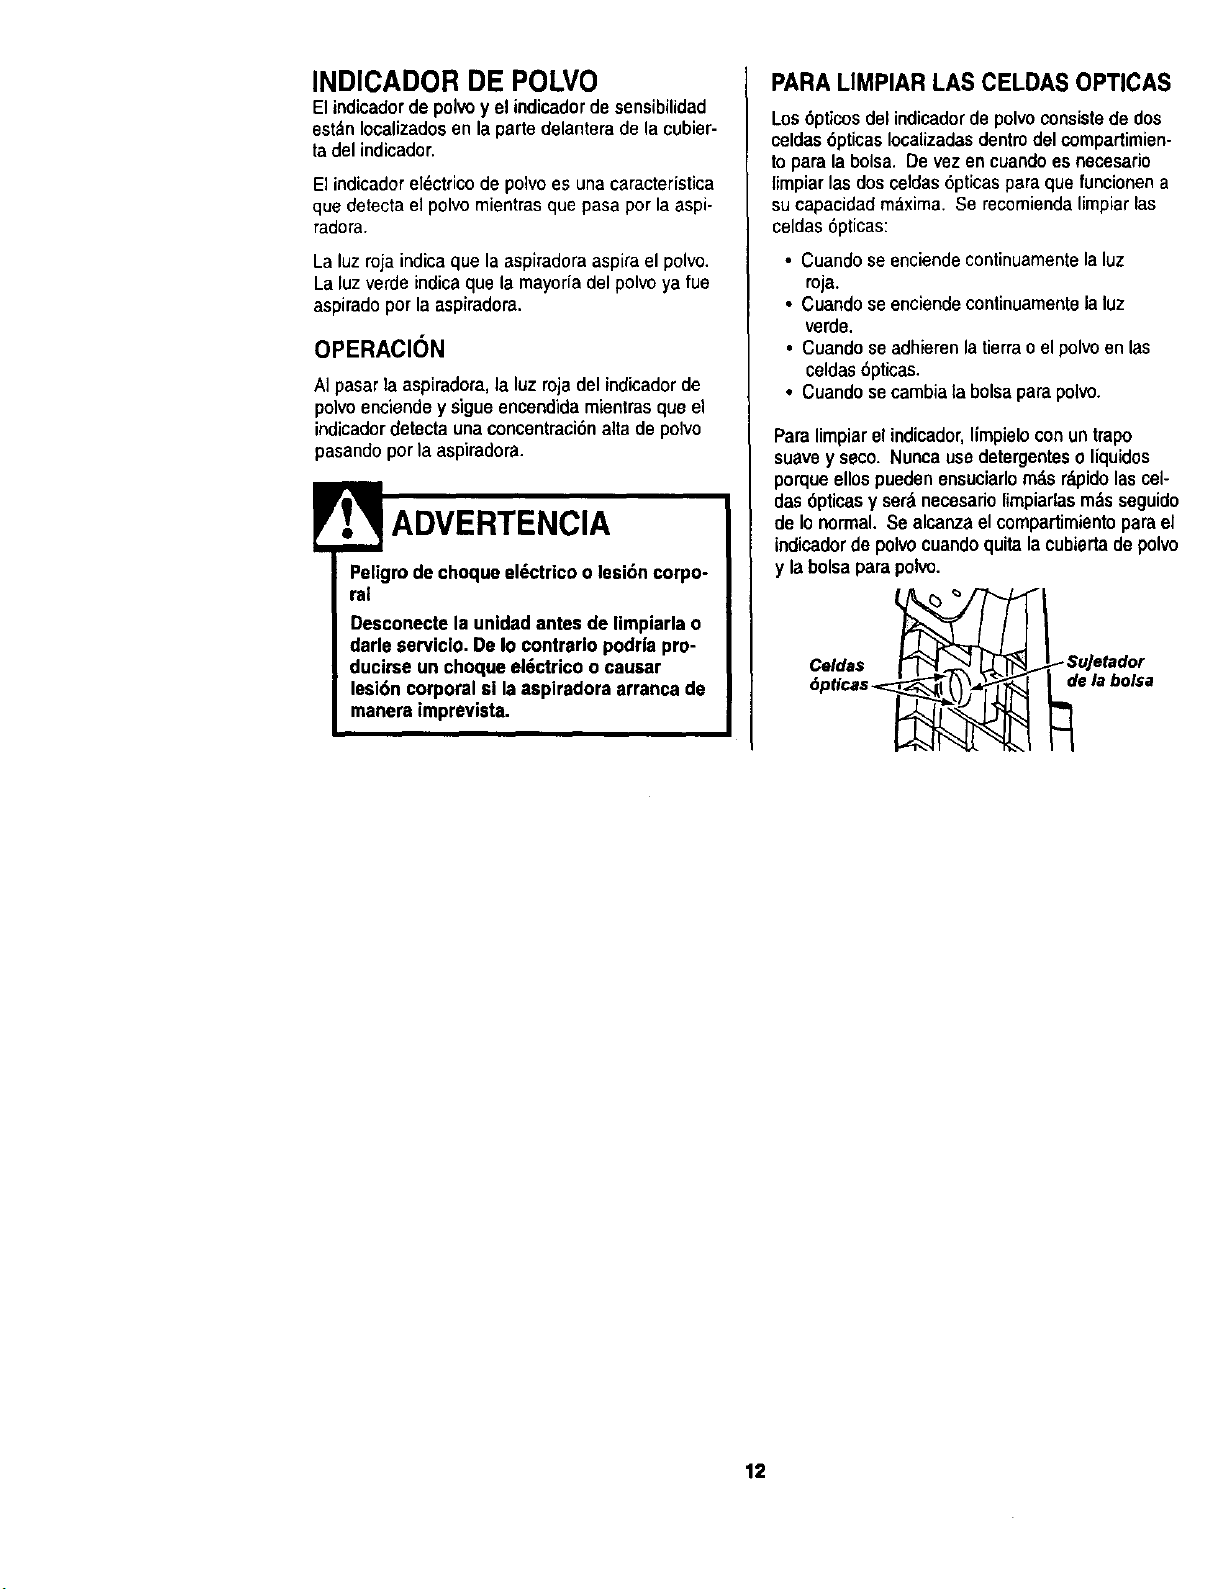
INDICADOR DE POLVO
Elindicadorde polvoy el indicadordesensibilidad
est_nIocalizadosenla partedelanterade lacubier-
tadel indicador.
El indicador el_ctrico de polvo es una caracteristica
que detecta el polvo mientras que pasa por la aspi-
radora.
La luzroja indicaque la aspiradoraaspiraelpolvo
La luzverde indicaque la mayoria del polvo ya fue
aspiradopot la aspiradora.
OPERACION
AI pasarla aspiradora,la luz roja del indicadorde
polvoenciendey sigue encendidamientrasque el
indicadordetectauna concentraci6nalta de potvo
pasandopor la aspiradora.
! ADVERTENCIA
Peligrode choqueeldctricoo lesi6ncorpo-
ral
Desconectela unldadantesde limpiarlao
darle serviclo.De Io contrariopodr|a pro-
ducirse un choqueeldctricoo causar
lesi6n corporalsi laaspiradora arrancade
manera imprevista.
PARA LIMPIAR LAS CELDAS OPTICAS
Los6pticos del indicadorde polvoconsistede dos
celdas6pticas Iocalizadasdentrodel compartimien-
to para la bolsa Devez en cuandoes necesario
fimpiarlas doscetdas6pticaspara que funcionena
su capacidad maxima Se recomiendalimpiarlas
celdas 6pticas:
• Cuandose enciendecontinuamentelaluz
roja.
• Cuandoseenciendecontinuamentela luz
verde.
• Cuandose adhierenla tierrao el polvoen las
celdas6pticas.
• Cuandosecambia la bolsaparapol_.
Paralimpiarel indicador,limpieloconuntrapo
suavey seco. Nuncausedetergenteso liquidos
porqueellospuedenensuciarlorodsrdpidolascel-
das6pticas y set&necesariolimpiarlasm&sseguido
de Ionormal.Se alcanzaelcompartimientoparael
indicadorde polvocuandoquitalacubiertade polvo
y labolsaparapolvo.
Celdas
de la bolsa
12
Siga siempretodas las instruccionesde seguddad
antesde efectuarel mantenimientoa su aspiradora.
RecojaeEcordeny enrrSIleloenlos sujetadoressu-
!
ADVERTENCIA
Peligrodechoqueeldctricoo lesi6ncorpo-
ral
Desconectela unidadantes deefectuar el
mantenimlentoa su aspiradora. DeIo con-
trario podrlaproducirseun choque el_c-
trico o causar lesidn corpora[si la aspira-
doraarrancade maneraimprevista.
per[or e inferior,sinque quede muyapretado.
Guardela aspiradora
bajo techo en un lu-
gar seco,con el
mangoen posicion
vertical.
Desconecteelcordenel_ctricodelaclavijade la
ADVERTENCIA
Peligmde choque eldctricoo lesl6n corpo-
ral
Si enrollael cord6n muyapretadopuede
tensarlo muchoy causarleda_os. Dedafiar.
se, el cord6n podrfacausar descargassl6c-
tricas y lea[oneso
da_os personales.
pared.NOmc;s agua sobrela aaplradora.
Limpieel exteriorconuntrapo suavey limp[o,que
ha sideexprimidedespuds de remojaren unasolu-
cionde agua y detergenteIfquido ligero.Seque el
exteriorconuntrapo seco despu6sde limpiar.
Limpiela superficieexteriordel recept_cuioy de los
accesoriospara reducirla electric[dadest_ticay la
acumulaci6ndepolvo.
Lavelosaccesoriosonaguatibia jabonosa,
enjuaguey dejesecaralaim. No los laveen lava-
doradeplatos.
CUIDADO
No use los accesorios sl estan mojados.
Los accesoriosque se utillcsnsn ;imas
sucias,debaJodel rsfrigerador,no deben
usarse sn otrassuperficiessin antesssr
lavados.Poddan dejarmamas.
13
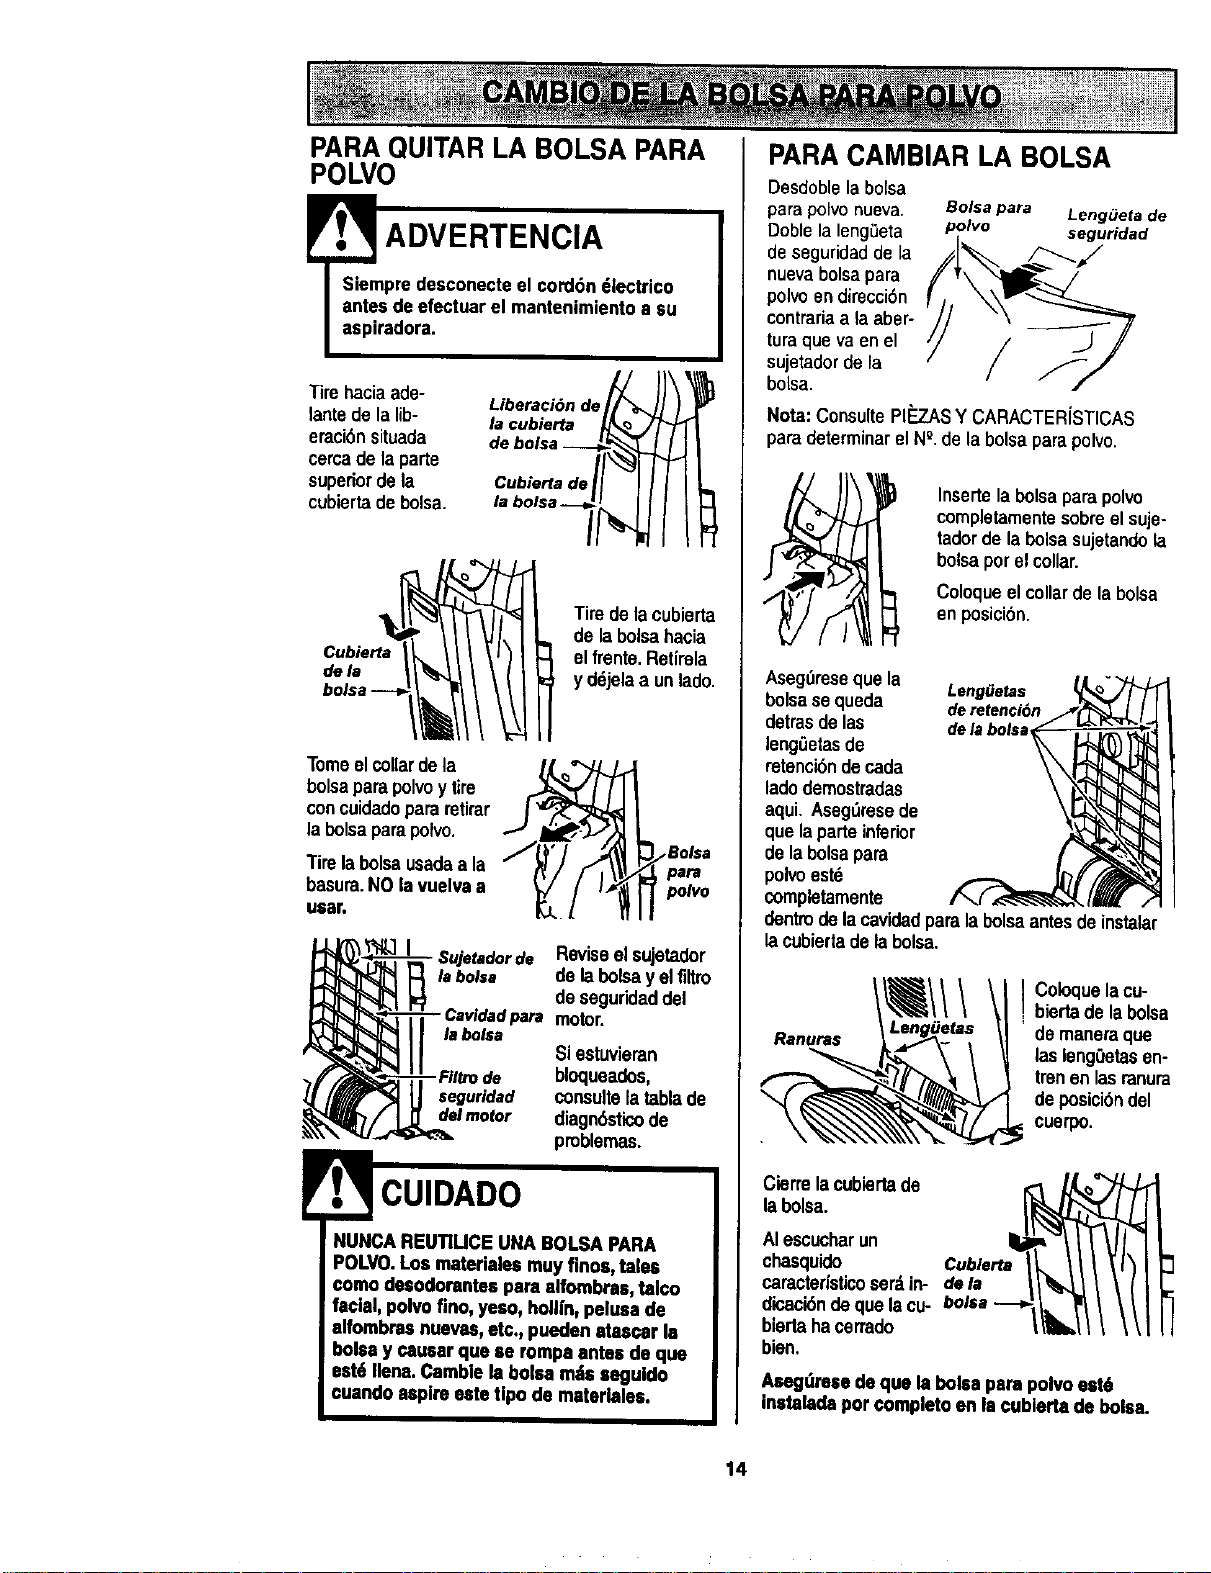
PARAQUITAR LA BOLSA PARA
POLVO
! ADVERTENCIA
Siempredesconecteel cordan _lectrico
antesde efectuarel mantenimientoa su
aspiredora,
Tirehaciaade-
tantede tatib-
erad6nsituada
cercade laparte
superiordela
cubiertadebolsa.
Liberaciande_
Cubiertade[/_"_
/
Cubierta__
Tomeelcollardela
bolsaparapolvoy tire
concuidadopararetirar
labolsaparapolvo.
Tirelabolsausadaa la
basura.NO lavuelvaa
uesr.
Tiredelacubierta
de labolsahacia
atfrente.Rot(rata
y dejela a unlade.
pa_
polo
*Sujotadorde Reviseel sujetader
labolsa de labolsay elfiltm
de segurk:laddel
para motor.
tabolsa
Siestuvieran
- Fillro de bloqueados,
seguridad consultelatablade
delmotor diagnasticode
problemas.
POLVO.Los matedales muyfinos,tales
comodesodorentespara alfombres, tal¢o
facial, polvofino, yeso, hollfn,pelesa de
alfombres nueves,etc., pueden atascar la
bolaay caesar qua ae rompaantes de qua
eat6 Ilena.Camblela bolesmatsseguldo
cuande aspire este tlpode materb,les.
PARA CAMBIAR LA BOLSA
Desdoblelabolsa
parapolvonueva. Bolsapara Long,eta de
Doblela lengSeta polvo seguridad
de segufidadde la _/
nuevabolsapara
polvo en direcci6n
contraria a la aber-
turaque va en el /
sujetadorde la
/
boisa.
Nora:Consulte Pl_JkS ¥ CARACTER{STICAS
para determinarel NQ.de labalsapara polvo.
Insertelabolsaparapolvo
completamentesobreel suje-
tadordela bolsasujetandola
bolsaporelcollar.
Coloqueel collarde labolsa
enposicibn.
Aseg_resequala LengfJelas
bolsase queda deretencian
detrasde las delabotsa
leng_etasde
retencibndecada
ladedemostradas
aqui, Aseg_resede
que la parteinferior
de la bolsapara
poivoest6
completamente
dentindelacavidadparalabolsaantes deinstalar
lacubiertadelabalsa,
I Coloquetacu_
biertade la bolsa
de maneraque
lasieng0etasen-
trenantasranura
de posiciandel
cuerpo.
Cierrelacubiertade
labolsa.
Atescucharun
chasquido Cubierta
caracterfsticoserdin- dola
dicaciande qualacu- bolsa ---_
biertahacerrado
bien,
Aesg,_resedequa la boisepare polvoest6
instaladapor completoenla cublertade boles.
14
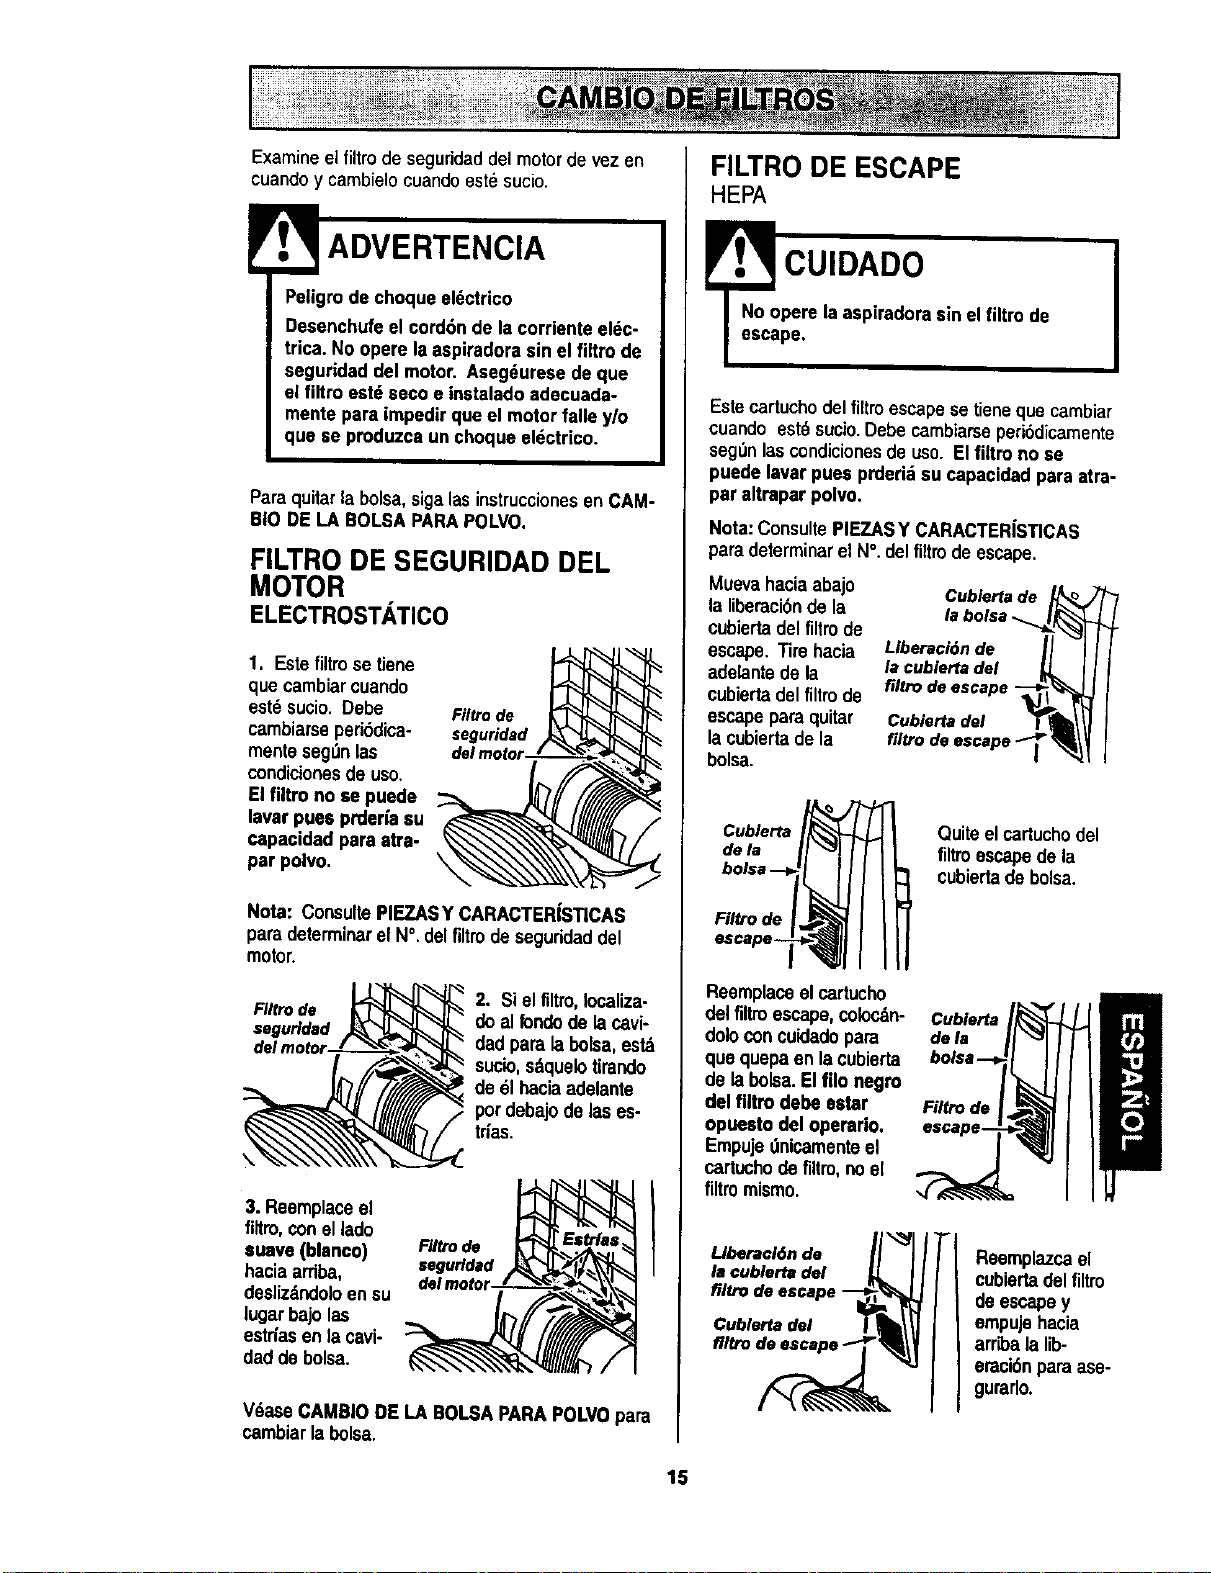
Examine elfiltro de seguridaddel motor de vez en
cuandoy cambielocuandoest_ sucio.
!
ADVERTENCIA
Petigrode choqua ek_ctrico
Desenchufeel cord6nde la corrienteel_c-
trica. No opere laaspiradorasin el firm de
seguridad de[ motor. Aseg_uresedeque
el filtro est_ secoe instaladoadecuada-
mente pareimpedirque el motorfalla y/o
qua so produzca un choqueeldctrico.
Paraquitarla bolsa,sigalasinstruccionesenCAM-
BIO DELA BOLSAPARAPOLVO.
FILTRO DE SEGURIDAD DEL
MOTOR
ELECTROSTATICO
1. Este filtro se tiene
que cambiarcuando
est_ sucio.Debe Filtrode
cambiarseperiSdica- seguridad
menteseg_nlas
condicionesde uso.
Elfiltro no se puede
laver puaa prderiasu
capa¢idadpare atra-
par polvo.
Note: ConsultePIEZASY CARACTER|STICAS
paredeterminerel N°.delfiltrodeseguridaddel
motor,
FIItro de
seguridad
2. Siel filtro,localize-
do alrondode lacavi-
dad paralabolsa,est_
sucio,sdquelotirando
de 61haciaadelante
pordebajode las es-
tries.
3. Reemplaceel
filtro, conel lado
suave(blanco)
haciaarriba,
doslizdndoloen su
lugarbajolas
estriasen )acavi-
dadde bolsa.
F#Uode
segufldad
ITlea
V_ase CAMBIODE LA BOLSAPARAPOLVOpara
cambiarla bolsa.
FILTRO DE ESCAPE
HEPA
.,3cu,o,oo
No opere laaspiradorasin el filtro de
escape.
Estecartuchodelfiltroescapese tienequecambiar
cuando est_sucio.Debecambiarseperibdicamente
seg_n_s cond_cionesdeuso. Elliltro no se
puedelavar pues prdari:_su capacidadpara atra-
paraltrapar polvo.
Note: ConsultePIEZAS¥ CARACTERiSTICAS
paredeterminar el N°. delfiltrode escape.
Muevahaciaabajo
la liberaci6nde la
cubiertadel filtrode
escape.Tirehacia
adelantedeta
cubiertadelfiltro de
escapepara quitar
lacubiertade la
bolsa.
Cublertade
labolsa._
Llberaci6nde II I
lacublerta del _ I I
filtrodeescape-_
Cubiertadel T_I II
Cubierta
dela
Filtro de
Quiteelcartuchodel
filtroescapedela
cubiertade bolsa.
Reemplaceelcartucho
delfiltroescape,colocdn-
dolo concuidadopare
qua quepaenlacubierta
de labolsa.El filonegro
del flltro debe ester
opueetodel operario,
Empujednicamenteel
cartuchodefiltro,noel
flttromismo.
Llberacl6nde I
la cublertadel
filtrode escape
Cublertadel
Cublerta
defa
Filtro de
Reempla7_cel
cubiartadel filtro
de escapey
empujehacia
arribala lib-
eraci6nparaase-
gurarlo.
15
!
',f. ADVERTENCIA
Peligrodechoque eldctricoo lesi6ncorpo-
ral
Desconectela unidadantesde efectuarel
mantenlmientoa su aspiradora.DeIo con-
trerio podr|aproducirse un choqueel_c-
tricoo causerlesi6n corporal si Isaspire-
dorasrranca de msnera Imprevlsta.
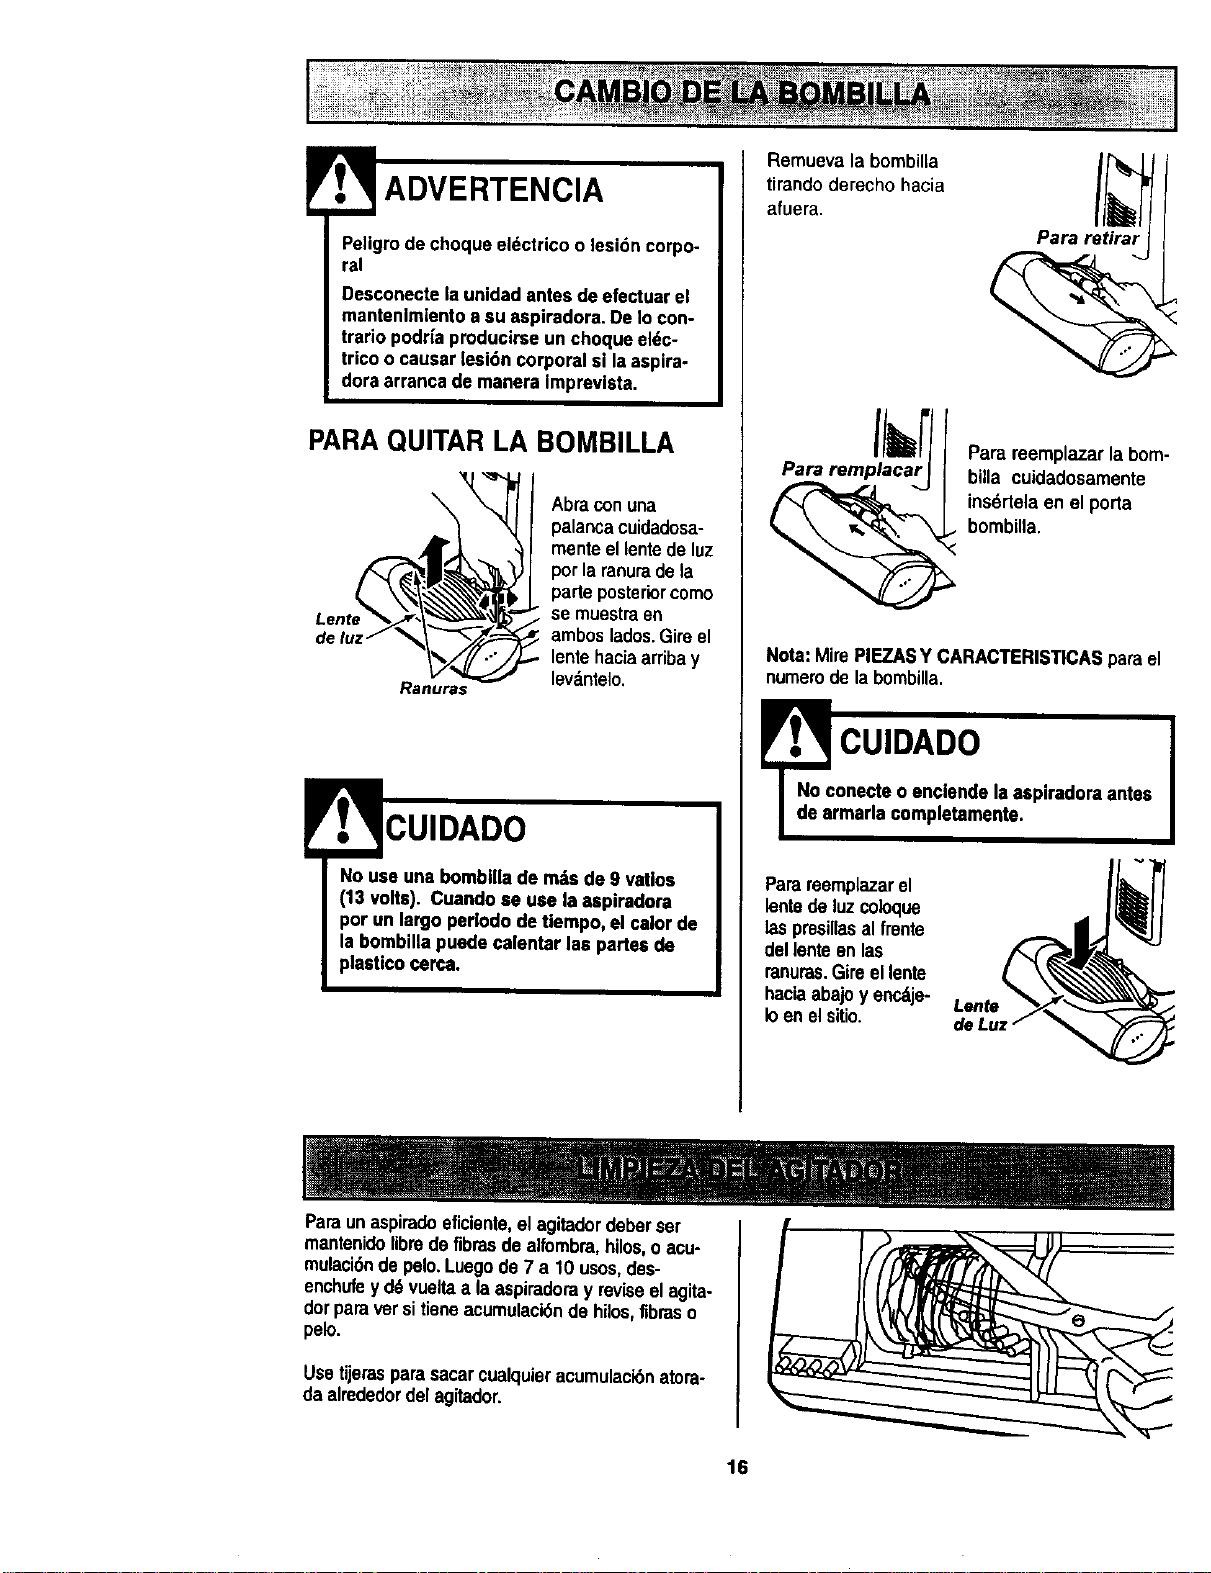
PARAQUITAR LA BOMBILLA
\
Ranuras
Abraconuna
palancacuidadesa-
menteellentede luz
porla ranuradela
parleposteriorcomo
se muestraen
amboslados.Gireel
lentehaciaarribay
lev_.ntelo.
CUIDADO
NOuse uns bomblllade mi,e de 9 vat|oe
(13 volts). Cuandose use la aspiradora
porun largo perlodode tiempo, el calorde
le hornbillspuedecslentar $espsrtes de
plasUcocerca.
Remuevala bombilla
tirandoderecho hacia
afuera.
Para retirar
Pare remplacar
Parareemplazar la bom-
billa cuidadosamente
ins6rtelaen el porta
bombilla.
Nota: MirePIEZASY CARACTERISTICASpara el
numerode la bombilla.
cUIDADO I
onecteo enclende Isaspiradora antes
rmarla ¢ompletamente.
Parareemplazarel
isnte de luz coioque
laspresillasalfrente
del lenteen tas
ranuras.Gireel lente
haciaabajoy encdje-
toen elsitio.
Paraunaspiradoeficiente,el agitadordeberser
mantenidelibredefibresde alfombra,hilos, oacu-
mulaci6ndepelo.Luego de7 a 10 usos,des-
enchufey d6vueltaala aspiradoray reviseel aglta-
dorparaversitieneacumulaci6nde hilos,fibreso
pelo.
Usetijerasparasacarcualquieracumulaci6natora-
daalrededordel agitador.
16

Procedasiempre conprecaucionesde seguddad
antes de efectuarel mantenimientoa su aspiradora.
f, ADVERTENCIA
I
Peligrode choque eldctricoo lesi6n corpo-
ral
Desconectela unidadantesde efectuarel
mantenimientoa su aspiradora.DeIo con-
trario podriaproducirseun choqueeldc-
tricoo causarlesi6n corporalsi la aspira-
doraarrancade manera imprevista.
Si consideraque la aspiradorano aspirabien
aseg_reseprimerode quela bolsa no est_Ilenay
de que el filtro no est6 atascado.Consulte lasins-
truccionessobreCAMBIODE LA BOLSAPARA
POLVOy LIMPIEZADEFILTROS.
Si laszonas del filtroy labolsano estan atascadas,
examine la zonade la manguem.Retire el extreme
inferiorde la mangueraexpansiblede la aspiradora
tomdndola por el collary tirandode hacia arriba.
Extienda y
afloje la
manguera
Enchufela aspira-
dora y encidndala.
Estireal mc_ximola
mangueray luego
permitaquese
encojahastasu
• tama_onormalde
-"almacenamiento.
Insertenuevamentelamangueraen laaberturade
laparteinferiordedonde laretir6,Empujecon fir-
meza para asegurarsede que quede bien conec-
tada.
- Manguera
expansible
Collar de la
manguera
E
ADVERTENCIA I
Peligrode iesi6n personal
NOcoloquenunca las manos ni los pies
debaJode Is unidad,
Si las _.reasde la bolsay del filtroy lasdreasdela
mangueraest_n libresde obstrucciones,
desconectelamangueradeltubode laboquillay
revisesihayresiduosdepolvoeneltubode la
boquilla.V_ase MMPIEZA DELAGITADORpara
comelimpiarelagitador.
Coloquela aspiradoraenla posicidnvertical antes
de conectarlaenel enchufe.
17
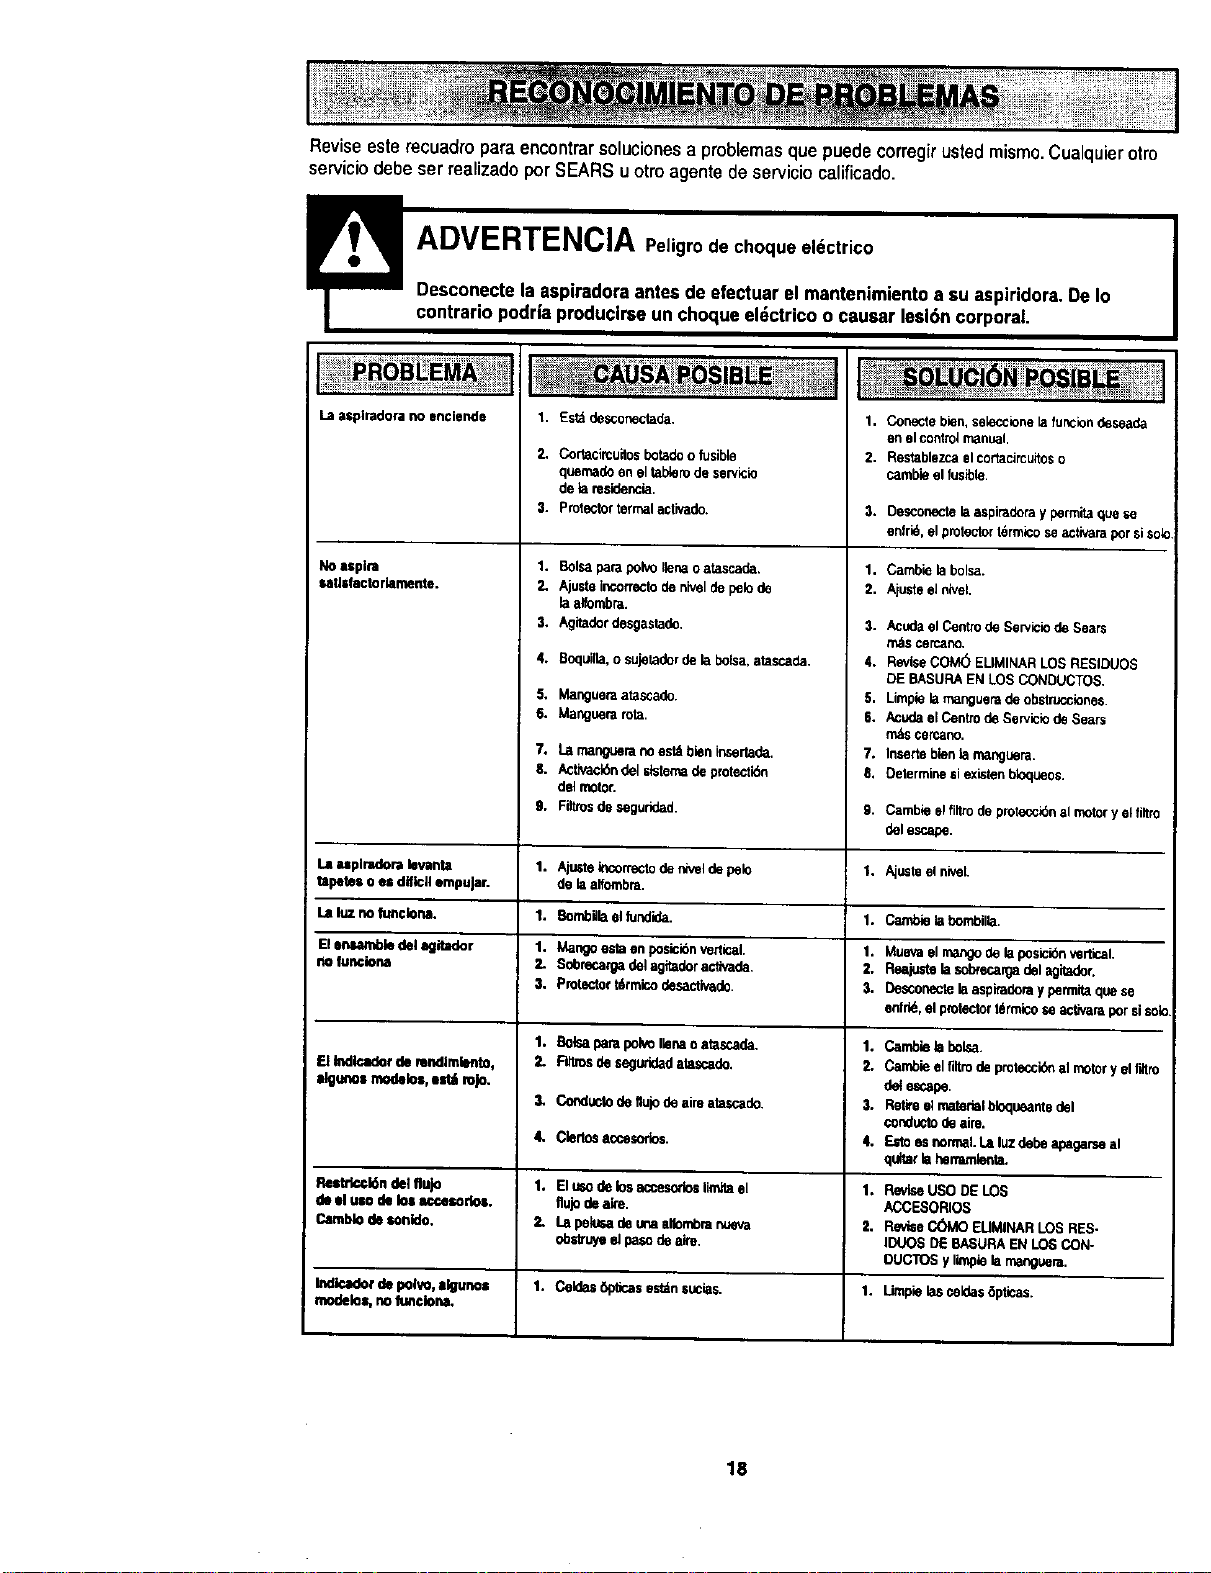
Reviseesterecuadroparaencontrarsolucionesaproblemasquepuedecorregirustedmismo.Cualquierotto
serviciodebeserrealizadoporSEARSuotroagentedeservicioealificado.
LB zspiradora no enclende
1. Est_ desconectada.
No uplra
satJsfactorlamente,
La atplradora tevsmta
tapetes o (usdff_cll empuJar.
La luz no func_ona.
El enumbJe del agitador
no funclona
ElIndlcadorderendlmlento,
Ilguno=rnodelos,estl rojo.
ReltdccbGndel flujo
de elUlO de losaccesodo=.
Camblode sonlde.
Indicadorde polvo,=_uno=
I modelos,noItmciona,
2, Cortacircuitosbotadoo fusible
quemadeeneltablerodeservicle
de lare_dencia.
3. protectortermalaclivado.
1. BoIsaparapolvoIlenaOatascade,
2, Ajusteincorrectodeniveldepelode
raalfombm.
3. /,,gitaderdesgasta_.
4. Boquilb,o sujeladerdelabolsa,stascada.
S. Mangueraatasca_.
6. Manguerarota.
7. t.=rnangueranoestAbieninsertode.
S. Activack_ndelslstemade protecti6n
del motor.
9. Fittrosdeseg,;r;ded.
1. Kjtistek_orrectoderWeldepeto
dela alfumbra.
1. BombUraellundide.
1. Mangoestoen posicibnvertical.
2, Sdorecargadelagitaderactivade,
3. Protectort6rm{codesactiva_.
1. BolsaparapolvoIlenaoatascade.
2. _ deseguridadatascado.
3, ConductodeIkflodeaireatascade.
4, Ciertosaccesorios.
1. Elmo de losaccesodoslimitael
fluJodeak'e.
2, Lll pelu_ deunaalfornbranueva
obstmyeel pasodea'_e.
1. Ce_as 6picas est_n sucks.
1. Conectebien,sek_rionele tonciondeseade
errotcontro_rr_r_t.
2. Restablezcaelcoflacircuitoso
cambieelfusible.
3. Desconecte la aspimdera y permita que se
enfrle, el protector Idrmico se activara por siso_o.
1, Camble lebolsa.
2. Ajuste el nivel.
3. AcudaetCen_odeSew_ciodeSears
m_$cercano.
4. ReviseCOM(5ELIMINARLOSRE61DUOS
DEBASURAEN LOSCONDUCTOS.
5. Limplela mangueradeobstrucciones.
6. AcudaelCentrodeServiciodeSears
m&scercano.
7. Insertoblenlarnanguera.
8. Determinesiexletonbloqueos,
9. Cambiee_fiYtrode pwotecc_bnalmotory elt_tro
delescape.
1. Aju_te el nivel.
1. CmnbieIst}on_il_a.
1. Muevael rnat_ode laposicibn_rtlcal.
2. Reajustelasobrecargadel agitador,
3. Desconecto!aas_)iraderayparmitaquese
enfrid,el protectort_rmicoseactJvaraporsisotc
1. Cambieb bolsa.
2. Cambieelflltrode protocc_ almotory el rdtro
deiescape.
3. Refn elmatedelbloqueantedel
€onductodeaire.
4. Estoesnormal.Laluz dedeapagarseal
qultarlahenarnienta.
1. RevleeUSODE LOS
ACCESORIOS
2. Revi6eC(_40 EUMINARLOSRES-
]DUOSDE BASURAENLOSCON-
OUCTO$y limpieL_manguera.
1. Limpie las celde$ 6ptleas.
18

g
19
_!i ill
i! _ii
Your Home
For repair - in your home - of all major brand appliances,
lawn and garden equipment, or heating and cooling systems,
no matter who made it, no matter who sold it!
For the replacement parts, accessories and
owner's manuals that you need to do-it-yourself.
For Sears professionalinstallation of home appliances
and items like garage door openers and water heaters.
1-800-4-MY-HOME ® Anytime, day or night
(1-800-469-4663) (U.S.A. and Canada)
WWW.sears.com WWW.sears.ca
Our Home
For repair of carry-in products like vacuums, lawn equipment.
and electronics, call or go on-line for the nearest
Sears Parts and Repair Center.
1-800488-1222 Anytime,dayornight(U.S.A.only)
www.sears,com
To purchase a protection agreement (U.S.A.)
or maintenance agreement (Canada) on a product serviced by Sears:
1-800-827-6655 (U.S.A.) 1-800-361-6665 (Canada)
Para pedir servicio de reparaci6n
a domicilio,y para ordenar piezas:
1.888-SU-HOGAR sM
(1-888-784-6427)
!_ilili
Au Canada pour service en franq_s:
1-800-LE-FOYER =c
(1-800-533.6937)
www.sears.ca
© Sears, Roebuck and CO.
TM $M
® Registered Trademark / Trademark / Service Mark of Sears, Roebuck and Co.
© Marca RBgistrada / TMMarca de Fdbrica /sm Marca de Servicio de Sears, Roebuck and Co.
MCMarque de commerce / MOMarque ddposde de Sears, Roebuck and Co.