INSTRUCTION AND
RECIPE BOOKLET
For your safety and continued enjoyment of this product, always read the instruction book carefully before using.
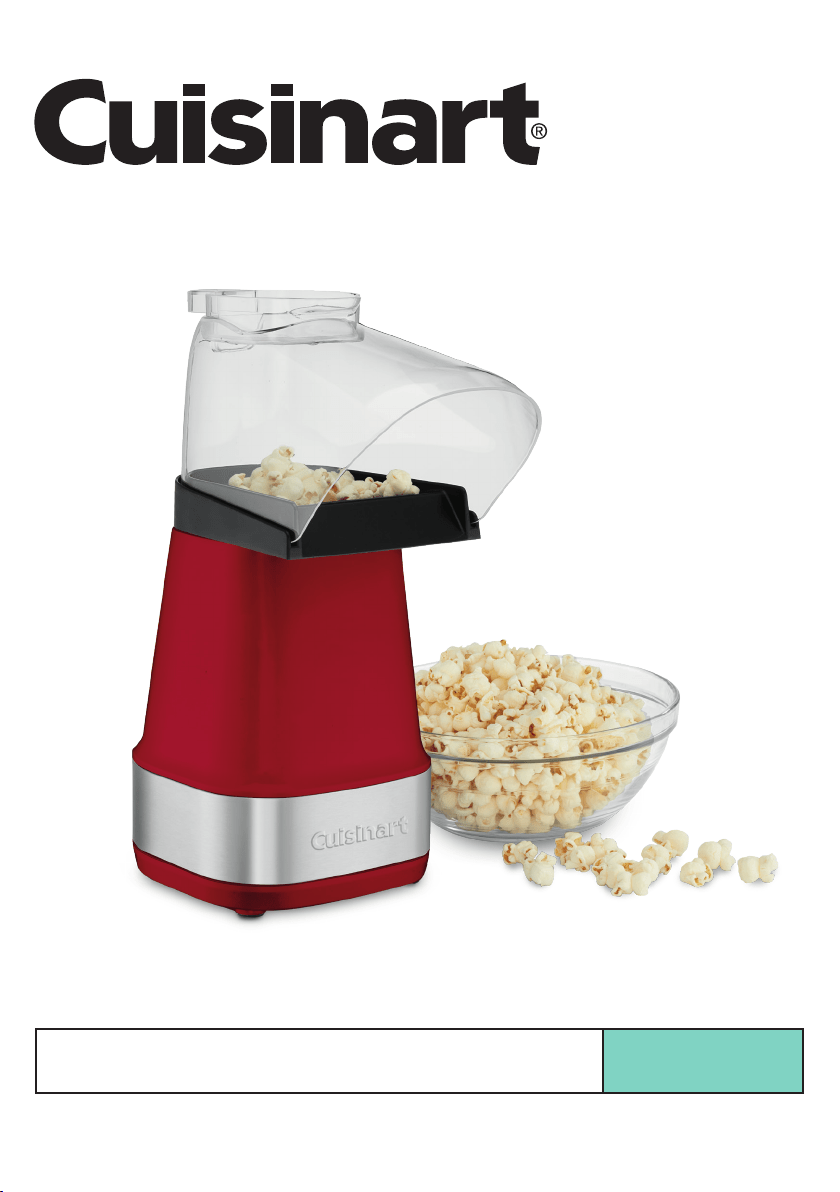
EasyPop
®
Hot Air Popcorn Maker
CPM-150 Series

2
IMPORTANT
SAFEGUARDS
When using an electrical appliance, basic
safety precautions should always be followed,
including the following:
1.
Read all instructions.
2.
Unplug from outlet when not in use and
before cleaning. Allow to cool before
putting on or taking off parts, and
before cleaning the appliance.
3.
To protect against electric shock, do not
immerse cord, plugs, or this appliance in
water or other liquids.
4.
Close supervision is necessary when any
appliance is used by or near children.
5.
Do not operate any appliance with a
damaged cord or plug, or after the
appliance malfunctions or has been
damaged in any manner. Return appliance
to the nearest authorized service facility
for examination, repair or adjustment.
6.
The use of accessory attachments
not recommended by the appliance
manufacturer may cause injuries.
7.
Never put oil or butter into the popping
chamber, or operate popper without
popcorn kernels in the popping chamber.
8.
Do not use outdoors.
9.
Do not let cord hang over edge of table or
counter, or touch hot surfaces.
10.
Do not place on or near a hot gas or
electric burner, or in a heated oven.
11.
To disconnect, turn switch to OFF, then
remove plug from wall outlet.
12.
Do not use appliance for anything other
than intended household use.
13.
A popper that is plugged into an outlet
should not be left unattended.
14.
CAUTION – Burns can result from misuse
of this product. Read instruction manual
for proper operating procedure.
15. Do not touch hot surface. Use handle or
knob.
16. Unplug from outlet when not in use and
before cleaning. Allow to cool before
putting on or taking off parts.
17. Extreme caution must be used when
moving an appliance containing hot oil
or other hot liquids.
18.
Do not operate your appliance in an
appliance garage or under a wall cabinet.
When storing in an appliance garage
always unplug the unit from the
electrical outlet. Not doing so could
create a risk of re, especially if the
appliance touches the walls of the garage
or the door touches the unit as it closes.
SAVE THESE
INSTRUCTIONS
FOR HOUSEHOLD
USE ONLY
SPECIAL CORDSET
INSTRUCTIONS
NOTICE
This appliance has a polarized plug (one
blade is wider than the other). To reduce
the risk of electric shock, this plug will t in
a polarized outlet only one way. If the plug
does not t fully in the outlet, reverse the
plug. If it still does not t, contact a qualied
electrician. Do not modify the plug in any
way.
CONTENTS
Important Safeguards . . . . . . . . . 2
Parts and Features . . . . . . . . . . . 3
Before the First Use . . . . . . . . . . 3
Cord Instructions . . . . . . . . . . . . 3
Operating Instructions . . . . . . . . . 4
Cleaning and Maintenance . . . . . . . 4
Tips and Hints . . . . . . . . . . . . . . 4
Seasoning Suggestions . . . . . . . . . 5
Recipes . . . . . . . . . . . . . . . . . 5
Warranty . . . . . . . . . . . . . . . 12
3
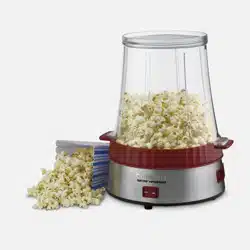
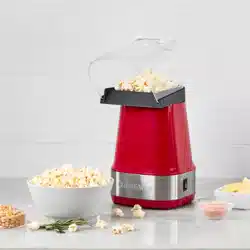
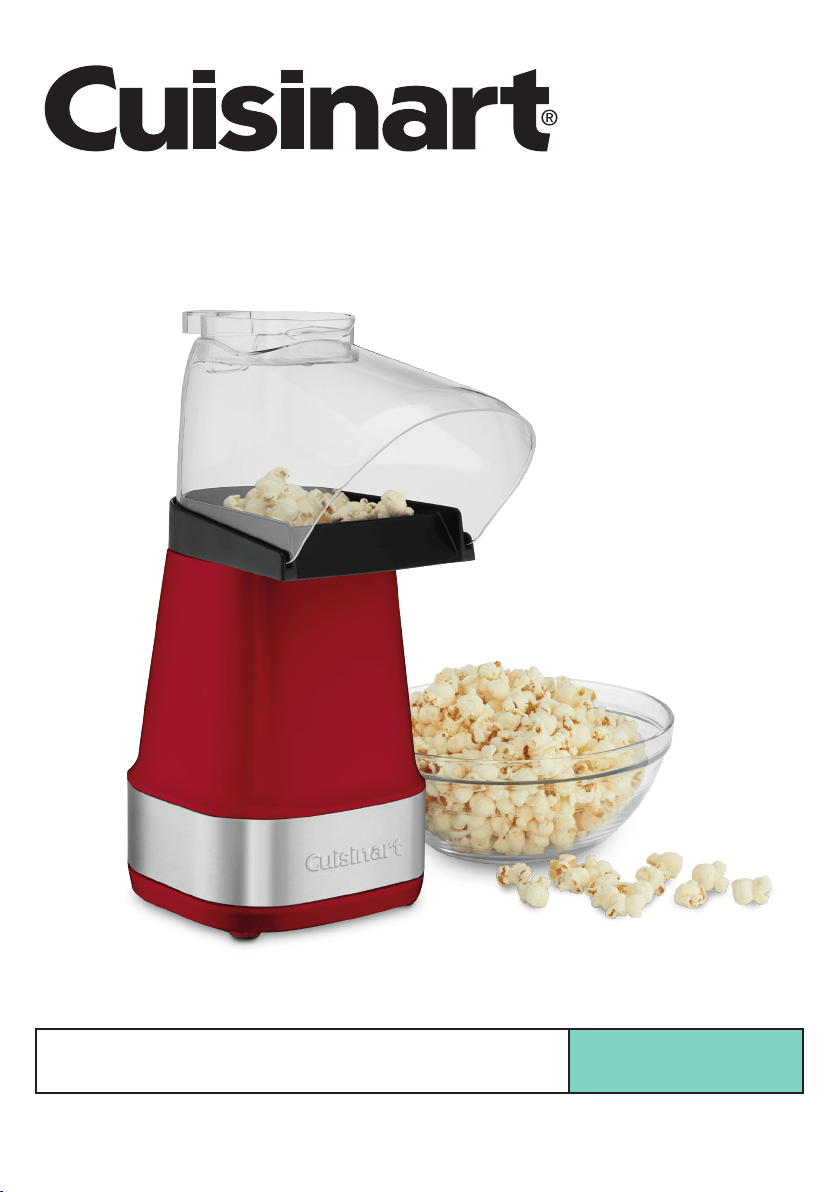
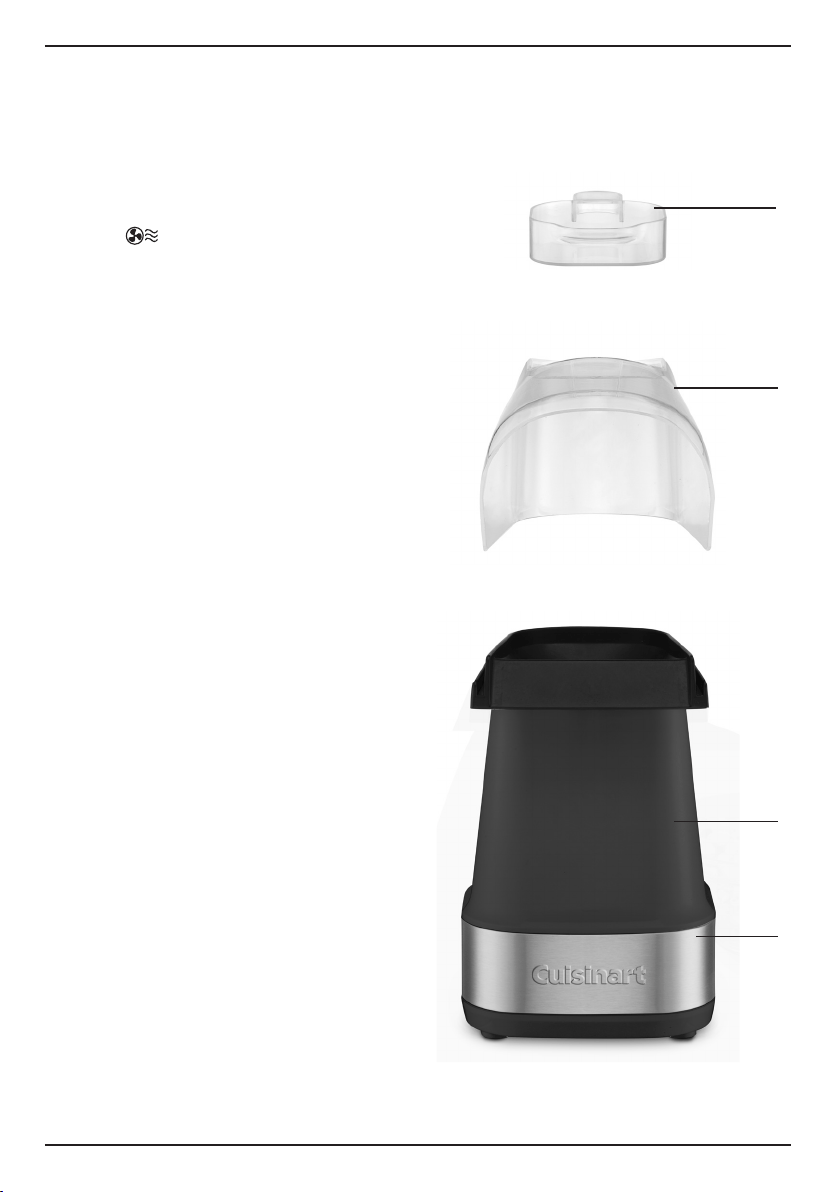
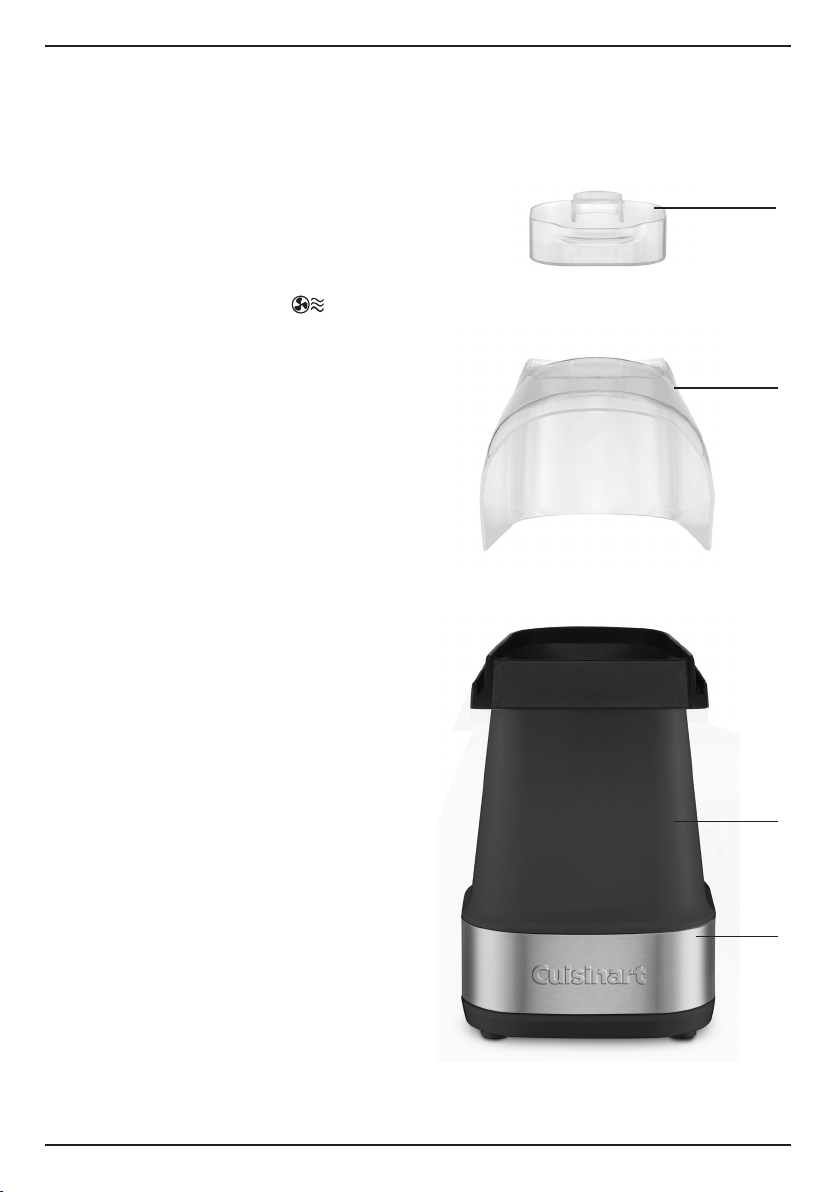
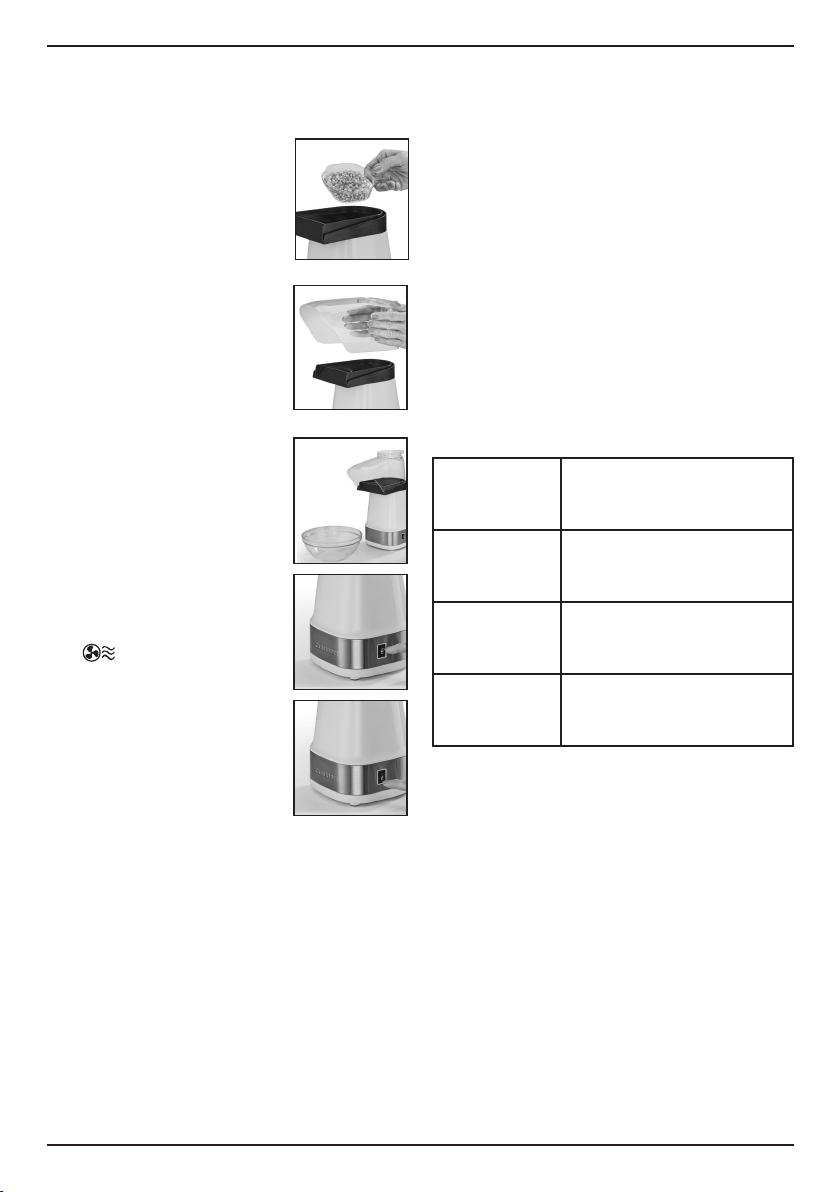
PARTS AND FEATURES
1. Kernel Measuring Cup
½-cup capacity
2. Popping Chute
removable for cleanup
3. Stay-Cool Housing
with stainless embossed logo
4. OFF/ /ON Switch
for an easy operation
5. BPA Free (not shown)
All materials that come in contact
with food are BPA free.
BEFORE THE FIRST USE
Remove all packaging and any promotional
labels or stickers from your popcorn maker.
Be sure that all parts (listed above, Parts
and Features) of your new popcorn maker
have been included before discarding any
packaging materials. You may want to keep
the box and packing materials for use at a
later date. Keep all plastic bags away from
children before using your Cuisinart
®
Easy-
Pop
®
Hot Air Popcorn Maker for the rst
time, remove all protective paper and wrap-
ping. Wipe housing and internal chamber
with a damp cloth to remove any dust from
the warehouse or shipping.
CORD INSTRUCTIONS
1. A short power supply cord is provided
to reduce the risk of becoming entan-
gled in or tripping over a long cord.
2. Extension cords may be used if care is
exercised in their use.
3. If an extension cord is used;
A) The marked electrical rating of the
extension cord should be at least as
great as the electrical rating of the
appliance. B) The longer cord should
be arranged so that it will not drape
over the countertop or tabletop where it
can be pulled on by children or tripped
over unintentionally.
1
2
3
4
4
OPERATING
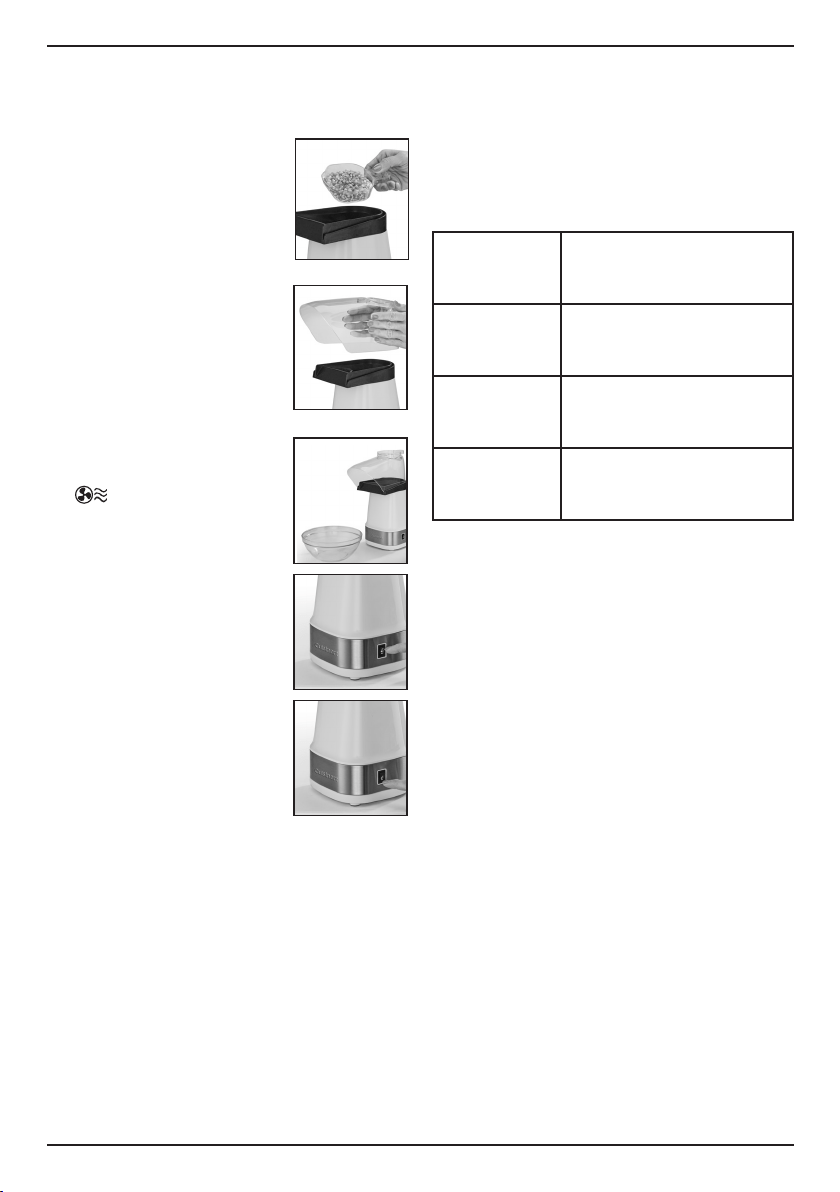
INSTRUCTIONS
1. Fill the kernel measuring
cup with up to ½ cup of
kernels.
2. Remove chute from unit
and pour kernels into
popping chamber.
DO NOT operate unit
without kernels in
chamber.
3. Replace chute.
4. Place bowl under chute
large enough to accom-
modate up to 15 cups of
popped corn.
5. Press switch to ON.
6. When kernels stop
popping, press switch to
to clear remaining
kernels and cool down
popcorn maker.
NOTE: Unit will still be
warm to the touch, but
cool enough to handle
and store.
7. When cool, press switch
to OFF and store pop-
corn maker.
CAUTION:
AFTER
POPPING, THE POPPING
CHAMBER IS EXTREMELY
HOT. DO NOT REMOVE
CHUTE OR PUT HANDS
NEAR CHAMBER UNTIL IT
IS COMPLETELY COOL.
CLEANING AND
MAINTENANCE
1. Unplug the popcorn maker and let
cool completely.
2. Wash the chute and kernel measuring
cup with mild detergent and rinse to
clean.
3. Exterior of unit can be wiped clean with
a damp cloth.
NOTE: Never immerse the popcorn
maker in water.
4. Any other servicing should be performed
by an authorized service representative.
TIPS AND HINTS
POPCORN AMOUNTS
Kernels
Popped
Popcorn
¼ cup
Approximately 7 cups
popped popcorn
1
⁄3 cup
Approximately 10 cups
popped popcorn
½ cup
Approximately 15 cups
popped popcorn
The avor possibilities for popcorn are
endless. Just add melted butter and your
favorite seasonings for a quick, easy, and
delicious topping!
For crispier popcorn with more intense
avor, toss popped corn with your favorite
topping and heat it in the oven at 300°F for
15–20 minutes on a foil-lined baking sheet
covered in nonstick cooking spray.
NOTE: It is very important to use fresh
popcorn. If your popcorn is old, the
kernels will not fully pop and/or it may
take longer for them to pop.

5
SEASONING SUGGESTIONS
Cheese
Taco seasoning
Chili powders
Hot sauce
Soy sauce
Italian seasoning and herbs
Butter/Seasoning Ratios for Popcorn
2 tablespoons melted butter for ¼ cup
unpopped kernels and a minimum of
1 teaspoon of seasoning.
3 tablespoons melted butter for
1
⁄3 cup
unpopped kernels and a minimum of
2 teaspoons of seasoning.
4 tablespoons melted butter for ½ cup
unpopped kernels and a minimum of 2½
teaspoons to a tablespoon of seasoning.
The amount of seasoning depends on the
intensity of the ingredients you are using –
it is important to let your taste be your
guide.
Note: Use olive oil for a little richer avor, or
grapeseed oil, which imparts no avor at all
to popcorn.
RECIPES
SAVORY
Asian-Style Popcorn
The avors of soy and sesame give this popcorn a
uniquely delicious avor.
Makes about 10 cups
¹/
3
cup popcorn kernels
3 tablespoons grapeseed oil
2 tablespoons soy sauce
½ teaspoon hot sauce
½ teaspoon sesame oil
1
tablespoon sesame seeds (white or
black)
1. Remove chute and put the kernels into the
popping chamber. Replace chute.
2. Place a large bowl underneath the chute and
turn unit on.
3. While the corn is popping, stir the remaining
ingredients together until fully combined.
4. Once the last kernel has popped, turn unit off.
Pour the oil mixture over the popped corn and
mix to fully coat. Serve immediately.
Nutritional information per 1-cup serving:
Calories 76 (60% from fat) • carb. 6g • pro. 2g • fat 5g
sat. fat 0g • chol. 0mg • sod. 222mg • calc. 4mg • fiber 1g
Buffalo-Style Popcorn
Spice up your popcorn with a little hot sauce!
Make about 10 cups
¹/
3
cup popcorn kernels
3 tablespoons grapeseed oil
2 tablespoons hot sauce
¼ teaspoon cider vinegar
pinch kosher or sea salt
1.
Remove chute and put the kernels into the popping
chamber. Replace chute.
2. Place a large bowl underneath the chute and

6
turn unit on.
3. While the corn is popping, stir the remaining
ingredients together until fully combined.
4. Once the last kernel has popped, turn unit off.
Pour the oil mixture over the popped corn and
mix to fully coat. Serve immediately.
Nutritional information per 1-cup serving:
Calories 65 (60% from fat) • carb. 6g • pro. 1g • fat 5g
sat. fat 0g • chol. 0mg • sod. 158mg • calc. 1mg • fiber 1g
Cacio e Pepe Popcorn
There’s nothing a little (or a lot of) cacio e pepe—
literally cheese and pepper—can’t make
innitely better.
Makes about 10 cups
¹/
3
cup popcorn kernels
3 tablespoons unsalted butter, cut into
pieces
Pinch kosher or sea salt, plus more
to taste
2 teaspoons freshly ground black
pepper, divided
½ cup (1 ounce) finely grated
Romano cheese
1. Remove chute and put the kernels into the
popping chamber. Replace chute.
2. Place a large bowl underneath the chute and
turn unit on.
3. While the corn is popping, melt the butter in
a small skillet over medium-low heat. Once
melted, stir in the salt and 1 teaspoon pepper;
remove from heat and reserve. (Alternatively,
microwave in a small microwave-safe bowl
using the BUTTER MELT program.)
4. Once the last kernel has popped, turn unit off.
5. Drizzle the melted butter mixture over the
popped corn and toss to fully coat. Mix in the
Romano cheese. Season with remaining salt
and pepper. Serve immediately.
Nutritional information per 1-cup serving:
Calories 65 (59% from fat) • carb. 5g • pro. 2g • fat 4g "
sat. fat 3g • chol. 12mg • sod. 69mg • calc. 51mg • fiber 1g
Curry Popcorn
If you love Indian spices, this will be a favorite for
sure!
Makes about 10 cups
¹/
3
cup popcorn kernels
3 tablespoons grapeseed oil
2 teaspoons curry powder
½ teaspoon ground turmeric
¼-½ teaspoon kosher or sea salt
pinch cayenne pepper
1.
Remove chute and put the kernels into the popping
chamber. Replace chute.
2. Place a large bow underneath the chute and
turn unit on.
3. While the corn is popping, stir the remaining
ingredients together until fully combined.
4. Once the last kernel has popped, turn unit off.
Pour the oil mixture over the popped corn and
mix to fully coat. Serve immediately.
Nutritional information per 1-cup serving:
Calories 59 (61% from fat) • carb. 5g • pro. 1g • fat 4g
sat. fat 0g • chol. 0mg • sod. 54mg • calc. 2mg • fiber 1g
Movie-Theater Butter Popcorn
The key to crunchy popcorn with extra-buttery avor
is claried butter. Forget about the fake stuff! (The
result is a pronounced, clean butter avoring that
won’t turn your popcorn soggy. The best part is that
it can easily made in the microwave!)
Makes about 10 cups
1 stick unsalted butter, cut into pieces
Popcorn:
¹/
3
cup popcorn kernels
3 tablespoons clarified butter
(instructions in step 1)
½ teaspoon kosher or sea salt, plus
more to taste
1. Place butter in a microwave-safe glass
measuring cup. Microwave on HIGH (70% if
using a high-wattage microwave) for 1 minute.
Melted butter will have separated into three
layers. At the center will be the claried butter:
a clear golden-yellow liquid. If not fully melted,
let settle then microwave in 30-second bursts
until layers are distinct. Let it rest for a few
minutes, then spoon off top layer and discard.

7
Pour clear golden-yellow liquid through a
cheese cloth-lined strainer or coffee lter into
an airtight container. Reserve 3 tablespoons
for popcorn. Refrigerate the remainder for up
to 6 months.
2. Remove chute and put the kernels into the
popping chamber. Replace chute.
3. Place a large bowl underneath the chute and
turn unit on.
4. Once the last kernel has popped, turn unit off.
Drizzle reserved butter over the popped corn
and season with salt. Toss to fully coat. Adjust
salt to taste. Serve immediately.
Nutritional information per 1-cup serving:
Calories 57 (63% from fat) • carb. 5g • pro. 1g • fat 4g
sat. fat 2g • chol. 10mg • sod. 56mg • calc. 0mg • fiber 1g
Popcorn Snack Mix
A healthier version of the store-bought mixes.
Make it for your next party and it will be a hit.
Makes about 12 cups
nonstick cooking spray
¹/
3
cup popcorn kernels
4 tablespoons grapeseed oil
½ teaspoon paprika
¼ teaspoon dried oregano
¼ teaspoon granulated garlic
½ teaspoon Worcestershire sauce
dash hot sauce
1 cup mini pretzels or pretzel sticks
(broken into ½-inch pieces)
1½ cups roasted mixed nuts
1. Preheat oven to 300°F. Line a ridged baking sheet
with foil and lightly coat the foil with the cooking
spray.
2.
Remove chute and put the kernels into the popping
chamber. Replace chute.
3. Place a large bowl underneath the chute and
turn unit on.
4. While the corn is popping, stir the oil, spices,
Worcestershire and hot sauce together until
fully combined; reserve.
5. Once the last kernel has popped, turn unit off.
Add the pretzels and mixed nuts, and then pour
the seasoned oil over the mixture and toss to
fully coat.
6. Pour mixture onto the prepared baking sheet.
Bake for about 20 minutes, stirring occasionally
to combine avors. Serve immediately.
Nutritional information per 1-cup serving:
Calories 255 (55% from fat) • carb. 24g • pro. 6g • fat 16g
sat. fat 2g • chol. 0mg • sod. 602mg • calc. 21mg • fiber 3g
Rosemary Sea Salt Popcorn
The savory, piney note of fresh rosemary
transforms an ordinary snack into something
special.
Makes about 10 cups
3 tablespoons extra virgin olive oil
1 whole sprig fresh rosemary, plus
1 tablespoon finely chopped fresh
rosemary leaves
¹/
3
cup popcorn kernels
½ teaspoon flaky sea salt, plus more
to taste
Freshly ground black pepper,
to taste
1. Heat the olive oil in a small skillet over medium
heat. Add the rosemary sprig to the hot oil and let
sizzle, ipping once, until darkened and crisp, about
15 seconds per side. Transfer to a paper towel to
drain. Remove infused oil from heat and let cool.
Reserve sprig and oil.
2. Remove chute and put the kernels into the popping
chamber. Replace chute.
3. Place a large bowl underneath the chute and turn
unit on.
4. Once the last kernel has popped, turn unit off.
Drizzle the rosemary oil over the popped corn and
season with chopped rosemary, salt, and black
pepper to taste. Toss to fully coat. Garnish with
fried rosemary leaves from reserved sprig. Serve
immediately.
Nutritional information per 1-cup serving:
Calories 60 (65% from fat) • carb. 5g • pro. 1g • fat 5g
sat. fat 1g • chol. 0mg • sod. 116mg • calc. 1mg • fiber 1g

8
Southwestern Popcorn
All of your favorite southwest avors make for a
delicious treat when paired with popcorn. Throw
in some toasted pepitas for extra crunch!
Makes about 10 cups
¹/
3
cup popcorn kernels
3 tablespoons grapeseed oil
1 teaspoon chili powder
1 teaspoon paprika
½ teaspoon kosher or sea salt
¼ teaspoon dried oregano
¼ teaspoon granulated garlic
¹/
8
teaspoon cayenne pepper
1. Remove chute and put the kernels into the
popping chamber. Replace chute.
2. Place a large bowl underneath the chute and
turn unit on.
3. While the corn is popping, stir the remaining
ingredients together until fully combined.
4. Once the last kernel has popped, turn unit off.
Pour the oil mixture over the popped corn and
mix to fully coat. Serve immediately.
Nutritional information per 1-cup serving:
Calories 59 (61% from fat) • carb. 5g • pro. 1g • fat 4g
sat. fat 0g • chol. 0mg • sod. 109mg • calc. 2mg • fiber 1g
SWEET
Birthday Cake Popcorn
A party in every bite! No birthday required.
Makes about 10 cups
¹/
3
cup popcorn kernels
3 tablespoons unsalted butter
½ cup box yellow or white cake mix
1 cup (6 ounces) white chocolate
chips, melted
1 teaspoon vegetable oil
¹/
3
cup rainbow nonpareils or sprinkles,
or a combination of both
1. Preheat the oven to 300°F. Line a baking sheet
with parchment paper; reserve.
2. Remove chute and put the kernels into the
popping chamber. Replace chute.
3. Place a large bowl underneath the chute and
turn unit on.
4. While the corn is popping, melt the butter in a
small skillet over medium-low heat. Remove
from heat and reserve. (Alternatively, microwave
in a small microwave-safe bowl using the
BUTTER MELT program.)
5. Once the last kernel has popped, turn unit off.
6. Drizzle melted butter over the popped corn;
toss to coat. Spread out on prepared baking
sheet. Sift dry cake mix over buttered popcorn
and toss to evenly coat. Bake popcorn for
10 minutes, tossing once halfway. (This step,
known as heat-treating, eliminates the risk of
ingesting harmful bacteria that can be found in
raw ingredients, such as the our used in box
cake mix. It also cooks off the raw taste of our,
so the popcorn can develop the cake avor we
love!) Let cool.
7. Meanwhile, melt white chocolate in a small
heatproof bowl set over a pan of simmering
water, stirring occasionally until smooth.
(Alternatively, microwave in a small microwave-
safe bowl using the CHOCOLATE MELT
program.) Stir in vegetable oil to thin. Keep
mixture warm.
8. Using the tines of a fork, drizzle most of the
white chocolate over cooled popcorn. Sprinkle
most of the nonpareils and/or sprinkles evenly
over the top. Transfer to freezer just to set.
Break up mixture and arrange so any bare
pieces of popcorn are now exposed. Repeat
with remaining white chocolate and nonpareils
and/or sprinkles. Transfer to freezer once again
to set. Serve immediately.
Nutritional information per 1-cup serving:
Calories 225 (35% from fat) • carb. 33g • pro. 2g • fat 4g
sat. fat 6g • chol. 12mg • sod. 123mg • calc. 88mg • fiber 1g
Caramel Popcorn
This caramel corn has a buttery toffee avor.
Follow these easy steps to turn it into yummy
popcorn balls.
Makes about 10 cups
3 tablespoons unsalted butter
¹/
3
cup packed light brown sugar

9
2 tablespoons light corn syrup
1 tablespoon water
¼ teaspoon sea salt
¼ teaspoon baking soda
2 teaspoons vegetable oil
¹/
3
cup popping kernels
1. Put the butter, brown sugar, corn syrup,
water, and salt into a heavy-bottomed small
saucepan. Set over medium-high heat and
bring mixture to a boil.
2. While the caramel mixture is heating, remove
the chute from the popcorn maker and put
the kernels into the popping chamber.
Replace chute.
3. Watch the caramel mixture on the stove
closely. Using a candy thermometer, monitor
the temperature of the caramel. It should be
between 240°F and 260°F, not exceeding
260°F. Once it is boiling and turning golden
brown (about 6 to 8 minutes), it should start
to thicken slightly. Turn the popcorn maker on
to begin popping. Leave the caramel on warm
until popcorn is popped.
4. Once corn has popped, take the saucepan off
of the heat and whisk in the baking soda.
5. Once the last kernel has popped, turn the
unit off. Drizzle the caramel sauce on top of
the popped corn and mix to fully coat. Serve
immediately.
6. This popcorn recipe also makes delicious
popcorn balls. To do so, line a tray or pan with
aluminum foil. Lightly coat the foil and a one
cup measure with nonstick cooking spray. Rub
a little spray on your hands as well. Using the
oiled measuring cup, scoop out 1 cup of the
caramel corn and form into a ball. Put onto the
oiled foil. Repeat with remaining popcorn. Yield
should be about 8 to 10 popcorn balls. If not
serving immediately,
wrap in waxed paper.
Nutritional information per 1-cup serving:
Calories 89 (36% from fat) • carb. 14g • pro. 1g • fat 4g
sat. fat 2g • chol. 9mg • sod. 24mg • calc. 1mg • fiber 1g
Kettle Corn
Classic kettle corn made fresh right at home.
Makes about 10 cups
¼ cup granulated sugar
¼ cup unsalted butter, cut into small
cubes
¹/
3
cup popcorn kernels
½ teaspoon kosher or sea salt
1. Put the sugar into a heavy-bottomed saucepan
and place over medium heat. Leave the sugar
over the heat for about 10 to 15 minutes,
shaking the pan every few minutes. The sugar
should still be white and granular, but will smell
of caramel.
2. Put the butter into the saucepan a little at a
time; the butter should begin to melt instantly
once it hits the pan. Whisk in all of the butter.
The mixture should be smooth and glossy.
Leave on very low heat until ready to use.
3. Remove the chute and put the kernels into the
popping chamber. Replace chute.
4. Place a large bowl underneath the chute and
turn unit on.
5. Once the last kernel has popped, turn unit off.
Pour the sugar mixture over the popped corn
and sprinkle in the salt; mix to fully coat.
Serve immediately.
Nutritional information per 1-cup serving:
Calories 88 (48% from fat) • carb. 11g • pro. 1g • fat 5g
sat. fat 3g • chol. 12mg • sod. 118mg • calc. 1mg • fiber 1g

10
S'mores Popcorn
This popcorn recipe captures the essence of
everyone’s favorite campre treat.
Makes about 10 cups
Nonstick cooking spray
¹/
3
cup popcorn kernels
1 7-ounce jar marshmallow creme,
warmed to a pourable consistency
2
/
3
cup (4 ounces) milk chocolate chips
4 sheets graham crackers
(about 2¹/
8
ounces), finely crushed
1. Preheat the oven to 325°F. Coat a large bowl
and baking sheet with nonstick cooking spray;
reserve.
2. Remove chute and put the kernels into the
popping chamber. Replace chute.
3. Place prepared bowl underneath the chute and
turn unit on.
4. Once the last kernel has popped, turn unit off.
Pour the marshmallow creme over the popped
corn and gently mix with a nonstick spatula until
evenly coated. Spread out popcorn mixture on
prepared baking sheet and bake, tossing once,
until dry and golden brown in spots, about 10 to
12 minutes. Let cool.
5. Meanwhile, melt chocolate in a small heatproof
bowl set over a pan of simmering water, stirring
occasionally until smooth. (Alternatively,
microwave in a small microwave-safe bowl
using the CHOCOLATE MELT program.) Pour
melted chocolate over cooled popcorn; gently
toss to coat.
6. While chocolate is wet, sprinkle crushed
graham crackers over top of popcorn; toss to
coat well. Transfer to freezer for 5 minutes to
set. Serve immediately
Nutritional information per 1-cup serving:
Calories 169 (4% from fat) • carb. 34g • pro. 2g • fat 4g
sat. fat 2g • chol. 0mg • sod. 53mg • calc. 18mg • fiber 1g

11
NOTES
_______________________________________________________________________________________
_______________________________________________________________________________________
_______________________________________________________________________________________
_______________________________________________________________________________________
_______________________________________________________________________________________
_______________________________________________________________________________________
_______________________________________________________________________________________
_______________________________________________________________________________________
_______________________________________________________________________________________
_______________________________________________________________________________________
_______________________________________________________________________________________
_______________________________________________________________________________________
_______________________________________________________________________________________
_______________________________________________________________________________________
_______________________________________________________________________________________
_______________________________________________________________________________________
_______________________________________________________________________________________
_______________________________________________________________________________________
_______________________________________________________________________________________
_______________________________________________________________________________________
_______________________________________________________________________________________
_______________________________________________________________________________________
_______________________________________________________________________________________
_______________________________________________________________________________________
_______________________________________________________________________________________
_______________________________________________________________________________________
_______________________________________________________________________________________
_______________________________________________________________________________________
_______________________________________________________________________________________
_______________________________________________________________________________________
_______________________________________________________________________________________
_______________________________________________________________________________________

©2022 Cuisinart
Glendale, AZ 85307
Printed in China
22CE0081226
WARRANTY
Limited Three-Year
Warranty
This warranty is available to U.S. consumers only.
You are a consumer if you own a Cuisinart
®
EasyPop
®
Hot Air Popcorn Maker
that was
purchased at retail for personal, family or household
use. Except as otherwise required under applicable
law, this warranty is not available to retailers or other
commercial purchasers or owners. We warrant that
your Cuisinart
®
EasyPop
®
Hot Air Popcorn Maker
will be free of defects in materials and workmanship
under normal home use for 3 years from the date of
original purchase. We recommend that you visit our
website, https://cuisinart.registria.com, for a fast,
efficient way to complete your product registration.
However, product registration does not eliminate the
need for the consumer to maintain the original proof
of purchase in order to obtain the warranty benefits.
In the event that you do not have proof of purchase
date, the purchase date for purposes of this
warranty will be the date of manufacture.
CALIFORNIA RESIDENTS ONLY
California law provides that for In-Warranty Service,
California residents have the option
of returning a nonconforming product (A) to
the store where it was purchased or (B) to another
retail store that sells Cuisinart products of the same
type. The retail store shall then, according to its
preference, either repair the product, refer the
consumer to an independent repair facility, replace
the product, or refund the purchase price less the
amount directly attributable to the consumer’s prior
usage of the product. If neither of the above two
options results in the appropriate relief to the
consumer, the consumer may then take the product
to an independent repair facility, if service or repair
can be economically accomplished. Cuisinart and
not the consumer will be responsible for the
reasonable cost of such service, repair, replacement,
or refund for nonconforming products under
warranty. California residents may also, according to
their preference, return nonconforming products
directly to Cuisinart for repair or, if necessary,
replacement by calling our Consumer Service Center
toll-free at 1-800-726-0190. Cuisinart will be
responsible for the cost of the repair, replacement,
and shipping and handling for such nonconforming
products under warranty.
HASSLE-FREE REPLACEMENT WARRANTY
Your ultimate satisfaction in Cuisinart products is
our goal, so if your Cuisinart
®
EasyPop
®
Hot Air
Popcorn Maker should fail within the generous
warranty period, we will repair it or, if necessary,
replace it at no cost to you. To obtain a return
shipping label, email us at https://www.cuisinart.
com/customer-care/product-assistance/product-
inquiry/. Or call our toll-free Consumer Service
Center at 1-800-726-0190 to speak with a
representative.
Your Cuisinart
®
EasyPop
®
Hot Air Popcorn Maker
has been manufactured to the strictest specifications
and has been designed for use only in 120-volt
outlets and only with authorized accessories and
replacement parts. This warranty expressly excludes
any defects or damages caused by attempted use of
this unit with a converter, as well as use with
accessories, replacement parts or repair service
other than those authorized by Cuisinart. This
warranty does not cover any damage caused by
accident, misuse, shipment or other than ordinary
household use. This warranty excludes all incidental
or consequential damages. Some states do not
allow the exclusion or limitation of these damages,
so these exclusions may not apply to you. You may
also have other rights, which vary from state to
state.
Important: If the nonconforming product is to
be serviced by someone other than Cuisinart’s
Authorized Service Center, please remind the
servicer to call our Consumer Service Center at
1-800-726-0190 to ensure that the problem is
properly diagnosed, the product is serviced with the
correct parts, and the product is still under warranty.
IB-17472-ESP
MANUAL DE
INSTRUCCIONES
YLIBRO DE
RECETAS
Para su seguridad y para disfrutar plenamente de este producto, siempre lea atentamente las instrucciones antes del uso.
Máquina de palomitas de aire caliente EasyPop
®
Serie CPM-150

2
MEDIDAS DE
SEGURIDAD
IMPORTANTES
Al usar aparatos eléctricos, siempre se deben
tomar precauciones básicas de seguridad,
entre ellas las siguientes:
1.
Lea todas las instrucciones.
2.
Desenchufe el aparato cuando no esté
en uso y antes de limpiarlo. Permita que
se enfríe antes de instalar/sacar piezas
y antes de limpiarlo.
3.
Para reducir el riesgo de descarga
eléctrica, no sumerja el cable, el enchufe
ni ninguna otra parte del aparato en agua
u otros líquidos.
4.
Supervise el uso de este aparato con
cuidado cuando sea usado por o cerca de
niños.
5.
No use este aparato si el cable o el
enchufe están dañados, después de un
mal funcionamiento, después de una
caída, o si está dañado; devuélvalo a un
centro de servicio autorizado para su
revisión, reparación o ajuste.
6.
El uso de accesorios no recomendados
por el fabricante presenta un riesgo de
lesiones personales.
7.
Nunca ponga mantequilla en la cámara de
cocción, ni haga funcionar el aparato sin
maíz en ella.
8.
No lo use en exteriores.
9.
No permita que el cable cuelgue del borde
de la encimera o de la mesa, ni que tenga
contacto con superficies calientes.
10.
No coloque el aparato sobre o cerca de un
quemador a gas o de un hornillo eléctrico
caliente, ni en un horno caliente.
11.
Para desconectar, ponga el interruptor en
“OFF”, y luego desenchufe el aparato.
12.
Solo use este aparato para el uso previsto
y solo úselo para uso doméstico.
13.
Nunca descuide/deje el aparato sin
vigilancia mientras está enchufado.
14.
PRECAUCIÓN: El uso indebido de este
producto puede causar quemaduras. Lea
atentamente las instrucciones antes de
usar el aparato.
15. No toque las superficies calientes; use el
mango o las perillas.
16. Desenchufe el aparato cuando no esté en
uso y antes de limpiarlo. Permita que se enfríe
antes de instalar/sacar piezas.
17. Tenga sumo cuidado al mover un aparato
que contenga aceite u otro líquido caliente.
18.
No haga funcionar el aparato debajo o
dentro de un armario/gabinete. Siempre
desenchufe el aparato antes de
guardarlo en un armario/gabinete. Dejar
el aparato enchufado representa un riesgo
de incendio, especialmente si este toca las
paredes o la puerta del armario/gabinete
cuando se cierra.
GUARDE ESTAS
INSTRUCCIONES
PARA USO DOMÉSTICO
SOLAMENTE
USO DE ALARGADORES
AVISO:
El cable de este aparato cuenta con un
enchufe polarizado (una pata es más ancha
que la otra). Como medida de seguridad,
aquel enchufe se podrá enchufar de una
sola manera en las tomas de corriente
polarizadas. Si no entra en la toma de
corriente, inviértalo. Si aun así no entra
completamente, comuníquese con un
electricista. No intente modificarlo.
ÍNDICE
Medidas de seguridad importantes . . . 2
Piezas y características . . . . . . . . . 3
Antes del primer uso . . . . . . . . . . 3
Uso de alargadores . . . . . . . . . . . 3
Instrucciones de uso . . . . . . . . . . 4
Limpieza y mantenimiento . . . . . . . 4
Consejos y sugerencias . . . . . . . . . 4
Condimentos sugeridos . . . . . . . . . 5
Recetas . . . . . . . . . . . . . . . . . 5
Garantía . . . . . . . . . . . . . . . . . 12
3
PIEZAS Y
CARACTERÍSTICAS
1. Vaso medidor
Capacidad de ½ taza (75 g) de granos
de maíz
2. Boca de salida
Removible para una fácil limpieza
3. Carcasa que permanece fría
con elegante logotipo Cuisinart
estampado
4. Interruptor de apagado/ /
encendido
para una operación simple
5. Sin bisfenol A (BPA) (no ilustrado)
Ninguna de las piezas en contacto con
los alimentos contiene bisfenol A (BPA)
ANTES DEL PRIMER USO
Retire el aparato del material de embalaje y
quite las etiquetas promocionales pegadas
a su cuerpo. Compruebe que todas las
piezas incluidas en la sección “PIEZAS
Y CARACTERÍSTICAS” están incluidas.
Se recomienda conservar el material de
embalaje para uso futuro. Mantenga las
bolsas de plástico fuera del alcance de los
niños. Antes de usar el aparato, retire todo
el material de protección. Limpie la carcasa
del aparato y el interior del gabinete con
un paño húmedo para eliminar el polvo
acumulado durante la fabricación y el
transporte.
USO DE ALARGADORES
1. El cable provisto con este aparato es
corto, para reducir el riesgo de que
alguien se enganche o tropiece con un
cable más largo.
2. Puede usarse un cable alargador/de
extensión, pero con cuidado.
3. Si usa un cable alargador/de extensión:
A) La clasificación nominal del cable
alargador/de extensión debe ser por
lo menos igual a la del aparato. B)
Coloque el cable sobre la encimera o la
mesa de tal forma que niños no puedan
jalar o tropezar con este.
1
2
3
4
4
INSTRUCCIONES
DE USO
1. Llene el vaso medidor
con ½ taza (75 g) de maíz
para hacer palomitas/
maíz palomero.
2. Retire la boca de salida
y eche los granos en la
cámara de cocción.
NO haga funcionar
el aparato sin maíz en
el depósito.
3. Vuelva a colocar la boca
de salida en su sitio.
4. Coloque un recipiente
grande debajo de la boca
de salida.
Nota: El recipiente deber
ser lo suficientemente
grande como para
contener 15 tazas (150 g)
de palomitas.
5. Ponga el interruptor en
“ON” para encender la
máquina.
6. Después de terminar,
ponga el interruptor en
“ ” para eliminar los
restos de maíz y enfriar
la máquina.
NOTA: La máquina
estará aún tibia al tacto,
pero lo suficientemente
fría como para
manipularla y guardarla.
7. Una vez fría, ponga el
interruptor en “OFF”
y guarde la máquina.
PRECAUCIÓN:
LA CÁMARA DE COCCIÓN
ESTARÁ EXTREMADAMENTE CALIENTE
DESPUÉS DEL USO; NO RETIRE LA BOCA
DE SALIDA NI COLOQUE LAS MANOS
CERCA DEL DEPÓSITO HASTA QUE SE
HAYA ENFRIADO.
LIMPIEZA Y
MANTENIMIENTO
1. Desenchufe el aparato y permita que se
enfríe.
2. Lave la boca de salida y el vaso medidor
a mano con un detergente suave, y luego
enjuáguelos.
3. El exterior del aparato puede limpiarse
con un paño húmedo.
NOTA: Nunca sumerja el aparato en agua.
4. Cualquier otro servicio debe ser realizado
por un técnico autorizado.
CONSEJOS Y
SUGERENCIAS
PROPORCIONES
Granos de
maíz
Palomitas
¼ de taza
Aprox. 7 tazas (70 g)
1
⁄3 de taza Aprox. 10 tazas (100 g)
½ taza
Aprox. 15 tazas (150 g)
Puede usar una variedad infinita de
condimentos. Simplemente agregue
mantequilla derretida y el condimento de su
elección a las palomitas.
Si desea que las palomitas condimentadas
sean más crujientes y que tengan un sabor
más intenso, métalas al horno en 300°F
(150°C) por 15 a 20 minutos.
NOTA: Es muy importante usar maíz
fresco para hacer palomitas frescas. Si
los granos de maíz están viejos, no se
reventarán completamente y la cocción
se demorará.

5
CONDIMENTOS
SUGERIDOS
Queso
Condimento para tacos
Chile en polvo
Salsa picante
Salsa de soya
Condimento italiano y hierbas italianas
Proporción de mantequilla/condimento
2 cucharadas (30 g) de mantequilla derretida
+ 1 cucharadita o más de condimento por ¼
taza (35 g) de granos de maíz.
3 cucharadas (45 g) de mantequilla derretida
+ 2 cucharaditas o más de condimento por
1
⁄3 taza (50 g) de granos de maíz.
4 cucharadas (55 g) de mantequilla derretida
+ 2½ cucharaditas o más de condimento
por ½ taza (75 g) de granos de maíz.
La cantidad de condimento exacta
dependerá de la intensidad de los
ingredientes usados – deje que su gusto lo
guíe.
Nota: Use aceite de oliva para un sabor un
poco más rico, o aceite de semilla de uva
para no añadir ningún sabor.
RECETAS
RECETAS SALADAS
Palomitas al estilo asiático
La salsa de soya y el sésamo les dan a las
palomitas un sabor rico y único.
Rinde aprox. 10 tazas (100 g)
¹/
3
taza (55 g) de maíz para hacer
palomitas/maíz palomero
3 cucharadas (45 ml) de aceite de
semilla de uva
2 cucharadas (30 ml) de salsa de soya
½ cucharadita de salsa picante
½ cucharadita de aceite de sésamo/
ajonjolí
1
cucharada de semillas de sésamo/
ajonjolí (blanco o negro)
1. Retirar la boca de salida y colocar los granos de
maíz en la cámara de cocción. Vuelva a colocar la
boca de salida en su sitio.
2. Colocar un recipiente grande debajo de la boca
de salida y encender el aparato.
3. Mientras el maíz se está cocinando, mezclar
los ingredientes restantes hasta que estén bien
combinados.
4. Cuando todos los granos se hayan reventado,
apagar la máquina. Rociar la mezcla de aceite
encima de las palomitas y revolver para cubrir.
Servir inmediatamente.
Información nutricional por porción de 1 taza (10 g):
Calorías 76 (60 % de grasa) • Carbohidratos 6 g • Proteínas 2 g
Grasa 5 g • Grasa saturada 0 g • Colesterol 0 mg • Sodio 222 mg
Calcio 317 mg • Fibra 1 g

6
Palomitas picantes
¡Sus palomitas de maíz serán aún más
interesantes con un poco de salsa picante!
Rinde 10 tazas (100 g)
¹/
3
taza (55 g) de maíz para hacer
palomitas/maíz palomero
3 cucharadas (45 ml) de aceite de
semilla de uva
2 cucharadas (30 ml)de salsa picante
¼ cucharadita de vinagre de sidra
1 pizca de sal kosher o sal marina
1.
Retirar la boca de salida y colocar los granos de
maíz en la cámara de cocción. Vuelva a colocar la
boca de salida en su sitio.
2. Colocar un recipiente grande debajo de la boca
de salida y encender el aparato.
3. Mientras el maíz se está cocinando, mezclar
los ingredientes restantes hasta que estén bien
combinados.
4. Cuando todos los granos se hayan reventado,
apagar la máquina. Rociar la mezcla de aceite
encima de las palomitas y revolver para cubrir.
Servir inmediatamente.
Información nutricional por porción de 1 taza (10 g):
Calorías 65 (60 % de grasa) • Carbohidratos 6 g • Proteínas 1 g
Grasa 5 g • Grasa saturada 0 g • Colesterol 0 mg • Sodio 158 mg
Calcio 317 mg • Fibra 1 g
Palomitas “Cacio e Pepe”
No hay nada que un poco de (o mucho) “cacio e
pepe” (literalmente queso y pimienta) no pueda
hacer infinitamente mejor.
Rinde aprox. 10 tazas (100 g)
¹/
3
taza (55 g) de maíz para hacer
palomitas/maíz palomero
3 cucharadas (45 g) de mantequilla sin
sal, en pedacitos
1 pizca de sal kosher (o más, al gusto)
2 cucharaditas de pimienta negra recién
molida
½ taza (30 g) de queso Romano
finamente rallado
1. Retirar la boca de salida y colocar los granos de
maíz en la cámara de cocción. Vuelva a colocar
la boca de salida en su sitio.
2. Colocar un recipiente grande debajo de la boca
de salida y encender el aparato.
3. Derretir la mantequilla a fuego medio-bajo en
una sartén pequeña. Una vez derretida, agregar
la sal y 1 cucharadita de la pimienta, y revolver
para incorporar. Retirar del fuego y reservar.
Nota: También puede derretir la mantequilla en
el microondas, colocándola en un recipiente
apto para microondas y usando el programa
“BUTTER MELT” (derretir mantequilla).
4. Cuando todos los granos se hayan reventado,
apagar la máquina.
5. Rociar la mezcla de mantequilla encima de
las palomitas y revolver para cubrir. Agregar
el queso Romano; revolver. Sazonar con sal y
pimienta. Servir inmediatamente.
Información nutricional por porción de 1 taza (10 g):
Calorías 65 (59 % de grasa) • Carbohidratos 5 g • Proteínas 2 g
Grasa 4 g • Grasa saturada 3 g • Colesterol 12 mg • Sodio 69 mg
Calcio 317 mg • Fibra 51 mg
Palomitas con curry
¡Si le gusta la comida india, le van a encantar estas
palomitas!
Rinde aprox. 10 tazas (100 g)
¹/
3
taza (55 g) de maíz para hacer
palomitas/maíz palomero
3 cucharadas (45 ml) de aceite de
semilla de uva
2 cucharaditas de curry en polvo
½ cucharadita de cúrcuma en polvo
¼ a ½ cucharadita de sal marina o sal
kosher
1 pizca de pimienta de Cayena
1.
Retirar la boca de salida y colocar los granos de
maíz en la cámara de cocción. Vuelva a colocar la
boca de salida en su sitio.
2. Colocar un recipiente grande bajo la boca de
salida y encender el aparato.
3. Mientras el maíz se está cocinando, mezclar
los ingredientes restantes hasta que estén bien
combinados.
4. Cuando todos los granos se hayan reventado,
apagar la máquina. Rociar la mezcla de aceite
encima de las palomitas y revolver para cubrir.
Servir inmediatamente.

7
Información nutricional por porción de 1 taza (10 g):
Calorías 59 (61 % de grasa) • Carbohidratos 5 g • Proteínas 1 g
Grasa 4 g • Grasa saturada 0 g • Colesterol 0 mg • Sodio 54 mg
Calcio 317 mg • Fibra 2 mg
Palomitas de cine con
mantequilla
El secreto para conseguir palomitas crujientes con un
sabor a mantequilla es usar mantequilla clarificada.
¡Olvídese de los impostores! No hay sustituto a la
mantequilla clarificada. El resultado es un sabor a
mantequilla pronunciado y limpio que no dejará las
palomitas empapadas. ¡Y lo mejor es que se puede
hacer fácilmente en el microondas!
Rinde aprox. 10 tazas (100 g)
½ taza (115 g) de mantequilla sin sal, en
pedacitos
Palomitas:
¹/
3
taza (55 g) de maíz para hacer
palomitas/maíz palomero
3 cucharadas (45 g) de mantequilla
clarificada (ver las instrucciones en
el paso 1)
½ cucharadita de sal kosher
(o más, al gusto)
1. Colocar la mantequilla en una taza medidora
de vidrio apta para microondas. Calentar en
“HIGH” (alto), o al 70 % de la potencia si usa un
microondas de alta potencia, por 1 minuto. La
mantequilla se separará en tres capas. La capa
en el medio, un líquido dorado/amarillo, es la
mantequilla clarificada. Si la mantequilla no se
ha derretido por completo, seguir calentándola,
en incrementos de 30 segundos, hasta
conseguir capas distintas. Dejar que repose
por unos minutos, luego quitar la capa superior
con una cuchara y tirarla. Colar la mantequilla
clarificada (el líquido dorado/amarillo) a través
de un colador forrado con estopilla o a través
de un filtro de café y guardarla en un recipiente
hermético Reservar 3 cucharadas (45 ml) para
las palomitas. Refrigerar el resto por hasta 6
meses.
2. Retirar la boca de salida y colocar los granos de
maíz en la cámara de cocción. Vuelva a colocar
la boca de salida en su sitio.
3. Colocar un recipiente grande debajo de la boca
de salida y encender el aparato.
4. Cuando todos los granos se hayan reventado,
apagar la máquina.
Rociar la mantequilla reservada encima de
las palomitas y sazonar con sal. Revolver
para mezclar. Ajustar la sal al gusto. Servir
inmediatamente.
Información nutricional por porción de 1 taza (10 g):
Calorías 57 (63 % de grasa) • Carbohidratos 5 g • Proteínas 1 g
Grasa 4 g • Grasa saturada 2 g • Colesterol 10 mg • Sodio 56 mg
Calcio 317 mg • Fibra 0 mg
Tentempié de palomitas
Una versión más saludable que las mezclas
disponibles en el comercio. Hará que su próxima
fiesta sea un éxito.
Rinde aprox. 12 tazas (120 g)
Spray vegetal
¹/
3
taza (55 g) de maíz para hacer
palomitas/maíz palomero
4 cucharadas (60 ml) de aceite de
semilla de uva
½ cucharadita de páprika
¼ cucharadita de orégano seco
¼ cucharadita de ajo en polvo
½ cucharadita de salsa Worcestershire
1 pizca de salsa picante
1 taza de mini pretzels (50 g),
en pedacitos
1½ tazas (150 g) de nueces mixtas
tostadas
1. Precalentar el horno a 300°F (150°C). Forrar una
placa para horno con papel de aluminio y engrasar
ligeramente con spray vegetal.
2.
Retirar la boca de salida y colocar los granos de
maíz en la cámara de cocción. Vuelva a colocar la
boca de salida en su sitio.
3. Colocar un recipiente grande debajo de la boca
de salida y encender el aparato.
4. Mientras el maíz se está cocinando, revolver el
aceite con las especias, la salsa Worcestershire
y la salsa picante; reservar.
5. Cuando todos los granos se hayan reventado,
apagar la máquina. Agregar los pretzels y las
nueces. Rociar la mezcla de aceite sazonada
encima y revolver para cubrir.

8
6. Verter la mezcla sobre la placa para horno.
Hornear por aprox. 20 minutos, revolviendo
ocasionalmente. Servir inmediatamente.
Información nutricional por porción de 1 taza (10 g):
Calorías 255 (55 % de grasa) • Carbohidratos 24 g • Proteínas 6 g
Grasa 16 g • Grasa saturada 2 g • Colesterol 0 mg
Sodio 602 mg • Calcio 11 mg • Fibra 3 g
Palomitas con romero
y sal marina
El sabor a pino del romero fresco convierte un
bocado ordinario en algo especial.
Rinde aprox. 10 tazas (100 g)
3 cucharadas (45 ml) de aceite de oliva
virgen extra
1 ramita de romero fresco + 1
cucharada de hojas de romero fresco
finamente picadas
¹/
3
taza (55 g) de maíz para hacer
palomitas/maíz palomero
½ cucharadita de sal kosher
(o más, al gusto)
Pimienta negra recién molida, al gusto
1. Poner el aceite de oliva a calentar a fuego medio, en
una sartén pequeña. Cuando el aceite esté caliente,
agregar la ramita de romero y freír aprox. 15 por
lado, hasta que las hojas estén oscuras y crujientes.
Reservar, sobre una hoja de papel absorbente.
Retirar el aceite del fuego y dejar enfriar. Reservar la
ramita y el aceite.
2. Retirar la boca de salida y colocar los granos de
maíz en la cámara de cocción. Vuelva a colocar la
boca de salida en su sitio.
3. Colocar un recipiente grande debajo de la boca de
salida y encender el aparato.
4. Cuando todos los granos se hayan reventado,
apagar la máquina. Rociar el aceite con sabor a
romero encima de las palomitas y sazonar con el
romero picado, sal y pimienta, al gusto. Revolver
para mezclar. Decorar con hojas de romero fritas
(de la ramita reservada). Servir inmediatamente.
Información nutricional por porción de 1 taza (10 g):
Calorías 60 (65 % de grasa) • Carbohidratos 5 g • Proteínas 1 g
Grasa 5 g • Grasa saturada 1 g • Colesterol 0 mg
Sodio 116 mg • Calcio 317 mg • Fibra 1 g
Palomitas al estilo suroeste
Combine sus sabores suroestes favoritos, para
palomitas sabrosas. ¡Agregue unas pepitas
tostadas para que las palomitas sean más
crujientes!
Rinde aprox. 10 tazas (100 g)
¹/
3
taza (55 g) de maíz para hacer
palomitas/maíz palomero
3 cucharadas (45 ml) de aceite de
semilla de uva
1 cucharadita de chile en polvo
1 cucharadita de páprika
½ cucharadita de sal marina o sal
kosher
¼ cucharadita de orégano seco
¼ cucharadita de ajo en polvo
¹/
8
cucharadita de pimienta de Cayena
1. Retirar la boca de salida y colocar los granos
de maíz en la cámara de cocción. Vuelva a
colocar la boca de salida en su sitio.
2. Colocar un recipiente grande debajo de la boca
de salida y encender el aparato.
3. Mientras el maíz se está cocinando, mezclar
los ingredientes restantes hasta que estén bien
combinados.
4. Cuando todos los granos se hayan reventado,
apagar la máquina. Rociar la mezcla de aceite
encima de las palomitas y revolver para cubrir.
Servir inmediatamente.
Información nutricional por porción de 1 taza (10 g):
Calorías 59 (61 % de grasa) • Carbohidratos 5 g • Proteínas 1 g
Grasa 4 g • Grasa saturada 0 g • Colesterol 0 mg
Sodio 109 mg • Calcio 317 mg • Fibra 2 mg

9
RECETAS DULCES
Palomitas de cumpleaños
¡Una fiesta en cada bocado! (con o sin cumpleaños
que celebrar)
Rinde aprox. 10 tazas (100 g)
¹/
3
taza (55 g) de maíz para hacer
palomitas/maíz palomero
3 cucharadas (45 g) de mantequilla
sin sal
½ paquete de mezcla de pastel amarillo
o blanco
1 taza (175 g) de chispas de chocolate
blanco, derretidas
1 cucharadita de aceite vegetal
¹/
3
taza (30 g) de granas (redondas o
regulares) multicolor
1. Precalentar el horno a 300°F (150°C). Forrar
una placa para horno con papel sulfurizado;
reservar.
2. Retirar la boca de salida y colocar los granos de
maíz en la cámara de cocción. Vuelva a colocar
la boca de salida en su sitio.
3. Colocar un recipiente grande debajo de la boca
de salida y encender el aparato.
4. Derretir la mantequilla a fuego medio-bajo
en una sartén pequeña. Retirar del fuego y
reservar. Nota: También puede derretir la
mantequilla en el microondas, colocándola
en un recipiente apto para microondas y
usando el programa “BUTTER MELT” (derretir
mantequilla).
5. Cuando todos los granos se hayan reventado,
apagar la máquina.
6. Rociar de mantequilla encima de las palomitas;
revolver para cubrir. Esparcir sobre la placa para
horno reservada. Tamizar la mezcla de pastel
por encima de las palomitas con mantequilla
y revolver para cubrir uniformemente, Hornear
por 10 minutos, revolviendo a la mitad del
tiempo. (Nota: Este paso, conocido como
tratamiento térmico, elimina el riesgo de ingerir
bacterias nocivas que pueden encontrarse en
los ingredientes crudos, como la harina usada
en las mezclas para pasteles. También quita
el sabor crudo de la harina, de modo que las
palomitas puedan desarrollar el sabor a pastel
que tanto nos gusta.) Dejar enfriar.
7. Mientras tanto, derretir el chocolate blanco
a baño María, revolviendo ocasionalmente
hasta conseguir una mezcla suave.
Nota: También puede hacer esto en el
microondas, colocándola en un recipiente
apto para microondas y usando el programa
“CHOCOLATE MELT” (derretir chocolate).
Agregar el aceite vegetal y revolver para
combinar. Mantener tibio hasta el momento de
usar.
8. Derretir la mayoría del chocolate por encima de
las palomitas, usando los dientes de un tenedor.
Rociar la mayoría de las granas por encima.
Congelar brevemente hasta que el chocolate
se solidifique. Romper la mezcla y disponerla
de manera que pedazos de palomitas estén
expuestos. Repetir con el chocolate y las granas
restantes. Congelar brevemente hasta que el
chocolate se solidifique. Servir inmediatamente.
Información nutricional por porción de 1 taza (10 g):
Calorías 225 (35 % de grasa) • Carbohidratos 33 g • Proteínas 2 g
Grasa 4 g • Grasa saturada 6 g • Colesterol 12 mg
Sodio 123 mg • Calcio 317 mg • Fibra 88 mg
Palomitas con caramelo
Ricas palomitas con sabor a dulce de leche.
Siga nuestras instrucciones fáciles para convertir
las palomitas en sabrosas bolas dulces.
Rinde aprox. 10 tazas (100 g)
3 cucharadas (45 g) de mantequilla sin
sal
¹/
3
taza llena (65 g) de azúcar rubia
(azúcar de caña integral)
2 cucharadas (30 ml) de jarabe de maíz
claro
1 cucharada (15 ml) de agua
¼ cucharadita de sal marina
¼ cucharadita de bicarbonato de sodio
2 cucharaditas de aceite vegetal
¹/
3
taza (50 g) de maíz para hacer
palomitas/maíz palomero
1. Colocar la mantequilla, el azúcar rubia, el
jarabe de maíz, el agua y la sal en una cacerola
pequeña de fondo pesado; revolver. Cocinar a
fuego medio-alto hasta que la mezcla empiece
a hervir.

10
2. Mientras tanto, Retirar la boca de salida y
colocar los granos de maíz en la cámara de
cocción. Volver a instalar la boca de salida.
3. Estar pendiente para que el caramelo no
se queme. Comprobar la temperatura del
caramelo con un termómetro de cocina.
Debería estar entre 240°F (115°C) y 260°F
(127°C). Aprox. 6 a 8 minutos después de
dorarse, empezará a espesarse ligeramente.
Encender la máquina para empezar a hacer
palomitas. Mantener el caramelo caliente hasta
que las palomitas estén listas.
4. Cuando las palomitas estén listas, retirar el
caramelo del fuego y agregar el bicarbonato,
batiendo.
5. Cuando todos los granos se hayan reventado,
apagar la máquina. Rociar el caramelo por
encima de las palomitas y revolver para cubrir.
Servir inmediatamente.
6. Esta receta puede servir de base para preparar
deliciosas bolas de palomitas. Forrar una
bandeja con papel de aluminio. Engrasar
ligeramente la bandeja y el interior de una
taza medidora con spray vegetal. Engrasar
ligeramente sus manos con spray vegetal
también. Medir 1 taza (15 g) de palomitas de
maíz con caramelo y formar una bola. Colocarla
sobre el papel de aluminio engrasado. Repetir
con las palomitas restantes. Debería conseguir
aprox. 8 a 10 bolas de palomitas. Servir
inmediatamente o envolver cada bola en papel
encerado.
Información nutricional por porción de 1 taza (10 g):
Calorías 89 (36 % de grasa) • Carbohidratos 14 g • Proteínas 1 g
Grasa 4 g • Grasa saturada 2 g • Colesterol 9 mg
Sodio 24 mg • Calcio 317 mg • Fibra 1 g
Palomitas saladas y dulces
Palomitas saladas y dulces clásicas, hechas en
casa.
Rinde aprox. 10 tazas (100 g)
¼ taza (50 g) de azúcar granulada
¼ taza (55 g) de mantequilla sin sal, en
cubitos
¹/
3
taza (55 g) de maíz para hacer
palomitas/maíz palomero
½ cucharadita de sal marina o sal
kosher
1. Colocar el azúcar en una cacerola de fondo
pesado y poner a calentar a fuego medio.
Calentar el azúcar por aprox. 10 a 15 minutos,
sacudiendo la cacerola cada 2 a 3 minutos. El
azúcar no cambiará de color/textura, pero olerá
a caramelo.
2. Agregar la mantequilla poco a poco; debería
derretirse al instante. Revolver con un batidor
hasta conseguir una mezcla suave y brillante.
Mantener caliente a fuego muy lento hasta el
momento de usar.
3. Retirar la boca de salida y colocar los granos
de maíz en la cámara de cocción. Vuelva a
colocar la boca de salida en su sitio.
4. Colocar un recipiente grande debajo de la boca
de salida y encender el aparato.
5. Cuando todos los granos se hayan reventado,
apagar la máquina. Rociar la mezcla de azúcar
encima de las palomitas, salpicar con sal y
revolver para cubrir.
Servir inmediatamente.
Información nutricional por porción de 1 taza (10 g):
Calorías 88 (48 % de grasa) • Carbohidratos 11 g • Proteínas 1 g
Grasa 5 g • Grasa saturada 3 g • Colesterol 12 mg
Sodio 118 mg • Calcio 317 mg • Fibra 1 g

11
Palomitas de maíz con
chocolate, malvaviscos y
galletas Graham
Esta receta de palomitas captura la esencia de
la golosina favorita de todos los campistas: los
“s'mores”.
Rinde aprox. 10 tazas (100 g)
Spray vegetal
¹/
3
taza (55 g) de maíz para hacer
palomitas/maíz palomero
1 jarra de 7 oz (205 ml) de crema de
malvaviscos, calentada hasta que se
pueda verter fácilmente
2
/
3
taza (115 g) de chispas de chocolate
con leche
4 hojas de galletas Graham, aprox.
2¹/
8
oz (60 g), finamente molidas
1. Precalentar el horno a 325°F (165 °C). Engrasar
una placa para horno con spray vegetal;
reservar.
2. Retirar la boca de salida y colocar los granos de
maíz en la cámara de cocción. Vuelva a colocar
la boca de salida en su sitio.
3. Colocar un recipiente debajo de la boca de
salida y encender el aparato.
4. Cuando todos los granos se hayan reventado,
apagar la máquina. Verter la crema de
malvavisco por encima de las palomitas
y mezcla suavemente con una espátula
antiadherente para cubrir uniformemente.
Esparcir la mezcla de palomitas sobre la placa
para horno reservada y hornear por aprox. 10
a 12 minutos, revolviendo una vez, hasta que
las palomitas estén secas y doradas en algunos
sitios. Dejar enfriar.
5. Mientras tanto, derretir el chocolate a baño
María, revolviendo ocasionalmente hasta
conseguir una mezcla suave. Nota: También
puede hacer esto en el microondas, colocándola
en un recipiente apto para microondas y usando
el programa “CHOCOLATE MELT” (derretir
chocolate). Verter el chocolate derretido por
encima de las palomitas enfriadas; revolver
suavemente para cubrir.
6. Rociar inmediatamente con las galletas Graham
molidas y revolver para cubrir. Congelar por
aprox. 5 minutos, hasta que el chocolate se
solidifique. Servir inmediatamente.
Información nutricional por porción de 1 taza (10 g):
Calorías 169 (4 % de grasa) • Carbohidratos 34 g • Proteínas 2 g
Grasa 4 g • Grasa saturada 2 g • Colesterol 0 mg
Sodio 53 mg • Calcio 317 mg • Fibra 18 mg

©2022 Cuisinart
Glendale, AZ 85307
Impreso en China
22CE081226
GARANTÍA
Garantía limitada
de tres años
Esta garantía es para los consumidores que residen
en los EE.UU. solamente. Usted es un consumidor
si posee una máquina de palomitas de aire caliente
EasyPop
®
de Cuisinart
®
que fue comprada en una
tienda para uso personal, familiar o casero. A menos
que la ley aplicable exija lo contrario, esta garantía
no es para los minoristas u otros consumidores/
compradores comerciales. Cuisinart garantiza este
producto contra todo defecto de materiales o
fabricación durante 3 años después de la fecha de
compra original, siempre que el aparato haya sido
usado para uso doméstico y según las
instrucciones. Se recomienda llenar el formulario de
registro disponible en https://cuisinart.registria.
com, a fin de facilitar la verificación de la fecha de
compra original de este producto. Sin embargo, no
es necesario registrar el producto para recibir
servicio bajo esta garantía. En ausencia de prueba
de la fecha de compra, el período de garantía será
calculado a partir de la fecha de fabricación del
producto.
RESIDENTES DE CALIFORNIA
La ley del Estado de California ofrece dos opciones
adicionales de servicio de garantía. Los residentes
del Estado de California pueden (A) devolver el
producto defectuoso a la tienda donde lo
compraron, o (B) a otra tienda que venda productos
Cuisinart del mismo tipo. La tienda podrá, a su
elección, reparar el producto, referir el consumidor a
un centro de servicio independiente, sustituir el
producto, o reembolsar al consumidor el precio de
compra menos la cantidad directamente atribuible al
uso anterior del producto por el consumidor. Si
estas dos opciones no satisfacen al consumidor,
podrá llevar el aparato a un centro de servicio
independiente, siempre que se pueda arreglar o
reparar el aparato de manera económica. Cuisinart
(no el consumidor) será responsable por los gastos
de servicio, reparación, sustitución o reembolso de
los productos defectuosos bajo garantía. Los
residentes de California también pueden, si lo
desean, mandar el producto defectuoso
directamente a Cuisinart para que lo reparen o lo
cambien. Para esto, se debe llamar a nuestro
servicio posventa al 1-800-726-0190. Cuisinart será
responsable por los gastos de reparación,
reemplazo, manejo y envío de los productos
defectuosos durante el período de garantía.
GARANTÍA DE REEMPLAZO SIN DIFICULTADES
Su máxima satisfacción es nuestra prioridad, así que
si este producto Cuisinart
®
falla dentro del generoso
período de garantía, lo repararemos o, de ser
necesario, lo reemplazaremos, sin costo alguno para
usted. Para obtener una etiqueta de devolución,
envíenos un correo electrónico, visitando https://
www.cuisinart.com/customer-care/product-
assistance/product-inquiry/. O llame sin cargo
a nuestro servicio de atención al cliente, al
1-800-726-0190, para hablar con un representante.
Este producto satisface las más altas exigencias de
fabricación y ha sido diseñado para funcionar con
120 V, usando accesorios y repuestos autorizados
solamente. Esta garantía excluye expresamente los
defectos o daños causados por accesorios, piezas o
reparaciones no autorizados por Cuisinart, así como
los defectos o daños causados por el uso de un
convertidor de voltaje. Esta garantía no cubre el uso
comercial o industrial del producto, y no es válida en
caso de daños causados por mal uso, negligencia o
accidente. Esta garantía excluye todos los daños
incidentales o consecuentes. Algunos Estados no
permiten la exclusión o limitación de daños
incidentales o consecuentes, de modo que las
limitaciones mencionadas pueden no regir para
usted. Usted puede tener otros derechos que varían
de un Estado a otro.
Importante: Si debe llevar el aparato defectuoso a
un centro de servicio no autorizado, por favor
informe al personal del centro de servicio que deben
llamar al Centro de Servicio al Cliente de Cuisinart,
al 1-800-726-0190 a fin de diagnosticar el problema
correctamente, usar las piezas correctas para
repararlo, y comprobar que el producto aún está
bajo garantía.
IB-17472-ESP