
物料名称
产品型号
物料编号
版次
M��� Pro+说明书(国际通用版)
Lefant M��� Pro+
V� (��.��)
设计:
日期:����.��.��
平面印刷品基本技术要求
材质:���g双铜纸
印刷颜色:单色印刷
装订方式:骑马钉装
页数:��p
尺寸:���*���mm
深圳市云视机器人有限公司
比例:�:�
变更记录:
M A N U A L
INSTRUCTION
User manual
Lefant M210 Series Robotic Vacuum Cleaner
Scan the QR code for the English version of the online user manual.
Scannen Sie den QR-Code, um das Online-Handbuch auf Deutsch zu erhalten.
Scannez le QR code pour obtenir le manuel en ligne en français.
Scansiona il codice QR per ottenere il manuale online in italiano.
Escanee el código QR para obtener el manual en línea en español.
QR コードをスキャンして、日本語のオンラインマニュアルを取得します。
1
Please read this instruction manual carefully before using the product and keep it in a safe place for future reference.
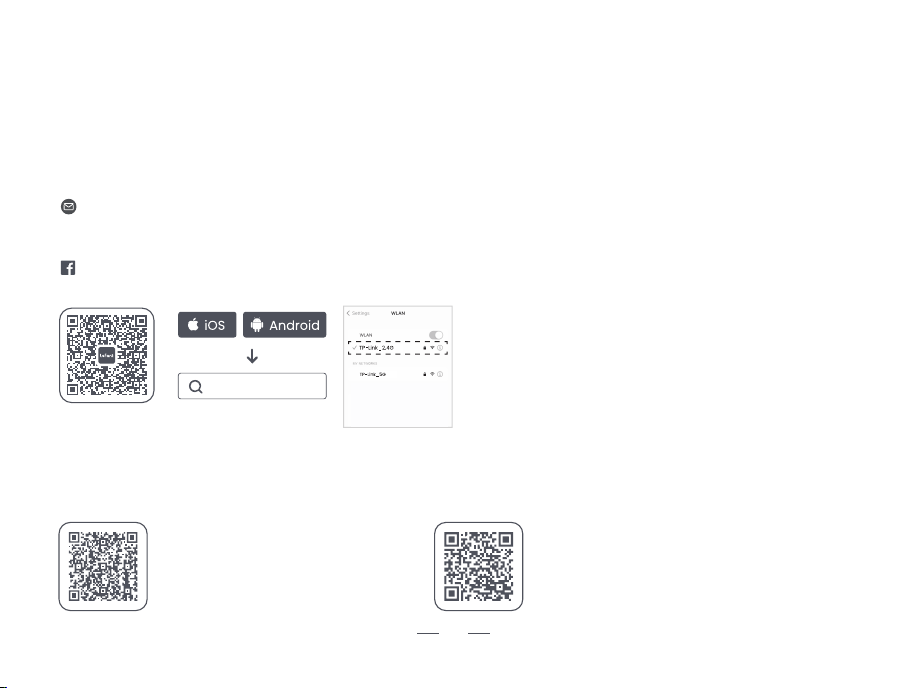
You can scan the QR code or download the "Lefant" app from the app store to connect to the robot and unlock more features.
Thank you for choosing Lefant.
This manual will guide you to fully understand and quickly install the robotic vacuum cleaner (hereinafter referred to as "the
robot"). It will also provide detailed information on usage and maintenance to help you have the best product experience.
If you encounter situations not properly addressed in this user manual, please contact our after - sales service. We'll solve your
specific problems. For more information, please visit the official website of Lefant ROBOTICS: www.lefant.com, or send an email to
the following email address:
Products are subject to physical appearance and specific details may differ from those shown.
Kind Reminder:
・After the installation of the robot, please follow the instructions on the mobile app to complete registration, logging in,
and network configuration.
・Before configuring the network, please ensure that your phone and home network are connected.
・This robot is only compatible with 2.4GHz Wi-Fi networks.
Lefant
Other countries: [email protected]
Facebook: @LEFANTOFFICIAL
Scan the QR code to access
the mop installation tutorial video
Scan the QR code to access
the charging dock installation video.

2
IMPORTANT SAFETY INSTRUCTIONS
WARNING: Read all safety warnings and instructions. Failure to follow the warnings and instructions may result in
electric shock, fire or serious injury.
READ ALL INSTRUCTIONS BEFORE USING THIS APPLIANCE.
1. The robot must be used in accordance with the
directions in this user manual. Our company cannot be
held liable or responsible for any damages or injuries
caused by improper use.
2. Do not allow to be used as a toy. Close attention is
necessary when used by or near children.
Do not allow children to sit on the vacuum.
3. Clear the area to be cleaned. Remove power cords and
small objects from the floor that could entangle the Robot.
Tuck rug fringe under the rug base, and lift items such as
curtains and table cloths off the floor.
4. If there is a drop off in the cleaning area due to a step
or stairs, you should operate the robot to ensure that it
can detect the step necessary to place a physical barrier
at the edge to keep the unit from falling. Make sure the
physical barrier is not a trip hazard.
5. Only use as described in this manual. Only use
attachments recommended or sold by the manufacturer.
6. Please make sure your power supply voltage matches
the power voltage marked on the docking station.
7. Do not handle or plug appliance with wet hands.
8. Non-rechargeable batteries are prohibited.
9. Do not use without dust bin and/or filters in place.
10. Do not operate the robot in an area where there are lit
candles or fragile objects on the floor to be cleaned.
11. Do not use and store in extremely hot or cold environ-
ments (below -5°C /23°F or above 40°C/104°F). Please
charge the robot in temperature above 0°C/32°F and below
40°C/104°F. Follow all charging instructions and do not
charge the battery pack or appliance outside of the
temperature range specified in the instructions. Charging
improperly or at temperatures outside of the specified
range may damage the battery and increase the risk of fire.
12. Keep hair, loose clothing, fingers, and all parts of body
away from any openings and moving parts.
13. Do not operate the robot in a room where an infant or
child is sleeping.
14. For INDOOR use ONLY. Do not use the robot in outdoor,
commercial or industrial environments. Do not use robot on
wet surfaces or surfaces with standing water.
15. Do not allow the robot to pick up large objects like
stones, large pieces of paper or any item that may clog
For Household use only
When using an electrical appliance, basic precautions should always be followed, including the following:

3
the robot.
16. Do not use the robot to pick up flammable or
combustible materials such as gasoline, printer or copier
toner, or use in areas where they may be present.
17. Do not use the robot to pick up anything that is burning
or smoking, such as cigarettes, matches, hot ashes, or
anything that could cause a fire.
18. Do not put any object into openings. Do not use with any
opening blocked; keep free of dust, lint, hair, and anything
that may reduce air flow.
19. Take care not to damage the power cord. Do not pull on
or carry the robot or the docking station by the power cord,
use the power cord as a handle, close a door on the power
cord, or pull power cord around sharp edges or corners. Do
not run the robot over the power cord.Keep power cord
away from hot surfaces. Do not unplug by pulling on cord,
To unplug, grasp the plug, not the cord.
20. If the power cord is damaged, it must be replaced by
the manufacturer or its service agent in order to avoid a
hazard.
21. Do not use the docking station if it is damaged.
22. Do not use the robot or the docking station if it is not
working properly, has been dropped, damaged, left
outdoors, or come in contact with water. It must be
repaired by the manufacturer or its service agent in order
to avoid a hazard.
23. Turn off the power switch before cleaning or
maintaining the robot. Power off all controls.
24. The plug must be removed from the receptacle
before cleaning or maintaining the docking station.
25. Remove the robot from the docking station, power off
the robot before removing the battery for robot disposal.
26. The battery must be removed and discarded
according to local laws and regulations before disposal
of the robot.
27. Please dispose of used batteries according to local
laws and regulations.
28. Do not incinerate the robot even if it is severely
damaged. The batteries can explode in a fire.
29. When not using the docking station for a long period
of time, please unplug it.
30. Prevent unintentional starting. Ensure the switch is in
the off position before connecting to battery pack,
picking up or carrying the robot. Carrying the robot with
your finger on the switch or energizing the robot that
have the switch on invites accidents.
31. When battery pack is not in use, keep it away from
other metal objects, like paper clips, coins,keys, nails,
screws,ect, that can make a connection from one
terminal to another. Shorting the battery terminals
together may cause burns or a fire.
32. Under abusive conditions, liquid may be ejected from
the battery; avoid contact. If contact accidentally occurs,
flush with water. If liquid contacts eyes, additionally seek
medical help. Liquid ejected from the battery may cause
4
irritation or burns.
33. Do not use a battery pack that is damaged or
modified. Damaged or modified batteries may exhibit
unpredictable behavior resulting in fire, explosion or risk of
injury.
34. Do not expose a battery pack or appliance to fire or
excessive temperature. Exposure to fire or temperature
above 130°C/265°F may cause explosion.
35. Have servicing performed by a qualified repair person
using only identical replacement parts.
36. Do not modify or attempt to repair the robot or the
battery pack (as applicable) except as indicated in the
instructions.
37. Do not operate the robot in a room that has lit candles
on furniture that the vacuum may accidentally hit or
bump into.
38. Recharge only with the charger specified by the
manufacturer. A charger that is suitable for one type of
battery pack may create a risk of fire when used with
another battery pack.
39. Use the robot only with specifically designated battery
packs. Use of any other battery packs may create a risk of
injury and fire.
40. The robot contains batteries that are only replaceable
by skilled persons. To replace the robot's battery, please
contact Customer Service.
41. If the robot is not going to be used for a long time, fully
charge the robot, power it off, and unplug the docking
station.
42. Please remove any fragile and miscellaneous items
from the floor (such as vases, plastic bags, etc.) to
prevent the robot from being obstructed or causing
damage to valuable items in the home due to minor
collisions.
WARNING: For the purposes of recharging the battery,
only use the detachable supply unit provided with this
appliance.
SAVE THESE INSTRUCTIONS
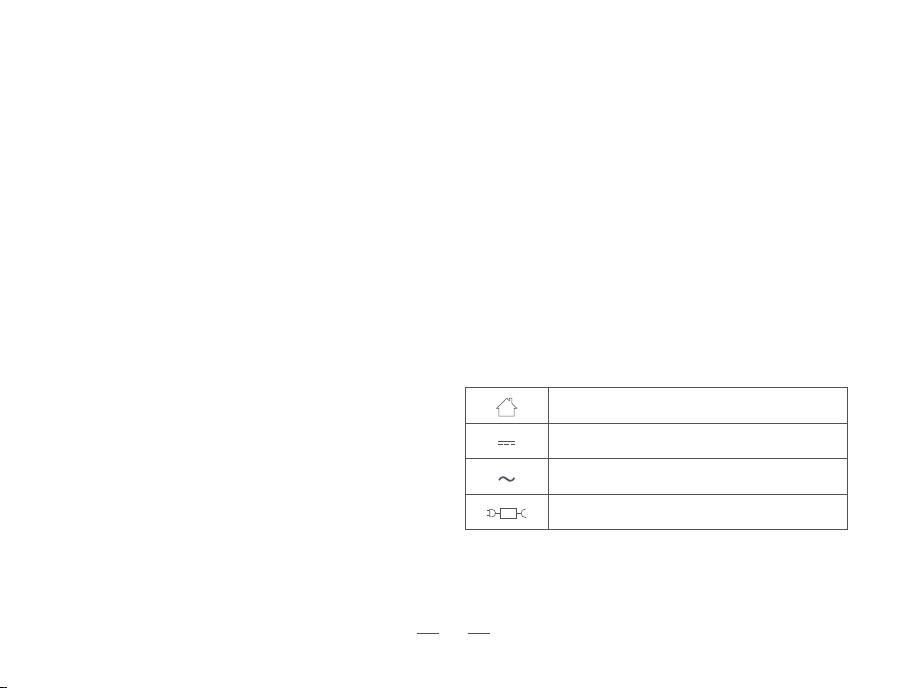
For indoor use only
Direct current
Alternating current
detachable supply unit
To satisfy RF exposure requirements, a separation
distance of 20 cm or more should be maintained
between this device and persons during device
operation.
To ensure compliance, operations at closer than this
distance is not recommended. The antenna used for this
transmitter must not be co-located in conjunction with
any other antenna or transmitter.

5
This marking indicates that this product should not be disposed of with other household waste throughout
the EU. To prevent possible harm to the environment or human health from uncontrolled waste disposal,
recycle it responsibly to promote the sustainable reuse of material resources. To recycle your used device,
please use the return and collection systems or contact the retailer where the product was purchased.
They can safely recycle this product.
Correct Disposal of this Product
Federal Communications Commission (FCC) Interference Statement
This device complies with Part 15 of the FCC Rules.
Operation is subject to the following two conditions:
(1) This device may not cause harmful interference,
and (2) this device must accept any interference
received, including interference that may cause
undesired operation.
FCC Caution:
Any changes or modifications not expressly approved by
the party responsible for compliance could void the user
5s authority to operate this equipment.
RF exposure warning
This equipment complies with FCC radiation exposure
limits set forth for an uncontrolled environment.This
equipment must be installed and operated in
accordance with provided instructions and the
antenna(s) used for this transmitter must be installed
antenna(s) used for this transmitter must be installed to
provide a separation distance of at least 20 cm from all
persons and must not be collocated or operating in
conjunction with any other antenna or transmitter.
This equipment has been tested and found to comply
with the limits for a Class B digital device, pursuant to Part
15 of the FCC Rules.
These limits are designed to provide reasonable
protection against harmful interference in a residential
installation. This equipment generate, uses and can
radiate radio frequency energy and, if not installed and
used in accordance with the instructions, may cause
harmful interference to radio communications.
However, there is no guarantee that interference will not
occur in a particular installation. If this equipment does
cause harmful interference to radio or television
reception, which can be determined by turning the
equipment off and on, the user is encouraged to try to
correct the interference by one of the following measures:
• Reorient or relocate the receiving antenna.
• Increase the separation between the equipment and
receiver.
• Connect the equipment into an outlet on a circuit
different from that to which the receiver is connected.
• Consult the dealer or an experienced radio/TV
technician for help.

6
- English:
This device contains licence-exempt transmitter(s)/receiver(s) that comply with Innovation, Science and Economic
Development Canada’s licence-exempt RSS(s). Operation is subject to the following two conditions:
(1) This device may not cause interference.
(2) This device must accept any interference, including interference that may cause undesired operation of the device.
Any changes or modifications not expressly approved by the party responsible for compliance could void the user's
authority to operate the equipment.
RF exposure statement:
The equipment complies with IC Radiation exposure limit set forth for uncontrolled environment. This equipment should
be installed and operated with minimum distance 20cm between the radiator and your body.
- French:
Cet appareil contient des émetteurs / récepteurs exemptés de licence conformes aux RSS (RSS) d'Innovation, Sciences
et Développement économique Canada. Le fonctionnement est soumis aux deux conditions suivantes:
(1) Cet appareil ne doit pas causer d'interférences.
(2) Cet appareil doit accepter toutes les interférences, y compris celles susceptibles de provoquer un fonctionnement
indésirable de l'appareil.
Tout changement ou modification non expressément approuvé par la partie responsable de la conformité pourrait
annuler l'autorité de l'utilisateur à utiliser l'équipement.
Déclaration d'exposition RF:
L'équipement est conforme à la limite d'exposition aux radiations de la IC établie pour un environnement non contrôlé.
Cet équipement doit être installé et utilisé avec une distance minimale de 20cm entre le radiateur et votre corps.
IC Caution:

7
Hold for 3 seconds: Power on (Robot charging will power on automatically)
Fast press: Start/Pause
Fast press twice: Auto-recharge
Hold for 6 seconds: Enter network pairing mode
Hold for 12 seconds: Power off
(Networking operation: Open the App, select ‘Add Device’, then press
and hold for 6 seconds to hear the voice prompt, wait for the App to
scan the device and then follow the networking guidelines to pair it.)
How to use the button
Indicator meaning
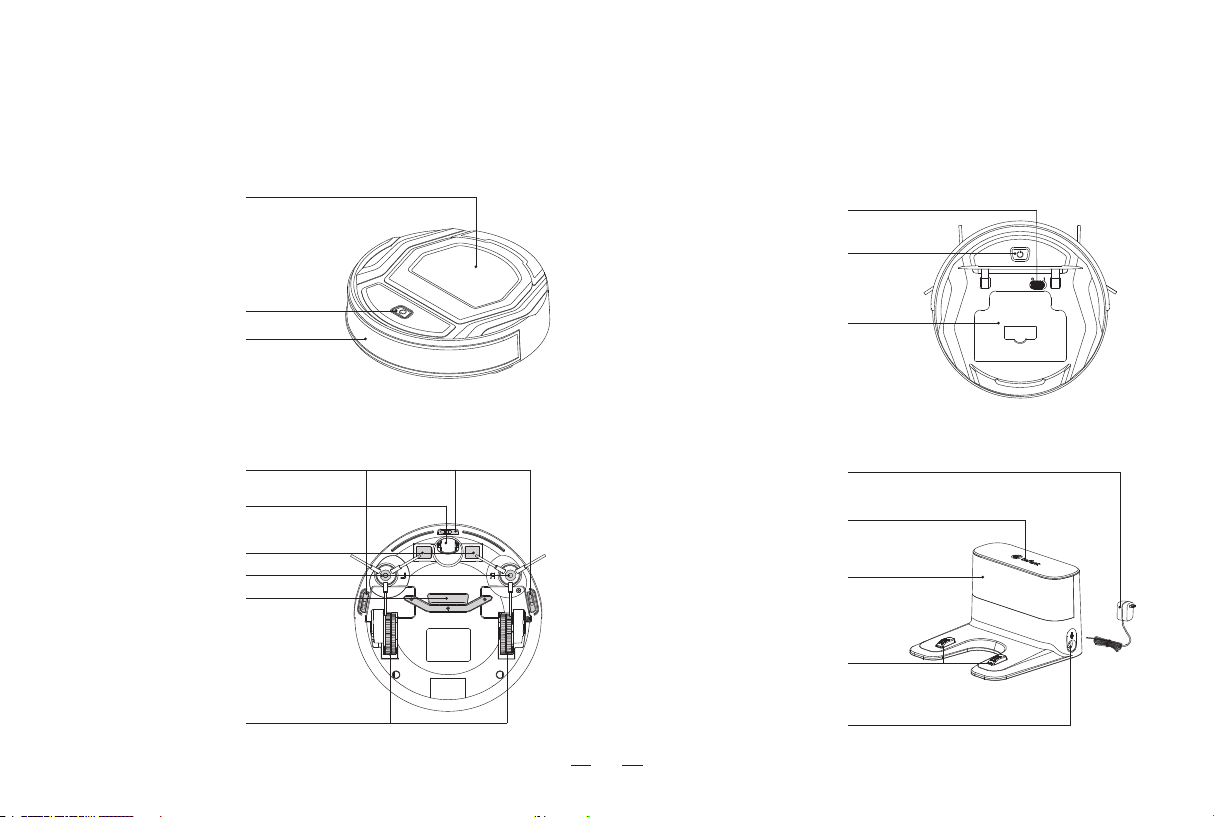
Product Introduction
A
Indicator light display status
Blue light is always on
Blue light is always on
Purple/Blue light breathing
Red light is always on
Purple light is always on
Blue light is flashing
Blue light is always on
Red light is always on/flashing
Cleaning
Paused/Standby
Automatic return charging due to
low battery
Automatic return charging after
cleaning completed
Charging started
Entering network
configuration status
Network - configuration successful
Robot status
Machine malfunction
8
A1
Robot (Top view)
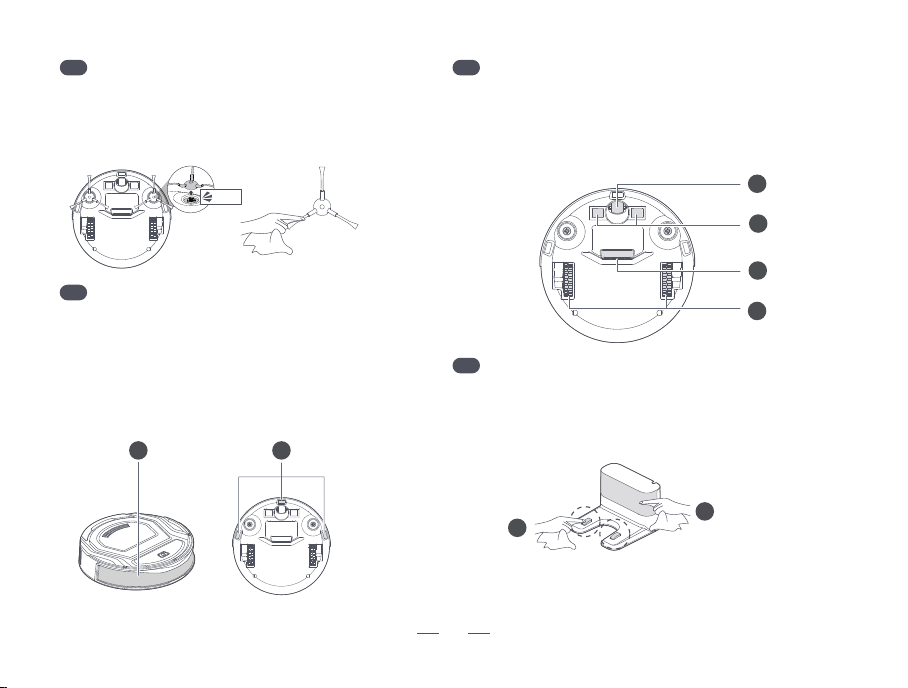
A2
Robot (Bottom view)
A4
Docking station
Charging electrode
Indicator light
Power adapter socket
Soft rubber
adhesive slot
Infrared signal
transmitter
Start/pause button
Air outlet
Obstacle
avoidance sensor
Anti-collision strip
Flip cover
Drive wheel
Holder mounting hole
Drop prevention sensor
Suction port
Charging electrode
Universal wheel
Side brushes
Battery
A3
Dust bin
Filter bracket
Filter cotton
High-efficiency filter
Dust bin body
9
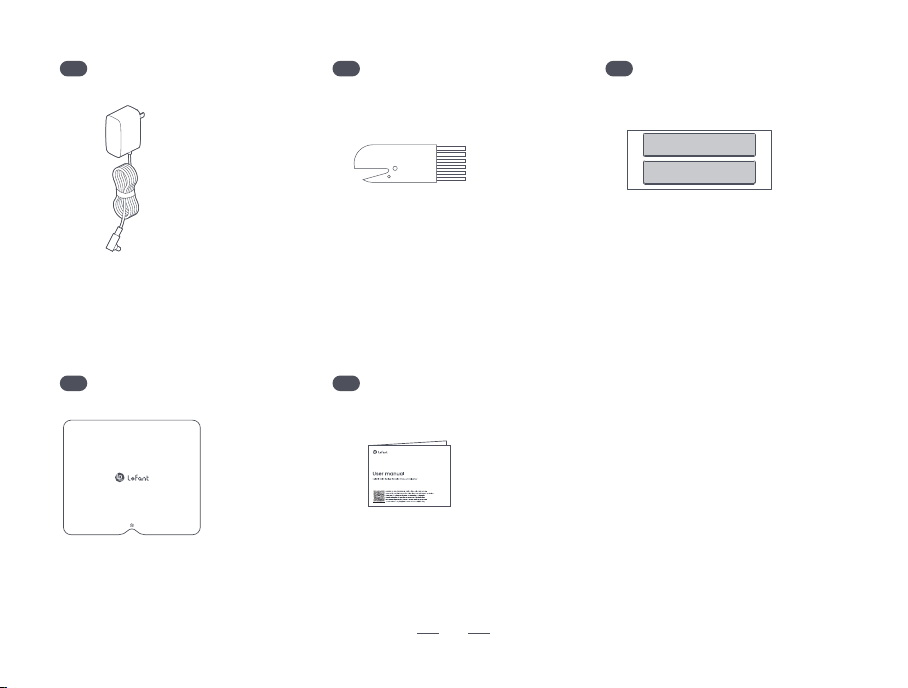
A5
Power adapter
A6
Cleaning brush
A7
Double-sided soft rubber
A8
Quick guide
A9
User manual
Please read the back before use
Quick Start Guide
10
Product Installation
B
Special note
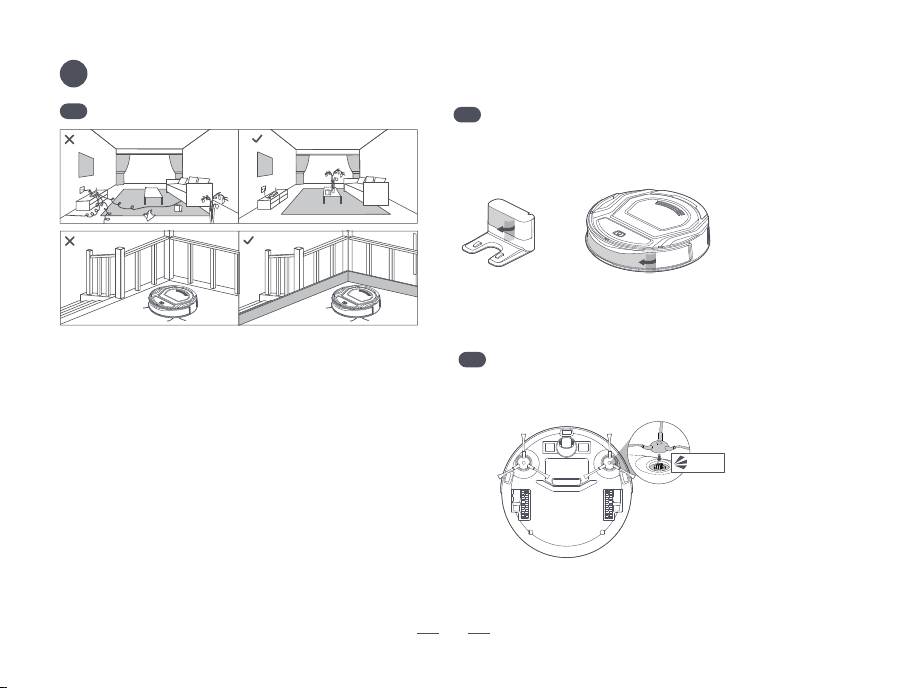
B1
2. If this product is used in a suspended environment,
be sure to use a sturdy physical barrier to prevent
personal or property damage caused by the robot
accidentally falling.
1. Before starting, please clear the floor of scattered
wires, hard objects, sharp items (such as nails and
glass) and other debris. Also, remove items that are
prone to falling, fragile, valuable or potentially
hazardous. Avoid getting entangled, stuck, dragged by
the robot or knocked down by it, which could cause
damage to people or property.
Tips:
1. During the initial cleaning, it is advisable to accompany the robot throughout the entire process to help address any minor issues that may
occur. Once these issues are resolved, the robot will be able to carry out autonomous cleaning smoothly in subsequent operations.
2. Avoid allowing the robot to vacuum up hard or sharp objects (such as construction debris, glass, nails, etc.), as this may damage both the
robot and the floor surface.
Remove protective film
B2
Install the side brushes
B3
Remove the protective film on the robot and docking station.
Push down firmly until you hear a “click”.
This indicates that it is in place.
Click
11
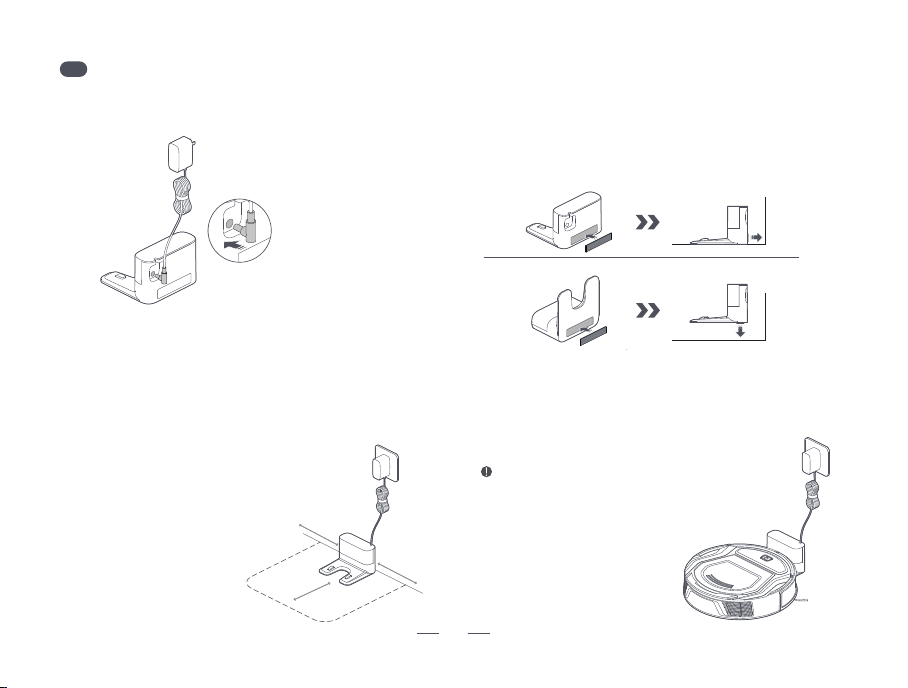
1. Connect the docking station to the adapter.
4. Charging
Place the robot with its button side facing the docking
station. When the button light starts to blink, it
indicates correct placement. (As shown below)
Charging time is approximately 5 hours.
When the robot is charging while it
is powered off, it will automatically
power on.
Docking station installation
B4
After placing the charging dock in position, attach the
double-sided soft adhesive to the back or bottom of
the charging dock to secure it to the wall or floor.
Method 1:
Method 2:
3. Instructions for using double-sided soft adhesive.
Place the docking station against the wall on a
flat surface. Ensure there are no items within
0.5m to the left or right and 1.5m in front to
avoid blocking the charging signal. Avoid
having reflective objects, such as floor
mirrors, near the docking station to
prevent signal reflection.
2. Position the docking station and connect it to the
power supply.
>�.�m
>�.�m
>�.�m
12
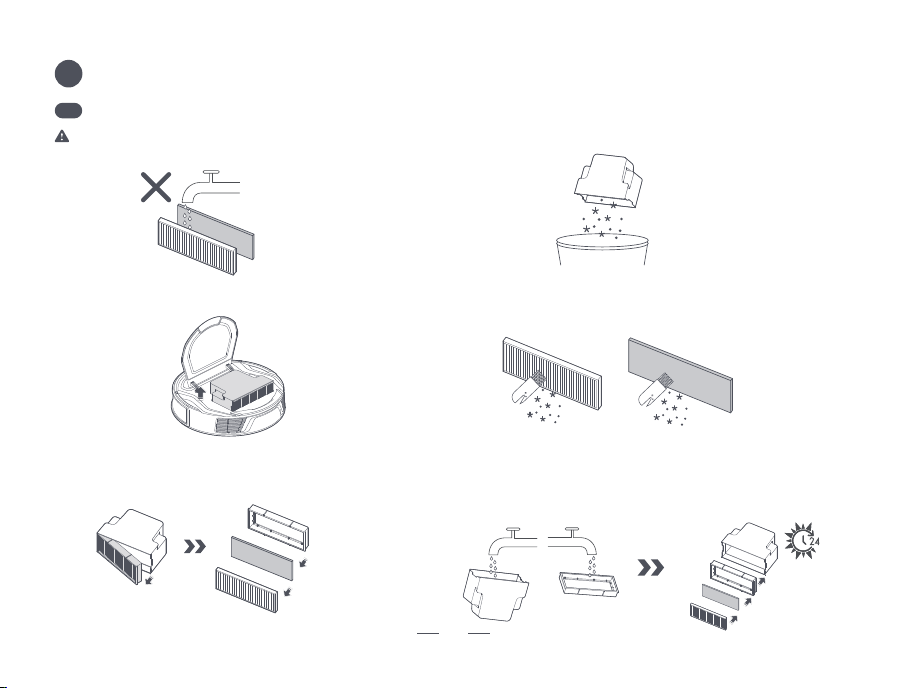
After cleaning, air - dry them for at least 24 hours until they are
completely dry, and then reinstall them in sequence for use.
2. First, remove the filtration component,
and then take out the high - efficiency filter
and filter cotton.
5. The main body of the dust box and the filter screen
bracket can be washed with water.
4. Clean the high - efficiency filter and filter cotton with
a cleaning brush. Do not wash them with water.
1. Open the faceplate and take out the dust bin.
3. Dumping of garbage.
Warning: The high - efficiency filter and filter
cotton are not washable.
Maintenance
C
Dust bin
C1
13
Use a soft dry cloth to wipe and clean the robot's components,
including:
Use a soft dry cloth to wipe and clean the
main unit sensors, including:
1. Front obstacle sensor
�. Drop prevention sensor (It is recommended
to clean the drop prevention sensor once a week
to prevent dust from blocking and affecting the
signal)
Robot sensors
C3
Main unit components
C4
�. Clean the charging electrode of the docking station to
ensure smooth charging.
�. Clean the infrared signal sensor lens of the docking
station to avoid signal interference.
Charging dock
C5
�. Universal wheel
2. Charging contacts
3. Suction inlet
�. Drive wheels
Pull the side brushes off forcefully. After cleaning the
side brushes, reinstall them. Replace the side brushes
with new ones based on wear and tear.
Side brushes
C2
2
1
3
4
1
2
2
1
Click
14
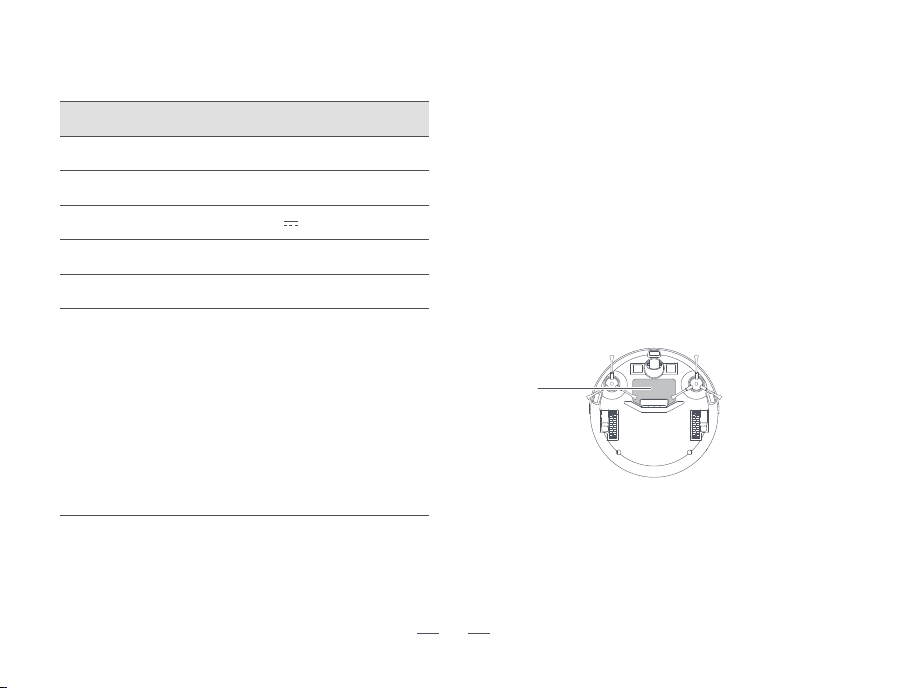
Technical parameters
Environmental protection
instructions
Robotic Vacuum Cleaner
M210 Series
Wireless Connections WiFi Smart Fast Connect
Robot operating voltage 14.4V
Robot rated power 25W
< 5 hours
The chemicals contained in the lithium-ion battery built into this product
may pollute the environment. Before disposal, remove the battery and
dispose of it at a designated battery recycling facility.
Battery Removal Steps
* The following information is applicable only when disposing of this
robot and is not part of regular operating instructions.
Tip:
• When disassembling the battery, make sure it is fully discharged and
work without connecting it to the charging dock.
• Please remove the entire battery pack as a whole. Avoid damaging
the battery pack casing to prevent short - circuits or the leakage of
hazardous substances.
• In case the battery leaks and you come into accidental contact with it,
rinse thoroughly with plenty of water and seek medical attention
immediately.
1. Let the robot run until it fully discharges and shuts down
automatically without being connected to the charging dock.
2. Make sure the robot is powered off.
3. Remove the screws that secure the battery cover on the bottom
shell of the robot.
4. Open the battery cover.
5. After taking out the battery, unplug the connector from the battery.
Product model
Charging time
V30-V0600R190-012AA0-US
V30-V0600R190-012AA0-DE
V30-V0600R190-012AA0-GB
V30-V0600R190-012AA0-AU
Adapter model
Battery Cover
AD-0191900100US
AD-0191900100EU
AD-0191900100UK
AD-0191900100AU
15
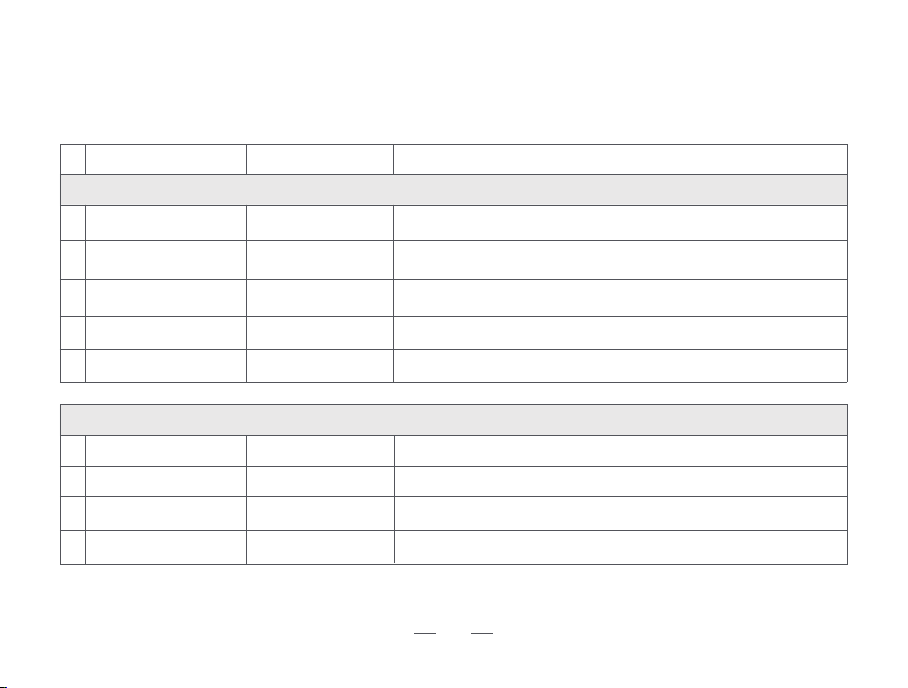
If the above methods don't resolve the problem, try the following: Hold the start/pause button on the robot for 12 seconds. After hearing a long
"beep", power off, then long press for 3 seconds to restart.
When the robot runs into trouble, its red indicator light will be on or flash and beep with different durations and
separations. The following table summarizes the corresponding causes:
Exception alarm prompt
The red light is on
Fault cause
Abnormal fan
Abnormal side brush
Abnormal driving wheel
Undetected dust bin
3
4
2
1
No.
4
3
2
1
Red light flashes
Solutions
Please check the waste in the dust bin and the air duct.
Please check whether the side brush is tangled, and then clean it up.
Please check whether the driving wheel is tangled , and clean it up.
Please install the dust bin in the robot.
Clean the electrode and ensure the original adapter.
Please move the robot to the docking station for charging.
Fail to get rid of a dilemma; please move to an open place.
The robot hangs in the air. Please move it to the ground.
Prompt sound
3 beeps for three times
5 beeps for three times
Difficulty in
automatic recharge
5
Abnormal charging, please manually move the main unit to the charging
cradle for charging.
6 beeps for three times
2 beeps for three times
1 beep for three times
5 beeps for three times
4 beeps for three times
3 beeps for three times
2 beeps for three times
Abnormal adapter
Low Battery
Dilemma elimination alarm
Ground-detection alarm
16
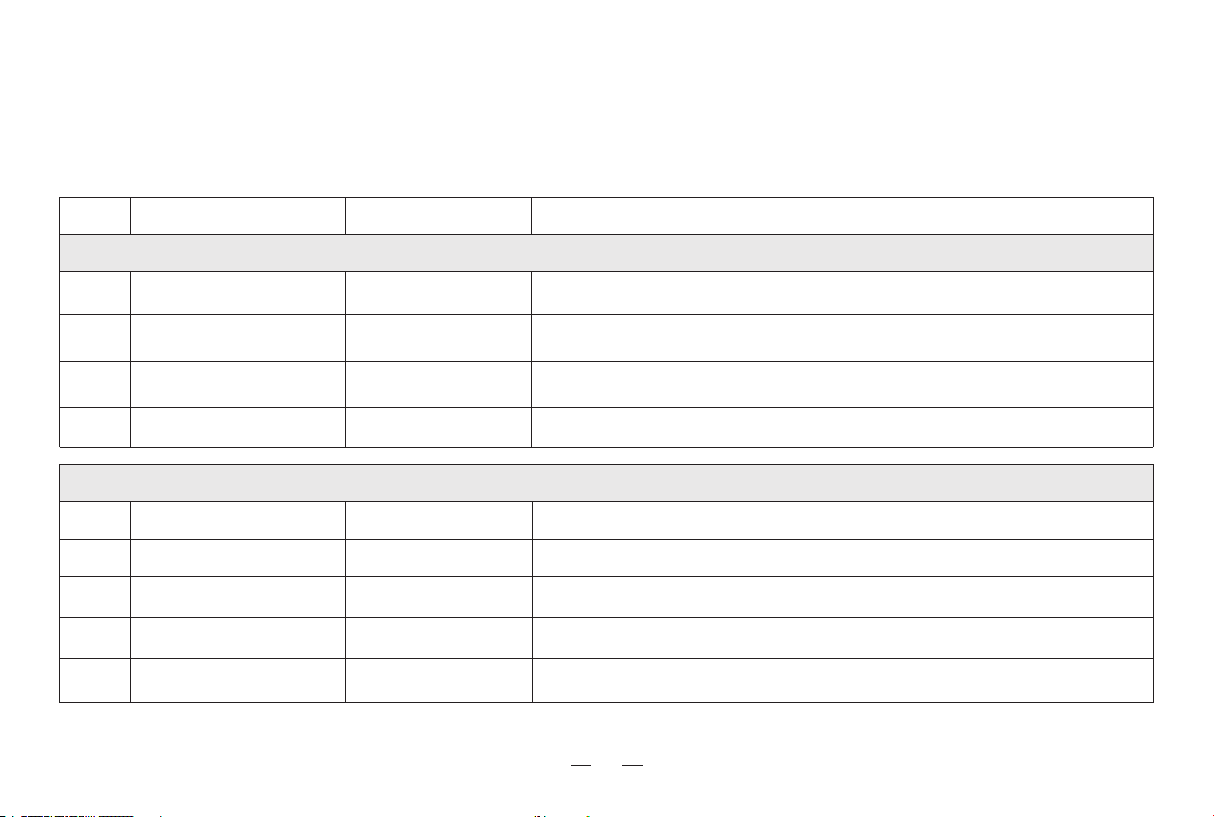
Troubleshooting
* If the issue cannot be eliminated according to the operation in the table, contact our customer service representative.
If the following problems occur in the application process of the product, users can resolve them independently by
comparison and inquiry.
Cleaning components blockage
Not entered Wi-Fi pairing mode
Possible causes
Abnormal cleaning
Fault
It is recommended to replace consumables regularly, including such as
high-efficiency filters (HEPA), pre-filters, side brushes, etc.
Keep pressing button for 6 seconds: Entering Wi-Fi pairing mode. please refer to
the App Networking Guide for details.
Solutions
2.4G Hz network isn't used.
Incorrect placement of docking station
The docking station is powered off or moved manually
Unable to connect to
App
Please place the docking station in an open and flat area.
The home is too large, and the environment is complex
Please refer to the chapter [B1 Special Note] of the manual.
You need to switch to 2.4G Hz network, please refer to the App Networking Guide for
details.
Please check whether the docking station is connected to the power supply. Do not
move the position of the docking station when the robot is working.
The power supply is not connected, or the plug is loose
Poor contact between the robot and the charging
electrode of the docking station
Battery deterioration caused by non-long-term use
Unable to charge
It's recommended to use this product regularly. If not used for an extended period,
charge fully, turn off the robot, and ensure it's charged once a month. If the
battery can't be charged, please contact after-sales service.
Ensure that the charging electrode of the robot and the docking station are fully
connected, and clean the charging electrode of the robot and the docking station
regularly.
Check if both ends of the power cord are connected and if the docking station
indicator light is on.
Dust on sensors and other components Please refer to the chapter [Maintenance] of the manual to clean the robot.
Difficult to return and
charge
The robot didn't clean from the docking station
Let the robot clean from the docking station.

Warranty
This warranty covers the repair or replacement of the malfunction device at our company’s discretion for a period of
1-year. In addition this certificate is void if altered. The serial number must be provided as well as all accessories to be
eligible for warranty coverage. Please kindly fill in below form accurately and completely.
Important:
When returning this device, carefully pack the product to avoid damage in shipping. Damage in shipping is not covered by the Warranty and
shall be the sole responsibility of Buyer. Damage or loss not covered by this Warranty or occurring outside the warranty period will require a fee
to cover the cost of handling and shipping. All such fees and costs shall be the sole responsibility of Buyer.
Exclusion
Unless agreed in writing, the warranty will not apply if the defects relate to:
• Consumable parts such as filters, or brushes etc, that are subject to normal wear and tear, and require regular maintenance and/or
replacement to ensure the proper functioning of your unit.
• Defects caused by rough or inappropriate handling or use or damage caused by accident, misuse, neglect, fire, water, lighting or other acts
of nature, external sources such as weather, electrical outages or power surges.
• Improper operation or maintenance, use not in accordance with the product instructions or connection to improper voltage supply.
• Accident, abuse, misapplication, or any unauthorized repair, modification, or disassembly of the product.
• Any failure to adequately package the product for transportation.
• Use of parts not in accordance with the product instructions.
• Use of parts and accessories other than those produced or recommended by our company.
• Use in a commercial environment as the product is designed for residential use only.
• Consequential and incidental damages.
• Any product(s) purchased from unauthorized dealers/resellers.
• Products used outside the country of purchase.
• Lost and/or stolen products.
Order Number:
Serial Number:
Date of Purchase:

Building 2, Fashion Brand Industrial Park, E'Bu Town,
Shenzhen-Shanwei Special Cooperation Zone, Shenzhen, Guangdong, China.
Shenzhen USEER Robotics Co., Ltd.
Website:
Email:
Facebook:
Community:
www.lefant.com
Other countries: [email protected]
@LEFANTOFFICIAL
facebook.com/groups/Lefantofficalcommunity
Official website