Loading ...
Loading ...
Loading ...
ENGLISH
15
Detector Cleaning and Storage
• Dirt and grease may be removed from the exterior of the
detector using a cloth or soft, non-metallic brush.
• The D
eWALT
Digital Laser Detector is waterproof. If you
should drop the detector in mud, wet concrete, or a similar
substance, simply hose the detector off. Do not use high
pressure water, e.g., from a pressure washer.
• The best storage place is one that is cool and dry–away
from direct sunlight and excess heat or cold.
Detector Service
Except for batteries, there are no user serviceable parts in the
Digital Laser Detector. Do not disassemble the unit. Unauth-
orized tampering with the laser detector will void all warranties.
Detector Troubleshooting
The detector will not turn on.
• Press and release the power/volume button.
• Check to see that the battery is in place and in the
proper position.
• If the detector is very cold, allow it to warm up in a
heated area.
• Replace the 9 volt battery. Turn the unit on.
• If the detector still does not turn on, take the detector to a
DeWALT
service center.
The detector’s speaker makes no sound.
• Ensure that the detector is on.
• Press the power/volume button. It will toggle from high, to
low, to mute.
• Ensure that the rotary laser is spinning and that it is emitting
a laser beam.
• If the detector is still not making any sound, take it to a
DeWALT
service center.
The detector does not respond to a stationary laser beam.
The
DeWALT
Digital Laser Detector has been designed to work
only with rotary lasers.
The detector gives off a tone but the LCD display window
does not function.
• If the detector is very cold, allow it to warm up in a
heated area.
• If the LCD display window is still not functioning, take the
detector to a
DeWALT
service center.
Mounting Bracket (Fig.
M
,
N
)
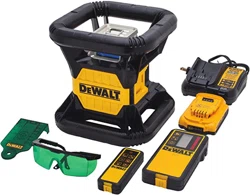
Some laser kits include a Wall Mount. It can be used for
attaching the tool to track or ceiling angle and to aid in
acoustical ceiling installation. Follow the directions below for
using the wall mount.
CAUTION: Before attaching the laser level to wall
track or ceiling angle, be sure that the track or angle is
properly secured.
1. Place the laser on the mounting base
37
aligning the 5/8–
11 screw hole on the tripod adapter (
20
, Fig.
C
) attached
to the bottom of the laser with the hole
39
in the mounting
base. Turn the mounting knob
40
to secure the laser.
2. With the wall mount measuring scale
41
facing you, loosen
the wall mount clamp locking knob
42
to open the clamp
jaws.
3. Position the clamp jaws around the wall track or ceiling
angle and tighten the wall mount clamp locking knob
42
to close the clamp jaws onto the track. Be sure that
the wall mount clamp locking knob is securely tightened
before proceeding.
CAUTION: Always use a ceiling wire hanger or
equivalent material, in addition to the wall mount
clamp locking knob, to help secure the laser level
while mounting it to a wall. Thread the wire through
the handle of the laser level. DO NOT thread the wire
through the protective metal cage. Additionally, screws
may be used to fasten the wall mount directly to the
wall as a back up. Screw holes
43
are located at the
top of the wall mount.
4. Using the base leveling knob
44
approximate a level
position from the wall.
5. The tool can be adjusted up and down to the desired offset
height for working. To change the height, loosen the locking
knob
45
located on the left of the wall mount. Support the
mounting base when adjusting the height.
6. Turn the adjustment knob
46
, located to the right of the
wall mount, to move the laser level up and down to set your
height. Use the wall mount measuring scale
41
to pinpoint
your mark.
NOTE: It may be helpful to turn the power on and turn the
rotary head so that it puts a dot on one of the laser scales.
The
DeWALT
target card is marked at 1–1/2" (38 mm),
therefore, it may be easiest to set the offset of the laser to
1–1/2" (38 mm) below the track.
7. Once you have positioned the laser at the desired height,
tighten the locking knob
45
to maintain this position.
DW074_DW079 User Manual - NA - TRANSLATED.indd 15 5/17/2018 2:05:34 PM
Loading ...
Loading ...
Loading ...